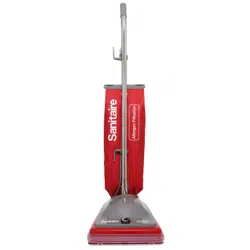
Series SC600 and SC800
For assembly and maintenance videos go to www.youtube.com/sanitairevacs
Thermal Cut-off
This vacuum cleaner has a special thermostat that protects the vacuum in case of motor overheating. If the vacuum suddenly shuts off, push the on/off switch off (0) and unplug the vacuum. Check the vacuum for a possible source of overheating such as a full dust bag, a blocked hose or clogged filter. If these conditions are found, fix them and wait at least 30 minutes before attempting to use the vacuum. After the 30 minute period, plug the vacuum back in and push the on/off switch on (1). If the vacuum still does not run, then take it to a Sanitaire Authorized Service Center for repair.
IMPORTANT SAFEGUARDS
When using an electrical appliance, basic precautions should always be followed, including the following:
READ ALL INSTRUCTIONS BEFORE USING THIS VACUUM CLEANER
WARNING
To reduce the risk of fire, electric shock, or injury:
- Do not use outdoors or on wet surfaces.
- Connect to a properly grounded outlet only. See grounding instructions.
- Do not leave vacuum cleaner when plugged in. Turn off the switch and unplug the electrical cord when not in use and before servicing.
- Always turn off this vacuum cleaner before connecting or disconnecting motorized nozzle.
- Do not allow to be used as a toy. Close attention is necessary when used by or near children.
- Use only as described in this manual. Use only manufacturer's recommended attachments.
- Do not use with damaged cord or plug. If vacuum cleaner is not working as it should, has been dropped, damaged, left outdoors, or dropped into water, return it to a service center before using.
- Do not pull or carry by cord. Do not use cord as a handle. Do not close a door on cord or pull cord around sharp edges or corners. Do not run vacuum cleaner over cord. Keep cord away from heated surfaces.
- Do not use extension cords or outlets with inadequate current carrying capacity.
- Turn off all controls before unplugging.
- Do not unplug by pulling on cord. To unplug, grasp the plug, not the cord.
- Do not handle plug or vacuum cleaner with wet hands.
- Do not put any object into openings. Do not use with any opening blocked; keep free of dust, lint, hair, and anything that may reduce airflow.
- This vacuum cleaner creates suction and contains a revolving brush roll. Keep hair, loose clothing, fingers, and all parts of body away from openings and moving parts.
- Do not place vacuum cleaner on furniture or stairs as the brush roll may cause damage. Use extra care when cleaning stairs. Place vacuum cleaner on floor with the handle in storage position while using attachments.
- Do not pick up anything that is burning or smoking, such as cigarettes, matches, or hot ashes.
- Do not use without disposable dust bag and motor filter in place.
- Belt pulleys can become hot during normal use. To prevent burns, avoid touching the belt pulley when servicing the drive belt.
- Do not use to pick up flammable or combustible liquids such as gasoline, or use in areas where they may be present.
- Store your vacuum cleaner indoors in a cool, dry area.
- Keep your work area well lighted.
- Unplug electrical appliances before vacuuming them.
- Use extra care when cleaning on stairs.
SAVE THESE INSTRUCTIONS
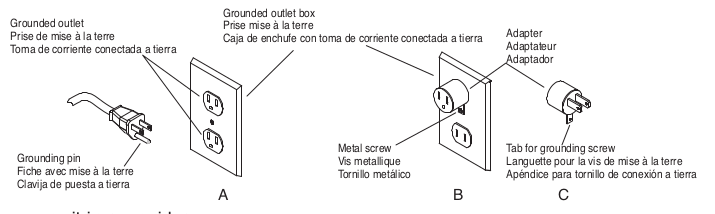
Grounding Instructions
This appliance must be grounded. If it should malfunction or break down, grounding provides a path of least resistance for electric current to reduce the risk of electric shock. This appliance is equipped with a cord that has an equipment-grounding conductor and grounding plug. The plug must be plugged into an appropriate outlet that is properly installed and grounded in accordance with all local codes and ordinances.
DANGER
Improper connection of an equipment-grounding conductor can result in risk of electric shock. Check with a qualified electrician or service person if you are in doubt as to whether the outlet is properly grounded. Do not modify the plug provided with the appliance. If it will not fit the outlet, have a proper outlet installed by a qualified technician.
This appliance is for use on a nominal 120-volt circuit and has a grounding plug that looks like the plug illustrated in Fig. A. A temporary adapter which looks like the adapter illustrated in Fig. B may be used to connect this plug to a two-pole receptacle, as shown, if a properly grounded outlet is not available. The temporary adapter should be used only until a properly grounded outlet, Fig. A, can be installed by a qualified electrician. The green colored rigid ear, lug, or the like extending from the adapter must be connected to a permanent ground such as a properly grounded outlet box cover. Whenever the adapter is used, Fig. C, it must be held in place by metal screw.
Note: In Canada, the use of a temporary adapter is not permitted by the Canadian Electrical Code.
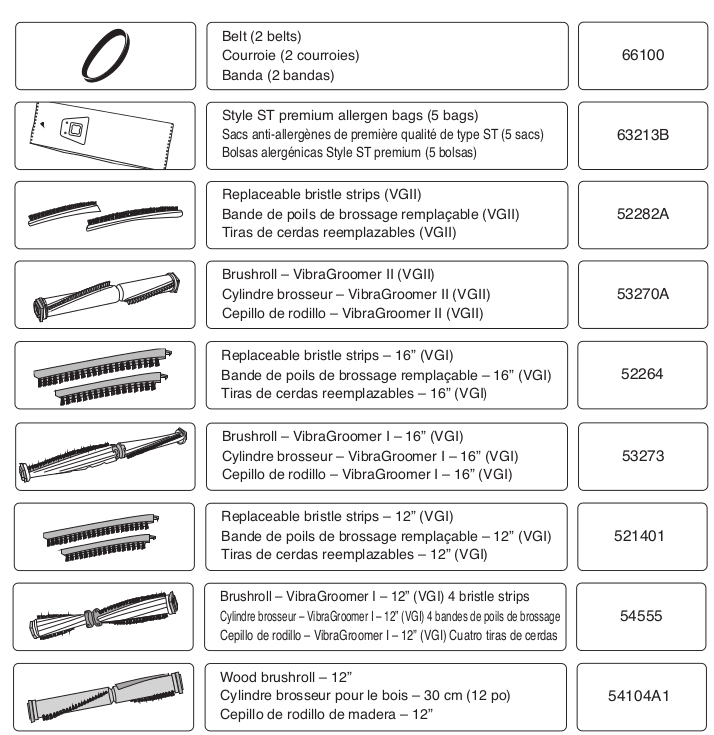
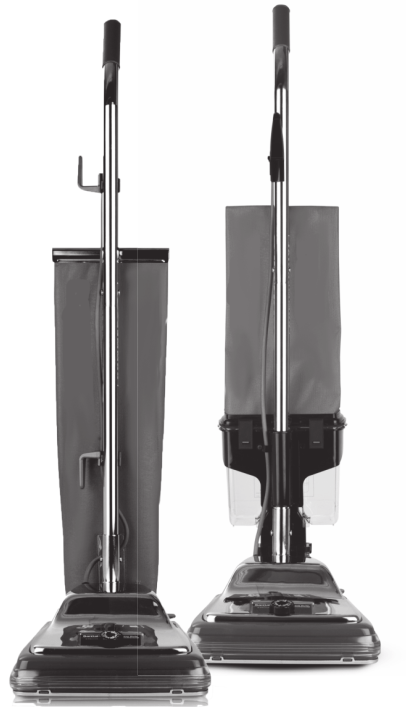
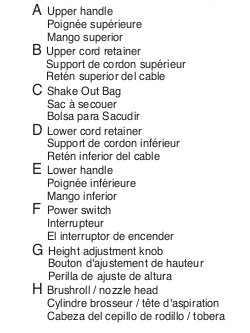
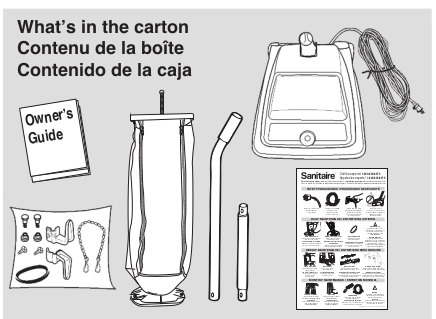
How to Identify Parts
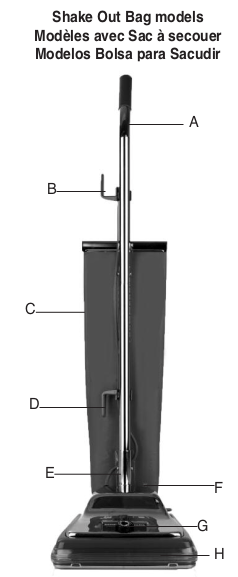
How to Assemble Shake Out Bag Models
CAUTION: Assemble vacuum cleaner FULLY before using.
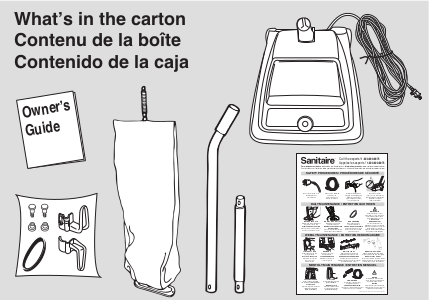
- Remove all parts from carton and identify each item shown. Make sure all parts are located before disposing of packing materials.
Assembly Packet
The assembly pack is with the owner's guide. The packet contains two 2-part bolts, extra belt and an upper and lower cord hook.
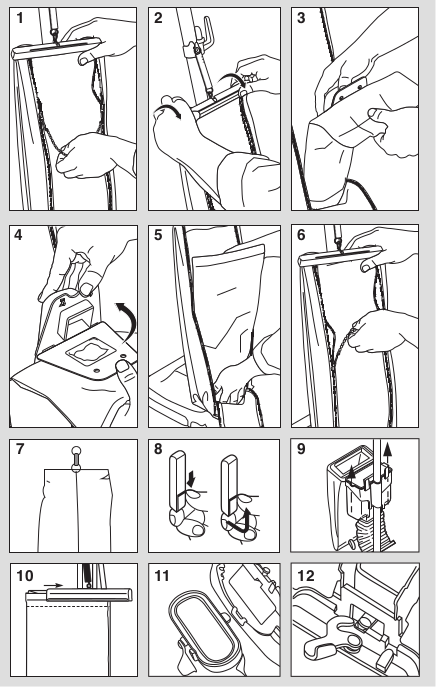
Assembly
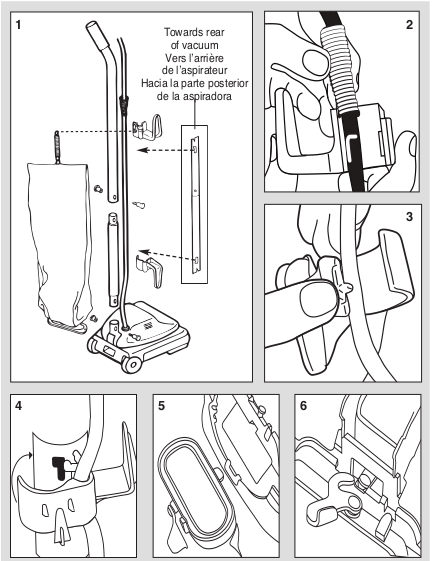
- Slide the upper handle and the lower handle together so the handle bolt holes are positioned as shown in the detail drawing. Insert a 2-part bolt in the center of the handle and tighten. Hold assembled handle so handle curves away from vacuum. Place lower handle into handle socket at rear of vacuum. Align holes. Insert 2-part bolt and tighten using screwdriver.
- Pull the spring on the electrical cord upward toward the top of the handle. Insert the lower half of the spring into the upper cord hook as shown. Snap the hook into the upper handle (Fig. 4).
- Insert the power cord into the lower cord hook. Snap into lower handle. Pull on the cord to tighten but leave enough slack near the base so the cord is not strained when the handle is lowered. Wrap the cord around the two cord hooks and fasten the plug to prevent unwinding.
- Insert the bag adapter clip on the bottom of the bag collar into the bag adapter retainer.
- Push the bag collar up and forward so the locator lug slides into the slot. Turn the cam latch to lock the bag onto the rivet. Loop the spring on the top of the bag onto the bag support on the back of the upper cord hook.
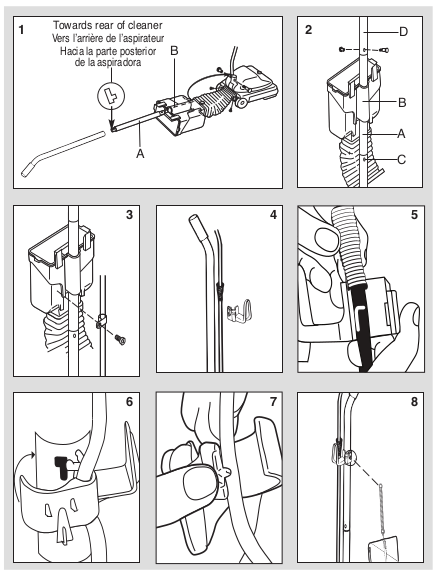
How to Assemble Dirt Cup Models
CAUTION: Assemble vacuum cleaner FULLY before using.
- Align the screw holes in the bellows adapter with the back of the base and fasten with two screws.
Assembly Packet
The assembly pack is with the owner's guide. The packet contains two 2-part bolts, two screws, an extra belt, upper cord hook, lower cord hook (on model SC689 only) and a cord clamp and screw.
Assembly
- Align the screw holes in the bellows adapter with the back of the base and fasten with two screws.
- Raise the dirt cup support. Push the lower handle (largest end down A) through the tube (B) of the dirt cup support and into the handle socket (C) at the back of the cleaner. Align the holes, insert a 2-part bolt and tighten. Hold the upper handle (D) so it curves away from the cleaner. Push it down over the lower handle and secure with the other 2-part bolt.
- Secure the electrical cord to the dirt cup support with the cord clamp and screw. Place the clamp over the electrical cord and screw to the tab below the left latch when facing the vacuum.
- Pull the spring on the electrical cord up toward the top of the handle. Insert the lower half of the spring into the upper cord hook (Fig. 5).
- Snap the hook into the upper handle.
- On model SC689 only, insert the power cord into the lower cord hook. Snap into lower handle. Pull on the cord to tighten but leave enough slack near the base so the cord is not strained when the handle is lowered. Wrap the cord around the two cord hooks and fasten the plug to prevent unwinding.
- Slip the ring at the top of the cloth bag over the support hook on the back of the top cord hook.
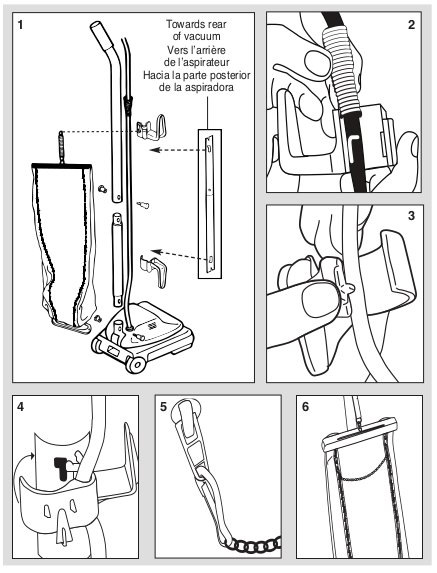
How to Assemble Dust Bag Models
CAUTION: Assemble vacuum cleaner FULLY before using.
- Slide the upper handle and the lower handle together so the handle bolt holes are positioned as shown in the detail drawing. Insert a 2-part bolt in the center of the handle and tighten. Hold the assembled handle so it curves away from the cleaner. Place the lower handle into the handle socket at the rear of the cleaner. Align the holes, insert the other 2-part bolt and tighten.
- Pull the spring on the electrical cord upward toward the top of the handle. Insert the lower half of the spring into the upper cord hook as shown. Snap the hook into the upper handle (Fig. 4).
- Insert the power cord into the lower cord hook. Snap into lower handle per figure (4). Pull on the cord to tighten, but leave enough slack near the base so the cord is not strained when the handle is lowered. Wrap the cord around the two cord hooks and fasten the plug to prevent unwinding. A downward twist of the cord hook frees the cord for quick removal.
- Hold outer bag with zipper away from the handle. Align holes in outer bag flange and base. Fasten with the two screws. Loop the bag spring onto the bag support hook located at the back of the upper handle section.
- Insert the clip on the end of the dual zipper connector through the eyelet of the zipper.
- Insert the clip on the other end of the dual zipper handle to the remaining zipper eyelet. This will form a looped connector that allows both zippers to be operated at the same time.
Warning: Do not use dual-zipper to lift vacuum cleaner.
How to Operate
Handle Adjustment
- With the tip of the foot press down the handle release located at the left rear side of the cleaner. Move the handle and adjust it to the desired position. Step on the handle release a second time to allow the handle to lay flat for cleaning under low furniture.
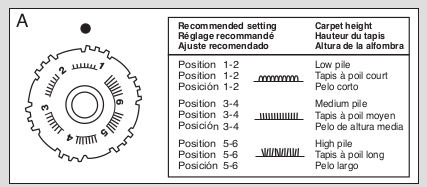
Vacuum Cleaner Height Settings
Warning: Avoid injury. Keep loose clothing, hair, fingers, and all other parts of body away from any moving part (such as the revolving brush). Turn cleaner off and unplug before changing the height.
With power cord unplugged, adjust base to highest setting with five-position adjustment knob. Plug in vacuum, step on power switch, and turn on vacuum. Lower setting one notch at a time until you hear bristles touching the carpet. This should be a noticeable sound change (Fig. A).
Changing the Dust Bag
- Grasp the top of the bag and release both zippers by pulling down on the dual zipper connector.
- Release the bag cap by grasping the finger tabs and rotating the cap towards the back of the bag.
- Support the top of the dirt tube and pull the dust bag collar forward.
- Place new dust bag collar on the tabs of the dirt tube interface and rotate up until dirt tube tabs fasten into the holes in the dust bag collar.
- Tuck bottom of dust bag into the lower portion of the outer bag.
- Replace the bag cap and pull up on the dual zipper connector to secure the back of the outer bag.
How to Empty Dirt Cup
- Unhook the clip from the top of the bag. Shake the cloth bag to release dust clinging inside.
- Release the two latches by pushing down on the latch and lifting up. Lift the lid and swing outward.
- Pull the dirt cup out of the holder and empty. Reverse steps to reinstall the dirt cup system.
How to Empty Shake Out Bag
- Slide the clamp away from the top of the bag.
- Turn the cam latch to release the bag. Hold the bag by the collar (bottom) and shake. Reinsert the bag adapter into the bag adapter retainer.
- Push the bag collar up and forward so the locator lug slides into the slot. Turn the cam latch to lock the bag onto the rivet.
CAUTION: The upright vacuum cleaner is designed to be used on multiple types of carpeting. Do not attempt to use the cleaner with the brushroll operating on bare floors, as damage to the floor covering may result.
How to Maintain
CAUTION: Turn off the switch and unplug the electrical cord before maintenance.
Important: Improper installation of the brushroll or brushroll belt could cause carpet or cleaner damage.
How to Replace a Worn Belt
Warning: Belt pulleys can become hot during normal use. To prevent burns, avoid touching the belt pulley when servicing the drive belt.
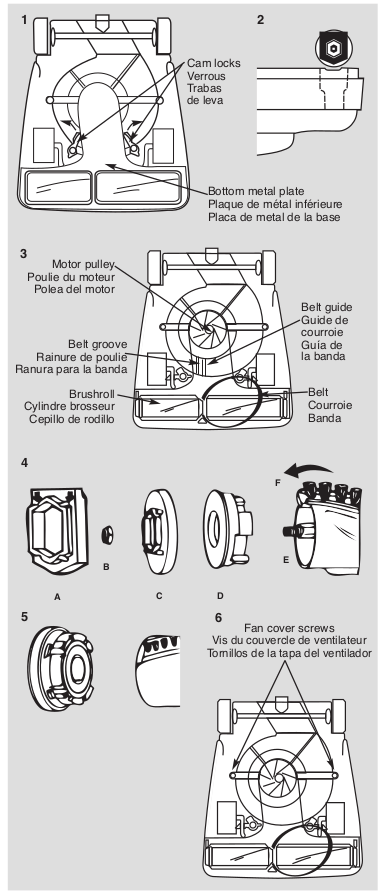
- Release cam locks and remove bottom plate. Pull up on belt to rotate it off of the motor pulley. Lift up on brushroll and remove worn belt. Place new belt around the brushroll. Align brushroll pulley with belt guide (Fig. 3).
- Ensure rubber end cap cover is installed correctly (Fig. 4A). Align end caps with slots in cleaner base. Push brushroll into base.
- Place lower side of belt into belt guide and pull to stretch the belt around the left side of the motor pulley. Rotate pulley to secure the belt into the groove. Replace bottom plate and secure with the cam locks.
How to Replace Bristle Strips (some models)
- Remove rubber end cap (A) from one end. Unscrew locknut (B). Remove end cap (C) - sleeve bearing brushroll includes a shaft washer not shown. Remove bearing retainer (D). Push shaft (E) through opposite end. Pull out worn bristle strip (F) with pliers. Slide in new bristle strip of same length (rounded end first.) Fit track on either side of the bristle strip into the brushroll slot. Replace the second strip from opposite end of brushroll.
- Replace shaft. Align indentation on bearing retainer with bristle strip on both ends of brushroll. Reassemble the remainder of brushroll and secure into the base (Fig. 2).
How to Clear Clog from Fan Chamber (some models)
- The clear cover provides easy inspection, cleaning and maintenance of the fan. Release two cam locks and remove bottom plate. Remove the two screws to release the clear fan cover.
How to Clear a Blockage
CAUTION: Ensure the vacuum is off and the cord is unplugged.
Check for Debris on the Brushroll
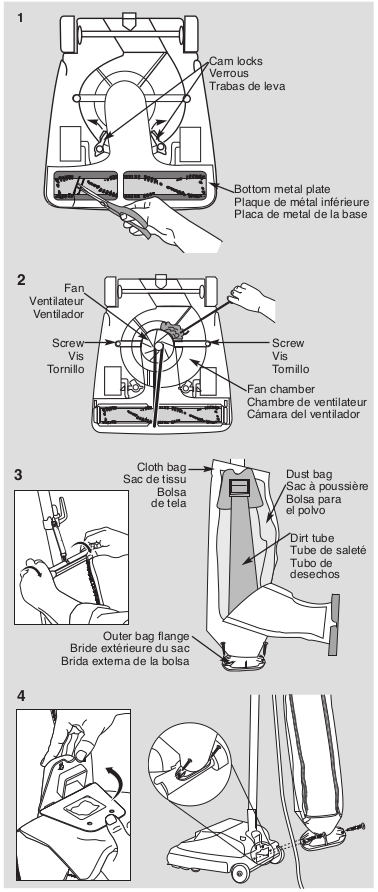
- If the dust bag is not full, check the bottom of the cleaner and the brushroll. Turn cleaner upside down. Clip strings with scissors. If necessary, release the cam locks and remove the bottom metal plate. Clear debris around the brushroll.
How to Clear Clog in Fan Chamber (some models)
- If there is not a clog around the brushroll, there may be a clog in the clear fan chamber. If you see a clog, release two cam locks and remove bottom plate. Remove the two screws to release the clear fan cover. Use a hanger to help release the clog around the fan, but do not remove the fan.
How to Clear Clog in Dirt Tube
- If you can't see a clog in the fan chamber and the fan spins freely, the clog may be in the dirt tube that connects the cleaner to the dust bag. Release cap on cloth bag by grasping finger tabs and rotating cap towards front of bag. Unzip the cloth bag and take the dust bag off of the plastic dirt tube. Using a screwdriver, remove the outer bag flange from the base of the cleaner. Use a tool or hanger to push any debris completely through the dirt tube to remove clog.
How to Reassemble the Vacuum Cleaner
- Reattach the dirt tube to the dust bag. Place dust bag collar on dirt tube tabs. Reattach cap on cloth bag and pull up on zipper. Replace bottom metal plate Secure cam locks (Fig. 1). Turn cleaner right side up. Screw the outer bag flange into base of cleaner.
How to Clear Clog in Bellows (Dirt Cup models)
- Using a screwdriver, remove the bellows from the base of the cleaner. Use a tool or hanger to push any debris completely through the bellows to clear clog. Reattach the bellows to the base of the cleaner.
Problem Solving
CAUTION: Always unplug vacuum cleaner before servicing.
Motor Will Not Start
- Turn power switch to on.
- Push plug securely into outlet.
- Try another outlet.
Vacuum Cleaner Does Not Clean
- Dust Bag model refer to pg. 10, Dirt Cup model pg. 8 or Shake Out Bag model pg. 6.
- Adjust carpet height setting to lower position.
- Check for clogs that restrict the air flow.
- Check for worn or broken belt and replace if necessary.
Vacuum Cleaner Is Hard to Push
- Adjust carpet height setting to higher position.
There Is a Clog
- Dust Bag model: Remove dust bag. Check for clog where dust bag attaches to dust bag collar and where the dust bag attaches to the dirt tube.
- All models: Remove bottom metal plate. Check for clog in base and / or brushroll. Refer to pgs.16-17.
There Is a Burning Smell
- The belt may be damaged or something may be caught in the brushroll.
- Check brushroll and remove any obstruction.
- Replace belt.
There Is Dust Leaking Out of Vacuum Cleaner
- Dust Bag model: Check to ensure disposable bag collar is properly attached inside cloth bag. Check disposable bag for tears.
- Shake Out Bag model: Make sure clamp on bag is secure. Refer to pg. 12.
The Sanitaire® Commercial Limited Warranty
This warranty gives you specific legal rights, and you may also have other rights which may vary from state to state. If you need additional instruction regarding this warranty or have questions regarding what it may cover, please contact Sanitaire® Customer Service by E-mail or telephone as described below.
Limited Two-Year Warranty
Subject to the "EXCEPTIONS AND EXCLUSIONS" identified below, upon receipt of the product Sanitaire will repair or replace (with new, refurbished, lightly used, or remanufactured components or products), at Sanitaire's option, free of charge from the date of purchase by the original purchaser, for two years any defective or malfunctioning part.
See information below on "If your Sanitaire product should require service."
This warranty does not apply to fans or routine maintenance components such as filters, belts or brushes. Damage or malfunction caused by negligence, abuse, neglect, unauthorized repair, or any other use not in accordance with the user guide is not covered.
Some states do not allow the exclusion or limitation of incidental or consequential damages, so the above limitation or exclusion may not apply to you.
EXCEPTIONS AND EXCLUSIONS FROM THE TERMS OF THE LIMITED WARRANTY
THIS WARRANTY IS EXCLUSIVE AND IN LIEU OF ANY OTHER WARRANTIES, EITHER ORAL OR WRITTEN. ANY IMPLIED WARRANTIES WHICH MAY ARISE BY OPERATION OF LAW, INCLUDING THE IMPLIED WARRANTIES OF MERCHANTABILITY AND FITNESS FOR A PARTICULAR PURPOSE, ARE LIMITED TO THE TWO YEAR DURATION FROM THE DATE OF PURCHASE AS DESCRIBED ABOVE.
Some states do not allow limitations on how long an implied warranty lasts so the above limitation may not apply to you.
NOTE: Please keep your original sales receipt. It provides proof of date of purchase in the event of a warranty claim.
Website: www.sanitairecommercial.com
If Your Sanitaire Product Should Require Service
You will find the nearest Sanitaire Authorized Service Center in your area online at sanitairecommercial.com under service locator or contact Sanitaire Customer Service. If you need information about repairs or replacement parts, or if you have questions about your warranty, contact Sanitaire Customer Service.
Website: www.sanitairecommercial.com
Call: Sanitaire Customer Service 1-800-800-8975 Monday - Friday 9 a.m. - 8:30 p.m. ET
Order Genuine Sanitaire Replacement Parts
Visit www.sanitairecommercial.com or call 1-800-800-8975