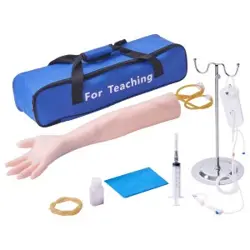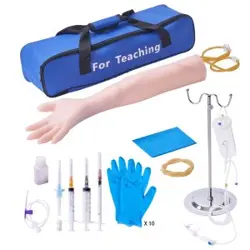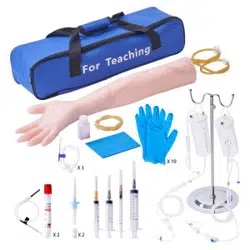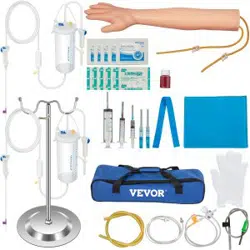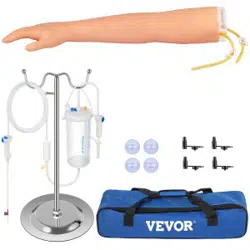

Arm intravenous injection model
1
、
Product function:
1. The eight main venous systems distributed on the arm can be used for puncture training such
as intravenous injection, infusion (blood), and blood drawing.
2. It can be injected into deltoid muscle.
3. The upper limb can be rotated 360 degrees, which can imitate the human arm, which is
convenient for puncture practice.
4. The needle has obvious sense of falling into the air, and there is blood return when puncturing
correctly.
5. The same puncture site of vein and skin can withstand hundreds of repeated puncture without
leakage.
6. The annular holster provides multiple training points for intradermal injection, which is put on
the model arm. If the liquid injection is correct, a hillock will appear on the skin. After the liquid is
drawn out, the hillock will disappear.
2
、
Installation method:
1. Take out the silicone upper limb model and adjusting infusion stand from the packing box.
2. Screw the fixing nut to firmly fix the hanging infusion bottle bracket on the jack position of the
model support plate.
3. Blood simulation with a small amount of blood powder and water configuration.
3
、
Training steps:
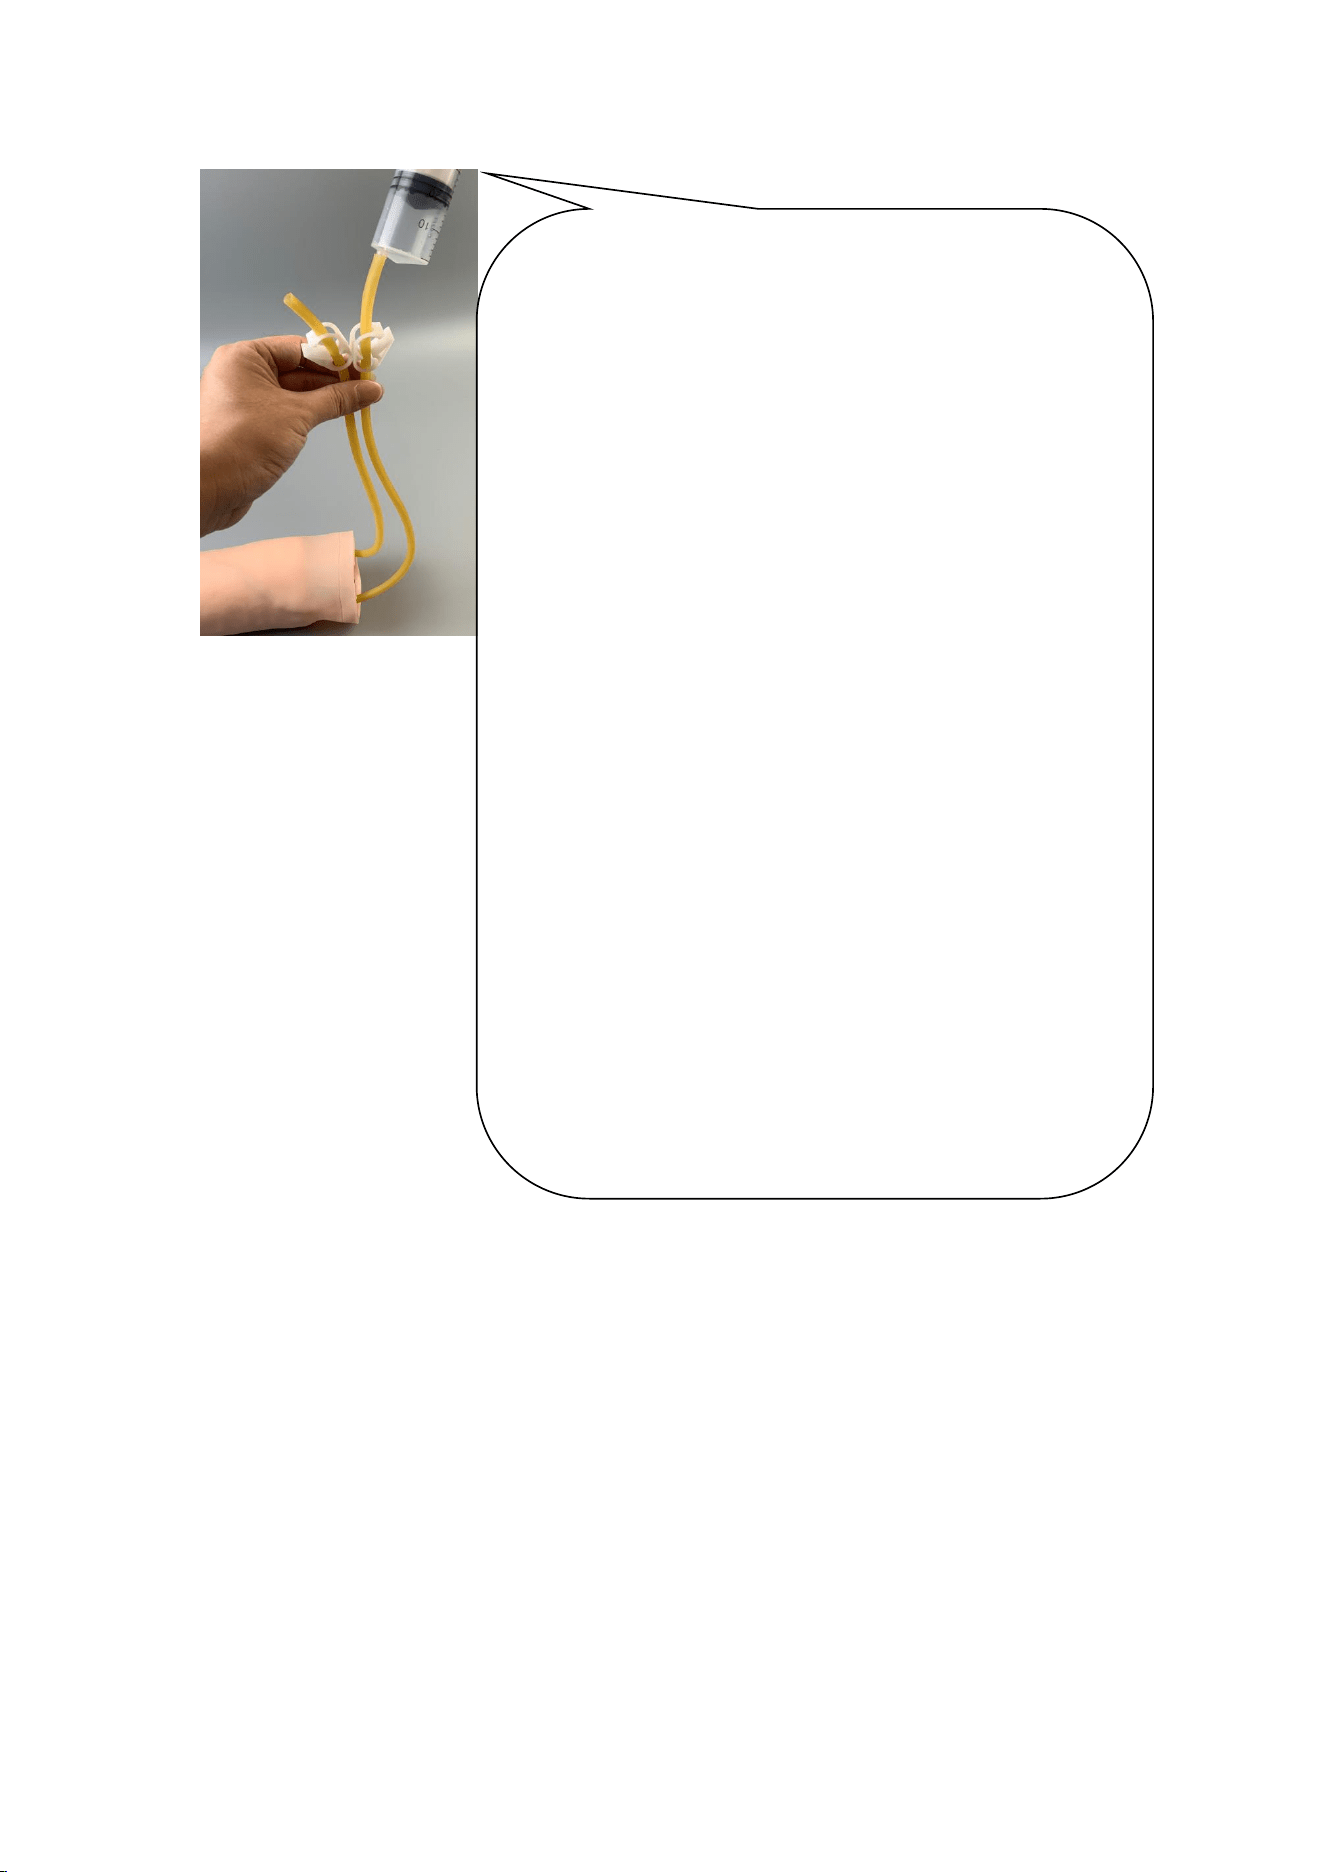
1. Blood was drawn from forearm vein of elbow
Step 1: 50 ml disposable syringe was connected with the upper rubber tube of the plastic upper
limb model, and the simulated blood was injected and filled with blood vessels. As shown in the
figure:

Step 2: routine disinfection of elbow and forearm skin.
Step 3: select the suitable vein, puncture the vein with 5 ml syringe, and draw 2 ml venous
blood (blood simulation solution).
2. Intravenous injection or intravenous infusion through elbow forearm:
Intravenous injection or intravenous infusion is to inject liquid medicine into the vein under
pressure. The common veins are cephalic vein and basilic vein,
Purpose: A: rescue or treatment of patients, through intravenous pressure injection of
glucose solubilized liquid or blood patients, increase the blood volume of coronary artery and
carotid artery, so as to improve the blood flow of heart and brain, and recover blood pressure
Two clips released
The blood vessels were filled with simulated blood
(after a head of water overflows, it is necessary to
continue to irrigate water to drain the air in the blood
vessel. The air in the blood vessel will affect the blood
return.)
One end clamp of blood vessel
Place the arm model horizontally
The other end clamp is released
The hand vessel is higher than the arm model
Venipuncture can produce blood returning effect
Warm tips: when injecting water, do not clamp the
clamp. Both clamps must be released and filled with
water. Otherwise, the blood vessel with needle eye
may leak. It is recommended to use tap water directly
for the first operation, and blood powder can be used
to simulate blood and water operation (improper
blood and water operation can easily contaminate the
model)

through reflex to rescue or treat patients. B: It is used to perform some special examinations,
etc. C: For chemotherapy.
3. Intravenous injection or intravenous infusion operation training:
Step 1: (the same as step 1 of blood drawing through elbow forearm vein), using injection
plate, suitable syringe, No. 6-8 needle, medicine, sandbag, sterile gloves and sterile
treatment towel, etc. In case of neonatal patients can choose radial vein, blood disease
patients contraindicated this method of injection, in order to avoid bleeding.
Step 2: disinfect the skin of elbow and forearm routinely, wear sterile gloves and lay sterile
hole towel.
Step 3: fix the selected vein with the left index finger and middle finger, the other hand with
a syringe (50ml syringe, No. 6-8 needle) with the liquid extracted, and stab into the vein
vertically at 40 ° angle. When the red liquid enters the syringe, clamp the upper rubber tube
clamp to block the upper rubber tube, loosen the lower rubber tube clip, fix the puncture
needle with one hand, and at the same time, use the other hand to fix the puncture needle
Push the liquid medicine as fast as possible with one hand, so that the liquid medicine in the
syringe flows through the pipeline system in the model, and the liquid medicine enters the
waste liquid bottle through the lower rubber tube. After the injection, quickly pull out the
needle. When there is red liquid entering the syringe, release the upper rubber pipe clamp
and adjust the dripping speed of the intravenous infusion set, so that the red blood simulation
liquid in the infusion bottle flows through the pipeline system in the model, and enters into
the waste liquid bottle through the lower rubber tube, and the puncture needle is fixed.
4. Transfemoral blood transfusion through elbow forearm
Step 1: the same as step 1 of drawing blood through elbow forearm vein.
Step 2: routine disinfection of elbow and forearm skin.
Step 3: select a suitable vein and puncture the vein with an injection needle. When the red
liquid enters the vein, adjust the dropping speed of the venous transfusion set to make the
red blood simulation liquid in the infusion bottle flow through the pipeline system in the model
and enter the waste liquid bottle through the lower rubber tube.

Modelo de inyección intravenosa en el brazo
1
、
Función del producto:
1. Los ocho sistemas venosos principales distribuidos en el brazo se pueden utilizar para el
entrenamiento de punción, como inyección intravenosa, infusión (sangre) y extracción de sangre.
2. Se puede inyectar en el músculo deltoides.
3. La extremidad superior se puede girar 360 grados, lo que puede imitar el brazo humano, lo que
es conveniente para la práctica de punción.
4. La aguja tiene una sensación evidente de caer en el aire y hay retorno de sangre cuando se
perfora correctamente.
5. El mismo sitio de punción de la vena y la piel puede soportar cientos de punciones repetidas
sin fugas.
6. La funda anular proporciona múltiples puntos de entrenamiento para la inyección intradérmica,
que se coloca en el brazo del modelo. Si la inyección del líquido es correcta, aparecerá un bulto
en la piel. Tras la extracción del líquido, este desaparecerá.
2
、
Método de instalación:
1. Saque el modelo de miembro superior de silicona y el soporte de infusión de ajuste de la caja
de embalaje.
2. Atornille la tuerca de fijación para fijar firmemente el soporte de la botella de infusión colgante
en la posición del gato de la placa de soporte del modelo.
3. Simulación de sangre con una pequeña cantidad de polvo de sangre y configuración de agua.
3
、
Pasos de entrenamiento:
1. Se extrajo sangre de la vena del antebrazo del codo.
Paso 1: Se conectó una jeringa desechable de 50 ml al tubo de goma superior del modelo de
extremidad superior de plástico y se inyectó la sangre simulada, llenando los vasos sanguíneos.
Como se muestra en la figura:

Paso 2: desinfección rutinaria de la piel del codo y antebrazo.
Paso 3: seleccione la vena adecuada, perfore la vena con una jeringa de 5 ml y extraiga 2 ml
de sangre venosa (solución de simulación de sangre).
2. Inyección intravenosa o infusión intravenosa a través del antebrazo o codo:
La inyección intravenosa o infusión intravenosa consiste en inyectar un medicamento líquido
en una vena bajo presión. Las venas más comunes son la cefálica y la basílica.
Propósito: A: Rescate o tratamiento de pacientes. Mediante la inyección intravenosa a
presión de glucosa solubilizada líquida o sangre, se aumenta el volumen sanguíneo de las
arterias coronarias y carótidas, mejorando así el flujo sanguíneo cardíaco y cerebral, y se
Two clips released
The blood vessels were filled with simulated blood
(after a head of water overflows, it is necessary to
continue to irrigate water to drain the air in the blood
vessel. The air in the blood vessel will affect the blood
return.)
One end clamp of blood vessel
Place the arm model horizontally
The other end clamp is released
The hand vessel is higher than the arm model
Venipuncture can produce blood returning effect
Warm tips: when injecting water, do not clamp the
clamp. Both clamps must be released and filled with
water. Otherwise, the blood vessel with needle eye
may leak. It is recommended to use tap water directly
for the first operation, and blood powder can be used
to simulate blood and water operation (improper
blood and water operation can easily contaminate the
model)

recupera la presión arterial por reflejo para el rescate o tratamiento de pacientes. B: Se utiliza
para realizar exámenes especiales, etc. C: Para quimioterapia.
3. Entrenamiento en operación de inyección intravenosa o infusión intravenosa:
Paso 1: (igual que el paso 1 de extracción de sangre a través de la vena del codo y del
antebrazo), utilizando una placa de inyección, una jeringa adecuada, una aguja del 6 al 8,
medicamentos, una bolsa de arena, guantes estériles y una toalla de tratamiento estéril, etc.
En el caso de pacientes neonatales, se puede elegir la vena radial; los pacientes con
enfermedades de la sangre tienen contraindicado este método de inyección para evitar el
sangrado.
Paso 2: desinfecte periódicamente la piel del codo y antebrazo, use guantes esterilizados y
coloque una toalla esterilizada.
Paso 3: fije la vena seleccionada con el dedo índice y el dedo medio izquierdos, la otra mano
con una jeringa (jeringa de 50 ml, aguja n.º 6-8) con el líquido extraído y pinche la vena
verticalmente en un ángulo de 40 ° . Cuando el líquido rojo entre en la jeringa, sujete la
abrazadera del tubo de goma superior para bloquear el tubo de goma superior, afloje el clip
del tubo de goma inferior, fije la aguja de punción con una mano y, al mismo tiempo, use la
otra mano para fijar la aguja de punción Empuje el medicamento líquido lo más rápido posible
con una mano, de modo que el medicamento líquido en la jeringa fluya a través del sistema
de tuberías en el modelo, y el medicamento líquido entre en la botella de líquido de desecho
a través del tubo de goma inferior. Después de la inyección, extraiga rápidamente la aguja.
Cuando entre líquido rojo en la jeringa, suelte la abrazadera del tubo de goma superior y
ajuste la velocidad de goteo del equipo de infusión intravenosa, de modo que el líquido de
simulación de sangre roja en la botella de infusión fluya a través del sistema de tuberías en
el modelo, y entre en la botella de líquido de desecho a través del tubo de goma inferior, y la
aguja de punción esté fija.
4. Transfusión sanguínea transfemoral a través del codo y el antebrazo.
Paso 1: igual que el paso 1 de extracción de sangre a través de la vena del antebrazo del codo.
Paso 2: desinfección rutinaria de la piel del codo y antebrazo.
Paso 3: Seleccione una vena adecuada y perfórela con una aguja de inyección. Cuando el
líquido rojo entre en la vena, ajuste la velocidad de goteo del equipo de transfusión venosa
para que el líquido de simulación de sangre roja de la botella de infusión fluya por el sistema
de tuberías del modelo y entre en la botella de líquido residual a través del tubo de goma
inferior.

Model wstrzyknięcia dożylnego do ramienia
1. Funkcja produktu:
1. Osiem głównych układów żylnych rozmieszczonych na ramieniu można wykorzystać do nauki
nakłuwania, np. wstrzyknięć dożylnych, infuzji (krwi) i pobierania krwi.
2. Można go wstrzykiwać w mięsie
ń
naramienny.
3. Górną ko
ń
czynę można obracać o 360 stopni, co może imitować ludzkie ramię, co jest wygodne
przy ćwiczeniu nakłuwania.
4. Igła ma wyraźny zmysł spadania w powietrze, a po prawidłowym nakłuciu następuje powrót
krwi.
5. To samo miejsce wkłucia żyły i skóry może wytrzymać setki nakłuć bez wycieku.
6. Obręcz pierścieniowa zapewnia wiele punktów treningowych do wstrzyknięć śródskórnych,
które są umieszczane na ramieniu modelu. Jeśli wstrzyknięcie płynu jest prawidłowe, na skórze
pojawi się wzgórek. Po wyciągnięciu płynu wzgórek zniknie.
2. Metoda instalacji:
1. Wyjmij z opakowania silikonowy model ko
ń
czyny górnej i regulacyjną podstawkę infuzyjną.
2. Przykręć nakrętkę mocującą, aby mocno zamocować uchwyt wiszącej butelki z infuzją w pozycji
podnośnika płyty podporowej modelu.
3. Symulacja krwi z niewielką ilością proszku krwi i konfiguracją wodną.
3. Etapy szkolenia:
1. Krew pobrano z żyły łokciowej przedramienia
Krok 1: Jednorazowa strzykawka o pojemności 50 ml została podłączona do górnej gumowej rurki
plastikowego modelu ko
ń
czyny górnej, a symulowana krew została wstrzyknięta i wypełniona
naczyniami krwionośnymi. Jak pokazano na rysunku:

Krok 2: rutynowa dezynfekcja skóry łokci i przedramion.
Krok 3: wybierz odpowiednią żyłę, nakłuj ją strzykawką o pojemności 5 ml i pobierz 2 ml krwi
żylnej (roztwór symulujący krew).
2. Wstrzyknięcie dożylne lub wlew dożylny przez łokieć lub przedramię:
Wstrzyknięcie dożylne lub infuzja dożylna polega na wstrzyknięciu leku w postaci płynnej do
żyły pod ciśnieniem. Typowymi żyłami są żyła odpromieniowa i żyła odłokciowa,
Cel: A: ratowanie lub leczenie pacjentów, poprzez dożylne wstrzyknięcie ciśnieniowe
rozpuszczonego płynu glukozy lub krwi pacjentów, zwiększenie objętości krwi tętnicy wień
cowej i tętnicy szyjnej, aby poprawić przepływ krwi do serca i mózgu oraz przywrócić
Two clips released
The blood vessels were filled with simulated blood
(after a head of water overflows, it is necessary to
continue to irrigate water to drain the air in the blood
vessel. The air in the blood vessel will affect the blood
return.)
One end clamp of blood vessel
Place the arm model horizontally
The other end clamp is released
The hand vessel is higher than the arm model
Venipuncture can produce blood returning effect
Warm tips: when injecting water, do not clamp the
clamp. Both clamps must be released and filled with
water. Otherwise, the blood vessel with needle eye
may leak. It is recommended to use tap water directly
for the first operation, and blood powder can be used
to simulate blood and water operation (improper
blood and water operation can easily contaminate the
model)

ciśnienie krwi poprzez odruch ratowania lub leczenia pacjentów. B: Jest stosowany do
wykonywania niektórych specjalistycznych badań itp. C: Do chemioterapii.
3. Szkolenie z zakresu operacji wlewów dożylnych i infuzji dożylnych:
Krok 1: (tak samo jak krok 1 pobierania krwi z żyły łokciowej lub przedramienia), używając
płytki do wstrzyknięć, odpowiedniej strzykawki, igły nr 6-8, leku, worka z piaskiem,
sterylnych rękawiczek i sterylnego ręcznika zabiegowego itp. W przypadku pacjentów
noworodkowych można wybrać żyłę promieniową. U pacjentów z chorobami krwi ta metoda
wstrzyknięcia jest przeciwwskazana w celu uniknięcia krwawienia.
Krok 2: regularnie dezynfekuj skórę łokcia i przedramienia, załóż sterylne rękawiczki i połóż
sterylny ręcznik na otwór.
Krok 3: zamocuj wybraną żyłę lewym palcem wskazującym i środkowym, drugą ręką
strzykawką (strzykawka 50 ml, igła nr 6-8) z wyekstrahowanym płynem i wbij ją pionowo pod
kątem 40°. Gdy czerwony płyn dostanie się do strzykawki, zaciśnij górny zacisk gumowej
rurki, aby zablokować górną gumową rurkę, poluzuj dolny zacisk gumowej rurki, zamocuj
igłę do nakłuwania jedną ręką i jednocześnie użyj drugiej ręki, aby zamocować igłę do
nakłuwania. Wprowadź płynny lek tak szybko, jak to możliwe jedną ręką, tak aby płynny lek
w strzykawce przepłynął przez system rurociągów w modelu, a płynny lek dostał się do
butelki z płynem odpadowym przez dolną gumową rurkę. Po wstrzyknięciu szybko wyciągnij
igłę. Gdy do strzykawki zacznie dostawać się czerwony płyn, zwolnij górny zacisk gumowej
rurki i wyreguluj prędkość kapania zestawu do infuzji dożylnej, tak aby czerwony płyn
symulujący krew w butelce infuzyjnej przepłynął przez system rurek w modelu i dostał się do
butelki z płynem odpadowym przez dolną gumową rurkę, a igła do nakłuwania została
zamocowana.
4. Transfuzja krwi przez łokieć i przedramię
Krok 1: taki sam jak krok 1 pobierania krwi z żyły łokciowej lub przedramienia.
Krok 2: rutynowa dezynfekcja skóry łokci i przedramion.
Krok 3: wybierz odpowiednią żyłę i nakłuj ją igłą iniekcyjną. Gdy czerwony płyn dostanie się
do żyły, dostosuj prędkość opadania zestawu do transfuzji żylnej, aby czerwony płyn
symulujący krew w butelce infuzyjnej przepłynął przez system rurociągów w modelu i wszedł
do butelki z płynem odpadowym przez dolną gumową rurkę.

Modell einer intravenösen Injektion am Arm
1. Produktfunktion:
1. Die acht am Arm verteilten Hauptvenensysteme können für Punktionsübungen wie
intravenöse Injektion, Infusion (Blut) und Blutentnahme genutzt werden.
2. Es kann in den Deltamuskel injiziert werden.
3. Die oberen Gliedmaßen können um 360 Grad gedreht werden, wodurch der menschliche Arm
nachgeahmt werden kann, was für Punktionsübungen praktisch ist.
4. Es ist deutlich zu spüren, dass die Nadel in die Luft fällt, und bei korrektem Einstechen fließt
das Blut zurück.
5. Dieselbe Punktionsstelle an Vene und Haut kann Hunderten von wiederholten Punktionen
standhalten, ohne dass es zu Leckagen kommt.
6. Das ringförmige Holster bietet mehrere Trainingspunkte für die intradermale Injektion und
wird am Modellarm angebracht. Bei korrekter Flüssigkeitsinjektion bildet sich ein kleiner Hügel
auf der Haut. Nach dem Herausziehen der Flüssigkeit verschwindet der Hügel.
2. Installationsmethode:
1. Nehmen Sie das Silikonmodell der oberen Extremitäten und den einstellbaren Infusionsständer
aus der Verpackungsschachtel.
2. Schrauben Sie die Befestigungsmutter fest, um die hängende Infusionsflaschenhalterung an
der Wagenheberposition der Modellträgerplatte zu befestigen.
3. Blutsimulation mit einer kleinen Menge Blutpulver und Wasserkonfiguration.
3. Trainingsschritte:
1. Blut wurde aus der Unterarmvene des Ellenbogens entnommen
Schritt 1: Eine 50-ml-Einwegspritze wurde mit dem oberen Gummischlauch des
Kunststoffmodells der oberen Extremität verbunden, und das künstliche Blut wurde injiziert und
die Blutgefäße gefüllt. Wie in der Abbildung dargestellt:

Schritt 2: Routinemäßige Desinfektion der Haut an Ellenbogen und Unterarm.
Schritt 3: Wählen Sie die geeignete Vene aus, punktieren Sie die Vene mit einer 5-ml-Spritze
und entnehmen Sie 2 ml venöses Blut (Blutsimulationslösung).
2. Intravenöse Injektion oder intravenöse Infusion durch den Ellenbogen oder Unterarm:
Bei der intravenösen Injektion oder intravenösen Infusion wird flüssiges Arzneimittel unter
Druck in die Vene injiziert. Die häufigsten Venen sind die Vena cephalica und die Vena
basilica.
Zweck: A: Rettung oder Behandlung von Patienten. Durch intravenöse Druckinjektion von
glucosegelöster Flüssigkeit oder Blut von Patienten wird das Blutvolumen der Koronararterien
Two clips released
The blood vessels were filled with simulated blood
(after a head of water overflows, it is necessary to
continue to irrigate water to drain the air in the blood
vessel. The air in the blood vessel will affect the blood
return.)
One end clamp of blood vessel
Place the arm model horizontally
The other end clamp is released
The hand vessel is higher than the arm model
Venipuncture can produce blood returning effect
Warm tips: when injecting water, do not clamp the
clamp. Both clamps must be released and filled with
water. Otherwise, the blood vessel with needle eye
may leak. It is recommended to use tap water directly
for the first operation, and blood powder can be used
to simulate blood and water operation (improper
blood and water operation can easily contaminate the
model)

und Halsschlagadern erhöht, um den Blutfluss von Herz und Gehirn zu verbessern und den
Blutdruck durch Reflex wiederherzustellen, um Patienten zu retten oder zu behandeln. B:
Wird verwendet, um bestimmte Spezialuntersuchungen usw. durchzuführen. C: Für
Chemotherapie.
3. Schulung zur intravenösen Injektion oder intravenösen Infusion:
Schritt 1: (dasselbe wie Schritt 1 der Blutentnahme durch die Unterarmvene am Ellenbogen),
verwenden Sie eine Injektionsplatte, eine geeignete Spritze, Nadeln Nr. 6–8, Medikamente,
einen Sandsack, sterile Handschuhe und ein steriles Behandlungstuch usw. Bei
Neugeborenen kann die Radialvene gewählt werden, bei Patienten mit Blutkrankheiten ist
diese Injektionsmethode kontraindiziert, um Blutungen zu vermeiden.
Schritt 2: Desinfizieren Sie die Haut an Ellenbogen und Unterarm regelmäßig, ziehen Sie
sterile Handschuhe an und legen Sie ein steriles Handtuch aus.
Schritt 3: Fixieren Sie die ausgewählte Vene mit dem linken Zeige- und Mittelfinger, halten
Sie mit der anderen Hand eine Spritze (50 ml-Spritze, Nadel Nr. 6–8) mit der abgesaugten
Flüssigkeit und stechen Sie sie senkrecht in einem Winkel von 40 ° in die Vene. Wenn die
rote Flüssigkeit in die Spritze gelangt, klemmen Sie die obere Gummischlauchklemme fest,
um den oberen Gummischlauch zu blockieren, lösen Sie die untere Gummischlauchklemme,
fixieren Sie die Punktionsnadel mit einer Hand und fixieren Sie gleichzeitig die Punktionsnadel
mit der anderen Hand. Drücken Sie das flüssige Medikament so schnell wie möglich mit einer
Hand, sodass das flüssige Medikament in der Spritze durch das Rohrleitungssystem im Modell
fließt und durch den unteren Gummischlauch in die Abfallflasche gelangt. Ziehen Sie nach der
Injektion die Nadel schnell heraus. Wenn rote Flüssigkeit in die Spritze gelangt, lösen Sie die
obere Gummischlauchklemme und passen Sie die Tropfgeschwindigkeit des intravenösen
Infusionssets an, sodass die rote Blutsimulationsflüssigkeit in der Infusionsflasche durch das
Rohrleitungssystem im Modell fließt und durch den unteren Gummischlauch in die
Abfallflüssigkeitsflasche gelangt und die Punktionsnadel fixiert wird.
4. Transfemorale Bluttransfusion durch den Ellenbogen-Unterarm
Schritt 1: Dasselbe wie Schritt 1 der Blutentnahme durch die Unterarmvene am Ellenbogen.
Schritt 2: Routinemäßige Desinfektion der Haut an Ellenbogen und Unterarm.
Schritt 3: Wählen Sie eine geeignete Vene aus und punktieren Sie diese mit einer
Injektionsnadel. Sobald die rote Flüssigkeit in die Vene gelangt, passen Sie die
Tropfgeschwindigkeit des Venentransfusionssets an, damit die rote Blutsimulationsflüssigkeit
in der Infusionsflasche durch das Rohrleitungssystem im Modell fließt und durch den unteren
Gummischlauch in die Abfallflüssigkeitsflasche gelangt.

Modèle d'injection intraveineuse du bras
1. Fonction du produit :
1. Les huit principaux systèmes veineux répartis sur le bras peuvent être utilisés pour la formation
à la ponction, comme l'injection intraveineuse, la perfusion (sang) et le prélèvement sanguin.
2. Il peut être injecté dans le muscle deltoïde.
3. Le membre supérieur peut être tourné à 360 degrés, ce qui peut imiter le bras humain, ce qui
est pratique pour la pratique de la ponction.
4. L'aiguille donne une sensation évidente de chute dans l'air et il y a un retour du sang lors d'une
perforation correcte.
5. Le même site de ponction de la veine et de la peau peut supporter des centaines de ponctions
répétées sans fuite.
6. L'étui annulaire offre plusieurs points d'entraînement pour l'injection intradermique, placé sur
le bras du modèle. Si l'injection du liquide est correcte, un boursouflure apparaîtra sur la peau.
Une fois le liquide aspiré, le boursouflure disparaîtra.
2. Méthode d'installation :
1. Retirez le modèle de membre supérieur en silicone et le support de perfusion réglable de la
boîte d'emballage.
2. Vissez l'écrou de fixation pour fixer fermement le support de bouteille de perfusion suspendu
sur la position du cric de la plaque de support du modèle.
3. Simulation de sang avec une petite quantité de poudre de sang et de configuration d'eau.
3
、
Étapes de formation :
1. Du sang a été prélevé dans la veine de l'avant-bras du coude
Étape 1 : Une seringue jetable de 50 ml a été connectée au tube supérieur en caoutchouc du
modèle de membre supérieur en plastique, puis le sang simulé a été injecté et les vaisseaux
sanguins ont été remplis. Comme illustré sur la figure :
Étape 2 : désinfection de routine de la peau du coude et de l’avant-bras.
Étape 3 : sélectionnez la veine appropriée, percez la veine avec une seringue de 5 ml et
prélevez 2 ml de sang veineux (solution de simulation sanguine).
2. Injection intraveineuse ou perfusion intraveineuse par le coude et l'avant-bras :
L'injection intraveineuse, ou perfusion intraveineuse, consiste à injecter un médicament
liquide dans une veine sous pression. Les veines les plus courantes sont la veine céphalique
et la veine basilique.
Objectif : A : sauvetage ou traitement des patients, par injection intraveineuse sous pression
de liquide solubilisé de glucose ou de sang, augmentation du volume sanguin de l'artère
Two clips released
The blood vessels were filled with simulated blood
(after a head of water overflows, it is necessary to
continue to irrigate water to drain the air in the blood
vessel. The air in the blood vessel will affect the blood
return.)
One end clamp of blood vessel
Place the arm model horizontally
The other end clamp is released
The hand vessel is higher than the arm model
Venipuncture can produce blood returning effect
Warm tips: when injecting water, do not clamp the
clamp. Both clamps must be released and filled with
water. Otherwise, the blood vessel with needle eye
may leak. It is recommended to use tap water directly
for the first operation, and blood powder can be used
to simulate blood and water operation (improper
blood and water operation can easily contaminate the
model)

coronaire et de l'artère carotide, afin d'améliorer le flux sanguin du cœur et du cerveau, et
rétablissement de la pression artérielle par réflexe pour sauver ou traiter les patients. B : Il
est utilisé pour effectuer certains examens spéciaux, etc. C : Pour la chimiothérapie.
3. Formation aux opérations d’injection intraveineuse ou de perfusion intraveineuse :
Étape 1 : (identique à l'étape 1 du prélèvement sanguin par la veine du coude et de
l'avant-bras), en utilisant une plaque d'injection, une seringue appropriée, une aiguille n°
6-8, un médicament, un sac de sable, des gants stériles et une serviette de traitement stérile,
etc. Dans le cas des patients néonatals, on peut choisir la veine radiale, les patients atteints
de maladies du sang sont contre-indiqués pour cette méthode d'injection, afin d'éviter les
saignements.
Étape 2 : désinfectez régulièrement la peau du coude et de l'avant-bras, portez des gants
stériles et posez une serviette stérile.
Étape 3 : Fixez la veine sélectionnée avec l’index et le majeur gauches, puis avec l’autre
main une seringue (seringue de 50 ml, aiguille n ° 6-8) contenant le liquide extrait, et
insérez-la verticalement à un angle de 40 ° . Lorsque le liquide rouge pénètre dans la
seringue, bloquez le tube en caoutchouc supérieur avec la pince, desserrez le clip inférieur,
fixez l’aiguille de ponction d’une main et fixez-la simultanément avec l’autre main. Poussez
le médicament liquide le plus rapidement possible d’une main, de sorte que le médicament
liquide contenu dans la seringue s’écoule dans le système de canalisations du modèle et
pénètre dans le flacon de liquide usagé par le tube en caoutchouc inférieur. Après l’injection,
retirez rapidement l’aiguille. Lorsqu'un liquide rouge pénètre dans la seringue, relâchez le
collier de serrage supérieur du tuyau en caoutchouc et ajustez la vitesse d'égouttement de
l'ensemble de perfusion intraveineuse, de sorte que le liquide de simulation de sang rouge
dans le flacon de perfusion s'écoule à travers le système de canalisation du modèle et pénètre
dans le flacon de liquide résiduaire par le tube en caoutchouc inférieur, et l'aiguille de
ponction est fixée.
4. Transfusion sanguine transfémorale par le coude et l'avant-bras
Étape 1 : identique à l’étape 1 du prélèvement de sang dans la veine du coude et de l’
avant-bras.
Étape 2 : désinfection de routine de la peau du coude et de l’avant-bras.
Étape 3 : sélectionnez une veine appropriée et percez-la avec une aiguille d'injection.
Lorsque le liquide rouge pénètre dans la veine, ajustez la vitesse de chute du dispositif de
transfusion veineuse pour que le liquide de simulation de sang rouge contenu dans le flacon
de perfusion s'écoule à travers le système de canalisations du modèle et pénètre dans le
flacon de liquide résiduaire par le tube en caoutchouc inférieur.

Modello di iniezione endovenosa del braccio
1. Funzione del prodotto:
1. Gli otto principali sistemi venosi distribuiti sul braccio possono essere utilizzati per
l'addestramento alla puntura, come l'iniezione endovenosa, l'infusione (di sangue) e il prelievo di
sangue.
2. Può essere iniettato nel muscolo deltoide.
3. L'arto superiore può essere ruotato di 360 gradi, imitando il braccio umano e risultando
comodo per la pratica della puntura.
4. L'ago ha un evidente senso di caduta in aria e, se la puntura è corretta, si verifica un ritorno di
sangue.
5. Lo stesso sito di puntura della vena e della pelle può resistere a centinaia di punture ripetute
senza perdite.
6. La fondina anulare offre diversi punti di addestramento per l'iniezione intradermica, che viene
posizionata sul braccio del modello. Se l'iniezione del liquido è corretta, si formerà una collinetta
sulla pelle. Dopo l'aspirazione del liquido, la collinetta scomparirà.
2. Metodo di installazione:
1. Estrarre il modello dell'arto superiore in silicone e il supporto per infusione regolabile dalla
scatola di imballaggio.
2. Avvitare il dado di fissaggio per fissare saldamente la staffa della bottiglia di infusione sospesa
sulla posizione del martinetto della piastra di supporto del modello.
3. Simulazione del sangue con una piccola quantità di polvere di sangue e configurazione
dell'acqua.
3
、
Fasi di formazione:
1. Il sangue è stato prelevato dalla vena dell'avambraccio del gomito
Fase 1: una siringa monouso da 50 ml è stata collegata al tubo di gomma superiore del modello di
arto superiore in plastica e il sangue simulato è stato iniettato e riempito di vasi sanguigni. Come
mostrato in figura:

Fase 2: disinfezione di routine della pelle del gomito e dell'avambraccio.
Fase 3: selezionare la vena adatta, perforarla con una siringa da 5 ml e prelevare 2 ml di
sangue venoso (soluzione di simulazione del sangue).
2. Iniezione endovenosa o infusione endovenosa attraverso l'avambraccio del gomito:
L'iniezione endovenosa o l'infusione endovenosa consiste nell'iniettare un farmaco liquido in
vena sotto pressione. Le vene più comuni sono la vena cefalica e la vena basilica.
Scopo: A: soccorso o trattamento dei pazienti, tramite iniezione endovenosa a pressione di
liquido solubilizzato in glucosio o sangue, per aumentare il volume sanguigno delle arterie
coronarie e carotidee, in modo da migliorare il flusso sanguigno al cuore e al cervello e
Two clips released
The blood vessels were filled with simulated blood
(after a head of water overflows, it is necessary to
continue to irrigate water to drain the air in the blood
vessel. The air in the blood vessel will affect the blood
return.)
One end clamp of blood vessel
Place the arm model horizontally
The other end clamp is released
The hand vessel is higher than the arm model
Venipuncture can produce blood returning effect
Warm tips: when injecting water, do not clamp the
clamp. Both clamps must be released and filled with
water. Otherwise, the blood vessel with needle eye
may leak. It is recommended to use tap water directly
for the first operation, and blood powder can be used
to simulate blood and water operation (improper
blood and water operation can easily contaminate the
model)

ripristinare la pressione sanguigna per riflesso, al fine di soccorso o trattamento dei pazienti.
B: Viene utilizzato per eseguire alcuni esami speciali, ecc. C: Per la chemioterapia.
3. Formazione sulla chirurgia per iniezione endovenosa o infusione endovenosa:
Fase 1: (uguale alla fase 1 del prelievo di sangue attraverso la vena del gomito e
dell'avambraccio), utilizzando una piastra di iniezione, una siringa adatta, un ago n. 6-8, un
medicinale, un sacchetto di sabbia, guanti sterili e un asciugamano sterile per trattamenti,
ecc. In caso di pazienti neonatali è possibile scegliere la vena radiale; i pazienti con malattie
del sangue hanno controindicazioni a questo metodo di iniezione, per evitare emorragie.
Fase 2: disinfettare regolarmente la pelle del gomito e dell'avambraccio, indossare guanti
sterili e stendere un asciugamano sterile.
Fase 3: fissare la vena selezionata con l'indice e il medio della mano sinistra, con l'altra mano
una siringa (siringa da 50 ml, ago n. 6-8) con il liquido estratto e incidere la vena
verticalmente con un angolo di 40°. Quando il liquido rosso entra nella siringa, bloccare il
tubo di gomma superiore con la fascetta, allentare la clip del tubo di gomma inferiore, fissare
l'ago di puntura con una mano e, contemporaneamente, utilizzare l'altra mano per fissare
l'ago di puntura. Spingere il farmaco liquido il più velocemente possibile con una mano, in
modo che il farmaco liquido nella siringa scorra attraverso il sistema di tubazioni del modello
e il farmaco liquido entri nella bottiglia del liquido di scarto attraverso il tubo di gomma
inferiore. Dopo l'iniezione, estrarre rapidamente l'ago. Quando il liquido rosso entra nella
siringa, rilasciare il morsetto superiore del tubo di gomma e regolare la velocità di
gocciolamento del set di infusione endovenosa, in modo che il liquido di simulazione del
sangue rosso nella bottiglia di infusione scorra attraverso il sistema di tubazioni nel modello
ed entri nella bottiglia del liquido di scarto attraverso il tubo di gomma inferiore e l'ago di
puntura sia fissato.
4. Trasfusione di sangue transfemorale attraverso l'avambraccio del gomito
Fase 1: uguale alla fase 1 del prelievo di sangue attraverso la vena dell'avambraccio del
gomito.
Fase 2: disinfezione di routine della pelle del gomito e dell'avambraccio.
Fase 3: selezionare una vena adatta e perforarla con un ago per iniezione. Quando il liquido
rosso entra nella vena, regolare la velocità di erogazione del set per trasfusione venosa per
far fluire il liquido di simulazione del sangue rosso presente nel flacone di infusione attraverso
il sistema di tubazioni del modello ed entrare nel flacone del liquido di scarto attraverso il tubo
di gomma inferiore.

Arm intraveneus injectiemodel
1. Productfunctie:
1. De acht belangrijkste veneuze systemen die over de arm verdeeld zijn, kunnen gebruikt
worden voor punctietraining zoals intraveneuze injectie, infusie (bloed) en bloedafname.
2. Het kan in de deltoïde spier worden geïnjecteerd.
3. De bovenste ledemaat kan 360 graden worden gedraaid, wat de menselijke arm kan imiteren,
wat handig is voor het oefenen van puncties.
4. De naald heeft een duidelijk valgevoel en er komt bloed terug als hij correct prikt.
5. Dezelfde prikplaats in de ader en in de huid kan honderden herhaalde prikpogingen weerstaan
zonder dat er lekkage optreedt.
6. De ringvormige holster biedt meerdere trainingspunten voor intradermale injectie en wordt op
de arm van het model geplaatst. Als de vloeistofinjectie correct is, verschijnt er een heuveltje op
de huid. Nadat de vloeistof is opgezogen, verdwijnt het heuveltje.
2. Installatiemethode:
1. Haal het siliconen bovenste ledemaatmodel en de instelbare infuusstandaard uit de
verpakking.
2. Draai de bevestigingsmoer vast om de beugel van de hangende infuusfles stevig op de
krikpositie van de modelsteunplaat te bevestigen.
3. Bloedsimulatie met een kleine hoeveelheid bloedpoeder en waterconfiguratie.
3. Trainingsstappen:
1. Bloed werd afgenomen uit de onderarmader van de elleboog
Stap 1: Een wegwerpspuit van 50 ml werd verbonden met de bovenste rubberen slang van het
plastic model van de bovenste ledematen, waarna het gesimuleerde bloed werd geïnjecteerd en
gevuld met bloedvaten. Zoals weergegeven in de afbeelding:

Stap 2: routinematige desinfectie van de huid van de elleboog en onderarm.
Stap 3: Selecteer de geschikte ader, prik de ader aan met een 5 ml-spuit en neem 2 ml
veneus bloed af (bloedsimulatieoplossing).
2. Intraveneuze injectie of intraveneuze infusie via de onderarm of elleboog:
Intraveneuze injectie of intraveneuze infusie is het onder druk injecteren van vloeibaar
medicijn in de ader. De meest voorkomende aderen zijn de vena cephalica en de vena
basilica.
Doel: A: Redding of behandeling van patiënten door middel van intraveneuze drukinjectie
met glucose-oplosbare vloeistof of bloed, om het bloedvolume van de kransslagader en
Two clips released
The blood vessels were filled with simulated blood
(after a head of water overflows, it is necessary to
continue to irrigate water to drain the air in the blood
vessel. The air in the blood vessel will affect the blood
return.)
One end clamp of blood vessel
Place the arm model horizontally
The other end clamp is released
The hand vessel is higher than the arm model
Venipuncture can produce blood returning effect
Warm tips: when injecting water, do not clamp the
clamp. Both clamps must be released and filled with
water. Otherwise, the blood vessel with needle eye
may leak. It is recommended to use tap water directly
for the first operation, and blood powder can be used
to simulate blood and water operation (improper
blood and water operation can easily contaminate the
model)

halsslagader te vergroten en zo de bloedstroom naar hart en hersenen te verbeteren, en de
bloeddruk te herstellen door reflexen om patiënten te redden of te behandelen. B: Het wordt
gebruikt voor bepaalde speciale onderzoeken, enz. C: Voor chemotherapie.
3. Opleiding voor intraveneuze injectie of intraveneuze infusie:
Stap 1: (hetzelfde als stap 1 van bloedafname via de ader in de onderarm van de elleboog),
met behulp van een injectieplaat, geschikte spuit, naald nr. 6-8, medicijnen, zandzak, steriele
handschoenen en steriele behandelhanddoek, enz. Bij neonatale patiënten kan de radiale
ader worden gekozen; patiënten met bloedziekten is deze injectiemethode
gecontra-indiceerd om bloedingen te voorkomen.
Stap 2: Desinfecteer de huid van de elleboog en de onderarm regelmatig, draag steriele
handschoenen en leg een steriele handdoek neer.
Stap 3: Fixeer de geselecteerde ader met de linker wijsvinger en middelvinger, de andere
hand met een spuit (50 ml spuit, naald nr. 6-8) met de opgezogen vloeistof en steek verticaal
in de ader in een hoek van 40 °. Wanneer de rode vloeistof de spuit binnenkomt, klemt u de
bovenste rubberen slangklem vast om de bovenste rubberen slang te blokkeren, maakt u de
onderste rubberen slangklem los, bevestigt u de priknaald met één hand en gebruikt u
tegelijkertijd de andere hand om de priknaald te fixeren. Duw het vloeibare medicijn zo snel
mogelijk met één hand in de spuit, zodat het vloeibare medicijn in de spuit door het
leidingsysteem in het model stroomt en via de onderste rubberen slang in de fles met
afvalvloeistof terechtkomt. Trek na de injectie de naald snel terug. Wanneer er rode vloeistof
in de spuit komt, laat u de bovenste rubberen buisklem los en past u de druppelsnelheid van
de intraveneuze infusieset aan, zodat de rode bloedsimulatievloeistof in de infuusfles door
het pijpleidingsysteem in het model stroomt en via de onderste rubberen buis in de
afvalvloeistoffles terechtkomt, en de punctienaald wordt vastgezet.
4. Transfemorale bloedtransfusie via de elleboog-onderarm
Stap 1: hetzelfde als stap 1 van het afnemen van bloed via de ader in de onderarm van de
elleboog.
Stap 2: routinematige desinfectie van de huid van de elleboog en onderarm.
Stap 3: Selecteer een geschikte ader en prik deze aan met een injectienaald. Wanneer de
rode vloeistof de ader binnenkomt, pas dan de druppelsnelheid van de veneuze transfusieset
aan zodat de rode bloedsimulatievloeistof in de infuusfles door het leidingsysteem in het
model stroomt en via de onderste rubberen slang in de afvalvloeistoffles terechtkomt.

Armintravenös injektionsmodell
1
、
Produktfunktion:
1. De åtta huvudsakliga vensystemen fördelade på armen kan användas för punkteringsträning
såsom intravenös injektion, infusion (blod) och blodtagning.
2. Det kan injiceras i deltamuskeln.
3. Den övre extremiteten kan roteras 360 grader, vilket kan imitera den mänskliga armen, vilket är
bekvämt för punktering.
4. Nålen har en tydlig känsla av att falla upp i luften, och det återkommer blod vid korrekt
punktering.
5. Samma punkteringsställe i ven och hud tål hundratals upprepade punktering utan läckage.
6. Det ringformade hölstret tillhandahåller flera träningspunkter för intradermal injektion, som
sätts på modellarmen. Om vätskeinjektionen är korrekt kommer en kulle att dyka upp på huden.
Efter att vätskan har dragits ut försvinner kullen.
2
、
Installationsmetod:
1. Ta ut silikonmodellen för övre extremiteter och justera infusionsstativet från förpackningen.
2. Skruva fast fixeringsmuttern för att ordentligt fästa den hängande infusionsflaskans fäste på
jackläget på modellens stödplatta.
3. Blodsimulering med en liten mängd blodpulver och vattenkonfiguration.
3, Träningssteg:
1. Blod togs från underarmsvenen i armbågen
Steg 1: 50 ml engångsspruta kopplades till den övre gummislangen på plastmodellen för övre
extremiteter, och det simulerade blodet injicerades och fylldes med blodkärl. Som visas i figuren:

Steg 2: rutinmässig desinfektion av armbågs- och underarmshud.
Steg 3: välj lämplig ven, punktera venen med 5 ml spruta och dra 2 ml venöst blod
(blodsimuleringslösning).
2. Intravenös injektion eller intravenös infusion genom armbågens underarm:
Intravenös injektion eller intravenös infusion är att injicera flytande medicin i venen under
tryck. De vanliga venerna är cephalic ven och basilic ven,
Syfte: A: räddning eller behandling av patienter, genom intravenös tryckinjektion av
glukossolubiliserad vätska eller blodpatienter, öka blodvolymen i kransartären och
halspulsådern, för att förbättra blodflödet i hjärtat och hjärnan, och återställa blodtrycket
Two clips released
The blood vessels were filled with simulated blood
(after a head of water overflows, it is necessary to
continue to irrigate water to drain the air in the blood
vessel. The air in the blood vessel will affect the blood
return.)
One end clamp of blood vessel
Place the arm model horizontally
The other end clamp is released
The hand vessel is higher than the arm model
Venipuncture can produce blood returning effect
Warm tips: when injecting water, do not clamp the
clamp. Both clamps must be released and filled with
water. Otherwise, the blood vessel with needle eye
may leak. It is recommended to use tap water directly
for the first operation, and blood powder can be used
to simulate blood and water operation (improper
blood and water operation can easily contaminate the
model)

genom reflex för att rädda eller behandla patienter. B: Det används för att utföra vissa
speciella undersökningar etc. C: För kemoterapi.
3. Intravenös injektion eller intravenös infusion träning:
Steg 1: (samma som steg 1 av bloddragning genom armbågsunderarmsvenen), med hjälp av
injektionsplatta, lämplig spruta, nr 6-8 nål, medicin, sandsäck, sterila handskar och steril
behandlingshandduk, etc. I fall av neonatala patienter kan välja radiell ven, patienter med
blodsjukdom kontraindicerade denna metod för injektion, för att undvika blödning.
Steg 2: desinficera huden på armbågen och underarmen rutinmässigt, bär sterila handskar
och lägg en steril hålhandduk.
Steg 3: fixera den valda venen med vänster pekfinger och långfinger, den andra handen med
en spruta (50ml spruta, nr 6-8 nål) med vätskan extraherad och stick in i venen vertikalt i
40 ° vinkel. När den röda vätskan kommer in i sprutan, klämma fast den övre
gummislangens klämma för att blockera den övre gummislangen, lossa den nedre
gummislangens klämma, fixera punkteringsnålen med ena handen, och samtidigt använd
den andra handen för att fixera punkteringsnålen. Skjut den flytande medicinen så fort som
möjligt med en hand, så att den flytande medicinen i vätskan flödade i vätskan i
sprutsystemet och in i sprutsystemet. flaska genom det nedre gummiröret. Dra snabbt ut
nålen efter injektionen. När det kommer röd vätska in i sprutan, släpp den övre
gummirörsklämman och justera dropphastigheten för det intravenösa infusionssetet, så att
den röda blodsimuleringsvätskan i infusionsflaskan strömmar genom rörledningssystemet i
modellen och kommer in i avfallsvätskeflaskan genom det nedre gummiröret, och
punkteringsnålen är fixerad.
4. Transfemoral blodtransfusion genom armbågsunderarm
Steg 1: samma som steg 1 för att ta blod genom armbågens underarmsven.
Steg 2: rutinmässig desinfektion av armbågs- och underarmshud.
Steg 3: välj en lämplig ven och punktera venen med en injektionsnål. När den röda vätskan
kommer in i venen, justera dropphastigheten för ventransfusionssetet för att få den röda
blodsimuleringsvätskan i infusionsflaskan att rinna genom rörledningssystemet i modellen
och gå in i avfallsvätskeflaskan genom den nedre gummislangen.