
Technical Support and E-Warranty Certificate www.vevor.com/support
FOLDING SEWING TABLE
USER MANUAL
We continue to be committed to provide you tools with competitive price.
"Save Half", "Half Price" or any other similar expressions used by us only represents an
estimate of savings you might benefit from buying certain tools with us compared to the major top
brands and does not necessarily mean to cover all categories of tools offered by us. You are
kindly reminded to verify carefully when you are placing an order with us if you are actually saving
half in comparison with the top major brands.
- 1 -
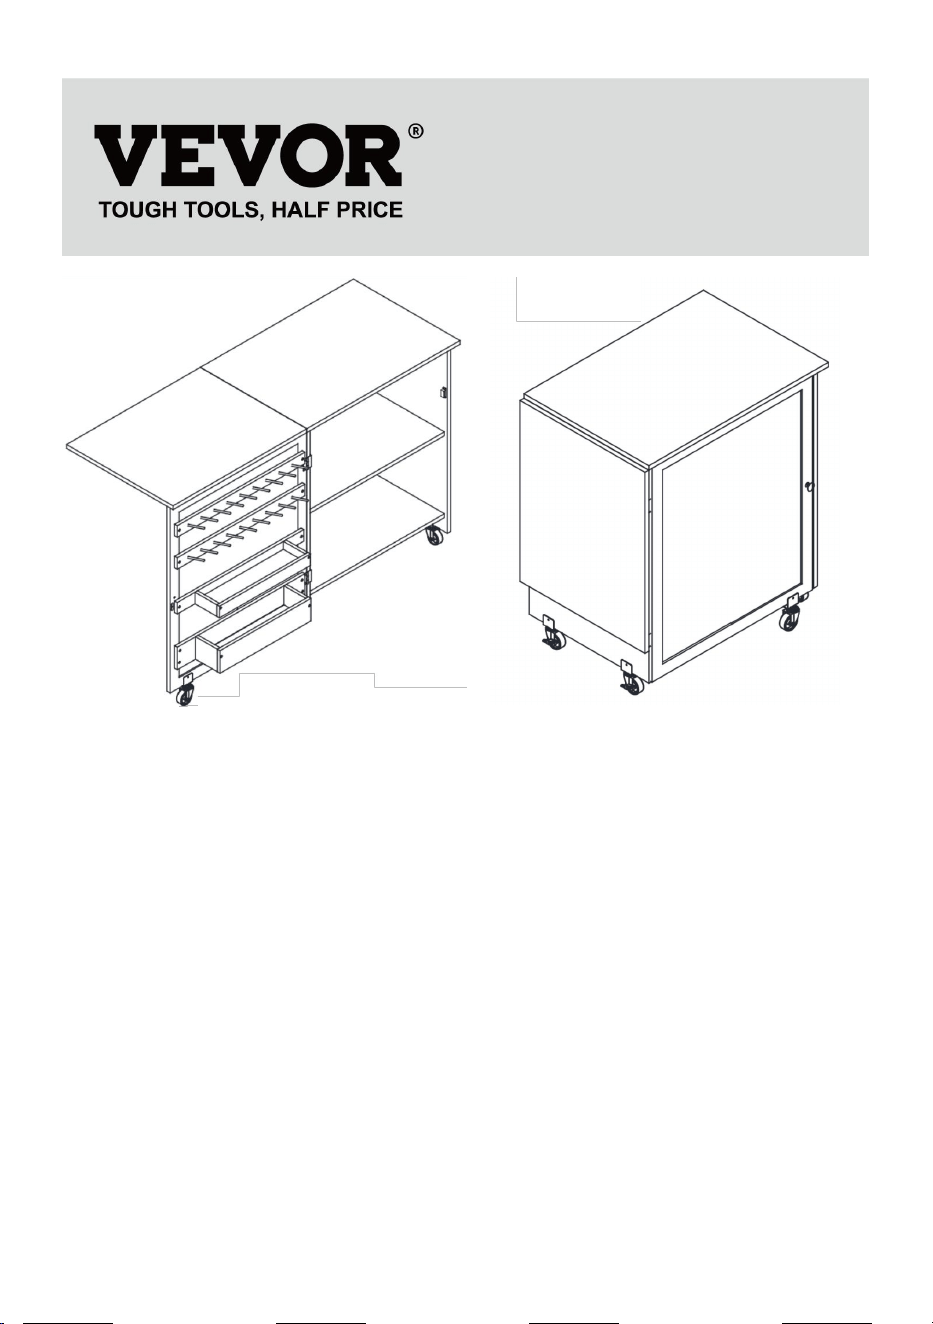
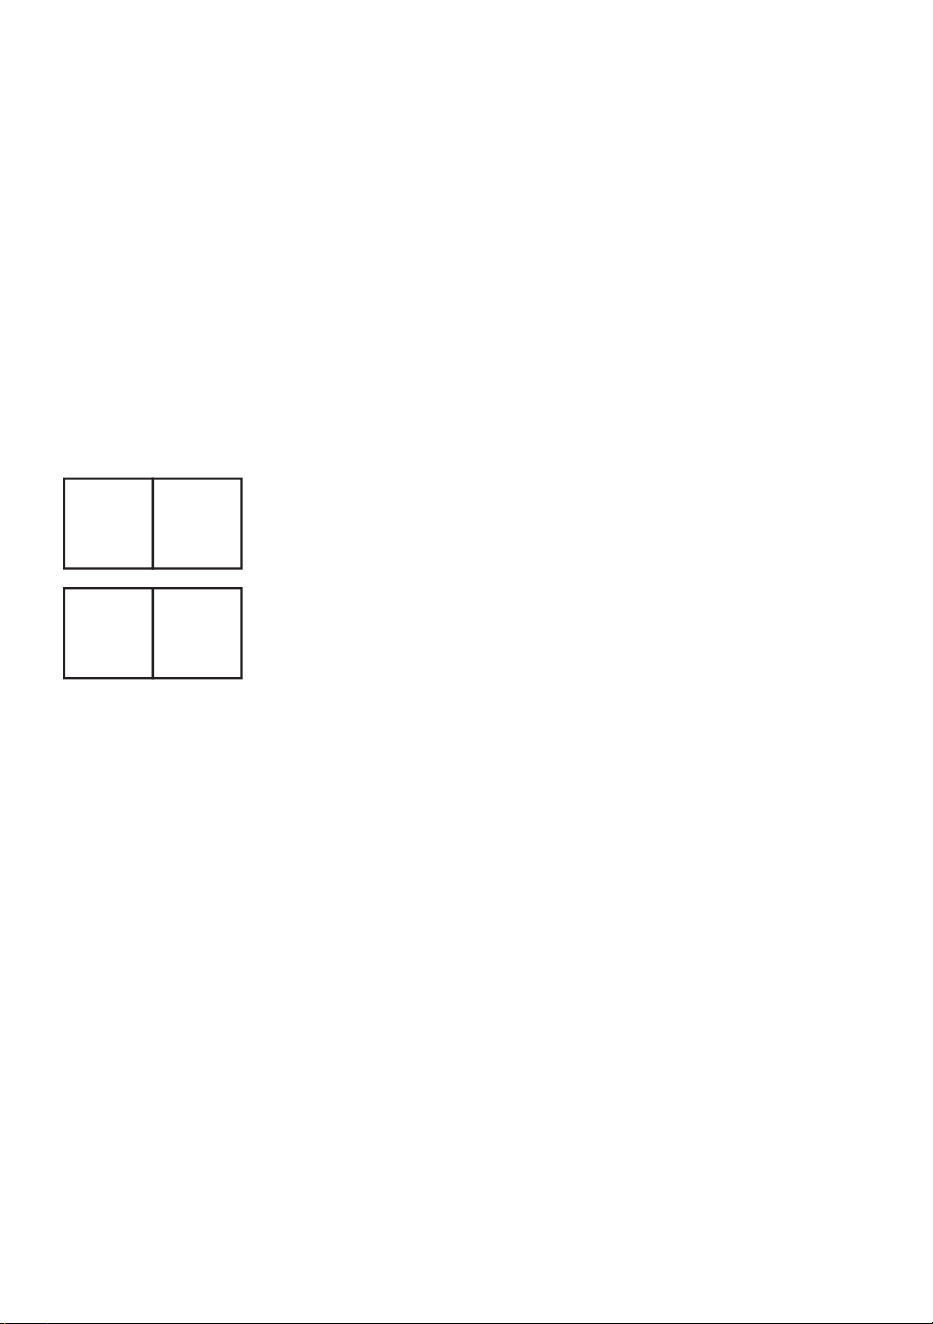
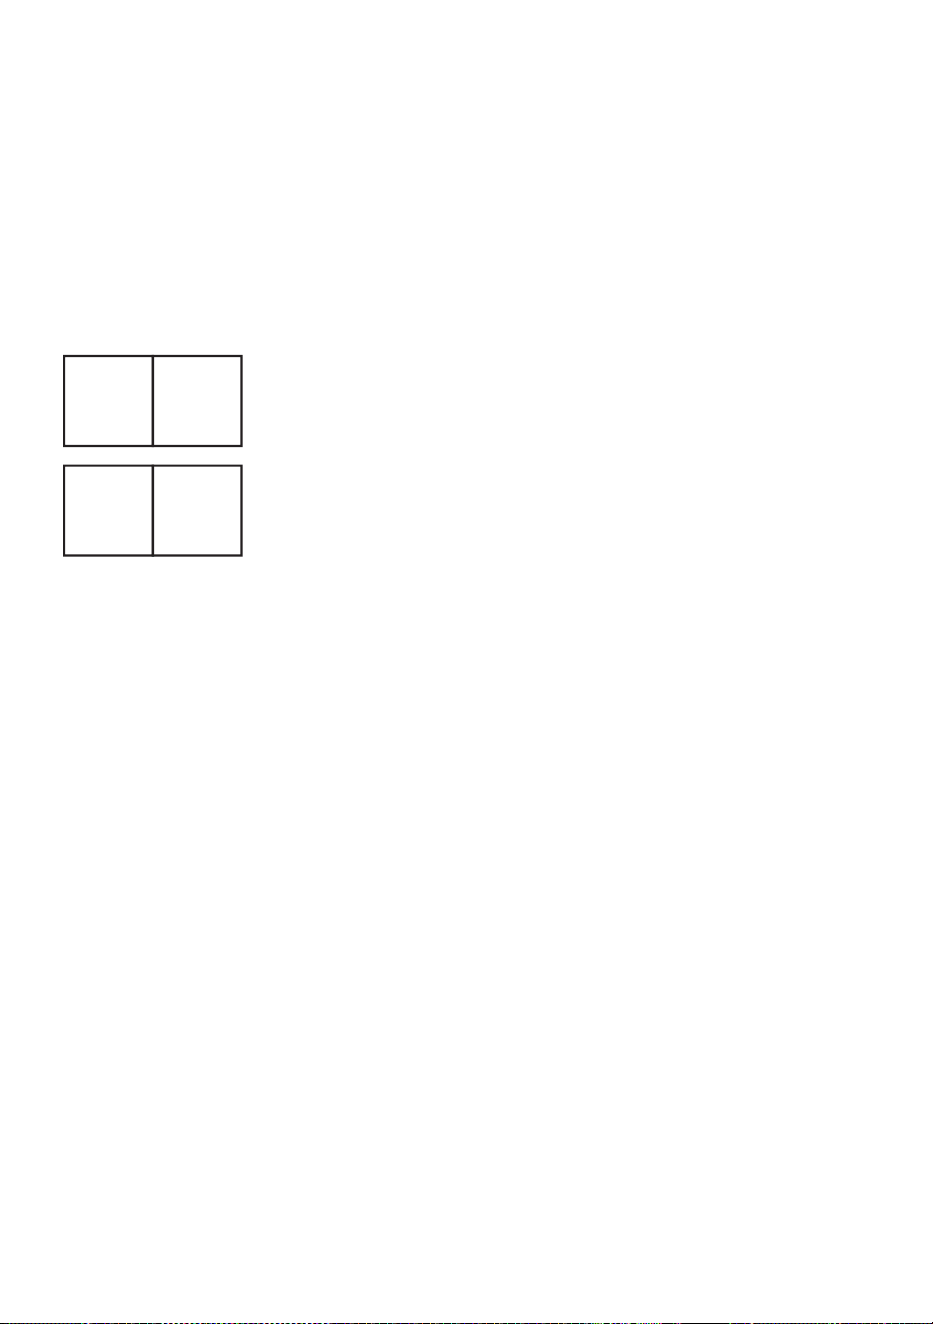
Unfold state Folding state
Note: The actual product you receive determines its look.
NEED HELP? CONTACT US!
Have product questions? Need technical support? Please feel free to contact us:
Technical Support and E-Warranty Certificate www.vevor.com/support
This is the original instruction, please read all manual instructions carefully before
operating. VEVOR reserves a clear interpretation of our user manual. The
appearance of the product shall be subject to the product you received. Please
forgive us that we won't inform you again if there are any technology or software
updates on our product.
FOLDING SEWING TABLE

- 2 -
1.Important safety instructions
Warning - To reduce the risk of injury, user must read instructions
manual carefully. Save These Instructions For Future Use
Warning- Be sure to wear eye protectors when using this product.
2. GENERAL SAFETY INSTRUCTIONS
READ ALL instructions before using this product. We strongly
recommendthat this product not be modified and/or used for any application
other than that forwhich it was designed.
1. Weight Limit: Ensure that the Main desktop(folding state) load
does not exceed the maximum specified limit of 40kg to avoid
deformation or damage.
2. Desktop Stability: When expanding the desktop, make sure the
hinges and supports are secure to prevent sudden folding or
wobbling.
3. Locking Casters: When using the table in a fixed position, ensure
that the lockable caster wheels are locked to prevent movement
during use.
4. Avoid Scratches: Avoid contact with sharp objects on the desktop
to prevent scratches or damage.
5. Pre-Use Check: Before each use, check that all screws, bolts,
knobs, and caster locks are securely fastened to ensure stability.
6. Proper Storage: Do not place the table in high-temperature,
high-humidity, or direct sunlight environments to prevent damage to
the wood and components.
7. No Standing: Do not stand on the tabletop or use any part of the
table as a step ladder to avoid structural damage and safety risks.
- 3 -
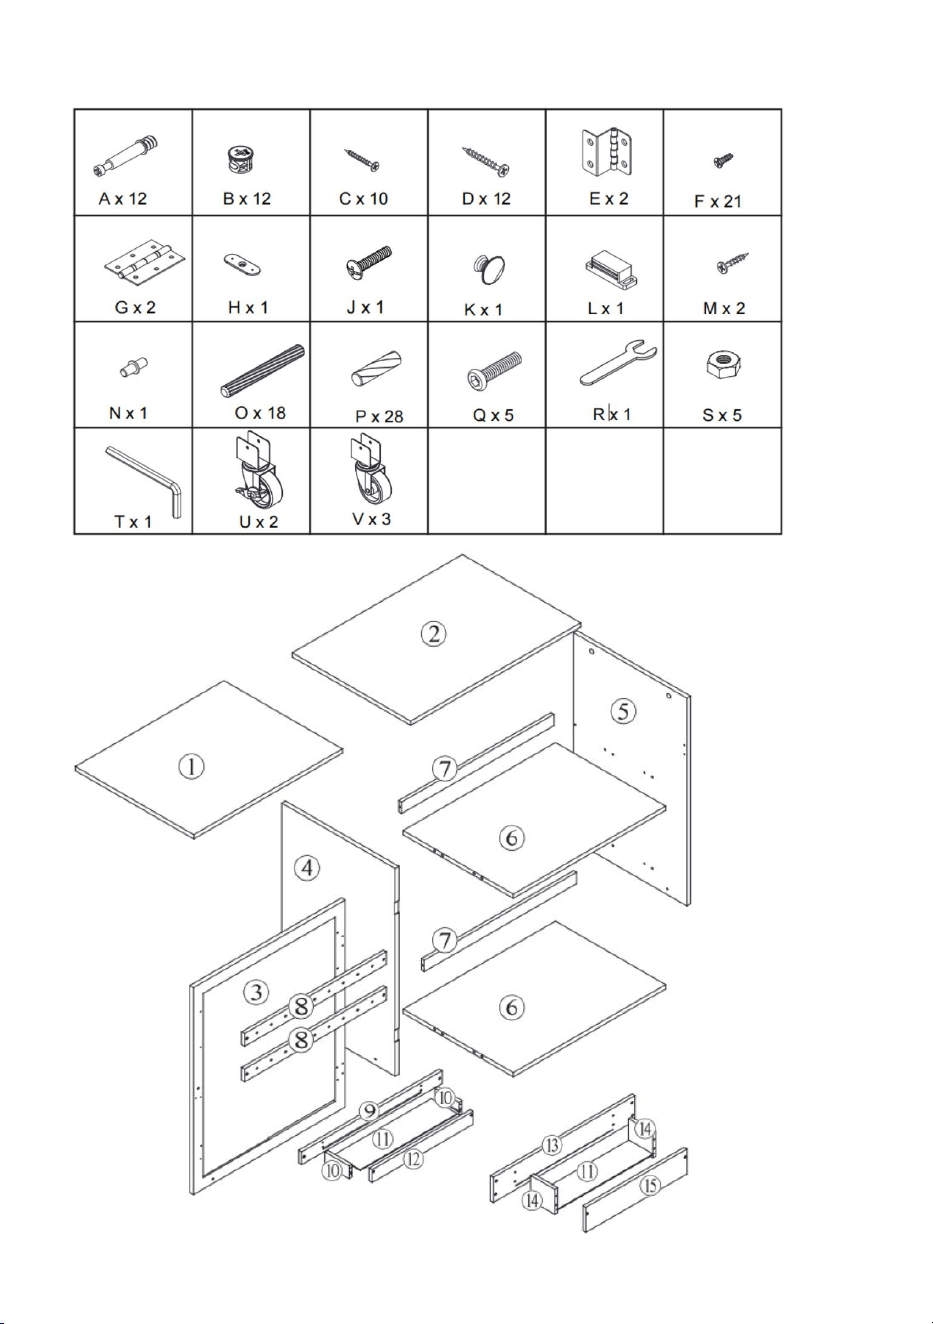
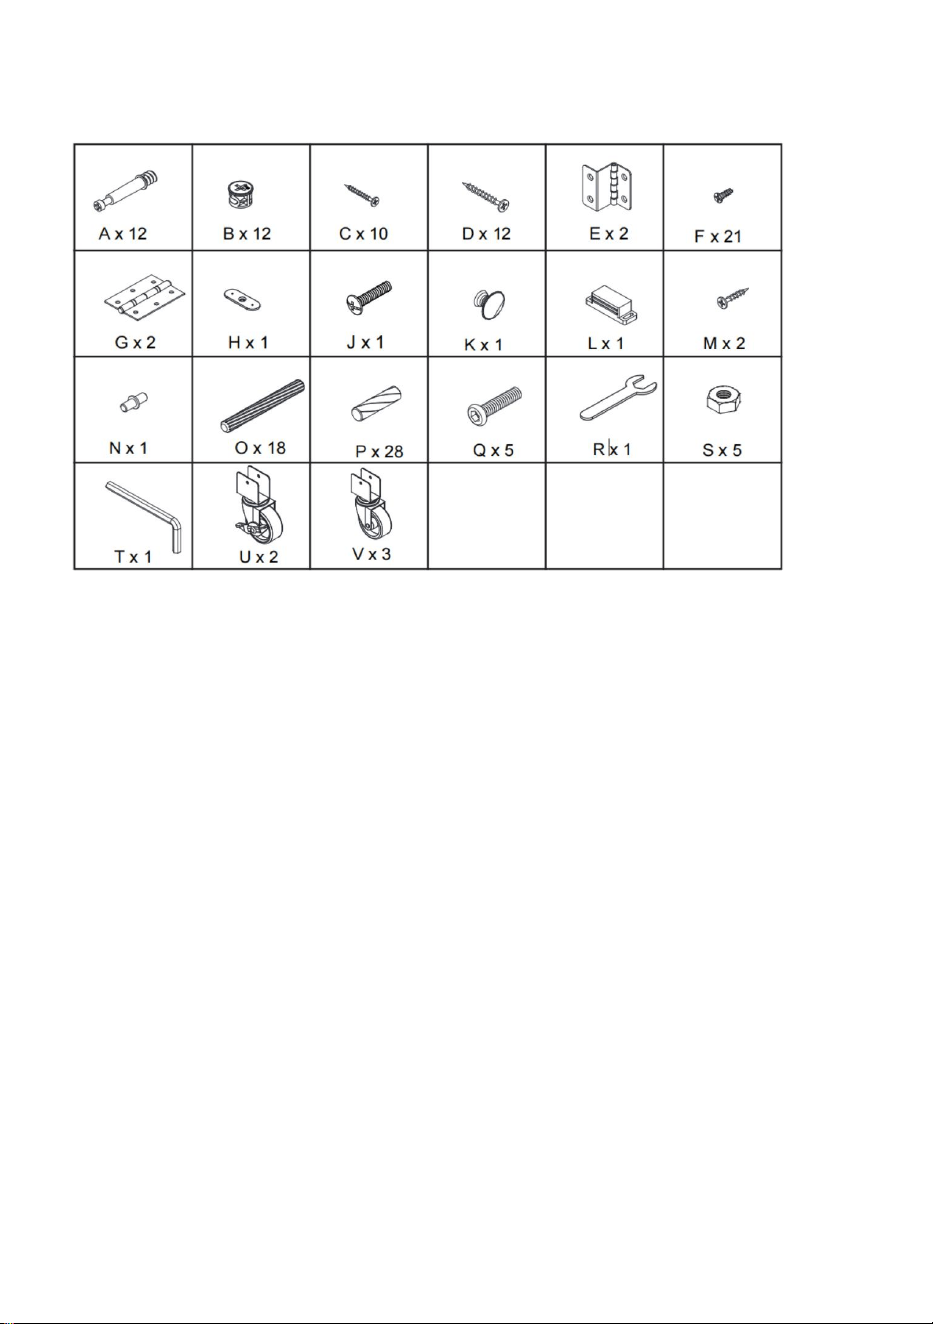
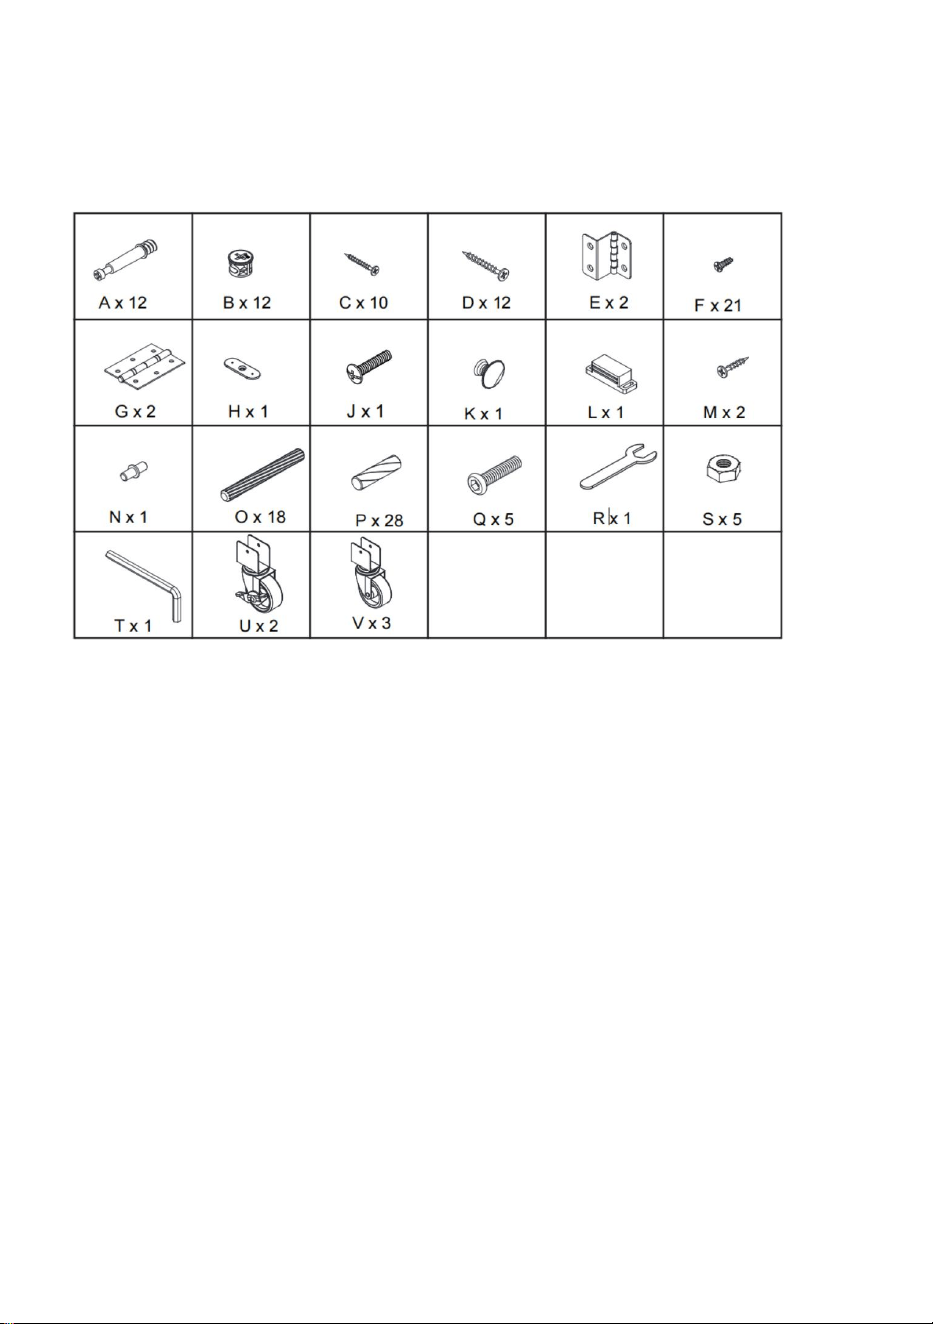
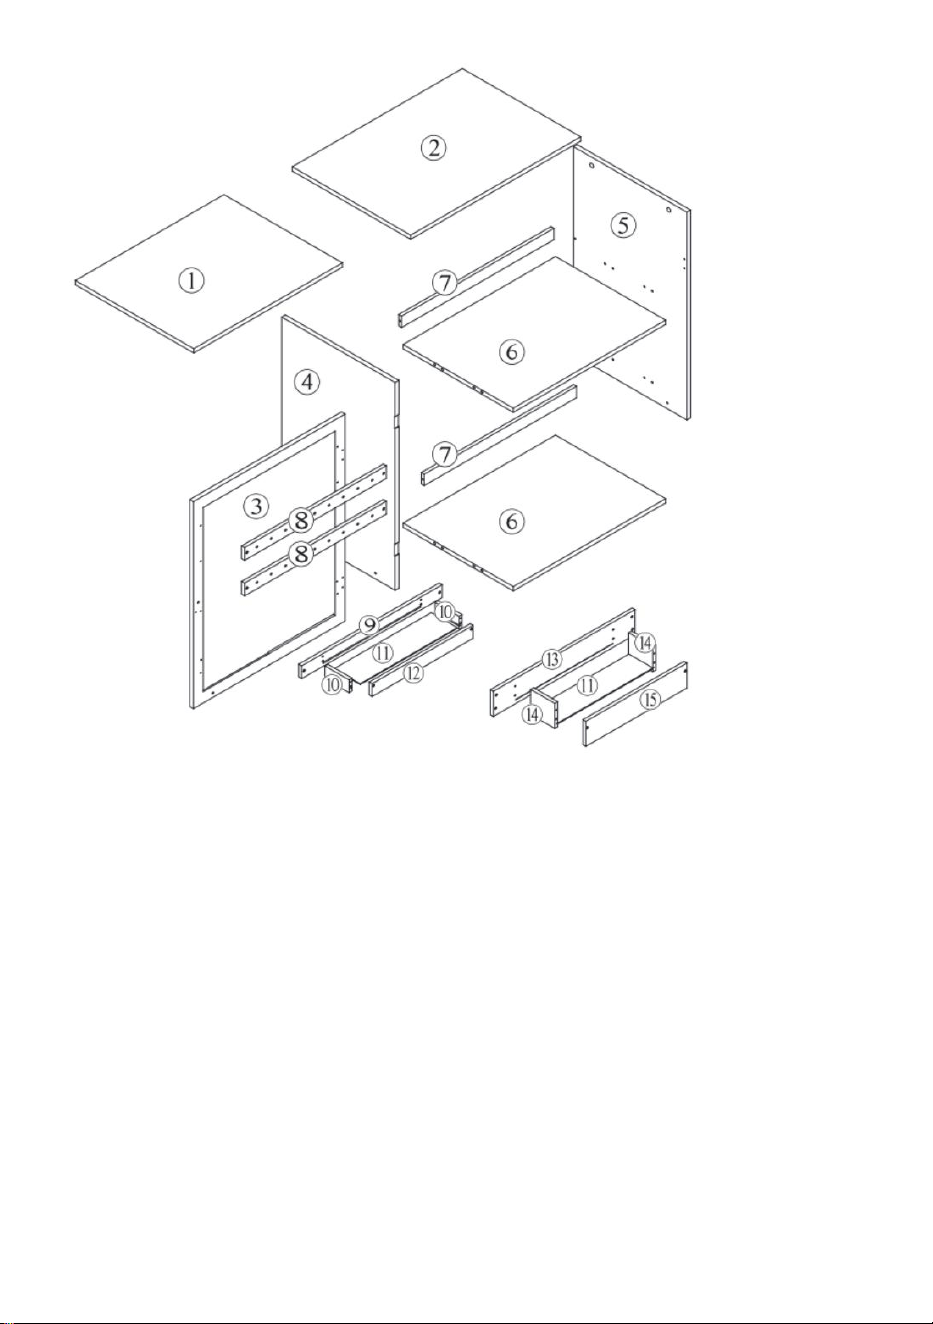
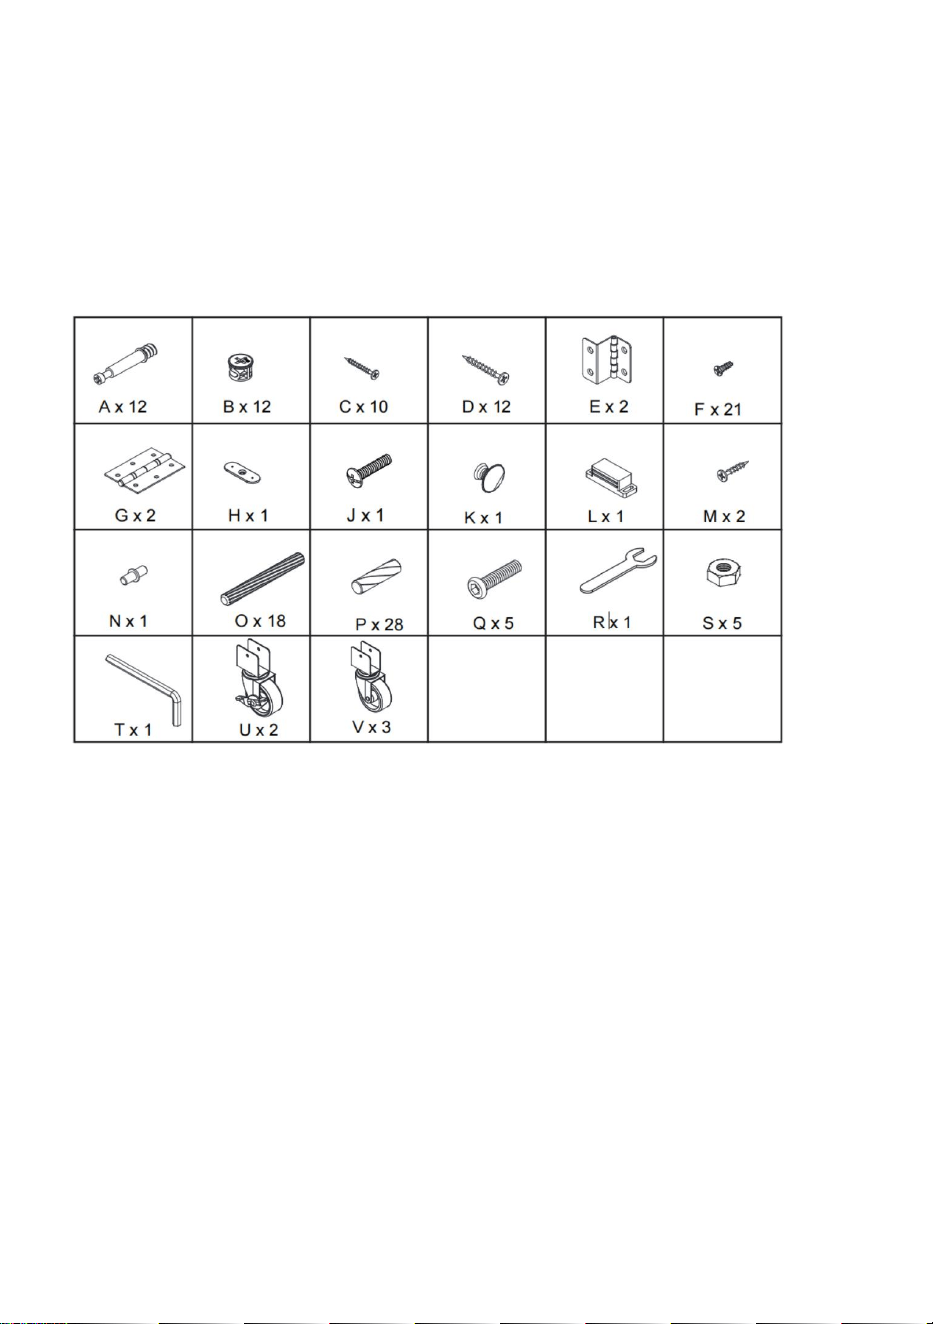
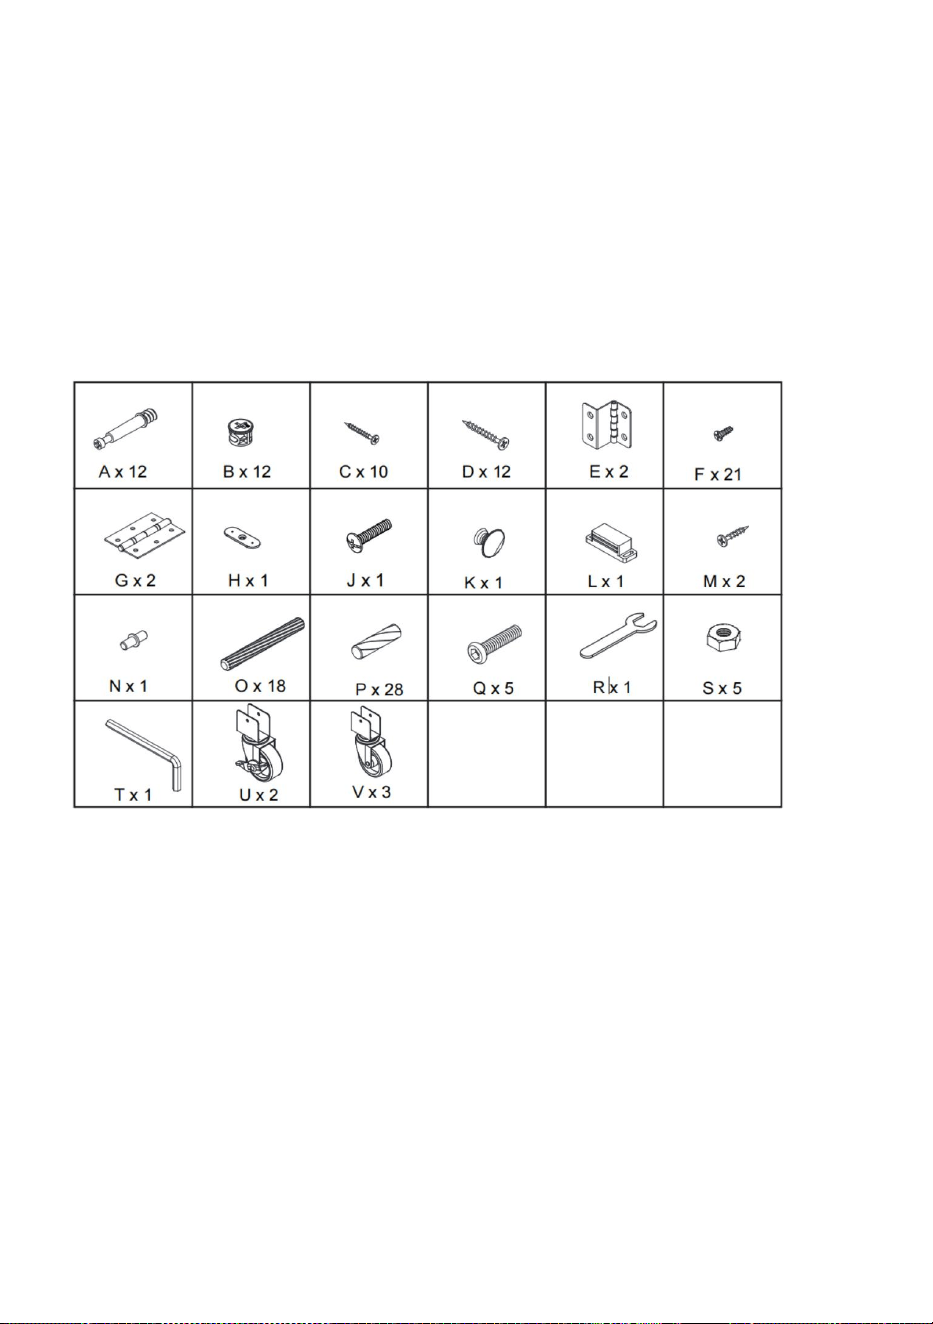
3 Part list
- 4 -
4 Main parameter
Folding Sewing Table
1. Model: HL20240800 Color: White
2. Model: HL20240801 Color: Wood Finish
3. Desktop size(L×W×H):1168×400×778mm
4. Main desktop max load: 40kg
5 Assembly process
Precautions before installation:
1. This product requires two adults to install, and gloves (not included in
the product) should be worn during installation. Safety precautions should
be taken when using tools during installation.
2. the entire installation process takes about 90 minutes.
3. The corresponding part and panel numbers are labeled on the
corresponding material.
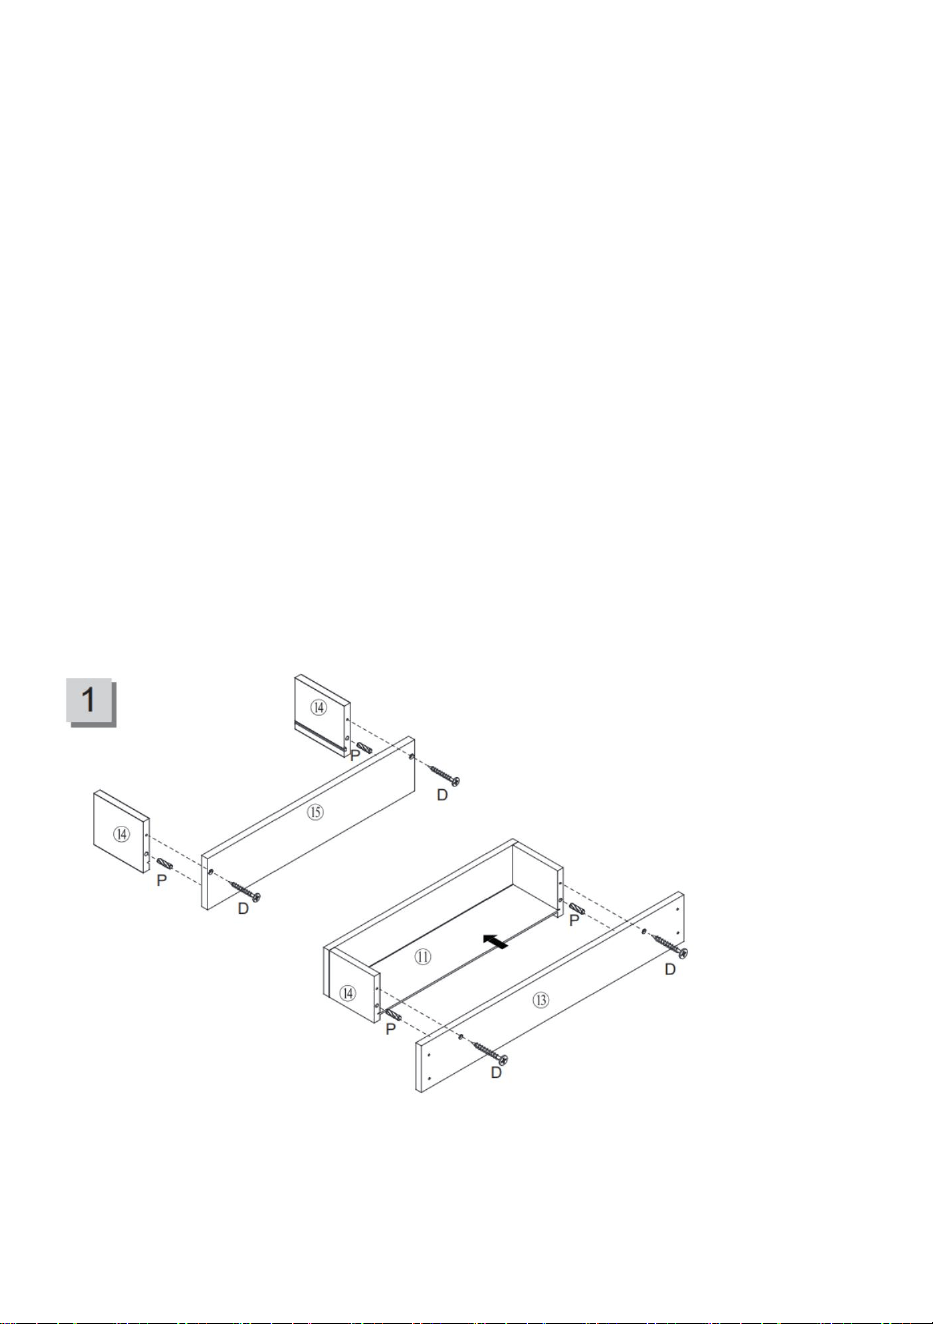
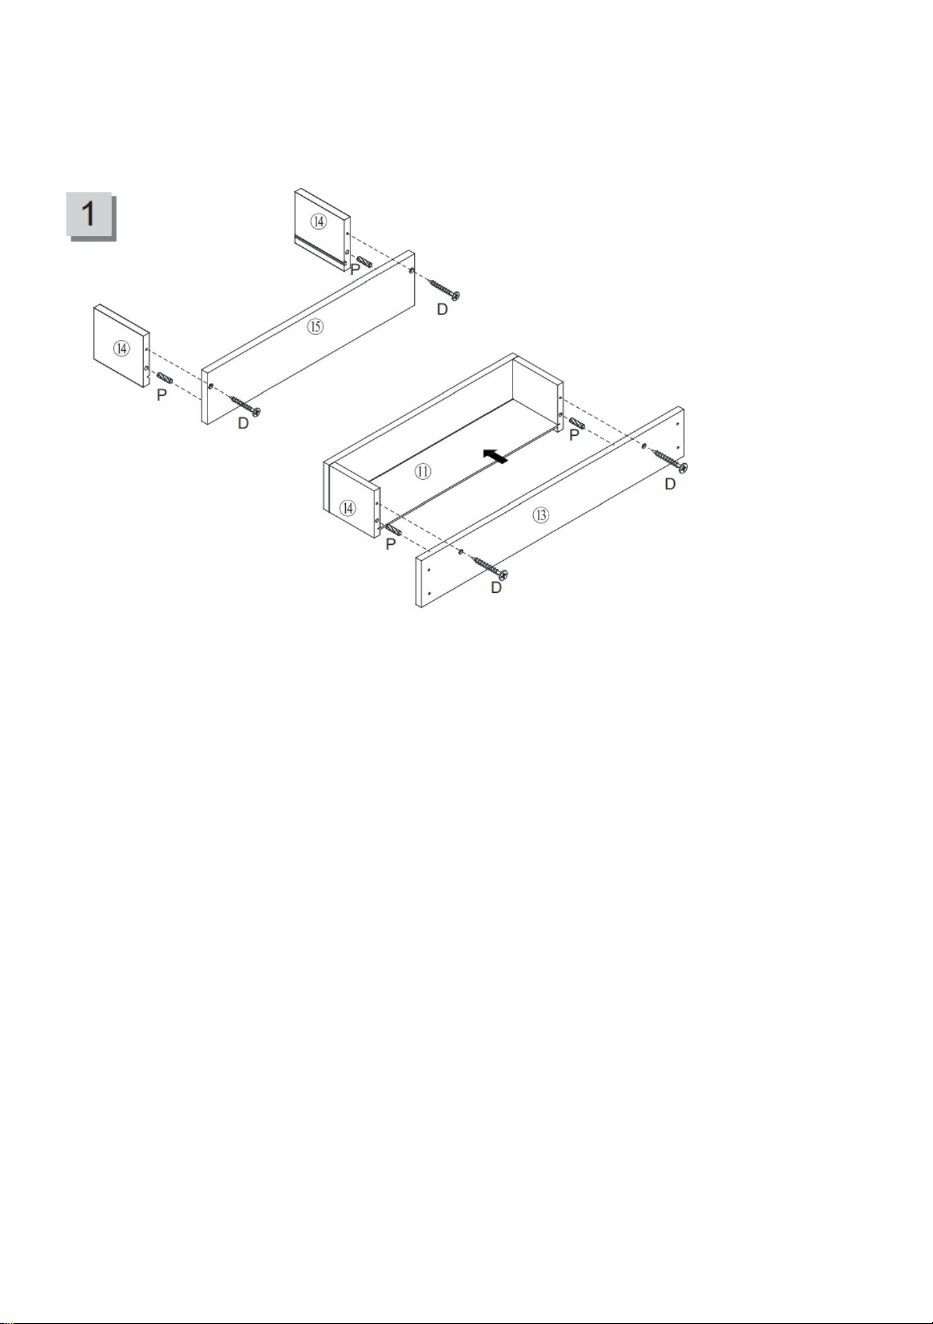
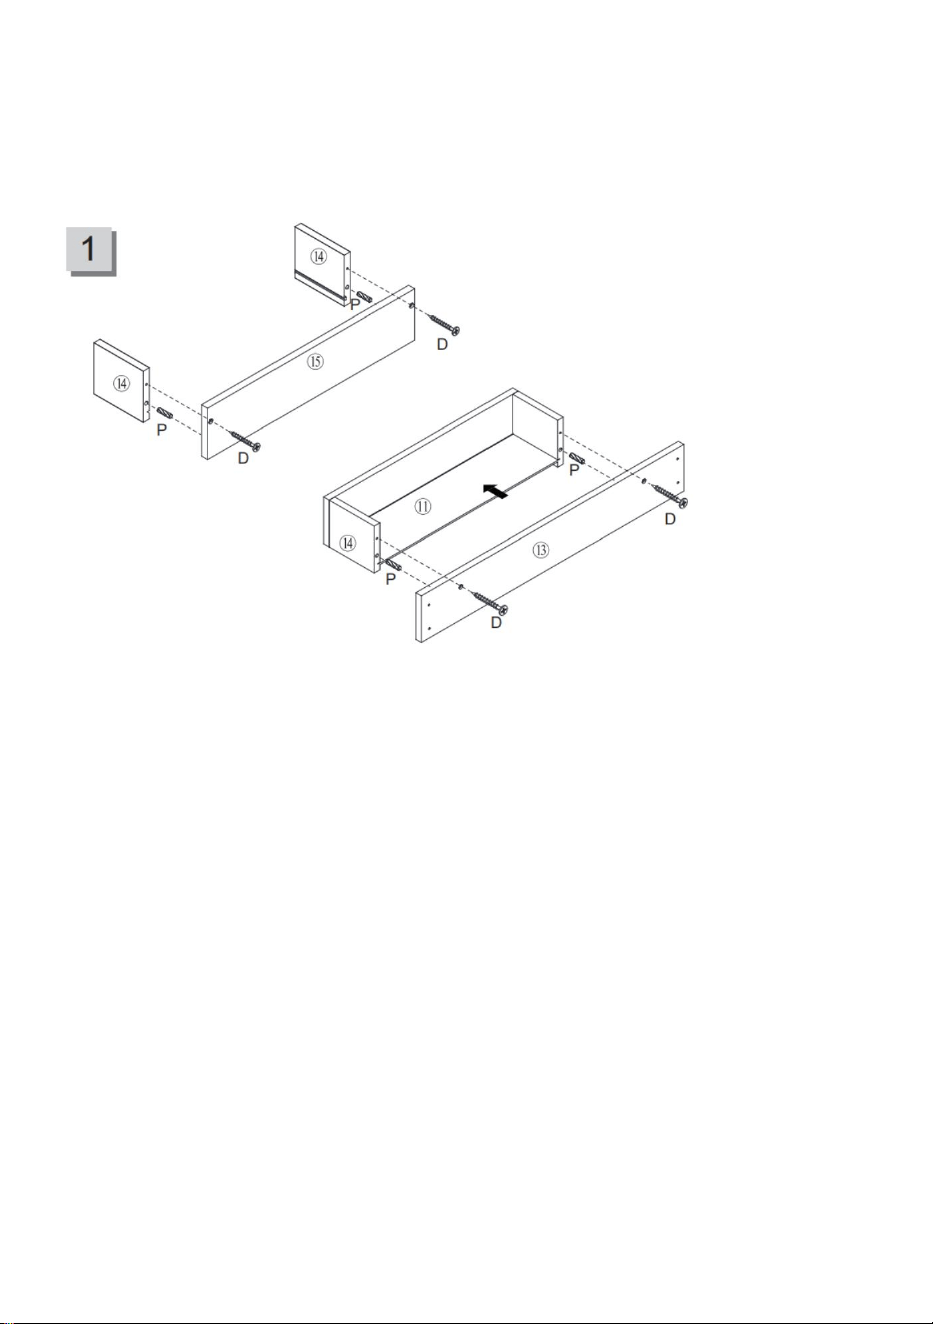
Step1: Install the large storage box
- Parts used:
- 11 (bottom panel) - 13 (front panel) - 14 (side panels)
- 15 (back panel) - P (dowels) - D (screws)
- Instructions

- 5 -
1. Insert dowels (P) into the pre-drilled holes of both 14 (side panels).
2. Align 14 (side panels) with 15 (front panel), connect them using dowels
(P), and secure with screws (D).
3. Slide 11 (bottom panel) between the side panels 14.
4. Attach 13 (back panel) between the side panels 14 and secure it with
screws (D).
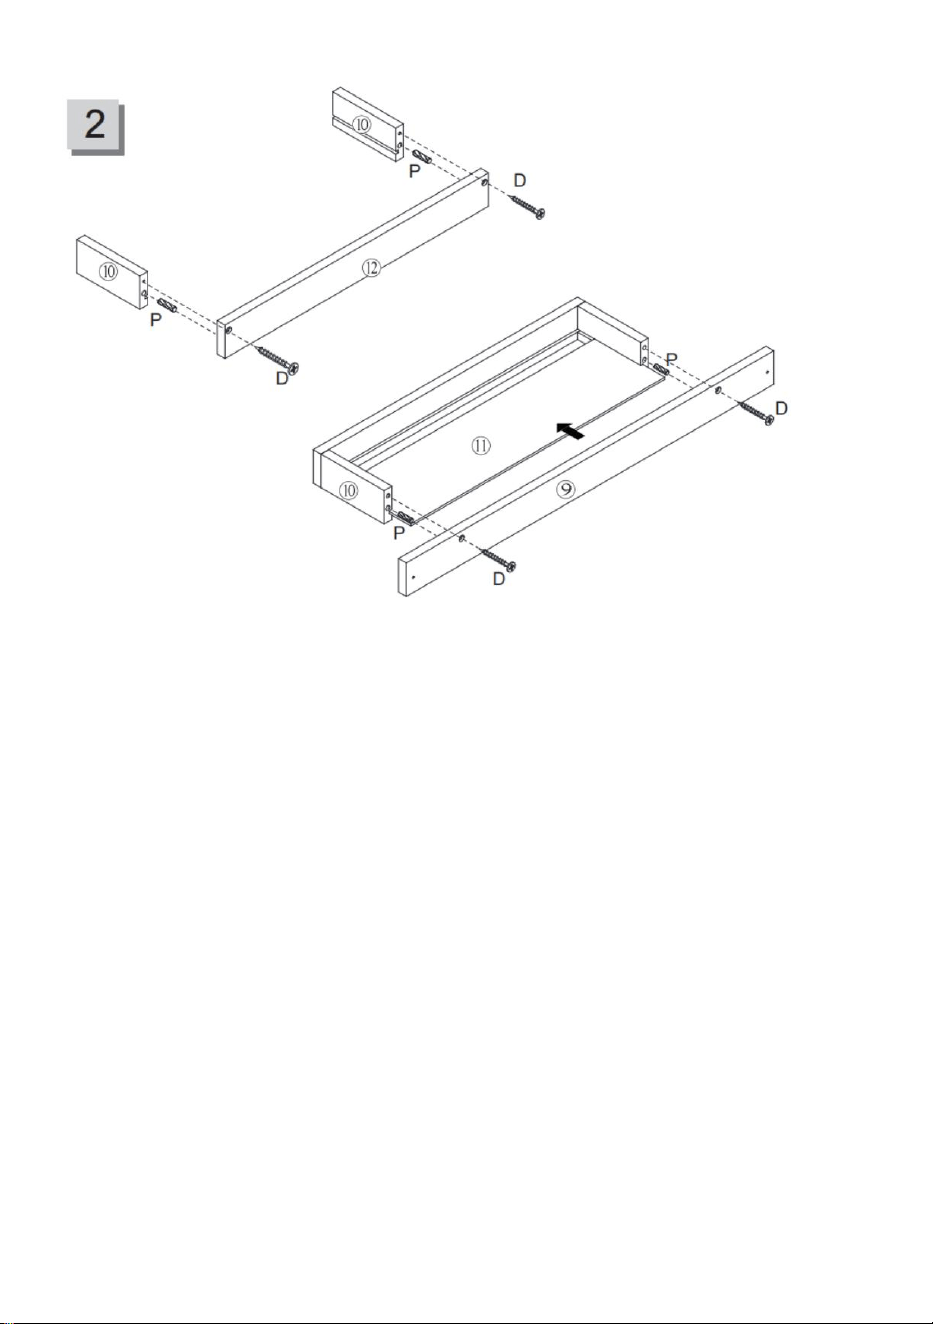
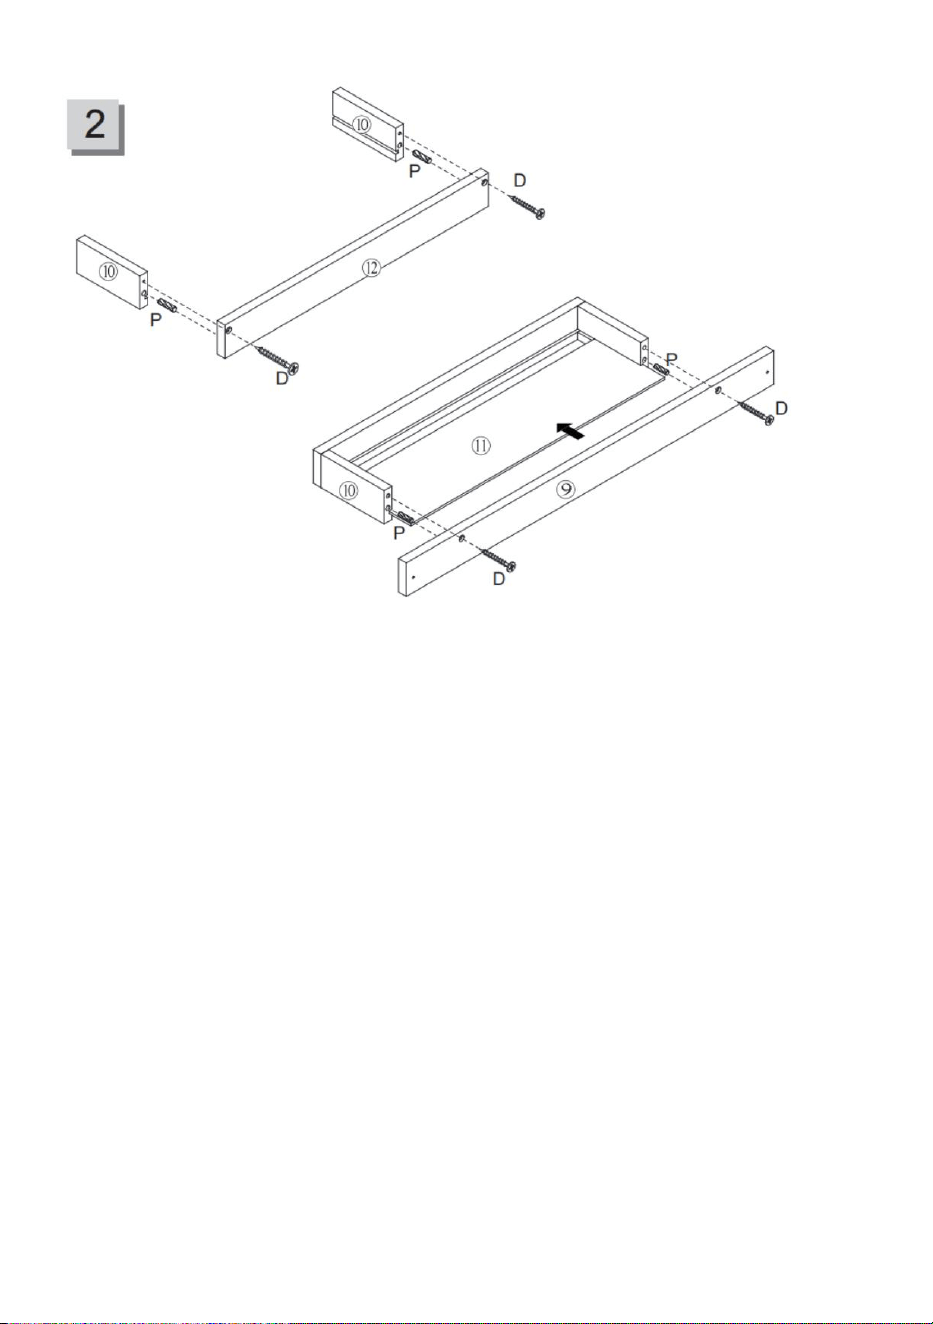
Step2: Assemble the Small Storage Box
- **Parts used**:
- 11 (bottom panel) - 9 (front panel) - 10 (side panels)
- 12 (back panel) - P (dowels) - D (screws)
- **Instructions**:
1. Insert dowels (P) into the pre-drilled holes of both 10 (side panels).
2. Align 10 (side panels) with 12 (front panel), connect them using dowels
(P), and secure with screws (D).
3. Slide 11 (bottom panel) between the side panels 10.
4. Attach 9 (back panel) between the side panels 10 and secure it with
screws (D).
- 6 -
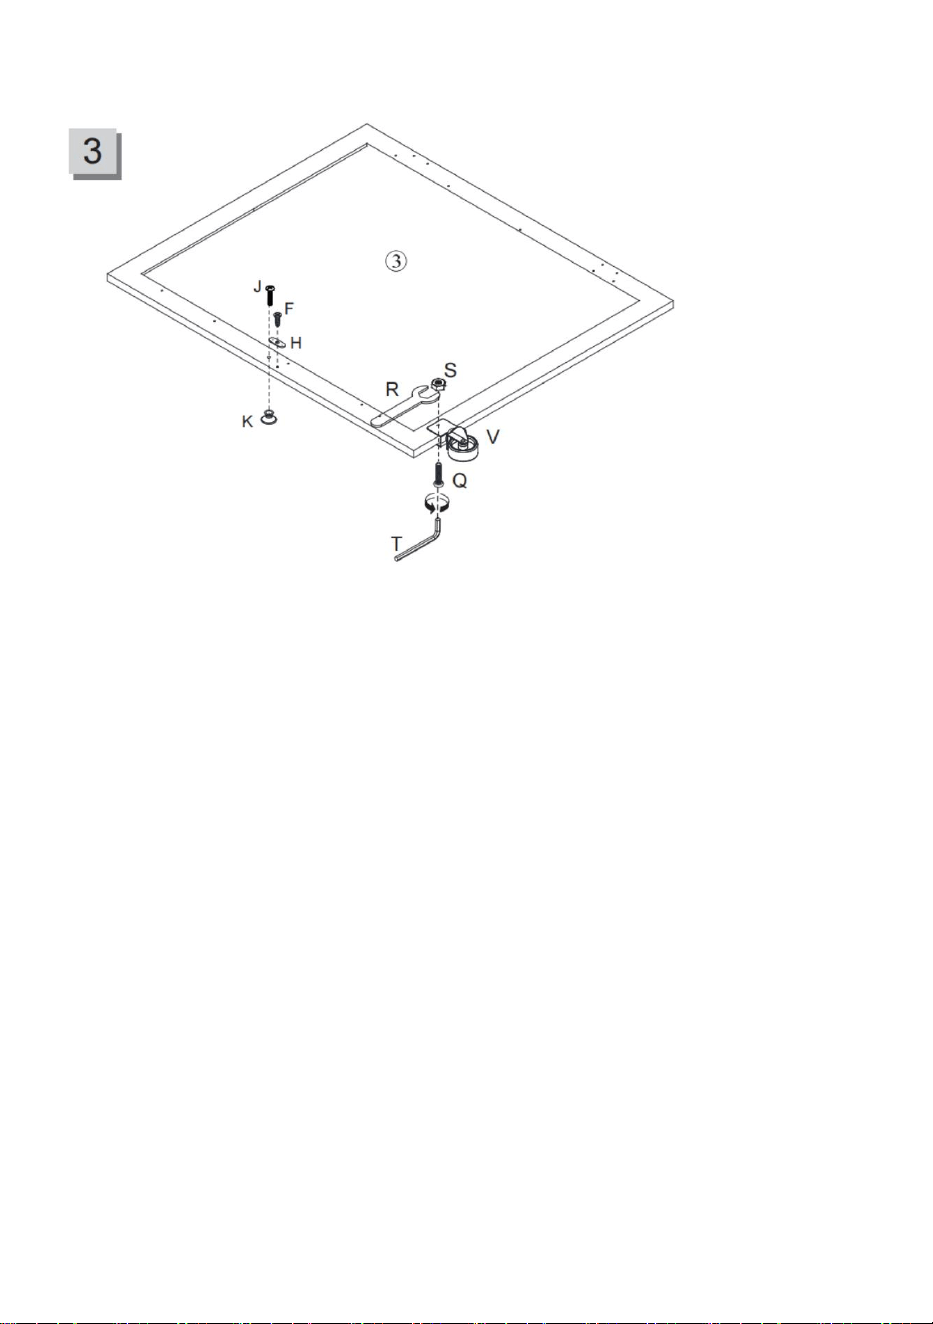
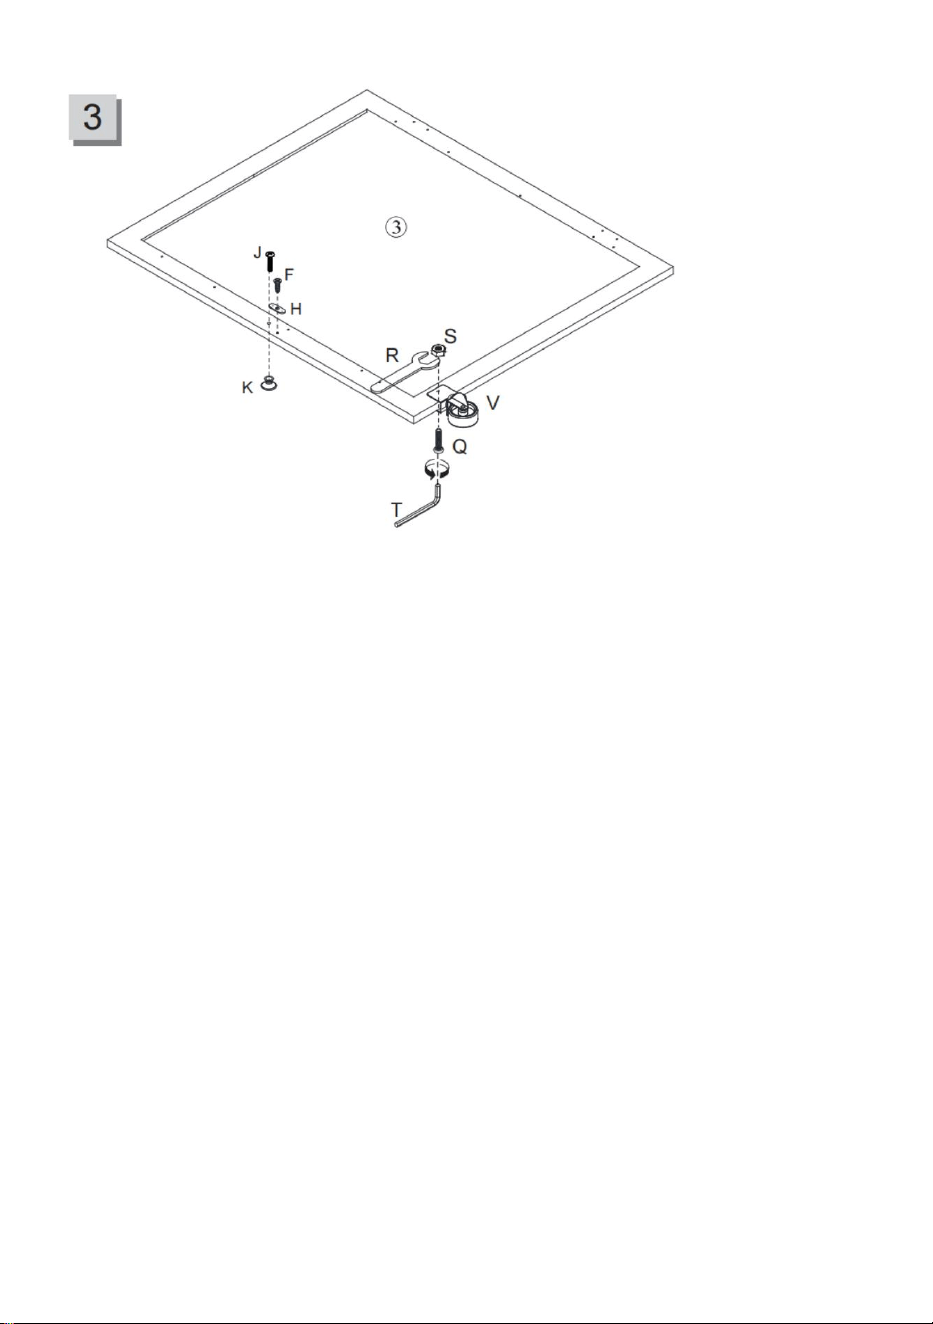
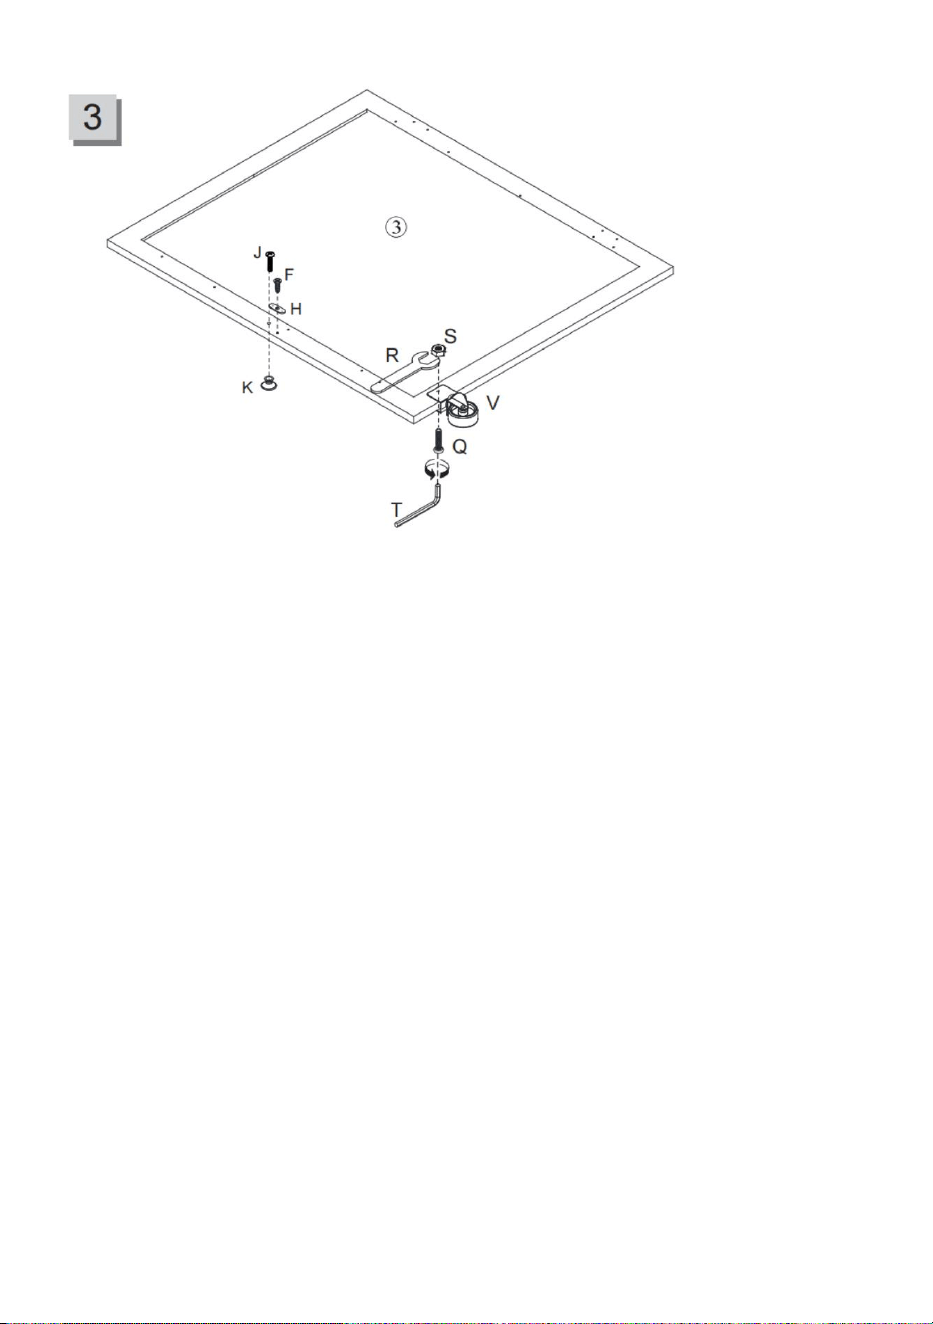
Step3: Install handles and caster wheels
- **Parts used**:
- 3 (door panel) - J (screws) - F (screws) - H (washers)
- K (handle) - S (nuts) - V (caster wheels) - Q (screws)
- R (hex wrench) - T (allen wrench)
- **Instructions**:
1. Insert screws (F) through washers (H) into the pre-drilled holes on panel
3, and secure them using screws (J).
2. Install the handle (K) at the designated location on the panel, securing it
with nuts (S).
3. Attach the caster wheels (V) to the bottom of the panel and secure them
with screws (Q) and nut (S)
4. Use the hex wrench (R) and allen wrench (T) to tighten all screws and
ensure the handle and caster wheels are firmly installed.
- 7 -
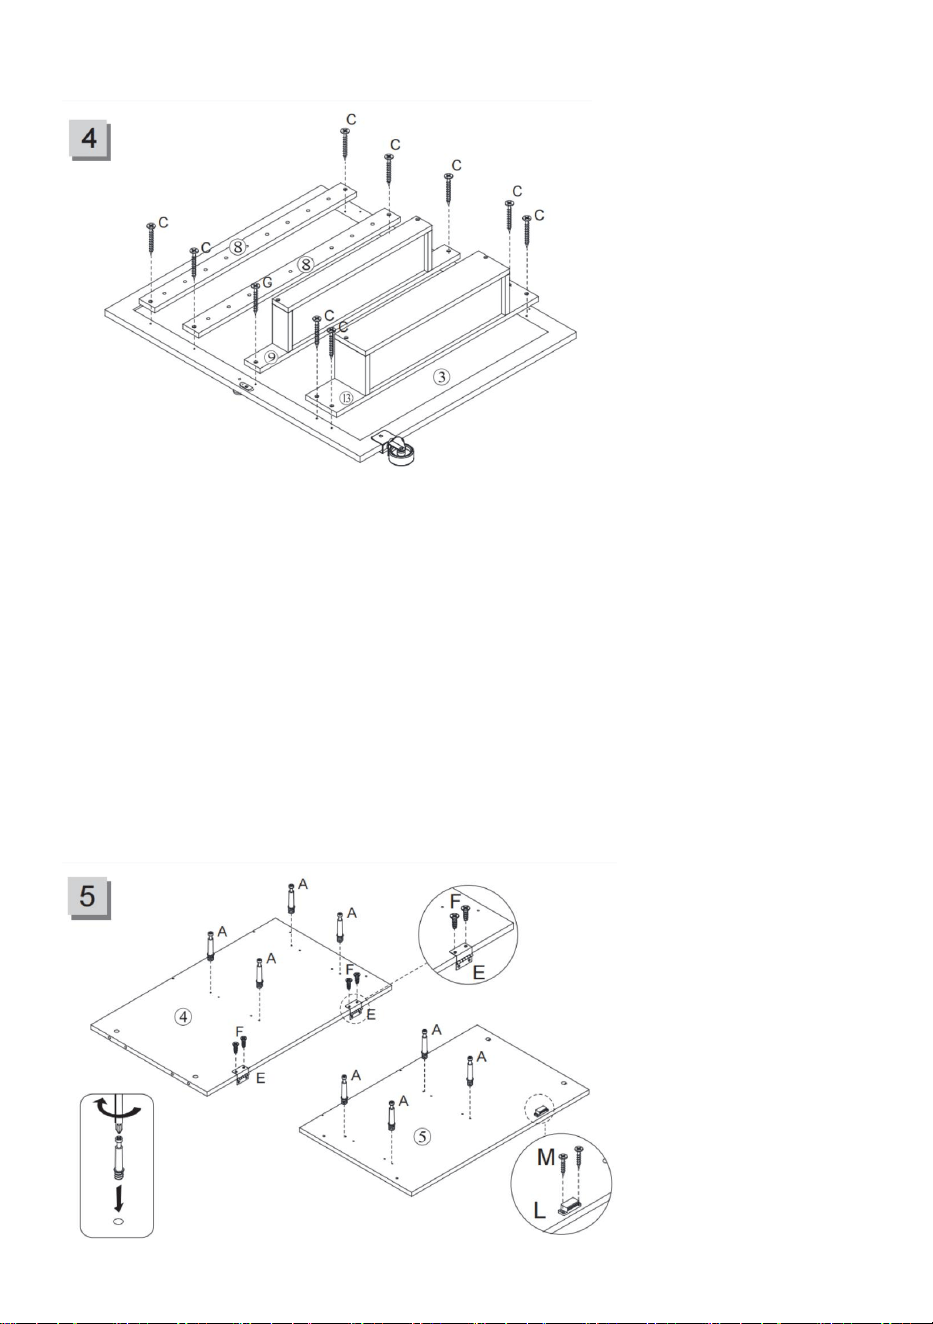
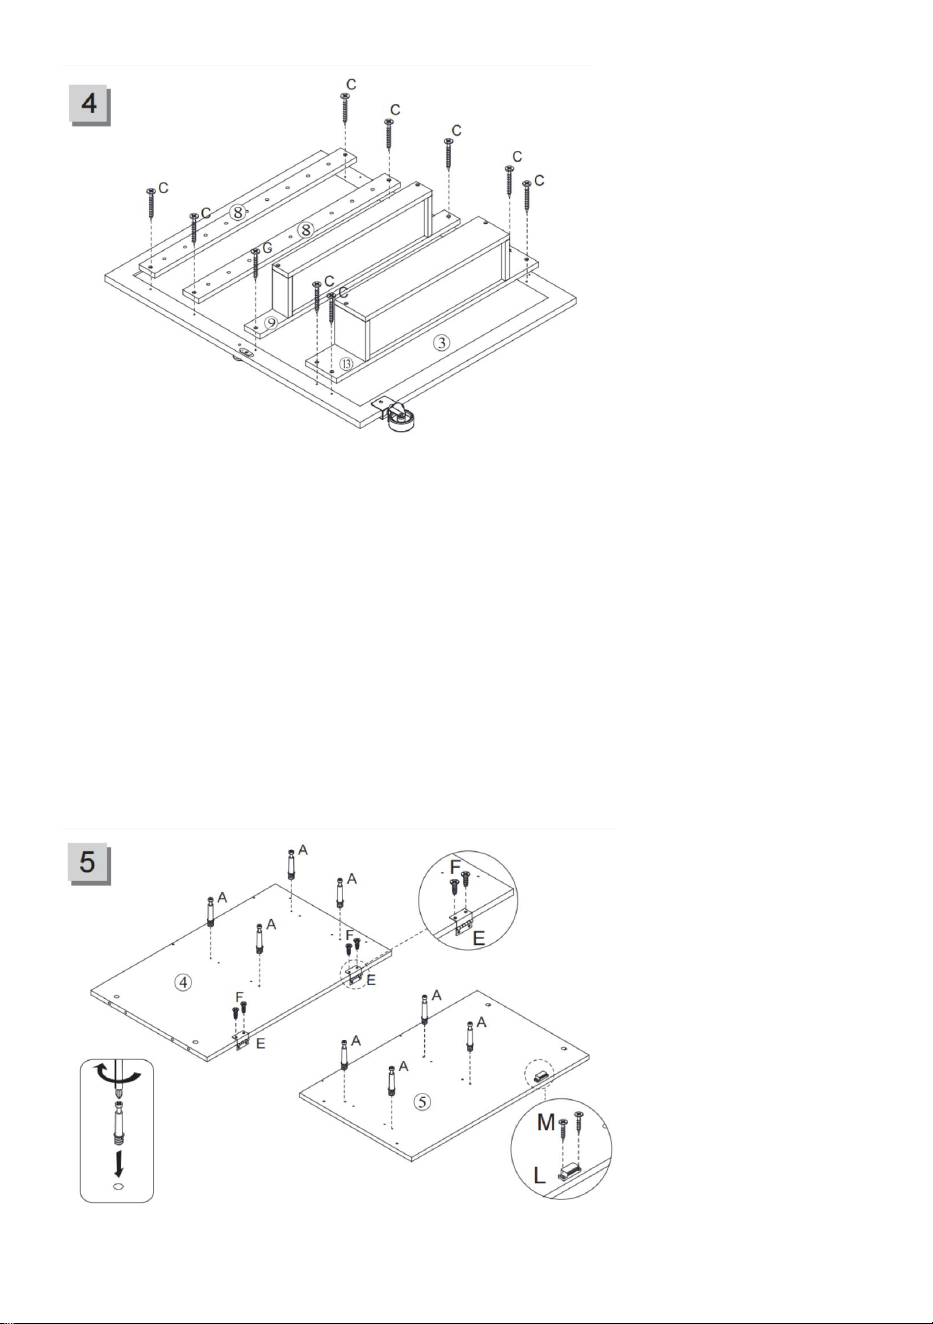
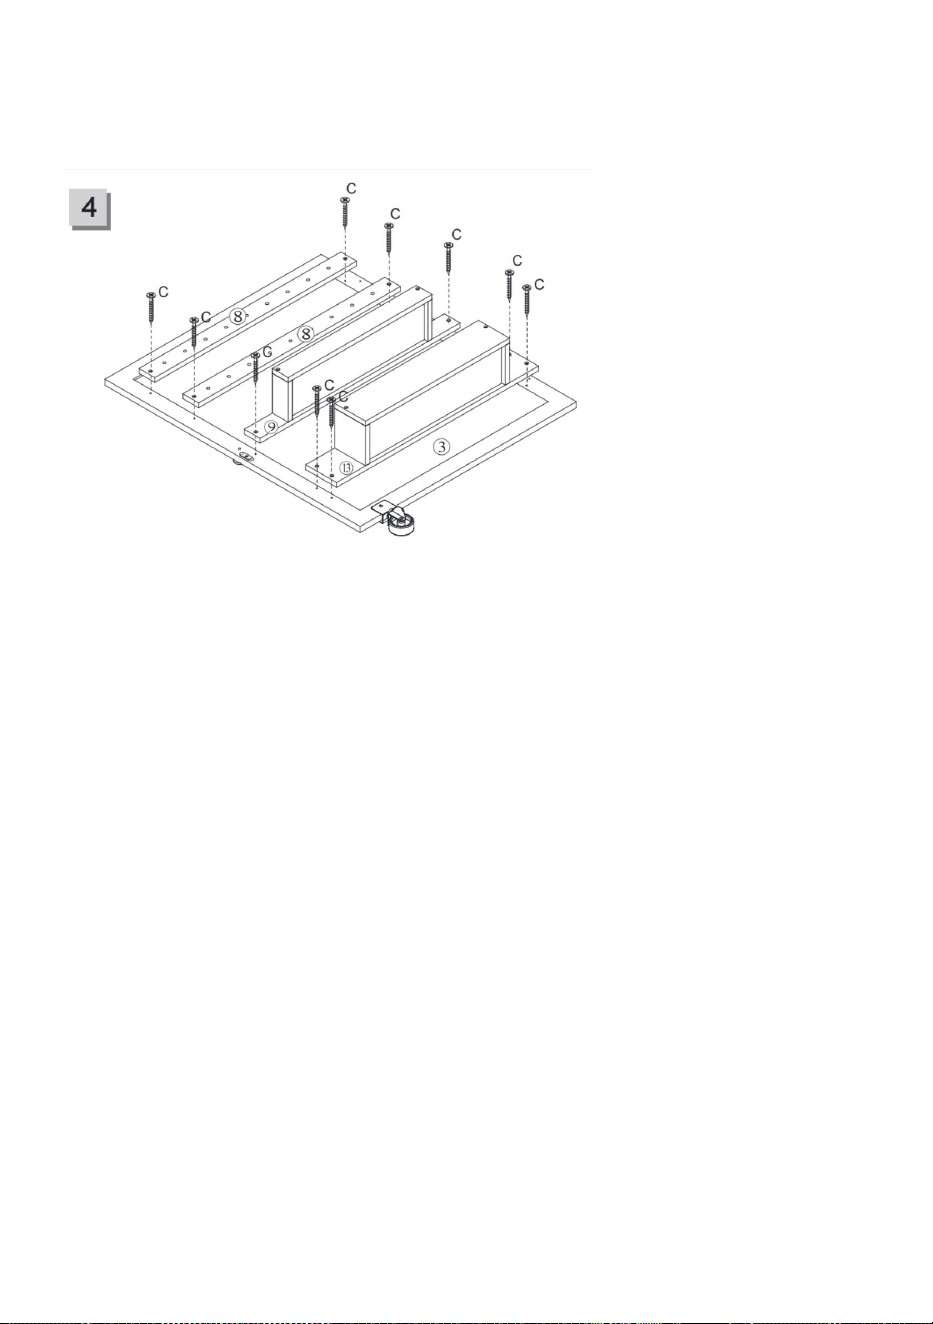
Step4: Install the storage box and spool storage onto the door panel
- **Parts used**:
- 3 (door panel) - 8 (spool storage) - C (screws)
- Components assembled in Step 1 and Step 2
- **Instructions**:
1. Place the two spool storages (8) in the designated positions on door
panel 3.
2. Use screws (C) to secure the spool storages (8) onto door panel 3.
3. Align the storage box components assembled in Step 1 and Step 2,
attach them to door panel 3, and secure them with screws (C).
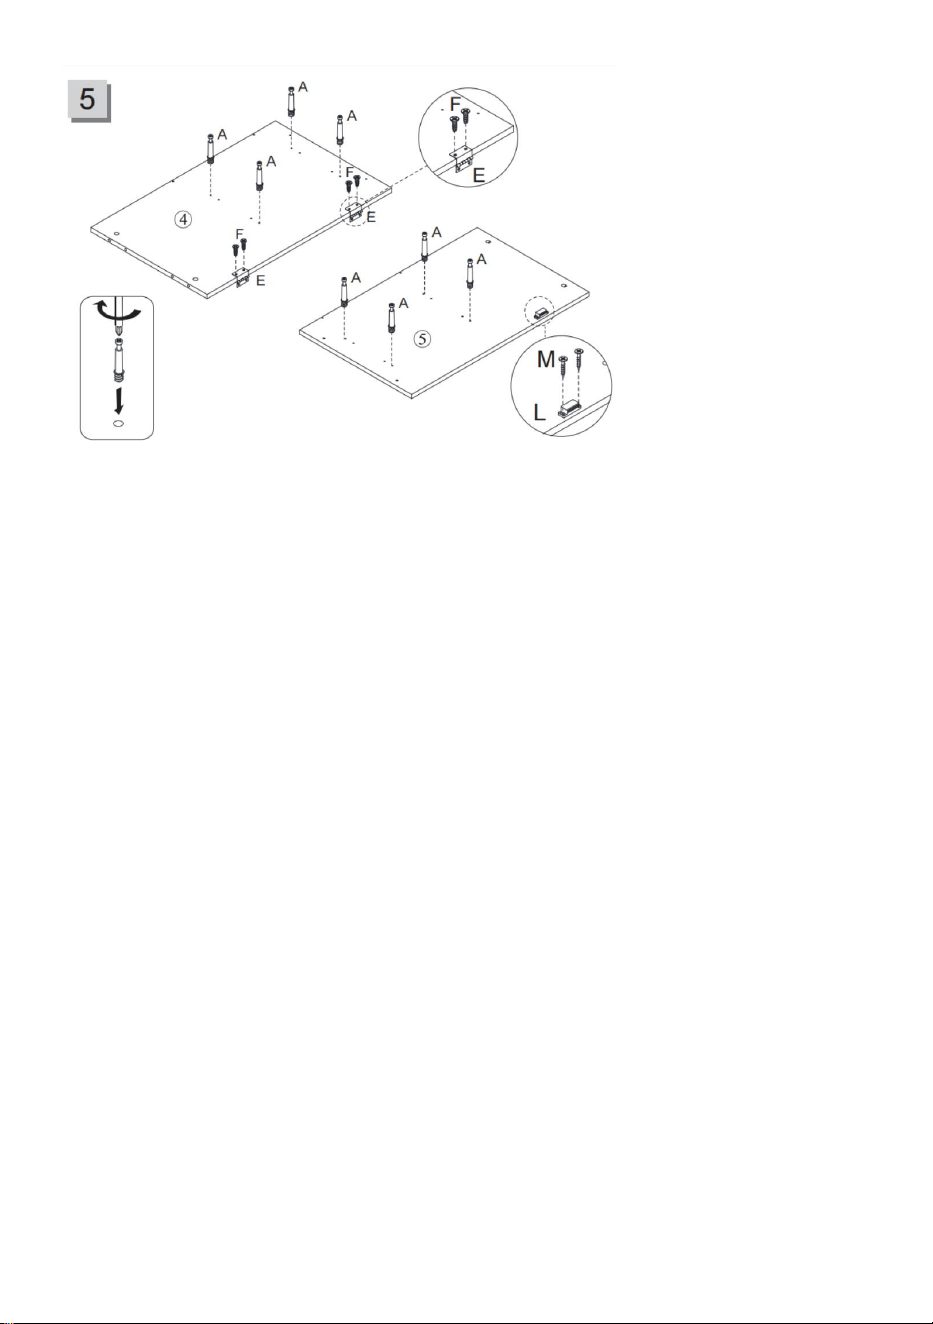
Step 5: Install Side Panels 4, 5, Hinges, and Magnetic Catch
- 8 -
- **Parts used**:
- 4 (side panel) - 5 (side panel) - A (bolts) - F (screws)
- E (hinges) - L (magnetic catch) - M (screws for magnetic catch)
- **Instructions**:
1. Insert bolts (A) into the pre-drilled holes in side panels 4 and 5.
2. Install hinges (E) at the designated positions on side panels 4 and 5, and
secure them with screws (F).
3. Attach the magnetic catch (L) to the specified spot on side panel 5 using
screws (M).
4. Tighten all screws to ensure that the bolts (A) and hinges (E) are
securely connected.
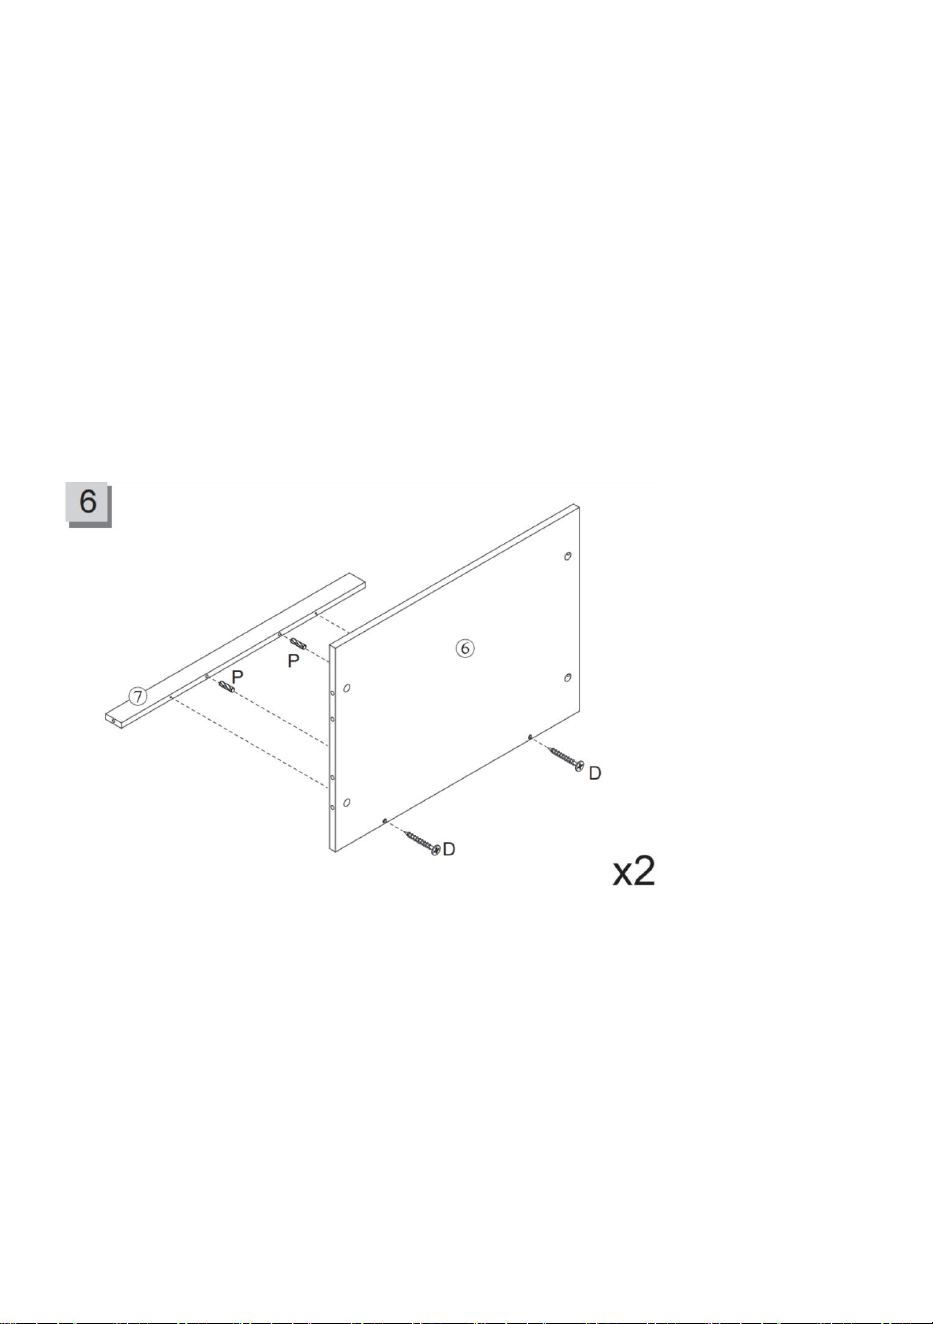
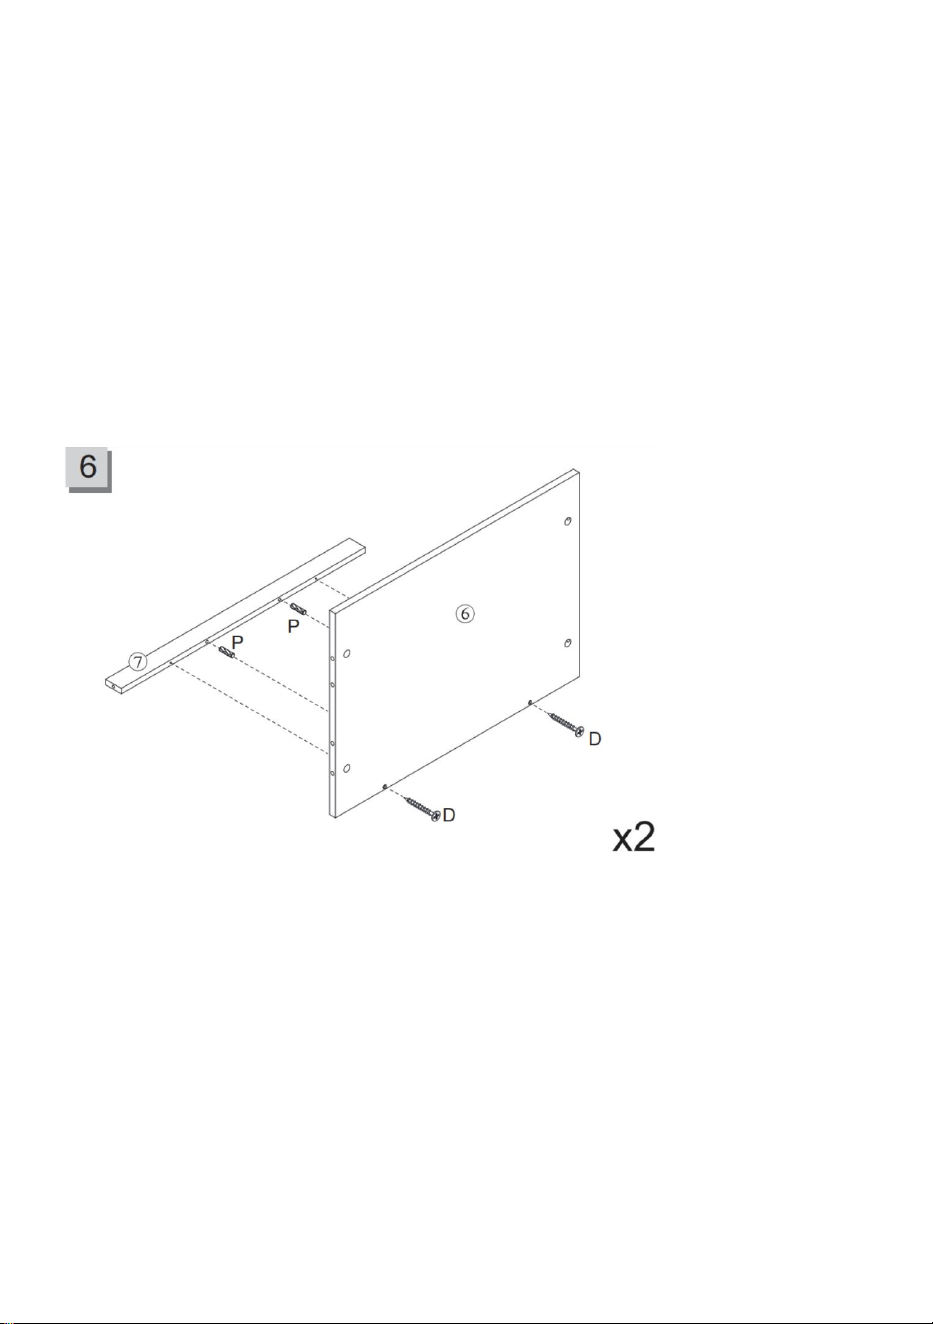
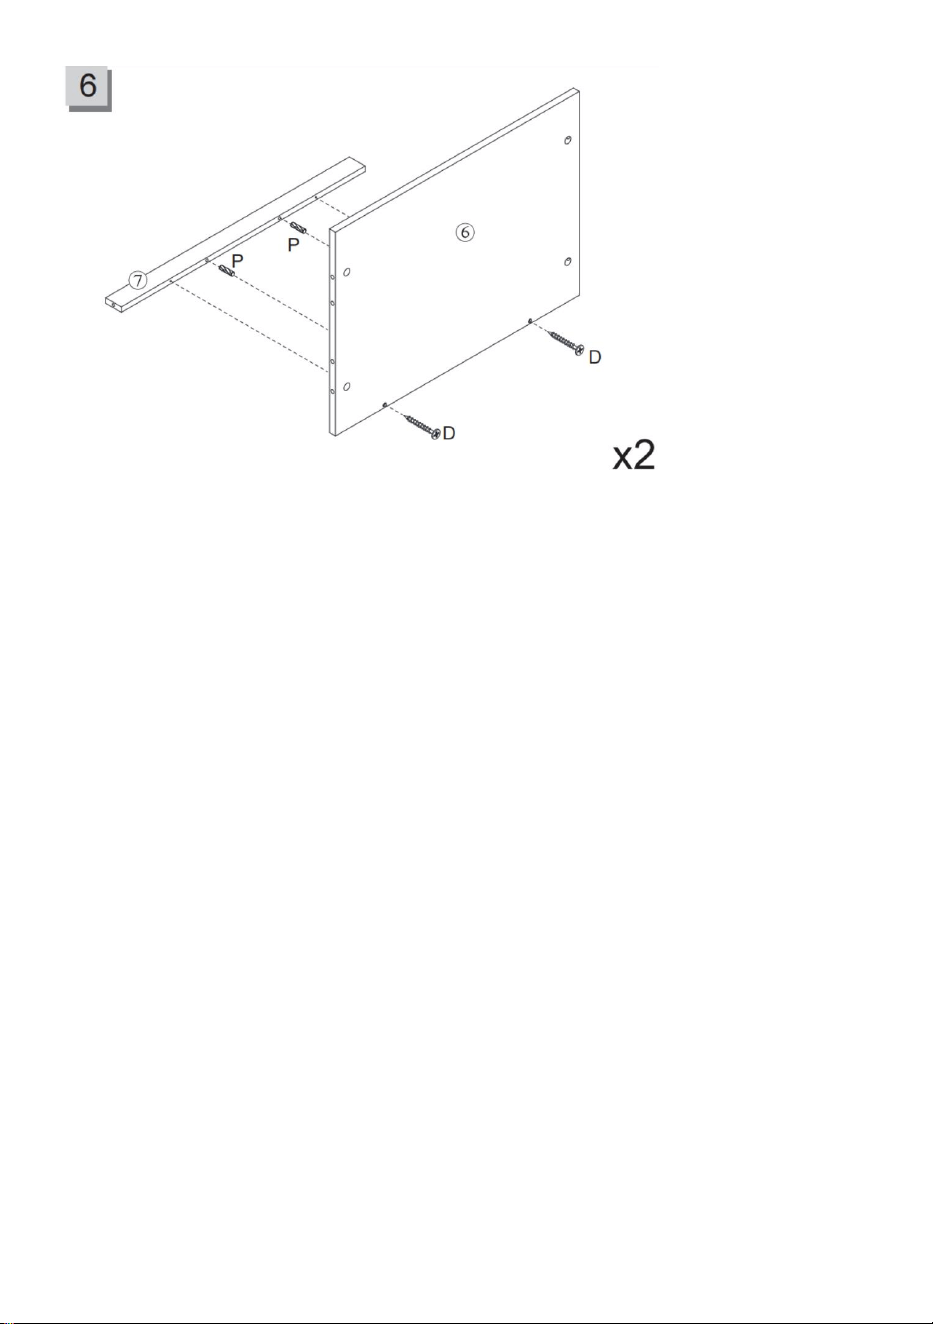
Step 6: Install Shelf Panels 6 (Two Shelves)
- **Parts used**:
- 6 (shelf panel) - 7 (support strip)
- P (dowels) - D (screws)
- **Instructions**:
1. Insert dowels (P) into the pre-drilled holes of the support strip (7).
2. Align the support strip (7) with the shelf panel (6), connecting them using
dowels (P).
3. Secure the support strip (7) to the side of the shelf panel (6) using
screws (D).
- 9 -
4. Repeat this step for the second shelf panel (6).
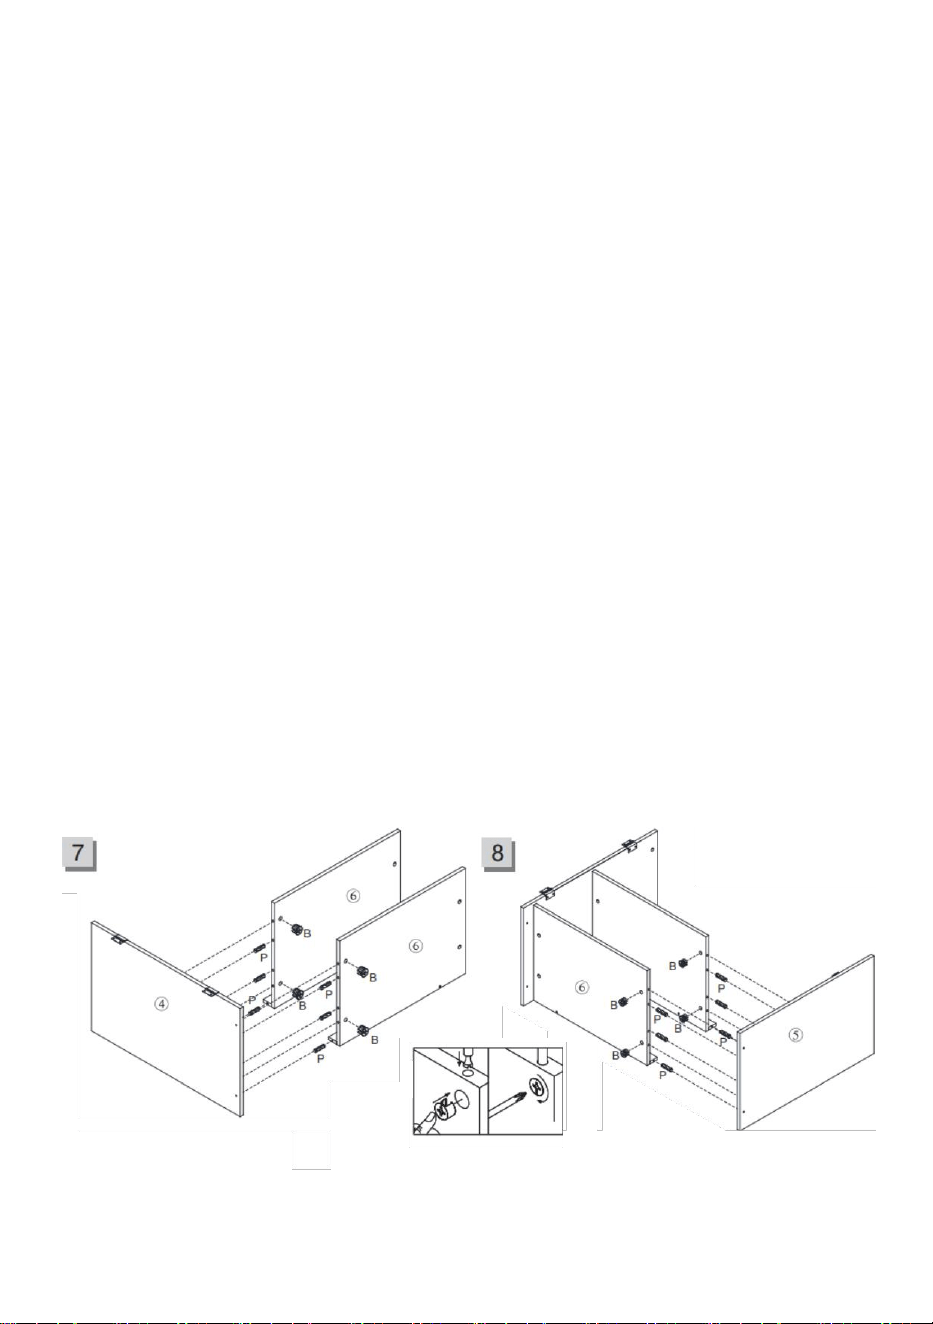
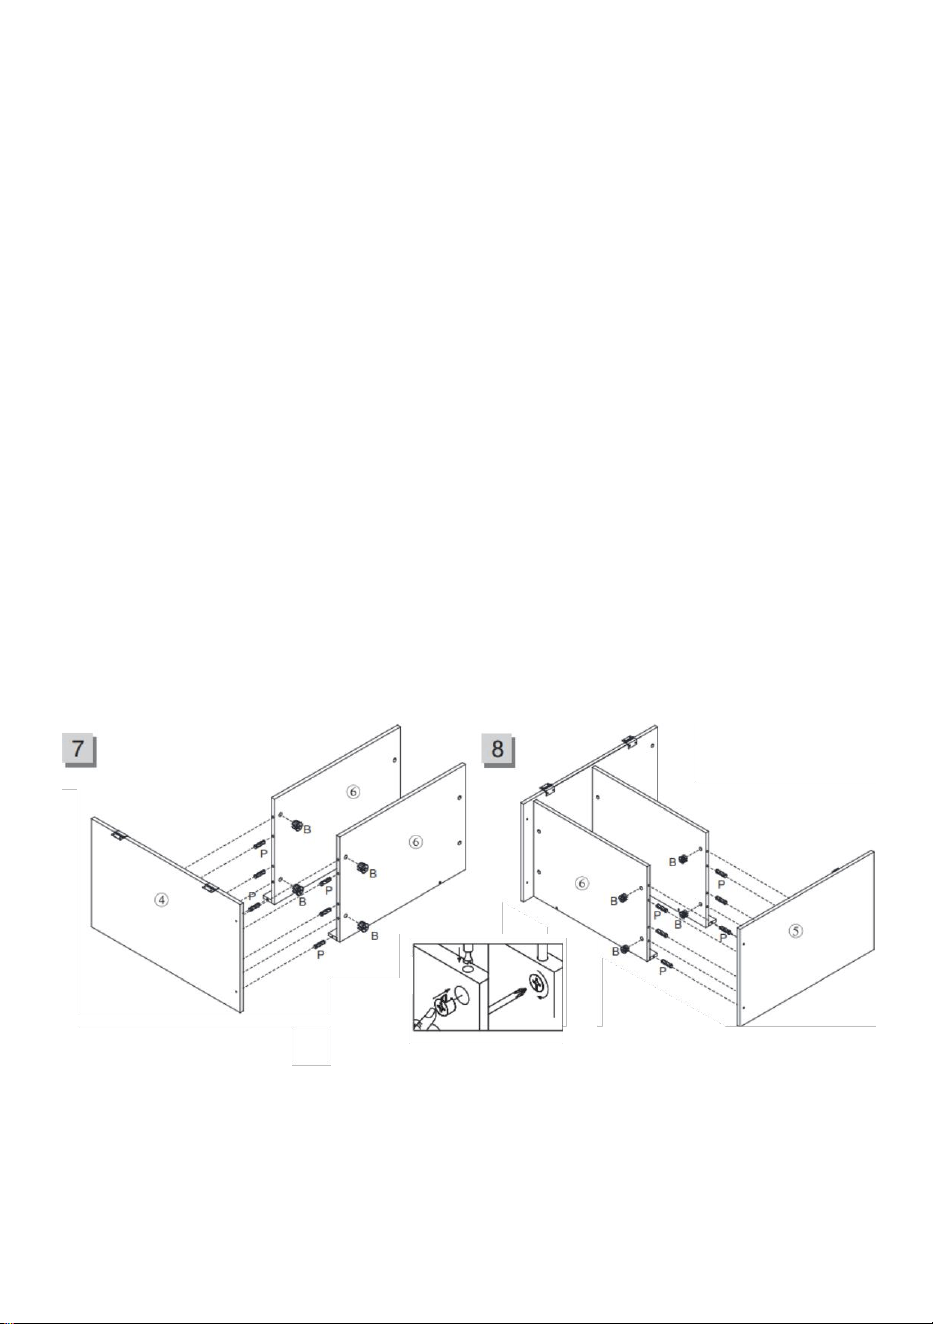
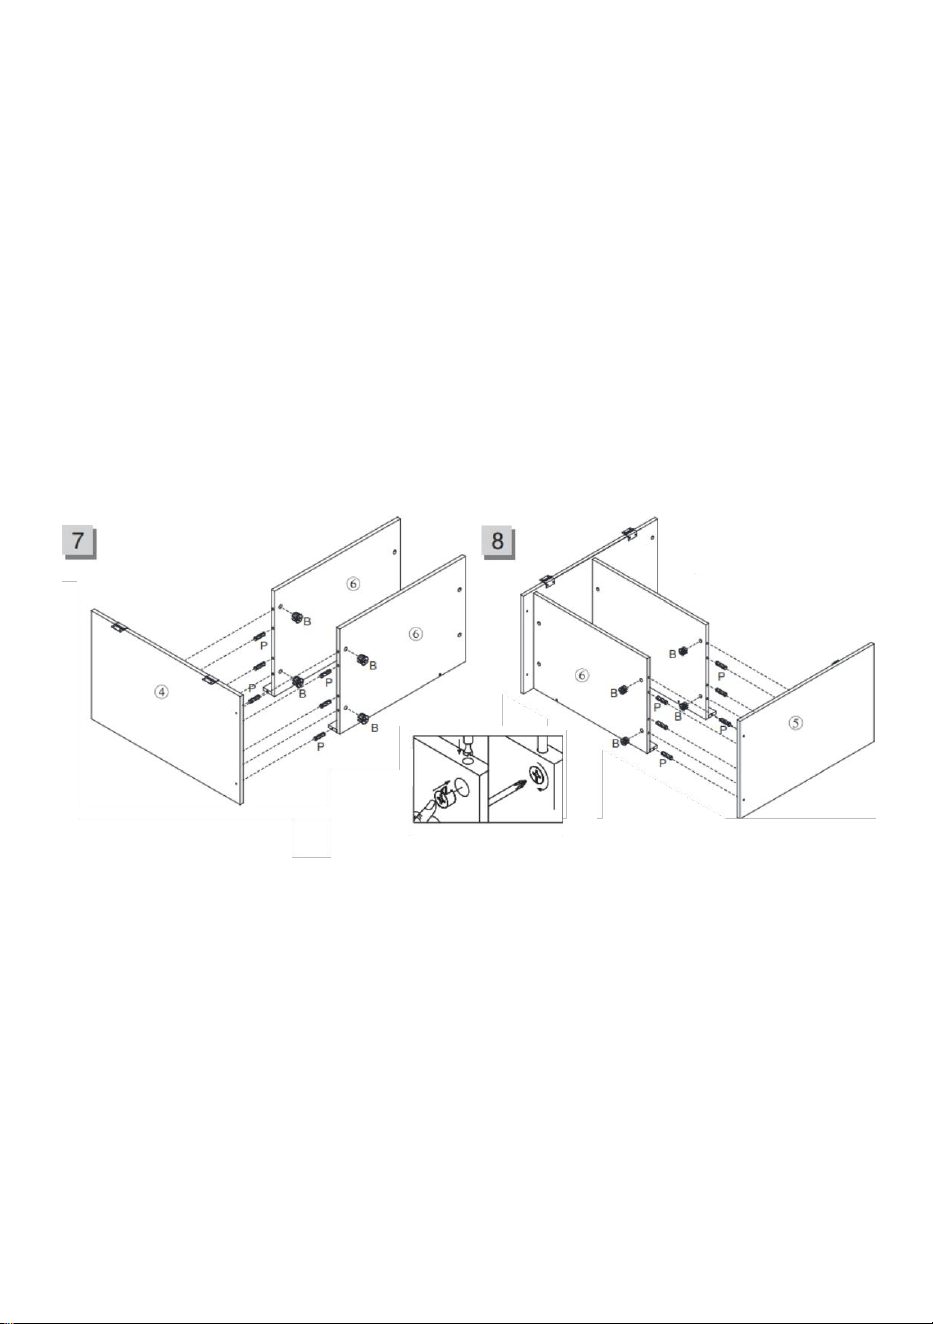
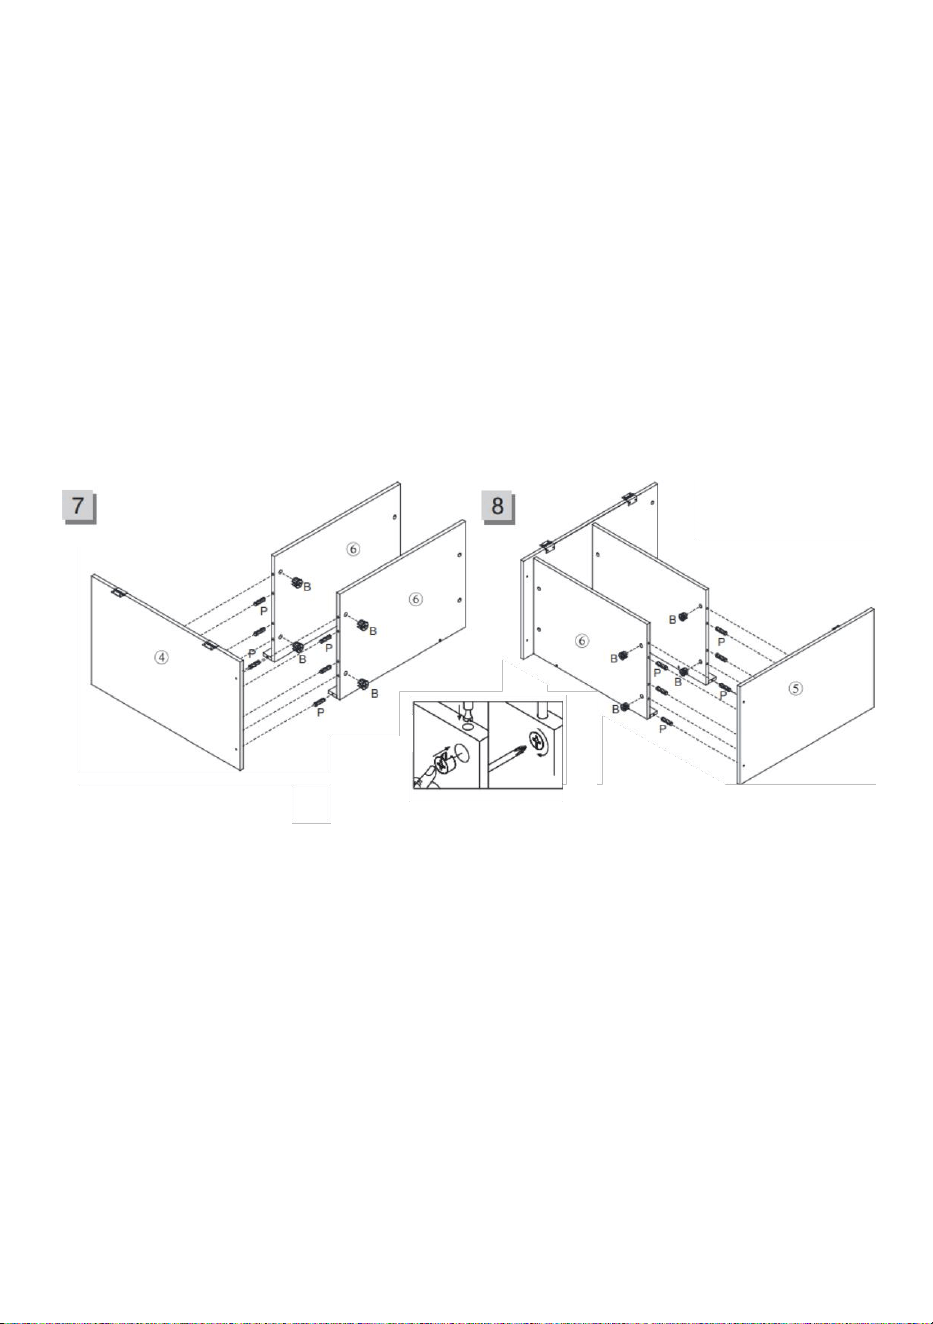
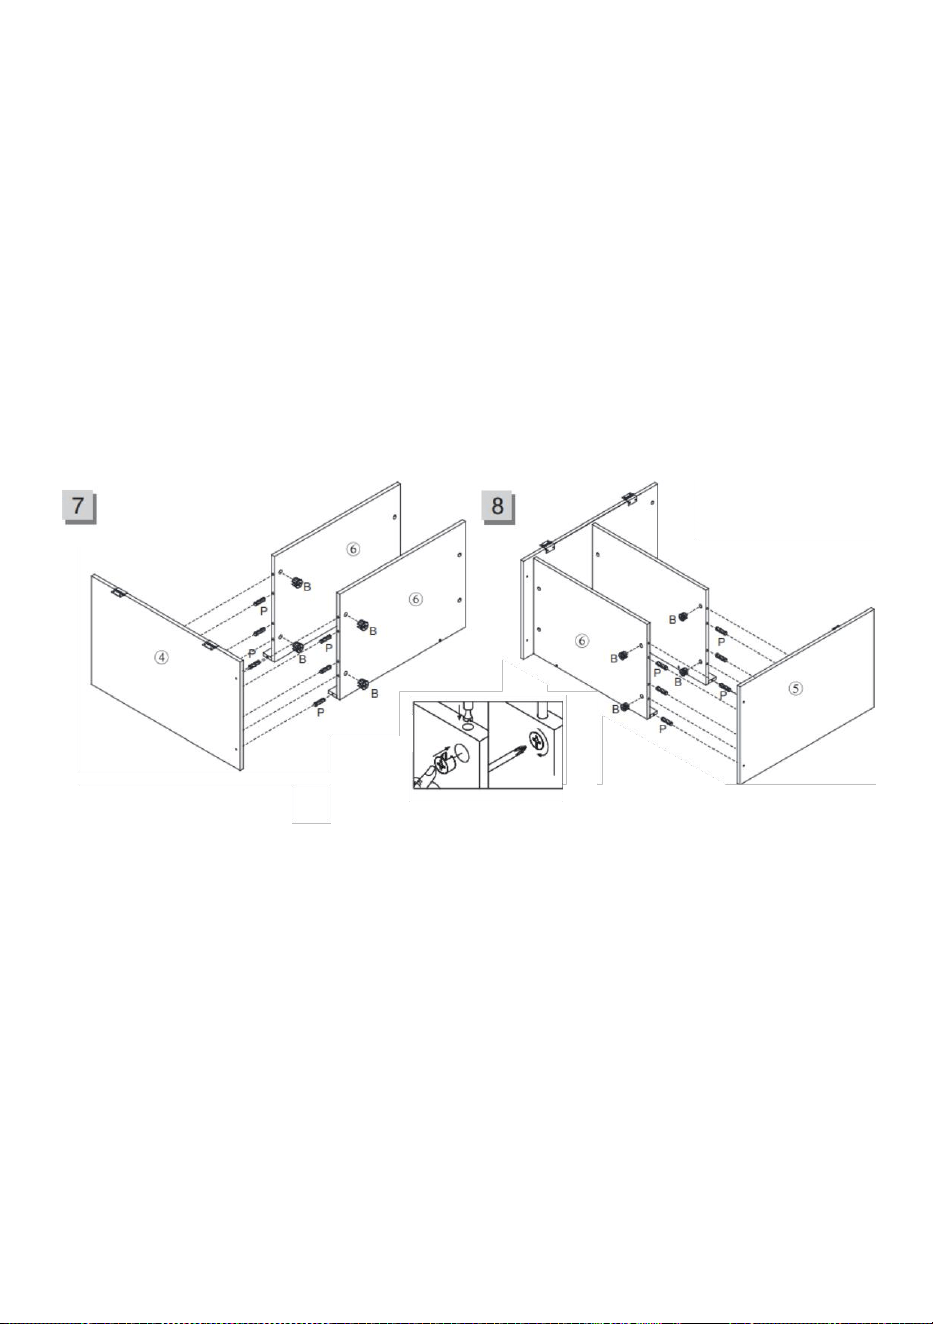
Step 7: Connect Side Panel 4 to Shelf Panels 6
- **Parts used**:
- 4 (side panel) - 6 (shelf panels) - 7 (support strip)
- P (dowels) - B (Cam locks)
- **Instructions**:
1. Insert dowels (P) into the pre-drilled holes on shelf panels 6 、support
stripand 7 and side panel 4.
2. Use Cam locks (B) to secure the shelf panels 6 to side panel 4.
3. Ensure both shelf panels 6 are securely connected to side panel 4.
Step 8: Connect Side Panel 5 to Shelf Panels 6
- **Parts used**:
- 5 (side panel) - 6 (shelf panels) - 7 (support strip)
- P (dowels) - B (Cam locks)
- **Instructions**:
1. Insert dowels (P) into the pre-drilled holes on shelf panels 6 、support
stripand 7 and side panel 5.
2. Use Cam locks (B) to secure the shelf panels 6 to side panel 5.
3. Ensure both shelf panels 6 are securely connected to side panel 5.
- 10 -
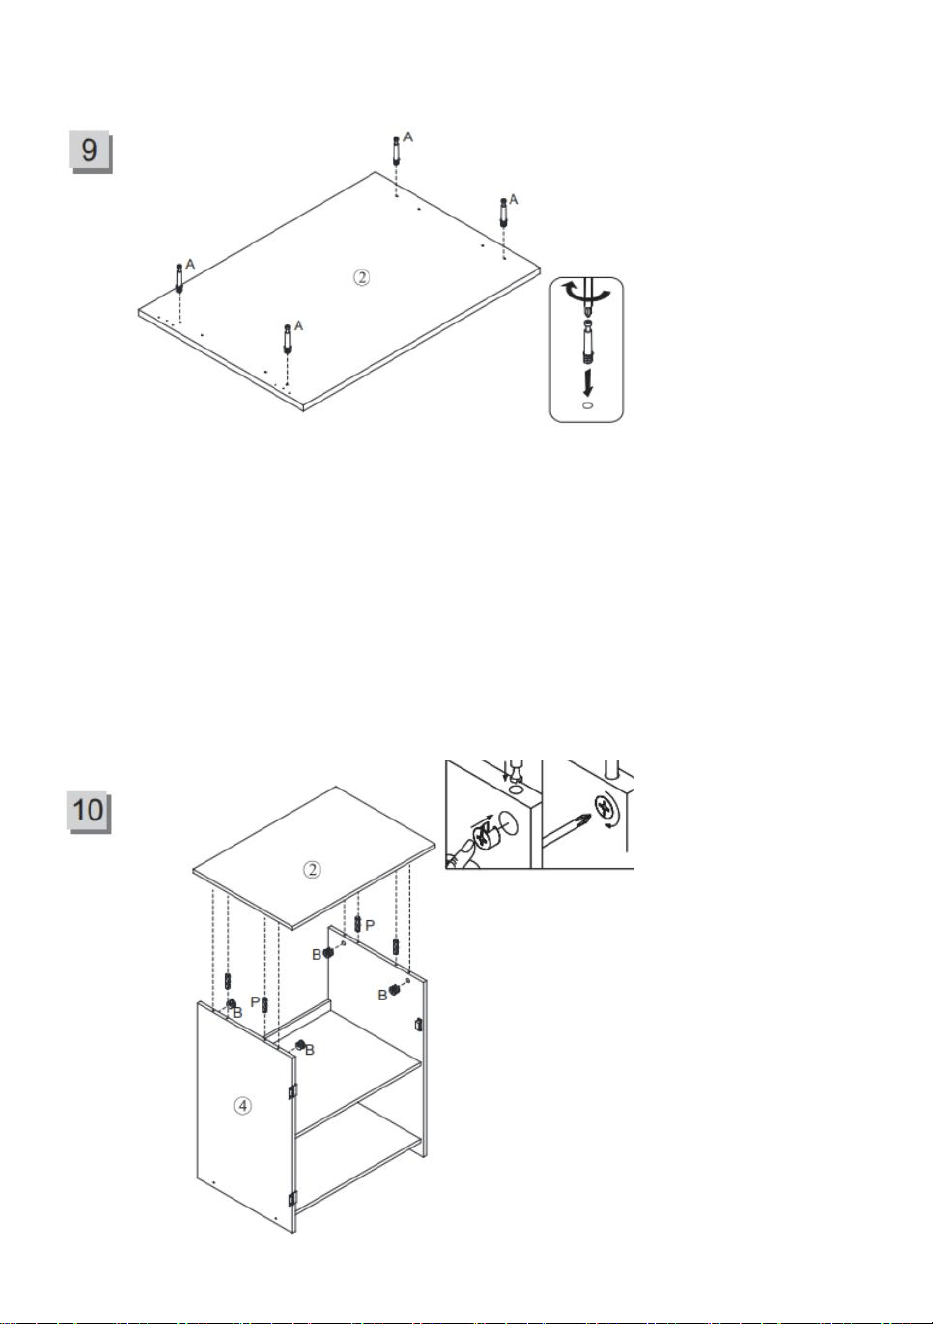
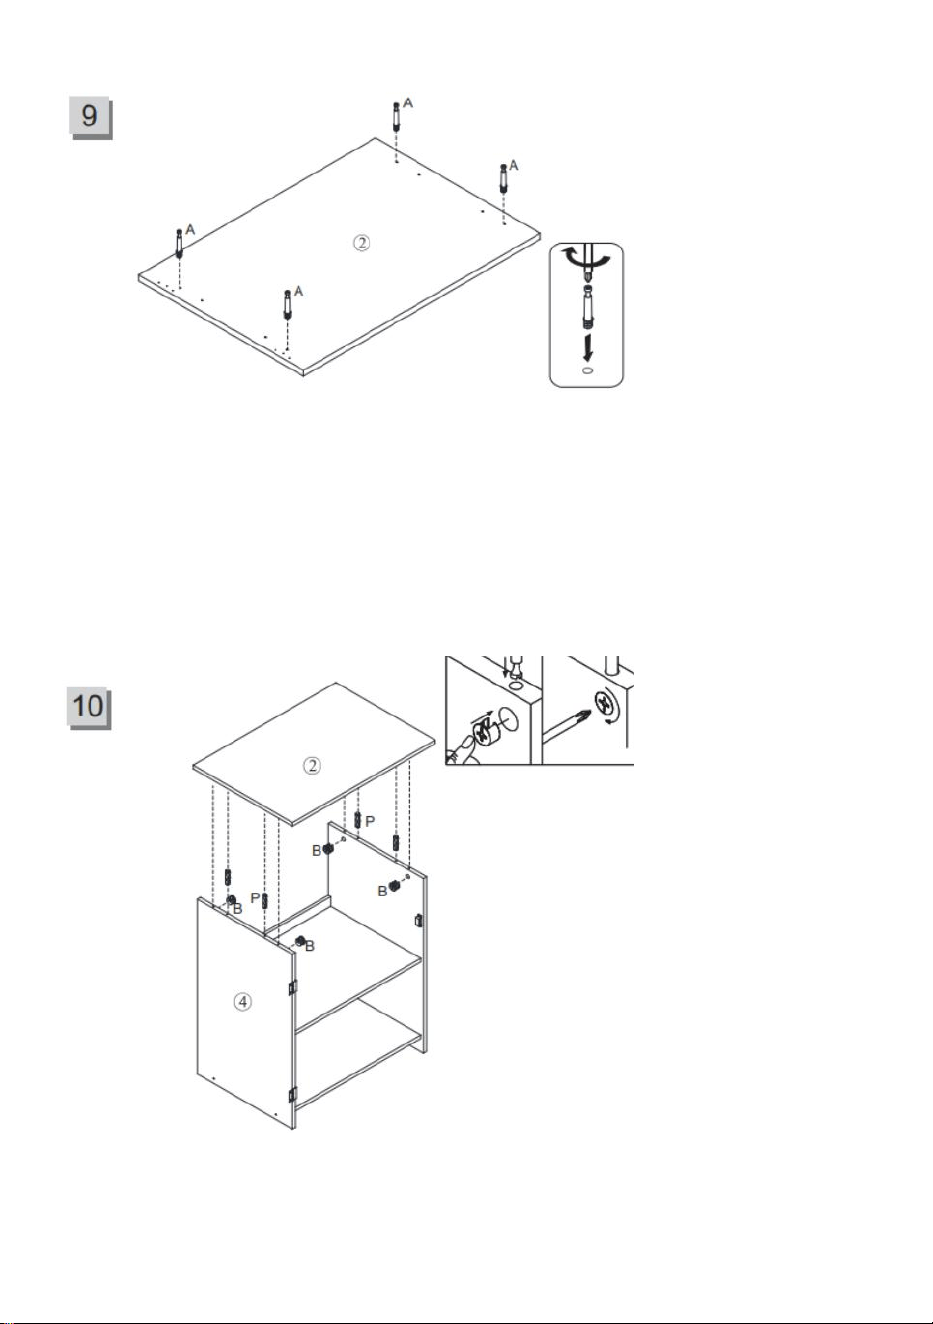
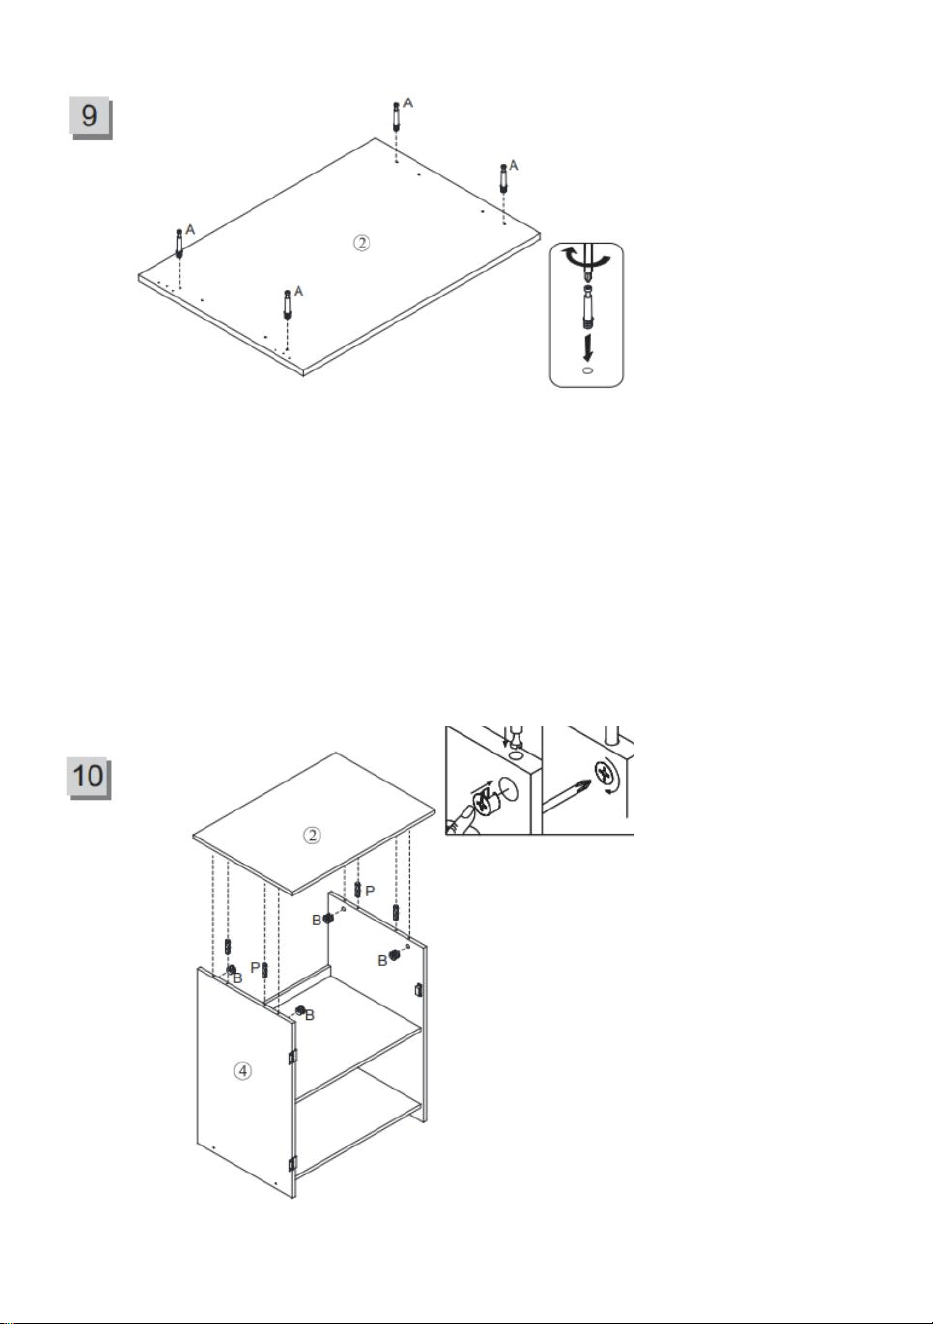
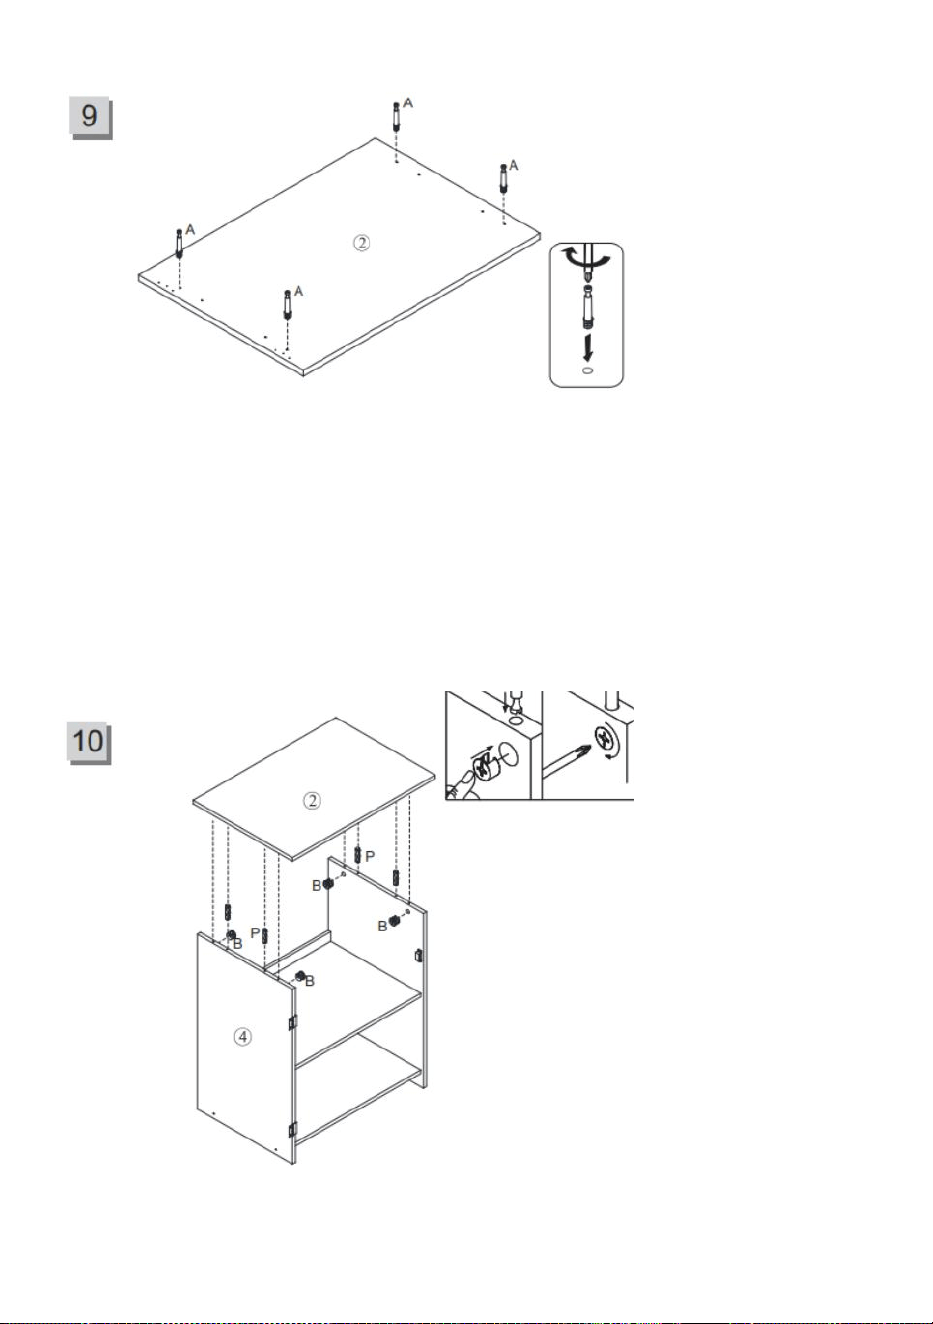
Step 9: Install the Connecting Screws on the Main Tabletop Panel (2)
- **Parts used**:
- 2 (main tabletop panel) - A (bolts)
- **Instructions**:
1. Insert the bolts (A) into the pre-drilled holes of the main tabletop panel
(2).
2. Ensure the bolts (A) are securely installed, in preparation for connecting
the tabletop to the cabinet.
Step 10: Assemble the Main Tabletop Panel from Step 9 with the
Cabinet

- 11 -
- **Parts used**:
- Main tabletop panel from Step 9 - Cabinet assembly from Step 8
- P (dowels) - B (Cam locks)
- **Instructions**:
1. Insert dowels (P) into the pre-drilled holes on top of the cabinet
assembly.
2. Place the main tabletop panel from Step 9 on top of the cabinet
assembly, align the dowels, and secure the connection using Cam locks
(B).
3. Ensure all Cam locks (B) are tightened and the connection is secure.
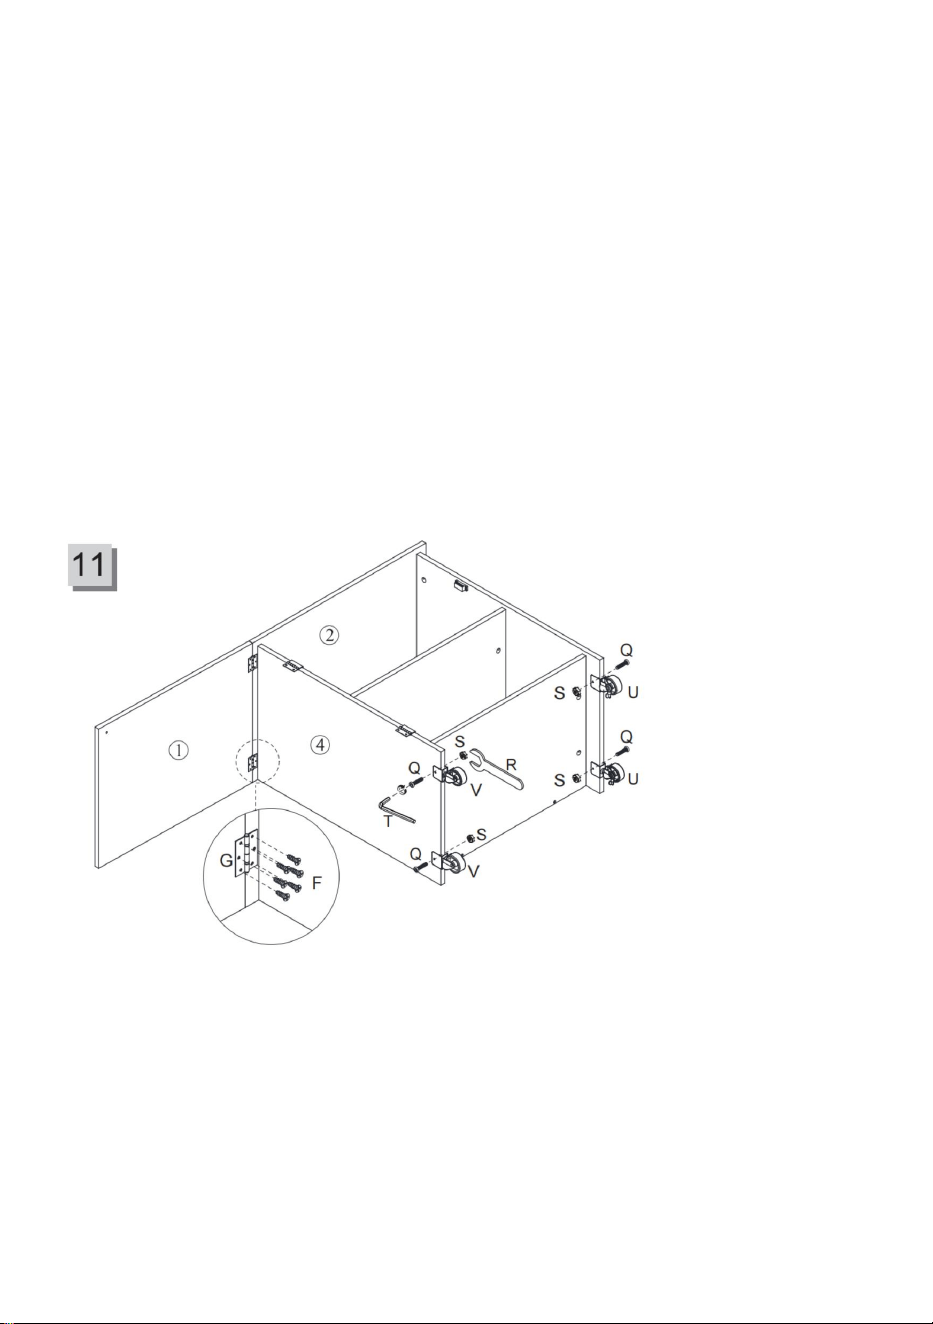
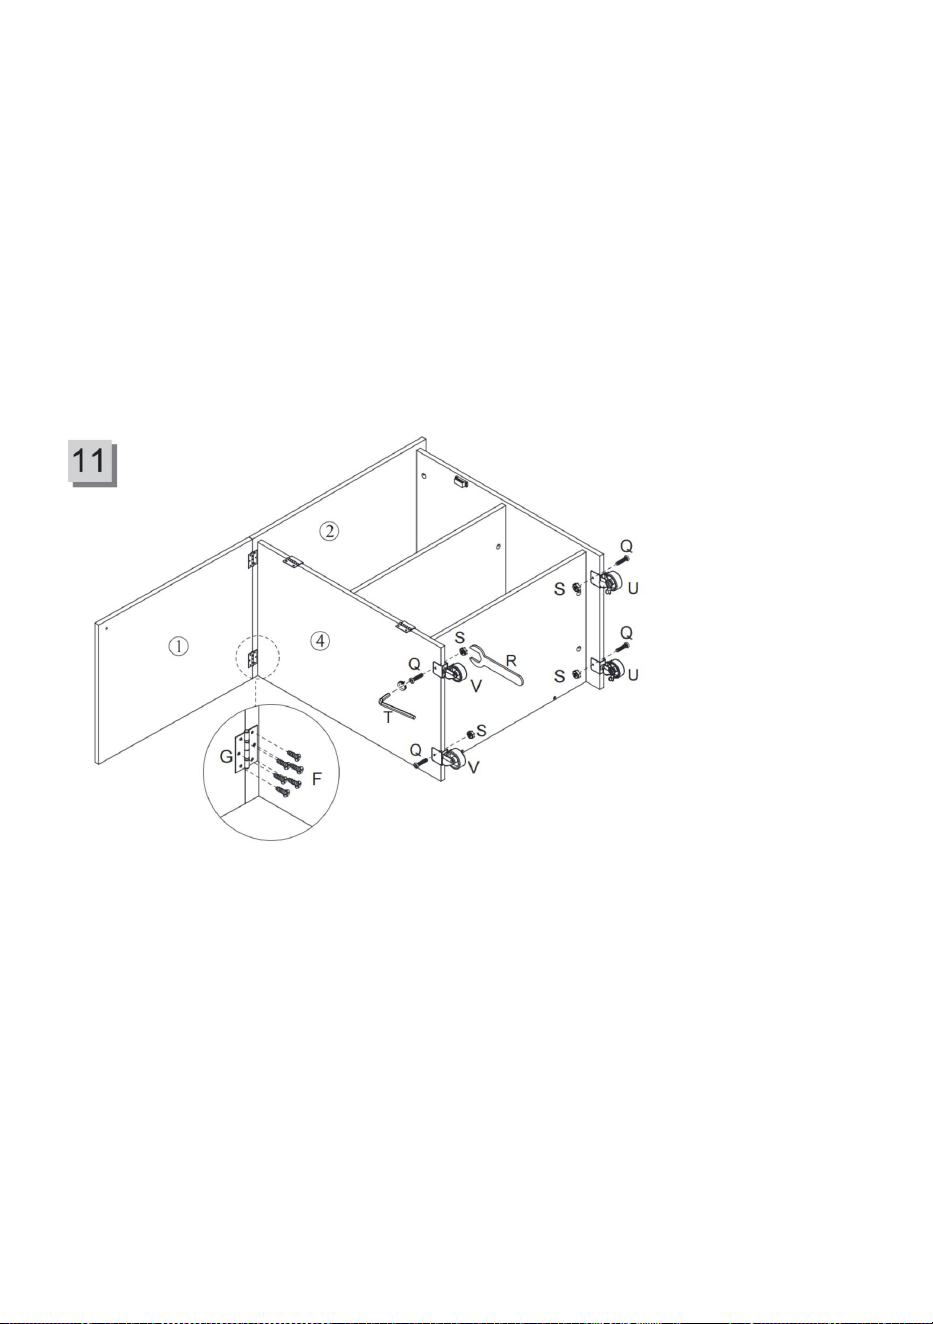
Step 11: Install Folding Tabletop Panel 1 to the Main Tabletop Panel 2
and Attach the Caster Wheels
- **Parts used**:
- 1 (folding tabletop panel) - Assembly from Step 10
- Q (screws) - F (screws) - G (hinges) - S (nuts)
- U (brake caster wheels) - V (non-locking caster wheels)
- R (hex wrench) - T (allen wrench)
- **Instructions**:
1. Use hinges (G) and screws (F) to attach the folding tabletop panel 1 to
- 12 -
the main tabletop panel 2.
2. Install two lockable caster wheels (U) on the outer sides of the table's
bottom and two non-locking caster wheels (V) on the inner sides. Secure
them with screws (Q) and nuts (S).
3. Use the allen wrench (T) and hex wrench (R) to ensure all screws and
caster wheels are tightened.
4. Check that the locking function of the caster wheels is working properly.
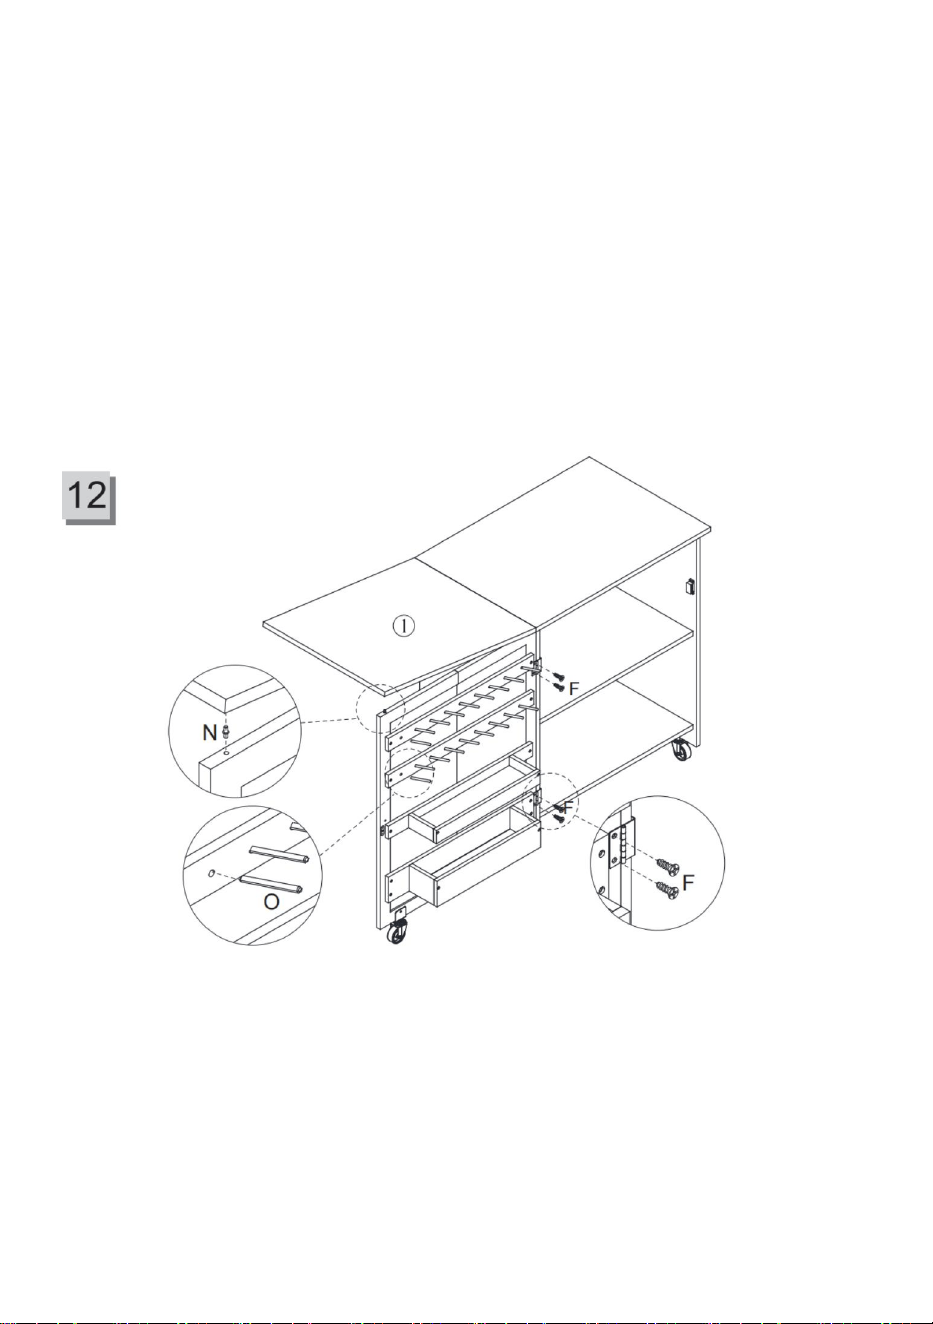
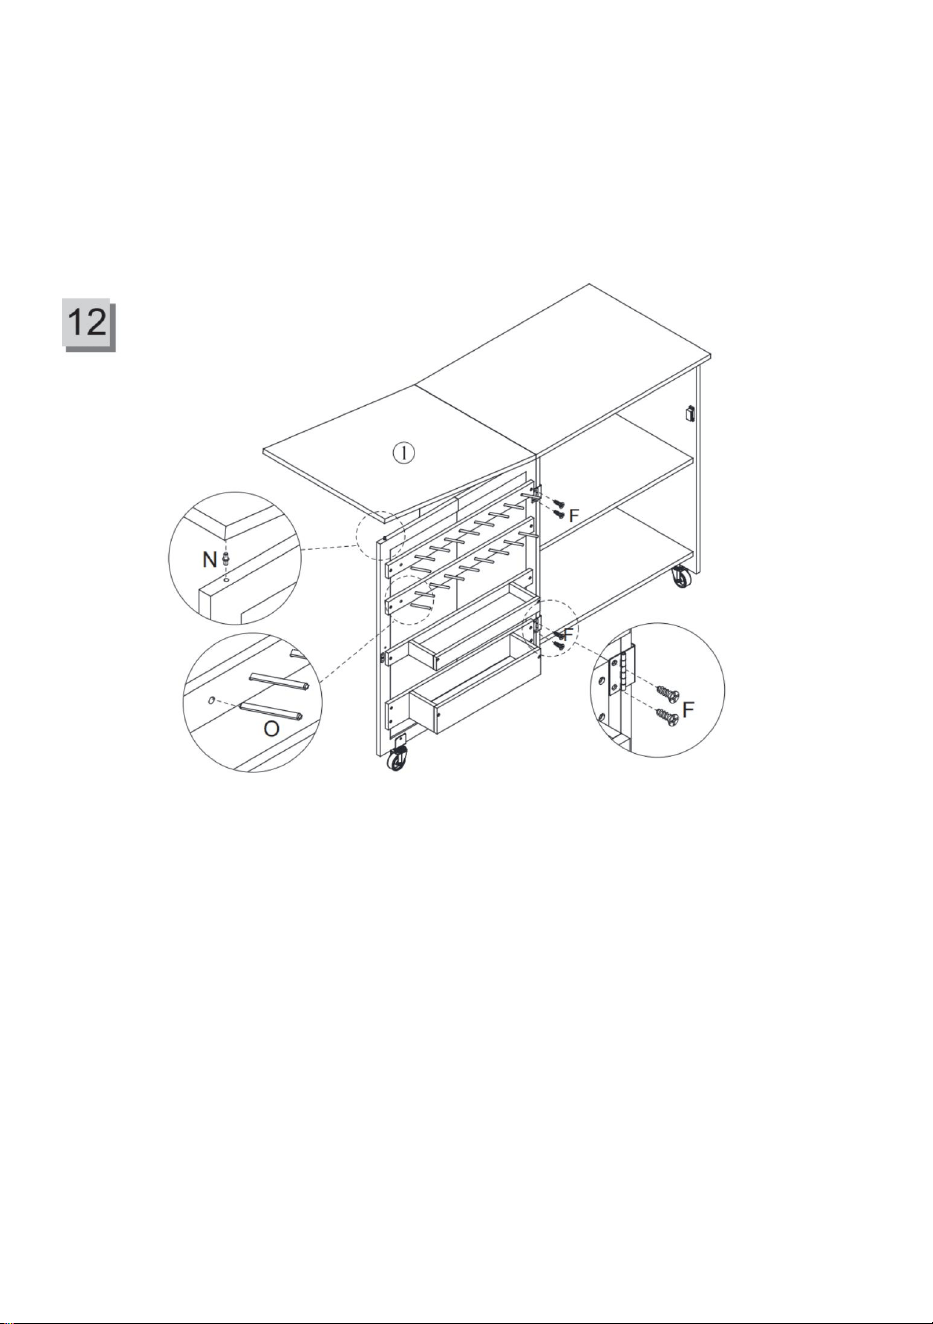
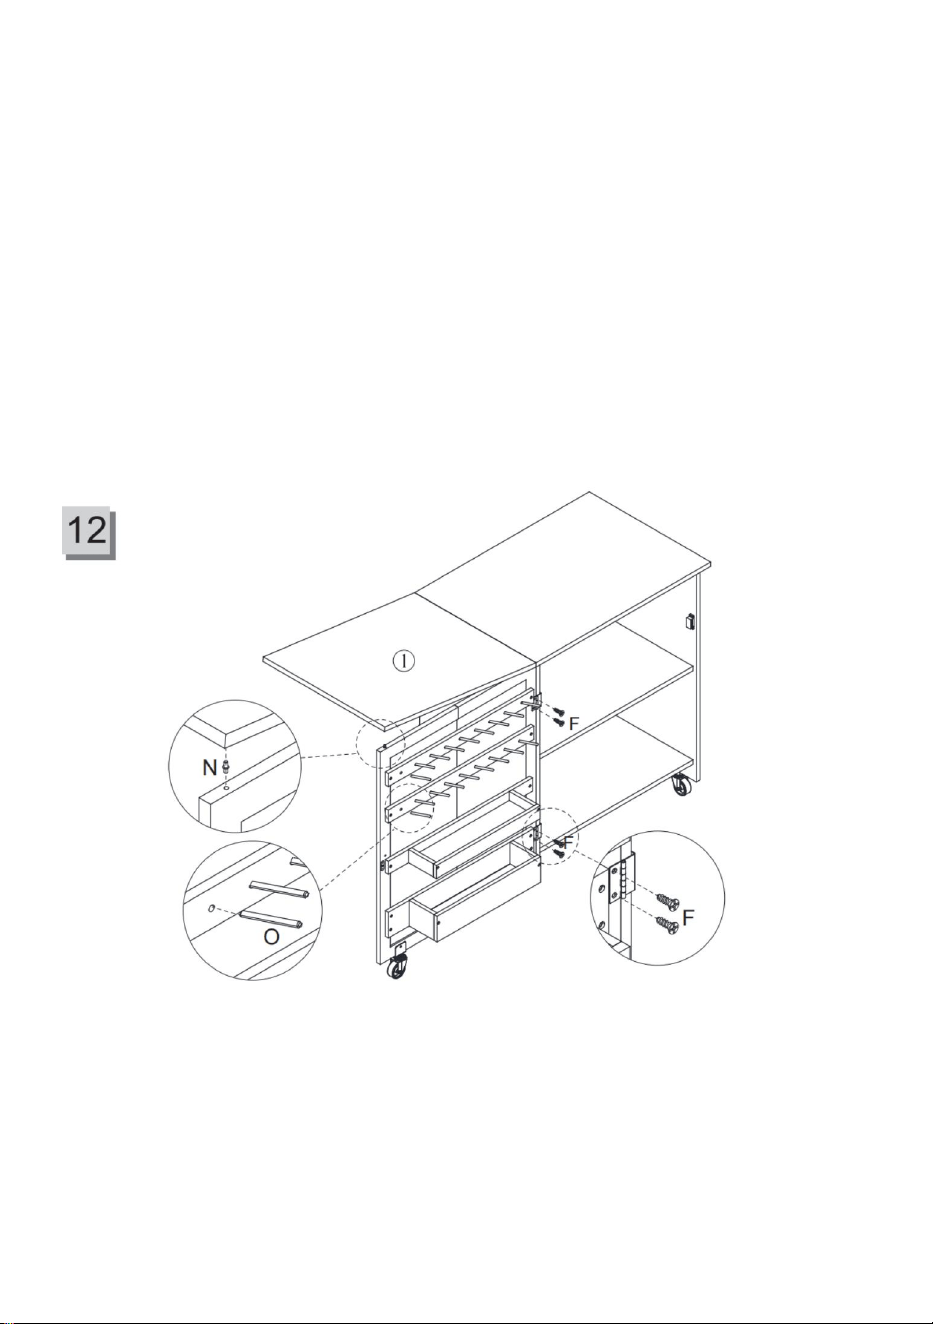
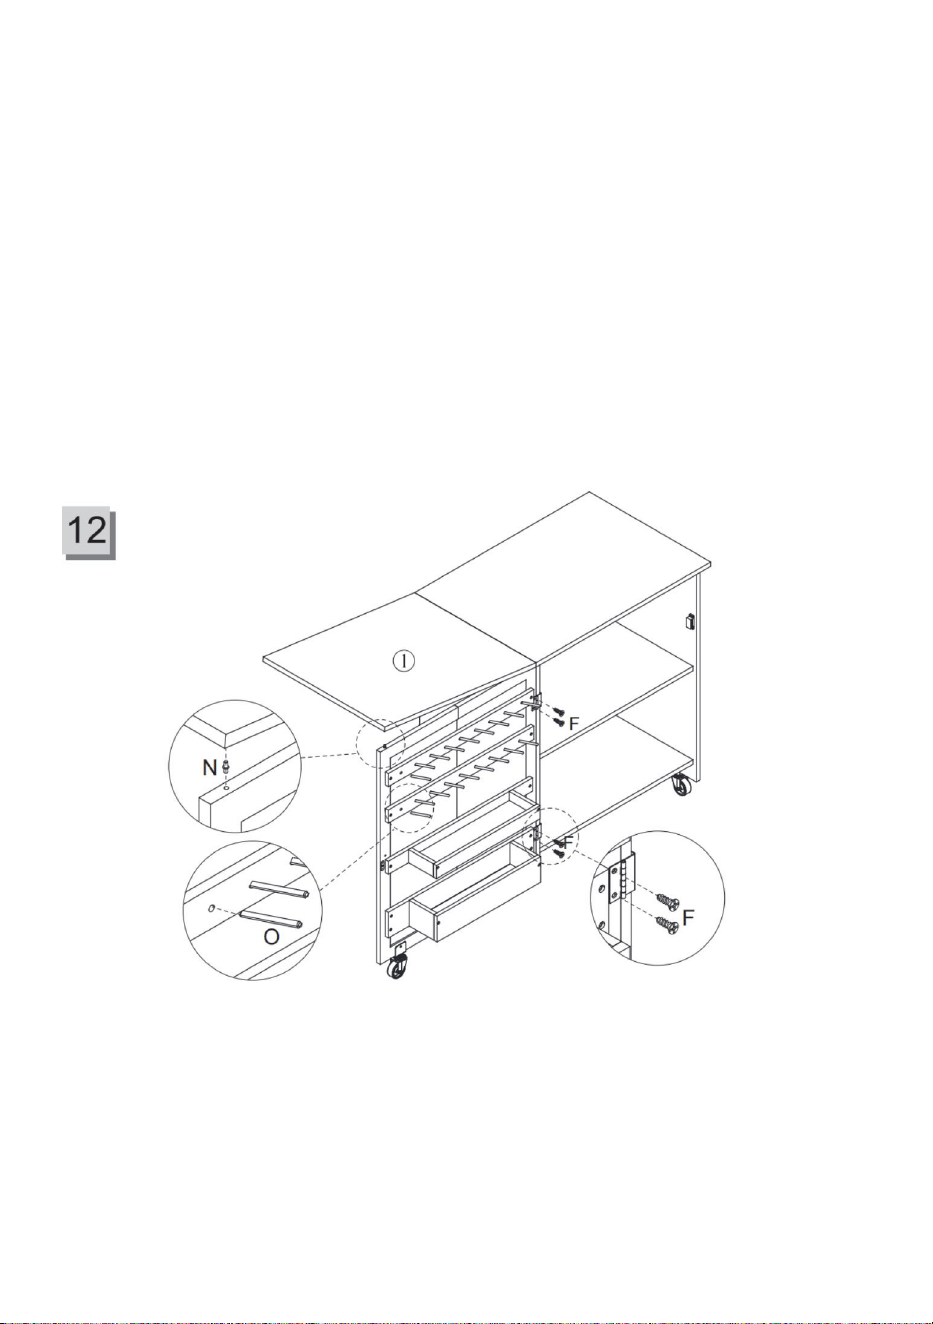
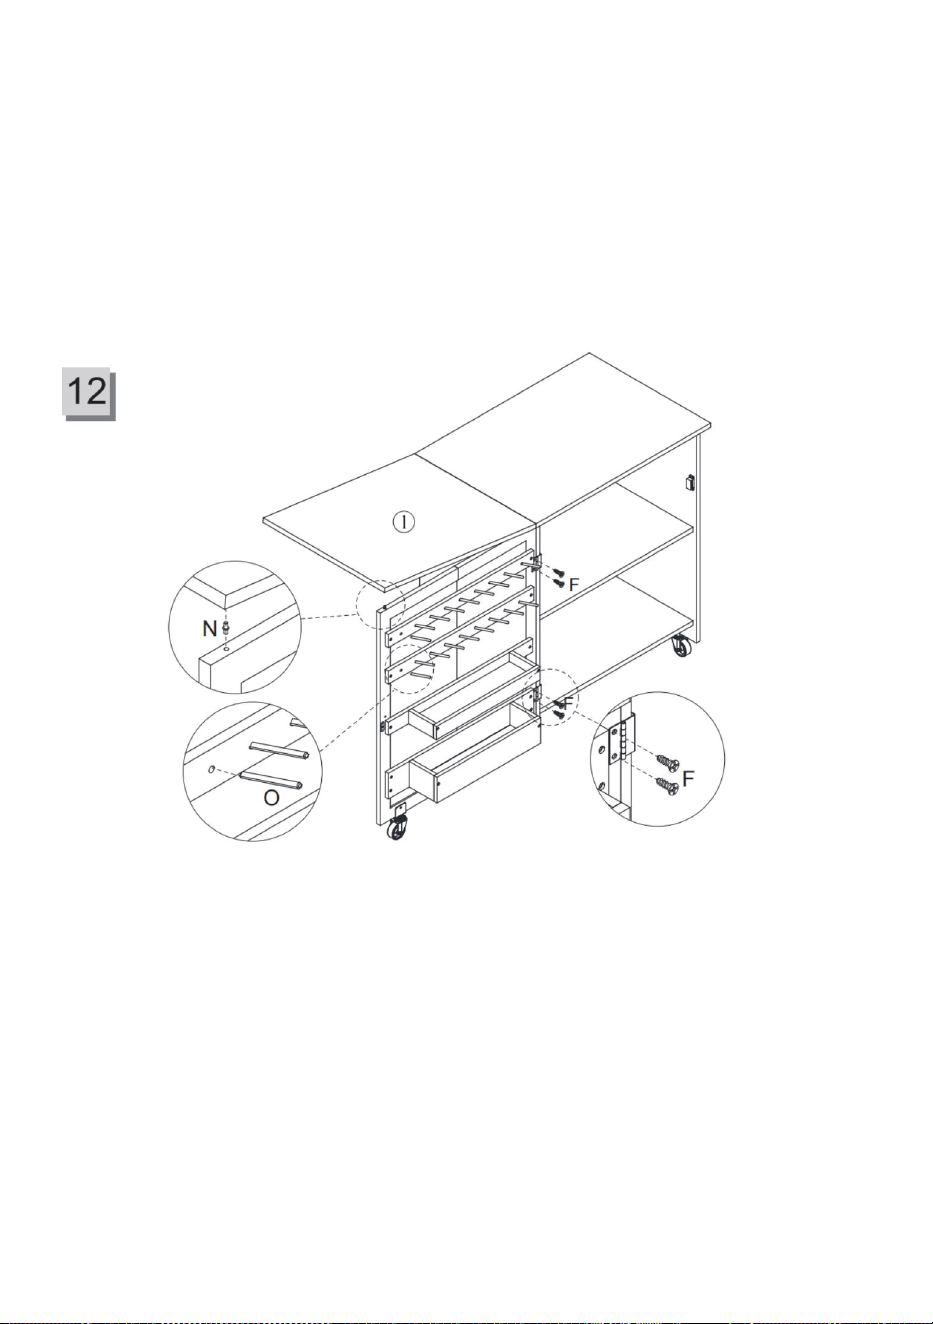
Step 12: Install the Door Panel to the Assembly from Step 11 and
Attach Double-Headed Dowels and Long Dowels
- **Parts used**:
- Assembly from Step 11 - N (double-headed dowels)
- O (long dowels) - F (screws)
- **Instructions**:
1. Use screws (F) to attach the door panel to the assembly from Step 11,
ensuring that the door panel can open and close smoothly.
2. Insert double-headed dowels (N) to secure the folding tabletop panel to
- 13 -
the door panel when it is extended.
3. Use long dowels (O) to reinforce the connection between the door panel
and the assembly from Step 11, ensuring a tight fit.
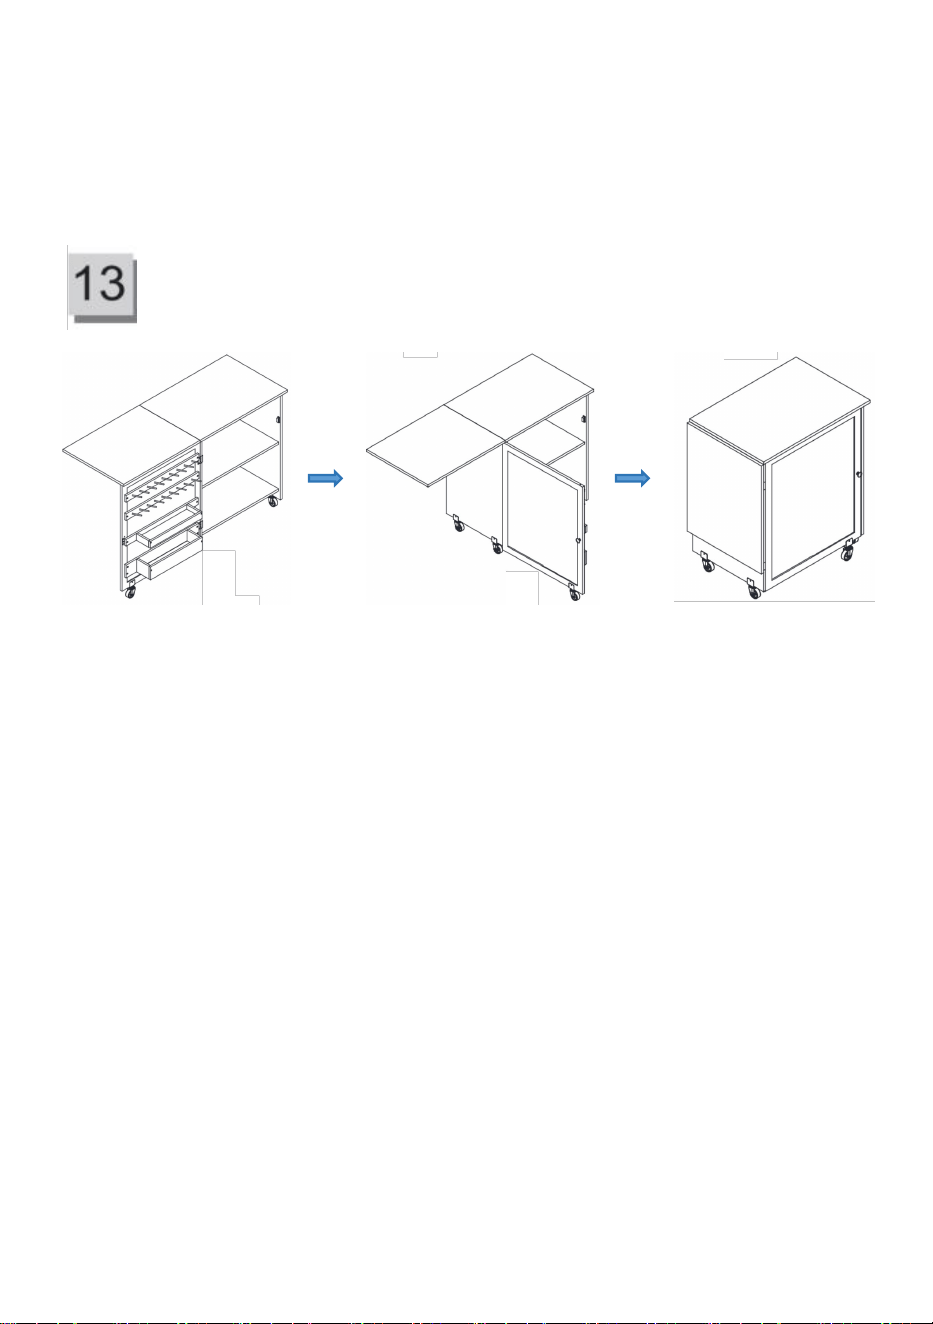
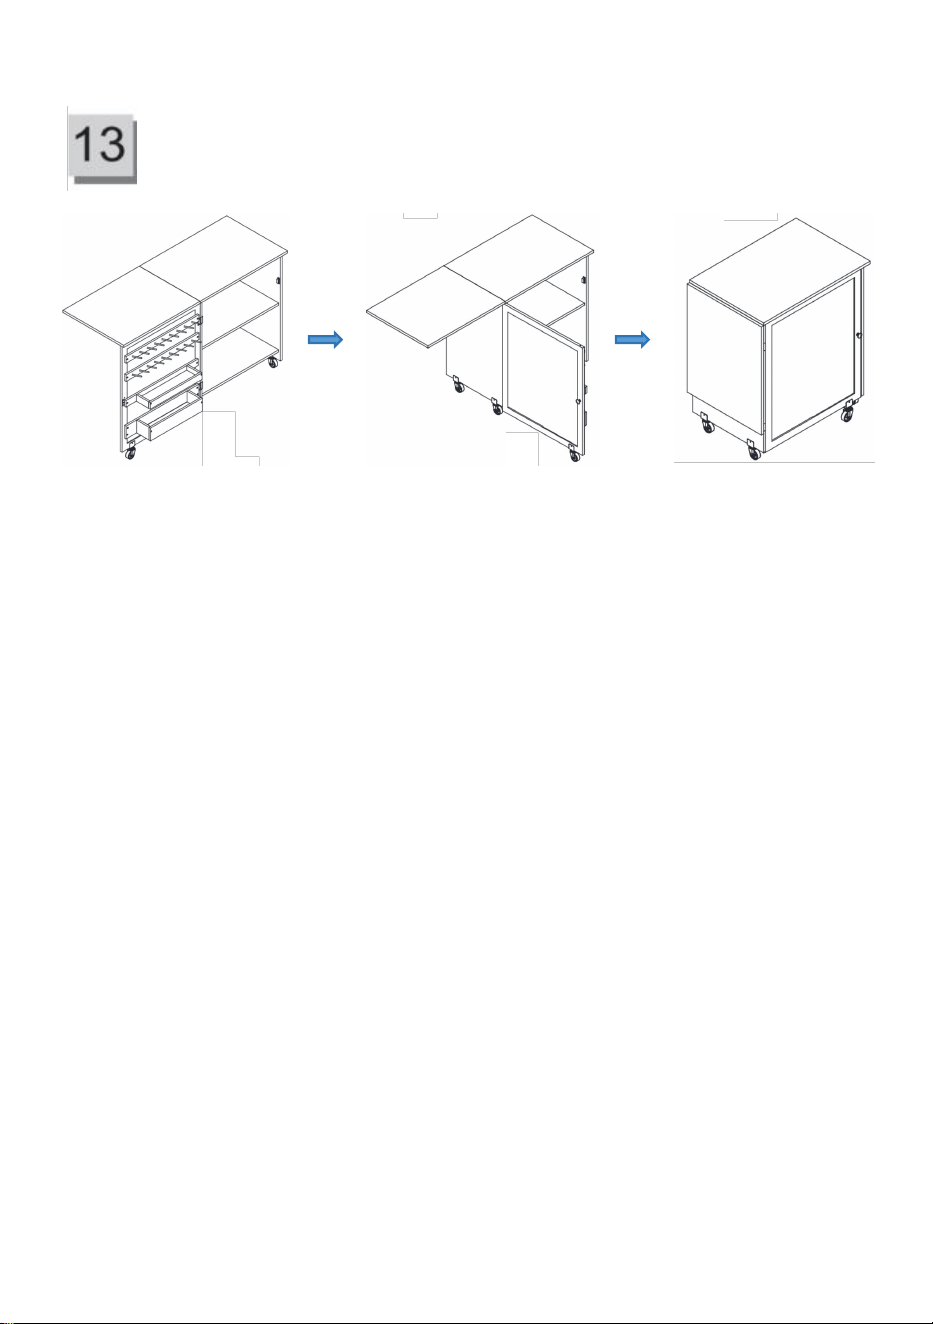
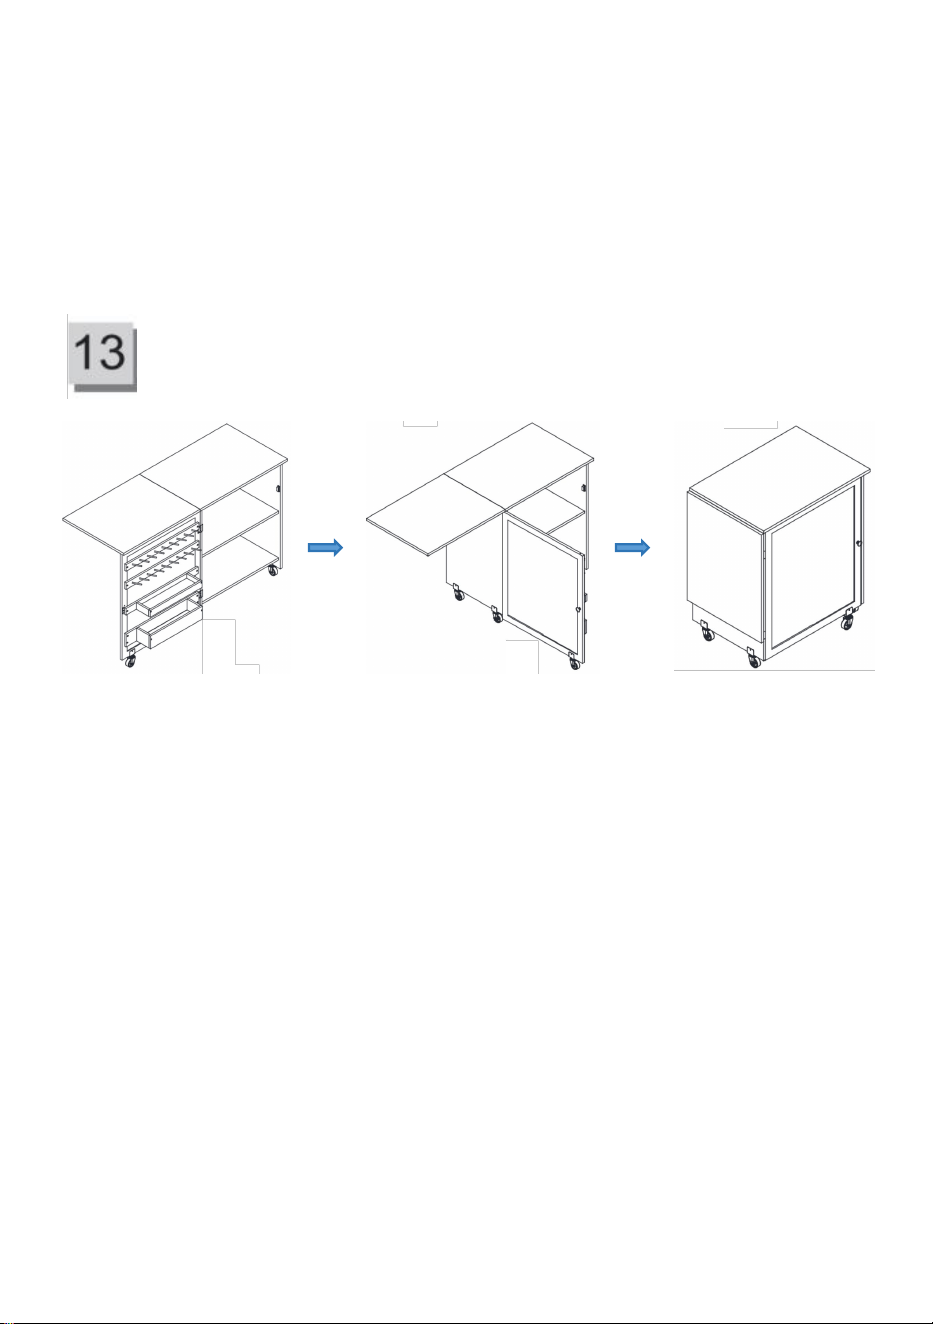
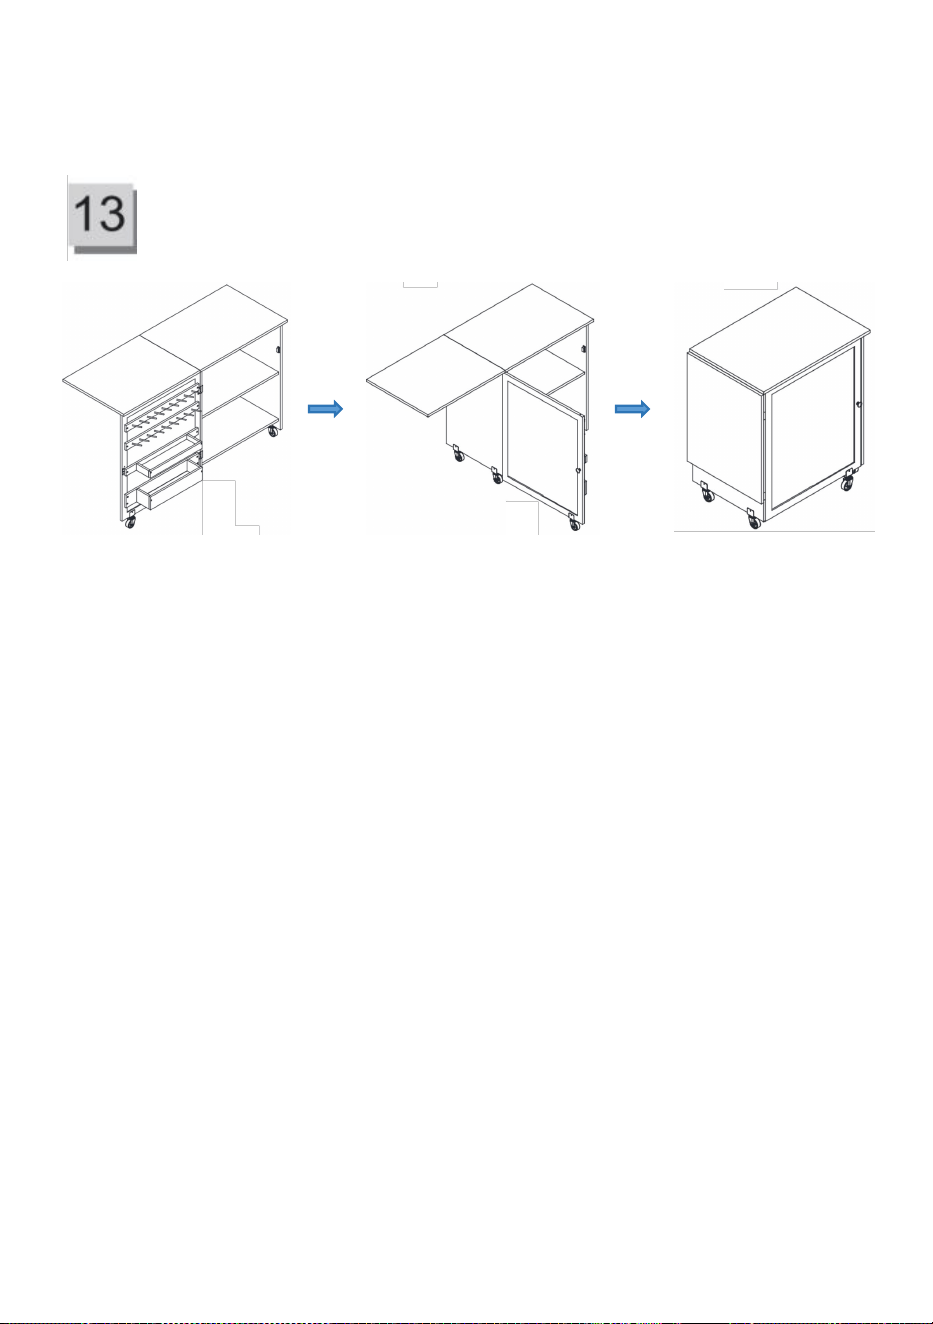
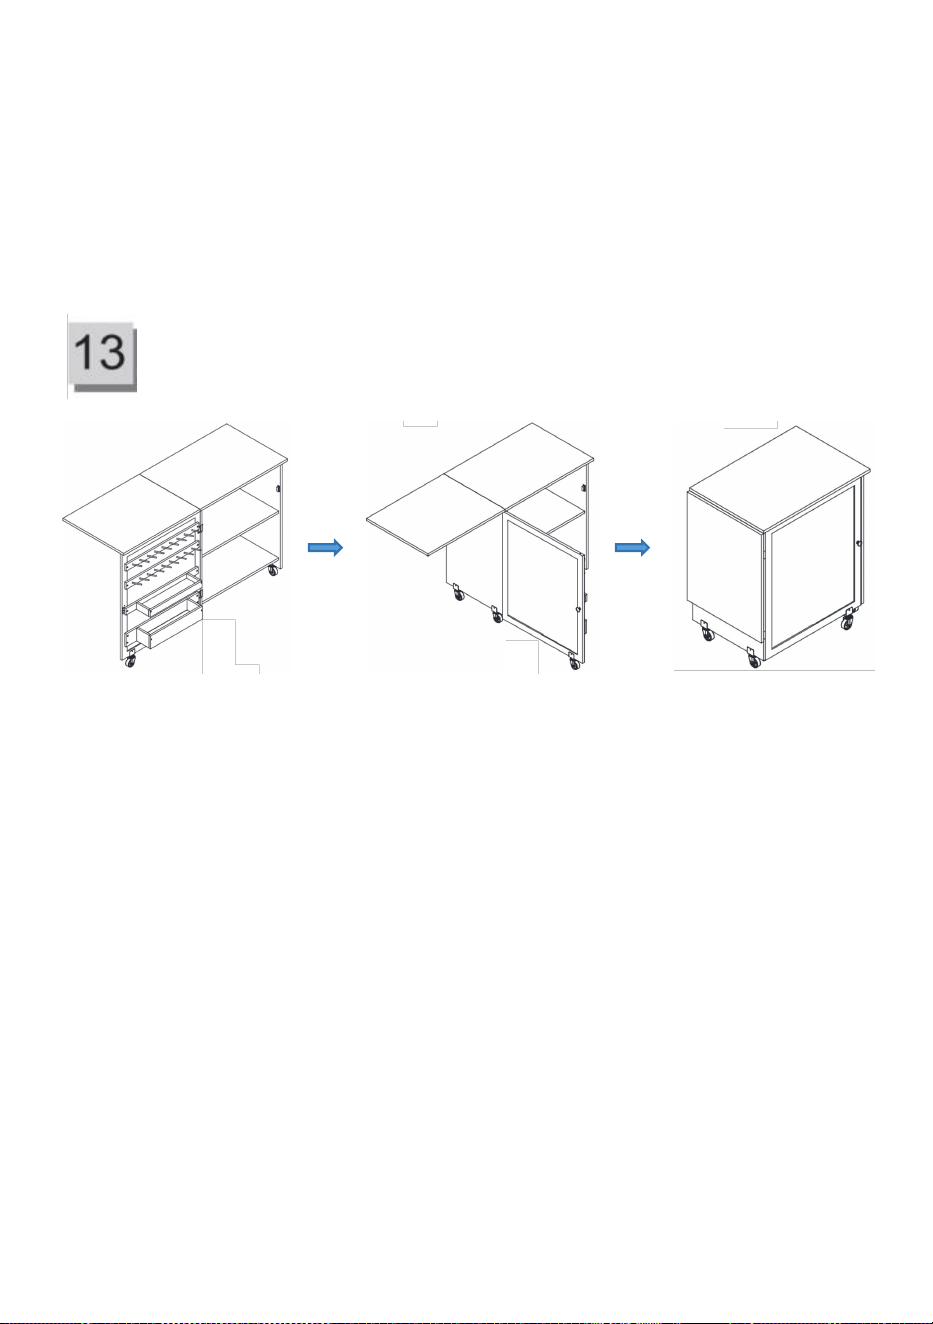
Step13: Assembly completed
(Assembly complete) (folding state)
Make sure all screws are tightened before using the product, and that the
product is securely installed.
6. Maintenance
1. Regular Tightening: Every 90 days, check and tighten all bolts,
screws, knobs, and caster locks to ensure that nothing is loose or
worn out.
2. Cleaning and Care: Wipe the surface with a soft cloth and avoid
harsh chemical cleaners.
3. Moisture Prevention: Keep the table dry, especially when in use or
stored, to prevent warping or swelling due to moisture.
4. Caster Cleaning and Lubrication: Regularly clean the caster
wheels of dust and debris to the wheel axles to keep them moving
smoothly.
5. Caster Wear Check: Periodically check the lockable casters for
signs of wear, looseness, or faulty locking mechanisms. Replace
them if necessary to ensure safe use.
- 14 -
Manufacturer: Shanghaimuxinmuyeyouxiangongsi
Address: Shuangchenglu 803nong11hao1602A-1609shi, baoshanqu,
shanghai 200000 CN.
Imported to AUS: SIHAO PTY LTD, 1 ROKEVA STREETEASTWOOD NSW
2122 Australia
Imported to USA: Sanven Technology Ltd., Suite 250, 9166 Anaheim Place,
Rancho Cucamonga, CA 91730
REP
EC
E-CrossStu GmbH
Mainzer Landstr.69, 60329 Frankfurt am Main.
REP
UK
YH CONSULTING LIMITED.
C/O YH Consulting Limited Office 147, Centurion House,
London Road, Staines-upon-Thames, Surrey, TW18 4AX


- 2 -
Teknisk Support och e-garanticertifikat www.vevor.com/support
FÄLLBART SYBORD
ANVÄNDARMANUAL
Vi fortsätter att vara engagerade i att ge dig verktyg till konkurrenskraftiga priser.
"Spara hälften", "halva priset" eller andra liknande uttryck som används av oss representerar
bara en uppskattning av besparingar du kan dra nytta av att köpa vissa verktyg hos oss jämfört
med de stora toppmärkena och betyder inte nödvändigtvis att täcka alla kategorier av verktyg
som erbjuds av oss. Du påminns vänligen om att noggrant kontrollera när du gör en beställning
hos oss om du faktiskt sparar hälften i jämförelse med de främsta stora varumärkena.

- 1 -
Utvikningsläge Vikningstillstånd
Obs: Den faktiska produkten du får avgör dess utseende.
BEHÖVER HJÄLP? KONTAKTA OSS!
Har du produktfrågor? Behöver du teknisk support? Kontakta oss gärna:
Teknisk support och e-garanticertifikat www.vevor.com/support
Detta är den ursprungliga instruktionen, läs alla instruktioner noggrant innan du
använder den. VEVOR reserverar sig för en tydlig tolkning av vår användarmanual.
Utseendet på produkten är beroende av den produkt du fått. Ursäkta oss att vi inte
kommer att informera dig igen om det finns någon teknik eller
mjukvaruuppdateringar på vår produkt.
FOLDING SEWING TABLE

- 2 -
1. Viktiga säkerhetsinstruktioner
Varning - För att minska risken för skada måste användaren läsa
bruksanvisningen noggrant. Spara dessa instruktioner för framtida
bruk
Varning- Var noga med att bära ögonskydd när du använder denna
produkt.
3. ALLMÄNNA SÄKERHETSINSTRUKTIONER
LÄS ALLA instruktioner innan du använder denna produkt. Vi
rekommenderar starkt att denna produkt inte modifieras och/eller används
för någon annan applikation än den som den designades för.
1. Viktgräns: Se till att belastningen på huvudskrivbordet (vikt
tillstånd) inte överskrider den maximala specificerade gränsen på 40
kg för att undvika deformation eller skada.
2. Skrivbordsstabilitet: När du expanderar skrivbordet, se till att
gångjärnen och stöden är säkra för att förhindra plötslig vikning eller
vinkling.
3. Låsande hjul: När du använder bordet i ett fast läge, se till att de
låsbara länkhjulen är låsta för att förhindra rörelse under
användning.
4. Undvik repor: Undvik kontakt med vassa föremål på skrivbordet
för att förhindra repor eller skador.
5. Kontroll före användning: Före varje användning, kontrollera att
alla skruvar, bultar, knoppar och hjullås är ordentligt fastsatta för att
säkerställa stabilitet.
6. Korrekt förvaring: Placera inte bordet i miljöer med hög temperatur,
hög luftfuktighet eller direkt solljus för att förhindra skador på trä och
komponenter.
7. Stå inte: Stå inte på bordsskivan eller använd någon del av bordet
som en stege för att undvika strukturella skador och säkerhetsrisker.
- 3 -
3 Dellista

- 4 -
4 Huvudparameter
Fällbart sybord
5. Modell: HL20240800 Färg: Vit
6. Modell: HL20240801 Färg: Träfinish
7. Skrivbordsstorlek (L×B×H):1168×400×778mm
8. Huvudskrivbords maxbelastning: 40 kg
5 Monteringsprocess
Försiktighetsåtgärder före installation:
4. Denna produkt kräver två vuxna för att installera, och handskar (ingår
inte i produkten) bör bäras under installationen. Säkerhetsåtgärder bör
vidtas när du använder verktyg under installationen .
5. hela installationsprocessen tar cirka 90 minuter.
- 5 -
6. Motsvarande artikel- och panelnummer är märkta på motsvarande
material.
Steg 1: Installera den stora förvaringslådan
- Använda delar:
- 11 (bottenpanel) - 13 (frontpanel) - 14 (sidopaneler)
- 15 (bakpanel) - P (pinnar) - D (skruvar)
- Instruktioner
1. Sätt in pluggar (P) i de förborrade hålen på båda 14 (sidopanelerna).
2. Rikta in 14 (sidopaneler) med 1 5 (frontpanel), anslut dem med pluggar
(P) och fäst med skruvar (D).
3. Skjut 11 (bottenpanelen) mellan sidopanelerna 14.
4. Fäst 1 3 (bakpanelen) mellan sidopanelerna 14 och fäst den med
skruvar (D).
Steg 2: Montera den lilla förvaringslådan

- 6 -
- **Använda delar**:
- 11 (bottenpanel) - 9 (frontpanel) - 10 (sidopaneler)
- 12 (bakpanel) - P (pinnar) - D (skruvar)
- **Instruktioner**:
1. Sätt in pluggar (P) i de förborrade hålen på båda 10 (sidopanelerna).
2. Rikta in 10 (sidopaneler) med 12 (frontpanel), anslut dem med pluggar
(P) och fäst med skruvar (D).
3. Skjut 11 (bottenpanelen) mellan sidopanelerna 10.
4. Fäst 9 (bakpanelen) mellan sidopanelerna 10 och fäst den med skruvar
(D).
Steg 3: Installera handtag och länkhjul
- 7 -
- **Använda delar**:
- 3 (dörrpanel) - J (skruvar) - F (skruvar) - H (brickor)
- K (handtag) - S (nötter) - V (svänghjul) - Q (skruvar)
- R (sexnyckel) - T (sexnyckel)
- **Instruktioner**:
1. Sätt in skruvarna ( F ) genom brickorna (H) i de förborrade hålen på
panel 3 och fäst dem med skruvar ( J ).
2. Montera handtaget (K) på den avsedda platsen på panelen och säkra
det med muttrar (S).
3. Fäst länkhjulen (V) i botten av panelen och fäst dem med skruvar (Q)
och mutter (S)
4. Använd insexnyckeln (R) och insexnyckeln (T) för att dra åt alla skruvar
och se till att handtaget och länkhjulen är ordentligt installerade.
Steg 4: Installera förvaringslådan och spolförvaringen på dörrpanelen
- 8 -
- **Använda delar**:
- 3 (dörrpanel) - 8 (spolförvaring) - C (skruvar)
- Komponenter monterade i steg 1 och steg 2
- **Instruktioner**:
1. Placera de två spolförråden (8) i de avsedda positionerna på
dörrpanelen 3.
2. Använd skruvar (C) för att fästa spolförråden (8) på dörrpanelen 3.
3. Rikta in förvaringslådans komponenter som monterades i steg 1 och
steg 2, fäst dem på dörrpanel 3 och fäst dem med skruvar (C).
Steg 5: Installera sidopaneler 4, 5, gångjärn och magnetspärr
- **Använda delar**:
- 9 -
- 4 (sidopanel) - 5 (sidopanel) - A (bultar) - F (skruvar)
- E (gångjärn) - L (magnetisk spärr) - M (skruvar för magnetisk spärr)
- **Instruktioner**:
1. Sätt i bultarna (A) i de förborrade hålen i sidopanelerna 4 och 5.
2. Montera gångjärn (E) på de avsedda platserna på sidopanelerna 4 och 5,
och fäst dem med skruvar (F).
3. Fäst den magnetiska spärren (L) på angiven plats på sidopanelen 5 med
skruvar (M).
4. Dra åt alla skruvar för att säkerställa att bultarna (A) och gångjärnen (E)
är ordentligt anslutna.
Steg 6: Installera hyllpaneler 6 (två hyllor)
- **Använda delar**:
- 6 (hyllpanel) - 7 (stödlist)
- P (pinnar) - D (skruvar)
- **Instruktioner**:
1. Sätt in pluggar (P) i de förborrade hålen på stödlisten (7).
2. Rikta in stödlisten (7) med hyllpanelen (6), anslut dem med pluggar (P).
3. Fäst stödlisten (7) på sidan av hyllpanelen (6) med skruvar (D).
4. Upprepa detta steg för den andra hyllpanelen (6).
Steg 7: Anslut sidopanel 4 till hyllpaneler 6
- 10 -
- **Använda delar**:
- 4 (sidopanel) - 6 (hyllpaneler) - 7 (stödlist)
- P (pinnar) - B (kamlås)
- **Instruktioner**:
1. Sätt in pluggar (P) i de förborrade hålen på hyllpanelerna 6 、 stödlist
och 7 och sidopanel 4.
2. Använd kamlås (B) för att fästa hyllpanelerna 6 vid sidopanelen 4.
3. Se till att båda hyllpanelerna 6 är ordentligt anslutna till sidopanelen 4.
Steg 8: Anslut sidopanel 5 till hyllpaneler 6
- **Använda delar**:
- 5 (sidopanel) - 6 (hyllpaneler) - 7 (stödlist)
- P (pinnar) - B (kamlås)
- **Instruktioner**:
1. Sätt in pluggar (P) i de förborrade hålen på hyllpanelerna 6 、 stödlist 7
och sidopanel 5.
2. Använd kamlås (B) för att fästa hyllpanelerna 6 vid sidopanelen 5.
3. Se till att båda hyllpanelerna 6 är ordentligt anslutna till sidopanelen 5.
Steg 9: Installera anslutningsskruvarna på huvudpanelen (2)
- 11 -
- **Använda delar**:
- 2 (huvudpanel för bordsskiva) - A (bultar)
- **Instruktioner**:
1. Sätt in bultarna (A) i de förborrade hålen på huvudskivan (2).
2. Se till att bultarna (A) är ordentligt installerade, som förberedelse för
anslutning av bordsskivan till skåpet.
Steg 10: Montera huvudbordspanelen från steg 9 med skåpet
- **Använda delar**:
- Huvudskiva från steg 9 - Skåpmontering från steg 8
- P (pinnar) - B (kamlås)

- 12 -
- **Instruktioner**:
1. Sätt in pluggar (P) i de förborrade hålen på toppen av skåpet.
2. Placera huvudskivan från steg 9 ovanpå skåpet, rikta in pluggarna och
säkra anslutningen med kamlås (B).
3. Se till att alla kamlås (B) är åtdragna och att anslutningen är säker.
Steg 11: Installera den vikbara bordsskivan 1 på den huvudsakliga
bordsskivan 2 och fäst hjulen
- **Använda delar**:
- 1 (vikbar bordsskiva) - Montering från steg 10
- Q (skruvar) - F (skruvar) - G (gångjärn) - S (muttrar)
- U (bromshjul) - V (icke-låsande länkhjul)
- R (sexnyckel) - T (sexnyckel)
- **Instruktioner**:
1. Använd gångjärn (G) och skruvar (F) för att fästa den fällbara
bordsskivan 1 på huvudskivan 2.
2. Montera två låsbara länkhjul (U) på utsidan av bordets botten och två
icke-låsande länkhjul (V) på insidan. Fäst dem med skruvar (Q) och
muttrar (S).
3. Använd insexnyckeln (T) och sexkantnyckeln (R) för att säkerställa att
- 13 -
alla skruvar och länkhjul är åtdragna.
4. Kontrollera att länkhjulens låsfunktion fungerar korrekt.
Steg 12: Installera dörrpanelen på enheten från steg 11 och fäst
dubbelhåriga dymlingar och långa pluggar
- **Använda delar**:
- Montering från steg 11 - N (dubbelhuvuden)
- O (långa pluggar) - F (skruvar)
- **Instruktioner**:
1. Använd skruvar (F) för att fästa dörrpanelen på enheten från steg 11,
och se till att dörrpanelen kan öppnas och stängas smidigt.
2. Sätt i dubbelhuvuden (N) för att fästa den fällbara bordsskivan vid
dörrpanelen när den är utdragen.
3. Använd långa pluggar (O) för att förstärka anslutningen mellan
dörrpanelen och monteringen från steg 11, för att säkerställa en tät
passform.
- 14 -
Steg 13: Monteringen slutförd
(Montering klar) (vikt läge)
Se till att alla skruvar är åtdragna innan du använder produkten och att
produkten är ordentligt installerad.
7. Underhåll
1. Regelbunden åtdragning: Var 90:e dag, kontrollera och dra åt alla
bultar, skruvar, knoppar och hjullås för att säkerställa att inget är löst
eller utslitet.
2. Rengöring och skötsel: Torka av ytan med en mjuk trasa och
undvik starka kemiska rengöringsmedel.
3. Fuktförebyggande: Håll bordet torrt, särskilt när det används eller
förvaras, för att förhindra skevhet eller svullnad på grund av fukt.
4. Rengöring och smörjning av hjul: Rengör regelbundet hjulen från
damm och skräp till hjulaxlarna för att hålla dem i rörelse smidigt.
5. Kontroll av hjulslitage: Kontrollera regelbundet de låsbara hjulen
för tecken på slitage, löshet eller felaktiga låsmekanismer. Byt ut
dem vid behov för säker användning.
Tillverkare: Shanghaimuxinmuyeyouxiangongsi
Adress: Shuangchenglu 803nong11hao1602A-1609shi, baoshanqu,
shanghai 200000 CN.
Importerad till AUS: SIHAO PTY LTD, 1 ROKEVA STREETEASTWOOD
NSW 2122 Australien

- 15 -
Importerad till USA: Sanven Technology Ltd., Suite 250, 9166 Anaheim
Place, Rancho Cucamonga, CA 91730
REP
EC
E-CrossStu GmbH
Mainzer Landstr.69, 60329 Frankfurt am Main.
REP
UK
YH CONSULTING LIMITED.
C/O YH Consulting Limited Office 147, Centurion House,
London Road, Staines-upon-Thames, Surrey, TW18 4AX


- 2 -
Técnico Soporte y certificado de garantía electrónica www.vevor.com/support
MESA DE COSTURA PLEGABLE
MANUAL DEL USUARIO
Seguimos comprometidos a brindarle herramientas a precios competitivos.
"Ahorre la mitad", "mitad de precio" o cualquier otra expresión similar que utilicemos solo
representa una estimación del ahorro que podría obtener al comprar ciertas herramientas con
nosotros en comparación con las principales marcas y no necesariamente significa que cubra
todas las categorías de herramientas que ofrecemos. Le recordamos que, al realizar un pedido
con nosotros, verifique cuidadosamente si realmente está ahorrando la mitad en comparación
con las principales marcas.

- 1 -
Estado desplegado Estado plegable
Nota: El producto real que usted recibe determina su apariencia.
¿NECESITA AYUDA? ¡CONTÁCTENOS!
¿Tiene preguntas sobre el producto? ¿Necesita asistencia técnica? No dude en
ponerse en contacto con nosotros:
Soporte técnico y certificado de garantía electrónica www.vevor.com/support
Estas son las instrucciones originales, lea atentamente todas las instrucciones del
manual antes de utilizar el producto. VEVOR se reserva una interpretación clara
de nuestro manual de usuario. La apariencia del producto estará sujeta al
producto que recibió. Perdónenos por no informarle nuevamente si hay
actualizaciones de tecnología o software en nuestro producto.
FOLDING SEWING TABLE

- 2 -
1.Instrucciones de seguridad importantes
Advertencia: para reducir el riesgo de lesiones, el usuario debe leer
atentamente el manual de instrucciones. Guarde estas instrucciones
para uso futuro.
Advertencia: Asegúrese de usar protectores para los ojos cuando
utilice este producto.
4. INSTRUCCIONES GENERALES DE SEGURIDAD
LEA TODAS las instrucciones antes de utilizar este producto.
Recomendamos encarecidamente que este producto no se modifique ni se
utilice para ninguna otra aplicación que no sea aquella para la que fue
diseñado.
1. Límite de peso: asegúrese de que la carga del escritorio principal
(estado plegable) no exceda el límite máximo especificado de 40 kg
para evitar deformaciones o daños.
2. Estabilidad del escritorio: al expandir el escritorio, asegúrese de
que las bisagras y los soportes estén seguros para evitar que se
doble o se tambalee repentinamente.
3. Ruedas bloqueables: cuando utilice la mesa en una posición fija,
asegúrese de que las ruedas bloqueables estén bloqueadas para
evitar que se muevan durante el uso.
4. Evite rayones: Evite el contacto con objetos afilados en el
escritorio para evitar rayones o daños.
5. Comprobación previa al uso: antes de cada uso, verifique que
todos los tornillos, pernos, perillas y seguros de las ruedas estén
bien fijados para garantizar la estabilidad.
6. Almacenamiento adecuado: No coloque la mesa en entornos con
altas temperaturas, alta humedad o luz solar directa para evitar
dañar la madera y los componentes.
7. No se pare sobre la mesa ni use ninguna parte de la mesa como
escalera para evitar daños estructurales y riesgos de seguridad.

- 3 -
Lista de 3 partes

- 4 -
4 Parámetro principal
Mesa de costura plegable
9. Modelo: HL20240800 Color: Blanco
10. Modelo: HL20240801 Color: Acabado en madera
11. Tamaño del escritorio (L × An × Al): 1168 × 400 × 778 mm
12. Carga máxima del escritorio principal: 40 kg
5 Proceso de montaje
Precauciones antes de la instalación:
7. Este producto requiere dos adultos para su instalación y se deben usar
guantes (no incluidos en el producto) durante la instalación. Se deben
tomar precauciones de seguridad al utilizar herramientas durante la
instalación .
- 5 -
8. El proceso completo de instalación tarda unos 90 minutos.
9. Los números de pieza y panel correspondientes están etiquetados en el
material correspondiente.
Paso 1: Instale la caja de almacenamiento grande
- Piezas utilizadas:
- 11 (panel inferior) - 13 (panel frontal) - 14 (paneles laterales)
- 15 (panel trasero) - P (pasadores) - D (tornillos)
- Instrucciones
1. Inserte las clavijas (P) en los orificios pretaladrados de ambos 14
(paneles laterales).
2. Alinee 14 (paneles laterales) con 1 5 (panel frontal), conéctelos con
clavijas (P) y asegúrelos con tornillos (D).
3. Deslice el panel 11 (panel inferior) entre los paneles laterales 14.
4. Coloque 1 3 (panel posterior) entre los paneles laterales 14 y fíjelo con
tornillos (D).
Paso 2: Ensamble la pequeña caja de almacenamiento
- 6 -
- **Piezas utilizadas**:
- 11 (panel inferior) - 9 (panel frontal) - 10 (paneles laterales)
- 12 (panel trasero) - P (pasadores) - D (tornillos)
- **Instrucciones**:
1. Inserte las clavijas (P) en los orificios pretaladrados de ambos 10
(paneles laterales).
2. Alinee 10 (paneles laterales) con 12 (panel frontal), conéctelos con
clavijas (P) y asegúrelos con tornillos (D).
3. Deslice el panel 11 (panel inferior) entre los paneles laterales 10.
4. Coloque el panel 9 (panel posterior) entre los paneles laterales 10 y
fíjelo con tornillos (D).
Paso 3: Instale las manijas y las ruedas giratorias

- 7 -
- **Piezas utilizadas**:
- 3 (panel de la puerta) - J (tornillos) - F (tornillos) - H (arandelas)
- K (manejar) - S (nueces) - V (ruedas giratorias) - Q (tornillos)
- R (llave hexagonal) - T (llave Allen)
- **Instrucciones**:
1. Inserte los tornillos ( F ) a través de las arandelas (H) en los orificios
pretaladrados en el panel 3 y fíjelos con tornillos ( J ).
2. Instale la manija (K) en la ubicación designada en el panel,
asegurándola con tuercas (S).
3. Coloque las ruedas giratorias (V) en la parte inferior del panel y fíjelas
con tornillos (Q) y tuercas (S)
4. Utilice la llave hexagonal (R) y la llave Allen (T) para apretar todos los
tornillos y asegurarse de que el mango y las ruedas giratorias estén
firmemente instaladas.

- 8 -
Paso 4: Instale la caja de almacenamiento y el almacenamiento del
carrete en el panel de la puerta
- **Piezas utilizadas**:
- 3 (panel de la puerta) - 8 (almacenamiento de carretes) - C (tornillos)
- Componentes ensamblados en el Paso 1 y Paso 2
- **Instrucciones**:
1. Coloque los dos almacenamientos de carretes (8) en las posiciones
designadas en el panel de la puerta 3.
2. Utilice los tornillos (C) para asegurar los almacenamientos de carrete (8)
al panel de la puerta 3.
3. Alinee los componentes de la caja de almacenamiento ensamblados en
el Paso 1 y el Paso 2, fíjelos al panel de la puerta 3 y asegúrelos con
tornillos (C).
Paso 5: Instale los paneles laterales 4, 5, las bisagras y el cierre
magnético

- 9 -
- **Piezas utilizadas**:
- 4 (panel lateral) - 5 (panel lateral) - A (pernos) - F (tornillos)
- E (bisagras) - L (cierre magnético) - M (tornillos para cierre magnético)
- **Instrucciones**:
1. Inserte los pernos (A) en los orificios pretaladrados en los paneles
laterales 4 y 5.
2. Instale las bisagras (E) en las posiciones designadas en los paneles
laterales 4 y 5, y fíjelas con tornillos (F).
3. Fije el cierre magnético (L) en el punto especificado en el panel lateral 5
usando tornillos (M).
4. Apriete todos los tornillos para asegurarse de que los pernos (A) y las
bisagras (E) estén conectados de forma segura.
Paso 6: Instale los paneles de los estantes 6 (dos estantes)

- 10 -
- **Piezas utilizadas**:
- 6 (panel de estante) - 7 (tira de soporte)
- P (tacos) - D (tornillos)
- **Instrucciones**:
1. Inserte las clavijas (P) en los orificios pretaladrados de la tira de soporte
(7).
2. Alinee la tira de soporte (7) con el panel del estante (6), conectándolos
mediante pasadores (P).
3. Fije la tira de soporte (7) al costado del panel del estante (6) usando
tornillos (D).
4. Repita este paso para el segundo panel del estante (6).
Paso 7: Conecte el panel lateral 4 a los paneles del estante 6
- **Piezas utilizadas**:
- 4 (panel lateral) - 6 (paneles de estante) - 7 (tira de soporte)
- P (pasadores) - B (Cerraduras de leva)
- **Instrucciones**:
1. Inserte las clavijas (P) en los orificios previamente perforados en los
paneles del estante 6 , la tira de soporte y 7 y panel lateral 4.
2. Utilice las cerraduras de leva (B) para asegurar los paneles del estante
6 al panel lateral 4.
- 11 -
3. Asegúrese de que ambos paneles del estante 6 estén conectados de
forma segura al panel lateral 4.
Paso 8: Conecte el panel lateral 5 a los paneles del estante 6
- **Piezas utilizadas**:
- 5 (panel lateral) - 6 (paneles de estantes) - 7 (tira de soporte)
- P (pasadores) - B (cerraduras de leva)
- **Instrucciones**:
1. Inserte las clavijas (P) en los orificios previamente perforados en los
paneles del estante 6 , tira de soporte y 7 y el panel lateral 5.
2. Utilice las cerraduras de leva (B) para asegurar los paneles del estante
6 al panel lateral 5.
3. Asegúrese de que ambos paneles del estante 6 estén conectados de
forma segura al panel lateral 5.
Paso 9: Instale los tornillos de conexión en el panel principal de la
mesa (2)
- 12 -
- **Piezas utilizadas**:
- 2 (panel principal de la mesa) - A (pernos)
- **Instrucciones**:
1. Inserte los pernos (A) en los orificios pretaladrados del panel principal
de la mesa (2).
2. Asegúrese de que los pernos (A) estén instalados de forma segura,
como preparación para conectar la mesa al gabinete.
Paso 10: Ensamble el panel principal de la mesa del paso 9 con el
gabinete
- **Piezas utilizadas**:
- 13 -
- Panel principal de la mesa del paso 9 - Montaje del gabinete del paso 8
- P (pasadores) - B (cerraduras de leva)
- **Instrucciones**:
1. Inserte las clavijas (P) en los orificios previamente perforados en la
parte superior del conjunto del gabinete.
2. Coloque el panel principal de la mesa del paso 9 sobre el conjunto del
gabinete, alinee las clavijas y asegure la conexión usando cerraduras de
leva (B).
3. Asegúrese de que todos los seguros de leva (B) estén apretados y que
la conexión sea segura.
Paso 11: Instale el panel de mesa plegable 1 en el panel de mesa
principal 2 y coloque las ruedas giratorias
- **Piezas utilizadas**:
- 1 (panel de mesa plegable) - Montaje a partir del paso 10
- Q (tornillos) - F (tornillos) - G (bisagras) - S (tuercas)
- U (ruedas giratorias con freno) - V (ruedas giratorias sin bloqueo)
- R (llave hexagonal) - T (llave Allen)
- **Instrucciones**:
1. Utilice bisagras (G) y tornillos (F) para fijar el panel de la mesa plegable
- 14 -
1 al panel de la mesa principal 2.
2. Instale dos ruedas giratorias bloqueables (U) en los lados exteriores de
la base de la mesa y dos ruedas giratorias sin bloqueo (V) en los lados
interiores. Fíjelas con tornillos (Q) y tuercas (S).
3. Utilice la llave Allen (T) y la llave hexagonal (R) para asegurarse de que
todos los tornillos y las ruedas giratorias estén bien apretados.
4. Compruebe que la función de bloqueo de las ruedas giratorias funcione
correctamente.
Paso 12: Instale el panel de la puerta en el conjunto del paso 11 y fije
las clavijas de doble cabeza y las clavijas largas
- **Piezas utilizadas**:
- Montaje a partir del paso 11 - N (pasadores de doble cabeza)
- O (pasadores largos) - F (tornillos)
- **Instrucciones**:
1. Use los tornillos (F) para fijar el panel de la puerta al conjunto del paso
11, asegurándose de que el panel de la puerta pueda abrirse y cerrarse sin
- 15 -
problemas.
2. Inserte clavijas de doble cabeza (N) para asegurar el panel de la mesa
plegable al panel de la puerta cuando esté extendido.
3. Utilice clavijas largas (O) para reforzar la conexión entre el panel de la
puerta y el conjunto del paso 11, asegurando un ajuste perfecto.
Paso 13: Montaje completado
(Montaje completo) (estado plegado)
Asegúrese de que todos los tornillos estén bien apretados antes de usar el
producto y de que el producto esté instalado de forma segura.
8. Mantenimiento
1. Ajuste regular: cada 90 días, revise y ajuste todos los pernos,
tornillos, perillas y seguros de las ruedas para asegurarse de que
nada esté flojo o desgastado.
2. Limpieza y cuidado: Limpie la superficie con un paño suave y
evite utilizar limpiadores químicos agresivos.
3. Prevención de la humedad: mantenga la mesa seca,
especialmente cuando esté en uso o guardada, para evitar que se
deforme o se hinche debido a la humedad.
4. Limpieza y lubricación de las ruedas: Limpie periódicamente el
polvo y los residuos de los ejes de las ruedas para que sigan
moviéndose sin problemas.

- 16 -
5. Comprobación del desgaste de las ruedas: compruebe
periódicamente que las ruedas bloqueables no presenten signos de
desgaste, estén sueltas o tengan mecanismos de bloqueo
defectuosos. Reemplácelas si es necesario para garantizar un uso
seguro.
Fabricante: Shanghaimuxinmuyeyouxiangongsi
Dirección: Shuangchenglu 803nong11hao1602A-1609shi, baoshanqu,
shanghai 200000 CN.
Importado a AUS: SIHAO PTY LTD, 1 ROKEVA STREETEASTWOOD NSW
2122 Australia
Importado a EE. UU.: Sanven Technology Ltd., Suite 250, 9166 Anaheim
Place, Rancho Cucamonga, CA 91730
REP
EC
E-CrossStu GmbH
Mainzer Landstr.69, 60329 Frankfurt am Main.
REP
UK
YH CONSULTING LIMITED.
C/O YH Consulting Limited Office 147, Centurion House,
London Road, Staines-upon-Thames, Surrey, TW18 4AX

- 17 -


- 2 -
Tecnico Supporto e certificato di garanzia elettronica www.vevor.com/support
TAVOLO DA CUCITO PIEGHEVOLE
MANUALE D'USO
Continuiamo a impegnarci per fornirvi strumenti a prezzi competitivi.
"Risparmia la metà", "Metà prezzo" o qualsiasi altra espressione simile da noi utilizzata
rappresenta solo una stima del risparmio che potresti ottenere acquistando determinati utensili
con noi rispetto ai principali marchi principali e non significa necessariamente coprire tutte le
categorie di utensili da noi offerti. Ti ricordiamo gentilmente di verificare attentamente quando
effettui un ordine con noi se stai effettivamente risparmiando la metà rispetto ai principali marchi
principali.

- 1 -
Stato di dispiegamento Stato di piegatura
Nota: l'aspetto del prodotto che riceverai ne determina l'aspetto.
HAI BISOGNO DI AIUTO? CONTATTACI!
Hai domande sui prodotti? Hai bisogno di supporto tecnico? Non esitare a
contattarci:
Supporto tecnico e certificato di garanzia elettronica www.vevor.com/support
Questa è l'istruzione originale, si prega di leggere attentamente tutte le istruzioni
del manuale prima di utilizzare. VEVOR si riserva una chiara interpretazione del
nostro manuale utente. L'aspetto del prodotto sarà soggetto al prodotto ricevuto.
Vi preghiamo di perdonarci se non vi informeremo di nuovo se ci sono
aggiornamenti tecnologici o software sul nostro prodotto.
FOLDING SEWING TABLE

- 2 -
1. Importanti istruzioni di sicurezza
Attenzione - Per ridurre il rischio di lesioni, l'utente deve leggere
attentamente il manuale di istruzioni. Conservare queste istruzioni per
un uso futuro
Attenzione: indossare sempre protezioni per gli occhi quando si
utilizza questo prodotto.
5. ISTRUZIONI GENERALI DI SICUREZZA
LEGGERE TUTTE le istruzioni prima di utilizzare questo prodotto.
Raccomandiamo vivamente che questo prodotto non venga modificato e/o
utilizzato per applicazioni diverse da quelle per cui è stato progettato.
1. Limite di peso: assicurarsi che il carico del tavolo principale (in
stato di piegatura) non superi il limite massimo specificato di 40 kg
per evitare deformazioni o danni.
2. Stabilità del desktop: quando si espande il desktop, assicurarsi
che le cerniere e i supporti siano ben saldi per evitare pieghe o
oscillazioni improvvise.
3. Ruote girevoli bloccabili: quando si utilizza il tavolo in una
posizione fissa, assicurarsi che le ruote girevoli bloccabili siano
bloccate per evitare movimenti durante l'uso.
4. Evitare graffi: evitare il contatto con oggetti appuntiti sulla
scrivania per prevenire graffi o danni.
5. Controllo prima dell'uso: prima di ogni utilizzo, verificare che tutte
le viti, i bulloni, le manopole e i blocchi delle rotelle siano saldamente
fissati per garantirne la stabilità.
6. Corretta conservazione: non collocare il tavolo in ambienti con
temperature elevate, elevata umidità o luce solare diretta per evitare
danni al legno e ai componenti.
7. Divieto di sosta: non sostare sul tavolo né utilizzare alcuna parte
del tavolo come scala a pioli per evitare danni strutturali e rischi per
la sicurezza.
- 3 -
3 Elenco delle parti
- 4 -
4 Parametro principale
Tavolo da cucito pieghevole
13. Modello: HL20240800 Colore: Bianco
14. Modello: HL20240801 Colore: Finitura legno
15. Dimensioni del desktop (L×W×H): 1168×400×778mm
16. Carico massimo del desktop principale: 40 kg
5 Processo di assemblaggio
Precauzioni prima dell'installazione:
10. Questo prodotto richiede due adulti per l'installazione e guanti (non
inclusi nel prodotto) devono essere indossati durante l'installazione. Si
devono adottare precauzioni di sicurezza quando si utilizzano utensili
durante l'installazione .

- 5 -
11. l'intero processo di installazione dura circa 90 minuti.
12. I numeri dei componenti e dei pannelli corrispondenti sono etichettati
sul materiale corrispondente.
Fase 1: installare il grande contenitore
- Parti utilizzate:
- 11 (pannello inferiore) - 13 (pannello frontale) - 14 (pannelli laterali)
- 15 (pannello posteriore) - P (tasselli) - D (viti)
- Istruzioni
1. Inserire i tasselli (P) nei fori preforati di entrambi i 14 (pannelli laterali).
2. Allineare 14 (pannelli laterali) con 1 5 (pannello frontale), collegarli
utilizzando i tasselli (P) e fissare con le viti (D).
3. Far scorrere il pannello 11 (pannello inferiore) tra i pannelli laterali 14.
4. Fissare 1 3 (pannello posteriore) tra i pannelli laterali 14 e fissarlo con le
viti (D).
Fase 2: assemblare la piccola scatola portaoggetti

- 6 -
- **Parti utilizzate**:
- 11 (pannello inferiore) - 9 (pannello frontale) - 10 (pannelli laterali)
- 12 (pannello posteriore) - P (tasselli) - D (viti)
- **Istruzioni**:
1. Inserire i tasselli (P) nei fori preforati di entrambi i 10 (pannelli laterali).
2. Allineare 10 (pannelli laterali) con 12 (pannello frontale), collegarli
utilizzando i tasselli (P) e fissare con le viti (D).
3. Far scorrere il pannello 11 (pannello inferiore) tra i pannelli laterali 10.
4. Fissare 9 (pannello posteriore) tra i pannelli laterali 10 e fissarlo con le
viti (D).
Fase 3: installare maniglie e ruote girevoli

- 7 -
- **Parti utilizzate**:
- 3 (pannello porta) - J (viti) - F (viti) - H (rondelle)
- K (maniglia) - S (noci) - V (ruote girevoli) - Q (viti)
- R (chiave esagonale) - T (chiave a brugola)
- **Istruzioni**:
1. Inserire le viti ( F ) attraverso le rondelle (H) nei fori preforati sul pannello
3 e fissarle utilizzando le viti ( J ).
2. Installare la maniglia (K) nel punto designato sul pannello, fissandola
con i dadi (S).
3. Fissare le ruote girevoli (V) alla parte inferiore del pannello e fissarle con
viti (Q) e dado (S)
4. Utilizzare la chiave esagonale (R) e la chiave a brugola (T) per stringere
tutte le viti e assicurarsi che la maniglia e le ruote piroettanti siano
installate saldamente.

- 8 -
Fase 4: installare la scatola portaoggetti e il contenitore della bobina
sul pannello della porta
- **Parti utilizzate**:
- 3 (pannello porta) - 8 (contenitore per rocchetti) - C (viti)
- Componenti assemblati nel passaggio 1 e nel passaggio 2
- **Istruzioni**:
1. Posizionare i due contenitori per rocchetti (8) nelle posizioni designate
sul pannello della porta 3.
2. Utilizzare le viti (C) per fissare i contenitori della bobina (8) sul pannello
della porta 3.
3. Allineare i componenti del contenitore assemblati nei passaggi 1 e 2,
fissarli al pannello della porta 3 e fissarli con le viti (C).
Fase 5: installare i pannelli laterali 4, 5, le cerniere e la chiusura
magnetica
- 9 -
- **Parti utilizzate**:
- 4 (pannello laterale) - 5 (pannello laterale) - A (bulloni) - F (viti)
- E (cerniere) - L (chiusura magnetica) - M (viti per chiusura magnetica)
- **Istruzioni**:
1. Inserire i bulloni (A) nei fori preforati nei pannelli laterali 4 e 5.
2. Installare le cerniere (E) nelle posizioni designate sui pannelli laterali 4 e
5 e fissarle con le viti (F).
3. Fissare il fermo magnetico (L) nel punto specificato sul pannello laterale
5 utilizzando le viti (M).
4. Serrare tutte le viti per garantire che i bulloni (A) e le cerniere (E) siano
collegati saldamente.
Fase 6: Installare i pannelli dei ripiani 6 (due ripiani)
- 10 -
- **Parti utilizzate**:
- 6 (pannello ripiano) - 7 (striscia di supporto)
- P (tasselli) - D (viti)
- **Istruzioni**:
1. Inserire i tasselli (P) nei fori preforati della striscia di supporto (7).
2. Allineare la striscia di supporto (7) con il pannello del ripiano (6),
collegandoli tramite tasselli (P).
3. Fissare la striscia di supporto (7) al lato del pannello del ripiano (6)
utilizzando le viti (D).
4. Ripetere questo passaggio per il secondo pannello del ripiano (6).
Fase 7: Collegare il pannello laterale 4 ai pannelli del ripiano 6
- **Parti utilizzate**:
- 4 (pannello laterale) - 6 (pannelli ripiano) - 7 (striscia di supporto)
- P (tasselli) - B (Serrature a camma)
- **Istruzioni**:
1. Inserire i tasselli (P) nei fori preforati sui pannelli del ripiano 6 , la striscia
di supporto e 7 e pannello laterale 4.
2. Utilizzare le serrature a camma (B) per fissare i pannelli del ripiano 6 al
pannello laterale 4.
3. Assicurarsi che entrambi i pannelli del ripiano 6 siano saldamente
- 11 -
collegati al pannello laterale 4.
Fase 8: Collegare il pannello laterale 5 ai pannelli del ripiano 6
- **Parti utilizzate**:
- 5 (pannello laterale) - 6 (pannelli ripiano) - 7 (striscia di supporto)
- P (tasselli) - B (serrature a camma)
- **Istruzioni**:
1. Inserire i tasselli (P) nei fori preforati sui pannelli del ripiano 6 , striscia di
supporto e 7 e pannello laterale 5.
2. Utilizzare le serrature a camma (B) per fissare i pannelli del ripiano 6 al
pannello laterale 5.
3. Assicurarsi che entrambi i pannelli del ripiano 6 siano saldamente
collegati al pannello laterale 5.
Fase 9: installare le viti di collegamento sul pannello principale del
tavolo (2)

- 12 -
- **Parti utilizzate**:
- 2 (pannello principale del tavolo) - A (bulloni)
- **Istruzioni**:
1. Inserire i bulloni (A) nei fori preforati del pannello principale del tavolo
(2).
2. Assicurarsi che i bulloni (A) siano saldamente installati, in preparazione
al collegamento del piano del tavolo al mobile.
Fase 10: assemblare il pannello principale del tavolo dal passaggio 9
con il mobile
- **Parti utilizzate**:

- 13 -
- Pannello principale del tavolo dal passaggio 9 - Assemblaggio del mobile
dal passaggio 8
- P (tasselli) - B (serrature a camma)
- **Istruzioni**:
1. Inserire i tasselli (P) nei fori preforati sulla parte superiore del mobile.
2. Posizionare il pannello principale del tavolo dal passaggio 9 sopra il
gruppo del mobile, allineare i tasselli e fissare la connessione utilizzando i
blocchi a camma (B).
3. Assicurarsi che tutti i blocchi a camma (B) siano serrati e che il
collegamento sia sicuro.
Fase 11: installare il pannello pieghevole del tavolo 1 sul pannello
principale del tavolo 2 e fissare le ruote girevoli
- **Parti utilizzate**:
- 1 (pannello pieghevole del tavolo) - Assemblaggio dal passaggio 10
- Q (viti) - F (viti) - G (cerniere) - S (dadi)
- U (ruote girevoli con freno) - V (ruote girevoli senza bloccaggio)
- R (chiave esagonale) - T (chiave a brugola)
- **Istruzioni**:
1. Utilizzare cerniere (G) e viti (F) per fissare il pannello del tavolo
- 14 -
pieghevole 1 al pannello del tavolo principale 2.
2. Installare due ruote girevoli bloccabili (U) sui lati esterni della base del
tavolo e due ruote girevoli non bloccabili (V) sui lati interni. Fissarle con viti
(Q) e dadi (S).
3. Utilizzare la chiave a brugola (T) e la chiave esagonale (R) per
assicurarsi che tutte le viti e le ruote girevoli siano serrate.
4. Controllare che la funzione di bloccaggio delle ruote girevoli funzioni
correttamente.
Fase 12: Installare il pannello della porta all'assemblaggio della fase
11 e fissare i tasselli a doppia testa e i tasselli lunghi
- **Parti utilizzate**:
- Assemblaggio dal passaggio 11 - N (tasselli a doppia testa)
- O (tasselli lunghi) - F (viti)
- **Istruzioni**:
1. Utilizzare le viti (F) per fissare il pannello della porta al gruppo del
passaggio 11, assicurandosi che il pannello della porta possa aprirsi e

- 15 -
chiudersi senza problemi.
2. Inserire i tasselli a doppia testa (N) per fissare il pannello del tavolo
pieghevole al pannello della porta quando è esteso.
3. Utilizzare tasselli lunghi (O) per rinforzare la connessione tra il pannello
della porta e il gruppo del passaggio 11, assicurando una tenuta salda.
Fase 13: Assemblaggio completato
(Montaggio completato) (stato di piegatura)
Prima di utilizzare il prodotto, assicurarsi che tutte le viti siano serrate e
che il prodotto sia installato saldamente.
9. Manutenzione
1. Serraggio regolare: ogni 90 giorni, controllare e serrare tutti i
bulloni, le viti, le manopole e i bloccaggi delle rotelle per assicurarsi
che nulla sia allentato o usurato.
2. Pulizia e cura: pulire la superficie con un panno morbido ed
evitare detergenti chimici aggressivi.
3. Prevenzione dell'umidità: mantenere il tavolo asciutto, soprattutto
quando è in uso o quando lo si ripone, per evitare deformazioni o
rigonfiamenti dovuti all'umidità.
4. Pulizia e lubrificazione delle ruote girevoli: pulire regolarmente le
ruote girevoli da polvere e detriti sugli assi delle ruote per
mantenerle in movimento senza problemi.
- 16 -
5. Controllo dell'usura delle rotelle: controllare periodicamente le
rotelle bloccabili per individuare segni di usura, allentamento o
meccanismi di bloccaggio difettosi. Sostituirle se necessario per
garantire un utilizzo sicuro.
Produttore: Shanghaimuxinmuyeyouxiangongsi
Indirizzo: Shuangchenglu 803nong11hao1602A-1609shi, baoshanqu,
shanghai 200000 CN.
Importato in AUS: SIHAO PTY LTD, 1 ROKEVA STREETEASTWOOD NSW
2122 Australia
Importato negli USA: Sanven Technology Ltd., Suite 250, 9166 Anaheim
Place, Rancho Cucamonga, CA 91730
REP
EC
E-CrossStu GmbH
Mainzer Landstr.69, 60329 Frankfurt am Main.
REP
UK
YH CONSULTING LIMITED.
C/O YH Consulting Limited Office 147, Centurion House,
London Road, Staines-upon-Thames, Surrey, TW18 4AX

- 17 -


- 2 -
Techniczny Wsparcie i certyfikat gwarancji elektronicznej www.vevor.com/support
SKŁADANY STÓŁ DO SZYCIA
INSTRUKCJA OBSŁUGI
Nadal staramy się oferować Państwu narzędzia w konkurencyjnych cenach.
„Oszczędź połowę”, „Połowa ceny” lub inne podobne wyrażenia używane przez nas stanowią
jedynie szacunkowe oszczędności, jakie możesz uzyskać, kupując u nas określone narzędzia w
porównaniu z głównymi markami i niekoniecznie oznaczają one objęcie wszystkich kategorii
narzędzi oferowanych przez nas. Uprzejmie przypominamy, aby dokładnie sprawdzić, czy
składając u nas zamówienie faktycznie oszczędzasz połowę w porównaniu z głównymi markami.

- 1 -
Rozwiń stan Składanie stanu
Uwaga: Wygląd produktu, który otrzymasz, ma wpływ na jego faktyczny wygląd.
POTRZEBUJESZ POMOCY? SKONTAKTUJ SIĘ Z NAMI!
Masz pytania dotyczące produktu? Potrzebujesz wsparcia technicznego?
Skontaktuj się z nami:
Wsparcie techniczne i certyfikat gwarancji elektronicznej www.vevor.com/support
To jest oryginalna instrukcja, przed użyciem należy uważnie przeczytać wszystkie
instrukcje. VEVOR zastrzega sobie jasną interpretację naszej instrukcji obsługi.
Wygląd produktu będzie zależał od produktu, który otrzymałeś. Prosimy o
wybaczenie, że nie poinformujemy Cię ponownie, jeśli w naszym produkcie
FOLDING SEWING TABLE

- 2 -
pojawią się jakiekolwiek aktualizacje technologiczne lub oprogramowania.
1. Ważne instrukcje bezpieczeństwa
Ostrzeżenie - Aby zmniejszyć ryzyko obrażeń, użytkownik musi
uważnie przeczytać instrukcję obsługi. Zachowaj tę instrukcję do
wykorzystania w przyszłości
Ostrzeżenie: Podczas stosowania tego produktu należy nosić okulary
ochronne.
6. OGÓLNE INSTRUKCJE BEZPIECZEŃSTWA
PRZECZYTAJ WSZYSTKIE instrukcje przed użyciem tego produktu.
Zdecydowanie zalecamy, aby tego produktu nie modyfikować i/lub nie
używać do żadnych innych zastosowań niż te, do których został
zaprojektowany.
1. Ograniczenie wagowe: Upewnij się, że obciążenie głównego
pulpitu (w stanie złożonym) nie przekracza maksymalnego
określonego limitu 40 kg, aby uniknąć odkształcenia lub
uszkodzenia.
2. Stabilność blatu: Rozkładając blat, upewnij się, że zawiasy i
podpory są bezpieczne, by zapobiec nagłemu złożeniu się blatu lub
jego chwianiu.
3. Blokowane kółka: W przypadku korzystania ze stołu w ustalonej
pozycji, należy upewnić się, że blokowane kółka są zablokowane,
aby zapobiec przesuwaniu się stołu podczas użytkowania.
4. Unikaj zarysowań: Aby zapobiec zarysowaniom lub uszkodzeniom,
należy unikać kontaktu z ostrymi przedmiotami na blacie biurka.
5. Kontrola przed użyciem: Przed każdym użyciem należy sprawdzić,
czy wszystkie śruby, nakrętki, pokrętła i blokady kółek są solidnie
dokręcone, aby zapewnić stabilność.
6. Prawidłowe przechowywanie: Aby zapobiec uszkodzeniu drewna i
podzespołów, nie należy umieszczać stołu w miejscach o wysokiej
temperaturze, dużej wilgotności lub narażonych na bezpośrednie
działanie promieni słonecznych.
7. Zakaz stania: Nie stawaj na blacie stołu ani nie używaj żadnej
jego części jako drabiny, aby uniknąć uszkodzeń konstrukcyjnych i
zagrożeń dla bezpieczeństwa.
- 3 -
3 Lista części

- 4 -
4 Główny parametr
Składany stół do szycia
17. Model: HL20240800 Kolor: Biały
18. Model: HL20240801 Kolor: Wykończenie drewniane
19. Rozmiar biurka (dł. × szer. × wys.): 1168 × 400 × 778 mm
20. Maksymalne obciążenie głównego pulpitu: 40 kg
5 Proces montażu
Środki ostrożności przed instalacją:
13. Do instalacji tego produktu wymagane są dwie osoby dorosłe, a
podczas instalacji należy nosić rękawice (nie są dołączone do produktu).
Należy zachować środki ostrożności podczas korzystania z narzędzi
podczas instalacji .

- 5 -
14. Cały proces instalacji trwa około 90 minut.
15. Odpowiednie numery części i paneli znajdują się na odpowiednim
materiale.
Krok 1: Zainstaluj duży pojemnik do przechowywania
- Części użyte:
- 11 (panel dolny) - 13 (panel przedni) - 14 (panele boczne)
- 15 (panel tylny) - P (kołki) - D (śruby)
- Instrukcje
1. Włóż kołki (P) w wywiercone wcześniej otwory w obu 14 (panelach
bocznych).
2. Wyrównaj 14 (panele boczne) z 1 5 (panelem przednim), połącz je za
pomocą kołków (P) i zabezpiecz śrubami (D).
3. Przesuń 11 (dolny panel) pomiędzy panele boczne 14.
4. Przymocuj 1 3 (panel tylny) pomiędzy panelami bocznymi 14 i
zabezpiecz go śrubami (D).
Krok 2: Złóż małe pudełko do przechowywania
- 6 -
- **Zastosowane części**:
- 11 (panel dolny) - 9 (panel przedni) - 10 (panele boczne)
- 12 (panel tylny) - P (kołki) - D (śruby)
- **Instrukcje**:
1. Włóż kołki (P) w wywiercone wcześniej otwory w obu 10 (panelach
bocznych).
2. Wyrównaj 10 (panele boczne) z 12 (panelem przednim), połącz je za
pomocą kołków (P) i zabezpiecz śrubami (D).
3. Przesuń 11 (dolny panel) pomiędzy panele boczne 10.
4. Przymocuj 9 (panel tylny) pomiędzy panelami bocznymi 10 i zabezpiecz
go śrubami (D).
Krok 3: Zamontuj uchwyty i kółka jezdne
- 7 -
- **Zastosowane części**:
- 3 (panel drzwi) - J (śruby) - F (śruby) - H (podkładki)
- K (uchwyt) - S (orzechy) - V (kółka jezdne) - Q (śruby)
- R (klucz imbusowy) - T (klucz imbusowy)
- **Instrukcje**:
1. Włóż śruby ( F ) przez podkładki (H) do wywierconych wcześniej
otworów w panelu 3 i przymocuj je za pomocą śrub ( J ).
2. Zamontuj uchwyt (K) w wyznaczonym miejscu na panelu,
zabezpieczając go nakrętkami (S).
3. Przymocuj kółka jezdne (V) do dolnej części panelu i zabezpiecz je
śrubami (Q) i nakrętką (S).
4. Za pomocą klucza imbusowego (R) i klucza imbusowego (T) dokręć
wszystkie śruby i upewnij się, że uchwyt i kółka jezdne są solidnie
zamontowane.

- 8 -
Krok 4: Zamontuj skrzynkę do przechowywania i schowek na szpulę
na panelu drzwi
- **Zastosowane części**:
- 3 (panel drzwi) - 8 (magazyn szpuli) - C (śruby)
- Elementy zmontowane w kroku 1 i kroku 2
- **Instrukcje**:
1. Umieścić dwa schowki na szpule (8) w wyznaczonych miejscach na
panelu drzwi 3.
2. Za pomocą śrub (C) przymocuj schowki na szpule (8) do panelu drzwi 3.
3. Wyrównaj elementy schowka zmontowane w kroku 1 i kroku 2,
przymocuj je do panelu drzwi 3 i zabezpiecz śrubami (C).
Krok 5: Zamontuj panele boczne 4, 5, zawiasy i zatrzask magnetyczny

- 9 -
- **Zastosowane części**:
- 4 (panel boczny) - 5 (panel boczny) - A (śruby) - F (wkręty)
- E (zawiasy) - L (zaczep magnetyczny) - M (śruby do zaczepu
magnetycznego)
- **Instrukcje**:
1. Włóż śruby (A) do uprzednio wywierconych otworów w panelach
bocznych 4 i 5.
2. Zamontuj zawiasy (E) w wyznaczonych miejscach na panelach
bocznych 4 i 5 i przymocuj je śrubami (F).
3. Przymocuj zatrzask magnetyczny (L) w wyznaczonym miejscu na
panelu bocznym 5 za pomocą śrub (M).
4. Dokręć wszystkie śruby, aby mieć pewność, że śruby (A) i zawiasy (E)
są solidnie połączone.
Krok 6: Zamontuj panele półek 6 (dwie półki)

- 10 -
- **Zastosowane części**:
- 6 (panel półki) - 7 (listwa nośna)
- P (kołki) - D (śruby)
- **Instrukcje**:
1. Włóż kołki (P) w uprzednio wywiercone otwory listwy podporowej (7).
2. Wyrównaj listwę nośną (7) z panelem półki (6), łącząc je za pomocą
kołków (P).
3. Przymocuj listwę podporową (7) do boku panelu półki (6) za pomocą
śrub (D).
4. Powtórz tę czynność dla drugiego panelu półki (6).
Krok 7: Podłącz panel boczny 4 do paneli półki 6
- **Zastosowane części**:
- 4 (panel boczny) - 6 (panele półek) - 7 (listwa nośna)
- P (kołki) - B (Zamki krzywkowe)
- **Instrukcje**:
1. Włóż kołki (P) w otwory wywiercone wcześniej w panelach półki 6 ,
listwę podporową i 7 i panel boczny 4.
2. Za pomocą zamków krzywkowych (B) przymocuj panele półki 6 do
panelu bocznego 4.
3. Upewnij się, że oba panele półki 6 są solidnie połączone z panelem

- 11 -
bocznym 4.
Krok 8: Podłącz panel boczny 5 do paneli półki 6
- **Zastosowane części**:
- 5 (panel boczny) - 6 (panele półek) - 7 (pasek podporowy)
- P (kołki) - B (zamki krzywkowe)
- **Instrukcje**:
1. Włóż kołki (P) w otwory wywiercone wcześniej w panelach półki 6 ,
podpierając listwę 7 i panel boczny 5.
2. Za pomocą zamków krzywkowych (B) przymocuj panele półki 6 do
panelu bocznego 5.
3. Upewnij się, że oba panele półki 6 są solidnie połączone z panelem
bocznym 5.
Krok 9: Zamontuj śruby łączące na głównym panelu blatu stołu (2)
- 12 -
- **Zastosowane części**:
- 2 (główny panel blatu stołu) - A (śruby)
- **Instrukcje**:
1. Włóż śruby (A) do uprzednio wywierconych otworów w głównym panelu
blatu stołu (2).
2. Upewnij się, że śruby (A) są solidnie zamontowane, przygotowując się
do połączenia blatu z szafką.
Krok 10: Złóż główny panel blatu stołu z kroku 9 z szafką
- **Zastosowane części**:
- Główny panel blatu stołu z kroku 9 - Montaż szafki z kroku 8
- 13 -
- P (kołki) - B (zamki krzywkowe)
- **Instrukcje**:
1. Włóż kołki (P) w uprzednio wywiercone otwory w górnej części szafki.
2. Umieść główny panel blatu stołu z kroku 9 na górze szafki, wyrównaj
kołki i zabezpiecz połączenie za pomocą zamków krzywkowych (B).
3. Sprawdź, czy wszystkie blokady krzywkowe (B) są dokręcone i
połączenie jest bezpieczne.
Krok 11: Zamontuj składany panel blatu stołu 1 do głównego panelu
blatu stołu 2 i zamontuj kółka jezdne
- **Zastosowane części**:
- 1 (składany panel blatu) - Montaż od kroku 10
- Q (śruby) - F (śruby) - G (zawiasy) - S (nakrętki)
- U (koła skrętne z hamulcem) - V (koła skrętne bez blokady)
- R (klucz imbusowy) - T (klucz imbusowy)
- **Instrukcje**:
1. Za pomocą zawiasów (G) i śrub (F) przymocuj składany panel blatu 1 do
głównego panelu blatu 2.
2. Zamontuj dwa blokowane kółka jezdne (U) po zewnętrznych stronach
spodu stołu i dwa nieblokowane kółka jezdne (V) po wewnętrznych
- 14 -
stronach. Zabezpiecz je śrubami (Q) i nakrętkami (S).
3. Za pomocą klucza imbusowego (T) i klucza imbusowego (R) sprawdź,
czy wszystkie śruby i kółka jezdne są dokręcone.
4. Sprawdź, czy funkcja blokowania kółek jezdnych działa prawidłowo.
Krok 12: Zamontuj panel drzwiowy do zestawu z kroku 11 i przymocuj
kołki dwugłowicowe i długie kołki
- **Zastosowane części**:
- Montaż od kroku 11 - N (kołki dwugłowicowe)
- O (długie kołki) - F (śruby)
- **Instrukcje**:
1. Za pomocą śrub (F) przymocuj panel drzwi do zespołu z kroku 11,
upewniając się, że panel drzwi może się płynnie otwierać i zamykać.
2. Włóż kołki dwugłowe (N), aby przymocować panel składanego blatu do
panelu drzwi, gdy jest on rozłożony.
3. Za pomocą długich kołków (O) wzmocnij połączenie między panelem
drzwi a zespołem z kroku 11, zapewniając ścisłe dopasowanie.
- 15 -
Krok 13: Montaż ukończony
(Montaż ukończony) (stan złożony)
Przed użyciem produktu należy sprawdzić, czy wszystkie śruby są
dokręcone i czy produkt jest solidnie zainstalowany.
10. Konserwacja
1. Regularne dokręcanie: Co 90 dni należy sprawdzić i dokręcić
wszystkie śruby, wkręty, pokrętła i blokady kółek, aby mieć pewność,
że nic nie jest poluzowane lub zużyte.
2. Czyszczenie i pielęgnacja: Przecieraj powierzchnię miękką
ściereczką i unikaj stosowania silnych środków czyszczących.
3. Zapobieganie wilgoci: Utrzymuj stół w suchości, zwłaszcza
podczas użytkowania lub przechowywania, aby zapobiec
odkształceniom lub pęcznieniu z powodu wilgoci.
4. Czyszczenie i smarowanie kółek: Regularnie czyść kółka z kurzu i
zanieczyszczeń gromadzących się na osiach kółek, aby zapewnić
ich płynny ruch.
5. Kontrola zużycia kółek: Okresowo sprawdzaj blokowane kółka
pod kątem oznak zużycia, luzów lub wadliwych mechanizmów
blokujących. W razie potrzeby wymień je, aby zapewnić bezpieczne
użytkowanie.
- 16 -
Producent: Shanghaimuxinmuyeyouxiangongsi
Adres: Shuangchenglu 803nong11hao1602A-1609shi, baoshanqu, szanghaj
200000 CN.
Importowane do AUS: SIHAO PTY LTD, 1 ROKEVA STREETEASTWOOD
NSW 2122 Australia
Importowane do USA: Sanven Technology Ltd., Suite 250, 9166 Anaheim
Place, Rancho Cucamonga, CA 91730
REP
EC
E-CrossStu GmbH
Mainzer Landstr.69, 60329 Frankfurt am Main.
REP
UK
YH CONSULTING LIMITED.
C/O YH Consulting Limited Office 147, Centurion House,
London Road, Staines-upon-Thames, Surrey, TW18 4AX

- 17 -


- 2 -
Technisch Support und E-Garantie-Zertifikat www.vevor.com/support
KLAPPBARER NÄHTISCH
BENUTZERHANDBUCH
Wir sind weiterhin bestrebt, Ihnen Werkzeuge zu wettbewerbsfähigen Preisen anzubieten.
„Sparen Sie die Hälfte“, „Halber Preis“ oder andere ähnliche Ausdrücke, die wir verwenden,
stellen nur eine Schätzung der Ersparnis dar, die Sie beim Kauf bestimmter Werkzeuge bei uns
im Vergleich zu den großen Topmarken erzielen können, und decken nicht unbedingt alle von
uns angebotenen Werkzeugkategorien ab. Wir möchten Sie freundlich daran erinnern, bei Ihrer
Bestellung bei uns sorgfältig zu prüfen, ob Sie im Vergleich zu den großen Topmarken tatsächlich
die Hälfte sparen.

- 1 -
Entfaltungszustand Einfaltungszustand
Hinweis: Das tatsächliche Produkt, das Sie erhalten, bestimmt sein Aussehen.
SIE HILFE? KONTAKTIEREN SIE UNS!
Sie haben Fragen zu unseren Produkten? Sie benötigen technischen Support?
Dann kontaktieren Sie uns gerne:
Technischer Support und E-Garantie-Zertifikat www.vevor.com/support
Dies ist die Originalanleitung. Bitte lesen Sie alle Anweisungen sorgfältig durch,
bevor Sie das Gerät in Betrieb nehmen. VEVOR behält sich eine klare Auslegung
unserer Bedienungsanleitung vor. Das Erscheinungsbild des Produkts richtet sich
nach dem Produkt, das Sie erhalten haben. Bitte verzeihen Sie uns, dass wir Sie
nicht erneut informieren, wenn es Technologie- oder Software-Updates für unser
FOLDING SEWING TABLE

- 2 -
Produkt gibt.
1.Wichtige Sicherheitshinweise
Achtung - Um das Verletzungsrisiko zu verringern, muss der
Benutzer die Bedienungsanleitung sorgfältig lesen. Bewahren Sie
diese Anleitung für die zukünftige Verwendung auf.
Warnung: Tragen Sie bei der Verwendung dieses Produkts unbedingt
einen Augenschutz.
7. ALLGEMEINE SICHERHEITSHINWEISE
LESEN SIE ALLE Anweisungen, bevor Sie dieses Produkt verwenden. Wir
empfehlen dringend, dieses Produkt nicht zu verändern und/oder für andere
Zwecke als die, für die es entwickelt wurde, zu verwenden.
1. Gewichtsgrenze: Stellen Sie sicher, dass die Belastung des
Hauptdesktops (im zusammengeklappten Zustand) die angegebene
Höchstgrenze von 40 kg nicht überschreitet, um Verformungen oder
Schäden zu vermeiden.
2. Stabilität der Tischplatte: Achten Sie beim Ausklappen der
Tischplatte darauf, dass die Scharniere und Stützen sicher sind, um
ein plötzliches Zusammenklappen oder Wackeln zu verhindern.
3. Feststellbare Lenkrollen: Wenn Sie den Tisch an einem festen Ort
verwenden, achten Sie darauf, dass die feststellbaren Lenkrollen
blockiert sind, um eine Bewegung während der Verwendung zu
verhindern.
4. Kratzer vermeiden: Vermeiden Sie den Kontakt mit scharfen
Gegenständen auf dem Schreibtisch, um Kratzer oder
Beschädigungen zu verhindern.
5. Kontrolle vor Gebrauch: Kontrollieren Sie vor jedem Gebrauch, ob
alle Schrauben, Bolzen, Knöpfe und Rollenfeststeller fest
angezogen sind, um Stabilität zu gewährleisten.
6. Richtige Lagerung: Stellen Sie den Tisch nicht an Orte mit hohen
Temperaturen, hoher Luftfeuchtigkeit oder direkter
Sonneneinstrahlung, um Schäden am Holz und den Komponenten
zu vermeiden.
7. Nicht stehen: Stellen Sie sich nicht auf die Tischplatte und
verwenden Sie keinen Teil des Tisches als Trittleiter, um strukturelle
- 3 -
Schäden und Sicherheitsrisiken zu vermeiden.
3 Teileliste

- 4 -
4 Hauptparameter
Klappbarer Nähtisch
21. Modell: HL20240800 Farbe: Weiß
22. Modell: HL20240801 Farbe: Holzoberfläche
23. Schreibtischgröße (L × B × H): 1168 × 400 × 778 mm
24. Maximale Belastung des Hauptdesktops: 40 kg
5 Montageprozess
Vorsichtsmaßnahmen vor der Installation:
16. Zur Installation dieses Produkts sind zwei Erwachsene erforderlich.
Während der Installation sollten Handschuhe (nicht im Lieferumfang
enthalten) getragen werden. Bei der Verwendung von Werkzeugen
während der Installation sind Sicherheitsvorkehrungen zu treffen .

- 5 -
17. der gesamte Installationsvorgang dauert etwa 90 Minuten.
18. Die entsprechenden Teile- und Plattennummern sind auf dem
entsprechenden Material aufgedruckt.
Schritt 1: Installieren Sie die große Aufbewahrungsbox
- Verwendete Teile:
- 11 (Bodenplatte) - 13 (Frontplatte) - 14 (Seitenwände)
- 15 (Rückseite) - P (Dübel) - D (Schrauben)
- Anweisungen
1. Stecken Sie Dübel (P) in die vorgebohrten Löcher beider 14
(Seitenteile).
2. 14 (Seitenteile) mit 1 5 (Frontteil) ausrichten, mit Dübeln (P) verbinden
und mit Schrauben (D) befestigen.
3. Schieben Sie 11 (Bodenplatte) zwischen die Seitenplatten 14.
4. 1 3 (Rückwand) zwischen den Seitenwänden 14 anbringen und mit
Schrauben (D) befestigen.
Schritt 2: Die kleine Aufbewahrungsbox zusammenbauen

- 6 -
- **Verwendete Teile**:
- 11 (Bodenplatte) - 9 (Frontplatte) - 10 (Seitenplatten)
- 12 (Rückseite) - P (Dübel) - D (Schrauben)
- **Anweisungen**:
1. Stecken Sie Dübel (P) in die vorgebohrten Löcher beider 10
(Seitenteile).
2. 10 (Seitenteile) mit 12 (Frontteil) ausrichten, mit Dübeln (P) verbinden
und mit Schrauben (D) befestigen.
3. Schieben Sie 11 (Bodenplatte) zwischen die Seitenplatten 10.
4. 9 (Rückwand) zwischen den Seitenwänden 10 anbringen und mit
Schrauben (D) befestigen.
Schritt 3: Griffe und Lenkrollen montieren

- 7 -
- **Verwendete Teile**:
- 3 (Türblech) - J (Schrauben) - F (Schrauben) - H (Unterlegscheiben)
- K (Griff) - S (Nüsse) - V (Lenkrollen) - Q (Schrauben)
- R (Sechskantschlüssel) - T (Inbusschlüssel)
- **Anweisungen**:
1. Führen Sie die Schrauben ( F ) durch die Unterlegscheiben (H) in die
vorgebohrten Löcher auf Platte 3 und befestigen Sie sie mit den
Schrauben ( J ).
2. Den Griff (K) an der dafür vorgesehenen Stelle auf der Platte anbringen
und mit den Muttern (S) befestigen.
3. Befestigen Sie die Lenkrollen (V) an der Unterseite des Paneels und
befestigen Sie sie mit Schrauben (Q) und Muttern (S).
4. Ziehen Sie alle Schrauben mit dem Inbusschlüssel (R) und dem
Inbusschlüssel (T) fest und stellen Sie sicher, dass Griff und Lenkrollen fest
montiert sind.
- 8 -
Schritt 4: Installieren Sie die Aufbewahrungsbox und die
Spulenaufbewahrung an der Türverkleidung
- **Verwendete Teile**:
- 3 (Türverkleidung) - 8 (Spulenspeicher) - C (Schrauben)
- In Schritt 1 und Schritt 2 zusammengebaute Komponenten
- **Anweisungen**:
1. Platzieren Sie die beiden Spulenaufbewahrungen (8) an den dafür
vorgesehenen Positionen am Türblatt 3.
2. Die Spulenaufbewahrungen (8) mit den Schrauben (C) am Türblech 3
befestigen.
3. Die in Schritt 1 und Schritt 2 zusammengebauten Bauteile der
Ablagebox ausrichten, an Türblech 3 ansetzen und mit den Schrauben (C)
fixieren.
Schritt 5: Seitenteile 4, 5, Scharniere und Magnetverschluss
montieren

- 9 -
- **Verwendete Teile**:
- 4 (Seitenteil) - 5 (Seitenteil) - A (Bolzen) - F (Schrauben)
- E (Scharniere) - L (Magnetverschluss) - M (Schrauben für
Magnetverschluss)
- **Anweisungen**:
1. Stecken Sie die Bolzen (A) in die vorgebohrten Löcher in den
Seitenteilen 4 und 5.
2. Scharniere (E) an den vorgesehenen Stellen der Seitenteile 4 und 5
montieren und mit Schrauben (F) befestigen.
3. Magnetverschluss (L) mit Schrauben (M) an der vorgesehenen Stelle
der Seitenwand 5 befestigen.
4. Ziehen Sie alle Schrauben fest, um sicherzustellen, dass die Bolzen (A)
und Scharniere (E) sicher verbunden sind.
Schritt 6: Regalplatten 6 (zwei Regale) installieren

- 10 -
- **Verwendete Teile**:
- 6 (Regalplatte) - 7 (Auflageleiste)
- P (Dübel) - D (Schrauben)
- **Anweisungen**:
1. Dübel (P) in die vorgebohrten Löcher der Trägerleiste (7) stecken.
2. Die Auflageleiste (7) mit der Regalplatte (6) ausrichten und mit Dübeln
(P) verbinden.
3. Befestigen Sie die Auflageleiste (7) mit den Schrauben (D) seitlich an
der Regalplatte (6).
4. Wiederholen Sie diesen Schritt für die zweite Regalplatte (6).
Schritt 7: Seitenteil 4 mit Regalteil 6 verbinden
- **Verwendete Teile**:
- 4 (Seitenteil) - 6 (Regalteile) - 7 (Auflageleiste)
- P (Dübel) - B (Nockenschlösser)
- **Anweisungen**:
1. Dübel (P) in die vorgebohrten Löcher der Regalplatten 6 , Stützleiste
und 7 und Seitenteil 4.
2. Befestigen Sie die Regalplatten 6 mit den Spannverschlüssen (B) an der
Seitenplatte 4.
3. Stellen Sie sicher, dass beide Regalplatten 6 sicher mit der Seitenplatte
- 11 -
4 verbunden sind.
Schritt 8: Seitenteil 5 mit Regalteil 6 verbinden
- **Verwendete Teile**:
- 5 (Seitenteil) - 6 (Regalteile) - 7 (Stützstreifen)
- P (Dübel) - B (Spannschlösser)
- **Anweisungen**:
1. Stecken Sie Dübel (P) in die vorgebohrten Löcher der Regalplatten 6 ,
der Stützleiste und 7 und Seitenteil 5.
2. Befestigen Sie die Regalplatten 6 mit den Spannschlössern (B) an der
Seitenplatte 5.
3. Stellen Sie sicher, dass beide Regalplatten 6 sicher mit der Seitenplatte
5 verbunden sind.
Schritt 9: Installieren Sie die Verbindungsschrauben an der
Haupttischplatte (2)

- 12 -
- **Verwendete Teile**:
- 2 (Haupttischplatte) - A (Bolzen)
- **Anweisungen**:
1. Stecken Sie die Bolzen (A) in die vorgebohrten Löcher der
Haupttischplatte (2).
2. Stellen Sie sicher, dass die Schrauben (A) fest sitzen, bevor Sie die
Tischplatte mit dem Schrank verbinden.
Schritt 10: Montieren Sie die Haupttischplatte aus Schritt 9 mit dem
Schrank
- **Verwendete Teile**:

- 13 -
- Haupttischplatte aus Schritt 9 - Schrankbaugruppe aus Schritt 8
- P (Dübel) - B (Spannschlösser)
- **Anweisungen**:
1. Stecken Sie Dübel (P) in die vorgebohrten Löcher oben auf der
Schrankbaugruppe.
2. Legen Sie die Haupttischplatte aus Schritt 9 auf die Schrankbaugruppe,
richten Sie die Dübel aus und sichern Sie die Verbindung mit
Nockenschlössern (B).
3. Stellen Sie sicher, dass alle Nockenschlösser (B) festgezogen sind und
die Verbindung sicher ist.
Schritt 11: Montieren Sie die Klapptischplatte 1 an der
Haupttischplatte 2 und befestigen Sie die Lenkrollen
- **Verwendete Teile**:
- 1 (klappbare Tischplatte) - Zusammenbau ab Schritt 10
- Q (Schrauben) - F (Schrauben) - G (Scharniere) - S (Muttern)
- U (Lenkrollen mit Bremse) - V (Lenkrollen ohne Feststeller)
- R (Sechskantschlüssel) - T (Inbusschlüssel)
- **Anweisungen**:
1. Befestigen Sie die klappbare Tischplatte 1 mit Scharnieren (G) und

- 14 -
Schrauben (F) an der Haupttischplatte 2.
2. Montieren Sie an der Außenseite der Tischunterseite zwei feststellbare
Lenkrollen (U) und an der Innenseite zwei nicht feststellbare Lenkrollen (V).
Befestigen Sie diese mit Schrauben (Q) und Muttern (S).
3. Verwenden Sie den Inbusschlüssel (T) und den Sechskantschlüssel (R),
um sicherzustellen, dass alle Schrauben und Lenkrollen festgezogen sind.
4. Überprüfen Sie, ob die Feststellfunktion der Lenkrollen ordnungsgemäß
funktioniert.
Schritt 12: Installieren Sie die Türverkleidung an der Baugruppe aus
Schritt 11 und befestigen Sie Doppelkopfdübel und lange Dübel
- **Verwendete Teile**:
- Zusammenbau ab Schritt 11 - N (Doppelkopfdübel)
- O (Langdübel) - F (Schrauben)
- **Anweisungen**:
1. Befestigen Sie das Türblatt mit den Schrauben (F) an der Baugruppe
aus Schritt 11 und stellen Sie sicher, dass sich das Türblatt problemlos
- 15 -
öffnen und schließen lässt.
2. Die ausgeklappte Klapptischplatte wird durch Einstecken von
Doppelkopfdübeln (N) an der Türplatte befestigt.
3. Verstärken Sie die Verbindung zwischen Türblatt und Baugruppe aus
Schritt 11 mit langen Dübeln (O) und sorgen Sie für einen festen Sitz.
Schritt 13: Montage abgeschlossen
(Montage abgeschlossen) (zusammengeklappter Zustand)
Stellen Sie vor der Verwendung des Produkts sicher, dass alle Schrauben
festgezogen sind und dass das Produkt sicher installiert ist.
11. Wartung
1. Regelmäßiges Anziehen: Überprüfen Sie alle 90 Tage alle Bolzen,
Schrauben, Knöpfe und Lenkrollenfeststeller und ziehen Sie sie fest,
um sicherzustellen, dass nichts locker oder abgenutzt ist.
2. Reinigung und Pflege: Wischen Sie die Oberfläche mit einem
weichen Tuch ab und vermeiden Sie aggressive chemische
Reinigungsmittel.
3. Feuchtigkeitsschutz: Halten Sie den Tisch trocken, insbesondere
während der Verwendung oder Lagerung, um ein Verziehen oder
Aufquellen durch Feuchtigkeit zu verhindern.
4. Reinigung und Schmierung der Lenkrollen: Befreien Sie die
Lenkrollenachsen regelmäßig von Staub und Schmutz, damit sie

- 16 -
sich reibungslos bewegen.
5. Überprüfung der Rollenabnutzung: Überprüfen Sie die
feststellbaren Rollen regelmäßig auf Anzeichen von Abnutzung,
Lockerheit oder fehlerhafte Verriegelungsmechanismen. Ersetzen
Sie sie bei Bedarf, um eine sichere Verwendung zu gewährleisten.
Hersteller: Shanghaimuxinmuyeyouxiangongsi
Adresse: Shuangchenglu 803nong11hao1602A-1609shi, baoshanqu,
Shanghai 200000 CN.
Nach AUS importiert: SIHAO PTY LTD, 1 ROKEVA STREETEASTWOOD
NSW 2122 Australien
Importiert in die USA: Sanven Technology Ltd., Suite 250, 9166 Anaheim
Place, Rancho Cucamonga, CA 91730
REP
EC
E-CrossStu GmbH
Mainzer Landstr.69, 60329 Frankfurt am Main.
REP
UK
YH CONSULTING LIMITED.
C/O YH Consulting Limited Office 147, Centurion House,
London Road, Staines-upon-Thames, Surrey, TW18 4AX

- 17 -


- 2 -
Technique Certificat d'assistance et de garantie électronique
www.vevor.com/support
TABLE DE COUTURE PLIANTE
MANUEL D'UTILISATION
Nous continuons à nous engager à vous fournir des outils à des prix compétitifs.
« Économisez la moitié », « Moitié prix » ou toute autre expression similaire utilisée par nous ne
représente qu'une estimation des économies que vous pourriez réaliser en achetant certains
outils chez nous par rapport aux grandes marques et ne couvre pas nécessairement toutes les
catégories d'outils que nous proposons. Nous vous rappelons de bien vouloir vérifier
soigneusement lorsque vous passez une commande chez nous si vous économisez réellement
la moitié par rapport aux grandes marques.
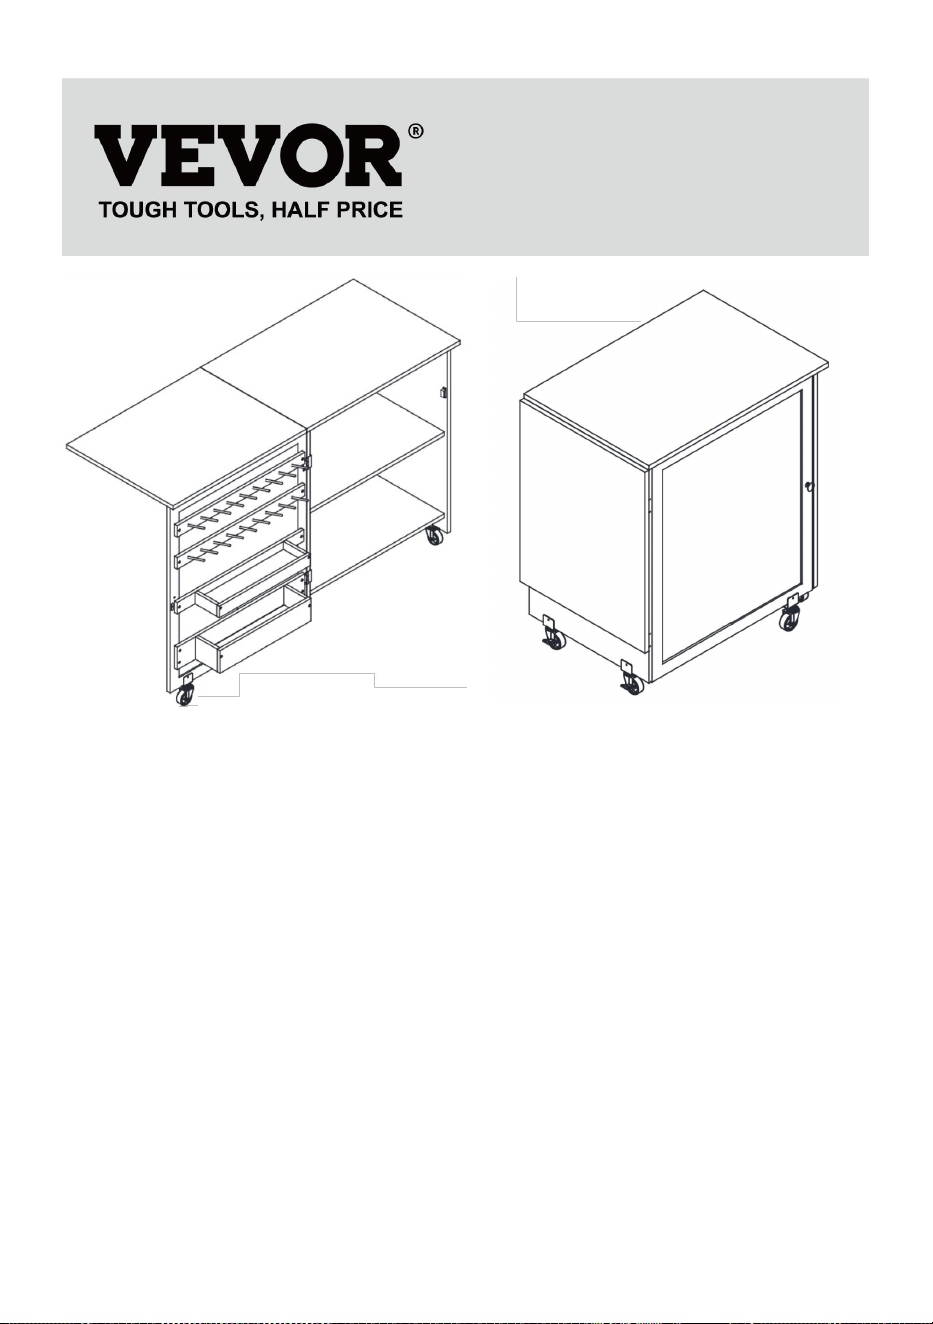
- 1 -
État déplié État plié
Remarque : le produit réel que vous recevez détermine son apparence.
BESOIN D'AIDE? CONTACTEZ-NOUS!
Vous avez des questions sur nos produits ? Vous avez besoin d'une assistance
technique ? N'hésitez pas à nous contacter :
Assistance technique et certificat de garantie électronique www.vevor.com/support
Il s'agit de la notice d'utilisation d'origine. Veuillez lire attentivement toutes les
instructions du manuel avant de l'utiliser. VEVOR se réserve le droit d'interpréter
clairement notre manuel d'utilisation. L'apparence du produit dépend du produit
que vous avez reçu. Veuillez nous excuser, nous ne vous informerons plus si des
mises à jour technologiques ou logicielles sont disponibles sur notre produit.
FOLDING SEWING TABLE

- 2 -
1. Consignes de sécurité importantes
Avertissement - Pour réduire le risque de blessure, l'utilisateur doit
lire attentivement le manuel d'instructions. Conservez ces instructions
pour une utilisation ultérieure
Avertissement – Assurez-vous de porter des lunettes de protection
lorsque vous utilisez ce produit.
8. CONSIGNES DE SÉCURITÉ GÉNÉRALES
LISEZ TOUTES les instructions avant d'utiliser ce produit. Nous
recommandons fortement de ne pas modifier ce produit et/ou de l'utiliser
pour une application autre que celle pour laquelle il a été conçu.
1. Limite de poids : assurez-vous que la charge du bureau principal
(état plié) ne dépasse pas la limite maximale spécifiée de 40 kg pour
éviter toute déformation ou tout dommage.
2. Stabilité du bureau : lorsque vous déployez le bureau,
assurez-vous que les charnières et les supports sont sécurisés pour
éviter tout pliage ou oscillation soudaine.
3. Roulettes verrouillables : lorsque vous utilisez la table dans une
position fixe, assurez-vous que les roulettes verrouillables sont
verrouillées pour empêcher tout mouvement pendant l'utilisation.
4. Évitez les rayures : évitez tout contact avec des objets tranchants
sur le bureau pour éviter les rayures ou les dommages.
5. Vérification avant utilisation : avant chaque utilisation, vérifiez que
toutes les vis, boulons, boutons et verrous de roulettes sont
solidement fixés pour assurer la stabilité.
6. Stockage approprié : ne placez pas la table dans des
environnements à haute température, à forte humidité ou à la
lumière directe du soleil pour éviter d'endommager le bois et les
composants.
7. Ne pas se tenir debout : ne pas se tenir debout sur la table ni
utiliser une partie de la table comme escabeau pour éviter tout
dommage structurel et tout risque de sécurité.

- 3 -
Liste en 3 parties
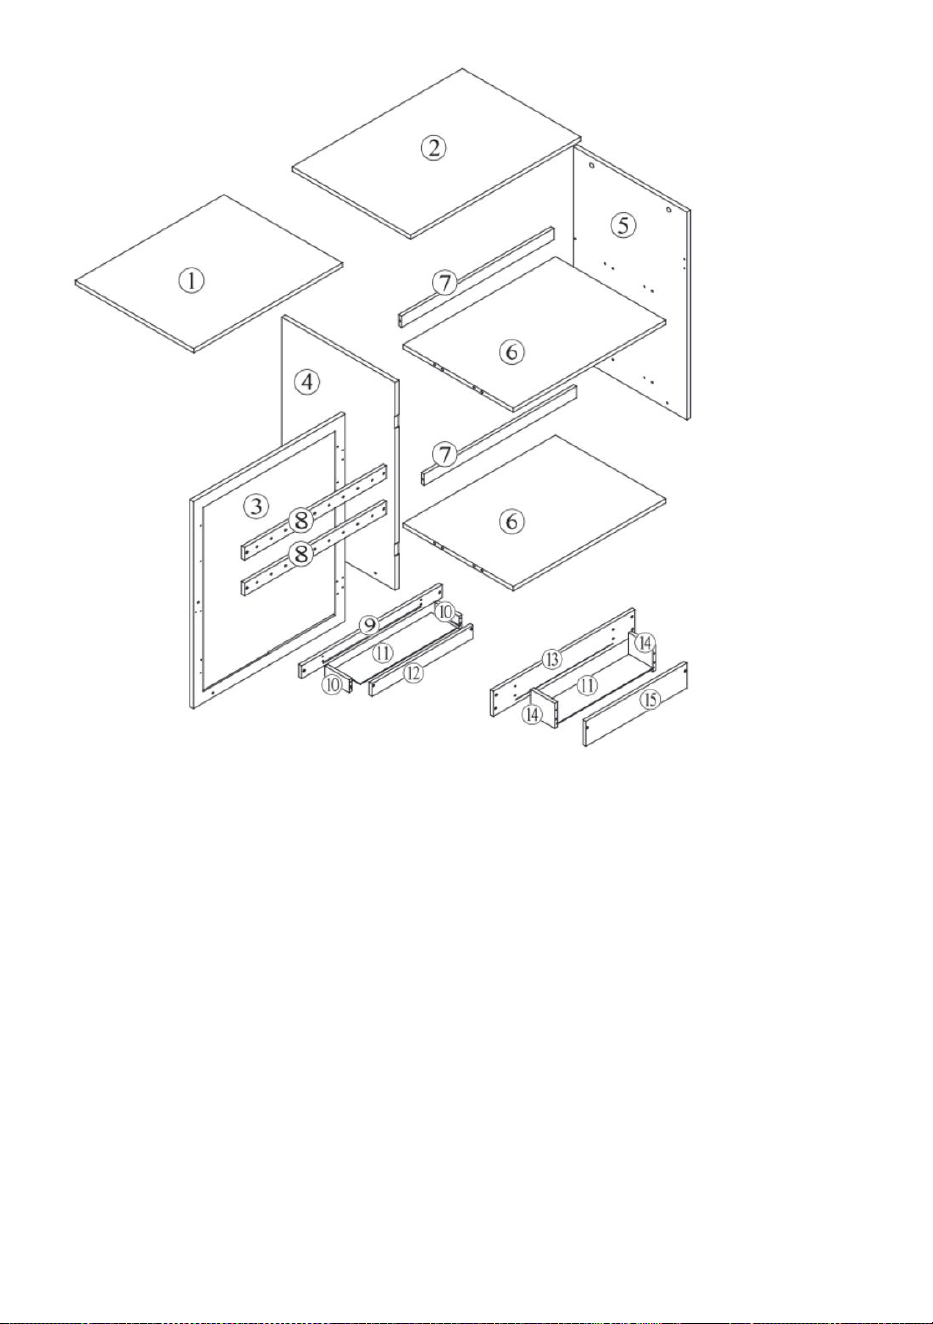
- 4 -
4 Paramètre principal
Table de couture pliante
25. Modèle : HL20240800 Couleur : Blanc
26. Modèle : HL20240801 Couleur : Finition bois
27. Taille du bureau (L × l × H) : 1168 × 400 × 778 mm
28. Charge maximale du bureau principal : 40 kg
5 Processus d'assemblage
Précautions avant l'installation :
19. Ce produit nécessite l'installation de deux adultes et des gants (non
inclus dans le produit) doivent être portés pendant l'installation. Des
précautions de sécurité doivent être prises lors de l'utilisation d'outils
pendant l'installation .

- 5 -
20. L'ensemble du processus d'installation prend environ 90 minutes.
21. Les numéros de pièces et de panneaux correspondants sont étiquetés
sur le matériau correspondant.
Étape 1 : Installez le grand coffre de rangement
- Pièces utilisées :
- 11 (panneau inférieur) - 13 (panneau avant) - 14 (panneaux latéraux)
- 15 (panneau arrière) - P (chevilles) - D (vis)
- Instructions
1. Insérez les chevilles (P) dans les trous pré-percés des deux 14
(panneaux latéraux).
2. Alignez 14 (panneaux latéraux) avec 1 5 (panneau avant), connectez-les
à l'aide de chevilles (P) et fixez-les avec des vis (D).
3. Faites glisser 11 (panneau inférieur) entre les panneaux latéraux 14.
4. Fixez le 1 3 (panneau arrière) entre les panneaux latéraux 14 et fixez-le
avec des vis (D).
Étape 2 : Assembler la petite boîte de rangement

- 6 -
- **Pièces utilisées** :
- 11 (panneau inférieur) - 9 (panneau avant) - 10 (panneaux latéraux)
- 12 (panneau arrière) - P (chevilles) - D (vis)
- **Instructions**:
1. Insérez les chevilles (P) dans les trous pré-percés des deux 10
(panneaux latéraux).
2. Alignez 10 (panneaux latéraux) avec 12 (panneau avant), connectez-les
à l'aide de chevilles (P) et fixez-les avec des vis (D).
3. Faites glisser 11 (panneau inférieur) entre les panneaux latéraux 10.
4. Fixez le 9 (panneau arrière) entre les panneaux latéraux 10 et fixez-le
avec des vis (D).
Étape 3 : Installez les poignées et les roulettes
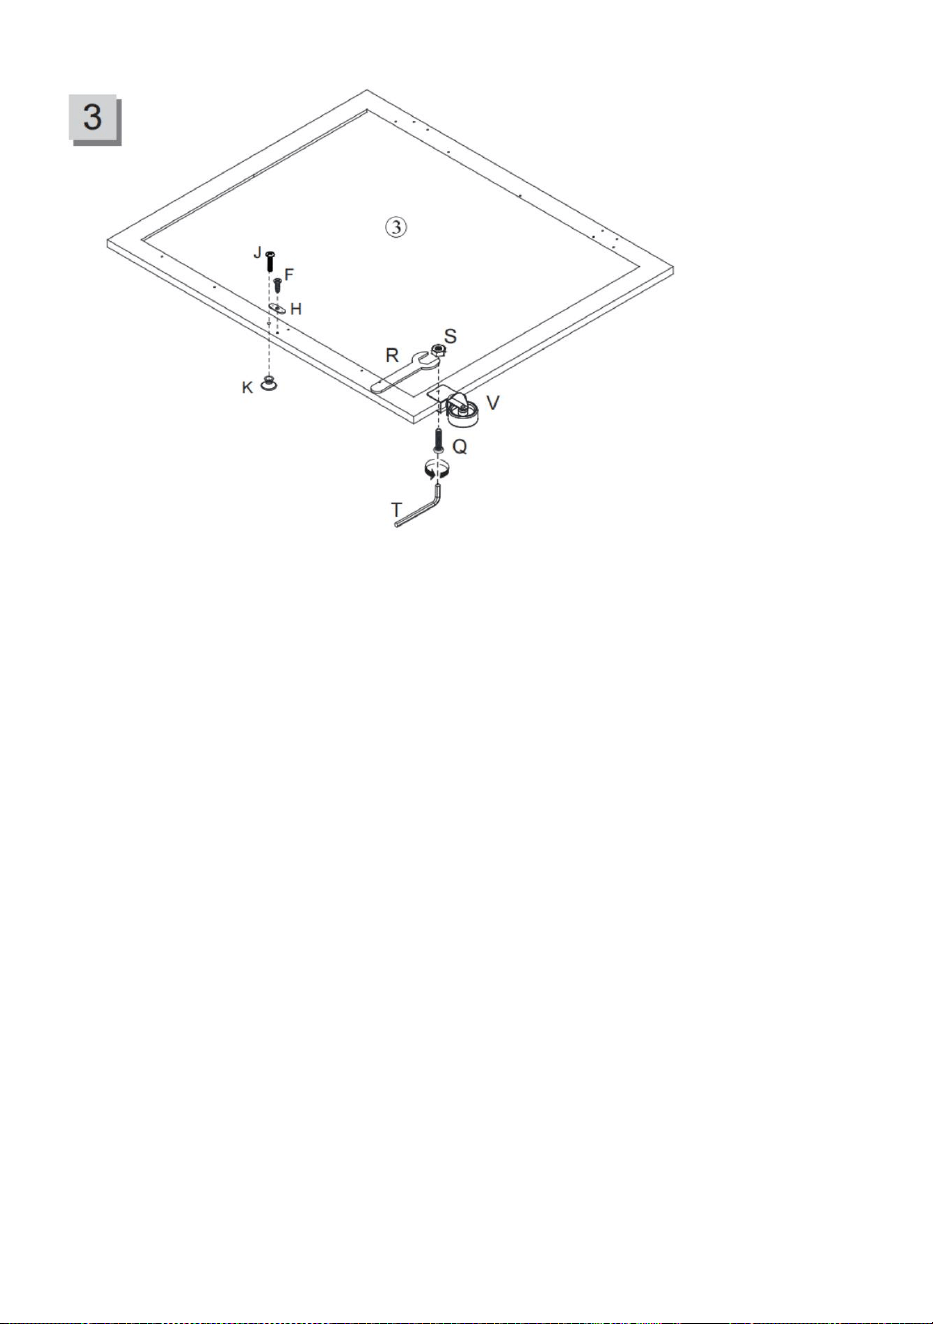
- 7 -
- **Pièces utilisées** :
- 3 (panneau de porte) - J (vis) - F (vis) - H (rondelles)
- K (poignée) - S (noix) - V (roulettes) - Q (vis)
- R (clé hexagonale) - T (clé Allen)
- **Instructions**:
1. Insérez les vis ( F ) à travers les rondelles (H) dans les trous pré-percés
sur le panneau 3 et fixez-les à l'aide des vis ( J ).
2. Installez la poignée (K) à l'emplacement désigné sur le panneau, en la
fixant avec des écrous (S).
3. Fixez les roulettes (V) au bas du panneau et fixez-les avec des vis (Q) et
un écrou (S)
4. Utilisez la clé hexagonale (R) et la clé Allen (T) pour serrer toutes les vis
et vous assurer que la poignée et les roulettes sont fermement installées.
Étape 4 : Installez le boîtier de rangement et le stockage de la bobine
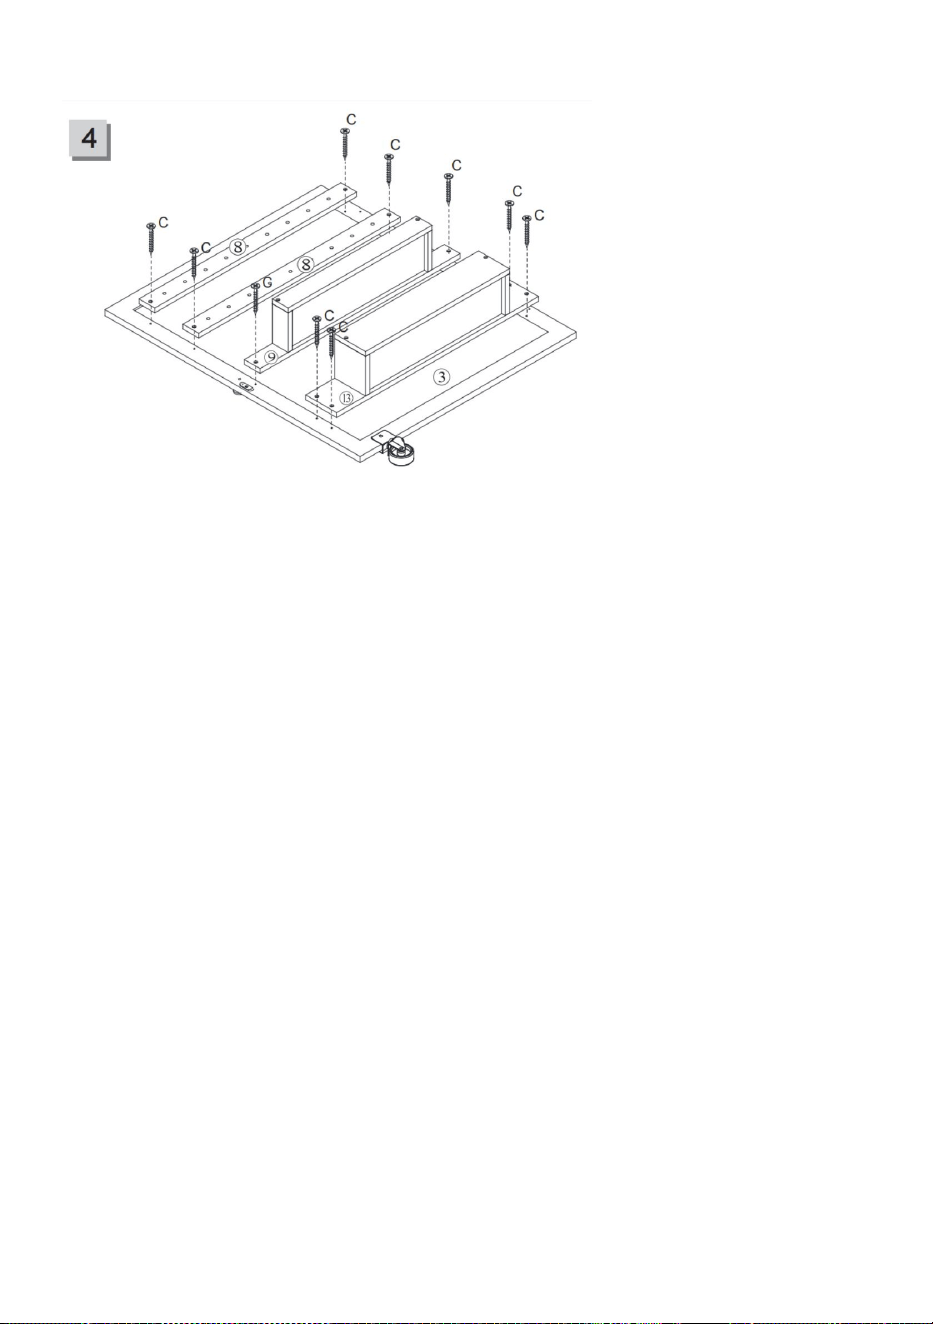
- 8 -
sur le panneau de porte
- **Pièces utilisées** :
- 3 (panneau de porte) - 8 (stockage de bobine) - C (vis)
- Composants assemblés à l'étape 1 et à l'étape 2
- **Instructions**:
1. Placez les deux rangements de bobines (8) dans les positions prévues
sur le panneau de porte 3.
2. Utilisez les vis (C) pour fixer les rangements de bobine (8) sur le
panneau de porte 3.
3. Alignez les composants du coffre de rangement assemblés à l’étape 1
et à l’étape 2, fixez-les au panneau de porte 3 et fixez-les avec des vis (C).
Étape 5 : Installez les panneaux latéraux 4, 5, les charnières et le
loquet magnétique

- 9 -
- **Pièces utilisées** :
- 4 (panneau latéral) - 5 (panneau latéral) - A (boulons) - F (vis)
- E (charnières) - L (loqueteau magnétique) - M (vis pour loqueteau
magnétique)
- **Instructions**:
1. Insérez les boulons (A) dans les trous pré-percés dans les panneaux
latéraux 4 et 5.
2. Installez les charnières (E) aux emplacements prévus sur les panneaux
latéraux 4 et 5 et fixez-les avec des vis (F).
3. Fixez le loquet magnétique (L) à l'emplacement spécifié sur le panneau
latéral 5 à l'aide des vis (M).
4. Serrez toutes les vis pour vous assurer que les boulons (A) et les
charnières (E) sont solidement fixés.
Étape 6 : Installer les panneaux d'étagère 6 (deux étagères)

- 10 -
- **Pièces utilisées** :
- 6 (panneau d'étagère) - 7 (bande de support)
- P (chevilles) - D (vis)
- **Instructions**:
1. Insérez les chevilles (P) dans les trous pré-percés de la bande de
support (7).
2. Alignez la bande de support (7) avec le panneau d'étagère (6), en les
reliant à l'aide de chevilles (P).
3. Fixez la bande de support (7) sur le côté du panneau d'étagère (6) à
l'aide de vis (D).
4. Répétez cette étape pour le deuxième panneau d’étagère (6).
Étape 7 : Connectez le panneau latéral 4 aux panneaux d'étagère 6
- **Pièces utilisées** :
- 4 (panneau latéral) - 6 (panneaux d'étagère) - 7 (bande de support)
- P (chevilles) - B (Serrures à came)
- **Instructions**:
1. Insérez les chevilles (P) dans les trous pré-percés sur les panneaux
d'étagère 6 , la bande de support et 7 et panneau latéral 4.
2. Utilisez les verrous à came (B) pour fixer les panneaux d'étagère 6 au
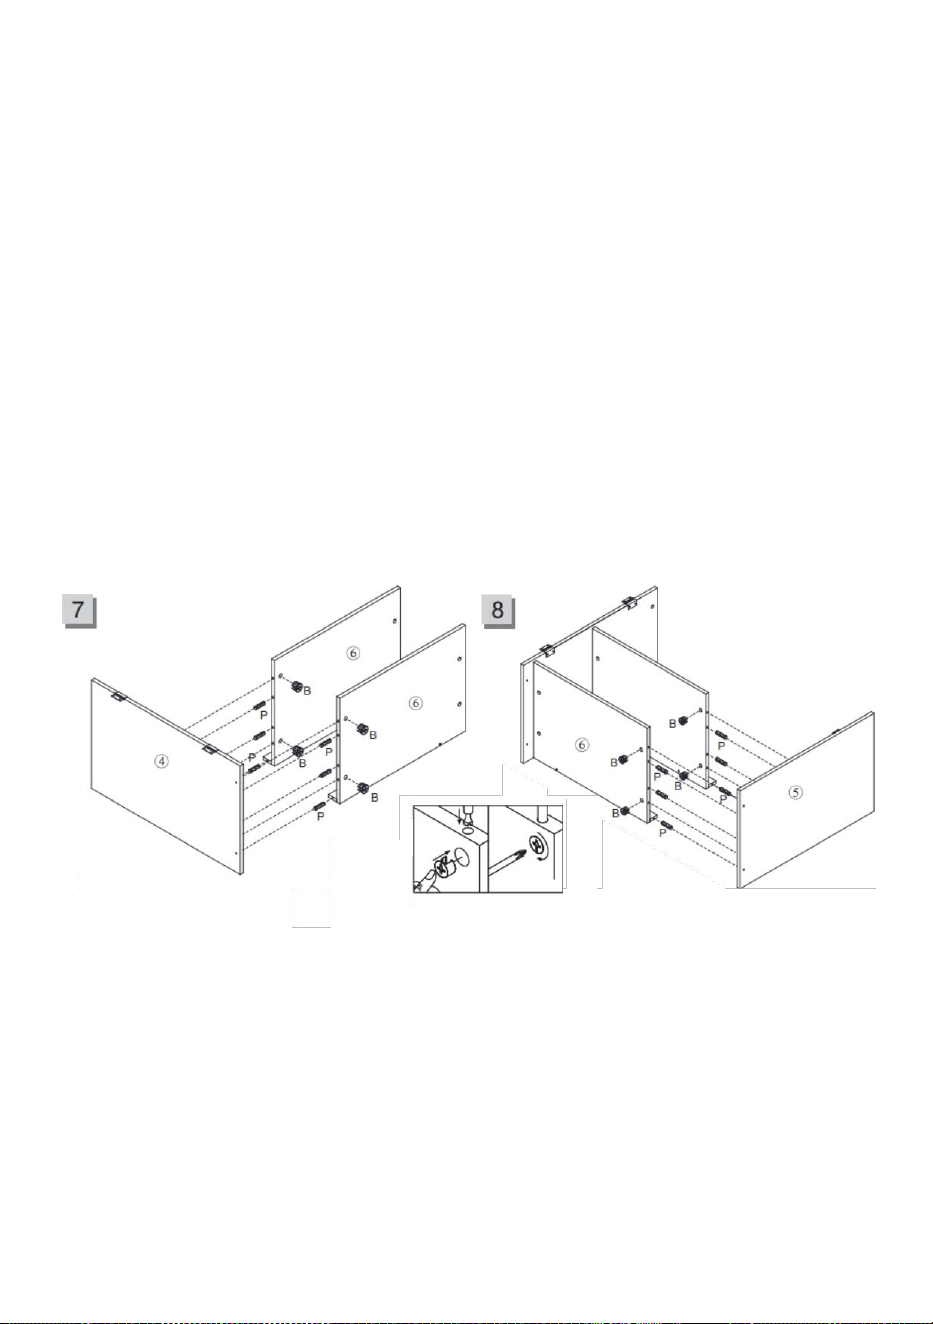
- 11 -
panneau latéral 4.
3. Assurez-vous que les deux panneaux d’étagère 6 sont solidement fixés
au panneau latéral 4.
Étape 8 : Connectez le panneau latéral 5 aux panneaux d'étagère 6
- **Pièces utilisées** :
- 5 (panneau latéral) - 6 (panneaux d'étagère) - 7 (bande de support)
- P (chevilles) - B (serrures à came)
- **Instructions**:
1. Insérez les chevilles (P) dans les trous pré-percés sur les panneaux
d'étagère 6 , la bande de support et 7 et panneau latéral 5.
2. Utilisez les verrous à came (B) pour fixer les panneaux d'étagère 6 au
panneau latéral 5.
3. Assurez-vous que les deux panneaux d’étagère 6 sont solidement fixés
au panneau latéral 5.
Étape 9 : Installez les vis de connexion sur le panneau principal de la
table (2)

- 12 -
- **Pièces utilisées** :
- 2 (panneau principal de la table) - A (boulons)
- **Instructions**:
1. Insérez les boulons (A) dans les trous pré-percés du panneau principal
de la table (2).
2. Assurez-vous que les boulons (A) sont solidement installés, en vue de la
connexion du plateau de table à l'armoire.
Étape 10 : Assemblez le panneau principal de la table de l'étape 9
avec l'armoire
- **Pièces utilisées** :
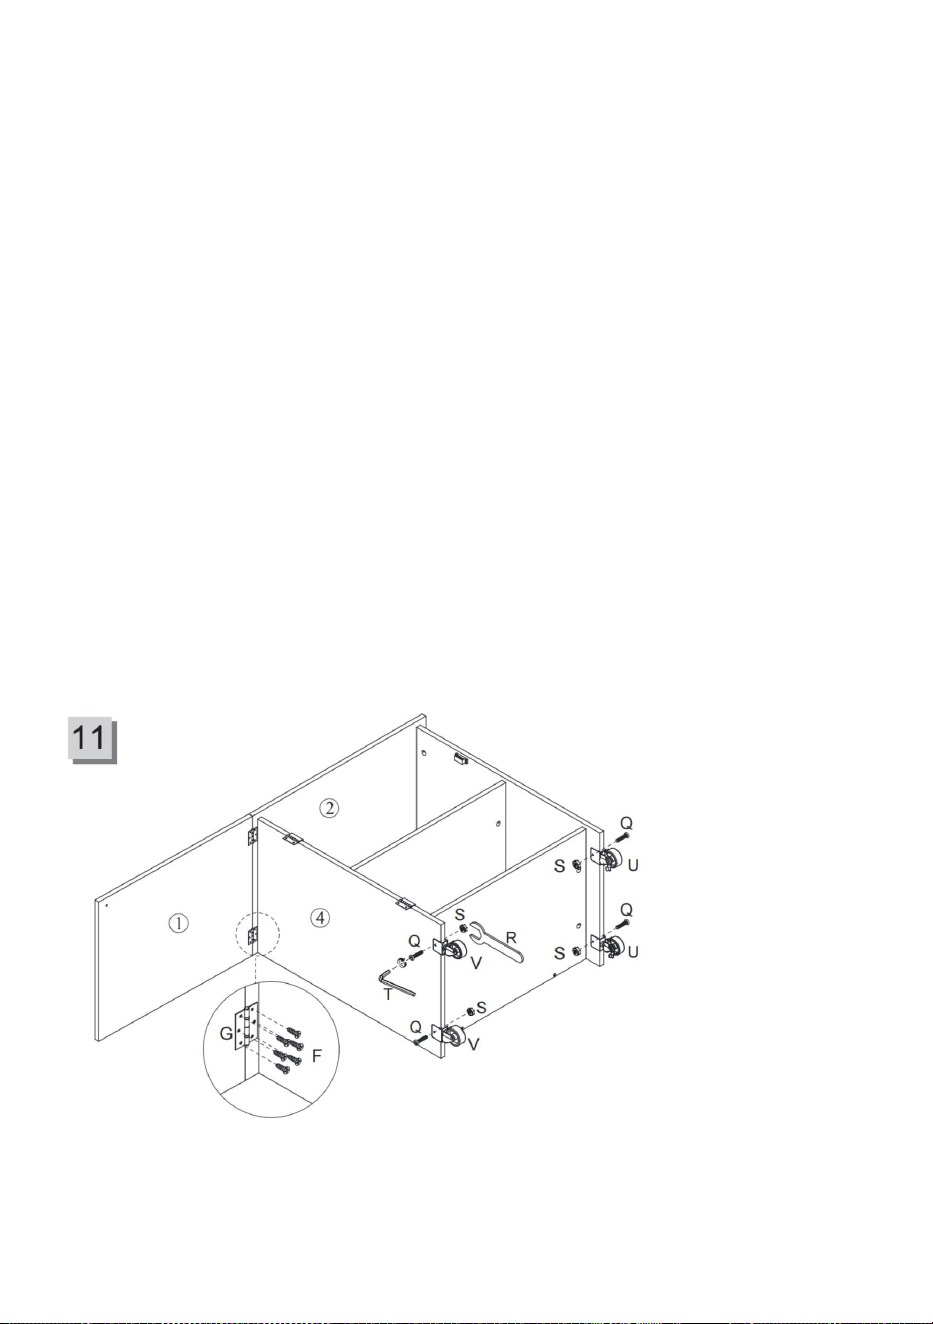
- 13 -
- Panneau principal de la table de l'étape 9 - Assemblage de l'armoire de
l'étape 8
- P (chevilles) - B (serrures à came)
- **Instructions**:
1. Insérez les chevilles (P) dans les trous pré-percés sur le dessus de l’
assemblage de l’armoire.
2. Placez le panneau principal de la table de l’étape 9 sur le dessus de l’
assemblage de l’armoire, alignez les chevilles et fixez la connexion à l’
aide des verrous à came (B).
3. Assurez-vous que tous les verrous à came (B) sont serrés et que la
connexion est sécurisée.
Étape 11 : Installez le panneau de table pliant 1 sur le panneau de
table principal 2 et fixez les roulettes
- **Pièces utilisées** :
- 1 (panneau de table pliable) - Assemblage à partir de l'étape 10
- Q (vis) - F (vis) - G (charnières) - S (écrous)
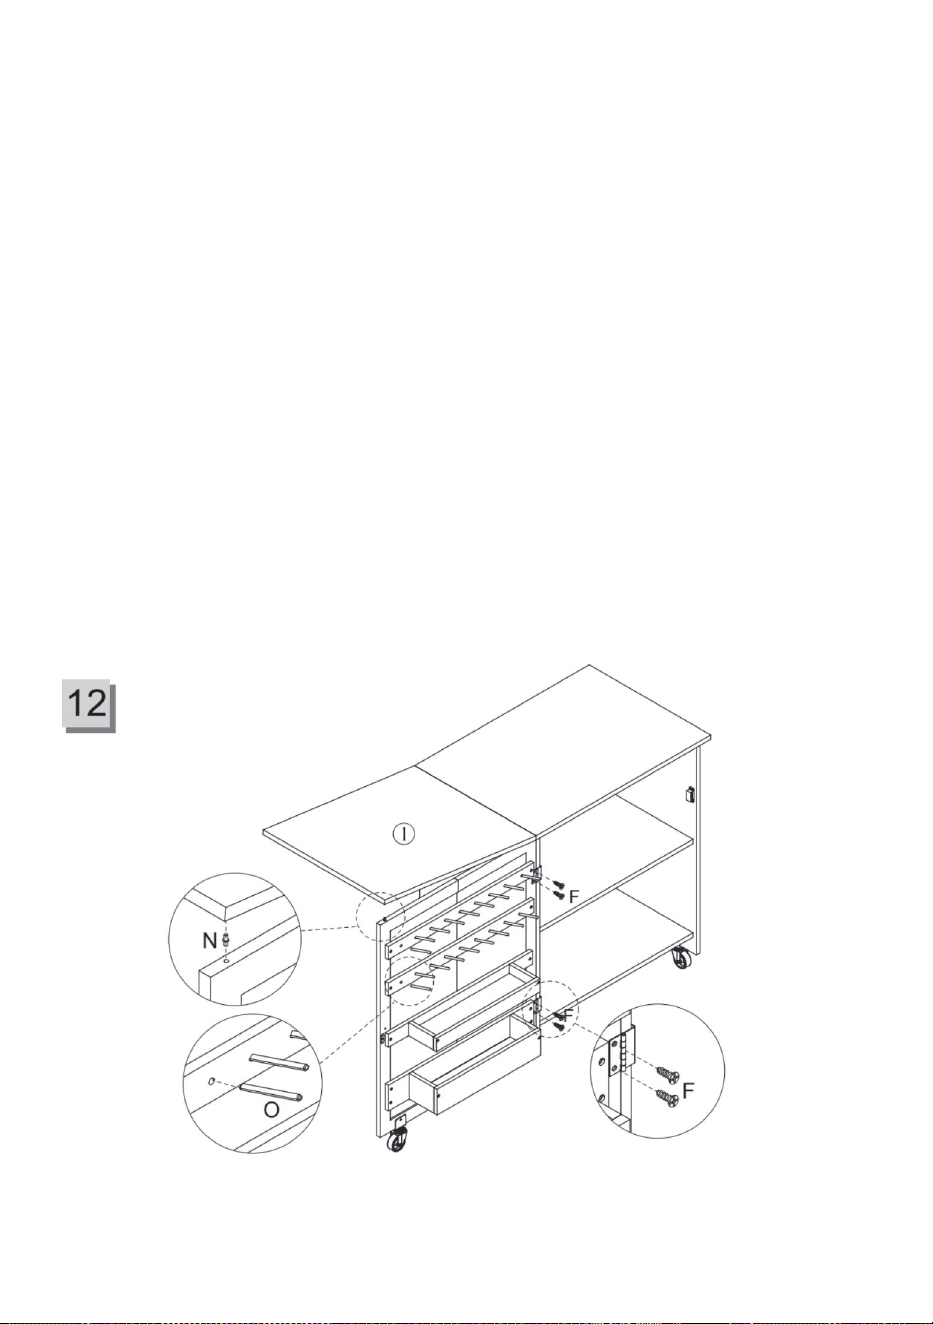
- 14 -
- U (roues pivotantes avec frein) - V (roues pivotantes non verrouillables)
- R (clé hexagonale) - T (clé Allen)
- **Instructions**:
1. Utilisez des charnières (G) et des vis (F) pour fixer le panneau de table
pliable 1 au panneau de table principal 2.
2. Installez deux roulettes verrouillables (U) sur les côtés extérieurs du
dessous de la table et deux roulettes non verrouillables (V) sur les côtés
intérieurs. Fixez-les avec des vis (Q) et des écrous (S).
3. Utilisez la clé Allen (T) et la clé hexagonale (R) pour vous assurer que
toutes les vis et roulettes sont serrées.
4. Vérifiez que la fonction de verrouillage des roulettes fonctionne
correctement.
Étape 12 : Installez le panneau de porte sur l'assemblage de l'étape 11
et fixez les chevilles à double tête et les chevilles longues
- **Pièces utilisées** :
- Assemblage à partir de l'étape 11 - N (chevilles à double tête)
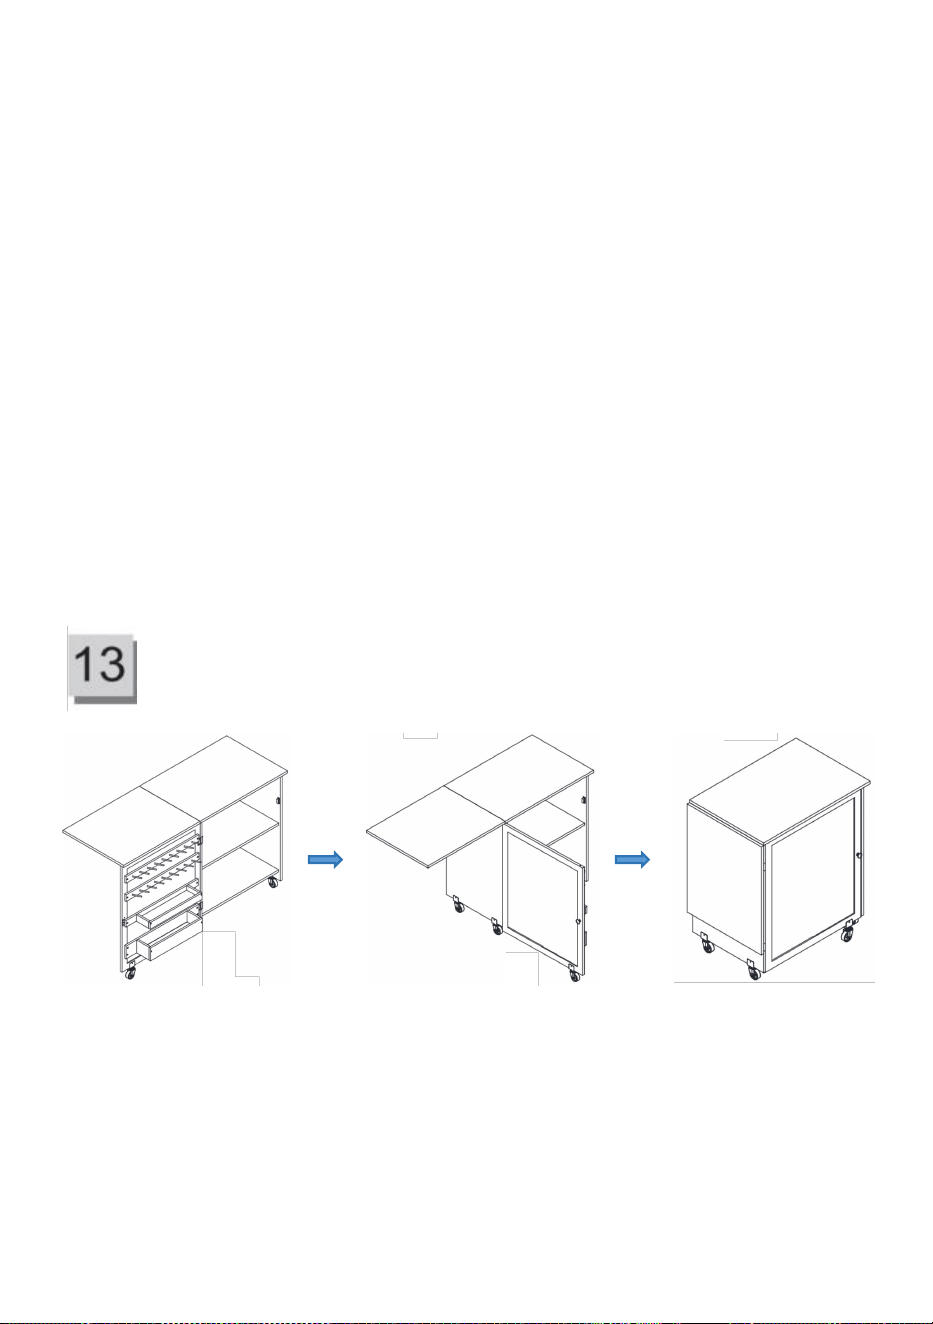
- 15 -
- O (chevilles longues) - F (vis)
- **Instructions**:
1. Utilisez des vis (F) pour fixer le panneau de porte à l’assemblage de l’
étape 11, en vous assurant que le panneau de porte peut s’ouvrir et se
fermer en douceur.
2. Insérez les chevilles à double tête (N) pour fixer le panneau de table
pliant au panneau de porte lorsqu'il est déployé.
3. Utilisez de longues chevilles (O) pour renforcer la connexion entre le
panneau de porte et l’assemblage de l’étape 11, en assurant un
ajustement serré.
Étape 13 : Assemblage terminé
(Assemblage terminé) (état plié)
Assurez-vous que toutes les vis sont serrées avant d’utiliser le produit et
que le produit est solidement installé.
12. Entretien
- 16 -
1. Serrage régulier : tous les 90 jours, vérifiez et serrez tous les
boulons, vis, boutons et verrous de roulettes pour vous assurer que
rien n'est desserré ou usé.
2. Nettoyage et entretien : Essuyez la surface avec un chiffon doux
et évitez les nettoyants chimiques agressifs.
3. Prévention de l'humidité : gardez la table au sec, surtout
lorsqu'elle est utilisée ou stockée, pour éviter toute déformation ou
gonflement dû à l'humidité.
4. Nettoyage et lubrification des roulettes : nettoyez régulièrement
les roulettes de la poussière et des débris sur les axes des roues
pour assurer leur bon fonctionnement.
5. Contrôle de l'usure des roulettes : vérifiez régulièrement que les
roulettes verrouillables ne présentent aucun signe d'usure, de
desserrage ou de mécanisme de verrouillage défectueux.
Remplacez-les si nécessaire pour garantir une utilisation en toute
sécurité.
Fabricant : Shanghaimuxinmuyeyouxiangongsi
Adresse : Shuangchenglu 803nong11hao1602A-1609shi, baoshanqu,
shanghai 200000 CN.
Importé en Australie : SIHAO PTY LTD, 1 ROKEVA STREET, ASTWOOD
NSW 2122 Australie
Importé aux États-Unis : Sanven Technology Ltd., Suite 250, 9166 Anaheim
Place, Rancho Cucamonga, CA 91730
REP
EC
E-CrossStu GmbH
Mainzer Landstr.69, 60329 Frankfurt am Main.
REP
UK
YH CONSULTING LIMITED.
C/O YH Consulting Limited Office 147, Centurion House,
London Road, Staines-upon-Thames, Surrey, TW18 4AX

- 17 -


- 2 -
Technisch Ondersteuning en E-garantiecertificaat www.vevor.com/support
OPVOUWBARE NAAITAFEL
GEBRUIKERSHANDLEIDING
Wij streven er voortdurend naar om u gereedschappen tegen concurrerende prijzen te leveren.
"Save Half", "Half Price" of andere soortgelijke uitdrukkingen die wij gebruiken, geven alleen een
schatting weer van de besparingen die u kunt behalen door bepaalde gereedschappen bij ons te
kopen in vergelijking met de grote topmerken en betekent niet noodzakelijkerwijs dat alle
categorieën gereedschappen die wij aanbieden, worden gedekt. Wij herinneren u eraan om
zorgvuldig te controleren of u daadwerkelijk de helft bespaart in vergelijking met de grote
topmerken wanneer u een bestelling bij ons plaatst.

- 1 -
Ontvouwstatus Vouwstatus
Let op: het uiterlijk van het product is afhankelijk van het daadwerkelijke product
dat u ontvangt.
HULP NODIG? NEEM CONTACT MET ONS OP!
Heeft u vragen over het product? Heeft u technische ondersteuning nodig? Neem
dan gerust contact met ons op:
Technische ondersteuning en e-garantiecertificaat www.vevor.com/support
Dit is de originele instructie, lees alle handleidingen zorgvuldig door voordat u het
product gebruikt. VEVOR behoudt zich een duidelijke interpretatie van onze
gebruikershandleiding voor. Het uiterlijk van het product is afhankelijk van het
product dat u hebt ontvangen. Vergeef ons dat we u niet opnieuw zullen
FOLDING SEWING TABLE

- 2 -
informeren als er technologie- of software-updates voor ons product zijn.
1. Belangrijke veiligheidsinstructies
Waarschuwing - Om het risico op letsel te verminderen, moet de
gebruiker de gebruiksaanwijzing zorgvuldig lezen. Bewaar deze
instructies voor toekomstig gebruik
Waarschuwing: draag altijd een oogbescherming wanneer u dit
product gebruikt.
9. ALGEMENE VEILIGHEIDSINSTRUCTIES
LEES ALLE instructies voordat u dit product gebruikt. Wij raden u ten
zeerste aan dit product niet te wijzigen en/of te gebruiken voor een andere
toepassing dan waarvoor het is ontworpen.
1. Gewichtslimiet: Zorg ervoor dat de belasting van het
hoofdbureaublad (opgevouwen) de maximaal toegestane belasting
van 40 kg niet overschrijdt om vervorming of schade te voorkomen.
2. Stabiliteit van het bureaublad: Zorg er bij het uitvouwen van het
bureaublad voor dat de scharnieren en steunen stevig vastzitten om
plotseling inklappen of wiebelen te voorkomen.
3. Vergrendelbare wielen: Wanneer u de tafel in een vaste positie
gebruikt, zorg er dan voor dat de vergrendelbare wielen vergrendeld
zijn om te voorkomen dat de tafel tijdens het gebruik beweegt.
4. Voorkom krassen: Vermijd contact met scherpe voorwerpen op
het bureaublad om krassen of schade te voorkomen.
5. Controle vóór gebruik: Controleer vóór elk gebruik of alle
schroeven, bouten, knoppen en wielvergrendelingen goed vastzitten
om stabiliteit te garanderen.
6. Juiste opslag: Plaats de tafel niet op plaatsen met een hoge
temperatuur, een hoge luchtvochtigheid of direct zonlicht om schade
aan het hout en de onderdelen te voorkomen.
7. Niet staan: Ga niet op het tafelblad staan en gebruik geen enkel
deel van de tafel als trap om structurele schade en veiligheidsrisico's
te voorkomen.
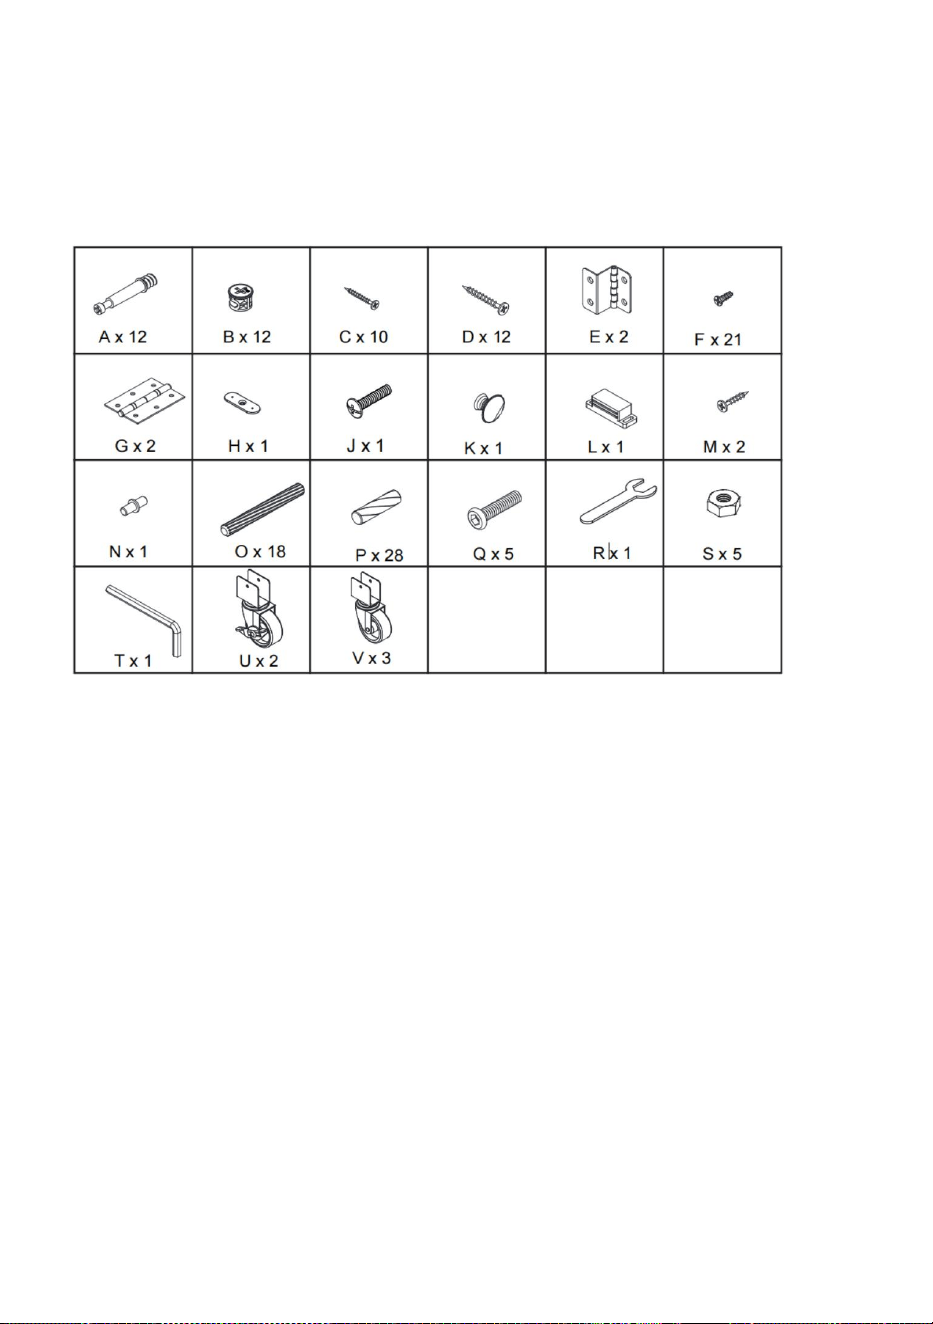
- 3 -
3 Onderdelenlijst

- 4 -
4 Hoofdparameter
Opvouwbare naaitafel
29. Model: HL20240800 Kleur: Wit
30. Model: HL20240801 Kleur: Hout Afwerking
31. Bureaubladformaat (L×B×H): 1168×400×778mm
32. Maximale belasting hoofdbureaublad: 40 kg
5 Montageproces
Voorzorgsmaatregelen voor installatie:
22. Voor de installatie van dit product zijn twee volwassenen nodig en
handschoenen (niet bij het product inbegrepen) moeten tijdens de
installatie worden gedragen. Veiligheidsmaatregelen moeten worden
genomen bij het gebruik van gereedschap tijdens de installatie .

- 5 -
23. Het gehele installatieproces duurt ongeveer 90 minuten.
24. De bijbehorende onderdeel- en paneelnummers staan op het
bijbehorende materiaal vermeld.
Stap 1: Installeer de grote opbergdoos
- Gebruikte onderdelen:
- 11 (onderste paneel) - 13 (voorste paneel) - 14 (zijpanelen)
- 15 (achterpaneel) - P (deuvels) - D (schroeven)
- Instructies
1. Plaats deuvels (P) in de voorgeboorde gaten van beide 14 (zijpanelen).
2. Lijn 14 (zijpanelen) uit met 15 ( voorpaneel), verbind ze met deuvels (P)
en zet ze vast met schroeven (D).
3. Schuif 11 (onderste paneel) tussen de zijpanelen 14.
4. Bevestig 1 3 (achterpaneel) tussen de zijpanelen 14 en zet het vast met
schroeven (D).
Stap 2: Monteer de kleine opbergdoos

- 6 -
- **Gebruikte onderdelen**:
- 11 (onderste paneel) - 9 (voorste paneel) - 10 (zijpanelen)
- 12 (achterpaneel) - P (deuvels) - D (schroeven)
- **Instructies**:
1. Plaats deuvels (P) in de voorgeboorde gaten van beide 10 (zijpanelen).
2. Lijn 10 (zijpanelen) uit met 12 (voorpaneel), verbind ze met deuvels (P)
en zet ze vast met schroeven (D).
3. Schuif 11 (onderste paneel) tussen de zijpanelen 10.
4. Bevestig 9 (achterpaneel) tussen de zijpanelen 10 en zet het vast met
schroeven (D).
Stap 3: Installeer handgrepen en zwenkwielen

- 7 -
- **Gebruikte onderdelen**:
- 3 (deurpaneel) - J (schroeven) - F (schroeven) - H (ringen)
- K (handvat) - S (noten) - V (zwenkwielen) - Q (schroeven)
- R (inbussleutel) - T (inbussleutel)
- **Instructies**:
1. Plaats de schroeven ( F ) door de ringen ( H ) in de voorgeboorde gaten
op paneel 3 en bevestig ze met schroeven ( J ).
2. Plaats de handgreep (K) op de daarvoor bestemde plaats op het paneel
en zet deze vast met moeren (S).
3. Bevestig de zwenkwielen (V) aan de onderkant van het paneel en zet ze
vast met schroeven (Q) en moer (S)
4. Gebruik de inbussleutel (R) en de inbussleutel (T) om alle schroeven
vast te draaien en zorg ervoor dat de handgreep en de zwenkwielen stevig
vastzitten.
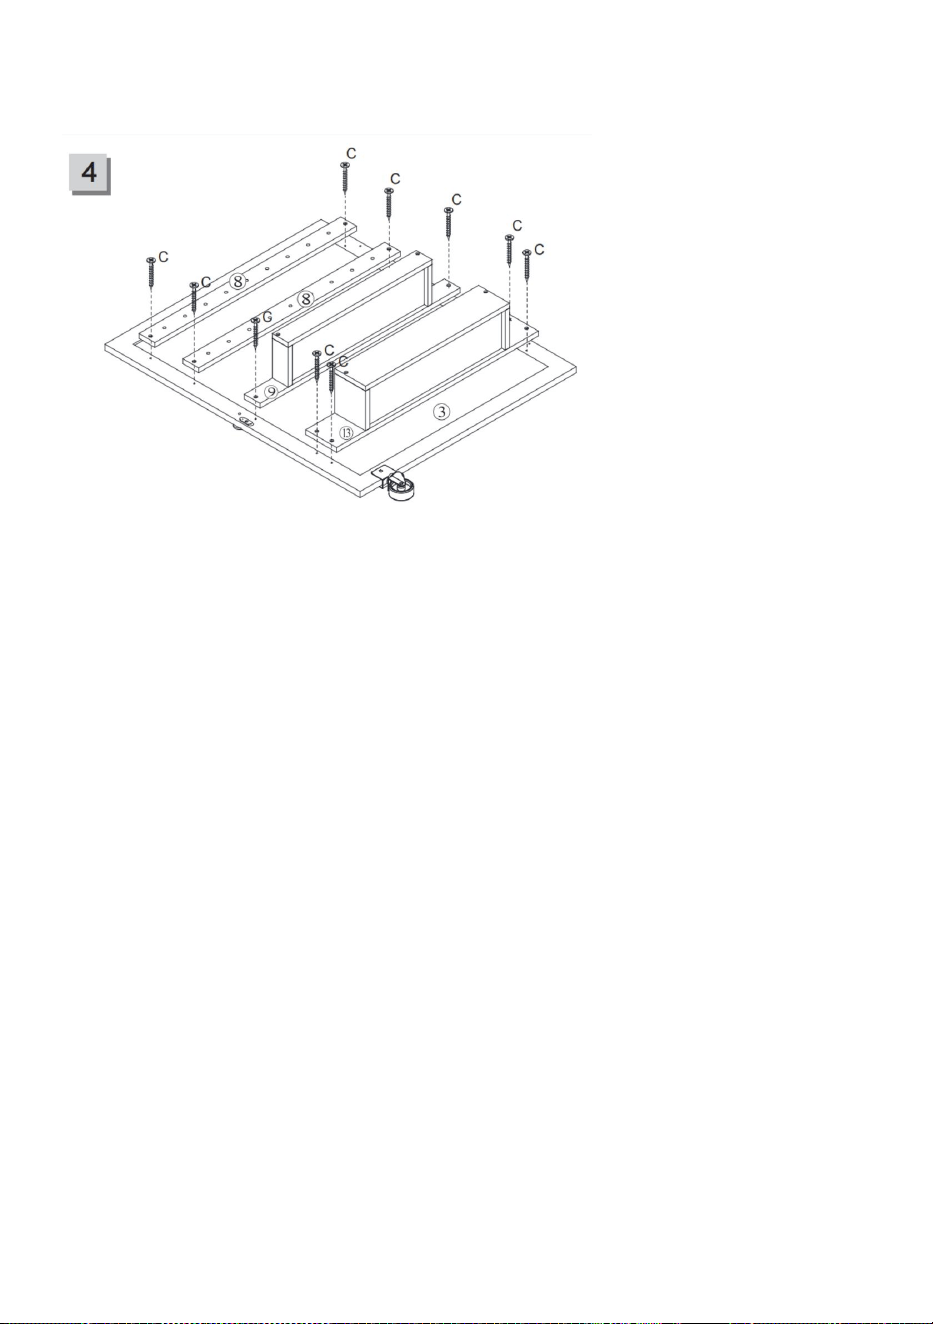
- 8 -
Stap 4: Installeer de opbergdoos en de spoelopslag op het
deurpaneel
- **Gebruikte onderdelen**:
- 3 (deurpaneel) - 8 (spoelopslag) - C (schroeven)
- Componenten geassembleerd in stap 1 en stap 2
- **Instructies**:
1. Plaats de twee spoelopbergvakken (8) op de daarvoor bestemde
plaatsen op deurpaneel 3.
2. Gebruik schroeven (C) om de spoelopslagplaatsen (8) aan deurpaneel 3
te bevestigen.
3. Lijn de onderdelen van de opbergdoos uit die u in stap 1 en stap 2 hebt
gemonteerd, bevestig ze aan deurpaneel 3 en zet ze vast met schroeven
(C).
Stap 5: Installeer zijpanelen 4, 5, scharnieren en magnetische sluiting

- 9 -
- **Gebruikte onderdelen**:
- 4 (zijpaneel) - 5 (zijpaneel) - A (bouten) - F (schroeven)
- E (scharnieren) - L (magneetsluiting) - M (schroeven voor
magneetsluiting)
- **Instructies**:
1. Plaats de bouten (A) in de voorgeboorde gaten in de zijpanelen 4 en 5.
2. Monteer de scharnieren (E) op de aangegeven posities op de zijpanelen
4 en 5 en bevestig ze met schroeven (F).
3. Bevestig de magneetsluiting (L) met schroeven (M) op de aangegeven
plaats op zijpaneel 5.
4. Draai alle schroeven vast om ervoor te zorgen dat de bouten (A) en
scharnieren (E) goed vastzitten.
Stap 6: Installeer plankpanelen 6 (twee planken)

- 10 -
- **Gebruikte onderdelen**:
- 6 (plankpaneel) - 7 (steunstrip)
- P (pluggen) - D (schroeven)
- **Instructies**:
1. Plaats deuvels (P) in de voorgeboorde gaten van de steunstrip (7).
2. Lijn de steunstrip (7) uit met het plankpaneel (6) en verbind ze met
deuvels (P).
3. Bevestig de steunstrip (7) aan de zijkant van het plankpaneel (6) met
schroeven (D).
4. Herhaal deze stap voor het tweede plankpaneel (6).
Stap 7: Verbind zijpaneel 4 met plankpanelen 6
- **Gebruikte onderdelen**:
- 4 (zijpaneel) - 6 (plankpanelen) - 7 (steunstrip)
- P (deuvels) - B (Cam-vergrendelingen)
- **Instructies**:
1. Plaats deuvels (P) in de voorgeboorde gaten op de plankpanelen 6 ,
steunstrip en 7 en zijpaneel 4.
2. Gebruik Camlocks (B) om de plankpanelen 6 aan het zijpaneel 4 te
bevestigen.
3. Zorg ervoor dat beide plankpanelen 6 stevig aan het zijpaneel 4 zijn

- 11 -
bevestigd.
Stap 8: Verbind zijpaneel 5 met plankpanelen 6
- **Gebruikte onderdelen**:
- 5 (zijpaneel) - 6 (plankpanelen) - 7 (steunstrip)
- P (deuvels) - B (nokvergrendelingen)
- **Instructies**:
1. Plaats deuvels (P) in de voorgeboorde gaten op de plankpanelen 6 ,
steunstrip en 7 en zijpaneel 5.
2. Gebruik Camlocks (B) om de plankpanelen 6 aan het zijpaneel 5 te
bevestigen.
3. Zorg ervoor dat beide plankpanelen 6 stevig aan het zijpaneel 5 zijn
bevestigd.
Stap 9: Installeer de verbindingsschroeven op het
hoofdtafelbladpaneel (2)

- 12 -
- **Gebruikte onderdelen**:
- 2 (hoofdtafelbladpaneel) - A (bouten)
- **Instructies**:
1. Plaats de bouten (A) in de voorgeboorde gaten van het
hoofdtafelbladpaneel (2).
2. Zorg ervoor dat de bouten (A) stevig vastzitten, ter voorbereiding op het
bevestigen van het tafelblad aan de kast.
Stap 10: Monteer het hoofdtafelbladpaneel uit stap 9 met de kast
- **Gebruikte onderdelen**:
- Hoofdtafelbladpaneel van stap 9 - Kastmontage van stap 8

- 13 -
- P (deuvels) - B (nokvergrendelingen)
- **Instructies**:
1. Plaats deuvels (P) in de voorgeboorde gaten bovenop de kast.
2. Plaats het hoofdtafelbladpaneel uit stap 9 bovenop de kastconstructie,
lijn de deuvels uit en bevestig de verbinding met behulp van Cam-locks
(B).
3. Zorg ervoor dat alle nokkensloten (B) goed vastzitten en dat de
verbinding goed vastzit.
Stap 11: Installeer het opvouwbare tafelbladpaneel 1 op het
hoofdtafelbladpaneel 2 en bevestig de zwenkwielen
- **Gebruikte onderdelen**:
- 1 (opklapbaar tafelblad) - Montage vanaf stap 10
- Q (schroeven) - F (schroeven) - G (scharnieren) - S (moeren)
- U (geremde zwenkwielen) - V (niet-blokkerende zwenkwielen)
- R (inbussleutel) - T (inbussleutel)
- **Instructies**:
1. Gebruik scharnieren (G) en schroeven (F) om het opvouwbare
tafelbladpaneel 1 aan het hoofdtafelbladpaneel 2 te bevestigen.
2. Installeer twee vergrendelbare zwenkwielen (U) aan de buitenkanten
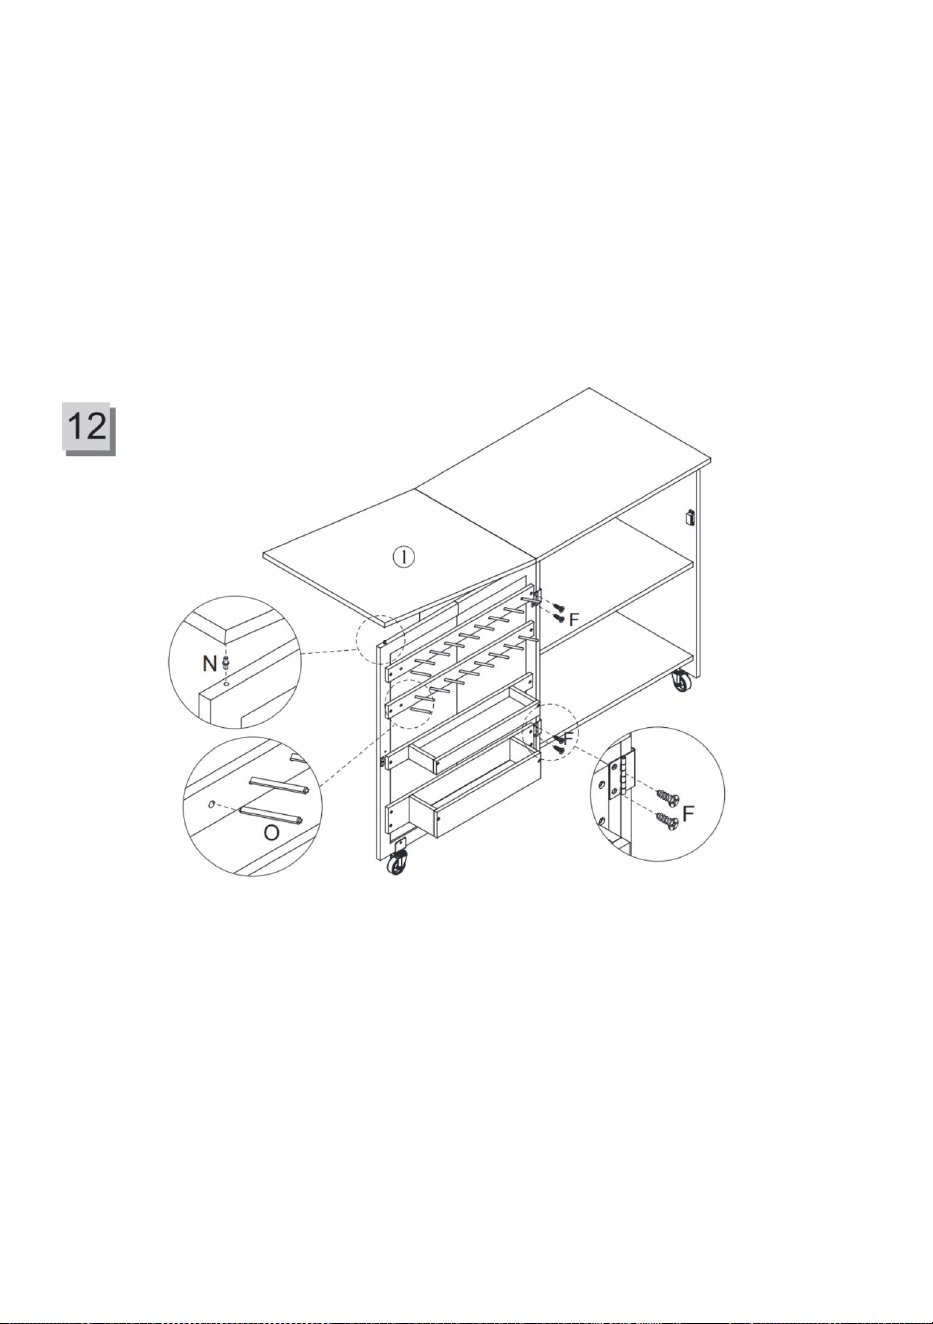
- 14 -
van de onderkant van de tafel en twee niet-vergrendelbare zwenkwielen (V)
aan de binnenkanten. Bevestig ze met schroeven (Q) en moeren (S).
3. Gebruik de inbussleutel (T) en de inbussleutel (R) om ervoor te zorgen
dat alle schroeven en zwenkwielen goed vastzitten.
4. Controleer of de vergrendelingsfunctie van de zwenkwielen goed werkt.
Stap 12: Installeer het deurpaneel op de constructie uit stap 11 en
bevestig de dubbele koppennen en lange deuvels
- **Gebruikte onderdelen**:
- Montage vanaf stap 11 - N (dubbelkoppige deuvels)
- O (lange deuvels) - F (schroeven)
- **Instructies**:
1. Gebruik schroeven (F) om het deurpaneel aan de constructie uit stap 11
te bevestigen. Zorg ervoor dat het deurpaneel soepel kan worden geopend
en gesloten.
2. Bevestig het opklapbare tafelbladpaneel met de dubbelkoppige deuvels
(N) aan het deurpaneel wanneer het is uitgeschoven.
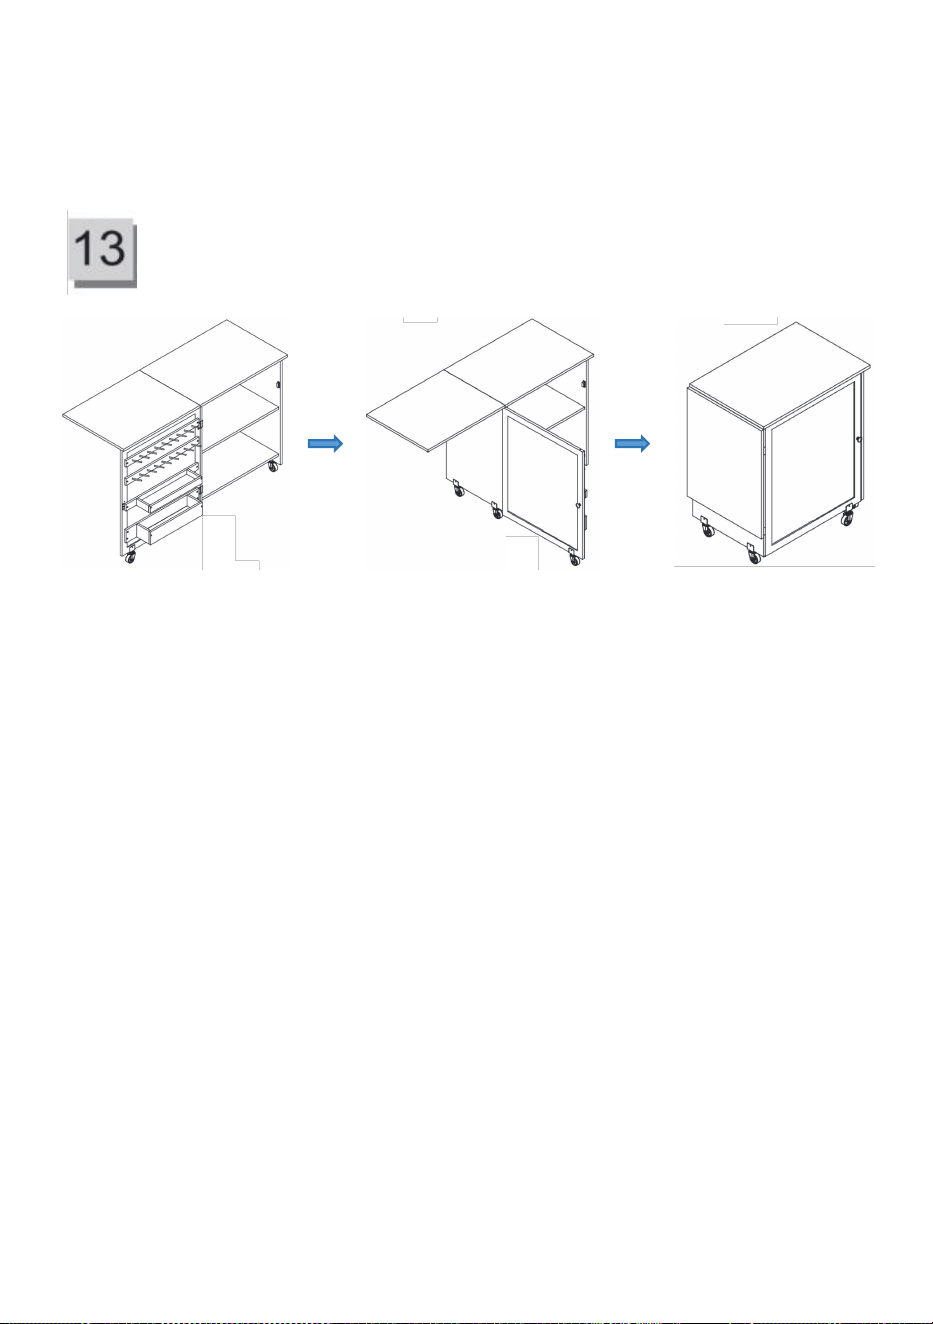
- 15 -
3. Gebruik lange deuvels (O) om de verbinding tussen het deurpaneel en
de constructie uit stap 11 te verstevigen en zorg voor een goede pasvorm.
Stap 13: Montage voltooid
(Montage voltooid) (opvouwbare toestand)
Zorg ervoor dat alle schroeven goed vastzitten voordat u het product
gebruikt, en dat het product stevig is geïnstalleerd.
13. Onderhoud
1. Regelmatig vastdraaien: Controleer elke 90 dagen alle bouten,
schroeven, knoppen en wielvergrendelingen en draai ze vast om er
zeker van te zijn dat er niets los of versleten is.
2. Reiniging en onderhoud: Veeg het oppervlak af met een zachte
doek en vermijd agressieve chemische reinigingsmiddelen.
3. Vochtpreventie: Houd de tafel droog, vooral wanneer u hem
gebruikt of opbergt, om kromtrekken of opzwellen door vocht te
voorkomen.
4. Reinigen en smeren van de zwenkwielen: Maak de zwenkwielen
regelmatig schoon om stof en vuil op de wielassen te verwijderen,
zodat ze soepel blijven bewegen.
5. Controle op slijtage van de wielen: Controleer de vergrendelbare
wielen regelmatig op tekenen van slijtage, losheid of defecte
vergrendelingsmechanismen. Vervang ze indien nodig om veilig
gebruik te garanderen.

- 16 -
Fabrikant: Shanghaimuxinmuyeyouxiangongsi
Adres: Shuangchenglu 803nong11hao1602A-1609shi, baoshanqu, shanghai
200000 CN.
Geïmporteerd naar AUS: SIHAO PTY LTD, 1 ROKEVA
STREETEASTWOOD NSW 2122 Australië
Geïmporteerd naar de VS: Sanven Technology Ltd., Suite 250, 9166
Anaheim Place, Rancho Cucamonga, CA 91730
REP
EC
E-CrossStu GmbH
Mainzer Landstr.69, 60329 Frankfurt am Main.
REP
UK
YH CONSULTING LIMITED.
C/O YH Consulting Limited Office 147, Centurion House,
London Road, Staines-upon-Thames, Surrey, TW18 4AX

- 17 -