
Raccolta Carta
User Manual / Manuel de l’utilisateur / Benutzerhandbuch /
Manuale utente / Manual de usuario / Podręczni
użytkownika / Gebruikershandleiding / Manual do Utilizador
XX CE.04.00.1118.02-A
01 02 03 04 05 06 07 08 09 10 11 12 13 14 15
16 17 18 19 20 21 22 23 24 25 26 27 28 29 30 31 32 33
34 35 36 37 38 39 40 41 42 43 44 45 46 47 48 49 50 51
52 53 54 55 56 57 58 59 60 61 62 63 64 65 66 67 68 69
70 71 72 73 74 75 76 77
78 79 80 81
82 83 84 85
86 87 88 89 90 91 92 93 94 95 96 97 98 99 100 101
102 103 104 105 106 107 108

EN The pictures shown are for illustration purposes only. The actual product or app interface may vary.
FR Les images sont présentées à titre indicatif uniquement. L'interface réelle du produit ou de l'application peut varier.
DE Die gezeigten Abbildungen dienen nur zur Veranschaulichung. Das tatsächliche Produkt oder die App-Oberfläche
kannvariieren.
IT Le immagini mostrate sono solo a scopo illustrativo. L'effettivo aspetto del prodotto e l'interfaccia dell'app
potrebbero variare.
ES Las imágenes que se muestran son solo para fines ilustrativos. El producto real o la interfaz de la aplicación
pueden variar.
PL Przedstawione obrazy służą wyłącznie do celów ilustracyjnych. Rzeczywisty produkt lub interfejs aplikacji może się
różnić.
NL De getoonde foto's zijn alleen ter illustratie. De daadwerkelijke product- of app-interface kan variëren.
PT As imagens apresentadas são meramente ilustrativas. A interface real do produto ou da aplicação pode variar.
EN Installation Video
FR Vidéo d’installation
DE Installations�Video
IT Video di installazione
ES Vídeo de instalación
PL Film instruktażowy dotyczący instalacji
NL Installatievideo
PT Vídeo de instalação
Segway Mobility App
EN WARNING: The Segway Mobility App contains additional and/or supplemental
warnings and instructions for the safe use of the eKickScooter. It also provides
guidance on certain functions or updates that are not included in this user manual as
of its publication date. Such information and/or notice is part of the user materials
that an user shall know and learn.
FR AVERTISSEMENT: L'application Segway Mobility contient des avertissements et des
instructions supplémentaires et/ou complémentaires pour une utilisation sûre de
l'eKickScooter. Elle fournit également des conseils sur certaines fonctions ou mises à
jour qui ne sont pas incluses dans ce Manuel de l'utilisateur à la date de sa
publication. Ces informations et/ou avis font partie des documents de l’utilisateur que
l’utilisateur doit connaître et apprendre.
DE WARNUNG: Die Segway Mobility-App enthält zusätzliche und/oder ergänzende
Warnungen und Anweisungen für die sichere Verwendung des eKickScooters. Sie
enthält außerdem Hinweise zu bestimmten Funktionen oder Aktualisierungen, die zum
Veröffentlichungsdatum dieses Benutzerhandbuchs noch nicht darin enthalten waren.
Solche Informationen und/oder Hinweise sind Teil der Benutzermaterialien, die ein
Benutzer kennen und lernen sollte.
IT AVVERTENZA: l'app Segway Mobility contiene avvertenze e istruzioni aggiuntive e/o
integrative per utilizzare in sicurezza l'eKickScooter. Fornisce inoltre indicazioni su
determinate funzioni o aggiornamenti che non sono inclusi nel presente manuale
utente alla data della sua pubblicazione. Tali informazioni e/o avvisi fanno parte dei
materiali che l'utente deve conoscere e apprendere.
ES ADVERTENCIA: La aplicación Segway Mobility contiene advertencias e instrucciones
adicionales y/o complementarias para el uso seguro del eKickScooter. También ofrece
instrucciones sobre ciertas funciones o actualizaciones que no están incluidas en este
manual de usuario en la fecha de su publicación. Dicha información y/o aviso forma
parte de los materiales del usuario que éste debe conocer y aprender.
PT OSTRZEŻENIE: Aplikacja Segway Mobility zawiera dodatkowe i/lub uzupełniające
ostrzeżenia oraz instrukcje dotyczące bezpiecznego korzystania z hulajnogi
eKickScooter. Zawiera również wskazówki dotyczące niektórych funkcji lub aktualizacji,
które nie zostały uwzględnione w niniejszym podręczniku użytkownika w dniu jego
publikacji. Takie informacje i/lub powiadomienia stanowią część materiałów
użytkownika, z którymi należy się dokładnie zapoznać.
NL WAARSCHUWING: De Segway Mobility-app bevat aanvullende en/of extra
waarschuwingen en instructies voor het veilig gebruik van de eKickScooter. Het biedt
ook richtlijnen voor bepaalde functies of updates die op de publicatiedatum nog niet
in deze gebruikershandleiding waren opgenomen. Dergelijke informatie en/of
mededelingen maken deel uit van de gebruikersmaterialen die een gebruiker moet
kennen en leren.
PT AVISO: A aplicação Segway Mobility contém avisos e instruções adicionais e/ou
suplementares para o uso seguro do eKickScooter. Fornece também orientação sobre
certas funções ou atualizações que não estão incluídas neste manual do utilizador na
data sua publicação. Tais informações e/ou avisos fazem parte dos materiais do
utilizador que o utilizador deve conhecer e aprender.
01 02 03 04 05 06 07 08 09 10 11 12 13 14 15
16 17 18 19 20 21 22 23 24 25 26 27 28 29 30 31 32 33
34 35 36 37 38 39 40 41 42 43 44 45 46 47 48 49 50 51
52 53 54 55 56 57 58 59 60 61 62 63 64 65 66 67 68 69
70 71 72 73 74 75 76 77
78 79 80 81
82 83 84 85
86 87 88 89 90 91 92 93 94 95 96 97 98 99 100 101
102 103 104 105 106 107 108
Welcome / Bienvenue / Willkommen / Benvenuto / Le
damos la bienvenida / Witamy / Welkom / Bem-vindo
Packing List / Contenu de la boîte / Packliste / Lista
imballaggio / Listado de contenido / Zawartość
opakowania / Paklijst / Lista de embalagem
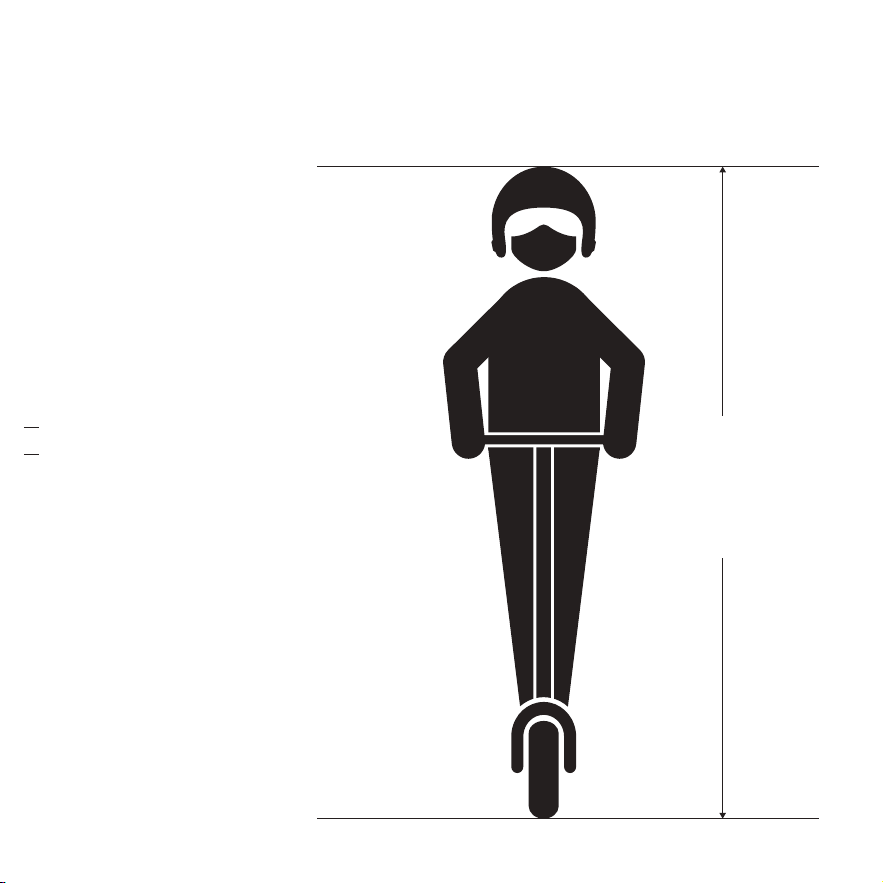
EN Always wear a helmet,
elbow pads and knee pads
when riding.
FR Portez toujours un casque,
des coudières et des
genouillères lorsque vous
roulez.
DE Tragen Sie beim Fahren
immer einen Helm,
Ellbogen- und
Knieschützer.
IT Durante la guida, indossare
sempre casco, gomitiere e
ginocchiere.
ES Utilice siempre casco,
coderas y rodilleras cuando
conduzca.
PL Na czas jazdy zawsze
należy zakładać kask,
nałokietniki i nakolanniki.
NL Draag altijd een
helm,elleboogbeschermers
en kniebeschermers tijdens
het rijden.
PT Utilize sempre capacete,
cotoveleiras e joelheiras ao
andar.
EN User Manual
FR Manuel de l’utilisateur
DE Benutzerhandbuch
IT Manuale utente
ES Manual de usuario
PL Podręcznik użytkownika
NL Gebruikershandleiding
PT Manual do Utilizador
× 1
× 1
× 1
× 1
× 1
× 1
× 1
× 1
16—55 anos
160 cm+
(5'3"+)
EN Important Information
FR Informations importantes
DE Wichtige Informationen
IT Informazioni importanti
ES Información importante
PL Ważne informacje
NL Belangrijke informatie
PT Informações importantes
× 1
× 1
× 1
× 1
× 1
× 1
× 1
× 1
01 02 03 04 05 06 07 08 09 10 11 12 13 14 15
16 17 18 19 20 21 22 23 24 25 26 27 28 29 30 31 32 33
34 35 36 37 38 39 40 41 42 43 44 45 46 47 48 49 50 51
52 53 54 55 56 57 58 59 60 61 62 63 64 65 66 67 68 69
70 71 72 73 74 75 76 77
78 79 80 81
82 83 84 85
86 87 88 89 90 91 92 93 94 95 96 97 98 99 100 101
102 103 104 105 106 107 108

Welcome / Bienvenue / Willkommen / Benvenuto / Le
damos la bienvenida / Witamy / Welkom / Bem-vindo
Packing List / Contenu de la boîte / Packliste / Lista
imballaggio / Listado de contenido / Zawartość
opakowania / Paklijst / Lista de embalagem
EN Always wear a helmet,
elbow pads and knee pads
when riding.
FR Portez toujours un casque,
des coudières et des
genouillères lorsque vous
roulez.
DE Tragen Sie beim Fahren
immer einen Helm,
Ellbogen- und
Knieschützer.
IT Durante la guida, indossare
sempre casco, gomitiere e
ginocchiere.
ES Utilice siempre casco,
coderas y rodilleras cuando
conduzca.
PL Na czas jazdy zawsze
należy zakładać kask,
nałokietniki i nakolanniki.
NL Draag altijd een
helm,elleboogbeschermers
en kniebeschermers tijdens
het rijden.
PT Utilize sempre capacete,
cotoveleiras e joelheiras ao
andar.
EN User Manual
FR Manuel de l’utilisateur
DE Benutzerhandbuch
IT Manuale utente
ES Manual de usuario
PL Podręcznik użytkownika
NL Gebruikershandleiding
PT Manual do Utilizador
× 1
× 1
× 1
× 1
× 1
× 1
× 1
× 1
16—55 anos
160 cm+
(5'3"+)
EN Important Information
FR Informations importantes
DE Wichtige Informationen
IT Informazioni importanti
ES Información importante
PL Ważne informacje
NL Belangrijke informatie
PT Informações importantes
× 1
× 1
× 1
× 1
× 1
× 1
× 1
× 1
01 02 03 04 05 06 07 08 09 10 11 12 13 14 15
16 17 18 19 20 21 22 23 24 25 26 27 28 29 30 31 32 33
34 35 36 37 38 39 40 41 42 43 44 45 46 47 48 49 50 51
52 53 54 55 56 57 58 59 60 61 62 63 64 65 66 67 68 69
70 71 72 73 74 75 76 77
78 79 80 81
82 83 84 85
86 87 88 89 90 91 92 93 94 95 96 97 98 99 100 101
102 103 104 105 106 107 108
●Accessories / Accessoires / Zubehör / Accessori / Accesorios / Akcesoria /
Accessoires / Acessórios
EN Note: Please keep the orginal packaging for at least 15 days!
FR Remarque : veuillez conserver l’emballage d’origine pendant au moins 15 jours !
DE Hinweis: Bitte bewahren Sie die Originalverpackung für mindestens 15 Tage auf!
IT Nota: conservare la confezione originale per almeno 15 giorni!
ES Nota: Conserve el embalaje original durante al menos 15 días.
PL Uwaga: Należy zachować oryginalne opakowanie przez co najmniej 15 dni.
NL Opmerking: Bewaar de originele verpakking minimaal 15 dagen!
PT Observação: Por favor, mantenha a embalagem original por pelo menos 15 dias!
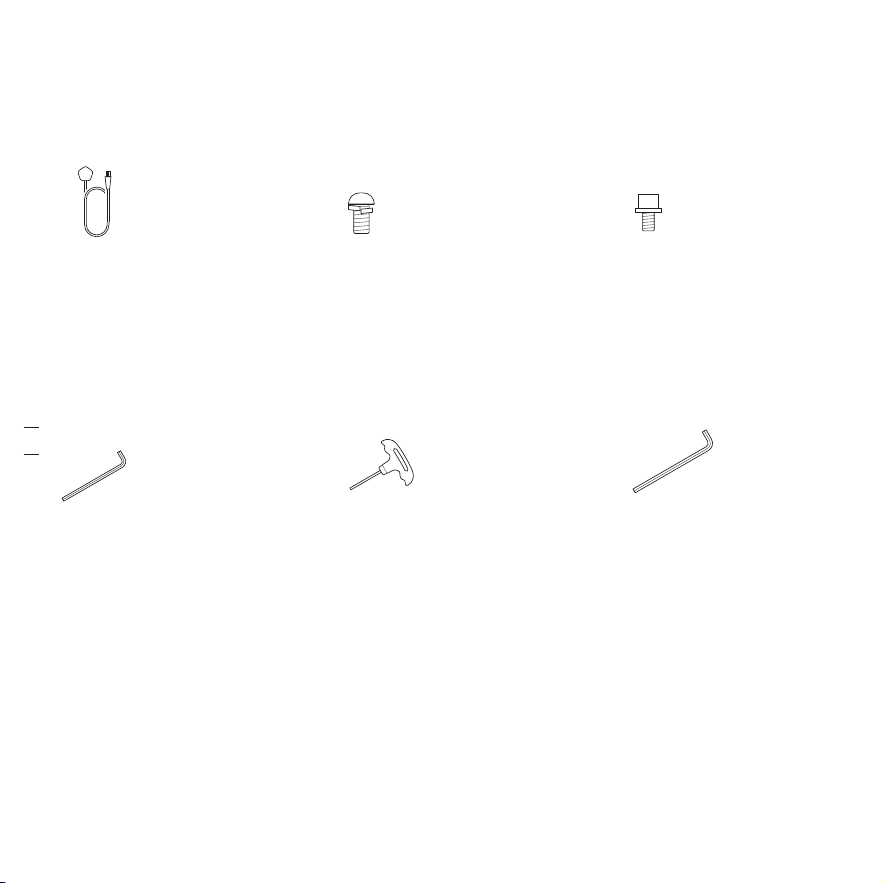
EN AC Cable
FR Ligne AC
DE AC-Kabel
IT Cavo AC
ES Cable de corriente alterna
PL Przewód zasilania (AC)
NL AC-draad
PT Fio CA
EN M6 Screw
FR Vis M6
DE M6 Schraube
IT M6 Viti
ES M6 Tornillo
PL M6 Śruba
NL M6 Schroef
PT M6 Parafuso
EN M4 Screw
FR Vis M4
DE M4 Schraube
IT M4 Viti
ES M4 Tornillo
PL M4 Śruba
NL M4 Schroef
PT M4 Parafuso
EN 2.5 mm (3/32'') Allen Wrench
FR Clé Allen 2,5 mm (3/32'')
DE 2,5 mm (3/32'')
Innensechskantschlüssel
IT Chiave a brugola da 2,5 mm
(3/32'')
ES Llave Allen de 2,5 mm
(3/32'')
PL Klucz imbusowy 2,5 mm
(3/32'')
NL 2,5 mm (3/32'') inbussleutel
PT Chave hexagonal de 2,5 mm
(3/32'')
EN 4 mm (5/32'') Allen
Wrench
FR Clé Allen 4 mm (5/32'')
DE 4 mm (5/32'')
Innensechskantschlüssel
IT Chiave a brugola da 4
mm (5/32'')
ES Llave Allen de 4 mm
(5/32'')
PL Klucz imbusowy 4 mm
(5/32'')
NL 4 mm (5/32'')
inbussleutel
PT Chave hexagonal de 4
mm (5/32'')
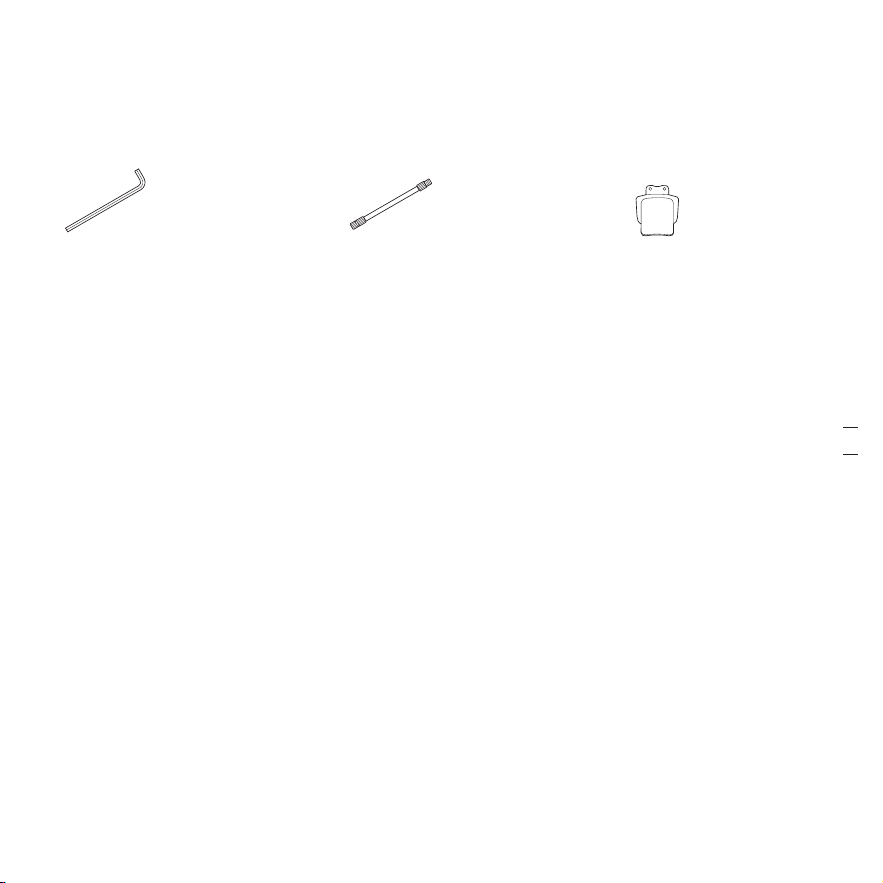
EN 3 mm (7/64'') Allen Wrench
FR Clé Allen 3 mm (7/64'')
DE 3 mm (7/64'')
Innensechskantschlüssel
IT Chiave a brugola da 3 mm
(7/64'')
ES Llave Allen de 3 mm (7/64'')
PL Klucz imbusowy 3 mm
(7/64'')
NL 3 mm (7/64'') inbussleutel
PT Chave hexagonal de 3 mm
(7/64'')
EN 5 mm (3/16'') Allen Wrench
FR Clé Allen 5 mm (3/16'')
DE 5 mm (3/16'')
Innensechskantschlüssel
IT Chiave a brugola da 5 mm
(3/16'')
ES Llave Allen de 5 mm (3/16'')
PL Klucz imbusowy 5 mm
(3/16'')
NL 5 mm (3/16'') inbussleutel
PT Chave hexagonal de 5 mm
(3/16'')
EN Valve Stem Extension
FR Extension tige de
soupape
DE Ventilschaftverlängerung
IT Estensione valvola
ES Extensión de la toma de
aire del neumático
PL Przedłuzka do zaworu
NL Trekstangverlenging
PT Extensão de Haste de
Válvula
× 1 × 5 × 2
× 1
× 1
× 1
× 1
× 1
EN License Plate Holder
FR Support de plaque
d’immatriculation
DE Kennzeichenhalter
IT Portatarga
ES Soporte de matrícula
PL Uchwyt tablicy
rejestracyjnej
NL Kentekenhouder
PT Suporte de matrícula
× 1
01 02 03 04 05 06 07 08 09 10 11 12 13 14 15
16 17 18 19 20 21 22 23 24 25 26 27 28 29 30 31 32 33
34 35 36 37 38 39 40 41 42 43 44 45 46 47 48 49 50 51
52 53 54 55 56 57 58 59 60 61 62 63 64 65 66 67 68 69
70 71 72 73 74 75 76 77
78 79 80 81
82 83 84 85
86 87 88 89 90 91 92 93 94 95 96 97 98 99 100 101
102 103 104 105 106 107 108
●Accessories / Accessoires / Zubehör / Accessori / Accesorios / Akcesoria /
Accessoires / Acessórios
EN Note: Please keep the orginal packaging for at least 15 days!
FR Remarque : veuillez conserver l’emballage d’origine pendant au moins 15 jours !
DE Hinweis: Bitte bewahren Sie die Originalverpackung für mindestens 15 Tage auf!
IT Nota: conservare la confezione originale per almeno 15 giorni!
ES Nota: Conserve el embalaje original durante al menos 15 días.
PL Uwaga: Należy zachować oryginalne opakowanie przez co najmniej 15 dni.
NL Opmerking: Bewaar de originele verpakking minimaal 15 dagen!
PT Observação: Por favor, mantenha a embalagem original por pelo menos 15 dias!
EN AC Cable
FR Ligne AC
DE AC-Kabel
IT Cavo AC
ES Cable de corriente alterna
PL Przewód zasilania (AC)
NL AC-draad
PT Fio CA
EN M6 Screw
FR Vis M6
DE M6 Schraube
IT M6 Viti
ES M6 Tornillo
PL M6 Śruba
NL M6 Schroef
PT M6 Parafuso
EN M4 Screw
FR Vis M4
DE M4 Schraube
IT M4 Viti
ES M4 Tornillo
PL M4 Śruba
NL M4 Schroef
PT M4 Parafuso
EN 2.5 mm (3/32'') Allen Wrench
FR Clé Allen 2,5 mm (3/32'')
DE 2,5 mm (3/32'')
Innensechskantschlüssel
IT Chiave a brugola da 2,5 mm
(3/32'')
ES Llave Allen de 2,5 mm
(3/32'')
PL Klucz imbusowy 2,5 mm
(3/32'')
NL 2,5 mm (3/32'') inbussleutel
PT Chave hexagonal de 2,5 mm
(3/32'')
EN 4 mm (5/32'') Allen
Wrench
FR Clé Allen 4 mm (5/32'')
DE 4 mm (5/32'')
Innensechskantschlüssel
IT Chiave a brugola da 4
mm (5/32'')
ES Llave Allen de 4 mm
(5/32'')
PL Klucz imbusowy 4 mm
(5/32'')
NL 4 mm (5/32'')
inbussleutel
PT Chave hexagonal de 4
mm (5/32'')
EN 3 mm (7/64'') Allen Wrench
FR Clé Allen 3 mm (7/64'')
DE 3 mm (7/64'')
Innensechskantschlüssel
IT Chiave a brugola da 3 mm
(7/64'')
ES Llave Allen de 3 mm (7/64'')
PL Klucz imbusowy 3 mm
(7/64'')
NL 3 mm (7/64'') inbussleutel
PT Chave hexagonal de 3 mm
(7/64'')
EN 5 mm (3/16'') Allen Wrench
FR Clé Allen 5 mm (3/16'')
DE 5 mm (3/16'')
Innensechskantschlüssel
IT Chiave a brugola da 5 mm
(3/16'')
ES Llave Allen de 5 mm (3/16'')
PL Klucz imbusowy 5 mm
(3/16'')
NL 5 mm (3/16'') inbussleutel
PT Chave hexagonal de 5 mm
(3/16'')
EN Valve Stem Extension
FR Extension tige de
soupape
DE Ventilschaftverlängerung
IT Estensione valvola
ES Extensión de la toma de
aire del neumático
PL Przedłuzka do zaworu
NL Trekstangverlenging
PT Extensão de Haste de
Válvula
× 1 × 5 × 2
× 1
× 1
× 1
× 1
× 1
EN License Plate Holder
FR Support de plaque
d’immatriculation
DE Kennzeichenhalter
IT Portatarga
ES Soporte de matrícula
PL Uchwyt tablicy
rejestracyjnej
NL Kentekenhouder
PT Suporte de matrícula
× 1
01 02 03 04 05 06 07 08 09 10 11 12 13 14 15
16 17 18 19 20 21 22 23 24 25 26 27 28 29 30 31 32 33
34 35 36 37 38 39 40 41 42 43 44 45 46 47 48 49 50 51
52 53 54 55 56 57 58 59 60 61 62 63 64 65 66 67 68 69
70 71 72 73 74 75 76 77
78 79 80 81
82 83 84 85
86 87 88 89 90 91 92 93 94 95 96 97 98 99 100 101
102 103 104 105 106 107 108

Diagram / Diagramme / Abbildung / Schema / Diagrama /
Diagram / Diagram / Diagrama
EN Right Direction Indicator
FR Indicateur de direction droit
DE Fahrtrichtungsanzeiger rechts
IT Indicatore di direzione destra
ES Indicador de dirección
derecho
PL Wskaźnik kierunku w prawo
NL Richtingaanwijzer rechts
PT Indicador de Direção Direito
● MAX G3
1
2
3
15
20
17
18
16
4
5
21
22
23
24
25
26
27
28
29
30
31
32
10
11
12
13
14
6
8
9
27
19
7
1
EN Brake Lever
FR Levier de frein
DE Bremshebel
IT Leva del freno
ES Palanca de freno
PL Dźwignia hamulca
NL Remhendel
PT Alavanca do travão
2
EN Headlight & Front Position Lamp
(Only for 051601E)
FR Feu de route & Feu de position
avant (Pour 051601E uniquement)
DE Scheinwerfer & Vordere
Positionsleuchte (Nur für
051601E)
IT Faro anteriore & Luce di posizione
anteriore (Solo per 051601E)
ES Luz delantera & Luz de posición
delantera (Solo para 051601E)
PL Światło przednie & Przednie
światło pozycyjne (Tylko w
modelu 051601E)
NL Koplamp & Positielicht vooraan
(Alleen voor 051601E)
PT Farol & Lâmpada de posição
frontal (Apenas para 051601E)
3
EN Stem
FR Potence
DE Qua
IT Asta
ES Eje
PL Kolumna
NL Stuurpen
PT Haste
4
EN Charging Port
FR Port de charge
DE Ladeanschluss
IT Porta di ricaricat
ES Puerto de carga
PL Gniazdo ładowania
NL Oplaadpoort
PT Porta de carregamento
5
EN Quick-release Lever
FR Levier de libération rapide
DE Schnelllösehebel
IT Leva di sgancio rapidot
ES Palanca de liberación rápida
PL Dźwignia szybkiego zwalniania
NL Snelspanhendel
PT Alavanca de remoção rápida
6
EN Folding Latch
FR Loquet pliant
DE Klappverschluss
IT Chiusura pieghevole
ES Pestillo plegable
PL Zatrzask mechanizmu
składania
NL Inklapbare
vergrendeling
PT Trinco dobrável
7
EN Folding Mechanism
FR Mécanisme de pliage
DE Klappmechanismus
IT Meccanismo di chiusura
pieghevolet
ES Mecanismo de plegado
PL Mechanizm składania
NL Vouwmechanisme
PT Mecanismo de
dobramento
8
EN Charging Port
FR Port de charge
DE Ladeanschluss
IT Porta di ricarica
ES Puerto de carga
PL Gniazdo ładowania
NL Oplaadpoort
PT Porta de
carregamento
9
01 02 03 04 05 06 07 08 09 10 11 12 13 14 15
16 17 18 19 20 21 22 23 24 25 26 27 28 29 30 31 32 33
34 35 36 37 38 39 40 41 42 43 44 45 46 47 48 49 50 51
52 53 54 55 56 57 58 59 60 61 62 63 64 65 66 67 68 69
70 71 72 73 74 75 76 77
78 79 80 81
82 83 84 85
86 87 88 89 90 91 92 93 94 95 96 97 98 99 100 101
102 103 104 105 106 107 108

EN Front Reflector
FR Réflecteur avant
DE Frontrückstrahler
IT Riflettore anteriore
ES Reflector delantero
PL Przedni reflektor
NL Reflector voor
PT Refletor frontal
10
EN Front Shock Absorber
FR Amortisseur de chocs
avant
DE Vorderer Stoßdämpfer
IT Ammortizzatore antiurto
anteriore
ES Amortiguador delantero
PL Przedni amortyzator
NL Voorste schokdemper
PT Amortecedor frontal
11
EN Front Mudguard
FR Garde-boue avant
DE Vorderer Kotflügel
IT Parafango anteriore
ES Guardabarros delantero
PL Przedni widelec
NL Spatbord aan de voorkant
PT Guarda-lamas dianteiro
12
EN Front Wheel
FR Roue avant
DE Vorderrad
IT Ruota anteriore
ES Rueda delantera
PL Przednie koło
NL Voorwiel
PT roda dianteira
13
EN Front Disc Brake
FR Frein à disque avant
DE Scheibenbremse vorne
IT Freno a disco anteriore
ES Freno de disco delantero
PL Przedni hamulec tarczowy
NL Schijfrem vooraan
PT Travão de disco dianteiro
14
EN Handlebar
FR Guidon
DE Lenkerr
IT Manubrio
ES Manillar
PL Kierownica
NL Stuur
PT Guiador
15
EN Left Direction Indicator
FR Indicateur de direction gauche
DE Fahrtrichtungsanzeiger links
IT Indicatore di direzione sinistra
ES Indicador de dirección izquierdo
PL Lewy wskaźnik kierunku
NL Richtingaanwijzer links
PT Indicador de Direção Esquerdo
16
EN Dashboard
FR Tableau de bord
DE Armaturenbrett
IT Cruscotto
ES Panel de control
PL Deska rozdzielcza
NL Dashboard
PT Tablier
17
EN Throttle
FR Accélérateur électronique
DE Elektronischer Gasgriff
IT Acceleratore
ES Acelerador
PL Przepustnica
NL Gaspedaal
PT Acelerador
18
EN Snap Hook
FR Mousqueton
DE Einrasthaken
IT Gancio a scatto
ES Mosquetón
PL Karabińczyk
NL Karabijnhaak
PT Gancho de Pressão
19
EN Bell
FR Sonnette
DE Klingel
IT Campanello
ES Timbre
PL Dzwonek
NL Stepbel
PT Campainha
20
EN Footboard
FR Repose-pieds
DE Trittbrett
IT Pedana
ES Reposapiés
PL Podest
NL Voetenplank
PT Tabuleiro de pés
21
EN Buckle
FR Système d'attache
DE Schloss
IT Punto di aggancio
ES Hebilla
PL Klamra
NL Vergrendeling
PT Fivela
22
EN Rear Mudguard
FR Garde-boue arrière
DE Hinterer Kotflügel
IT Parafango posteriore
ES Guardabarros trasero
PL Błotnik
NL Spatbord aan de
achterkant
PT Guarda-lamas traseiro
23
EN Taillight & Rear Reflector
FR Feu arrière et catadioptre
arrière
DE Rücklicht und Hinterer
Reflektor
IT Fanale posteriore e riflettore
posteriore
ES Luz trasera y reflector trasero
PL Światło tylne i tylne światło
odblaskowe
NL Achterlicht en achterreflector
PT Luz traseira e refletor traseiro
24
EN License Plate Holder
FR Support de plaque d’immatriculation
DE Kennzeichenhalter
IT Portatarga
ES Soporte de matrícula
PL Uchwyt tablicy rejestracyjnej
NL Kentekenhouder
PT Suporte de matrícula
25
EN Rear Disc Brake
FR Frein à disque arrière
DE Freno a disco posteriorex
IT Freno a disco posteriore
ES Freno de disco trasero
PL Tylny hamulec tarczowy
NL Schijfrem achteraan
PT Travão de disco traseiro
26
EN Rear Shock Absorber
FR Amortisseur arrière
DE Stoßdämpfer hinten
IT Ammortizzatore posteriore
ES Amortiguador trasero
PL Tylny amortyzator
NL Schokdemper achter
PT Amortecedor Traseiro
27
01 02 03 04 05 06 07 08 09 10 11 12 13 14 15
16 17 18 19 20 21 22 23 24 25 26 27 28 29 30 31 32 33
34 35 36 37 38 39 40 41 42 43 44 45 46 47 48 49 50 51
52 53 54 55 56 57 58 59 60 61 62 63 64 65 66 67 68 69
70 71 72 73 74 75 76 77
78 79 80 81
82 83 84 85
86 87 88 89 90 91 92 93 94 95 96 97 98 99 100 101
102 103 104 105 106 107 108

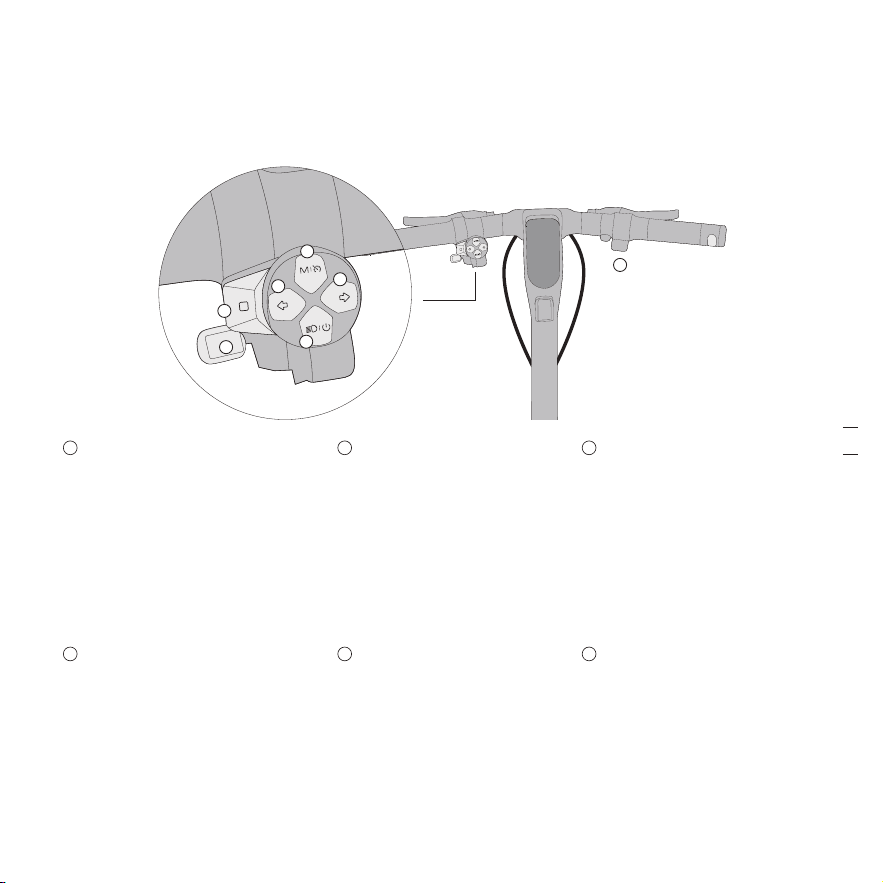
EN Mode Switching
FR Changement de mode
DE Moduswechsel
IT Passaggio di modalità
ES Cambio de modo
PL Przełączanie trybu
NL Schakelen tussen modi
PT Mudança de modo
1
EN Custom Button
FR Bouton personnalisé
DE Benutzerdefinierte Taste
IT Pulsante personalizzato
ES Botón personalizado
PL Przycisk spersonalizowany
NL Aangepaste knop
PT Botão personalizado
2
EN Direction Indicator Buttons
FR Bouton d'indicateur de direction
DE Fahrtrichtungsanzeiger�Taste
IT Pulsante dell'indicatore di
direzione
ES Botón del indicador de
dirección
PL Przycisk kierunkowskazu
NL Knop richtingaanwijzer
PT Botão indicador de direção
3
EN Power Button/Headlight
FR Bouton marche/arrêt/feu de route
DE Ein-/Aus-Schalter/Frontlicht
IT Pulsante di accensione/Fanale
ES Botón de encendido/faro
PL Przycisk zasilania/światła
przedniego
NL Aan/uit-knop/koplamp
PT Botão de alimentação/farol
4
EN Bell Button
FR Sonnette
DE Klingel
IT Campanello
ES Timbre
PL Przycisk dzwonka
NL Bel
PT Buzina
5
EN Throttle
FR Accélérateur électronique
DE Elektronischer Gasgriff
IT Acceleratore
ES Acelerador
PL Przepustnica
NL Gaspedaal
PT Acelerador
6
EN Wheel Hub Motor
FR Moyeu moteur de la
roue
DE Radnabenmotor
IT Motore a mozzo ruota
ES Motor de rueda
PL Silnik piasty koła
NL Wielnaafmotor
PT Motor da roda
28
EN Rear Wheel
FR Roue arrière
DE Hinterrad
IT Ruota posteriore
ES Rueda trasera
PL Tylnego koła
NL Achterwiel
PT Roda traseira
29
EN Battery Compartment
FR Compartiment de batterie
DE Batteriefach
IT Vano batteria
ES Compartimento de la
batería
PL Komora akumulatora
NL Accucompartiment
PT Compartimento da bateria
30
EN Main Frame
FR Cadre principal
DE Hauptrahmen
IT Telaio principale
ES Chasis principal
PL Rama główna
NL Hoofdframe
PT Estrutura principal
31
EN Kickstand
FR Béquille
DE Ständer
IT Cavalletto
ES Soporte
PL Podpórka
NL Standaard
PT Descanso
32
●Handlebar Functions / Fonctions du guidon / Lenkerfunktionen / Funzioni del
manubrio / Funciones del manillar / Funkcje kierownicy / Functies van het stuur /
Funções do guiador
5
6
4
3
3
1
2
01 02 03 04 05 06 07 08 09 10 11 12 13 14 15
16 17 18 19 20 21 22 23 24 25 26 27 28 29 30 31 32 33
34 35 36 37 38 39 40 41 42 43 44 45 46 47 48 49 50 51
52 53 54 55 56 57 58 59 60 61 62 63 64 65 66 67 68 69
70 71 72 73 74 75 76 77
78 79 80 81
82 83 84 85
86 87 88 89 90 91 92 93 94 95 96 97 98 99 100 101
102 103 104 105 106 107 108
Name
EN
Operation
Mode switching Press the button to switch the speed mode.
Press the button to use bell.
Twist / Press the throttle to speed up.
Default Electronic Horn. Customize Quick Features through the Segway Mobility
App. After setting, you can press the custom button to use it.
Press the button to light up left/right signal, then the signal flashes, and press the
button again to turn it off. Press and hold the left or right direction indicator button
for 2s to turn on/off emergency flashers.
Press the Power Button to power on the scooter. Press and hold for 2s to power it
off. After powering on, press the button to switch headlight mode, successively On
[1]
,
Auto Mode and Off.
Custom Button
Direction Indicator Buttons
Power Button/Headlight
Bell Button
Throttle
[1] When headlight is on, the clearance lamps light up white, when the direction indicator is on, the clearance lamps flash
yellow. You can disable clearance lamp in Segway Mobility App.
*As different versions of App/firmware may vary, please refer to the actual vehicle.
Nom
FR
Opération
Changement de mode Appuyez sur le bouton pour changer de mode de vitesse.
Appuyez sur le bouton pour utiliser la sonnette.
Tournez/appuyez sur l’ accélérateur électronique pour accélérer.
Klaxon électronique par défaut. Personnalisez les Fonctionnalités rapides via l’
application Segway Mobility. Après le réglage, vous pouvez appuyer sur le bouton
personnalisé pour l’ utiliser.
Appuyez sur le bouton pour allumer le signal gauche/droite, puis le signal clignote.
Appuyez à nouveau sur le bouton pour l’éteindre. Appuyez et maintenez enfoncé le
bouton indicateur de direction gauche ou droit pendant 2 s pour allumer/éteindre les
clignotants d’urgence.
Appuyez sur le bouton marche/arrêt pour allumer le scooter. Appuyez et maintenez
enfoncé pendant 2 secondes pour l’éteindre. Après la mise sous tension, appuyez
sur le bouton pour changer le mode feu de route sur Allumé
[1]
, Automatique ou
Éteint.
Bouton personnalisé
Bouton d'indicateur de
direction
Bouton marche/arrêt/feu de
route
Sonnette
Accélérateur électronique
[1] Lorsque le feu de route est allumé, le feu d’encombrement s’allume en blanc ; lorsque le clignotant est allumé, le feu
d’encombrement clignote en jaune. Vous pouvez désactiver le feu d’encombrement depuis l’application Segway Mobility.
*Étant donné que les différentes versions de l'application/du firmware peuvent varier, veuillez vous référer au véhicule réel.
Nome
IT
Operazione
Passaggio di modalità Premere il pulsante per modificare la modalità di velocità.
Premere il pulsante per utilizzare il campanello.
Ruotare/premere l'acceleratore per accelerare.
Clacson elettronico predefinito. Per personalizzare le funzioni rapide, utilizzare l'app
Segway Mobility. Dopo averle impostate, è possibile premere il pulsante
personalizzato per utilizzarlo.
Premere il pulsante per attivare il segnale destro/sinistro e farlo lampeggiare;
premere nuovamente il pulsante per disattivarlo. Tenere premuto il pulsante
dell'indicatore di direzione sinistro o destro per 2 secondi per accendere/spegnere i
lampeggianti di emergenza.
Premere il pulsante per accendere lo scooter. Tenerlo premuto per 2 secondi per
spegnerlo. Dopo averlo acceso, premere il pulsante per passare in successione alla
modalità fanale anteriore, attiva
[1]
, automatica e per spegnerlo.
Pulsante personalizzato
Pulsante dell'indicatore
di direzione
Pulsante di accensione/
Fanale
Campanello
Acceleratore
[1] Quando il fanale anteriore è acceso, le luci di posizione si illuminano di bianco; quando l'indicatore di direzione è acceso,
le luci di posizione lampeggiano di giallo. È possibile disabilitare la luce di posizione nell'app Segway Mobility.
*Poiché le diverse versioni dell'app/firmware possono variare, fare riferimento al veicolo effettivo.
Name
DE
Betätigung
Moduswechsel Drücken Sie die Taste, um den Geschwindigkeitsmodus zu wechseln.
Drücken Sie die Taste, um die Klingel zu benutzen.
Drehen/drücken Sie den elektronischen Gasgriff, um zu beschleunigen.
Standardmäßige elektronische Hupe. Passen Sie Schnellfunktionen über die Segway
Mobility�App an. Nach der Einstellung können Sie die benutzerdefinierte Taste
drücken, um sie zu verwenden.
Durch Drücken der Taste leuchten die linken/rechten Fahrtrichtungsanzeiger auf,
dann blinkt der Fahrtrichtungsanzeiger, und durch erneutes Drücken der Taste
schalten Sie ihn aus. Zum Ein-/Ausschalten der Notfall-Blinker die Taste für den
linken oder rechten Fahrtrichtungsanzeiger zwei Sekunden lang gedrückt halten.
Drücken Sie den Ein-/Aus-Schalter, um den Roller einzuschalten. Zum Ausschalten
2 Sekunden lang gedrückt halten. Nach dem Einschalten drücken Sie die Taste, um
den Scheinwerfermodus nacheinander einzuschalten
[1]
, Auto-Modus und Aus.
Benutzerdefinierte
Taste
Fahrtrichtungsanzeiger�Taste
Ein-/Aus-Schalter/
Frontlicht
Klingel
Elektronischer Gasgriff
[1] Bei eingeschaltetem Frontlicht leuchten die Begrenzungsleuchten weiß, bei eingeschaltetem Fahrtrichtungsanzeiger
blinken die Begrenzungsleuchten gelb. Sie können die Begrenzungsleuchte in der Segway Mobility-App deaktivieren.
*Da die App-/Firmware-Versionen unterschiedlich sein können, beziehen Sie sich bitte auf das jeweilige Fahrzeug.
01 02 03 04 05 06 07 08 09 10 11 12 13 14 15
16 17 18 19 20 21 22 23 24 25 26 27 28 29 30 31 32 33
34 35 36 37 38 39 40 41 42 43 44 45 46 47 48 49 50 51
52 53 54 55 56 57 58 59 60 61 62 63 64 65 66 67 68 69
70 71 72 73 74 75 76 77
78 79 80 81
82 83 84 85
86 87 88 89 90 91 92 93 94 95 96 97 98 99 100 101
102 103 104 105 106 107 108
Nazwa
PL
Działanie
Przełączanie trybu Naciśnij ten przycisk, aby przełączyć tryb prędkości.
Naciśnij ten przycisk, aby użyć dzwonka.
Obróć/naciśnij przepustnicę, aby przyśpieszyć.
Domyślny klakson elektroniczny. Dostosuj szybkie funkcje za pomocą aplikacji
Segway Mobility. Po ustawieniu funkcji można ją wybrać, naciskając przycisk
spersonalizowany.
Naciśnij ten przycisk, aby włączyć lewy/prawy kierunkowskaz. Zacznie on migać. Aby
go wyłączyć, naciśnij przycisk ponownie. Naciśnij i przytrzymaj przez 2 s przycisk
lewego lub prawego kierunkowskazu, aby włączyć/wyłączyć światła awaryjne.
Naciśnij ten przycisk, aby włączyć hulajnogę. Naciśnij i przytrzymaj przez 2 sekundy,
aby wyłączyć. Po włączeniu zasilania naciśnij przycisk, aby przełączyć tryby światła
przedniego, kolejno: włączenie
[1]
, tryb automatyczny i wyłączenie.
Przycisk spersonalizowany
Przycisk kierunkowskazu
Przycisk zasilania/ światła
przedniego
Przycisk dzwonka
Przepustnica
[1] Gdy włączone jest światło przednie, światła obrysowe świecą na biało. Gdy włączony jest kierunkowskaz, światła
obrysowe migają na żółto. Możesz wyłączyć światło obrysowe w aplikacji Segway Mobility.
* Ponieważ różne wersje aplikacji/oprogramowania wbudowanego mogą się różnić, należy odnieść się do rzeczywistego
pojazdu.
Naam
NL
Werking
Schakelen tussen modi Druk op de knop om van snelheidsmodus te wisselen.
Druk op de knop om de bel te gebruiken.
Draai/druk op het gaspedaal om te versnellen.
Standaard elektronische claxon. Pas Snelle functies aan via de Segway Mobility-app.
Na het instellen kunt u op de aangepaste knop drukken om deze te gebruiken.
Druk op de knop om het links/rechts-signaal te laten branden, waarna het signaal
knippert en druk opnieuw op de knop om het uit te schakelen. Houd de knop van de
linker of rechter richtingaanwijzer 2 s ingedrukt om de alarmlichten in of uit te
schakelen.
Druk op de aan/uit-knop om de scooter in te schakelen. Houd de knop 2 s ingedrukt
houden om de scooter uit te schakelen. Druk na het inschakelen op de knop om over
te schakelen naar de koplampmodus, achtereenvolgens Aan
[1]
, Automatische modus
en Uit.
Aangepaste knop
Knop richtingaanwijzer
Aan/uit-knop/koplamp
Bel
Gaspedaal
[1] Als de koplamp brandt, branden de begrenzingslampen wit, als de richtingaanwijzer brandt, knipperen de
begrenzingslampen geel. U kunt de begrenzingslamp uitschakelen in de Segway Mobility-app.
*Verwijs naar het werkelijke voertuig, aangezien verschillende versies van de app/firmware kunnen variëren.
Nome
PT
Operação
Mudança de modo Pressione o botão para alternar o modo de velocidade.
Prima o botão para utilizar a campainha.
Rodar/Pressionar o acelerador para acelerar.
Buzina eletrónica padrão. Personalize as funcionalidades rápidas através da
Aplicação Segway Mobility. Após a definição, pode premir o botão personalizado
para o utilizar.
Pressione o botão para acender o sinal esquerdo/direito, então o sinal pisca e
pressione o botão novamente para desligá-lo. Prima e mantenha premido o botão
indicador de direção esquerdo ou direito durante 2 segundos para ligar/desligar os
piscas de emergência.
Prima o botão de alimentação para ligar a scooter. Pressione e segure por 2s para
desligá-lo. Depois de ligar, pressione o botão para mudar o modo farol,
sucessivamente ligado
[1]
, modo automático e desligado.
Botão personalizado
Botão indicador de
direção
Botão de
alimentação/farol
Buzina
Acelerador
[1] Quando o farol está aceso, as luzes de folga acendem-se a branco, quando o indicador de direção está aceso, as
lâmpadas de folga piscam a amarelo. Pode desativar a lâmpada de folga na Aplicação Segway Mobility.
*Uma vez que as diferentes versões da aplicação/firmware podem variar, consulte o veículo atual.
Nombre
ES
Operación
Cambio de modo Presione el botón para cambiar el modo de velocidad.
Pulse el botón para usar el timbre.
Gire o presione el acelerador para acelerar.
Bocina electrónica predeterminada. Personalice funciones rápidas a través de la
aplicación Segway Mobility. Después de configurarlo, puede presionar el botón
personalizado para usarlo.
Pulse el botón para encender la señal izquierda/derecha. A continuación, la señal
parpadea. Pulse el botón nuevamente para apagarla. Mantenga presionado el botón
indicador de dirección izquierdo o derecho durante 2 segundos para
encender/apagar las luces intermitentes de emergencia.
Pulse el botón de encendido para encender el patinete. Manténgalo pulsado durante
2 segundos para apagarlo. Después de encender, presione el botón para cambiar el
modo del faro, sucesivamente Encendido
[1]
, Modo automático y Apagado.
Botón personalizado
Botón del indicador de
dirección
Botón de encendido/
faro
Timbre
Acelerador
[1] Cuando el faro está encendido, los faros de señalización se iluminan en blanco; cuando el indicador de dirección está
encendido, los faros de señalización parpadean en amarillo. Puede desactivar el faro de señalización en la aplicación
Segway Mobility.
*Como las diferentes versiones de la aplicación o el firmware pueden variar, consulte el vehículo real.
01 02 03 04 05 06 07 08 09 10 11 12 13 14 15
16 17 18 19 20 21 22 23 24 25 26 27 28 29 30 31 32 33
34 35 36 37 38 39 40 41 42 43 44 45 46 47 48 49 50 51
52 53 54 55 56 57 58 59 60 61 62 63 64 65 66 67 68 69
70 71 72 73 74 75 76 77
78 79 80 81
82 83 84 85
86 87 88 89 90 91 92 93 94 95 96 97 98 99 100 101
102 103 104 105 106 107 108
●Dashboard / Tableau de bord / Anzeigetafel / Cruscotto / Panel de control / Tablica
wskaźników / Dashboard / Tablier
82
1
6
9
3
4
10
5
11
7
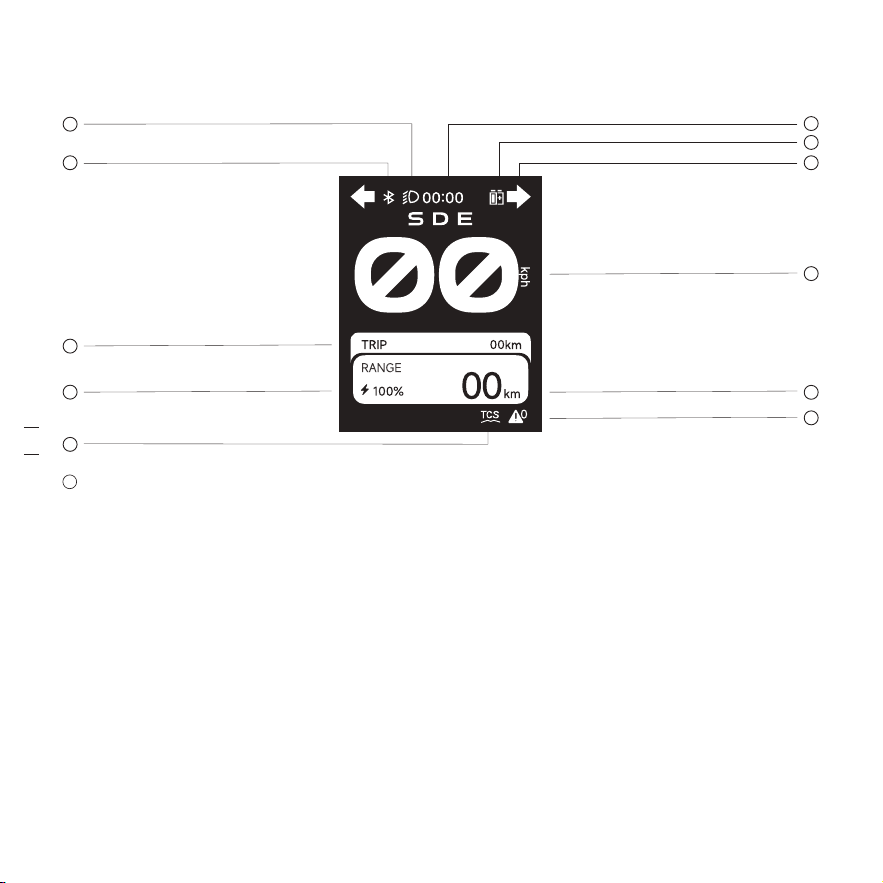
EN Headlight: It indicates that the headlight is on.
*When entering Walk Mode, the headlight and tail light are always on and can't be turned off.
FR Feu de route: Indique que le feu de route est allumé.
*Lorsque vous passez en mode Walk, le feu de route et le feu arrière restent allumés et ne peuvent pas être éteints.
DE Frontlicht: Frontlicht: Es zeigt an, dass der Scheinwerfer eingeschaltet ist.
*Beim Wechsel in den Laufmodus sind das Frontlicht und das Rücklicht immer eingeschaltet und können nicht
ausgeschaltet werden.
IT Fanale anteriore: Indica che il fanale anteriore è acceso.
*Quando si entra in modalità Camminata, il fanale anteriore e posteriore sono sempre accesi e non possono essere
spenti.
ES Faro: Indica que el faro está encendido.
*Al activar el modo de paseo, el faro y la luz trasera siempre están encendidos y no se pueden apagar.
PL Światło przednie: Oznacza, że światło przednie jest włączone.
* Po włączeniu trybu pieszego światła przednie i tylne są zawsze włączone i nie można ich wyłączyć.
NL Koplamp: Het geeft aan dat de koplamp aan is.
*Bij het inschakelen van de wandelmodus zijn de koplamp en het achterlicht altijd aan en kunnen ze niet worden
uitgeschakeld.
PT Farol: Indica que o farol está aceso.
*Ao entrar no modo de caminhada, o farol e a luz traseira estão sempre acesos e não podem ser desligados.
1
EN Bluetooth: When the icon lights up, it indicates that the scooter has been successfully connected to the mobile
device.
FR Bluetooth: Lorsque l’icône s’allume, cela indique que le scooter a été connecté avec succès à l’appareil mobile.
DE Bluetooth: Wenn das Symbol aufleuchtet, zeigt dies an, dass der Roller erfolgreich mit dem Mobilgerät verbunden
wurde.
IT Bluetooth: Quando l'icona si accende, indica che lo scooter è stato collegato correttamente al dispositivo mobile.
ES Bluetooth: Cuando el icono se enciende, indica que el patinete se ha conectado correctamente al dispositivo móvil.
PL Bluetooth: Świecenie tej ikony w sposób ciągły sygnalizuje nawiązanie połączenia hulajnogi z urządzeniem
mobilnym.
NL Bluetooth: Als het pictogram oplicht, geeft dit aan dat de scooter is verbonden met het mobiele apparaat.
PT Bluetooth: Quando o ícone se acende, indica que a scooter foi ligada com sucesso ao dispositivo móvel.
2
EN Trip: It displays the riding distance of this riding.
FR Voyage: Indique la distance parcourue pendant le parcours actuel.
DE Fahrt: Es zeigt die Fahrstrecke dieser Fahrt an.
IT Percorso: Visualizza la distanza di guida del percorso attuale.
ES Viaje: Muestra la distancia de conducción de este viaje.
PL Podróż: Wyświetla dystans przejechany podczas aktualnej jazdy.
NL Rit: Dit geeft de afgelegde afstand van deze rit weer.
PT Viagem: Apresenta a distância de condução desta condução.
3
EN Battery Level: It indicates the remaining battery level.
*The battery level is lower than 10% when it displays red.
FR Niveau de batterie: Indique le niveau de batterie restant.
* Le niveau de la batterie est inférieur à 10 % lorsqu’il s’affiche en rouge.
DE Akkuladestand: Zeigt den verbleibenden Akkuladestand an.
*Der Akkuladestand liegt unter 10 %, wenn die Anzeige rot ist.
IT Livello della batteria: Indica il livello residuo della batteria.
*Quando viene visualizzato in rosso, il livello della batteria è inferiore al 10%.
ES Nivel de batería: Indica el nivel de batería restante.
*El nivel de batería es inferior al 10 % cuando aparece en rojo.
PL Poziom naładowania akumulatora: Wskazuje pozostały poziom naładowania akumulatora.
*Poziom naładowania akumulatora jest niższy niż 10%, gdy wskaźnik świeci na czerwono.
NL Accuniveau: Het geeft het resterend accuniveau aan.
*Het accuniveau is lager dan 10% als dit in het rood wordt weergegeven.
PT Nível de bateria: Indica o nível de bateria restante.
*O nível da bateria é inferior a 10% quando apresenta vermelho.
4
01 02 03 04 05 06 07 08 09 10 11 12 13 14 15
16 17 18 19 20 21 22 23 24 25 26 27 28 29 30 31 32 33
34 35 36 37 38 39 40 41 42 43 44 45 46 47 48 49 50 51
52 53 54 55 56 57 58 59 60 61 62 63 64 65 66 67 68 69
70 71 72 73 74 75 76 77
78 79 80 81
82 83 84 85
86 87 88 89 90 91 92 93 94 95 96 97 98 99 100 101
102 103 104 105 106 107 108

●Dashboard / Tableau de bord / Anzeigetafel / Cruscotto / Panel de control / Tablica
wskaźników / Dashboard / Tablier
82
1
6
9
3
4
10
5
11
7
EN Headlight: It indicates that the headlight is on.
*When entering Walk Mode, the headlight and tail light are always on and can't be turned off.
FR Feu de route: Indique que le feu de route est allumé.
*Lorsque vous passez en mode Walk, le feu de route et le feu arrière restent allumés et ne peuvent pas être éteints.
DE Frontlicht: Frontlicht: Es zeigt an, dass der Scheinwerfer eingeschaltet ist.
*Beim Wechsel in den Laufmodus sind das Frontlicht und das Rücklicht immer eingeschaltet und können nicht
ausgeschaltet werden.
IT Fanale anteriore: Indica che il fanale anteriore è acceso.
*Quando si entra in modalità Camminata, il fanale anteriore e posteriore sono sempre accesi e non possono essere
spenti.
ES Faro: Indica que el faro está encendido.
*Al activar el modo de paseo, el faro y la luz trasera siempre están encendidos y no se pueden apagar.
PL Światło przednie: Oznacza, że światło przednie jest włączone.
* Po włączeniu trybu pieszego światła przednie i tylne są zawsze włączone i nie można ich wyłączyć.
NL Koplamp: Het geeft aan dat de koplamp aan is.
*Bij het inschakelen van de wandelmodus zijn de koplamp en het achterlicht altijd aan en kunnen ze niet worden
uitgeschakeld.
PT Farol: Indica que o farol está aceso.
*Ao entrar no modo de caminhada, o farol e a luz traseira estão sempre acesos e não podem ser desligados.
1
EN Bluetooth: When the icon lights up, it indicates that the scooter has been successfully connected to the mobile
device.
FR Bluetooth: Lorsque l’icône s’allume, cela indique que le scooter a été connecté avec succès à l’appareil mobile.
DE Bluetooth: Wenn das Symbol aufleuchtet, zeigt dies an, dass der Roller erfolgreich mit dem Mobilgerät verbunden
wurde.
IT Bluetooth: Quando l'icona si accende, indica che lo scooter è stato collegato correttamente al dispositivo mobile.
ES Bluetooth: Cuando el icono se enciende, indica que el patinete se ha conectado correctamente al dispositivo móvil.
PL Bluetooth: Świecenie tej ikony w sposób ciągły sygnalizuje nawiązanie połączenia hulajnogi z urządzeniem
mobilnym.
NL Bluetooth: Als het pictogram oplicht, geeft dit aan dat de scooter is verbonden met het mobiele apparaat.
PT Bluetooth: Quando o ícone se acende, indica que a scooter foi ligada com sucesso ao dispositivo móvel.
2
EN Trip: It displays the riding distance of this riding.
FR Voyage: Indique la distance parcourue pendant le parcours actuel.
DE Fahrt: Es zeigt die Fahrstrecke dieser Fahrt an.
IT Percorso: Visualizza la distanza di guida del percorso attuale.
ES Viaje: Muestra la distancia de conducción de este viaje.
PL Podróż: Wyświetla dystans przejechany podczas aktualnej jazdy.
NL Rit: Dit geeft de afgelegde afstand van deze rit weer.
PT Viagem: Apresenta a distância de condução desta condução.
3
EN Battery Level: It indicates the remaining battery level.
*The battery level is lower than 10% when it displays red.
FR Niveau de batterie: Indique le niveau de batterie restant.
* Le niveau de la batterie est inférieur à 10 % lorsqu’il s’affiche en rouge.
DE Akkuladestand: Zeigt den verbleibenden Akkuladestand an.
*Der Akkuladestand liegt unter 10 %, wenn die Anzeige rot ist.
IT Livello della batteria: Indica il livello residuo della batteria.
*Quando viene visualizzato in rosso, il livello della batteria è inferiore al 10%.
ES Nivel de batería: Indica el nivel de batería restante.
*El nivel de batería es inferior al 10 % cuando aparece en rojo.
PL Poziom naładowania akumulatora: Wskazuje pozostały poziom naładowania akumulatora.
*Poziom naładowania akumulatora jest niższy niż 10%, gdy wskaźnik świeci na czerwono.
NL Accuniveau: Het geeft het resterend accuniveau aan.
*Het accuniveau is lager dan 10% als dit in het rood wordt weergegeven.
PT Nível de bateria: Indica o nível de bateria restante.
*O nível da bateria é inferior a 10% quando apresenta vermelho.
4
01 02 03 04 05 06 07 08 09 10 11 12 13 14 15
16 17 18 19 20 21 22 23 24 25 26 27 28 29 30 31 32 33
34 35 36 37 38 39 40 41 42 43 44 45 46 47 48 49 50 51
52 53 54 55 56 57 58 59 60 61 62 63 64 65 66 67 68 69
70 71 72 73 74 75 76 77
78 79 80 81
82 83 84 85
86 87 88 89 90 91 92 93 94 95 96 97 98 99 100 101
102 103 104 105 106 107 108

EN Traction Control System (TCS): When the icon lights up, it indicates that the Traction Control System (TCS) is
enabled.
FR Système de contrôle de traction (TCS):Lorsque l’icône s’allume, cela indique que le système de contrôle de traction
(TCS) est activé.
DE Traktionskontrollsystem (TCS): Wenn das Symbol aufleuchtet, bedeutet dies, dass das Traktionskontrollsystem
(TCS) aktiviert ist.
IT Sistema di controllo della trazione (TCS): Quando l'icona si accende, indica che il sistema di controllo della trazione
(TCS) è attivato.
ES Sistema de control de tracción (TCS): Cuando el icono se enciende, indica que el Sistema de control de tracción
(TCS) está habilitado.
PL System kontroli trakcji (TCS): Świecenie tej ikony w sposób ciągły wskazuje, że system kontroli trakcji (TCS) jest
włączony.
NL Traction Control System (TCS): Als het pictogram oplicht, geeft dit aan dat het Traction Control System (TCS) is
ingeschakeld.
PT Sistema de controlo de tração (TCS): Quando o ícone acende, indica que o Sistema de Controlo de Tração (TCS)
está ativado.
5
EN Time: It displays local time.
FR Heure: L’heure locale s’affiche.
DE Zeit: Es zeigt die Ortszeit an.
IT Ora: Visualizza l'ora locale.
ES Hora: Muestra la hora local.
PL Czas: Wyświetla czas lokalny.
NL Tijd: Het geeft de lokale tijd weer.
PT Tempo: Apresenta a hora local.
6
EN Battery Level of External Battery: It displays the battery level of external battery after it is installed onto the scooter.
*External Battery shall be purchased separately.
FR Niveau de batterie de la batterie externe: Indique le niveau de la batterie externe après son installation sur le
scooter.
* La batterie externe doit être achetée séparément.
DE Akkuladestand des externen Akkus: Es zeigt den Akkuladestand des externen Akkus an, nachdem dieser am Roller
installiert wurde.
*Der externe Akku muss separat erworben werden.
IT Livello della batteria della batteria esterna: Visualizza il livello della batteria della batteria esterna dopo che è stata
installata sullo scooter.
*La batteria esterna deve essere acquistata separatamente.
7
EN Left / Right Direction Indicator: The indicator flashes after pressing a direction indicator button. Both sides
direction indicators flash simutaneously after Emergency Flashers are turned on.
FR Indicateur de direction gauche/droit: L’indicateur clignote après un appui sur un bouton d’indicateur de direction.
Les deux indicateurs de direction clignotent simultanément après l'allumage des clignotants d'urgence.
DE Linker/rechter :Fahrtrichtungsanzeiger: Nach dem Drücken einer Fahrtrichtungsanzeiger-Taste blinkt der
Fahrtrichtungsanzeiger. Nachdem der Notfall-Blinker eingeschaltet wurde, blinken die Fahrtrichtungsanzeiger auf
beiden Seiten gleichzeitig.
IT Indicatore di direzione sinistro/destro: L'indicatore lampeggia dopo aver premuto un pulsante dell'indicatore di
direzione. Gli indicatori di direzione su entrambi i lati lampeggiano contemporaneamente dopo aver acceso i
lampeggianti di emergenza.
ES Indicador de dirección derecho/izquierdo: El indicador parpadea después de pulsar un botón indicador de
dirección. Los indicadores de dirección de ambos lados parpadean simultáneamente después de encender las
luces intermitentes de emergencia.
PL Lewy/prawy kierunkowskaz: Wskaźnik miga po naciśnięciu przycisku kierunkowskazu. Po włączeniu świateł
awaryjnych obydwa kierunkowskazy migają jednocześnie.
NL Linker/rechter richtingaanwijzer: De indicator knippert na het indrukken van een richtingaanwijzerknop. Beide
richtingaanwijzers knipperen tegelijk nadat de alarmlichten zijn ingeschakeld.
PT Indicador de Direção Esquerdo/Direito: O indicador pisca depois de pressionar um botão indicador de direção. Os
indicadores de direção de ambos os lados piscam simultaneamente depois dos piscas de emergência serem
ligados.
8
EN Speedometer: It indicates the current speed of the scooter during riding.
FR Compteur de vitesse: Indique la vitesse actuelle du scooter pendant la conduite.
DE Tachometer: Es zeigt die aktuelle Geschwindigkeit des Rollers während der Fahrt an.
IT Tachimetro: Indica la velocità attuale dello scooter durante la guida.
ES Velocímetro: Indica la velocidad actual del patinete durante la conducción.
PL Prędkościomierz: Wskazuje aktualną prędkość hulajnogi podczas jazdy.
NL Speedometer: Deze geeft de actuele snelheid van de scooter aan tijdens het rijden.
PT Velocímetro: Indica a velocidade atual da scooter durante a condução.
9
ES Nivel de batería de la batería externa: Muestra el nivel de batería de la batería externa después de instalarla en el
patinete.
*La batería externa se comprará por separado.
PL Poziom naładowania akumulatora zewnętrznego: Wyświetla poziom naładowania akumulatora zewnętrznego po jego
zamontowaniu w hulajnodze.
*Akumulator zewnętrzny należy zakupić osobno.
NL Accuniveau van externe accu: Geeft het accuniveau van de externe accu weer nadat deze op de scooter is
geplaatst.
*Externe accu moet apart worden aangeschaft.
PT Nível da bateria externa:Apresenta o nível da bateria externa depois de instalada na scooter.
*A bateria externa deve ser adquirida separadamente.
01 02 03 04 05 06 07 08 09 10 11 12 13 14 15
16 17 18 19 20 21 22 23 24 25 26 27 28 29 30 31 32 33
34 35 36 37 38 39 40 41 42 43 44 45 46 47 48 49 50 51
52 53 54 55 56 57 58 59 60 61 62 63 64 65 66 67 68 69
70 71 72 73 74 75 76 77
78 79 80 81
82 83 84 85
86 87 88 89 90 91 92 93 94 95 96 97 98 99 100 101
102 103 104 105 106 107 108
EN Remain Mileage: It displays the remaining range of the scooter.
FR Kilométrage restant: Indique l’autonomie restante du scooter.
DE Verbleibende Laufleistung: Es zeigt die verbleibende Reichweite des Rollers an.
IT Chilometraggio residuo: Visualizza l'autonomia residua dello scooter.
ES Kilometraje restante: Muestra la autonomía restante del patinete.
PL Pozostały zasięg: Wyświetla pozostały zasięg hulajnogi.
NL Resterend aantal kilometer: Dit geeft het resterend bereik van de scooter weer.
PT Quilometragem Restante: Apresenta a autonomia restante da scooter.
10
EN Warning: When the icon lights up, it indicates that the scooter has detected errors. The number refers to the qty of
errors.
FR Avertissement: Lorsque l’icône s’allume, cela indique que le scooter a détecté des erreurs. Le chiffre fait référence
au nombre d’erreurs.
DE Warnung: Wenn das Symbol aufleuchtet, bedeutet dies, dass der Roller Fehler erkannt hat. Die Zahl bezieht sich
auf die Anzahl der Fehler.
IT Avvertenza: Quando l'icona si accende, indica che lo scooter ha rilevato degli errori. Il numero si riferisce alla
quantità di errori.
ES Advertencia: Cuando el icono se ilumina indica que el patinete ha detectado errores. El número se refiere a la
cantidad de errores.
PL Ostrzeżenie: Świecenie tej ikony w sposób ciągły wskazuje, że hulajnoga wykryła błędy. Liczba oznacza ilość
błędów.
NL Waarschuwing: Als het pictogram oplicht, geeft dit aan dat de scooter fouten heeft gedetecteerd. Het getal
verwijst naar het aantal fouten.
PT Aviso: Quando o ícone acende, isso indica que a scooter detetou erros. O número refere-se à quantidade de erros.
11
●Speed Modes / Modes de vitesse / Geschwindigkeitsmodi / Modalità di velocità / Mo�
dos de velocidad / Tryby prędkości / Snelheidsmodi / Modos de velocidade
Mode
(ECO Mode)
(Drive Mode)
(Sport Mode)
(Walk Mode)
051601E
15 km/h (9.3 mph)
20 km/h (12.4 mph)
25 km/h (15.5 mph)
5 km/h (3.1 mph)
051601I 051601D
20 km/h (12.4 mph)
Speed Limit
EN
Mode
(Mode ECO)
(Mode DRIVE)
(Mode SPORT)
(Mode WALK)
051601E
15 km/h (9,3 mi/h)
20 km/h (12,4 mi/h)
25 km/h (15,5 mi/h)
5 km/h (3,1 mi/h)
051601I 051601D
20 km/h (12,4 mi/h)
Limite de vitesse
FR
Modus
(ECO-Modus)
(DRIVE-Modus)
(Sport-Modus)
(Laufmodus)
051601E
15 km/h (9,3 mph)
20 km/h (12,4 mph)
25 km/h (15,5 mph)
5 km/h (3,1 mph)
051601I 051601D
20 km/h (12,4 mph)
Höchstgeschwindigkeit für
DE
Modalità
(Modalità ECO)
(Modalità DRIVE)
(Modalità SPORT)
(Modalità Camminata)
051601E
15 km/h (9,3 mph)
20 km/h (12,4 mph)
25 km/h (15,5 mph)
5 km/h (3,1 mph)
051601I 051601D
20 km/h (12,4 mph)
Limite di velocità
IT
01 02 03 04 05 06 07 08 09 10 11 12 13 14 15
16 17 18 19 20 21 22 23 24 25 26 27 28 29 30 31 32 33
34 35 36 37 38 39 40 41 42 43 44 45 46 47 48 49 50 51
52 53 54 55 56 57 58 59 60 61 62 63 64 65 66 67 68 69
70 71 72 73 74 75 76 77
78 79 80 81
82 83 84 85
86 87 88 89 90 91 92 93 94 95 96 97 98 99 100 101
102 103 104 105 106 107 108
Modo
(Modo ECO)
(Modo DRIVE)
(Modo deportivo)
(Modo de paseo)
051601E
15 km/h (9,3 mph)
20 km/h (12,4 mph)
25 km/h (15,5 mph)
5 km/h (3,1 mph)
051601I 051601D
20 km/h (12,4 mph)
Límite de velocidad
ES
Tryb
(Tryb ECO)
(Tryb standardowy)
(Tryb sportowy)
(Tryb pieszy)
051601E
15 km/h (9,3 mph)
20 km/h (12,4 mph)
25 km/h (15,5 mph)
5 km/h (3,1 mph)
051601I 051601D
20 km/h (12,4 mph)
Ograniczenie prędkości
PL
Modus
(ECO-modus)
(Standaardmodus)
(Sportmodus)
(Wandelmodus)
051601E
15 km/h (9,3 mph)
20 km/h (12,4 mph)
25 km/h (15,5 mph)
5 km/h (3,1 mph)
051601I 051601D
20 km/h (12,4 mph)
Snelheidslimiet
NL
Modo
(Modo ECO)
(Modo de condução)
(modo desportivo)
(Modo de caminhada)
051601E
15 km/h (9,3 mph)
20 km/h (12,4 mph)
25 km/h (15,5 mph)
5 km/h (3,1 mph)
051601I 051601D
20 km/h (12,4 mph)
Limite de velocidade
PT
01 02 03 04 05 06 07 08 09 10 11 12 13 14 15
16 17 18 19 20 21 22 23 24 25 26 27 28 29 30 31 32 33
34 35 36 37 38 39 40 41 42 43 44 45 46 47 48 49 50 51
52 53 54 55 56 57 58 59 60 61 62 63 64 65 66 67 68 69
70 71 72 73 74 75 76 77
78 79 80 81
82 83 84 85
86 87 88 89 90 91 92 93 94 95 96 97 98 99 100 101
102 103 104 105 106 107 108
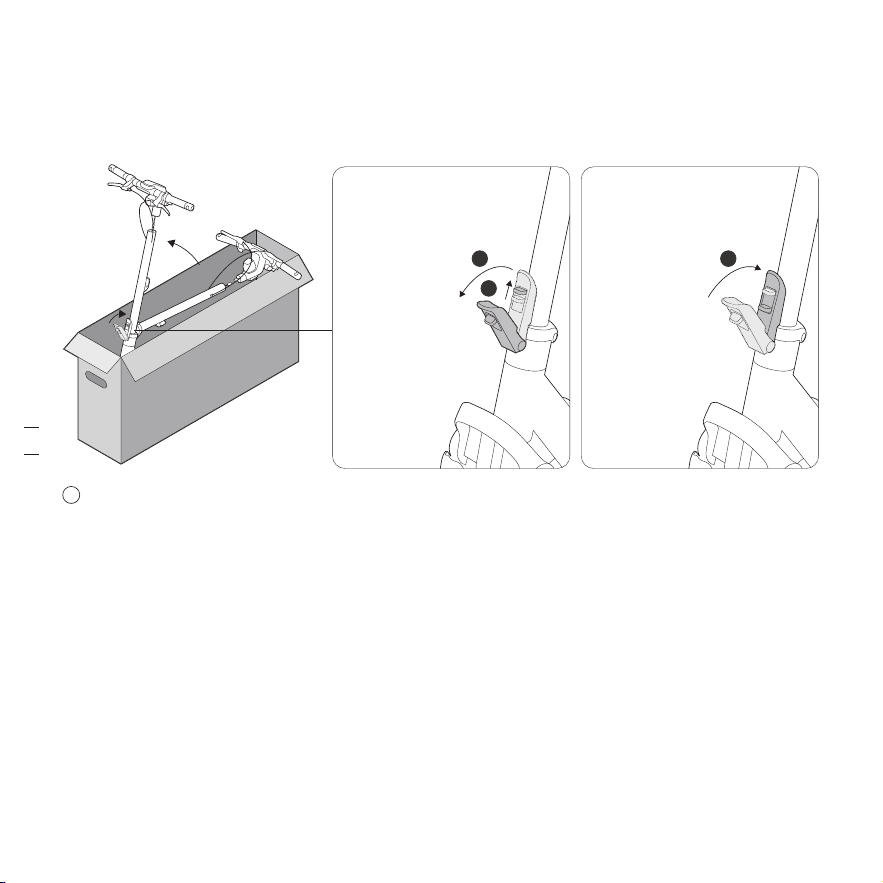
Assembly / Montage / Zusammenbau / Assemblaggio /
Montaje / Montaż / Montage / Montagem
EN Unfold the stem and close the quick-release lever until the folding latch reaches the bottom. Make sure the quick
release lever is locked firmly when you push the quick release lever down without lifting folding latch.
FR Dépliez la tige et fermez le levier à dégagement rapide jusqu’à ce que le loquet pliant atteigne le fond. Assurez�
vous que le levier à dégagement rapide est fermement verrouillé lorsque vous le poussez vers le bas sans soulever
le loquet pliant.
DE Klappen Sie die Lenkstange auf und schließen Sie den Schnellspannhebel, bis die Klappverriegelung unten ist.
Stellen Sie sicher, dass der Schnellspannhebel fest verriegelt ist, wenn Sie den Schnellspannhebel nach unten
drücken, ohne den Klappriegel anzuheben.
IT Dispiegare il manubrio e richiudere la leva a sgancio rapido fino a quando la chiusura pieghevole raggiunge la
parte inferiore. Assicurarsi che la leva di sgancio rapido sia bloccata saldamente nello spingerla verso il basso,
senza sollevare la chiusura pieghevole.
ES Despliegue el eje y cierre la palanca de liberación rápida hasta que el pestillo plegable llegue al fondo. Asegúrese
de que la palanca de liberación rápida esté bloqueada firmemente cuando la empuje hacia abajo sin levantar el
pestillo plegable.
PL Rozłóż kolumnę kierownicy i zamknij dźwignię szybkiego zwalniania, aż zatrzask mechanizmu składania znajdzie się
na dole. Upewnij się, że dźwignia szybkiego zwalniania jest dobrze zablokowana, naciskając ją bez podniesionego
zatrzasku mechanizmu składania.
NL Vouw de stuurpen uit en sluit de snelspanner tot de inklapbare vergrendeling de bodem bereikt. Zorg ervoor dat
2
1
1
EN Open
FR Ouvrir
DE Öffnen
IT Apertura
ES Abrir
PL Otwieranie
NL Openen
PT Abrir
EN Close
FR Fermer
DE Schließen
IT Chiusura
ES Cerrar
PL Zamykanie
NL Sluiten
PT Fechar
de snelspanner stevig is vergrendeld wanneer u de snelspanner naar beneden duwt zonder de inklapbare vergrendeling
op te tillen.
PT Desdobre a haste e feche a alavanca de libertação rápida até que o trinco de dobragem atinja o fundo. Certifique�
se de que a alavanca de libertação rápida está firmemente bloqueada quando empurra a alavanca de libertação
rápida para baixo sem levantar o trinco dobrável.
EN Slide the handlebar and the wires into the stem with the headlight facing forward. Install the four screws in order
with the 4 mm (5/32'') Allen Wrench.
FR Faites glisser le guidon et les fils dans la tige avec le feu de route vers l’avant. Installez les quatre vis dans l’ordre
avec la clé Allen 4 mm (5/32'').
DE Schieben Sie den Lenker und die Kabel mit dem Frontlicht nach vorne in die Lenkstange.Montieren Sie die vier
Schrauben der Reihe nach mit dem 4 mm (5/32'') innensechskantschlüssel.
IT Far scorrere il manubrio e i fili nell'attacco del manubrio con il fanale rivolto in avanti. Installare le quattro viti in
ordine utilizzando la chiave a brugola da 4 mm (5/32'').
ES Deslice el manillar y los cables dentro del eje con el faro mirando hacia adelante. Instale los cuatro tornillos en
orden con la llave Allen de 4 mm (5/32'').
PL Wsuń kierownicę i przewody do kolumny z reflektorem skierowanym do przodu. Wkręć cztery śruby w
odpowiedniej kolejności za pomocą klucza imbusowy 4 mm (5/32'').
NL Schuif het stuur en de draden in de stuurpen met de koplamp naar voor gericht. Monteer de vier schroeven in
volgorde met de 4 mm (5/32'') inbussleutel.
PT Introduza o guiador e os fios na haste com o farol virado para a frente. Instalar os quatro parafusos por ordem com
a chave hexagonal de 4 mm (5/32'').
(9 ± 1 N·m)
1
3
2
4
1 2
01 02 03 04 05 06 07 08 09 10 11 12 13 14 15
16 17 18 19 20 21 22 23 24 25 26 27 28 29 30 31 32 33
34 35 36 37 38 39 40 41 42 43 44 45 46 47 48 49 50 51
52 53 54 55 56 57 58 59 60 61 62 63 64 65 66 67 68 69
70 71 72 73 74 75 76 77
78 79 80 81
82 83 84 85
86 87 88 89 90 91 92 93 94 95 96 97 98 99 100 101
102 103 104 105 106 107 108
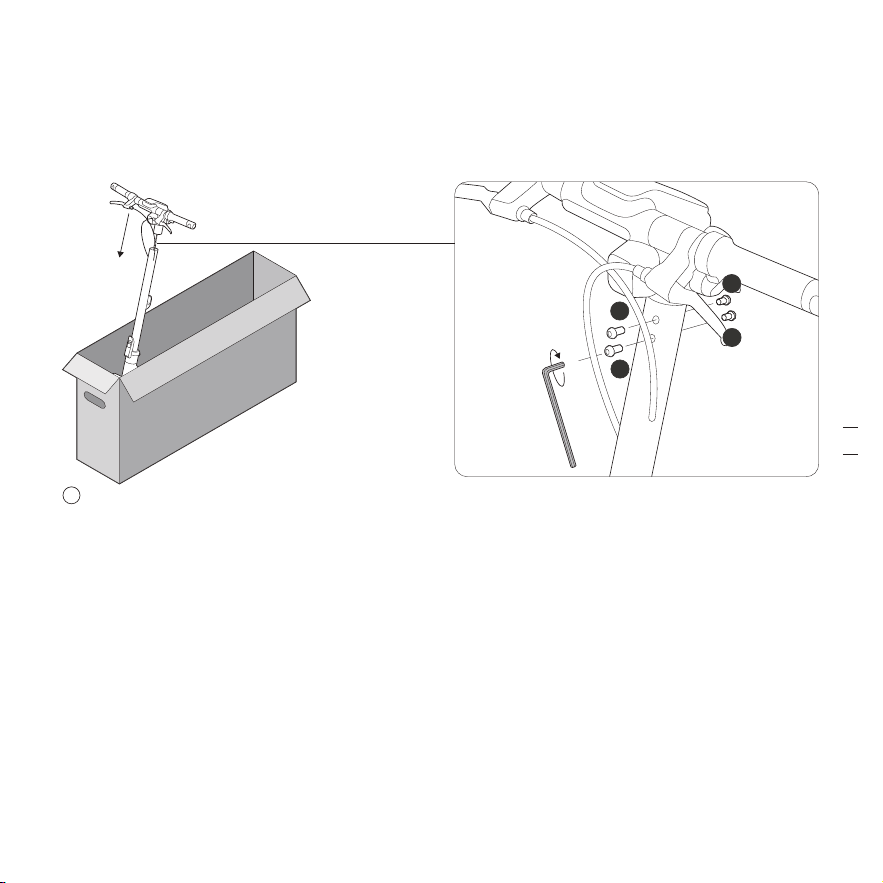
Assembly / Montage / Zusammenbau / Assemblaggio /
Montaje / Montaż / Montage / Montagem
EN Unfold the stem and close the quick-release lever until the folding latch reaches the bottom. Make sure the quick
release lever is locked firmly when you push the quick release lever down without lifting folding latch.
FR Dépliez la tige et fermez le levier à dégagement rapide jusqu’à ce que le loquet pliant atteigne le fond. Assurez�
vous que le levier à dégagement rapide est fermement verrouillé lorsque vous le poussez vers le bas sans soulever
le loquet pliant.
DE Klappen Sie die Lenkstange auf und schließen Sie den Schnellspannhebel, bis die Klappverriegelung unten ist.
Stellen Sie sicher, dass der Schnellspannhebel fest verriegelt ist, wenn Sie den Schnellspannhebel nach unten
drücken, ohne den Klappriegel anzuheben.
IT Dispiegare il manubrio e richiudere la leva a sgancio rapido fino a quando la chiusura pieghevole raggiunge la
parte inferiore. Assicurarsi che la leva di sgancio rapido sia bloccata saldamente nello spingerla verso il basso,
senza sollevare la chiusura pieghevole.
ES Despliegue el eje y cierre la palanca de liberación rápida hasta que el pestillo plegable llegue al fondo. Asegúrese
de que la palanca de liberación rápida esté bloqueada firmemente cuando la empuje hacia abajo sin levantar el
pestillo plegable.
PL Rozłóż kolumnę kierownicy i zamknij dźwignię szybkiego zwalniania, aż zatrzask mechanizmu składania znajdzie się
na dole. Upewnij się, że dźwignia szybkiego zwalniania jest dobrze zablokowana, naciskając ją bez podniesionego
zatrzasku mechanizmu składania.
NL Vouw de stuurpen uit en sluit de snelspanner tot de inklapbare vergrendeling de bodem bereikt. Zorg ervoor dat
2
1
1
EN Open
FR Ouvrir
DE Öffnen
IT Apertura
ES Abrir
PL Otwieranie
NL Openen
PT Abrir
EN Close
FR Fermer
DE Schließen
IT Chiusura
ES Cerrar
PL Zamykanie
NL Sluiten
PT Fechar
de snelspanner stevig is vergrendeld wanneer u de snelspanner naar beneden duwt zonder de inklapbare vergrendeling
op te tillen.
PT Desdobre a haste e feche a alavanca de libertação rápida até que o trinco de dobragem atinja o fundo. Certifique�
se de que a alavanca de libertação rápida está firmemente bloqueada quando empurra a alavanca de libertação
rápida para baixo sem levantar o trinco dobrável.
EN Slide the handlebar and the wires into the stem with the headlight facing forward. Install the four screws in order
with the 4 mm (5/32'') Allen Wrench.
FR Faites glisser le guidon et les fils dans la tige avec le feu de route vers l’avant. Installez les quatre vis dans l’ordre
avec la clé Allen 4 mm (5/32'').
DE Schieben Sie den Lenker und die Kabel mit dem Frontlicht nach vorne in die Lenkstange.Montieren Sie die vier
Schrauben der Reihe nach mit dem 4 mm (5/32'') innensechskantschlüssel.
IT Far scorrere il manubrio e i fili nell'attacco del manubrio con il fanale rivolto in avanti. Installare le quattro viti in
ordine utilizzando la chiave a brugola da 4 mm (5/32'').
ES Deslice el manillar y los cables dentro del eje con el faro mirando hacia adelante. Instale los cuatro tornillos en
orden con la llave Allen de 4 mm (5/32'').
PL Wsuń kierownicę i przewody do kolumny z reflektorem skierowanym do przodu. Wkręć cztery śruby w
odpowiedniej kolejności za pomocą klucza imbusowy 4 mm (5/32'').
NL Schuif het stuur en de draden in de stuurpen met de koplamp naar voor gericht. Monteer de vier schroeven in
volgorde met de 4 mm (5/32'') inbussleutel.
PT Introduza o guiador e os fios na haste com o farol virado para a frente. Instalar os quatro parafusos por ordem com
a chave hexagonal de 4 mm (5/32'').
(9 ± 1 N·m)
1
3
2
4
1 2
01 02 03 04 05 06 07 08 09 10 11 12 13 14 15
16 17 18 19 20 21 22 23 24 25 26 27 28 29 30 31 32 33
34 35 36 37 38 39 40 41 42 43 44 45 46 47 48 49 50 51
52 53 54 55 56 57 58 59 60 61 62 63 64 65 66 67 68 69
70 71 72 73 74 75 76 77
78 79 80 81
82 83 84 85
86 87 88 89 90 91 92 93 94 95 96 97 98 99 100 101
102 103 104 105 106 107 108
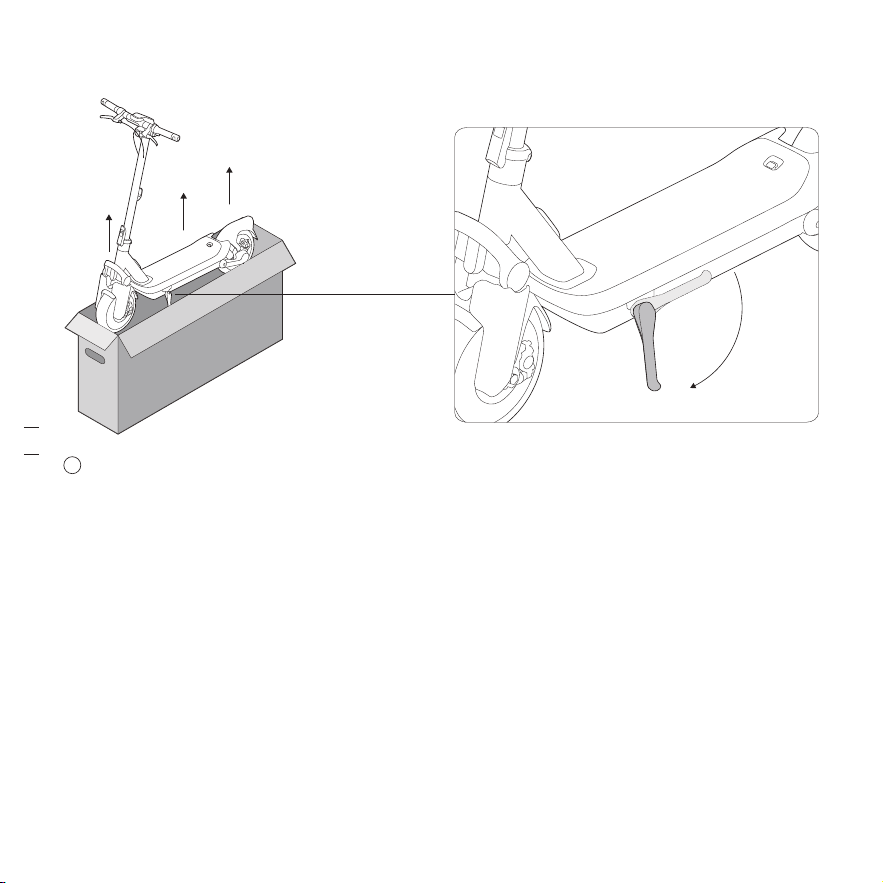
EN Get a friend to help you lift the scooter out of the box, place it on the ground, and unfold the kickstand.
FR Demandez à un ami de vous aider à sortir le scooter de la boîte, placez-le sur le sol et dépliez la béquille.
DE Bitten Sie eine Person, Ihnen zu helfen, den Roller aus der Verpackung zu heben, ihn auf den Boden zu stellen und
den Ständer auszuklappen.
IT Chiedere aiuto a un'altra persona per estrarre lo scooter dalla scatola, posizionarlo a terra e aprire il cavalletto.
ES Pida ayuda a otra persona para que le ayude a sacar el patinete de la caja, colóquelo en el suelo y despliegue la
pata de apoyo.
PL Poproś kogoś o pomoc w wyjęciu hulajnogi z pudełka, postawieniu jej na ziemi i rozłożeniu nóżki.
NL Vraag een vriend om je te helpen om de scooter uit de doos te tillen, op de grond te zetten en de standaard uit te
klappen.
PT Peça para um amigo o ajudar a tirar a scooter da caixa, colocá-la no chão e desdobrar o suporte.
EN As shown in the picture, install License Plate Holder with 3 mm (7/64'') Allen Wrench.
FR Comme indiqué sur l'image, installez le porte-plaque d'immatriculation avec une Clé Allen 3 mm (7/64'') .
DE Installieren Sie gemäß dem Bild die Kennzeichenhalterung mit einem 3 mm (37/64'') Innensechskantschlüssel.
IT Come mostrato nell'immagine, installare il porta targa con una Chiave a brugola da 3 mm (7/64'').
ES Como se muestra en la imagen, instala el soporte de la matrícula con una Llave Allen de 3 mm (7/64'').
PL Jak pokazano na zdjęciu, zamontuj uchwyt tablicy rejestracyjnej za pomocą Klucz imbusowy 3 mm (7/64'').
NL Zoals te zien is op de foto, installeer de kentekenplaathouder met een 3 mm (7/64'') inbussleutel.
PT Conforme mostrado na imagem, instale o suporte da placa com uma Chave hexagonal de 3 mm (7/64'').
EN *Tighten the screw until it is flush with the screw hole; donot use excessive force.
FR *Serrez la vis jusqu'à ce qu'elle soit alignée avec le trou devis ; n'utilisez pas de force excessive.
DE *Drehen Sie die Schraube fest, bis sie bündig mit demSchraubenloch sitzt. Verwenden Sie keine übermäßige Kraft.
IT *Stringere la vite fino a che sia allineata al foro della vite;non utilizzare una forza eccessiva.
ES *Apriete el tornillo hasta que quede al ras con el agujerodel tornillo; no aplique fuerza excesiva.
PL *Dokręć śrubę, aż będzie wyrównana z otworem na śrubę;nie używaj zbyt dużej siły
NL *Draai de schroef aan totdat deze gelijk ligt met hetschroefgat; oefen geen overmatige kracht uit.
PT *Aperte o parafuso até que esteja alinhado com o furo doparafuso; não utilize força excessiva.
1
2
(5 ± 1 N·m)
3
4
01 02 03 04 05 06 07 08 09 10 11 12 13 14 15
16 17 18 19 20 21 22 23 24 25 26 27 28 29 30 31 32 33
34 35 36 37 38 39 40 41 42 43 44 45 46 47 48 49 50 51
52 53 54 55 56 57 58 59 60 61 62 63 64 65 66 67 68 69
70 71 72 73 74 75 76 77
78 79 80 81
82 83 84 85
86 87 88 89 90 91 92 93 94 95 96 97 98 99 100 101
102 103 104 105 106 107 108
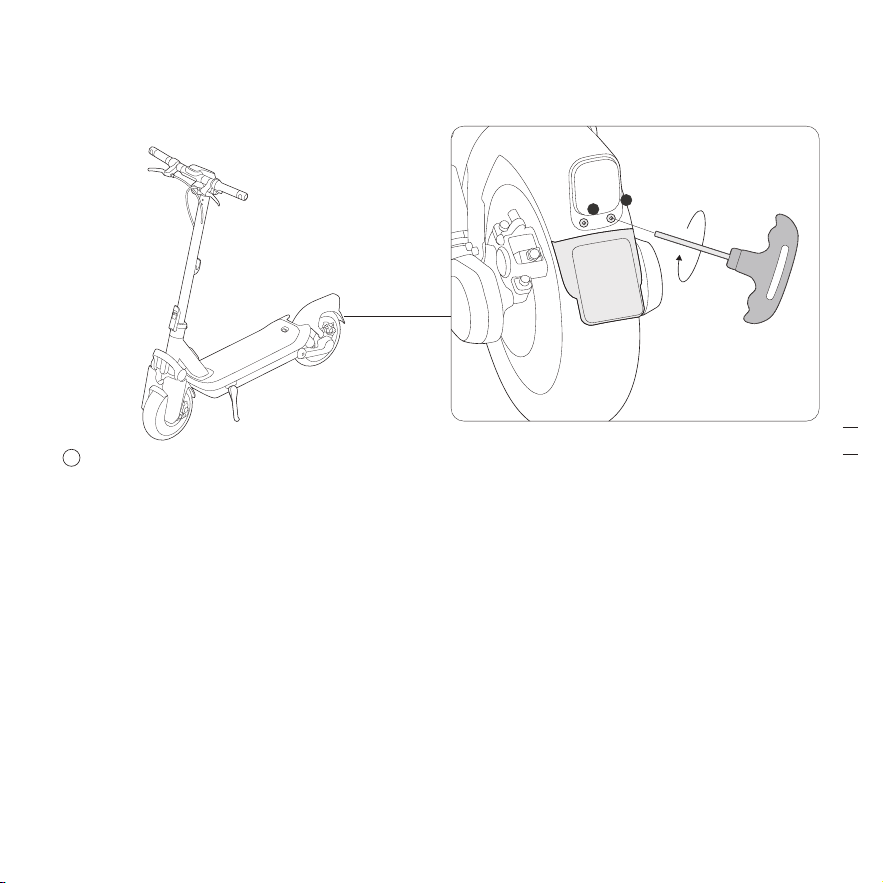
EN Get a friend to help you lift the scooter out of the box, place it on the ground, and unfold the kickstand.
FR Demandez à un ami de vous aider à sortir le scooter de la boîte, placez-le sur le sol et dépliez la béquille.
DE Bitten Sie eine Person, Ihnen zu helfen, den Roller aus der Verpackung zu heben, ihn auf den Boden zu stellen und
den Ständer auszuklappen.
IT Chiedere aiuto a un'altra persona per estrarre lo scooter dalla scatola, posizionarlo a terra e aprire il cavalletto.
ES Pida ayuda a otra persona para que le ayude a sacar el patinete de la caja, colóquelo en el suelo y despliegue la
pata de apoyo.
PL Poproś kogoś o pomoc w wyjęciu hulajnogi z pudełka, postawieniu jej na ziemi i rozłożeniu nóżki.
NL Vraag een vriend om je te helpen om de scooter uit de doos te tillen, op de grond te zetten en de standaard uit te
klappen.
PT Peça para um amigo o ajudar a tirar a scooter da caixa, colocá-la no chão e desdobrar o suporte.
EN As shown in the picture, install License Plate Holder with 3 mm (7/64'') Allen Wrench.
FR Comme indiqué sur l'image, installez le porte-plaque d'immatriculation avec une Clé Allen 3 mm (7/64'') .
DE Installieren Sie gemäß dem Bild die Kennzeichenhalterung mit einem 3 mm (37/64'') Innensechskantschlüssel.
IT Come mostrato nell'immagine, installare il porta targa con una Chiave a brugola da 3 mm (7/64'').
ES Como se muestra en la imagen, instala el soporte de la matrícula con una Llave Allen de 3 mm (7/64'').
PL Jak pokazano na zdjęciu, zamontuj uchwyt tablicy rejestracyjnej za pomocą Klucz imbusowy 3 mm (7/64'').
NL Zoals te zien is op de foto, installeer de kentekenplaathouder met een 3 mm (7/64'') inbussleutel.
PT Conforme mostrado na imagem, instale o suporte da placa com uma Chave hexagonal de 3 mm (7/64'').
EN *Tighten the screw until it is flush with the screw hole; donot use excessive force.
FR *Serrez la vis jusqu'à ce qu'elle soit alignée avec le trou devis ; n'utilisez pas de force excessive.
DE *Drehen Sie die Schraube fest, bis sie bündig mit demSchraubenloch sitzt. Verwenden Sie keine übermäßige Kraft.
IT *Stringere la vite fino a che sia allineata al foro della vite;non utilizzare una forza eccessiva.
ES *Apriete el tornillo hasta que quede al ras con el agujerodel tornillo; no aplique fuerza excesiva.
PL *Dokręć śrubę, aż będzie wyrównana z otworem na śrubę;nie używaj zbyt dużej siły
NL *Draai de schroef aan totdat deze gelijk ligt met hetschroefgat; oefen geen overmatige kracht uit.
PT *Aperte o parafuso até que esteja alinhado com o furo doparafuso; não utilize força excessiva.
1
2
(5 ± 1 N·m)
3
4
01 02 03 04 05 06 07 08 09 10 11 12 13 14 15
16 17 18 19 20 21 22 23 24 25 26 27 28 29 30 31 32 33
34 35 36 37 38 39 40 41 42 43 44 45 46 47 48 49 50 51
52 53 54 55 56 57 58 59 60 61 62 63 64 65 66 67 68 69
70 71 72 73 74 75 76 77
78 79 80 81
82 83 84 85
86 87 88 89 90 91 92 93 94 95 96 97 98 99 100 101
102 103 104 105 106 107 108
Activation / Activation / Aktivierung / Attivazione /
Activación / Aktywacja / Activering / Ativação
EN Scan the QR code to download the Segway Mobility App to register or log in.
FR Scannez le QR code pour télécharger l’application Segway Mobility et vous
inscrire ou vous connecter.
DE Scannen Sie den QR-Code, um die Segway Mobility�App herunterzuladen
und sich zu registrieren oder anzumelden.
IT Scansionare il codice QR per scaricare l'app Segway Mobility, registrarsi o
effettuare l’accesso.
ES Escanee el código QR para descargar la aplicación Segway Mobility para
registrarse o iniciar sesión.
PT Zeskanuj kod QR, aby pobrać aplikację Segway Mobility i zarejestrować lub
zalogować się.
NL Scan de QR-code om de Segway Mobility-app te downloaden om te
registreren of u aan te melden.
PT Escaneie o código QR para baixar o aplicativo Segway Mobility para se
cadastrar ou fazer login.
EN * An non-activated eKickScooter will keep beeping when turned on, and its speed is limi ted to 15 km/h (9.3 mph).
Please follow the steps to activate your eKickScooter.
FR * Un eKickScooter non activé continue à émettre des signaux sonores lorsqu'il est allumé, et sa vitesse est limitée
à 15 km/h (9,3 mph). Veuillez suivre les étapes pour activer votre eKickScooter.
DE * Ein nicht aktivierter eKickScooter piept nach dem Einschalten ständig und seine Geschwindigkeit ist auf 15 km/h
(9,3 mph) begrenzt. Bitte befolgen Sie die Schritte, um Ihren eKickScooter zu aktivieren.
IT * Un eKickScooter disattivato continuerà a emettere un segnale acustico quando è acceso e la sua velocità sarà
limitata a 15 km/h (9,3 mph). Segui i passaggi per attivare il tuo eKickScooter.
ES * Si el eKickScooter no está activado, seguirá emitiendo pitidos cuando se encienda. Su velocidad está limitada a
15 km/h (9,3 mph). Por favor, siga los pasos para activar el eKickScooter.
PT * Nieaktywowana hulajnoga eKickScooter po włączeniu będzie wydawać sygnały dźwiękowe, a jej prędkość będzie
ograniczona do 15 km/h (9,3 mph). Postępuj zgodnie z instrukcjami, aby aktywować hulajnogę eKickScooter.
NL * Een niet-geactiveerde eKickScooter blijft piepen wanneer deze is ingeschakeld en de snelheid is beperkt tot 15
km/u (9,3 mph). Volg de stappen om uw eKickScooter te activeren.
PT * Uma eKickScooter não ativada continuará a emitir sinais enquanto estiver ligado e a sua velocidade é limitada a
15 km/h (9,3 mph). Siga os passos para ativar a sua eKickScooter.
EN Charge the eKickScooter for three seconds to activate the battery. Power on the eKickScooter.
FR Chargez le eKickScooter pendant trois secondes pour activer la batterie.
DE Laden Sie den eKickScooter drei Sekunden lang auf, um den Akku zu aktivieren. Schalten Sie den eKickScooter ein.
IT Carica il eKickScooter per tre secondi per attivare la batteria.
ES Cargue el eKickScooter durante tres segundos para activar la batería. Encienda el eKickScooter.
PL Aby aktywować akumulator, należy ładować hulajnogę eKickScooter przez trzy sekundy. Włącz zasilanie hulajnogi
eKickScooter.
NL Charge the eKickScooter for three seconds to activate the battery. Power on the eKickScooter.
PT Carregue a eKickScooter por três segundos para ativar a bateria. Ligue a eKickScooter.
1
01 02 03 04 05 06 07 08 09 10 11 12 13 14 15
16 17 18 19 20 21 22 23 24 25 26 27 28 29 30 31 32 33
34 35 36 37 38 39 40 41 42 43 44 45 46 47 48 49 50 51
52 53 54 55 56 57 58 59 60 61 62 63 64 65 66 67 68 69
70 71 72 73 74 75 76 77
78 79 80 81
82 83 84 85
86 87 88 89 90 91 92 93 94 95 96 97 98 99 100 101
102 103 104 105 106 107 108
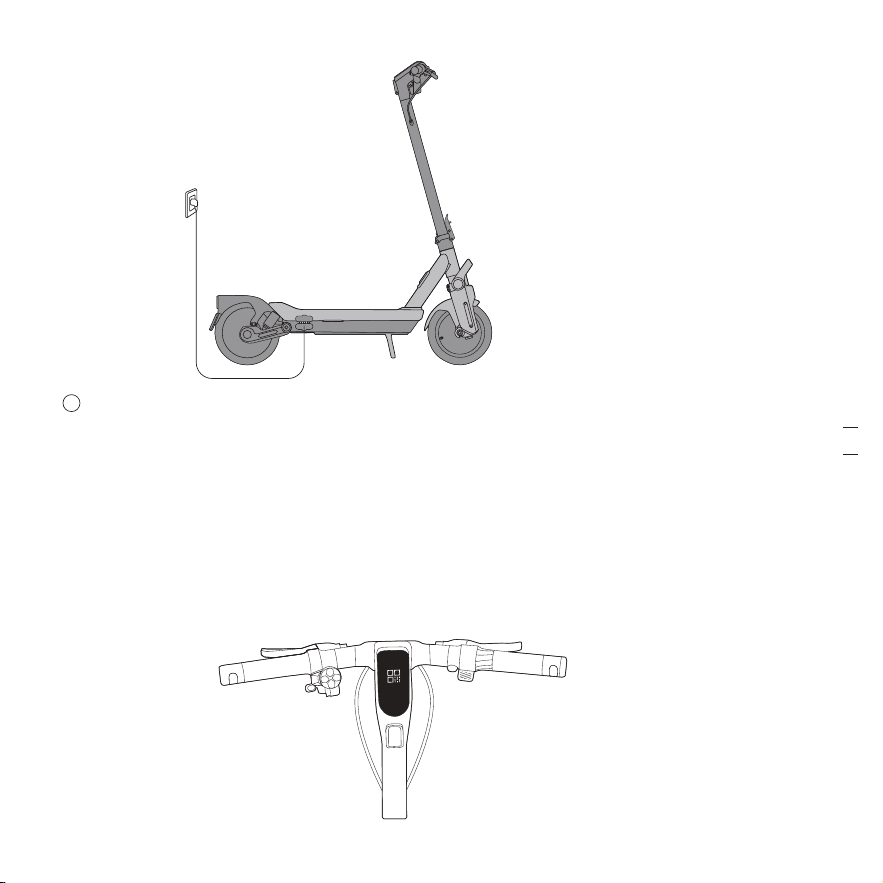

App Features / Caractéristiques de l’application /
App-Funktionen / Funzioni dell'app / Funciones de la
aplicación / Funkcje aplikacji / App-functies /
Funcionalidades da aplicação
EN Light Effect
FR Effet lumineux
DE Lichteffekt
IT Effetto luminoso
ES Efecto de luz
PL Efekty światła
NL Verlichtingseffect
PT Efeito de luz
EN Scan the QR Code displayed on the dashboard via Segway Mobility App or tap "Search vehicle" in App and pair
with your eKickScooter. Follow the instructions and watch the Riding Safety video. Tap to activate the eKickScooter.
* When the scooter is activated, the speed mode is set to Drive mode by default.
FR Scannez le QR code affiché sur le tableau de bord avec l’application Segway Mobility ou appuyez sur « Rechercher
un véhicule » dans l’application et associez-la à votre eKickScooter. Suivez les instructions et regardez la vidéo sur
la sécurité de conduite.
* Lorsque le scooter est activé, le mode de vitesse est réglé sur le mode DRIVE par défaut.
DE Scannen Sie den auf der Anzeigetafel angezeigten QR�Code über die Segway Mobility-App oder tippen Sie in der
App auf „Nach Fahrzeug scannen“ und koppeln Sie es mit Ihrem eKickScooter. Folgen Sie den Anweisungen und
sehen Sie sich das Video zur Fahrsicherheit an.
* Wenn der Roller aktiviert ist, ist der Geschwindigkeitsmodus standardmäßig auf den DRIVE-Modus eingestellt.
IT Scansionare il codice QR visualizzato sul cruscotto tramite l'app Segway Mobility oppure toccare "Cerca veicolo"
nell'app e associarlo all'eKickScooter. Seguire le istruzioni e guardare il video "Sicurezza durante la guida". Premi
per attivare il eKickScooter.
* Quando lo scooter viene attivato, la modalità di velocità è impostata sulla Modalità DRIVE per impostazione
predefinita.
ES Escanee el código QR que aparece en el panel de control a través de la aplicación Segway Mobility o toque
"Buscar vehículo" en la aplicación y emparéjela con su eKickScooter. Siga las instrucciones y vea el vídeo Seguridad
de uso. Toque para activar el eKickScooter.
* Cuando se activa el patinete, el modo de velocidad se establece en Modo DRIVE de forma predeterminada.
PL Zeskanuj kod QR wyświetlany na tablicy wskaźników za pomocą aplikacji Segway Mobility lub kliknij „Wyszukaj
pojazd” w aplikacji i sparuj ze swoją hulajnogą eKickScooter. Postępuj zgodnie z instrukcjami i obejrzyj film o
bezpiecznej jeździe.
* Po aktywowaniu hulajnogi domyślnym trybem prędkości jest Tryb standardowy
NL Scan de QR-code op het dashboard via de Segway Mobility-app of tik op "Zoek voertuig" in de app en koppel met
uw eKickScooter. Volg de instructies en bekijk de video over rijveiligheid. Tik om de eKickScooter te activeren.
* Wanneer de scooter is geactiveerd, is de snelheidsmodus standaard ingesteld op de Standaardmodus.
PT Leia o código QR exibido no tablier através da Aplicação Segway Mobility ou toque em «Modo de pesquisa» na
aplicação e emparelhe com o seu eKickScooter. Siga as instruções e veja o vídeo da Segurança na Condução.
Toque para ativar a eKickScooter.
* Quando a scooter é ativada, o modo velocidade é definido para o Modo de condução por padrão.
EN Energy Recovery*
FR Récupération d’énergie*
DE Energierückgewinnung*
IT Recupero energetico*
ES Recuperación de energía*
PL Odzyskiwanie energii*
NL Energierecuperatie*
PT Recuperação de energia*
EN Start Speed
FR Vitesse de démarrage
DE Startgeschwindigkeit
IT Velocità iniziale
ES Velocidad de inicio
PL Prędkość początkowa
NL Startsnelheid
PT Velocidade de arranque
EN *As different versions of App/firmware may vary, please refer to the actual vehicle. Please customize these features
via the Segway Mobility App
FR *Étant donné que les différentes versions de l'application/du firmware peuvent varier, veuillez vous référer au
véhicule réel. Veuillez personnaliser ces fonctionnalités via l’application Segway Mobility.
DE *Da die App-/Firmware-Versionen unterschiedlich sein können, beziehen Sie sich bitte auf das jeweilige Fahrzeug.
Bitte passen Sie diese Funktionen über die Segway Mobility-App an.
IT *Poiché le diverse versioni dell'app/firmware possono variare, fare riferimento al veicolo effettivo. Personalizzare
queste funzioni tramite l'app Segway Mobility.
ES *Como las diferentes versiones de la aplicación o el firmware pueden variar, consulte el vehículo real. Personalice
estas funciones a través de la aplicación Segway Mobility.
PL *APonieważ różne wersje aplikacji/oprogramowania wbudowanego mogą się różnić, należy odnieść się do
rzeczywistego pojazdu. Te funkcje można dostosować za pomocą aplikacji Segway Mobility
NL *Verwijs naar het werkelijke voertuig, aangezien verschillende versies van de app/firmware kunnen variëren. Pas
deze functies aan via de Segway Mobility-app.
PT *Uma vez que as diferentes versões da aplicação/firmware podem variar, consulte o veículo atual. Por favor
personalize estas características através da aplicação Segway Mobility.
2
01 02 03 04 05 06 07 08 09 10 11 12 13 14 15
16 17 18 19 20 21 22 23 24 25 26 27 28 29 30 31 32 33
34 35 36 37 38 39 40 41 42 43 44 45 46 47 48 49 50 51
52 53 54 55 56 57 58 59 60 61 62 63 64 65 66 67 68 69
70 71 72 73 74 75 76 77
78 79 80 81
82 83 84 85
86 87 88 89 90 91 92 93 94 95 96 97 98 99 100 101
102 103 104 105 106 107 108

EN
*Notes on Energy Recovery Function:
Function Introduction: Set the “Energy Recovery” level in the “Segway Mobility” App: Off/Strong/Weak
○ By default, the vehicle’s Energy Recovery feature is set to “off.” Users can enable or disable the Energy Recovery
function in the “Segway Mobility” App.
○ Once Energy Recovery is enabled, releasing the throttle while riding will automatically activate this feature. The
motor will then produce a reverse electromotive force, causing the vehicle to slow down and create a noticeable
sensation of deceleration (akin to the feeling of pulling the brake lever). The intensity of Energy Recovery can be
adjusted to “strong” or “weak.” When set to “strong,” the deceleration is more evident.
Safety Tips
○ Before using the Energy Recovery feature during rides, practice in a secure environment until you are familiar with its
operation and effects. Please be aware that this feature can provide additional resistance to decelerate the vehicle
when the throttle is released, complementing the standard friction and braking mechanisms. Therefore, users need to
control the vehicle properly and maintain the balance well for a safe ride.
○ Energy Recovery is designed to assist, not replace, the braking system. When you need to stop or slow down safely,
please use the brake by pulling the brake lever.
○ Please exercise increased caution when using the Energy Recovery feature on downhill paths or under special riding
conditions to prevent falls. Releasing the throttle on a decline may still result in acceleration due to gravity and
inertia. Because of the acceleration, Energy Recovery will engage simultaneously, providing decelerative force, which
necessitates careful balance maintenance.
○ The Energy Recovery feature does not engage while the vehicle is in cruise control mode. Once you disengage cruise
control, releasing the throttle will initiate Energy Recovery (if already enabled in the App), creating a distinct
reduction in speed.
○ Once the Energy Recovery is enabled, it will remain on until the function is manually turned off via the “Segway
Mobility” App. The feature is not automatically disabled in the event of the vehicle shutting down or running out of
battery. The vehicle’s dashboard does not display Energy Recovery status, which can only be verified and adjusted
(Off/Strong/Weak) in the App.
○ Please inform any borrower of the vehicle about the current Energy Recovery settings to ensure they are aware of
how the feature affects vehicle operation.
○ If you have any questions about this function, please contact Technical Support.
FR
*Remarques sur la fonction de récupération d'énergie :
Présentation de la fonction : définissez le niveau « Récupération d’énergie » dans l’application « Segway Mobility » :
Désactivée/Forte/Faible
○ Par défaut, la fonction de récupération d’énergie du véhicule est désactivée. Les utilisateurs peuvent activer ou
désactiver la fonction de récupération d’énergie dans l’application Segway Mobility.
○ Une fois Récupération d’énergie activée, relâcher l’accélérateur pendant la conduite activera automatiquement cette
fonctionnalité. Le moteur produira alors une force électromotrice inverse, provoquant le ralentissement du véhicule et
créant une sensation notable de décélération (comme la sensation de tirer le levier de frein). L’intensité de la
récupération d’énergie peut être ajustée à « forte » ou « faible ». Lorsqu’elle est réglée sur « forte », la décélération
est plus évidente.
EN Locking Function
FR Fonction de verrouillage
DE Verriegelungsfunktion
IT Funzione di blocco
ES Función de bloqueo
PL Funkcja blokady
NL Vergrendelfunctie
PT Função de bloqueio
EN Scheduled Charging
FR Charge programmée
DE Geplantes Laden
IT Carica programmata
ES Carga programada
PL Planowane ładowanie
NL Gepland opladen
PT Carregamento
programado
EN Custom Button
FR Bouton personnalisé
DE Benutzerdefinierte Taste
IT Pulsante personalizzato
ES Botón personalizado
PL Przycisk
spersonalizowany
NL Aangepaste knop
PT Botão personalizado
EN Imperial/Metric System
FR Système impérial/métrique
DE Angloamerikanisches/Metrisches
System
IT Sistema imperiale/metrico
ES Sistema imperial/métrico
PL System imperialny/metryczny
NL Imperiaal/metrisch stelsel
PT Sistema Imperial/Métrico
EN Custom Sound Effect
FR Effet sonore
personnalisé
DE Benutzerdefinierter
Toneffekt
IT Effetto sonoro
personalizzato
ES Efecto de sonido
personalizado
PL Niestandardowy efekt
dźwiękowy
NL Aangepast
geluidseffect
PT Efeito sonoro
personalizado
EN Customize Mode Speed
FR Personnaliser la vitesse
du mode
DE Passen Sie den Modus
Geschwindigkeit an
IT Personalizzare la
modalità di velocità
ES Customize Mode Speed
PL Tryb dostosowywania
prędkości
NL Personalizar la
velocidad del modo
PT Personalizar o
velocidade do modo
EN Charging Limit
FR Limite de charge
DE Ladelimit
IT Limite di carica
ES Límite de carga
PL Ograniczenie
ładowania
NL Oplaadlimiet
PT Limite de
carregamento
EN Traction Control System (TCS)
FR Système de contrôle de
traction (TCS)
DE Traktionskontrollsystem (TCS)
IT Sistema di controllo della
trazione (TCS)
ES Sistema de control de tracción
(TCS)
PL System kontroli trakcji (TCS)
NL Traction Control System (TCS)
PT Sistema de controlo de tração
(TCS)
EN Incoming Call Notification
FR Notification d’appel entrant
DE Benachrichtigung über
eingehende Anrufe
IT Notifica di chiamata in
arrivo
ES Notificación de llamada
entrante
PL Powiadomienie o
połączeniu przychodzącym
NL Melding inkomende
oproep
PT Notificação de chamada
recebida
01 02 03 04 05 06 07 08 09 10 11 12 13 14 15
16 17 18 19 20 21 22 23 24 25 26 27 28 29 30 31 32 33
34 35 36 37 38 39 40 41 42 43 44 45 46 47 48 49 50 51
52 53 54 55 56 57 58 59 60 61 62 63 64 65 66 67 68 69
70 71 72 73 74 75 76 77
78 79 80 81
82 83 84 85
86 87 88 89 90 91 92 93 94 95 96 97 98 99 100 101
102 103 104 105 106 107 108
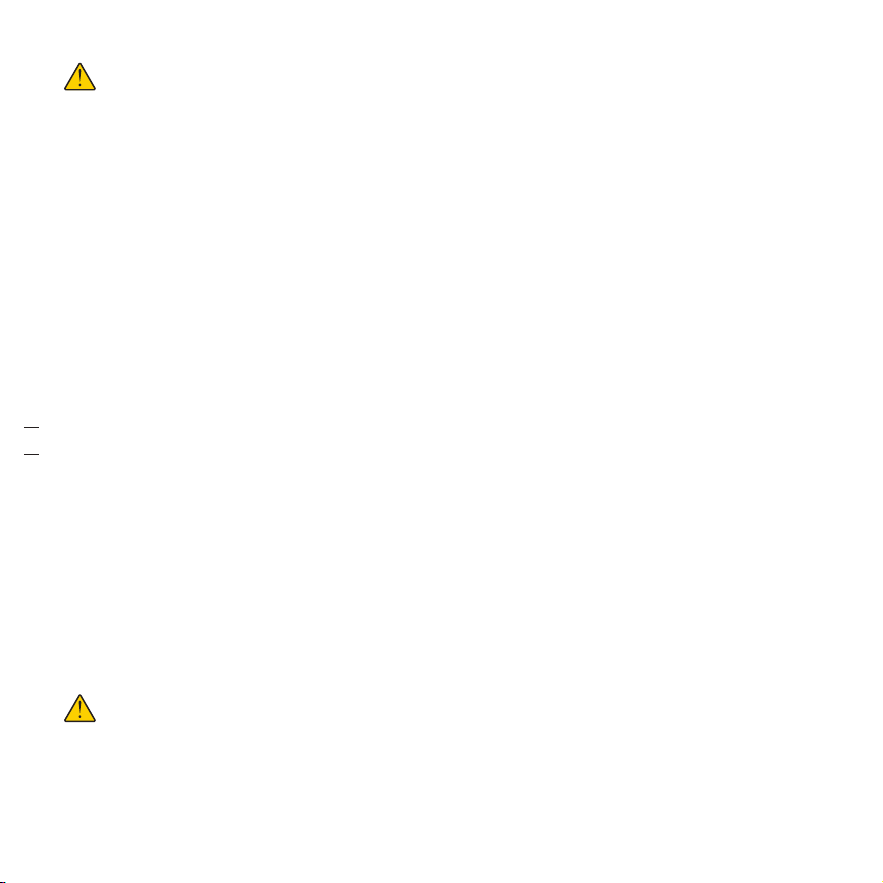
○ Die Energierückgewinnung wurde entwickelt, um das Bremssystem zu unterstützen, nicht zu ersetzen. Wenn Sie
sicher anhalten oder abbremsen müssen, betätigen Sie bitte die Bremse, indem Sie den Bremshebel ziehen.
○ Bitte seien Sie bei der Verwendung der Energierückgewinnungsfunktion auf Bergabstrecken oder unter besonderen
Fahrbedingungen besonders vorsichtig, um Stürze zu vermeiden. Das Loslassen des elektronischen Gasgriffs bei
einem Gefälle kann immer noch zu einer Beschleunigung aufgrund von Schwerkraft und Trägheit führen. Aufgrund
der Beschleunigung schaltet sich gleichzeitig die Energierückgewinnung ein und sorgt für eine Verzögerungskraft, die
eine sorgfältige Aufrechterhaltung des Gleichgewichts erfordert.
○ Die Energierückgewinnungsfunktion wird nicht aktiviert, wenn sich das Fahrzeug im Tempomat-Modus befindet.
Wenn Sie den Tempomat ausschalten, wird durch Loslassen des elektronischen Gasgriffs die Energierückgewinnung
eingeleitet (sofern in der App bereits aktiviert), was zu einer deutlichen Geschwindigkeitsreduzierung führt.
○ Sobald die Energierückgewinnung aktiviert ist, bleibt sie eingeschaltet, bis die Funktion manuell über die „Segway
Mobility“-App ausgeschaltet wird. Die Funktion wird nicht automatisch deaktiviert, wenn das Fahrzeug ausgeht oder
der Akku leer ist. Der Status der Energierückgewinnung wird auf der Anzeigetafel des Fahrzeugs nicht angezeigt und
kann nur in der App überprüft und angepasst werden (Aus/Stark/Schwach).
○ Bitte informieren Sie alle Entleiher des Fahrzeugs über die aktuellen Einstellungen zur Energierückgewinnung, um
sicherzustellen, dass sie sich bewusst sind, wie sich diese Funktion auf den Fahrzeugbetrieb auswirkt.
○ Wenn Sie Fragen zu dieser Funktion haben, wenden Sie sich bitte an den Technischen Support.
IT
*Note sulla funzione di recupero energetico:
Introduzione alla funzione: impostare il livello del ""Recupero energetico"" nell'app ""Segway Mobility"": Off/Elevato/Basso
○ Per impostazione predefinita, la funzione di Recupero energetico del veicolo è impostata su ""off"". Gli utenti possono
attivare o disattivare la funzione di Recupero energetico nell'app Segway Mobility.
○ Una volta abilitato il Recupero energetico, la funzione si attiverà automaticamente rilasciando l'acceleratore durante la
guida. A quel punto, il motore produrrà una forza elettromotrice inversa, facendo rallentare il veicolo e creando una
sensazione di decelerazione (simile alla sensazione di tirare la leva del freno). L'intensità del Recupero energetico può
essere regolata su""elevata"" o ""bassa"". Se impostata su ""elevata"", la decelerazione sarà più evidente.
Consigli per la sicurezza:
○ Prima di utilizzare la funzione di Recupero energetico durante la guida, esercitarsi in un ambiente sicuro fino a
familiarizzare con il suo funzionamento e i suoi effetti. Tenere presente che questa funzione può creare una resistenza
aggiuntiva per far rallentare il veicolo quando si rilascia l'acceleratore, integrando i meccanismi di attrito e di frenata
standard. Per una guida sicura, l'utente deve perciò controllare correttamente il veicolo e mantenere l'equilibrio.
○ E Il Recupero energetico è progettato per assistere il sistema frenante e non per sostituirlo. Quando è necessario
fermarsi orallentare in modo sicuro, utilizzare il freno tirando la rispettiva leva.
○ Prestare maggiore attenzione quando si utilizza la funzione di Recupero energetico su percorsi in discesa o in
condizioni particolari per evitare cadute. Rilasciando l'acceleratore in discesa, potrebbe comunque generarsi
un'accelerazione dovuta alla gravità e all'inerzia. A causa di questa accelerazione, il Recupero energetico si attiva
contemporaneamente, fornendo una forza decelerante che richiede un attento mantenimento dell'equilibrio.
○ La funzione di Recupero energetico non si attiva quando il veicolo è in modalità Cruise Control. Una volta disattivato il
Cruise control, il Recupero energetico si attiverà rilasciando l'acceleratore (se già abilitato nell'app), riducendo così
nettamente la velocità.
○ Una volta abilitato, il Recupero energetico rimarrà attivo finché la funzione non verrà disattivata manualmente tramite
Conseils de sécurité :
○ Avant d’utiliser la fonctionnalité de récupération d’énergie pendant les sorties, entraînez-vous dans un environnement
sécurisé jusqu’à ce que vous soyez familiarisé avec son fonctionnement et ses effets. Veuillez noter que cette
fonctionnalité peut fournir une résistance supplémentaire pour ralentir le véhicule lorsque l'accélérateur électronique
est relâché, complétant les mécanismes de friction et de freinage standard. Par conséquent, les utilisateurs doivent
contrôler le véhicule correctement et bien maintenir l'équilibre pour une conduite en toute sécurité.
○ La récupération d’énergie est conçue pour aider et non remplacer le système de freinage. Lorsque vous devez vous
arrêter ou ralentir en toute sécurité, veuillez utiliser le frein en tirant sur le levier de frein.
○ Pour éviter les chutes, veuillez faire preuve d'une prudence accrue lorsque vous utilisez la fonction de récupération
d'énergie sur des voies en descente ou dans des conditions de conduite spéciales. Relâcher l’accélérateur
électronique dans une descente peut encore entraîner une accélération due à la gravité et à l'inertie. En raison de
l'accélération, la récupération d’énergie s'enclenchera simultanément, fournissant une force de décélération, ce qui
nécessite un maintien prudent de l'équilibre.
○ TLa fonction de récupération d’énergie ne s’enclenche pas lorsque le véhicule est en mode régulateur de vitesse. Une
fois que vous avez désengagé le régulateur de vitesse, relâcher l’accélérateur déclenchera la récupération d’énergie
(si elle est déjà activée dans l’application), créant une nette réduction de la vitesse.
○ OUne fois la récupération d’énergie activée, elle restera activée jusqu’à ce que la fonction soit désactivée
manuellement via l’application « Segway Mobility ». La fonction n’est pas automatiquement désactivée en cas d’arrêt
ou de panne de batterie du véhicule. Le tableau de bord du véhicule n’affiche pas l’état de récupération d’énergie, qui
ne peut être vérifié et ajusté que (Désactivée/Forte/Faible) dans l’application.
○ Veuillez informer tout utilisateur du véhicule des paramètres actuels de récupération d’énergie pour vous assurer qu’il
est conscient de la façon dont la fonction affecte le fonctionnement du véhicule.
○ Si vous avez des questions sur cette fonction, veuillez contacter le Support technique.
DE
*Hinweise zur Energierückgewinnungsfunktion:
Einführung in die Funktion: Stellen Sie die Stufe „Energierückgewinnung“ in der „Segway Mobility“-App ein: Aus/Stark/
Schwach
○ Standardmäßig ist die Energierückgewinnungsfunktion des Fahrzeugs auf „Aus“ eingestellt. Benutzer können die
Energierückgewinnungsfunktion in der Segway Mobility-App aktivieren oder deaktivieren.
○ OSobald die Energierückgewinnung aktiviert ist, wird diese Funktion automatisch aktiviert, wenn Sie während der
Fahrt den elektronischen Gasgriff loslassen. Der Motor erzeugt dann eine umgekehrte elektromotorische Kraft, die
dazu führt, dass das Fahrzeug langsamer wird und ein spürbares Gefühl der Verzögerung erzeugt (ähnlich dem
Gefühl beim Ziehen des Bremshebels). Die Intensität der Energierückgewinnung kann auf „stark“ oder „schwach“
eingestellt werden. In der Einstellung „stark“ ist die Verzögerung deutlicher spürbar.
Sicherheitstipps
○ Bevor Sie die Energierückgewinnungsfunktion während der Fahrt verwenden, üben Sie in einer sicheren Umgebung,
bis Sie mit ihrer Funktionsweise und Wirkung vertraut sind. Bitte beachten Sie, dass diese Funktion zusätzlichen
Widerstand bieten kann, um das Fahrzeug abzubremsen, wenn der elektronische Gasgriff losgelassen wird, und die
Standard-Reibungs�und Bremsmechanismen ergänzt. Daher müssen die Benutzer das Fahrzeug richtig kontrollieren
und das Gleichgewicht gut halten, um eine sichere Fahrt zu gewährleisten..
01 02 03 04 05 06 07 08 09 10 11 12 13 14 15
16 17 18 19 20 21 22 23 24 25 26 27 28 29 30 31 32 33
34 35 36 37 38 39 40 41 42 43 44 45 46 47 48 49 50 51
52 53 54 55 56 57 58 59 60 61 62 63 64 65 66 67 68 69
70 71 72 73 74 75 76 77
78 79 80 81
82 83 84 85
86 87 88 89 90 91 92 93 94 95 96 97 98 99 100 101
102 103 104 105 106 107 108
PL
*Uwagi dotyczące funkcji odzyskiwania energii:
Opis funkcji: Ustaw poziom odzyskiwania energii w aplikacji Segway Mobility: wyłączone/silne/słabe
○ Domyślnie funkcja odzyskiwania energii w pojeździe jest wyłączona. Użytkownicy mogą włączyć lub wyłączyć funkcję
odzyskiwania energii w aplikacji Segway Mobility.
○ Po włączeniu funkcji odzyskiwania energii zwolnienie przepustnicy podczas jazdy automatycznie aktywuje tę funkcję.
Silnik wytwarza wówczas odwrotną siłę elektromotoryczną, powodując zwalnianie pojazdu, czemu towarzyszy
odczuwalne wrażenie utraty prędkości (podobne jak w przypadku pociągnięcia dźwigni hamulca). Intensywność
odzyskiwania energii można ustawić na silną lub słabą. Przy ustawieniu silnego odzyskiwania wrażenie utraty
prędkości jest bardziej odczuwalne.
Wskazówki dotyczące bezpieczeństwa:
○ Przed rozpoczęciem korzystania z funkcji odzyskiwania energii na drodze należy poćwiczyć w bezpiecznym otoczeniu,
aby zapoznać się z jej działaniem i efektami. Należy pamiętać, że ta funkcja może generować dodatkowy opór w celu
spowolnienia pojazdu po zwolnieniu przepustnicy, uzupełniając standardowe mechanizmy cierne i hamujące. Dlatego
ze względów bezpieczeństwa użytkownicy muszą podczas jazdy odpowiednio kontrolować pojazd i utrzymywać
równowagę.
○ Funkcja odzyskiwania energii tylko wspomaga działanie układu hamulcowego, a nie go zastępuje. Aby bezpiecznie
zatrzymać się lub zwolnić, należy użyć hamulca, pociągając jego dźwignię.
○ Podczas korzystania z funkcji odzyskiwania energii na zjazdach lub w szczególnych warunkach należy zachować
szczególną ostrożność, aby się nie przewrócić. Po zwolnieniu przepustnicy na zjeździe hulajnoga może nadal
przyśpieszać w wyniku grawitacji i bezwładności. Przyśpieszenie powoduje włączenie funkcji odzyskiwania energii,
która wytwarza siłę hamującą, co wymaga ostrożnego utrzymywania równowagi.
○ Funkcja odzyskiwania energii nie włącza się, gdy pojazd jest w trybie utrzymywania stałej prędkości. Po wyłączeniu
tego trybu zwolnienie przepustnicy zainicjuje funkcję odzyskiwania energii (jeśli została już włączona w aplikacji),
powodując wyraźne zmniejszenie prędkości.
○ Po włączeniu funkcji odzyskiwania energii pozostanie ona włączona do momentu jej ręcznego wyłączenia w aplikacji
Segway Mobility. Funkcja ta nie wyłącza się automatycznie po wyłączeniu pojazdu lub rozładowaniu się akumulatora.
Na tablicy wskaźników nie jest wyświetlany stan działania funkcji odzyskiwania energii. Można go sprawdzić i
dostosować (wyłączone/silne/słabe) tylko w aplikacji.
○ Każdą osobę wypożyczającą pojazd należy poinformować o aktualnych ustawieniach odzyskiwania energii, aby mieć
pewność, że jest ona świadoma wpływu tej funkcji na działanie pojazdu.
○ W przypadku pytań dotyczących tej funkcji prosimy o kontakt z działem pomocy technicznej.
NL
*Opmerkingen over de functie energierecuperatie:
Inleiding tot de functie: Stel het niveau ""Energierecuperatie"" in de Segway Mobility app in: Uit/Sterk/Zwak
○ De functie Energierecuperatie van het voertuig is standaard ingesteld op 'uit'. Gebruikers kunnen de functie
Energierecuperatie in- of uitschakelen in de ""Segway Mobility""-app.
○ Zodra Energierecuperatie is ingeschakeld, wordt deze functie automatisch geactiveerd door het gaspedaal tijdens het
rijden los te laten. De motor zal dan een omgekeerde elektromotorische kracht produceren, waardoor het voertuig
langzamer gaat rijden en een merkbaar gevoel van vertraging ontstaat (vergelijkbaar met het gevoel zoals wanneer u
aan de remhendel trekt). De intensiteit van Energierecuperatie kan worden aangepast naar ""sterk"" of ""zwak"". Indien
l'app Segway Mobility. La funzione non si disattiva automaticamente in caso di spegnimento del veicolo o di esaurimento
della batteria. Il cruscotto del veicolo non visualizza lo stato di Recupero energetico, che può essere verificato e
regolato (Off/Elevato/Basso) solo nell'app.
○ Informare chi prende in prestito il veicolo sulle impostazioni attuali del Recupero energetico per assicurarsi che sia
consapevole di come la funzione influisce sul funzionamento del veicolo.
○ In caso di domande su questa funzione, contattare l'Assistenza tecnica.
ES
*Notas sobre la función Recuperación de energía:
Introducción a la función: Configure el nivel de ""Recuperación de energía"" en la aplicación Segway Mobility:
Desactivada/Fuerte/Débil
○ B De forma predeterminada, la función de recuperación de energía del vehículo está desactivada. Los usuarios
pueden habilitar o inhabilitar la función de recuperación de energía en la aplicación Segway Mobility.
○ OUna vez que se habilita la recuperación de energía, al soltar el acelerador mientras se conduce se activará
automáticamente esta función. A continuación, el motor producirá una fuerza electromotriz inversa, lo que hará que
el vehículo disminuya la velocidad y cree una sensación notable de desaceleración (similar a la sensación de tirar de
la palanca de freno). La intensidad de la Recuperación de energía se puede ajustar a ""fuerte"" o ""débil"". Cuando se
establece como ""fuerte"", la desaceleración es más evidente.
Consejos de seguridad:
○ Antes de utilizar la función de recuperación de energía durante la conducción, practique en un entorno seguro hasta
que se familiarice con su funcionamiento y sus efectos. Tenga en cuenta que esta función puede proporcionar
resistencia adicional para desacelerar el vehículo cuando se suelta el acelerador, complementando a los mecanismos
de fricción y frenado estándar. Por lo tanto, los usuarios deben controlar el vehículo adecuadamente y mantener bien
el equilibrio para un recorrido seguro.
○ La función Recuperación de energía está diseñada para asistir (no reemplazar) al sistema de frenado. Cuando
necesite detenerse o reducir la velocidad de forma segura, utilice el freno tirando de la palanca de freno.
○ Tenga mayor precaución cuando use la función Recuperación de energía cuesta abajo o en condiciones especiales de
conducción con el fin de evitar caídas. Soltar el acelerador en una pendiente puede resultar en una aceleración
debido a la gravedad y la inercia. Debido a la aceleración, la función Recuperación de energía se activará
simultáneamente, proporcionando fuerza desaceleradora, lo que requiere mantener el equilibrio con cuidado.
○ La función de recuperación de energía no se activa mientras el vehículo está en modo de control de crucero. Una vez
que desactive el control de crucero, al soltar el acelerador se iniciará la recuperación de energía (si ya está habilitada
enla aplicación), dando lugar a una clara reducción en la velocidad.
○ Una vez habilitada la recuperación de energía, permanecerá encendida hasta que la función se desactive
manualmente a través de la aplicación Segway Mobility. La función no se desactiva automáticamente en caso de que
el vehículo se apague o se quede sin batería. El panel de control del vehículo no muestra el estado de Recuperación
de energía, que solo se puede verificar y ajustar (Desactivada/Fuerte/Débil) en la aplicación.
○ Informe a cualquier prestatario del vehículo sobre la configuración actual de recuperación de energía para asegurarse
de que sepa cómo afecta al funcionamiento del vehículo.
○ Si tiene alguna pregunta sobre esta función, comuníquese con el soporte técnico.
01 02 03 04 05 06 07 08 09 10 11 12 13 14 15
16 17 18 19 20 21 22 23 24 25 26 27 28 29 30 31 32 33
34 35
36 37 38 39 40 41 42 43 44 45 46 47 48 49 50 51
52 53 54 55 56 57 58 59 60 61 62 63 64 65 66 67 68 69
70 71 72 73 74 75 76 77
78 79 80 81
82 83 84 85
86 87 88 89 90 91 92 93 94 95 96 97 98 99 100 101
102 103 104 105 106 107 108
ingesteld op ""sterk"", is de vertraging duidelijker.
Veiligheidstips:
○ Oefen voordat u de functie Energierecuperatie tijdens ritten gebruikt in een veilige omgeving, tot u vertrouwd bent
met de werking en effecten ervan. Houd er rekening mee dat deze functie extra weerstand kan bieden om het
voertuig te vertragen wanneer het gaspedaal wordt losgelaten, als aanvulling op de standaard wrijvings- en
remmechanismen. Daarom moeten gebruikers het voertuig goed besturen en het evenwicht goed bewaren voor een
veilige rit.
○ Energierecuperatie is ontworpen om het remsysteem te ondersteunen, niet te vervangen. Als u veilig moet stoppen of
afremmen, gebruik dan de rem door aan de remhendel te trekken.
○ Wees extra voorzichtig bij het gebruik van de functie Energierecuperatie op paden bergaf of onder speciale
rijomstandigheden om vallen te voorkomen. Het loslaten van het gaspedaal tijdens dalen, kan nog steeds leiden tot
acceleratie als gevolg van zwaartekracht en traagheid. Door de acceleratie wordt Energierecuperatie gelijktijdig
ingeschakeld, wat zorgt voor een vertragende kracht, wat een zorgvuldig evenwicht vereist.
○ De functie Energierecuperatie wordt niet ingeschakeld als het voertuig in de modus Cruise control staat. Zodra u
Cruise control uitschakelt, wordt door het loslaten van het gaspedaal Energierecuperatie gestart (indien al
ingeschakeld in de app), met een duidelijke snelheidsvermindering als gevolg.
○ Zodra de Energierecuperatie is ingeschakeld, blijft deze ingeschakeld tot de functie handmatig wordt uitgeschakeld
via de "Segway Mobility"-app. De functie wordt niet automatisch uitgeschakeld als het voertuig wordt uitgeschakeld
of de accu leeg raakt. Het dashboard van het voertuig geeft geen status van Energierecuperatie weer, deze kan alleen
in de app kan worden geverifieerd en aangepast (Uit/Sterk/Zwak).
○ Informeer elke lener van het voertuig over de huidige instellingen voor Energierecuperatie om er zeker van te zijn dat
ze op de hoogte zijn van de invloed van de functie op de werking van het voertuig.
○ Als u vragen hebt over deze functie, neem dan contact op met Technische ondersteuning.
PT
*Notas sobre a função de recuperação de energia:
Introdução à função: Defina o nível de «Recuperação de energia» na aplicação Segway Mobility: Desligado/Forte/Fraco
○ Por predefinição, a funcionalidade de recuperação de energia do veículo está definida como «desligada». Os
utilizadores podem ativar ou desativar a função de Recuperação de Energia na aplicação «Segway Mobility».
○ Quando a Recuperação de Energia está ativada, soltar o acelerador durante a condução ativa automaticamente esta
função. O motor produzirá então uma força eletromotriz inversa, fazendo com que o veículo abrande e crie uma
sensação percetível de desaceleração (semelhante à sensação de puxar a alavanca do travão). A intensidade da
recuperação de energia pode ser ajustada para «forte» ou «fraca». Quando definido como «forte», a desaceleração
é mais evidente.
Dicas de segurança:
○ Antes de utilizar a função de Recuperação de Energia durante a condução, pratique num ambiente seguro até estar
familiarizado com o seu funcionamento e efeitos. Tenha em atenção que esta função pode proporcionar uma
resistência adicional para desacelerar o veículo quando o acelerador é libertado, complementando os mecanismos
normais de fricção e travagem. Por conseguinte, os utilizadores têm de controlar corretamente o veículo e manter o
equilíbrio para uma condução segura.
○ A recuperação de energia foi concebida para ajudar, e não para substituir, o sistema de travagem. Quando precisar de
EN * Enable / Disable CodeLock via Segway Mobility App, at homepage >> More Functions >> Locking Function, and
choose DigitalCodeLock or Pattern CodeLock.
FR * Activez/désactivez CodeLock via l’application Segway Mobility, sur la Page d’accueil >> Plus de fonctions >>
Fonction de verrouillage, et choisissez CodeLock numérique ou CodeLock schéma.
DE * Aktivieren/Deaktivieren Sie CodeLock über die Segway Mobility-App auf der Startseite >> Weitere Funktionen >>
Verriegelungsfunktion und wählen Sie „Digital CodeLock“ oder „Pattern CodeLock“.
IT * Abilitare/disabilitare il CodeLock tramite l'app Segway Mobility, dalla homepage >> Altre funzioni >> Funzione di
blocco e scegliere CodeLock digitale o CodeLock a sequenza.
ES *Habilite/inhabilite CodeLock a través de la aplicación Segway Mobility, en la página de inicio >> Más funciones >>
F unción de bloqueo, y elija CodeLock digital o CodeLock de patrón.
PL * Włącz/wyłącz funkcję CodeLock w aplikacji Segway Mobility na stronie głównej >> Więcej funkcji >> Funkcja
blokady i wybierz opcję blokady cyfrowej CodeLock lub ze wzorem.
NL * Schakel CodeLock in/uit via de Segway Mobility-app, >> startpagina Meer functies >> Vergrendelfunctie en kies
Digitaal CodeLock of Patroon CodeLock.
PT * Ativar/desativar o CodeLock através da aplicação Segway Mobility, na página inicial >> Mais funções >> Função
de bloqueio, e escolher Digital CodeLock ou Pattern CodeLock.
parar ou abrandar em segurança, utilize o travão puxando a alavanca do travão.
○ Tenha mais cuidado ao utilizar a função de Recuperação de Energia em descidas ou em condições especiais de
condução para evitar quedas. Soltar o acelerador numa descida pode ainda resultar em aceleração devido à
gravidade e à inércia. Devido à aceleração, a recuperação de energia é ativada simultaneamente, fornecendo força de
desaceleração, o que exige uma manutenção cuidadosa do equilíbrio.
○ A função de Recuperação de Energia não é ativada enquanto o veículo estiver no modo de controlo da velocidade de
cruzeiro. Depois de desativar o controlo da velocidade de cruzeiro, soltar o acelerador iniciará a Recuperação de
Energia (se já estiver ativada na aplicação), criando uma redução nítida da velocidade.
○ Uma vez ativada a Recuperação de Energia, esta permanecerá ligada até que a função seja desligada manualmente
através da aplicação «Segway Mobility». A função não é automaticamente desativada no caso de o veículo se
desligar ou ficar sem bateria. O tablier do veículo não apresenta o estado da Recuperação de Energia, que só pode
ser verificado e ajustado (Desligado/Forte/Fraco) na aplicação.
○ Informe qualquer mutuário do veículo sobre as atuais definições de Recuperação de Energia, para garantir que está
ciente da forma como a funcionalidade afeta o funcionamento do veículo.
○ Se tiver alguma dúvida sobre esta função, contacte o Apoio Técnico.
●CodeLock
EN Enable Digital CodeLock via the App. Set a four-digit password (e.g. 1234).
FR Activez CodeLock numérique via l’application. Définissez un mot de passe à quatre chiffres (par exemple, 1234).
DE Aktivieren Sie Digital CodeLock über die App. Legen Sie ein vierstelliges Passwort fest (z. B. 1234).
○ DIgital CodeLock / CodeLock numérique / DIgital CodeLock / CodeLock digitale / CodeLock digital / Cyfrowa
blokada CodeLock / Digitaal CodeLock / Digital CodeLock
1
01 02 03 04 05 06 07 08 09 10 11 12 13 14 15
16 17 18 19 20 21 22 23 24 25 26 27 28 29 30 31 32 33
34 35 36 37
38 39 40 41 42 43 44 45 46 47 48 49 50 51
52 53 54 55 56 57 58 59 60 61 62 63 64 65 66 67 68 69
70 71 72 73 74 75 76 77
78 79 80 81
82 83 84 85
86 87 88 89 90 91 92 93 94 95 96 97 98 99 100 101
102 103 104 105 106 107 108

EN Press the Power Button and use Mode Switching Button and Power Button to enter the password. The number
decreases by one for each pressing of Mode Switching Button and increases by one for each pressing of Power
Button. Squeeze any brake lever or press Custom Button to confirm each password entered.
FR Appuyez sur le bouton marche/arrêt et utilisez le bouton de changement de mode et le bouton marche/arrêt pour
saisir le mot de passe. Le nombre diminue de 1 pour chaque pression sur le bouton de changement de mode et
augmente de 1 pour chaque pression sur le bouton marche/arrêt. Appuyez sur n’importe quel levier de frein ou
bouton personnalisé pour confirmer chaque mot de passe saisi.
DE Drücken Sie den Ein-/Aus-Schalter und geben Sie das Passwort mit der Moduswechseltaste und der Einschalttaste
ein. Bei jedem Drücken der Moduswechseltaste verringert sich die Zahl um eins, und bei jedem Drücken des
Ein-/Aus-Schalters erhöht sie sich um eins. Drücken Sie einen beliebigen Bremshebel oder die benutzerdefinierte
Taste, um jedes eingegebene Passwort zu bestätigen.
IT Premere il pulsante di accensione e utilizzare il pulsante di commutazione della modalità e il pulsante di
accensione per inserire la password. Il diminuisce aumenta di uno ogni volta che viene premuto il pulsante di
commutazione della modalità e numero di uno ogni volta che viene premuto il pulsante di accensione. Per
confermare ogni password inserita, premere una leva del freno qualsiasi o il pulsante personalizzato.
ES Presione el botón de encendido y use el botón de cambio de modo y el botón de encendido para introducir la
contraseña. El número disminuye en uno por cada pulsación del botón de cambio de modo y aumenta en uno por
cada pulsación del botón de encendido. Presione cualquier palanca de freno o botón personalizado para confirmar
la contraseña introducida.
PL Naciśnij przycisk zasilania i wprowadź hasło przy użyciu przycisku przełączania trybu oraz przycisku zasilania.
Liczba zmniejsza się o jeden po każdym naciśnięciu przycisku przełączania trybu i zwiększa się o jeden po każdym
EN Rider can also press the left and right buttons to check each password entered and use Mode Switching Button
and Power Button to change the password. After successfully entering the digital password, the buzzer will send
out two short beeps and the vehicle power on.
FR Le pilote peut également appuyer sur les boutons gauche et droit pour vérifier chaque mot de passe saisi et
utiliser le bouton de changement de mode et le bouton marche/arrêt pour modifier le mot de passe. Après avoir
saisi avec succès le mot de passe numérique, le buzzer enverra deux bips courts et le véhicule se mettra sous
tension.
DE Der Fahrer kann auch die linke und rechte Taste drücken, um jedes eingegebene Passwort zu überprüfen und die
Moduswechseltaste und den Ein-/Aus-Schalter verwenden, um das Passwort zu ändern. Nach erfolgreicher
Eingabe des digitalen Passwortes ertönen vom Summer zwei kurze Pieptöne und das Fahrzeug schaltet sich ein.
IT Il guidatore può inoltre premere i pulsanti destro e sinistro per controllare ogni password inserita e utilizzare il
pulsante di commutazione della modalità e il pulsante di accensione per modificare la password. Dopo aver inserito
correttamente la password digitale, verranno emessi due brevi segnali acustici e il veicolo si accenderà.
ES El usuario también puede presionar los botones izquierdo y derecho para verificar cada contraseña introducida y
usar el botón de cambio de modo y el botón de encendido para cambiar la contraseña. Después de introducir
correctamente la contraseña digital, el timbre emitirá dos pitidos cortos y el vehículo se encenderá.
IT Attivare il CodeLock digitale tramite l'app. Impostare una password di quattro cifre (ad esempio, 1234).
ES Habilite CodeLock digital a través de la aplicación. Establezca una contraseña de cuatro dígitos (por ejemplo, 1234).
PL Włącz cyfrową blokadę CodeLock w aplikacji. Ustaw czterocyfrowe hasło (np. 1234).
NL Schakel Digitaal CodeLock in via de app. Stel een wachtwoord van vier cijfers in (bijv. 1234).
PT Ativar o Digital CodeLock através da aplicação. Defina uma palavra�passe de quatro dígitos (por exemplo, 1234).
XXXX
naciśnięciu przycisku zasilania. Naciśnij dowolną dźwignię hamulca lub przycisk spersonalizowany, aby potwierdzić każde
wprowadzone hasło.
NL Druk op de aan/uit-knop en gebruik de knop voor het wisselen van modus en de aan/uit-knop om het wachtwoord
in te voeren. Het aantal neemt af met één telkens u op de schakelaar voor het wisselen van modus drukt en neemt
toe met één telkens u op de aan/uit-knop drukt. Druk op een remhendel of aangepaste knop om elk ingevoerd
wachtwoord te bevestigen.
PT Prima o botão de alimentação e utilize o botão de comutação de modo e o botão de alimentação para introduzir a
palavra�passe. O número diminui em um para cada pressão no botão de comutação de modo e aumenta em um
para cada pressão no botão de alimentação. Prima qualquer alavanca do travão ou botão personalizado para
confirmar cada palavra-passe introduzida.
2
3
01 02 03 04 05 06 07 08 09 10 11 12 13 14 15
16 17 18 19 20 21 22 23 24 25 26 27 28 29 30 31 32 33
34 35 36 37 38 39
40 41 42 43 44 45 46 47 48 49 50 51
52 53 54 55 56 57 58 59 60 61 62 63 64 65 66 67 68 69
70 71 72 73 74 75 76 77
78 79 80 81
82 83 84 85
86 87 88 89 90 91 92 93 94 95 96 97 98 99 100 101
102 103 104 105 106 107 108
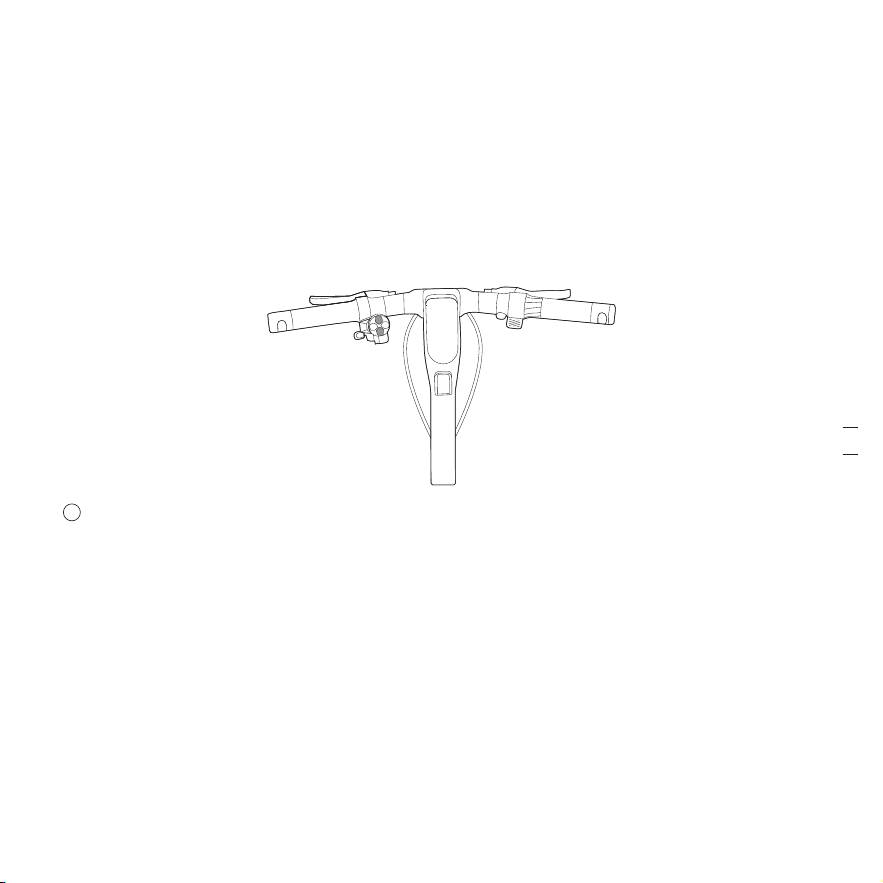
EN Press the Power Button and use Mode Switching Button and Power Button to enter the password. The number
decreases by one for each pressing of Mode Switching Button and increases by one for each pressing of Power
Button. Squeeze any brake lever or press Custom Button to confirm each password entered.
FR Appuyez sur le bouton marche/arrêt et utilisez le bouton de changement de mode et le bouton marche/arrêt pour
saisir le mot de passe. Le nombre diminue de 1 pour chaque pression sur le bouton de changement de mode et
augmente de 1 pour chaque pression sur le bouton marche/arrêt. Appuyez sur n’importe quel levier de frein ou
bouton personnalisé pour confirmer chaque mot de passe saisi.
DE Drücken Sie den Ein-/Aus-Schalter und geben Sie das Passwort mit der Moduswechseltaste und der Einschalttaste
ein. Bei jedem Drücken der Moduswechseltaste verringert sich die Zahl um eins, und bei jedem Drücken des
Ein-/Aus-Schalters erhöht sie sich um eins. Drücken Sie einen beliebigen Bremshebel oder die benutzerdefinierte
Taste, um jedes eingegebene Passwort zu bestätigen.
IT Premere il pulsante di accensione e utilizzare il pulsante di commutazione della modalità e il pulsante di
accensione per inserire la password. Il diminuisce aumenta di uno ogni volta che viene premuto il pulsante di
commutazione della modalità e numero di uno ogni volta che viene premuto il pulsante di accensione. Per
confermare ogni password inserita, premere una leva del freno qualsiasi o il pulsante personalizzato.
ES Presione el botón de encendido y use el botón de cambio de modo y el botón de encendido para introducir la
contraseña. El número disminuye en uno por cada pulsación del botón de cambio de modo y aumenta en uno por
cada pulsación del botón de encendido. Presione cualquier palanca de freno o botón personalizado para confirmar
la contraseña introducida.
PL Naciśnij przycisk zasilania i wprowadź hasło przy użyciu przycisku przełączania trybu oraz przycisku zasilania.
Liczba zmniejsza się o jeden po każdym naciśnięciu przycisku przełączania trybu i zwiększa się o jeden po każdym
EN Rider can also press the left and right buttons to check each password entered and use Mode Switching Button
and Power Button to change the password. After successfully entering the digital password, the buzzer will send
out two short beeps and the vehicle power on.
FR Le pilote peut également appuyer sur les boutons gauche et droit pour vérifier chaque mot de passe saisi et
utiliser le bouton de changement de mode et le bouton marche/arrêt pour modifier le mot de passe. Après avoir
saisi avec succès le mot de passe numérique, le buzzer enverra deux bips courts et le véhicule se mettra sous
tension.
DE Der Fahrer kann auch die linke und rechte Taste drücken, um jedes eingegebene Passwort zu überprüfen und die
Moduswechseltaste und den Ein-/Aus-Schalter verwenden, um das Passwort zu ändern. Nach erfolgreicher
Eingabe des digitalen Passwortes ertönen vom Summer zwei kurze Pieptöne und das Fahrzeug schaltet sich ein.
IT Il guidatore può inoltre premere i pulsanti destro e sinistro per controllare ogni password inserita e utilizzare il
pulsante di commutazione della modalità e il pulsante di accensione per modificare la password. Dopo aver inserito
correttamente la password digitale, verranno emessi due brevi segnali acustici e il veicolo si accenderà.
ES El usuario también puede presionar los botones izquierdo y derecho para verificar cada contraseña introducida y
usar el botón de cambio de modo y el botón de encendido para cambiar la contraseña. Después de introducir
correctamente la contraseña digital, el timbre emitirá dos pitidos cortos y el vehículo se encenderá.
IT Attivare il CodeLock digitale tramite l'app. Impostare una password di quattro cifre (ad esempio, 1234).
ES Habilite CodeLock digital a través de la aplicación. Establezca una contraseña de cuatro dígitos (por ejemplo, 1234).
PL Włącz cyfrową blokadę CodeLock w aplikacji. Ustaw czterocyfrowe hasło (np. 1234).
NL Schakel Digitaal CodeLock in via de app. Stel een wachtwoord van vier cijfers in (bijv. 1234).
PT Ativar o Digital CodeLock através da aplicação. Defina uma palavra�passe de quatro dígitos (por exemplo, 1234).
XXXX
naciśnięciu przycisku zasilania. Naciśnij dowolną dźwignię hamulca lub przycisk spersonalizowany, aby potwierdzić każde
wprowadzone hasło.
NL Druk op de aan/uit-knop en gebruik de knop voor het wisselen van modus en de aan/uit-knop om het wachtwoord
in te voeren. Het aantal neemt af met één telkens u op de schakelaar voor het wisselen van modus drukt en neemt
toe met één telkens u op de aan/uit-knop drukt. Druk op een remhendel of aangepaste knop om elk ingevoerd
wachtwoord te bevestigen.
PT Prima o botão de alimentação e utilize o botão de comutação de modo e o botão de alimentação para introduzir a
palavra�passe. O número diminui em um para cada pressão no botão de comutação de modo e aumenta em um
para cada pressão no botão de alimentação. Prima qualquer alavanca do travão ou botão personalizado para
confirmar cada palavra-passe introduzida.
2
3
01 02 03 04 05 06 07 08 09 10 11 12 13 14 15
16 17 18 19 20 21 22 23 24 25 26 27 28 29 30 31 32 33
34 35 36 37 38 39
40 41 42 43 44 45 46 47 48 49 50 51
52 53 54 55 56 57 58 59 60 61 62 63 64 65 66 67 68 69
70 71 72 73 74 75 76 77
78 79 80 81
82 83 84 85
86 87 88 89 90 91 92 93 94 95 96 97 98 99 100 101
102 103 104 105 106 107 108
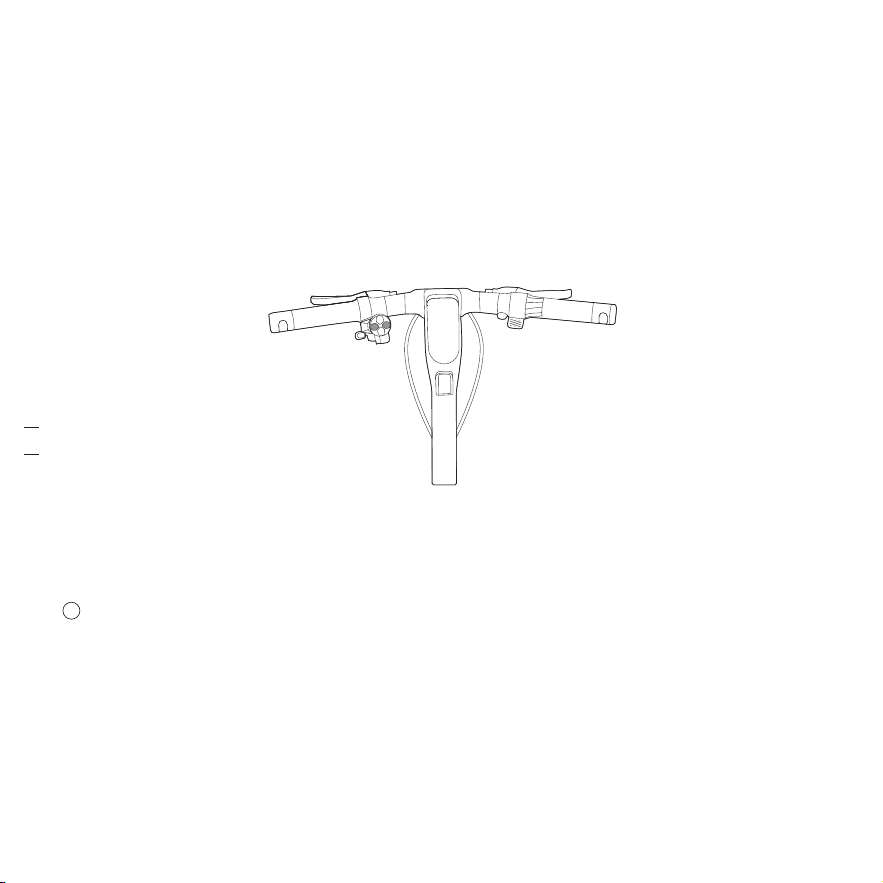
EN Enable Pattern CodeLock via the App. Set a 4~8 password (e.g. ↑↓←→ ).
FR Activez CodeLock schéma via l’application. Définissez un mot de passe de 4 à 8 directions (par exemple ↑↓←→ ).
DE Aktivieren Sie Pattern CodeLock über die App. Legen Sie ein Passwort aus 4~8 Mustern fest (z. B. ↑↓←→ ).
IT Abilitare il CodeLock a sequenza tramite l'app. Impostare una password di 4~8 caratteri (ad esempio, ↑↓←→ ).
ES Habilite el CodeLock de patrón a través de la aplicación. Establezca una contraseña de 4~8 (por ejemplo, ↑↓←→ ).
PL Włącz blokadę CodeLock ze wzorem w aplikacji. Ustaw hasło składające się z 4~8 wzorów (np. ↑↓←→ ).
NL Schakel Patroon CodeLock in via de app. Stel een wachtwoord met 4~8 patronen in (bijv. ↑↓←→ ).
PT Ativar o Pattern CodeLock através da aplicação. Defina uma palavra-passe de 4 a 8 (por exemplo, ↑ ↓ ←→ ).
○ Pattern CodeLock / CodeLock schéma / Pattern CodeLock / CodeLock a sequenza / CodeLock de patrón /
CodeLock ze wzorem / Patroon CodeLock / Pattern CodeLock
EN Enable AirLock via the App. Turn on Bluetooth on your mobile phone and connect to the vehicle. Vehicle's
Bluetooth will automatically connect when the mobile phone is close to the vehicle, and the Bluetooth icon on the
dashboard lights up. Press the Power Button to power on the vehicle.
FR Appuyez sur le bouton marche/arrêt et utilisez les boutons directionnels haut, bas, gauche et droite pour saisir le
mot de passe. Chaque fois qu’un bouton de direction est appuyé, le bouton clignote une fois et la direction
correspondante est affichée sur le tableau de bord. Le buzzer émettra également un bip court. Après avoir saisi
avec succès le schéma du mot de passe, le buzzer émettra deux bips courts et le véhicule se mettra sous tension.
DE Drücken Sie den Ein-/Aus-Schalter und geben Sie das Passwort mit den Richtungstasten nach oben, unten, links
und rechts ein. Bei jeder Eingabe einer Richtungstaste blinkt die Taste einmal und die entsprechende Richtung wird
auf der Anzeigetafel angezeigt. Zusätzlich gibt der Summer einen kurzen Piepton aus. Nach erfolgreicher Eingabe
des Musterpassworts gibt der Summer zwei kurze Pieptöne aus und das Fahrzeug schaltet sich ein.
IT Per inserire la password, premere il pulsante di accensione e utilizzare i pulsanti direzionali su, giù, sinistra e
destra. Ogni volta che si preme un pulsante direzionale, il pulsante lampeggia una volta e la direzione
corrispondente viene visualizzata sul cruscotto. Viene emesso inoltre un breve segnale acustico. Dopo aver inserito
correttamente la password del modello, vengono emessi due brevi segnali acustici e il veicolo si accende.
ES Presione el botón de encendido y use los botones direccionales arriba, abajo, izquierda y derecha para introducir la
contraseña. Cada vez que se introduce un botón de dirección, el botón parpadea una vez y la dirección
correspondiente se muestra en el panel de control. El timbre también emitirá un pitido corto. Después de introducir
correctamente la contraseña de patrón, el timbre emitirá dos pitidos cortos y el vehículo se encenderá.
PL Naciśnij przycisk zasilania i użyj przycisków kierunku w górę, w dół, w lewo i w prawo, aby wprowadzić hasło. Po
każdym naciśnięciu przycisku kierunku mignie on raz i odpowiedni kierunek zostanie wyświetlony na tablicy
wskaźników. Rozlegnie się również krótki sygnał dźwiękowy. Po wprowadzeniu hasła wzoru rozlegną się dwa krótkie
sygnały dźwiękowe i pojazd zostanie włączony.
NL Druk op de aan/uit-knop en gebruik de richtingstoetsen omhoog, omlaag, links en rechts om het wachtwoord in te
voeren. Telkens een richtingsknop wordt gebruikt, knippert de knop één keer en wordt de bijbehorende richting op
het dashboard weergegeven. De zoemer produceert ook een korte pieptoon. Na het invoeren van het
patroonwachtwoord, produceert de zoemer twee korte pieptonen en wordt het voertuig ingeschakeld.
PT Prima o botão de alimentação e utilize os botões de direção para cima, para baixo, para a esquerda e para a direita
para introduzir a palavra-passe. Cada vez que um botão de direção é introduzido, o botão pisca uma vez e a
XXXX
PL Kierowca może również nacisnąć lewy i prawy przycisk, aby sprawdzić każde wprowadzone hasło, a także je
zmienić, naciskając przyciski przełączania trybu i zasilania. Po wprowadzeniu hasła blokady cyfrowej rozlegną się
dwa krótkie sygnały dźwiękowe i pojazd zostanie włączony.
NL De rijder kan ook op de linker- en rechterknop drukken om elk ingevoerd wachtwoord te controleren en de knop
voor wisselen van modus en de aan/uit-knop gebruiken om het wachtwoord te wijzigen. Na het invoeren van het
digitaal wachtwoord, zal de zoemer twee korte pieptonen produceren en het voertuig inschakelen.
PT O condutor pode também premir os botões esquerdo e direito para verificar cada palavra-passe introduzida e
utilizar o botão de comutação de modo e o botão de alimentação para alterar a palavra-passe. Depois de introduzir
a palavra-passe digital com êxito, a campainha emite dois sinais sonoros curtos e o veículo liga-se.
1
2
01 02 03 04 05 06 07 08 09 10 11 12 13 14 15
16 17 18 19 20 21 22 23 24 25 26 27 28 29 30 31 32 33
34 35 36 37 38 39 40 41
42 43 44 45 46 47 48 49 50 51
52 53 54 55 56 57 58 59 60 61 62 63 64 65 66 67 68 69
70 71 72 73 74 75 76 77
78 79 80 81
82 83 84 85
86 87 88 89 90 91 92 93 94 95 96 97 98 99 100 101
102 103 104 105 106 107 108
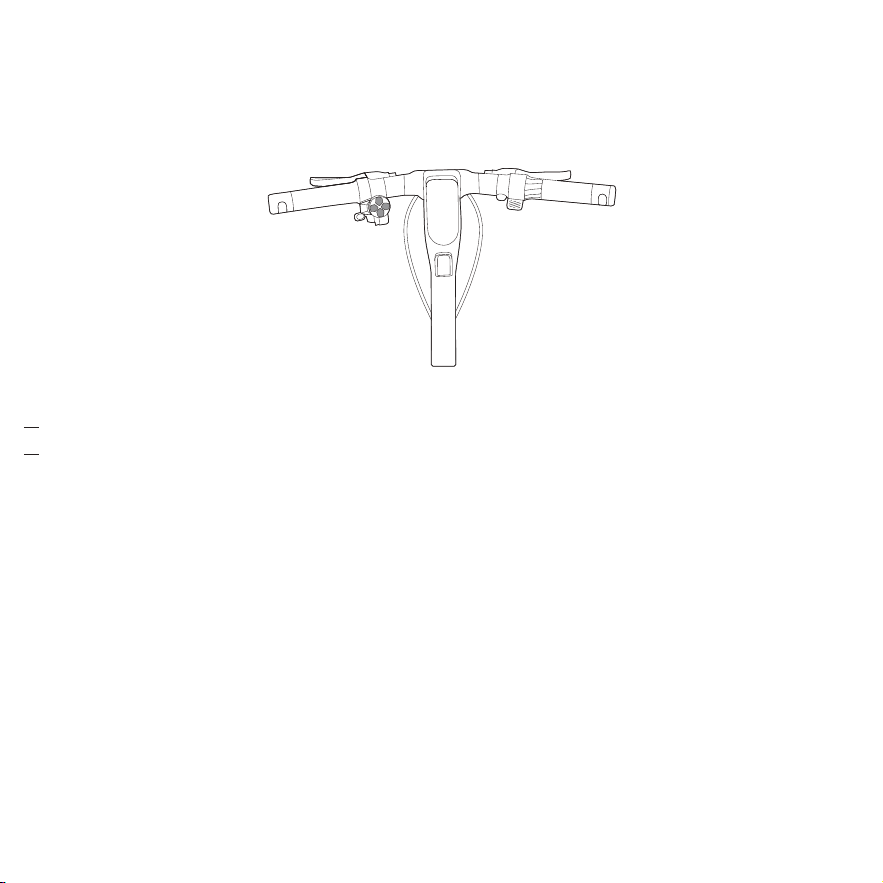
EN * Enable/Disable AirLock via Segway Mobility App, at homepage >> More Functions >> Locking Function.
FR * Activez/désactivez AirLock via l’application Segway Mobility, sur la Page d’accueil >> Plus de fonctions >>
Fonction de verrouillage
DE * Aktivieren/Deaktivieren Sie AirLock über die Segway Mobility-App auf der Startseite >> Weitere Funktionen >>
Verriegelungsfunktion.
IT Abilitare/disabilitare il AirLock tramite l'app Segway Mobility, dalla homepage >> Altre funzioni >> Funzione di
blocco
ES * Habilite/inhabilite AirLock a través de la aplicación Segway Mobility, en la página de inicio >> Más funciones >>
Función de bloqueo
PL * Włącz/wyłącz funkcję AirLock w aplikacji Segway Mobility na stronie głównej >> Więcej funkcji >> Funkcja
blokady
NL * Schakel CodeLock in/uit via de Segway Mobility-app, >> startpagina Meer functies >> Vergrendelfunctie
PT * Ativar/desativar o AirLock através da aplicação Segway Mobility, na página inicial >> Mais funções >> Função de
bloqueio
● Segway AirLock
EN Set digital or pattern unlocking passcode first via the App.
FR Commencez par définir un code d’accès numérique ou un schéma de déverrouillage sur l’application.
DE Legen Sie zunächst über die App einen digitalen oder Muster-Entriegelungscode fest.
IT Impostare prima il codice di sblocco digitale o a sequenza tramite l'app.
ES Set digital or pattern unlocking passcode first via the App.
PL Najpierw ustaw kod odblokowania blokady cyfrowego lub odblokowania za pomocą wzoru w aplikacji.
NL Stel eerst een digitale of patroon ontgrendelingswachtcode in via de app
PT Defina primeiro o código de acesso de desbloqueio digital ou padrão através da aplicação.
EN Note: You can enter the digital/pattern password up to3 times. After entering the wrong number 3 times,
thescreen will automatically power off. You can try to powerit on again for the fourth time. If you still enter the
wrongpassword, it will trigger a alert.
FR Remarque : vous pouvez saisir le mot de passe numérique/schéma jusqu’à 3 fois. Après 3 saisies incorrectes,
l’écrans’éteindra automatiquement. Vous pouvez essayer de lerallumer pour la quatrième tentative. Si vous
saisissezà nouveau un mot de passe erroné, une alerte seradéclenchée.
DE Hinweis: Sie können das digitale/Muster-Passwort bis zudreimal eingeben. Nach dreimaliger Eingabe einer
falschenNummer wird der Bildschirm automatisch ausgeschaltet. Siekönnen ein viertes Mal versuchen, es wieder
einzuschalten.Wenn Sie dennoch das falsche Passwort eingeben, wirdeine Warnung ausgelöst.
IT Nota: è possibile inserire la password digitale/a sequenza fino a 3 volte. Dopo aver inserito il numero errato per 3
volte, lo schermo si spegne automaticamente. Si può provare a riaccendere il veicolo una quarta volta. Se si
inserisce ancora una password sbagliata, si attiverà un allarme.
ES Nota: Puede introducir la contraseña digital o de patrón hasta 3 veces. Después de introducir una contraseña
incorrecta 3 veces, la pantalla se apagará automáticamente. Puede intentar encenderlo nuevamente por cuarta
vez. Si vuelve a introducir una contraseña incorrecta, se activará una alerta.
PL Uwaga: Hasło blokady cyfrowej/wzoru można wprowadzićmaksymalnie 3 razy. Po 3-krotnym wprowadzeniu
błędnego numeru ekran wyłączy się automatycznie. Możesz spróbować włączyć go ponownie po raz czwarty. Jeśli
ponownie wprowadzisz nieprawidłowe hasło, uruchomi się alarm.
NL Opmerking: U kunt het digitaal/patroonwachtwoord maximaal 3 keer invoeren. Nadat u 3 keer het verkeerde
nummer hebt ingevoerd, wordt het scherm automatisch uitgeschakeld. U kunt proberen hem voor de vierde keer
opnieuw in te schakelen. Als u nog steeds het verkeerde wachtwoord invoert, wordt er een waarschuwing
geactiveerd.
PT Observação: A palavra-passe digital/padrão pode serintroduzida até 3 vezes. Depois de introduzir o número errado
3 vezes, o ecrã desliga-se automaticamente. Pode tentar ligá-lo novamente pela quarta vez. Se continuar a
introduzir a palavra-passe errada, será acionado um alerta.
XXXX
direção correspondente é apresentada no tablier. A campainha também emite um breve sinal sonoro. Depois de
introduzir com êxito a palavra-passe em padrão, a campainha emite dois sinais sonoros curtos e o veículo liga-se.
1
01 02 03 04 05 06 07 08 09 10 11 12 13 14 15
16 17 18 19 20 21 22 23 24 25 26 27 28 29 30 31 32 33
34 35 36 37 38 39 40 41 42 43
44 45 46 47 48 49 50 51
52 53 54 55 56 57 58 59 60 61 62 63 64 65 66 67 68 69
70 71 72 73 74 75 76 77
78 79 80 81
82 83 84 85
86 87 88 89 90 91 92 93 94 95 96 97 98 99 100 101
102 103 104 105 106 107 108
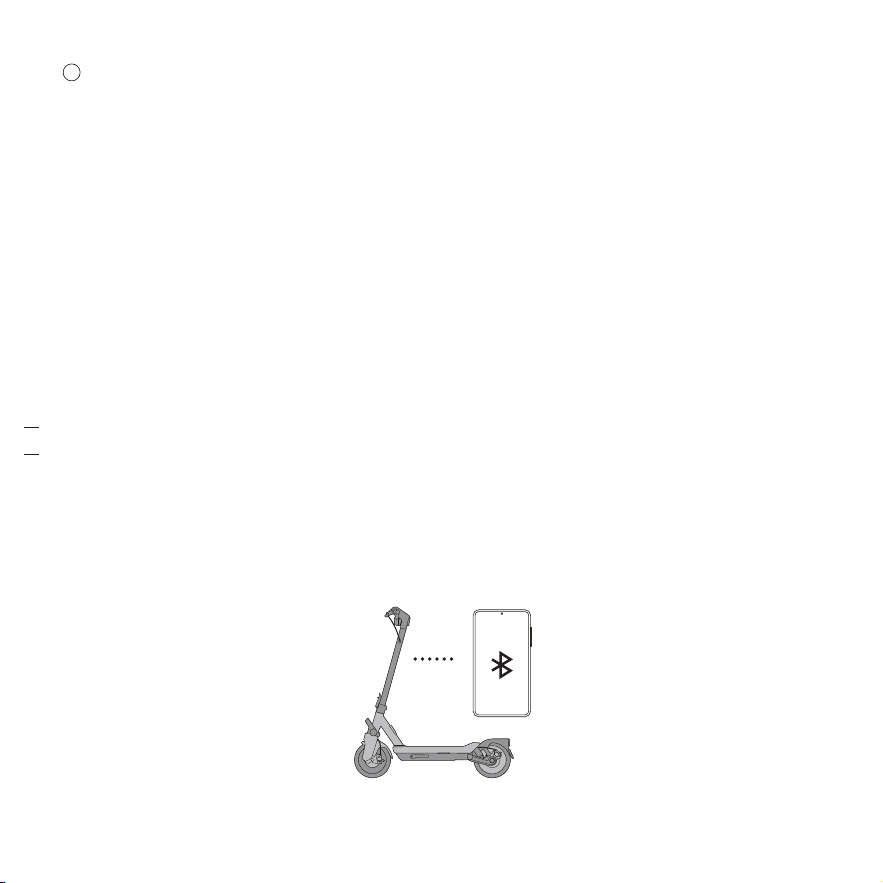
EN Note: If encountering a situation where AirLock is enabledbut unlocking fails, you can press the power button to
tryAirLock again or double press power button and use digitalpassword to unlock the vehicle. So that it can ensure
that your vehicle can ride normally in special circumstances.
FR Remarque : dans le cas où AirLock est activé mais que ledéverrouillage échoue, vous pouvez appuyer sur le bouton
marche/arrêt pour réessayer de lancer Airlock ou appuyerdeux fois sur le bouton marche/arrêt afin d’entrer le mot
de passe numérique pour déverrouiller le véhicule. Ceci garantit que votre véhicule puisse rouler normalement
dans des circonstances particulières.
DE Hinweis: Wenn AirLock aktiviert ist, das Entsperren jedochfehlschlägt, können Sie den Ein-/Aus-Schalter drücken,
um AirLock erneut zu versuchen, oder den Ein-/Aus-Schalter zweimal drücken und das Fahrzeug mit einem
digitalen Passwort entriegeln. Damit kann sichergestellt werden, dass Ihr Fahrzeug auch unter besonderen
Umständen normal fahren kann.
IT Nota: se si verifica una situazione in cui l'AirLock è abilitato ma lo sblocco non riesce, è possibile premere il
pulsante di accensione per riprovare ad abilitare l'AirLock oppure premere due volte il pulsante di accensione,
utilizzando la password digitale per sbloccare il veicolo. In questo modo, il veicolo può circolare normalmente in
circostanze particolari.
ES Nota: Si se encuentra con una situación en la que AirLockestá habilitado pero falla el desbloqueo, puede
presionarel botón de encendido para volver a probar con AirLocko pulsar dos veces el botón de encendido y usar
lacontraseña digital para desbloquear el vehículo. Paragarantizar que su vehículo pueda circular normalmente
encircunstancias especiales.
PL Uwaga: W sytuacji, gdy blokada AirLock jest włączona, ale odblokowanie nie powiedzie się, można nacisnąć
przycisk zasilania, aby spróbować użyć funkcji Airlock. Możesz też dwukrotnie nacisnąć przycisk zasilania, aby
wprowadzić hasło blokady cyfrowej i odblokować pojazd. Pozwala to normalnie jechać pojazdem w szczególnych
okolicznościach.
NL Opmerking: Als u in een situatie komt waar AirLock isingeschakeld maar de ontgrendeling mislukt, kunt u op de
aan/uit-knop drukken om te proberen om AirLock opnieuw te activeren of twee keer op de aan/uit-knop drukken
en het digitaal wachtwoord gebruiken om het voertuig te ontgrendelen. Zodat het ervoor kan zorgen dat uw
voertuig in bijzondere omstandigheden normaal kan rijden.
PT Observação: Se encontrar uma situação em que o AirLock está ativado, mas o desbloqueio falhar, pode pressionar
o botão ligar/desligar para tentar o AirLock novamente ou pressionar duas vezes o botão ligar/desligar e usar a
palavra-passe digital para desbloquear o veículo. Para que possa garantir que o seu veículo possa circular
normalmente em circunstâncias especiais.
EN Enable AirLock via the App. Turn on Bluetooth on your mobile phone and connect to the vehicle. Vehicle's
Bluetooth will automatically connect when the mobile phone is close to the vehicle, and the Bluetooth icon on the
dashboard lights up. Press the Power Button to power on the vehicle.
FR Activez AirLock via l’application. Activez le Bluetooth sur votre téléphone portable et connectez-vous au véhicule.
Le Bluetooth du véhicule se connectera automatiquement lorsque le téléphone portable est proche du véhicule et
que l’icône Bluetooth sur le tableau de bord s’allume. Appuyez sur le bouton marche/arrêt pour mettre le véhicule
sous tension.
DE Aktivieren Sie AirLock über die App. Schalten Sie Bluetooth auf Ihrem Mobiltelefon ein und stellen Sie eine
Verbindung zum Fahrzeug her.Die Bluetooth-Verbindung des Fahrzeugs wird automatisch hergestellt, wenn sich
das Mobiltelefon in der Nähe des Fahrzeugs befindet und das Bluetooth�Symbol auf der Anzeigetafel aufleuchtet.
Drücken Sie den Ein-/Aus-Schalter, um das Fahrzeug einzuschalten.
IT Attivare l'AirLock tramite l'app. Attivare il Bluetooth sul telefono cellulare e collegarlo al veicolo. VIl Bluetooth del
veicolo si collega automaticamente quando il telefono cellulare è vicino al veicolo e l'icona Bluetooth sul cruscotto
si accende. Premere il pulsante di accensione per accendere il veicolo.
ES Habilite AirLock a través de la aplicación. Active el Bluetooth en su teléfono móvil y conéctese al vehículo. El
Bluetooth del vehículo se conectará automáticamente cuando el teléficono de Bluetooth en el panel de control se
ilumine. Pulse el botón de encendido para encender el vehículo.
PL Włącz blokadę AirLock w aplikacji. Włącz Bluetooth w telefonie komórkowym i połącz go z pojazdem. Bluetooth
pojazdu połączy się automatycznie, gdy telefon komórkowy znajdzie się w jego pobliżu, i zaświeci się ikona
Bluetooth na tablicy wskaźników. Naciśnij przycisk zasilania, aby włączyć pojazd.
NL Schakel AirLock in via de app. Schakel Bluetooth in op uw mobiele telefoon en maak verbinding met het voertuig.
De Bluetooth van het voertuig maakt automatisch verbinding wanneer de mobiele telefoon zich in de buurt van het
voertuig bevindt en het Bluetooth-pictogram op het dashboard licht op. Druk op de aan/uit-knop om het voertuig
in te schakelen.
PT Ative o AirLock através da aplicação. Ligue o Bluetooth no seu telemóvel e ligue-o ao veículo. O Bluetooth do
veículo liga-se automaticamente quando o telemóvel está próximo do veículo e o ícone Bluetooth no tablier
acende-se. Prima o botão de alimentação para ligar o veículo.
2
01 02 03 04 05 06 07 08 09 10 11 12 13 14 15
16 17 18 19 20 21 22 23 24 25 26 27 28 29 30 31 32 33
34 35 36 37 38 39 40 41 42 43 44 45
46 47 48 49 50 51
52 53 54 55 56 57 58 59 60 61 62 63 64 65 66 67 68 69
70 71 72 73 74 75 76 77
78 79 80 81
82 83 84 85
86 87 88 89 90 91 92 93 94 95 96 97 98 99 100 101
102 103 104 105 106 107 108

EN Abnormal Movement Alert can be turned on / off via Segway Mobility App
FR L'alerte de mouvement anormal peut être activée/désactivée tvia l'application Segway Mobility.
DE Der Alarm für abnormale Bewegungen kann über die Segway Mobility-App ein- und ausgeschaltet werden.
IT L'avviso di movimento anomalo può essere attivato/disattivato tramite l'app Segway Mobility.
ES La alerta de movimiento anormal se puede activar o desactivar mediante la aplicación Segway Mobility
PL Alarm nieprawidłowego ruchu można włączyć/wyłączyć za pomocą aplikacji Segway Mobility
NL Waarschuwingen voor abnormale bewegingen kunnen worden in-/uitgeschakeld via de Segway Mobility-app.
PT O alerta de movimento anormal pode ser ativado/desativado através da aplicação Segway Mobility.
● Abnormal Movement Alert / Alerte de mouvement anormal / Alarm für abnormale
Bewegungen kann / Avviso di movimento anomalo / Alerta de movimiento anormal /
Alarm nieprawidłowego ruchu / Waarschuwing voor abnormale bewegingen / Alerta
de movimento anormal
● Scheduled Charging / Charge programmée / Geplantes Laden / Ricarica
programmata / Carga programada / Zaplanowane ładowanie / Gepland opladen /
Carregamento programado
EN After setting, if the vehicle detects abnormal movement in a powered off state, the buzzer will send out an alert for
5 seconds (a short alert every 0.5 second), and the driving wheel will be locked. The alert will stop if there is no
abnormal movement after 5 seconds, or all the lights will flash with the alert for 5 seconds. If there is still abnormal
movement, the alert will last.
FR Si le véhicule détecte un mouvement anormal dans un état éteint, le buzzer émettra une alerte pendant 5
secondes (une courte alerte toutes les 0,5 seconde) et la roue motrice sera verrouillée. L’alerte s’arrêtera s’il n’y a
pas de mouvement anormal après 5 secondes, ou tous les voyants clignoteront avec l’alerte pendant 5 secondes.
S’il y a toujours un mouvement anormal, l’alerte continuera.
DE Wenn das Fahrzeug im verriegelten Zustand eine anormale Bewegung erkennt, ertönt über den Summer 5
Sekunden lang ein Alarmsignal (alle 0,5 Sekunden ein kurzer Alarm) und das Antriebsrad wird gesperrt. Der Alarm
endet, wenn nach 5 Sekunden keine ungewöhnliche Bewegung erfolgt, oder alle Leuchten blinken im Alarmfall 5
Sekunden lang. Wenn weiterhin ungewöhnliche Bewegungen auftreten, bleibt der Alarm bestehen.
IT Se il veicolo rileva un movimento anomalo in stato spento, viene emesso un avviso per 5 secondi (un breve avviso
ogni 0,5 secondi) e la ruota motrice si blocca. L'avviso si interrompe se non si verifica alcun movimento anomalo
dopo 5 secondi; in caso contrario, tutte le luci lampeggeranno insieme all'allarme per 5 secondi. Se il movimento
continua a essere anomalo, l'avviso proseguirà.
ES Si el vehículo detecta un movimiento anormal estando apagado, el timbre enviará una alerta durante 5 segundos
(una alerta breve cada 0,5 segundos) y la rueda motriz se bloqueará. La alerta se detendrá si no hay ningún
movimiento anormal después de 5 segundos, o todas las luces parpadearán con la alerta durante 5 segundos. Si
sigue habiendo movimientos anormales, la alerta continuará.
PL Jeżeli pojazd wykryje nieprawidłowy ruch w stanie wyłączonym, przed 5 sekund będzie emitowany ostrzegawczy
sygnał dźwiękowy (krótkie sygnały co 0,5 sekundy) i kierownica zostanie zablokowana. Alarm zostanie zatrzymany,
jeśli stan nieprawidłowego ruchu nie zostanie wykryty po 5 sekundach. Przez 5 sekund wraz z alarmem będą migać
wszystkie światła. Jeśli nadal występuje nieprawidłowy ruch, alert będzie trwał.
NL Als het voertuig abnormale bewegingen detecteert in uitgeschakelde toestand, produceert de zoemer gedurende
5 seconden een waarschuwing (elke 0,5 seconde een korte waarschuwing) en wordt het aandrijfwiel vergrendeld.
De waarschuwing stopt als er na 5 seconden geen abnormale beweging is of alle lampjes zullen 5 seconden
knipperen als waarschuwing. Als er nog steeds een abnormale beweging is, blijft de waarschuwing van kracht.
PT Se o veículo detetar um movimento anormal num estado desligado, a campainha emitirá um alerta durante 5
segundos (um alerta curto a cada 0,5 segundos) e a roda motriz será bloqueada. O alerta para se não houver
movimento anormal após 5 segundos, ou todas as luzes piscam com o alerta durante 5 segundos. Se continuar a
registar-se um movimento anormal, o alerta mantém-se.
EN Enable Scheduled Charging via Segway Mobility App and set the charging schedule.
FR Activez la charge programmée depuis l’application Segway Mobility et définissez le calendrier de charge.
DE Aktivieren Sie das geplante Laden über die Segway Mobility-App und legen Sie den Ladezeitplan fest.
IT Abilitare la Ricarica programmata tramite l'app Segway Mobility e impostare il programma di ricarica.
ES Active la carga programada a través de la aplicación Segway Mobility y configure el horario de carga.
PL Włącz zaplanowane ładowanie za pomocą aplikacji Segway Mobility i ustaw harmonogram ładowania.
NL Schakel Gepland opladen in via de Segway Mobility-app en stel het oplaadschema in.
PT Ative o carregamento programado através da aplicação Segway Mobility e defina o horário de carregamento.
EN Plug in the charger and the charging will start automatically at the set schedule with two beeps.
FR Branchez le chargeur, et la charge démarrera automatiquement à l’heure choisie avec deux bips.
DE Schließen Sie das Ladegerät an. Der Ladevorgang beginnt automatisch gemäß dem eingestellten Zeitplan mit zwei
Pieptönen.
IT Collegare il caricabatterie e la ricarica si avvierà automaticamente emettendo due segnali acustici in base al
programma impostato.
ES Enchufe el cargador y la carga comenzará automáticamente en el horario establecido con dos pitidos.
PL Podłącz ładowarkę, a ładowanie rozpocznie się automatycznie zgodnie z ustawionym harmonogramem i będzie
Scheduled Charging (Enable before Each Charging)
Scheduled Charging (Enable before Each Charging)
Charging Time Period
Enable Scheduled Charging (only effective during this charging), and
this function will be disabled utomatically after being fully charged or
unplugging the charger. Charging will start immediately after plugging
in charger again.
Click "Start Now" (or squeeze and hold any braking lever
for 3s) to start charging immediately.
00:00
To
00:00
Start Charging
01 02 03 04 05 06 07 08 09 10 11 12 13 14 15
16 17 18 19 20 21 22 23 24 25 26 27 28 29 30 31 32 33
34 35 36 37 38 39 40 41 42 43 44 45 46 47
48 49 50 51
52 53 54 55 56 57 58 59 60 61 62 63 64 65 66 67 68 69
70 71 72 73 74 75 76 77
78 79 80 81
82 83 84 85
86 87 88 89 90 91 92 93 94 95 96 97 98 99 100 101
102 103 104 105 106 107 108
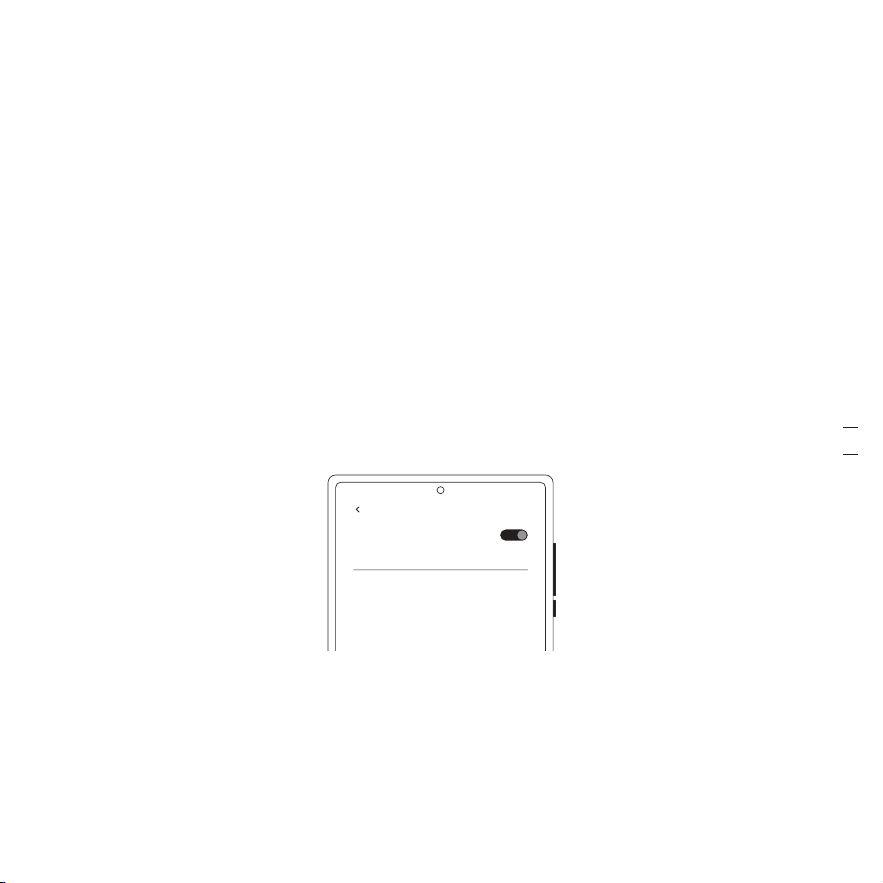
EN Abnormal Movement Alert can be turned on / off via Segway Mobility App
FR L'alerte de mouvement anormal peut être activée/désactivée tvia l'application Segway Mobility.
DE Der Alarm für abnormale Bewegungen kann über die Segway Mobility-App ein- und ausgeschaltet werden.
IT L'avviso di movimento anomalo può essere attivato/disattivato tramite l'app Segway Mobility.
ES La alerta de movimiento anormal se puede activar o desactivar mediante la aplicación Segway Mobility
PL Alarm nieprawidłowego ruchu można włączyć/wyłączyć za pomocą aplikacji Segway Mobility
NL Waarschuwingen voor abnormale bewegingen kunnen worden in-/uitgeschakeld via de Segway Mobility-app.
PT O alerta de movimento anormal pode ser ativado/desativado através da aplicação Segway Mobility.
● Abnormal Movement Alert / Alerte de mouvement anormal / Alarm für abnormale
Bewegungen kann / Avviso di movimento anomalo / Alerta de movimiento anormal /
Alarm nieprawidłowego ruchu / Waarschuwing voor abnormale bewegingen / Alerta
de movimento anormal
● Scheduled Charging / Charge programmée / Geplantes Laden / Ricarica
programmata / Carga programada / Zaplanowane ładowanie / Gepland opladen /
Carregamento programado
EN After setting, if the vehicle detects abnormal movement in a powered off state, the buzzer will send out an alert for
5 seconds (a short alert every 0.5 second), and the driving wheel will be locked. The alert will stop if there is no
abnormal movement after 5 seconds, or all the lights will flash with the alert for 5 seconds. If there is still abnormal
movement, the alert will last.
FR Si le véhicule détecte un mouvement anormal dans un état éteint, le buzzer émettra une alerte pendant 5
secondes (une courte alerte toutes les 0,5 seconde) et la roue motrice sera verrouillée. L’alerte s’arrêtera s’il n’y a
pas de mouvement anormal après 5 secondes, ou tous les voyants clignoteront avec l’alerte pendant 5 secondes.
S’il y a toujours un mouvement anormal, l’alerte continuera.
DE Wenn das Fahrzeug im verriegelten Zustand eine anormale Bewegung erkennt, ertönt über den Summer 5
Sekunden lang ein Alarmsignal (alle 0,5 Sekunden ein kurzer Alarm) und das Antriebsrad wird gesperrt. Der Alarm
endet, wenn nach 5 Sekunden keine ungewöhnliche Bewegung erfolgt, oder alle Leuchten blinken im Alarmfall 5
Sekunden lang. Wenn weiterhin ungewöhnliche Bewegungen auftreten, bleibt der Alarm bestehen.
IT Se il veicolo rileva un movimento anomalo in stato spento, viene emesso un avviso per 5 secondi (un breve avviso
ogni 0,5 secondi) e la ruota motrice si blocca. L'avviso si interrompe se non si verifica alcun movimento anomalo
dopo 5 secondi; in caso contrario, tutte le luci lampeggeranno insieme all'allarme per 5 secondi. Se il movimento
continua a essere anomalo, l'avviso proseguirà.
ES Si el vehículo detecta un movimiento anormal estando apagado, el timbre enviará una alerta durante 5 segundos
(una alerta breve cada 0,5 segundos) y la rueda motriz se bloqueará. La alerta se detendrá si no hay ningún
movimiento anormal después de 5 segundos, o todas las luces parpadearán con la alerta durante 5 segundos. Si
sigue habiendo movimientos anormales, la alerta continuará.
PL Jeżeli pojazd wykryje nieprawidłowy ruch w stanie wyłączonym, przed 5 sekund będzie emitowany ostrzegawczy
sygnał dźwiękowy (krótkie sygnały co 0,5 sekundy) i kierownica zostanie zablokowana. Alarm zostanie zatrzymany,
jeśli stan nieprawidłowego ruchu nie zostanie wykryty po 5 sekundach. Przez 5 sekund wraz z alarmem będą migać
wszystkie światła. Jeśli nadal występuje nieprawidłowy ruch, alert będzie trwał.
NL Als het voertuig abnormale bewegingen detecteert in uitgeschakelde toestand, produceert de zoemer gedurende
5 seconden een waarschuwing (elke 0,5 seconde een korte waarschuwing) en wordt het aandrijfwiel vergrendeld.
De waarschuwing stopt als er na 5 seconden geen abnormale beweging is of alle lampjes zullen 5 seconden
knipperen als waarschuwing. Als er nog steeds een abnormale beweging is, blijft de waarschuwing van kracht.
PT Se o veículo detetar um movimento anormal num estado desligado, a campainha emitirá um alerta durante 5
segundos (um alerta curto a cada 0,5 segundos) e a roda motriz será bloqueada. O alerta para se não houver
movimento anormal após 5 segundos, ou todas as luzes piscam com o alerta durante 5 segundos. Se continuar a
registar-se um movimento anormal, o alerta mantém-se.
EN Enable Scheduled Charging via Segway Mobility App and set the charging schedule.
FR Activez la charge programmée depuis l’application Segway Mobility et définissez le calendrier de charge.
DE Aktivieren Sie das geplante Laden über die Segway Mobility-App und legen Sie den Ladezeitplan fest.
IT Abilitare la Ricarica programmata tramite l'app Segway Mobility e impostare il programma di ricarica.
ES Active la carga programada a través de la aplicación Segway Mobility y configure el horario de carga.
PL Włącz zaplanowane ładowanie za pomocą aplikacji Segway Mobility i ustaw harmonogram ładowania.
NL Schakel Gepland opladen in via de Segway Mobility-app en stel het oplaadschema in.
PT Ative o carregamento programado através da aplicação Segway Mobility e defina o horário de carregamento.
EN Plug in the charger and the charging will start automatically at the set schedule with two beeps.
FR Branchez le chargeur, et la charge démarrera automatiquement à l’heure choisie avec deux bips.
DE Schließen Sie das Ladegerät an. Der Ladevorgang beginnt automatisch gemäß dem eingestellten Zeitplan mit zwei
Pieptönen.
IT Collegare il caricabatterie e la ricarica si avvierà automaticamente emettendo due segnali acustici in base al
programma impostato.
ES Enchufe el cargador y la carga comenzará automáticamente en el horario establecido con dos pitidos.
PL Podłącz ładowarkę, a ładowanie rozpocznie się automatycznie zgodnie z ustawionym harmonogramem i będzie
Scheduled Charging (Enable before Each Charging)
Scheduled Charging (Enable before Each Charging)
Charging Time Period
Enable Scheduled Charging (only effective during this charging), and
this function will be disabled utomatically after being fully charged or
unplugging the charger. Charging will start immediately after plugging
in charger again.
Click "Start Now" (or squeeze and hold any braking lever
for 3s) to start charging immediately.
00:00
To
00:00
Start Charging
01 02 03 04 05 06 07 08 09 10 11 12 13 14 15
16 17 18 19 20 21 22 23 24 25 26 27 28 29 30 31 32 33
34 35 36 37 38 39 40 41 42 43 44 45 46 47
48 49 50 51
52 53 54 55 56 57 58 59 60 61 62 63 64 65 66 67 68 69
70 71 72 73 74 75 76 77
78 79 80 81
82 83 84 85
86 87 88 89 90 91 92 93 94 95 96 97 98 99 100 101
102 103 104 105 106 107 108
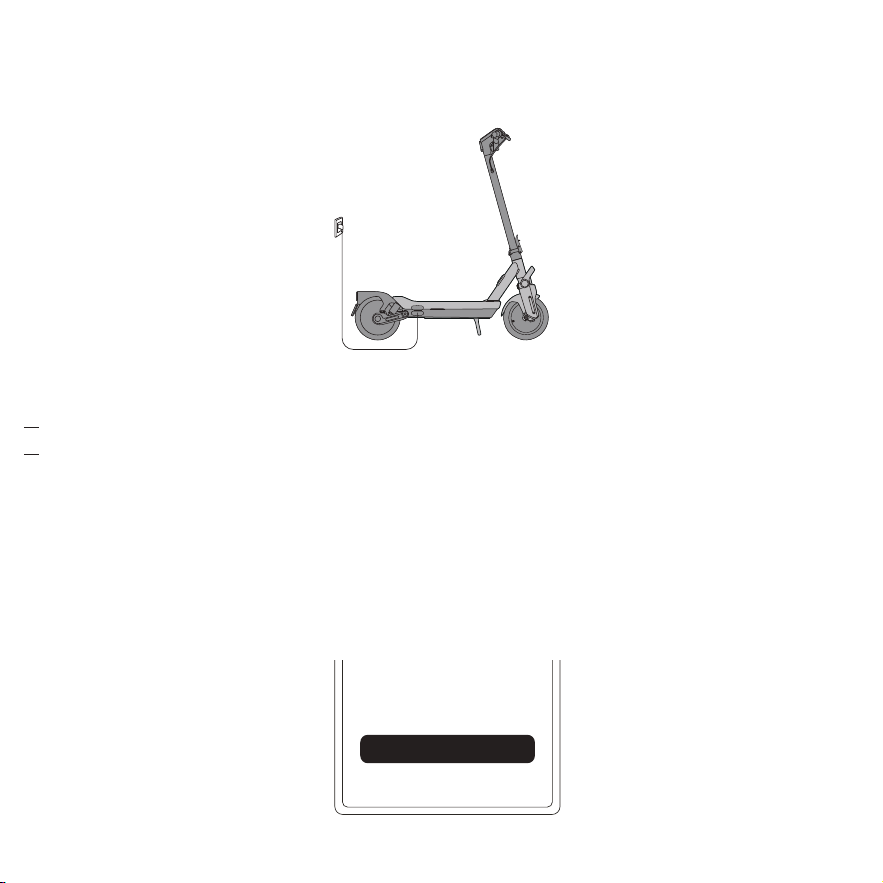
Method A / Méthode A / Methode A / Metodo A / Método A / Metoda A / Methode A / Método A
EN Connect vehicle with Segway Mobility app, and enable Find My at homepage >> More Functions >>Locating
vehicle >> Enable, then it wil automatically switch to the Find My app. Tap "+"and tap "Add Other ltem", thenchoose
your vehicle and follow the instructions to pair it with Find My.
FR Connectez le véhicule à l'application Segway Mobility et activez Find My sur la page d'accueil >> Plus de fonctions
>> Localisation du véhicule >> Activer, puis il passera automatiquement à l'application Find My. Appuyez sur « + »
et appuyez sur « Ajouter un autre élément », puis choisissez votre véhicule et suivez les instructions pour l’associer
avec Find My.
DE Verbinden Sie das Fahrzeug mit der Segway Mobility�App und aktivieren Sie Find My auf der Startseite >> Weitere
Funktionen >> Fahrzeug orten >> Aktivieren, dann wird automatisch zur Find My App gesprungen. Tippen Sie auf
„+“ und dann auf „Anderes Element hinzufügen“, wählen Sie dann Ihr Fahrzeug aus und befolgen Sie die
Anweisungen, um es mit Find My zu koppeln.
IT Connetti il veicolo all'app Segway Mobility e abilita Find My andando su home page >> Altre funzioni >>
Localizzazione del veicolo >> Abilita, quindi passerà automaticamente all'app Find My. Premi «+» e premi
«Aggiungi altro articolo», quindi scegli il tuo veicolo e segui le istruzioni per abbinarlo a Find My.
ES Conecte el vehículo con la aplicación Segway Mobility y desactive Find My en la página de inicio >> Más funciones
>> Localizar vehículo >> Desactivar; a continuación, elimine manualmente el vehículo de la aplicación Find My.
PL Połącz pojazd z aplikacją Segway Mobility i włącz funkcję Find My na stronie głównej >> Więcej funkcji >>
Lokalizowanie pojazdu >> Włącz, a pojazd automatycznie przejdzie do aplikacji Find My. Stuknij „+” i „Dodaj inny
element”, a następnie wybierz swój pojazd i postępuj zgodnie z instrukcjami, aby sparować go z aplikacją Find My.
NL Verbind het voertuig met de Segway Mobility-app en schakel Find My in op de startpagina >> Meer functies >>
Voertuig lokaliseren >> Inschakelen, waarna het automatisch naar de Find My-app gaat. Tik op "+" en tik op "Ander
item toevoegen", kies vervolgens uw voertuig en volg de instructies om het te koppelen met Find My.
PT Ligue o veículo à aplicação Segway Mobility e ative a opção Encontrar na página inicial >> Mais funções >>
Localizar veículo >> Ativar, e depois saltará automaticamente para a aplicação Find My. Toque em "+" e toque em
«Adicionar outro item», depois escolha o seu veículo e siga as instruções para o emparelhar com o Find My.
● Add Vehicle (Use Method A or B) / Ajoutez à Find My (utilisez la méthode A ou B) /
Apple Find My-Netzwerk / Aggiungi a Find My (usa il metodo A o B) / Añadir vehículo
(Utilice el método A o B) / Dodaj pojazd (zastosuj metodę A lub B) /
Voertuigtoevoegen(gebruikmethodeAofB) / Adicionar veículo (Utilizar o
métodoAouB)
EN If you hope to start charging beyond the set schedule, you can double press power button or click "Start Now" in
App after plugging in the charger.
FR Pour continuer à charger après l’heure définie, vous pouvez appuyer deux fois sur le bouton marche/arrêt ou
cliquer sur « Démarrer maintenant » dans l’application après avoir branché le chargeur
DE Wenn Sie den Ladevorgang nach dem festgelegten Zeitplan starten möchten, können Sie nach dem Einstecken des
Ladegeräts den Ein-/Aus-Schalter zweimal drücken oder in der App auf „Jetzt starten“ klicken.
IT Se si desidera avviare la ricarica indipendentemente dal programma impostato, è possibile premere due volte il
pulsante di accensione oppure, dopo aver collegato il caricabatterie, fare clic su "Avvia ora" nell'app.
ES Si desea comenzar a cargar más allá del horario establecido, puede pulsar dos veces el botón de encendido o
hacer clic en "Iniciar ahora" en la aplicación después de enchufar el cargador.
PL Jeśli chcesz rozpocząć ładowanie poza ustalonym harmonogramem, możesz nacisnąć dwukrotnie przycisk zasilania
lub kliknąć „Rozpocznij teraz” w aplikacji po podłączeniu ładowarki.
NL Als u wilt beginnen met opladen na het ingestelde schema, kunt u na het aansluiten van de lader twee keer op de
aan/uit-knop drukken of op "Nu starten" in de app klikken.
PT Se espera começar a carregar além do horário definido, pode pressionar duas vezes o botão ligar/desligar ou clicar
em «Iniciar agora» na aplicação depois de conectar o carregador.
Scheduled Charging (Enable before Each Charging)
Scheduled Charging (Enable before Each Charging)
Charging Time Period
Enable Scheduled Charging (only effective during this charging), and
this function will be disabled utomatically after being fully charged or
unplugging the charger. Charging will start immediately after plugging
in charger again.
Click "Start Now" (or squeeze and hold any braking lever
for 3s) to start charging immediately.
00:00
To
00:00
Start Charging
sygnalizowane dwoma sygnałami dźwiękowymi.
NL Sluit de lader aan en het opladen begint automatisch op het ingestelde schema met twee pieptonen.
PT Ligue o carregador e o carregamento começará automaticamente no horário definido com dois sinais sonoros.
Apple Find My network / Réseau Apple Find My / Apple
Find My-Netzwerk / Rete Apple Find My / Red Find My de
Apple / Sieć Apple Find My / Apple Find My-netwerk /
Rede Apple Find My
01 02 03 04 05 06 07 08 09 10 11 12 13 14 15
16 17 18 19 20 21 22 23 24 25 26 27 28 29 30 31 32 33
34 35 36 37 38 39 40 41 42 43 44 45 46 47 48 49
50 51
52 53 54 55 56 57 58 59 60 61 62 63 64 65 66 67 68 69
70 71 72 73 74 75 76 77
78 79 80 81
82 83 84 85
86 87 88 89 90 91 92 93 94 95 96 97 98 99 100 101
102 103 104 105 106 107 108
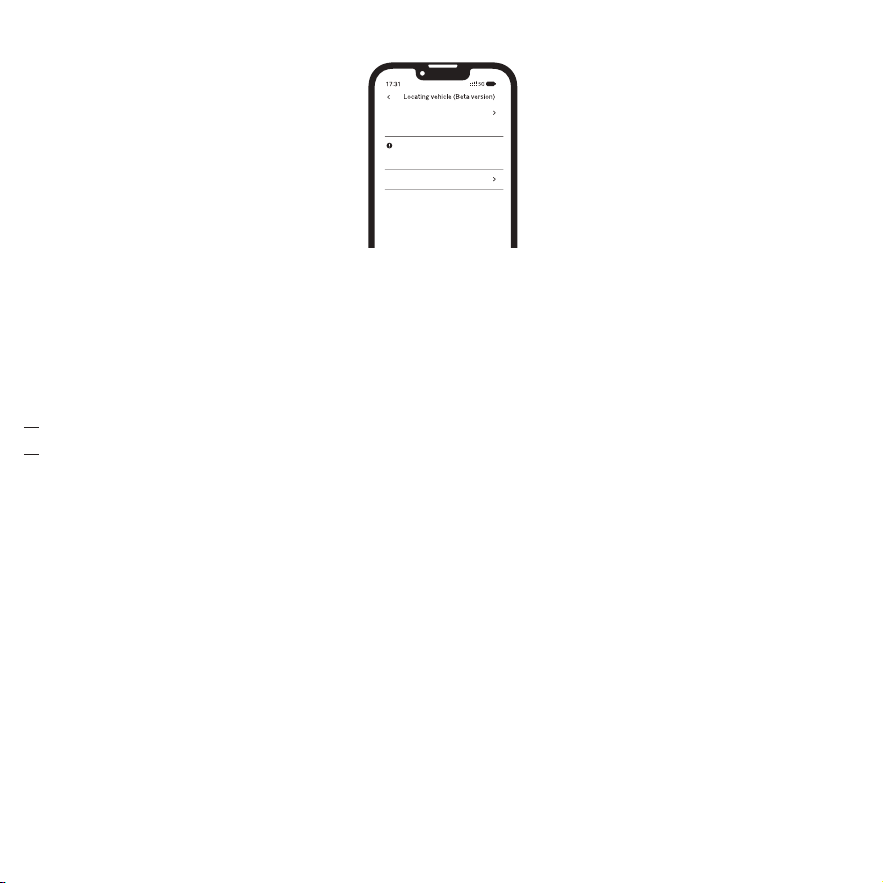
Method A / Méthode A / Methode A / Metodo A / Método A / Metoda A / Methode A / Método A
EN Connect vehicle with Segway Mobility app, and disable Find My at homepage >> More Functions >> Locating
vehicle >> Disable, then manually remove your vehicle from Find My App.
FR Connectez le véhicule avec l'application Segway Mobility et désactivez Find My sur la page d'accueil >> Plus de
fonctions >> Localisation du véhicule >> Désactiver, puis supprimez manuellement votre véhicule de l'application
Find My.
DE Verbinden Sie das Fahrzeug mit der Segway Mobility�App und deaktivieren Sie Find My auf der Startseite >>
Weitere Funktionen >> Fahrzeug orten >> Deaktivieren und entfernen Sie Ihr Fahrzeug dann manuell aus der Find
My App.
IT Connetti il veicolo all'app Segway Mobility e disabilita Find My andando su home page >> Altre funzioni >>
Localizzazione del veicolo >> Disabilita, quindi rimuovi manualmente il veicolo dall'app Find My.
ES Conecte el vehículo con la aplicación Segway Mobility y desactive Find My en la página de inicio >> Más funciones
>> Localizar vehículo >> Desactivar; a continuación, elimine manualmente el vehículo de la aplicación Find My.
PL Połącz pojazd z aplikacją Segway Mobility i wyłącz funkcję Find My na stronie głównej >> Więcej funkcji >>
Lokalizowanie pojazdu >> Wyłącz, a następnie ręcznie usuń pojazd z aplikacji Find My.
Method B / Méthode B / Methode B / Metodo B / Método B / Metoda B / Methode B / Método B
EN Launch Find My app on a iPhone or iPad, Tap + then tap Add Other Item ⊕ . Power on the vehicle, and pair vehicle
(unlocked) with Apple Find My by squeezing the brake lever three times, pressing the power button once, then
choosing the vehicle in the Find My app and following the on-screen instructions to pair it with Find My.
FR Lancez l’application Find My sur un iPhone ou un iPad, appuyez sur + puis appuyez sur Ajouter un autre élément
⊕. Allumez le véhicule et associez le véhicule (déverrouillé) avec Apple Find My en appuyant trois fois sur le levier
de frein, en appuyant une fois sur le bouton marche/arrêt, puis en choisissant le véhicule dans l'application Find My
et en suivant les instructions à l'écran pour l’associer avec Find My.
DE Starten Sie die Find My App auf einem iPhone oder iPad, tippen Sie auf „+“ und dann auf „Anderes Element
hinzufügen“ ⊕ . Schalten Sie das Fahrzeug ein und koppeln Sie das Fahrzeug (entriegelt) mit Apple Find My, indem
Sie dreimal den Bremshebel betätigen, einmal den Ein-/Aus-Schalter drücken, dann das Fahrzeug in der Find My
App auswählen und den Anweisungen auf dem Bildschirm folgen, um es mit Find My zu koppeln.
IT Avvia l'app Find My sul tuo iPhone o iPad, premi +, quindi premi Aggiungi altro articolo ⊕ . Accendi il veicolo e
associa il veicolo (sbloccato) a Find My per Apple premendo tre volte la leva del freno, premendo una volta il
pulsante di accensione, quindi scegliendo il veicolo nell'app Find My e seguendo le istruzioni sullo schermo per
associarlo a Find My.
ES Inicie la aplicación Find My en un iPhone o iPad, toque + y, a continuación, toque Añadir otro elemento ⊕ .
Encienda el vehículo y emparéjelo (desbloqueado) con Find My de Apple apretando la palanca de freno tres veces,
pulsando el botón de encendido una vez, eligiendo el vehículo en la aplicación Find My y siguiendo las
instrucciones de la pantalla para emparejarlo con Find My.
PL Uruchom aplikację Find My na iPhonie lub iPadzie, stuknij +, a następnie stuknij Dodaj inny element ⊕ . Włącz
pojazd i sparuj go (odblokowany) z aplikacją Apple Find My, trzykrotnie naciskając dźwignię hamulca, naciskając
przycisk zasilania, a następnie wybierając pojazd w aplikacji Find My i postępując zgodnie z instrukcjami
wyświetlanymi na ekranie, aby sparować go z Find My.
NL Start de Find My-app op een iPhone of iPad, tik op + en tik vervolgens op Ander item toevoegen ⊕ . Schakel het
voertuig in en koppel het voertuig (ontgrendeld) met Apple Find My door de remhendel driemaal in te knijpen,
eenmaal op de aan/uit-knop te drukken, vervolgens het voertuig te kiezen in de Find My-app en de instructies op
het scherm te volgen om het te koppelen met Find My.
● RESET (Use Method A or B) / RÉINITIALISATION (utilisez la méthode A ou B) / RESET
(Methode A oder Bverwenden) / RESET (Usa il metodo A o B) / RESET (Utilice el
método A o B) / RESET (zastosuj metodę A lub B) / RESET (gebruik methode A of B) /
REINICIALIZAÇÃO(Utilizar ométodoAouB)
Findmy function
xxx
xxx
xxx
xxx
Disabled
PT Abre a Find My app num iPhone ou iPad, toque + e depois toque em Adicionar outro item ⊕ . Ligue a
eKickScooter, e emparelhe a eKickScooter (desbloqueada) com o Apple Find My apertando a alavanca do travão
três vezes, premindo uma vez o botão de energia, depois escolha a eKickScooter na Find My app e siga as
instruções no ecrã.
× 3
01 02 03 04 05 06 07 08 09 10 11 12 13 14 15
16 17 18 19 20 21 22 23 24 25 26 27 28 29 30 31 32 33
34 35 36 37 38 39 40 41 42 43 44 45 46 47 48 49 50 51
52 53 54 55 56 57 58 59 60 61 62 63 64 65 66 67 68 69
70 71 72 73 74 75 76 77
78 79 80 81
82 83 84 85
86 87 88 89 90 91 92 93 94 95 96 97 98 99 100 101
102 103 104 105 106 107 108
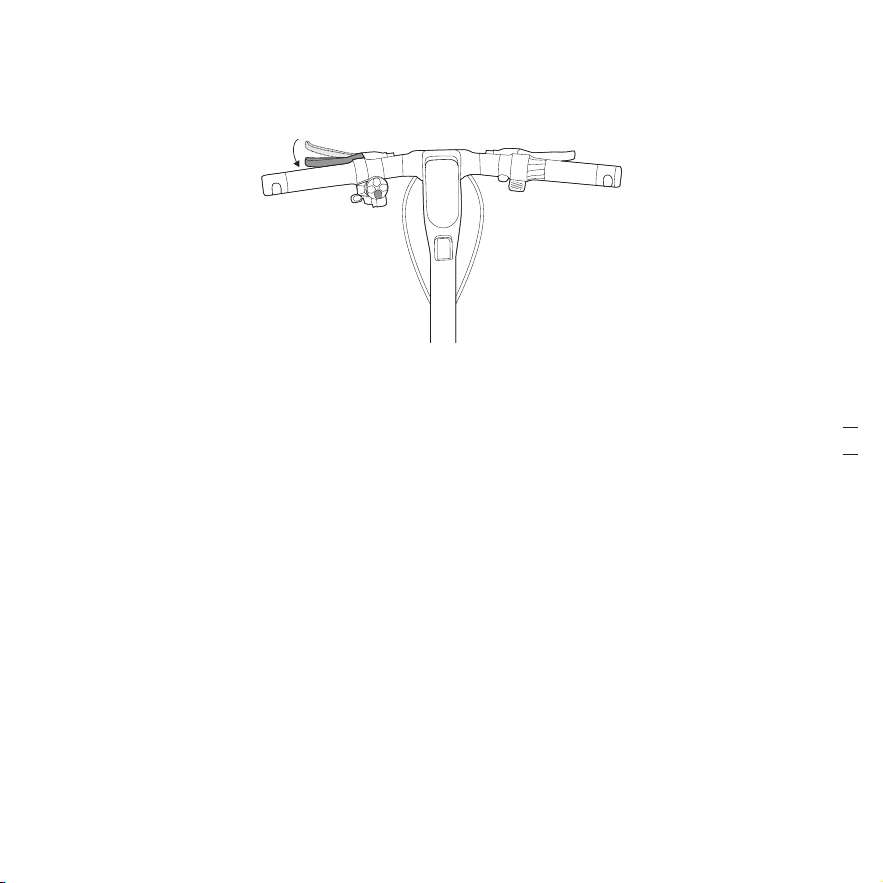

Method B / Méthode B / Methode B / Metodo B / Método B / Metoda B / Methode B / Método B
EN After powering on the vehicle, owner can complete RESET by squeezing brake lever by 5 times and pressing power
button once in unlocked status, then manually remove your vehicle from Find My app. After these steps, the owner
can not use Find My to find this vehicle.
FR Après avoir mis sous tension le véhicule, le propriétaire peut terminer la réinitialisation en appuyant 5 fois sur le
levier de frein et en appuyant une fois sur le bouton marche/arrêt en état déverrouillé, puis en supprimant
manuellement votre véhicule de l'application Find My. Après ces étapes, le propriétaire ne peut pas utiliser Find My
pour trouver ce véhicule.
DE Nach dem Einschalten des Fahrzeugs können Sie einen RESET durchführen, indem Sie den Bremshebel fünfmal
betätigen und den Ein-/Aus-Schalter einmal im entriegelten Zustand drücken. Anschließend können Sie das
Fahrzeug manuell aus der Find My App entfernen. Nach diesen Schritten ist das Fahrzeug nicht mehr mit Find My
zu finden.
IT Dopo aver acceso il veicolo, il proprietario può completare il RESET premendo la leva del freno per 5 volte \e
premendo il pulsante di accensione una volta sbloccato, quindi rimuovendo manualmente il veicolo tramite l’app
Find My. Dopo questi passaggi, il proprietario non può utilizzare Find My per trovare questo veicolo.
ES Después de encender el vehículo, el propietario puede realizar RESET apretando la palanca de freno 5 veces y
pulsando el botón de encendido una vez en estado desbloqueado, para después eliminar el vehículo de la
aplicación Find My. Después de realizar estos pasos, el propietario no podrá utilizar Find My para encontrar este
vehículo.
PL Po włączeniu pojazdu właściciel może wykonać RESET, naciskając dźwignię hamulca 5 razy i naciskając raz przycisk
zasilania w stanie odblokowanym, a następnie ręcznie usunąć pojazd z aplikacji Find My. Po wykonaniu tych
czynności właściciel nie może korzystać z funkcji Find My, aby znaleźć ten pojazd.
NL Na het inschakelen van het voertuig kan de eigenaar de RESET uitvoeren door de remhendel 5 keer in te knijpen
en eenmaal op de aan/uit-knop te drukken in de ontgrendelde status en vervolgens uw voertuig handmatig uit de
Find My-app te verwijderen. Na deze stappen kan de eigenaar Find My niet meer gebruiken om dit voertuig te
vinden.
NL Verbind het voertuig met de Segway Mobility-app en schakel Find My uit op de startpagina >> Meer functies >>
Voertuig lokaliseren >> Uitschakelen en verwijder uw voertuig vervolgens handmatig uit de Find My-app.
PT Ligue o veículo à aplicação Segway Mobility e desative a opção Encontrar na página inicial >> Mais funções >>
Localizar veículo >> Desativar e, em seguida, remova manualmente o seu veículo da aplicação Find My
× 5
Findmy function
xxx
xxx
xxx
xxx
Pairing
Findmy function
xxx
xxx
xxx
xxx
Disabled
PT Depois de ligar o veículo, o proprietário pode concluir a REINICIALIZAÇÃO apertando a alavanca do travão 5 vezes
e premindo o botão de alimentação uma vez no estado desbloqueado e, em seguida, remover manualmente o
veículo da aplicação Find My. Após estes passos, o proprietário não pode utilizar o serviço Find My para encontrar
este veículo.
EN * Max. Quantity of Connected Devices
A eKickScooter can be connected to maximum 3 iOS devices (with same account).
FR * Quantité maximum d’appareils connectés
Un eKickScooter peut être connecté à un maximum de 3 appareils iOS (avec le même compte).
DE * Max. Anzahl der angeschlossenen Geräte
Ein eKickScooter kann mit maximal 3 iOS-Geräten (mit demselben Konto) verbunden werden.
IT * Max. quantità di dispositivi collegati
Il eKickScooter può essere collegato a un massimo di 3 dispositivi iOS (con lo stesso account).
ES * Cantidad máx. de dispositivos conectados
Un eKickScooter se puede conectar a un máximo de 3 dispositivos iOS (con la misma cuenta).
PL * Maks. liczba połączonych urządzeń
eKickScooter można połączyć z maksymalnie 3 urządzeniami z systemem iOS (z tym samym kontem).
NL * Max. aantal aangesloten apparaten
Een eKickScooter kan worden verbonden met maximaal 3 iOS-apparaten (met hetzelfde account).
PT * Quantidade máxima de dispositivos ligados
Uma eKickScooter pode ser ligada a um máximo 3 dispositivos iOS (com a mesma conta).
○
1
○
2
○
3
01 02 03 04 05 06 07 08 09 10 11 12 13 14 15
16 17 18 19 20 21 22 23 24 25 26 27 28 29 30 31 32 33
34 35 36 37 38 39 40 41 42 43 44 45 46 47 48 49 50 51
52 53
54 55 56 57 58 59 60 61 62 63 64 65 66 67 68 69
70 71 72 73 74 75 76 77
78 79 80 81
82 83 84 85
86 87 88 89 90 91 92 93 94 95 96 97 98 99 100 101
102 103 104 105 106 107 108
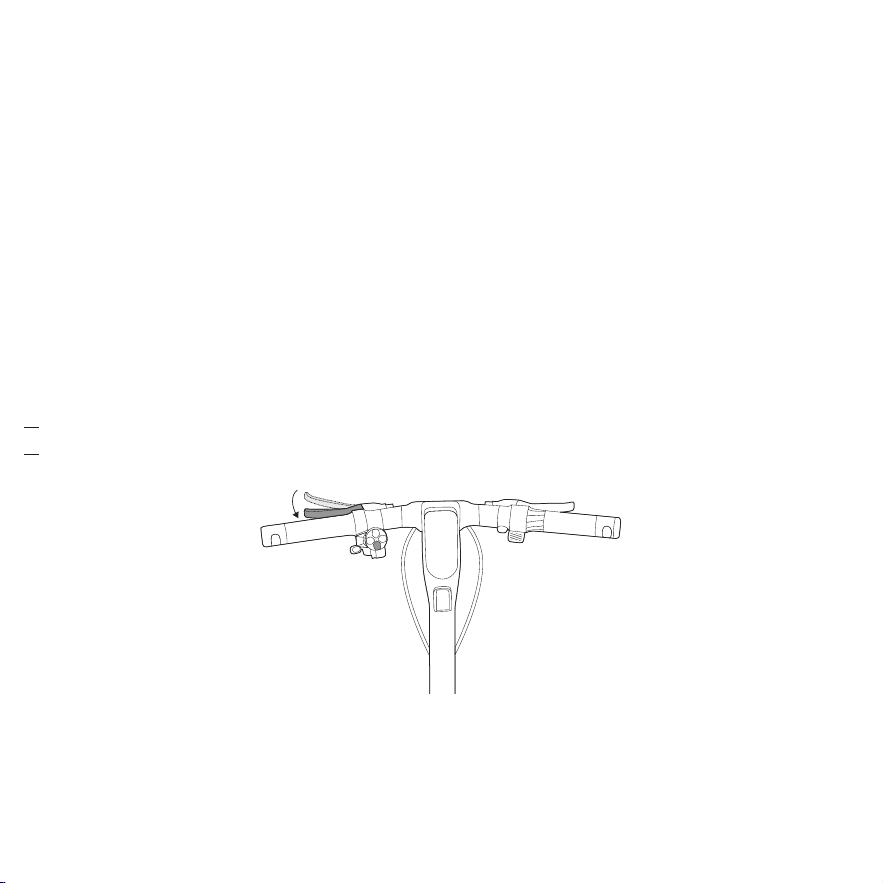
× 9 × 8
EN * Enable & Disable Find My Beacon
Owner can enable & disable Find My Beacon by squeezing brake lever by 9 times and pressing power button once
in unlocked status (position information).
FR * Activer et désactiver Find My Beacon
Le propriétaire peut activer et désactiver Find My Beacon en appuyant 9 fois sur le levier de frein et en appuyant
une fois sur le bouton marche/arrêt en état déverrouillé (informations de position).
DE * Find My Beacon aktivieren und deaktivieren
Besitzer können Find My Beacon aktivieren und deaktivieren, indem sie im entriegelten Zustand
(Positionsangaben) den Bremshebel neunmal betätigen und den Ein-/Aus-Schalter einmal im entsperrten Zustand
drücken.
IT * Abilita e disabilita Find My Beacon
Il proprietario può abilitare e disabilitare Find My Beacon premendo la leva del freno per 9 volte e premendo il
pulsante di accensione una volta in stato di sblocco (informazioni sulla posizione).
ES * Activar y desactivar Find My Beacon
El propietario puede activar y desactivar Find My Beacon apretando la palanca de freno 9 veces y pulsando el
botón de encendido una vez en estado desbloqueado (información de posición).
PL * Włączanie i wyłączanie funkcji Find My Beacon
Właściciel może włączać i wyłączać funkcję Find My Beacon, naciskając dźwignię hamulca 9 razy i naciskając raz
przycisk zasilania w stanie odblokowanym (informacja o pozycji).
NL * Find My Beacon in- en uitschakelen
De eigenaar kan Find My Beacon in- en uitschakelen door de remhendel 9 keer in te knijpen en eenmaal op de
aan/uit-knop te drukken in de ontgrendelde status (positie�informatie).
PT * Ativar e desativar o Find My Beacon
O proprietário pode ativar e desativar o Find My Beacon apertando a alavanca do travão 9 vezes e premindo o
botão de ligar/desligar quando estiver desbloqueado.
EN * SN Look up (Only for special conditions)
Any iOS user can connect to the vehicle by Apple Find My app, and then check vehicle's S/N by squeezing brake
lever for 8 times and pressing power button once. The S/N will display on the Apple Find My app.
FR * Recherche de SN (uniquement pour des conditions spéciales)
Tout utilisateur iOS peut se connecter au véhicule via l'application Apple Find My, puis vérifier le S/N du véhicule
en appuyant 8 fois sur le levier de frein et en appuyant une fois sur le bouton marche/arrêt. Le S/N s’affichera sur
EN *Firmware Update
Owner can update the firmware after connecting the eKickScooter to Segway Mobility App. Non-owner is not
allowed to update the firmware.
FR *Mise à jour du firmware
Le propriétaire peut mettre à jour le firmware après avoir connecté le eKickScooter à l’application
Segway-Ninebot. Le non-propriétaire n’est pas autorisé à mettre à jour le firmware.
l’application Find My.
DE * Suche nach Seriennummer (nur bei besonderen Bedingungen)
Alle iOS-Benutzer können über die Apple Find My App eine Verbindung zum Fahrzeug herstellen und dann die
Seriennummer des Fahrzeugs überprüfen, indem sie achtmal den Bremshebel betätigen und einmal den
Ein-/Aus-Schalter drücken. Die Seriennummer wird in der Find My App angezeigt.
IT * SN Look up (solo per condizioni speciali)
Qualsiasi utente iOS può connettersi al veicolo tramite l'app Find My di Apple e quindi controllare il numero di
serie del veicolo premendo la leva del freno per 8 volte e premendo il pulsante di accensione una volta. Il numero
di serie verrà visualizzato sull’app Find My.
ES * Búsqueda de NS (solo para situaciones especiales)
Cualquier usuario de iOS puede conectarse al vehículo mediante la aplicación Find My de Apple y, a continuación,
comprobar el número de serie (NS) del vehículo apretando la palanca de freno 8 veces y pulsando el botón de
encendido una vez. El número de serie se mostrará en la aplicación Find My.
PL * Sprawdzenie numeru seryjnego (tylko w specjalnych warunkach)
Każdy użytkownik iOS może połączyć się z pojazdem za pomocą aplikacji Apple Find My, a następnie sprawdzić
numer seryjny pojazdu, naciskając dźwignię hamulca 8 razy i jednokrotnie naciskając przycisk zasilania. Numer
seryjny zostanie wyświetlony w aplikacji Apple Find My.
NL * SN opzoeken (Alleen voor speciale voorwaarden)
Elke iOS-gebruiker kan verbinding maken met het voertuig via de Apple Find My-app en vervolgens de S/N van
het voertuig controleren door de remhendel 8 keer in te knijpen en eenmaal op de aan/uit-knop te drukken. Het
serienummer wordt weergegeven in de Apple Find My-app.
PT * Procura SN (Apenas para condições especiais)
Qualquer utilizador iOS pode ligar-se à eKickScooter pela Apple Find My app, e depois verificar o número de série
da eKickScooter apertando a alavanca do travão por 8 vezes e premindo uma vez o botão de ligar/desligar. O
número será apresentado na Apple Find My App.
01 02 03 04 05 06 07 08 09 10 11 12 13 14 15
16 17 18 19 20 21 22 23 24 25 26 27 28 29 30 31 32 33
34 35 36 37 38 39 40 41 42 43 44 45 46 47 48 49 50 51
52 53 54 55
56 57 58 59 60 61 62 63 64 65 66 67 68 69
70 71 72 73 74 75 76 77
78 79 80 81
82 83 84 85
86 87 88 89 90 91 92 93 94 95 96 97 98 99 100 101
102 103 104 105 106 107 108

EN * Nearby Status and Separated Status
If the vehicle has been paired with Find My, when the owner leaves away from the vehicle or turns off the
Bluetooth of his or her mobile device after a riding, the vehicle will automatically enter Nearby status after a short
period of time. After a long period of time, the vehicle will enter Separated status. When owner gets close to the
vehicle with the mobile device, the Bluetooth of the device will automatically connect with the vehicle and the
vehicle will enter Connected status. If the vehicle is in Separated status, non-owner can connect to this vehicle via
Find My app, and use the method mentioned above to check the SN. Owners can still use Find My to find the
vehicle.
FR * Statut Nearby et statut Separated
Si le véhicule a été associé avec Find My, lorsque le propriétaire s'éloigne du véhicule ou éteint le Bluetooth de son
appareil mobile après un trajet, le véhicule entrera automatiquement dans le statut Nearby après une courte
période de temps. Après une longue période de temps, le véhicule entrera en statut Separated. Lorsque le
propriétaire s'approche du véhicule avec l'appareil mobile, le Bluetooth de l'appareil se connectera
automatiquement au véhicule et le véhicule entrera dans l'état Connected. Si le véhicule est en statut Separated,
le non-propriétaire peut se connecter à ce véhicule via l'application Find My et utiliser la méthode mentionnée
ci-dessus pour vérifier le SN. Les propriétaires peuvent toujours utiliser Find My pour trouver le véhicule.
DE * Status „Nearby“ und „Separated“
Wenn das Fahrzeug mit Find My gekoppelt wurde und der Besitzer das Fahrzeug verlässt oder nach einer Fahrt
das Bluetooth seines Mobilgeräts ausschaltet, wechselt das Fahrzeug nach kurzer Zeit automatisch in den Status
„Nearby“. Nach einer längeren Zeitspanne geht das Fahrzeug in den Status „Separated“ über. Wenn sich der/die
Besitzer/in mit seinem/ihrem Mobilgerät dem Fahrzeug nähert, stellt das Bluetooth des Geräts automatisch eine
Verbindung mit dem Fahrzeug her und das Fahrzeug wechselt in den Status „Connected“. Wenn sich das Fahrzeug
im Status „Separated“ befindet, können Nichtbesitzer über die Find My App eine Verbindung zu diesem Fahrzeug
herstellen und die oben genannte Methode verwenden, um die SN zu überprüfen. Besitzer können weiterhin die
Funktion Find My verwenden, um das Fahrzeug zu finden.
IT * Stato Nearby e stato Separated
Se il veicolo è stato associato a Find My, quando il proprietario si allontana dal veicolo o disattiva il Bluetooth del
suo dispositivo mobile dopo un viaggio, il veicolo passerà automaticamente allo stato Nearby dopo un breve
DE * Firmware-Update
Eigentümer können die Firmware aktualisieren, nachdem sie den eKickScooter mit der Segway Mobility-App
verbunden haben. Nicht-Eigentümer dürfen die Firmware nicht aktualisieren.
IT *Aggiornamento del firmware
Il proprietario può aggiornare il firmware dopo aver collegato il eKickScooter all'app Segway Mobility. Il non
proprietario non è autorizzato ad aggiornare il firmware.
ES *Actualización de firmware
El propietario puede actualizar el firmware después de conectar el eKickScooter a la aplicación Segway-Ninebot.
El usuario que no es propietario no puede actualizar el firmware.
PL *Aktualizacja oprogramowania wbudowanego
Właściciel może zaktualizować oprogramowanie wbudowane po podłączeniu hulajnogi eKickScooter do aplikacji
Segway-Ninebot. Osoby niebędące właścicielami nie mogą aktualizować oprogramowania wbudowanego.
NL *Firmware-update
De eigenaar kan de firmware bijwerken nadat hij de eKickScooter heeft aangesloten op de Segway Mobility�app.
Een niet-eigenaar mag de firmware niet bijwerken.
PT *Atualização de firmware
O proprietário pode atualizar o firmware depois de ligar a eKickScooter à aplicação Segway Mobility. O não�
proprietário não tem permissão para atualizar o firmware.
periodo di tempo. Dopo un lungo periodo di tempo, il veicolo entrerà nello stato Separated. Quando il proprietario si
avvicina al veicolo con il dispositivo mobile, il Bluetooth del dispositivo si connette automaticamente al veicolo e il
veicolo passerà allo stato Connected. Se il veicolo è in stato Separated, il non proprietario può connettersi a
questo veicolo tramite l'app Find My e utilizzare il metodo sopra menzionato per controllare l’ SN. I proprietari
possono comunque utilizzare Find My per trovare il veicolo.
ES * Estado Nearby y estado Separated
Si el vehículo ha sido emparejado con Find My, cuando el propietario se aleje del vehículo o apague el Bluetooth
del dispositivo móvil después de un trayecto, el vehículo entrará automáticamente en estado Nearby tras un breve
periodo de tiempo. Tras un largo periodo de tiempo, el vehículo entrará en estado Separated. Cuando el
propietario se acerque al vehículo con el dispositivo móvil, el Bluetooth del dispositivo se conectará
automáticamente con el vehículo y éste entrará en estado Connected. Si el vehículo está en estado Separated, una
persona distinta del propietario puede conectarse a este vehículo a través de la aplicación Find My y utilizar el
método mencionado anteriormente para comprobar el NS. Los propietarios pueden seguir utilizando Find My para
encontrar el vehículo.
PL * Estado Nearby e Estado Separated
Se o veículo tiver sido emparelhado com o Find My, quando o proprietário se afasta do veículo ou desliga o
Bluetooth do seu dispositivo móvel após uma viagem, o veículo entra automaticamente no estado Nearby após um
curto período de tempo. Após um longo período de tempo, o veículo entrará no estado Separated. Quando o
proprietário se aproximar do veículo com o dispositivo móvel, o Bluetooth do dispositivo ligar-se-á
automaticamente ao veículo e este entrará no estado Connected. Se o veículo estiver no estado Separated, o não
proprietário pode ligar-se a este veículo através da aplicação Find My e utilizar o método mencionado acima para
verificar o NS. Os proprietários podem ainda utilizar o Find My para encontrar o veículo.
NL * Status Nearby en status Separated
Als het voertuig is gekoppeld met Find My en de eigenaar na een rit weggaat bij het voertuig of de Bluetooth van
zijn of haar mobiele apparaat uitschakelt, gaat het voertuig na korte tijd automatisch naar de status Nearby. Na
een lange periode komt het voertuig in de status Separated. Wanneer de eigenaar met het mobiel apparaat in de
buurt van hetvoertuig komt, maakt de Bluetooth van het apparaat automatisch verbinding met het voertuig en
krijgt het voertuig de status Connected. Als het voertuig de status Separated heeft, kan een niet-eigenaar
verbinding maken met dit voertuig via de Find My-app en de hierboven genoemde methode gebruiken om het SN
te controleren. Eigenaren kunnen Find My nog steeds gebruiken om het voertuig te vinden.
PT * Estado Nearby e Estado Separated
Se o veículo tiver sido emparelhado com o Find My, quando o proprietário se afasta do veículo ou desliga o
Bluetooth do seu dispositivo móvel após uma viagem, o veículo entra automaticamente no estado Nearby após um
curto período de tempo. Após um longo período de tempo, o veículo entrará no estado Separated. Quando o
proprietário se aproximar do veículo com o dispositivo móvel, o Bluetooth do dispositivo ligar-se-á
automaticamente ao veículo e este entrará no estado Connected. Se o veículo estiver no estado Separated, o não
proprietário pode ligar-se a este veículo através da aplicação Find My e utilizar o método mencionado acima para
verificar o NS. Os proprietários podem ainda utilizar o Find My para encontrar o veículo.
01 02 03 04 05 06 07 08 09 10 11 12 13 14 15
16 17 18 19 20 21 22 23 24 25 26 27 28 29 30 31 32 33
34 35 36 37 38 39 40 41 42 43 44 45 46 47 48 49 50 51
52 53 54 55 56 57
58 59 60 61 62 63 64 65 66 67 68 69
70 71 72 73 74 75 76 77
78 79 80 81
82 83 84 85
86 87 88 89 90 91 92 93 94 95 96 97 98 99 100 101
102 103 104 105 106 107 108
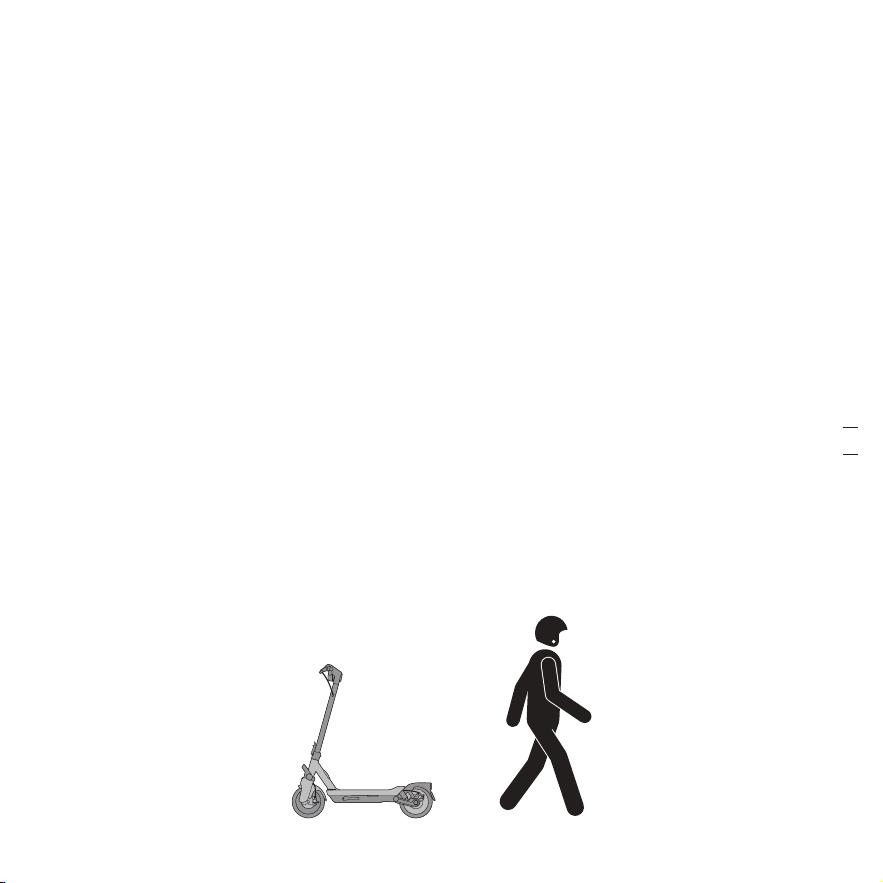
EN * Nearby Status and Separated Status
If the vehicle has been paired with Find My, when the owner leaves away from the vehicle or turns off the
Bluetooth of his or her mobile device after a riding, the vehicle will automatically enter Nearby status after a short
period of time. After a long period of time, the vehicle will enter Separated status. When owner gets close to the
vehicle with the mobile device, the Bluetooth of the device will automatically connect with the vehicle and the
vehicle will enter Connected status. If the vehicle is in Separated status, non-owner can connect to this vehicle via
Find My app, and use the method mentioned above to check the SN. Owners can still use Find My to find the
vehicle.
FR * Statut Nearby et statut Separated
Si le véhicule a été associé avec Find My, lorsque le propriétaire s'éloigne du véhicule ou éteint le Bluetooth de son
appareil mobile après un trajet, le véhicule entrera automatiquement dans le statut Nearby après une courte
période de temps. Après une longue période de temps, le véhicule entrera en statut Separated. Lorsque le
propriétaire s'approche du véhicule avec l'appareil mobile, le Bluetooth de l'appareil se connectera
automatiquement au véhicule et le véhicule entrera dans l'état Connected. Si le véhicule est en statut Separated,
le non-propriétaire peut se connecter à ce véhicule via l'application Find My et utiliser la méthode mentionnée
ci-dessus pour vérifier le SN. Les propriétaires peuvent toujours utiliser Find My pour trouver le véhicule.
DE * Status „Nearby“ und „Separated“
Wenn das Fahrzeug mit Find My gekoppelt wurde und der Besitzer das Fahrzeug verlässt oder nach einer Fahrt
das Bluetooth seines Mobilgeräts ausschaltet, wechselt das Fahrzeug nach kurzer Zeit automatisch in den Status
„Nearby“. Nach einer längeren Zeitspanne geht das Fahrzeug in den Status „Separated“ über. Wenn sich der/die
Besitzer/in mit seinem/ihrem Mobilgerät dem Fahrzeug nähert, stellt das Bluetooth des Geräts automatisch eine
Verbindung mit dem Fahrzeug her und das Fahrzeug wechselt in den Status „Connected“. Wenn sich das Fahrzeug
im Status „Separated“ befindet, können Nichtbesitzer über die Find My App eine Verbindung zu diesem Fahrzeug
herstellen und die oben genannte Methode verwenden, um die SN zu überprüfen. Besitzer können weiterhin die
Funktion Find My verwenden, um das Fahrzeug zu finden.
IT * Stato Nearby e stato Separated
Se il veicolo è stato associato a Find My, quando il proprietario si allontana dal veicolo o disattiva il Bluetooth del
suo dispositivo mobile dopo un viaggio, il veicolo passerà automaticamente allo stato Nearby dopo un breve
DE * Firmware-Update
Eigentümer können die Firmware aktualisieren, nachdem sie den eKickScooter mit der Segway Mobility-App
verbunden haben. Nicht-Eigentümer dürfen die Firmware nicht aktualisieren.
IT *Aggiornamento del firmware
Il proprietario può aggiornare il firmware dopo aver collegato il eKickScooter all'app Segway Mobility. Il non
proprietario non è autorizzato ad aggiornare il firmware.
ES *Actualización de firmware
El propietario puede actualizar el firmware después de conectar el eKickScooter a la aplicación Segway-Ninebot.
El usuario que no es propietario no puede actualizar el firmware.
PL *Aktualizacja oprogramowania wbudowanego
Właściciel może zaktualizować oprogramowanie wbudowane po podłączeniu hulajnogi eKickScooter do aplikacji
Segway-Ninebot. Osoby niebędące właścicielami nie mogą aktualizować oprogramowania wbudowanego.
NL *Firmware-update
De eigenaar kan de firmware bijwerken nadat hij de eKickScooter heeft aangesloten op de Segway Mobility�app.
Een niet-eigenaar mag de firmware niet bijwerken.
PT *Atualização de firmware
O proprietário pode atualizar o firmware depois de ligar a eKickScooter à aplicação Segway Mobility. O não�
proprietário não tem permissão para atualizar o firmware.
periodo di tempo. Dopo un lungo periodo di tempo, il veicolo entrerà nello stato Separated. Quando il proprietario si
avvicina al veicolo con il dispositivo mobile, il Bluetooth del dispositivo si connette automaticamente al veicolo e il
veicolo passerà allo stato Connected. Se il veicolo è in stato Separated, il non proprietario può connettersi a
questo veicolo tramite l'app Find My e utilizzare il metodo sopra menzionato per controllare l’ SN. I proprietari
possono comunque utilizzare Find My per trovare il veicolo.
ES * Estado Nearby y estado Separated
Si el vehículo ha sido emparejado con Find My, cuando el propietario se aleje del vehículo o apague el Bluetooth
del dispositivo móvil después de un trayecto, el vehículo entrará automáticamente en estado Nearby tras un breve
periodo de tiempo. Tras un largo periodo de tiempo, el vehículo entrará en estado Separated. Cuando el
propietario se acerque al vehículo con el dispositivo móvil, el Bluetooth del dispositivo se conectará
automáticamente con el vehículo y éste entrará en estado Connected. Si el vehículo está en estado Separated, una
persona distinta del propietario puede conectarse a este vehículo a través de la aplicación Find My y utilizar el
método mencionado anteriormente para comprobar el NS. Los propietarios pueden seguir utilizando Find My para
encontrar el vehículo.
PL * Estado Nearby e Estado Separated
Se o veículo tiver sido emparelhado com o Find My, quando o proprietário se afasta do veículo ou desliga o
Bluetooth do seu dispositivo móvel após uma viagem, o veículo entra automaticamente no estado Nearby após um
curto período de tempo. Após um longo período de tempo, o veículo entrará no estado Separated. Quando o
proprietário se aproximar do veículo com o dispositivo móvel, o Bluetooth do dispositivo ligar-se-á
automaticamente ao veículo e este entrará no estado Connected. Se o veículo estiver no estado Separated, o não
proprietário pode ligar-se a este veículo através da aplicação Find My e utilizar o método mencionado acima para
verificar o NS. Os proprietários podem ainda utilizar o Find My para encontrar o veículo.
NL * Status Nearby en status Separated
Als het voertuig is gekoppeld met Find My en de eigenaar na een rit weggaat bij het voertuig of de Bluetooth van
zijn of haar mobiele apparaat uitschakelt, gaat het voertuig na korte tijd automatisch naar de status Nearby. Na
een lange periode komt het voertuig in de status Separated. Wanneer de eigenaar met het mobiel apparaat in de
buurt van hetvoertuig komt, maakt de Bluetooth van het apparaat automatisch verbinding met het voertuig en
krijgt het voertuig de status Connected. Als het voertuig de status Separated heeft, kan een niet-eigenaar
verbinding maken met dit voertuig via de Find My-app en de hierboven genoemde methode gebruiken om het SN
te controleren. Eigenaren kunnen Find My nog steeds gebruiken om het voertuig te vinden.
PT * Estado Nearby e Estado Separated
Se o veículo tiver sido emparelhado com o Find My, quando o proprietário se afasta do veículo ou desliga o
Bluetooth do seu dispositivo móvel após uma viagem, o veículo entra automaticamente no estado Nearby após um
curto período de tempo. Após um longo período de tempo, o veículo entrará no estado Separated. Quando o
proprietário se aproximar do veículo com o dispositivo móvel, o Bluetooth do dispositivo ligar-se-á
automaticamente ao veículo e este entrará no estado Connected. Se o veículo estiver no estado Separated, o não
proprietário pode ligar-se a este veículo através da aplicação Find My e utilizar o método mencionado acima para
verificar o NS. Os proprietários podem ainda utilizar o Find My para encontrar o veículo.
01 02 03 04 05 06 07 08 09 10 11 12 13 14 15
16 17 18 19 20 21 22 23 24 25 26 27 28 29 30 31 32 33
34 35 36 37 38 39 40 41 42 43 44 45 46 47 48 49 50 51
52 53 54 55 56 57
58 59 60 61 62 63 64 65 66 67 68 69
70 71 72 73 74 75 76 77
78 79 80 81
82 83 84 85
86 87 88 89 90 91 92 93 94 95 96 97 98 99 100 101
102 103 104 105 106 107 108
EN Only users of Apple devices need to read this Apple Find My app instruction.
FR Seuls les utilisateurs d'appareils Apple doivent lire cette instruction d’application Apple Find My.
DE Nur Benutzer von Apple-Geräten müssen diese Anleitung zur Apple Find My App lesen.
IT Solo gli utenti di dispositivi Apple devono leggere queste istruzioni dell'app Find My per Apple.
ES Solo los usuarios de dispositivos Apple deben leer estas instrucciones de la aplicación Find My de Apple.
PL Tę instrukcję aplikacji Apple Find My muszą przeczytać tylko użytkownicy urządzeń Apple.
NL Alleen gebruikers van Apple-apparaten hoeven deze Apple Find My-app-instructie te lezen.
PT Apenas os utilizadores de dispositivos Apple precisam de ler esta instrução Apple Find My App.
EN * Use of the Works with Apple badge means that a product has been designed to work specifically with the
technology identified in the badge and has been certified by the product manufacturer to meet Apple Find My
network product specifications and requirements. Apple is not responsible for the operation of this device or use
of this product or its compliance with safety and regulatory standards.
FR * L’utilisation du badge Works with Apple signifie qu’un produit a été conçu pour fonctionner spécifiquement avec
la technologie identifiée dans le badge et qu’il a été certifié par le fabricant du produit pour répondre aux
spécifications et aux exigences de produit du réseau Apple Find My. Apple n’est pas responsable du
fonctionnement de cet appareil, de son utilisation ou de sa conformité aux normes de sécurité et réglementaires.
DE * Die Verwendung des „Works with Apple“-Logos bedeutet, dass ein Produkt speziell für die Verwendung mit der
im Logo angegebenen Technologie entwickelt wurde und vom Produkthersteller zertifiziert wurde, dass es die
Produktspezifikationen und -anforderungen des Apple Find My Netzwerks erfüllt. Apple ist nicht verantwortlich für
den Betrieb dieses Geräts oder die Verwendung dieses Produkts oder für die Einhaltung von Sicherheits- und
Regulierungsstandards.
IT * L'uso del badge Works with Apple significa che un prodotto è stato progettato per funzionare specificamente con
la tecnologia identificata nel badge ed è stato certificato dal produttore del prodotto per soddisfare le specifiche e
i requisiti del prodotto di rete Apple Find My. Apple non è responsabile del funzionamento di questo dispositivo o
dell'utilizzo che viene fatto di questo prodotto o della sua conformità agli standard di sicurezza e normativi.
ES * El uso del distintivo Works with Apple significa que un
producto ha sido diseñado para funcionar específicamente con la tecnología identificada en el distintivo y ha sido
certificado por el fabricante del producto para cumplir con las especificaciones y requisitos del producto de la red
Find My de Apple. Apple no es responsable del funcionamiento de este dispositivo ni del uso de este producto, ni
de su cumplimiento de las normas de seguridad y reglamentarias.
PL * Użycie plakietki Works with Apple oznacza, że produkt
został zaprojektowany specjalnie do współpracy z technologią określoną na plakietce i został certyfikowany przez
producenta produktu pod kątem niezbędnej specyfikacji i wymagań produktu sieci Apple Find My. Firma Apple nie
ponosi odpowiedzialności za działanie tego urządzenia lub korzystanie z tego produktu ani za jego zgodność z
normami bezpieczeństwa i regulacyjnymi.
NL * Het gebruik van de Works with Apple-badge betekent
dat een product is ontworpen om specifiek te werken met de technologie die in de badge wordt geïdentificeerd
ppen dat het door de productfabrikant is gecertificeerd om te voldoen aan deApple Find
My-netwerkproductspecificaties en -vereisten. Apple is niet verantwoordelijk voor de werking van dit apparaat of
het gebruik van dit product of de naleving van veiligheids- en regelgevingsnormen.
PT * O uso do selo Works with Apple significa que um
produto foi projetado para funcionar especificamente com a tecnologia identificada no selo e foi certificado pelo
fabricante do produto para atender às especificações e requisitos do produto da rede Apple Find My. A Apple não
EN App Store, Apple Logo, Apple, Apple Find My, App le Watch, Find My, iPhone, iPad, iPadOS, Mac, macOS and
watchOS are trademarks of Apple Inc. IOS is a trademark of Cisco and is used under license.
FR App Store, Apple logo, Apple, Apple Find My, Apple Watch, Find My, iPhone, iPad, iPadOS, Mac, macOS et
watchOS sont des marques déposées d'Apple Inc. IOS est une marque commerciale de Cisco et est utilisé sous
licence.
DE App Store, Apple Logo, Apple, Apple Find My, Apple Watch, Find My, iPhone, iPad, iPadOS, Mac, macOS und
watchOS sind Marken von Apple Inc. IOS ist eine Marke von Cisco und wird unter Lizenz verwendet.
IT App Store, Apple Logo, Apple, Apple Find My, Apple Watch, Find My, iPhone, iPad, iPadOS, Mac, macOS e
watchOS sono marchi di Apple Inc. IOS è un marchio di Cisco e viene utilizzato su licenza.
ES App Store, el logotipo de Apple, Apple, Find My de Apple, Apple Watch, Find My, iPhone, iPad, iPadOS, Mac,
macOS y watchOS son marcas comerciales de Apple Inc. IOS es una marca comercial de Cisco y se utiliza bajo
licencia.
PL App Store, logo Apple, Apple, Apple Find My, Apple Watch, Find My, iPhone, iPad, iPadOS, Mac, macOS i watchOS
są znakami towarowymi firmy Apple Inc. IOS jest znakiem towarowym firmy Cisco i jest używany na podstawie
licencji.
NL App Store, Apple Logo, Apple, Apple Find My, Apple Watch, Find My, iPhone, iPad, iPadOS, Mac, macOS en
watchOS zijn handelsmerken van Apple Inc. IOS is een handelsmerk van Cisco en wordt onder licentie gebruikt.
PT App Store, logótipo da Apple, Apple, Apple Find My, Apple Watch, Find My, iPhone, iPad, iPadOS, Mac, macOS e
watchOS são marcas registadas da Apple Inc. IOS é uma marca registada da Cisco e é usada sob licença.
é responsável pela operação deste dispositivo ou pelo uso deste produto ou por sua conformidade com os padrões
regulatórios e de segurança.
01 02 03 04 05 06 07 08 09 10 11 12 13 14 15
16 17 18 19 20 21 22 23 24 25 26 27 28 29 30 31 32 33
34 35 36 37 38 39 40 41 42 43 44 45 46 47 48 49 50 51
52 53 54 55 56 57 58 59
60 61 62 63 64 65 66 67 68 69
70 71 72 73 74 75 76 77
78 79 80 81
82 83 84 85
86 87 88 89 90 91 92 93 94 95 96 97 98 99 100 101
102 103 104 105 106 107 108
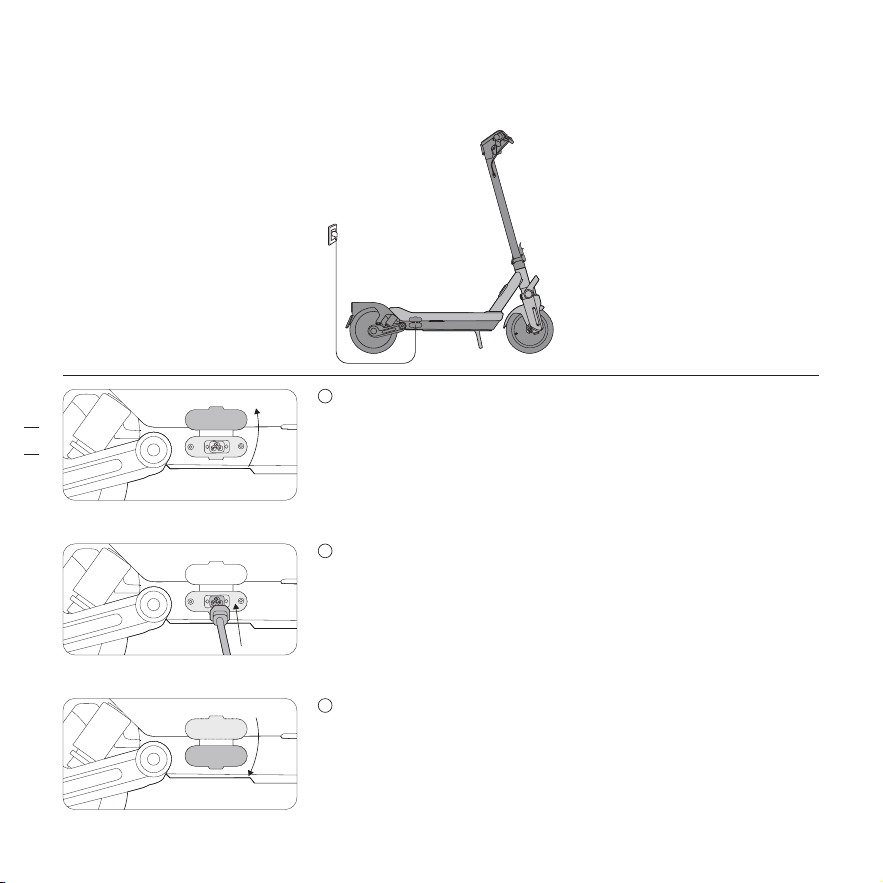
Charging / Chargement / Aufladen / Ricarica / Carga /
Ładowanie / Bezig met opladen / A Carregar
EN Open the charging port rubber plug.
FR Ouvrez le capuchon en caoutchouc du port tde charge.
DE Öffnen Sie den Gummistopfen des Ladeanschlusses.
IT Aprire il tappo in gomma della porta di ricarica.
ES Abra el tapón de goma del puerto de carga.
PL Otwórz gumową osłonę portu ładowania.
NL Open de rubberen plug van de laadpoort.
PT Abrir a ficha de borracha da porta de carregamento.
1
EN Insert the charge plug.
FR Insérez la prise de charge.
DE Den Ladestecker einstecken.
IT Inserire la spina di ricarica.
ES Inserte el enchufe de carga.
PL Włóż wtyk ładowania.
NL Steek de stekker van de lader in een stopcontact.
PT Insira o ficha de carregamento.
2
EN Fasten the rubber plug when finished.
FR Replacez le capuchon en caoutchouc lorsque vous avez terminé.
DE Befestigen Sie zum Abschluss den Gummistopfen.
IT Al termine, fissare il tappo di gomma.
ES Fije el tapón de goma cuando haya terminado.
PL Po zakończeniu zamocuj gumową osłonę.
NL Draai de rubberen plug vast als u klaar bent.
PT Aperte a ficha de borracha quando terminar.
EN When charging with Ninebot eKickScooter Adaptor (sold separately), please open the charging port cover on the
lower end of stem and plug in the charger.
FR Lors de la charge avec l’adaptateur eKickScooter de Ninebot (vendu séparément), ouvrez le cache du port de
charge en bas de la tige et branchez le chargeur.
DE Wenn Sie mit dem Ninebot eKickScooter-Adapter (separat erhältlich) aufladen, öffnen Sie bitte die Abdeckung des
Ladeanschlusses am unteren Ende der Lenkstange und schließen Sie das Ladegerät an.
IT Durante la ricarica con l'adattatore Ninebot eKickScooter (venduto separatamente), aprire il coperchio della porta
di ricarica sull'estremità inferiore dello stelo e collegare il caricabatterie.
ES Cuando cargue con el adaptador de Ninebot eKickScooter (se vende por separado), abra la tapa del puerto de
carga en el extremo inferior del mástil y conecte el cargador.
PL Podczas ładowania za pomocą adaptera Ninebot eKickScooter (sprzedawanego oddzielnie) otwórz pokrywę portu
ładowania znajdującą się na dolnym końcu kolumny kierownicy i podłącz ładowarkę.
NL Als u oplaadt met de Ninebot eKickScooter-adapter (apart verkrijgbaar), open dan het klepje van de laadpoort aan
de onderkant van de stuurpen en sluit de lader aan.
PT Ao carregar com o adaptador Ninebot eKickScooter (vendido separadamente), abra a tampa da porta de
carregamento na extremidade inferior da haste e ligue o carregador.
EN When the battery power is under 30% and the scooter is not powered on for about 7 consecutive days, the battery
will enter into sleep mode. If this happens, your scooter cannot be powered on. Please charge it for three seconds
to activate the battery.
FR Lorsque la puissance de la batterie est inférieure à 30 % et que le scooter n'est pas allumé pendant environ 7 jours
consécutifs, la batterie entre en mode veille. Si cela se produit, votre scooter ne peut pas être allumé. Veuillez le
charger pendant trois secondes pour activer la batterie.
DE Wenn die Batterieleistung weniger als 30 % beträgt und der Roller für etwa 7 aufeinanderfolgende Tage lang nicht
eingeschaltet wird, wechselt der Akku in den Schlaf-Modus. In diesem Fall lässt sich Ihr Roller nicht mehr
einschalten. Bitte laden Sie ihn für drei Sekunden auf, um den Akku zu aktivieren.
IT Quando la carica della batteria è inferiore al 30% e lo scooter non viene acceso per circa 7 giorni consecutivi, la
batteria entra in modalità di sospensione. Se ciò accade, non è possibile accendere lo scooter. Per attivare la
3
30%
+
≈
=
7
01 02 03 04 05 06 07 08 09 10 11 12 13 14 15
16 17 18 19 20 21 22 23 24 25 26 27 28 29 30 31 32 33
34 35 36 37 38 39 40 41 42 43 44 45 46 47 48 49 50 51
52 53 54 55 56 57 58 59 60 61
62 63 64 65 66 67 68 69
70 71 72 73 74 75 76 77
78 79 80 81
82 83 84 85
86 87 88 89 90 91 92 93 94 95 96 97 98 99 100 101
102 103 104 105 106 107 108
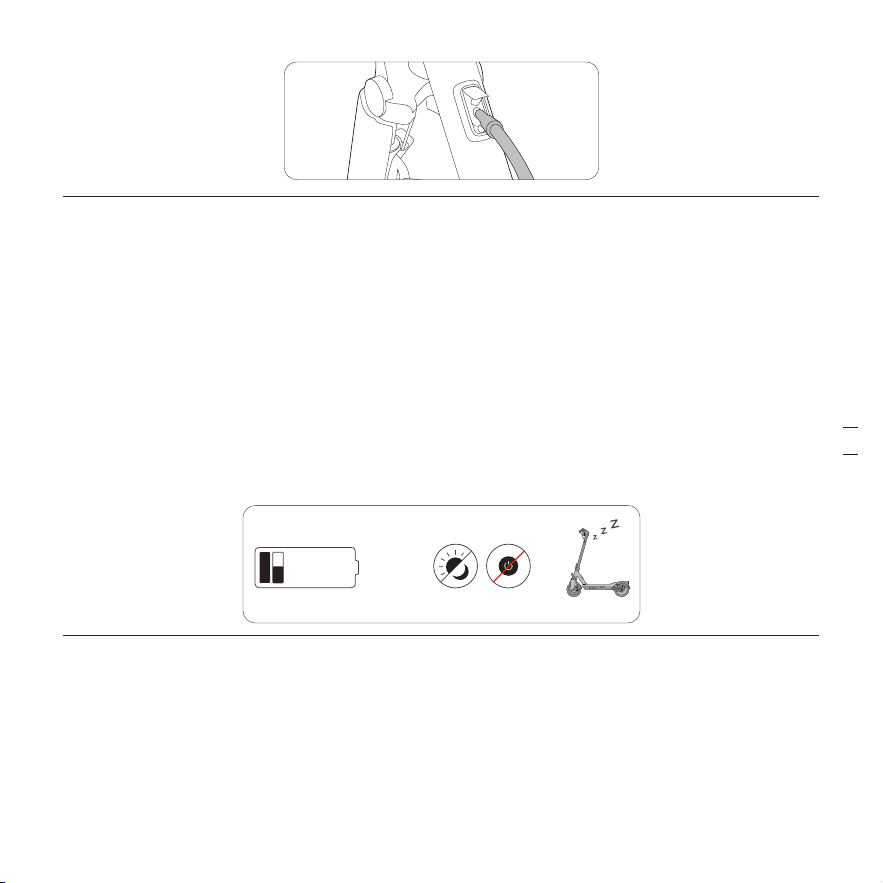
Charging / Chargement / Aufladen / Ricarica / Carga /
Ładowanie / Bezig met opladen / A Carregar
EN Open the charging port rubber plug.
FR Ouvrez le capuchon en caoutchouc du port tde charge.
DE Öffnen Sie den Gummistopfen des Ladeanschlusses.
IT Aprire il tappo in gomma della porta di ricarica.
ES Abra el tapón de goma del puerto de carga.
PL Otwórz gumową osłonę portu ładowania.
NL Open de rubberen plug van de laadpoort.
PT Abrir a ficha de borracha da porta de carregamento.
1
EN Insert the charge plug.
FR Insérez la prise de charge.
DE Den Ladestecker einstecken.
IT Inserire la spina di ricarica.
ES Inserte el enchufe de carga.
PL Włóż wtyk ładowania.
NL Steek de stekker van de lader in een stopcontact.
PT Insira o ficha de carregamento.
2
EN Fasten the rubber plug when finished.
FR Replacez le capuchon en caoutchouc lorsque vous avez terminé.
DE Befestigen Sie zum Abschluss den Gummistopfen.
IT Al termine, fissare il tappo di gomma.
ES Fije el tapón de goma cuando haya terminado.
PL Po zakończeniu zamocuj gumową osłonę.
NL Draai de rubberen plug vast als u klaar bent.
PT Aperte a ficha de borracha quando terminar.
EN When charging with Ninebot eKickScooter Adaptor (sold separately), please open the charging port cover on the
lower end of stem and plug in the charger.
FR Lors de la charge avec l’adaptateur eKickScooter de Ninebot (vendu séparément), ouvrez le cache du port de
charge en bas de la tige et branchez le chargeur.
DE Wenn Sie mit dem Ninebot eKickScooter-Adapter (separat erhältlich) aufladen, öffnen Sie bitte die Abdeckung des
Ladeanschlusses am unteren Ende der Lenkstange und schließen Sie das Ladegerät an.
IT Durante la ricarica con l'adattatore Ninebot eKickScooter (venduto separatamente), aprire il coperchio della porta
di ricarica sull'estremità inferiore dello stelo e collegare il caricabatterie.
ES Cuando cargue con el adaptador de Ninebot eKickScooter (se vende por separado), abra la tapa del puerto de
carga en el extremo inferior del mástil y conecte el cargador.
PL Podczas ładowania za pomocą adaptera Ninebot eKickScooter (sprzedawanego oddzielnie) otwórz pokrywę portu
ładowania znajdującą się na dolnym końcu kolumny kierownicy i podłącz ładowarkę.
NL Als u oplaadt met de Ninebot eKickScooter-adapter (apart verkrijgbaar), open dan het klepje van de laadpoort aan
de onderkant van de stuurpen en sluit de lader aan.
PT Ao carregar com o adaptador Ninebot eKickScooter (vendido separadamente), abra a tampa da porta de
carregamento na extremidade inferior da haste e ligue o carregador.
EN When the battery power is under 30% and the scooter is not powered on for about 7 consecutive days, the battery
will enter into sleep mode. If this happens, your scooter cannot be powered on. Please charge it for three seconds
to activate the battery.
FR Lorsque la puissance de la batterie est inférieure à 30 % et que le scooter n'est pas allumé pendant environ 7 jours
consécutifs, la batterie entre en mode veille. Si cela se produit, votre scooter ne peut pas être allumé. Veuillez le
charger pendant trois secondes pour activer la batterie.
DE Wenn die Batterieleistung weniger als 30 % beträgt und der Roller für etwa 7 aufeinanderfolgende Tage lang nicht
eingeschaltet wird, wechselt der Akku in den Schlaf-Modus. In diesem Fall lässt sich Ihr Roller nicht mehr
einschalten. Bitte laden Sie ihn für drei Sekunden auf, um den Akku zu aktivieren.
IT Quando la carica della batteria è inferiore al 30% e lo scooter non viene acceso per circa 7 giorni consecutivi, la
batteria entra in modalità di sospensione. Se ciò accade, non è possibile accendere lo scooter. Per attivare la
3
30%
+
≈
=
7
01 02 03 04 05 06 07 08 09 10 11 12 13 14 15
16 17 18 19 20 21 22 23 24 25 26 27 28 29 30 31 32 33
34 35 36 37 38 39 40 41 42 43 44 45 46 47 48 49 50 51
52 53 54 55 56 57 58 59 60 61
62 63 64 65 66 67 68 69
70 71 72 73 74 75 76 77
78 79 80 81
82 83 84 85
86 87 88 89 90 91 92 93 94 95 96 97 98 99 100 101
102 103 104 105 106 107 108
EN
○ Do not charge the battery if the charge port, the battery charger or power cord is wet.
○ Only use the original battery charger provided by the manufacturer. Do not use a charger from any other product.
○ Do not charge or use the battery if it is damaged or you can see traces of water.
○ Close the charge port cover when not charging the battery.
○ Unplug the charger when it is not in use.
○ Do not leave the scooter unattended while charging.
FR
○ Ne chargez pas la batterie si le port de charge, le chargeur de batterie ou le cordon d’alimentation est mouillé.
○ N’utilisez que le chargeur de batterie d’origine fourni par le fabricant. N’utilisez pas le chargeur d’un autre produit.
○ Ne chargez pas et n’utilisez pas la batterie si elle est endommagée ou si vous pouvez voir des traces d’eau.
○ Fermez le couvercle du port de charge lorsque vous ne chargez pas la batterie.
○ Débranchez le chargeur lorsqu’il n’est pas utilisé.
○ Ne laissez pas le scooter sans surveillance pendant la charge.
DE
○ Laden Sie den Akku nicht auf, wenn der Ladeanschluss, das Akkuladegerät oder das Netzkabel nass ist.
○ Verwenden Sie nur das vom Hersteller gelieferte Original-Akkuladegerät. Verwenden Sie kein Ladegerät von einem
anderen Produkt.
○ Laden oder verwenden Sie den Akku nicht, wenn er beschädigt ist oder Wasserspuren zu sehen sind.
○ Schließen Sie die Abdeckung des Ladeanschlusses, wenn Sie den Akku nicht aufladen.
○ Ziehen Sie den Stecker aus der Steckdose, wenn das Ladegerät nicht verwendet wird.
○ Lassen Sie den Roller während des Ladevorgangs nicht unbeaufsichtigt.
WARNING! / AVERTISSEMENTS! / WARNHINWEIS! /
AVVERTENZE! / ¡ADVERTENCIA! / OSTRZEŻENIA! /
WAARSCHUWING! / AVISO!
batteria, caricarlo per tre secondi.
ES Cuando la energía de la batería está por debajo del 30 % y el patinete no se enciende durante aproximadamente 7
días consecutivos, la batería entrará en modo reposo. Si esto sucede, el patinete no se podrá encender. Cárguelo
durante tres segundos para activar la batería.
PL Gdy poziom naładowania akumulatora spadnie poniżej 30%, a hulajnoga nie będzie włączona przez około 7
kolejnych dni, akumulator przejdzie w tryb uśpienia. W takim przypadku hulajnogi nie będzie można włączyć. Aby
aktywować akumulator, należy go ładować przez trzy sekundy.
NL Wanneer het batterijvermogen onder de 30% is en de scooter ongeveer 7 opeenvolgende dagen niet is
ingeschakeld, gaat de batterij naar de slaapstand. Als dit gebeurt, kan uw scooter niet worden ingeschakeld. Laad
drie seconden op om de batterij te activeren.
PT Quando a carga da bateria for inferior a 30% e a scooter não for ligada durante cerca de 7 dias consecutivos, a
bateria entrará no modo de suspensão. Se isso acontecer, a sua scooter não poderá ser ligada. Carregue-a durante
três segundos para ativar a bateria.
IT
○ Non ricaricare la batteria se la porta di ricarica, il caricabatteria o il cavo di alimentazione sono bagnati.
○ Utilizzare solo il caricabatteria originale fornito dal produttore. Non utilizzare caricabatterie di altri prodotti.
○ Non caricare o utilizzare la batteria se è danneggiata o se sono presenti tracce d'acqua.
○ Chiudere il coperchio della porta di ricarica quando non si carica la batteria.
○ Scollegare il caricabatterie quando non è in uso.
○ Non lasciare lo scooter incustodito durante la ricarica.
ES
○ No cargue la batería si el puerto de carga, el cargador de la batería o el cable de alimentación están mojados.
○ Utilice únicamente el cargador de la batería original proporcionado por el fabricante. No utilice ningún cargador
decualquier otro producto.
○ No cargue ni utilice la batería si está dañada o puede ver rastros de agua.
○ Cierre la tapa del puerto de carga cuando no esté cargando la batería.
○ Desconecte el cargador cuando no esté en uso.
○ No deje el patinete desatendido mientras se está cargando.
PL
○ Nie należy ładować akumulatora, jeśli gniazdo ładowania, ładowarka akumulatora lub przewód zasilania są wilgotne.
○ Używaj wyłącznie oryginalnej ładowarki akumulatora dostarczonej przez producenta. Nie używać ładowarek
przeznaczonychdo innych produktów.
○ Nie ładuj ani nie używaj akumulatora, jeśli jest uszkodzony lub widać ślady zalania.
○ Zamknij pokrywę gniazda ładowania, jeśli nie ładujesz akumulatora.
○ Odłączaj ładowarkę, gdy jej nie używasz.
○ Nie pozostawiaj hulajnogi bez nadzoru podczas ładowania.
NL
○ Laad de accu niet op als de laadpoort, de acculader of het netsnoer nat is.
○ Gebruik alleen de originele acculader die door de fabrikant wordt geleverd. Gebruik GEEN lader van een ander
product.
○ Laad de accu niet op en gebruik deze niet als deze beschadigd is of als u sporen van water ziet.
○ Sluit het klepje van de laadpoort als u de accu niet oplaadt.
○ Haal de lader uit het stopcontact als deze niet wordt gebruikt.
○ Laat de scooter niet onbeheerd achter tijdens het opladen.
PT
○ Não carregue a bateria se a porta de carregamento, o carregador de bateria ou o cabo de alimentação estiverem
molhados.
○ Utilize apenas o carregador de bateria original fornecido pelo fabricante. Não utilize um carregador de qualquer outro
produto.
○ Não carregue nem utilize a bateria se esta estiver danificada ou se forem visíveis vestígios de água.
○ Feche a tampa da porta de carregamento quando não estiver a carregar a bateria.
○ Desligue o carregador quando não estiver em uso.
○ Não deixe a scooter sem supervisão durante o carregamento.
01 02 03 04 05 06 07 08 09 10 11 12 13 14 15
16 17 18 19 20 21 22 23 24 25 26 27 28 29 30 31 32 33
34 35 36 37 38 39 40 41 42 43 44 45 46 47 48 49 50 51
52 53 54 55 56 57 58 59 60 61 62 63
64 65 66 67 68 69
70 71 72 73 74 75 76 77
78 79 80 81
82 83 84 85
86 87 88 89 90 91 92 93 94 95 96 97 98 99 100 101
102 103 104 105 106 107 108
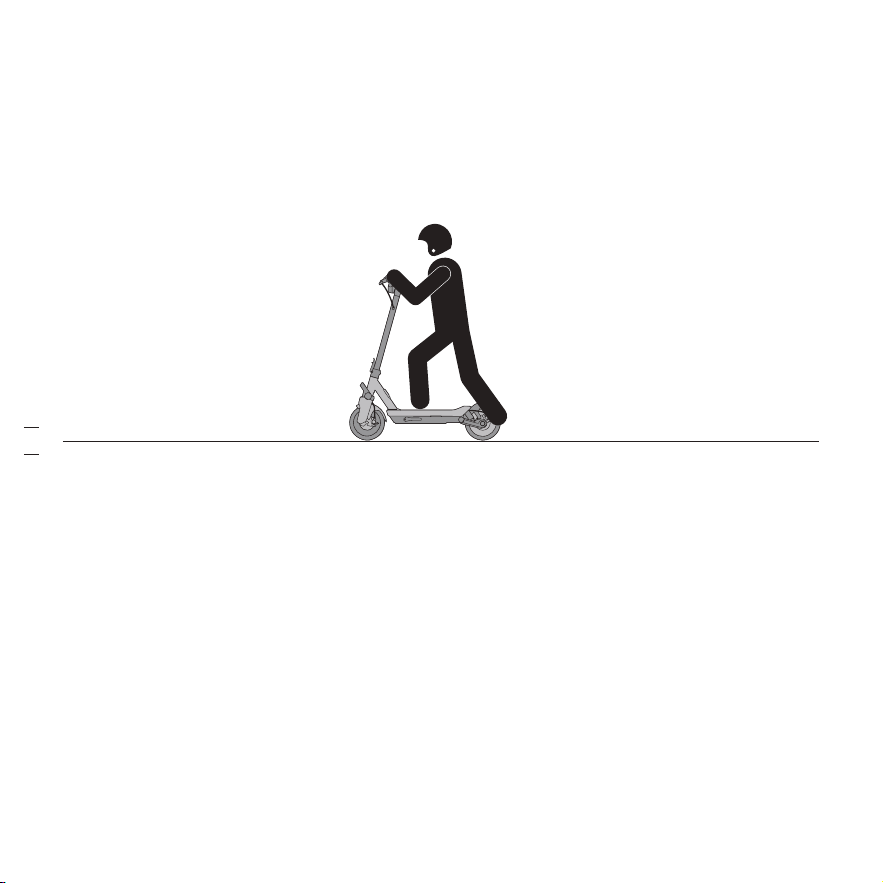
● Gliding / Glisser / Gleiten / Avviare / Deslizarse / Swobodna jazda / Glijden / Deslizar
How to Ride / Comment rouler / Fahren / Come guidare /
Cómo conducir / Jak jeździć / Hoe rijden / Como conduzir
EN Power on the eKickScooter, and stand on the footboard with one foot and push off with the other foot to start
gliding.
FR Allumez le KickScooter, pliez la béquille vers le haut. Tenez�vous sur le repose-pieds avec un pied et poussez avec
l’autre pied pour commencer à rouler.
DE Klappen Sie den Ständer hoch. Stellen Sie sich mit einem Fuß auf das Trittbrett und stoßen Sie sich mit dem
anderen Fuß ab, um loszufahren.
IT Accendi il eKickScooter. Piega il cavalletto verso l'alto. Posizionare un piede sulla pedana e spingere con l'altro in
modo che lo scooter cominci a muoversi.
ES Encienda el eKickScooter, doble la pata de apoyo. Mantenga un pie en el reposapiés y empuje con el otro pie para
comenzar a deslizarse.
PL Włącz zasilanie hulajnogi eKickScooter, podnieś nóżkę. Stań na podeście jedną nogą, a drugą odepchnij się, aby
rozpocząć jazdę.
NL De eKickScooter inschakelen, Klap de standaard omhoog. Ga met één voet op de treeplank staan en duw met de
andere voet af om te beginnen met glijden.
PT Ligue a eKickScooter. Fique de pé no tabuleiro de pés com um pé e empurre com o outro para começar a deslizar.
● Acceleration / Accélérer / Beschleunigen / Accelerare / Acelerar / Przyspieszanie /
Versnellen / Acelerar
EN Put both feet on the footboard and stand stably. Press the throttle to speed up when you are balanced.
Note: For your safety, the motor will not engage until theeKickScooter reaches 3 km/h (1.9 mph). The Start
Speedcan be adjusted via Segway Mobility App.
FR Mettez les deux pieds sur le repose-pieds et tenez-vous debout de manière stable. Appuyez sur l'accélérateur pour
accélérer lorsque vous êtes en équilibre.
Remarque : Pour votre sécurité, le moteur ne s'enclenchera pas tant que le eKickScooter n'aura pas atteint 3 km/h
(1,9 mph). La vitesse de démarrage (3-5 km/h) peut être ajustée via l'application Segway Mobility.
DE Stellen Sie beide Füße auf das Trittbrett und stehen Sie sicher. Drücken Sie den elektronischen Gasgriff, um
schneller zu fahren, wenn Sie im Gleichgewicht sind.
Hinweis: Zu Ihrer Sicherheit schaltet sich der Motor erst ein, wenn der eKickScooter eine Geschwindigkeit von 3
km/h (1,9 mph) erreicht. Die Startgeschwindigkeit (3–5 km/h) kann über die Segway Mobility-App angepasst
werden.
IT Posizionare entrambi i piedi sulla pedana e mantenere una posizione stabile. Quando si è raggiunto un equilibrio,
premere l'acceleratore per accelerare.
Nota: Per la tua sicurezza, il motore non si avvierà fino a quando il eKickScooter non raggiunge i 3 km/h (1,9 mph).
La velocità iniziale (3-5 km/h) può essere regolata tramite l'app Segway Mobility.
ES Ponga ambos pies en el reposapiés y párese de manera estable. Presione el acelerador para acelerar cuando esté
equilibrado.
Nota: Por su seguridad, el motor no se activará hasta que el eKickScooter alcance los 3 km/h (1,9 mph). La
velocidad de inicio (3-5 km/h) se puede ajustar a través de la aplicación Segway Mobility.
PL Postaw obie stopy na podeście i stań stabilnie. Po złapaniu równowagi naciśnij przepustnicę, aby przyspieszyć.
Uwaga: ze względów bezpieczeństwa silnik nie włączy się, dopóki hulajnoga eKickScooter nie osiągnie prędkości 3
km/h (1,9 mph).Prędkość początkową (3-5 km/h) można regulować za pomocą aplikacji Segway Mobility
01 02 03 04 05 06 07 08 09 10 11 12 13 14 15
16 17 18 19 20 21 22 23 24 25 26 27 28 29 30 31 32 33
34 35 36 37 38 39 40 41 42 43 44 45 46 47 48 49 50 51
52 53 54 55 56 57 58 59 60 61 62 63 64 65
66 67 68 69
70 71 72 73 74 75 76 77
78 79 80 81
82 83 84 85
86 87 88 89 90 91 92 93 94 95 96 97 98 99 100 101
102 103 104 105 106 107 108
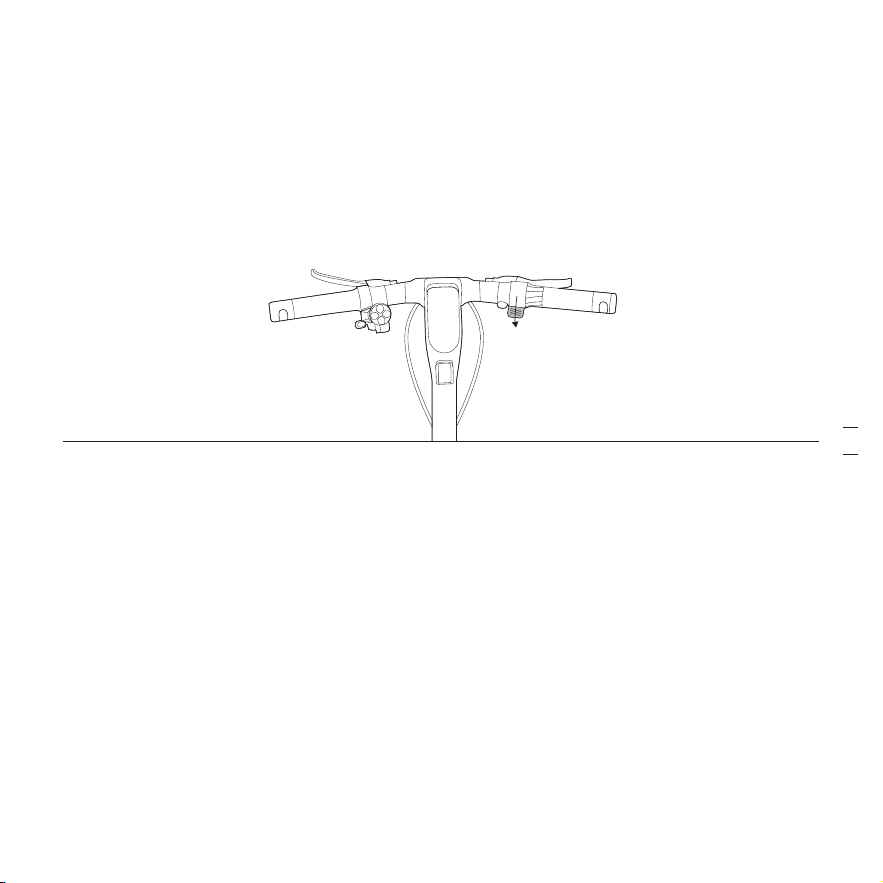
● Gliding / Glisser / Gleiten / Avviare / Deslizarse / Swobodna jazda / Glijden / Deslizar
How to Ride / Comment rouler / Fahren / Come guidare /
Cómo conducir / Jak jeździć / Hoe rijden / Como conduzir
EN Power on the eKickScooter, and stand on the footboard with one foot and push off with the other foot to start
gliding.
FR Allumez le KickScooter, pliez la béquille vers le haut. Tenez�vous sur le repose-pieds avec un pied et poussez avec
l’autre pied pour commencer à rouler.
DE Klappen Sie den Ständer hoch. Stellen Sie sich mit einem Fuß auf das Trittbrett und stoßen Sie sich mit dem
anderen Fuß ab, um loszufahren.
IT Accendi il eKickScooter. Piega il cavalletto verso l'alto. Posizionare un piede sulla pedana e spingere con l'altro in
modo che lo scooter cominci a muoversi.
ES Encienda el eKickScooter, doble la pata de apoyo. Mantenga un pie en el reposapiés y empuje con el otro pie para
comenzar a deslizarse.
PL Włącz zasilanie hulajnogi eKickScooter, podnieś nóżkę. Stań na podeście jedną nogą, a drugą odepchnij się, aby
rozpocząć jazdę.
NL De eKickScooter inschakelen, Klap de standaard omhoog. Ga met één voet op de treeplank staan en duw met de
andere voet af om te beginnen met glijden.
PT Ligue a eKickScooter. Fique de pé no tabuleiro de pés com um pé e empurre com o outro para começar a deslizar.
● Acceleration / Accélérer / Beschleunigen / Accelerare / Acelerar / Przyspieszanie /
Versnellen / Acelerar
EN Put both feet on the footboard and stand stably. Press the throttle to speed up when you are balanced.
Note: For your safety, the motor will not engage until theeKickScooter reaches 3 km/h (1.9 mph). The Start
Speedcan be adjusted via Segway Mobility App.
FR Mettez les deux pieds sur le repose-pieds et tenez-vous debout de manière stable. Appuyez sur l'accélérateur pour
accélérer lorsque vous êtes en équilibre.
Remarque : Pour votre sécurité, le moteur ne s'enclenchera pas tant que le eKickScooter n'aura pas atteint 3 km/h
(1,9 mph). La vitesse de démarrage (3-5 km/h) peut être ajustée via l'application Segway Mobility.
DE Stellen Sie beide Füße auf das Trittbrett und stehen Sie sicher. Drücken Sie den elektronischen Gasgriff, um
schneller zu fahren, wenn Sie im Gleichgewicht sind.
Hinweis: Zu Ihrer Sicherheit schaltet sich der Motor erst ein, wenn der eKickScooter eine Geschwindigkeit von 3
km/h (1,9 mph) erreicht. Die Startgeschwindigkeit (3–5 km/h) kann über die Segway Mobility-App angepasst
werden.
IT Posizionare entrambi i piedi sulla pedana e mantenere una posizione stabile. Quando si è raggiunto un equilibrio,
premere l'acceleratore per accelerare.
Nota: Per la tua sicurezza, il motore non si avvierà fino a quando il eKickScooter non raggiunge i 3 km/h (1,9 mph).
La velocità iniziale (3-5 km/h) può essere regolata tramite l'app Segway Mobility.
ES Ponga ambos pies en el reposapiés y párese de manera estable. Presione el acelerador para acelerar cuando esté
equilibrado.
Nota: Por su seguridad, el motor no se activará hasta que el eKickScooter alcance los 3 km/h (1,9 mph). La
velocidad de inicio (3-5 km/h) se puede ajustar a través de la aplicación Segway Mobility.
PL Postaw obie stopy na podeście i stań stabilnie. Po złapaniu równowagi naciśnij przepustnicę, aby przyspieszyć.
Uwaga: ze względów bezpieczeństwa silnik nie włączy się, dopóki hulajnoga eKickScooter nie osiągnie prędkości 3
km/h (1,9 mph).Prędkość początkową (3-5 km/h) można regulować za pomocą aplikacji Segway Mobility
01 02 03 04 05 06 07 08 09 10 11 12 13 14 15
16 17 18 19 20 21 22 23 24 25 26 27 28 29 30 31 32 33
34 35 36 37 38 39 40 41 42 43 44 45 46 47 48 49 50 51
52 53 54 55 56 57 58 59 60 61 62 63 64 65
66 67 68 69
70 71 72 73 74 75 76 77
78 79 80 81
82 83 84 85
86 87 88 89 90 91 92 93 94 95 96 97 98 99 100 101
102 103 104 105 106 107 108
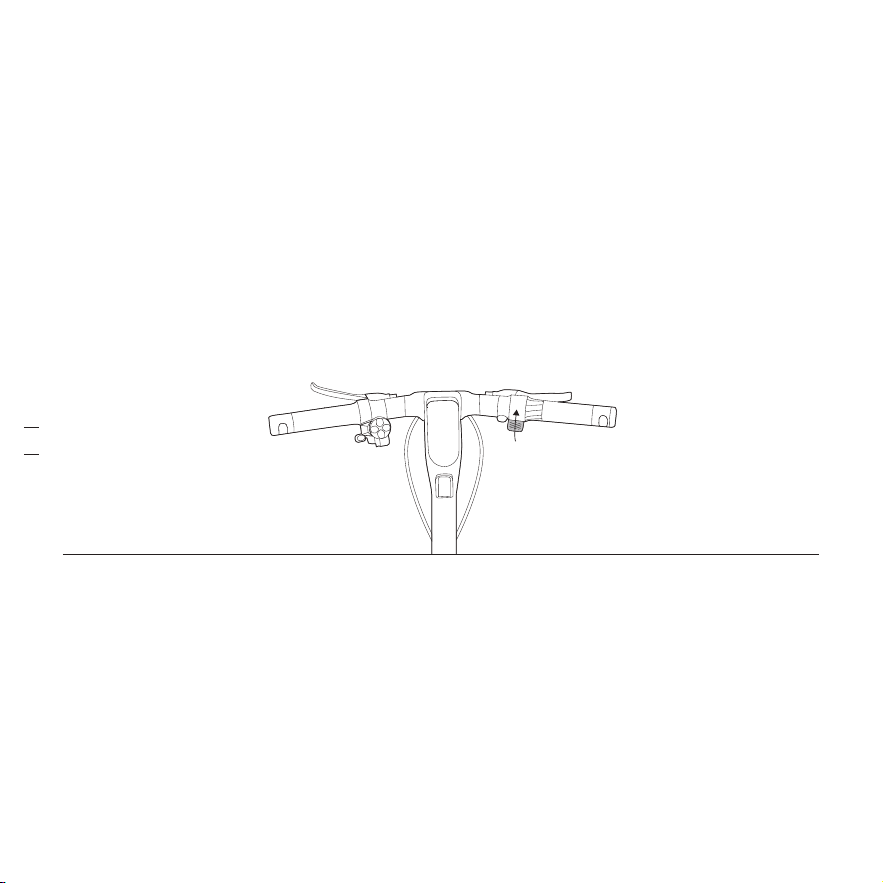
● Deceleration / Décélérer / Verzögern / Decelerare / Desacelerar / Zwalnianie /
Vertragen / Desacelerar
EN Slow down by releasing the throttle and squeezing the brake lever.
FR Ralentissez en relâchant l’accélérateur électronique et en serrant le levier de frein.
DE Sie verlangsamen das Tempo, indem Sie den elektronischen Gasgriff loslassen und den Bremshebel betätigen.
IT Rallentare rilasciando l'acceleratore e premendo la leva del freno.
ES Reduzca la velocidad soltando el acelerador y apretando la palanca de freno.
PL Zmniejsz prędkość, zwalniając przepustnicę i naciskając dźwignię hamulca.
NL Vertraag door het gaspedaal los te laten en in de remhendel te knijpen.
PT Diminua a velocidade soltando o acelerador e apertando a alavanca do travão.
EN *Braking distance may vary significantly depending on the rider's weight and other conditions. Heavier riders may
experience longer brake distances. Always adjust your speed and maintain a safe distance while riding.
*Be cautious and maintain balance when riding uphill. Thescooter may decelerate depending on the rider's
weightand environmental conditions.
DO NOT ride uphill on slopes steeper than 30° .
FR *La distance de freinage peut varier considérablement en fonction du poids du pilote et d'autres conditions. Les
pilotes plus lourds peuvent avoir des distances de freinage plus longues. Adaptez toujours votre vitesse et
maintenez une distance de sécurité lorsque vous roulez.
*Soyez prudent et maintenez l’équilibre lorsque vous roulez en montée. Le scooter peut décélérer en fonction du
poids du pilote et des conditions environnementales.
NE roulez PAS en montée sur des pentes supérieures à30° .
DE *Der Bremsweg kann je nach Gewicht des Fahrers und anderen Bedingungen erheblich variieren. Bei schwereren
Fahrern kann es zu längeren Bremswegen kommen. Passen Sie Ihre Geschwindigkeit immer an und halten Sie
beim Fahren einen Sicherheitsabstand ein.
*Seien Sie beim Bergauffahren vorsichtig und halten Sie das Gleichgewicht. Je nach Gewicht des Fahrers und
Umgebungsbedingungen kann es vorkommen, dass der Roller langsamer wird.
Fahren Sie NICHT bergauf auf Hängen, die steiler als 30 ° sind.
IT *La distanza di frenata può variare notevolmente a seconda del peso del conducente e di altre condizioni. Per i
conducenti più pesanti, lo spazio di frenata potrebbe essere più ampio. Durante la guida, regolare sempre la
velocità e mantenere la distanza di sicurezza.
*Quando si guida in salita, prestare attenzione e mantenere l'equilibrio. Lo scooter potrebbe decelerare a seconda
del peso del conducente e delle condizioni ambientali.
NON guidare su salite con pendenza superiore a 30° .
ES *La distancia de frenado puede variar significativamente según el peso del conductor y otras condiciones. Los
conductores más pesados pueden experimentar distancias de frenado más largas. Ajuste siempre su velocidad y
mantenga la distancia de seguridad al conducir.
*Tenga cuidado y mantenga el equilibrio al conducir cuesta arriba. El patinete puede desacelerar dependiendo del
peso del conductor y de las condiciones del entorno.
NO conduzca cuesta arriba en pendientes con una inclinación superior a 30° .
PL *Długość drogi hamowania może się znacznie różnić w zależności od wagi użytkownika i innych warunków. W
przypadku użytkowników o większej wadze droga hamowania może być dłuższa. Podczas jazdy zawsze należy
dostosowywać prędkość do warunków i zachowywać bezpieczną odległość.
*Podczas jazdy pod górę należy zachować ostrożność i utrzymywać równowagę. Hulajnoga może zwalniać w
zależności od wagi użytkownika i warunków otoczenia.
NIE WOLNO jeździć pod górę, jeśli kąt nachylenia podjazdu przekracza 30° .
NL *De remweg kan aanzienlijk variëren, afhankelijk van het gewicht van de rijder en andere omstandigheden.
Zwaardere rijders kunnen een langere remweg ervaren. Pas altijd uw snelheid aan en houd een veilige afstand
tijdens het rijden.
*Wees voorzichtig en bewaar uw evenwicht als u bergop fietst. De scooter kan vertragen, afhankelijk van het
gewicht van de rijder en de omgevingsomstandigheden.
Rijd NIET bergopwaarts op hellingen die steiler zijn dan30° .
PT *A distância da travagem pode variar significativamente dependendo do peso do condutor e de outras condições.
Condutores mais pesados podem ter distâncias de travagem maiores. Ajuste sempre a sua velocidade e mantenha
uma distância segura ao conduzir.
*Seja cauteloso e mantenha o equilíbrio ao subir ladeiras. A scooter pode desacelerar dependendo do peso do
condutor e das condições ambientais.
NÃO suba ladeiras com inclinação superior a 30° .
NL Zet beide voeten op de treeplank en sta stabiel. Druk op het gaspedaal om te versnellen wanneer u in evenwicht
bent.
Opmerking: Voor uw veiligheid zal de motor niet inschakelen tot de eKickScooter 3 km/u (1,9 mph) bereikt. De
startsnelheid.
PT Coloque ambos os pés sobre o tabuleiro de pés e fique de pé de forma estável. Pressione o acelerador para
acelerar quando estiver equilibrado.
Observação: Para sua segurança, o motor não engatará até que a eKickScooter atinja 3 km/h (1,9 mph).A
velocidade de arranque (3-5 km/h) pode ser ajustada através da aplicação Segway Mobility.
01 02 03 04 05 06 07 08 09 10 11 12 13 14 15
16 17 18 19 20 21 22 23 24 25 26 27 28 29 30 31 32 33
34 35 36 37 38 39 40 41 42 43 44 45 46 47 48 49 50 51
52 53 54 55 56 57 58 59 60 61 62 63 64 65 66 67
68 69
70 71 72 73 74 75 76 77
78 79 80 81
82 83 84 85
86 87 88 89 90 91 92 93 94 95 96 97 98 99 100 101
102 103 104 105 106 107 108
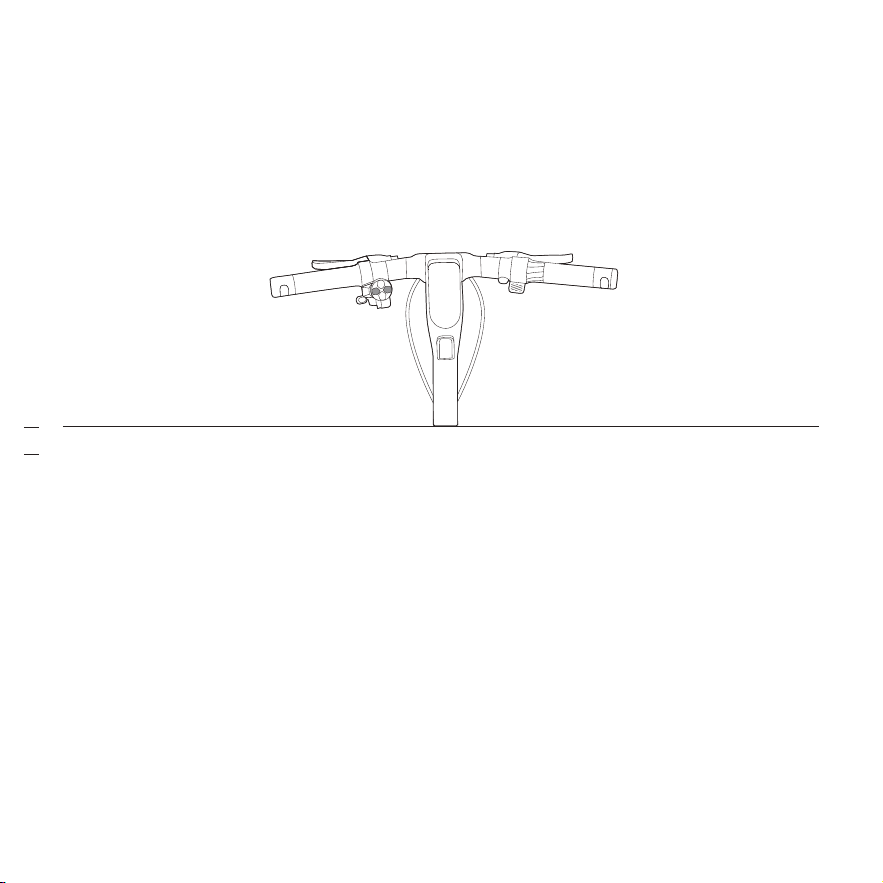
EN When turning left or right, press the “←” (left) or “→” (right) button. Then the direction indicator will flash regularly
which can be turned off by pressing the corresponding button again.
FR Lorsque vous tournez à gauche ou à droite, appuyez sur le bouton « ← » (gauche) ou « → » (droite). L’indicateur
de direction clignotera après que vous aurez appuyé sur le bouton de l’indicateur de direction gauche/droit.
Appuyez à nouveau sur le bouton pour l’éteindre.
DE Wenn Sie nach links oder rechts abbiegen, drücken Sie die Taste „ ←“ (links) oder „ →“ (rechts). Nach dem Drücken
der linken/rechten Fahrtrichtungsanzeiger-Taste blinkt der Fahrtrichtungsanzeiger. Zum Ausschalten erneut
drücken.
IT Per girare a sinistra o a destra, premere il pulsante " ← " (sinistra) o " → " (destra). Dopo aver premuto il pulsante
dell'indicatore di direzione sinistro/destro, l'indicatore di direzione lampeggerà. Premerlo nuovamente per
spegnerlo.
ES Cuando gire a la izquierda o a la derecha, presione el botón “←” (izquierda) o “→” (derecha). El indicador de
dirección parpadeará después de presionar el botón indicador de dirección derecho/izquierdo. Pulse nuevamente
para desactivar.
PL Skręcając w lewo lub prawo, naciśnij przycisk „ ←” (w lewo) lub „ →” (w prawo). Po naciśnięciu przycisku
kierunkowskazu lewego/prawego kierunkowskazu kierunkowskaz zacznie migać. Naciśnij ponownie, aby wyłączyć.
NL Druk op de knop “←” (links) of “→” (rechts) als u naar links of rechts draait. De richtingaanwijzer knippert na het
indrukken van de linker/rechter richtingaanwijzerknop. Druk opnieuw om uit te schakelen.
PT Ao virar à esquerda ou à direita, pressione o botão “←” (esquerda) ou “→” (direita). O indicador de direção piscará
depois de pressionar o botão indicador de direção esquerdo/direito. Pressione novamente para desligar.
EN Slightly turn the handlebar to turn left/right.
FR Tournez légèrement le guidon pour tourner à gauche ou à droite.
DE Drehen Sie den Lenker leicht, um nach links/rechts abzubiegen.
IT Girare leggermente il manubrio per svoltare a sinistra/destra.
ES Gire ligeramente el manillar para girar a la izquierda/derecha.
PL Obróć nieznacznie kierownicę, aby skręcić w lewo/prawo.
NL Draai het stuur iets om naar links/rechts te draaien.
PT Gire levemente o guiador para virar à esquerda/direita.
● Steering / Tourner / Abbiegen / Svoltare / Girar / Skręcanie / Draaien / Virar
01 02 03 04 05 06 07 08 09 10 11 12 13 14 15
16 17 18 19 20 21 22 23 24 25 26 27 28 29 30 31 32 33
34 35 36 37 38 39 40 41 42 43 44 45 46 47 48 49 50 51
52 53 54 55 56 57 58 59 60 61 62 63 64 65 66 67 68 69
70 71 72 73 74 75 76 77
78 79 80 81
82 83 84 85
86 87 88 89 90 91 92 93 94 95 96 97 98 99 100 101
102 103 104 105 106 107 108
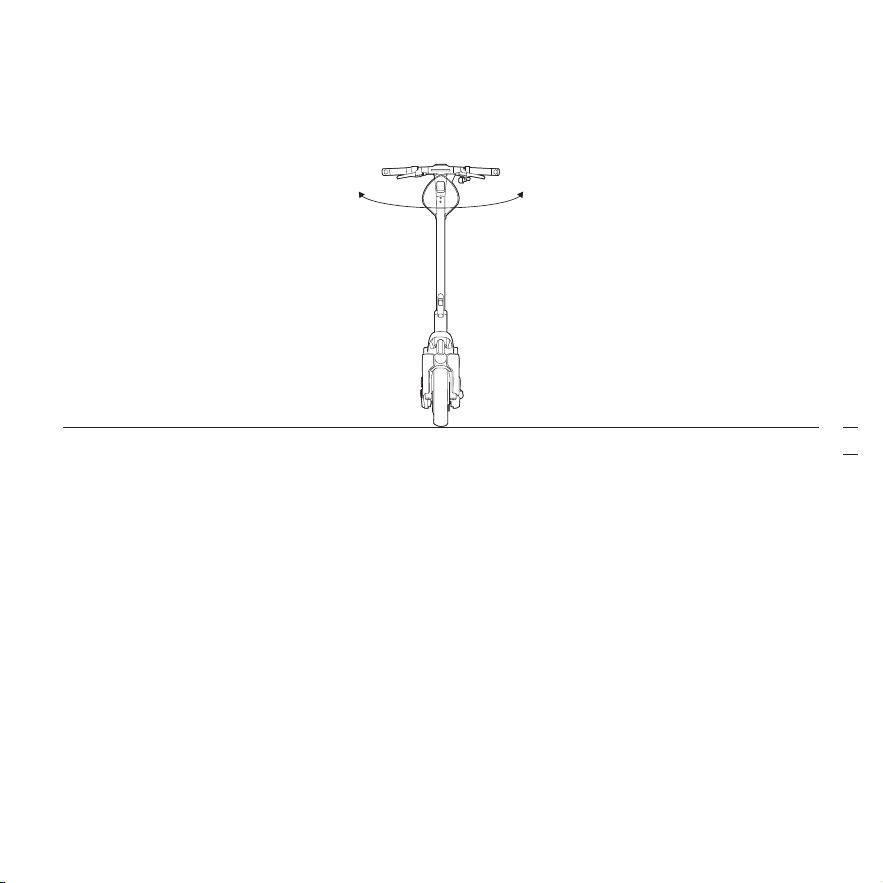
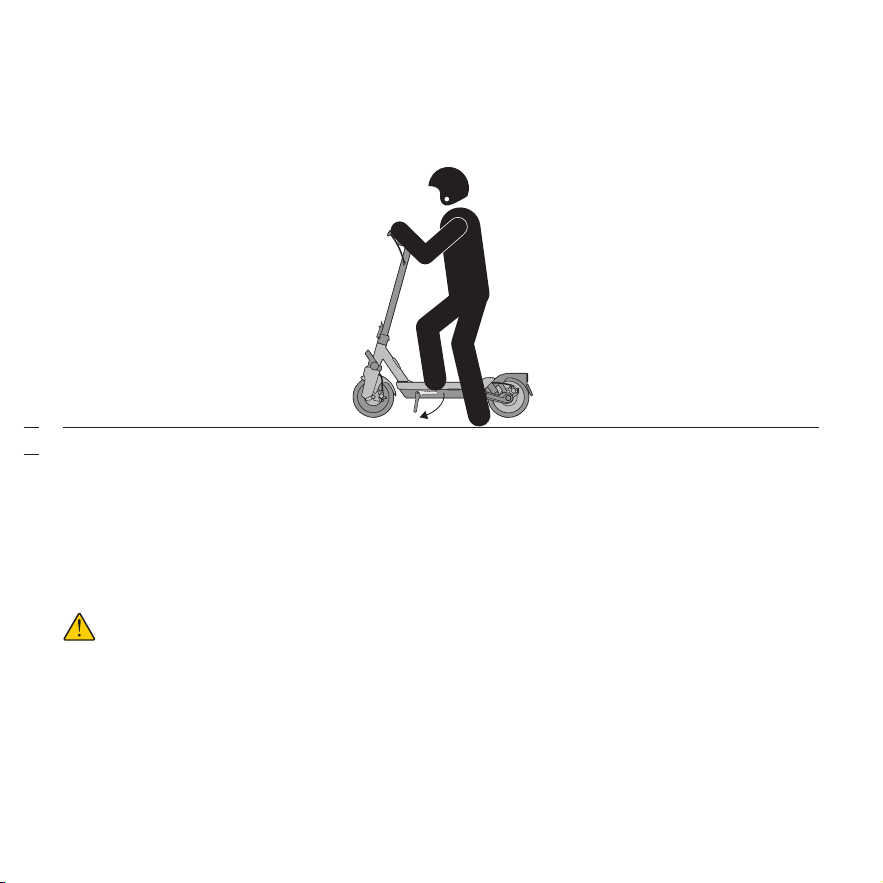
EN Put down the kickstand when you are getting off the eKickScooter.
FR Dépliez la béquille lorsque vous descendez du eKickScooter.
DE Klappen Sie den Ständer herunter, wenn Sie vom eKickScooter absteigen.
IT Abbassare il cavalletto scendendo dal eKickScooter.
ES Ponga la pata de apoyo cuando se baje del eKickScooter.
PL Po zejściu z hulajnogi eKickScooter rozłóż nóżkę.
NL Klap de standaard neer als u van de eKickScooter stapt.
PT Abaixe o suporte ao descer da eKickScooter.
EN Caution: Parking on a hardwood floor may cause irreversible stains or damage to the surface.
*Store your eKickScooter in a cool, dry place away from direct sunlight and extreme temperatures.
If left powered on and unattended for a long period, the eKickScooter may enter sleep mode. Refer to Activation
part for instructions on reactivating it from sleep mode.
FR Attention : le stationnement sur un plancher en bois peut provoquer des taches irréversibles ou des dommages à
la surface.
*Rangez votre eKickScooter dans un endroit frais et sec, à l'abri de la lumière directe du soleil et des températures
extrêmes.
Si l'eKickScooter est laissé sous tension et sans surveillance pendant une longue période, il peut entrer en mode
veille. Reportez-vous à la partie Activation pour obtenir des instructions sur la façon de le réactiver à partir du
mode veille.
● Park Vehicle / Stationner le véhicule / Fahrzeug parken / Parcheggiare il veicolo /
Estacionar vehículo / Zaparkuj pojazd / Parkeer voertuig /
DE Vorsicht: Das Parken auf einem Hartholzboden kann zu irreversiblen Flecken oder Schäden an der Oberfläche
führen.
*Lagern Sie Ihren eKickScooter an einem kühlen, trockenen Ort, geschützt vor direkter Sonneneinstrahlung und
extremen Temperaturen.
Wenn der eKickScooter über einen längeren Zeitraum eingeschaltet und unbeaufsichtigt bleibt, wechselt er
möglicherweise in den Ruhemodus. Anweisungen zum Reaktivieren aus dem Ruhemodus finden Sie im Abschnitt
Aktivierung.
IT Attenzione: parcheggiare su un pavimento in parquet può causare macchie irreversibili o danni alla superficie.
*Conservare l'eKickScooter in un luogo fresco e asciutto, al riparo dalla luce solare diretta e da temperature
estreme.
Se l'eKickScooter viene lasciato acceso e incustodito, potrebbe entrare in modalità di sospensione. Per istruzioni su
come riattivarlo dalla modalità di sospensione, fare riferimento alla sezione Attivazione.
ES Precaución: Aparcar sobre un suelo de madera puede provocar manchas irreversibles o daños en la superficie.
*Guarde su eKickScooter en un lugar fresco y seco, lejos de la luz solar directa y de temperaturas extremas.
Si se deja encendido y sin supervisión durante un período prolongado, el eKickScooter puede entrar en modo de
reposo. Consulte la parte Activación para obtener instrucciones sobre cómo reactivarlo desde el modo de reposo.
PL Przestroga: Ustawienie hulajnogi na drewnianej podłodze może spowodować nieusuwalne plamy lub uszkodzenie
powierzchni.
*Przechowuj hulajnogę eKickScooter w chłodnym i suchym miejscu, z dala od bezpośredniego światła słonecznego
i ekstremalnych temperatur.
Jeśli hulajnoga eKickScooter pozostanie włączona i bez nadzoru przez dłuższy czas, może przejść w tryb uśpienia.
Instrukcje dotyczące ponownej aktywacji urządzenia z trybu uśpienia można znaleźć w części Aktywacja.
NL Opgelet: Parkeren op een hardhouten vloer kan onherstelbare vlekken of schade aan het oppervlak veroorzaken.
*Stal uw eKickScooter op een koele, droge plaats, uit de buurt van direct zonlicht en extreme temperaturen. Als de
eKickScooter gedurende een langere periode ingeschakeld en onbeheerd wordt achtergelaten, kan deze naar de
stille modus overschakelen. Raadpleeg het deel Activering voor instructies over het opnieuw activeren vanuit de
stille modus.
PT Cuidado: Estacionar sobre um piso de madeira pode causar manchas irreversíveis ou danos à superfície.
*Guarde a sua eKickScooter num local fresco e seco, longeda luz solar direta e de temperaturas extremas. Se a
eKickScooter for deixada ligada e sem supervisão por um longo período, esta pode entrar no modo de suspensão.
Consulte a parte Ativação para obter instruções sobre como reativá-la do modo de suspensão.
01 02 03 04 05 06 07 08 09 10 11 12 13 14 15
16 17 18 19 20 21 22 23 24 25 26 27 28 29 30 31 32 33
34 35 36 37 38 39 40 41 42 43 44 45 46 47 48 49 50 51
52 53 54 55 56 57 58 59 60 61 62 63 64 65 66 67 68 69
70 71 72 73 74 75 76 77
78 79 80 81
82 83 84 85
86 87 88 89 90 91 92 93 94 95 96 97 98 99 100 101
102 103 104 105 106 107 108
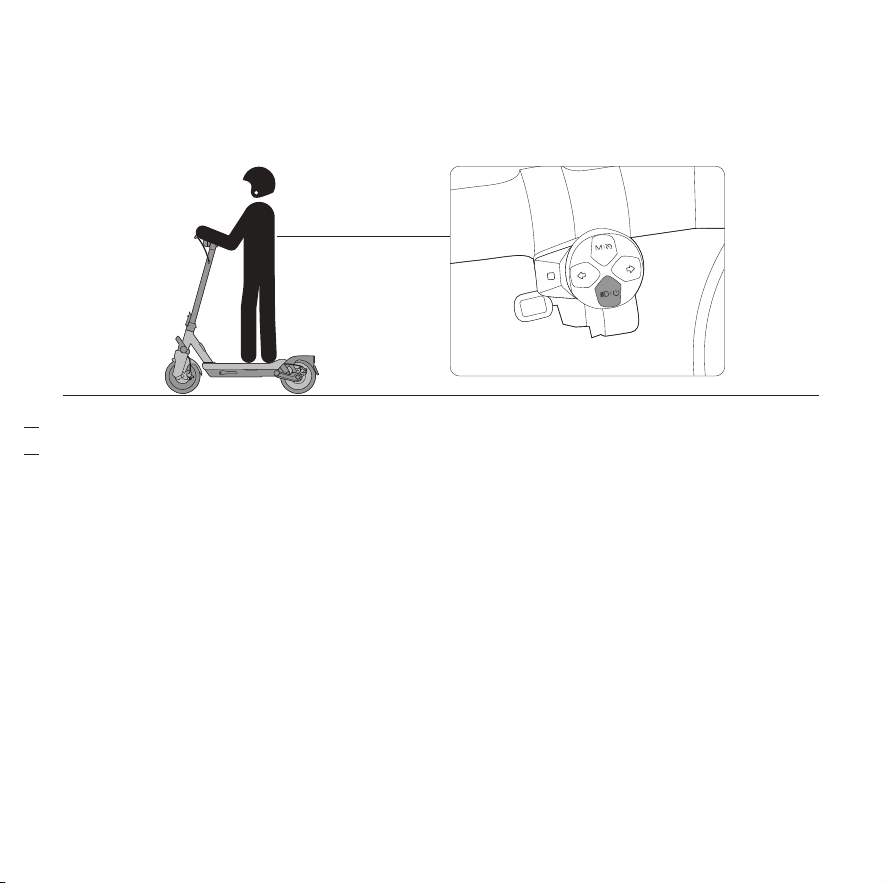
EN When eKickScooter is powered on, press power button to switch to Auto Headlight mode, then the headlight will
turn on/off in accordance with the ambient brightness.
*Auto Headlight can be disabled via Segway Mobility App.
FR Avec l’eKickScooter allumé, appuyez sur le bouton marche/arrêt pour passer en mode feux de route automatique :
le feu de route s’allumera ou s’éteindra en fonction de la luminosité ambiante.
Remarque : vous pouvez désactiver le feu de route automatique via l’application Segway Mobility.
DE Wenn der eKickScooter eingeschaltet ist, drücken Sie den Ein-/Aus-Schalter, um in den automatischen
Scheinwerfermodus zu wechseln. Anschließend wird der Scheinwerfer je nach Umgebungshelligkeit ein- und
ausgeschaltet.
Hinweis: Sie können den automatischen Scheinwerfer über die Segway Mobility-App deaktivieren.
IT Quando l'eKickScooter è acceso, premere il pulsante di accensione per passare alla modalità fanale anteriore
automatico; a quel punto, il fanale anteriore si accenderà/ spegnerà in base alla luminosità ambientale.
Nota: è possibile disabilitare il fanale anteriore automatico tramite l'app Segway Mobility.
ES Cuando el eKickScooter esté encendido, presione el botón de encendido para pasar al modo de faro automático y
el faro se encenderá o apagará dependiendo de la luminosidad ambiental.
Nota: Puede desactivar el faro automático a través de la aplicación Segway Mobility.
PL Po włączeniu hulajnogi eKickScooter naciśnij przycisk zasilania, aby przełączyć na tryb automatycznego światła
przedniego. Następnie światło będzie włączać się i wyłączać w zależności od jasności otoczenia.
*Automatyczne światło przednie można wyłączyć za pomocą aplikacji Segway Mobility.
NL Druk, als de eKickScooter is ingeschakeld, op de aan/uit�knop om over te schakelen naar de Modus automatische
koplamp, dan zal de koplamp aan/uit gaan overeenkomstig met de omgevingsverlichting.
*Automatische koplamp kan worden uitgeschakeld via de Segway Mobility-app.
PT Quando o eKickScooter estiver ligado, pressione o botão liga/desliga para mudar para o modo de farol automático
e, em seguida, o farol liga/desliga de acordo com o brilho ambiente.
*O farol automático pode ser desativado através da SegwayMobility.
● Auto Headlight / Feu de route automatique / Automatischen Scheinwerfer / Fanale
anteriore automatico / Faro automático / Automatyczne światło przednie /
Automatische koplamp / Farol Automático
WARNINGS / AVERTISSEMENTS / ACHTUNG / AVVERTEN�
ZE / ADVERTENCIAS / OSTRZEŻENIA / WAARSCHUWIN�
GEN / AVISOS
EN Always wear a helmet while riding.
FR Portez toujours un casque pendant la conduite.
DE Tragen Sie beim Fahren immer einen Helm.
IT Indossare sempre il casco durante la guida.
ES Lleve siempre puesto un casco para circular.
PL Podczas jazdy zawsze używaj kasku.
NL Draag altijd een helm tijdens het rijden.
PT Use sempre um capacete durante a condução.
EN DO NOT wear high heels when riding.
FR Ne portez PAS de talons hauts lorsque vous roulez.
DE Tragen Sie beim Fahren KEINE hohen Absätze.
IT NON indossare tacchi alti durante la guida.
ES NO use tacones altos cuando conduzca.
PL NIE wkładaj butów na wysokim obcasie na czas
jazdy.
NL Draag GEEN hoge hakken tijdens het rijden.
PT NÃO use saltos altos ao conduzir.
EN DO NOT overtake.
FR Ne doublez PAS.
DE Überholen Sie NICHT.
IT NON sorpassare.
ES NO adelante.
PL NIE wyprzedzaj.
NL NIET inhalen.
PT NÃO ultrapasse.
EN DO NOT carry any passengers.
FR Ne transportez PAS de passagers.
DE Befördern Sie KEINE Passagiere.
IT NON trasportare passeggeri.
ES NO lleve pasajeros.
PL NIE przewoź pasażerów.
NL Vervoer GEEN passagiers.
PT NÃO transporte passageiros.
01 02 03 04 05 06 07 08 09 10 11 12 13 14 15
16 17 18 19 20 21 22 23 24 25 26 27 28 29 30 31 32 33
34 35 36 37 38 39 40 41 42 43 44 45 46 47 48 49 50 51
52 53 54 55 56 57 58 59 60 61 62 63 64 65 66 67 68 69
70 71 72 73 74 75 76 77
78 79 80 81
82 83 84 85
86 87 88 89 90 91 92 93 94 95 96 97 98 99 100 101
102 103 104 105 106 107 108
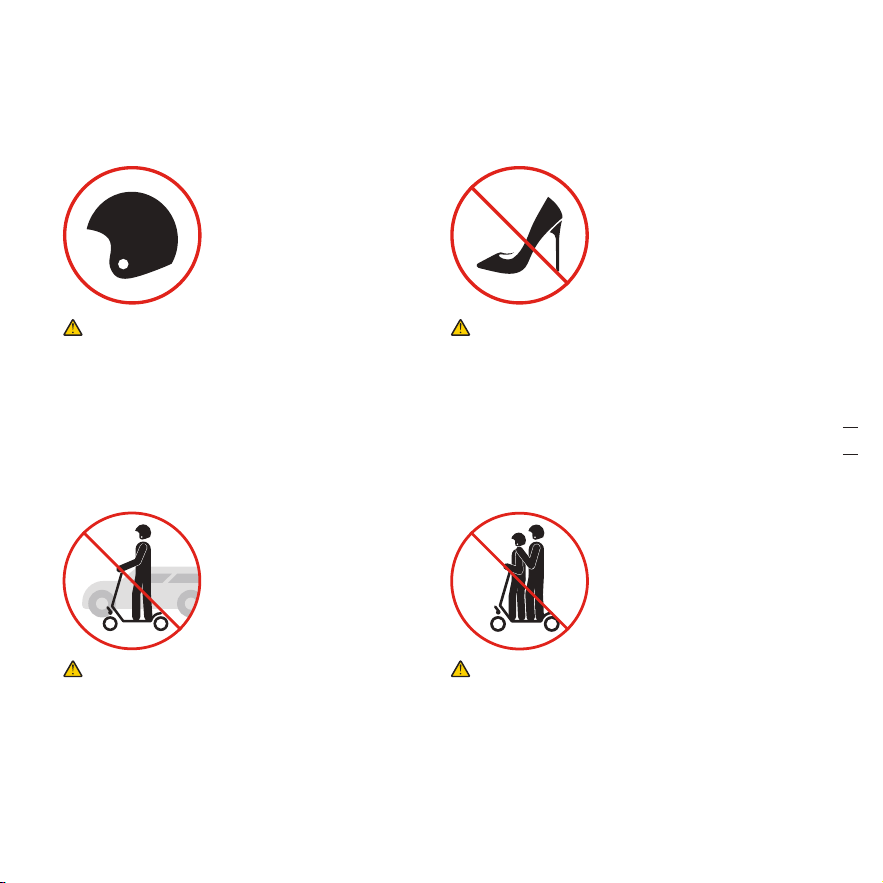
EN When eKickScooter is powered on, press power button to switch to Auto Headlight mode, then the headlight will
turn on/off in accordance with the ambient brightness.
*Auto Headlight can be disabled via Segway Mobility App.
FR Avec l’eKickScooter allumé, appuyez sur le bouton marche/arrêt pour passer en mode feux de route automatique :
le feu de route s’allumera ou s’éteindra en fonction de la luminosité ambiante.
Remarque : vous pouvez désactiver le feu de route automatique via l’application Segway Mobility.
DE Wenn der eKickScooter eingeschaltet ist, drücken Sie den Ein-/Aus-Schalter, um in den automatischen
Scheinwerfermodus zu wechseln. Anschließend wird der Scheinwerfer je nach Umgebungshelligkeit ein- und
ausgeschaltet.
Hinweis: Sie können den automatischen Scheinwerfer über die Segway Mobility-App deaktivieren.
IT Quando l'eKickScooter è acceso, premere il pulsante di accensione per passare alla modalità fanale anteriore
automatico; a quel punto, il fanale anteriore si accenderà/ spegnerà in base alla luminosità ambientale.
Nota: è possibile disabilitare il fanale anteriore automatico tramite l'app Segway Mobility.
ES Cuando el eKickScooter esté encendido, presione el botón de encendido para pasar al modo de faro automático y
el faro se encenderá o apagará dependiendo de la luminosidad ambiental.
Nota: Puede desactivar el faro automático a través de la aplicación Segway Mobility.
PL Po włączeniu hulajnogi eKickScooter naciśnij przycisk zasilania, aby przełączyć na tryb automatycznego światła
przedniego. Następnie światło będzie włączać się i wyłączać w zależności od jasności otoczenia.
*Automatyczne światło przednie można wyłączyć za pomocą aplikacji Segway Mobility.
NL Druk, als de eKickScooter is ingeschakeld, op de aan/uit�knop om over te schakelen naar de Modus automatische
koplamp, dan zal de koplamp aan/uit gaan overeenkomstig met de omgevingsverlichting.
*Automatische koplamp kan worden uitgeschakeld via de Segway Mobility-app.
PT Quando o eKickScooter estiver ligado, pressione o botão liga/desliga para mudar para o modo de farol automático
e, em seguida, o farol liga/desliga de acordo com o brilho ambiente.
*O farol automático pode ser desativado através da SegwayMobility.
● Auto Headlight / Feu de route automatique / Automatischen Scheinwerfer / Fanale
anteriore automatico / Faro automático / Automatyczne światło przednie /
Automatische koplamp / Farol Automático
WARNINGS / AVERTISSEMENTS / ACHTUNG / AVVERTEN�
ZE / ADVERTENCIAS / OSTRZEŻENIA / WAARSCHUWIN�
GEN / AVISOS
EN Always wear a helmet while riding.
FR Portez toujours un casque pendant la conduite.
DE Tragen Sie beim Fahren immer einen Helm.
IT Indossare sempre il casco durante la guida.
ES Lleve siempre puesto un casco para circular.
PL Podczas jazdy zawsze używaj kasku.
NL Draag altijd een helm tijdens het rijden.
PT Use sempre um capacete durante a condução.
EN DO NOT wear high heels when riding.
FR Ne portez PAS de talons hauts lorsque vous roulez.
DE Tragen Sie beim Fahren KEINE hohen Absätze.
IT NON indossare tacchi alti durante la guida.
ES NO use tacones altos cuando conduzca.
PL NIE wkładaj butów na wysokim obcasie na czas
jazdy.
NL Draag GEEN hoge hakken tijdens het rijden.
PT NÃO use saltos altos ao conduzir.
EN DO NOT overtake.
FR Ne doublez PAS.
DE Überholen Sie NICHT.
IT NON sorpassare.
ES NO adelante.
PL NIE wyprzedzaj.
NL NIET inhalen.
PT NÃO ultrapasse.
EN DO NOT carry any passengers.
FR Ne transportez PAS de passagers.
DE Befördern Sie KEINE Passagiere.
IT NON trasportare passeggeri.
ES NO lleve pasajeros.
PL NIE przewoź pasażerów.
NL Vervoer GEEN passagiers.
PT NÃO transporte passageiros.
01 02 03 04 05 06 07 08 09 10 11 12 13 14 15
16 17 18 19 20 21 22 23 24 25 26 27 28 29 30 31 32 33
34 35 36 37 38 39 40 41 42 43 44 45 46 47 48 49 50 51
52 53 54 55 56 57 58 59 60 61 62 63 64 65 66 67 68 69
70 71 72 73 74 75 76 77
78 79 80 81
82 83 84 85
86 87 88 89 90 91 92 93 94 95 96 97 98 99 100 101
102 103 104 105 106 107 108
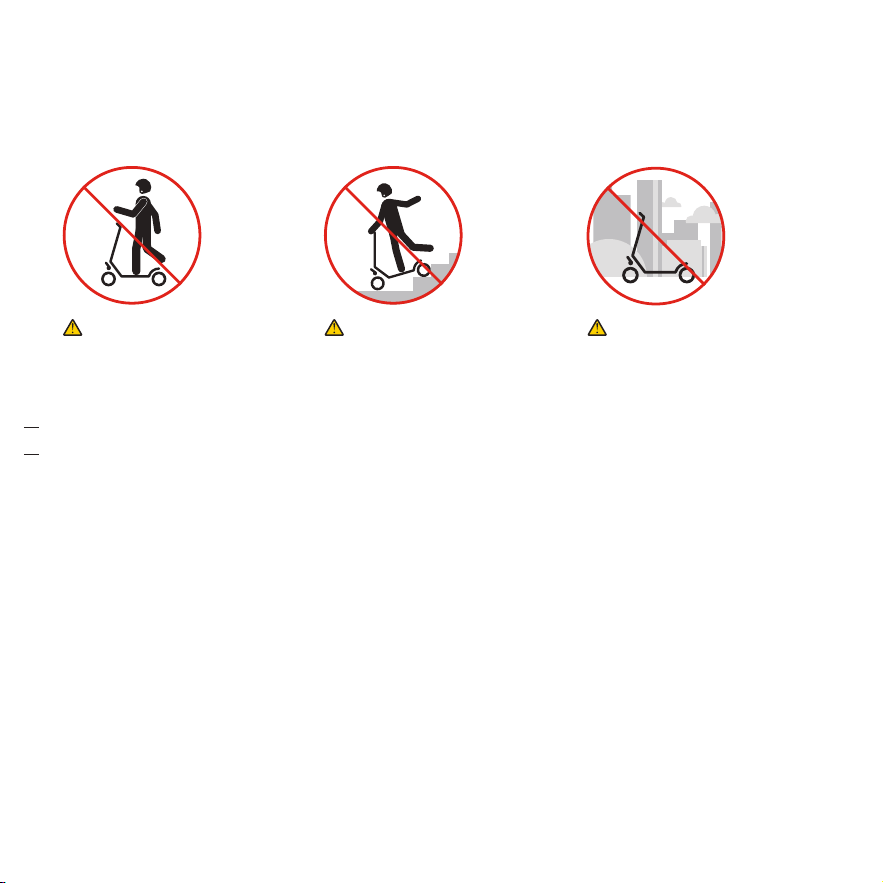
EN DO NOT ride the scooter with
only one foot or one hand.
FR Ne conduisez PAS la
trottinette avec un seul pied
ou une seule main.
DE Fahren Sie den Roller NICHT
mit nur einem Fuß oder einer
Hand.
IT NON guidare lo scooter con
un solo piede o una sola
mano.
ES NO conduzca el patinete con
un solo pie o una mano.
PL NIE jedź, stojąc na jednej
nodze lub trzymając
kierownicę jedną ręką.
NL Rijd NIET op de scooter met
slechts één voet of één hand.
PT NÃO ande na scooter com
apenas um pé ou uma mão.
EN DO NOT ride up and down
stairs or jump over obstacles.
FR NE PAS monter ou descendre
des escaliers et ne pas sauter
par-dessus les obstacles.
DE Fahren Sie NICHT Treppen
hoch und runter und springen
Sie NICHT über Hindernisse.
IT NON utilizzare lo scooter per
salire o scendere le scale, né
tantomeno per superare
ostacoli.
ES NO suba ni baje escaleras ni
salte obstáculos.
PL NIE wjeżdżaj i nie zjeżdżaj po
scho�dach ani nie przeskakuj
przeszkód.
NL Rijd GEEN trappen op en af of
spring niet over obstakels.
PT NÃO suba nem desça escadas
nem salte obstáculos.
EN DO NOT park in the open
space or outdoors for a long
time.
FR Ne stationnez PAS en espace
ouvert ou à l’extérieur pendant
une longue période.
DE Stellen Sie das Fahrzeug
NICHT für längere Zeit im
Freien ab.
IT NON parcheggiare all'aria
aperta o in aree esterne per
lungo tempo.
ES NO estacione al aire libre
durante mucho tiempo.
PL NIE pozostawiaj hulajnogi na
długi czas na otwartej
przestrzeni lub na zewnątrz.
NL Parkeer NIET langdurig in de
open lucht of buiten.
PT NÃO estacione em espaço
aberto ou ao ar livre por muito
tempo.
EN Avoid contacting obstacles
with the tire/wheel.
FR Évitez de toucher les obstacles
avec le pneu ou la roue.
DE Vermeiden Sie es, mit dem
Reifen/ Rad Hindernisse zu
berühren.
IT Evitare di urtare eventuali
ostacoli con gli pneumatici/le
ruote.
ES Evite tocar obstáculos con el
neumático/rueda.
PL Unikaj kontaktu opony/koła z
prze�szkodami.
NL Vermijd contact van de
band/het wiel met obstakels.
PT Evite entrar em contacto
comobstáculos com o
pneu/roda.
EN Watch your head when passing
through doorways.
FR Faites attention à votre tête en
passant les portes.
DE Beim Durchfahren von
Türdurch�gängen sollten Sie
auf Ihren Kopf achten.
IT Prestare attenzione alla testa
nell'attraversare porte.
ES Tenga cuidado con la cabeza al
atravesar puertas.
PL Uważaj na głowę podczas
przejeż-dżania przez otwory
drzwiowe.
NL B eLet op uw hoofd als u door
deuropeningen gaat.
PT Cuidado com a sua cabeça ao
passar pelas portas.
EN DO NOT twist / press the
throttle while pushing vehicle.
FR NE tournez/appuyez PAS sur
l’accé-lérateur tout en
poussant le véhicule.
DE Beim Schieben des Fahrzeugs
NICHT am Gasgriff
drehen/drücken.
IT NON ruotare/premere
l'acceleratore mentre si spinge
il veicolo.
ES NO gire ni presione el
acelerador mientras está
empujando el vehículo.
PL NIE WOLNO obracać/naciskać
przepustnicy podczas pchania
pojazdu.
NL Draai / druk NIET op het
gaspedaal terwijl u het
voertuig duwt.
PT NÃO torne / pressione o
acelerador enquanto empurra
o veículo.
01 02 03 04 05 06 07 08 09 10 11 12 13 14 15
16 17 18 19 20 21 22 23 24 25 26 27 28 29 30 31 32 33
34 35 36 37 38 39 40 41 42 43 44 45 46 47 48 49 50 51
52 53 54 55 56 57 58 59 60 61 62 63 64 65 66 67 68 69
70 71 72 73 74 75 76 77
78 79 80 81
82 83 84 85
86 87 88 89 90 91 92 93 94 95 96 97 98 99 100 101
102 103 104 105 106 107 108
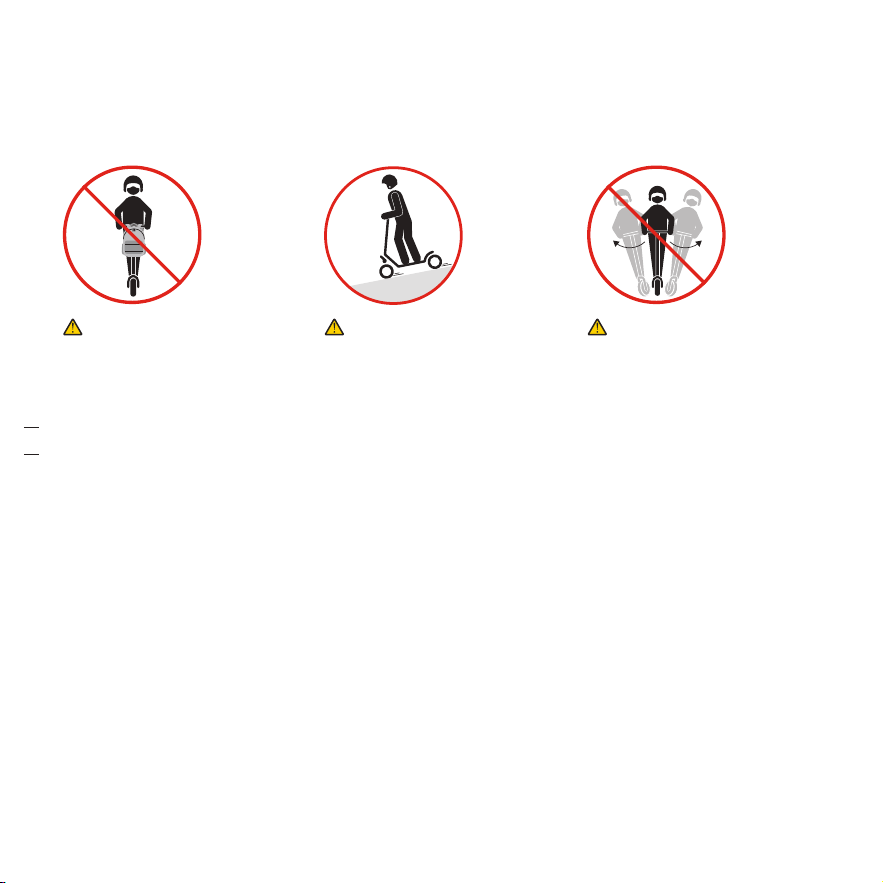
EN DO NOT carry heavy objects
on the handlebar.
FR Ne transportez PAS d’objets
lourds sur le guidon.
DE Befördern Sie KEINE schweren
Gegenstände am Lenker.
IT NON trasportare oggetti
pesanti sul manubrio.
ES NO transporte objetos
pesados en el manillar.
PL NIE przewoź ciężkich
przedmiotów na kierownicy.
NL Draag GEEN zware
voorwerpen op het stuur.
PT NÃO carregue objetos
pesados no guiador.
EN Control your speed when
going downhill.
FR Contrôlez votre vitesse en des�
cente.
DE Achten Sie auf Ihre Geschwin�
digkeit, wenn Sie bergab
fahren.
IT Controllare la velocità
guidando in discesa.
ES Controle la velocidad cuando
vaya cuesta abajo.
PL Kontroluj prędkość podczas
zjeż-dżania w dół.
NL Beheers uw snelheid als u
bergaf rijdt.
PT Controle a sua velocidade ao
descer.
EN DO NOT rotate the handle
violently while driving at high
speed.
FR NE faites PAS pivoter
violemment le guidon lorsque
vous conduisez à grande
vitesse.
DE Drehen Sie den Griff NICHT
heftig, während Sie mit hoher
Geschwindig�keit fahren.
IT NON ruotare la maniglia con
forza eccessiva durante la
guida ad alta velo�cità.
ES NO gire el manillar de forma
agre�siva mientras conduce a
alta velocidad.
PL NIE skręcaj gwałtownie
podczas jazdy z dużą
prędkością.
NL Draai de hendel NIET met
geweld terwijl u met hoge
snelheid rijdt.
PT NÃO gire o guiador com
violência enquanto conduz a
alta velocidade.
EN Do NOT keep your feet
on the rear mudguard.
FR NE gardez PAS vos pieds
sur le garde-boue
arrière.
DE Lassen Sie Ihre Füße
nicht auf dem hinteren
Kotflügel.
IT NON tenere i piedi sul
parafango posteriore.
ES NO apoye los pies en el
guardabar�ros trasero.
PL NIE opieraj stóp na
błotniku tylnym.
NL Houd uw voeten NIET op
het ach�terspatbord.
PT NÃO mantenha os pés
sobre o guarda-lamas
traseiro.
EN DO NOT use a mobile
phone or wear earphones
when riding the
eKickScooter.
FR N’utilisez PAS de téléphone
portable et ne portez pas
d’écouteurs lorsque vous
conduisez le eKickScoo�
ter.
DE Benutzen Sie während der
Fahrt mit dem
eKickScooter KEIN
Mobiltele�fon und tragen
Sie keine Kopfhörer.
IT NON utilizzare telefoni
cellulari o indossare
auricolari alla guida dell'eKi�
ckScooter.
ES NO utilice un teléfono
móvil ni auriculares al
conducir el eKickScooter.
PL NIE używaj telefonu
komórkowego ani
słuchawek podczas jazdy
na hulaj�nodze
eKickScooter.
NL Gebruik GEEN mobiele
telefoon en draag GEEN
oortelefoons tijdens het
rijden op de eKickScooter.
PT NÃO use um telemóvel
nem use auriculares ao
conduzir a eKickScooter.
EN Keep your speed between
3.1–6.2mph (5–10 km/h) when you
ride through speed bumps or other
uneven surfaces.
FR Maintenez votre vitesse entre 5 et
10 km/h (3,1 et 6,2 mph) lorsque
vous passez sur des ralentisseurs
ou d’autres surfaces inégales.
DE Halten Sie eine Geschwindigkeit
zwischen 5 und 10 km/h (3,1–6,2
mph) bei, wenn Sie über Schwellen
zur Ge�schwindigkeitsbegrenzung
oder andere unebene Oberflächen
fahren.
IT Mantenere una velocità compresa
tra 5 e 10 km/h (3,1–6,2 mph)
quando si attraversano dossi o altre
superfici irregolari.
ES Mantenga su velocidad entre 5 y 10
km/h (entre 3,1 y 6,2 mph) cuando
pase por badenes u otras
superficies irregulares.
PL Podczas pokonywania progów
zwalniających lub innych
nierówności utrzymuj prędkość w
zakresie 5–10 km/h (3,1–6,2 mph).
NL Houd de snelheid tussen 5-10 km/u
(3,1-6,2 mph) als u over
verkeersdrem�pels of andere
ongelijke oppervlakken rijdt.
PT Mantenha a sua velocidade entre 5
a 10 km/h (3,1 a 6,2 mph) ao passar
por lombas ou outras superfícies
irregula�res.
01 02 03 04 05 06 07 08 09 10 11 12 13 14 15
16 17 18 19 20 21 22 23 24 25 26 27 28 29 30 31 32 33
34 35 36 37 38 39 40 41 42 43 44 45 46 47 48 49 50 51
52 53 54 55 56 57 58 59 60 61 62 63 64 65 66 67 68 69
70 71 72 73 74 75 76 77
78 79 80 81
82 83 84 85
86 87 88 89 90 91 92 93 94 95 96 97 98 99 100 101
102 103 104 105 106 107 108
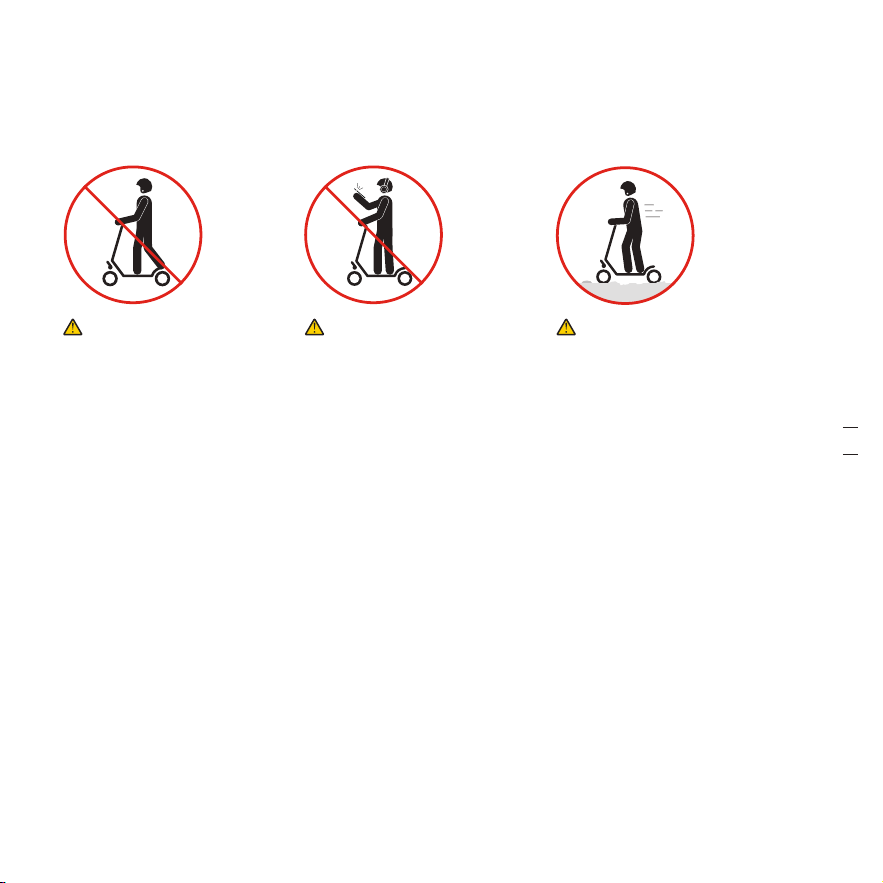
EN DO NOT carry heavy objects
on the handlebar.
FR Ne transportez PAS d’objets
lourds sur le guidon.
DE Befördern Sie KEINE schweren
Gegenstände am Lenker.
IT NON trasportare oggetti
pesanti sul manubrio.
ES NO transporte objetos
pesados en el manillar.
PL NIE przewoź ciężkich
przedmiotów na kierownicy.
NL Draag GEEN zware
voorwerpen op het stuur.
PT NÃO carregue objetos
pesados no guiador.
EN Control your speed when
going downhill.
FR Contrôlez votre vitesse en des�
cente.
DE Achten Sie auf Ihre Geschwin�
digkeit, wenn Sie bergab
fahren.
IT Controllare la velocità
guidando in discesa.
ES Controle la velocidad cuando
vaya cuesta abajo.
PL Kontroluj prędkość podczas
zjeż-dżania w dół.
NL Beheers uw snelheid als u
bergaf rijdt.
PT Controle a sua velocidade ao
descer.
EN DO NOT rotate the handle
violently while driving at high
speed.
FR NE faites PAS pivoter
violemment le guidon lorsque
vous conduisez à grande
vitesse.
DE Drehen Sie den Griff NICHT
heftig, während Sie mit hoher
Geschwindig�keit fahren.
IT NON ruotare la maniglia con
forza eccessiva durante la
guida ad alta velo�cità.
ES NO gire el manillar de forma
agre�siva mientras conduce a
alta velocidad.
PL NIE skręcaj gwałtownie
podczas jazdy z dużą
prędkością.
NL Draai de hendel NIET met
geweld terwijl u met hoge
snelheid rijdt.
PT NÃO gire o guiador com
violência enquanto conduz a
alta velocidade.
EN Do NOT keep your feet
on the rear mudguard.
FR NE gardez PAS vos pieds
sur le garde-boue
arrière.
DE Lassen Sie Ihre Füße
nicht auf dem hinteren
Kotflügel.
IT NON tenere i piedi sul
parafango posteriore.
ES NO apoye los pies en el
guardabar�ros trasero.
PL NIE opieraj stóp na
błotniku tylnym.
NL Houd uw voeten NIET op
het ach�terspatbord.
PT NÃO mantenha os pés
sobre o guarda-lamas
traseiro.
EN DO NOT use a mobile
phone or wear earphones
when riding the
eKickScooter.
FR N’utilisez PAS de téléphone
portable et ne portez pas
d’écouteurs lorsque vous
conduisez le eKickScoo�
ter.
DE Benutzen Sie während der
Fahrt mit dem
eKickScooter KEIN
Mobiltele�fon und tragen
Sie keine Kopfhörer.
IT NON utilizzare telefoni
cellulari o indossare
auricolari alla guida dell'eKi�
ckScooter.
ES NO utilice un teléfono
móvil ni auriculares al
conducir el eKickScooter.
PL NIE używaj telefonu
komórkowego ani
słuchawek podczas jazdy
na hulaj�nodze
eKickScooter.
NL Gebruik GEEN mobiele
telefoon en draag GEEN
oortelefoons tijdens het
rijden op de eKickScooter.
PT NÃO use um telemóvel
nem use auriculares ao
conduzir a eKickScooter.
EN Keep your speed between
3.1–6.2mph (5–10 km/h) when you
ride through speed bumps or other
uneven surfaces.
FR Maintenez votre vitesse entre 5 et
10 km/h (3,1 et 6,2 mph) lorsque
vous passez sur des ralentisseurs
ou d’autres surfaces inégales.
DE Halten Sie eine Geschwindigkeit
zwischen 5 und 10 km/h (3,1–6,2
mph) bei, wenn Sie über Schwellen
zur Ge�schwindigkeitsbegrenzung
oder andere unebene Oberflächen
fahren.
IT Mantenere una velocità compresa
tra 5 e 10 km/h (3,1–6,2 mph)
quando si attraversano dossi o altre
superfici irregolari.
ES Mantenga su velocidad entre 5 y 10
km/h (entre 3,1 y 6,2 mph) cuando
pase por badenes u otras
superficies irregulares.
PL Podczas pokonywania progów
zwalniających lub innych
nierówności utrzymuj prędkość w
zakresie 5–10 km/h (3,1–6,2 mph).
NL Houd de snelheid tussen 5-10 km/u
(3,1-6,2 mph) als u over
verkeersdrem�pels of andere
ongelijke oppervlakken rijdt.
PT Mantenha a sua velocidade entre 5
a 10 km/h (3,1 a 6,2 mph) ao passar
por lombas ou outras superfícies
irregula�res.
01 02 03 04 05 06 07 08 09 10 11 12 13 14 15
16 17 18 19 20 21 22 23 24 25 26 27 28 29 30 31 32 33
34 35 36 37 38 39 40 41 42 43 44 45 46 47 48 49 50 51
52 53 54 55 56 57 58 59 60 61 62 63 64 65 66 67 68 69
70 71 72 73 74 75 76 77
78 79 80 81
82 83 84 85
86 87 88 89 90 91 92 93 94 95 96 97 98 99 100 101
102 103 104 105 106 107 108
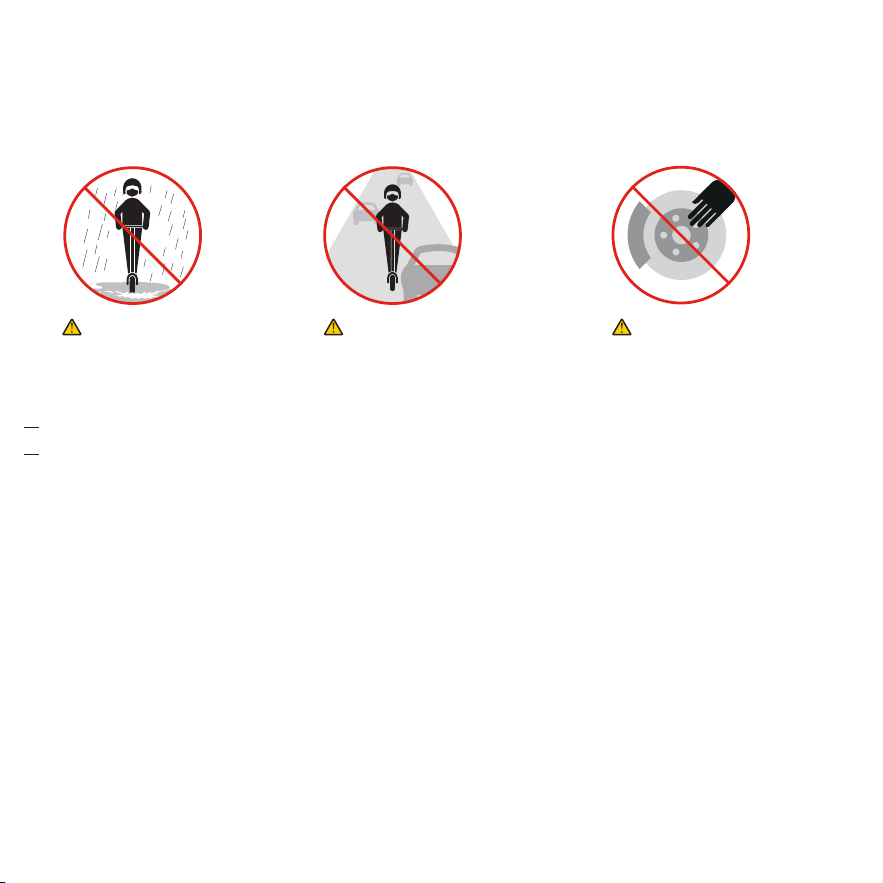
EN DO NOT ride the scooter in
the rain. DO NOT ride through
puddles or other obstacles.
FR NE conduisez PAS le scooter
sous la pluie. NE traversez PAS
de flaques d’eau ni d’autres
obstacles.
DE Fahren Sie den Roller NICHT
im Regen. Fahren Sie NICHT
durch Pfüt�zen oder andere
Hindernisse.
IT NON guidare lo scooter sotto
la pioggia. NON attraversare
pozzanghe�re o altri ostacoli.
ES NO conduzca el patinete
cuando llueva. NO pase por
charcos u otros obstáculos.
PL NIE używaj hulajnogi w
deszczu. NIE przejeżdżaj przez
kałuże ani inne przeszkody.
NL Rijd NIET op de scooter in de
re�gen. Rijd NIET door plassen
of andere obstakels.
PT NÃO ande de scooter na
chuva. NÃO atravesse poças
ou outros obstá-culos.
EN DO NOT ride on public roads,
motorways, or highways unless the
local laws or regulations have
exceptions.
FR Ne roulez PAS sur les routes
publiques, les autoroutes ou les
voies rapides, à moins que les lois ou
les règlements locaux ne prévoient
des exceptions.
DE Fahren Sie NICHT auf öffentlichen
Straßen, Autobahnen oder Landstra-
ßen, es sei denn, die örtlichen
Gesetze oder Vorschriften sehen
Ausnahmen vor.
IT NON guidare su strade pubbliche,
superstrade o autostrade, se non nei
casi in cui le leggi o le normative
locali prevedono eccezioni.
ES NO conduzca en carreteras, auto�
pistas o autovías a menos que las
leyes o normativas locales lo
permitan.
PL NIE jeźdź po drogach publicznych,
drogach szybkiego ruchu ani
autostra�dach, chyba że lokalne
prawo na to zezwala.
NL Rijd NIET op openbare wegen,
autowegen of autosnelwegen, tenzij
de plaatselijke wet- en regelgeving
uitzonderingen toestaat.
PT NÃO ande em vias públicas, es�
tradas ou auto-estradas, a menos
que as leis ou regulamentos locais
tenham exceções.
EN DO NOT touch the brake
after riding.
FR NE touchez PAS le frein
après avoir roulé.
DE Berühren Sie die Bremse
nach dem Fahren NICHT.
IT NON toccare il freno dopo
la guida.
ES NO toque el freno después
de conducir.
PL NIE dotykaj hamulca po
jeździe.
NL Raak de rem NIET aan na
het rijden.
PT NÃO toque no travão
depois de conduzir.
EN DO NOT touch the hub
motor after riding because
it can get hot.
FR Ne touchez PAS le moyeu
moteur après avoir roulé
car il peut devenir chaud.
DE Berühren Sie den
Radnabenmotor nach dem
Fahren NICHT, da er heiß
werden kann.
IT NON toccare il motore a
mozzo dopo la guida
perché potrebbe essersi
surriscaldato.
ES NO toque el motor de
rueda después de
conducir, ya que podría
estar caliente.
PL NIE dotykaj silnika piasty
po jeź-dzie, ponieważ
może być gorący.
NL Raak de naafmotor NIET
aan na het rijden omdat
deze warm kan worden.
PT NÃO toque no motor
depois de conduzir, pois
este pode ficar quente.
EN Avoid potholes.
FR Évitez les nids-de-poule.
DE Vermeiden Sie Schlaglöcher.
IT Evitare le buche.
ES Evite los baches.
PL Unikaj dziur w drogach.
NL Vermijd kuilen in de weg.
PT Evite buracos.
EN SECURE your scooter properly during
transportation to avoid battery
damage from collision.
FR FIXEZ correctement votre scooter
pendant le transport pour éviter
d'endommager la batterie en cas de
collision.
DE SICHERN Sie Ihren Roller während
des Transports ordnungsgemäß, um
eine Beschädigung des Akkus durch
Stöße zu vermeiden.
IT FISSARE correttamente lo scooter
durante il trasporto per evitare danni
alla batteria dovuti a collisioni.
ES ASEGURE su patinete correctamente
durante el transporte para evitar
daños a la batería debido a una
colisión.
PL ZABEZPIECZ hulajnogę odpowiednio
podczas transportu, aby uniknąć
uszkodzenia akumulatora w wyniku
uderzenia.
NL Maak uw scooter STEVIG VAST
tijdens transport om schade aan de
accu door stoten te voorkomen.
PT SEGURE a sua scooter corretamente
durante o transporte para evitar
danos à bateria em caso de colisão.
01 02 03 04 05 06 07 08 09 10 11 12 13 14 15
16 17 18 19 20 21 22 23 24 25 26 27 28 29 30 31 32 33
34 35 36 37 38 39 40 41 42 43 44 45 46 47 48 49 50 51
52 53 54 55 56 57 58 59 60 61 62 63 64 65 66 67 68 69
70 71 72 73 74 75 76 77
78 79
80 81
82 83 84 85
86 87 88 89 90 91 92 93 94 95 96 97 98 99 100 101
102 103 104 105 106 107 108
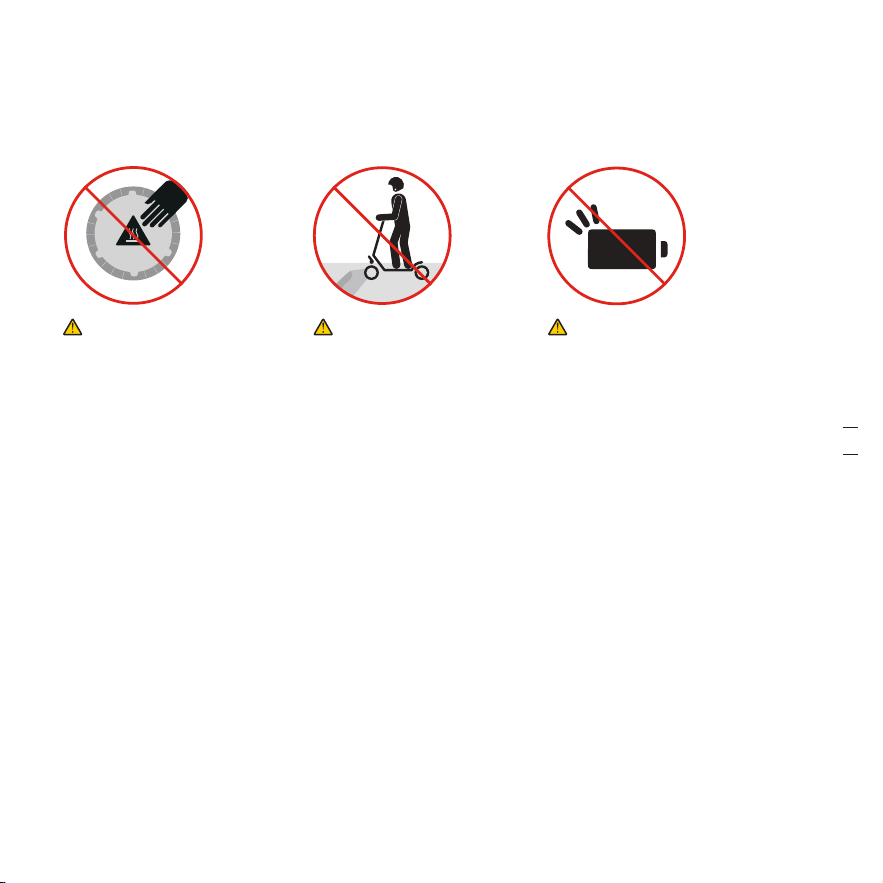
EN DO NOT ride the scooter in
the rain. DO NOT ride through
puddles or other obstacles.
FR NE conduisez PAS le scooter
sous la pluie. NE traversez PAS
de flaques d’eau ni d’autres
obstacles.
DE Fahren Sie den Roller NICHT
im Regen. Fahren Sie NICHT
durch Pfüt�zen oder andere
Hindernisse.
IT NON guidare lo scooter sotto
la pioggia. NON attraversare
pozzanghe�re o altri ostacoli.
ES NO conduzca el patinete
cuando llueva. NO pase por
charcos u otros obstáculos.
PL NIE używaj hulajnogi w
deszczu. NIE przejeżdżaj przez
kałuże ani inne przeszkody.
NL Rijd NIET op de scooter in de
re�gen. Rijd NIET door plassen
of andere obstakels.
PT NÃO ande de scooter na
chuva. NÃO atravesse poças
ou outros obstá-culos.
EN DO NOT ride on public roads,
motorways, or highways unless the
local laws or regulations have
exceptions.
FR Ne roulez PAS sur les routes
publiques, les autoroutes ou les
voies rapides, à moins que les lois ou
les règlements locaux ne prévoient
des exceptions.
DE Fahren Sie NICHT auf öffentlichen
Straßen, Autobahnen oder Landstra-
ßen, es sei denn, die örtlichen
Gesetze oder Vorschriften sehen
Ausnahmen vor.
IT NON guidare su strade pubbliche,
superstrade o autostrade, se non nei
casi in cui le leggi o le normative
locali prevedono eccezioni.
ES NO conduzca en carreteras, auto�
pistas o autovías a menos que las
leyes o normativas locales lo
permitan.
PL NIE jeźdź po drogach publicznych,
drogach szybkiego ruchu ani
autostra�dach, chyba że lokalne
prawo na to zezwala.
NL Rijd NIET op openbare wegen,
autowegen of autosnelwegen, tenzij
de plaatselijke wet- en regelgeving
uitzonderingen toestaat.
PT NÃO ande em vias públicas, es�
tradas ou auto-estradas, a menos
que as leis ou regulamentos locais
tenham exceções.
EN DO NOT touch the brake
after riding.
FR NE touchez PAS le frein
après avoir roulé.
DE Berühren Sie die Bremse
nach dem Fahren NICHT.
IT NON toccare il freno dopo
la guida.
ES NO toque el freno después
de conducir.
PL NIE dotykaj hamulca po
jeździe.
NL Raak de rem NIET aan na
het rijden.
PT NÃO toque no travão
depois de conduzir.
EN DO NOT touch the hub
motor after riding because
it can get hot.
FR Ne touchez PAS le moyeu
moteur après avoir roulé
car il peut devenir chaud.
DE Berühren Sie den
Radnabenmotor nach dem
Fahren NICHT, da er heiß
werden kann.
IT NON toccare il motore a
mozzo dopo la guida
perché potrebbe essersi
surriscaldato.
ES NO toque el motor de
rueda después de
conducir, ya que podría
estar caliente.
PL NIE dotykaj silnika piasty
po jeź-dzie, ponieważ
może być gorący.
NL Raak de naafmotor NIET
aan na het rijden omdat
deze warm kan worden.
PT NÃO toque no motor
depois de conduzir, pois
este pode ficar quente.
EN Avoid potholes.
FR Évitez les nids-de-poule.
DE Vermeiden Sie Schlaglöcher.
IT Evitare le buche.
ES Evite los baches.
PL Unikaj dziur w drogach.
NL Vermijd kuilen in de weg.
PT Evite buracos.
EN SECURE your scooter properly during
transportation to avoid battery
damage from collision.
FR FIXEZ correctement votre scooter
pendant le transport pour éviter
d'endommager la batterie en cas de
collision.
DE SICHERN Sie Ihren Roller während
des Transports ordnungsgemäß, um
eine Beschädigung des Akkus durch
Stöße zu vermeiden.
IT FISSARE correttamente lo scooter
durante il trasporto per evitare danni
alla batteria dovuti a collisioni.
ES ASEGURE su patinete correctamente
durante el transporte para evitar
daños a la batería debido a una
colisión.
PL ZABEZPIECZ hulajnogę odpowiednio
podczas transportu, aby uniknąć
uszkodzenia akumulatora w wyniku
uderzenia.
NL Maak uw scooter STEVIG VAST
tijdens transport om schade aan de
accu door stoten te voorkomen.
PT SEGURE a sua scooter corretamente
durante o transporte para evitar
danos à bateria em caso de colisão.
01 02 03 04 05 06 07 08 09 10 11 12 13 14 15
16 17 18 19 20 21 22 23 24 25 26 27 28 29 30 31 32 33
34 35 36 37 38 39 40 41 42 43 44 45 46 47 48 49 50 51
52 53 54 55 56 57 58 59 60 61 62 63 64 65 66 67 68 69
70 71 72 73 74 75 76 77
78 79
80 81
82 83 84 85
86 87 88 89 90 91 92 93 94 95 96 97 98 99 100 101
102 103 104 105 106 107 108

EN Note: Operate after powering off.
Warning: If the locking device becomes loose or cannot be locked properly, stop using the scooter immediately and
contact customer service for assistance. Do not continue riding until the issue is resolved to ensure your safety
FR Note: Opérez après avoir éteint.
Attention: Si le dispositif de verrouillage devient lâche ou ne peut pas être correctement verrouillé, arrêtez
immédiatement d'utiliser la trottinette et contactez le service clientèle pour obtenir de l'aide. Ne continuez pas à
rouler tant que le problème n'est pas résolu pour garantir votre sécurité.
DE Hinweis: Bedienen Sie nach dem Ausschalten.
Warnung: Wenn die Verriegelungsvorrichtung lose wird oder nicht ordnungsgemäß verriegelt werden kann,
beenden Sie sofort die Benutzung des Rollers und wenden Sie sich an den Kundendienst um Hilfe. Fahren Sie
nicht weiter, bis das Problem behoben ist, um Ihre Sicherheit zu gewährleisten.
IT Nota: Operare dopo aver spento.
Avvertenza: Se il dispositivo di bloccaggio diventa allentato o non può essere correttamente bloccato, smetti
immediatamente di usare lo scooter e contatta il servizio clienti per assistenza. Non continuare a guidare fino a
quando il problema non è risolto per garantire la tua sicurezza.
ES Nota: Operar después de apagar.
Advertencia: Si el dispositivo de bloqueo se afloja o no se puede bloquear correctamente, deje de usar el scooter
de inmediato y póngase en contacto con el servicio al cliente para obtener ayuda. No continúe conduciendo hasta
que se resuelva el problema para garantizar su seguridad.
PL NIE skręcaj gwałtownie podczas jazdy z dużą prędkością.
Ostrzeżenie: Jeśli urządzenie blokujące staje się luźne lub nie można go odpowiednio zablokować, natychmiast
przestań używać hulajnogi i skontaktuj się z obsługą klienta w celu uzyskania pomocy. Nie kontynuuj jazdy, dopóki
problem nie zostanie rozwiązany, aby zapewnić bezpieczeństwo.
NL Opmerking: Bedien na het uitschakelen.
Waarschuwing: Als het vergrendelingsapparaat losraakt of niet goed kan worden vergrendeld, stop dan
onmiddellijk met het gebruik van de scooter en neem contact op met de klantenservice voor hulp. Ga niet verder
met rijden totdat het probleem is opgelost om uw veiligheid te waarborgen.
PT Nota: Operar após desligar.
Aviso: Se o dispositivo de travamento ficar frouxo ou não puder ser travado corretamente, pare imediatamente de
usar o patinete e entre em contato com o serviço de atendimento ao cliente para obter assistência. Não continue a
utilizar até que o problema seja resolvido para garantir a sua segurança.
Folding, Carrying and Unfolding / Pliage, Transport et
Dépliage / Zusammenklappen, Tragen und Aufklappen /
Chiusura, Trasporto y Aperrtura / Plegado, Transporte y
Despliegue / Składanie, Przenoszenie i Pompowanie opon
/ Vouwen, Dragen en Ontvouwen / Dobrar, Transportar e
Desdobrar
● Folding / Pliage / Zusammenklappen / Chiusura / Plegado / Składanie / Vouwen /
Dobrar
1
EN Lift folding latch up and open the quick-release lever, then press the lever again and fold the stem.
FR Soulevez le loquet pliant et ouvrez le levier à dégagement rapide, puis appuyez à nouveau sur le levier et pliez la
tige, pliez la tige.
DE Klappverschluss nach oben heben und Schnellspannhebel öffnen, anschließend Hebel erneut drücken und
Lenkstange einklappen.
IT Sollevare la chiusura pieghevole e aprire la leva a sgancio rapido, quindi premere nuovamente la leva e ripiegare lo
stelo.
ES Levante el pestillo plegable y abra la palanca de liberación rápida y luego presione la palanca de nuevo y doble el
vástago.
PL Podnieś zatrzask mechanizmu składania i otwórz dźwignię szybkiego zwalniania, a następnie naciśnij dźwignię
ponownie i złóż kolumnę kierownicy.
NL Til de vouwsluiting op en open de snelspanner, druk vervolgens opnieuw op de hendel en vouw de stuurpen dicht.
PT Levante o trinco de dobragem e abra a alavanca de libertação rápida, depois prima novamente a alavanca e dobre
a haste.
2
1
01 02 03 04 05 06 07 08 09 10 11 12 13 14 15
16 17 18 19 20 21 22 23 24 25 26 27 28 29 30 31 32 33
34 35 36 37 38 39 40 41 42 43 44 45 46 47 48 49 50 51
52 53 54 55 56 57 58 59 60 61 62 63 64 65 66 67 68 69
70 71 72 73 74 75 76 77
78 79 80 81
82 83 84 85
86 87 88 89 90 91 92 93 94 95 96 97 98 99 100 101
102 103 104 105 106 107 108
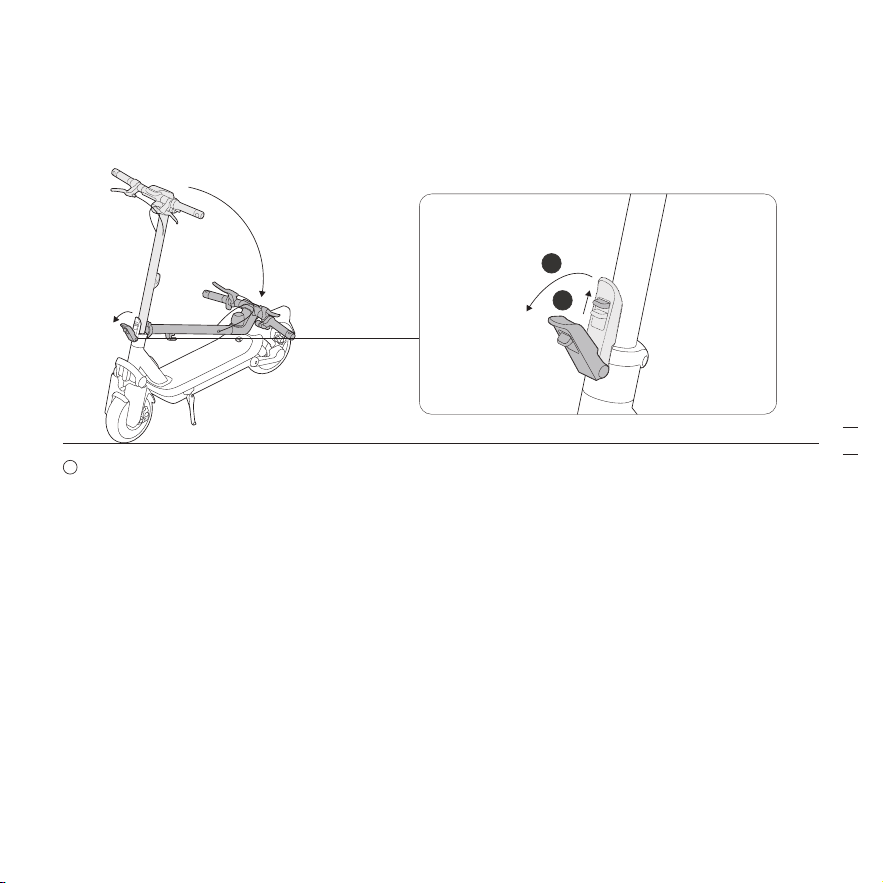
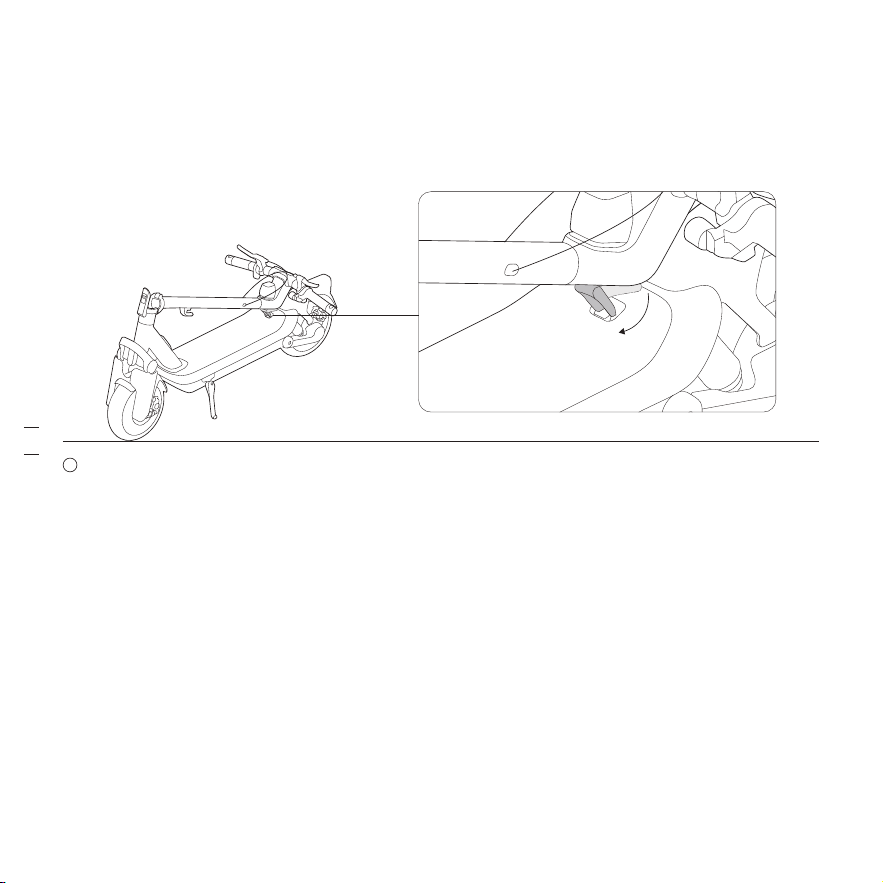
● Carrying / Transport / Tragen / Trasporto / Transporte / Przenoszenie / Dragen /
Transportar
2
EN Align the snap hook with the illustrated area at the rear of the pedal and press it down to hook onto the buckle.
FR Alignez le mousqueton avec la zone illustrée à l’arrière de la pédale et appuyez dessus pour l’accrocher à la
boucle.
DE Richten Sie den Einrasthaken auf den dargestellten Bereich an der Rückseite des Pedals aus und drücken Sie ihn
nach unten, um ihn in der Schließe einzurasten.
IT Allineare il gancio a scatto con l'area illustrata posta sul retro del pedale e premere per agganciarlo alla fibbia.
ES Alinee el mosquetón con el área que aparece en la ilustración de la parte trasera del pedal y presiónelo hacia
abajo para engancharlo en la hebilla.
PL Dopasuj karabińczyk do pokazanego na ilustracji obszaru z tyłu pedału i dociśnij, aby zaczepić go o klamrę.
NL Lijn de karabijnhaak uit met het aangegeven gebied op de achterkant van het pedaal en druk deze naar beneden
om aan de gesp te haken.
PT Alinhe o gancho de pressão com a área ilustrada na parte de trás do pedal e prima-o para baixo para o prender à
fivela.
EN Lift by the stem to carry.
FR Soulevez le véhicule par la tige pour le transporter.
DE Zum Tragen an der Lenkstange anheben.
IT Per trasportare lo scooter, sollevarlo dal manubrio.
ES Levante por el mástil para transportarlo.
PL Przenoś hulajnogę, trzymając za kolumnę kierownicy.
NL Til bij de stuurstang op om te dragen.
PT Levante pela haste para pegar.
01 02 03 04 05 06 07 08 09 10 11 12 13 14 15
16 17 18 19 20 21 22 23 24 25 26 27 28 29 30 31 32 33
34 35 36 37 38 39 40 41 42 43 44 45 46 47 48 49 50 51
52 53 54 55 56 57 58 59 60 61 62 63 64 65 66 67 68 69
70 71 72 73 74 75 76 77
78 79 80 81
82 83
84 85
86 87 88 89 90 91 92 93 94 95 96 97 98 99 100 101
102 103 104 105 106 107 108
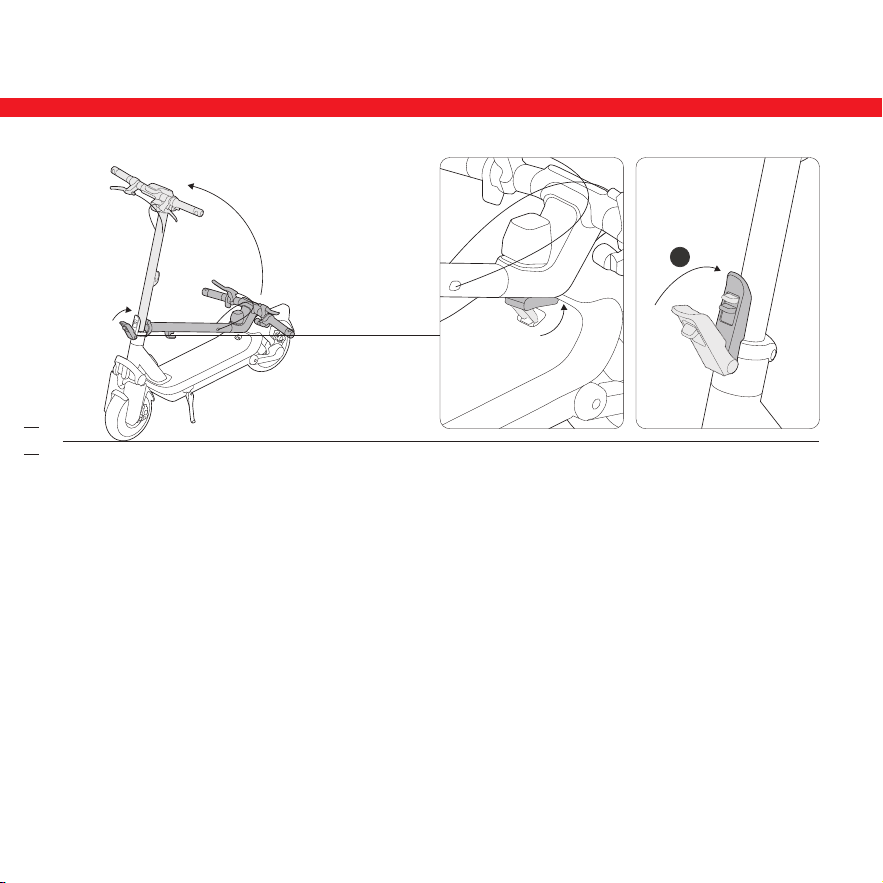
1
● Unfolding / Dépliage / Aufklappen / Aperrtura / Despliegue / Rozkładanie /
Ontvouwen / Desdobrar
EN Disengage the snap hook from the buckle. Unfold the stem and close the quick-release lever. Make sure the
folding latch reaches the bottom.
FR Dégagez le mousqueton de la boucle. Dépliez la tige du guidon et fermez le levier à dégagement rapide. Assurez�
vous que le loquet de pliage atteigne le fond.
DE Lösen Sie den Einrasthaken aus der Schließe. Klappen Sie die Lenkstange auf und schließen Sie den
Schnellspannhebel. Stellen Sie sicher, dass der Klappverschluss den Boden erreicht.
IT Rimuovere il gancio a scatto dal supporto di chiusura. Aprire il manubrio e chiudere la leva a sgancio rapido.
Įsitikinkite, kad sulankstymo užraktas pasiekia dugną.
ES Desenganche el mosquetón de la hebilla. Despliegue el eje y cierre la palanca de liberación rápida. Asegúrese de
que el pestillo de plegado llegue hasta el fondo.
PL Odepnij karabińczyk od klamry. Rozłóż kolumnę kierownicy i zamknij dźwignię szybkiego zwalniania. Upewnij się,
że zatrzask składania sięga dna.
NL Maak de karabijnhaak los van de gesp. Vouw de stuurstang open en sluit de snelspanner. Zorg ervoor dat het
vouwslot de bodem bereikt.
PT Desengate o gancho de pressão da fivela. Desdobre a haste e feche a alavanca de libertação rápida. Certifique�se
de que o fecho de dobragem atinja o fundo.
EN Press the quick release lever firmly to make sure the folding mechanism is tightened.
* The scooter will make a "click" sound when the folding mechanism is tightened.
FR Appuyez fermement sur le levier à dégagement rapide pour vous assurer que le mécanisme de pliage est bien
serré.
* Le scooter émettra un « clic » lorsque le mécanisme de pliage sera serré.
DE Drücken Sie den Schnellspannhebel fest nach unten, um sicherzustellen, dass der Klappmechanismus angezogen
ist.
* Der Roller gibt ein „Klick“-Geräusch von sich, wenn der Klappmechanismus angezogen wird.
IT Premere con decisione la leva a sgancio rapido per assicurarsi che il meccanismo di piegatura sia serrato.
* Lo scooter emette un «clic» quando il meccanismo di piegatura viene serrato.
ES Presione firmemente la palanca de liberación rápida para asegurarse de que el mecanismo de plegado esté
apretado.
* El patinete emitirá un sonido de "clic" cuando se apriete el mecanismo de plegado.
PL Silnie naciśnij dźwignię szybkiego zwalniania, aby zablokować mechanizm składania.
* Po dociśnięciu mechanizmu składania hulajnogi usłyszysz odgłos „kliknięcia”.
NL Druk stevig op de snelspanhendel om ervoor te zorgen dat het vouwmechanisme vastzit.
* De scooter maakt een "klik"-geluid wanneer het vouwmechanisme wordt vastgedraaid.
PT Pressione firmemente a alavanca de libertação rápida para se certificar de que o mecanismo de dobragem está
apertado.
* A scooter faz um som de «clique» quando o mecanismo de dobragem é apertado.
×
√
01 02 03 04 05 06 07 08 09 10 11 12 13 14 15
16 17 18 19 20 21 22 23 24 25 26 27 28 29 30 31 32 33
34 35 36 37 38 39 40 41 42 43 44 45 46 47 48 49 50 51
52 53 54 55 56 57 58 59 60 61 62 63 64 65 66 67 68 69
70 71 72 73 74 75 76 77
78 79 80 81
82 83 84 85
86 87 88 89 90 91 92 93 94 95 96 97 98 99 100 101
102 103 104 105 106 107 108
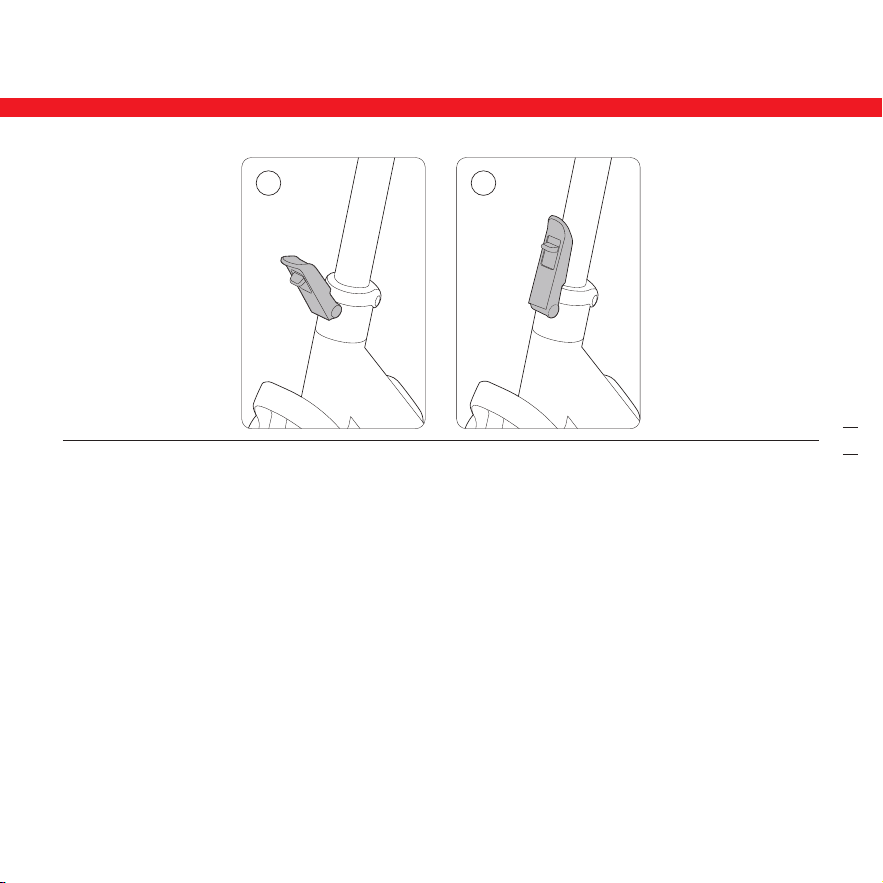
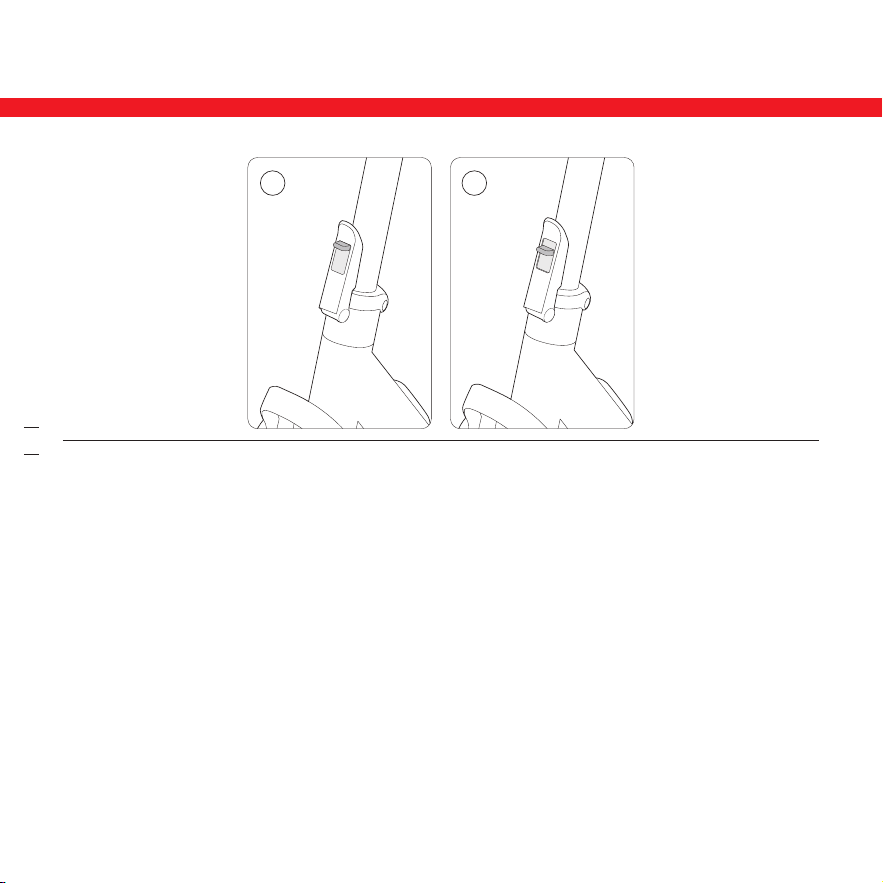
Inflate the Tires / Gonfler les pneus / Reifen aufpumpen /
Gonfia i pneumatici / Infle los neumáticos / Pompowanie
opon / De banden oppompen / Encher os pneus
1
EN Unscrew the valve cap.
FR Dévissez le capuchon de la valve.
DE Schrauben Sie die Ventilkappe ab.
IT Svitare il tappo della valvola.
ES Desenrosque la tapa de la válvula.
PL Odkręć kapturek zaworu.
NL Draai de ventieldop los.
PT Desaperte a tampa da válvula.
2
EN Connect the valve stem extension to the tire
valve stem.
FR Connectez l'extension tige desoupape à la
potence de soupape du pneu.
DE Verbinden Sie die Ventilvorbauverlängerung
mit dem Reifenventilschaft.
IT Collegare l'estensione della presa d'aria del
spneumatico alla valvola del pneumatico.
ES Conecte la extensión de la toma de aire del
neumático en la válvula del neumático.
PL Podłączyć przedłużkę do zaworu do wentyla.
NL Sluit de ventielsteelverlenging aan op de
ventielsteel van de band.
PT Conecte a extensão de haste da válvula à
haste da válvula do pneu.
EN Make sure the folding latch is in the locked position before riding!
* Stop riding immediately if the folding latch somehow cannot be locked. Serious danger may occur!
FR Assurez-vous que le loquet pliant est sur la position verrouillée avant de rouler !
* Arrêtez de rouler immédiatement si le loquet pliant ne peut pas être verrouillé d'une manière ou d'une autre. Un
grave danger peut survenir !
DE Vergewissern Sie sich vor der Fahrt, dass die Klappverschluss in der verriegelten Stellung ist!
* Unterbrechen Sie die Fahrt sofort, wenn sich die Klappverschluss aus irgendeinem Grund nicht verriegeln lässt.
Es kann akute Gefahr entstehen!
IT Prima di procedere alla guida, assicurarsi che il Chiusura pieghevole sia in posizione bloccata!
* Interrompi immediatamente la guida se il Chiusura pieghevole può essere bloccato in alcun modo. Potrebbe
verificarsi un grave pericolo!
ES Asegúrese de que el Pestillo plegable esté en la posición de bloqueo antes de conducir.
* Deje de conducir inmediatamente si el Pestillo plegable no se bloquea. Pueden producirse graves daños.
PL Przed rozpoczęciem jazdy ustaw Zatrzask mechanizmu składania w położeniu blokady!
* Jeśli nie można zablokować Zatrzask mechanizmu składania, natychmiast przerwij jazdę. Może to spowodować
poważne niebezpieczeństwo!
NL Zorg ervoor dat de inklapbare vergrendeling in de vergrendelde positie staat voordat u gaat rijden!
* Stop onmiddellijk met rijden als de inklapbare vergrendeling op de een of andere manier niet vergrendeld kan
worden. Er kan ernstig gevaar ontstaan!
PT Certifique-se de que o Trinco dobrável está na posição bloqueada antes de andar!
* Pare imediatamente de conduzir se o Trinco dobrável não puder ser bloqueado. Pode ocorrer um perigo grave!
×
√
01 02 03 04 05 06 07 08 09 10 11 12 13 14 15
16 17 18 19 20 21 22 23 24 25 26 27 28 29 30 31 32 33
34 35 36 37 38 39 40 41 42 43 44 45 46 47 48 49 50 51
52 53 54 55 56 57 58 59 60 61 62 63 64 65 66 67 68 69
70 71 72 73 74 75 76 77
78 79 80 81
82 83 84 85
86 87
88 89 90 91 92 93 94 95 96 97 98 99 100 101
102 103 104 105 106 107 108
3
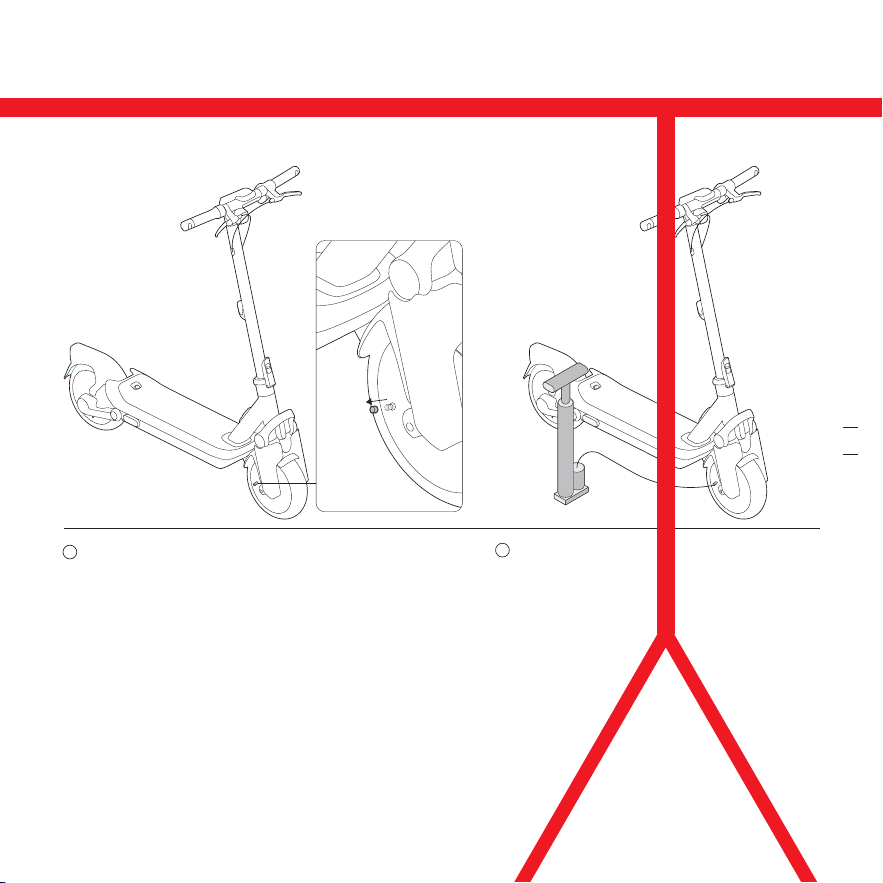
Approx.
25 km/h (15.5 mph)
Operating Temperature
Storage Temperature
IP Rating
[3]
Charging Duration (Single)
[4]
Charging Duration (Dual)
[5]
Nominal Voltage
Max. Charging Voltage
Nominal Energy
Nominal Capacity
-10—40℃ (14—104℉)
-10—50℃ (14—122℉)
IPX6
Approx. 3.5 h
Approx. 2.5 h
46.8 V
54.6 V
597 Wh
12.75 Ah
Approx. 75 km (47 miles)
Approx. 80 km (50 miles)
Approx. 30%
Approx.
25 km/h (15.5 mph)
Approx.
20 km/h (12.4 mph)
Approx.
65 km (40 miles)
DRIVE
ECO
SPORT
Partial unpaved roads, and mostly smooth roads or normal asphalt,
tarmac roads
Approx.
65 km (40 miles)
Approx.
75 km (47 miles)
051601D
Max. Speed
Max. Slope
[2]
Traversable Terrain
Charging Ambient
Temperature
Product Info
Item Parameter
Riding
Requirements
Vehicle
Performance
Battery Pack
0—55℃ (32—131℉)
Range at Max.
Speed
[1]
EN Caution: Ensure tires are properly inflated before riding. Operating the scooter with underinflated tires can cause
permanent damage to the tires, affect riding safety, and may lead to the motor overworking and overheating
(which could cause the motor to shut off unexpectedly). Always check tire pressure regularly.
FR Attention : Assurez-vous que les pneus sont correctement gonflés avant de rouler. L'utilisation du scooter avec des
pneus sous-gonflés peut causer des dommages permanents aux pneus, affecter la sécurité de conduite et peut
entraîner un surmenage et une surchauffe du moteur (ce qui pourrait provoquer l'arrêt inattendu du moteur).
Vérifiez toujours régulièrement la pression des pneus.
DE Vorsicht Stellen Sie vor der Fahrt sicher, dass die Reifen den richtigen Druck haben. Der Betrieb des Rollers mit zu
geringem Reifendruck kann zu dauerhaften Reifenschäden führen, die Fahrsicherheit beeinträchtigen und zu einer
Überlastung und Überhitzung des Motors führen (was zu einem unerwarteten Motorstopp führen kann). Überprüfen
Sie regelmäßig den Reifendruck.
IT Attenzione: prima di partire, assicurarsi che gli pneumatici siano gonfiati adeguatamene. Utilizzare lo scooter con
pneumatici sgonfi può causare danni permanenti agli pneumatici, compromettere la sicurezza di guida e causare il
sovraccarico e il surriscaldamento del motore (che potrebbe a sua volta causarne lo spegnimento improvviso).
Controllare sempre e con regolarità la pressione degli pneumatici.
ES Precaución: Asegúrese de que los neumáticos estén inflados correctamente antes de conducir. Operar el patinete
con neumáticos desinflados puede causar daños permanentes a los neumáticos, afectar a la seguridad de uso y
puede generar que el motor trabaje demasiado y se sobrecaliente (lo que podría causar que el motor se
inesperadamente). Compruebe la presión de los neumáticos periódicamente.
PL Przestroga: Przed jazdą sprawdź, czy opony są odpowiednio napompowane. Jazda hulajnogą ze zbyt niskim
ciśnieniem w oponach może spowodować trwałe uszkodzenie opon, zmniejszyć bezpieczeństwo jazdy oraz
doprowadzić do przeciążenia i przegrzania silnika (co może skutkować jego nieoczekiwanym wyłączeniem). Zawsze
regularnie sprawdzaj ciśnienie w oponach.
NL Opgelet: Zorg ervoor dat de banden goed zijn opgepompt voordat u gaat fietsen. Als u de scooter gebruikt met te
zachte banden, kan dit permanente schade aan de banden veroorzaken, de rijveiligheid beïnvloeden en ertoe
leiden dat de motor overbelast wordt en oververhit raakt (waardoor de motor onverwacht kan uitschakelen).
Controleer regelmatig de bandenspanning.
PT Cuidado Certifique-se de que os pneus estão devidamente calibrados antes de andar. Operar a scooter com pneus
murchos pode causar danos permanentes aos pneus, afetar a segurança na condução e pode levar ao excesso de
operação e sobre-aquecimento do motor (o que pode fazer com que o motor desligue inesperadamente). Verifique
sempre a pressão dos pneus regularmente.
EN Specifications
Name
Model
L × W × H
L × W × H (folded)
Net Weight
Max. Payload
Recommended Age
Required Height
Segway eKickScooter Ninebot MAX G3
051601E
Approx. 1218×590×1299 mm (48×23.2×51.1 in)
Approx. 1218×590×592 mm (48×23.2×23.3 in)
Approx. 24.6 kg (54.2 lbs)
130 kg (286 lbs)
16—55 years
160 cm+
051601I
01 02 03 04 05 06 07 08 09 10 11 12 13 14 15
16 17 18 19 20 21 22 23 24 25 26 27 28 29 30 31 32 33
34 35 36 37 38 39 40 41 42 43 44 45 46 47 48 49 50 51
52 53 54 55 56 57 58 59 60 61 62 63 64 65 66 67 68 69
70 71 72 73 74 75 76 77
78 79 80 81
82 83 84 85
86 87 88 89
90 91 92 93 94 95 96 97 98 99 100 101
102 103 104 105 106 107 108
3 量产后变更:文案更新
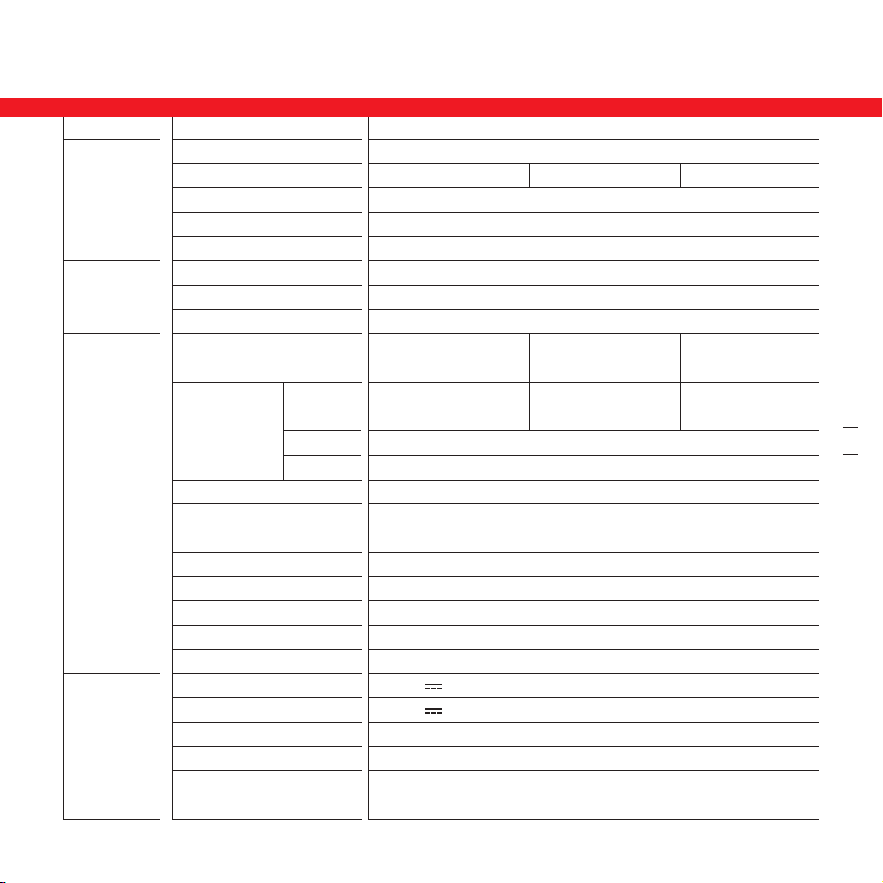
Approx.
25 km/h (15.5 mph)
Operating Temperature
Storage Temperature
IP Rating
[3]
Charging Duration (Single)
[4]
Charging Duration (Dual)
[5]
Nominal Voltage
Max. Charging Voltage
Nominal Energy
Nominal Capacity
-10—40℃ (14—104℉)
-10—50℃ (14—122℉)
IPX6
Approx. 3.5 h
Approx. 2.5 h
46.8 V
54.6 V
597 Wh
12.75 Ah
Approx. 75 km (47 miles)
Approx. 80 km (50 miles)
Approx. 30%
Approx.
25 km/h (15.5 mph)
Approx.
20 km/h (12.4 mph)
Approx.
65 km (40 miles)
DRIVE
ECO
SPORT
Partial unpaved roads, and mostly smooth roads or normal asphalt,
tarmac roads
Approx.
65 km (40 miles)
Approx.
75 km (47 miles)
051601D
Max. Speed
Max. Slope
[2]
Traversable Terrain
Charging Ambient
Temperature
Product Info
Item Parameter
Riding
Requirements
Vehicle
Performance
Battery Pack
0—55℃ (32—131℉)
Range at Max.
Speed
[1]
EN Caution: Ensure tires are properly inflated before riding. Operating the scooter with underinflated tires can cause
permanent damage to the tires, affect riding safety, and may lead to the motor overworking and overheating
(which could cause the motor to shut off unexpectedly). Always check tire pressure regularly.
FR Attention : Assurez-vous que les pneus sont correctement gonflés avant de rouler. L'utilisation du scooter avec des
pneus sous-gonflés peut causer des dommages permanents aux pneus, affecter la sécurité de conduite et peut
entraîner un surmenage et une surchauffe du moteur (ce qui pourrait provoquer l'arrêt inattendu du moteur).
Vérifiez toujours régulièrement la pression des pneus.
DE Vorsicht Stellen Sie vor der Fahrt sicher, dass die Reifen den richtigen Druck haben. Der Betrieb des Rollers mit zu
geringem Reifendruck kann zu dauerhaften Reifenschäden führen, die Fahrsicherheit beeinträchtigen und zu einer
Überlastung und Überhitzung des Motors führen (was zu einem unerwarteten Motorstopp führen kann). Überprüfen
Sie regelmäßig den Reifendruck.
IT Attenzione: prima di partire, assicurarsi che gli pneumatici siano gonfiati adeguatamene. Utilizzare lo scooter con
pneumatici sgonfi può causare danni permanenti agli pneumatici, compromettere la sicurezza di guida e causare il
sovraccarico e il surriscaldamento del motore (che potrebbe a sua volta causarne lo spegnimento improvviso).
Controllare sempre e con regolarità la pressione degli pneumatici.
ES Precaución: Asegúrese de que los neumáticos estén inflados correctamente antes de conducir. Operar el patinete
con neumáticos desinflados puede causar daños permanentes a los neumáticos, afectar a la seguridad de uso y
puede generar que el motor trabaje demasiado y se sobrecaliente (lo que podría causar que el motor se
inesperadamente). Compruebe la presión de los neumáticos periódicamente.
PL Przestroga: Przed jazdą sprawdź, czy opony są odpowiednio napompowane. Jazda hulajnogą ze zbyt niskim
ciśnieniem w oponach może spowodować trwałe uszkodzenie opon, zmniejszyć bezpieczeństwo jazdy oraz
doprowadzić do przeciążenia i przegrzania silnika (co może skutkować jego nieoczekiwanym wyłączeniem). Zawsze
regularnie sprawdzaj ciśnienie w oponach.
NL Opgelet: Zorg ervoor dat de banden goed zijn opgepompt voordat u gaat fietsen. Als u de scooter gebruikt met te
zachte banden, kan dit permanente schade aan de banden veroorzaken, de rijveiligheid beïnvloeden en ertoe
leiden dat de motor overbelast wordt en oververhit raakt (waardoor de motor onverwacht kan uitschakelen).
Controleer regelmatig de bandenspanning.
PT Cuidado Certifique-se de que os pneus estão devidamente calibrados antes de andar. Operar a scooter com pneus
murchos pode causar danos permanentes aos pneus, afetar a segurança na condução e pode levar ao excesso de
operação e sobre-aquecimento do motor (o que pode fazer com que o motor desligue inesperadamente). Verifique
sempre a pressão dos pneus regularmente.
EN Specifications
Name
Model
L × W × H
L × W × H (folded)
Net Weight
Max. Payload
Recommended Age
Required Height
Segway eKickScooter Ninebot MAX G3
051601E
Approx. 1218×590×1299 mm (48×23.2×51.1 in)
Approx. 1218×590×592 mm (48×23.2×23.3 in)
Approx. 24.6 kg (54.2 lbs)
130 kg (286 lbs)
16—55 years
160 cm+
051601I
01 02 03 04 05 06 07 08 09 10 11 12 13 14 15
16 17 18 19 20 21 22 23 24 25 26 27 28 29 30 31 32 33
34 35 36 37 38 39 40 41 42 43 44 45 46 47 48 49 50 51
52 53 54 55 56 57 58 59 60 61 62 63 64 65 66 67 68 69
70 71 72 73 74 75 76 77
78 79 80 81
82 83 84 85
86 87 88 89
90 91 92 93 94 95 96 97 98 99 100 101
102 103 104 105 106 107 108
3 量产后变更:文案更新
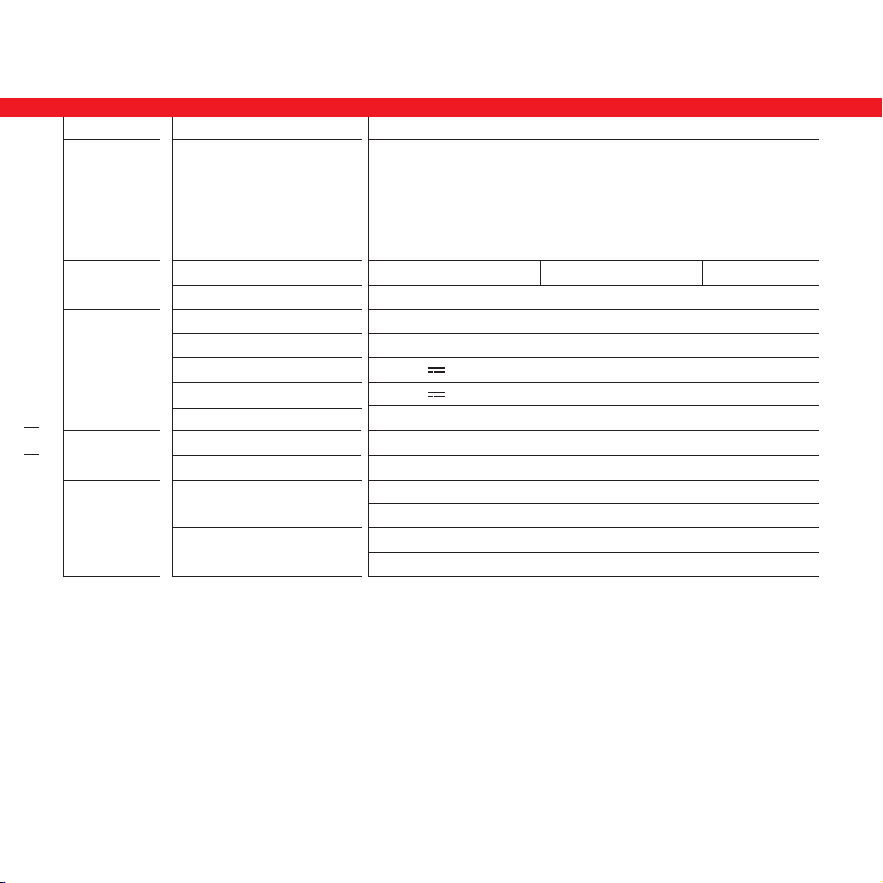
[1] Range of Speed Modes: Tested while riding with a full battery, 75±5 kg (165±11 lbs) load, 25±5℃ (77±9℉), at the max.
speed of each speed mode on pavement.
* Some of the factors that affect range include speed, load, number of starts and stops, ambient temperature, etc.
[2] Max. Slope: tested while riding with 70% (±10%) battery, 75 kg (165 lbs) load, at a speed of 15 km/h (9.3 mph)
climbing up a 10 m long slope ( the speed greater than 6 km/h (3.7 mph) when passing through the slope).
[3] IP Rating: The product is protected against high pressure water stream from any angle, which has been rated IPX6
for water resistance according to the IEC Standard 60529 and has been tested under controlled conditions. Do not
charge the product when it is wet or in a moist environment. Immersion in liquid and the resulting damage is not
covered by the warranty.
[4] Charging Duration (Single): Charge with the AC charging wire in the package with 220V voltage in an environment of
20—25℃(77—86℉).
[5] Charging Duration (Dual): Charge with the AC charging wire in the package and Ninebot adaptor (sold saparatedly,
model: NBW54D601D3D) at the same timewith 220V voltage in a environment of 20—25℃(77—86℉).
Item Parameter
Battery Management
System
Nominal Power
Max. Power
Type
Input Voltage
Nominal Output
Max. Output
Rated Output Power
Tire Type
Tire Pressure
0.7 kW, 700 W
2 kW, 2000 W
Built-in
100—240 V~50—60 Hz
53.6 V 3.9 A MAX
54.6 V
209.04 W
11-inch Tubeless Self-sealing Tires
42—48 psi
Front Twin-tube Hydraulic Shock Absorber
Rear Dual Hydraulic Shock Absorbers
Front Disc Brake
Rear Disc Brake
0.5 kW, 500 W 0.5 kW, 500 W
Battery Pack
Suspension System
Brake System
Motor
Charger
Tire
Others
Charge Time Tracking, Smart Charge Scheduling, Battery Health
Monitoring, Short Circuit Protection, Overcurrent Protection,
Temperature Protection, Overcharging Protection, Under Voltage
Protection, Over-discharging Protection, Customizable Charging
Limit, IPX7 Water-resistant Battery Pack.
Environ
25 km/h (15,5 mi/h)
Température de
fonctionnement
Température de stockage
Protection IP
[3]
Durée de charge (simple)
[4]
Durée de charge (double)
[5]
Tension nominale
Tension de charge max.
Énergie nominale
Capacité nominale
Température de charge
-10—40℃ (14—104℉)
-10—50℃ (14—122℉)
IPX6
Environ 3,5 h
Environ 2,5 h
46.8 V
54.6 V
597 Wh
12,75 Ah
0—55℃ (32—131℉)
Environ 75 km (47 miles)
Environ 80 km (50 miles)
Environ 30%
Environ
25 km/h (15,5 mi/h)
Environ
20 km/h (12,4 mi/h)
Environ
65 km (40 miles)
DRIVE
ECO
SPORT
Routes partiellement non pavées, et routes généralement lisses ou
asphaltées normales, routes goudronnées
Environ
65 km (40 miles)
Environ
75 km (47 miles)
051601D
Vitesse max.
Pente max.
[2]
Terrain traversable
Informations
sur le produit
Élément Paramètre
Exigences de
conduite
Performance
du véhicule
Pack batterie
Autonomies
des modes de
vitesse
[1]
FR Caractéristiques techniques
Nom
Modèle
L × W × H
L × W × H (Plié)
Poids net
Charge utile max.
Âge recommandé
Hauteur requise
Segway eKickScooter Ninebot MAX G3
051601E
Environ 1218×590×1299 mm (48×23,2×51,1 po)
Environ 1218×590×592 mm (48×23,2×23,3 po)
Environ 24,6 kg (54,2 lb)
130 kg (286 lb)
16—55 ans
160 cm+
051601I
01 02 03 04 05 06 07 08 09 10 11 12 13 14 15
16 17 18 19 20 21 22 23 24 25 26 27 28 29 30 31 32 33
34 35 36 37 38 39 40 41 42 43 44 45 46 47 48 49 50 51
52 53 54 55 56 57 58 59 60 61 62 63 64 65 66 67 68 69
70 71 72 73 74 75 76 77
78 79 80 81
82 83 84 85
86 87 88 89 90 91
92 93 94 95 96 97 98 99 100 101
102 103 104 105 106 107 108
量产后变更:文案更新
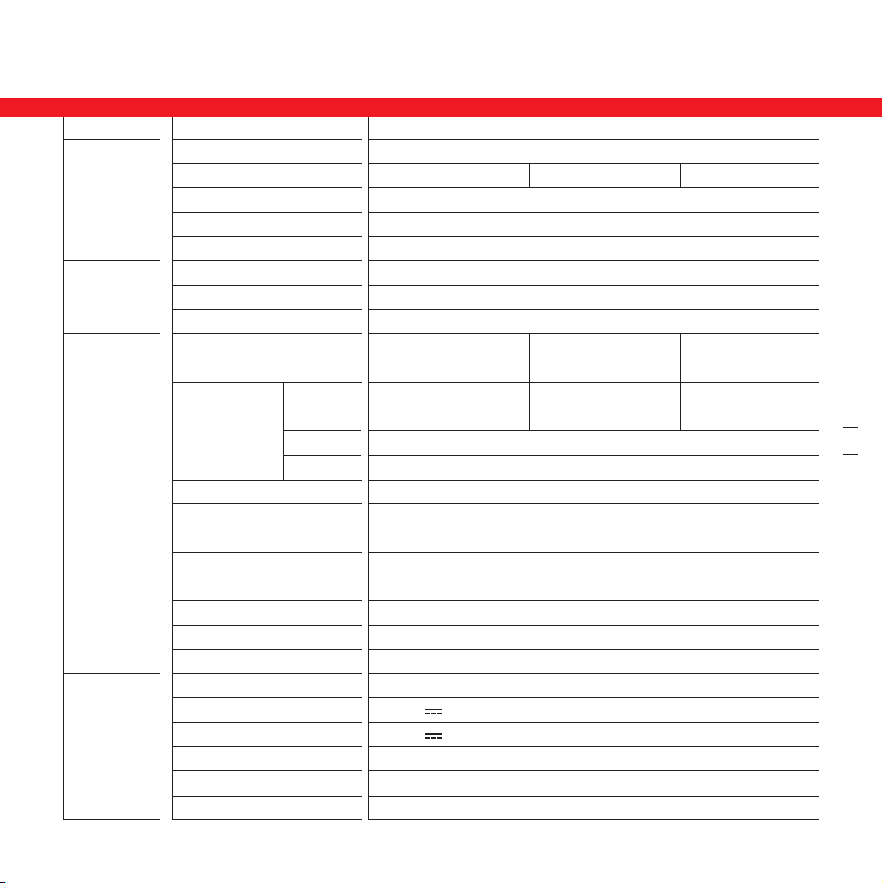
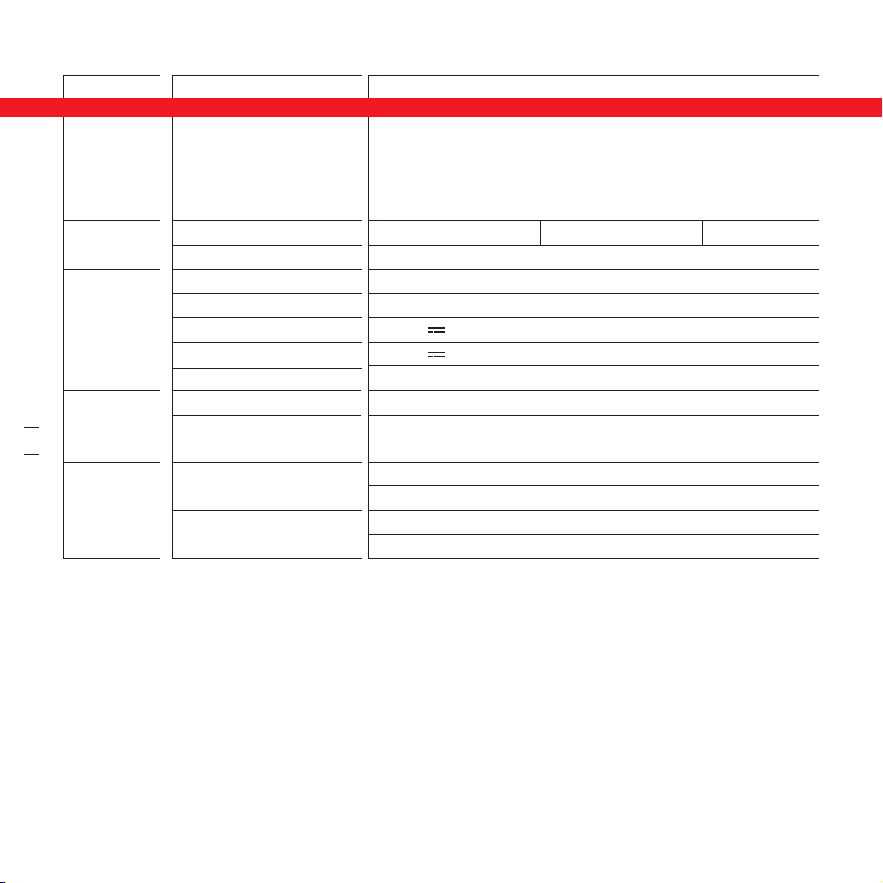
Ca.
25 km/h (15,5 mph)
Betriebstemperatur
Lagerungstemperatur
IP-Schutzklasse
[3]
Ladedauer (Einzeln)
[4]
Ladedauer (Dual)
[5]
Nennspannung
Max. Ladespannung
Nennenergie
Nennkapazität
Ladetemperatur
-10—40℃ (14—104℉)
-10—50℃ (14—122℉)
IPX6
Ca. 3,5 h
Ca. 2,5 h
46,8 V
54,6 V
597 Wh
12,75 Ah
0—55℃ (32—131℉)
Approx. 75 km (47 miles)
Approx. 80 km (50 miles)
Approx. 30%
Ca.
25 km/h (15,5 mph)
Ca.
20 km/h (12,4 mph)
Ca. 65 km (40 miles)
DRIVE
ECO
SPORT
Teilweise unbefestigte Straßen, überwiegend glatte Straßen oder
normale Asphalt- und Teerstraßen
Ca. 65 km (40 miles) Ca. 75 km (47 miles)
051601D
Max. Geschwindigkeit
Max. Steigung
[2]
Befahrbares Terrain
Produktinfo
Position Parameter
Fahr�
Anforderungen
Fahrzeugleistu
ng
Akkusatz
Reichweiten
der
Geschwindigke
itsmodi
[1]
DE Technische Daten
Name
Modell
L × B × H
L × B × H (Eingeklappt)
Nettogewicht
Max. Traglast
Empfohlenes Alter
Erforderliche Größe
Segway eKickScooter Ninebot MAX G3
051601E
Ca. 1218×590×1299 mm (48×23,2×51,1 Zoll)
Ca. 1218×590×592 mm (48×23,2×23,3 Zoll)
Ca. 24,6 kg (54,2 lbs)
130 kg (286 lbs)
16—55 Jahre alt
160 cm+
051601I
Élément Paramètre
[1] Autonomies des modes de vitesse : Testées avec une batterie pleine, une charge de 75±5 kg (165±11 lb), à 225±5℃
(77±9℉), à la vitesse maximale de chaque mode de vitesse sur chaussée.
* Certains des facteurs qui influent sur l'autonomie comprennent : la vitesse, la charge, le nombre de démarrages et
d'arrêts, la température ambiante, etc.
[2] Pente max.: testée en roulant à 70% (±10 %) de batterie, avec une charge de 75kg (165lbs), à une vitesse de 15
km/h (9,3mi/h) en montant une pente de 10m de long (vitesse supérieure à 6 km/h (3,7 mi/h) en traversant la pente).
[3] Protection IP : Le produit est protégé contre les jets d'eau à haute pression provenant de n'importe quel angle, classé
IPX6 pour la résistance à l'eau conformément à la norme IEC 60529 et testé dans des conditions contrôlées. Ne
chargez pas le produit s'il est mouillé ou dans un environnement humide. L'immersion dans un liquide et les
dommages qui en résultent ne sont pas couverts par la garantie.
[4]Durée de charge (simple): Wenn Sie nach links oder rechts abbiegen, drücken Sie die Taste „←“ (links) oder „→“
(rechts).[5]Durée de charge (double): Chargez avec le câble de charge CA fourni dans l'emballage et l’adaptateur
Ninebot (vendu séparément, modèle: NBW54D601D3D) en même temps avec une tension de 220V dans un
environnement de 20 à 25°C (77 à 86°F).
Système de gestion de
batterie
Puissance nominale
Puissance max.
Type
Tension d'entrée
Sortie nominale
Sortie max.
Puissance nominale
Pneus
Pression de gonflage
recommandée
0,7 kW, 700 W
2 kW, 2000 W
Intégré
100—240 V~50—60 Hz
53,6 V 3,9 A max.
54,6 V
209,04 W
Pneus tubeless auto-obturants de 11 pouces
42—48 psi
Amortisseur hydraulique à double tube avant
Amortisseurs hydrauliques doubles arrière
Frein à disque avant
Frein à disque arrière
0.5 kW, 500 W 0.5 kW, 500 W
Pack batterie
Système de suspension
Système de freinage
Moteur
Chargeur
Pneu
Autres
Suivi du temps de charge, planification de charge intelligente,
surveillance de l'état de la batterie, protection contre les
courts-circuits, protection contre les surintensités, protection
contre la surchauffe, protection contre les surcharges, protection
contre les sous-tensions, protection contre la décharge excessive,
limite de charge personnalisable, pack batterie résistant à l'eau
IPX7
01 02 03 04 05 06 07 08 09 10 11 12 13 14 15
16 17 18 19 20 21 22 23 24 25 26 27 28 29 30 31 32 33
34 35 36 37 38 39 40 41 42 43 44 45 46 47 48 49 50 51
52 53 54 55 56 57 58 59 60 61 62 63 64 65 66 67 68 69
70 71 72 73 74 75 76 77
78 79 80 81
82 83 84 85
86 87 88 89 90 91 92 93
94 95 96 97 98 99 100 101
102 103 104 105 106 107 108
量产后变更:文案更新
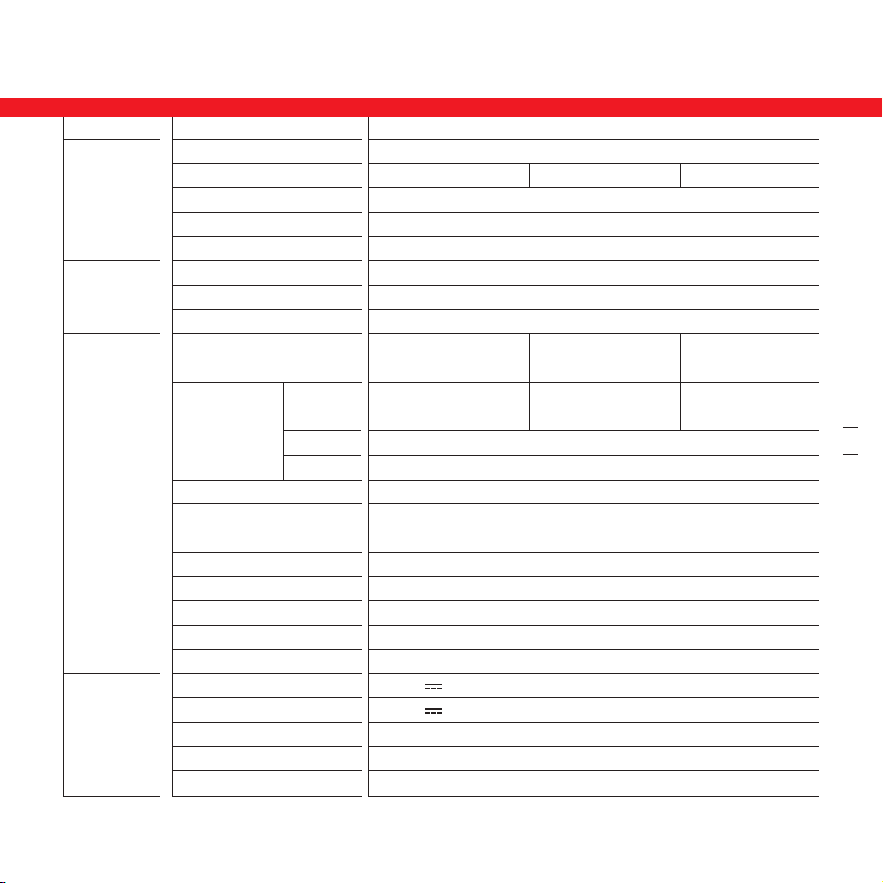
Ca.
25 km/h (15,5 mph)
Betriebstemperatur
Lagerungstemperatur
IP-Schutzklasse
[3]
Ladedauer (Einzeln)
[4]
Ladedauer (Dual)
[5]
Nennspannung
Max. Ladespannung
Nennenergie
Nennkapazität
Ladetemperatur
-10—40℃ (14—104℉)
-10—50℃ (14—122℉)
IPX6
Ca. 3,5 h
Ca. 2,5 h
46,8 V
54,6 V
597 Wh
12,75 Ah
0—55℃ (32—131℉)
Approx. 75 km (47 miles)
Approx. 80 km (50 miles)
Approx. 30%
Ca.
25 km/h (15,5 mph)
Ca.
20 km/h (12,4 mph)
Ca. 65 km (40 miles)
DRIVE
ECO
SPORT
Teilweise unbefestigte Straßen, überwiegend glatte Straßen oder
normale Asphalt- und Teerstraßen
Ca. 65 km (40 miles) Ca. 75 km (47 miles)
051601D
Max. Geschwindigkeit
Max. Steigung
[2]
Befahrbares Terrain
Produktinfo
Position Parameter
Fahr�
Anforderungen
Fahrzeugleistu
ng
Akkusatz
Reichweiten
der
Geschwindigke
itsmodi
[1]
DE Technische Daten
Name
Modell
L × B × H
L × B × H (Eingeklappt)
Nettogewicht
Max. Traglast
Empfohlenes Alter
Erforderliche Größe
Segway eKickScooter Ninebot MAX G3
051601E
Ca. 1218×590×1299 mm (48×23,2×51,1 Zoll)
Ca. 1218×590×592 mm (48×23,2×23,3 Zoll)
Ca. 24,6 kg (54,2 lbs)
130 kg (286 lbs)
16—55 Jahre alt
160 cm+
051601I
Élément Paramètre
[1] Autonomies des modes de vitesse : Testées avec une batterie pleine, une charge de 75±5 kg (165±11 lb), à 225±5℃
(77±9℉), à la vitesse maximale de chaque mode de vitesse sur chaussée.
* Certains des facteurs qui influent sur l'autonomie comprennent : la vitesse, la charge, le nombre de démarrages et
d'arrêts, la température ambiante, etc.
[2] Pente max.: testée en roulant à 70% (±10 %) de batterie, avec une charge de 75kg (165lbs), à une vitesse de 15
km/h (9,3mi/h) en montant une pente de 10m de long (vitesse supérieure à 6 km/h (3,7 mi/h) en traversant la pente).
[3] Protection IP : Le produit est protégé contre les jets d'eau à haute pression provenant de n'importe quel angle, classé
IPX6 pour la résistance à l'eau conformément à la norme IEC 60529 et testé dans des conditions contrôlées. Ne
chargez pas le produit s'il est mouillé ou dans un environnement humide. L'immersion dans un liquide et les
dommages qui en résultent ne sont pas couverts par la garantie.
[4]Durée de charge (simple): Wenn Sie nach links oder rechts abbiegen, drücken Sie die Taste „←“ (links) oder „→“
(rechts).[5]Durée de charge (double): Chargez avec le câble de charge CA fourni dans l'emballage et l’adaptateur
Ninebot (vendu séparément, modèle: NBW54D601D3D) en même temps avec une tension de 220V dans un
environnement de 20 à 25°C (77 à 86°F).
Système de gestion de
batterie
Puissance nominale
Puissance max.
Type
Tension d'entrée
Sortie nominale
Sortie max.
Puissance nominale
Pneus
Pression de gonflage
recommandée
0,7 kW, 700 W
2 kW, 2000 W
Intégré
100—240 V~50—60 Hz
53,6 V 3,9 A max.
54,6 V
209,04 W
Pneus tubeless auto-obturants de 11 pouces
42—48 psi
Amortisseur hydraulique à double tube avant
Amortisseurs hydrauliques doubles arrière
Frein à disque avant
Frein à disque arrière
0.5 kW, 500 W 0.5 kW, 500 W
Pack batterie
Système de suspension
Système de freinage
Moteur
Chargeur
Pneu
Autres
Suivi du temps de charge, planification de charge intelligente,
surveillance de l'état de la batterie, protection contre les
courts-circuits, protection contre les surintensités, protection
contre la surchauffe, protection contre les surcharges, protection
contre les sous-tensions, protection contre la décharge excessive,
limite de charge personnalisable, pack batterie résistant à l'eau
IPX7
01 02 03 04 05 06 07 08 09 10 11 12 13 14 15
16 17 18 19 20 21 22 23 24 25 26 27 28 29 30 31 32 33
34 35 36 37 38 39 40 41 42 43 44 45 46 47 48 49 50 51
52 53 54 55 56 57 58 59 60 61 62 63 64 65 66 67 68 69
70 71 72 73 74 75 76 77
78 79 80 81
82 83 84 85
86 87 88 89 90 91 92 93
94 95 96 97 98 99 100 101
102 103 104 105 106 107 108
量产后变更:文案更新
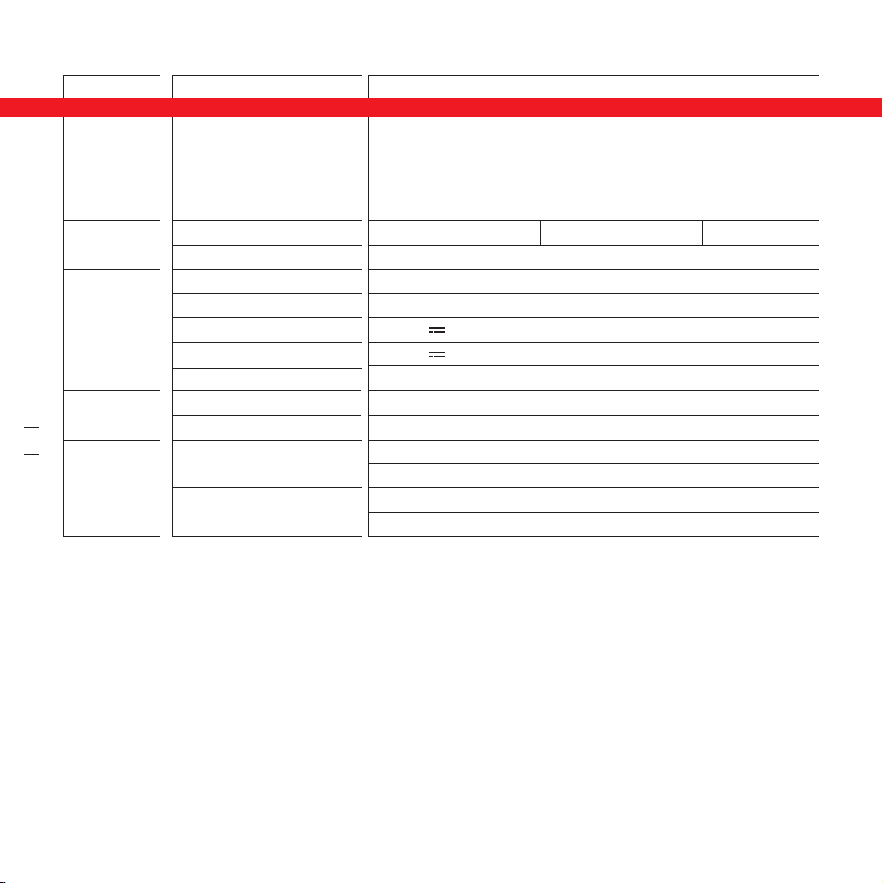
Circ
25 km/h (15,5 mph)
Temperatura di esercizio
Temperatura di conservazione
Grado di protezione IP
[3]
Durata della ricarica (singola)
[4]
Durata della ricarica (doppia)
[5]
Tensione nominale
Max. tensione di ricarica
Energia nominale
Capacità nominale
Temperatura di ricarica
-10—40°C (14—104°F)
-10—50°C (14—122°F)
IPX6
Circa 3,5 h
Circa 2,5 h
46,8 V
54,6 V
597Wh
12,75 Ah
0—55°C (32—131°F)
Circa 75 km (47 mi)
Circa 80 km (50 mi)
Circa 30%
Circ
25 km/h (15,5 mph)
Circ
20 km/h (12,4 mph)
Circa 65 km (40 mi)
DRIVE
ECO
SPORT
Strade parzialmente non asfaltate e per lo più strade lisce o
normalmente asfaltate
Circa 65 km (40 mi) Circa 75 km (47 mi)
051601D
Max. velocità
Max. pendenza
[2]
Terreni percorribili
Informazioni
sul prodotto
Voci Parametro
Requisiti
per la guida
Prestazioni
del veicolo
Pacco
batteria
Autonomia
delle varie
modalità di
velocità
[1]
IT Specifiche
Nome
Modello
L × W × H
L × W × H (Da piegato)
Peso netto
Carico utile max.
Età consigliata
Altezza necessaria
Segway eKickScooter Ninebot MAX G3
051601E
Circa 1218×590×1299 mm (48×23,2×51,1 in)
Circa 1218×590×592 mm (48×23,2×23,3 in)
Circa 24,6 kg (54,2 lbs)
130 kg (286 lb)
16—55 anni
160 cm+
051601I
[1] Reichweiten der Geschwindigkeitsmodi: Getestet während der Fahrt mit vollem Akku, 75±5 kg (165±11 lbs) Last, 25±5
℃ (77±9℉), bei max. Durchschnittsgeschwindigkeit jedes Geschwindigkeitsmodus auf Asphalt.
* Einige der Faktoren, die die Reichweite beeinflussen, sind Geschwindigkeit, Last, Anzahl der Starts und Stopps,
Umgebungstemperatur usw.
[2] Max. Steigung: getestet beim Fahren mit 70 % (±10 %) Akku, 75 kg (165 lbs) Last, bei einer Geschwindigkeit von 15
km/h (9,3 mph) beim Aufstieg auf eine 10 m lange Steigung (die Geschwindigkeit ist größer als 6 km/h (3,7 mph)
beim Durchfahren der Steigung).
[3] IP-Schutzklasse: Das Produkt ist gemäß der IEC-Norm 60529 gegen Wasserstrahlen aus allen Winkeln geschützt und
gemäß IPX6 für Wasserbeständigkeit eingestuft. Es wurde unter kontrollierten Bedingungen getestet. Laden Sie das
Produkt nicht, wenn es nass oder in einer feuchten Umgebung ist. Die Eintauchung in Flüssigkeit und die daraus
resultierenden Schäden sind nicht durch die Garantie abgedeckt.
[4]Ladedauer (Einzeln): Laden Sie mit dem im Paket enthaltenen AC-Ladekabel mit 220 V Spannung in einer
Umgebung von 20–25 °C (77–86 °F).
[5]Ladedauer (Dual): Laden Sie mit dem im Paket enthaltenen AC-Ladekabel und dem Ninebot-Adapter (separat
erhältlich, Modell: NBW54D601D3D) gleichzeitig mit 220 V Spannung in einer Umgebung von 20–25 °C (77–86 °F).
Position Parameter
BMS
(Akkumanagementsystem)
Nennleistung
Max. Leistung
Typ
Eingangsspannung
Nennleistung
Max. Leistung
Nenn-Ausgangsleistung
Reifen
Empfohlener Reifendruck
0,7 kW, 700 W
2 kW, 2000 W
Integriert
100—240 V~50—60 Hz
53,6 V 3,9 A Max.
54,6 V
209,04 W
Selbstabdichtende schlauchlose 11-Zoll-Reifen
42—48 psi
Vorne hydraulischer Zweirohr-Stoßdämpfer
Hinten hydraulischer Zweirohr-Stoßdämpfer
Vorne Scheibenbremse
Hinten Scheibenbremse
0.5 kW, 500 W 0.5 kW, 500 W
Akkusatz
Federungssystem
Bremssystem
Motor
Ladegerät
Reifen
Sonstiges
Ladezeiterfassung, intelligente Ladeplanung, Überwachung
des Akkuzustands, Kurzschlussschutz, Überstromschutz,
Temperaturschutz, Überladeschutz, Unterspannungsschutz,
Tiefentladeschutz, anpassbares Ladelimit, wasserdichter IPX7-
Akkusatz
01 02 03 04 05 06 07 08 09 10 11 12 13 14 15
16 17 18 19 20 21 22 23 24 25 26 27 28 29 30 31 32 33
34 35 36 37 38 39 40 41 42 43 44 45 46 47 48 49 50 51
52 53 54 55 56 57 58 59 60 61 62 63 64 65 66 67 68 69
70 71 72 73 74 75 76 77
78 79 80 81
82 83 84 85
86 87 88 89 90 91 92 93 94 95
96 97 98 99 100 101
102 103 104 105 106 107 108

Circ
25 km/h (15,5 mph)
Temperatura di esercizio
Temperatura di conservazione
Grado di protezione IP
[3]
Durata della ricarica (singola)
[4]
Durata della ricarica (doppia)
[5]
Tensione nominale
Max. tensione di ricarica
Energia nominale
Capacità nominale
Temperatura di ricarica
-10—40°C (14—104°F)
-10—50°C (14—122°F)
IPX6
Circa 3,5 h
Circa 2,5 h
46,8 V
54,6 V
597Wh
12,75 Ah
0—55°C (32—131°F)
Circa 75 km (47 mi)
Circa 80 km (50 mi)
Circa 30%
Circ
25 km/h (15,5 mph)
Circ
20 km/h (12,4 mph)
Circa 65 km (40 mi)
DRIVE
ECO
SPORT
Strade parzialmente non asfaltate e per lo più strade lisce o
normalmente asfaltate
Circa 65 km (40 mi) Circa 75 km (47 mi)
051601D
Max. velocità
Max. pendenza
[2]
Terreni percorribili
Informazioni
sul prodotto
Voci Parametro
Requisiti
per la guida
Prestazioni
del veicolo
Pacco
batteria
Autonomia
delle varie
modalità di
velocità
[1]
IT Specifiche
Nome
Modello
L × W × H
L × W × H (Da piegato)
Peso netto
Carico utile max.
Età consigliata
Altezza necessaria
Segway eKickScooter Ninebot MAX G3
051601E
Circa 1218×590×1299 mm (48×23,2×51,1 in)
Circa 1218×590×592 mm (48×23,2×23,3 in)
Circa 24,6 kg (54,2 lbs)
130 kg (286 lb)
16—55 anni
160 cm+
051601I
[1] Reichweiten der Geschwindigkeitsmodi: Getestet während der Fahrt mit vollem Akku, 75±5 kg (165±11 lbs) Last, 25±5
℃ (77±9℉), bei max. Durchschnittsgeschwindigkeit jedes Geschwindigkeitsmodus auf Asphalt.
* Einige der Faktoren, die die Reichweite beeinflussen, sind Geschwindigkeit, Last, Anzahl der Starts und Stopps,
Umgebungstemperatur usw.
[2] Max. Steigung: getestet beim Fahren mit 70 % (±10 %) Akku, 75 kg (165 lbs) Last, bei einer Geschwindigkeit von 15
km/h (9,3 mph) beim Aufstieg auf eine 10 m lange Steigung (die Geschwindigkeit ist größer als 6 km/h (3,7 mph)
beim Durchfahren der Steigung).
[3] IP-Schutzklasse: Das Produkt ist gemäß der IEC-Norm 60529 gegen Wasserstrahlen aus allen Winkeln geschützt und
gemäß IPX6 für Wasserbeständigkeit eingestuft. Es wurde unter kontrollierten Bedingungen getestet. Laden Sie das
Produkt nicht, wenn es nass oder in einer feuchten Umgebung ist. Die Eintauchung in Flüssigkeit und die daraus
resultierenden Schäden sind nicht durch die Garantie abgedeckt.
[4]Ladedauer (Einzeln): Laden Sie mit dem im Paket enthaltenen AC-Ladekabel mit 220 V Spannung in einer
Umgebung von 20–25 °C (77–86 °F).
[5]Ladedauer (Dual): Laden Sie mit dem im Paket enthaltenen AC-Ladekabel und dem Ninebot-Adapter (separat
erhältlich, Modell: NBW54D601D3D) gleichzeitig mit 220 V Spannung in einer Umgebung von 20–25 °C (77–86 °F).
Position Parameter
BMS
(Akkumanagementsystem)
Nennleistung
Max. Leistung
Typ
Eingangsspannung
Nennleistung
Max. Leistung
Nenn-Ausgangsleistung
Reifen
Empfohlener Reifendruck
0,7 kW, 700 W
2 kW, 2000 W
Integriert
100—240 V~50—60 Hz
53,6 V 3,9 A Max.
54,6 V
209,04 W
Selbstabdichtende schlauchlose 11-Zoll-Reifen
42—48 psi
Vorne hydraulischer Zweirohr-Stoßdämpfer
Hinten hydraulischer Zweirohr-Stoßdämpfer
Vorne Scheibenbremse
Hinten Scheibenbremse
0.5 kW, 500 W 0.5 kW, 500 W
Akkusatz
Federungssystem
Bremssystem
Motor
Ladegerät
Reifen
Sonstiges
Ladezeiterfassung, intelligente Ladeplanung, Überwachung
des Akkuzustands, Kurzschlussschutz, Überstromschutz,
Temperaturschutz, Überladeschutz, Unterspannungsschutz,
Tiefentladeschutz, anpassbares Ladelimit, wasserdichter IPX7-
Akkusatz
01 02 03 04 05 06 07 08 09 10 11 12 13 14 15
16 17 18 19 20 21 22 23 24 25 26 27 28 29 30 31 32 33
34 35 36 37 38 39 40 41 42 43 44 45 46 47 48 49 50 51
52 53 54 55 56 57 58 59 60 61 62 63 64 65 66 67 68 69
70 71 72 73 74 75 76 77
78 79 80 81
82 83 84 85
86 87 88 89 90 91 92 93 94 95
96 97 98 99 100 101
102 103 104 105 106 107 108
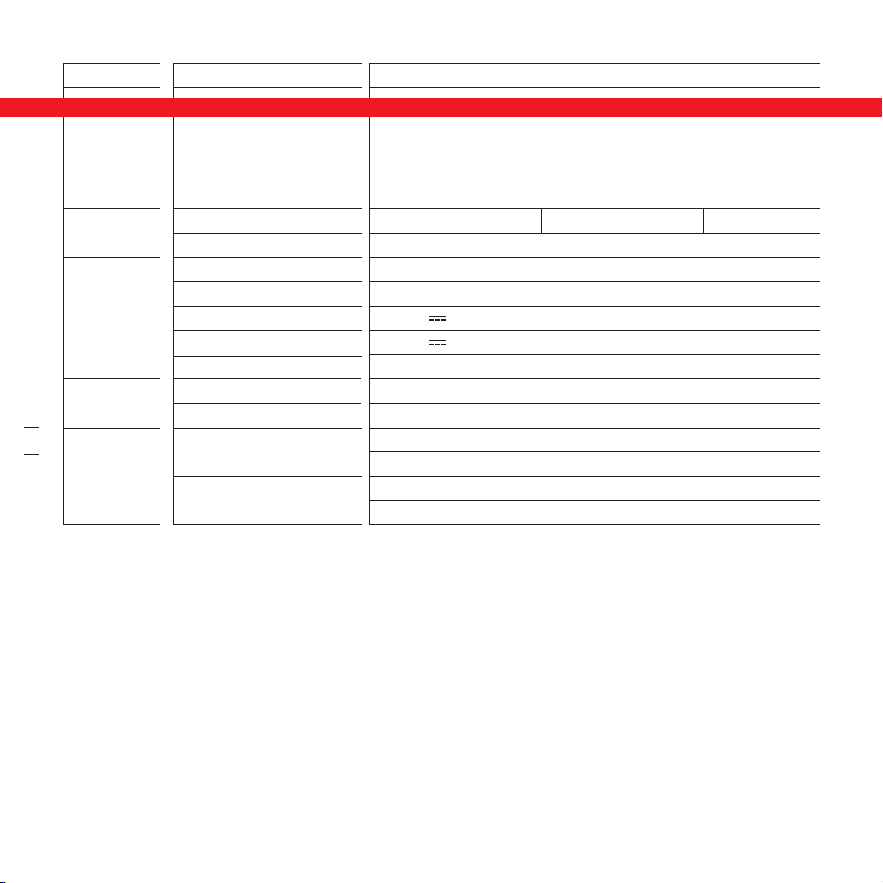
[1] Autonomia delle varie modalità di velocità: Testata durante la guida con batteria a piena carica, con carico di 75±5 kg
(165±11 lb), a una temperatura di 25±5°C (77±9°F) e alla max. velocità media di ciascuna modalità di velocità su
asfalto.
*Tra i fattori che influenzano l'autonomia figurano velocità, carico, numero di avviamenti e arresti, temperatura ambiente,
ecc.
[2] Max. pendenza: testato durante la guida con batteria al 70% (±10%), carico di 75 kg (165 lbs), a una velocità di 15
km/h (9,3 mph) salendo una salita di 10 m (velocità superiore a 6 km/h (3,7 mph) quando si attraversa il pendio).
[3] Grado di protezione IP: Il prodotto è protetto contro i getti d'acqua ad alta pressione provenienti da qualsiasi
angolazione, classificato IPX6 per la resistenza all'acqua secondo lo standard IEC 60529 e testato in condizioni
controllate. Non caricare il prodotto quando è bagnato o in un ambiente umido. L'immersione in liquido e i danni
risultanti non sono coperti dalla garanzia.
[4]Durata della ricarica (singola): Eseguire la ricarica utilizzando il cavo di ricarica CA in dotazione con una tensione di
220 V e in un ambiente con temperatura compresa tra 20 e 25 ℃ (77 e 86 ℉).
[5]Durata della ricarica (doppia): Eseguire la ricarica utilizzando contemporaneamente il cavo di ricarica CA in dotazione
e l'adattatore Ninebot (venduto separatamente, modello: NBW54D601D3D) con tensione 220 V e in un ambiente con
temperatura compresa tra 20 e 25 ℃ (77 e 86 ℉).
Voci Parametro
Sistema di gestione della
batteria
Potenza nominale
Max. potenza
Tipo
Tensione di ingresso
Uscita nominale
Uscita max.
Potenza erogata
Tipo di pneumatici
Pressione degli pneumatici
0,7 kW, 700 W
2 kW, 2000 W
Incorporato
100—240 V~50—60 Hz
53,6 V 3,9 A max.
54,6 V
209,04 W
Pneumatici tubeless autosigillanti da 11 pollici
42—48 psi
Anteriore: Ammortizzatore idraulico anteriore a due tubi
Posteriore: Doppi ammortizzatori idraulici posteriori
Anteriore: freno a disco
Posteriore: freno a disco
0.5 kW, 500 W 0.5 kW, 500 W
Pacco
batteria
Sistema di sospensione
Sistema frenante
Motore
Caricabatterie
Pneumatici
Altro
Monitoraggio del tempo di ricarica, programmazione intelligente
della ricarica, monitoraggio dello stato della batteria, protezione da
cortocircuito, protezione da sovracorrente, protezione da temperatura,
protezione da sovraccarico, protezione da sottotensione, protezione
da scarica eccessiva, limite di carica personalizzabile, pacco batteria
impermeabile di grado IPX7
Aprox.
25 km/h (15,5 mph)
Temperatura de funcionamiento
Temperatura de almacenamiento
Clasificación IP
[3]
Duración de la carga (simple)
[4]
Duración de la carga (dual)
[5]
Tensión nominal
Máx. tensión de carga
Energía nominal
Capacidad nominal
Temperatura de carga
-10—40°C (14—104°F)
-10—50℃ (14—122℉)
IPX6
Aprox. 3,5 h
Aprox. 2,5 h
46,8 V
54,6 V
597 Wh
12,75 Ah
0—55℃ (32—131℉)
Aprox. 75 km (47 miles)
Aprox. 80 km (50 miles)
Aprox. 30%
Aprox.
25 km/h (15,5 mph)
Aprox.
20 km/h (12,4 mph)
Aprox.
65 km (40 miles)
DRIVE
ECO
SPORT
Strade parzialmente non asfaltate e per lo più strade lisce o
normalmente asfaltate
Aprox.
65 km (40 miles)
Aprox.
75 km (47 miles)
051601D
Velocidad máx.
Pendiente máxima
[2]
Terreno transitable
Información
del producto
Artículo Parámetro
Requisitos de
conducción
Rendimiento
del vehículo
Batería
Alcances de
modos de
velocidad
[1]
ES Especificaciones
Nombre
Modelo
L × W × H
L × W × H (Plegado)
Peso neto
Carga útil máxima
Edad recomendada
Altura requerida
Segway eKickScooter Ninebot MAX G3
051601E
Aprox. 1218×590×1299 mm (48×23,2×51,1 in)
Aprox. 1218×590×592 mm (48×23,2×23,3 in)
Aprox. 24,6 kg (54,2 lb)
130 kg (286 lb)
16—55 años
160 cm+
051601I
01 02 03 04 05 06 07 08 09 10 11 12 13 14 15
16 17 18 19 20 21 22 23 24 25 26 27 28 29 30 31 32 33
34 35 36 37 38 39 40 41 42 43 44 45 46 47 48 49 50 51
52 53 54 55 56 57 58 59 60 61 62 63 64 65 66 67 68 69
70 71 72 73 74 75 76 77
78 79 80 81
82 83 84 85
86 87 88 89 90 91 92 93 94 95 96 97
98 99 100 101
102 103 104 105 106 107 108

[1] Alcances de modos de velocidad: Probados mientras se conduce con batería llena, 75 ± 5 kg (165 ± 11 lb) de carga,
25 ± 5℃ (77 ± 9℉), a la velocidad máxima de cada modo de velocidad en promedio en el pavimento.
* Algunos de los factores que afectan al rango incluyen: velocidad, carga, número de arranques y paradas, temperatura
ambiente, etc.
[2] Pendiente máx.: probada con un 70% (±10%) de batería, 75 kg (165 lbs) de carga, a una velocidad de 15 km/h (9,3
mph) subiendo una pendiente de 10 m de longitud (con una velocidad superior a 6 km/h (3,7 mph) al pasar por la
pendiente).
[3] El producto está protegido contra corrientes de agua de alta presión desde cualquier ángulo, clasificado como IPX6
para resistencia al agua según la norma IEC 60529 y probado en condiciones controladas. No cargue el producto
cuando esté mojado o en un ambiente húmedo. La inmersión en líquido y los daños resultantes no están cubiertos
por la garantía.
[4] Duración de la carga (simple): Cargue con el cable de carga de CA del paquete con voltaje de 220V en un entorno
de 20 a 25℃ (77 a 86℉).
[5] Duración de la carga (Dual): Cargue con el cable de carga de CA que se incluye y el adaptador Ninebot (se vende por
separado, modelo: NBW54D601D3D) al mismo tiempo con voltaje de 220V en un entorno de 20—25℃ (77—86℉).
Artículo Parámetro
Sistema de gestión de la
batería
Potenza nominale
Max. potenza
Tipo
Tensione di ingresso
Uscita nominale
Uscita max.
Potenza erogata
Tipo di pneumatici
Pressione degli pneumatici
0,7 kW, 700 W
2 kW, 2000 W
Integrado
100—240 V~50—60 Hz
53,6 V 3,9 A máx.
54,6 V
209,04 W
Neumáticos sin cámara autosellantes de 11 pulgadas
42—48 psi
Amortiguador hidráulico de doble tubo delantero
Amortiguadores hidráulicos duales traseros
Delantero: freno de disco
Trasero: freno de disco
0.5 kW, 500 W 0.5 kW, 500 W
Batería
Sistema de suspensión
Sistema de frenos
Motor
Cargador
Neumático
Otros
Seguimiento del tiempo de carga, programación de carga inteligente,
monitoreo del estado de la batería, protección contra cortocircuitos,
protección contra la sobretensión, protección de temperatura,
protección contra sobrecarga, protección contra baja tensión,
protección contra descarga excesiva, límite de carga personalizable,
compartimento de las baterías resistente al agua IPX7
Około
25 km/h (15,5 mph)
Temperatura robocza
Temperatura otoczenia
podczasprzechowywania
Stopień ochrony IP
[3]
Czas ładowania (pojedyncze)
[4]
Czas ładowania (podwójne)
[5]
Napięcie nominalne
Max. napięcie ładowania
Energia nominalna
Pojemność nominalna
Temperatura otoczenia ładowania
-10—40℃ (14—104℉)
-10—50℃ (14—122℉)
IPX6
Około 3,5 h
Około 2,5 h
46,8 V
54,6 V
597 Wh
12,75 Ah
0—55℃ (32—131℉)
Około 75 km (47 mili)
Około 80 km (50 mili)
Około 30%
Około
25 km/h (15,5 mph)
Około
20 km/h (12,4 mph)
Około
65 km (40 mili)
DRIVE
ECO
SPORT
Przeważnie drogi o gładkiej nawierzchni lub normalne drogi
asfaltowe
Około
65 km (40 mili)
Około
75 km (47 mili)
051601D
Prędkość maks.
Nachylenie maks.
[2]
Nawierzchnia nadająca się do
jeżdżenia
Informacje o
produkcie
Elementy Parametr
Wymagania
dotyczące
jazdy
Osiągi
pojazdu
Zespół
akumulatora
Zasięg w
poszczególnyc
h trybach
prędkości
[1]
PL Dane techniczne
Nazwa
Model
Dł. × szer. × wys.
Dł. × szer. × wys. (po złożeniu)
Masa netto
Maks. obciążenie użyteczne
Zalecany wiek
Wymagany wzrost
Segway eKickScooter Ninebot MAX G3
051601E
Około 1218×590×1299 mm (48×23,2×51,1 cala)
Około 1218×590×592 mm (48×23,2×23,3 cala)
Około 24,6 kg (54,2 funtów)
130 kg (286 funtów)
16—55 lat
160 cm+
051601I
01 02 03 04 05 06 07 08 09 10 11 12 13 14 15
16 17 18 19 20 21 22 23 24 25 26 27 28 29 30 31 32 33
34 35 36 37 38 39 40 41 42 43 44 45 46 47 48 49 50 51
52 53 54 55 56 57 58 59 60 61 62 63 64 65 66 67 68 69
70 71 72 73 74 75 76 77
78 79 80 81
82 83 84 85
86 87 88 89 90 91 92 93 94 95 96 97 98 99
100 101
102 103 104 105 106 107 108

Ca.
25 km/h (15,5 mph)
Bedrijfstemperatuur
Omgevingstemperatuur
voor opslag
IP-klasse
[3]
Oplaadduur (enkel)
[4]
Oplaadduur (dubbel)
[5]
Nominale spanning
Max. laadspanning
Nominale energie
Nominale capaciteit
Omgevingstemperatuur bij
opladen
-10—40℃ (14—104℉)
-10—50℃ (14—122℉)
IPX6
Ca. 3,5 h
Ca. 2,5 h
46,8 V
54,6 V
597 Wh
12,75 Ah
0—55℃ (32—131℉)
Ca. 75 km (47 miles)
Ca. 80 km (50 miles)
Ca. 30%
Ca.
25 km/h (15,5 mph)
Ca.
20 km/h (12,4 mph)
Ca.
65 km (40 miles)
DRIVE
ECO
SPORT
Gedeeltelijk onverharde wegen en meestal vlakke wegen of
normaal asfalt, geasfalteerde wegen
Ca.
65 km (40 miles)
Ca.
65 km (40 miles)
051601D
Max. snelheid
Max. hellingshoek
[2]
Overrijdbaar terrein
Informatie
over het
product
Item Parameter
Vereisten voor
het rijden
Voertuig
prestaties
Accu
Bereiken van
snelheidsmodi
[1]
NL Specifications
Naam
Model
L × B × H*
L × B × H (gevouwen)
Netto gewicht
Maximaal laadvermogen
Aanbevolen leeftijd
Vereiste hoogte
Segway eKickScooter Ninebot MAX G3
051601E
Ca. 1218×590×1299 mm (48×23,2×51,1 in)
Ca. 1218×590×592 mm (48×23,2×23,3 in)
Ca. 24,6 kg (54,2 lbs)
130 kg (286 lbs)
16—55 years
160 cm+
051601I
[1] Zasięg w poszczególnych trybach prędkości: Testowany podczas jazdy z pełnym akumulatorem, z obciążeniem 75±5
kg (165±11 funtów), w temperaturze 25±5℃ (77±9℉) i uśrednioną prędkością maksymalną każdego trybu prędkości
na utwardzonej nawierzchni.
* Niektóre z czynników wpływających na zasięg to: prędkość, obciążenie, liczba ruszeń i zatrzymań, temperatura
otoczenia itp.
[2] MMaks. nachylenie: testowany podczas jazdy z akumulatorem naładowanym w 70% (±10%), obciążeniem 75 kg (165
funtów), z prędkością 15 km/h (9,3 mph) podczas podjazdu na zbocze o długości 10 m (prędkość większa niż 6 km/h
(3,7 mph) podczas jazdy po zboczu).
[3] Stopień ochrony IP: Produkt jest chroniony przed strumieniem wody o wysokim ciśnieniu z dowolnego kierunku, który
został oceniony na odporność na wodę IPX6 zgodnie ze standardem IEC 60529 i przetestowany w kontrolowanych
warunkach. Nie ładuj produktu, gdy jest mokry lub w wilgotnym środowisku. Zanurzenie w płynie i wynikające z tego
uszkodzenia nie podlegają gwarancji.
[4] Czas ładowania (pojedyncze): Ładuj za pomocą przewodu ładującego AC dołączonego do zestawu napięciem 220 V
w temperaturze 20–25℃ (77–86℉).
[5] Czas ładowania (podwójne): Ładuj za pomocą przewodu ładującego AC dołączonego do zestawu i adaptera Ninebot
(sprzedawanego oddzielnie, model: NBW54D601D3D) napięciem 220 V w temperaturze otoczenia 20–25℃ (77–86℉).
Elementy Parametr
System zarządzania
akumulatorem
Moc nominalna
Moc maks.
Escribe
Napięcie wejściowe
Maks. moc
Moc znamionowa
Moc wyjściowa znamionowa
Typ opony
Ciśnienie w oponach
0,7 kW, 700 W
2 kW, 2000 W
Incorporado - Integrado
100—240 V~50—60 Hz
53,6 V 3,9 A Maks.
54,6 V
209,04 W
11-calowe samouszczelniające opony bezdętkowe
42—48 psi
Przedni amortyzator hydrauliczny dwururowy
Tylne podwójne amortyzatory hydrauliczne
Przód: Hamulec tarczowy
Tył: Hamulec tarczowy
0.5 kW, 500 W 0.5 kW, 500 W
Zespół
akumulatora
Układ zawieszenia
Układ hamulcowy
Silnik
Ładowarka
Opona
Inne
Śledzenie czasu ładowania, inteligentne planowanie ładowania,
monitorowanie stanu akumulatora, zabezpieczenie przed zwarciem,
zabezpieczenie nadprądowe, zabezpieczenie temperaturowe,
zabezpieczenie przed przeładowaniem, zabezpieczenie przed zbyt
niskim napięciem, zabezpieczenie przed nadmiernym rozładowaniem,
konfigurowalne ograniczenie ładowania, wodoodporny zespół
akumulatora IPX7
01 02 03 04 05 06 07 08 09 10 11 12 13 14 15
16 17 18 19 20 21 22 23 24 25 26 27 28 29 30 31 32 33
34 35 36 37 38 39 40 41 42 43 44 45 46 47 48 49 50 51
52 53 54 55 56 57 58 59 60 61 62 63 64 65 66 67 68 69
70 71 72 73 74 75 76 77
78 79 80 81
82 83 84 85
86 87 88 89 90 91 92 93 94 95 96 97 98 99 100 101
102 103 104 105 106 107 108
Ca.
25 km/h (15,5 mph)
Bedrijfstemperatuur
Omgevingstemperatuur
voor opslag
IP-klasse
[3]
Oplaadduur (enkel)
[4]
Oplaadduur (dubbel)
[5]
Nominale spanning
Max. laadspanning
Nominale energie
Nominale capaciteit
Omgevingstemperatuur bij
opladen
-10—40℃ (14—104℉)
-10—50℃ (14—122℉)
IPX6
Ca. 3,5 h
Ca. 2,5 h
46,8 V
54,6 V
597 Wh
12,75 Ah
0—55℃ (32—131℉)
Ca. 75 km (47 miles)
Ca. 80 km (50 miles)
Ca. 30%
Ca.
25 km/h (15,5 mph)
Ca.
20 km/h (12,4 mph)
Ca.
65 km (40 miles)
DRIVE
ECO
SPORT
Gedeeltelijk onverharde wegen en meestal vlakke wegen of
normaal asfalt, geasfalteerde wegen
Ca.
65 km (40 miles)
Ca.
65 km (40 miles)
051601D
Max. snelheid
Max. hellingshoek
[2]
Overrijdbaar terrein
Informatie
over het
product
Item Parameter
Vereisten voor
het rijden
Voertuig
prestaties
Accu
Bereiken van
snelheidsmodi
[1]
NL Specifications
Naam
Model
L × B × H*
L × B × H (gevouwen)
Netto gewicht
Maximaal laadvermogen
Aanbevolen leeftijd
Vereiste hoogte
Segway eKickScooter Ninebot MAX G3
051601E
Ca. 1218×590×1299 mm (48×23,2×51,1 in)
Ca. 1218×590×592 mm (48×23,2×23,3 in)
Ca. 24,6 kg (54,2 lbs)
130 kg (286 lbs)
16—55 years
160 cm+
051601I
[1] Zasięg w poszczególnych trybach prędkości: Testowany podczas jazdy z pełnym akumulatorem, z obciążeniem 75±5
kg (165±11 funtów), w temperaturze 25±5℃ (77±9℉) i uśrednioną prędkością maksymalną każdego trybu prędkości
na utwardzonej nawierzchni.
* Niektóre z czynników wpływających na zasięg to: prędkość, obciążenie, liczba ruszeń i zatrzymań, temperatura
otoczenia itp.
[2] MMaks. nachylenie: testowany podczas jazdy z akumulatorem naładowanym w 70% (±10%), obciążeniem 75 kg (165
funtów), z prędkością 15 km/h (9,3 mph) podczas podjazdu na zbocze o długości 10 m (prędkość większa niż 6 km/h
(3,7 mph) podczas jazdy po zboczu).
[3] Stopień ochrony IP: Produkt jest chroniony przed strumieniem wody o wysokim ciśnieniu z dowolnego kierunku, który
został oceniony na odporność na wodę IPX6 zgodnie ze standardem IEC 60529 i przetestowany w kontrolowanych
warunkach. Nie ładuj produktu, gdy jest mokry lub w wilgotnym środowisku. Zanurzenie w płynie i wynikające z tego
uszkodzenia nie podlegają gwarancji.
[4] Czas ładowania (pojedyncze): Ładuj za pomocą przewodu ładującego AC dołączonego do zestawu napięciem 220 V
w temperaturze 20–25℃ (77–86℉).
[5] Czas ładowania (podwójne): Ładuj za pomocą przewodu ładującego AC dołączonego do zestawu i adaptera Ninebot
(sprzedawanego oddzielnie, model: NBW54D601D3D) napięciem 220 V w temperaturze otoczenia 20–25℃ (77–86℉).
Elementy Parametr
System zarządzania
akumulatorem
Moc nominalna
Moc maks.
Escribe
Napięcie wejściowe
Maks. moc
Moc znamionowa
Moc wyjściowa znamionowa
Typ opony
Ciśnienie w oponach
0,7 kW, 700 W
2 kW, 2000 W
Incorporado - Integrado
100—240 V~50—60 Hz
53,6 V 3,9 A Maks.
54,6 V
209,04 W
11-calowe samouszczelniające opony bezdętkowe
42—48 psi
Przedni amortyzator hydrauliczny dwururowy
Tylne podwójne amortyzatory hydrauliczne
Przód: Hamulec tarczowy
Tył: Hamulec tarczowy
0.5 kW, 500 W 0.5 kW, 500 W
Zespół
akumulatora
Układ zawieszenia
Układ hamulcowy
Silnik
Ładowarka
Opona
Inne
Śledzenie czasu ładowania, inteligentne planowanie ładowania,
monitorowanie stanu akumulatora, zabezpieczenie przed zwarciem,
zabezpieczenie nadprądowe, zabezpieczenie temperaturowe,
zabezpieczenie przed przeładowaniem, zabezpieczenie przed zbyt
niskim napięciem, zabezpieczenie przed nadmiernym rozładowaniem,
konfigurowalne ograniczenie ładowania, wodoodporny zespół
akumulatora IPX7
01 02 03 04 05 06 07 08 09 10 11 12 13 14 15
16 17 18 19 20 21 22 23 24 25 26 27 28 29 30 31 32 33
34 35 36 37 38 39 40 41 42 43 44 45 46 47 48 49 50 51
52 53 54 55 56 57 58 59 60 61 62 63 64 65 66 67 68 69
70 71 72 73 74 75 76 77
78 79 80 81
82 83 84 85
86 87 88 89 90 91 92 93 94 95 96 97 98 99 100 101
102 103 104 105 106 107 108

Segway eKickScooter Ninebot MAX G3
051601E
Aprox. 1218×590×1299 mm (48×23,2×51,1 in)
Aprox. 1218×590×592 mm (48×23,2×23,3 in)
Aprox. 24,6 kg (54,2 libras)
130 kg (286 libras)
16—55 anos
160 cm+
[1] Bereiken van snelheidsmodi: Bereiken van snelheidsmodi: getest tijdens het rijden met een volle accu, 75±5 kg
(165±11 lbs) lading, 25± 5℃ (77±9℉), bij de maximale snelheid van elke snelheidsmodus op gemiddeld wegdek.
* Enkele factoren die het bereik beïnvloeden zijn: snelheid, aantal starts en stops, omgevingstemperatuur, enz.
[2] Max. hellingshoek: getest tijdens het rijden met 70% (±10%) batterij, 75 kg (165 lbs) lading, met een snelheid van 15
km/u (9,3 mph) bij het beklimmen van een 10 m lange helling (de snelheid is hoger dan 6 km/u (3,7 mph) bij het
passeren van de helling).
[3] IP-klasse: Het product is beschermd tegen hoge druk waterstralen vanuit elke hoek, wat IPX6 is beoordeeld voor
waterbestendigheid volgens de IEC-standaard 60529 en is getest onder gecontroleerde omstandigheden. Laad het
product niet op als het nat is of in een vochtige omgeving. Onderdompeling in vloeistof en de resulterende schade
vallen niet onder de garantie.
[4] Oplaadduur (enkel): Opladen met de AC-laaddraad in de verpakking met een spanning van 220 V in een omgeving
met een temperatuur van 20-25 ℃ (77-86 ℉).
[5] Oplaadduur (dubbel): Opladen met de AC-oplaadkabel in de verpakking, samen met de Ninebot-adapter (apart
verkrijgbaar, model: NBW54D601D3D) met 220V spanning in een omgeving met een temperatuur van 20—25℃
(77—86℉).
Item Parameter
Accubeheersysteem
Nominaal vermogen
Max. vermogen
Type
Ingangsspanning
Max. uitgang
Nominale uitgang
Nominaal uitgangsvermogen
Type band
Bandenspanning
0,7 kW, 700 W
2 kW, 2000 W
Integrado
100—240 V~50—60 Hz
53,6 V 3,9 A Max.
54,6 V
209,04 W
11-inch Zelfdichtende tubeless banden
42—48 psi
Hydraulische schokdemper vooraan met twee buizen
Dubbele hydraulische schokdempers achteraan
Vooraan: Schijfrem
Achteraan: Schijfrem
0.5 kW, 500 W 0.5 kW, 500 W
Accu
Ophanging
Remsysteem
Motor
Lader
Band
Overige
Registratie laadtijd, slimme laadplanning, bewaking
accugezondheid, kortsluitbeveiliging, overstroombeveiliging,
temperatuurbeveiliging, overlaadbeveiliging,
onderspanningsbeveiliging, overontladingsbeveiliging,
aanpasbare oplaadlimiet, IPX7 waterbestendige accu
Aprox.
25 km/h (15,5 mph)
Temperatura de operação
Temperatura de armazenamento
IP Rating
[3]
Duração do carregamento (único)
[4]
Duração do carregamento (duplo)
[5]
Voltagem nominal
Máx. Tensão de carregamento
Energia Nominal
Capacidade nominal
Temperatura de Carregamento
-10—40℃ (14—104℉)
-10—50℃ (14—122℉)
IPX6
Aprox. 3,5 h
Aprox. 2,5 h
46,8 V
54,6 V
597 Wh
12,75 Ah
0—55℃ (32—131℉)
Aprox. 75 km (47 milhas)
Aprox. 80 km (50 milhas)
Aprox. 30%
Aprox.
25 km/h (15,5 mph)
Approx.
20 km/h (12,4 mph)
Aprox.
65 km (40 milhas)
DRIVE
ECO
SPORT
Parte das estradas não pavimentadas e a maior parte das
estradas lisas ou de asfalto normal, estradas de alcatrão
Aprox.
65 km (40 milhas)
Approx.
75 km (47 milhas)
051601D
Máx. Velocidade
Inclinação máxima
[2]
Terreno Atravessável
Informações
sobre o
produto
Item Parâmetro
Requisitos de
condução
Desempenho
do veículo
Bateria
Alcance de
Modos de
Velocidade
[1]
PT Especificações
Nome
Modelo
L × W × H
L × W × H (Dobrada)
Peso líquido
Máx. Carga útil
Idade recomendada
Altura Necessária
051601I
01 02 03 04 05 06 07 08 09 10 11 12 13 14 15
16 17 18 19 20 21 22 23 24 25 26 27 28 29 30 31 32 33
34 35 36 37 38 39 40 41 42 43 44 45 46 47 48 49 50 51
52 53 54 55 56 57 58 59 60 61 62 63 64 65 66 67 68 69
70 71 72 73 74 75 76 77
78 79 80 81
82 83 84 85
86 87 88 89 90 91 92 93 94 95 96 97 98 99 100 101
102 103
104 105 106 107 108
Appendix: Phone Holder Installation / Annexe : installation
du support de téléphone / Anhang: Installation des
Telefonhalters / Appendice: Installazione del supporto per
telefono / Anexo: Instalación del soporte del teléfono /
Załącznik: Montaż uchwytuna telefon / Bijlage: Installatie
telefoonhouder / Apêndice: Instalação do suporte do
telemóvel
[1] Alcance de Modos de Velocidade: Testadas enquanto se viaja com uma bateria carregada por completo, 75 kg±5 kg
(165±11 lbs) de carga, 25±5°C (77±9°F), à velocidade máxima de cada modo de velocidade em média no pavimento.
* Alguns dos fatores que afetam a gama incluem velocidade, carga, número de arranques e paragens, temperatura
ambiente, etc.
[2] Inclinação máxima: testado durante a condução com 70% (±10%) de bateria, 75 kg (165 lbs) de carga, a uma
velocidade de 15 km/h (9,3 mph) a subir uma inclinação de 10 m de comprimento (a velocidade superior a 6 km/h (3,7
mph) ao passar pela inclinação).
[3] IP Rating: O produto está protegido contra jatos de água de alta pressão de qualquer ângulo, com classificação IPX6
para resistência à água de acordo com a norma IEC 60529 e testado em condições controladas. Não carregue o
produto quando estiver molhado ou em ambiente úmido. A imersão em líquido e os danos resultantes não são
cobertos pela garantia.
[4] Duração do carregamento (único): Carregue com o fio de carregamento CA na embalagem com tensão de 220 V
num ambiente de 20 a 25 ℃ (77 a 86 ℉).
[5] Duração do carregamento (duplo): Carregue com o fio de carregamento CA no pacote e adaptador Ninebot (vendido
separadamente, modelo: NBW54D601D3D) ao mesmo tempo com tensão de 220 V em um ambiente de 20—25 ℃
(77—86 ℉).
Item Parâmetro
Sistema de gestão de
bateria
Potência nominal
Potência máxima
Tipo
Tensão de entrada
Saída nominal
Saída máxima
Potência de saída
Pneus
Pressão recomendada dos pneus
0,7 kW, 700 W
2 kW, 2000 W
Embutido
100—240 V~50—60 Hz
53,6 V 3,9 A máxima
54,6 V
209,04 W
Pneus sem câmara de ar de 11 polegadas para todo-o-terreno
42—48 psi
Amortecedor hidráulico de tubo duplo dianteiro
Amortecedores hidráulicos duplos traseiros
Travão de disco dianteiro
Travão de disco traseiro
0.5 kW, 500 W 0.5 kW, 500 W
Bateria
Sistema de suspensão
Sistema de travagem
Motor
Carregador
Pneu
Outros
Monitorização de tempo de carregamento, programação de
carregamento inteligente, monitorização da integridade da
bateria, proteção contra curto-circuito, proteção contra
sobrecorrente, proteção de temperatura, proteção contra
sobrecarga, proteção contra subtensão, proteção contra
sobre-descarga, limite de carregamento personalizável, bateria
resistente à água IPX7
EN As shown in the picture, use appropriate tool to dismantle the removable part.
FR Comme illustré ici, utilisez un outil adéquat pour démonter la pièce amovible.
DE Verwenden Sie zum Demontieren des abnehmbaren Teils das entsprechende Werkzeug, wie in der Abbildung
gezeigt.
IT Come mostrato in figura, utilizzare lo strumento appropriato per smontare la parte rimovibile.
ES Como se muestra en la imagen, utilice la herramienta adecuada para desmontar la pieza extraíble.
PL Jak pokazano na rysunku, należy użyć odpowiedniego narzędzia do zdemontowania wyjmowanej części.
NL Gebruik, zoals op de afbeelding weergegeven, het juiste gereedschap om het verwijderbare deel te demonteren.
PT Como mostrado na imagem, use a ferramenta apropriada para desmontar a peça removível.
EN Note: Phone Holder shall be purchased separately.
FR Remarque : le support de téléphone doit être acheté séparément.
DE Hinweis: Der Telefonhalter muss separat erworben werden.
IT Nota: il supporto del telefono deve essere acquistato separatamente.
ES Nota: El soporte del teléfono se comprará por separado.
PL Uwaga: Uchwyt na telefon należy zakupić osobno.
NL Opmerking: De telefoonhouder moet apart worden aangeschaft.
PT Observação: O suporte de telemóvel deve ser adquirido separadamente.
01 02 03 04 05 06 07 08 09 10 11 12 13 14 15
16 17 18 19 20 21 22 23 24 25 26 27 28 29 30 31 32 33
34 35 36 37 38 39 40 41 42 43 44 45 46 47 48 49 50 51
52 53 54 55 56 57 58 59 60 61 62 63 64 65 66 67 68 69
70 71 72 73 74 75 76 77
78 79 80 81
82 83 84 85
86 87 88 89 90 91 92 93 94 95 96 97 98 99 100 101
102 103 104 105
106 107 108
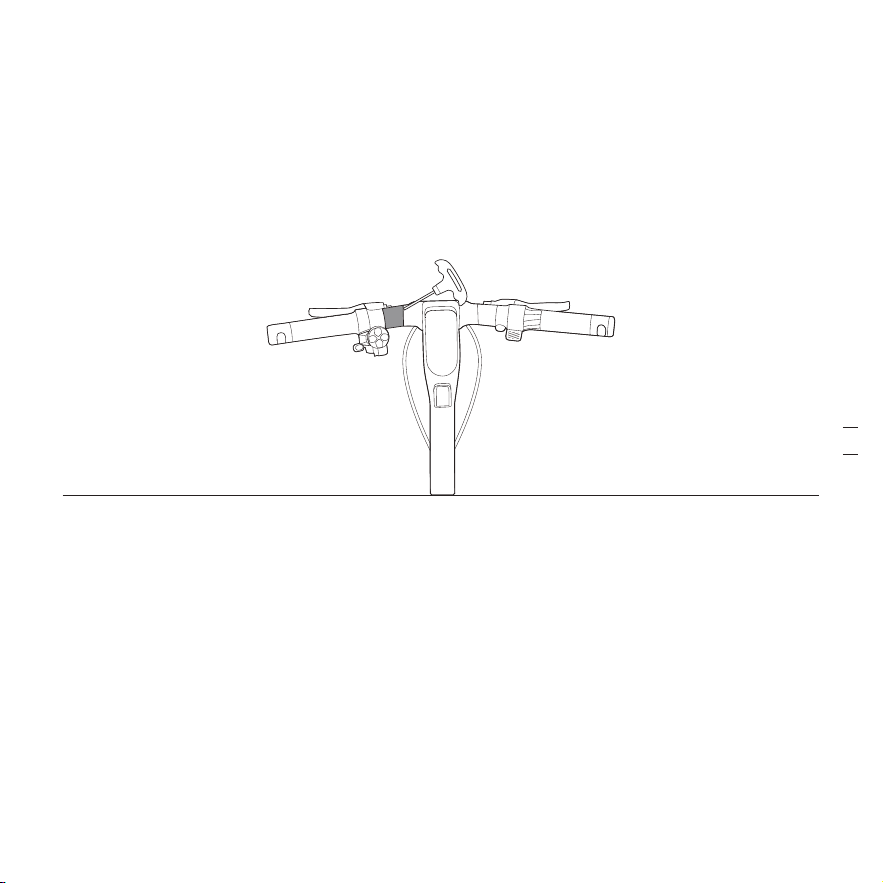
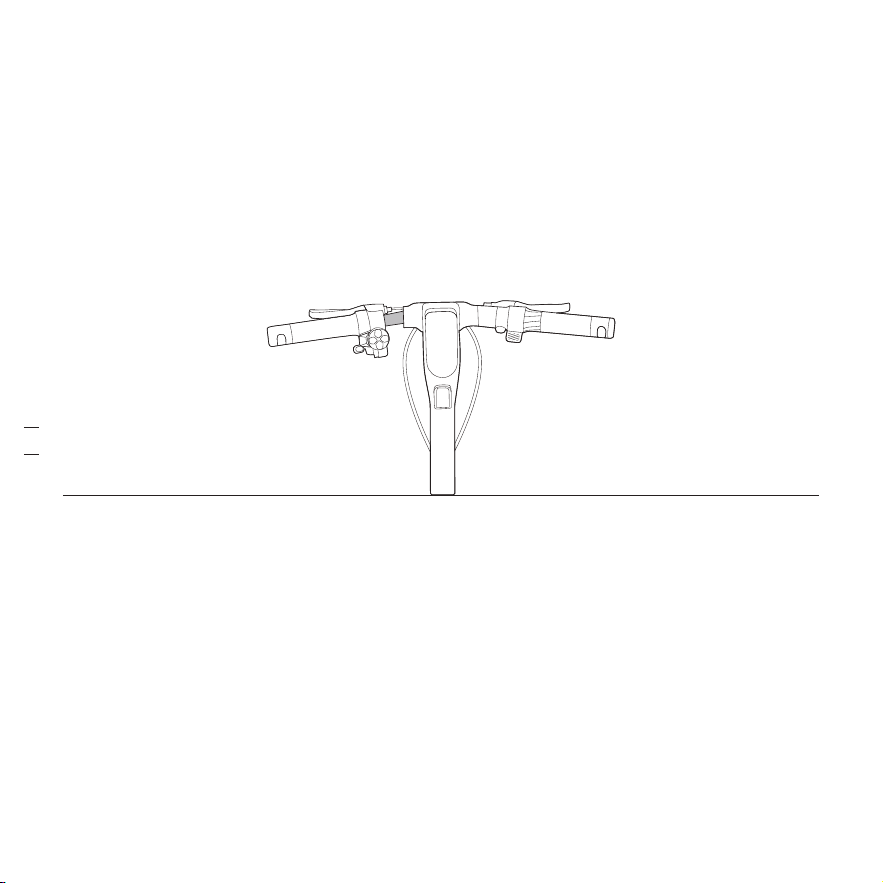
EN Install the phone holder in the place of the original Removable Part. (For specific installation steps, please refer to
the phone holder manual).
FR Installez le support de téléphone à la place de la pièce amovible d’origine. (Pour les étapes d’installation
spécifiques, veuillez vous référer au manuel du support de téléphone.)
DE Installieren Sie die Telefonhalterung anstelle des ursprünglichen abnehmbaren Teils. (Detaillierte
Installationsschritte finden Sie im Handbuch der Telefonhalterung.)
IT Installare il supporto del telefono al posto della parte rimovibile originale (per le fasi specifiche di installazione,
consultare il manuale del supporto del telefono).
ES Instale el soporte del teléfono en el lugar de la pieza extraíble original. (Para conocer pasos de instalación
específicos, consulte el manual del soporte del teléfono.)
PL Zamontuj uchwyt na telefon w miejscu oryginalnego elementu demontowalnego (szczegółowe informacje na temat
instalacji można znaleźć w instrukcji obsługi uchwytu na telefon.)
NL Installeer de telefoonhouder op de plaats van het originele verwijderbare onderdeel. (Raadpleeg voor specifieke
installatiestappen de handleiding van de telefoonhouder.)
PT Instale o suporte do telemóvel no lugar da peça removível original. (Para saber os passos específicos de instalação,
consulte o manual do suporte do telemóvel.)
01 02 03 04 05 06 07 08 09 10 11 12 13 14 15
16 17 18 19 20 21 22 23 24 25 26 27 28 29 30 31 32 33
34 35 36 37 38 39 40 41 42 43 44 45 46 47 48 49 50 51
52 53 54 55 56 57 58 59 60 61 62 63 64 65 66 67 68 69
70 71 72 73 74 75 76 77
78 79 80 81
82 83 84 85
86 87 88 89 90 91 92 93 94 95 96 97 98 99 100 101
102 103 104 105 106 107
108
Raccolta Carta
User Manual / Manuel de l’utilisateur / Benutzerhandbuch /
Manuale utente / Manual de usuario / Podręczni
użytkownika / Gebruikershandleiding / Manual do Utilizador
XX CE.04.00.1118.02-A
01 02 03 04 05 06 07 08 09 10 11 12 13 14 15
16 17 18 19 20 21 22 23 24 25 26 27 28 29 30 31 32 33
34 35 36 37 38 39 40 41 42 43 44 45 46 47 48 49 50 51
52 53 54 55 56 57 58 59 60 61 62 63 64 65 66 67 68 69
70 71 72 73 74 75 76 77
78 79 80 81
82 83 84 85
86 87 88 89 90 91 92 93 94 95 96 97 98 99 100 101
102 103 104 105 106 107 108