
Technical Support and E-Warranty Certificate www.vevor.com/support
SPREADER USER MANUAL
We continue to be committed to provide you tools with competitive price.
"Save Half", "Half Price" or any other similar expressions used by us only represents an
estimate of savings you might benefit from buying certain tools with us compared to the major
top brands and does not necessarily mean to cover all categories of tools offered by us. You
are kindly reminded to verify carefully when you are placing an order with us if you are
actually saving half in comparison with the top major brands.

1
Model: GT1504B
Have product questions? Need technical support? Please feel free to
contact us:
Technical Support and E-Warranty Certificate
www.vevor.com/support
NEED HELP? CONTACT US!
This is the original instruction, please read all manual instructions
carefully before operating. VEVOR reserves a clear interpretation of our
user manual. The appearance of the product shall be subject to the
product you received. Please forgive us that we won't inform you again if
there are any technology or software updates on our product.
SPREADER

2
This is the original instruction, please read all manual instructions
carefully before operating. VEVOR reserves a clear interpretation of our
user manual. The appearance of the product shall be subject to the
product you received. Please forgive us that we won't inform you again if
there are any technology or software updates on our product.
IMPORTANT NOTE:
Do not overload the hopper. Lightweight filters and potting mixers
are recommended.
SPECIFICATIONS
Model
GT1504B
Product Size
770×530×820mm
Color
Black
3
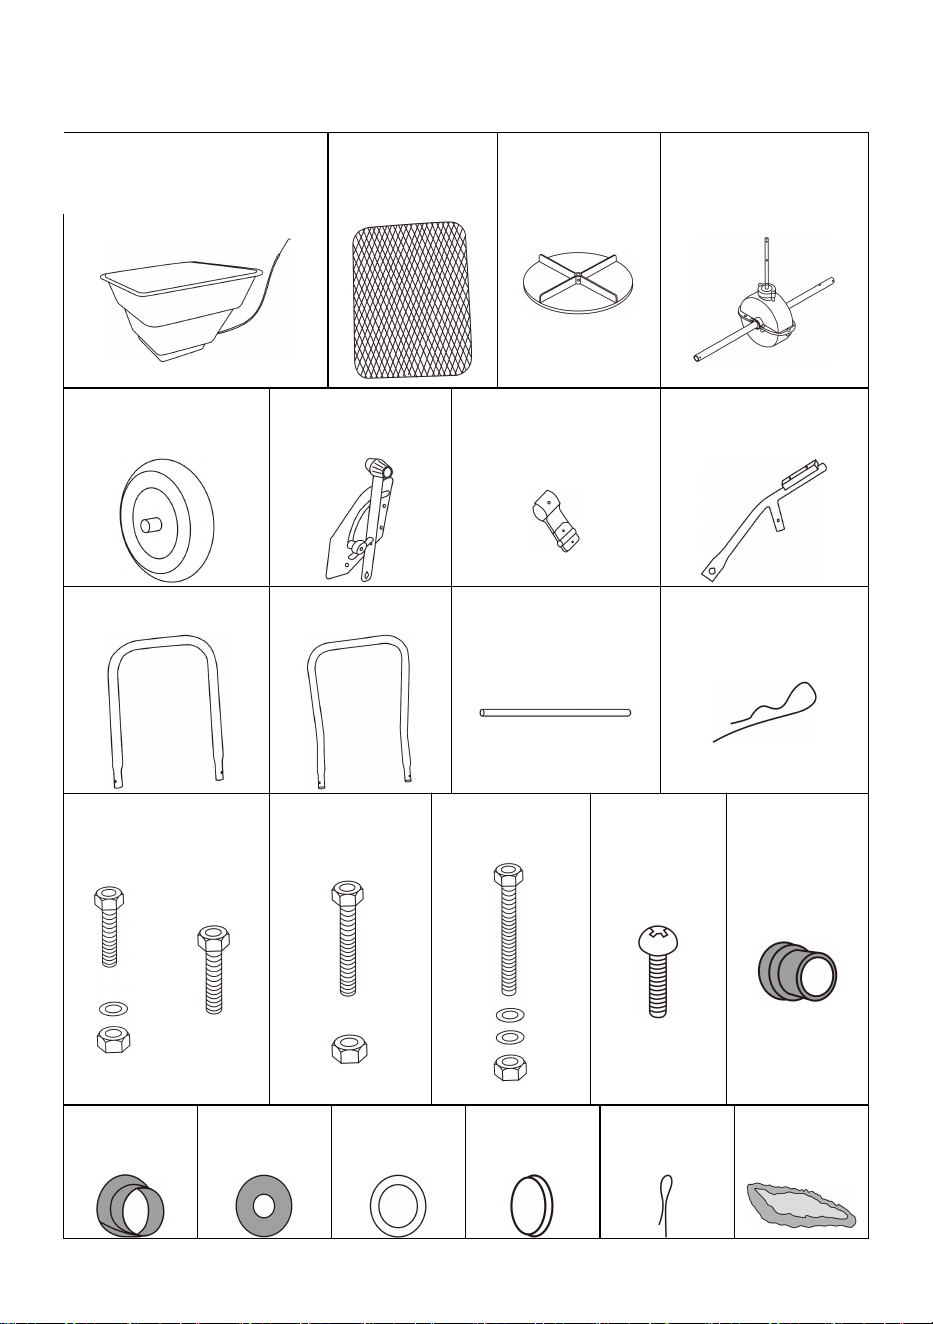
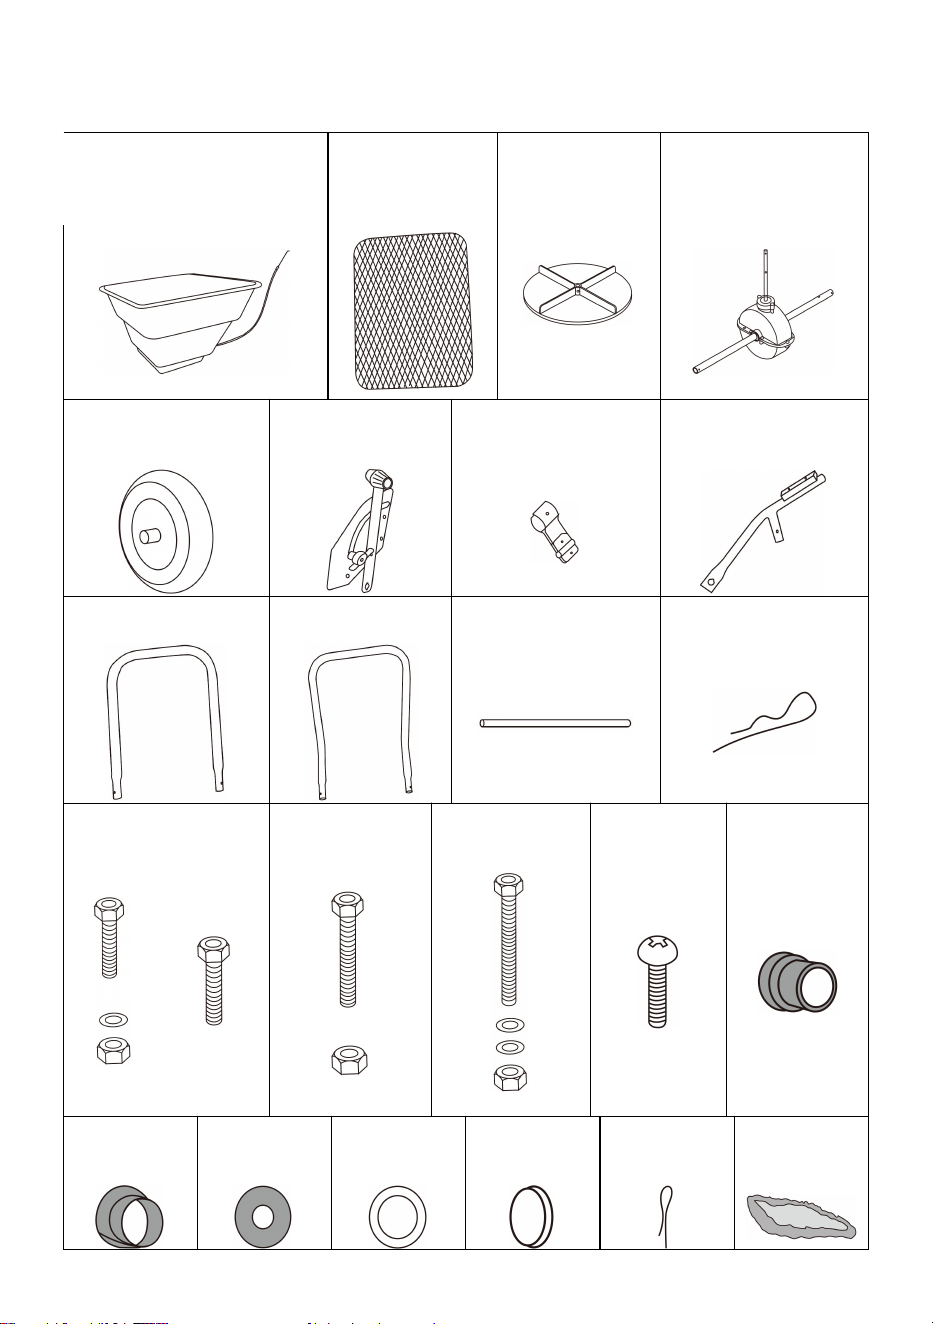
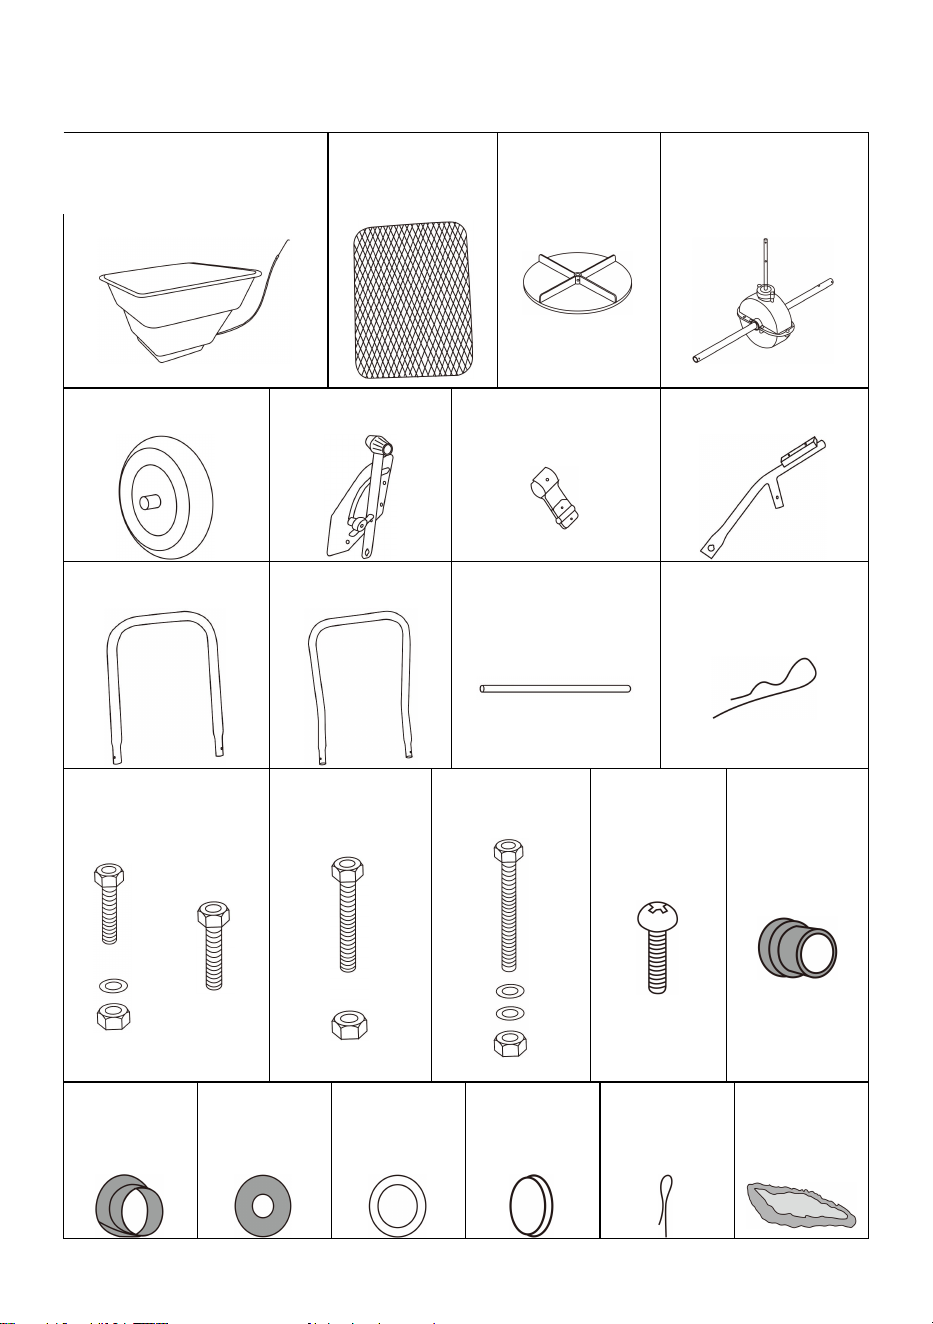
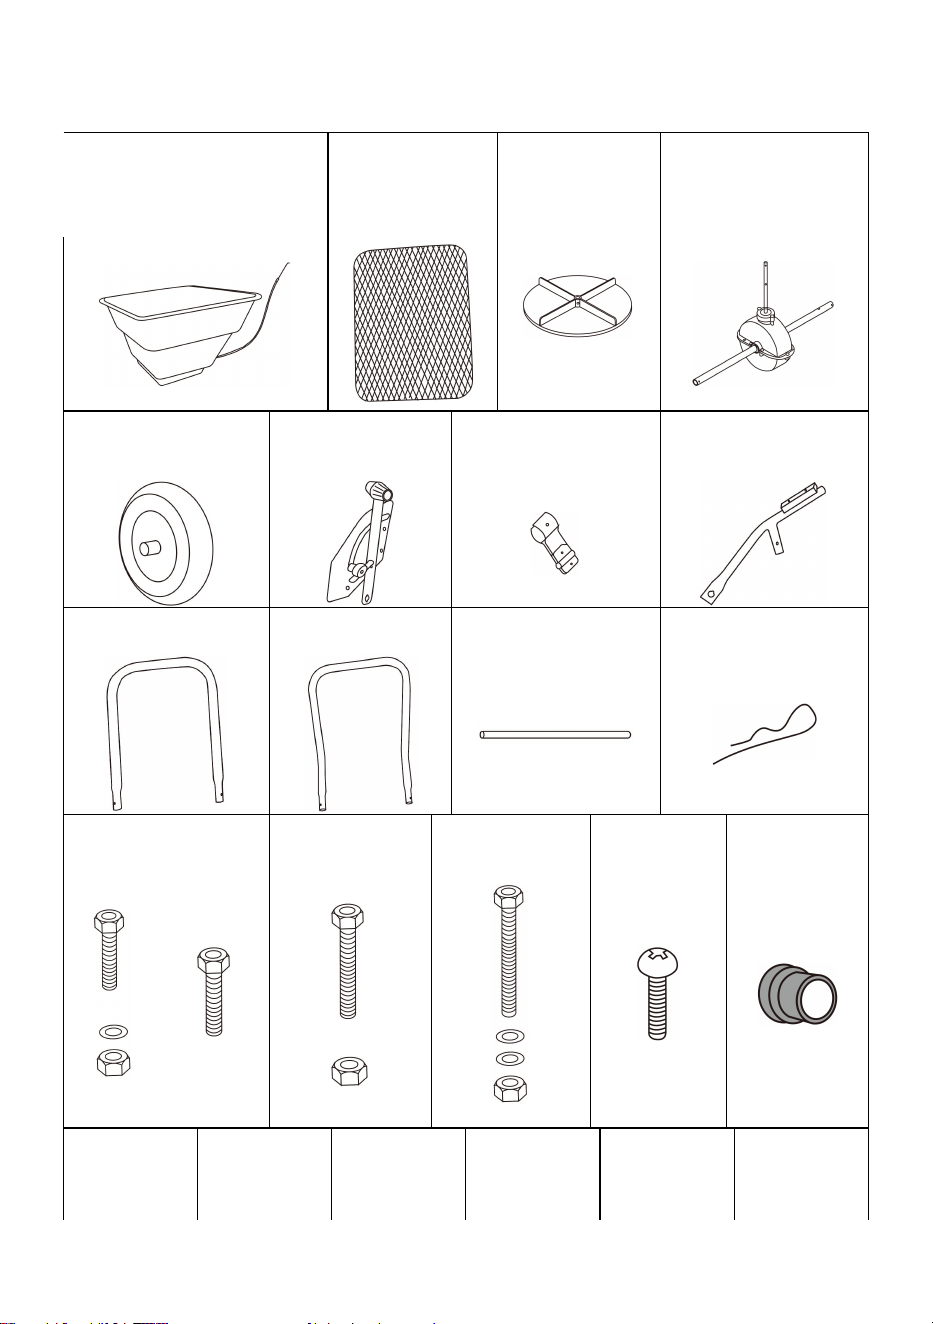
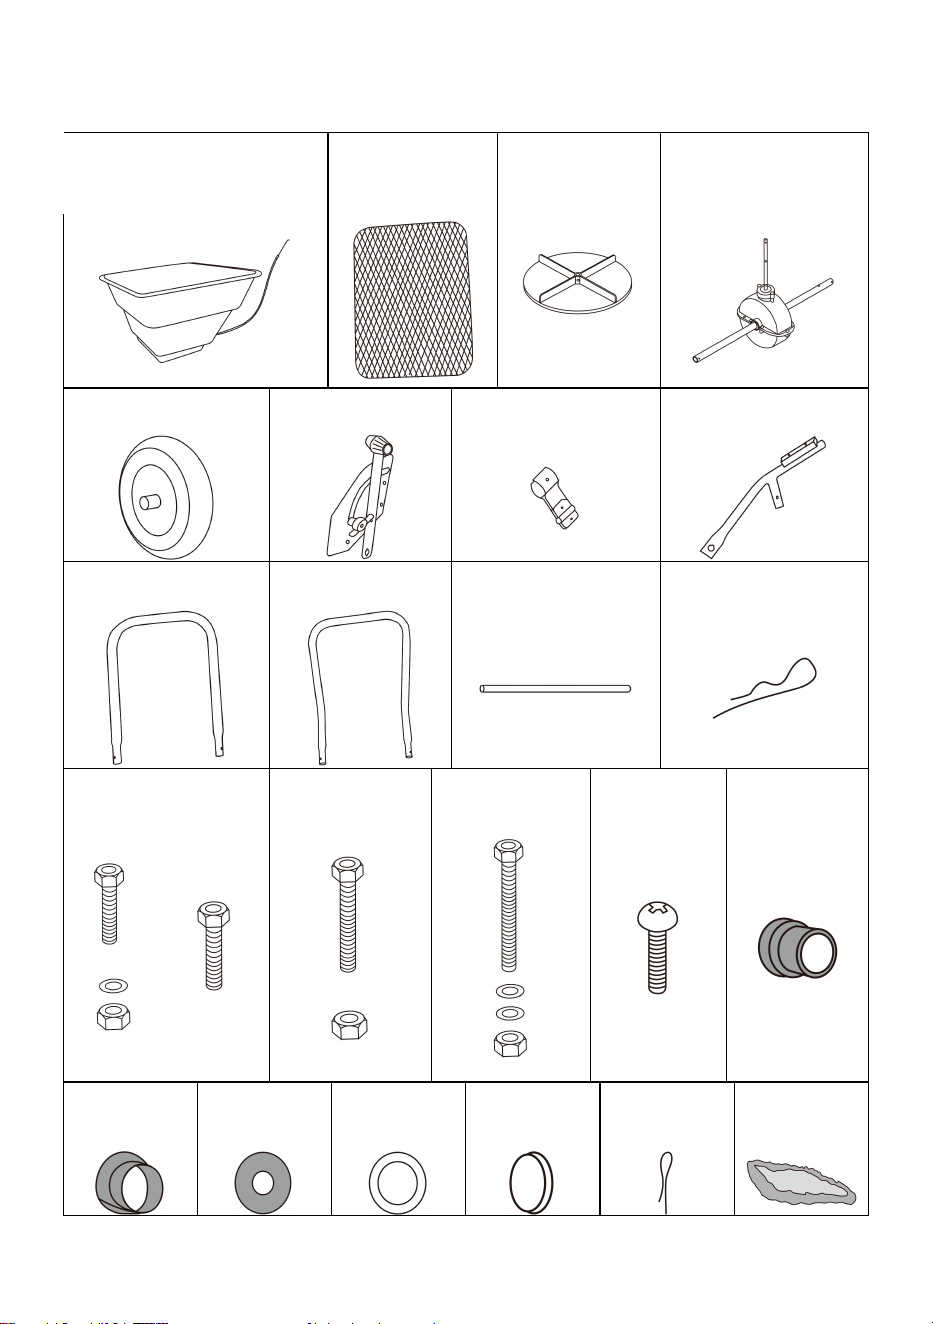
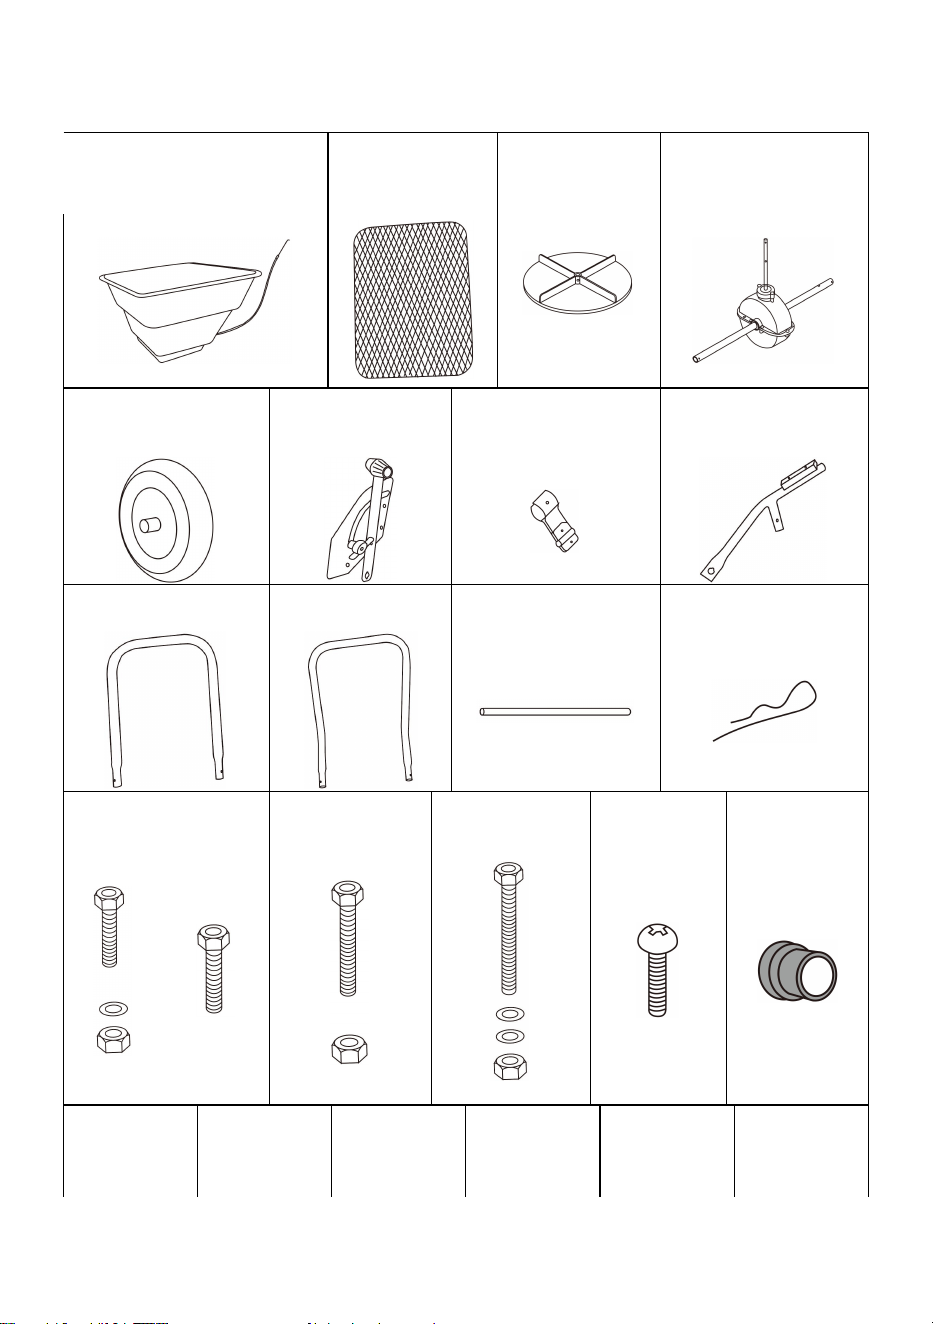
COMPONENTS
A×1
Hopper & control cable
B×1
Hopper screen
C×1
Impeller
C1×1
Gear & axle
assembly
D×2
Wheel
E×1
Control switch
F×1
Holder
G×2
Wheel assembly
frame
H×1
Support leg
I×1
Handle
J×1
Fixing rod
K×1
R pin
L×5 L×2
Bolt
M×1
Bolt
N×4
Bolt
O×1
Bolt
P×2
Out
bushing
M6×35
M6×35
M5×45
M6×50
M4×20
Q×2
Inner
bushing
R×4
Washer
S×2
Flat washer
T×2
Alex end
cap
U×2
Pin
V×1
Rain Cover

4
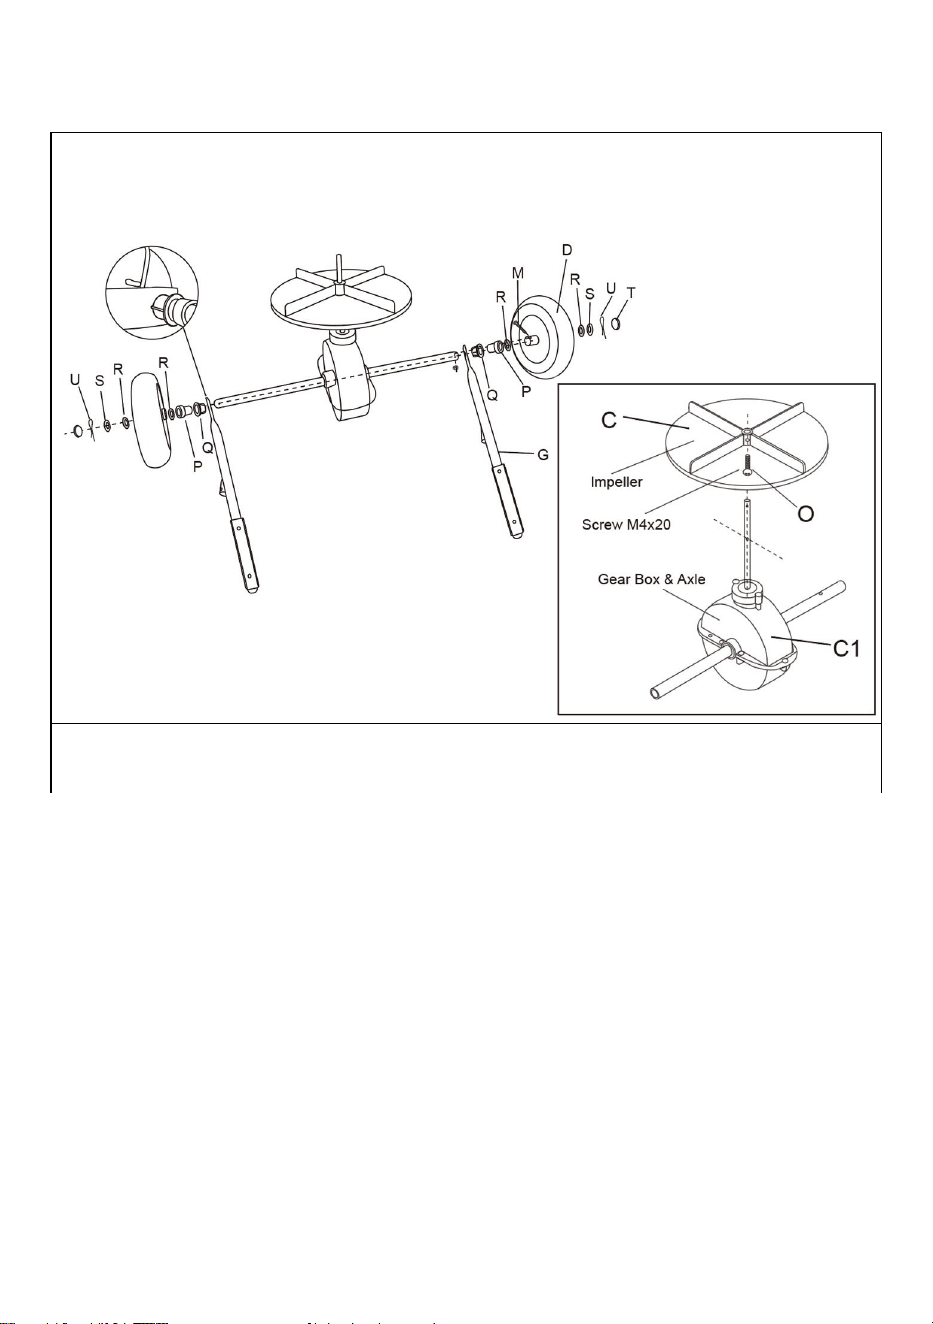
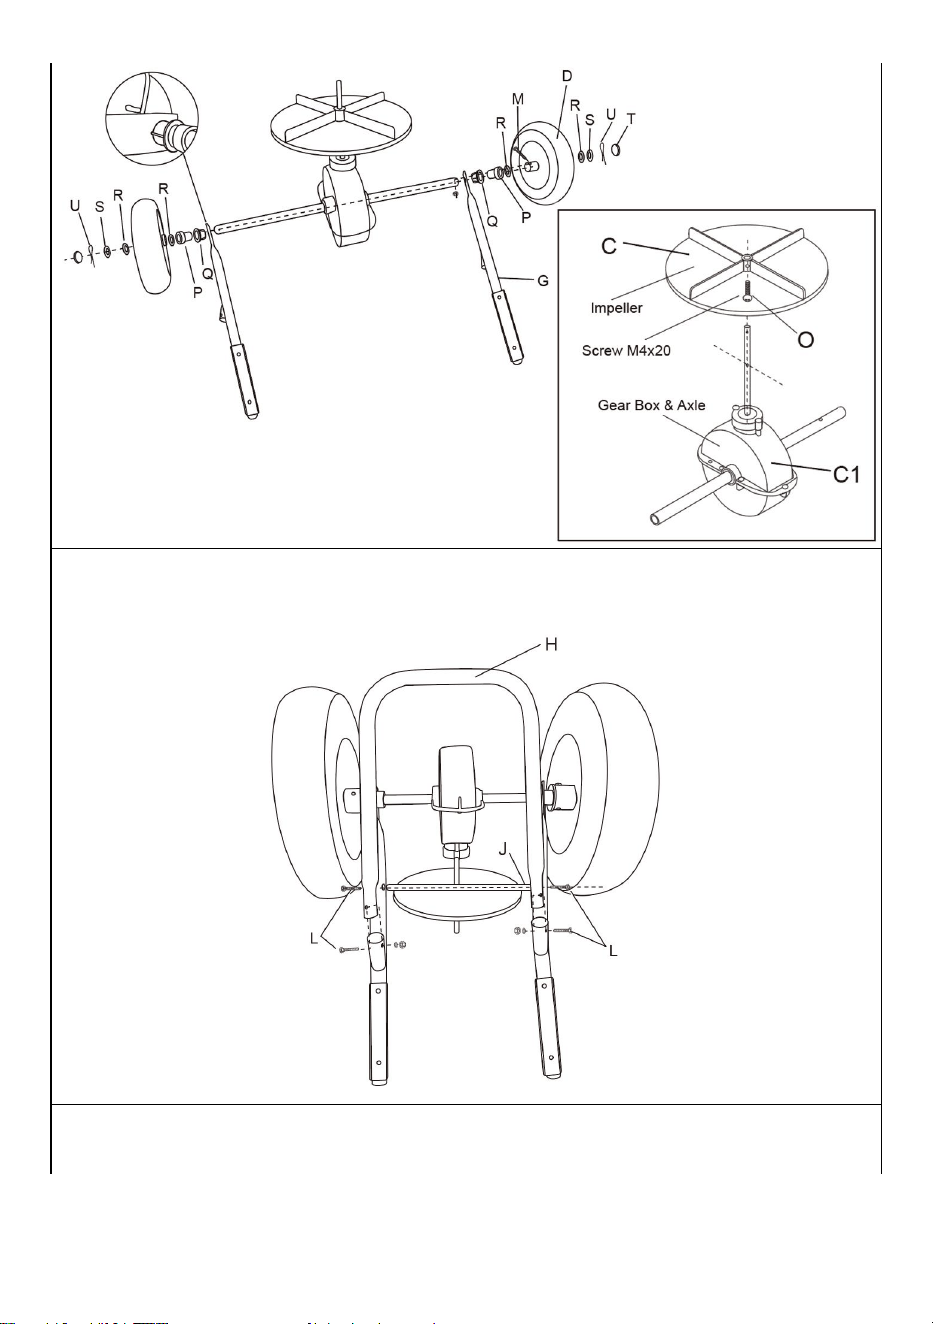
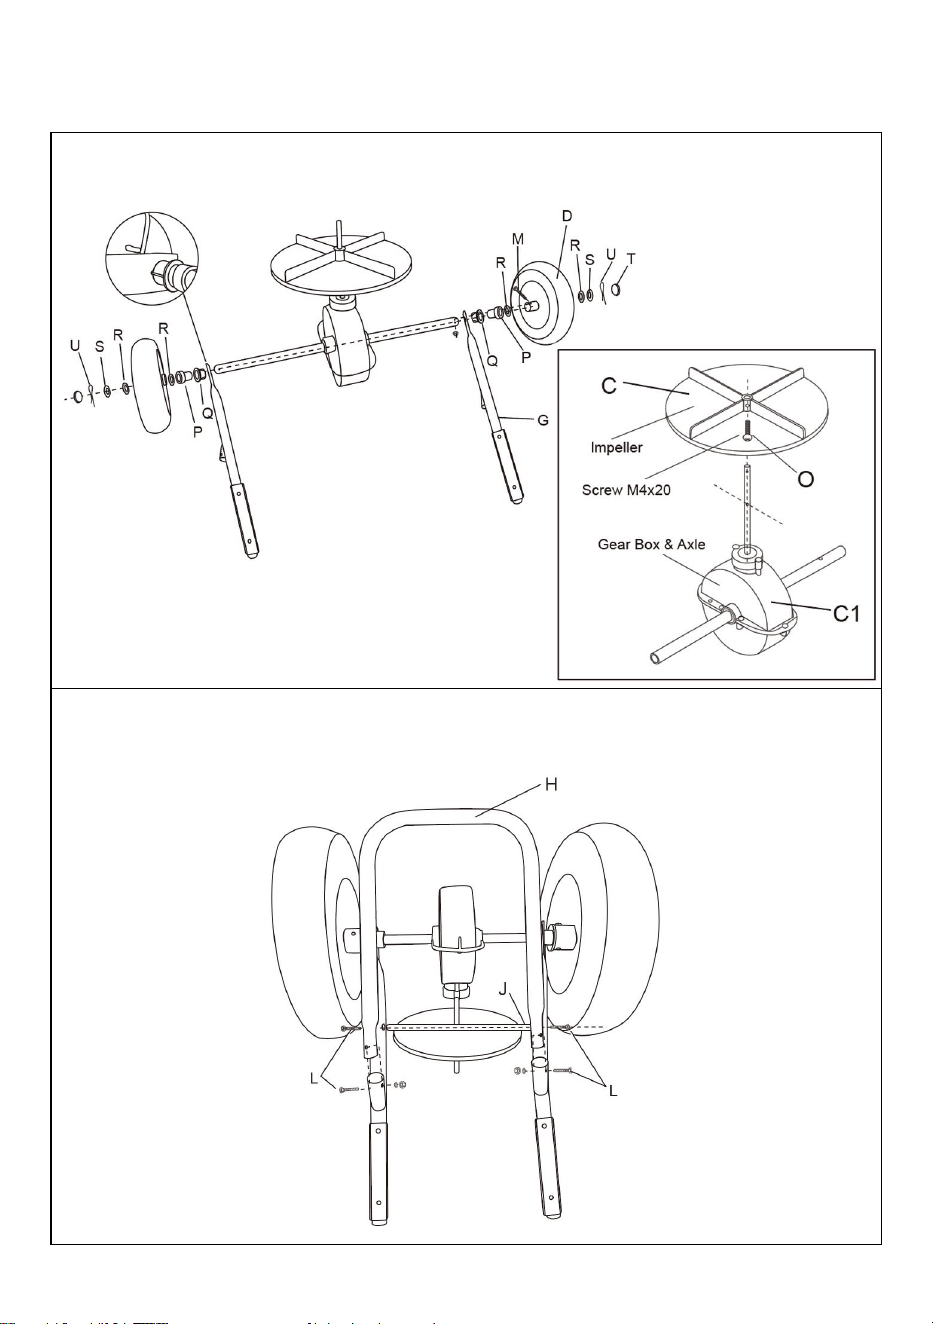
Installation instructions:
①Install the wheels and gear and axle and impeller assembly
②Install the support leg
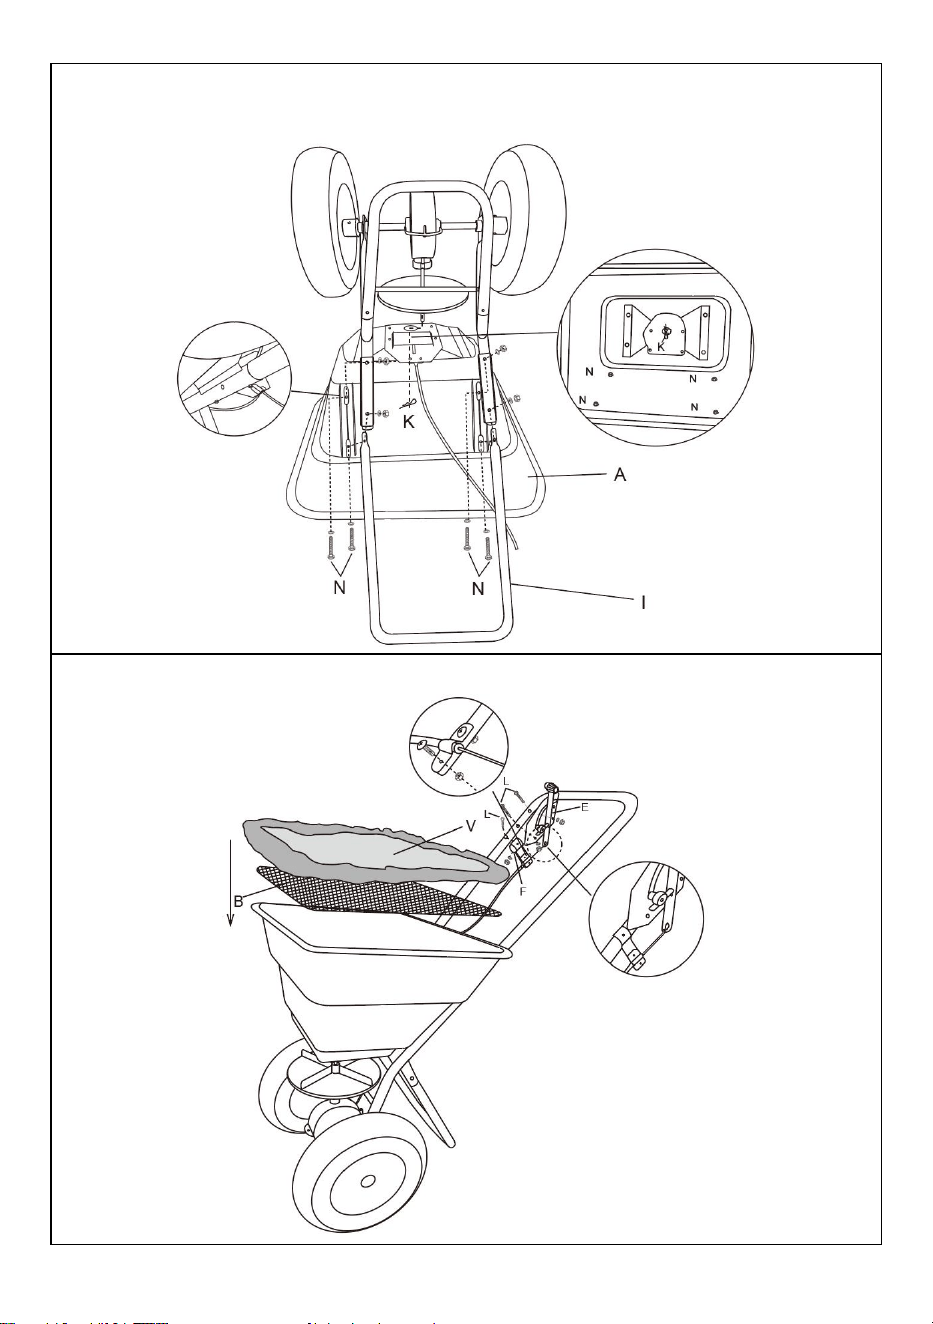
5
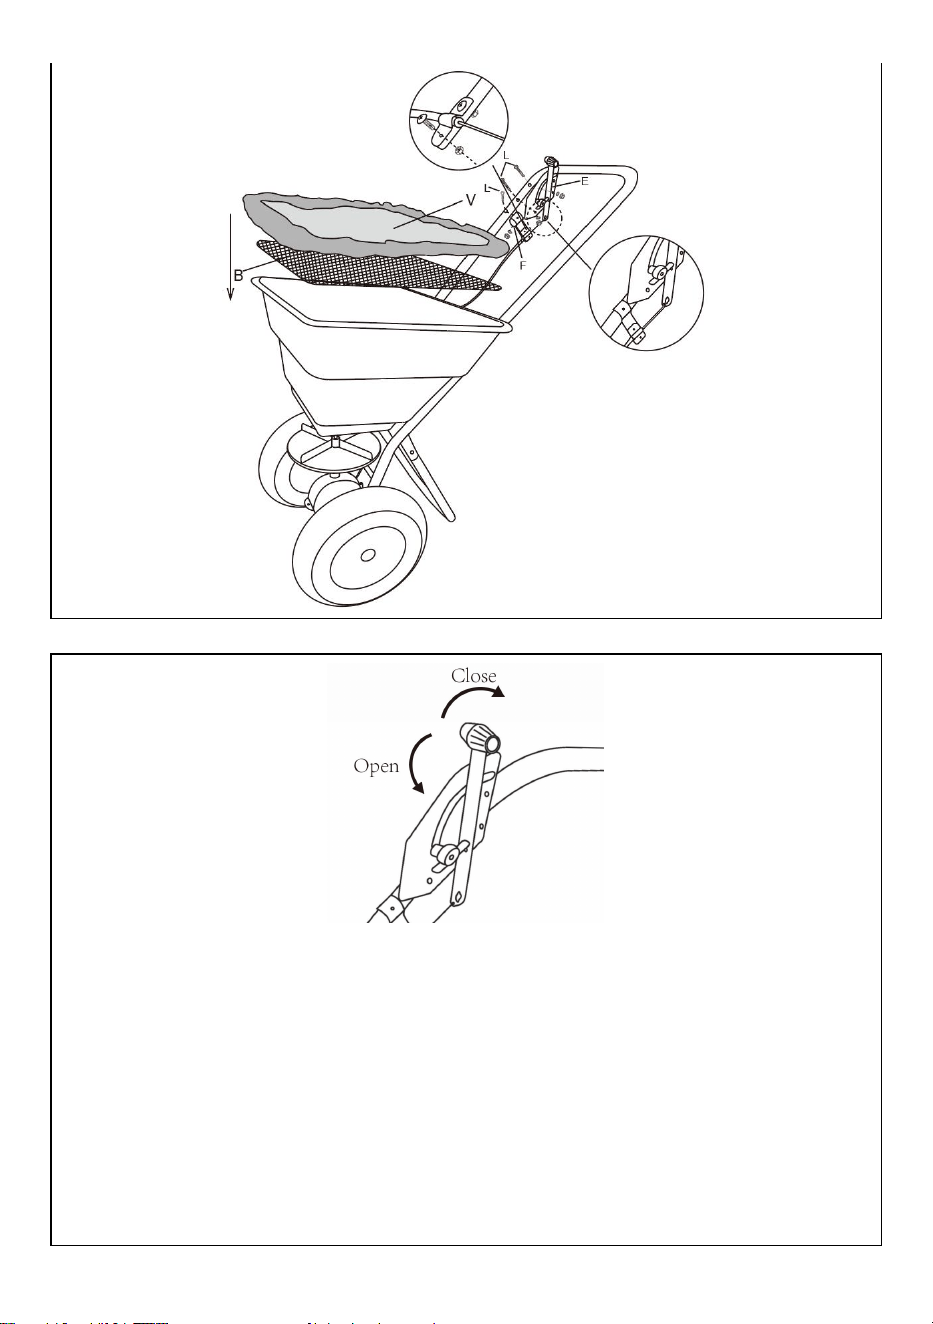
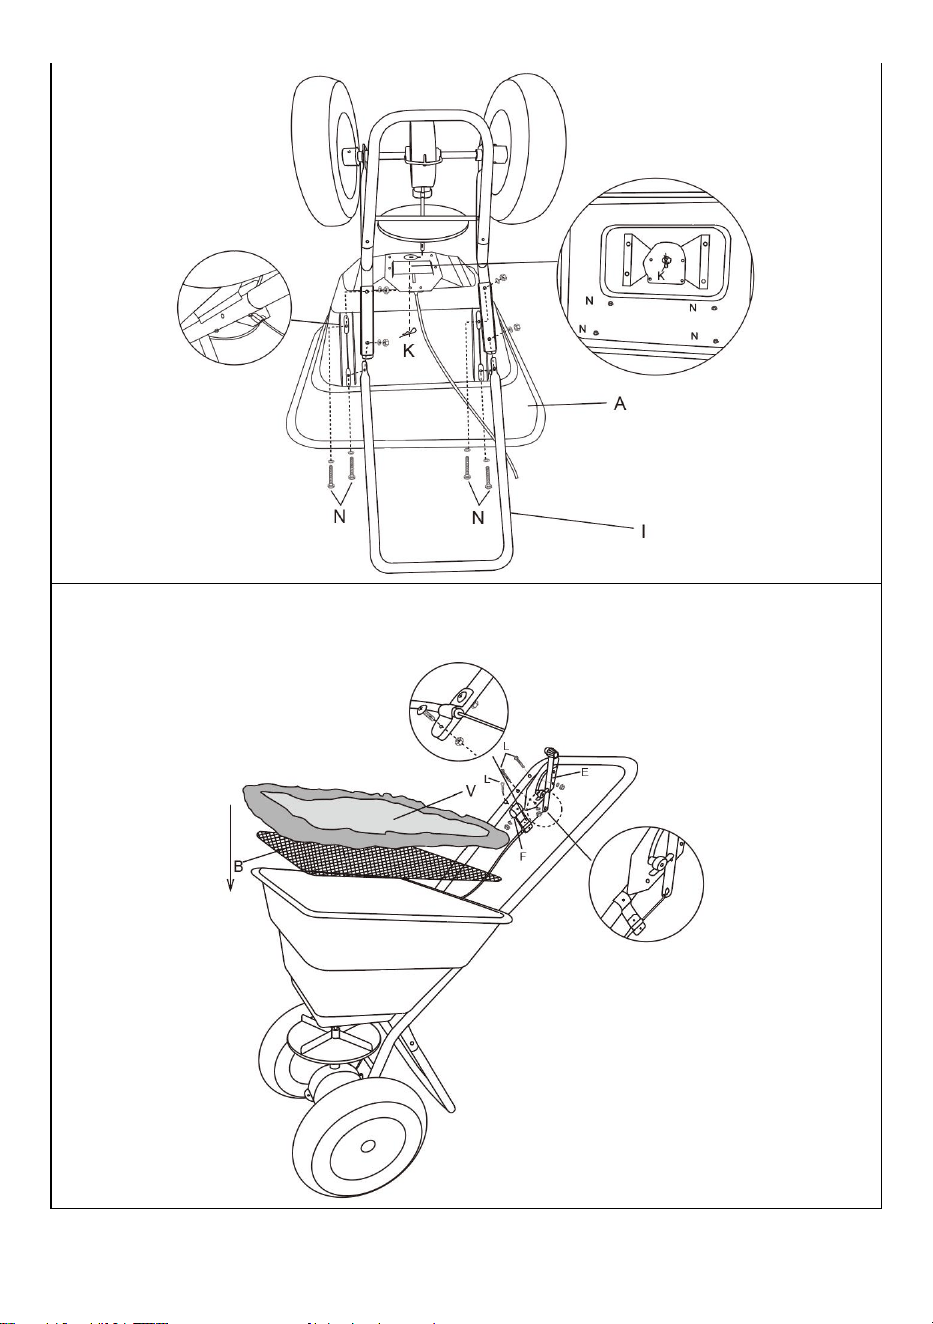
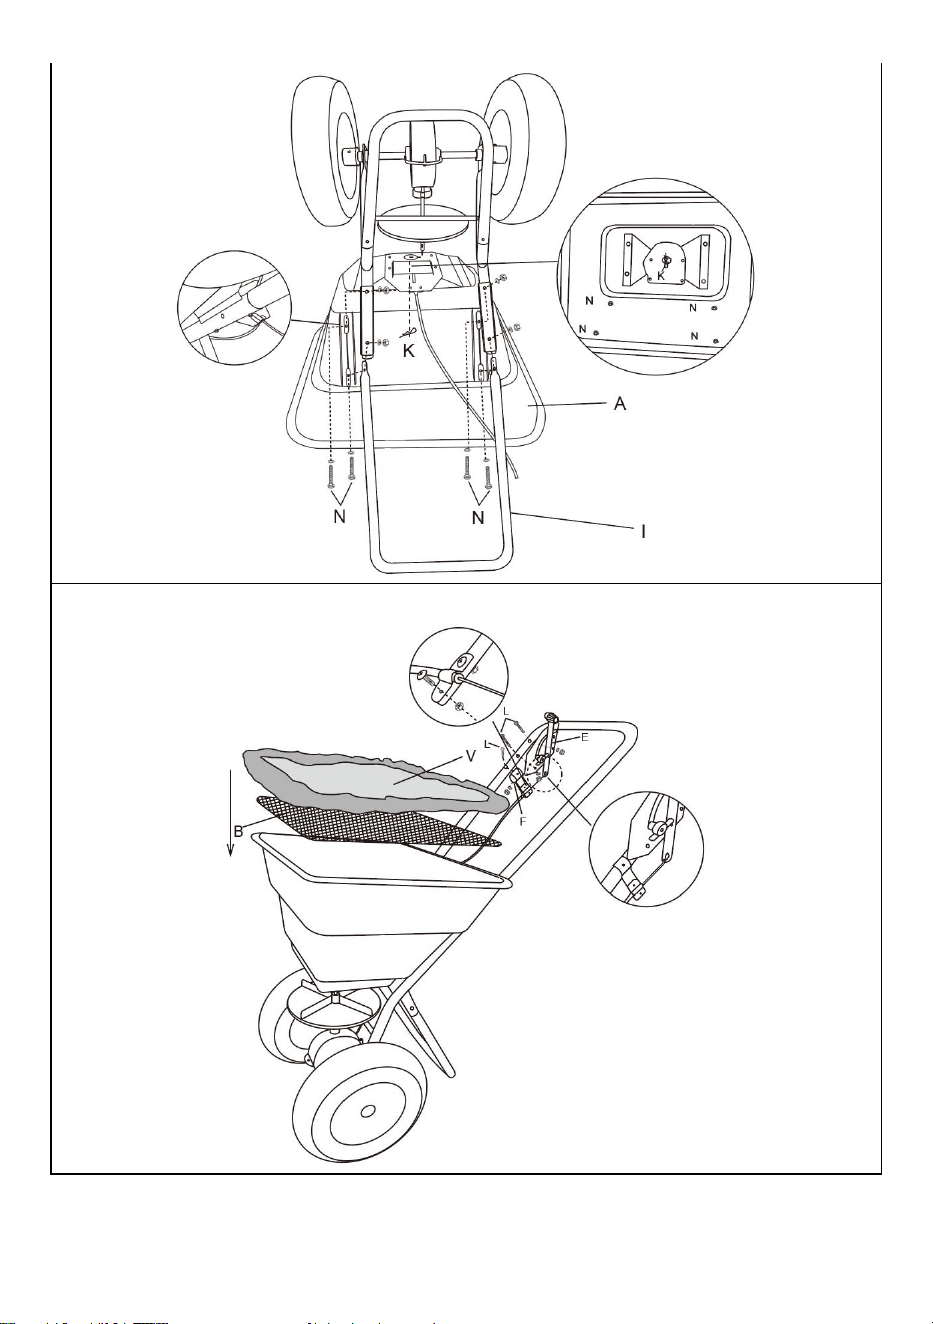
③Install the hopper and handle
④Install the control switch and hopper and rain cover

6
USING YOUR SPREADER
HOW TO USE THE SPREADER TROLLEY
TO OPEN- Push the Control Level forward until it stops against button.
TO CLOSE- Pull the control Lever fully back toward Operator.
Follow the instructions provided by the manufacturer of the spreading material.
NOTE: Make sure that the spreading material is evenly distributed. The spreading
material must be dry.
1. Before feeding in the spreading material, set the dispensing lever to the 0FF position
(dispensing flap closed).
2. Fill the spreader trolley hopper.
3. To adjust the volume of spread, set the dispensing lever to the desired position.
4. In order to spread or scatter the material, drive the spreader trolley at an even speed (the
higher the speed, the greater the scattering distance).
5. Close the dispensing flap as soon as you stop the spreader trolley (dispensing lever in
0FF position).
Address: Baoshanqu Shuangchenglu 803long 11hao 1602A-1609shi Shanghai
Imported to AUS: SIHAO PTY LTD.1 ROKEVA STREETEASTWOOD NSW 2122 Australia
Imported to USA: Sanven Technology Ltd.Suite 250, 9166 Anaheim Place, Rancho
Cucamonga, CA 91730
Made In China


Technique Assistance et certificat de garantie électronique
www.vevor.com/support
ÉPANDEUR MANUEL DE L'UTILISATEUR
We continue to be committed to provide you tools with competitive price.
"Save Half", "Half Price" or any other similar expressions used by us only represents an
estimate of savings you might benefit from buying certain tools with us compared to the major
top brands and does not necessarily mean to cover all categories of tools offered by us. You
are kindly reminded to verify carefully when you are placing an order with us if you are
actually saving half in comparison with the top major brands.

1
Modèle : GT1504B
Have product questions? Need technical support? Please feel free to
contact us:
Technical Support and E-Warranty Certificate
www.vevor.com/support
NEED HELP? CONTACT US!
This is the original instruction, please read all manual instructions
carefully before operating. VEVOR reserves a clear interpretation of our
user manual. The appearance of the product shall be subject to the
product you received. Please forgive us that we won't inform you again if
there are any technology or software updates on our product.
SPREADER

2
This is the original instruction, please read all manual instructions
carefully before operating. VEVOR reserves a clear interpretation of our
user manual. The appearance of the product shall be subject to the
product you received. Please forgive us that we won't inform you again if
there are any technology or software updates on our product.
NOTE IMPORTANTE:
Ne surchargez pas la trémie. Des filtres légers et des mélangeurs
d’empotage sont recommandés.
CARACTÉRISTIQUES
Modèle
GT1504B
Taille du produit
770×530×820mm
Couleur
Noir
3
COMPOSANTS
A×1
Trémie et câble de
commande
B×1
Tamis de trémie
C×1
Turbine
C1×1
Assemblage
d'engrenages et
d'essieux
D×2
Roue
E×1
Interrupteur de
commande
F×1
Titulaire
G×2
Cadre d'assemblage
de roues
H×1
Jambe d'appui
je×1
Poignée
J×1
Tige de fixation
K×1
Goupille R
L×5 L×2
Boulon
M×1
Boulon
N×4
Boulon
O×1
Boulon
P×2
Dehors
bague
M6×35
M6×35
M5×45
M6×50
M4×20
Q×2
Douille
intérieure
R×4
Machine à
laver
S×2
Rondelle
plate
T×2
Embout
Alex
U×2
Épingle
V×1
Housse de
pluie

4
Instructions d'installation:
① Installez les roues, l'engrenage, l'essieu et la turbine.
②Installez le pied de support

5
③Installez la trémie et la poignée
④Installez l'interrupteur de commande, la trémie et la housse de pluie

6
UTILISER VOTRE ÉPANDEUR
COMMENT UTILISER LE CHARIOT ÉPANDEUR
POUR OUVRIR - Poussez le niveau de contrôle vers l'avant jusqu'à ce qu'il s'arrête contre
le bouton.
POUR FERMER - Tirez complètement le levier de commande vers l'arrière vers l'opérateur.
Suivez les instructions fournies par le fabricant du matériau d'épandage.
REMARQUE : Assurez-vous que le matériau à épandre est réparti uniformément. Le
matériau à épandre doit être sec.
6. Avant d'introduire le produit à épandre, placez le levier de distribution sur la position 0FF
(volet de distribution fermé).
7. Remplissez la trémie du chariot épandeur .
8. Pour régler le volume de pâte à tartiner, placez le levier de distribution sur la position
souhaitée .
9. Pour épandre ou disperser le matériau, conduire le chariot épandeur à une vitesse
constante (plus la vitesse est élevée, plus la distance de dispersion est grande).
10. Fermez la trappe de distribution dès l'arrêt du chariot épandeur (levier de distribution en
position 0FF).
Adresse : Baoshanqu Shuangchenglu 803long 11hao 1602A-1609shi Shanghai
Importé en AUS : SIHAO PTY LTD.1 ROKEVA STREETESTWOOD NSW 2122 Australie
Importé aux États-Unis : Sanven Technology Ltd.Suite 250, 9166 Anaheim Place, Rancho
Cucamonga, CA 91730

7
Fabriqué en Chine


Technisch Support- und E-Garantie-Zertifikat www.vevor.com/support
STREUER BENUTZERHANDBUCH
We continue to be committed to provide you tools with competitive price.
"Save Half", "Half Price" or any other similar expressions used by us only represents an
estimate of savings you might benefit from buying certain tools with us compared to the major
top brands and does not necessarily mean to cover all categories of tools offered by us. You
are kindly reminded to verify carefully when you are placing an order with us if you are
actually saving half in comparison with the top major brands.

1
Modell: GT1504B
Have product questions? Need technical support? Please feel free to
contact us:
Technical Support and E-Warranty Certificate
www.vevor.com/support
NEED HELP? CONTACT US!
This is the original instruction, please read all manual instructions
carefully before operating. VEVOR reserves a clear interpretation of our
user manual. The appearance of the product shall be subject to the
product you received. Please forgive us that we won't inform you again if
there are any technology or software updates on our product.
SPREADER

2
This is the original instruction, please read all manual instructions
carefully before operating. VEVOR reserves a clear interpretation of our
user manual. The appearance of the product shall be subject to the
product you received. Please forgive us that we won't inform you again if
there are any technology or software updates on our product.
WICHTIGER HINWEIS:
Überladen Sie den Trichter nicht. Empfohlen werden leichte Filter
und Blumenerde.
SPEZIFIKATIONEN
Modell
GT1504B
Produktgröße
770×530×820mm
Farbe
Schwarz
3
KOMPONENTEN
A×1
Trichter und Steuerkabel
B×1
Trichtersieb
C×1
Laufrad
C1×1
Getriebe- und
Achsmontage
D×2
Rad
E×1
Steuerschalter
F×1
Halter
G×2
Radmontagerahmen
H×1
Stützbein
I×1
Handhaben
J×1
Befestigungsstange
K×1
R-Pin
L×5 L×2
Bolzen
M×1
Bolzen
N×4
Bolzen
O×1
Bolzen
P×2
Aus
Buchse
M6×35
M6×35
M5×45
M6×50
M4×20
Q×2
Innenbuchs
e
R×4
Waschmasc
hine
S×2
Flache
Unterlegsch
eibe
T×2
Alex-Endka
ppe
U×2
Stift
V×1
Regenschut
z
4
Installationsanleitung:
① Montieren Sie die Räder und das Getriebe sowie die Achsen- und
Laufradbaugruppe
②Montieren Sie das Stützbein

5
③Installieren Sie den Trichter und den Griff
④ Installieren Sie den Steuerschalter sowie den Trichter und die
Regenabdeckung
6
VERWENDUNG IHRES STREUERS
So verwenden Sie den Streuwagen
ZUM ÖFFNEN: Schieben Sie die Steuerebene nach vorne, bis sie am Knopf anschlägt.
ZUM SCHLIESSEN: Ziehen Sie den Steuerhebel vollständig zurück in Richtung Bediener.
Befolgen Sie die Anweisungen des Herstellers des Streumittels.
HINWEIS: Achten Sie auf eine gleichmäßige Verteilung des Streugutes. Das Streugut muss
trocken sein.
11. Stellen Sie den Dosierhebel vor dem Einfüllen des Streugutes auf die Position 0FF
(Dosierklappe geschlossen).
12. Trichter des Streuwagens .

7
13. Um die Streumenge einzustellen, stellen Sie den Dosierhebel auf die gewünschte
Position .
14. Um das Material zu verteilen bzw. zu streuen, fahren Sie den Streuwagen mit
gleichmäßiger Geschwindigkeit (je höher die Geschwindigkeit, desto größer die
Streuweite).
15. Schließen Sie die Ausgabeklappe, sobald Sie den Streuwagen anhalten
(Ausgabehebel in Stellung 0FF).
Adresse: Baoshanqu Shuangchenglu 803long 11hao 1602A-1609shi Shanghai
Importiert nach AUS: SIHAO PTY LTD.1 ROKEVA STREETEASTWOOD NSW 2122
Australien
In die USA importiert: Sanven Technology Ltd. Suite 250, 9166 Anaheim Place, Rancho
Cucamonga, CA 91730
In China hergestellt


Tecnico Supporto e certificato di garanzia elettronica www.vevor.com/support
SPARGITORE MANUALE D'USO
We continue to be committed to provide you tools with competitive price.
"Save Half", "Half Price" or any other similar expressions used by us only represents an
estimate of savings you might benefit from buying certain tools with us compared to the major
top brands and does not necessarily mean to cover all categories of tools offered by us. You
are kindly reminded to verify carefully when you are placing an order with us if you are
actually saving half in comparison with the top major brands.

1
Modello: GT1504B
Have product questions? Need technical support? Please feel free to
contact us:
Technical Support and E-Warranty Certificate
www.vevor.com/support
NEED HELP? CONTACT US!
This is the original instruction, please read all manual instructions
carefully before operating. VEVOR reserves a clear interpretation of our
user manual. The appearance of the product shall be subject to the
product you received. Please forgive us that we won't inform you again if
there are any technology or software updates on our product.
SPREADER

2
This is the original instruction, please read all manual instructions
carefully before operating. VEVOR reserves a clear interpretation of our
user manual. The appearance of the product shall be subject to the
product you received. Please forgive us that we won't inform you again if
there are any technology or software updates on our product.
NOTA IMPORTANTE:
Non sovraccaricare la tramoggia. Si consigliano filtri leggeri e
miscelatori per invasatura.
SPECIFICHE
Modello
GT1504B
Taglia del prodotto
770×530×820mm
Colore
Nero

3
COMPONENTI
A×1
Tramoggia e cavo di
controllo
B×1
Schermo della
tramoggia
C×1
Girante
C1×1
ingranaggio e asse
D×2
Ruota
E×1
Interruttore di
controllo
F×1
Titolare
G×2
Telaio di montaggio
ruota
H×1
Gamba di supporto
I×1
Maniglia
J×1
Asta di fissaggio
K×1
perno R
L×5 L×2
Bullone
M×1
Bullone
N×4
Bullone
O×1
Bullone
P×2
Fuori
boccola
M6×35
M6×35
M5×45
M6×50
M4×20
Q×2
Boccola
interna
R×4
Rondella
S×2
Rondella
piatta
T×2
Tappo
terminale
Alex
U×2
Spillo
V×1
Copertura
antipioggia

4
Istruzioni per l'installazione:
① Installare le ruote, l'ingranaggio, il gruppo asse e girante

5
②Installare la gamba di supporto
③Installare la tramoggia e la maniglia
6
④ Installare l'interruttore di controllo, la tramoggia e la copertura
antipioggia
UTILIZZANDO IL VOSTRO DIFFUSORE

7
COME USARE IL CARRELLO STENDITORE
PER APRIRE: spingere la leva di controllo in avanti finché non si ferma contro il pulsante.
PER CHIUDERE - Tirare completamente indietro la leva di comando verso l'operatore.
Seguire le istruzioni fornite dal produttore del materiale da spalmare.
NOTA: assicurarsi che il materiale da spargere sia distribuito uniformemente. Il materiale da
stendere deve essere asciutto.
16. Prima di introdurre il materiale da spargere, portare la leva di dosaggio in posizione
0FF (sportello di dosaggio chiuso).
17. Riempire la tramoggia del carrello dello spargitore .
18. Per regolare il volume di spalmatura, impostare la leva di erogazione nella posizione
desiderata .
19. Per stendere o spargere il materiale, guidare il carrello spargitore a una velocità
uniforme (maggiore è la velocità, maggiore è la distanza di spargimento).
20. Chiudere lo sportello di distribuzione non appena si ferma il carrello spargitore (leva di
distribuzione in posizione 0FF).
Indirizzo: Baoshanqu Shuangchenglu 803long 11hao 1602A-1609shi Shanghai
Importato in AUS: SIHAO PTY LTD.1 ROKEVA STREETEASTWOOD NSW 2122 Australia
Importato negli Stati Uniti: Sanven Technology Ltd.Suite 250, 9166 Anaheim Place,
Rancho Cucamonga, CA 91730
Made in China


Técnico Soporte y certificado de garantía electrónica www.vevor.com/support
ESPARCIDOR MANUAL DE USUARIO
We continue to be committed to provide you tools with competitive price.
"Save Half", "Half Price" or any other similar expressions used by us only represents an
estimate of savings you might benefit from buying certain tools with us compared to the major
top brands and does not necessarily mean to cover all categories of tools offered by us. You
are kindly reminded to verify carefully when you are placing an order with us if you are
actually saving half in comparison with the top major brands.

1
Modelo: GT1504B
Have product questions? Need technical support? Please feel free to
contact us:
Technical Support and E-Warranty Certificate
www.vevor.com/support
NEED HELP? CONTACT US!
This is the original instruction, please read all manual instructions
carefully before operating. VEVOR reserves a clear interpretation of our
user manual. The appearance of the product shall be subject to the
product you received. Please forgive us that we won't inform you again if
there are any technology or software updates on our product.
SPREADER

2
This is the original instruction, please read all manual instructions
carefully before operating. VEVOR reserves a clear interpretation of our
user manual. The appearance of the product shall be subject to the
product you received. Please forgive us that we won't inform you again if
there are any technology or software updates on our product.
NOTA IMPORTANTE:
No sobrecargue la tolva. Se recomiendan filtros livianos y
mezcladores para macetas.
ESPECIFICACIONES
Modelo
GT1504B
Tamaño del producto
770×530×820mm
Color
Negro
3
COMPONENTES
A×1
Tolva y cable de control
B×1
Pantalla de
tolva
C×1
Impulso
C1×1
engranajes y ejes
D×2
Rueda
E×1
Interruptor de
control
F×1
Poseedor
G×2
Marco de montaje
de ruedas
Alto×1
Pierna de apoyo
I×1
Manejar
J×1
Varilla de fijación
K×1
pasador R
Largo×5 Largo×2
Tornillo
M×1
Tornillo
N×4
Tornillo
O×1
Tornillo
P×2
Afuera
cojinete
M6×35
M6×35
M5×45
M6×50
M4×20
Q×2
casquillo
interior
R×4
Lavadora
S×2
Arandela
plana
T×2
Tapa final
Alex
U×2
Alfiler
V×1
Cubierta
para la
lluvia

4
Instrucciones de instalación:
① Instale las ruedas y el conjunto de engranaje, eje e impulsor.
5
②Instale la pata de apoyo
③Instale la tolva y la manija.

6
④Instale el interruptor de control, la tolva y la cubierta para lluvia.
USANDO SU ESPARCIDOR

7
CÓMO UTILIZAR EL CARRO ESPARCIDOR
PARA ABRIR: Empuje el nivel de control hacia adelante hasta que se detenga contra el
botón.
PARA CERRAR: tire de la palanca de control completamente hacia el operador.
Siga las instrucciones proporcionadas por el fabricante del material para esparcir.
NOTA: Asegúrese de que el material para esparcir esté distribuido uniformemente. El
material a esparcir debe estar seco.
21. Antes de introducir el material para esparcir, coloque la palanca dispensadora en la
posición 0FF (tapa dispensadora cerrada).
22. Llene la tolva del carro esparcidor .
23. Para ajustar el volumen de untado, coloque la palanca dispensadora en la posición
deseada .
24. Para esparcir o dispersar el material, conduzca el carro esparcidor a una velocidad
uniforme (cuanto mayor sea la velocidad, mayor será la distancia de dispersión).
25. Cierre la trampilla de dispensación tan pronto como detenga el carro esparcidor
(palanca de dispensación en posición 0FF).
Dirección: Baoshanqu Shuangchenglu 803long 11hao 1602A-1609shi Shanghai
Importado a AUS: SIHAO PTY LTD.1 ROKEVA STREETEASTWOOD NSW 2122 Australia
Importado a EE. UU.: Sanven Technology Ltd.Suite 250, 9166 Anaheim Place, Rancho
Cucamonga, CA 91730

8
Hecho en china


Technisch Ondersteuning en e-garantiecertificaat www.vevor.com/support
VERSPREIDER HANDLEIDING
We continue to be committed to provide you tools with competitive price.
"Save Half", "Half Price" or any other similar expressions used by us only represents an
estimate of savings you might benefit from buying certain tools with us compared to the major
top brands and does not necessarily mean to cover all categories of tools offered by us. You
are kindly reminded to verify carefully when you are placing an order with us if you are
actually saving half in comparison with the top major brands.

1
Model: GT1504B
Have product questions? Need technical support? Please feel free to
contact us:
Technical Support and E-Warranty Certificate
www.vevor.com/support
NEED HELP? CONTACT US!
This is the original instruction, please read all manual instructions
carefully before operating. VEVOR reserves a clear interpretation of our
user manual. The appearance of the product shall be subject to the
product you received. Please forgive us that we won't inform you again if
there are any technology or software updates on our product.
SPREADER

2
This is the original instruction, please read all manual instructions
carefully before operating. VEVOR reserves a clear interpretation of our
user manual. The appearance of the product shall be subject to the
product you received. Please forgive us that we won't inform you again if
there are any technology or software updates on our product.
BELANGRIJKE NOTITIE:
Overbelast de voorraadbak niet. Lichtgewicht filters en potmixers
worden aanbevolen.
SPECIFICATIES
Model
GT1504B
Product grootte
770×530×820mm
Kleur
Zwart

3
COMPONENTEN
EEN×1
Hopper- en
bedieningskabel
B×1
Hopper scherm
C×1
Waaier
C1×1
Tandwiel- en
asmontage
D×2
Wiel
E×1
Schakelaar
F×1
Houder
G×2
Frame voor
montage van wielen
H×1
Steunbeen
Ik×1
Hendel
J×1
Bevestigingsstang
K×1
R-pin
L×5 L×2
Bout
M×1
Bout
N×4
Bout
O×1
Bout
P×2
Uit
bus
M6×35
M6×35
M5×45
M6×50
M4×20
Q×2
Binnenbus
R×4
Wasmachin
e
S×2
Platte
sluitring
T×2
Eindkap van
Alex
U×2
Pin
V×1
Regenbesc
herming

4
Installatie instructies:
① Installeer de wielen en het tandwiel, de as en het rotorblad
②Installeer de steunpoot

5
③Installeer de hopper en het handvat
④Installeer de bedieningsschakelaar, de trechter en de regenkap

6
UW STROOIER GEBRUIKEN
HOE DE STROOIERWAGEN TE GEBRUIKEN
OPENEN - Duw het bedieningsniveau naar voren totdat het tegen de knop stopt.
SLUITEN - Trek de bedieningshendel volledig naar achteren in de richting van de
machinist.
Volg de instructies van de fabrikant van het strooigoed.
OPMERKING: Zorg ervoor dat het strooigoed gelijkmatig wordt verdeeld. Het strooigoed
moet droog zijn.
26. Voordat u het strooigoed invoert, de doseerhendel in stand 0FF zetten (doseerklep
gesloten).
27. trechter van de strooiwagen .
28. Om het verspreidingsvolume aan te passen, zet u de doseerhendel in de gewenste
stand .
29. Om het materiaal te verspreiden of te strooien, rijdt u de verspreiderwagen met een
gelijkmatige snelheid (hoe hoger de snelheid, hoe groter de strooiafstand).
30. Sluit de doseerklep zodra u de strooiwagen stopt (doseerhendel in stand 0FF).
Adres: Baoshanqu Shuangchenglu 803long 11hao 1602A-1609shi Shanghai
Geïmporteerd naar AUS: SIHAO PTY LTD.1 ROKEVA STREETEASTWOOD NSW 2122
Australië
Geïmporteerd naar de VS: Sanven Technology Ltd.Suite 250, 9166 Anaheim Place,
Rancho Cucamonga, CA 91730

7
Gemaakt in China


Teknisk Support och e-garanticertifikat www.vevor.com/support
SPRIDARE ANVÄNDARMANUAL
We continue to be committed to provide you tools with competitive price.
"Save Half", "Half Price" or any other similar expressions used by us only represents an
estimate of savings you might benefit from buying certain tools with us compared to the major
top brands and does not necessarily mean to cover all categories of tools offered by us. You
are kindly reminded to verify carefully when you are placing an order with us if you are
actually saving half in comparison with the top major brands.

1
Modell: GT1504B
Have product questions? Need technical support? Please feel free to
contact us:
Technical Support and E-Warranty Certificate
www.vevor.com/support
NEED HELP? CONTACT US!
This is the original instruction, please read all manual instructions
carefully before operating. VEVOR reserves a clear interpretation of our
user manual. The appearance of the product shall be subject to the
product you received. Please forgive us that we won't inform you again if
there are any technology or software updates on our product.
SPREADER

2
This is the original instruction, please read all manual instructions
carefully before operating. VEVOR reserves a clear interpretation of our
user manual. The appearance of the product shall be subject to the
product you received. Please forgive us that we won't inform you again if
there are any technology or software updates on our product.
VIKTIG NOTERING:
Överbelasta inte behållaren. Lättviktsfilter och ingjutningsblandare
rekommenderas.
SPECIFIKATIONER
Modell
GT1504B
Produktstorlek
770×530×820 mm
Färg
Svart
3
KOMPONENTER
A×1
Behållare & kontrollkabel
B×1
Hopper skärm
C×1
Impeller
C1×1
Kugghjul &
axelmontage
D×2
Hjul
E×1
Kontrollbrytare
F×1
Hållare
G×2
Hjulmonteringsram
H×1
Stödben
I×1
Hantera
J×1
Fäststång
K×1
R stift
L×5 L×2
Bult
M×1
Bult
N×4
Bult
O×1
Bult
P×2
Ut
bussning
M6×35
M6×35
M5×45
M6×50
M4×20
Q×2
Inre
bussning
R×4
Bricka
S×2
Platt bricka
T×2
Alex
ändlock
U×2
Stift
V×1
Regnskydd
4
Installations instruktioner:
① Montera hjulen och kugghjulet samt axel- och pumphjulsenheten
② Montera stödbenet

5
③ Installera behållaren och handtaget
④ Montera kontrollbrytaren och behållaren och regnskyddet

6
ANVÄNDA DIN SPRADARE
HUR MAN ANVÄNDER SPRIDARVAGNEN
ATT ÖPPNA- Skjut kontrollnivån framåt tills den stannar mot knappen.
FÖR ATT STÄNGA- Dra kontrollspaken helt bakåt mot föraren.
Följ instruktionerna från tillverkaren av spridningsmaterialet.
OBS: Se till att spridningsmaterialet är jämnt fördelat. Spridningsmaterialet måste vara torrt.
31. Innan du matar in spridningsmaterialet, ställ utmatningsspaken i läge 0FF
(utmatningsluckan stängd).
32. Fyll spridarvagnens behållare .
33. För att justera spridningsvolymen, ställ utmatningsspaken i önskat läge .
34. För att sprida eller sprida materialet, kör spridarvagnen med jämn hastighet (ju högre
hastighet, desto större spridningsavstånd).
35. Stäng utmatningsluckan så snart du stoppar spridarvagnen (utmatningsspaken i
0FF-läge).
Adress: Baoshanqu Shuangchenglu 803long 11hao 1602A-1609shi Shanghai
Importerad till AUS: SIHAO PTY LTD.1 ROKEVA STREETEASTWOOD NSW 2122
Australien
Importerad till USA: Sanven Technology Ltd.Suite 250, 9166 Anaheim Place, Rancho
Cucamonga, CA 91730
Tillverkad i Kina


Techniczny Certyfikat wsparcia i e-gwarancji www.vevor.com/support
ROZSZERZACZ INSTRUKCJA OBSŁUGI
We continue to be committed to provide you tools with competitive price.
"Save Half", "Half Price" or any other similar expressions used by us only represents an
estimate of savings you might benefit from buying certain tools with us compared to the major
top brands and does not necessarily mean to cover all categories of tools offered by us. You
are kindly reminded to verify carefully when you are placing an order with us if you are
actually saving half in comparison with the top major brands.

1
Model: GT1504B
Have product questions? Need technical support? Please feel free to
contact us:
Technical Support and E-Warranty Certificate
www.vevor.com/support
NEED HELP? CONTACT US!
This is the original instruction, please read all manual instructions
carefully before operating. VEVOR reserves a clear interpretation of our
user manual. The appearance of the product shall be subject to the
product you received. Please forgive us that we won't inform you again if
there are any technology or software updates on our product.
SPREADER

2
This is the original instruction, please read all manual instructions
carefully before operating. VEVOR reserves a clear interpretation of our
user manual. The appearance of the product shall be subject to the
product you received. Please forgive us that we won't inform you again if
there are any technology or software updates on our product.
WAŻNA UWAGA:
Nie przeciążaj zasobnika. Zalecane są lekkie filtry i mieszalniki
doniczkowe.
SPECYFIKACJE
Model
GT1504B
Rozmiar produktu
770×530×820 mm
Kolor
Czarny
3
SKŁADNIKI
A×1
Zbiornik i kabel sterujący
B×1
Ekran zbiornika
C×1
Wirnik
C1×1
przekładni i osi
D×2
Koło
Przykład×1
Przełącznik
kontrolny
F×1
Uchwyt
G×2
Rama montażowa
koła
H×1
Noga podporowa
Ja×1
Uchwyt
J×1
Pręt mocujący
K×1
Sworzeń R
Dł. × 5 Dł. × 2
Śruba
M×1
Śruba
N×4
Śruba
O×1
Śruba
P×2
Na zewnątrz
tuleja
M6×35
M6×35
M5×45
M6×50
M4×20
Pytanie×2
Tuleja
wewnętrzna
R×4
Pralka
S×2
Podkładka
płaska
T×2
Zaślepka
Alex
U×2
Szpilka
V×1
Osłona
przeciwdesz
czowa

4
Instrukcje Instalacji:
① Zamontuj koła i przekładnię oraz zespół osi i wirnika

5
②Zamontuj podpórkę
③Zamontuj zbiornik i uchwyt
6
④Zamontuj przełącznik sterujący oraz zbiornik i osłonę przeciwdeszczową
KORZYSTANIE Z ROZSIEWACZA

7
JAK KORZYSTAĆ Z WÓZKA ROZPROWADZAJĄCEGO
ABY OTWARĆ – Przesuń poziom sterowania do przodu, aż zatrzyma się na przycisku.
ABY ZAMKNĄĆ – Pociągnij dźwignię sterującą całkowicie do tyłu w kierunku operatora.
Postępować zgodnie z instrukcjami producenta rozsiewanego materiału.
UWAGA: Upewnij się, że rozsypywany materiał jest równomiernie rozłożony. Rozsypywany
materiał musi być suchy.
36. Przed podaniem rozsypanego materiału dźwignię dozującą należy ustawić w pozycji
0FF (klapa dozująca zamknięta).
37. Napełnij zbiornik wózka rozsiewającego .
38. Aby wyregulować objętość smarowania, należy ustawić dźwignię dozującą w żądanej
pozycji .
39. W celu rozsypania lub rozsypania materiału należy jechać wózkiem rozsiewającym z
równą prędkością (im większa prędkość, tym większa odległość rozrzucania).
40. Zamknąć klapę dozującą zaraz po zatrzymaniu wózka rozsiewającego (dźwignia
dozująca w pozycji 0FF).
Adres: Baoshanqu Shuangchenglu 803long 11hao 1602A-1609shi Szanghaj
Import do AUS: SIHAO PTY LTD.1 ROKEVA STREETEASTWOOD NSW 2122 Australia
Import do USA: Sanven Technology Ltd.Suite 250, 9166 Anaheim Place, Rancho
Cucamonga, CA 91730
Wyprodukowano w Chinach