
Technical Support and E-Warranty Certificate www.vevor.com/support
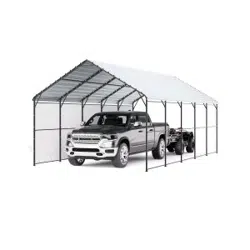
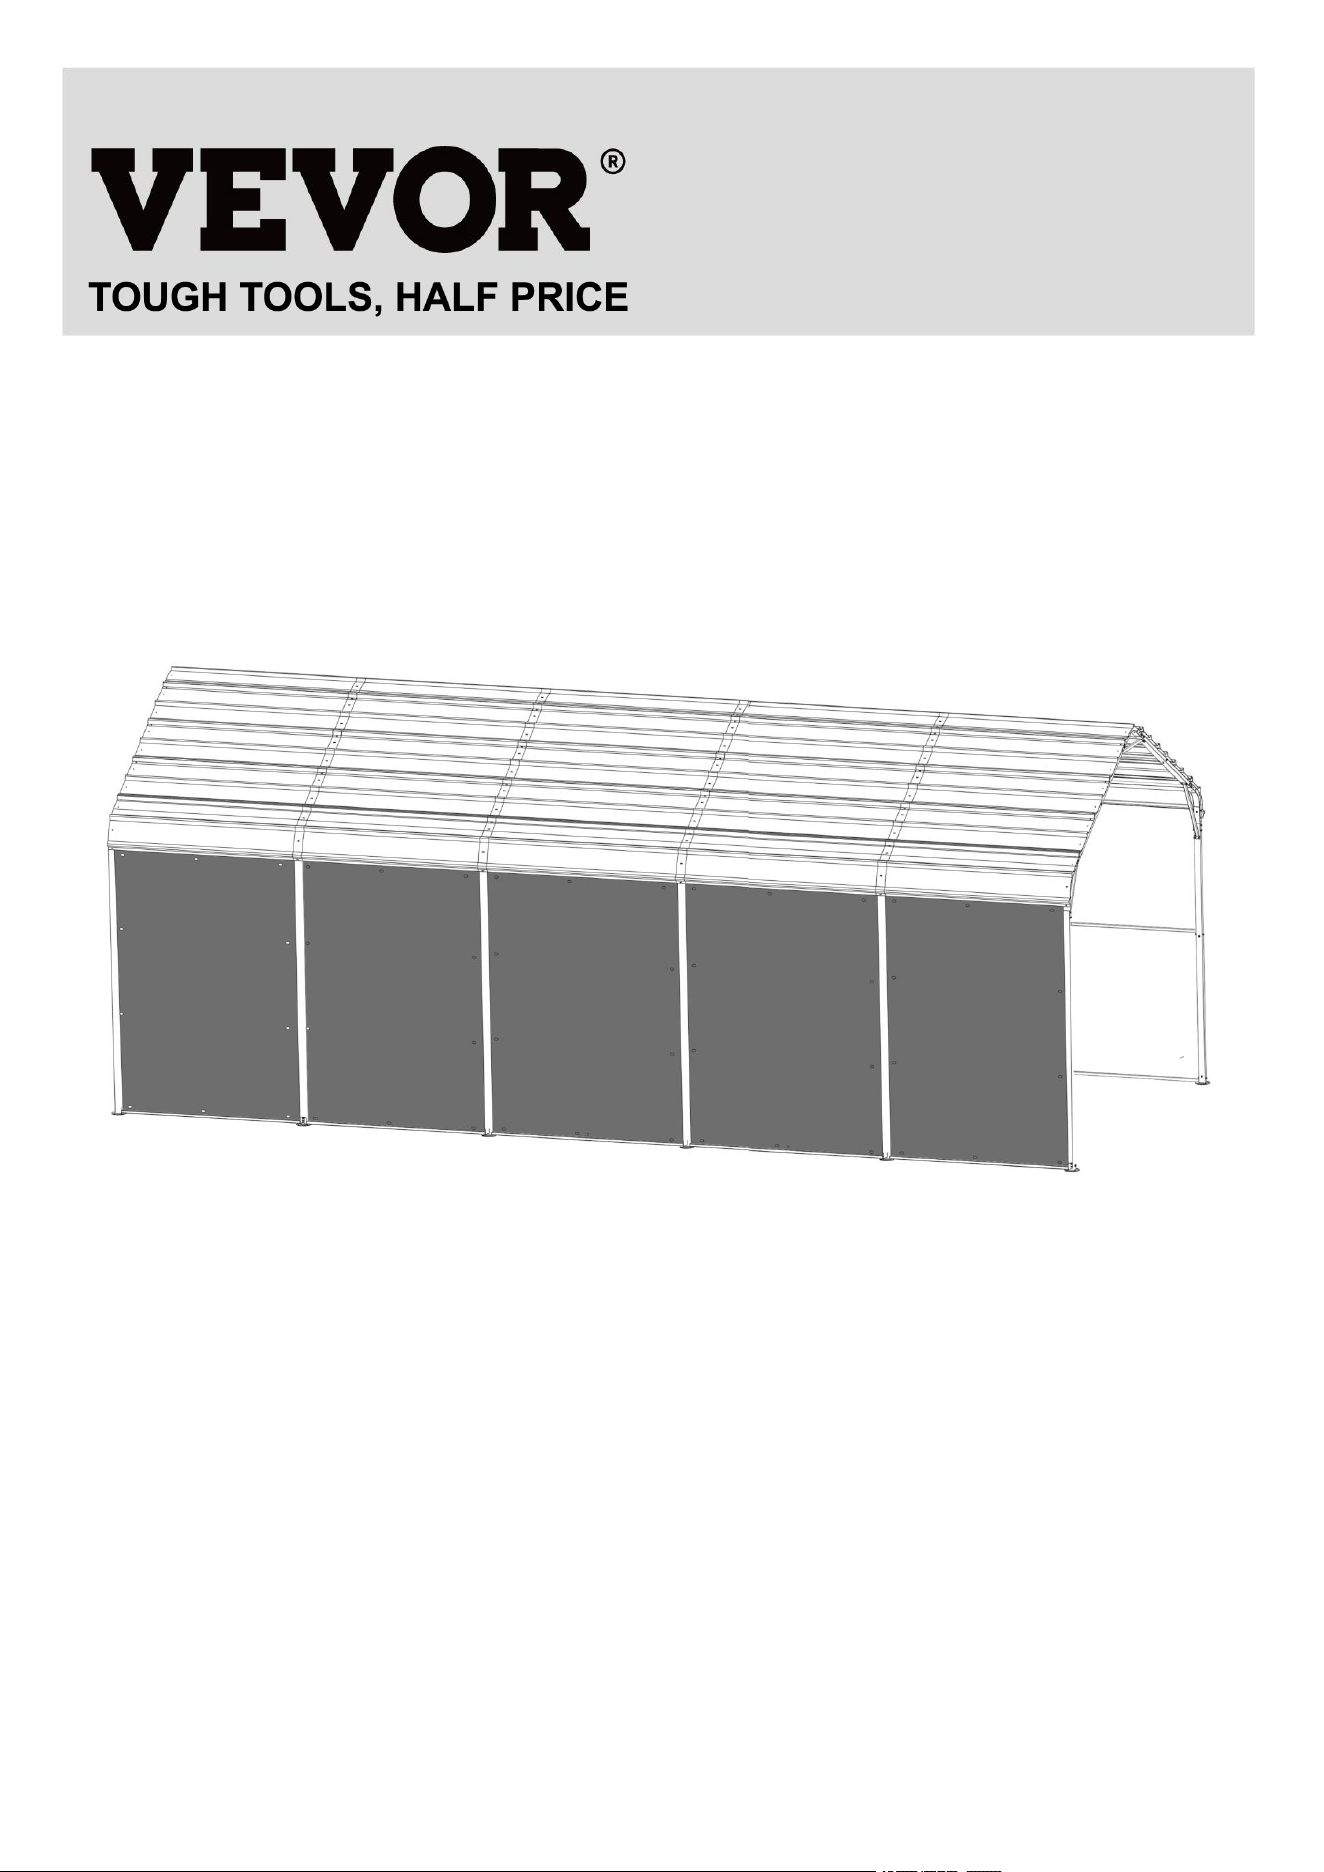
HEAVY DUTY CARPORTS
USER MANUAL
MODEL:KD-TPQC-007-13*26FT
We continue to be committed to provide you tools with competitive price.
"Save Half", "Half Price" or any other similar expressions used by us only
represents an estimate of savings you might benefit from buying certain tools
with us compared to the major top brands and does not necessarily mean to cover
all categories of tools offered by us. You are kindly reminded to verify carefully
when you are placing an order with us if you are actually Saving
Half in comparison with the top major brands.
1
MODEL:KD-TPQC-007-13*26FT
NEED HELP? CONTACT US!
Have product questions? Need technical support? Please feel free to contact us:
Technical Support and E-Warranty Certificate www.vevor.com/support
This is the original instruction, please read all manual instructions carefully before operating. VEVOR
reserves a clear interpretation of our user manual. The appearance of the product shall be subject to
the product you received. Please forgive us that we won't inform you again if there are any technology
or software updates on our product.
Heavy Duty carports

2
SAFETY INSTRUCTIONS
WARNING:
Read this material before using this product. Failure to do so can result in serious injury.
Assembly precautions
1. Assemble only according to these instructions. Improper assembly can create hazards.
2. Wear ANSI-approved safety goggles and heavy-duty work gloves during assembly.
3. Keep the assembly area clean and well-lit.
4. Keep bystanders out of the area during assembly.
5. Do not assemble if tired or when under the influence of alcohol, drugs or medication.
6. The product capabilities apply to properly and completely assembled products only.
7. Assemble on a flat, level, hard and smooth surface capable of safely supporting the Wooden Hall
Tree.
8. For additional information regarding the parts listed in the following pages, please refer to the
Assembly Diagram of this manual. Unwrap and separate all parts in a clean work area.
Use precautions
1. DO NOT SIT OR STAND ON THIS ITEM.
2. This product is not a toy. Do not allow children to play with or near this item.
3. Do not exceed specified weight capacities.
4. Use only on a flat, level, hard, and smooth surface that can safely support a fully loaded Wooden
Hall Tree.
5. Use as intended only.
6. Inspect before every use; do not use if parts are loose or damaged.
SAVE THIS MANUAL
3
IMPORTANT! PLEASE READ THIS INSTRUCTION
CAREFULLY BEFORE INSTALLATION.
1. Installation requires at least two adults. Read all instructions carefully and follow it
accordingly. Failure to do so may result in injury or damage to the carport.
2. Never set up the product in rainy, windy or stormy conditions, especially lighting storms.
3. Keep your carport off of the steep slopes and inclination.
4. After installation, the carport should be anchored to prevent damage and possible injury. It
is the user's responsibility to properly anchor the product.
5. Always inspect the carport and each part before use. Make sure that everything is tightly
secured. Replace any worn, defective missing parts.
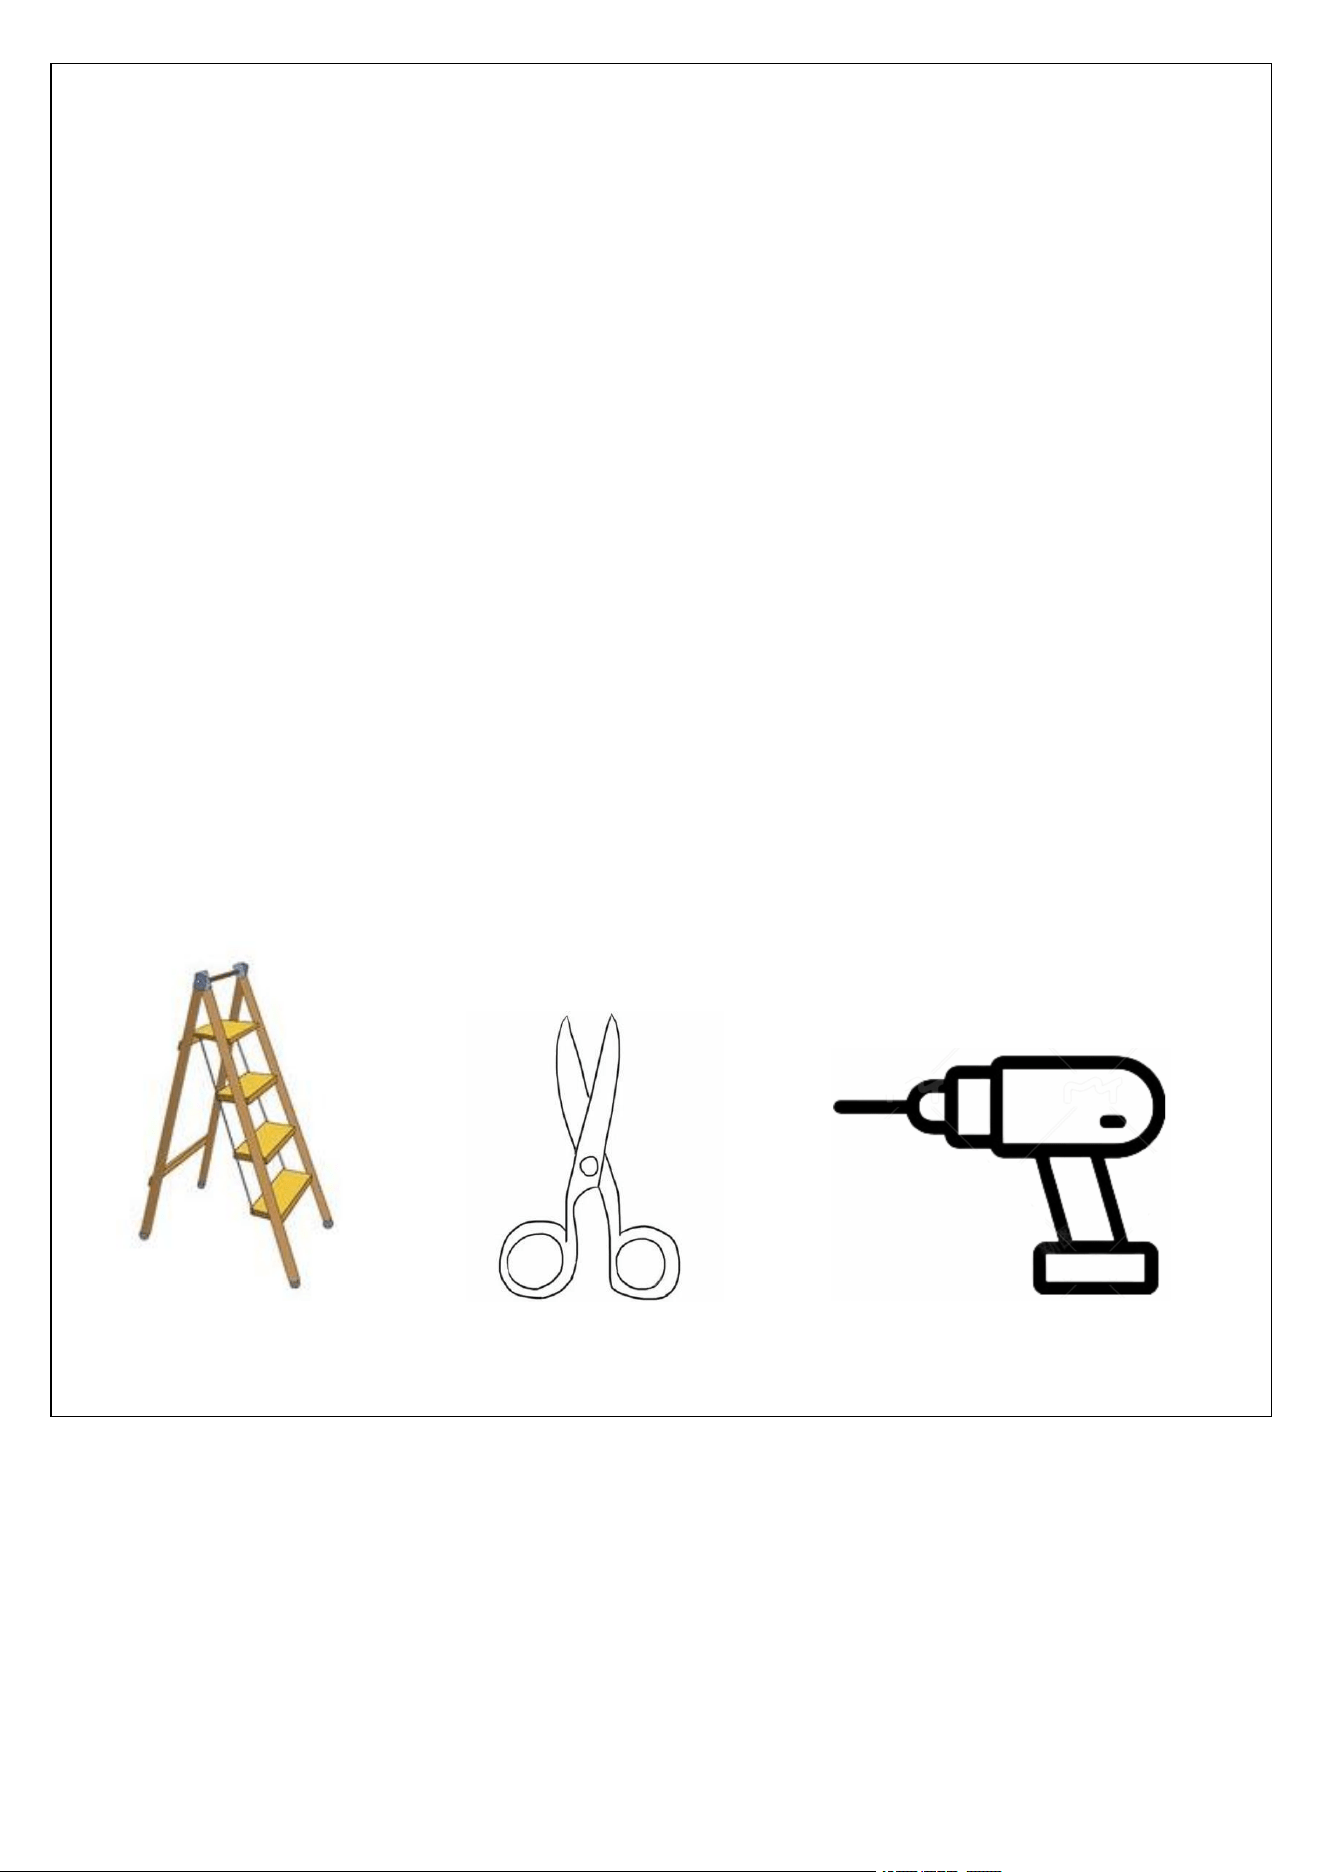
6. For a better installation and use experience, it is recommended to bring your own ladder,
scissors, electric drill and glass glue.
Ladder Scissors Electric drill
4
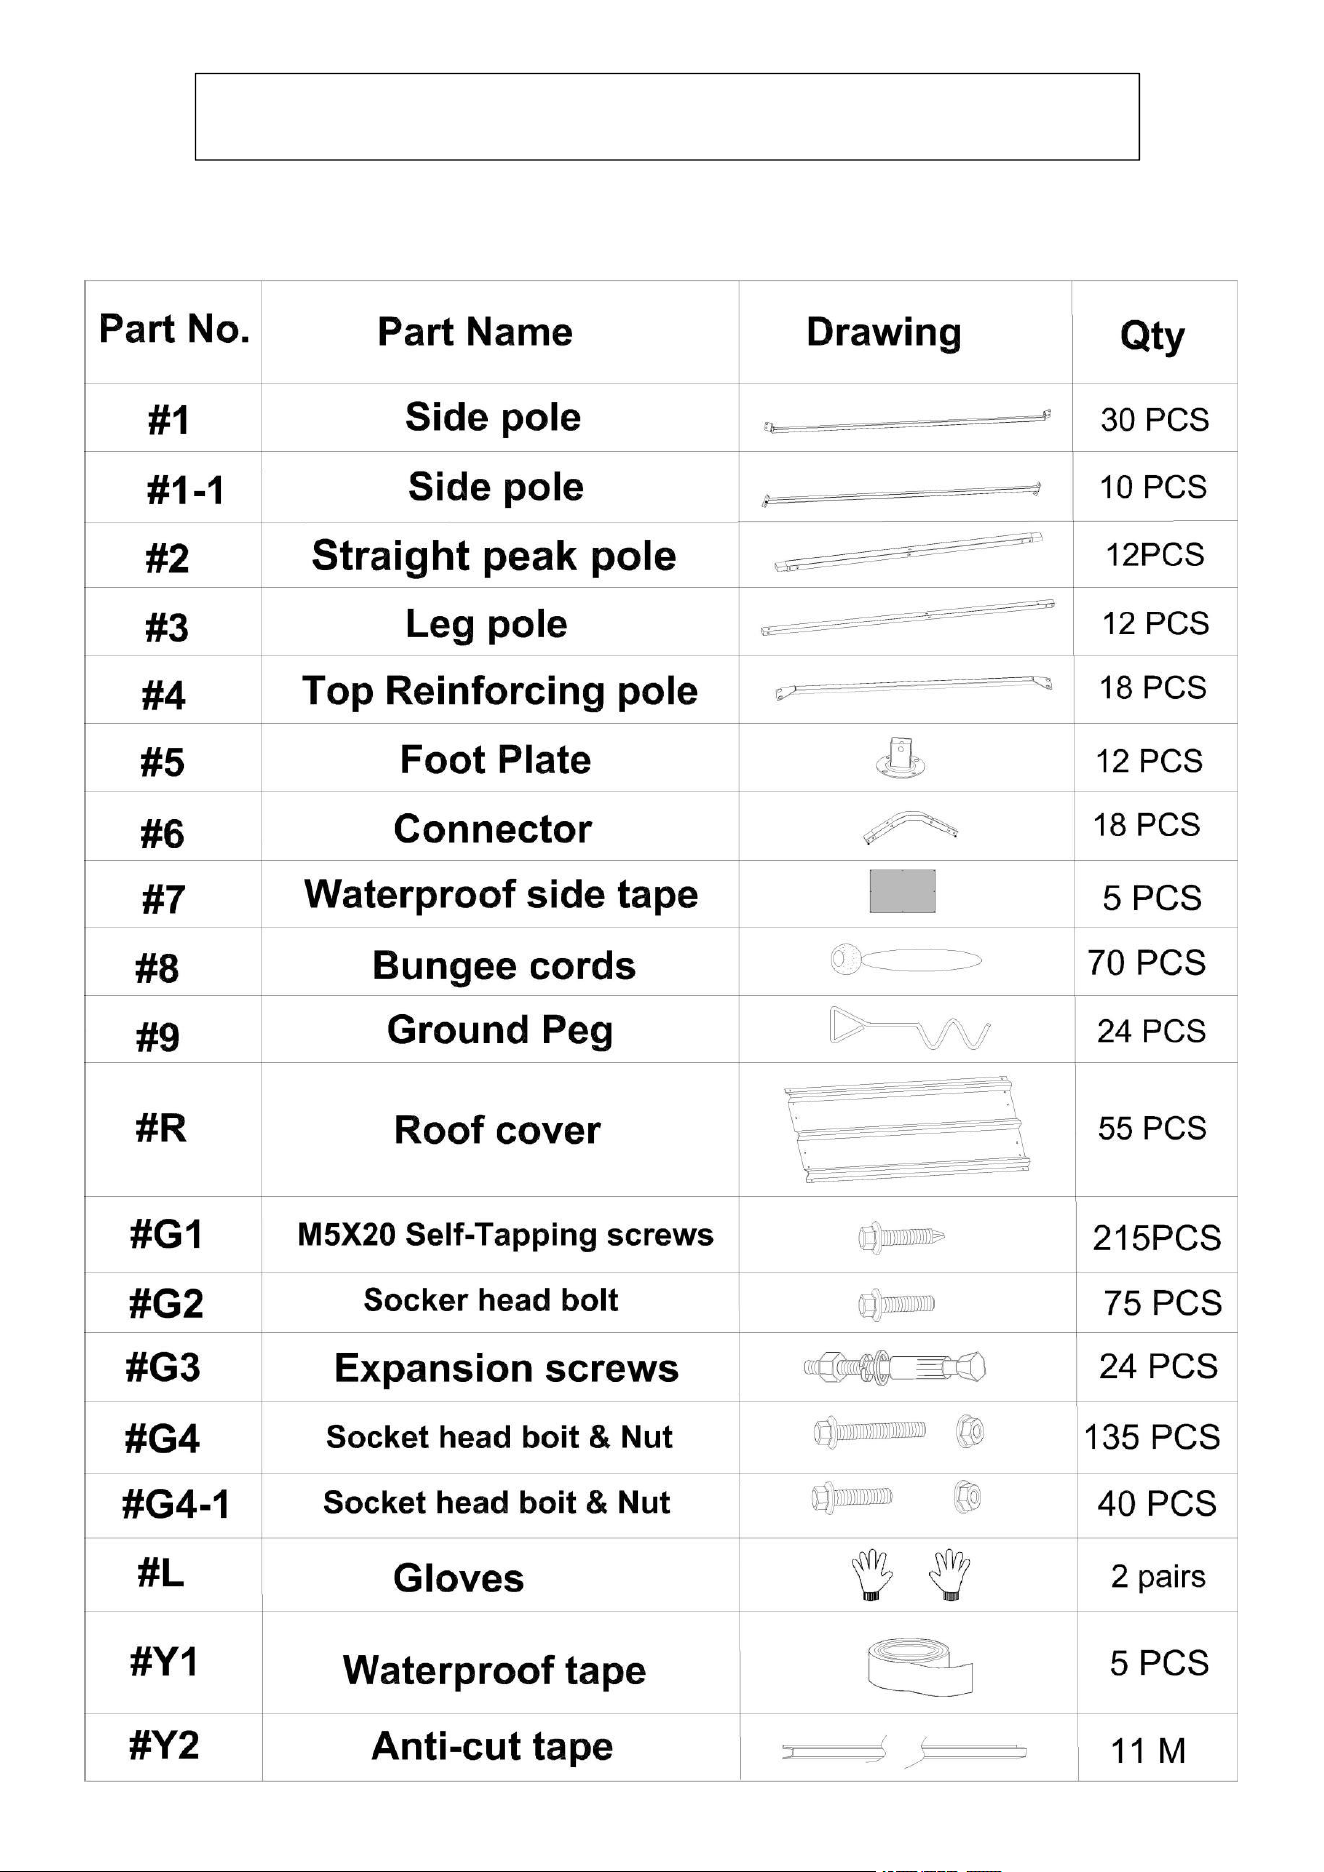
This carport is packed in Several boxes. Before the installation, please check
the contents according to the part list. If there is any part missing or defective,
please contents us immediately to get replacement parts.
PACKAGE CONTENTS

5
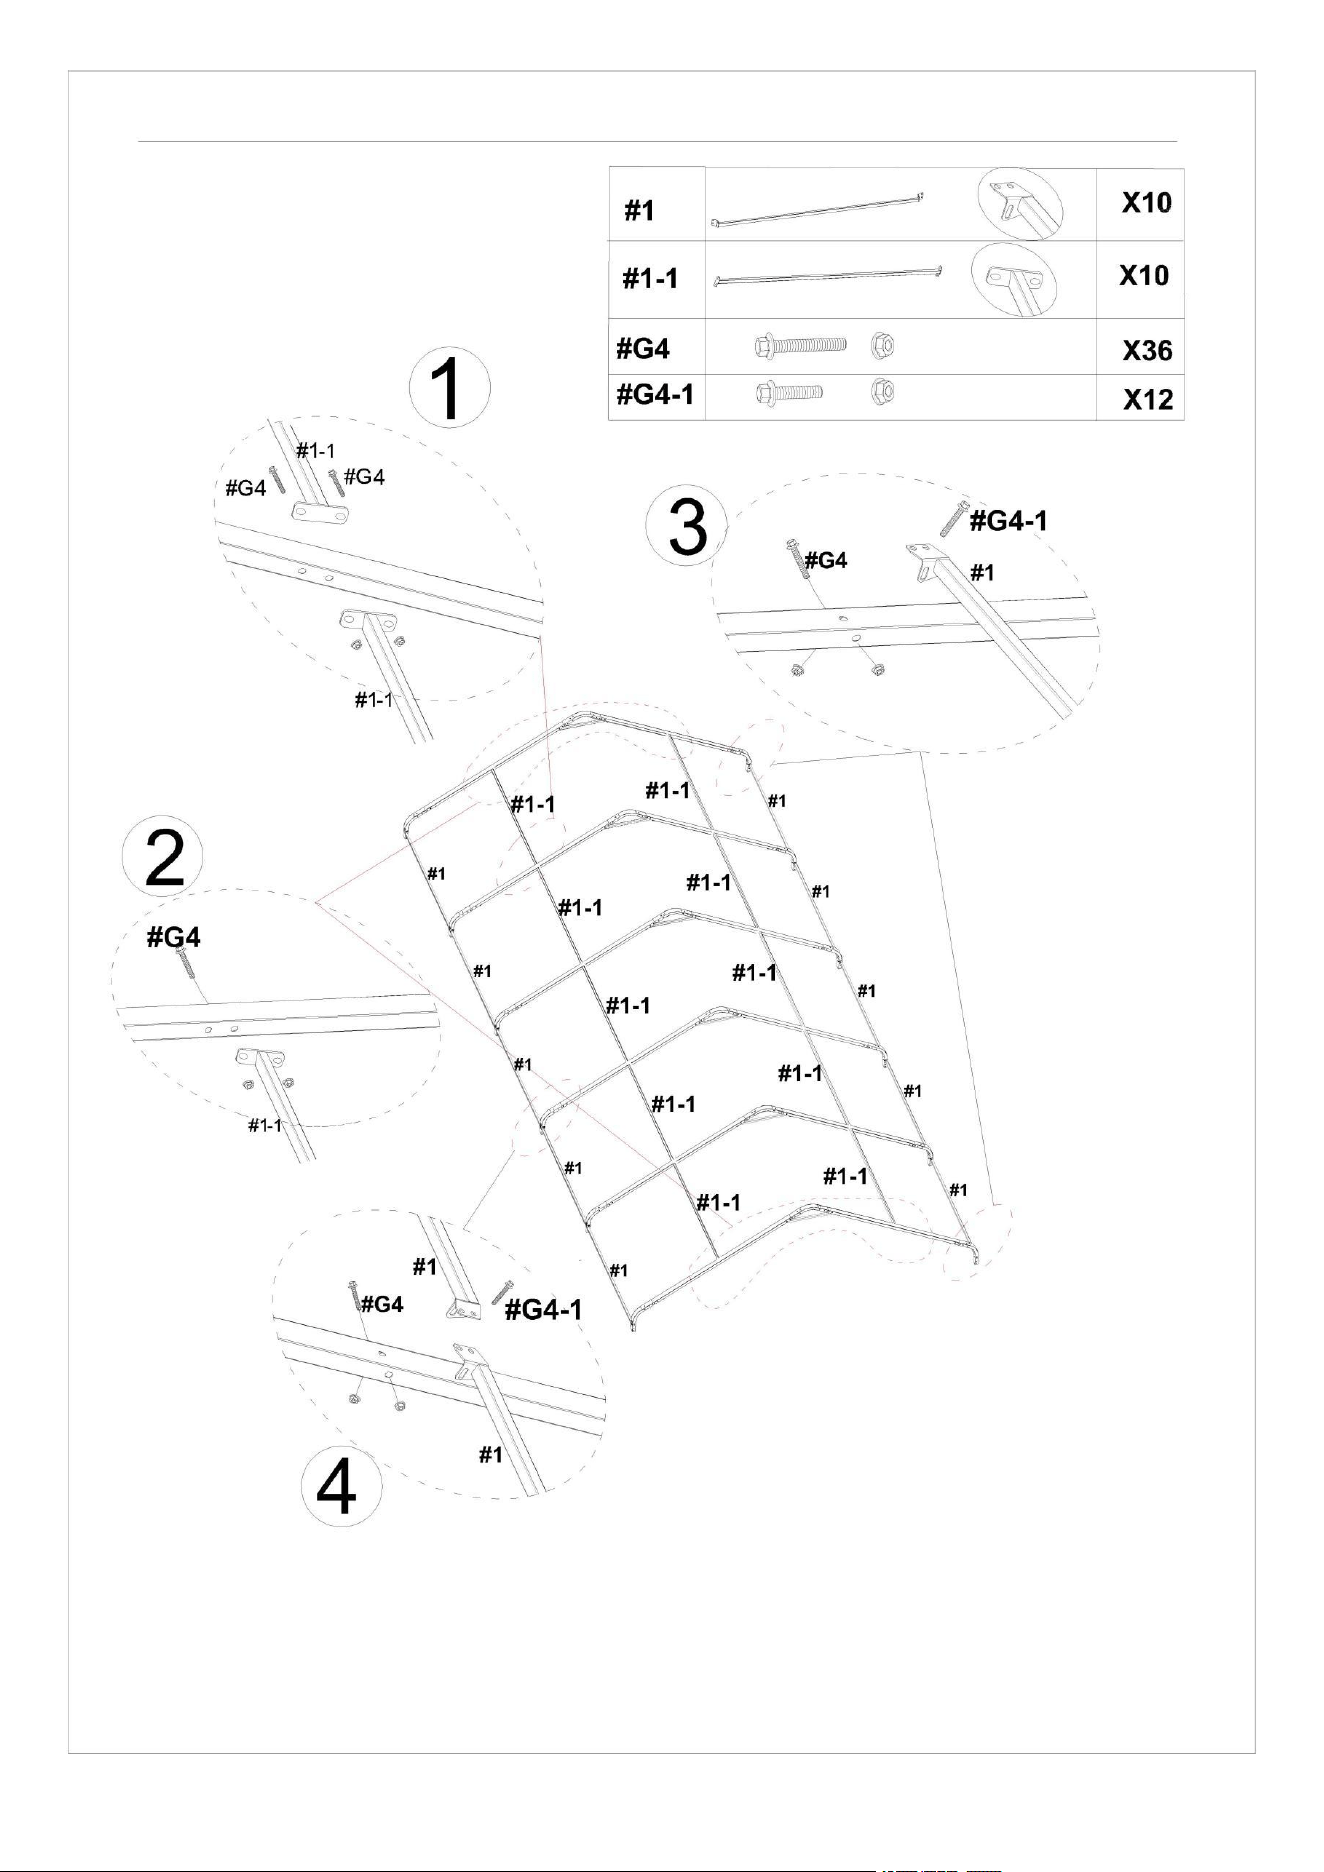
STEP 1: Assemble the top Frame
6
STEP 2:
7
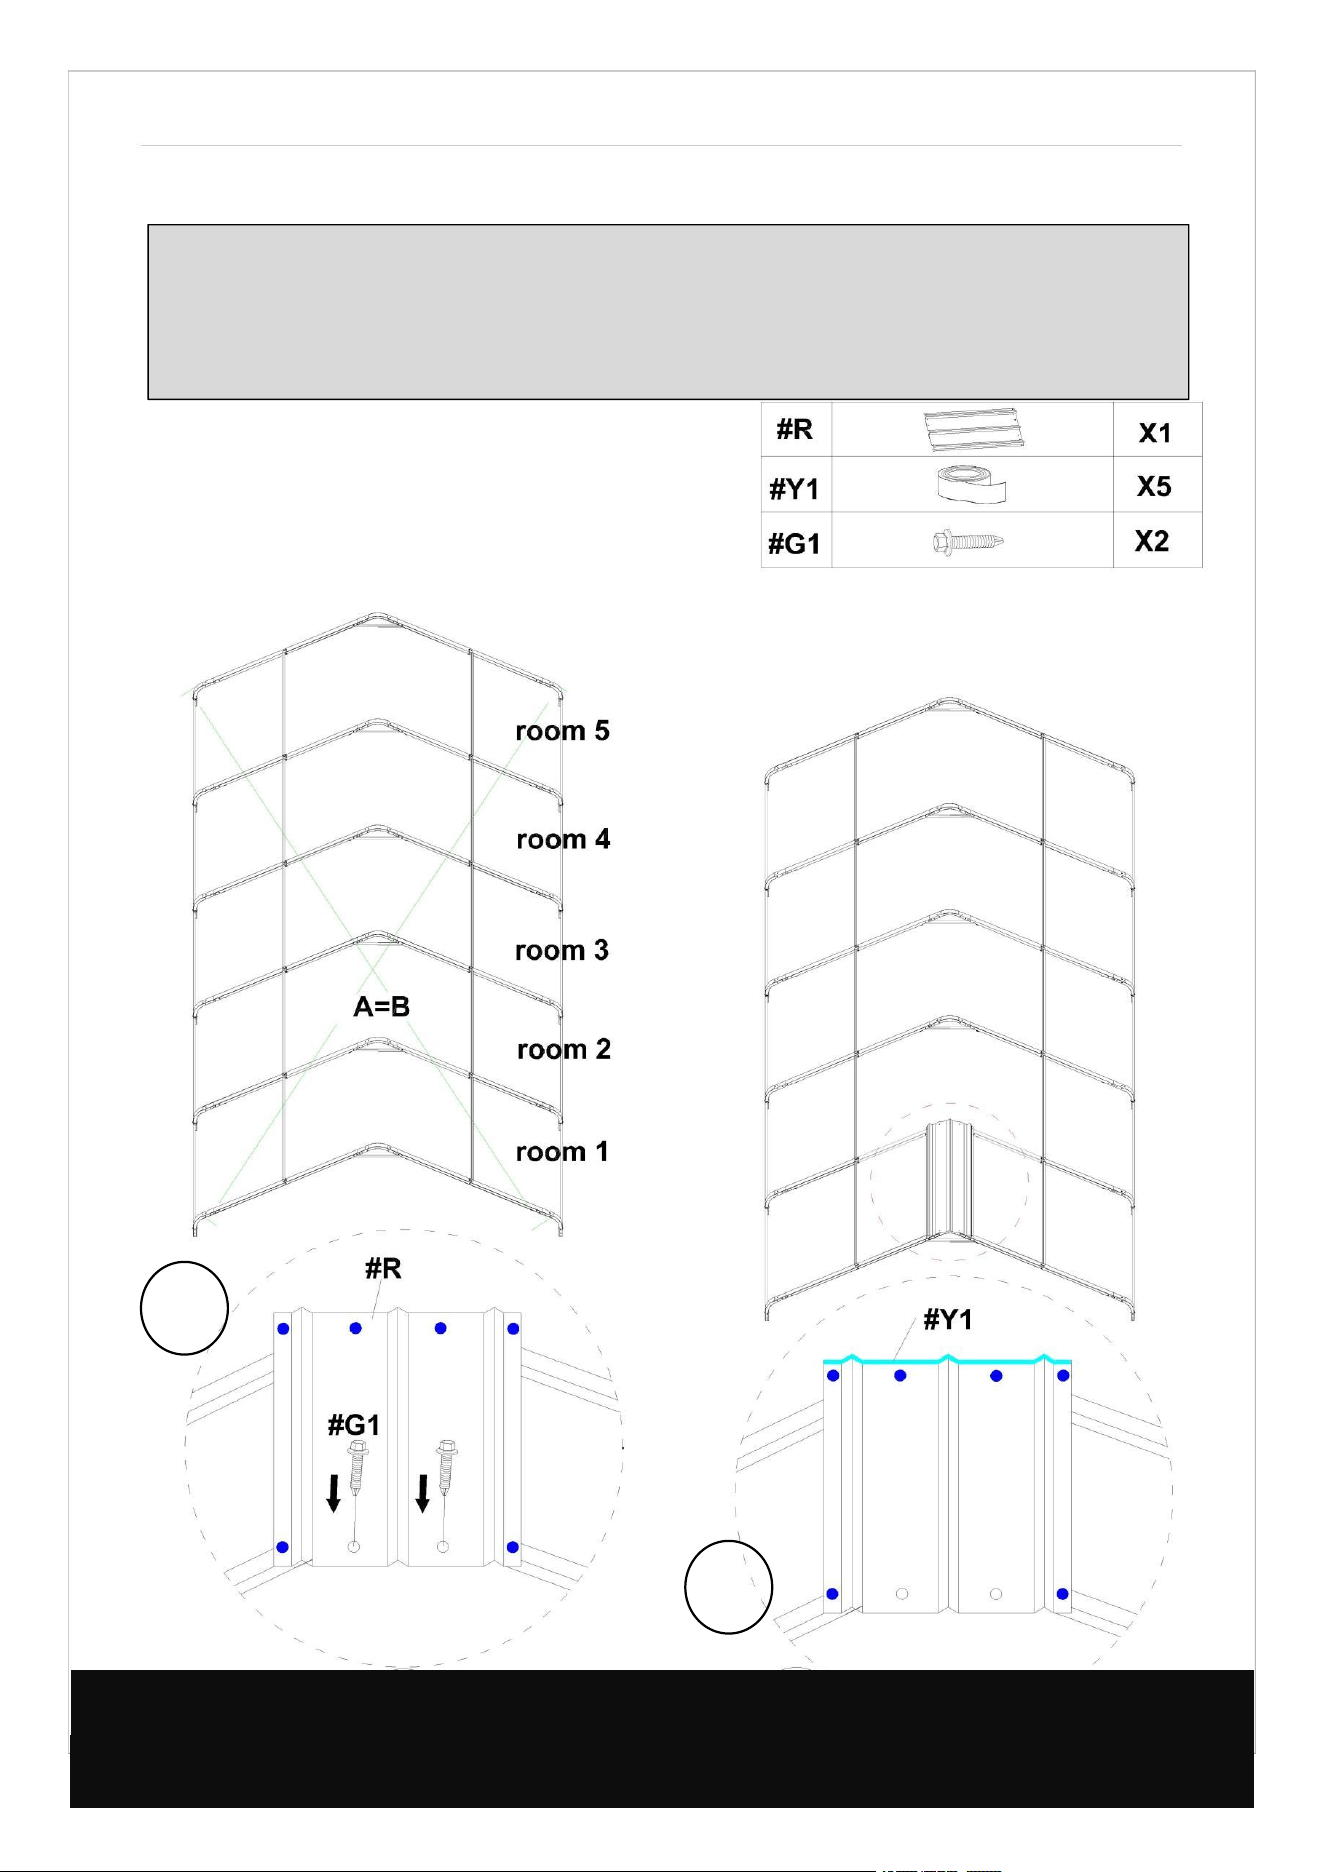
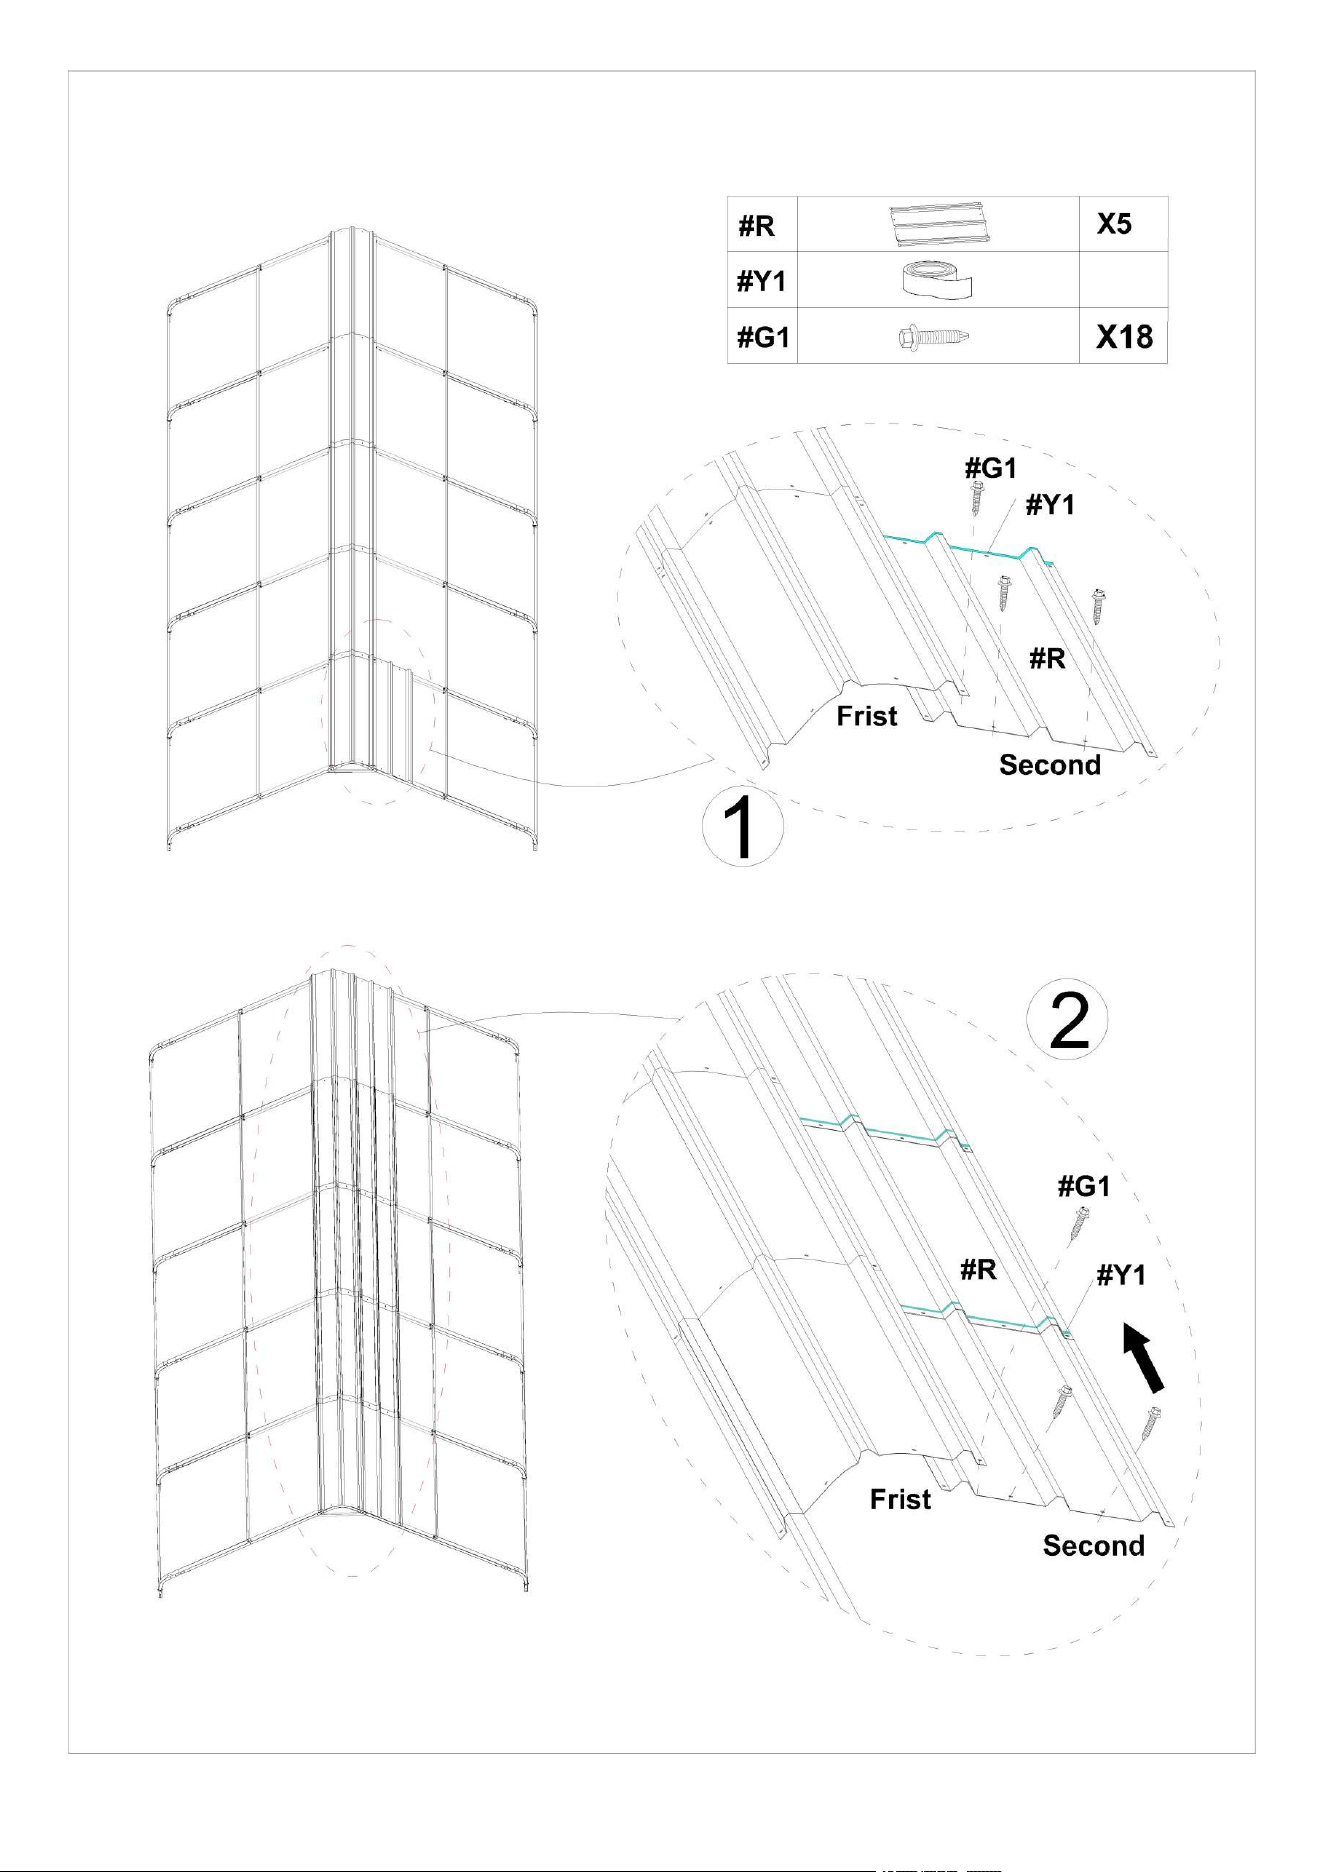
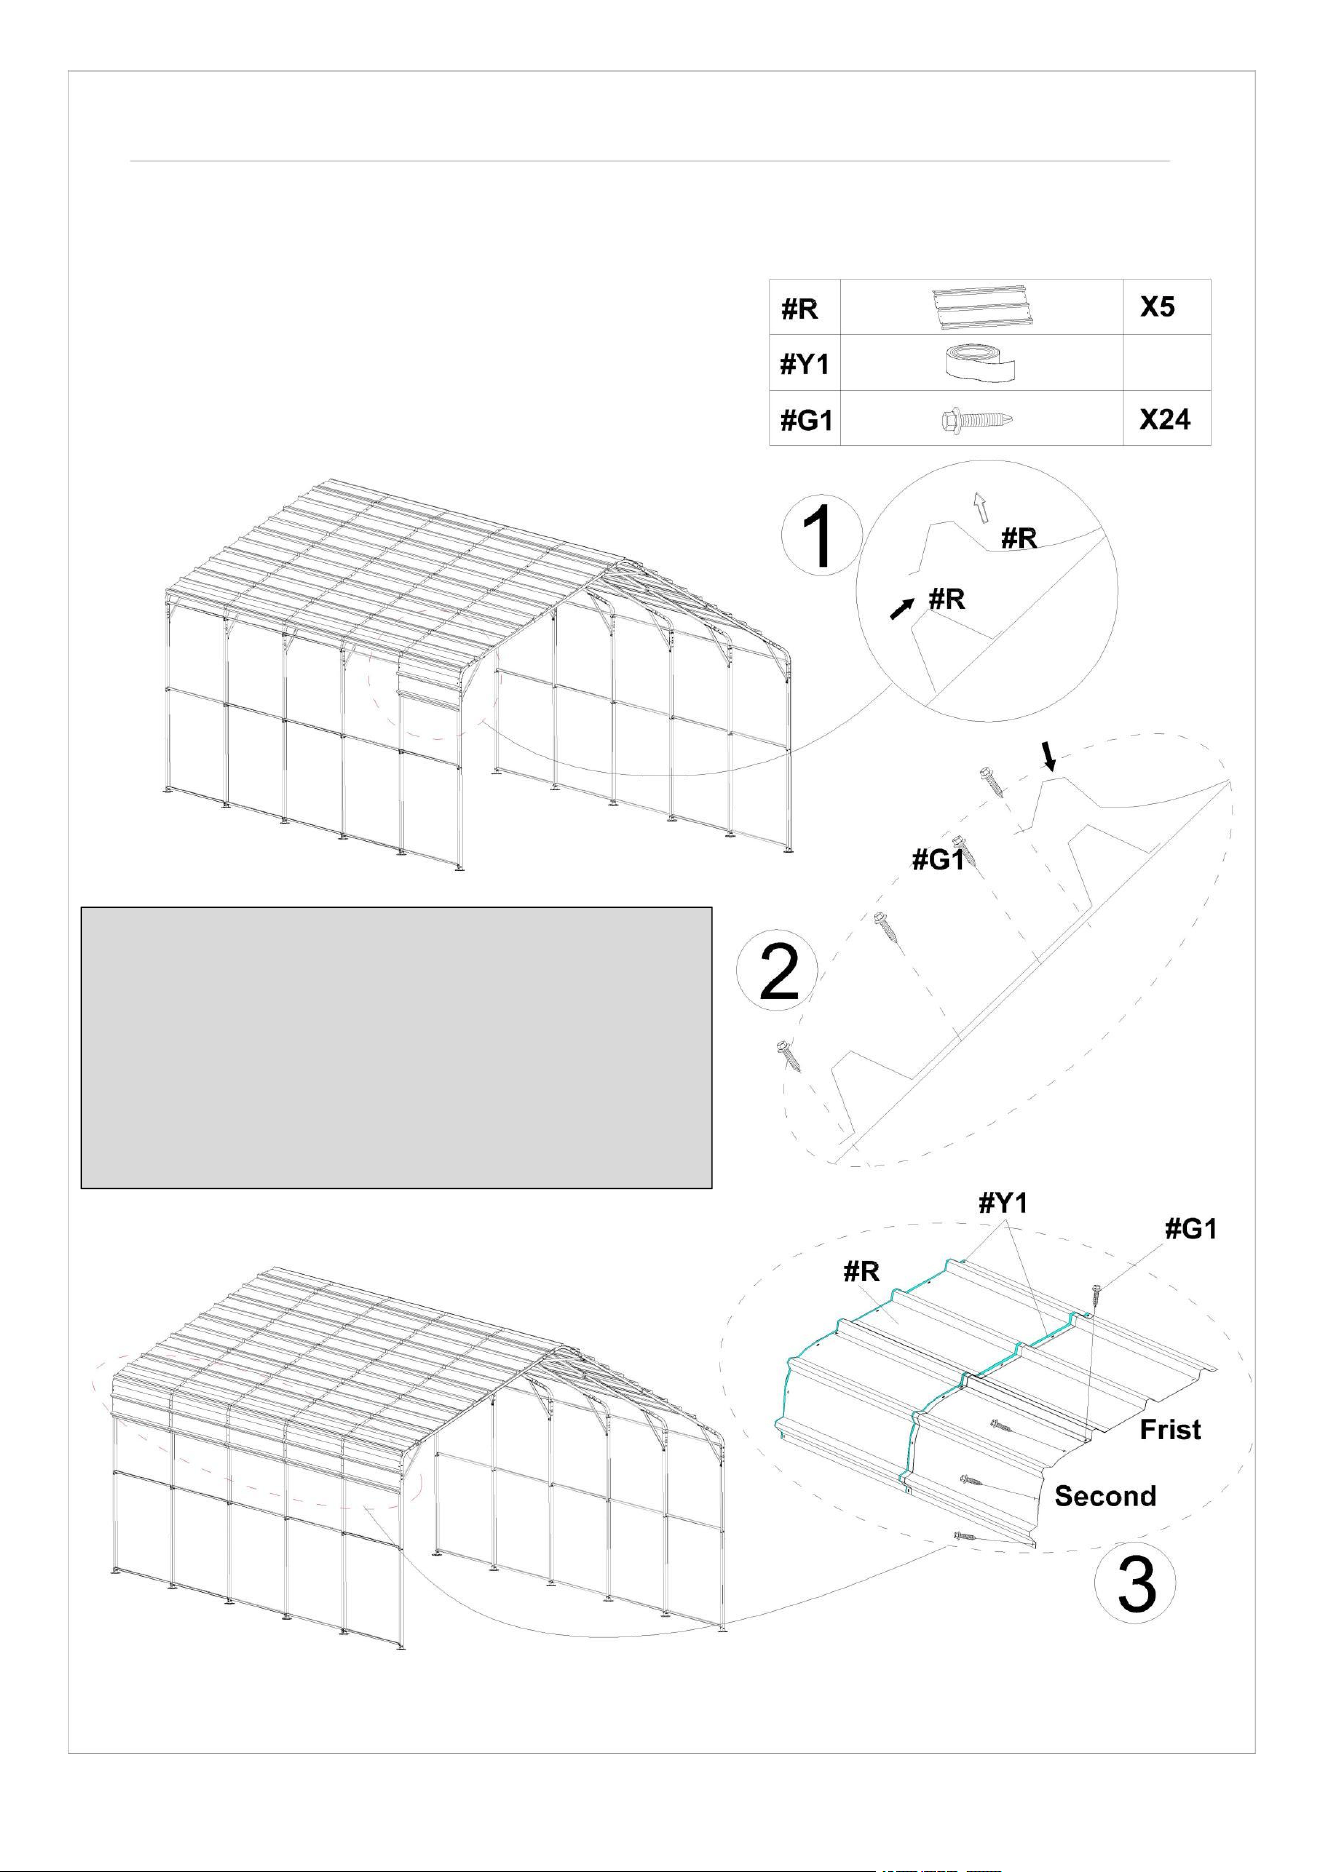
STEP 3: Install the Top Roof
Install all the Roof Cover(#R) to the top frame. The linking screws in this step are all:
Self-Tapping Screws(#G1), as shown in the picture.
Notice:
1. The meaning of different colored holes in the Roof Cover(#R);
Blue hole: no screws here right now.
○Black hole: normal installation
1) Before installing the first row of top covers(#R);
Ensure that the dimensions of A and B are the
same. Starting from the top middle of room 1 to room
5, install the first row of Roof Covers(#R)
2) When installing each Roof
COVER(#R), you need to use Waterproof
Tape(#Y1) as shown in the picture.
Please make sure it is in the center of the roof before bolting.
IMPORTANT NOTE:
1
2
8
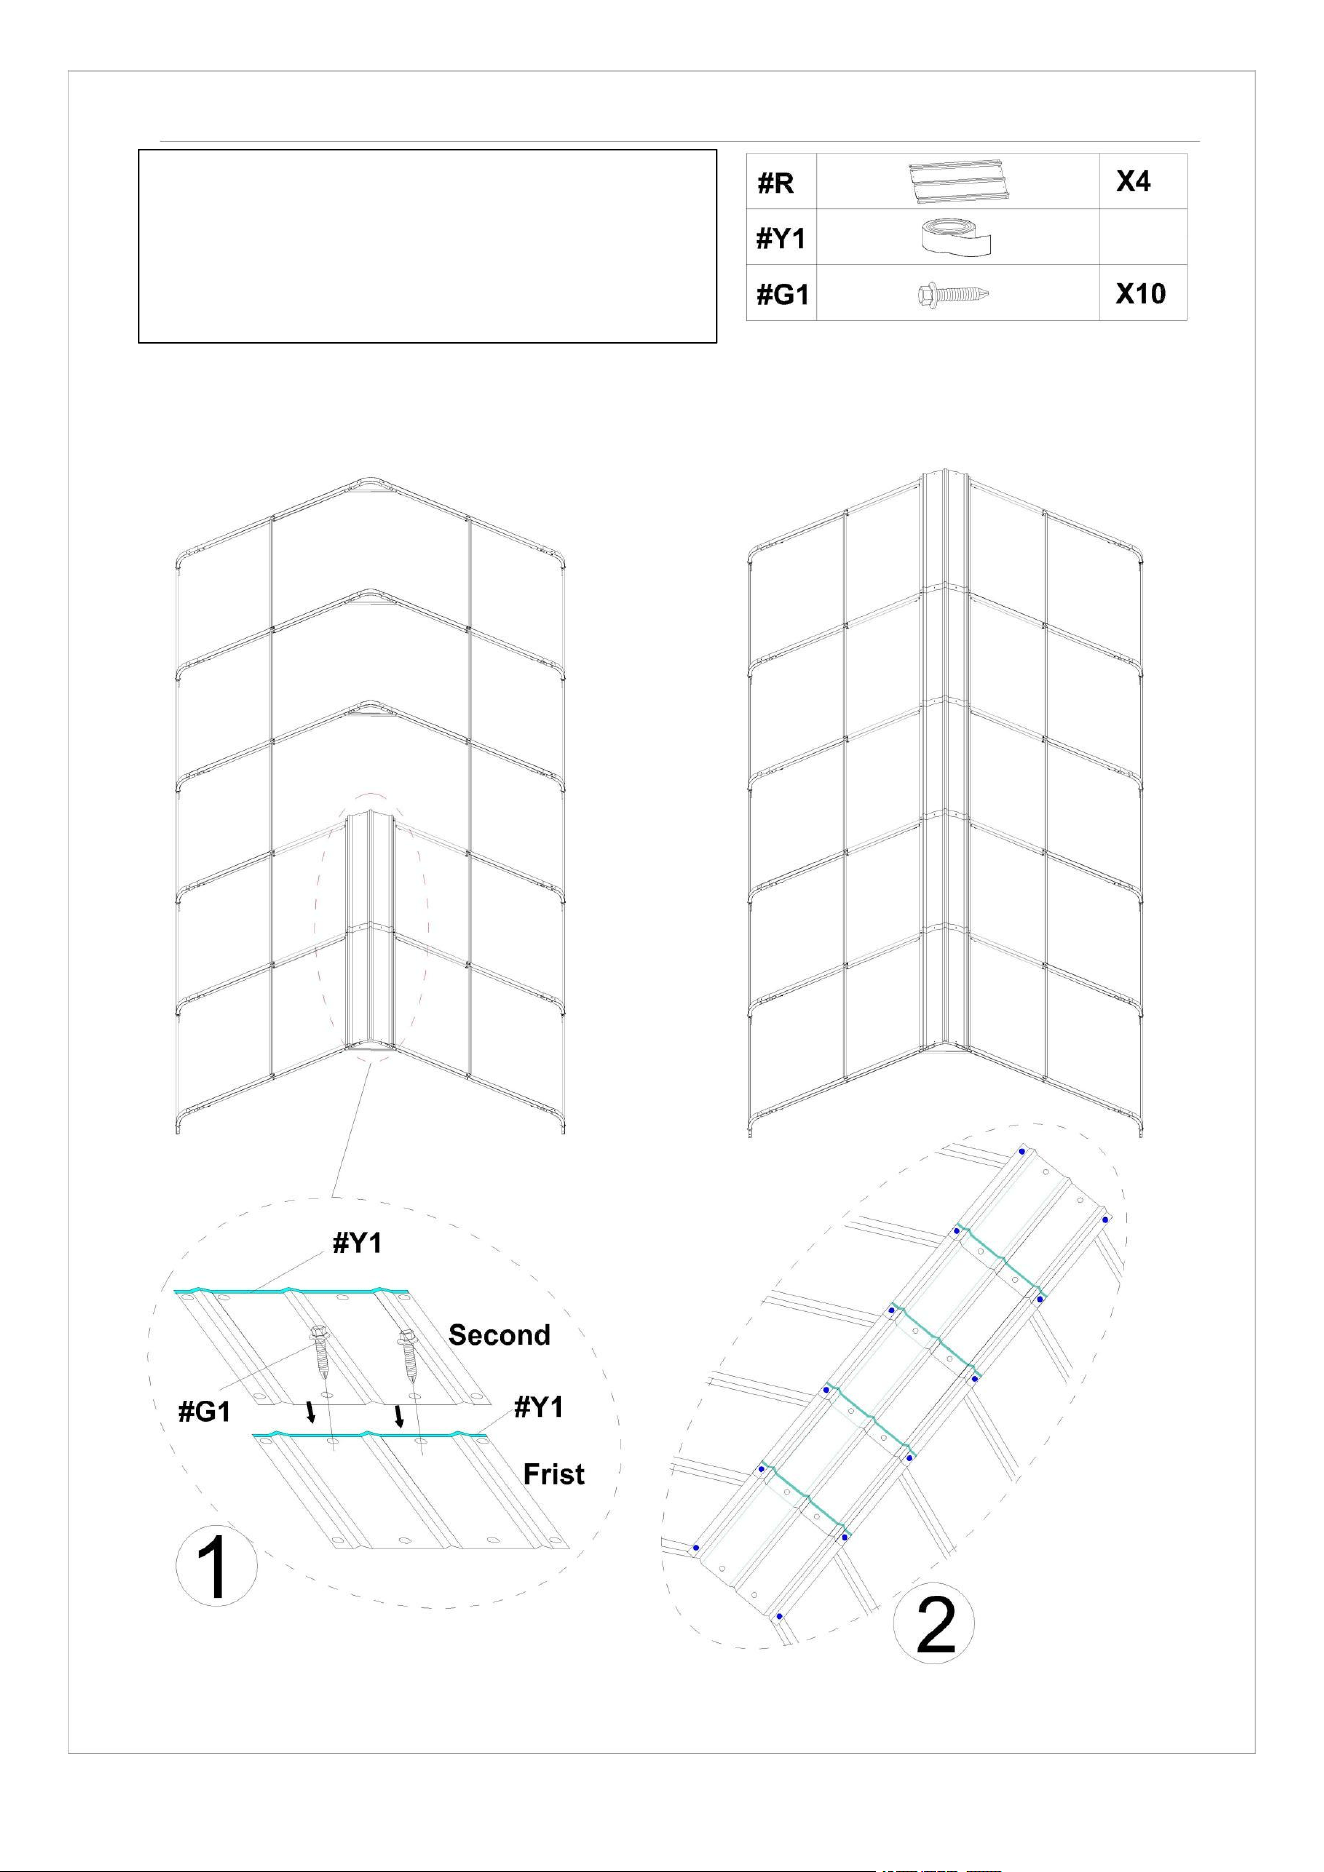
STEP 4:
Notice:
1. Make sure that the screw holes are aligned,
and then press the Waterproof Tape(#Y1)
2. Make sure there are no gaps between the
two roof covers to prevent water leakage.
3.1) The second Roof Cover(#R) needs
to be placed on the first Roof Cover(#R).
3.2) Follow the previous steps and continue
to install the remaining Roof Cover(#R) in
the middle row.
9
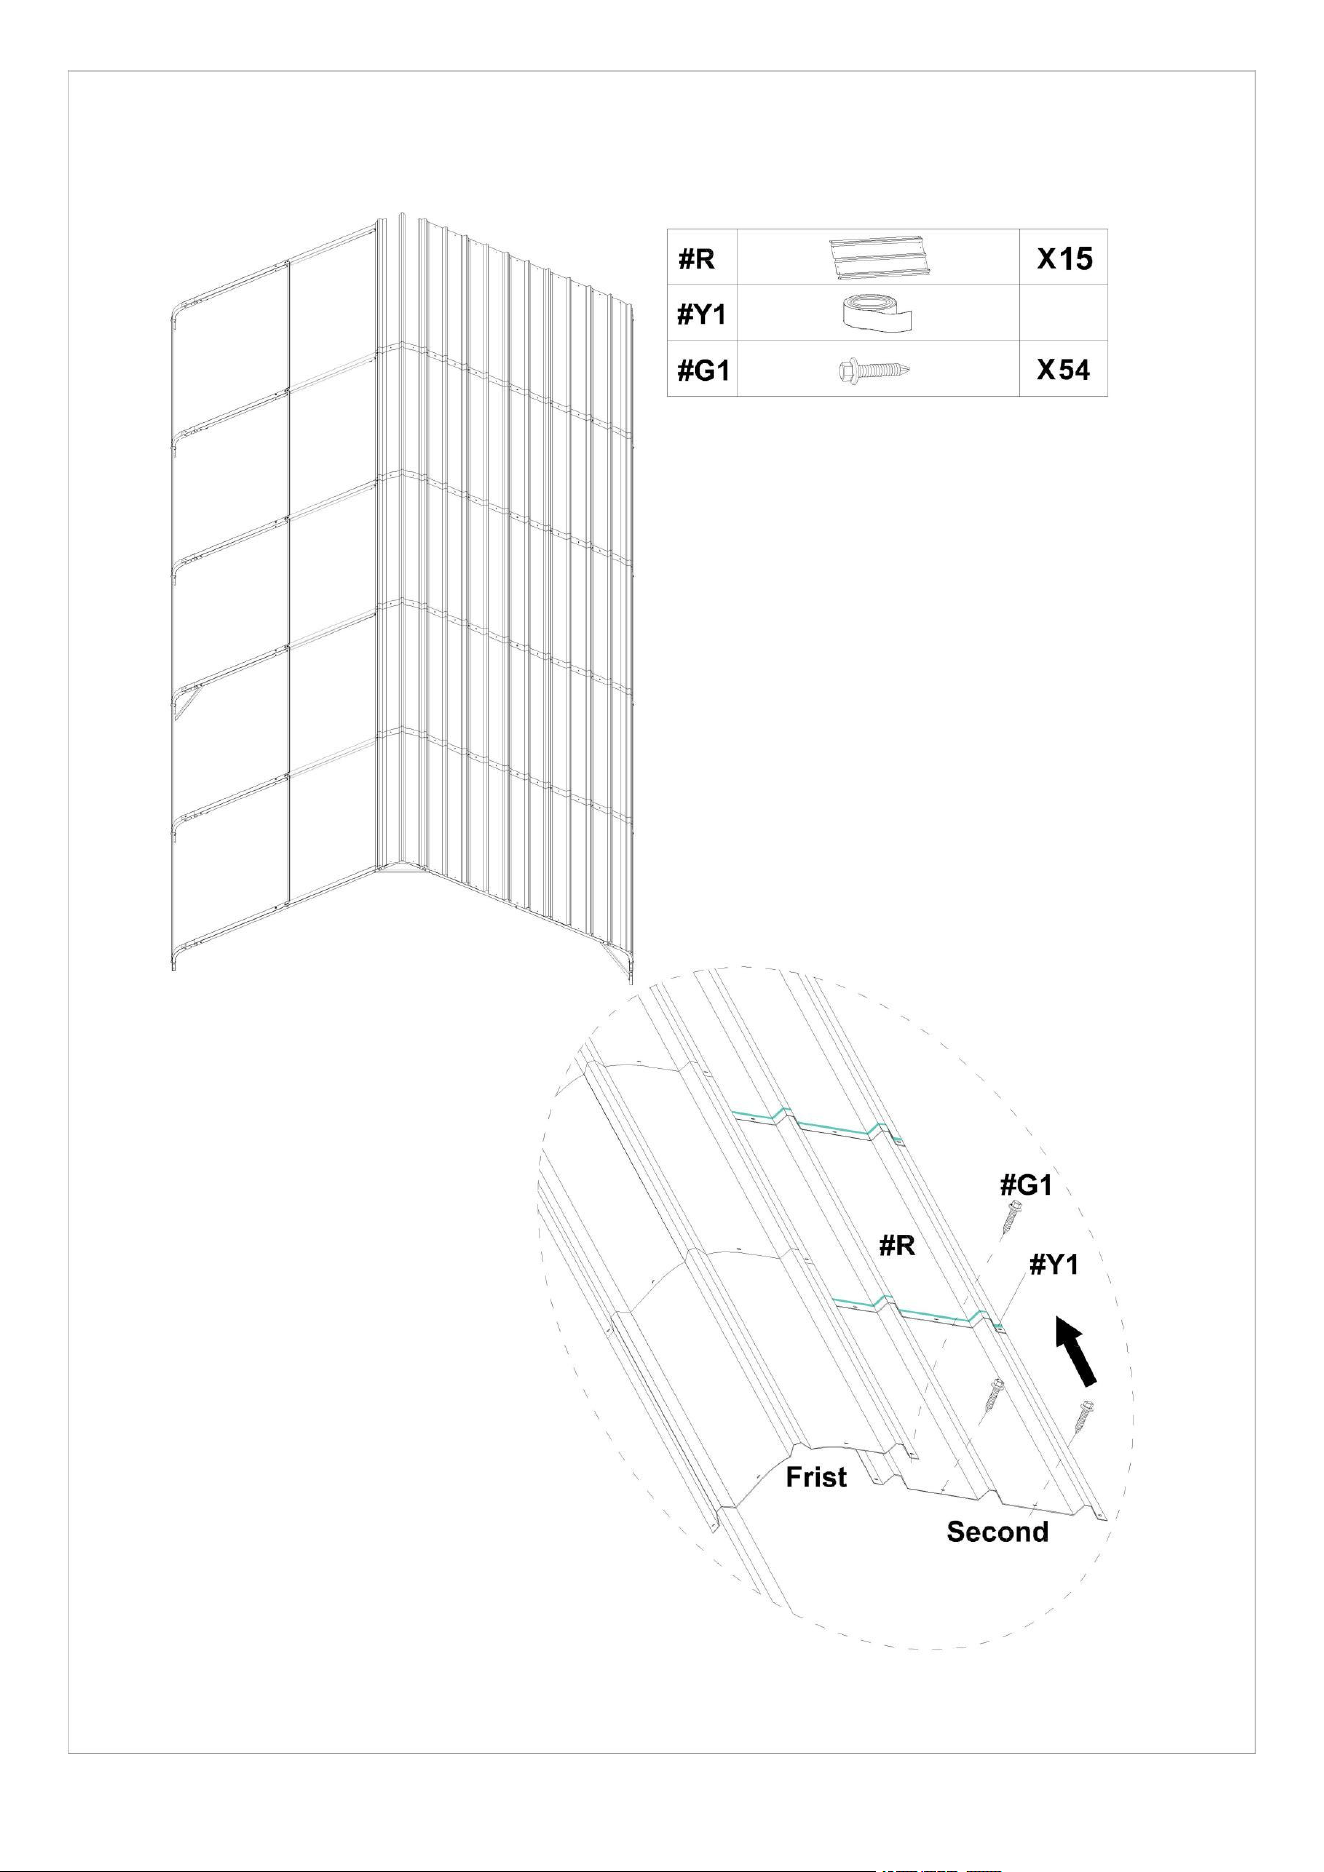
4.1) After installing the middle row, continue to install the rows on the right. Each newly
installed Roof Cover #R) in a row needs to be placed below the Roof Cover(#R) in the
previous row, as shown in the picture.
4.2) Same as the previous step, after pasting the Waterproof Tape(#Y1) of Roof
Covers(#R), install the next Roof Covers(#R).
10
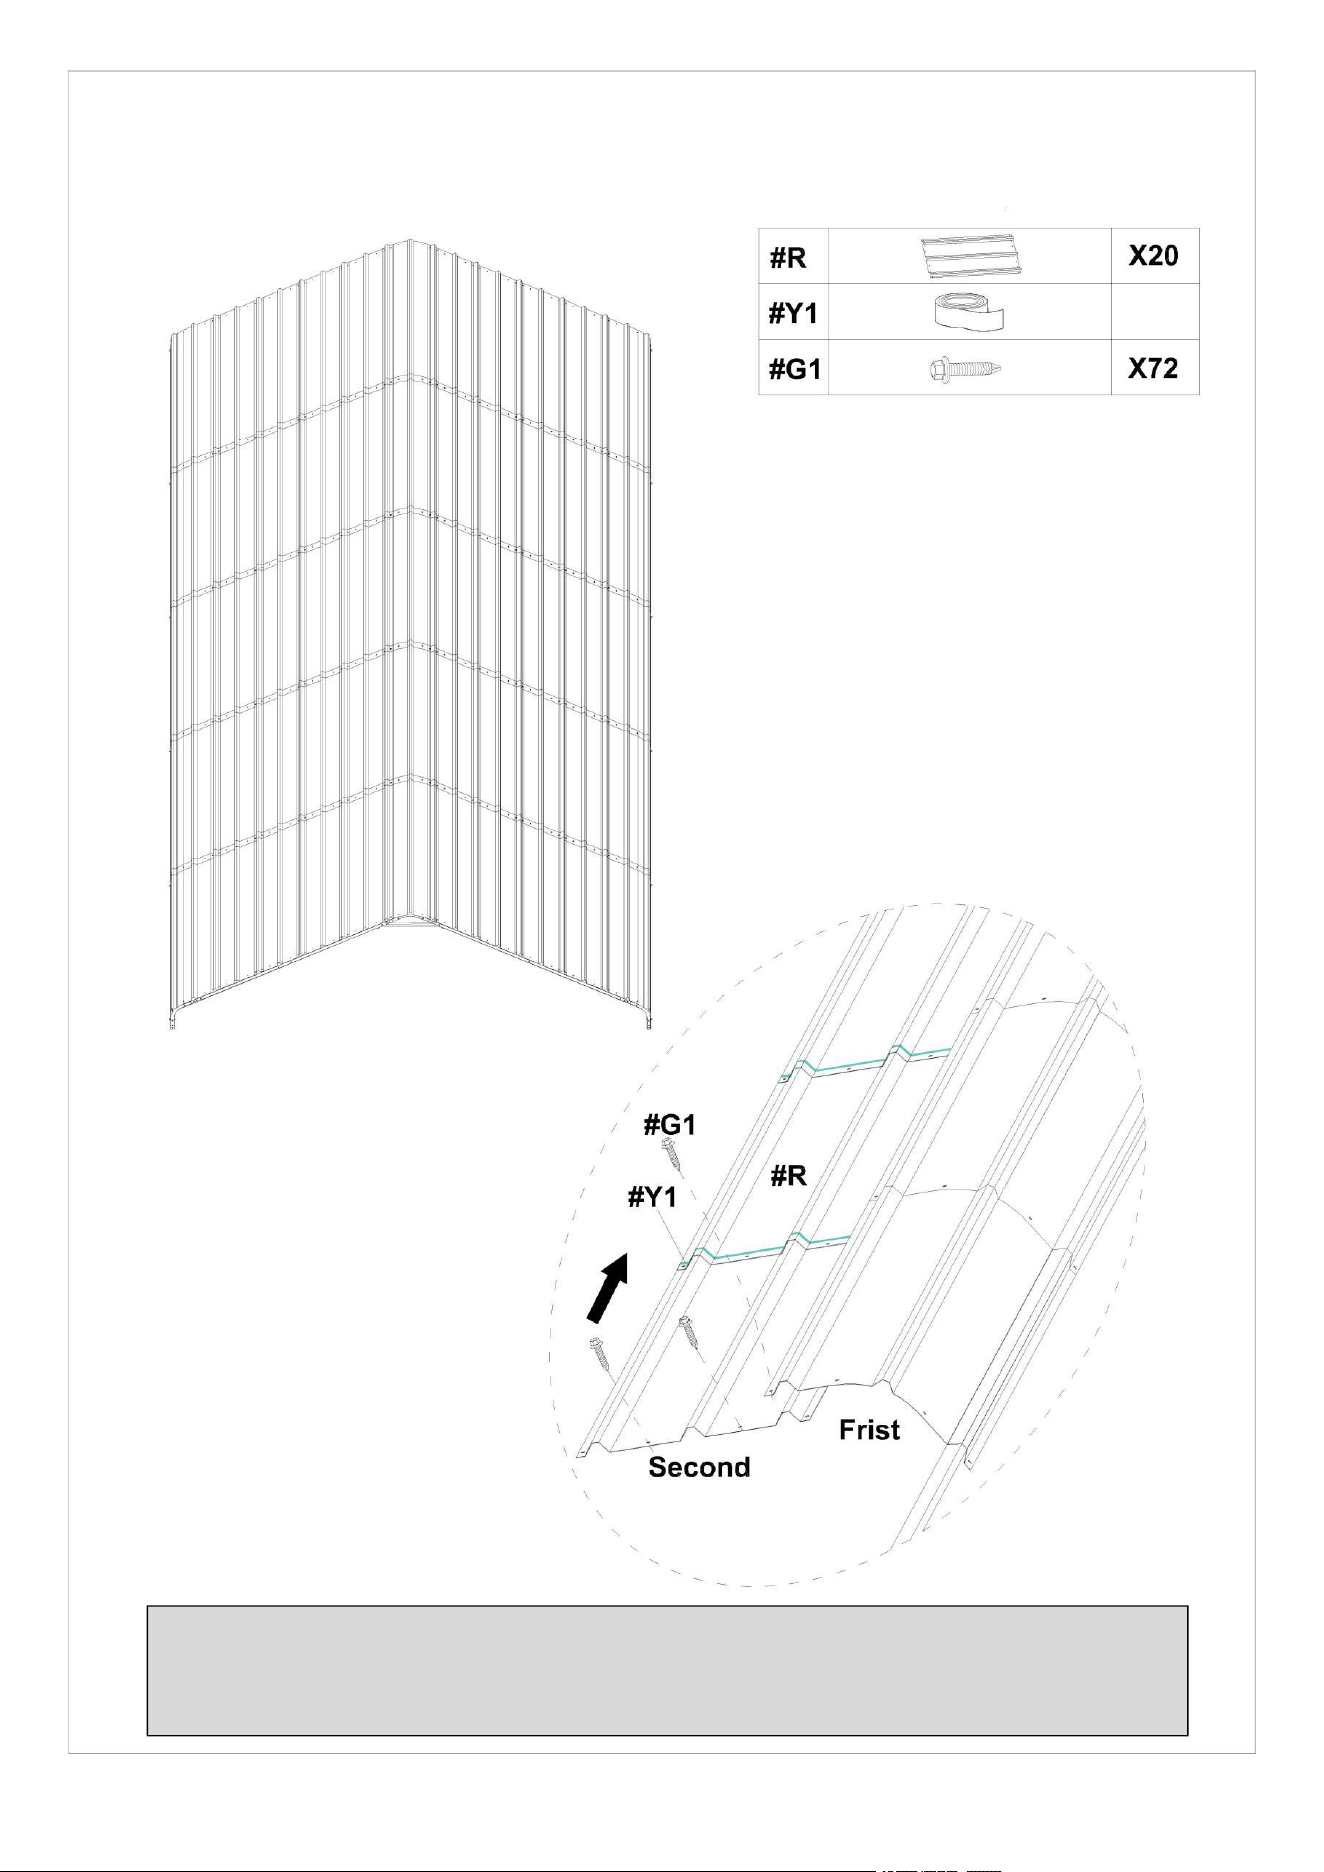
4.3) Same as the previous step, after pasting the Waterproof Tape(#Y1) of Roof
Covers(#R), install the next Roof Covers(#R).
11
4.4) Same as the installation steps for the rows on the right, please complete the
installation of Roof Cover(#R) of the rows on the left.
Note:
After Roof Covers(#R) are installed, the remaining 10pcs Roof Covers(#R) will be
installed in the Step7 later.
12
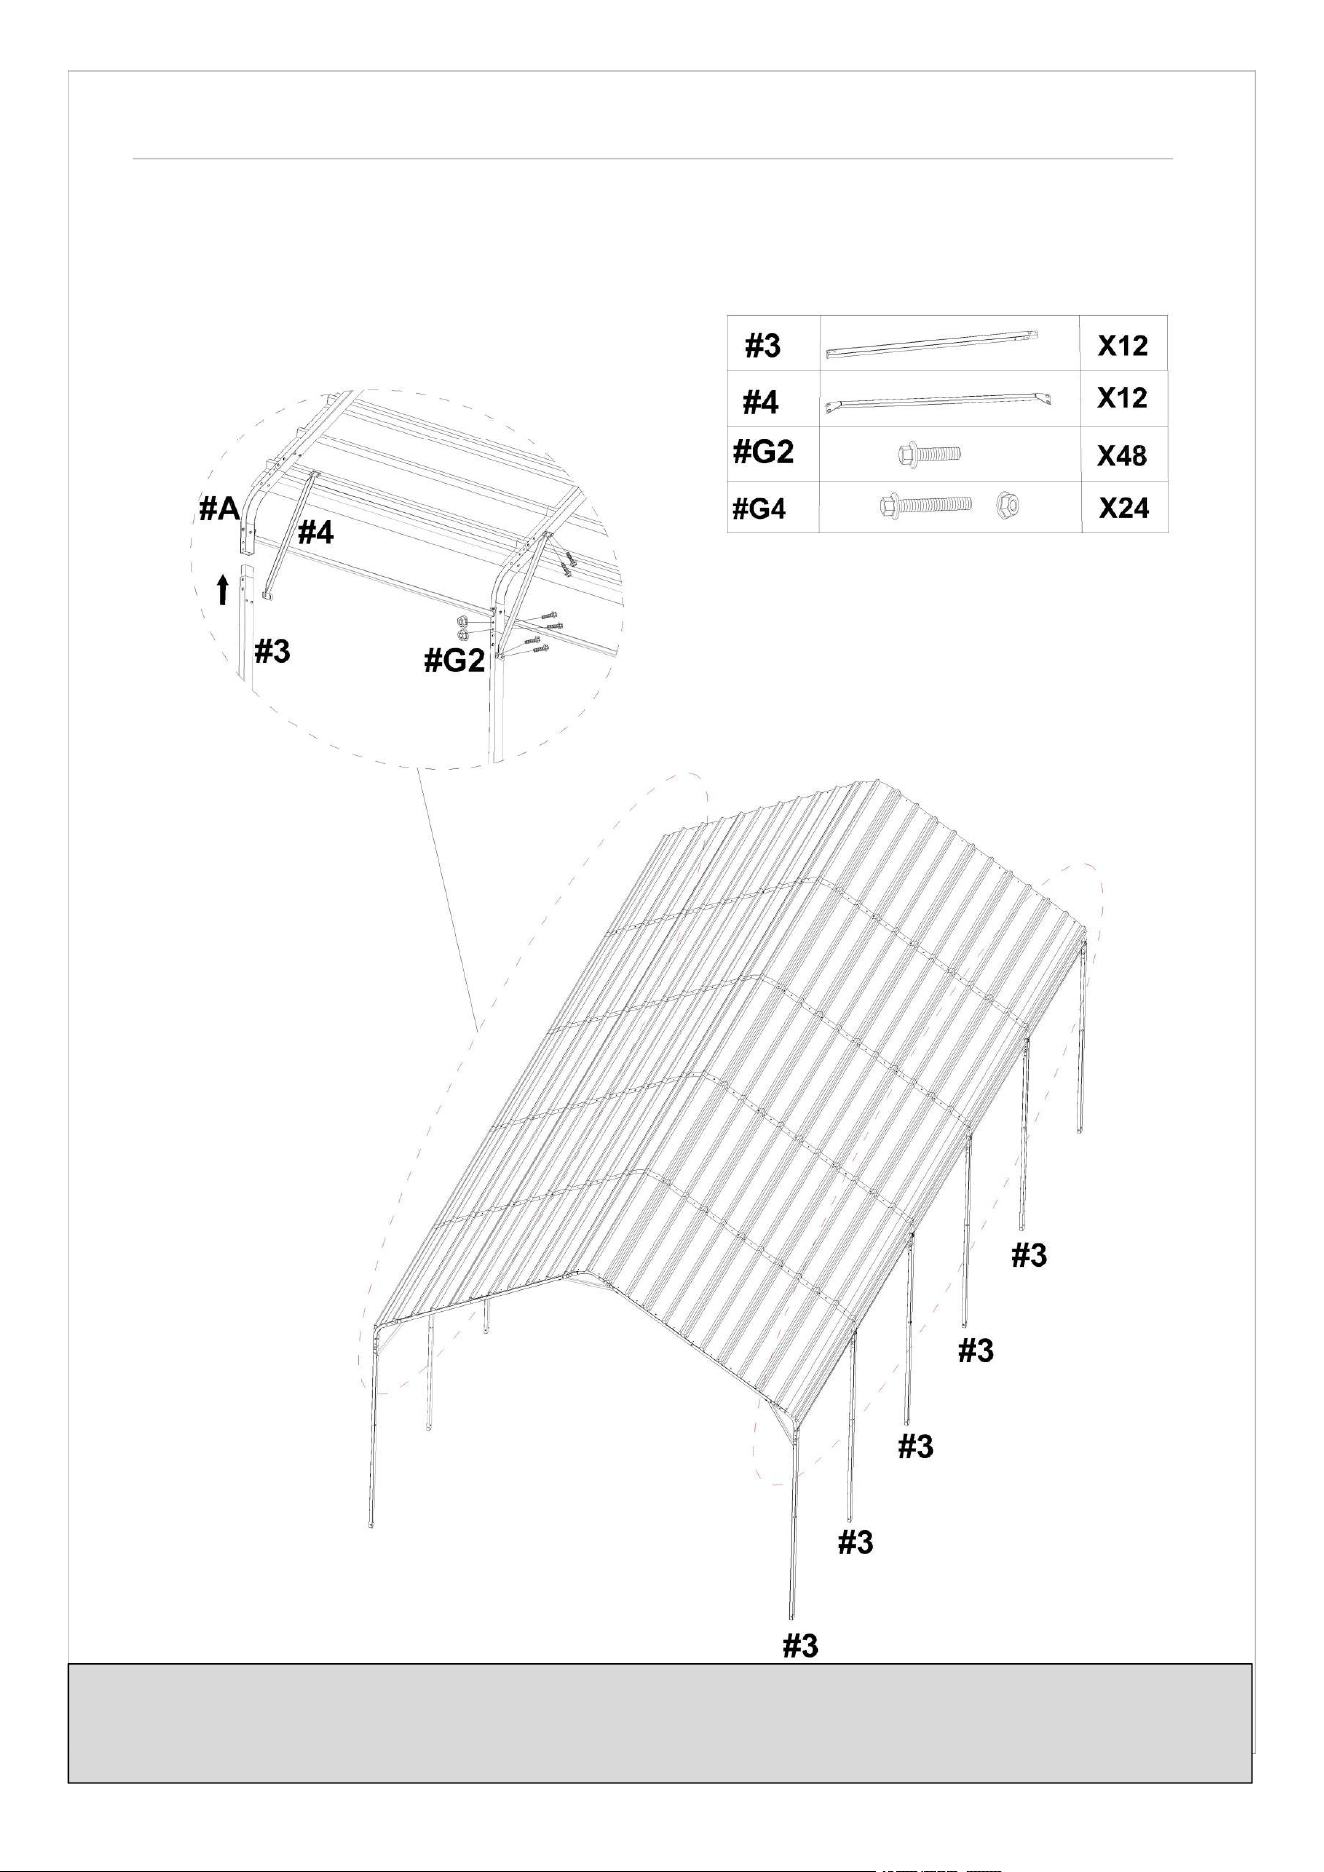
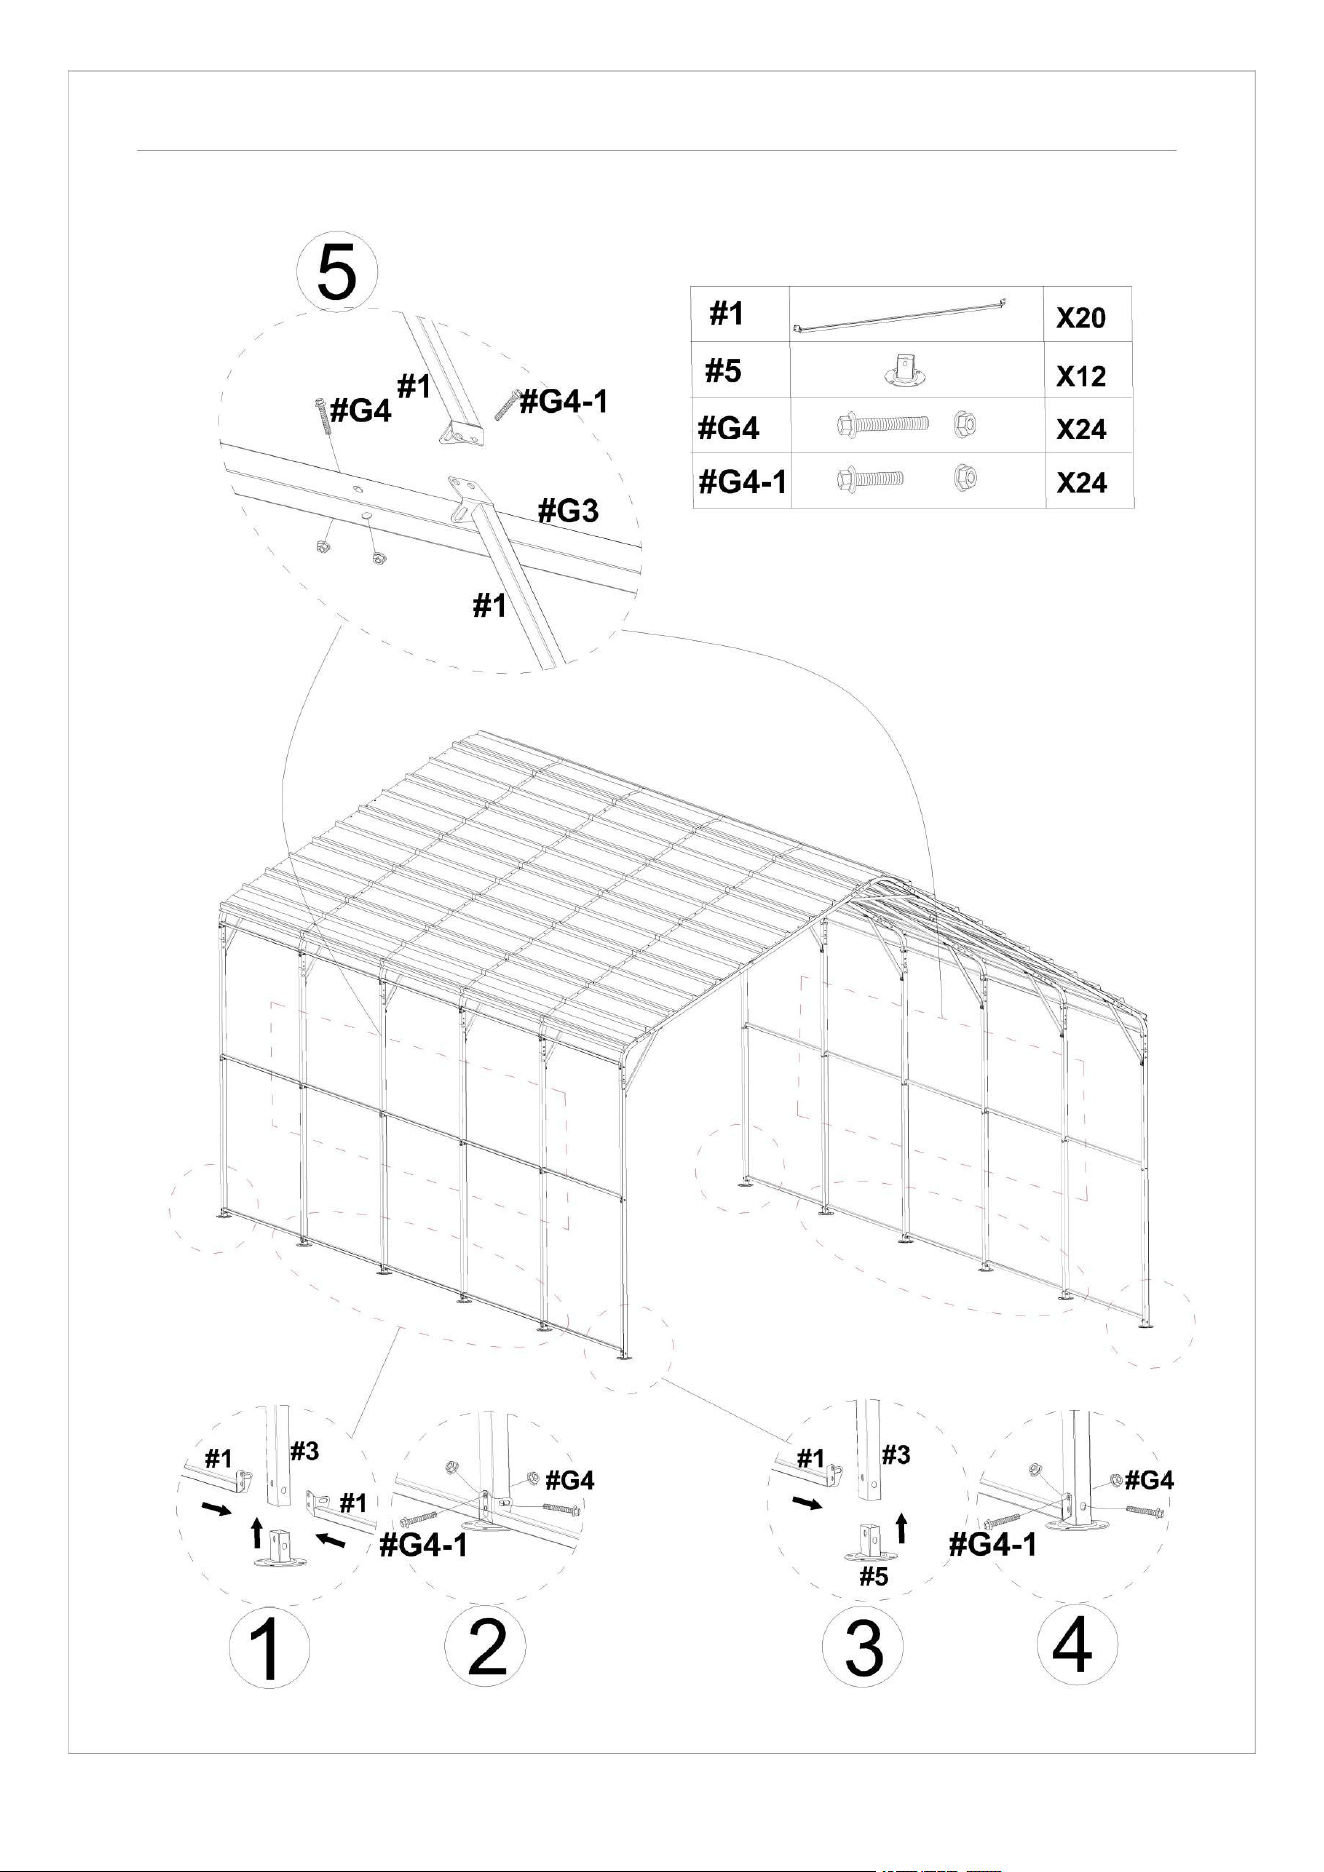
STEP 5: Connect Legs
1) Install Leg Pole(#3) and Top Reinforcing pole(#4) to the Connector(#A).
2) The linking screws in this step are all: Hex Head Cap Bolt (#G2).
Note:
Insert all the poles on one side and then all the poles on the other side.
Be careful not to tip over the shed.
13
1) Connect all the Side pole(#1) to Leg Pole(#3) and Foot Plate(#5).
2) The linking screws in this step are all: Socket head bolt & Nut(#G4).
STEP 6: Reinforce the Frame
14
1) Connect all the Side pole(#1) to Leg Pole(#3) and Foot Plate(#5).
2) The linking screws in this step are all: Socket head bolt & Nut(#G4).
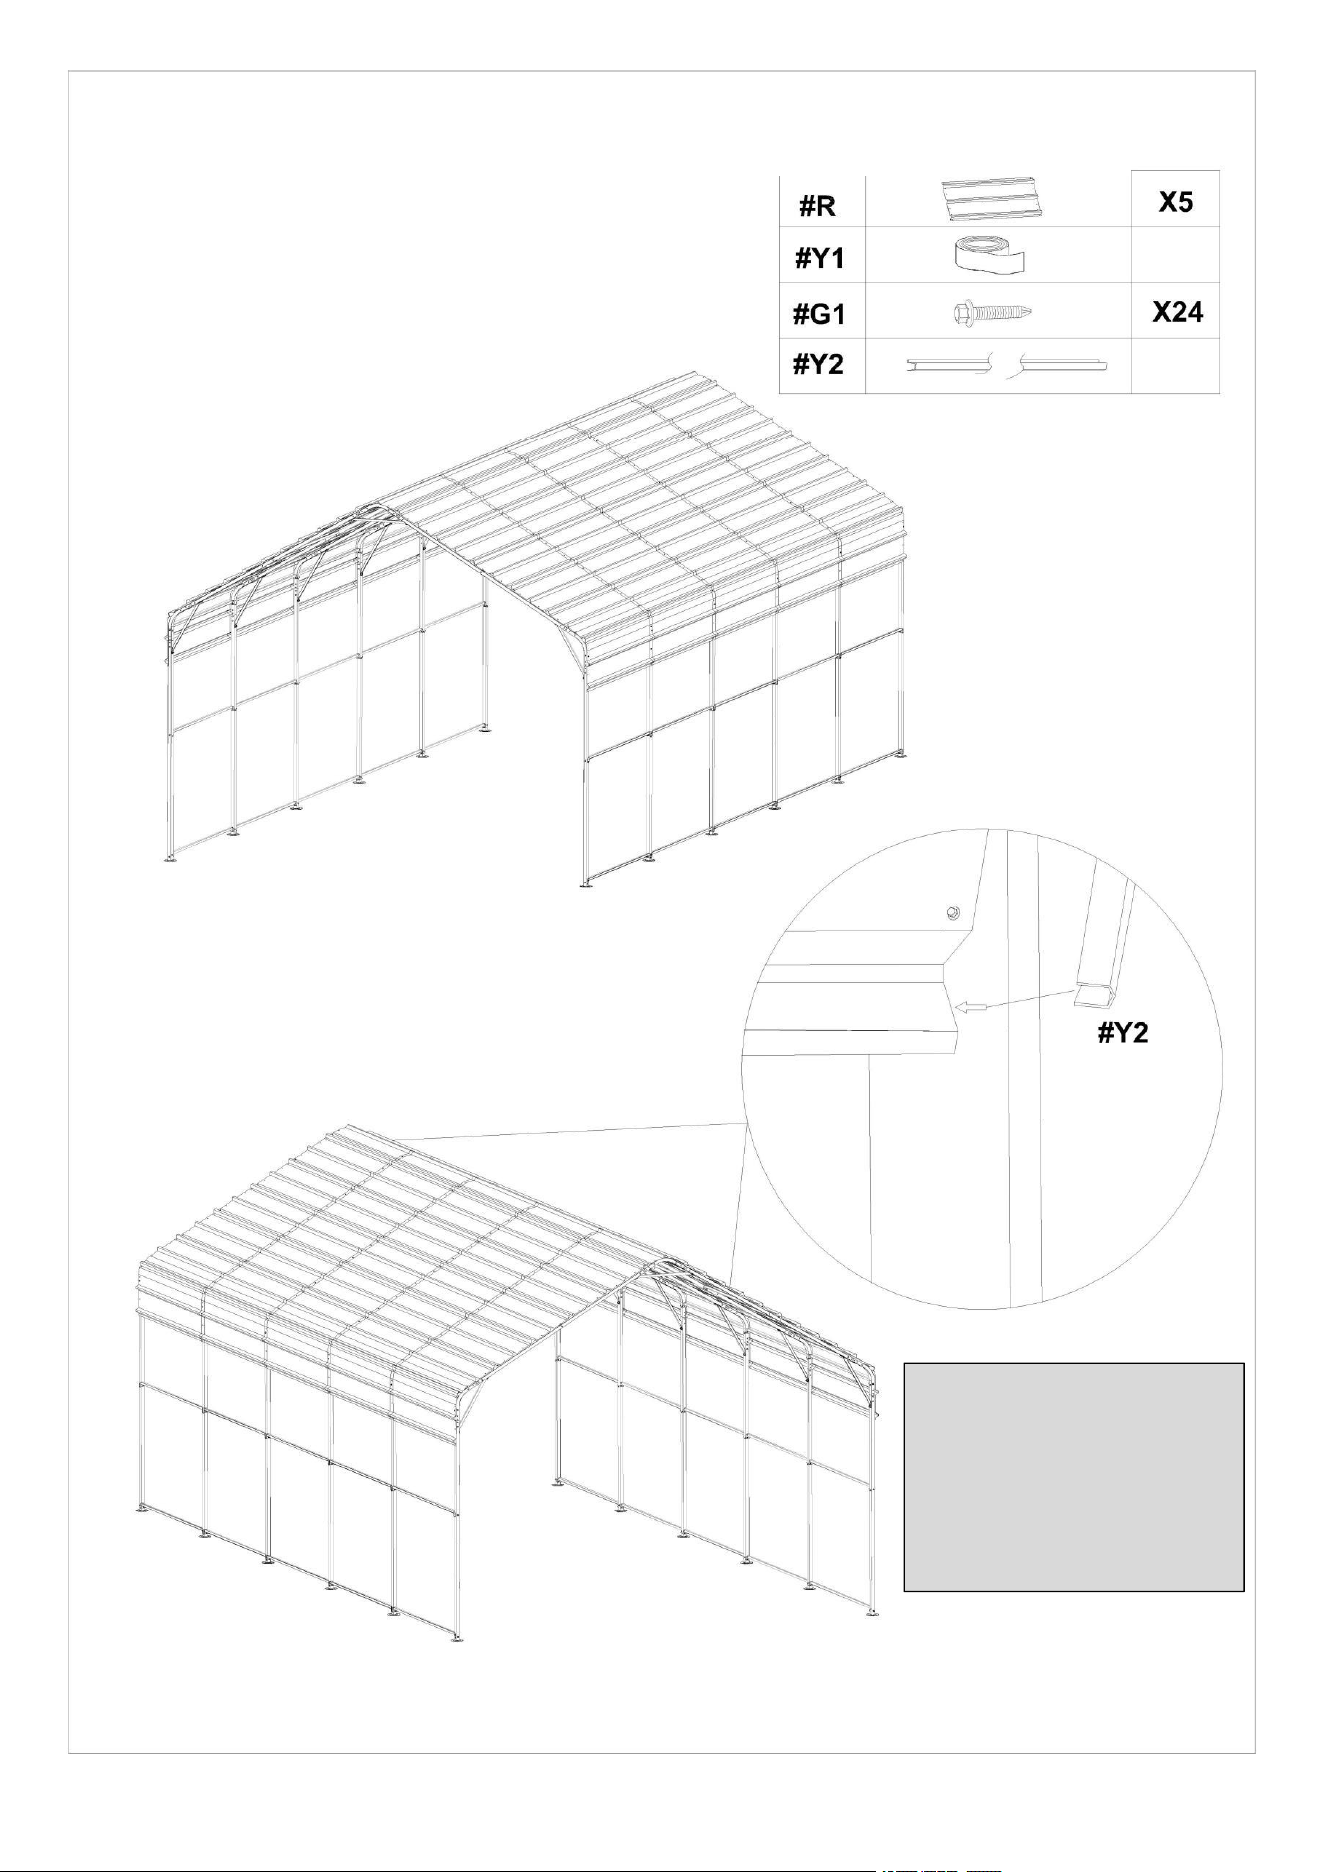
STEP 7: Install the Side Roof
Notice:
1. Make sure that the screw holes are aligned, and
then press the Waterproof Tape(#Y1).
2. Make sure there are no gaps between the two
roof covers to prevent water leakage.
3. The second Roof Cover(#R) needs to be placed
on the first Roof Cover(#R).
15
2) Follow the previous steps and continue to install the Roof Cover(#R) in the
remaining 4 rows on the right.
3. Wrap the Anti-cut Tape(#Y2) around the
outer edge of the Roof Coveers(#R).
Notice:
Be careful not to start
from the 4 corners when
wrapping the tape. Right
angles are sharp and
need to be avoided.

16
Notice:Be sure to cover the top cover at this time,
otherwise the subsequent installation will not
work normally.
STEP 8: Waterproof side tape
After installing Waterproof side tape (#7) on the Side pole(#1) and Straight peak
pole(#3), using the Bungee cords(#8), as shown in the picture.
Waterproof side tape installation:
Mode 2: Folded in half through
the middle rod.
Waterproof side tape installation:
Mode 1: Full surface installation;
17
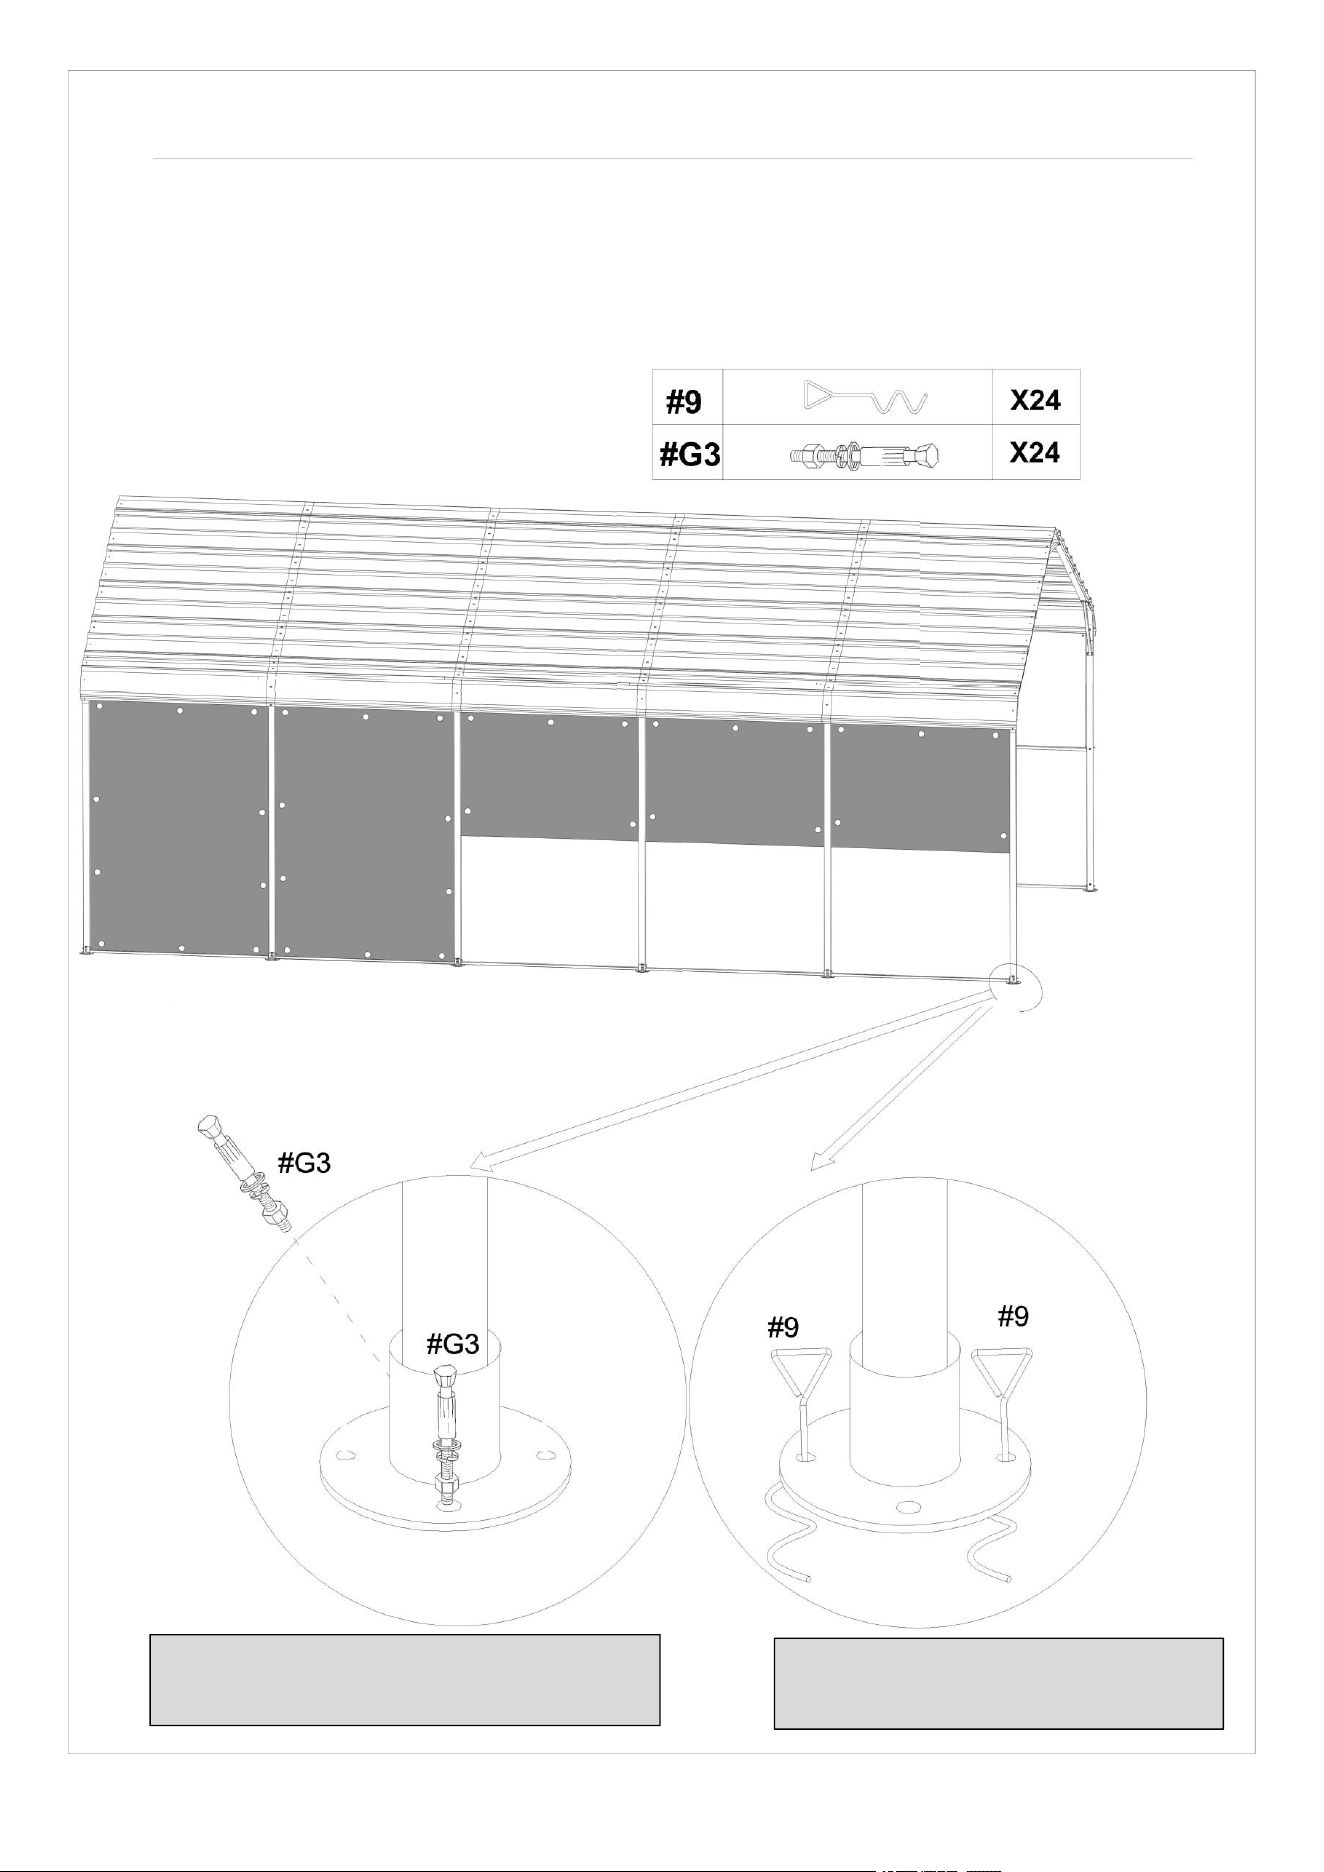
STEP 9: Anchor the Carport
Install the Anchor the Carport on the ground.
Expansion screw installation method:
suitable for cement floor.
Ground nail installation method:
suitable for dirt and grass.

18
Manufacturer: Shanghaimuxinmuyeyouxiangongsi
Address: Shuangchenglu 803nong11hao1602A-1609shi, baoshanqu, shanghai 200000 CN.
EC REP: E-CrossStu GmbH.
Mainzer Landstr.69, 60329 Frankfurt am Main.
UK REP: YH CONSULTING LIMITED.
C/O YH Consulting Limited Office 147, Centurion House, London Road, Staines-upon-Thames,
Surrey, TW18 4AX
Imported to AUS: SIHAO PTY LTD.
1 ROKEVA STREETEASTWOOD NSW 2122 Australia
Imported to USA: Sanven Technology Ltd.
Suite 250, 9166 Anaheim Place, Rancho Cucamonga, CA 91730