Technical Support and E-Warranty Certificate
www.vevor.com/support
POWER TOOL ORGANIZER
USER MANUAL
We continue to be committed to provide you tools with competitive price.
"Save Half", "Half Price" or any other similar expressions used by us only represents an
estimate of savings you might benefit from buying certain tools with us compared to the major
top brands and does not necessarily mean to cover all categories of tools offered by us. You
are kindly reminded to verify carefully when you are placing an order with us if you are
actually saving half in comparison with the top major brands.
- 1 -
Model: JC-PTO-001;JC-PTO-002;JC-PTO-003;JC-PTO-004; JC-PTO-005
Have product questions? Need technical support? Please feel free to
contact us:
Technical Support and E-Warranty Certificate
www.vevor.com/support
NEED HELP? CONTACT US!
This is the original instruction, please read all manual instructions
carefully before operating. VEVOR reserves a clear interpretation of our
user manual. The appearance of the product shall be subject to the
product you received. Please forgive us that we won't inform you again if
there are any technology or software updates on our product.
POWER TOOL
ORGANIZER

- 2 -
1. WARNING!
1
.Before installation, make sure it does not run the risk of piercing any
hidden current cables or water pipes. In case of doubt, use a digital
tracking device or consult an expert.
2
.The rail should be mounted on a stable surface. Do not overload.
3.The installation of the wall mount should be done by an adult, and
children should not use it without supervision.
4
.Recommended for brick and concrete only; use special hardware for
installing it to plasterboard or other substrates.
5
.Before installing and using a power tool organizer, be sure to read and
understand all safety warnings and instructions.
6.Please ensure that the power tool organizer is installed on a stable wall
to prevent the power tool organizer and tools from falling.
7
.Please do not exceed the maximum load capacity of the power tool
organizer to prevent damage to the power tool organizer and tools from
falling.
8
.Please periodically check the stability of the tool holder and the safety
of the tools.
2. Maintenance Guide
1. Clean the tool organizer regularly to avoid the accumulation of dust and
grime.
2. Check the stability of the power tool organizer to make sure all mounting
hardware is secure and undamaged.
3. Check the load of the power tool organizer to ensure that the maximum
load capacity is not exceeded.
- 3 -
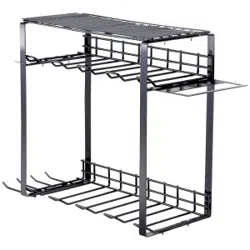
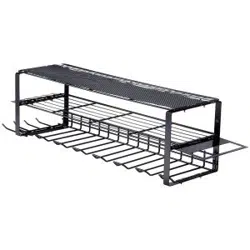
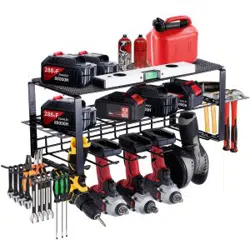
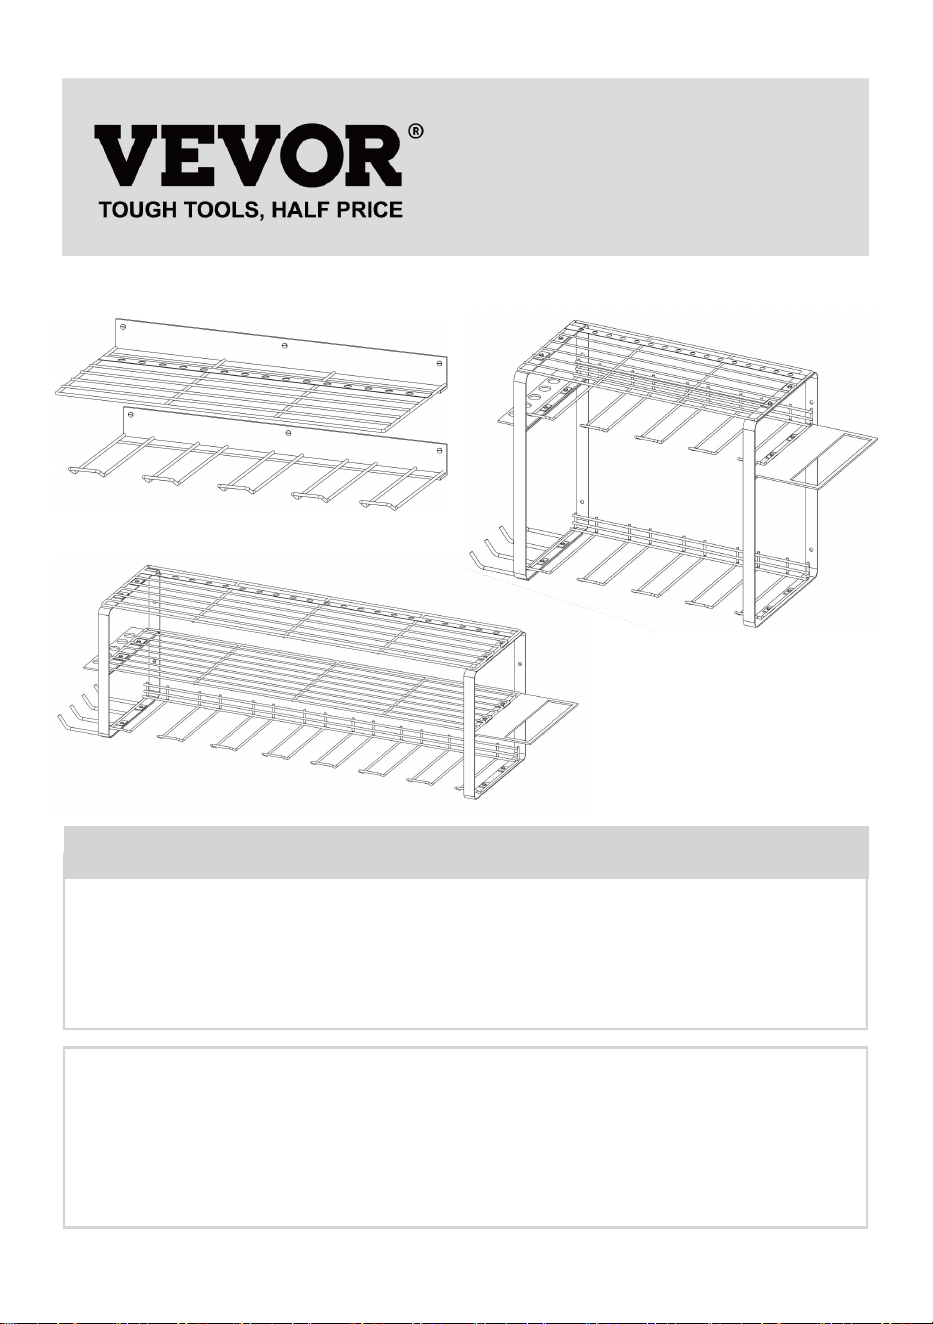
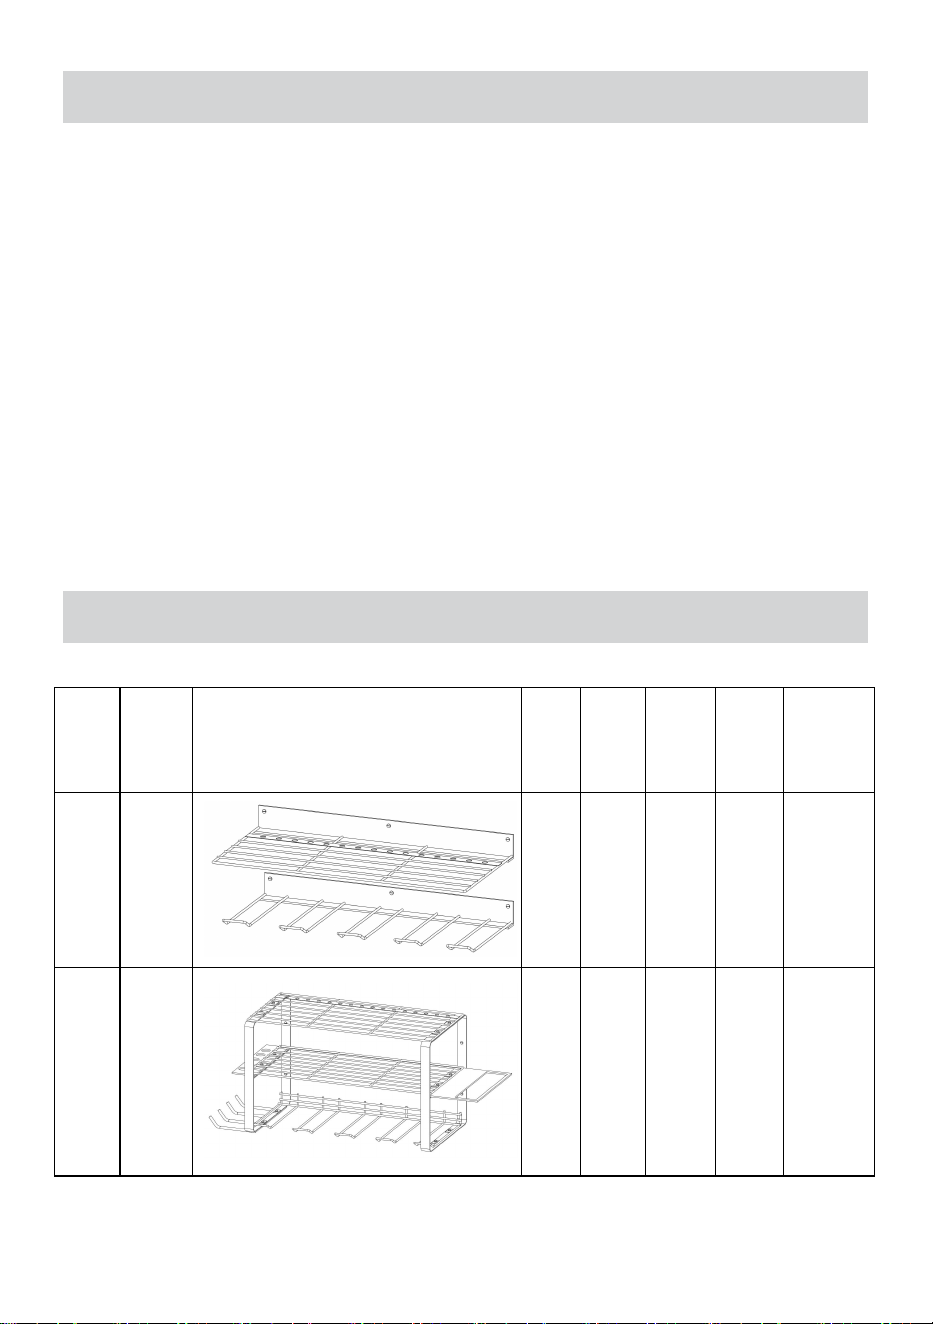
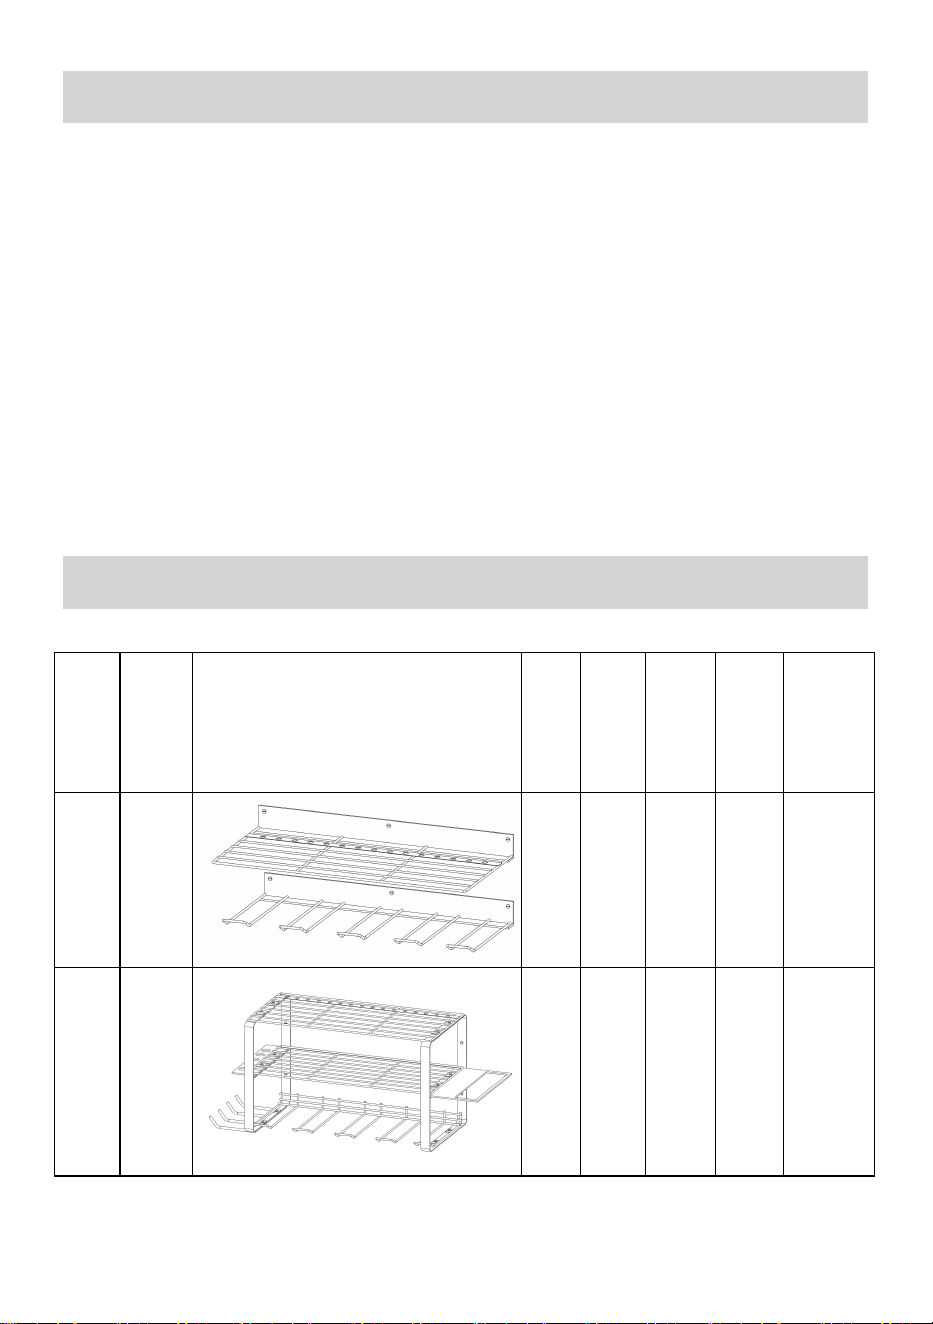
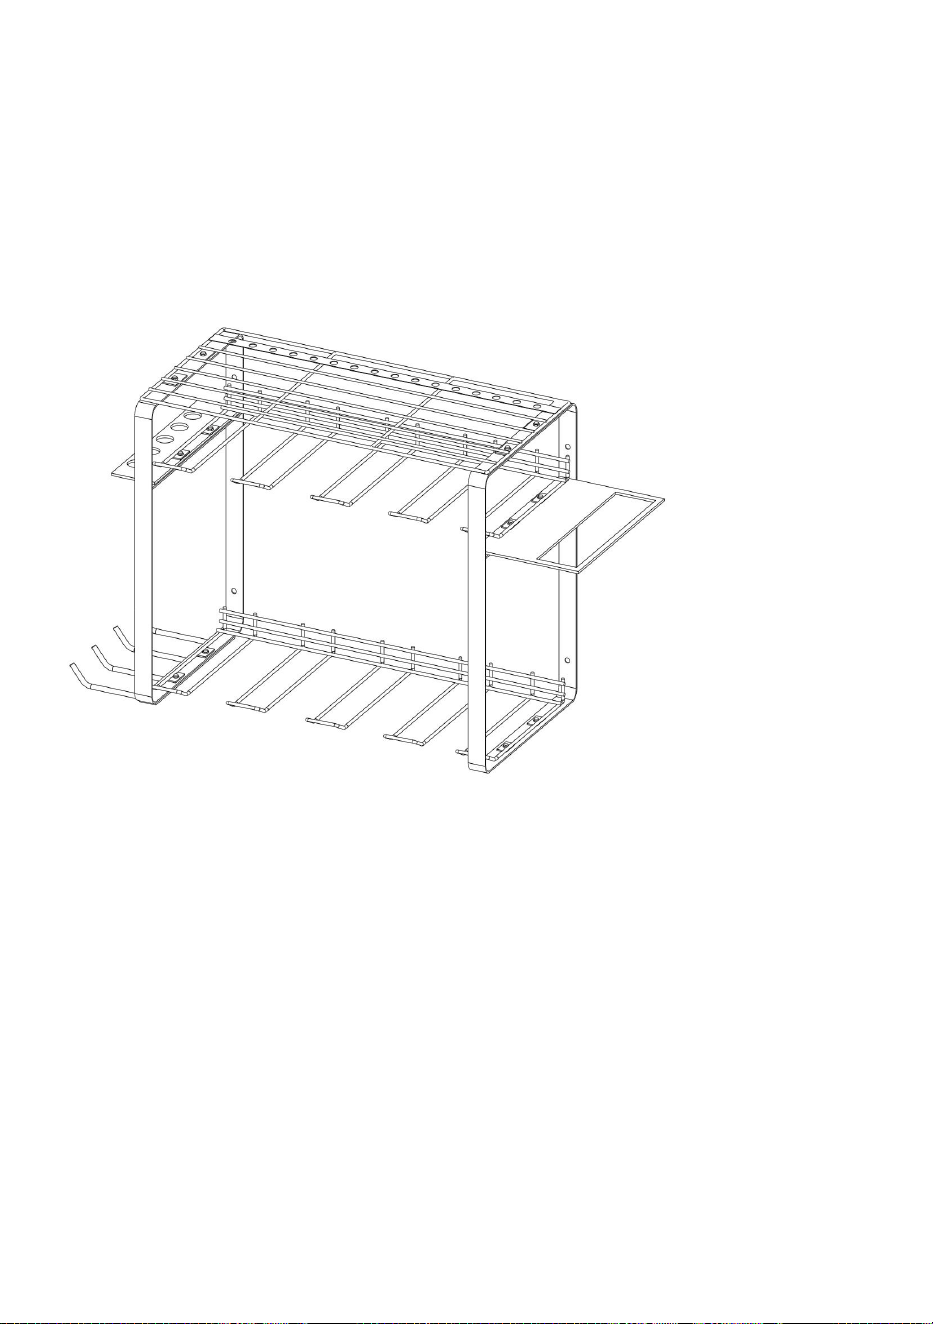
3. Product Description
The power tool organizer is a power tool organizer specially designed for
storing small cordless metal cutting and assembly power tools (electric
drills, impact drills, electric reciprocating saws, electric screwdrivers,
electric wrenches, etc.). Power tools can be hung on the bottom slot
(upright or upside down), and the flat layer can store batteries, small tool
boxes (with different types of drill bits, etc.), and slightly larger tools (such
as angle grinders and electric cutters). The product is mainly used in
garages, workshops, and tool rooms; the screwdriver storage hole is used
to place small manual tools such as screwdrivers and pliers.
4. Product Parameter
item
Model
Picture
Lay
ers
Groo
ves
N.W
G.W
Packagi
ng Size
SKU
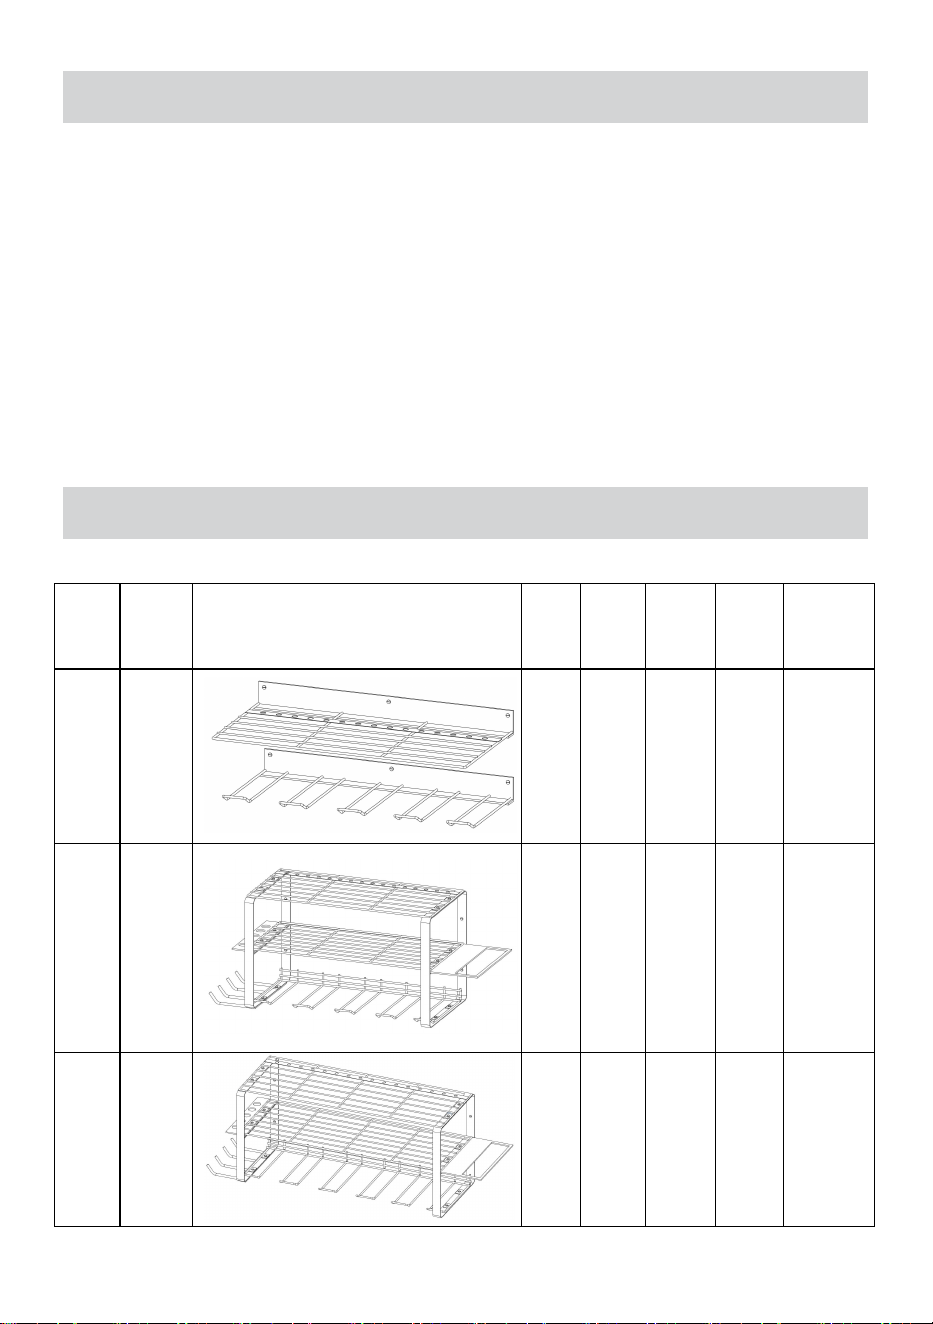
1
JC-
PTO-
001
2
4
3.0kg
3.3kg
445*220
*86mm
SKU
2
JC-
PTO-
002
3
4
2.3kg
2.7kg
430*227
*83mm
SKU
3
JC-
PTO-
003
3
5
2.5kg
3.0kg
505*227
*85mm

- 4 -
SKU
4
JC-
PTO-
004
3
7
3.0kg
3.5kg
655*225
*80mm
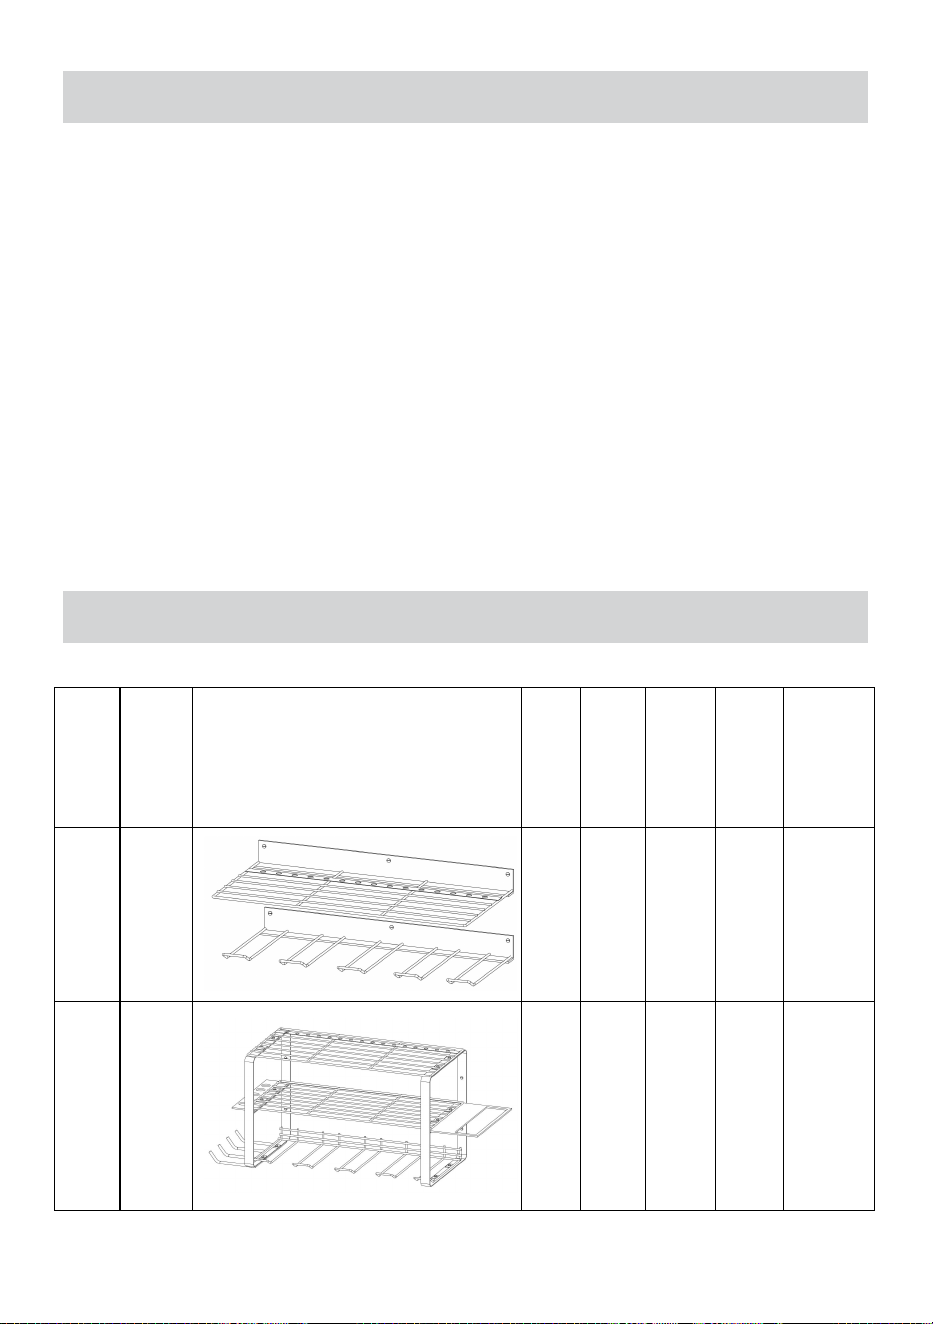
SKU
5
JC-
PTO-
005
3
8
2.8kg
3.2kg
435*237
*115mm
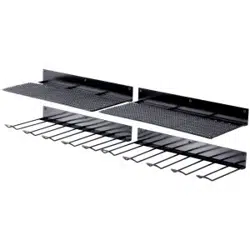
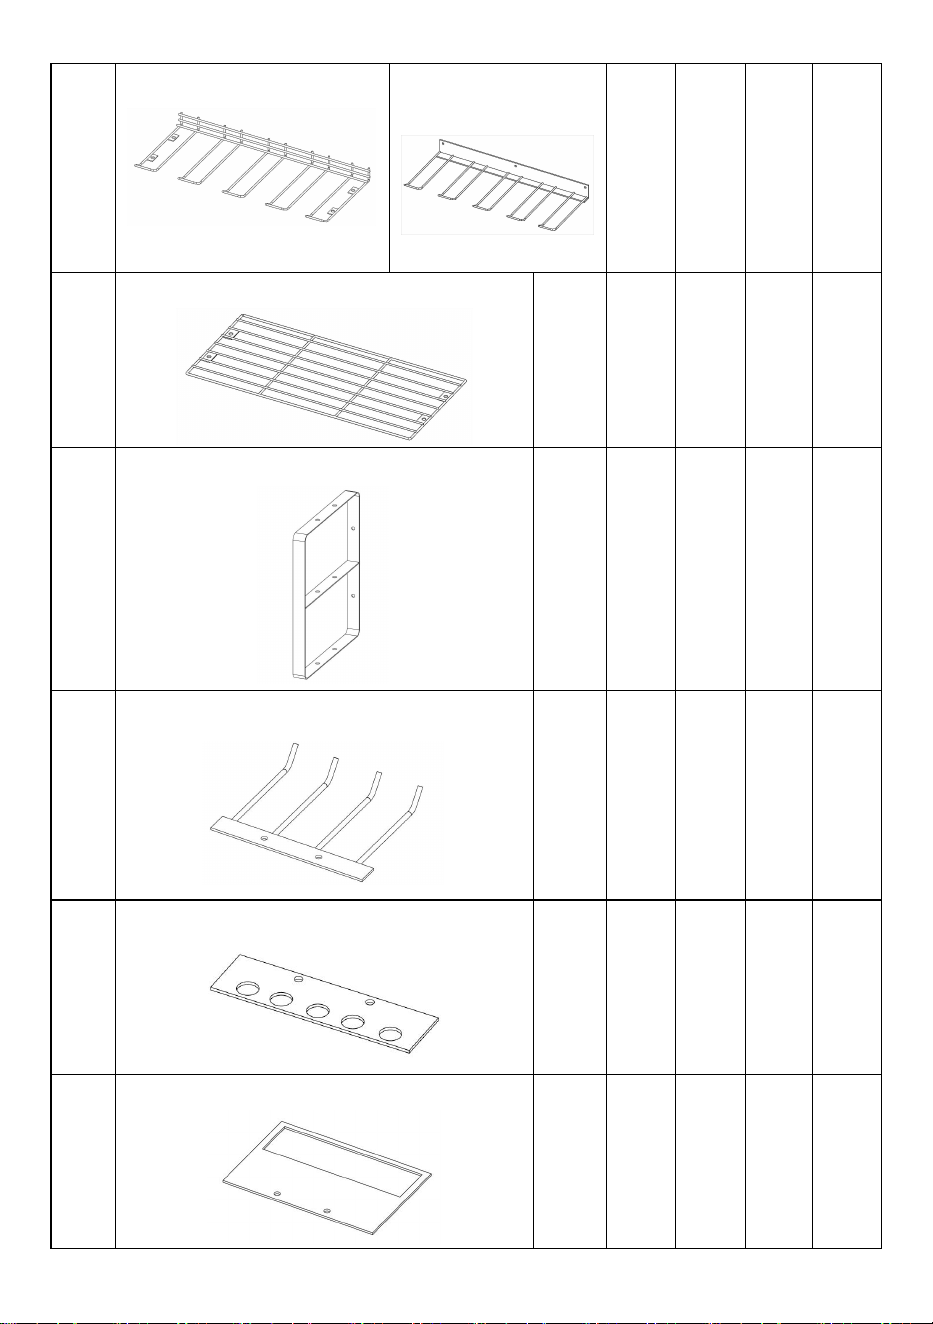
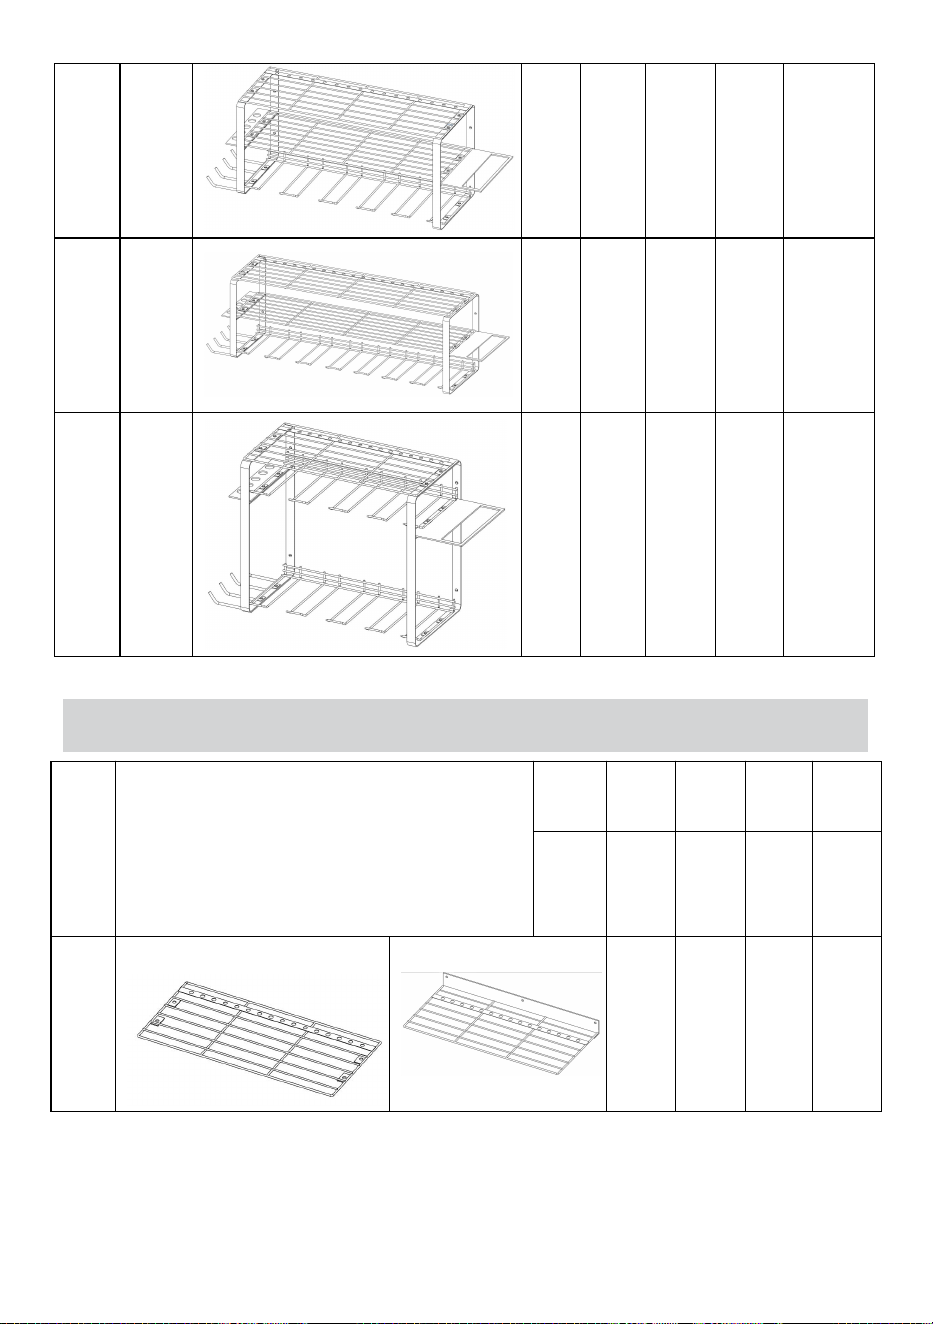
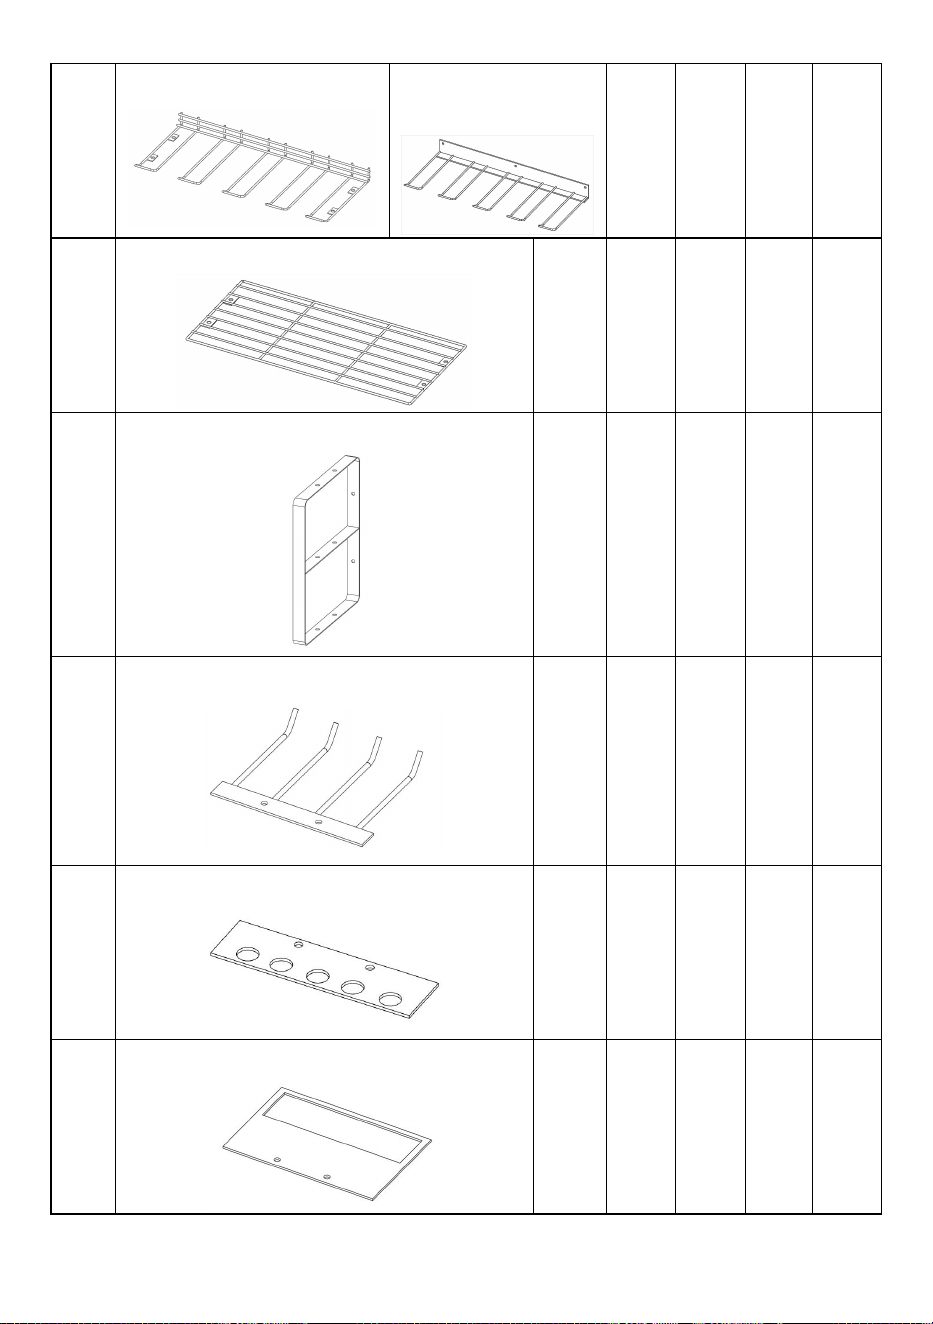
5. Part list
item
Parts
SKU
1
SKU
2
SKU
3
SKU
4
SKU
5
JC-
PTO-
001
JC-
PTO-
002
JC-
PTO-
003
JC-
PTO-
004
JC-
PTO-
005
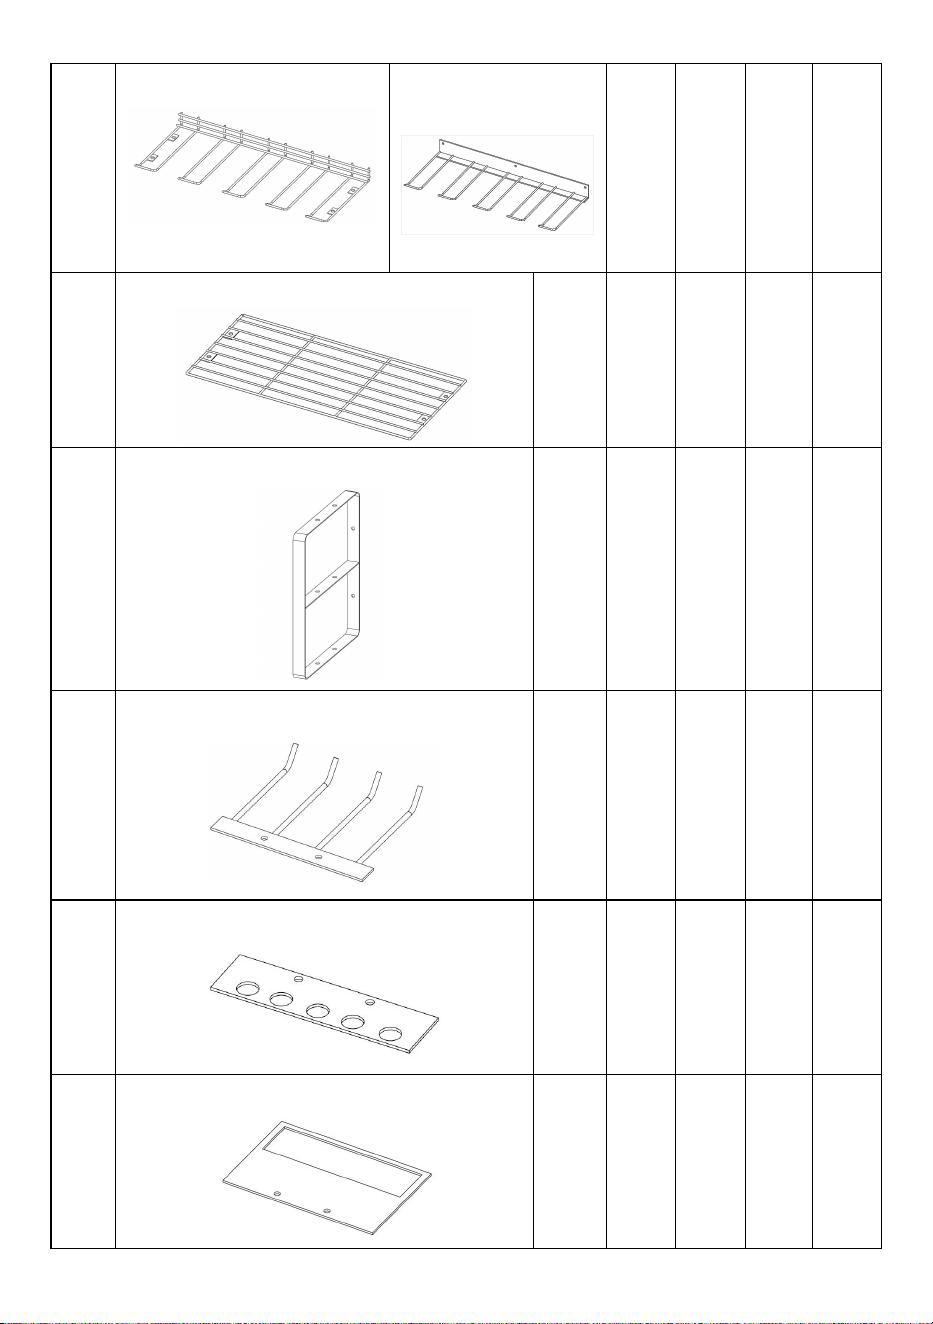
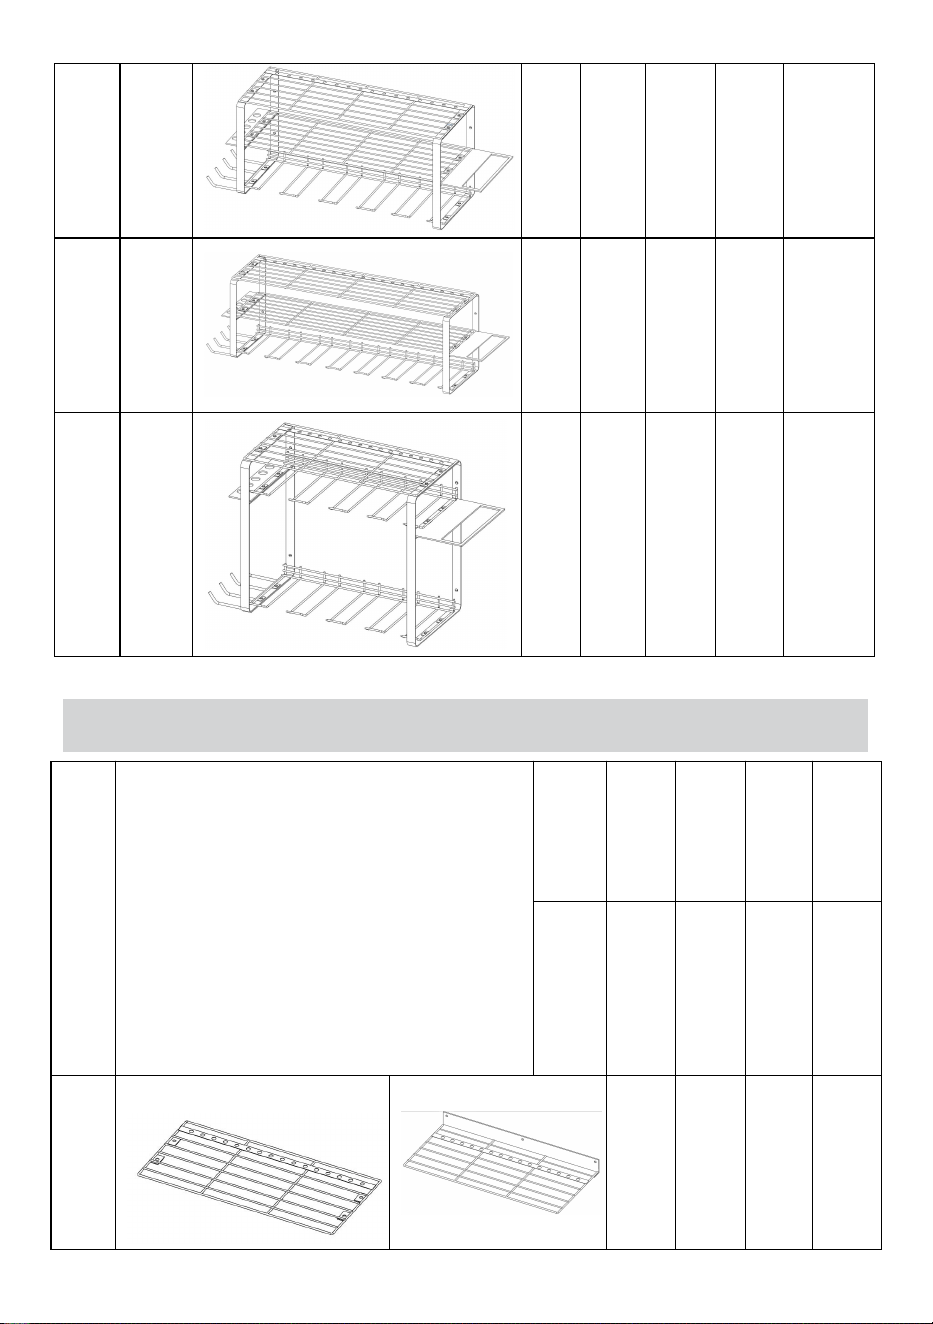
A
Tool panel
2pcs
1pcs
1pcs
1pcs
1pcs
B
Groove panel
2pcs
(4 Grooves)
1pcs
(
4
Groo
ves)
1pcs
(
5
Groo
ves)
1pcs
(
7
Groo
ves)
2pcs
(
4
Groo
ves)

- 5 -
C
Mid panel
/
1pcs
1pcs
1pcs
/
D
Bracket
/
2pcs
2pcs
2pcs
2pcs
E
Long hook
/
1pcs
1pcs
1pcs
1pcs
F
Pliers holder
/
1pcs
1pcs
1pcs
1pcs
G
Hammer holder
/
1pcs
1pcs
1pcs
1pcs
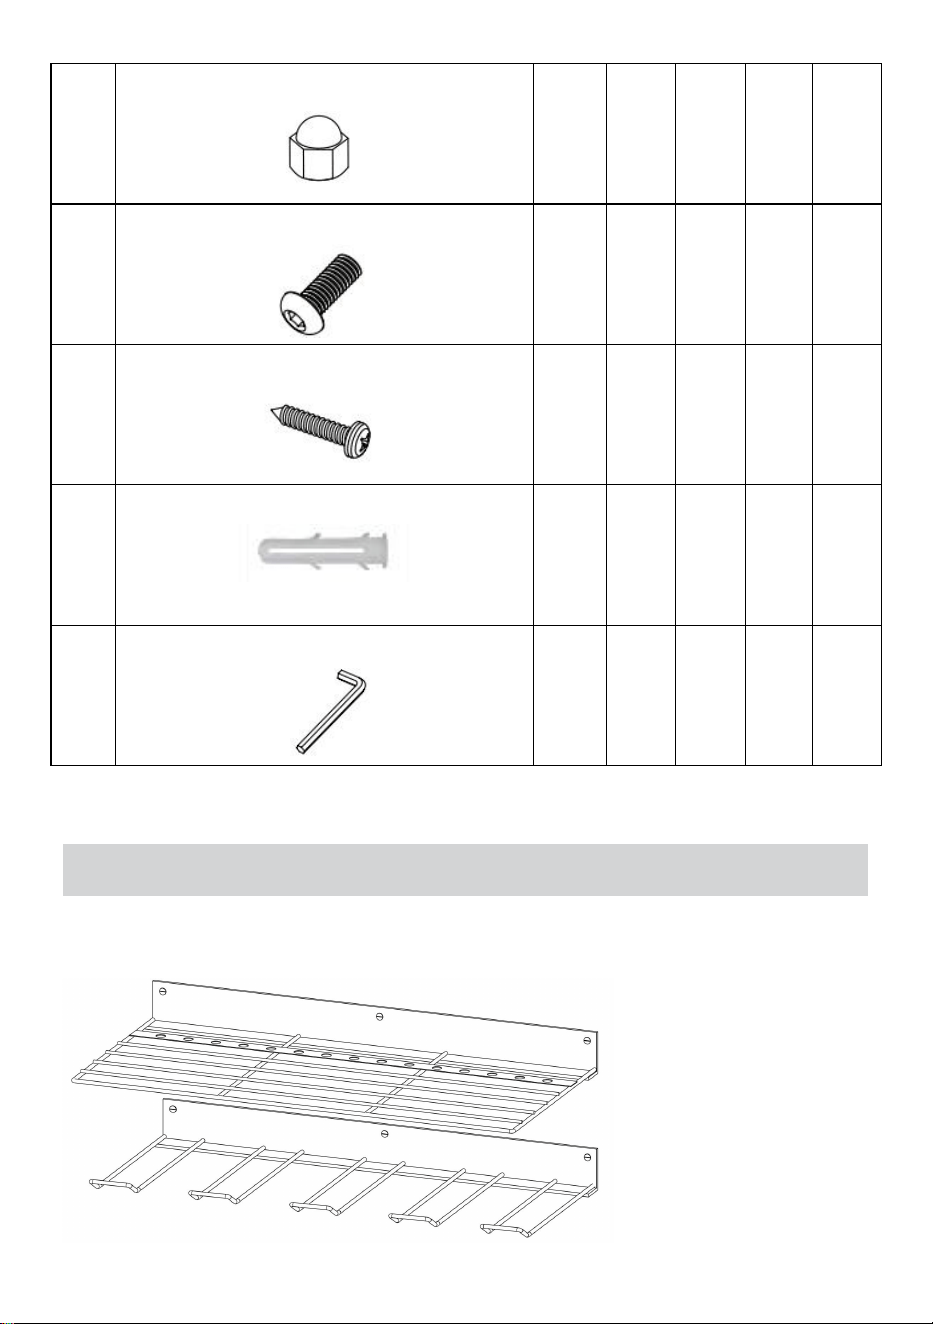
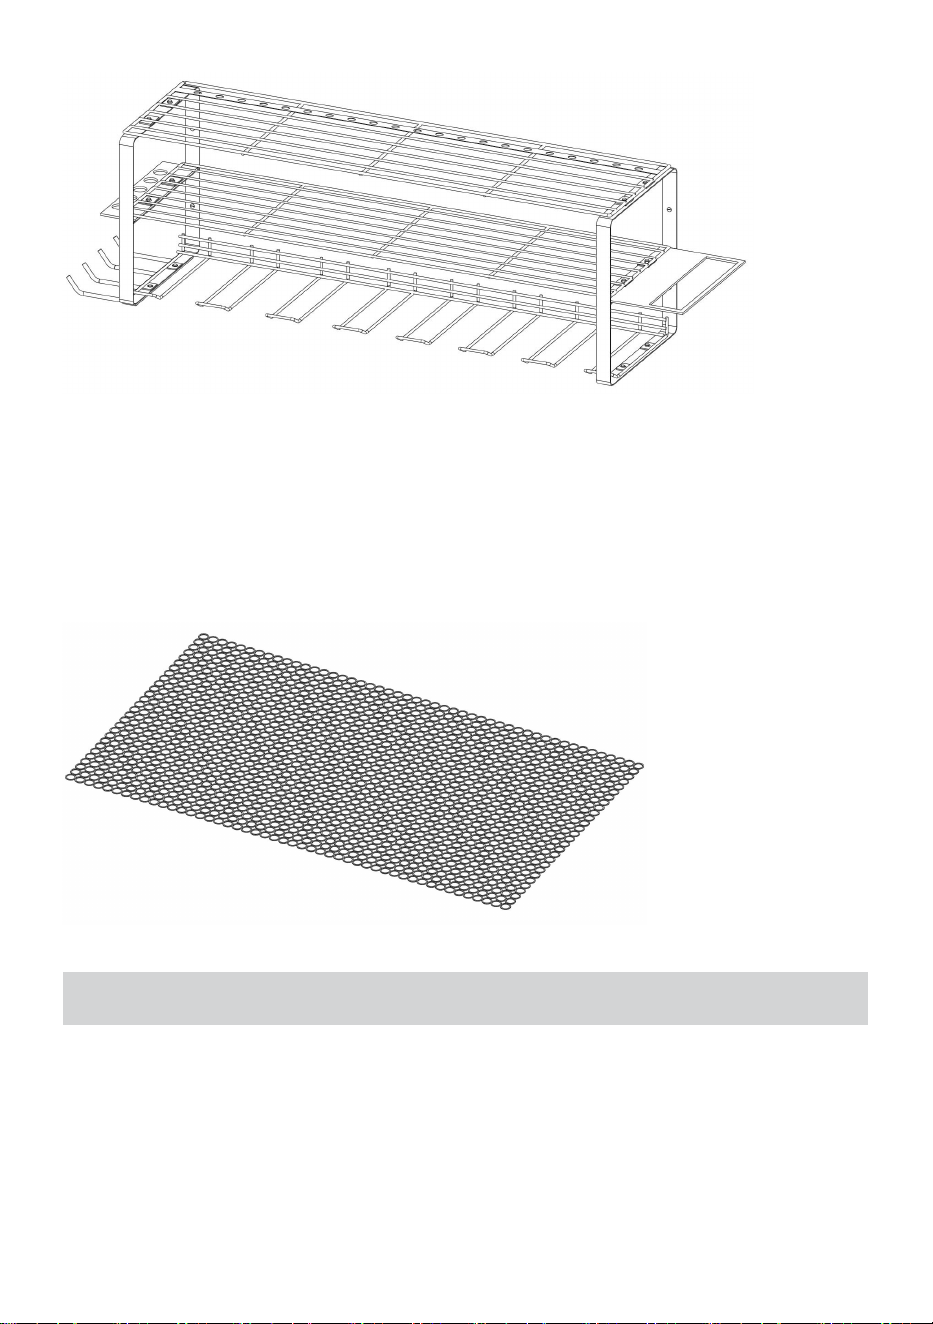
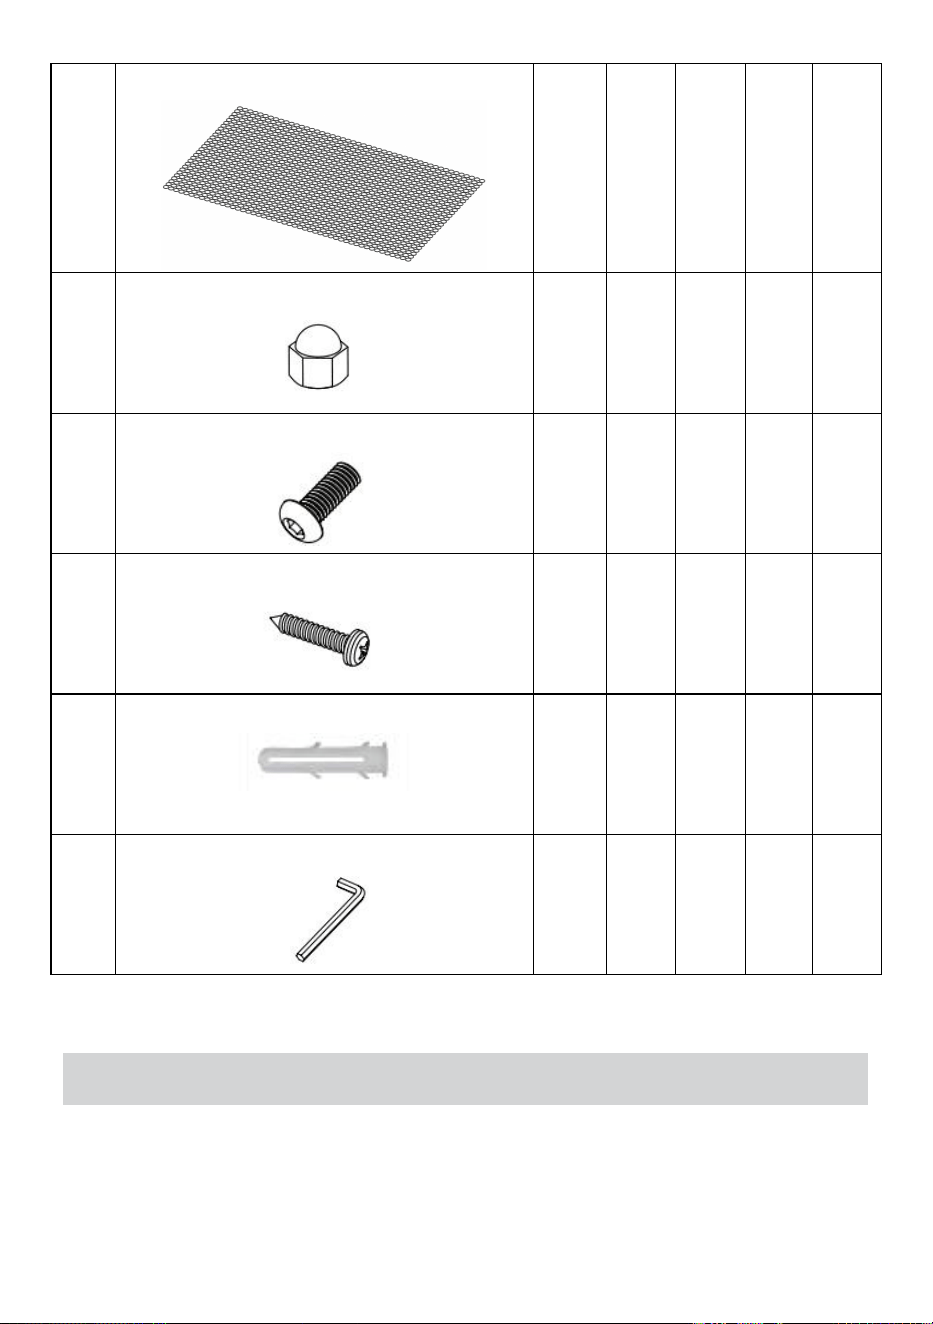
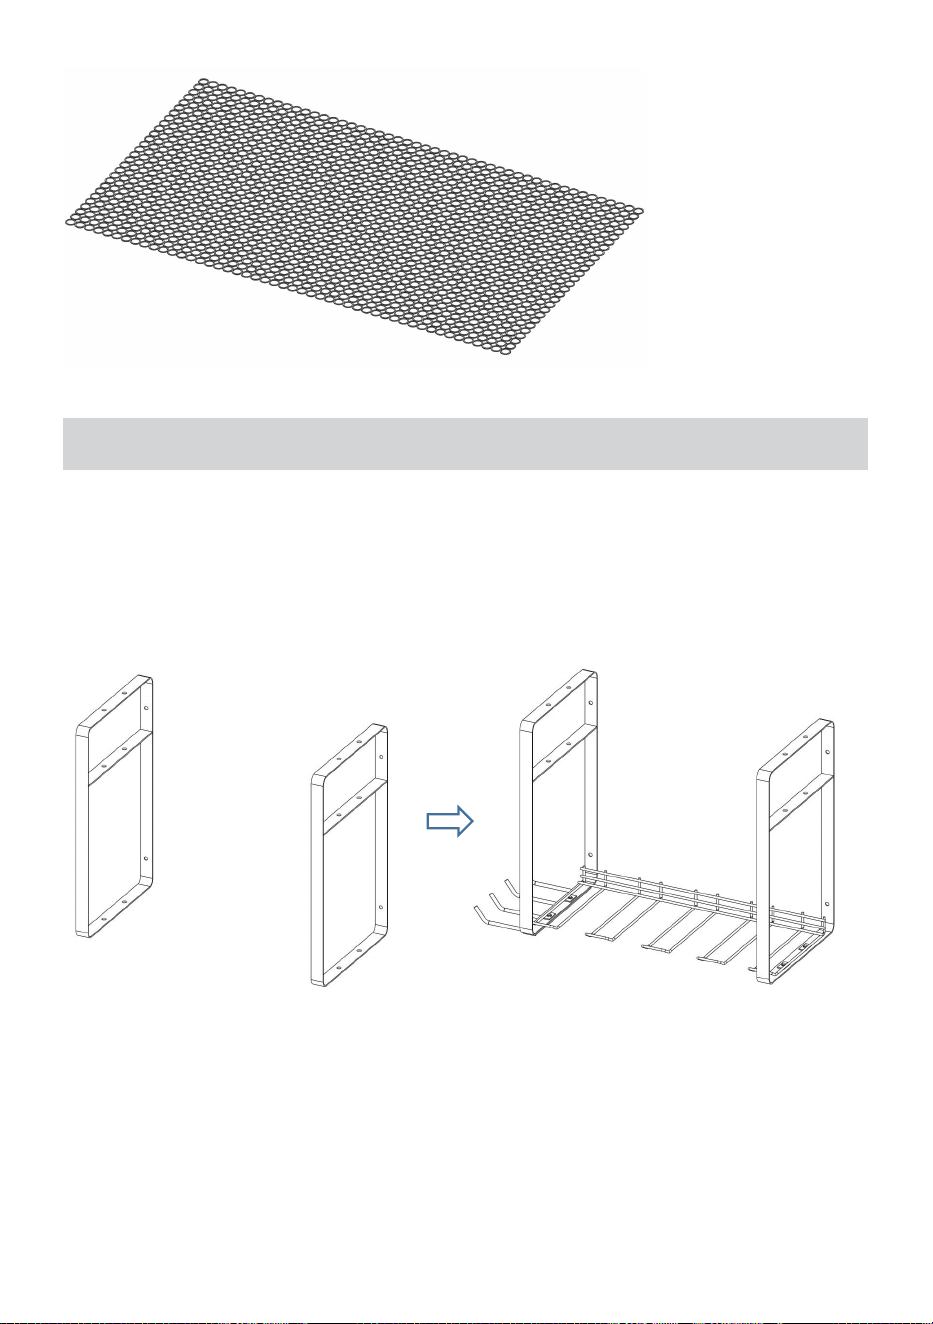
H
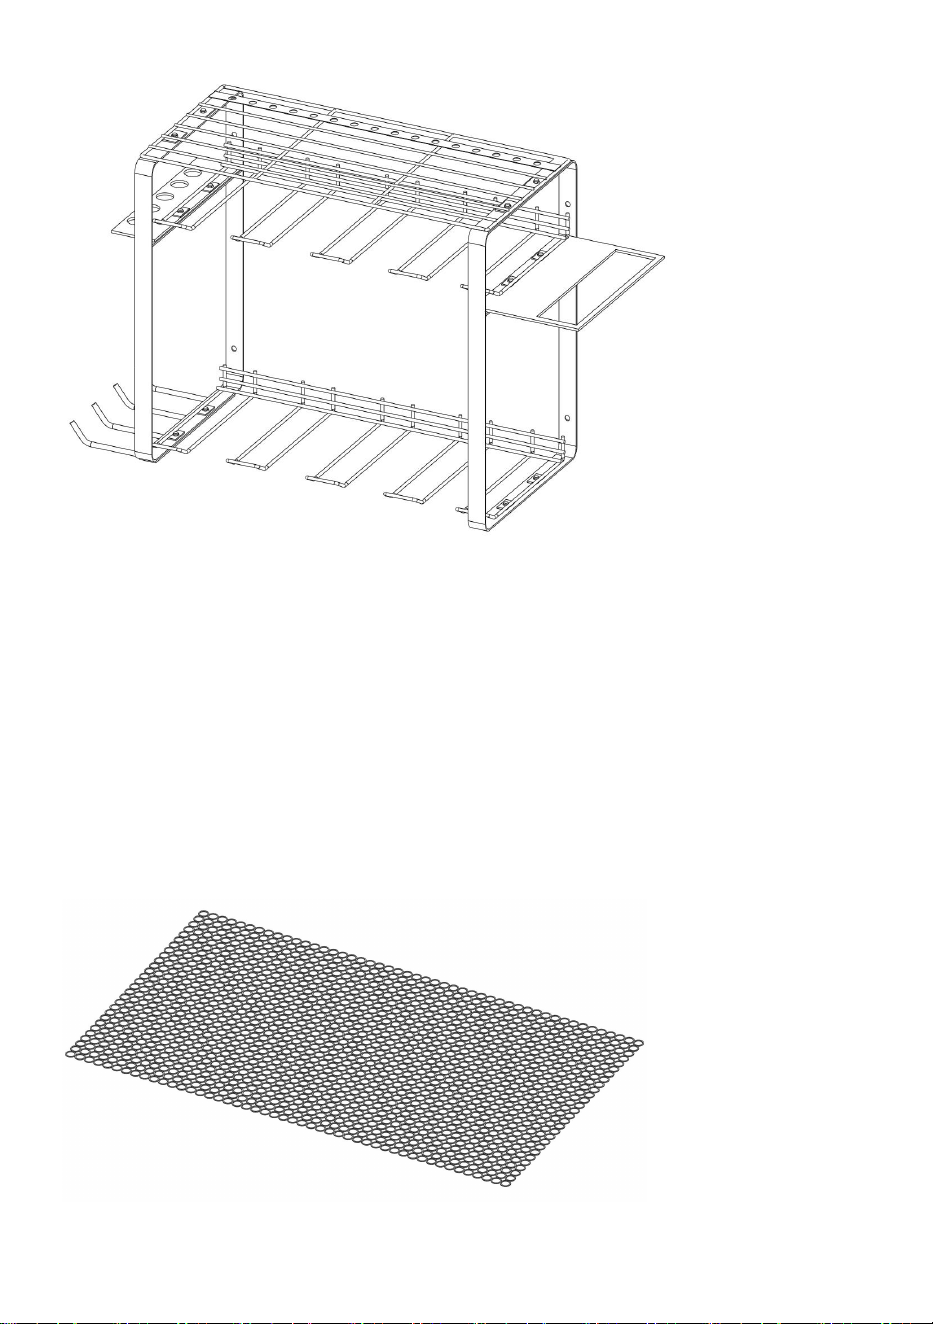
Anti-slip mat
2pcs
1pcs
1pcs
1pcs
1pcs
- 6 -
I
Nut
/
12
pcs
12
pcs
12
pcs
12
pcs
J
Screw
/
12
pcs
12
pcs
12
pcs
12
pcs
K
Self tapping screw
12pcs
4pcs
4pcs
4pcs
4pcs
L
Dowels
12pcs
4pcs
4pcs
4pcs
4pcs
M
Wrench
/
1pcs
1pcs
1pcs
1pcs
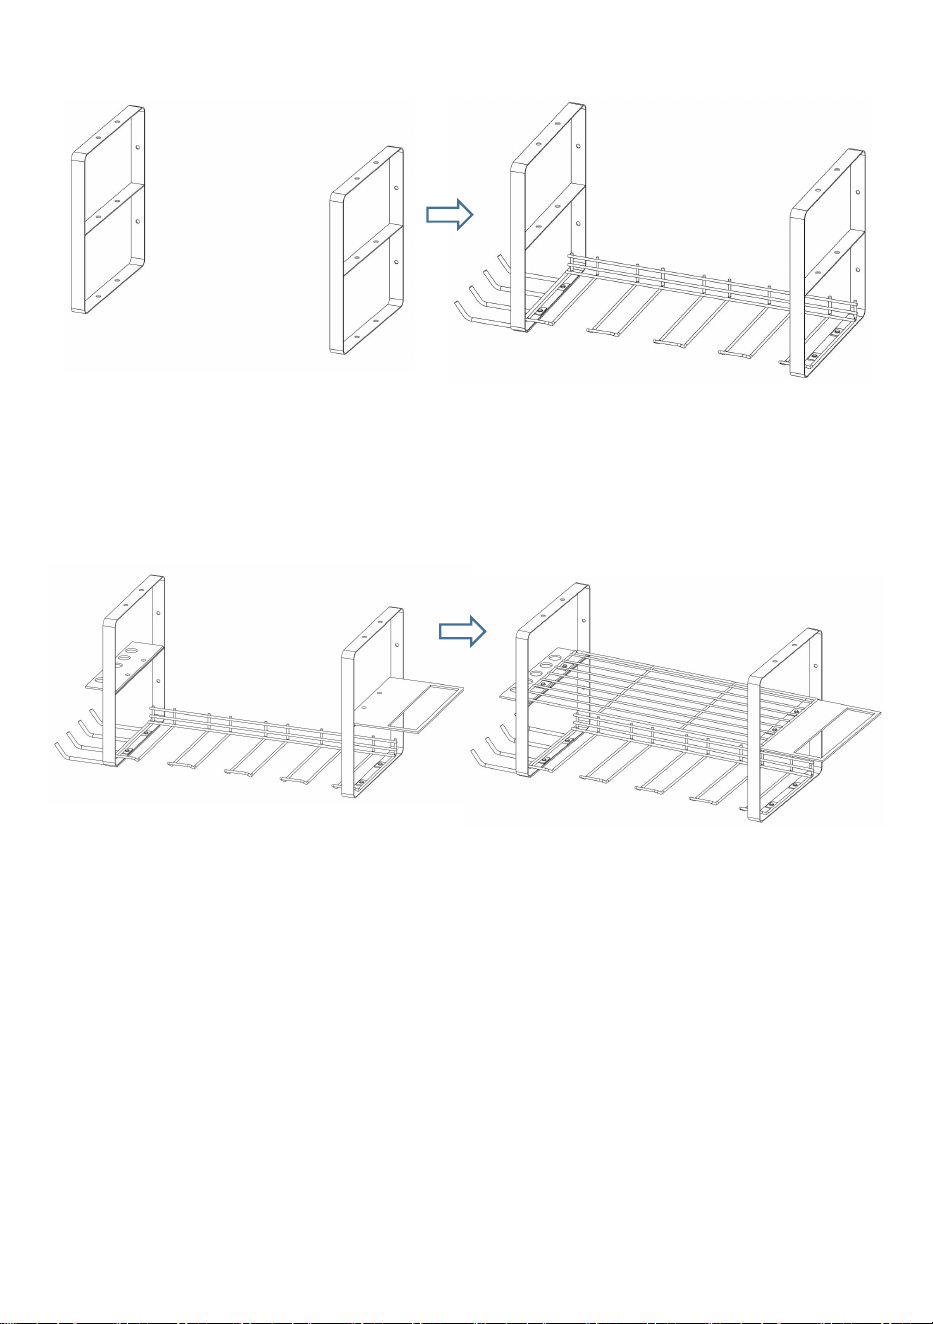
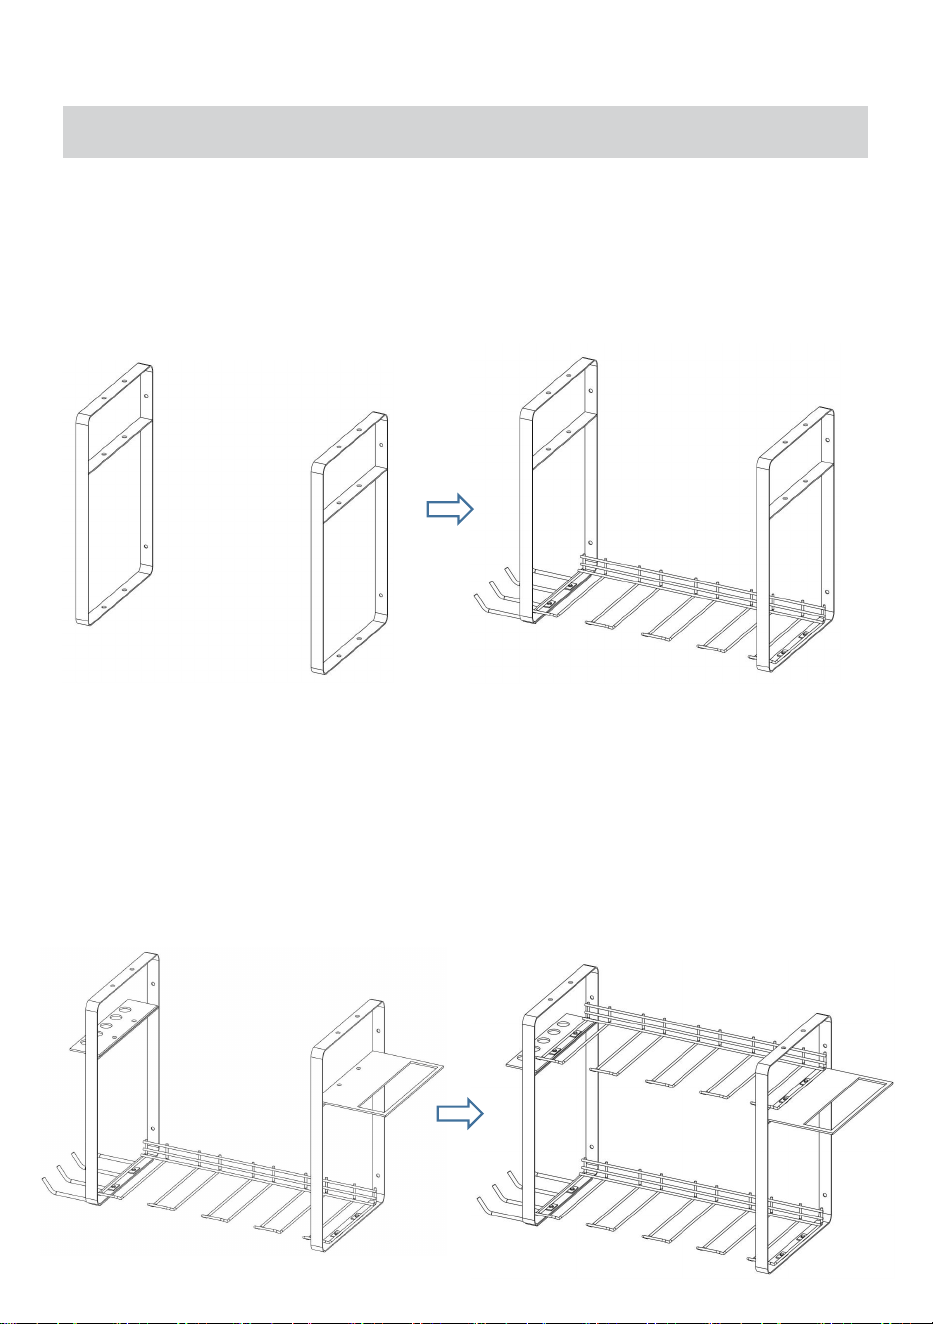
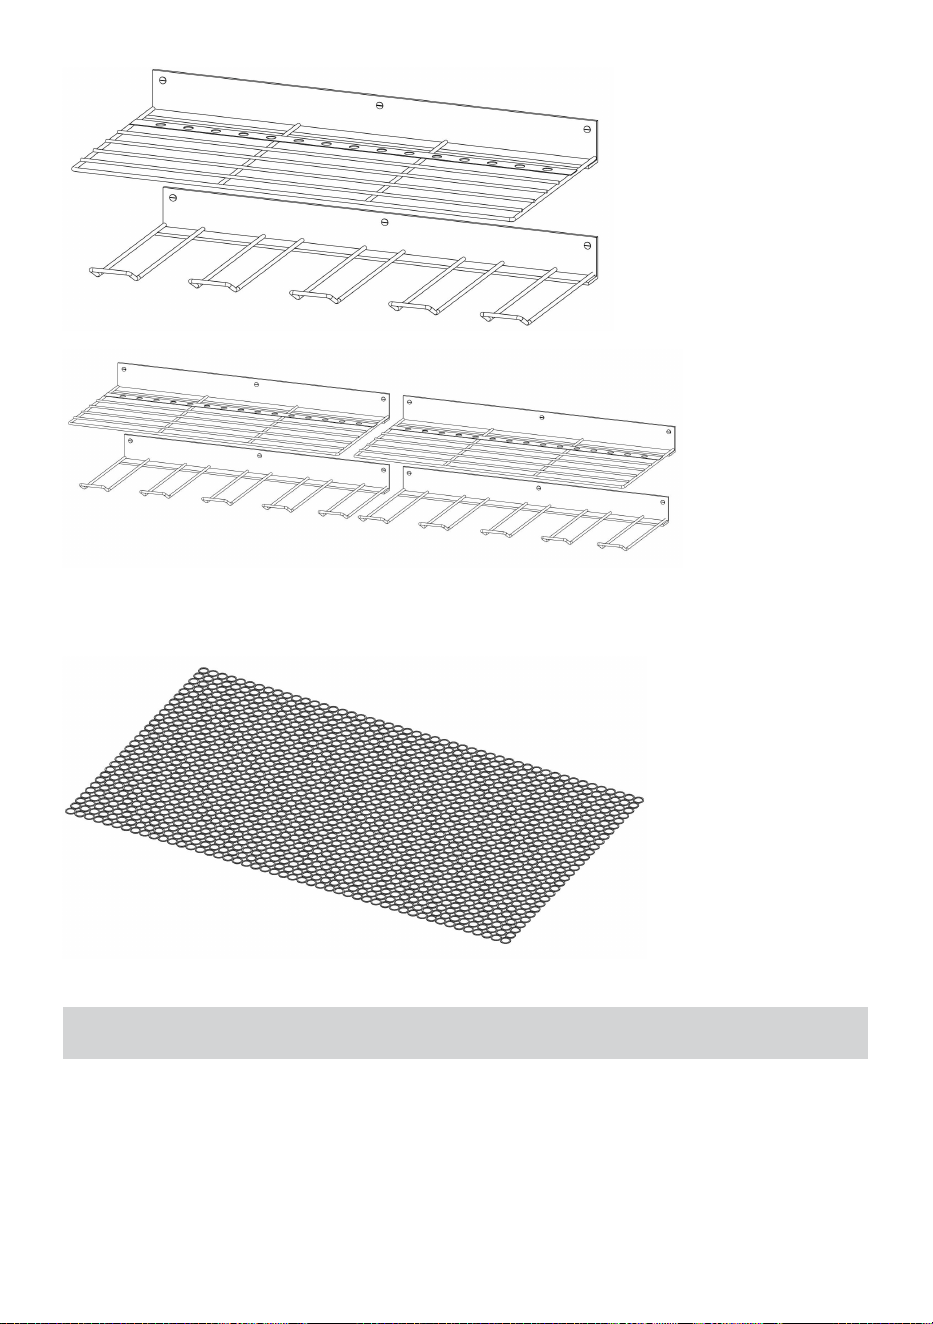
6. Installation Guide for SKU1
Step 1. Use Part K (Self-tapping screw)and Part L (Dowels) to fix the top
and lower panels to the wall, and the height can be randomly defined.
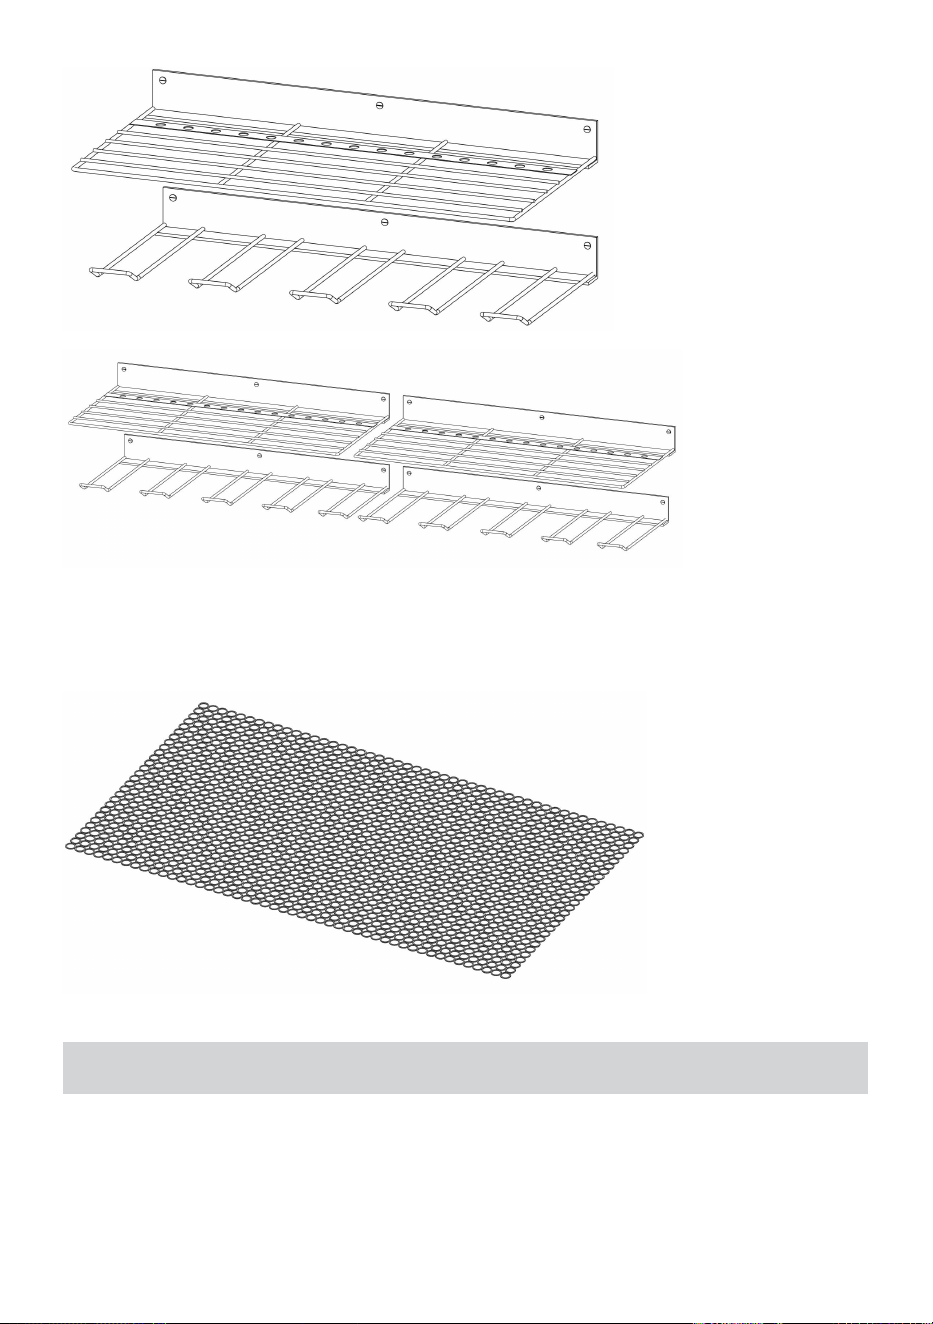
Part A and Part B
- 7 -
Part A and Part B
Step 2. Place part H(Anti-slip mat) on top of part A.
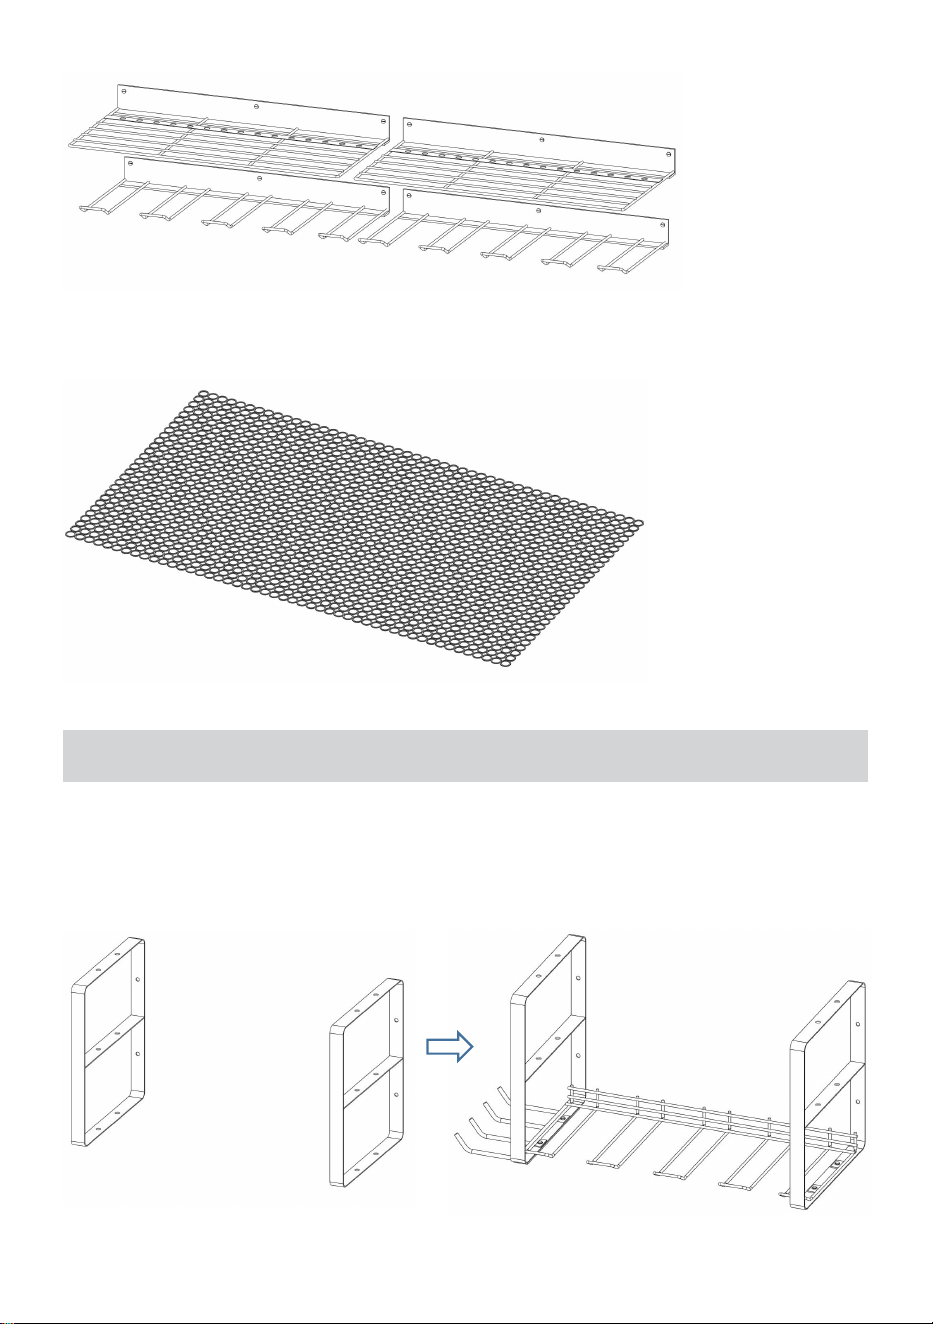
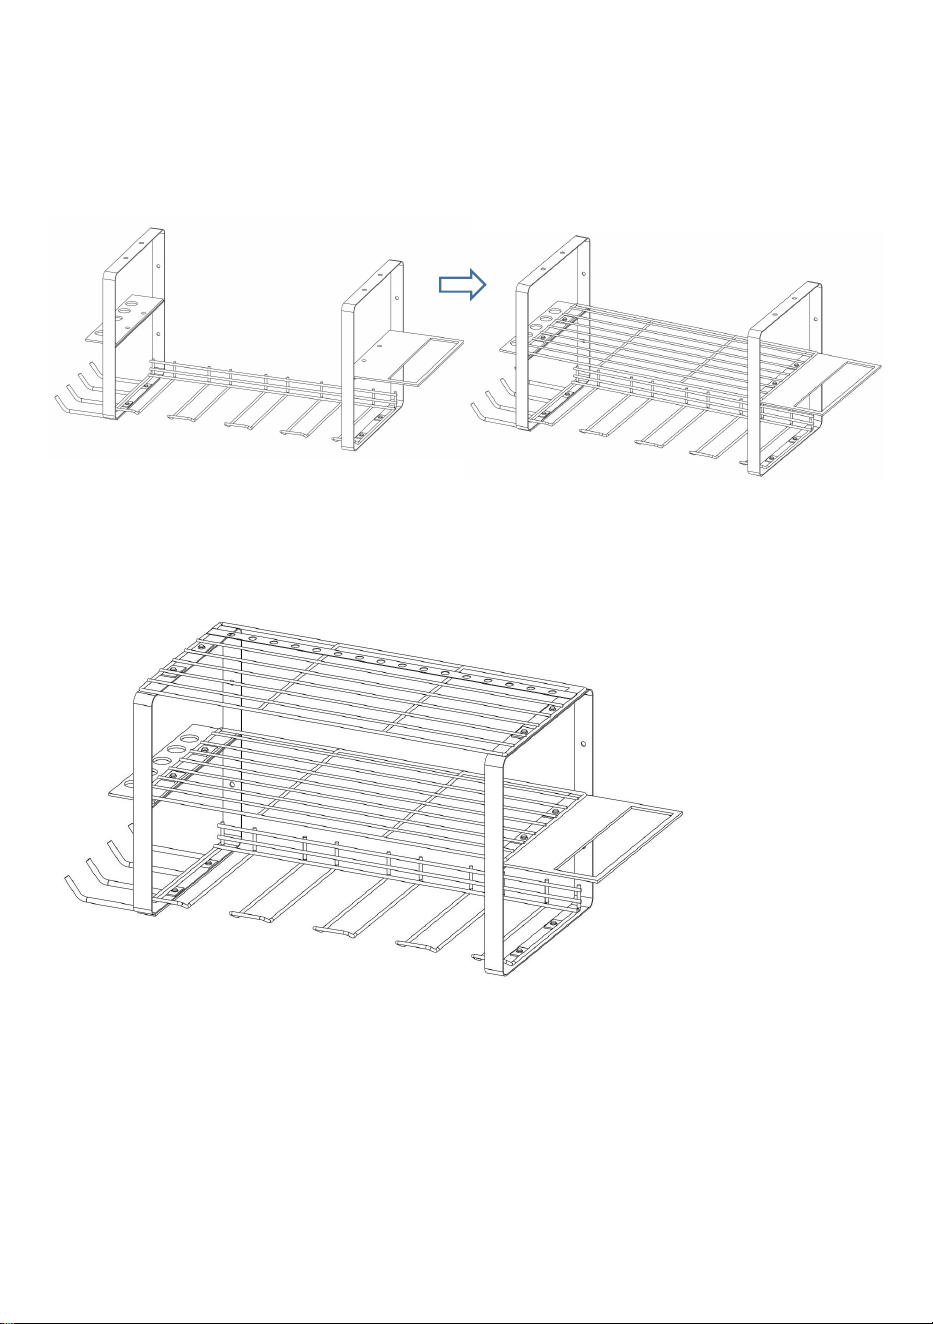
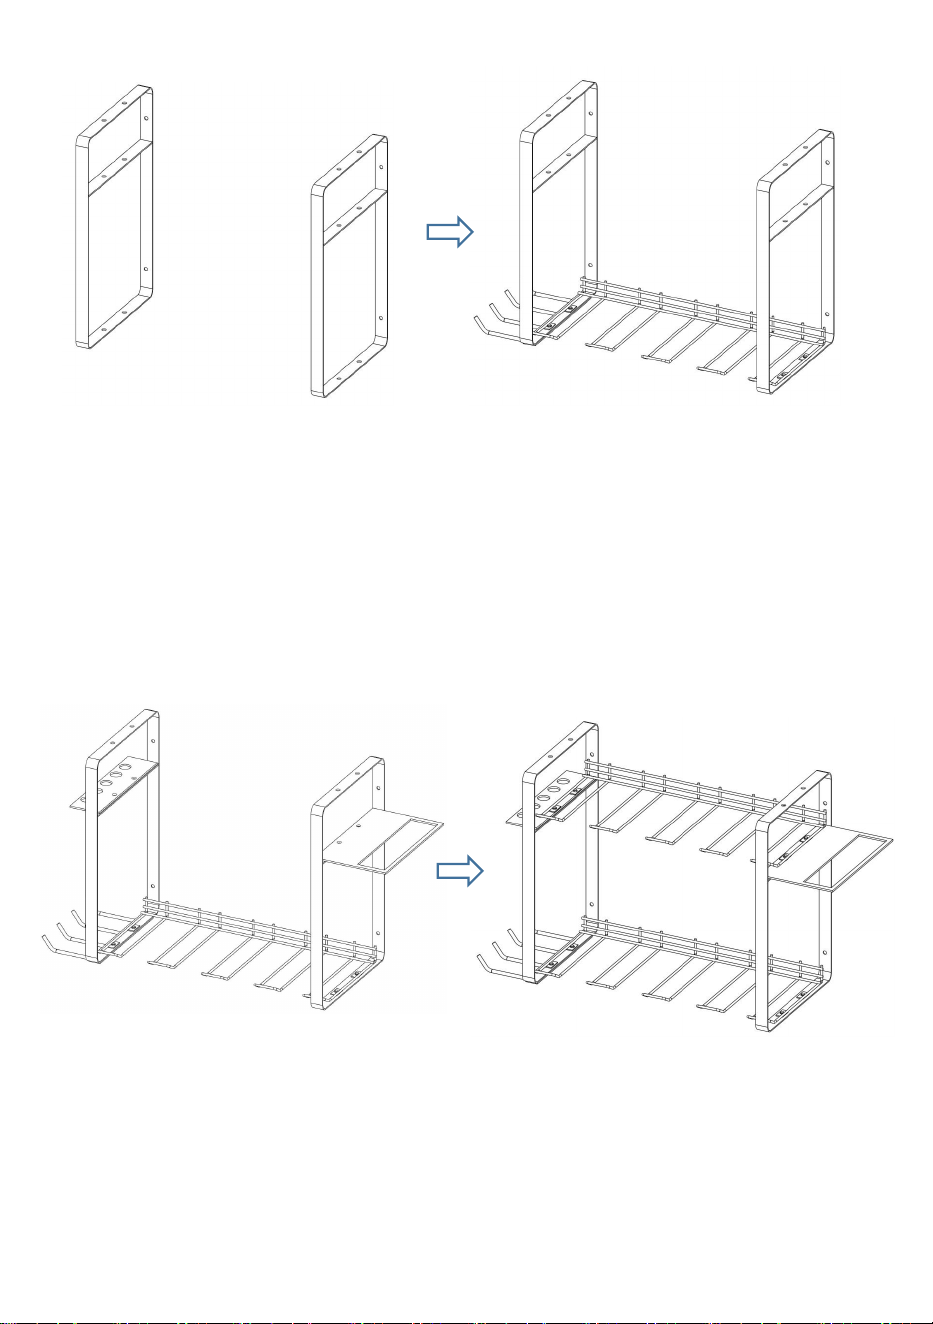
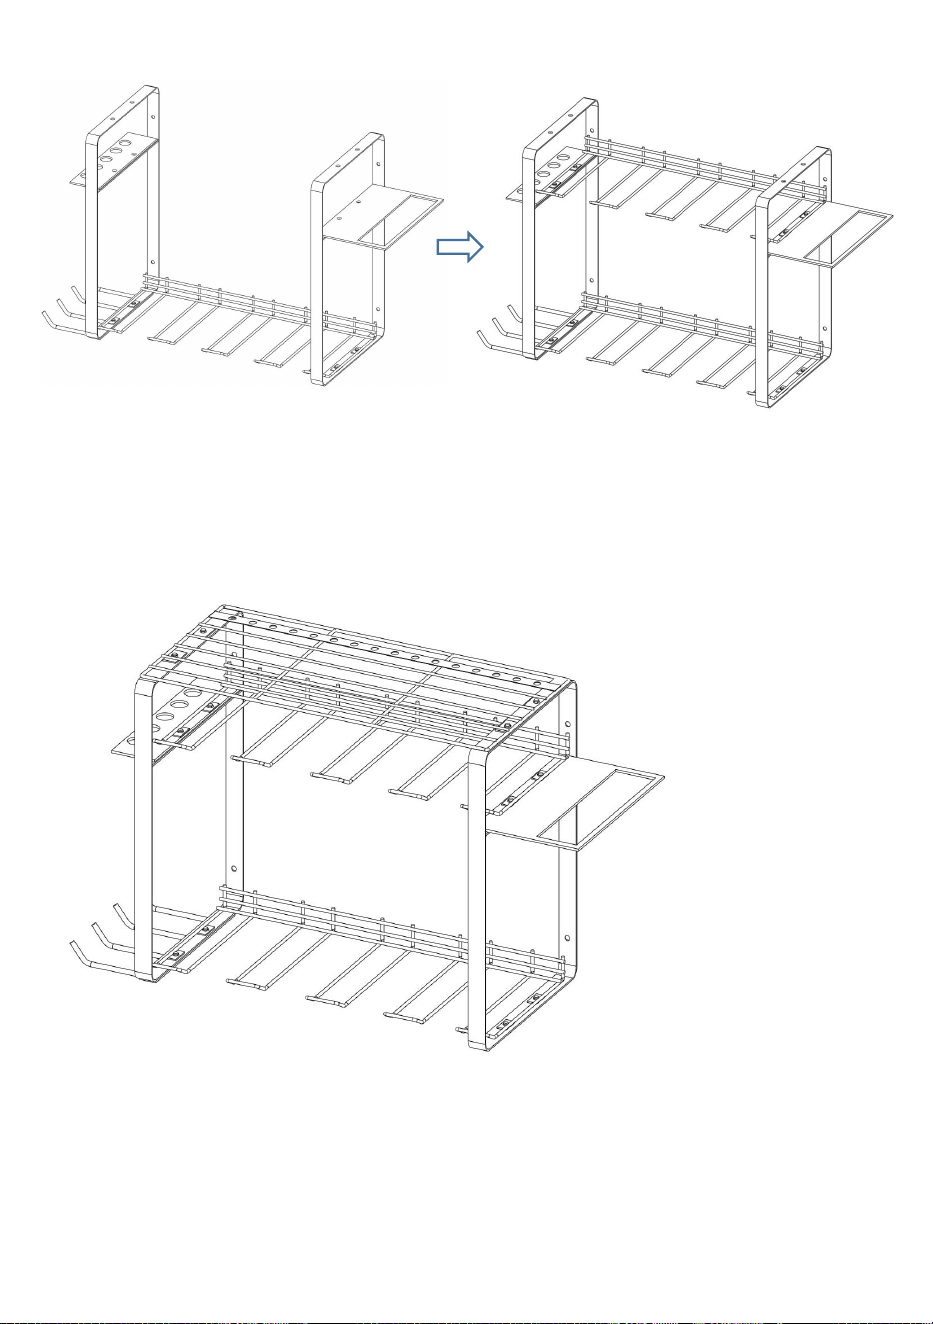
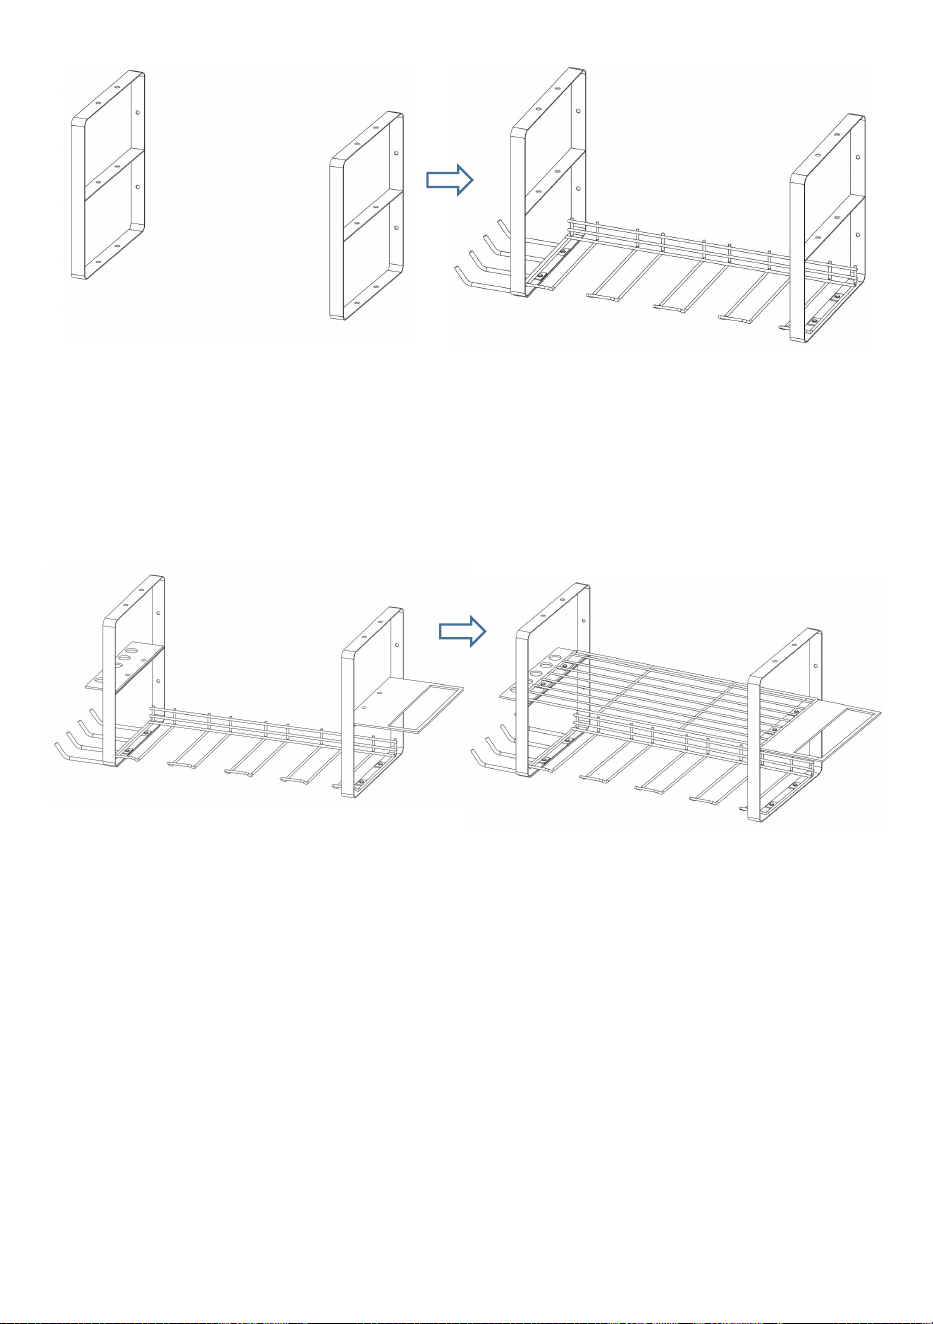
7. Installation Guide for SKU2 ~ SKU4
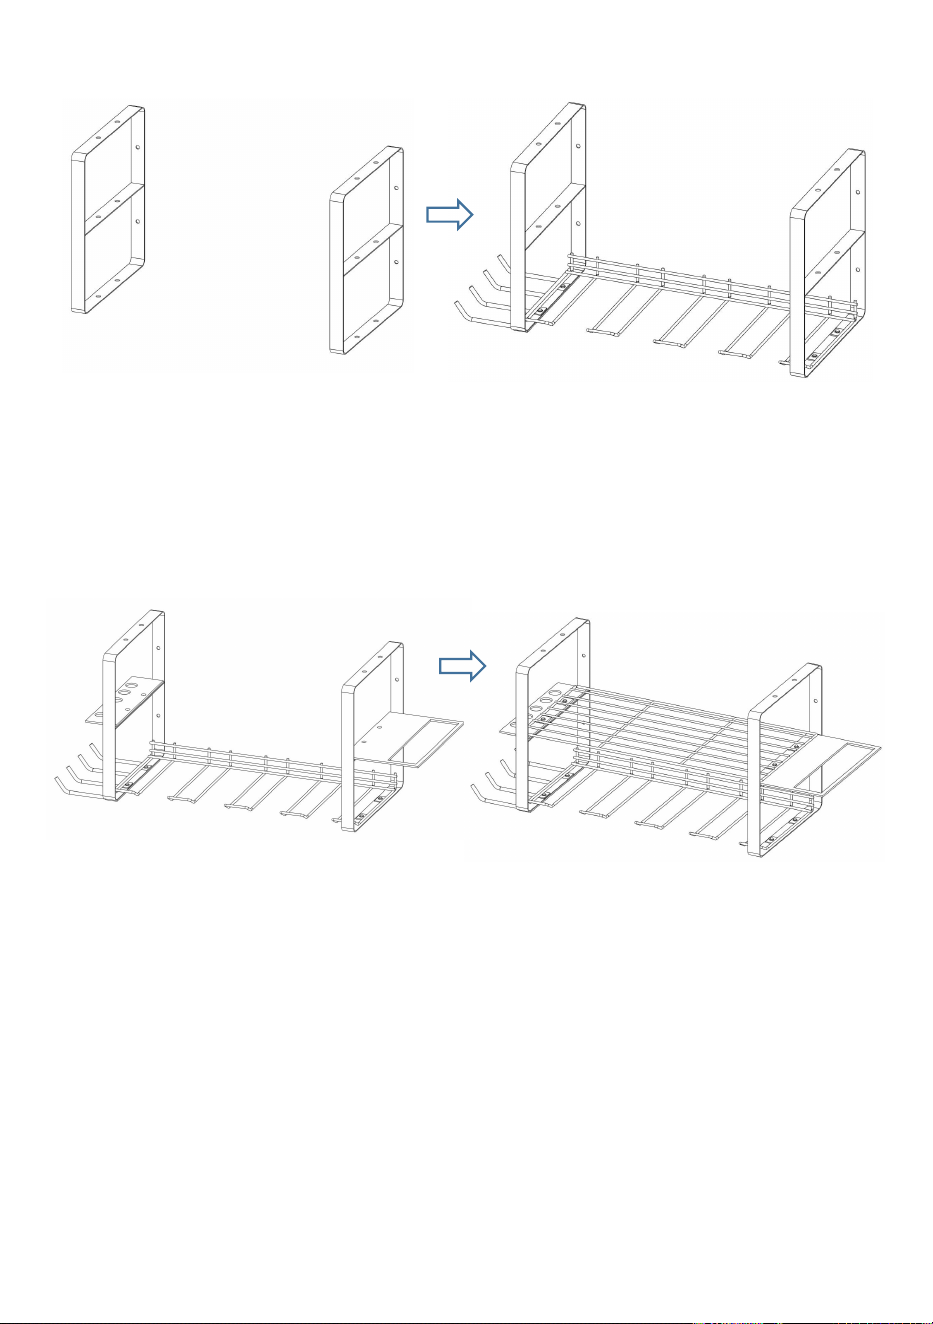
Step 1. As shown in the picture, locate Part D (Bracket) and place Part B
(Groove panel) and Part E (long hook) between the two side panels. Use
the tool Part M (wrench) along with the fasteners Part J (Screw) and Part I
(Nut) to securely fasten Part B and Part E onto Part D.
Part D Install Part B and Part E
- 8 -
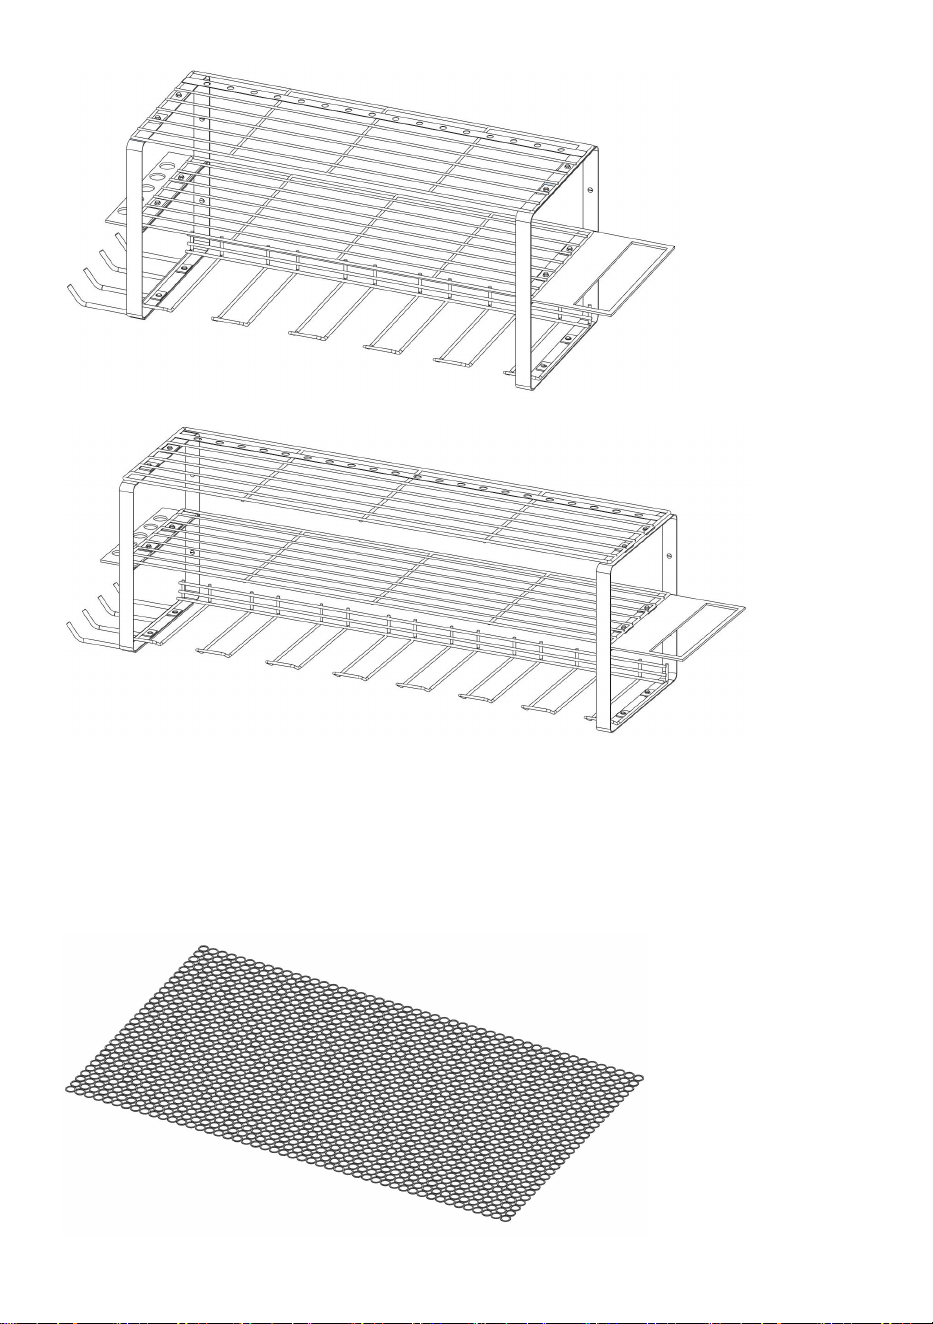
Step 2.Place Part G (Hammer holder), Part F (Pliers holder), and Part C
(Mid panel) in the middle layer of t Part D (Bracket), Use the tool Part M
(wrench) along with the fasteners Part J (Screw) and Part I (Nut) to
securely fasten them in place.
Install Part G and Part F Install Part C
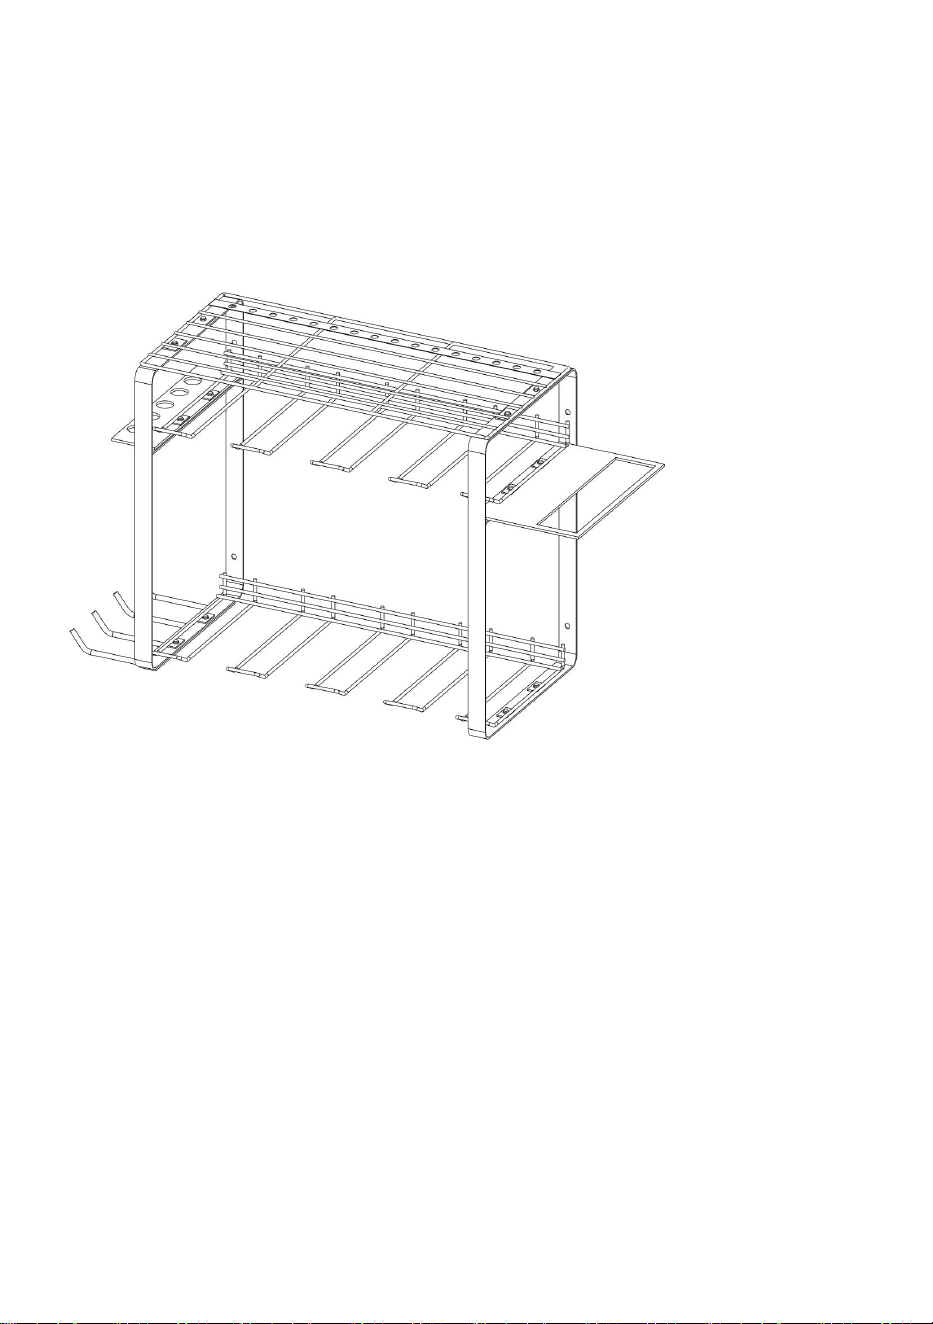
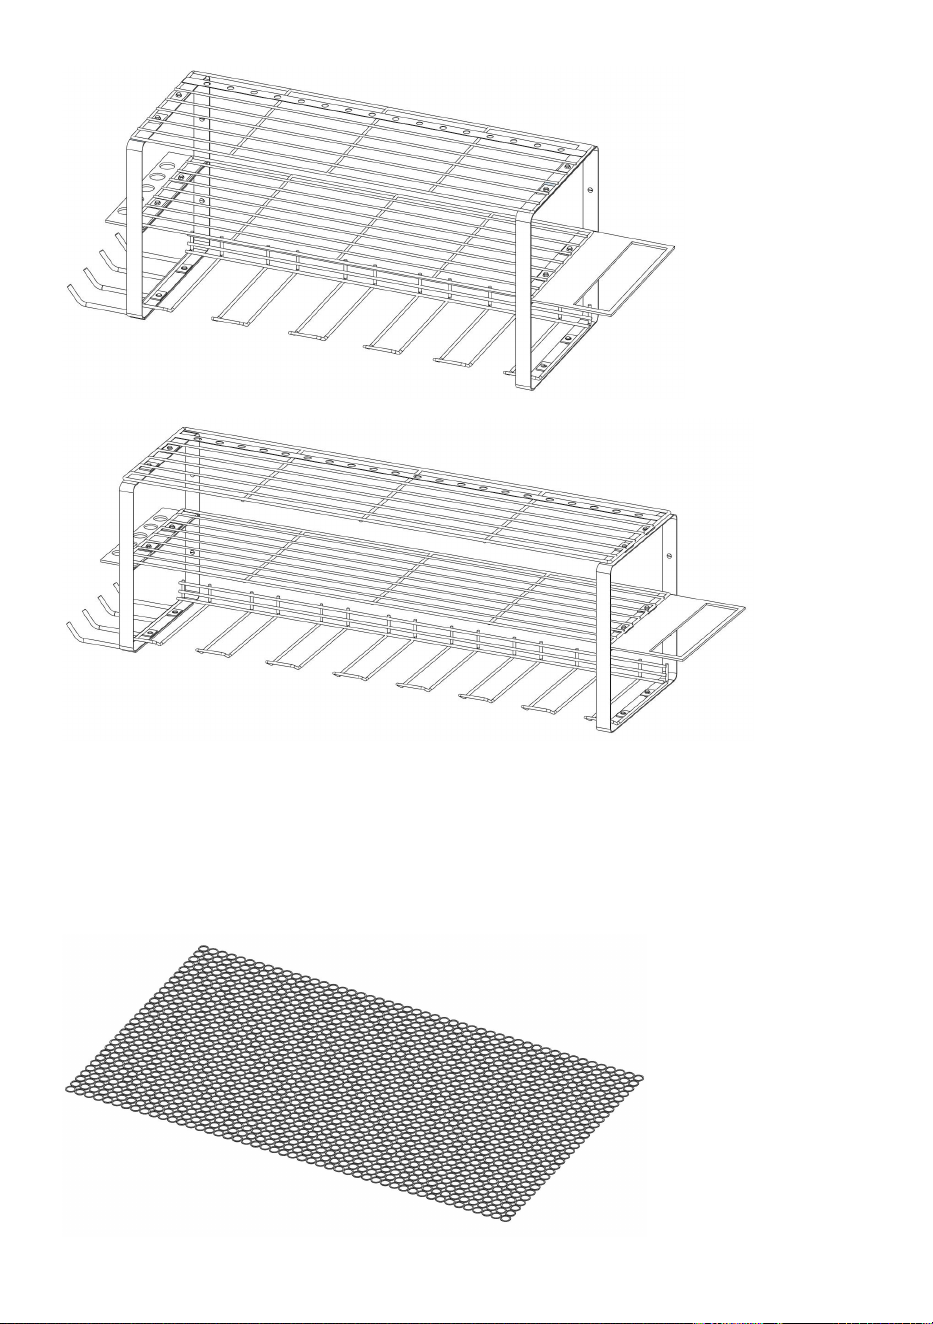
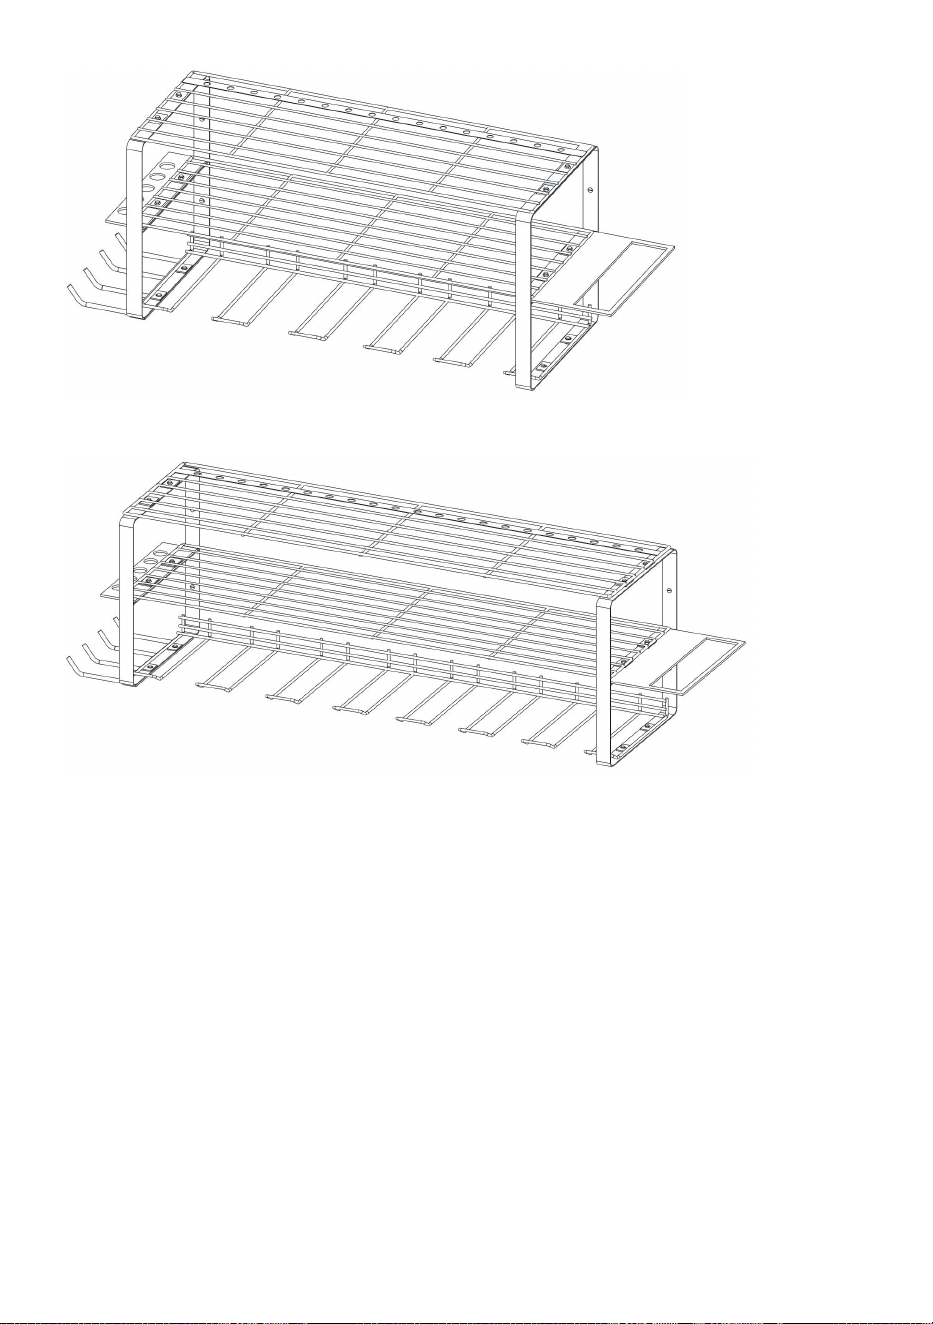
Step 3: Install Part A (Tool panel). Use the tool Part M (wrench) along with
the fasteners Part J (Screw) and Part I (Nut) to securely fasten it in place.
Install Part A
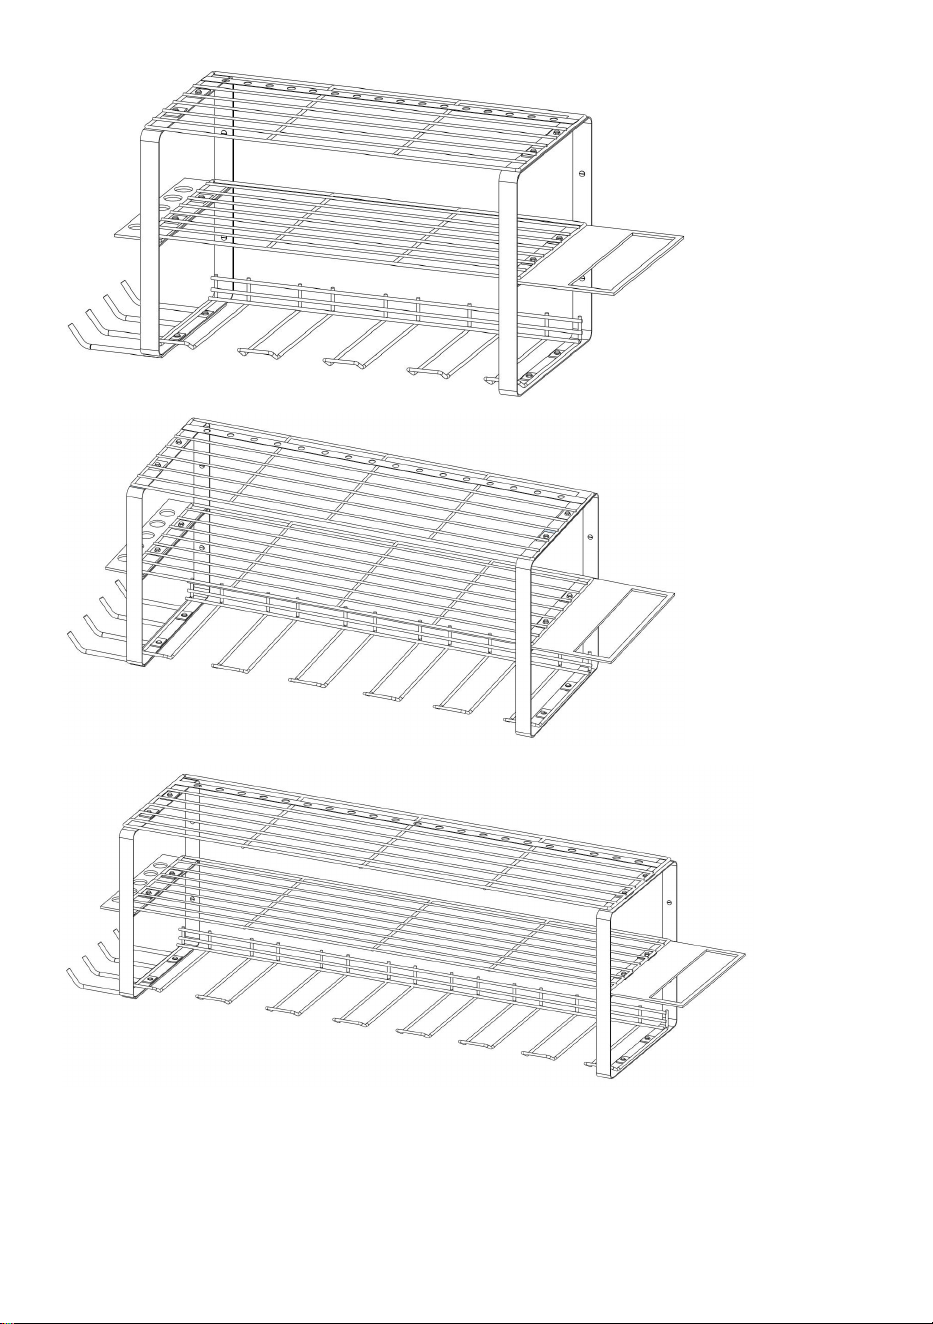
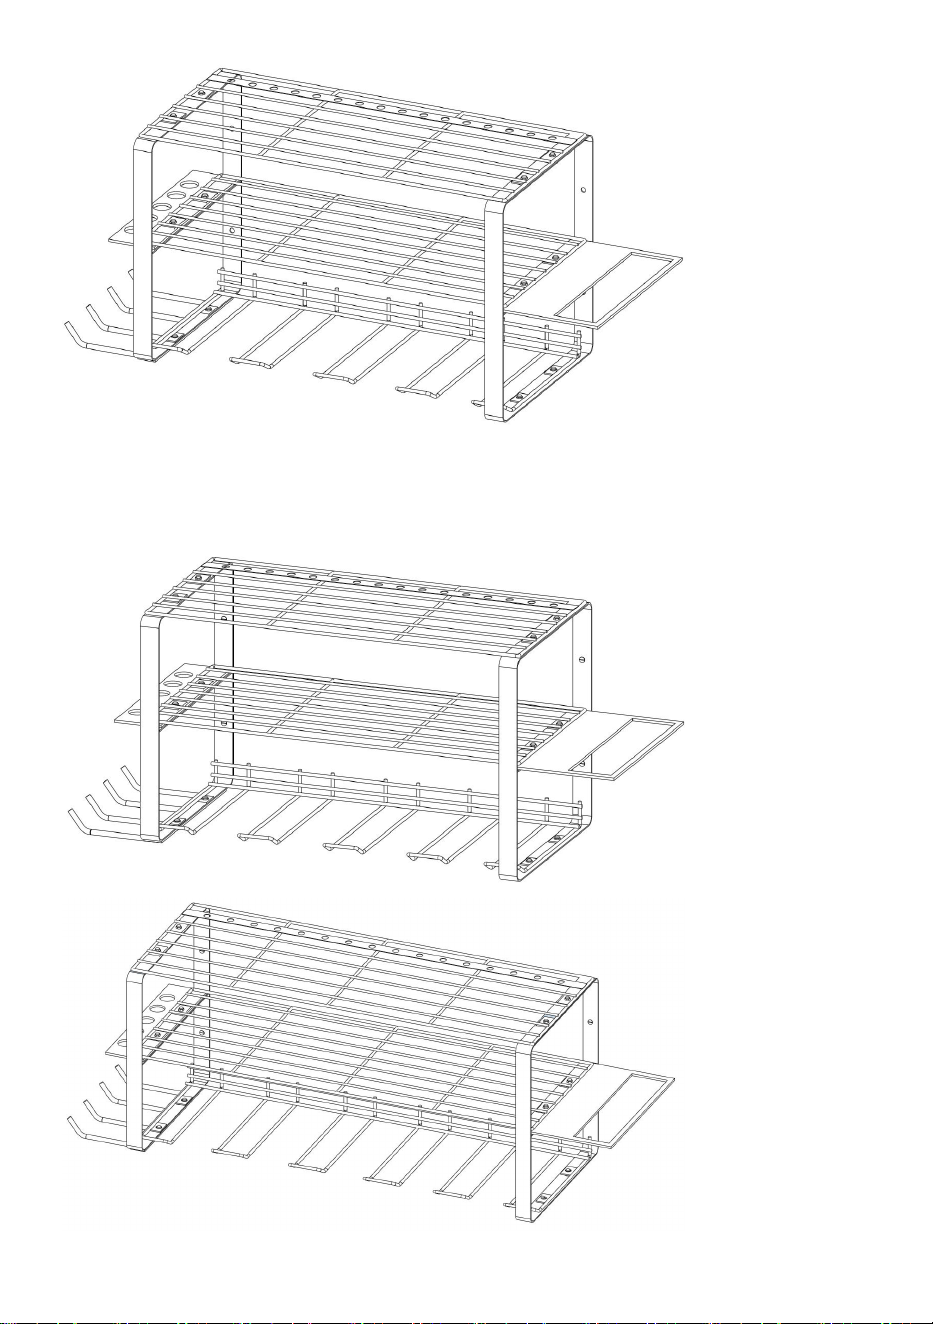
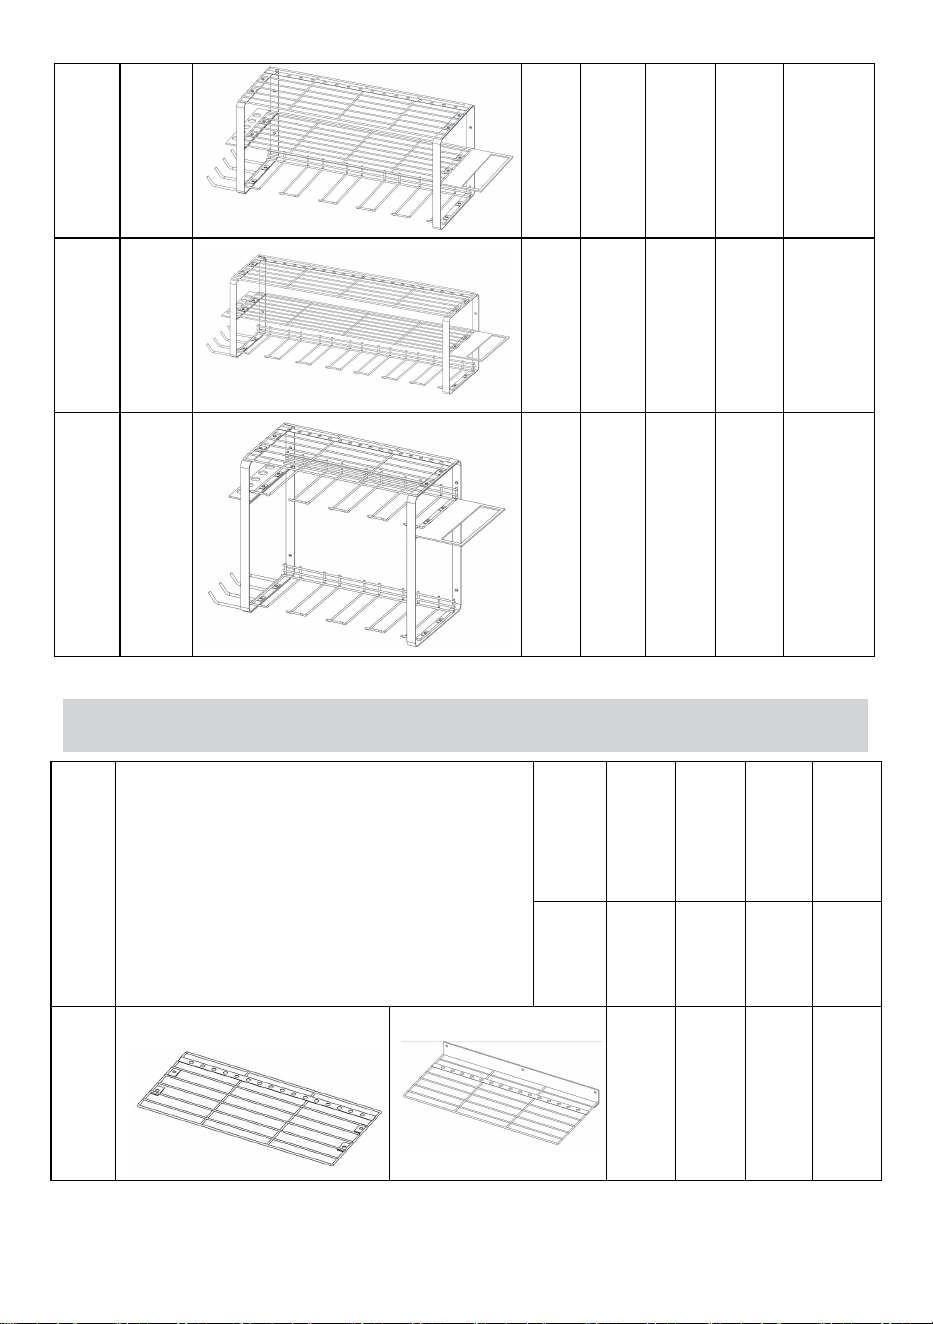
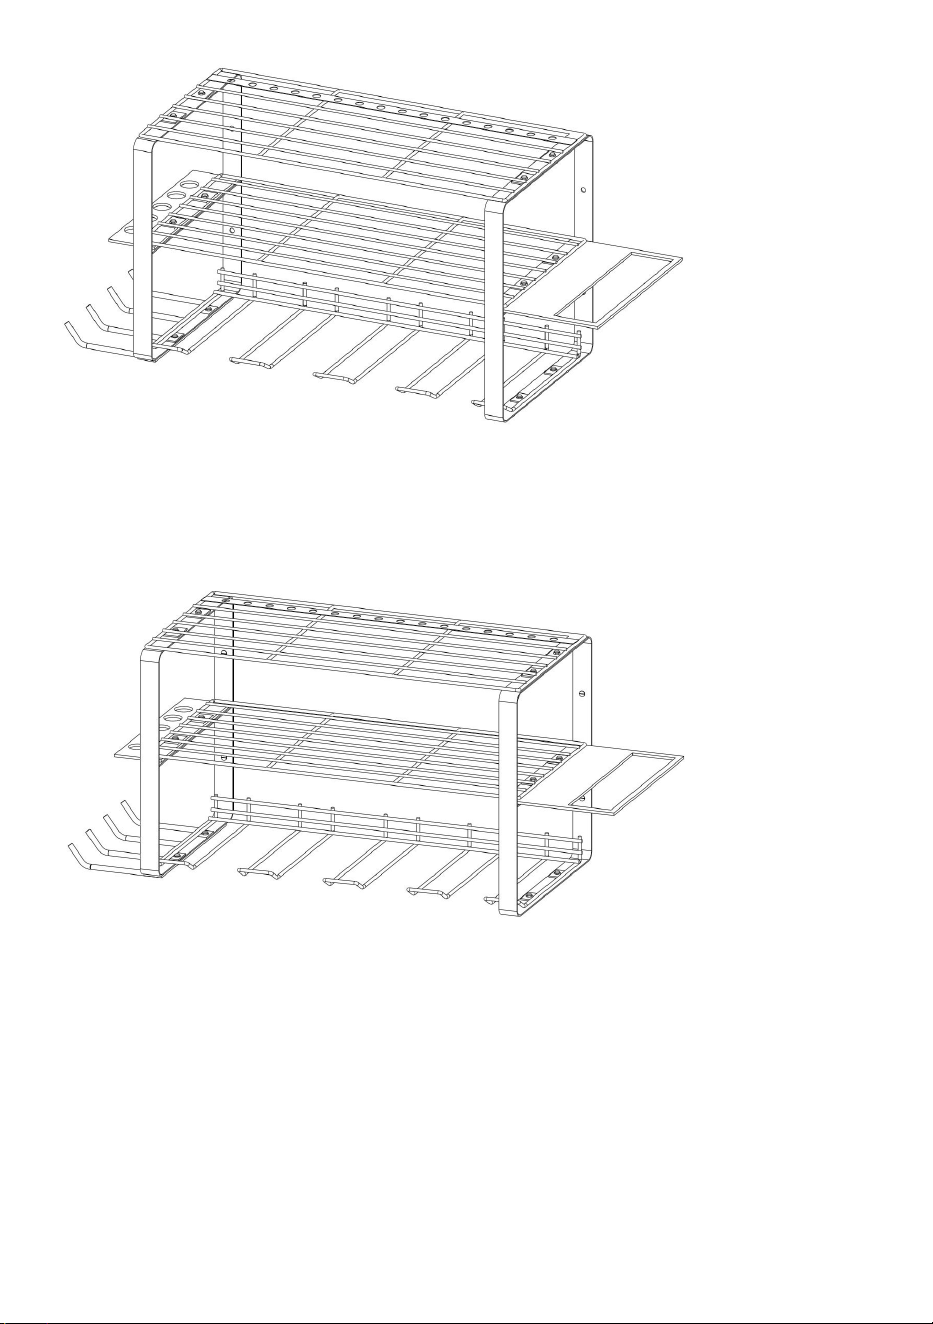
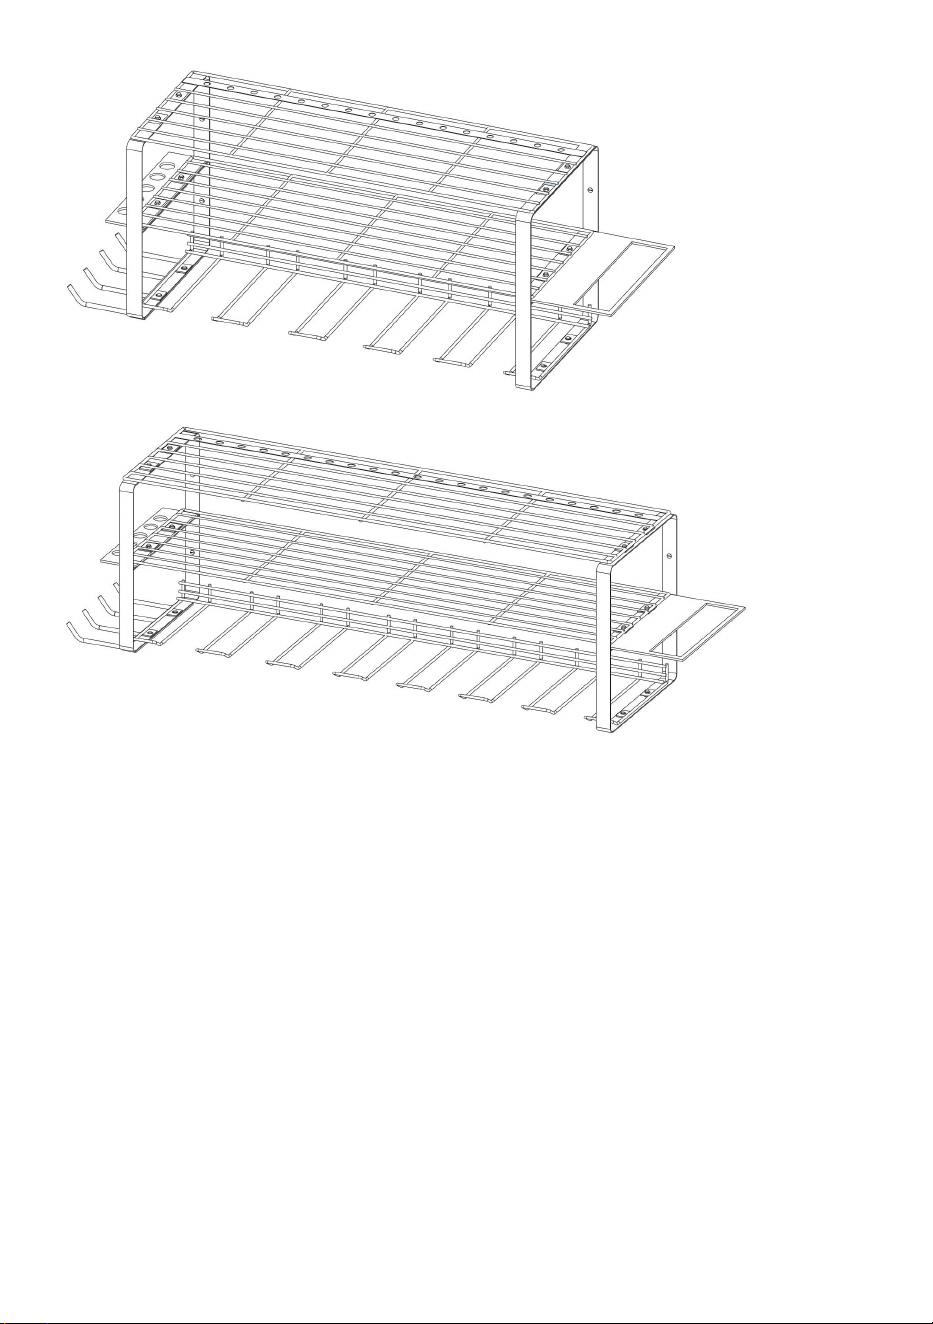
Note: Below is the appearance of SKU2, SKU3, and SKU4 after installing
the tool panel.
- 9 -
SKU2
SKU3
SKU4
Step 4: Use Part K (Self-tapping screw) and Part L (Dowels) to securely
fasten the power tool organizer in the desired location on the wall.
Step 5: Place Part H (Anti-slip mat) on top of Part A. The installation
process is complete.

- 10 -
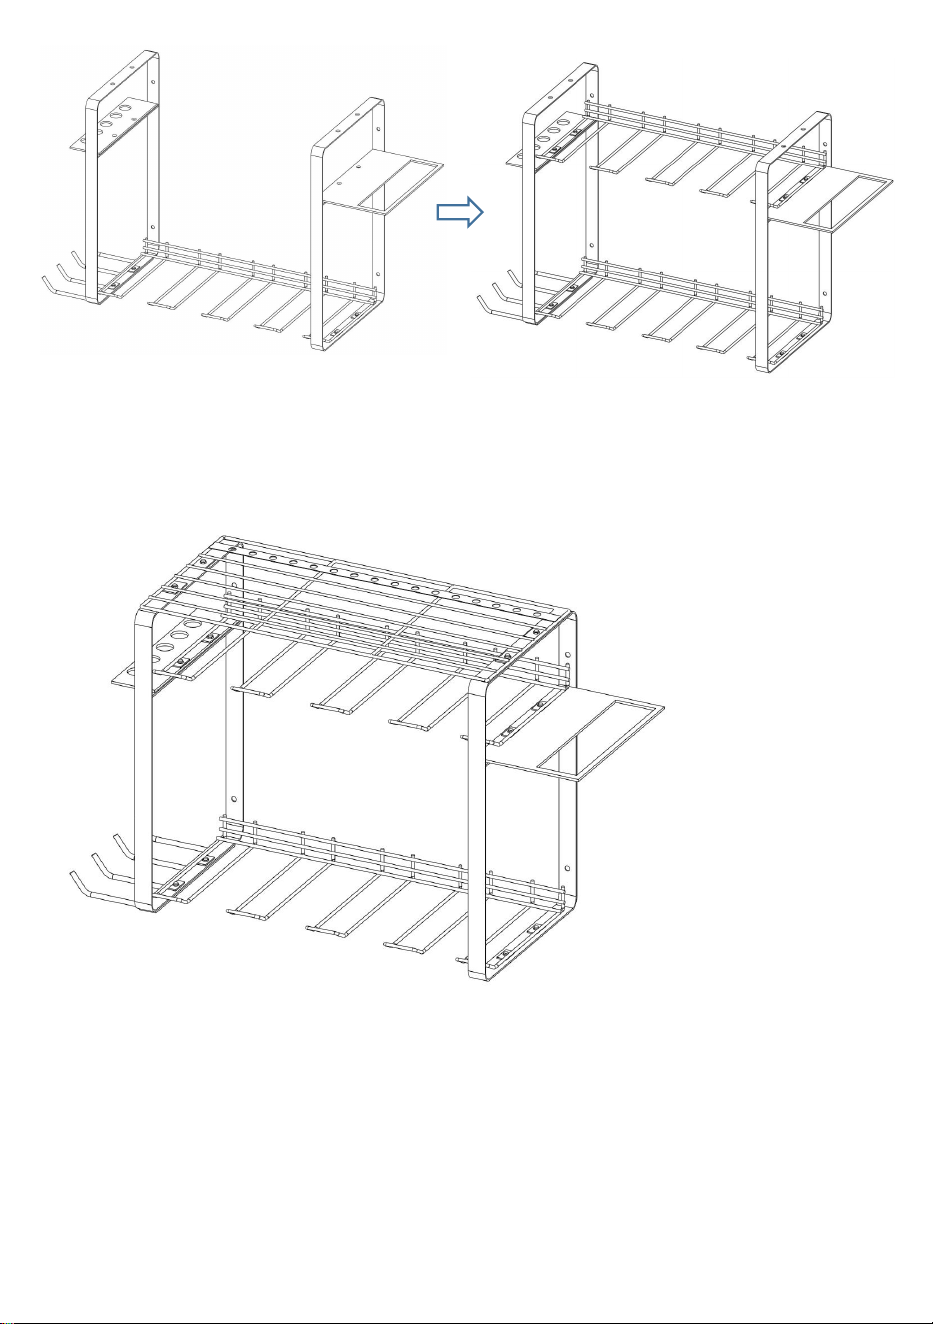
8. Installation Guide for SKU5
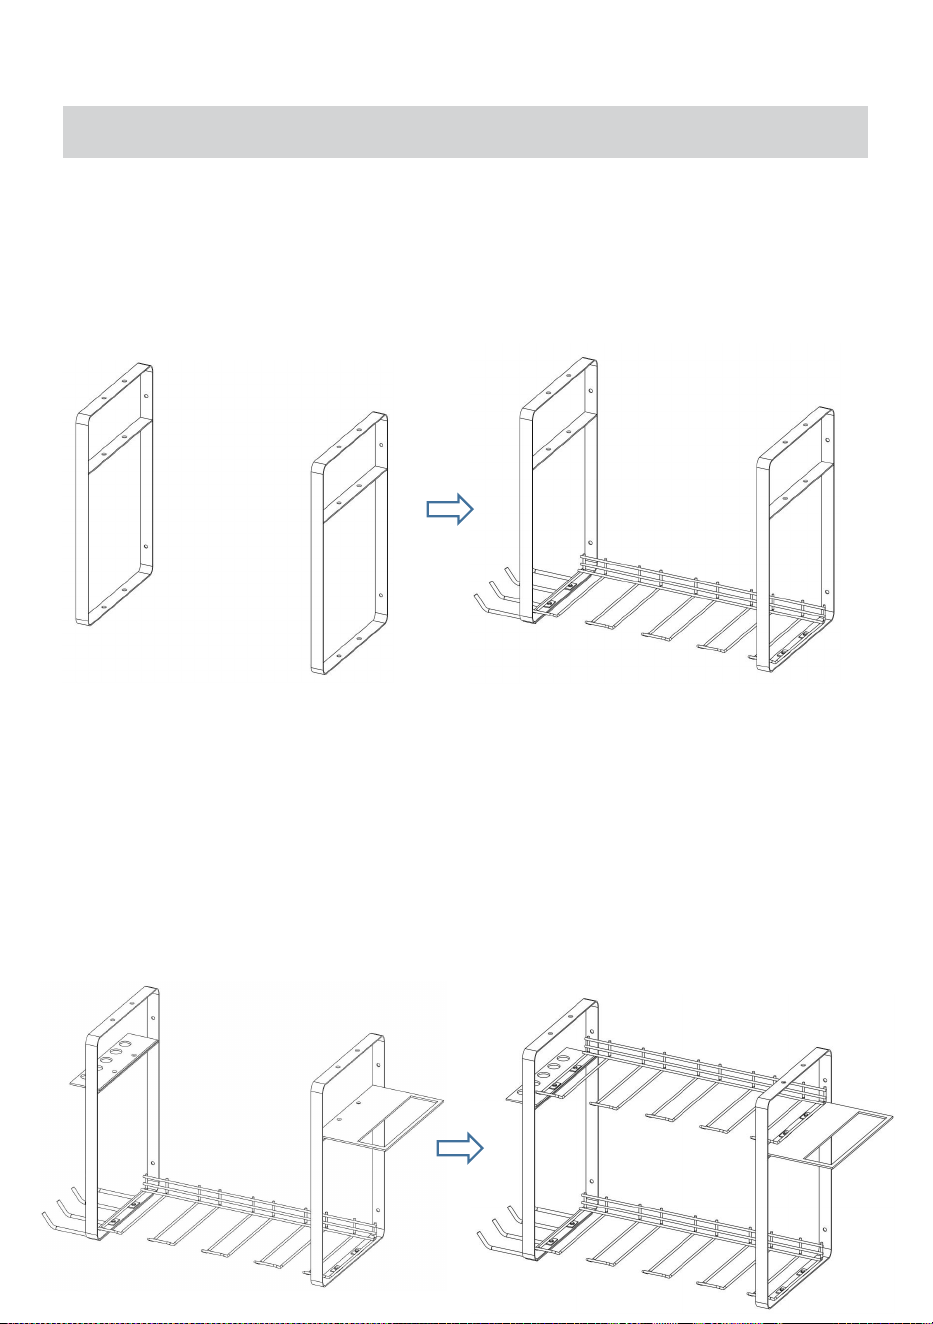
Step 1. As shown in the picture, locate Part D (Bracket) and place Part B
(Groove panel) and Part E (long hook) between the two side panels. Use
the tool Part M (wrench) along with the fasteners Part J (Screw) and Part I
(Nut) to securely fasten Part B and Part E onto Part D.
Find Part D Install Part B and Part E
Step 2. Place Part G (Hammer holder), Part F (Pliers holder), and Part
B(Groove panel) in the middle layer of t Part D (Bracket), Use the tool Part
M (wrench) along with the fasteners Part J (Screw) and Part I (Nut) to
securely fasten them in place.
- 11 -
Install Part G and Part F Install Part B
Step 3. Install Part A (Tool panel). Use the tool Part M (wrench) along with
the fasteners Part J (Screw) and Part I (Nut) to securely fasten it in place.
Step 4: Use Part K (Self-tapping screw) and Part L (Dowels) to securely
fasten the power tool organizer in the desired location on the wall.

- 12 -
Step 5: Place Part H (Anti-slip mat) on top of Part A. The installation
process is complete.
9. User Guide
1. Make sure that items hung on the rack do not exceed their weight limit.
2. Try to distribute the weight on the hanger evenly and avoid being too
heavy on one side.
3. Do not hang sharp or damaged objects on the hanger, as this may
scratch the hanger or cause injury.
4. Adjust the spacing of the hooks as needed to accommodate items of
different sizes and shapes.
5. Before loading, the hook needs to be completely placed on the rail.

- 13 -
Manufacturer: Shanghaimuxinmuyeyouxiangongsi
Address: Shuangchenglu 803nong11hao1602A-1609shi, baoshanqu,
shanghai 200000 CN.
Imported to AUS: SIHAO PTY LTD, 1 ROKEVA STREETEASTWOOD NSW
2122 Australia
Imported to USA: Sanven Technology Ltd., Suite 250, 9166 Anaheim Place,
Rancho Cucamonga, CA 91730
REP
EC
E-CrossStu GmbH
Mainzer Landstr.69, 60329 Frankfurt am Main.
REP
UK
YH CONSULTING LIMITED.
C/O YH Consulting Limited Office 147, Centurion House,
London Road, Staines-upon-Thames, Surrey, TW18 4AX


Technique Certificat d'assistance et de garantie électronique
www.vevor.com/support
ORGANISATEUR D'OUTILS
ÉLECTRIQUES
MANUEL D'UTILISATION
We continue to be committed to provide you tools with competitive price.
"Save Half", "Half Price" or any other similar expressions used by us only represents an
estimate of savings you might benefit from buying certain tools with us compared to the major
top brands and does not necessarily mean to cover all categories of tools offered by us. You
are kindly reminded to verify carefully when you are placing an order with us if you are
actually saving half in comparison with the top major brands.


- 1 -
Modèle : JC-PTO-001 ; JC-PTO-002 ; JC-PTO-003 ; JC-PTO-004 ; JC-PTO-005
Have product questions? Need technical support? Please feel free to
contact us:
Technical Support and E-Warranty Certificate
www.vevor.com/support
NEED HELP? CONTACT US!
This is the original instruction, please read all manual instructions
carefully before operating. VEVOR reserves a clear interpretation of our
user manual. The appearance of the product shall be subject to the
product you received. Please forgive us that we won't inform you again if
there are any technology or software updates on our product.
POWER TOOL
ORGANIZER

- 2 -
10. WARNING!
9
.Avant l'installation, assurez-vous qu'il ne risque pas de percer des
câbles électriques ou des conduites d'eau cachés. En cas de doute,
utilisez un dispositif de repérage numérique ou consultez un expert.
10
.Le rail doit être monté sur une surface stable. Ne pas surcharger.
11.L'installation du support mural doit être effectuée par un adulte et les
enfants ne doivent pas l'utiliser sans surveillance.
12
.Recommandé pour la brique et le béton uniquement ; utilisez du
matériel spécial pour l'installation sur des plaques de plâtre ou d'autres
substrats.
13
.Avant d’installer et d’utiliser un organisateur d’outils électriques ,
assurez-vous de lire et de comprendre tous les avertissements et
instructions de sécurité.
14
.Assurez-vous que l' organisateur d'outils électriques est installé sur un
mur stable pour éviter que Organisateur d'outils électriques et outils contre
les chutes.
15
.Veuillez ne pas dépasser la capacité de charge maximale du
organisateur d'outils électriques pour éviter d'endommager le Organisateur
d'outils électriques et outils contre les chutes.
16
.Veuillez vérifier périodiquement la stabilité du porte-outil et la sécurité
des outils .
11. Maintenance Guide
4. Nettoyez régulièrement l’ organiseur d’outils pour éviter l’accumulation
de poussière et de saleté.
5. Vérifiez la stabilité du Organisateur d'outils électriques pour s'assurer

- 3 -
que tout le matériel de montage est sécurisé et non endommagé.
6. Vérifiez la charge du Organisateur d'outils électriques pour garantir que
la capacité de charge maximale ne soit pas dépassée.
- 4 -
12. Product Description
L' organisateur d'outils électriques est un organisateur d'outils électriques
Conçu spécialement pour ranger les petits outils électriques de coupe et
d'assemblage de métaux sans fil (perceuses électriques, perceuses à
percussion, scies alternatives électriques, tournevis électriques, clés
électriques, etc.). Les outils électriques peuvent être suspendus sur la
fente inférieure (à la verticale ou à l'envers), et la couche plate peut stocker
des batteries, de petites boîtes à outils (avec différents types de forets, etc.)
et des outils légèrement plus grands (tels que des meuleuses d'angle et
des coupeurs électriques). Le produit est principalement utilisé dans les
garages, les ateliers et les salles d'outillage ; le trou de rangement du
tournevis est utilisé pour placer de petits outils manuels tels que des
tournevis et des pinces.
13. Product Parameter
articl
e
Modèl
e
Image
Cou
che
s
Rain
ures
Nord-
Oues
t
GW
Taille de
l'emball
age
SKU
1
JC-
PTO-
001
2
4
3,0
kg
3,3
kg
445*220
*86mm
SKU
2
JC-
PTO-
002
3
4
2,3
kg
2,7
kg
430*227
*83mm

- 5 -
SKU
3
JC-
PTO-
003
3
5
2,5
kg
3,0
kg
505*227
*85mm
SKU
4
JC-
PTO-
004
3
7
3,0
kg
3,5
kg
655*225
*80mm
SKU
5
JC-
PTO-
005
3
8
2,8
kg
3,2
kg
435*237
*115mm
14. Part list
articl
e
Parties
UGS
1
SKU
2
SKU
3
SKU
4
SKU
5
JC-
PTO-
001
JC-
PTO-
002
JC-
PTO-
003
JC-
PTO-
004
JC-
PTO-
005
UN
Panneau d'outils
2 pièces
1
pièce
1
pièce
1
pièce
1
pièce

- 6 -
B
Panneau rainuré
2 pièces
(4 rainures)
1
pièce
(4
rainur
es)
1
pièce
(5
rainur
es)
1
pièce
(7
rainu
res)
2
pièce
s
(4
rainu
res)
C
Panneau central
/
1
pièce
1
pièce
1
pièce
/
D
Support
/
2
pièce
s
2
pièce
s
2
pièce
s
2
pièce
s
E
Crochet long
/
1
pièce
1
pièce
1
pièce
1
pièce
F
Porte-pince
/
1
pièce
1
pièce
1
pièce
1
pièce
G
Porte-marteau
/
1
pièce
1
pièce
1
pièce
1
pièce

- 7 -
H
Tapis antidérapant
2
pièce
s
1
pièce
1
pièce
1
pièce
1
pièce
je
Noix
/
12
pièce
s
12
pièce
s
12
pièce
s
12
pièce
s
J
Vis
/
12
pièce
s
12
pièce
s
12
pièce
s
12
pièce
s
K
Vis autotaraudeuse
12
pièce
s
4
pièce
s
4
pièce
s
4
pièce
s
4
pièce
s
L
Chevilles
12
pièce
s
4
pièce
s
4
pièce
s
4
pièce
s
4
pièce
s
M
Clé
/
1
pièce
1
pièce
1
pièce
1
pièce
15. Installation Guide for SKU1
Étape 1. Utilisez la partie K ( vis autotaraudeuse ) et la partie L (chevilles)
pour fixer les panneaux supérieur et inférieur au mur, et la hauteur peut
être définie de manière aléatoire.

- 8 -
Partie A et partie B
Partie A et partie
B
Étape 2. Placez la partie H (tapis antidérapant) sur la partie A.
16. Installation Guide for SKU2 ~ SKU4
Étape 1. Comme indiqué sur l'image, localisez la pièce D (support) et
placez la pièce B (panneau rainuré) et la pièce E (crochet long) entre les
deux panneaux latéraux. Utilisez l'outil pièce M (clé) ainsi que les fixations
pièce J (vis) et pièce I (écrou) pour fixer solidement la pièce B et la pièce E
- 9 -
sur la pièce D.
Partie D Installer la partie B et la partie E
Étape 2. Placez la pièce G (porte-marteau), la pièce F (porte-pince) et la
pièce C (panneau central) dans la couche intermédiaire de la pièce D
(support). Utilisez l'outil pièce M (clé) avec les fixations pièce J (vis) et
pièce I (écrou) pour les fixer solidement en place.
Installer la partie G et la partie F Installer la partie C
Étape 3 : Installez la pièce A (panneau à outils). Utilisez l'outil Pièce M (clé)
ainsi que les fixations Pièce J (vis) et Pièce I (écrou) pour le fixer
solidement en place.

- 10 -
Installer la partie
A
Remarque : vous trouverez ci-dessous l'apparence des SKU2, SKU3 et
SKU4 après l'installation du panneau d'outils.
SKU2
- 11 -
SKU3
SKU4
Étape 4 : Utilisez la partie K (vis autotaraudeuse) et la partie L (chevilles)
pour fixer solidement l'organiseur d'outils électriques à l'emplacement
souhaité sur le mur.
Étape 5 : Placez la partie H (tapis antidérapant) sur la partie A. Le
processus d'installation est terminé.
- 12 -
17. Installation Guide for SKU5
Étape 1. Comme indiqué sur l'image, localisez la pièce D (support) et
placez la pièce B (panneau rainuré) et la pièce E (crochet long) entre les
deux panneaux latéraux. Utilisez l'outil pièce M (clé) ainsi que les fixations
pièce J (vis) et pièce I (écrou) pour fixer solidement la pièce B et la pièce E
sur la pièce D.
Trouver la partie D Installer la partie B et la partie E
Étape 2. Placez la partie G (porte-marteau), la partie F (porte-pince) et la
partie B (panneau rainuré) dans la couche intermédiaire de la partie D
(support). Utilisez l'outil Partie M (clé) avec les fixations Partie J (vis) et
Partie I (écrou) pour les fixer solidement en place.
- 13 -
Installer la partie G et la partie F Installer la partie B
Étape 3. Installez la partie A (panneau à outils). Utilisez l'outil de la partie M
(clé) ainsi que les éléments de fixation de la partie J (vis) et de la partie I
(écrou) pour le fixer solidement en place.
Étape 4 : Utilisez la partie K (vis autotaraudeuse) et la partie L (chevilles)
pour fixer solidement l'organiseur d'outils électriques à l'emplacement
souhaité sur le mur.
Étape 5 : Placez la partie H (tapis antidérapant) sur la partie A. Le
processus d'installation est terminé.

- 14 -
18. User Guide
6. Assurez-vous que les objets suspendus sur le support ne dépassent
pas leur limite de poids.
7. Essayez de répartir le poids sur le cintre de manière uniforme et évitez
d'être trop lourd d'un côté.
8. Ne suspendez pas d’objets tranchants ou endommagés sur le cintre,
car cela pourrait le rayer ou provoquer des blessures.
9. Ajustez l’espacement des crochets selon vos besoins pour accueillir
des articles de différentes tailles et formes.
10. Avant le chargement, le crochet doit être complètement placé sur le
rail .

- 15 -
Fabricant : Shanghaimuxinmuyeyouxiangongsi
Adresse : Shuangchenglu 803nong11hao1602A-1609shi, baoshanqu,
Shanghai 200000 CN.
Importé en Australie : SIHAO PTY LTD, 1 ROKEVA STREET, ASTWOOD
NSW 2122 Australie
Importé aux États-Unis : Sanven Technology Ltd., Suite 250, 9166 Anaheim
Place, Rancho Cucamonga, CA 91730
REP
EC
E-CrossStu GmbH
Mainzer Landstr.69, 60329 Frankfurt am Main.
REP
UK
YH CONSULTING LIMITED.
C/O YH Consulting Limited Office 147, Centurion House,
London Road, Staines-upon-Thames, Surrey, TW18 4AX


Technisch Support und E-Garantie-Zertifikat
www.vevor.com/support
ORGANIZER FÜR ELEKTROWERKZEUGE
BENUTZERHANDBUCH
We continue to be committed to provide you tools with competitive price.
"Save Half", "Half Price" or any other similar expressions used by us only represents an
estimate of savings you might benefit from buying certain tools with us compared to the major
top brands and does not necessarily mean to cover all categories of tools offered by us. You
are kindly reminded to verify carefully when you are placing an order with us if you are
actually saving half in comparison with the top major brands.

- 1 -
Modell: JC-PTO-001; JC-PTO-002; JC-PTO-003; JC-PTO-004; JC-PTO-005
Have product questions? Need technical support? Please feel free to
contact us:
Technical Support and E-Warranty Certificate
www.vevor.com/support
NEED HELP? CONTACT US!
This is the original instruction, please read all manual instructions
carefully before operating. VEVOR reserves a clear interpretation of our
user manual. The appearance of the product shall be subject to the
product you received. Please forgive us that we won't inform you again if
there are any technology or software updates on our product.
POWER TOOL
ORGANIZER

- 2 -
19. WARNING!
17
.Stellen Sie vor der Installation sicher, dass keine versteckten Strom-
oder Wasserleitungen beschädigt werden. Verwenden Sie im Zweifelsfall
ein digitales Ortungsgerät oder wenden Sie sich an einen Experten.
18
.Die Schiene muss auf einer stabilen Oberfläche montiert werden.
Überlasten Sie sie nicht.
19
.Die Montage der Wandhalterung sollte durch einen Erwachsenen
erfolgen und Kinder sollten diese nicht ohne Aufsicht verwenden.
20.Nur für Ziegel und Beton empfohlen. Für die Befestigung an
Gipskartonplatten oder anderen Untergründen verwenden Sie
Spezialbeschläge.
21.Organizers für Elektrowerkzeuge unbedingt alle
Sicherheitswarnungen und Anweisungen.
22
.Bitte achten Sie darauf, dass der Werkzeughalter an einer stabilen
Wand montiert wird, um ein Organizer für Elektrowerkzeuge und
Werkzeuge vor dem Herunterfallen.
23
.Bitte überschreiten Sie nicht die maximale Tragkraft des
Elektrowerkzeug-Organizer zur Vermeidung von Schäden am Organizer
für Elektrowerkzeuge und Werkzeuge vor dem Herunterfallen.
24
.Bitte überprüfen Sie regelmäßig die Stabilität des Werkzeughalters
und die Sicherheit der Werkzeuge .
20. Maintenance Guide
7. Reinigen Sie den Werkzeugorganizer regelmäßig , um die Ansammlung
von Staub und Schmutz zu vermeiden.
8. Überprüfen Sie die Stabilität des Organizer für Elektrowerkzeuge, um

- 3 -
sicherzustellen, dass alle Befestigungsteile sicher und unbeschädigt
sind.
9. Überprüfen Sie die Belastung des Elektrowerkzeug-Organizer, um
sicherzustellen, dass die maximale Tragkraft nicht überschritten wird.

- 4 -
21. Product Description
Der Elektrowerkzeug-Organizer ist ein Organizer für Elektrowerkzeuge
speziell für die Aufbewahrung kleiner kabelloser Elektrowerkzeuge zum
Metallschneiden und -montieren (Bohrmaschinen, Schlagbohrmaschinen,
elektrische Säbelsägen, elektrische Schraubendreher, elektrische
Schraubenschlüssel usw.) konzipiert. Elektrowerkzeuge können am
unteren Schlitz aufgehängt werden (aufrecht oder kopfüber), und in der
flachen Ebene können Batterien, kleine Werkzeugkästen (mit
verschiedenen Arten von Bohrern usw.) und etwas größere Werkzeuge
(wie Winkelschleifer und elektrische Schneider) aufbewahrt werden. Das
Produkt wird hauptsächlich in Garagen, Werkstätten und Werkzeugräumen
verwendet; das Schraubendreher-Aufbewahrungsloch dient zur
Aufbewahrung kleiner Handwerkzeuge wie Schraubendreher und Zangen.
22. Product Parameter
Artik
el
Model
l
Bild
Schi
chte
n
Rille
n
NW
GW
Verpack
ungsgrö
ße
Artik
elnu
mme
r 1
JC-
Zapfw
elle-0
01
2
4
3,0
kg
3,3
kg
445 x
220 x
86 mm
Artik
elnu
mme
r 2
JC-
Zapfw
elle-0
02
3
4
2,3
kg
2,7
kg
430*227
*83 mm

- 5 -
Artik
elnu
mme
r 3
JC-
Zapfw
elle-0
03
3
5
2,5
kg
3,0
kg
505 x
227 x
85 mm
Artik
elnu
mme
r 4
JC-
PTO-
004
3
7
3,0
kg
3,5
kg
655 x
225 x
80 mm
Artik
elnu
mme
r 5
JC-
Zapfw
elle-0
05
3
8
2,8
kg
3,2
kg
435 x
237 x
115 mm
23. Part list
Artik
el
Ersatzteile
Artike
lnum
mer 1
Artike
lnum
mer 2
Artike
lnum
mer 3
Artik
elnu
mme
r 4
Artik
elnu
mme
r 5
JC-
Zapfw
elle-0
01
JC-
Zapf
welle
-002
JC-
Zapf
welle
-003
JC-
Zapf
welle
-004
JC-
Zapf
welle
-005
A
Werkzeugleiste
2 Stück
1
Stück
1
Stück
1
Stüc
k
1
Stück
- 6 -
B
Nutenplatte
2 Stück
(4 Rillen)
1
Stück
(4
Rillen
)
1
Stück
(5
Rillen
)
1
Stüc
k
(7
Rille
n)
2
Stück
(4
Rillen
)
C
Mittelteil
/
1
Stück
1
Stück
1
Stüc
k
/
D
Klammer
/
2
Stück
2
Stück
2
Stüc
k
2
Stück
E
Langer Haken
/
1
Stück
1
Stück
1
Stüc
k
1
Stück
F
Zangenhalter
/
1
Stück
1
Stück
1
Stüc
k
1
Stück
G
Hammerhalter
/
1
Stück
1
Stück
1
Stüc
k
1
Stück

- 7 -
H
Anti-Rutsch-Matte
2
Stück
1
Stück
1
Stück
1
Stüc
k
1
Stück
ICH
Nuss
/
12
pcs
12
pcs
12
pcs
12
pcs
J
Schrauben
/
12
pcs
12
pcs
12
pcs
12
pcs
K
Selbstschneidende Schraube
12
Stück
4
Stück
4
Stück
4
Stüc
k
4
Stück
M
Dübel
12
Stück
4
Stück
4
Stück
4
Stüc
k
4
Stück
M
Schlüssel
/
1
Stück
1
Stück
1
Stüc
k
1
Stück
24. Installation Guide for SKU1
Schritt 1. Mit Teil K (Blechschraube ) und Teil L (Dübel) die oberen und
unteren Paneele an der Wand befestigen, die Höhe kann beliebig
festgelegt werden.

- 8 -
Teil A und Teil B
Teil A und Teil B
Schritt 2. Legen Sie Teil H (Anti-Rutsch-Matte) auf Teil A.
25. Installation Guide for SKU2 ~ SKU4
Schritt 1. Suchen Sie wie im Bild gezeigt Teil D (Klammer) und platzieren
Sie Teil B (Nutplatte) und Teil E (langer Haken) zwischen den beiden
Seitenplatten. Verwenden Sie das Werkzeug Teil M (Schraubenschlüssel)
zusammen mit den Befestigungselementen Teil J (Schraube) und Teil I
(Mutter), um Teil B und Teil E sicher an Teil D zu befestigen.

- 9 -
Teil D Installieren Sie Teil B und Teil E
Schritt 2. Platzieren Sie Teil G (Hammerhalter), Teil F (Zangenhalter) und
Teil C (Mittelteil) in der mittleren Schicht von Teil D (Halterung). Verwenden
Sie das Werkzeug Teil M (Schraubenschlüssel) zusammen mit den
Befestigungselementen Teil J (Schraube) und Teil I (Mutter), um sie sicher
an ihrem Platz zu befestigen.
Installieren Sie Teil G und Teil F Teil C installieren
Schritt 3: Installieren Sie Teil A (Werkzeugtafel). Verwenden Sie das
Werkzeug Teil M (Schraubenschlüssel) zusammen mit den
Befestigungselementen Teil J (Schraube) und Teil I (Mutter), um es sicher
an Ort und Stelle zu befestigen.
- 10 -
Teil A installieren
Hinweis: Unten sehen Sie das Erscheinungsbild von SKU2, SKU3 und
SKU4 nach der Installation des Werkzeugfelds.
Artikelnummer 2
Artikelnummer 3
- 11 -
Artikelnu
mmer 4
Schritt 4: Befestigen Sie den Elektrowerkzeug-Organizer mit Teil K
(Blechschraube) und Teil L (Dübel) sicher an der gewünschten Stelle an
der Wand.
Schritt 5: Legen Sie Teil H (Anti-Rutsch-Matte) auf Teil A. Der
Installationsvorgang ist abgeschlossen.
26. Installation Guide for SKU5
Schritt 1. Suchen Sie wie im Bild gezeigt Teil D (Klammer) und platzieren
Sie Teil B (Nutplatte) und Teil E (langer Haken) zwischen den beiden
Seitenplatten. Verwenden Sie das Werkzeug Teil M (Schraubenschlüssel)
zusammen mit den Befestigungselementen Teil J (Schraube) und Teil I
(Mutter), um Teil B und Teil E sicher an Teil D zu befestigen.
- 12 -
Finden Sie Teil D Installieren Sie Teil B und Teil E
Schritt 2. Platzieren Sie Teil G (Hammerhalter), Teil F (Zangenhalter) und
Teil B (Nutplatte) in der mittleren Schicht von Teil D (Klammer). Verwenden
Sie das Werkzeug Teil M (Schraubenschlüssel) zusammen mit den
Befestigungselementen Teil J (Schraube) und Teil I (Mutter), um sie sicher
an ihrem Platz zu befestigen.
Installieren Sie Teil G und Teil F Teil B installieren
Schritt 3. Installieren Sie Teil A (Werkzeugtafel). Verwenden Sie das
Werkzeug Teil M (Schraubenschlüssel) zusammen mit den
Befestigungselementen Teil J (Schraube) und Teil I (Mutter), um es sicher
an Ort und Stelle zu befestigen.
- 13 -
Schritt 4: Befestigen Sie den Elektrowerkzeug-Organizer mit Teil K
(Blechschraube) und Teil L (Dübel) sicher an der gewünschten Stelle an
der Wand.
Schritt 5: Legen Sie Teil H (Anti-Rutsch-Matte) auf Teil A. Der
Installationsvorgang ist abgeschlossen.

- 14 -
27. User Guide
11. Stellen Sie sicher, dass die am Gestell aufgehängten Gegenstände ihr
Gewichtslimit nicht überschreiten.
12. Versuchen Sie, das Gewicht auf dem Kleiderbügel gleichmäßig zu
verteilen und vermeiden Sie, dass eine Seite zu schwer ist.
13. Hängen Sie keine scharfen oder beschädigten Gegenstände an den
Kleiderbügel, da dies zu Kratzern am Kleiderbügel oder zu
Verletzungen führen kann.
14. Passen Sie den Abstand der Haken nach Bedarf an, um Gegenstände
unterschiedlicher Größe und Form unterzubringen.
15. Vor dem Beladen muss der Haken vollständig auf der Schiene platziert
werden .

- 15 -
Hersteller: Shanghaimuxinmuyeyouxiangongsi
Adresse: Shuangchenglu 803nong11hao1602A-1609shi, baoshanqu,
Shanghai 200000 CN.
Nach AUS importiert: SIHAO PTY LTD, 1 ROKEVA STREETEASTWOOD
NSW 2122 Australien
Importiert in die USA: Sanven Technology Ltd., Suite 250, 9166 Anaheim
Place, Rancho Cucamonga, CA 91730
REP
EC
E-CrossStu GmbH
Mainzer Landstr.69, 60329 Frankfurt am Main.
REP
UK
YH CONSULTING LIMITED.
C/O YH Consulting Limited Office 147, Centurion House,
London Road, Staines-upon-Thames, Surrey, TW18 4AX


Tecnico Supporto e certificato di garanzia elettronica
www.vevor.com/support
ORGANIZZATORE PER UTENSILI
ELETTRICI
MANUALE D'USO
We continue to be committed to provide you tools with competitive price.
"Save Half", "Half Price" or any other similar expressions used by us only represents an
estimate of savings you might benefit from buying certain tools with us compared to the major
top brands and does not necessarily mean to cover all categories of tools offered by us. You
are kindly reminded to verify carefully when you are placing an order with us if you are
actually saving half in comparison with the top major brands.


- 1 -
Modello: JC-PTO-001;JC-PTO-002;JC-PTO-003;JC-PTO-004; JC-PTO-005
Have product questions? Need technical support? Please feel free to
contact us:
Technical Support and E-Warranty Certificate
www.vevor.com/support
NEED HELP? CONTACT US!
This is the original instruction, please read all manual instructions
carefully before operating. VEVOR reserves a clear interpretation of our
user manual. The appearance of the product shall be subject to the
product you received. Please forgive us that we won't inform you again if
there are any technology or software updates on our product.
POWER TOOL
ORGANIZER

- 2 -
28. WARNING!
25
.Prima dell'installazione, assicurarsi che non corra il rischio di perforare
cavi elettrici nascosti o tubi dell'acqua. In caso di dubbio, utilizzare un
dispositivo di tracciamento digitale o consultare un esperto.
26
.La rotaia deve essere montata su una superficie stabile. Non
sovraccaricare.
27
.L'installazione del supporto a parete deve essere effettuata da un
adulto; i bambini non devono utilizzarlo senza supervisione.
28.Consigliato solo per mattoni e cemento; per l'installazione su
cartongesso o altri substrati utilizzare ferramenta speciale.
29
.Prima di installare e utilizzare un organizer per utensili elettrici ,
assicurarsi di leggere e comprendere tutte le avvertenze e le istruzioni di
sicurezza.
30
.Assicurarsi che l' organizzatore per utensili elettrici sia installato su
una parete stabile per evitare che organizer per utensili elettrici e
protezione dagli urti.
31
.Si prega di non superare la capacità di carico massima del
organizzatore per utensili elettrici per evitare danni all' organizer per
utensili elettrici e protezione dagli urti.
32
.Controllare periodicamente la stabilità del portautensili e la sicurezza
degli utensili .
29. Maintenance Guide
10. Pulire regolarmente l' organizzatore degli utensili per evitare
l'accumulo di polvere e sporcizia.
11. Controllare la stabilità del Organizzatore per utensili elettrici per

- 3 -
garantire che tutta la ferramenta di montaggio sia sicura e intatta.
12. Controllare il carico del Organizzatore per utensili elettrici per garantire
che non venga superata la capacità di carico massima.
- 4 -
30. Product Description
L' organizzatore degli utensili elettrici è un organizzatore di utensili elettrici
appositamente progettato per riporre piccoli utensili elettrici senza fili per il
taglio e l'assemblaggio di metalli (trapani elettrici, trapani a percussione,
seghetti alternativi elettrici, cacciaviti elettrici, chiavi elettriche, ecc.). Gli
utensili elettrici possono essere appesi alla fessura inferiore (in verticale o
capovolta) e lo strato piatto può contenere batterie, piccole cassette degli
attrezzi (con diversi tipi di punte da trapano, ecc.) e utensili leggermente
più grandi (come smerigliatrici angolari e taglierine elettriche). Il prodotto è
utilizzato principalmente in garage, officine e sale attrezzi; il foro di
stoccaggio del cacciavite è utilizzato per riporre piccoli utensili manuali
come cacciaviti e pinze.
31. Product Parameter
artic
olo
Model
lo
Immagine
Stra
ti
Scan
alatu
re
Nord-
Oves
t
GW
Dimensi
oni della
confezio
ne
Codi
ce
artic
olo1
JC-
PTO-
001
2
4
3,0
kg
3,3
kg
445*220
*86mm
Codi
ce
artic
olo2
JC-
PTO-
002
3
4
2,3
kg
2,7
kg
430*227
*83mm
- 5 -
Codi
ce
artic
olo3
JC-
PTO-
003
3
5
2,5
kg
3,0
kg
505*227
*85mm
Codi
ce
artic
olo4
JC-
PTO-
004
3
7
3,0
kg
3,5
kg
655*225
*80mm
Codi
ce
artic
olo5
JC-
PTO-
005
3
8
2,8
kg
3,2
kg
435*237
*115mm
32. Part list
artic
olo
Parti
Codic
e
Prodo
tto 1
Codic
e
artico
lo2
Codic
e
artico
lo3
Codi
ce
artic
olo4
Codi
ce
artico
lo5
JC-
PTO-
001
JC-
PTO-
002
JC-
PTO-
003
JC-
PTO-
004
JC-
PTO-
005
UN
Pannello degli strumenti
2 pezzi
1 pz
1 pz
1 pz
1 pz
- 6 -
B
Pannello scanalato
2 pezzi
(4 scanalature)
1 pz
(4
scan
alatur
e)
1 pz
(5
scan
alatur
e)
1 pz
(7
scan
alatu
re)
2
pezzi
(4
scan
alatur
e)
C
Pannello centrale
/
1 pz
1 pz
1 pz
/
D
Staffa
/
2
pezzi
2
pezzi
2
pezzi
2
pezzi
E
Gancio lungo
/
1 pz
1 pz
1 pz
1 pz
F
Porta pinze
/
1 pz
1 pz
1 pz
1 pz
G
Porta martello
/
1 pz
1 pz
1 pz
1 pz

- 7 -
H
Tappetino antiscivolo
2
pezzi
1 pz
1 pz
1 pz
1 pz
IO
Noce
/
12
pz.
12
pz.
12
pz.
12
pz.
J
Vite
/
12
pz.
12
pz.
12
pz.
12
pz.
E
Vite autofilettante
12
pezzi
4
pezzi
4
pezzi
4
pezzi
4
pezzi
L
Tasselli
12
pezzi
4
pezzi
4
pezzi
4
pezzi
4
pezzi
M
Chiave
/
1 pz
1 pz
1 pz
1 pz
33. Installation Guide for SKU1
Fase 1. Utilizzare la Parte K (vite autofilettante ) e la Parte L (tasselli) per
fissare i pannelli superiore e inferiore alla parete; l'altezza può essere
definita in modo casuale.

- 8 -
Parte A e Parte B
Parte A e Parte B
Fase 2. Posizionare la parte H (tappetino antiscivolo) sopra la parte A.
34. Installation Guide for SKU2 ~ SKU4
Fase 1. Come mostrato nell'immagine, individuare la Parte D (Staffa) e
posizionare la Parte B (Pannello scanalato) e la Parte E (gancio lungo) tra i
due pannelli laterali. Utilizzare l'utensile Parte M (chiave inglese) insieme
agli elementi di fissaggio Parte J (Vite) e Parte I (Dado) per fissare
saldamente la Parte B e la Parte E sulla Parte D.

- 9 -
Parte D Installare la Parte B e la Parte E
Fase 2. Posizionare la Parte G (porta martello), la Parte F (porta pinza) e la
Parte C (pannello centrale) nello strato centrale della Parte D (staffa).
Utilizzare lo strumento Parte M (chiave inglese) insieme agli elementi di
fissaggio Parte J (vite) e Parte I (dado) per fissarli saldamente in posizione.
Installare la Parte G e la Parte F Installare la parte C
Fase 3: installare la Parte A (pannello degli utensili). Utilizzare l'utensile
Parte M (chiave inglese) insieme agli elementi di fissaggio Parte J (vite) e
Parte I (dado) per fissarlo saldamente in posizione.
- 10 -
Installare la
parte A
Nota: di seguito è riportato l'aspetto di SKU2, SKU3 e SKU4 dopo
l'installazione del pannello degli strumenti.
Codice articolo2
- 11 -
Codice articolo3
Codice
articolo4
Fase 4: Utilizzare la Parte K (vite autofilettante) e la Parte L (tasselli) per
fissare saldamente l'organizzatore per elettroutensili nella posizione
desiderata sulla parete.
Fase 5: Posizionare la Parte H (tappetino antiscivolo) sopra la Parte A. Il
processo di installazione è completato.

- 12 -
35. Installation Guide for SKU5
Fase 1. Come mostrato nell'immagine, individuare la Parte D (Staffa) e
posizionare la Parte B (Pannello scanalato) e la Parte E (gancio lungo) tra i
due pannelli laterali. Utilizzare l'utensile Parte M (chiave inglese) insieme
agli elementi di fissaggio Parte J (Vite) e Parte I (Dado) per fissare
saldamente la Parte B e la Parte E sulla Parte D.
Trova la parte D Installare la Parte B e la Parte E
Fase 2. Posizionare la Parte G (porta martello), la Parte F (porta pinza) e la
Parte B (pannello scanalato) nello strato centrale della Parte D (staffa).
Utilizzare lo strumento Parte M (chiave inglese) insieme agli elementi di
fissaggio Parte J (vite) e Parte I (dado) per fissarli saldamente in posizione.

- 13 -
Installare la Parte G e la Parte F Installare la parte B
Fase 3. Installare la Parte A (pannello degli utensili). Utilizzare l'utensile
Parte M (chiave) insieme agli elementi di fissaggio Parte J (vite) e Parte I
(dado) per fissarlo saldamente in posizione.
Fase 4: Utilizzare la Parte K (vite autofilettante) e la Parte L (tasselli) per
fissare saldamente l'organizzatore per elettroutensili nella posizione
desiderata sulla parete.

- 14 -
Fase 5: Posizionare la Parte H (tappetino antiscivolo) sopra la Parte A. Il
processo di installazione è completato.
36. User Guide
16. Assicurarsi che gli oggetti appesi al rack non superino il peso massimo
consentito.
17. Cerca di distribuire il peso sulla gruccia in modo uniforme ed evita di
appesantirla troppo da un lato.
18. Non appendere oggetti appuntiti o danneggiati all'appendino, poiché
potrebbero graffiarlo o causare lesioni.
19. Regolare la spaziatura dei ganci in base alle esigenze per adattare
oggetti di diverse dimensioni e forme.
20. Prima del carico, il gancio deve essere completamente posizionato
sulla rotaia .

- 15 -
Produttore: Shanghaimuxinmuyeyouxiangongsi
Indirizzo: Shuangchenglu 803nong11hao1602A-1609shi, baoshanqu,
shanghai 200000 CN.
Importato in AUS: SIHAO PTY LTD, 1 ROKEVA STREETEASTWOOD NSW
2122 Australia
Importato negli USA: Sanven Technology Ltd., Suite 250, 9166 Anaheim
Place, Rancho Cucamonga, CA 91730
REP
EC
E-CrossStu GmbH
Mainzer Landstr.69, 60329 Frankfurt am Main.
REP
UK
YH CONSULTING LIMITED.
C/O YH Consulting Limited Office 147, Centurion House,
London Road, Staines-upon-Thames, Surrey, TW18 4AX


Técnico Certificado de soporte y garantía electrónica
www.vevor.com/support
ORGANIZADOR DE HERRAMIENTAS
ELÉCTRICAS
MANUAL DEL USUARIO
We continue to be committed to provide you tools with competitive price.
"Save Half", "Half Price" or any other similar expressions used by us only represents an
estimate of savings you might benefit from buying certain tools with us compared to the major
top brands and does not necessarily mean to cover all categories of tools offered by us. You
are kindly reminded to verify carefully when you are placing an order with us if you are
actually saving half in comparison with the top major brands.


- 1 -
Modelo: JC-PTO-001;JC-PTO-002;JC-PTO-003;JC-PTO-004; JC-PTO-005
Have product questions? Need technical support? Please feel free to
contact us:
Technical Support and E-Warranty Certificate
www.vevor.com/support
NEED HELP? CONTACT US!
This is the original instruction, please read all manual instructions
carefully before operating. VEVOR reserves a clear interpretation of our
user manual. The appearance of the product shall be subject to the
product you received. Please forgive us that we won't inform you again if
there are any technology or software updates on our product.
POWER TOOL
ORGANIZER

- 2 -
37. WARNING!
33
.Antes de la instalación, asegúrese de que no exista riesgo de perforar
cables de corriente o tuberías de agua ocultos. En caso de duda, utilice un
dispositivo de seguimiento digital o consulte a un experto.
34
.El riel debe montarse sobre una superficie estable. No lo sobrecargue.
35.La instalación del soporte de pared debe ser realizada por un adulto y
los niños no deben utilizarlo sin supervisión.
36
.Recomendado únicamente para ladrillo y hormigón; utilice herrajes
especiales para instalarlo en placas de yeso u otros sustratos.
37
.Antes de instalar y utilizar un organizador de herramientas eléctricas ,
asegúrese de leer y comprender todas las advertencias e instrucciones de
seguridad.
38
.Asegúrese de que el organizador de herramientas eléctricas esté
instalado en una pared estable para evitar que Organizador de
herramientas eléctricas y herramientas para evitar que se caigan.
39
.No exceda la capacidad máxima de carga del Organizador de
herramientas eléctricas para evitar daños en las mismas. Organizador de
herramientas eléctricas y herramientas para evitar que se caigan.
40
.Compruebe periódicamente la estabilidad del portaherramientas y la
seguridad de las herramientas .
38. Maintenance Guide
13. Limpie periódicamente el organizador de herramientas para evitar la
acumulación de polvo y suciedad.
14. Compruebe la estabilidad de la Organizador de herramientas
eléctricas para garantizar que todo el hardware de montaje esté seguro
y sin daños.

- 3 -
15. Compruebe la carga del Organizador de herramientas eléctricas para
garantizar que no se exceda la capacidad de carga máxima.

- 4 -
39. Product Description
El organizador de herramientas eléctricas es un organizador de
herramientas eléctricas Especialmente diseñado para almacenar
pequeñas herramientas eléctricas inalámbricas de corte y montaje de
metales (taladro eléctrico, taladro de impacto, sierra eléctrica alternativa,
destornillador eléctrico, llave eléctrica, etc.). Las herramientas eléctricas
se pueden colgar en la ranura inferior (en posición vertical o al revés), y la
capa plana puede almacenar baterías, pequeñas cajas de herramientas
(con diferentes tipos de brocas, etc.) y herramientas un poco más grandes
(como amoladoras angulares y cortadoras eléctricas). El producto se
utiliza principalmente en garajes, talleres y salas de herramientas; el
orificio de almacenamiento del destornillador se utiliza para colocar
pequeñas herramientas manuales como destornilladores y alicates.
40. Product Parameter
artíc
ulo
Model
o
Imagen
Cap
as
Surc
os
noroe
ste
GW
Tamaño
del
embalaj
e
Códi
go 1
JC-
Toma
de
fuerz
a-001
2
4
3,0
kilogr
amos
3,3
kilos
445*220
*86 mm
Códi
go 2
JC-
Toma
de
fuerz
a-002
3
4
2,3
kilos
2,7
kilos
430*227
*83 mm
- 5 -
Códi
go 3
JC-
Toma
de
fuerz
a-003
3
5
2,5
kilos
3,0
kilogr
amos
505*227
*85 mm
Códi
go 4
JC-
PTO-
004
3
7
3,0
kilogr
amos
3,5
kilos
655*225
*80 mm
Códi
go 5
JC-
PTO-
005
3
8
2,8
kilos
3,2
kilos
435*237
*115
mm
41. Part list
artíc
ulo
Regiones
Códig
o
SKU
1
Códi
go 2
Códi
go 3
Códi
go 4
Códi
go 5
JC-
Toma
de
fuerz
a-001
JC-
Toma
de
fuerz
a-002
JC-
Toma
de
fuerz
a-003
JC-
PTO-
004
JC-
PTO-
005
A
Panel de herramientas
2 piezas
1
pieza
1
pieza
1
pieza
1
pieza

- 6 -
B
Panel ranurado
2 piezas
(4 ranuras)
1
pieza
(4
ranur
as)
1
pieza
(5
ranur
as)
1
pieza
(7
ranur
as)
2
pieza
s
(4
ranur
as)
do
Panel central
/
1
pieza
1
pieza
1
pieza
/
D
Soporte
/
2
pieza
s
2
pieza
s
2
pieza
s
2
pieza
s
mi
Gancho largo
/
1
pieza
1
pieza
1
pieza
1
pieza
F
Porta pinzas
/
1
pieza
1
pieza
1
pieza
1
pieza
GRA
MO
Soporte para martillo
/
1
pieza
1
pieza
1
pieza
1
pieza
- 7 -
yo
Alfombrilla antideslizante
2
pieza
s
1
pieza
1
pieza
1
pieza
1
pieza
I
Tuerca
/
12
pieza
s
12
pieza
s
12
pieza
s
12
pieza
s
Yo
Tornillo
/
12
pieza
s
12
pieza
s
12
pieza
s
12
pieza
s
K
Tornillo autorroscante
12
pieza
s
4
pieza
s
4
pieza
s
4
pieza
s
4
pieza
s
yo
Pasadores
12
pieza
s
4
pieza
s
4
pieza
s
4
pieza
s
4
pieza
s
MET
RO
Llave inglesa
/
1
pieza
1
pieza
1
pieza
1
pieza
42. Installation Guide for SKU1
Paso 1. Utilice la Parte K ( tornillo autorroscante ) y la Parte L (Tacos) para
fijar los paneles superior e inferior a la pared; la altura se puede definir
aleatoriamente.
- 8 -
Parte A y Parte B
Parte A y Parte B
Paso 2. Coloque la parte H (alfombrilla antideslizante) encima de la parte
A.
43. Installation Guide for SKU2 ~ SKU4
Paso 1. Como se muestra en la imagen, ubique la Pieza D (Soporte) y
coloque la Pieza B (Panel de ranura) y la Pieza E (Gancho largo) entre los
dos paneles laterales. Use la herramienta Pieza M (Llave) junto con los
sujetadores Pieza J (Tornillo) y Pieza I (Tuerca) para sujetar firmemente la
- 9 -
Pieza B y la Pieza E a la Pieza D.
Parte D Instalar la Parte B y la Parte E
Paso 2. Coloque la Parte G (Soporte del martillo), la Parte F (Soporte de
los alicates) y la Parte C (Panel intermedio) en la capa intermedia de la
Parte D (Soporte). Use la herramienta Parte M (llave) junto con los
sujetadores Parte J (Tornillo) y Parte I (Tuerca) para fijarlos firmemente en
su lugar.
Instalar la Parte G y la Parte F Instalar la parte C
Paso 3: Instale la pieza A (panel de herramientas). Utilice la pieza M (llave)
junto con los sujetadores J (tornillo) y I (tuerca) para fijarla en su lugar.

- 10 -
Instalar la parte
A
Nota: A continuación se muestra la apariencia de SKU2, SKU3 y SKU4
después de instalar el panel de herramientas.
Código 2
- 11 -
Código 3
Código 4
Paso 4: Use la Parte K (tornillo autorroscante) y la Parte L (Tacos) para
fijar firmemente el organizador de herramientas eléctricas en la ubicación
deseada en la pared.
Paso 5: Coloque la Parte H (alfombrilla antideslizante) encima de la Parte
A. El proceso de instalación está completo.
- 12 -
44. Installation Guide for SKU5
Paso 1. Como se muestra en la imagen, ubique la Pieza D (Soporte) y
coloque la Pieza B (Panel de ranura) y la Pieza E (Gancho largo) entre los
dos paneles laterales. Use la herramienta Pieza M (Llave) junto con los
sujetadores Pieza J (Tornillo) y Pieza I (Tuerca) para sujetar firmemente la
Pieza B y la Pieza E a la Pieza D.
Encuentre la Parte D Instalar la Parte B y la Parte E
Paso 2. Coloque la Parte G (Soporte del martillo), la Parte F (Soporte de
los alicates) y la Parte B (Panel de ranura) en la capa intermedia de la
Parte D (Soporte). Use la herramienta Parte M (llave) junto con los
sujetadores Parte J (Tornillo) y Parte I (Tuerca) para fijarlas firmemente en
su lugar.
- 13 -
Instalar la Parte G y la Parte F Instalar la parte B
Paso 3. Instale la pieza A (panel de herramientas). Utilice la herramienta
pieza M (llave) junto con los sujetadores pieza J (tornillo) y pieza I (tuerca)
para fijarla en su lugar de forma segura.
Paso 4: Use la Parte K (tornillo autorroscante) y la Parte L (Tacos) para
fijar firmemente el organizador de herramientas eléctricas en la ubicación
deseada en la pared.
Paso 5: Coloque la Parte H (alfombrilla antideslizante) encima de la Parte
A. El proceso de instalación está completo.

- 14 -
45. User Guide
21. Asegúrese de que los artículos colgados en el estante no excedan su
límite de peso.
22. Intente distribuir el peso en la percha de manera uniforme y evite que
esté demasiado pesado en un lado.
23. No cuelgue objetos afilados o dañados en la percha, ya que esto
podría rayarla o provocar lesiones.
24. Ajuste el espacio entre los ganchos según sea necesario para
acomodar artículos de diferentes tamaños y formas.
25. Antes de cargar, el gancho debe estar completamente colocado en el
riel .

- 15 -
Fabricante: Shanghaimuxinmuyeyouxiangongsi
Dirección: Shuangchenglu 803nong11hao1602A-1609shi, baoshanqu,
shanghai 200000 CN.
Importado a AUS: SIHAO PTY LTD, 1 ROKEVA STREETEASTWOOD NSW
2122 Australia
Importado a EE. UU.: Sanven Technology Ltd., Suite 250, 9166 Anaheim
Place, Rancho Cucamonga, CA 91730
REP
EC
E-CrossStu GmbH
Mainzer Landstr.69, 60329 Frankfurt am Main.
REP
UK
YH CONSULTING LIMITED.
C/O YH Consulting Limited Office 147, Centurion House,
London Road, Staines-upon-Thames, Surrey, TW18 4AX


Techniczny Wsparcie i certyfikat e-gwarancji
www.vevor.com/support
ORGANIZER NA ELEKTRONARZĘDZIA
INSTRUKCJA OBSŁUGI
We continue to be committed to provide you tools with competitive price.
"Save Half", "Half Price" or any other similar expressions used by us only represents an
estimate of savings you might benefit from buying certain tools with us compared to the major
top brands and does not necessarily mean to cover all categories of tools offered by us. You
are kindly reminded to verify carefully when you are placing an order with us if you are
actually saving half in comparison with the top major brands.

- 1 -
Model: JC-PTO-001; JC-PTO-002; JC-PTO-003; JC-PTO-004; JC-PTO-005
Have product questions? Need technical support? Please feel free to
contact us:
Technical Support and E-Warranty Certificate
www.vevor.com/support
NEED HELP? CONTACT US!
This is the original instruction, please read all manual instructions
carefully before operating. VEVOR reserves a clear interpretation of our
user manual. The appearance of the product shall be subject to the
product you received. Please forgive us that we won't inform you again if
there are any technology or software updates on our product.
POWER TOOL
ORGANIZER

- 2 -
46. WARNING!
41
.Przed instalacją upewnij się, że nie ma ryzyka przebicia ukrytych kabli
prądowych lub rur wodnych. W razie wątpliwości użyj cyfrowego
urządzenia śledzącego lub skonsultuj się z ekspertem.
42
.Szynę należy zamontować na stabilnej powierzchni. Nie przeciążać.
43.Montaż uchwytu ściennego powinna wykonać osoba dorosła. Dzieci
nie powinny używać uchwytu bez nadzoru.
44
.Zalecany wyłącznie do cegły i betonu. W przypadku montażu na
płytach gipsowo-kartonowych i innych podłożach należy stosować
specjalne elementy mocujące.
45
.organizera na elektronarzędzia należy dokładnie przeczytać i
zrozumieć wszystkie ostrzeżenia i instrukcje dotyczące bezpieczeństwa.
46
.Upewnij się, że organizer na elektronarzędzia jest zamontowany na
stabilnej ścianie, aby zapobiec organizer elektronarzędzi i narzędzi przed
upadkiem.
47
.Proszę nie przekraczać maksymalnego dopuszczalnego obciążenia
organizer narzędzi elektrycznych zapobiegający uszkodzeniom organizer
elektronarzędzi i narzędzi przed upadkiem.
48
.Proszę okresowo sprawdzać stabilność uchwytu narzędzia i
bezpieczeństwo narzędzi .
47. Maintenance Guide
16. organizer narzędzi, aby zapobiec gromadzeniu się kurzu i brudu.
17. Sprawdź stabilność organizator elektronarzędzi, aby mieć pewność,
że wszystkie elementy montażowe są bezpieczne i nieuszkodzone.
18. Sprawdź obciążenie organizator elektronarzędzi, aby mieć pewność,
że maksymalny udźwig nie zostanie przekroczony.
- 3 -
48. Product Description
Organizer narzędzi elektrycznych jest organizatorem elektronarzędzi
specjalnie zaprojektowane do przechowywania małych bezprzewodowych
narzędzi do cięcia i montażu metalu (wiertarki elektryczne, wiertarki
udarowe, elektryczne piły szablaste, wkrętarki elektryczne, klucze
elektryczne itp.). Narzędzia elektryczne można zawiesić na dolnym
gnieździe (w pozycji pionowej lub do góry nogami), a płaska warstwa może
przechowywać baterie, małe skrzynki narzędziowe (z różnymi typami
wierteł itp.) oraz nieco większe narzędzia (takie jak szlifierki kątowe i
przecinarki elektryczne). Produkt jest głównie używany w garażach,
warsztatach i narzędziowniach; otwór do przechowywania wkrętaków
służy do umieszczania małych narzędzi ręcznych, takich jak wkrętaki i
szczypce.
49. Product Parameter
prze
dmio
t
Model
Zdjęcie
War
stw
y
Row
ki
Półno
cny
Zach
ód
GW
Rozmiar
opakow
ania
SKU
1
JC-
PTO-
001
2
4
3,0
kg
3,3
kg
Wymiar
y:
445*220
*86mm
SKU
2
JC-
PTO-
002
3
4
2,3
kg
2,7
kg
430*227
*83mm

- 4 -
Num
er
katal
ogo
wy 3
JC-
PTO-
003
3
5
2,5
kg
3,0
kg
505*227
*85mm
SKU
4
JC-
PTO-
004
3
7
3,0
kg
3,5
kg
655*225
*80mm
SKU
5
JC-
PTO-
005
3
8
2,8
kg
3,2
kg
Wymiar
y:
435*237
*115
mm
50. Part list
prze
dmio
t
Strony
Nume
r
katalo
gowy
1
SKU
2
Num
er
katal
ogow
y 3
SKU
4
SKU
5
JC-
PTO-
001
JC-
PTO-
002
JC-
PTO-
003
JC-
PTO-
004
JC-
PTO-
005
A
Panel narzędzi
2 szt.
1 szt.
1 szt.
1 szt.
1 szt.

- 5 -
B
Panel rowkowy
2 szt.
(4 rowki)
1 szt.
(4
rowki
)
1 szt.
(5
rowk
ów)
1 szt.
(7
rowk
ów)
2 szt.
(4
rowki
)
C
Środkowy panel
/
1 szt.
1 szt.
1 szt.
/
D
Nawias
/
2 szt.
2 szt.
2 szt.
2 szt.
mi
Długi hak
/
1 szt.
1 szt.
1 szt.
1 szt.
F
Uchwyt na szczypce
/
1 szt.
1 szt.
1 szt.
1 szt.
G
Uchwyt na młotek
/
1 szt.
1 szt.
1 szt.
1 szt.

- 6 -
H
Mata antypoślizgowa
2 szt.
1 szt.
1 szt.
1 szt.
1 szt.
I
Nakrętka
/
12
szt.
12
szt.
12
szt.
12
szt.
J
Śruba
/
12
szt.
12
szt.
12
szt.
12
szt.
K
Wkręt samogwintujący
12
szt.
4 szt.
4 szt.
4 szt.
4 szt.
L
Kołki
12
szt.
4 szt.
4 szt.
4 szt.
4 szt.
M
Klucz
/
1 szt.
1 szt.
1 szt.
1 szt.
51. Installation Guide for SKU1
Krok 1. Za pomocą części K (wkrętów samogwintujących ) i części L
(kołków) przymocuj górny i dolny panel do ściany. Wysokość można ustalić
losowo.

- 7 -
Część A i część B
Część A i część
B
Krok 2. Umieść część H (matę antypoślizgową) na części A.
52. Installation Guide for SKU2 ~ SKU4
Krok 1. Jak pokazano na rysunku, zlokalizuj część D (wspornik) i umieść
część B (panel rowkowy) i część E (długi hak) między dwoma panelami
bocznymi. Użyj narzędzia Część M (klucz) wraz z elementami mocującymi
Część J (śruba) i Część I (nakrętka), aby solidnie przymocować część B i

- 8 -
część E do części D.
Część D Zainstaluj część B i część E
Krok 2. Umieść część G (uchwyt na młotek), część F (uchwyt na szczypce)
i część C (panel środkowy) w środkowej warstwie części D (wspornik). Za
pomocą narzędzia części M (klucz) wraz z elementami złącznymi części J
(śruba) i części I (nakrętka) pewnie przymocuj je na miejscu.
Zainstaluj część G i część F Zainstaluj część C
Krok 3: Zainstaluj część A (panel narzędzi). Użyj narzędzia Część M (klucz)
wraz z elementami mocującymi Część J (śruba) i Część I (nakrętka), aby
solidnie przymocować ją na miejscu.

- 9 -
Zainstaluj część
A
Uwaga: Poniżej przedstawiono wygląd SKU2, SKU3 i SKU4 po
zainstalowaniu panelu narzędzi.
SKU2

- 10 -
Numer
katalogowy 3
Numer
katalogowy 4
Krok 4: Za pomocą części K (wkrętów samogwintujących) i części L
(kołków) pewnie zamocuj organizer na elektronarzędzia w wybranym
miejscu na ścianie.
Krok 5: Umieść część H (matę antypoślizgową) na części A. Proces
instalacji jest zakończony.

- 11 -
53. Installation Guide for SKU5
Krok 1. Jak pokazano na rysunku, zlokalizuj część D (wspornik) i umieść
część B (panel rowkowy) i część E (długi hak) między dwoma panelami
bocznymi. Użyj narzędzia Część M (klucz) wraz z elementami mocującymi
Część J (śruba) i Część I (nakrętka), aby solidnie przymocować część B i
część E do części D.
Znajdź część D Zainstaluj część B i część E
Krok 2. Umieść część G (uchwyt młotka), część F (uchwyt szczypiec) i
część B (panel rowkowy) w środkowej warstwie części D (wspornik). Za
pomocą narzędzia części M (klucz) wraz z elementami złącznymi części J
(śruba) i części I (nakrętka) pewnie przymocuj je na miejscu.
- 12 -
Zainstaluj część G i część F Zainstaluj część B
Krok 3. Zainstaluj część A (panel narzędziowy). Użyj narzędzia Część M
(klucz) wraz z elementami mocującymi Część J (śruba) i Część I (nakrętka),
aby solidnie przymocować ją na miejscu.
Krok 4: Za pomocą części K (wkrętów samogwintujących) i części L
(kołków) pewnie zamocuj organizer na elektronarzędzia w wybranym
miejscu na ścianie.

- 13 -
Krok 5: Umieść część H (matę antypoślizgową) na części A. Proces
instalacji jest zakończony.
54. User Guide
26. Upewnij się, że przedmioty zawieszone na wieszaku nie przekraczają
dopuszczalnego ciężaru.
27. Staraj się równomiernie rozłożyć ciężar na wieszaku i unikaj
umieszczania go zbyt mocno po jednej stronie.
28. Nie wieszaj na wieszaku ostrych lub uszkodzonych przedmiotów, gdyż
może to spowodować zarysowanie wieszaka lub obrażenia.
29. Dostosuj rozstaw haczyków w razie potrzeby, aby pomieścić
przedmioty o różnych rozmiarach i kształtach.
30. Przed załadowaniem hak musi być całkowicie umieszczony na szynie .

- 14 -
Producent: Shanghaimuxinmuyeyouxiangongsi
Adres: Shuangchenglu 803nong11hao1602A-1609shi, baoshanqu, szanghaj
200000 CN.
Importowane do AUS: SIHAO PTY LTD, 1 ROKEVA STREETEASTWOOD
NSW 2122 Australia
Importowane do USA: Sanven Technology Ltd., Suite 250, 9166 Anaheim
Place, Rancho Cucamonga, CA 91730
REP
EC
E-CrossStu GmbH
Mainzer Landstr.69, 60329 Frankfurt am Main.
REP
UK
YH CONSULTING LIMITED.
C/O YH Consulting Limited Office 147, Centurion House,
London Road, Staines-upon-Thames, Surrey, TW18 4AX


Technisch Ondersteuning en E-garantiecertificaat
www.vevor.com/support
ORGANISATOR VOOR ELEKTRISCH
GEREEDSCHAP
GEBRUIKERSHANDLEIDING
We continue to be committed to provide you tools with competitive price.
"Save Half", "Half Price" or any other similar expressions used by us only represents an
estimate of savings you might benefit from buying certain tools with us compared to the major
top brands and does not necessarily mean to cover all categories of tools offered by us. You
are kindly reminded to verify carefully when you are placing an order with us if you are
actually saving half in comparison with the top major brands.


- 1 -
Model: JC-PTO-001; JC-PTO-002; JC-PTO-003; JC-PTO-004; JC-PTO-005
Have product questions? Need technical support? Please feel free to
contact us:
Technical Support and E-Warranty Certificate
www.vevor.com/support
NEED HELP? CONTACT US!
This is the original instruction, please read all manual instructions
carefully before operating. VEVOR reserves a clear interpretation of our
user manual. The appearance of the product shall be subject to the
product you received. Please forgive us that we won't inform you again if
there are any technology or software updates on our product.
POWER TOOL
ORGANIZER

- 2 -
55. WARNING!
49
.Controleer voor de installatie of er geen risico is dat verborgen
stroomkabels of waterleidingen worden doorboord. Gebruik bij twijfel een
digitaal volgapparaat of raadpleeg een expert.
50
.De rail moet op een stabiele ondergrond worden gemonteerd. Niet
overbelasten.
51
.De montage van de muurbeugel dient door een volwassene te worden
uitgevoerd. Kinderen mogen het apparaat niet zonder toezicht gebruiken.
52.Alleen aanbevolen voor baksteen en beton. Gebruik speciale
bevestigingsmaterialen voor de installatie op gipsplaten of andere
ondergronden.
53.Zorg ervoor dat u alle veiligheidswaarschuwingen en -instructies leest
en begrijpt voordat u een organizer voor elektrisch gereedschap installeert
en gebruikt .
54.Zorg ervoor dat de organizer voor elektrisch gereedschap aan een
stabiele muur wordt gemonteerd om te voorkomen dat organizer voor
elektrisch gereedschap en voorkomt dat gereedschap valt.
55.Overschrijd de maximale draagkracht van de organizer voor elektrisch
gereedschap om schade aan de organizer voor elektrisch gereedschap en
voorkomt dat gereedschap valt.
56.Controleer regelmatig de stabiliteit van de gereedschapshouder en de
veiligheid van het gereedschap .
56. Maintenance Guide
19. Maak de gereedschapsorganizer regelmatig schoon om ophoping van
stof en vuil te voorkomen.

- 3 -
20. Controleer de stabiliteit van de organizer voor elektrisch gereedschap
om ervoor te zorgen dat alle bevestigingsmaterialen veilig en
onbeschadigd zijn.
21. Controleer de belasting van de organizer voor elektrisch gereedschap
om ervoor te zorgen dat het maximale draagvermogen niet wordt
overschreden.

- 4 -
57. Product Description
De organizer voor elektrisch gereedschap is een organizer voor elektrisch
gereedschap speciaal ontworpen voor het opbergen van kleine snoerloze
metaalsnij- en montagegereedschappen (elektrische boormachines,
slagboormachines, elektrische reciprozagen, elektrische
schroevendraaiers, elektrische sleutels, enz.). Elektrisch gereedschap kan
aan de onderste gleuf worden gehangen (rechtop of ondersteboven), en
de vlakke laag kan batterijen, kleine gereedschapskisten (met
verschillende soorten boortjes, enz.) en iets grotere gereedschappen
(zoals haakse slijpers en elektrische snijmachines) opbergen. Het product
wordt voornamelijk gebruikt in garages, werkplaatsen en
gereedschapskamers; het opberggat voor schroevendraaiers wordt
gebruikt om kleine handgereedschappen zoals schroevendraaiers en
tangen te plaatsen.
58. Product Parameter
item
Model
Afbeelding
Lag
en
Groe
ven
NW
GW
Verpakk
ingsgro
otte
SKU
1
JC-
PTO-
001
2
4
3,0
kg
3,3
kg
445*220
*86mm
SKU
2
JC-
PTO-
002
3
4
2,3
kg
2,7
kg
430*227
*83mm
- 5 -
SKU
3
JC-
PTO-
003
3
5
2,5
kg
3,0
kg
505*227
*85mm
SKU
4
JC-
PTO-
004
3
7
3,0
kg
3,5
kg
655*225
*80mm
SKU
5
JC-
PTO-
005
3
8
2,8
kg
3,2
kg
435*237
*115mm
59. Part list
item
Onderdelen
SKU
1
SKU
2
SKU
3
SKU
4
SKU
5
JC-
PTO-
001
JC-
PTO-
002
JC-
PTO-
003
JC-
PTO-
004
JC-
PTO-
005
A
Gereedschapspaneel
2 stuks
1
stuks
1
stuks
1
stuks
1
stuks
- 6 -
B
Groefpaneel
2 stuks
(4 groeven)
1
stuks
(4
groev
en)
1
stuks
(5
groev
en)
1
stuks
(7
groe
ven)
2
stuks
(4
groev
en)
C
Middenpaneel
/
1
stuks
1
stuks
1
stuks
/
D
Beugel
/
2
stuks
2
stuks
2
stuks
2
stuks
Ik
Lange haak
/
1
stuks
1
stuks
1
stuks
1
stuks
F
Tangenhouder
/
1
stuks
1
stuks
1
stuks
1
stuks
G
Hamerhouder
/
1
stuks
1
stuks
1
stuks
1
stuks

- 7 -
H
Antislipmat
2
stuks
1
stuks
1
stuks
1
stuks
1
stuks
I
Moer
/
12
stuks
12
stuks
12
stuks
12
stuks
J
Schroef
/
12
stuks
12
stuks
12
stuks
12
stuks
Ik
Zelftappende schroef
12
stuks
4
stuks
4
stuks
4
stuks
4
stuks
Ik
Deuvels
12
stuks
4
stuks
4
stuks
4
stuks
4
stuks
M
Moersleutel
/
1
stuks
1
stuks
1
stuks
1
stuks
60. Installation Guide for SKU1
Stap 1. Gebruik onderdeel K (zelftappende schroef ) en onderdeel L
(pluggen) om de bovenste en onderste panelen aan de muur te bevestigen.
De hoogte kan willekeurig worden bepaald.
- 8 -
Deel A en Deel B
Deel A en Deel B
Stap 2. Plaats onderdeel H (antislipmat) op onderdeel A.
61. Installation Guide for SKU2 ~ SKU4
Stap 1. Zoals afgebeeld, lokaliseer onderdeel D (beugel) en plaats
onderdeel B (groefpaneel) en onderdeel E (lange haak) tussen de twee
zijpanelen. Gebruik het gereedschap onderdeel M (sleutel) samen met de
bevestigingsmiddelen onderdeel J (schroef) en onderdeel I (moer) om
onderdeel B en onderdeel E stevig vast te maken aan onderdeel D.
- 9 -
Deel D Installeer deel B en deel E
Stap 2. Plaats onderdeel G (hamerhouder), onderdeel F (tanghouder) en
onderdeel C (middenpaneel) in de middelste laag van onderdeel D
(beugel). Gebruik het gereedschap onderdeel M (sleutel) samen met de
bevestigingsmiddelen onderdeel J (schroef) en onderdeel I (moer) om ze
stevig vast te zetten.
Installeer deel G en deel F Deel C installeren
Stap 3: Installeer onderdeel A (gereedschapspaneel). Gebruik het
gereedschap onderdeel M (sleutel) samen met de bevestigingsmiddelen
onderdeel J (schroef) en onderdeel I (moer) om het stevig vast te zetten.

- 10 -
Deel A
installeren
Let op: Hieronder ziet u hoe SKU2, SKU3 en SKU4 eruitzien nadat u het
gereedschapspaneel hebt geïnstalleerd.
SKU2
- 11 -
Artikelnummer3
Artikelnummer4
Stap 4: Gebruik onderdeel K (zelftappende schroef) en onderdeel L
(pluggen) om de gereedschapsorganizer stevig op de gewenste plek aan
de muur te bevestigen.
Stap 5: Plaats onderdeel H (antislipmat) op onderdeel A. Het
installatieproces is voltooid.
- 12 -
62. Installation Guide for SKU5
Stap 1. Zoals afgebeeld, lokaliseer onderdeel D (beugel) en plaats
onderdeel B (groefpaneel) en onderdeel E (lange haak) tussen de twee
zijpanelen. Gebruik het gereedschap onderdeel M (sleutel) samen met de
bevestigingsmiddelen onderdeel J (schroef) en onderdeel I (moer) om
onderdeel B en onderdeel E stevig vast te maken aan onderdeel D.
Vind Deel D Installeer deel B en deel E
Stap 2. Plaats onderdeel G (hamerhouder), onderdeel F (tanghouder) en
onderdeel B (groefpaneel) in de middelste laag van onderdeel D (beugel).
Gebruik het gereedschap onderdeel M (sleutel) samen met de
bevestigingsmiddelen onderdeel J (schroef) en onderdeel I (moer) om ze
stevig vast te zetten.

- 13 -
Installeer deel G en deel F Deel B installeren
Stap 3. Installeer onderdeel A (gereedschapspaneel). Gebruik het
gereedschap onderdeel M (sleutel) samen met de bevestigingsmiddelen
onderdeel J (schroef) en onderdeel I (moer) om het stevig vast te zetten.
Stap 4: Gebruik onderdeel K (zelftappende schroef) en onderdeel L
(pluggen) om de gereedschapsorganizer stevig op de gewenste plek aan
de muur te bevestigen.

- 14 -
Stap 5: Plaats onderdeel H (antislipmat) op onderdeel A. Het
installatieproces is voltooid.
63. User Guide
31. Zorg ervoor dat de artikelen die u aan het rek hangt, niet zwaarder zijn
dan het toegestane gewicht.
32. Probeer het gewicht gelijkmatig over de hanger te verdelen en zorg dat
er niet te veel gewicht aan één kant hangt.
33. Hang geen scherpe of beschadigde voorwerpen aan de hanger. Dit
kan krassen op de hanger veroorzaken of verwondingen veroorzaken.
34. Pas de afstand tussen de haken indien nodig aan om items van
verschillende grootte en vorm op te hangen.
35. Voordat u gaat laden, moet de haak volledig op de rail worden
geplaatst .

- 15 -
Fabrikant: Shanghaimuxinmuyeyouxiangongsi
Adres: Shuangchenglu 803nong11hao1602A-1609shi, baoshanqu, shanghai
200000 CN.
Geïmporteerd naar AUS: SIHAO PTY LTD, 1 ROKEVA
STREETEASTWOOD NSW 2122 Australië
Geïmporteerd naar de VS: Sanven Technology Ltd., Suite 250, 9166
Anaheim Place, Rancho Cucamonga, CA 91730
REP
EC
E-CrossStu GmbH
Mainzer Landstr.69, 60329 Frankfurt am Main.
REP
UK
YH CONSULTING LIMITED.
C/O YH Consulting Limited Office 147, Centurion House,
London Road, Staines-upon-Thames, Surrey, TW18 4AX


Teknisk Support och e-garanticertifikat
www.vevor.com/support
POWER TOOL ORGANIZER
ANVÄNDARMANUAL
We continue to be committed to provide you tools with competitive price.
"Save Half", "Half Price" or any other similar expressions used by us only represents an
estimate of savings you might benefit from buying certain tools with us compared to the major
top brands and does not necessarily mean to cover all categories of tools offered by us. You
are kindly reminded to verify carefully when you are placing an order with us if you are
actually saving half in comparison with the top major brands.

- 1 -
Modell: JC-PTO-001;JC-PTO-002;JC-PTO-003;JC-PTO-004; JC-PTO-005
Have product questions? Need technical support? Please feel free to
contact us:
Technical Support and E-Warranty Certificate
www.vevor.com/support
NEED HELP? CONTACT US!
This is the original instruction, please read all manual instructions
carefully before operating. VEVOR reserves a clear interpretation of our
user manual. The appearance of the product shall be subject to the
product you received. Please forgive us that we won't inform you again if
there are any technology or software updates on our product.
POWER TOOL
ORGANIZER

- 2 -
64. WARNING!
57
.Innan installationen, se till att den inte riskerar att sticka hål på dolda
strömkablar eller vattenledningar. Vid tveksamhet, använd en digital
spårningsenhet eller rådfråga en expert.
58
.Skenan ska monteras på ett stabilt underlag. Överbelasta inte.
59.Installationen av väggfästet bör göras av en vuxen, och barn bör inte
använda det utan tillsyn.
60
.Rekommenderas endast för tegel och betong; använd speciell
hårdvara för att installera den på gipsskivor eller andra underlag.
61
.Innan du installerar och använder en elverktygsorganisator ska du
läsa och förstå alla säkerhetsvarningar och instruktioner.
62.Se till att verktygsfördelaren är installerad på en stabil vägg för att
förhindra att elverktygsorganisatör och verktyg från att falla.
63
.Vänligen överskrid inte den maximala lastkapaciteten för
elverktygsorganisator för att förhindra skador på elverktygsorganisatör och
verktyg från att falla.
64
.Kontrollera regelbundet verktygshållarens stabilitet och säkerheten för
verktygen .
65. Maintenance Guide
22. Rengör verktygsfördelaren regelbundet för att undvika ansamling av
damm och smuts .
23. Kontrollera stabiliteten på elverktygsorganisator för att se till att all
monteringsutrustning är säker och oskadad.
24. Kontrollera belastningen på elverktygsorganisator för att säkerställa att
den maximala lastkapaciteten inte överskrids.

- 3 -
66. Product Description
Elverktygsarrangören är en elverktygsarrangör speciellt utformad för
förvaring av små sladdlösa verktyg för skärande och montering av metall
(elektriska borrar, slagborrar, elektriska kolvsågar, elektriska skruvmejslar,
elektriska skiftnycklar, etc.). Elverktyg kan hängas på den nedre skåran
(upprätt eller upp och ner), och det platta lagret kan förvara batterier, små
verktygslådor (med olika typer av borr, etc.) och lite större verktyg (som
vinkelslipar och el). skärare). Produkten används främst i garage,
verkstäder och verktygsrum; skruvmejselns förvaringshål används för att
placera små manuella verktyg som skruvmejslar och tång.
67. Product Parameter
punk
t
Model
l
Bild
Lag
er
Spår
NW
GW
Förpack
ningssto
rlek
SKU
1
JC-
PTO-
001
2
4
3,0
kg
3,3
kg
445*220
*86mm
SKU
2
JC-
PTO-
002
3
4
2,3
kg
2,7
kg
430*227
*83mm
SKU
3
JC-
PTO-
003
3
5
2,5
kg
3,0
kg
505*227
*85mm
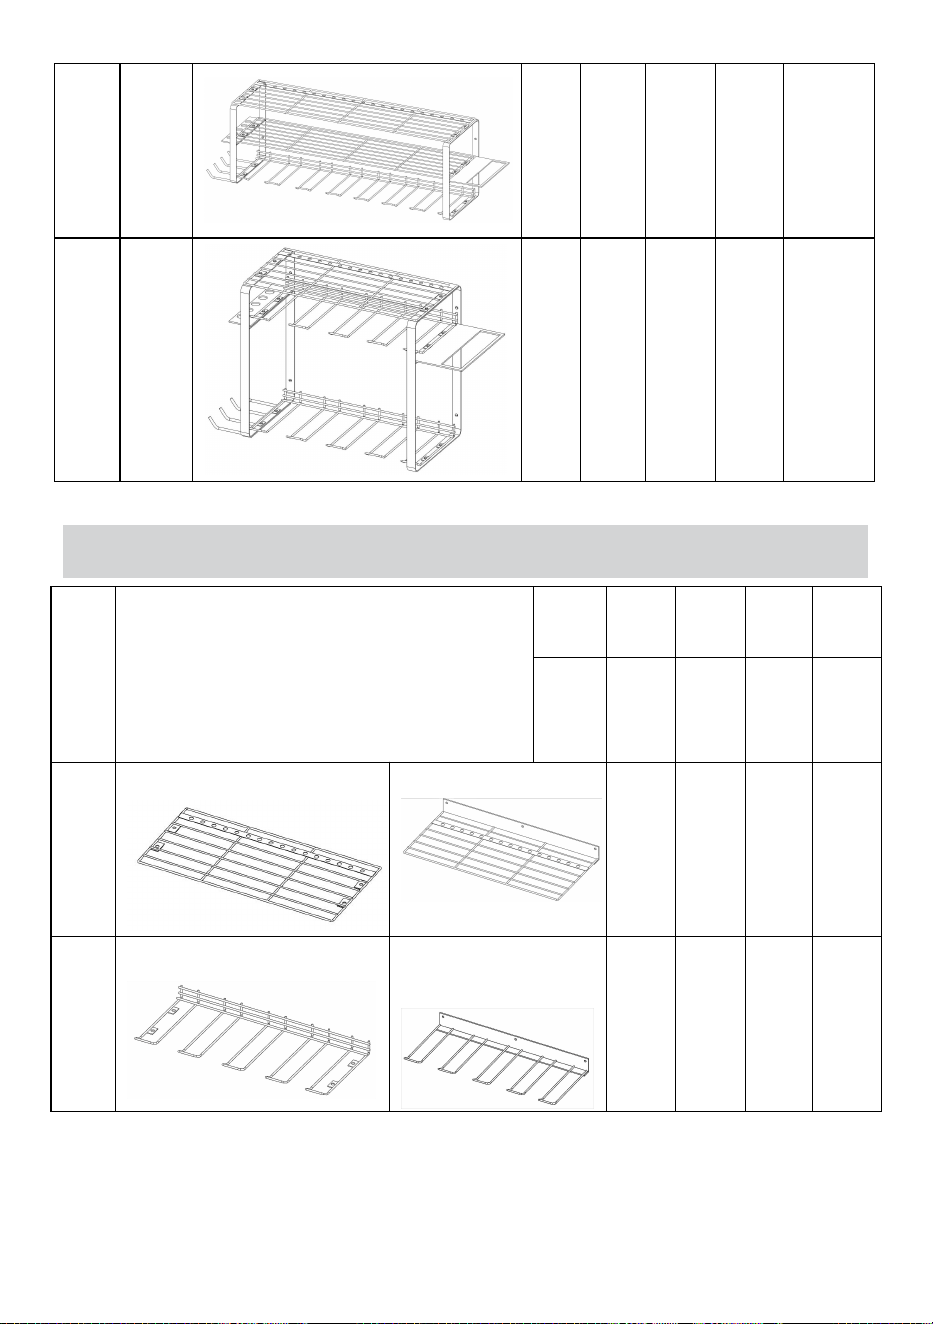
- 4 -
SKU
4
JC-
PTO-
004
3
7
3,0
kg
3,5
kg
655*225
*80mm
SKU
5
JC-
PTO-
005
3
8
2,8
kg
3,2
kg
435*237
*115mm
68. Part list
punk
t
Delar
SKU
1
SKU
2
SKU
3
SKU
4
SKU
5
JC-
PTO-
001
JC-
PTO-
002
JC-
PTO-
003
JC-
PTO-
004
JC-
PTO-
005
A
Verktygspanel
2 st
1 st
1 st
1 st
1 st
B
Spårpanel
2 st
(4 spår)
1 st
(4
spår)
1 st
(5
spår)
1 st
(7
spår)
2 st
(4
spår)
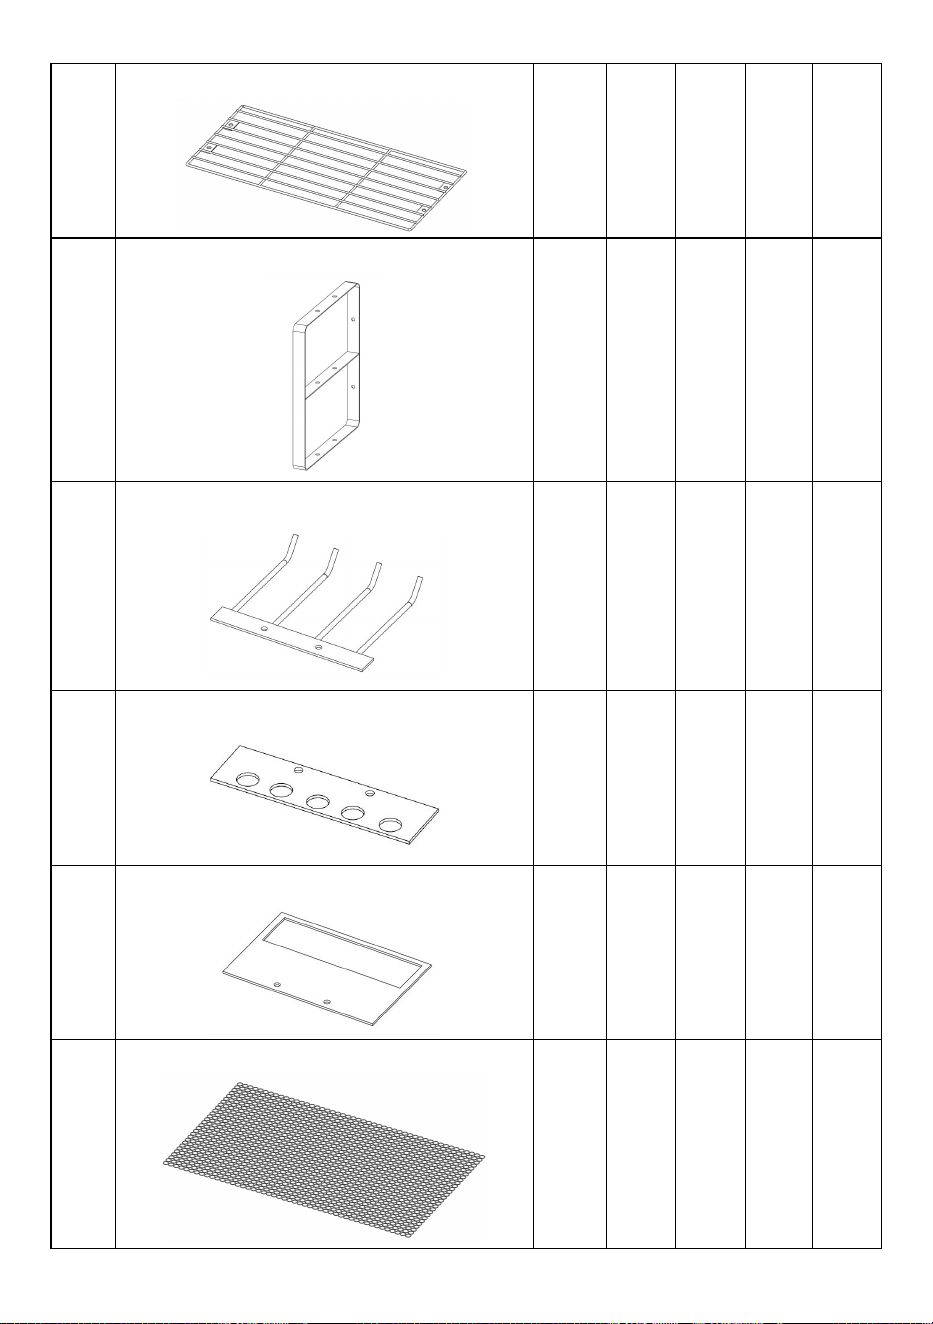
- 5 -
C
Mittpanel
/
1 st
1 st
1 st
/
D
Konsol
/
2 st
2 st
2 st
2 st
E
Lång krok
/
1 st
1 st
1 st
1 st
F
Tånghållare
/
1 st
1 st
1 st
1 st
G
Hammarhållare
/
1 st
1 st
1 st
1 st
H
Anti-halk matta
2 st
1 st
1 st
1 st
1 st
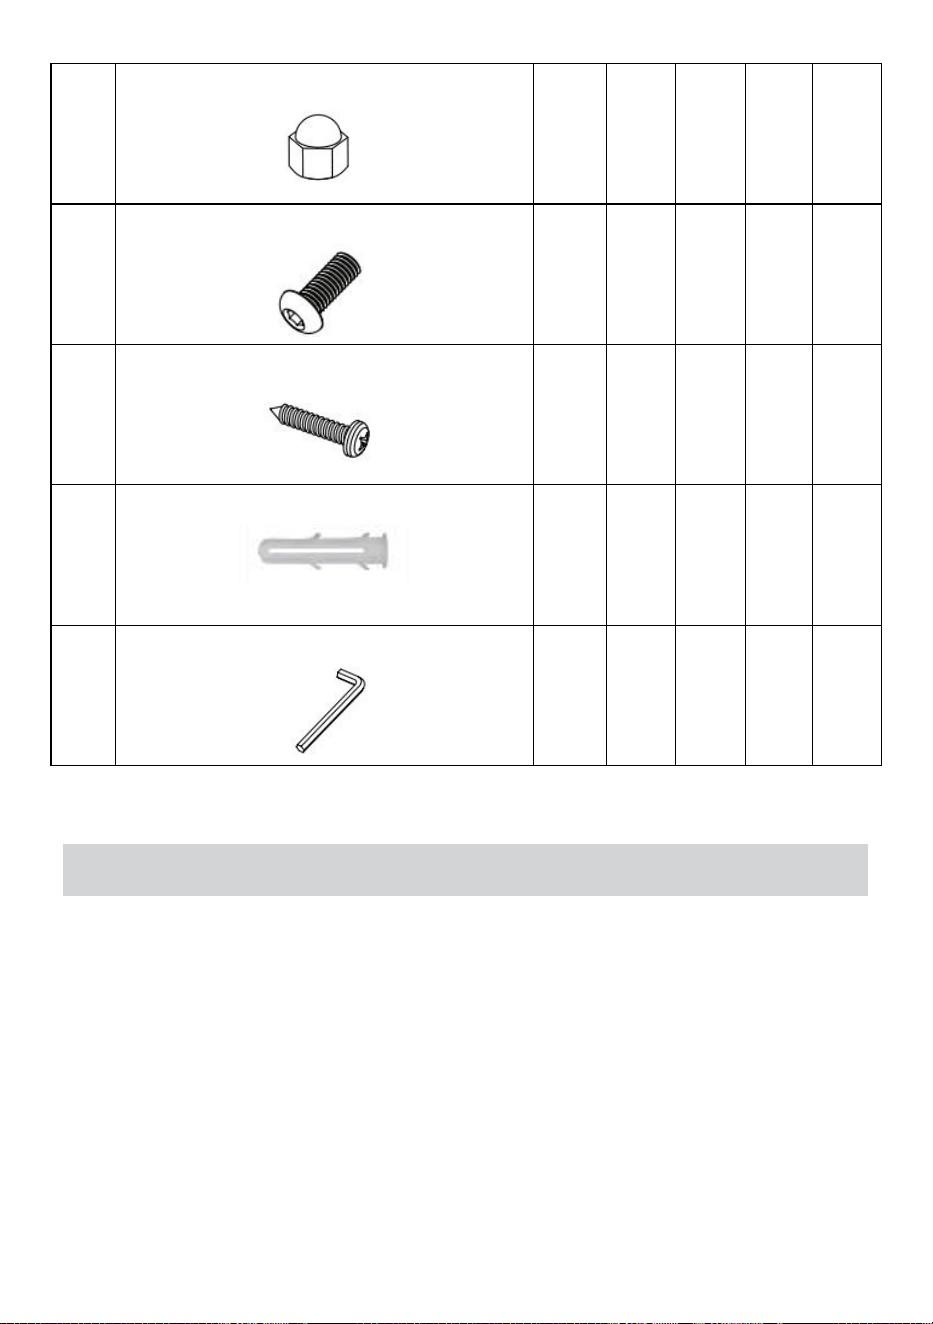
- 6 -
jag
Mutter
/
12 st
12 st
12 st
12 st
J
Skruva
/
12 st
12 st
12 st
12 st
K
Självgängande skruv
12 st
4 st
4 st
4 st
4 st
L
Pluggar
12 st
4 st
4 st
4 st
4 st
M
Rycka
/
1 st
1 st
1 st
1 st
69. Installation Guide for SKU1
Steg 1. Använd del K (självgängande skruv ) och del L (tappar) för att fästa
de övre och nedre panelerna på väggen, och höjden kan definieras
slumpmässigt.

- 7 -
Del A och del B
Del A och del B
Steg 2. Lägg del H (Anti-slip matta) ovanpå del A.
70. Installation Guide for SKU2 ~ SKU4
Steg 1. Som visas på bilden, lokalisera del D (fäste) och placera del B
(spårpanel) och del E (lång krok) mellan de två sidopanelerna. Använd
verktyget Del M (nyckel) tillsammans med fästelementen Del J (Skruva)
och Del I (Mutter) för att säkert fästa Del B och Del E på Del D.
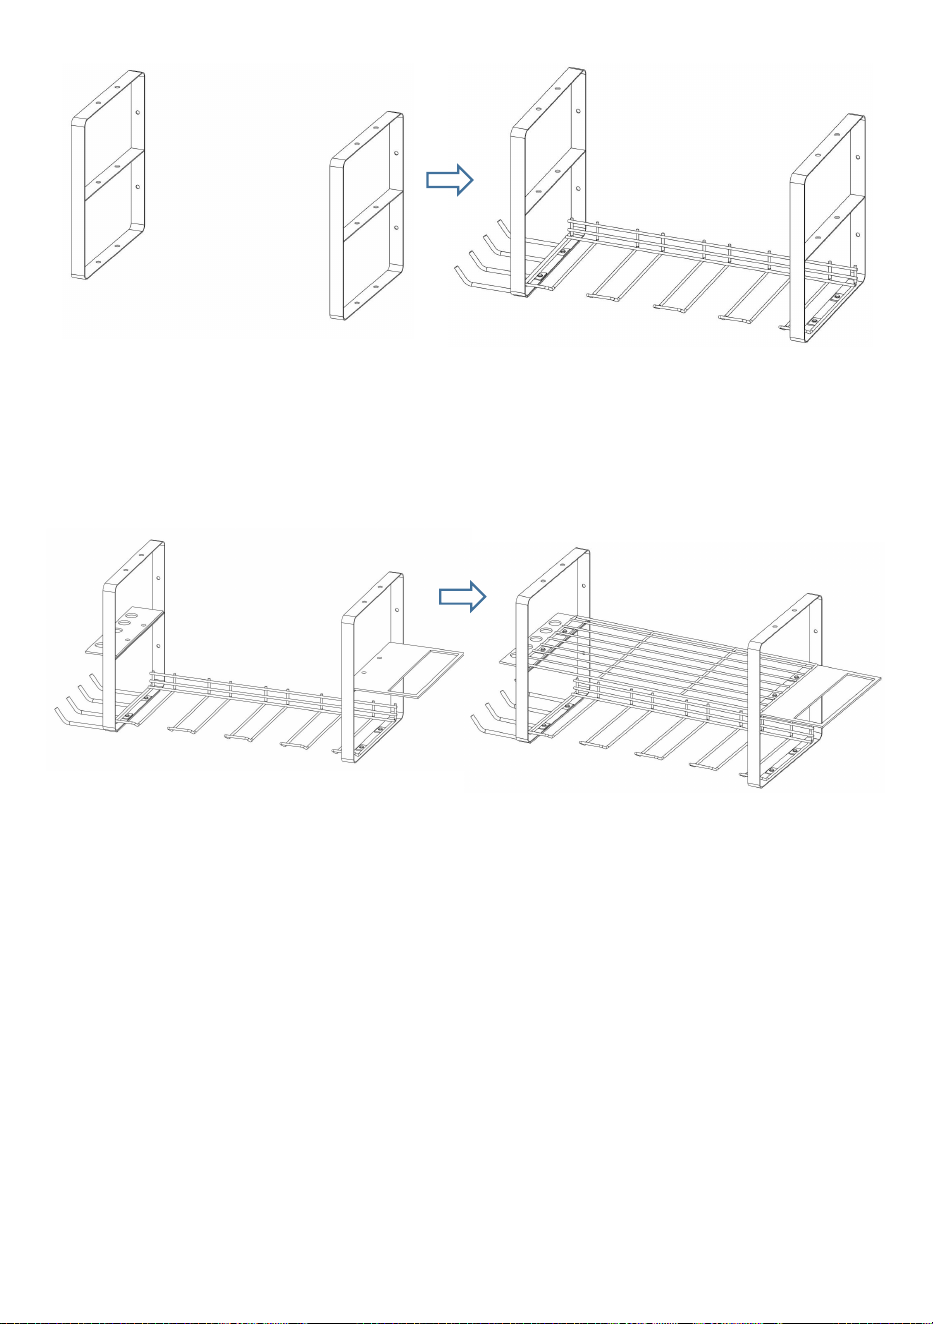
- 8 -
Del D Installera del B och del E
Steg 2. Placera del G (hammarhållare), del F (tånghållare) och del C
(mittpanel) i mitten av t del D (fäste), använd verktyget del M (nyckel)
tillsammans med fästelementen del J (skruv) och del I (mutter) för att
säkert fästa dem på plats.
Installera del G och del F Installera del C
Steg 3: Installera del A (verktygspanel). Använd verktyget Del M (nyckel)
tillsammans med fästelementen Del J (Skruva) och Del I (Mutter) för att
säkert fästa det på plats.

- 9 -
Installera del A
Obs: Nedan ser du hur SKU2, SKU3 och SKU4 ser ut efter installation av
verktygspanelen.
SKU2
SKU3
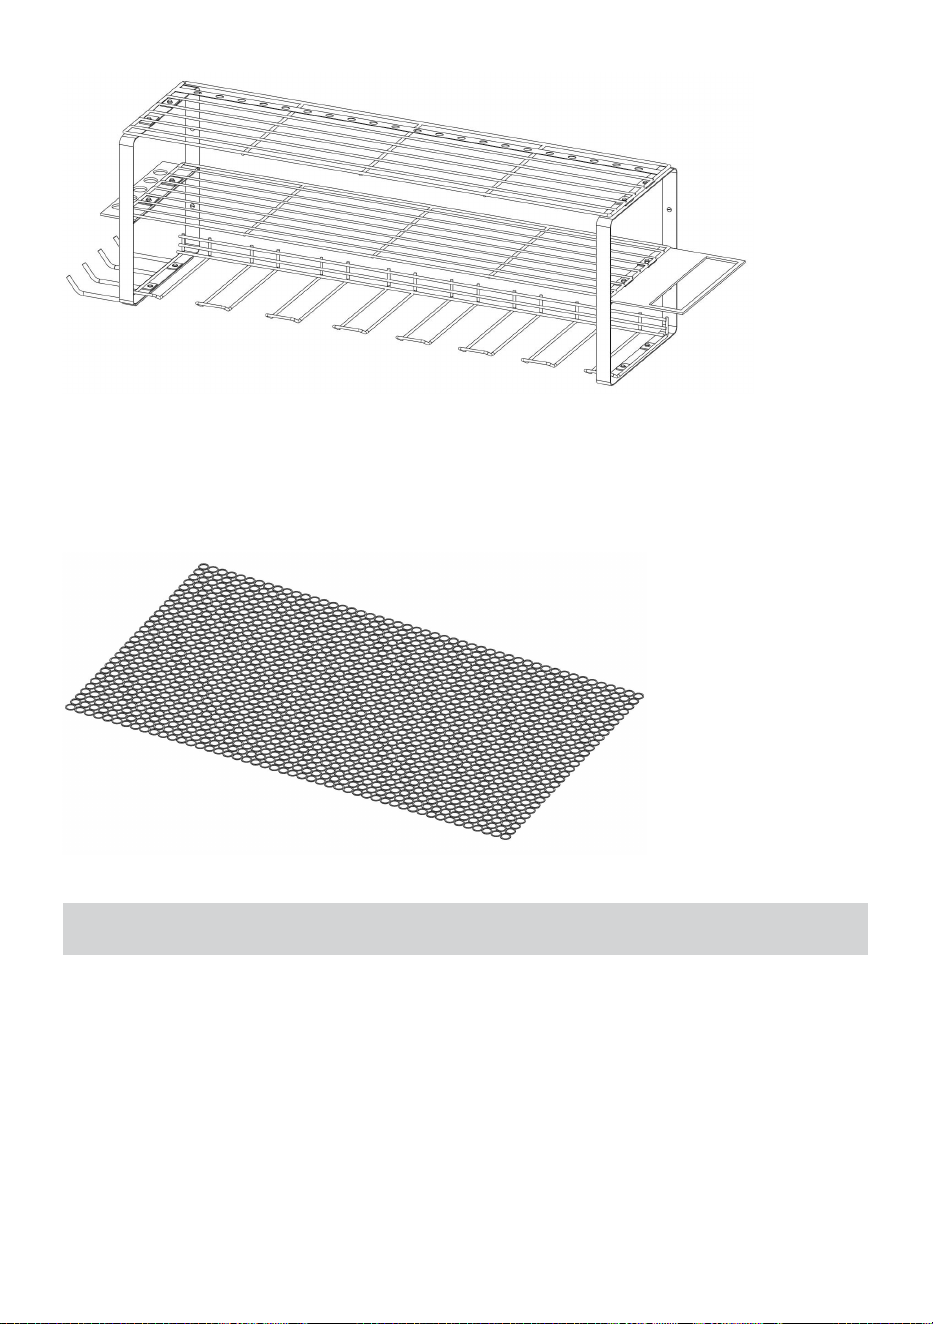
- 10 -
SKU4
Steg 4: Använd del K (självgängande skruv) och del L (tappar) för att säkert
fästa verktygsverktyget på önskad plats på väggen.
Steg 5: Placera del H (anti-halkmatta) ovanpå del A. Installationsprocessen
är klar.
71. Installation Guide for SKU5
Steg 1. Som visas på bilden, lokalisera del D (fäste) och placera del B
(spårpanel) och del E (lång krok) mellan de två sidopanelerna. Använd
verktyget Del M (nyckel) tillsammans med fästelementen Del J (Skruva)
och Del I (Mutter) för att säkert fästa Del B och Del E på Del D.
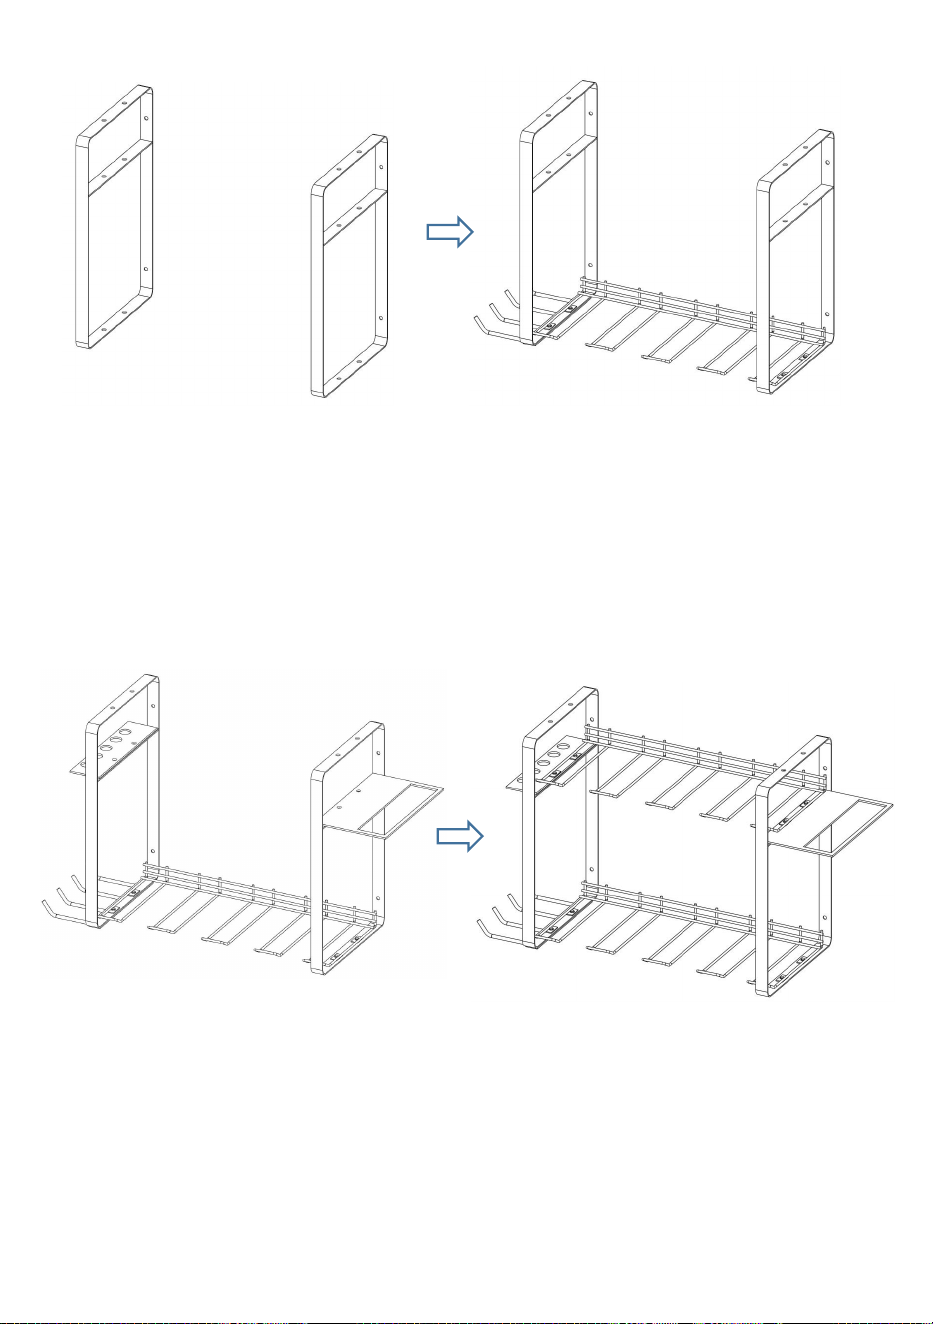
- 11 -
Hitta del D Installera del B och del E
Steg 2. Placera del G (hammarhållare), del F (tånghållare) och del B
(spårpanel) i mittskiktet av del D (fäste), använd verktyget del M (nyckel)
tillsammans med fästelementen del J (skruv) och del I (mutter) för att
säkert fästa dem på plats.
Installera del G och del F Installera del B
Steg 3. Installera del A (verktygspanel). Använd verktyget Del M (nyckel)
tillsammans med fästelementen Del J (Skruva) och Del I (Mutter) för att
säkert fästa det på plats.
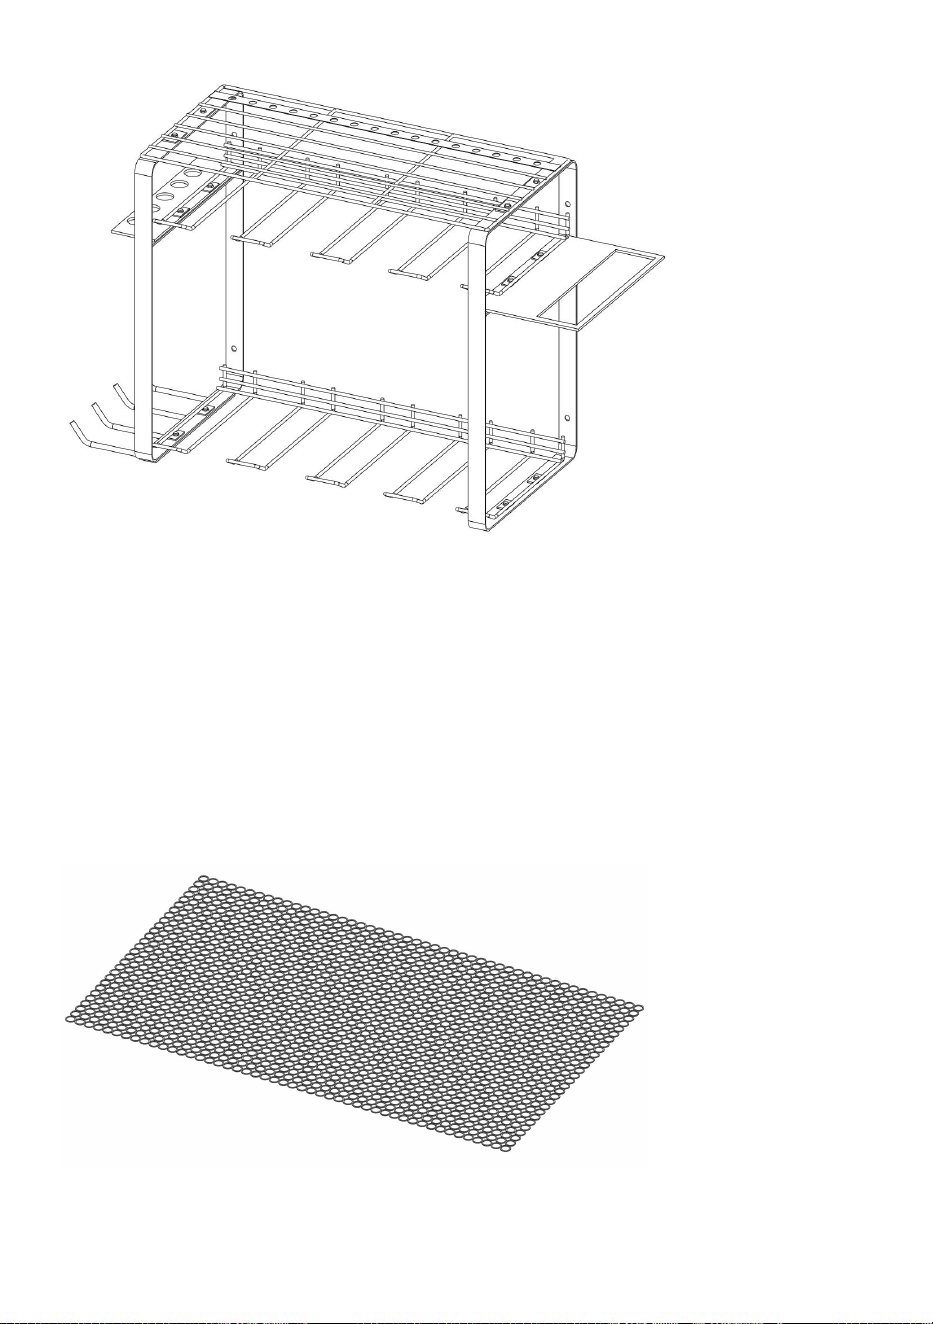
- 12 -
Steg 4: Använd del K (självgängande skruv) och del L (tappar) för att säkert
fästa verktygsverktyget på önskad plats på väggen.
Steg 5: Placera del H (anti-halkmatta) ovanpå del A. Installationsprocessen
är klar.

- 13 -
72. User Guide
36. Se till att föremål som hängs på stativet inte överskrider deras
viktgräns.
37. Försök att fördela vikten på galgen jämnt och undvik att vara för tung
på ena sidan.
38. Häng inte vassa eller skadade föremål på hängaren, eftersom det kan
repa hängaren eller orsaka skada.
39. Justera avståndet mellan krokarna efter behov för att rymma föremål
av olika storlekar och former.
40. Före lastning måste kroken vara helt placerad på skenan .

- 14 -
Tillverkare: Shanghaimuxinmuyeyouxiangongsi
Adress: Shuangchenglu 803nong11hao1602A-1609shi, baoshanqu,
shanghai 200000 CN.
Importerad till AUS: SIHAO PTY LTD, 1 ROKEVA STREETEASTWOOD
NSW 2122 Australien
Importerad till USA: Sanven Technology Ltd., Suite 250, 9166 Anaheim
Place, Rancho Cucamonga, CA 91730
REP
EC
E-CrossStu GmbH
Mainzer Landstr.69, 60329 Frankfurt am Main.
REP
UK
YH CONSULTING LIMITED.
C/O YH Consulting Limited Office 147, Centurion House,
London Road, Staines-upon-Thames, Surrey, TW18 4AX