Technical Support and E-Warranty Certificate www.vevor.com/support
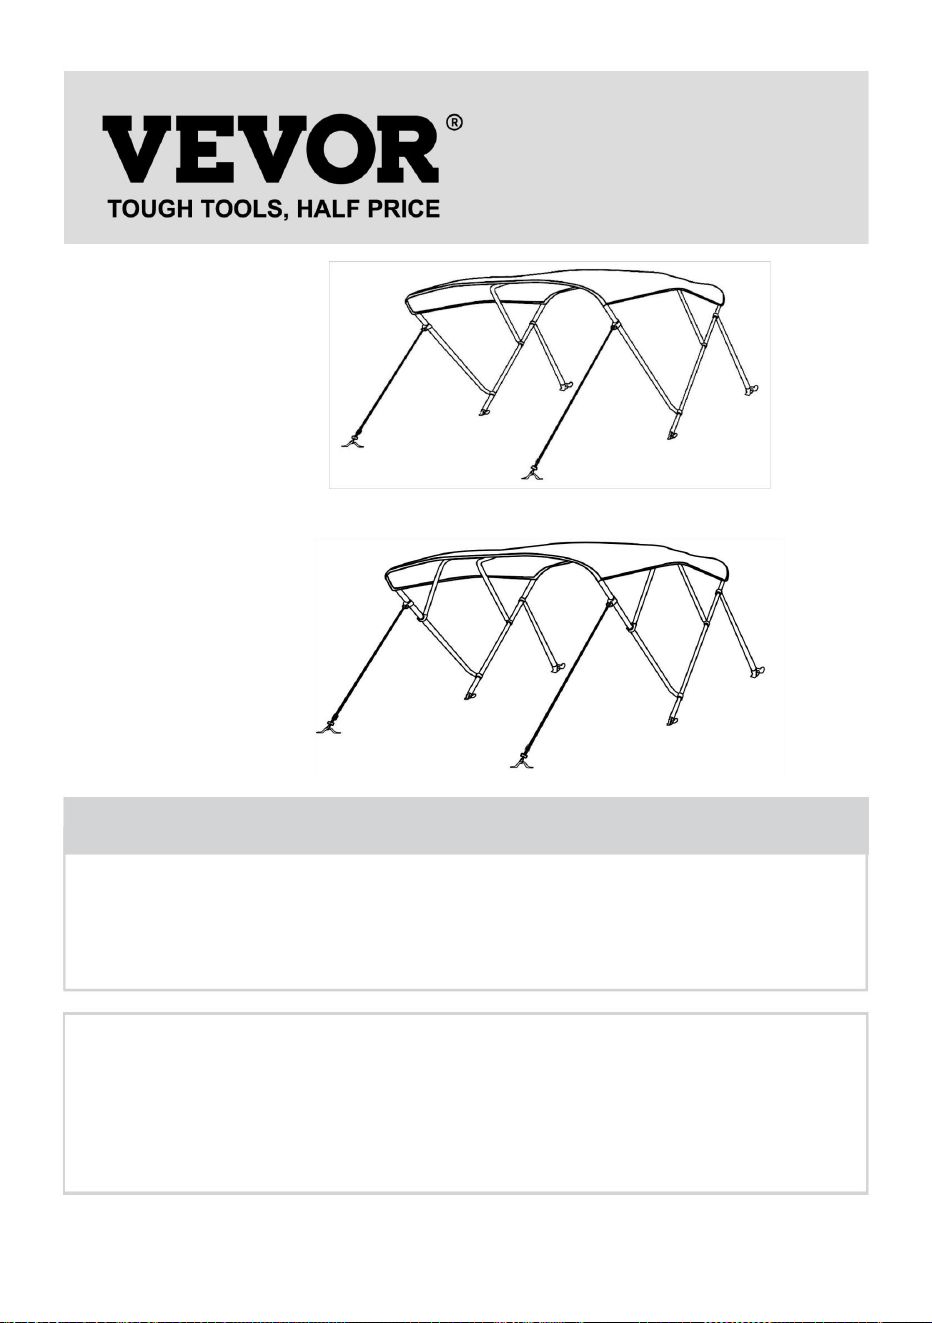
BOAT BIMINI TOP
We continue to be committed to provide you tools with competitive price.
"Save Half", "Half Price" or any other similar expressions used by us only
represents an estimate of savings you might benefit from buying certain tools with
us compared to the major top brands and does not necessarily mean to cover all
categories of tools offered by us. You are kindly reminded to verify carefully when
you are placing an order with us if you are actually saving half in comparison with
the top major brands.
- 1 -
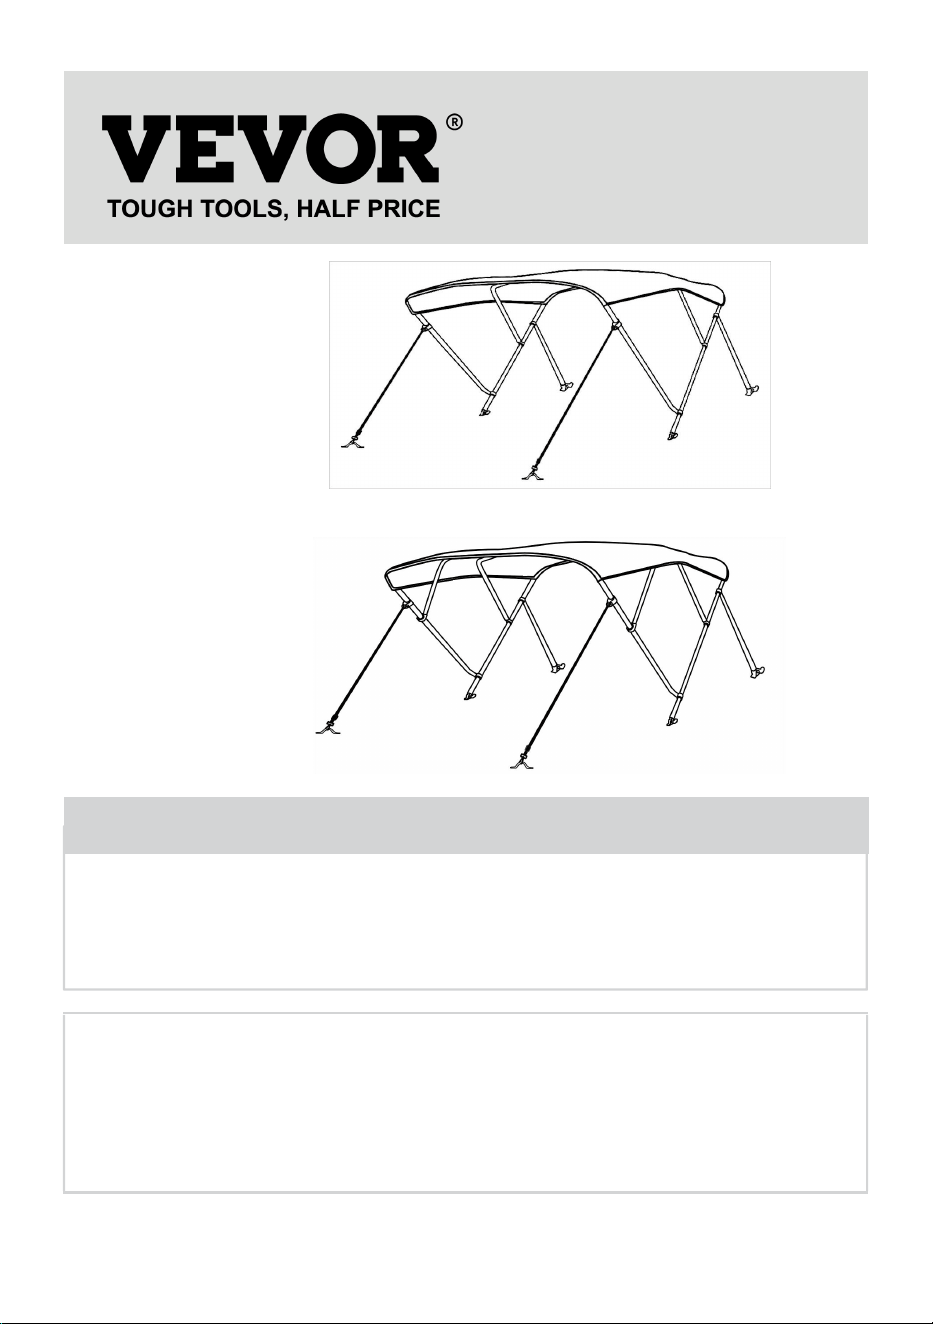
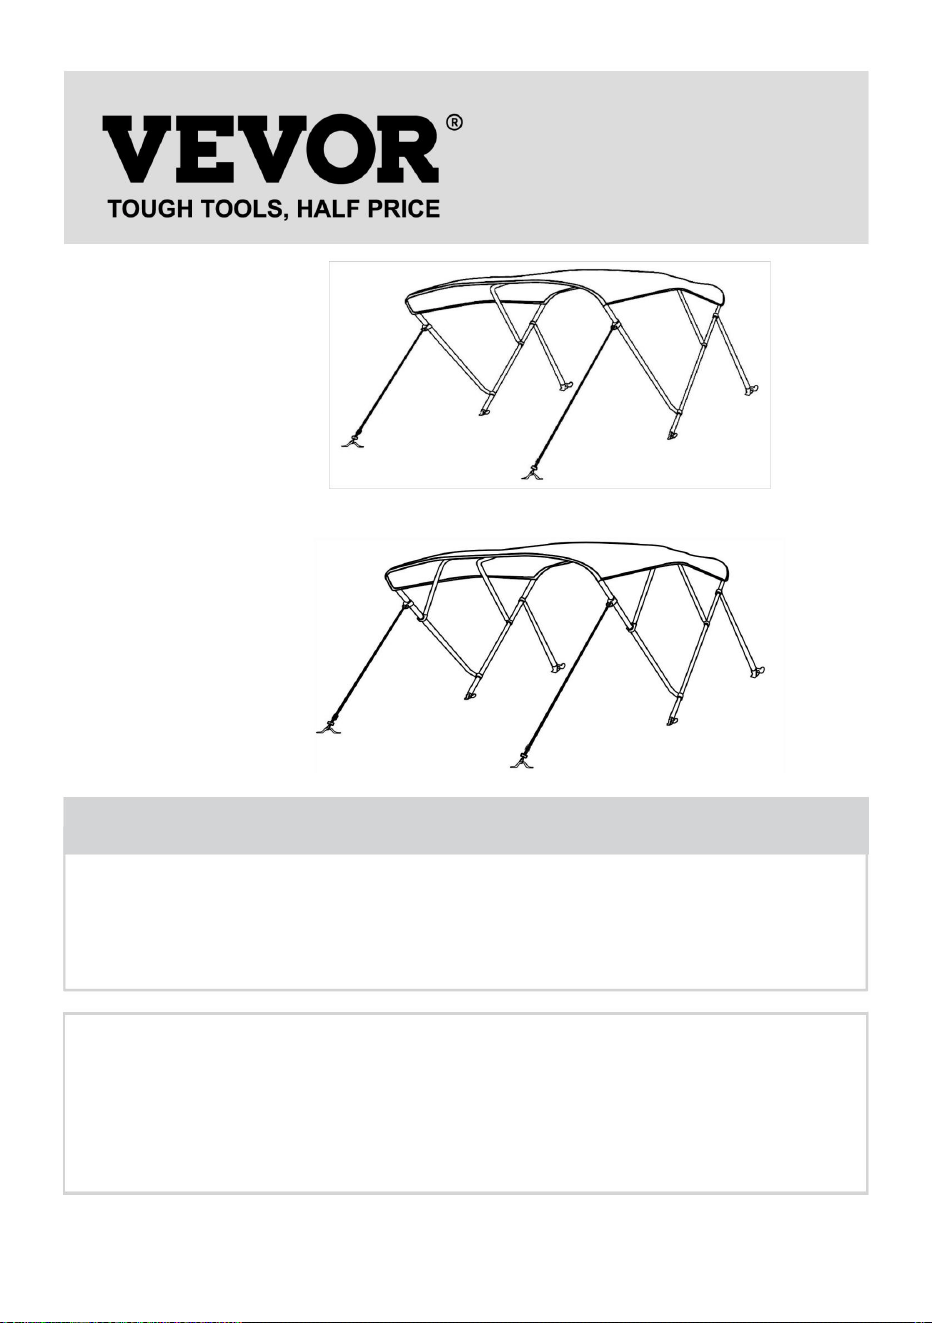
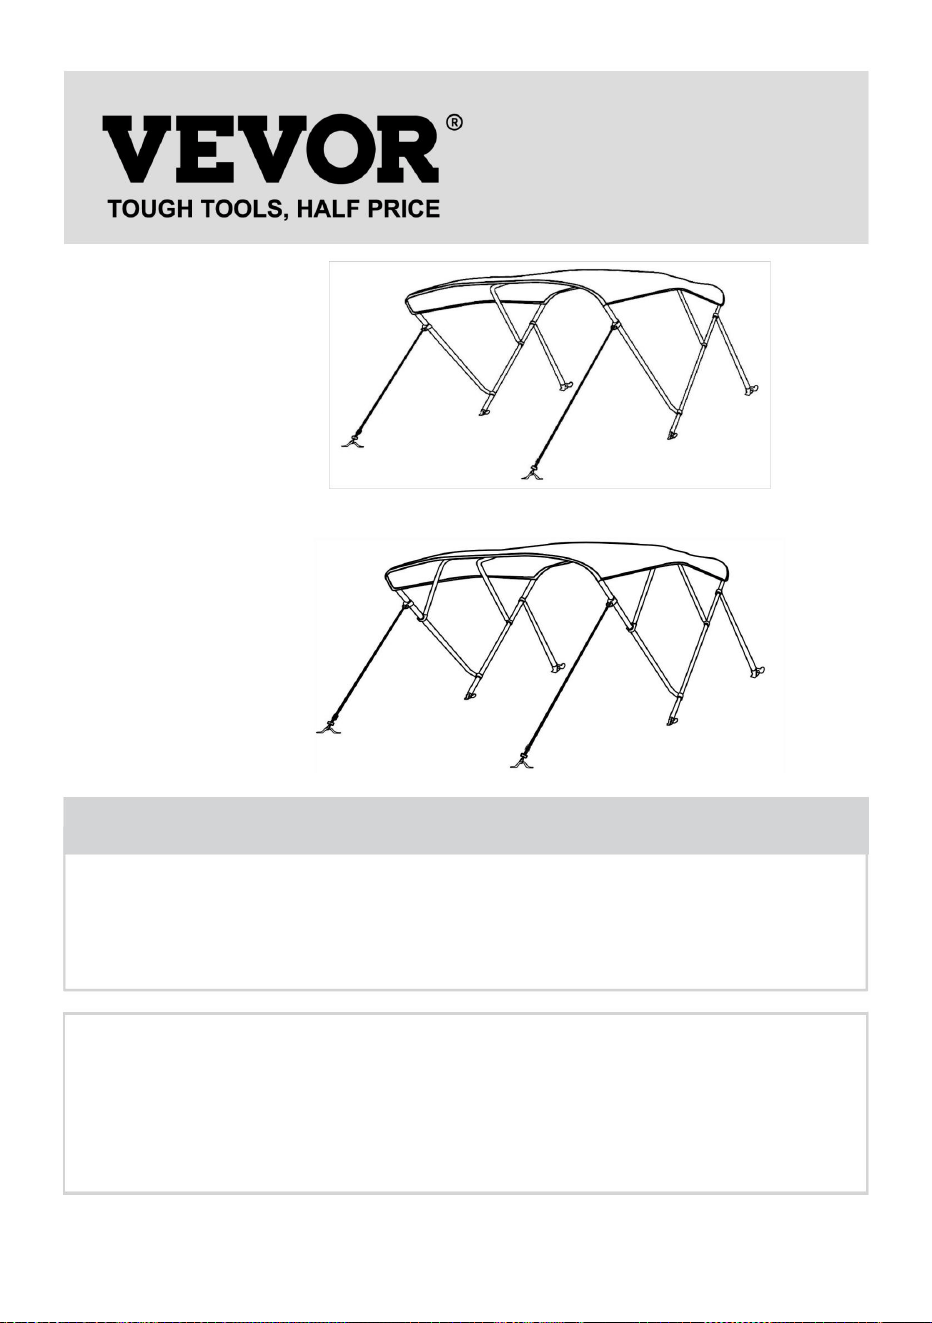
3 BOW BIMINI
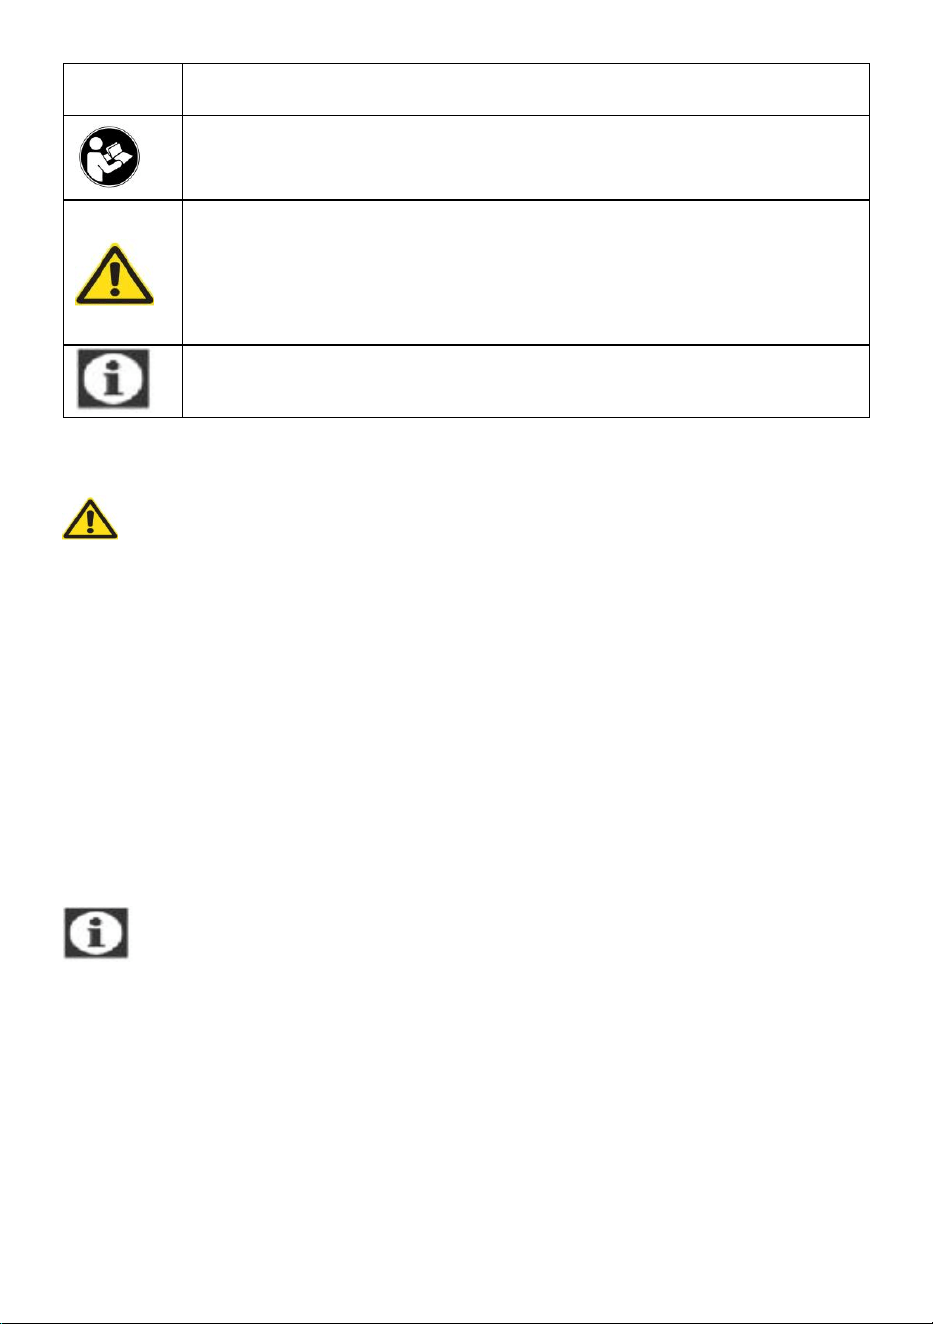
4 BOW BIMINI
Have product questions? Need technical support? Please feel free to
contact us:
Technical Support and E-Warranty Certificate
www.vevor.com/support
NEED HELP? CONTACT US!
This is the original instruction, please read all manual instructions
carefully before operating. VEVOR reserves a clear interpretation of our
user manual. The appearance of the product shall be subject to the
product you received. Please forgive us that we won't inform you again if
there are any technology or software updates on our product.
BOAT BIMINI TOP
- 2 -
Symbol
Symbol Description
Warning: To reduce the risk of injury, the user must read the
instructions manual carefully.
This symbol, placed before a safety comment, indicates a kind of
precaution, warning, or danger. Ignoring this warning may lead to
an accident. To reduce the risk of injury, fire, or electrocution,
please always follow the recommendation shown below.
Note
SAFTY INSTRUCTIONS
WARNING:
• Please read this manual carefully before using the product.
• Keep away from open flame. This product will ignite and burn if brought into
contact with an open flame.
• Keep away from sharp points, blades and other items, so as not to scratch the
product.
• In order to ensure your own safety, please make sure to wear a helmet, gloves
and solid shoes when installing this product.
• This product is not a toy. Please keep small spare parts out of children's reach.
• The awnings should only be assembled by at least two adults. Please keep
children away from the awnings while assembling it to protect them.
NOTE:
•
Please use the boot to protect the fabric when the bimini top is not in use.
•
Please fold the bimini top when the vessel speed exceeds 45MPH.
•
Please repeat the same operation for 3 bow bimini top.
Note: Please check if all parts are in before assembly.
SAVE THESE INSTRUCTION
- 3 -
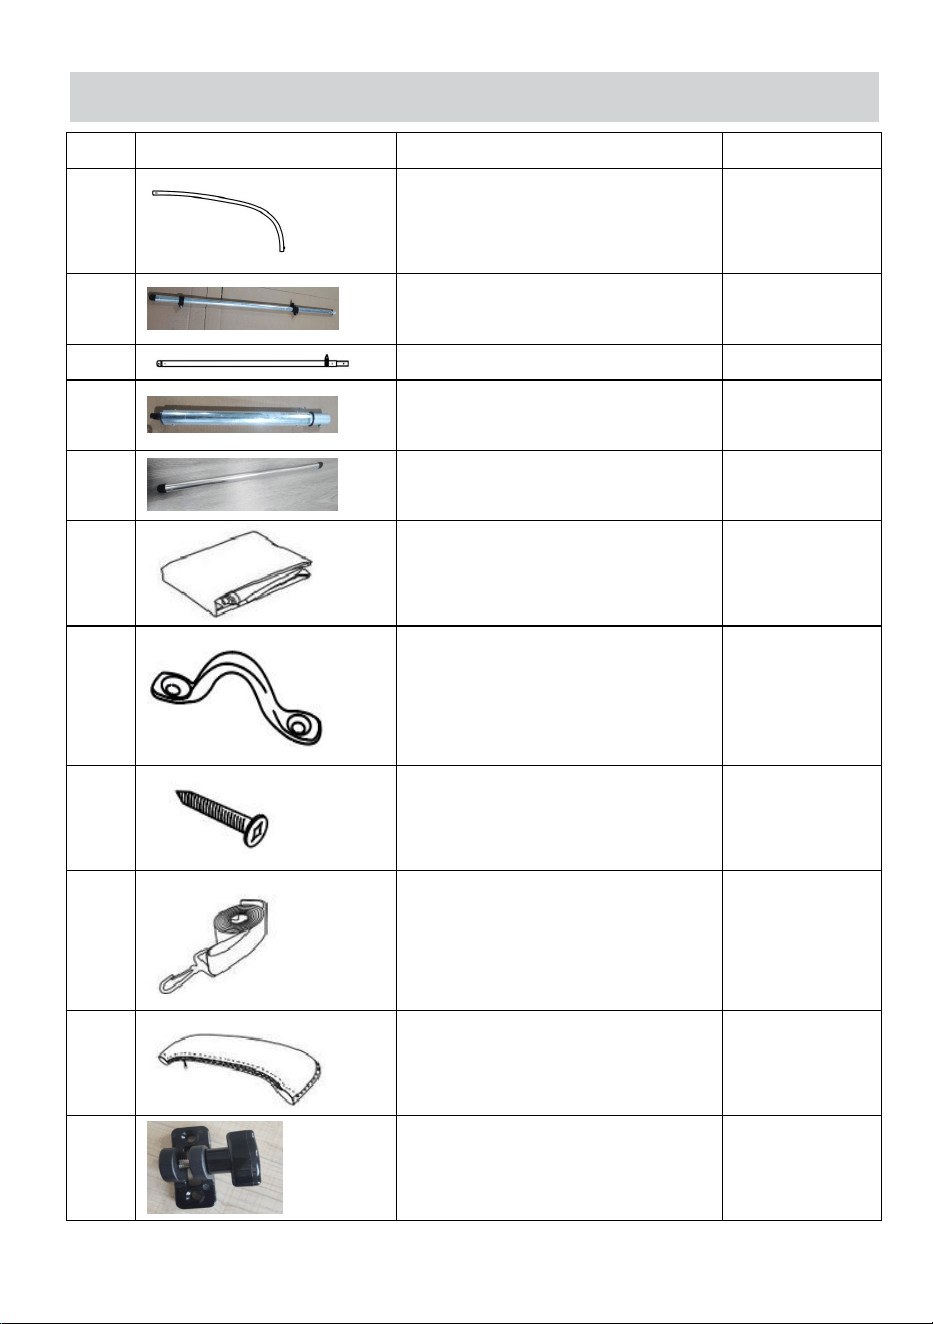
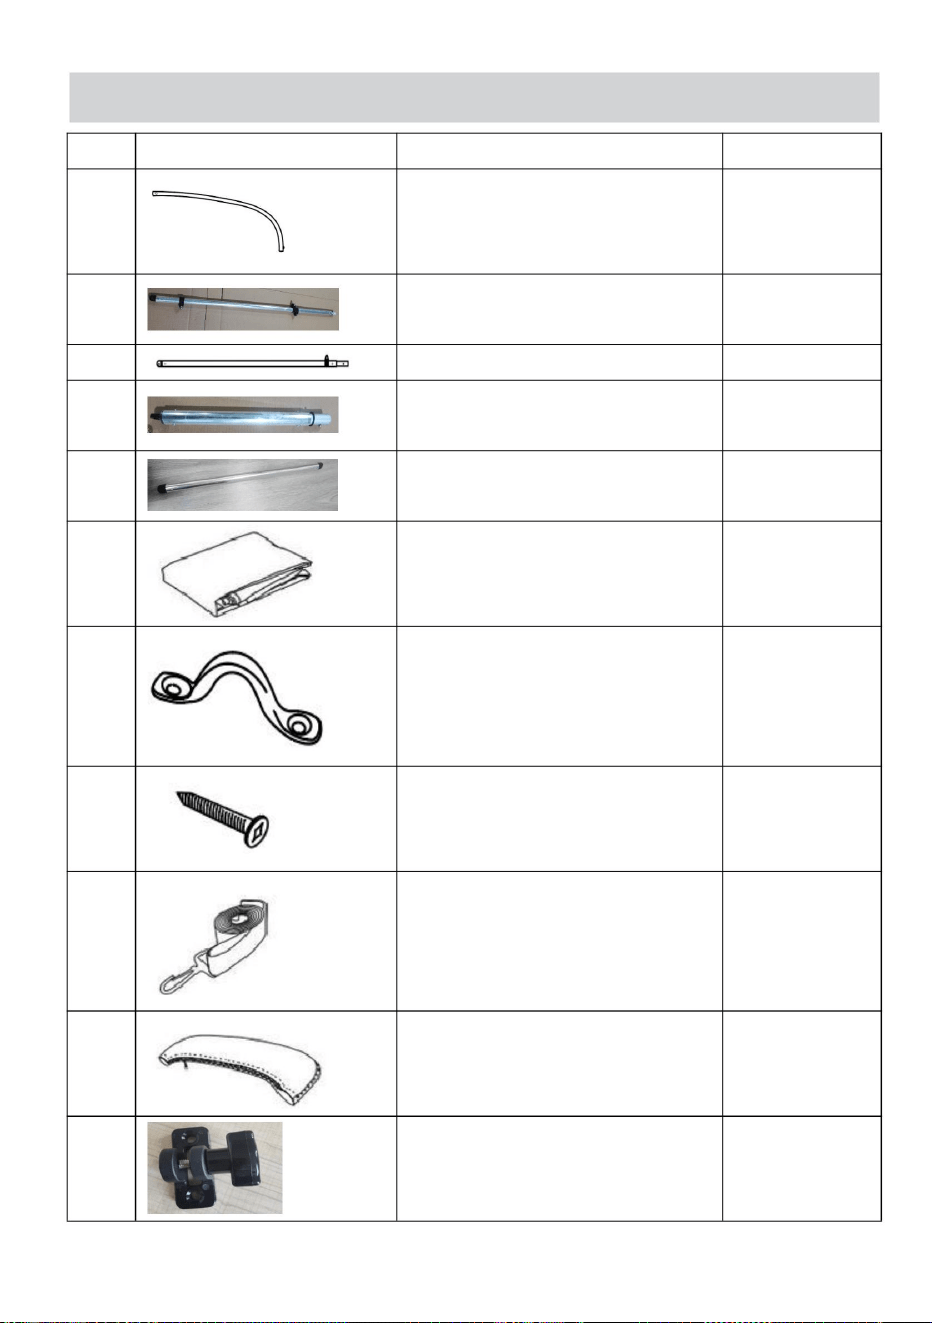
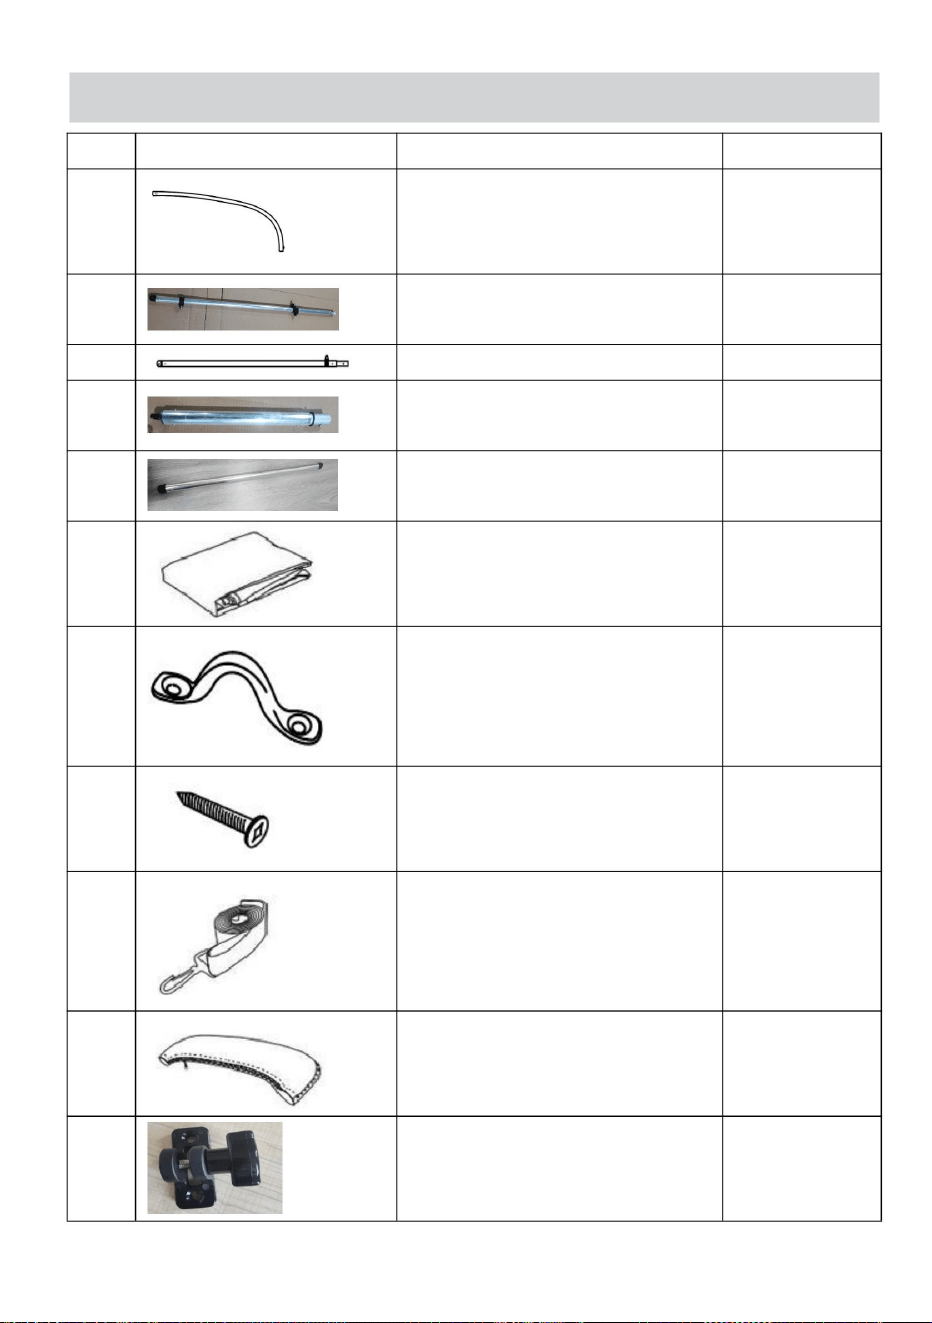
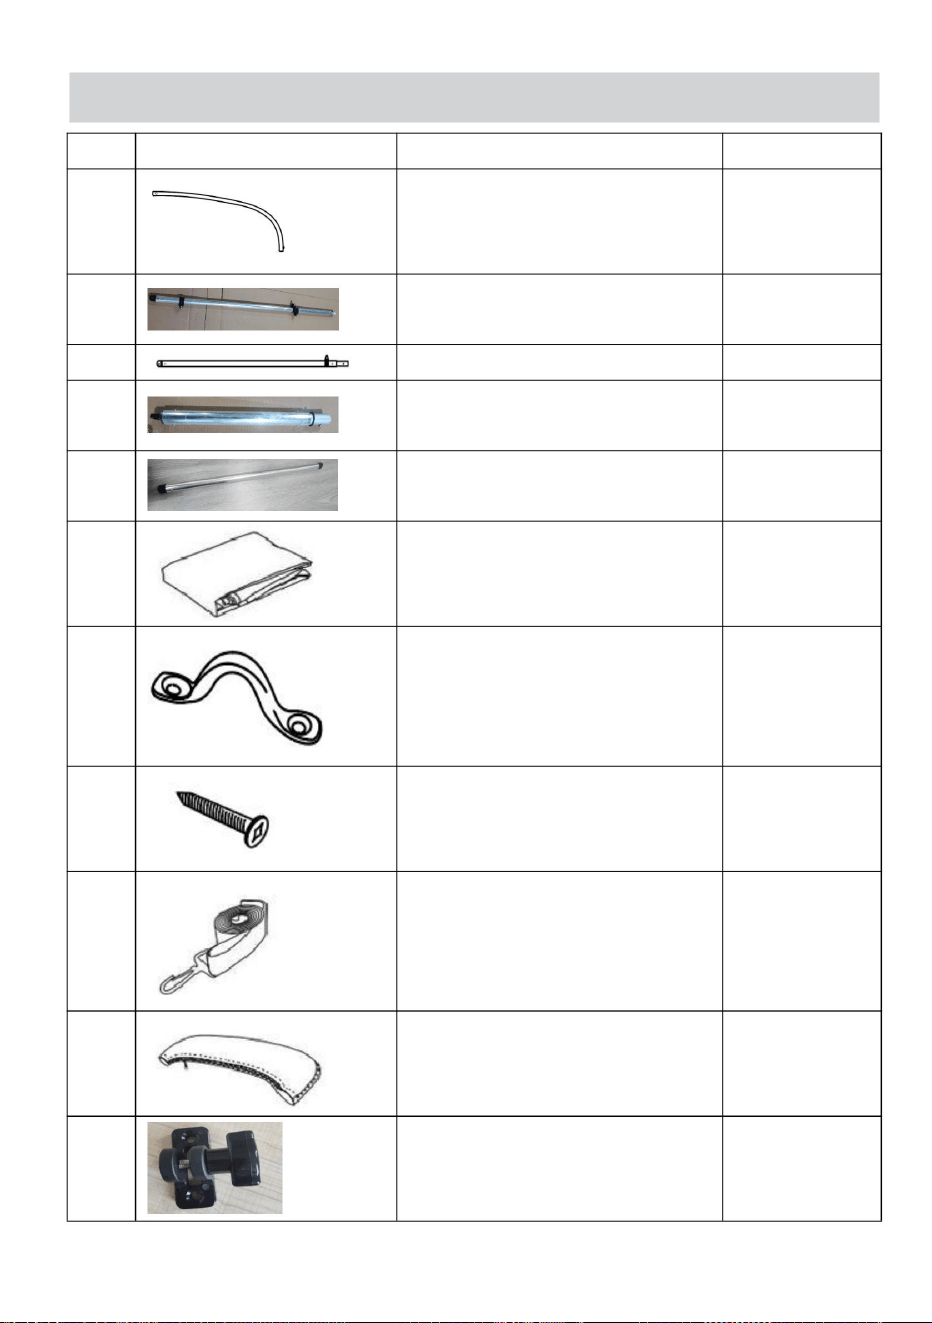
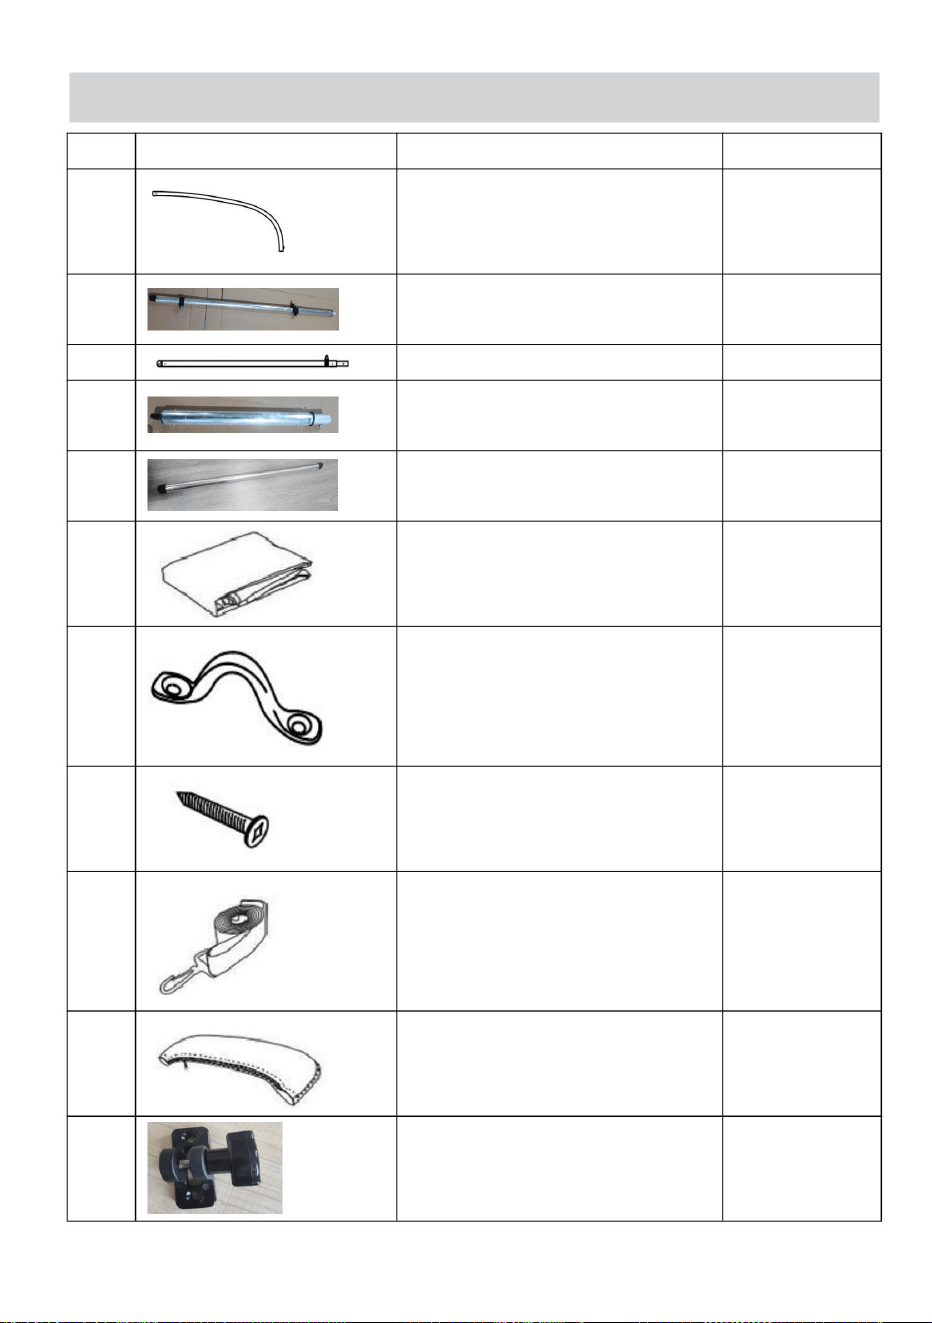
3 BOW BIMINI PACKING LIST
Component
Quantity
1
Crossbars
3+3
2
Long Bow
2
3
Mid Bow
2
4
Short Bow
2
5
Rear Support Pole
2
6
Tent
1
7
Stainless Steel Saddle
4
8
Self Tapping Screw
16
9
Straps with Stainless Steel
Hook & Webbing Adjuster
4
10
Storage Boot
1
11
Pole Base
4

- 4 -
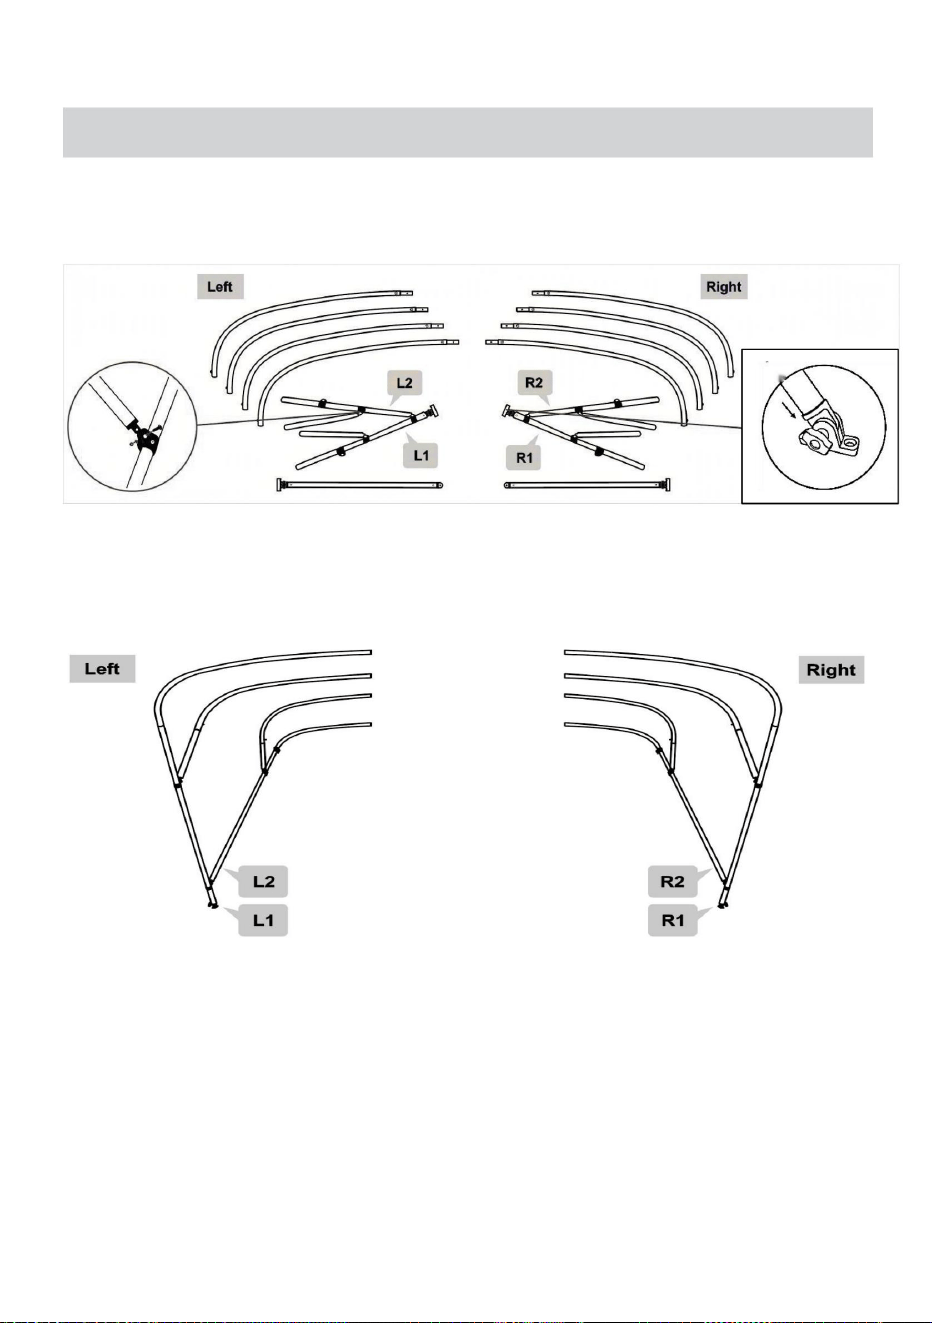
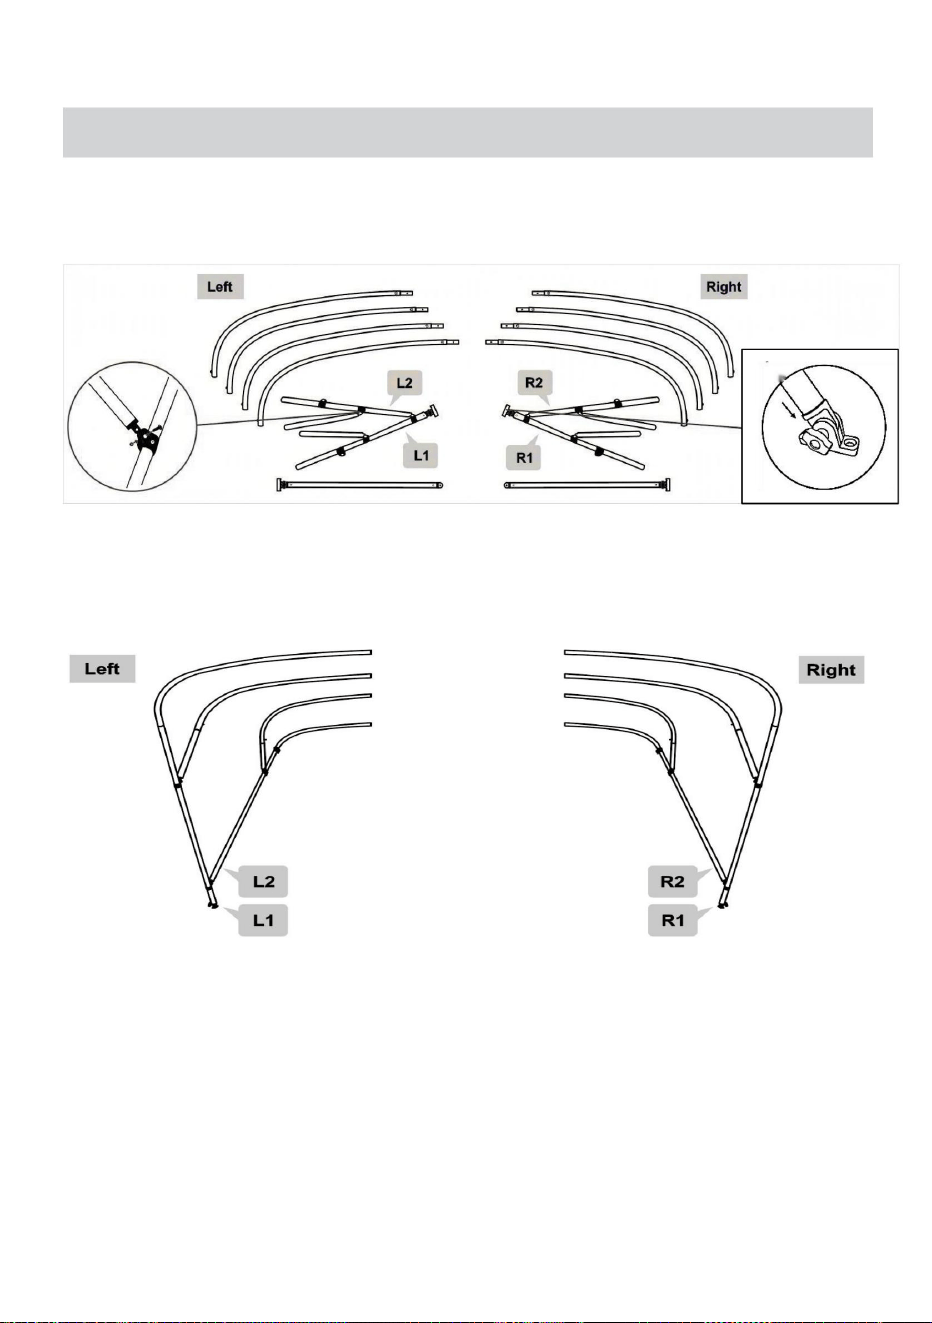
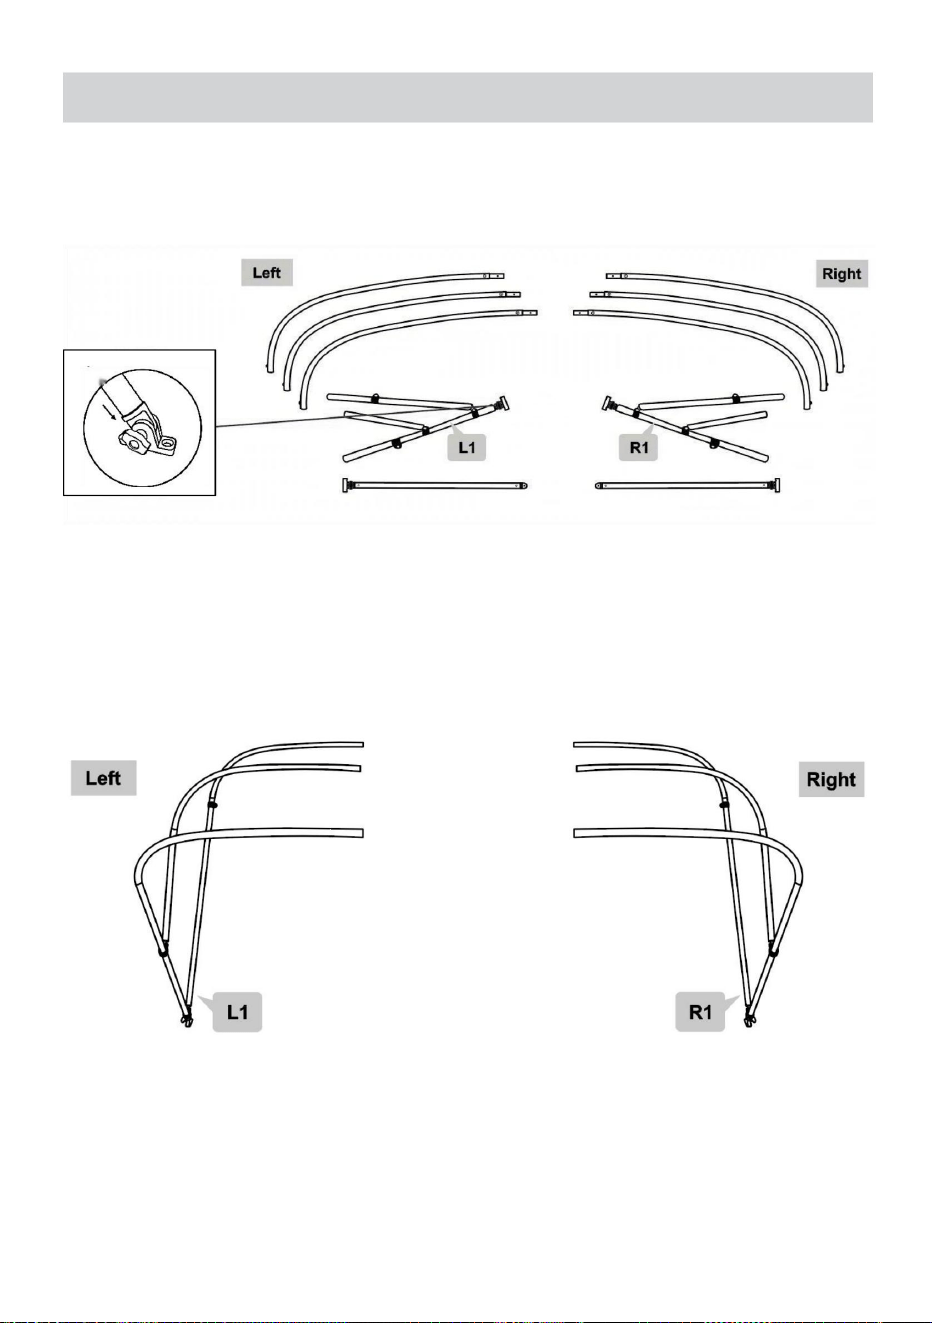
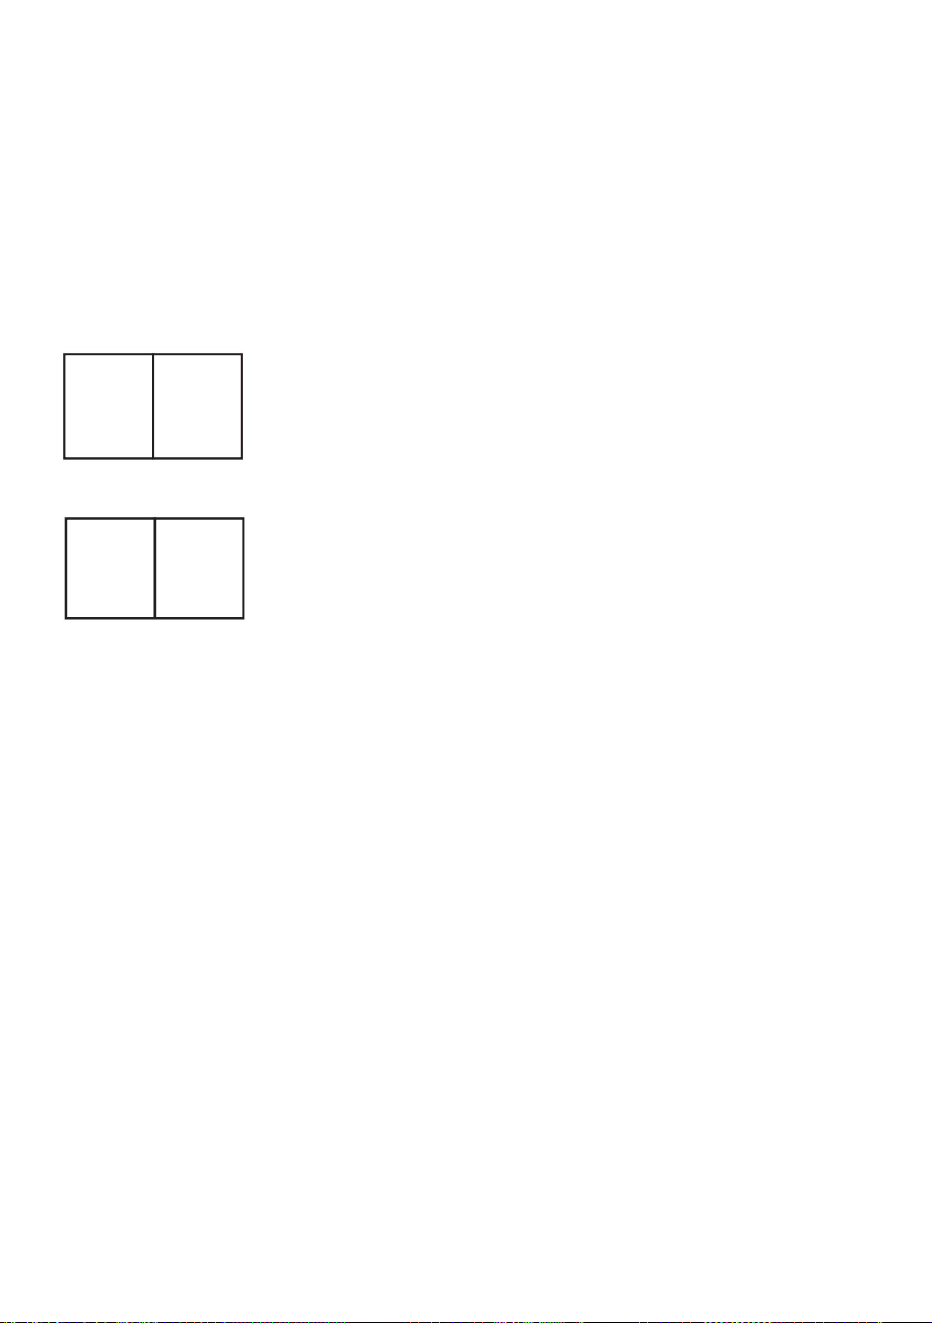
3 BOW BIMINI ASSEMBLY INSTRUCTIONS
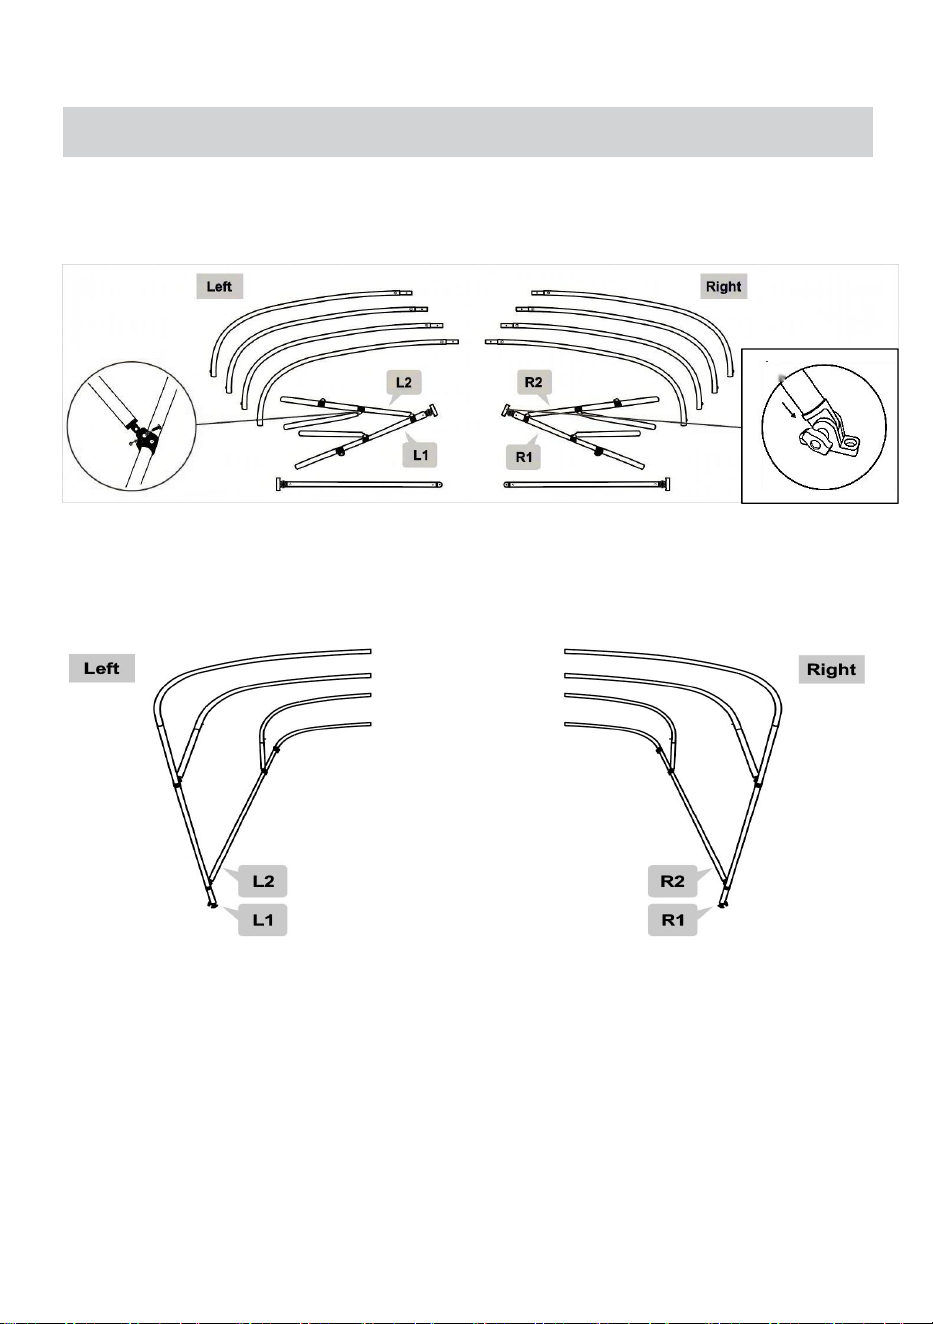
1. Open the package and check the product.
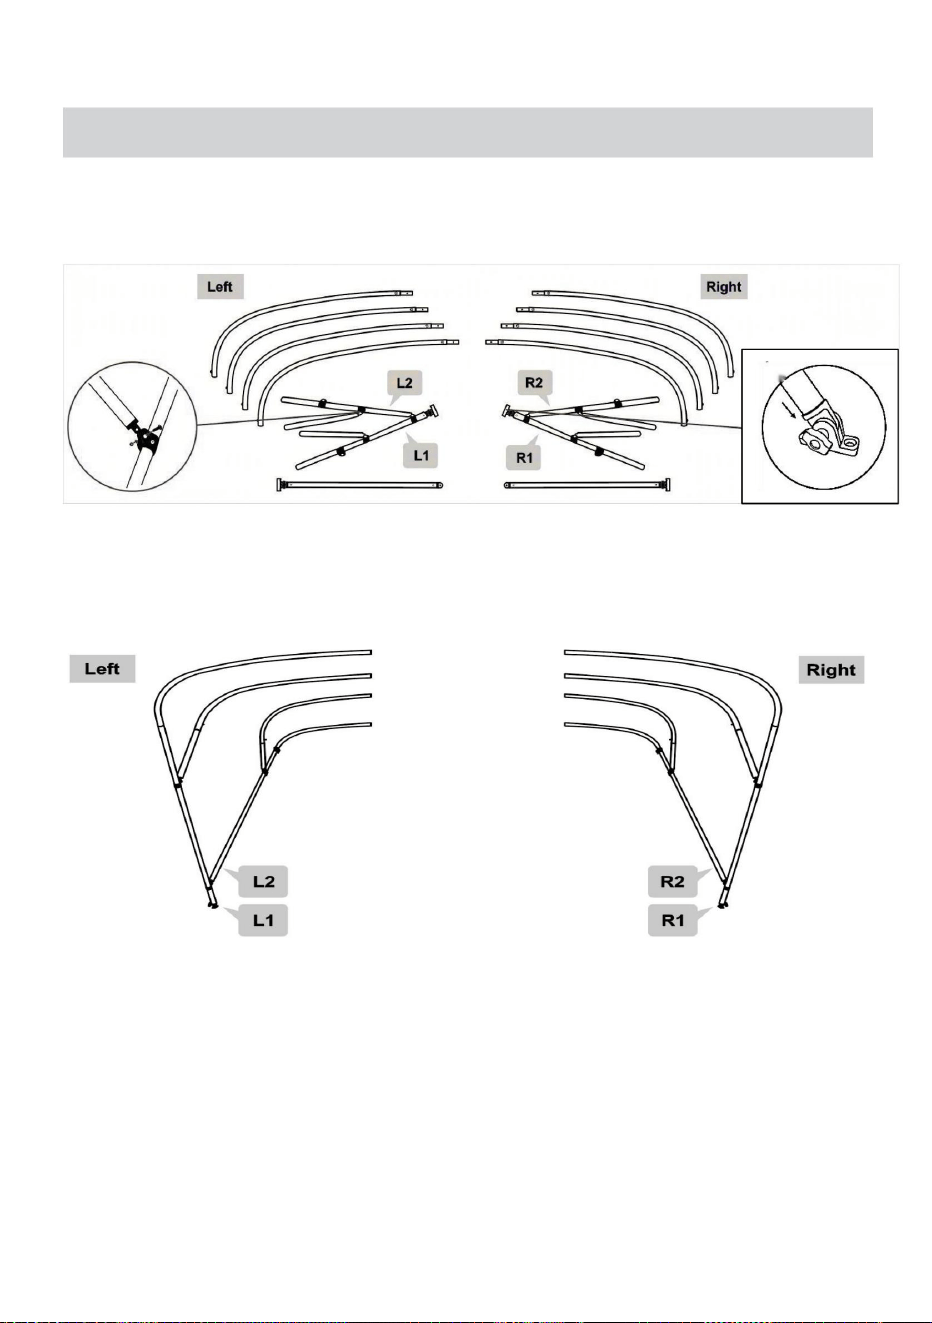
Assemble the left and right sections of the frame, as shown the below
figure.
2. Frame setup is completed. (Attention: Pay attention to screws between
adapting pieces.)
Please note that we have pasted L1 and R1 stickers on the frame to help you
distinguish left from right.
Connect L1 and L2 to tube, then repeat for the right tubes.

- 5 -
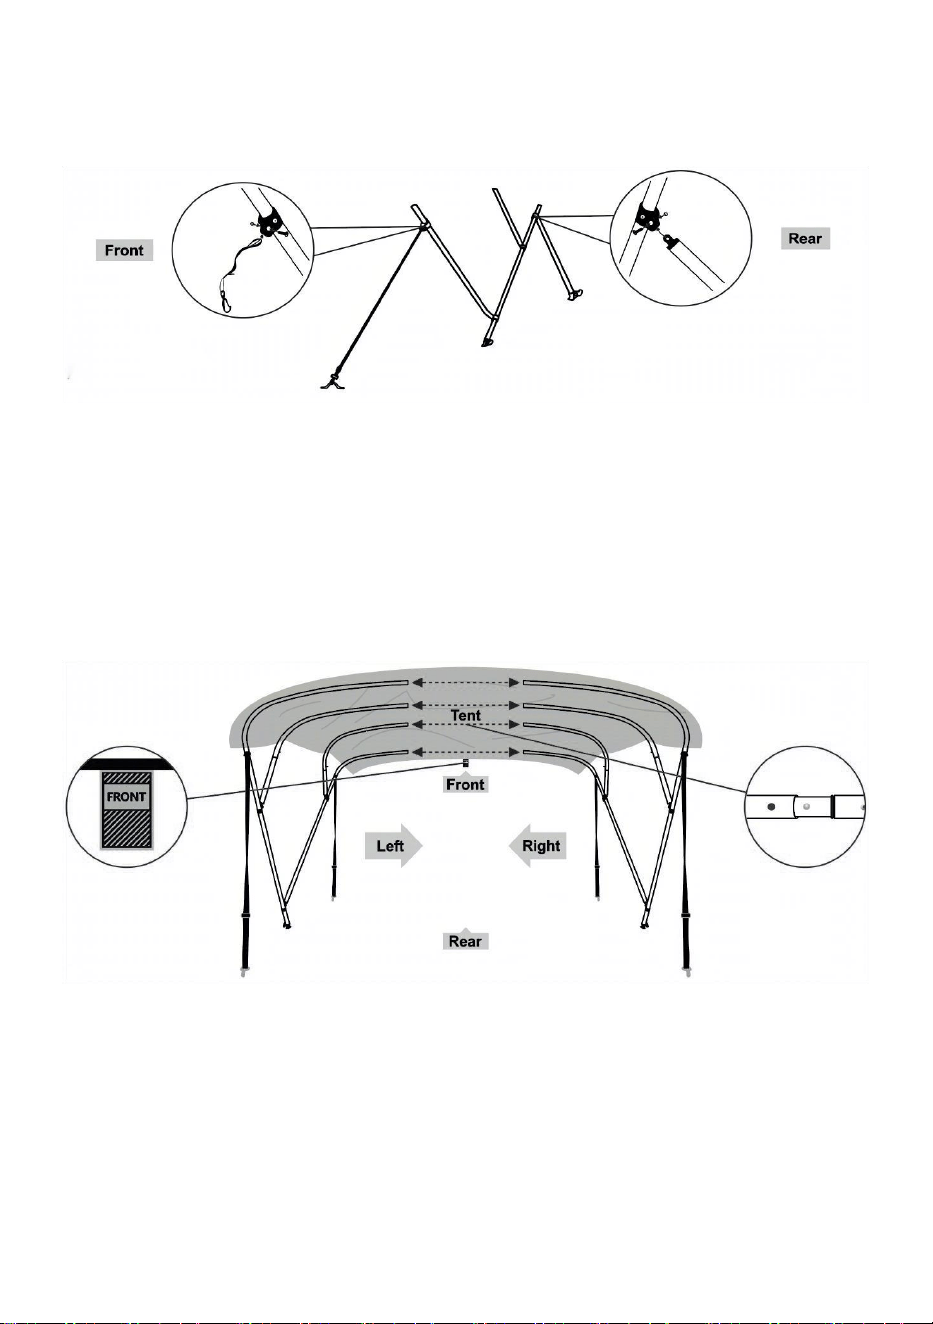
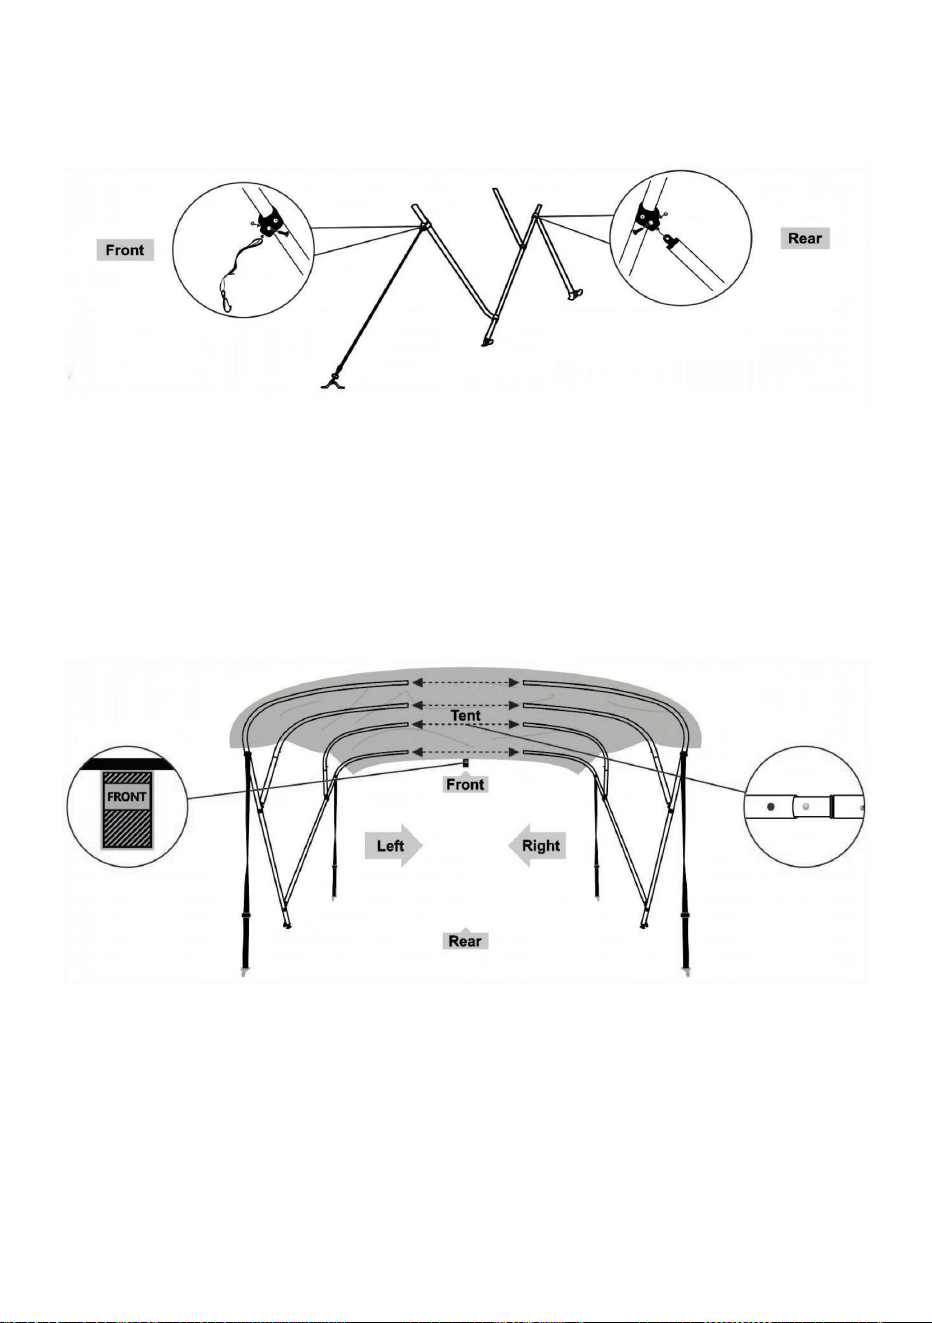
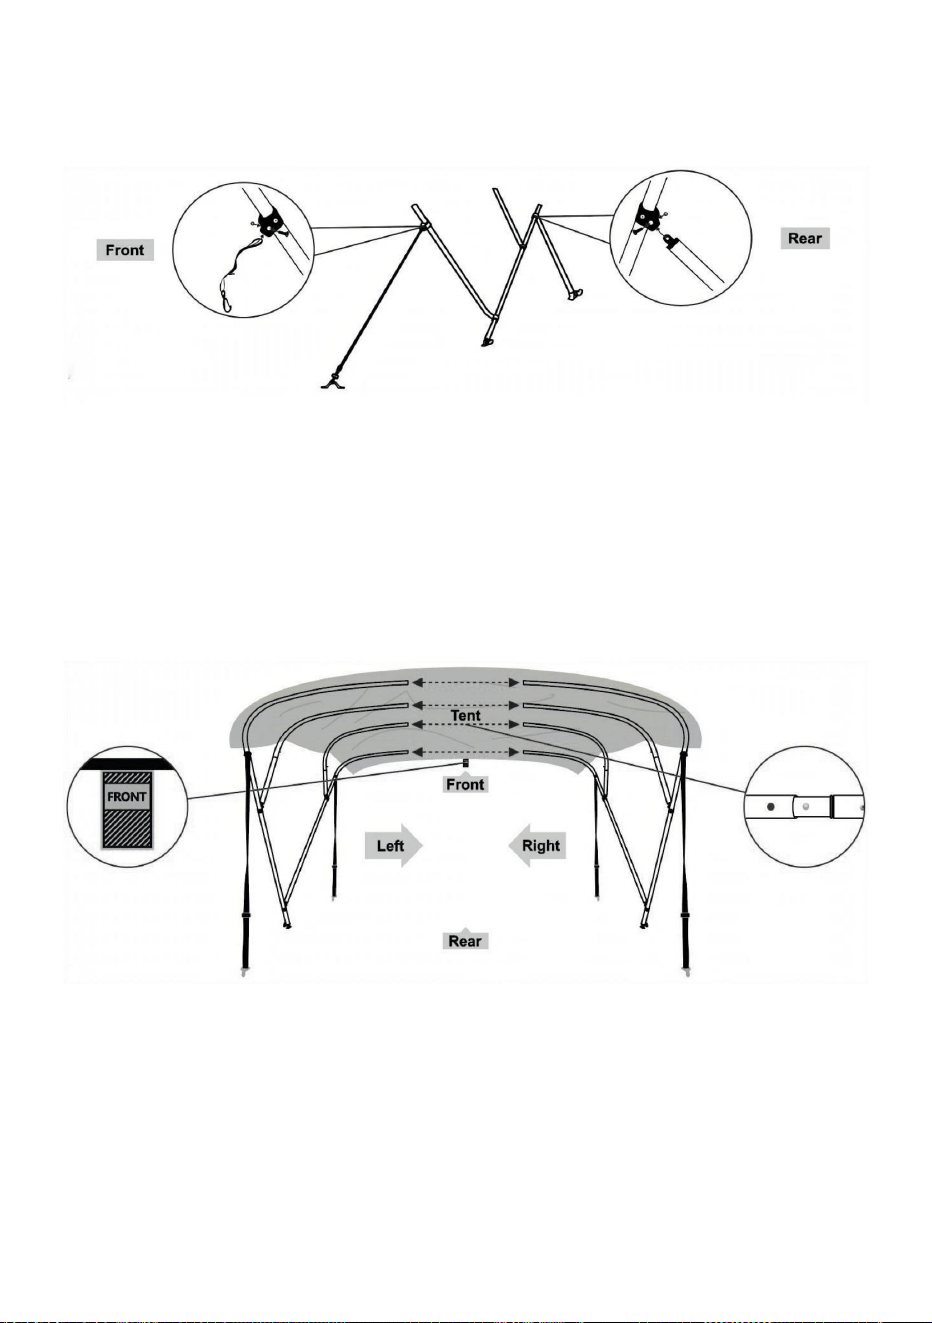
3. Connect the bolt head to the long pole and to the mid pole, as shown the
below figure.
Connect the top of the adapting piece (on the mid bow) to the webbing, as
shown the figure.
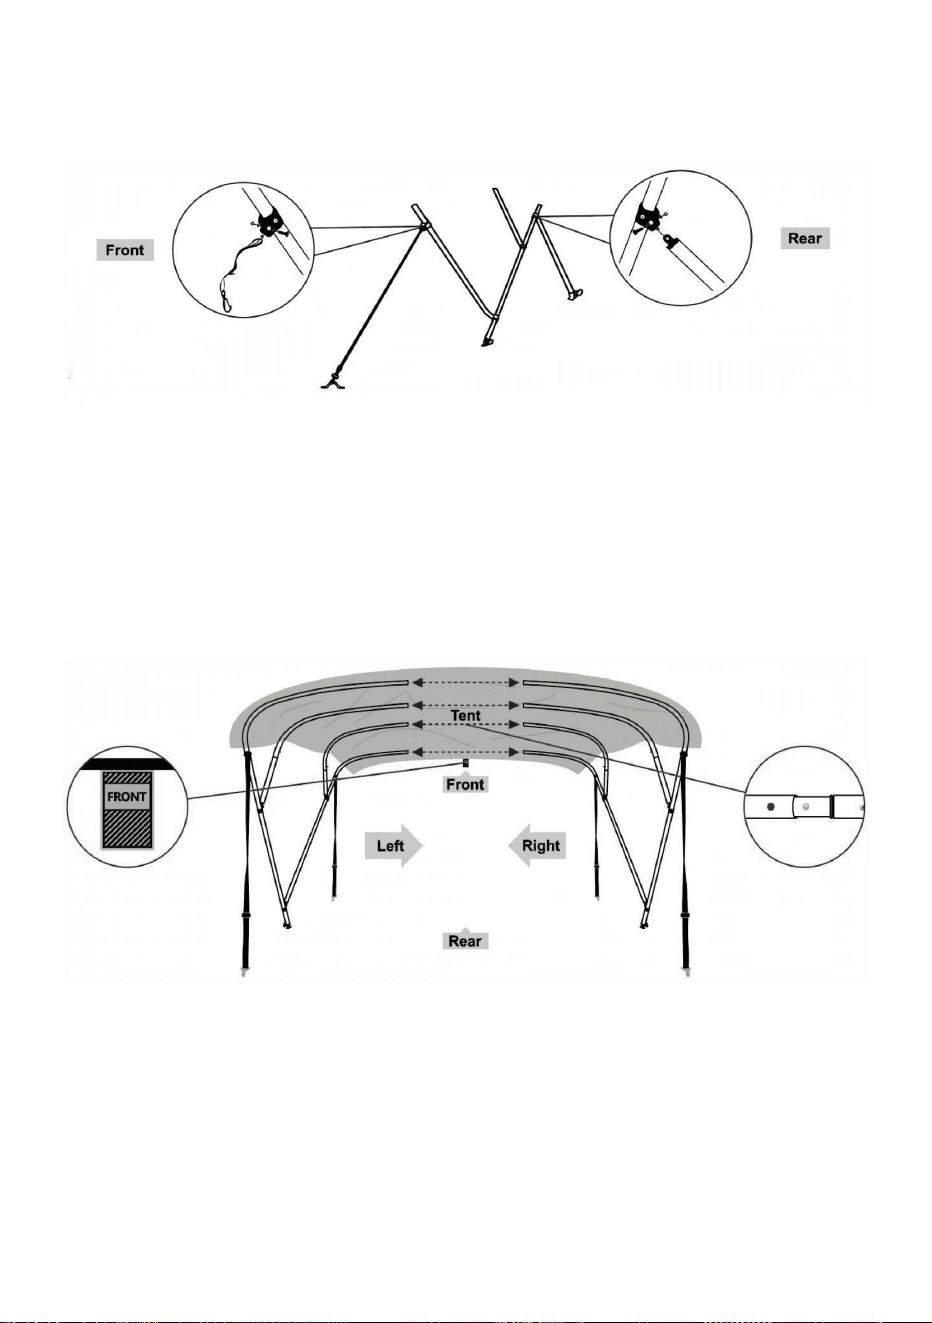
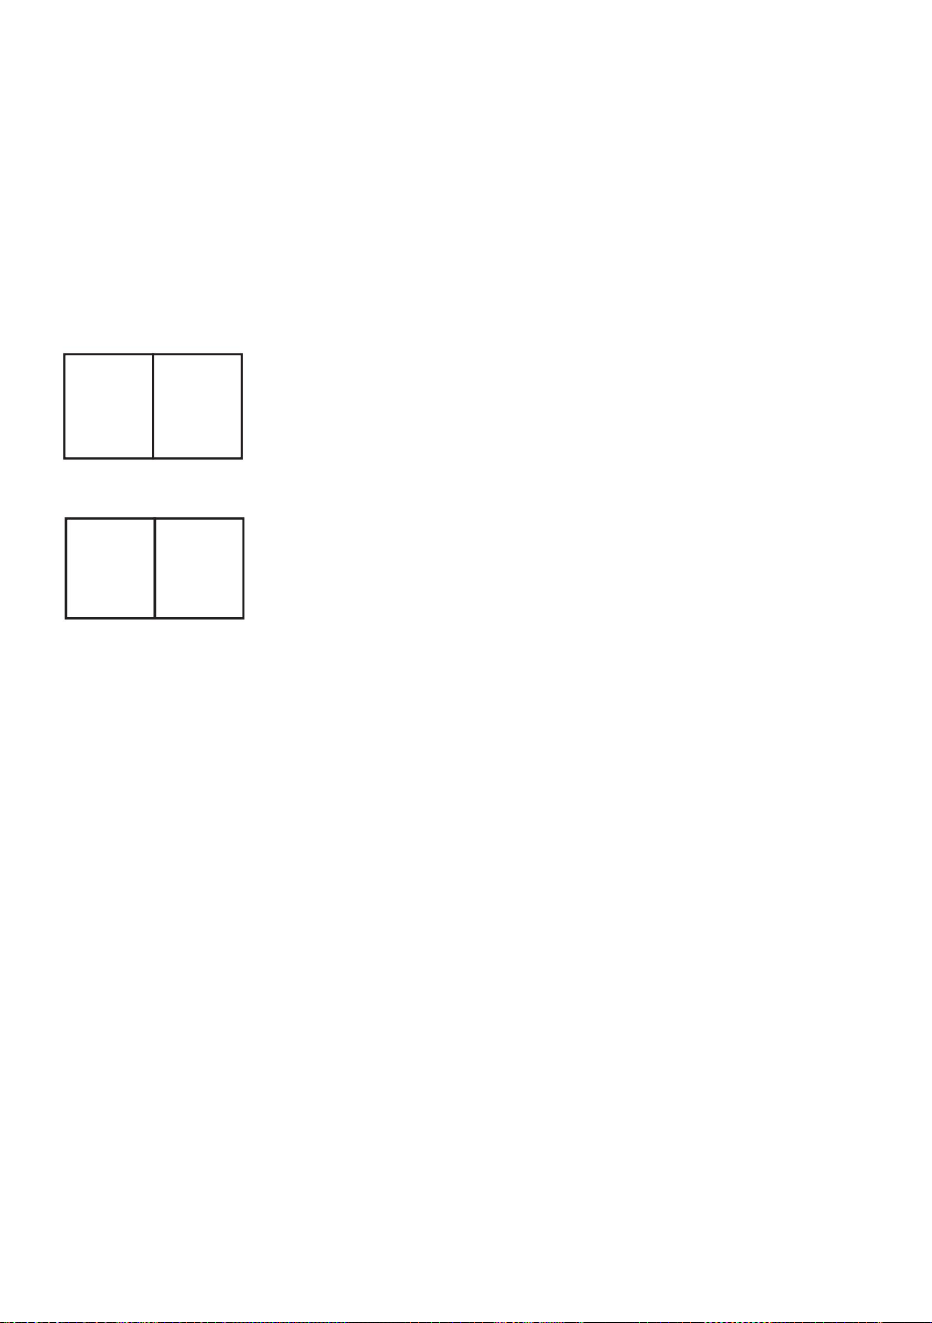
4. Please pay attention to the "Front" label before installation. Hold the left
or right side of the frame and insert the frame tube through the tent, as
shown in the figure below. After one side has been dealt with, connect the
tube together, and finally, stretch the cover to make it flat.
- 6 -
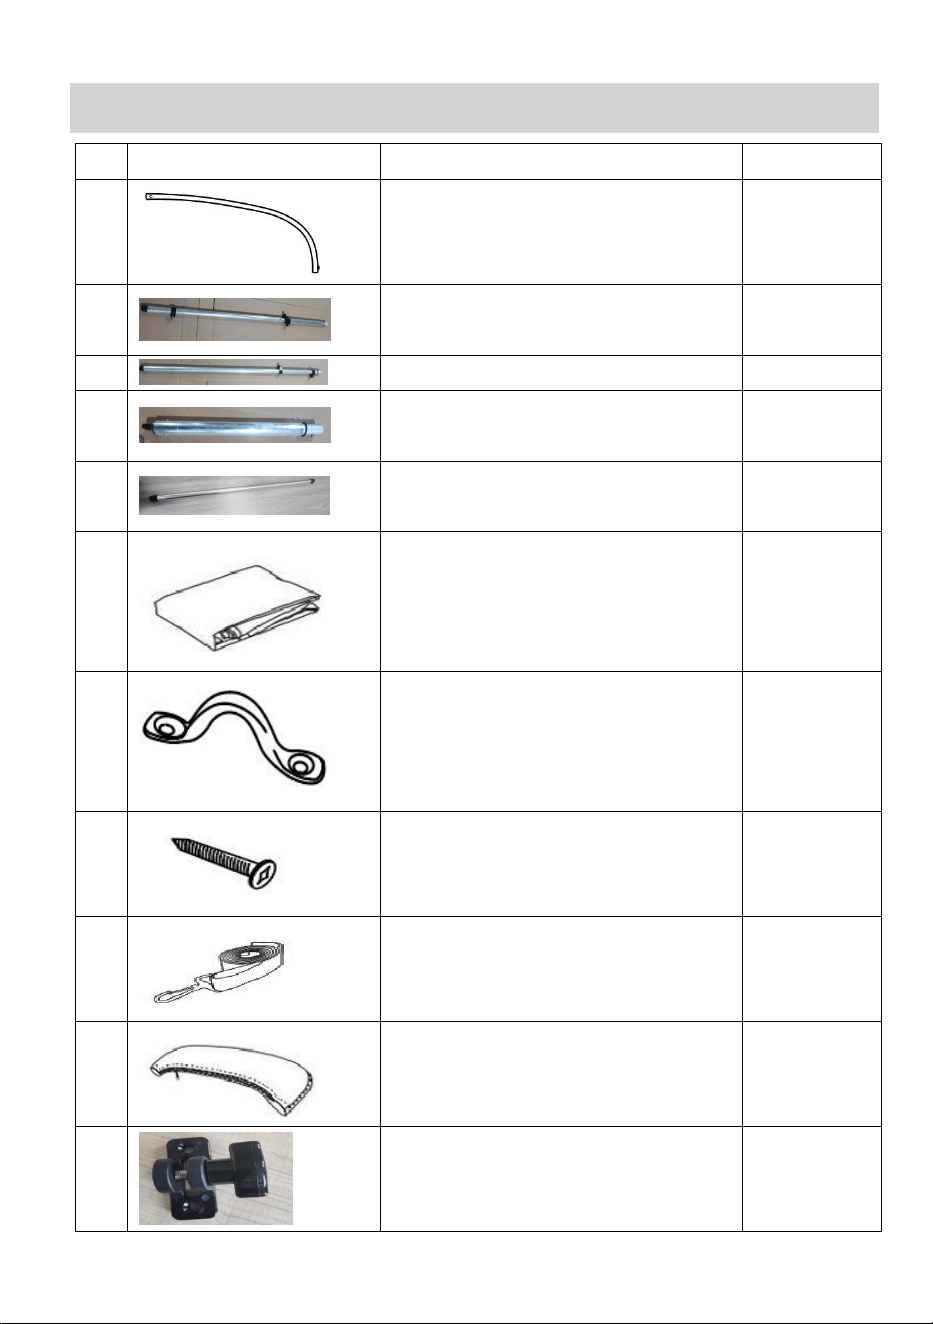
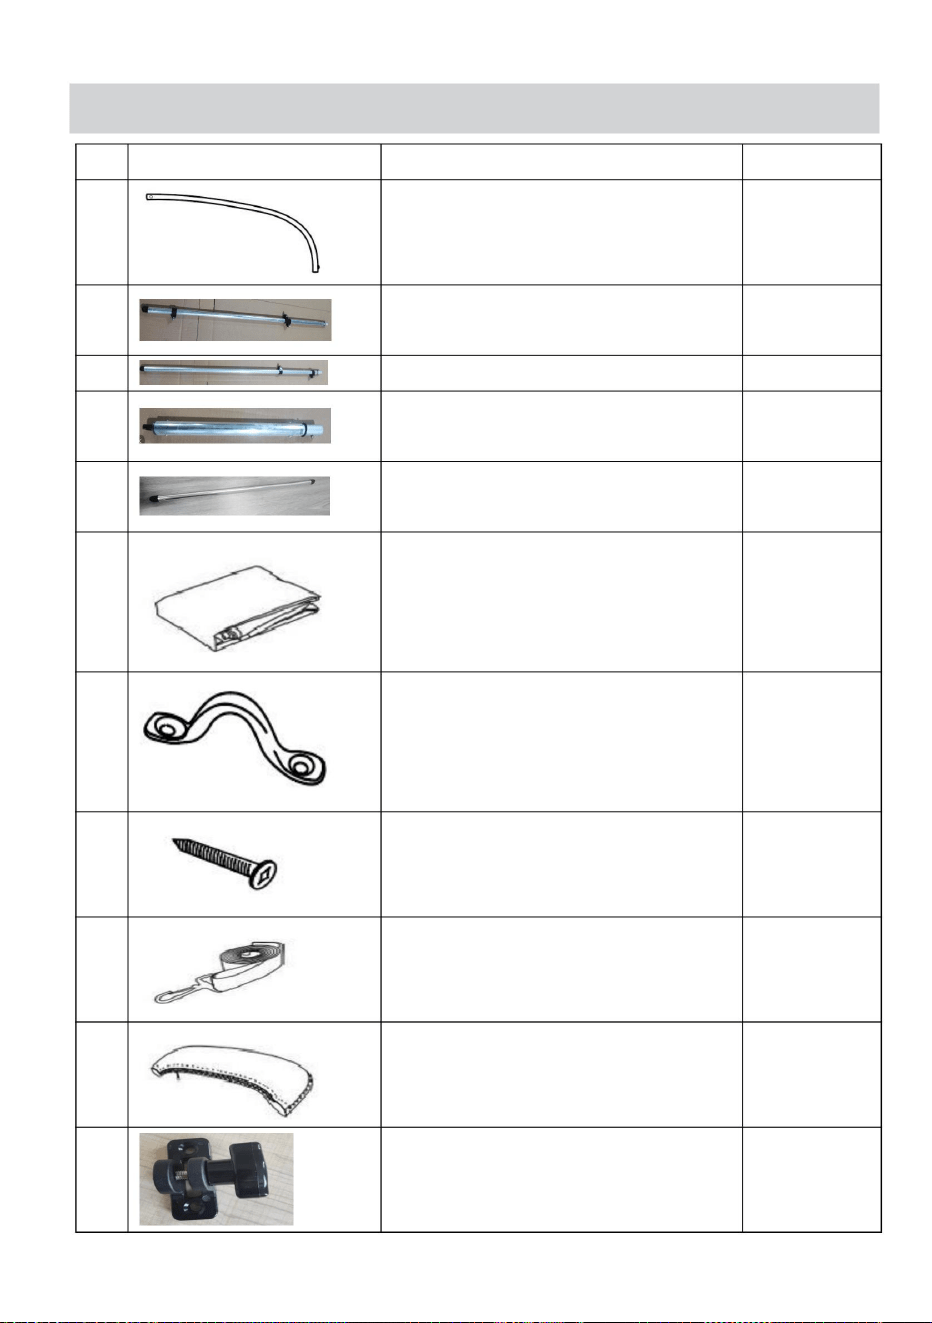
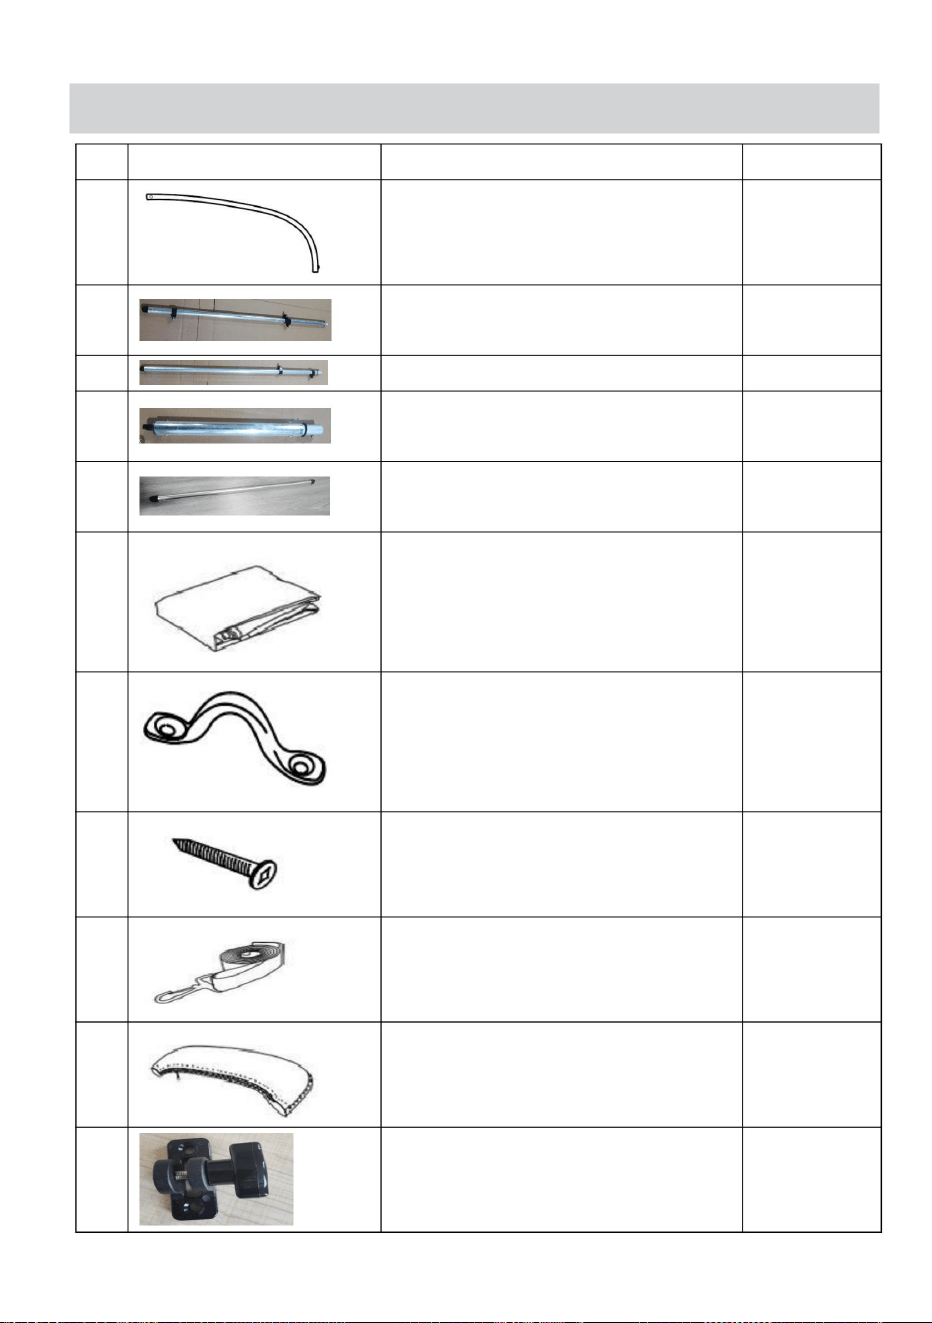
4 BOW BIMINI PACKING LIST
Component
Quantity
1
Crossbars
4+4
2
Long Bow
2
3
Mid Bow
2
4
Short Bow
4
5
Rear Support Pole
2
6
Tent
1
7
Stainless Steel Saddle
4
8
Self Tapping Screw
16
9
Straps with Stainless Steel Hook
& Webbing Adjuster
4
10
Storage Boot
1
11
Pole Base
4
- 7 -
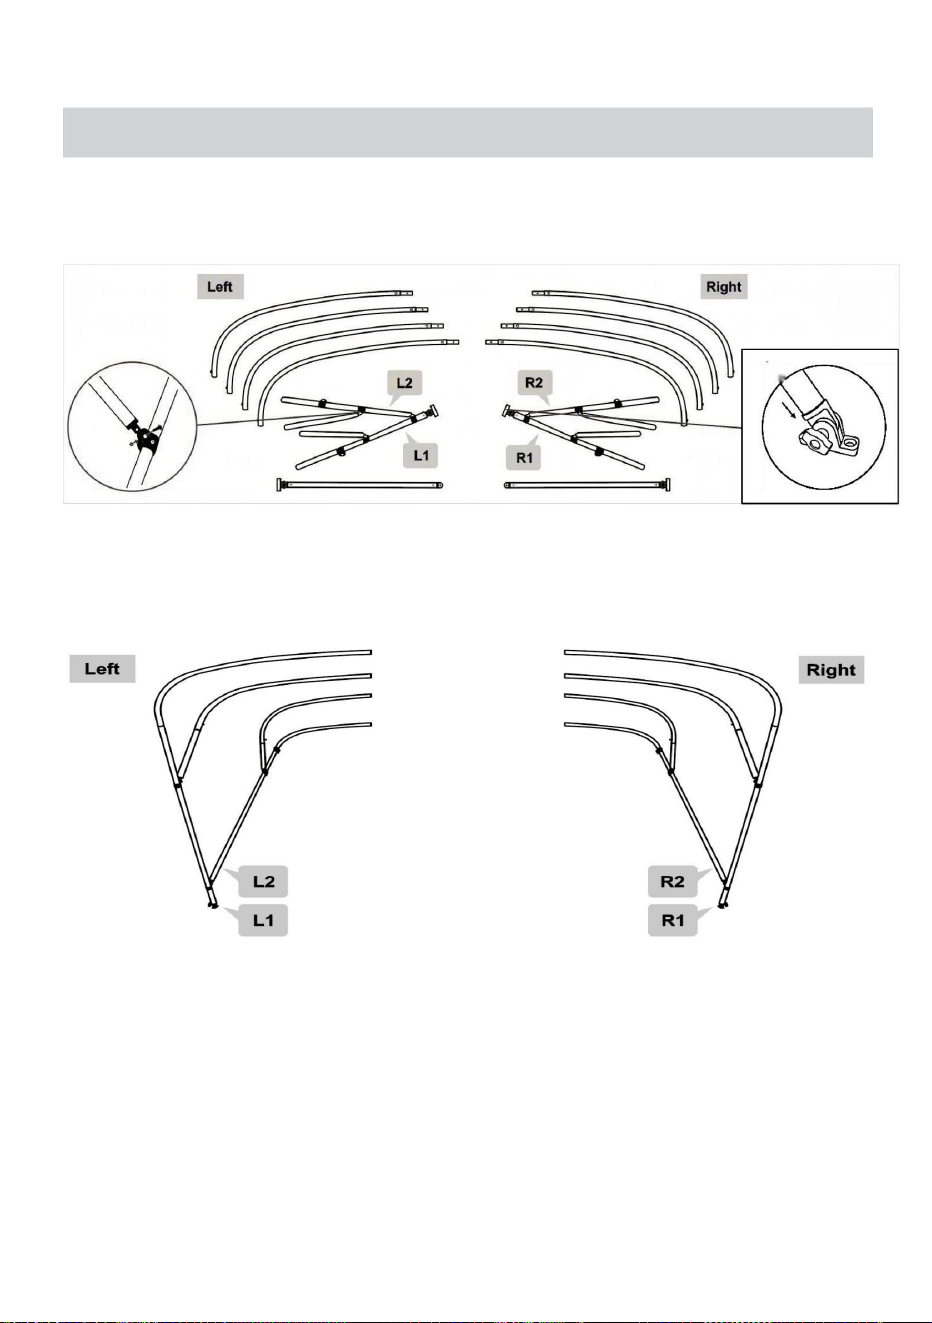
4 BOW BIMINI ASSEMBLY INSTRUCTIONS
1. Open the package and check the product.
Assemble the left and right section of the frame, as shown the below
figure.
2. Frame setup is completed. (Attention: Pay attention to screws
between adapting pieces.)
Please note that we have pasted L1 and R1 stickers on the frame to help you
distinguish left from right.
Connect L1 and L2 to tube, then repeat for the right tubes.
- 8 -
3. Connect the bolt head to the long pole and to the mid pole, as shown
the below figure.
Connect the top of the adapting piece (on the mid bow) to the
webbing, as shown the figure.
4. Please pay attention to the "Front" label before installation. And hold the left or
right side of the frame and insert the frame tube through the tent, as shown in the
figure below. After one side has been dealt with, connect the tube together, and
finally, stretch the cover to make it flat.
- 9 -
Address:Baoshanqu Shuangchenglu 803long 11hao 1602A-1609shi Shanghai
Imported to AUS: SIHAO PTY LTD. 1 ROKEVA STREETEASTWOOD NSW 2122
Australia
Imported to USA: Sanven Technology Ltd. Suite 250, 9166 Anaheim Place,
Rancho Cucamonga, CA 91730
REP
UK
Pooledas Group Ltd
Unit 5 Albert Edward House, The Pavilions
Preston, United Kingdom
REP
EC
SHUNSHUN GmbH
Römeräcker 9 Z2021, 76351
Linkenheim-Hochstetten, Germany
Made In China


Assistancetechniqueetcertificatdegarantieélectroniquewww.vevor.com/support
HAUTDEBIMINIPOURBATEAU
"Économisezlamoitié","Moitiéprix"outouteautreexpressionsimilairequenousutilisons
nereprésentequ'uneestimationdeséconomiesdontvouspourriezbénéficierenachetantcertains
outilscheznousparrapportauxgrandesmarquesetnesignifiepasnécessairementcouvrirtoutes
lescatégoriesd'outilsproposés.parnous.Nousvousrappelonsdebienvouloirvérifierattentivement
lorsquevouspassezunecommandecheznoussivouséconomisezréellementlamoitiéparrapport
auxgrandesmarques.
Nouscontinuonsànousengageràvousfournirdesoutilsàdesprixcompétitifs.
Machine Translated by Google
Assistancetechniqueetcertificatdegarantie
électroniquewww.vevor.com/support
BESOIND'AIDE?CONTACTEZNOUS!
1
Ils'agitdesinstructionsoriginales,veuillezlireattentivementtouteslesinstructionsdu
manuelavantdel'utiliser.VEVORseréserveuneinterprétationclairedenotremanueld’utilisation.
L'apparenceduproduitdépendduproduitquevousavezreçu.Veuilleznouspardonnerque
nousnevousinformeronspluss'ilyadesmisesàjourtechnologiquesoulogiciellessurnotreproduit.
Vousavezdesquestionssurlesproduits?Besoind'uneassistancetechnique?N'hésitezpasà
nouscontacter:
BIMINI3ARC
BIMINI4ARC
HAUTDEBIMINIPOURBATEAU
Machine Translated by Google

CONSERVEZCESINSTRUCTIONS
CONSIGNESDESÉCURITÉ
2
précaution,avertissementoudanger.Ignorercetavertissementpeutconduireà
lesenfantsloindesauventslorsdesonassemblagepourlesprotéger.
Remarque:veuillezvérifiersitouteslespiècessontprésentesavantl'assemblage.
Cesymbole,placéavantuncommentairedesécurité,indiqueunesortede
etdeschaussuressolideslorsdel'installationdece
produit.•Ceproduitn'estpasunjouet.Veuillezconserverlespetitespiècesderechangehorsdeportée
desenfants.•Lesauventsnedoiventêtreassemblésqueparaumoinsdeuxadultes.S'ilvousplaîtgarder
Veuillezutiliserlabottepourprotégerletissulorsqueletoitbiminin'estpasutilisé.
Note
unaccident.Pourréduirelerisquedeblessure,d'incendieoud'électrocution,
veuilleztoujourssuivrelesrecommandationsindiquéescidessous.
NOTE:
•Veuillezplierletoitbiminilorsquelavitessedunaviredépasse45MPH.•Veuillezrépéter
lamêmeopérationpourlebiminià3arceaux.
•
attentivementlemanueld’instructions.
contactavecuneflammenue.•
Teniràl'écartdespointestranchantes,deslamesetautresobjets,afindenepasrayerle
produit.•
Afind'assurervotrepropresécurité,assurezvousdeporteruncasque,desgants
Avertissement:Pourréduirelerisquedeblessure,l'utilisateurdoitlirele
•Veuillezlireattentivementcemanuelavantd'utiliserleproduit.•Teniràl'écart
desflammesnues.Ceproduits'enflammeraetbrûleras'ilestintroduitdans
AVERTISSEMENT:
SymboleSymboleDescription
Machine Translated by Google
LISTEDECOLISAGEBIMINIÀ3ARC
Barrestransversales
Arccourt
Selleenacierinoxydable
6
Sanglesenacierinoxydable
dix
1
9
5
8
1
2
4
Basedepoteau
2
2
16
Unarc
Tente
Ajusteurdecrochetetdesangle
Composant
4
1
4
7
3+3
2
4
Démarragedestockage
Visautotaraudeuse
11
Arclong
Poteaudesupportarrière
Quantité
2
3
3
Machine Translated by Google

INSTRUCTIONSDEMONTAGEDUBIMINIÀ3ARC
VeuilleznoterquenousavonscollédesautocollantsL1etR1surlecadrepourvousaiderà
distinguerlagauchedeladroite.
1.Ouvrezl'emballageetvérifiezleproduit.
2.Laconfigurationducadreestterminée.(Attention:faitesattentionauxvisentrelespièces
d'adaptation.)
ConnectezL1etL2autube,puisrépétezpourlesbonstubes.
Assemblezlessectionsgaucheetdroiteducadre,commeindiquésurlafigurecidessous.
4
Machine Translated by Google

4.Veuillezfaireattentionàl'étiquette«Front»avantl'installation.Tenezlecôtégaucheou
droitducadreetinsérezletubeducadreàtraverslatente,commeindiquédanslafigureci
dessous.Unefoisqu'uncôtéaététraité,connectezlestubesensembleetenfin,étirezle
couverclepourlerendreplat.
3.Connectezlatêteduboulonaupoteaulongetaupoteaucentral,commeindiquésurla
figurecidessous.
Connectezlehautdelapièced'adaptation(surlenœudcentral)àlasangle,commeindiqué
surlafigure.
5
Machine Translated by Google
LISTEDECOLISAGEBIMINIÀ4ARC
2
5
8
1
9
1
Selleenacierinoxydable
Barrestransversales
Arccourt
dix
Composant
Unarc
Tente
etajusteurdesangle
2
2
16
Basedepoteau
Démarragedestockage
4+4
4
4
4
1
7
4
Sanglesaveccrochetenacierinoxydable
3
6
4
Quantité
2
Arclong
Poteaudesupportarrière
Visautotaraudeuse
11
6
Machine Translated by Google
INSTRUCTIONSDEMONTAGEDUBIMINIÀ4ARC
Assemblezlessectionsgaucheetdroiteducadre,commeindiquésurlafigurecidessous.
2.Laconfigurationducadreestterminée.(Attention:faitesattentionauxvisentrelespièces
d'adaptation.)
1.Ouvrezl'emballageetvérifiezleproduit.
ConnectezL1etL2autube,puisrépétezpourlesbonstubes.
VeuilleznoterquenousavonscollédesautocollantsL1etR1surlecadrepourvousaiderà
distinguerlagauchedeladroite.
7
Machine Translated by Google
3.Connectezlatêteduboulonaupoteaulongetaupoteaucentral,commeindiquésur
lafigurecidessous.
Connectezlehautdelapièced'adaptation(surlenœudcentral)àla
sangle,commeindiquésurlafigure.
4.Veuillezfaireattentionàl'étiquette«Front»avantl'installation.Etmaintenezlagaucheou
côtédroitducadreetinsérezletubeducadreàtraverslatente,commeindiquésurle
enfin,étirezlahoussepourlarendreplate.
8
Figurecidessous.Unefoisqu'uncôtéaététraité,connectezletubeensembleet
Machine Translated by Google

ImportéauxÉtatsUnis:SanvenTechnologyLtd.Suite250,9166AnaheimPlace,Rancho
Cucamonga,CA91730
Preston,RoyaumeUni
Römeräcker9Z2021,76351
Adresse:BaoshanquShuangchenglu803long11hao1602A1609shiShanghaiImportéen
Australie:SIHAOPTYLTD.1ROKEVASTREETASTWOODNSW2122Australie
GroupePooledasLtd
LinkenheimHochstetten,Allemagne
SHUNSHUNGmbH
Unité5MaisonAlbertEdward,LesPavillons
FabriquéenChine
9
REPRÉSENTANTCE
REPRÉSENTANTDUROYAUMEUNI
Machine Translated by Google

Machine Translated by Google


„Sparen Sie die Hälfte“, „Halber Preis“ oder andere ähnliche von uns verwendete Ausdrücke
stellen lediglich eine Schätzung der Einsparungen dar, die Sie durch den Kauf bestimmter Werkzeuge
bei uns im Vergleich zu den großen Top-Marken erzielen könnten, und bedeuten nicht unbedingt,
dass alle angebotenen Werkzeugkategorien abgedeckt werden von uns. Bitte prüfen Sie bei Ihrer
Bestellung sorgfältig, ob Sie im Vergleich zu den Top-Marken tatsächlich die Hälfte sparen.
Wir sind weiterhin bestrebt, Ihnen Werkzeuge zu wettbewerbsfähigen Preisen anzubieten.
BOOT-BIMINI-TOP
Technischer Support und E-Garantiezertifikat www.vevor.com/support
Machine Translated by Google
Haben Sie Fragen zum Produkt? Benötigen Sie technische Unterstützung? Sie können uns
gerne kontaktieren:
Dies ist die Originalanleitung. Bitte lesen Sie alle Bedienungsanleitungen sorgfältig durch,
bevor Sie das Gerät in Betrieb nehmen. VEVOR behält sich eine klare Auslegung unserer
Bedienungsanleitung vor. Das Aussehen des Produkts hängt von dem Produkt ab, das Sie
erhalten haben. Bitte entschuldigen Sie, dass wir Sie nicht erneut informieren, wenn es zu unserem
Produkt technische oder Software-Updates gibt.
3-BOGEN-BIMINI
4-BOGEN-BIMINI
BOOT-BIMINI-TOP
- 1 -
Technischer Support und E-Garantiezertifikat
www.vevor.com/support
BRAUCHEN SIE HILFE? KONTAKTIERE UNS!
Machine Translated by Google
- 2 -
Dieses Symbol vor einem Sicherheitskommentar weist auf eine Art hin
und festes Schuhwerk bei der Installation dieses Produkts. •
Dieses Produkt ist kein Spielzeug. Bitte bewahren Sie kleine Ersatzteile außerhalb der Reichweite von Kindern auf.
• Die Markisen sollten nur von mindestens zwei Erwachsenen aufgebaut werden. Bitte behalte
Lesen Sie die Bedienungsanleitung sorgfältig durch.
Vorsichtsmaßnahme, Warnung oder Gefahr. Das Ignorieren dieser Warnung kann dazu führen
Halten Sie Kinder beim Aufbau von der Markise fern, um sie zu schützen.
NOTIZ:
ein Unfall. Um das Risiko von Verletzungen, Bränden oder Stromschlägen zu verringern,
befolgen Sie bitte immer die unten aufgeführten Empfehlungen.
Bitte verwenden Sie den Kofferraum, um den Stoff zu schützen, wenn das Bimini-Top nicht verwendet wird.
Notiz
•
• Bitte klappen Sie das Bimini-Top zusammen, wenn die Schiffsgeschwindigkeit 45 MPH
überschreitet. • Bitte wiederholen Sie den gleichen Vorgang für das Bimini-Top mit 3 Bögen.
Warnung: Um das Verletzungsrisiko zu verringern, muss der Benutzer die lesen
• Bitte lesen Sie dieses Handbuch sorgfältig durch, bevor Sie das Produkt verwenden.
• Von offenen Flammen fernhalten. Dieses Produkt entzündet sich und brennt, wenn es hineingebracht wird
Hinweis: Bitte prüfen Sie vor dem Zusammenbau, ob alle Teile vorhanden sind.
Produkt. •
Um Ihre eigene Sicherheit zu gewährleisten, tragen Sie bitte unbedingt einen Helm und Handschuhe
Kontakt mit einer offenen Flamme. •
Halten Sie sich von scharfen Spitzen, Klingen und anderen Gegenständen fern, um das Gerät nicht zu zerkratzen
Symbol Symbolbeschreibung
WARNUNG:
Bewahren Sie diese Anleitung auf
SICHERHEITSHINWEISE
Machine Translated by Google

- 3 -
4
1
9
Querstangen
Kurzbogen
Sattel aus Edelstahl
10
5
8
1
2
Stangenbasis
2
2
16
Komponente
Ein Bogen
Zelt
1
4
7
Haken- und Gurtversteller
4
3+3
2
4
Speicherstart
Selbstschneidende Schraube
11
Langer Bogen
Hintere Stützstange
3
6
Riemen mit Edelstahl
Menge
2
3 BOGEN-BIMINI -PACKLISTE
Machine Translated by Google

- 4 -
1. Öffnen Sie die Verpackung und überprüfen Sie das Produkt.
2. Die Rahmeneinrichtung ist abgeschlossen. (Achtung: Achten Sie auf die Schrauben zwischen den
Adapterstücken.)
Verbinden Sie L1 und L2 mit dem Rohr und wiederholen Sie den Vorgang für die rechten Rohre.
Montieren Sie den linken und rechten Teil des Rahmens, wie in der folgenden Abbildung gezeigt.
Bitte beachten Sie, dass wir L1- und R1-Aufkleber auf den Rahmen geklebt haben, um Ihnen die Unterscheidung
zwischen links und rechts zu erleichtern.
3 MONTAGEANLEITUNG FÜR BOGEN-BIMINI
Machine Translated by Google

- 5 -
3. Verbinden Sie den Schraubenkopf mit der langen Stange und der mittleren Stange, wie in der
folgenden Abbildung dargestellt.
Verbinden Sie die Oberseite des Adapterstücks (am Mittelbogen) mit dem Gurtband, wie in der
Abbildung gezeigt.
4. Bitte achten Sie vor der Installation auf das Etikett „Front“. Halten Sie den Rahmen links oder rechts
fest und führen Sie das Rahmenrohr durch das Zelt, wie in der Abbildung unten gezeigt. Nachdem eine
Seite bearbeitet wurde, verbinden Sie den Schlauch miteinander und dehnen Sie schließlich die
Abdeckung, um sie flach zu machen.
Machine Translated by Google

- 6 -
4
1
9
Querstangen
Kurzbogen
Sattel aus Edelstahl
10
5
8
1
2
Stangenbasis
2
2
16
Komponente
Ein Bogen
Zelt
1
4
7
& Gurtbandversteller
4
4
4+4
4
Speicherstart
Selbstschneidende Schraube
11
Langer Bogen
Hintere Stützstange
3
6
Riemen mit Edelstahlhaken
2
Menge
4-BOGEN-BIMINI -PACKLISTE
Machine Translated by Google
- 7 -
1. Öffnen Sie die Verpackung und überprüfen Sie das Produkt.
2. Die Rahmeneinrichtung ist abgeschlossen. (Achtung: Achten Sie auf die Schrauben zwischen den
Adapterstücken.)
Verbinden Sie L1 und L2 mit dem Rohr und wiederholen Sie den Vorgang für die rechten Rohre.
Montieren Sie den linken und rechten Teil des Rahmens, wie in der folgenden Abbildung gezeigt.
Bitte beachten Sie, dass wir L1- und R1-Aufkleber auf den Rahmen geklebt haben, um Ihnen die Unterscheidung
zwischen links und rechts zu erleichtern.
4 MONTAGEANLEITUNG FÜR BOGEN-BIMINI
Machine Translated by Google

rechte Seite des Rahmens und führen Sie das Rahmenrohr durch das Zelt, wie in der Abbildung gezeigt
Zum Schluss dehnen Sie den Bezug, um ihn flach zu machen.
4. Bitte achten Sie vor der Installation auf das Etikett „Front“. Und halten Sie die linke oder
Abbildung unten. Nachdem eine Seite bearbeitet wurde, verbinden Sie das Rohr miteinander und
- 8 -
Verbinden Sie die Oberseite des Adapterstücks (am Mittelbogen) mit dem
Gurtband, wie in der Abbildung gezeigt.
3. Verbinden Sie den Schraubenkopf mit der langen Stange und der mittleren Stange, wie in der
folgenden Abbildung dargestellt.
Machine Translated by Google

- 9 -
EG-REP
UK REP
Pooledas Group Ltd
Römeräcker 9 Z2021, 76351
Einheit 5 Albert Edward House, Die Pavillons
Adresse: Baoshanqu Shuangchenglu 803long 11hao 1602A-1609shi Shanghai Importiert nach AUS:
SIHAO PTY LTD. 1 ROKEVA STREETEASTWOOD NSW 2122 Australien
Linkenheim-Hochstetten, Germany
Preston, Vereinigtes Königreich
In die USA importiert: Sanven Technology Ltd. Suite 250, 9166 Anaheim Place, Rancho
Cucamonga, CA 91730
SHUNSHUN GmbH
In China hergestellt
Machine Translated by Google

Machine Translated by Google


Supporto tecnico e certificato di garanzia elettronica www.vevor.com/support
BIMINI TOP PER BARCA
"Risparmia la metà", "Metà prezzo" o qualsiasi altra espressione simile da noi
utilizzata rappresenta solo una stima del risparmio che potresti trarre dall'acquistare determinati
strumenti con noi rispetto ai principali marchi più importanti e non significa necessariamente
coprire tutte le categorie di strumenti offerti da noi. Ti ricordiamo gentilmente di verificare
attentamente quando effettui un ordine con noi se stai effettivamente risparmiando la metà
rispetto ai migliori marchi principali.
Continuiamo a impegnarci per fornirvi strumenti a prezzi competitivi.
Machine Translated by Google

BIMINI TOP PER BARCA
HO BISOGNO DI AIUTO? CONTATTACI!
Queste sono le istruzioni originali, leggere attentamente tutte le
istruzioni del manuale prima dell'uso. VEVOR si riserva una chiara
interpretazione del nostro manuale d'uso. L'aspetto del prodotto sarà
soggetto al prodotto ricevuto. Ti preghiamo di perdonarci se non ti
informeremo più se sono presenti aggiornamenti tecnologici o software sul nostro prodotto.
Hai domande sul prodotto? Hai bisogno di supporto tecnico? Non esitate
a contattarci:
3 BIMINI DI PRUA
4 BIMINI DI PRUA
- 1 -
Supporto tecnico e certificato di garanzia
elettronica www.vevor.com/support
Machine Translated by Google

Simbolo Simbolo Descrizione
AVVERTIMENTO:
ISTRUZIONI DI SICUREZZA
CONSERVARE QUESTE ISTRUZIONI
-2-
attentamente il manuale di istruzioni.
Prodotto.
• Per garantire la vostra sicurezza, assicuratevi di indossare casco e guanti
Questo simbolo, posto prima di un commento sulla sicurezza, indica un tipo di
e scarpe solide durante l'installazione di questo prodotto.
• Questo prodotto non è un giocattolo. Si prega di tenere i piccoli pezzi di ricambio fuori dalla portata dei
bambini. • Le tende da sole devono essere montate solo da almeno due adulti. Per favore, continua
precauzione, avvertimento o pericolo. Ignorare questo avviso può portare a
allontanare i bambini dal tendalino durante il montaggio per proteggerli.
un incidente. Per ridurre il rischio di lesioni, incendio o elettrocuzione, seguire
sempre le raccomandazioni riportate di seguito.
NOTA:
Nota
Si prega di utilizzare il bagagliaio per proteggere il tessuto quando il bimini top non è in uso.
•
• Si prega di ripiegare il bimini top quando la velocità dell'imbarcazione supera le 45 miglia
orarie. • Ripetere la stessa operazione per il bimini top a 3 prua.
• Leggere attentamente questo manuale prima di utilizzare il prodotto. • Tenere
lontano da fiamme libere. Questo prodotto si accenderà e brucerà se portato all'interno
Nota: verificare che tutte le parti siano presenti prima del montaggio.
Avvertenza: per ridurre il rischio di lesioni, l'utente deve leggere il
contatto con una fiamma libera. •
Tenere lontano da punte taglienti, lame e altri oggetti, per non graffiare il
Machine Translated by Google
3 LISTA IMBALLAGGIO BIMINI DI PRUA
2
5
8
1
9
1
Sella in acciaio inossidabile
Traverse
Arco corto
10
Componente
Un arco
Tenda
Gancio e regolatore della cinghia
2
2
16
Base del palo
Avvio di archiviazione
3+3
2
4
4
1
7
4
Cinturini con acciaio inossidabile
3
6
4
2
Quantità
Arco lungo
Palo di supporto posteriore
Vite autofilettante
11
- 3 -
Machine Translated by Google

3 ISTRUZIONI DI MONTAGGIO BIMINI DI PRUA
Assemblare le sezioni sinistra e destra del telaio, come mostrato nella figura seguente.
2. La configurazione della cornice è completata. (Attenzione: prestare attenzione alle
viti tra i pezzi di adattamento.)
1. Apri la confezione e controlla il prodotto.
Collegare L1 e L2 al tubo, quindi ripetere per i tubi giusti.
Tieni presente che abbiamo incollato gli adesivi L1 e R1 sul telaio per aiutarti a distinguere la
sinistra da destra.
-4-
Machine Translated by Google

3. Collegare la testa del bullone al palo lungo e al palo intermedio, come mostrato
nella figura seguente.
Collega la parte superiore del pezzo di adattamento (sull'arco centrale) alla cinghia,
come mostrato nella figura.
4. Prestare attenzione all'etichetta "Front" prima dell'installazione. Tenere il lato
sinistro o destro del telaio e inserire il tubo del telaio attraverso la tenda, come
mostrato nella figura seguente. Dopo aver trattato un lato, collegare insieme il tubo
e, infine, allungare il coperchio per appiattirlo.
-5-
Machine Translated by Google

4 LISTA IMBALLAGGIO BIMINI DI PRUA
2
5
8
1
9
1
Sella in acciaio inossidabile
Traverse
Arco corto
10
Componente
Un arco
Tenda
e regolatore della cinghia
2
2
16
Base del palo
Avvio di archiviazione
4+4
4
4
4
1
7
4
Cinghie con gancio in acciaio inossidabile
3
6
4
Quantità
2
Arco lungo
Palo di supporto posteriore
Vite autofilettante
11
-6-
Machine Translated by Google

4 ISTRUZIONI DI MONTAGGIO BIMINI DI PRUA
Assemblare la sezione sinistra e destra del telaio, come mostrato nella figura
seguente.
2. La configurazione della cornice è completata. (Attenzione: prestare attenzione
alle viti tra i pezzi di adattamento.)
1. Apri la confezione e controlla il prodotto.
Collegare L1 e L2 al tubo, quindi ripetere per i tubi giusti.
Tieni presente che abbiamo incollato gli adesivi L1 e R1 sul telaio per aiutarti a
distinguere la sinistra da destra.
-7-
Machine Translated by Google

3. Collegare la testa del bullone al palo lungo e al palo intermedio, come
mostrato nella figura seguente.
Collega la parte superiore del pezzo di adattamento (sull'arco centrale)
alla cinghia, come mostrato nella figura.
4. Prestare attenzione all'etichetta "Front" prima dell'installazione. E tieni la sinistra o
lato destro del telaio e inserire il tubo del telaio attraverso la tenda, come mostrato nella figura
infine, allungare la copertura per appiattirla.
-8-
figura sotto. Dopo che un lato è stato trattato, collegare insieme il tubo e
Machine Translated by Google

Preston, Regno Unito
Römeräcker 9 Z2021, 76351
Linkenheim-Hochstetten, Germania
Unità 5 Casa Albert Edward, I Padiglioni
SHUNSHUN GmbH
Gruppo Pooledas Ltd
Indirizzo: Baoshanqu Shuangchenglu 803long 11hao 1602A-1609shi Shanghai Importato
in AUS: SIHAO PTY LTD. 1 ROKEVA STREETEASTWOOD NSW 2122 Australia
Importato negli Stati Uniti: Sanven Technology Ltd. Suite 250, 9166 Anaheim
Place, Rancho Cucamonga, CA 91730
Made in China
-9-
REP.CE
REP. DEL REGNO UNITO
Machine Translated by Google

Machine Translated by Google


"Ahorreamitaddeprecio","Amitaddeprecio"ocualquierotraexpresiónsimilarutilizada
pornosotrossolorepresentaunaestimacióndelosahorrosquepodríabeneficiarsealcomprarciertas
herramientasconnosotrosencomparaciónconlasprincipalesmarcasynosignificanecesariamente
cubrirtodaslascategoríasdeherramientasofrecidas.pornosotros.Lerecordamosque,cuandorealice
unpedidoconnosotros,verifiquecuidadosamentesirealmenteestáahorrandolamitadencomparación
conlasprincipalesmarcas.
Seguimoscomprometidosaproporcionarleherramientasaprecioscompetitivos.
TOPBIMINIBARCO
Soportetécnicoycertificadodegarantíaelectrónicawww.vevor.com/support
Machine Translated by Google

¿Tienepreguntassobreelproducto?¿Necesitasoportetécnico?Siéntetelibrede
contactarnos:
Estassonlasinstruccionesoriginales;leaatentamentetodaslasinstrucciones
delmanualantesdeoperar.VEVORsereservaunainterpretaciónclaradenuestro
manualdeusuario.Laaparienciadelproductoestarásujetaalproductoque
recibió.Perdonequenoleinformaremosnuevamentesihayactualizacionesde
tecnologíaosoftwareennuestroproducto.
BIMINI3ARCOS
BIMINI4LAZOS
TOPBIMINIBARCO
1
Soportetécnicoycertificadodegarantía
electrónicawww.vevor.com/support
¿NECESITASAYUDA?¡CONTÁCTENOS!
Machine Translated by Google

2
Advertencia:Parareducirelriesgodelesiones,elusuariodebeleerel
•Leaatentamenteestemanualantesdeutilizarelproducto.•Mantener
alejadodellamasabiertas.Esteproductoseencenderáyarderásiseintroduceen
Nota:compruebesitodaslaspiezasestáninstaladasantesdelmontaje.
manualdeinstruccionesconatención.
contactoconunallamaabierta.•
Manteneralejadodepuntasafiladas,cuchillasyotroselementosparanorayarel
producto.
•Paragarantizarsupropiaseguridad,asegúresedeusarcasco,guantes
•
•Dobleeltoldobiminicuandolavelocidaddelaembarcaciónsuperelas45MPH.•
Repitalamismaoperaciónparaelbiminide3proas.
unaccidente.Parareducirelriesgodelesiones,incendiooelectrocución,siga
siemprelasrecomendacionesquesemuestranacontinuación.
NOTA:
Utiliceelmaleteroparaprotegerlatelacuandoeltoldobimininoestéenuso.
Nota
Estesímbolo,colocadoantesdeuncomentariodeseguridad,indicaunaespeciede
yzapatossólidosalinstalaresteproducto.•Este
productonoesunjuguete.Mantengalaspiezasderepuestopequeñasfueradelalcancedelosniños.
•Lostoldossólodebensermontadosporalmenosdosadultos.Porfavorsigue
precaución,advertenciaopeligro.Ignorarestaadvertenciapuedeprovocar
Mantengaalosniñosalejadosdelostoldosmientraslosmontaparaprotegerlos.
SímboloSímboloDescripción
ADVERTENCIA:
GUARDEESTASINSTRUCCIONES
INSTRUCCIONESDESEGURIDAD
Machine Translated by Google
3
Basedelposte
2
2
Componente
dieciséis
Unarco
Carpa
Ajustadordeganchoycorreas
1
Sillíndeaceroinoxidable.
barrastransversales
Arcocorto
9
10
5
8
2
1
Tornillopenetrante
Arcolargo
Postedesoportetrasero
11
CorreasconAceroInoxidable
3
6
Cantidad
2
4
4
1
7
4
Arranquedealmacenamiento
3+3
2
4
LISTADEEMBALAJEDELBIMINIDE3ARCOS
Machine Translated by Google
4
1.Abraelpaqueteyverifiqueelproducto.
2.Secompletalaconfiguracióndelmarco.(Atención:presteatenciónalostornillosentrelas
piezasdeadaptación).
ConecteL1yL2altubo,luegorepitaparalostubosderechos.
Ensamblelasseccionesizquierdayderechadelmarco,comosemuestraenlasiguientefigura.
TengaencuentaquehemospegadopegatinasL1yR1enelmarcoparaayudarleadistinguir
laizquierdadeladerecha.
INSTRUCCIONESDEMONTAJEBIMINI3ARCOS
Machine Translated by Google

5
3.Conectelacabezadelpernoalpostelargoyalpostemedio,comosemuestraenla
siguientefigura.
Conectelapartesuperiordelapiezaadaptadora(enelarcocentral)alacinta,comose
muestraenlafigura.
4.Presteatenciónalaetiqueta"Frente"antesdelainstalación.Sostengaellado
izquierdooderechodelmarcoeinserteeltubodelmarcoatravésdelatienda,comose
muestraenlasiguientefigura.Unavezquesehayatratadounlado,conecteeltuboy,
finalmente,estirelacubiertaparaquequedeplana.
Machine Translated by Google
6
Basedelposte
Arranquedealmacenamiento
4+4
4
4
4
1
7
4
Correasconganchodeaceroinoxidable.
3
6
4
Cantidad
2
Arcolargo
Postedesoportetrasero
Tornillopenetrante
11
2
5
8
1
9
1
Sillíndeaceroinoxidable.
barrastransversales
Arcocorto
10
Componente
Unarco
Carpa
Yajustadordecorreas
2
2
dieciséis
LISTADEEMBALAJEDELBIMINIDE4ARCOS
Machine Translated by Google
7
1.Abraelpaqueteyverifiqueelproducto.
2.Secompletalaconfiguracióndelmarco.(Atención:presteatenciónalostornillosentre
laspiezasdeadaptación).
ConecteL1yL2altubo,luegorepitaparalostubosderechos.
Ensamblelasseccionesizquierdayderechadelmarco,comosemuestraenlasiguiente
figura.
TengaencuentaquehemospegadopegatinasL1yR1enelmarcoparaayudarlea
distinguirlaizquierdadeladerecha.
INSTRUCCIONESDEMONTAJEBIMINI4PROA
Machine Translated by Google
ladoderechodelmarcoeinserteeltubodelmarcoatravésdelatienda,comosemuestraenla
finalmente,estiralafundaparaquequedeplana.
4.Presteatenciónalaetiqueta"Frente"antesdelainstalación.Ymanténpresionadoelbotónizquierdoo
lasiguientefigura.Despuésdehabertratadounlado,conecteeltuboy
8
Conectelapartesuperiordelapiezaadaptadora(enelarcocentral)ala
cinta,comosemuestraenlafigura.
3.Conectelacabezadelpernoalpostelargoyalpostemedio,comosemuestra
enlasiguientefigura.
Machine Translated by Google

9
REPRESENTANTEDELREINOUNIDO
REPRESENTANTEDELACE
Preston,ReinoUnido
Römeräcker9Z2021,76351
LinkenheimHochstetten,Alemania
Unidad5CasaAlbertEdward,LosPabellones
SHUNSHUNGmbH
GrupoPooledasLtd
Dirección:BaoshanquShuangchenglu803long11hao1602A1609shiShanghai
ImportadoaAUS:SIHAOPTYLTD.1ROKEVASTREETASTWOODNSW2122Australia
ImportadoaEE.UU.:SanvenTechnologyLtd.Suite250,9166AnaheimPlace,
RanchoCucamonga,CA91730
Hechoenchina
Machine Translated by Google

Machine Translated by Google


Wsparcie techniczne i certyfikat e-gwarancji www.vevor.com/support
TOP BIMINI DO ŁODZI
„Zaoszczędź o połowę”, „o połowę ceny” lub inne podobne wyrażenia używane przez nas
przedstawiają jedynie szacunkową oszczędność, jaką możesz zyskać kupując u nas określone narzędzia
w porównaniu z głównymi najlepszymi markami i niekoniecznie oznaczają uwzględnienie wszystkich
kategorii oferowanych narzędzi przez nas. Przypominamy, aby podczas składania zamówienia u nas
dokładnie sprawdzić, czy faktycznie oszczędzasz połowę w porównaniu z czołowymi markami.
Nadal dokładamy wszelkich starań, aby zapewnić Państwu narzędzia w konkurencyjnej cenie.
Machine Translated by Google

TOP BIMINI DO ŁODZI
POTRZEBUJĘ POMOCY? SKONTAKTUJ SIĘ Z NAMI!
Masz pytania dotyczące produktu? Potrzebujesz wsparcia technicznego? Śmiało możesz się z nami
skontaktować:
To jest oryginalna instrukcja. Przed przystąpieniem do obsługi prosimy o dokładne
zapoznanie się ze wszystkimi instrukcjami. VEVOR zastrzega sobie jasną interpretację naszej
instrukcji obsługi. Wygląd produktu zależy od produktu, który otrzymałeś. Proszę wybaczyć
nam, że nie będziemy ponownie informować Państwa, jeśli pojawią się jakieś aktualizacje technologii
lub oprogramowania naszego produktu.
3 KOŁKI BIMINI
4 KOŁKOWE BIMINI
- 1 -
Wsparcie techniczne i certyfikat e-gwarancji
www.vevor.com/support
Machine Translated by Google

OSTRZEŻENIE:
Symbol Symbol Opis
ZACHOWAJ TĘ INSTRUKCJĘ
INSTRUKCJE BEZPIECZEŃSTWA
- 2 -
dzieci z dala od markizy podczas jej montażu, aby je chronić.
• Przed użyciem produktu prosimy o uważne przeczytanie niniejszej instrukcji. •
Trzymać z dala od otwartego ognia. Ten produkt zapali się i spali, jeśli zostanie wniesiony do środka
Uwaga: przed montażem sprawdź, czy wszystkie części są na swoim miejscu.
Ostrzeżenie: Aby zmniejszyć ryzyko obrażeń, użytkownik musi przeczytać
kontakt z otwartym płomieniem. •
Trzymaj z dala od ostrych punktów, ostrzy i innych przedmiotów, aby nie porysować
produkt. •
W trosce o własne bezpieczeństwo prosimy o noszenie kasku i rękawiczek
instrukcję obsługi.
•
• Proszę złożyć daszek bimini, gdy prędkość statku przekracza 45 mil na godzinę. • Powtórz
tę samą operację w przypadku bimini z 3 kokardkami.
Wypadek. Aby zmniejszyć ryzyko obrażeń, pożaru lub porażenia prądem, należy
zawsze postępować zgodnie z zaleceniami przedstawionymi poniżej.
NOTATKA:
Notatka
Użyj ochraniacza, aby zabezpieczyć tkaninę, gdy bimini nie jest używane.
Ten symbol, umieszczony przed uwagą dotyczącą bezpieczeństwa, oznacza rodzaj
i solidne buty podczas instalacji tego produktu. • Ten
produkt nie jest zabawką. Małe części zamienne należy przechowywać poza zasięgiem dzieci. • Markizy
powinny być montowane wyłącznie przez co najmniej dwie osoby dorosłe. Proszę zachować
środek ostrożności, ostrzeżenie lub niebezpieczeństwo. Zignorowanie tego ostrzeżenia może prowadzić do
Machine Translated by Google

3 LIST PAKOWANIA BIMINI KOŁKOWYCH
2
16
2
3+3
4
Rozruch pamięci masowej
1
4
7
4
3
6
Paski ze stali nierdzewnej
2
Ilość
4
Samogwintujące śruby
11
Długi łuk
Tylny słupek podporowy
5
8
1
2
1
9
Krótki łuk
Siodełko ze stali nierdzewnej
Poprzeczki
10
Część
Jeden łuk
Namiot
Regulacja haczyka i taśmy
Baza Polak
2
- 3 -
Machine Translated by Google

3 INSTRUKCJA MONTAŻU BIMINI
Zmontuj lewą i prawą część ramy, jak pokazano na poniższym rysunku.
2. Konfiguracja ramy została zakończona. (Uwaga: Zwróć uwagę na śruby pomiędzy
elementami dopasowującymi.)
1. Otwórz opakowanie i sprawdź produkt.
Podłącz L1 i L2 do rurki, a następnie powtórz tę czynność dla prawych rurek.
Uwaga: na ramę nakleiliśmy naklejki L1 i R1, które pomogą Ci odróżnić lewą stronę od prawej.
- 4 -
Machine Translated by Google

4. Przed instalacją proszę zwrócić uwagę na etykietę „Przód”. Przytrzymaj lewą lub
prawą stronę ramy i włóż rurkę ramy przez namiot, jak pokazano na poniższym
rysunku. Po uporaniu się z jedną stroną łączymy rurkę ze sobą, a na koniec naciągamy
osłonę tak, aby była płaska.
3. Połącz łeb śruby z długim słupkiem i środkowym słupkiem, jak pokazano na
poniższym rysunku.
Połącz górną część elementu dopasowującego (na środkowym pałąku) z taśmą, jak
pokazano na rysunku.
- 5 -
Machine Translated by Google

4 LIST PAKOWANIA BIMINI KOŁKOWYCH
Długi łuk
Tylny słupek podporowy
5
Samogwintujące śruby
8
1
11
Paski z haczykiem ze stali nierdzewnej
3
6
4
Ilość
2
4
1
7
4
Rozruch pamięci masowej
4+4
4
4
2
2
16
Baza Polak
Część
Jeden łuk
Namiot
i regulator taśmy
1
9
Siodełko ze stali nierdzewnej
Krótki łuk
Poprzeczki
10
2
- 6 -
Machine Translated by Google

4 INSTRUKCJA MONTAŻU BIMINI
Uwaga: na ramę nakleiliśmy naklejki L1 i R1, które pomogą Ci odróżnić lewą stronę
od prawej.
1. Otwórz opakowanie i sprawdź produkt.
2. Konfiguracja ramy została zakończona. (Uwaga: Zwróć uwagę na śruby pomiędzy
elementami dopasowującymi.)
Podłącz L1 i L2 do rurki, a następnie powtórz tę czynność dla prawych rurek.
Zmontuj lewą i prawą część ramy, jak pokazano na poniższym rysunku.
- 7 -
Machine Translated by Google

3. Połącz łeb śruby z długim słupkiem i środkowym słupkiem, jak pokazano na
poniższym rysunku.
Połącz górną część elementu dopasowującego (na środkowym pałąku) z
taśmą, jak pokazano na rysunku.
Niżej wymienione. Po uporaniu się z jedną stroną połącz rurkę ze sobą i
prawej stronie ramy i przełóż rurkę ramy przez namiot, jak pokazano na rysunku
na koniec rozciągnij pokrywę, aby była płaska.
- 8 -
4. Przed instalacją proszę zwrócić uwagę na etykietę „Przód”. I przytrzymaj lewy lub
Machine Translated by Google
Römeräcker 9 Z2021, 76351
Jednostka 5 Albert Edward House, pawilony
Adres: Baoshanqu Shuangchenglu 803long 11hao 1602A-1609shi Szanghaj Import do
Australii: SIHAO PTY LTD. 1 ROKEVA STREETEASTWOOD NSW 2122 Australia
Import do USA: Sanven Technology Ltd. Suite 250, 9166 Anaheim Place, Rancho
Cucamonga, CA 91730
Preston, Wielka Brytania
SHUNSHUN GmbH
Linkenheim-Hochstetten, Niemcy
Pooledas Group Ltd
Wyprodukowano w Chinach
- 9 -
REPUBLIKA Wielkiej Brytanii
REPREZENT KE
Machine Translated by Google

Machine Translated by Google


'Bespaar de helft', 'Halve prijs' of andere soortgelijke uitdrukkingen die door ons worden gebruikt
vertegenwoordigen slechts een schatting van de besparingen die u zou kunnen profiteren als u bepaalde
gereedschappen bij ons koopt in vergelijking met de grote topmerken en betekenen niet noodzakelijkerwijs
dat ze alle categorieën van aangeboden gereedschappen dekken. door ons. Wij verzoeken u vriendelijk
om bij het plaatsen van een bestelling bij ons goed na te gaan of u daadwerkelijk de helft bespaart in
vergelijking met de grote topmerken.
We blijven ons inzetten om u gereedschap tegen een concurrerende prijs te bieden.
BOOT BIMINI-TOP
Technische ondersteuning en e-garantiecertificaat www.vevor.com/support
Machine Translated by Google

Heeft u productvragen? Technische ondersteuning nodig? Neem dan gerust contact
met ons op:
Dit is de originele instructie. Lees alle instructies in de handleiding zorgvuldig
door voordat u ermee aan de slag gaat. VEVOR behoudt zich een duidelijke interpretatie
van onze gebruikershandleiding voor. Het uiterlijk van het product is afhankelijk
van het product dat u heeft ontvangen. Vergeef ons alstublieft dat we u niet opnieuw
zullen informeren als er technologie- of software-updates zijn voor ons product.
3 BOOG BIMINI
4 BOOG BIMINI
BOOT BIMINI-TOP
- 1 -
Technische ondersteuning en e-
garantiecertificaat www.vevor.com/support
HULP NODIG? NEEM CONTACT MET ONS OP!
Machine Translated by Google

- 2 -
Dit symbool, geplaatst vóór een veiligheidsopmerking, duidt op een soort
en stevige schoenen bij het installeren van dit product. • Dit
product is geen speelgoed. Bewaar kleine reserveonderdelen buiten het bereik van kinderen. • De luifels mogen
uitsluitend door minimaal twee volwassenen worden gemonteerd. Houd alsjeblieft
Product. •
Om uw eigen veiligheid te garanderen, verzoeken wij u een helm en handschoenen te dragen
voorzorg, waarschuwing of gevaar. Het negeren van deze waarschuwing kan leiden tot
Houd kinderen uit de buurt van de luifels terwijl u deze monteert om ze te beschermen.
OPMERKING:
een ongeluk. Om het risico op letsel, brand of elektrocutie te verminderen, dient u altijd de
onderstaande aanbeveling op te volgen.
Gebruik de laars om de stof te beschermen wanneer de biminitop niet in gebruik is.
Opmerking
•
• Vouw de bimini-top op als de snelheid van het vaartuig hoger is dan 70 km/u. • Herhaal dezelfde
handeling voor een biminitop met 3 boegs.
Waarschuwing: Om het risico op letsel te verminderen, moet de gebruiker de instructies lezen
• Lees deze handleiding zorgvuldig door voordat u het product gebruikt. • Uit de buurt van
open vuur houden. Dit product zal ontbranden en verbranden als het erin wordt gebracht
Let op: Controleer vóór montage of alle onderdelen aanwezig zijn.
gebruiksaanwijzing zorgvuldig.
contact met een open vlam. • Blijf uit de
buurt van scherpe punten, messen en andere voorwerpen, zodat er geen krassen op komen
Symbool Symboolbeschrijving
WAARSCHUWING:
VEILIGE INSTRUCTIES
BEWAAR DEZE INSTRUCTIE
Machine Translated by Google

- 3 -
4
1
9
Dwarsbalken
Korte boog
Roestvrij stalen zadel
10
5
8
1
2
Paal basis
2
2
16
Onderdeel
Tent
Haak- en riemversteller
1
4
7
Eén boog
4
3+3
2
4
Opslag opstarten
Zelftappende schroef
11
Lange boog
Achterste steunpaal
3
6
Bandjes met roestvrij staal
2
Hoeveelheid
3 BOOG BIMINI -PAKKETLIJST
Machine Translated by Google

- 4 -
1. Open de verpakking en controleer het product.
2. Het instellen van het frame is voltooid. (Let op: Let op schroeven tussen passtukken.)
Sluit L1 en L2 aan op de buis en herhaal dit voor de rechter buizen.
Monteer de linker- en rechtersecties van het frame, zoals weergegeven in de onderstaande
afbeelding.
Houd er rekening mee dat we L1- en R1-stickers op het frame hebben geplakt, zodat u links
van rechts kunt onderscheiden.
3 BOOG BIMINI MONTAGE-INSTRUCTIES
Machine Translated by Google

- 5 -
3. Sluit de boutkop aan op de lange paal en op de middenpaal, zoals weergegeven in
onderstaande afbeelding.
Verbind de bovenkant van het aanpassingsstuk (op de middelste boog) met de band, zoals
weergegeven in de afbeelding.
4. Let vóór de installatie op het label "Front". Houd de linker- of rechterkant van het frame
vast en steek de framebuis door de tent, zoals weergegeven in onderstaande afbeelding.
Nadat één kant is behandeld, verbindt u de buis met elkaar en rekt u tenslotte de hoes uit om
deze plat te maken.
Machine Translated by Google

- 6 -
4
1
9
Dwarsbalken
Korte boog
Roestvrij stalen zadel
10
5
8
1
2
Paal basis
2
2
16
Onderdeel
Tent
& Singelversteller
1
4
7
Eén boog
4
4+4
4
4
Opslag opstarten
Zelftappende schroef
11
Lange boog
Achterste steunpaal
3
6
Bandjes met roestvrijstalen haak
2
Hoeveelheid
4 BOOG BIMINI -PAKKETLIJST
Machine Translated by Google
- 7 -
2. Het instellen van het frame is voltooid. (Let op: Let op schroeven tussen passtukken.)
1. Open de verpakking en controleer het product.
Sluit L1 en L2 aan op de buis en herhaal dit voor de rechter buizen.
Houd er rekening mee dat we L1- en R1-stickers op het frame hebben geplakt, zodat u links
van rechts kunt onderscheiden.
Monteer het linker- en rechtergedeelte van het frame, zoals weergegeven in onderstaande
afbeelding.
4 BOOG BIMINI MONTAGE-INSTRUCTIES
Machine Translated by Google
rechterkant van het frame en steek de framebuis door de tent, zoals weergegeven in de afbeelding
Ten slotte rekt u de hoes uit om deze plat te maken.
- 8 -
Figuur hieronder. Nadat één kant is behandeld, verbindt u de buis met elkaar en
4. Let vóór de installatie op het label "Front". En houd de linker of
Verbind de bovenkant van het aanpassingsstuk (op de middelste boog) met de
band, zoals weergegeven in de afbeelding.
3. Sluit de boutkop aan op de lange paal en op de middenpaal, zoals weergegeven in
onderstaande afbeelding.
Machine Translated by Google

- 9 -
Britse REP
EG REP
Eenheid 5 Albert Edward House, de paviljoens
Adres: Baoshanqu Shuangchenglu 803long 11hao 1602A-1609shi Shanghai Geïmporteerd
in AUS: SIHAO PTY LTD. 1 ROKEVA STREETEASTWOOD NSW 2122 Australië
Geïmporteerd naar de VS: Sanven Technology Ltd. Suite 250, 9166 Anaheim Place,
Rancho Cucamonga, CA 91730
Preston, Verenigd Koninkrijk
SHUNSHUN GmbH
Linkenheim-Hochstetten, Duitsland
Pooledas Group Ltd
Römeräcker 9 Z2021, 76351
Gemaakt in China
Machine Translated by Google

Machine Translated by Google


Teknisk support och e-garanticertifikat www.vevor.com/support
BÅT BIMINI TOPP
"Spara hälften", "halva priset" eller andra liknande uttryck som används av oss
representerar bara en uppskattning av besparingar du kan dra nytta av att köpa vissa
verktyg hos oss jämfört med de stora toppmärkena och betyder inte nödvändigtvis att
täcka alla kategorier av verktyg som erbjuds av oss. Du påminns vänligen om att noggrant
kontrollera när du gör en beställning hos oss om du faktiskt sparar hälften i jämförelse
med de främsta stora varumärkena.
Vi fortsätter att vara engagerade i att ge dig verktyg till konkurrenskraftiga priser.
Machine Translated by Google
BÅT BIMINI TOPP
BEHÖVS HJÄLP? KONTAKTA OSS!
Har du produktfrågor? Behöver du teknisk support? Kontakta oss gärna:
Detta är den ursprungliga instruktionen, läs alla instruktioner
noggrant innan du använder den. VEVOR reserverar sig för en tydlig
tolkning av vår användarmanual. Utseendet på produkten är beroende
av den produkt du fått. Ursäkta oss att vi inte kommer att informera dig
igen om det finns någon teknik eller mjukvaruuppdateringar på vår produkt.
3 BÅG BIMINI
4 BOW BIMINI
- 1 -
Teknisk support och e-garanticertifikat
www.vevor.com/support
Machine Translated by Google

VARNING:
Symbol Symbol Beskrivning
SÄKERHETSINSTRUKTIONER
SPARA DESSA INSTRUKTIONER
- 2 -
bruksanvisningen noggrant.
produkt. •
För att garantera din egen säkerhet, se till att bära hjälm, handskar
Denna symbol, placerad före en säkerhetskommentar, indikerar ett slags
och solida skor när du installerar denna produkt. •
Denna produkt är inte en leksak. Förvara små reservdelar utom räckhåll för barn. • Markisen får
endast monteras av minst två vuxna. Snälla behåll
försiktighetsåtgärd, varning eller fara. Att ignorera denna varning kan leda till
barn bort från markisen när de monteras för att skydda dem.
en olycka. För att minska risken för skada, brand eller elstöt, följ alltid
rekommendationen nedan.
NOTERA:
Notera
Använd stöveln för att skydda tyget när biminitoppen inte används.
•
• Vik biminitoppen när fartygets hastighet överstiger 45 MPH. • Upprepa samma
operation för 3 bågar bimini toppar.
• Läs denna bruksanvisning noggrant innan du använder produkten. •
Förvaras åtskilt från öppen låga. Denna produkt kommer att antändas och brinna om den tas in i den
Obs: Kontrollera att alla delar sitter i innan montering.
Varning: För att minska risken för skador måste användaren läsa
kontakt med öppen låga. • Håll dig
borta från vassa spetsar, knivar och andra föremål för att inte repa
Machine Translated by Google
3 BÅG BIMINI PACKLISTA
Sadel i rostfritt stål
Kort båge
Tvärstänger
3
6
10
4
1
9
5
2
8
1
Stångbas
2
2
16
En båge
Komponent
Tält
Krok & Webbing Justerare
4
4
1
7
Förvaringsstövel
3+3
2
4
Självgängande skruv
Lång båge
Bakre stödstång
Kvantitet
2
11
Remmar med rostfritt stål
- 3 -
Machine Translated by Google

3 BOW BIMINI MONTERINGSINSTRUKTIONER
Montera de vänstra och högra delarna av ramen, som bilden nedan visar.
2. Raminställningen är klar. (Obs: Var uppmärksam på skruvarna mellan anpassningsdelarna.)
1. Öppna förpackningen och kontrollera produkten.
Anslut L1 och L2 till röret, upprepa sedan för rätt rör.
Observera att vi har klistrat L1 och R1 klistermärken på ramen för att hjälpa dig att skilja vänster
från höger.
- 4 -
Machine Translated by Google

4. Var uppmärksam på "Front"-etiketten före installation. Håll i vänster eller
höger sida av ramen och för in ramröret genom tältet, som visas i bilden nedan.
Efter att ena sidan har behandlats, koppla ihop röret och sträck slutligen locket
för att göra det platt.
Anslut överdelen av anpassningsstycket (på mittbågen) till bandet, som bilden
visar.
3. Anslut bulthuvudet till den långa stolpen och till mittpolen, enligt bilden
nedan.
- 5 -
Machine Translated by Google

4 BÅG BIMINI PACKLISTA
Tvärstänger
Kort båge
Sadel i rostfritt stål
6
Remmar med krok i rostfritt stål
10
1
9
5
8
1
2
4
Stångbas
2
2
16
En båge
Tält
& Webbing Adjuster
Komponent
4
1
4
7
4+4
4
4
Förvaringsstövel
Självgängande skruv
11
Lång båge
Bakre stödstång
Kvantitet
2
3
- 6 -
Machine Translated by Google

4 MONTERINGSINSTRUKTIONER FÖR BOW BIMINI
Observera att vi har klistrat L1 och R1 klistermärken på ramen för att hjälpa dig att skilja
vänster från höger.
1. Öppna förpackningen och kontrollera produkten.
2. Raminställningen är klar. (Obs: Var uppmärksam på skruvarna mellan
anpassningsdelarna.)
Anslut L1 och L2 till röret, upprepa sedan för rätt rör.
Montera den vänstra och högra delen av ramen, enligt bilden nedan.
- 7 -
Machine Translated by Google

3. Anslut bulthuvudet till den långa stolpen och till mittpolen, enligt bilden
nedan.
Anslut överdelen av anpassningsstycket (på mittbågen) till bandet,
som bilden visar.
figuren nedan. Efter att ena sidan har behandlats, koppla ihop röret och
höger sida av ramen och för in ramröret genom tältet, som visas i
sträck slutligen ut locket så att det blir platt.
- 8 -
4. Var uppmärksam på "Front"-etiketten före installation. Och håll vänster eller
Machine Translated by Google
SHUNSHUN GmbH
Pooledas Group Ltd
Adress: Baoshanqu Shuangchenglu 803long 11hao 1602A-1609shi Shanghai
Importerad till AUS: SIHAO PTY LTD. 1 ROKEVA STREETEASTWOOD NSW 2122
Australien
Importerad till USA: Sanven Technology Ltd. Suite 250, 9166 Anaheim Place,
Rancho Cucamonga, CA 91730
Preston, Storbritannien
Linkenheim-Hochstetten, Tyskland
Römeräcker 9 Z2021, 76351
Enhet 5 Albert Edward House, The Pavilions
Tillverkad i Kina
- 9 -
EC REP
UK REP
Machine Translated by Google

Machine Translated by Google