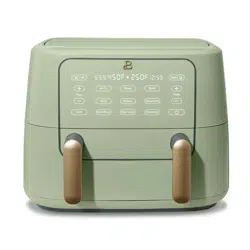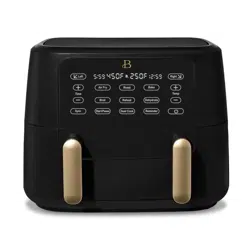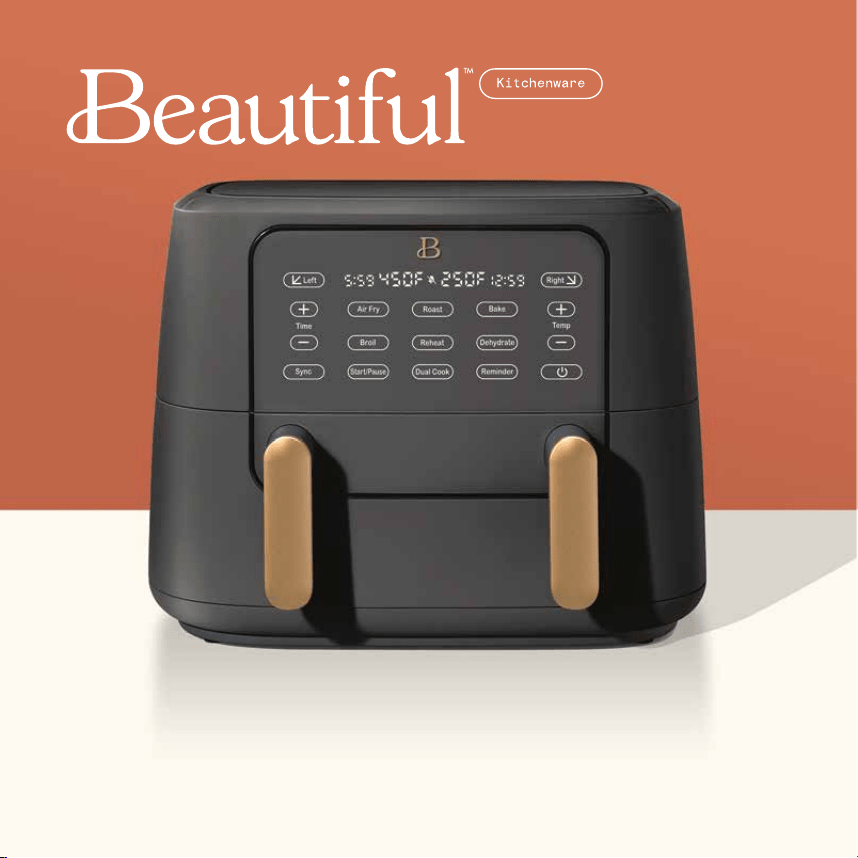
9qt TriZone
™
Air Fryer with Touch-Activated Display
Instruction Manual
Freidora de aire TriZone™ de 9 cuartos de galón con
pantalla táctil
Manual de instrucciones

The kitchen is my family’s happy
place. It’s where we cook and eat
and bake and laugh and share our
most beautiful moments together.
That’s what inspired the creation
of Beautiful, my new collection
of easy-to-use kitchenware that
you’ll want to keep out on your
kitchen counter. So whether
your kitchen has flour all over
the place from a kid's baking
session or you’re throwing an adult
dinner party, I hope every step will
be simple, delicious and beautiful!
www.cookwithbeautiful.com

Section 1: Safety
Important Safeguards ...................................................4-6
Additional Important Safeguards ......................................... 7-8
Notes on the Plug ........................................................9
Notes on the Cord ........................................................9
Plasticizer Warning ......................................................10
Electric Power ........................................................... 10
Section 2: Instructions
Getting to know your 9qt TriZone™ Air Fryer .......................... 12-13
Touch-Activated Display Control Panel ................................. 14-16
Before using for the rst time ..........................................17
Operating instructions ...................................................18
6 Preset FUNCTIONS: AIR FRY, ROAST, BROIL, BAKE, REHEAT and
DEHYDRATE
Preset TEMPS & TIMES Chart ...................................... 20
Manual operation .............................................. 21
TriZone™ Mode: Using the Full Basket without Basket Divider (Using both
zones without basket divider) ............................................22
Dual Cook: Using both Zones (LEFT and RIGHT side) with Basket Divider . 23-24
Single Zone Mode: Using One Zone (either LEFT or RIGHT side) with
Basket Divider ....................................................... 24-25
Air fry technique .................................................... 25-26
Air frying pre-packaged frozen foods ....................................26
Hints for roast ....................................................... 26-27
Hints for broil ..........................................................27
Hints for bake ........................................................... 27
Hints for dehydrate ................................................... 27-28
Air Fry / Roast cooking chart ........................................ 28-31
USDA Cooking Guidelines .................................................31
Dehydrate chart .......................................................... 32
User maintenance instructions ............................................33
Care & cleaning instructions ............................................. 33
Storing instructions .....................................................33
Warranty .............................................................. 34-35
Table of Contents

Sección 1: Seguridad
Medidas de seguridad importantes ..................................... 37-39
Otras medidas de seguridad importantes ............................... 40-42
Notas sobre el enchufe ..................................................42
Notas sobre el cable ....................................................43
Advertencia sobre plasticados ........................................... 44
Potencia eléctrica .......................................................44
Sección 2: Instrucciones
Conozca su freidora de aire TriZone™ de 9 cuartos de galón ........... 46-47
Panel de control de pantalla activado por toque ...................... 48-51
Antes del primer uso ....................................................52
Instrucciones de funcionamiento .......................................53-54
Seis conguraciones preestablecidas: AIR FRY (FREÍR AL AIRE), ROAST
(ROSTIZAR), BROIL (ASAR), BAKE (HORNEAR), REHEAT (RECALENTAR), DEHYDRATE
(DESHIDR ATAR)
Tabla de TEMPERATURAS y TIEMPOS preestablecidos .......................55
Operación manual ...................................................56
Modo TriZone™: Cómo utilizar la canasta completa sin el divisor
de canasta (ambas zonas sin el divisor de canasta) ..................57
Cocción doble: Cómo utilizar ambas zonas (lado IZQUIERDO y DERECHO) con
el divisor de canasta ..............................................58-59
Modo de una sola zona: Cómo utilizar una zona (ya sea del lado
IZQUIERDO o DERECHO) con divisor de canasta .......................59-60
Técnica de freído al aire............................................. 61-62
Freír al aire alimentos congelados preenvasados .........................62
Consejos para rostizar ...................................................63
Consejos para asar .......................................................64
Consejos para hornear....................................................64
Consejos para deshidratar ................................................65
Tabla de freído al aire / cocción de rostizado .......................66-69
Pautas de cocina del USDA ...............................................70
Tabla de deshidratación ............................................... 70 -71
Instrucciones de mantenimiento para el usuario ........................... 72
Instrucciones de limpieza y cuidado .....................................72
Instrucciones de almacenamiento ..........................................72
Garantía .............................................................. 73-74
Índice
3
Section 1
Safety
1

4
IMPORTANT SAFEGUARDS
When using electrical appliances, basic safety precautions
should always be followed, including the following:
1. READ ALL INSTRUCTIONS.
2. Do not touch hot surfaces. Use handles or knobs. Use
oven mitts or potholders.
3. To protect against electric shock do not immerse cord,
plugs, or appliance in water or other liquid.
4. This appliance may be used and cleaned by children
age 8 and older or by persons with reduced physical,
sensory or mental capabilities, or lack of experience
and knowledge, ONLY IF they have been given supervision
or instruction concerning use of the appliance by a
person responsible for their safety.
5. Children should be supervised to ensure that they do
not play with the appliance.
6. Unplug from outlet when not in use and before cleaning.
Allow to cool before putting on or taking off parts,
and before cleaning the appliance.
7. Do not operate any appliance with a damaged cord or
plug, or after the appliance malfunctions, or has
been damaged in any manner. Bring it to a qualied
technician for examination, repair or electrical or
mechanical adjustment.

5
NOTE: DO NOT ATTEMPT TO REPAIR THE UNIT YOURSELF.
THIS WILL VOID THE WARRANTY.
8. The use of accessory attachments not recommended by the
appliance manufacturer may cause injuries.
9. Do not use outdoors.
10. Do not let cord hang over edge of table or counter,
or touch hot surfaces.
11. Do not place on or near a hot gas or electric burner,
or in a heated oven.
12. Extreme caution must be used when moving an appliance
containing hot oil or other hot liquids.
13. To disconnect, press
and pull active fryer basket
out of the air fryer body. Remove plug from wall outlet.
14. Do not use appliance for other than intended use.
15. When using the crisping tray(s), make sure they are
properly inserted into the air fryer basket before
cooking.
16. Make sure the crisping tray is in place before adding
food to be air fried.
17. Always make sure air fryer basket is fully inserted
and locked into the front of the Air Fryer before
operation.
WARNING: Air Fryer will not operate unless the air
fryer basket is fully closed.

6
CAUTION: After hot air frying, roasting, broiling,
baking, or reheating, the fryer basket, crisping trays
(if used) and the cooked foods are hot. Extreme caution
must be used when handling the hot Air Fryer basket and
crisping trays.
FOR HOUSEHOLD USE
ONLY
SAVE THESE
INSTRUCTIONS

7
ADDITIONAL IMPORTANT
SAFEGUARDS
CAUTION HOT SURFACES: This appliance generates heat and
may release steam during use. Proper precautions must be
taken to prevent the risk of burns, res, or other injury
to persons or damage to property.
CAUTION: This appliance is hot during operation and
retains heat for some time after turning OFF. Always use
oven mitts when handling hot materials and allow metal
parts to cool before cleaning. Do not place anything on top
of the appliance while it is operating or while it is hot.
1. All users of this appliance must read and understand
this instruction manual before operating or cleaning
this appliance.
2. The cord to this appliance should be plugged into a
120V AC electrical outlet only.
3. If this appliance begins to malfunction during use,
press
and pull air fryer basket out of the body.
Remove plug from wall outlet. Do not use or attempt to
repair the malfunctioning appliance. Contact Customer
Service.
4. Do not immerse power cord in any liquid. If the power
cord to this appliance is damaged, it must be replaced.

8
5. Keep the cord out of reach from children and infants to
avoid the risk of electric shock and choking.
6. Place the TriZone™ Air Fryer on a at, stable, heat-
resistant work area.
7. Do not obstruct the air outlet or air inlets on the back
and sides of the Air Fryer, with any objects. Avoid
escaping steam from the air outlet during air frying.
8. Keep appliance at least 4 inches away from walls or
other objects during operation.
9. Always use the fryer basket handle to remove the fryer
basket.
WARNING: Under- or over-lling the fryer basket may
damage the Air Fryer and could result in serious
personal injury.
10. Never move a hot Air Fryer or an Air Fryer containing
hot food. Allow to cool before moving.
WARNING! This Air Fryer should not be used to boil
water.
WARNING! This Air Fryer should never be used to deep
fry foods.

9
NOTES ON THE PLUG
This appliance has a polarized plug (one blade is wider
than the other). To reduce the risk of electric shock, this
plug will t in a polarized outlet only one way. If the
plug does not t fully into the outlet, reverse the plug.
If it still does not t, contact a qualied electrician.
Do not modify the plug in any way.
NOTES ON THE CORD
A. A short power-supply cord (or detachable power-supply
cord) is to be provided to reduce the risk resulting
from becoming entangled in or tripping over a
longer cord.
B. Longer detachable power-supply cords or extension cords
are available and may be used if care is exercised in
their use.
C. If a long detachable power-supply cord or extension
cord is used:
1. The marked electrical rating of the cord or
extension cord should be at least as great as the
electrical rating of the appliance;
2. If the appliance is of the grounded type, the
extension cord should be a grounding-type3-wire
cord.
3. The longer cord should be arranged so that it does
not drape over the countertop or table top where
it can be pulled on by children or tripped over
unintentionally.

10
PLASTICIZER WARNING
CAUTION: To prevent Plasticizers from migrating from the
nish of the counter top or table top or other furniture,
place NON-PLASTIC coasters or place mats between the
appliance and the nish of the counter top or table top.
Failure to do so may cause the nish to darken; permanent
blemishes may occur or stains can appear.
ELECTRIC POWER
If the electrical circuit is overloaded with other
appliances, your appliance may not operate properly.
It should be operated on a separate electrical circuit
from other appliances.
11
Section 2
Instructions
2
12
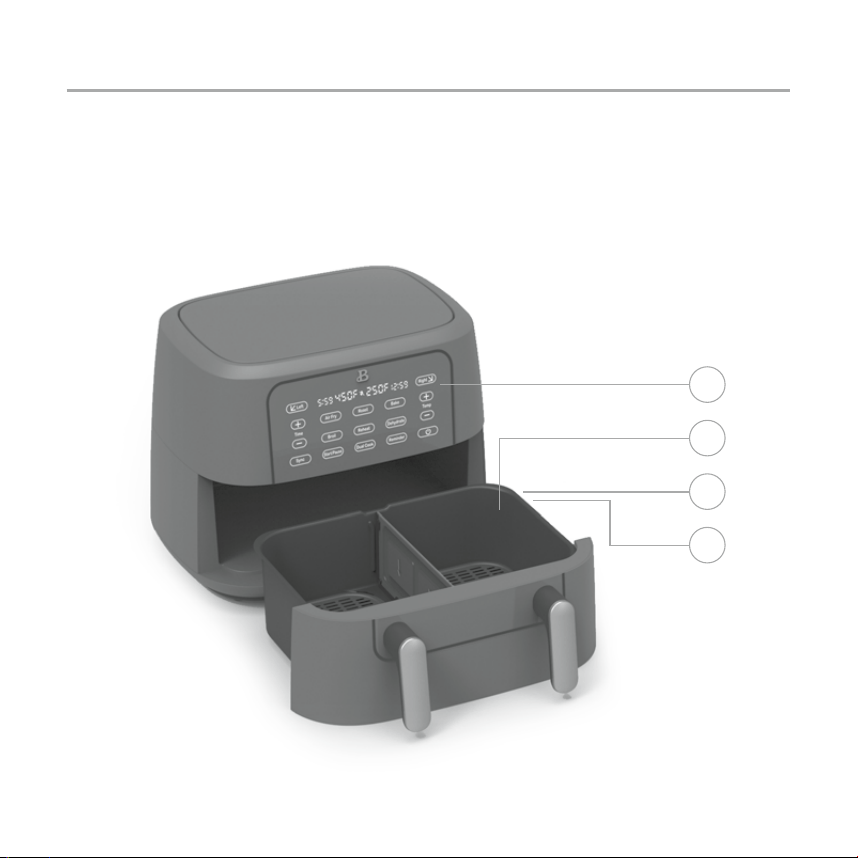
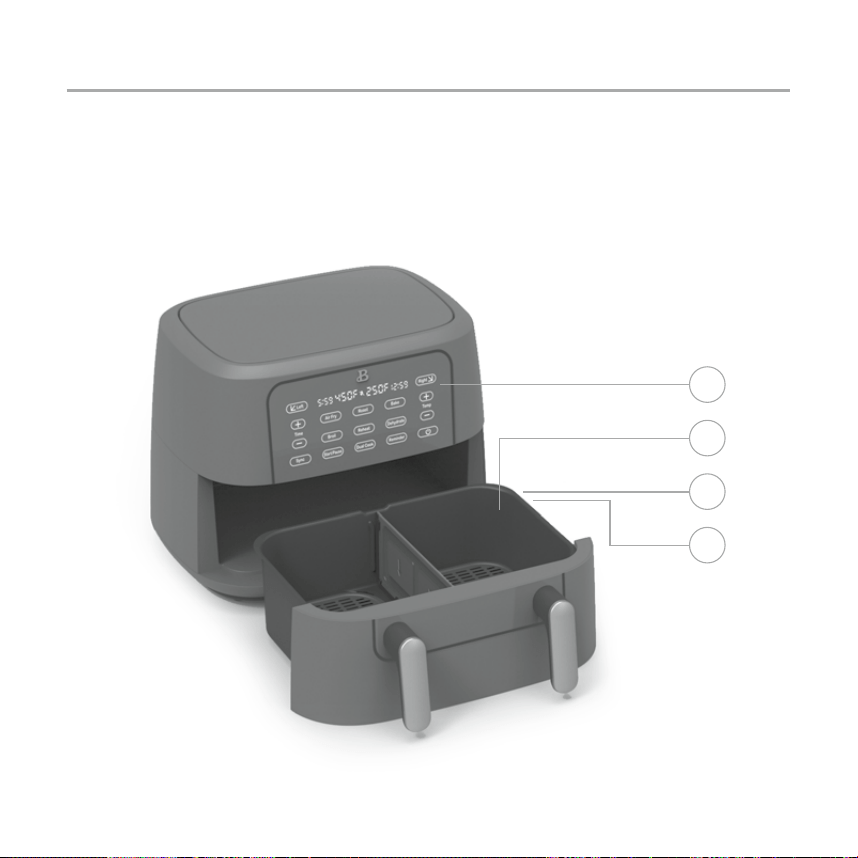
Getting To Know Your 9qt TriZone™ Air Fryer
Product may vary slightly from illustration
1. Touch-Activated Display Control Panel
2. 9QT Removable TriZone™ AirFryer Basket
3. Power Cord with Polarized Plug (not shown)
4. Non-Skid Feet (not shown)
1
2
3
4
13
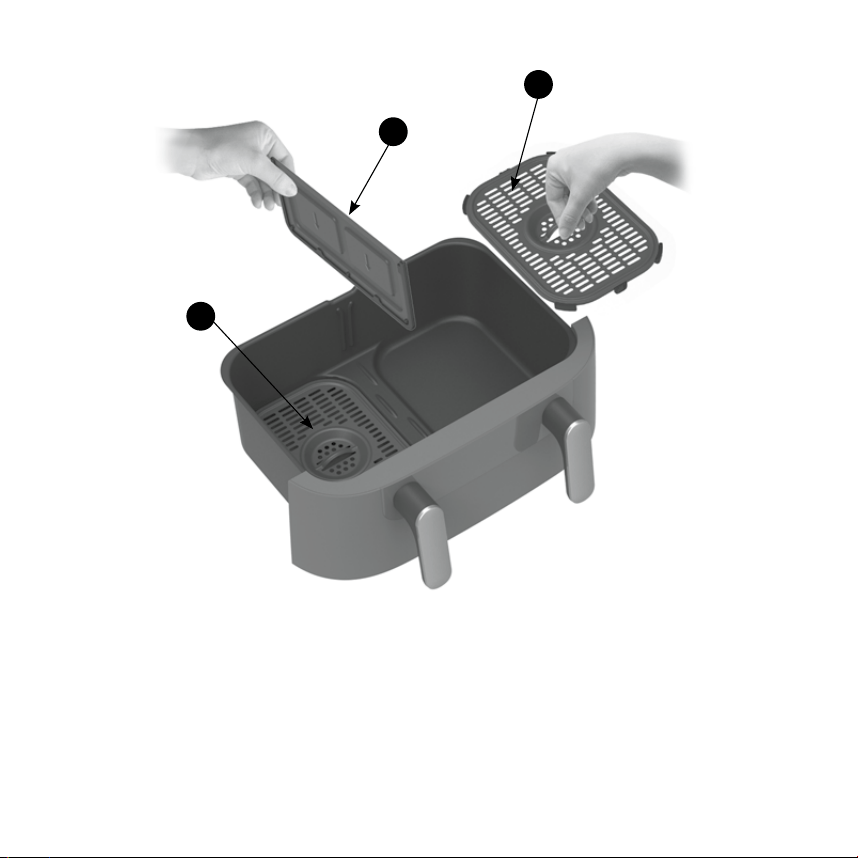
1
1
2
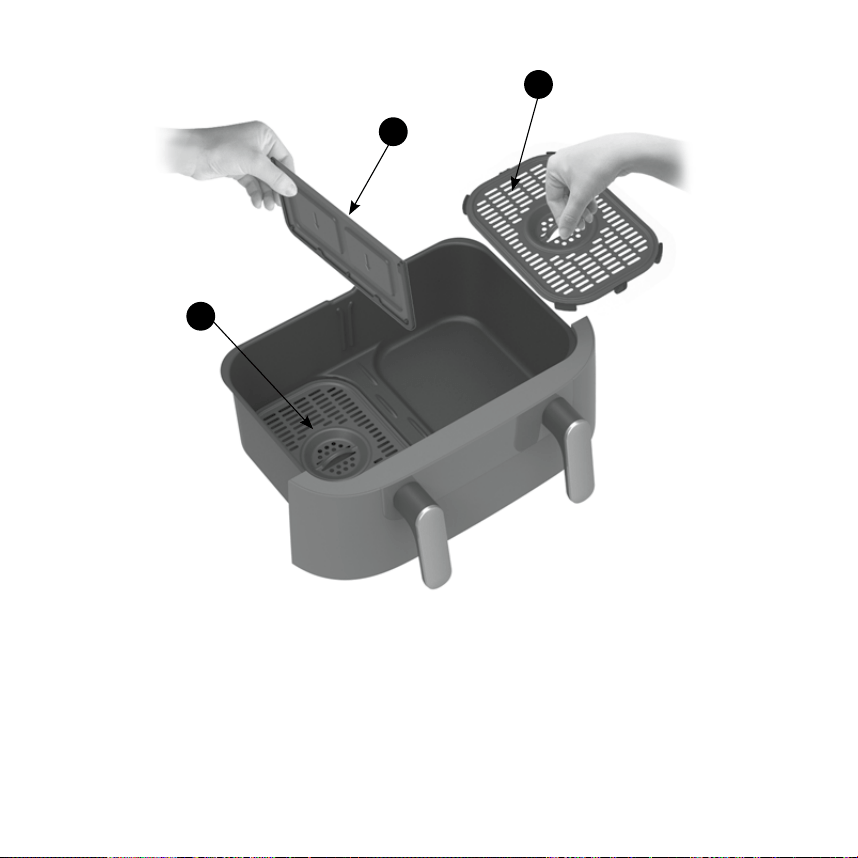
1. 2 Non Stick Crisping Trays
2. Basket Divider
14
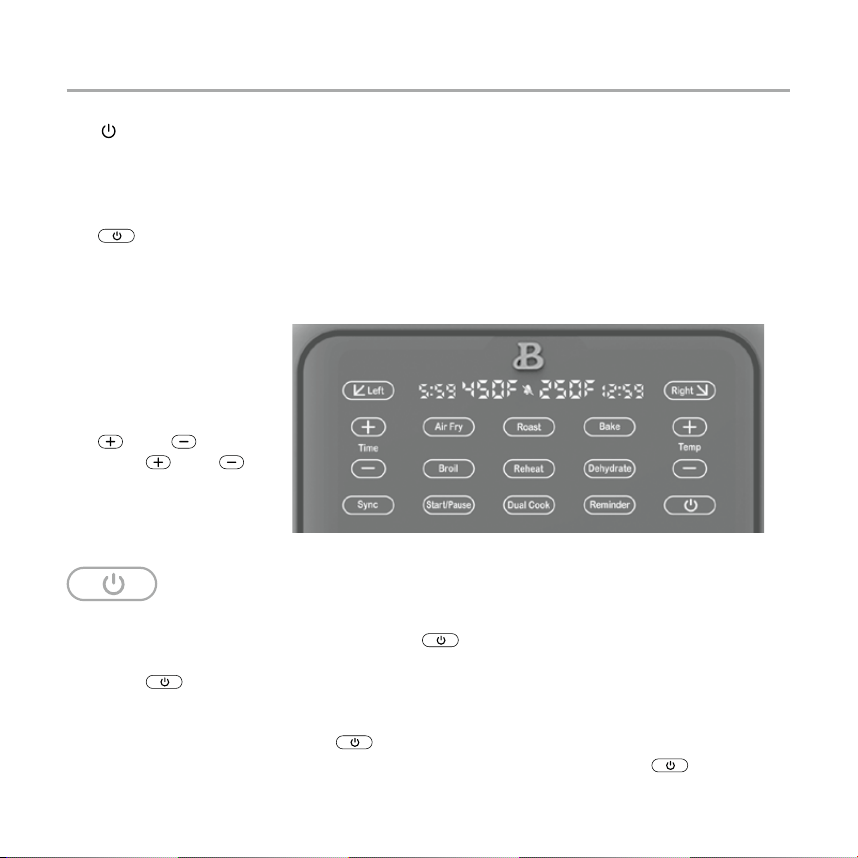
Touch-Activated Display Control Panel
A screen that only shows up when you need it.
The
button and any FUNCTION button will illuminate when active and vanish
when not in use. Steady high heat combined with convection air, ensures crispy
results with a minimum or no oil. This Beautiful™ TriZone™ Air Fryer can be
programmed for precision TIME and TEMPs. No need to hover in the kitchen.
When TIME expires, the Air Fryer turns OFF automatically.
1.
ON/OFF
2. Dual Digital TIME/TEMP Display
3. LEFT / RIGHT Zone Control
4. AIR FRY
5. ROAST
6. BROIL
7. BAKE
8. REHEAT
9. DEHYDRATE
10. TEMPERATURE
and
11. TIME and
12. REMINDER
13. SYNC
14. DUAL COOK
15. START/PAUSE
• When the Air Fryer is plugged in, a tone will sound, the control panel
will illuminate for 1 second. The button will illuminate and then
pulse slowly on and off.
• When
is pressed, a tone will sound, the 6 preset functions:
AIR FRY, ROAST, BAKE, BROIL, REHEAT, DEHYDRATE and the DUAL COOK icons
will illuminate and remain active for 5 minutes.
• When in operation, press
to turn the whole unit off.
• The function sound can be muted / unmuted by pressing the
button
for 3 seconds.

15
• When the pulsing is pressed, a tone will sound, and the 6 preset
functions: AIR FRY, ROAST, BAKE, BROIL, REHEAT, DEHYDRATE and the
DUAL COOK button will illuminate. Press any preset FUNCTION button to
continue.
• When any of the 6 preset FUNCTION buttons (AIR FRY, ROAST, BAKE, BROIL,
REHEAT, DEHYDRATE) has been pressed, a tone will sound and the default
TIME and TEMP will illuminate and continue to ash on your screen.
• Press TIME
or to increase or decrease cook TIME.
• Press TEMP
or to increase or reduce TEMP in 5 degree increments.
• Press and hold
or can quickly adjust the TIME and TEMP.
NOTE: By DEFAULT, the 9Qt TriZone™ Air Fryer is set up to use the whole
9Qt basket (with divider removed).
• When the DUAL COOK button has been pressed, a tone will sound and the
LEFT and RIGHT buttons will illuminate and the DEFAULT LEFT button
will continue to ash on your screen notifying you to program the LEFT
Zone (left side) rst, followed by the RIGHT zone in order to cook 2
different foods at once.
• Press the LEFT or RIGHT button to program the Left or Right zone.
While LEFT or RIGHT ashes, press any preset FUNCTION button
to continue.
NOTE: LEFT or RIGHT zones may be programmed independently, at any time
before or during operation.
NOTE: Be sure to add the basket divider if you are going to use
DUAL COOK (Left and Right zones) of the TriZone™ air fryer basket.
See instructions to add the basket divider. (Figure 1)
• The LEFT or RIGHT button will illuminate steadily on the screen when
active. To adjust or add programming at any time, press the appropriate
LEFT or RIGHT zone control button. When the button begins to ash,
TEMP/TIME can be adjusted.
• Press TIME
or to increase or decrease cook TIME.
• Press TEMP
or to increase or reduce TEMP in 5 degree increments.
• Press and hold
or can quickly adjust the TIME and TEMP.

16
• Press REMINDER to turn this feature ON. The Reminder button will ash
when selected.
• For all preset FUNCTION selections except BROIL, REHEAT and DEHYDRATE, 5
tones will sound at 2/3 of the cook time, to remind you to shake
the basket.
• With the basket divider in place, program each zone independently with
its own cook times and temperatures.
• The default for DUAL COOK is to program the LEFT zone rst, then RIGHT
TIP: Do not set two extreme opposing temperatures in each zone.
Even with the basket divider in place, the temperature from the hotter
zone can affect the cooking temperature in the other zone.
• Both LEFT and RIGHT zones must be programmed rst.
• Press SYNC to ensure both zones will complete cooking together.
• HOLD will appear on the display as the TriZone™ Air Fryer synchronizes
the nal cook times.
NOTE: Once cooking has started SYNC function will not be operable.
• DEHYDRATE is not an option when you select SYNC.
• Press to START the cooking process or to PAUSE any operation.

17
Before Using for the First Time
Remove all packing material and labels
from the inside and outside of the Air
Fryer. Check that there is no packaging
underneath and around the fryer basket
and crisping trays.
1. Your 9qt TriZone™ Air Fryer is
shipped with 2 crisping trays and
the basket divider packaged inside
the TriZone™ air fryer basket.
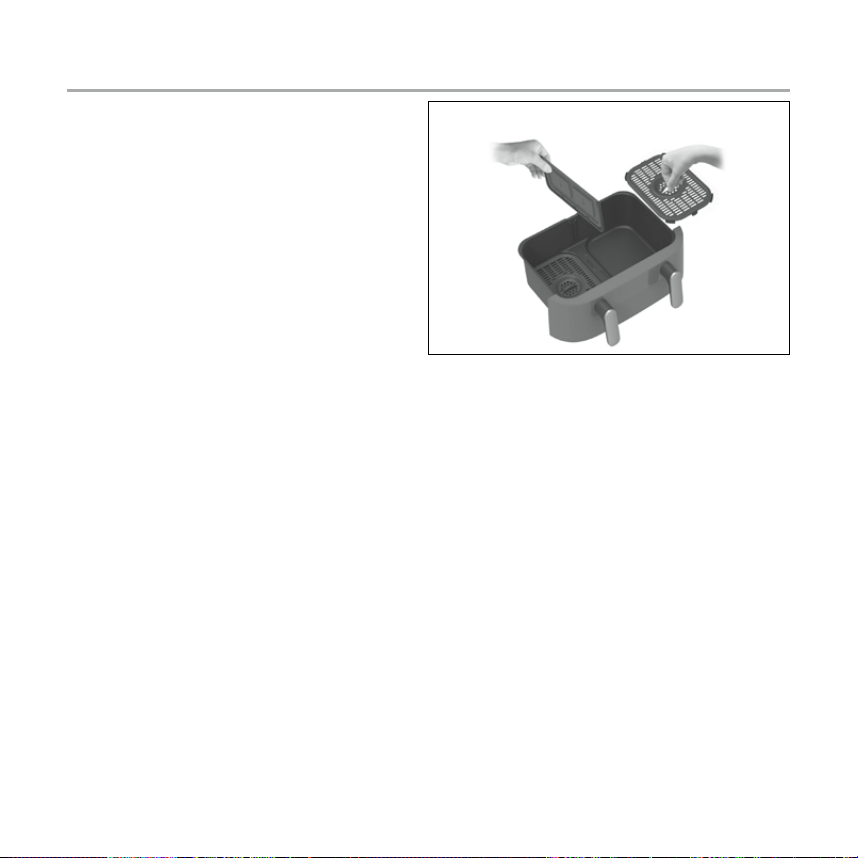
2. Firmly grasp the fryer basket
handles, to pull fryer basket out
of the main body.
3. Grasp the basket divider and
crisping tray handle and lift to remove from the basket. (Figure 1)
4. Wash the fryer basket, crisping trays and basket divider in hot,
soapy water.
5. DO NOT IMMERSE THE AIR FRYER BODY IN WATER. Wipe Air Fryer body with
a damp cloth. Dry all parts thoroughly.
6. Replace crisping trays into the fryer basket. With the handle facing up,
insert each tray so that the rubber corners t and lock securely into
each basket.
NOTE: If you plan on using only ONE zone (one side) when using DUAL
COOK, be sure to place divider rmly in the middle of the air fryer
basket.
NOTE: Refer to Figure 1 for directions to insert the basket divider.
Follow the arrow direction on the basket divider to ensure that you
insert the basket divider the correct way.
7. Due to base unit’s gracious front curve, the air fryer basket must be
properly inserted.
NOTE: During rst use, the TriZone™ Air Fryer may emit a slight odor.
This is normal and will not affect avor.
Figure 1

18
Operating Instructions
IMPORTANT! The maximum food capacity recommended for the Air Fryer basket
is 9 quarts or 7.5 lbs. of food. Using the full basket will enable you to feed
up to 9 people.
WARNING! This TriZone™ Air Fryer should not be used to boil water.
WARNING! This TriZone™ Air Fryer should never be used to deep fry foods.
1. Place the TriZone™ Air Fryer on a at, stable, heat-resistant work area,
close to an electrical outlet. (Figure 2)
2. If needed, add crisping tray(s) and insert basket divider (add basket
divider only if you are planning to use ONE zone or using DUAL COOK
(both LEFT and RIGHT zones).
See “Before Using for the First Time” for a detailed description.
(Figure 1)
3. Place food into the fryer basket. Do not overll. To ensure proper
cooking and air circulation, NEVER ll any fryer basket more than 2/3
full. When air frying fresh vegetables, we do not recommend adding more
than 4 to 6 cups of food to the fryer basket. (Figure 4)
NOTE: Up to 6 cups of ingredients may be dehydrated as food will
shrink to a fraction of its original volume. Place a single layer of
ingredients into the empty air fryer basket. Create a second layer by
placing the crisping tray into the basket over the ingredients.
Add food on top of the crisping tray.
4. Insert the assembled fryer basket into the front of the TriZone™
Air Fryer. Always make sure the fryer basket is fully inserted
and fully closed before operating.
NOTE: By default, the air fryer uses its full capacity. Please remove
the basket divider. If you plan on using Dual Cook or only a Single
Zone, please insert the basket divider to control the temperature
in the left or right zone.

19
Figure 2
Figure 4
Figure 3
Figure 5

20
6 Preset FUNCTIONS: AIR FRY, ROAST, BROIL, BAKE, REHEAT
and DEHYDRATE
Preset TEMPS & TIMES Chart
Menu Default
TEMP
Default
TIME
TEMP Range TIME Range SHAKE Food
AIR FRY 400 °F 20 mins 170 °F - 450 °F 1 - 60
mins
2/3 time/ 1x
ROAST 400 °F 35 mins 350 °F - 450 °F 1 - 60
mins
2/3 time/ 1x
BROIL 450 °F 10 mins 450 °F 1 - 30
mins
not
recommended
BAKE 350 °F 25 mins 170 °F - 400 °F 1 - 60
mins
2/3 time/ 1x
REHEAT 250 °F 6 mins 170 °F - 400 °F 1 - 60
mins
not
recommended
DEHYDRATE 130 °F 8 hours 90 °F - 170 °F 1 hour -
24 hours
not
recommended

21
MANUAL OPERATION
Consult the PRESET TIMES & TEMPS chart for minimum and maximum programming
options.
1. To change default TIME before or during cooking, simply press the
and buttons to adjust the TIME or press the and buttons
to adjust the TEMP.
2. When the desired TIME and TEMP appear on the digital display, press
START/PAUSE to turn the Air Fryer ON.
The target TIME will begin to count down.
3. When the remaining TIME reaches 00:00, will appear and 2 tones will
sound as the Air Fryer automatically turns OFF.
NOTE: The quantity, density, weight of food will alter the total cooking
time necessary. Remember, frying smaller batches will result in shorter
cooking times and higher food quality.
4. To adjust the air frying TIME or TEMP during operation use TIME or TEMP
or to advance or decrease TIME or TEMP as you cook.
22
TriZone™ Mode: Using the Full Basket without Basket Divider
(Using both zones without basket divider)
1. Plug cord in the wall outlet. An audible tone will sound and the control
panel will illuminate. The button will illuminate and slowly pulse.
2. Press
again. The 6 presets AIR FRY, ROAST, BROIL, BAKE, REHEAT,
DEHYDRATE and DUAL COOK will light up as default for TriZone™ Mode
(using both zones and entire basket simultaneously).
3. Select one of the 6 presets FUNCTIONS. A tone will sound. All other
function buttons and DUAL COOK will vanish when not in use. The default
TEMP and TIME, and START/ PAUSE will illuminate and begin to ash. The
and buttons for TEMP and TIME adjustments will also illuminate.
If you wish to select another preset, you can go back by pressing .
NOTE: REMINDER will ONLY illuminate when you select AIR FRY, ROAST, and
BAKE function. REMINDER is not an option when you select BROIL, REHEAT
or DEHYDRATE.
4. You can now adjust the temperature by pressing the
or on the
right side of the screen and adjust the time by pressing the or
on the left side of the screen.
TIP: You have the option of using the Reminder feature if you select
AIR FRY, ROAST or BAKE. Press REMINDER to set a reminder to shake
or ip your food at 2/3 the cooking time for an even air frying
on the surface of the food.
5. Press START/PAUSE, the unit will begin working. The timer will begin to
count down. The right side of the display will indicate the temperature
and the left side will display the remaining time.
NOTE: At any time during operation, you can adjust the time or
temperature by pressing their respective
or buttons.
6. Pressing START/PAUSE will pause the cooking. Pressing it again will
restart the cooking.
7. Press
button, the unit will stop and return to standby mode.
23
Dual Cook: Using both Zones (LEFT and RIGHT side) with
Basket Divider
1. Plug cord in the wall outlet. An audible tone will sound and the control
panel will illuminate. The button will illuminate and slowly pulse.
NOTE: Insert the basket divider into the middle of the air fryer basket
as well as adding both crisping trays (crisping trays optional).
NOTE: Refer to Figure 1 for directions to insert the basket divider.
Follow the arrow direction on the basket divider to ensure that you
insert the basket divider the correct way.
2. Press
again. The 6 presets FUNCTIONS, AIR FRY, ROAST, BROIL, BAKE,
REHEAT, DEHYDRATE and DUAL COOK button will illuminate.
3. Select DUAL COOK (Figure 5). A tone will sound. Both the LEFT and RIGHT
buttons will illuminate on your screen and the default LEFT button will
begin to ash.
4. You are now ready to program the LEFT zone. Select one of the 6 presets
FUNCTIONS. A tone will sound. All other function buttons will vanish
when not in use. The default TEMP and TIME, START/PAUSE and LEFT button
will illuminate and begin to ash. The
and buttons for TEMP and
TIME adjustments and SYNC will also illuminate on your screen. If you
wish to select another preset, you can go back by pressing .
NOTE: REMINDER will ONLY illuminate when you select AIR FRY, ROAST, and
BAKE function. REMINDER is not an option when you select BROIL, REHEAT
or DEHYDRATE.
5. To adjust the temperature of the LEFT zone, press the
o r on the
right side of the screen. To adjust the TIME, press the and on
the left side of the screen.
TIP: You have the option of using the REMINDER feature if you select
AIR FRY, ROAST or BAKE functions. Press REMINDER to set a reminder to
shake or ip your food at 2/3 the cooking time for an even air frying
on the surface of the food.
TIP: You also have the option of pressing SYNC to sync the nish
cooking time of other basket if both your foods follow different
recipes & different cooking times.
6. Press the RIGHT button on the screen to program the RIGHT zone and
follow the same steps as points 4 through 5: i.e Select a preset and
adjust the time and temperature for the RIGHT zone.
24
7. Press START/PAUSE button to begin operation. Pressing it again will
pause the cooking cycle for both LEFT and RIGHT zones.
NOTE: At any time during operation, you can adjust the time or
temperature by pressing their respective
or . You will need to
select the LEFT or RIGHT zone rst.
Single Zone Mode: Using One Zone (either LEFT or RIGHT side)
with Basket Divider
1. Plug cord in the wall outlet. An audible tone will sound and the control
panel will illuminate. The button will illuminate and slowly pulse.
NOTE: Insert the basket divider into the middle of the air fryer basket
as well as adding both crisping trays (crisping trays optional).
NOTE: Refer to Figure 1 for directions to insert the basket divider.
Follow the arrow direction on the basket divider to ensure that you
insert the basket divider the correct way.
2. Press
again. The 6 presets FUNCTIONS, AIR FRY, ROAST, BROIL, BAKE,
REHEAT, DEHYDRATE and DUAL COOK button will illuminate.
3. Select DUAL COOK (Figure 5). A tone will sound. Both the LEFT and RIGHT
buttons will illuminate on your screen and the default LEFT button will
begin to ash.
4. Select between LEFT or RIGHT zone to program.
5. Select one of the 6 presets FUNCTIONS. A tone will sound. All other
function buttons will vanish when not in use. The default TEMP and
TIME, START/ PAUSE and LEFT or RIGHT button (depending which zone you
selected to program) will illuminate and begin to ash. The
and
buttons for TEMP and TIME adjustments and SYNC will also illuminate on
your screen. If you wish to select another preset, you can go back by
pressing .
NOTE: REMINDER will ONLY illuminate when you select AIR FRY, ROAST,
and BAKE function. REMINDER is not an option when you select BROIL,
REHEAT or DEHYDRATE.
6. To adjust the temperature, press the
or on the right side
of the screen. To adjust the TIME, press the or on the left
side of the screen.
TIP: You have the option of using the REMINDER feature if you select

25
AIR FRY, ROAST or BAKE functions. Press REMINDER to set a reminder to
shake or ip your food at 2/3 the cooking time for an even air frying
on the surface of the food.
7. Press START/PAUSE to begin the cooking. Pressing it again will pause the
cooking cycle.
NOTE: At any time during operation, you can adjust the time or
temperature by pressing their respective
or buttons.
8. Press
button, the unit will stop and return to standby mode.
Air Fry Technique
Please consult the Air Fry / Roast Cooking Chart and/or follow package
directions for suggested TIME and TEMP.
1. Always pat food dry before cooking to encourage browning and avoid
excess smoke.
2. To assure even cooking/browning, ALWAYS open the air fry basket halfway
to 2/3 through the cooking time and check, turn or shake foods in
the fryer basket. Some recipes may call to brush or spray oil halfway
through cooking. Adjust TEMP or TIME if needed.
WARNING: Extreme caution must be used when handling any hot
fryer basket or crisping tray. Avoid escaping steam from the fryer
basket and the food.
CAUTION: Always use oven mitts when handling the hot air fryer basket.
CAUTION: Hot oil can collect at the base of the basket. Use caution
when removing cooking foods.
3. To avoid excess smoke, when cooking naturally high fat foods, such as
bacon, chicken wings or sausages, it may be necessary to empty fat from
the fryer basket between batches.
4. To ensure crispiness, make sure the skin or exterior surface of your
food is dry! Air fry small batches of freshly breaded foods. Create more
surface area by cutting food into smaller pieces. Press breading onto
food to help it adhere. Refrigerate breaded foods for at least
30 minutes before frying.
5. To improve crispiness, dust poultry skin or exterior surface lightly
with corn starch. Spray with oil.

26
6. Arrange breaded food in fryer basket so that food is not touching to
allow air ow on all surfaces.
7. Spray oils work best. Oil is distributed evenly and less oil is needed.
Canola, olive, avocado, coconut, grapeseed, peanut, or vegetable oil
work well.
8. Shake air fried foods out onto serving area. Promptly insert any fryer
basket into Air Fryer body and lock into place. Continue air frying
subsequent batches, if any.
9. Press REHEAT to air fry food for 6 minutes at 250 °F. Simply pull out
the air fry basket to interrupt air frying at any time to check on food
serving temperature. Repeat to extend cook time until food is heated
to your liking.
10. Unplug the TriZone™ Air Fryer when not in use.
Air Frying Pre-Packaged Frozen Foods
• As a rule, depending on the food and amount to be cooked, suggested cook
posted cook TIMES may have to be reduced slightly. Always check food
halfway through cooking time to determine nal cook TIME and TEMP.
• Always check cooking progress after TIME has expired.
Hints For Roast
IMPORTANT! Consult the USDA Cooking Guidelines section of this instruction
manual before cooking begins. Always test meat using an accurate cooking
thermometer.
• A meat thermometer inserted into the center of the meat should always
be used to ensure desired doneness.
• Cook meats to 5 to 10 degrees below desired doneness (internal
temperature). Allow meat to stand 15 to 20 minutes before serving.
The temperature will continue to rise while standing.
• ROAST large, tender cuts of meat and poultry. Seasoning prior to cooking
adds to the avor and the aroma during cooking.
• A layer of fat on the top of the roast promotes better browning and
provides natural basting.
• To speed up browning, brush lean cuts of meat, chicken and sh with oil,
margarine or melted butter.

27
• Place meat (fat side up) and turn over half-way through ROAST time.
IMPORTANT: Turn and check food halfway through ROAST time.
• Press REMINDER to turn this feature ON.
Hints For Broil
• Use BROIL to melt cheese or to brown crumb toppings.
• Typically, BROIL is used for thinner, tender cuts of meats, or marinated
meats, chops, poultry or sh, fruits and vegetables
• Dry marinated meats and sh before broiling. ALWAYS pat meat dry to
reduce smoke and promote brownness during broiling.
• To speed up browning and add lusciousness, brush lean cuts of meat,
chicken and sh with oil or melted butter.
• Trim excess fat from meat and score edges to prevent curling.
• Thaw frozen meats and sh before broiling.
• BROIL TIME is determined by the desired doneness Always use a meat
thermometer.
Hints For Bake
• When using BAKE, you may need to lower the bake recipe temperature
by 50 °F to a minimum of 300 °F.
• Check package directions to determine if the container is suitable
for use in an Air Fryer.
• Reminder is off by default.
Hints For Dehydrate
NOTE: When manually programming DEHYDRATE menu selection, TIME will increase or
decrease in 30 minute increments.
• Dehydrate fresh, ripe foods to preserve nutrients and enhance avor.
• Your TriZone™ Air Fryer’s automated drying makes home dehydration both
simple and rewarding and ensures healthy, safe, preservative-free results.
• DEHYDRATE combines low, steady heat with steady convection fan power.

28
• Precise low temperatures dry out foods evenly without cooking or
overheating.
NOTE: Turn food several times during DEHYDRATE .
Air Fry / Roast Cooking Chart
Times are estimated and based on average sizes and weights.
ALWAYS USE A MEAT THERMOMETER TO ENSURE THAT MEAT, POULTRY AND FISH ARE COOKED
THOROUGHLY BEFORE SERVING.
NOTE: Frying smaller batches will result in shorter cooking times and higher
food quality. Adjust air frying TEMP and TIME as necessary to suit your taste.
NOTE: Unless food is pre-packaged and pre-oiled, for browned and crispy results,
all foods should be lightly oiled before air frying.
Single zone TriZone™
Vegetables Temp Time Time
Asparagus, 1 bunch thin spears 400 °F 5-7 min 10-14 min
Asparagus, 1 bunch thick spears 400 °F 7-9 min 12-15 min
Cauliower Florets, 3-4 cups 400 °F 13-18 min 18-25 min
Egg Plant, 1 1/2 inch cubes (roasted) 400 °F 15 min 24 min
Kale, 3 cups, stems removed 375 °F 9 min 15-18 min
Peppers, Bell, 1 inch chunks 375 °F 10 min 15-20 min
Pickles, breaded 400 °F 5-7 min 9-13 min
Potatoes, white, French Fries,
(fresh soaked, 1/4 to 1/3 inch thick)
400 °F 16-20 min 30-40 min
Potatoes, white, 1 inch cubed 400 °F 12-14 min 24-35 min
Potatoes, white, wedges 390 °F 20-25 min 35-40 min
Broccoli Florets, 3-4 cups 400 °F 15-20 min 22-28 min
Brussels Sprouts, 1lb 375 °F 12-15 min 20-25 min

29
Corn on the Cob, 4 ears 390 °F 12-15 min 18-20 min
Carrots, 2 1/2 cups, 1/2 inch pieces 400 °F 10-12 min 20-24 min
Mushrooms, 3 cups sliced 400 °F 10-12 min 18-22 min
Peppers, Jalapeno, poblano (roasted) 375 °F 10 min 12-15 min
Zucchini, 1/4 inch discs 400 °F 14-17 min 22-24 min
Root Vegetables, 1/2 inch chunks
(roasted)
400 °F 15-20 min 25-40 min
Single zone TriZone™
Beef Temp Time Time
Hamburger, 1/4lb (up to 4) 360 °F 12-16 min 16-18 min
Hot Dogs/Sausages 360 °F 10-15 min 20-25 min
Meat Loaf, 1lb 360 °F 33-40 min 45-50 min
Steak, 2 (8 oz) Steaks 360 °F 8-21 min 10-24 min
Beef Tenderloin, 1lb, rare 360 °F 16 min 18-20 min
Beef Tenderloin, 1lb, medium 360 °F 18 min 20-24 min
Single zone TriZone™
Chicken Temp Time Time
Chicken Breast, boneless, skinless 360 °F 18-20 min 22-25 min
Chicken Thighs, 6 - 8oz ea, boneless 360 °F 20-25 min 28-30 min
Chicken Tenders/Fingers: battered 360 °F 13-15 min 16-19 min
Chicken Wings, 2Ibs 400 °F 22-27 min 40-45 min

30
Single zone TriZone™
Pork Temp Time Time
Lamb Loin Chops, 1 inch thick 400 °F 8-12 min 14-18 min
Pork Chops, 1 inch thick 375 °F 10 -14 min 20-25 min
Pork Chops, 2 inch thick 375 °F 15-19 min 22-28 min
Single zone TriZone™
Fish and Sea Food Temp Time Time
Shrimp, thawed and battered 325 °F 12 min 14-15 min
Catsh Fingers, thawed and battered 400 °F 10-15 min 18-25 min
Shrimp, thawed and sauced 325 °F 5-8min 10-12 min
Salmon Filets, thawed 400 °F 9-12 min 17-24 min
Single zone TriZone™
Frozen Foods* Temp Time Time
Cheese Sticks 350 °F 6-9 min 10-12 min
French Fries, Thick, 2 cups 400 °F 17-21 min 24-30 min
French Fries 400 °F 15-17 min 20-24 min
Onion Rings 360 °F 12-16 min 18-22 min
Chicken nuggets, 12 oz box 360 °F 10-15 min 17-22 min
Fish Sticks 400 °F 12-18 min 18-22 min
Meatballs, 1 inch, pre-cooked 390 °F 7-9min 11-14 min
Pizza 7 inch x 8 inch 360 °F 12-15 min 15-17 min
• All items are to be air tried from frozen (do not thaw).

31
Single zone TriZone™
Deserts Temp Time Time
Apple Turnovers 400 °F 10 min 14 min
Donuts 350 °F 8 min 9-11 min
USDA Cooking Guidelines
The USDA recommends that meats such as beef and lamb, etc. should be cooked to
an internal temperature of 145 °F/63 °C. Pork should be cooked to an internal
temperature of 160 °F/71 °C and poultry products should be cooked to an internal
temperature of 170 °F/77 °C - 180 °F/82 °C to be sure any harmful bacteria has
been killed. When reheating meat/poultry products, they should also be cooked to
an internal temperature of 165 °F/74 °C.

32
Dehydrate Chart
• Turn food several times during DEHYDRATE for even drying.
Herb Temp Time Herb Temp Time
Oregano 135 °F
2-3
hrs
Parsley 135 °F
2-3
hrs
Thyme 135 °F
3-4
hrs
Rosemary 135 °F
2-3
hrs
Tarragon 135 °F
3-4
hrs
Sage 135 °F
3-4
hrs
Kale Chips
Stems Removed
135 °F
2-3
hrs
Fruit / Vegetables
Wash all fruit skins well.
Slice fruit into 1/4 inch thick slices and arrange with space between each slice
to ensure even drying.
Rotate foods halfway through DEHYDRATE time for even drying.
Dehydrate Temp Time Dehydrate Temp Time
Apple Rounds Core
Slice into 1/4 inch
slices
135 °F
8-9
hrs
Orange Slices
Fully dried
Citrus is crisp
when fully dried
135 °F 10 hrs
Mango/Papaya Pieces
peal slice into 1/4
inch slices
135 °F
8-10
hrs
Tomatoes Roma skin
side down
150 °F
8-9
hrs
Kiwi
14 inch rounds
135 °F 6 hrs
Tomatoes, Cherry/
Grape
Skin side down
150 °F
5-9
hrs

33
User Maintenance Instructions
This appliance requires little maintenance. It contains no user-serviceable
parts. Any servicing requiring disassembly other than cleaning must be
performed by a qualied appliance repair technician.
Care & Cleaning Instructions
WARNING! Allow the TriZone™ Air Fryer to cool fully before cleaning.
1. Unplug the air fryer. Remove the fryer basket from the Air Fryer body.
Make sure the air fry basket, crisping trays and basket divider have
cooled completely before cleaning.
2. Wash air fryer basket, basket divider and crisping trays in hot soapy
water. Do not use metal kitchen utensils or abrasive cleansers or
cleaning products as this may damage the non-stick coating.
3. Air fryer basket, basket divider and crisping trays are dishwasher-safe.
For best results, place in the top rack of your dishwasher to clean.
4. Wipe the TriZone™ Air Fryer body with a soft, non-abrasive damp cloth
to clean.
Storing Instructions
1. Make sure the TriZone™ Air Fryer is unplugged and all parts are clean
and dry before storing.
2. Never store the TriZone™ Air Fryer while it is hot or wet.
3. Insert each clean crisping tray and basket divider into the fryer basket
and store inside the air fryer body.
4. Store TriZone™ Air Fryer in its box or in a clean, dry place.

Limited Two-Year Warranty
Sensio Inc. dba Made by Gather™
hereby warrants that for a period
of TWO YEARS from the date of
purchase, this product will be free
from mechanical defects in material
and workmanship, and for 90 days in
respect to non-mechanical parts. At
its sole discretion, Sensio Inc. dba
Made by Gather™ will either repair
or replace the product found to be
defective, or issue a refund on the
product during the warranty period.
The warranty is only valid for
the original retail purchaser from
the date of initial retail purchase
and is not transferable.
Keep the original sales receipt,
as proof of purchase isrequired
to obtain warranty validation.
Retail stores selling this product
do not have the right to alter,
modify, or in any way revise the
terms and conditions of the warranty.
Exclusions:
The warranty does not cover normal
wear of parts or damage resulting
from any of thefollowing: negligent
use of the product, use of improper
voltage or current, improper routine
maintenance, use contrary to the
operating instructions, disassembly,
repair, or alteration by anyone
other than qualied Sensio Inc.
dba Made by Gather™ personnel.
Also, the warranty does not cover
Acts of God such as re, oods,
hurricanes, or tornadoes.
Sensio Inc. dba Made by Gather™ shall
not be liable for any incidental or
consequential damages caused by the
breach of any express or implied
warranty. Apart from the extent
prohibited by applicable law, any
implied warranty of merchantability
or tness for a particular purpose
is limited in time to the duration
of the warranty. Some states,
provinces or jurisdictions do not
allow the exclusion or limitation
of incidental or consequential
damages, or limitations on how
long an implied warranty lasts,
and therefore, the above exclusions
or limitations may not apply to you.
The warranty covers specic legal
rights which may vary by state,
province and/or jurisdiction.
34

35
How To Obtain Warranty Service:
You must contact Customer Service at
our toll-free number: 1-877-775-3564.
A Customer Service Representative
will attempt to resolve warranty
issues over thephone. If the
Customer Service Representative
is unable to resolve the problem,
you will be provided with a case
number and asked to return the
product to Sensio Inc. dba Made
by Gather™ Attach a tag to the
product that includes: your name,
address, daytime contact telephone
number, case number, and description
of the problem.
Also, include a copy of the original
sales receipt. Carefully package
the tagged product with the sales
receipt, and send it (with shipping
and insurance prepaid) to SENSIO
Inc.’s address. Sensio Inc. dba
Made by Gather™ shall bear no
responsibility or liability for
the returned product while in
transit to Sensio Inc. DBA Made by
Gather™ Customer Service Center.
Sección 1
Seguridad
1

37
MEDIDAS DE SEGURIDAD
IMPORTANTES
Al utilizar electrodomésticos, siempre deben cumplirse
las precauciones de seguridad básicas, incluidas las
siguientes:
1. LEER TODAS LAS INSTRUCCIONES.
2. No tocar las supercies calientes. Utilizar las asas
o las perillas. Usar guantes de cocina o agarraderas.
3. Para protegerse de descargas eléctricas, no sumergir
el cable, los enchufes ni el electrodoméstico en agua
ni en ningún otro líquido.
4. Este electrodoméstico se puede usar y limpiar por
niños de 8 años de edad en adelante o por personas con
capacidades físicas, sensoriales o mentales reducidas,
o con falta de experiencia y conocimiento, SOLAMENTE SI
son supervisados o reciben instrucciones sobre el uso
del electrodoméstico por una persona responsable por
su seguridad.
5. Se debe supervisar a los niños para asegurarse de que
no jueguen con el electrodoméstico.
6. Desenchufar el electrodoméstico del tomacorriente
antes de limpiarlo y cuando no se lo utilice.
Dejar que el electrodoméstico se enfríe antes de
colocar o retirar piezas y antes de limpiarlo.
1

38
7. No utilizar ningún electrodoméstico que tenga un
cable o enchufe dañado, que muestre un funcionamiento
defectuoso o que se haya dañado de cualquier manera.
Lleve este aparato a un técnico calicado para que
lo examine, repare o ajuste.
NOTA: NO INTENTAR REPARAR LA UNIDAD POR CUENTA PROPIA.
ESTO ANULARÁ LA GARANTÍA.
8. El uso de accesorios no recomendados por el fabricante
del electrodoméstico puede provocar lesiones.
9. No utilizar el electrodoméstico en exteriores.
10. No permitir que el cable cuelgue del borde de una
mesa o de una encimera ni que entre en contacto con
supercies calientes.
11. No colocarlo sobre un quemador a gas o eléctrico,
o cerca de este, ni dentro de un horno caliente.
12. Se debe ser sumamente cuidadoso al mover un
electrodoméstico que contiene aceite caliente u otros
líquidos calientes.
13. Para desconectar, presione
y saque la cesta activa
del cuerpo de la freidora. A continuación, desenchufe
el aparato del tomacorriente.
14. No utilizar el electrodoméstico para otros nes
que no sean para los que fue diseñado.
15. Cuando utilice la(s) bandeja(s) para textura crujiente,
asegúrese de que estén correctamente insertadas en la
cesta de la freidora antes de cocinar.

39
16. Asegúrese de que la bandeja para el modo crujiente
esté en su lugar antes de agregar los alimentos
que se van a freír con aire.
17. Asegurarse siempre de que la canasta freidora
esté completamente insertada y trabada en la parte
delantera de la freidora de aire antes de ponerla en
funcionamiento.
ADVERTENCIA: La freidora de aire no funcionará a menos
que la canasta freidora esté completamente cerrada.
PRECAUCIÓN: Después de freír, asar, hornear o
recalentar con aire caliente, las cestas de la
freidora, la bandeja para textura crujiente
(si se usan) y los alimentos cocidos estarán calientes.
Se debe tener mucho cuidado al manipular las cestas de
la freidora de aire caliente y la bandeja para textura
crujiente.
GUARDAR ESTAS
INSTRUCCIONES
SOLO PARA USO
DOMÉSTICO

40
OTRAS MEDIDAS
DE SEGURIDAD
IMPORTANTES
PRECAUCIÓN, SUPERFICIES CALIENTES: ESTE APARATO GENERA
CALOR Y PUEDE LIBERAR VAPOR DURANTE SU USO. SE DEBEN
TOMAR LAS PRECAUCIONES ADECUADAS PARA PREVENIR EL RIESGO
DE QUEMADURAS, INCENDIOS U OTROS DAÑOS PERSONALES O
MATERIALES.
ATENCIÓN: Este electrodoméstico se calienta durante su
funcionamiento y retiene calor durante un tiempo luego de
ser apagado. Siempre se deben usar manoplas al manipular
materiales calientes y dejar enfriar las piezas de metal
antes de lavarlas. No colocar ningún elemento sobre el
electrodoméstico mientras está en funcionamiento
o caliente.
1. Todos los usuarios de este electrodoméstico deben leer
y comprender este Manual de instrucciones antes de
poner en funcionamiento o limpiar la unidad.
2. El cable de este electrodoméstico debe enchufarse
únicamente en un tomacorriente eléctrico de 120 V CA.
3. Si este aparato comienza a tener fallos durante el
uso, presione
y extraiga la cesta del cuerpo de la
freidora. A continuación, desenchufe el aparato del
tomacorriente. No use ni intente reparar el aparato

41
si no funciona correctamente. Póngase en contacto con
Servicio al Cliente.
4. Si comienza a mostrar un funcionamiento defectuoso
durante el uso, desenchufar el cable de inmediato.
No utilizar el electrodoméstico
5. ni intentar repararlo si funciona mal. Contactar
servicio al cliente.
6. Coloque la freidora de aire TriZone™ en una supercie
nivelada, estable y resistente al calor.
7. No sumergir el cable de alimentación en ningún líquido.
Si el cable de alimentación o este electrodoméstico se
dañan, se los deberá reemplazar. Contactar servicio al
cliente.
8. Mantener el cable fuera del alcance de los bebés y niños
para evitar riesgos de descarga eléctrica o asxia.
9. Colocar la freidora de aire en un área de trabajo plana
y resistente al calor.
10. Nunca mueva una freidora de aire caliente o una
freidora de aire que contenga alimentos calientes.
Deje que se enfríe antes de moverla.
11. Mantener el electrodoméstico por lo menos a 4 pulgadas
(10 centímetros) de distancia de paredes u otros
objetos mientras está en funcionamiento.
12. Siempre usar el asa de la canasta freidora para abrir
el cajón de la canasta.

42
13. No colocar el cajón de la canasta vacío (sin la canasta
freidora) dentro del cuerpo de la freidora de aire.
Revisar que la canasta freidora esté bien asegurada en
su lugar dentro del cajón.
ADVERTENCIA: Un llenado deciente o excesivo de la canasta
freidora puede dañar la freidora de aire y podría provocar
lesiones físicas graves.
14. Nunca mover una freidora de aire caliente o una
freidora de aire con alimentos calientes dentro.
Dejar que se enfríe por completo antes de moverla.
ADVERTENCIA: Esta freidora de aire no debe utilizarse para
hervir agua.
ADVERTENCIA: Esta freidora de aire nunca debe utilizarse
para freír alimentos en abundante aceite.
NOTAS SOBRE EL ENCHUFE
Este electrodoméstico tiene un enchufe polarizado (una
pata es más ancha que la otra). Para reducir el riesgo
de descargas eléctricas, este enchufe encaja de una sola
manera en un tomacorriente polarizado. Si el enchufe no
encaja bien en el tomacorriente, darlo vuelta. Si aun así
no encaja, comunicarse con un electricista calicado.
No realizar ningún tipo de modicación al enchufe.

43
NOTAS SOBRE EL CABLE
a) Se debe utilizar un cable de alimentación corto
(o un cable de alimentación desconectable) para reducir
el riesgo de enredarse o tropezar con uno más largo.
b) Existen cables de alimentación desconectables más
largos o prolongadores y pueden usarse si se hace con
precaución.
c) Si se utiliza un cable de alimentación desconectable más
largo o un prolongador, tenga en cuenta lo siguiente:
1) La capacidad eléctrica nominal del cable de
alimentación desconectable o prolongador debe
ser al menos igual a la capacidad eléctrica del
electrodoméstico.
2) Si el electrodoméstico cuenta con conexión a tierra,
el prolongador debe ser del tipo con conexión a tierra
de 3 alambres.
3) El cable más largo debe estar dispuesto de manera
que no cuelgue de la encimera o de la mesa, ya que
puede ser jalado por niños, o cualquier persona
podría tropezarse.

44
ADVERTENCIA SOBRE PLASTIFICADOS
ATENCIÓN: A n de evitar que los plasticados se adhieran
al acabado de la encimera, la mesa u otro mueble, colocar
un posafuentes o salvamanteles que NO SEAN DE PLÁSTICO
entre el electrodoméstico y el acabado de la supercie
de la encimera o mesa. Si no se hace esto, es posible que
el acabado se oscurezca, se formen marcas permanentes o
aparezcan manchas.
POTENCIA ELÉCTRICA
Si el circuito eléctrico está sobrecargado por el uso
de otros electrodomésticos, es posible que no funcione
correctamente. Esta unidad debe funcionar en un circuito
eléctrico separado de otros electrodomésticos.
45
Sección 2
Instrucciones
2
46
Conozca su freidora de aire TriZone™ de 9 cuartos de galón
El producto puede diferir ligeramente del que aparece en las ilustraciones
1. Panel de control de pantalla activado por toque
2. Cesta de la freidora de aire
TriZone™ extraíble de 9 cuartos de galón
3. Cable de alimentación con enchufe polarizado (no se muestra)
4. Patas antideslizantes (no se muestran)
1
2
3
4
47
1
1
2
1. 2 bandejas antiadherentes para textura crujiente
2. Divisor de cesta

48
Panel de control de pantalla activado por toque
Una pantalla que solo aparece cuando la necesita.
El botón
y cualquier botón de FUNCIÓN se iluminará cuando esté activa la
función y desaparecerá cuando no se utilice. El calor uniforme combinado con el
aire por convección garantiza resultados crujientes prácticamente sin aceite.
La freidora de aire Beautiful se puede programar para funcionar en horas y a
temperaturas precisas. No necesita esperar en la cocina. Cuando se cumple el
TIEMPO, la freidora de aire se apaga automáticamente.
1.
ENCENDIDO APAGADO
2. Pantalla digital doble TIME/TEMP (Tiempo/Temperatura)
3. Control de zona LEFT/RIGHT (Izquierda/Derecha)
4. AIR FRY (Freír con aire)
5. ROAST (Rostizar)
6. BROIL (Asar)
7. BAKE (Hornear)
8. REHEAT (Recalentar)
9. DEHYDRATE (Deshidratar)
10. TEMPERATURA
y
11. TIME (Tiempo) y
12. REMINDER(Recordatorio)
13. SYNC (Sincronizar)
14. DUAL COOK (Cocción Dual)
15. START/PAUSE (Inicio/Pausa)
49
• Cuando la freidora de aire está enchufada, sonará un tono, y el panel
de control se iluminará y luego se oscurecerá. El botón
se
iluminará y luego pulse lentamente encender y apagar.
• Al presionar
, sonará un tono, las 6 funciones preestablecidas,
AIR FRY (Freír), ROAST (Tostar), BAKE (Hornear), BROIL (Asar),
REHEAT (Recalentar), DEHYDRATE (Deshidratar) y los iconos DUAL COOK
(Cocción doble) se iluminarán y permanecerán activos durante 5 minutos.
• Cuando esté en funcionamiento, presione
para apagar la unidad
por completo.
• El sonido HECHO POR la función se puede silenciar o reactivar
presionando el botón
durante 3 segundos.
• Al pulsar
, sonará un tono y las 6 funciones preestablecidas,
AIR FRY (Freír), ROAST (Tostar), BAKE (Hornear), BROIL (Asar),
REHEAT (Recalentar), DEHYDRATE (Deshidratar) y el botón DUAL COOK
(Cocción doble) se iluminarán. Presionar cualquier botón de FUNCIÓN
preestablecida para continuar.
• Cuando se haya pulsado cualquiera de los 6 botones de FUNCIÓN
preestablecida (AIR FRY [Freír], ROAST [Tostar], BAKE [Hornear], BROIL
[Asar], REHEAT [Recalentar], DEHYDRATE [Deshidratar], sonará un tono
y el TIEMPO y la TEMPERATURA predeterminados se iluminarán y seguirán
parpadeando en la pantalla
• Presionar TIME (Tiempo)
o para aumentar o disminuir el TIEMPO
de cocción.
• Presionar TEMP (Temperatura)
o para aumentar o reducir
la TEMPERATURA en incrementos de 5º.
• Mantener presionado
o para ajustar rápidamente el TIEMPO
y la TEMPERATURA.
NOTA: Por DEFECTO, la freidora de aire TriZone™ de 9 cuartos (8.5 L)
está congurada para utilizar toda la canasta de 9 cuartos (8.5 L)
(sin el divisor).
• Al presionar el botón DUAL COOK (Cocción doble), un tono sonará y los
50
botones LEFT (Izquierda) y RIGHT (Derecha) se iluminarán, y el botón
LEFT (Izquierda) predeterminado seguirá parpadeando en la pantalla, esto
indica que primero se debe programar la Zona IZQUIERDA (lado izquierdo)
y luego la zona DERECHA para cocinar 2 alimentos diferentes a la vez.
• Presionar el botón LEFT (Izquierda) o RIGHT (Derecha) para programar
la zona izquierda o derecha.
Mientras parpadea IZQUIERDA o DERECHA, presionar cualquier botón de
FUNCIÓN preestablecida para continuar.
NOTA: Las zonas IZQUIERDA o DERECHA se pueden programar de manera
independiente, en cualquier momento antes o durante el funcionamiento.
NOTA: Asegurarse de añadir el divisor de canasta si se utiliza la
función DUAL COOK (Cocción doble) (zona izquierda y derecha) de la
canasta de la freidora de aire TriZone™.
Consultar las instrucciones para añadir el divisor de canasta
(Figura 1).
• El botón LEFT (Izquierda) o RIGHT (Derecha) se iluminará de forma ja
en la pantalla cuando esté activo. Para ajustar o añadir la programación
en cualquier momento, presionar el botón de control de zona LEFT
(Izquierda) o RIGHT (Derecha) correspondiente. Cuando el botón comience
a parpadear, se podrá ajustar la TEMPERATURA y el TIEMPO.
• Presionar TIME (Tiempo)
o para aumentar o disminuir el TIEMPO
de cocción.
• Presionar TEMP (Temperatura)
o para aumentar o reducir
la TEMPERATURA en incrementos de 5º.
• Mantener presionado
o para ajustar rápidamente el TIEMPO
y la TEMPERATURA.
• Presionar REMINDER (Recordatorio) para activar esta función.
El botón de recordatorio parpadeará cuando esté seleccionado.
• Para todas las selecciones de FUNCIÓN preestablecida, excepto BROIL
(Asar), REHEAT (Recalentar) y DEHYDRATE (Deshidratar), sonarán 5 tonos
a los 2/3 del tiempo de cocción, para recordar que se debe agitar
la canasta.

51
• Con el divisor de canasta en su lugar, programar cada zona de forma
independiente con sus propios tiempos y temperaturas de cocción.
• El valor predeterminado para el cocción dual DUAL COOK es programar
primero la zona LEFT Izquierda y luego RIGHT la Derecha.
SUGERENCIA: No establezca dos temperaturas extremas opuestas en cada
zona. Incluso con el divisor de la cesta en su lugar, la temperatura
de la zona más caliente puede afectar la temperatura de cocción
en la otra zona.
• Las zonas IZQUIERDA y DERECHA se deben programar primero.
• Presione SYNC FINISH (Sincronizar n) para asegurar que ambas cestas
terminarán de cocinar juntas.
• En la pantalla aparecerá HOLD cuando la freidora de aire de doble cesta
sincroniza los tiempos nales de cocción.
NOTA: Una vez que la cocción ha comenzado, la función SYNC
no estará disponible.
• DEHYDRATE (Deshidratar) no es una opción cuando selecciona SYNC
(Sincronizar).
• Presione
START para iniciar el proceso de cocción o para poner
en PAUSA cualquier operación.
52
Antes del primer uso
Retire todo el material de embalaje
y las etiquetas del interior y el
exterior de la freidora de aire.
Comprobar que no haya embalaje debajo
y alrededor de la canasta freidora y
de las bandejas de fritura.
1. La freidora de aire TriZone™ de
9 cuartos (8.5 L) se envía con 2
bandejas de fritura y el divisor
de canasta empaquetados dentro de
la canasta de la freidora de aire
TriZone™.
2. Sujete con rmeza las asas de la
cesta freidora para retirar el
cesta del interior del cuerpo principal.
3. Agarre el divisor de la cesta y el asa de la bandeja para textura
crujiente y levántelos para sacarlos de la cesta. (Figura 1)
4. Limpie la cesta de la freidora, las bandejas para textura crujiente
y el divisor de la cesta en agua caliente con jabón.
5. NO SUMERJA EL CUERPO DE LA FREIDORA EN AGUA. Limpie el cuerpo de la
freidora de aire con un paño húmedo. Seque bien todas las piezas.
6. Vuelva a colocar las bandejas textura crujiente en la cesta de la
freidora. Con el asa hacia arriba, insertar cada bandeja de forma que
las esquinas de goma encajen y se ajusten de forma segura en cada
canasta.
NOTA: Si tiene previsto utilizar solo UNA zona (un lado) cuando utilice
la función DUAL COOK (Cocción doble), asegúrese de colocar el divisor
rmemente en el centro de la canasta freidora.
NOTA: Consultar la Figura 1 para ver las instrucciones para insertar el
divisor de canasta. Seguir la dirección de la echa en el divisor de
canasta para asegurarse de insertarlo correctamente.
7. Debido a la elegante curva en el frente de la unidad base, la cesta
de la freidora se debe insertar correctamente.
NOTA: Durante el primer uso, la freidora TriZone™ Freidora de aire puede
emitir un ligero olor. Esto es normal y no afectará el sabor.
Figure 1

53
Instrucciones de funcionamiento
¡IMPORTANTE! La capacidad máxima de alimentos recomendada para la cesta
de la freidora de aire es de 9 cuartos de galón o 7.5 libras de alimentos.
El uso de la cesta completa le permitirá cocinar porciones hasta
para 9 personas.
¡ADVERTENCIA! ESTA FREIDORA DE AIRE TRIZONE™ NO DEBE USARSE PARA HERVIR AGUA.
¡ADVERTENCIA! ESTA FREIDORA DE AIRE TRIZONE™ NUNCA DEBE USARSE PARA FREÍR
ALIMENTOS SUMERGIDOS EN ACEITE.
1. Coloque la freidora de aire TriZone™ en una supercie nivelada, estable
y resistente al calor, cerca de un tomacorriente. (Figura 2)
2. Si es necesario, añadir la bandeja de fritura e insertar el divisor
de canasta (añadir el divisor de canasta solo si piensa utilizar UNA
zona o si utiliza la función DUAL COOK (Cocción doble) (ambas zonas,
la IZQUIERDA y la DERECHA]).
Consultar "Antes de usar por primera vez" para obtener una descripción
detallada (Figura 1).
3. Coloque los alimentos en la cesta de la freidora. No lo llene en exceso.
Para garantizar una cocción adecuada y buena circulación de aire, NUNCA
llene una cesta freidora a más de 2/3 de la capacidad máxima.
Al freír verduras frescas, no recomendamos agregar más de 4 a 6 tazas
de vegetales a la cesta de la freidora. (Figura 4)
NOTA: Se pueden deshidratar hasta 6 tazas de ingredientes, ya que los
alimentos se reducirán a una fracción de su volumen original. Coloque
una sola capa de ingredientes en una cesta vacía de la freidora de aire.
Cree una segunda capa colocando la bandeja para textura crujiente en la
cesta sobre los ingredientes. Agregue el alimento en la parte de arriba
de la bandeja para textura crujiente.
4. Inserte la cesta de la freidora ensamblada en la parte delantera
de la freidora de aire TriZone™. Siempre asegúrese de que la cesta de la
freidora esté completamente insertada y completamente bloqueada
antes de funcionar. (Figura 5)
NOTA: De forma predeterminada, la freidora utiliza toda su capacidad.
Quite el divisor de la cesta. Si tiene previsto usar el cocción dual o
solo una zona únicamente, inserte el divisor de la cesta para controlar
la temperatura en la zona LEFT izquierda o RIGHT derecha.

54
Figura 2
Figura 4
Figura 3
Figura 5

55
Seis configuraciones preestablecidas: AIR FRY (FREÍR AL AIRE),
ROAST (ROSTIZAR), BROIL (ASAR), BAKE (HORNEAR), REHEAT
(RECALENTAR), DEHYDRATE (DESHIDRATAR)
Tabla de TEMPERATURAS y TIEMPOS preestablecidos
MENÚ TEMP
(TEMPERATURA)
POR DEFECTO
TIME
(TIEMPO)
POR
DEFECTO
RANGO DE
TEMPE-
RATURAS
RANGO DE
TIEMPO
SHAKE
(SACUDIR)
ALIMENTOS
AIR FRY (Freír
al aire)
400 °F 20 min 170 °F -
450 °F
1 - 60
min
2/3 veces/
1 vez
ASAR 400 °F 35 min 350 °F -
450 °F
1 - 60
mins
2/3 veces/
1 vez
BROIL (Asar) 450 °F 10 min 450 °F 1 - 30
min
no
recomendado
BAKE (Hornear) 350 °F 25 min 170 °F -
400 °F
1 - 60
min
2/3 veces/
1 vez
REHEAT
(Recalentar)
250 °F 6 min 170 °F -
400 °F
1 - 60
min
no
recomendado
DEHYDRATE
(Deshidratar)
130 °F 8 horas 90 °F -
170 °F
1 hora
- 24
horas
no
recomendado

56
OPERACIÓN MANUAL
Consultar la tabla de TIEMPOS Y TEMPERATURAS PREESTABLECIDO para obtener las
opciones de programación mínimas y máximas.
1. Para cambiar el TIEMPO predeterminado antes o durante la cocción,
presionar simplemente los botones
y para ajustar el TIEMPO,
o presionar los botones
y para ajustar la TEMPERATURA.
2. Cuando aparece el TIEMPO y la TEMPERATURA deseados en la pantalla
digital, presionar START/PAUSE (Iniciar/Pausar) para encender la
freidora. El TIEMPO objetivo comenzará la cuenta regresiva.
3. Cuando el TIEMPO restante llegue a 00:00, aparecerá y sonarán 2 tonos
mientras la freidora se apaga automáticamente.
NOTA: La cantidad, la densidad y el peso de los alimentos alterarán el
tiempo total de cocción necesario. Recordar que la cocción de alimentos
en tandas más pequeñas resultará en tiempos de cocción más breves y una
mayor calidad.
4. Para ajustar el TIEMPO o la TEMPERATURA de la freidora de aire durante
el funcionamiento, utilizar TIEMPO o TEMPERATURA, o para avanzar o
disminuir el TIEMPO o la TEMPERATURA mientras cocina.
57
Modo TriZone™: Cómo utilizar la canasta completa sin el divisor
de canasta (ambas zonas sin el divisor de canasta)
1. Enchufe el cable en el tomacorriente de pared. Se emitirá un sonido
y el panel de control se iluminará. El botón se iluminará y
parpadeará lentamente.
2. Presione
de nuevo. Los 6 ajustes preestablecidos AIR FRY, ROAST,
BROIL, BAKE, REHEAT, DEHYDRATE (DESHYDRATE) y DUAL COOK se iluminarán
de forma predeterminada para el modo TriZone™ (usando ambas zonas
y toda la cesta simultáneamente).
3. Seleccionar una de las 6 FUNCIONES preestablecidas. Sonará un tono.
Todos los demás botones de función y DUAL COOK (Cocción doble) se
apagarán cuando no estén en uso. Los botones predeterminados TEMP
(Temperatura) y TIME (Tiempo), y START/PAUSE (Iniciar/Pausar) se
iluminarán y comenzarán a parpadear. Los botones
y para los
ajustes de TEMPERATURA y TIEMPO también se iluminarán. Si desea
seleccionar otro ajuste preestablecido, puede volver atrás pulsando .
NOTA: REMINDER (Recordatorio) solo se iluminará cuando seleccione
las funciones AIR FRY (Freír), ROAST (Tostar) y BAKE (Hornear).
El RECORDATORIO no es una opción cuando selecciona BROIL (Asar),
REHEAT (Recalentar) o DEHYDRATE (Deshidratar).
4. Ahora puede ajustar la temperatura presionando
y en el lado
derecho de la pantalla y ajustar el tiempo presionando y
en el lado izquierdo de la pantalla.
CONSEJO: Tiene la opción de usar la función de recordatorio REMINDER si
selecciona AIR FRY, ROAST o BAKE. Presione REMINDER para congurar un
recordatorio para agitar o voltear su comida a los 2/3 del tiempo para
una cocción uniforme de la supercie del alimento.
5. Presione START/PAUSE, la unidad comienza a funcionar. El temporizador
comenzará a contar hacia atrás. El lado derecho de la pantalla indicará
la temperatura y el lado izquierdo mostrará el tiempo restante.
NOTA: En cualquier momento durante la operación, puede ajustar la hora
o la temperatura presionando sus respectivos botones
y .
6. Al presionar START/PAUSE se pausará la cocción. Al presionarlo
nuevamente, se reiniciará la cocción.
7. Presione el botón
, la unidad se detendrá y volverá al modo
de espera.
58
Cocción doble: Cómo utilizar ambas zonas (lado IZQUIERDO y
DERECHO) con el divisor de canasta
1. Enchufar el cable en el tomacorriente. Un tono audible sonará y el
panel de control se iluminará. El botón se iluminará y pulsará
lentamente.
NOTA: Insertar el divisor de canasta en el centro de la canasta freidora
y añadir las dos bandejas de fritura (las bandejas de fritura son
opcionales).
NOTA: Consultar la Figura 1 para ver las instrucciones para insertar
el divisor de canasta. Seguir la dirección de la echa en el divisor
de canasta para asegurarse de insertarlo correctamente.
2. Presionar nuevamente
. Se iluminarán las 6 FUNCIONES preestablecidas,
AIR FRY (Freír), ROAST (Tostar), BROIL (Asar), BAKE (Hornear),
REHEAT (Recalentar), DEHYDRATE (Deshidratar) y el botón DUAL COOK
(Cocción doble).
3. Seleccionar DUAL COOK (Cocción doble) (Figura 5). Sonará un tono. Los
botones LEFT (Izquierda) y RIGHT (Derecha) se iluminarán en la pantalla,
y el botón LEFT (Izquierda) predeterminado comenzará a parpadear.
4. Ahora está listo para programar la zona IZQUIERDA. Seleccionar una
de las 6 FUNCIONES preestablecidas. Sonará un tono. Todos los demás
botones de función se apagarán cuando no se utilicen. Los botones
predeterminados TEMP (Temperatura) y TIME (Tiempo), START/PAUSE (Iniciar/
Pausar) y LEFT (Izquierda) se iluminarán y comenzarán a parpadear.
Los botones
y para los ajustes de TEMPERATURA y TIEMPO, y SYNC
(Sincronizar) también se iluminarán en la pantalla. Si desea seleccionar
otro ajuste preestablecido, puede volver atrás pulsando .
NOTA: REMINDER (Recordatorio) solo se iluminará cuando seleccione
las funciones AIR FRY (Freír), ROAST (Tostar) y BAKE (Hornear). El
RECORDATORIO no es una opción cuando selecciona BROIL (Asar), REHEAT
(Recalentar) o DEHYDRATE (Deshidratar).
5. Para ajustar la temperatura de la zona IZQUIERDA, presionar los botones
o en la parte derecha de la pantalla. Para ajustar el TIEMPO,
presionar los botones o en la parte izquierda de la pantalla.
SUGERENCIA: Tiene la opción de utilizar la función REMINDER
(Recordatorio) si selecciona las funciones AIR FRY (Freír), ROAST

59
(Tostar) o BAKE (Hornear). Presionar REMINDER (Recordatorio) para
establecer un recordatorio para agitar o voltear sus alimentos a los 2/3
del tiempo de cocción para que la supercie de los alimentos se cocine
de manera uniforme.
SUGERENCIA: Tiene la opción de utilizar la función REMINDER
(Recordatorio) si selecciona las funciones AIR FRY (Freír), ROAST
(Tostar) o BAKE (Hornear). Presionar REMINDER (Recordatorio) para
establecer un recordatorio para agitar o voltear sus alimentos a los 2/3
del tiempo de cocción para que la supercie de los alimentos se cocine
de manera uniforme.
SUGERENCIA: También tiene la opción de presionar SYNC (Sincronizar) para
sincronizar el tiempo de nalización de la cocción de otra canasta si
ambos alimentos siguen recetas y tiempos de cocción diferentes.
6. Presionar el botón RIGHT (Derecha) en la pantalla para programar
la zona DERECHA y seguir los mismos pasos que se indican en los puntos
4 a 5: seleccionar una función predeterminada y ajustar el tiempo
y la temperatura para la zona DERECHA.
7. Presionar el botón START/PAUSE (Iniciar/Pausar) para iniciar el
funcionamiento. Al presionarlo de nuevo, el ciclo de cocción se detendrá
para las zonas IZQUIERDA y DERECHA.
NOTA: En cualquier momento durante el funcionamiento, puede ajustar
el tiempo o la temperatura presionando los botones
o
correspondientes. Deberá seleccionar primero la zona IZQUIERDA o DERECHA.
Modo de una sola zona: Cómo utilizar una zona (ya sea del lado
IZQUIERDO o DERECHO) con divisor de canasta
1. Enchufar el cable en el tomacorriente. Un tono audible sonará y el
panel de control se iluminará. El botón se iluminará y pulsará
lentamente.
NOTA: Insertar el divisor de canasta en el centro de la canasta freidora
y añadir las dos bandejas de fritura (las bandejas de fritura son
opcionales).
2. Presionar nuevamente
. Se iluminarán las 6 FUNCIONES preestablecidas,
AIR FRY (Freír), ROAST (Tostar), BROIL (Asar), BAKE (Hornear),
REHEAT (Recalentar), DEHYDRATE (Deshidratar) y el botón DUAL COOK
(Cocción doble).

60
3. Seleccionar DUAL COOK (Cocción doble) (Figura 5). Sonará un tono.
Los botones LEFT (Izquierda) y RIGHT (Derecha) se iluminarán
en la pantalla, y el botón LEFT (Izquierda) predeterminado comenzará
a parpadear.
4. Seleccionar entre la zona IZQUIERDA o DERECHA para programar.
5. Seleccionar una de las 6 FUNCIONES preestablecidas. Sonará un tono.
Todos los demás botones de función se apagarán cuando no se utilicen.
Los botones predeterminados TEMP (Temperatura) y TIME (Tiempo), START/
PAUSE (Iniciar/Pausar) y LEFT (Izquierda) o RIGHT (Derecha) (dependiendo
de la zona que haya seleccionado para programar) se iluminarán y
comenzarán a parpadear. Los botones
y para los ajustes de
TEMPERATURA y TIEMPO, y SYNC (Sincronizar) también se iluminarán en la
pantalla. Si desea seleccionar otro ajuste preestablecido, puede volver
atrás pulsando .
NOTA: REMINDER (Recordatorio) solo se iluminará cuando seleccione
las funciones AIR FRY (Freír), ROAST (Tostar) y BAKE (Hornear).
El RECORDATORIO no es una opción cuando selecciona BROIL (Asar),
REHEAT (Recalentar) o DEHYDRATE (Deshidratar).
6. Para ajustar la temperatura, presionar los botones
o en la parte
derecha de la pantalla. Para ajustar el TIEMPO, presionar los botones
and en la parte izquierda de la pantalla.
SUGERENCIA: Tiene la opción de utilizar la función REMINDER
(Recordatorio) si selecciona las funciones AIR FRY (Freír), ROAST
(Tostar) o BAKE (Hornear). Presionar REMINDER (Recordatorio) para
establecer un recordatorio para agitar o voltear sus alimentos a los 2/3
del tiempo de cocción para que la supercie de los alimentos se cocine
de manera uniforme.
7. Presionar START/PAUSE (Iniciar/Pausar) para iniciar la cocción.
Si se presiona de nuevo, el ciclo de cocción se detendrá.
NOTA: En cualquier momento durante el funcionamiento, puede ajustar
el tiempo o la temperatura presionando los botones
o
correspondientes.
8. Presionar el botón
; el aparato se detendrá y volverá al modo
de espera.

61
Técnica de freído al aire
Consulte la tabla de freído al aire / cocción de rostizado y/o siga las
instrucciones del paquete para ver el tiempo y la temperatura sugeridos.
1. Siempre seque los alimentos con palmaditas antes de cocinarlos para que
se doren bien y evitar el exceso de humo.
2. Para asegurar una cocción y un dorado uniformes, abrir SIEMPRE la
canasta freidora a mitad o a 2/3 del tiempo de cocción, y controlar,
girar o agitar los alimentos en la canasta freidora. Algunas recetas
pueden requerir rociar aceite a mitad de la cocción. Ajustar la
TEMPERATURA o el TIEMPO de ser necesario.
ADVERTENCIA: Se debe tener mucho cuidado al manipular cestas freidoras
o bandejas para textura crujiente calientes. Evite el vapor que sale
de la cesta freidora y los alimentos.
PRECAUCIÓN: Utilice siempre guantes para horno cuando manipule la cesta
de la freidora de aire caliente.
PRECAUCIÓN: El aceite caliente puede acumularse en la base de la cesta.
Tenga cuidado al retirar los alimentos que se cocinan.
3. Para evitar el exceso de humo, cuando cocine alimentos naturalmente
ricos en grasas, como tocino, alitas de pollo o salchichas, puede ser
necesario vaciar la grasa de la cesta de la freidora entre lotes.
4. Para asegurar una textura crujiente, asegúrese de que el pellejo o la
supercie exterior de su comida esté seca. Fría al aire pequeños lotes
de alimentos recién empanados. Cree más área de supercie al cortar
los alimentos en piezas más pequeñas. Presione el empanado contra
los alimentos para ayudar a que se adhiera. Refrigere los alimentos
empanados por al menos 30 minutos antes de freírlos.
5. Para mejorar la textura crujiente, espolvoree ligeramente el pellejo
de las aves de corral o la supercie exterior con almidón de maíz.
Rocíe con aceite.
6. Coloque los alimentos empanizados en la cesta de la freidora de manera
que los alimentos no se toquen para permitir el ujo de aire en todas
las supercies.
7. Los aceites en aerosol funcionan mejor. El aceite se distribuye de
manera uniforme y se necesita menos aceite. Los aceites de canola,
oliva, palta, coco, semilla de uva, maní o vegetal funcionan bien.

62
8. Sacuda los alimentos fritos al aire en el área de servicio. Inserte
rápidamente cualquier cesta freidora en el cuerpo de la freidora
de aire y bloquéela en posición. Siga friendo al aire los lotes
siguientes, si los hay.
9. Presione REHEAT para freír los alimentos al aire durante 6 minutos
a 250 °F. Sacar simplemente la canasta freidora para interrumpir el
freído en cualquier momento y controlar la temperatura de servicio de
los alimentos. Repetir la operación para prolongar el tiempo de cocción
hasta que los alimentos se calienten a su gusto.
10. Desenchufe la freidora de aire TriZone™ cuando no esté en uso.
Freír al aire alimentos congelados preenvasados
• Como regla general, en función de los alimentos y la cantidad a cocinar,
los tiempos sugeridos de cocción pueden tener que reducirse ligeramente.
Siempre verique los alimentos a mitad del tiempo de cocción para
determinar el tiempo y la temperatura nales de cocción.
• Siempre verique el progreso de la cocción una vez expirado el tiempo.

63
Consejos para rostizar
¡IMPORTANTE! Consulte la sección Pautas de cocción del USDA de este manual
de instrucciones antes de comenzar la cocción. Siempre pruebe la carne con un
termómetro de cocción preciso.
• Siempre debe usarse un termómetro para carne insertado en el centro
de la carne para asegurar la cocción deseada.
• Cocine las carnes a temperaturas de 5 a 10 grados por debajo de la
cocción deseada (temperatura interna). Deje reposar la carne
de 15 a 20 minutos antes de servir. La temperatura continuará
aumentando mientras reposa.
• Rostice cortes grandes y tiernos de carne y ave. Al sazonar antes
de cocinar se añade sabor y aroma durante la cocción.
• Una capa de grasa en la parte superior de la carne rostizada promueve
un mejor dorado y proporciona un untado natural.
• Para acelerar el dorado, cepille los cortes magros de carne,
pollo y pescado con aceite, margarina o mantequilla derretida.
• Coloque la carne (con el lado con la grasa hacia arriba) y voltee
a la mitad del tiempo de rostizado.
IMPORTANTE: Dé la vuelta y revise los alimentos a la mitad del tiempo
de ASADO.
• Presione REMINDER para activar esta función.

64
Consejos para asar
• Use BROIL para derretir queso o dorar cubiertas de migas de pan.
• Por lo general, BROIL se usa para cortes tiernos y delgados de carnes
o chuletas, aves o pescado marinados, frutas y verduras.
• Seque las carnes y pescados marinados antes de asarlos. SIEMPRE seque
la carne para reducir el humo y promover el dorado al asar.
• Para acelerar el dorado y agregar jugosidad, cepille los cortes magros
de carne, pollo y pescado con aceite o mantequilla derretida.
• Corte el exceso de grasa de la carna y recorte de manera irregular
los bordes para evitar el rizado.
• Descongele las carnes y el pescado antes de asar.
• El tiempo de asado se determina según el punto de cocción deseado.
Siempre use un termómetro de carne.
Consejos para hornear
• Al usar BAKE, es posible que deba bajar la temperatura de la receta
de horneado en 50 °F hasta un mínimo de 300 °F.
• Verique las instrucciones del paquete para determinar si el contenido
es adecuado para su uso en una freidora de aire.
• El recordatorio REMINDER está desactivado de forma predeterminada.

65
Consejos para deshidratar
NOTA: Al programar manualmente la selección del menú DEHYDRATE (DESHIDRATAR),
TIME (TIEMPO) aumentará o disminuirá en incrementos de 30 minutos.
• Deshidrate alimentos frescos y maduros para conservar los nutrientes
y realzar el sabor.
• El deshidratado automático de su Freidora de aire TriZone™ hace que
la deshidratación en el hogar sea simple y graticante y garantiza
resultados saludables, seguros y sin preservantes.
• DEHYDRATE combina un calor bajo y uniforme, con la potencia constante
del ventilador de convección.
• Las bajas temperaturas precisas secan los alimentos de manera uniforme
sin cocinar ni sobrecalentar.
NOTA: Dé la vuelta a los alimentos varias veces durante el modo
DESHIDRATAR.

66
Tabla de freído al aire / cocción de rostizado
Los tiempos son estimativos y se basan en tamaños y pesos promedio.
UTILICE SIEMPRE UN TERMÓMETRO DE CARNE PARA ASEGURARSE DE QUE LA CARNE,
LAS AVES DE CORRAL Y EL PESCADO SE COCINAN COMPLETAMENTE ANTES DE SERVIR.
NOTA: Freír lotes más pequeños dará como resultado tiempos de cocción más
cortos y una mejor calidad de los alimentos. Ajuste la TEMPERATURA y el TIEMPO
de freír según sea necesario para su gusto. NOTA: A menos que los alimentos
estén empaquetados y engrasados previamente, para obtener resultados dorados y
crujientes, todos los alimentos deben engrasarse ligeramente antes de freírlos
al aire.
ZONA ÚNICA TRIZONE™
VERDURAS
TEMPE-
RATURA
TIEMPO TIEMPO
Espárragos, 1 manojo de espárragos
nos
400 °F 5 - 7 min 10 - 14 min
Espárragos, 1 manojo de espárragos
gruesos
400 °F 7 - 9 min 12 - 15 min
Floretes de colior, 3-4 tazas 400 °F 13 - 18 min 18 - 25 min
Berenjena, cubos de 1 1/2 pulgada
(asados)
400 °F 15 min 24 min
Kale, 3 tazas, sin tallos 375 °F 9 min 15 - 18 min
Pimientos morrones, trozos de 1
pulgada
375 °F 10 min 15 - 20 min
Pepinillos, empanados 400 °F 5 - 7 min 9 - 13 min
Patatas blancas, patatas fritas, 400 °F 16-20 min 30 - 40 min
(recién rebosadas de 1/4 a 1/3 de
pulgada de espesor)
400 °F 16 - 20 min 30 - 40 min
Papas blancas, en cubos de 1 pulgada 400 °F 12 - 14 min 24 - 35 min

67
Patatas blancas, en cuñas 390 °F 20 - 25 min 35 - 40 min
Floretes de brócoli, 3-4 tazas 400 °F 15 - 20 min 22 - 28 min
Coles de Bruselas, 1 libra 375 °F 12 - 15 min 20 - 25 min
Maíz en la mazorca, 4 mazorcas 390 °F 12 - 15 min 18 - 20 min
Zanahorias, 2 1/2 tazas, trozos de
1/2 pulgada
400 °F 10 - 12 min 20 - 24 min
Champiñones, 3 tazas en rodajas 400 °F 10 - 12 min 18 - 22 min
Pimientos, jalapeños, poblano
(asados)
375 °F 10 min 12 - 15 min
Calabacín, cubitos de 1/4 de pulgada 400 °F 14 - 17 min 22 - 24 min
Tubérculos, trozos de 1/2 pulgada
(asados)
400 °F 15 - 20 min 25 - 40 min
ZONA ÚNICA TRIZONE™
CARNE DE RES
TEMPE-
RATURA
TIEMPO TIEMPO
Hamburguesa, 1/4lb (hasta 4) 360 °F 12 - 16 min 16 - 18 min
Perritos calientes/salchichas 360 °F 10 - 15 min 20 - 25 min
Pastel de carne, 1 libra 360 °F 33 - 40 min 45 - 50 min
Filete, 2 letes (8 oz) 360 °F 8 - 21 min 10 - 24 min
Solomillo de ternera, 1 libra, a
medio cocer (rojo)
360 °F 16 min 18 - 20 min
Solomillo de ternera, 1 libra,
término medio
360 °F 18 min 20 - 24 min

68
ZONA ÚNICA TRIZONE™
POLLO
TEMPE-
RATURA
TIEMPO TIEMPO
Pechuga de pollo, deshuesada, sin
pellejo
360 °F 18 - 20 min 22 - 25 min
Muslos de pollo, 6-8 oz cada uno,
deshuesados
360 °F 20 - 25 min 28 - 30 min
Filetes/ Tiras de pollo: rebozados 360 °F 13 - 15 min 16 - 19 min
Alitas de pollo, 2 libras 400 °F 22 - 27 min 40 - 45 min
ZONA ÚNICA TRIZONE™
PESCADOS Y MARISCOS
TEMPE-
RATURA
TIEMPO TIEMPO
Camarones, descongelados y rebozados 325 °F 12 min 14 - 15 min
Tiras de bagre, descongeladas y
rebozadas
400 °F 10 - 15 min 18 - 25 min
Camarones, descongelados y salteados 325 °F 5 - 8min 10 - 12 min
Filetes de salmón, descongelados 400 °F 9 - 12 min 17 - 24 min

69
ZONA ÚNICA TRIZONE™
ALIMENTOS CONGELADOS*
TEMPE-
RATURA
TIEMPO TIEMPO
Palitos de queso 350 °F 6 - 9 min 10 - 12 min
Papas fritas, gruesas, 2 tazas 400 °F 17 - 21 min 24 - 30 min
Papas fritas 400 °F 15 - 17 min 20 - 24 min
Aros de cebolla 360 °F 12 - 16 min 18 - 22 min
Nuggets de pollo, caja de 12 oz 360 °F 10 - 15 min 17 - 22 min
Palitos de pescado 400 °F 12 - 18 min 18 - 22 min
Albóndigas, 1 pulgada, precocidas 390 °F 7 - 9 min 11 - 14 min
Pizza de 7 x 8 pulgadas 360 °F 12 - 15 min 15 - 17 min
• Todos los artículos se deben cocinar en la freidora congelados (no
descongelar).
ZONA ÚNICA TRIZONE™
POSTRES
TEMPE-
RATURA
TIEMPO TIEMPO
Empanadas de manzanas 400 °F 10 min 14 min
Rosquillas 350 °F 8 min 9 - 11 min

70
Pautas de cocina del USDA
El USDA recomienda que las carnes como la ternera y el cordero, etc., se
cocinen a una temperatura interna de 145 °F/63 °C. El cerdo debe cocinarse
a una temperatura interna de 160 °F/71 °C y los productos de aves de corral
deben cocinarse a una temperatura interna de 170 °F/77 °C - 180 °F/ 82 °C para
asegurarse de que se haya eliminado cualquier bacteria dañina. Al recalentar
productos cárnicos/avícolas, también deben cocinarse a una temperatura interna
de 165 °F/74 °C.
Tabla de deshidratación
• Dé la vuelta a los alimentos varias veces durante la DESHIDRATACIÓN para
que queden uniforme.
HIERBAS TEMPERATURA TIEMPO HIERBAS TEMPERATURA TIEMPO
Orégano 135 °F
2 - 3
horas
Perejil 135 °F
2 - 3
horas
Tomillo 135 °F
3 - 4
horas
Romero 135 °F
2 - 3
horas
Estragón 135 °F
3 - 4
horas
Salvia 135 °F
3 - 4
horas
Chips de col
rizada
135 °F
2-3
hrs
con los tallos
eliminados
135 °F
2 - 3
horas

71
Frutas/verduras
Lavar todas las cáscaras de las frutas bien.
Cortar la fruta en rebanadas de 1/4 de pulgada de grosor y organizar dejando
un espacio entre cada rebanada para asegurar la deshidratación uniforme.
Rote los alimentos a la mitad del tiempo de DESHIDRATACIÓN para que queden
uniformes.
DESHIDRATAR TEMPERATURA TIEMPO DESHIDRATAR TEMPERATURA TIEMPO
Corazón de
manzana
Cortar en
rodajas
de 1/4 de
pulgada
135 °F
8 - 9
horas
Rodajas de
naranja
ompletamente
secos Los
cítricos están
crujientes
cuando están
ompletamente
secos
135 °F
10
horas
Trozos de
mango/
papaya pelar
en rodajas
de 1/4 de
pulgada
135 °F
8 - 10
horas
Tomates Roma
con la cáscara
hacia abajo
150 °F
8 - 9
horas
Kiwi
Rodajas de
14 pulgadas
135 °F
6
horas
Tomates, tipo
cereza/uva con
la cáscara
hacia abajo
150 °F
5 - 9
horas

72
Instrucciones de mantenimiento para el usuario
Este aparato requiere poco mantenimiento. No contiene piezas que el usuario
pueda reparar. Cualquier mantenimiento que requiera desarmarlo, aparte de
la limpieza, debe ser realizado por un técnico calicado en reparación de
electrodomésticos.
Instrucciones de limpieza y cuidado
¡ADVERTENCIA! Deje que la freidora de aire trizone™ se enfríe completamente
antes de limpiarla.
1. Desenchufar la freidora de aire. Retirar la canasta freidora de la
freidora de aire. Asegurarse de que la canasta freidora, las bandejas
de fritura y el divisor de canasta se hayan enfriado completamente antes
de limpiarlos.
2. Lave la cesta de la freidora, el divisor de la cesta y las bandejas
para textura crujiente en agua caliente con jabón.
No use utensilios de cocina metálicos, limpiadores abrasivos o productos
de limpieza ya que estos pueden dañar el recubrimiento antiadherente.
3. La cesta de la freidora de aire, el divisor de la cesta y las bandejas
para verduras se pueden lavar en el lavavajillas. Para obtener mejores
resultados, coloque en la parte superior del lavavajillas.
4. Limpie el cuerpo de la freidora de aire TriZone™ con un paño húmedo
suave y no abrasivo.
Instrucciones de almacenamiento
1. Asegúrese de que la freidora de aire TriZone™ esté desenchufada
y que todas las piezas estén limpias y secas antes de guardarla.
2. Nunca guarde la freidora de aire TriZone™ mientras esté caliente
o húmeda.
3. Inserte cada bandeja para textura crujiente y el divisor de cesta
limpios en la cesta de la freidora y guárdelos dentro del cuerpo
de la freidora.
4. Guarde TriZone™ Freidora de aire en su caja o en un lugar limpio y seco.

73
Garantía limitada de dos años
Mediante la presente, Sensio Inc.
dba Made by Gather™. garantiza que,
durante el plazo de DOS AÑOS a partir
de la fecha de compra, este producto
no presentará defectos mecánicos en
el material ni en la mano de obra, y
durante 90 días, no los presentará en
las piezas no mecánicas. A su entera
discreción, Sensio Inc. dba Made by
Gather™ que resulte defectuoso, o
emitirá un reembolso por el producto
durante el plazo de garantía.
Esta garantía es válida únicamente
para el comprador minorista
original a partir de la fecha de
compra minorista inicial y no es
transferible. Conserve el recibo
de compra original, ya que se exige
una prueba de compra para obtener
la validación de la garantía. Las
tiendas minoristas no tienen derecho
a alterar, modicar ni corregir
de ninguna manera los términos y
condiciones de la garantía.
Exclusiones:
La garantía no cubre el desgaste
normal de las piezas ni el daño
ocasionado por cualquiera de las
siguientes causas: uso negligente
del producto, uso de un voltaje o
corriente incorrectos, mantenimiento
de rutina inadecuado, uso
contrario al de las instrucciones
de funcionamiento, desarmado,
reparación o alteración a cargo
de personas que no sean miembros
del personal calicado de Sensio
Inc. dba Made by Gather™ Asimismo,
la garantía no cubre actos de
la naturaleza, como incendios,
inundaciones, huracanes o tornados.
Sensio Inc. dba Made by Gather™
no asumirá responsabilidad por
daños incidentales o resultantes
ocasionados por la violación
de cualquier garantía expresa
o implícita. Salvo en la medida
en que lo prohíban las leyes
aplicables, cualquier garantía
implícita de comerciabilidad o
aptitud para un propósito particular
se limita temporalmente a la
duración de la garantía. Algunos
estados, provincias o jurisdicciones
no permiten la exclusión ni la
limitación de daños incidentales
o resultantes, o limitaciones
sobre la duración de una garantía
implícita y, por lo tanto, es posible
que las exclusiones o limitaciones
mencionadas no le correspondan.
La garantía cubre derechos legales
especícos que pueden variar de
un estado, una provincia o una
jurisdicción a otros.

74
Cómo obtener el servicio de garantía
Debe comunicarse con el Servicio
de atención al cliente a nuestro
número telefónico gratuito:
1-877-775-3564. Un representante
del Servicio de atención al cliente
intentará resolver los problemas
referidos a la garantía por
teléfono. Si este no puede resolver
el problema, le proporcionarán un
número de caso y le solicitarán que
devuelva el producto a Sensio Inc.
dba Made by Gather™ Adhiera una
etiqueta al producto que incluya:
su nombre, dirección, número
telefónico de contacto durante el
día, número de caso y descripción
del problema. Además, incluya una
copia del recibo de compra original.
Envuelva cuidadosamente el producto
etiquetado con el recibo de compra,
y envíelo (con el envío y el seguro
prepagados) a la dirección de Sensio
Inc. dba Made by Gather™. Sensio
Inc. dba Made by Gather™ no asumirá
obligación ni responsabilidad alguna
por el producto devuelto que esté
en el trayecto hacia el Centro de
servicio al cliente de Sensio Inc.
dba Made by Gather™


INSIDE back cover