
HE 1 MANUAL

HE 1
Model: HE 1
Headphone Amplier System
Instruction manual

Sonova Consumer Hearing GmbH
Am Labor 1, 30900 Wedemark, Germany
www.sennheiser-hearing.com
Printed and hand-bound in Germany, Publ. 09/22, 596629/A01 EN
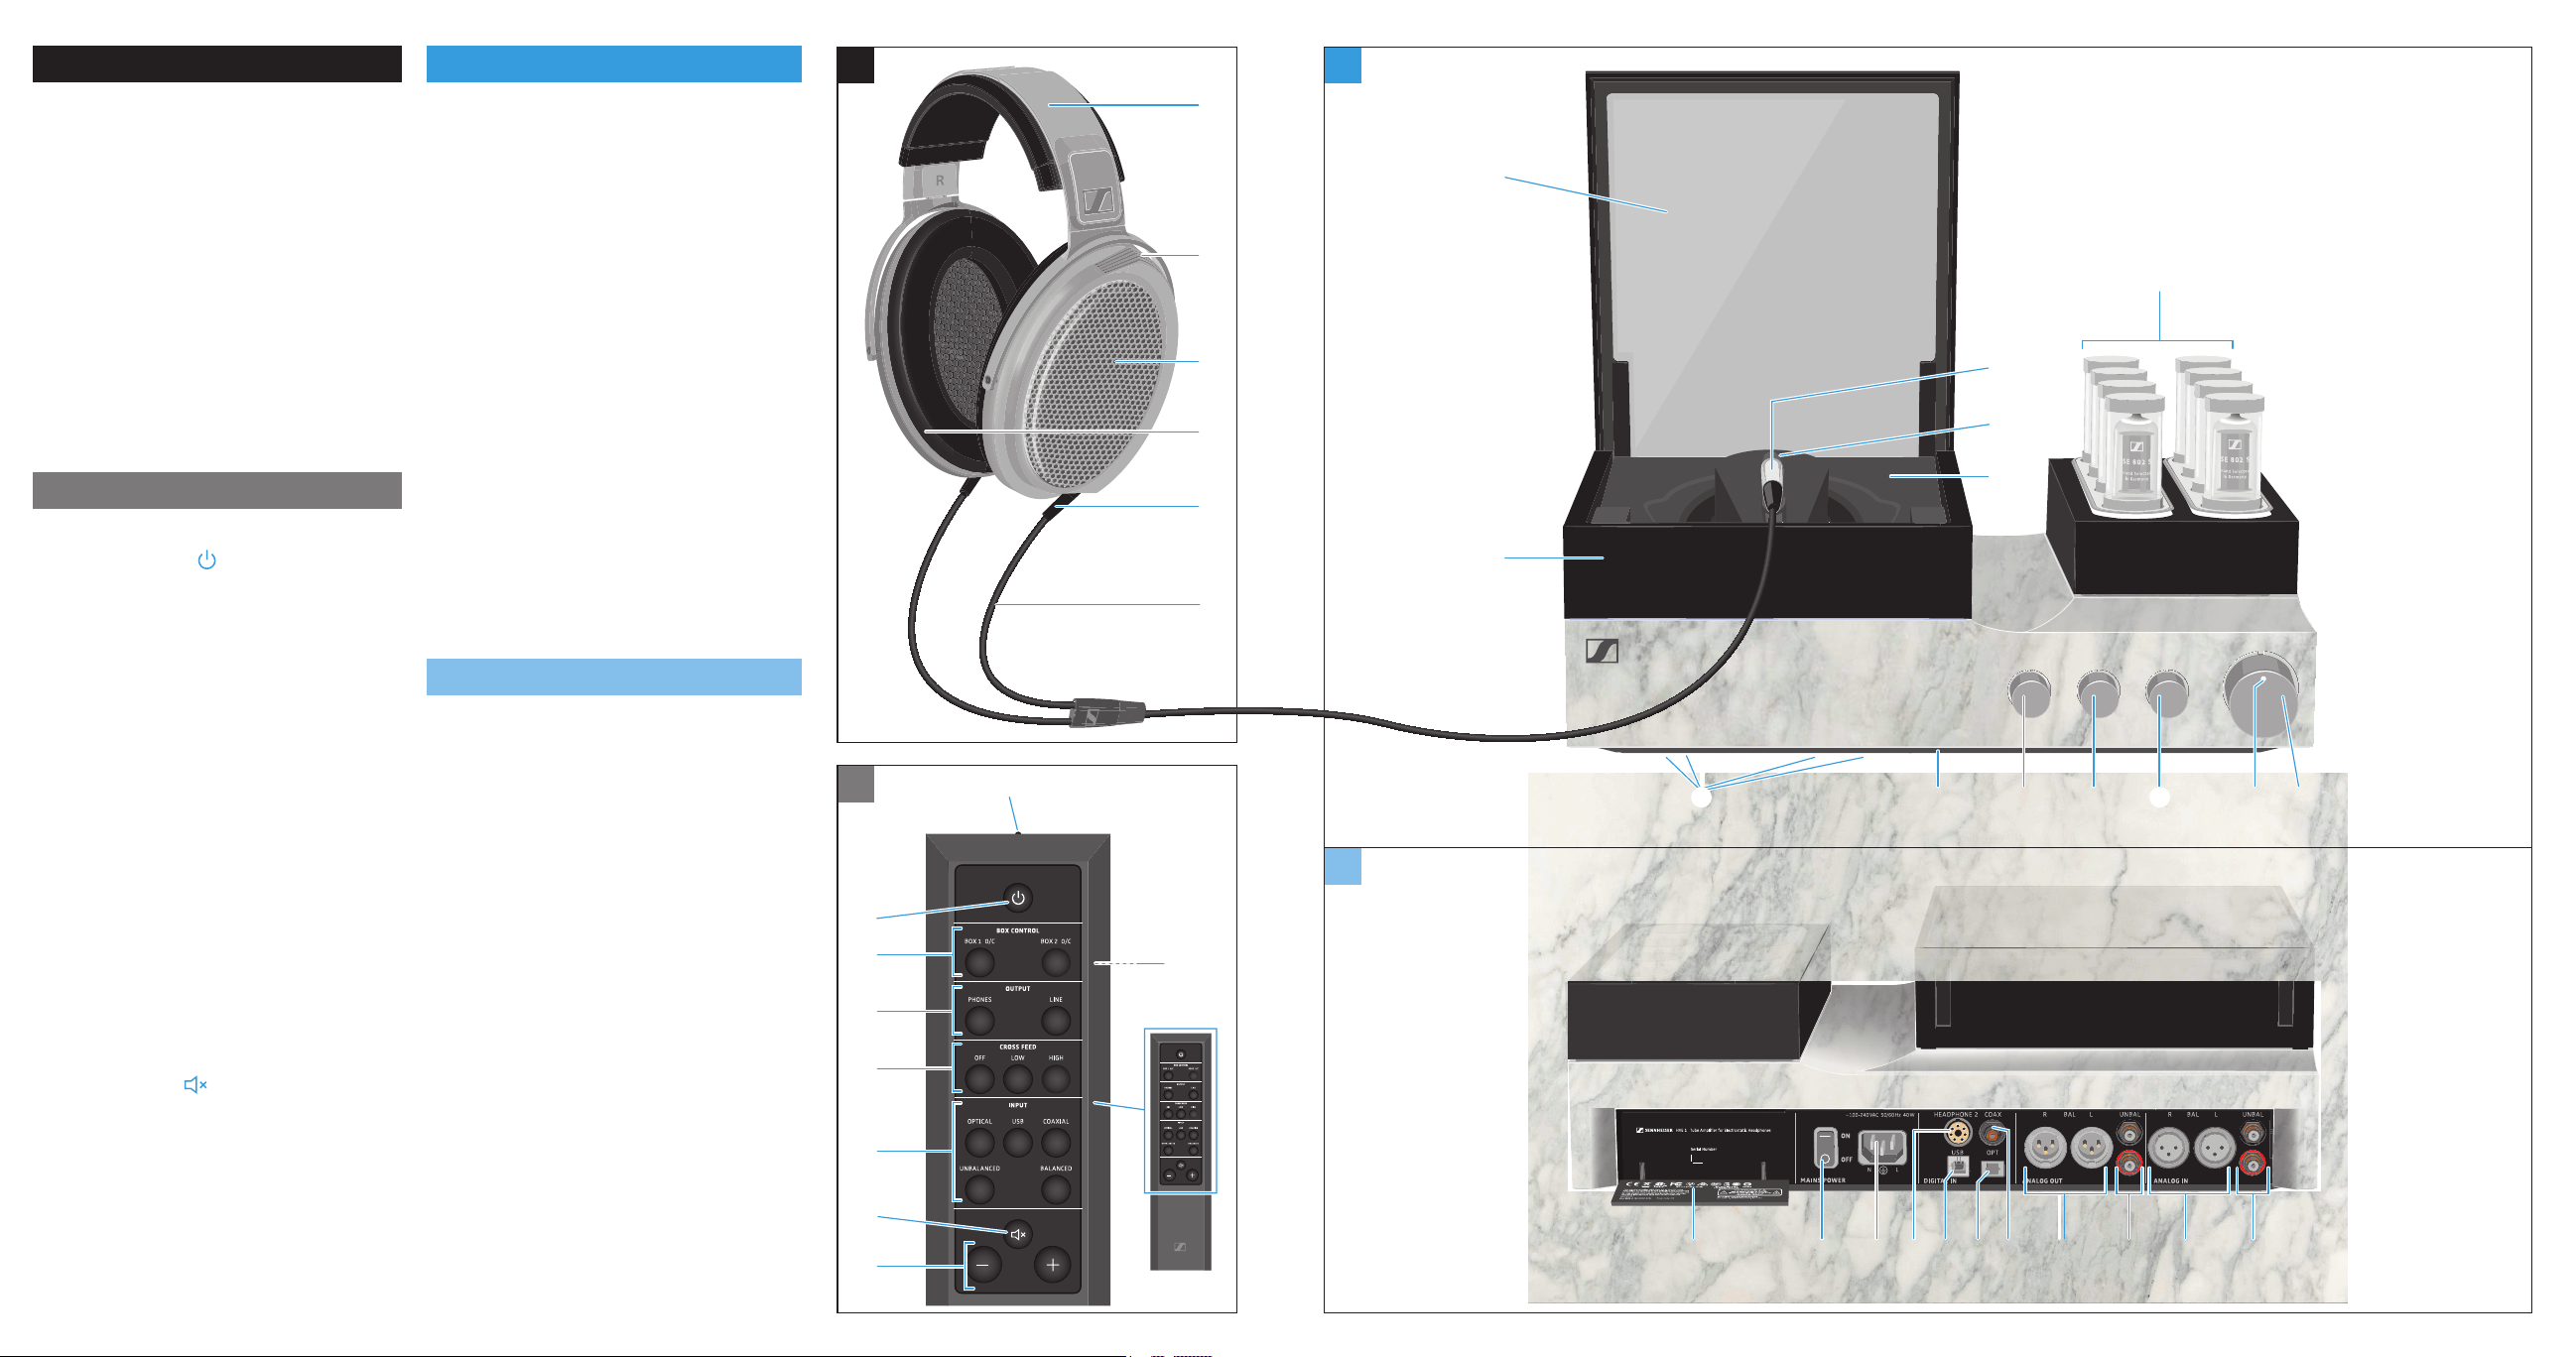
Headphones
1 Headband, adjustable in increments
2 Aluminum heat sink for
high-voltage amplier
3 Electrostatic transducers
4 Ear pads
5 Structure-borne noise reducing cable
connections
6 Highly exible OFC headphone
cable, PTFE insulated, insensitive to
structure-borne noise
Remote control
7 Infra-red transmitter
8 On/off button
9 Control buttons for glass cover
• BOX 1 O/C storage box 1
• BOX 2 O/C storage box 2
0 OUTPUT selection buttons
• PHONES
• LINE
A CROSS FEED selection buttons
• OFF
• LOW
• HIGH
B INPUT selection buttons
• OPTICAL
• USB
• COAXIAL
• UNBALANCED
• BALANCED
C Mute button
D Volume buttons –/+
E Battery compartment for
CR2032 battery, 3 V
(located at the bottom side)
Amplifier (front panel)
F Headphone storage box
G Glass cover
H Headphone plug
I Headphone socket 1 (HEADPHONE 1)
J Headphone compartment with
velvety-soft ocking
K Amplier tubes, housed in protective
cylinders
L On/off button and volume control
M Status LED
N OUTPUT selection rotary switch
O CROSS FEED selection rotary switch
P INPUT selection rotary switch
Q Infra-red remote control sensor
R Vibration absorbing feet
Amplifier (rear panel)
S RCA input sockets, unbalanced
(UNBAL) red R, black L
T XLR-3 input sockets, balanced
(BAL / R / L)
U RCA output sockets, unbalanced
(UNBAL) red R, black L
V XLR-3 output sockets, balanced
(BAL / R / L)
W S/PDIF input, coaxial (COAX)
X S/PDIF input, optical (OPT)
Y USB input (Type B) (USB)
Z Headphone socket 2 (HEADPHONE 2)
[ IEC mains socket
(~100-240 VAC 50/60 Hz 40 W)
\ Power switch (ON/OFF)
] Cover for product information
and approvals
INPUT
CROSS FEED
OUTPUT
USB COAXIALOPTICAL
BALANCEDUNBALANCED
LOW HIGHOFF
LINEPHONES
BOX CONTROL
BOX 2 O/CBOX 1 O/C
0123
INPUT
CROSS FEED
OUTPUT
USB COAXIALOPTICAL
BALANCEDUNBALANCED
LOW HIGHOFF
LINEPHONES
BOX CONTROL
BOX 2 O/CBOX 1 O/C
G
J
LPQ O
T SUVWXYZ[] \
K
M
I
H
F
C
B
A
0
9
7
8
E
N
D
R
1
2
3
4
5
6
Made in Ireland

3
Contents
Contents
Contact 4
Important safety instructions 5
Package contents 10
Product overview 11
Overview of the LED indicator 11
Overview of the operating elements 12
Putting the HE 1 into operation 13
Setting up the tube headphone amplier 13
Connecting the tube headphone amplier to audio sources 14
Using the tube headphone amplier connected to a Mac/PC 18
Connecting the headphone tube amplier to a power amplier or
to active loudspeakers 24
Connecting the tube headphone amplier to the power supply system 26
Using the HE 1 27
Switching the tube headphone amplier on 27
Switching the tube headphone amplier off 29
Connecting headphones 30
Putting on the headphones 31
Selecting the INPUT audio inputs 32
Adjusting the signal levels of the INPUT audio inputs 33
Using the crossfeed function 34
Selecting the OUTPUT audio output 35
Adjusting the signal levels of the OUTPUT audio outputs 36
Adjusting the volume 37
Muting the audio 38
Opening/closing the headphone storage box 39
Cleaning and maintaining the HE 1 40
Servicing the HE 1 41
Replacing the ear pads 41
Replacing the headband padding 42
Replacing the amplier tubes 42
Replacing the battery of the BFI 1 remote control 43
Calibrating the mechanical components 44
Restoring the factory default settings 45
Installing rmware updates 46

4
Contents
Transporting the HE 1 47
If a problem occurs 48
Specifications 51
Reference diffuse-eld frequency response curve 54
Manufacturer Declarations 55
Contact
Please contact your Sonova Consumer Hearing partner for assistance.
To nd a partner in your country, search at
www.sennheiser-hearing.com/service-support

5
Important safety instructions
Important safety instructions
1 Read these safety instructions.
2. Keep these safety instructions. Always include these safety instructions
when passing the product on to third parties.
3. Heed all warnings.
4 Follow all instructions.
5. Do not use the product near water.
6. Only clean the product when it is not connected to the power supply
system. Clean only with a dry cloth.
7. Ensure circulating ventilation. The product generates heat which is
dissipated through the housing, especially through the extended tubes.
Install in accordance with the manufacturer’s instructions.
8 Do not install near any heat sources such as radiators, heat registers,
stoves, or other products that produce heat and do not expose to direct
sunlight.
9. Do not defeat the safety purpose of the polarized or grounding-type
plug. A polarized plug has two blades with one wider than the other. A
grounding type plug has two blades and a third grounding prong. The wide
blade or the third prong are provided for your safety. If the provided plug
does not t into your outlet, consult an electrician for replacement of the
obsolete outlet.
10. Protect the power supply cord from being walked on or pinched, particu-
larly at plugs, convenience receptacles, and the point where it exits from
the product.
11 Use only attachments/accessories/spare parts supplied or recommended
by Sonova Consumer Hearing.
12. Use only with shelves, racks, or tables that can safely support the weight
the product (see “Specications” on page 51). Please note that the
installation location and the substructure have effects on the sound quality.
13. Unplug the product during lightning storms or when unused for long
periods of time.
6
Important safety instructions
14 Refer all servicing to qualied service personnel. Servicing is required when
the product has been damaged in any way, such as power supply cord or
plug is damaged, liquid has been spilled or objects have fallen into the
product, when the product has been exposed to rain or moisture, does not
operate normally, or has been dropped.
15. WARNING: To reduce the risk of re and electric shock, do not expose the
product to dripping or splashing and ensure that no objects lled with
liquids, such as vases, are placed on the product.
16. To completely disconnect this product from the AC mains, disconnect the
power supply cord plug from the AC receptacle.
17. The plug of the power supply cord shall remain readily accessible.
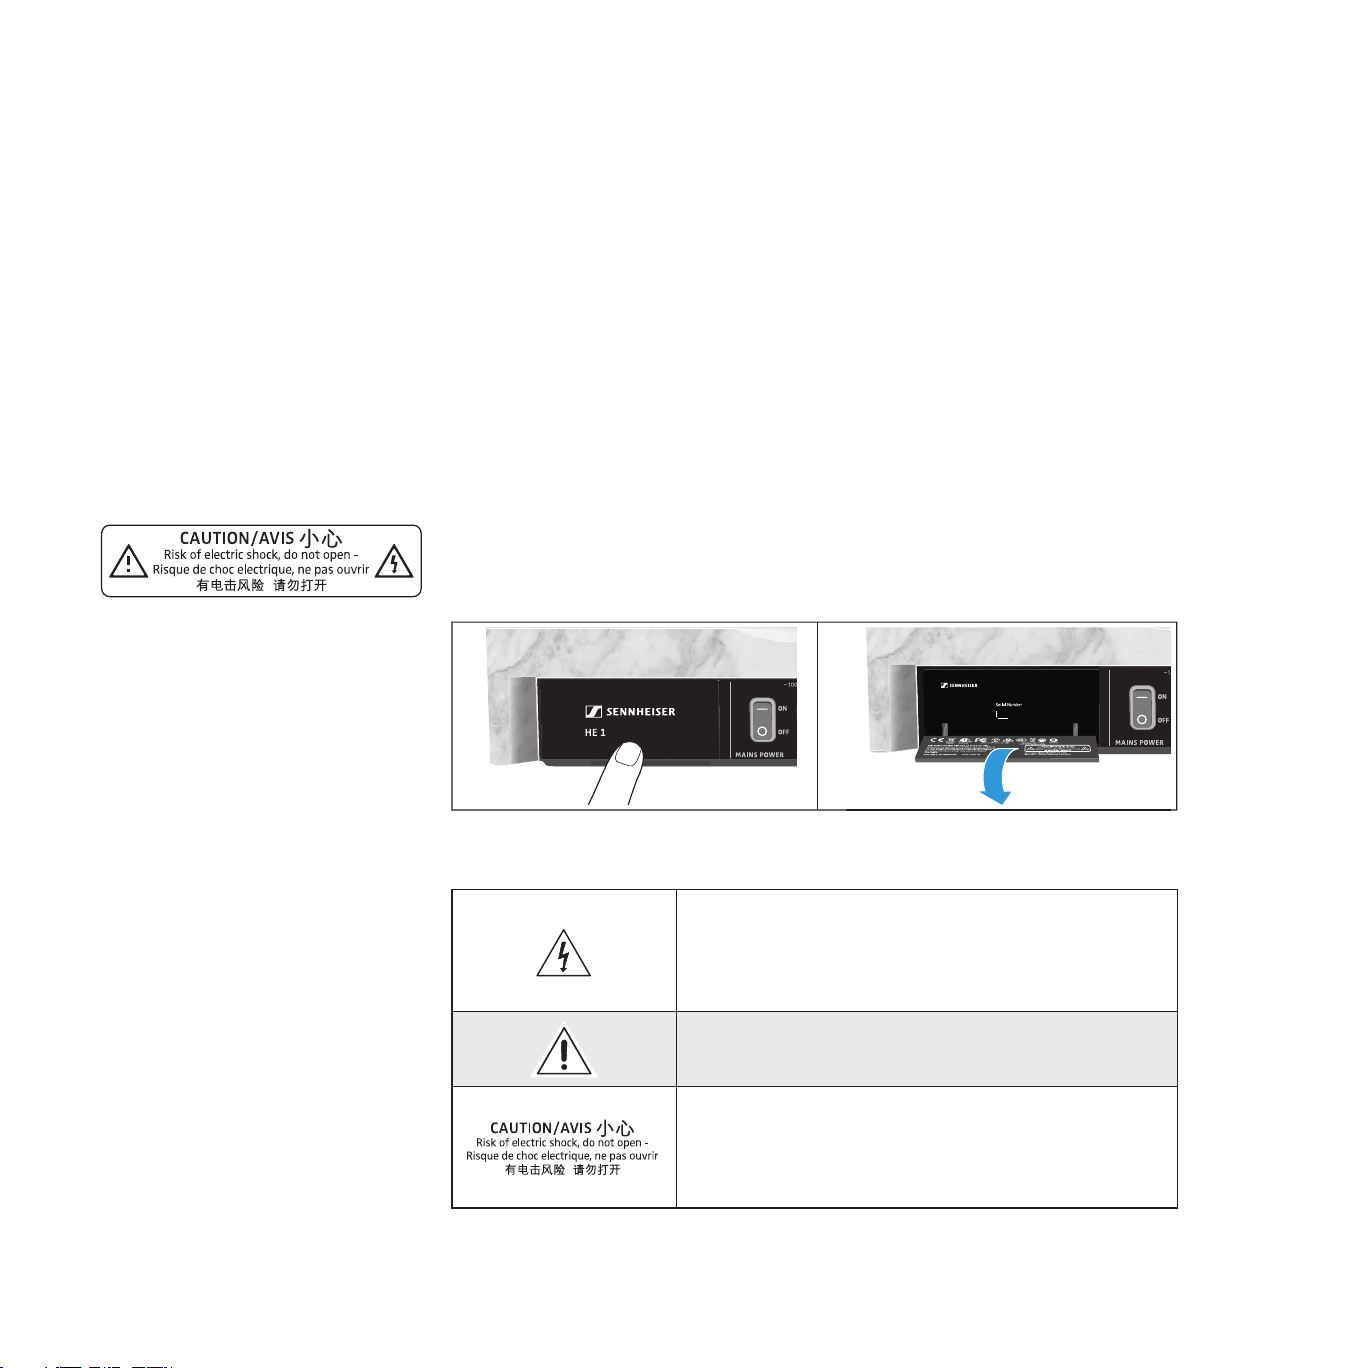
Hazard warnings on the rear of the product
The label shown on the left can be found at the rear of the amplier behind a
hinged cover.
▷ Lightly press the lower part of the cover to open it.
The symbols on this label have the following meaning:
Presence of uninsulated dangerous voltage within
the product’s enclosure that may be of sufcient
magnitude to constitute a risk of re or electric
shock.
Read and follow the safety and operating
instructions contained in this instruction manual.
Never open the product as there is a risk of electric
shock. There are no user serviceable parts inside the
product. Only refer repairs to an authorized Sonova
Consumer Hearing service partner.
0123
Made in Ireland
HVE 1 Tube Amplifier for Electrostatic Headphones
7
Important safety instructions
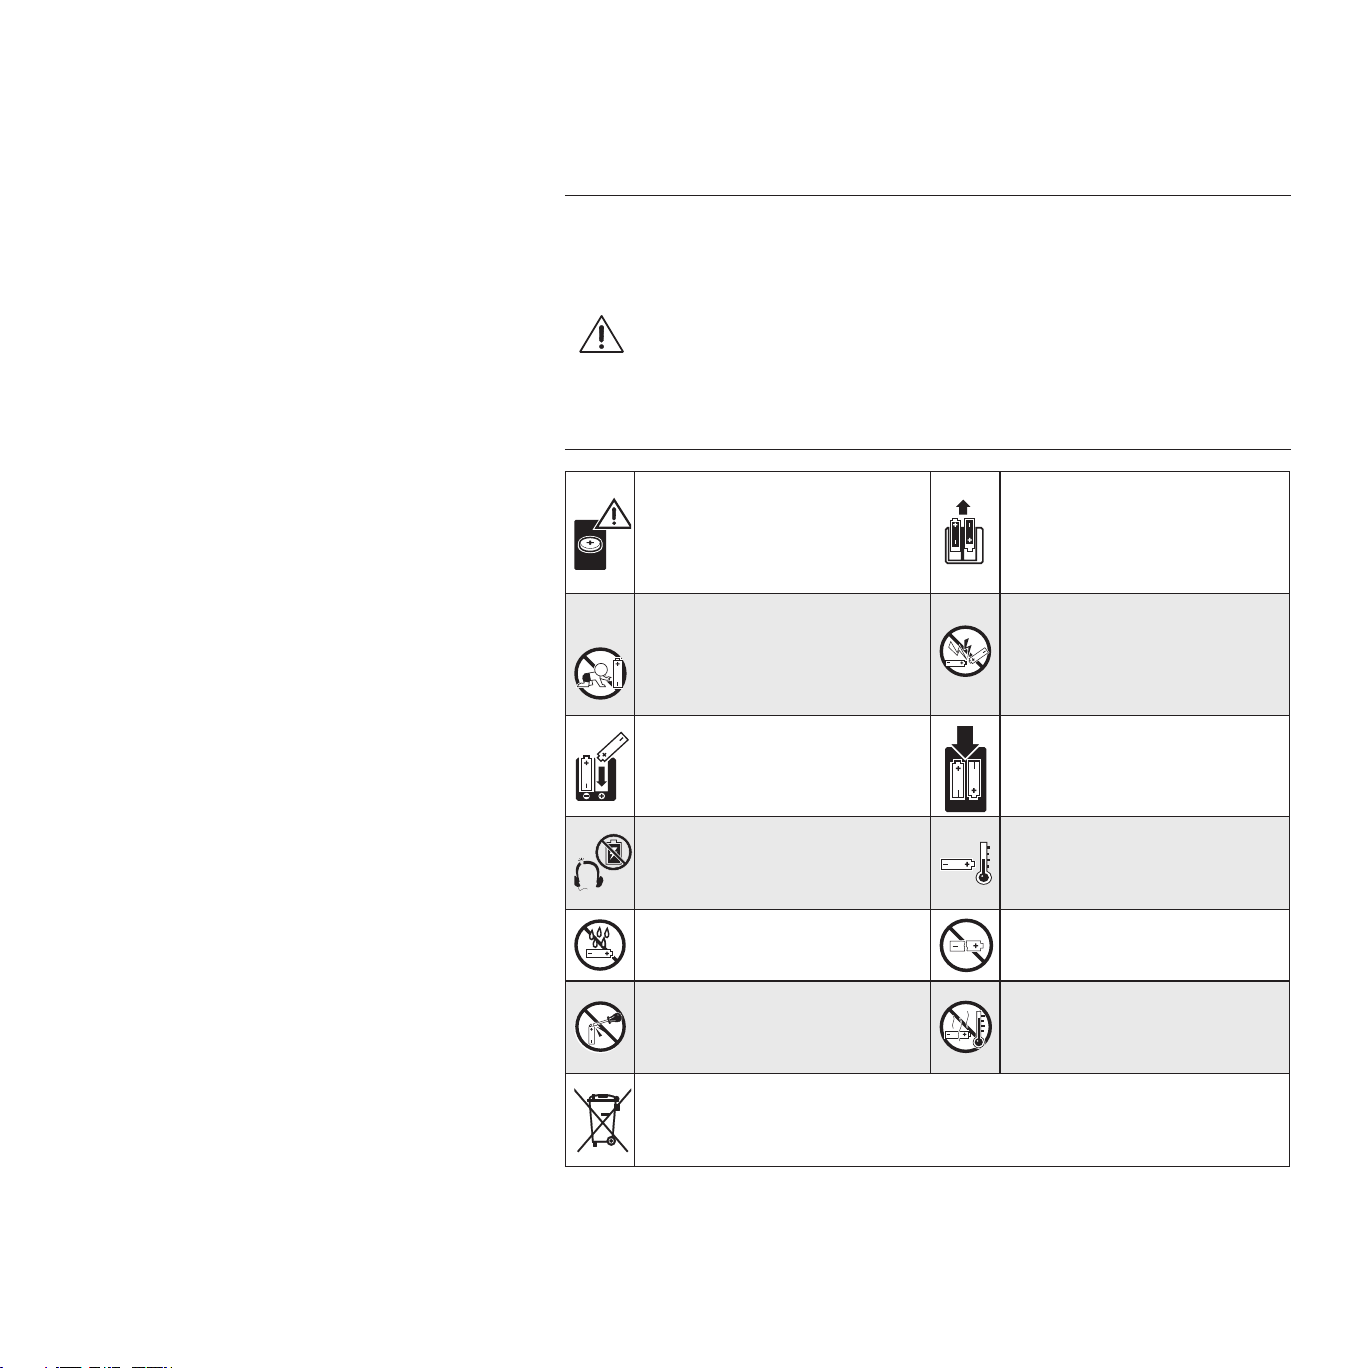
Safety instructions for Lithium coin batteries (marking with CR or Li)
The coin battery is for use with the BFI 1 remote control.
WARNING
If abused or misused, the batteries may leak. In extreme cases, they may even
present a risk of
• explosion,
• heat and re development,
• smoke and/or gas development,
• damage to health and/or the environment.
If you think batteries have
been swallowed or are lodged
in the body, seek medical
assistance immediately.
Remove the batteries if the
product will not be used for
extended periods of time.
Keep away from children.
Pack/store batteries so that
the terminals cannot
contact each other – danger
of shorting out/fire hazard.
Observe correct polarity.
Only use batteries
specified by Sonova
Consumer Hearing.
Immediately remove the
batteries from an obviously
defective product.
Store the product in a cool
and dry place (approx.
20 °C/68 °F).
Do not expose to moisture.
Do not continue to use
defective batteries.
Do not mutilate or dismantle.
Do not heat above
70°C/158 °F, e.g. do not expose
to sunlight or throw into a fire.
Dispose of exhausted batteries at special collection points or return
them to you specialist dealer to facilitate recycling. To avoid short
circuits, cover the poels of the batteries with tape.
For AUSTRALIA: If you suspect your child has swallowed or inserted a coin bat-
tery, call the Poisons Information Centre immediately on 131126 for 24/7 fast,
expert advice. If your child is having any difculty breathing, call 000.

8
Important safety instructions
Preventing damage to health and accidents
▷ Protect your hearing from high volume levels. Permanent hearing damage
may occur when headphones are used at high volume levels for long
periods of time. Headphones of the brand Sennheiser sound exceptionally
good at low and medium volume levels.
▷ Do not use the headphones when your hair is damp or wet.
▷ Do not insert pointed objects through the outer and inner covers of the
headphones to avoid contact with live parts or the delicate diaphragms.
▷ Do not use the product when the protective cylinders of the amplier tubes
are removed.
▷ Keep the product, accessories and packaging parts out of reach of children
and pets to prevent accidents and choking hazards.
▷ Do not use the product in an environment that requires your special atten-
tion (e.g. when performing skilled jobs).
Preventing damage to the product and malfunctions
▷ If the product was moved from a cold environment to a warm one, allow
the product to stand for at least 2 hours before putting it into operation.
▷ Do not place your headphones on a dummy head, chair armrest or similar
objects for long periods as this can widen the headband and reduce the
contact pressure of the headphones.
Intended use/Liability
The electrostatic headphones and the tube headphone amplier have been
designed for reproducing music from analog and digital high-end systems.
This product is intended for private domestic use only.
It is considered improper use when the product is used for any application not
named in the corresponding instruction manual.
Sonova Consumer Hearing GmbH is not liable for damages to USB devices that
are not consistent with the USB specications.
Sonova Consumer Hearing GmbH does not accept liability for damage arising
from abuse or misuse of this product and its attachments/accessories.
Before putting into operation, please observe the respective country-specic
regulations.
9
Important safety instructions
Notes on the use and disposal of storage media
You can use the supplied USB ash drive for storing data, including personal
data. If the ash drive is sold/passed on or disposed of, the data once stored
on it and then deleted using a standard delete method can be recovered with
special software and be misused.
We therefore recommend using special software for secure deletion of data
to ensure that personal data is not misused. Please note that you yourself are
responsible for the secure deletion of the data on your ash drive.
We recommend backing up the data saved on your ash drive regularly. Sonova
Consumer Hearing GmbH does not accept liability for damage or loss of data.
Notes on servicing
We recommend having the product serviced regularly (about every 3 years) to
maintain the perfect sound reproduction of the electrostatic headphones and
the tube headphone amplier. Contact your Sonova Consumer Hearing partner
to arrange for a complete revision and careful refreshment of the product (see
“Contact” on page 4).
The service card inserted in the rear cover of this instruction manual provides
information on the servicing carried out.
Notes on driver and firmware updates
We recommend using the latest DAC (digital-to-analog converter) rmware for
your tube headphone amplier and the latest driver for your operating system
(MacOS), Windows).
DAC rmware and driver updates can be downloaded free of charge from the
Internet at www.sennheiser-hearing.com/download or can be obtained from
your Sonova Consumer Hearing partner (see page 18 and 45).
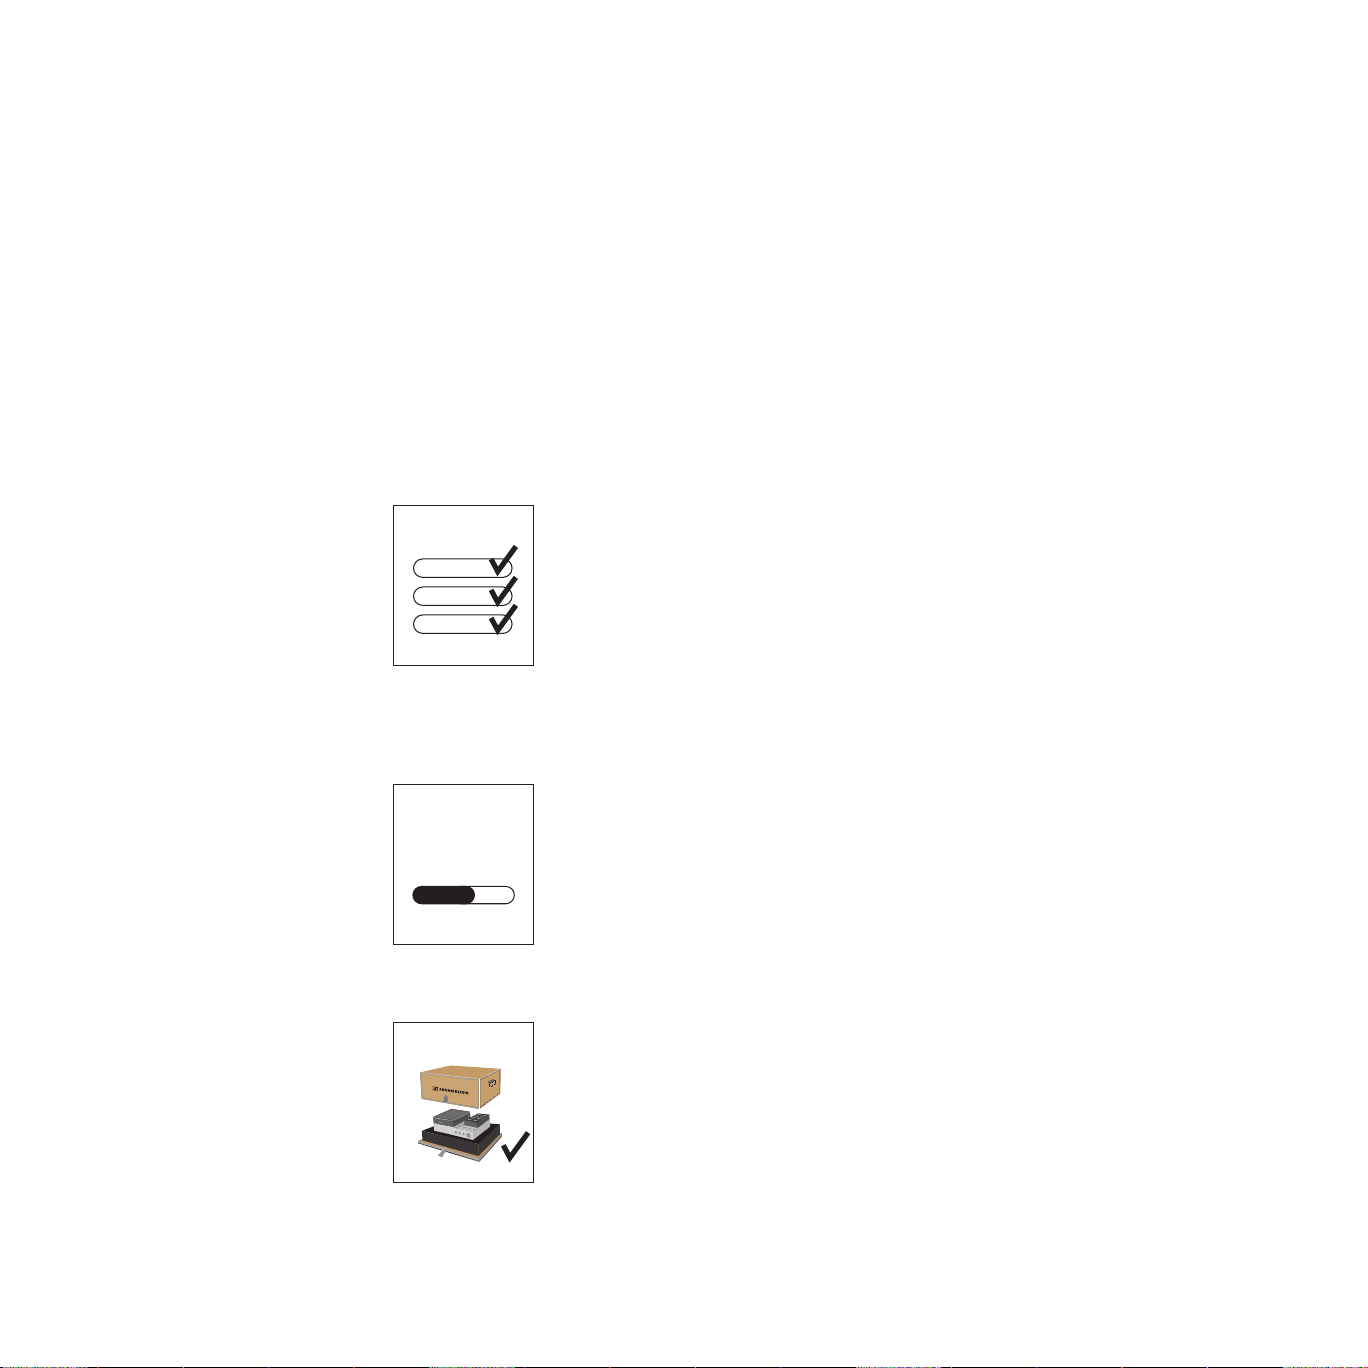
Notes on the packaging
We recommend using the original packaging to ensure safe storage and
transport of the HE 1. Damage during transport is often caused by the use
of unsuitable packaging. The original packaging of the HE 1 provides optimal
protection and minimizes the risk of damage during transport.
Alternatively, you can contact your Sonova Consumer Hearing partner to
arrange for the transport of the HE 1 (see “Contact” on page 4).
HE 1
HE 1
UPDATE
HE 1

10
Package contents
Package contents
INPUT
CROSS FEED
OUTPUT
USB COAXIALOPTICAL
BALANCEDUNBALANCED
LOW HIGHOFF
LINEPHONES
BOX CONTROL
BOX 2 O/CBOX 1 O/C
HVE 1 tube headphone amplier
HE 1-HP electrostatic headphones
3 power cables (only for regions with EU, UK and US
power plug, length 1.8 m)
BFI 1 remote control
incl. CR 2032 battery (3 V)
Brochure, instruction manual, certicate with measurement
result and service card
Microber cloth
USB ash drive (Model: SD-U16L) with instruction manual
(as PDF le) and driver software for Microsoft Windows
operating systems
Silk gloves for servicing
A list of accessories can be found on the HE 1 product page at
www.sennheiser-hearing.com. For information on suppliers, contact your
Sonova Consumer Hearing partner (see “Contact” on page 4).
11
Product overview | Overview of the LED indicator
Product overview
The product overview can be found on the fold-out page at the beginning of
this instruction manual.
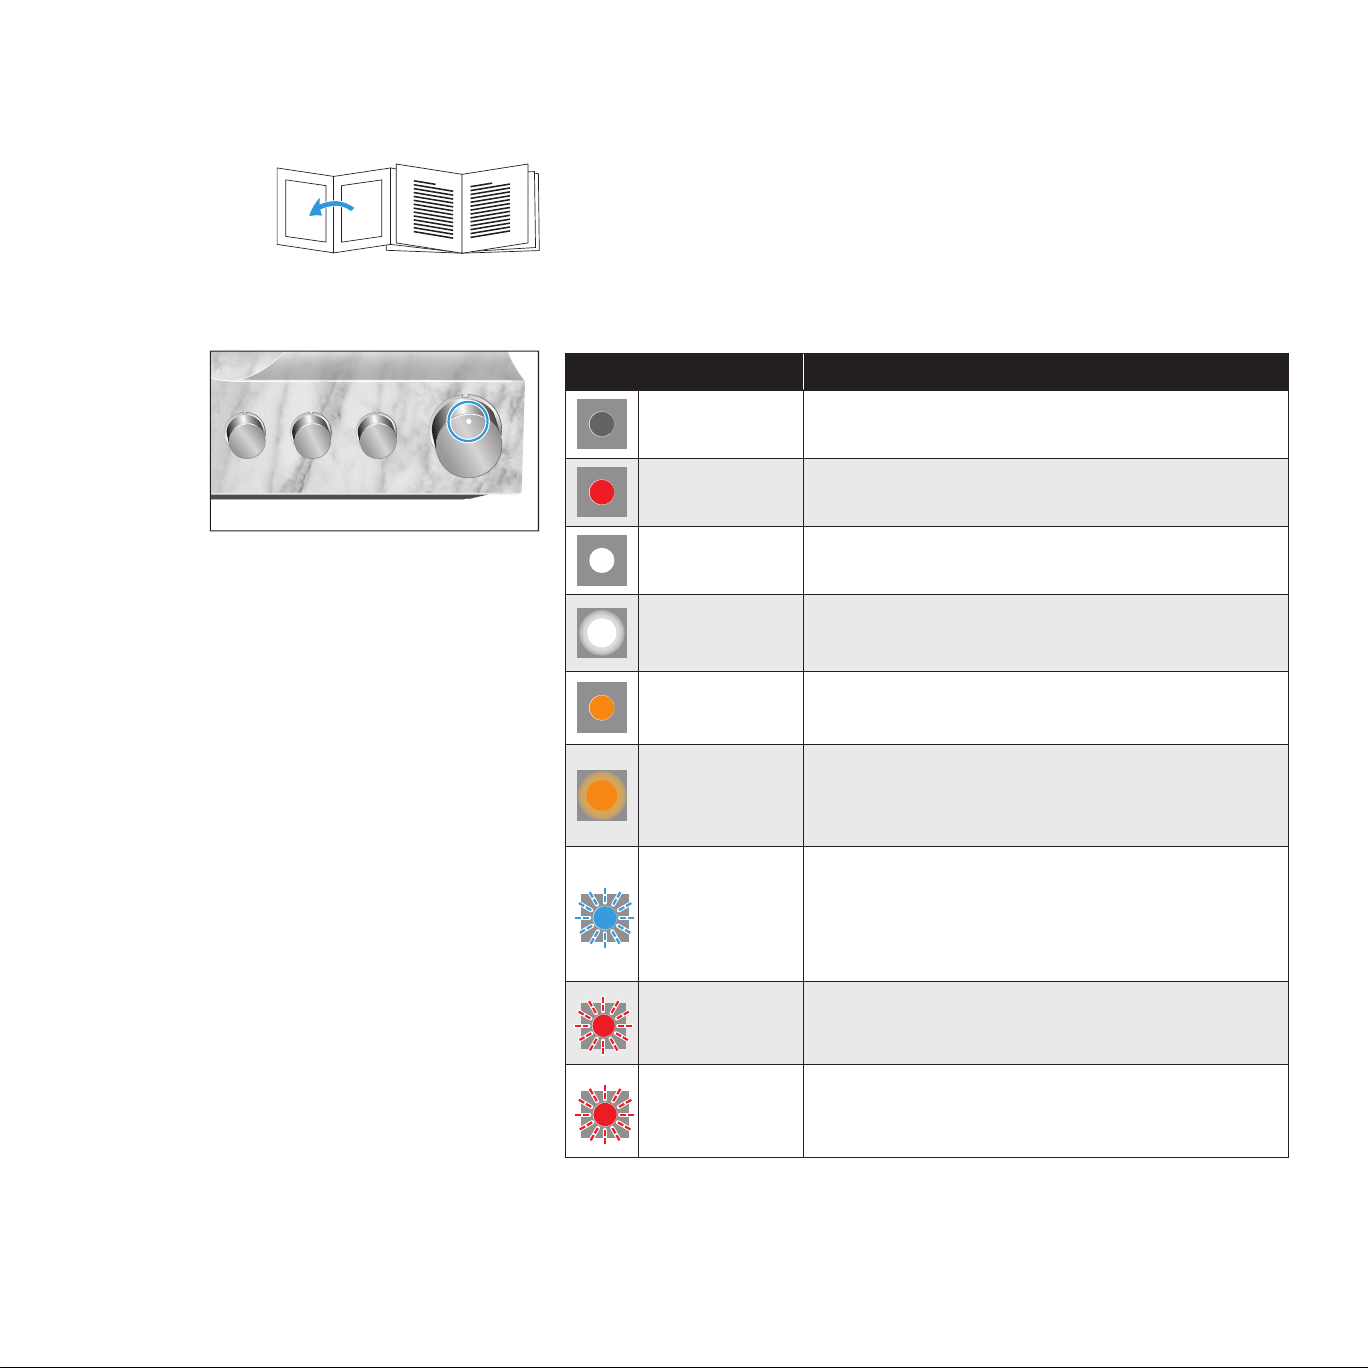
Overview of the LED indicator
Status LED Meaning
– Power switch set to position OFF
lights up red Standby
lights up white Operation
pulses white
Headphones are/audio output is muted
(OUTPUT rotary switch in position MUTE)
lights up
orange
Operation, a tube replacement is required
(see page 42)
pulses orange
Headphones are/audio output is muted
(OUTPUT rotary switch in position MUTE),
a tube replacement is required (see page 42)
flashes blue
quickly 2 times
Incompatible digital audio signal; headphones are/
audio output is muted (OUTPUT rotary switch in
position MUTE) (see page 16)
flashes red
quickly 2 times
High-voltage protection is activated; device cannot
be operated (see page 50)
flashes red
quickly 3 times
Operating elements or amplifier tubes are blocked;
device cannot be operated
(see page 28)
12
Product overview | Overview of the operating elements
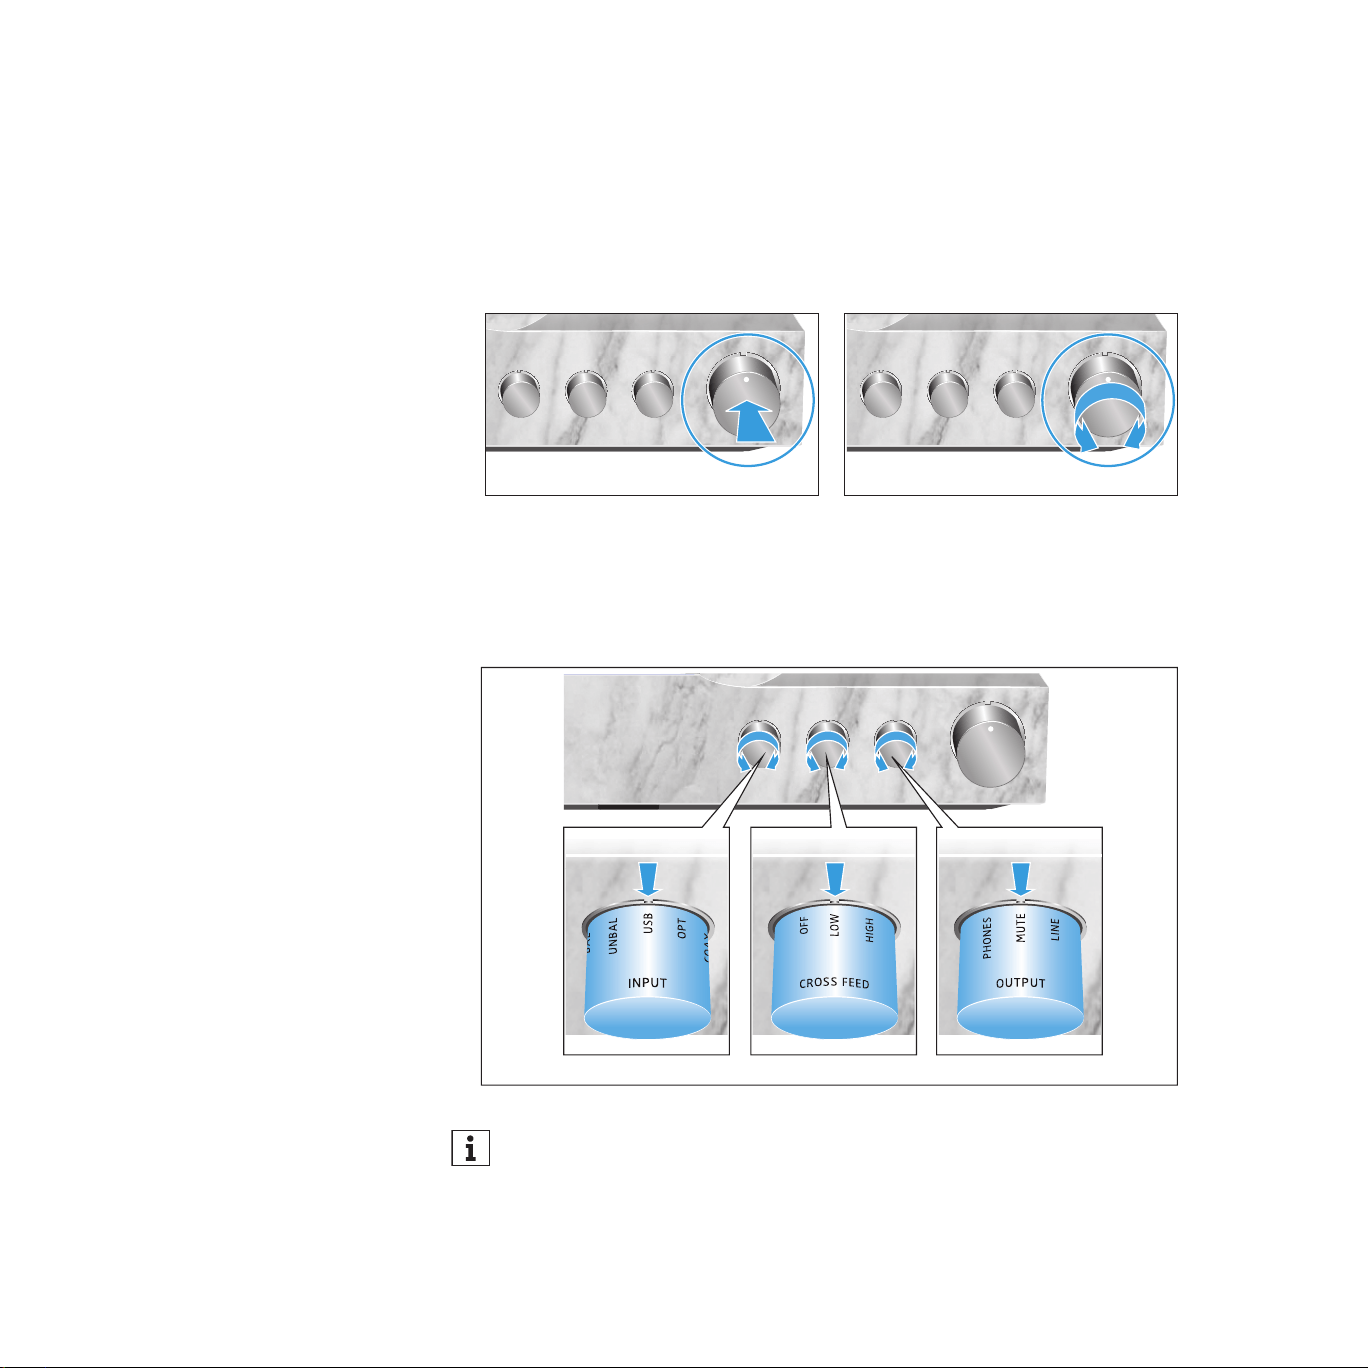
Overview of the operating elements
On/off button and volume control
▷ Press the button to start the switch-on or switch-off process.
▷ Turn the control to steplessly adjust the volume.
Vol. – Vol. +
ON/OFF
Rotary switches
▷ Turn the INPUT, CROSS FEED or OUTPUT rotary switch until the desired
setting points to the marking.
INPUT
CROSS FEED OUTPUT
When using the remote control for adjusting a setting or the volume, the
rotary switch or the volume control on the headphone amplier automat-
ically adjusts to the desired position.
13
Putting the HE 1 into operation | Setting up the tube headphone amplier
Putting the HE 1 into operation
Setting up the tube headphone amplifier
CAUTION
Risk of staining of furniture surfaces!
Varnish or furniture polish may degrade the feet of the product, which could
stain your furniture.
▷ Do not place the product on delicate surfaces; if necessary, use a non-slip
pad under the product.
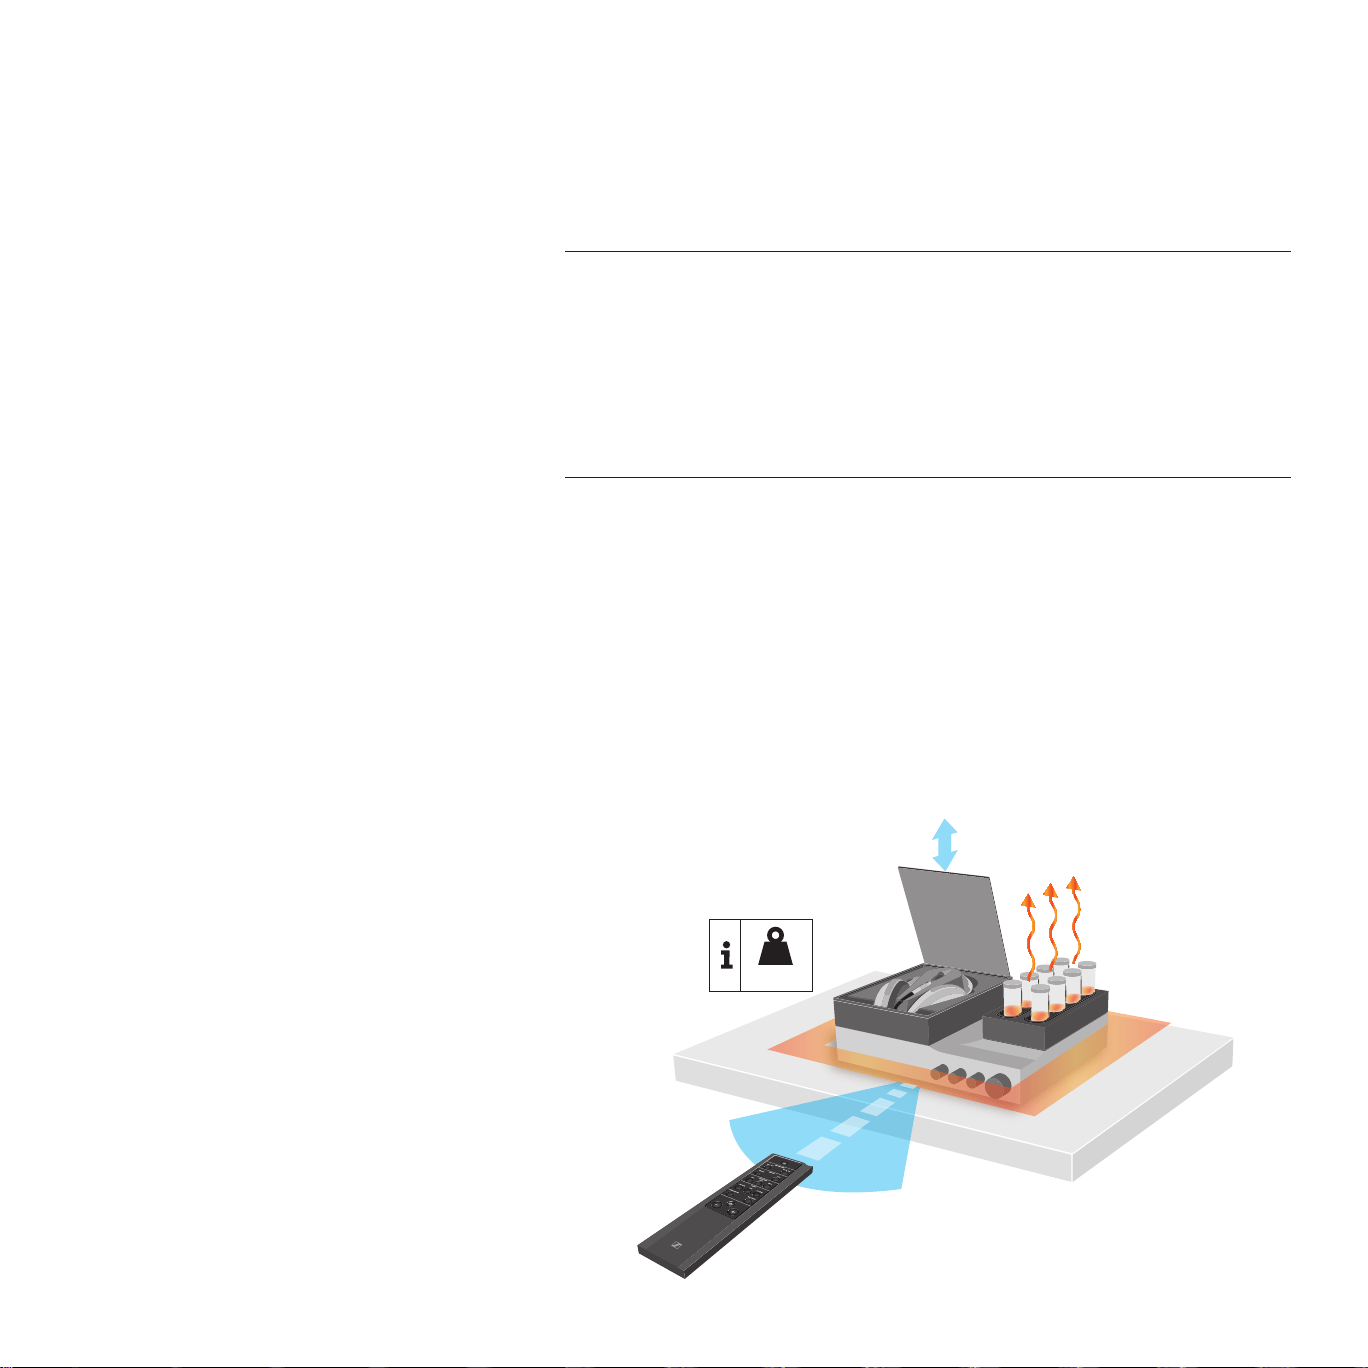
The installation location and the substructure have effects on the sound
quality. Observe the following notes:
▷ Place the tube headphone amplier on a stable, at, horizontal and low-vi-
bration surface that can safely carry the weight of the amplier.
▷ Ensure circulating ventilation. The amplier generates heat which is dissi-
pated through the housing, especially through the extended tubes. Do not
operate the amplier in closed cabinets.
▷ The power switch at the rear of the amplier must always be easily
accessible.
> 10
cm
>
5
c
m
45
°
<
6 m
45
°
21 kg

14
Putting the HE 1 into operation | Connecting the tube headphone amplier to audio sources
▷ There must be sufcient room in front of and above the amplier as the
operating elements and the amplier tubes extend automatically and the
glass cover opens automatically (see diagram).
▷ Observe the range of the remote control (see diagram).
Connecting the tube headphone amplifier to audio
sources
You can connect several audio sources to the tube headphone amplier and
switch between these connected sources using the INPUT rotary switch.
▷ Switch your audio sources off before connecting the tube headphone
amplier.
▷ Select a suitable high-quality connection cable for your audio source. Please
observe the recommended maximum cable length as given in the table.
▷ To connect the tube headphone amplier to your audio source, refer to the
connection diagram suitable for your your audio source (see the following
chapters):
Connection possibilities of the
audio source
Connection cable Max. cable
length
Page
ANALOG
A
XLR-3 (BAL)
2 balanced XLR-3
cables
10 m
15
B
RCA (UNBAL)
Stereo audio cable
with 2 RCA connec-
tors at each end
3 m
15
DIGITAL
C
USB (USB)
USB 2.0 certified
cable with Type A and
Type B connector
5 m
16
D
Optical (OPT) Optical cable 5 m
16
E
Coaxial (COAX) Coaxial cable (75 Ω) 5 m
16
15
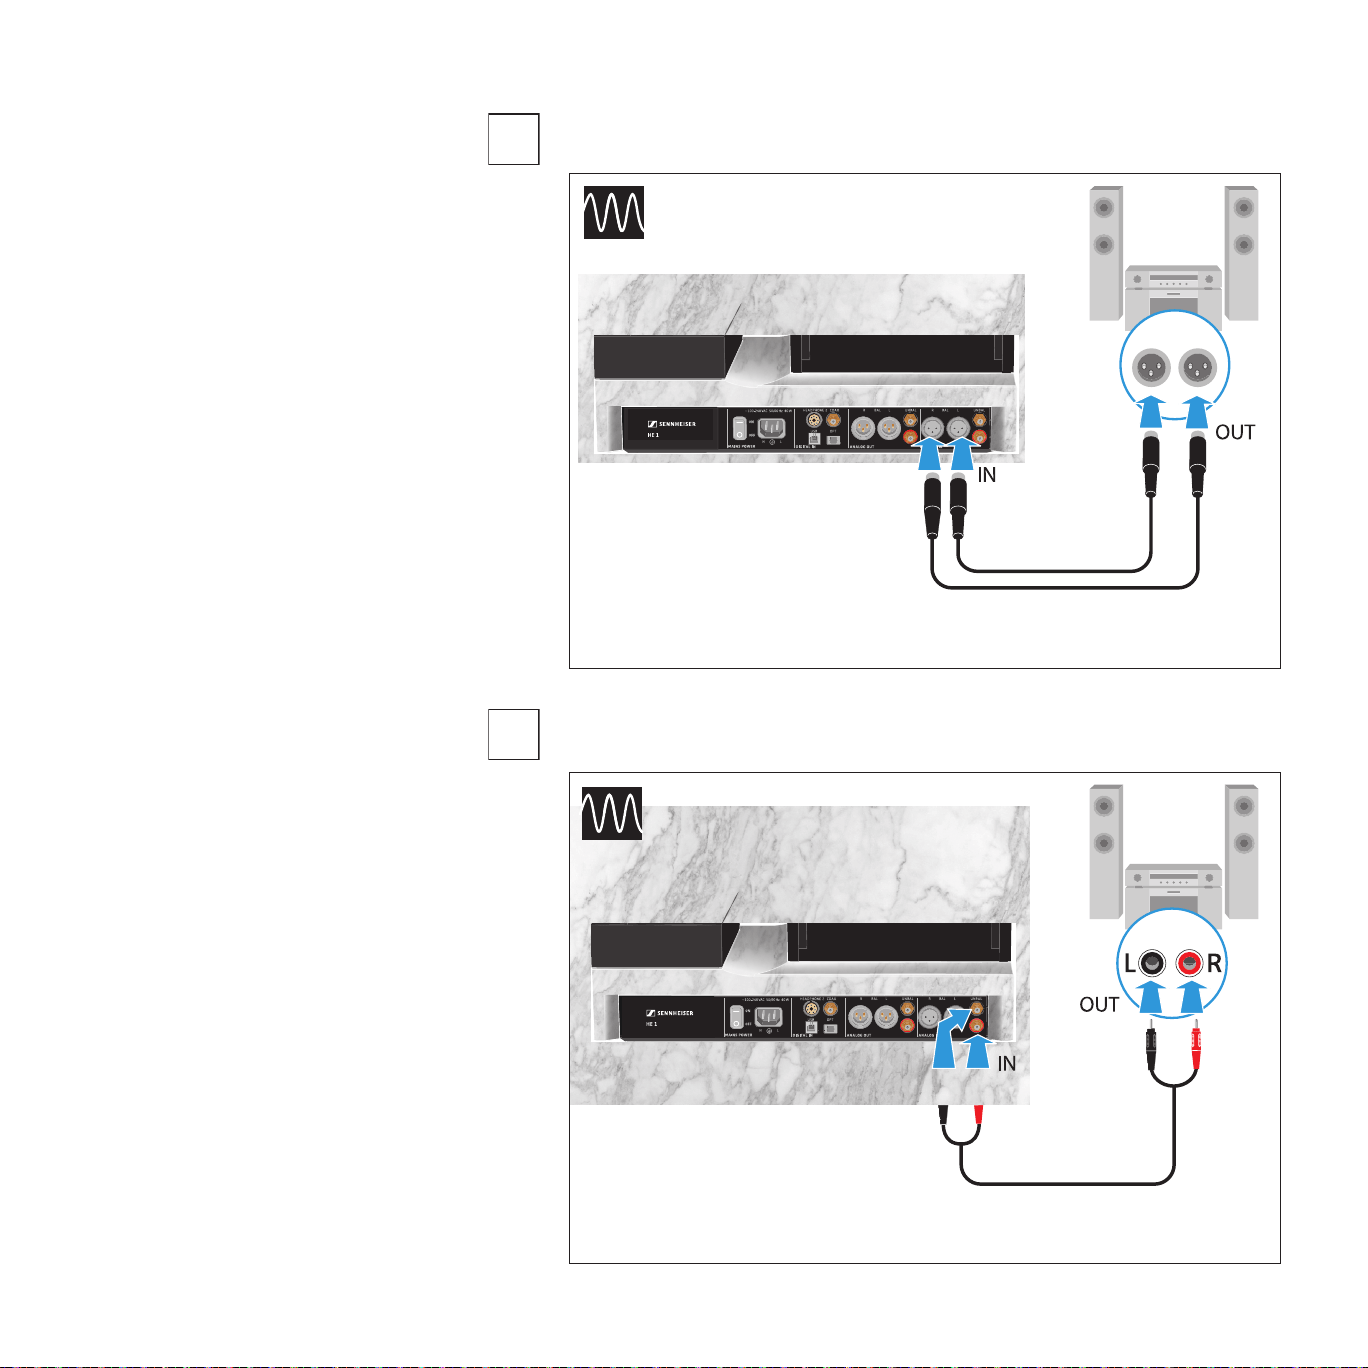
Putting the HE 1 into operation | Connecting the tube headphone amplier to audio sources
Connection possibility of the audio source: analog, XLR-3, balanced
Connection possibility of the audio source: analog, RCA, unbalanced
A
ORPHEUS
BAL
R L
L R
Connection cable: 2 balanced XLR-3 cables
B
UNBAL
RL
RL
ORPHEUS
Connection cable: stereo audio cable with 2 RCA connectors at each end
16
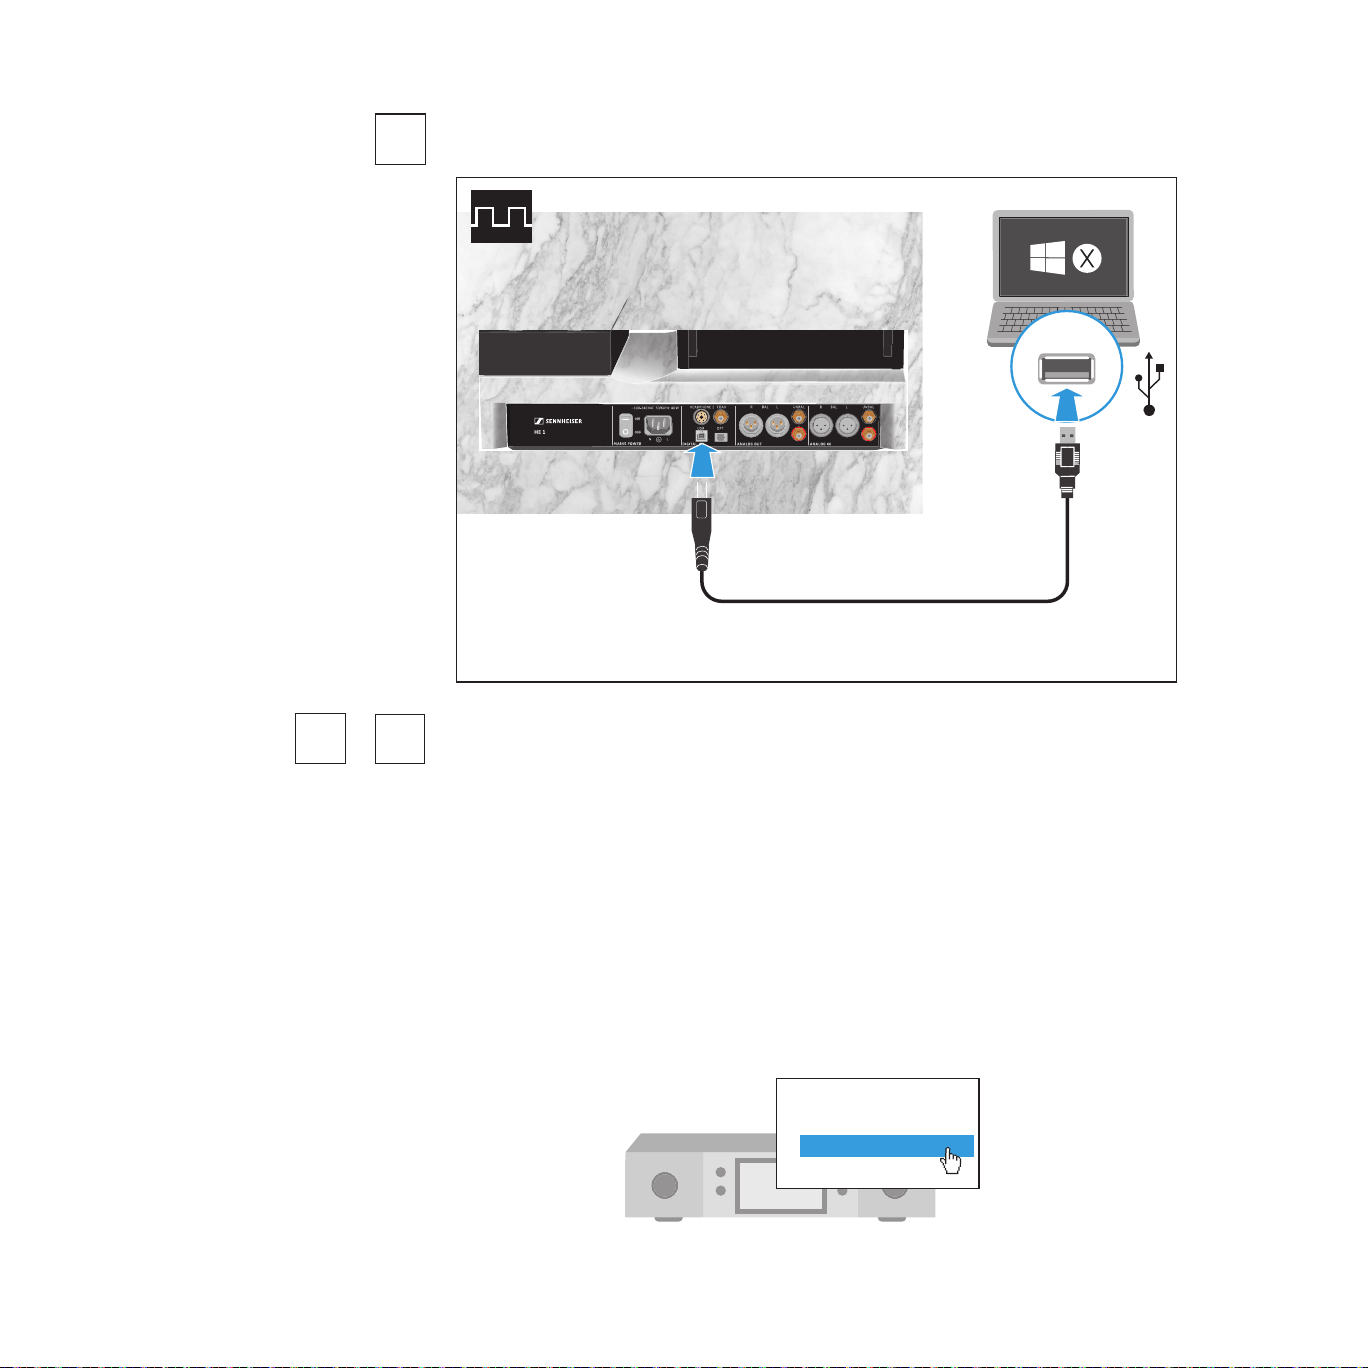
Putting the HE 1 into operation | Connecting the tube headphone amplier to audio sources
Connection possibility of the audio source: digital, USB connection
USB
ORPHEUS
Connection cable: USB 2.0 certied cable with Type B connector for
connection to the headphone amplier
Requirements for digital connections
The digital audio inputs (DIGITAL IN , OPT or COAX) can receive digital audio
signals in PCM format (supported sample rates: optical: up to 96 kHz, coaxial:
up to 192 kHz).
Information on how to set the audio signal of the connected device to PCM can
be found in the Sound or Settings menu or in the instruction manual of your
device.
If an incompatible digital audio signal is being received, the status LED of the
HE 1 ashes blue. The headphones are/the audio output is muted (OUTPUT
rotary switch in position MUTE) and music playback is not possible.
Sound menu
Digital sound output
Bitstream
PCM
C
E
D
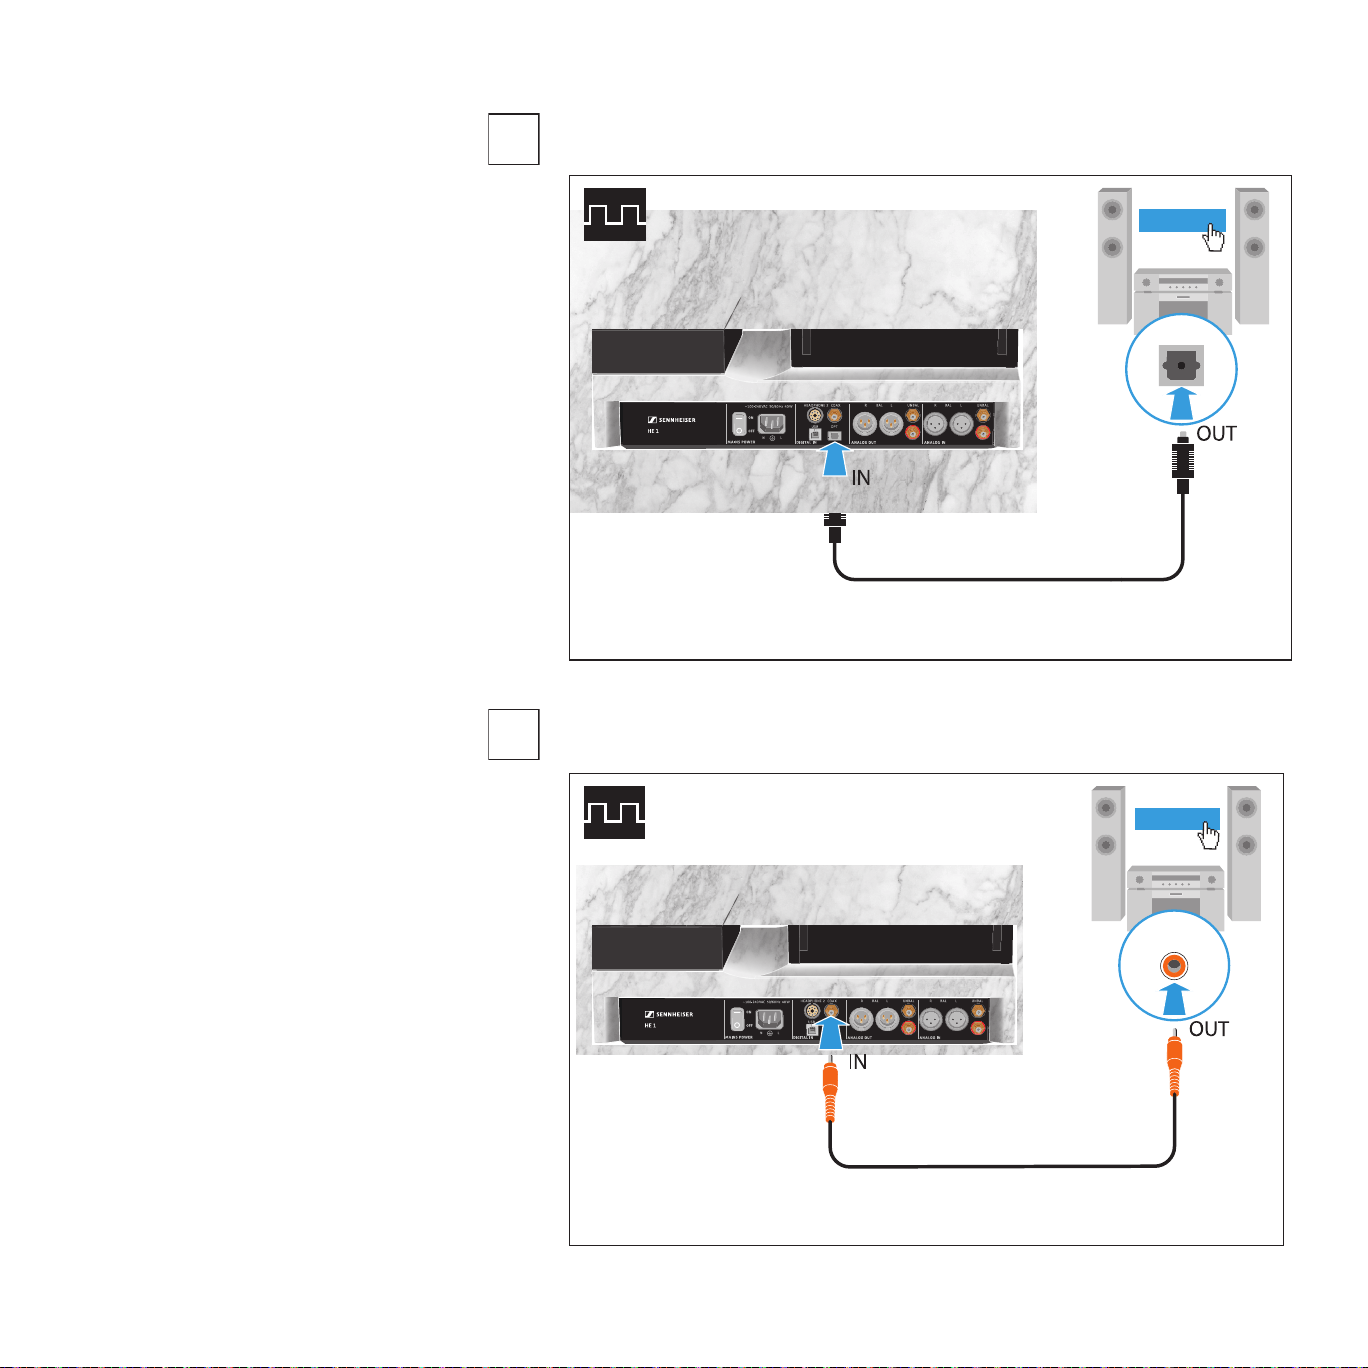
17
Putting the HE 1 into operation | Connecting the tube headphone amplier to audio sources
Connection possibility of the audio source: digital, optical connection
OPT
ORPHEUS
PCM
Connection cable: optical cable
Connection possibility of the audio source: digital, coaxial connection
COAX
ORPHEUS
PCM
Connection cable: coaxial cable (75 Ω)
D
E
18
Putting the HE 1 into operation | Using the tube headphone amplier connected to a Mac/PC
Using the tube headphone amplifier connected to a
Mac/PC
You can connect the HE 1 via USB directly to your Mac or PC and use it as an
audio output device. Depending on the driver and settings used,
high-resolution music les can be reproduced via the high-quality
DAC (digital-to-analog converter) of the HE 1.
Notes on DSD reproduction
Information on the possible conguration options for your Mac or PC for
native reproduction of DSD music les using third-party software can be
found on the HE 1 product page at www.sennheiser-hearing.com/
download
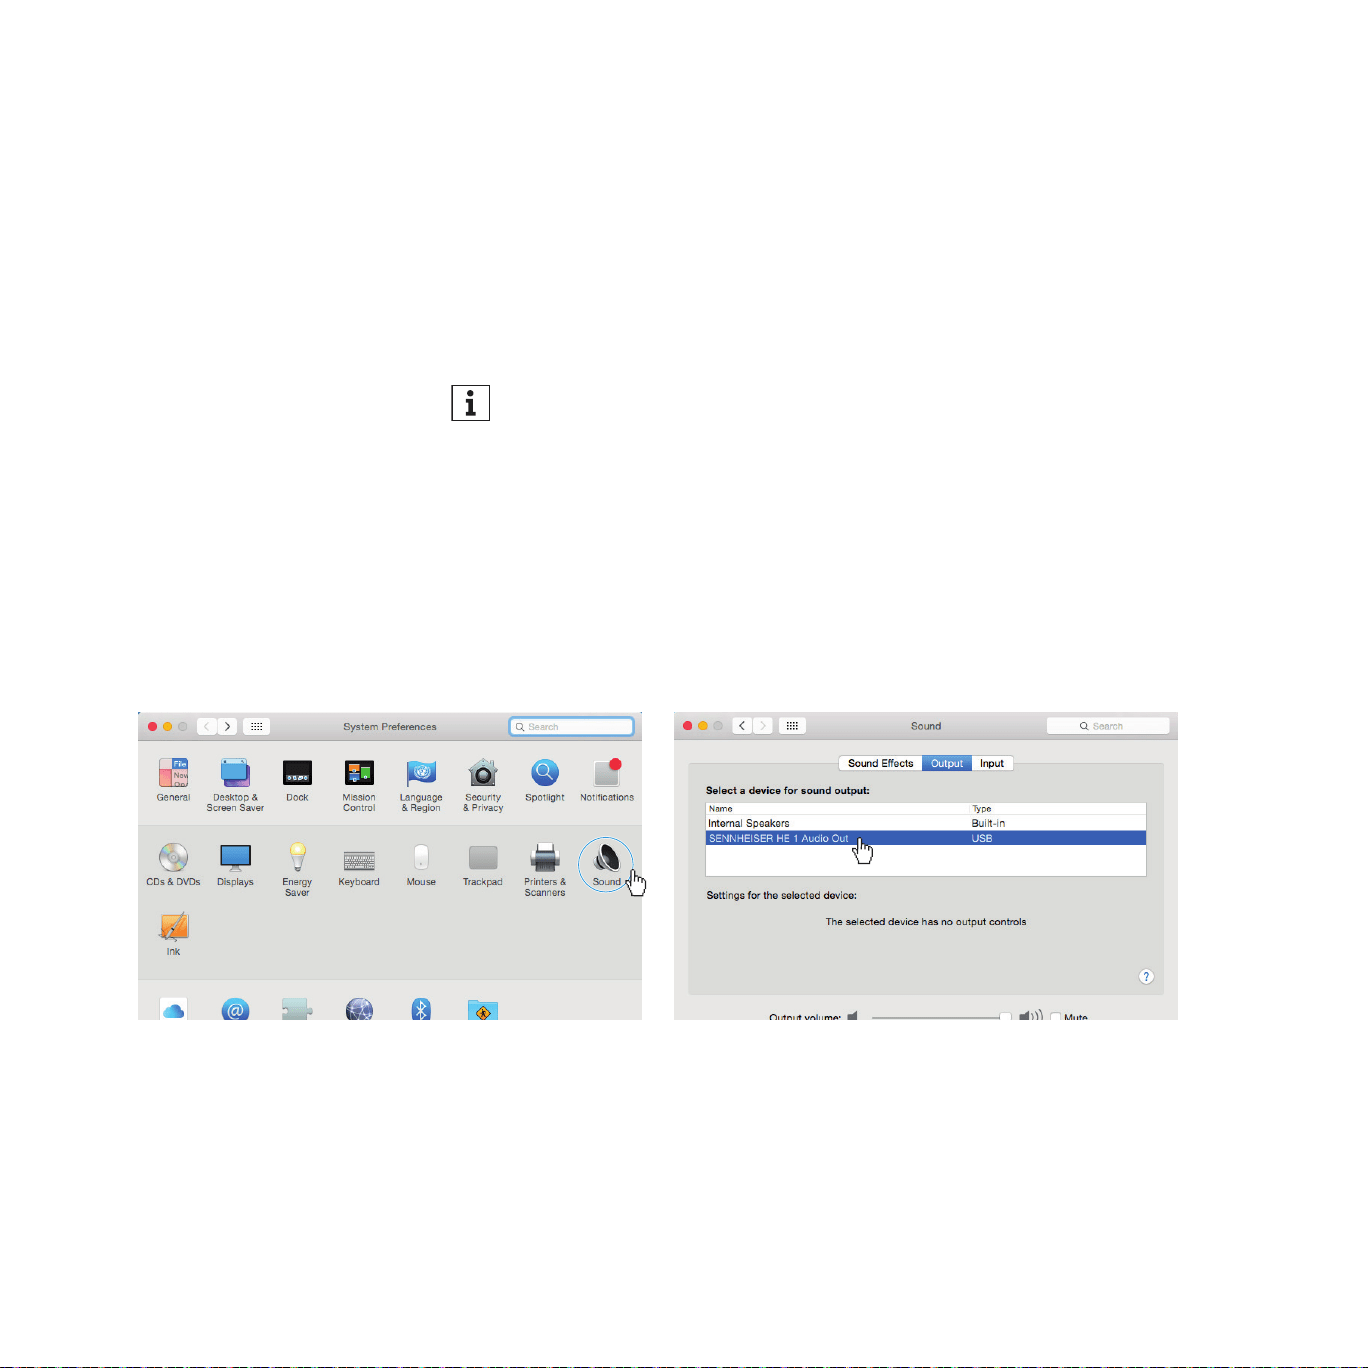
Apple OS X operating system
For an Apple Mac OS X operating system from version 10.6 onwards, you do
not have to install a driver. The HE 1 is recognized automatically.
▷ From the System Preferences, select “Sound” and then select “Sennheiser
HE 1” as the default audio output device.
19
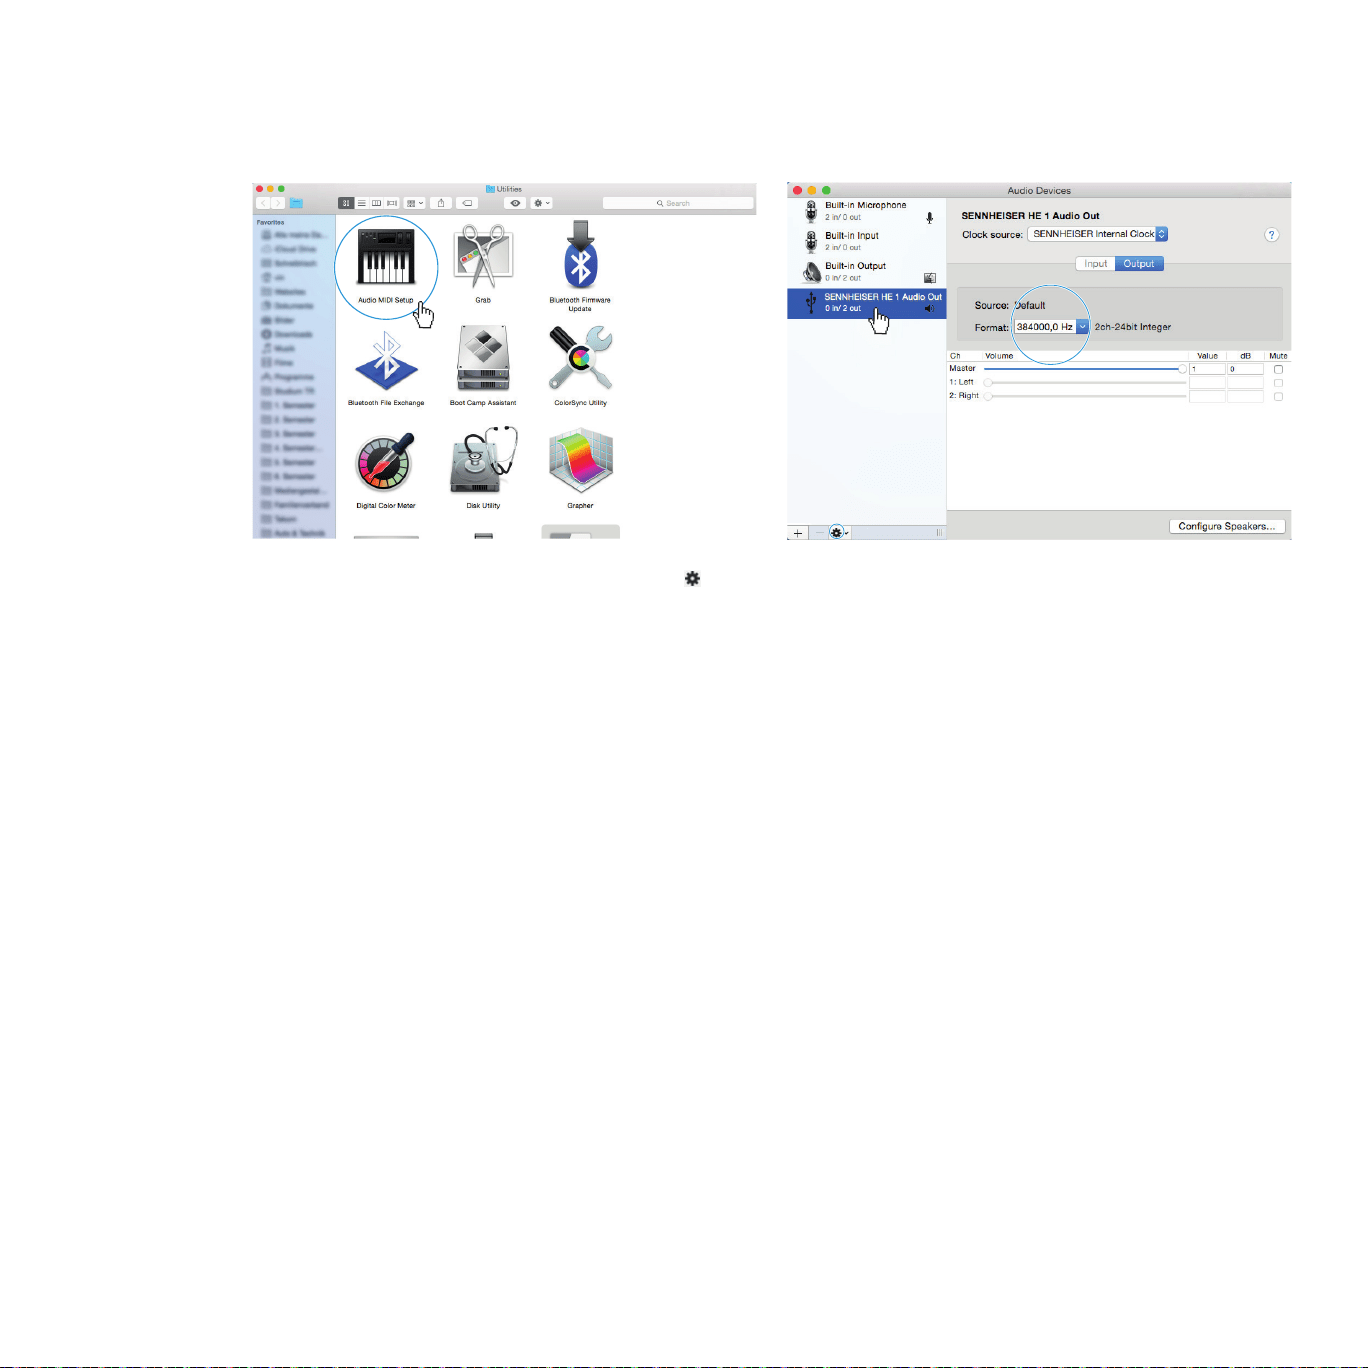
Putting the HE 1 into operation | Using the tube headphone amplier connected to a Mac/PC
▷ Open the “Audio Midi Setup” utility program and select “Sennheiser HE 1”
from the left-side column.
▷ From the drop-down menu, select “Use this device for sound output”.
▷ In the device settings, select the maximum sample rate from the “Format”
drop-down list. Select “384000 Hz” for the best possible sound quality.

20
Putting the HE 1 into operation | Using the tube headphone amplier connected to a Mac/PC
Microsoft Windows operating system
If you use a Microsoft Windows operating system, you have to install USB
Audio drivers that come with the “HE 1 USB Audio Software Package”. After
installation of the drivers, the HE 1 is recognized automatically.
System requirements
• Intel Core 2 processor with 1.6 GHz (minimum) or similar processor
• 2 GB RAM (minimum)
• Microsoft Windows 7/8/8.1/10 operating system (32 or 64 bit)
HE 1 USB Audio Software Package
The software package contains the following components:
• WDM USB audio driver
• ASIO USB audio driver
• Control Panel
• HE 1 Updater
Notes on the USB audio modes
If you use standard software (e.g. Windows Media Player or Apple iTunes),
the best possible transmission mode is limited by the operating system (the
played music le is mixed with System Sounds and adapted to the sample rate
and bit depth set for the WDM driver).
For native reproduction of high-resolution les (without driver-induced ad-
aptation of sample rate and bit depth; 32 bits/up to 384 kHz or DSD les),
you require an ASIO driver and special third-party software, which transmits
the music le natively from the player software to the DAC of the HE 1 (see
page 18).
Example: Microsoft Windows 10
To install the “HE 1 USB Audio Software Package” and to set the HE 1 as the
default audio output device:
▷ Install the “HE 1 USB Audio Software Package” from the USB ash drive
(supplied). The software package can also be downloaded from the
Internet at www.sennheiser-hearing.com/download or be obtained from
your Sonova Consumer Hearing partner. You need administrator rights for
installation.

21
Putting the HE 1 into operation | Using the tube headphone amplier connected to a Mac/PC
▷ Open the Control Panel and select “Sound”.
The “Sound” window opens.
▷ Select “HE 1” as the default audio output device.
▷ Click on “Properties” and, in the “Advanced” tab, select the maximum
sample rate from the “Default Format” drop-down list. Select “32 bit,
192000 Hz (studio quality)” for the best possible sound quality.
▷ Click on “OK” to apply the settings.
22
Putting the HE 1 into operation | Using the tube headphone amplier connected to a Mac/PC
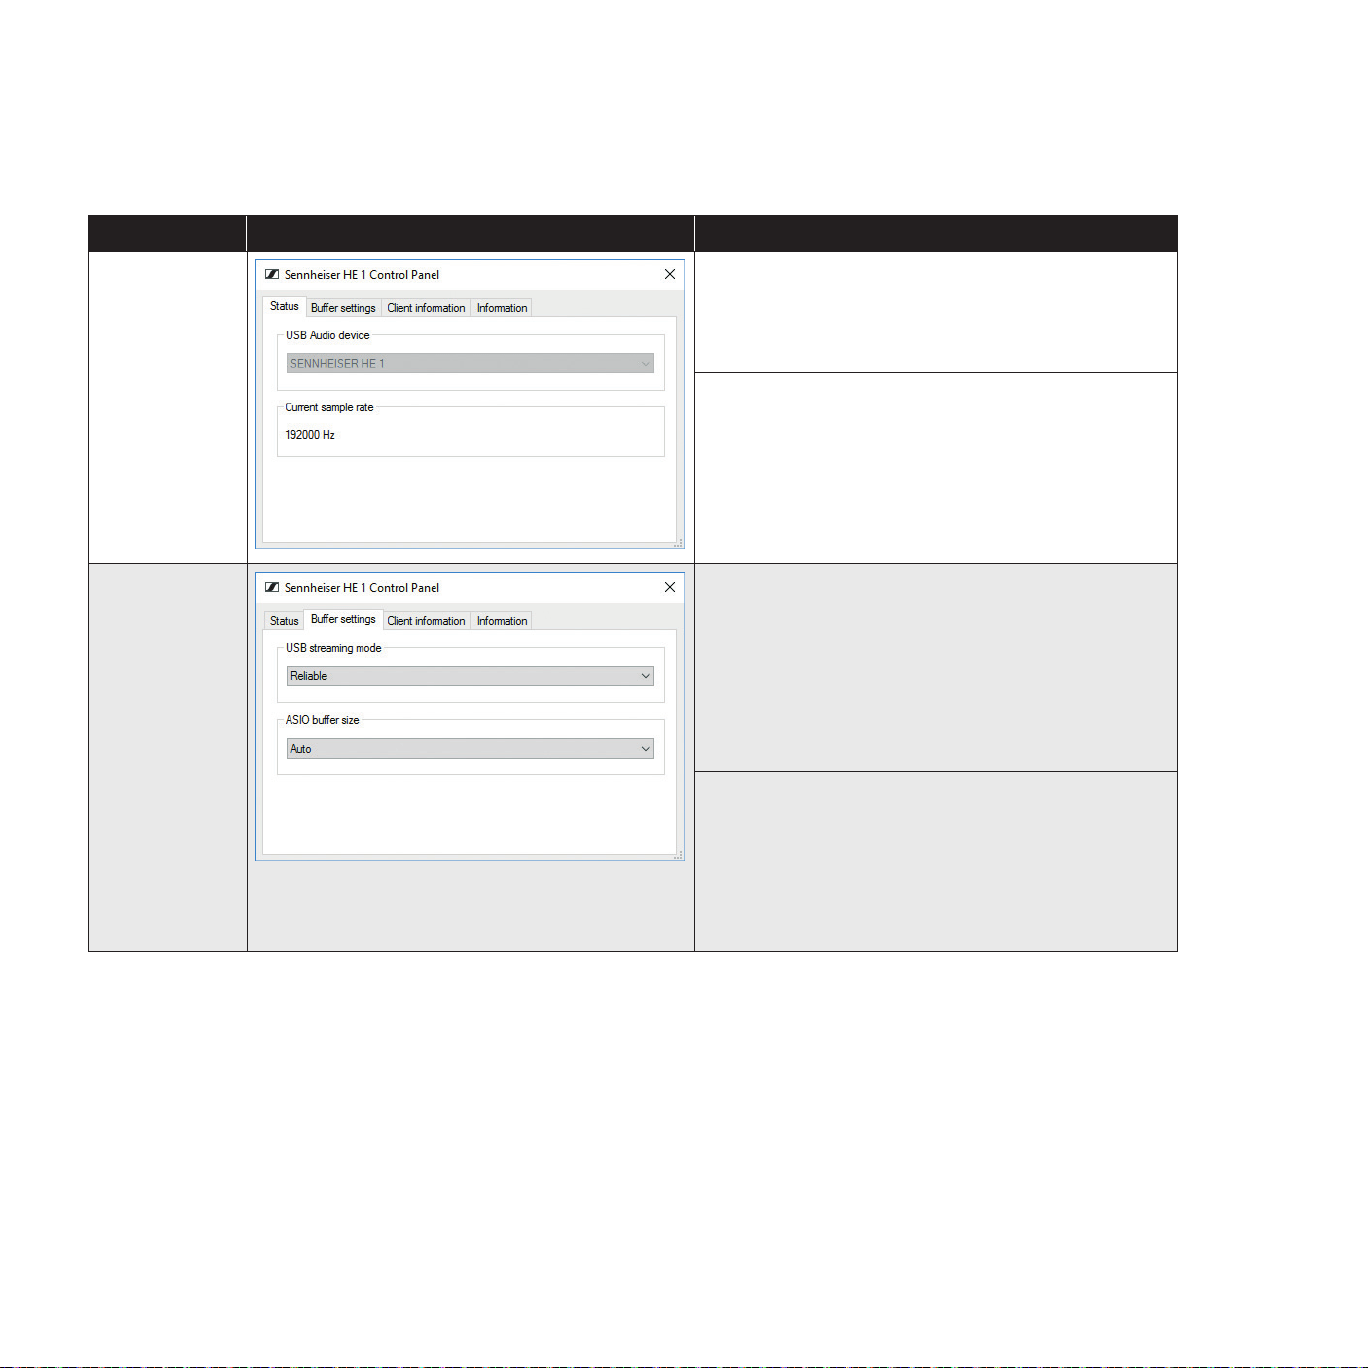
Using the Sennheiser Control Panel
The Control Panel allows you to congure the HE 1 for the reproduction of
high-resolution music les and to monitor the current operating state.
Tab Control Panel view Display/Setting option
Status
USB Audio device
Currently connected and used device. If several
devices devices are connected simultaneously, you
can select the desired device here.
Current sample rate
PCM: 44100, 48000, 88200, 96000, 176400,
192000, 352800, 384000 Hz
DSD: 2822400, 5644800, 11289600 Hz
Buffer settings
USB streaming mode
The buffer of the USB streaming mode controls
the latency of the music signal from the le source
(PC client) and the DAC (HE 1). The lower the
latency, the more CPU power the PC client has to
allocate to this process. Recommended setting:
“Reliable”.
ASIO buffer size
The ASIO buffer size controls the data transfer
between the driver and the playback software.
The ASIO buffer size depends on the buffer of the
USB streaming mode.
Recommended setting: “Auto”.
23
Putting the HE 1 into operation | Using the tube headphone amplier connected to a Mac/PC
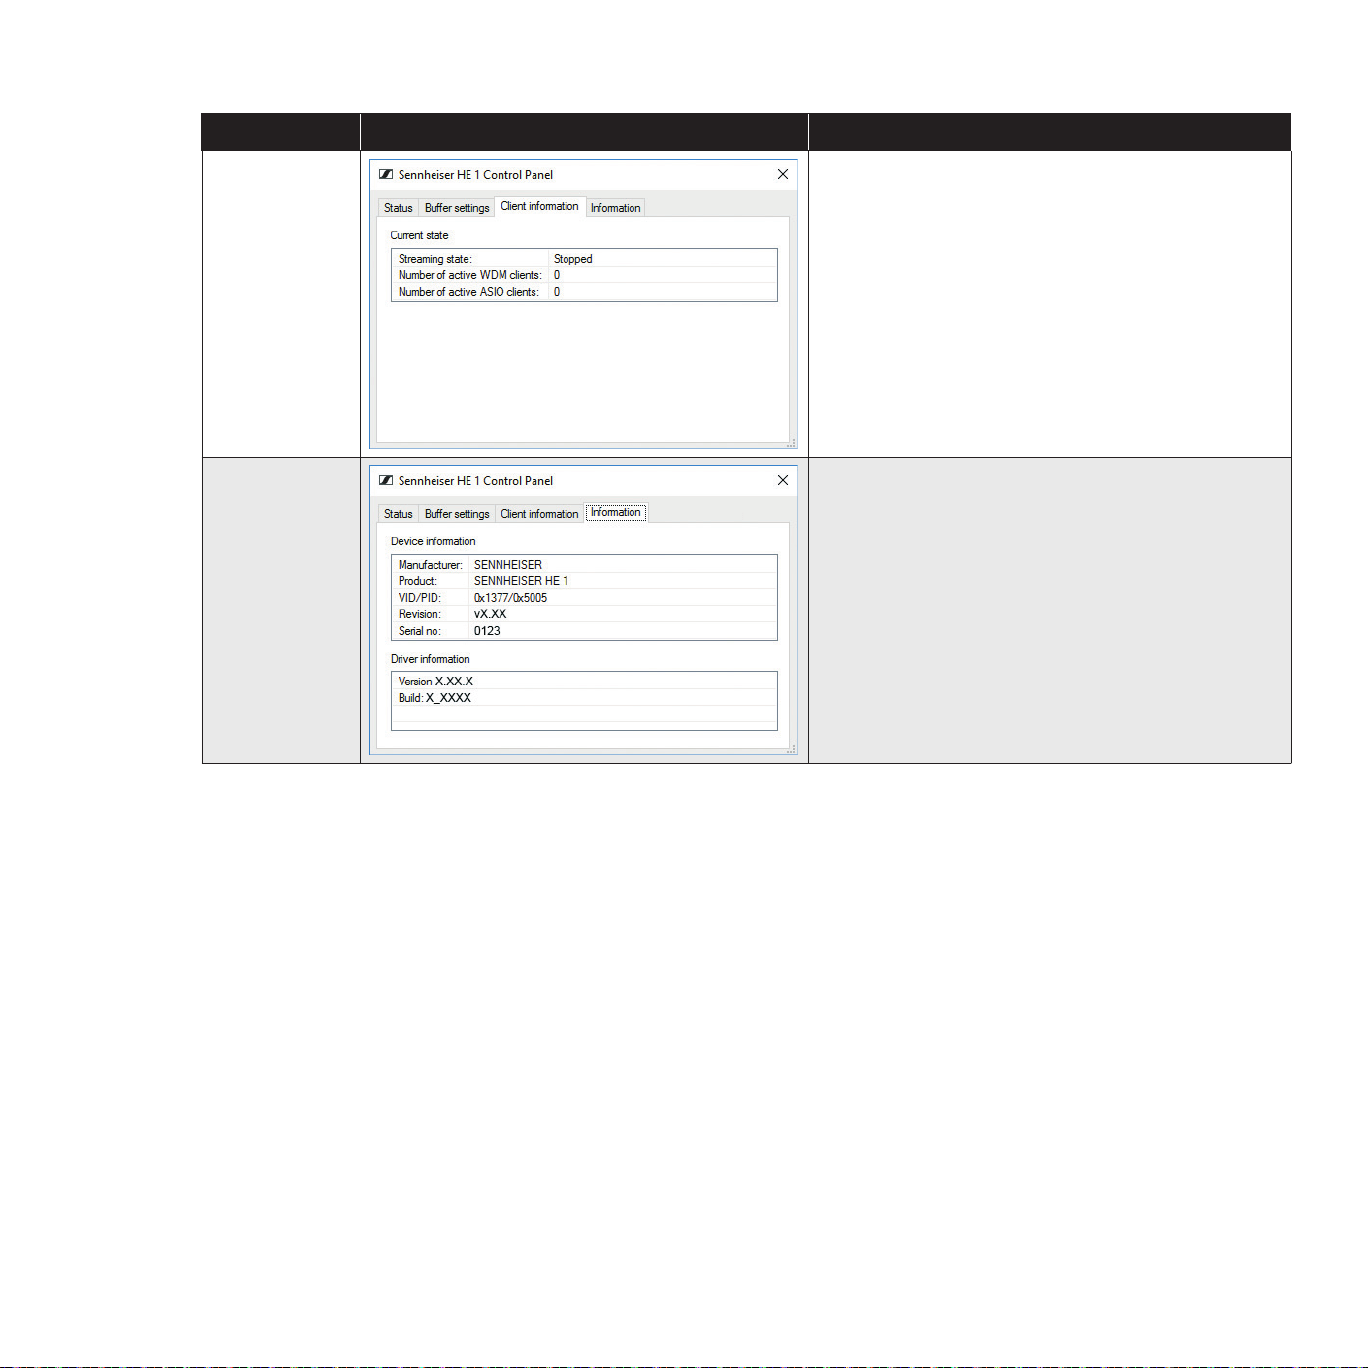
Tab Control Panel view Display/Setting option
Client
information
Current state
Information on the PC client on which the Control
Panel is installed and on the streaming state
(“Active” or “Stopped”).
The type of driver used is displayed via the
number of active WDM or ASIO clients.
Information
Device information/Driver information
Information on the currently connected device and
on the driver.

24
Putting the HE 1 into operation | Connecting the headphone tube amplier to a power amplier or to active loudspeakers
Connecting the headphone tube amplifier to a power
amplifier or to active loudspeakers
You can use the tube headphone amplier as a preamplier and connect it to a
power amplier or to active loudspeakers. To switch the audio output from the
headphones to the audio outputs, set the OUTPUT rotary switch to LINE
▷ Switch your audio devices off before connecting the tube headphone
amplier.
▷ Select a suitable high-quality connection cable for your audio device. Please
observe the recommended maximum cable length as given in the table.
▷ To connect the tube headphone amplier to your audio source, refer to the
connection diagram suitable for your your audio source (see the following
chapters):
Connection possibility of the
audio device:
Connection cable Max. cable
length
Page
ANALOG
A
XLR-3 (BAL)
2 balanced XLR-3
cables
10 m
25
B
RCA (UNBAL)
Stereo audio cable with
2 RCA connectors at
each end
5 m
25
25
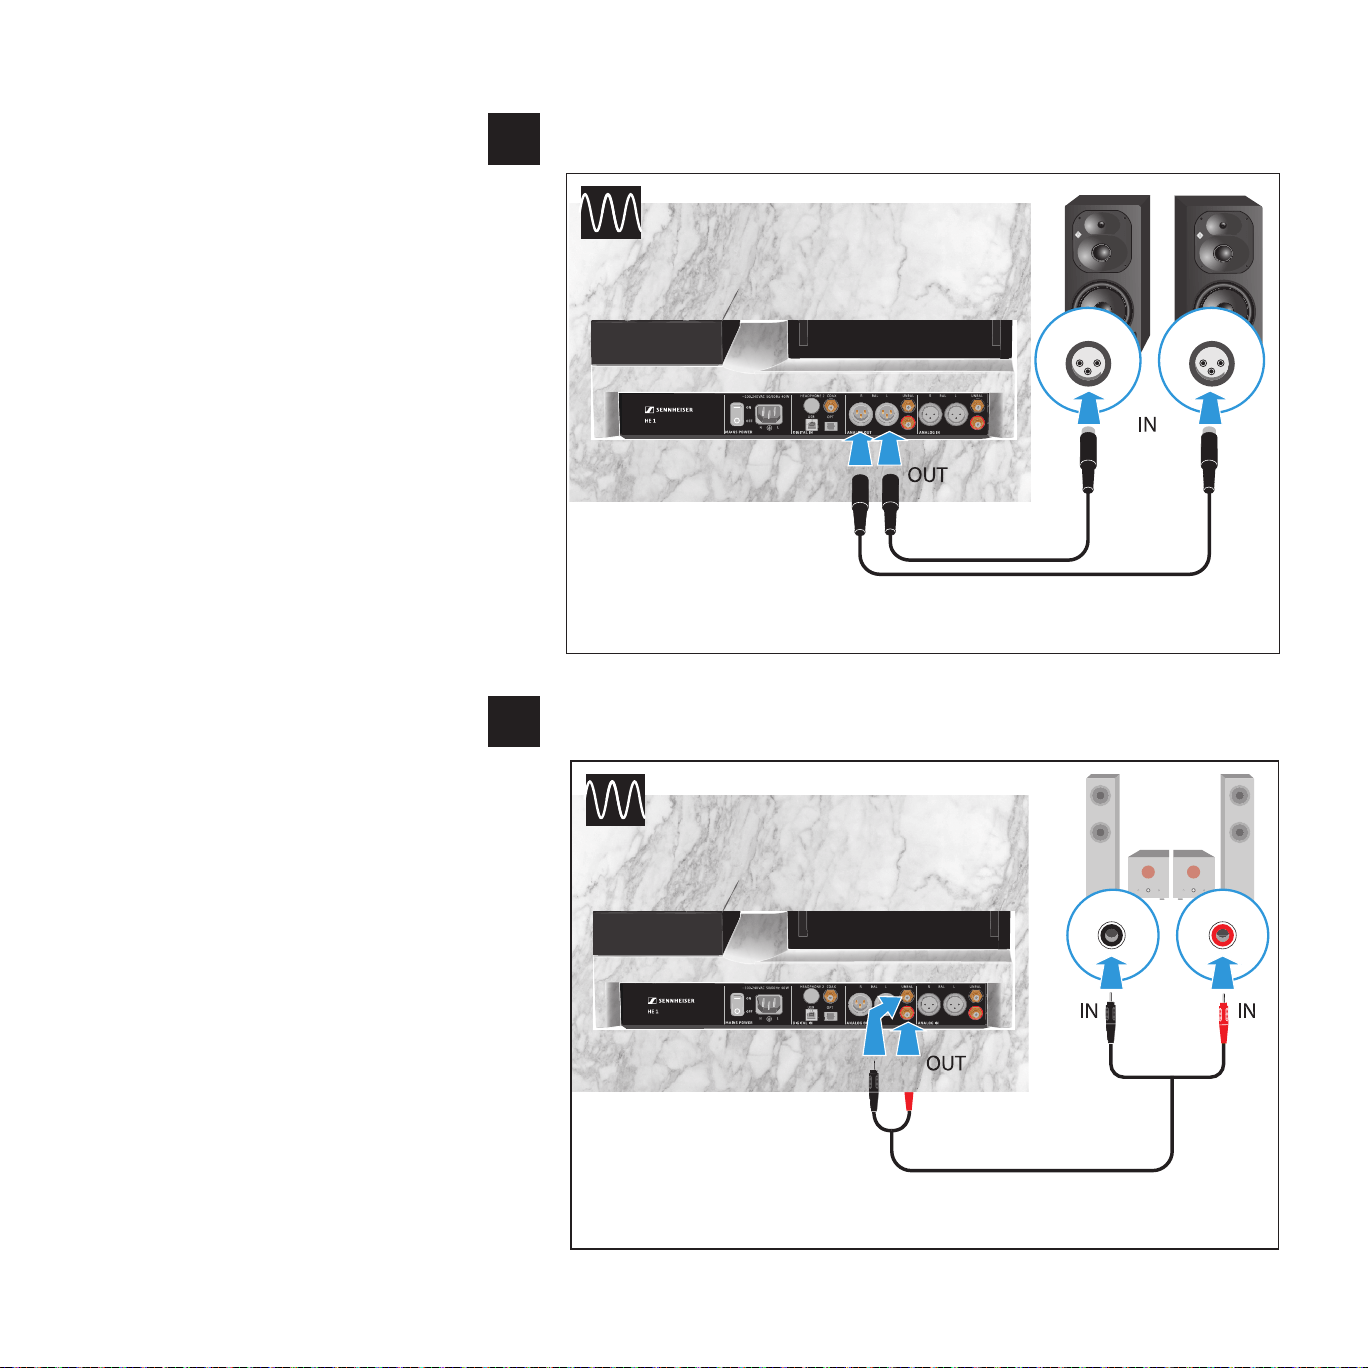
Putting the HE 1 into operation | Connecting the headphone tube amplier to a power amplier or to active loudspeakers
Connection possibility of the audio device: analog, XLR-3, balanced
Connection possibility of the audio device: analog, RCA, unbalanced
ORPHEUS
RL
RL
UNBAL
Connection cable: stereo audio cable with 2 RCA connectors at each end
A
ORPHEUS
R L
L R
BAL
Connection cables: 2 balanced XLR-3 cables
B
26
Putting the HE 1 into operation | Connecting the tube headphone amplier to the power supply system
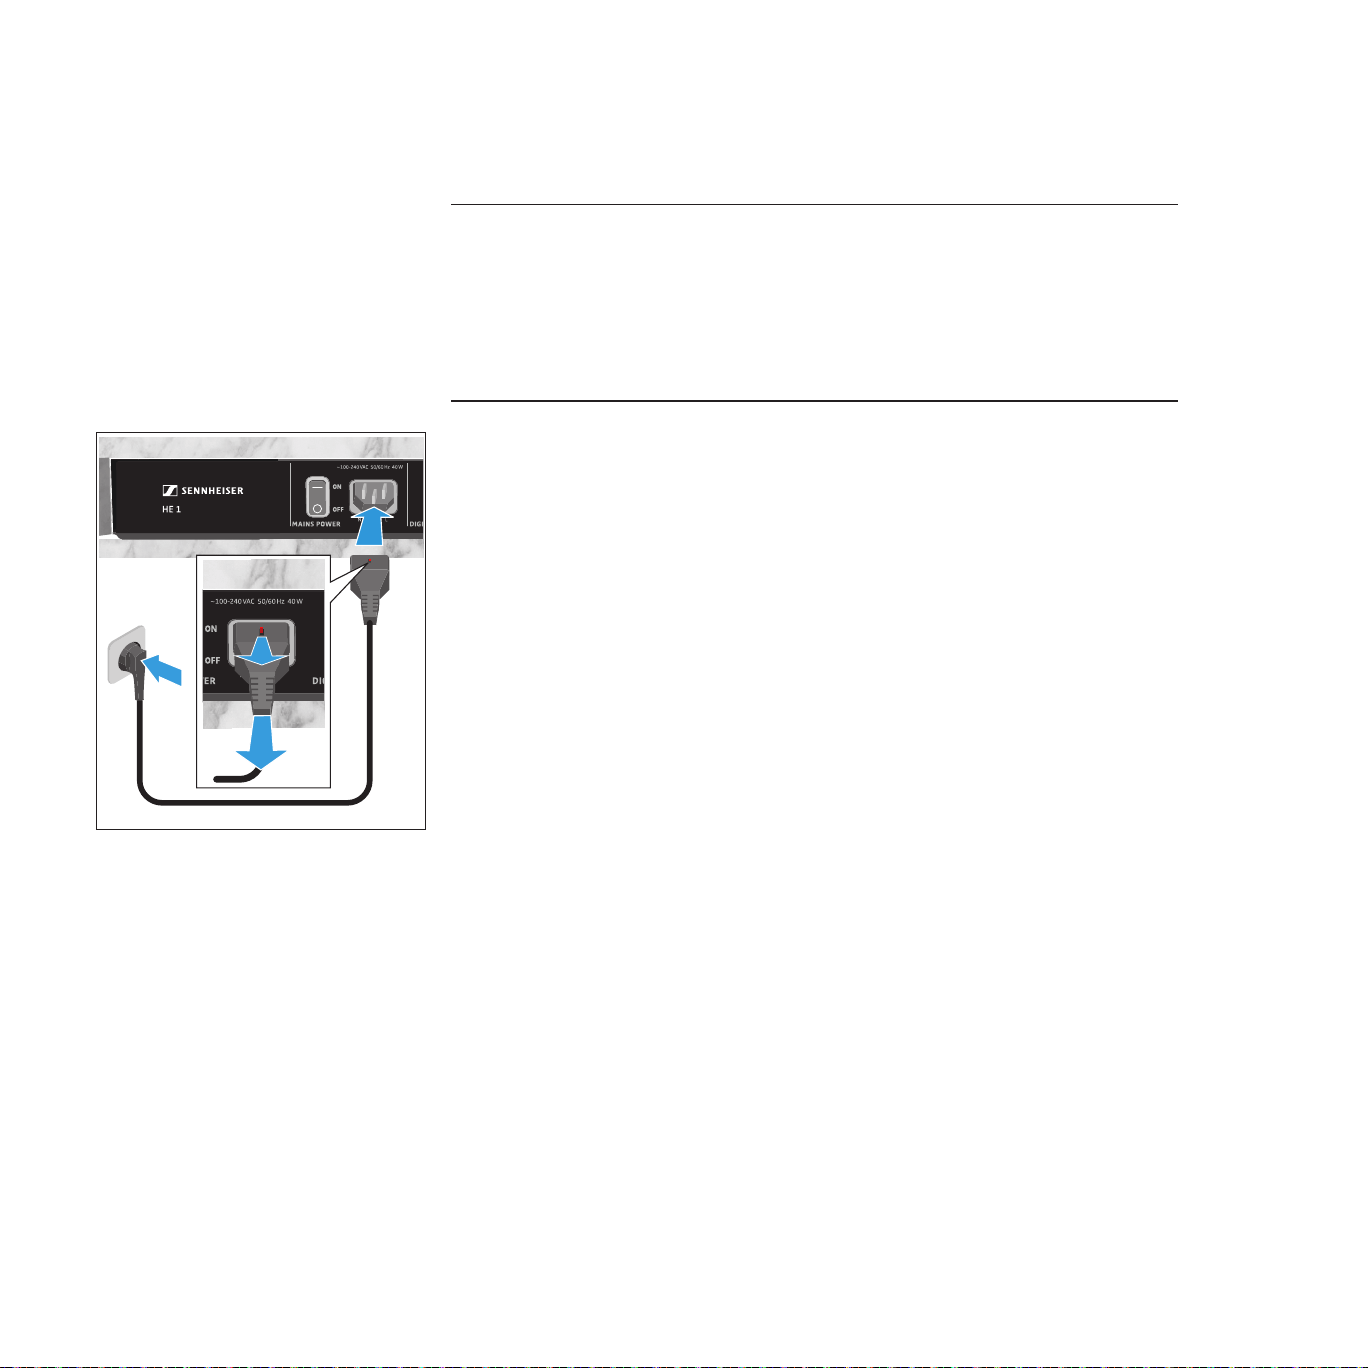
Connecting the tube headphone amplifier to the power
supply system
CAUTION
Danger of damage to the product!
If you connect to an unsuitable power supply, the product can be damaged.
▷ Use a suitable power cable (supplied) to connect the product to the power
supply system (100 - 240 V~, 50/60 Hz).
▷ Connect a suitable power cable (supplied for the regions EU, UK or US) to
the IEC mains socket and a wall socket.
To disconnect the power cable:
▷ Push and hold the red safety pin on the power plug and pull the power plug
from the IEC mains socket.
27
Using the HE 1 | Switching the tube headphone amplier on
Using the HE 1
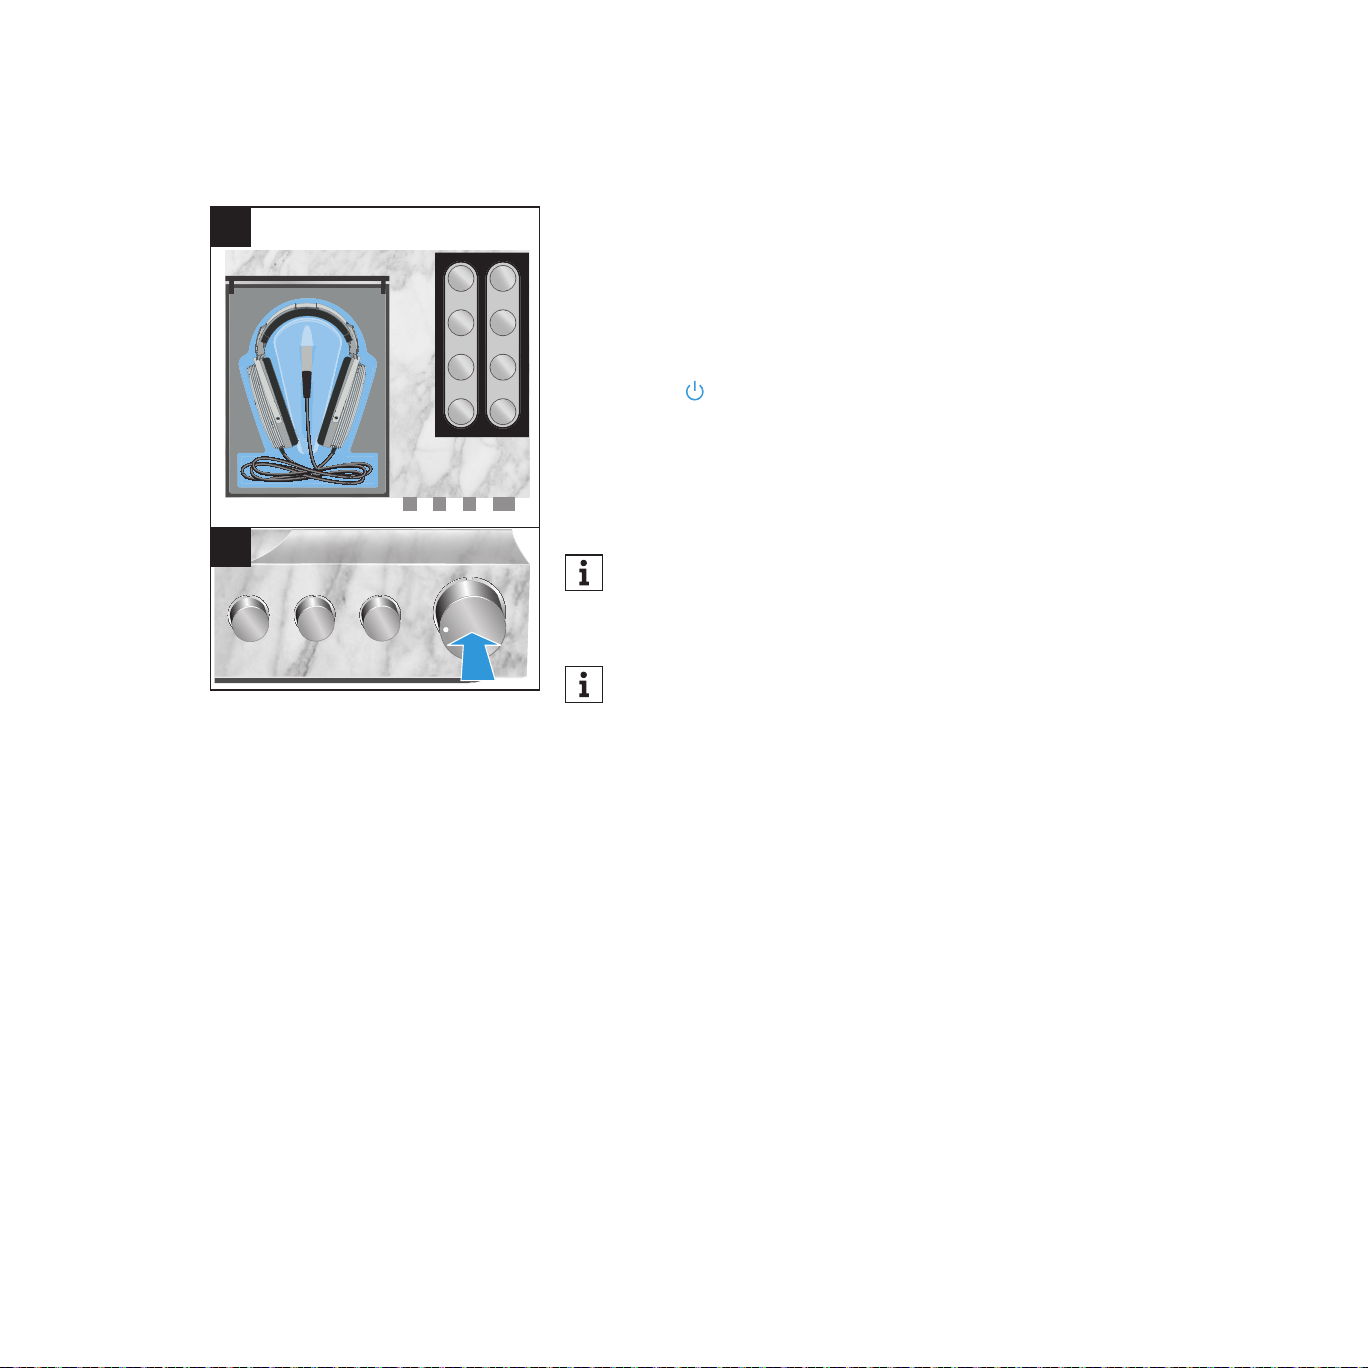
Switching the tube headphone amplifier on
CAUTION
Danger of hearing damage!
Listening at high volume levels for long periods of time can lead to permanent
hearing defects. Toggling between the audio sources may cause enormous
volume jumps that can permanently damage your hearing.
▷ Before putting the headphones on and before switching between audio
sources, adjust the volume to a low level.
▷ Do not continuously expose yourself to high volume levels.
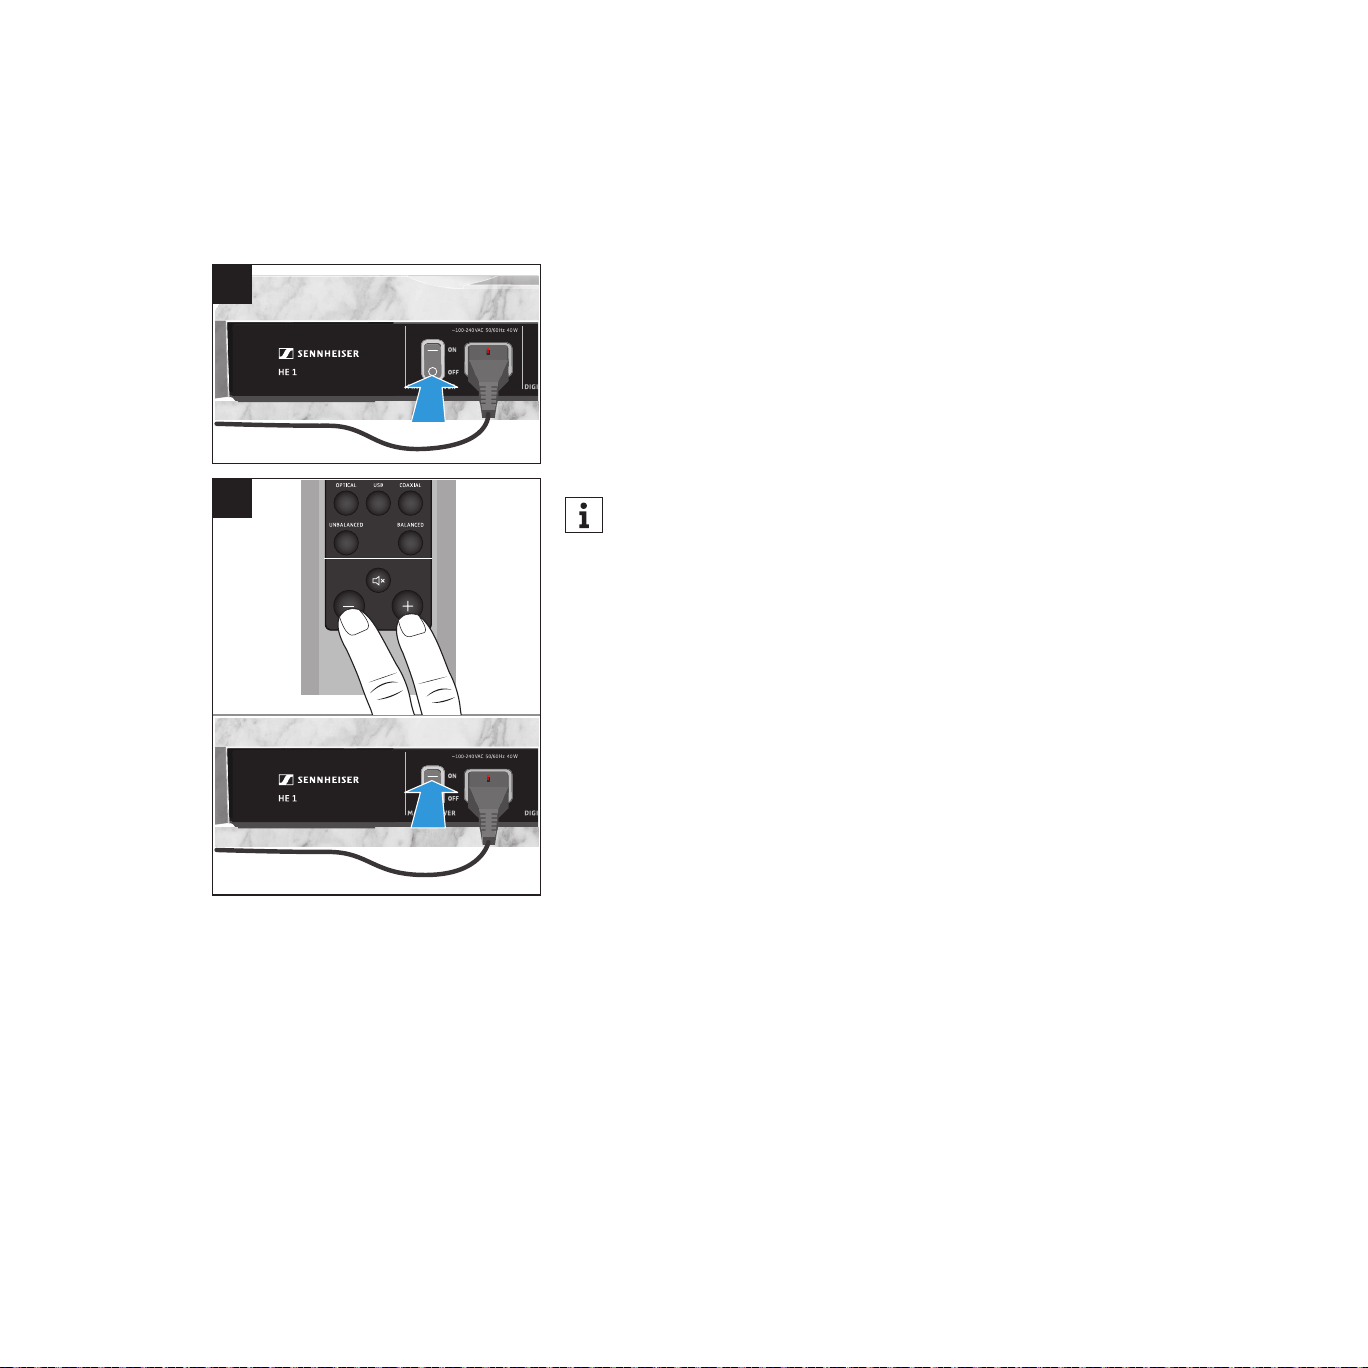
1 Set the power switch to ON to switch the HE 1 on.
2. Press the on/off button.
Or:
▷ Press the button on the remote control.
The status LED starts pulsing. The operating elements and the amplier tubes
extend automatically and switch to the last position. The glass cover of the
headphone storage box opens. Once the initialization and the warm-up phase
of the amplier tubes is completed, the status LED lights up white. The HE 1 is
ready for operation.
You can adjust the volume for the INPUT audio inputs and the OUTPUT
audio outputs according to your needs (see page 33 and 36).
If the OUTPUT rotary switch is set to LINE, the headphone storage box
remains closed when the HE 1 is switched on (see page 35).
Vol +
Vol -
HE 1 erstellt von Vincent
II
1 + 2

28
Using the HE 1 | Switching the tube headphone amplier on
Deactivating the blockage protection
If, during initialization, the operating elements and the amplier tubes cannot
extend automatically because they are blocked or if the glass cover cannot
open because it is blocked, the blockage protection will be activated.
The status LED ashes red. In this case, the HE 1 cannot be used.
To deactivate the blockage protection of the HE 1:
▷ Set the power switch to OFF to switch the HE 1 off and wait until the status
LED goes off (up to 30 seconds).
▷ Make sure that the operating elements, the amplier tubes and the glass
cover are not blocked.
▷ Set the power switch to ON to switch the HE 1 on again.
It might be that the operating elements retract to the “off” position.
▷ Press the on/off button.
The HE 1 switches on normally (see previous page).
29
Using the HE 1 | Switching the tube headphone amplier off
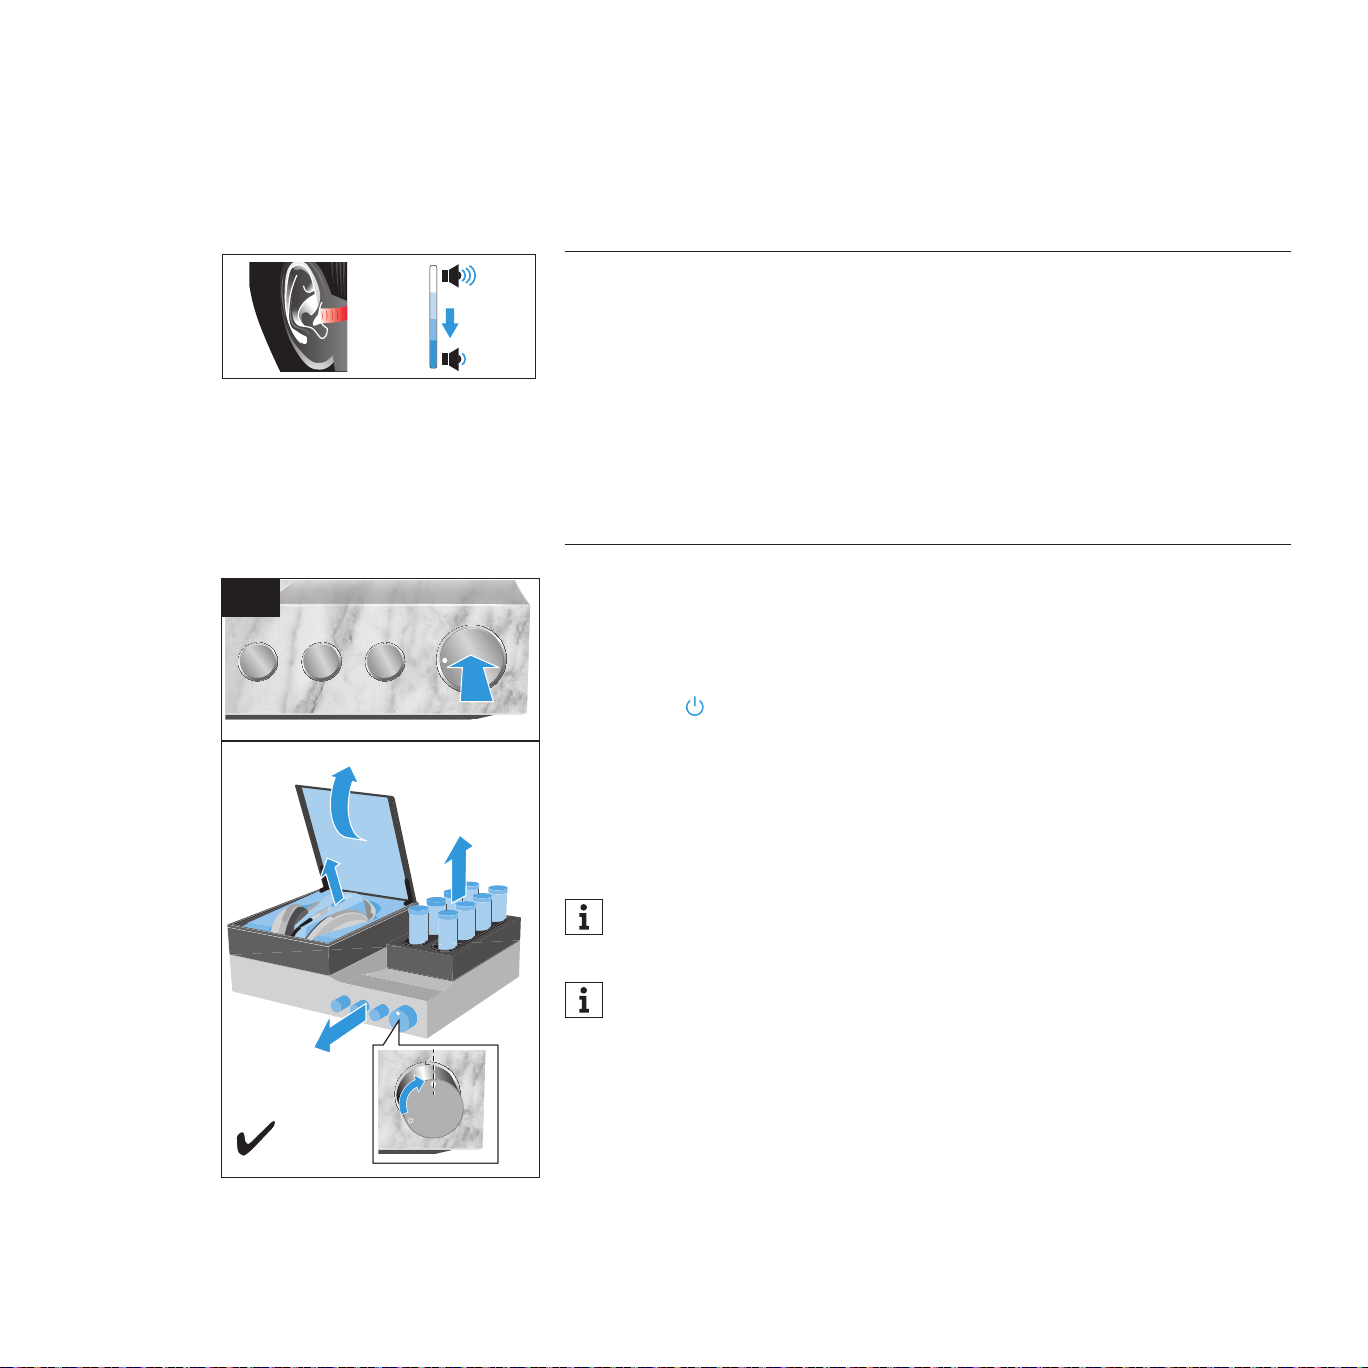
Switching the tube headphone amplifier off
▷ Open the glass cover of the storage box (see page 39) if necessary.
1 Telescope the headband, place the headphones in the headphone
compartment and carefully roll up the cable so that it ts completely into
the storage box.
2. Press the on/off button.
Or:
▷ Press the button on the remote control.
The status LED starts pulsing. The glass cover of the headphone storage box
closes. The amplier tubes and the operating elements retract to the “off”
position. Once the switch-off procedure is completed, the status LED lights up
red. The HE 1 is switched off (standby).
If, during switch-off of the HE 1 and closing of the glass cover, the cable
leaves the storage box or the travel of the glass cover is blocked, the
glass cover remains ajar so that e.g. the cable does not get clamped.
If you want to accelerate the switch-off process, press the on/off button
for 2 seconds when switching the amplier off.
To disconnect the HE 1 from the power supply system:
▷ Set the power switch to OFF to switch the HE 1 off.
▷ Unplug the power plug from the wall socket.
▷ Push and hold the red safety pin on the power plug and pull the power plug
from the IEC mains socket.
I
1
2
30
Using the HE 1 | Connecting headphones
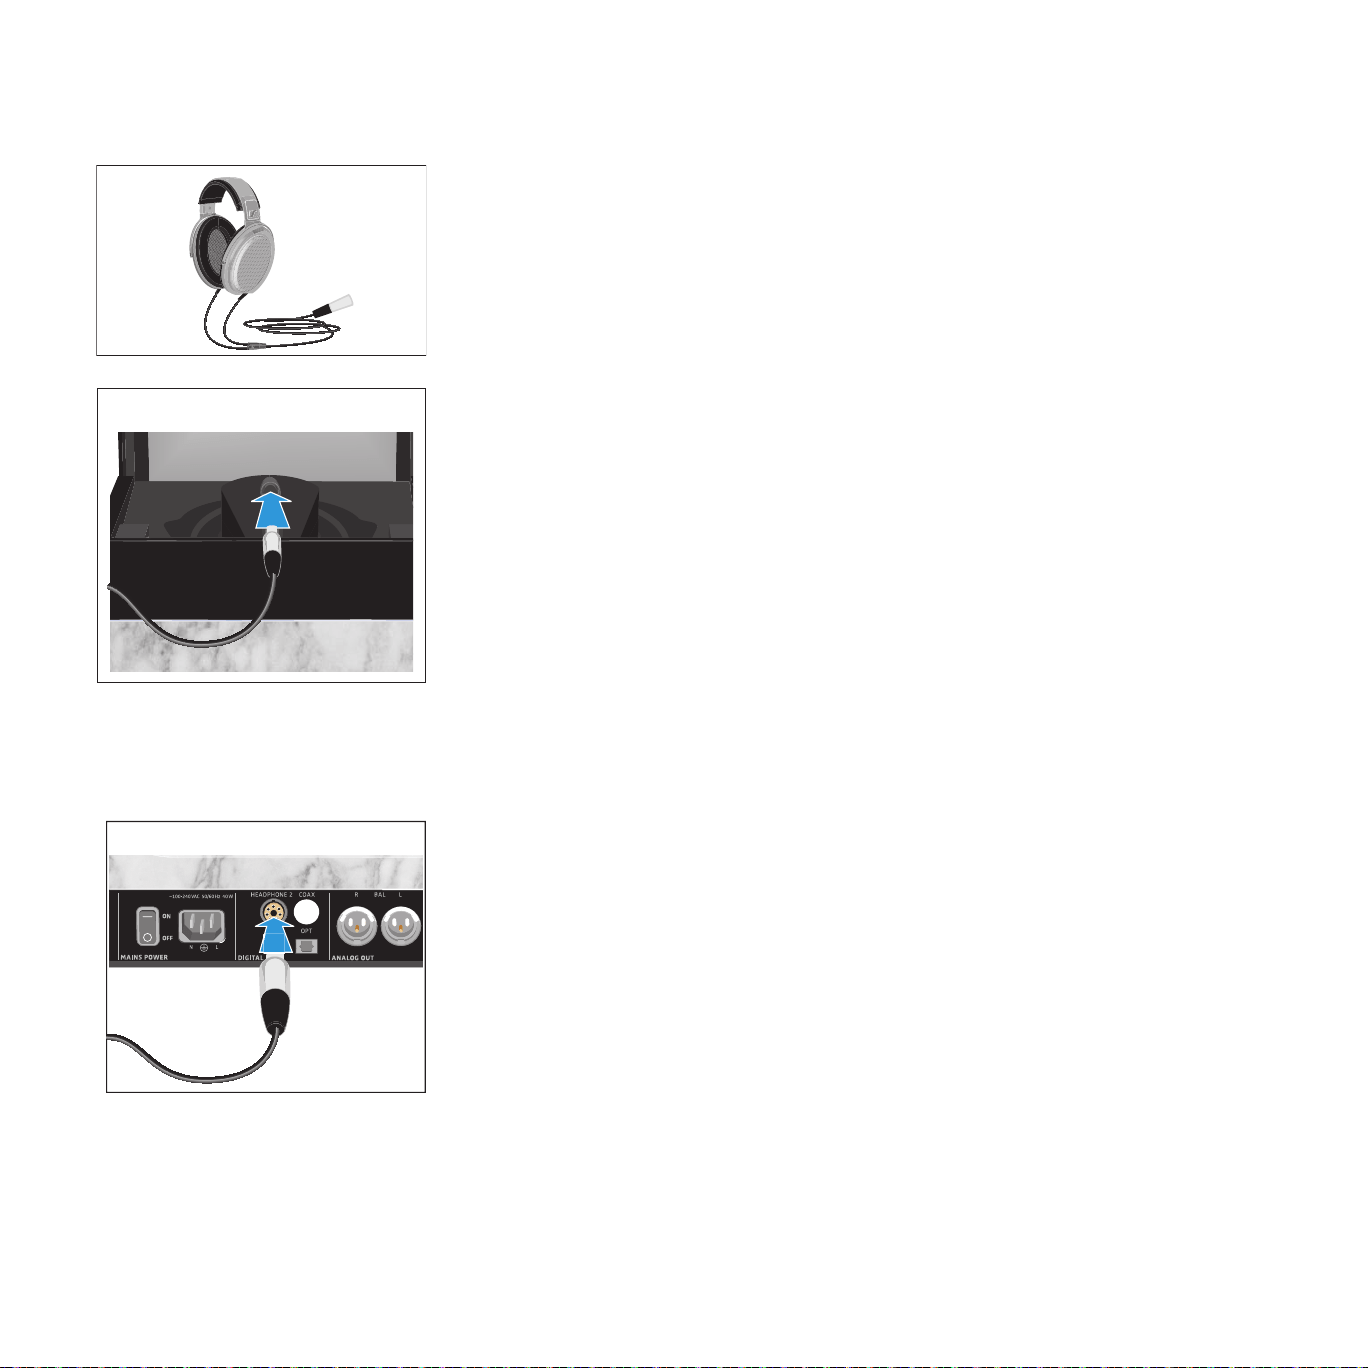
Connecting headphones
You can connect up to two Sennheiser HE 1-HP electrostatic headphones to
the tube headphone amplier. The volume setting and the selected audio input
apply to both headphones.
Connecting headphones
▷ If necessary, open the glass cover of the BOX 1 storage box (see
page 39).
▷ Connect the connector of the headphones to the HEADPHONE 1 socket of
the amplier. Make sure that the connector ts properly into the socket.
Connecting an additional pair of headphones
An additional pair of Sennheiser HE 1-HP electrostatic headphones is
optionally available.
▷ Connect the connector of the headphones to the HEADPHONE 2 socket of
the amplier. Make sure that the connector ts properly into the socket.
HEADPHONE 1
HEADPHONE 2
31
Using the HE 1 | Putting on the headphones
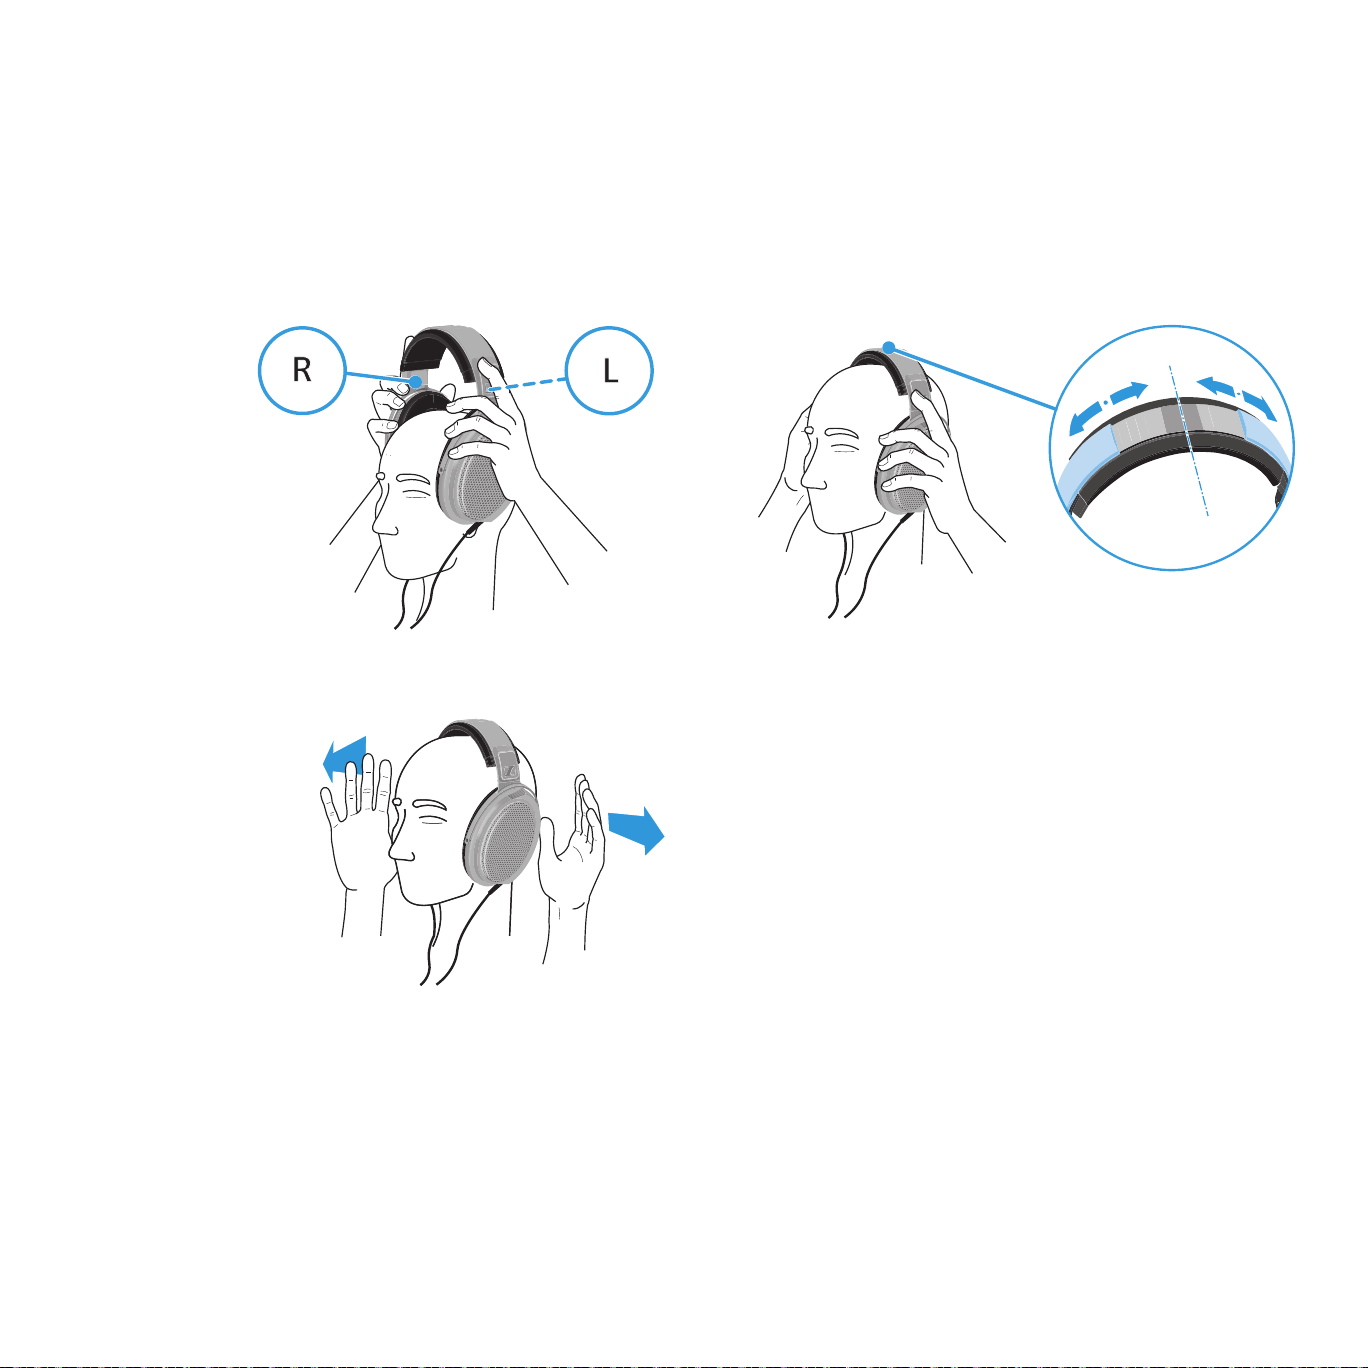
Putting on the headphones
▷ Put on your headphones and then pull the ear cups down until they rest
comfortably over the ears. Make sure you wear them the right way round
by observing the R (right) and L (left) markings on the ear cup bands.
▷ For optimum sound quality, ensure that the ear cups are not covered.
32
Using the HE 1 | Selecting the INPUT audio inputs
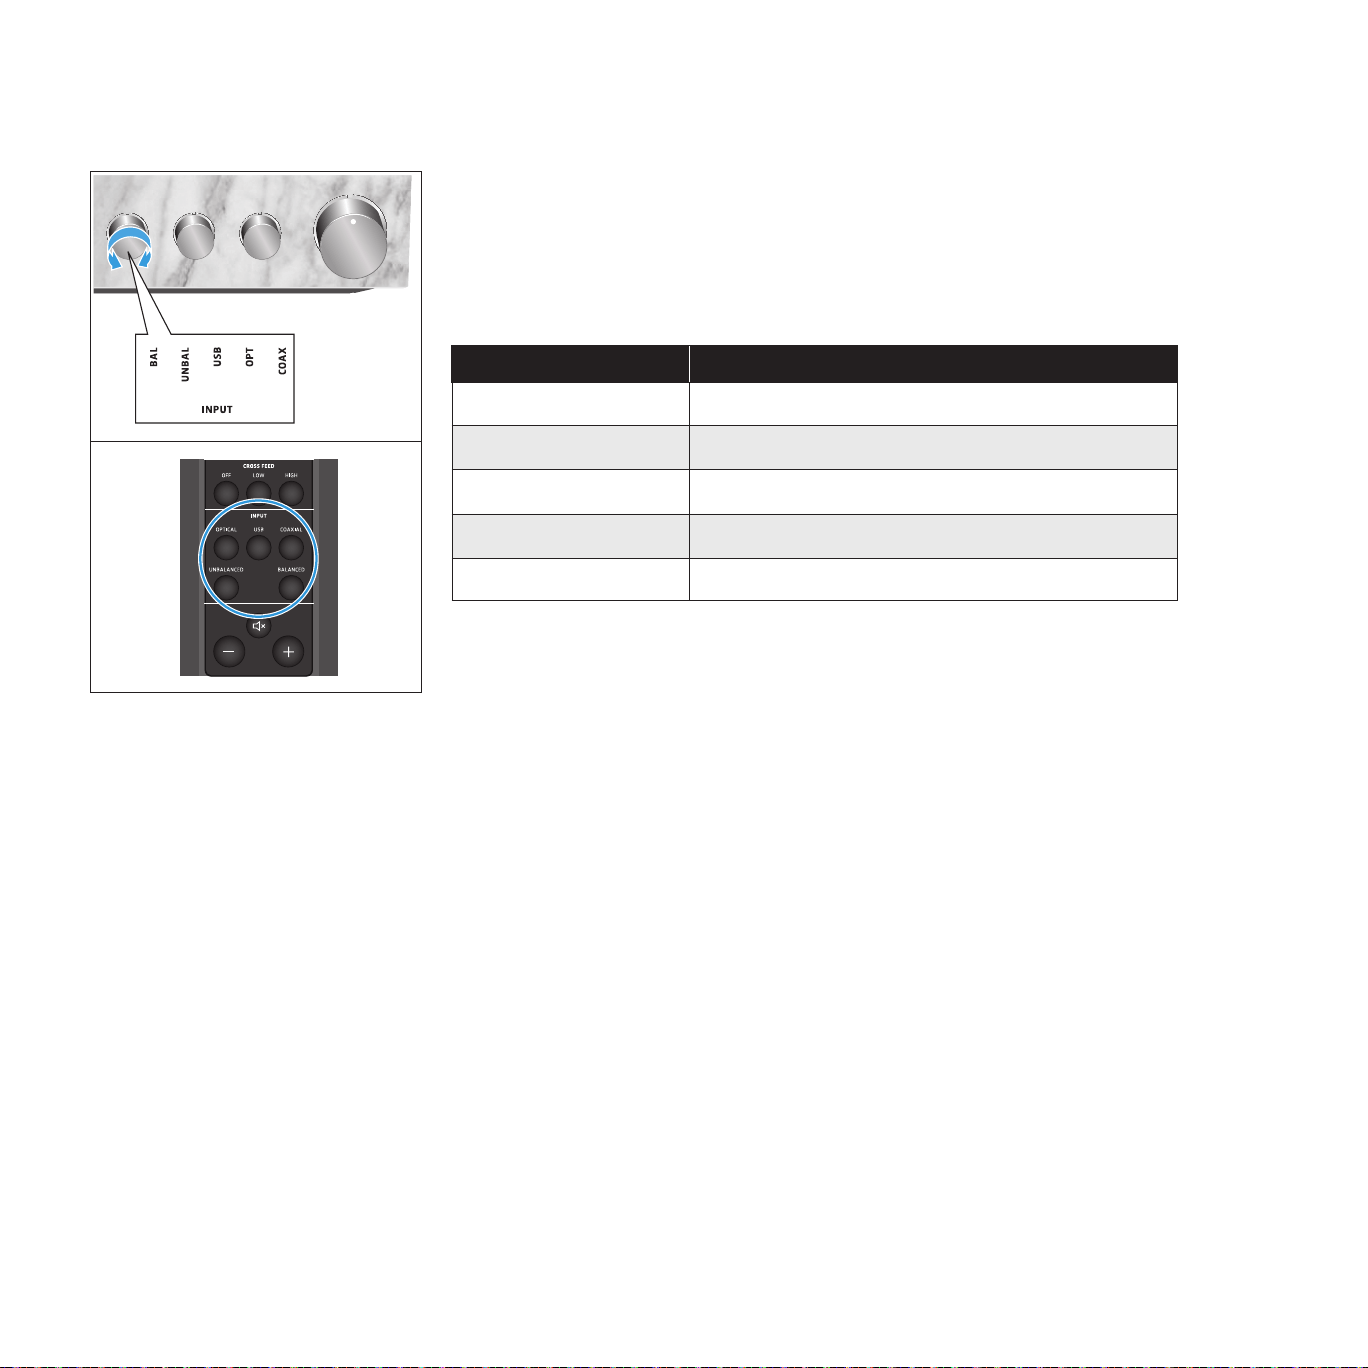
Selecting the INPUT audio inputs
▷ Turn the INPUT rotary switch until the desired audio source points to the
marking.
Or:
▷ Press the INPUT button on the remote control.
INPUT audio inputs Selected input on the headphone amplier
BALANCED / BAL XLR-3 (analog)
UNBALANCED / UNBAL RCA (analog)
USB / USB USB (digital)
OPTICAL / OPT Optical (digital)
COAXIAL / COAX Coaxial (digital)
INPUT
CROSS FEED
OUTPUT
USB COAXIALOPTICAL
BALANCEDUNBALANCED
LOW HIGHOFF
LINEPHONES
BOX CONTROL
BOX 2 O/CBOX 1 O/C
33
Using the HE 1 | Adjusting the signal levels of the INPUT audio inputs
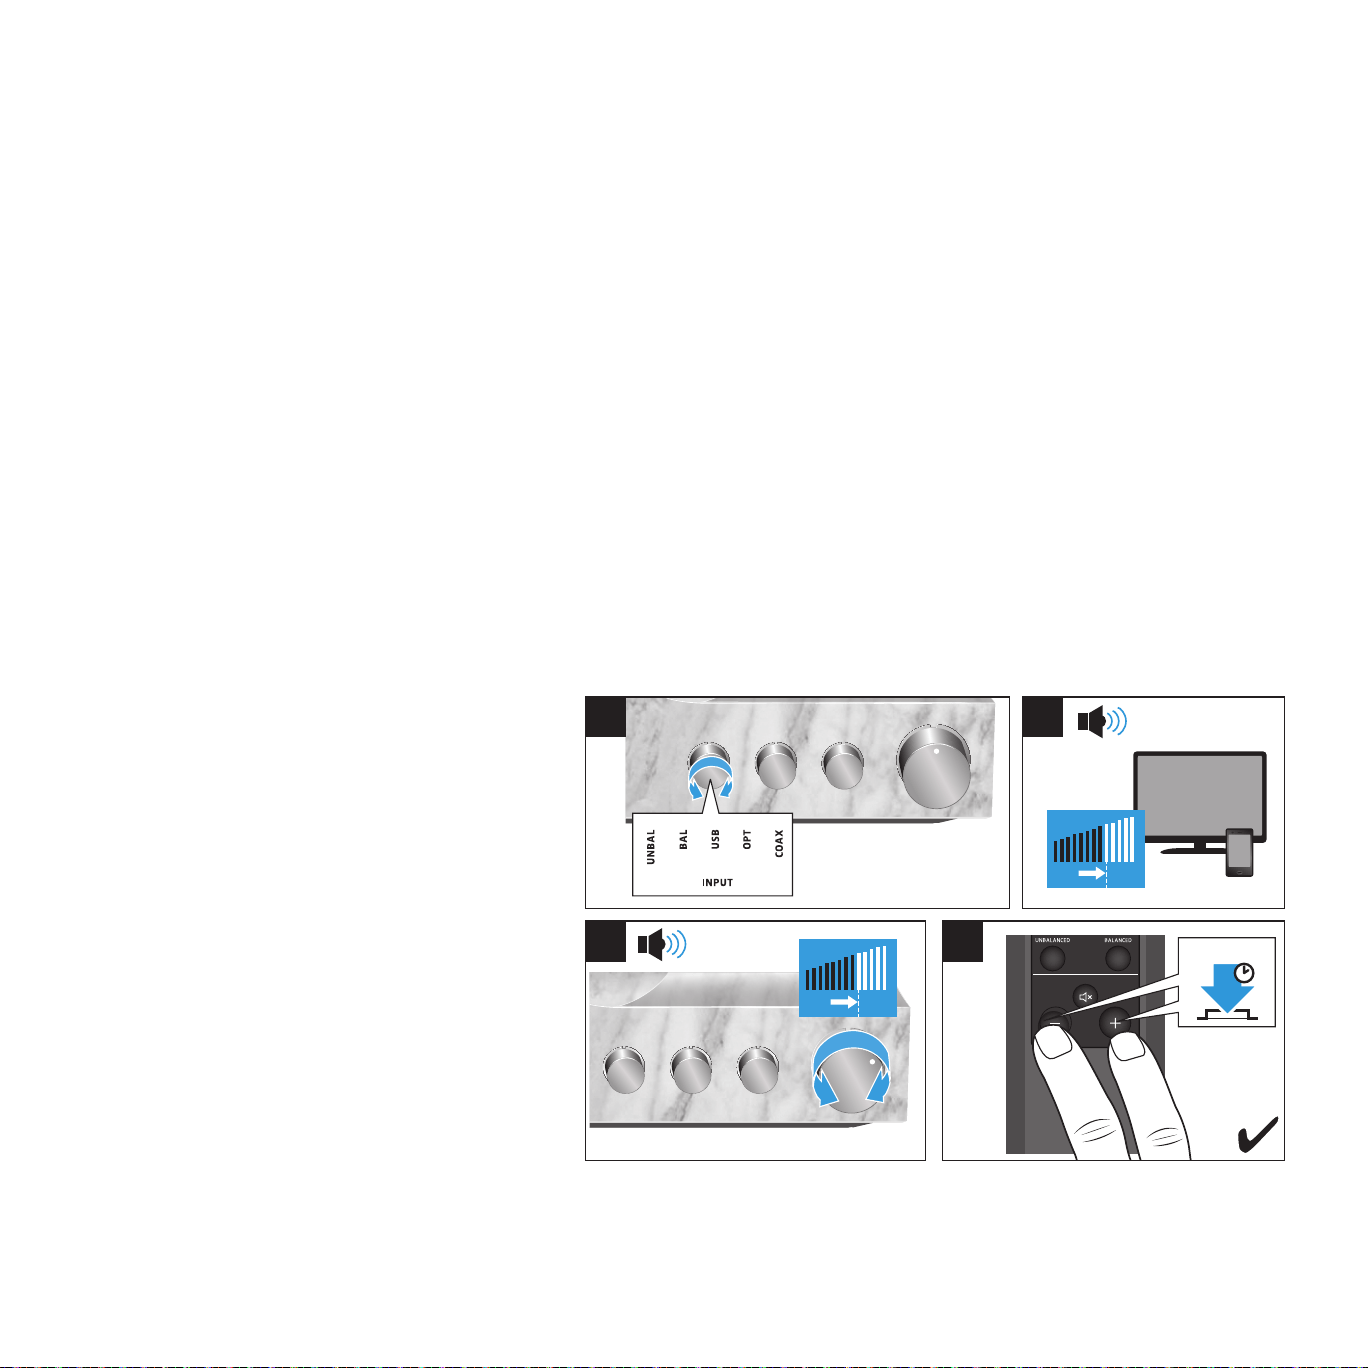
Adjusting the signal levels of the INPUT audio inputs
Depending on the device used or your listening preferences, you can adjust the
volume/signal levels of the audio inputs so that e.g. all devices used with the
HE 1 are reproduced at the same volume. This allows you to use the complete
adjustment range of the volume control for all audio inputs.
1 Select the desired INPUT audio source and start playing music from the
selected device.
2. If your selected device is tted with an adjustable output (e.g. headphone
output), adjust the output volume to at least a medium level.
3. Adjust the listening volume on the HE 1 to a medium level that is
comfortable for you. This volume level becomes the reference level for the
center position of the volume control.
4 Press and hold the - button and the + button on the remote control for
2 seconds.
The status LED ashes green. The signal level for the audio input is stored.
The volume control automatically returns to the center position so that you
can use the complete volume range for the selected device.
2
INPUT
CROSS FEED
OUTPUT
USB COAXIALOPTICAL
BALANCEDUNBALANCED
LOW HIGHOFF
LINEPHONES
BOX CONTROL
BOX 2 O/CBOX 1 O/C
2 s
4
I
3
1
3
2
4
34
Using the HE 1 | Using the crossfeed function
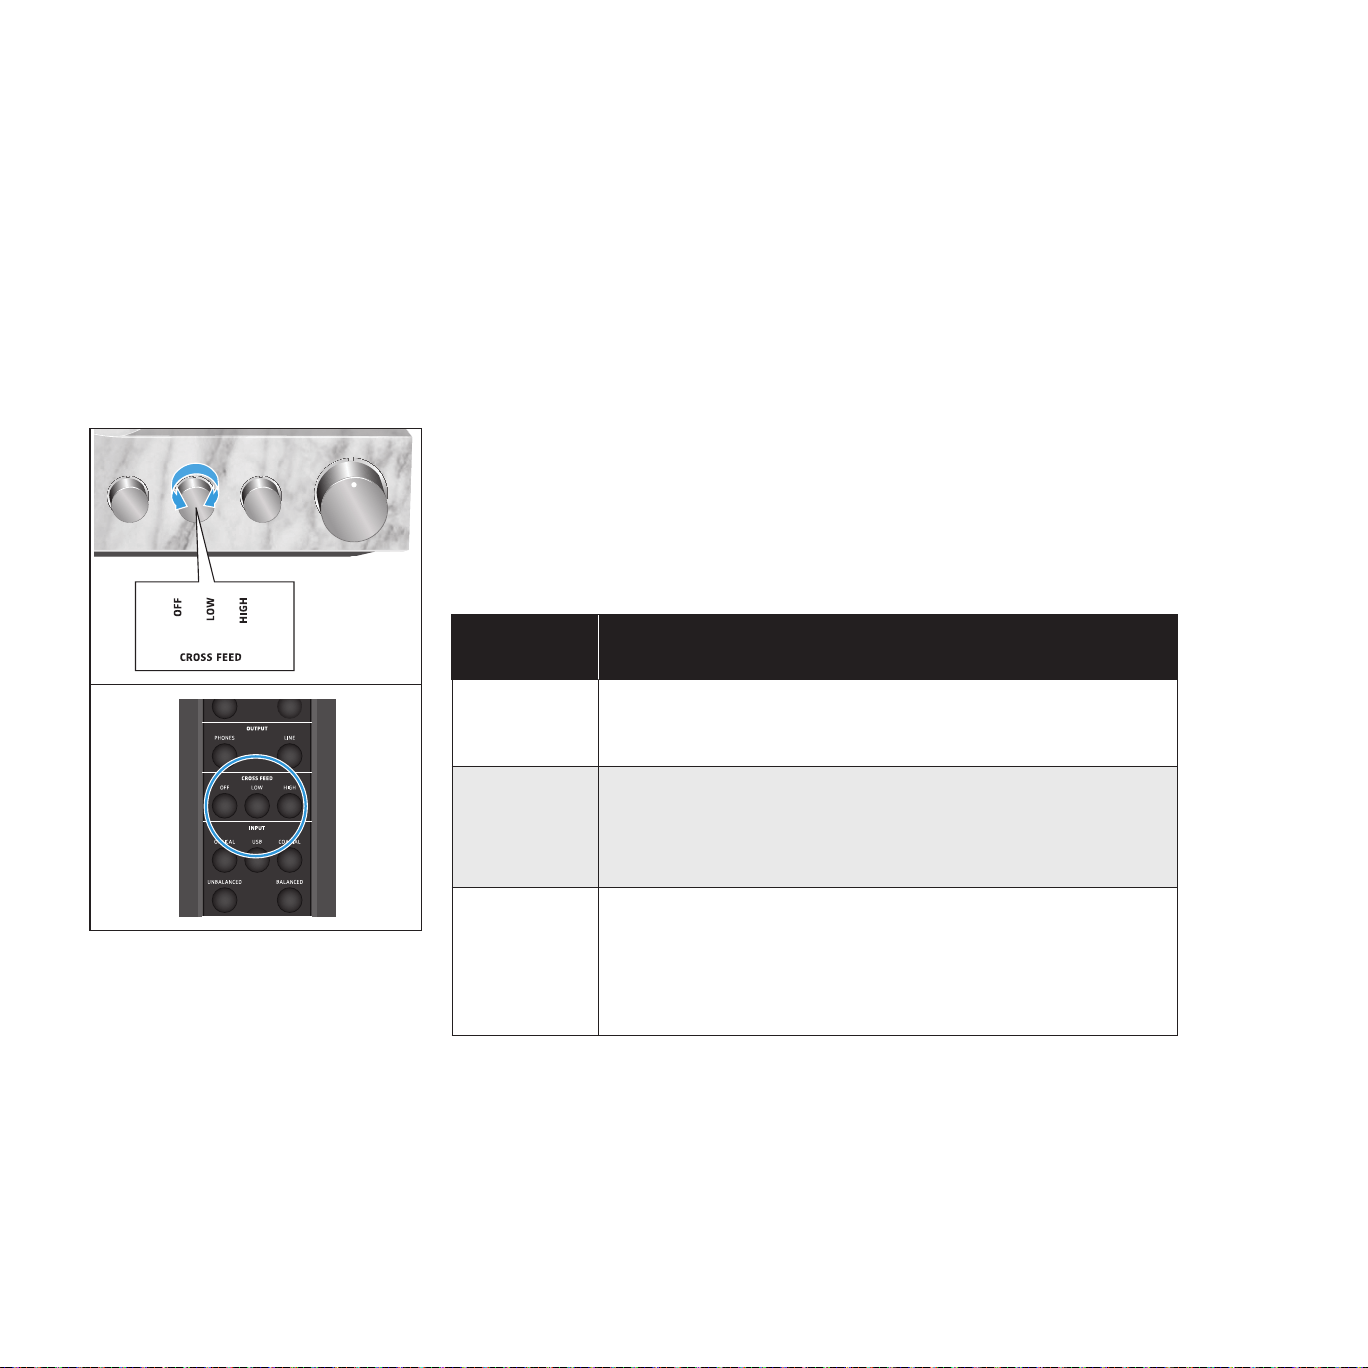
Using the crossfeed function
With certain recordings, the bass portion of the music signal is hard-panned to
just one of the stereo channels. Some people will nd such recordings tiring to
listen to using headphones.
This effect can be minimized by activating the crossfeed function of the HE
1. The crossfeed function feeds the bass portion of the music signal to both
the right and left stereo channel, thus helping to alleviate excessive stereo
separation. This function is only intended for use with headphones. The LINE
output remains unchanged.
▷ Turn the CROSS FEED rotary switch until the desired setting points to the
marking.
Or:
▷ Press the desired CROSS FEED function button on the remote control.
CROSS FEED
rotary switch
Function
OFF
The crossfeed function is deactivated.
The music recording is reproduced unchanged.
LOW
The crossfeed function is activated, the crossfeed intensity
level is low.
The bass portion of the music signal is fed to both the right
and left stereo channel.
HIGH
The crossfeed function is activated, the crossfeed intensity
level is high.
The bass portion of the music signal is fed to both the right
and left stereo channel and is boosted slightly.
INPUT
CROSS FEED
OUTPUT
USB COAXIALOPTICAL
BALANCEDUNBALANCED
LOW HIGHOFF
LINEPHONES
BOX CONTROL
35
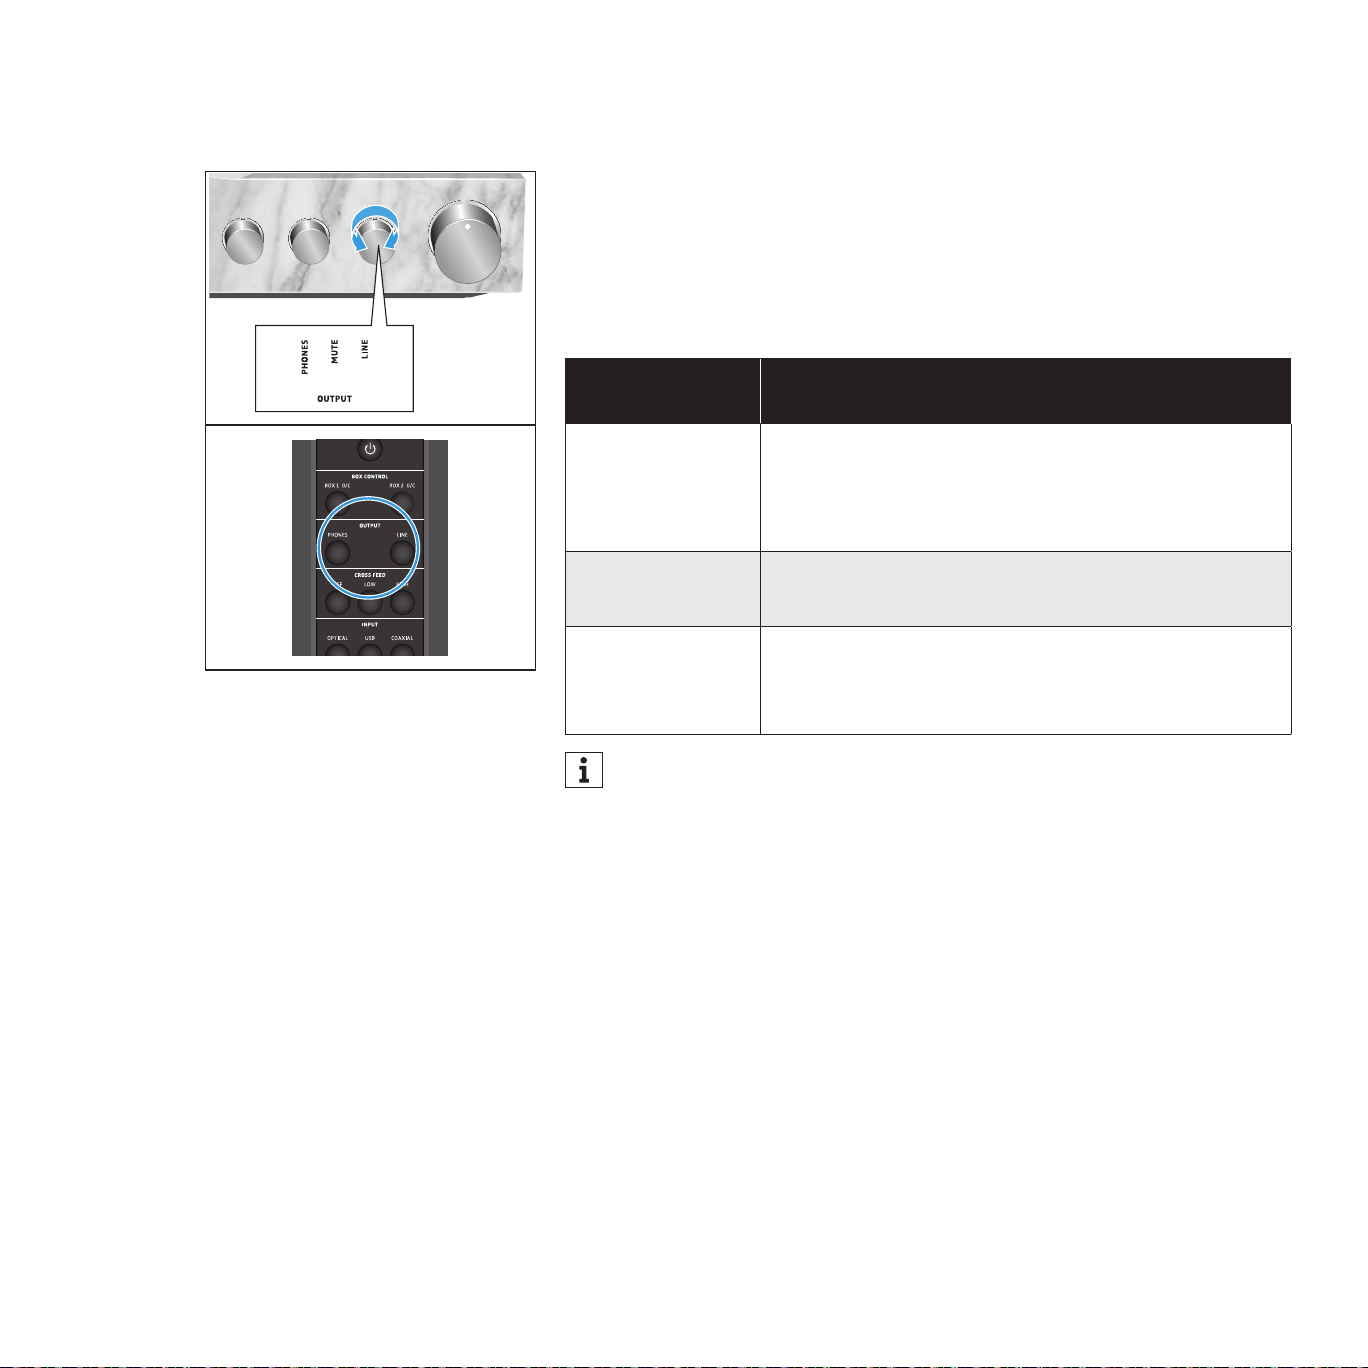
Using the HE 1 | Selecting the OUTPUT audio output
Selecting the OUTPUT audio output
▷ Turn the OUTPUT rotary switch until the desired audio output points to the
marking.
Or:
▷ Press the desired OUTPUT function button on the remote control.
OUTPUT audio
output
Selected output on the tube headphone amplier
PHONES
The HE 1-HP electrostatic headphones are selected as
the audio output. The headphones are connected to the
HEADPHONE 1 socket and/or the HEADPHONE 2 socket.
MUTE The audio is muted. The status LED pulses.
LINE
A power amplifier or active loudspeakers are selected
as the audio output. The devices are connected to the
ANALOG OUT sockets.
If the OUTPUT audio output is set to LINE, the headphone storage box
remains closed when the HE 1 is switched on. In this case, open the
storage box manually (see page 39).
INPUT
CROSS FEED
OUTPUT
USB COAXIALOPTICAL
BALANCEDUNBALANCED
LOW HIGHOFF
36
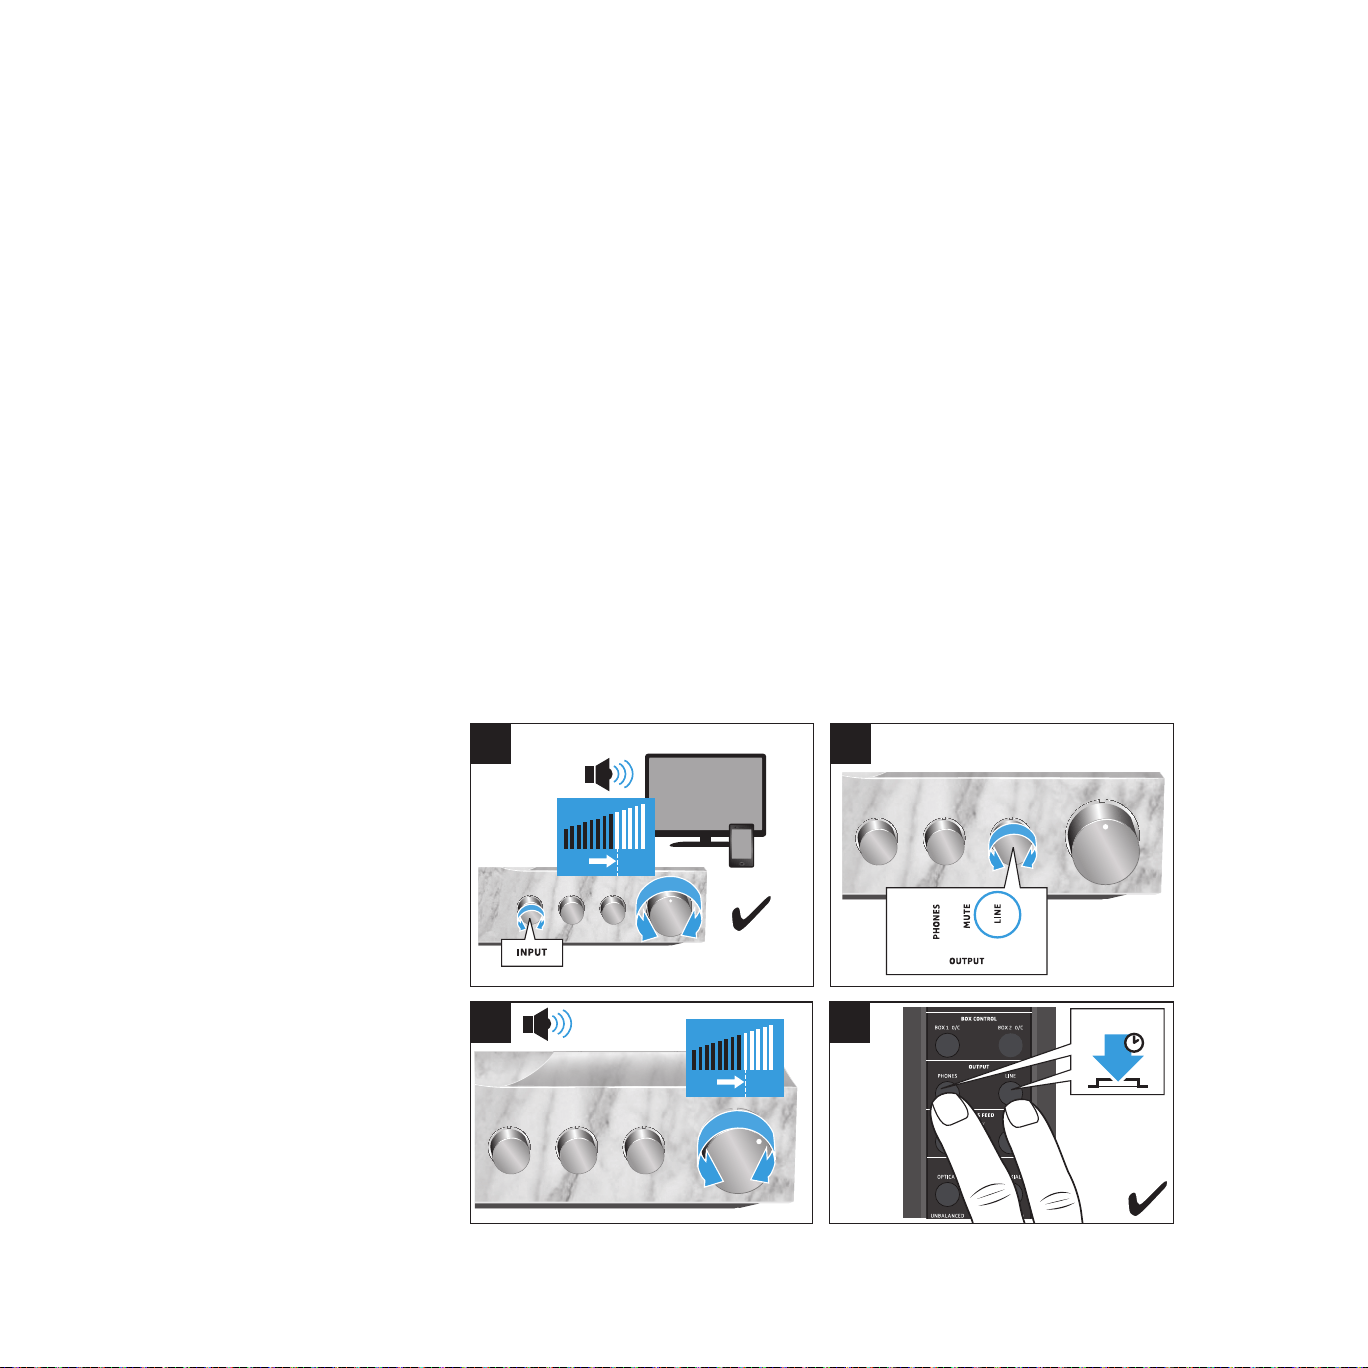
Using the HE 1 | Adjusting the signal levels of the OUTPUT audio outputs
Adjusting the signal levels of the OUTPUT audio
outputs
You can increase or reduce the audio output level depending on the power
amplier or the active loudspeakers used. Thus, the complete adjustment
range of the HE 1 volume control is maintained and perfectly adjusted to the
devices used.
1 Make sure that the signal levels of the INPUT audio inputs are correctly
adjusted (see page 33).
2. Set the OUTPUT rotary switch to LINE and start playback.
3. Adjust the volume on the HE 1 to a medium level that is comfortable for
you and suitable for your power amplier or the active loudspeakers used.
This volume level becomes the reference level for the center position of the
volume control.
4 Press and hold the PHONES button and the LINE button on the remote
control for 2 seconds.
The status LED ashes green. The signal level for the audio inputs is stored.
The volume control automatically returns to the center position so that you
can use the complete volume range.
INPUT
CROSS FEED
OUTPUT
USB COAXIALOPTICAL
BALANCEDUNBALANCED
LOW HIGHOFF
LINEPHONES
2 s
4
I
3
1
3 4
2
2
I
OutputInput
37
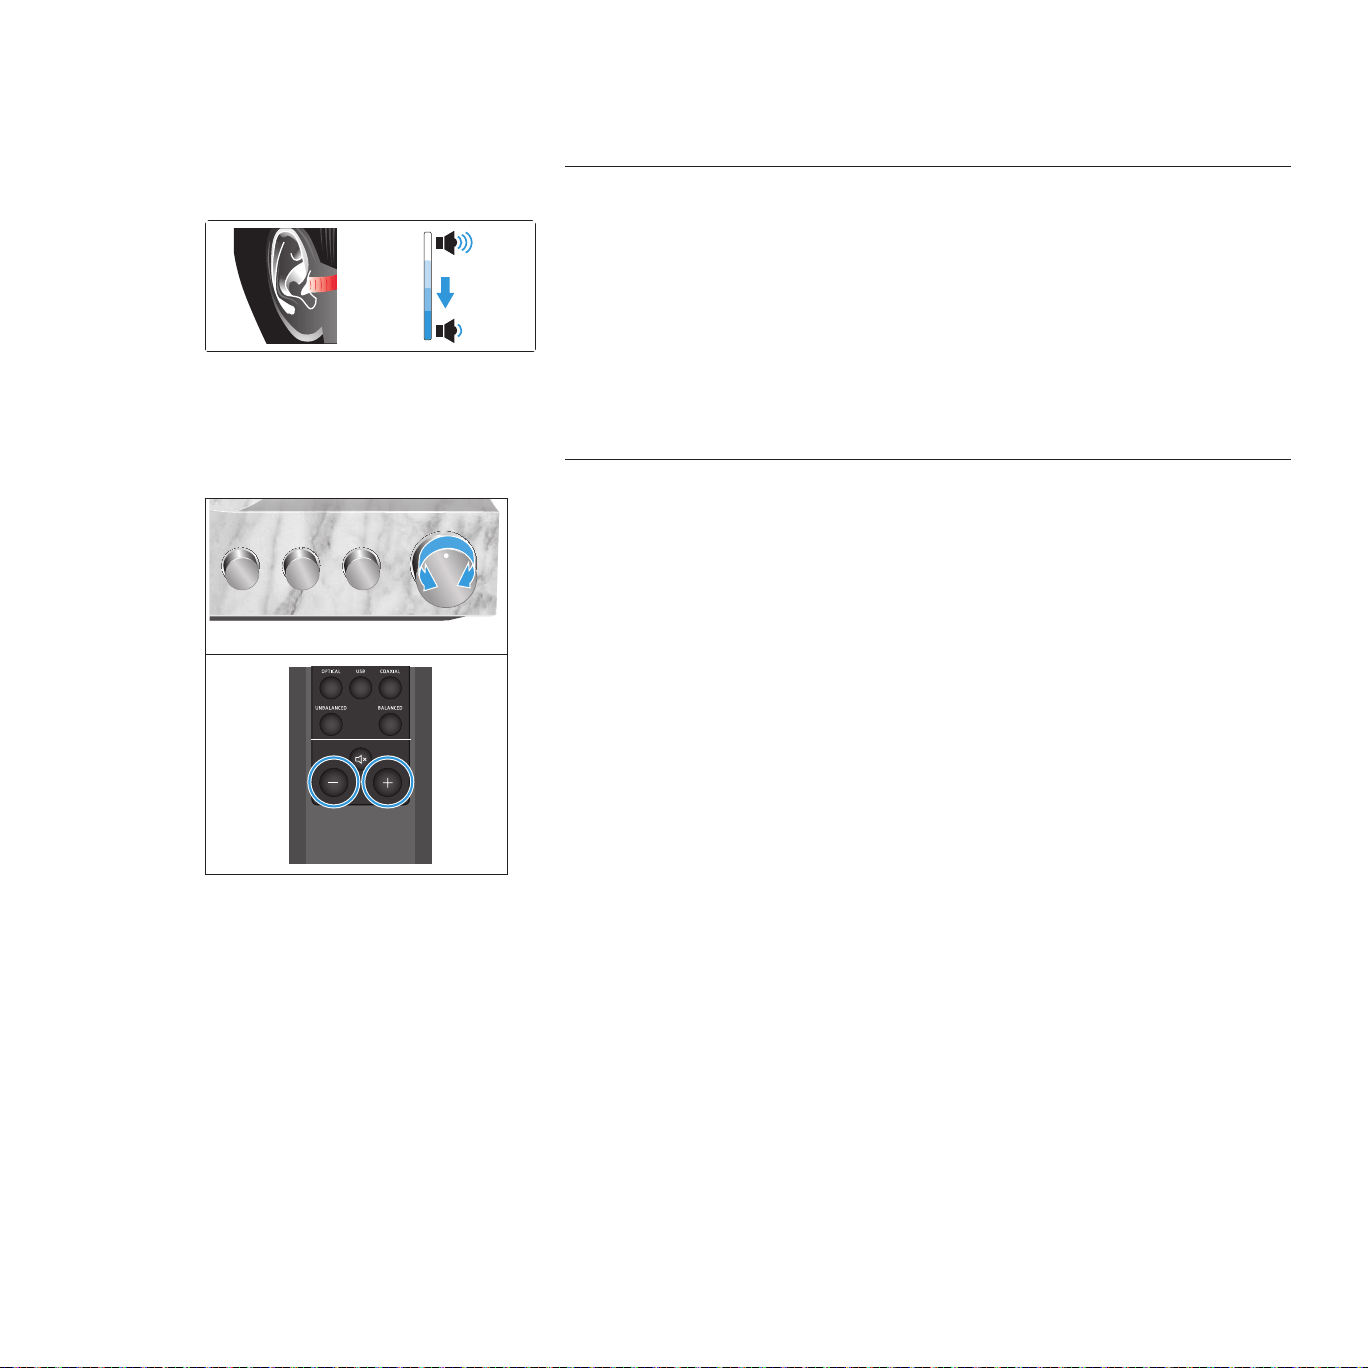
Using the HE 1 | Adjusting the volume
Adjusting the volume
CAUTION
Danger of hearing damage!
Listening at high volume levels for long periods of time can lead to permanent
hearing defects. Toggling between the audio sources may cause enormous
volume jumps that can permanently damage your hearing.
▷ Before putting the headphones on and before switching between audio
sources, adjust the volume to a low level.
▷ Do not continuously expose yourself to high volume levels.
▷ Use the volume control to adjust the desired volume.
Or:
▷ Press the - button or the + button on the remote control until the desired
volume is reached.
The volume setting applies to both the headphones (PHONES) and the audio
outputs (LINE). If you have connected two headphones to the headphone
amplier, the volume setting applies to both headphones. The volume/signal
levels of the INPUT audio input and OUTPUT audio outputs can be adjusted
individually (see page 33 and 36).
Vol +
Vol -
HE 1 erstellt von Vincent
INPUT
CROSS FEED
OUTPUT
USB COAXIALOPTICAL
BALANCEDUNBALANCED
LOW HIGHOFF
LINEPHONES
BOX CONTROL
BOX 2 O/CBOX 1 O/C
Vol +
Vol –
Vol +
Vol –
38
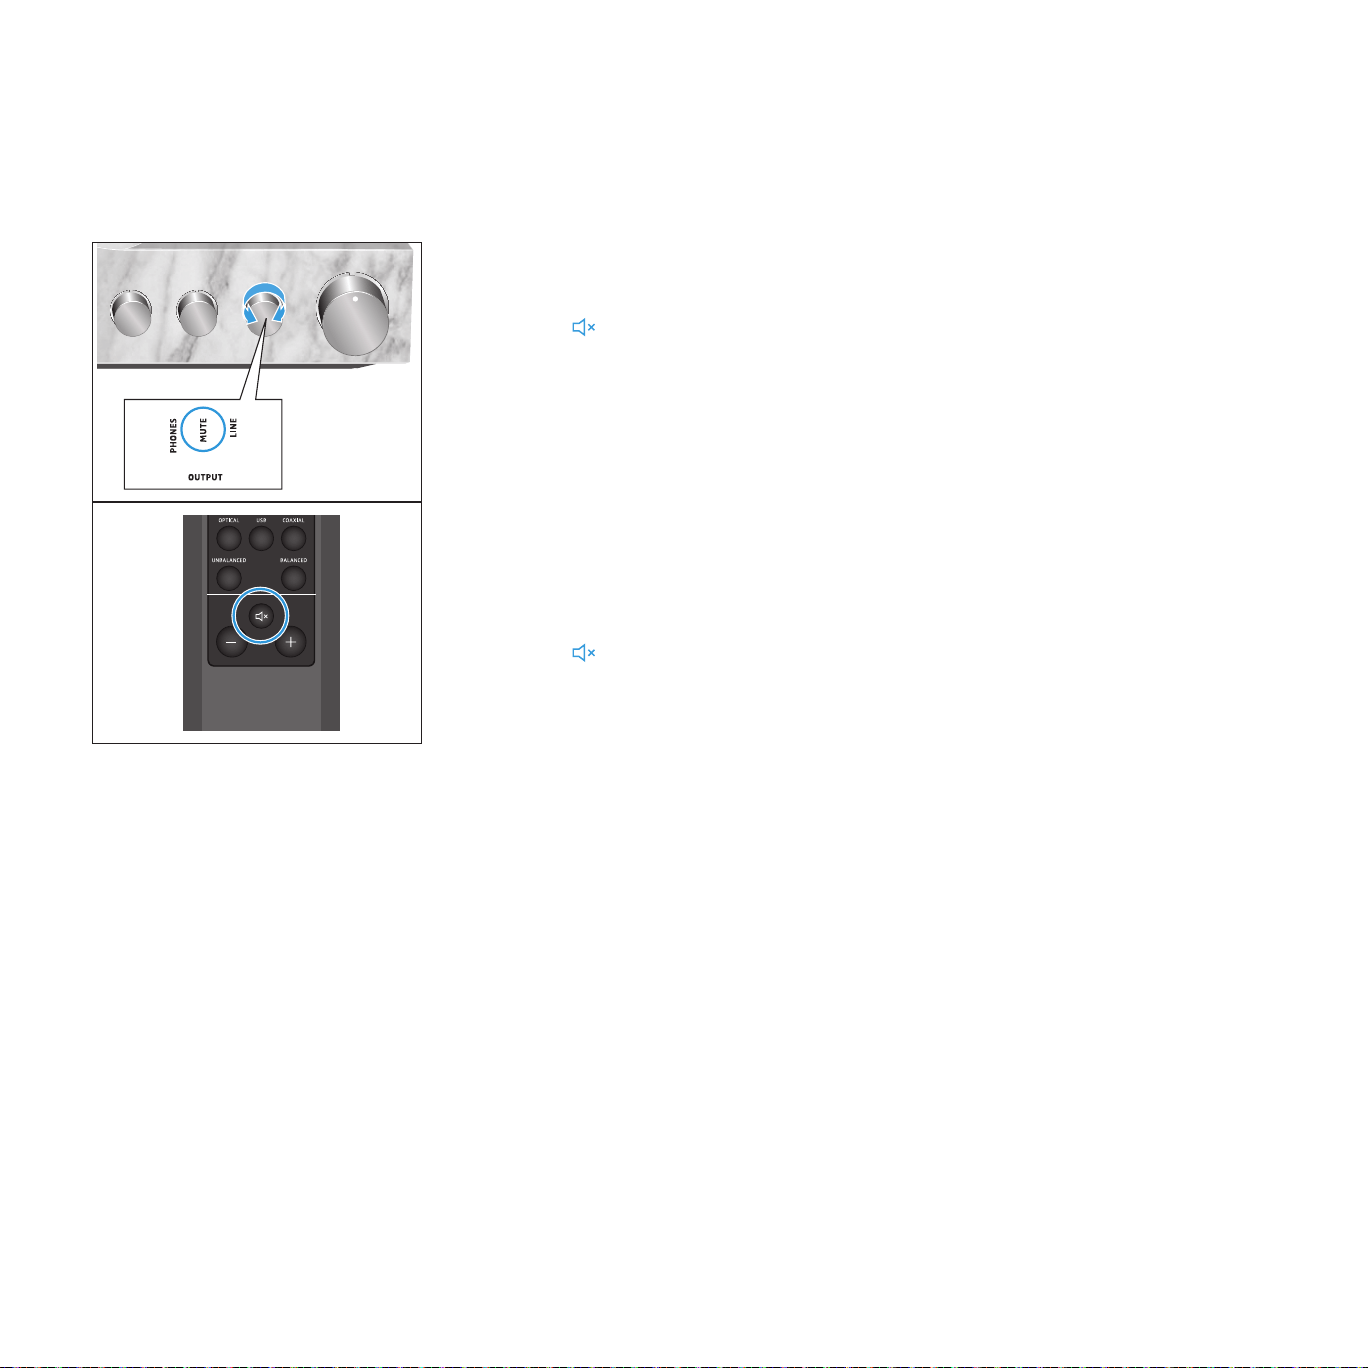
Using the HE 1 | Muting the audio
Muting the audio
You can mute the headphones and the audio outputs of the tube headphone
amplier:
▷ Turn the OUTPUT rotary switch until MUTE points to the marking.
Or:
▷ Press the button on the remote control.
The audio is muted. The status LED pulses.
To cancel the muting:
▷ Change the volume (see page 37).
Or:
▷ Turn the OUTPUT rotary switch back to the desired output.
Or:
▷ Press the button on the remote control again or press the desired
OUTPUT audio output on the remote control.
INPUT
CROSS FEED
OUTPUT
USB COAXIALOPTICAL
BALANCEDUNBALANCED
LOW HIGHOFF
LINEPHONES
BOX CONTROL
BOX 2 O/CBOX 1 O/C

39
Using the HE 1 | Opening/closing the headphone storage box
Opening/closing the headphone storage box
The BOX 1 headphone storage box and the optional separate BOX 2 storage
box open automatically during switch-on and close automatically during
switch-off of the tube headphone amplier.
To open or close the glass cover of the BOX 1 or BOX 2 storage box during
operation:
▷ Press the BOX 1 O/C button or the BOX 2 O/C button on the remote control.
The glass cover opens or closes. If, during closing of the glass cover, the
cable leaves the storage box or the travel of the glass cover is blocked, the
glass cover remains ajar so that e.g. the cable does not get clamped.
If the OUTPUT audio output is set to LINE, the headphone storage boxes
remain closed when the HE 1 is switched on.
INPUT
USB COAXIALOPTICAL
BALANCEDUNBALANCED
INPUT
CROSS FEED
OUTPUT
USB COAXIALOPTICAL
BALANCEDUNBALANCED
LOW HIGHOFF
LINEPHONES

40
Cleaning and maintaining the HE 1
Cleaning and maintaining the HE 1
CAUTION
Liquids can damage the electronics of the product!
Liquids entering the housing of the product can cause a short-circuit and
damage the electronics.
▷ Keep all liquids far away from the product.
▷ Do not use any solvents or cleansing agents.
▷ Clean the product only with a dry and soft microber cloth (supplied).
41
Servicing the HE 1 | Replacing the ear pads
Servicing the HE 1
We recommend having the product serviced regularly (about every 3 years) to
maintain the perfect sound reproduction of the electrostatic headphones and
the tube headphone amplier. Contact your Sonova Consumer Hearing partner
to arrange for a complete revision and careful refreshment of the product
(see “Contact” on page 4).
By default, servicing includes the replacement of the ear pads, headband
padding and amplier tubes.
The service card inserted in the cover of this instruction manual provides
information on the servicing carried out.
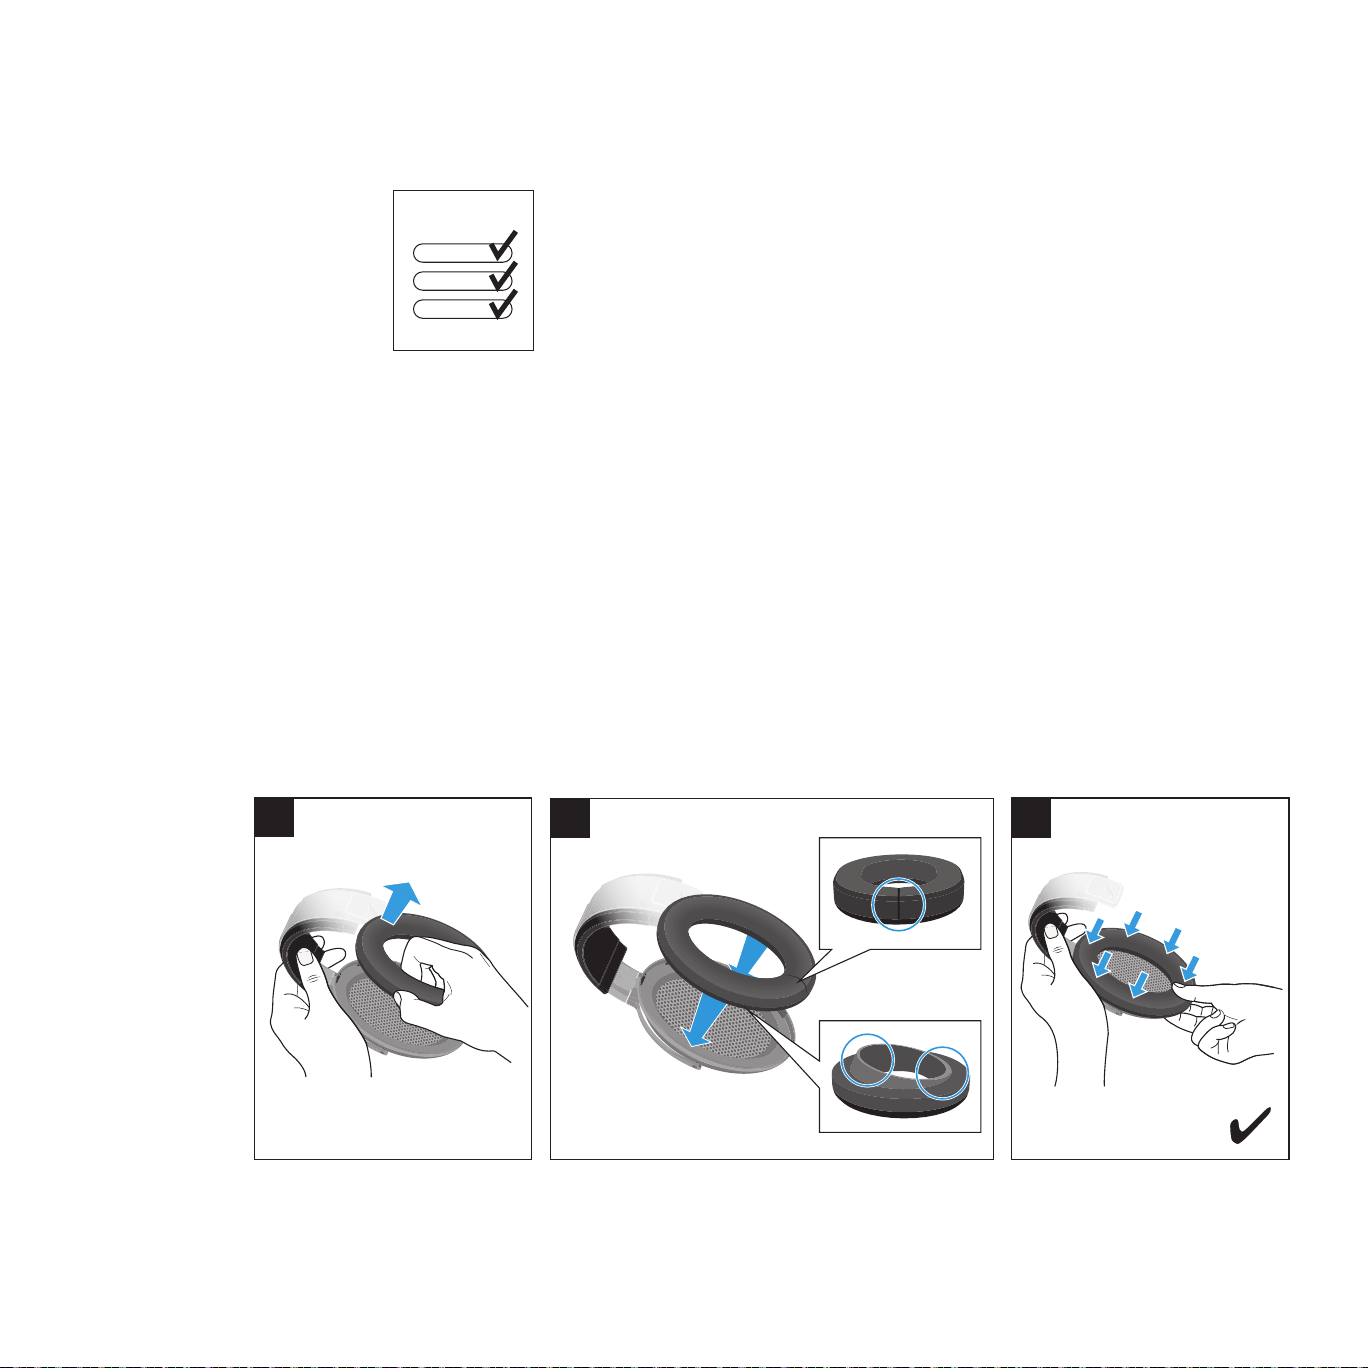
Replacing the ear pads
For reasons of hygiene, you should replace the ear pads from time to time.
1 Grasp behind the ear pad and carefully pull it up and away from the ear
cup.
2. Place the new ear pad onto the ear cup. Observe the orientation of the
circumferential edge and make sure that the seam points downwards.
3. Attach the ear pad to the ear cup by pressing gently around the ear pad
until it locks into place.
HE 1
1
3
2
42
Servicing the HE 1 | Replacing the headband padding
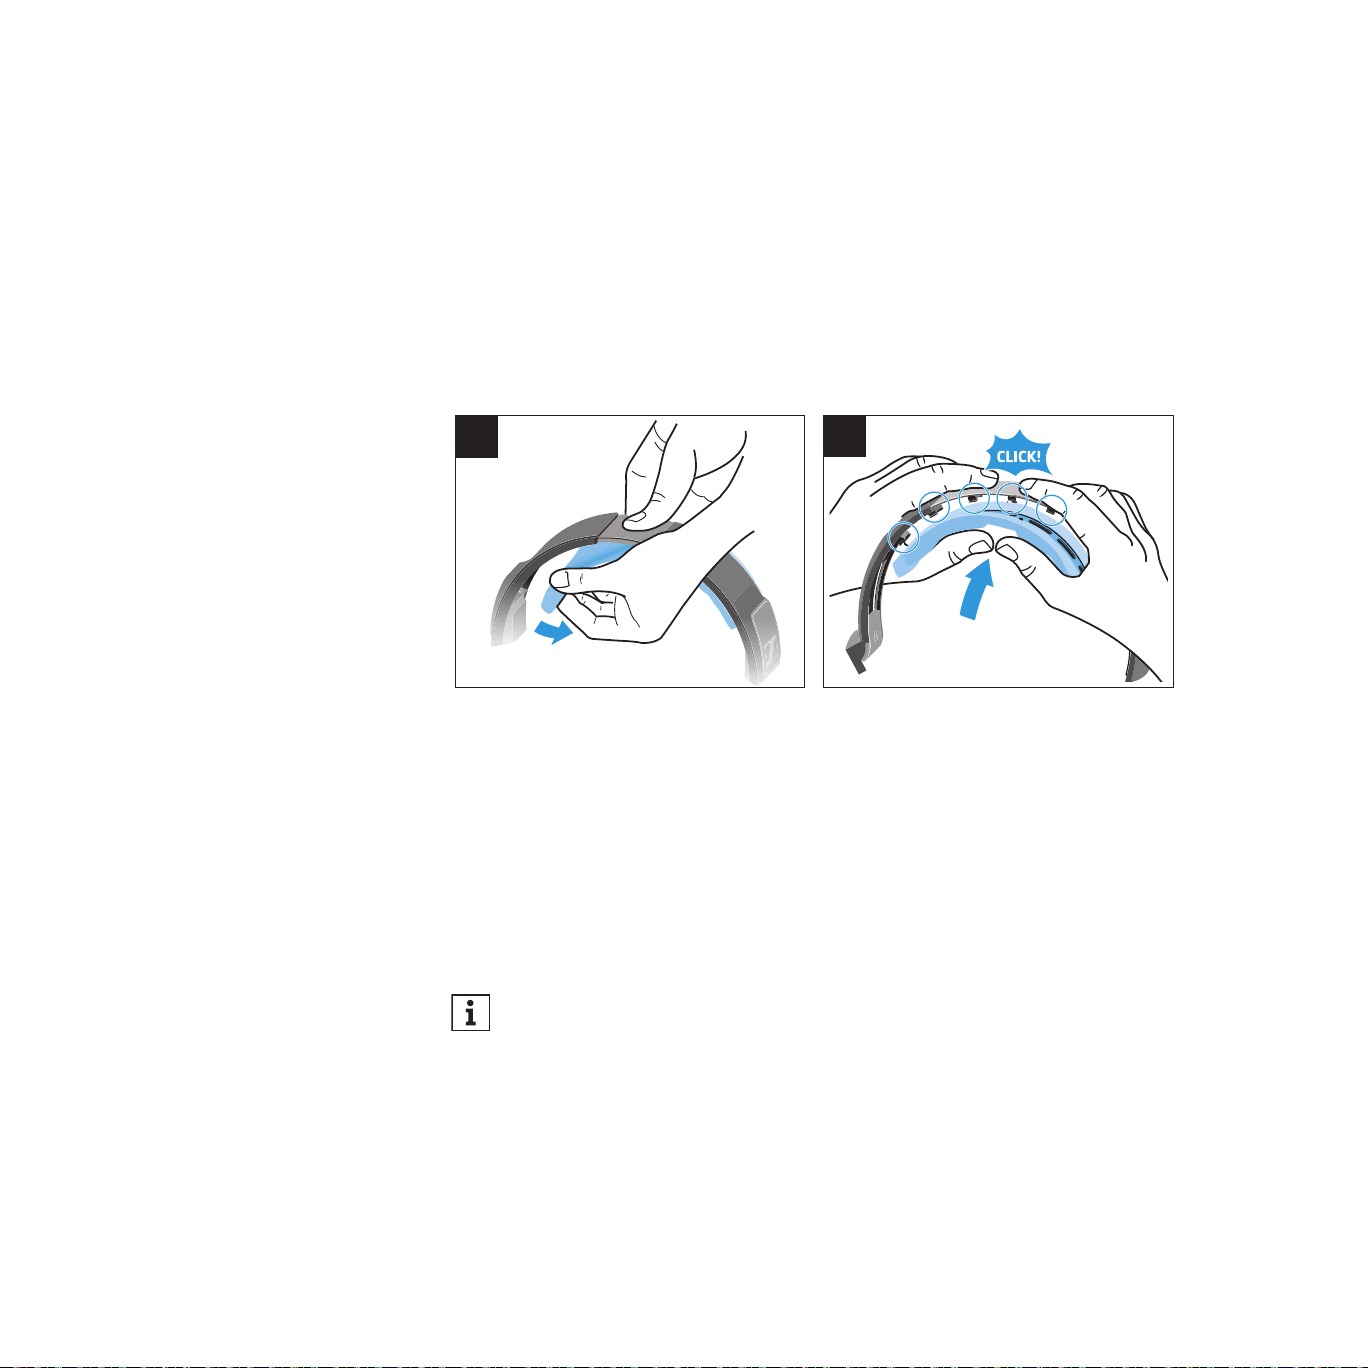
Replacing the headband padding
For reasons of hygiene, you should replace the headband padding from
time to time.
1 Hold the headband rmly in the middle and detach the headband padding
from one side to the other.
2. Place the new headband padding onto the headband and, starting from the
middle and moving outwards, attach it to the headband by pushing on the
latches until they click into place.
2
1
Replacing the amplifier tubes
The amplier tubes are consumable elements. The lifetime of the tubes de-
pends on the type and the duration of use. The amplier’s status LED lights
up orange when tube replacement is required. Always replace all 8 tubes
with new ones. Instructions on tube replacement are enclosed with the tube
replacement set or can be downloaded from the Internet at
www.sennheiser-hearing.com/download.
You can use the amplier even if a tube replacement is required, but be
aware that the sound quality can be reduced.
43
Servicing the HE 1 | Replacing the battery of the BFI 1 remote control
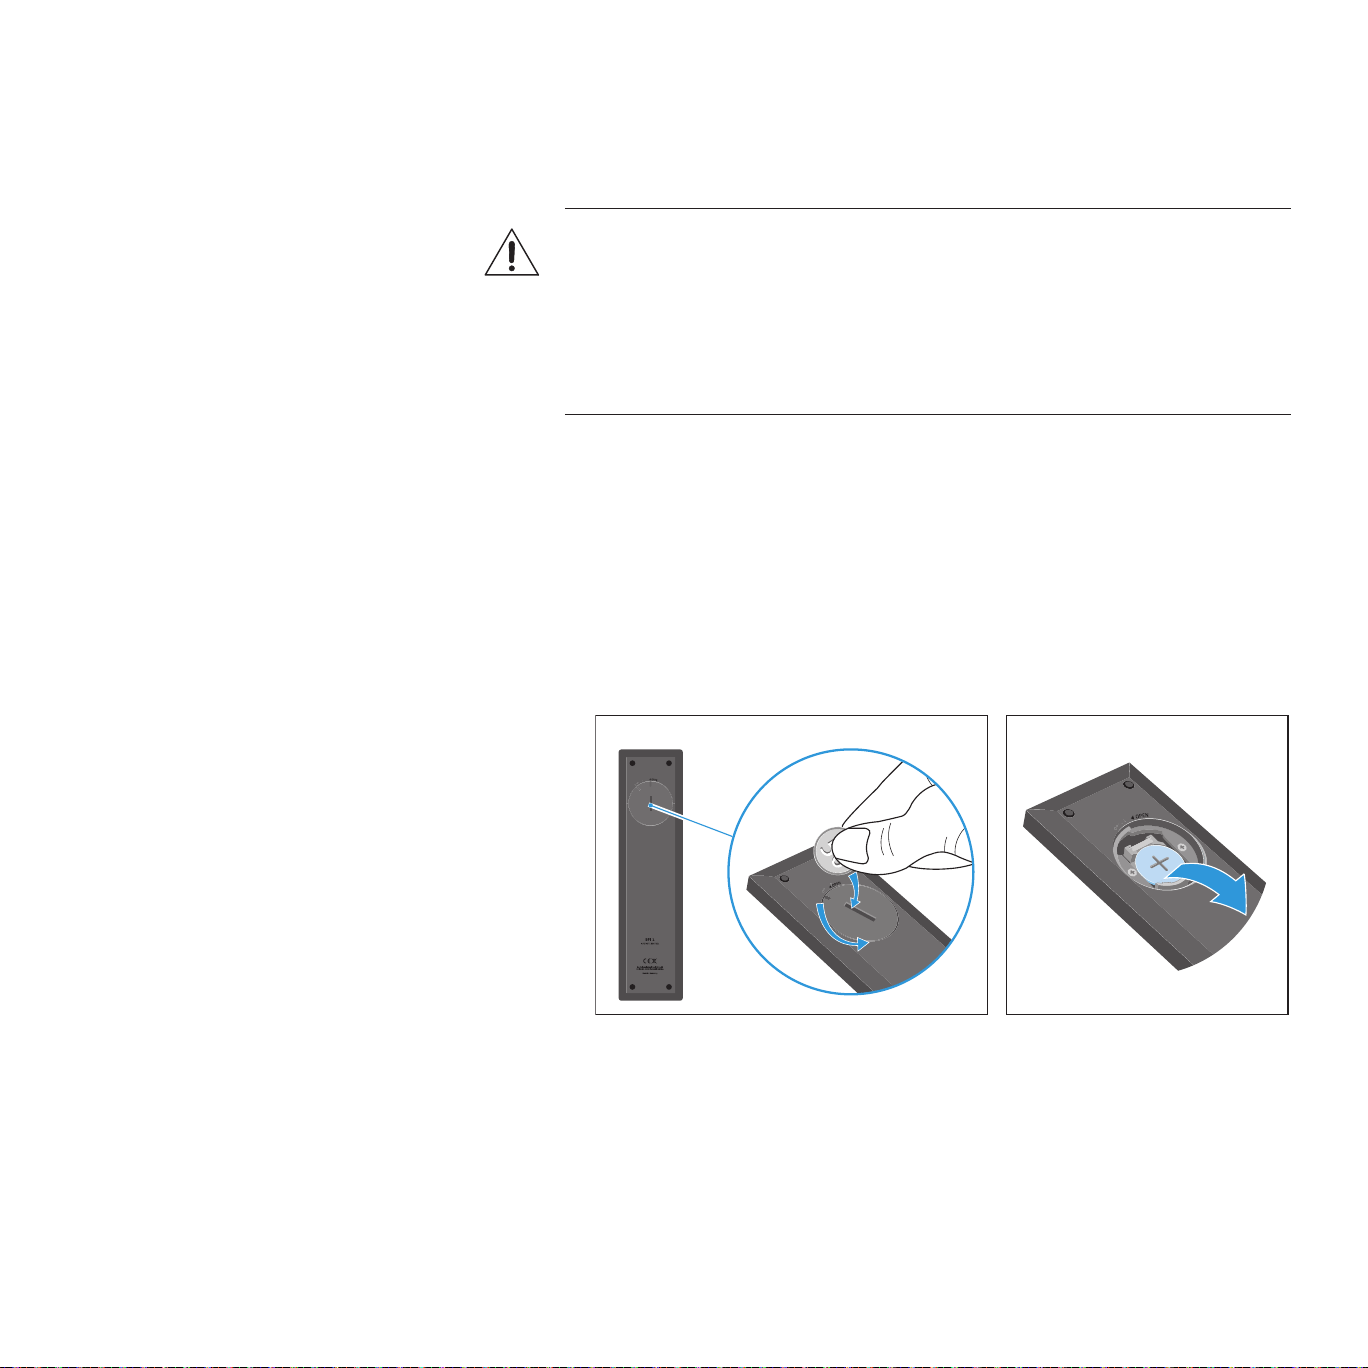
Replacing the battery of the BFI 1 remote control
If the range of the remote control decreases, you have to replace the battery.
CAUTION
Danger of accidents!
Misuse or swallowing of batteries can cause injuries and health problems.
▷ Observe the safety instructions for lithium batteries on page 7.
▷ Keep batteries away from children.
1 Use a suitable object (e.g. a coin) to open the battery compartment cover
by turning one turn counter-clockwise.
2. Remove the used battery. In order to protect the environment, dispose of
used batteries at special collection points or return them to your specialist
dealer.
3. Insert the new battery (type CR2032, 3 V) into the battery compartment.
Observe correct polarity when inserting the battery.
4 Close the battery compartment cover by turning one turn clockwise.
44
Servicing the HE 1 | Calibrating the mechanical components
Calibrating the mechanical components
If the mechanical components of the HE 1 are decalibrated (e.g. the rotary
switches do not switch correctly, the glass cover does not open or close
correctly or the amplier tubes do not extend or retract correctly), it might be
necessary to recalibrate them:
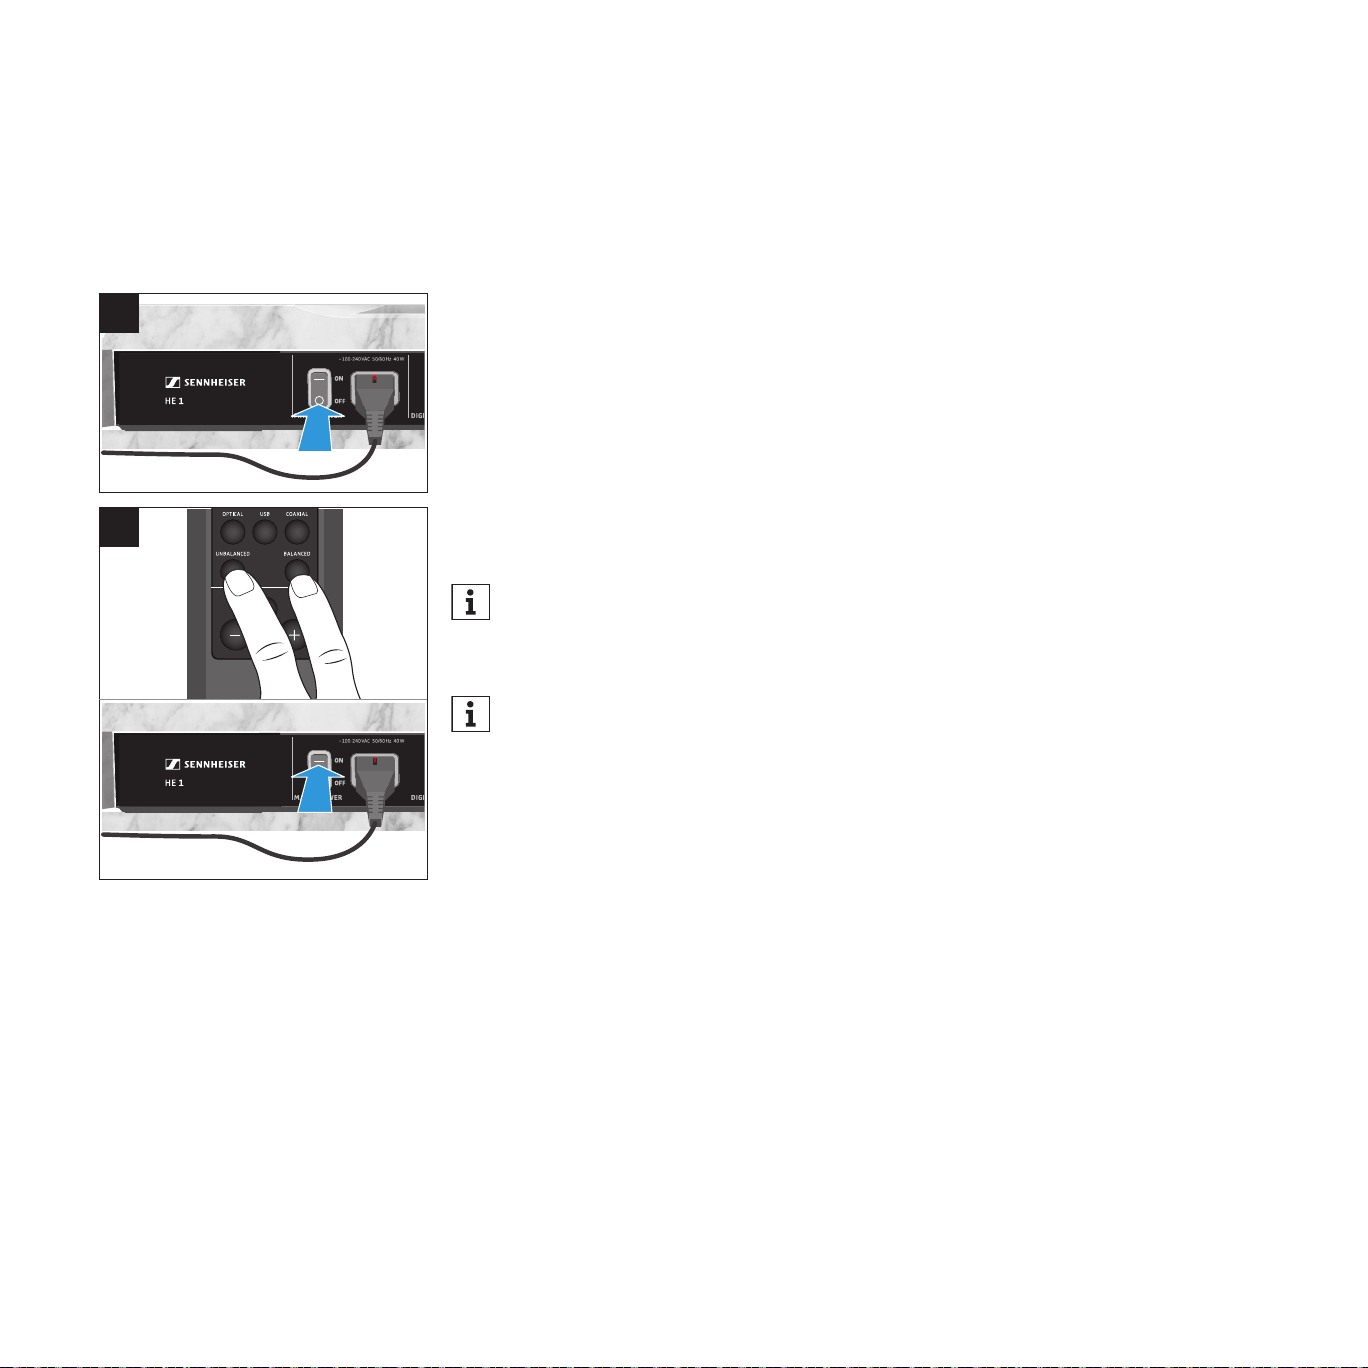
1 Set the power switch to OFF to switch the HE 1 off and wait until the status
LED goes off (up to 30 seconds).
2. Simultaneously press the UNBALANCED and the BALANCED button on the
remote control and then set the power switch to ON to switch the HE 1 on.
The status LED ashes green. The mechanical components are calibrated
(the rotary switches switch through all the settings one after the other, the
glass cover opens and closes, and the operating elements and the amplier
tubes extend and retract). Once the calibration process is completed, the
status LED lights up red. The HE 1 is switched off (standby).
When calibrating the mechanical components, make sure to point the
remote control at the remote control sensor located on the front bottom
of the amplier. Otherwise the amplier switches on normally.
In order to ensure proper functioning of the HE 1, the mechanical
components are automatically calibrated at predetermined time
intervals. The automatic calibration process starts during switch-off
(standby) of the HE 1.
INPUT
CROSS FEED
OUTPUT
USB COAXIALOPTICAL
BALANCEDUNBALANCED
LOW HIGHOFF
LINEPHONES
BOX CONTROL
BOX 2 O/CBOX 1 O/C
OFF
ON
1
2
45
Servicing the HE 1 | Restoring the factory default settings
Restoring the factory default settings
To reset all individually stored signal levels of the INPUT audio inputs and
OUTPUT audio outputs and the last settings used to the factory default
settings:
1 Set the power switch to OFF to switch the HE 1 off and wait until the status
LED goes off (up to 30 seconds).
2. Simultaneously press the - and the + button on the remote control and
then set the power switch to ON to switch the HE 1 on.
The status LED ashes green. All settings are reset to the factory default
settings. Once the process is completed, the status LED lights up red. The
HE 1 is switched off (standby).
When restoring the factory default settings, make sure to point the
remote control at the remote control sensor located on the front bottom
of the amplier. Otherwise the amplier switches on normally.
INPUT
CROSS FEED
OUTPUT
USB COAXIALOPTICAL
BALANCEDUNBALANCED
LOW HIGHOFF
LINEPHONES
BOX CONTROL
BOX 2 O/CBOX 1 O/C
OFF
ON
1
2

46
Servicing the HE 1 | Installing rmware updates
Installing firmware updates
The DAC (digital-to-analog converter) rmware can be updated using the free
of charge “Sennheiser HE 1 Updater” program. The program be downloaded
from the Internet at www.sennheiser-hearing.com/download or be obtained
from your Sonova Consumer Hearing partner. The program is available for
Windows and Mac operating systems.
▷ Make sure that the HE 1 is connected to your Mac or PC via USB and that it
is switched on.
▷ From Windows or MacOS, start the “Sennheiser HE 1 Updater” program and
follow the instructions on the screen.
The program automatically checks if the new DAC rmware is compatible
with your HE 1. If this is the case, the program guides you through the
installation steps and then conrms successful installation.
47
Transporting the HE 1
Transporting the HE 1
Use the original packaging or contact your Sonova Consumer Hearing partner
to arrange for the transport of the HE 1 (see “Contact” on page 4).
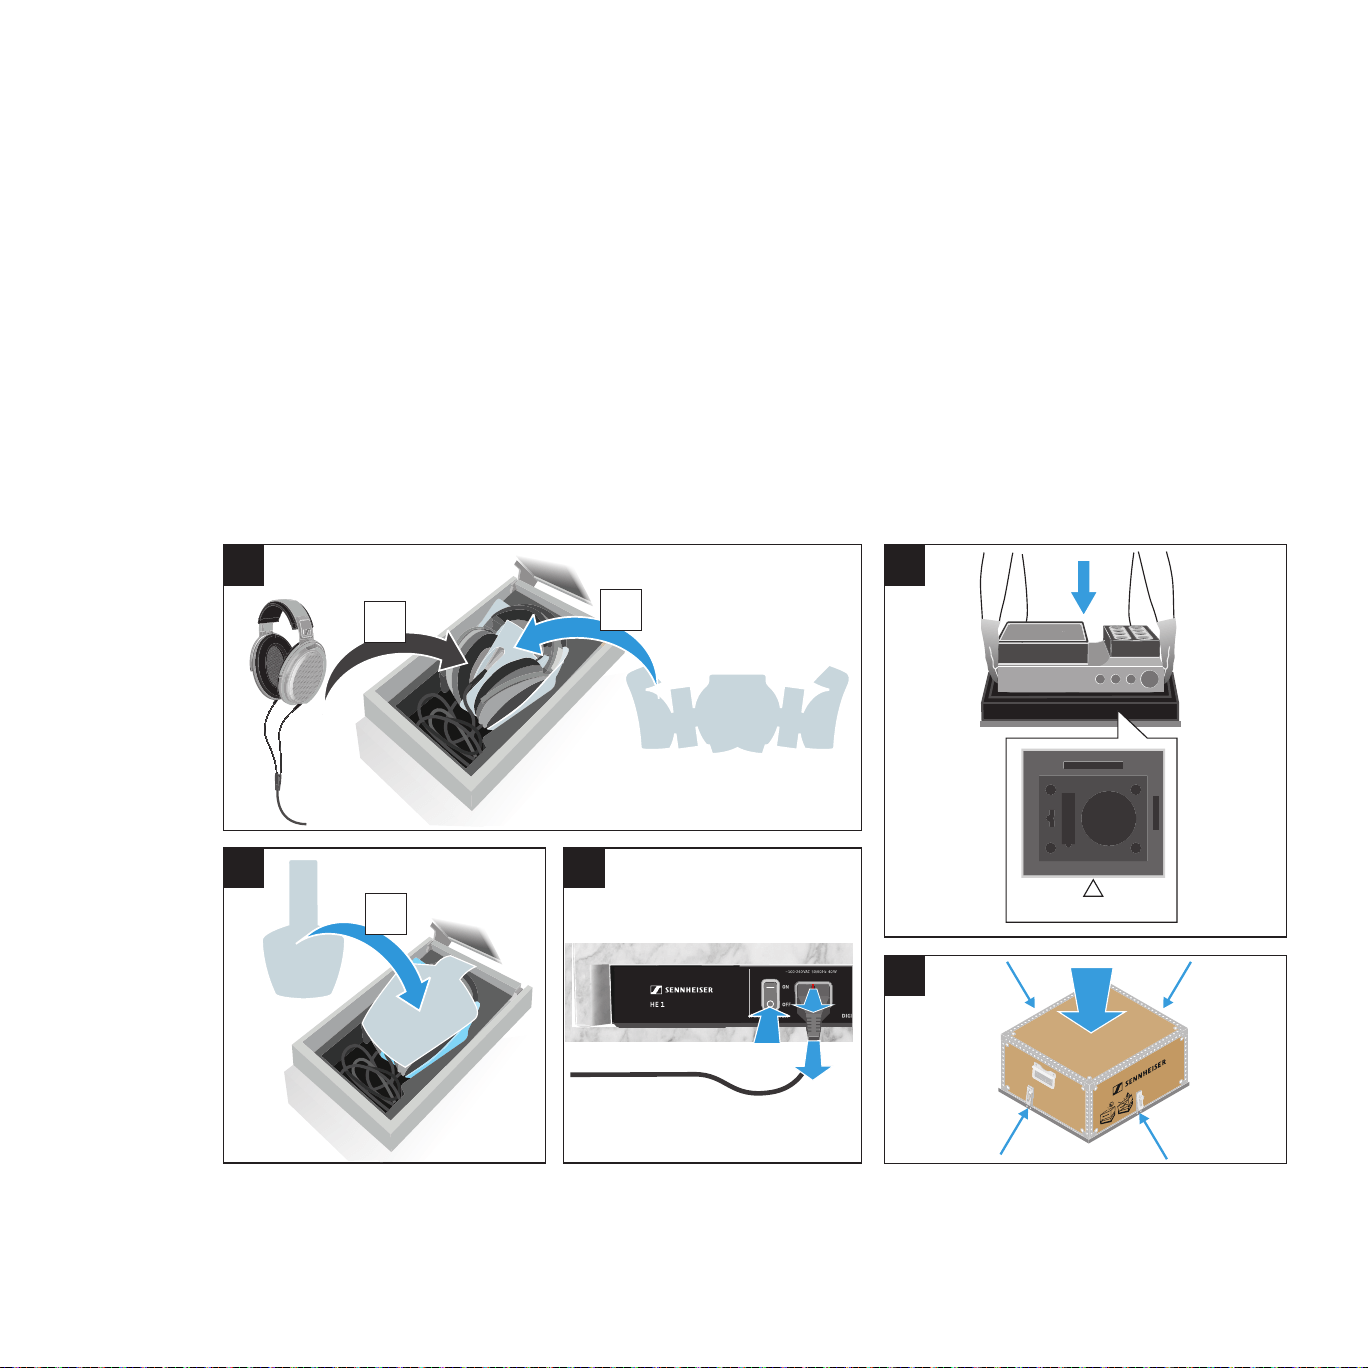
1 Place the foam protection a (supplied) in the headphone compartment.
Place the headphones b onto the foam protection. Roll up the cable so that
it ts completely into the storage box and connect the connector of the
headphones to the connection socket.
2. Place the foam protection c onto the headphones.
3. Switch the HE 1 off as normal and then disconnect all cable connections.
4 Place the HE 1 on the base plate of the transport box as shown.
5. Place the lid of the transport box on the base plate and close all 4 clip locks.
OFF
Front
1
2 3
4
5
c
a
b

48
If a problem occurs ...
If a problem occurs
Problem Possible cause Corrective action Page
The headphones cannot be
switched on
No connection to the power
supply system.
Check if the HE 1 is connected to the
power supply system and if the power
switch is set to ON.
26
The power fuse has blown. Contact your Sonova Consumer Hearing
partner.
–
No audio signal The HE 1 is switched off. Switch the HE 1 on. 27
The volume is adjusted to low. Increase the volume. 37
The mute function (MUTE) is
activated.
Deactivate the mute function. 38
The INPUT rotary switch is set to a
different audio source.
Set the INPUT rotary switch to the
desired audio source.
32
No audio signal when a digital
audio source is connected
The data format of the digital
audio source is not PCM.
Set the audio source to PCM data
format.
16
The audio signal is very low or
distorted when an analog audio
source is connected
The volume of the audio signal on
the audio source is adjusted too
low or too high.
If possible, adjust the volume of the
audio signal on the audio source to a
medium level.
–
The signal level of the INPUT
audio input is adjusted too low/
too high.
Increase or reduce the signal level of the
INPUT audio input.
33
Cracking noise occurs when the
headphones are put on
This is no malfunction – the
cracking noise occurs due to a
temporary overpressure in the ear
cups.
Pressure compensation is performed
automatically within approx. 2 seconds.
The headphones are then fully
operational.
–
Audio signal only on one ear The analog audio cable is not
properly connected.
Properly connect the audio cable to the
playback device.
15
One tube is defective. Replace the tubes or contact your
Sonova Consumer Hearing partner.
42
The PC does not recognize the
HE 1 as the audio output device
No driver is installed. Install the USB Audio driver. 20
No audio signal when the HE 1
is connected to a PC via USB
Another audio output device is
selected.
Select “Sennheiser HE 1” as the audio
output device.
18
No driver is installed. Install the USB Audio driver. 20

49
If a problem occurs ...
Problem Possible cause Corrective action Page
Sound dropouts when con-
nected via USB
The USB cable is not sufficiently
shielded.
Use a USB cable that is at least USB 2.0
certified.
16
The bass reproduction is very
powerful
The crossfeed function is set to
HIGH.
Set the crossfeed function to LOW or
OFF.
34
The storage box does not open
after switch-on
The OUTPUT rotary switch is set
to LINE.
Set the OUTPUT rotary switch to
PHONES.
35
The separate headphone
storage box is connected to the
HEADPHONE 1 socket.
Only connect the separate headphone
storage box to the HEADPHONE 2
socket.
30
The remote control does not
function properly or has a lim-
ited range.
The battery is exhausted. Replace the battery. 43
A lot of sunlight/extraneous light
(fluorescent lamps with electronic
control gear) can reduce the
range of the remote control.
Do not expose the HE 1 to direct sun-
light/extraneous light.
–
The rotary switches do not
switch to the desired setting,
the glass cover and/or the am-
plifier tubes do not close flush
The rotary switches are/glass
cover is/amplifier tubes are
decalibrated.
Start the calibration of the mechanical
components.
44
During switch-off, the rotary
switches switch through all the
settings one after the other.
This is no malfunction – the
rotary switches are automatically
recalibrated after approx. 500
hours of operation.
Once the calibration process is
completed, the HE 1 switches off
(standby).
–
The signal level of the INPUT
audio inputs cannot be ad-
justed, the status LED lights up
red.
The volume control is set to
minimum (turned fully to the
left).
Increase the volume to adjust the signal
level.
33
The HE 1 does not react to any
operation
The function of the HE 1 is faulty. Disconnect the HE 1 from the power
supply system and switch it on normally
once the LED has gone off (up to 30
seconds).
27
Reset the HE 1 to the factory default
settings.
45
If a problem occurs that is not listed in the above table or if the problem cannot be solved with the proposed solutions,
please contact your Sonova Consumer Hearing partner for assistance (see “Contact” on page 4).

50
If a problem occurs ...
High-voltage protection
In order to best protect you, the high voltage of the electrostatic headphones
and tube headphone amplifier is permanently monitored at the transducers,
cables and connections. If irregular values are observed, the high-voltage
protection is activated immediately and the voltage is cut off. The status LED
flashes red quickly two times. In this case, the HE 1 cannot be used.
Should the high-voltage protection be activated, proceed as follows to deacti-
vate it:
▷ Set the power switch to OFF to switch the HE 1 off and wait until the status
LED goes off (up to 30 seconds).
▷ Make sure that there is no moisture on or in the product, that no objects
touch the transducers and that the cables are in perfect condition.
▷ Set the power switch to ON to switch the HE 1 on again.
It might be that the operating elements retract to the “off” position.
▷ Press the on/off button.
The HE 1 switches on normally.
If the high-voltage protection is still activated, please contact your Sonova
Consumer Hearing partner (see “Contact” on page 4).

51
Specications
Specifications
HE 1-HP headphones
Transducer principle electrostatic, push-pull principle
Acoustic operating principle open
Ear coupling circum-aural
Contact pressure 4.3 N ± 0.3 N
Frequency characteristic diffuse eld equalized
Frequency response 8 – 80,000 Hz (-3 dB)
4 – 100,000 Hz (-10 dB)
Max. sound pressure level 114 dB SPL
THD < 0.01 % (1 kHz, 100 dB SPL)
Connection cable silver-plated, oxygen-free copper cable
(OFC), balanced, shielded, PTFE insulated,
3 m
Connector 9-pin HV connector
Operating voltage 780 V DC
Polarization voltage 650 V
Max. input level 20 dBV
Weight (without cable) approx. 550 g
Temperature range operation: +10 °C to +40 °C
storage: -20 °C to +70 °C
Relative air humidity
(non-condensing)
operation: 20 to 85 %,
storage : 10 to 95 %

52
Specications
HVE 1 tube headphone amplifier
Max. ouput level 20 dBV
Frequency response 5 – 110,000 Hz (-3 dB)
3 – 180,000 Hz (-10 dB)
THD typ. 0.01 % (1 kHz, 6 dBV)
Inputs Analog BAL: XLR-3
Analog UNBAL: RCA
Digital USB: USB Type B
Digital OPT: TOSLINK
Digital COAX: RCA
Outputs for HE 1-HP headphones:
9-pin HV socket
for separate HEADPHONE 2 storage box:
9-pin HV socket
Analog BAL: XLR-3
Analog UNBAL: RCA
Weight approx. 21 kg
Dimensions (W x H x D) closed:
approx. 434 x 160 x 350 mm
open:
approx. 434 x 405 x 375 mm
Temperature range operation: +10 °C to +40 °C
storage: -20 °C to +70 °C
Relative air humidity
(non-condensing)
operation: 20 to 85 %,
storage : 10 to 95 %
Power supply
Voltage range 100 – 240 V ~, 50/60 Hz
Power consumption 40 W
Analog input (XLR-3)
Min. input level (full scale) -6 dBV
Max. input level 24 dBV
Input resistance 40 kΩ

53
Specications
Analog input (RCA)
Min. input level -6 dBV
Max. input level 18 dBV
Input resistance 20 kΩ
Digital inputs (coaxial/optical)
Standard S/PDIF
Supported data streams PCM
Supported sample rates coaxial/optical: 44.1; 48; 88.2; 96 kHz
coaxial: 176.4; 192 kHz
Digital input (USB Type B)
USB standard min. USB 2.0
USB audio class USB Audio Class 2
Supported le formats PCM: 32 bits, 44.1; 48; 88.2; 96; 176.4;
192; 352.8; 384 kHz
DSD: 64 (2,822,400 Hz),
128 (5,644,800 Hz), 256 (11,289,600 Hz)
Analog output (XLR-3)
Max. output level 4 dBV
Output impedance 1 kΩ
Analog output (RCA)
Max. output level 4 dBV
Output impedance 1 kΩ
54
Specications
BFI 1 remote control
Transmission infra-red
Range approx. 6 m
Power supply coin cell, type CR2032, 3 V
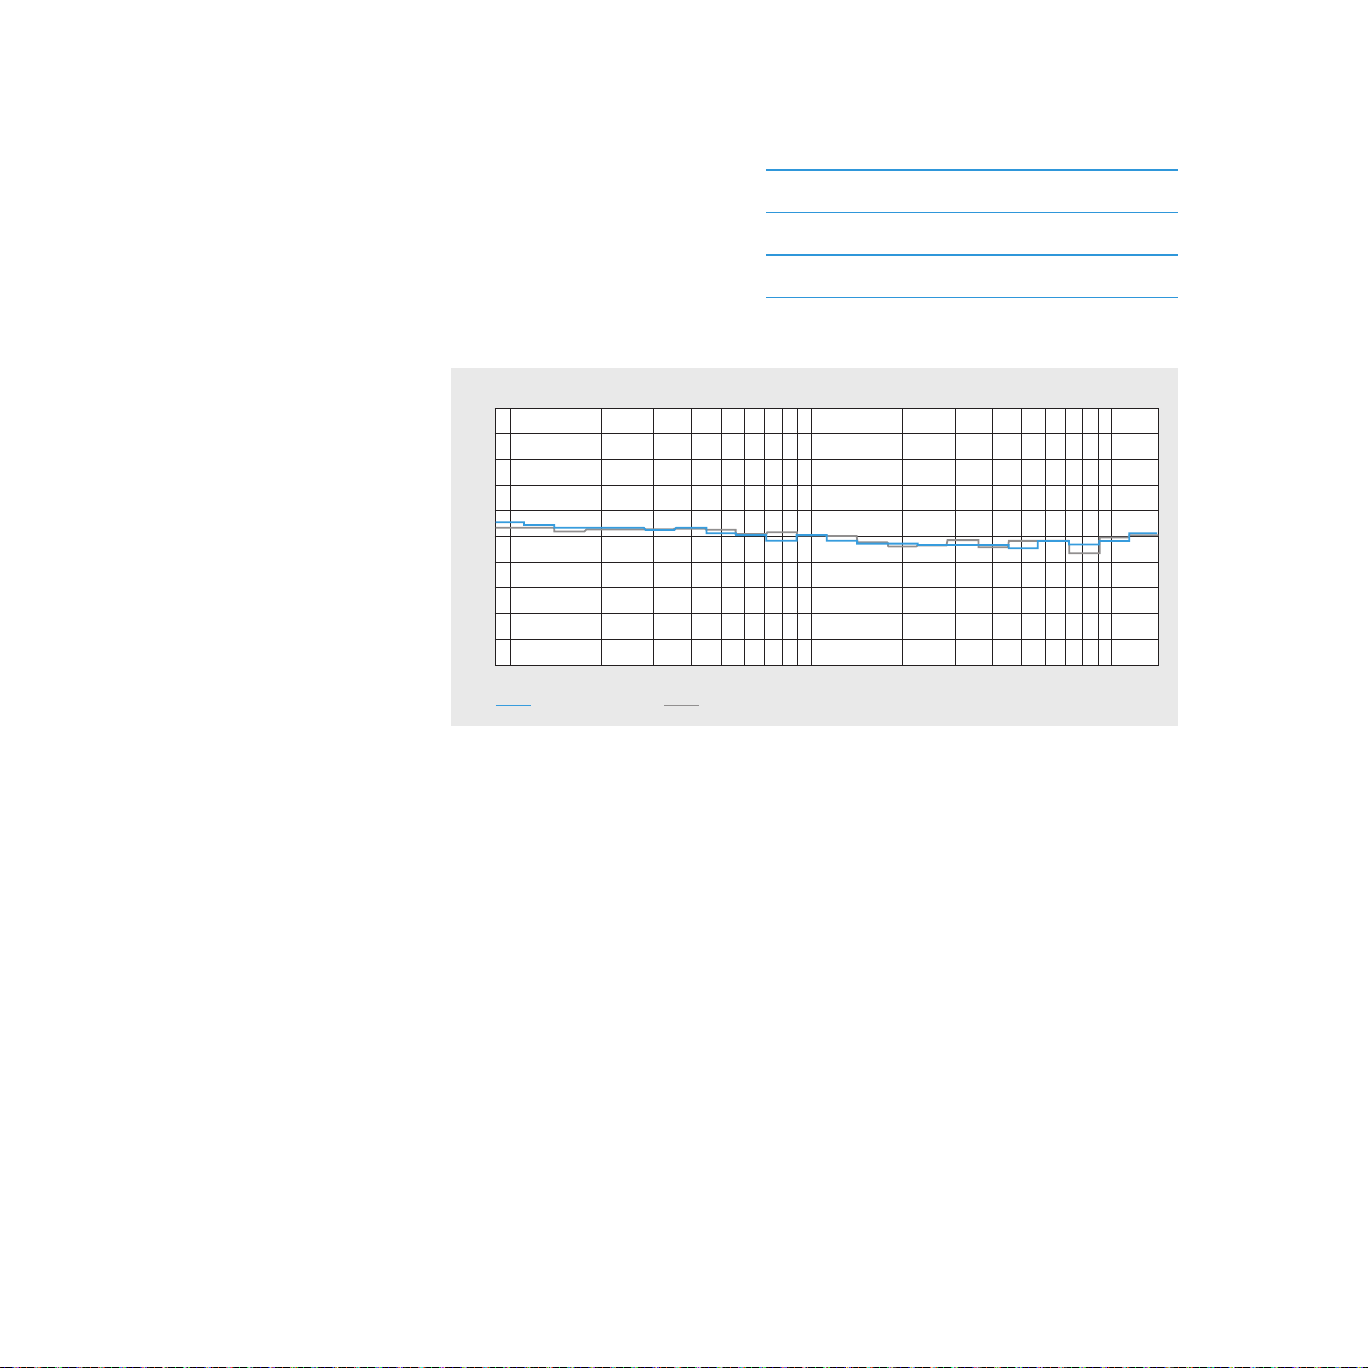
Reference diffuse-field frequency response curve
-25
-20
-15
-10
-5
0
5
10
15
20
25
dB SPL
HE 1 HE 90
5k100 200 500 1k 2k 10k Hz
Explanations on the diffuse-field frequency response curve
In an anechoic chamber, 8 highly linear loudspeakers emit noise signals
independently of each other. In the central area of the chamber, the various
sound data meet and are superimposed on each other to form a diffuse eld,
in which it is no longer possible to determine from which direction the sound
is coming. This noise is then varied in distances of a third and reproduced alter-
nately over the speakers and the headphones to be measured. A large number
of test persons then evaluate the difference in volume between the room
noise and the noise in the headphones.
The ideal state is when the volume impression between the diffuse eld and
the headphones is the same. Diffuse-eld equalized headphones provide
a clearly more spatial impression and make it easier to determine whether
sounds are coming from the front or rear. Put simply: The sound events take
place outside the head and are not conned to the space between the ears.

55
Manufacturer Declarations
Manufacturer Declarations
Warranty
Sonova Consumer Hearing GmbH gives a warranty of 24 months on this pro-
duct. For the current warranty conditions, please visit our website at
www.sennheiser-hearing.com/warranty or contact your Sonova Consumer
Hearing partner.
For AUSTRALIA and NEW ZEALAND ONLY
Sonova Hearing Australia Pty Ltd provides a warranty of 24 months on these products.
For the current warranty conditions, visit the Sonova Consumer Hearing
website: www.sennheiser-hearing.com/warranty.
Sonova Consumer Hearing goods come with guarantees that cannot be ex-
cluded under Australian and New Zealand Consumer law. You are entitled to
a replacement or refund for a major failure and compensation for any other
reasonably foreseeable loss or damage. You are also entitled to have the goods
repaired or replaced if the goods fail to be of acceptable quality and the failure
does not amount to a major failure. This warranty is in addition to other rights
or remedies under law. Nothing in this warranty excludes, limits or modies
any remedy available to the consumer which is granted by law.
To make a claim under this contract, raise a case via the Sonova Consumer
Hearing website: www.sennheiser-hearing.com/service-support.
All expenses of claiming the warranty will be borne by the person making the claim.
Sonova Consumer Hearing international warranty is provided by: Sonova
Hearing Australia Pty Ltd (ABN 82651492929) The Zenith, Level 14, Tower A,
821 Pacic Highway, Chatswood New South Wales 2067, Australia.
In compliance with the following requirements
EU declaration of conformity
• EMC Directive (2014/30/EU)
• ErP Directive (2009/125/EC)
• Low Voltage Directive (2014/35/EU)
• RoHS Directive (2011/65/EU)
The declaration is available at www.sennheiser-hearing.com/download.

56
Manufacturer Declarations
UK declaration of conformity
• EMC Regulations (2016)
• The Ecodesign for Energy-Related Products and Energy Information
(Amendment) (EU Exit) Regulations (2019)
• Electrical Equipment (Safety)Regulations (2016)
• RoHS Regulations (2012)
Notes on disposal
• EU: WEEE Directive (2012/19/EU)
• EU: Battery Directive (2006/66/EC & 2013/56/EU)
• UK: WEEE Regulations (2013)
• UK: Battery Regulations (2015)
The symbol of the crossed-out wheeled bin on the product, the
battery/rechargeable battery (if applicable) and/or the packaging indicates
that these products must not be disposed of with normal household waste,
but must be disposed of separately at the end of their operational lifetime.
For packaging disposal, observe the legal regulations on waste segregation
applicable in your country. Improper disposal of packaging materials can harm
your health and the environment.
The separate collection of waste electrical and electronic equipment, batteries/
rechargeable batteries (if applicable) and packagings is used to promote the
reuse and recycling and to prevent negative effects on your health and the
environment, e.g. caused by potentially hazardous substances contained in
these products. Recycle electrical and electronic equipment and
batteries/rechargeable batteries at the end of their operational lifetime in
order to make contained recyclable materials usable and to avoid littering the
environment.
If batteries/rechargeable batteries can be removed without damaging them,
you are obliged to dispose of them separately (for the safe removal of
batteries/rechargeable batteries, see the instruction manual of the product).
Handle lithium-containing batteries/rechargeable batteries with special care,
as they pose particular risks, such as the risk of re and/or the risk of ingestion
in the case of coin batteries. Reduce the generation of battery waste as much
as possible by using longer-life batteries or rechargeable batteries.
57
Manufacturer Declarations
Further information on the recycling of these products can be obtained from
your municipal administration, from the municipal collection points, or from
your Sonova Consumer Hearing partner. You can also return electrical or
electronic equipment to distributors who have a take-back obligation.
Herewith you make an important contribution to the protection of the
environment and public health.
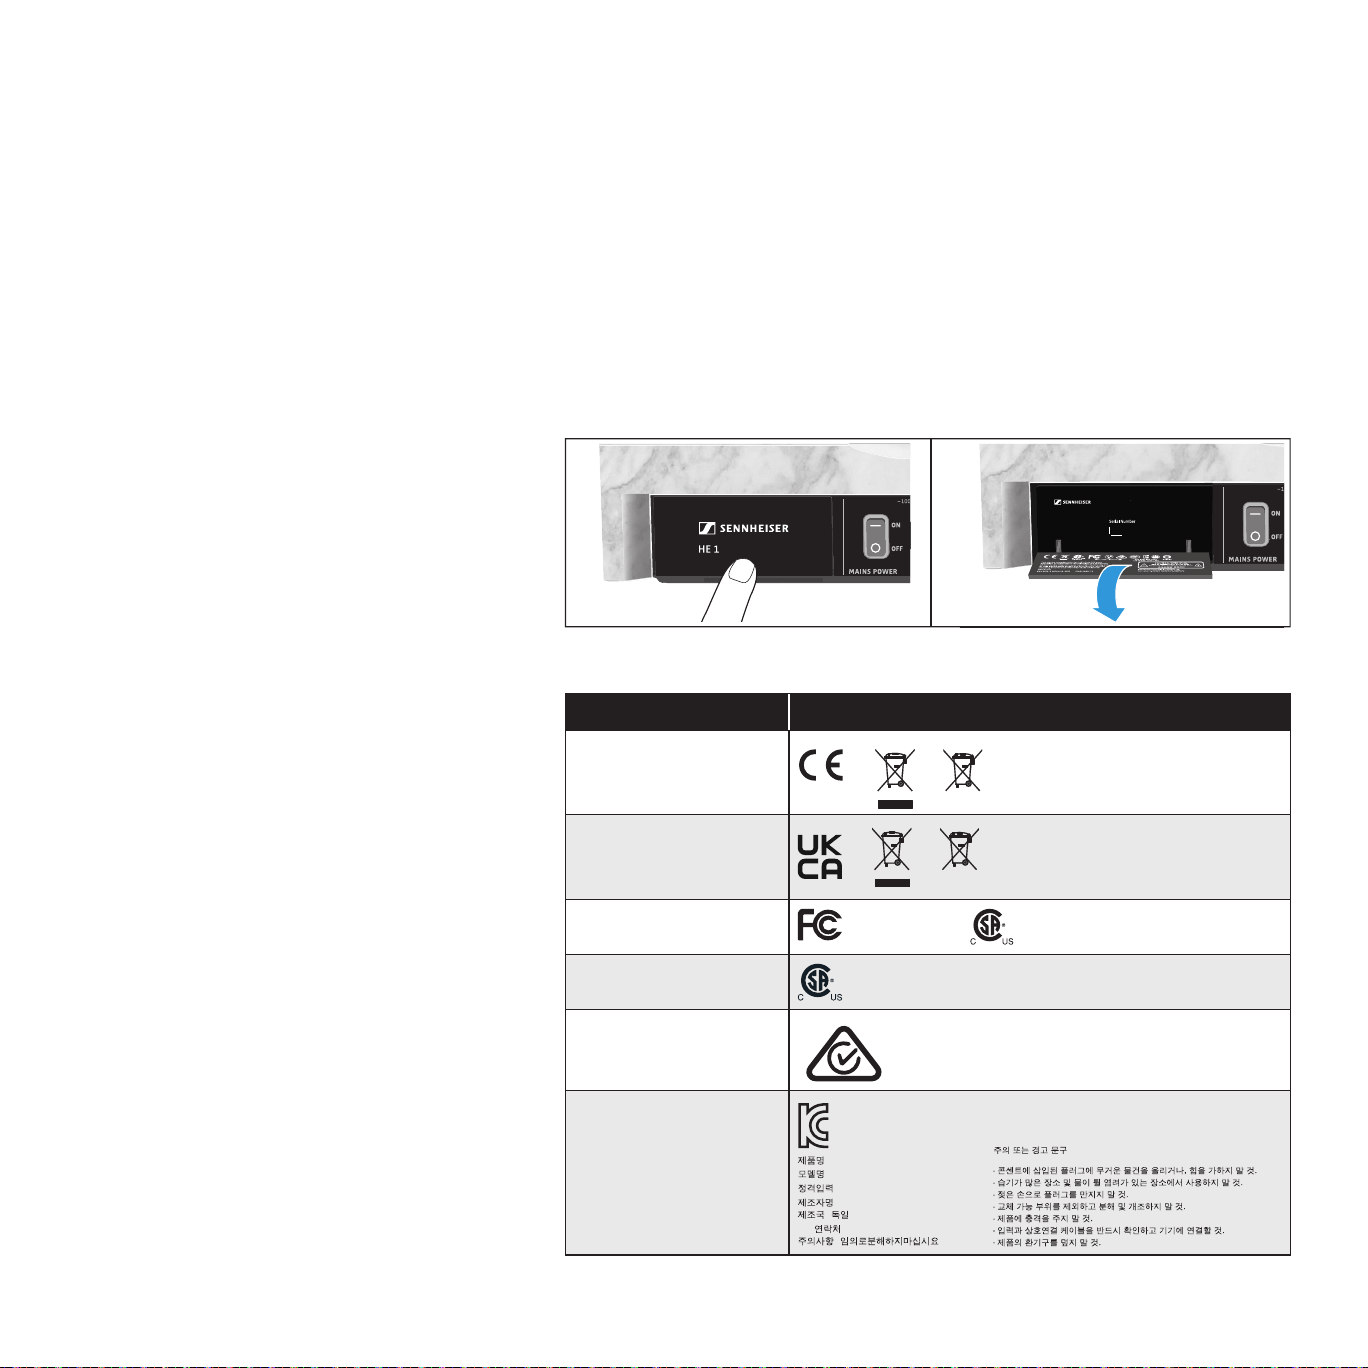
Type plate and approval numbers
The type plate can be found on the rear of the amplier behind a hinged cover.
▷ Lightly press the lower part of the cover to open it.
0123
Made in Ireland
HVE 1 Tube Amplifier for Electrostatic Headphones
Country/region Model: HE 1
Europe*
United Kingdom*
USA
FCC Part 15 B
Canada
CAN ICES3(B)/NMB3(B)
Australia/
New Zealand
Republic of Korea
MSIP-REM-SE9-HE1
: Electrostatic Audiosystem
: HE 1
: ~100-240 VAC, 50/60 Hz, 40 W
: Sonova Consumer Hearing GmbH
: (Germany)
A/S
: 1544-1699
:
(Caution or Warning)
58
Manufacturer Declarations
Country/region Model: HE 1
Mainland China
S&E
15 5
HE 1 CR2032
Japan
* as well valid for remote control Model: BFI 1

59
Manufacturer Declarations
Statements regarding FCC and ISED
Déclaration requise par la FCC et ISDE
SENNHEISER
Model No:
FCC Supplier's Declaration of Conformity (SDoC)
We,
Sonova Consumer Hearing USA, LLC
One Enterprise Drive • Old Lyme •
CT 06371 • USA
Tel:
+1 (860) 598-7824
declare the above devi ce comply with the requirements of Federal Communications Commission.
This devi ce complies with Part 15 of the FCC rules. Operation is subjected to the following two conditions:
1) This devi ce may not cause harmful interference, and
2) This devi ce must accept any interference received, including interference that may cause undesired operation.
Responsible Party: Lou deLaforcade
HE 1, SD-U16L
This device has been tested and found to comply with the limits for a Class B
digital device, pursuant to Part 15 of the FCC Rules. These limits are designed
to provide reasonable protection against harmful interference in a residential
installation. This equipment generates, uses, and can radiate radio frequency
energy, and, if not installed and used in accordance with the instructions, may
cause harmful interference to radio communications. However, there is no
guarantee that interference will not occur in a particular installation. If this
equipment does cause harmful interference to radio or television reception,
which can be determined by turning the equipment off and on, the user is
encouraged to try to correct the interference by one or more of the following
measures:
• Reorient or relocate the receiving antenna.
• Increase the separation between the equipment and receiver.
• Connect the equipment into an outlet on a circuit different from that to
which the receiver is connected.
• Consult the dealer or an experienced radio/TV technician for help.
Changes or modications made to this equipment not expressly approved by
the manufacturer may void FCC authorization to operate this equipment.
Ce dispositif a été testé et trouvé conforme aux limites dénies pour
un dispositif numérique de classe B, dans le cadre de la Partie 15 des
réglementations de la FCC. Ces limites sont conçues pour offrir une protection
raisonnable contre les interférences nocives pour une installation résidentielle.
Cet équipement produit, utilise et peut émettre une énergie haute fréquence
et, s’il n’est pas installé et utilisé conformément aux instructions, provoquer
des interférences gênantes pour les communications radio. Des risques

60
Manufacturer Declarations
d’interférences ne peuvent toutefois pas être totalement exclus dans certaines
installations, même en cas de respect des instructions.
Dans le cas d’interférences gênantes pour la réception des émissions de
radio ou télédiffusées (il suft, pour le constater, d’allumer et d’éteindre
l’équipement), l’utilisateur est invité à prendre l’une des mesures suivantes
pour les éliminer :
• Réorienter ou déplacer l’antenne réceptrice.
• Éloigner l’équipement du récepteur.
• Brancher l’équipement sur une prise ou un circuit différent de celui du
récepteur.
• Consulter un revendeur ou un technicien de radio ou télévision expérimenté.
Toute modication non expressément approuvée par le fabricant peut annuler
le droit de l’utilisateur à l’emploi de l’équipement en question.
China RoHS
部件名称
(Part Name)
有害物质
铅
(Pb)
汞
(Hg)
镉
(Cd)
六价铬
(CrVI)
多溴联苯
(PBB)
多溴二苯醚
(PBDE)
产品环保年限
(EFUP)
金属部件
(Metal Parts)
x o o o o o 15
电路模块
(Circuit Modules)
x o o o o o 15
电缆及电缆组件
(Cables & Cable Assemblies)
x o o o o o 15
电路开关 – 如果包含
(Circuit Breakers)
x o o o o o 15
电池 – 如果包含
(Battery)
x o o o o o 5
遥控器BFI 1
(BFI 1 Remote Control)
x o o o o o 15
本表格依据 SJ/T 11364 的规定编制。
o: 表示该有害物质在该部件所有均质材料中的含量均在GB/T 26572规定的限量要求以下。
x: 表示该有害物质至少在该部件的某一均质材料中的含量超出GB/T 26572规定的限量要求。