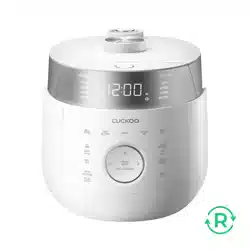
CR-10 Series
1.8L (2~10
인분
) / 1.8L (2~10 Persons)
NO.1 CUCKOO
Electric Rice cooker/warmer
使用說明書
사용설명서
MANUEL D'UTILISATION
User Manual

CONTENTS
Safety and Functions
I
mportant safeguards
...................................................................
3
Specifications
...............................................................................
5
Safety precaution
.
...................................................................
6~7
Part names
................................................................................
14
How to Clean and Maintain Your Rice Cooker
..................
15~16
Panel Display
.............................................................................
17
WHEN USING
Before cooking rice
....................................................................
18
For Tastier Rice
.........................................................................
19
How to Start Cooking
..........................................................
20~21
How to use “SCORCHED RICE”
.............................................
22
How to use “MY MODE”
..........................................................
23
How to use “GABA”
.............................................................
24~26
How to use “SOUP”
..................................................................
27
How to use “ SOYMILK”
............................................................
28
How to use “YOGURT”
............................................................
29
How to use “STEAM COOK”
....................................................
30
How to use “ “BABY FOOD”
.....................................................
31
How to use “SLOW COOK”
..............................................
32~33
How to use “MULTI COOK”
.....................................................
34
How to preset timer for cooking
...............................................
35
To keep cooked rice warm and tasty
................................
36~37
CONTENTS
목차
사용하기전에
Important safeguards
..............................................
3
제품규격
.................................................................
5
안전상의 경고
.................................................
10~11
제품 손질 방법
................................................
38~39
기능 조작부의 이름과 역할/기능표시부의 이상점검 기능
.......
40
사용할 때
취사 전 준비사항
.....................................................
41
맛있는 밥을 드시려면
..............................................
42
취사는 이렇게 하십시오
....................................
43~44
누룽지 기능은 이렇게 하십시오.
................................
45
쿠쿠 맞춤취사 기능은 이렇게 하십시오.
.....................
46
현미/발아는 이렇게 하십시오.
............................
47~49
탕은 이렇게 하십시오.
.............................................
50
두유는 이렇게 하십시오.
...........................................
51
요거트는 이렇게 하십시오.
.......................................
52
만능찜은 이렇게 하십시오.
.......................................
53
이유식은 이렇게 하십시오.
.......................................
54
웰빙쿡은 이렇게 하십시오.
................................
55~56
멀티쿡은 이렇게 하십시오.
.......................................
57
예약 취사는 이렇게 하십시오.
...................................
58
밥을 맛있게 보온하려면
....................................
59~60
TABLE DES MATIÈRES
AVANT L'UTILISATION
Important safeguards
…………………………………………………
3
Spécifications
…………………………………………………………
5
MESURES DE SÉCURITÉ
…………………………………………
8~9
目 录
使用前
重要安全措施
..........................................................
3
产品规格
...............................................................
5
安全注意事项
..................................................
12~13
清洁和保养指南
...............................................
61~62
功能操作说明
........................................................
63
使用时
煮饭前准备事项
....................................................
64
如何制作美味可口的米饭
......................................
65
煮饭方法
........................................................
66~67
锅巴功能使用指南
.................................................
68
调节煮饭功能使用指南
..........................................
69
发芽糙米指南
.................................................
70~72
汤制作指南
...........................................................
73
豆奶制作指南
........................................................
74
酸奶制作指南
........................................................
75
蒸/炖制作指南
......................................................
76
宝宝食品制作指南
.................................................
77
健康料理制作指南
..........................................
78~79
多种料理
..............................................................
80
预约煮饭使用指南
.................................................
81
米饭保温指南
.................................................
82~83

3
www.cuckoo.co.kr
1
. Read all instructions before using this appliance.
2. Do not touch hot surfaces. Use handles or knobs.
3. To protect against fire, electric shock and / or injury to persons, do not immerse cord, plugs, or Pres-
sure Cooker Body in water or any other liquid.
4. Close supervision is necessary when this appliance is used by or near children. This appliance is
not intended for use by young children without supervision.
5. Unplug cord from outlet when not in use and before cleaning.
Allow appliance to cool before putting on or taking off parts, and before cleaning the appliance.
6. Do not operate any appliance if it malfunctions, has a damaged cord or plug, or has been damaged
in any manner. Return the appliance to the nearest authorized service facility for examination, repair
or adjustment.
7. The use of accessory attachments not recommended by the appliance manufacturer may result in
fire, electric shock, and / or injury to persons.
8. If the supply cord is damaged, it must be replaced by a special cord or assembly available from the
manufacturer or your service agent.
9. Do not use outdoors.
10. Do not let the cord hang over the edge of a table or counter, or touch hot surfaces.
11. Do not place on or near a hot gas, electric burner, or in a heated oven.
12. Always attach the plug to the appliance first, then plug the cord into the wall outlet. To disconnect,
set all control to “off”, then remove the plug from the wall outlet.
13. Do not use this appliance for other than its intended use.
14. Extreme caution must be used when moving an appliance containing hot oil or any hot liquids.
15. Oversized foods, metal foil packages, or utensils must not be inserted into the appliance as they
may result in fire or electric shock.
16. Fire may occur if the appliance is covered or touches flammable material including curtains,
draperies, walls, etc while in operation.
17. To reduce the risk of electric shock, cook only in the provided inner pot.
18. This appliance cooks under pressure. Improper use may result in scalding injury.
Before operating the unit, properly secure and close the unit. See “Operating Instructions.”
19. Do not cook foods such as applesauce, cranberries, cereals, macaroni, spaghetti, or other foods.
These foods tend to foam, froth, and sputter, and may block the pressure releasing device.
20. Before use always check the pressure releasing device for clogging.
21. Do not open the pressure cooker until the unit has cooled and internal pressure has been reduced.
See “Operating Instructions.”
22. Do not use this pressure cooker to fry in oil.
IMPORTANT SAFEGUARDS / 重要安全措施
ADDITIONAL IMPORTANT SAFEGUARDS
SAVE THESE INSTRUCTIONS
THIS APPLIANCE IS FOR HOUSEHOLD USE ONLY
WARNING : This appliance generates heat and releases steam during use. Use proper precau-
tion to prevent risk of burns, fire, injuries, or damage to property.
1. Keep hands and face away from the Pressure Release Valve when releasing pressure.
2. Take extreme caution when opening the Lid after cooking. Severe burns can result from steam
inside.
3. Never open the Lid while the unit is in operation.
4. Do not use without the inner Pot in place.
5. Do not cover the Pressure Valve with anything as an explosion may occur.
6. Do not touch the inner pot nor any heating parts, immediately after use.
Allow the unit to cool down completely first.
This appliance is intended to be used in household and similar applications such as :
- staff kitchen areas in shops, offices and other working environments;
- farm houses;
- by clients in hotels, motels and other residential type environments;
- bed and breakfast type environments.

4
1. Lisez toutes les instructions avant d'utiliser cet appareil.
2
. Ne touchez pas les surfaces chaudes. Utilisez les poignées ou les boutons.
3. Pour prévenir les risques d'incendie, les chocs électriques et/ou les blessures, ne plongez pas le cordon, les prises
ou le corps autocuiseur dans l'eau ou tout autre liquide.
4. Une surveillance étroite est nécessaire quand cet appareil est utilisé par des enfants ou qu'il se situe à leur portée.
Cet appareil n'est pas prévu pour être utilisé par de jeunes enfants sans surveillance.
5. Débranchez le cordon de la prise lorsque vous ne vous servez pas de l'appareil et avant de le nettoyer. Laissez
l'appareil refroidir avant de remettre en place ou de retirer des pièces, et avant de le nettoyer.
6. N'utilisez aucun appareil si le cordon ou la fiche est endommagé, s'il ne fonctionne pas correctement ou s'il est en-
dommagé de quelque façon que ce soit. Renvoyez l'appareil à un centre technique agréé le plus proche pour le
faire examiner, réparer ou régler.
7. L'utilisation d'accessoires non recommandés par le fabricant peut causer un incendie, un choc électrique et/ou des
blessures.
8. Si le cordon d'alimentation est endommagé, il doit être remplacé par un cordon ou ensemble prévu à cet effet,
disponible auprès du fabricant ou de réparateurs agréés.
9. N'utilisez pas l'appareil à l'extérieur.
10. Ne laissez pas le cordon pendre d'une table ou d'un comptoir. Ne le laissez pas non plus en contact avec une sur-
face chaude.
11. Ne placez pas l'appareil au-dessus ou près d'un brûleur à gaz, sur une plaque électrique ou dans un four chaud.
12. Branchez toujours la fiche sur l'appareil en premier, puis branchez le cordon dans la prise murale. Pour
débrancher, ou désactiver toutes les commandes, retirez la fiche de la prise murale.
13. N'utilisez pas cet appareil à des fins autres que celles pour lesquelles il a été conçu.
14. Une prudence extrême est requise lorsque vous déplacez l'appareil contenant de l'huile chaude ou tout autre liquide
chaud.
15. Des denrées alimentaires de taille excessive, les emballages sous feuille métallique, ou les ustensiles ne doivent
pas être insérés dans l'appareil car ils constituent un risque d'incendie ou de choc électrique.
16. Un incendie peut se déclarer si l'appareil est couvert ou en contact avec des matériaux inflammables, y compris
des rideaux ou des draperies, des murs, etc durant son fonctionnement.
17. Afin de réduire le risque de choc électrique, faites cuire uniquement dans le récipient amovible fourni.
18. Cet appareil cuit sous pression. Un mauvais usage peut entraîner des brûlures. Avant d'utiliser l'appareil, mettez
l'appareil bien en place et fermez-le. Reportez-vous à la section « Instructions d'utilisation ».
19. Ne cuisinez pas des aliments tels que compotes de pommes, canneberges, céréales, macaronis, spaghettis ou
autres. Ces aliments ont tendance à mousser, écumer et à crépiter et peuvent obstruer le dispositif de relâche-
ment de la pression.
20. Avant toute utilisation, vérifiez toujours si le dispositif de relâchement de la pression est obstrué.
21. N'ouvrez pas l'autocuiseur jusqu'à ce que l'appareil ait refroidi et que la pression interne ait diminué. Reportez-
vous à la section « Instructions d'utilisation ».
22. N'utilisez pas cet autocuiseur pour faire frire dans de l'huile.
MESURES DE PROTECTION IMPORTANTES
MESURES DE PROTECTION SUPPLÉMENTAIRES
CONSERVEZ CES INSTRUCTIONS
CET APPAREIL EST DESTINÉ À UN USAGE DOMESTIQUE UNIQUEMENT
AVERTISSEMENT : Cet appareil génère de la chaleur et libère de la vapeur durant son fonctionnement. Utilisez
les protections appropriées pour prévenir le risque de brûlures, d'incendies, de blessures ou
de dégâts matériels.
1. Gardez vos mains et votre visage à l'écart de la soupape de décharge lors du relâchement de la pression.
2. Faites extrêmement attention lors de l'ouverture du couvercle après la cuisson. La vapeur à l'intérieur peut provo-
quer des brûlures graves.
3. N'ouvrez jamais le couvercle lorsque l'appareil est en fonctionnement.
4. N'utilisez pas l'appareil sans la cuve de cuisson à sa place.
5. Ne recouvrez pas la soupape de pression par un objet quelconque, une explosion pourrait survenir.
6. Ne touchez pas la cuve de cuisson ni les éléments chauffants immédiatement après utilisation. Laissez tout
d'abord l'appareil refroidir complètement. Cet appareil est prévu pour être utilisé à la maison à des fins telles que :
- la cuisine pour le personnel dans des magasins, des bureaux et d'autres environnements de travail;
- les fermes;
- par des clients dans des hôtels, des motels et autres environnements de type résidentiel;
- des environnements de type chambres d'hôtes.
5
www.cuckoo.co.kr
▶Avoid touching hot parts : outer lid, inner pot, inner lid and especially the steam vent hole.
▶Do not switch on when the main body is empty.
▶Make sure that heating plate and the magnetic switch are clean and dry whenever putting the
inner pot into the cooker.
▶Do not use sharp instruments to clean the inner pot as these will damage the non-stick coating.
▶A short power-supply cord is provided to prevent becoming entangled in or tripping over a longer
cord.
▶Longer detachable power-supply cords or extension cords are available and may be used if care
is exercised in their use.
▶This appliance is intended to be used in household and similar applications such as :
- staff kitchen areas in shops, offices and other working environments;
- farm houses;
- by clients in hotels, motels and other residential type environments;
- bed and breakfast type environments.
Note : A. A short power-supply cord (or cord set) is provided to prevent becoming entangled in or trip-
ping over a longer cord.
B. Longer cord sets or extension cords are available and may be used if care is exercised in
their use.
C. If a long cord set or extension cord is used.
(1) the marked electrical rating of the cord set or extension cord should be at least equal to
the electrical rating of the appliance.
(2) if the appliance is of the grounded type, the extension cord should be a grounding-type
three-wire cord, and
(3) the longer cord should be arranged so that it will not drape over the counter top or tabletop
where it can be pulled on by children or tripped over accidentally.
CAUTION : During use, the internal parts of the rice cooker and the area around the steam vent are HOT.
Keep out of reach of children to avoid possible injury.
SHORT CORD INSTRUCTIONS/SPECIFICATIONS
ADDITIONAL SAFEGUARDS
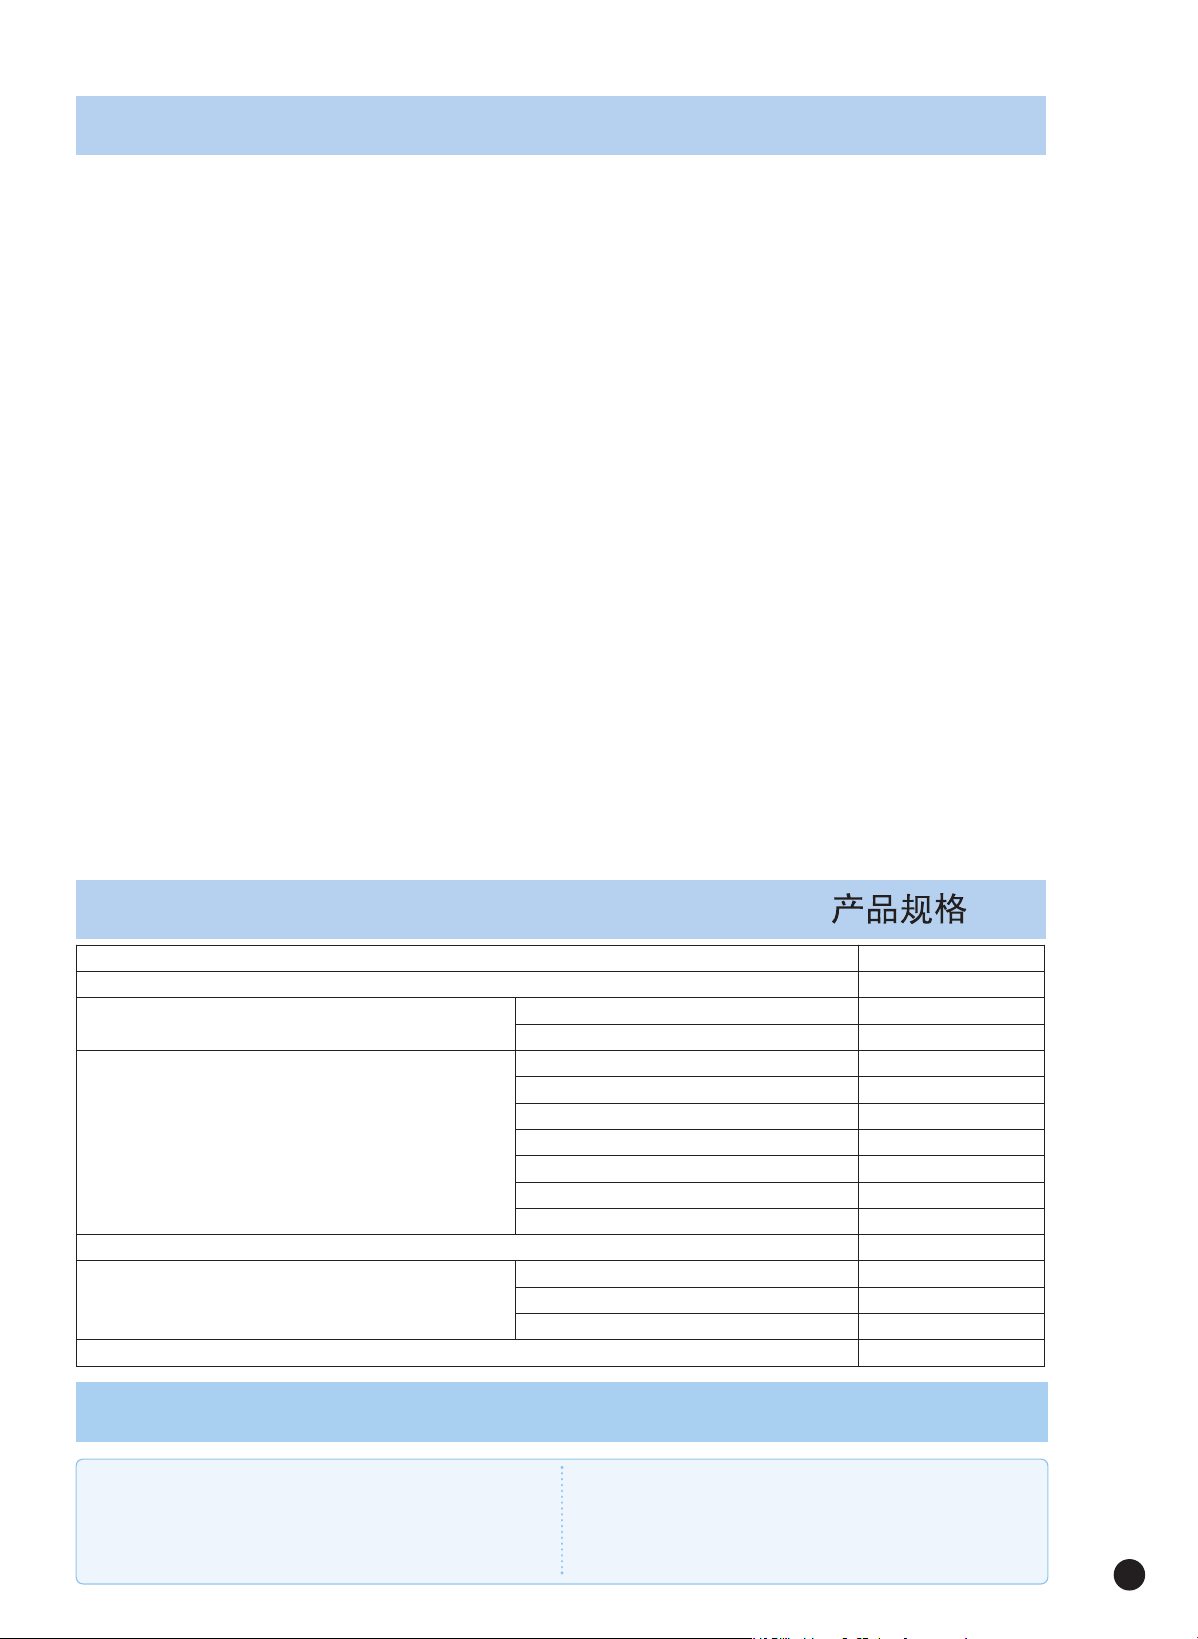
제품규격/
Specifications
/
SPÉCIFICATIONS
/
IF PRODUCTS NEEDS TO bE SERVICED
The East and the Central Districts
Tel. No. 718 888 9144
The West and the Central Districts
Tel. No. 323 780 8808
TORONTO
Tel. No. 905 707 8224
VANCOUVER
Tel. No. 604 540 1004
USA Canada
모델명(Model Name) / 型号
CR-1010F / CR-1020F
전원(Power Supply) / 额定电压
AC120V, 60Hz
소비전력(Power Consumption)
Approx(약) / 额定功率
취사(Cook) / 煮饭
890W
보온(Warm) / 保温
135W
취사용량 (Cooking Capacity)
/ 煮饭容量
백미(WHITE RICE) / 白米2~10cup
백미쾌속(TURBO WHITE RICE) / 白米快速
2~6cup
현미발아(GABA) / 发芽糙米
2~6cup
누룽지(NU RUNG JI) / 锅巴
2~4cup
잡곡/현미(Mixed/Brown) / 杂谷/糙米
2~8cup
된죽(THICK PORRIDGE) / 稠粥1~2cup
묽은죽(THIN PORRIDGE) / 稀粥0.5~1.5cup
전원코드길이(Power Cord Length) / 电源线长度
1.2m
치수 (Dimension) / 尺寸
폭 (Width) / 宽
28.8cm
길이 (Length) / 长
37.8cm
높이 (height) / 高25.9cm
제품중량 (Product weight) / 产品重量약(约)4.5kg
SAFETY PRECAUTIONS
6
Do not cover the automatic steam outlet with your
hand or face.
•It can cause burns. Do not cover the steam cap with your hand or face.
•Especially be careful to keep it out of children’s reach.
Do not use the cooker near hot things such as stove,
gas stove or direct ray of light.
•It can cause an electric shock, fire, deformation, malfunction or discoloration.
•Do not put the Power Cord near an electric heating appliance.
The sheath of the Cord may melt and cause fire or electric shock. Please check
the power cord and plug frequently.
Don’t spray or put any insecticide and chemicals.
•This may cause fire.
•If cockroaches or any insects get inside the cooker, please call a dealer or a
service center.
Please be careful of water and chemicals.
•It can cause an electric shock, fire, deformation, malfunction or discoloration.
•If water gets into the product, please contact Customer Service center.
Do not open the lid during heating and cooking.
•If you open the lid while boiling or steaming, the steam may cause a burn.
•Be careful when you open the lid right after cooking. The steam may cause a
burn.
Do not over unplug and plug the power cord excessively.
•It can cause an electric shock or fire.
Use a single socket with the rated current above 15A.
Using several lines can cause overflow or breakdown.
•Using several lines in one socket can cause overheating or fire. Please check
the power cord and plug frequently.
•
If there is a foreign substance or moisture on the Power Plug, wipe it off before use.
•Use an extension cord with the rated current above 15A.
Do not use a rice cooker at a place where dust is
trapped or chemical material is located.
•Do not use any combustible gas or flammable materials nearby a product.
•It can cause explosion or fire.
Do not use a deformed Inner Pot or an Inner Pot
other than the one exclusively for the product.
•Using another inner pot can cause an operation error or fire.
•When you have dropped the Inner Pot or the Inner Pot is deformed, contact
Customer Service center.
Do not use it without the inner pot.
•It can cause electric shock or malfunction.
•Do not pour rice or water without the inner pot.
•If rice or water gets inside the body, do not turn the product over or shake
it. Please contact the dealer or service center.
Do not cover the automatic steam outlet with a
duster, a towel or apron, etc.
•It can cause a fire or a breakdown.
•It can cause an explosion by pressure.
Do not bend, tie or pull the power cord by force.
•It can cause an electric shock or short circuit resulting in fire. Please check
the power cord and plug frequently.
Remove external substances on plug with a clean cloth.
•It may cause fire. Please check the power cord and plug frequently.
Do not change, extend or connect the power cord
without the advice of a technical expert.
•
It can cause an electric shock or fire.
Do not move the product by pulling the power cord.
•Electric short might cause fire.
Do not clean the product with water or pour water in
the product.
•It can cause an electric shock or fire.
Do not alter, reassemble, disassemble or repair.
•It can cause an electric shock or fire.
•Only a service technician should dismantle or repair the product. Contact
Customer Service center for repairs or malfunction.
Do not put a foreign substance such as a metal stick
into the Steam cap or the product. (Extra caution
with children.)
•It can cause an electric shock or fire.
•
This sign is intended to remind and alert that something
may cause problems under the certain situation.
•
Please read and follow the instruction to avoid any harmful
situation.
•
Indicates a prohibition
This means that the action it describes
may result in death or severe injury.
•
Indicates an instruction
Read the following product safety guide carefully to prevent any accidents and/or serious danger.
‘Warning’ and ‘Caution’ are different as follows.
Warning
This means that the action it describes
may result in injury or property damage.
Caution
Warning
Do not
Do not use damaged power cord, plug or loose socket.
•If the sheath of the Power Cord has peeled off or is picked due to careless
ness during use of the product, it may cause fire or electric shock. Thus, check
the status of the Power Cord, Power Plug, and socket frequently.
•If the Power Cord or the Power Plug is damaged, let the manufacturer, the
store, or a qualified technician (service technician) change the cord to pre-
vent harm.
•Please let the designated service center repair the product without fail.
SAFETY PRECAUTIONS
7
www.cuckoo.co.kr
ENGLISH
Please clean the body and other parts after cooking.
•
If you cook and warm rice after making a steamed dish, the smell may permeate the rice.
•Refer to Page 15 and clean it before use.
To clean the product, wait until it cools down.
•The heated areas may cause a burn.
When you clean the product, wash the Inner Pot and the
Detachable Cover with neutral detergent, and dry them.
Wipe the product with a dry and clean cloth.
be cautious when opening rice cooker immediately after cooking be-
cause steam and heat from the inside of the product can cause burns.
After cooking, wipe out the water remaining in the product.
•The heated areas may cause a burn.
•Wipe out the water remaining in the tray of the product.
Do not place on rough top or tilted top.
•It may cause fire or malfunction.
•Be careful not to get caught in the Power Cord with hands, feet, or other
objects and fall on the product.
Please pull out the plug when not in use.
•
It may cause electric shock, electrical short, and fire due to the low-
ering of the insulation performance.
Do n
ot touc
h the meta
l
lic su
r
face of th
e inner pot
and hea
ti
ng plate after c
ooking or warmi
ng
•
You
may get b
u
r
ned.
Please contact dealer or service center when strange smell or smoke occur.
Do NOT use near wall or furniture. Otherwise wall or
furniture may be damaged, discolored or deformed
due to vapor or heat.
•When using in drawer or cabinet etc, ensure that vapors do not enter it.
Please carefully pull out the plug when not in use.
•
It can cause electric shocks or fire.
•
Use AC 120V only.
Do not drop or impact the cooker.
•It can cause a safety problem.
•Do not apply excessive force to or drop the product.
Do not use over the maximum capacity.
•It can cause overflow or breakdown.
•Do not make porridge over the designated amount.
Don’t use inner pot for various purposes. And do not
heat up the inner pot on the gas stove.
•The Inner Pot may be deformed or the coating may be peeled off which may
cause a malfunction.
The Inner Pot coating may be peeled off.
•
Inner pot coating may wear away after long use.
•When cleaning the inner pot, do not use tough scrubber,metallic
scrubber, brush, abrasive metallic etc.
Please avoid using it on an unstable location where
the rice cooker can easily fall.
•It can cause a deformation or a fire. •It can cause burns or breakdowns.
•Be careful to install the power cord in an area that is not easily disturbed.
Take out the Rice shovel before keeping warm.
•It may cause odor or discoloration.
If possible, only use warming function when cooking
white rice. Other foods are easily discolored.
During warming, close the lid and then connect the
power supply.
•Long period of warming may cause a smell of rice or discoloration.
Please plug the power cord completely into the power
socket.
Do not put any needles, cleaning pins, etc. in the
ventilator or any gap of the cooker.
•It can cause an electric shock or fire.
Keep the cooker out of reach of children.
•I
t can cause burns, electric shock or injury.
Warning
Do not
Warning
Remember
Caution
Do not
Caution
Remember
be careful that both the plug and power cord are
not bit by animals or pierced by sharp metal mate-
rials.
•Damages by impact can cause an electric shock or fire. Please check the
power cord and plug frequently.
Do not plug or pull out the power cord with wet hands.
•If the power cord is impacted it may cause electric shock and fire.
Do not use the product for other than cooking, warming, and designated menu,
such as boiling water, sweet rice drink, seaweed soup, curry, frying, etc.
•It may cause a malfunction or odor.
Do not use on a rice chest or a shelf.
•Do not use between furniture.
Please check the power cord and plug frequently.
•I
f used on furniture, automatic steam releasing can cause damage,
f
ire and an electric shock.
Clean any dust or external substances off the tem-
perature sensor and inner pot.
•It can cause a system problem or fire.
Attach the Detachable Cover before you use the prod-
uct.
•If you use the product without the Detachable Cover, it may cause electric
shock, fire, steam leak and a disorder of the product
Do not place heavy things on the power cord.
•It can cause an electric shock or fire. Please check the power cord and plug
frequently.
be careful not to harm your hands when opening the cover.
•Do not leave the cover opened. It might cause accident.
Do not plug or pull out the power cord with wet hands.
•If you pull the Power Plug out with a wet hand, it may cause electric shock.
•If you excessively pull the Power Plug, it may cause electrical short and
electric shock due to a disorder in the Power Cord.
MESURES DE SÉCURITÉ
8
Avertissement
INDICATION
Ne pas utiliser un cordon d’alimentation, prise élec-
trique, ou prise murale endommagée.
•P
eut entrainer un choc électrique ou un incendie
Do not cover the automatic steam outlet with your
hand or face.
•Cela peut provoquer des brûlures. Ne pas couvrir le couvercle de vapeur avec
vos mains ou votre visage.
•Veuillez particulièrement éloigner l’appareil hors de la portée des enfants.
Ne pas ouvrir le couvercle pendant le réchauffement
ou la cuisson.
•Si vous ouvrez le couvercle au cours de l’ébullition ou de la cuisson, cela peut
provoquer des brûlures dues à la vapeur.
•Soyez vigilant lorsque vous ouvrez le couvercle immédiatement après le cuis-
son. Cela peut provoquer des brûlures dues à la vapeur.
Ne pas placer d’autres récipients à l’intérieur
De l’appareil.
•il se pourrait qu’il atteigne Une température plus élevée et qu’il provoque Des
brûlures aux mains ou choc électrique
Ne pas utiliser l’autocui seur sans le panier Amovible.
•peut entrainer choc électrique ou Dysfonctionnement
•Ne pas mettre directement Le riz ou l’eau sans le panier.
Ne pas recouvrir le couvercle avec un chiffon, une
serviette
•Provoquer un dysfonctionnement ou l’arrêt de l’autocuiseur
Ne pas placer l’appareil dans l’eau, liquide ouflamme.
•entraine un choc électrique ou une incendie
Ne pas placer l’appareil dans l’eau, liquide ou flamme.
•entraine un choc électrique ou une incendie
Ne jamais vaporiser de l’insecticide ou un produit
chimique dans l’autocuiseur
•Risque d’incendie et d’intoxication mortelle
Utiliser le courant électrique comme Spécifié, n’utiliser
que du 15A.
•peut entrainer un choc électrique ou un incendie
Ne pas placer l’autocuiseur dans un environnement
poussiéreux Ou à côté de substances chimiques
(facilement inflammable)
•Peut entrainer des explosions ou un incendie.
Ne pas plier, ne pas attacher le cordon D’alimentation
•entraine un choc électrique Ou un court circuit suivi d’une incendie
Enlever tout élément étranger de la prise Electrique ou
du cordon d’alimentation avec
•Une serviette propre
Ne pas changer, étendre ou manipuler le Cordon d’ali-
mentation sans l’avis d’un expert.
•Peut causer un choc électrique ou un incendie.
Ne pas déplacer le produit en tirant sur la corde Ali-
mentaire.
•Peut entrainer un incendie.
Ne pas verser de l’eau à l’extérieur du bac de cuisson
•entraine un choc électrique ou une incendie
Ne pas démonter ou réparer les pièces de L’appareil
soit même.
•peut entrainer un choc électrique Ou un incendie.
•Contacter directement le revendeur
Ne pas démonter ou réparer les pièces de L’appareil
soit même.
•peut entrainer un choc électrique Ou un incendie.
•Contacter directement le revendeur
Ne pas mettre en contact avec un objet métallique ou
d’un objet étranger dans l’autocuiseur
•Peut causer un choc électrique ou un incendie
Ne pas insérer d’aiguille, de tige de nettoyage dans le
ventilateur ou tout autre élément dans la mijoteuse.
•Cela peut provoquer un choc électrique ou un incendie.
Ne jamais laisser des enfants utiliser l’appareil sans
surveillance.
•Cela peut causer des brûlures et des chocs électriques.
Ne pas brancher et débrancher la prise électrique ou
cordon d’alimentation.
•entraine une incendie ou un choc électrique
Ne pas mettre à la portée d’un animal domestique
•Entraine des brûlures, choc électrique, incendie
Lisez attentivement le guide de sécurité du produit qui suit afin d'éviter les accidents et/ou les dangers graves.
« Avertissement » et « Attention » diffèrent comme suit :
•
Ce symbole vise à rappeler et à alerter que quelque chose peut
entraîner des problèmes dans la situation donnée.
•
Veuillez lire et respecter l'instruction afin d'éviter toute situation
dangereuse.
•
Indique une interdiction.
Cela signifie que l'action qui est décrite peut
entraîner la mort ou une blessure grave.
Cela signifie que l'action décrite peut entraîner
des blessures ou des dégâts matériels.
•
Indique une instruction.
Avertissement
Attention

9
www.cuckoo.co.kr
FRENCH
MESURES DE SÉCURITÉ
Avertissement
INDICATION
ATTENTION
Ne pas
Ne pas le placer sur une étagère ou une table d’appoint.
•Ne pas mettre le cordon alimentaire entre les meubles pour éviter un risque
d’incendie. Vérifier souvent le bon état Du cordon alimentaire et prise élec-
trique
Retirez la poussière ou toute substance externe du
détecteur de température et du contenant interne.
•Cela peut provoquer un problème du système ou un incendie.
Assurez-vous de placer le couvercle amovible avant
d’utiliser l’appareil.
•S
i vous utilisez l’appareil sans le couvercle, cela peut provoquer un choc élec-
t
rique, un incendie, des fuites de vapeur et une défectuosité de l’appareil.
Attention de ne pas se faire mal aux mains Lors de
l’ouverture du couvercle
•Ne pas laisser Ouvert le couvercle pour éviter des accidents
Ne pas poser des objets lourds sur le cordon d’ali-
mentation
•E
ntraine un choc électrique ou une incendie
Ne pas brancher ou débrancher l’appareil avec
•L
es mains mouillées Entraine un choc électrique
Ne pas utiliser l’autocuiseur pour d’autres fonctions
inadaptées.
•Provoque une mauvaise odeur ou la dégradation du panier amovible.
Contacter le revendeur pour service après vente pour
tout anomalie (odeur, fumée…) Débrancher la prise de
courant et contacter le revendeur
Débrancher le cordon d’alimentation après son utilisation
•Entraine choc électrique ou incendie N’utiliser que du AC 220~240 V
Ne pas utiliser au-delà de la capacité de l’autocuiseur
•Entraine un arrêt. Ne pas cuir de la soupe ou du bouillon.
De préférence, utiliser la fonction « garde chaud » que
pour la Cuisson du riz blanc. Les autres aliments peu-
vent décolorer lors De la cuisson.
Enlever la cuillière à riz avant la cuisson.
•Cela peut décolorer le riz ou riqued' être collé au riz.
Utiliser l’autocuiseur sur une surface plate
•Et stable et éviter que celui-ci tombe Provoque un dysfonctionnement
Ne pas utiliser le panier amovible pour une autre Utili-
sation. Ne pas réchauffer le récipient sur un réchaud.
•Entraine une déformation du panier Et la dégradation de l’anti adhésif.
Débrancher la prise en cas de non utilisation de l’au-
tocuiseur.
•Provoque un électrochoc ou une incendie.
D’alimentation et peut entrainer un dysfonction-
nement
•
Ne pas faire tomber l’autocuiseur. Entraine un dysfonctionnement
Ne pas déposer l’autocuiseur par terre ou sur.
•Une surface trop haute. Abime le cordon
Ne pas toucher les parties métalliques de l’au-
tocuiseur Après son utilisation
•Provoque des brûlures.
Ne pas placer à proximité d’un mur, meuble, objet.
•La vapeur entraine un changement de couleur ou déformation de l’objet.
Contacter le service après vente si le panier Amovible
est s’est abimé. Le film anti adhésif Peut partir avec le
temps. Ne pas utiliser.
•D’éponge métallique, de brosse pour le lavage.
Lorsque vous nettoyez l’appareil, veuillez vous as-
surer de laver le contenant interne et le couvercle
amovible avec un détergent neutre et veuillez
l’assécher adéquatement.
Essuyez l’appareil avec un chiffon sec et propre.
Soyez vigilant et évitez les brûlures dues à la vapeur
et la chaleur provenant du contenant interne de l’ap-
pareil après la cuisson.
Veuillez nettoyer l’unité principale et les autres pièces
après la cuisson.
•Si vous faites cuire et réchauffer du riz directement après avoir fait des plats
cuits à la vapeur, l’odeur peut imprégner le riz.
Lors du « garde chaud », rabattre le couvercle Et al-
lumer la fonction.
•Sinon le riz colle sur le panier Amovible
Attendre le refroidissement des parties à nettoyer
•pour éviter des brûlures
bien nettoyer le corps de l’autocuiseur après L’utilisation
•pour éviter les odeurs et dégradations
안전상의 경고
10
경고
(금지)
전원코드나 전원플러그가 파손되었거나 콘센트가 흔들릴 때는
사용을 중지하고, 고객상담실로 문의바랍니다.
•제품 사용 중 사용상의 부주의로 전원 코드의 피복이 벗겨지거나
찍힐 경우 화재 및 감전의 원인이 될 수 있으니, 수시로 전원코드와
전원플러그, 콘센트의 상태를 꼭 확인하십시오.
•전원코드나 전원플러그가 파손된 경우에는 위험이 생기지 않도록
하기 위하여 제조자나 그 판매점 또는 유자격 기술자 (서비스 기사)
에 의해 코드 교환을 하십시오.
•반드시 지정된 서비스센터에서 수리하시기 바랍니다.
사용 중 증기 배출구에는 손과 얼굴을 가까이 하지 마십시오.
•화상의 우려가 있습니다. 취사 중 나오는 증기는 매우 뜨거우므로
손이나 얼굴을 가까이 하지 마십시오.
•전원코드를 열기구 가까이 두지 마십시오. 코드피복이 녹아 화재,
감전의 원인이 됩니다. 수시로 전원코드의 상태를 꼭 확인하십시오.
제품내에 살충제나 화학물질 등을 뿌리거나 투입하지 마십시오.
•화재 발생의 우려가 있습니다.
•제품 내 바퀴벌레나 벌레 등이 들어갔을 경우는 고객상담실로 문의
하십시오.
싱크대, 목욕탕 등 제품에 물이 들어 갈 수 있는 곳에서는 사용
하지 마십시오.
•전기 누전 및 감전의 위험이 있습니다.
•제품에 물이 들어 갔을 경우에는 고객상담실로 꼭 문의하십시오.
제품을 직사광선이 쬐는 곳, 가스레인지, 라이터, 전열기구 등
의 가까이에서 사용하지 마십시오.
•
전기누전, 감전, 변형, 변색 및 화재의 원인이 됩니다.
•
전원코드를 열기구 가까이 두지 마십시오. 코드피복이 녹아 화재, 감전
의 원인이 됩니다. 수시로 전원코드의 상태를 꼭 확인하십시오.
취사나 요리가 진행 중에 있을 때, 뚜껑을 열지 마십시오.
•밥이 끓거나 뜸이 진행 중일 때 뚜껑을 열면 증기에 의한 화상의
원인이 됩니다.
•취사 후 뚜껑을 열 때 증기에 의한 화상의 위험이 있으므로 주의를
요합니다.
반드시 정격 15A 이상의 접지단자가 있는 교류 120V 전용 콘
센트에서만 사용해 주시고 한 콘센트에 여러 제품의 전원플러그
를 동시에 꽂아 사용하지 마십시오.
•여러 제품과 함께 사용하거나, 다른 기구에 사용하면 발열 및 발화,
감전의 원인이 됩니다. 수시로 콘센트 상태를 꼭 확인하십시오.
•전원플러그에 이물질이나 물기가 묻어 있는 경우에는 잘 닦은 다음
사용하십시오.
•연장코드도 15A 이상의 것을 사용하여 주십시오.
먼지가 많은 곳이나 화학성 물질이 있는 곳에서는 사용하지 마
십시오.
•제품 근처에서 가연성 가스나 인화성 물질 등을 사용하지 마십시오.
•폭발 및 화재의 원인이 됩니다.
변형된 내솥이나 전용 내솥이 아닌 것은 사용하지 마십시오.
•내솥이 가열되어 이상작동 및 화재의 원인이 됩니다.
•내솥을 떨어뜨렸거나 변형된 경우에는 고객상담실로 문의 하십시오.
내솥 없이 사용을 하지 마십시오.
•감전 및 고장의 원인이 됩니다.
•내솥이 없는 상태에서 쌀이나 물을 넣지 마십시오.
•쌀이나 물이 들어갔을 경우에는 제품을 뒤집거나 흔들지 마시고고객
상담실로 문의하십시오.
증기배출구를 막거나 증기구에 행주나 장식용 덮개, 기타물건을
올린 채 사용하지 마십시오.
•본체의 변형, 변색 및 고장의 원인이 됩니다.
전원코드를 무리하게 구부리거나, 묶거나, 잡아당기지 마십시오.
•감전이나 쇼트로 인해 화재의 원인이 될 수 있습니다. 수시로 전원코드
상태를 확인하십시오.
전원플러그에 묻은 이물질은 물기가 없는 천으로 깨끗이 제거하
여 주십시오.
•화재의 원인이 됩니다. 수시로 전원플러그 상태를 꼭 확인하십시오.
전원코드를 임의로 연장하거나 연결하는 등 가공하여 사용하지 마십시오.
•감전 및 화재의 원인이 됩니다.
제품 이동시 전원코드를 이용하여 들어올리거나 잡아당겨서 이동
하지 마십시오.
•쇼트로 인한 화재의 원인이 될 수 있습니다.
제품을 싱크대에 넣고 닦거나 제품 내부에 물을 넣지 마십시오.
•전기누전 및 감전, 화재의 원인이 됩니다.
•제품에 물이 들어간 경우는 사용을 중지하고 전원플러그를 뽑은 다음
고객상담실로 문의하십시오.
제품을 분해 하거나 개조하지 마십시오.
•화재 및 감전의 원인이 됩니다.
•서비스기사 이외의 사람이 분해하거나 수리하지 마십시오, 수리 및
고장 상담은 고객상담실로 문의하십시오.
증기구나 제품 내부에 금속 막대기 등 이물질을 절대 넣지 마십
시오(특히, 어린이 주의)
•감전 및 화재의 원인이 됩니다.
전원플러그를 반복하여 뺐다 꽂았다 하지 마십시오.
•감전 및 화재의 원인이 있습니다.
흡·배기구 또는 틈 사이에 바늘, 금속물 등 이물질이 들어가거
나 막히지 않도록 하십시오.
•감전 및 화재의 원인이 됩니다.
플러그 및 전원 코드부를 동물이 물어뜯거나 못과 같이 날카로운
금속물체로부터 충격을 받지 않도록 주의하여 주십시오.
•충격으로 인한 파손은 합선, 감전, 화재 등의 원인이 됩니다.
수시로 전원코드와 전원플러그 상태를 꼭 확인하십시오.
어린이 혼자 사용하거나 어린이가 만질 수 있는 장소에 제품을
두지 마십시오.
•고열에 화상을 입거나 감전이 될 수 있습니다.
•이 기호는 특정조건하에서 위험을 끼칠 우려가 있는 사항에
대하여 주의를 환기시키는 표시입니다.
•
위험 발생을 피하기 위해 주의깊게 읽고 지시에 따라 사용하십시오.
•이 기호는 어떤 행위를 ‘금지’하는 표시입니다.
피하지 않을 경우 사망이나 중상을
초래할 수 있는 잠재적인 위험상황
피하지 않을 경우 경상을 초래할 수
있는 잠재적인 위험상황
•이 기호는 어떤 행위를 ‘지시’하는 표시입니다.
‘안전상의 경고’는 제품을 안전하고 올바르게 사용하여 사고나 위험을 미리 막기 위한 것이므로 반드시 지켜 주십시오.
‘안전상의 경고’는 ‘경고’와 ‘주의’의 두가지로 구분되어 있으며 ‘경고’와 ‘주의’의 의미는 다음과 같습니다.

안전상의 경고
11
www.cuckoo.co.kr
KOREAN
주의
(금지)
주의
지시
경고
(지시)
쌀통 및 다용도 선반 등에 제품을 놓고 사용하지 마십시오.
•전원코드가 틈새에 눌러져 화재 및 감전의 원인이 됩니다.
수시로 전원코드 상태를 꼭 확인하십시오.
•취사 또는 요리 중 증기가 배출될 때 쌀통 및 다용도 선반에 의해 제품
의 손상, 화재, 감전의 원인이 됩니다.
제품 사용시 반드시 분리형 커버를 부착한 후 사용하십시오.
•분리형 커버 없이 사용시 감전, 화재 증기누설 및 제품고장의 원인
이 됩니다.
뚜껑을 여닫을 때 손을 다치지 않도록 주의 하십시오.
•뚜껑을 열어 놓은 상태로 방치하지 마십시오, 사고의 원인이 됩니다.
온도감지기, 밥솥 내부 및 열판 또는 내솥 바깥부위의 이물질 (밥알,
기타음식물 등)은 반드시 제거 후 사용하십시오.
•제품 사용 전 반드시 이물질 제거상태 확인 후 사용하십시오.
•온도감지를 정확히 못하게 되므로 내솥이 가열되어 이상작동 및 화
재의 원인이 됩니다.
전원코드 위에 무거운 물건을 올려놓거나 코드가 제품 바닥에 눌러
지지 않도록 주의해 주십시오.
•
화재 및 감전의 원인이 됩니다. 수시로 전원코드 상태를 꼭 확인하십시오.
전원플러그를 콘센트에서 꽂거나 뺄때는 손의 물기를 반드시 제
거한 후 전원플러그를 잡고 꽂거나 빼 주십시오.
•젖은 손으로 전원플러그를 뽑으면 감전의 원인이 될 수 있습니다.
•무리하게 당겨 뽑으면 전원코드에 이상이 발생되어 누전 및 감전이
될 수 있습니다.
취사,보온 지정된 메뉴 이외의 물끓임, 식혜, 미역국, 카레, 기름으
로튀기는 요리 등 다른용도로 사용하지 마십시요.
•고장 및 냄새의 원인이 됩니다.
사용 중에 이상한 소리나 냄새 또는 연기가나면 즉시 전원플러
그를 뽑고 고객상담실로 문의해 주십시오.
120V 이외에는 사용하지 마십시오.
•감전, 화재의 원인이 될 수 있습니다.
•제품이 정상적으로 작동을 하지 않습니다.
•220V 전원에서 승압용 트랜스를 120V로 감압해서 사용하지 마십시오.
제품에 심한 충격을 주가나 떨어뜨리지 마십시오.
•제품 고장 및 안전상의 문제가 발생할 수 있습니다.
•제품에 무리하게 힘을 가하거나 떨어뜨리지 마십시오.
최대 용량 이상으로 내용물을 넣고 사용하지 마십시오.
•밥물 넘침이나 취사불량 등 고장의 원인이 됩니다.
•죽은 지정된 용량 이상은 사용하지 마십시오
주걱을 넣은 채 보온하지 마십시오.
•밥 냄새 또는 변색의 원인이 됩니다.
제품 밑에 깔판, 방석, 전기장판 등을 놓고 사용하지 마십시오.
•화재 및 변형의 원인이 됩니다.
수시로 제품 상태를 꼭 확인하십시오.
사용하지 않을 때는 전원플러그를 콘센트에서 뽑아 주십시오.
•절연 성능 저하로 인해 감전, 누전, 화재의 원인이 될 수 있습니다.
내솥을 다른 용도로 사용하거나 불위에 올리지 마십시오.
•
내솥의 변형 및 코팅이 벗겨져 제품에 이상이 발생할 수 있습니다.
사용 중이거나 사용직후는 내솥 및 내부, 내솥케이스, 열판 등은
뜨거우므로 만지지 마십시오.
•고열에 의한 화상을 입을 수 있습니다.
내솥을 다른 용도로 사용하거나 불위에 올리지 마십시오.
•내솥의 변형 및 코팅이 벗겨져 제품에 이상이 발생할 수 있습니다.
경사진 곳이나 울퉁불퉁한 곳에서는 사용하지 마십시오.
•화상 및 제품 고장의 원인이 됩니다.
•전원코드에 손이나 발, 기타 물체가 걸려 제품에 떨어지지 않도록 주
의 하십시오.
흰밥 이외의 식품에는 변질하기 쉬운 것(팥밥, 혼식, 크로켓,
그라탱 등)이 있으므로 가능하면 보온하지 마십시오.
전원플러그를 뽑을 때는 전원코드를 잡지 마시고 꼭 전원플러그를
잡고 뽑아주십시오.
•전원코드에 충격이 가면 감전 및 화재의 원인이 될 수 있습니다.
보온 중에는 반드시 뚜껑을 닫고 전원을 접속하여 주십시오.
•밥 냄새 또는 변색의 원인이 됩니다.
청소는 제품을 식힌 후에 하십시오.
•고온부에 접촉되어 화상의 원인이 됩니다.
취사가 끝난 뒤에는 반드시 본체에 고인물을 닦아 주십시오.
•이상한 냄새 및 변색의 원인이 됩니다.
•본체의 물받이에 고인 물을 닦아 주십시오.
제품을 청소할 때는 내솥과 분리형 커버는 중성세제로 씻은 후 잘
건조 시키시고 본체는 물기가 없는 깨끗한 천으로 닦아서 말려주
십시오.
취사 직후, 제품 내부의 증기 및 고열로 인한 화상의 우려가 있으
므로 주의를 요합니다.
전원커넥터는 제품 플러그 끝까지 꽂아 주십시오.
전원플러그를 뽑을 때는 전원코드를 잡지 마시고 꼭 전원플러그를
잡고 뽑아주십시오.
•전원코드에 충격이 가면 감전 및 화재의 원인이 될 수 있습니다.
요리 후에는 반드시 청소해 주십시오.
•찜 요리 후 취사 및 보온을 하게 되면 밥에 냄새가 배어들 수도 있
습니다.
•37쪽을 참조하여 개끗이 닦아낸 후 사용하십시오.
내솥 코팅이 벗겨질 수 있습니다.
•제품을 장기간 사용할 경우 내솥 코팅이 벗겨질 수 있습니다.
•거친 수세미나 금속성 수세미로 내솥을 씻을 경우 코팅이 벗겨질 수
있으니 반드시 주방용 중성세제와 스폰지로 씻어 주십시오.
•날카로운 식기류(포크, 숟가락, 젓가락 등)를 내솥에 넣은 채 씻을 경
우 내솥 코팅이 벗겨질 수 있습니다.
벽 및 가구 가까이에서 사용하지 마십시오, 증기 또는 열로 인해
벽 및 가구를 손상 시키고, 변색 및 변형의 원인이 됩니다.
•
수납 캐비닛 등에서 사용할 때에는 안에 증기가 스며들지 않도록 해 주십
시오.
安全注意事项
12
警告
禁止
产品内请勿喷或放入杀虫剂或化学物品。
•可能会发生火灾。
•蟑螂或其它虫子进入产品内部时,请拨打售后服务电话。
应避免光线直射,严禁靠近煤气炉、电热器具等。
•可能会导致漏电、触电、变形、变色、引发火灾。
•电源线严禁靠近热器具以避免电源线融化造成
火灾或触电等危险。请随时确认电源线状态。
使用中,请勿将手或脸靠近蒸汽排出孔。
•有烫伤的可能。煮饭或料理中所排出
的高温蒸汽很烫,请勿将手或脸直接靠近。
•特别注意勿让儿童靠近。
必须使用额定电流10A以上专用插座,不宜与
其它电子产品共用一个插座。
•与多个产品共同使用或用于其他产品时,产品可能会发
热、触电、发生火灾。
•电源插头表面有水或异物时,擦净后使用。
•必须使用额定电流10A以上延长线。
请勿将产品放置于灰尘多或有化学性物质处使用。
•请勿在产品附近使用可燃性气体或易燃性物质。
•可能会导致爆炸或火灾。
•
此标记表示必须小心及注意的事项。
•
为避免发生危险,请详细阅读使用说明书并按照指示使用。
•
此符号表示禁止实施的事项。
使用方法错误会引发危险,
可能导致死亡或重伤的情况。
警告
注意
使用方法错误会引发危险,
可能引起轻伤以及财产损失的情况。
•
此符号表示务必实施的事项。
“安全警告”是为了预防事故的发生,请正确使用产品,并遵守安全注意事项。
“安全警告”有“警告”和“注意”两种区分,其意如下:
请勿使用破损的电源线和插座。
•使用破损的电源线会引发火灾、触电,请随时检查电源
线、电源插头、插座的状态。
•为避免因电源线及电源插头破损而发生危险,请在制造商
或商店处,或通过技师(售后服务技师)更换电源线。
•请在指定的售后服务中心修理。
请小心置放产品,勿靠近水源或化学液体。
•可能会导致漏电、触电或发生火灾。
•产品内部进水时,请马上切断电源,停止使用,拨打售后
服务电话。
煮饭或料理时请勿开启锅盖。
•
如煮饭结束前或焖饭时开启锅盖,可能会因蒸汽而导致烫伤。
•煮饭完成后立即开启锅盖会有烫伤的危险,请多加注意。
请勿让儿童独自使用或将产品放置于儿童可碰触处。
•可能会因高温导致烫伤或触电。
请勿强行弯曲、捆绑、拉伸电源线。
•因短路可能会发生火灾,请及时确认电源线状态。
严禁用金属物或针堵塞排气孔或产品缝隙。
•可能会触电或发生火灾。
严禁堵塞蒸汽排出孔或在其上面放置抹布、
装饰物及其它物品。
•机体变形、变色或发生故障的可能。
蒸汽排出口或产品内部严禁放入金属棒等异物。
(特别注意儿童)
•可能会导致触电或火灾。
无内锅时严禁使用。
•可能会导致触电或故障。•无内锅时请勿放入米或水。
•米或水进入时请勿翻转、晃动产品。
严禁私自拆卸或改装。
•可能会发生火灾或触电。
•除专业修理人员外请勿私自拆卸或修理。
维修或出现故障时,请拨打售后服务电话。
请勿使用变形内锅或其它非专用内锅。
•内锅加热时产生异常现象或发生火灾的可能。
•内锅磨损或变形时,请拔打售后服务电话。
请勿将产品放在水槽池边清洗或使内部进水。
•可能会导致产品漏电或引发火灾。
•
产品内部进水时,请停止使用,切断电源后咨询售后服务中心。
请用干燥的抹布擦净电源插头表面上的异物。
•可能会引起火灾,请随时检查电源插头的状态。
请不要随意将电源线延长或连接后使用。
•可能会导致触电或火灾。
请不要拉拽电源线将产品提起或拖拉。
•可能会因短路造成火灾。
避免动物撕咬电源线及插头,避免产品受到
钉子等锋利金属物体的冲击。
•会发生短路、触电或发生火灾,
请随时确认电源线及电源插头状态。
请勿反复插拔电源插头。
•可能会导致触电或火灾。

安全注意事项
13
www.cuckoo.co.kr
CHINESE
警告
指示
注意
禁止
开关锅盖时注意不要夹到手。
使用时请安装分离型内锅盖。
•未安装分离型内锅盖更可能会导致触电、火灾、蒸汽泄漏及产品故障。
•请不要在锅盖开启状态下放置,可能会发生事故。
插、拔电源前请将手擦干。
•用湿手插或拔电源时,可能会发生触电。
•请勿强行拔电源,可能会发生触电或漏电。
电源线上方请勿放置重物,请勿将电源线
压在产品底部。
•可能会导致火灾或触电,请随时确认电源线状态。
禁止将本产品放置在米桶及多层柜上使用。
•
电源线夹在缝隙里可能会发生触电或火灾,请随时检查电源线状态。
•煮饭或料理排出蒸汽时,置放在米桶及多层柜上
使用可能会导致产品损坏,造成火灾触电等危险。
先擦净温度感应器、产品内部或内锅周围的异物
(米粒、其他食物等)后再使用。
•请清除异物后再使用。
•无法正确感应内部温度,可能会发生火灾或异常。
除煮饭、保温、指定菜单外,请勿使用其它
(煮水、海带汤,咖喱,油炸食品等)用途。
•可能会产生异味或故障。
请勿使产品受到严重的冲击或使其跌落。
•可能会导致产品故障或发生安全事故。
•请不要对产品施加重力或使其跌落。
使用时不要超出限定容量。
•米汤溢出或出现故障的可能。
•煮粥时请不要超出指定容量。
红豆饭、杂食、炸丸子、奶酪炒年糕等料理
比米饭变质要快,请尽量不要保温。
请不要放入饭勺进行保温。
•可能会导致米饭变色或产生异味。
使用中出现异常声音、异味或冒烟时,
请立即切断电源,咨询售后服务中心。
本产品只能使用120V交流电源。
•有可能触电或发生火灾。
•产品将无法正常运行。
请保持电源接头与产品插头始终连接。
等产品散热后再清理。
•可能会因产品温度过高导致烫伤。
本产品不宜在倾斜或凹凸面上使用。
•可能会烫伤或发生故障。
•请勿用手、脚或其他物体牵绊电源线而使其跌落。
使用时请勿靠近墙壁、家具,可能会因蒸汽
或热量损坏墙壁或家具,使其变色或变形。
•置于收纳柜上使用时,请确保蒸汽不会渗入其中。
内锅涂层可能会脱落。
•长时间使用产品时,内锅涂层可能会轻微脱落。
•
用硬刷,钢丝球清洗内锅时,涂层会脱落,要用中性洗涤剂和海绵清洗。
•请不要将尖锐的餐具(叉子、勺子、筷子)放入内锅中清洗,
可能会导致涂层脱落。
请勿将内锅用于其他用途或置于火上。
•可能会导致内锅变形或涂层脱落,产品出现异常。
使用中或使用后内锅内部、内锅盖、加热盘
等,温度较高,请勿触摸。
•可能会因高温导致烫伤。
请勿将产品放置于垫板、坐垫、电热毯上使用。
•会引发火灾及导致产品变形,请随时确定产品状态。
不使用时请切断电源。
•可能会由于绝缘性能下降导致 触电、漏电、火灾。
注意
指示
使用后产品要清洁干净。
•蒸炖料理结束后进行保温时,米饭可能会有异味。
•请参照第40页进行清理后再使用。
保温时务必关闭锅盖、接通电源。
•可能会导致米饭异味或变色。
清理产品时请用中性洗涤剂清理内锅及分离
型锅盖,再用干燥的抹布擦净水分。
煮饭后可能会因产品内部蒸汽及高温导致
烫伤,请多加注意。
请抓住电源插头将其拔下,严禁拉拽电源线拔
下电源插头。
•如电源线受到冲击,可能会造成火灾或触电。
煮饭完成后请将积水部的水清理干净。
•可能会导致异味、变色。
•请将积水部的水清理干净。
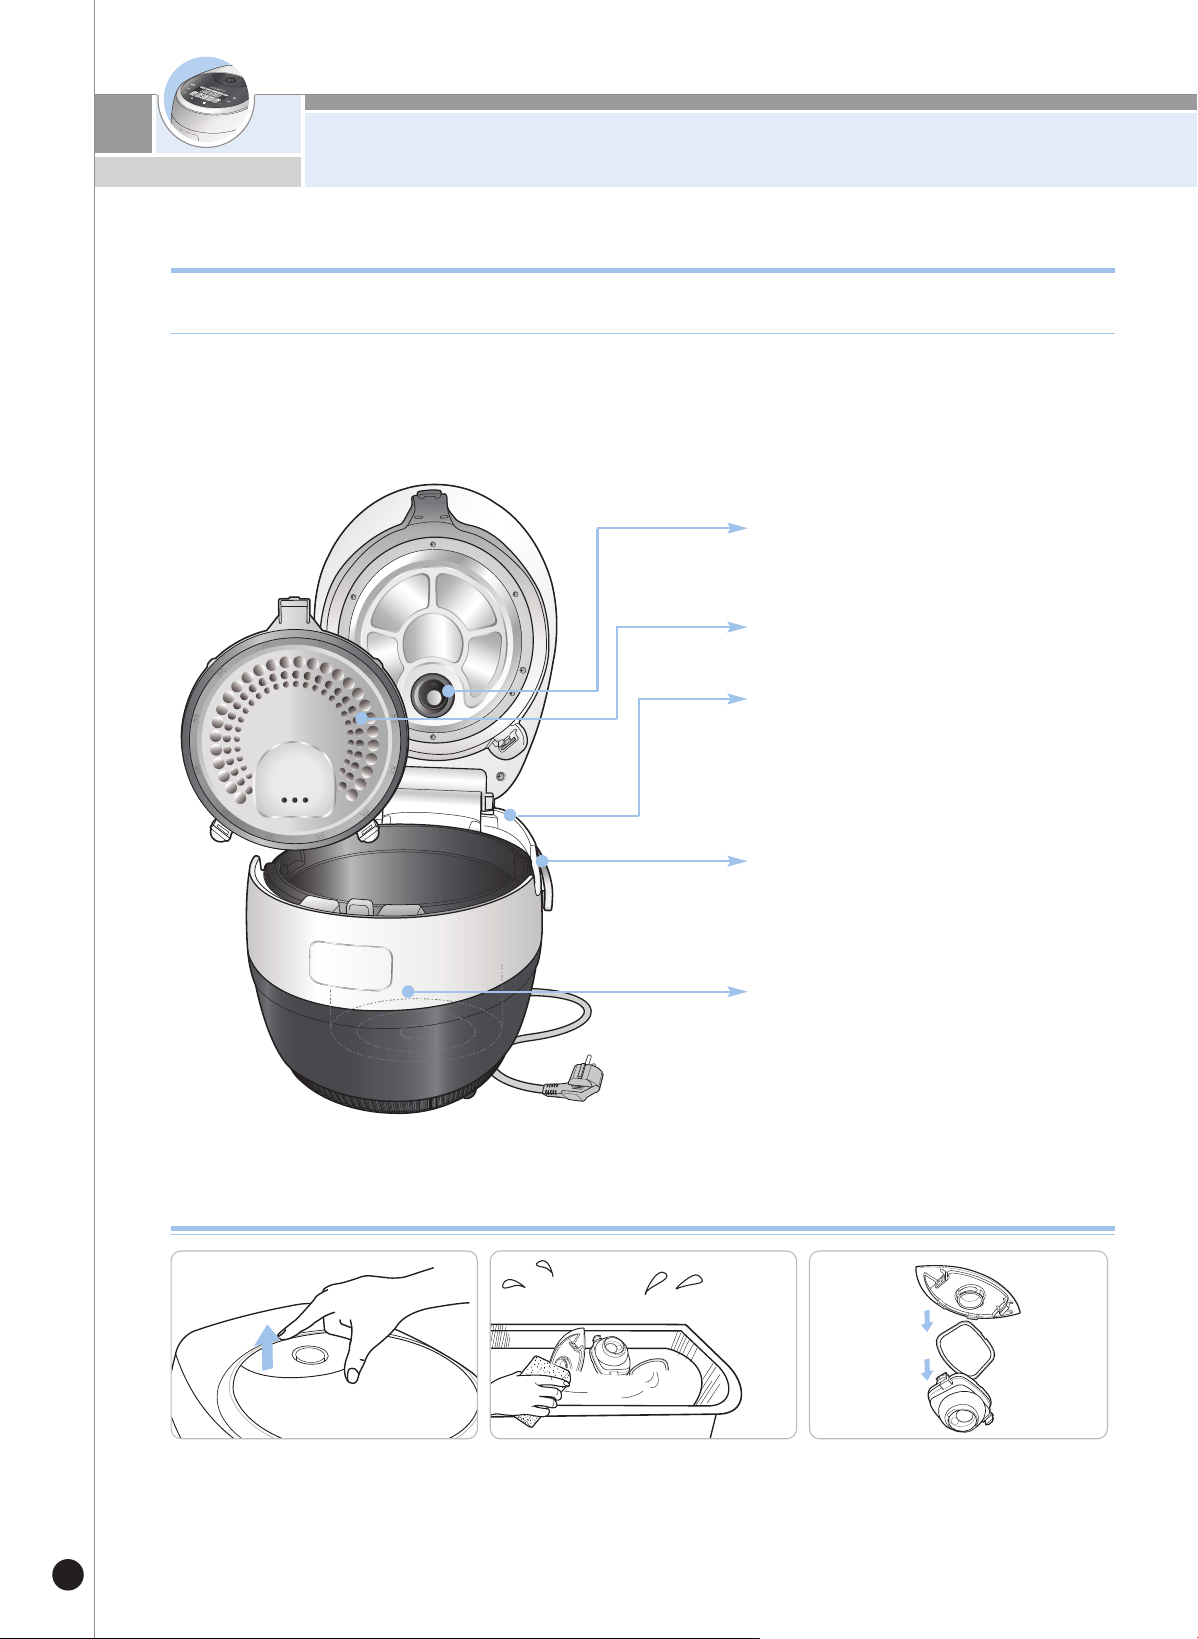
Part Names
14
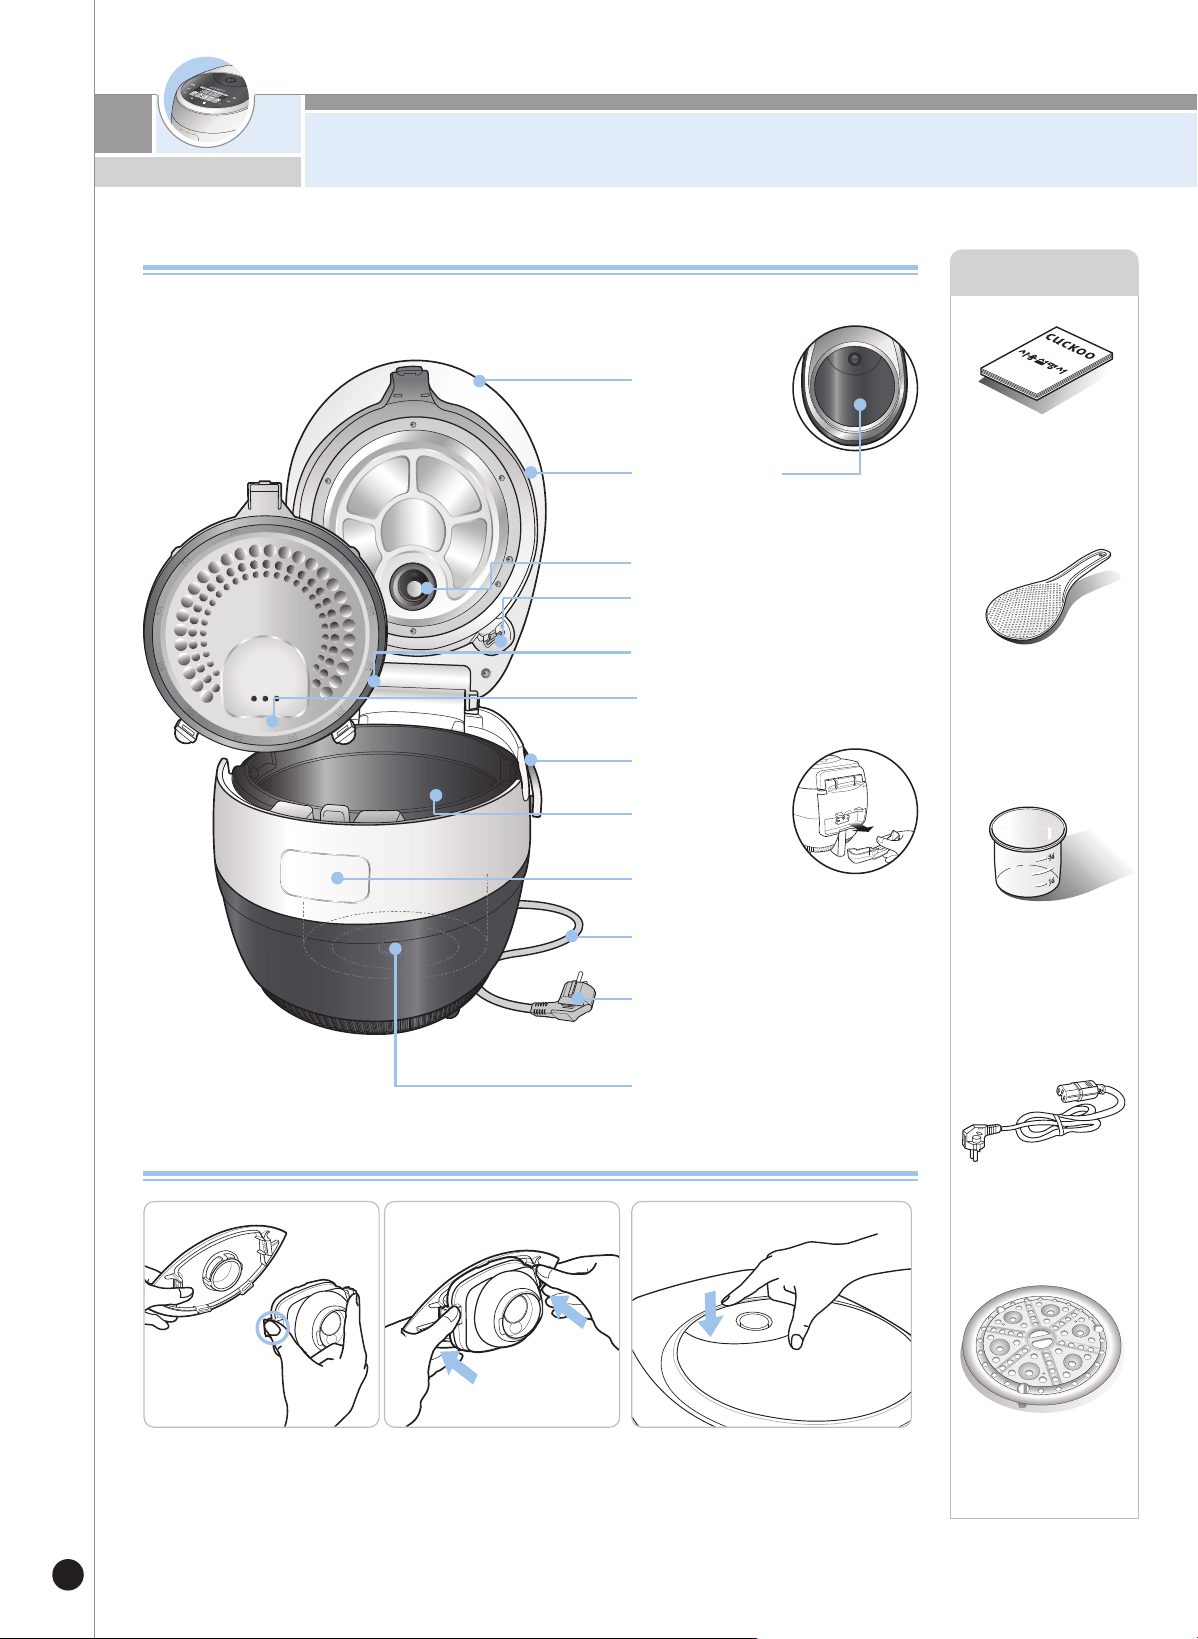
Name of each part
How to assemble the steam cap
Accessories
Manual
Rice Paddle
Rice measuring cup
Power cord
Steam Plate
Lid
Detachable cover lever
Steam cap
Inner pot
Detachable cover packing
Detachable cover
Clamp knob
Power plug
Temperature sensor
Power cord
1. Hold the soft steam cap
as seen in the picture.
2. Insert into the interlocking
position.
※ To separate it, follow the
steps above in reverse
order.
3. Assemble the soft steam cap
to the top of the rice cooker
Drain dish
After cooking or
warming, throw the
water out of dew dish.
Failure to remove
contents in the dew
dish will cause an
odor to appear.
Co
n
t
r
o
l
p
a
n
e
l
Lock
How to Clean and Maintain Your Rice Cooker
15
www.cuckoo.co.kr
ENGLISH
- Clean your product periodically to maintain upkeep of the rice cooker.
(Make sure your product is unplugged when cleaning your product)
Wipe the main body and the lid with a dry dishcloth. Do not use any commercial cleaners.
Wipe off all remaining food ma-
terial and moisture from all areas
of the outer and inner pot.
**Using a rough sponge, brush
or abrasive material may result
in damaging the inner pot.
Use dish soap with a soft
sponge for optimal cleaning.
If moisture accumulates on the
inner lid, wipe the lid with a dry
dishcloth
the inner lid, wipe the lid with a dry dish-
cloth.
※Caution when cleaning inner pot
The rice water generated while cooking is
designed to be collected in the dew dish.
After cooking, clean it with a dry cloth
Inner Pot
Main Unit
If any material sticks to the tem-
perature detector inside of the
inner body, remove it and avoid
damaging the metal plate.
Wipe food material or moisture
from the thermal plate.
Inner body
Inner Lid
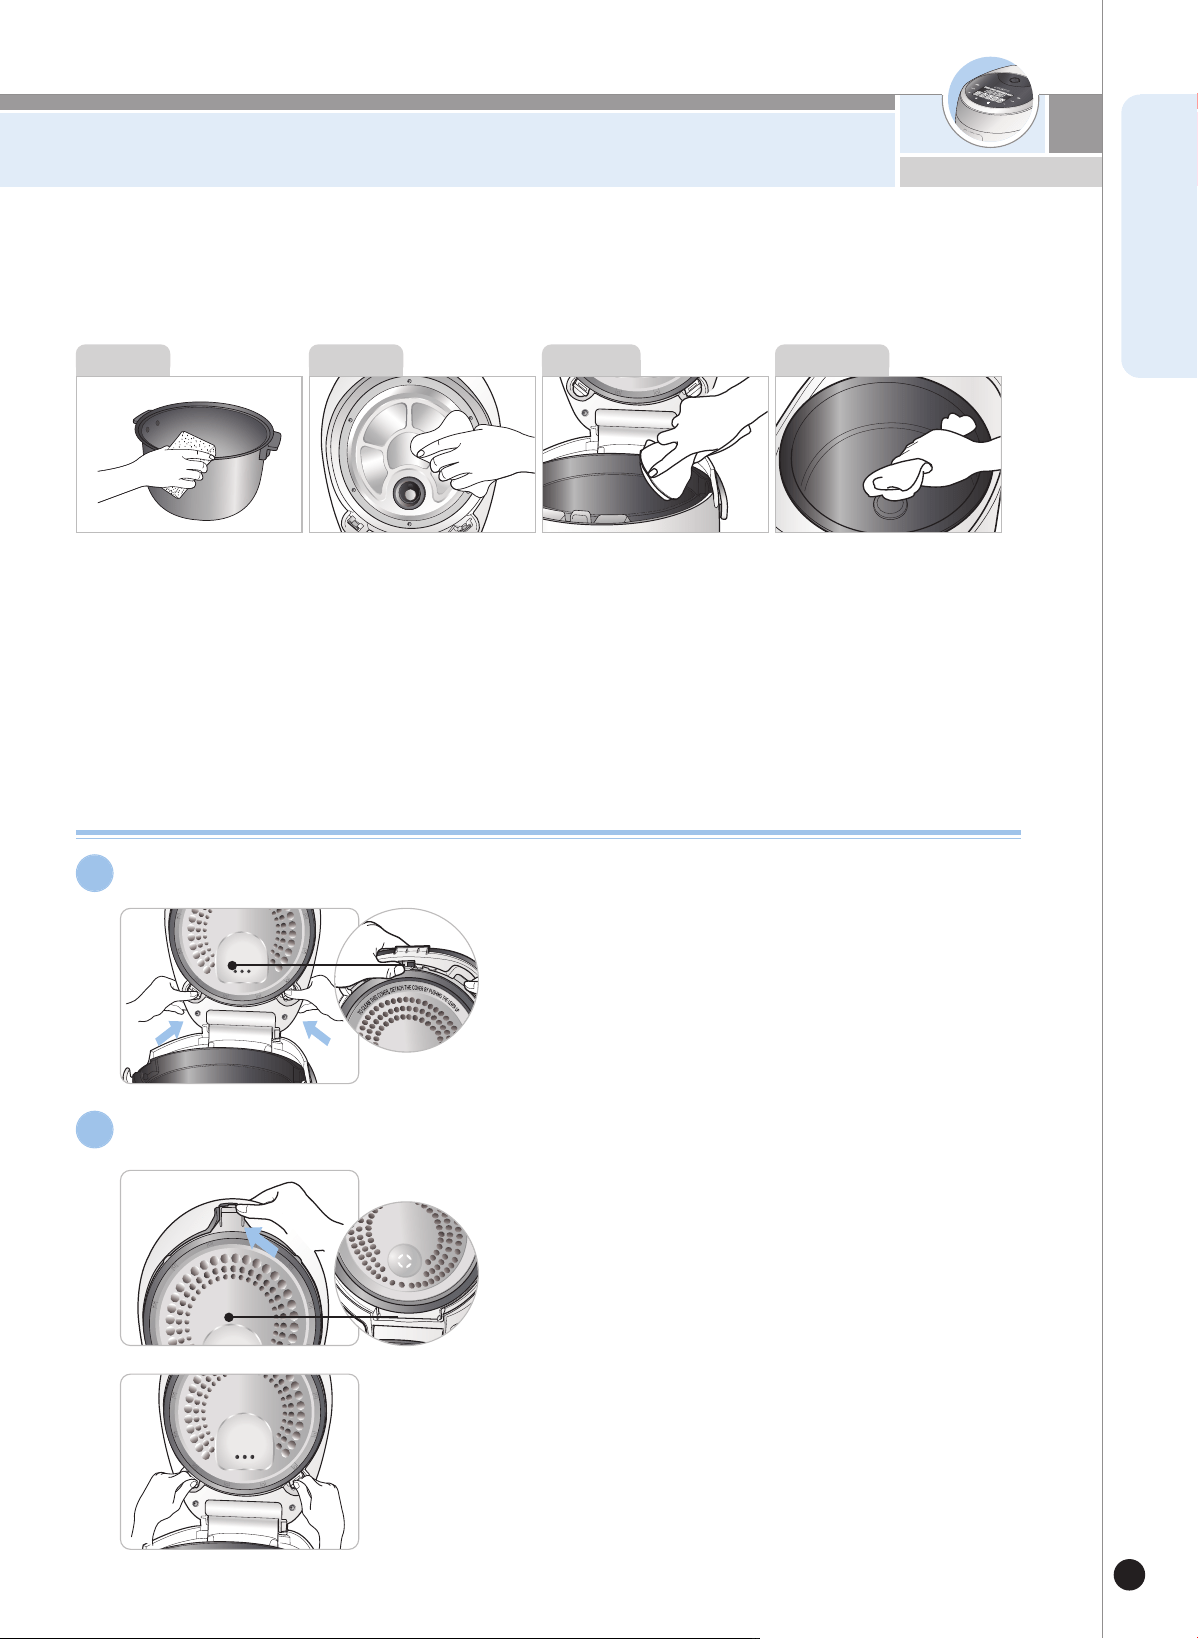
How to detach/attach detachable cover
How to detach detachable cover
▶Gently pull the detachable cover towards you by grabbing the
tabs at the bottom of the lid
1
How to attach detachable cover
▶Gently insert the protrusion of the detachable cover into the lid of
your rice cooker
▶Simply push the cover into the lid until the cover snaps into place.
※CAUTION: If you attach the detachable cover in the oppo-
site direction, it may cause damage to your
rice cooker.
2
※ Caution when cleaning inner pot
Do not use sharp cutlery (fork, spoon, etc.) in the pot.
- It may damage the inner pot coating.
How to Clean and Maintain Your Rice Cooker
16
The steam cap
1. The steam cap should be cleaned
after every use. Remove the steam
cap by simply pulling it off from the
lid.
2. Separate the steam cap into two
parts and soak them in lukewarm
water. Wash with a sponge or a soft
cloth
3. Assemble the two parts together until
there is a clicking sound
- Only use the Rice paddle inside the inner pot.
- Do not use any metal utensils or dishware in the product.
- Do not use any commercial cleaner.
- If you have used seasoning inside the inner pot, wash the product immediately after use.
- Some stains may remain during use, but this does not affect the cleanliness.
The inner pot contains a non-stick fluorocarbon coating in order to prevent rice from sticking to the
pot.
Maintaining Your Rice Cooker
After cooking, please wipe any moisture
from the inner pot to prevent odors.
Before cleaning, unplug the
steam cap.
Before cleaning, remove the detach-
able cover.
When storing your cooker, make
sure to wipe down your product to
prevent any discoloration.
When cleaning, if there is any
food material on the tempera-
ture sensor, carefully remove the
material without scratching the
metal plate
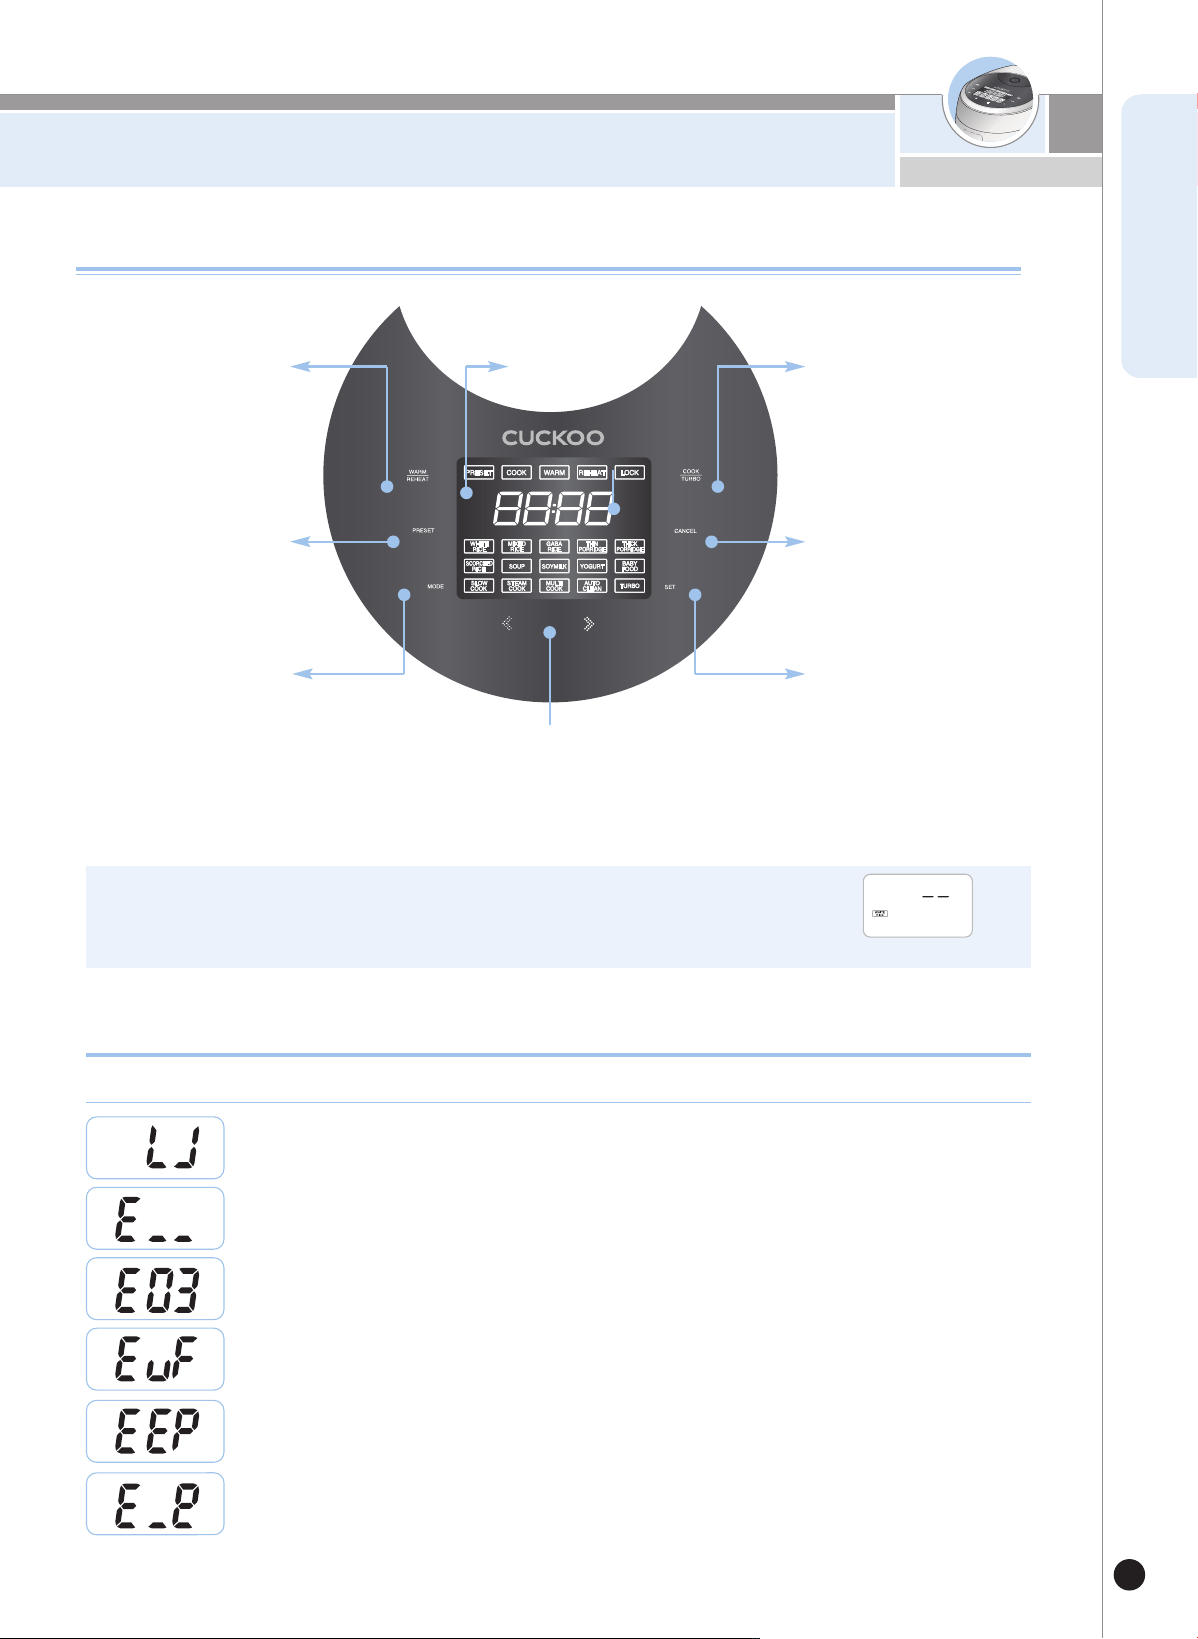
Panel Display
17
www.cuckoo.co.kr
ENGLISH
※
Press the buttons until you hear a buzzer sound. The design of this template may
differ from the actual product.
Error notifications may appear if product is not working properly.
Error Notifications
Temperature sensor issue. (Consult the service center and dealer)
When the inner pot is not correctly placed into the unit
properly.
Problem on micom memory.
This indicates that the micom memory is not working correctly.
(Contact Customer Service).
This indicates that the environmental sensor failed to work.
(Contact our Customer Service).
When the cooking mode has not finished for a long time. (Contact our service
center and dealer)
SET button
Press to finalize/lock desired cook-
ing mode.
SELECTION button
Press to select desired cooking mode.
<Standby Mode Screen>
CANCEL button
Press to cancel the selected mode.
MODE button
This button is used to select cooking
temperatures.
Display
Keep WARM/REHEAT
button
Press to warm or reheat the previously
cooked food.
COOK/TURbO button
Press to start the cooking process
in turbo or normal mode.
PRESET button
Use it to set a lapse time of completion
cooking time you want.
Panel Display
BEFORE COOKING RICE
18
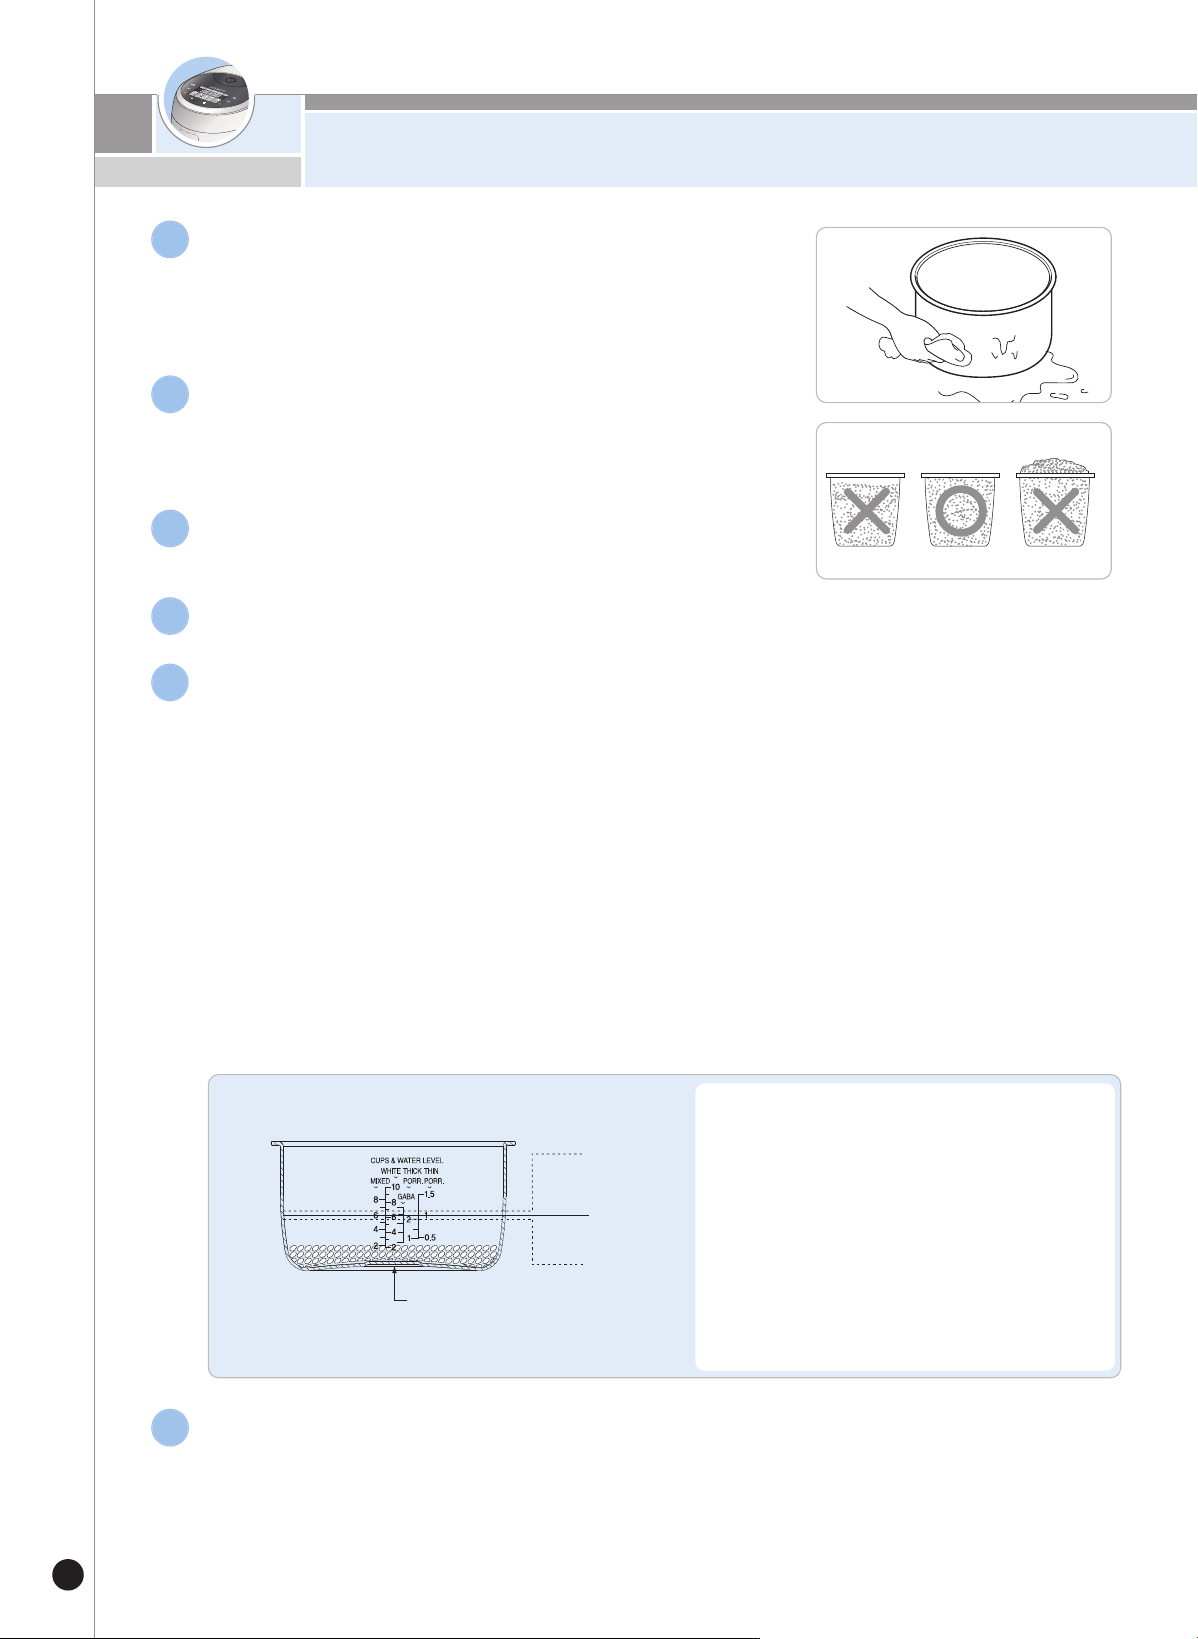
Clean the inner pot and remove any moisture.
▶C
lean the inner pot with a dishcloth.
▶Using a rough sponge may cause damage to the surface of the
inner pot.
1
Measure the rice correctly with a measuring cup.
▶Recommended serving: 1 full cup of rice equals to one person.
(Example : 2 persons for 2 cups, 4 persons for 4 cups)
2
Clean the rice in a separate container until the
water becomes clear.
3
Put rinsed rice into the inner pot.
4
Put the inner pot into the main body and cover the inner lid.
• Make sure the inner pot is completely inserted.
▶If there is any food material or objects at the bottom of the rice cooker, the pot will not work properly.
6
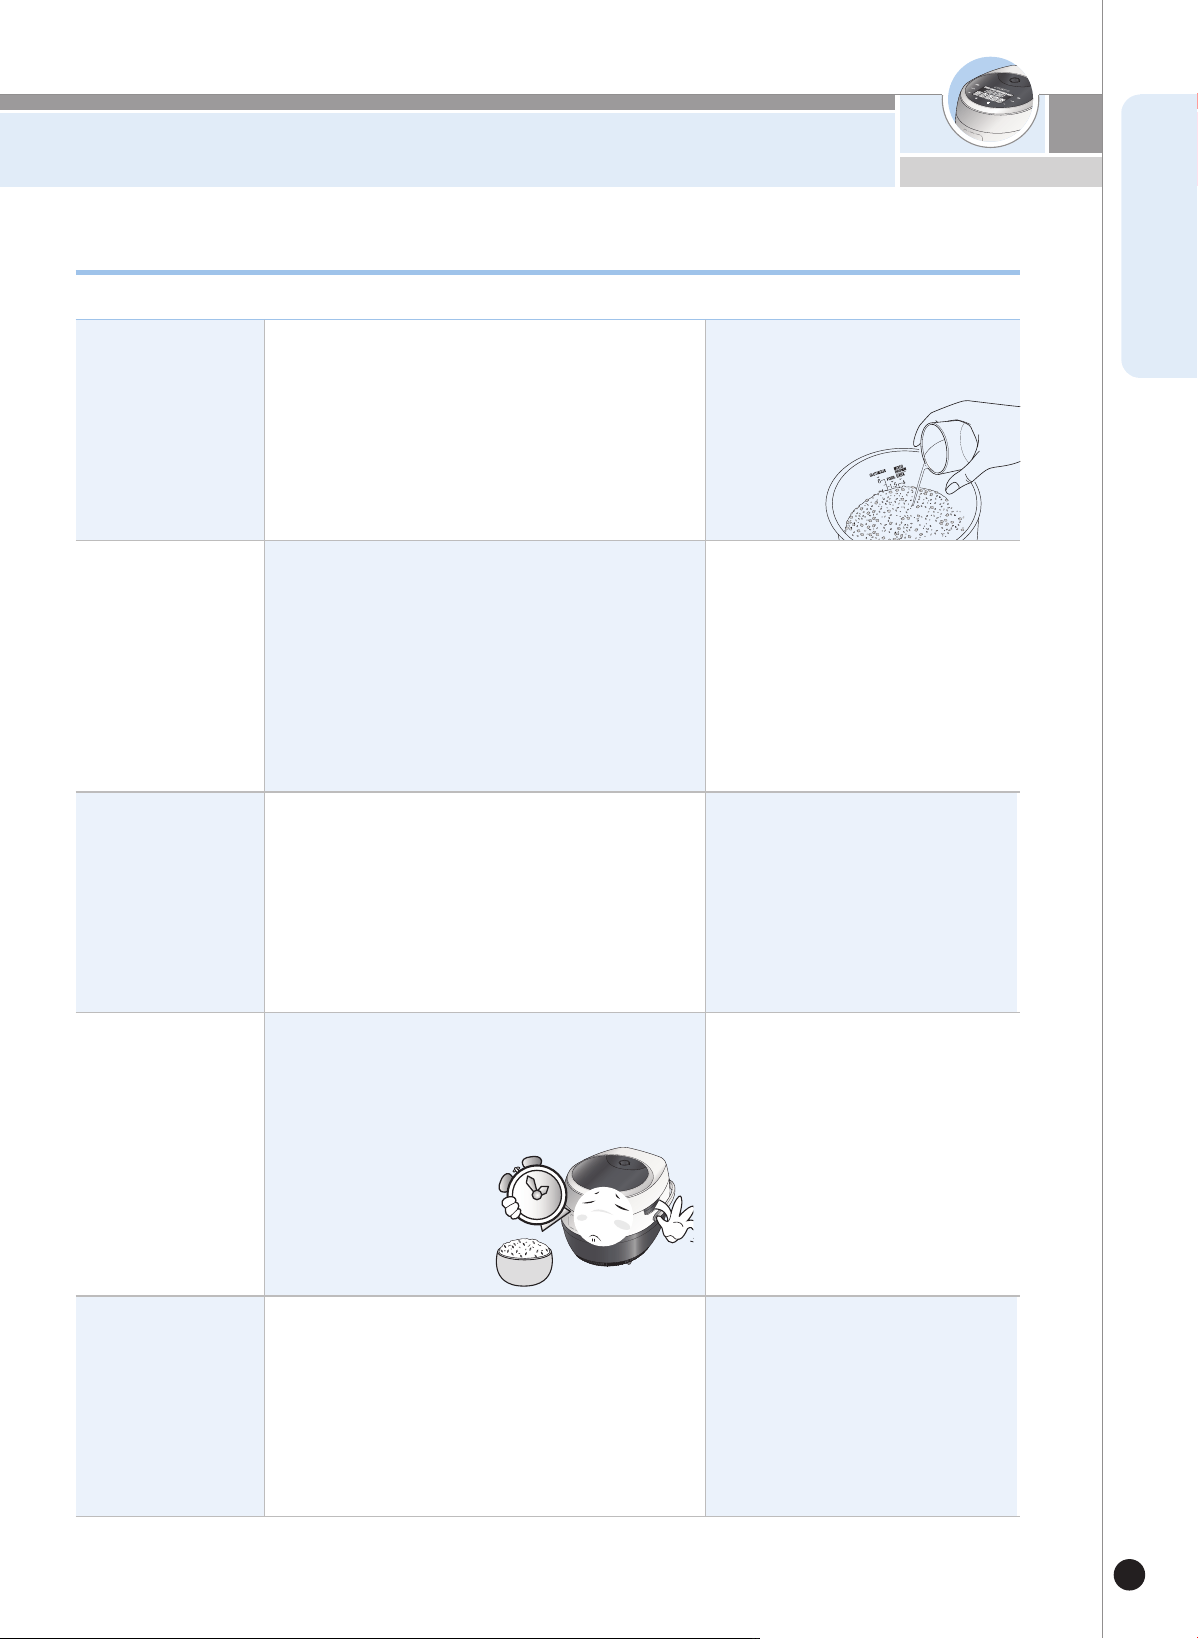
❶
To cook sticky rice or for old rice :
Pour more water than the required water level
❷
To cook rice for 6 people (6 measuring cups) :
Pour water up to water level 6.
❸
When the rice is soaked sufficiently or to over-
cook rice:
Pour less water than the required water level
❹
When the rice is overcooked or undercooked :
the cooking result can be varied due to the mois-
ture content of rice (old rice) If the rice is over-
cooked or undercooked, please pour 1~10%
more water into the pot before initiating cooking.
❶
❷
❸
Pour water into the inner pot until you reach the proper rice to water ratio.
▶Place the inner pot on a flat surface and adjust the water amount to the water level line.
▶The water level line is marked in the inner pot.
▶Adjustment of water height
• WHITERICE, TURBO WHITE RICE, SCORCHED RICE: Adjust water based on 'WHITE RICE` water level line.
• Max.10 persons for WHITER RICE.
• Max.6 persons for TURBO WHITE RICE.
• Max.4 persons for SCORCHED RICE
• MIXED RICE: Adjust water based on 'MIXED RICE` water level line. Max.8 persons for MIXED RICE.
• GABA RICE: Adjust water based on 'GABA RICE`.
• Max.6 persons for GABA RICE.
•
THICK PORRIDGE : Adjust water based on 'THICK PORRIDGE` water level line Max.2 cups for THICK PORRIDGE
•
THIN PORRIDGE: Adjust water based on 'THIN PORRIDGE` water level line. Max.1.5 cups for THIN PORRIDGE.
5
• For 10 persons (1.8L) product
Plain rice for 6 persons
( 6 measuring cup)
FOR TASTIER RICE
19
www.cuckoo.co.kr
ENGLISH
Storing the rice
correctly.
Keep your cooker
clean at all times
•
Pour the rice according to the measuring
cup. (The rice amount measured by a com-
mercial rice container may vary depending on
the product.)
•
Adjust water amount to the water level line
after placing the inner pot on a flat surface.
•
Purchase rice in small quantity to ensure
freshness.
•
For dried rice unpacked for a long time, it is
better to cook with more water (about a half
water level line).
•
Clean your cooker frequently
Wipe foreign materials from the lid frequently.
If the rice is extra dry, add more
water to increase the likelihood of
better tasting rice.
By not cleaning your cooker, it can
compromise the quality of your
rice.
▶Observe the following instructions for tasty rice:
How to Cook Tastier Rice
Measure rice with
a measuring cup.
Pour water up to
the water level line
of the inner pot.
Exceeding the “Keep warm” time
limit of 12 hours may cause discol-
oration of the rice.
Do not exceed 12
hours in “Keep
warm mode”
If the amount of water is incorrect
for rice amount, the rice
may be undercooked or
overcooked.
It is better to make
the timer cooking
short.
•
For dried-up rice, avoid timer cooking if at all
possible and add water (about a half water
level line).
•
Exceeding 12 hours in “Keep warm mode”
may decrease the quality of your cooked rice.
Timer cooking over 10 hours or
with dried rice may cause rice to
be undercooked, scorched or
cooked unevenly.
HOW TO START COOKING
20
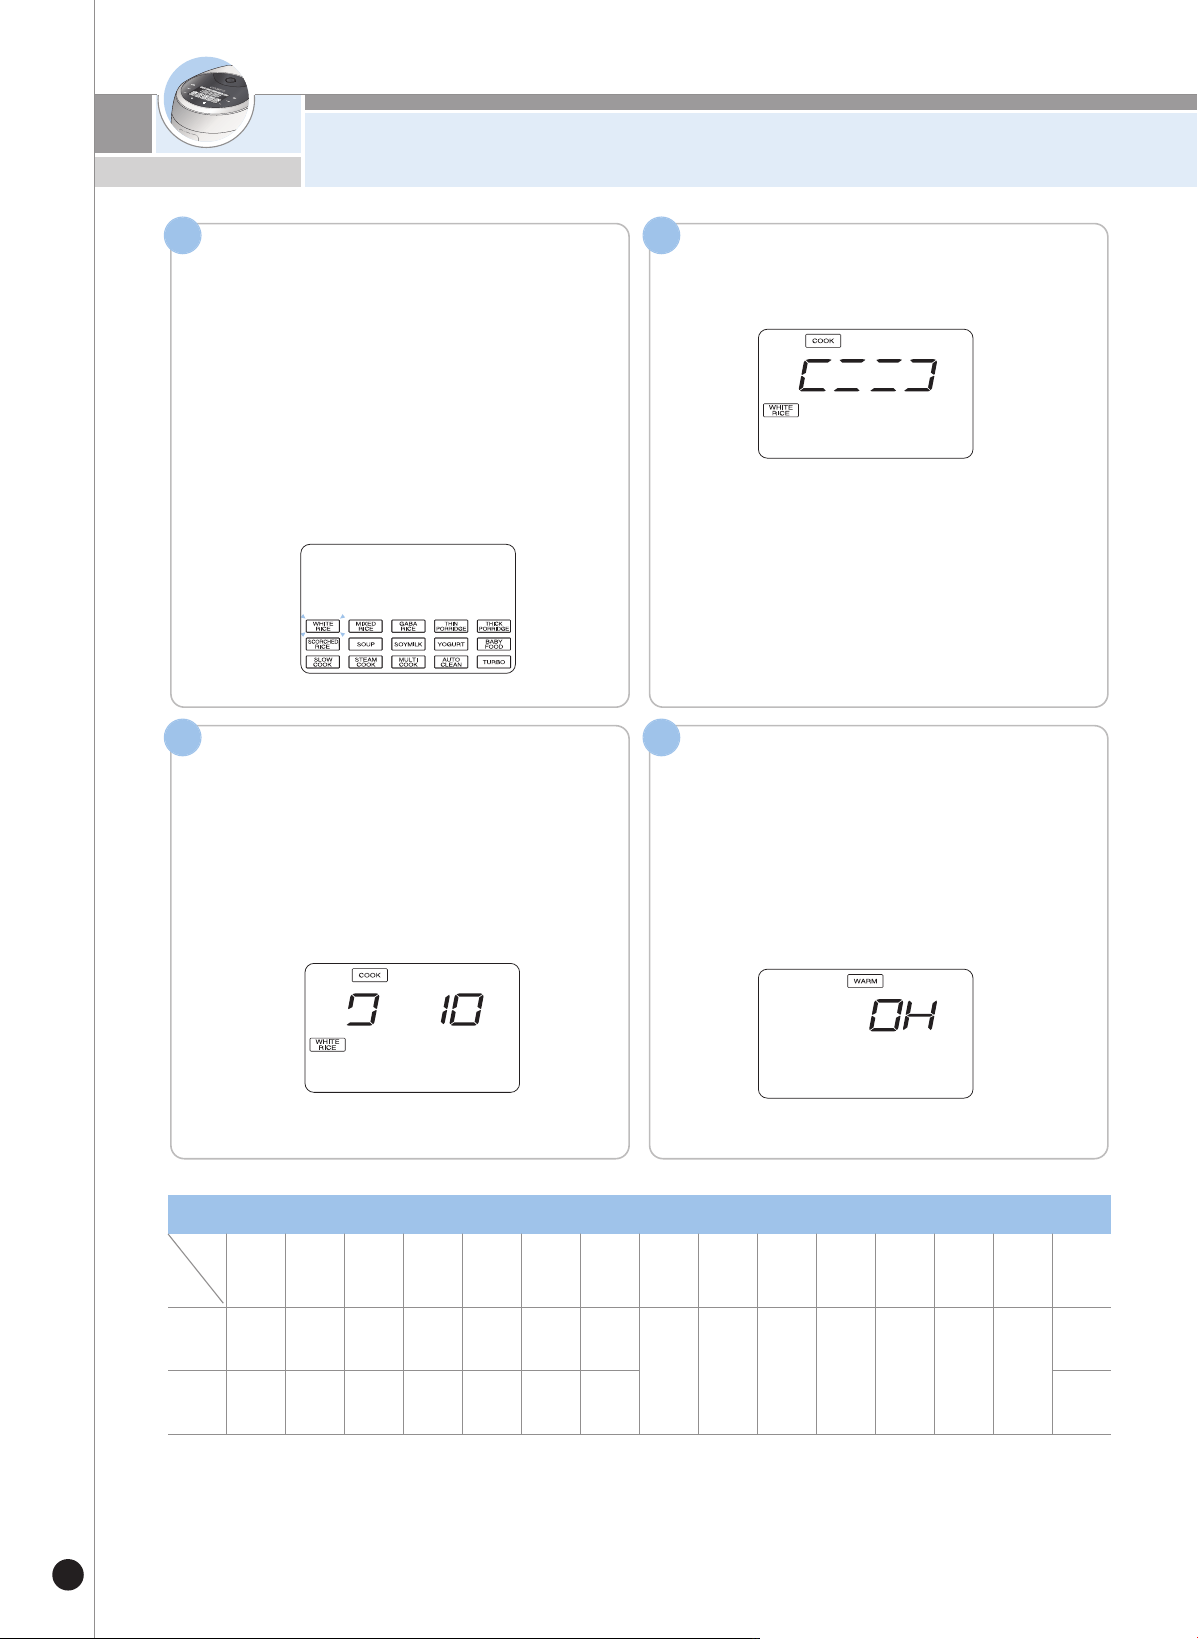
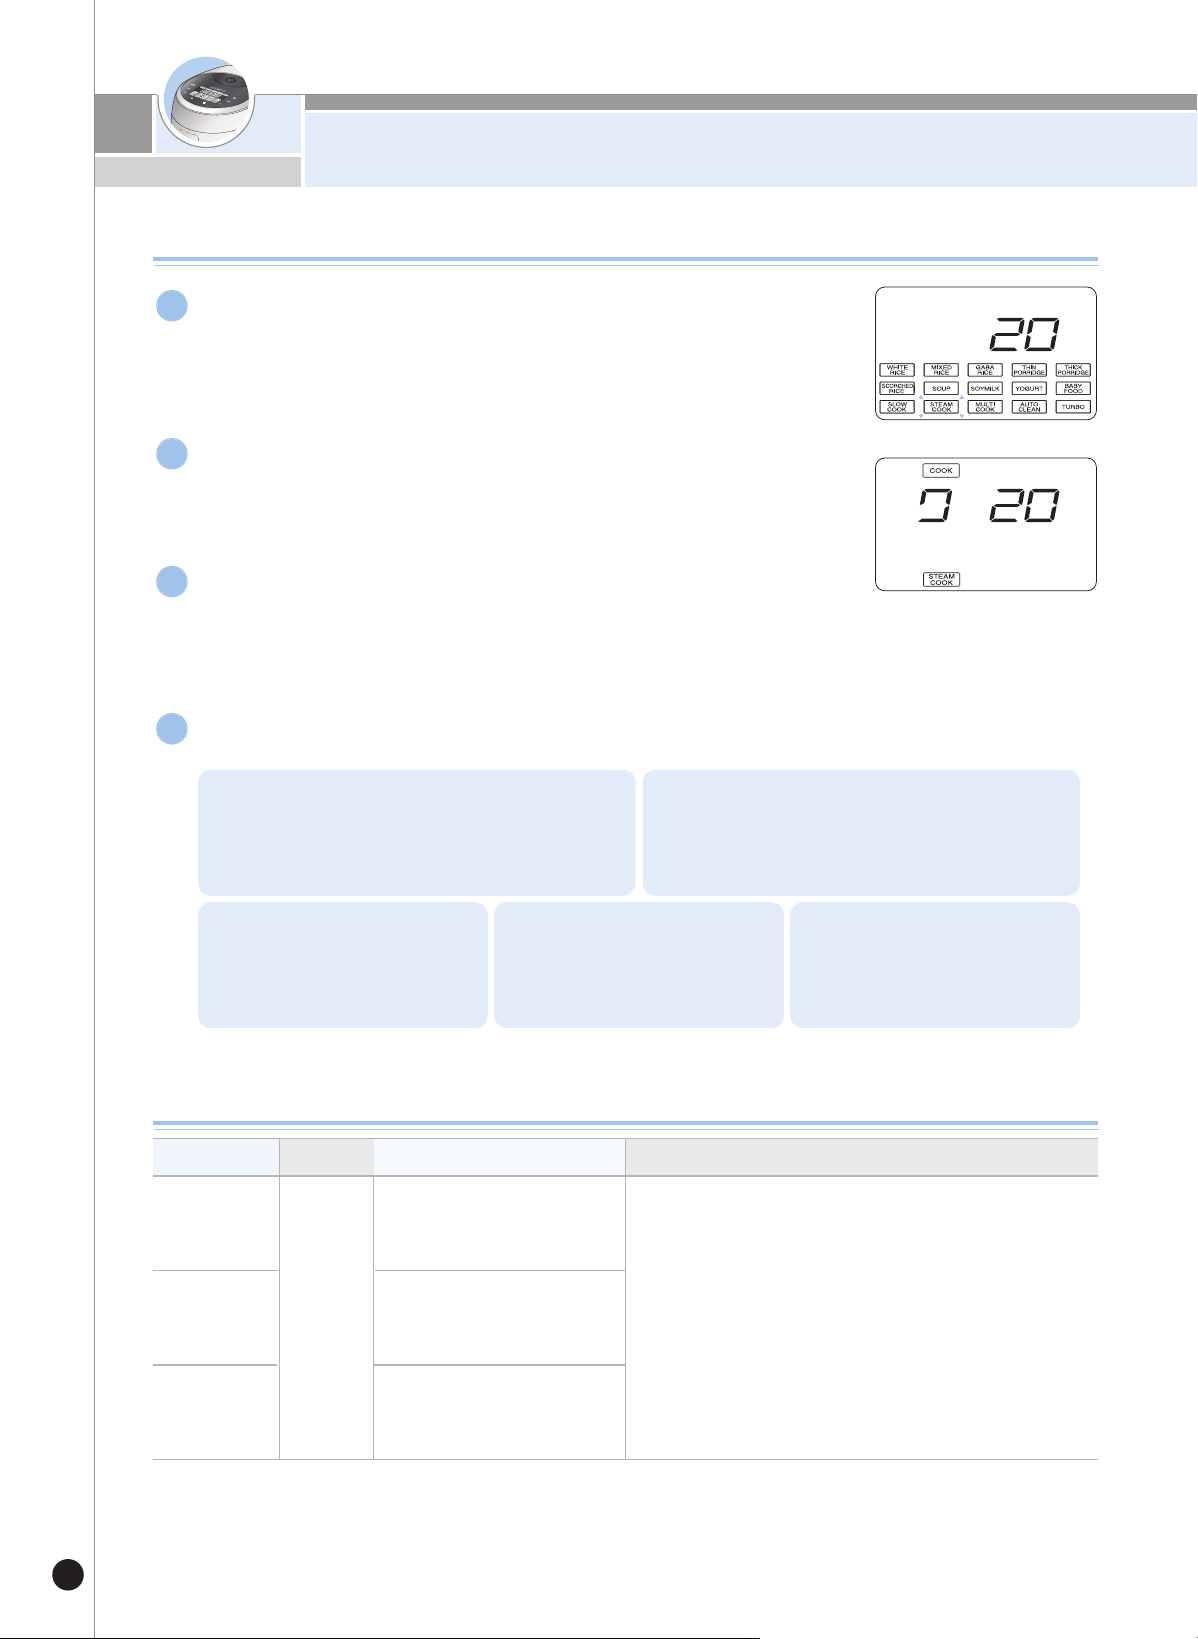
Press the “SELECTION” button to select
your desired cooking mode.
Press the “COOK/TURBO” button to start
cooking.
1 2
Completion
˙
When the cooking is completed you will be notified by a beeping
sound, then it will automatically start “Keep Warm” mode.
˙
When the rice is done cooking, be sure to stir the rice.
˙
Do not press the “CANCEL” button while cooking. Unless
an emergency occurs.
4
Steaming boiled rice
(example: WHITE RICE)
·The remaining cook time is shown on the display from the
steaming boiled rice process.
·The remaining time may vary depending on the menu.
3
▶Be sure to clean your cooker thoroughly before cooking the following: SOUP, SOY MILK, YO
GURT, SLOW COOK function.(Clean the lid referring to Page 15)
▶The cooking time may vary depending on which cooking mode is selected.
Example) Cooking WHITE RICE.
Cooking Time by Menu
Menu
Category
WHITE
RICE
TURBO
WHITE
RICE
MIXED
RICE
GABA
RICE
SCORCHED
RICE
THICK
PORRIDGE
THIN
PORRIDGE
SOUP
SOYMILK
YOGURT
BABY
FOOD
SLOW
COOK
STEAM
COOK
MULTI
COOK
AUTO
CLEAN
Cooking
Quantity
2~10
persons
2~6
persons
2~8
persons
2~6
persons
2~4
persons
1~2
cup
0.5~1.5
cup
Refer
to
Page
27.
Refer
to
Page
28.
Refer
to
Page
29.
Refer
to
Page
31.
Refer
to
Page
32~33.
Refer
to
Page
30.
Refer
to
Page
34.
up to
water
level 2
Cooking
Time
39~60
min.
31~41
min.
42~63
min.
76~101
min.
46~51
min.
90min.
105min.
About
25min
Example) Selection of WHITE RICE
Whenever the "SELECTION" button is pressed, the cooking
options will be highlighted in sequential order from WHITE
RICE, MIXED RICE, GABA RICE,
THIN PORRIDGE, THICK PORRIDGE, SCORCHED RICE,
SOUP, SOYMILK, YOGURT, BABY FOOD, SLOW COOK,
STEAM COOK, MULTI COOK, AUTO CLEAN, TURBO
WHITE RICE.
·After the WHITE RICE, GABA RICE, and MIXED RICE set-
tings have been used, your cooker will memorize your
preference. Skip this step and press COOK/TURBO
HOW TO START COOKING
21
www.cuckoo.co.kr
ENGLISH
When cooking the rice it can become slightly yellow at the bottom of the inner pot, but this is
normal. This is more prevalent in the “Preset” than just than just using the regular cooking op-
tions. It does not mean the cooker is defective.
The Searing Effect
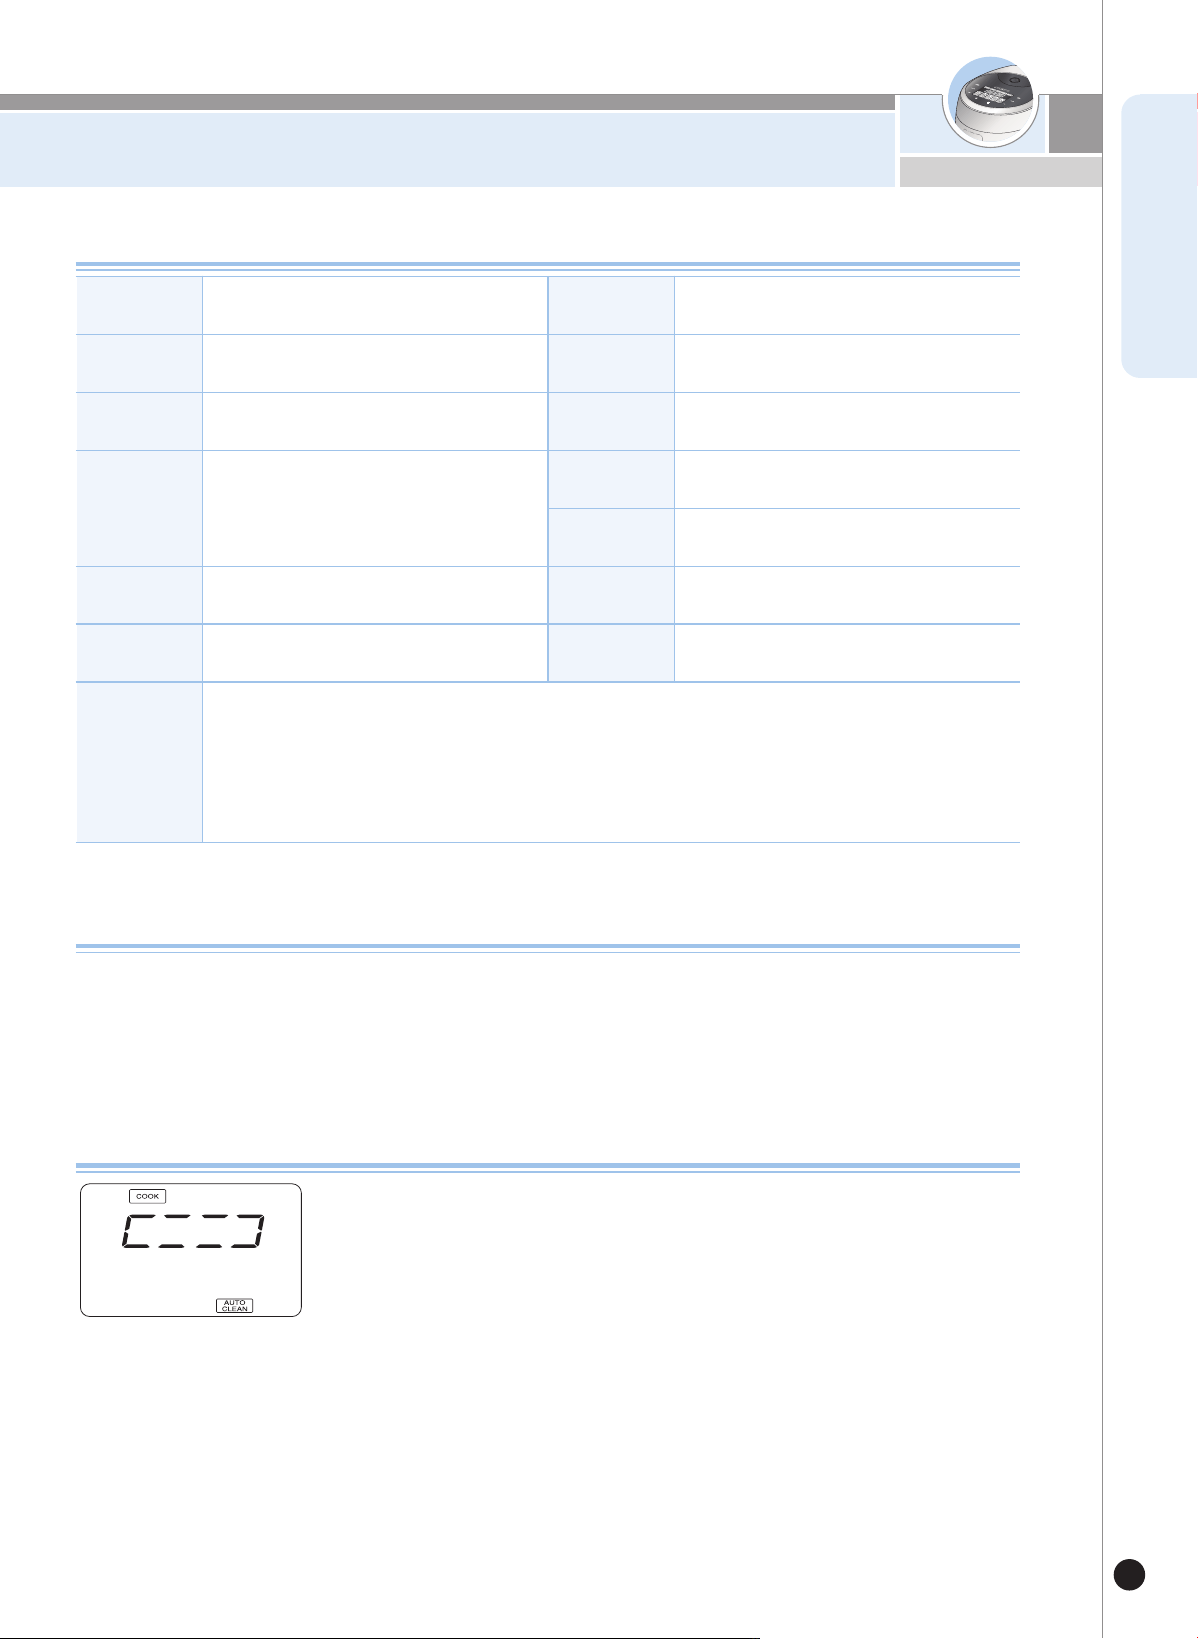
How to use Automatic Sterilization (Steam Cleaning)
Detailed Settings for each Cooking Option
Add water to level 2 and then close and lock the cover.
Method 1. To use the automatic cleaning menu by pressing "Menu" button,
then Select “COOK/TURBO” button.
Method 2. To use the automatic cleaning mode press the “PRESET” button twice in
standby mode, then press “COOK/TURBO” button to start.
※Be sure to empty the dew dish located on the back side of the cooker.
WHITE RICE
For short grain white rice.
MIxED RICE
When cooking long rice or brown
rice.
GAbA RICE
This function will be used for germi-
nated brown rice.
SCORCHED
RICE
For SCORCHED RICE.
STEAM
COOK
For steaming food.
*Set time manually
THICK
PORRIDGE
For THICK PORRIDGE.
SLOW
COOK
For porridge, soup, tea, etc.
*For optimal usage, set to low tem-
perature
THIN
PORRIDGE
For THIN PORRIDGE.
bAbY FOOD
For BABY FOOD.
MULTI
COOK
Manual settings are required for thermal
power, temperature and cooking time.
SOUP
For making/boiling soup
SOYMILK
For boiling soy beans.
YOGURT
For starting the fermentation
process of yogurt.
TURbO
FUNCTION
Press “COOK/TURBO” twice after choosing “WHITE RICE”and it will switch to
“quick cook.” It will take about 31~33 minutes (For 2 people)
*TURBO WHITE RICE mode, the preset function is not available.
HOW TO USE SCORCHED RICE
22
▶
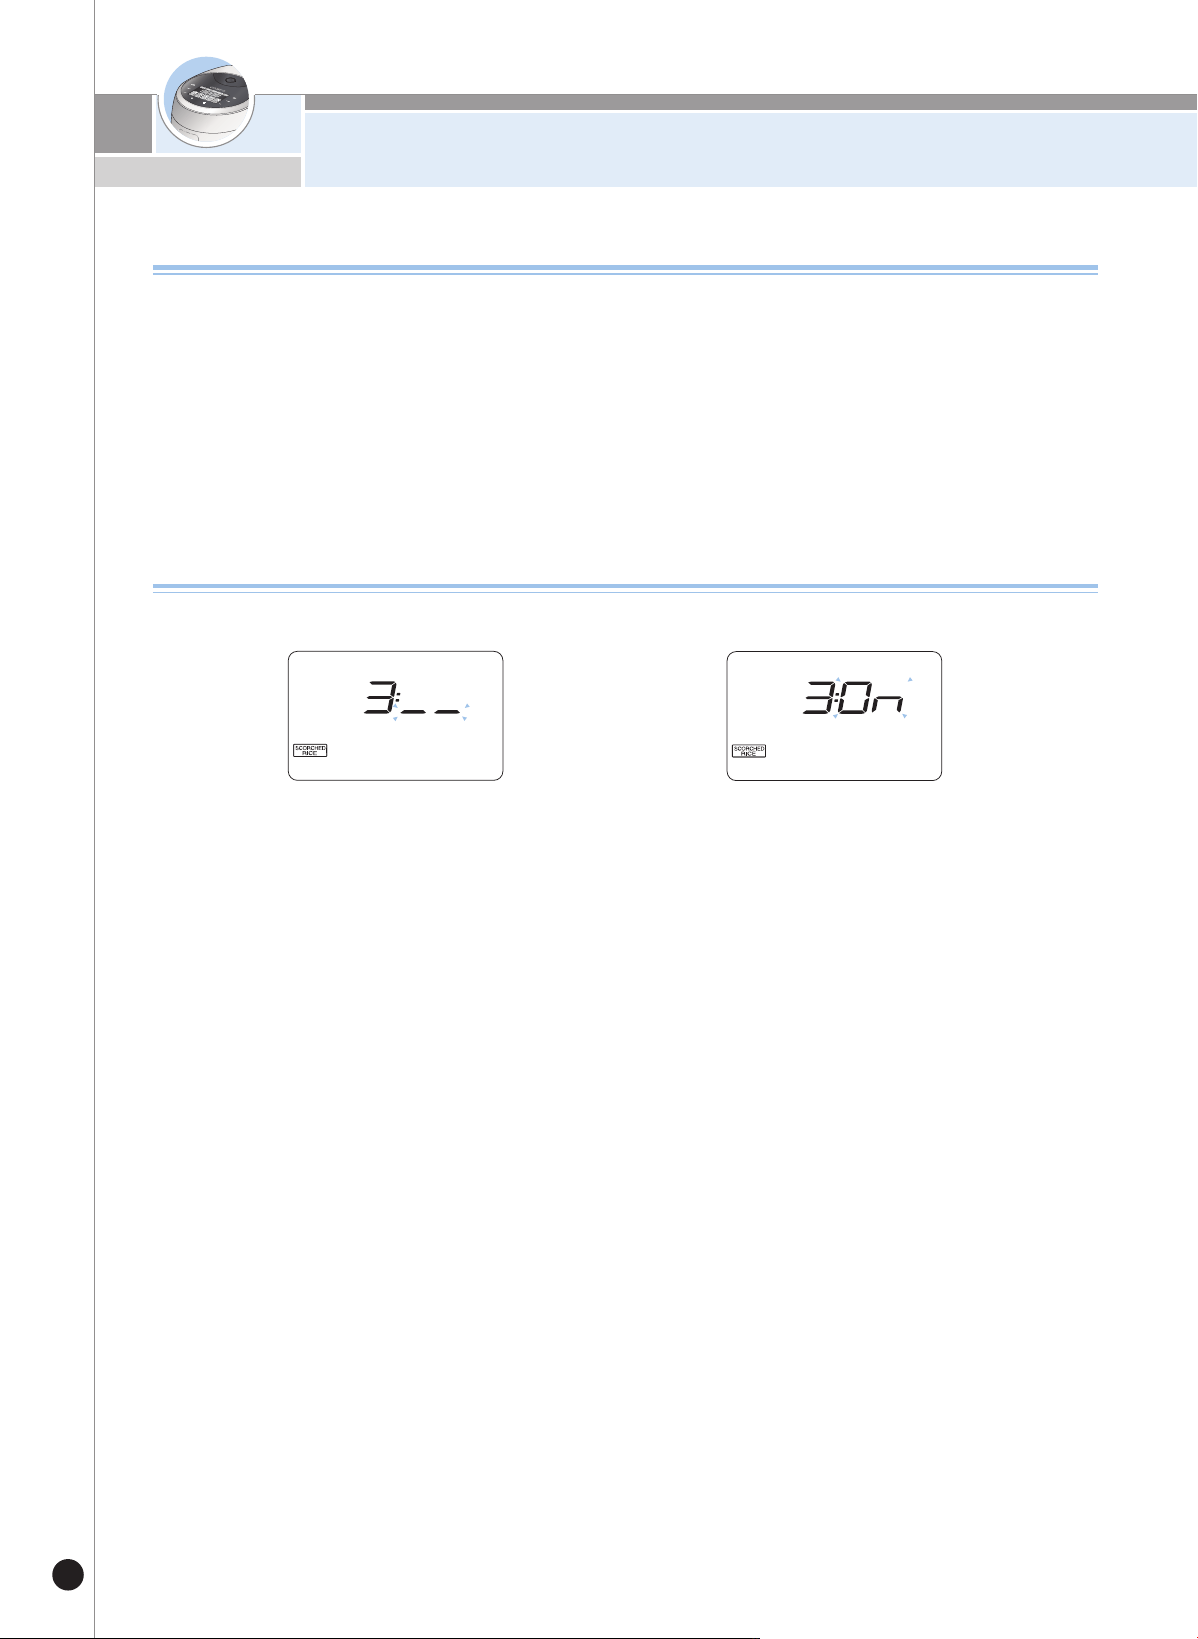
How to set up the enhanced burning SCORCHED RICE (for enhanced burning SCORCHED RICE).
1. If you push the mode button 4 times in an idle state, enhanced burning SCORCHED RICE mode will be set
2. Make sure to press and hold the MODE button for at least one second to set up initial mode.
3. The display will be shown above once the cooker is in burning SCORCHED RICE mode.
Press the SET button after choosing “Enhanced Burning SCORCHED RICE" by pressing MENU/SELEC-
TION button.
4. If no button is pressed within 7 seconds, enhanced burning SCORCHED RICE mode will be canceled and
will return to standby mode.
How to set up the function of burning SCORCHED RICE
Select the SCORCHED RICE cooking option by pressing the SELECTION button.
P
ress the COOK/TURBO button to start cooking.
Once cooking is complete, open the lid, scoop out the rice and enjoy your SCORCHED RICE.
▶ The SCORCHED RICE can be cooked for up to 4 servings.
▶ Set the amount of water for cooking 'WHITE RICE.'
▶ Do not wash the rice too clean for cooking. (Enough to opaque water)
▶ For SCORCHED RICE, place rice and water in the inner pot and leave it for about 30 minutes with the lid
closed before cooking.
How to Use the SCORCHED RICE Option
HOW TO USE “MY MODE”
23
www.cuckoo.co.kr
ENGLISH
Initialization is set up “ ” get step by step as the case may be.
- High step : for cooking cereals, soft-boiled rice.
- Low step : for cooking the year’s crop of rice.
While cooking you can control the heating temperature (both high an low) depending on, your prefenence.
Cuckoo customized cooking function
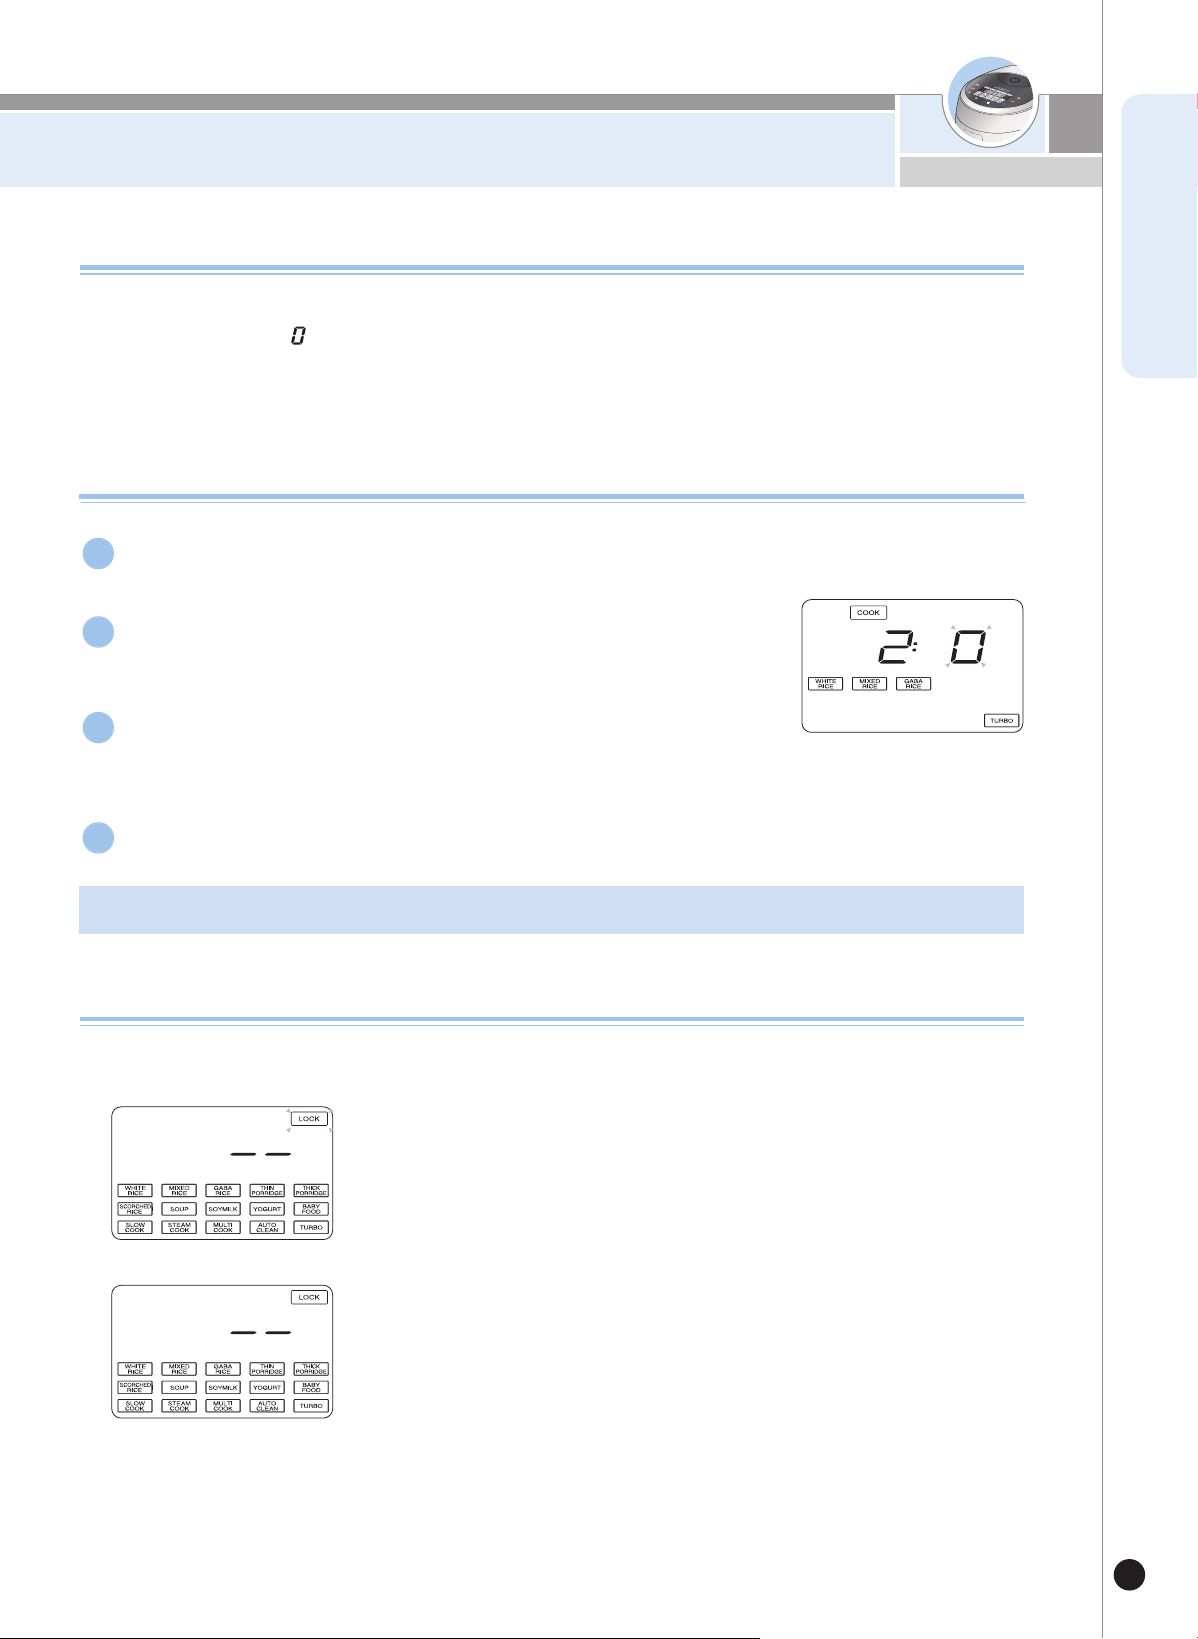
1. Pressing the SET button for three seconds or longer
in cook, preset, warming or reheating mode will lock
the buttons.
2. The lock indicator turns on in the display when it is
set.
1. Pressing the SET button for another three seconds
in cook, preset, warming and reheating mode will
unlock the buttons.
2. The button lock indicator turns off when it is can-
celed.
Lock can be set for touch button to prevent accidental touch during cleaning or by children.
How to Set ''LOCK bUTTONS''
Customized cooking Function
- Its factory setting is Step 0 and you can set it as needed.
▶
-2→1 →0 →1 →2
Enter "MY MODE" by pressing the MODE button three times.
Make sure to press down the MODE button for at least one second.
1
It returns to Standby mode if you press CANCEL or no button for 7 sec-
onds in the My Mode setting menu.
4
The following screen is displayed in the initial "MY MODE"
settings
2
Select your desired mode and press the SET button.
3
▶Setting Method
▶How to set and unset the mode
※ If you press any other button than the 'BACK' button while the button lock is selected, a buzzer sound will be made, and
the screen notifying that it is in the locked status will be displayed.
※ You may unlock the buttons by pressing the 'BACK' button for three seconds or longer.
※ If you pull out and put in the Power Plug again after setting the button lock, the Button Lock Function will be canceled.
HOW TO USE “GABA”
24
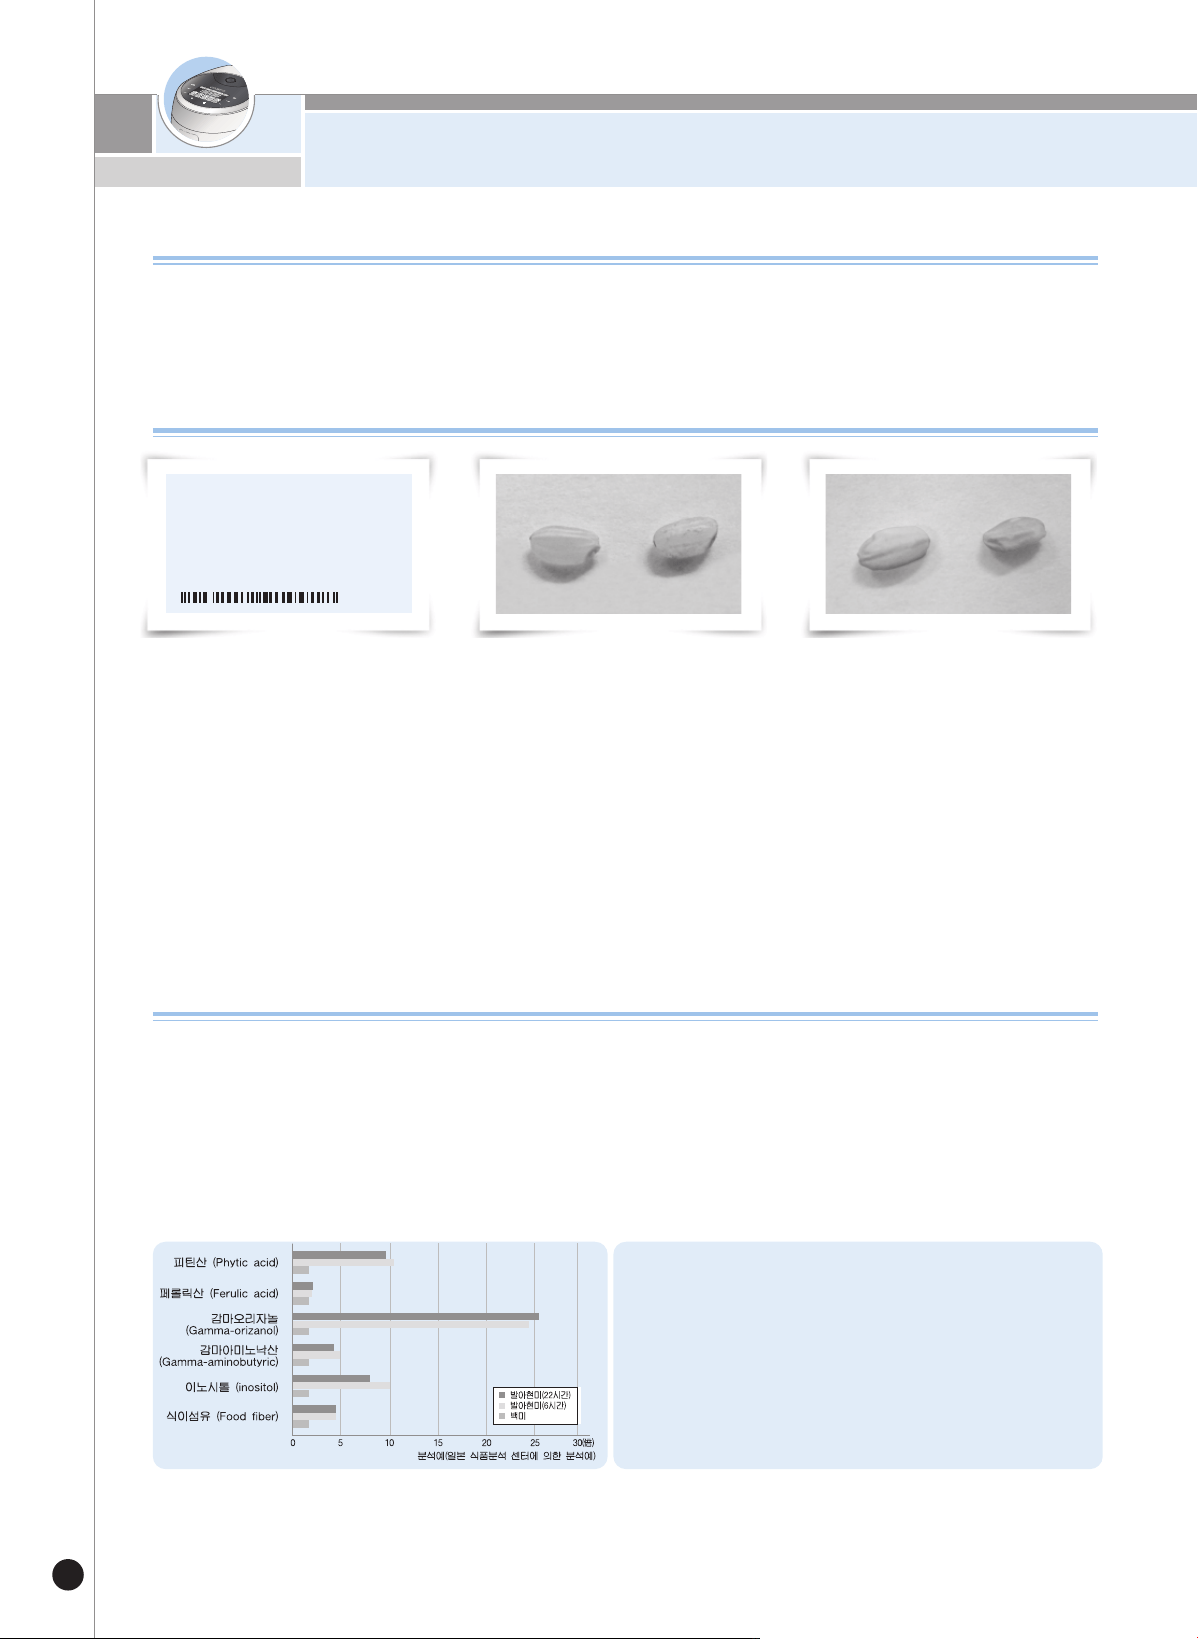
원산지 : 경기 용인
품 목 : 추청
단 위 : 1.5kg
생산년도 : ××××년산
도정일자 : ××××년 ××월 ××일
Check the dates of harvest and pounding.
▶The dates should be within 1year from a harvest, 3 months from pounding.
Inspect rice with your eyes.
•heck that embryo is alive
•Rice surface should be light yellow and glazing. Whitely stirred up surface, or darkish colored Brown rice is
not suitable for a germination
•Avoid fractured, not fully corned, or empty ear. Empty ear may generate odor during germination and
bluish- nor corned Brown rice cannot be germinated.
(Regular brown rice) (Poor brown rice-
Missing embryo)
<Comparison of Germinated brown rice's nutri-
tion and Glutinous rice's (6 hours) nutrition>
▶
Phytic acid 10.3 Times
▶
Ferulic acid 1.4 Times
▶
Gamma-orizanol
23.9 Time
▶
Gamma-aminobutyric
5 Times
▶
Inositol 10 Times
▶
Food fiber 4.3 Times
▶Brown rice is rich in nutrients. However, brown rice is harder to digest.
Germinated brown rice has activated enzymes, generating nutrients that are more digestible
What is Germinated brown rice?
Germinated Brown rice promotes healthier nutrients and enhances taste. Germinated Brown rice also im-
proves digestibility.
▶Enhanced taste
▶Better digestion and rich in nutrients.
▶Rich with dietary fiber.
▶Germinated brown rice has rich GABA (Gamma Amino Butryc Acid)
GABA promotes metabolic efficiency in the liver and kidneys, lowers blood pressure, promotes
brain function - these effects have been proved by medical studies
Features of Germinated brown rice
Tips to buy Quality brown Rice
(Poor brown rice-
Empty ear and nit fully corned brown rice)
HOW TO USE “GABA”
25
www.cuckoo.co.kr
ENGLISH
1.
The Right
arrow but-
ton in-
creases the
cooking
time for
GABA by
two hours.
2. 3.
Press the SET button
to enter the germina-
tion time settings
mode.
4. Set the time with the
MENU/SELECTION
button. The germination
time can be set to 0, 2,
4 or 6 hours. The rice is
cooked in brown rice
cooking mode when
the time is set to 0.
Using “GAbA” Cooking Option
In order to promote germination, soak brown rice for 16 hours in water.
Before using the “GABA” cooking mode
Rinse brown rice and place in a container, pour enough water to cover the water.
▶ Soak for 16 hours (do not exceed the 16 hour limit). After the 16 hours, make sure to rinse the
soaked rice again being careful not to disturbing the germinated sprouts on the grain.
▶ After rinsing the soaked rice, pour rice into inner pot. Pour appropriated volume of water, and
use “GABA” menu.
* In summer or in a warmer climate, odor may be present.
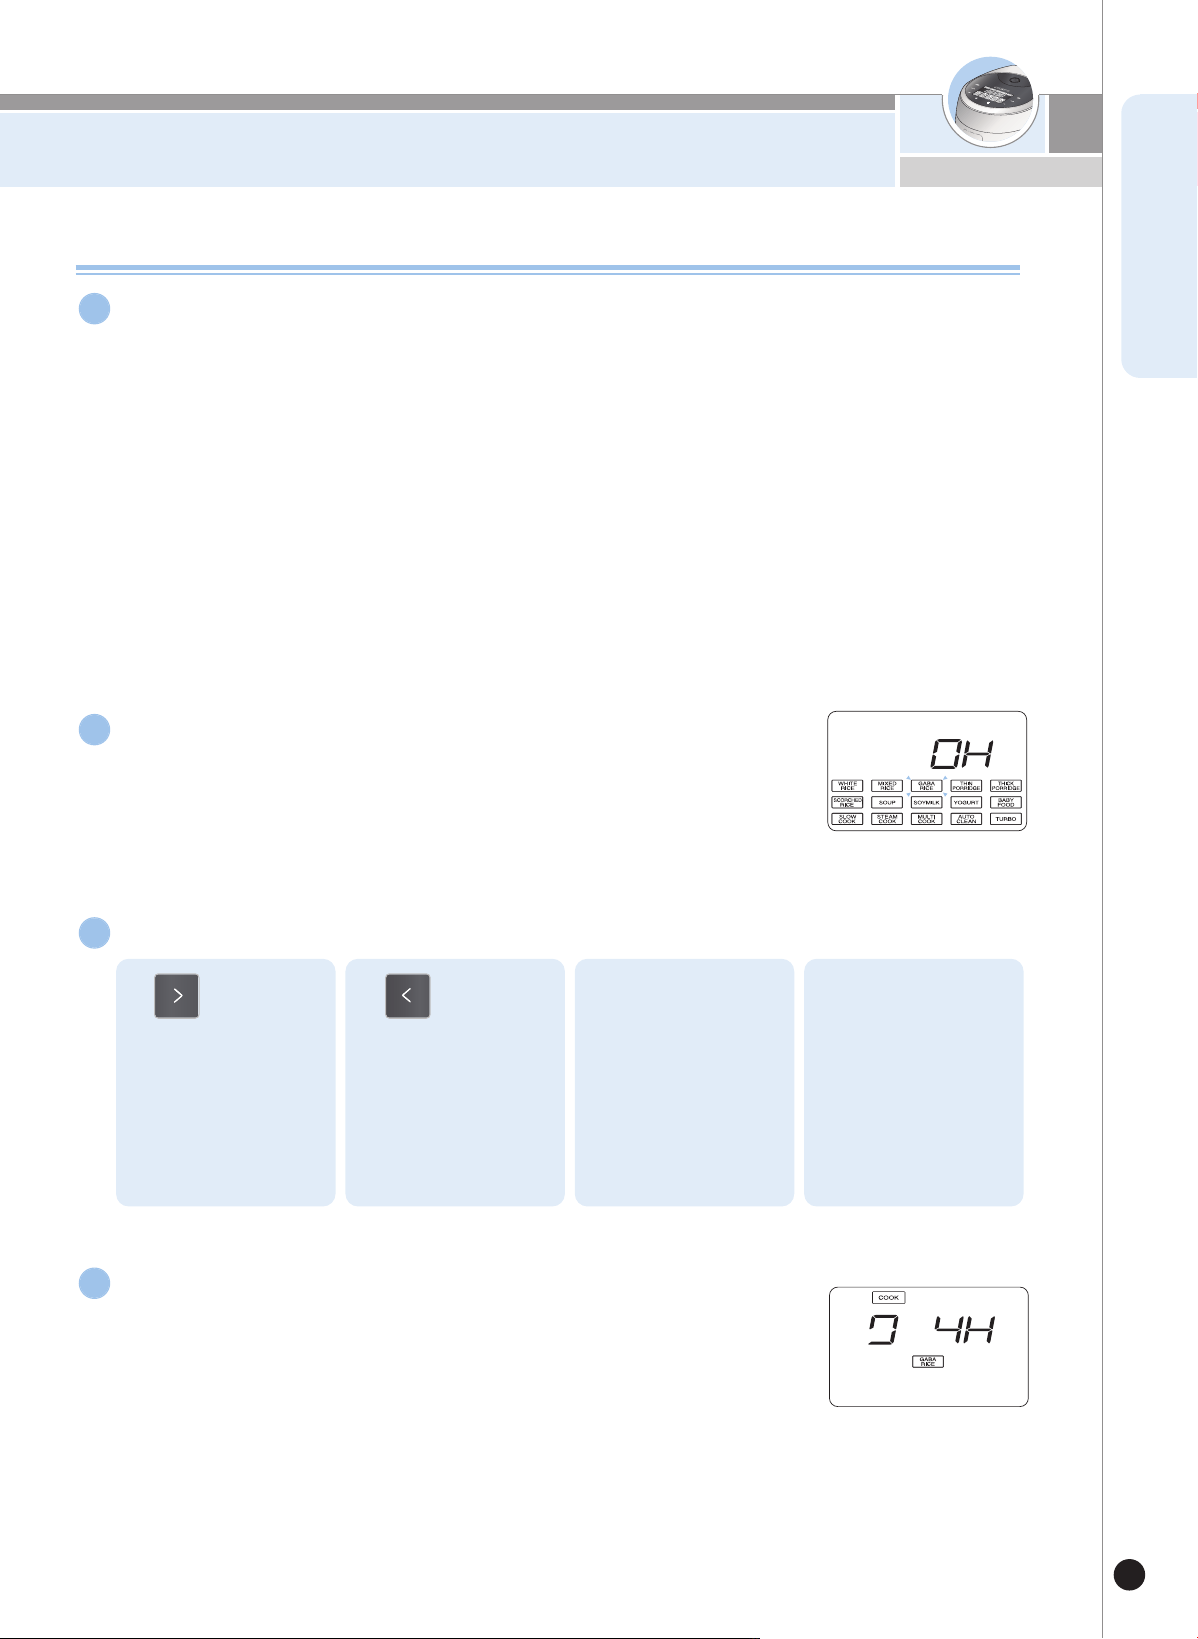
▶When the “GABA” is selected,“OH” will appear on the dis-
play.
1
To use the “GABA” Setting:
Turn the handle to “Lock”, press the “SELECTION”
button to select “GABA”.
2
Press select buttons to set time.
3
▶Pressing “COOK/TURBO” button will begin the “GABA”
process, after which. cooking will begin immediately.
▶During “GABA” mode, a “Cook” indicator will be shown
together with the remaining cooking time.
Press “COOK/TURBO” button.
4
The left
arrow button
decreases
the cooking
time for
GABA by
two hours.

HOW TO USE “GABA”
26
4. Press the Preset or COOK / TURBO button.
Preset brown GAbA as following
1. Select GABA by pressing the MENU/SELECTION button.
2. Press SET and then set the time to 0 with the MENU/SELECTION button. Press SET.
Preset mode cannot be used for 2H, 4H and 6H time settings.
3. Set the cooking time to complete with the MENU/SELECTION button.
HOW TO USE “SOUP”
27
www.cuckoo.co.kr
ENGLISH
How to Use and Preset SOUP
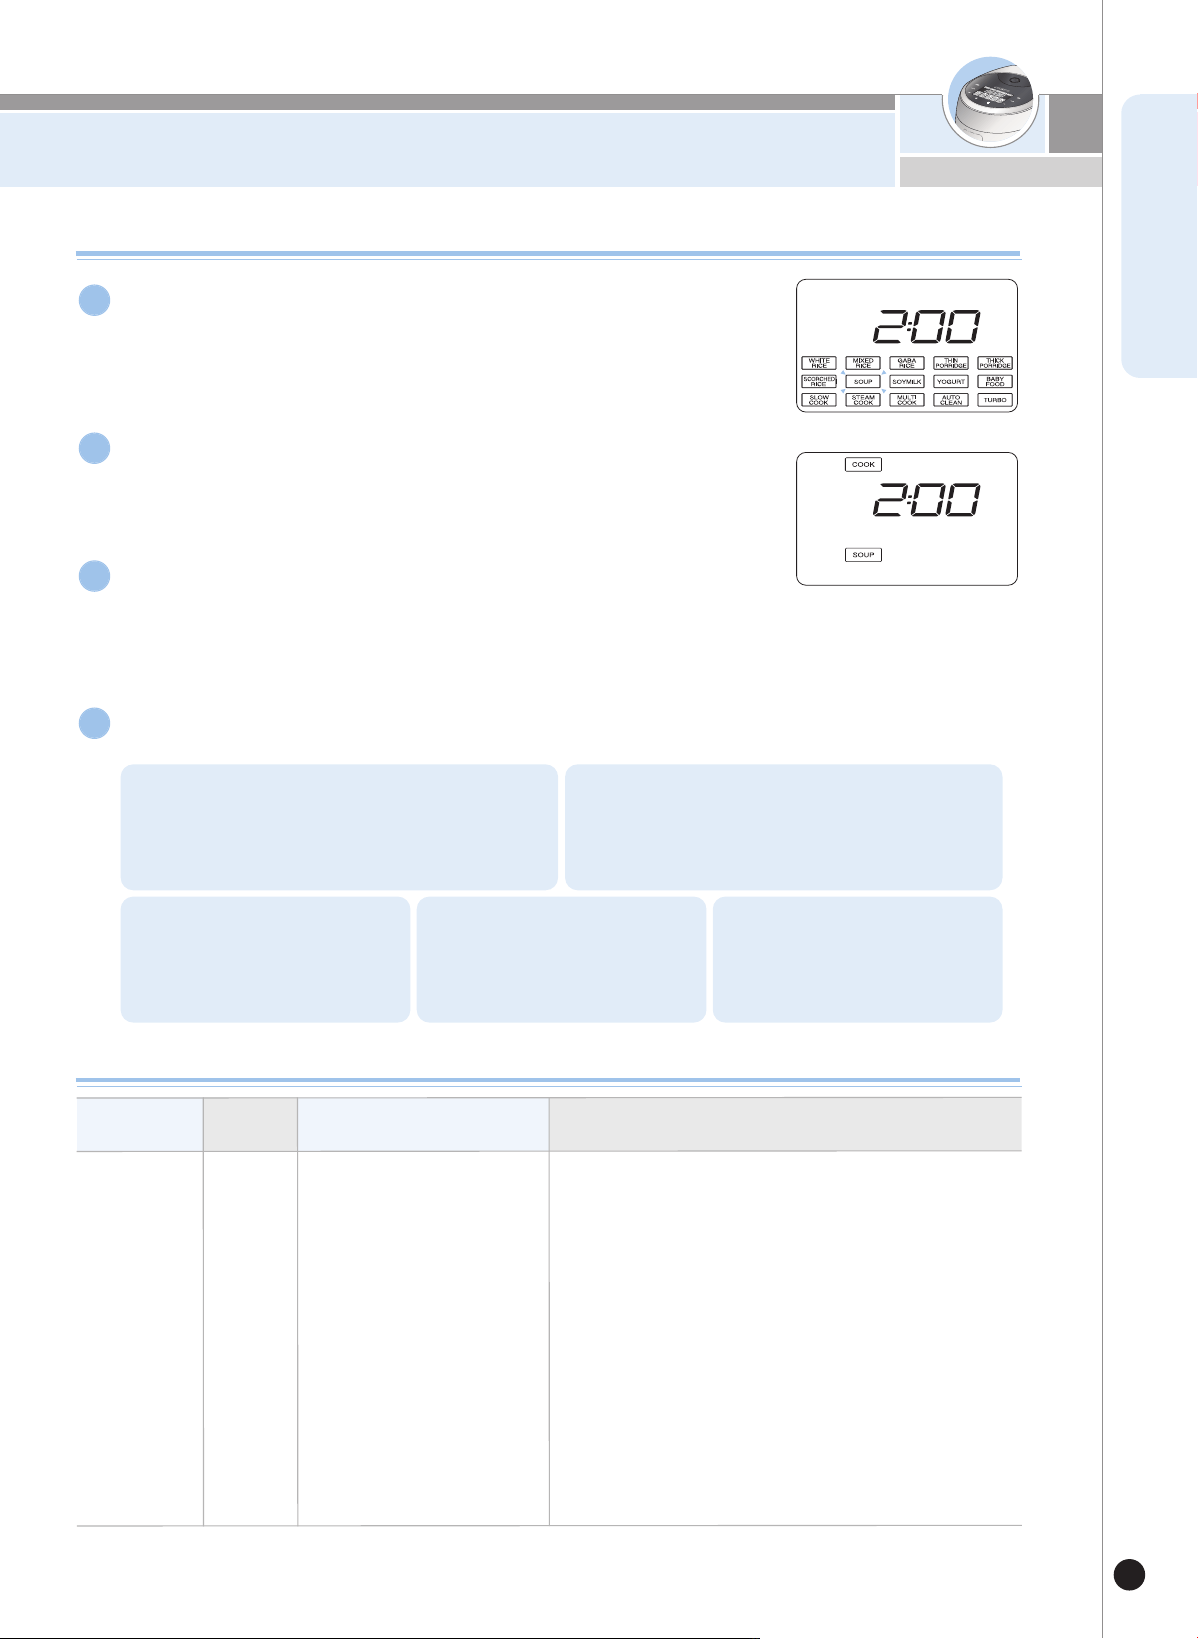
▶Once the SOUP mode begins, the cooking icon and the remaining cooking
time are shown on the display.
▶
The default time is 2 hours and can be set from 1 to 4 hours.
(The time increases or decreases by 10 minutes unit.)
▶
The display shows 2 hours when the SOUP menu is selected.
Select the SOUP menu and press SET.
1
Preset the SOUP cook as follows:
4
Set the cooking time.
2
Press the COOK/TURBO button.
3
SOUP recipe
1. Press the PRESET button. 2. Select your desired menu and press the SET
button.
3. Select your desired cooking
time and press the SET
button.
4. Set the time to complete
cooking by pressing the
SELECTION button.
5. Press the Preset or
COOK/TURBO button.
M
ENU
TO
COO
K
SEL
ECT
M
ENU
INGR
ED
IENTS
DIRECTIONS
Ch
i
c
ke
n
Soup
SO
UP
a chicken (1 kg) 2 root of fresh
ginseng, Jujube 10EA, 1 cup
glutinous rice, some ground
pepper,some garlic
1) Sheath the bottom of the prepared chicken to make
two small holes.
2) Stuff the chicken with glutinous rice soaked in water for
longer than 2 hours and garlic.
(If the rice is not soaked, it may not cooked completely.)
3) To make thick broth, stuff the chicken with 1/2 rice and
place the other half out of the chicken in the pot.
4) Bring both legs crossed and fix each leg in the hole cut
previously.
5) Place the chicken in the inner pot with washed ginseng
and dates. Pour in about 7 cups of water.
6) C
lose the lid and press the SELECTION
button to set the
stew option. Set the time to 2 hours and press the
COOK/TURBO
button.
- Note -
Be careful not to put too much water. It may cause the
soup to steam out during the pressure discharge.
HOW TO USE “SOYMILK”
28
How to Use and Preset SOYMILK
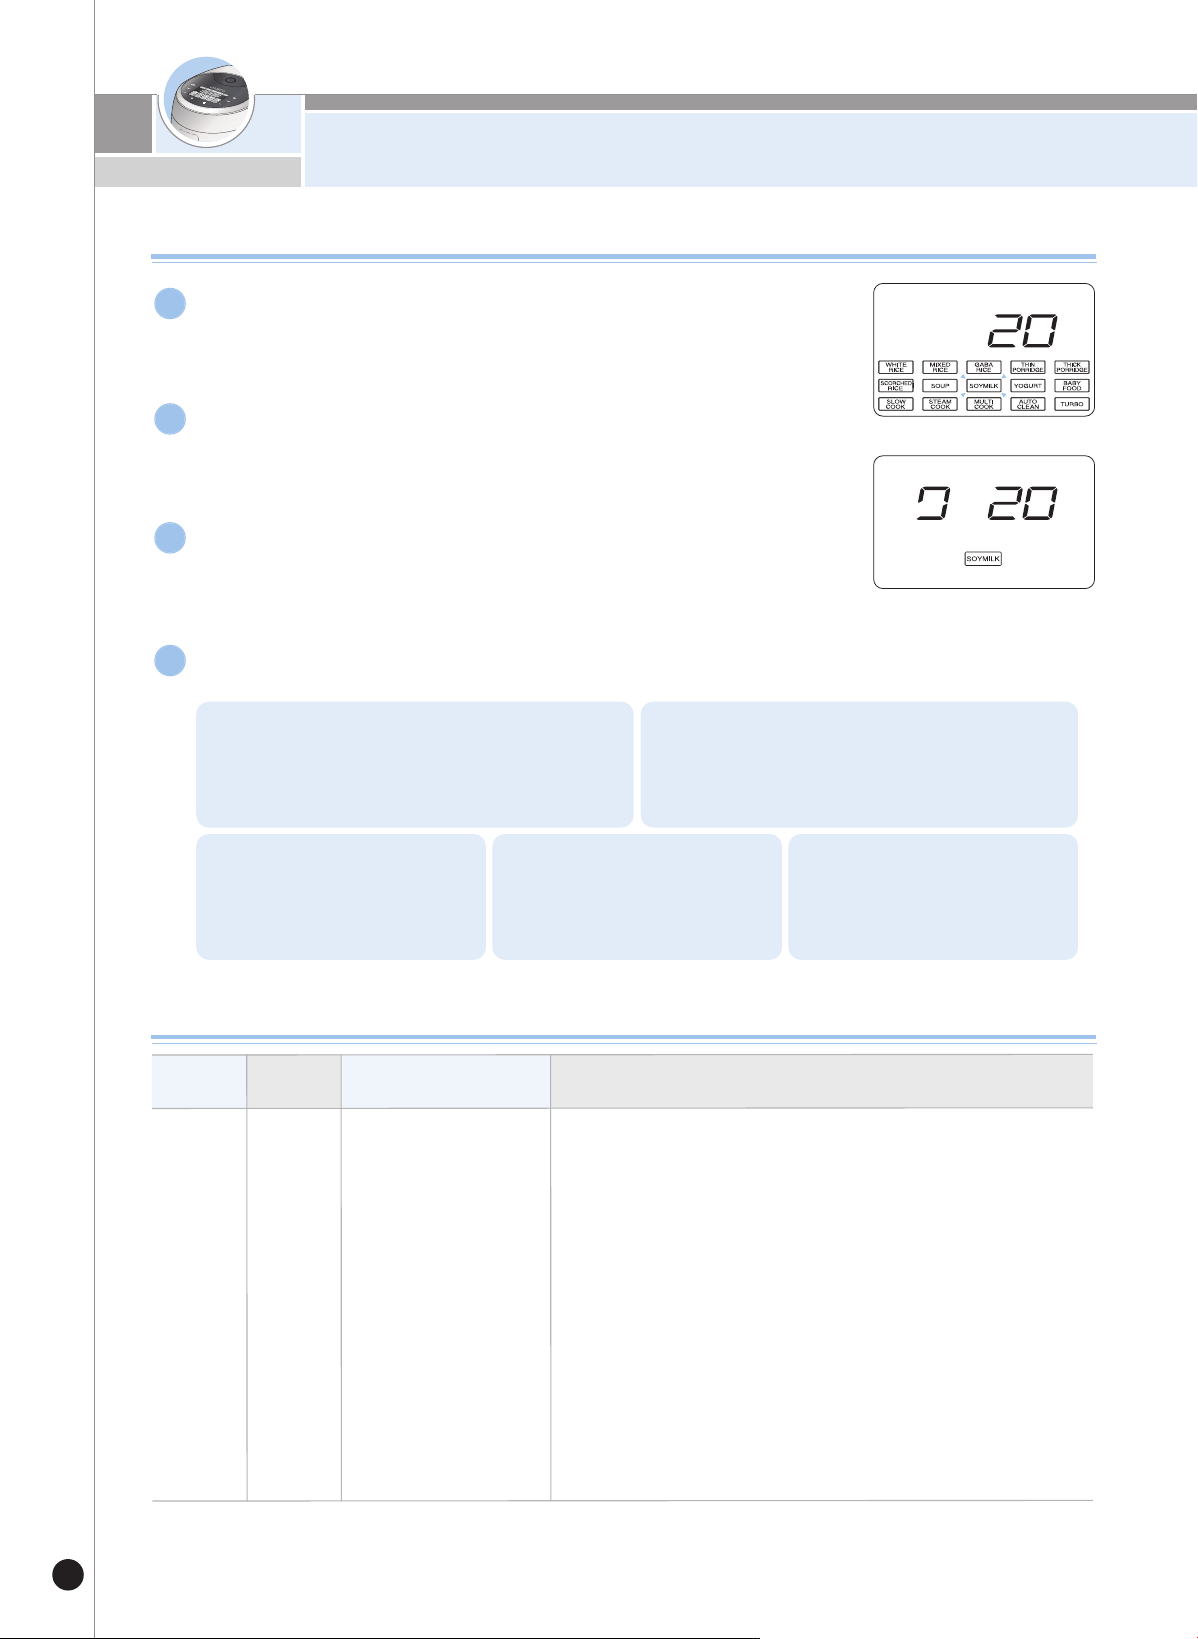
▶
Once the SOYMILK mode begins, the cooking icon and the remaining
cooking time are shown on the display.
▶
The default time is 20 min and can be set from 10 min to 1:30 hours.
(The time increases or decreases in 10 minute increments.)
▶
The display shows 20 mins when the SOYMILK menu is selected.
Select the SOYMILK menu and press SET.
1
Preset the SOYMILK cook as follows:
4
Set the cooking time.
2
Press the COOK/TURBO button.
3
SOYMILK recipe
1. Press the PRESET button. 2. Select your desired menu and press the SET
button.
3. Select your desired cooking
time and press the SET
button.
4. Set the time to complete
cooking by pressing the
SELECTION button.
5. Press the Preset or
COOK/TURBO button.
MENU TO
CO
O
K
SELECT
M
ENU
INGR
ED
IENTS
DIRECTIONS
SO
YM
IL
K
SO
YM
IL
K
- BE
AN : 250g
- Prim
ary water : 500g
- Secondary water :950g
- Salt, Some sugar
1. Soak the beans in water about twice the amount of the beans the day before.
(Soak them until the skin gently comes off by hand.)
2. Place the soaked and peeled beans with 500g of water (initially) in the inner pot. Close
the lid, select the "
SOYMILK
" menu, set the time to 20 minutes and press the
COOK/TURBO
button.
(The boiled beans are crisp.) The boiled beans that can be crushed easily with a hand
can smell like meju - fermented soybean.
3. Scoop the beans out with a strainer and wash them in running water.
(It may smell fishy if you do not remove the bubbles generated while the beans are boiled.)
4. Place the beans in a blender and grind them with (additional) 950g of water gradually
poured in.
5. Strain the ground beans.
6. Season them with sugar or salt to your preference.
<Precautions>
*
Make sure to remove the bean shells completely before boiling them.
(The bean shell may block the steam vent causing the water to overflow while boiling.)
* Wash the detachable cover after cooking is complete.

HOW TO USE “YOGURT”
29
www.cuckoo.co.kr
ENGLISH
How to Use and Preset YOGURT
▶
Once the YOGURT cook begins, the cooking icon and the remaining cooking
time are shown on the display.
▶
The default time is 6 hours and can be set from 30 minute to 12 hours.
(it will increase and decreased by 30 minutes increments)
▶
The display shows 6:00 hours when the YOGURT menu is selected.
Select the YOGURT menu and press SET.
1
Screen will show "END" when YOGURT menu is completed.
*This does not go into automatic Warm Mode.
4
Preset the YOGURT cook as follows:
5
Set the cooking time.
2
Press the COOK/TURBO button.
3
YOGURT recipe
1. Press the PRESET button. 2. Select your desired menu and press the SET
button.
3. Select your desired cooking
time and press the SET
button.
4. Set the time to complete
cooking by pressing the
SELECTION button.
5. Press the Preset or
COOK/TURBO button.
M
ENU
TO
COO
K
SEL
ECT
M
ENU
INGR
ED
IENTS
DIRECTIONS
YO
GURT
YO
GURT
Milk 1L,
Plaing yogurt 290g
1. Place all the ingredients in the Inner pot and mix lightly.
2. C
lose the lid, select [
YOGURT
], set the cooking time to 6
hours and press the
COOK/TURBO
button.
-NOTE-
• Use unflavored plain milk.
(High calcium, low fat or sterilized milk may not be fer
-
mented.)
• Be aware that the yogurt could go bad when mixed with
any other ingredients.
• Place the yogurt in the fridge once completed and eat
cold. - You can add fresh fruit, cereal and jam to your
yogurt.
HOW TO USE “STEAM COOK”
30
How to Use and Preset STEAM COOK
▶
Once the STEAM COOK mode begins, the cooking icon and the remaining
cooking time are shown on the display.
▶
The default time is 20mins and can be set from 10 to 90 minutes
▶The display shows 20 mins when the STEAM COOK menu is selected.
Select the STEAM COOK menu and press SET.
1
Preset the STEAM COOK as follows:
4
Set the cooking time
2
Press the COOK/TURBO button.
3
STEAM COOK recipes
1. Press the PRESET button. 2. Select your desired menu and press the SET
button.
3. Select your desired cooking
time and press the SET
button.
4. Set the time to complete
cooking by pressing the
SELECTION button.
5. Press the Preset or
COOK/TURBO button.
Dumplings : 15EA
Water : ¾cup
1. Prepare the ingredients.
2. Put 3/4 to one and 1 1/2 cup of water in the Inner
Pot and place the Steam Plate on the pot.
3. Place the prepared ingredients in the plate.
4. Close
the lid, select the STEAM COOK option with the
[MENU] button, set the cooking time to 30 minutes (50
minutes for sweet potatoes or potatoes) and press
the COOK/TURBO button.
INGREDIENTS DIRECTIONS
MENU TO COOK
Steamed
Dumpling
Sweet potato : 3EA (more than 150g)
Water : 1 1/2cup
Steamed
Sweet Po-
tato
Potato : 3EA (more than 200g)
Water : 1 1/2cup
Steamed
potato
STEAM
COOK
SELECT MENU

HOW TO USE “BABY FOOD”
31
www.cuckoo.co.kr
ENGLISH
1. Press the PRESET button. 2. Select your desired menu and press the SET
button.
3. Select your desired cooking
time and press the SET
button.
4.Set the time to complete
cooking by pressing the SE-
LECTION button.
5. Press the Preset or
COOK/TURBO button.
Sweet
potato 70g,
apple 70g,
water 1cup and
some honey
1.
Peel the skins of apple and sweet potato and cut them into thin slices.
2.
Plcae the recipe no.1 and with 1/4cup of water in the inner pot
3.
After locking the cover and choosing [BABY FOOD] in the SELECTION
BU
TTON push [COOK/TURBO] button after setting up the time of
universal steam for 45 minutes.
4.
After cooking is completed, mash up it with a rice paddle and mix it
with some honey.
Ingredient Procedure
bAbY FOOD RECIPES
Food
Sweet Po-
tato & Apple
Porridge
50g of rice,
30g of tuna(can),
10g of bell pepper,
10g of carrot,
1/2 cup of water, but-
ter,
little bit of laver owder
1.
Pour out oil from tuna, tear it up into little pieces with chopsticks.
2.
Finely chop bell pepper and carrot.
3.
Mix rice, tuna, bell pepper, and carrot.
4.
Spread butter on the bottom of inner pot, put ingredients of 3.and
pour water.
5.
Lock the lid, select [BABY FOOD] menu by pressing the SELECTION
BUTTON set multipurpose steam time 15minutes, and press the
[COOK/TURBO] button.
6.
Mix it well with a spatula after multipurpose steam is completed.
Soft rice
with tuna
and veg-
etable
bAbY
FOOD
Menu
How to Use and Preset bAbY FOOD
Press the “SELECTION” button to select BABY FOOD.
1
▶
When BABY FOOD is selected, the display shows 10 minutes.
Press the “SELECTION” buttons to set the desired time.
2
1.
The right arrow button
increases the cooking
time for BABY FOOD
in increments of 5
minutes.
The left arrow button
decreases the cook-
ing time for BABY
FOOD in increments
of 5 minutes.
2. 3.
Press the “COOK / TURBO” button to start the BABY
FOOD menu.
3
▶Once the BABY FOOD mode starts, the cooking status and the re-
maining time is displayed.
How to preset the BABY FOOD menu.
4
The cooking time for BABY
FOOD can be set from 10 to
50 minutes.

HOW TO USE “SLOW COOK”
32
How to use SLOW COOK function and preset time
Press the “SELECTION” button and select
SLOW COOK menu.
1
▶If the SLOW COOK mode is selected, the display will show
3 hours.
Press the “SELECTION” buttons to set the desired time.
2
1.
The right arrow button in-
creases the cooking time
for SLOW COOK in 10
minute increments.
The left arrow button de-
creases the cooking time
for SLOW COOK in 10
minutes increments.
2. 3.
The cooking time for SLOW
COOK can be set from 1 to
10 hours
Press the “COOK/TURBO” button to start the SLOW COOK
menu.
3
▶Once the SLOW COOK mode starts, the cooking status
and the remaining time is displayed.
How to preset the SLOW COOK function
4
1. Press the PRESET button.
2.
Select your desired menu and press the SET
button.
3.
Select your desired cooking
time and press the SET but-
ton.
4.
Set the time to complete
cooking by pressing the SE-
LECTION button.
5. Press the Preset or
COOK/TURBO button.

HOW TO USE “SLOW COOK”
33
www.cuckoo.co.kr
ENGLISH
500g pumpkins
peeled
100g glutinous rice
flour
a teaspoon of sugar,
a teaspoon of salt
Rice of 1 person,
50g carrots
50g onions, 30g
green onions
a teaspoon of salt,
a teaspoon of pep-
per
30g carrots, 30g
onions, 30g potatoes
30g Mushrooms, 20g
sirloins
100g vichyssoise
1 tablespoon olive
oil, a tea spoon of
salt
180g jujubes, ½grain
of gingers, a tea-
spoon of honey
1. Pumpkins peeled cut into thin slices.
2. Pour 3 cups of water and glutinous rice flour Into the inner
pot.
3. Put the sliced pumpkins into the inner pot and select
[SLOW COOK] by pressing the “SELECTION” button.
Set the Multi cook time to 3 hours.
And Press the “COOK/TURBO” button.
4. After wellbeing cooking, grind it using a sieve or a blender
then put some sugar and salt as your taste.
1. Carrots, onions and green onions cut into thin slices.
2. Put 1 portion of rice, julienne Carrots, onions, green onions
into the inner pot. Then pour 2
½
cups of water into the
inner pot.
3. Close the lid and select [SLOW COOK] by pressing the
“SELECTION” button. Set the time to 5 hours. And Press
the “COOK/TURBO” button.
4. When finishing the SLOW COOK, put some salt and pep-
per as taste.
1. Onions, potatoes and carrots cut into thin slices.
2. Chop mushrooms as regular size.
3.
Fry the chopped ingredients with 1 tablespoon olive oil.
4. Close the lid and Pour 3 cups of water and put powder of
cream soup into the inner pot. Put the roasted ingredients
then close the lid.
5. After wellbeing cooking, grind it using a sieve or a blender
then put some sugar and salt as your taste.
1. Clean and peel the gingers. then cut into thin slices
2. Put jujube, gingers peeled Into the inner pot.
And pour the water up to water level 4 for Glutinous.
3.
Look the inner lid and select [SLOW COOK] by pressing the
“SELECTION” button. Set the
SLOW COOK
time to 8 hours.
And Press the “COOK/TURBO button.
4. After wellbeing cooking Put some honey as your taste. And
stir the food.
Preparations Procedure
SLOW COOKrecipes
Food
Pumpkin
Porridge
Vegetable
porridge
Vegetable
soup
Jujube Tea
SLOW
COOK
Menu
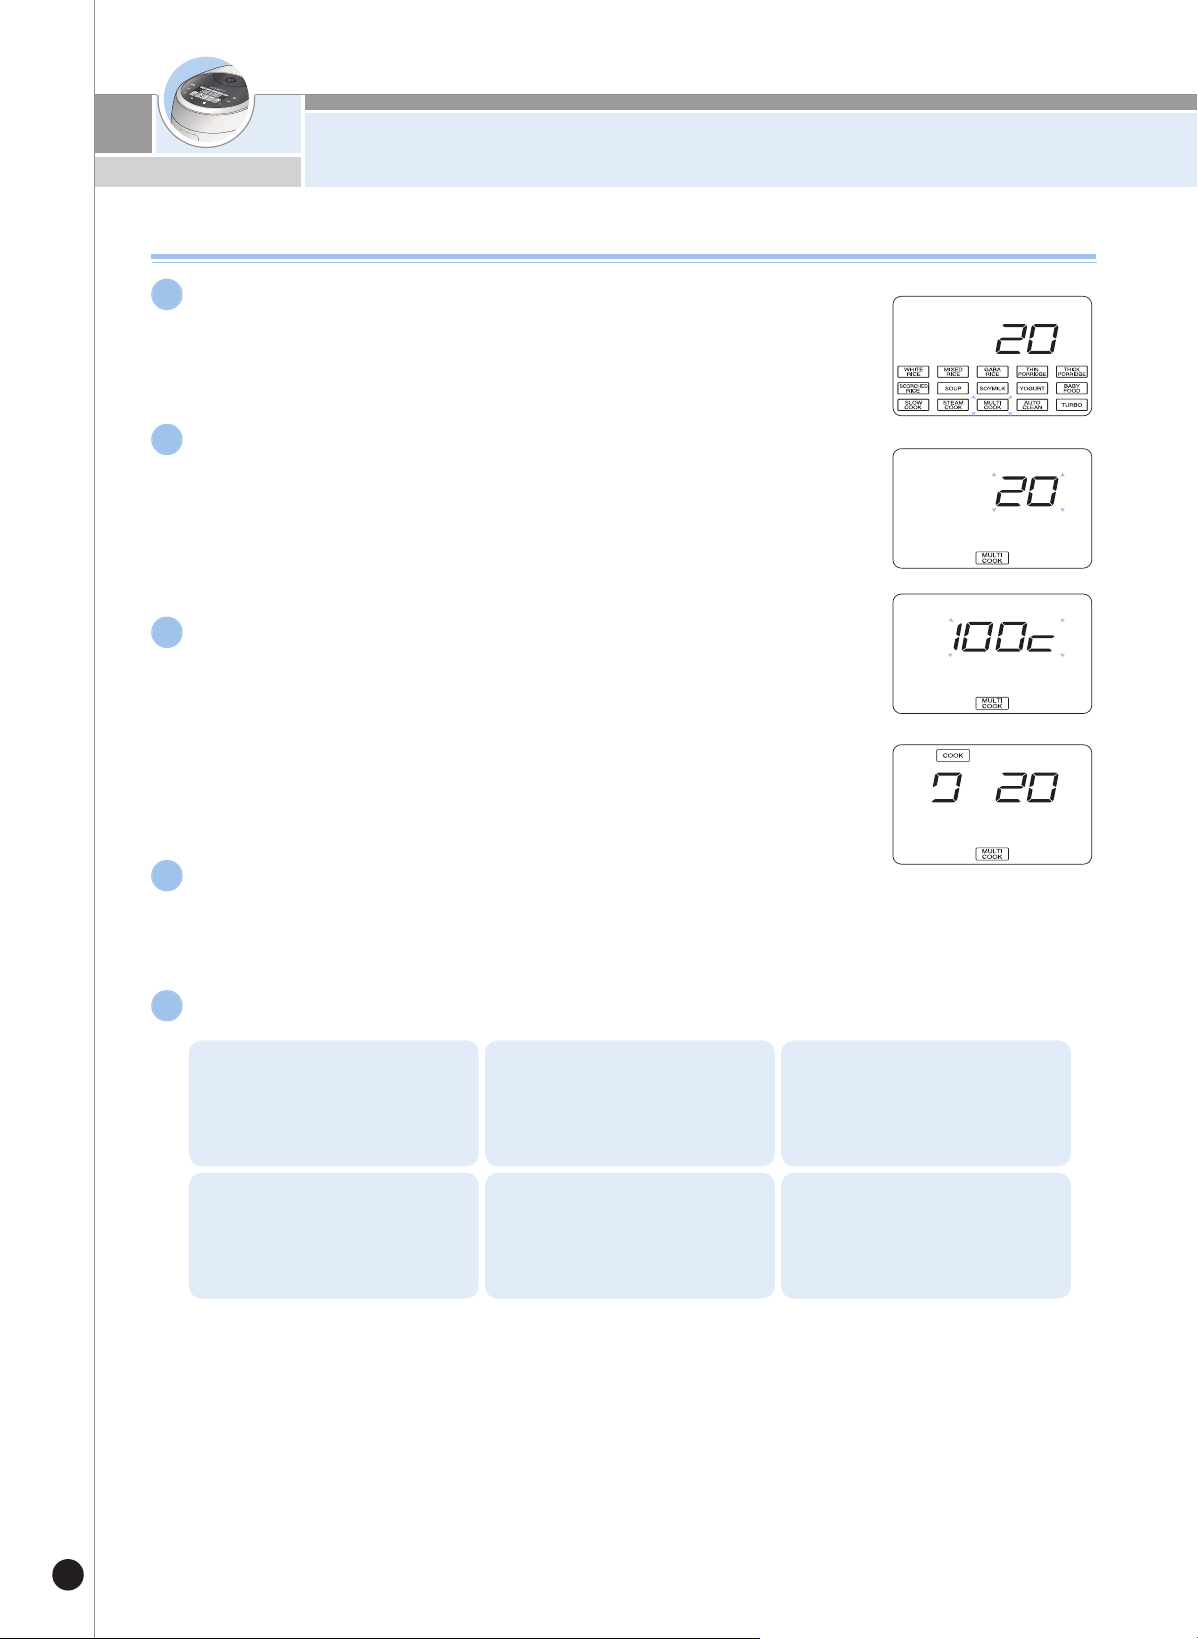
HOW TO USE “MULTI COOK”
34
How to Use MULTI COOK
Select MULTI COOK with the SELECTION button
and press SET.
1
▶The display shows 20 minutes when MULTI COOK
mode is selected.
Set the cooking time with the SELECTION button.
2
▶Once you set the time and press the SET button, it moves to
the temperature setting menu.
▶The default cooking time is 20 minutes and can be set from
10 minutes to 1hour and 30 minutes.
(The time increases or decreases by increments of 10
minutes.)
Press the COOK / TURBO button.
4
▶Once the MULTI COOK mode starts, the cooking status and
the remaining time is displayed.
Press the SET button to set the cooking temperature.
3
▶Once you set the desired cooking temperature and press the
COOK/TURBO button, the cooking process will begin.
▶The default temperature is 100℃ and can be set from 35℃
to 130℃.
(The temperature increases or decreases by 1 unit increments.)
The temperature displayed may differ from the actual tem-
perature depending on the surroundings and contents.
Preset MULTI COOK as follows:
5
1. Press the PRESET button.
2.
Select MULTI COOK by
pressing the SELECTION but-
ton and press the SET button.
3.
Set the cooking time by press-
ing the SELECTION button and
press SET.
4.
Set the cooking temperature
and press SET.
5.
Set the time to complete
cooking by pressing the SE-
LECTION button.
6.
Press the PRESET or
COOK/TURBO button.
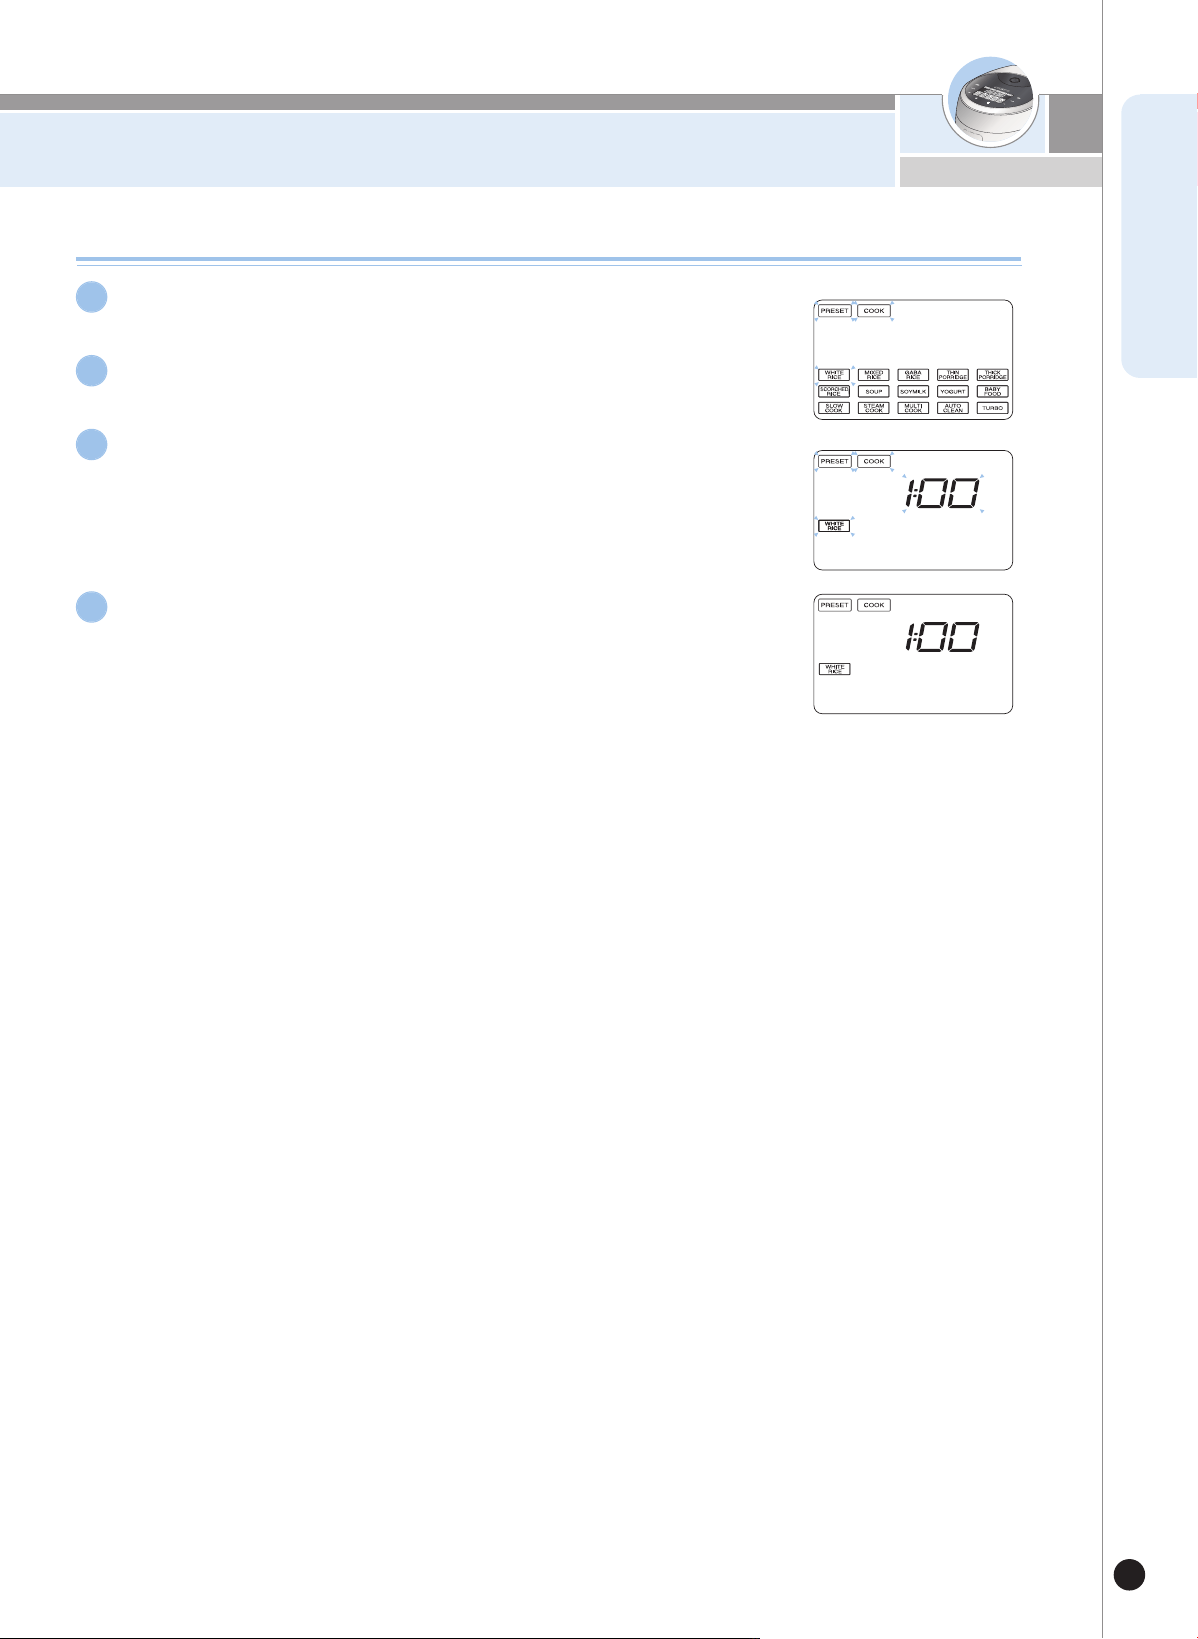
HOW TO PRESET TIMER FOR COOKING
35
www.cuckoo.co.kr
ENGLISH
How to preset timer for cooking
Press the PRESET button.
1
Select your desired menu and press the SET button.
2
Set the time to complete cooking by pressing the
SELECTION button.
3
Press the COOK/TURBO button.
4
▶ Once the preset setting is complete, "PRESET" flashes in the
display panel three times and stays on. - this needs to be on the
same line as the sentence above
▶ Cooking is completed at the set time.
(There may be a slight time difference depending on the amount of
contents and the conditions of use.)
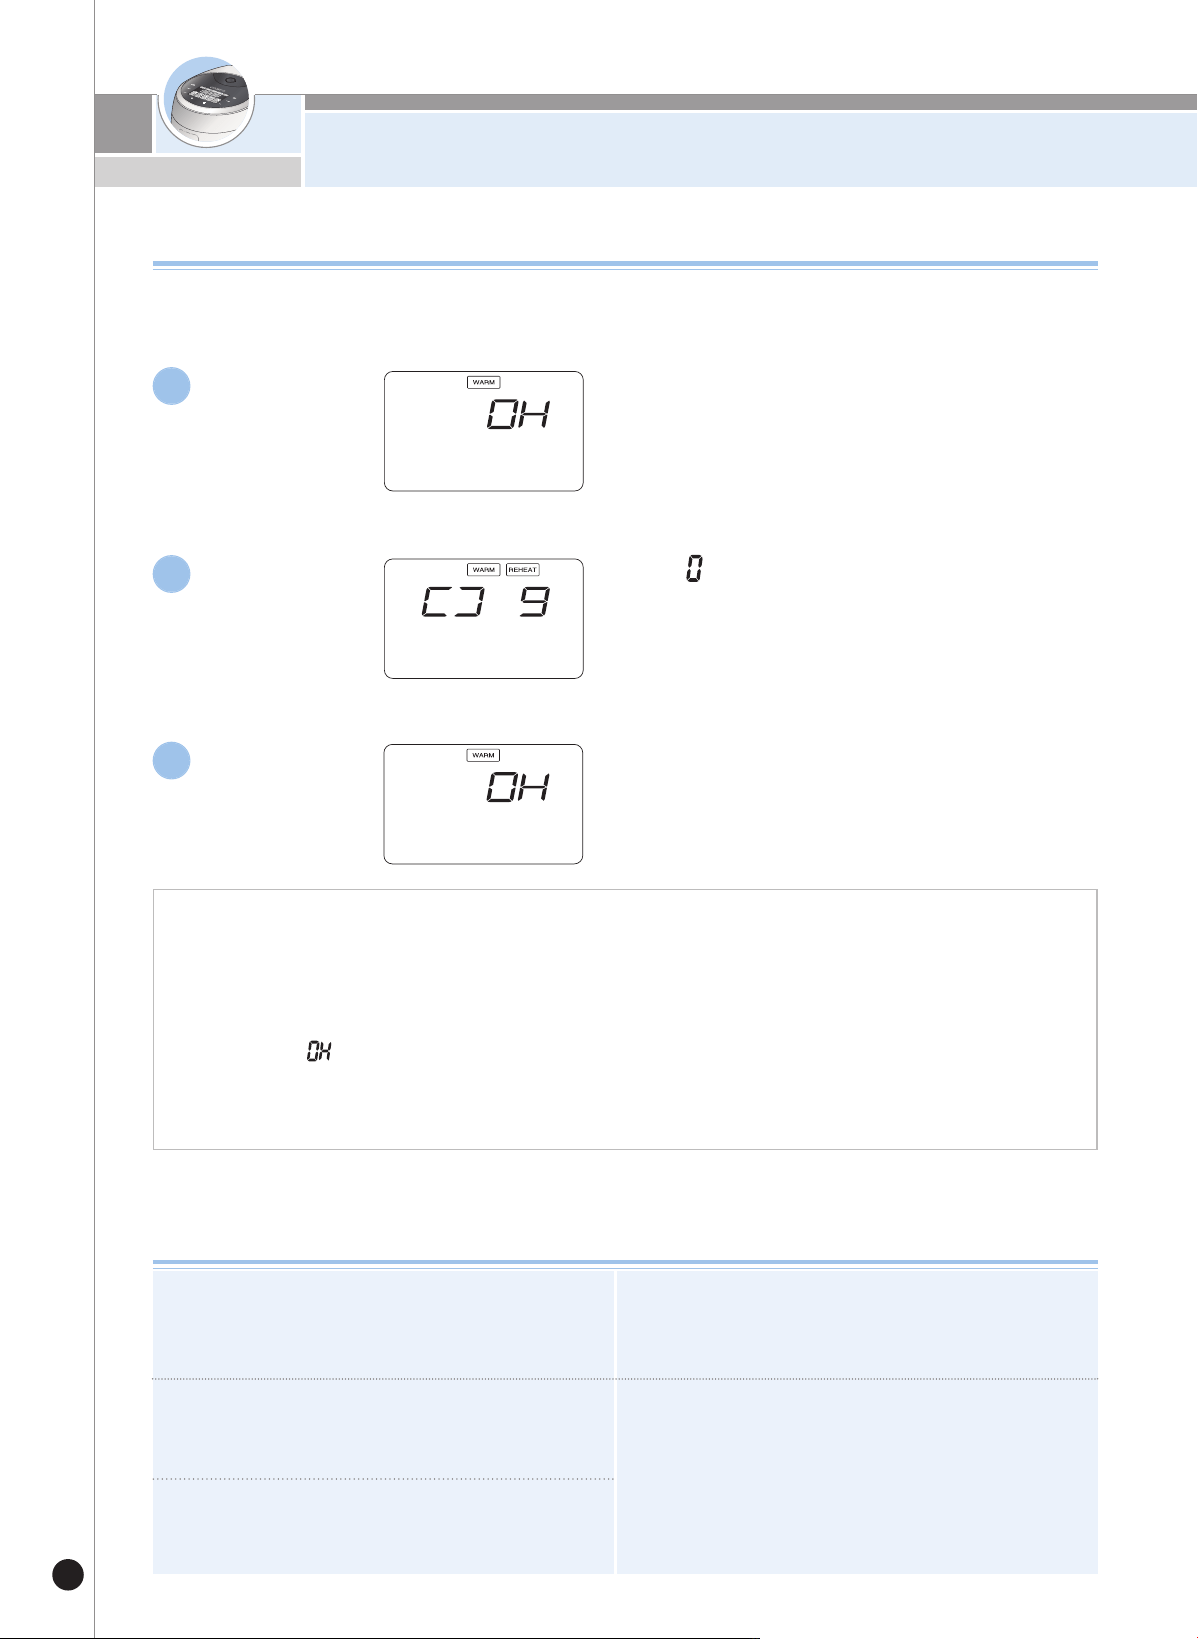
TO KEEP COOKED RICE WARM AND TASTY
36
To adjust the warming temperature, hold the
MODE button for 3 seconds.
The ‘ ’ mark will circulate while reheat-
ing.
After reheating, the Keep Warm function
restarts and the elapsed warming time is dis-
played.
▶If you want warm rice, press the “WARM/REHEAT” button to start the reheating process. After 9
minutes, your rice should be ready to eat.
▶
The frequent use of the Reheat function may cause the cooked rice to be discolored or dried. Use it once
or twice per day.
▶
If a separate heating appliance or gas burner is used to cook rice, put the cooked rice into the cooker
and press the Keep “WARM/REHEAT” button to keep the rice warm.
At this time, ' ' is shown on the display. (Like this, transferring hot rice to a cold cooker may cause the
rice to be discolored or develop an odor.
▶
If the “Keep Warm” mode exceeds 24 hours the display will blink to notify you that it is over used.
To Keep
Warm
1
To Reheat
2
Completion of
Reheating
3
It is recommended to evenly stir the cooked rice after cooking.
(For a small quantity of rice, pile the rice in the center area of the
inner pot to keep warm)
Do not keep rice scooper or wooden scooper in the inner pot
while keeping the cooked rice warm. This may cause bacteria to
formulate.
Do not mix too small quantity of rice or leftovers with the rice
under keeping warm. Doing so may develop an odor.
(Use a microwave oven for the cold rice.)
Keeping rice warm for a long time may cause the rice to be discol-
ored or develop an odor. So, it is recommended to keep warm for
less than 12 hours.
24 hours after keeping the cooked rice warm, the passed time
blinks on the display.
The warming status of mixed/brown rice is worse than plain rice. Do
not keep it warm if at all possible.
The rice on the edge of the inner pot or the bottom of the steam out-
let may turns plain and swollen. In this case, stir and mix the rice.
Keep Warm Precautions
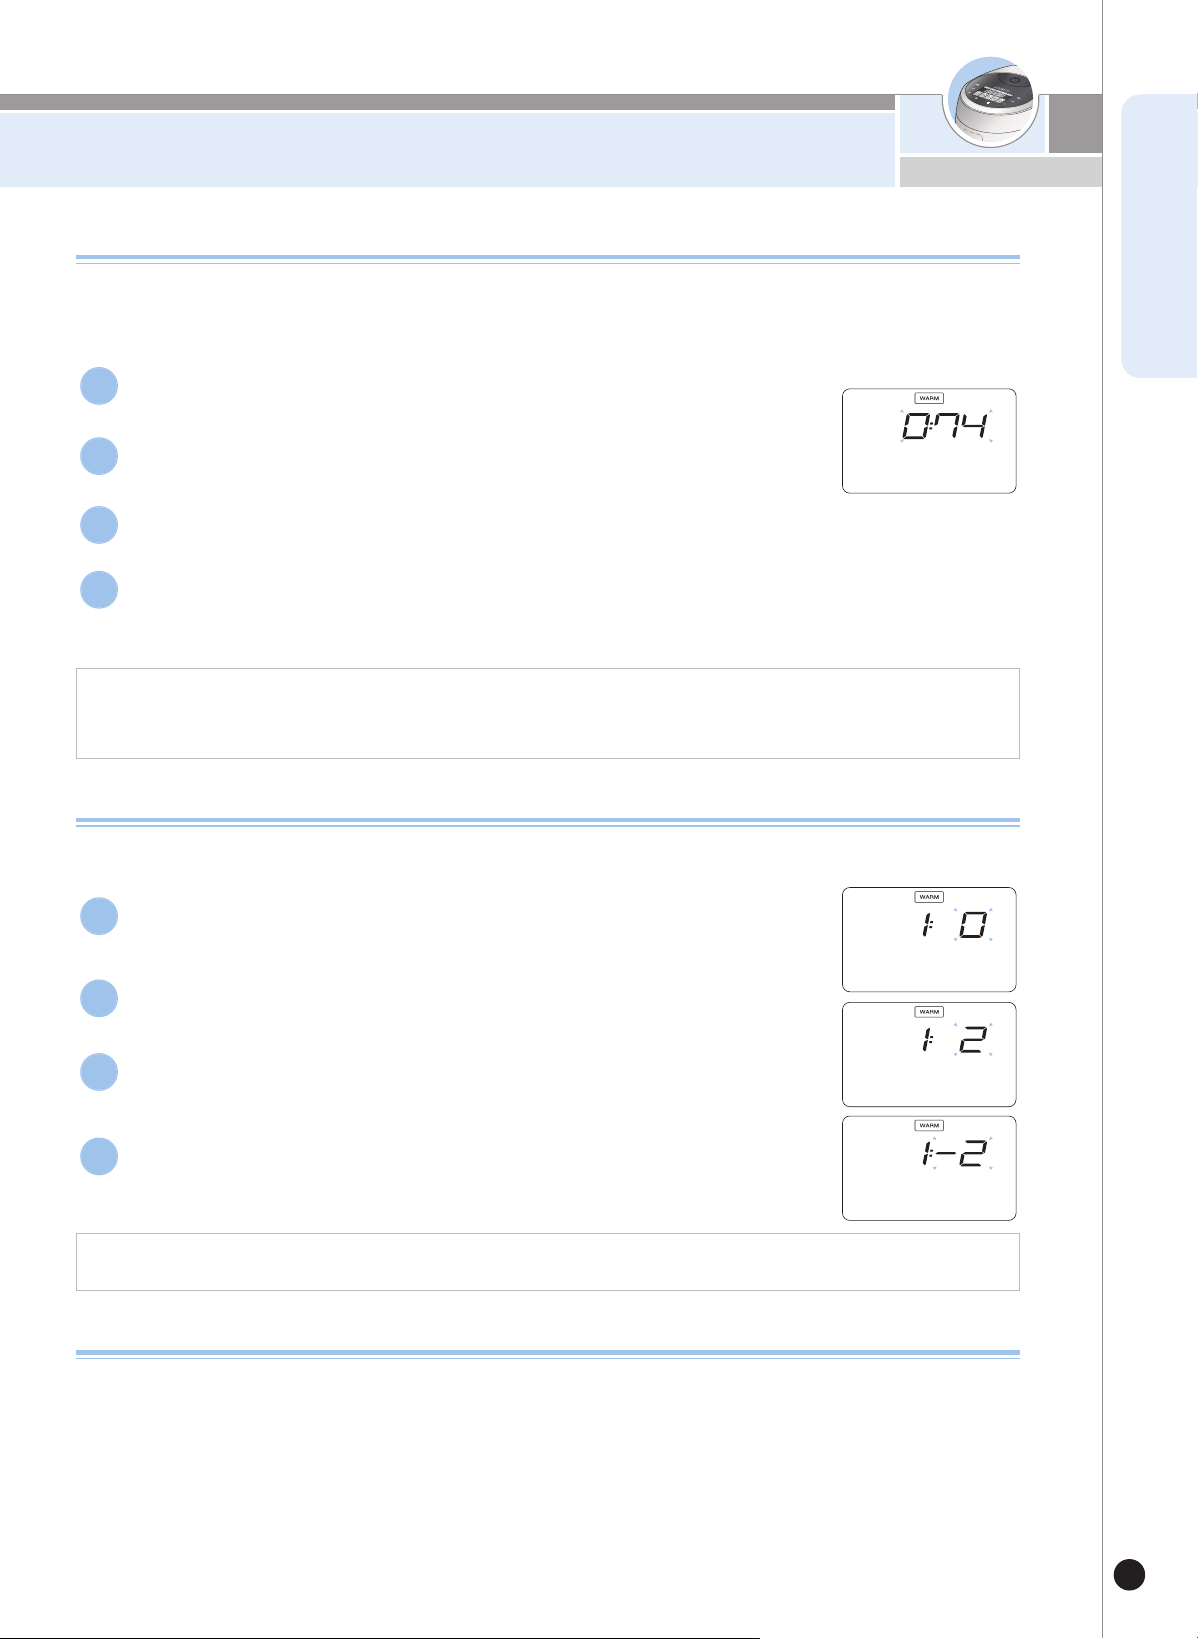
TO KEEP COOKED RICE WARM AND TASTY
37
www.cuckoo.co.kr
ENGLISH
How to Adjust the Warm Temperature
▶If the “warm” temperature setting is incorrect, there is a chance the rice can become
discolored. If this happens simply adjust the temperature.
To adjust the warm temperature while keeping the rice warm, press the “Keep Warm” button for over 5 seconds and
adjust the warm temperature.
If stale odor develops and moisture appears then the warm temperature is low. Raise the temperature by 1 ~ 2℃.
How to adjust the Customized Warm function
This function is used in case that water runs when you open the inner lid while keeping warm or the cooked rice is
swelled up.
1. If water flows out too much when the lid is opened, set the customized warm option 1 to 2 levels higher.
2. If the rice on the edge is overcooked, set the customized warm option 1 to 2 levels higher.
To enter the "Warm Temp" setting mode in Standby mode,
press the MODE button for one second.
1
In the "Warm Temp" setting mode, the currently set tempera-
ture is displayed.
2
Select your desired temperature by pressing the SELECTION
button and press the SET or COOK/TURBO button.
3
It returns to Standby mode if you press CANCEL or no button for 7 seconds in
the "Warm Temp" menu.
※
The factory setting is 74℃, and you can set it as needed.
4
To enter the “Customized Warm" setting mode in Standby
mode, press the MODE button for twice.
1
In the "Customized Warm" setting mode, the currently set
temperature is displayed.
2
Select your desired Customized Warm temperature by press-
ing the SELECTION button and press the SET or
COOK/TURBO button.
3
It returns to Standby mode if you press CANCEL or no button
for 7 seconds in the "Customized Warm" menu.
※
The factory setting is 0 step, and you can set it as needed.
4
If Odor Develops While Keeping Warm
▶ Clean the cooker frequently. Neglecting to clean the lid may cause an odor to develop .
▶ Even though the product is apparently clean, bacteria can still be present. If strong a odor develops, boil water to sterilize.
Fill with the inner pot up to the water line for two persons. Add a spoonful of ginger. After that, close the lid and press the
COOK/TURBO button to boil the water.
Press the cancel button 30 ~ 40 minutes into the cycle. After boiling, always clean the inner pot.
▶ If you keep the cooked rice warm without cleaning the inner pot after steaming food, an odor may affect the rice.
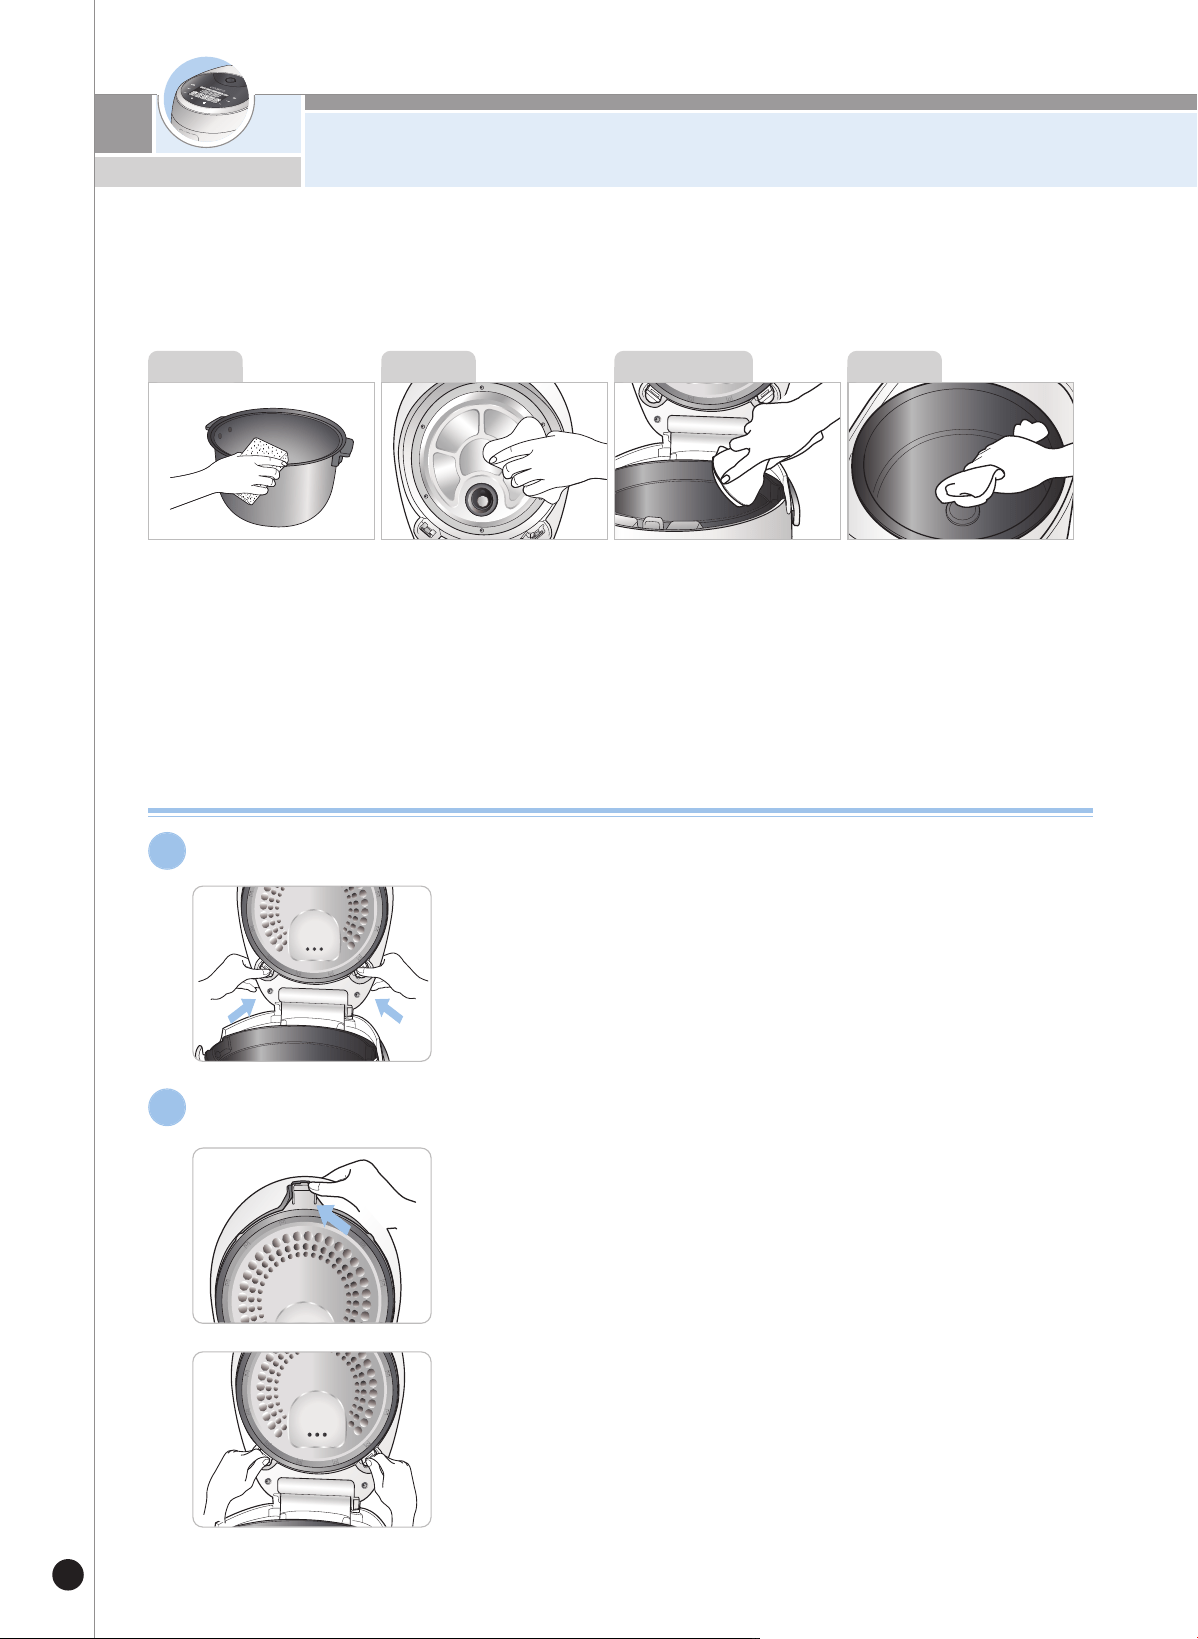
제품 손질 방법
38
- 청소를 잘하지 않으면 보온 중 냄새가 나는 원인이 됩니다. 특히 뚜껑부는 자주 청소해 주십시오.
(전원플러그를 빼고 본체의 열이 식고 난 후 손질하십시오.)
- 본체·뚜껑은 물기를 제거한 행주로 닦아 주십시오. 벤젠, 신나 등은 사용하지 마십시오.
- 사용 중 분리형 커버, 내솥 뚜껑이나 내솥 내부에 밥물이 묻어 전분막이 생기는 수가 있으나, 위생상 아무런 영향이 없습니다.
내솥의 바깥면이나 밑면의 이물질 및
물기를 깨끗이 닦아 주십시오.
거친 수세미, 솔, 연마제 등은 코팅이
벗겨질 수 있으므로 주방용 세제와
부드러운 천, 스폰지로 닦아 주십시오.
내솥의 분리형 커버에 밥물이 묻어 있는
경우, 분리형커버를 본체에서 탈거한 후
물기를 제거한 행주로 분리형커버와 뚜
껑 내부를 닦아 주십시오. 뚜껑의 가장자
리 부분은 금속으로 되어 있으므로 청소
할 때 주의 하십시오.(※분리형커버가 변
하지 않도록 주의해 사용하시고 청소 후
반드시 장착하여 사용해 주십시오.)
취사시 발생하는 밥물은 이곳에 고일
수 있도록 설계되어 있으므로 취사 완
료 후 물기를 제거한 행주로 깨끗이
닦아 주십시오.
내 솥
본체 물고임부
온도감지기에 이물질이 눌러 붙어 있는
경우는 금속판이 손상되지 않게 제거
하십시오. 열판에 이물질이나 물기를
부드러운 천으로 깨끗이 닦아 주십시오.
본체내부
뚜 껑
분리형커버 탈·부착방법
분리형커버 탈착 방법
▶ 한손으로 분리형 커버 손잡이를 잡습니다.
▶ 다른 한손으로 분리형 커버 탈착 부위를 화살표 방향으로 살짝
밀어준 뒤, 가볍게 분리형 커버를 당겨주면 탈착이 됩니다.
※ 분리형커버의 패킹을 잡고 당기지 마십시오.
1
분리형커버 부착 방법
▶ 분리형 커버의 윗 부분을 먼저 뚜껑의 안쪽 윗부분에 걸어줍니다.
▶ 윗그림 상태에서 분리형커버 아랫부분을 손으로 살짝 밀어 넣어주면
부착이 완료됩니다.
※ 제품 및 소비자의 안전을 고려하여 분리형커버를 부착하지 않았을
경우에는 뚜껑이 닫히지 않도록 만들어져 있으므로 반드시 분리형
커버를 부착하여 사용하십시오.
2
※
내솥 세척 시 유의 사항
날카로운 식기류(포크, 숟가락, 젓가락 등)를 내솥에 넣은 채 세척 하지 마십시
오. - 내솥 코팅이 손상 될 수 잇슴니다.

제품 손질 방법
39
www.cuckoo.co.kr
KOREAN
스팀캡 분리·결합 및 청소법
1. 매번 사용 후에는 스팀캡을 뚜껑으로 부터
분리 시키십시오.
2. 스팀캡을 그림과 같이 분리하신 후 미지
근한 물에 담구어 부드러운 행주나 스폰
지로 씻은 후, 물기를 제거해 주십시오.
3. 약쪽 2개소의 체결부분에‘딱’소리가
나도록 조립하십시오.
- 반드시 부속품의 주걱을 사용해 주십시오.
- 금속성 스푼이나 식기류를 넣지 마십시오.
-
벤젠, 신나 등은 사용하지 마십시오.
- 조미료 사용시에는 곧바로 씻어 주십시오.
- 사용 중 얼룩이 생기는 수가 있으나 이는 위생상에는 아무런 영향이 없습니다.
밥알이 달라붙는 것을 방지하기 위하여 내면에 불화탄소수지 코팅을 하였습니다.
제품 내부 손질 방법
취사완료 후 밥물이 고여 있으면
냄새의 원인이 됨으로 항상 깨끗이
닦아 주십시오.
스팀캡을 분리 후 깨끗이 씻은 후
사용하십시오.
분리형커버를 분리 후
깨끗이 씻은 후 사용하십시오.
보관 및 취사 또는 보온시 내솥 바깥
면의 물기를 완전히 제거 하십시오.
바깥면 코팅 변색의 원인이 됩니다.
온도감지기 및 손질방법
밥알이 눌어 붙어 있을 경우에는
온도 감지기나 열판이 손상되지 않게
제거하십시오.
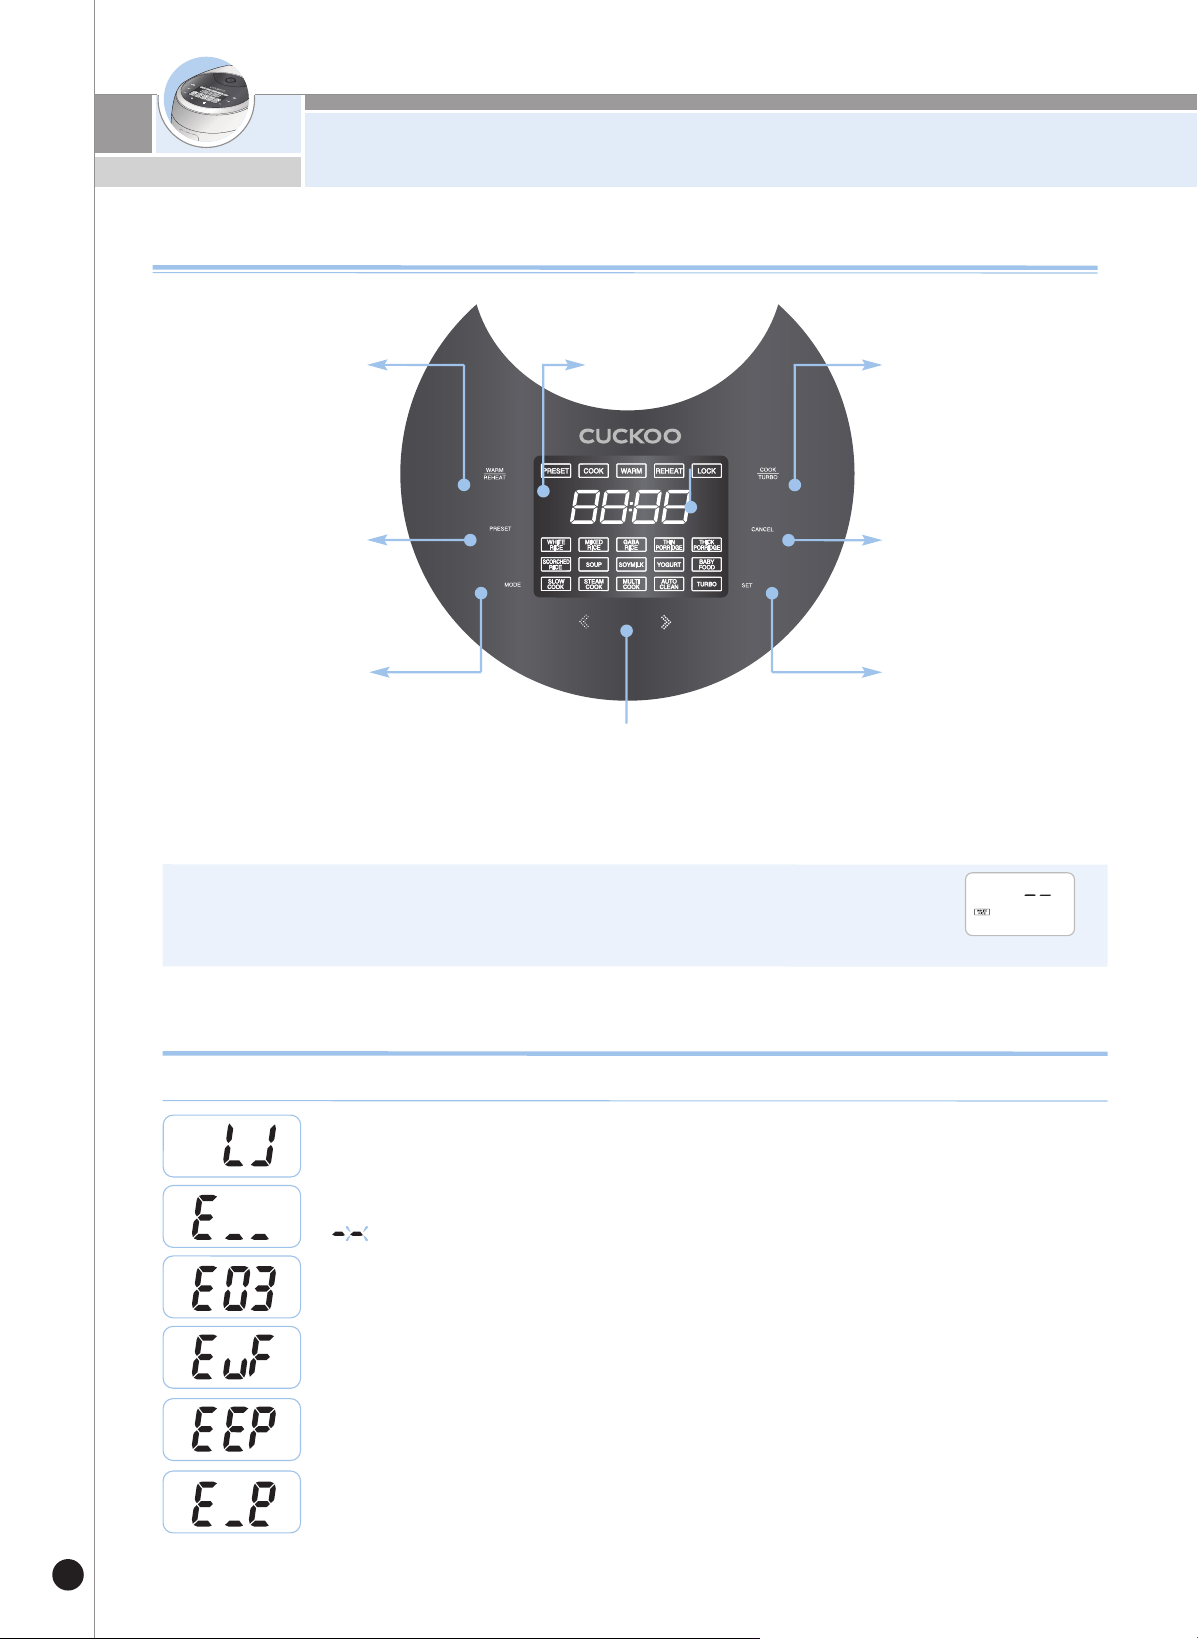
기능 조작부의 이름과 역할 / 기능 표시부의 이상점검 기능
40
※
전원플러그를
꽂고
아무
동작을
하지
않은
경우,
그림과
같이
화면상태가
나타날
때가
대기
상태입니다.
(대기
상태
화면의
메뉴,
시간은
사용자의
설정에
따라
다릅니다.
)
※
기능
조작
시
취소
버튼을
누르면
대기
상태로
전환됩니다.
※
버튼은
부저음이
날
때까지
확실히
눌러
주시고
본
명판의
디자인은
실물과
다를
수
있습니다.
사용방법이 올바르지 않거나 제품에 이상이 생겼을 때 아래와 같은 표시가 나타나 경보를 하여 줍니다.
기능 표시부의 이상점검 기능
온도 감지기에 이상이 있을 때 나타납니다.
(“ ”표시가 깜박거립니다
.
)
내솥이 없을 때 나타납니다.
1
마이컴 내부 메모리에 이상이 있을 때 나타납니다.
마이컴 내부 메모리에 이상이 있을 때 나타납니다.
환경센서에 이상이 있을 때 나타납니다.
제품에 이상이 생겨(
히터단선, 열량부족 등) 장시간 밥이 완료되지 않을 때 나타납니다.
확인 버튼
선
택
한
기
능을
설
정
하
거
나
버
튼
잠
금
기능
을 설
정
할
경
우
사용
선택 버튼
백
미
, 백
미
쾌
속
, 잡곡, 현
미
/
발
아
, 누룽지
, 된
죽
, 묽
은
죽
,
탕
, 두유
, 요
거
트, 이
유
식
, 웰
빙쿡
, 스
팀쿡
, 멀티
쿡, 자동
세
척
등
의
메
뉴
를 선
택
할
경
우
사
용
<대
기
상
태
화
면
>
취소 버튼
선
택
한
기
능을
취
소
할
경우
사
용
모드 버튼
보온온도,
맞춤보온,
맞춤취사,
누룽지
눌음강화를
설정
할
경우
사용
기능표시부
보
온
/
재
가
열
버
튼
보
온
을
할
경
우
나
식
사
직
전
밥
을
따
뜻
하
게
데
울
경
우
사
용
▶
5
9
쪽
참
조
취사/
백미쾌속
버튼
취
사
를
시
작
할
경
우
사
용
▶
43~
44쪽
참
조
예약 버튼
예
약
취
사
를 할
경
우
사
용
▶
58
쪽
참
조
기능조작부의
이름과
역할
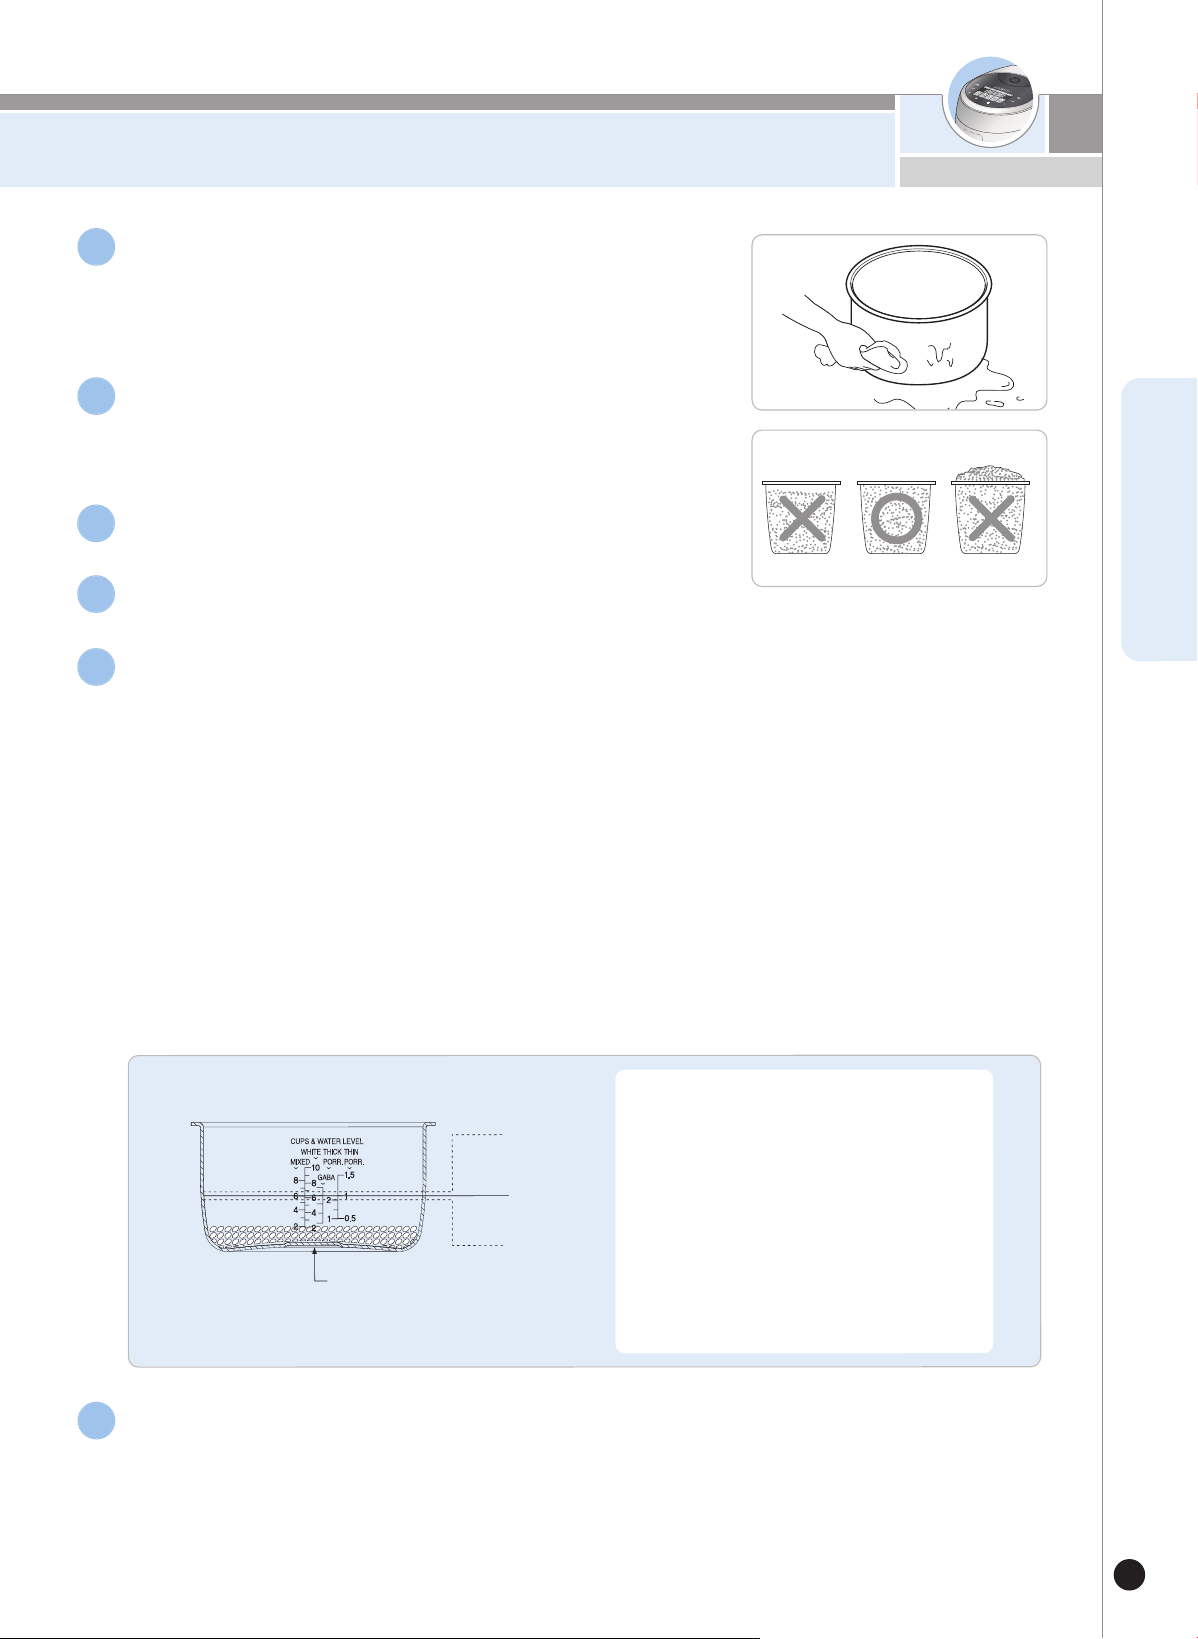
취사 전 준비사항
41
www.cuckoo.co.kr
KOREAN
˙
백미, 백미쾌속, 누룽지
:
“
백미”
물눈금
기준으로
물을
맞춥니다.
백미는
최대
10인분까지
취사
가능합니다.
백미쾌속,
영양밥은
최대
6인분까지
취사
가능합니다.
누룽지는
최대
4인분까지
취사
가능
합니다.
• 잡곡
:
“
잡곡”물눈금 기준으로 물을 맞춥니다.
잡곡은 최대 8
인분까지 취사 가능합니다.
• 현미발아
:
“현미발아
”물눈금 기준으로 물을 맞춥니다.
현미발아는 최대 6
인분까지 취사 가능합니다.
• 된죽
:‘된죽’
물눈금 기준으로 맞춥니다. 된죽은 최대 2컵까지 취사 가능합니다.
• 묽은죽
:‘묽은죽’
물눈금 기준으로 맞춥니다. 묽은죽은 최대 1.5
컵까지 취사 가능합니다.
내솥은 깨끗이 씻은 후 물기를 닦습니다.
▶ 내솥을 씻을 때는 부드러운 행주를 사용하여 주십시오.
▶ 강한 수세미를 사용하면 내솥 안쪽 표면이 벗겨지는 경우가 있습니다.
1
계량컵을 사용하여 쌀을 인분수 만큼 별도의 용기에 담습니다.
▶ 쌀을 계량컵의 윗면 기준하여 평평하게 맞추면 1인분에 해당됩니다.
(예 : 2인분일 경우 → 2컵, 4인분일 경우 → 4컵)
2
별도의 용기에 맑은 물이 나올 때까지 깨끗이 씻습니다.
3
깨끗이 씻은 쌀을 내솥에 옮겨 담습니다.
4
내솥을 본체에 넣고 뚜껑을 닫아 주십시오.
내솥을 넣을 때 본체에 완전히 들어가도록 주의하여 넣습니다.
▶내솥의 바닥면에 쌀 등의 이물질이 붙어 있으면 취사가 잘 되지 않거나 고장의 우려가 있습니다.
6
❷
쌀 4인분의 경우 (계량컵 4컵) 내솥의 ‘백미’
눈금 4에 물을 맞춥니다.
❸
쌀을 충분히 불렸을 때 또는 된밥을 원할 때 :
물을 규정량보다 적게 부어 주십시오.
❹
밥이 설익거나 꼬들한 경우 :
쌀의 품종 차이 또는 함수율(묵은쌀)차이로 발생
합니다. 이 경우는 기존 취사 물량 대비 1~10%
물량을 늘려서 취사해 주십시오
❶
묵은쌀로 밥을 지을때나 진밥을 원할때 :
물을 규정량보다 많이 부어 주십시오.
❶
❷
❸
메
뉴
에
따
라
물
의
양을
조
절합
니
다
.
▶
바
닥
이
평
탄
한
곳
에
내
솥
을
올
려
놓
고
내
솥
에
표
시
된
눈
금
에
맞
춰
물
의
양
을
조
절
합
니
다
.
(
물
의
양
이
많
은
경
우
취
사
도
중
증
기
배
출
구
로
밥
물
이
넘
치
거
나
,
거
품
오
름
이
발
생
할
수
있
습
니
다
.
)
▶
내
솥
에
표
시
된
눈
금
은
쌀
과
물을 함께 부
었을 때
의 물
눈
금
을 표
시
합
니다
.
▶
물
높
이
조
절
에
대
하
여
5
● 10인분 (1.8
L
)제품
쌀 6인분 (계량컵 6컵)
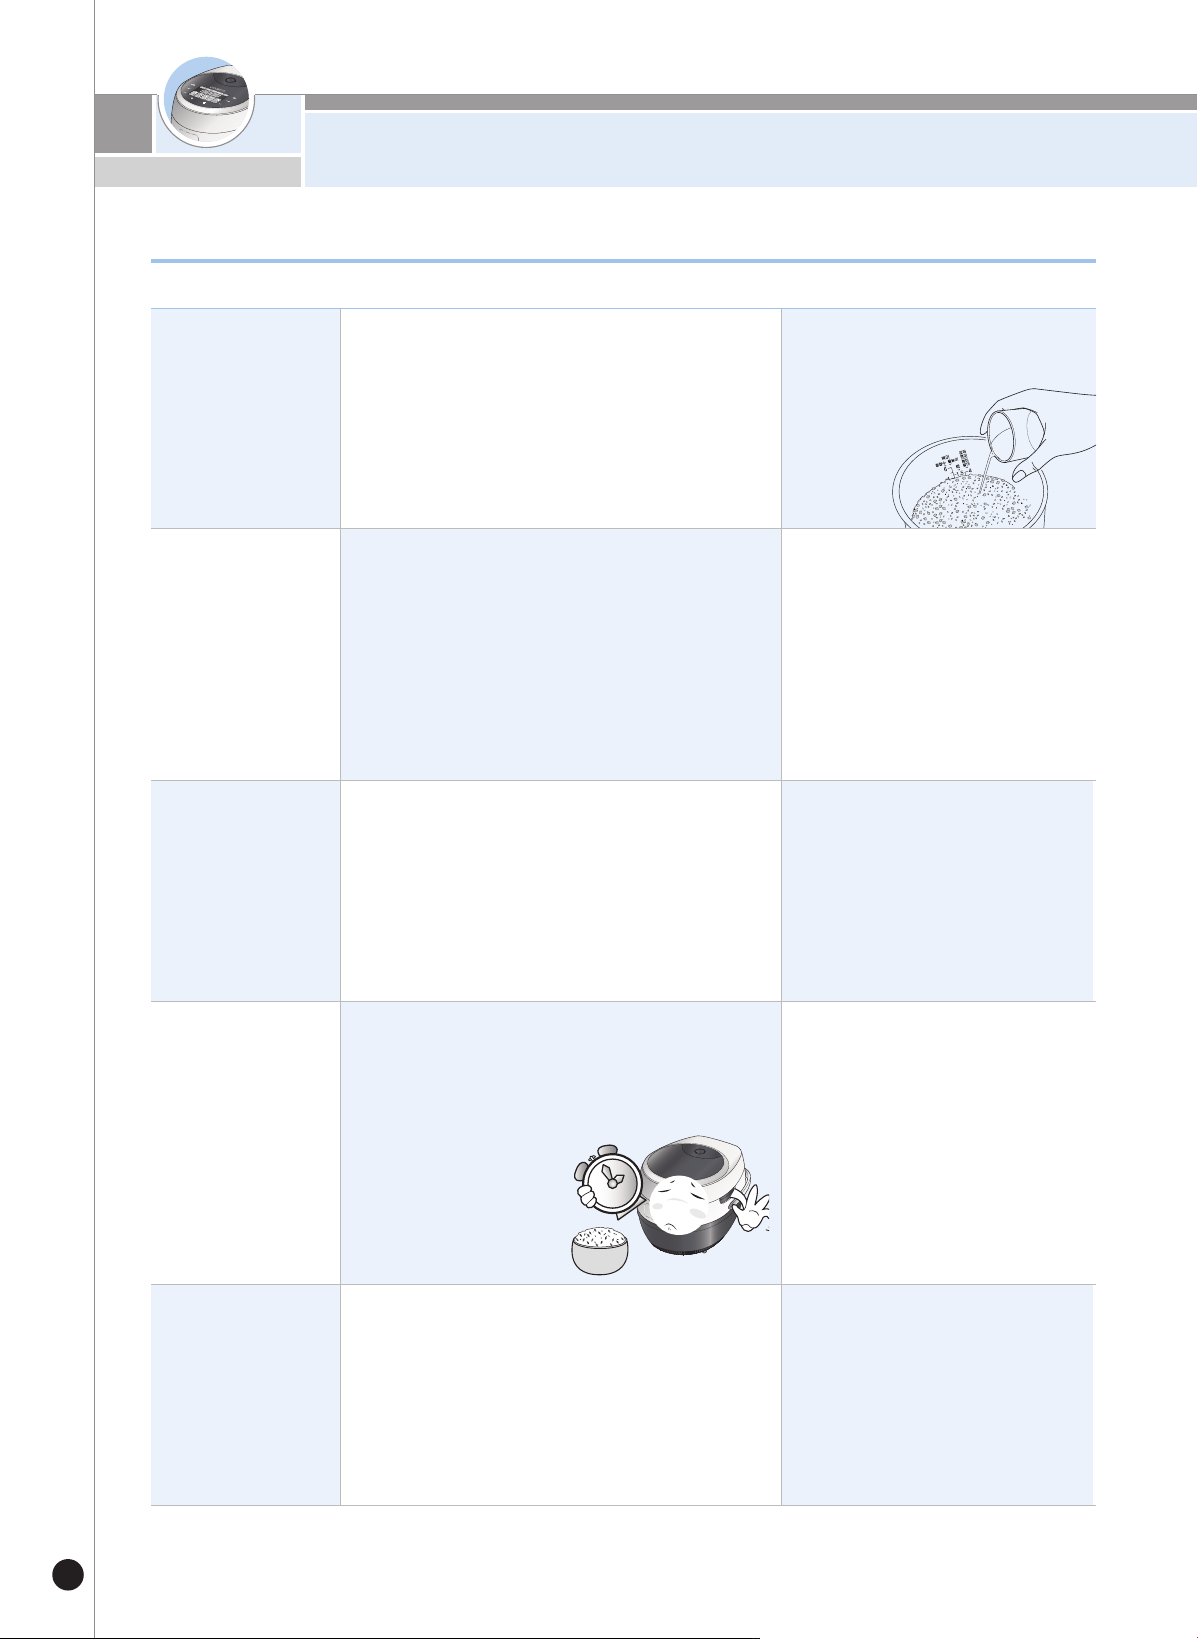
맛있는 밥을 드시려면
42
쌀은 보관
방법이 중요!
제품은 깨끗하게!
•
쌀은 반드시 계량컵을 사용하여 정확히 계량합니
다.(시중에 유통되고 있는 쌀통은 제품에 따라
쌀의 양이 다소 차이가 날 수도 있습니다.)
•물의 양은 내솥을 평평한 곳에 놓고 내솥의 물(水)
높이에 맞춥니다.
• 쌀은 가급적이면 소량으로 구입하여 통풍이 잘되
고 직사광선이 없는 서늘한 곳에 쌀의
수분이 잘 증발되지 않도록 보관합니다.
• 쌀이 개봉한지 오래되어 말라 있는 경우는 물을
반눈금 정도 더 넣고 취사를 하면 좋습니다.
• 청소를 자주 하십시오.
특히, 뚜껑부에 이물질이 묻어 있지 않도록
자주 닦아주십시오.
쌀이 많이 말라 있는 경우는
계량을 정확히 하더라도 밥이
퍼석할 수가 있습니다.
청소를 자주 하지 않으면 세균이
번식하여 보온시 밥에서 냄새가
날 수 있습니다.
맛있는 밥을 드시려면 다음 사항을 꼭 알아두십시오.
밥솥으로 맛있는 밥 짓기
쌀은 계량컵으로!
물은 내솥눈금
으로 정확히!
장시간 보온을 하게되면 밥색깔이
변하거나 밥에서 냄새가 날 수도
있습니다.
보온시간은 짧을
수록 좋습니다!
쌀의 양과 물의 양이 맞지
않으면 밥이 퍼석하거나
설익거나 질게 될수가
있습니다.
예약 취사 시간은
짧을수록 좋습니
다!
• 쌀이 많이 말라 있는 경우는 가급적 예약취사를
피하시고 물을 반눈금 정도 더 넣고 취사합니다.
• 보온은 12시간 이내로 하는 것이 좋습니다.
10시간 이상 예약취사하거나 말라
있는 쌀을 예약취사할 경우는 밥이
퍼석하거나 설익을 수가 있으며
심한 경우는 층밥이 될 수도
있습니다.

취사는 이렇게 하십시오
43
www.cuckoo.co.kr
KOREAN
선택버튼을 눌러 원하시는 메뉴를 선택하세요.
취사/백미쾌속 버튼을 눌러 취사를 시작합니다.
˙
백미, 잡곡, 현미/발아, 묽은죽, 된죽, 누룽지, 탕, 두유, 요거
트
, 이유식, 웰빙쿡, 스팀쿡, 멀티쿡, 자동세척, 백미 순으로
반복 선택됩니다.
˙
백미, 잡곡, 현미/발아는 한번 취사가 완료되고 나면 메뉴가
기억되므로 동일 메뉴를 연속 사용할 경우는 메뉴 선택을
하지 않아도 됩니다.
1 2
취사완료
˙
취사가 끝날 때 완료음이 울리면 보온 기능을 시작합니다.
˙
취사가 끝나면 즉시 밥을 골고루 잘 섞어 주십시오.
섞지 않고 그냥두면 밥이 굳고 변색되어 냄새가 발생합니다.
˙
취사 중에는 취소 버튼을 누르지 마십시오. 취사가 취소됩니다.
뜸들이기(예 : 백미)
˙
뜸 진행부터는 표시부에 남은 취사시간을 표시합니다.
메뉴에 따라 남은 시간은 차이가 있습니다.
▶
탕, 두유, 요거트, 웰빙쿡 등의 요리 후 취사하게 되면 냄새가 배어들 수도 있습니다.
(
38쪽을 참조하여 분리형 커버 및 뚜껑부위를 깨끗하게 닦아낸 후 사용하여 주십시오.)
▶
메뉴별 취사시간은 제품의 사용환경에 따라 다소 차이가 날 수도 있습니다.
예) 백미를 선택할 경우
예)백미를 취사 할 경우
메
뉴
별
취사시간
M
e
nu
Categor
y
백미
백미
쾌속
잡곡
현미
발아
누룽지
된죽
묽은죽
탕
두유
요거트
이유식
웰빙죽
만능찜
멀티쿡
자동
세척
취사량
2~10
인
분
2~6
인
분
2~8
인분
2~6
인
분
2~4
인
분
1~2
cup
0.5~1.5
c
up
50 쪽을
참조하여
주십시오.
51
쪽을
참조하여
주십시오.
52 쪽을
참조하여
주십시오.
54 쪽을
참조하여
주십시오.
55~56
쪽을
참조하여
주십시오.
53 쪽을
참조하여
주십시오.
57
쪽을
참조하여
주십시오.
백미 물눈금
2까지
취사
시간
약39분~
약60분
약31분~
약41분
약42분~
약63분
약76분~
약101분
약46분~
약51분
약90분
약105분
약25분
4
3
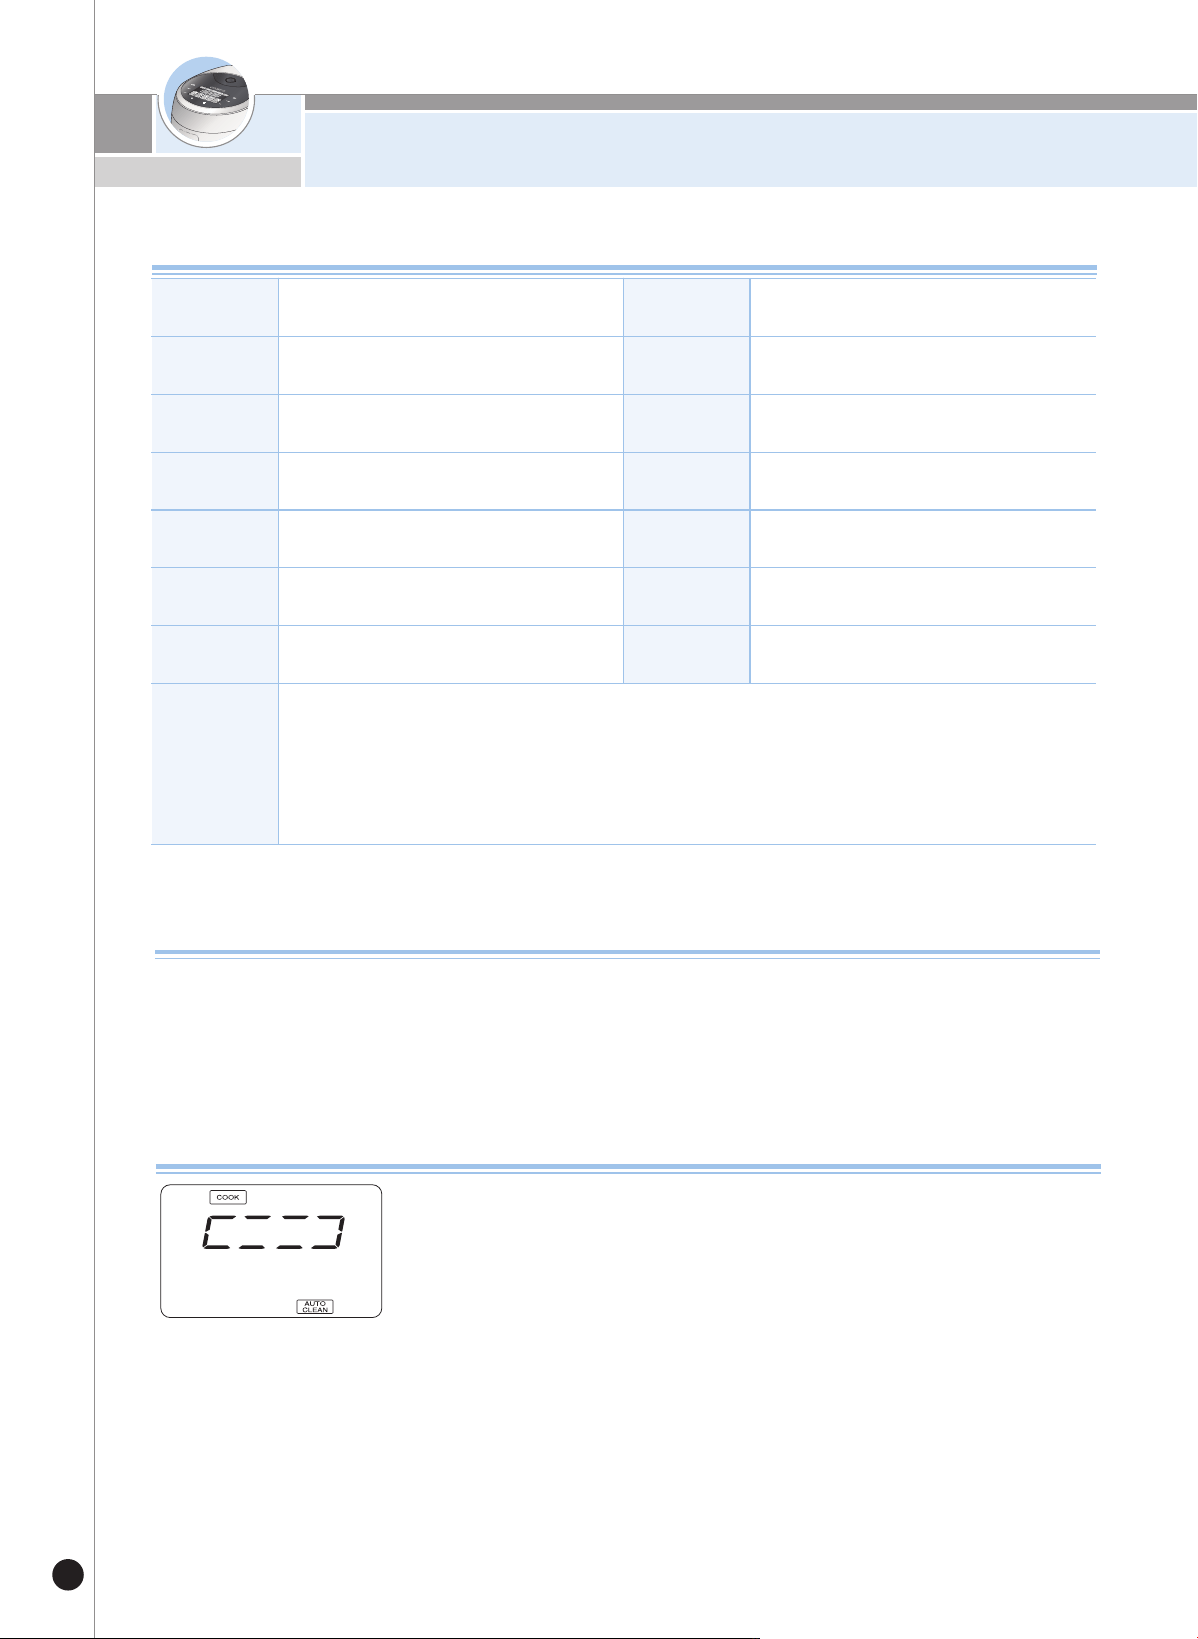
취사는 이렇게 하십시오
44
이 밥솥은 밥의 밑면에 엷은 누런 빛깔이 나타나는데, 이는 밥이 잔여수분을 밥 내부로 흡수시켜
밥 특유의 구수한 향기와 맛을 내는 멜라노이징 현상을 일으켜 맛있는 밥이 되도록 설계되어 있기 때문입니다.
특히“예약취사”와 같이 쌀알이 오랜시간 침전되면 내솥 바닥에 미세 전분이 가라앉아“일반 취사”보다
멜라노이징(미세 밥 눌음)현상이 심하게 나타날 수도 있습니다.
멜라노이징(미세 밥 눌음) 현상
자동세척은 이렇게 하십시오.
내솥에 물을 백미 물눈금 2까지 붓고 뚜껑을 덮어 주십시오.
방법1.
선택 버튼으로“자동세척”메뉴를 선택한 후 취사/백미쾌속 버튼을 눌러 주십시오.
방법2. 대기상태에서 예약 버튼을 2회 눌러 선택한 후 취사/백미쾌속 버튼을 눌러 주십
시오.
취사메뉴 사용법
※백미쾌속 및 저인분 취사 후에는 물받이에 있는 물이 많을 수 있으므로 취사 후 물을 버려 주십시오.
백미
백미를 취사할 때 사용합니다.
잡곡
백미에 현미를 섞어서 취사할 경우 사용
합니다.
현미/발아
현미를 발아시켜 발아현미 밥을 드시고자
할 때 사용합니다.
누룽지
취사할 때 누룽지를 만들어 줍니다.
찜
수동으로 찜시간을 설정해서 요리합니다.
된죽
된 죽을 끓이는 기능입니다.
웰빙쿡
저온 조리기능으로 죽이나, 스프, 건강차
등의 요리가 가능합니다.
묽은죽
묽은죽을 끓이는 기능입니다.
이유식
여러가지 이유식 요리가 가능합니다.
탕
탕을 끓이는 기능입니다.
멀티쿡
수동으로 화력, 온도, 시간을 설정해서
요리합니다.
요거트
요거트를 발효시켜 줍니다.
두유
콩을 삶는 기능입니다.
자동세척
취사, 보온 또는 요리 후 베어든 냄새를
세척 할 때 사용합니다.
백미
쾌속
•“ 백미”메뉴를 선택한 후, 취사/쾌속 버튼을 두번 누르거나 백미쾌속 메뉴를 선택하면
백미쾌속 취사로 동작하여 밥짓는 시간이 단축됩니다.(백미 2인분 기준 약31~33분 정도 걸림)
• 취사 전 쌀을 20분 정도 불린 다음 백미쾌속으로 취사하시면 밥맛이 더욱 좋아집니다.
• 백미쾌속은 예약이 되지 않습니다.
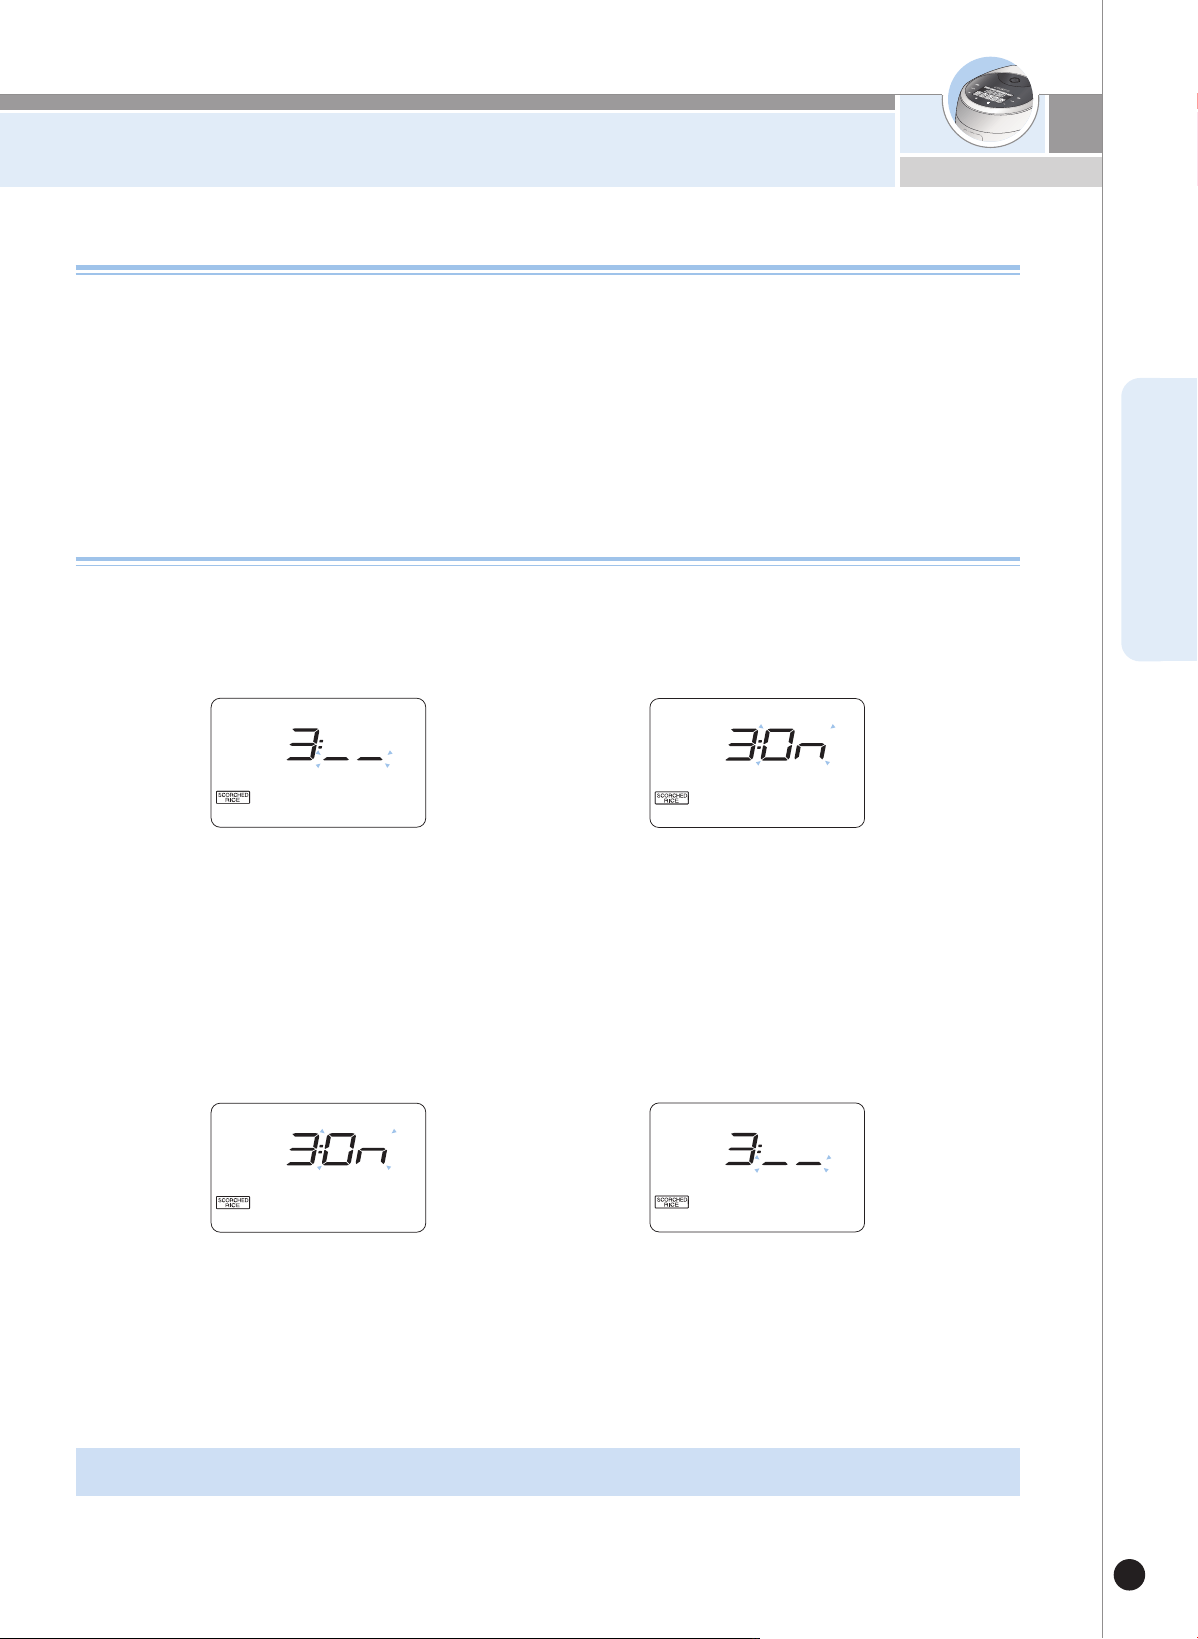
누룽지 기능은 이렇게 하십시오
45
www.cuckoo.co.kr
KOREAN
"누룽지" 메뉴 취사 시 바닥의 밥 눌음 정도를 조절할 수 있는 기능으로 기호에 따라 설정해 주십시오.
▶ 누룽지 눌음 강화 기능 설정 방법 (누룽지 취사시 눌음량의 증가를 원하시는 경우)
1. 대기상태에서 모드 버튼을 4회 누르면“누룽지 눌음강화”설정모드로 진입합니다.
모드 버튼을 초기에 누를시 1초 이상 눌러야 진입 가능합니다.
2.“누룽지 눌음강화”설정모드로 들어왔을 때, 위의 화면이 표시 됩니다.
3. 선택 버튼으로 원하시는 모드를 선택한 후 확인 버튼을 눌러 주십시오.
4.“누룽지 눌음강화”설정모드 진입 후 아무런 버튼 입력 없이 7초가 지나거나, 취소 버튼을 누르면 기능이 설정되지 않
고 취소되며 대기모드로 돌아갑니다.
누룽지 눌음 강화 기능의 설정 방법
▶ 누룽지 눌음강화 기능 해제 방법 (누룽지 일반 취사를 원하시는 경우)
1. 대기상태에서 모드 버튼을 4회 누르면“누룽지 눌음강화”설정모드로 진입합니다.
모드 버튼을 초기에 누를시 1초 이상 눌러야 진입 가능합니다.
2.“누룽지 눌음강화”설정모드로 들어왔을 때 위의 화면이 표시 됩니다.
3. 선택 버튼으로 원하시는 모드를 선택한 후 확인 버튼을 눌러 주십시오.
4..“누룽지 눌음강화”설정모드 진입 후 아무런 버튼 입력 없이 7초가 지나거나, 취소 버튼을 누르면 기능이 설정되지 않
고 취소되며 대기모드로 돌아갑니다.
▶본 기능은 제품 출하시 눌음강화 해제 상태로 되어 있으니 필요에 따라 설정해 주십시오.
1. 메뉴/선택 버튼으로“누룽지”메뉴를 선택합니다.
2. 취사/백미쾌속 버튼을 눌러 취사를 시작합니다.
3. 누룽지가 완료되면 뚜껑을 열고 밥을 덜어내 드시고 바닥의 누룽지는 기호에 따라 드시면 됩니다.
▶ 누룽지 취사는 최대 4인분까지만 가능합니다.
▶ 누룽지 취사시 물량은“백미”물눈금 기준으로 맞추시면 됩니다.
▶ 쌀을 너무 깨끗이 씻지 말고(물이 불투명할 정도)취사하십시오.
▶ 누룽지를 강하게(눌게)하고 싶은 경우, 물량을 맞춘 내솥을 제품에 넣고 뚜껑을 닫아 쌀을 30분 정도 물에 불린 후 취사하십시오.
누룽지는 이렇게 하십시오.
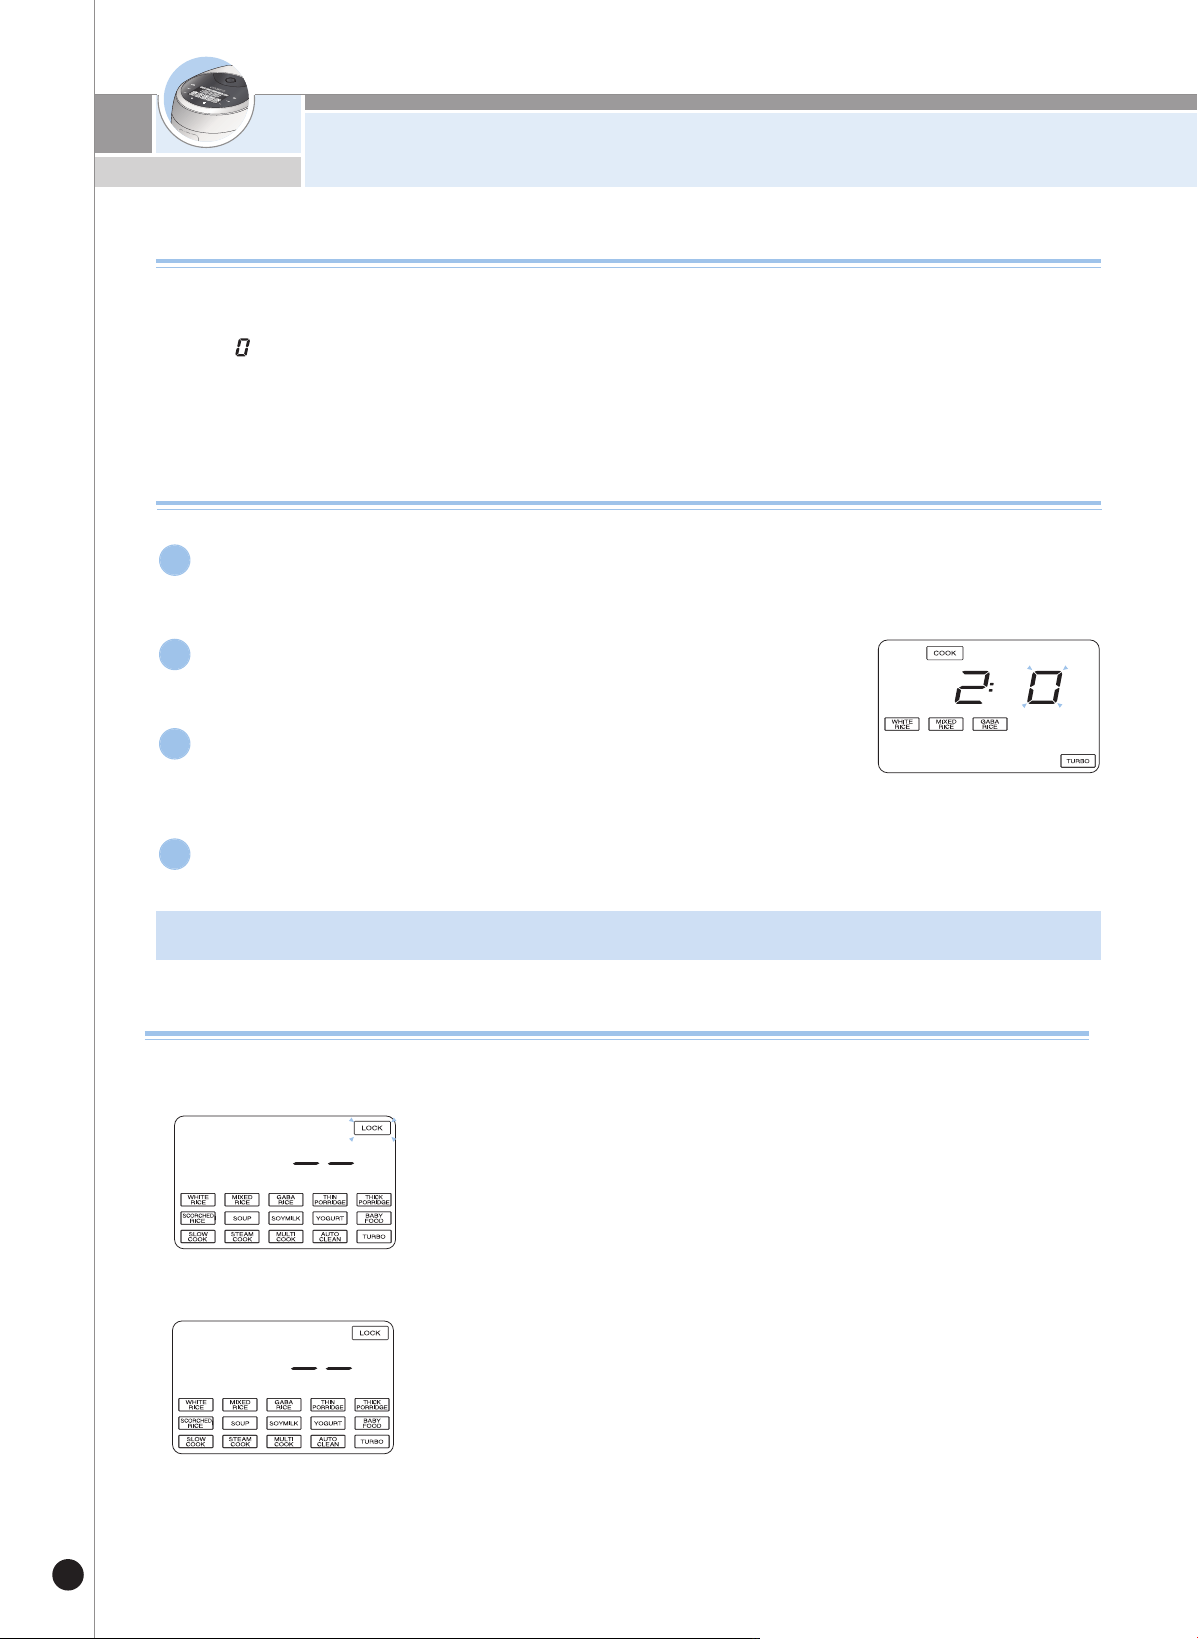
쿠쿠 맞춤취사 기능은 이렇게 하십시오
46
초기값은 단계로 설정되어 있으며 경우에 따라 단계별 조절을 해주십시오.
- 높은단계 : 잡곡류 및 묵은쌀로 취사하실 경우나 차진밥을 좋아하실 경우에 설정해 주십시오.
- 낮은단계 : 햅쌀로 취사하실 경우나 차진밥을 싫어하실 경우에 설정해 주십시오.
취사시 가열완료 온도단계를 조절(온도의 높고, 낮음)하여 취사할 수 있는 기능으로 기존 취사시 고정되어 있던 온도단계를
소비자가 직접 조절할 수 있으므로 소비자가 원하는 기호에 맞게 취사할 수 있습니다.
쿠쿠 맞춤취사 기능(취사온도 조절기능)
쿠쿠 맞춤취사 사용방법
본 기능은 제품 출하시 맞춤취사 0단계 상태로 되어 있으니 필요에 따라 설정해 주십시오.
▶
-2 -1 0 1 2 .
대기상태에서 모드 버튼을 3회 누르면“맞춤취사”설정모드로 진입합니
다.모드 버튼을 초기에 누를시 1초 이상 눌러야 진입 가능합니다
1
“맞춤취사”설정모드 진입 후 아무런 버튼 입력 없이 7초가 지나거나,
취소 버튼을 누르면 기능이 설정되지 않고 취소되며 대기모드로 돌아갑니다.
4
“맞춤취사”설정모드로 들어왔을 때 아래의 화면이 표시 됩니다.
2
선택 버튼으로 원하시는 단계를 선택한 후 확인 버튼을 눌러 주십시오.
3
버튼 잠금기능
1. 취사, 예약, 보온, 재가열 중이나 대기상태에서 확인 버튼을 3초이상 누르면
버튼 잠금이 설정됩니다.
2. 버튼잠금이 설정 되었을때, 화면에 잠금 표시가 깜빡거립니다.
청소 시나 어린이 접촉에 의한 오동작을 방지하기 위해 버튼잠금(LOCK)을 설정할 수 있는 기능 입니다.
※ 버튼잠금이 설정된 상태에서 확인버튼을 제외한 다른 버튼을 누를 경우, 부저음이 발생됩니다.
▶ 설정방법
1. 취사, 예약, 보온, 재가열 중이나 대기상태에서 확인 버튼을 3초이상 누르면
버튼잠금이 해제 됩니다.
2. 버튼잠금이 해제 되었을때, 화면에 잠금 표시가 사라집니다.
※ 확인버튼을 3초이상 눌러 버튼잠금을 해제한 후 원하시는 기능을 설정하실 수 있습니다.
※ 버튼잠금이 설정된 상태에서 전원 OFF후 재인가시 버튼잠금기능이 해제 됩니다.
▶ 해제방법
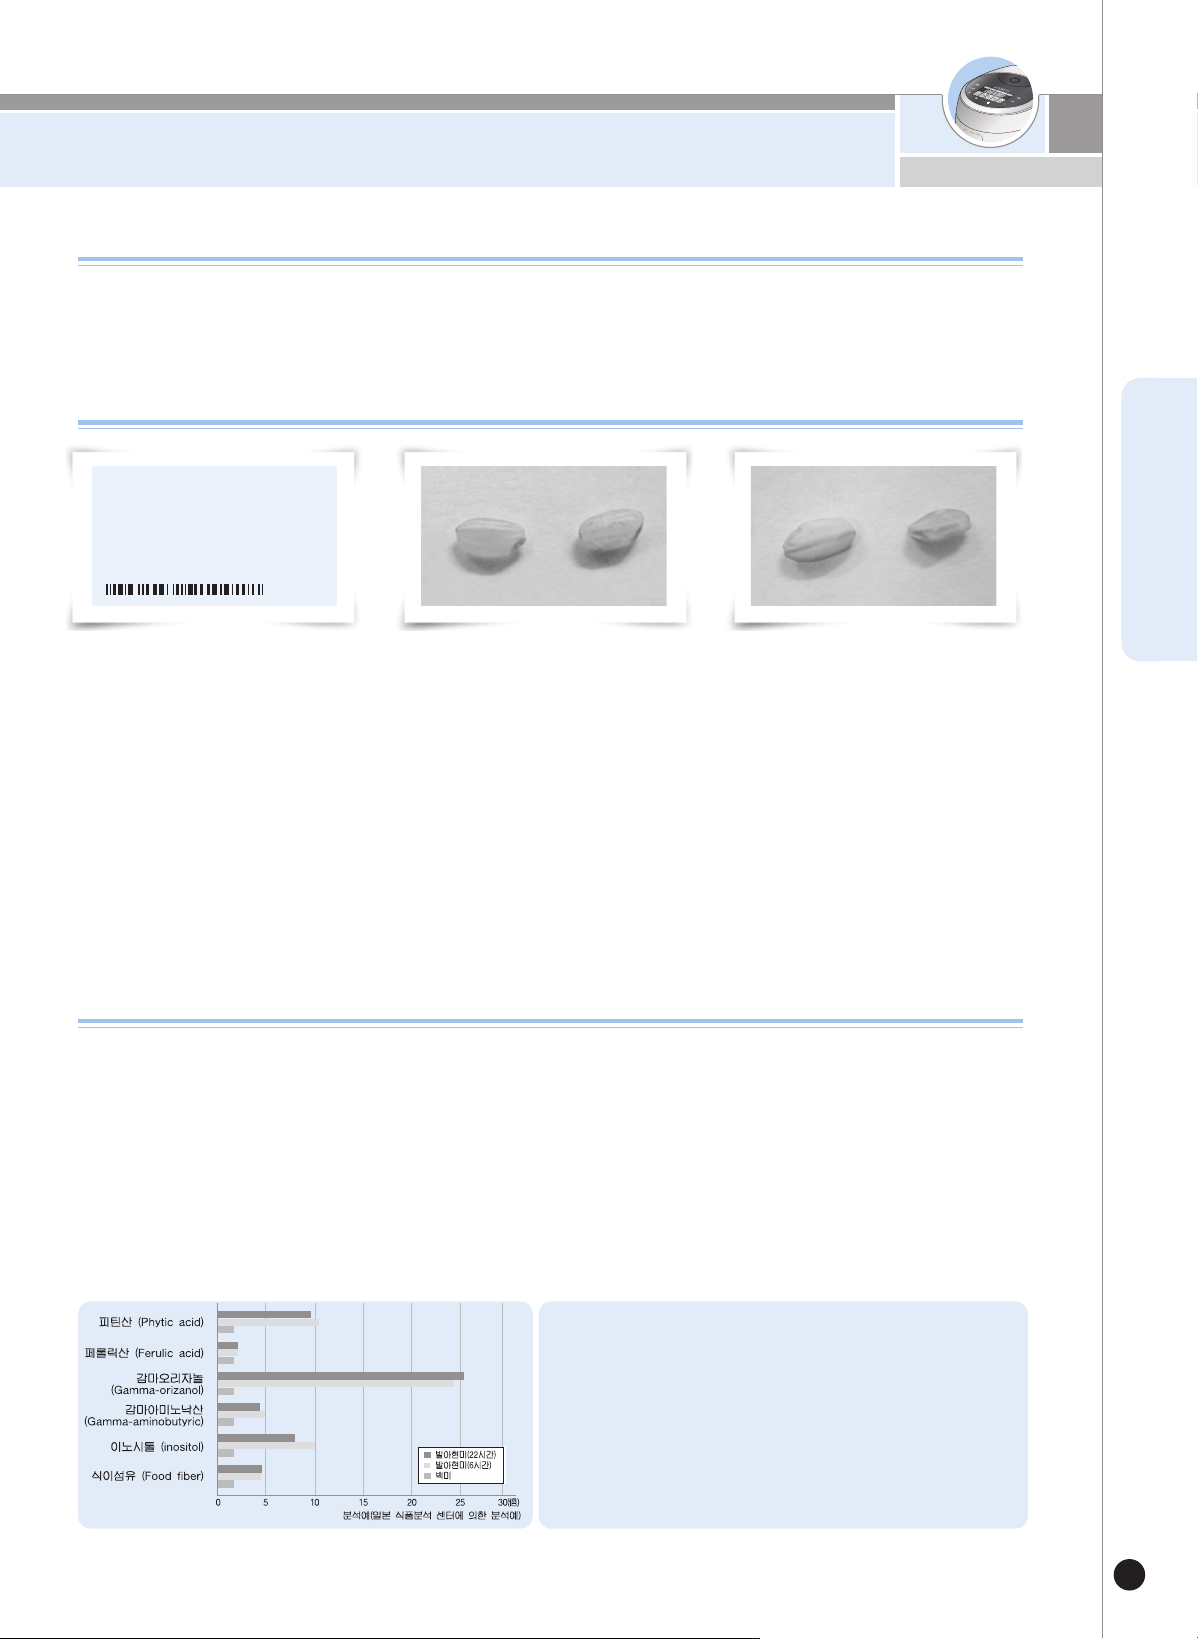
현미/발아는 이렇게 하십시오
47
www.cuckoo.co.kr
KOREAN
원산지 : 경기 용인
품 목 : 추청
단 위 : 1.5kg
생산년도 : ××××년산
도정일자 : ××××년 ××월 ××일
먼저 생산일자와 도정일자를 확인 하십시오.
▶수확한지 1년 이내 그리고 도정일자로부터 3개월 이내의 현미를 사용하십시오.
(현미의 경우 수확년도와 도정날짜가 표시되어 있습니다.)
눈으로 현미를 직접 확인하십시오.
▶시중에서 판매하는 현미의 대부분은 내부를 볼 수 있도록 되어 있습니다.
•씨눈이 살아 있는지 먼저 확인하십시오.
•쌀 표면이 밝은 황색을 띄고 표면에 윤기가 흐르면 좋은 현미이고 표면이 하얗게 일어나거나 색이 검은 기운을 띄면
발아에 적합하지 않은 현미입니다.
•조각나거나 덜 여문 현미는 피하시고 쭉정이가 없는 현미를 고르세요.
쭉정이는 발아 중 썩어 냄새를 유발하고 푸르스름한 색을 띄는 덜 여문 현미는 발아가 되지 않습니다.
(정상현미) (불량 현미 - 씨눈 소실)
발아현미(6시간)와 백미의 영양 비교
발아현미는 백미에 비해 높은 영양소를 가집니다.
피틴산 10.3배
페롤릭산 1.4배
감마오리자놀 23.9배
감마아미노낙산 5배
이노시톨 10배
식이섬유 4.3배
현미는 백미에 비교 영양가가 높은 식품이지만 먹었을 때 거칠고 딱딱하며, 소화하기 힘들다는 단점이 있으나 아주 조금만
발아시켜도 잠자고 있던 효소가 활성화되어 영양성분이 보다 풍부하게 되고 소화 흡수가 훨씬 수월한 형태로 변화됩니다.
발아현미란
발아현미는 영양가 높은 현미를 발아시켜 영양소를 더욱 증가시키고 현미의 단점인 거친 밥맛이 개선된
소화가 잘되는 훌륭한 영양원입니다.
▶ 현미보다 부드러운 밥맛을 즐기실 수 있습니다.
▶ 소화가 잘되고 영양소가 풍부합니다 - 발아과정에서 당화호르몬이 분비되어 소화흡수가 잘됩니다.
▶ 어린이나 수험생의 영양 건강식으로 좋습니다 - 식이섬유가 풍부합니다.
▶ 발아현미에는 GABA(감마아미노낙산)가 다량 함유되어 있습니다. GABA는 간장과 신장의 신진대사를 촉진하며 중성지방
증가 억제 작용, 혈압상승 방지효과, 뇌세포 대사 촉진 등 우리몸에 좋은 효과가 있음이 의학적으로 확인되었습니다.
발아현미의 특징
현미구입방법
(불량 현미 - 쭉정이와 덜 여문 현미)
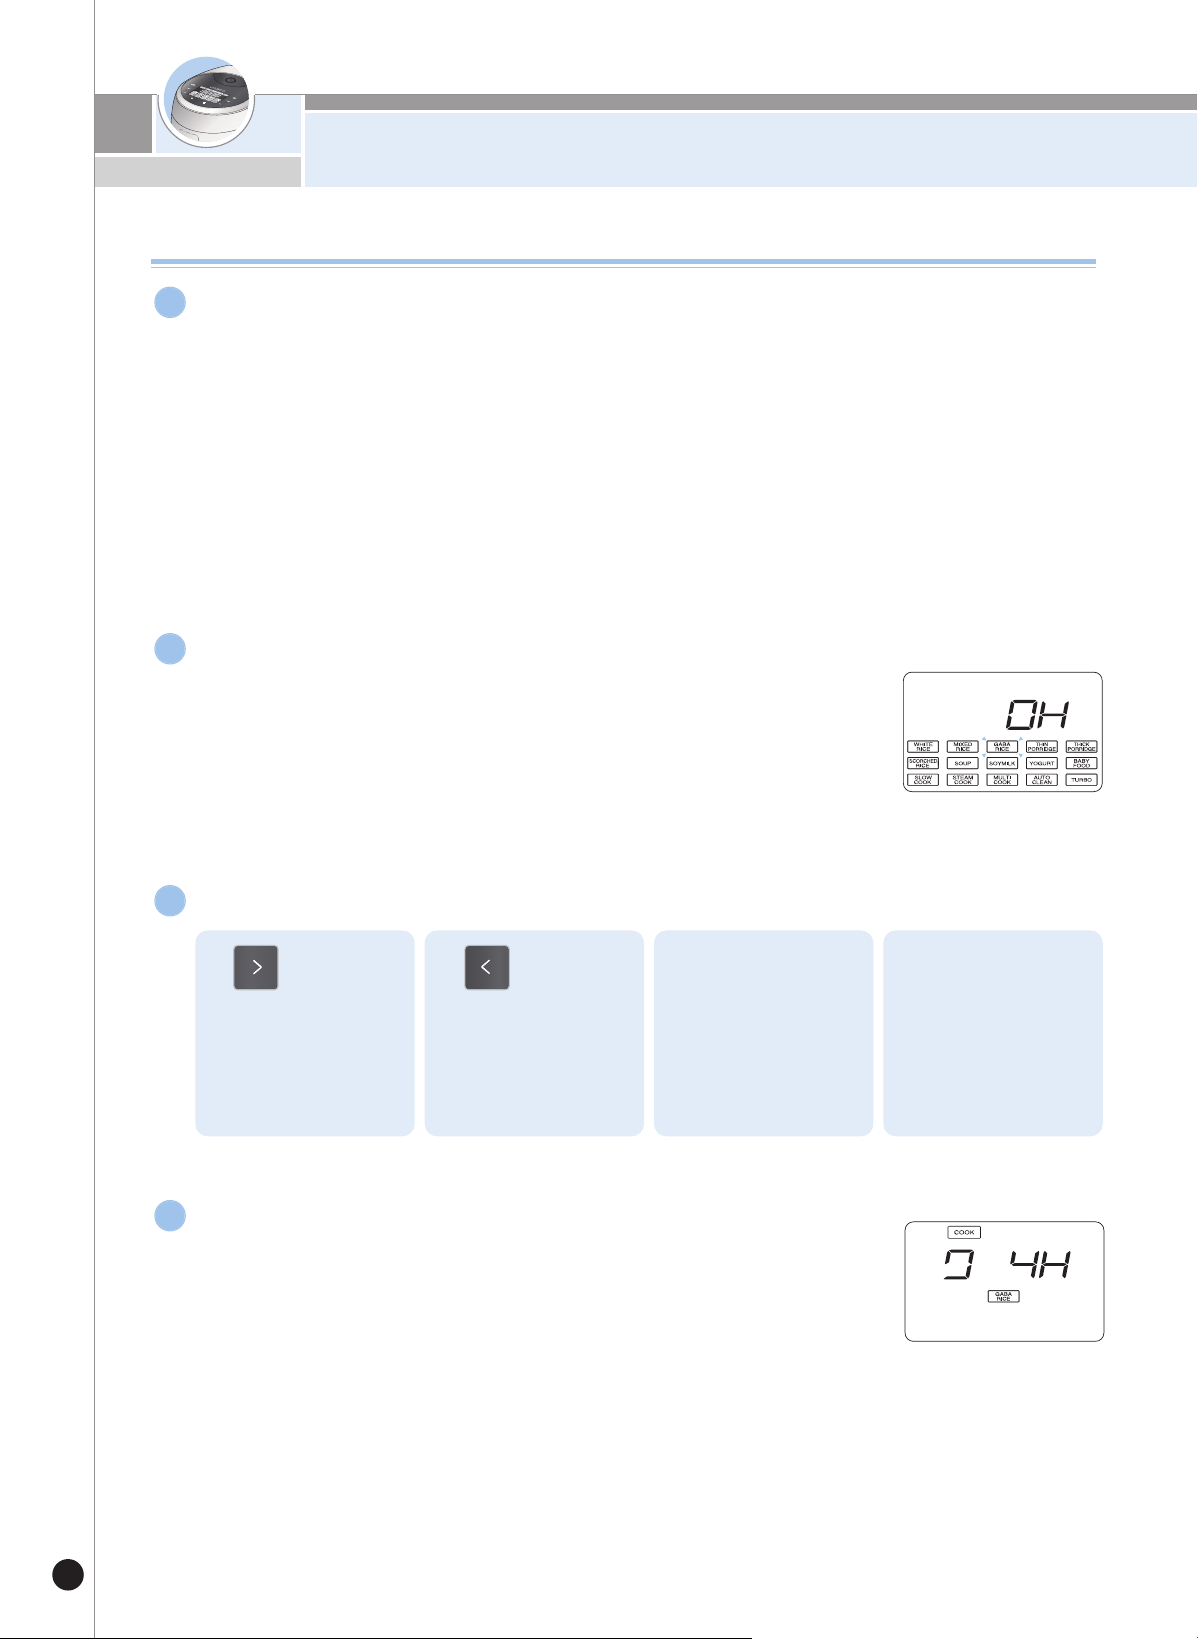
현미/발아는 이렇게 하십시오
48
현미/발아 메뉴의 조작방법
발아를 더욱 촉진 시키기 위해 현미를 미리 16시간 이내로 침수하여 예비발아를 해주십시오.
예비발아방법
▶일반적으로 가정에서 사용하시는 용기에 씻은 현미를 넣은 뒤, 최대한 물을 충분히 넣고 침수시킨 후 예비발아하여 주십시오.
▶예비발아는 16시간 이내로 하여 주시고 현미/발아 메뉴 사용 전에는 반드시 흐르는 물에 세척하신 후 사용하여 주십시오.
지나치게 세게 문질러 세척하면 쌀눈(배아)이 떨어져 발아되지 않을 수 있습니다.
▶예비발아하실 때 침수시간에 따라 특유의 냄새가 날 수 있습니다.
▶예비발아가 완료된 현미는 씻은 후에 내솥에 넣고 취사량에 따라 물높이를 맞추신 후 현미/발아 메뉴를 사용하여 주십시오.
▶기온이 높은 여름이나 보관온도 등에 따라 예비발아시에는 냄새가 날 수 있으니 가급적 예비발아시간을 줄여 주시고
더 주의해서 깨끗이 잘 씻어 주십시오.
▶
현미/발아 메뉴가 선택되었을 때는 표시부에 0H표시됩니다.
1
선택 버튼을 눌러 현미/발아를 선택합니다.
2
선택 버튼을 눌러 시간을 설정합니다.
3
1.버튼을 누르면
현미/발아
시간이 2시간씩
증가 합니다.
2. 버튼을 누르면
현미/발아 시
간이 2시간씩
감소 합니다.
3. 확인 버튼을 누르면
발아시간 선택 모드로
진입합니다.
4.
메뉴/선택 버튼으로 발아
시간을 설정 합니다.
현미/발아 시간은 0, 2, 4,
6 시간까지 설정 가능합
니다. 현미/발아 0시간으
로 설정 후 취사 시 현미
메뉴로 취사가 됩니다.
▶
취사/백미쾌속 버튼을 누르면 설정된 시간만큼 현미/발아를 시작하고,
발아 완료 후 즉시 취사가 시작됩니다.
▶
현미/발아 중에는‘취사’표시가 나타나며 남은 시간이 표시됩니다.
취사/백미쾌속 버튼을 누릅니다.
4

현미/발아는 이렇게 하십시오
49
www.cuckoo.co.kr
KOREAN
4.예약 또는 취사/쾌속 버튼을 누릅니다.
현미/발아 취사시 유의사항
❶ 발아된 싹의 크기를 키우지 않고 좀 더 빨리 드시고 싶으면 예비발아를 하지 않고 현미발아를 선택하여 원하는 발아시간을
설정하신 후 취사/백미쾌속 버튼을 눌러 취사하십시오. (싹의 크기에 따른 영양분의 차이는 크지 않습니다.)
❷ 기온이 높을 때 오랜시간 발아시키면 냄새가 날 경우가 있습니다. 그 경우에는 발아 설정시간을 단축하여 짧게 설정하여 주십시
오.
❸ 현미/발아 메뉴로 취사하실 경우에는 최대 4인분 이하로 하여 주십시오.
❹ 물은 수돗물을 사용하셔도 무방하나 생수를 이용하시면 더욱 좋습니다. 단, 뜨거운 물, 끓인 물은 식힌 경우라 하더라도
발아가 되지 않을 수 있으니 사용을 피해주십시오.
❺ 현미의 발아율이나 싹의 길이 등의 발아상태는 현미의 종자와 보관상태, 보관기간에 따라 차이가 있을 수 있습니다.
- 발아현미는 현미를 싹틔운 것으로, 현미의 종자에 따라 발아율 및 발아된 후의 싹의 길이에 차이가 있을 수 있습니다.
발아시킬 현미는 반드시 수확 후 1년 미만의 것을 사용해 주시고, 도정 후 보관기간이 가급적 짧은 것을 이용해 주십시오.
❻ 현미의 종류에 따라 멜라노이징 또는 밥상태의 차이가 나타날 수 있습니다.
기호에 맞게 물량을 가감하거나 맞춤취사 기능을 이용해주십시오. (46쪽 참조)
❼ 사용환경이나 쌀 상태에 따라서 싹이 보이지 않을 수 있습니다.
현미/발아 예약은 이렇게 하십시오
1. 선택 버튼을 눌러 현미/발아를 선택 합니다.
2. 확인 버튼을 누른 후 선택 버튼으로 발아시간을 0시간으로 설정후 확인 버튼을 누릅니다. 2H,4H,6H설정시
예약이 되지 않습니다.
3. 선택 버튼으로 취사완료시간을 설정합니다.
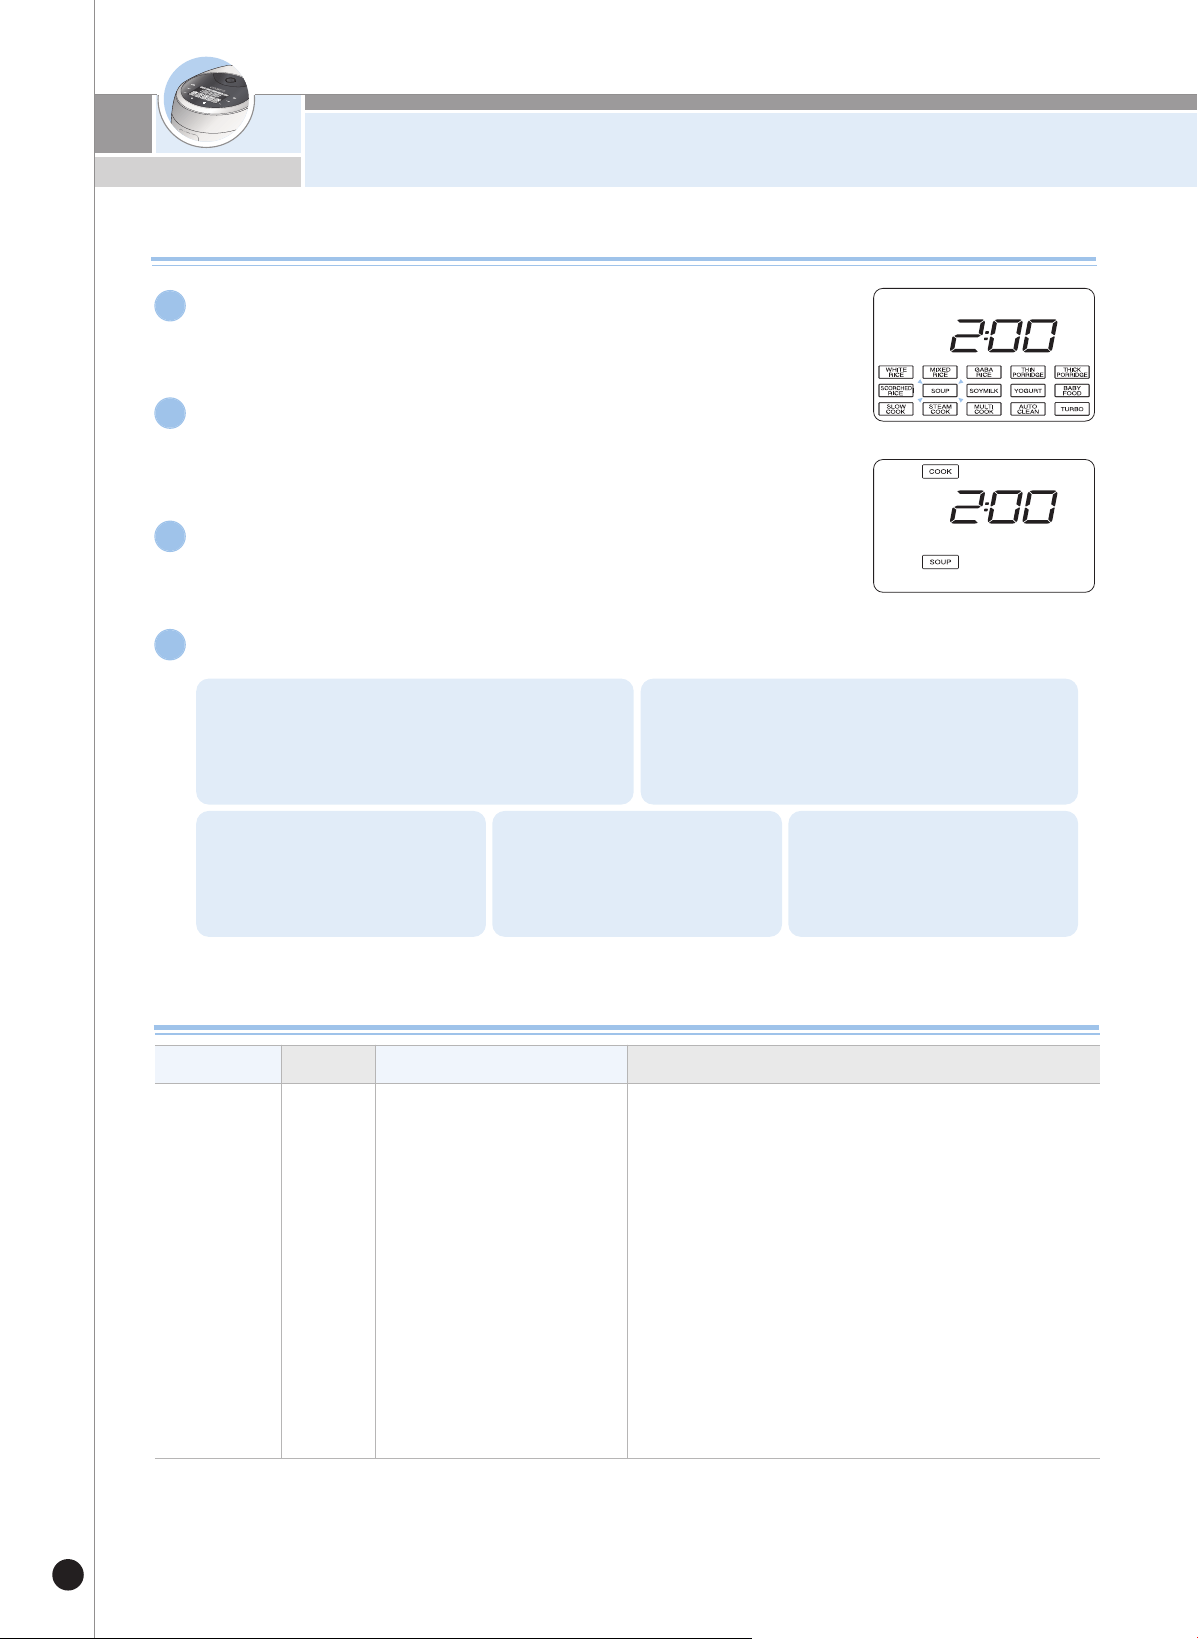
탕은 이렇게 하십시오
50
탕 사용 및 예약 방법
▶
탕 요리가 시작되면 취사 표시가 나타나며, 남은 시간이 표시됩니다.
▶기본값은“2:00”시간이고, 1시간에서 4시간까지 설정 가능 합니다.
(10분 단위로 증가 또는 감소합니다.)
▶
탕 메뉴가 선택 되었을 때는 표시부에 2:00이 표시됩니다.
선택 버튼으로 탕 메뉴를 선택한 후 확인 버튼을 누릅니다
1
탕 예약은 이렇게 하십시오
4
선택 버튼을 눌러 요리 시간을 설정합니다.
2
취사/쾌속 버튼을 누릅니다.
3
탕 만드는 방법
1. 예약 버튼을 누릅니다.2. 선택 버튼을 눌러 요거트를 선택한 후 확인
버튼을 누릅니다.
3. 선택 버튼을 눌러 요리
시간을 선택한 후 확인 버튼을
누릅니다.
4. 선택 버튼을 눌러 예약
완료 시간을 선택합니다.
5. 예약 또는 취사/백미쾌속 버튼
을누릅니다.
요리종류메뉴선택준비할 재료이렇게 만드세요
삼계탕탕
닭 1마리(1kg),
수삼 2뿌리, 대추 10개,
찹쌀 1컵, 소금, 후춧가루,
마늘 약간
1) 준비된 닭의 양쪽 다리에 칼집을 내어 구멍을 뚫어 주십시오.
2) 손질한 닭의 뱃속에 2시간 이상 불린 찹쌀과 마늘을 채워 넣어
주십시오. (찹쌀을 불리지 않으면 설익을 수 있습니다.)
3) 식성에 따라 걸쭉한 국물을 원하시면 찹쌀의 1/2은 닭의 뱃속에
넣고, 나머지 1/2는 밖으로 꺼내 놓아 주십시오.
4)
칼집을 낸 구멍에 두 다리를 엇갈리게 끼우고 고정시켜 주십시오.
5) 내솥에 준비한 닭을 넣고 깨끗이 씻은 수삼과 대추를 넣은 후,
물은 계랑컵 으로 7컵을 부어 주십시오.
6) 뚜껑을 닫고 『선택』버튼으로 soup 메뉴를 선택한 후, 시간을
2시간으로 설정한 뒤, 취사/쾌속 버튼을 눌러 주십시오
-참고-
물을 너무 많이 넣으면 취사 완료 후 압력 배출시 탕물이 올라올
수 있으니 주의 하십시오.
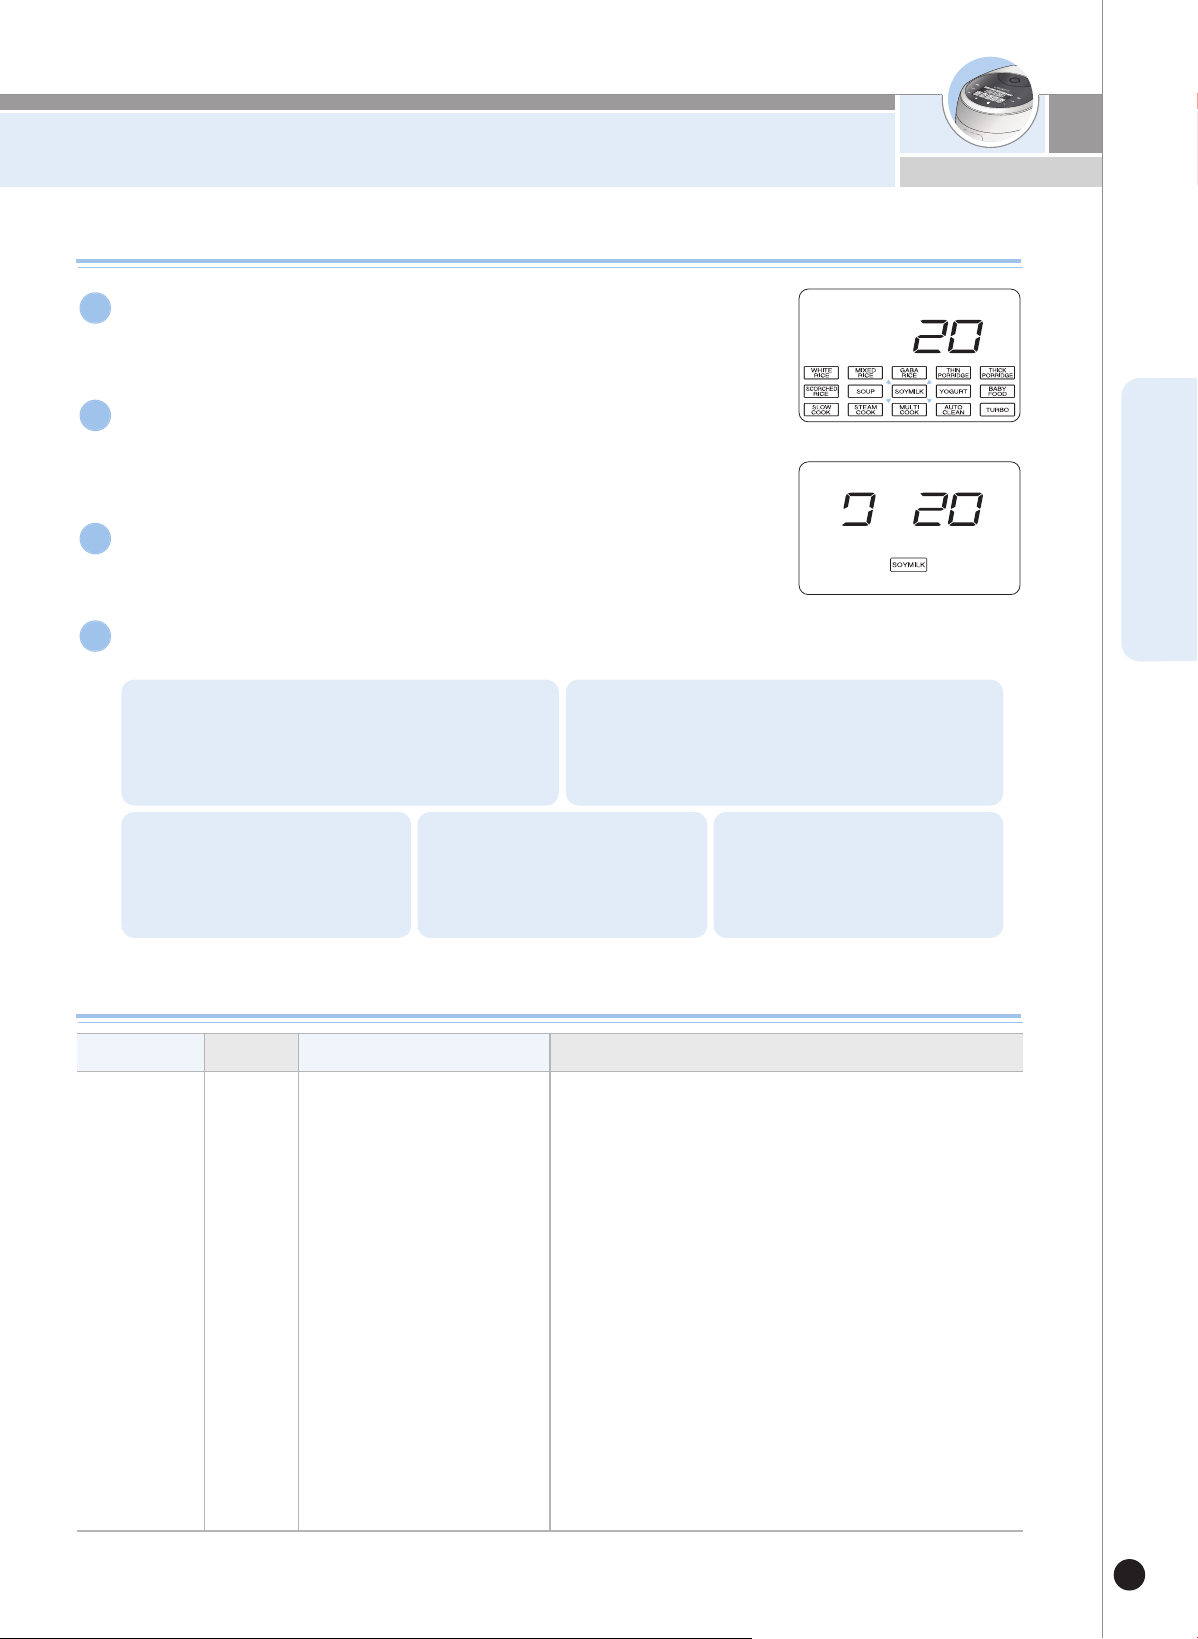
두유는 이렇게 하십시오
51
www.cuckoo.co.kr
KOREAN
두유 사용 및 예약방법
▶
두유 요리가 시작되면 취사 표시가 나타나며, 남은 시간이 표시됩니다.
▶기본값은“20”시간이고, 10분에서 1시간 30분까지 설정 가능 합니
다.
(10분 단위로 증가 또는 감소합니다.)
▶
두유 메뉴가 선택 되었을 때는 표시부에 20이 표시됩니다.
선택 버튼으로 두유 메뉴를 선택한 후 확인 버튼을 누릅니다.
1
두유 예약은 이렇게 하십시오.
4
선택 버튼을 눌러 원하시는 발효시간을 설정합니다.
2
취사/쾌속 버튼을 누릅니다.
3
두유 만드는 방법
1. 예약 버튼을 누릅니다.2. 선택 버튼을 눌러 두유를 선택한 후 확인
버튼을 누릅니다.
3. 선택 버튼을 눌러 요리
시간을 선택한 후 확인 버튼을
누릅니다.
4. 선택 버튼을 눌러 예약
완료 시간을 선택합니다.
5. 예약 또는 취사/백미쾌속 버튼
을누릅니다.
요리종류메뉴선택준비할 재료이렇게 만드세요
두유두유
백태: 250g
소금, 설탕 약간
1차 물: 500g
2차 물: 950g
1. 콩은 하루 전날 2배 가량의 물을 넣고 불려 주십시오.
(콩 껍질이 손으로 부드럽게 벗겨질 때까지 불려 주십시오.)
2. 불려둔 콩은 껍질을 반드시 전부 제거한 뒤, 내솥에 물
500g(1차)과 함께 넣어주십시오.
뚜껑을 닫고 『선택』버튼으로 SOYMILK 메뉴를 선택한 후,
시간을 20분으로 설정한 뒤, 취사/쾌속 버튼을 눌러 주세요.
(완성된 콩은 서걱서걱 씹히는 상태입니다. 콩이 손으로 으깨질
만큼 푹 삶길 경우는 매주 냄새가 날 수 있으니 주의하십시오.)
3. 삶은 콩은 체로 건져내어 흐르는 물에 씻어 주십시오.
4. 콩을 믹서기에 넣고, 물950g(2차)을 조금씩 넣어가면서 갈아
주십시오.
5. 갈아둔 콩은 체에 한번 내려주십시오.
6. 기호에 따라 설탕과 소금으로 간을 하여 드십시오.
-주의사항-
* 콩 껍질은 반드시 전부 제거한 후 삶아 주십시오.
( 콩 껍질이 남아 있을 경우, 증기배출구를 막아 콩물이 끓어
넘칠 수 있습니다.)
* 요리 후 분리형 커버를 세척해 주십시오.
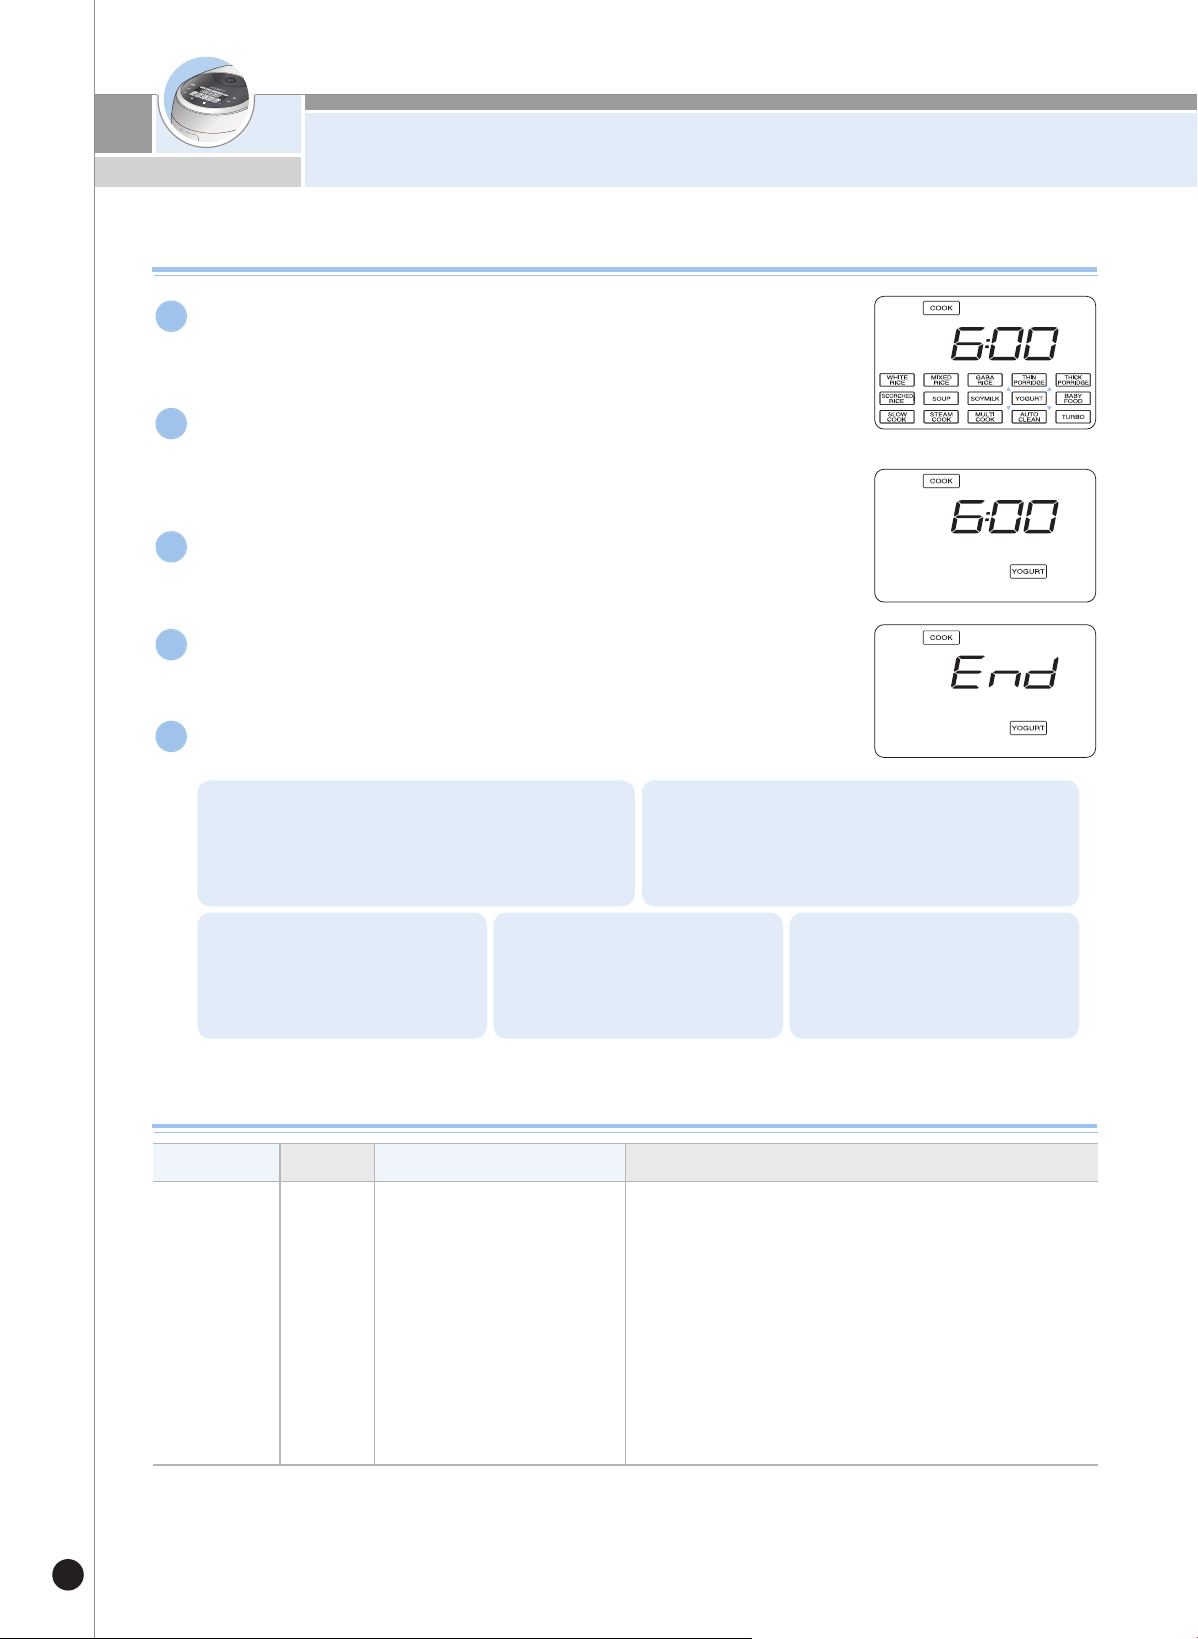
요거트는 이렇게 하십시오.
52
요거트 사용 및 예약방법
▶
요거트가 시작되면 취사 중 표시가 나타나며 남은 시간이 표시됩니다.
▶기본은 6시간이고, 30분~12시간까지 설정 가능합니다.
(30분 단위로 증가 또는 감소 합니다.)
▶
요거트 메뉴가 선택 되었을 때 표시부에 6시간이 표시됩니다.
선택 버튼으로 요거트를 선택한 후 확인 버튼을 누릅니다.
1
요거트가 완료되면 완료 화면에“End”가 표시되며, 보온으로 전환되지
않습니다.
4
요거트 예약은 이렇게 하십시오.
5
선택 버튼을 눌러 원하시는 발효시간을 설정합니다.
2
취사/백미쾌속 버튼을 누르면 요거트 메뉴가 시작됩니다.
3
요거트 만드는 방법
1. 예약 버튼을 누릅니다.2. 선택 버튼을 눌러 요거트를 선택한 후 확인
버튼을 누릅니다.
3. 선택 버튼을 눌러 요리
시간을 선택한 후 확인 버튼을
누릅니다.
4. 선택 버튼을 눌러 예약
완료 시간을 선택합니다.
5. 예약 또는 취사/백미쾌속 버튼
을누릅니다.
요리종류메뉴선택준비할 재료이렇게 만드세요
요거트요거트
우유 1L,
플레인 요거트 290g
1. 내솥에 준비한 재료를 모두 넣고 가볍게 섞어 주십시오.
2.
뚜껑을 닫고 메뉴/선택 버튼으로 요거트를 선택하고 시간을
6시간으로 설정한 뒤, 취사/백미쾌속 버튼을 눌러 주십시오.
<참고>
* 우유는 일반 흰우유를 사용하십시오.
(칼슘, 저지방, 멸균 우유의 경우 발효가 안될 수 있습니다.)
* 요거트 발효 시 다른 재료를 함께 넣으면 변질될 수
있으니 주의 하십시오.
*
완료후 냉장고에 넣어 차갑게 드십시오.
기호에 따라 생과일, 씨리얼, 잼 등을 넣어 드셔도 좋습니다.
※초기 설정시 6시간

만능찜은 이렇게 하십시오
53
www.cuckoo.co.kr
KOREAN
만능찜 요리방법
만능찜 사용 및 예약 방법
▶
만능찜 취사가 시작되면 취사 표시가 나타나며, 남은 시간이 표시됩니다.
▶기본값은20분이고, 10분~90분까지 설정 가능 합니다.
(5분 단위로 증가 또는 감소 합니다.)
▶
만능찜 메뉴가 선택 되었을때는 표시부에 20분이 표시됩니다.
메뉴/선택 버튼으로 찜을 선택합니다.
1
만능찜 예약은 이렇게 하십시오.
4
확인 버튼을 눌러 요리 시간을 설정합니다.
2
취사/백미쾌속 버튼을 누릅니다.
3
1. 예약 버튼을 누릅니다.2. 선택 버튼을 눌러 만능찜을 선택한 후 확인
버튼을 누릅니다.
3. 선택 버튼을 눌러 요리
시간을 선택한 후 확인 버튼을
누릅니다.
4. 선택 버튼을 눌러 예약
완료 시간을 선택합니다.
5. 예약 또는 취사/백미쾌속 버튼
을누릅니다.
요리종류메뉴선택준비할 재료이렇게 만드세요
만두찜
만능찜
만두 : 15개
물 :
3
/
4
컵
1. 재료를 준비해 주십시오.
2. 내솥에 물
3
/
4
~
1
1
/
2
컵을 넣고 찜판을 올려 놓아주십시오.
3. 그 위에 준비한 재료를 올려 놓아 주십시오.
4. 뚜껑을 닫고선택 버튼을 눌러 만능찜을 선택한 후 찜시
간을 만두찜은 30분, 고구마찜, 감자찜은 50분을 설정한
뒤 취사/쾌속 버튼을 눌러 주십시오.
고구마찜
고구마 : 3개 (150g이하)
물 : 1
1
/
2
컵
감자찜
감자 : 3개 (200g이하)
물 : 1
1
/
2
컵
※초기 설정시 20분
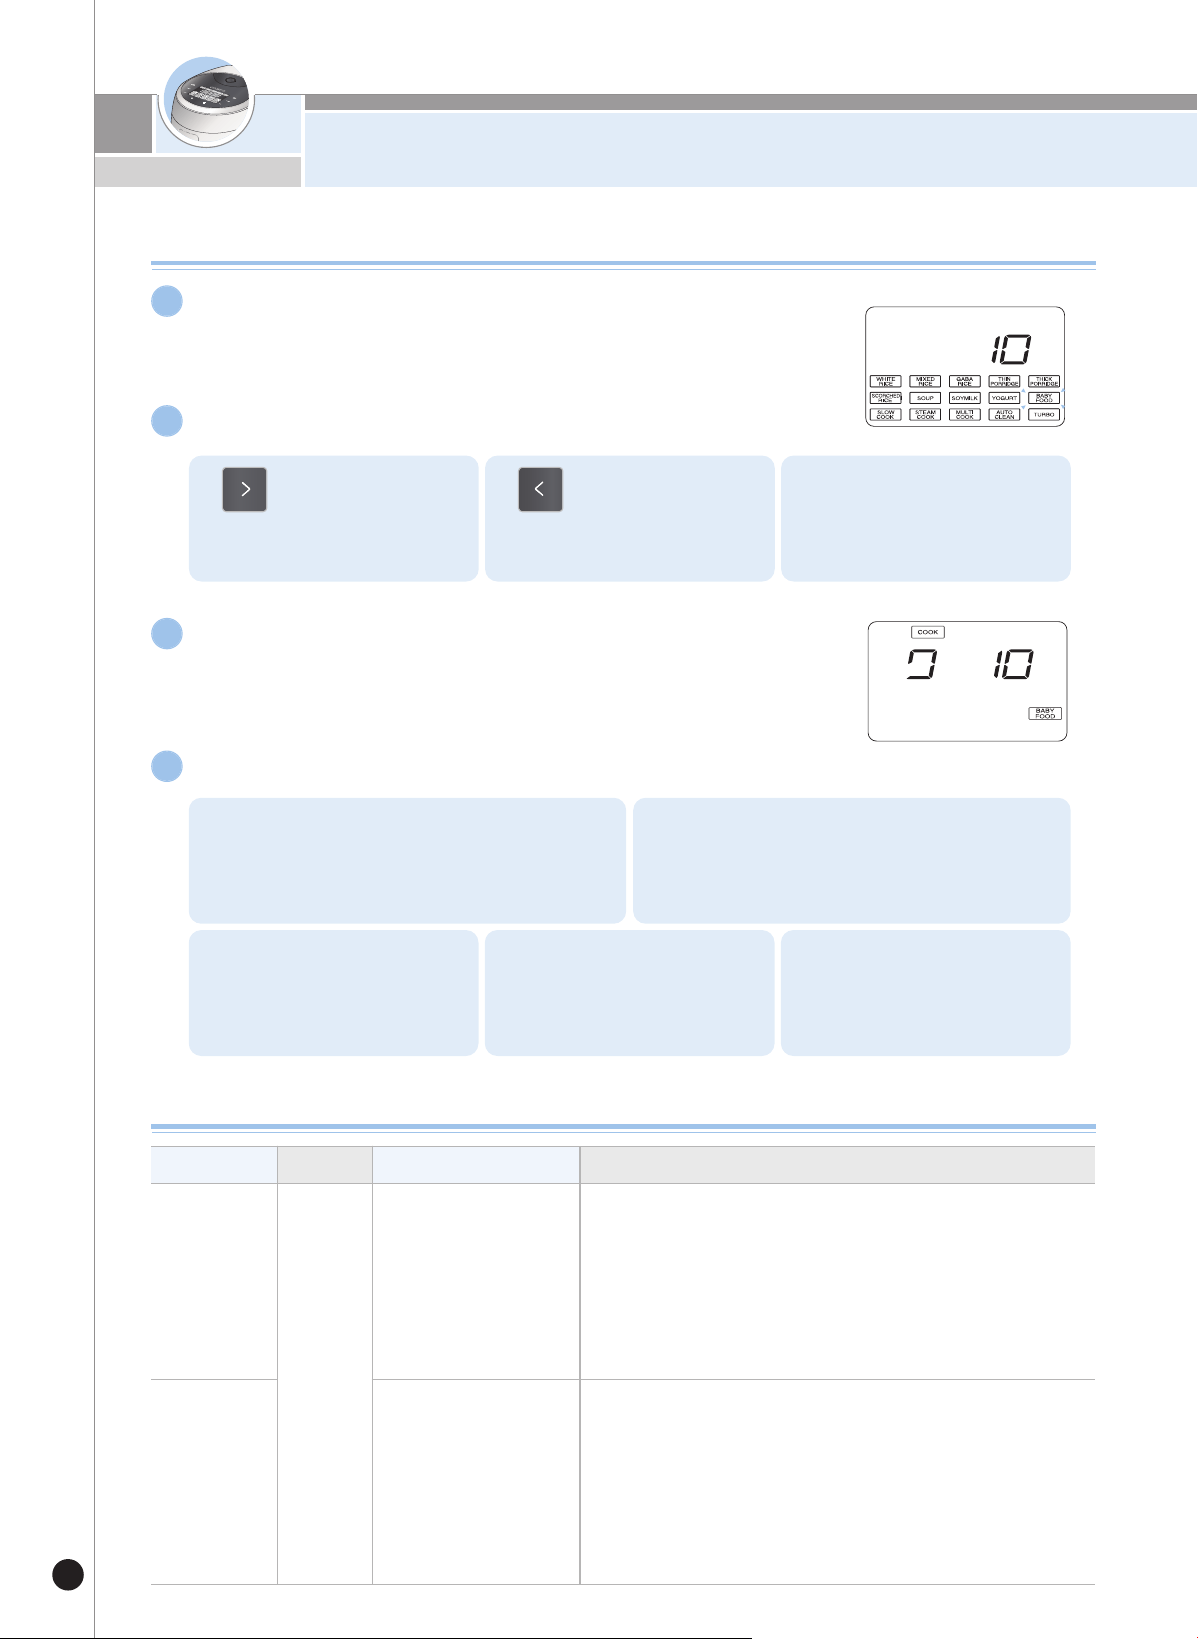
이유식은 이렇게 하십시오
54
이유식 사용 및 예약방법
선택 버튼으로 이유식 메뉴를 선택한 후 확인 버튼을 누릅니다.
1
▶
이유식 메뉴가 선택 되었을 때는 표시부에 10분이 표시됩니다.
선택 버튼으로 요리 시간을 선택합니다.
2
1.버튼을 누르면 이유식
시간이 5분씩 증가
합니다.
2.버튼을 누르면 이유
식시간이 5분씩 감소
합니다.
3.이유식 시간은 10분 ~ 50분까
지 설정 가능합니다.
취사/백미쾌속 버튼을 누르면 이유식 메뉴가 시작됩니다.
3
▶ 이유식 취사가 시작되면 취사 중 표시가 나타나며 남은 시간이 표시됩니다.
이유식 예약은 이렇게 하십시오.
4
1. 예약 버튼을 누릅니다.2. 선택 버튼을 눌러 이유식을 선택한 후 확인
버튼을 누릅니다.
3. 선택 버튼을 눌러 요리
시간을 선택한 후 확인 버튼을
누릅니다.
4. 선택 버튼을 눌러 예약
완료 시간을 선택합니다.
5. 예약 또는 취사/백미쾌속 버튼
을누릅니다.
요리종류메뉴선택준비할 재료이렇게 만드세요
고구마
사과죽
이유식
고구마 : 70g
사과 : 70g
물 : 1컵
꿀 : 약간
1. 사과와 고구마는 껍질을 벗기고 얇게 썰어 주십시오.
2. 내솥에 1.과 물을 넣어 주십시오.
3. 뚜껑을 닫고선택 버튼을 눌러 이유식을 선택한 후 이유식
시간을 45분으로 설정한 뒤 취사/백미쾌속 버튼을 눌러
주십시오.
4. 요리가 완료되면 나무주걱으로 곱게 으깨어 꿀을 조금 넣어
섞어 주십시오.
참치야채
무른밥
밥 : 50g
참치살(캔) : 30g
피망 : 10g
당근 : 10g
물 : 1/2컵
버터, 김가루 : 약간씩
1. 참치살은 기름을 빼고 젓가락으로 잘게 찢어 준비해 주십시오.
2. 피망과 당근은 잘게 다져 주십시오.
3. 그릇에 밥과 참치살, 피망과 당근을 섞어서 준비해 주십시오.
4. 내솥 바닥에 버터를 바른 후 3.의 재료를 넣고 물을 부어 주십시오.
5. 뚜껑을 닫고 선택 버튼을 눌러 이유식을 선택한 후 이유식 시간을
15분으로 설정한 뒤 취사/백미쾌속 버튼을 눌러 주십시오.
6. 요리가 완료되면 주걱으로 잘 섞어 주십시오.
이유식 요리방법
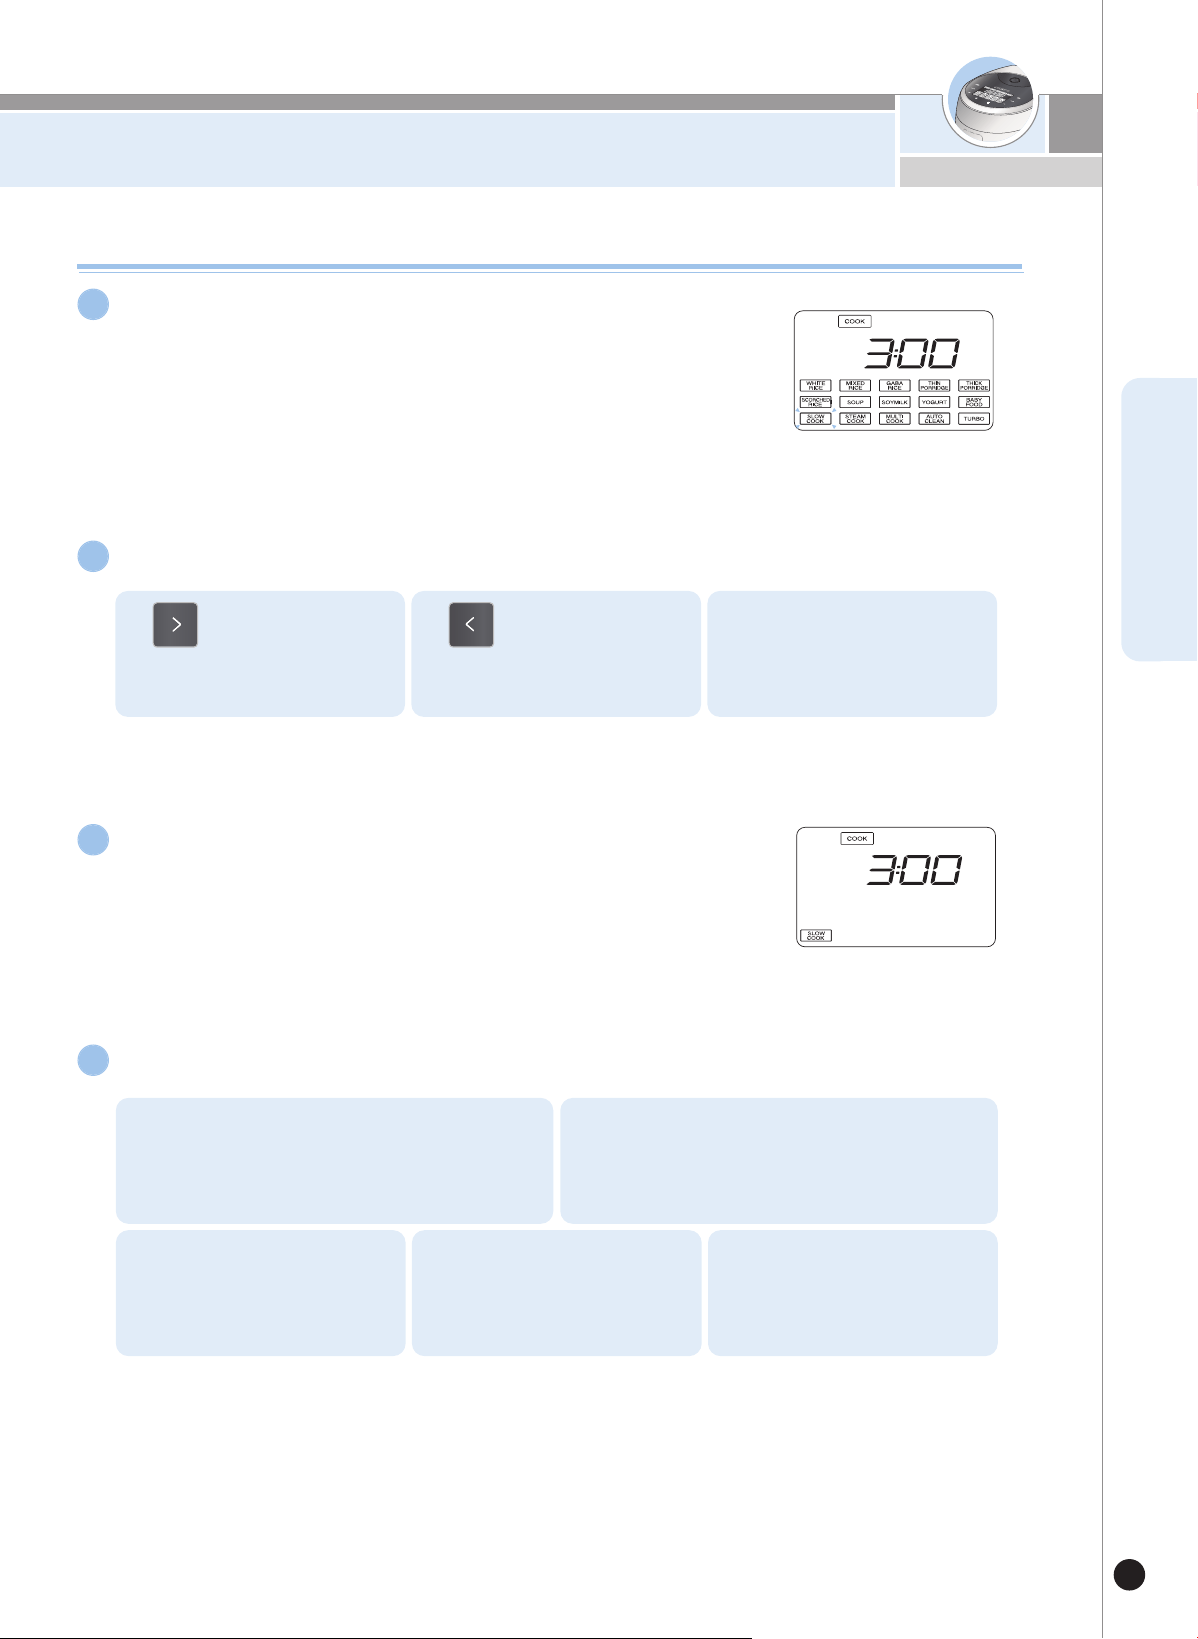
웰빙쿡은 이렇게 하십시오
55
www.cuckoo.co.kr
KOREAN
웰빙쿡 사용 및 예약방법
선택 버튼을 눌러 웰빙쿡을 선택한 후 확인 버튼을 누릅니다.
1
▶
웰빙쿡 메뉴가 선택 되었을 때는 표시부에 3시간이 표시됩니다.
선택 버튼을 눌러 시간을 설정합니다.
2
1.버튼을 누르면 웰빙쿡
시간이 10분씩 증가
합니다.
2.버튼을 누르면 웰빙쿡
시간이 10분씩 감소
합니다.
3.웰빙쿡 시간은 1시간 ~ 10시
간까지 설정 가능합니다.
취사/백미쾌속 버튼을 누르면 웰빙쿡 메뉴가 시작됩니다.
3
▶
웰빙쿡 취사가 시작되면 취사 중 표시가 나타나며 남은 시간이 표시됩니다.
웰빙쿡 예약은 이렇게 하십시오.
4
1. 예약 버튼을 누릅니다.2. 선택 버튼을 눌러 웰빙쿡을 선택한 후 확인
버튼을 누릅니다.
3. 선택 버튼을 눌러 요리
시간을 선택한 후 확인 버튼을
누릅니다.
4. 선택 버튼을 눌러 예약
완료 시간을 선택합니다.
5. 예약 또는 취사/백미쾌속 버튼
을누릅니다.

웰빙쿡은 이렇게 하십시오
56
껍질 제거한 호박 :
500g
찹쌀가루 : 100g
설탕, 소금 : 약간씩
물 : 3컵(계량컵 기준)
남은밥 : 1인분
당근 : 50g
양파 : 50g
쪽파 : 30g
소금, 추후 : 약간씩
물 :
2
1
/
2
컵 (계량컵기준)
양파 : 30g
감자 : 30g
당근 : 30g
양송이 : 30g
쇠고기등심 : 50g
크림스프가루 : 100g
올리브오일 : 약간
물 : 3컵(계량컵 기준)
대추 : 180g
생강 :
1
/
2
톨
꿀 : 약간
물 : 백미 물눈금 4까지
1. 호박은 껍질을 제거하고, 얇게 썰어 두십시오.
2. 내솥에 썰어둔 호박과 찹쌀가루, 물을 넣어 주십시오.
3. 뚜껑을 닫고 선택 버튼을 눌러 웰빙쿡을 선택한 후
웰빙쿡 시간을 3시간으로 설정한 뒤 취사/백미쾌속 버튼을
눌러 주십시오.
4. 요리가 완료되면 체에 내려 으깨어 주거나, 믹서기로 갈아준
뒤 설탕과 소금으로 기호에 맞도록 간을 하여 주십시오.
1. 당근, 양파, 쪽파는 깨끗이 씻어 잘게 다져 준비해 두십시오.
2. 내솥에 준비해둔 밥 1인분과 다져둔 재료, 물을 넣어 섞어 주
십시오.
3. 뚜껑을 닫고 선택 버튼을 눌러 웰빙쿡을 선택한 후
웰빙쿡 시간을 5시간으로 설정한 뒤 취사/백미쾌속 버튼을
눌러 주십시오.
4. 요리가 완료되면 소금과 후추로 기호에 맞도록 간을 하여 주십
시오.
1. 양파, 간장, 당근을 얇게 썰어 2cm정도의 정사각형 모양으
로 썰어두고 쇠고기 등심도 얇게 저며 2.5cm정도의 정사각
형 모양으로 썰어두고 양송이는 모양대로 편을 내어 썰어
주십시오.
2. 썰어둔 재료를 올리브오일 약간에 1/2큰술의 소금을 넣고 볶
아서 준비하십시오. (재료를 볶지 않고 그냥 사용하여도 됩니
다.)
3. 내솥에 크림스프가루와 물을 넣고 잘 풀어준 뒤 재료를 넣고
한번더 저어 준다.
4. 뚜껑을 닫고 선택 버튼을 눌러 웰빙쿡을 선택한 후 웰빙쿡 시
간을 5시간으로 설정한 뒤 취사/백미쾌속 버튼을 눌러
주십시오.
1. 대추는 깨끗이 씻어두고 생강은 깨끗이 씻어 껍질을 벗기고,
얇게 썰어 준비해 주십시오.
2. 내솥에 준비해둔 대추와 썰어둔 생강을 넣고, 물을 백미 물
눈금4까지 부어 주십시오.
3. 뚜껑을 닫고선택 버튼을 눌러 웰빙쿡을 선택한 후
웰빙쿡 시간을 8시간으로 설정한 뒤취사/백미쾌속 버튼을
눌러 주십시오.
4. 요리가 완료되면 꿀을 기호에 맞도록 넣어 주십시오.
준비할 재료이렇게 만드세요
웰빙쿡 요리방법
요리종류
호박죽
야채죽
야채스프
대추차
웰빙쿡
메뉴선택
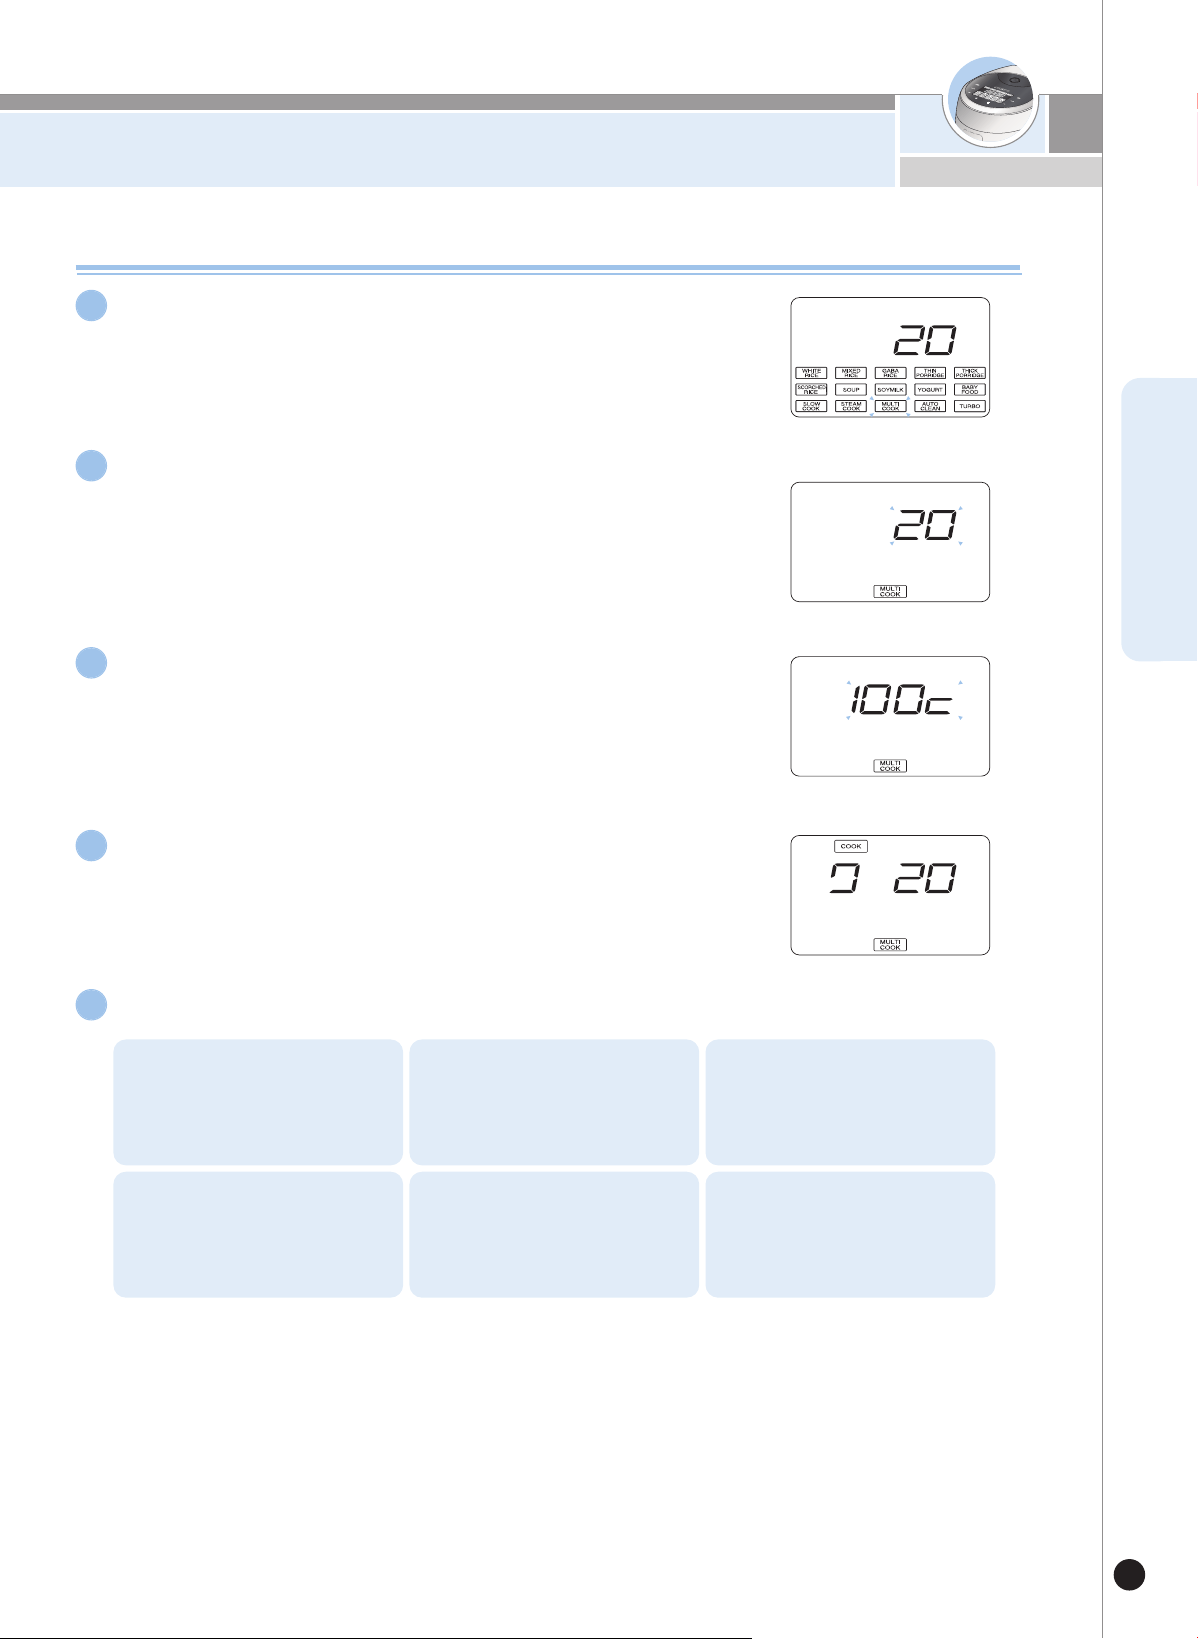
멀티쿡은 이렇게 하십시오
57
www.cuckoo.co.kr
KOREAN
멀티쿡 요리방법
선택 버튼으로 멀티쿡을 선택한 후 확인버튼을 누릅니다.
1
▶
멀티쿡 메뉴가 선택되었을때는 표시부에“20”이 표시됩니다.
선택 버튼을 눌러 요리 시간을 설정합니다.
2
▶
원하시는 요리시간을 설정한 뒤, 확인 버튼을 누르면 요리 온도 설정 단계로
넘어갑니다.
▶
기본값은“20”분이고,“1시간30분”까지 설정 가능 합니다.
(10분 단위로 증가 또는 감소합니다.)
확인 버튼을 눌러 요리 온도를 설정합니다.
3
▶
원하시는 요리 온도를 설정한 뒤, 취사 버튼을 누르면 취사가 시작됩니다.
▶
기본값은 100℃이고, 35℃~130℃ 까지 설정 가능합니다.
※ 표시되는 온도는 주변 환경과 내용물에 따라 차이가 있을 수 있습니다.
(1℃ 단위로 증가 또는 감소합니다.)
취사/쾌속 버튼을 누릅니다.
4
▶
멀티쿡 취사가 시작되면 취사 표시가 나타나며, 남은 시간이 표시됩니다.
멀티쿡 예약은 이렇게 하십시오.
4
1. 예약 버튼을 누릅니다.2.선택 버튼을 눌러 멀티쿡을 선
택한 후 확인 버튼을 누릅니다.
3. 선택 버튼을 눌러 요리 시간을
선택한 후 확인 버튼을 누릅니다.
4.선택 버튼을 눌러 요리 온도를
선택한 후 확인 버튼을 누릅니다.
5.
선택버튼을 눌러 예약 완료 시간
을 선택합니다
6.예약 또는 취사/쾌속
버튼을 누릅니다.
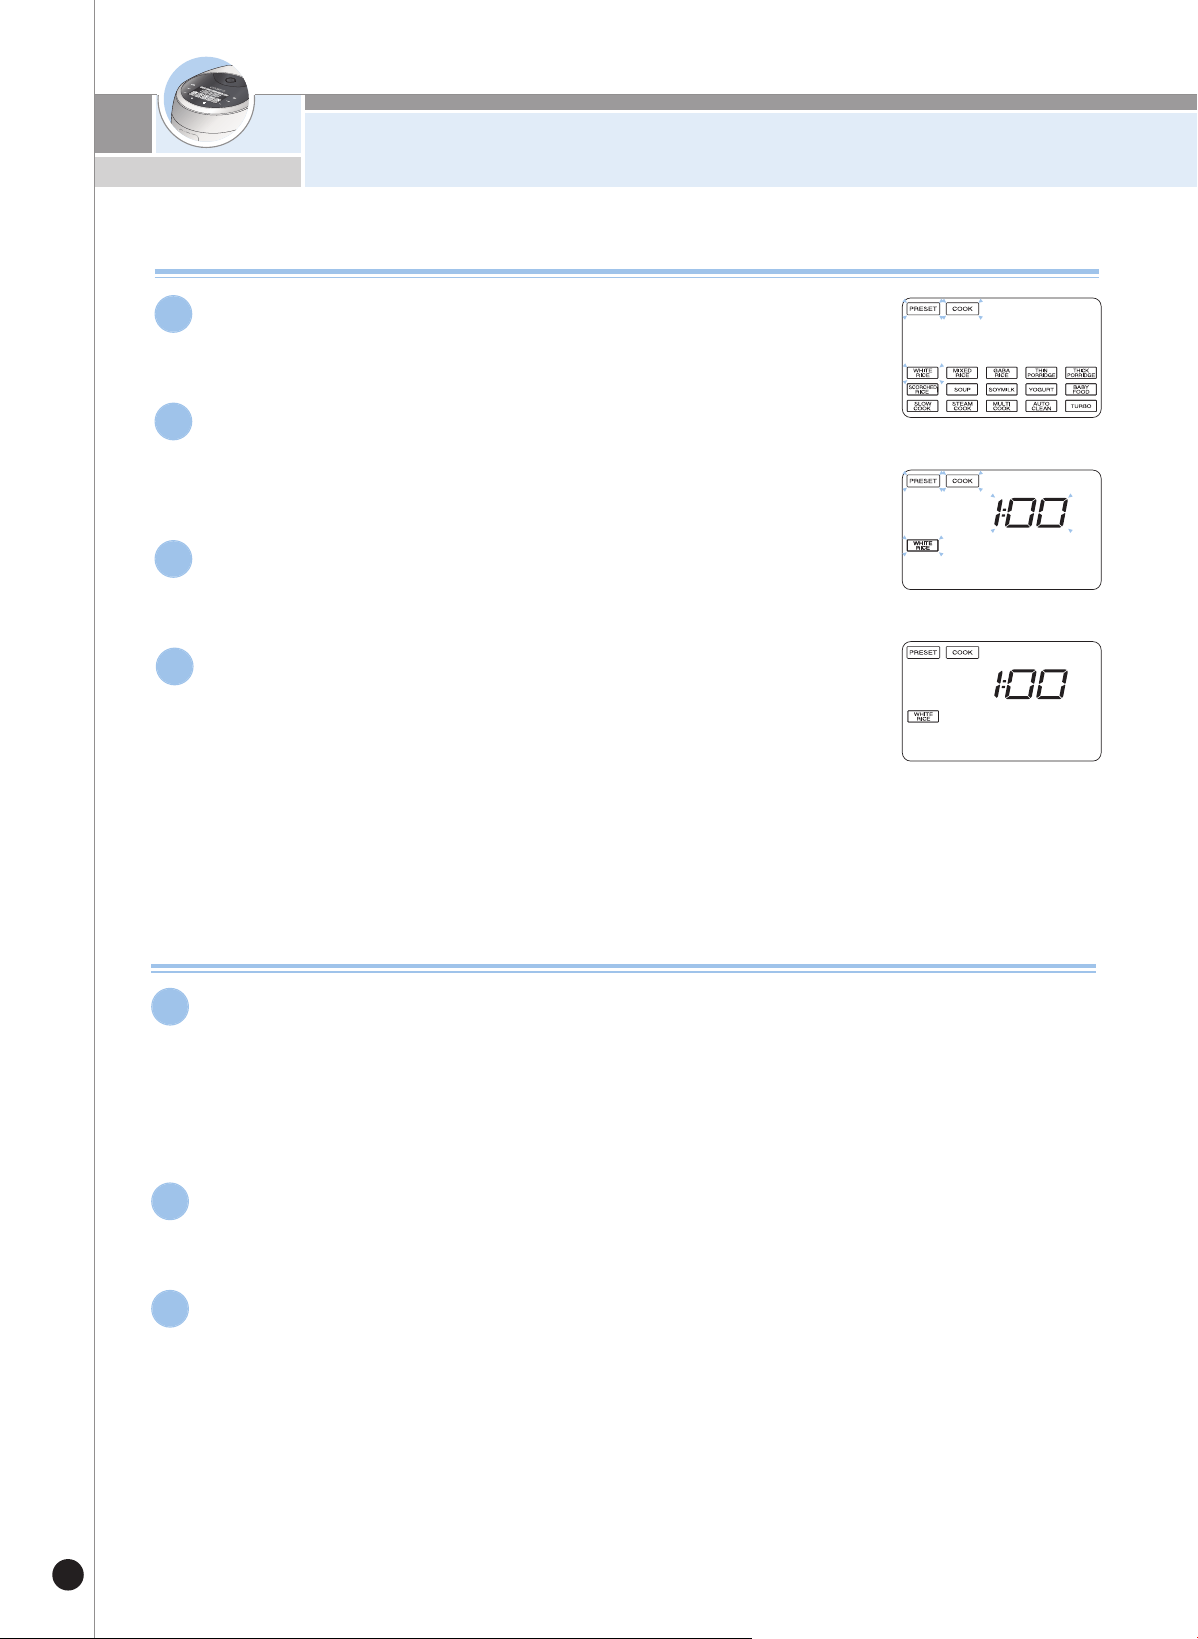
예약취사는 이렇게 하십시오
58
예약 버튼을 누릅니다.
1
선택 버튼으로 원하시는 메뉴를 선택한 후 확인
버튼을 누릅니다.
2
선택 버튼으로 예약취사 완료 시간을 선택합니다.
▶예약취사 설정이 완료되면,“예약”글자가 3회 깜빡인 후 점등됩니다.
▶예약 취사 완료시간은 설정한 시간에 완료됩니다.
(취사량 및 사용 조건에 따라 완료시각이 다소 차이가 날 수도 있습니다.)
3
취사/백미쾌속 버튼을 누릅니다.
4
예약 취사하는 방법
예약 취사시 유의사항
예약 취사를 할 경우
▶ 쌀이 개봉된 지 오래되어 매우 말라버린 경우에는 층밥이 되는 수도 있습니다.
▶ 예약취사 설정시간 또는 주변 환경조건에 따라서 밥이 되거나 질어질 수 있으므로 내솥표시의 물(水)높
이 기준에서 가감하여 물량을 조절해 주십시오.
▶ 예약설정시간에 따라서 멜라노이징 현상이 나타날 수 있습니다.
1
예약 시각 변경
▶ 예약 시각을 변경할 경우는 취소 버튼을 눌러 취소시킨 후 다시 시작하십시오.
2
예약 설정 가능 시간을 벗어난 경우
▶ 설정 시간이 예약 설정 가능 시간보다 짧았을 경우 즉시 취사를 시작합니다.
3
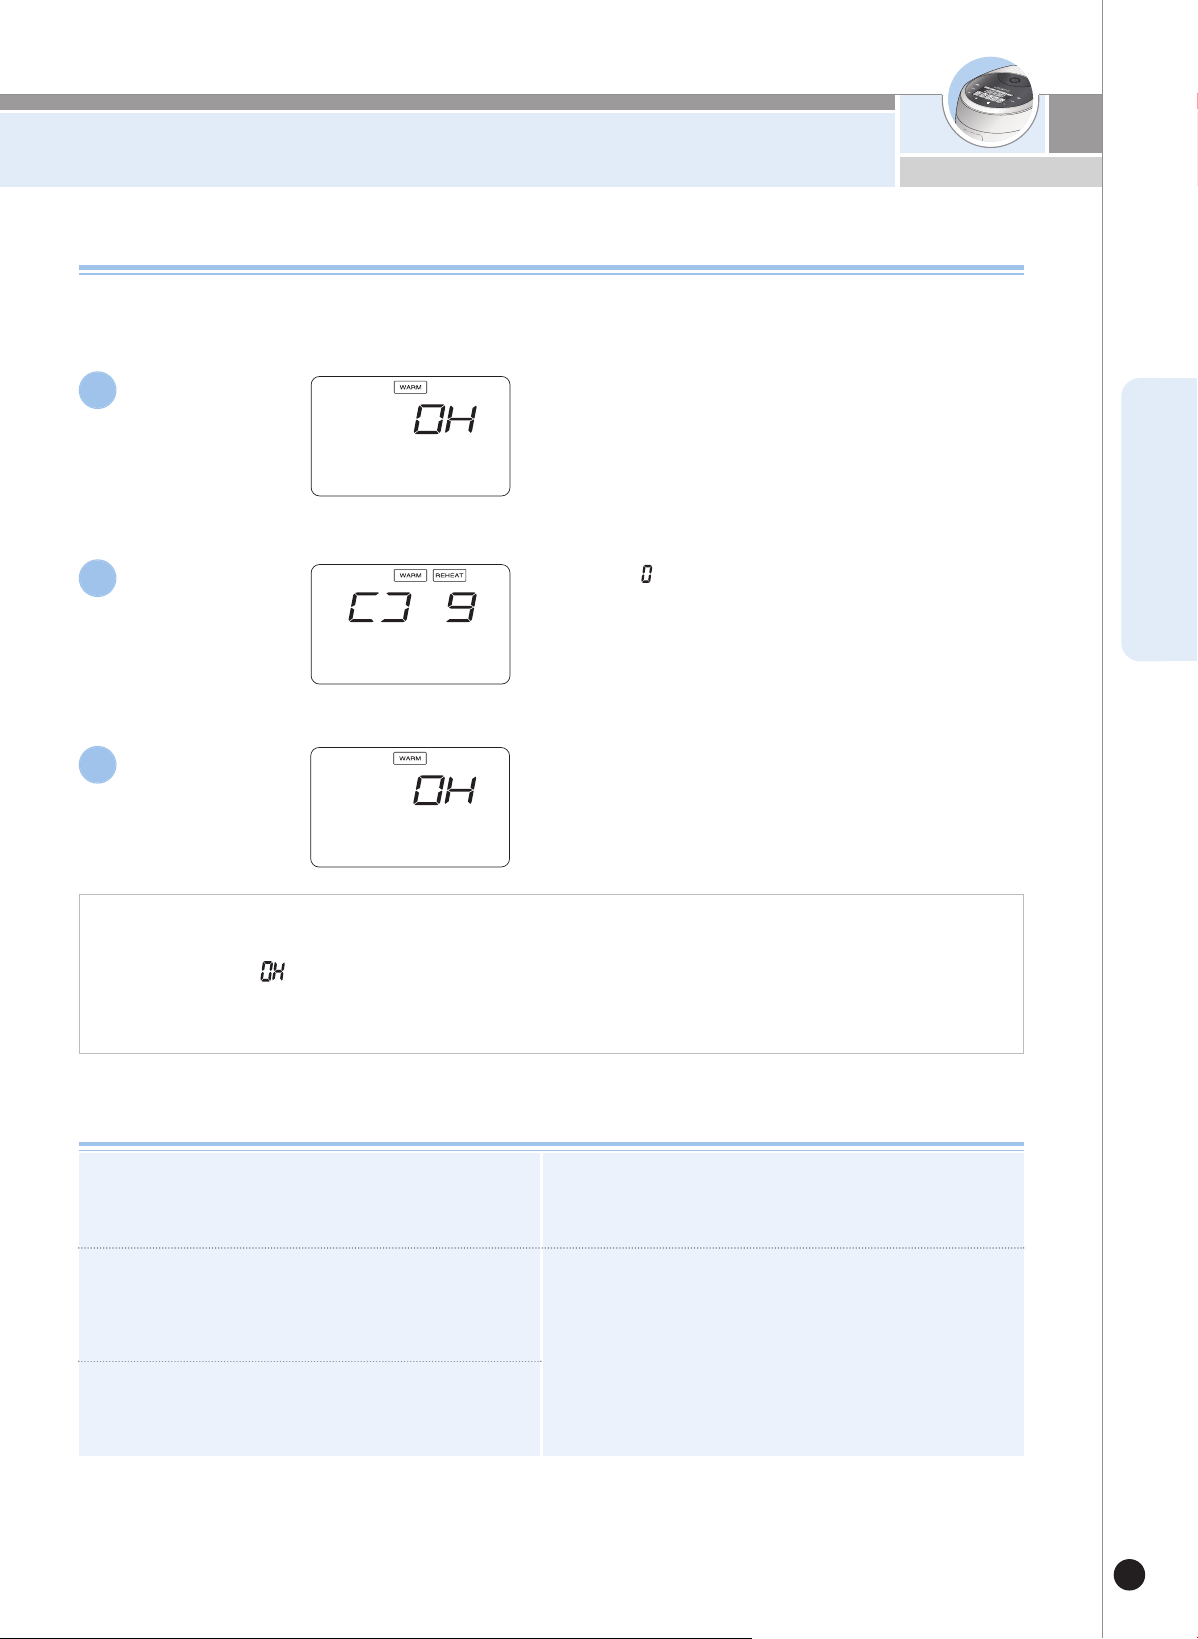
밥을 맛있게 보온하려면
59
www.cuckoo.co.kr
KOREAN
보온 중 모드 버튼을 3초간 누르면 보온온도를 변경 할 수
있습니다.
표시부의“ ”표시가 빙글빙글 돌아가며
재가열을 합니다.
재가열이 끝나면 다시 보온을 진행하며 보온경과
시간이 표시됩니다.
식사하실 때
▶보온 중 식사를 하실 때 따끈따끈한 밥을 원하시면, 보온/재가열 버튼을 누르면 보온재가열이 시작되고 9분 후 밥을
드시면 금방 지은 밥처럼 따끈따끈한 밥을 드실 수 있습니다.
▶ 재가열 기능을 너무 자주 사용하시면 밥이 변색되거나 마르는 경우가 있습니다. 1일 1~2회만 사용하세요.
▶ 별도의 전열기구나 가스불로 밥을 지은 경우는 밥을 밥솥에 담은 후 보온/재가열 버튼을 1회 눌러 보온을 합니다.
이때, 표시부에는“ ”가 표시됩니다.
(이와 같이 차가운 밥솥에 뜨거운 밥을 옮겨 담아 보온할 경우 냄새나 변색이
있을 수 있습니다.)
▶ 보온 24시간 경과 이후부터 보온 경과시간을 깜빡이게 표시하여 보온이 장시간 경과 되었음을 알립니다.
보온 중
1
재가열 중
2
재가열 완료
3
취사 완료 후 밥을 밑면까지 골고루 섞어 보온하면 밥상태가 좋습니
다.
(적은 밥은 내솥의 중앙에 불룩하게 모아서 보온하십시오.)
주걱을 넣어 둔 채로 보온하지 마십시오.
특히, 나무주걱 등은 세균을 발생시켜 냄새의 원인이 됩니다.
너무 적은 밥을 보온하거나 먹다 남은 밥이나 찬밥을 보온 중인
밥과 섞어서 보온하지 마십시오. 밥에서 냄새가 날 수 있습니다.
(찬밥은 전자레인지를 이용하십시오.)
장시간 보온하면 밥이 변색되고 냄새가 날 수 있으므로 보온은
12시간 이내로 하는 것이 좋습니다. 보온 24시간 경과 이후부터
보온 경과시간을 깜빡이며 표시합니다.
잡곡은 백미보다 보온 상태가 좋지 않으므로 가급적 보온은 피하십
시오.
보온 중 내솥의 가장자리나 증기 배출구 하단부는 부분적으로 밥이
하얗게 변하고 부풀어 오를 수도 있습니다.
이럴 경우는 밥을 저어서 섞어 주십시오.
보온할 때 주의사항
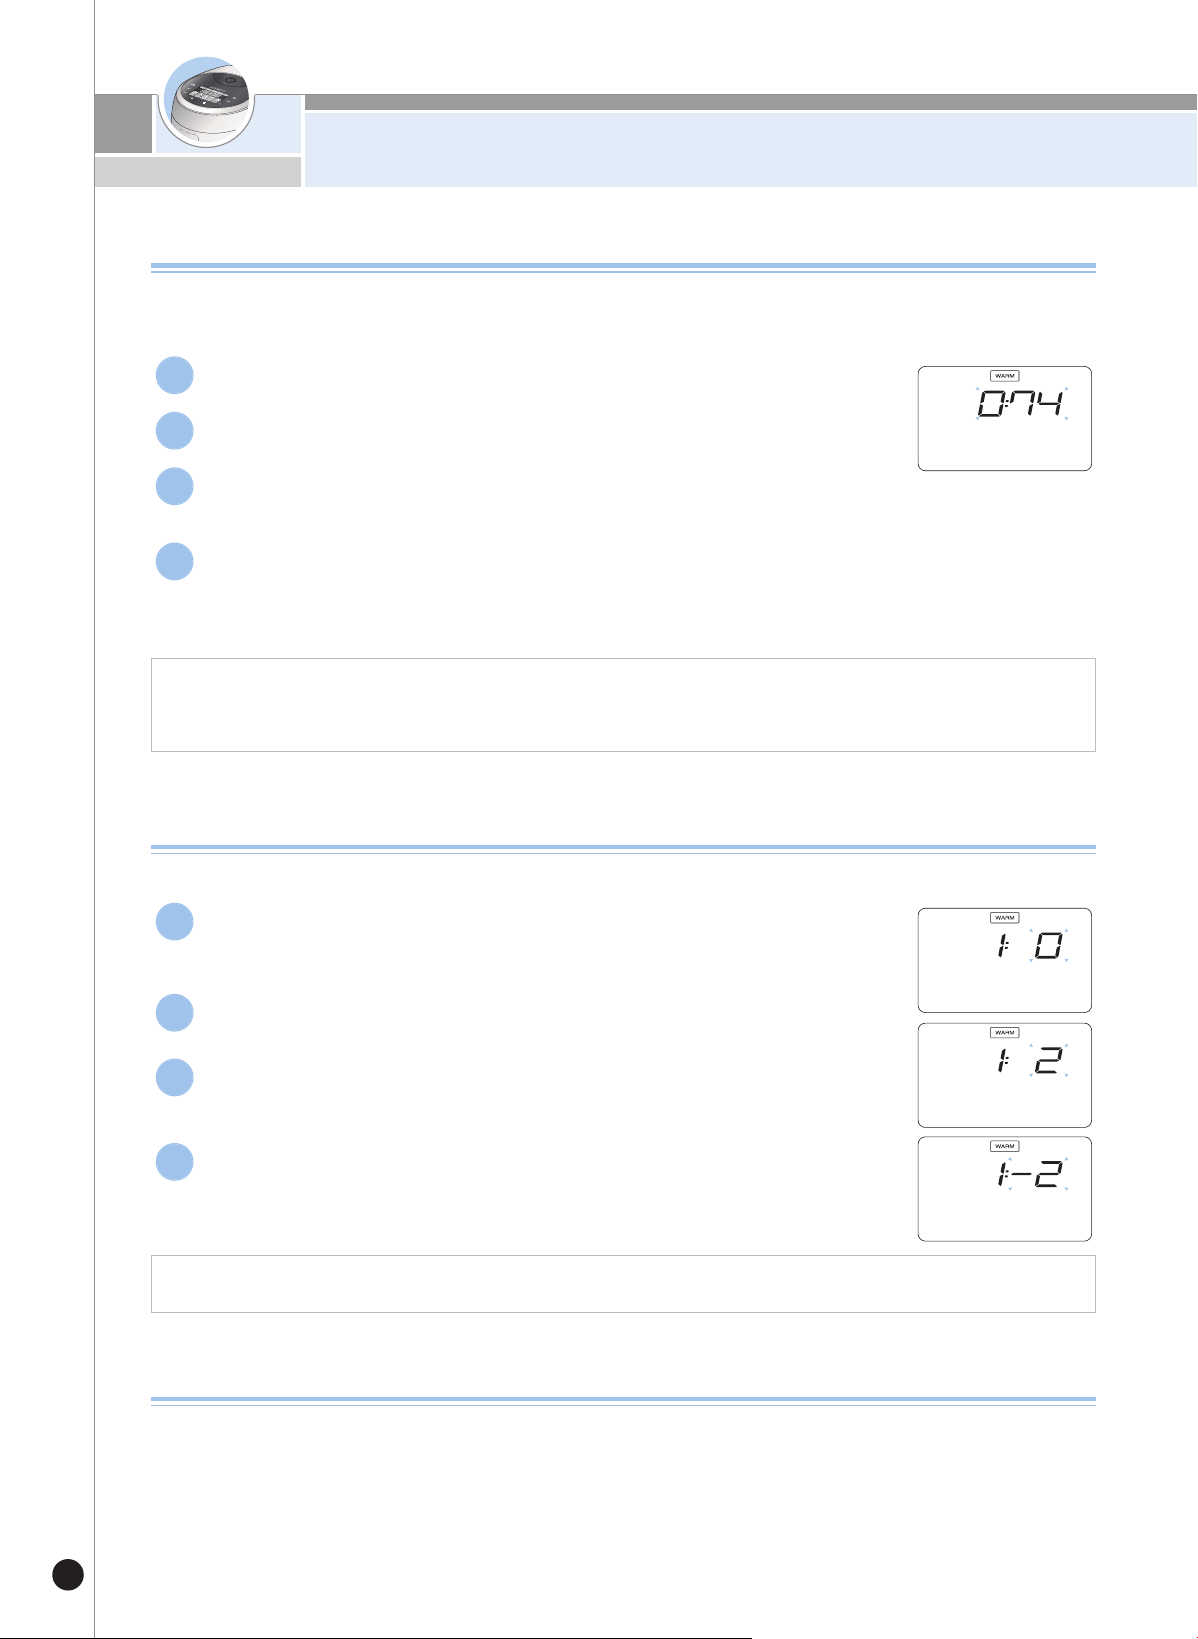
밥을 맛있게 보온하려면
60
보온온도 조정방법
청소를 자주하고 물을 끓여 소독을 하였는데도 냄새가 나고 물이 맺히거나 색깔이 변하는 경우는 보온 온도가 맞지
않은 경우이므로 보온 온도를 조정합니다.
보온 중 보온온도를 조정하실 때에는 보온 버튼을 5초 이상 누른 후 보온 온도를 조정하십시오.
1. 쉰 냄새가 많이 나고 물이 많이 맺히는(밥이 삭는)경우 : 보온 온도가 낮은 경우 입니다. 보온 온도를 1~2℃정도 높여 줍니다.
2. 밥 색깔이 심하게 누렇고 밥이 마르면서 냄새가 날 경우 : 보온 온도가 높은 경우 입니다. 보온 온도를 1~2℃정도 낮춰 줍니다.
맞춤보온 기능 조정방법
보온시 뚜껑을 열 때 물이 많이 흐를 경우나 밥 가장자리에 밥 퍼짐 현상이 생길 경우에 사용합니다.
1. 뚜껑이 열때 물이 많이 흐를 경우 : : 맞춤보온 단계를 1,2단계 높여줍니다.
2. 밥 가장자리에 밥퍼짐 현상이 생기는 경우 : 맞춤보온 단계를 1,2단계 높여줍니다.
보온시 냄새가 날 때
▶ 청소를 자주 해 주십시오. 특히, 뚜껑부의 청소상태가 나쁘면 세균이 번식하여 보온시 냄새가 날 수 있습니다.
▶ 외관상 깨끗하더라도 곳곳에 세균이 서식하여 보온시 냄새를 발생시킬 수 있으므로 냄새가 많이 날 경우는 물을 내솥의
백미 물눈금 2인분 정도에 맞추고 식초를 1큰술 넣은 후 뚜껑을 닫고 자동세척을 선택한 후 취사/쾌속 버튼을 눌러 주십시오.
완료 후 내솥을 반드시 깨끗이 씻어 냅니다.
▶ 만능찜, 이유식, 웰빙쿡 등의 요리를 한 후 깨끗이 씻어내지 않고 보온하면 밥에 냄새가 배어들 수 있습니다.
대기상태에서 모드 버튼을 1초이상 누르면“보온온도”설정모드로 진입합니다.
1
“보온온도”설정모드로 들어왔을 때, 현재 설정된 보온온도가 표시 됩니다.
2
선택 버튼으로 원하시는 보온온도를 선택한 후 확인이나 취사/쾌속 버튼을
눌러 주십시오.
3
“보온온도”설정모드 진입 후 아무런 버튼 입력 없이 7초가 지나거나,
취소 버튼을 누르면 기능이 설정되지 않고 취소되며 대기모드로 돌아갑니다.
※ 본 기능은 제품 출하시“74도”상태로 되어 있으니 필요에 따라 설정해 주십시오.
4
대기상태에서 모드 버튼을 2회 누르면“맞춤보온”설정모드로 진입합니다.
▶ 모드 버튼을 초기에 누를시 1초 이상 눌러야 진입 가능합니다.
1
“맞춤보온”설정모드로 들어왔을 때, 현재 설정된 맞춤 보온상태가 표시 됩니다.
2
선택 버튼으로 원하시는 맞춤 보온 단계를 선택한 후 확인이나
취사/쾌속 버튼을 눌러 주십시오.
3
“맞춤보온”설정모드 진입 후 아무런 버튼 입력 없이 7초가 지나거나, 취소
버튼을 누르면 기능이 설정되지 않고 취소되며 대기모드로 돌아갑니다.
※ 본 기능은 제품 출하시“0단계”상태로 되어 있으니 필요에 따라 설정해 주십시오.
4
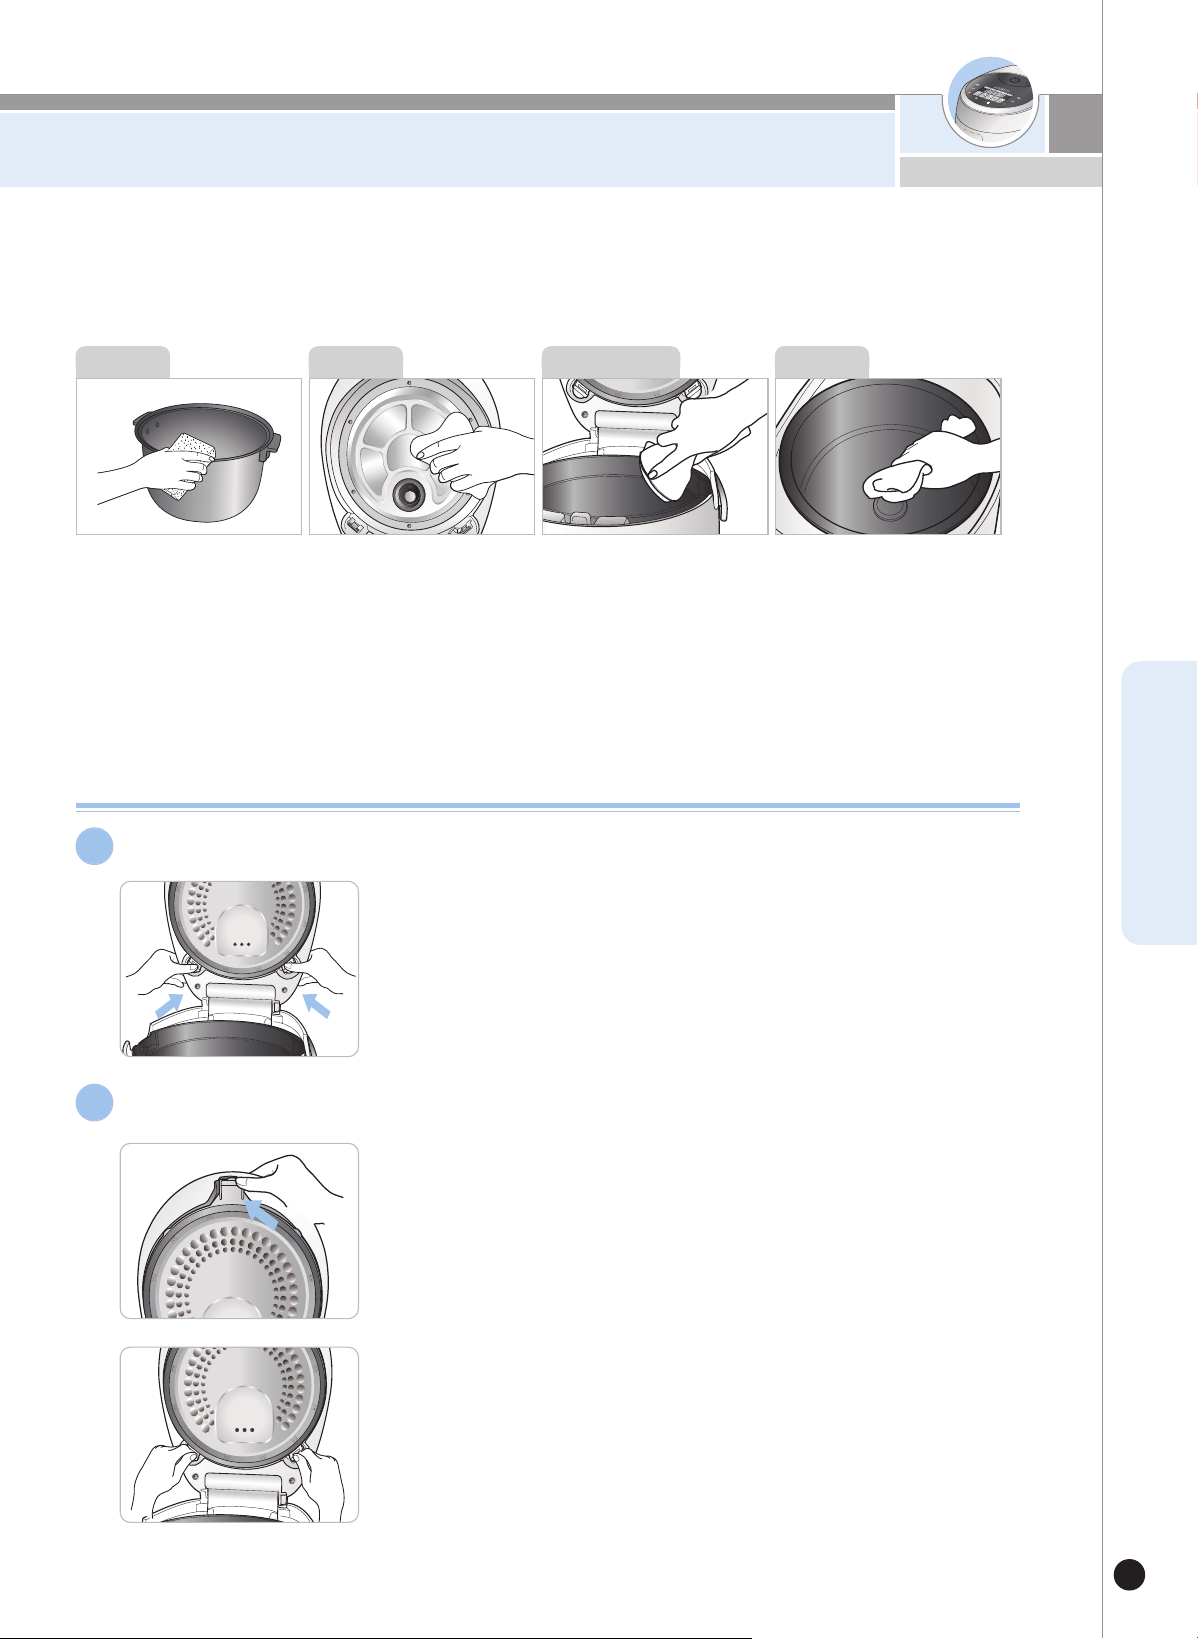
清洁和保养指南
61
www.cuckoo.co.kr
CHINESE
- 不及时清洗将会产生异味,特别是锅盖,请经常清理。
(切断电源待机体散热后再清理。)
- 请用抹布擦净机体和锅盖的水,严禁使用苯、稀释剂等清理。
- 使用过程中分离型内锅盖及内锅盖表面可能会因粘有饭汤产生淀粉膜,但对卫生没有影响,请放心食用。
擦净内锅外部及底部的异物及
水渍,清洗时请用柔软的抹布
或海绵清洗,严禁使用钢丝
球、铁刷、研磨剂以免涂层脱
落。
分离型内锅盖上粘有饭汤时,
将分离型内锅盖拆卸后,用干
燥的抹布将分离型内锅盖及锅
盖清理干净。锅盖边缘处为金
属材质,请多加注意。
煮饭时饭汤会流到此处,煮饭
完成后,请用抹布清理干净。
内锅
机体积水部
温度感应器上粘有异物时,请
将异物清除,注意勿损坏金属
盘。加热盘上粘有水渍时,请
用柔软的抹布清理干净。
机体内部
锅盖
分离型内锅盖拆卸/安装方法
分离型内锅盖拆卸方法
▶ 一只手抓住分离型内锅盖把手。
▶ 另一只手向箭头方法轻轻推动分离型内锅盖,如能轻松将分离型
内锅盖拖动即可分离。
※ 请勿抓住分离型内锅盖的密封圈拉拽。
1
分离型内锅盖安装方法
▶ 请先将分离型内锅盖的上部与锅盖内侧上部连接。
▶ 如上图,用手轻轻推动分离型内锅盖的下部,即可安装。
※ 为考虑产品及消费者的安全,如没安装分离型内锅盖时,
锅盖是无法关闭的,使用时请务必安装分离型内锅盖。
2
※
清洗内锅时注意事项
请勿将尖锐的餐具(叉子、勺子、筷子等)放入内锅中清洗。
- 会导致内锅涂层脱落。
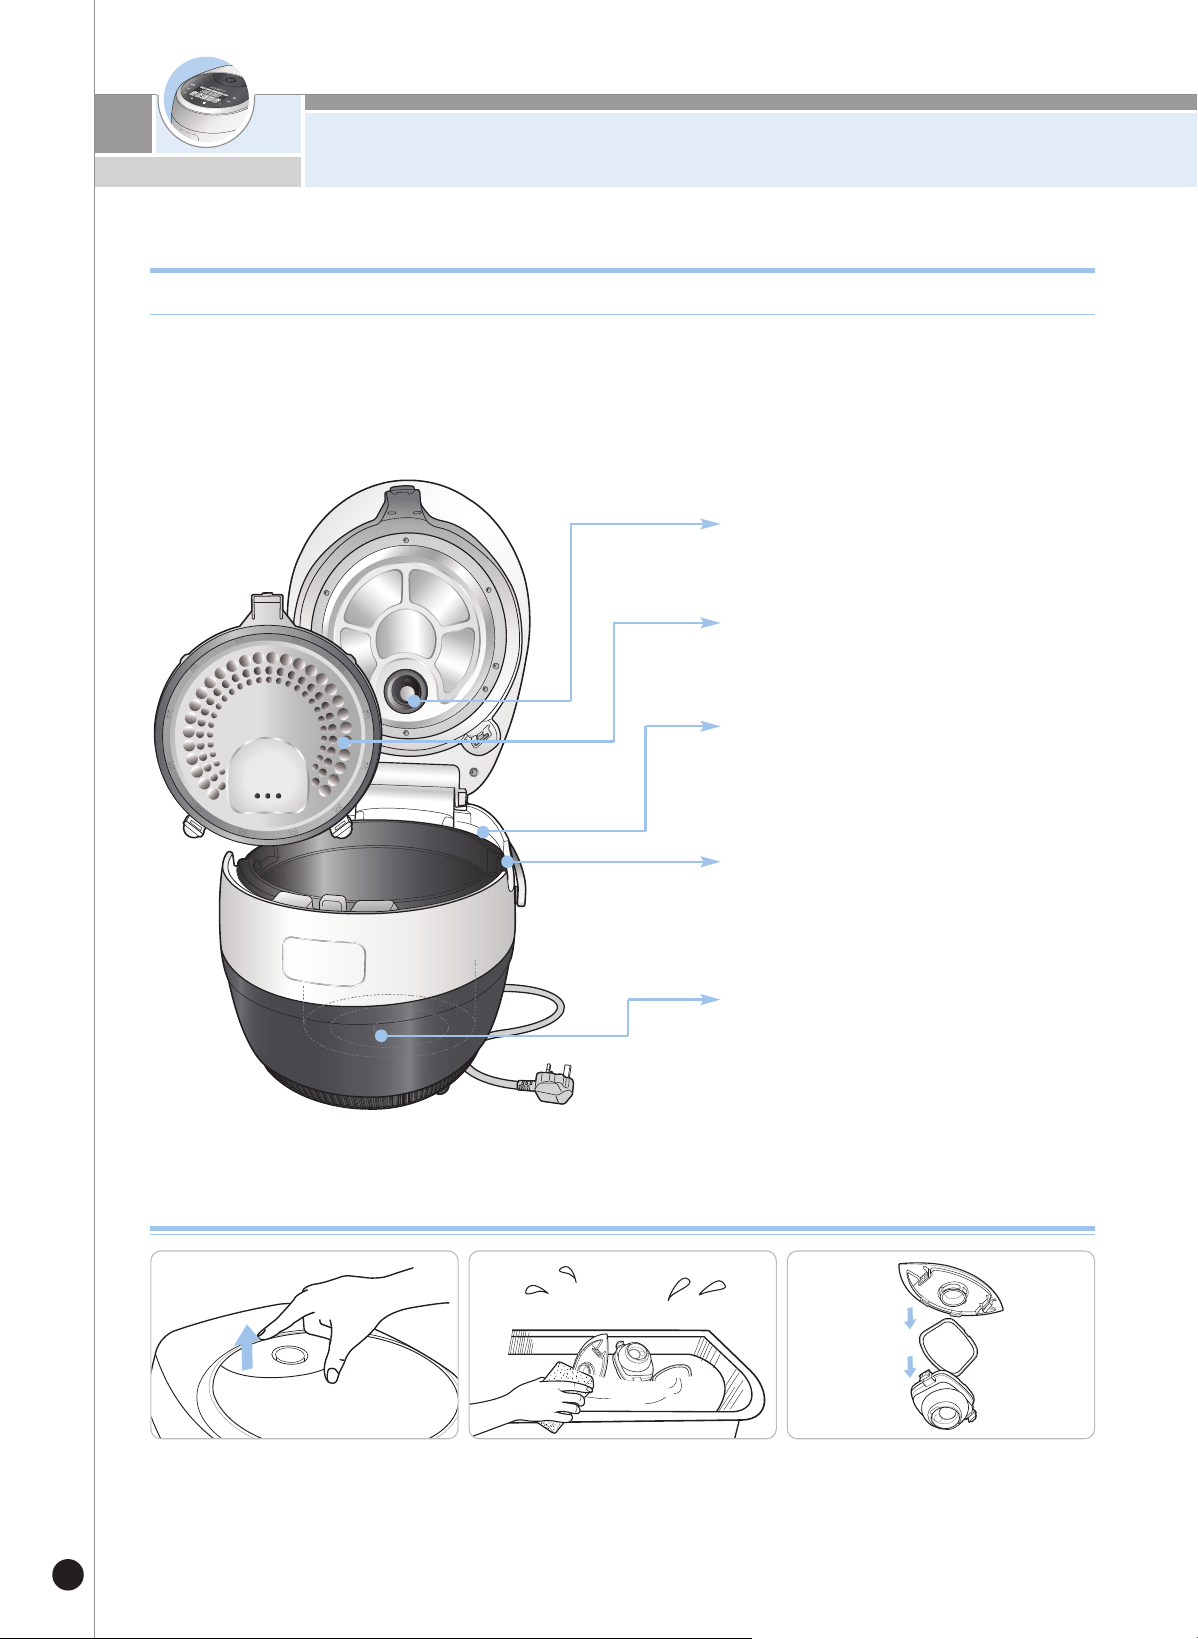
清洁和保养指南
62
蒸汽帽分离/安装及清洁方法
1. 每次使用之后,从锅盖处开始分离蒸
汽帽。
2. 如图所示将蒸汽帽分离后浸泡在温
水中,用柔软的抹布或海绵清洗后,
擦除水渍。
3. 两侧的两个连接部位发出“嗒”声,
即安装到位。
- 请务必使用配件中的饭勺。
- 请勿放入汤匙或餐具。
- 请勿放入苯、冲淡剂清洗。
- 放入调味料使用后请清洗干净。
- 使用中可能会出现斑点,不影响卫生。
为防止米粒粘附,内侧涂层为氟化碳树脂涂层。
产品内部清洁方法
煮饭完成后如有饭汤残留,
可能会产生异味,请保持清洁。
将蒸汽帽分离后清理干净。
将分离型锅盖分离后清洗干净再
使用。
保管、煮饭、保温时请将内锅外
侧的水渍擦净,否则可能会导致
外侧涂层脱落。
温度感应器及清洁方法
粘有米粒时,请清理干净,注意
不要损坏温度感应器或加热盘。
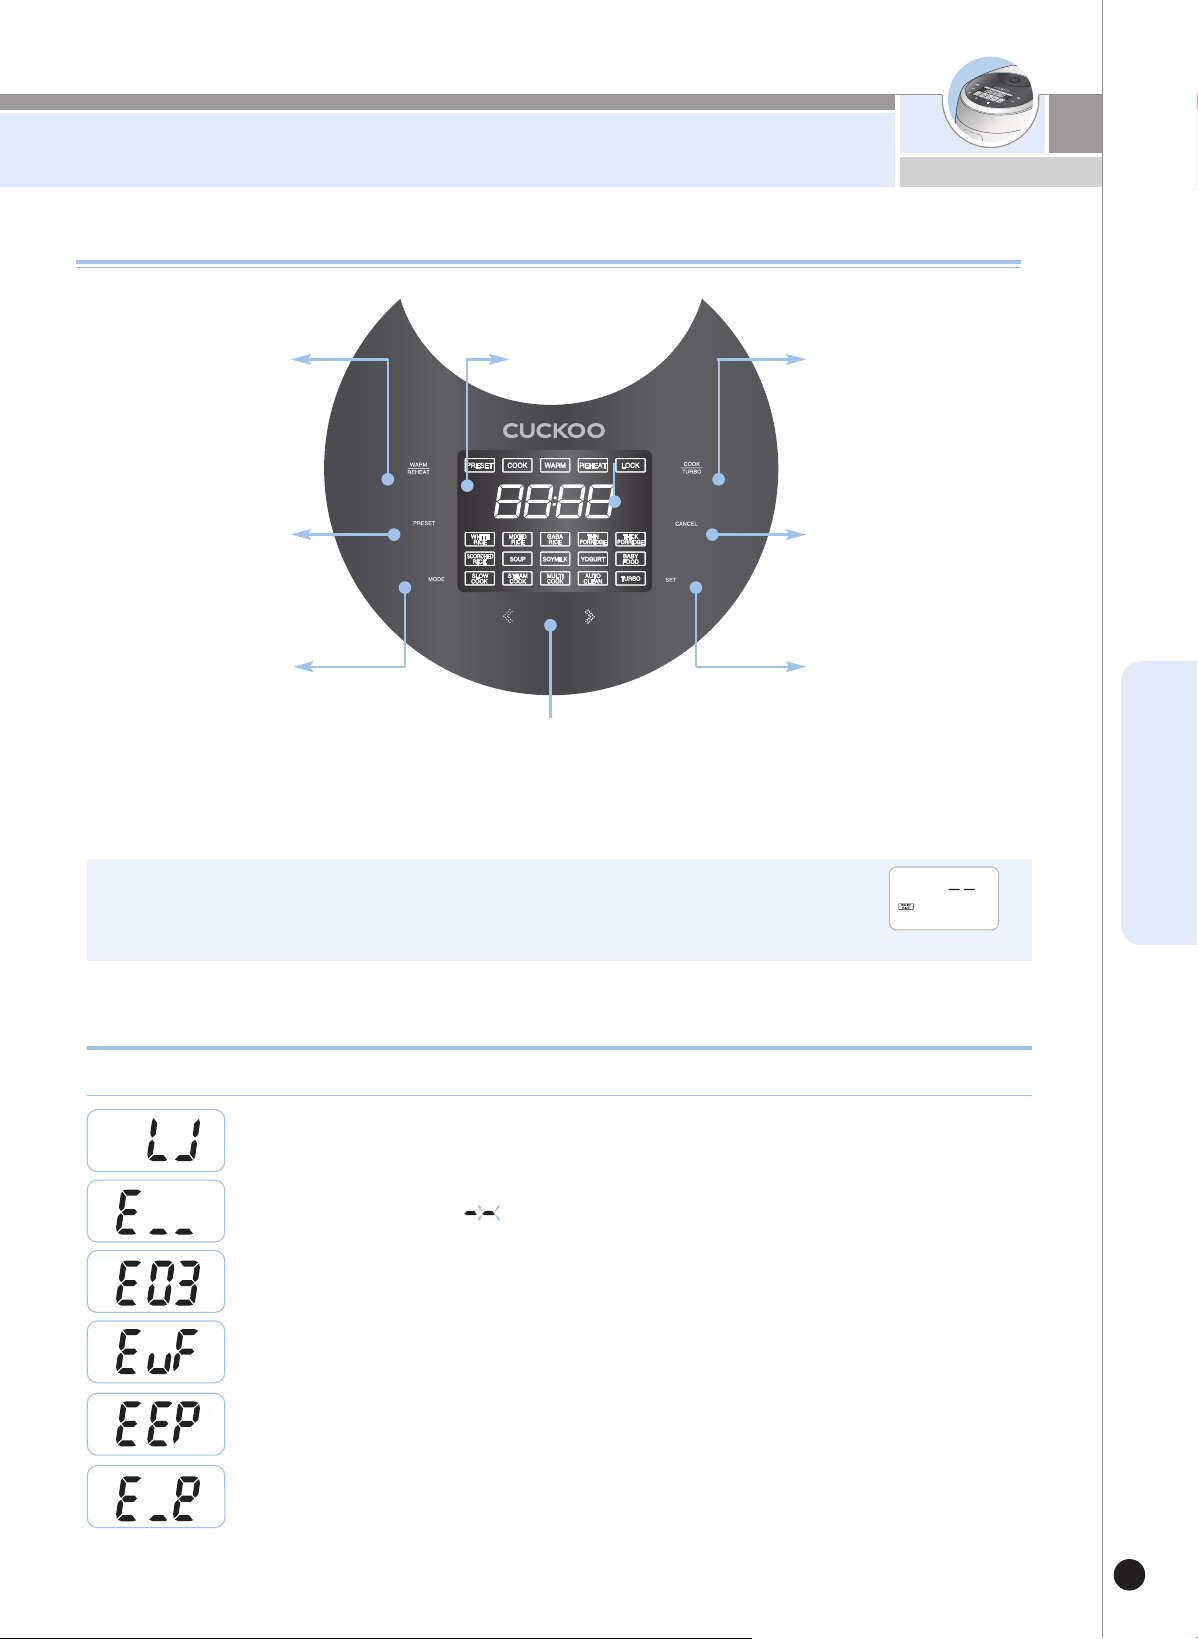
功能操作说明
63
www.cuckoo.co.kr
CHINESE
※ 接通电源后无任何操作时,如图所示,功能显示部会显示待机画面。
(待机画面下菜单、时间,根据用户的设定会有所差异)
※ 进行功能操作时,如按取消键会返回待机状态。
※ 按键力度以听到响声为准,本产品的标签设计可能与实物略有差异。
使用方法错误,或产品出现异常时,会出现以下标识给予警告。
功能显示部异常检测功能
温度感应器异常时显示。(“ ”标识闪烁)
无内锅时显示。
微电脑内存异常时显示。
微电脑内存异常时显示。
环境感应器异常时显示。
产品出现异常(加热器短路,热量不足等),长时间不能完成煮饭时显示。
确认键
设置已选功能或设置按键锁
定时使用
选择键
白米 , 白米快速, 杂谷,发芽糙米 , 锅巴, 稠粥, 稀粥 , 汤,
豆奶, 酸奶, 宝宝食品, 健康料理, 蒸/炖, 多种料理, 自动
洗涤等菜单时使用
<待机画面>
取消键
取消已选功能时使用
模式键
功能显示部
保温/再加热键
保温或餐前热饭时使用。
煮饭/白米快速键
开始煮饭时使用
▶参照66~67页
预约键
预约煮饭时使用
功能操作部名称及作用
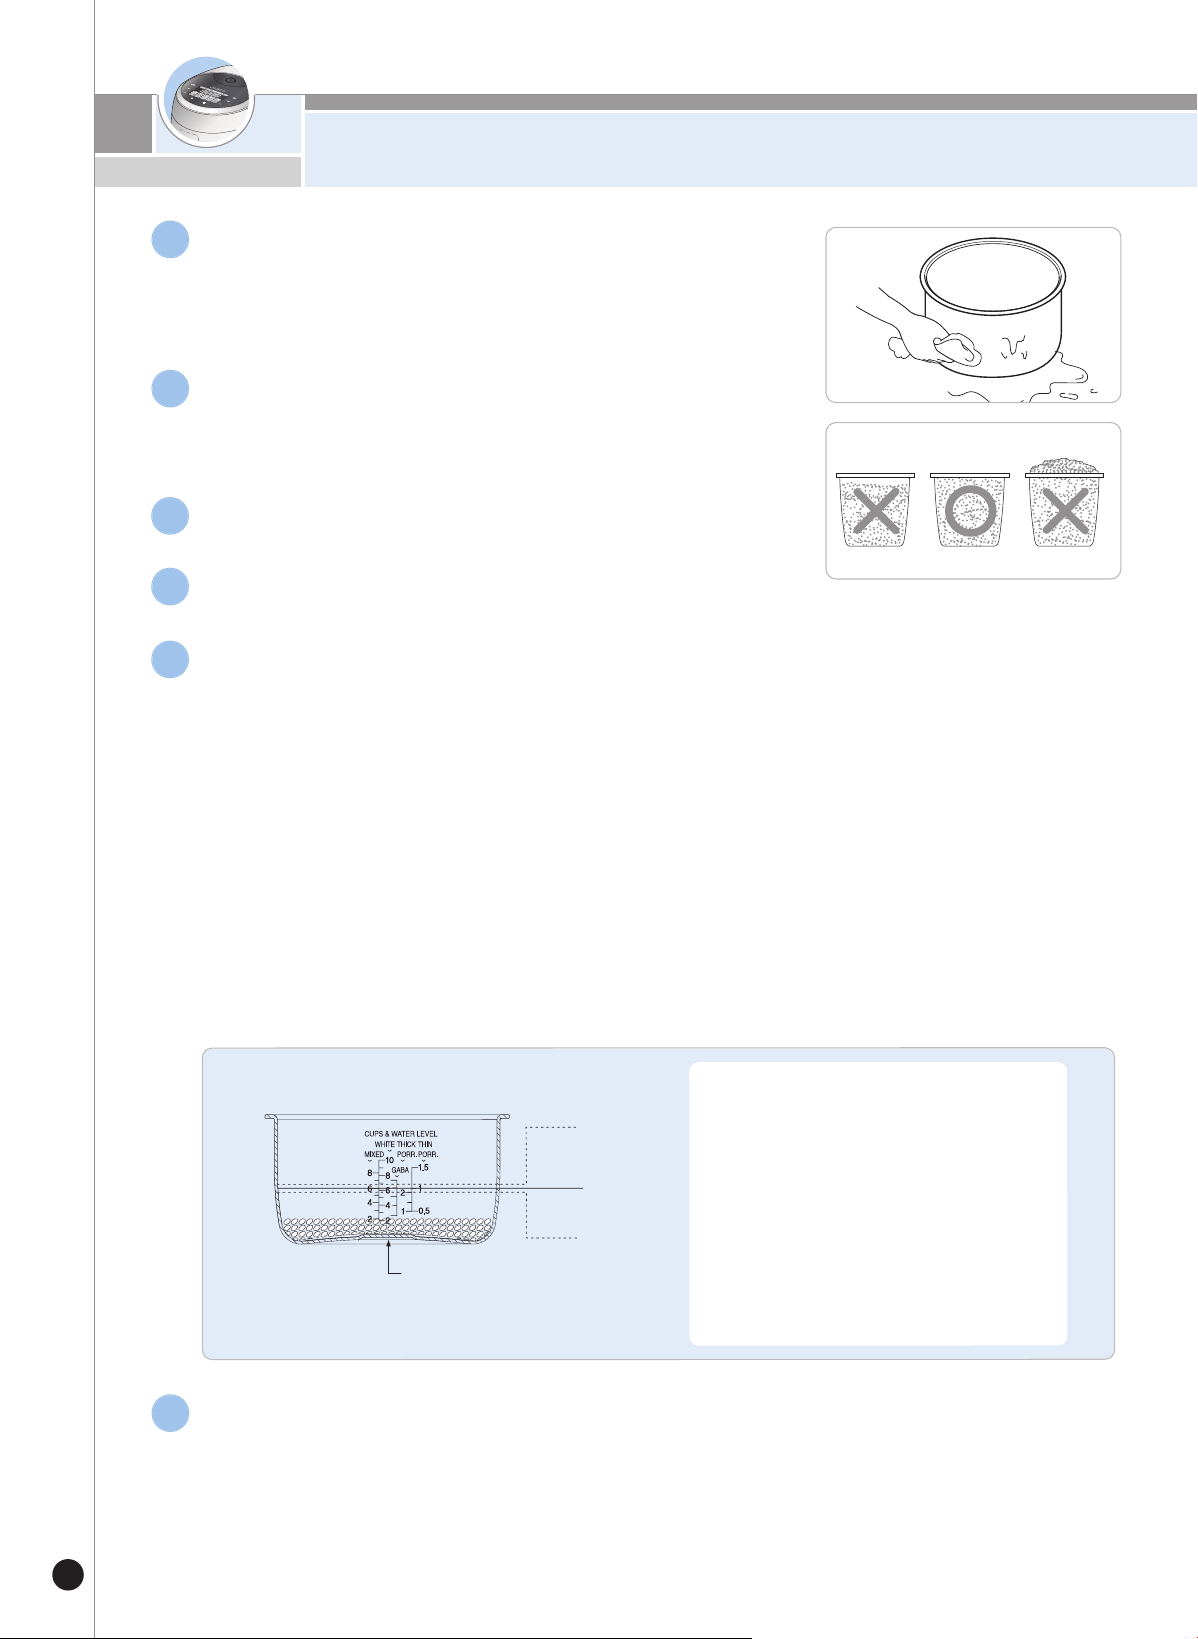
煮饭前准备事项
64
•
白米,白米快速,锅巴
:
以“白米”水位为基准,白米最多可做1
0
人份,
白米快速、营养饭最多可做6
人份,锅巴最多可做4
人份。
•
杂谷:以“杂谷”水位为基准,杂谷最多可做8
人份。
•
发芽糙米
:
以“发芽糙米”水位为基准,糙米发芽最多可做6
人份。
•
稠粥
:
以‘稠粥’水位为基准,稠粥最多可做2
杯。
•
稀粥
:
以‘稀粥’水位为基准,稀粥最多可做1
.5
杯。
洗净内锅,擦干水分。
▶
请用柔软的抹布清洗内锅。
▶ 使用粗质抹布清洗内锅时易使内锅表面的涂层脱落。
1
按人数用量杯计量米量后放入内锅。
▶ 米量以量杯水平面为基准,1杯等于1人份。
(例:2人份时米量为2杯,4人份时米量为4杯)
2
请
将
米
淘
洗
干
净
。
3
将
洗
净
的
米
倒
入
内
锅
。
4
将内锅放入机体,关闭锅盖。
请注意要将内锅完全放入机体内。
▶ 如内锅底部粘有米粒或异物,会导致煮饭无法完成或产生故障。
6
❷
煮6人份米饭时(6量杯):
将水位调至‘白米、杂谷’水位6刻度。
❸
用充分浸泡的米煮饭或煮干硬的米饭时:
加入比规定量少的水。
❹
米饭夹生或米饭较硬时:
由于米饭品种差异或含水量(陈米)不同
会导致此现象,此时请加入比基本水量
多1~10%的水。
❶
用陈米煮饭时或煮较黏的米饭时使用:
请加入比规定量多的水。
❶
❷
❸
根
据
所
需
菜
单
调
整
水
位
。
▶
将内锅放在水平面上,按照水位刻度调整水量。
(水量过多时,饭汤可能会通过蒸汽排出口溢出,或喷出气泡。)
▶
内锅水刻度为米和水同时放入时的刻度。
▶
水位调整方法
5
●
10人份(5.0L
)产品
大米6人份(6量杯)

如何制作美味可口的米饭
65
www.cuckoo.co.kr
CHINESE
大米保管方法!
产品要保持干净!
•
请使用量杯正确量取米。
(市面上流通的米量杯的容量会根据不同的
产品有所差异。)
•
请将内锅水平放置后调整水位。
•
建议选购小袋装的米,以免长时间放置
质量变差。
将米存放于阴凉干燥处。
•
若煮开封时间较长的米时,多加半刻度水。
•
请经常清理本产品。
特别是内锅盖粘有异物时应及时清理。
煮干硬的米时,即使使用量杯正
确量取米也会出现过硬现象。
产品未经常清理时,细菌容易
滋生并会产生异味。
使用须知
用电饭煲制作美味米饭
使用量杯正确
量取米!
按水刻度正确
调整水位!
长时间保温时米饭会出现异味或
变色现象。
保温时间越短
越好!
若水量调整不正确,可
能会出现过硬,夹生,
过稀等现象。
预约煮饭时间
越短越好!
•
煮干硬的米时,应避免预约煮饭,请多加
半刻度水后进行煮饭。
•
保温时间要控制在12小时以内。
预约时间超过10小时或预约干硬
的米时,会有夹生及夹层现象。
预约时间越长,锅底米饭糊化现
象会更明显。
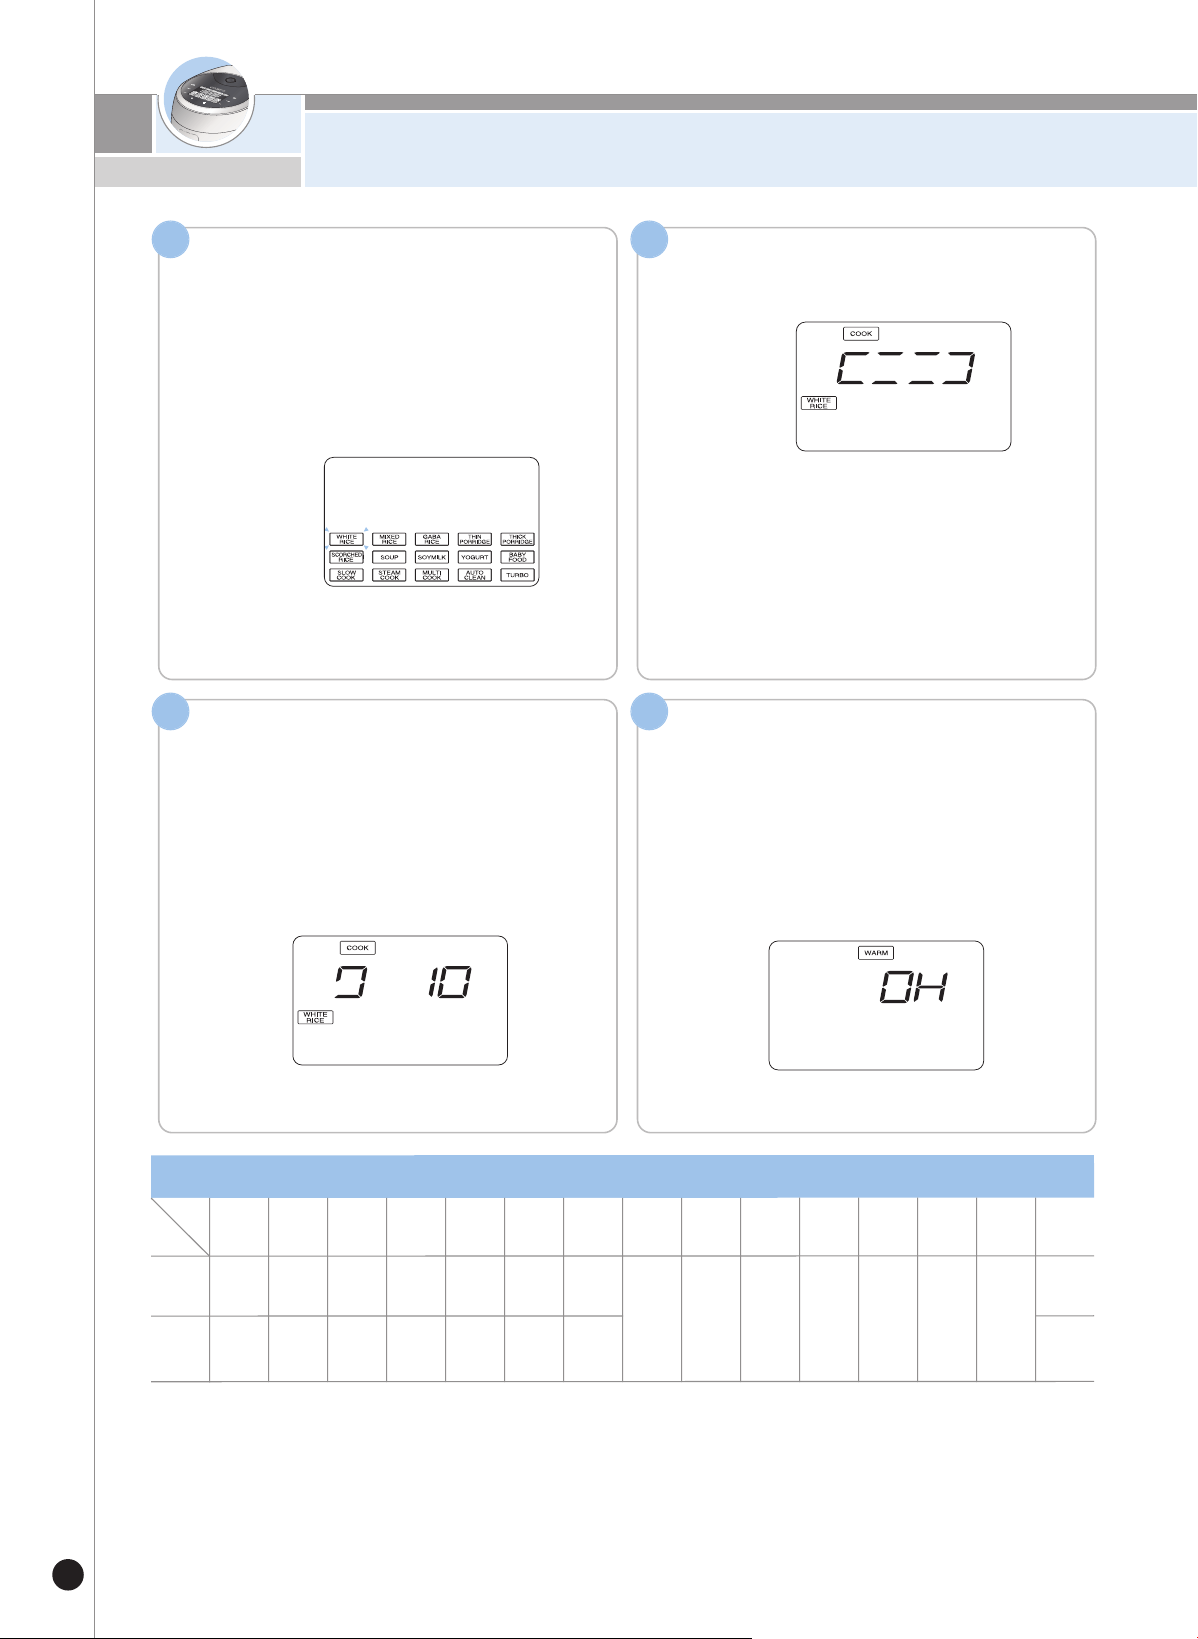
煮饭方法
66
按菜单/选择键选择所需菜单。 按煮饭/白米快速键开始煮饭。
˙
白
米 , 杂谷, 发芽糙米 , 稀粥 , 稠粥, 锅巴, 汤, 豆奶, 酸
奶,宝宝食品, 健康料理, 蒸/炖, 多种料理, 白米的顺序
依次选择。
˙
使用白米、杂谷、发芽糙米菜单煮饭后,产品会自动
保存最后使用的选项,连续使用同一菜单时不必重复
选择。
1 2
煮饭完成
˙
煮饭完成时,提示音响起,即开始保温。
˙
煮饭结束后请立即搅匀米饭,如未将米饭搅匀,
可能会导致米饭干硬、变色、异味。
˙
煮饭时请勿按取消键,以免煮饭功能会被取消。
焖饭(例:白米)
˙
开始焖饭时显示部会显示剩余时间,各菜单剩余时间
略有差异。
▶
汤, 豆奶, 酸奶, 健康料理等料理后再煮饭时可能会有异味在米饭内。
(请参照第61页将分离型内锅盖及锅盖周围清洗干净后再使用。)
▶
各菜单煮饭时间可能会因产品使用时的电压、水量、水温等而略有差异。
例)选择白米时
例)煮白米饭时
各菜单煮饭时间
菜
单
区
分
白米
白米
快速
杂谷
发芽
糙米
锅巴
稠粥
稀粥
汤
豆奶
酸奶
宝宝
食品
健康
料理
蒸/炖
多种
料理
自动
洗涤
煮饭量
2~10
人
份
2~6
人份
2~8
人
份
2~6
人
份
2~4
人
份
1~2杯
0.5~
1.5杯
请参考
73页
请参考
74页
请参考
75页
请参考
77页
请参考
78~79页
请参考
76页
请参考
80页
白米水
位2刻度
煮饭
时间
约39~
60分钟
约31~
41分钟
约42~
63分钟
约76~
101分钟
约46~
51分钟
药90分
约105分
约25分
4
3
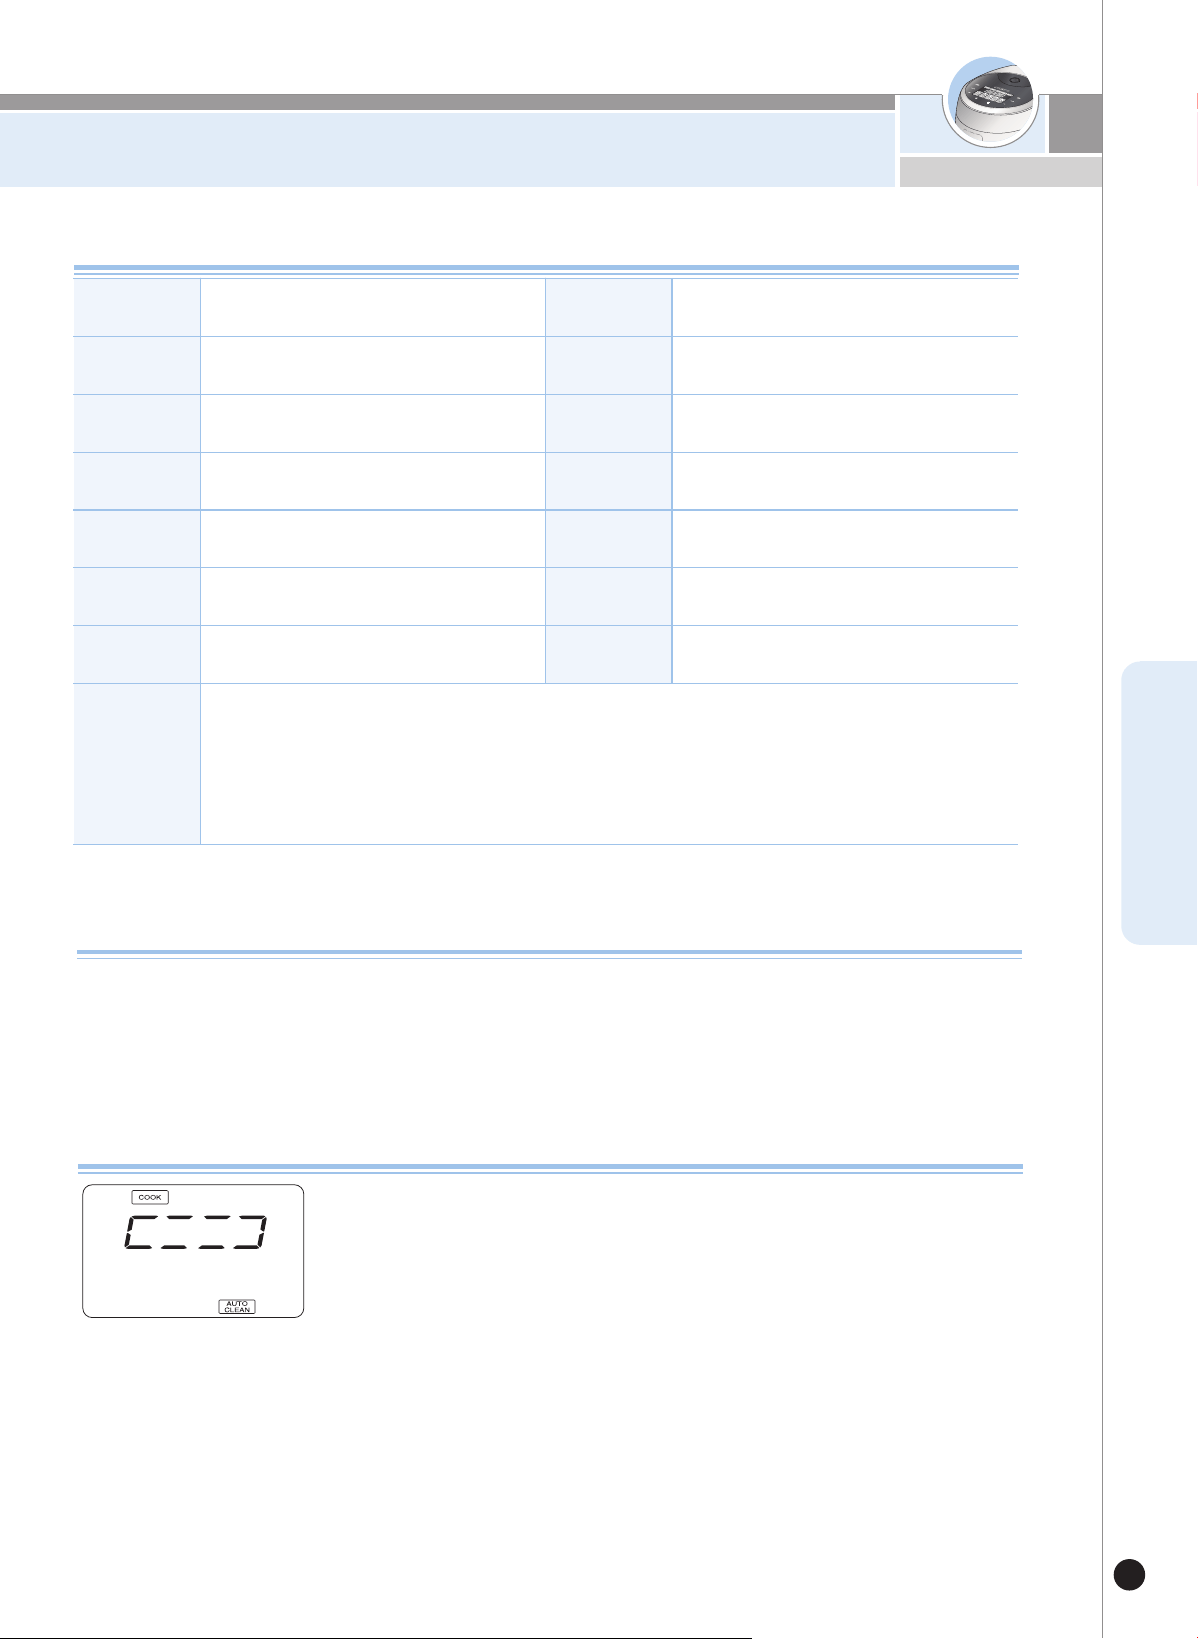
煮饭方法
67
www.cuckoo.co.kr
CHINESE
用该饭煲煮饭时米饭底部会出现糊化现象,这是米饭吸收残留水分后而形成的特有的香醇味道,
特别是如“预约煮饭”,米粒经过长时间浸泡在内锅底部形成微小淀粉沉淀,与煮“普通米饭”相
比,糊化现象更明显。
糊化现象(米饭微黄)
自动洗涤使用方法
将内锅中倒入2刻度水,关闭锅盖。
方法1. 按选择键选择“自动洗涤”后,按煮饭/白米快速键。
方法2. 待机状态下,按2次预约键,再按煮饭/白米快速键。
煮饭菜单使用方法
※
使用白米快速功能或烹煮少量米饭时会产生较多的蒸汽水,需及时清理积水盒内的水。
白米
煮较粘的米饭时使用。
杂谷
将杂谷掺入白米中煮饭时使用。
发芽糙米
将糙米发芽做发芽糙米饭时使用。
锅巴
煮锅巴饭时使用。
蒸/炖
手动设置蒸/炖时间时使用。
稠粥
煮稠粥时使用。
健康料理
可通过低温料理功能制作粥、
汤、健康茶等料理。
稀粥
煮稀粥时使用。
宝宝食品
可制作多种宝宝食品。
汤
煮汤时使用。
多种料理
手动设置火力、温度、时间时使用。
酸奶
使酸奶发酵时使用。
豆奶
煮豆奶时使用。
自动洗涤
煮饭、保温或料理后清除异味时使用。
白米快速
•
选择“白米”菜单后按2次煮饭/白米快速键可缩短煮饭时间。
(以白米2人份为基准大约需31~33分钟。)
•
煮饭前先将白米充分浸泡20分钟后用白米快速菜单煮饭效果更佳。
•
白米快速煮饭不能使用预约功能。
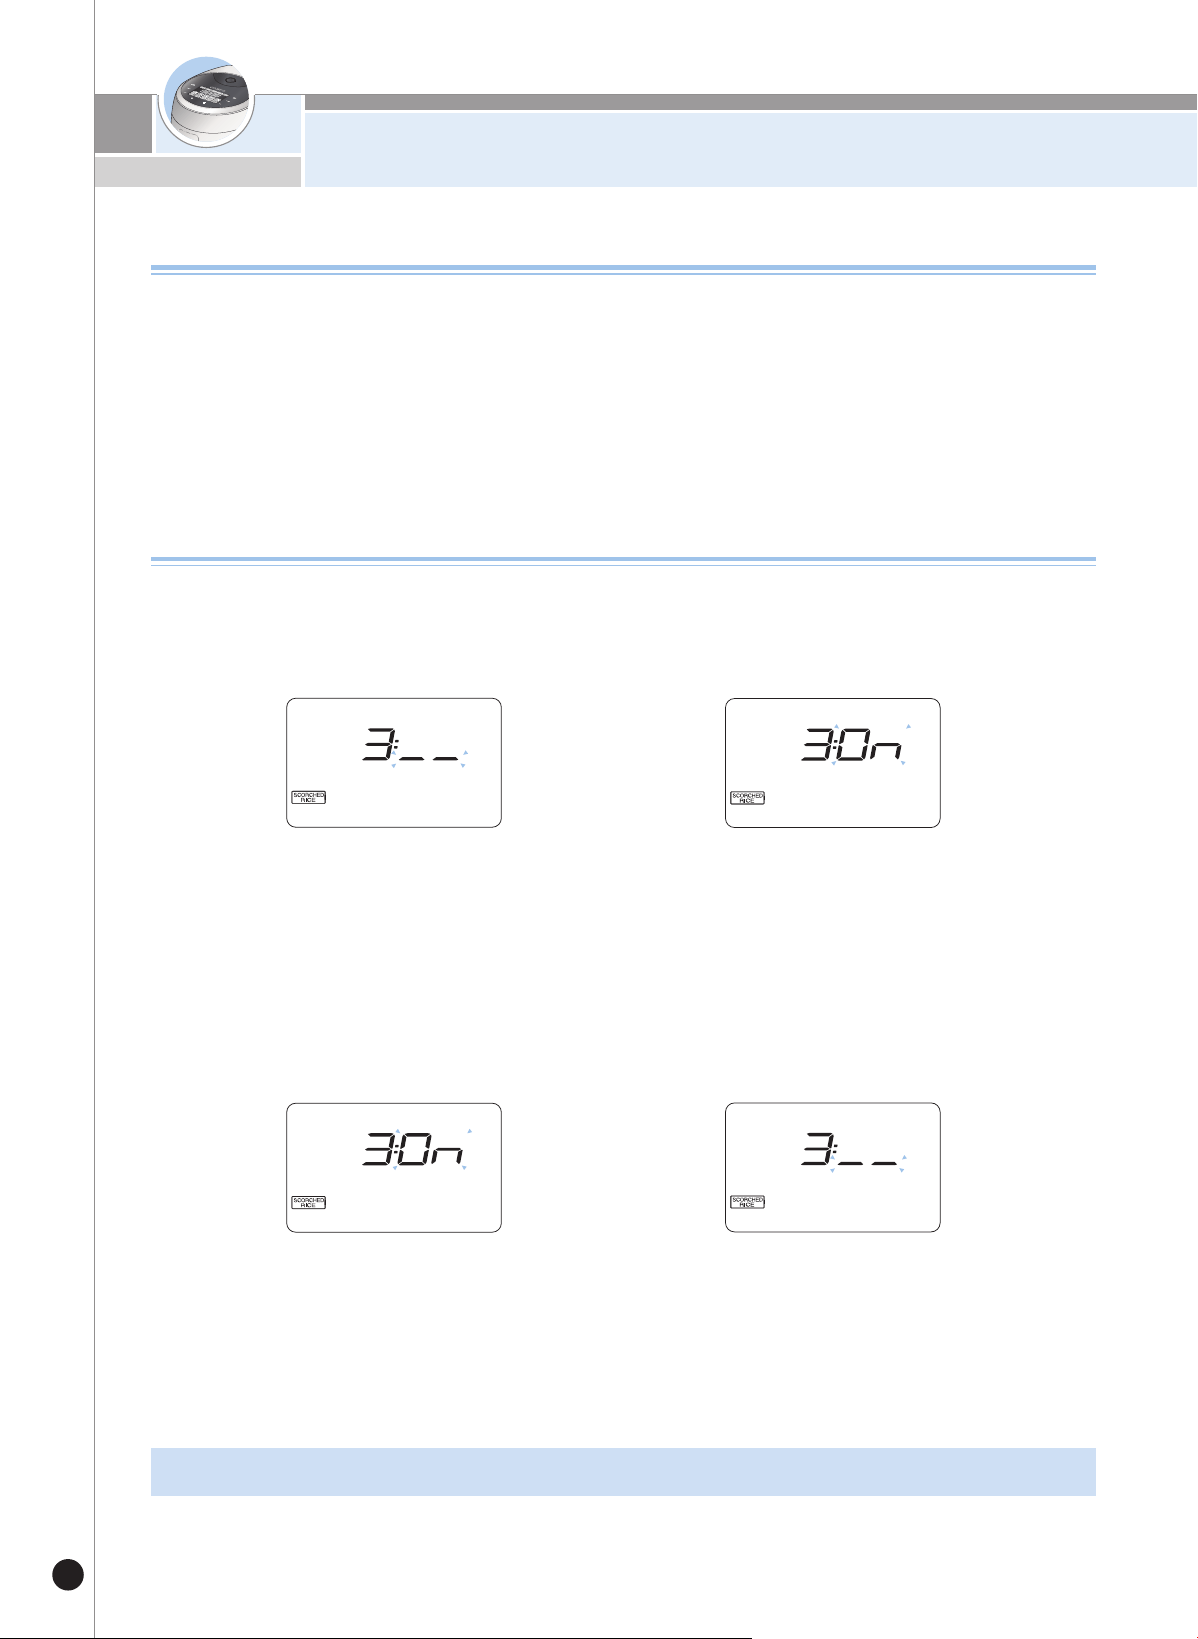
锅巴功能使用指南
68
使用“锅巴”功能煮饭时,可使用该功能根据个人口味调节锅底的的糊化程度。
▶
锅巴强化功能设置方法(增强锅巴饭的糊化程度时)
1. 待机状态下按4次模式键进入“锅巴强化”设置模式。
首次按模式键时需按1秒以上。
2. 进入“锅巴强化”设置模式时,显示画面如上。
3. 按菜单/选择键选择所需模式后按确认键。
4. 进入“锅巴强化”设置模式后,如7秒内无任何按键操作,功能设置将被取消并返回待机模式。
锅巴强化功能设置方法
▶
锅巴强化功能解除方法(煮普通锅巴饭时)
1. 待机状态下按4次模式键进入“锅巴强化”设置模式,
初次按键时需按1秒以上。
2. 进入“锅巴强化”设置模式时,显示画面如上。
3. 按菜单/选择键选择所需模式后按确认键。
4. 进入“锅巴强化”设置模式后,如7秒内无任何按键操作,或按取消键,功能设置将被取消并返回待机模式。
▶
本功能初始设置为锅巴强化解除状态,请根据需要自行设置。
1. 按菜单/选择键选择“锅巴”菜单。
2. 按煮饭/白米快速键开始煮饭。
3. 锅巴制作完成后打开锅盖,将米饭倒出,根据个人口味食用锅底的锅巴。
▶
用锅巴菜单煮饭最多可做4人份。
▶
用锅巴菜单煮饭时请以“白米”水量为基准。
▶
清洗米时将水洗至半透明状态即可。
▶
想食用较糊的锅巴时,调整水位后放入内锅关闭锅盖,将大米浸泡30分钟左右后再煮饭。
锅巴使用方法
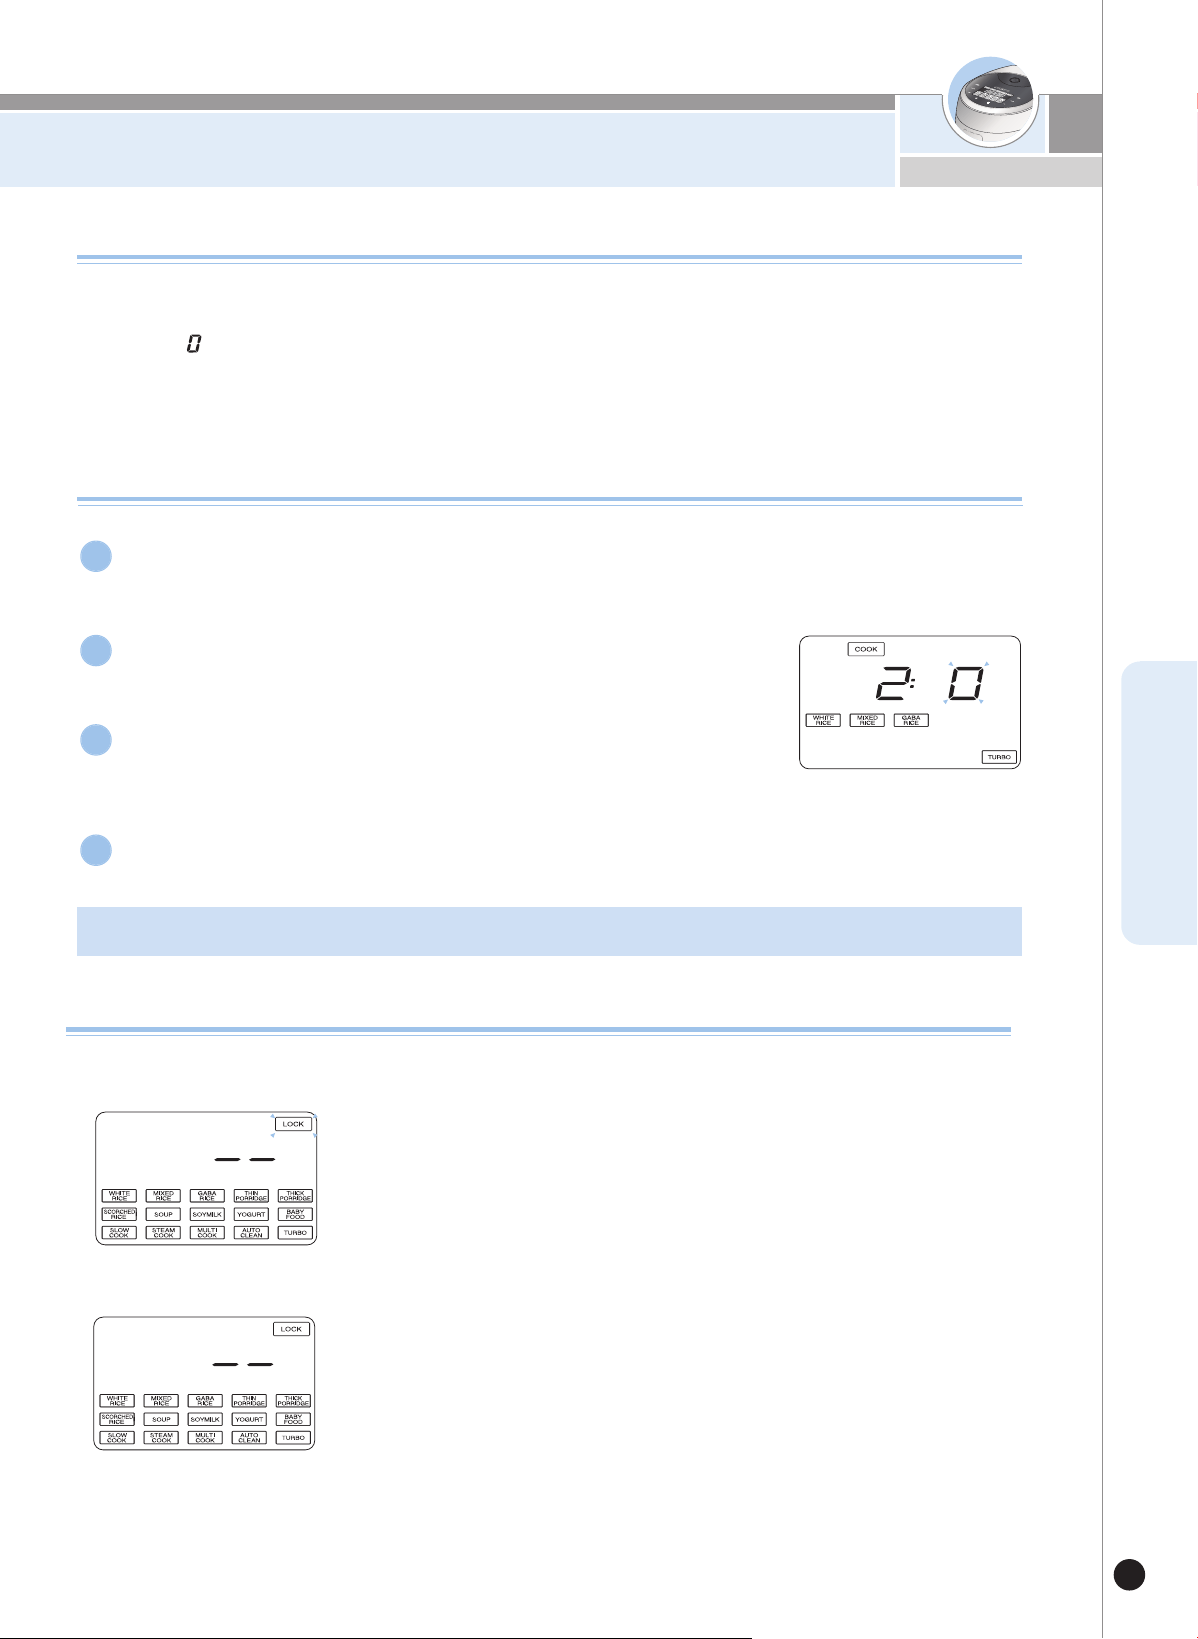
调节煮饭功能使用指南
69
www.cuckoo.co.kr
CHINESE
初始值设置为 阶段,请根据需要设置。
- 高阶段:用杂谷及陈米煮饭时,如喜欢较黏的米饭,请将温度设定为此阶段。
- 低阶段:用新米煮饭时,如不喜食用较黏的米饭,请将温度设定为此阶段。
在煮饭过程中已完成加热时,可调节温度阶段(温度高、低),顾客可根据个人喜好,直接调节当前煮
饭中的固定温度阶段。
调节煮饭功能(煮饭温度调节功能)
调节煮饭使用方法
本功能出厂设置为0阶段,请根据需要设置。
▶
-2 -1 0 1 2 .
待机状态下按3次模式键进入“调节煮饭”设置模式,
初次按键时请按1秒以上。
1
进入“调节煮饭”设置模式后,如7秒内无任何按键操作或按取消键,
功能设置被取消并返回待机状态。
4
进入“调节煮饭”设置模式时,画面如右图所示。
2
按菜单/选择键选择所需阶段后按确认键。
3
按键锁定功能
1. 煮饭、预约、保温、再加热中或待机状态下,按确认键3秒以上,
即可设置按键锁定。
2. 已设置按键锁定时,画面中的锁定标识会闪烁。
为防止清理时或为防止儿童的错误操作,本产品设置了按键锁定功能。
※在设置了按键锁定状态下,除了确认键之外,按其它键时会有按键音。
※按确认键3秒以上,解除按键锁定后,可设置所需功能。
※在设置了按键锁定状态下,切断电源后再重新接通电源时,按键锁定功能被解除。
▶
设置方法
1. 煮饭、预约、保温、再加热中或待机状态下,按确认键3秒以上,
即可解除按键锁定。
2. 已解除按键锁定时,画面中的锁定标识会闪烁。
▶
解除方法

发芽糙米指南
70
원산지 : 경기 용인
품 목 : 추청
단 위 : 1.5kg
생산년도 : ××××년산
도정일자 : ××××년 ××월 ××일
先确认生产日期和加工日期。
▶
应选择收割一年以内或加工3个月内的糙米。
(糙米的包装袋上印有收割日期及加工日期。)
用肉眼确认。
▶
市面上销售的糙米大多可以观察到糙米内部。
•
首先确认是否长有胚芽。
•
糙米的表面发黄且有光泽的属于好糙米,表面脱白层或发黑的糙米不适合发芽。
•
请挑选饱满的糙米。
•
请避免选择表面脱白层、发黑,没有胚芽及没有糠层的糙米。
使用没有糠层的糙米发芽会产生异味及异色;腌制过的糙米不能发芽。
(정상현미) (불량 현미 - 씨눈 소
<发芽糙米(6小时发芽)和白米的营养比较>
发芽糙米的营养价值比白米高。
植酸10.3倍
阿魏酸1.4倍
谷维素23.9倍.
V氨基丁酸5倍
肌醇10倍
食用纤维4.3倍
糙米比白米营养价值高,但有口感欠佳、较硬、不易消化等缺陷。不过稍微发芽会激活其含有的营养
成分,并促进吸收。
什么是发芽糙米?
发芽糙米的营养价值高,改善米饭的口感,具有促进消化及吸收的特点。
▶
发芽糙米的口感比糙米好。
▶
营养丰富易消化-糙米发芽过程中会产生淀粉酶激素,因而促进吸收。
▶
对儿童及考生是营养健康食品。-含有丰富的食用纤维。
▶
在医学界认为,GABA(氨基丁酸)可促进肝和肾的新陈代谢,抑制中性脂肪层的增加。
▶
防止血压上升,促进脑细胞的新陈代谢等益于人体的功效。
.
发芽糙米的特征
糙米选购方法
(불량 현미 - 쭉정이와 덜 여문 현미)
阿魏酸
肌醇
食用纤维
谷维素
V氨基丁酸
植酸
日本食品研究所分析
发芽糙米(22小时)
发芽糙米(6小时)
白米
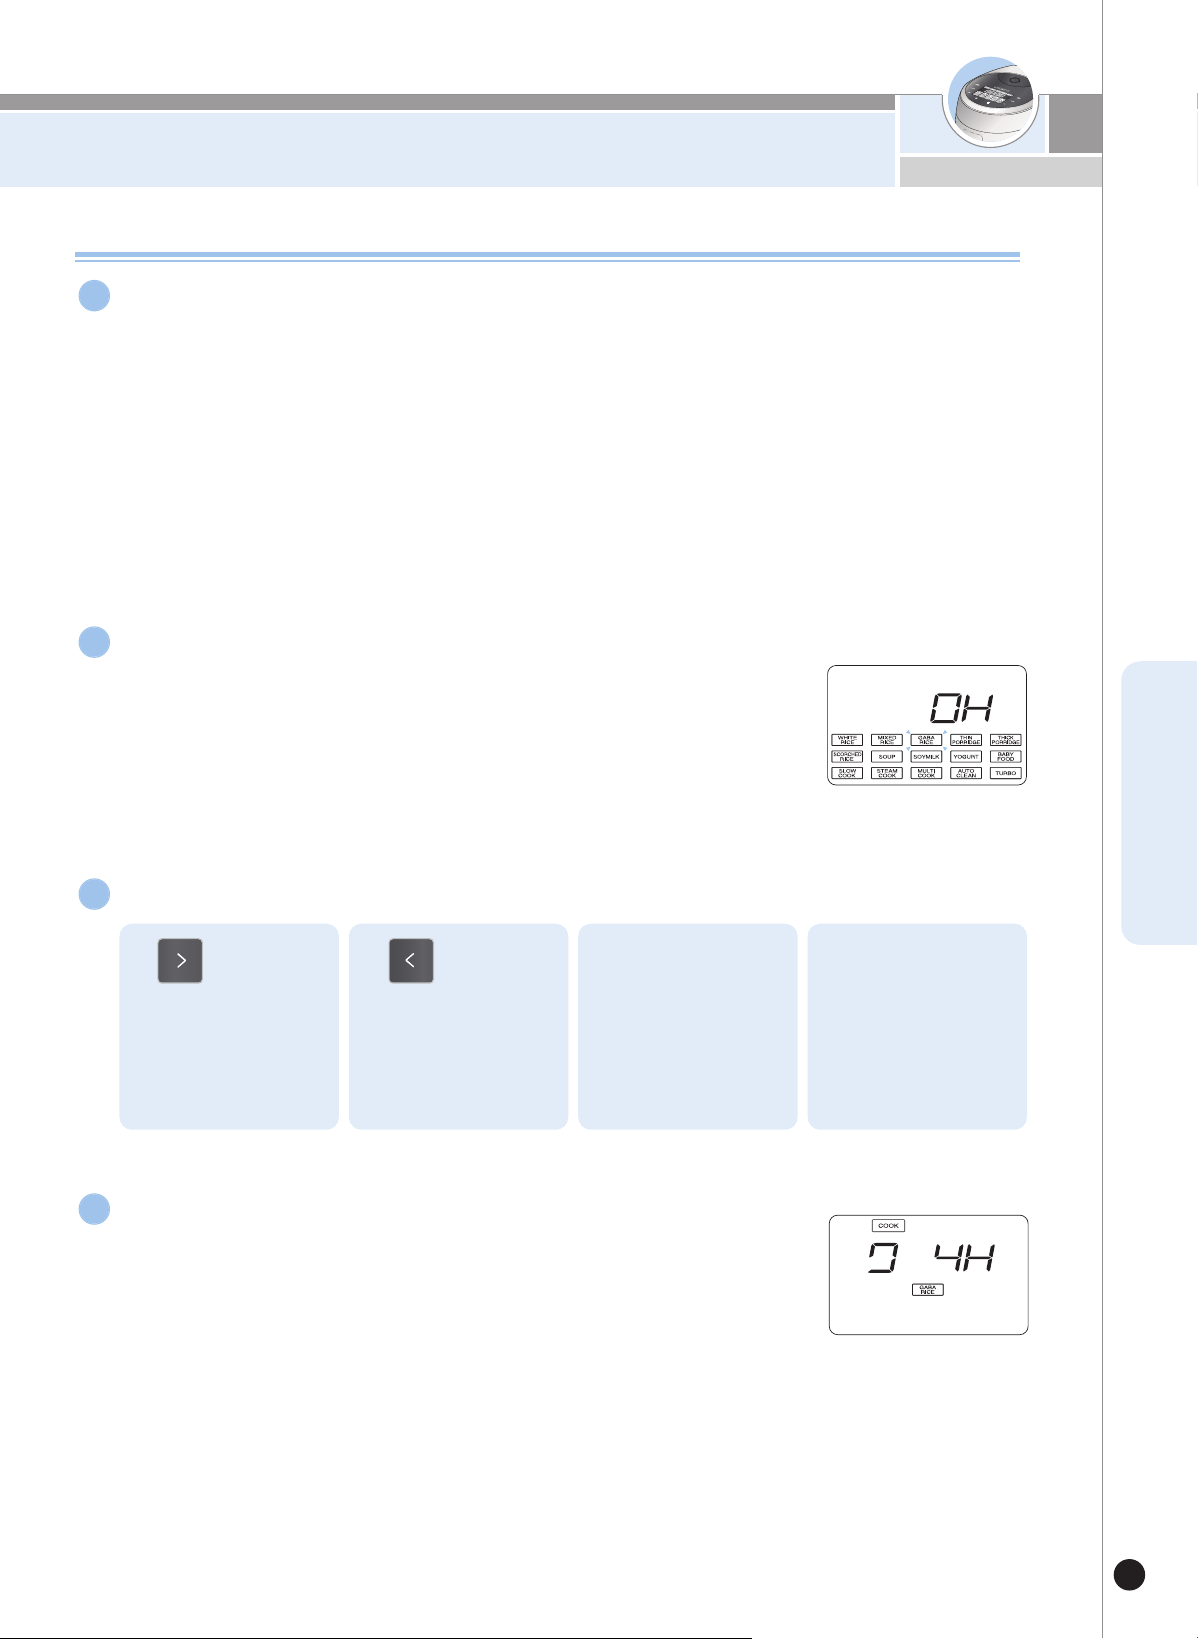
发芽糙米指南
71
www.cuckoo.co.kr
CHINESE
发芽糙米菜单操作方法
为促进发芽率,请将糙米提前浸泡16小时。
预备发芽方法
▶
将洗好的糙米放入容器里,倒入充足的水浸泡。
▶
预备发芽时间应控制在16小时以内,使用糙米发芽菜单之前必须確保糙被清洗好才使用此煮飯功能。
▶
清洗时,应轻轻搓洗,若过度用力搓洗会使胚芽掉落,容易导致糙米不发芽。
▶
预备发芽时,不同的浸泡时间会产生不同的特殊味道。
▶
将洗好的预备发芽糙米放入内锅,按煮饭量调整水位,选择糙米发芽菜单。
▶
糙米在预备发芽时会因受炎热的天气或保温温度的影响下而产生异味,请缩短浸泡时间,且淘米时多加留意。
▶
已选择糙米/发芽时显示部显示OH。
1
按菜单/选择键选择糙米/发芽。
2
按菜单/选择键设置时间。
3
1.
按此键糙米/
发芽时间以2
个小时为单位
增加。
2.
按此键糙米/
发芽时间以2
个小时为单位
减少。
3.
按确认键进入选择
发芽时间模式。
4.
按菜单/选择键设置
发芽时间,糙米/发
芽时间可设置为0、
2、4、6个小时。
如要煮糙米,将糙米
/发芽时间设置为0
小时后煮饭即可。
▶
如按煮饭/白米快速键,按照设置的时间开始进行糙米/发芽,
发芽结束后立刻开始煮饭。
▶
糙米/发芽中显示‘煮饭’标识及剩余时间。
按煮饭/白米快速键。
4

发芽糙米指南
72
4. 按预约键或煮饭/白米快速键。
煮发芽糙米时注意事项
❶
想尽快食用发芽糙米饭时,无需浸泡做预备发芽,可直接选择糙米发芽功能设定糙米发芽时间后,
按煮饭/白米快速键。(芽的大小并不影响营养成分的多与少。)
❷
在气温过高的环境下设定糙米发芽时间过长时会产生异味,此时把糙米发芽设定时间缩短为宜。
❸
使用糙米发芽功能时,最多可做4人份。
❹
可以使用自来水,但使用矿泉水会更好,不可使用开水或凉开水,可能会导致糙米不发芽。
❺
糙米的发芽率或芽的长度等发芽状态会根据糙米存放环境和保管时间的不同会有所差异。
-发芽糙米根据糙米种子的不同胚芽长度及发芽率会有所差异。
-发芽糙米必须使用收割未满1年的糙米,尽可能使用加工后保管时间短的糙米。
❻ 不同种类的糙米出现糊化现象及米饭状态会有所差异。
可根据个人口味调整水位或使用调节饭味功能。(参照69页)
❼
根据使用环境及大米状态的不同可能会看不到芽。
发芽糙米预约方法
1. 按菜单/选择键选择糙米/发芽。
2. 按确认键后再按菜单/选择键设置发芽时间,接着再按确认键。
设置为2H,4H,6H时可预约。
3. 按菜单/选择键设置煮饭完成时间。

汤制作指南
73
www.cuckoo.co.kr
CHINESE
汤菜单使用及预约方法
▶
如开始制作汤时,显示煮饭及剩余时间。
▶
基本值为2个小时,可设置为1~4小时。
(以10分钟为单位增加或减少。)
▶
选择汤菜单时,显示部显示2:00 。
按选择键选择汤菜单后,再按确认键。
1
汤预约方法。
4
按选择键设定料理时间。
2
按煮饭/快速键。
3
汤制作方法
1.
按预约键。
2.
按选择键选择汤菜单后,再按确认键。
3.
按选择键选择料理时间后,
再按确认键。
4.
按选择键选择预约完成
时间。
5.
按预约键或煮饭/白米快速键。
料理种类 菜单选择 准备材料 制作方法
参鸡汤 汤
鸡1只(1kg),
水参2根,大枣10个,
糯米1杯,盐、胡椒粉、
蒜 少许
1. 在鸡肚子上切开一个口。
2.
将浸泡2个小时的糯米与大蒜塞入洗净的鸡肚子内。
(糯米如未浸泡,可能会夹生。)
3.
根据个人口味如想食用浓汤时,请将一半糯米塞入
鸡肚子内,另一半放入汤内即可。
4.将鸡腿交错塞入切开的口子内。
5.
将鸡放入内锅中,并放入洗净的水参、大枣,用计
量杯倒入7杯水。
6.
盖好锅盖,按「选择」键选择汤菜单后,时间
设定为2个小时,再按煮饭/快速键。
-参考-
如加入过多的水,煮饭完成后排除压力时,汤会溢出,
请多加注意。
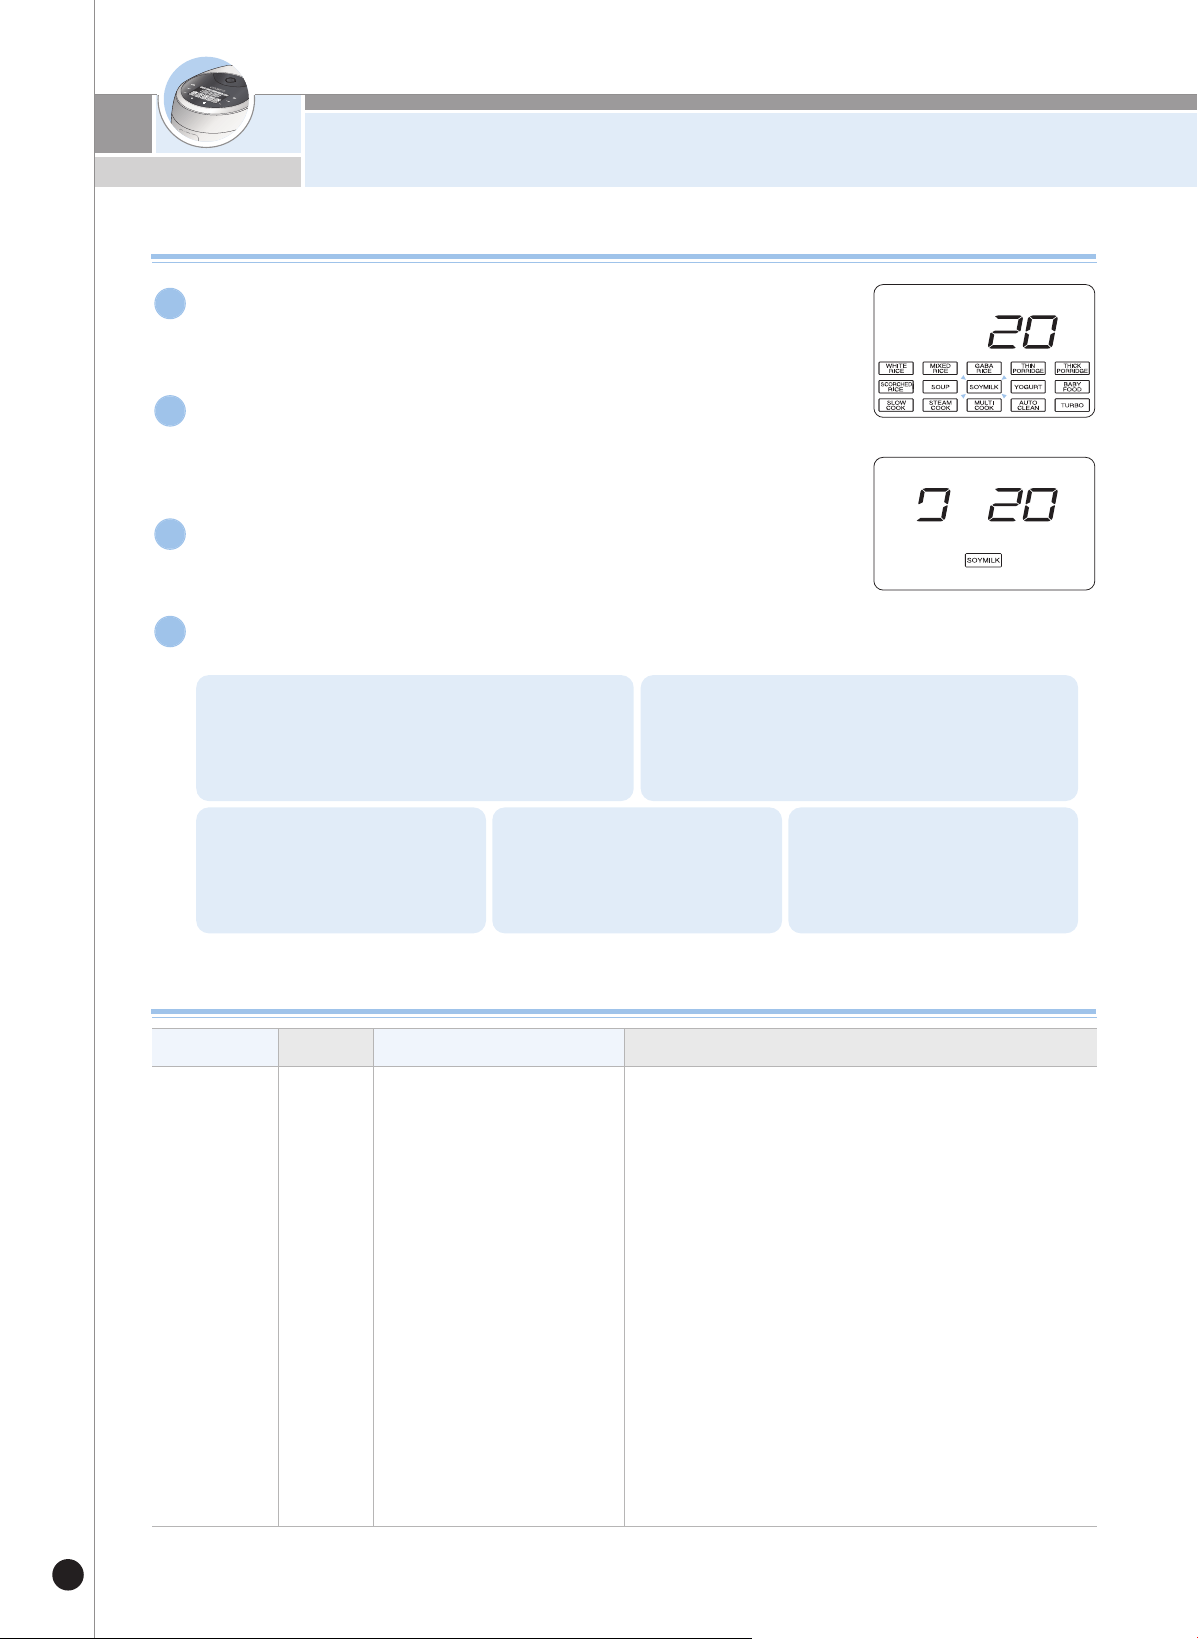
豆奶制作指南
74
豆奶菜单使用及预约方法
▶
如开始制作豆奶时,显示煮饭及剩余时间。
▶
基本值为20分钟,可设置为10分钟~1小时30分钟。
(以10分钟为单位增加或减少。)
▶
选择豆奶菜单时,显示部显示 20。
按选择键选择豆奶菜单后,再按确认键。
1
豆奶预约方法。
4
按选择键设定所需的发酵时间。
2
按煮饭/快速键。
3
豆奶制作方法
1.
按预约键。
2.
按选择键选择豆奶菜单后,再按确认键。
3.
按选择键选择料理时间后,
再按确认键。
4.
按选择键选择预约完成
时间。
5.
按预约键或煮饭/白米快速键。
料理种类 菜单选择 准备材料 制作方法
豆奶 豆奶
黄豆:250
盐、白糖 少许
第一次加水:500g
第二次加水:950g
1. 黄豆要提前一天放入2倍的水进行浸泡。
(黄豆要浸泡至可以用手去皮为止。)
2. 将浸泡的黄豆去皮后倒入内锅,加入500g的水
(第一次加水。)
盖上锅盖,按「选择」键选择豆奶菜单后,
时间设定为20分钟,按煮饭/快速键。
(咀嚼已煮好的黄豆时,会有咔哧咔哧的松脆感,长
时间煮黄豆,黄豆容易被碾碎,会产生酱曲的味道)
3. 将煮好的黄豆用筛子洗净。
4. 将黄豆倒入榨汁机内,加入950g水(第二次加水),
加水时要缓慢倒入。
5. 将磨好的黄豆用筛子筛一下。
6. 根据个人喜好放入适当的盐和白糖
-注意事项-
黄豆要全部去皮后再煮。
(如未将黄豆全部去皮时,会导致蒸汽排出口堵塞,
豆汤可能会溢出。)
料理结束后,将分离型内锅盖洗净。

酸奶制作指南
75
www.cuckoo.co.kr
CHINESE
酸奶使用及预约方法
▶
如开始制作酸奶,显示煮饭及剩余时间。
▶
基本值为6个小时,可设置为30分钟~12小时。
(以30分钟为单位增加或减少。)
▶
已选择酸奶菜单时显示部显示6小时。
按菜单/选择键选择酸奶后按确认键。
1
酸奶制作完成后画面显示End标识,并转换为保温状态。
4
酸奶预约方法。
5
按菜单/选择键设置所需要的发酵时间。
2
按煮饭/白米快速键开始制作酸奶。
3
酸奶制作方法
1.
按预约键。
2.
按菜单/选择键选择酸奶后按确认键。
3.
按菜单/选择键选择料理时
间后按确认键。
4.
按菜单/选择键选择预约
完成时间。
5.
按预约或煮饭/白米快速键。
料理种类 菜单选择 准备材料 制作方法
酸奶 酸奶
牛奶1L
原味酸奶290g
1. 将备好的材料全部放入内锅,轻轻搅拌。
2. 关闭锅盖按菜单/选择键选择酸奶后将时间设置
为6个小时,按煮饭/白米快速键。
<参考>
请使用普通白色牛奶。
(含钙、低脂肪、灭菌牛奶不可发酵。)
酸奶发酵时放入其他材料会导致酸奶变质。
完成后请放入冰箱内冷藏食用。
根据个人口味放入鲜水果、杂谷、果酱食用,
味道更佳
※
初始设置为6小时
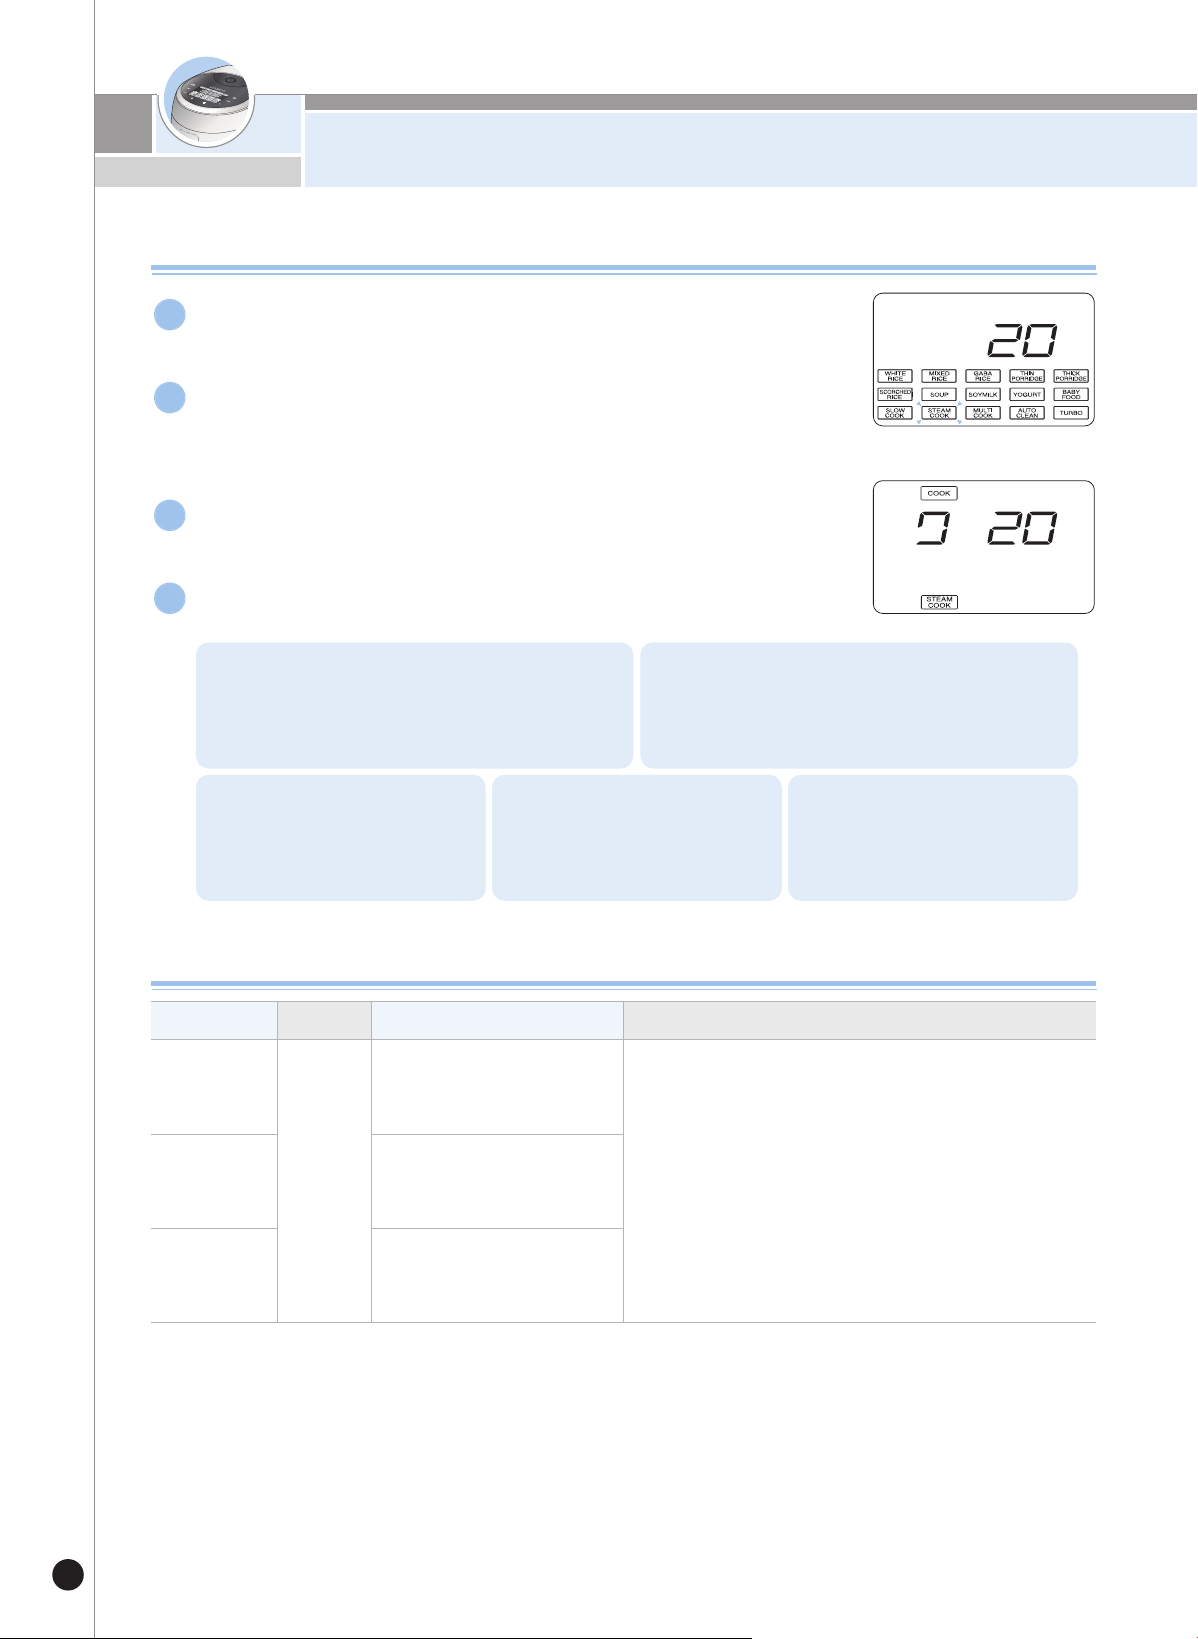
蒸/炖制作指南
76
蒸/炖料理方法
蒸/炖使用及预约方法
▶
蒸/炖开始后显示煮饭标识及剩余时间。
▶
基本值为20分钟,可设置为5~90分钟。
(以5分钟为单位增加或减少。)
▶
选择蒸/炖菜单后显示部显示20分钟。
按菜单/选择键选择蒸炖。
1
蒸/炖预约方法
4
按确认键设置料理时间。
2
按煮饭/白米快速键。
3
1.
按预约键。
2.
按菜单/选择键选择蒸/炖后按确认键。
3.
按菜单/选择键选择料理
时间后按确认键。
4.
按菜单/选择键选择预约
完成时间。
5.
按预约或煮饭/白米快速键。
料理种类 菜单选择 准备材料 制作方法
蒸饺子
蒸/炖
饺子:15个
水:3/4杯
1. 将材料备好。
2. 锅内倒入3/4~1.5杯水,放入蒸盘。
3. 将备好的材料放到蒸盘上。
4. 关闭锅盖按菜单/选择键选择蒸/炖后,将蒸饺
子时间设为30分钟,蒸地瓜、蒸土豆时间设
置为50分钟后,按煮饭/白米快速键。
蒸地瓜
地瓜:3个(150g以下)
水:1杯半
蒸土豆
土豆:3个(200g以下)
水:1杯半
※
初始设置为20分钟

宝宝食品制作指南
77
www.cuckoo.co.kr
CHINESE
宝宝食品使用及预约方法
按菜单/选择键选择宝宝食品菜单后,按确认键。
1
▶
选择宝宝食品后显示部显示10分钟。
按菜单/选择键选择料理时间。
2
1.
按此键时宝宝食品
料理时间以5分钟为
单位增加。
2.
按此键时宝宝食品
料理时间以5分钟为
单位减少。
3.
宝宝食品料理时间可设置为
10~50分钟。
按煮饭/白米快速键,开始制作宝宝食品。
3
▶
开始制作宝宝食品时,画面显示煮饭及剩余时间。
宝宝食品预约方法。
4
1.
按预约键。
2.
按菜单/选择键选择宝宝食品后按确认键。
3.
按菜单/选择键选择料理
时间后按确认键。
4.
按菜单/选择键选择预约
完成时间。
5.
按预约或煮饭/白米快速键。
料理种类 菜单选择 准备材料 制作方法
地瓜苹果粥
宝宝
食品
地瓜:70g
苹果:70g
水:1杯
蜂蜜:若干
1. 将苹果与地瓜去皮,切薄片。
2. 内锅中倒入水及食材。
3. 关闭锅盖按菜单/选择键选择
宝宝食品后,
将时间设置为45分钟,按煮饭/白米快速键。
4. 料理结束后用木勺将其碾碎,放入蜂蜜食用。
金枪鱼蔬
菜黏米饭
米饭:50g
金枪鱼(罐头):30g
甜椒:10g
胡萝卜:10g
水:1/2杯
黄油、紫菜粉:若
1. 将金枪鱼去油,用筷子将肉撕开。
2. 胡萝卜、甜椒切碎。
3. 将米饭、金枪鱼、甜椒、胡萝卜放入碗中搅匀。
4. 将锅底抹上黄油,倒入所有食材。
5. 关闭锅盖按菜单/选择键选择
宝宝食品后,将时间
设置为15分钟,按煮饭/白米快速键。
6. 料理完成后用饭勺搅匀。
宝宝食品料理方法
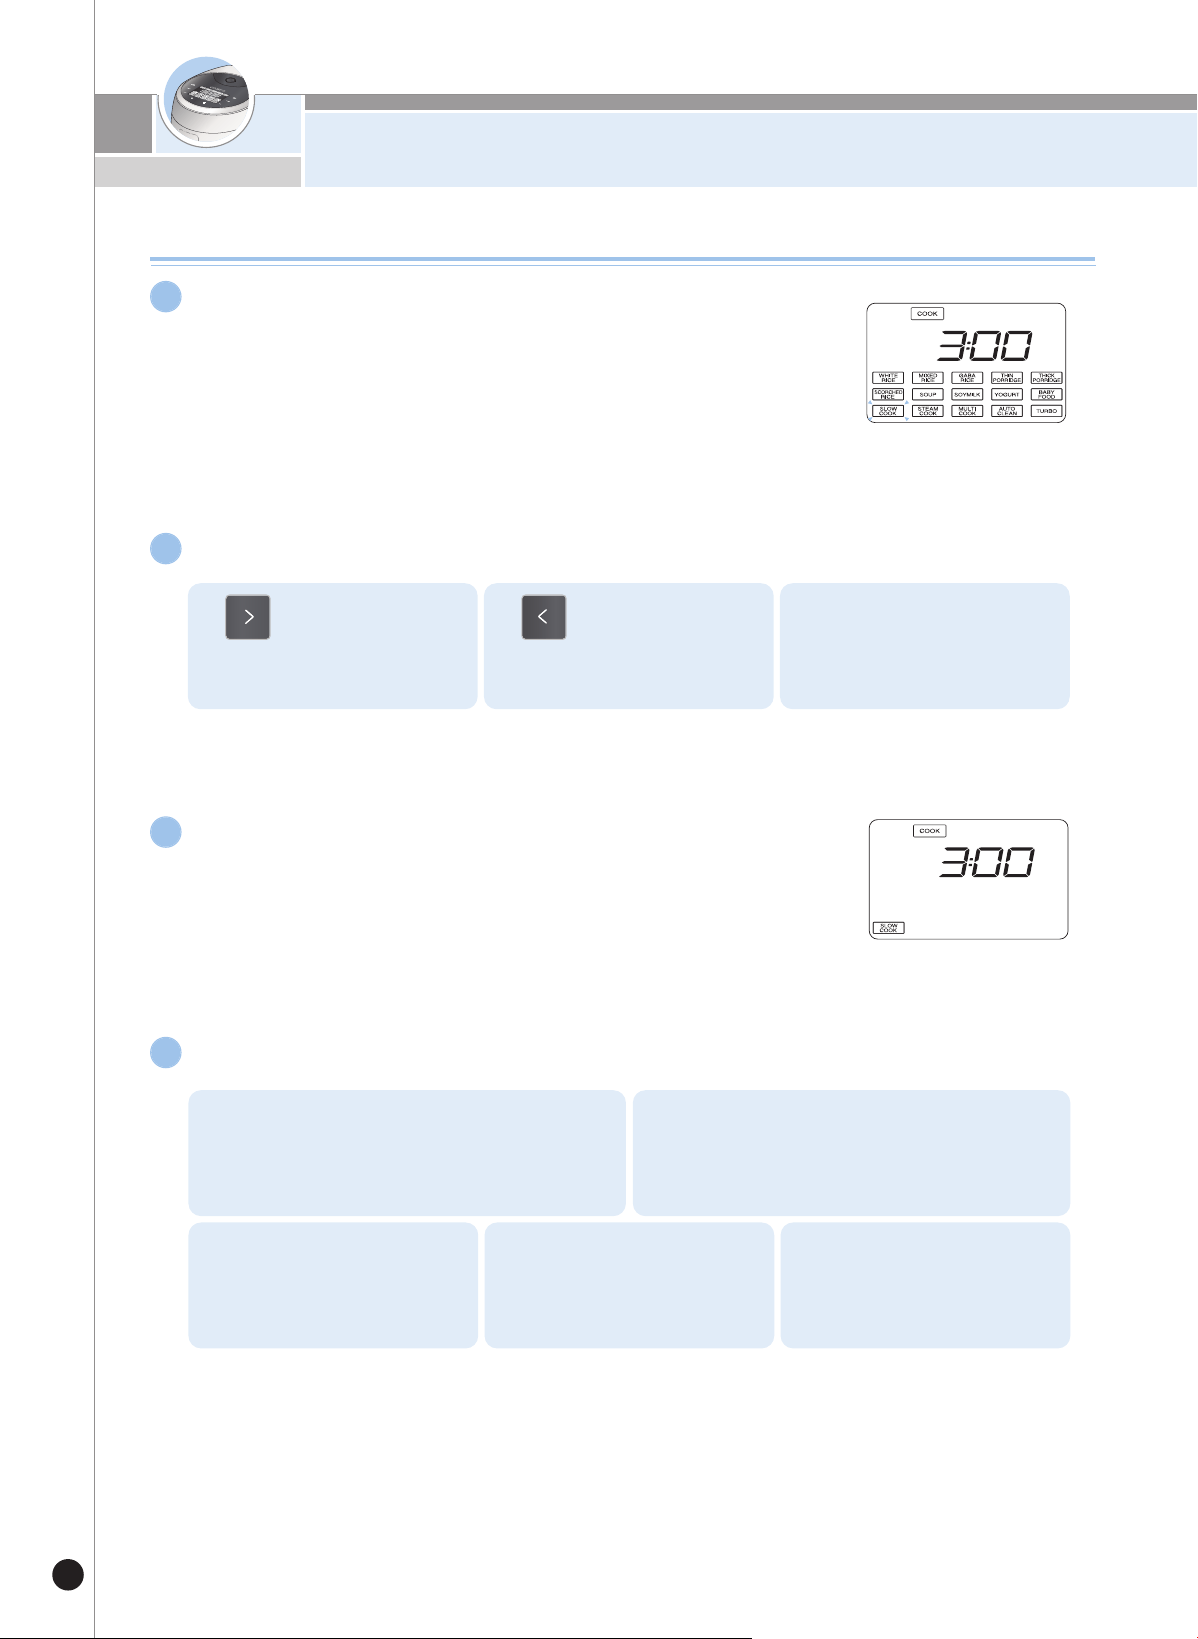
健康料理制作指南
78
健康料理使用及预约方法
按菜单/选择键选择健康料理后按确认键。
1
▶
选择健康料理时显示部显示3小时。
按菜单/选择键设置时间。
2
1.
按此键时健康料理
以10分钟为单位增加。
2.
按此键时健康料理
以10分钟为单位减
少。
3.
健康料理时间可设置为
1~10小时。
如按煮饭/白米快速键,开始制作健康料理。
3
▶
开始制作健康料理后,画面显示煮饭及剩余时间。
健康料理预约方法
4
1.
按预约键。
2.
按菜单/选择键选择健康料理后,
按确认键。
3.
按菜单/选择键选择料理时
间后按确认键。
4.
按菜单/选择键选择预约完
成时间。
5.
按预约键或煮饭/白米快
速键。

健康料理制作指南
79
www.cuckoo.co.kr
CHINESE
去皮南瓜:500g
糯米粉:100g
白糖、盐:若干
水:3杯(以量杯为准)
饭:1人份
胡萝卜:50g
洋葱:50g
香葱:30g
盐、胡椒:若干
水:2.5杯(以量杯
为准
洋葱:30g
土豆:30g
胡萝卜:30g
香菇:30g
牛里脊:50g
奶油汤粉:100g
橄榄油:若干
水:3杯(以量杯
为准)
红枣:180g
生姜:1/2块
蜂蜜:若干
水:白米水位4刻度
1. 将南瓜去皮,切薄片。
2. 将南瓜片、糯米粉、水放入内锅。
3. 关闭锅盖按菜单/选择键选择
健康料理后,
将时间设置为3小时,按煮饭/白米快速键。
4. 料理完成后倒入筛子中碾碎,或用榨汁机捣碎后,
根据个人口味加入白糖、盐后食用。
1. 将胡萝卜、洋葱、香葱洗净切碎备用。
2. 内锅中放入备好的1人份米饭与切好的材料,
倒入水搅匀。
3. 关闭锅盖按菜单/选择键选择
健康料理后,
将时间设置为5小时,按煮饭/白米快速键。
4. 料理结束后,根据个人口味加入盐、胡椒调味。
1. 将洋葱、土豆、胡萝卜切成2cm左右的丁,牛
里脊切成2.5cm左右的丁,香菇切片。
2. 用橄榄油将切好的材料中加入1/2大勺盐翻炒。
(不将材料翻炒直接使用也可。)
3. 将内锅中倒入奶油汤粉及水,搅匀后放入材料,
再次搅匀。
4. 关闭锅盖按菜单/选择键选择
健康料理后,
将时间调整为5小时,按煮饭/白米快速键。
1. 将红枣洗净,生姜洗净去皮切薄片。
2. 将红枣和切好的姜片放入内锅,加水至白米水
位4刻度。
3. 关闭锅盖按菜单/选择键选择
健康料理后,
将时间设置为8小时,按煮饭/白米快速键。
4. 料理结束后根据个人口味加入蜂蜜食用。
准备材料
制作方法
健康料理制作方法
料理种类
南瓜粥
蔬菜粥
蔬菜汤
红枣茶
健康
料理
菜单选择
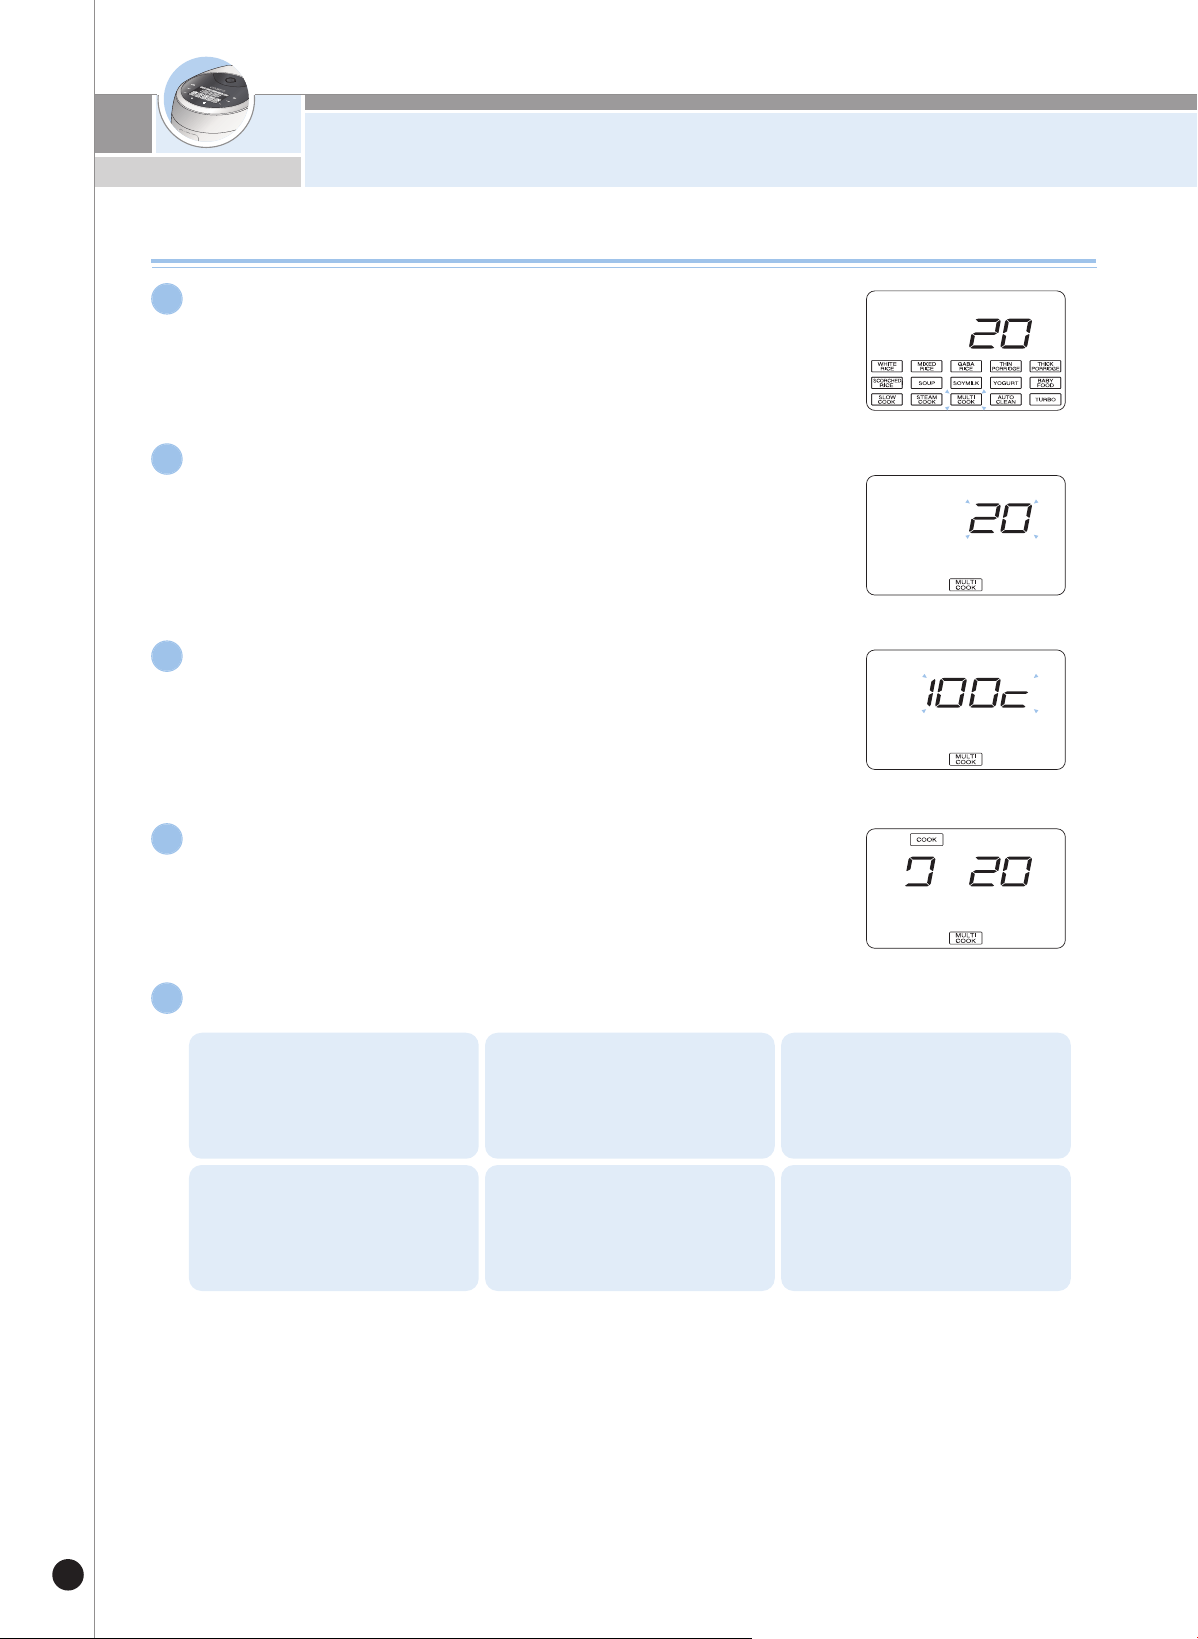
多种料理
80
多种料理菜单料理方法
按选择键选择多种料理菜单后,再按确认键。
1
▶
选择多种料理菜单时,显示部显示20 。
按选择键设定料理时间。
2
▶
设定所需料理时间后,再按确认键时进入料理温度设定阶段。
▶
基本值为20分钟,可设置为1小时30分钟。
(以10分钟为单位增加或减少。)
按确认键设定料理温度。
3
▶
设定所需料理温度后,按煮饭键进行煮饭。
▶
基本值为100℃,可设置为35℃~130℃。
※ 显示的温度根据周边环境和内容物不同,可能会有所差异。
(以1℃为单位增加或减少。)
按煮饭/快速键。
4
▶
如开始制作多种料理时,显示煮饭及剩余时间。
健康料理预约方法。
4
1.
按预约键。
2.
按选择键选择健康料理菜单
后,再按确认键。
3.
按选择键选择料理时间后,
再按确认键。
4.
按选择键选择料理温度后,
再按确认键。
5.
按选择键选择预约完成时间。
6.
按预约键或煮饭/白米快速键。
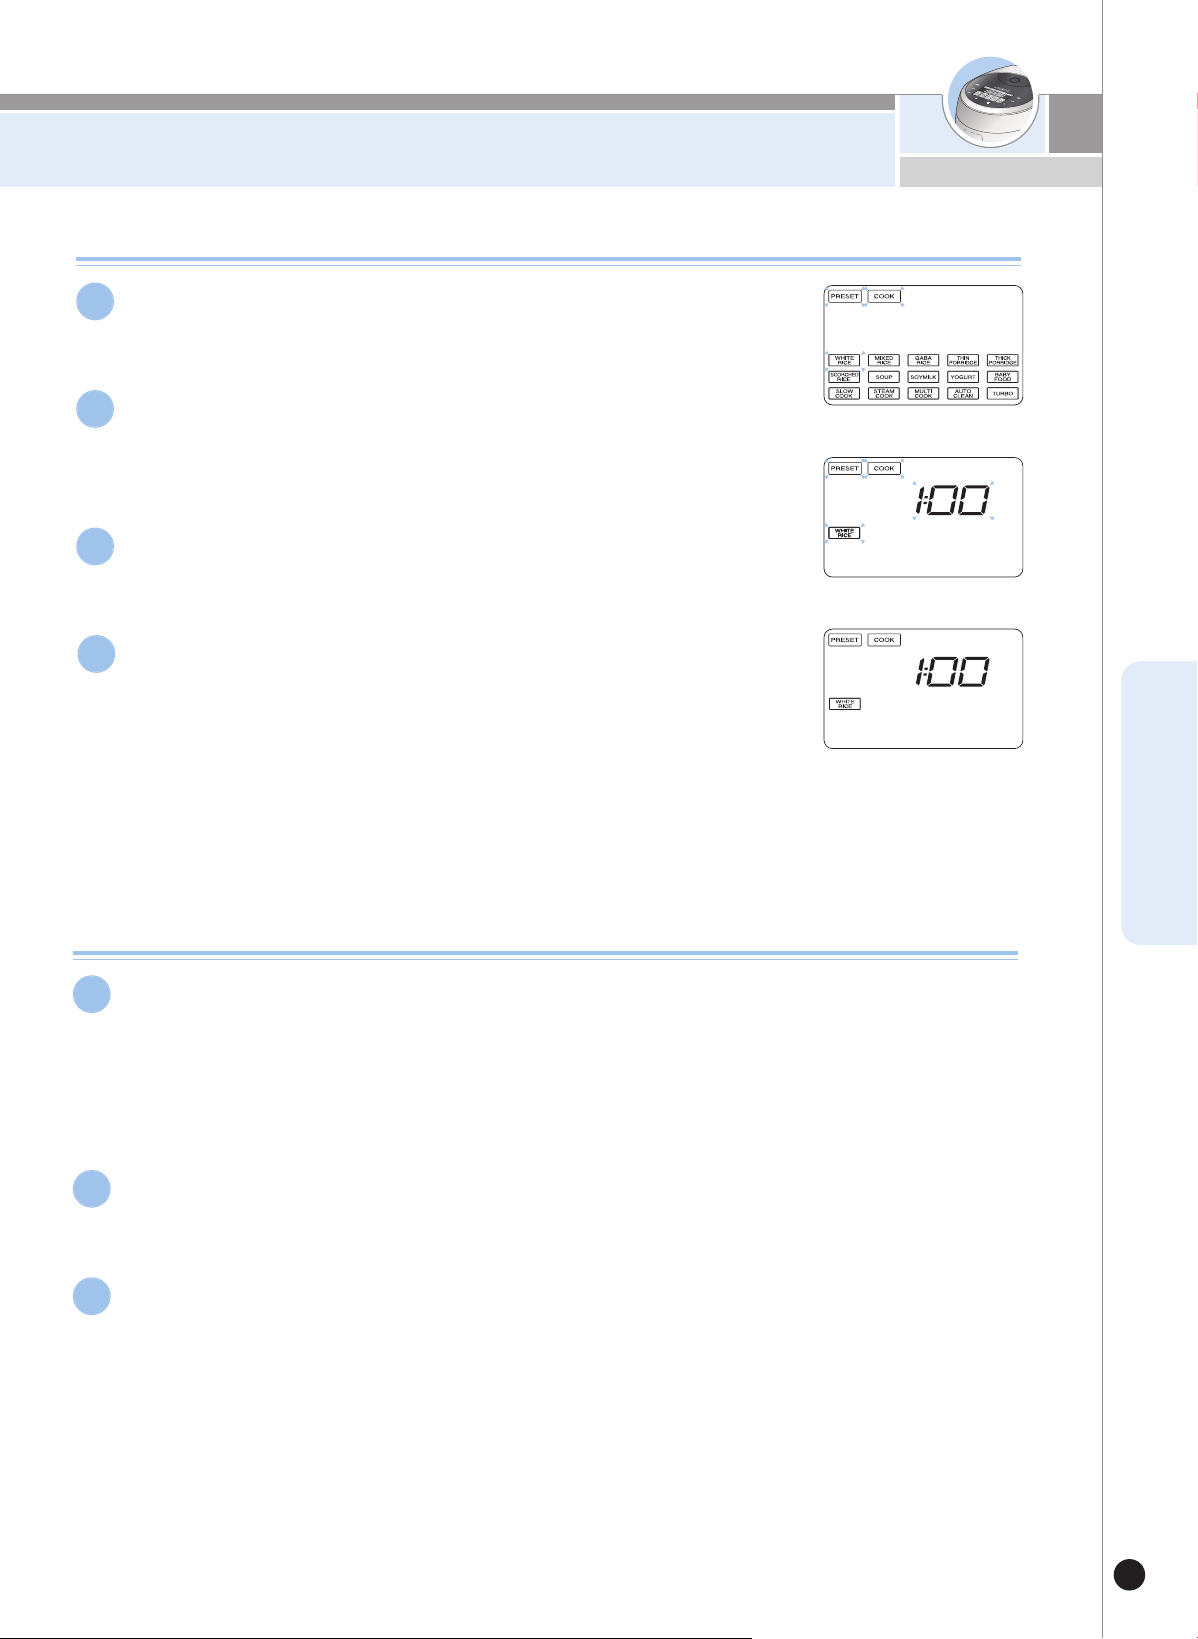
预约煮饭使用指南
81
www.cuckoo.co.kr
CHINESE
请按预约键。
1
按菜单/选择键选择所需菜单后按确认键。
2
按菜单/选择键选择预约煮饭完成时间。
▶
时间可设置为1~12小时50分钟。
▶
完成预约煮饭时,“预约”字样闪烁3次后亮起。
▶
在设置时间内完成预约煮饭。
(根据煮饭量及使用条件不同,煮饭完成时间略有差异。)
3
按煮饭/白米快速键。
4
预约煮方法
预约煮饭时注意事项
预约煮饭时
▶
大米开封时间长较干硬时,米饭可能会夹生。
▶
根据预约煮饭设定时间或周围环境条件,米饭可能会发硬或发软,请根据内锅水位
刻度增减水量。
▶
预约设置时间越长就会增加糊化现象。
1
变更预约时间
▶
变更预约时间时,按取消键取消预约时间后再重新设定。
2
超出可预约设定时间时
▶
设置的时间比可预约设置时间短时,立即开始煮饭。(请参照45页各菜单煮饭时间)
3
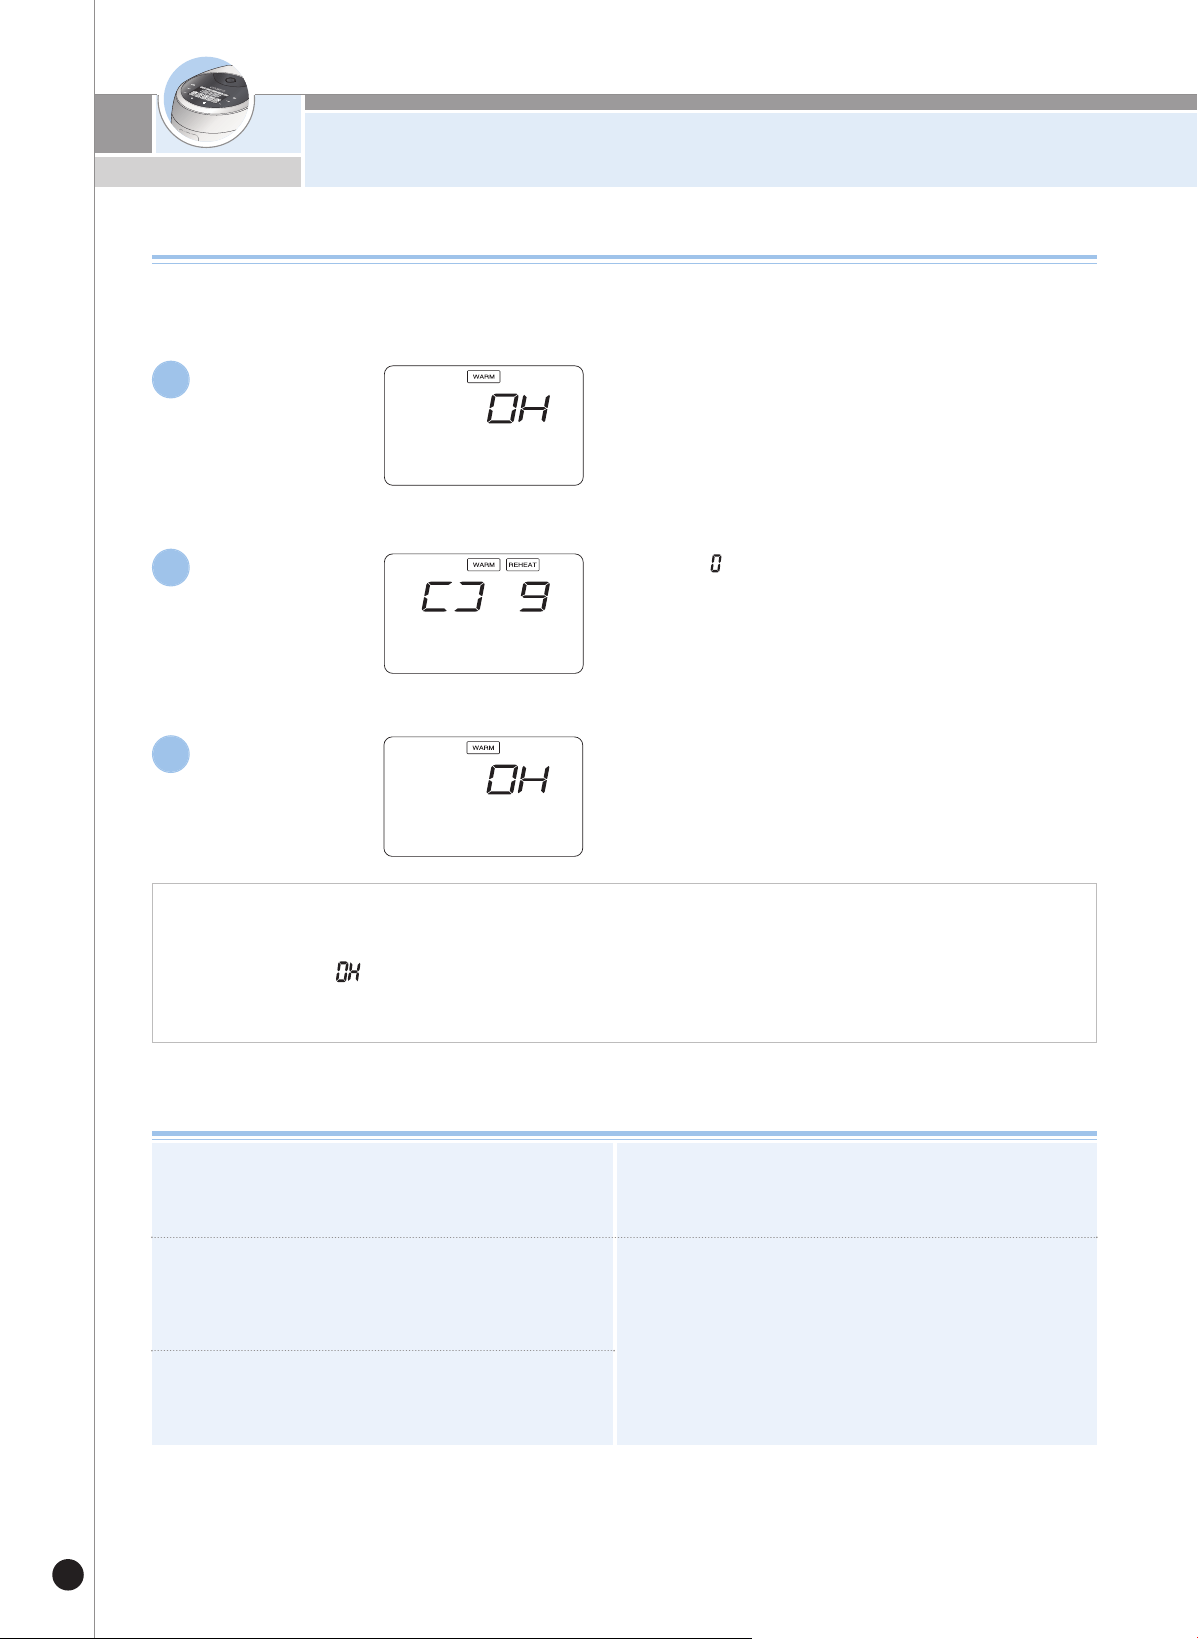
米饭保温指南
82
保温中按3秒模式键即可变更保温温度。
显示部“ ”标识转动,进行再加热。
完成再加热后重新开始保温,显示已保温时间。
用餐时
▶
保温中若想食用热乎乎的米饭时,按保温/再加热键,开始保温再加热,9分钟后可食用热乎乎的米饭。
▶
频繁使用再加热功能,可能会导致米饭变色或发干,建议1日使用1~2次为宜。
▶
保温使用其他电热器具或煤气煮的米饭时,请将米饭倒入内锅,按1次保温/再加热键。
此时,显示部显示“ ”(将热饭倒入冷的饭锅保温时,可能会导致米饭变色或变味。)
▶
保温时间超过24小时后,已保温时间会开始闪烁以提示保温时间过长。
保温中
1
再加热中
2
完成再加热
3
煮饭完成后,将米饭搅匀进行保温效果会更佳。
(保温少量的米饭时,请将米饭堆积在内锅中央。)
请勿将饭勺放入锅内一起保温。
特别是放入木勺时,细菌容易滋生及产生异味。
请勿保温过少的米饭或请勿将剩饭与凉饭一起保温,
保温中米饭可能会产生异味。
(请使用微波炉保温冷饭。)
长时间保温时,可能会产生变色或异味,请将保温时间
控制在12小时以内。保温时间超过24小时后,保温时
间开始闪烁。
保温杂谷,糙米时米饭质量不如白米,因此尽
量不要保温。
保温中内锅边缘或蒸汽排出口下端的米饭可能会产生白
化现象,此时请将米饭搅匀。
保温时注意事项
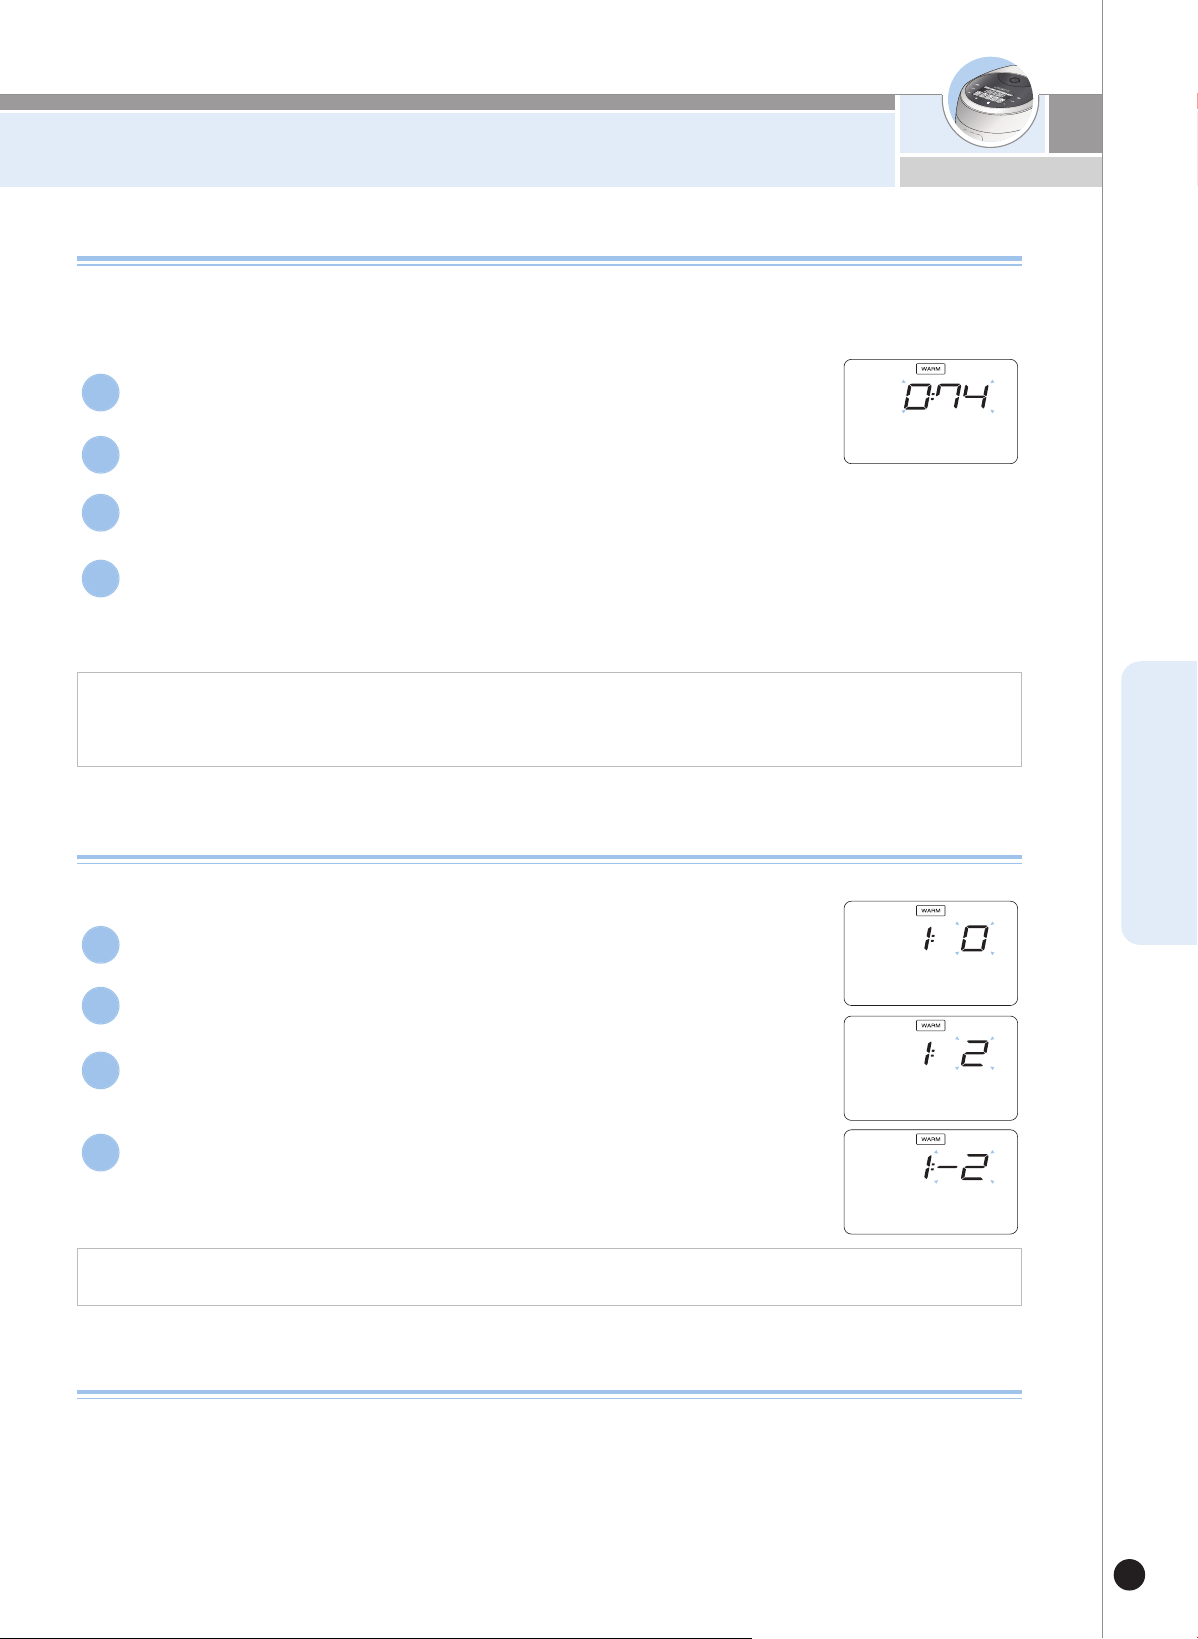
米饭保温方法
83
www.cuckoo.co.kr
CHINESE
保温温度调整方法
即使经常清理或煮水消毒,保温中的米饭仍产生异味或变色是由于保温温度不正确所致,
请调整保温温度。
调整保温温度时请咨询售后服务中心。
保温中调节保温温度时请按保温键5秒以上设置保温温度。
1. 有严重馊味,并有较多水珠凝结(米饭发酵)时:保温温度过低,请将保温温度调高1~2度。
2. 米饭严重发黄、焦化、干硬并有异味时:保温温度过高,请将保温温度调低1~2度。
1. 开启锅盖时有就较多水流出时:将调节设置模式调高1、2个阶段。
2. 米饭边缘处有泡白现象时:将调节设置模式调低-1、-2个阶段。
保温有异味时
▶
请及时清理产品,特别是内锅盖清理不干净时细菌容易滋生,保温时会产生异味。
▶
即使产品外观清洁,但仍有细菌,所以保温时会产生异味,请煮水进行消毒。
水量以白米2人份为基准,加入1汤匙醋,关闭锅盖后按选择自动洗涤键后,按煮饭/白米快速键。
煮水结束后请将内锅清洗干净。
▶
做汤或蒸/煮料理后,如未将产品清洁干净,保温时会产生异味。
待机状态下按1秒以上模式键进入“保温温度”设置模式。
1
进入“保温温度”设置模式时,显示当前设置的保温温度。
2
按菜单/选择键选择所需保温温度后按确认键或煮饭/白米快速键。
3
进入“保温温度”设置模式后,如7秒内无任何按键操作,
请按取消键,功能设置将被取消并返回待机模式。
※
本产品出厂设置为“74度”,请根据需要设置。
4
待机状态下按2次模式键进入“调节保温”设置模式。
1
进入“调节煮饭”设置模式时,显示当前设置的调节保温状态。
2
按菜单/选择键选择所需的调节保温阶段后,按确认白米快速键。
3
进入“调节保温”设置模式后如7秒内无任何按键操作,
或按取消键,功能设置被取消并返回待机模式。
※
本产品出厂设置为“0阶段”,请根据需要设置。
4
调节保温设定方法
此功能只用于当米饭在保温时打开分离型内锅盖,过多的水溢出;或已煮熟的米饭继续膨胀的情况。

100% Recycled paper Z0383-0025G0 Rev.0
CR-1010F /
CR-1020F
5-48 46th Rd. Long Island City, NY 11101