
Technical Support and E-Warranty Certificate www.vevor.com/support
Dog-door-for-sliding-door
USER MANUAL
We continue to be committed to provide you tools with competitive price.
"Save Half", "Half Price" or any other similar expressions used by us only represents an
estimate of savings you might benefit from buying certain tools with us compared to the major
top brands and does not necessarily mean to cover all categories of tools offered by us. You are
kindly reminded to verify carefully when you are placing an order with us if you are actually
saving half in comparison with the top major brands.
- 1 -
CWM01-S/CWM01-M/CWM01-L/CWM01-XL
NEED HELP? CONTACT US!
Have product questions? Need technical support? Please feel free to contact us:
Technical Support and E-Warranty Certificate www.vevor.com/support
This is the original instruction, please read all manual instructions carefully before
operating. VEVOR reserves a clear interpretation of our user manual. The
appearance of the product shall be subject to the product you received. Please
forgive us that we won't inform you again if there are any technology or software
updates on our product.
Dog-door-for-sliding-
door

- 2 -
Important Safety Information
The warning sign depicted serves to alert you about possible dangers that may
cause personal injuries. Adhere to all subsequent safety instructions indicated by
this symbol to prevent any potential harm or fatal consequences.
WARNING indicates a hazardous situation which, if not avoided, could result in
death or serious injury.
CAUTION used with the safety alert symbol, indicates a hazardous situation
which, if not avoided, could result in minor or moderate injury.
NOTICE is used to address safe use practices not related to personal injury.
When there are children in the home, it's crucial to integrate the pet door into your
child safety measures. The risk lies in a child potentially misusing the pet door
and gaining access to hazardous areas beyond it. Parents or homeowners with
swimming pools must ensure constant supervision of the pet entrance and
implement sufficient barriers around the pool. Should a novel danger arise within
or outside the home, reachable via the pet door, remember that the included
closing panel or lock, if available, is designed primarily for aesthetics and energy
conservation, not as a security feature. VEVOR will not be held responsible for
any unintended usage, and by purchasing this product, you accept full
accountability for supervising the access it permits.
Power tools pose a high risk of severe injuries; adherence to all safety guidelines
is mandatory. Always don appropriate safety gear.
Before installation, users must acquaint themselves with relevant building codes
impacting the pet door's installation. Collaborate with a licensed contractor to
assess the door's fitness for the specific installation—note that this pet door isn't
fire-resistant. Both owner and contractor should carefully evaluate any existing or
potential hazards on either side of the pet door, plus those arising from property
modifications and their implications on the door's presence, proper use, and
potential misuse.
Retain these guidelines alongside your vital documents, and ensure they are
conveyed to the prospective owner of the property. Inspect the intended location
for the pet door for any electrical or plumbing installations that might interfere.
Verify that the support fits securely, neither excessively lengthy nor unduly brief,
as either condition could inflict harm on the wall. If fastening screws into vinyl
siding, you might need to bore a pilot hole slightly wider than the screw heads
through the siding. This enables the screws to anchor flush against the plywood
without deforming the vinyl siding.
- 3 -
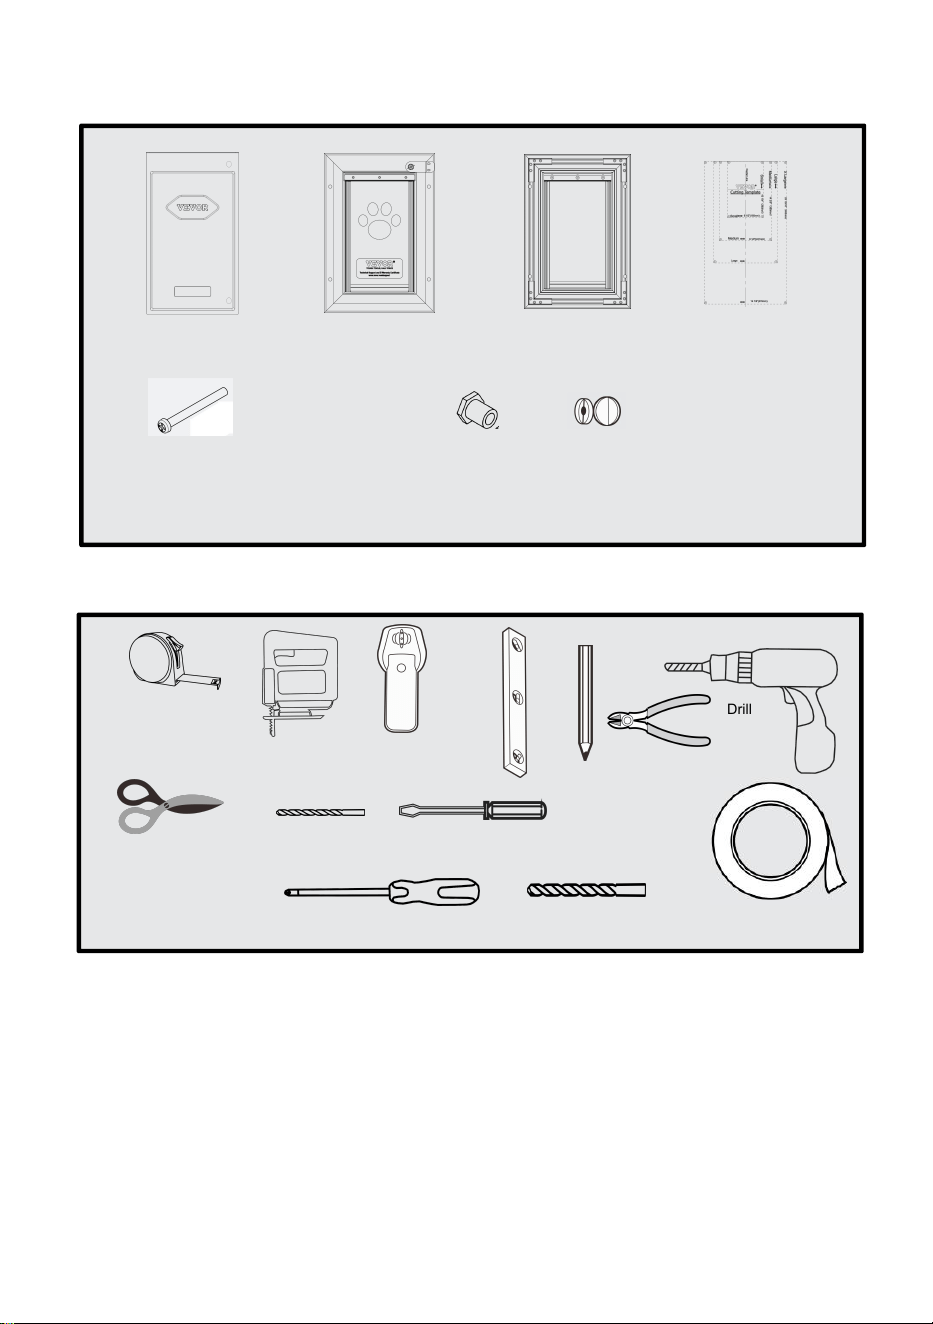
Kit includes
Tools Needed
Key Definitions
Outer Frame Size: Overall pet door dimensions
Cut door Size: Opening cut in homeowner's door for proper fit and pet door
installation
Replacement Flap Size: 0verall flap size when removed from pet door. During
extreme changes in
weather, vinyl flaps can shrink during cold months and stretch in warmer months
Flap Opening Size: Usable flap size for pet to enter and exit through pet door
Interior Frame: Pet door frame on the inside of home
Exterior Frame: Pet door frame on the outside of home
Drill
Masking or
Painter’s Tape
7mm
Drill Bit
12mm
Drill Bit
Screwdriver
Tape Measure
Closing Panel
Interior Frame
Exterior Frame
Cutting
Machine
Stud
Finder
Pencil
Level
Scissor
Cutting Template
Screw (M4*75, M4*65 , M4*55 )and Screw Sleeves and Screw Caps:
Both CWM01-S and CWM01-M have 5PCS
Both CWM01-L and CWM01-XL have 7PCS
Pliers
Screwdriver
- 4 -
Model and Parameters
Suitable Door Thickness
:
1 1/16" ~ 2"
(
27~50mm
)
CWM01-S:
Flap Opening Size: 5 1/4"W × 8 1/8"H (133×206mm)
Cutting Door Size: 6 1/2"W ×10 1/4 "H (165×260mm
)
CWM01-M:
Flap Opening Size: 8 1/4"W × 12 1/4"H (210×311mm)
Cutting Door Size: 9 1/2"W ×14 2/5"H (241×365mm)
CWM01-L
:
Flap Opening Size: 10 1/4"W × 16 1/4"H (260×413mm)
Cutting Door Size: 11 1/2"W ×18 2/5"H(292*467mm)
CWM01-XL
:
Flap Opening Size: 13 5/8"W × 23 5/8"H (346×600mm)
Cutting Door Size: 14 7/8"W ×25 13/16 "H(378×655mm )
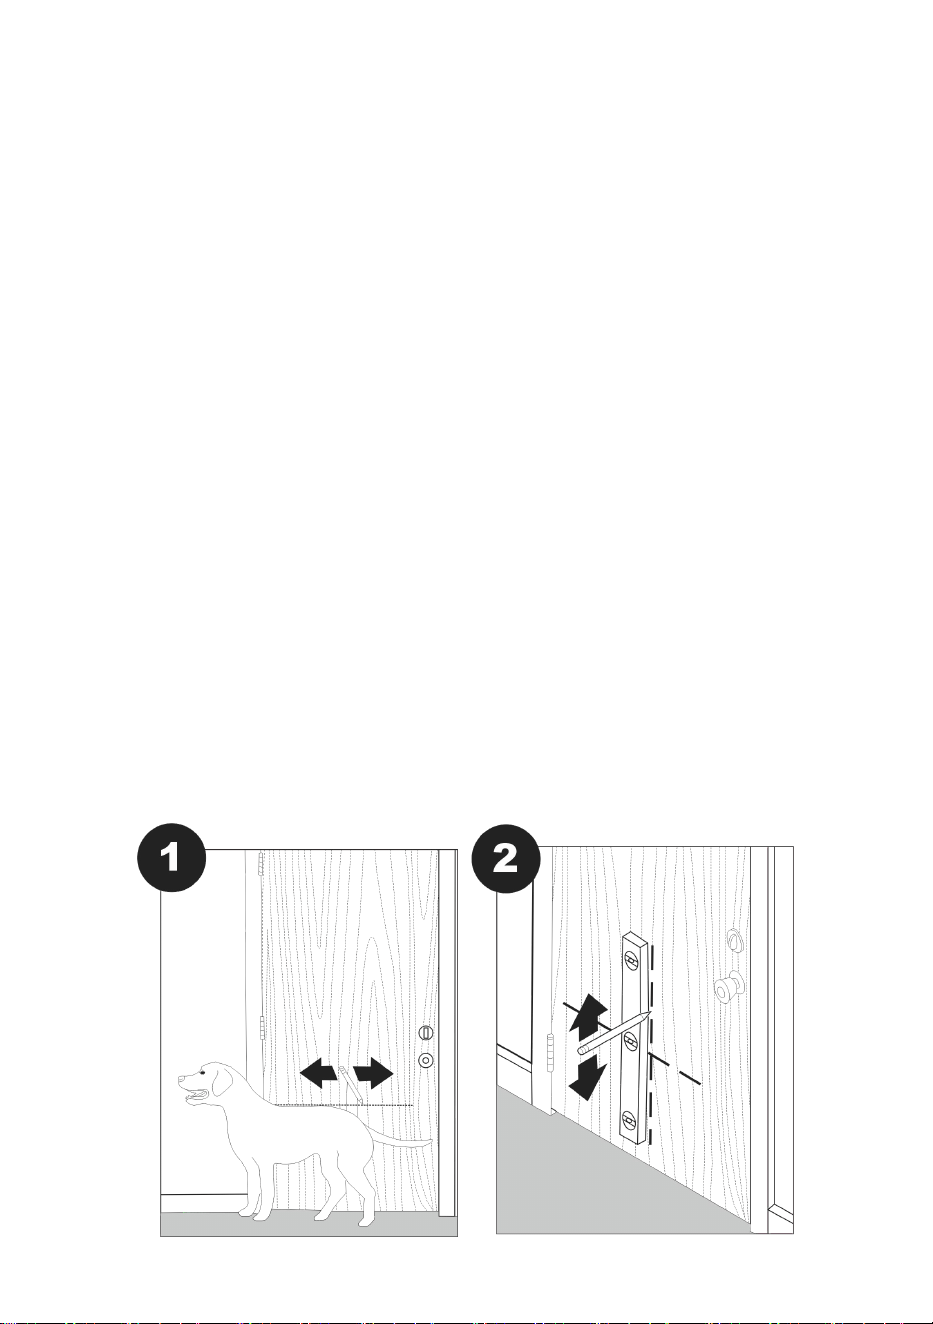
Mark the pet door location
1. Measure and mark your pet's shoulder height on the inside of the door where
you will install the pet door
2. Using a level, draw a vertical line where you want the center/centre of the pet
door to be located ,The pet door must be level to swing properly.
- 5 -
Prepare the door
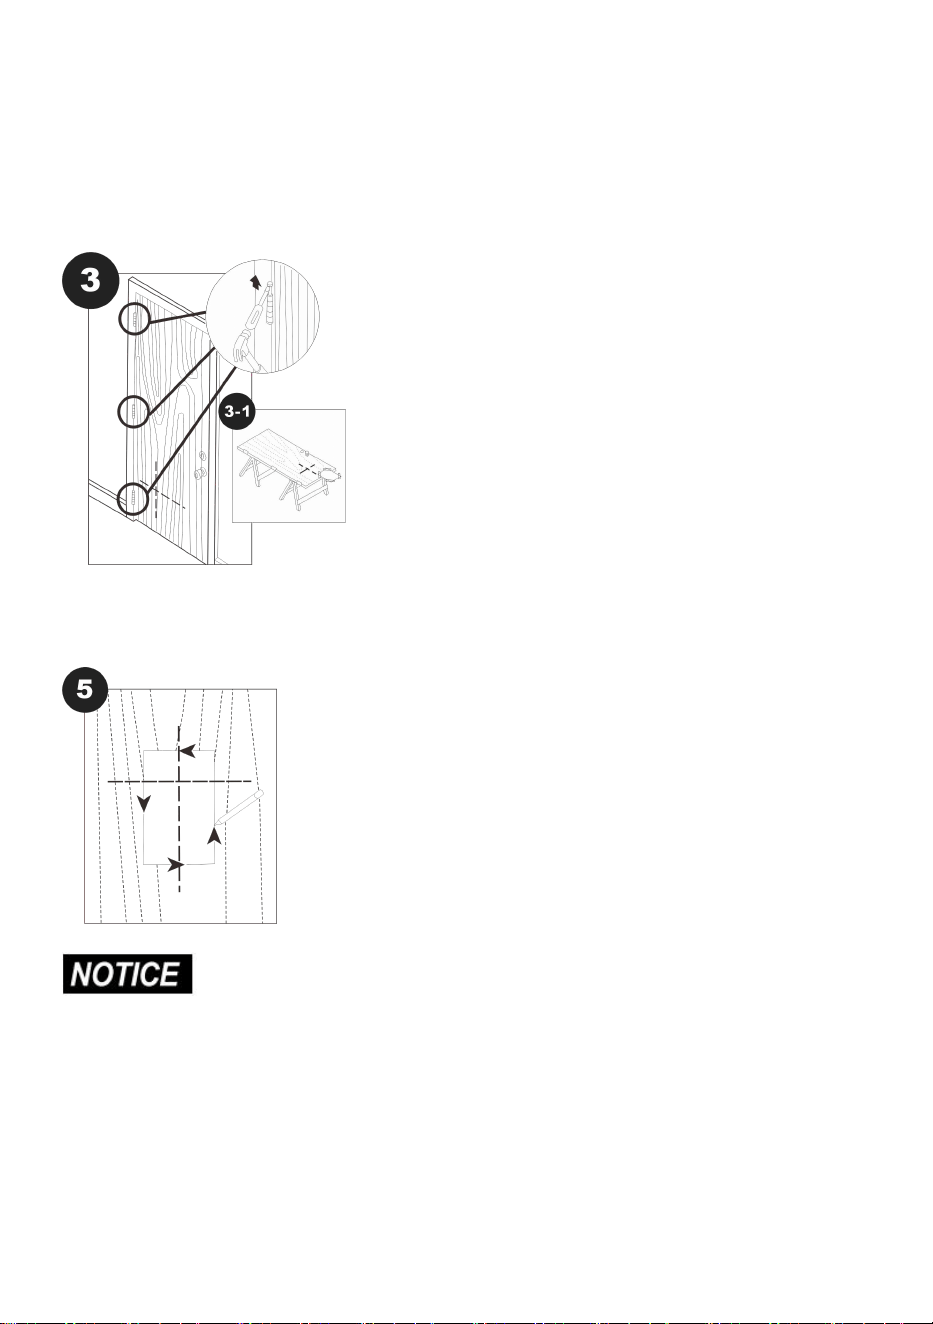
3.If possible, remove the door from its hinges and place it on a raised level
surface, such as two saw horses (3-1). The interior side of the door should face
up. Make sure there is nothing underneath the door where you will cut the
opening for the pet door.
If necessary, you can install the pet door without removing the door from its
hinges.
4. Cut out the correct size cutting template for your pet door.
5.Tape the cutting template to the interior side of the door, matching the shoulder
and center/centre lines on the template with the shoulder and center/centre lines
you drew previously
Make sure there is a minimum of 3 inches (8 centimetres) between the outer edge
of the cutting template and the bottom and sides of the door to maintain the
structural integrity of the door.
6. Trace the outside edge of the cutting template, making sure to connect the
corners.
7. Remove the cutting template and any excess tape from the door.
- 6 -
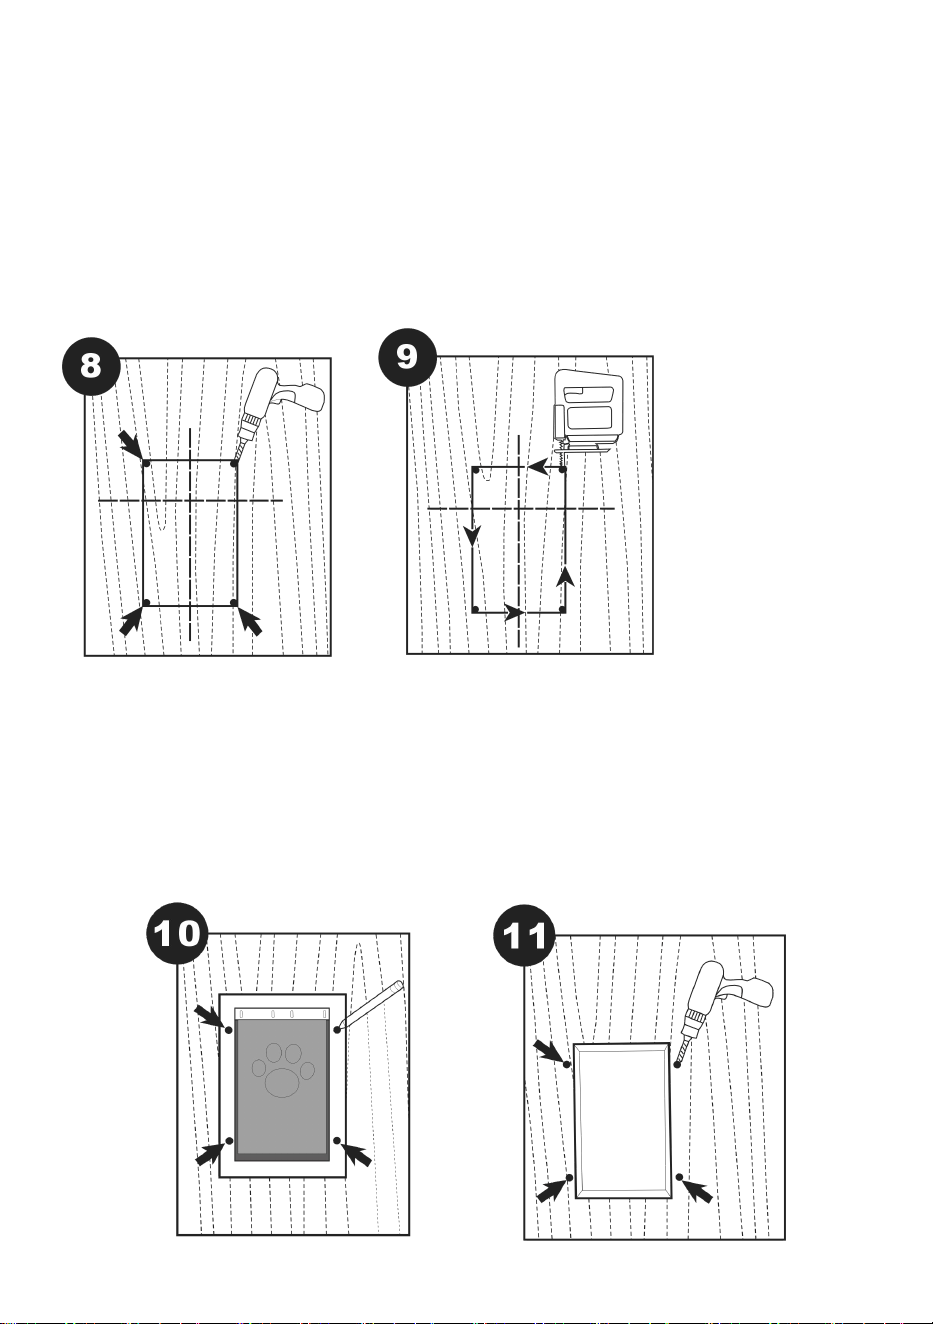
Cut the pet door opening
NOTE: When drilling holes and cutting the opening for the pet door, wear safety
glasses and make sure to hold the drill and jigsaw with both hands and at a 90-
degree angle to the door
8.Drill 1/2-inch (12-millimetre) holes just inside the corners of the drawn template.
These will be the pilot holes for the saw blade.
9.Cut between the holes you just drilled, along the drawn template lines
Drill holes for the frame
10. Place the interior frame (the frame with one flap) in the opening and mark the
screw holes (four holes for the medium and large pet doors, six holes for the x-
large pet door)
11. Remove the frame and drill 1/4-inch (7-millimetre) holes in the marked
locations.
- 7 -
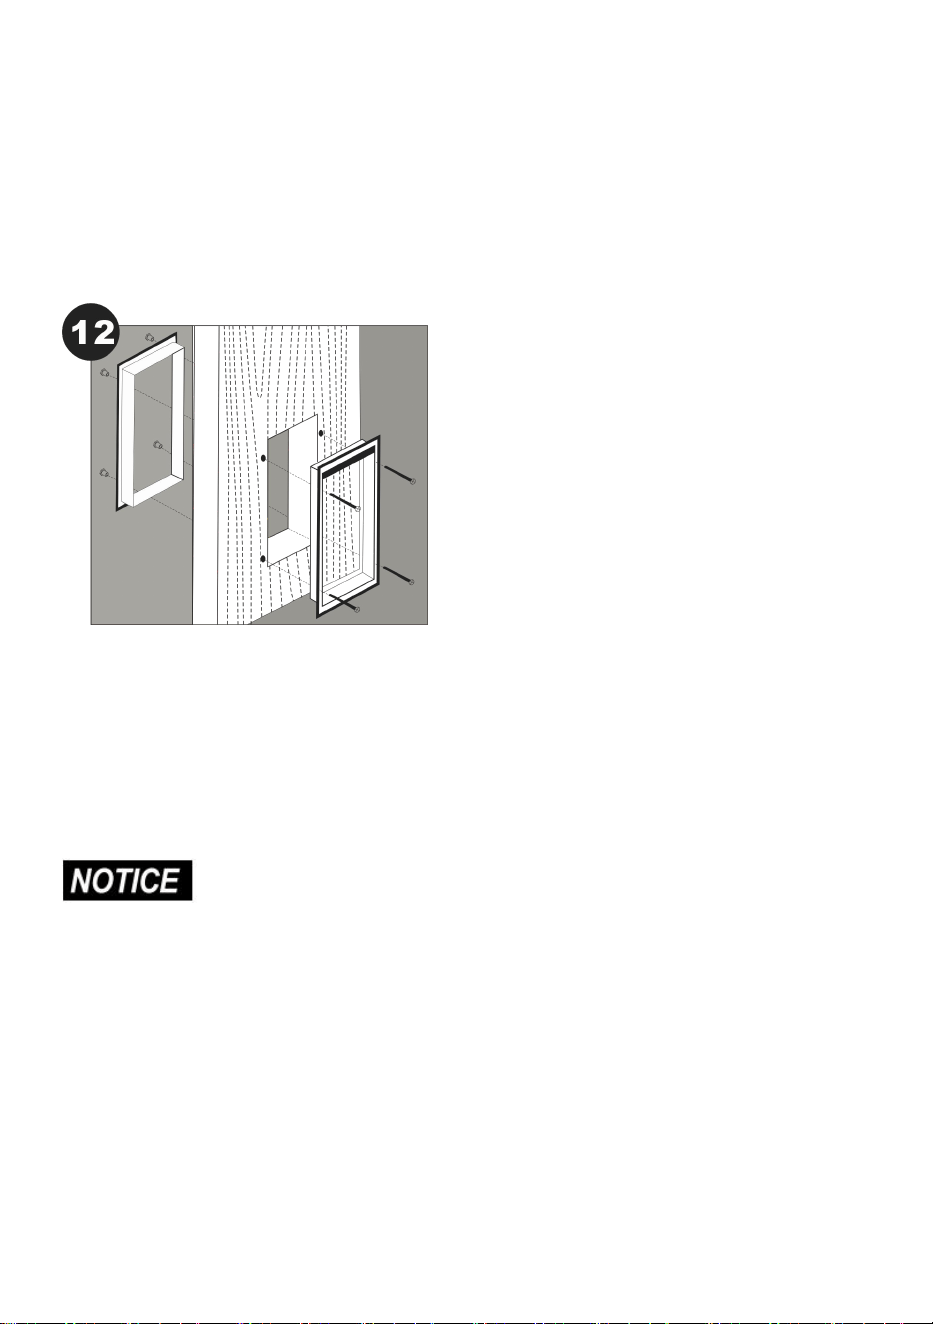
Install the pet door
NOTE:If you purchased an Installation Adaptor, place the installation adaptor
plates on the interior and exterior frames of the pet door before installation. The
Installation Adaptor is necessary only if you are installing the pet door in a door
less than 1 1/2 inches(38 millimetres) thick. For more details, please contact
Customer Care.
12. Place the interior frame (the frame with one flap) in the opening on the interior
side of the door.
13. Place the exterior frame (the frame with two flaps) in the opening on the
exterior side of the door.
14. Insert screws through the holes in the interior and exterior frames and match
screw sleeves to the end of each screw.
15. Tighten the screws until the frames come together and the screw sleeves are
flush with the exterior frame.
16.Use a manual screwdriver to tighten screws. Do not overtighten.
Overtightening can strip the screws or warp the pet door frame.
17. For best weather resistance, caulk around the exterior frame and inside the
threshold where the frames meet.
18.If you removed your door from its hinges, rehang it now.
Train your pet
19. Lift the flaps or tape them open as you use praise and treats to encourage
your pet to go through the pet door.
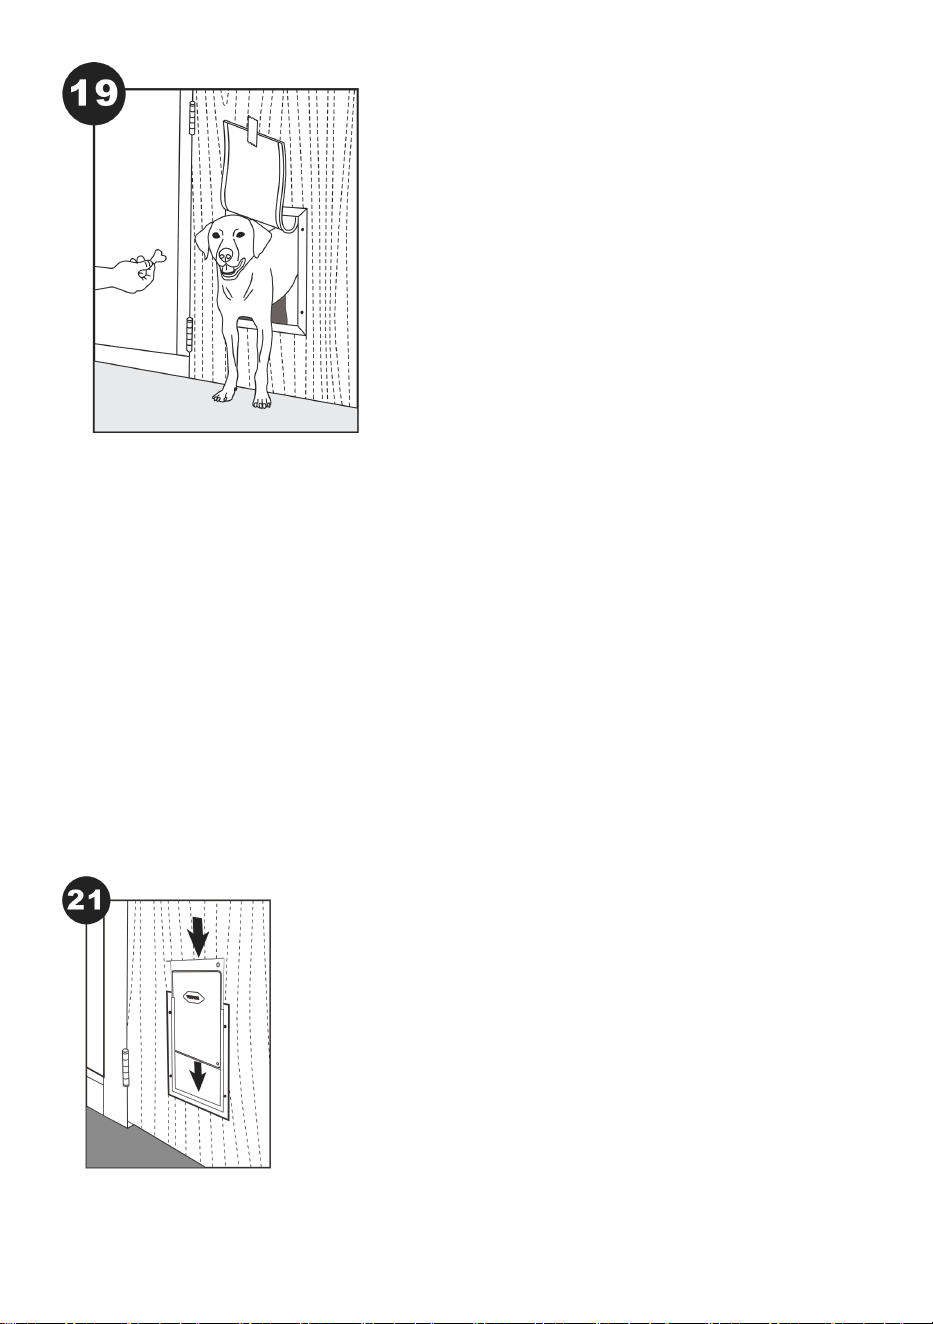
- 8 -
It may help if you are on one side of the door and your pet is on the other. Do not
force your pet through the pet door.
20. After your pet has gone through the pet door a few times, allow the flaps to
touch your pet's back so he will become comfortable using the pet door on his
own.
Use the closing panel
The closing panel is useful during inclement weather, or to prevent your pet
from using the pet door at certain times.
21.To use the closing panel, slide it into the grooves at each side of the pet door
frame. Pull and release the latch to lock it in place.
To remove, pull the latch and slide the closing panel up and off the pet door frame.
You can use an additional closing panel (sold separately) on the exterior frame of
- 9 -
the pet door for improved weather resistance.
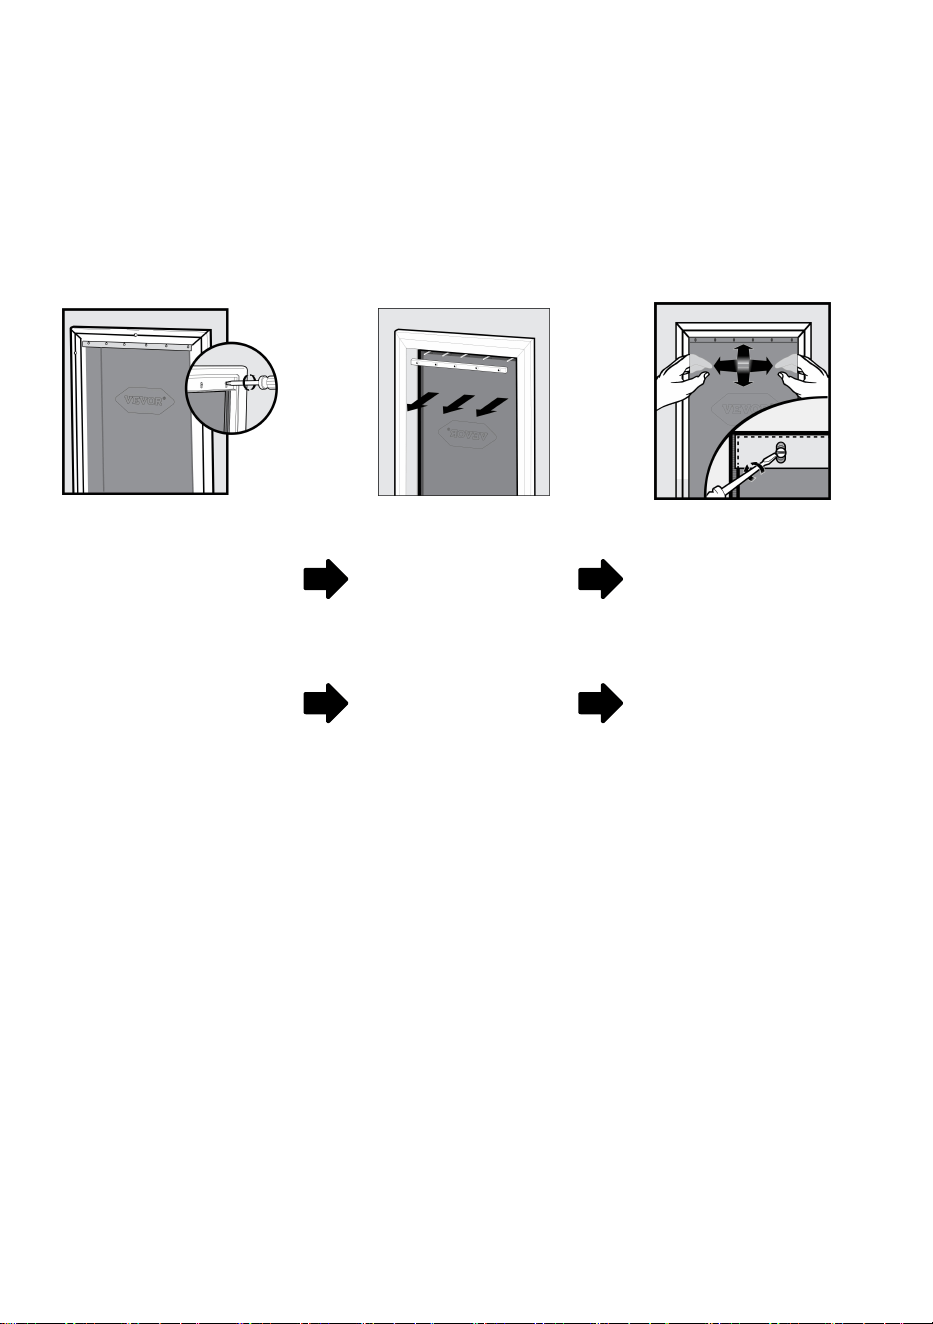
Replacement Flaps
Replace & Adjust
During extreme changes in weather, vinyl flaps can shrink during cold months and
stretch in warmer months. Easily replace or adjust to ensure a snug fit during
seasonal changes.
Terms of Use and Limitation of Liability
1. Acceptance of Terms Usage of this product is conditional upon your unaltered
acceptance of the terms, conditions, and notices detailed herein. Engaging with
the product signifies your agreement to all such provisions.
2. Intended Usage The product has been tailored for pet training purposes. It is
essential to consider your pet's unique disposition, as it may not be compatible
with this system. Should you have doubts about its suitability for your pet, seek
advice from a veterinarian or a certified animal behaviorist. Adequate usage
encompasses studying the comprehensive Operating Guide accompanying your
product and heeding all specific Warnings included.
3. Prohibited Applications The design of this product confines its application to
pets exclusively. It is not purposed to cause harm, injury, or agitation.
Misapplication of the product in contradiction to its intended function could lead to
breaches of federal, state, or municipal regulations.
4. Liability Exclusion Vevor shall not be held accountable for any direct, indirect,
punitive, incidental, special, or consequential harms, or any damages of any kind
arising from or in connection with the proper or improper use of this Product. The
To Replace: Remove
screws from the interior
frame of pet door.
Remove bar and flap.
Replace new vinyl flap and
position horizontally and
vertically to fit into door
frame. Replace existing
bar and tighten screws in
place.
To Adjust: Slightly loosen
screws from interior frame
of pet door.
Slightly move bar
away from flap.
Adjust flap horizontally
and/or vertically to fit
into door frame. Push bar
towards flap and tighten
screws in place.

- 10 -
purchaser accepts full responsibility and liability stemming from the utilization of
this Product.
5. Amendments to Terms and Conditions Vevor Corporation retains the authority
to amend the terms, conditions, and notices governing the provision of this
Product at its discretion.
Manufacturer: Shanghaimuxinmuyeyouxiangongsi
Address: Shuangchenglu 803nong11hao1602A-1609shi, baoshanqu,
shanghai 200000 CN.
EC REP: E-CrossStu GmbH.
Mainzer Landstr.69, 60329 Frankfurt am Main.
UK REP: YH CONSULTING LIMITED.
C/O YH Consulting Limited Office 147, Centurion House, London Road,
Staines-upon-Thames, Surrey, TW18 4AX
Imported to AUS: SIHAO PTY LTD.
1 ROKEVA STREETEASTWOOD NSW 2122 Australia
Imported to USA: Sanven Technology Ltd.
Suite 250, 9166 Anaheim Place, Rancho Cucamonga, CA 91730