MODEL CODE/S
IBBQBI4B/IBBQBI6B
Built-in Grill
4/6 Burner
—
USER MANUAL INALTO.HOUSE
A HIGHER LEVEL OF COOKING
V.2 | 1020

WELCOME PAGE 02
Residentia Group Pty Ltd
ACN. 600 546 656
165 Barkly Avenue
Burnley, Victoria
Australia 3121
—
Applico Ltd
635 Great South Road
Penrose, Auckland 1061
New Zealand
Congratulations on purchasing your new appliance!
The InAlto brand is proudly distributed within
Australia by Residentia Group Pty Ltd and within
New Zealand by Applico Ltd.
Please refer to the warranty card at the rear of this
manual for information regarding your product’s
parts and labour warranty, or visit online at:
→ www.residentia.group
→ www.applico.co.nz
→ www.inalto.house
Both Residentia Group & Applico are customer
obsessed and our Support Teams are there to ensure
you get the most out of your appliance. Should you
want to learn more about recommended usage, the
various features of your appliance, and importantly
taking care of the unit when cleaning, our Support
Teams are here to help.
Telephone Contacts:
→ AU: 1300 11 4357
→ NZ: 0800 763 448
It is important that you read through the following
use and care manual thoroughly to familiarise
yourself with the installation and operation
requirements of your appliance to ensure optimum
performance.
Again, thank you for choosing an InAlto appliance
and we look forward to being of service to you.
Welcome

06
USE OUTDOORS
ONLY
08
YOUR INALTO BBQ
02
WELCOME
04
SAFETY
INSTRUCTIONS
12
INSTALLATION
INSTRUCTIONS
19
TECHNICAL
DATA
CONTENTS
21
CLEANING &
MAINTENANCE
22
TROUBLESHOOTING
23
PURCHASE
DETAILS
24
WARRANTY
INFORMATION

USER MANUAL PAGE 04
Your safety is of the utmost importance to us.
Please make sure that you read this instruction booklet
before attempting to install or use the appliance.
If you are unsure of any of the information contained
in this booklet, please contact the Retailer where you
purchased your unit from.
The appliance should only be installed and connected
by a suitably qualified and authorised person, strictly
in accordance with the manufacturer's instructions.
Please see the specific section of this user manual that
refers to installation.
IMPORTANT!
The gas supply to the BBQ must be cut off before any
adjustments or maintenance work is undertaken.
WARNING
When using this product, basic precautions should always
be taken including the following:
► The appliance is designed for domestic household
use and for the cooking and frying of domestic
foodstuffs.
► Care should be taken to ensure that the units and
work surfaces that you build the appliance into,
meet with the relevant standards.
► Do not spray aerosols in the vicinity of this
appliance while it is in operation.
► Do not use or store flammable materials in the
appliance storage drawer or near this appliance.
► Do not modify this appliance.
► Do not use this appliance as a space heater.
► This appliance is for outdoor use only.
IMPORTANT!
The adjacent furniture and all materials used in the
installation must be able to withstand a minimum
temperature of 65°C above the ambient temperature
of the room it is located in, whilst in use.
► Certain types of vinyl or laminate kitchen cabinetry
are particularly prone to heat damage or discolouration
at temperatures above the guidelines given.
► Any damage caused by the BBQ being installed
in contravention of this temperature limit, will be the
liability of the owner.
► Your new BBQ is guaranteed against electrical or
mechanical defects, subject to certain exclusions that
are noted in the Warranty Terms and Conditions (at the
rear of this user manual). The foregoing does not affect
your statutory rights.
► The use of this BBQ for any other purpose or in
any other environment, without the express agreement
of InAlto, will invalidate any warranty or liability claim.
► You should not use this appliance to store items on
or as a work surface.
► No modifications to the appliance are permitted by
InAlto.
► You should not store or place flammable or highly
flammable liquids/materials on top of or near the
appliance. Items made from aluminium, plastic
or plastic film should also be kept away from the
appliance, as they may fuse to the surface.
► Repairs may only be carried out by authorised
service agents.
► Your InAlto BBQ is not to be used by children or
persons with reduced physical, sensory or mental
capabilities, or lack of experience and knowledge,
unless they have been given supervision or instruction.
► Any film or stickers that are present on the BBQ when it
is delivered should be removed before use.
► Care should be used when utilising the BBQ, otherwise
there is a risk of burns being caused.
► You should not allow the electrical connection cables
to come into contact with the cooking surface when
it is hot or any hot cookware.
► If fat and oil overheats, then it can ignite extremely
quickly. For this reason, when cooking with fat and
oil the appliance should not be left unattended.
► Make sure that all of the cooking zones are switched
off after use.
► Cleaning of the BBQ should be carried out on
a regular basis, once the surface has cooled down.
► Great care should be taken whilst using this appliance
and when following the cleaning procedure.
► You should not use a steam jet or any other high
pressure cleaning equipment to clean the appliance.
Safety Instructions

INALTO.HOUSEPAGE 05
DECLARATION OF CONFORMITY
This appliance complies with the following
European Directives and Australian Standards:
— AGA Certificate No. 8138
The manufacturer declares that the BBQ is built using
certified materials and requires the appliance to be installed
in accordance with the standards currently in force. This
BBQ should only be used by a trained person and for
domestic purposes only.
UNPACKING
During transportation, protective packaging was used to
protect the appliance against any damage. After unpacking,
please dispose of all elements of packaging in a way that
will not cause damage to the environment. All materials
used for packaging the appliance are environmentally
friendly; they are 100% recyclable and are marked with
the appropriate symbol.
► During unpacking, the packaging materials (polythene
bags, polystyrene pieces, etc.) should be kept out of
reach of children.
DISPOSAL OF THE APPLIANCE
Old appliances should not simply be disposed of with
normal household waste, but should be delivered to a
collection and recycling centre for electric and electronic
equipment. A symbol shown on the product, the instruction
manual or the packaging shows that it is suitable for
recycling.
Materials used inside the appliance are recyclable and are
labelled with information concerning this. By recycling
materials or other parts from used devices you are making
a significant contribution to the protection of
our environment.
Information on appropriate disposal centres for used
devices can be provided by your local authority.
FOR OUTDOOR USE ONLY
► PLEASE READ THE INSTRUCTIONS CAREFULLY AND
BE SURE YOUR BARBECUE IS CORRECTLY INSTALLED
AND ASSEMBLED. FAILURE TO FOLLOW THESE
INSTRUCTIONS MAY RESULT IN SERIOUS INJURY
OR DAMAGE!
► PLEASE RETAIN THE MANUAL FOR FUTURE
REFERENCE.
► CONVERSION TO NATURAL GAS SHOULD ONLY
BE CARRIED OUT BY AUTHORIZED PERSONS.
► PLEASE ENSURE THAT YOU REMOVE ALL PACKAGING
AND TRANSIT PACKING PRIOR TO USE.
► DO NOT SPRAY AEROSOLS IN THE VICINITY OF
THE APPLIANCE WHILE IT IS IN OPERATION
► This appliance is not intended for use by persons
(including children) with reduced physical, sensory
or mental capabilities, or lack of experience and
knowledge, unless they have been given supervision
or instruction concerning use of the appliance by a
person responsible for their safety.
► Children should be supervised to ensure that they
do not play with the appliance.
WARNING
► This barbecue is designed for use outdoors, away
from any flammable materials.
► It is important that there are no overhead obstructions
and that there is a minimum distance of 50mm from
the side or rear of the appliance.
► The barbecue must be used on a level, stable,
non-flammable surface.
► The appliance should be protected from direct
draughts and shall be positioned or protected against
direct penetration by any trickling water (e.g. rain).
Parts sealed by the manufacturer or his agent must
not be altered by the user.
► No modifications should be made to any part of this
barbecue and repairs and maintenance should only
be carried out by a registered service engineer
DO NOT let children operate or play near grill.
DO NOT use charcoal or ceramic briquettes in a gas grill
DO NOT attempt to light burner with lid closed. A buildup
of non-ignited gas inside a closed grill is hazardous
USER MANUAL PAGE 06
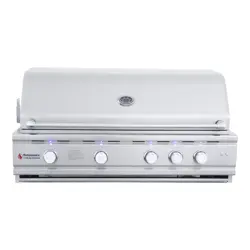
Use Outdoors Only
This appliance shall only be used in an above ground open-
air situation with natural ventilation, without stagnant
areas, where gas leakage and products of combustion are
rapidly dispersed by wind and natural convection.
Any outdoor enclosure in which the appliance is used shall
comply with one of the following:
► An enclosure with walls on all sides, but at least one
permanent opening at ground level and no overhead
cover. See Figure 1.
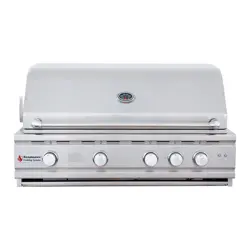
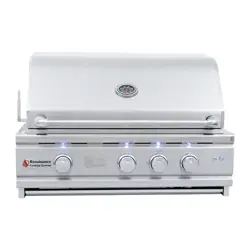
► Within a partial enclosure that includes an overhead
cover and no more than two walls. See Figure 2 & 3.
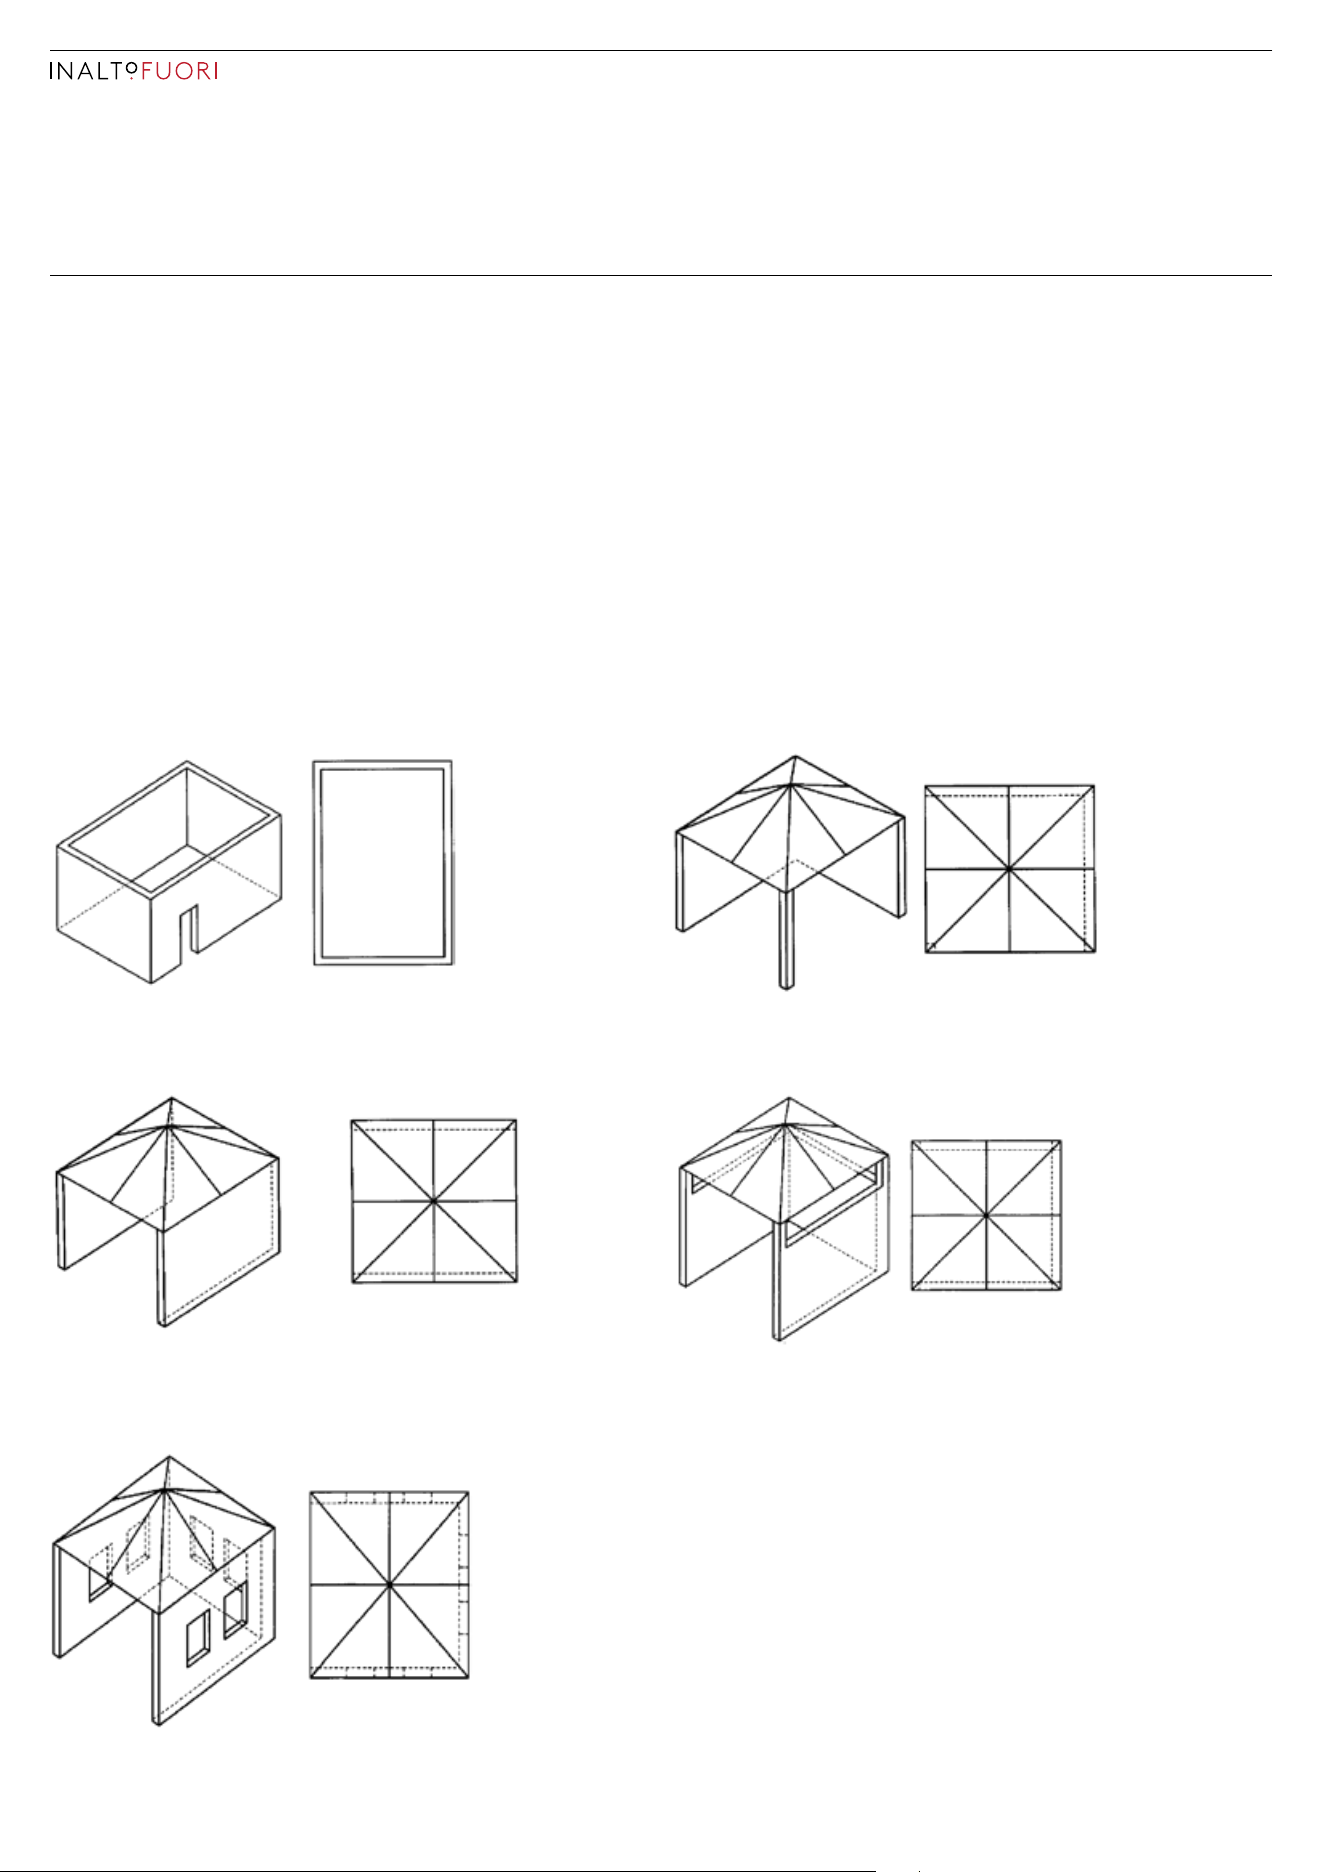
► Within a partial enclosure that includes an overhead
cover and more than two walls, the following shall
apply:
— At least 25% of the total wall area is completely
open; and
— At least 30% of the remaining wall area is open
and unrestricted. See Figure 4 & 5.
► In the case of balconies, at least 20% of the total of the
side, back and front wall areas shall be and remain
open and unrestricted.
The following diagrams provide a diagrammatic
representation of outdoor areas. Rectangular areas have
been used in these figures - the same principles apply
to any other shaped area.
Figure 1.
Enclosure with walls on all sides but no overhead cover.
Figure 2.
Partial Enclosure with overhead cover and no more than
two walls.
Figure 3
Partial Enclosure with overhead cover and no more than
two walls.
Figure 4.
Open side at least 25% of total wall area.30 % or more in
total of the remaining wall area is open and unrestricted.
Figure 5.
Open side at least 25% of total wall area. 30 percent or more
in total of the remaining wall area is open and unrestricted.
INALTO.HOUSEPAGE 07
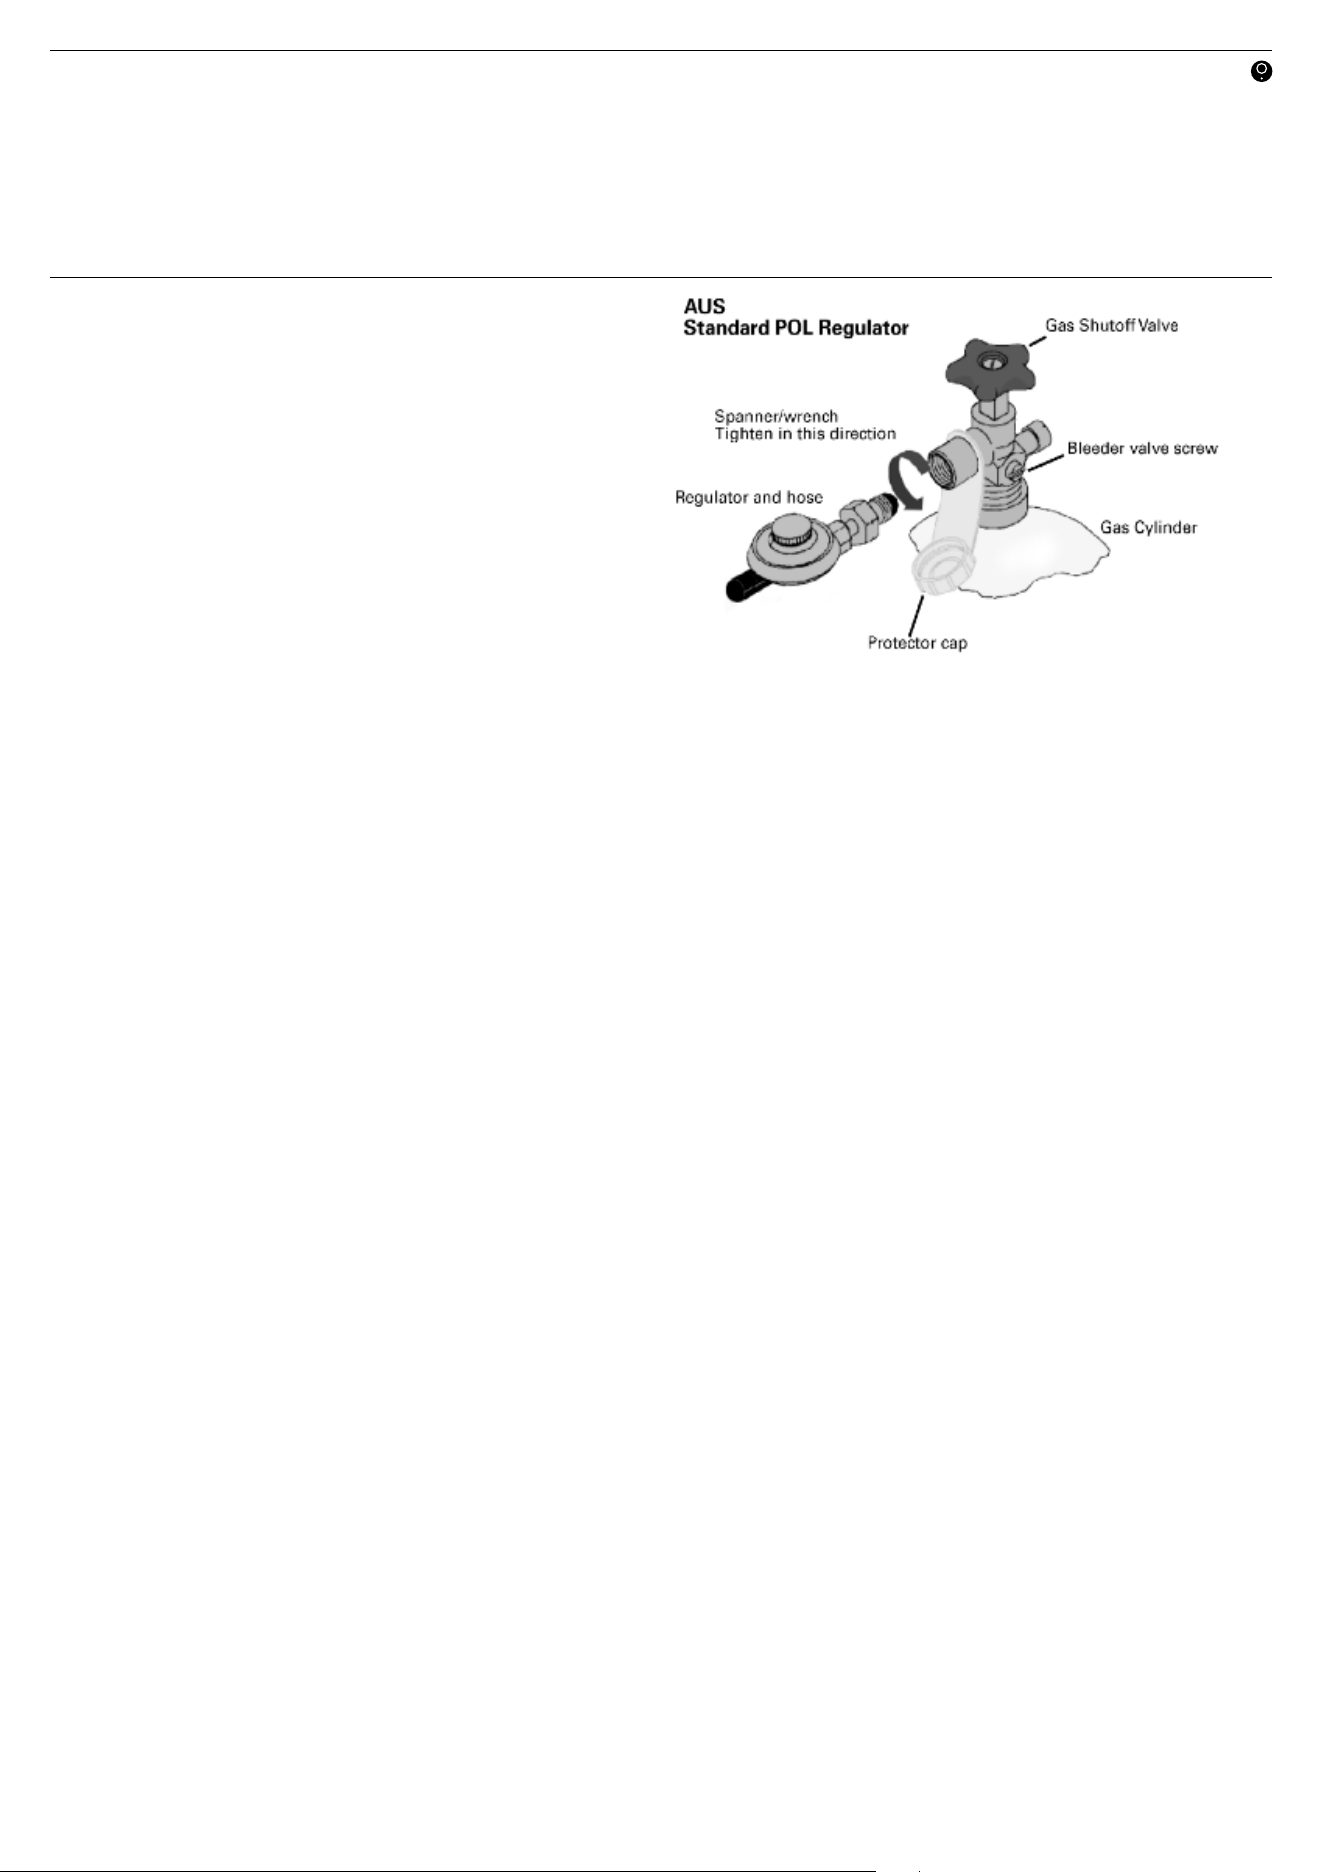
GAS CYLINDER INFORMATION
This appliance is designed to be used with a gas cylinder
not exceeding (Australia 9KG)
► The gas cylinder supply valve must be turned off when
the appliance is not in use.
► Gas cylinders must be stored outdoors, out of reach of
children and must not be stored in a building, garage
or any other enclosed area.
► The gas cylinder used must incorporate a safety collar
to protect the valve assembly.
* Never store a spare cylinder under the barbecue
shelves or inside the trolley housing. Any LPG cylinder
not attached to the BBQ for use should be stored
outdoors and well away from this appliance.
IMPORTANT:
► When disconnecting and removing the gas cylinder for
the purpose of refilling, always observe the following
procedure.
► Ensure that all gas control valves on the appliance and
the gas cylinder are turned off before disconnecting
the regulator from the cylinder.
► Do not smoke or use a naked flame near the appliance
or gas cylinder while disconnecting the gas line
between the appliance and gas cylinder.
► Remove the gas cylinder from the enclosure before
disconnecting the regulator from the appliance.
► Tighten all connections before placing the gas cylinder
back in its enclosure.
► The gas leak testing procedure should be conducted
every time the gas cylinder is refilled and reconnected
to the appliance before using the appliance.
Regulator Connection
1. Check that all control knobs are in the ‘Off’ position.
2. Make sure the cylinder valve is off.
3. Remove the protective cap from the cylinder if present.
4. Leak test the connection with a soapy water solution.
Gas Leak Test Procedure
Never use a naked flame to check for gas leaks.
Always use the following procedure to check for gas leaks.
1. In a small container, mix up a solution of 1/2 water and
1/2 detergent or soap. Mix the solution well.
2. Make sure that the gas supply valve on the gas cylinder
is turned on.
3. Make sure that the gas control valves on the appliance
are all turned off.
4. Using a brush or spray bottle apply the solution to the
gas line and each join in the gas line.
5. Bubbling of the solution will indicate that there is a leak
present.
6. Re-tighten or re-seal any joints that are leaking.
7. If a leak persists then contact your distributor or the
manufacturer for assistance.
LIGHTING YOUR BARBECUE
1. Open the lid and make sure all the knobs are in the OFF
position.
2. Push down the knob and turn the knob anticlockwise
to HIGH position, then keep pressing the igniter for 2-3
seconds (a sound can be heard), thus the burner will
ignite. If the burner does not light, turn off the knob
and wait for 5 minutes then repeat this process.
3. Adjust the heat by turning the knob to the High /Low
position.
4. To light other burners, repeat the same process for the
adjacent burner and continue in sequence until all the
burners are lit.
5. To turn the barbecue OFF, turn the cylinder valve or
regulator switch to the “OFF” position and then turn all
of the control knobs on the barbecue clockwise to the
“OFF” position.
For Match- Lighting:
1. Follow above instruction step 1-3.
2. Place the match into match holder chain and fire the
match, then put the match into the burners
3. Push down and turn the knob anticlockwise to HIGH
position, then the burner can be lit. If the burner does
not light, turn off the gas tap and wait for 5 minutes
then repeat this step 2–3.
Before cooking for the first time, turn on all the main
burners and keep burning for 10 minutes with the lid closed
and knobs at LOW position. This will “heat clean” the
internal parts and dissipate odour from any painted finish.
The color of the cooking area may change a little. This is
normal for stainless steel when subject to high heat.
WARNING
While igniting main burners and infrared rear burner,
please make sure the lid for main burners is in open
position. While cooking with the hood closed and with
all the burners on, please make sure all burners are set to
LOW position.
USER MANUAL PAGE 08
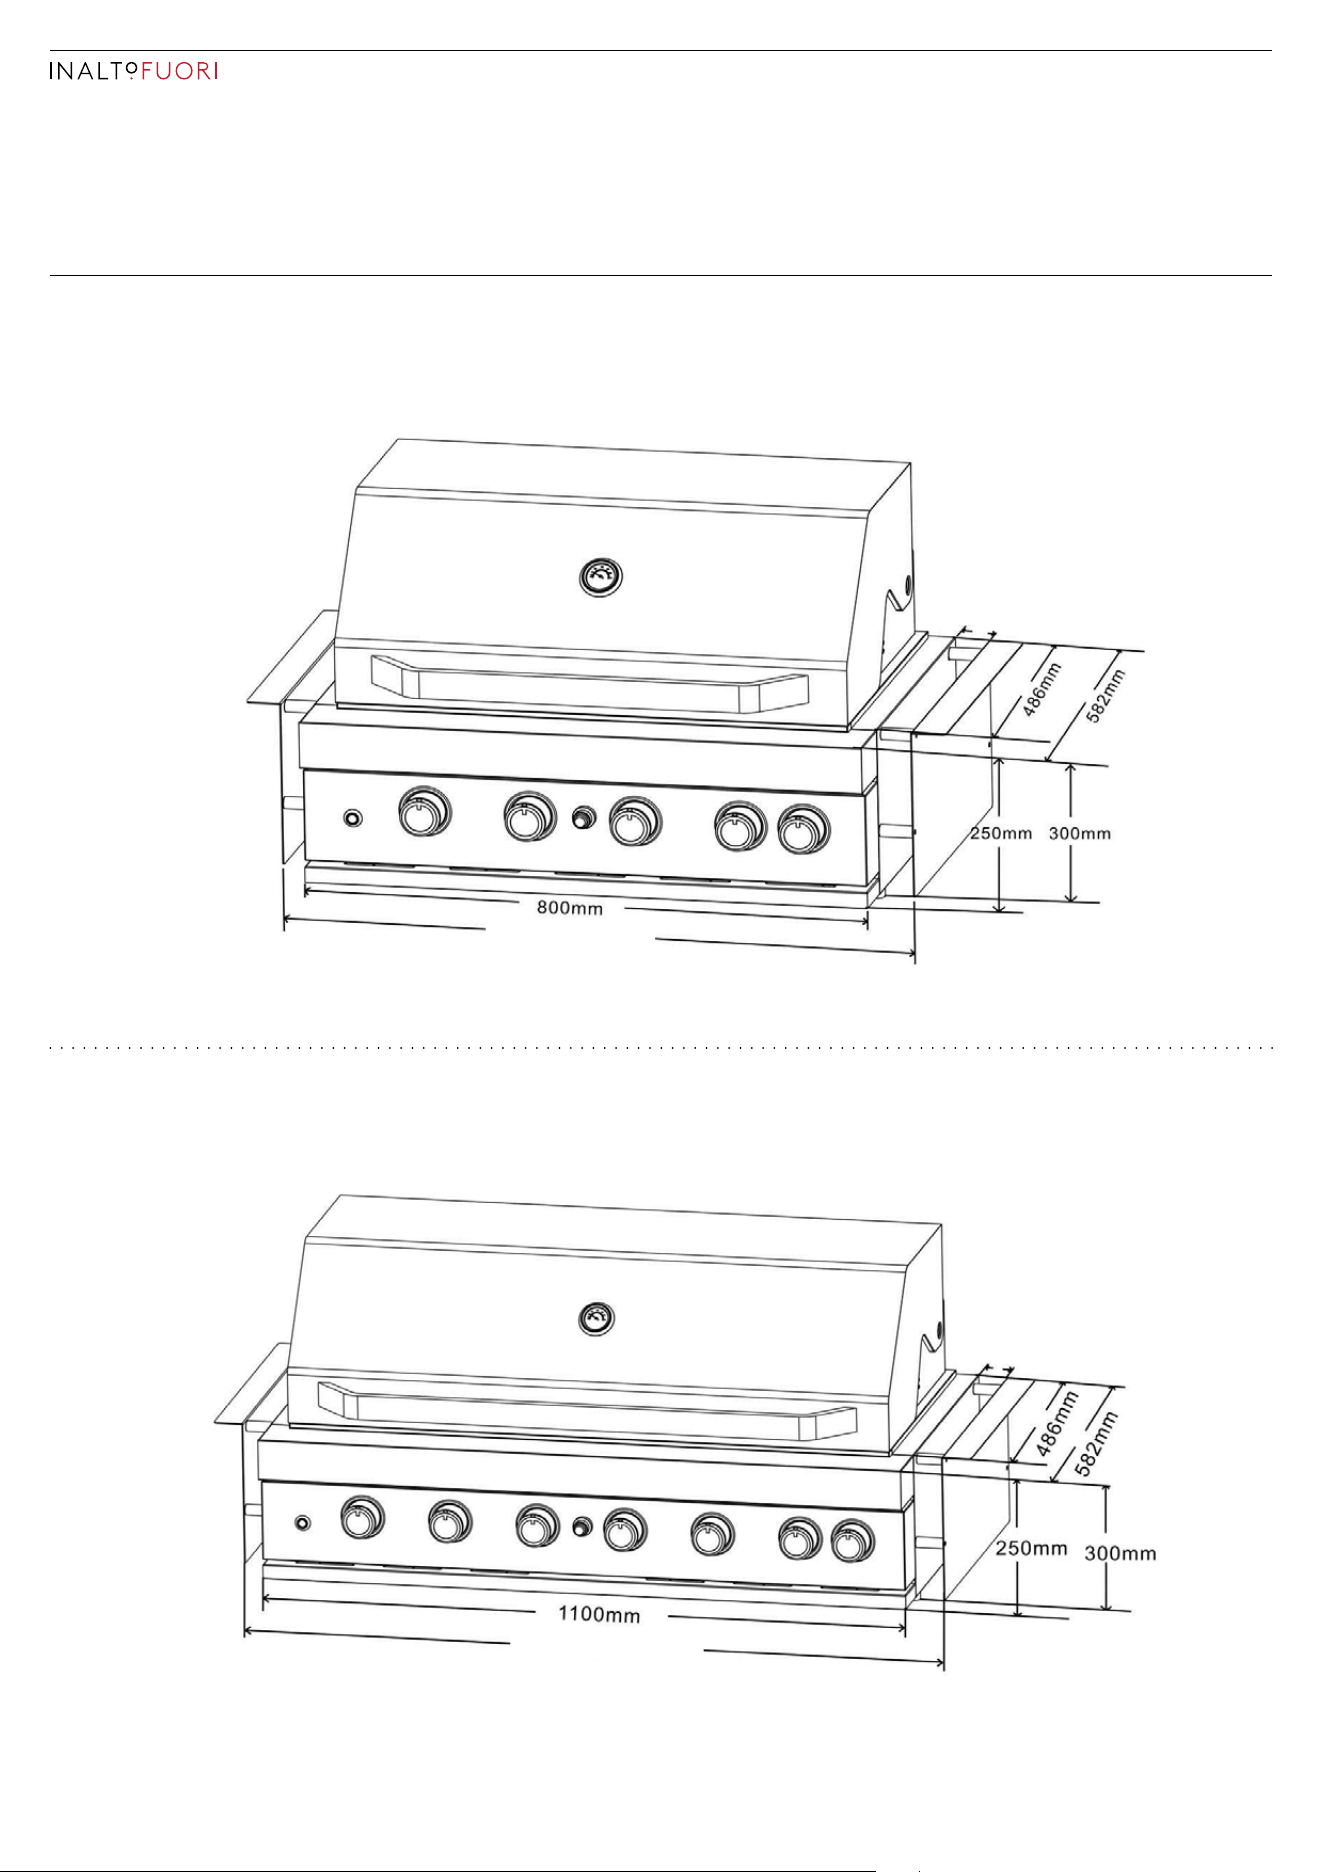
SPECIFICATIONS
IBBQBI4B
Your InAlto BBQ
IBBQBI6B
20mm / 50mm
20mm / 50mm
873mm / 903mm
1173mm / 1203mm
INALTO.HOUSEPAGE 09
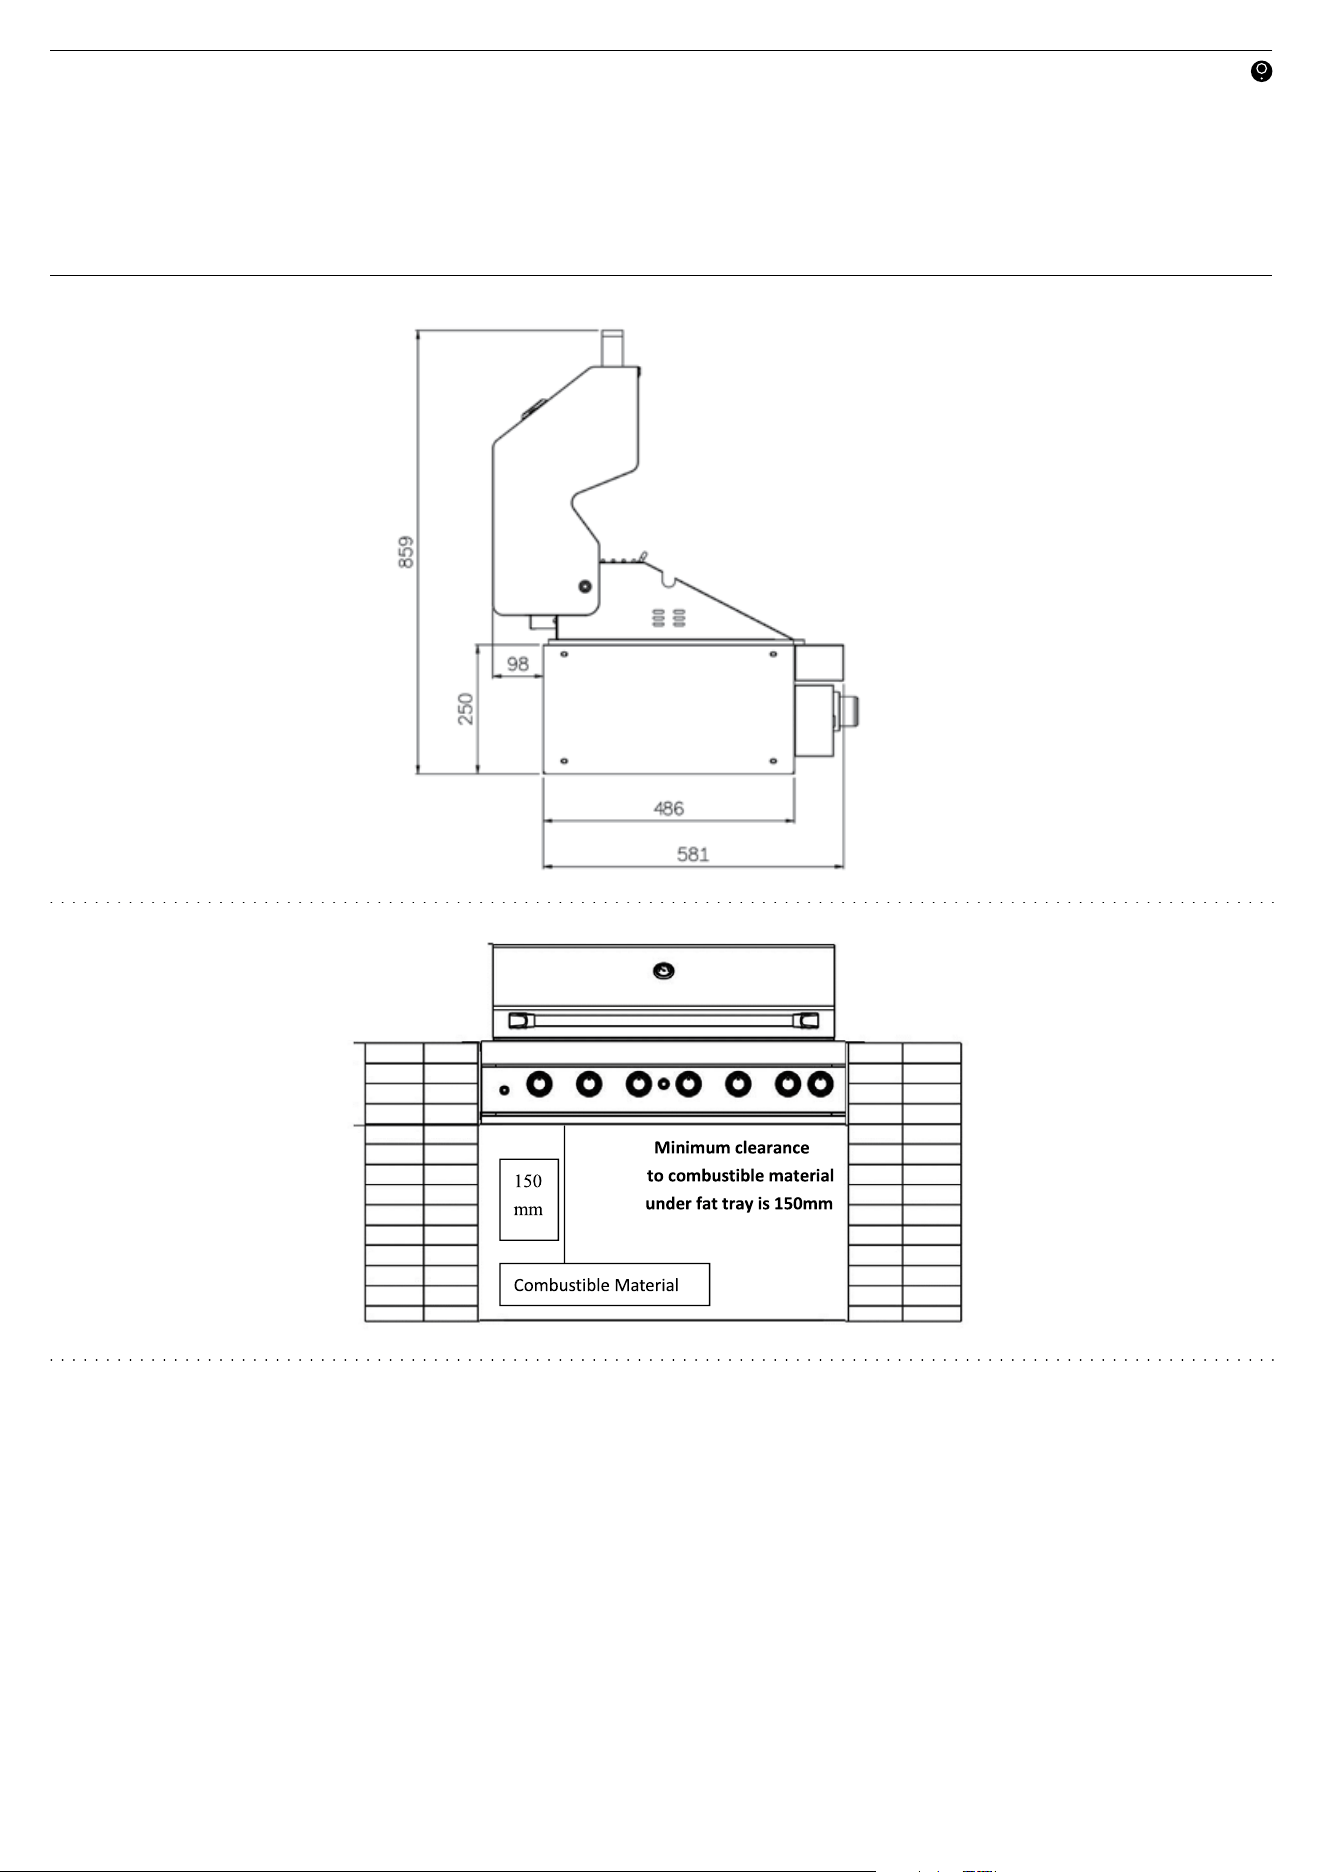
SIDE VIEW: IBBQBI4B / IBBQBI6B
BUILT IN INSTALLATION
WARNING
THE CONSTRUCTION OF THE ENCLOSURE AND INSTALLATION OF THE BBQ SHOULD BE CARRIED OUT ONLY BY
AUTHORISED PERSONS.
THE BARBECUE MUST ALSO BE SECURED TO THE ENCLOSURE TO PREVENT IT BEING PULLED OUT AND STRAINING
THE GAS CONNECTIONS.
► Please follow these instructions for installation. Any other requirements of AS/NZS 5601.1, local authority, or relevant statutory
regulations, and ensure adequate ventilation.
► e minimum clearance at the sides of the BBQ to combustible materials is 50mm. Where a non-combustible material is used, this
clearance is not required.
► DO NOT block any ventilation slots of the BBQ below or behind.
► e enclosure material for the cutout must not be combustible.
► DO NOT place gas cylinder underneath the barbeque, keep required clearance and ensure there is 'permanent separation', i.e.
no line of sight between the gas cylinder and combustion area. If the gas cylinder is enclosed, ensure adequate high and low
ventilation (200 square cm each) as required by AS/NZS 5601.1.
► Ensure 150mm clearance to combustibles underneath barbecue fat tray.
USER MANUAL PAGE 010
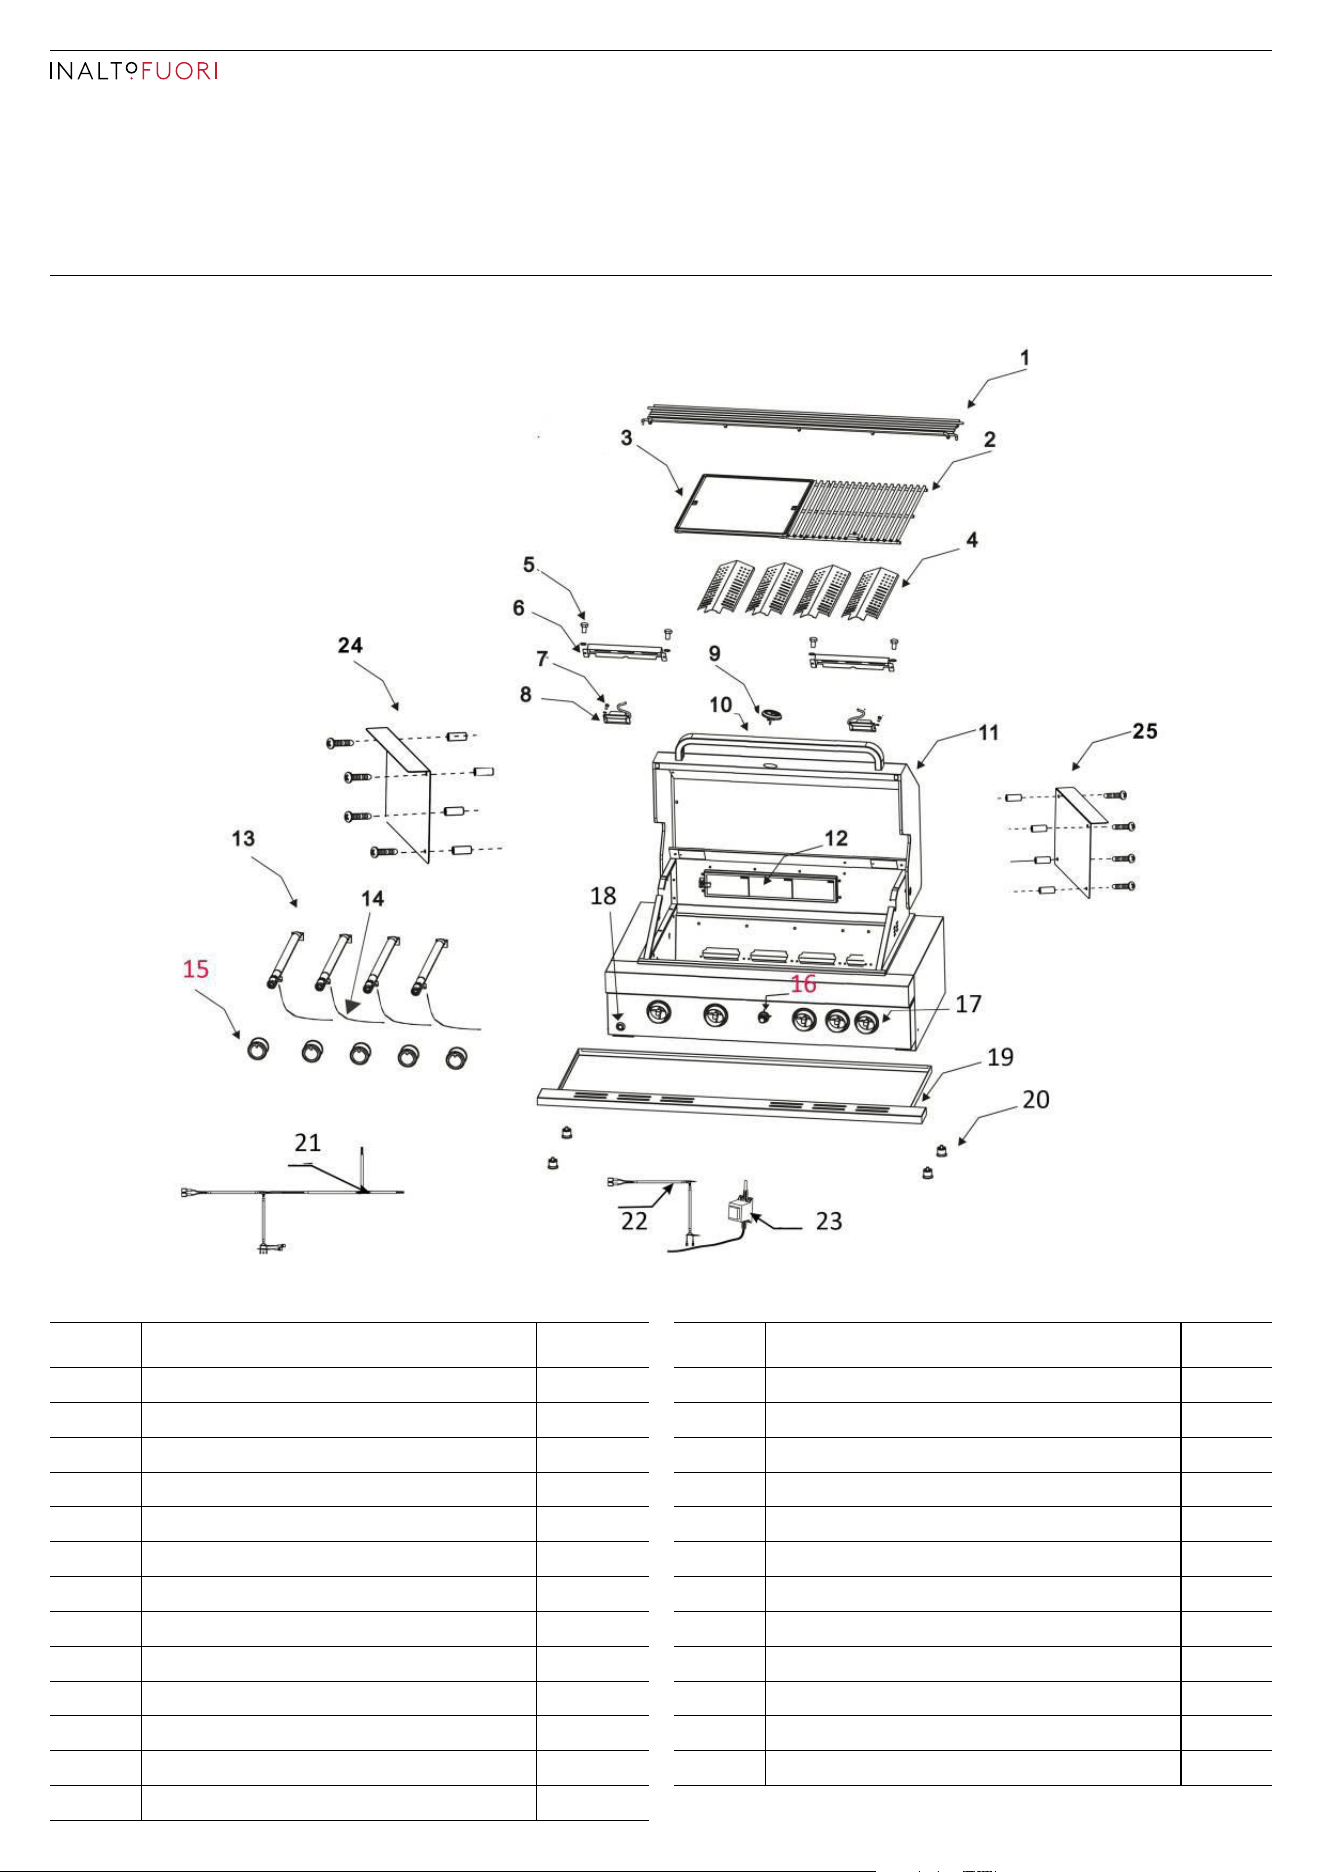
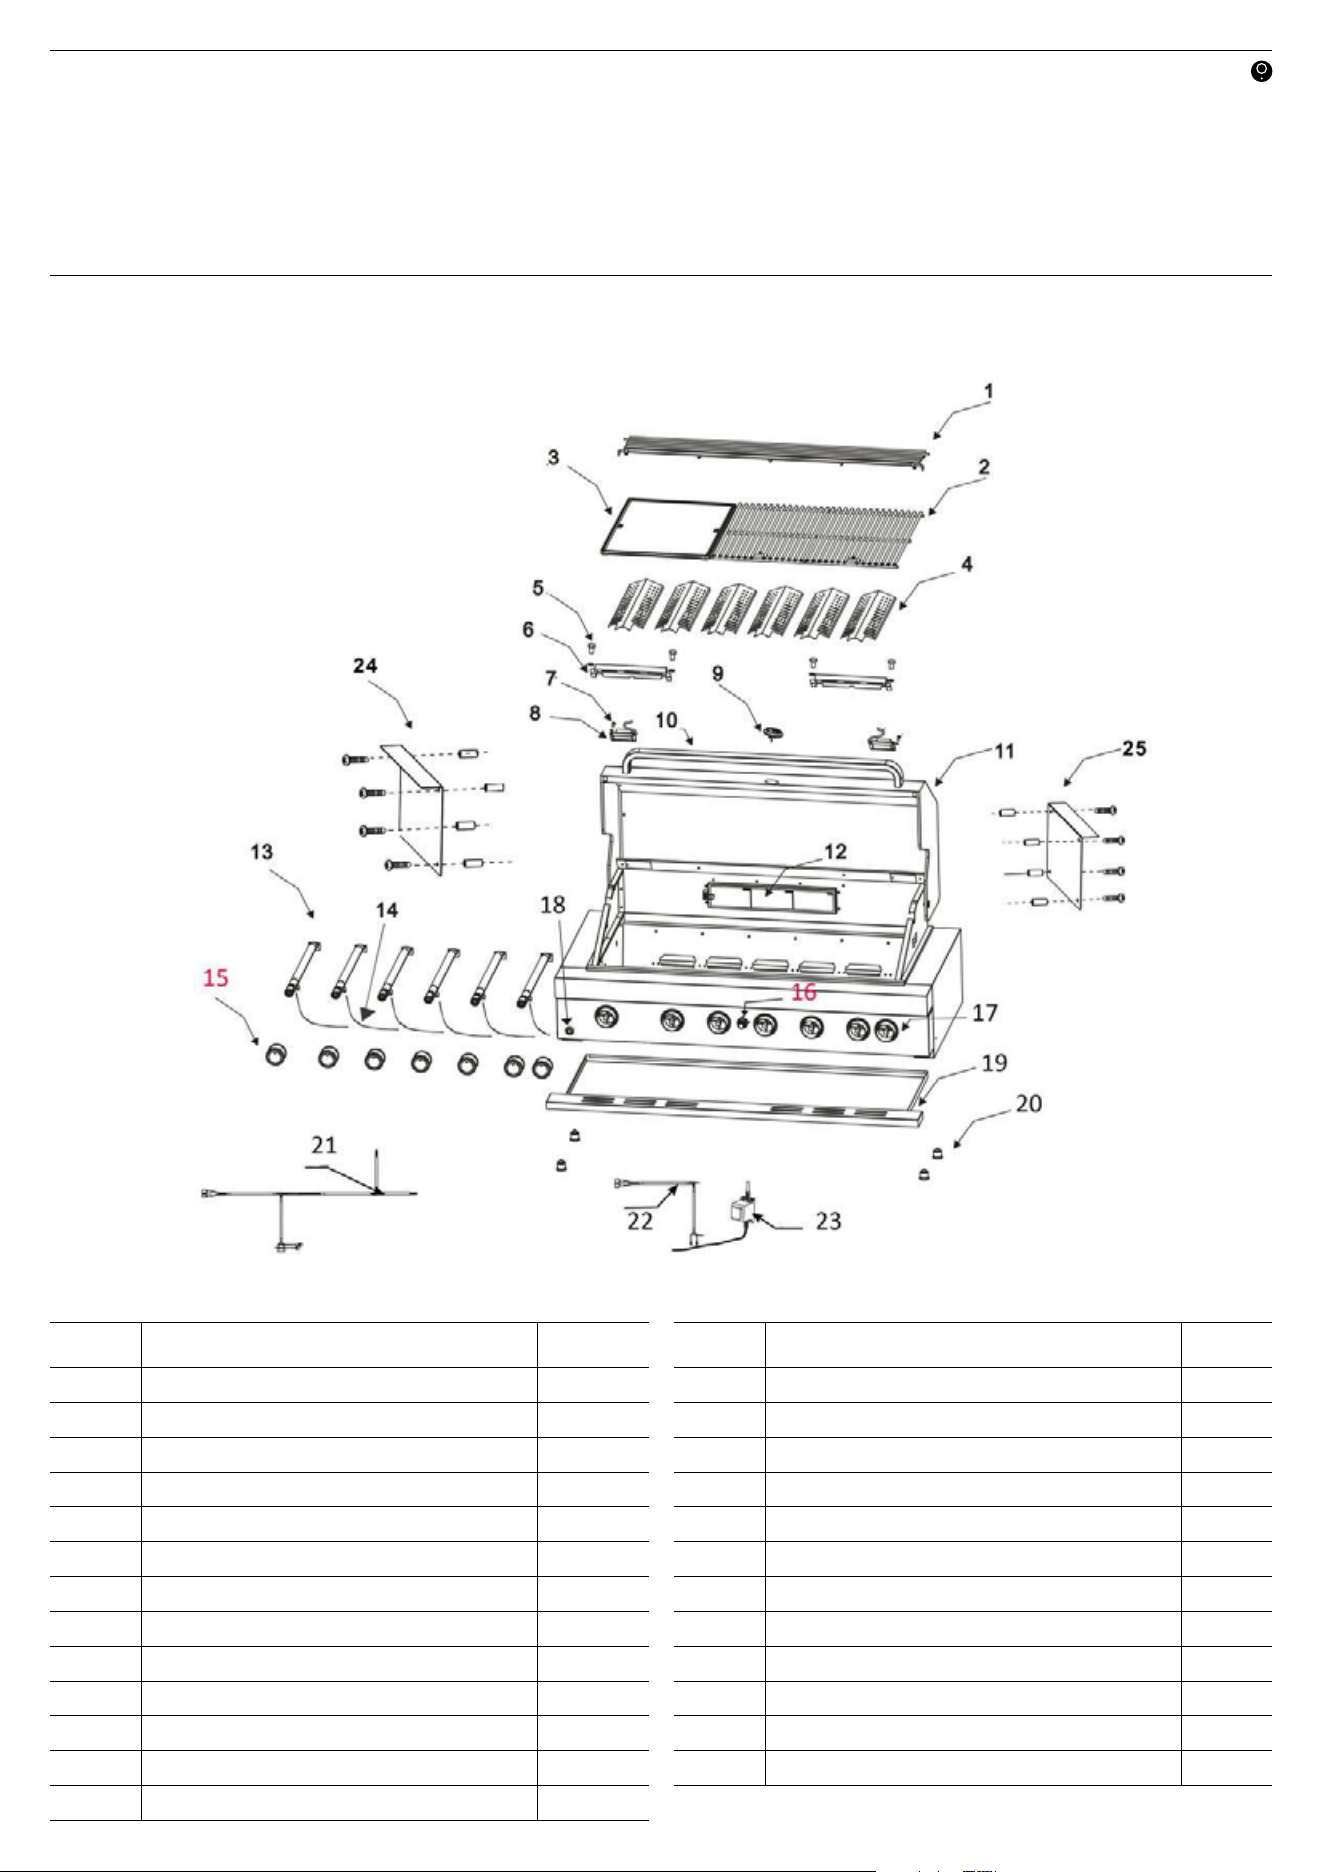
PART LIST & EXPLODED VIEW
— IBBQBI4B
PART # DESCRIPTION QTY PART # DESCRIPTION QTY
1 Warming Rack 1 14 Ignition cable 4
2 Stainless steel cooking grid 1 15 Control Knob 7
3 Cast iron flat plate 1 16 Igniter (1 for 5) 1
4 Flame diffuser 4 17 Knob bezel with blue LED 7
5 Screws (M5) 4 18 Light /LED Switch 1
6 Light cover 2 19 Grease tray 1
7 Screw 2 20 Foot 4
8 Light 2 21 Cable for light 1
9 Temperature gauge 1 22 Cable for LED 1
10 Handle 1 23 Transformer 1
11 Hood 1 24 Built in supporting bracket- L 1
12 Infrared rear burner 1 25 Built in supporting bracket- R 1
13 Main burner 4
INALTO.HOUSEPAGE 011
PART LIST & EXPLODED VIEW
— IBBQBI6B
PART # DESCRIPTION QTY
PART # DESCRIPTION QTY
1 Warming Rack 1 14 Ignition cable 6
2 Cast iron cooking grid 2 15 Control Knob 7
3 Cast iron flat plate 1 16 Igniter ( 1 for 7) 1
4 Flame diffuser 6 17 Knob bezel with blue LED 7
5 Screws (M5) 4 18 Light /LED Switch 1
6 Light cover 2 19 Grease tray 1
7 Screw 2 20 Foot 4
8 Light 2 21 Cable for light 1
9 Temperature gauge 1 22 Cable for LED 1
10 Handle 1 23 Transformer 1
11 Hood 1 24 Built in supporting bracket- L 1
12 Infrared rear burner 1 25 Built in supporting bracket- R 1
13 Main burner 6
PAGE 12USER MANUAL
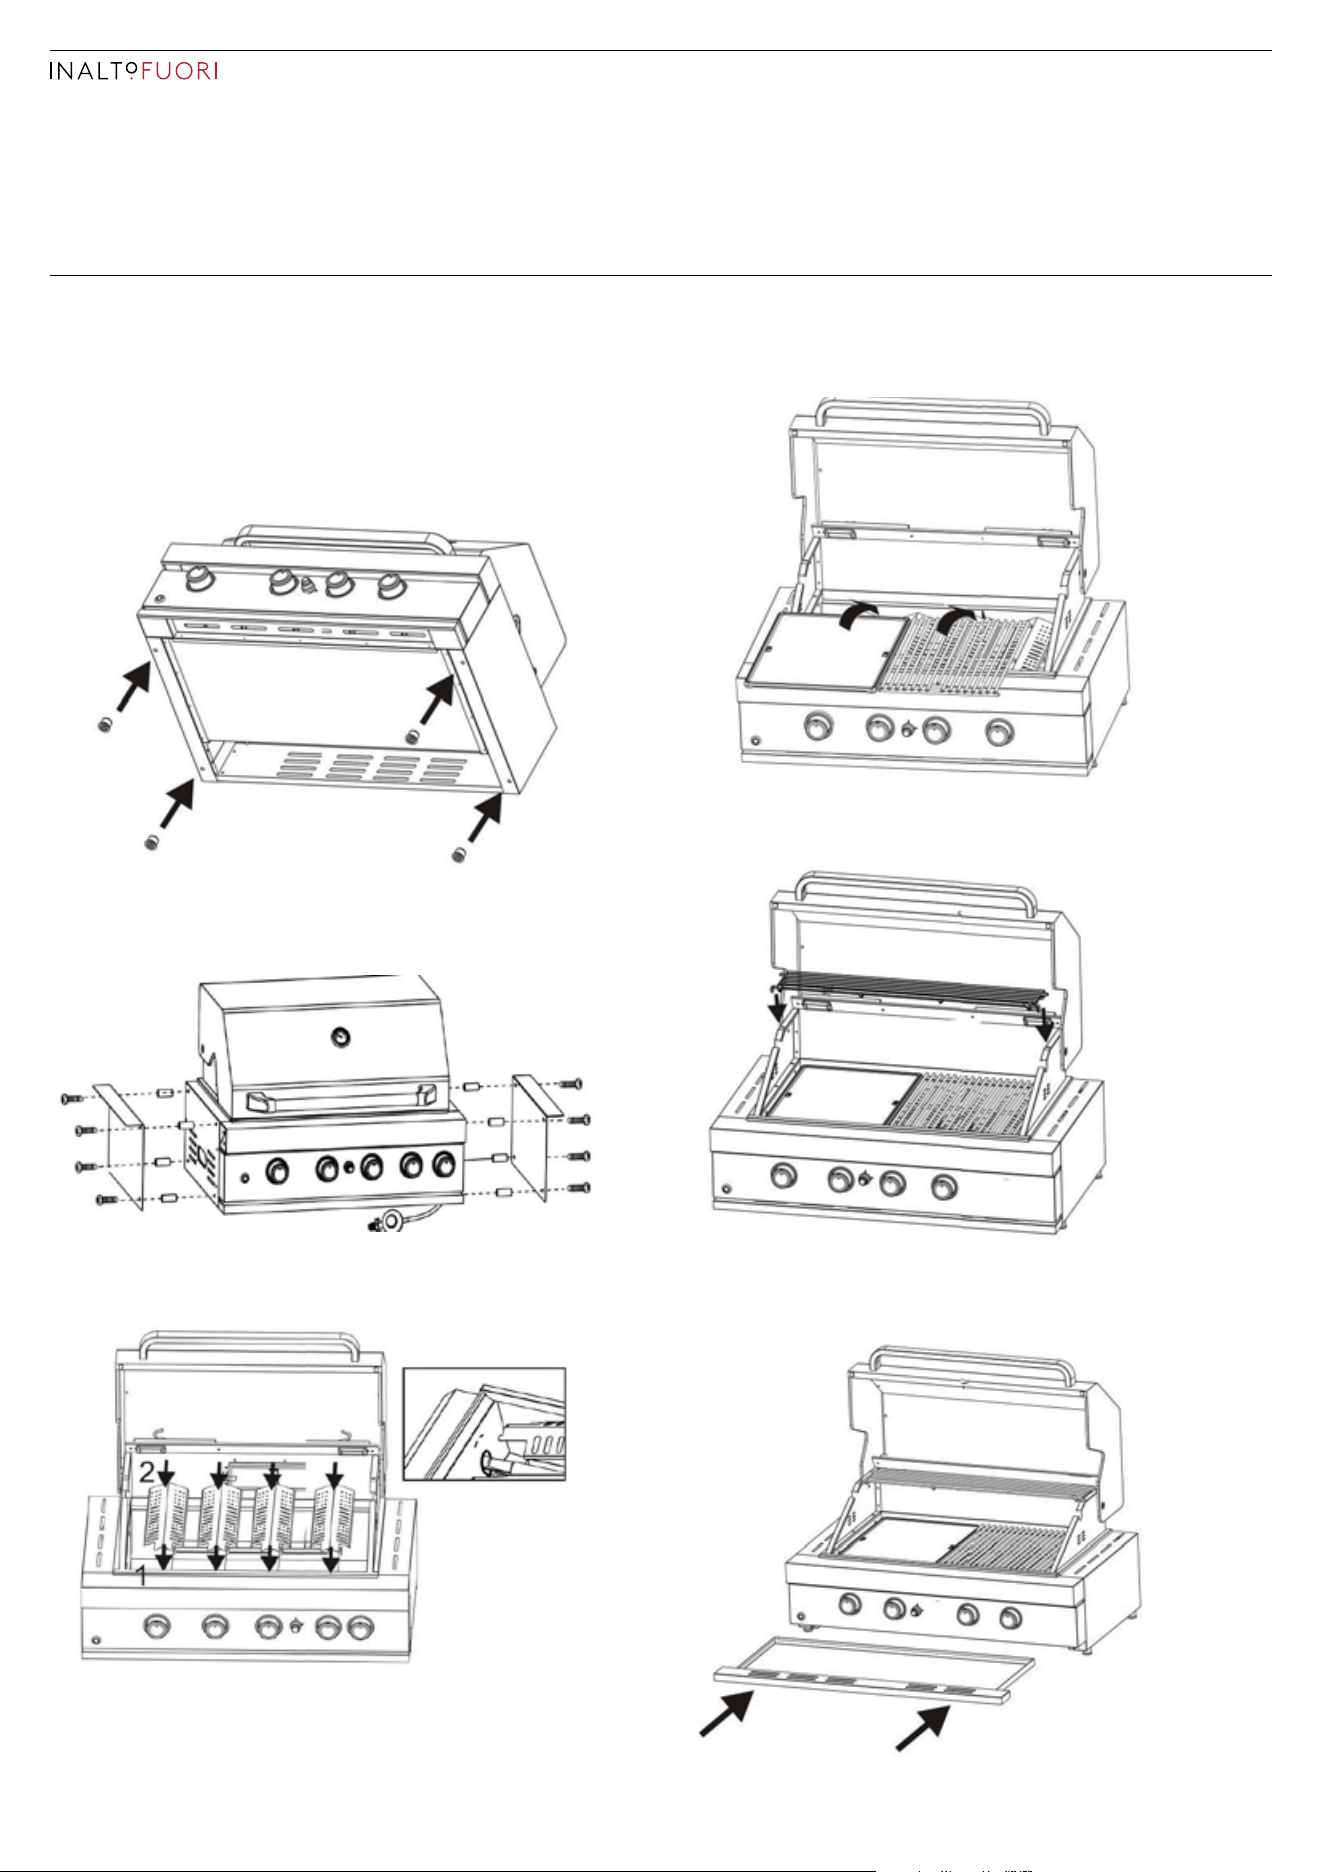
ASSEMBLY INSTRUCTIONS: IBBQBI4B
WARNING
Ensure all transit protection is removed prior
to assembly.
1 Foot (No.20) assembly
2 Built in supporting bracket assembly (No.24.25)
3 Flame tamer (No.4) assembly
4 Cooking grid (No.2)/plate (No.3) assembly
5 Warming rack (No.1) assembly
6 Grease tray (No.19)
Installation Instructions
Please go to page 14 for step 7
PAGE 13 INALTO.HOUSE
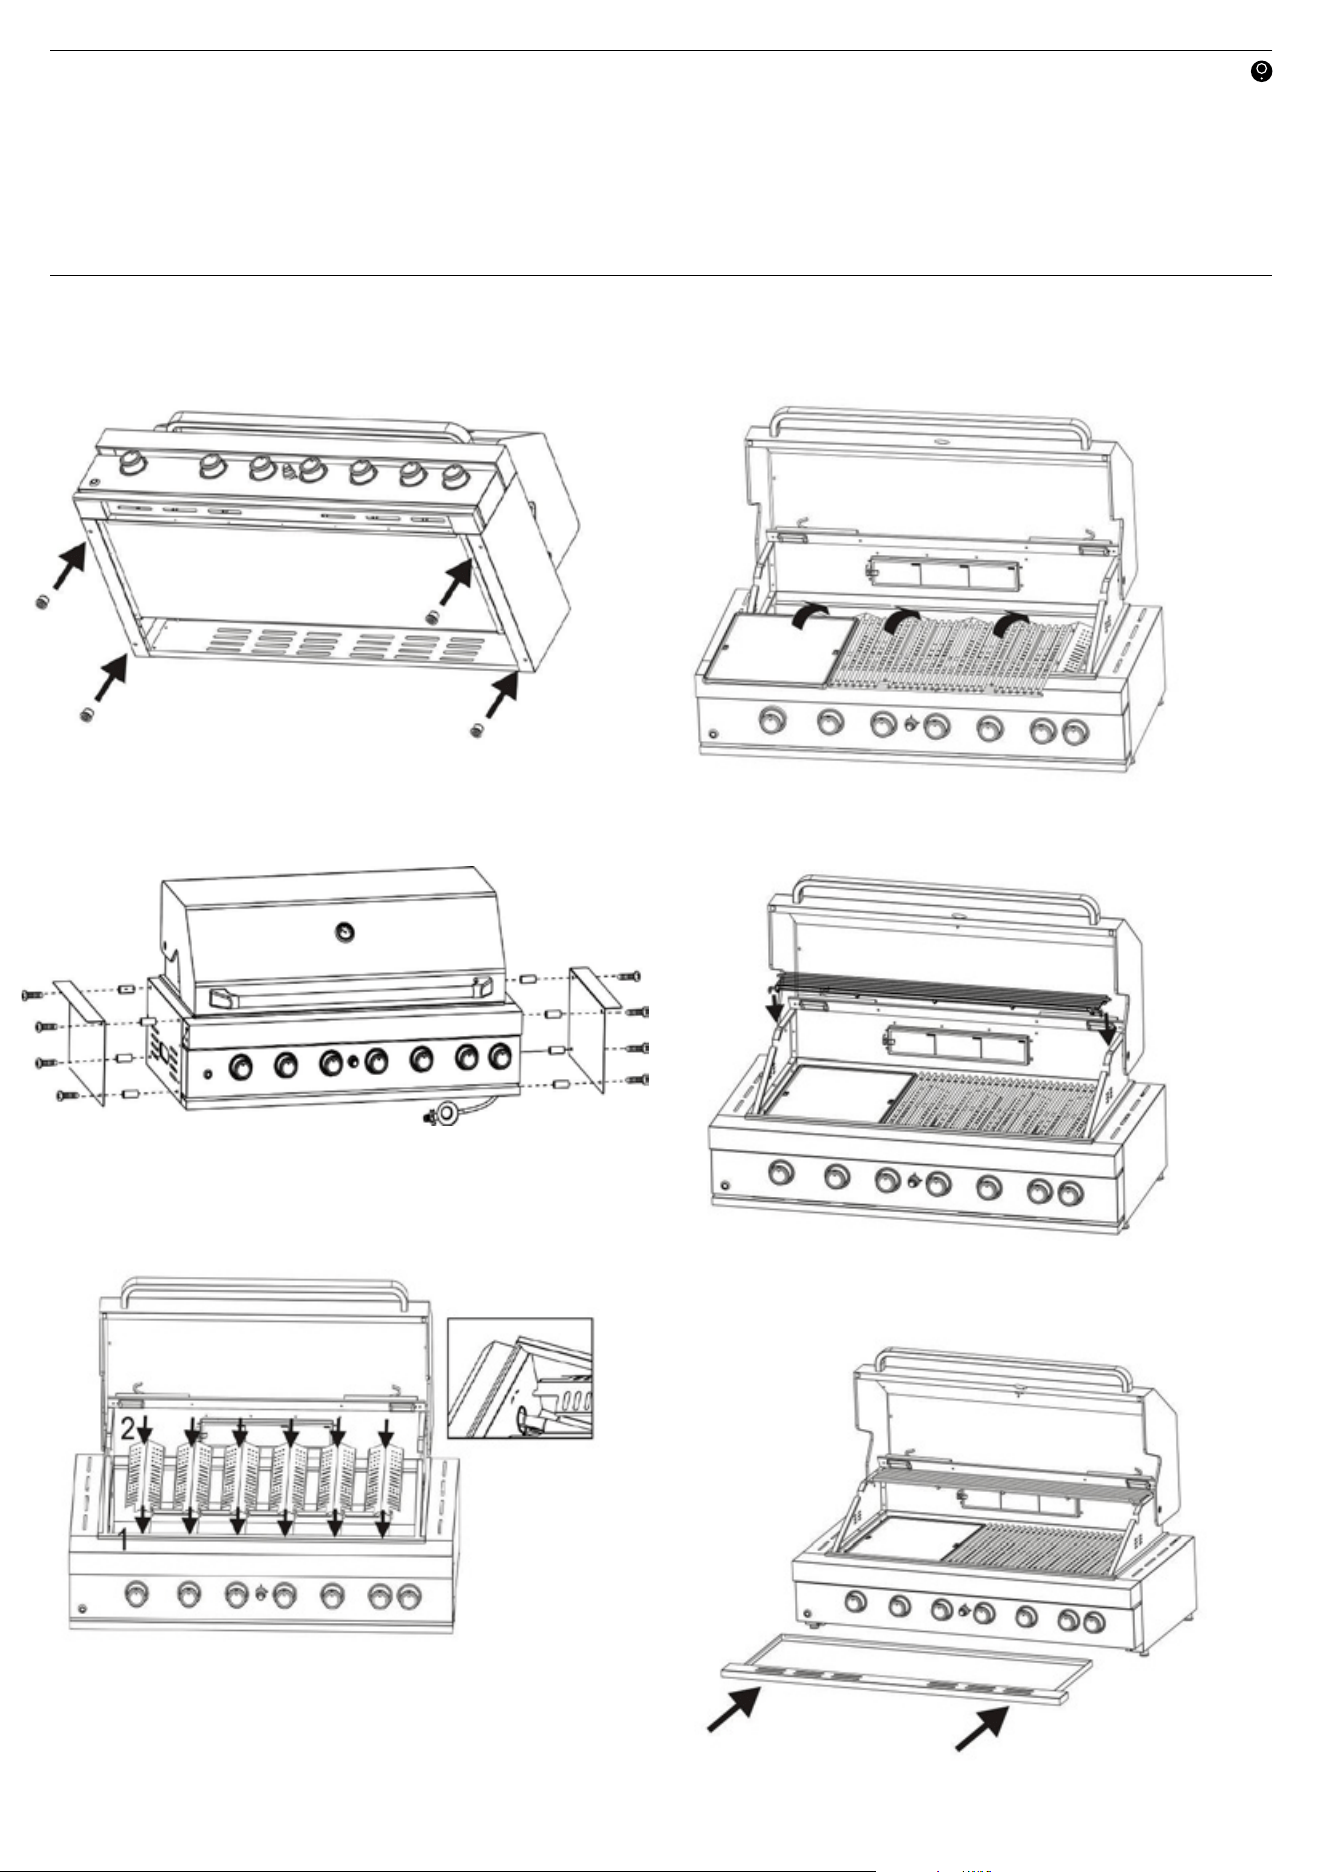
ASSEMBLY INSTRUCTIONS: IBBQBI6B
1 Foot (No.20) assembly
2 Built in supporting bracket assembly (No.24.25)
3 Flame tamer (No.4) assembly
4 Cooking grid (No.2)/plate (No.3) assembly
5 Warming rack (No.1) assembly
6 Grease tray (No.19)
Please go to page 14 for step 7
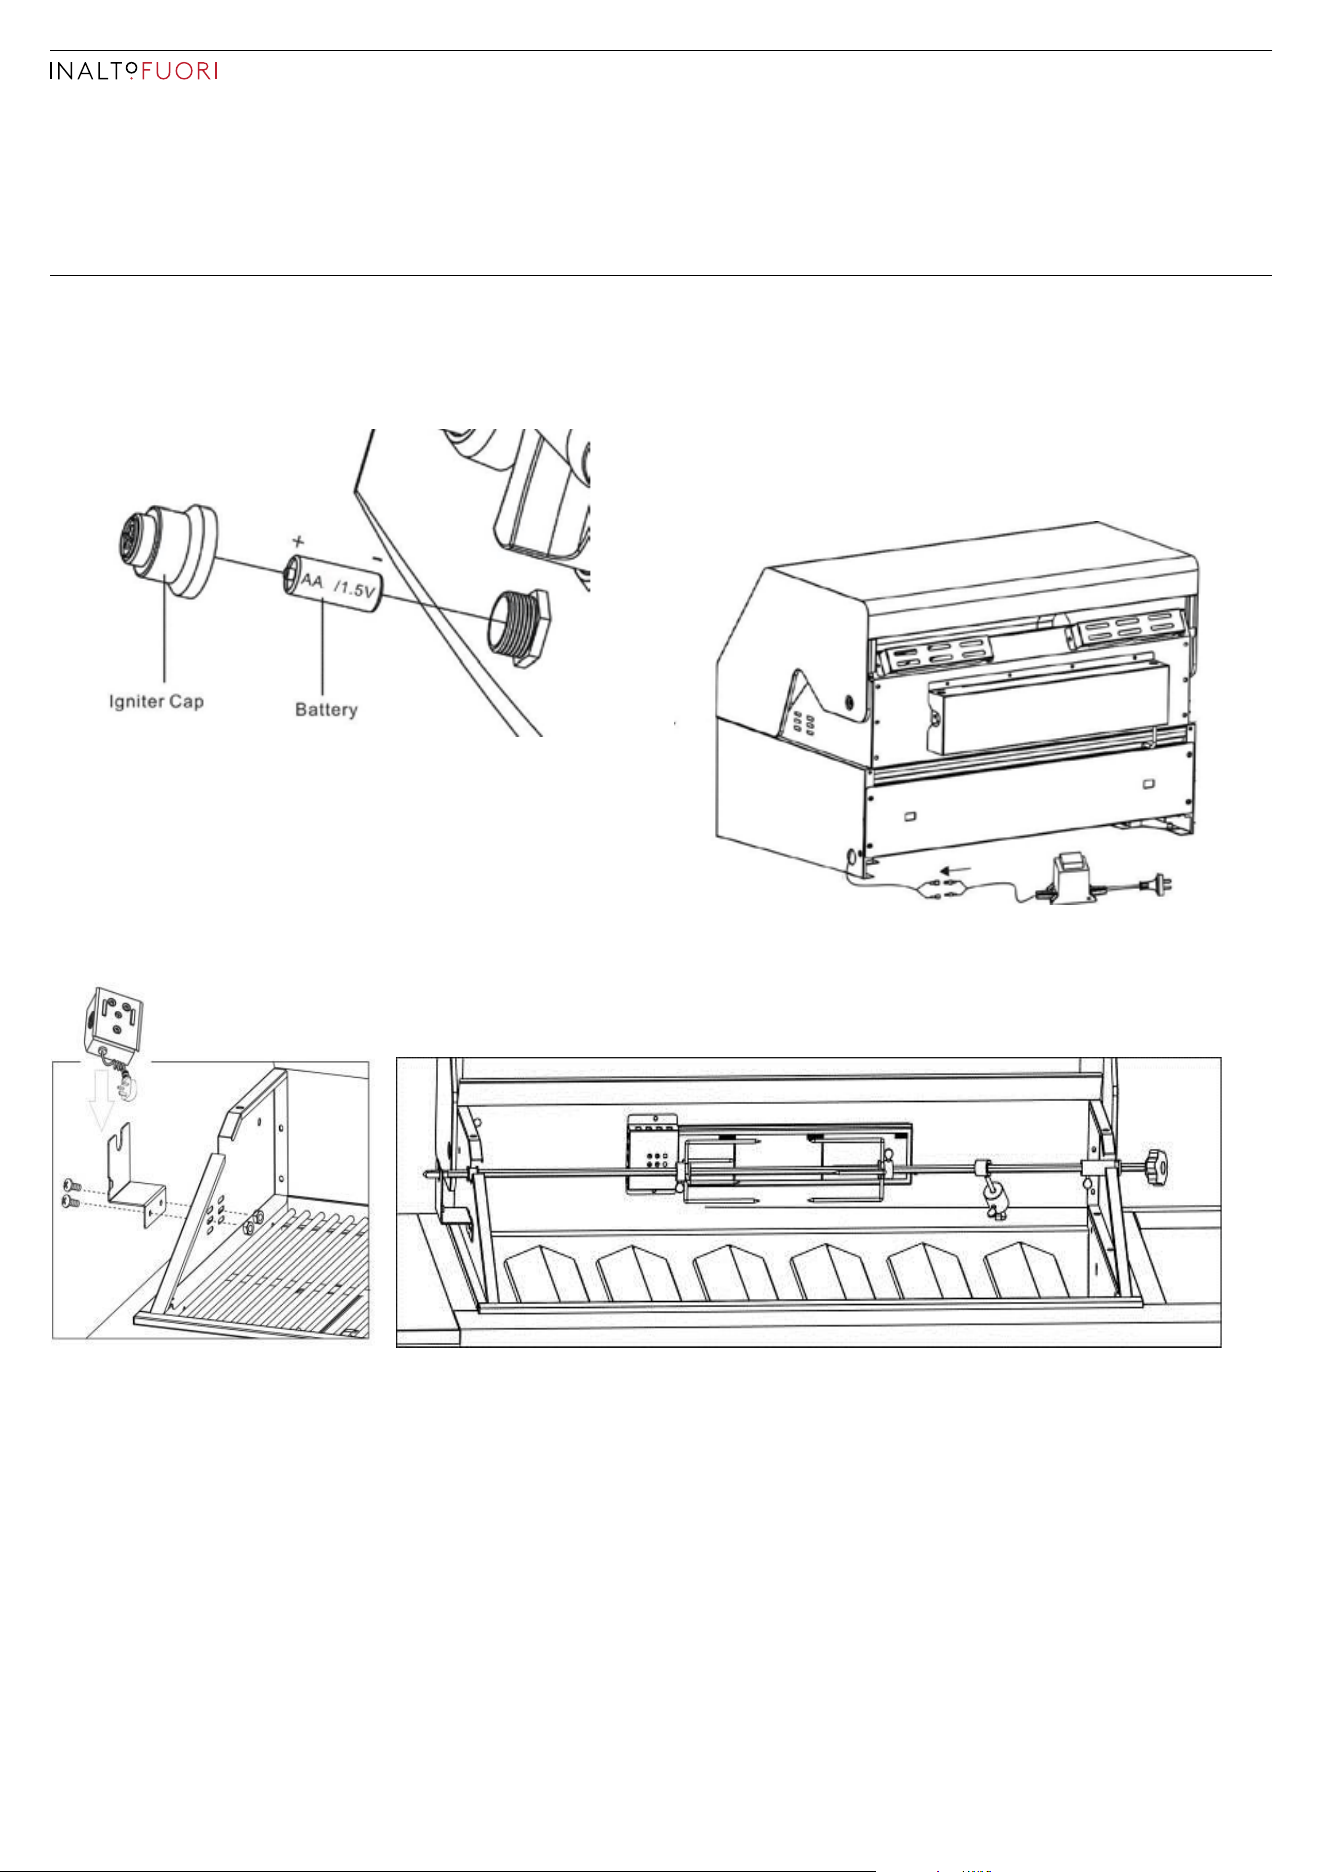
PAGE 14USER MANUAL
ASSEMBLY INSTRUCTIONS: IBBQBI4B or IBBQBI6B
7 Battery is require for ignition Battery
(Battery is not included)
* FOR ROTISSERIE KITS
8 Transformer (for BBQ lights / LED)
► AssemblyTransformer needs to be installed and fixed
where it is located well away from high temperatures.
► The transformer must be always kept dry.
PAGE 15 INALTO.HOUSE
NATURAL GAS CONVERSION
WARNING
1 Conversions only to be done by an Authorized person
2 A restraining tether or bracket is required to be fixed
to the appliance and to the wall within 50mm of
each connection point. The length of the tether shall
not exceed 80% of the length of the natural gas hose
assembly.
TOOLS REQUIRED
1 Socket head screw driver (Included with the product)
2 Wrench
GAS PIPING
1 A minimum pipe with diameter 15mm is required for
inlet piping. A lever operated shut-off valve should be
installed within 1 meter of the appliance for servicing
the appliance.
2 Where it is not practical to install solid copper pipe to
AS/NZS 5601.1, hose assemblies certified to AS/NZS 1869
or limited flexibility connectors certified to AS 4631 may
be used.
The internal diameter of the hose must not be less than
10mm. The hose should be as short as practicable in
accordance with AS/NZS 5601.
3 All gas pipe connections must be sealed with a gas pipe
compound resistant to natural gas. Remove LPG hose
and regulator and ensure that a Natural Gas regulator
(not supplied with the appliance) is used.
NOTE TO INSTALLERS
► For main burner, the U-LPG jet is 0.98mm, the NG jet is
1.50mm
► For back burner, the U-LPG jet is 0.98mm, the NG jet is
1.65mm
► Both U-LPG injector and NG injector are installed
together like right photo shows. The BBQ is set for
U-LPG by manufacturer.
1 Test operation of appliance such as leak-tightness,
burner flames at high and low, and instruct user on safe
operation before leaving.
2 If the appliance cannot be adjusted to perform correctly
contact your distributor or the manufacturer for
assistance.
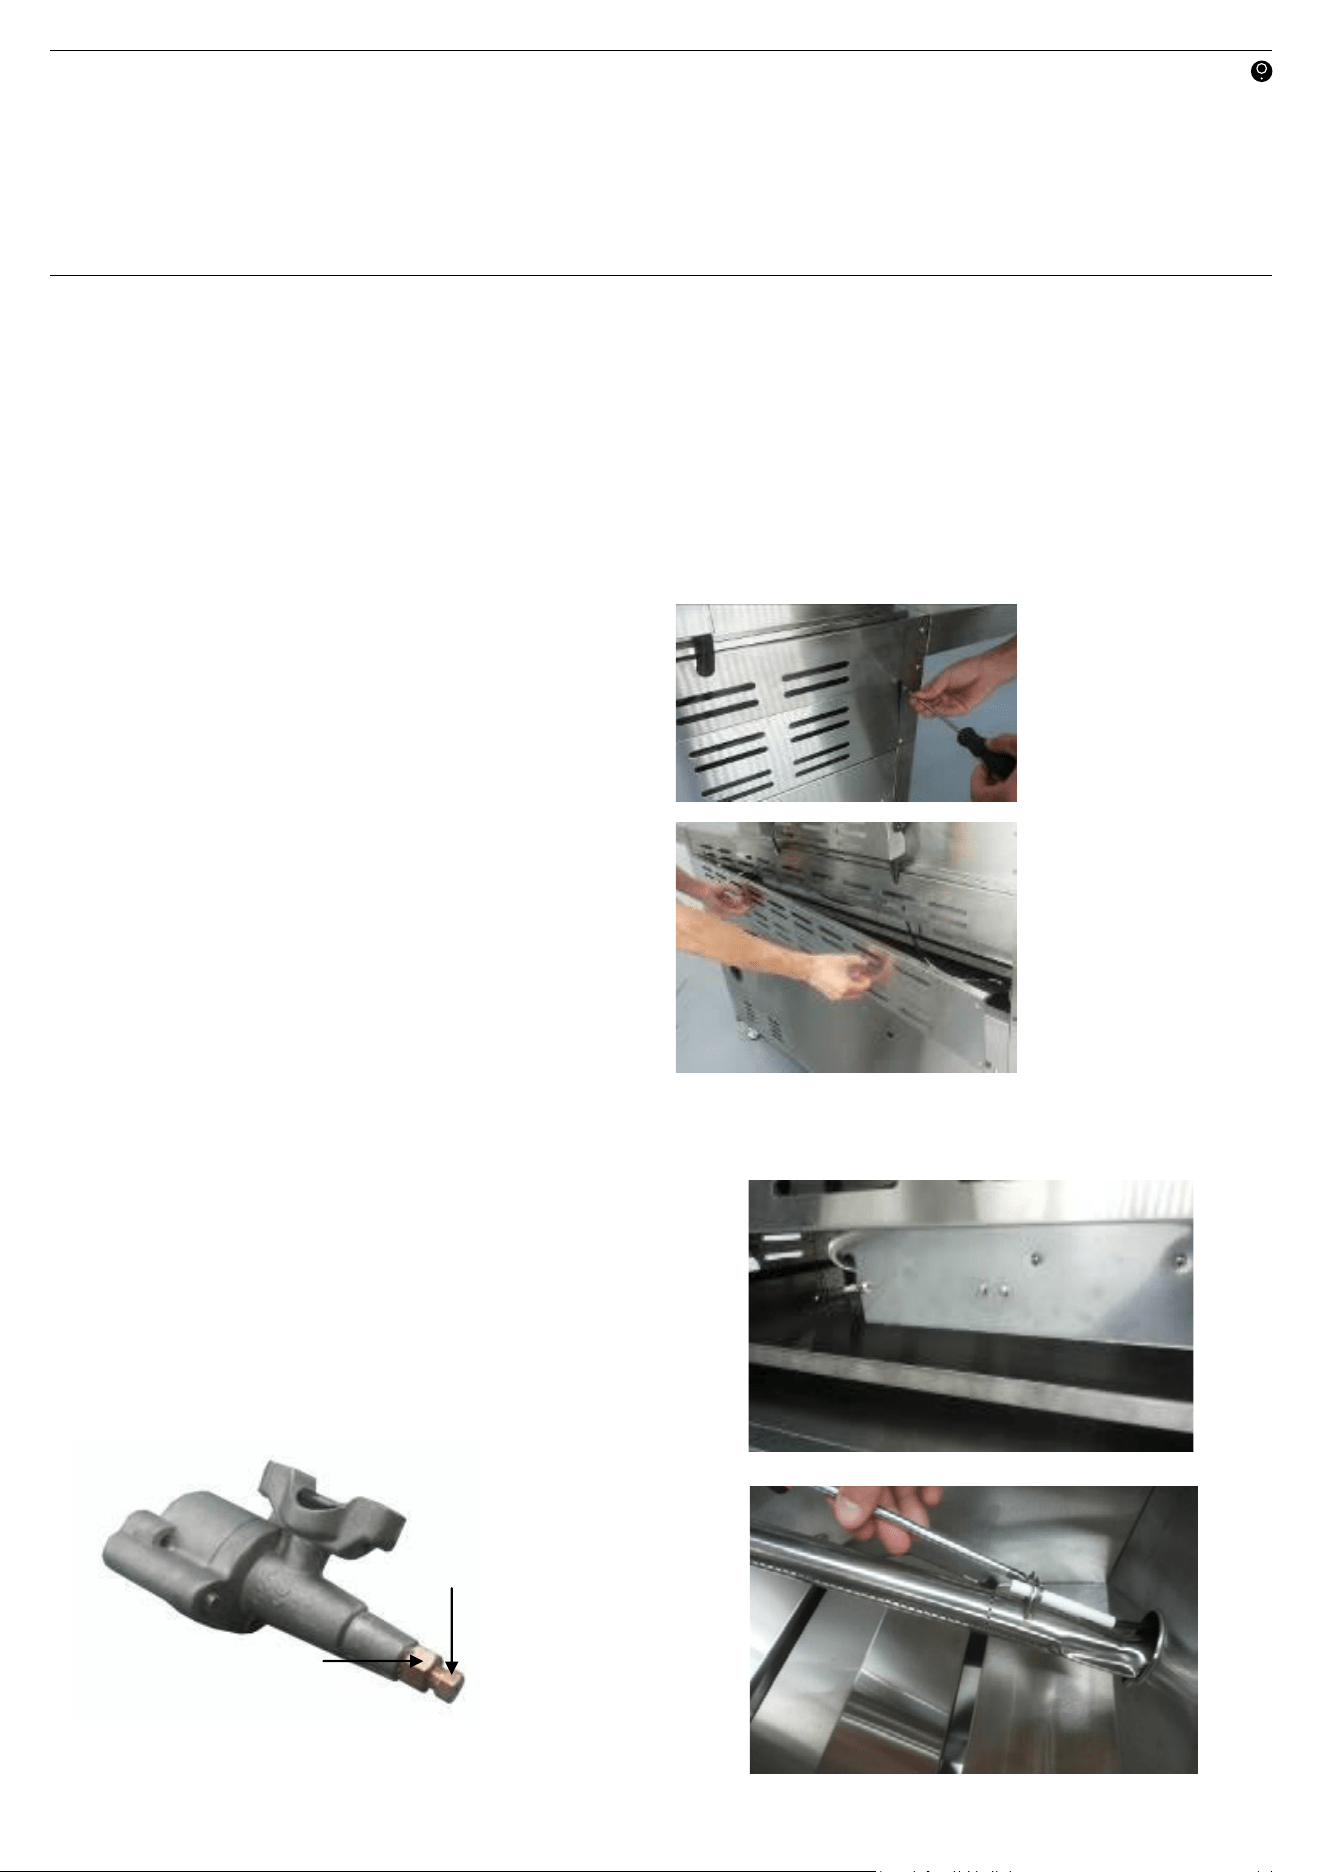
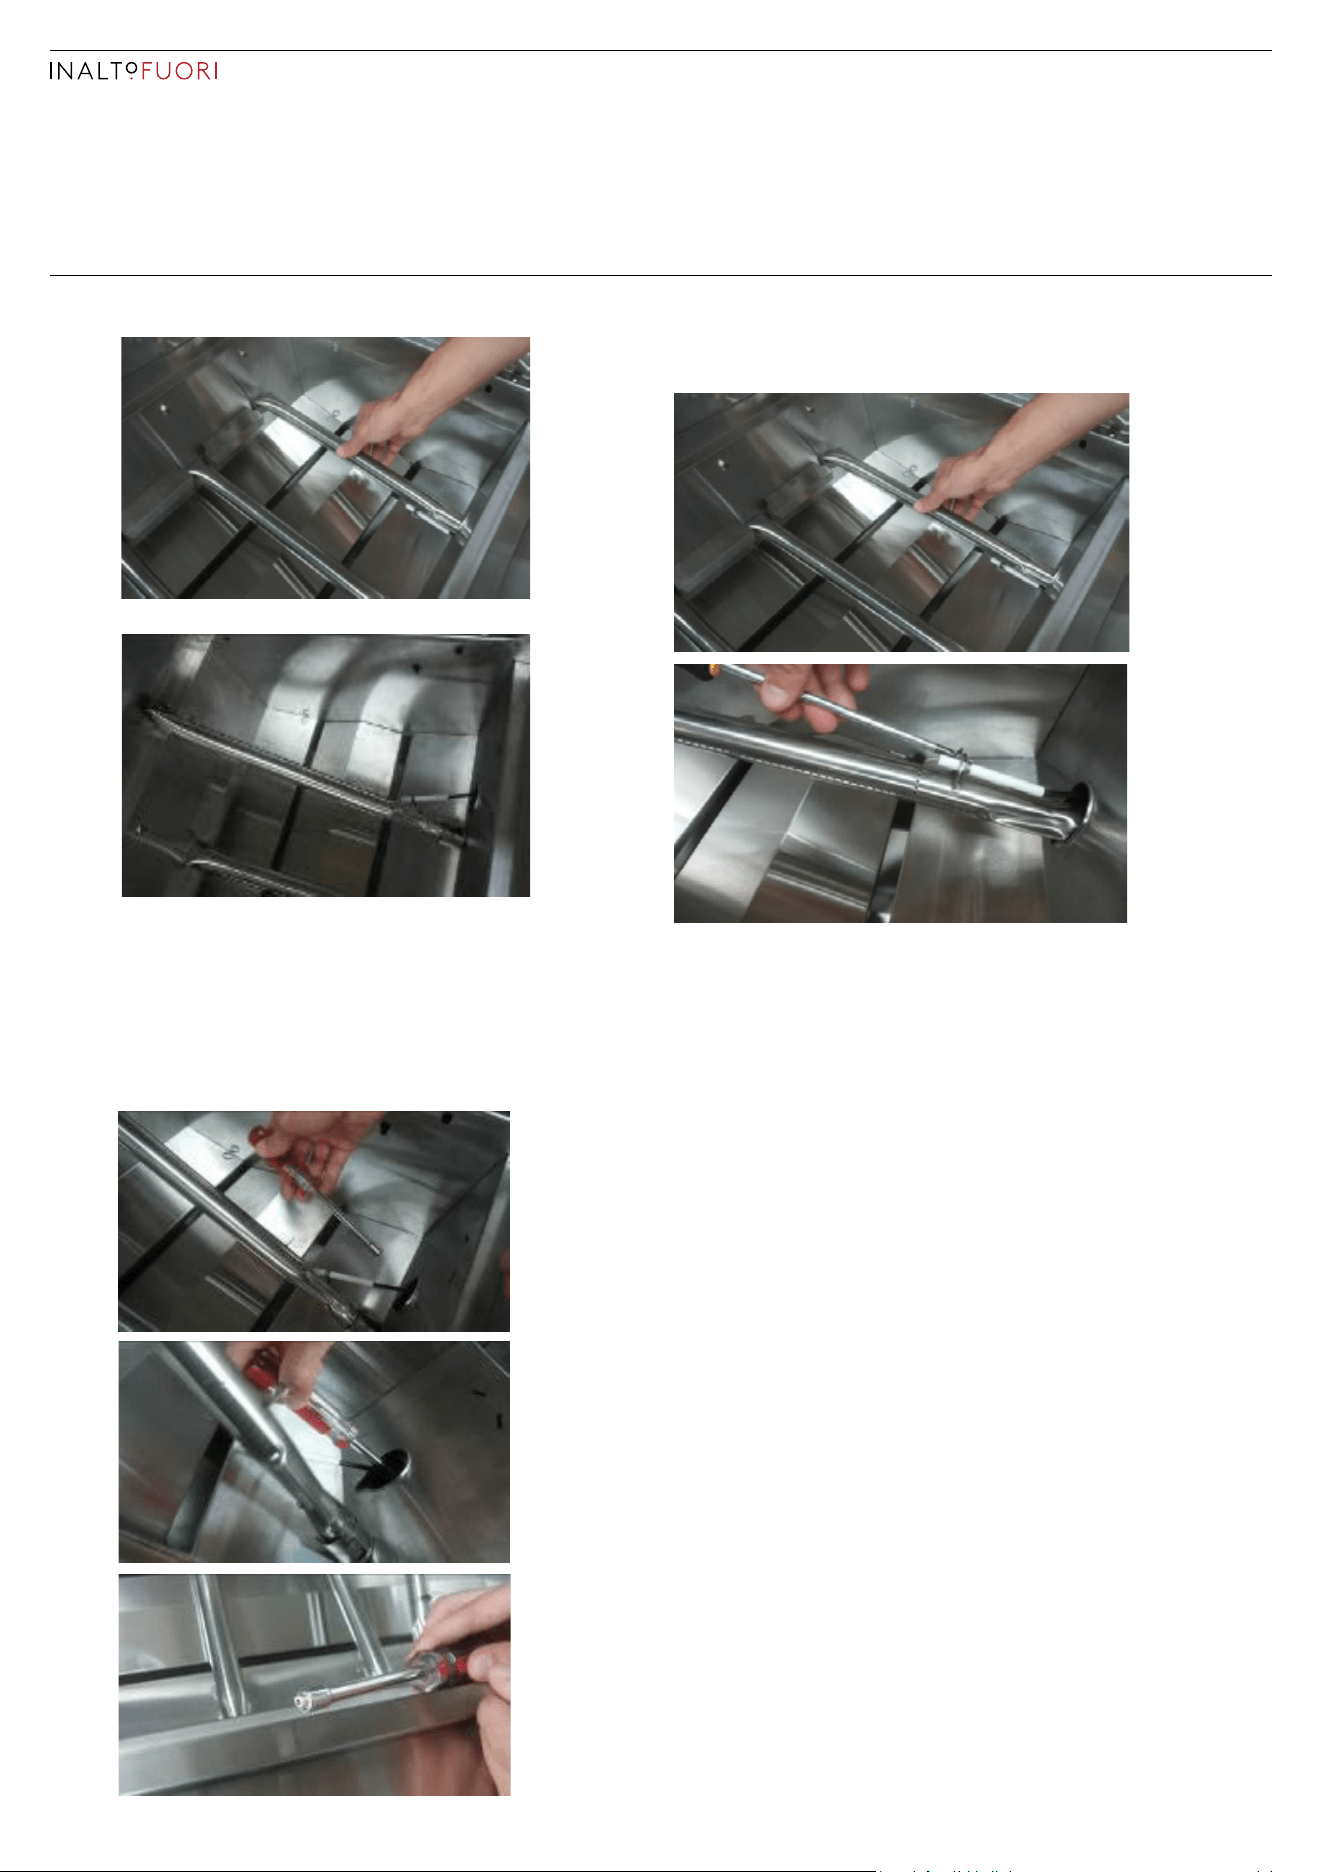
INSTRUCTIONS FOR CONVERTING THE MAIN BURNER
1. Unscrew and remove the rear panel pictured.
2. Unscrew the main burner securing screws and
remove the burner, sitting it alongside.
(1)
(2)
Jet for LPG
JET FOR NG
PAGE 16USER MANUAL
(3)
(4)
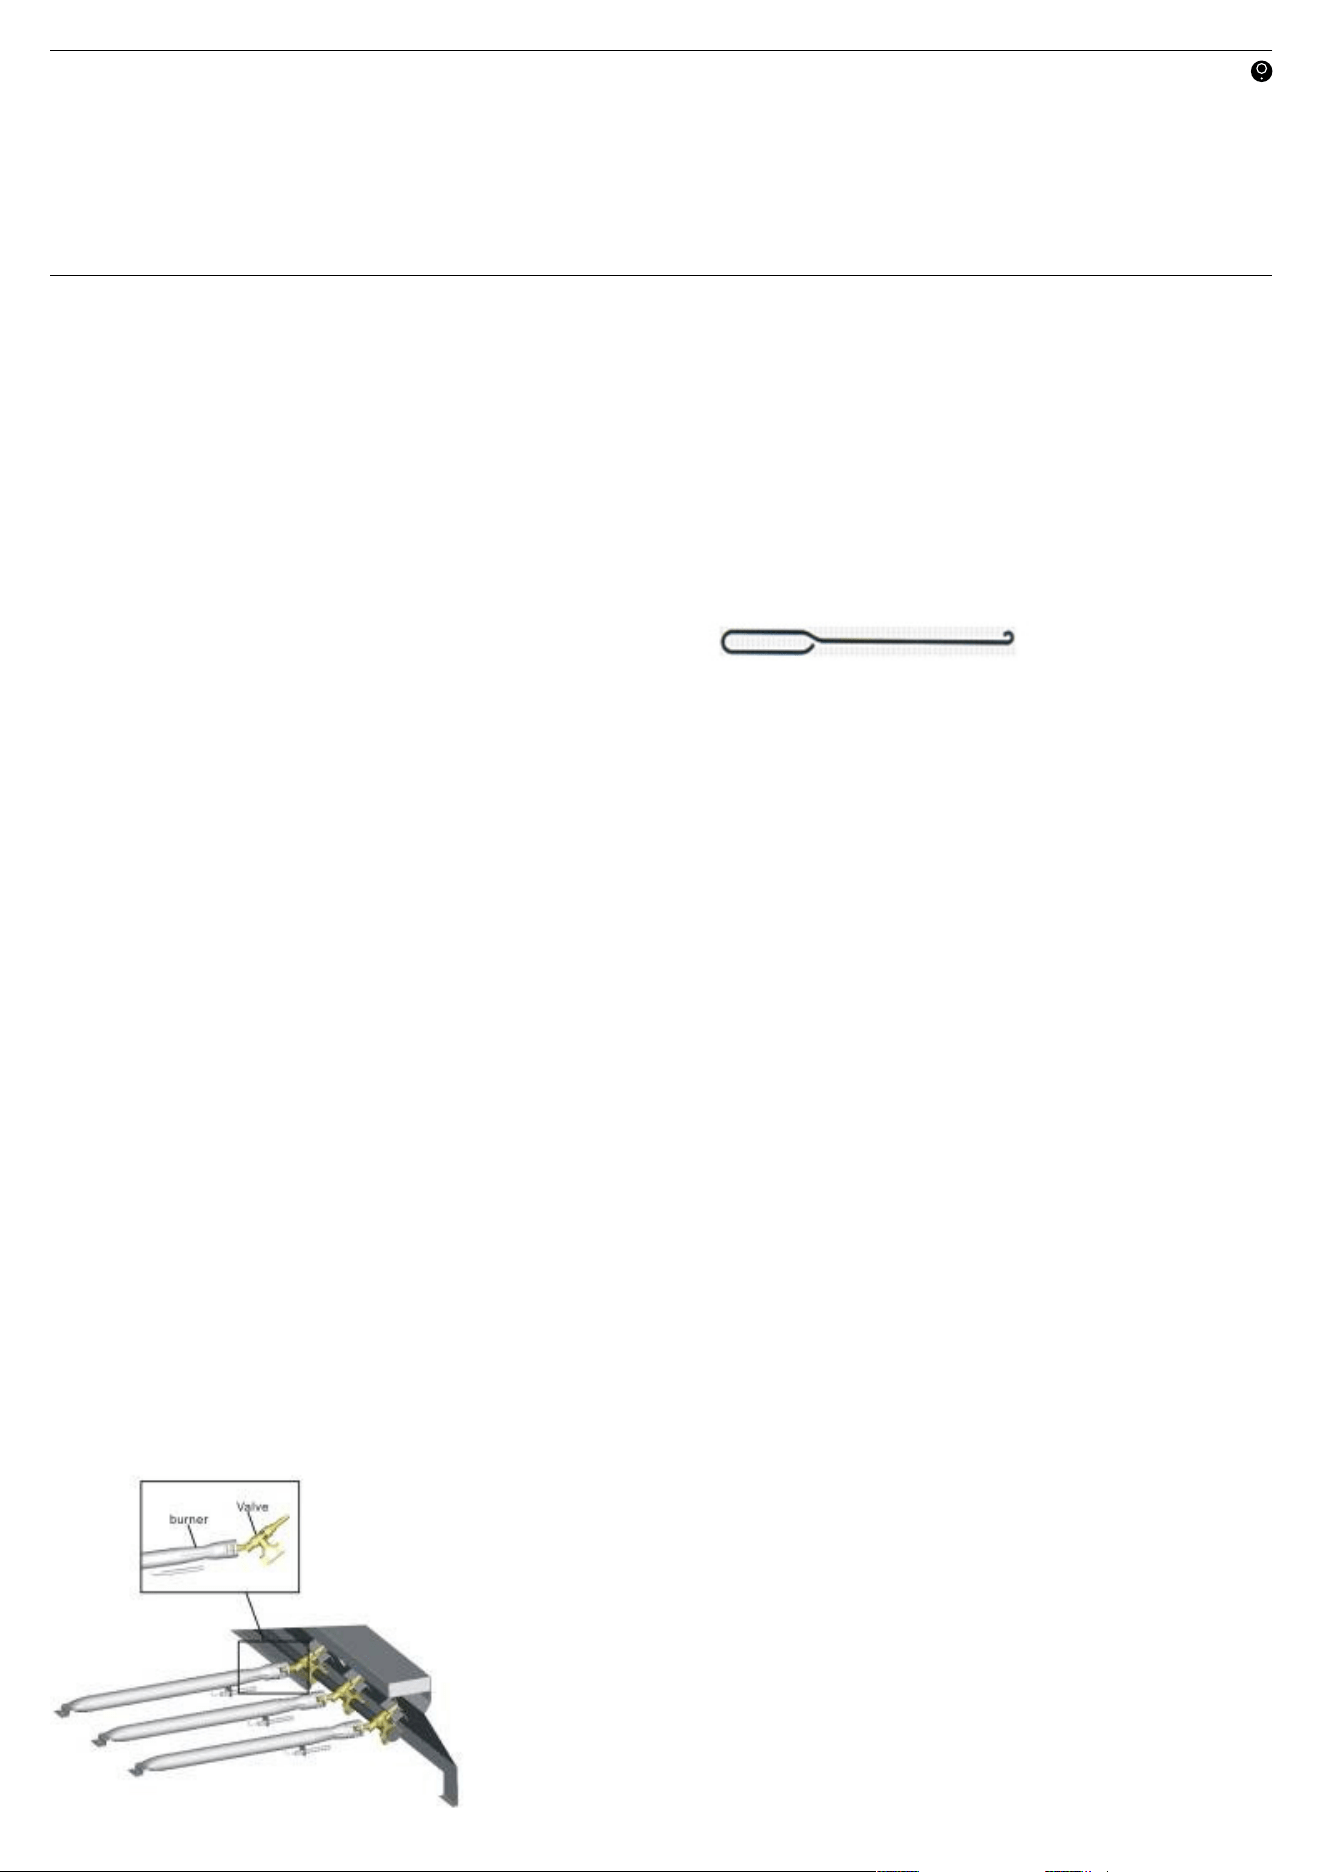
3. With the burner removed, you will see the brass gas jet
which is screwed into the end of the valve. Using the
socket driver supplied, unscrew the end LPG jet while
retaining the inner (NG) jet.
4 . Reassemble the burner.
Note: Please make sure the gas valve is located well
inside the main burner tube when re-installing the
burners.
5. Repeat the above steps for the other main burners.
PAGE 17 INALTO.HOUSE
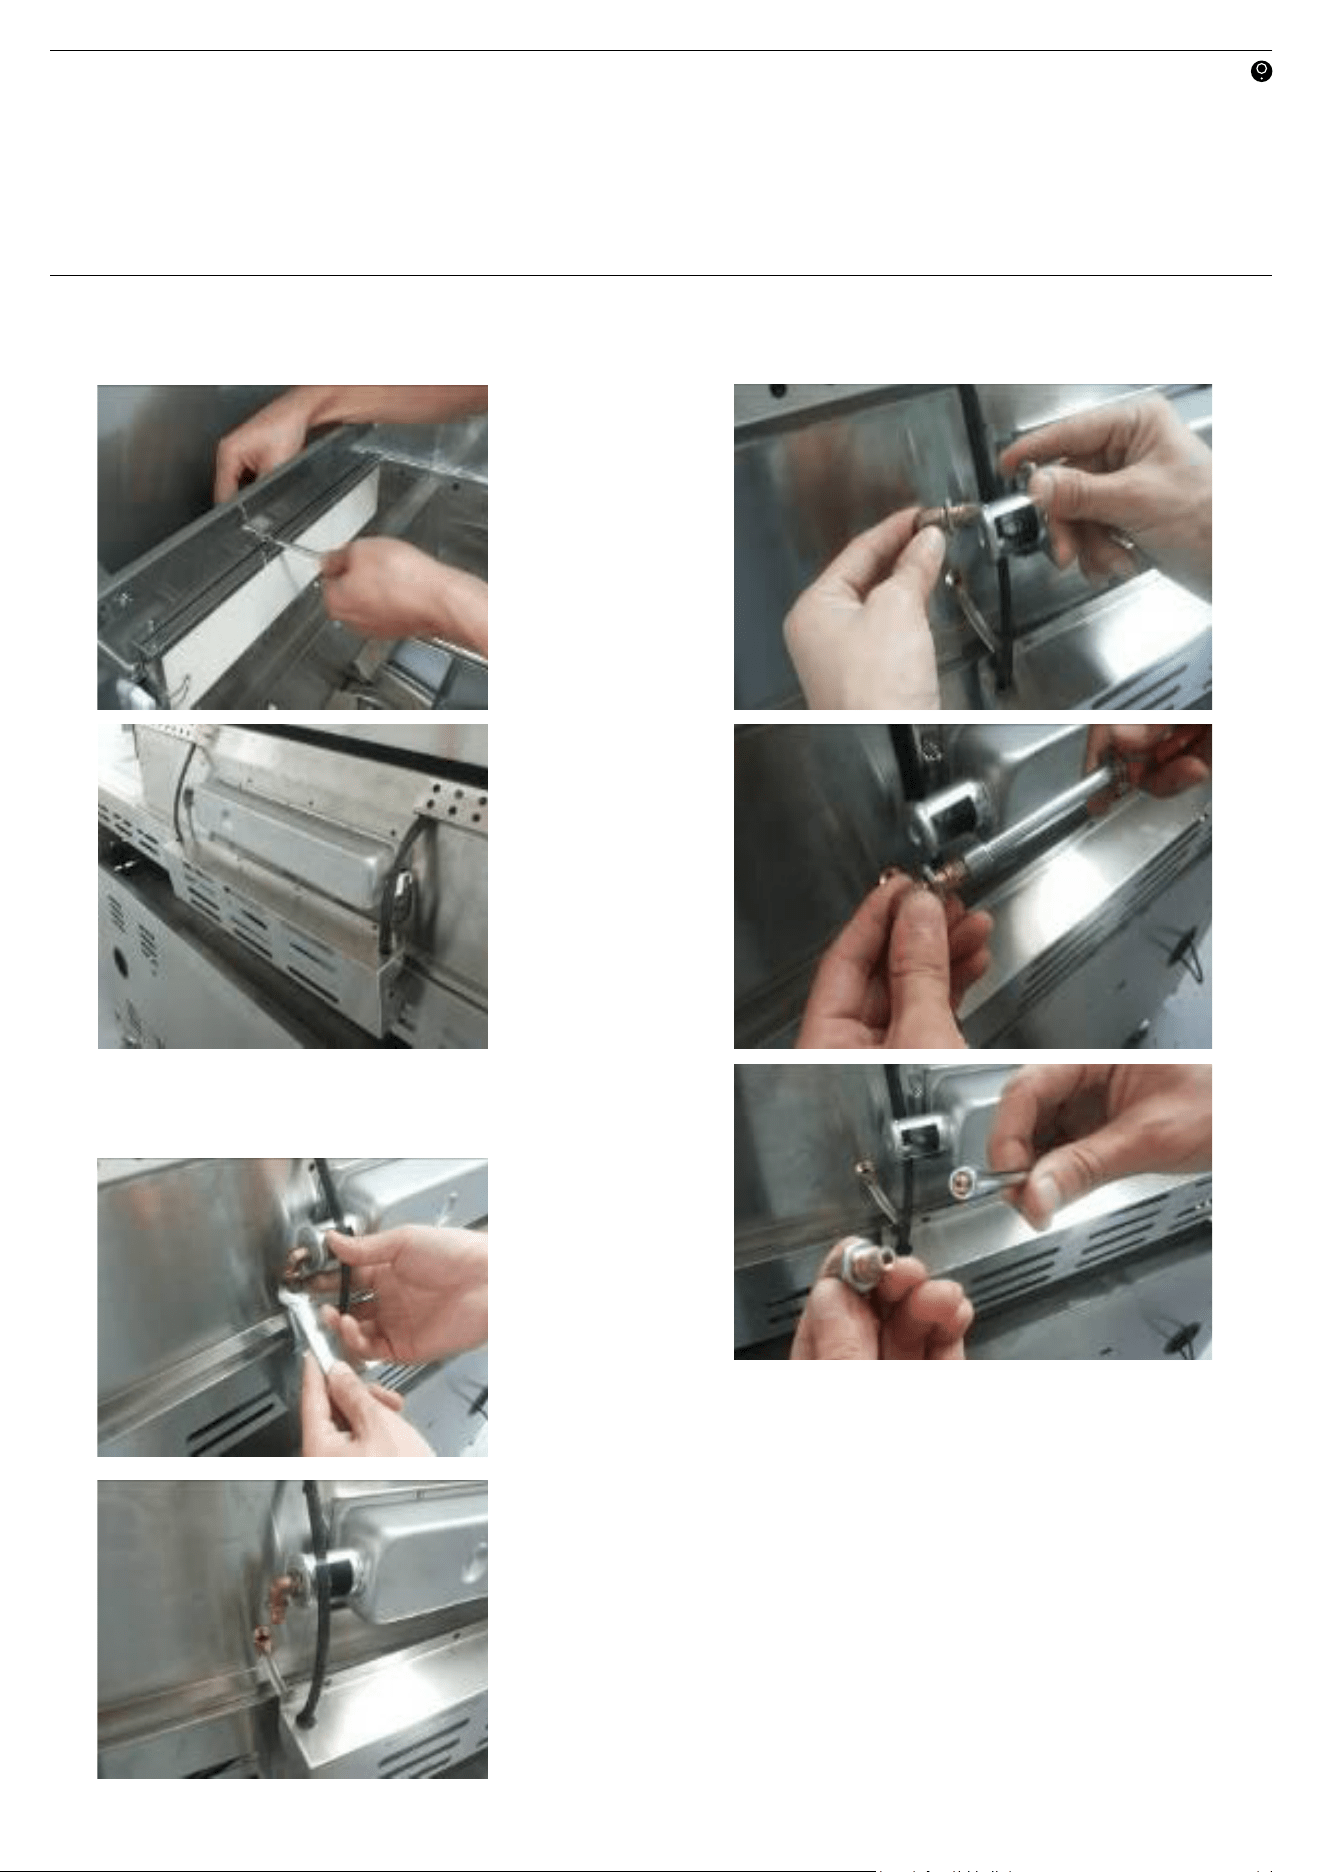
INSTRUCTIONS FOR CONVERTING THE BACK BURNER
1. Remove the back burner cover
2. Remove the LPG jet from the elbow shaped brass
injector assembly.
(1)
(2)
(3)
(4)
(5)
PAGE 18USER MANUAL
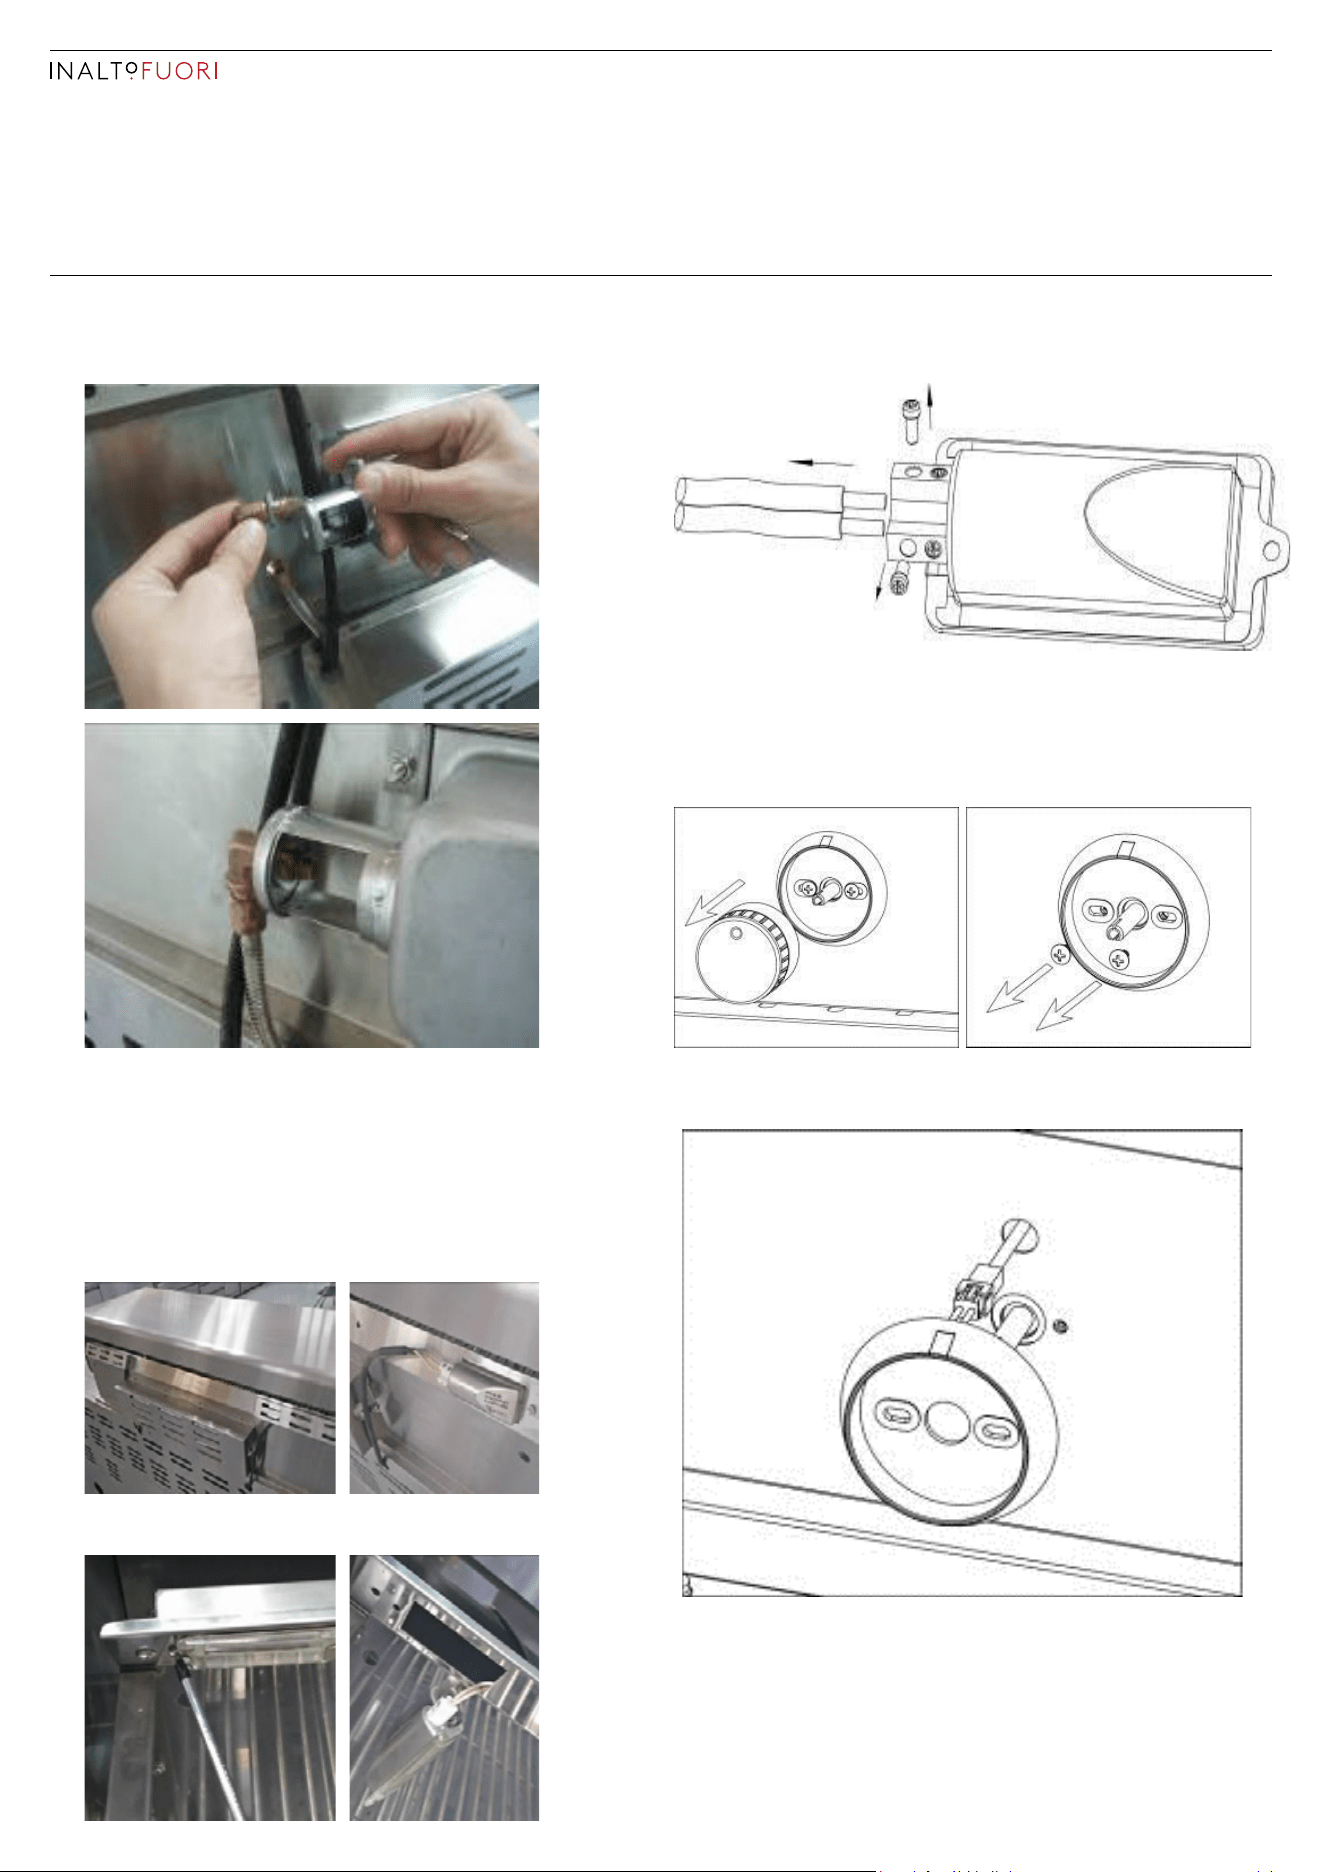
3. Reassemble the plates as removed.
BARBECUE LIGHT & LED
WARNING
Always keep the plug in dry condition.
Instruction to replace the barbecue lights
1. Take off the light rear cover
2. Take off the light
3. Disconnect the cable
4. Replace a new light and re-assemble
Instruction to replace the LED light
1. Take off the control knob and unscrew the knob bezel
2. Take off the unit and disconnect the cable
3. Replace a new one and re- assemble
PAGE 19 INALTO.HOUSE
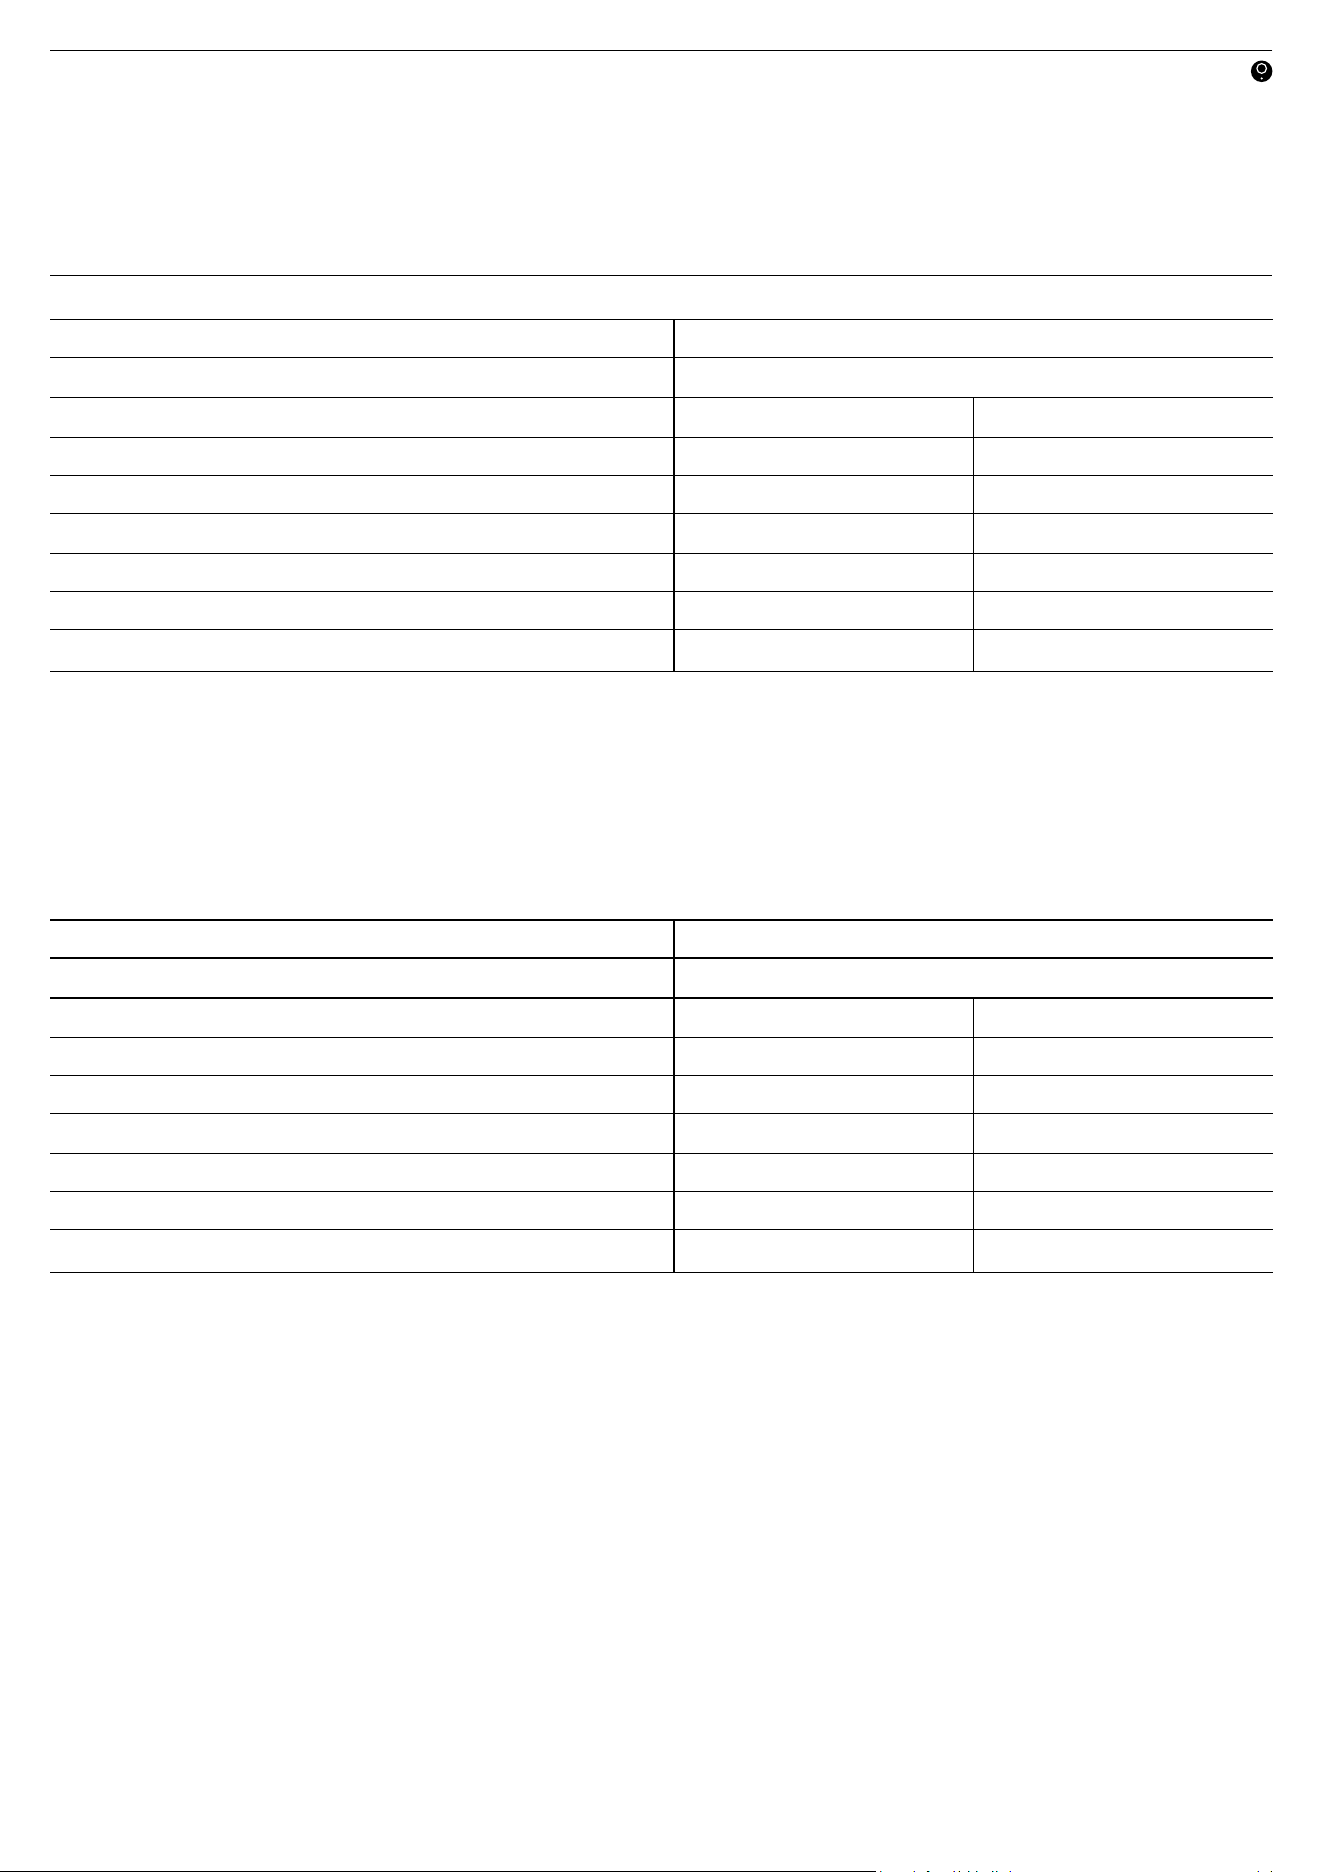
Technical Data
Model No.: IBBQBI4B
Gas Type Universal LP Gas & Natural Gas
Universal LP Gas Natural Gas
Test Point Pressure 2.75KPA 1.0KPA
Main Burner (injector size) 0.98mm 1.50mm
Back Burner (Injector size) 0.98mm 1.65mm
Total Nominal Gas Consumption (MJ/h) 64.5 57
Main Burner Nominal Gas Consumption (MJ/h) 13×4 11×4
Back Burner Nominal Gas Consumption (MJ/h) 12.5×1 13×1
Model No.: IBBQBI6B
Gas Type Universal LP Gas & Natural Gas
Universal LP Gas Natural Gas
Test Point Pressure 2.75KPA 1.0KPA
Main Burner (injector size) 0.98mm 1.50mm
Back Burner (Injector size) 0.98mm 1.65mm
Total Nominal Gas Consumption (MJ/h) 90.5 79
Main Burner Nominal Gas Consumption (MJ/h) 13×6 11×6
Back Burner Nominal Gas Consumption (MJ/h) 12.5×1 13×1
Note:
► For outdoors use only
► Conversion to natural gas only to be done by authorized person
► The maximum cylinder size for use with this appliance is 9kgs
► The thread type of this appliance is G1/4B-19.
► Always keep the electrical components in dry condition
AC Adaptor Input: 230-240VAC, 50Hz
Output: 12VAC 2000mA
Cord: 250V, 10A
AC Adaptor Input: 230-240VAC, 50Hz
Output: 12VAC 5000mA
Cord: 250V, 10A
PAGE 20USER MANUAL
Rating Labels
Gas Type:
– Universal LP Gas
– Natural Gas
Test Point pressure:
ULPG- 2.75kPa / NG -1.0kPa
For Electrical Components
AC Adaptor
– Input: 230-240VAC, 50Hz
– Output: 12VAC 5000mA
Cord: 250V, 10A
FOR USE WITH UNIVERSAL GAS
REFER TO YOUR LOCAL GAS AUTHORITY
FOR CONFIRMATION OF THE GAS TYPE,
IF IN NEED
FOR USE WITH NATURAL GAS
REFER TO YOUR LOCAL GAS AUTHORITY
FOR CONFIRMATION OF THE GAS TYPE,
IF IN NEED
Total Nominal Gas Consumption:
ULPG-64.5 MJ/h | NG -57 MJ/h
Gas Type: ULPG
Burner Gas Consumption Injector
Main 13×4 (MJ/h 0.98mm
Back 12.5×1 MJ/h 0.98mm
Gas Type: NG
Burner Gas Consumption Injector
Main 11×4 MJ/h 1.50mm
Back 13×1 MJ/h 1.65mm
WARNING: For Built-in Barbecue
1 The minimum clearance to combustibles under fat tray is 150mm
2 The minimum clearance to the sides/rear is 50mm
OUTDOOR
USE ONLY
Model: IBBQBI4B
AGA Certificate No. 8138
Serial No.:
Gas Type:
– Universal LP Gas
– Natural Gas
Test Point pressure:
ULPG- 2.75kPa / NG -1.0kPa
For Electrical Components
AC Adaptor
– Input: 230-240VAC, 50Hz
– Output: 12VAC 5000mA
Cord: 250V, 10A
FOR USE WITH UNIVERSAL GAS
REFER TO YOUR LOCAL GAS AUTHORITY
FOR CONFIRMATION OF THE GAS TYPE,
IF IN NEED
FOR USE WITH NATURAL GAS
REFER TO YOUR LOCAL GAS AUTHORITY
FOR CONFIRMATION OF THE GAS TYPE,
IF IN NEED
Total Nominal Gas Consumption:
ULPG-90.5 MJ/h | NG -79 MJ/h
Gas Type: ULPG
Burner Gas Consumption Injector
Main 13×6 MJ/h 0.98mm
Back 12.5×1 MJ/h 0.98mm
Gas Type: NG
Burner Gas Consumption Injector
Main 11×6 MJ/h 1.50mm
Back 13×1 MJ/h 1.65mm
Model: IBBQBI6B
AGA Certificate No. 8138
Serial No.:
WARNING: For Built-in Barbecue
1 The minimum clearance to combustibles under fat tray is 150mm
2 The minimum clearance to the sides/rear is 50mm
OUTDOOR
USE ONLY
PAGE 21 INALTO.HOUSE
All cleaning and maintenance should be carried out when
the barbecue is cool and with the fuel supply turned OFF at
the gas cylinder after each use.
► DO NOT mistake brown or black accumulation of
grease and smoke for paint. Interiors of gas grills are not
painted at the factory (and should NEVER be painted).
Apply a strong solution of detergent and water or use
a grill cleaner with brush on insides of grill lid and
bottom. Rinse and allow to completely air dry.
► DO NOT apply a caustic grill / oven cleaner to painted
surfaces.
► DO NOT use abrasive or flammable cleaners as it will
damage parts of the product and may start a fire.
Stainless steel surfaces: Stainless steel will corrode if
not maintained. To maintain your grill’s high quality
appearance, wash with mild detergent and warm soapy
water and wipe dry with a soft nonabrasive cloth after each
use. For further information, please refer to our website.
Cooking grid: Use a mild soapy water solution. Non-
abrasive scouring powder can be used on stubborn stains
then rinse with water.
Cleaning the burner assembly
Follow these instructions to clean parts of burner
assembly or if you have trouble igniting grill.
1. Turn gas off at control knobs and LP Tank.
2. Remove cooking grates, grease tray and grease cup.
3. Remove screw and nuts at end of burner using a
spanner.
4. Carefully lift each burner up and away from valve
openings.
5. Wire brush entire outer surface of burner to remove
food residue and dirt.
6. Clean any blocked ports with a stiff wire such as an
open paper clip.
7. Check burner for damage, due to normal wear and
corrosion some holes may become enlarged. If any
large cracks or holes are found replace burner.
8. Carefully refit burners.
9. Replace screw at the end of burner.
10. Replace grease tray and cooking grates.
Inspect burner for any damage (cracks or holes). If damage
is found, replace with a new burner. Reinstall the burner,
check to ensure that the gas valve orifices are correctly
positioned and secured inside the burner inlet.
MAINTENANCE SCHEDULE
No regular maintenance is required for the BBQ except
cleaning. We suggest the following ways to clean the burner
tubes.
(A) Bend a stiff wire into a small hook. Run the hook
through each burner tube and burner, several times.
(B) Use a narrow bottle brush with a flexible handle (DO
NOT use a brass wire brush), run the brush through
each burner tube and burner, several times.
(C) Wear eye protection: use an air hose to force air into
the burner tube and out the air ports. Check each port
to make sure air comes out each hole.
CAUTION
NATURAL HAZARD SPIDERS
FACT: sometimes spiders and other insects climb into
the grill tubes attached to the burners. The spiders spin
webs,build nests and lay eggs. The webs or nests can be
very small,but they are very strong and can block the
flow of gas. Clean burners prior to use after storing, at the
beginning of grilling season or after a period of one month
not being used.
Spider guards are on the air intakes in an effort to reduce
this problem, but it will not eliminate it! An obstruction can
result in a “flashback” (a fire in the burner tubes). The grill
may still light, but the obstruction does not allow full gas
flow to the burners.
Abnormal Operation:
Any of the following are considered to be abnormal
operation and may require service:
► Yellow tipping of the yellow flame
► Shooting up of grill plates
► Burners not igniting properly
► Burners failing to remain alight
► Gas valves, which are difficult to turn
It is recommended the appliance is cleaned after each use,
and inspected yearly by a registered service engineer.
If the appliance cannot be adjusted to perform correctly
contact our Service Team for assistance.
Cleaning & Maintenance
PAGE 22USER MANUAL
Troubleshooting
Tips & Hints
Please read the issues below carefully and try all relevant steps.
If none of this helps, please contact us for further advice or
to schedule a technician to inspect your BBQ.
THE BURNERS WON'T LIGHT
Please check...
That your BBQ is plugged in and there is power to the wall socket.
That the gas supply valve is turned on and the gas supply to your
house is working.
Hint: If you listen closely, you should be able to hear the gas coming
out of a burner when it is turned on. Due to flame failure safety, the
knob must be pressed down once it is turned on — this initiates the
ignition and allows the gas to come out.
That the gas igniters are clean.
Hint: If in doubt, use a toothbrush and a heavy duty cleaner or
methylated spirits to remove any potential build-up or blockage.
That the BBQ has been installed and assembled correctly.
THE BURNER FLAMES ARE SLOW TO START
Please check...
The burner parts may be blocked with water or another substance.
Please contact our Support Team for advice.
If connected to a gas bottle, this may be running low. Check and refill
if required.
The gas pressure may not be set at the correct level. Please contact our
Support Team for advice.
THE COOKING SURFACE IS DIRTY AFTER COOKING
Please note...
Once it has cooled down, your BBQ should be cleaned after every use.
Typically you should only ever need to clean your cooking surface
with warm soapy water, or light cleaning products to assist with the
removal of fat or oil emulsions (such as general cleaning sprays).
Avoid any harsh scourer pads or steel wool, as these can scratch the
stainless steel.
OPERATION IN CASE OF EMERGENCY
Please note, in the event of an emergency you should:
► Switch off all BBQ controls.
► Switch the gas off at the isolation switch or at the gas meter.
► Call our Support Team.
Please note that if an engineer is asked to attend whilst the product is under warranty and finds that the problem
is not the result of an appliance fault, then you may be liable for the cost of the call out charge.

PAGE 23 INALTO.HOUSE
Purchase Details
For future reference, please record the following
information which can be found on the rating plate
and the date of purchase which can be found on
your sales invoice.
STORE DETAILS
STORE NAME
|
ADDRESS
|
TELEPHONE
|
PURCHASE DATE
|
PRODUCT DETAILS
MODEL NO.
|
SERIAL NO.
|
RECEIPT

PAGE 24USER MANUAL
AUSTRALIAN WARRANTY TERMS & CONDITIONS
BBQ APPLIANCES
This document sets out the terms and conditions of the
product warranties for Residentia Group Appliances. It is
an important document. Please keep it with your proof of
purchase documents in a safe place for future reference
should you require service for your Appliance.
1. IN THIS WARRANTY
(a) ‘acceptable quality’ as referred to in clause 10 of this
warranty has the same meaning referred to in the ACL;
(b) ‘ACL’ means Trade Practices Amendment (Australian
Consumer Law) Act (No.2) 2010;
(c) ‘Appliance’ means any Residentia Group product
purchased by you accompanied by this document;
(d) ‘ASR’ means Residentia Group authorised service
representative;
(e) ‘Residentia Group’ means Residentia Group Pty Ltd
of 118 Campbell St, Collingwood VIC, ACN 600 546 656
in respect of Appliances purchased in Australia;
(f ) ‘major failure’ as referred to in clause 10 of this
warranty has the same meaning referred to in the ACL
and includes a situation when an Appliance cannot
be repaired or it is uneconomic for Residentia Group,
at its discretion, to repair an Appliance during the
Warranty Period;
(g) ‘Warranty Period’ means:
(i) where the Appliance is used for personal,
domestic or household use (i.e. normal
single family use) as set out in the instruction
manual, the Appliance is warranted against
manufacturing defects for 24 months, following
the date of original purchase of the Appliance;
(h) ‘you’ means the purchaser of the Appliance not having
purchased the Appliance for re-sale, and ‘your’ has a
corresponding meaning.
2. This warranty only applies to Appliances purchased
and used in Australia and is in addition to (and does
not exclude, restrict, or modify in any way) any non-
excludable statutory warranties in Australia.
3. During the Warranty Period Residentia Group or its
ASR will, at no extra charge if your Appliance is readily
accessible for service, without special equipment
and subject to these terms and conditions, repair or
replace any parts which it considers to be defective.
Residentia Group or its ASR may use remanufactured
parts to repair your Appliance. You agree that any
replaced Appliances or parts become the property
of Residentia Group. This warranty does not apply
to light globes, batteries, filters or similar perishable
parts.
4. Parts and Appliances not supplied by Residentia Group
are not covered by this warranty.
Warranty Information

PAGE 25 INALTO.HOUSE
5. You will bear the cost of transportation, travel and
delivery of the Appliance to and from Residentia
Group or its ASR. If you reside outside of the service
area, you will bear the cost of:
(a) travel of an authorised representative;
(b) transportation and delivery of the Appliance to and
from Residentia Group or its ASR, in all instances,
unless the Appliance is transported by Residentia
Group or its ASR, the Appliance is transported at the
owner’s cost and risk while in transit to and from
Residentia Group or its ASR.
6. Proof of purchase is required before you can make a
claim under this warranty.
7. You may not make a claim under this warranty unless
the defect claimed is due to faulty or defective parts
or workmanship. Residentia Group is not liable in the
following situations (which are not exhaustive):
(a) the Appliance is damaged by:
(i) accident
(ii) misuse or abuse, including failure to properly
maintain or service
(iii) normal wear and tear
(iv) power surges, electrical storm damage or
incorrect power supply
(v) incomplete or improper installation
(vi) incorrect, improper or inappropriate operation
(vii) insect or vermin infestation
(viii) failure to comply with any additional instructions
supplied with the Appliance;
(b) the Appliance is modified without authority from
Residentia Group in writing;
(c) the Appliance’s serial number or warranty seal has
been removed or defaced;
(d) the Appliance was serviced or repaired by anyone
other than Residentia Group, an authorised repairer or
ASR.
8. This warranty, the contract to which it relates and the
relationship between you and Residentia Group are
governed by the law applicable where the Appliance
was purchased.
9. To the extent permitted by law, Residentia Group
excludes all warranties and liabilities (other than as
contained in this document) including liability for any
loss or damage whether direct or indirect arising from
your purchase, use or non use of the Appliance.
10. For Appliances and services provided by Residentia
Group in Australia, the Appliances come with a
guarantee by Residentia Group that cannot be
excluded under the Australian Consumer Law.
You are entitled to a replacement or refund for a
major failure and for compensation for any other
reasonably foreseeable loss or damage. You are also
entitled to have the Appliance repaired or replaced
if the Appliance fails to be of acceptable quality and
the failure does not amount to a major failure. The
benefits to you given by this warranty are in addition
to your other rights and remedies under a law in
relation to the Appliances or services to which the
warranty relates.
11. At all times during the Warranty Period, Residentia
Group shall, at its discretion, determine whether
repair, replacement or refund will apply if an
Appliance has a valid warranty claim applicable to it.
12. Missing parts are not covered by warranty. Residentia
Group reserves the right to assess each request for
missing parts in a case by case basis. Any parts that are
not reported missing in the first week after purchase
will not provide free of charge.
13. To enquire about claiming under this warranty, please
follow these steps:
(a) carefully check the operating instructions, user
manual and the terms of this warranty;
(b) have the model and serial number of the Appliance
available;
(c) have the proof of purchase (e.g. an invoice) available;
(d) telephone the numbers shown below.
14. You accept that if you make a warranty claim,
Residentia Group and its ASR may exchange
information in relation to you to enable Residentia
Group to meet its obligations under this warranty.
IMPORTANT
Before calling for service, please ensure that the steps in
point 13 have been followed.
Telephone contacts
► Service: Please call 1300 11 HELP (4357)
► Spare Parts: Please call 1300 11 SPARE (7727)
Our goods come with guarantees that cannot be excluded under the Australian Consumer Law.
You are entitled to a replacement or refund for a major failure and for compensation for any other
reasonably foreseeable loss or damage. You are also entitled to have the goods repaired or replaced if
the goods fail to be of acceptable quality and the failure does not amount to a major failure.
The Australian Consumer Law requires the
inclusion of the following statement with
this warranty:

This page
is intentionally
left blank

NEW ZEALAND WARRANTY TERMS & CONDITIONS
BBQ APPLIANCES
To help care for your investment, be sure to register your
appliance online. Registration will help you if you need to
arrange service in the future, and serves as a record of your
purchase – including critical information like model number
and serial number – that you can refer to at any time.
Simply visit the below website, or ask your retailer
for help: www.inalto.house/nz/registration
WARRANTY
These products are covered by a warranty for a period of 24
months from the date of purchase, subject to the following
conditions*. The warranty covers rectification free of charge
of any fault arising from defective materials or components,
or faulty workmanship or assembly.
* The conditions above mentioned are:
1. That the purchaser carefully follows all instructions
packed with the product;
2. That the purchaser and/or installer carefully follows
the installation instructions provided and complies
with electrical wiring regulations, gas and/or plumbing
codes;
3. That the purchaser carefully follows instructions
provided in the owner’s handbook relating to the
proper use and care of the product and does not use
the product for any purpose other than the domestic
use for which it has been designed;
4. Commercial use of the product for professional or
industrial purposes will void this warranty.;
5. That the product was purchased and installed in
New Zealand;
6. That this warranty does not extend to:
a) optional glass lids for hobs apart from claims
which relate to mechanical or physical damage
thereof at the date of purchase;
b) ‘consumable’ parts such as light bulbs or filters;
c) damage to ceramic glass caused by liquid
or solid spill-overs, lack of maintenance,
or impact;
d) damage to surface coatings caused by
cleaning or maintenance using products not
recommended by the owner’s handbook;
e) defects caused by normal wear and tear,
accident, negligence, alteration, misuse or
incorrect installations;
f ) a product dismantled, repaired or serviced
by any serviceman other than an authorised
service agent;
g) a product not in possession of the original
purchaser;
h) damage caused by power outages or surges
i) damage caused by pests (eg. rats, cockroaches
etc.)
7. That if the product is a freestanding microwave
oven or small appliance it must be returned to the
dealer/ retailer for servicing. These products, unless
stated otherwise, have a 12 month warranty from
original date of purchase with 24 months on the
microwave magnetron; Waste disposers have a 12
month warranty.
8. The provision of service under this warranty is limited
by a 25km boundary from the retailer where the
product was purchased except for microwaves. Such
travelling outside of these limits will incur commercial
cost to be paid by you, regulated by the number of
kilometres travelled beyond the 25km limit (50km
return trip). Microwaves are to be delivered to the
nearest authorised service agent by the customer.
Please refer to your user manual for any further conditions
that may apply to your specific model.
Nothing herein contained shall be construed in any way
as excluding or limiting your rights under the Consumer
Guarantees Acts 1993.
For Service please visit www.applico.co.nz/service or
contact the dealer/retailer from whom you purchased the
product from or call the 0800 number listed below. If you
are unable to establish the date of purchase, or the fault is
not covered by this warranty, or if the product is found to
be in working order, you will be required to bear all service
call charges.
Registration of this warranty constitutes acceptance of the
terms and conditions of this warranty.
Should you require any assistance, please call Customer
Services on 0800 763 448.
Distributed by Applico Ltd.
www.applico.co.nz
July 2019
After registering your appliance online, we recommend you
fill out the below information for your reference and keep
this warranty card in a safe place.
THIS WARRANTY IS VALID IN NEW ZEALAND ONLY.
Warranty Information

—
WWW.INALTO.HOUSE/FUORI
—