Scan to register
bellakitchenware.com
Steam
Espresso Maker
Instruction Manual and Recipe Guide
Cafetera
Espresso de Vapor
Manual de instrucciones y guía de recetas
35105_Bella_MultiUSA_Steam Espresso_CoffeeMaker_Oatmilk_IM_R7.indd 135105_Bella_MultiUSA_Steam Espresso_CoffeeMaker_Oatmilk_IM_R7.indd 1 2024-09-03 4:54 PM2024-09-03 4:54 PM

35105_Bella_MultiUSA_Steam Espresso_CoffeeMaker_Oatmilk_IM_R7.indd 235105_Bella_MultiUSA_Steam Espresso_CoffeeMaker_Oatmilk_IM_R7.indd 2 2024-09-03 4:54 PM2024-09-03 4:54 PM

1
TABLE OF CONTENTS
IMPORTANT SAFEGUARDS ................................................................................................................................................2-3
ADDITIONAL IMPORTANT SAFEGUARDS ................................................................................................................... 3-4
NOTES ON THE PLUG ..............................................................................................................................................................5
NOTES ON THE CORD.............................................................................................................................................................5
PLASTICIZER WARNING ....................................................................................................................................................... 5
ELECTRIC POWER ......................................................................................................................................................................5
GETTING TO KNOW YOUR STEAM ESPRESSO MAKER ............................................................................................ 6
SAFETY WARNINGS ................................................................................................................................................................ 6
BEFORE USING FOR THE FIRST TIME ................................................................................................................................ 6
BREWING ESPRESSO .............................................................................................................................................................. 7
PREPARING CAPPUCCINO ................................................................................................................................................... 7
USER MAINTENANCE INSTRUCTIONS ............................................................................................................................8
CARE & CLEANING INSTRUCTIONS ..................................................................................................................................8
DESCALING .................................................................................................................................................................................8
STORING INSTRUCTIONS .....................................................................................................................................................8
WARRANTY ................................................................................................................................................................................ 9
ÍNDICE
MEDIDAS IMPORTANTES DE SEGURIDAD ................................................................................................................ 10-11
MEDIDAS IMPORTANTES DE SEGURIDAD ADICIONALES ................................................................................. 11-13
NOTAS SOBRE EL ENCHUFE ...............................................................................................................................................13
NOTAS SOBRE EL CABLE ......................................................................................................................................................13
ADVERTENCIA SOBRE EL ACABADO .............................................................................................................................. 13
ALIMENTACIÓN ELÉCTRICA .............................................................................................................................................. 13
CONOZCA MEJOR SU CAFETERA ESPRESSO DE VAPOR ........................................................................................14
ADVERTENCIAS DE SEGURIDAD ...................................................................................................................................... 14
ANTES DEL PRIMER USO .................................................................................................................................................... 14
PREPARAR ESPRESSO ............................................................................................................................................................ 15
PREPARAR CAPPUCCINO ............................................................................................................................................. 15-16
INSTRUCCIONES DE MANTENIMIENTO PARA EL USUARIO..................................................................................16
INSTRUCCIONES DE LIMPIEZA Y CUIDADO .................................................................................................................16
DESCALCIFICACIÓN ..............................................................................................................................................................16
INSTRUCCIONES DE ALMACENAMIENTO ................................................................................................................. 16
GARANTÍA ................................................................................................................................................................................17
35105_Bella_MultiUSA_Steam Espresso_CoffeeMaker_Oatmilk_IM_R7.indd 135105_Bella_MultiUSA_Steam Espresso_CoffeeMaker_Oatmilk_IM_R7.indd 1 2024-09-03 4:54 PM2024-09-03 4:54 PM

2
IMPORTANT SAFEGUARDS
When using electrical appliances, basic safety precautions shouldalways
be followed, including the following:
1. READ ALL INSTRUCTIONS.
2. Do not touch hot surface. Use handles or knobs only.
3. This appliance is not intended for use by persons (including children) with
reduced physical, sensory or mental capabilities, or lack of experience and
knowledge, unless they have been given supervision or instruction concerning
use of the appliance bya person responsible for their safety.
4. Close supervision is necessary when any appliance is used by or near children.
5. In order to minimize the risk of property damage, never place the Coee
Maker under cabinets. Make sure the area several feet above the Coee
Maker is clear fromall furniture or cabinetry.
6. Do not open water tank lid while coee is brewing. Scalding may occur if
thewatertank lid is removed during the brewing cycle.
7. Do not use outdoors.
8. Unplug unit from outlet when not in use and before cleaning.
Allow unit to cool before putting on or taking o parts, and before cleaning.
9. To protect against re, electrical shock and injury to persons, do not immerse
cord, plugs, or appliance in water or other liquids.
10. Do not operate any appliance with a damaged cord or plug, or aer the
appliance malfunctions, or has been damaged in any manner. Return
appliance to the nearest authorized service facility for examination, repair or
adjustment.
NOTE: DO NOT ATTEMPT TO REPAIR THE UNIT YOURSELF.
THIS WILL VOID THE WARRANTY.
11. The use of accessory attachments not recommended by the appliance
manufacturermay result in re, electric shock or injury to persons.
12. Never move the appliance by pulling the cord. Do not let the cord hang over
the edge of a table or counter or touch hot surfaces.
13. Stand the appliance on a table or at surface.
14. Do not use a cracked glass carafe or a carafe having a loose or weakened
handle.
15. Only use the glass carafe with this appliance. Handle with care as the glass is
very fragile.
16. Snap lid securely onto glass carafe before serving coee.
17. Never use your Coee Maker without water in it.
18. Do not place appliance on or near a hot gas or electric burner or in a heated
oven.
19. The carafe is designed for use with this appliance. It must never be used on a
range top.
20. Do not set hot glass carafe on a wet or cold surface.
21. Do not clean glass carafe with cleaners, steel wool pads, or other abrasive
material.
35105_Bella_MultiUSA_Steam Espresso_CoffeeMaker_Oatmilk_IM_R7.indd 235105_Bella_MultiUSA_Steam Espresso_CoffeeMaker_Oatmilk_IM_R7.indd 2 2024-09-03 4:54 PM2024-09-03 4:54 PM

3
22. Do not use this appliance for other than its intended use.
23. Scalding may occur if the lid is removed during the brewing cycles.
24. To reduce the risk of re, do not mount unit over or near any portion of a
heating orcooking appliance.
25. To reduce the risk of electric shock, do not mount over a sink.
26. To reduce the risk of re, do not store anything directly on top of the appliance
surface when the appliance is in operation.
27. To reduce the risk of Fire or Electric Shock, do not remove bottom cover. No
user serviceable parts inside. Repair should be done by authorized service
personnel only.
28. WARNING: To avoid the risk of injury, do not open the brew chamber during
the brew process.
29. Before using check that the voltage of wall outlet corresponds to rated voltage
marked on the rating plate.
30. This appliance has been incorporated with a Polarized plug. Please ensure the
wall outlet in your house is well grounded.
31. Ensure the power cord does not touch hot surfaces of the appliance.
32. To disconnect, remove plug from wall outlet. Always hold the plug, but never
pull on the cord.
33. Be careful not to get burned by the steam.
34. Do not let the coee maker operate without water.
35. Do not remove the metal lter when the appliance is brewing coee or making
steam.
36. Connect plug to wall outlet before using and turn any switch o before plug is
removed from wall outlet.
37 The room temperature of operating or storing should be more than 0°/32°F,
and be less than 45°/113°F, the environment should be dry and ventilated.
FOR HOUSEHOLD USE ONLY
ADDITIONAL IMPORTANT
SAFEGUARDS
WARNING: This appliance generates heat and escaping steam during use.
Proper precautions must be taken to prevent the risk of burns, res, or other
injury to persons or damage to property.
CAUTION: The Espresso Maker must be allowed to cool down suciently before
addingmore water to avoid splattering.
1. All users of this appliance must read and understand this Instruction Manual
beforeoperating or cleaning this appliance.
2. The cord to this appliance should be plugged into a 120V AC electrical outlet
only.
35105_Bella_MultiUSA_Steam Espresso_CoffeeMaker_Oatmilk_IM_R7.indd 335105_Bella_MultiUSA_Steam Espresso_CoffeeMaker_Oatmilk_IM_R7.indd 3 2024-09-03 4:54 PM2024-09-03 4:54 PM
4
3. Use water only in this appliance! Do not put any other liquids or food products
in this appliance. Do not mix or add anything to the water placed in this
appliance, except as instructed in the Descaling section of this Instruction
Manual.
4. DO NOT attempt to move an appliance containing hot liquids.
Allow appliance to cool completely before moving.
5. Keep appliance at least 4 inches away from walls or other objects during
operation.
6. Place the appliance on a surface that is resistant to heat.
7. If this appliance begins to malfunction during use, turn function knob to
OFF, then immediately unplug the cord. Do not use or attempt to repair the
malfunctioning appliance.
8. If this appliance falls or accidentally becomes immersed in water or any other
liquid, unplug it immediately. Do not reach into the water! Do not use this
appliance aer it has fallen into or has become immersed in water. Contact
Consumer Service for examination and repair.
9. Always use fresh, cool water in your appliance. Warm water or other liquids,
except as described in the descaling section, may cause damage to the
appliance.
10. Turn the control knob to OFF and unplug from the electrical outlet when not
in use and before cleaning. Allow to cool before putting on or taking o parts
and before cleaning the appliance.
11. DO NOT remove the reservoir cap or brew basket until pressure is
completelyrelieved.
12. CAUTION: PRESSURE. In order to check if the appliance is under pressure,
follow these steps:
A. Turn the function knob to the OFF position and unplug the appliance.
B. Rotate the function knob to the
(steam) position. If steam comes out of
the Steam Wand, then the water reservoir is still under pressure.
C. To release the pressure, hold a pitcher of water under the Steam Wand
and immerse the Steam Wand in the water. SLOWLY TURN THE
FUNCTION KNOB TO THE
(STEAM) POSITION AND RELEASE THE
STEAM.
D. When the steam wand stops releasing steam, turn the Function Knob to the
OFF position and slowly remove the cap.
E. Do not remove the Filter Basket at any time during the brewing process or
until pressure is relieved.
F. Use caution when removing the lter basket. The metal parts may still be
very hot. Also, there may be hot water oating on the top of the lter.
G. If coee does not drip from basket, the brew basket is blocked. Allow the
appliance to cool down, then release the steam with the instructions above.
The blockage may be caused by too nely ground coee.
H. When cleaning the steam wand, place a frothing pitcher or large cup
half full of water under the steam wand. Make sure the tip of the frothing
tube is submerged in liquid before turning the function knob to the
(steam) position.
35105_Bella_MultiUSA_Steam Espresso_CoffeeMaker_Oatmilk_IM_R7.indd 435105_Bella_MultiUSA_Steam Espresso_CoffeeMaker_Oatmilk_IM_R7.indd 4 2024-09-03 4:54 PM2024-09-03 4:54 PM

5
SAVE THESE INSTRUCTIONS
NOTES ON THE PLUG
This appliance has a polarized plug. To reduce the risk of electric shock, this plug is
intended to t into a polarized power outlet one way only. If the plug does not t
fully into the power outlet, reverse the plug. If it still does not t, contact a qualied
electrician. Do not attempt to modify the plug in any way.
NOTES ON THE CORD
A. A short power-supply cord (or detached power-supply cord) is provided
to reduce the risk resulting from becoming entangled in or tripping over
a long cord.
B. Longer detachable power-supply cords or extension cords are available
and may be used if care is exercised in their use.
C. If a long detachable power-supply cord or extension cord is used:
1. The marked electrical rating of the cord set or extension cord
should be at least as great as the electrical rating of the appliance;
2. The cord should be arranged so that it will not drape over the
countertop or tabletop where it can be pulled on by children or
tripped over unintentionally; and
3. If the appliance is of the grounded type, the cord set or extension
cord should be a grounding-type 3-wire cord.
PLASTICIZER WARNING
CAUTION: To prevent Plasticizers from migrating to the nish of the counter top or
table top or other furniture, place NONPLASTIC coasters or place mats between
the appliance and the nish of the counter top or table top. Failure to do so may
cause the nish to darken; permanent blemishes may occur or stains can appear.
ELECTRIC POWER
If the electrical circuit is overloaded with other appliances, your appliance may not
operate properly. It should be operated on a separate electrical circuit from other
appliances.
35105_Bella_MultiUSA_Steam Espresso_CoffeeMaker_Oatmilk_IM_R7.indd 535105_Bella_MultiUSA_Steam Espresso_CoffeeMaker_Oatmilk_IM_R7.indd 5 2024-09-03 4:54 PM2024-09-03 4:54 PM
6
13
11
10
9
8
7
6
5
4
3
2
12
14
1
15
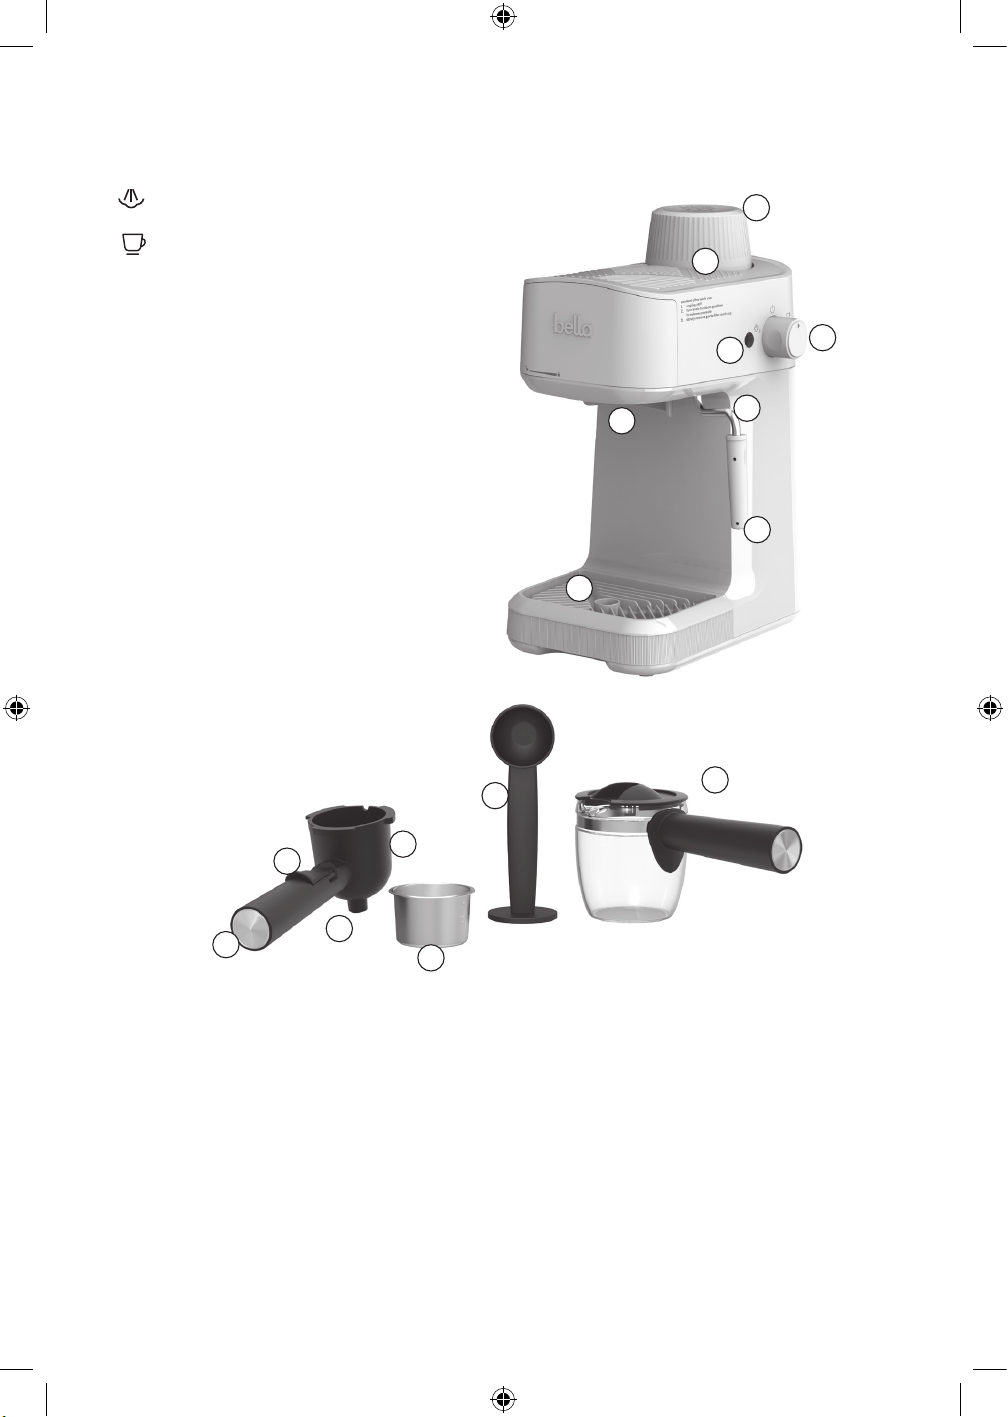
Figure 1
GETTING TO KNOW YOUR ESPRESSO MAKER
Product may vary slightly from illustration.
1. Water Tank Safety Lid
2. Function Knob
(steam)
OFF
(espresso)
3. POWER Light
4. Water Tank (not shown)
5. Brew Head (not shown)
6. Steam Wand
7. “Perfect Froth” Tip
8. Glass Carafe with Lid
9. Removable Drip Tray
10. Measuring Scoop and Tamper Tool
11. Filter Basket
12. Filter Basket Holder
13. Nozzle
14. Security Clip
15. Handle
SAFETY WARNINGS
1. Proper precautions must be made to avoid burns from sprays of hot water or steam.
2. Avoid touching any hot surfaces on the machine or any parts of the filter basket holder, filter basket, or
any parts of the steam wand while the Espresso Maker is in use or after it is just been used to prepare
hotbeverages.
3. To avoid water spillage, it is necessary to wipe the drip tray clean. Lift the drip plate up and off the unit. Empty
water, wipe dry, and replace drip plate. Touchscreen Control
BEFORE USING FOR THE FIRST TIME
1. Before brewing your first cup of espresso, we suggest you pre-clean the machine. Place the Espresso Maker on
a level surface, within close proximity to a sink to discard water.
2. Make sure the Espresso Maker is unplugged.
3. Brew 2 carafes of water without coffee, following the procedures outlined in the Brewing Espresso sectionof
this Instruction Manual. This will thoroughly clean the unit.
35105_Bella_MultiUSA_Steam Espresso_CoffeeMaker_Oatmilk_IM_R7.indd 635105_Bella_MultiUSA_Steam Espresso_CoffeeMaker_Oatmilk_IM_R7.indd 6 2024-09-03 4:54 PM2024-09-03 4:54 PM
7
BREWING ESPRESSO
1. Make sure the function knob is in the OFF position. Plug the Espresso Maker into a 120V AC electrical outlet. The
POWER light should be off.
2. Remove the water tank safety lid by turning it counter-clockwise.
3. To brew fresh espresso, fill glass carafe with 2 to 4 cups of cold water, using the markings on the carafe for
reference. Pour water into the water tank.
4. Turn the water tank safety lid clockwise until it is tightly sealed.
5. If the filter basket holder is locked into the Espresso Maker, remove from the brew head. Grasp the handle
firmly and turn clockwise until the handle faces the left, unlocked position. The filter basket holder will drop
down and out from the brew head.
6. With the measuring spoon, measure ground coffee and place into the filter basket until the“4”level mark
indicated inside the filter. Gently tamp the coffee to pack it. To assure a proper fit intotheEspresso Maker’s
brew head, do not add coffee above this “4” level mark. For best results, use medium ground coffee. Note:
avoid using fine grind or espresso ground coffee as it may cause brewing issues.
7. Place the filter basket into the filter basket holder.
8. Align the filter basket holder with slots up in the Espresso Maker’s brew head.
Turn handle counter-clockwise (to the right) until the filter basket holder is securely locked.
9. Place the cover on the carafe and return the carafe to the Drip Tray Cover. Align hole in lid under nozzle.
10. Turn the function knob to
(espresso). The POWER light will illuminate.
11. A. When brewing only 4 cups of espresso (4 cups of water will be added into the water tank), espresso will
begin to flow into the carafe after approximately 2 minutes.
B. When brewing 4 cups of cappuccino (4 cups of water + 1 steam
level of water will be added into the
water tank), espresso will begin to flow into the carafe after approximately 3 minutes.
NOTE: For cappuccino, refer immediately to the Preparing Cappuccino section in this Instruction Manual.
12. When the coffee has stopped flowing into the carafe, turn the function knob to OFF. The POWER light will turn off.
13. To refill the water tank for additional servings, make sure the water tank is cooled and empty and the POWER
light is off.
CAUTION: This Espresso Maker will continue to heat water under pressure until the water tank is empty. Before
removing the Filter Holder, or the water tank safety lid, turn the function knob to
(steam) . Whenno further
steam is emitted from the steam jet, turn the function knob OFF. The POWER light will turn off.
CAUTION: To avoid scalding or burns, do not open the water tank safety lid or remove the Filter Holder during
the brewing process, or when the POWER light is illuminated.
PREPARING CAPPUCCINO
Cappuccino is a delicious blend of espresso, steamed milk and frothed milk.
CAUTION: To avoid scalding or burns, do not open the water tank safety lid or remove the Filter Holder duringthe
brewing process or when the POWER light is illuminated.
NOTE: To prepare 4 cups of cappuccino, ll the carafe with 4 cups of cool, clean water for espresso + 1 steam
level
of water for steaming.
1. Follow the detailed procedures for brewing espresso outlined in this Instruction Manual.
This should be added making reference to the previous espresso description.
2. While espresso coffee is brewing, fill a deep, metal or ceramic pitcher half full with fresh, cold skim milk and
place it next to the Espresso Maker.
3. Once espresso coffee has finished brewing to the desired 4 cup mark on the Glass Carafe, turn the function
knob to OFF.
4. Hold the pitcher by the handle and bring up to the steam jet. Insert the “Perfect Froth” tip just underthesurface
of the milk. Turn the function knob gradually to
(steam). Move the pitcher inaslightly circular motion, and
continue to froth the milk.
REMINDER: To avoid splattering, the tip must remain just under the surface of the milk.
Otherwise, splattering may occur.
IMPORTANT: When frothing milk, the volume of milk will double. The top half will be frothed, the bottom half
will be milk.
5. After frothing, turn the function knob back to OFF.
6. Remove the pitcher from the steam jet.
CAUTION: Before removing the Filter Holder, or the water tank safety lid, turn the function knob to
(steam)
and wait until no further steam is emitted from the steam jet. This will allow any extra steam to be released and
will clean the steam jet of any excess milk. Then turn the function knob back to theOFFposition.
7. Fill a cappuccino cup 1/3 full of freshly brewed espresso. Pour in an equal amount of warm milk and a
spoonfrothed milk on top.
8. Dust froth with cocoa powder, fresh grated nutmeg or cinnamon and enjoy a delicious, freshly brewed
cappuccino.
35105_Bella_MultiUSA_Steam Espresso_CoffeeMaker_Oatmilk_IM_R7.indd 735105_Bella_MultiUSA_Steam Espresso_CoffeeMaker_Oatmilk_IM_R7.indd 7 2024-09-03 4:54 PM2024-09-03 4:54 PM
8
USER MAINTENANCE INSTRUCTIONS
This appliance requires little maintenance. It contains no user serviceable parts. Do not try to repair it yourself. Any
servicing requiring disassembly must be performed by a qualied appliance repair technician.
CARE & CLEANING INSTRUCTIONS
CAUTION: NEVER IMMERSE THE ESPRESSO MAKER IN WATER OR ANY OTHER LIQUID.
1. Unplug the Espresso Maker from the electrical outlet and allow to cool completely before cleaning.
CAUTION: The Espresso Maker creates hot water and steam under pressure. To avoid burns on fingers
or hands, always make sure the POWER light is off. NEVER touch the filter basket holder or steam wand
immediately after brewing or steaming. Allow all parts to cool thoroughly before touching.
IMPORTANT: The filter basket holder and filter basket should be emptied and rinsed thoroughly
withwarmwater after every use.
2. Grasp the filter basket holder handle firmly and turn clockwise until the handle faces the left, unlocked position.
The filter basket holder will drop down and out of the unit.
3. Remove the filter basket and empty the used coffee grounds.
4. If necessary, clean the filter basket with a kitchen brush. A pin may be used to clear clogged holes ofeither
filter basket or the steam wand. Dry thoroughly.
5. Remove the drip plate. Empty water from drip tray. Dry with a clean cloth.
6. Rinse and replace clean drip plate.
7. Wipe the outside of the Espresso Maker and the steam wand with a damp cloth.
WARNING: Never use solvents or any detergents that may scratch or damage the surface of the machine.
8. Clean the carafe and carafe lid with warm, soapy water. Handle with extreme care, as glass will become
slippery when wet.
DESCALING
Minerals and calcium found in hard-water areas can accumulate and aect the operation of your machine. Depending
on water conditions and frequency of use, your Espresso Maker should be cleaned with distilled vinegar approximately
every 3 months to remove scale.
1. Before cleaning your Espresso Maker, make sure the function knob is in the OFF position and the appliance has
been disconnected from the wall outlet.
2. Fill the carafe with 1 part white vinegar to 3 parts cold water. Pour water and vinegar solution into thewater
reservoir.
3. Securely fasten the water tank safety lid.
4. Attach empty coffee filter basket and holder.
5. Place carafe onto drip plate.
6. Plug the Espresso Maker into 120V AC electrical outlet.
7. Turn function knob to
(espresso). In a few minutes, the hot vinegar will start to flow through
thecoffeebasket into the carafe.
8. Place steam jet into a tall glass or mug. Move function knob to
(steam) position during the flowing toclean
any residue left in the tube from the milk steaming process.
9. Turn function knob back to
(espresso), permitting the hot vinegar to continue to flow
in the carafe.
10. When the flow has stopped, turn function knob to OFF position and allow to cool completely. Make sure the
POWER light is off. Then remove filter basket holder, carafe and rinse with hot water.
11. Repeat above steps using cold water to rinse any residual vinegar. Repeat twice.
12. Unplug the Espresso Maker from the wall outlet.
STORING INSTRUCTIONS
1. Make sure unit is unplugged and fully cooled before storing.
WARNING: Never store Espresso Maker while it is hot or still plugged in.
2. Do not put any stress on cord where it enters unit, as this could cause cord to fray and break.
3. Store the Espresso Maker in its box, in a clean, dry area.
35105_Bella_MultiUSA_Steam Espresso_CoffeeMaker_Oatmilk_IM_R7.indd 835105_Bella_MultiUSA_Steam Espresso_CoffeeMaker_Oatmilk_IM_R7.indd 8 2024-09-03 4:54 PM2024-09-03 4:54 PM

9
SENSIO Inc. hereby warrants that for a period of TWO YEARS from the date of purchase,
this product will be free from mechanical defects in material and workmanship, and
for 90 days in respect to non-mechanical parts. At its sole discretion, SENSIO Inc. will
either repair or replace the product found to be defective, or issue a refund on the
product during the warranty period.
The warranty is only valid for the original retail purchaser from the date of initial retail
purchase and is not transferable. Keep the original sales receipt, as proof of purchase is
required to obtain warranty validation. Retail stores selling this product do not have the
right to alter, modify, or in any way revise the terms and conditions of the warranty.
EXCLUSIONS:
The warranty does not cover normal wear of parts or damage resulting from any of the
following: negligent use of the product, use of improper voltage or current, improper
routine maintenance, use contrary to the operating instructions, disassembly, repair, or
alteration by anyone other than qualied SENSIO Inc. personnel. Also, the warranty
does not cover Acts of God such as re, oods, hurricanes, or tornadoes.
SENSIO Inc. shall not be liable for any incidental or consequential damages caused
by the breach of any express or implied warranty. Apart from the extent prohibited
by applicable law, any implied warranty of merchantability or tness for a particular
purpose is limited in time to the duration of the warranty. Some states, provinces or
jurisdictions do not allow the exclusion or limitation of incidental or consequential
damages, or limitations on how long an implied warranty lasts, and therefore, the
above exclusions or limitations may not apply to you. The warranty covers specic legal
rights which may vary by state, province and/or jurisdiction.
HOW TO OBTAIN WARRANTY SERVICE:
You must contact Customer Service at our toll-free number: 1-866-832-4843.
A Customer Service Representative will attempt to resolve warranty issues over the
phone. If the Customer Service Representative is unable to resolve the problem, you will
be provided with a case number and asked to return the product to SENSIO Inc. Attach
a tag to the product that includes: your name, address, daytime contact telephone
number, case number, and description of the problem. Also, include a copy of the
original sales receipt. Carefully package the tagged product with the sales receipt,
and send it (with shipping and insurance prepaid) to SENSIO Inc.’s address. SENSIO
Inc. shall bear no responsibility or liability for the returned product while in transit to
SENSIOInc.’s Customer Service Center.
LIMITED TWO-YEAR WARRANTY
35105_Bella_MultiUSA_Steam Espresso_CoffeeMaker_Oatmilk_IM_R7.indd 935105_Bella_MultiUSA_Steam Espresso_CoffeeMaker_Oatmilk_IM_R7.indd 9 2024-09-03 4:54 PM2024-09-03 4:54 PM

10
MEDIDAS IMPORTANTES DE
SEGURIDAD
Al utilizar electrodomésticos, se deben tomar siempre precauciones de seguridad
básicas, incluidas las siguientes:
1. LEA TODAS LAS INSTRUCCIONES.
2. No tocar supercies calientes. Utilice solo las asas o las perillas.
3. Este aparato no está diseñado para que lo utilicen personas (incluidos niños)
con capacidades físicas, sensoriales o mentales limitadas, ni con falta de
experiencia o conocimiento, a menos que hayan recibido instrucciones o estén
bajo supervisión en el uso del aparato por parte de una persona responsable
de su seguridad.
4. Es necesaria una estrecha supervisión cuando los niños utilizan un aparato o si
este se utiliza cerca de ellos.
5. Para minimizar el riesgo de que se produzcan daños materiales, no coloque
nunca la cafetera debajo de armarios. Asegúrese de que haya una separación
vertical aceptable de varios pies de distancia entre la cafetera y muebles o
armarios.
6. No abra ninguna tapa mientras se está preparando el café. Pueden producirse
quemaduras si se quita la tapa del tanque de agua durante el ciclo de
preparación.
7. No utilizar en exteriores.
8. Desenchufe la unidad del tomacorriente cuando no lo utilice y antes de
limpiarlo. Deje que la unidad se enfríe antes de poner o quitar piezas y antes
de limpiarla.
9. Para protegerse contra incendios, descargas eléctricas y lesiones a las
personas, no sumerja el cable, los enchufes o el aparato en agua u otro
líquido.
10. No utilice un aparato con un cable o enchufe dañados, después de una avería
o si se dañó de cualquier manera. Devuelva el aparato al centro de servicio
técnico autorizado más cercano para su revisión, reparación o ajuste.
NOTA: NO INTENTE REPARAR LA UNIDAD POR SU CUENTA, ESTO
ANULARÁ LA GARANTÍA.
11. El uso de accesorios no recomendados por el fabricante del aparato puede
ocasionar incendios, descargas eléctricas o lesiones.
12. Nunca mueva el aparato tirando del cable. No deje que el cable cuelgue
sobre el borde de una mesa o mostrador, ni que toque las supercies calientes.
13. Coloque el aparato sobre una mesa o una supercie plana.
14. No utilice una jarra de vidrio agrietada o una jarra con el asa oja o dañada.
15. Solo use la jarra de vidrio con este aparato. Trátela con cuidado, ya que el
vidrio es delicado.
16. Ponga la tapa en la jarra de vidrio antes de servir el café.
17. No use nunca la cafetera sin agua.
18. No coloque el aparato sobre o cerca de un hornillo eléctrico o a gas, o en un
horno caliente.
35105_Bella_MultiUSA_Steam Espresso_CoffeeMaker_Oatmilk_IM_R7.indd 1035105_Bella_MultiUSA_Steam Espresso_CoffeeMaker_Oatmilk_IM_R7.indd 10 2024-09-03 4:54 PM2024-09-03 4:54 PM

11
19. La jarra se diseñó para utilizarse con este aparato. Nunca se debe utilizar
sobre una estufa.
20. No ponga la jarra de vidrio caliente sobre una supercie húmeda o fría.
21. No limpie la jarra de vidrio con limpiadores, estropajos de lana de acero u
otro material abrasivo.
22. No utilice este aparato para otro uso que no sea el indicado.
23. Pueden producirse quemaduras si se levanta la tapa durante el ciclo de
preparación del café.
24. Para reducir el riesgo de incendio, no monte la unidad sobre o cerca de
ninguna parte de un aparato de calefacción o de cocinar.
25. Para reducir el riesgo de descarga eléctrica, no lo coloque sobre un fregadero.
26. Para reducir el riesgo de incendio, no ponga nada directamente encima de la
supercie del aparato cuando esté en funcionamiento.
27. Para reducir el riesgo de incendios o de descargas eléctricas, no quite la
cubierta inferior. No hay piezas que el usuario pueda reparar adentro. La
reparación la debe realizar solo el personal autorizado del servicio técnico.
28. ADVERTENCIA: Para evitar el riesgo de lesión, no abra la cámara de
preparación mientras está preparando café.
29. Antes de usar, verique que el voltaje del tomacorriente de pared corresponda
al que se muestra en la placa de clasicación.
30. Este aparato tiene un enchufe polarizado integrado. Asegúrese de que el
tomacorriente de pared de su hogar esté bien conectado a tierra.
31. Asegúrese de que el cable de alimentación no toque las supercies calientes
del aparato.
32. Para desconectar, saque el enchufe del tomacorriente de pared. Siempre tome
del enchufe y nunca jale del cable.
33. Tenga cuidado de no quemarse con el vapor.
34. No deje que la cafetera funcione sin agua.
35. No quite el ltro de metal mientras el aparato está preparando café o
emitiendo vapor.
36. Conecte el enchufe al tomacorriente de pared antes de usar y apague los
interruptores antes de quitar el enchufe del tomacorriente.
37. La temperatura ambiente de operación o almacenamiento debe ser superior a
0°C/32°F, e inferior a 45°C/113°F. El ambiente debe estar seco y ventilado.
SOLO PARA USO DOMÉSTICO
MEDIDAS DE SEGURIDAD
IMPORTANTES ADICIONALES
ADVERTENCIA: Este aparato genera calor y emite vapor durante el uso.
Se deben tomar las precauciones adecuadas para prevenir el riesgo de
quemaduras, incendios u otros daños personales o materiales.
35105_Bella_MultiUSA_Steam Espresso_CoffeeMaker_Oatmilk_IM_R7.indd 1135105_Bella_MultiUSA_Steam Espresso_CoffeeMaker_Oatmilk_IM_R7.indd 11 2024-09-03 4:54 PM2024-09-03 4:54 PM
12
PRECAUCIÓN: Debe dejar que la cafetera espresso se enfríe lo suciente antes
de agregar más agua y evitar salpicaduras.
1. Todos los usuarios de este aparato deben leer y comprender el manual de
instrucciones antes de utilizar o limpiar el aparato.
2. El cable de este aparato se debe enchufar solamente a un tomacorriente de
120 voltios de CA.
3. ¡Use agua solamente con este aparato! No vierta otros líquidos o productos
alimenticios en el aparato. No mezcle ni agregue nada al agua que añada
al aparato, excepto como se indica en las instrucciones en la sección de
Descalcicación de este Manual de instrucciones.
4. NO intente mover un aparato que contenga líquidos calientes. Deje que el
aparato se enfríe completamente antes de moverlo.
5. Mantenga el aparato a al menos 4 pulgadas de las paredes u otros objetos
cuando está en funcionamiento.
6. Coloque el aparato sobre una supercie resistente al calor.
7. Si este aparato comienza a funcionar de forma incorrecta, lleve la perilla de
función a OFF y desenchufe de inmediato el cable. No utilice ni intente reparar
al aparato averiado.
8. Si este aparato cae o por accidente se sumerge en agua u otro líquido,
desenchúfelo inmediatamente. ¡No toque el agua! No utilice este aparato si
se cayó o se sumergió en agua. Comuníquese con el Servicio al Cliente para su
revisión y reparación.
9. Use siempre agua potable y fresca en el aparato. Usar agua tibia u otros
líquidos, excepto como se describe en la sección de descalcicación, puede
dañar el aparato.
10. Gire la perilla de control a OFF y desenchúfelo del tomacorriente cuando no lo
utilice y antes de limpiarlo. Deje que se enfríe antes de poner o quitar piezas y
antes de limpiar el aparato.
11. NO quite la tapa del depósito ni la canasta de preparación hasta que la
presión se libere por completo.
12. PRECAUCIÓN: PRESIÓN. Para vericar si el aparato está bajo presión, siga
estos pasos:
A. Gire la perilla de función a la posición OFF y desenchufe el aparato.
B. Gire la perilla de función a la posición de
(vapor). Si sale vapor por la
varilla de vapor, el depósito de agua todavía conserva presión.
C. Para liberar la presión, sostenga una jarra de agua debajo de la varilla de
vapor y sumerja la varilla de vapor en agua. GIRE DESPACIO LA PERILLA
DE FUNCIÓN A LA POSICIÓN DE
(VAPOR) Y LIBERE EL VAPOR.
D. Cuando la varilla de vapor deje de liberar vapor, gire la perilla de función
a la posición OFF y quite la tapa lentamente.
E. No quite la canasta del ltro durante el proceso de preparación o hasta
que se alivie la presión.
F. Tenga cuidado al quitar la canasta del ltro. Las piezas de metal aún
podrían estar muy calientes. Además, habrá agua caliente otando
encima del ltro.
35105_Bella_MultiUSA_Steam Espresso_CoffeeMaker_Oatmilk_IM_R7.indd 1235105_Bella_MultiUSA_Steam Espresso_CoffeeMaker_Oatmilk_IM_R7.indd 12 2024-09-03 4:54 PM2024-09-03 4:54 PM

13
G. Si no gotea café por la canasta, la canasta de preparación está
bloqueada. Deje que el aparato se enfríe y luego libere el vapor siguiendo
las instrucciones anteriores. El bloqueo podría deberse a un café molido
muy no.
H. Cuando limpie la varilla de vapor, coloque una jarra de texturizado o una
taza grande medio llena de agua debajo de la varilla de vapor. Asegúrese
de que la punta del tubo de texturizado esté sumergida en líquido antes
de girar la perilla de función a la posición de vapor.
GUARDE ESTAS INSTRUCCIONES
NOTAS SOBRE EL ENCHUFE
Este aparato posee un enchufe polarizado. Para reducir el riesgo de descarga
eléctrica, este enchufe solo encajará en un tomacorriente polarizado de una
sola manera. Si el enchufe no entra completamente en el tomacorriente, gire el
enchufe. Si aun así no encaja, contacte a un técnico electricista calicado. No
intente modicar el enchufe de ninguna manera.
NOTAS SOBRE EL CABLE
A. Se proporciona un cable de alimentación corto (o un cable de alimentación
desconectable) para reducir el riesgo de enredarse o tropezarse con un cable
largo.
B. Hay disponibles cables de alimentación desconectables más largos o cables
de extensión, y estos se pueden utilizar si se tiene cuidado en su uso.
C. Si se utiliza un cable de alimentación desconectable largo o un cable de
extensión:
1. La clasicación eléctrica marcada en el cable de alimentación
desconectable o cable de extensión deberá ser al menos igual a la
clasicación eléctrica del aparato.
2. El cable debe colocarse de manera que no cuelgue de una encimera o
mesa de donde los niños pudieran jalarlo o tropezar con él
accidentalmente.
3. Si el aparato es del tipo con conexión a tierra, el conjunto de cables o el
cable de extensión deberá ser un cable de 3 hilos con conexión a tierra.
ADVERTENCIA SOBRE EL ACABADO
PRECAUCIÓN: Para evitar que el acabado de las encimeras, mesas u otros
muebles se dañe, ponga posavasos o tapetes NO PLÁSTICOS entre estos y el
aparato. No hacerlo puede provocar que el acabado se oscurezca; provocar
imperfecciones permanentes o pueden aparecer manchas.
ALIMENTACIÓN ELÉCTRICA
Si el circuito eléctrico está sobrecargado con otros aparatos, este aparato podría
no funcionar correctamente. Debe utilizarse en un circuito eléctrico diferente al de
otros electrodomésticos.
35105_Bella_MultiUSA_Steam Espresso_CoffeeMaker_Oatmilk_IM_R7.indd 1335105_Bella_MultiUSA_Steam Espresso_CoffeeMaker_Oatmilk_IM_R7.indd 13 2024-09-03 4:54 PM2024-09-03 4:54 PM

14
13
11
10
9
8
7
6
5
4
3
2
12
14
1
15
Figura 1
CONOZCA SU CAFETERA DE ESPRESSO
El producto puede diferir ligeramente del que aparece en la ilustración.
1 Tapa de seguridad del depósito de agua
2. Perilla de función
(vapor)
OFF (apagado)
(espresso)
3. Luz POWER (Alimentación)
4. Depósito de agua (no se muestra)
5. Cabezal de preparación (no se muestra)
6. Varilla de vapor
7. Punta de “Texturizado perfecto”
8. Jarra de vidrio con tapa
9. Bandeja de goteo extraíble
10. Cuchara de medición y apisonador
11. Canasta del filtro
12. Soporte de la canasta del filtro
13. Boquilla
14. Clip de seguridad
15. Asa
ADVERTENCIAS DE SEGURIDAD
1. Se deben tomar las precauciones adecuadas para evitar quemaduras por la salpicadura del agua caliente o
vapor.
2. Evite tocar superficies calientes de la máquina o piezas del soporte de la canasta del filtro, la canasta de filtro
o las piezas de la varilla de vapor mientras está usando la cafetera espresso o apenas después de usarla para
preparar bebidas calientes.
3. Para evitar derrames de agua, es necesario limpiar la bandeja de goteo. Levante la bandeja de goteo y quítela
de la unidad. Vacíe el agua, seque y vuelva a colocarla. Pantalla táctil de control
ANTES DEL PRIMER USO
1. Antes de preparar la primera taza de espresso, le sugerimos limpiar la máquina. Coloque la cafetera espresso
sobre una superficie nivelada, cerca de un lavabo para desechar el agua.
2. Asegúrese de que la cafetera espresso esté desenchufada.
3. Prepare 2 jarras de agua sin café, tal como indican los procedimientos en la sección Preparar espresso de este
manual de instrucciones. Esto limpiará por completo la unidad.
35105_Bella_MultiUSA_Steam Espresso_CoffeeMaker_Oatmilk_IM_R7.indd 1435105_Bella_MultiUSA_Steam Espresso_CoffeeMaker_Oatmilk_IM_R7.indd 14 2024-09-03 4:54 PM2024-09-03 4:54 PM
15
PREPARAR ESPRESSO
1. Asegúrese de que la perilla de función posición OFF. Enchufe la cafetera espresso en un tomacorriente de
120V CA. La luz POWER debe estar apagada.
2. Quite la tapa de seguridad del tanque de agua girándola en sentido antihorario.
3. Para preparar espresso fresco, llene la jarra de vidrio con entre 2 y 4 tazas de agua fría. Use las marcas en la
jarra como referencia. Vierta agua en el tanque de agua.
4. Gire la tapa de seguridad del tanque de agua en sentido horario hasta que se selle.
5. Si el soporte de la canasta del filtro está fijada a la cafetera espresso, quítela del cabezal de preparación.
Tome el asa con firmeza y gire en sentido horario hasta que el asa esté orientada hacia la izquierda, la
posición desbloqueada. El soporte de la canasta del filtro se desenganchará del cabezal de preparación.
6. Con la cuchara de medición, mida el café molido y colóquelo en la canasta del filtro hasta la marca de nivel
“4” que se encuentra dentro del filtro. Pisonee con suavidad el café para comprimirlo. Para garantizar que el
cabezal de preparación encaje bien en la cafetera espresso, no agregue café por encima de la marca de nivel
“4”. Para obtener mejores resultados, use un café de molido medio. Nota: Evite usar café o espresso de molido
fino ya que podría causar problemas durante la preparación.
7. Coloque la canasta del filtro en el soporte de la canasta del filtro.
8. Alinee el soporte de la canasta del filtro con las ranuras hacia arriba en el cabezal de preparación de la
cafetera espresso. Gire el asa en sentido antihorario (hacia la derecha) hasta que el soporte de la canasta del
filtro esté bien bloqueado.
9. Coloque la cubierta sobre la jarra y vuelva a colocar la jarra en la cubierta de la bandeja de goteo. Alinee el
orificio en la tapa debajo de la boquilla.
10. Gire la perilla de función a
(espresso). Se iluminará la luz POWER.
11. A. Cuando prepare solo 4 tazas de espresso (agregará 4 tazas de agua al tanque de agua), comenzará a fluir
espresso a la jarra después de aproximadamente 2 minutos.
B. Cuando prepare 4 tazas de cappuccino (agregará 4 tazas de agua + 1 nivel de
vapor de agua al
tanque de agua), comenzará a fluir espresso a la jarra después de aproximadamente 3 minutos.
NOTA: Para cappuccino, consulte inmediatamente la sección Preparar cappuccino en este Manual de
instrucciones.
12. Cuando el café haya dejado de fluir a la jarra, gire la perilla de función a OFF. La luz POWER se apagará.
13. Para volver a llenar el tanque de agua y servir más café, asegúrese de que el tanque de agua esté frío y vacío,
y que la luz POWER esté apagada.
PRECAUCIÓN: La cafetera espresso seguirá calentando agua bajo presión hasta que el tanque de agua esté
vacío. Antes de quitar el soporte del filtro, o la tapa de seguridad del tanque de agua, gire la perilla de función
a
(vapor). Cuando no salga más vapor del chorro de vapor, gire la perilla de función a OFF. La luz POWER
se apagará.
PRECAUCIÓN: Para evitar escaldadas o quemaduras, no abra la tapa de seguridad del tanque de agua ni
quite el soporte del filtro durante el proceso de preparación o mientras la luz POWER esté encendida.
PREPARAR CAPPUCCINO
El cappuccino es una mezcla deliciosa de espresso, leche vaporizada y leche texturizada.
PRECAUCIÓN: Para evitar escaldadas o quemaduras, no abra la tapa de seguridad del tanque de agua ni quite el
soporte del ltro durante el proceso de preparación o mientras la luz POWER esté encendida.
NOTA: Para preparar 4 tazas de cappuccino, llene la jarra con 4 tazas de agua fría para espresso + 1 nivel de
(vapor) de agua para vaporizar.
1. Siga los procedimientos detallados para preparar espresso delimitados en este Manual de instrucciones. Esto
debe considerarse referencia adicional a la descripción anterior de espresso.
2. Mientras se prepara el café espresso, llene hasta la mitad una jarra profunda de metal o cerámica con leche
descremada fría y colóquela junto a la cafetera espresso.
3. Cuando la cafetera espresso haya terminado de preparar, llegando a la marca deseada de 4 tazas en la jarra
de vidrio, gire la perilla de función a OFF.
4. Sujete la jarra por el asa y súbala hacia el chorro de vapor. Inserte la punta de “Texturizado perfecto” justo
debajo de la superficie de la leche. Gire la perilla de función despacio a
(vapor). Mueva la jarra en
círculos y siga para texturizar la leche.
RECORDATORIO: Para evitar salpicaduras, la punta debe permanecer apenas debajo de la superficie de la
leche. De lo contrario, se producirán salpicaduras.
IMPORTANTE: Al texturizar la leche, su volumen se duplicará. La mitad superior será texturizada y la mitad
inferior será leche.
5. Después de texturizar, gire la perilla de función de regreso a OFF.
6. Quite la jarra del chorro de vapor.
PRECAUCIÓN: Antes de quitar el soporte del filtro, o la tapa de seguridad del tanque de agua, gire la perilla
de función a
(vapor) y espere hasta que no salga más vapor del chorro de vapor. Esto permitirá que se
35105_Bella_MultiUSA_Steam Espresso_CoffeeMaker_Oatmilk_IM_R7.indd 1535105_Bella_MultiUSA_Steam Espresso_CoffeeMaker_Oatmilk_IM_R7.indd 15 2024-09-03 4:54 PM2024-09-03 4:54 PM
16
libere el vapor adicional y limpiará el chorro de vapor en caso de haber restos de leche. Luego gire la perilla
de función de regreso a OFF.
7. Llene 1/3 de una taza de cappuccino con espresso recién preparado. Vierta una cantidad igual de leche
caliente y una cuchara de leche texturizada encima.
8. Vierta texturizado con polvo de cacao, nuez moscada recién rallada o canela y disfrute de un cappuccino
delicioso y recién preparado.
INSTRUCCIONES DE MANTENIMIENTO PARA EL USUARIO
Este aparato requiere poco mantenimiento. No contiene piezas que el usuario pueda reparar. No intente repararla
por cuenta propia. Cualquier mantenimiento que requiera desarmarlo debe ser realizado por un técnico calicado en
reparación de electrodomésticos.
INSTRUCCIONES DE LIMPIEZA Y CUIDADO
PRECAUCIÓN: NUNCA SUMERJA LA CAFETERA ESPRESSO EN AGUA U OTRO LÍQUIDO.
1. Desenchufe la cafetera espresso del tomacorriente y deje que se enfríe completamente antes de limpiarla.
PRECAUCIÓN: La cafetera espresso genera mucha agua caliente y vapor a presión. Para evitar quemaduras
en dedos y manos, siempre asegúrese de que la luz POWER esté apagada. NUNCA toque el soporte de la
canasta de filtro o la varilla de vapor apenas termine de preparar o vaporizar. Deje que todas las piezas se
enfríen bien antes de tocarlas.
IMPORTANTE: El soporte de la canasta del filtro y la canasta de filtro deben vaciarse y enjuagarse bien con
agua caliente después de cada uso.
2. Tome el asa del soporte de la canasta del filtro con firmeza y gire en sentido horario hasta que el asa esté
orientada hacia la izquierda, la posición desbloqueada. El soporte de la canasta del filtro se desenganchará
de la unidad.
3. Quite la canasta de filtro y deseche el café usado.
4. De ser necesario, limpie la canasta del filtro con un cepillo de cocina. Se puede usar un pasador para limpiar
los orificios tapados de la canasta del filtro o de la varilla de vapor. Seque bien.
5. Quite la bandeja de goteo. Vacíe el agua de la bandeja de goteo. Seque con un paño limpio.
6. Enjuague y vuelva a colocar la bandeja de goteo limpia.
7. Limpie el exterior de la cafetera espresso y de la varilla de vapor con un paño húmedo.
ADVERTENCIA: Nunca use solventes ni detergentes que puedan rayar o dañar la superficie de la máquina.
8. Lave la jarra y la tapa de la jarra con agua tibia y jabón. Manipule con extremo cuidado, ya que el vidrio
puede ser resbaladizo mientras está húmedo.
DESCALCIFICACIÓN
Los minerales y la cal que se encuentran en las zonas de agua dura pueden acumularse y afectar el funcionamiento de
su máquina. Según las condiciones del agua y la frecuencia de uso, su cafetera espresso debe limpiarse con vinagre
destilado para eliminar la cal aproximadamente cada 3 meses.
1. Antes de limpiar la cafetera espresso, asegúrese de que el selector de control de función esté en posición OFF y
que el aparato esté desconectado del tomacorriente.
2. Llene la jarra con 1 parte de vinagre blanco y 3 partes de agua fría. Vierta la solución de agua y vinagre en el
depósito de agua.
3. Asegure bien la tapa de seguridad del tanque de agua.
4. Fije el soporte y la canasta del filtro de café vacía.
5. Coloque la jarra en la placa de goteo.
6. Enchufe la cafetera espresso en un tomacorriente de 120 V CA.
7. Gire la perilla de función a
(espresso). En pocos minutos, el vinagre caliente comenzará a fluir por la
canasta de café hacia la jarra.
8. Coloque el chorro de vapor en un vaso o taza alta. Mueva la perilla de función a la posición de
(vapor)
durante el flujo para limpiar los residuos restantes en el tubo del proceso de vaporizar leche.
9. Gire la perilla de función de regreso a
(espresso) para permitir que el vinagre caliente siga fluyendo hacia
la jarra.
10. Cuando se haya detenido el flujo, gire la perilla de función a la posición OFF y deje que se enfríe por completo.
Asegúrese de que la luz POWER esté apagada. Luego quite el soporte de la canasta del filtro, la jarra y
enjuague con agua caliente.
11. Repita los pasos anteriores con agua fría para enjuagar los restos de vinagre. Repita dos veces.
12. Desenchufe la cafetera espresso del tomacorriente de pared.
INSTRUCCIONES DE ALMACENAMIENTO
1. Asegúrese de que la unidad esté desenchufada y completamente fría antes de guardarla.
ADVERTENCIA: Nunca guarde la cafetera espresso mientras esté caliente o enchufada.
2. No ejerza presión sobre el cable donde entra en la unidad, ya que esto podría deshilacharlo y romperlo.
3. Guarde la cafetera espresso en su caja, en un lugar limpio y seco.
35105_Bella_MultiUSA_Steam Espresso_CoffeeMaker_Oatmilk_IM_R7.indd 1635105_Bella_MultiUSA_Steam Espresso_CoffeeMaker_Oatmilk_IM_R7.indd 16 2024-09-03 4:54 PM2024-09-03 4:54 PM

17
Mediante la presente, SENSIO Inc. garantiza que, durante el plazo de DOS AÑOS a partir
de la fecha de compra, este producto no presentará defectos mecánicos en el material
ni en la mano de obra, y durante 90 días, no los presentará en las piezas no mecánicas.
A su entera discreción, SENSIO Inc. reparará o reemplazará el producto que resulte
defectuoso, o emitirá un reembolso por el producto durante el plazo de garantía.
Esta garantía es válida únicamente para el comprador minorista original a partir de
la fecha de compra minorista inicial y no es transferible. Conserve el recibo de compra
original, ya que se exige una prueba de compra para obtener la validación de la garantía.
Las tiendas minoristas no tienen derecho a alterar, modicar ni corregir de ninguna
manera los términos y condiciones de la garantía.
EXCLUSIONES:
La garantía no cubre el desgaste normal de las piezas ni el daño ocasionado por
cualquiera de las siguientes causas: uso negligente del producto, uso de un voltaje
o corriente incorrectos, mantenimiento de rutina inadecuado, uso contrario al de las
instrucciones de funcionamiento, desarmado, reparación o alteración a cargo de personas
que no sean miembros del personal calicado de SENSIO Inc. Asimismo, la garantía no
cubre actos de la naturaleza, como incendios, inundaciones, huracanes o tornados.
SENSIO Inc. no asumirá responsabilidad por daños incidentales o resultantes ocasionados
por la violación de cualquier garantía expresa o implícita. Salvo en la medida en que lo
prohíban las leyes aplicables, cualquier garantía implícita de comerciabilidad o aptitud
para un propósito particular se limita temporalmente a la duración de la garantía. Algunos
estados, provincias o jurisdicciones no permiten la exclusión ni la limitación de daños
incidentales o resultantes, o limitaciones sobre la duración de una garantía implícita y, por
lo tanto, es posible que las exclusiones o limitaciones mencionadas no le correspondan.
La garantía cubre derechos legales especícos que pueden variar de un estado, una
provincia o una jurisdicción a otros.
CÓMO OBTENER EL SERVICIO DE GARANTÍA:
Debe comunicarse con el Servicio de atención al cliente a nuestro número telefónico
gratuito: 1-866-832-4843. Un representante del Servicio de atención al cliente intentará
resolver los problemas referidos a la garantía por teléfono. Si este no puede resolver el
problema, le proporcionarán un número de caso y le solicitarán que devuelva el producto
a SENSIO Inc. Adhiera una etiqueta al producto que incluya: su nombre, dirección,
número telefónico de contacto durante el día, número de caso y descripción del problema.
Además, incluya una copia del recibo de compra original. Envuelva cuidadosamente
el producto etiquetado con el recibo de compra, y envíelo (con el envío y el seguro
prepagados) a la dirección de SENSIO Inc. SENSIO Inc. no asumirá obligación ni
responsabilidad alguna por el producto devuelto que esté en el trayecto hacia el Centro
de servicio al cliente de SENSIO Inc.
GARANTÍA LIMITADA DE DOS AÑOS
35105_Bella_MultiUSA_Steam Espresso_CoffeeMaker_Oatmilk_IM_R7.indd 1735105_Bella_MultiUSA_Steam Espresso_CoffeeMaker_Oatmilk_IM_R7.indd 17 2024-09-03 4:54 PM2024-09-03 4:54 PM
For customer service questions or comments
Dudas o comentarios contactar el departamento de servicio al cliente
1-866-832-4843 / help@bellahousewares.com
Sensio Inc.
dba Made by Gather
TM
New York, NY 10016/USA
35105 R. 7
35105_Bella_MultiUSA_Steam Espresso_CoffeeMaker_Oatmilk_IM_R7.indd 1835105_Bella_MultiUSA_Steam Espresso_CoffeeMaker_Oatmilk_IM_R7.indd 18 2024-09-03 4:54 PM2024-09-03 4:54 PM