MADE IN GERMANY
RX2 PRO
USER MANUAL

2
wir gratulieren Ihnen zum Kauf dieses hochwertigen BRAX-Verstärkers.
Mit der BRAX REVELATION RX2 PRO haben Sie sich für einen Verstärker entschieden, der klangliche Exzellenz und
kompromisslose Handwerkskunst auf höchstem Niveau vereint. Er markiert den Beginn einer neuen Ära, da erstmals
digitale Technologie in einen BRAX Verstärker Einzug gehalten hat und damit alles Vorangegangene im Car Audio-
Segment in den Schatten stellt. Bei der Fertigung setzen wir ausschließlich auf sorgfältig ausgewählte Komponenten und
edle Materialien, um Ihnen ein unvergleichliches High-End Musikerlebnis zu garantieren.
Seit über 30 Jahren steht BRAX für herausragende Audiokomponenten, die weltweit Maßstäbe setzen. Zahlreiche
Referenzauszeichnungen und internationale Innovationspreise bestätigen die Qualität unserer Produkte und unseren
Anspruch, stets das Beste zu bieten.
Mit der BRAX REVELATION RX2 PRO setzen wir neue Maßstäbe in Klangqualität, Präzision und Zuverlässigkeit.
Wir sind stolz darauf, Ihnen mit diesem Verstärker ein echtes High-End Produkt MADE IN GERMANY präsentieren zu
können.
Viel Freude mit der BRAX REVELATION RX2 PRO wünscht Ihnen
AUDIOTEC FISCHER GmbH
SEHR GEEHRTER KUNDE
Heinz Fischer
Gründer und Geschäftsführer
Julian Fischer
Inhaber und Geschäftsführer

3
Ein Name, der verpichtet – die Marke BRAX steht seit Anbeginn für die Umsetzung des technisch Machbaren mit dem
Ziel, Musik in ihrer reinsten, sprich ursprünglichen Form vollendet wiederzugeben. Dieser Anspruch fordert das Team in
Schmallenberg, welches die Produkte komplett „Made in Germany“ entstehen lässt, kontinuierlich dazu auf, die Grenzen
weiter zu verschieben.
„Als leidenschaftlicher Musiker mit über 45 Jahren Erfolg in der Audio Branche, hätte ich es nie für möglich gehalten, dass
Class D-Technologie jemals in der Lage sein würde mit Analogtechnik zu konkurrieren. Aber eines muss ich mit voller
Deutlichkeit zum Ausdruck bringen: Die BRAX REVELATION RX2 PRO verschlägt mir den Atem. Was dieser Verstärker
an absolut audiophiler Performance bietet, ist nicht von dieser Welt und hebt den BRAX Anspruch an kompromisslosen
Klang ohne Wenn und Aber auf ein neues Niveau. Ich bin davon überzeugt, dass dieses technologische Kunstwerk selbst
den größten Verfechtern der Analogtechnik die Augen für eine neue Ära der High-End-Verstärkung önen wird.“
– Heinz Fischer
Die BRAX REVELATION RX2 PRO markiert den Beginn einer neuen Ära, in der digitale Verstärkertechnologie erstmals
das klangliche Niveau der analogen Referenzmodelle übertrit. Dank der innovativen EIGENTAKT-Technologie des
dänischen Herstellers PURIFI, welche in enger Zusammenarbeit innerhalb dieses bahnbrechenden Verstärkerkonzepts
implementiert wurde, wird ein bisher unerreichtes Maß an Ezienz und Klangtreue erreicht. Das Ergebnis: Überragende
Leistung gepaart mit minimalsten Verzerrungen und einer beeindruckenden Dynamik.
Mit einer Ausgangsleistung von 2 x 300 Watt an 4 Ohm oder 2 x 510 Watt an 2 Ohm überzeugt die BRAX REVELATION
RX2 PRO nicht nur durch seine enorme Kraft, sondern auch durch außergewöhnliche technische Werte, wie einem
Dämpfungsfaktor von über 10.000 – Und dies über das gesamte Audioband hinweg. Ihre Multistage-Feedback-Schaltung
sorgt dafür, dass jegliche Nichtlinearitäten kompensiert werden und die Ausgangsleistung stets präzise bleibt – unabhängig
von der Impedanz des angeschlossenen Lautsprechers.
Egal unter welchem Gesichtspunkt man die BRAX REVELATION RX2 PRO betrachtet – er ist schlicht und ergreifend eine
Revolution. Nach über drei Jahren intensiver Forschungs- und Entwicklungszeit setzt er ein unvergleichliches Zeichen
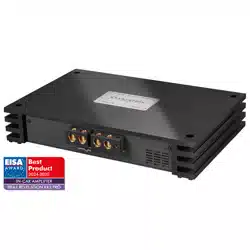
und damit den neuen Maßstab im Verstärkerbau, was bereits zum Marktstart mit der EISA-Prämierung als bester „In-Car
Amplier“ 2024-2025 kompromisslos anerkannt wird.
DIE BRAX-PHILOSOPHIE

4
ALLGEMEINE HINWEISE
Allgemeines zum Einbau von BRAX-Verstärkern
Um die Qualität sowie alle Möglichkeiten des Produktes optimal ausschöpfen zu können, lesen Sie bitte sorgfältig die
nachfolgenden Installationshinweise. Wir garantieren, dass jedes Gerät vor Versand auf seinen einwandfreien Zustand
überprüft wurde.
Vor Beginn der Installation unterbrechen Sie den Minusanschluss der Autobatterie.
Um einen sicheren Betrieb zu gewährleisten, empfehlen wir dringend, den Einbau von einem autorisierten BRAX-
Fachhändler durchführen zu lassen, da der Nachweis eines fachgerechten Einbaus und Anschlusses des Gerätes
Voraussetzung für die Garantieleistungen von BRAX by AUDIOTEC FISCHER sind.
Zudem hilft Ihnen Ihr BRAX-Fachhändler bei der Auswahl weiterer Komponenten und berät Sie in allen sicherheitstechnischen
und klanglichen Aspekten.
Installieren Sie Ihren Verstärker an einer trockenen Stelle im Auto und vergewissern Sie sich, dass der Verstärker am
Montageort genügend Kühlung erhält. Montieren Sie das Gerät nicht in zu kleine, abgeschlossene Gehäuse ohne
Luftzirkulation oder in der Nähe von wärmeabstrahlenden Teilen oder elektronischen Steuerungen des Fahrzeuges. Im
Sinne der Unfallsicherheit muss der Verstärker professionell befestigt werden. Dieses geschieht über Schrauben, die in
eine Montageäche eingeschraubt werden, die wiederum genügend Halt bieten muss.
Bevor Sie die Schrauben im Montagefeld befestigen, vergewissern Sie sich, dass keine elektrischen Kabel und
Komponenten, hydraulische Bremsleitungen, der Benzintank etc. dahinter verborgen sind. Diese könnten sonst beschädigt
werden.
Achten Sie bitte darauf, dass sich solche Teile auch in der doppelten Wandverkleidung verbergen können.

5
Allgemeines zum Anschluss des BRAX REVELATION RX2 PRO Verstärkers
Der Verstärker darf nur in Kraftfahrzeuge eingebaut werden, die den 12 V-Minuspol an Masse haben. Bei anderen
Systemen können der BRAX Verstärker und die elektrische Anlage des Kfz beschädigt werden.
Die Plusleitung für die gesamte Anlage sollte in einem Abstand von max. 30 cm von der Batterie mit einer Hauptsicherung
abgesichert werden. Der Wert der Sicherung errechnet sich aus der maximalen Stromaufnahme der Car-Hi Anlage.
Verwenden Sie zum Anschluss des Verstärkers an die Stromversorgung des Fahrzeugs ausschließlich geeignete
Kabel mit ausreichendem Kabelquerschnitt. Die Sicherungen im Verstärker dürfen nur mit den gleichen Werten
(4 x 25 A) ersetzt werden, um eine Beschädigung des Gerätes zu verhindern. Höhere Werte können zu gefährlichen
Folgeschäden führen!
Die Kabelverbindungen müssen so verlegt sein, dass keine Klemm-, Quetsch- oder Bruchgefahr besteht. Bei scharfen
Kanten (Blechdurchführungen) müssen alle Kabel gegen Durchscheuern gepolstert sein. Ferner darf das Versorgungskabel
niemals mit Zuleitungen zu Vorrichtungen des Kfz (Lüftermotoren, Brandkontrollmodulen, Benzinleitungen etc.) verlegt
werden.
6
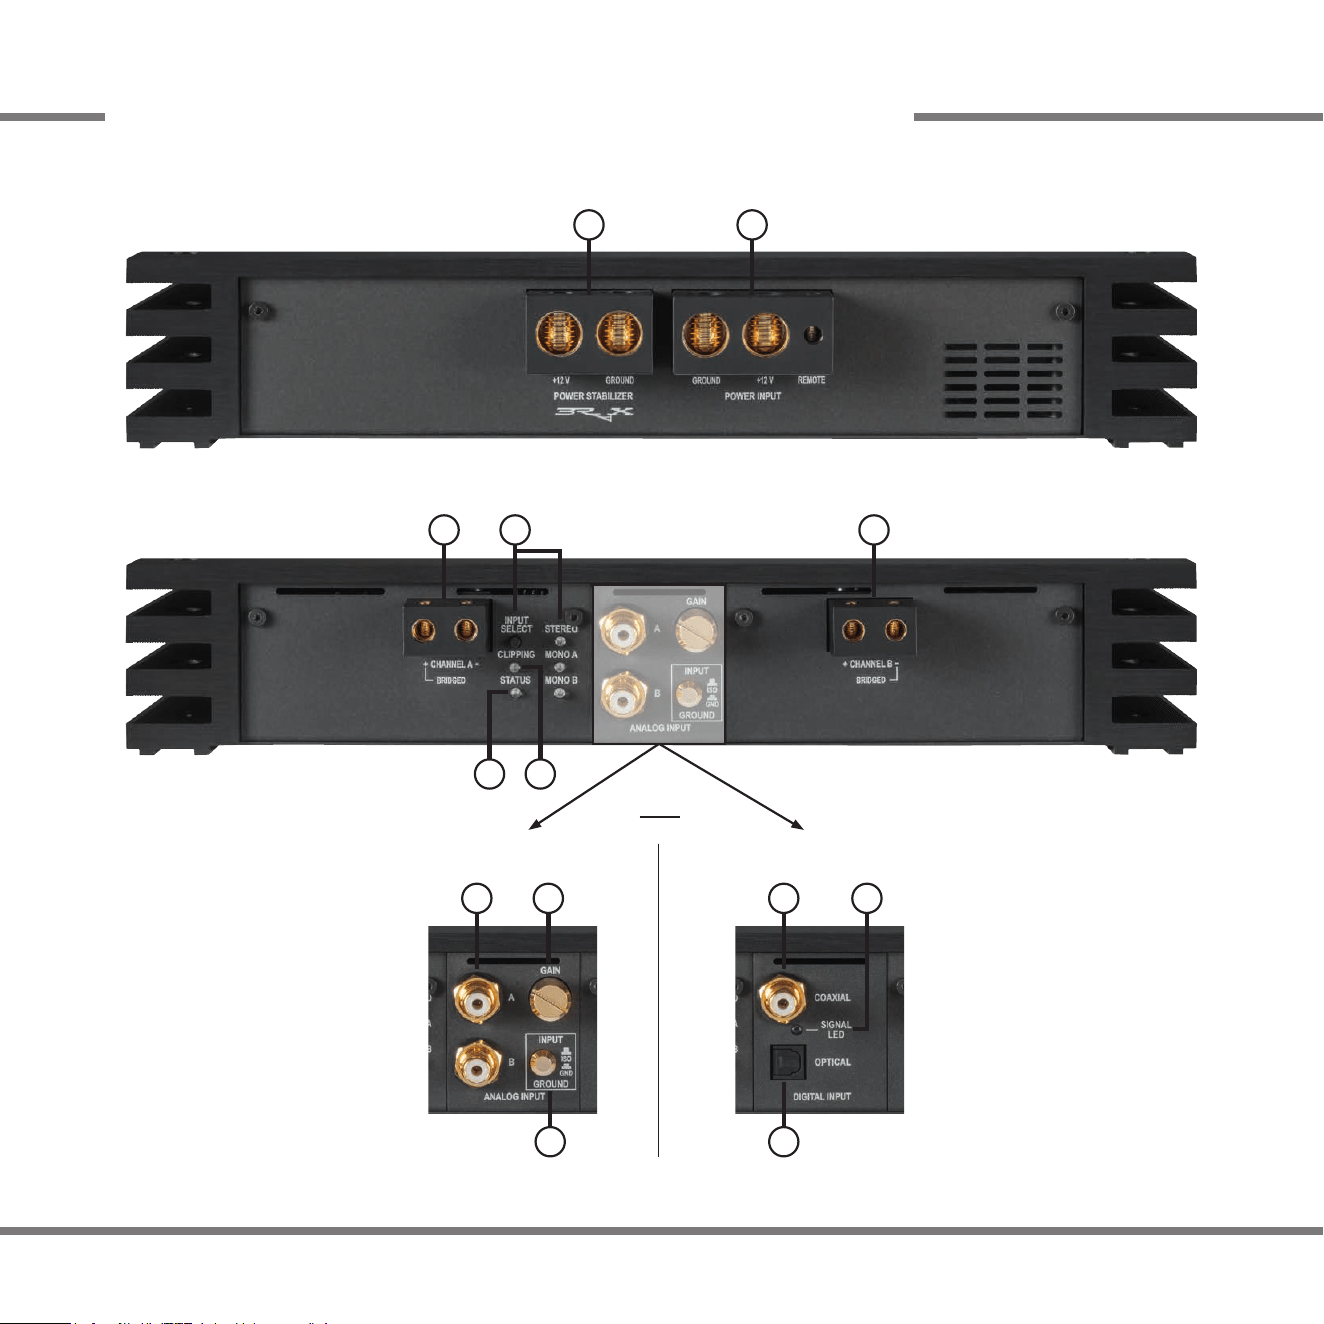
ANSCHLUSS- UND BEDIENELEMENTE
1 2
3 4
5
3
87
9
Analoges Eingangsmodul
12
10 11
Digitales Eingangsmodul
oder
6

7
Anschluss BRAX Power Stabilizer
Seite 9, Punkt 3
1
Anschluss Stromversorgung & Remote
Seite 9, Punkt 2
2
Lautsprecherausgänge
Seite 11, Punkt 6
3
Betriebsmodus-Taster & LEDs
Seite 10, Punkt 4
4
Status LED
Seite 12, Punkt 1
5
CORE Modell
Lowlevel-Vorverstärkereingänge
Seite 8, Punkt 1
7
Gain-Regler
Seite 10, Punkt 5
8
Input Ground Schalter
Seite 12, Punkt 7
9
Koaxialer Digitaleingang
Seite 8, Punkt 1
10
Signal LED
Seite 13, Punkt 3
11
Optischer Digitaleingang
Seite 8, Punkt 1
12
Analoges Eingangsmodul Digitales Eingangsmodul
Clipping LED
Seite 13, Punkt 2
6

8
Kongurieren Sie den Verstärker in der nachfolgenden Reihenfolge
Achtung: Für die Durchführung der nachfolgenden Schritte werden Spezialwerkzeuge und Fachwissen benötigt. Um
Anschlussfehler und Beschädigungen zu vermeiden, fragen Sie im Zweifelsfall Ihren Einbauspezialisten und beachten Sie
zwingend die allgemeinen Anschluss- und Einbauhinweise (siehe Seite 4).
1 Anschluss der analogen oder digitalen Signaleingänge
Die BRAX REVELATION RX2 PRO bietet ein modulares Eingangskonzept mit wählbaren Eingangsmodulen. Je nach
installiertem Modul erfolgt der Anschluss der Signaleingänge wie folgt:
Analoges Eingangsmodul:
Anschluss der Lowlevel-Vorverstärkereingänge:
Die zwei Vorverstärkereingänge werden mit passenden Kabeln an den RCA- / Cinch-Ausgang der Signalquelle (z. B.
Radio, DSP oder DSP-Verstärker) angeschlossen. Abhängig vom gewählten Betriebsmodus kann es ausreichend sein,
nur einen der beiden Eingangskanäle zu verwenden (Seite 10, Punkt 4).
Die Eingangsempndlichkeit lässt sich mithilfe des Gain-Reglers optimal an die Signalquelle anpassen (Seite 6, Punkt 8).
Digitales Eingangsmodul:
Anschluss einer digitalen Signalquelle im SPDIF-Format:
Verfügen Sie über eine Signalquelle mit koaxialem oder optischem Digitalausgang, kann diese an den entsprechenden
Eingang angeschlossen werden. Die Abtastrate muss zwischen 32 und 96 kHz für den optischen Eingang und zwischen
32 und 192 kHz für den Koaxialeingang liegen. Das Eingangssignal wird automatisch an die interne Abtastrate angepasst.
Achtung: Achten Sie darauf, dass das digitale Audiosignal Ihrer Signalquelle lautstärkegeregelt ist. Andernfalls liegt an
den Lautsprecherausgängen des Verstärkers der volle Pegel an, was im Extremfall die angeschlossenen Lautsprecher
zerstören kann. Verwenden Sie daher nur lautstärkegeregelte, digitale Signalquellen.
Hinweis: Die BRAX REVELATION RX2 PRO verarbeitet ausschließlich unkomprimierte, digitale Stereo-PCM-Signale mit
einer Abtastrate zwischen 32 kHz und 96 kHz bzw. 192 kHz. MP3- oder Dolby-codierte Daten können nicht verarbeitet
werden, nur Stereosignale.
HARDWARE-KONFIGURATION

9
2 Anschluss der Stromversorgung & Remote
ACHTUNG: Vor dem Anschluss des +12 V Versorgungskabels an das Bordnetz muss die Autobatterie abgeklemmt wer-
den. Achten Sie unbedingt auf eine korrekte Polarität.
+12 V: Anschluss für die Plusleitung (Seite 6, Punkt 2).
Das +12 V Stromkabel ist am Pluspol der Batterie anzuschließen. Die Plusleitung sollte in einem Abstand von max. 30 cm
von der Batterie mit einer Hauptsicherung abgesichert werden. Der Wert der Sicherung errechnet sich aus der maximalen
Stromaufnahme der gesamten Car-Hi Anlage (BRAX REVELATION RX2 PRO = max. 150 A RMS).
Verwenden Sie einen Querschnitt von mindestens 35 mm².
GROUND: Anschluss für die Masseleitung (Seite 6, Punkt 2).
Das Massekabel muss an einer nicht isolierten Stelle mit dem Kfz-Chassis oder direkt mit dem Minuspol der Autobatterie
verbunden werden. Der Kabelquerschnitt sollte den gleichen Durchmesser wie die Plusleitung haben.
Ein nicht ausreichender Massekontakt führt zu unerwünschten Störgeräuschen und Fehlfunktionen.
REMOTE: Der Remote-Eingang dient zum Einschalten der BRAX REVELATION RX2 PRO (Seite 6, Punkt 2).
Dazu muss der Remote-Eingang des Verstärkers mit dem Remote-Ausgang des Radios / der Head Unit verbunden wer-
den. Somit wird der Verstärker über das Radio ein- und ausgeschaltet. Sofern sich ein zusätzlicher digitaler Signalprozes-
sor (DSP) im Signalweg zwischen Radio und Verstärker bendet, muss der Remote-Ausgang des DSPs zum Einschalten
der BRAX REVELATION RX2 PRO verwendet werden.
Es wird dringend davon abgeraten, den Remote-Eingang des Verstärkers über das Zündungsplus des Fahrzeugs zu steu-
ern, um Störgeräusche beim Ein- und Ausschalten zu vermeiden.
3 Optional: Anschluss eines BRAX Power Stabilizers (BRAX IPC)
Diese Eingänge (Seite 6, Punkt 1) ermöglichen den direkten Anschluss eines BRAX Power Stabilizers an die Leistungs-
transistoren der BRAX REVELATION RX2 PRO. Durch den Einsatz eines Power Stabilizers werden Spannungsschwan-
kungen in der Stromversorgung ausgeglichen, sodass der Verstärker stets ausreichend Energie zur Verfügung hat, um
seine volle Leistung zu entfalten. Achten Sie darauf, dass die Kabellänge zwischen Verstärker und Power Stabilizer 30 cm
nicht überschreitet und einen Querschnitt von mindestens 35 mm² aufweist.

10
4 Betriebsart des Verstärkers festlegen
Der Betriebsmodus-Taster (Input Select / Seite 6, Punkt 4) ermöglicht die Auswahl der Betriebsart des Verstärkers durch
einfaches Drücken. Die aktuell gewählte Betriebsart wird durch eine der drei neben dem Schalter bendlichen LEDs ange-
zeigt: Stereo, Mono A oder Mono B. Diese Einstellung beeinusst alle Signaleingänge, unabhängig davon, ob ein digitales
oder analoges Eingangsmodul verbaut ist.
Stereo: Im Stereo-Modus wird jeder der Lautsprecherausgänge mit dem dazugehörigen Eingangssignal versorgt.
Mono A: Im Mono A Modus wird nur das Eingangssignal von Kanal A verwendet und auf beide Verstärkerkanäle über-
tragen. Das bedeutet, dass das Signal von Kanal A parallel auf Kanal B weitergeleitet wird. Bitte beachten Sie, dass die
Fader- und Balanceregler des Steuergeräts in diesem Modus gleichermaßen auf beide Kanäle wirken.
Mono B: Im Mono B Modus wird ausschließlich das Eingangssignal von Kanal B genutzt und auf beide Verstärkerkanäle
übertragen. Das Eingangssignal von Kanal B wird dabei parallel auf Kanal A weitergeleitet. Beachten Sie, dass in diesem
Modus die Fader- und Balanceregler des Steuergeräts gleichermaßen auf beide Kanäle wirken.
5 Einstellen der Eingangsempndlichkeit
ACHTUNG: Es ist zwingend notwendig, die Eingangsempndlichkeit der BRAX REVELATION RX2 PRO an die Signal-
quelle anzupassen, um eine optimale Signalqualität zu gewährleisten und Schäden am Verstärker zu vermeiden. Je nach
verbautem Eingangsmodul sind unterschiedliche Schritte zur Einstellung erforderlich.
a. BRAX REVELATION RX2 PRO mit analogem Eingangsmodul:
Die Eingangsempndlichkeit kann über den Gain-Regler (Seite 6, Punkt 8) optimal an die Signalquelle angepasst wer-
den. Der Regler dient ausschließlich der Anpassung der Eingangsempndlichkeit und ist kein Lautstärkeregler. Seine
Einstellung beeinusst beide Vorverstärkereingänge. Werkseitig ist die Eingangsempndlichkeit auf 8 Volt voreinge-
stellt, was in den meisten Fällen die optimale Einstellung darstellt. Der Gain-Regelbereich reicht von 1,0 V bis 8,0 V.
Falls die Signalquelle eine niedrigere Ausgangsspannung hat, kann die Eingangsempndlichkeit über den Gain-Reg-
ler stufenlos erhöht werden. Die Clipping-LED (Seite 6, Punkt 6) dient als Kontrollanzeige.
Hinweis: Schließen Sie während der Einstellung keine Lautsprecher an die Ausgänge des Verstärkers an.

11
Schritte zur Anpassung der Eingangsempndlichkeit:
1. Schalten Sie den Verstärker ein.
2. Drehen Sie die Lautstärke Ihres Radios auf 90 % der Gesamtlautstärke und spielen Sie ein geeignetes Test-
signal, z.B. Rosa Rauschen, (Vollaussteuerung 0 dB) ab.
3. Falls die Clipping-LED bereits leuchtet, reduzieren Sie mit dem Gain-Regler die Eingangsempndlichkeit, bis
die LED erlischt.
4. Erhöhen Sie die Eingangsempndlichkeit durch Rechtsdrehen des Gain-Reglers, bis die Clipping-LED wieder
aueuchtet. Drehen Sie dann den Gain-Regler gegen den Uhrzeigersinn, bis die Clipping-LED erlischt.
b. BRAX REVELATION RX2 PRO mit digitalem Eingangsmodul:
Die Clipping-LED zeigt ebenfalls an, ob einer der digitalen Eingangskanäle übersteuert wird. Sollte dies der Fall sein,
muss der Ausgangspegel der angeschlossenen Signalquelle reduziert werden, bis die Clipping-LED nicht mehr dau-
erhaft aueuchtet. Wie Sie die Eingangsempndlichkeit der Signalquelle einstellen, entnehmen Sie bitte der jeweiligen
Bedienungsanleitung.
6 Anschluss der Lautsprecherausgänge
Die Lautsprecherausgänge können direkt mit den Lautsprecherleitungen verbunden werden. Verbinden Sie niemals die
Lautsprecherleitungen mit der Kfz-Masse (Fahrzeugkarosserie). Dieses kann Ihren Verstärker und Ihre Lautsprecher zer-
stören.
Achten Sie darauf, dass alle Lautsprechersysteme phasenrichtig angeschlossen sind, d.h. Plus zu Plus und Minus zu
Minus. Vertauschen von Plus und Minus hat einen Totalverlust der Basswiedergabe zur Folge. Der Pluspol ist bei den
meisten Lautsprechern gekennzeichnet.
Die Impedanz pro Kanal darf 2 Ohm (im Brückenbetrieb 4 Ohm) nicht unterschreiten, da sonst die Schutzschaltung des
Verstärkers aktiviert wird.

12
7 Optional & nur mit analogem Eingangsmodul: Einstellen der Signalmasse des analogen Eingangs
In einigen Fällen kann es erforderlich sein, die Signalmasse des Vorverstärkereingangs anzupassen.
ISO: In dieser Schalterstellung wird die Signalmasse durch einen Dierenzverstärker von der Bordnetzmasse getrennt.
Dies ist in den meisten Fahrzeugen die optimale Einstellung, um Störgeräusche, wie z. B. von der Lichtmaschine, zu ver-
meiden.
GND: Die Signalmasse des Eingangs wird direkt mit der Bordnetzmasse verbunden. Diese Einstellung sollte gewählt wer-
den, wenn bei der Schalterstellung ISO Störgeräusche auftreten.
WEITERE FUNKTIONEN
1 Status LED
Die Status LED zeigt den Betriebszustand des Verstärkerks an:
Grün
blinkend: Startvorgang des Verstärkers.
Grün:
Verstärker eingeschaltet und betriebsbereit.
Orange
schnell blinkend: Sicherung im Inneren des Geräts zerstört. Prüfen Sie die Sicherungen im Gerät und tauschen
diese gegebenenfalls aus. Die Sicherungen im Verstärker dürfen nur mit den gleichen Werten (4 x 25 A) ersetzt werden,
um eine Beschädigung des Gerätes zu verhindern. Höhere Werte können zu gefährlichen Folgeschäden führen.
Orange
langsam blinkend: Die Temperatur des Verstärkers liegt über 75°C. Die Leistung wird reduziert bis eine sichere
Betriebstemperatur erreicht hat.
Orange:
Protection Mode aktiv. Dieser kann durch folgende Ursachen ausgelöst werden:
1. Unterspannung: Die Eingangsspannung des Verstärkers liegt dauerhaft unter 9 Volt. Kurzfristige Einbrüche bis auf 6 Volt
sind zulässig und aktivieren nicht den Unterspannungsschutz.
2. Überspannung: Die Eingangsspannung des Verstärkers überschreitet 18 Volt.
3. Lautsprecherimpedanz zu niedrig: Die Impedanz des angeschlossenen Lautsprechers darf 2 Ohm nominell (1,8 Ohm
Gleichstromwiderstand) nicht unterschreiten. Dies wird zusätzlich durch ein rotes Blinken der Clipping LED angezeigt.

13
Sollte sich der Verstärker nach Beseitigung der Fehlerquelle nicht wieder einschalten lassen, liegt ein Defekt vor und muss
zur Reparatur eingeschickt werden. Wenden Sie sich hierzu an einen autorisierten BRAX Händler vor Ort.
Rot:
Protection Mode aktiv. Die Temperatur des Verstärkers liegt über 85°C. Die interne Temperaturüberwachung schaltet
das Gerät ab, bis ein sicherer Betrieb wieder gewährleistet werden kann.
2 Clipping LED
In der Regel ist die LED aus und leuchtet nur auf, wenn einer der Vorverstärker- oder digitalen Signaleingänge übersteuert
wird.
On (rot): Einer der Signaleingänge wird übersteuert. Reduzieren Sie die Eingangsempndlichkeit, wie im Abschnitt „Ein-
stellen der Eingangsempndlichkeit“ (Seite 10, Punkt 5) beschrieben, bis die LED erlischt.
3 Signal LED (nur bei digitalem Eingangsmodul)
Die LED zeigt den Betriebszustand des verwendeten Digitaleingangs an.
Aus: Kein Digitalsignal erkannt.
Grün: Digitalsignal erkannt, keine DiSAC 2.0 Lautstärkeinformationen im Datenstrom enthalten.
Blau: Digitalsignal erkannt, DiSAC 2.0 Lautstärkeregelung in Verbindung mit dem BRAX DSP aktiv.

14
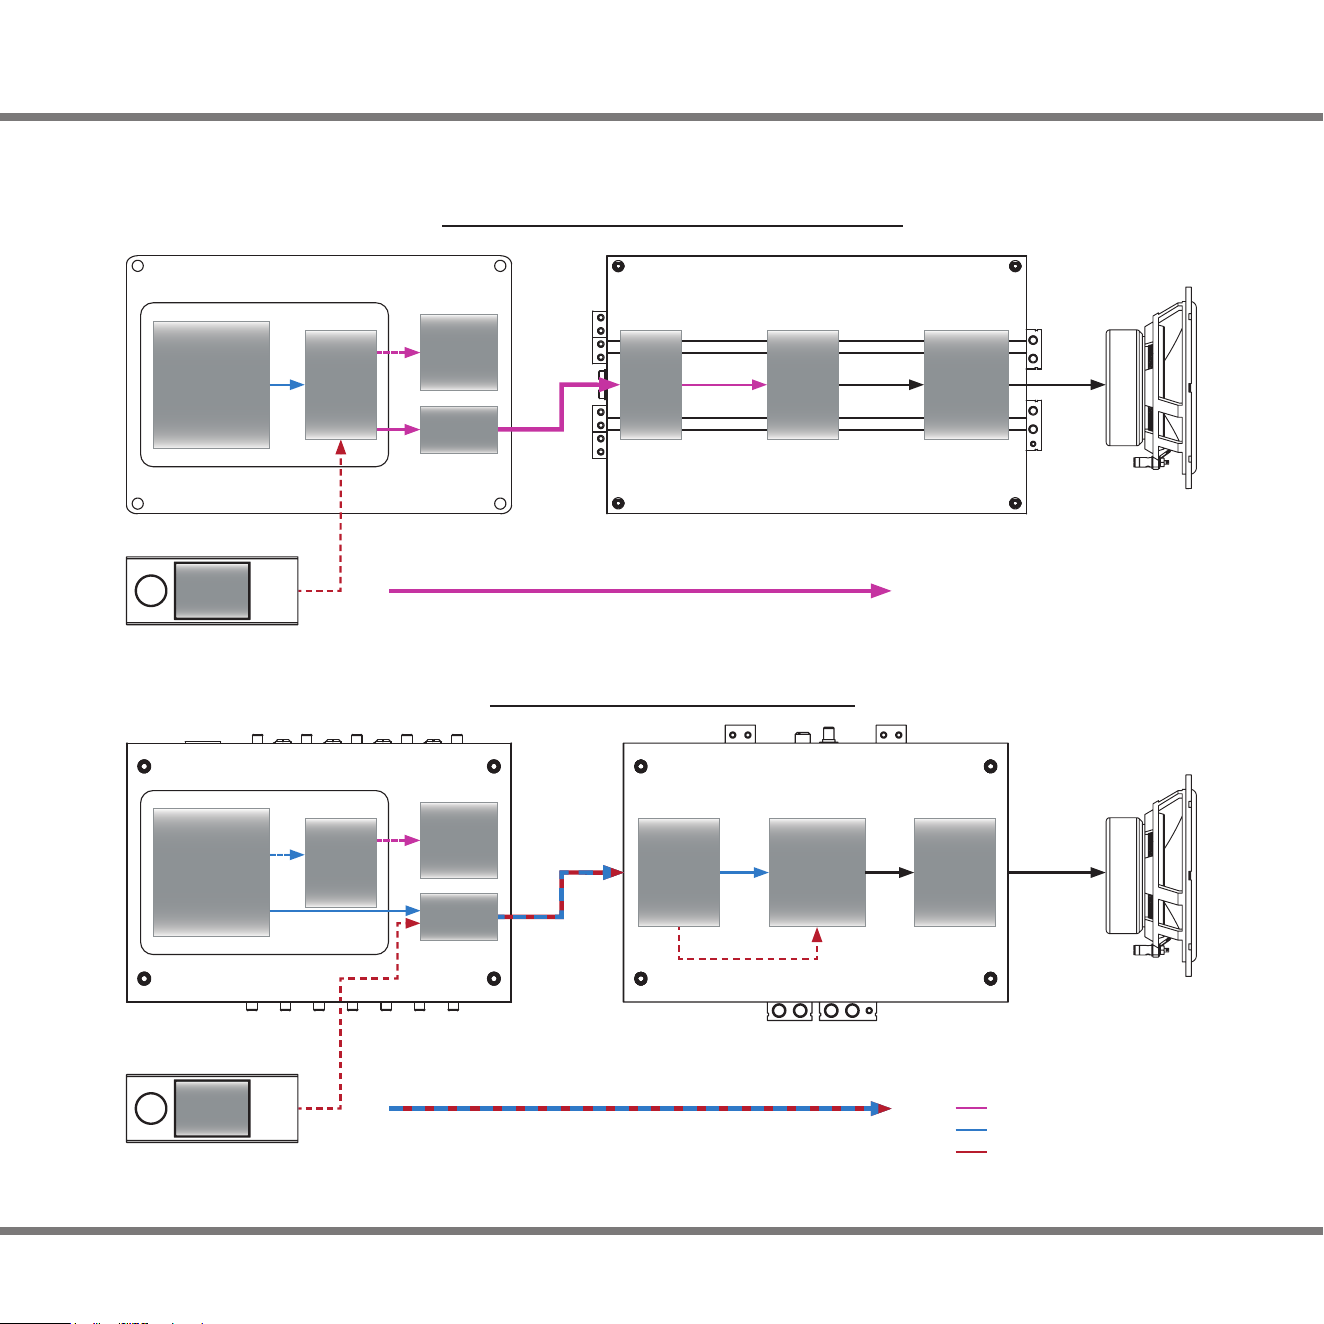
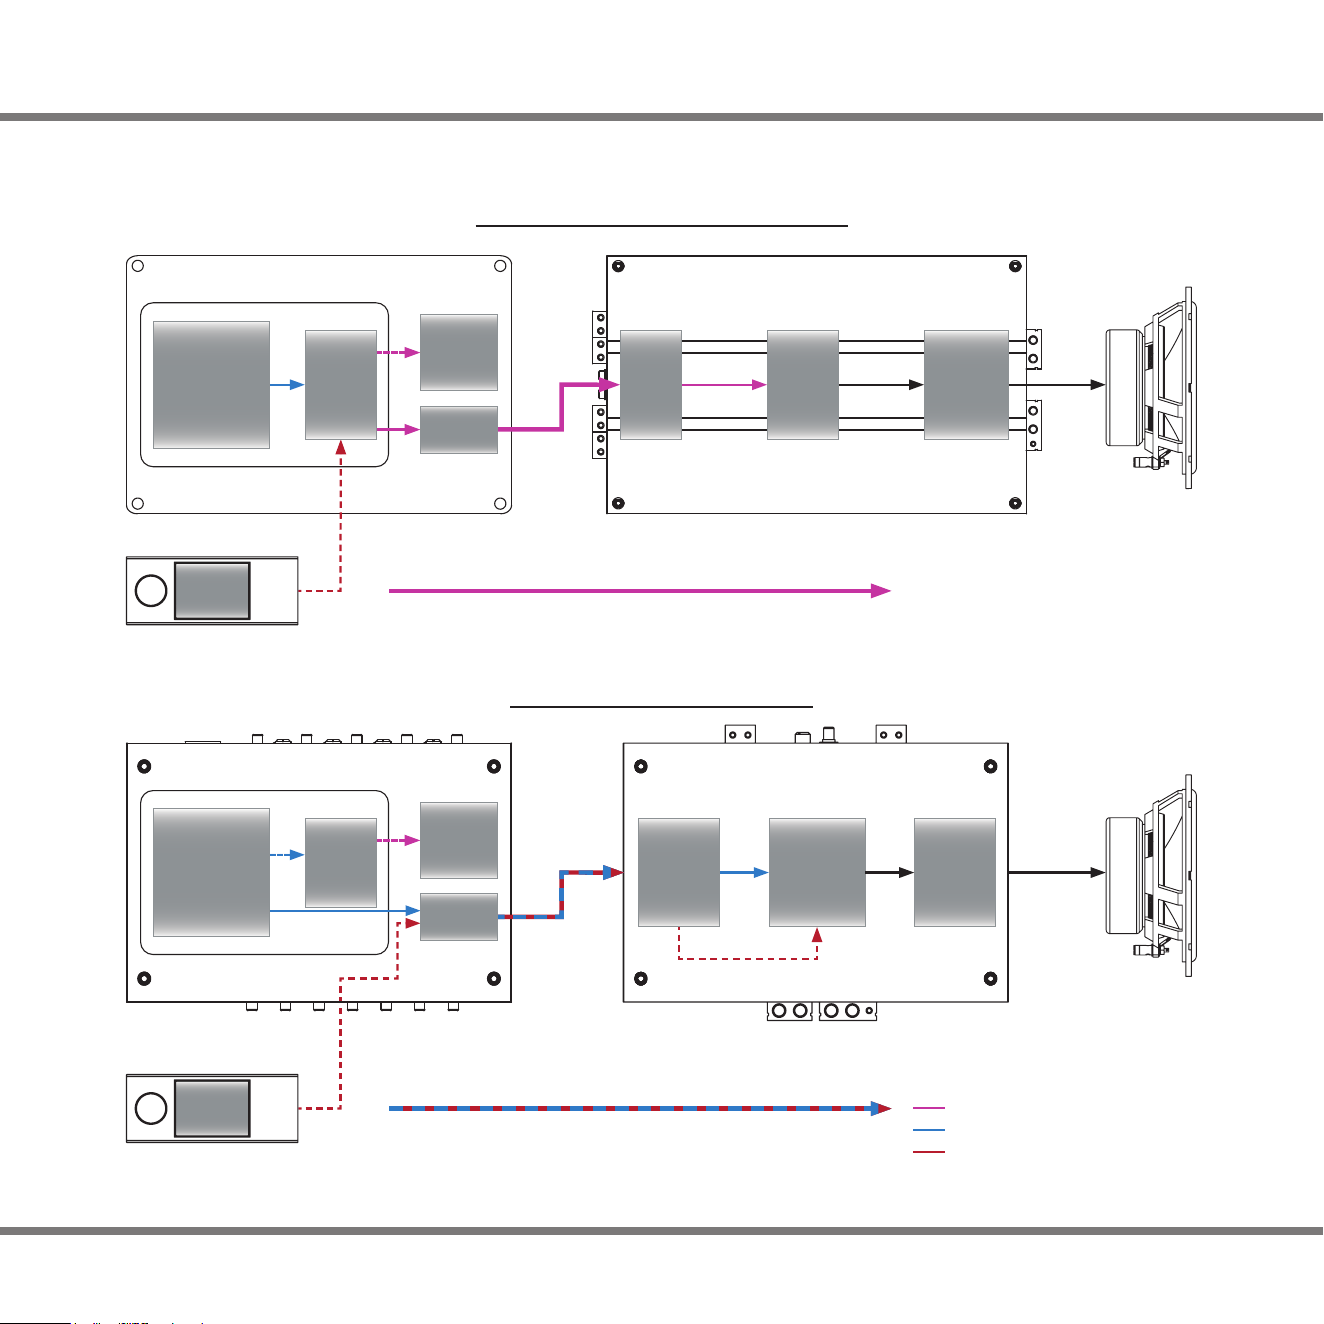
DiSAC – Die optimale Lautstärkeeinstellung in Verbindung mit dem BRAX DSP
In einer Car-HiFi-Anlage gibt es typischerweise zwei Methoden zur Regelung der Lautstärke:
a) Lautstärkeregelung über die Signalquelle (z.B. Autoradio):
Dies ist die gängigste Methode, hat jedoch den Nachteil, dass die volle Signalauösung eines digitalen Signalprozessors
(DSP) nur dann genutzt wird, wenn die Lautstärke an der Quelle auf Maximum eingestellt ist. Andernfalls wird nicht
die volle Bit-Auösung des AD-Wandlers oder des eingehenden Digitalsignals genutzt, was insbesondere bei niedrigen
Lautstärken zu einer verminderten Klangpräzision führen kann.
b) Lautstärkeregelung über den digitalen Signalprozessor (DSP):
Hierbei liefert die Signalquelle immer den maximalen Signalpegel, sodass der nachgeschaltete DSP optimal ausgesteuert
wird und das Eingangssignal in höchster Qualität weiterverarbeiten kann. Die Lautstärke wird in diesem Fall über eine an
den DSP angeschlossene Fernbedienung digital in höchster Auösung geregelt. Allerdings sind auch bei dieser Methode
klangliche Verluste bei sehr niedrigen Lautstärken nicht völlig auszuschließen.
Die perfekte Lösung
BRAX MATRIX MX4 PRO und die neue BRAX REVELATION RX2 PRO bieten in Verbindung mit dem BRAX DSP eine
optimale Lösung für die Lautstärkeregelung, dank der exklusiven, proprietären „DiSAC“-Technologie. Diese sorgt dafür,
dass klangliche Einbußen gar nicht erst entstehen. Die Technologie funktioniert am besten, wenn die Signalquelle entweder
keine Lautstärkeregelung hat oder auf maximale Grundlautstärke eingestellt ist. Das Signal wird dann im BRAX DSP stets
mit optimalem Pegel verarbeitet, ohne dass irgendwo die Auösung reduziert wird. Zur Lautstärkeregelung werden die
Fernbedienungen CONDUCTOR oder DIRECTOR verwendet.
Das Besondere daran ist, dass die von der Fernbedienung an den DSP gesendeten Lautstärkeinformationen in den digitalen
Audio-Datenstrom der SPDIF-Ausgänge des BRAX DSP eingebettet und so an die BRAX REVELATION RX2 PRO bzw.
BRAX MATRIX MX4 PRO übertragen wird. In den BRAX-Verstärkern wird diese Information wieder aus dem Datenstrom
extrahiert und zur Steuerung der Lautstärke-Steller in der Endstufe verwendet.
So erfolgt die Lautstärkeregelung an der idealen Stelle – nämlich unmittelbar vor den Leistungsstufen, die die Lautsprecher
ansteuern.
DiSAC 2.0 LAUTSTÄRKEREGELUNG

15
DiSAC Generation 2.0 – „Take it to the limit“
Der neue DA-Wandler ES9039Q2M von ESS Audio, der im optionalen digitalen Stereo-Eingangsmodul verwendet wird,
hebt mit seinen außergewöhnlich Performance die Leistungsgrenzen nochmals deutlich an – ebenso wie die BRAX
REVELATION RX2 PRO selbst. Insbesondere in Bezug auf Signal-Rauschabstand und Klirrfaktor erreicht der Wandler so
herausragende Werte, dass wir unser DiSAC-Konzept überdenken mussten.
Der bisher genutzte PGA (Programmable Gain Amplier), der bisher die analoge Lautstärkeregelung in der vorherigen
Version der DiSAC Technologie übernahm, würde in Verbindung mit dem ESS DA-Wandler und der proprietären
EIGENTAKT Class D-Endstufentechnologie zum schwächsten Glied in der Signalkette werden.
Deshalb verfolgt DiSAC 2.0 einen neuen technischen Ansatz. Wie gewohnt wird die Lautstärkeinformation in den nicht-
lautstärkegeregelten, digitalen Audiostream der SPDIF-Ausgänge des BRAX DSP eingebettet und so das Audio-Signal mit
maximaler Auösung an die BRAX REVELATION RX2 PRO übertragen. Die Lautstärkeregelung übernimmt nun allerdings
eine spezielle im DA-Wandler integrierte Funktionseinheit. Diese nutzt die hohe 32 Bit Auösung des DA-Wandlers um den
erforderlichen Lautstärkeregelbereich von 96 dB bereitzustellen, ohne die Auösung des Musiksignals zu beeinträchtigen.
Dadurch werden mögliche Rundungsfehler bei der Lautstärkeabsenkung, die zu Quantisierungsverzerrungen und
-rauschen führen könnten, von vornherein vermieden.
Dank des direkten Zugris auf den digitalen Signalpfad agiert der Lautstärkeregler im ES9039Q2M wie ein analoger
Regler, jedoch mit dem entscheidenden Vorteil, dass das Eigenrauschen und die Klirranteile des zuvor verwendeten PGA
vollständig entfallen. Erst durch diese Technologie war es möglich, die Performance auf ein unvergleichliches Höchstniveau
zu heben und neue Maßstäbe in Klangqualität und Präzision zu setzen.
DiSAC 2.0 bietet zweifellos sowohl technisch als auch klanglich die überlegene Lösung zur Regelung der Lautstärke eines
Musiksignals. Dank dieser innovativen Technologie erfolgt die Lautstärkeregelung erst am spätestmöglichen Punkt in der
Signalkette, unmittelbar vor den Leistungsstufen, was das absolute Optimum in der Klangverarbeitung darstellt. So wird
eine bisher unerreichte Klangtreue erreicht, die neue Maßstäbe in der Audio-Performance setzt.
16
KONVENTIONELLE LAUTSTÄRKEREGELUNG
Konventioneller DSP Konventioneller Verstärker mit SPDIF Eingang
DiSAC 2.0 LAUTSTÄRKEREGELUNG
Digitale, voll ausgesteuerte Audiodaten im 24 Bit Format mit eingebetteten
Lautstärkeinformationen – Immer maximale Auösung des Audiosignals
unabhängig von der eingestellten Lautstärke
Digitale
Audio-
Verarbeitung
Fernbe-
dienung
Digitale
Lautstär-
kerege-
lung
Elektrisches
oder
optisches
Kabel
BRAX DSP
BRAX REVELATION RX2 PRO
SPDIF
Eingang
DAC mit
integriertem
Laut stärke-
steller
Verstärker
Dekodierte
Lautstärkeinformation
Digitale, lautstärkegeregelte Audiodaten im 24 Bit Format
–
Auösung des Audiosignals abhängig von der eingestellten Lautstärke
CONDUCTOR oder
DIRECTOR
DAC
Digitale
Audio-
Verarbeitung
Fernbe-
dienung
DAC
Digitale
Lautstär-
kerege-
lung
SPDIF
Ausgang
SPDIF
Eingang
Verstärker
Elektrisches
oder
optisches
Kabel
Digitales Audiosignal in voller Auösung
Digitales, lautstärkegeregeltes Audiosignal
Lautstärkeinformation
Lautstärkeinformation
Lautstärkeinformation
DAC
SPDIF
Ausgänge
CONDUCTOR oder
DIRECTOR

17
TECHNISCHE DATEN
BRAX REVELATION RX2 PRO Mit analogem Eingangsmodul Mit digitalem Eingangsmodul
Leistung RMS ≤ 1% THD+N
- @ 4 Ohm
- @ 2 Ohm
- gebrückt an 4 Ohm
2 x 300 Watt
2 x 510 Watt
1 x 930 Watt
2 x 300 Watt
2 x 510 Watt
1 x 930 Watt
Verstärkertechnologie PURIFIs „EIGENTAKT“ Class D PURIFIs „EIGENTAKT“ Class D
Eingänge 2 x Cinch
1 x Remote In
1 x Power Stabilizer Eingang
1 x Optisch SPDIF (32 - 96 kHz)
1 x Koaxial SPDIF (32 - 192 kHz)
1 x Remote In
1 x Power Stabilizer Eingang
Eingangsempndlichkeit Cinch: 1,0 - 8,0 Volt –
Eingangsimpedanz Cinch: 4 kOhm –
Ausgänge 2 x Lautsprecherausgang 2 x Lautsprecherausgang
Signalwandler für den
Digitaleingang
– ESS 9039Q2M mit HyperStream IV Dual
DAC Technologie und fortschrittlicher
SABRE HiFi Architektur / Unterstützt
Audiotec Fischers proprietäre DiSAC 2.0
Technologie
Operationsverstärker Analog-
eingang
TI / BurrBrown OPA1612 mit SoundPlus
Technologie
–
Frequenzbereich 10 Hz - 60 kHz 10 Hz - 60 kHz
Signal- / Rauschabstand
(A-bewertet)
Analogeingang: > 125 dB Digitaleingang: > 125 dB
Klirrfaktor (THD) < 0,0002 % < 0,0002 %
Dämpfungsfaktor > 10.000 > 10.000
Betriebsspannung 9 - 18 Volt (max. 5 Sek. bis hinab zu 6 Volt) 9 - 18 Volt (max. 5 Sek. bis hinab zu 6 Volt)
Leerlaufstromaufnahme 1,5 A 1,5 A
Leistungsaufnahme DC 12 V
150 A max. DC 12 V 150 A max.
Sicherung 4 x 25 A LP-Mini-Stecksicherung 4 x 25 A LP-Mini-Stecksicherung
Betriebstemperaturbereich -20° C bis +70° C -20° C bis +70° C
Zusätzliche Features Basiert auf Puri‘s EIGENTAKT Technologie,
BRAX Power Stabilizer Anschluss, Start-
Stopfähigkeit, Eingangsmodus-Schalter
Basiert auf Puri‘s EIGENTAKT Technologie,
BRAX Power Stabilizer Anschluss, Start-
Stopfähigkeit, Eingangsmodus-Schalter
Abmessungen (H x B x T) 56 x 310 x 200 mm 56 x 310 x 200 mm
Gewicht netto 4,0 Kg 4,0 Kg
18
Die BRAX REVELATION RX2 PRO verfügt über ein modulares Eingangskonzept mit austauschbaren Eingangsmodulen.
Im folgenden Abschnitt werden die wichtigsten Schritte zum Wechsel eines Moduls erläutert.
Wichtig: Verwenden Sie ausschließlich für die BRAX REVELATION RX2 PRO vorgesehene Module und installieren Sie
diese nur an der dafür vorgesehenen Position. Der Einsatz eines nicht spezizierten Moduls oder eine fehlerhafte Installa-
tion kann Schäden am Modul, am Verstärker, am Radio oder an anderen angeschlossenen Geräten verursachen.
1. Vor der Installation des Moduls müssen alle Anschlüsse entfernt werden. Achten Sie darauf, dass es nicht zu einem
Kurzschluss mit den freiliegenden Stromkabeln kommt.
2. Lösen Sie alle Schrauben des Bodenblechs und entfernen dieses.
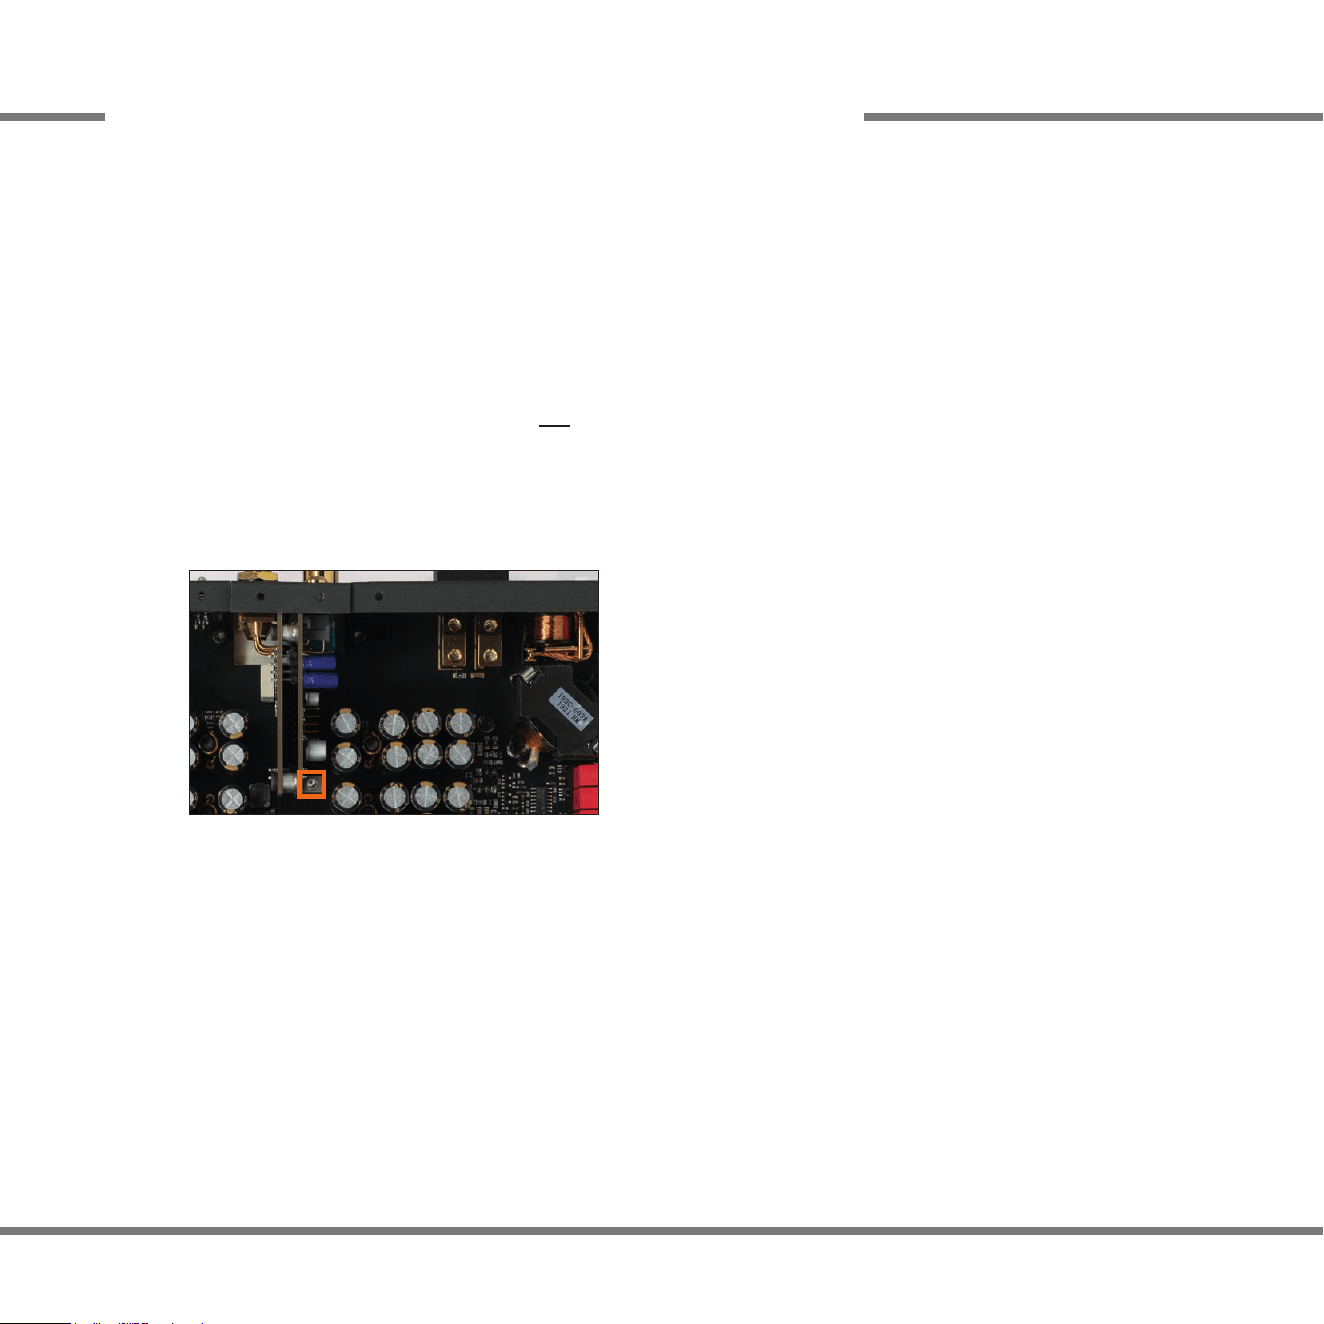
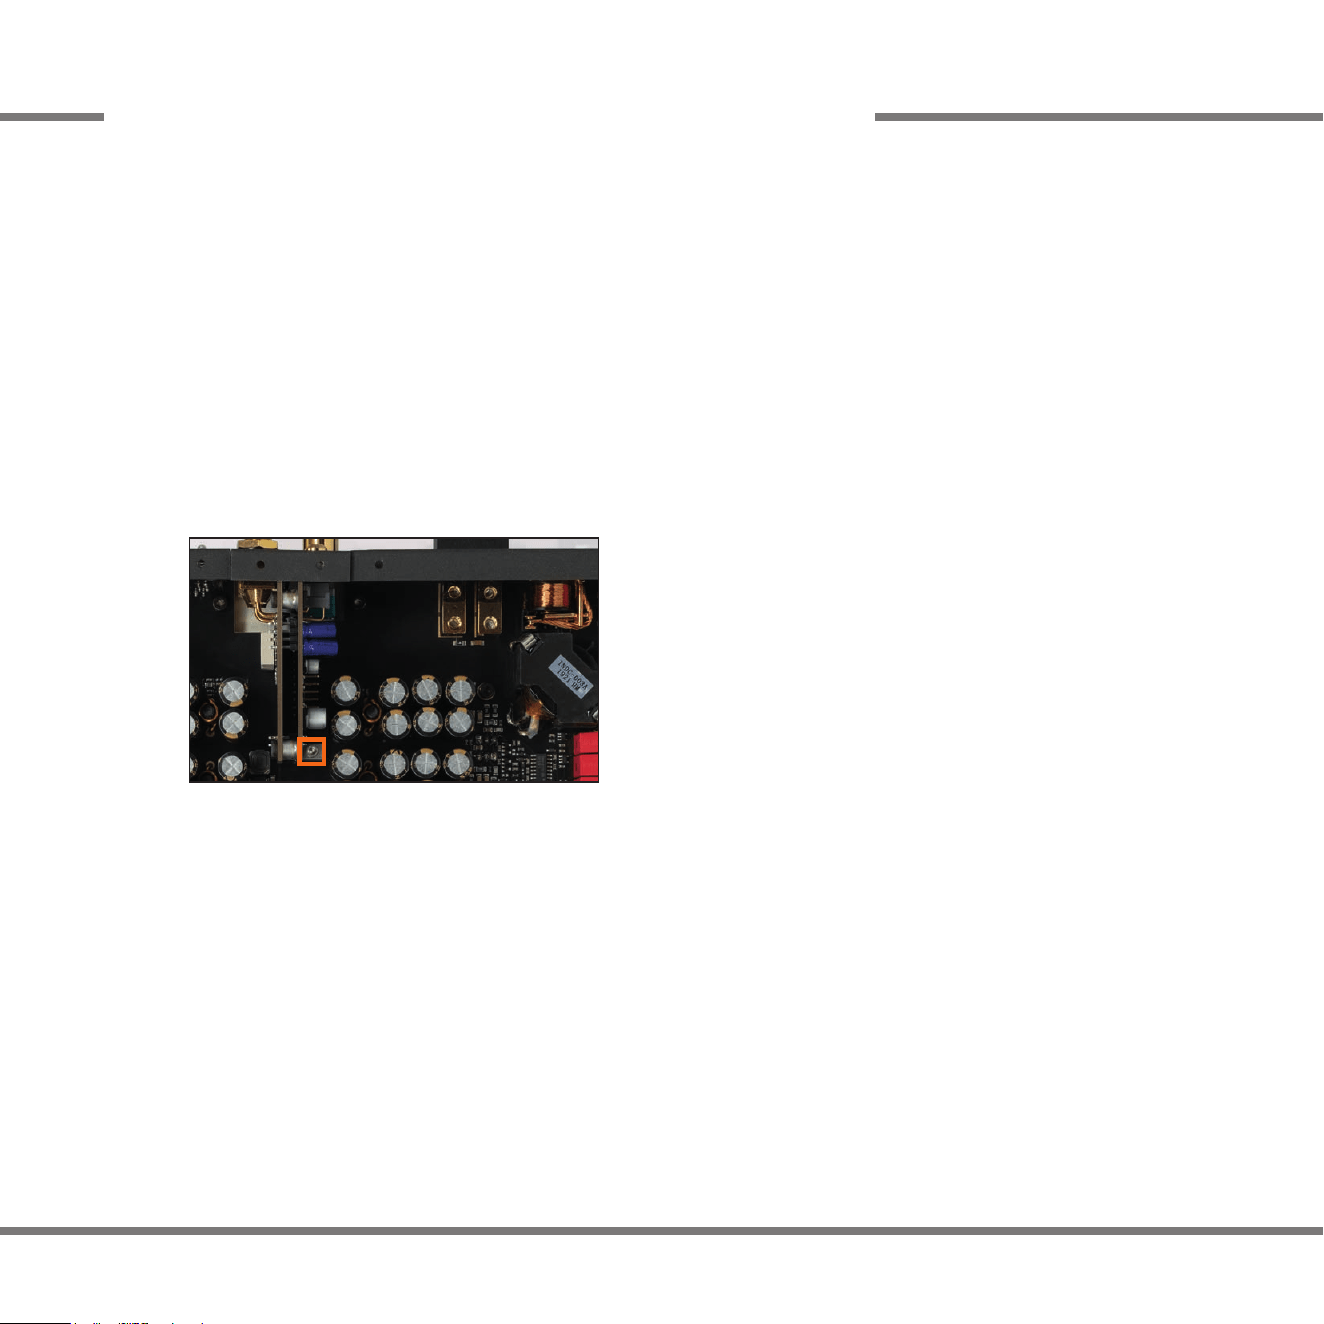
3. Lösen Sie die Masseanschlussschraube des verbauten Moduls (siehe Markierung im nachfolgenden Bild) und
ziehen Sie das Modul nach oben hin ab.
4. Stecken Sie das neue Modul in den im Gerät vorgesehenen Sockel.
5. Achten Sie auf den richtigen Sitz des Moduls und darauf, dass alle Kontaktstifte vollständig im Sockel stecken.
6. Verschrauben Sie das Modul mit Hilfe der Masseanschlussschraube mit der Platine.
7. Montieren Sie anschließend wieder das Bodenblech.
8. Schließen Sie alle Anschlüsse wieder an das Gerät an.
9. Schalten Sie den Verstärker ein. Das installierte Modul wird automatisch vom Gerät erkannt.
WECHSEL DES EINGANGSMODULS

19
BRAX-Produkte genießen aufgrund ihres überaus hohen Qualitätsniveaus international einen ausgezeichneten Ruf.
Grundsätzlich gewähren wir eine Garantiezeit von 2 Jahren. Für Erstbesitzer des Verstärkers BRAX REVELATION
RX2 PRO mit Nachweis eines fachgerechten Einbaus bieten wir eine verlängerte Garantie auf alle elektrischen
Komponenten. Mechanische Teile sind hiervon ausgenommen. Die Produkte werden während der gesamten Ferti-
gung ständig kontrolliert und geprüft. Bitte beachten Sie im Servicefall folgende Hinweise:
1. Die Garantiezeit beginnt mit Kauf des Produktes.
2. Während der Garantiezeit beseitigen wir etwaige Mängel, die nachweislich auf Material- oder Fabrikationsfehlern
beruhen, nach unserer Wahl durch Austausch oder Nachbesserung der defekten Teile. Weitergehende Ansprüche,
insbesondere auf Minderung, Wandlung, Schadenersatz oder Folgeschäden sind ausgeschlossen. Ersetzte Teile
gehen in das Eigentum der Audiotec Fischer GmbH über. Die Garantiezeit wird von einer Garantieleistung durch
uns nicht berührt.
3. Am Produkt dürfen keine unsachgemäßen Eingrie vorgenommen worden sein.
4. Bei Inanspruchnahme der Garantie wenden Sie sich bitte zuerst an Ihren Fachhändler. Sollte es notwendig sein,
das Produkt an uns einzuschicken, so beachten Sie bitte folgende Hinweise:
a) Das Produkt muss in einwandfreier Originalverpackung verschickt werden.
b) Die Garantiekarte muss ausgefüllt dem Produkt beiliegen.
c) Das Produkt muss frachtfrei zugestellt werden, d.h. Porto und Risiko gehen zu Ihren Lasten.
d) Der Kaufbeleg muss beiliegen.
5. Von der Garantie ausgenommen sind:
a) Transportschäden, sichtbar oder unsichtbar (Reklamationen für solche Schäden müssen umgehend bei der
Transportrma eingereicht werden).
b) Kratzer in Metallteilen, Frontabdeckungen usw. Diese Defekte müssen innerhalb von 5 Tagen nach Kauf direkt
bei Ihrem Händler reklamiert werden.
c) Fehler, die durch fehlerhafte Aufstellung, falschen Anschluss, unsachgemäße Bedienung, Beanspruchung oder
äußere gewaltsame Einwirkung entstanden sind.
d) Unsachgemäß reparierte oder geänderte Geräte, die von anderer Seite als von uns geönet wurden.
e) Folgeschäden an fremden Geräten.
f) Kostenerstattung bei Schadensbehebung durch Dritte ohne unser vorheriges Einverständnis.
g) Geräte mit entfernten Typenschildern und / oder Seriennummern.
GARANTIEBESTIMMUNGEN

20
WAS IST WENN?
Sollten während der Installation oder im Betrieb Probleme auftreten, nden Sie in den FAQs auf unserer Webseite hilfreiche
Informationen und Lösungen.
Besuchen Sie die FAQ-Seite unter: www.audiotec-scher.de/knowledge-base/FAQ/brax/
Sollte das Problem nach Umsetzung der vorgeschlagenen Lösungen weiterhin bestehen, wenden Sie sich bitte an Ihren
Einbauspezialisten für weitere Unterstützung.
21
RECHTLICHE HINWEISE
Hinweise zur Entsorgung
Dieses Symbol bedeutet, dass das Produkt nicht über den Hausmüll entsorgt werden darf, sondern bei einer
entsprechenden Sammelstelle zum Recycling abgegeben werden muss. Befolgen Sie die örtlichen Vorschriften
und entsorgen Sie das Produkt niemals mit dem normalen Hausmüll. Die ordnungsgemäße Entsorgung von
Altgeräten trägt zur Vermeidung von Umwelt- und Gesundheitschäden bei.
Regulatorische Hinweise
Dieses Produkt ist mit einer CE-Kennzeichnung versehen. Damit ist das Gerät für den Betrieb in Fahrzeugen
innerhalb der Europäischen Union (EU) zertiziert.
Dieses Produkt ist mit einer UKCA-Kennzeichnung versehen. Damit ist das Gerät für den Betrieb in Fahrzeugen
innerhalb des Vereinigten Königreichs zertiziert.
Dieses Produkt ist mit einer EAC-Kennzeichnung versehen. Damit ist das Gerät für den Betrieb in Fahrzeugen
innerhalb der Eurasian Customs Union zertiziert.

22
Congratulations on your purchase of this high-quality BRAX amplier.
With the BRAX REVELATION RX2 PRO, you have chosen an amplier that combines sonic excellence and uncompromising
craftsmanship at the highest level. It marks the beginning of a new era, as digital technology has found its way into a BRAX
amplier for the rst time, eclipsing everything that has gone before in the car audio segment. During production, we rely
exclusively on carefully selected components and high-quality materials to guarantee you an unrivalled high-end music
experience.
For more than 30 years, BRAX has been synonymous with outstanding audio components that set standards worldwide. In
the meantime, the BRAX brand has gained a worldwide reputation for superior quality. Numerous awards from the world’s
leading car audio magazines and, last but not least, numerous global innovation awards are proof of our excellent work.
With the BRAX REVELATION RX2 PRO we set new standards in sound quality, precision and reliability.
We are proud to present you with this amplier, a true high-end product MADE IN GERMANY.
We wish you many hours of enjoyment with your BRAX REVELATION RX2 PRO.
AUDIOTEC FISCHER GmbH
DEAR CUSTOMER
Heinz Fischer
Founder and CEO
Julian Fischer
Owner and CEO

23
A name that’s set for commitment – since its beginning, the BRAX brand stands for products at the highest level of
technological achievement with the sole target to reproduce music in its purest form, This ambition continually drives the
team in Schmallenberg / Germany, where the products are entirely “made in Germany,” to push boundaries further.
„As a passionate musician with over 45 years of success in the audio industry, I never thought Class D technology could
ever compete with analog. But let me be clear: The BRAX REVELATION RX2 PRO takes my breath away. The level of
audiophile performance this amplier delivers is out of this world and elevates BRAX‘s commitment to uncompromising
sound to a new level. I am convinced that this technological masterpiece will open the eyes of even the most dedicated
analog enthusiasts to a new era of high-end amplication.“
– Heinz Fischer
The BRAX REVELATION RX2 PRO marks the beginning of a new era, where digital amplier technology surpasses the
sound quality of its analog reference counterparts for the rst time. Thanks to the innovative EIGENTAKT technology from
Danish manufacturer PURIFI, which was implemented through close collaboration in this groundbreaking amplier concept,
an unprecedented level of eciency and sound delity has been achieved. The result: outstanding power combined with
minimal distortion and impressive dynamics.
With an output of 2 x 300 Watts at 4 Ohms or 2 x 510 Watts at 2 Ohms, the BRAX REVELATION RX2 PRO impresses not
only with its immense power but also with exceptional technical specications, including a damping factor of over 10,000
across the entire frequency spectrum. Its multi-stage feedback circuit ensures that all non-linearities are compensated for,
maintaining precise output power regardless of the connected speaker’s impedance.
No matter how you perceive the BRAX REVELATION RX2 PRO, it is nothing short of a revolution. After over three years
of intensive research and development, it sets an unparalleled benchmark in amplier design, a fact that was immediately
recognized at its market launch with the EISA Award for the best “In-Car Amplier“ 2024-2025.
THE BRAX PHILOSOPHY

24
GENERAL INSTRUCTIONS
General installation instructions for BRAX ampliers
In order to maintain the quality of this product and to ensure safe operation, read this manual carefully and follow all
installation instructions. This product has been checked for proper function prior to shipping and is guaranteed against
manufacturing defects.
Before starting your installation, disconnect the battery’s negative terminal to prevent damage to the unit, re
and / or risk of injury.
For a proper performance and to ensure full warranty coverage, we strongly recommend to get this product installed by
an authorized BRAX dealer. The installation by a professional and certied technician will qualify you for our extended
warranty. Your BRAX dealer will also assist you in selecting the correct additional components and ensures that proper
consideration is given to all the safety and sound related aspects.
Install your amplier in a dry location with sucient air circulation for proper cooling of the equipment. The amplier should
be secured to a solid mounting surface using proper mounting hardware. Before mounting, carefully examine the area
around and behind the proposed installation location to insure that there are no electrical cables or components, hydraulic
brake lines or any part of the fuel tank located behind the mounting surface. Failure to do so may result in unpredictable
damage to these components and possible costly repairs to the vehicle.

25
General instruction for connecting the BRAX REVELATION RX2 PRO amplier
The amplier may only be installed in vehicles which have a 12 Volts negative terminal connected to the chassis ground.
Any other system could cause damage to the amplier and the electrical system of the vehicle.
The positive cable from the battery for the complete system should be provided with a main fuse at a distance of max.
12 inches (30 cm) from the battery. The value of the fuse is calculated from the maximum total current input of the car
audio system.
Use only suitable cables with sucient cable cross-section for the connection of BRAX REVELATION RX2 PRO.
The fuses may only be replaced by identically rated fuses (4 x 25 A) to avoid damage of the amplier. Higher fuse
ratings can lead to dangerous consequences!
Prior to installation, plan the wire routing to avoid any possible damage to the wire harness. All cabling should be protected
against possible crushing or pinching hazards. Also avoid routing cables close to potential noise sources such as electric
motors, high power accessories and other vehicle harnesses.

26
1 2
3 4
5
3
87
9
Analog input module
12
10 11
Digital input module
or
6
CONNECTORS AND CONTROL UNITS

27
BRAX Power Stabilizer connector
Page 29, point 3
1
Power & Remote connector
Page 29, point 2
2
Speaker outputs
Page 31, point 6
3
Operation mode pushbutton & LEDs
Page 30, point 4
4
Status LED
Page 32, point 1
5
CORE model
Lowlevel line inputs
Page 28, point 1
7
Gain control
Page 30, point 5
8
Input Ground pushbutton
Page 31, point 7
9
Coaxial digital input
Page 28, point 1
10
Signal LED
Page 32, point 3
11
Optical digital input
Page 28, point 1
12
Analog input module Digital input module
Clipping LED
Page 32, point 2
6

28
Congure the amplier as follows
Caution: Carrying out the following steps will require special tools and technical knowledge. In order to avoid connection
errors and/or damage, ask your dealer for assistance if you have any questions and follow all instructions in this manual
(see page 24). It is recommended that this unit is installed by an authorized BRAX dealer.
1 Connecting the pre-amplier or digital inputs
The BRAX REVELATION RX2 PRO amplier features a modular input concept with selectable input modules. Depending
on the installed module, the signal inputs are connected as follows:
Analog input module:
Connecting the lowlevel pre-amplier inputs:
The two lowlevel line inputs can be connected to signal sources such as head units / car radios, DSPs, or DSP ampliers
using appropriate cables. Depending on the selected operating mode, it may be sucient to use only one of the two input
channels (page 30, point 4).
The input sensitivity can be optimally adjusted to the signal source using the gain control (page 26, point 8).
Digital input module:
Connecting a digital signal source in SPDIF format:
If you have a signal source with a coaxial or optical digital output you can connect it to the amplier using the appropriate
input. The sampling rate must be in the range of 32 kHz to 192 kHz (32 - 96 kHz for optical input). The input signal is auto-
matically adapted to the internal sample rate.
Caution: Ensure that the digital audio signal from your signal source is volume-controlled – otherwise this will lead to full
level on the outputs of the BRAX REVELATION RX2 PRO. This may cause severe damage to your speakers. Therefore
we strongly recommend to solely use volume-controlled digital sources!
Note: This amplier can only handle uncompressed digital stereo signals in PCM format with a sample rate between
32 kHz and 96 kHz and no MP3- or Dolby-coded digital audio stream!
HARDWARE CONFIGURATION

29
2 Connection to power supply & remote
CAUTION: Make sure that the battery is disconnected before the +12 V power cable is connected to the car’s electrical
system. Ensure correct polarity.
+12 V: Connector for the positive cable (Page 26, point 2).
Connect the +12 V power cable to the positive terminal of the battery. The positive wire from the battery to the ampli-
ers power terminal needs to have an inline fuse at a distance of no more than 12 inches (30 cm) from the battery. The
value of the fuse is calculated from the maximum total current input of the whole car audio system (BRAX REVELATION
RX2 PRO = max. 150 A RMS). Use a cable with a wire gauge of at least 35 mm² / AWG2.
GROUND: Connector for the ground cable (Page 26, point 2).
The ground wire should be connected to a common ground reference point (this is located where the negative terminal of
the battery is grounded to the metal body of the vehicle) or to a prepared metal location on the vehicle chassis, i.e., an area
cleaned of all paint residues. The cable should have the same gauge as the +12 V wire. Inadequate grounding causes
audible interference and malfunctions.
REMOTE: Connector for the ground cable (Page 26, point 2).
The remote input is used to switch the amplier on and o. The remote lead is connected to the remote / automatic antenna
output of the head unit (radio). If a digital signal processor (DSP) is installed in the signal path, the remote output of the
DSP must be used to turn on the amplier.
We do not recommend controlling the remote input via the ignition switch to avoid pop noise during turn on / o.
3 Optional: Connecting a BRAX Power Stabilizer (BRAX IPC)
These inputs (page 26, point 1) allow the direct connection of a BRAX Power Stabilizer to the output transistors of the
BRAX REVELATION RX2 PRO. The power stabilizer balances voltage uctuations in the power supply, ensuring that the
amplier always has sucient energy to deliver its full power. Ensure the cable between the amplier and power stabilizer
does not exceed 12 inches (30 cm) in length and has a wire gauge of at least 35 mm².

30
4 Setting the operating mode of the amplier
The Input Select pushbutton (page 26, point 4) allows you to select the amplier’s operating mode with a simple press. The
selected mode is indicated by one of the three LEDs next to the button: Stereo, Mono A, or Mono B. This setting aects all
signal inputs, regardless of whether a digital or analog input module is installed.
Stereo: In stereo mode, each speaker output is supplied with the corresponding input signal.
Mono A: In Mono A mode, only the input signal from channel A is used and routed to both amplier channels. This means
that the signal from channel A is routed to channel B in parallel. Please note that the fader and balance controls of the head
unit aect both channels equally in this mode.
Mono B: In Mono B mode, only the input signal from channel B is used and routed to both amplier channels. The input
signal from channel B is routed in parallel to channel A. Please note that the fader and balance controls of the head unit
aect both channels equally in this mode.
5 Adjustment of the input sensitivity
ATTENTION: It is mandatory to properly adapt the input sensitivity of the BRAX REVELATION RX2 PRO to the signal
source to achieve the best possible signal quality and avoid damage to the amplier. The required steps depend on the
installed input module.
a. BRAX REVELATION RX2 PRO with analog input module:
The input sensitivity can be optimally adjusted to the signal source using the gain control (see page 26, point 8). This
is not a volume control, it’s only for adjusting the gain of the amplier. Its adjustment aects both lowlevel line inputs.
Input sensitivity is factory set to 8 Volts. This is denitely the best setting in most applications.
The gain adjustment range is 1.0 V to 8.0 V. If the signal source provides a lower output voltage, the input sensitivity
can be smoothly increased via the Gain Control. The clipping LED (page 26, point 6) serves as monitoring tool.
Note: Don‘t connect any loudspeakers to the outputs of the amplier during this setup.
Steps for input sensitivity adjustment:
1. Turn on the amplier.
2. Adjust the volume of your radio to approx. 90 % of the max. volume, and playback an appropriate test tone,

31
e.g. pink noise (0 dB).
3. If the Clipping LED already lights up, you have to reduce the input sensitivity via the Gain Control until the
LED turns o.
4. Increase the input sensitivity by turning the Gain Control clockwise until the Clipping LED lights up. Now turn
the control counterclockwise until the Clipping LED turns o again.
b. BRAX REVELATION RX2 PRO with digital input module:
The clipping LED also indicates if one of the digital input channels is being overdriven. In this case, the output level
of the connected signal source must be reduced until the clipping LED turns o. For information on how to adjust the
input sensitivity of your signal source, please refer to the appropriate user manual.
6 Connecting the loudspeaker outputs
The loudspeaker outputs can be connected directly to the wires of the loudspeakers. Never connect any of the loudspeaker
cables with the chassis ground as this will damage your amplier and your speakers. Ensure that the loudspeakers are
correctly connected (in phase), i.e., plus to plus and minus to minus.
Exchanging plus and minus causes a total loss of bass reproduction. The plus pole is indicated on most speakers. The
impedance must not be lower than 2 Ohms (4 Ohms in bridge mode), otherwise, the amplier protection will be activated.
7 Optional & only with analog input module: Adjusting the signal ground of the analog input
In some cases, it may be necessary to adjust the signal ground of the lowlevel pre-amplier inputs.
ISO: In this switch position, the signal ground is separated from the vehicle’s ground by a dierential amplier. This is usu-
ally the best setting in most vehicles to prevent interference noise, e.g. from the alternator.
GND: The signal ground is tied together with the vehicle’s ground. This setting should be selected if noise occurs in the
ISO position.

32
ADDITIONAL FUNCTIONS
1 Status LED
The Status LED indicates the operating mode of the amplier:
Green ashing: Amplier startup in progress.
Green: Amplier is ready for operation
Orange fast ashing: The internal fuses are blown. Check the fuses inside the device and replace them if necessary. The
fuses should only be replaced with ones of the same rating (4 x 25 A) to prevent damage to the device. Using higher-rated
fuses can lead to dangerous consequences.
Orange slow ashing: The temperature of the amplier exceeds 75°C. The power is reduced until a safe operating
temperature is reached.
Orange: Protection mode is active. This may have dierent root causes.
1. Undervoltage: The input voltage of the amplier is continuously below 9 Volts. Short-term drops down to 6 Volts are
permissible and do not activate the undervoltage protection.
2. Overvoltage: The input voltage of the amplier exceeds 18 Volts.
3. Speaker impedance too low: The impedance of the connected speaker must not be lower than 2 Ohms nominal
(1.8 Ohms DC resistance). This is also indicated by the red ashing Clipping LED.
If the amplier does not switch back on after the issue has been resolved, it may be defective and should be sent to your
local authorized dealer for repair.
Red: Protection mode is active. The temperature of the amplier exceeds 85°C. The internal temperature protection shuts
down the device until it reaches a safe temperature level again.
2 Clipping LED
Normally, the LED is o and only lights up when one of the lowlevel pre-amplier or digital signal inputs is overdriven.
On (red): One of the signal inputs is overdriven. Reduce the input sensitivity as described in the section “Adjusting the input
sensitivity” (page 30, point 5) until the LED turns o.
3 Signal LED (only with digital input module)
This LED indicates the status of the digital input in use.
O: No digital signal detected.
Green: Digital signal detected, no DiSAC 2.0 volume information embedded in the data stream.
Blue: Digital signal detected, DiSAC 2.0 volume control active in combination with the BRAX DSP.

33
DiSAC – The optimal volume setting in connection with the BRAX DSP
In a car hi- system, there are typically two methods for controlling the volume:
a) volume control via the signal source (e.g. car radio):
This is the most common method, but it has the disadvantage that the full signal resolution of a digital signal processor
(DSP) is only used when the volume is set to maximum at the source. Otherwise, the full bit resolution of the AD converter
or the incoming digital signal is not used, which can lead to a reduced sound precision, especially at low volumes.
b) Volume control via the digital signal processor (DSP):
In this case, the signal source always delivers the maximum signal level so that the downstream DSP is optimally driven
and can process the input signal in the highest quality. In this case, the volume is controlled digitally in the highest resolution
via a remote control connected to the DSP. However, even with this method, sound losses at very low volumes cannot be
completely ruled out.
The perfect solution
The BRAX MATRIX MX4 PRO and the new BRAX REVELATION RX2 PRO, in combination with the BRAX DSP, oer an
optimal solution for volume control, thanks to the exclusive, proprietary ‘DiSAC’ technology.
This ensures that there is no loss of sound in the rst place. The technology works best when the signal source either has
no volume control or is set to maximum output level.
The signal is then always processed at the optimum level in the BRAX DSP, without any reduction in resolution. The
CONDUCTOR or DIRECTOR remote controls are used to control the volume.
The special thing about this is that the volume information sent from the remote control to the DSP is embedded in the
digital audio data stream of the BRAX DSP’s SPDIF outputs and thus transmitted to the BRAX REVELATION RX2 PRO
or BRAX MATRIX MX4 PRO. In the BRAX ampliers, this information is extracted from the data stream again and used to
control the volume control in the amplication stage.
This means that volume control is carried out at the ideal point – namely directly before the power stages that control the
loudspeakers.
DiSAC 2.0 VOLUME CONTROL

34
DiSAC Generation 2.0 – “Take it to the limit”
The new ES9039Q2M DA converter from ESS Audio, used in the optional digital stereo input module, signicantly raises
the performance limits with its extraordinary performance – just like the BRAX REVELATION RX2 PRO itself. In particular,
the converter achieves outstanding values in terms of signal-to-noise ratio and distortion, which is why we had to rethink
our DiSAC concept. The previously used PGA (Programmable Gain Amplier), which was used for analog volume control
in the previous version of DiSAC technology, would become the weakest link in the signal chain when combined with the
ESS DA converter and the proprietary EIGENTAKT Class D power amplier technology.
That is why DiSAC 2.0 takes a new technical approach. As usual, the volume information is embedded in the full-scale
digital audio stream of the SPDIF outputs of the BRAX DSP, thus transmitting the audio signal to the BRAX REVELATION
RX2 PRO with maximum resolution. However, volume control is now handled by a special functional unit integrated in the
DAC. This uses the DA converter’s high 32 Bit resolution to provide the required volume control range of 96 dB without
aecting the resolution of the music signal. This avoids possible rounding errors during volume reduction, which could lead
to quantization distortion and noise.
Thanks to direct access to the digital signal path, the volume control in the ES9039Q2M acts like an analog control, but with
the decisive advantage that the inherent noise and distortion of the previously used PGA are completely eliminated. It is
only through this technology that it has been possible to raise performance to an unparalleled level and set new standards
in sound quality and precision.
DiSAC 2.0 is without doubt the superior solution for controlling the volume of a music signal, both technically and in terms
of sound quality. Thanks to this innovative technology, volume control is performed at the latest possible point in the
signal chain, immediately before the power stages, which is the absolute optimum in sound processing. This achieves an
unprecedented level of sound delity that sets new standards in audio performance.
35
DiSAC 2.0 VOLUME CONTROL
Digital, full 24 Bits audio data with embedded volume information – always
full resolution of the audio signal regardless of the adjusted volume
Digital
audio
processing
Remote
control
Digital
volume
control
Electrical
or optical
cable
BRAX DSP
BRAX REVELATION RX2 PRO
SPDIF
input
DAC with
integrated
volume
control
Amplier
Decoded volume
information
Digital audio signal in full resolution
Digital, volume controlled audio signal
Volume information
Volume information
DAC
SPDIF
outputs
CONDUCTOR or
DIRECTOR
CONVENTIONAL VOLUME CONTROL
Conventional DSP Conventional amplier with SPDIF input
Digital, volume controlled audio data in 24 Bits format
–
resolution of the audio signal depends on the adjusted volume
DAC
Digital
audio
processing
Remote
control
DAC
Digital
volume
control
SPDIF
output
SPDIF
input
Amplier
Electrical
or optical
cable
Volume information
CONDUCTOR or
DIRECTOR

36
TECHNICAL DATA
BRAX REVELATION RX2 PRO With analog input module With digital input module
Power RMS ≤ 1% THD+N
- @ 4 Ohms
- @ 2 Ohms
- bridged @ 4 Ohms
2 x 300 Watts
2 x 510 Watts
1 x 930 Watts
2 x 300 Watts
2 x 510 Watts
1 x 930 Watts
Amplier technology PURIFIs “EIGENTAKT” Class D PURIFIs “EIGENTAKT” Class D
Inputs 2 x RCA / Cinch
1 x Remote In
1 x Power Stabilizer input
1 x Optical SPDIF (32 - 96 kHz)
1 x Coaxial SPDIF (32 - 192 kHz)
1 x Remote In
1 x Power Stabilizer input
Input sensitivity RCA / Cinch: 1.0 - 8.0 Volts –
Input impedance RCA / Cinch: 4 kOhms –
Outputs 2 x Speaker output 2 x Speaker output
Signal converter for digital input – ESS 9039Q2M with HyperStream IV Dual
DAC technology and advanced SABRE HiFi
architekture / Supports Audiotec Fischers
proprietary DiSAC 2.0 technology
OpAmp analog input TI / BurrBrown OPA1612 with SoundPlus
technology
–
Frequency response 10 Hz - 60 kHz 10 Hz - 60 kHz
Signal-to-noise ratio (A-weighted) Analog input: > 125 dB Digital input: > 125 dB
Distortion (THD) < 0.0002 % < 0.0002 %
Damping factor > 10,000 > 10,000
Operating voltage 9 - 18 Volts (max. 5 sec. down to 6 Volts) 9 - 18 Volts (max. 5 sec. down to 6 Volts)
Idle current 1.5 A 1.5 A
Power rating DC 12 V
150 A max. DC 12 V 150 A max.
Fuse 4 x 25 A LP-Mini-fuse (APS) 4 x 25 A LP-Mini-fuse (APS)
Operating temperature range -20° C to +70° C -20° C to +70° C
Additional features Based on Purif’s EIGENTAKT technology,
BRAX Power Stabilizer connector, Start-Stop
capability, input mode switch
Based on Purif’s EIGENTAKT technology,
BRAX Power Stabilizer connector, Start-Stop
capability, input mode switch
Dimensions (H x W x D) 56 x 310 x 200 mm / 2.21 x 12.21 x 7.87” 56 x 310 x 200 mm / 2.21 x 12.21 x 7.87”
Net weight 4.0 kg 4.0 kg
37
EXCHANGE OF THE INPUT MODULE
The BRAX REVELATION RX2 PRO amplier features a modular input concept with selectable input modules.
The most important steps for changing a module are explained in the following section.
Important: Install the modules only in the designated device and its specic slot. The use of a non-specied module or
incorrect installation can cause damage to the module, the amplier, the radio or other connected devices.
1. Before installing the module, all connections must be removed. Make sure to avoid a short circuit with the exposed
power cables.
2. Untighten all screws of the bottom plate and remove it.
3. Untighten the ground connection screw of the module (see marking in the following picture) and pull the module
upwards.
4. Insert the new module into the specic slot of the device.
5. Make sure that the module is installed properly and all pins are fully inserted into the socket.
6. Fix the module to the circuit board by using the ground connection screw.
7. Then mount the bottom plate again.
8. Reconnect all cables to the device.
9. Turn on the amplier. The module is automatically detected by the device.

38
Due to their high quality standards, BRAX products achieved an excellent international reputation. Therefore, we grant
a warranty period of 2 years. In addition, we oer an extended warranty on all electronic components to any rst
owner who can provide proof of a professional installation of the BRAX REVELATION RX2 PRO. Mechanical parts
are excluded. The products are checked and tested carefully during the entire production process. In the case of service,
please note the following:
1. The 2 years warranty period begins with the purchase of the product and is applicable only to the rst owner.
2. During the warranty period we will rectify any defects due to faulty material or workmanship by replacing or repairing
the defective part at our decision. Further claims, and in particular those for price reduction, cancellation of sale,
compensation for damages or subsequent damages, are excluded. All replaced parts removed from the system in
connection with any services become the property of Audiotec Fischer GmbH upon their replacement. The warranty
period is not altered by the fact that we have carried out warranty work.
3. Unauthorized tampering with the product will invalidate this warranty.
4. Consult your authorized dealer rst, if warranty service is needed. Should it be necessary to return the product to the
factory, please ensure that:
a) The product is packed in original factory packing in good condition.
b) The warranty card has been lled out and attached to the product.
c) The product is shipped prepaid, i.e. at your expense and risk.
d) The receipt / invoice as proof of purchase is enclosed.
5 Excluded from the warranty are:
a) Shipping damages, either readily apparent or concealed (claims for such damages must be immediately notied
to the forwarding agent).
b) Scratches in metal parts, front panels or covers etc. This must be notied to your dealer within 5 days of purchase.
c) Defects caused by incorrect installation or connection, by operation errors, by overloading or by external force.
d) Products which have been repaired incorrectly or modied or where the product has been opened by other
persons than us.
e) Consequential damages to other equipments.
f) Reimbursement when repairing damages by third parties without our previous permission.
g) Products with removed serial numbers.
WARRANTY REGULATIONS
39
TROUBLE-SHOOTING
If you have any problems during installation or operation, please refer to the FAQs on our website for helpful information
and solutions.
Visit the FAQ page at: www.audiotec-scher.de/en/knowledge-base/FAQ/brax/
If the problem persists after implementing the suggested solutions, please contact your installation specialist for further
assistance.
LEGAL INFORMATION
Correct disposal of this product
This symbol means the product must not be discarded as household waste, and should be delivered to an
appropriate collection facility for recycling. Follow local rules and never dispose of the product with normal
household waste. Correct disposal of old products helps prevent negative consequences for the environment
and human health.
Regular notes
This product has been issued a CE marking. This means that the device is certied for use in vehicles within
the European Union (EU).
This product has been issued an UKCA marking. This means that the device is certied for use in vehicles
within the United Kingdom.
This product has been issued an EAC marking. This means that the device is certied for use in vehicles within
the Eurasian Customs Union.

Audiotec Fischer GmbH
Hünegräben 26 - 28 · 57392 Schmallenberg · Germany
Tel.: +49 2972-97880 · Fax: +49 2972-978888
E-mail: brax@audiotec-scher.com · Internet: www.audiotec-scher.com
Made in Germany