


;KƉƚŝŽŶĂůͿ
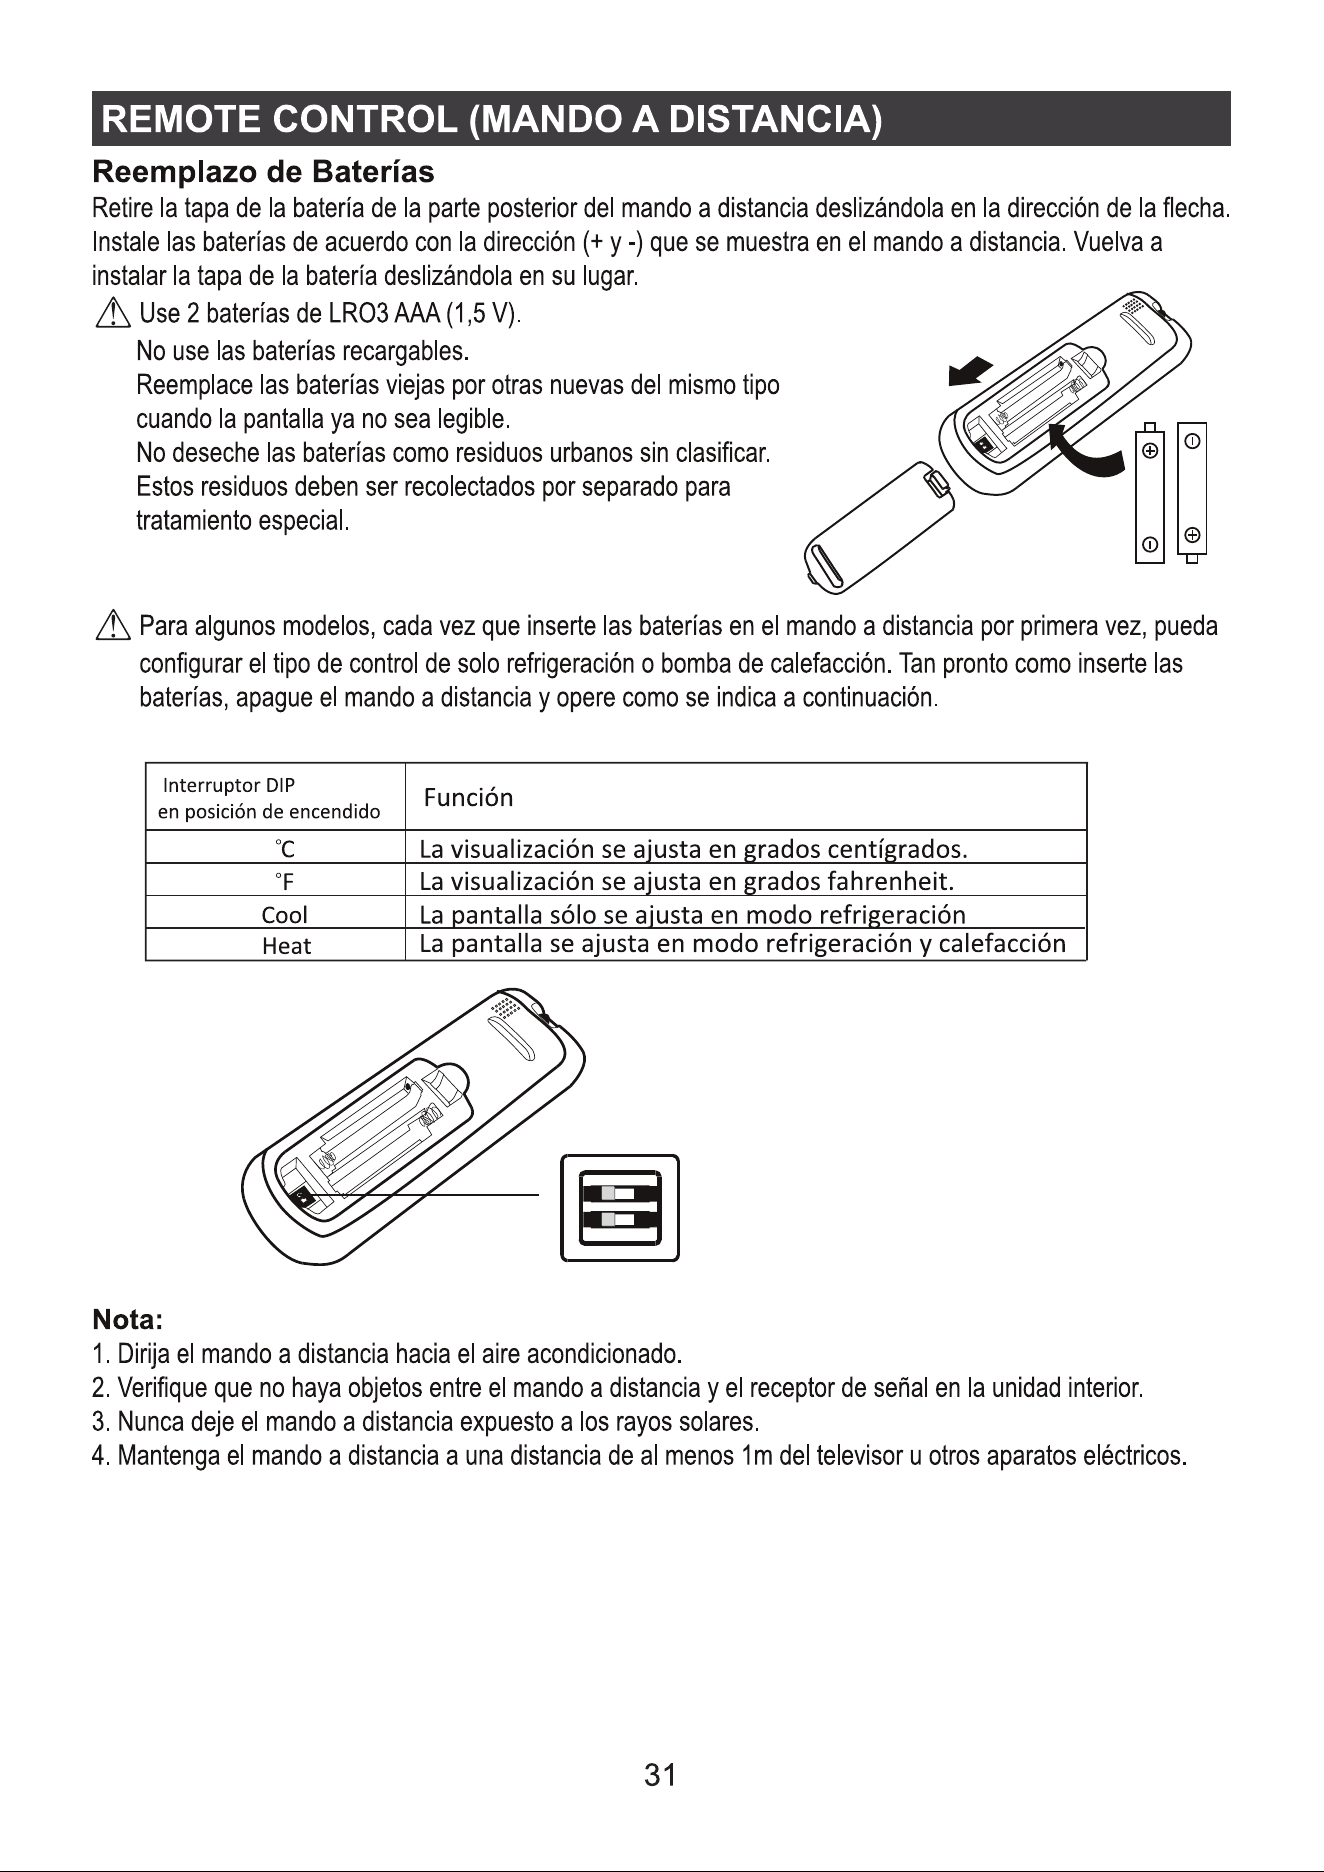
Corbero
Kurbin Lane S.L.
Paseo del Ferrocarril 335 08860 Castelldefels BARCELONA (ESPAÑA)
Corbero es una marca registrada bajo licencia de Electrolux España S.A.


Kurbin Lane S.L.
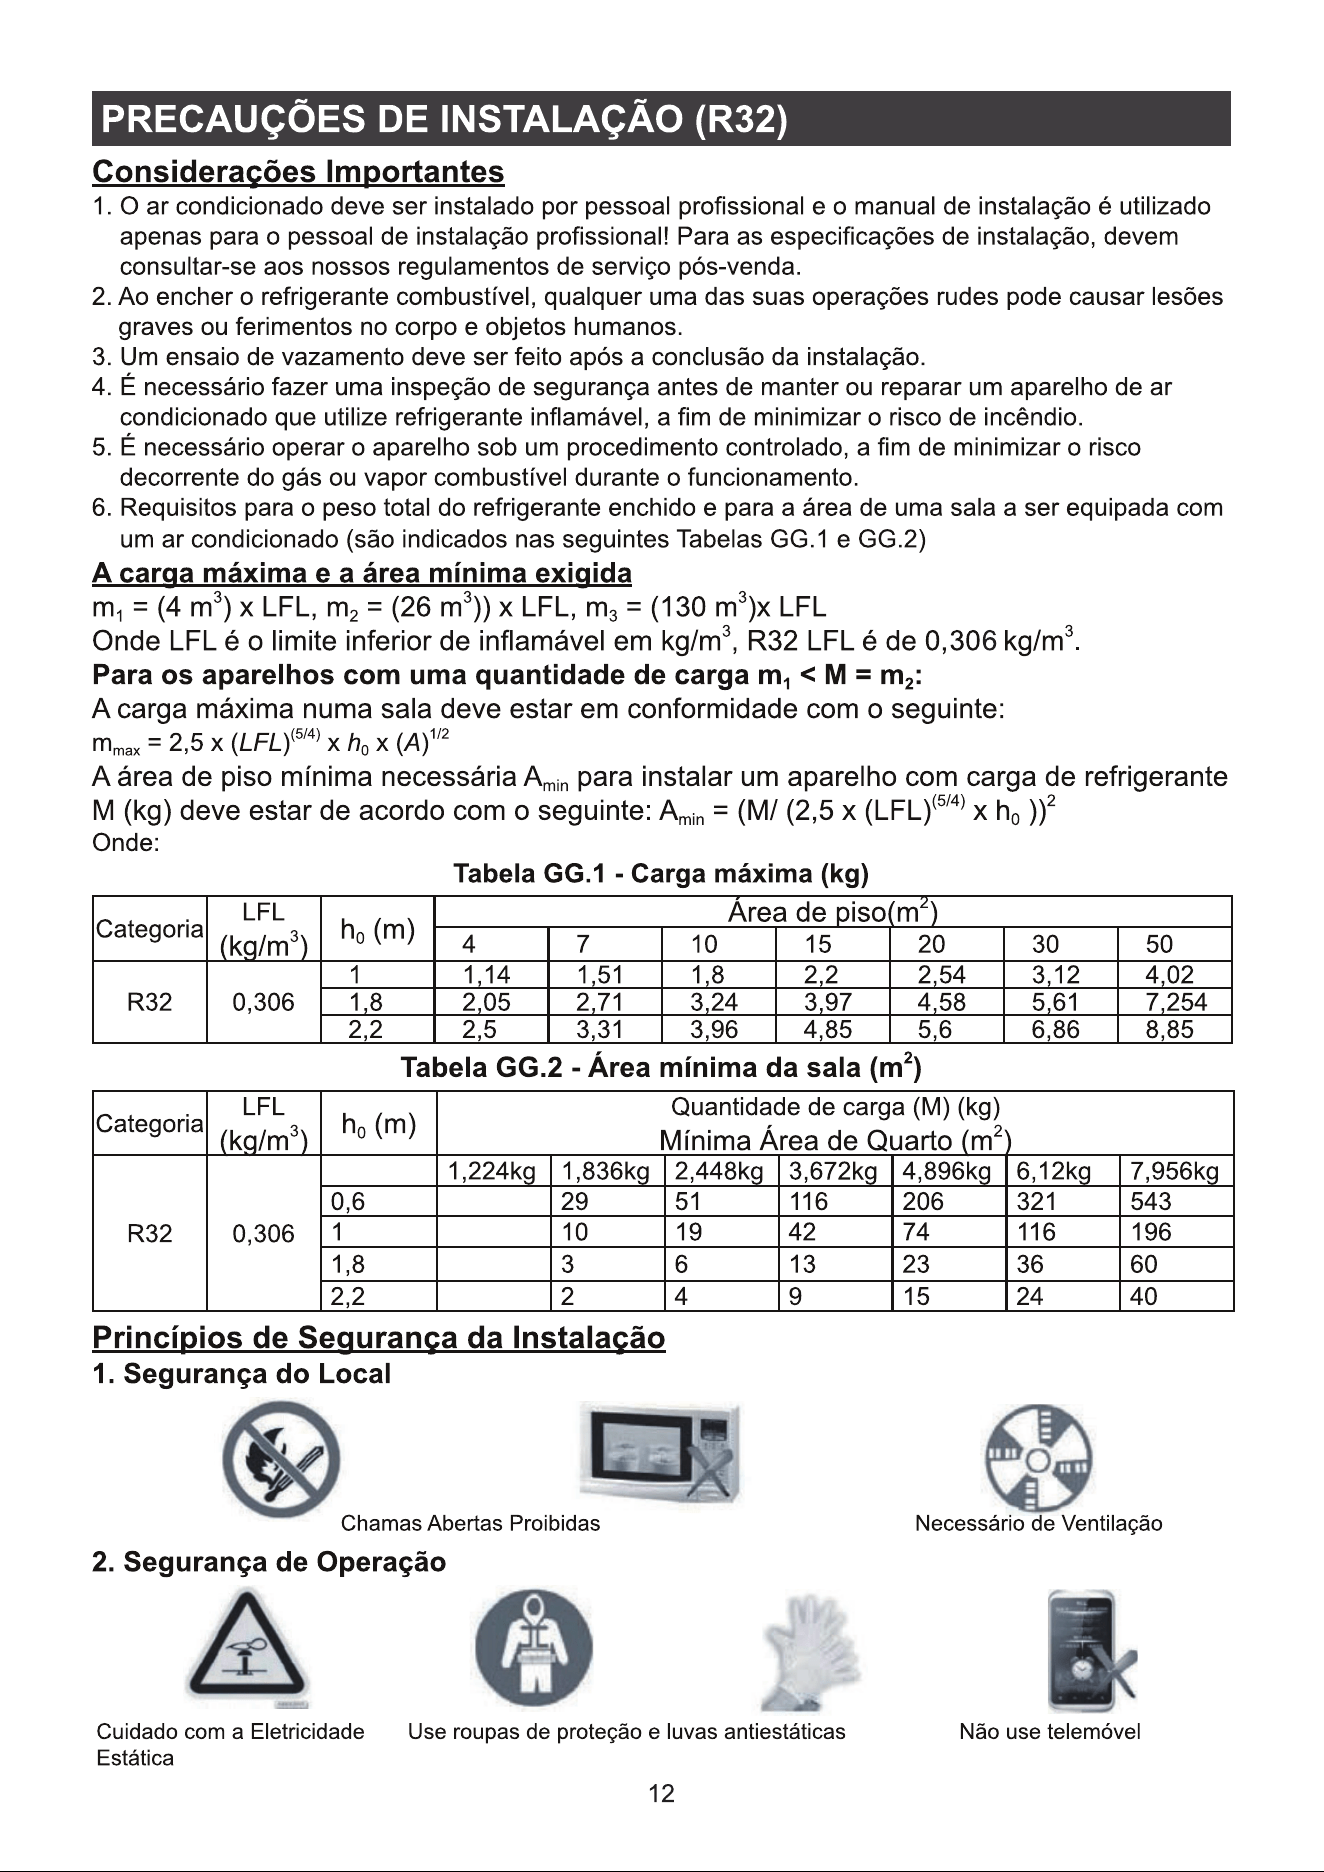
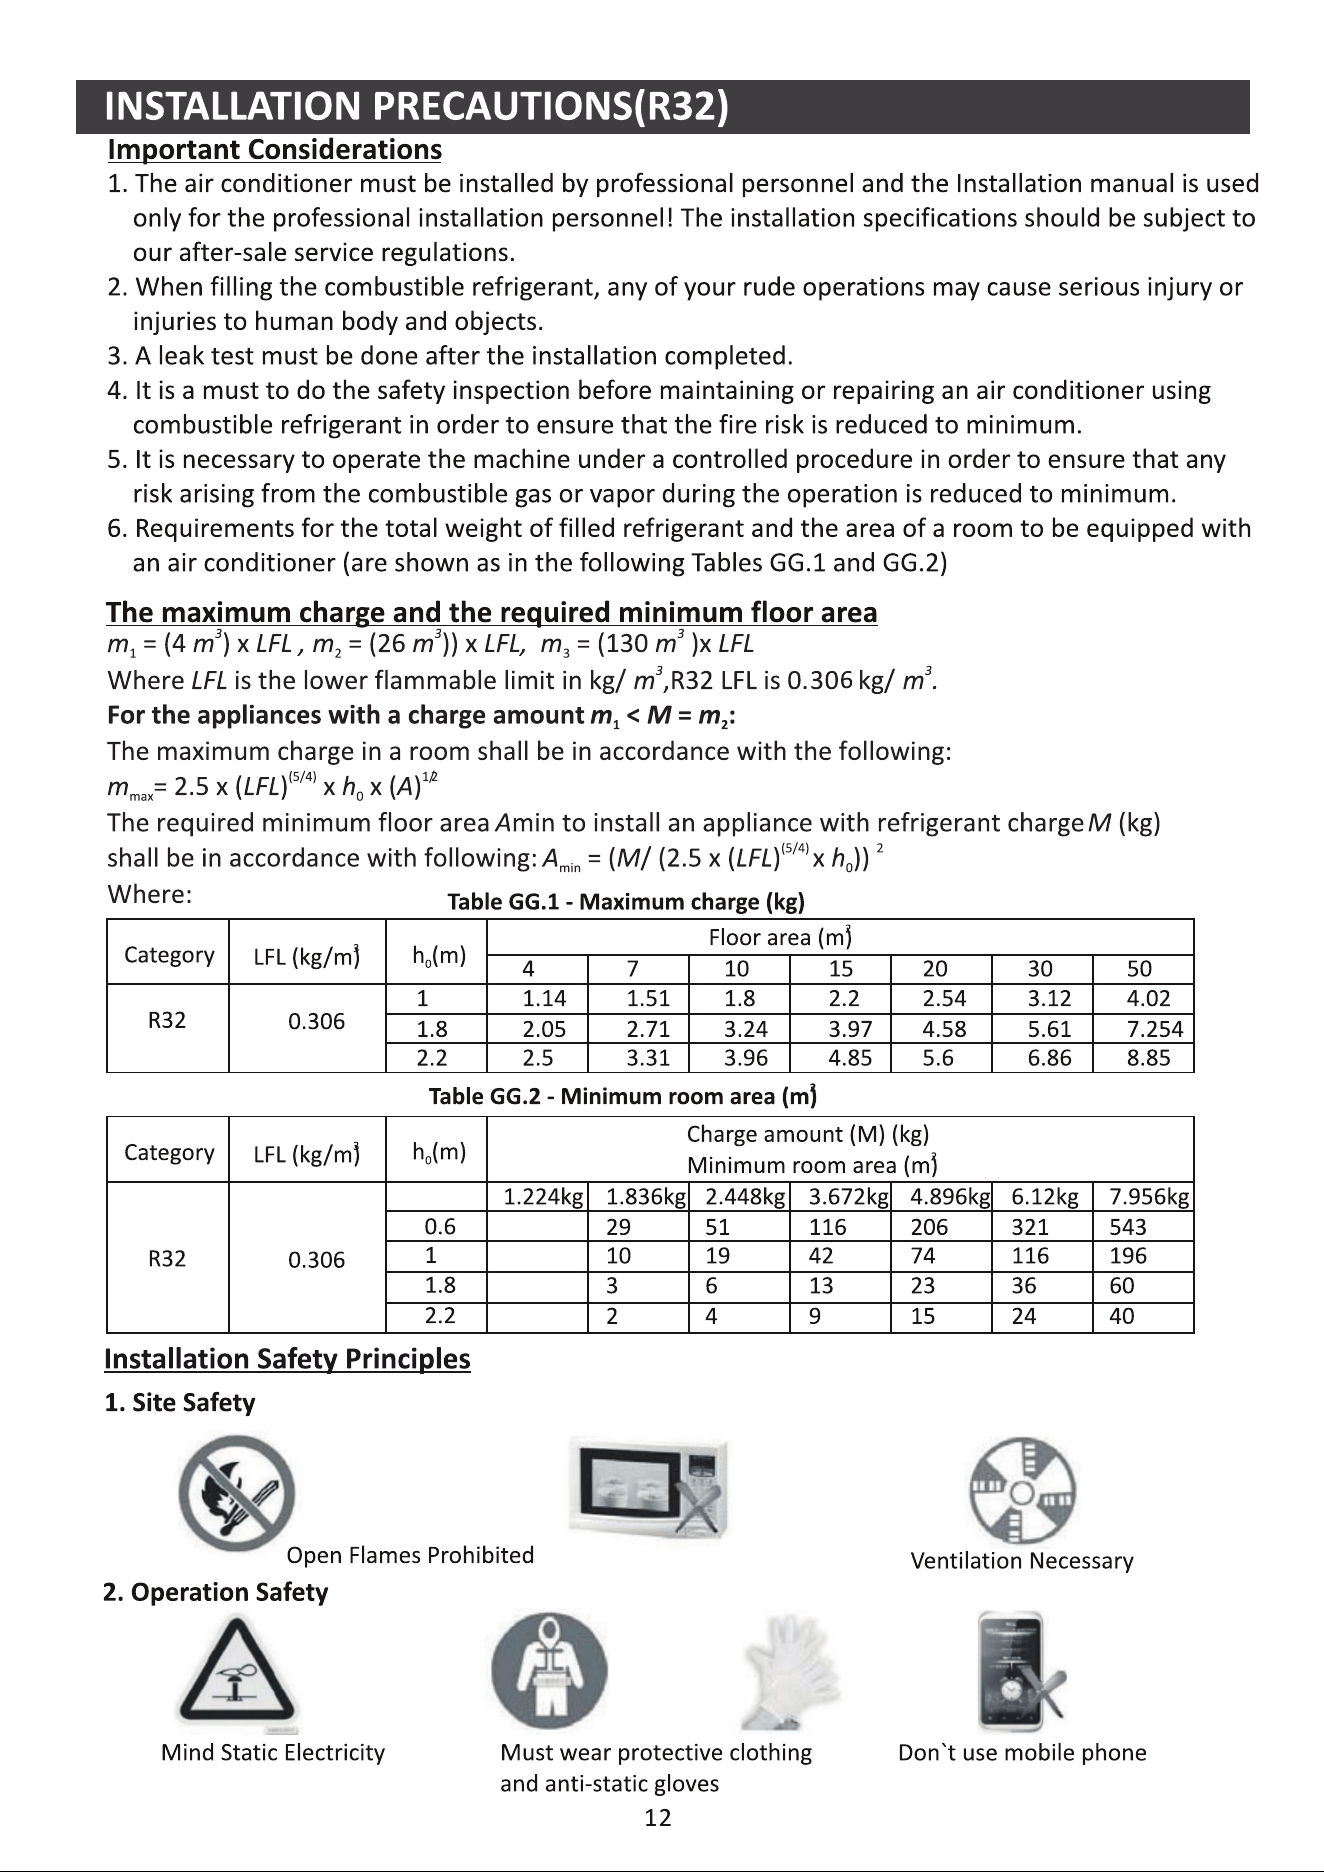
Paseo del Ferrocarril 335 08860 Castelldefels BARCELONA (ESPAÑA)
Corbero es una marca registrada bajo licencia de Electrolux España S.A.
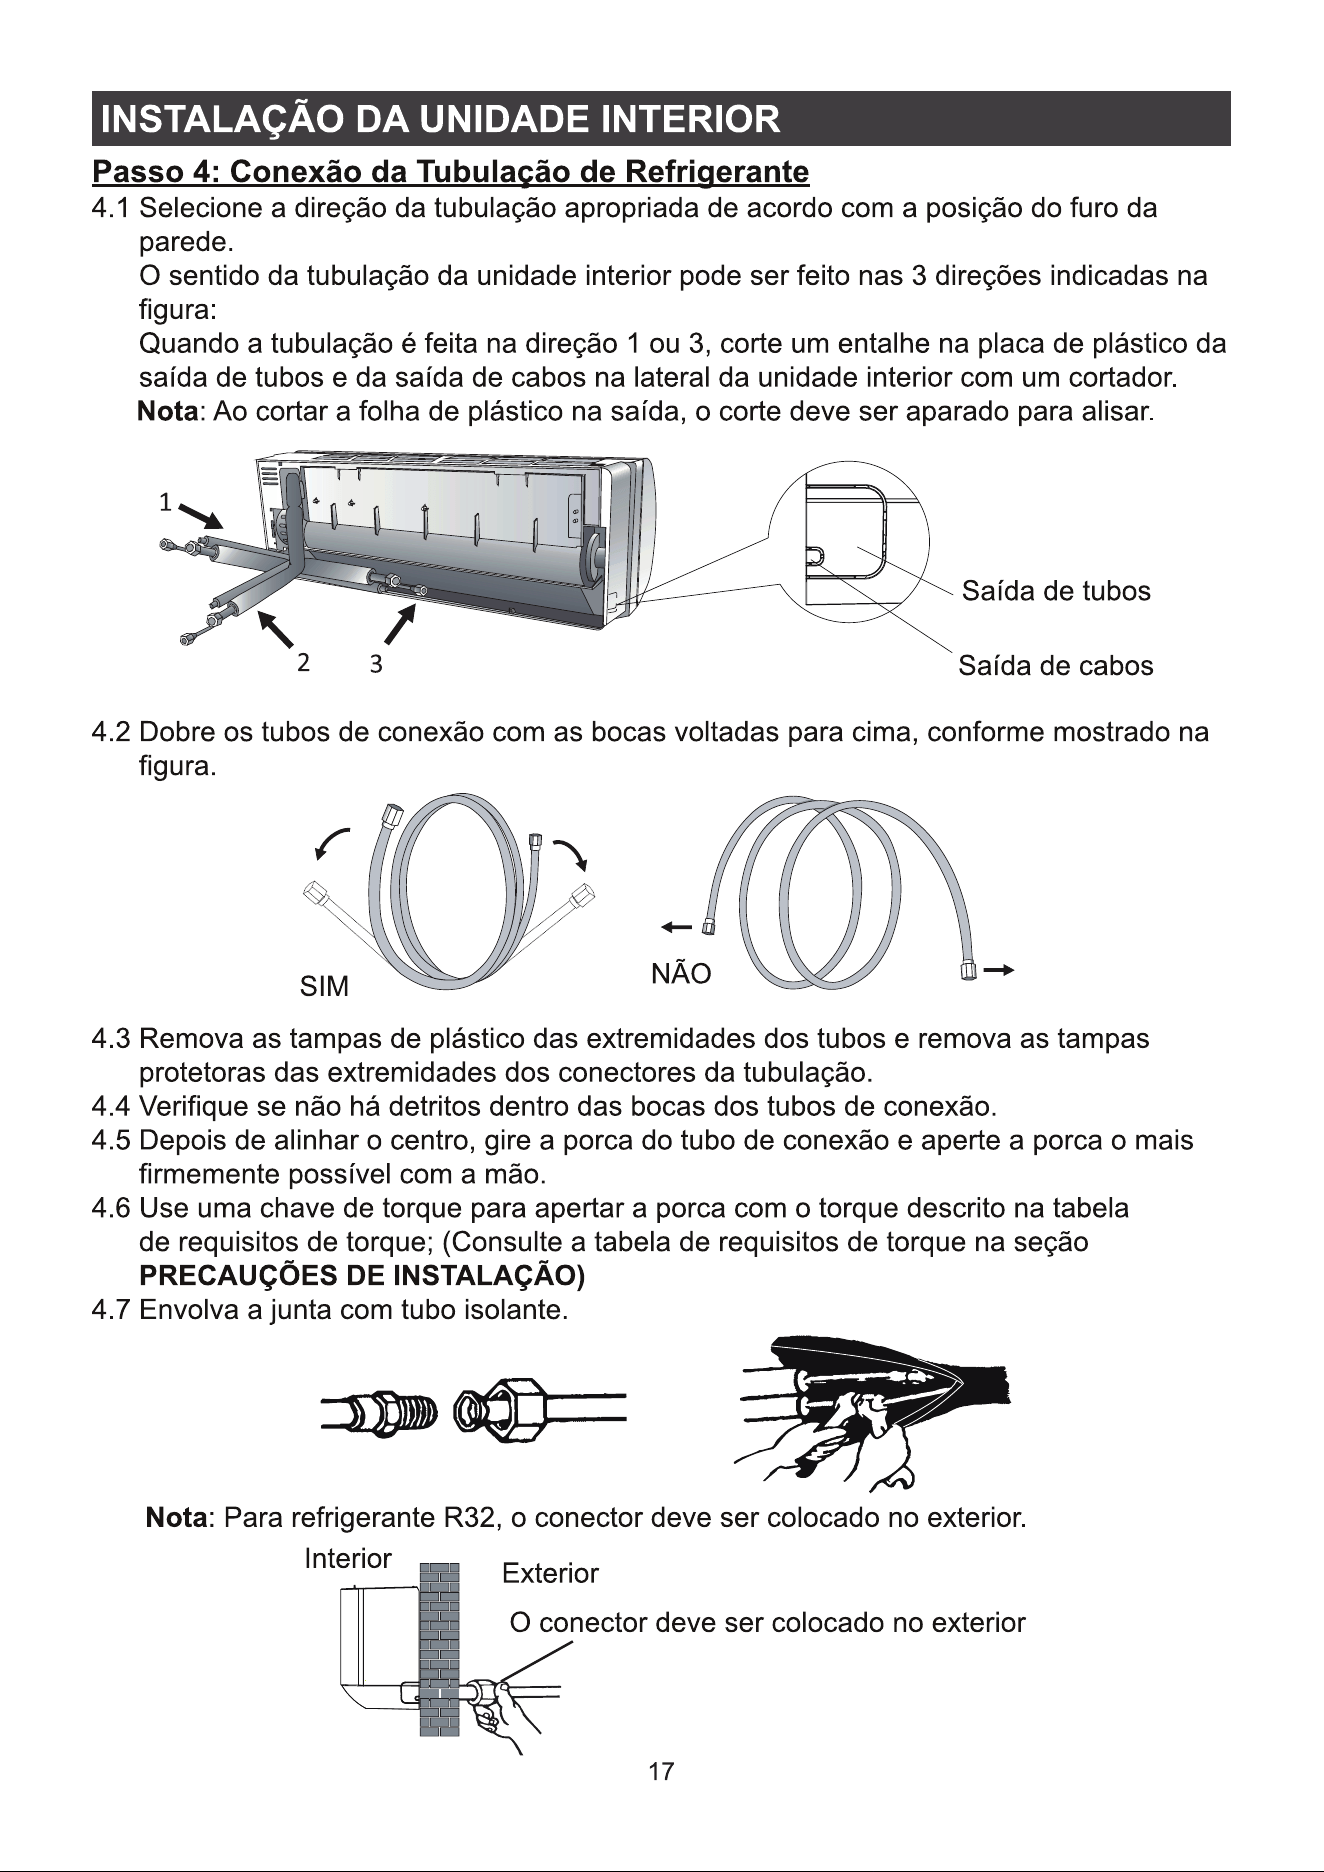
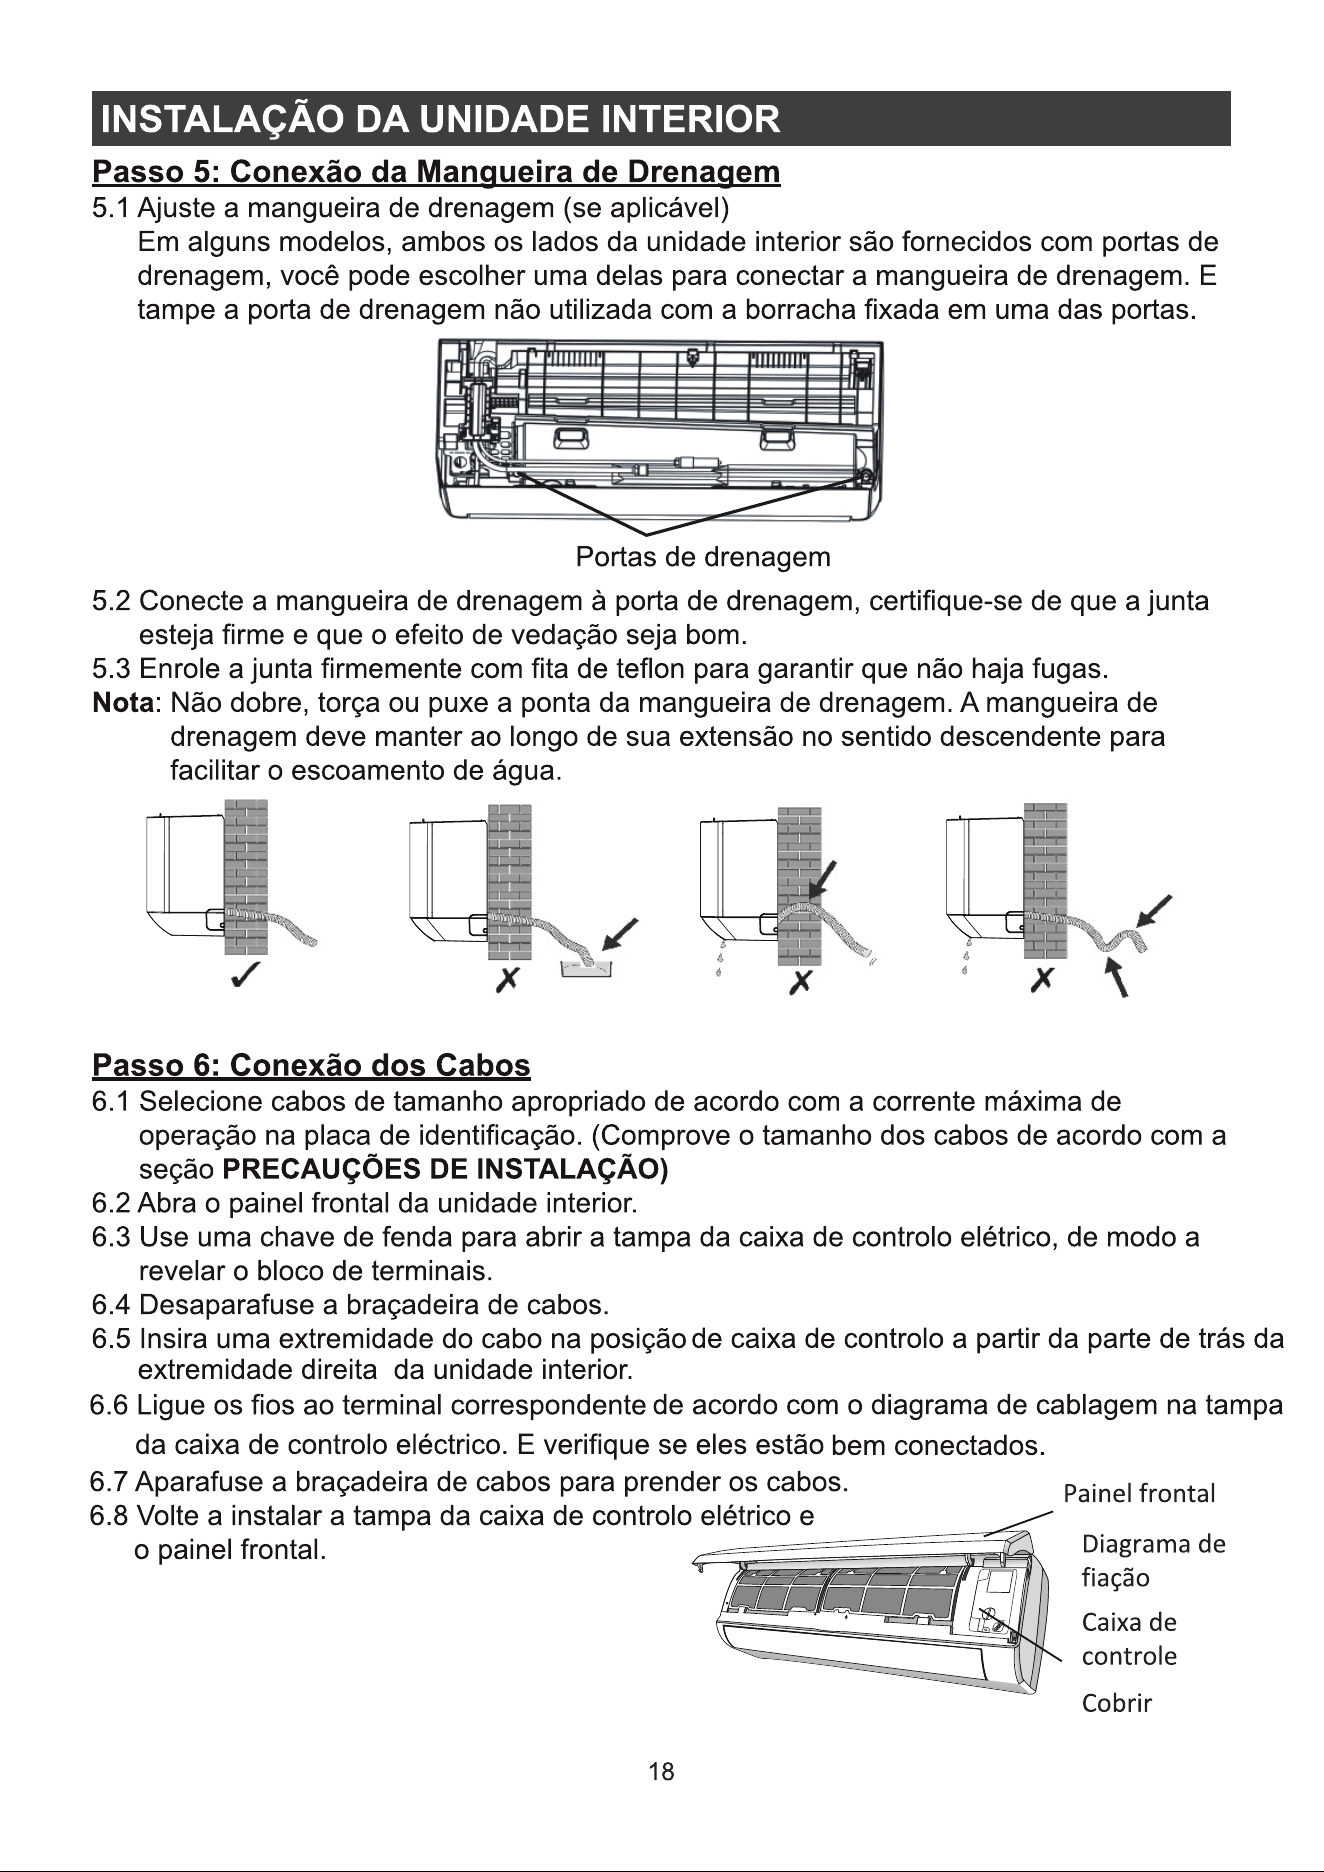
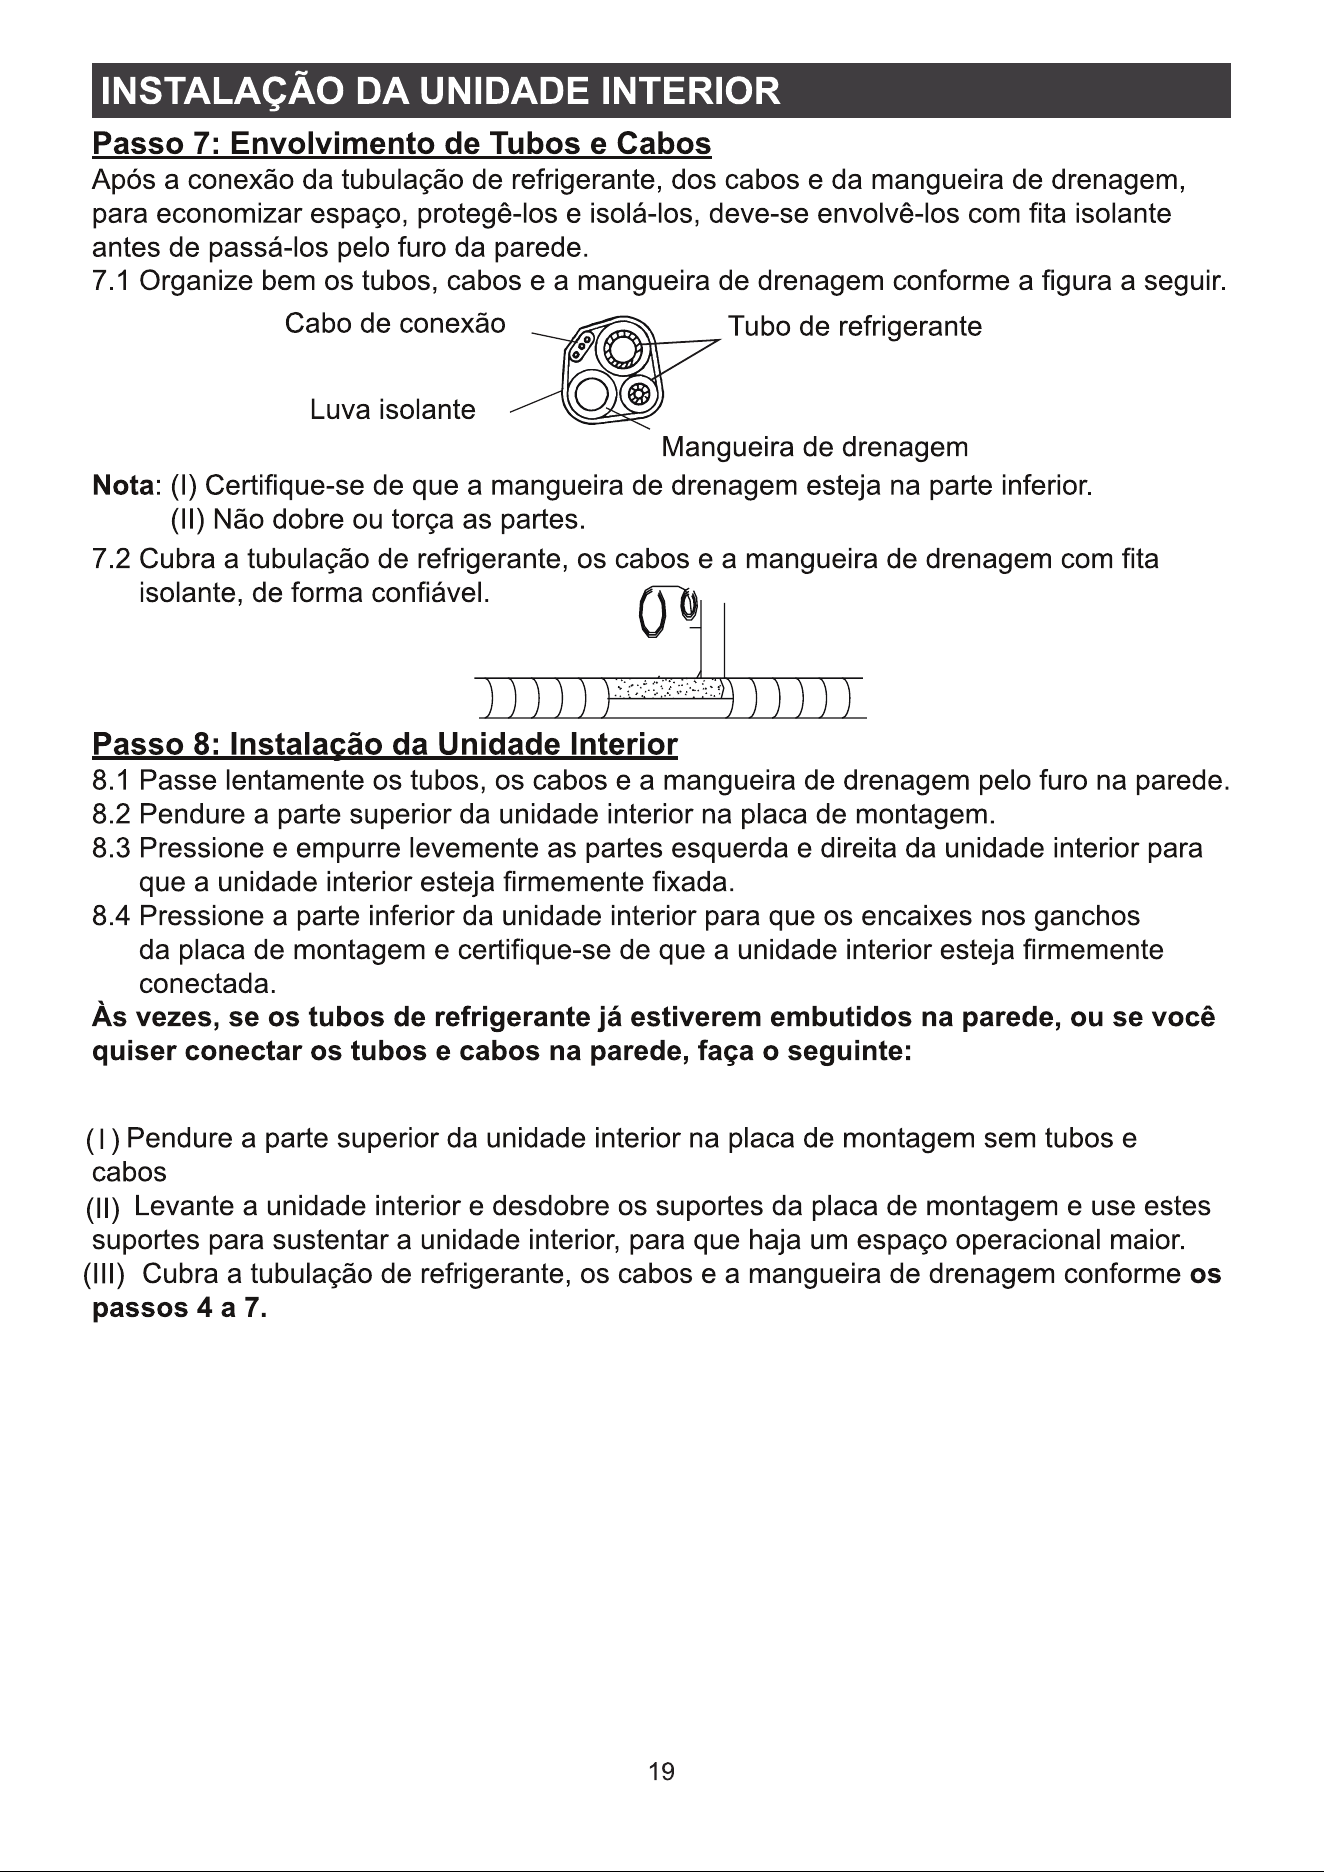
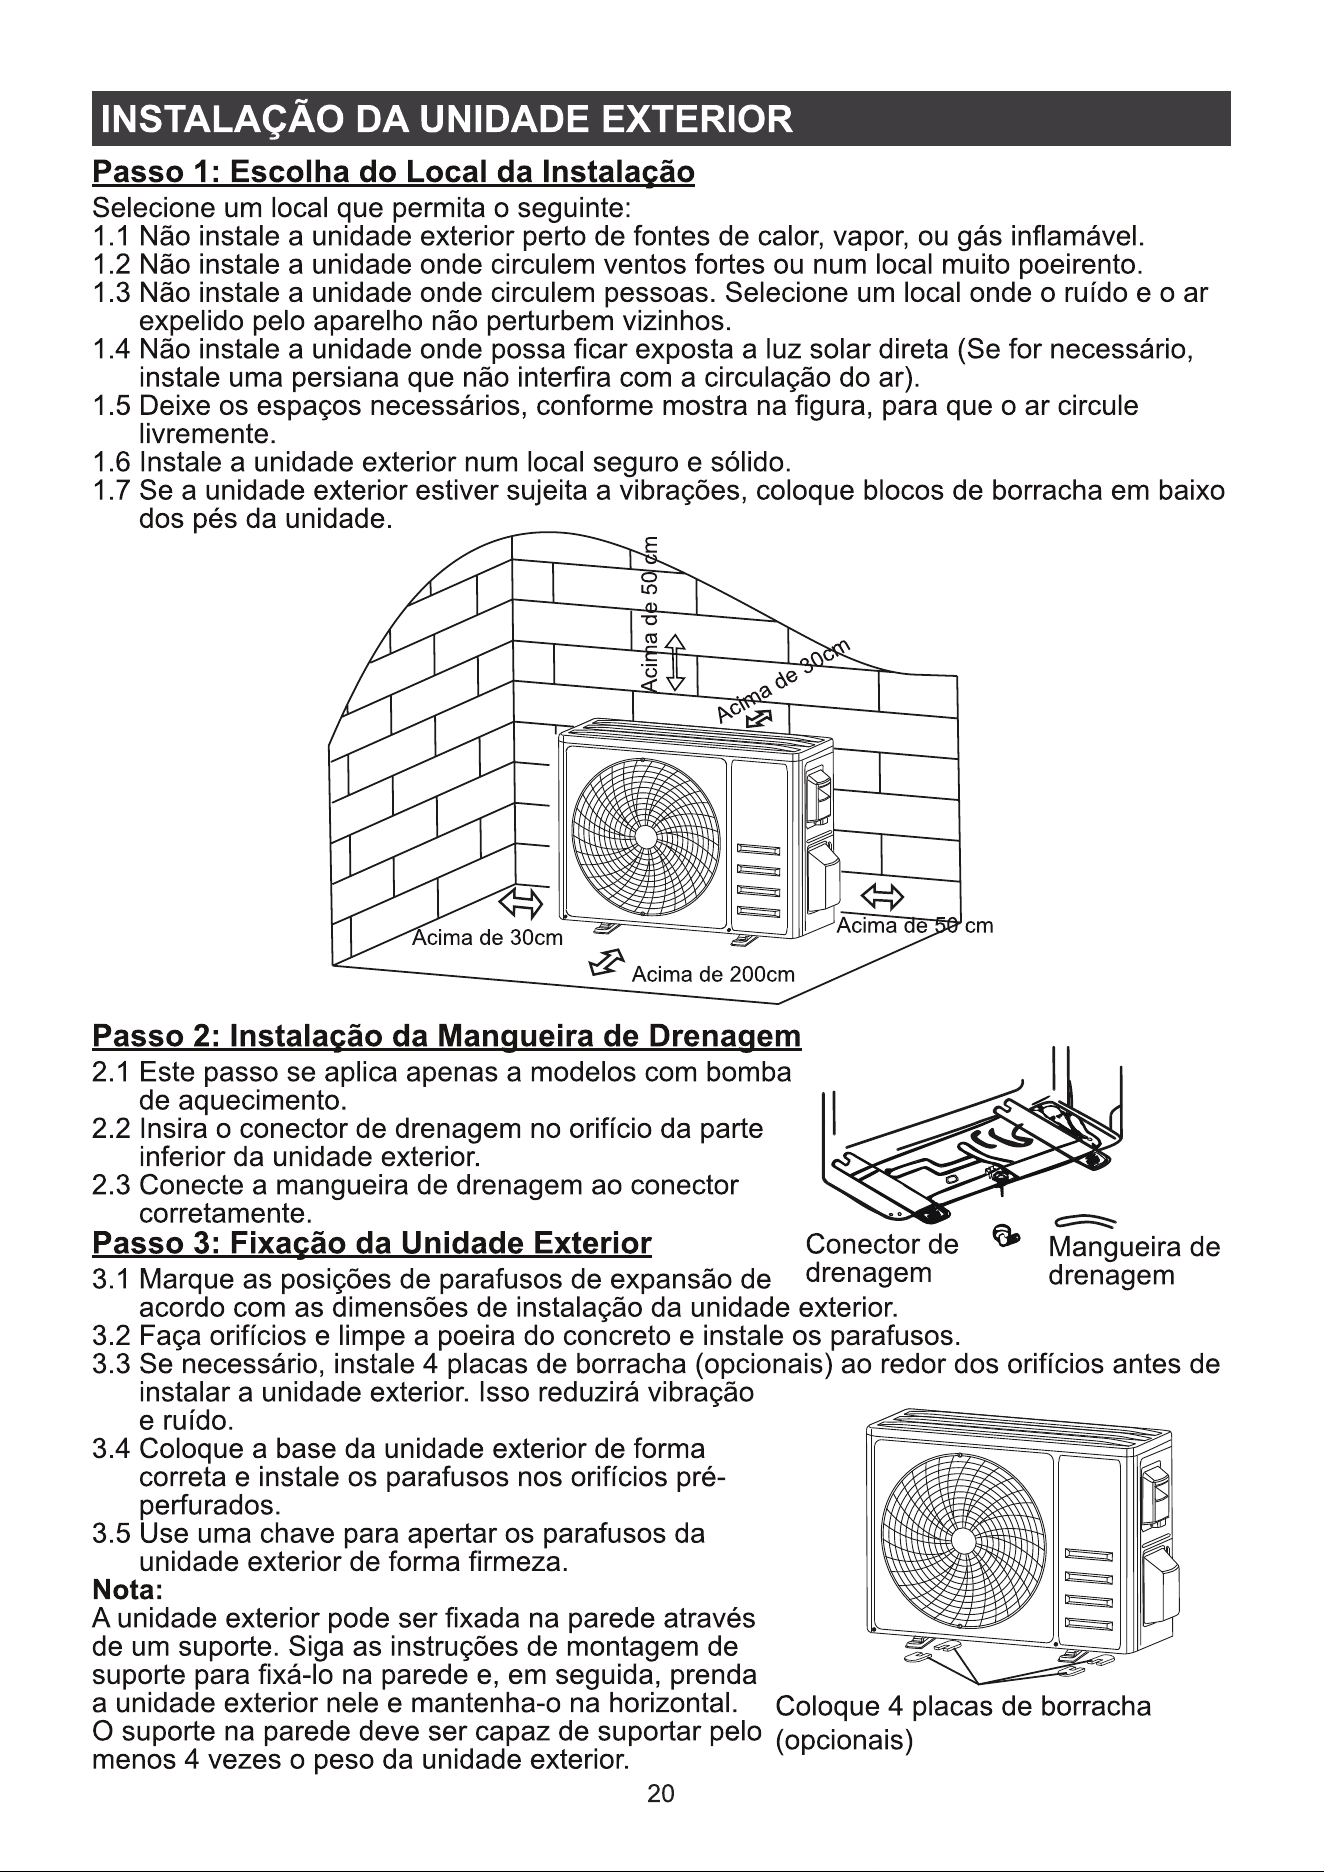
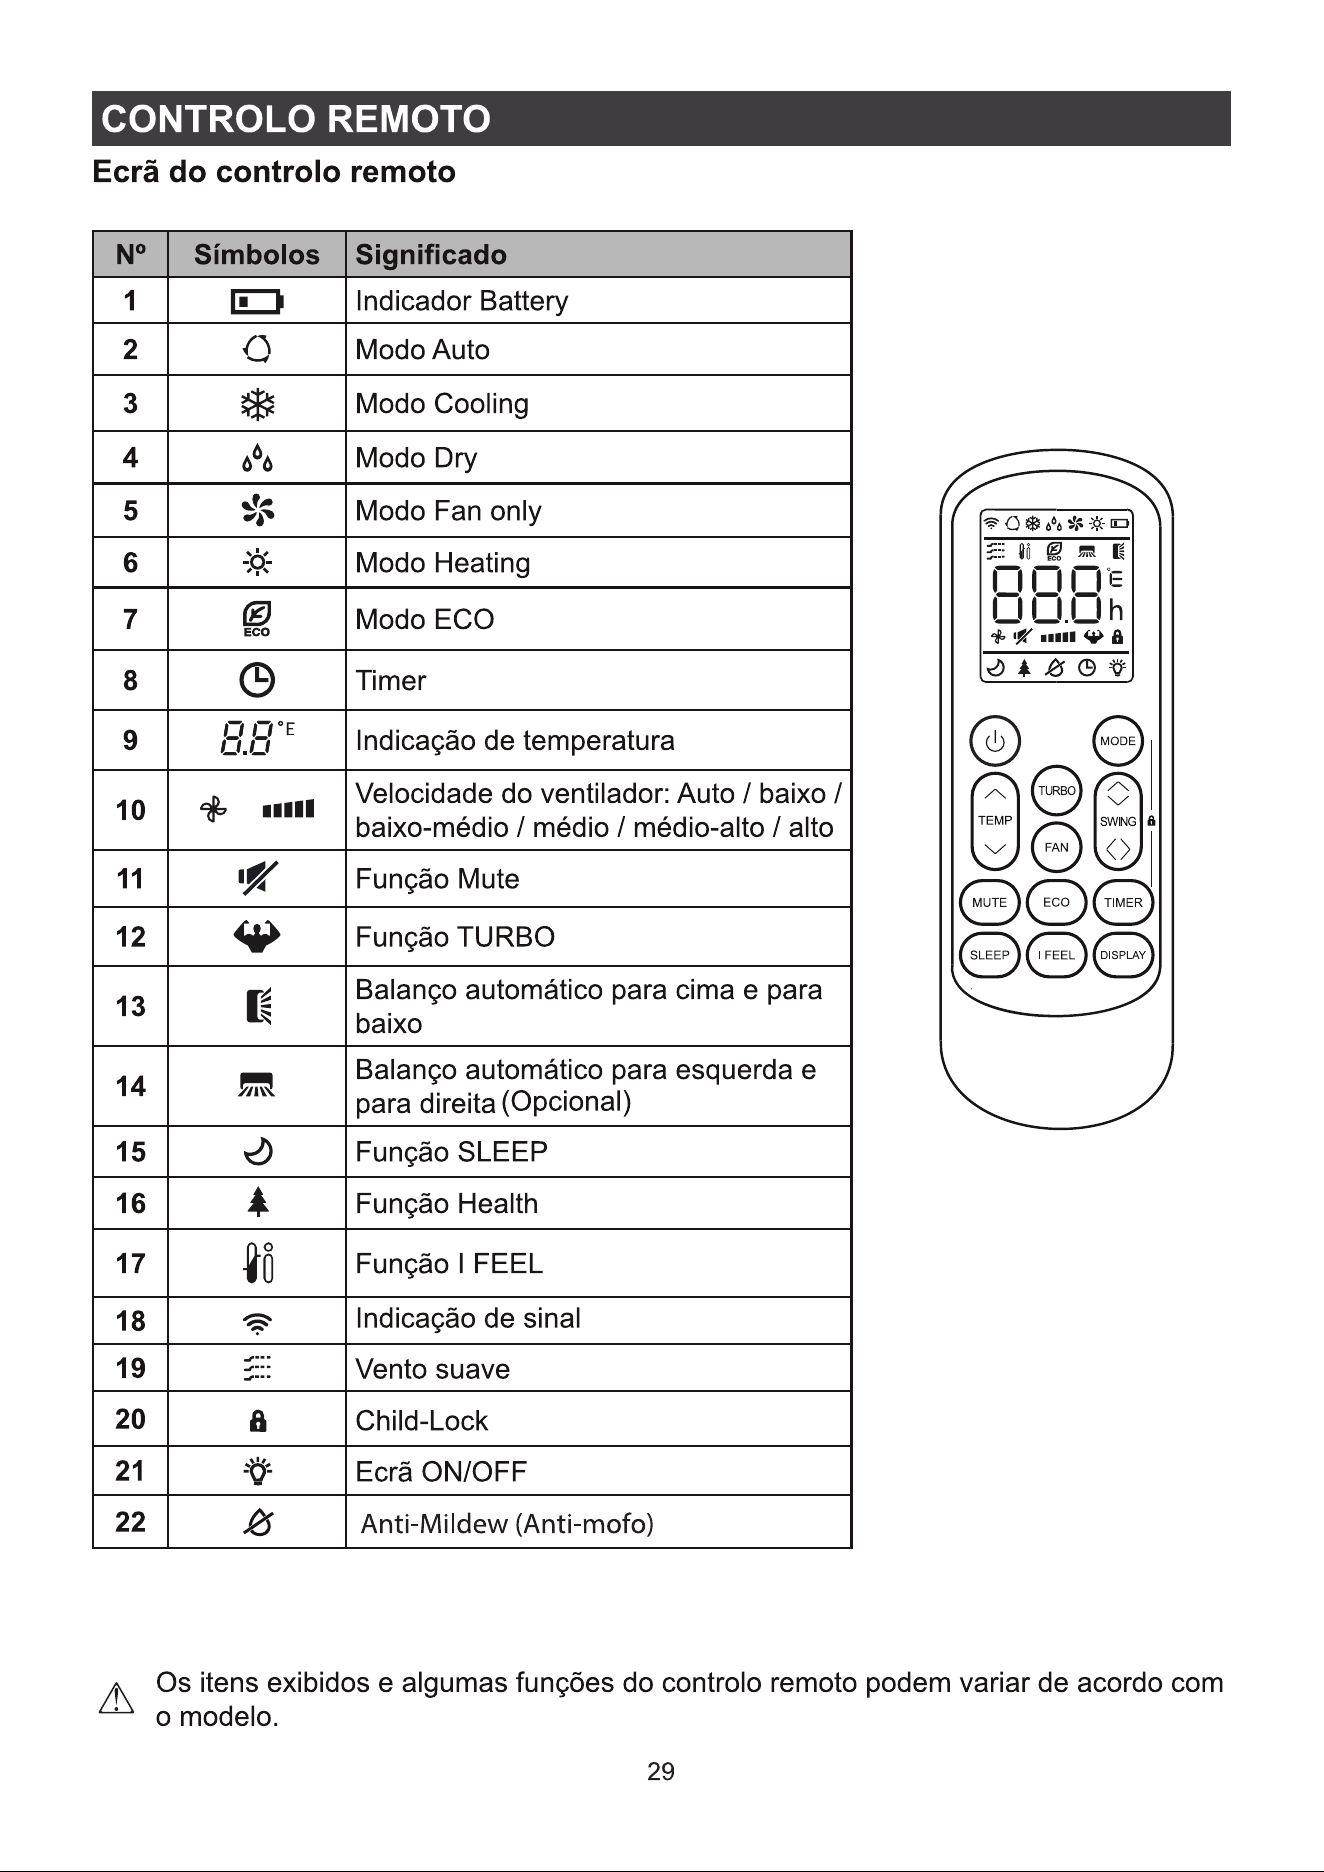
Vamos começar!
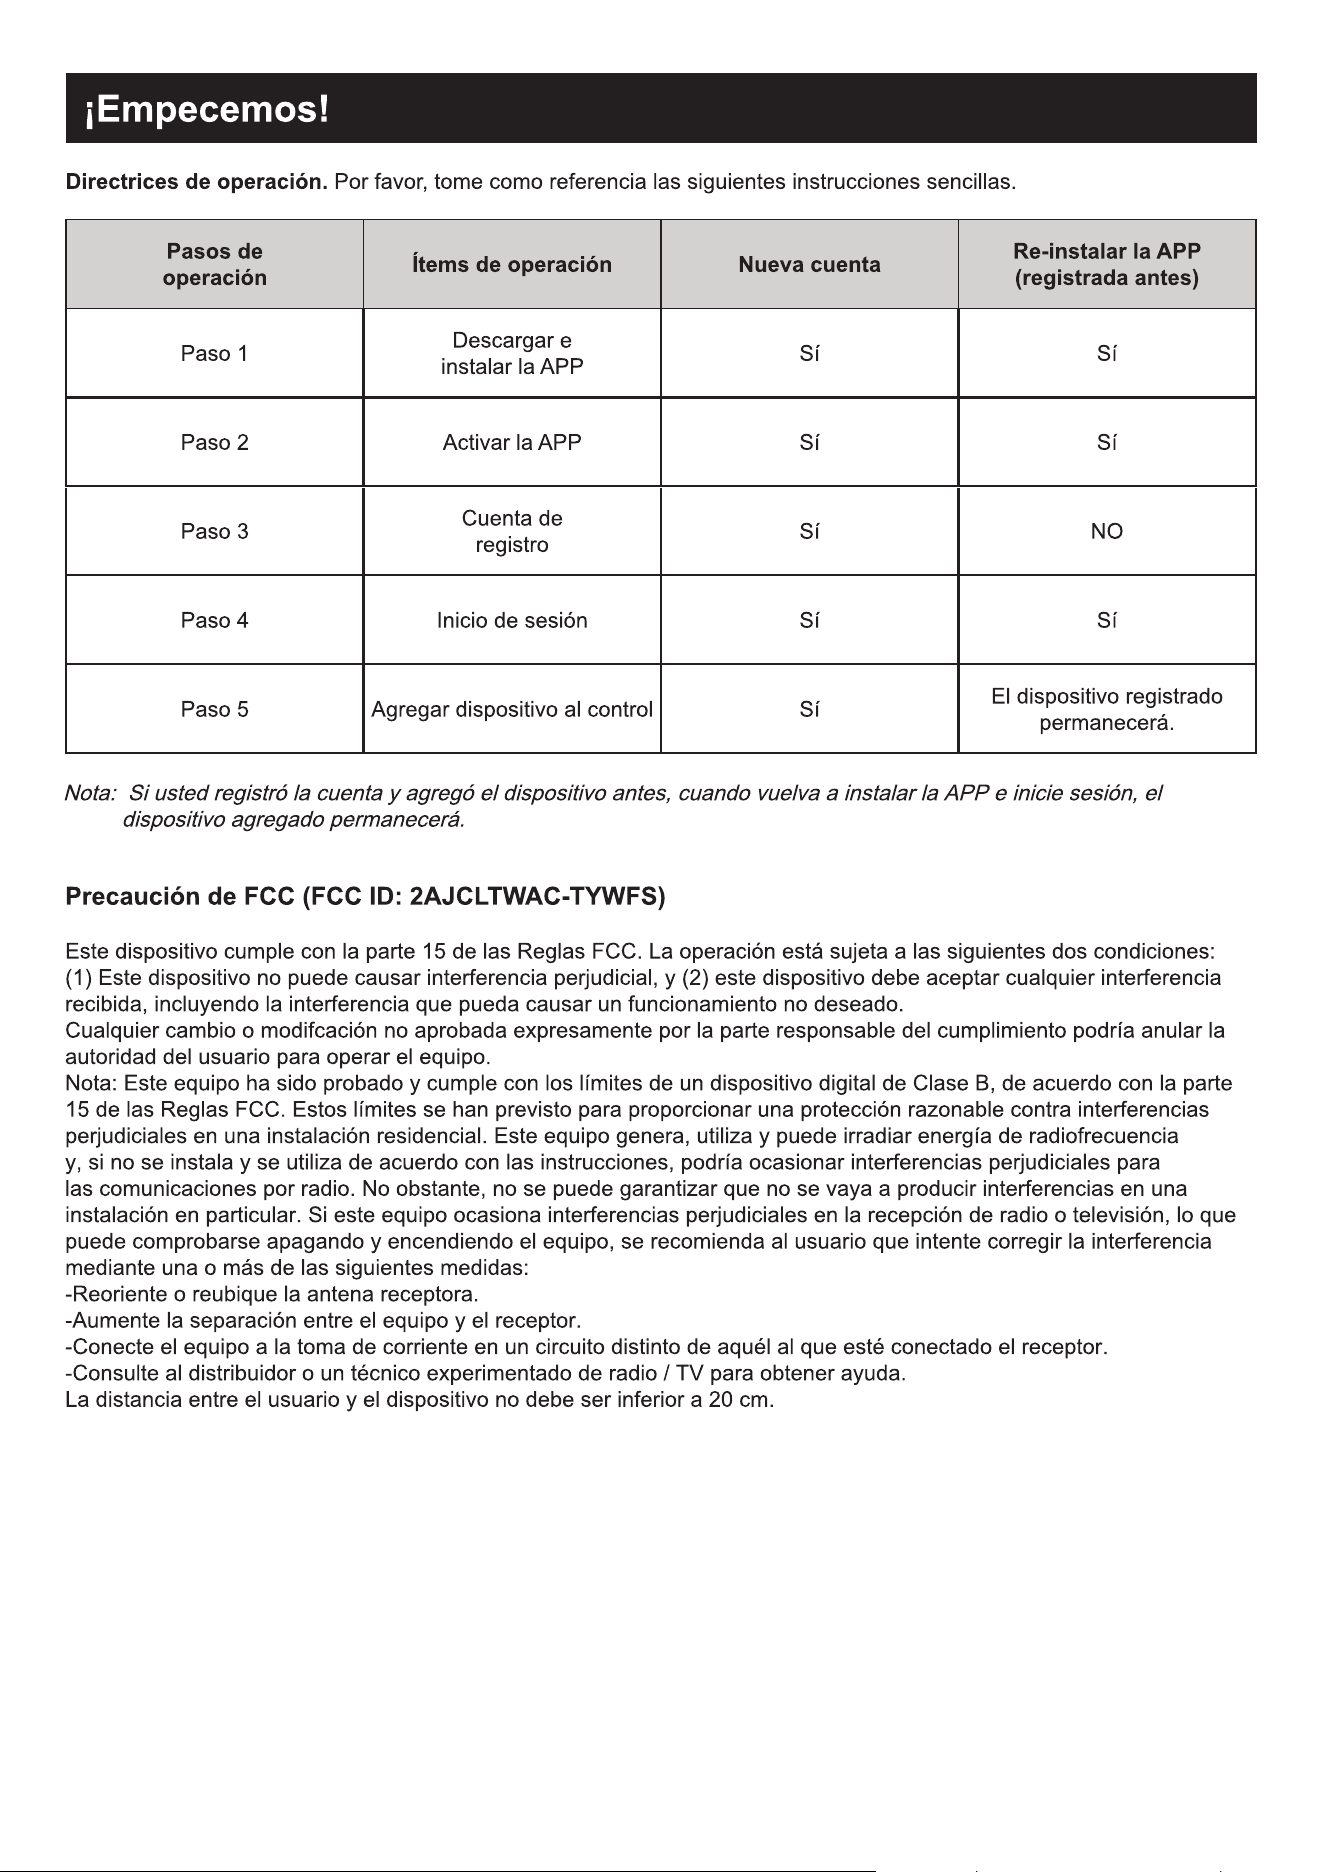
Guia de operação. Observe as instruções simples abaixo como referência.
Passos de Operação Itens de Operação Nova a Conta
Reinstalar o APP (registado
antes)
Passo 1 Baixar e instalar o APP SIM SIM
Passo 2 Ativar o APP SIM SIM
Passo 3 Registar a Conta SIM NÃO
Passo 4 Login SIM SIM
Passo 5
Adicionar dispositivo a
controlo
SIM
Restará um dispositivo
registado.
Cuidado FCC (FCC ID: 2AJCLTWAC-TYWFS)
Este dispositivo está de acordo com a parte 15 das Regras FCC. A operação está sujeita às duas condições a seguir: (1)
Este dispositivo não pode causar interferência nociva, e (2) ele deverá aceitar qualquer interferência recebida, incluindo
toda interferência que possa causar a operação indesejada.
4XDOTXHUPXGDQoDRXPRGL¿FDomRQmRH[SUHVVDPHQWHDSURYDGDSHORGHSDUWDPHQWRGHFRQIRUPLGDGHSRGHDQXODUD
autoridade do utilizador para operar o equipamento.
Nota: Este equipamento foi testado e está de acordo com os limites para um dispositivo de classe digital B, conforme a
parte 15 das regras FCC. Esses limites foram projetados para fornecer uma proteção razoável contra interferência nociva
em uma instalação residencial. Este equipamento gera usos e pode irradiar frequência de energia e, se não instalado de
acordo com as instruções, pode causar interferência nociva a comunicações de rádio. Entretanto, não há garantia que a
interferência não ocorrerá em uma instalação particular. Se esse equipamento não causar a interferência nociva de rádio
RXQDUHFHSomRGH79RTXHSRGHVHUYHUL¿FDGRDRVHGHVOLJDUHOLJDURHTXLSDPHQWRUHFRPHQGDVHTXHRXWLOL]DGRU
tente corrigir a interferência com um ou mais medidas a seguir:
-Reoriente ou realoque a antena de recepção.
-Aumenta a separação entre o equipamento e o receptor.
-Conecta o equipamento na tomada de um circuito diferente da conexão do receptor.
-Consulte o revendedor ou um técnico de rádio/TV experiente para obter ajuda.
A distância entre o utilizador e o dispositivo deve ser de pelo menos 20 cm.
Nota: Se você registou uma conta e adicionou um dispositivo antes, ao reinstalar o APP de novo e autenticar-se, restará
um dispositivo adicionado.

(VSHFL¿FDo}HVHLQIRUPDo}HVEiVLFDVGHPyGXOR:L)L.............................................. 1
Baixar e instalar o APP ................................................................................................. 2
Ativar o APP ................................................................................................................. 3
Registo ......................................................................................................................... 4
Login ............................................................................................................................. 6
Adicionar dispositivos ................................................................................................... 8
Controlo de ar condicionado....................................................................................... 10
Gestão de conta ......................................................................................................... 29
Resolução de problemas ............................................................................................ 30
ÍNDICE
1
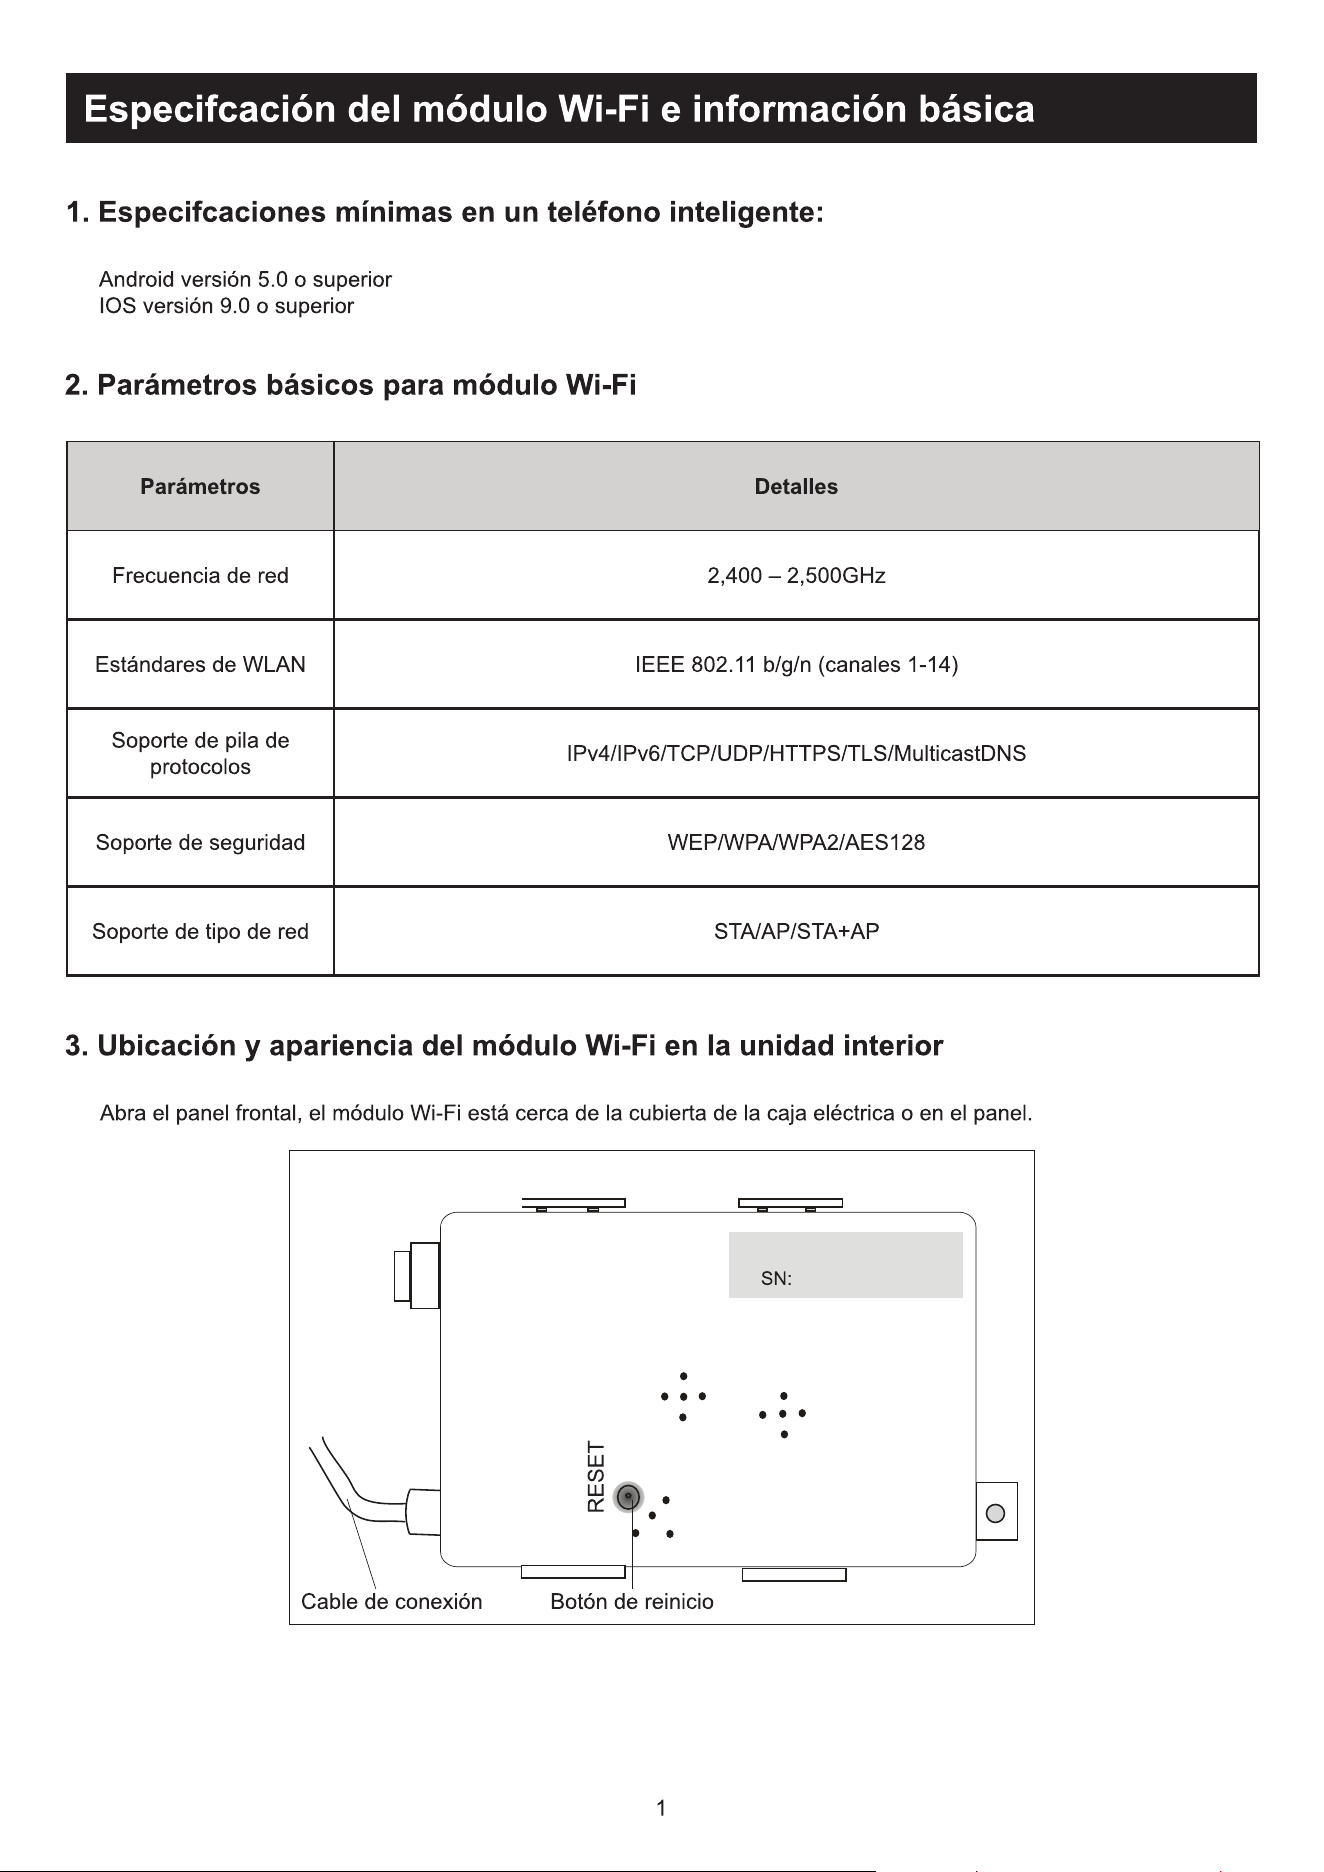
(VSHFL¿FDo}HVHLQIRUPDo}HVEiVLFDVGHPyGXOR:L)L
3DUkPHWURVEiVLFRVSDUDPyGXOR:L)L
Versão Android 5.0 ou superior
Versão IOS 9.0 ou superior
$EUDRSDLQHOIURQWDO2PyGXORGH:L)LHVWiSUy[LPRGDWDPSDGDFDL[DHOpWULFDQRSDLQHO
Parâmetros Detalhes
Frequência de rede 2,400 - 2,500GHz
Normas de WLAN IEEE 802.11 b/g/n (canais 1-14)
Compatibilidade de pilha
de protocolo
IPv4/IPv6/TCP/UDP/HTTPS/TLS/MulticastDNS
Apoio à segurança WEP/WPA/WPA2/AES128
Redes compatíveis STA/AP/STA+AP
(VSHFL¿FDo}HVPtQLPDVQXPWHOHPyYHOLQWHOLJHQWH
/RFDOL]DomRGHPyGXOR:L)LHDSDUrQFLDHPXQLGDGHLQWHUQD
cabo de ligação Botão Reset
2
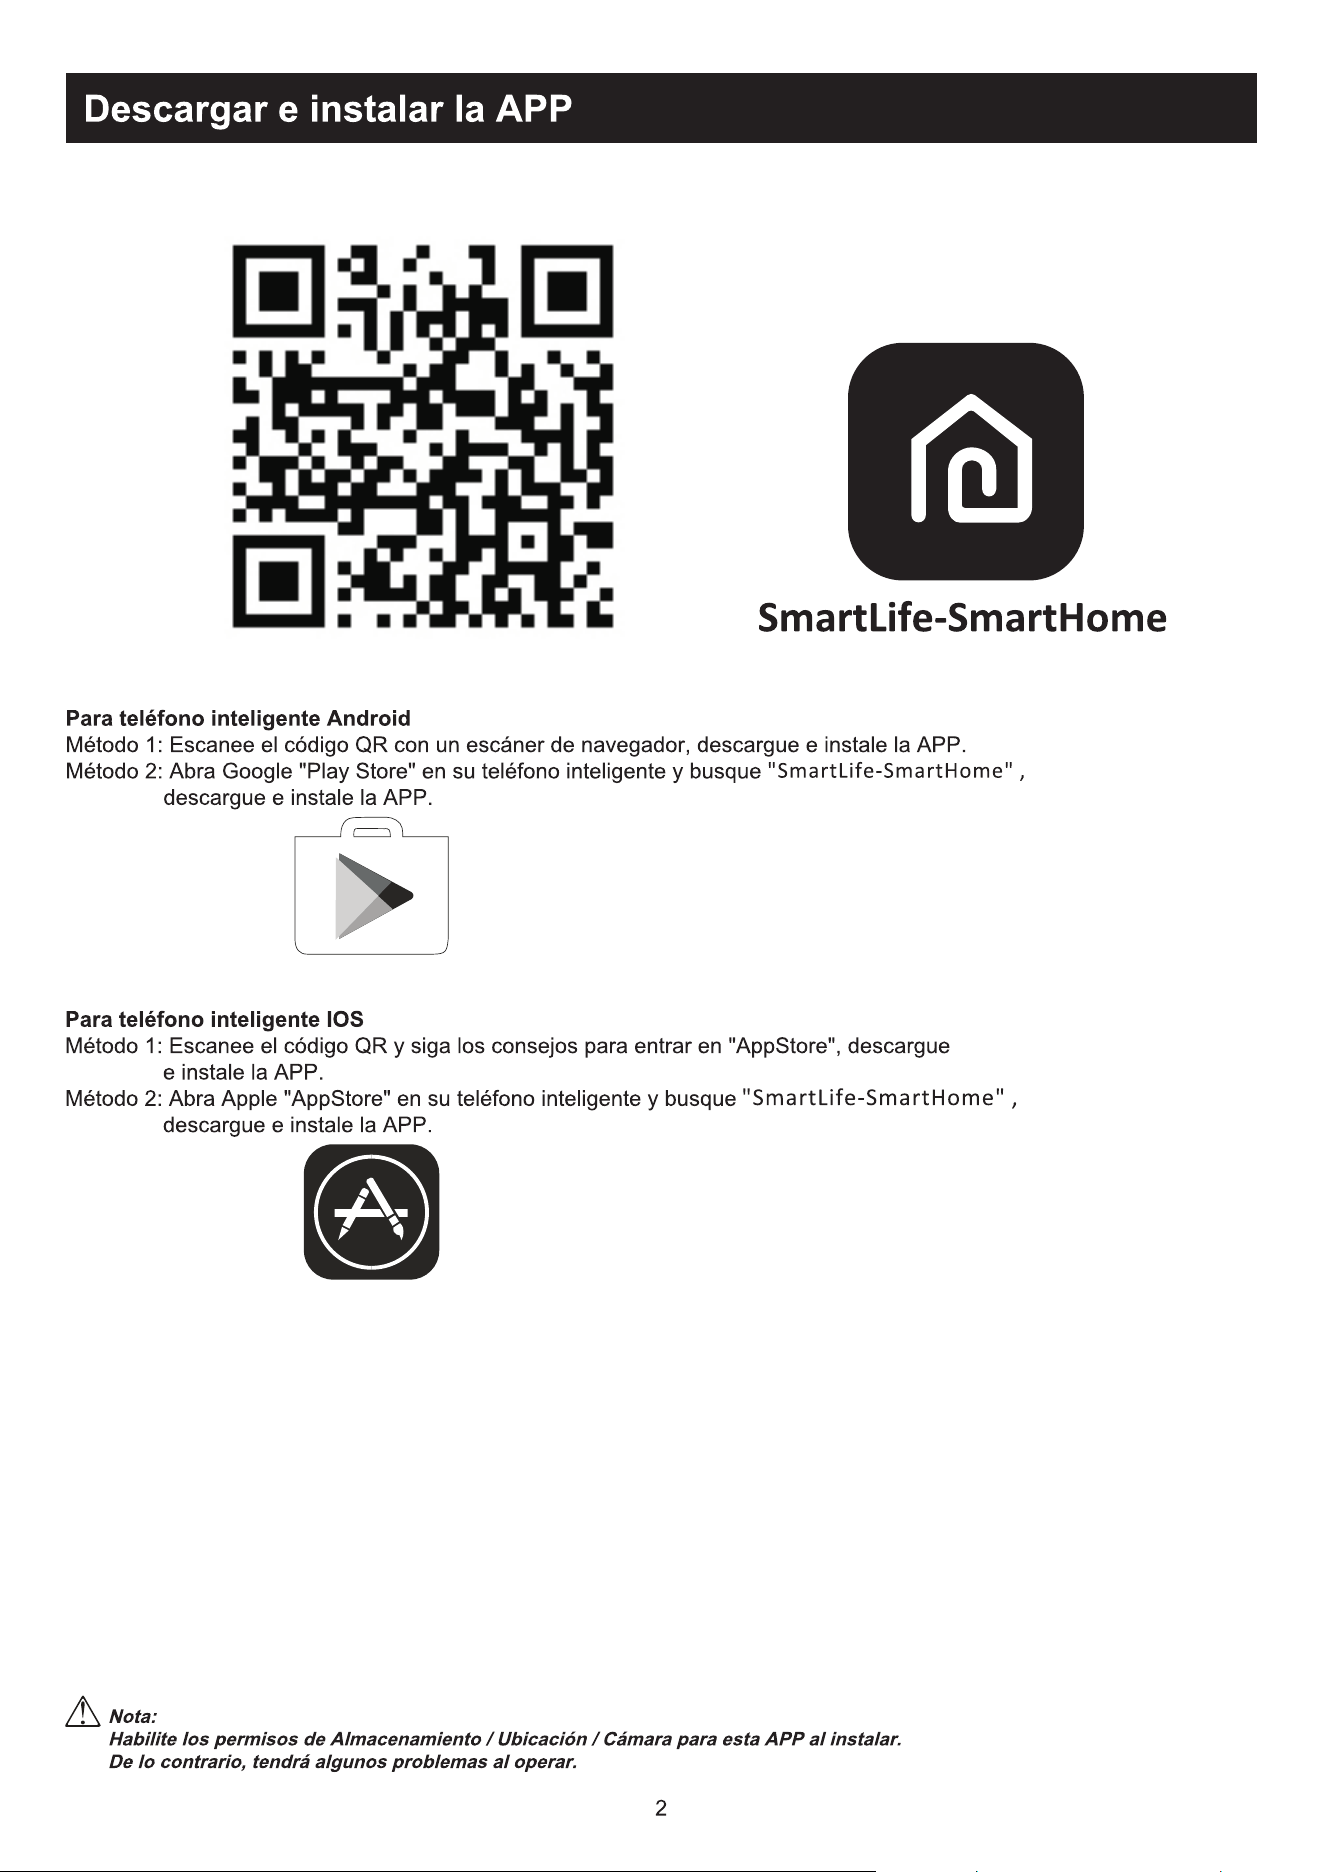
Baixar e instalar o APP
Nota:
Ative as permissões de Armazenamento / Localização / Câmera para este APP ao instalar.
&DVRFRQWUiULRRFRUUHUmRDOJXQVSUREOHPDVDRRSHUDU
3DUDRWHOHPyYHOLQWHOLJHQWH$QGURLG
0pWRGR'LJLWDOL]HRFyGLJR45FRPXPGLJLWDOL]DGRU$VHJXLUEDL[HHLQVWDOHR$33
0pWRGR$EUD3OD\6WRUHQRVHXWHOHPyYHOLQWHOLJHQWHHSURFXUHSRU6PDUW/LIH6PDUW+RPH´(PVHJXLGDEDL[HH
instale o APP.
Para iPhone
0pWRGR'LJLWDOL]HRFyGLJR45HVLJDDVGLFDVSDUDDFHVVDUD³$SS6WRUH´HEDL[DUHLQVWDODUR$33
0pWRGR$EUDD³$SS6WRUH´GD$SSOHQRVHXWHOHPyYHOLQWHOLJHQWHHSURFXUHSRU6PDUW/LIH6PDUW+RPH(PVHJXLGD
baixe e instale o APP.
3
Ativar
o APP
%DL[HR
$336PDUW/LIH6PDUW+RPHQRVHXWHOHPyYHOLQWHOLJHQWH
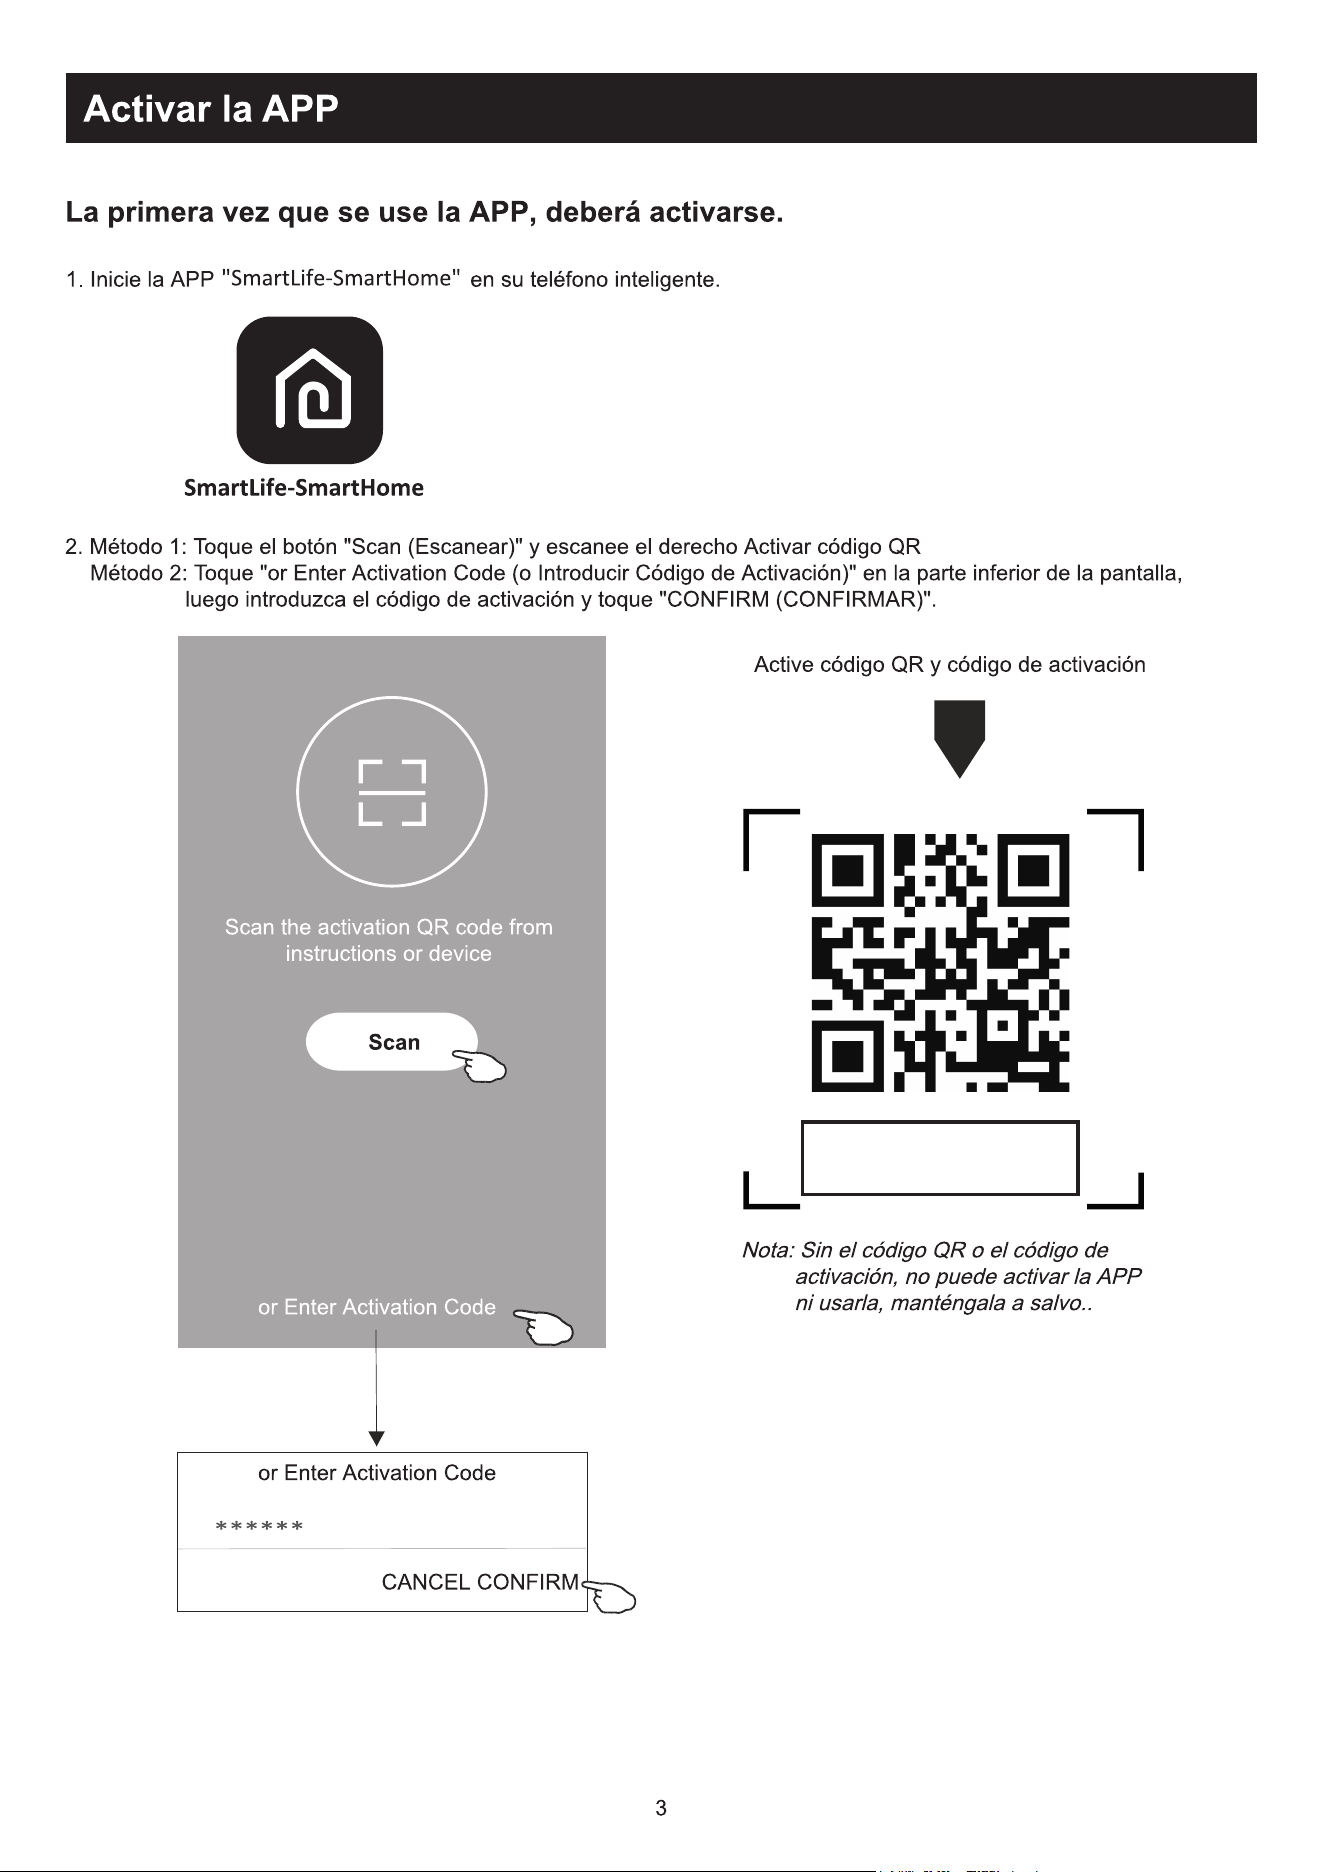
0pWRGR7RTXHQRERWmR³6FDQ´SDUDGLJLWDOL]DURFyGLJRGHDWLYDomR45FRUUHWR
0pWRGR7RTXHHP³RU(QWHU$FWLYDWLRQ&RGH´QRFDQWRGRHFUmHHQWmRGLJLWHRFyGLJRGHDWLYDomRRXWRTXHHP
³&21),50´
$WLYDUFyGLJR45HFyGLJRGHDWLYDomR
1RWDVHPRFyGLJR45RXRGHDWLYDomR
não será possível ativar o
APP ou
utilizá-lo. Mantenha-os seguros.
******
1DSULPHLUDYH]TXHR$33IRUXWLOL]DGRSUHFLVDUiVHUDWLYDGR
Corbero
4
Registo
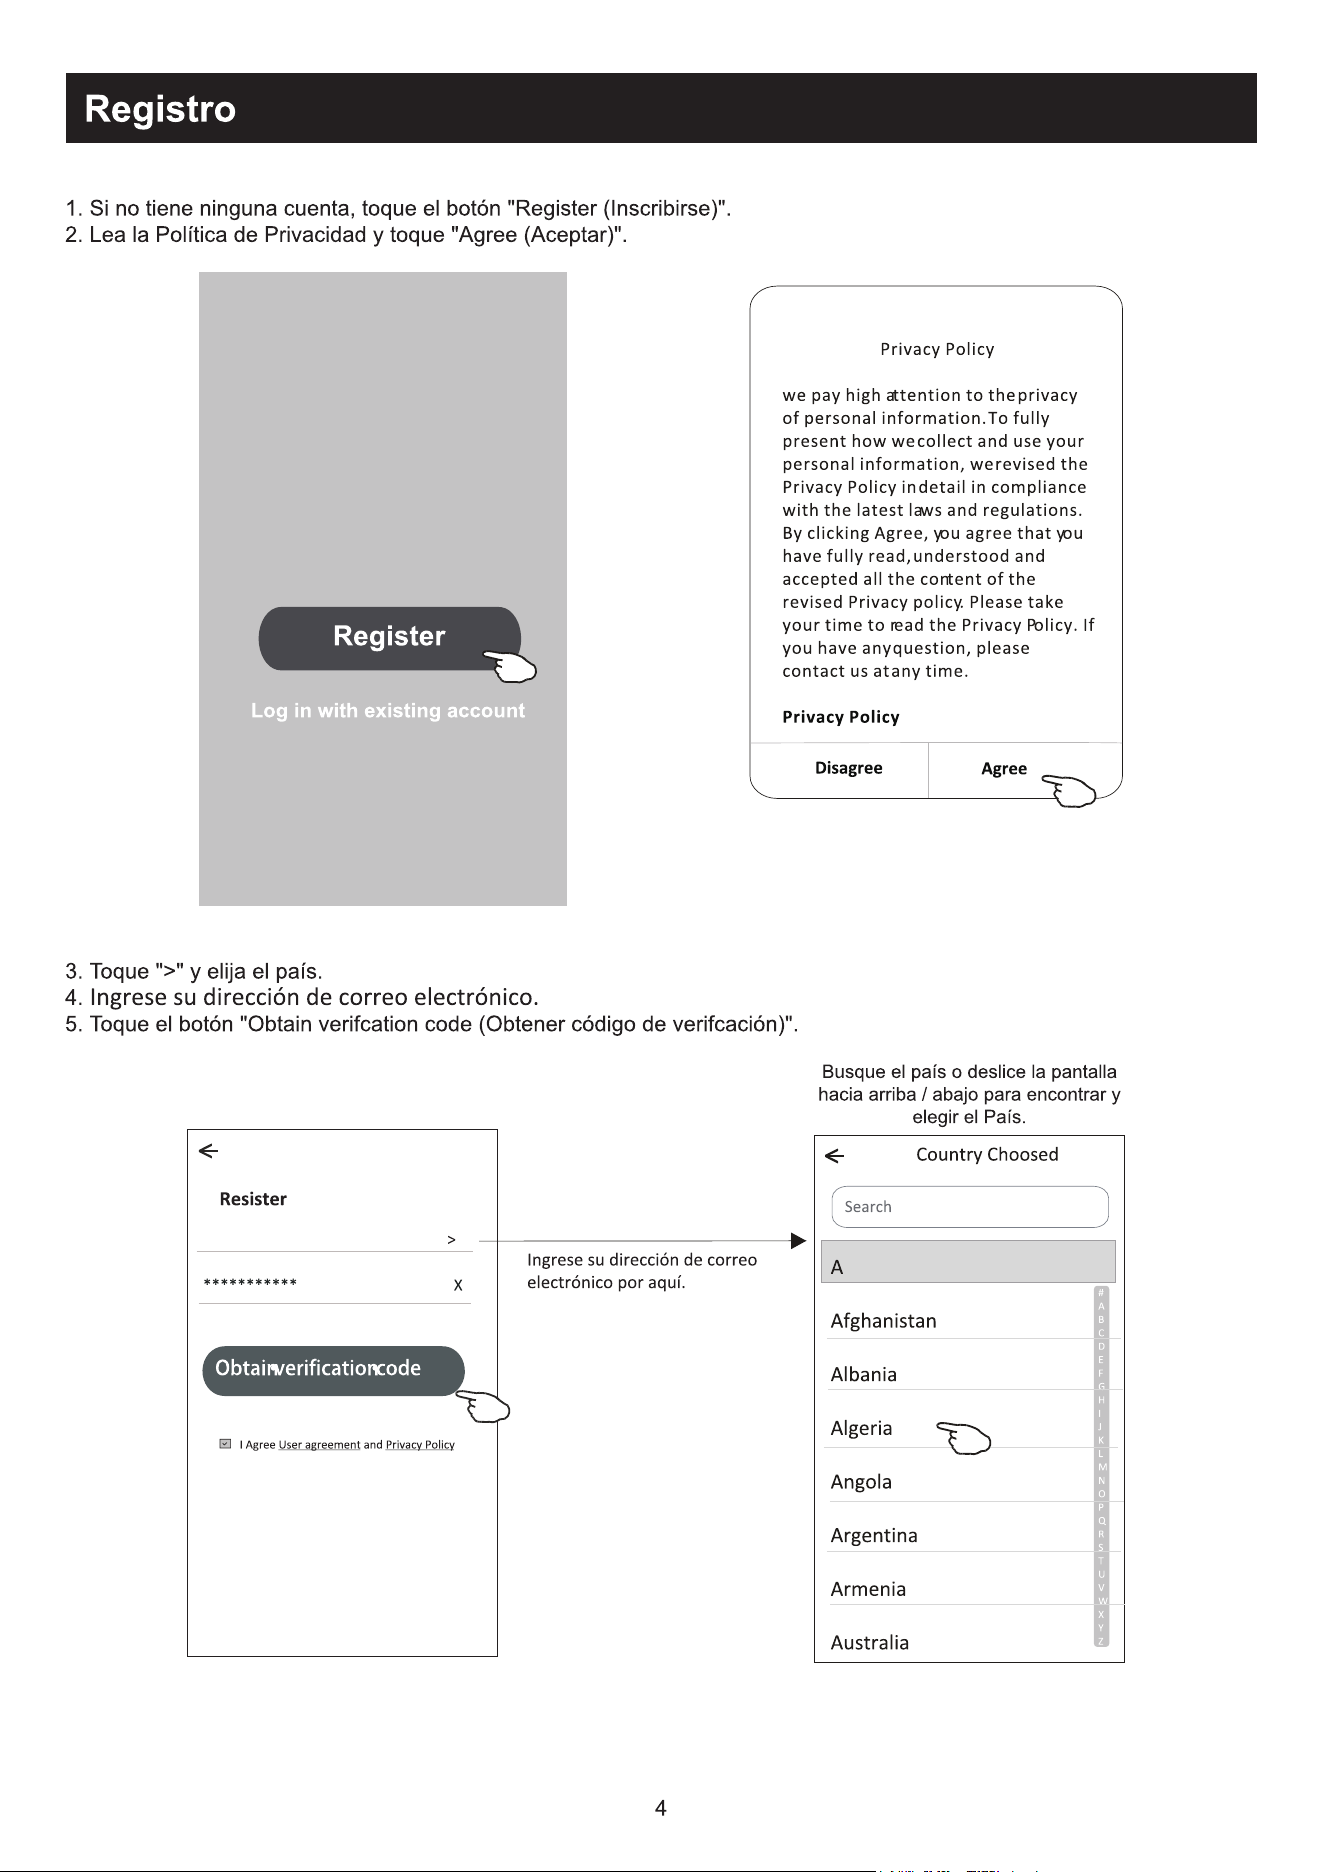
6HYRFrQmRWLYHUXPDFRQWDWRTXHQRERWmR³5HJLVWHU´
/HLDDSROtWLFDGHSULYDFLGDGHHWRTXHHP³$JUHH´
3. Toque em ">" e escolha o país.
4. Digite o endereço de email.
7RTXHQRERWmR³2EWDLQYHUL¿FDWLRQFRGH´
#
A
B
C
D
E
F
G
H
I
J
K
L
M
N
O
P
Q
R
S
T
U
V
W
X
Y
Z
Country Choosed
A
Afghanistan
Albania
Algeria
Angola
Argenna
Armenia
Australia
Search
<
Resister
>
*********** X
<
I Agree User agreement and Privacy Policy
Obtain•verificaon•code
Busque o país ou deslize o ecrã para
cima / para baixo para encontrar e
escolher o país.
Digite o endereço de email aqui.
5
Registo
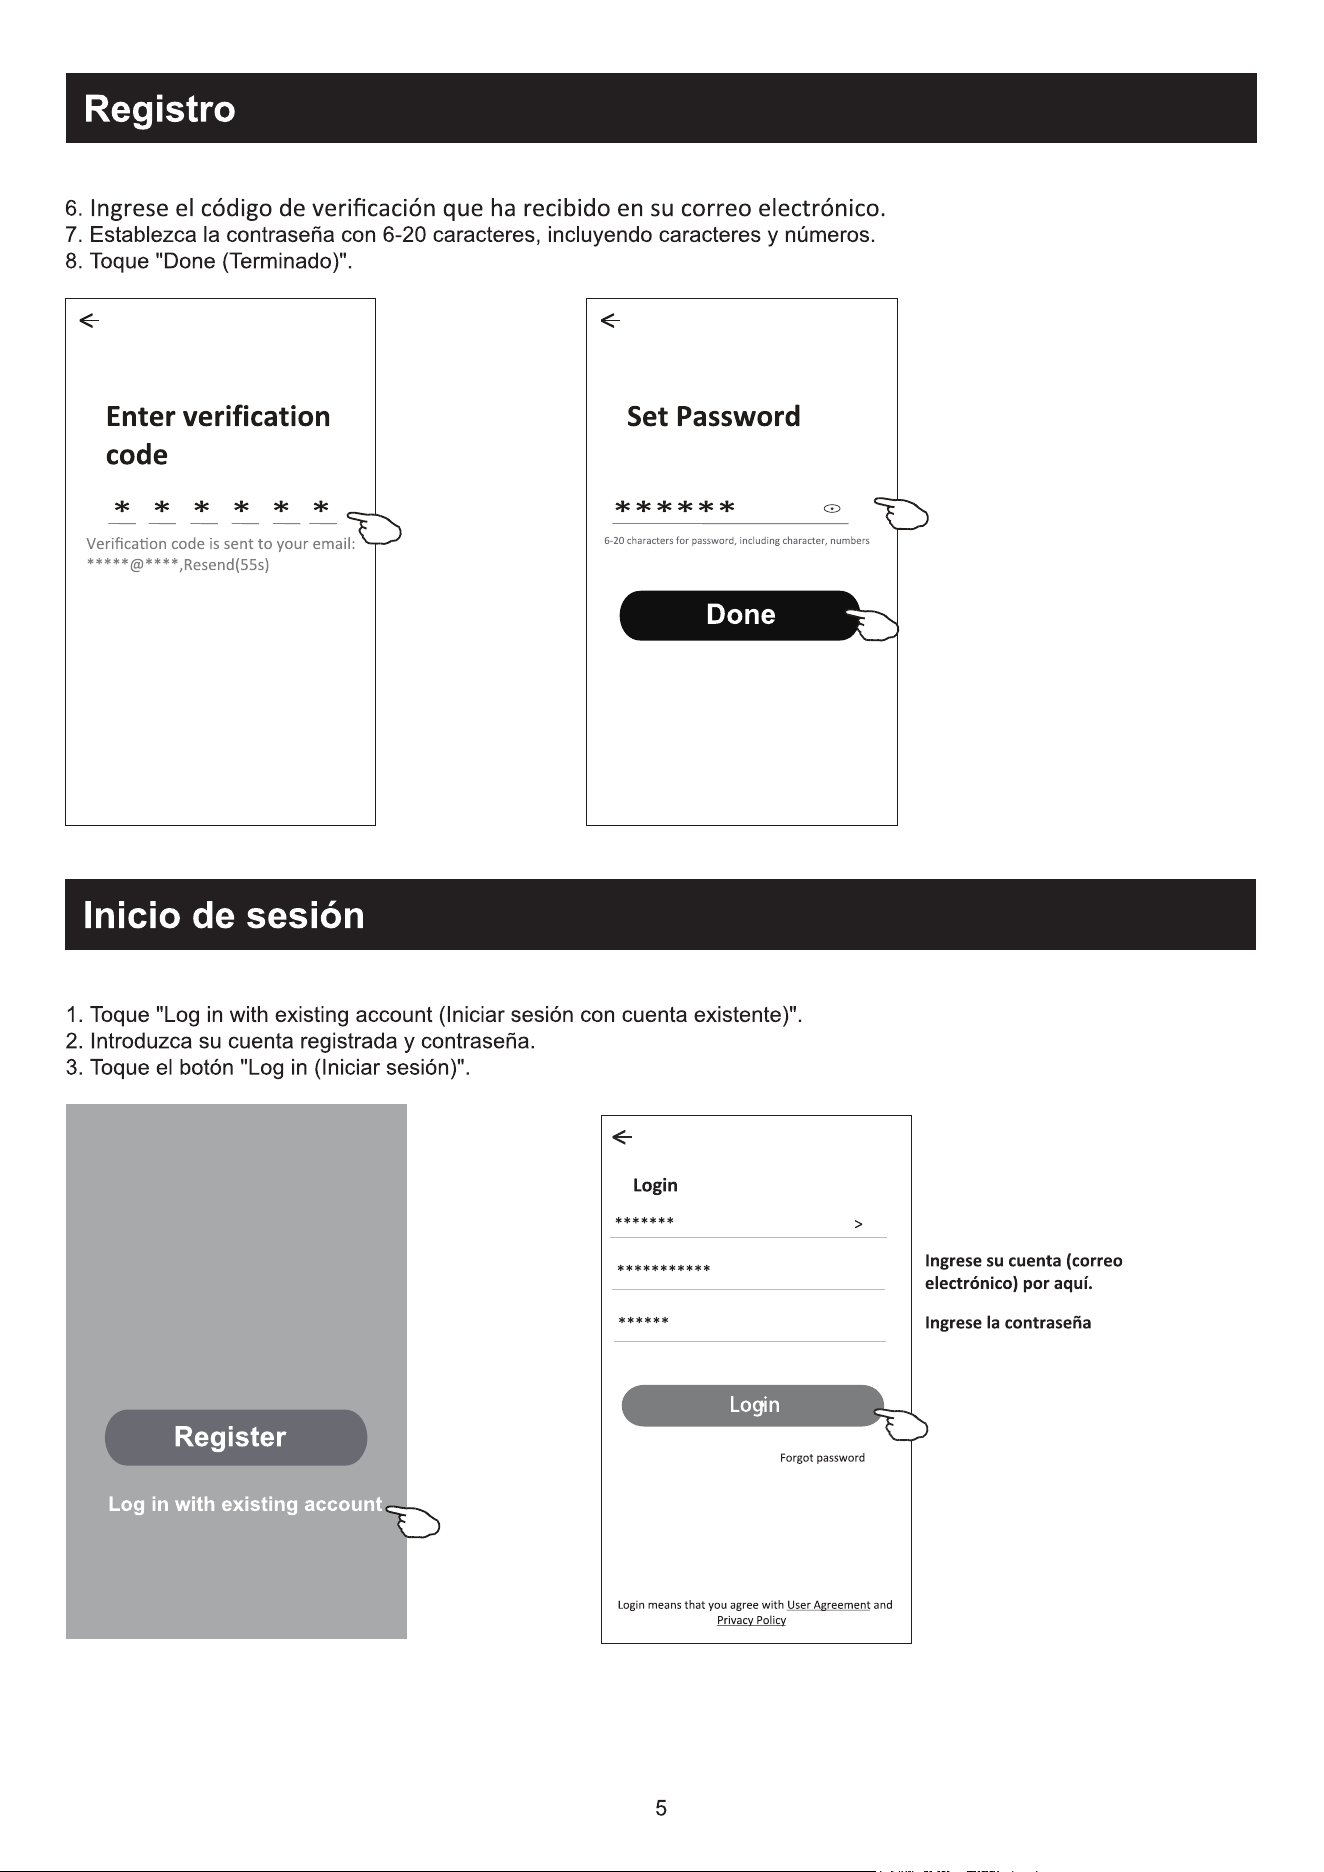
'LJLWHRFyGLJRGHYHUL¿FDomRUHFHELGRGRHPDLO
'H¿QDXPDVHQKDFRPDFDUDFWHUHVLQFOXLQGROHWUDVHQ~PHURV
7RTXHHP'RQH´
7RTXHHP/RJLQZLWKH[LVWLQJDFFRXQW´
2. Digite a sua conta registada e senha.
7RTXHQRERWmR³/RJLQ´
Digite a sua conta (endereço de
email) aqui.
Digite a senha.
Enter verification
code
* * * * * *
<
Verificaon code is sent to your email:
*****@****,Resend(55s)
Login
Login
******* >
***********
<
Login means that you agree with User Agreement and
Privacy Policy
Log•in
******
Forgot password
6
Login
1DSULPHLUDYH]TXHR$33IRUXWLOL]DGRVHUiQHFHVViULRFULDUXPDIDPtOLD
7RTXHHP&UHDWHIDPLO\´
5. Crie um nome para a família.
'H¿QDDORFDOL]DomR
7. Escolha as salas padrão ou adicione novas salas.
7RTXHHP³'RQH´H³&RPSOHWHG´
Escolha a sala recomendada ou crie
XPDQRYDVDODHWRTXHHP³'RQH´
Nota:
2$33SRGHDEULURPDSDQRVHX
WHOHIRQHHYRFrSRGHUiGH¿QLUD
ORFDOL]DomRHPTXHHVWi
7
Login
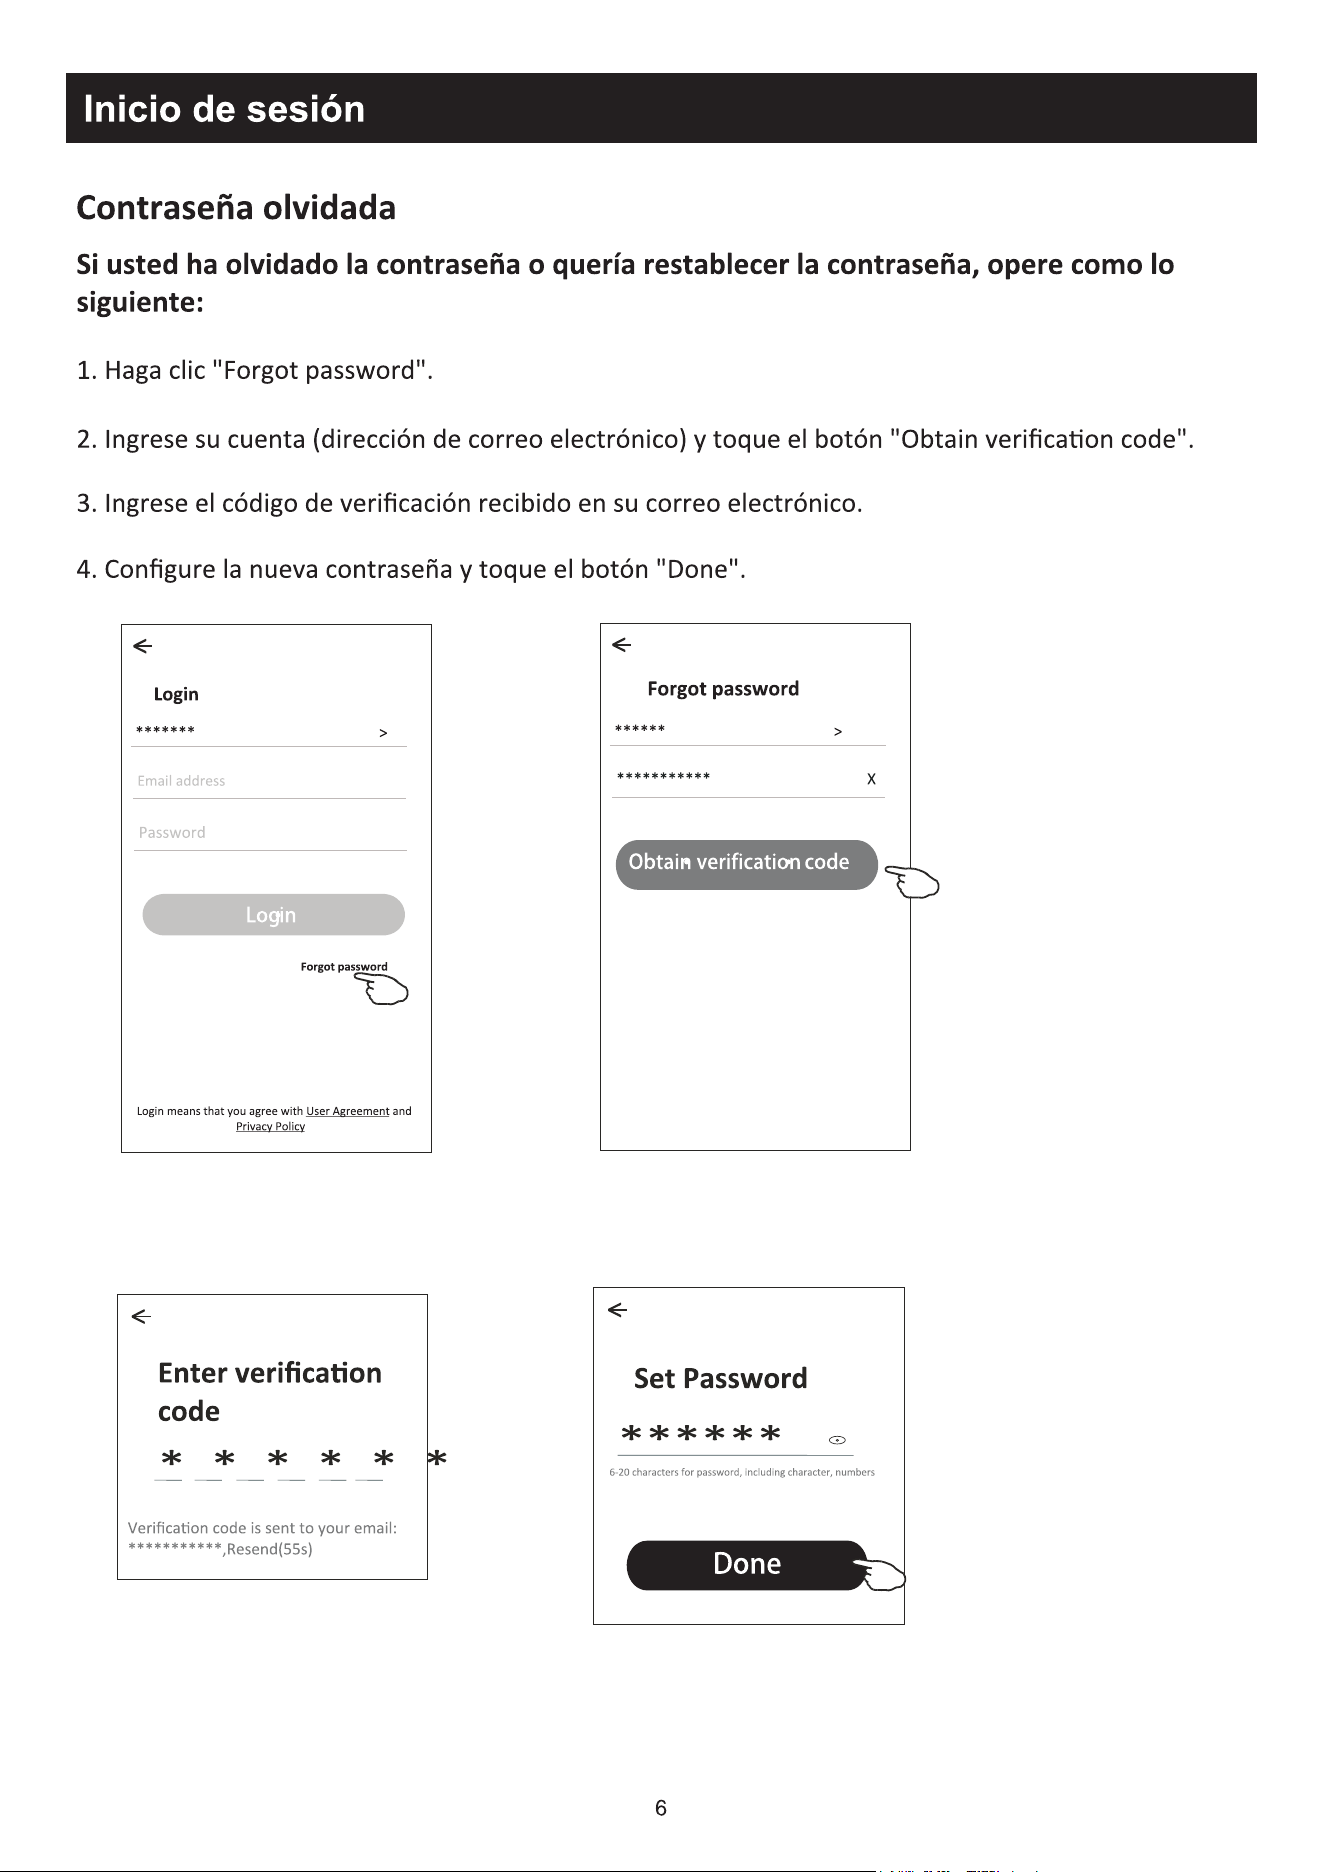
Esqueci a senha
6HYRFrHVTXHFHXDVHQKDRXGHVHMDUHGH¿QLUDVXDVHQKDH[HFXWHRVSDVVRVDVHJXLU
7RTXHHP³)RUJRWSDVVZRUG´
7RTXHQDVXDFRQWDHQGHUHoRGHHPDLOHWRTXHHP³2EWDLQYHUL¿FDWLRQFRGH´
'LJLWHRFyGLJRGHYHUL¿FDomRUHFHELGRSRUHPDLO
'H¿QDDQRYDVHQKDHWRTXHQRERWmR³'RQH´
Login
******* >
Email address
<
Log•in
Password
Forgot password
Forgot password
****** >
*********** X
<
Obtain•verification•code
Enter verification
code
Verificaon code is sent to your email:
***********,Resend(55s)
* * * * * *
<
Set Password
6-20 characters for password, including character, numbers
******
<
Done
Login means that you agree with User Agreement and
Privacy Policy
8
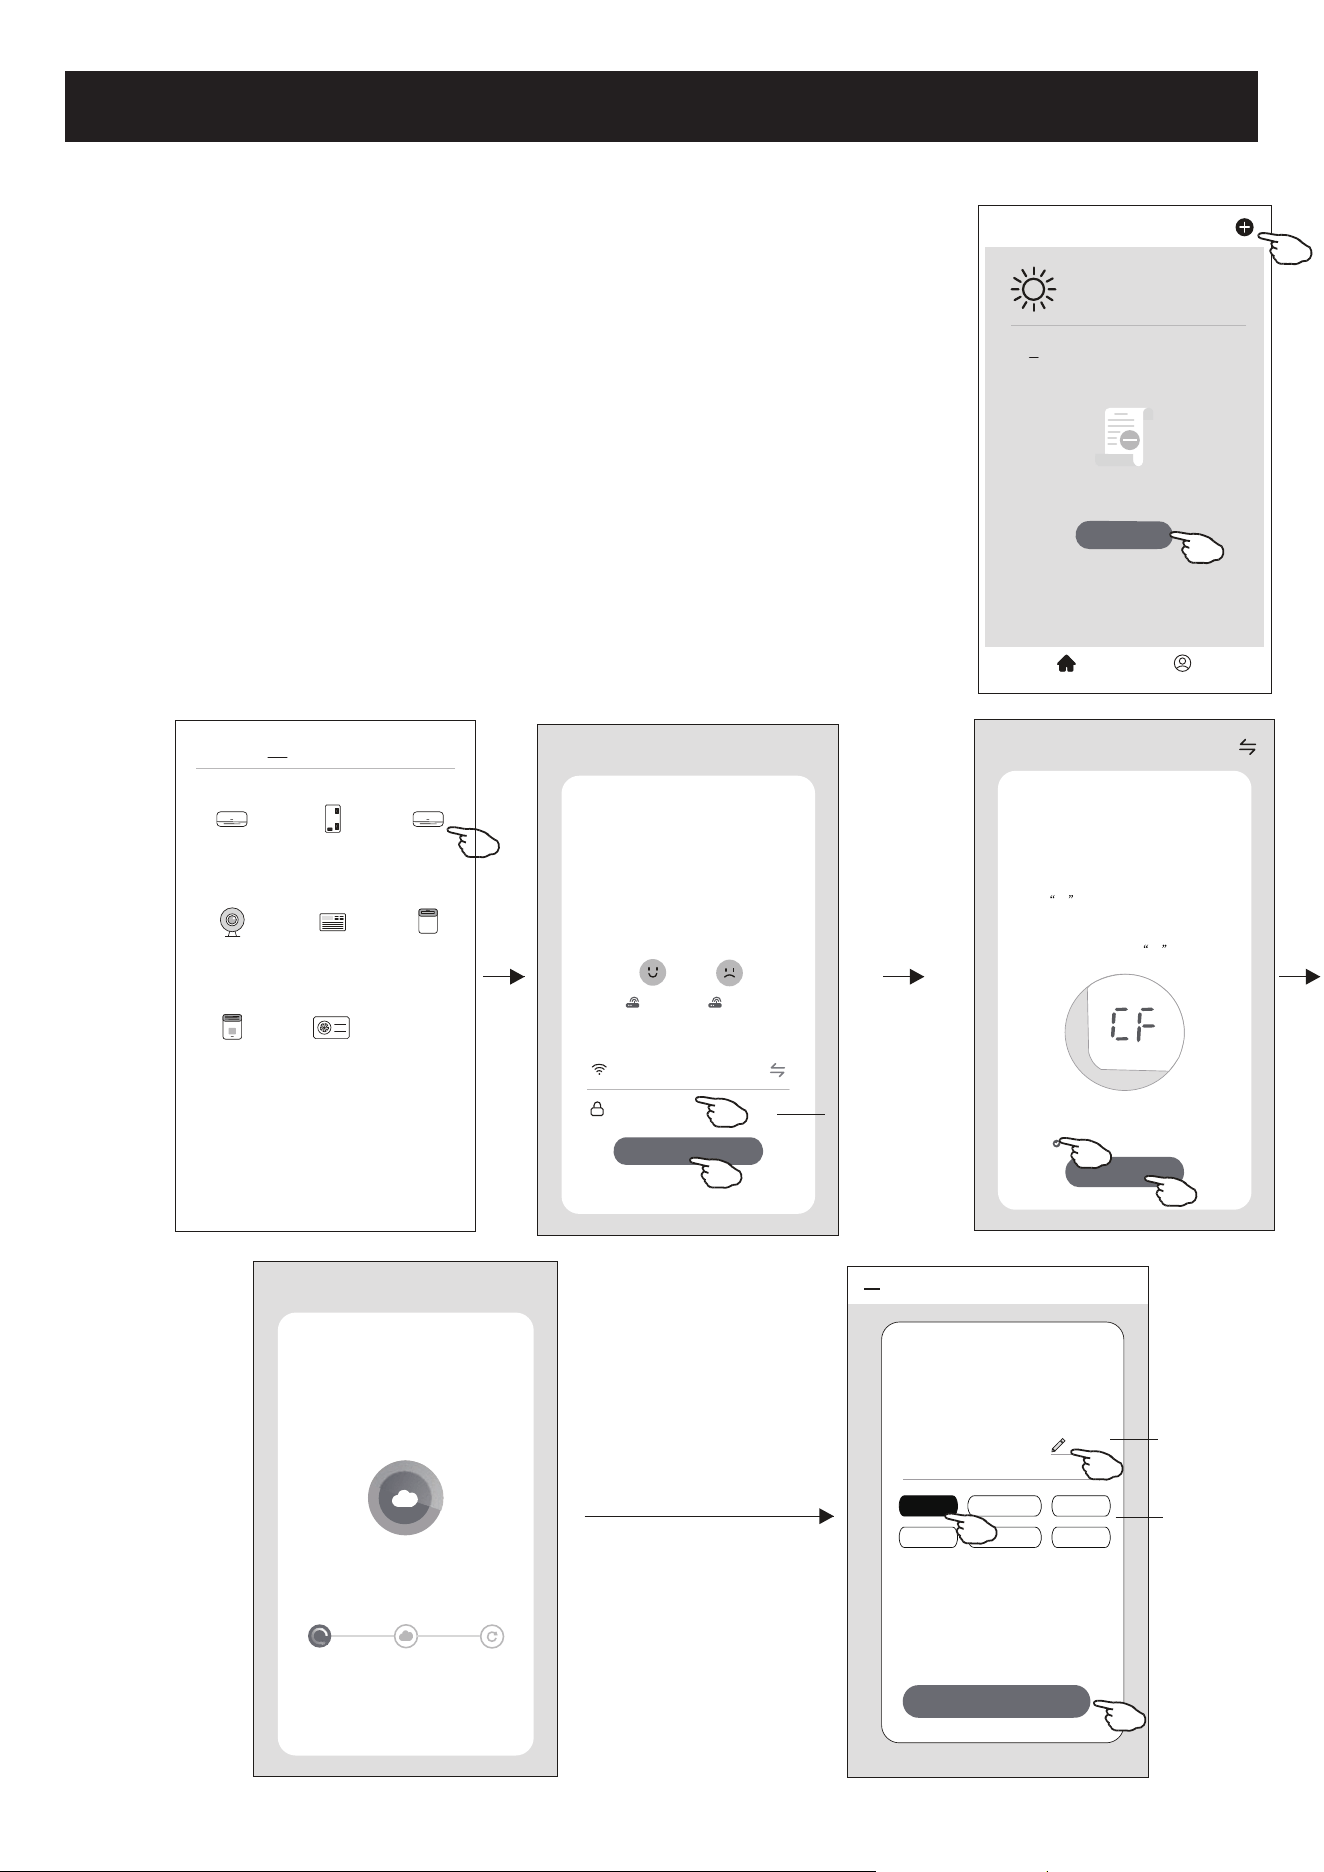
Adicionar dispositivos
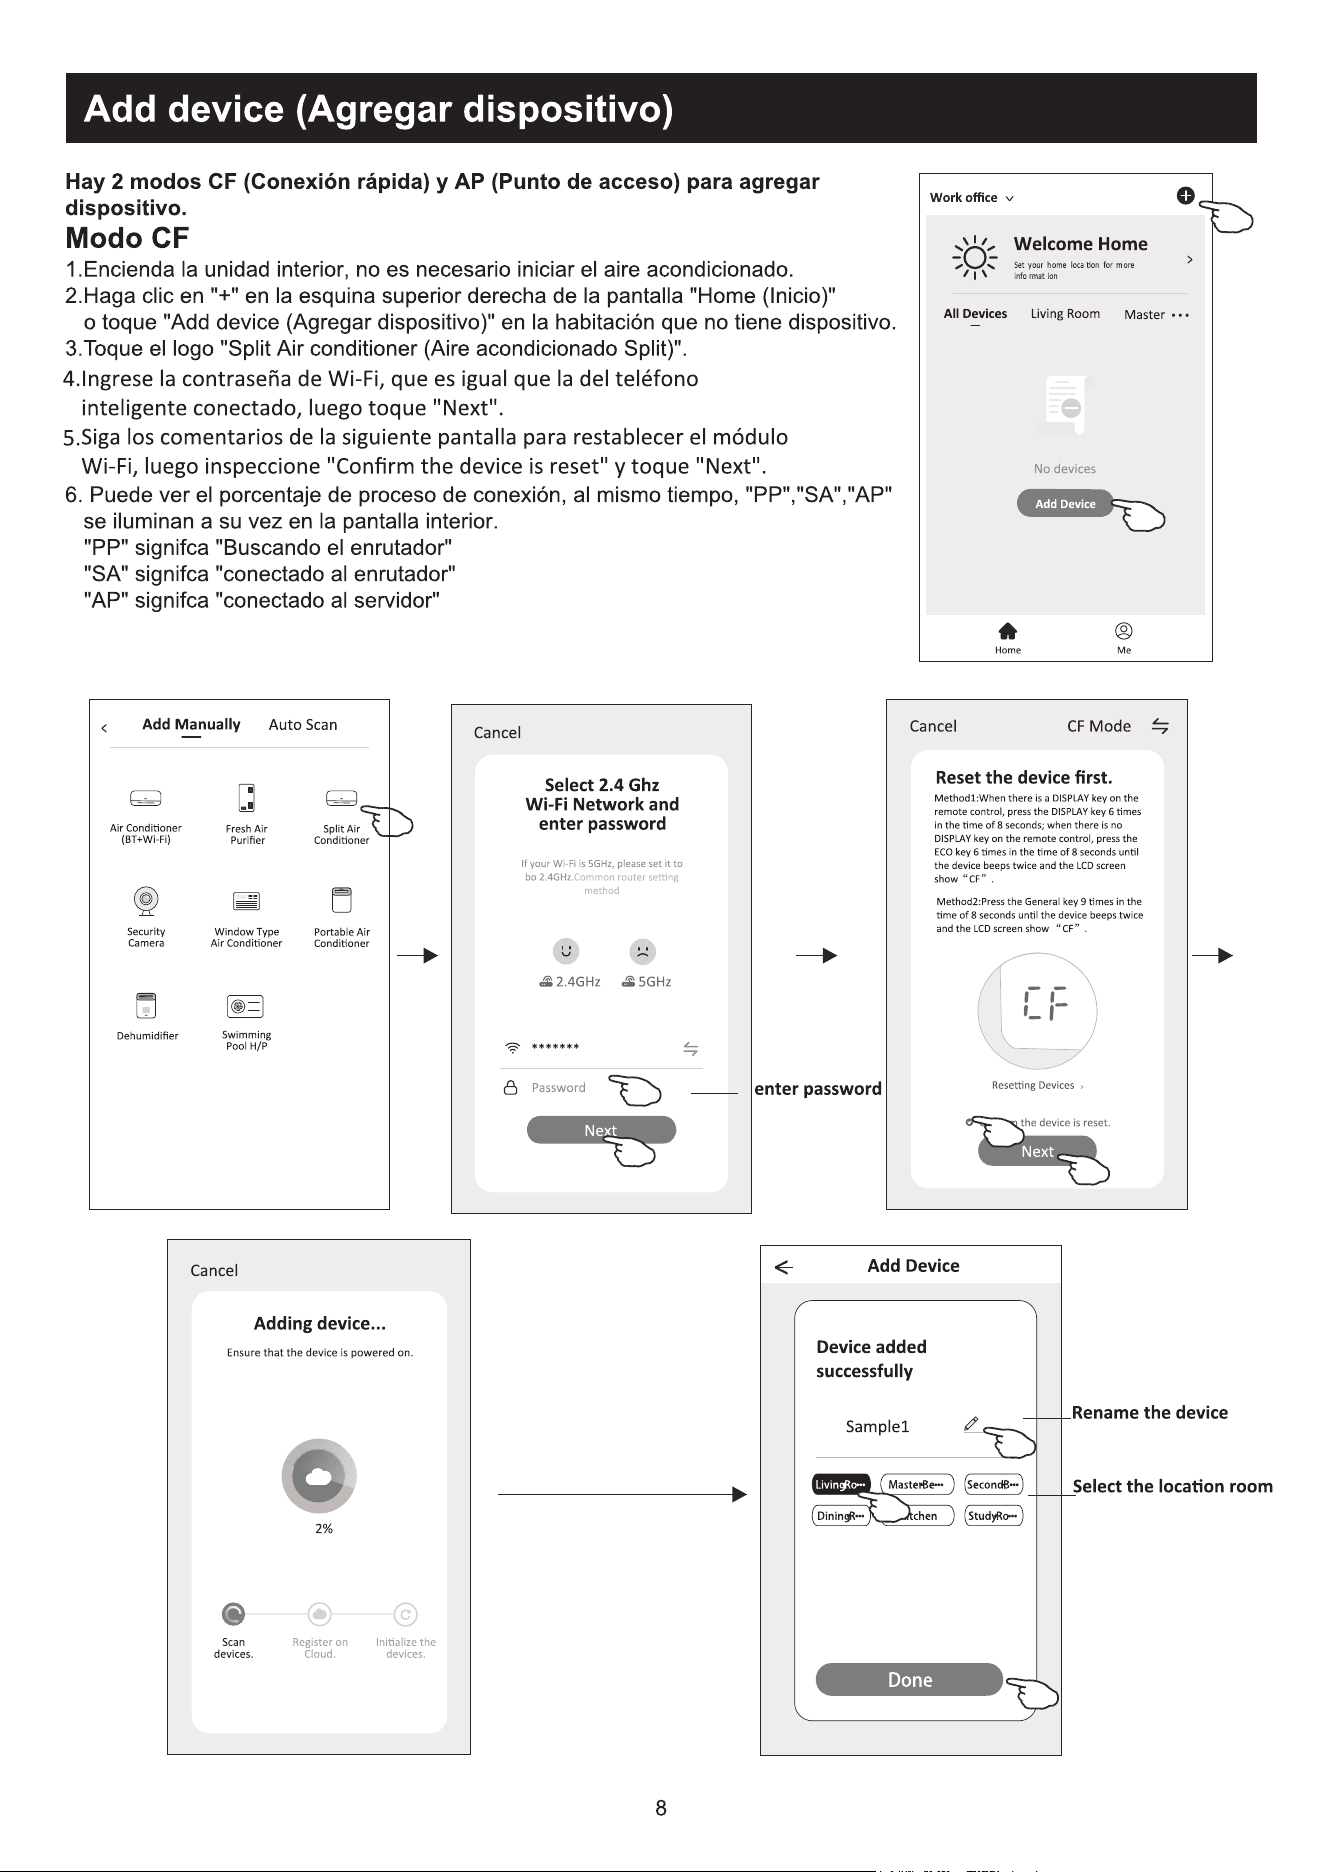
+iGRLVPRGRV&)FRQH[mRUiSLGDH$3SRQWRGHDFHVVRSDUDDGLFLRQDUR
dispositivo.
Modo CF
1. Ative a unidade interna. Não há necessidade de ligar o ar condicionado.
2. Clique em "+" no canto superior direito do ecrã principal ou toque em "Add device" do
quarto que não possuir um dispositivo.
3. Toque na logo "Split Air conditioner".
'LJLWHDVHQKDGR:L)LTXHpDPHVPDTXHRVHXWHOHPyYHOLQWHOLJHQWHXWLOL]RXSDUD
FRQHFWDUHHQWmRWRTXHHP1H[W´
6LJDRVFRPHQWiULRVGRSUy[LPRHFUmSDUDUHGH¿QLURPyGXOR:L)LHHQWmRPDUTXH
&RQ¿UPWKHGHYLFHLVUHVHWHWRTXHHP1H[W´
6. Você pode ver a taxa percentual do processo de conexão, ao mesmo tempo, que vê
336$´H$3SLVFDQGRQRYLVRULQWHUQR
33VLJQL¿FD6HDUFKLQJWKHURXWHU´
6$VLJQL¿FD&RQQHFWHGWRWKHURXWHU´
$3VLJQL¿FD&RQQHFWHGWRWKHVHUYHU´
<
Welcome Home
Set your home locaon for more
information
All Devices Living Room
Master
...
Add Device
Home Me
Work office
<
No devices
CF Mode
Reset the device first.
Method1:When there is a DISPLAY key on the
remote control, press the DISPLAY key 6 mes
in the me of 8 seconds; when there is no
DISPLAY key on the remote control, press the
ECO key 6 mes in the me of 8 seconds unl
the device beeps twice and the LCD screen
show CF .
Next
Cancel
Confirm the device is reset.
Reseng Devices
<
Method2:Press the General key 9 mes in the
me of 8 seconds unl the device beeps twice
and the LCD screen show CF .
Add Device
<
Device added
successfully
Sample1
Living•Ro••• Master•Be••• Second•B•••
Dining•R••• Kitchen Study•Ro•••
Done
Select 2.4 Ghz
Wi-Fi Network and
enter password
Next
Cancel
If your Wi-Fi is 5GHz, please set it to
bo 2.4GHz.Common router seng
method
2.4GHz 5GHz
*******
Password
<
Add Manually
Auto Scan
Dehumidifier
Air Condioner
(BT+Wi-Fi)
Fresh Air
Purifier
Split Air
Condioner
Window Type
Air Condioner
Portable Air
Condioner
Security
Camera
Swimming
Pool H/P
Adding device...
Cancel
Ensure that the device is powered on.
2%
Scan
devices.
Register on
Cloud.
Inialize the
devices.
digite a senha
Renomear
dispositivo
Selecione a sala
de localização
9
Select 2.4 Ghz
Wi-Fi Network and
enter password
Next
Cancel
If your Wi-Fi is 5GHz, please set it to
bo 2.4GHz.Common router seng
method
2.4GHz 5GHz
*******
Password
AP Mode
Reset the device first.
Method1:When there is a DISPLAY key on the
remote control, press the DISPLAY key 6 mes
in the me of 8 seconds; when there is no
DISPLAY key on the remote control, press the
ECO key 6 mes in the me of 8 seconds unl
the device beeps twice and the LCD screen
show AP .
Next
Cancel
Confirm the device is reset.
Reseng Devices
<
Method2:Press the General key 9 mes in the
me of 8 seconds unl the device beeps twice
and the LCD screen show AP .
AP Mode
Reset the device first.
Method1:When there is a DISPLAY key on the
remote control, press the DISPLAY key 6 mes
in the me of 8 seconds; when there is no
DISPLAY key on the remote control, press the
ECO key 6 mes in the me of 8 seconds unl
the device beeps twice and the LCD screen
show AP .
Next•
Cancel
Confirm the device is reset.
Reseng Devices
<
Method2:Press the General key 9 mes in the
me of 8 seconds unl the device beeps twice
and the LCD screen show AP .
CF Mode
AP Mode
Default
<
Add Manually
Auto Scan
Dehumidifier
Air Condioner
(BT+Wi-Fi)
Fresh Air
Purifier
Split Air
Condioner
Window Type
Air Condioner
Portable Air
Condioner
Security
Camera
Swimming
Pool H/P
<
WLAN
AVAILABLE NETWORKS
SmartLife-****
office wifi
WIFI1
Add Device
<
Device added
successfully
Sample1
Living•Ro••• Master•Be••• Second•B•••
Dining•R••• Kitchen Study•Ro•••
Done
<
Welcome Home
Set your home locaon for more
information
All Devices Living Room
Master
...
Add Device
Home Me
Work office
<
No devices
digite a senha
<
Connect phone to devices
wifi hotspot
Connect now
1.Please connect your phone to the hotspot
shown below
Wi-Fi
Home
5G
Guest
4G
12:30
<
SmartLife-XXXX
2.Return to this app and connue adding
devices
Confirm hot spot connecton,next
Adding device...
Cancel
Ensure that the device is powered on.
2%
Scan
devices.
Register on
Cloud.
Inialize the
devices.
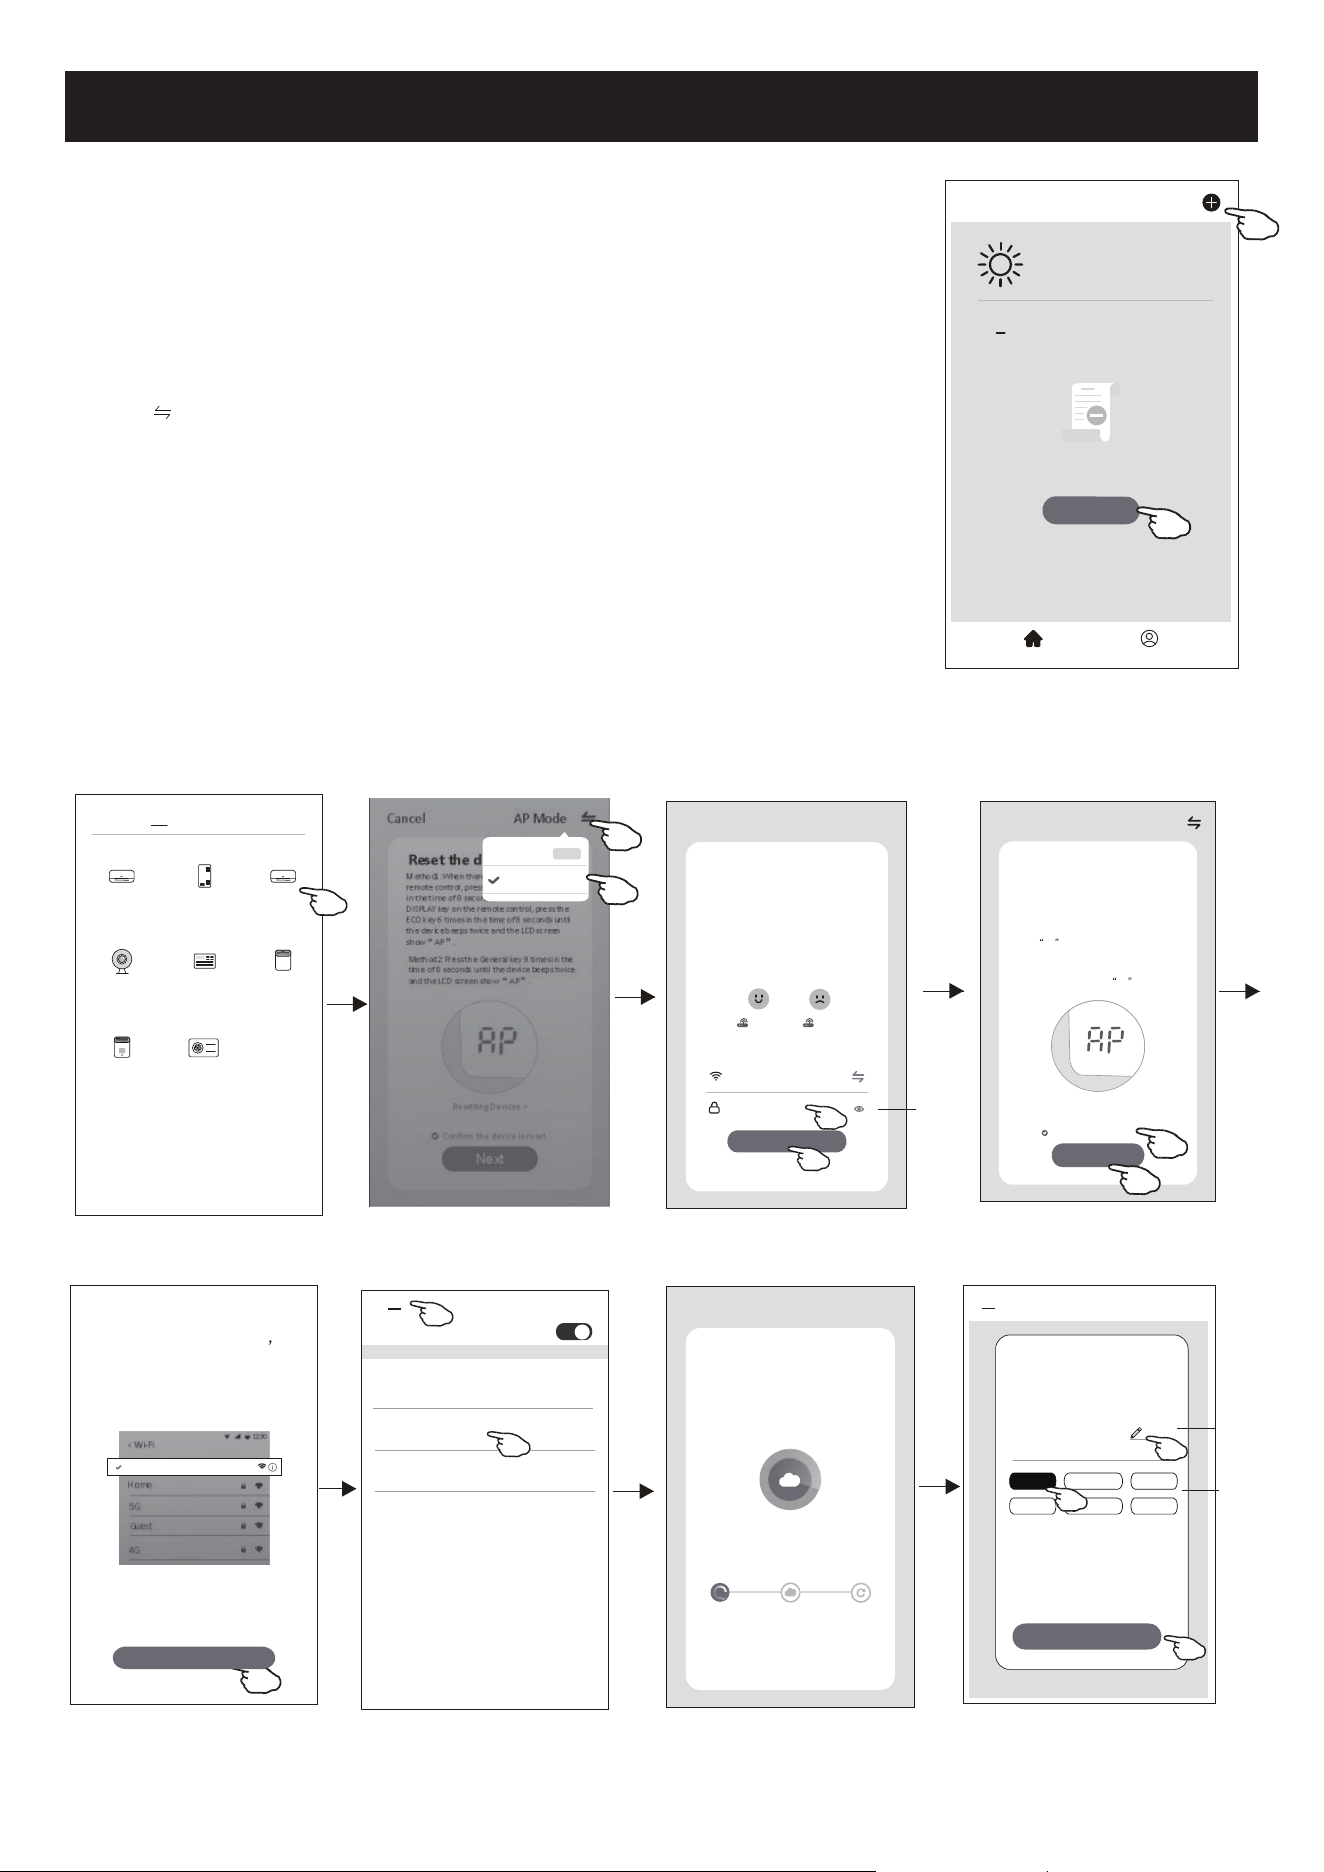
Adicionar dispositivos
Renomear
dispositivo
Selecione
a sala de
localização
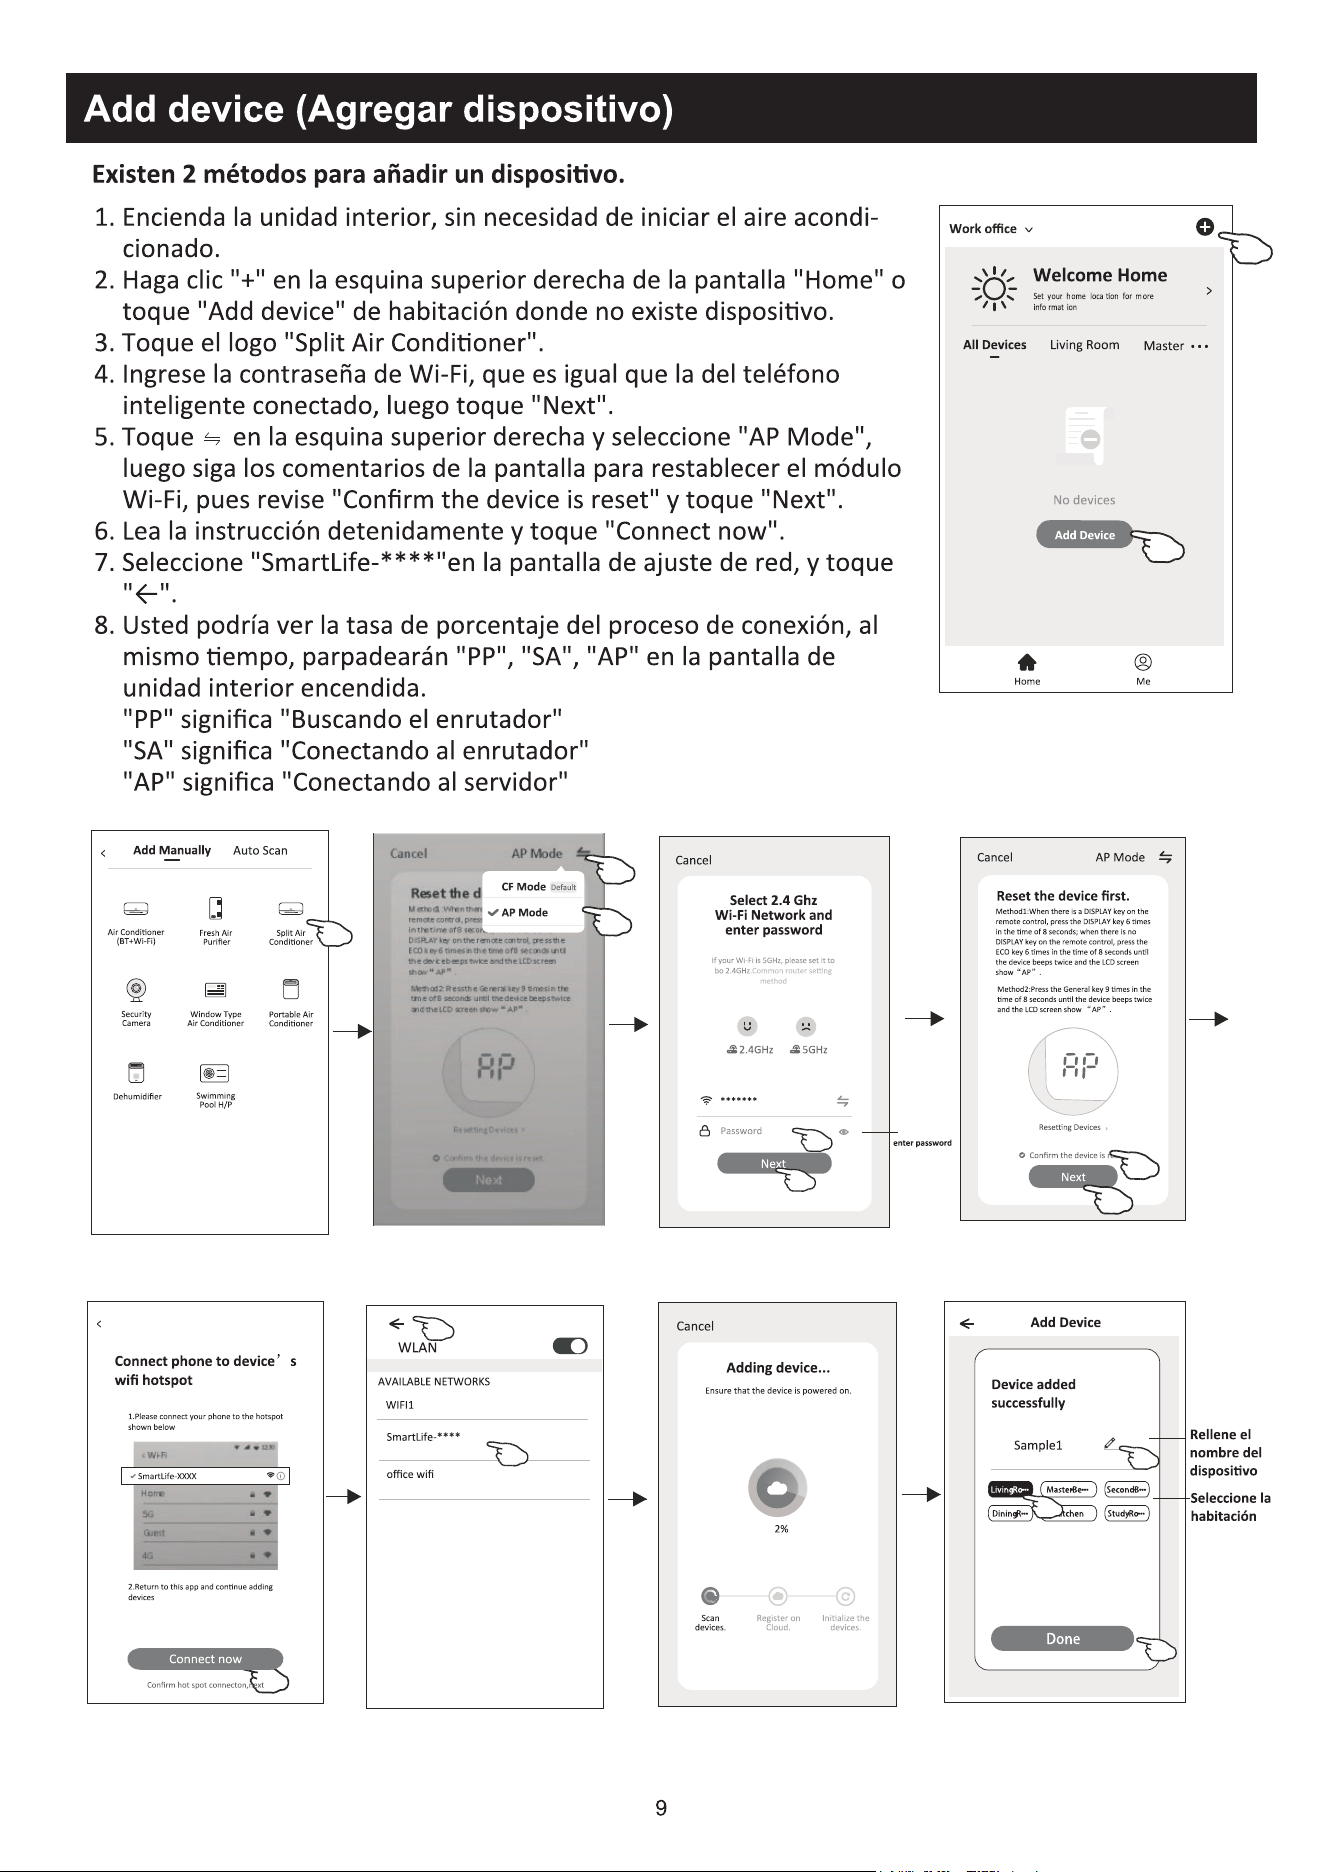
+iGRLVPpWRGRVGHDGLFLRQDURGLVSRVLWLYR
Modo 2-AP
1. Ative a unidade interna. Não há necessidade de ligar o ar condicionado.
2. Clique em "+" no canto superior direito do ecrã principal ou toque em "Add
device" do quarto que não possuir um dispositivo.
3. Toque na logo "Split Air conditioner".
'LJLWHDVHQKDGR:L)LTXHpDPHVPDTXHRVHXWHOHPyYHOLQWHOLJHQWH
XWLOL]RXSDUDFRQHFWDUHHQWmRWRTXHHP1H[W´
5. Toque
no canto superior direito e escolha "AP Mode" (modo AP). Em
VHJXLGDVLJDRVFRPHQWiULRVGRHFUmSDUDUHGH¿QLURPyGXOR:L)LHPDUTXH
&RQ¿UPWKHGHYLFHLVUHVHWFRQ¿UPDUVHRGLVSRVLWLYRIRLUHGH¿QLGRH
FOLTXHHP1H[W´SUy[LPR
/HLDDVLQVWUXo}HVFRPFXLGDGRHWRTXHHP&RQQHFWQRZ´FRQHFWDUVH
agora).
1RHFUmGHFRQ¿JXUDomRGDUHGHVHOHFFLRQH6PDUW/LIHHWRTXHHP
ĸ
8. Você pode ver a taxa percentual do processo de conexão, ao mesmo tempo,
TXHYr336$´H$3SLVFDQGRQRYLVRULQWHUQR
33VLJQL¿FD6HDUFKLQJWKHURXWHU´
6$VLJQL¿FD&RQQHFWHGWRWKHURXWHU´
$3VLJQL¿FD&RQQHFWHGWRWKHVHUYHU´
10
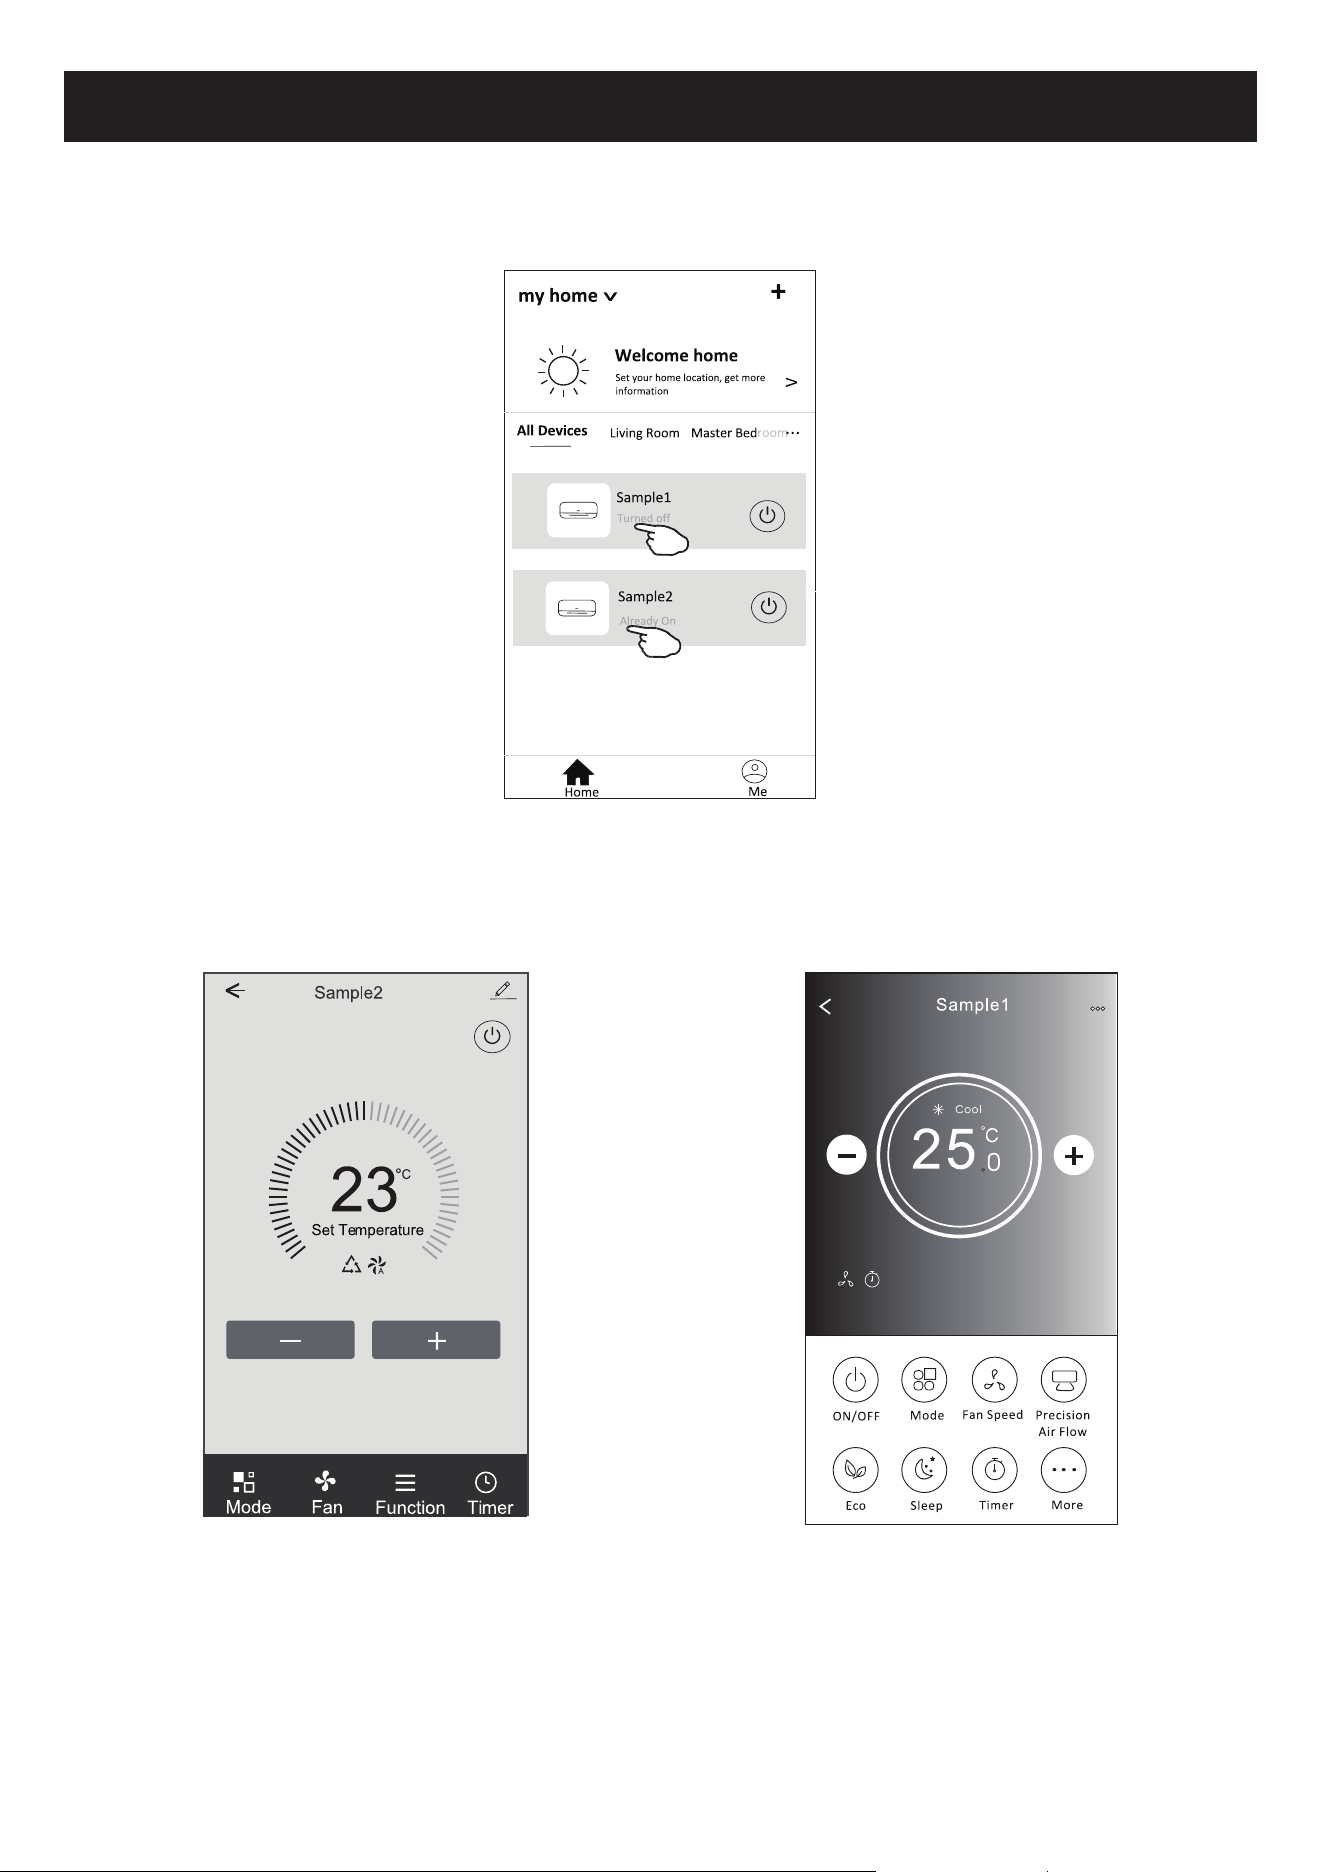
Controlo de ar condicionado
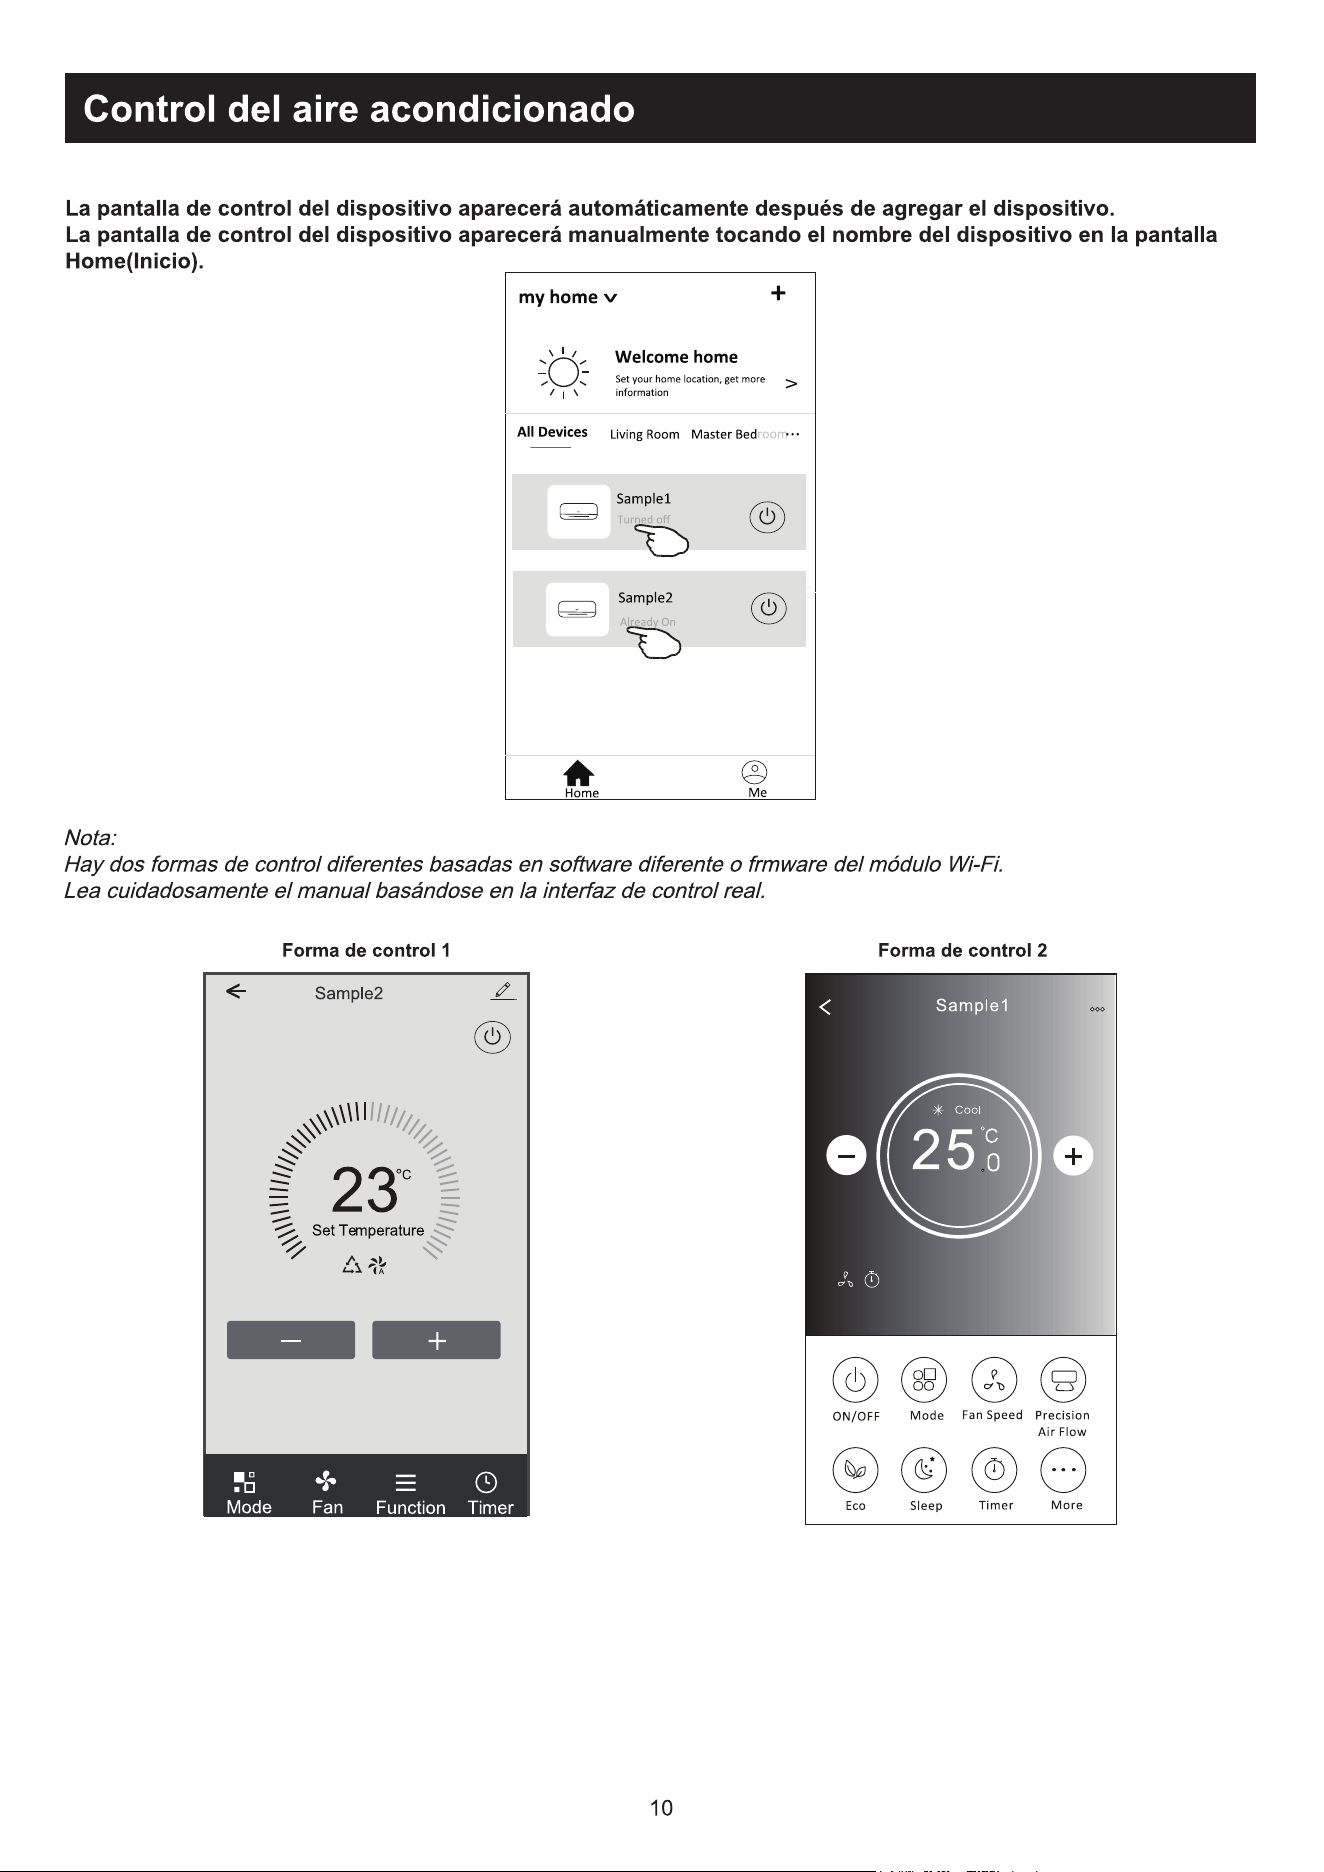
2HFUmGHFRQWURORGRGLVSRVLWLYRDSDUHFHUiDXWRPDWLFDPHQWHDSyVDGLFLRQDURGLVSRVLWLYR
2HFUmGHFRQWURORGRGLVSRVLWLYRDSDUHFHUiPDQXDOPHQWHDRWRFDURQRPHGRGLVSRVLWLYRQRHFUmLQLFLDO
Nota:
+iGXDVIRUPDVGLIHUHQWHVGHFRQWURORTXHIRUPDPDEDVHGRVGLIHUHQWHVVRIWZDUHVRX¿UPZDUHGHPyGXOR:L)L
Leia o manual da interface real de controlo cuidadosamente.
)RUPXOiULRGHFRQWUROR )RUPXOiULRGHFRQWUROR
11
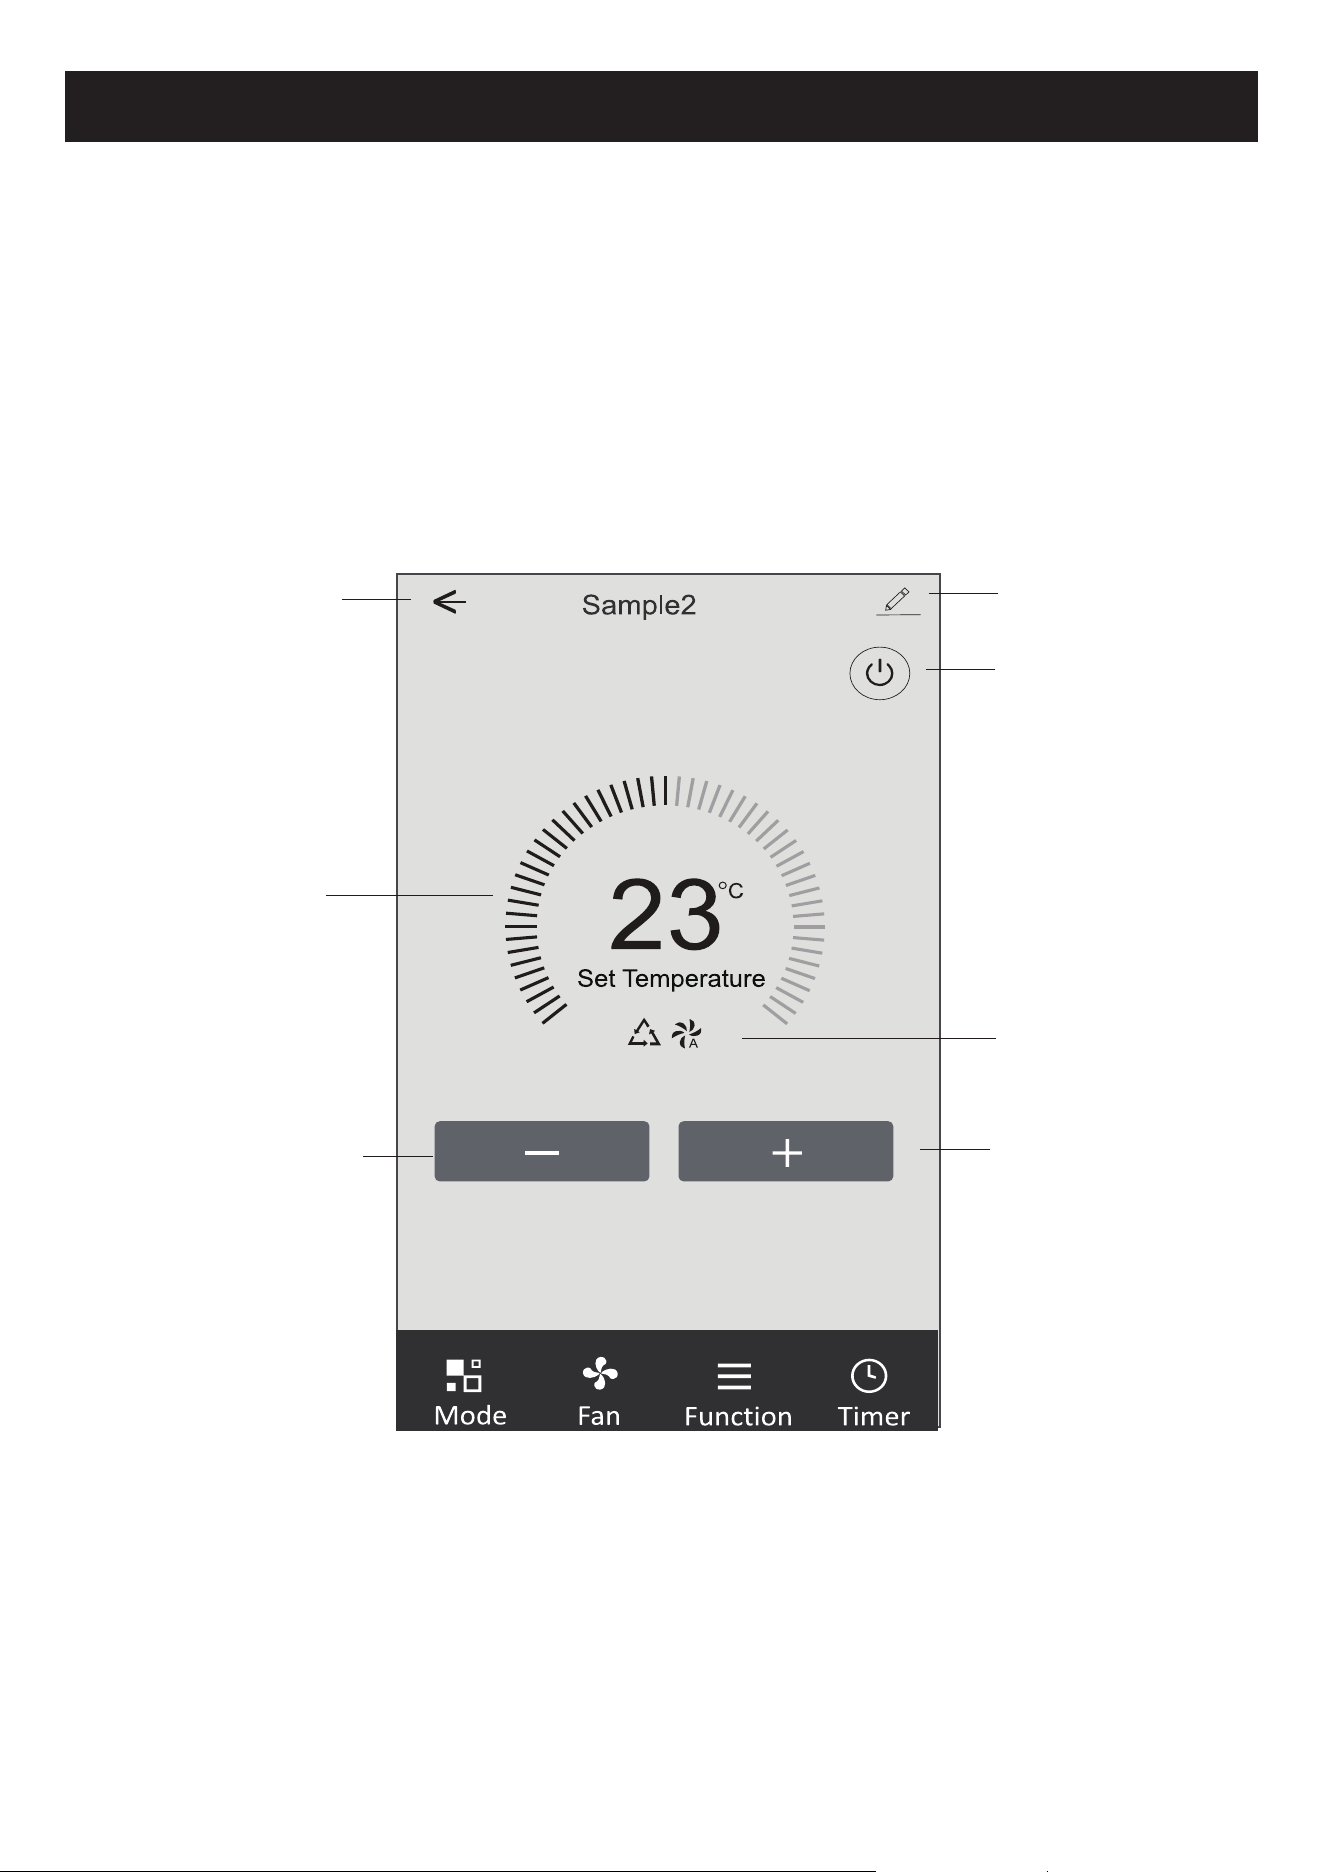
Controlo de ar condicionado
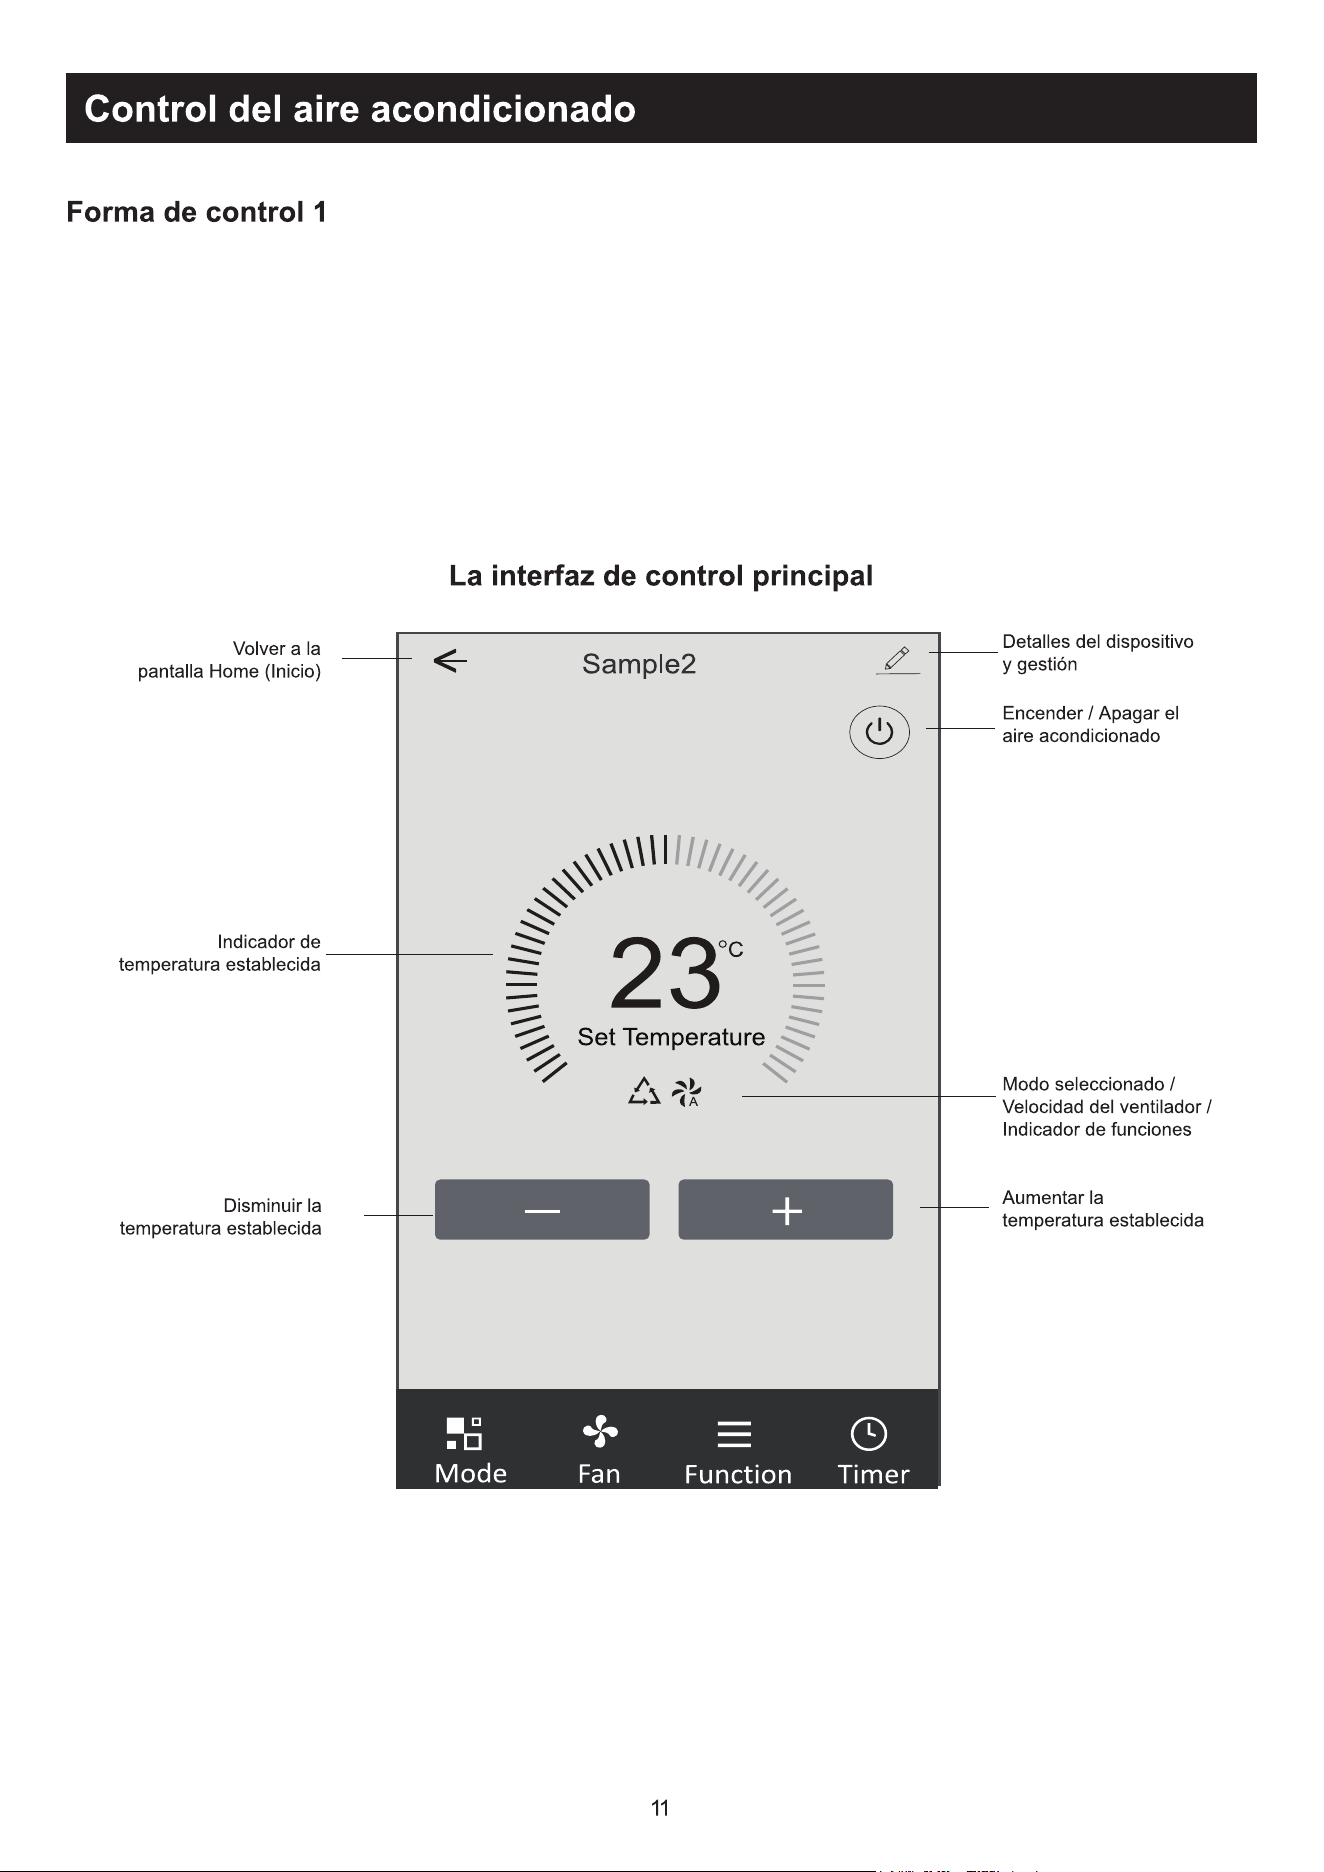
)RUPXOiULRGHFRQWUROR
,QWHUIDFHGHFRQWURORSULQFLSDO
Detalhes e gerenciamento de
dispositivo
Voltar para o ecrã inicial
,QGLFDGRUGHGH¿QLomRGH
temperatura
'LPLQXLUDFRQ¿JXUDomRGH
temperatura
Para ligar/desligar o ar
condicionado
Selecione o indicador de
Mode/Fan speed/Functions
$XPHQWDUDFRQ¿JXUDomRGH
temperatura
12
Controlo de ar condicionado
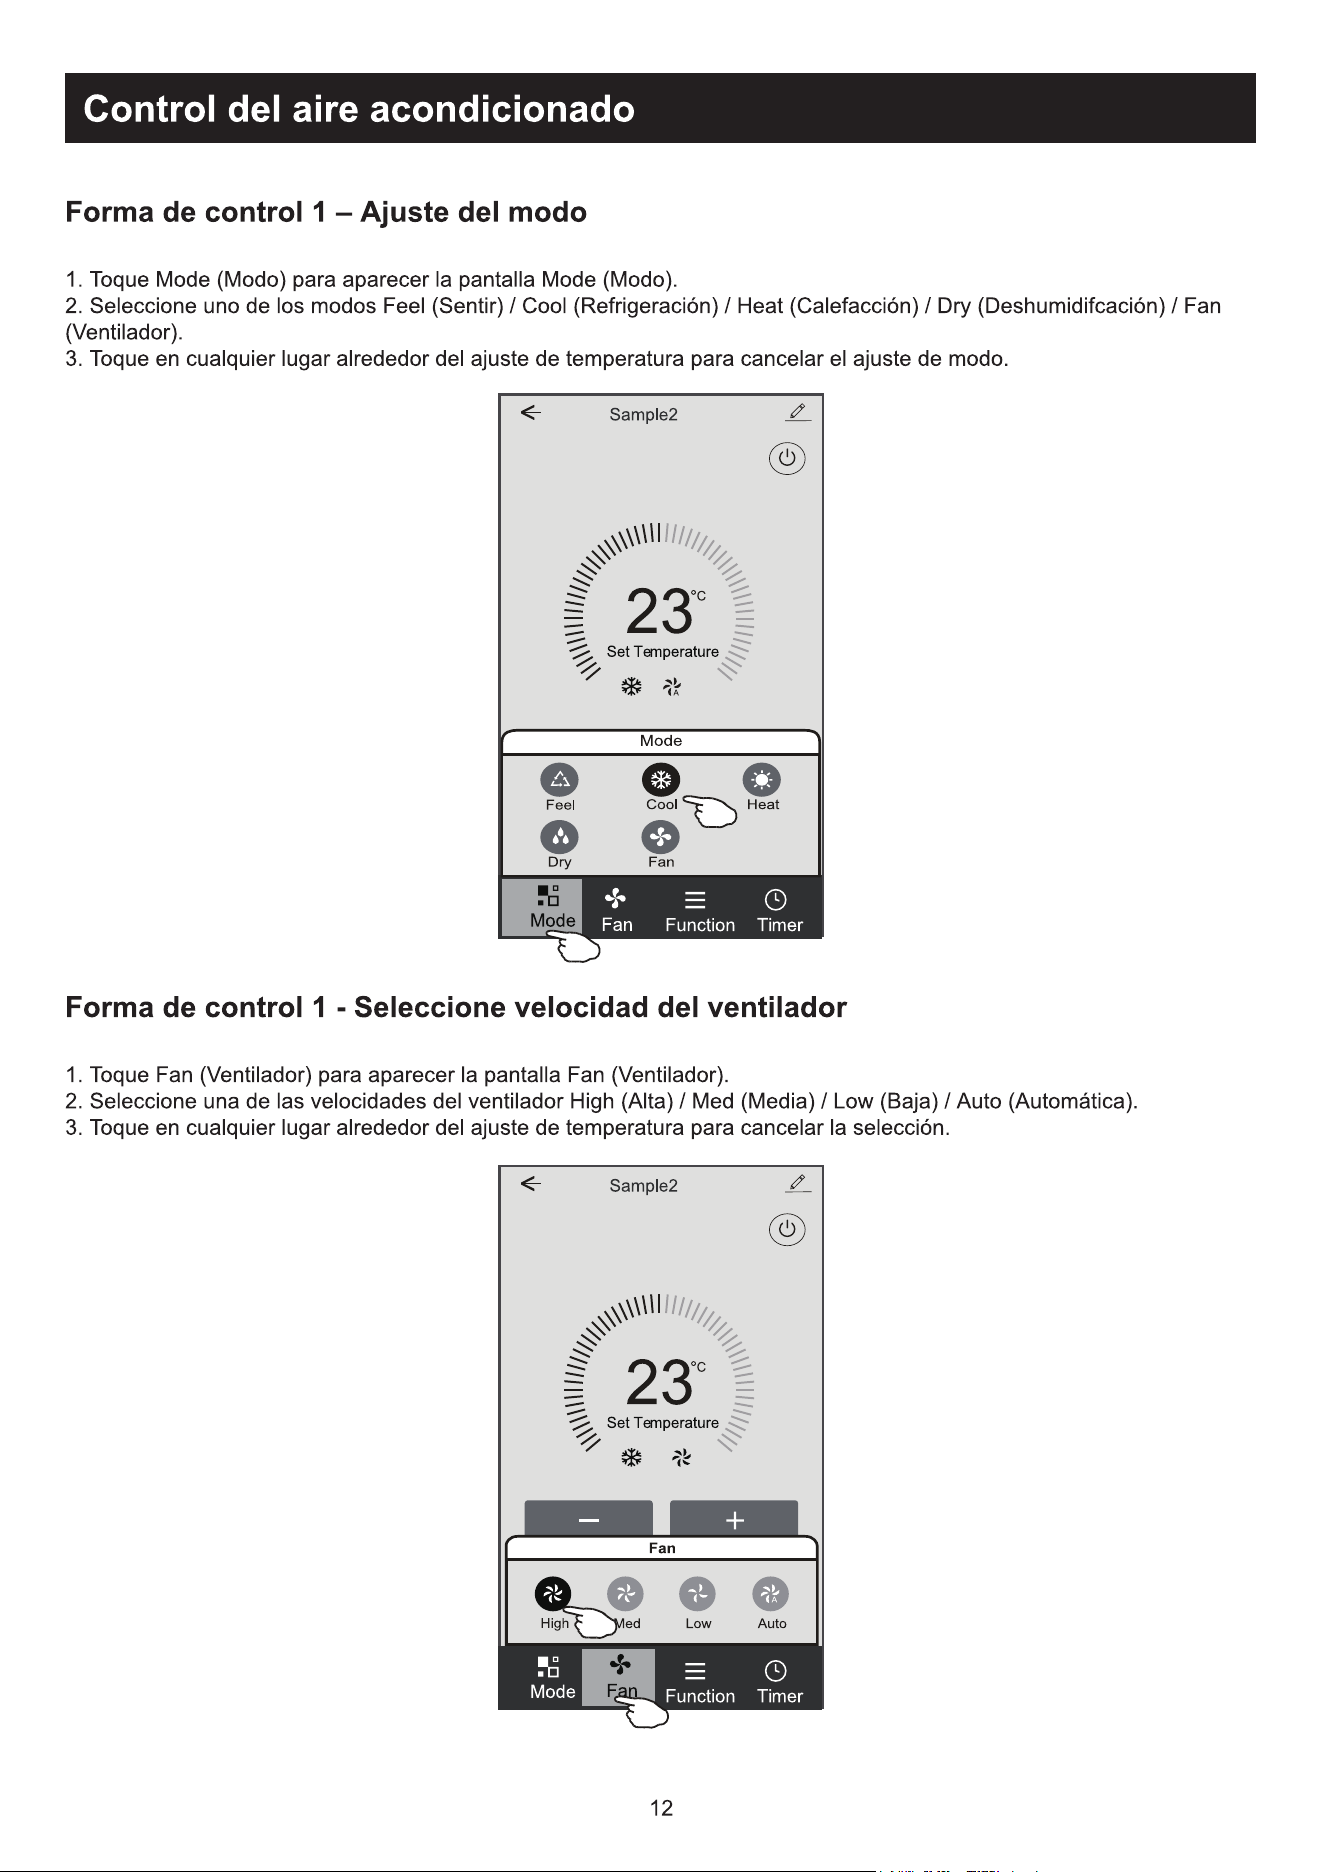
1. Toque em Mode para fazer aparecer o ecrã de modo.
2. Selecione um dos modos Feel / Cool / Heat / Dry / Fan.
7RTXHHPTXDOTXHUOXJDUGDFRQ¿JXUDomRGHWHPSHUDWXUDSDUDFDQFHODUDFRQ¿JXUDomRGHPRGR
1. Toque em Fan para abrir o ecrã do ventilador.
2. Seleccione um dos ventiladores de velocidade High / Med / Low / Auto.
7RTXHHPTXDOTXHUOXJDUGDFRQ¿JXUDomRGHWHPSHUDWXUDSDUDFDQFHODUDVHOHomR
)RUPXOiULRGHFRQWUROR'H¿QLomRGRPRGR
)RUPXOiULRGHFRQWUROR6HOHFFLRQDUDYHORFLGDGHGRYHQWLODGRU
13
Controlo de ar condicionado
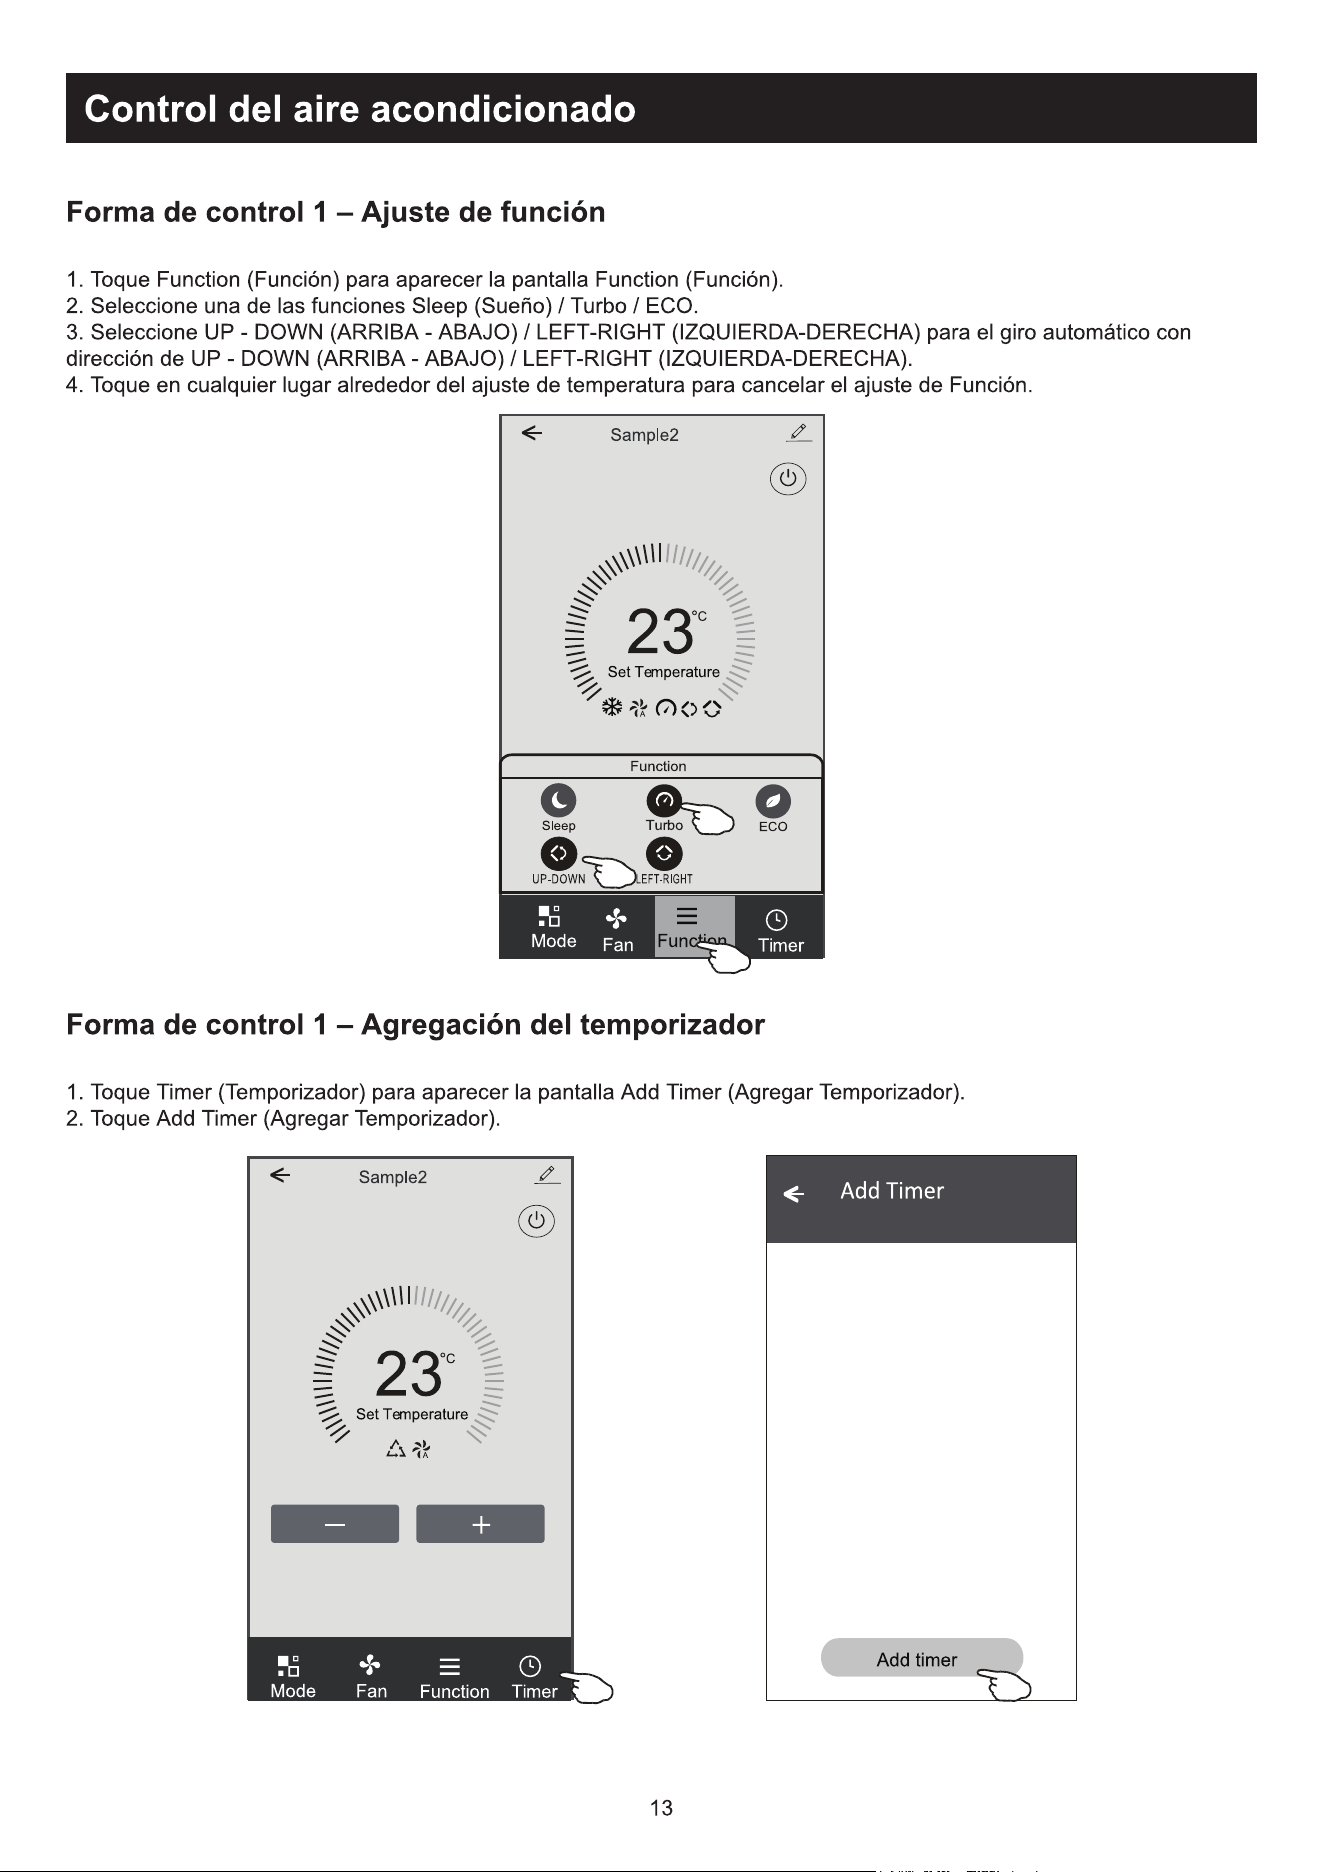
1. Toque na função para fazer aparecer o ecrã de Função.
2. Selecione uma das funções Sleep / Turbo / ECO.
3. Selecione UP-DOWN / LEFT-RIGHT para troca automática de direção no sentido CIMA-BAIXO-ESQUERDA-DIREITA.
7RTXHHPTXDOTXHUOXJDUGDFRQ¿JXUDomRGHWHPSHUDWXUDSDUDFDQFHODUDFRQ¿JXUDomRGH)XQomR
1. Toque em Timer para abrir o ecrã Add Timer.
7RTXHHP³$GG7LPHU´
)RUPXOiULRGHFRQWUROR'H¿QLomRGDIXQomR
)RUPXOiULRGHFRQWUROR$FUHVFHQWDUWHPSRUL]DGRU
14
Controlo de ar condicionado
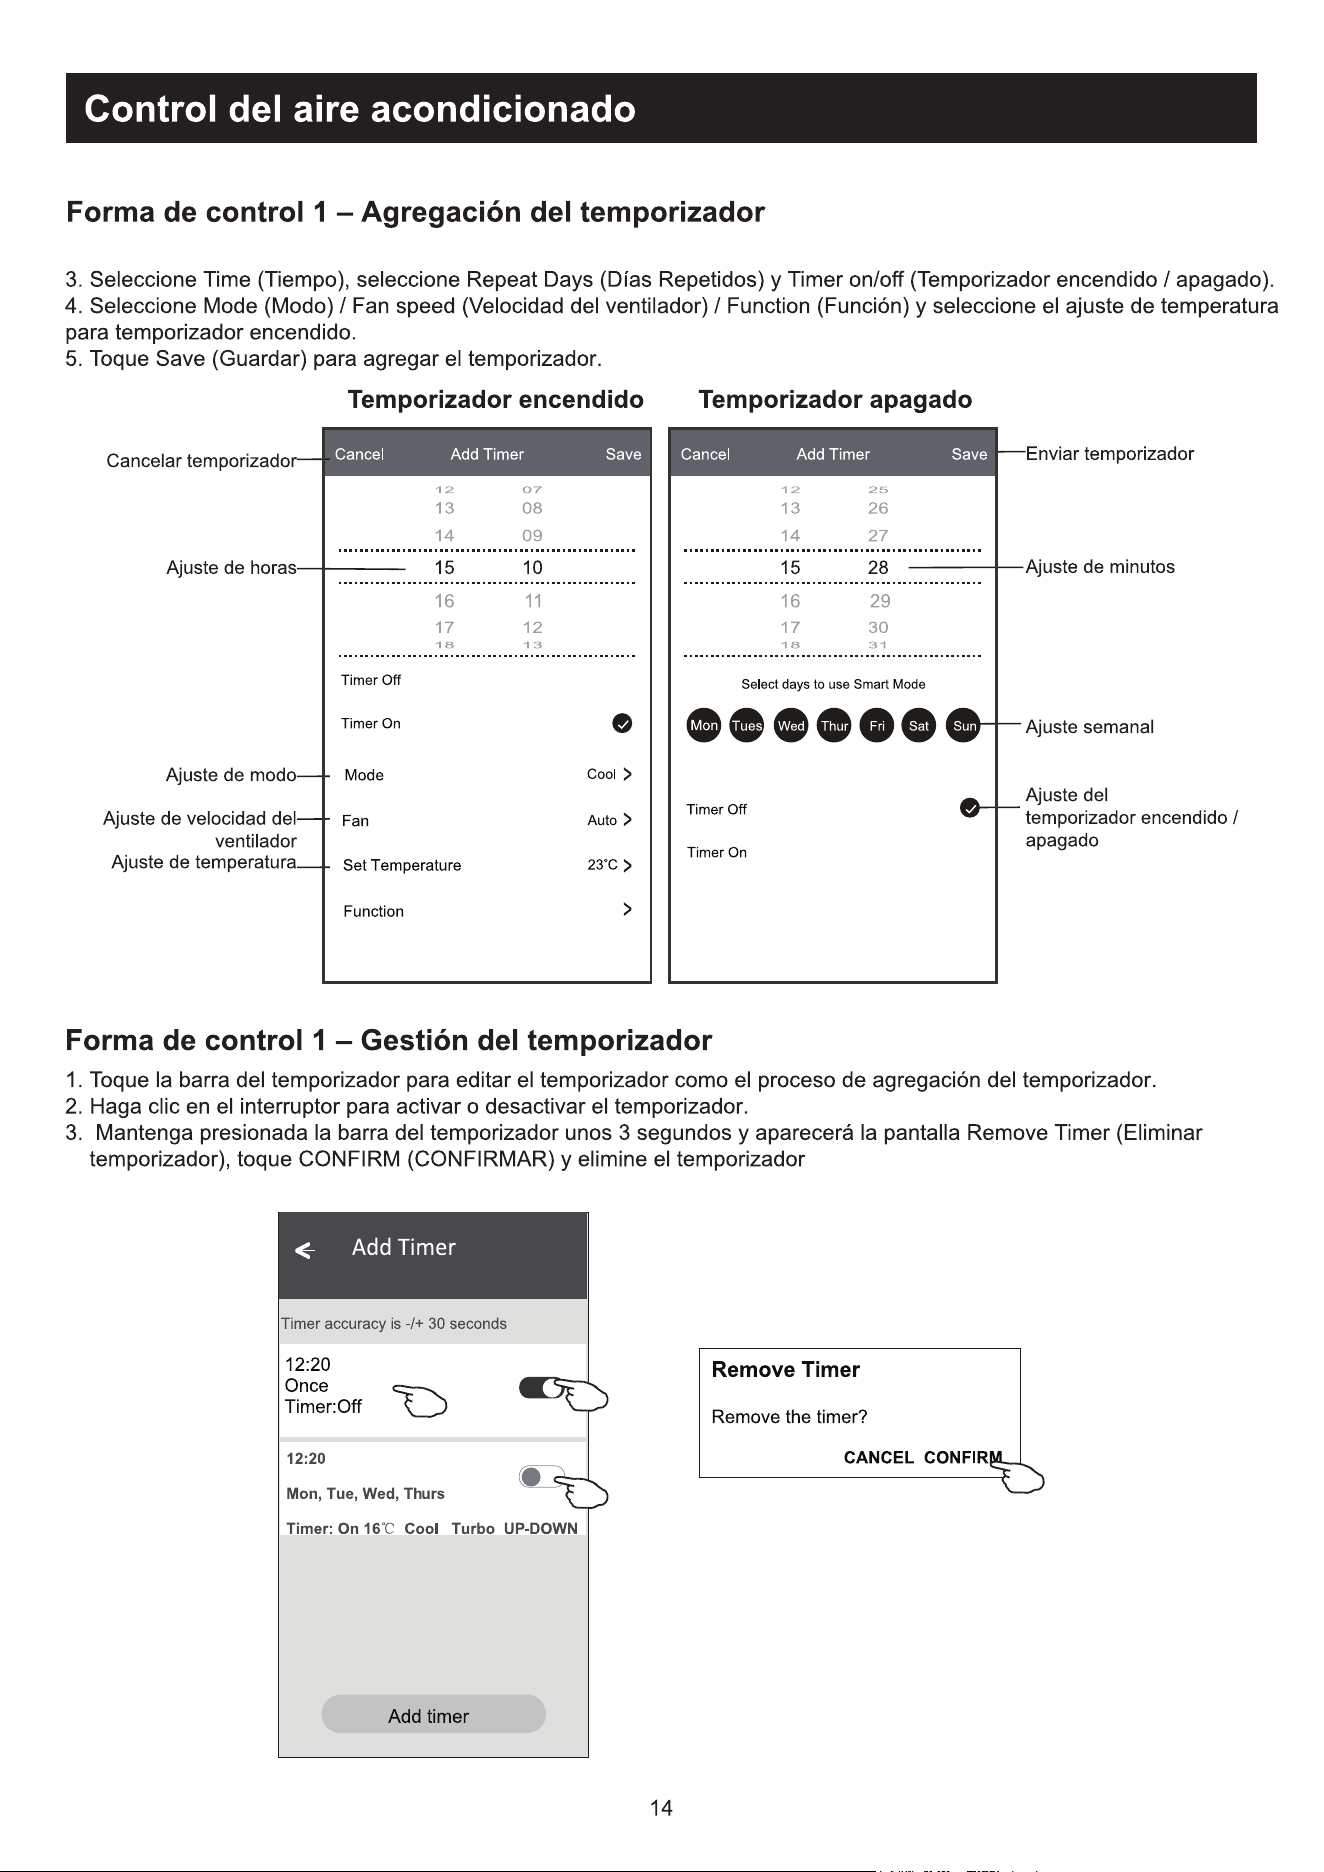
3. Selecione a hora, os dias de repetição, e Timer on/off.
6HOHFLRQHR0RGH)DQVSHHG)XQFWLRQHDWHPSHUDWXUDGHFRQ¿JXUDomRSDUD7LPHURQ
7RTXHHP³6DYH´SDUDDGLFLRQDUR7LPHU
1. Toque na barra do Timer para alterar o Timer da mesma forma que o processo de adicioná-lo.
2. Clique na chave para ativar ou desativar o Timer.
6HJXUHDEDUUDGR7LPHUSRUFHUFDGHVHJXQGRVHIDoDDSDUHFHURHFUm³5HPRYH7LPHU´(PVHJXLGDWRTXHHP
CONFIRM para removê-lo.
&RQ¿JXUDomRGH7LPHU21
OFF
Timer On 7LPHU2II
)RUPXOiULRGHFRQWUROR$FUHVFHQWDUWHPSRUL]DGRU
)RUPXOiULRGHFRQWUROR*HVWmRGR7LPHU
Enviar o Timer
&RQ¿JXUDomRGHPLQXWRV
&RQ¿JXUDomRGHVHPDQD
Cancelar o Timer
&RQ¿JXUDomRGHKRUD
&RQ¿JXUDomRGHPRGR
&RQ¿JXUDomRGH
velocidade do ventilador
&RQ¿JXUDomRGHWHPSHUDWXUD
15
Controlo de ar condicionado
)RUPXOiULRGHFRQWUROR
,QWHUIDFHGHFRQWURORSULQFLSDO
Modo atual
$XPHQWDUDFRQ¿JXUDomR
de temperatura
Voltar para o
ecrã inicial
'LPLQXLUDFRQ¿JXUDomR
de temperatura
Indicador de funções
selecionado
Power on/off
Fundo diferente para
modo diferente: Cool/
Heat/Dry/Fan/Auto
Dicas
Nome do dispositivo
Botões de funções
Nota: eles podem parecer ligeiramente
diferentes, dependendo do modelo
de ar condicionado. Segue abaixo um
exemplo:
16
Controlo de ar condicionado
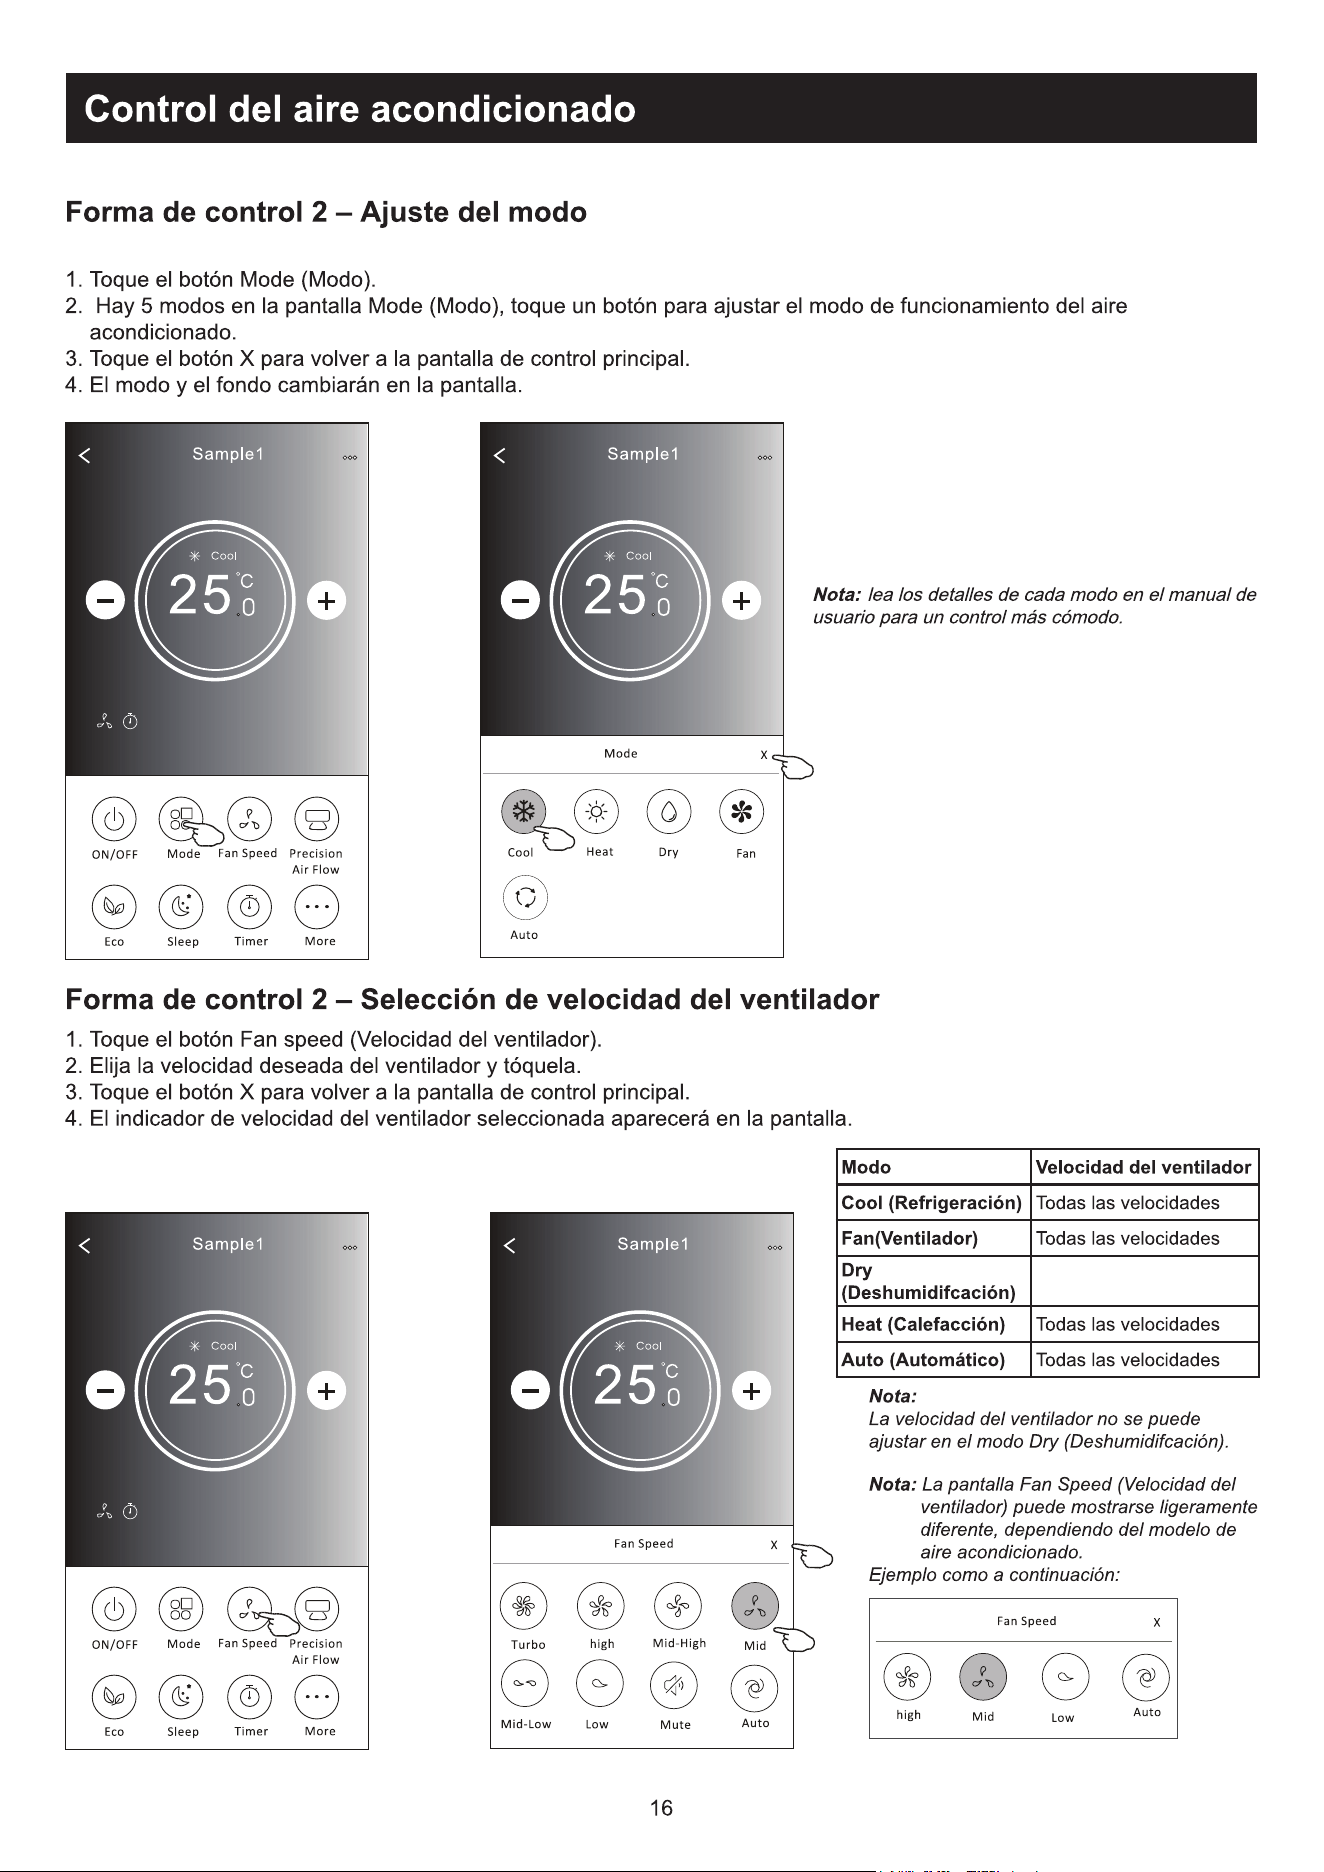
1. Toque no botão Mode.
+iPRGRVQRHFUm0RGH7RTXHHPXPERWmRSDUDGH¿QLUDWHPSHUDWXUDGHIXQFLRQDPHQWRGRDUFRQGLFLRQDGR
3. Toque no botão X para voltar à tela de controlo principal.
4. O modo e o fundo serão alterados no ecrã.
1. Toque no botão de velocidade do ventilador.
2. Escolha a velocidade desejada e toque nela.
3. Toque no botão X para voltar à tela de controlo principal.
4. O indicador de velocidade selecionada de ventilador aparecerá no ecrã.
Mode Fan Speed
Cool Todas as velocidades
Fan
Dry Todas as velocidades
Heat Todas as velocidades
Auto Todas as velocidades
Nota: A velocidade do ventilador pode parecer
ligeiramente diferente dependendo do
modelo do ar condicionado.
Segue abaixo um exemplo:
)RUPXOiULRGHFRQWUROR'H¿QLomRGRPRGR
)RUPXOiULRGHFRQWUROR6HOHFomRGHYHORFLGDGHGRYHQWLODGRU
Nota: leia cuidadosamente os detalhes de cada
modo no manual de instruções para controlar mais
confortavelmente.
Nota:
A velocidade do ventilador não pode ser
ajustada em Dry Mode (modo seco).
17
Controlo de ar condicionado
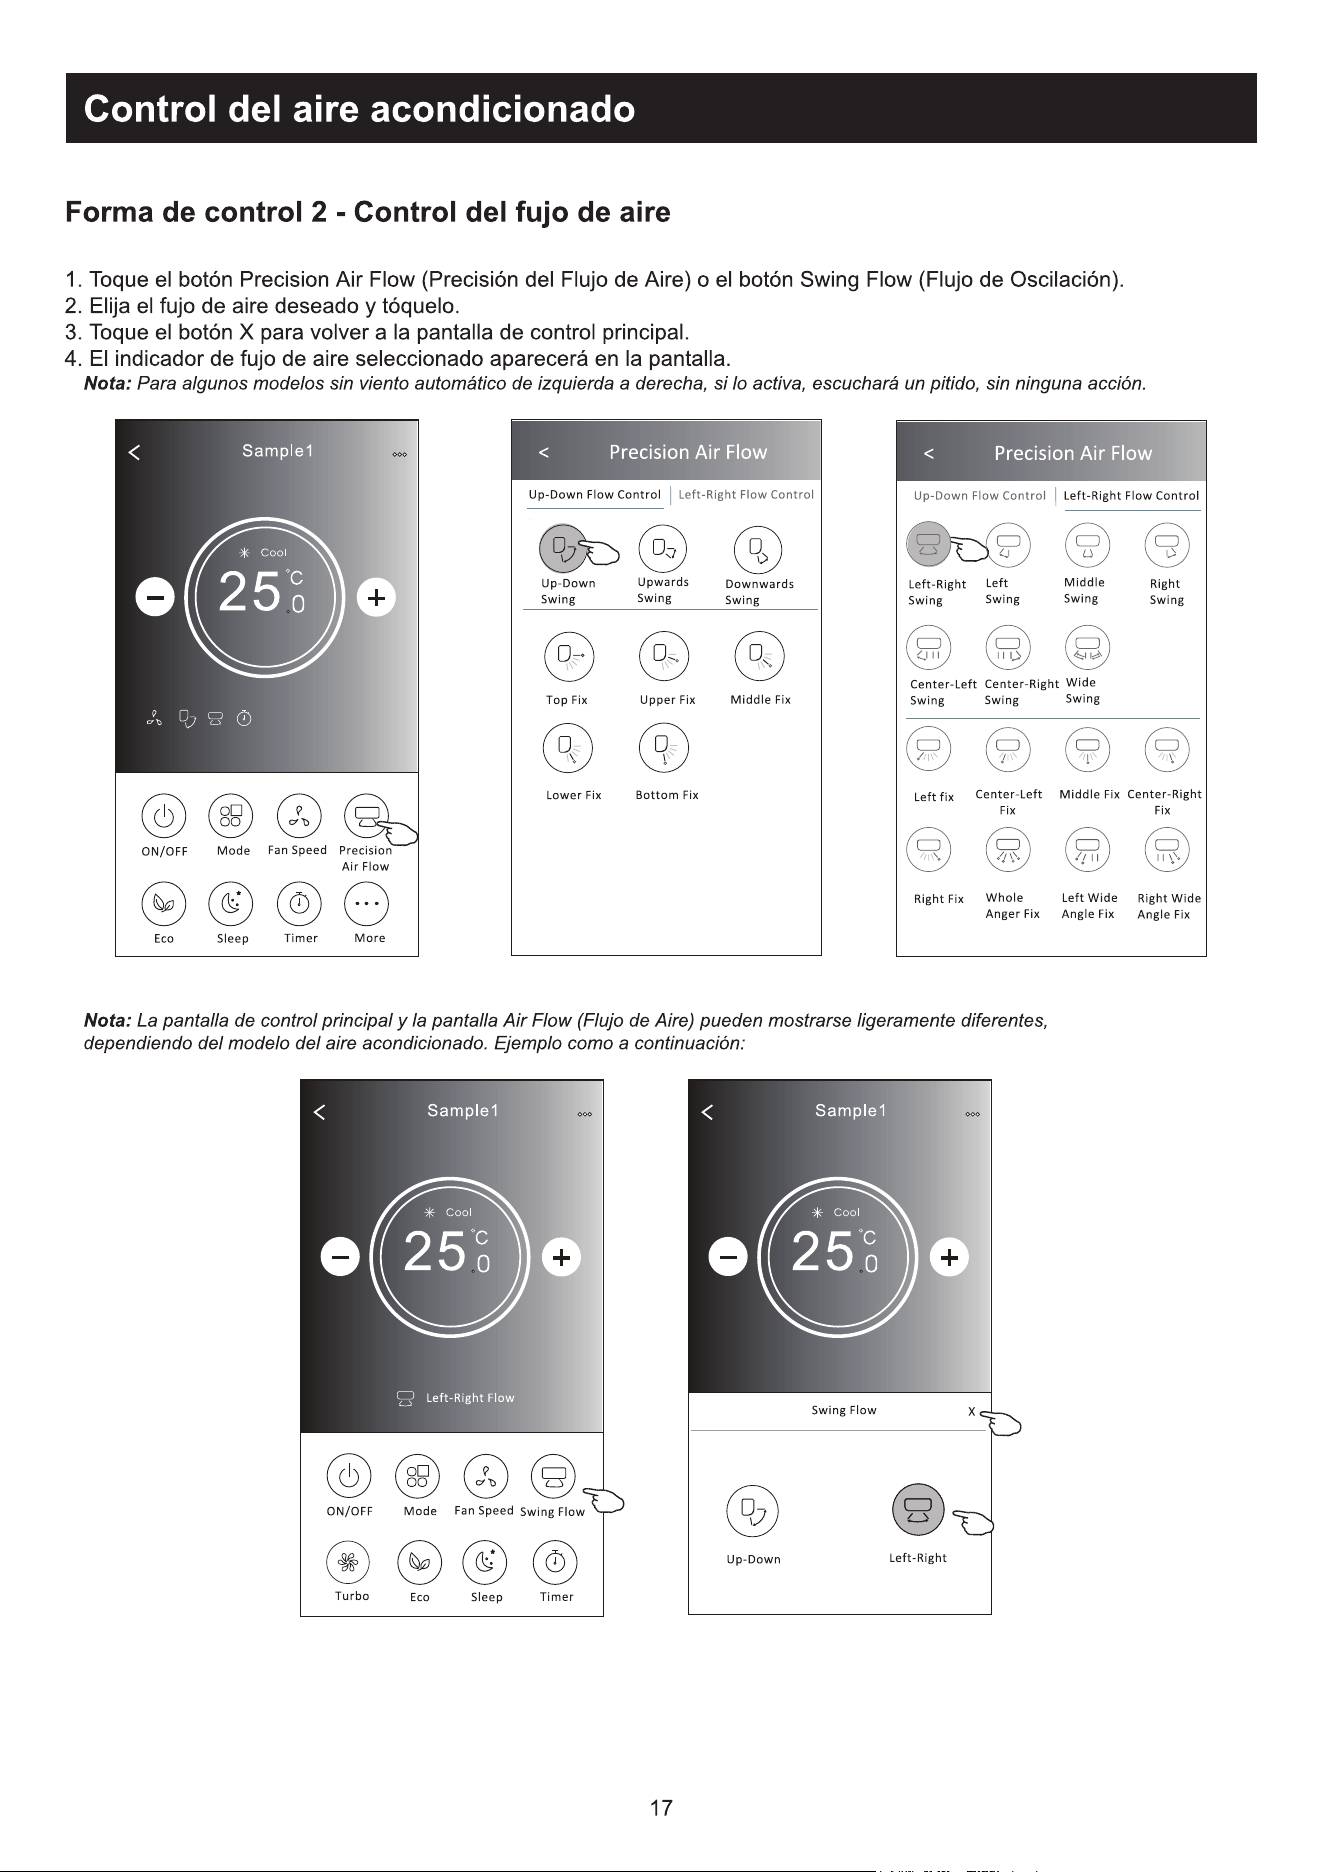
7RTXHERWmR³3UHFLVLRQ$LU)ORZ´RX6ZLQJ)ORZ
(VFROKDRÀX[RGHDUGHVHMDGRHWRTXHQHOD
3. Toque no botão em forma de X para voltar à tela de controlo principal.
2LQGLFDGRUGHÀX[RGHDUVHOHFLRQDGRDSDUHFHUiQRHFUm
Nota: Alguns modelos não possuem ventilação esquerda-direita automática; se você ativá-la, ouvirá um bipe, mas nada ocorrerá.
Nota: 2HFUmGHFRQWURORSULQFLSDOHRHFUmGHÀX[RGHDUSRGHPDSDUHFHUOLJHLUDPHQWHGLIHUHQWHVGHSHQGHQGRGRPRGHORGHDU
condicionado. Por exemplo:
)RUPXOiULRGHFRQWUROR6HOHFomRGHYHORFLGDGHGRYHQWLODGRU
18
Controlo de ar condicionado
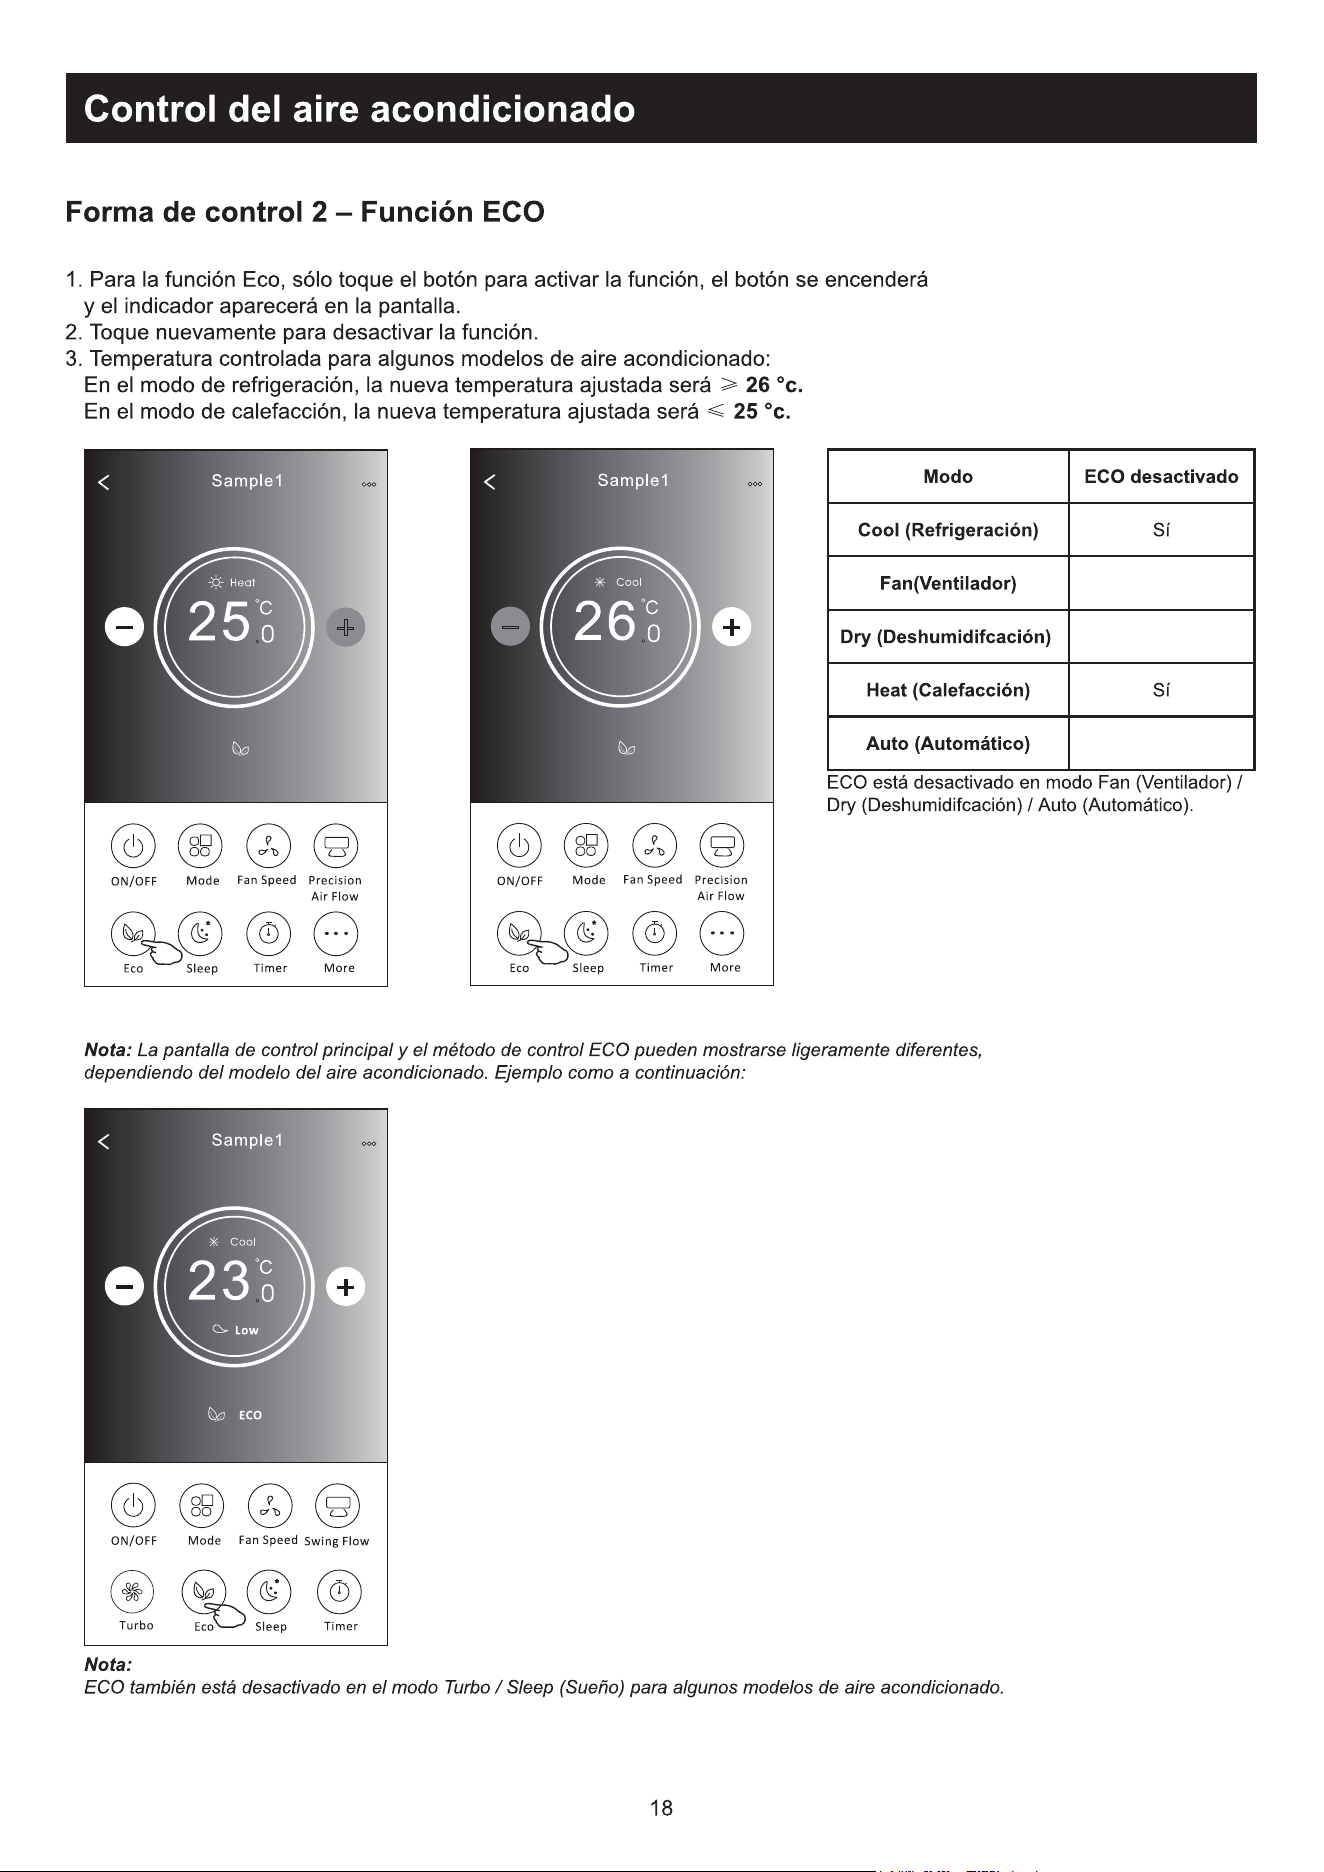
1. No caso da função ECO, basta clicar no botão para ativar a função; o botão se acenderá e o indicador aparecerá no
ecrã.
2. Toque novamente para desativar a função.
3. Controlado por temperatura para alguns modelos de ar condicionado:
1RPRGRGHUHVIULDPHQWRDQRYDFRQ¿JXUDomRGHWHPSHUDWXUDVHUi&.
1RPRGRGHDTXHFLPHQWRDQRYDFRQ¿JXUDomRGHWHPSHUDWXUDVHUi&.
Nota: O ecrã de controlo principal e o ecrã de método de controlo ECO podem parecer ligeiramente diferentes dependendo do modelo de
ar condicionado. Por exemplo:
O ECO é desativado no modo Fan / Dry / Auto.
Nota:
O ECO também é desativado no
modo Turbo / Sleep no caso de
alguns modelos de ar condicionado.
Mode ECO ativado
Cool Sim
Fan
Dry
Heat Sim
Auto
)RUPXOiULRGHFRQWUROR)XQomR(&2
19
Controlo de ar condicionado
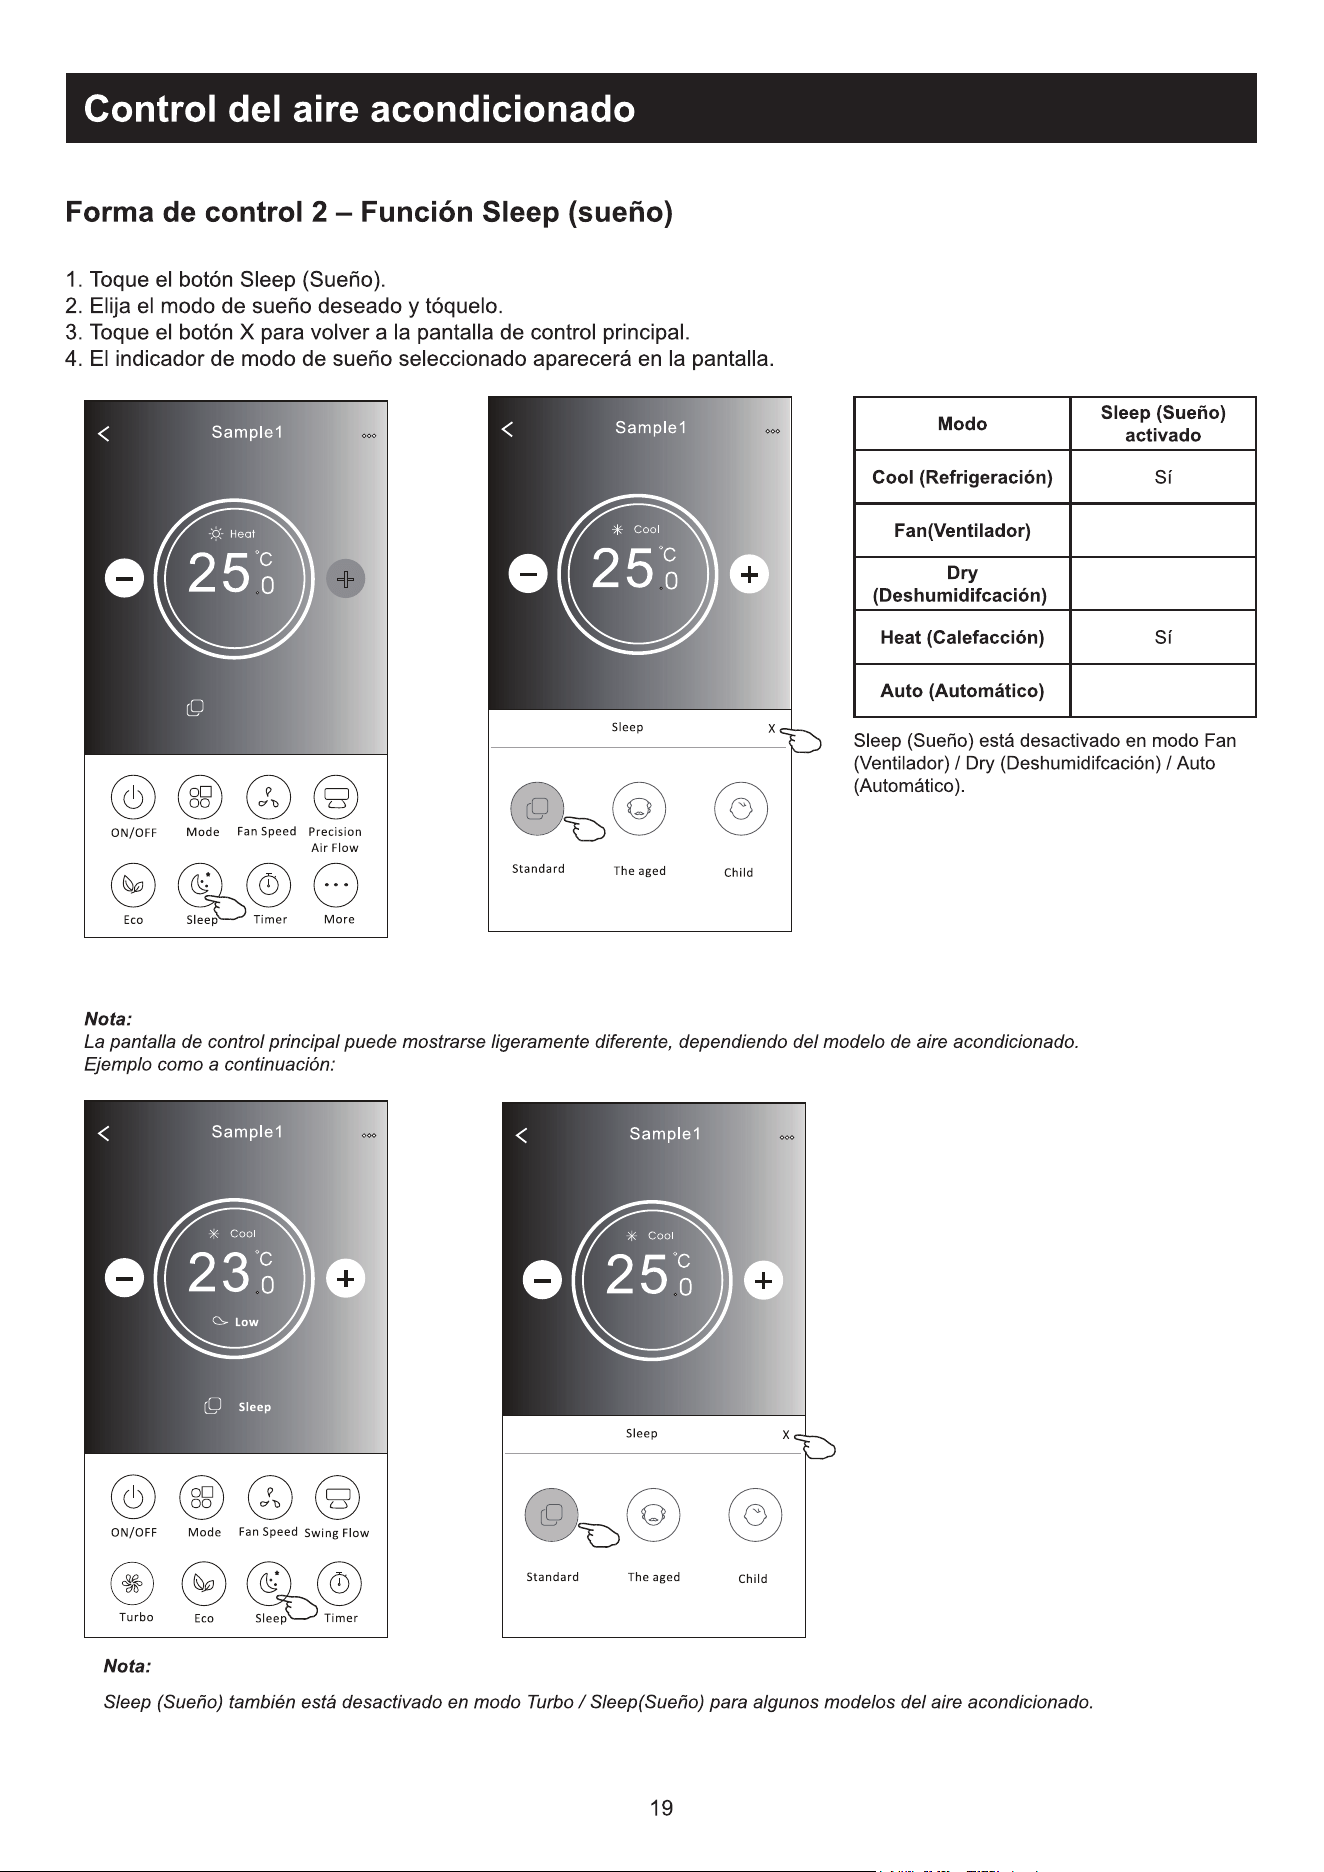
1. Toque no botão Sleep.
2. Escolha o modo de sleep e toque nele.
3. Toque no botão em forma de X para voltar à tela de controlo principal.
4. O indicador selecionado de dormir aparecerá no ecrã.
Nota:
A velocidade do controlo principal pode parecer ligeiramente diferente dependendo do modelo do ar condicionado.
Segue abaixo um exemplo:
Nota:
O modo dormir também é
desativado no modo Turbo / Sleep
no caso de alguns modelos de ar
condicionado.
2PRGR³6OHHS´pGHVDWLYDGRQRPRGR)DQ
Dry / Auto.
Mode Sleep ativado
Cool Sim
Fan
Dry
Heat Sim
Auto
)RUPXOiULRGHFRQWUROR)XQomR6OHHS
20
Controlo de ar condicionado
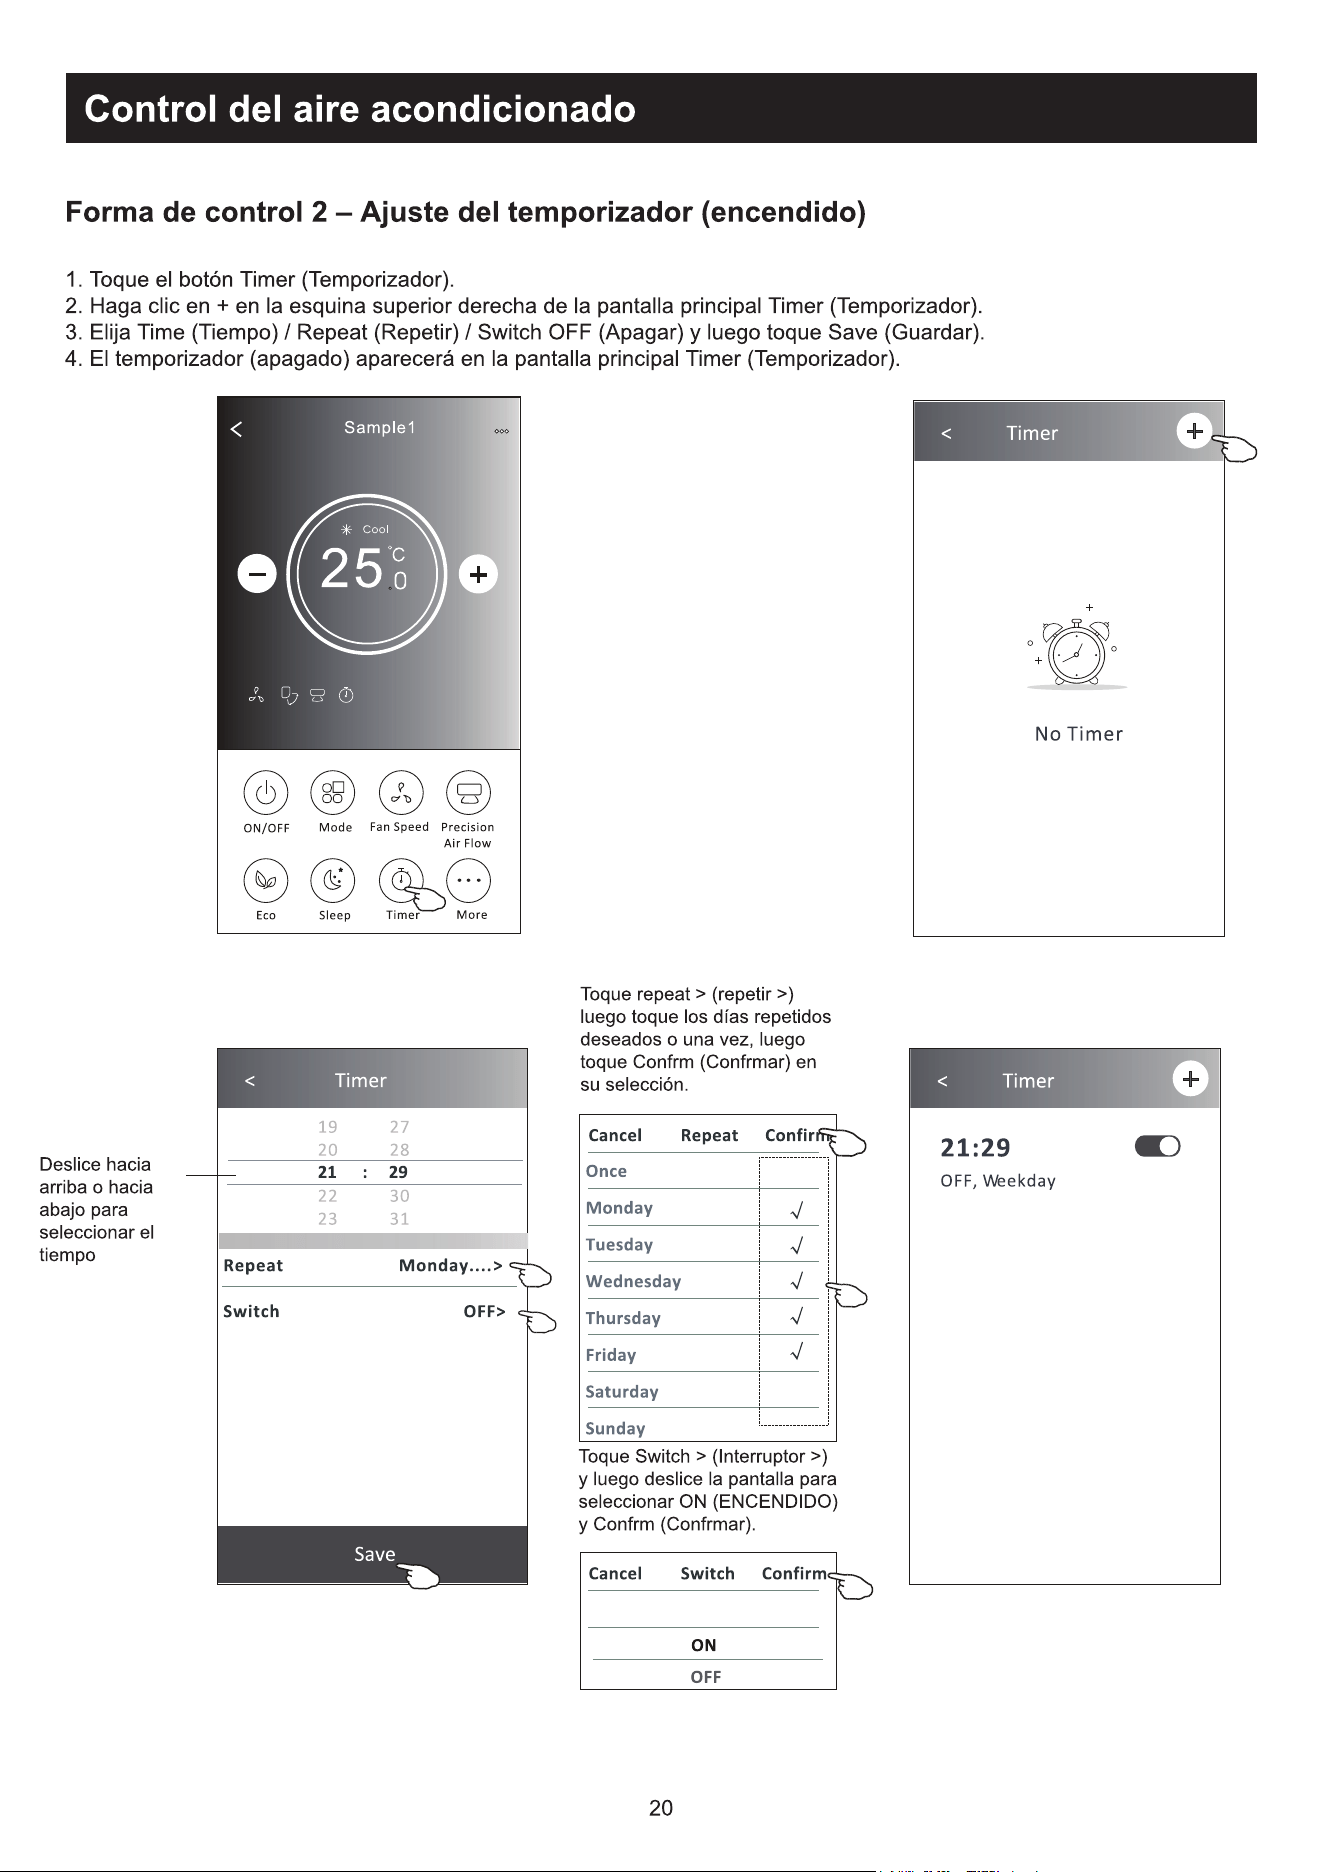
1. Toque no botão Timer.
2. Toque em + no canto superior do ecrã principal de Timer.
3. Escolha Time / Repeat / Switch OFF, e toque em Save.
4. O Timer (off) aparecerá no ecrã principal do Timer.
Toque em Switch > e depois
deslize o ecrã para escolher
21H&RQ¿UP
)RUPXOiULRGHFRQWUROR'H¿QLomRGR7LPHURQ
Deslize para cima
ou para baixo
para selecionar o
tempo.
Toque em Repetir > depois
toque nos dias de repetição
desejados ou Uma vez, depois
WRTXHHP&RQ¿UPDUDVXD
selecção.
21
Controlo de ar condicionado
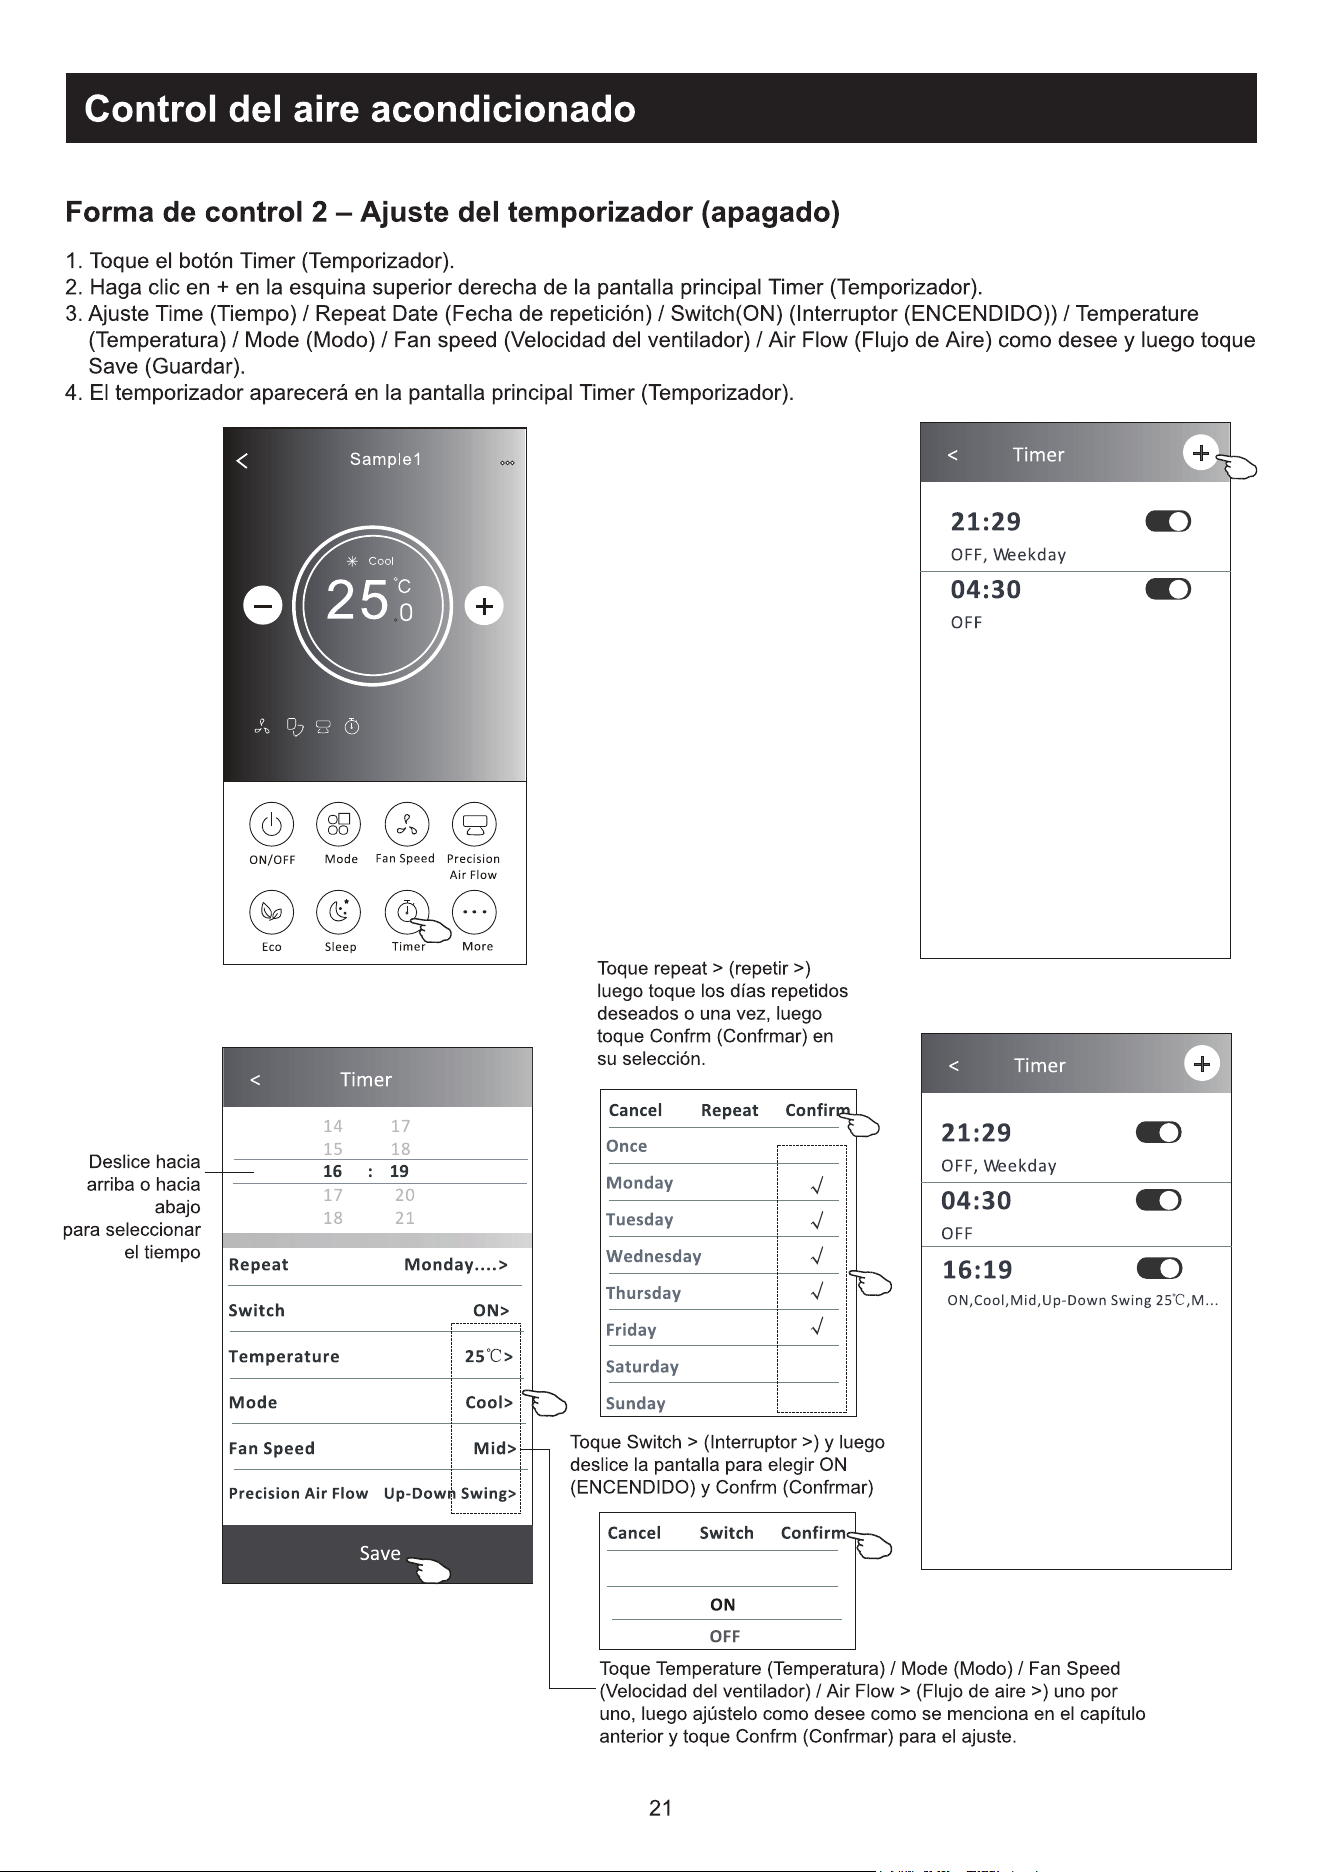
1. Toque no botão Timer.
2. Toque em + no canto superior do ecrã principal de Timer.
3. Selecione Time / Repeat Date / Switch (ON) / Temperature / Mode / Fan speed / Air Flow como desejar e então toque
em Save.
4. O Timer aparecerá no ecrã principal do Timer.
Toque em Switch > e depois
deslize o ecrã para escolher
21H&RQ¿UP
Toque em Temperature / Mode / Fan
Speed / Air Flow > item por item e
ajuste-os conforme o desejado, de
acordo com o capítulo anterior. Em
VHJXLGDWRTXHHP&RQ¿UP
)RUPXOiULRGHFRQWUROR'H¿QLomRGR7LPHURII
Toque em Repetir > depois
toque nos dias de repetição
desejados ou Uma vez, depois
WRTXHHP&RQ¿UPDUDVXD
selecção.
Deslize para
cima ou para
baixo para
selecionar o
tempo.
22
Controlo de ar condicionado
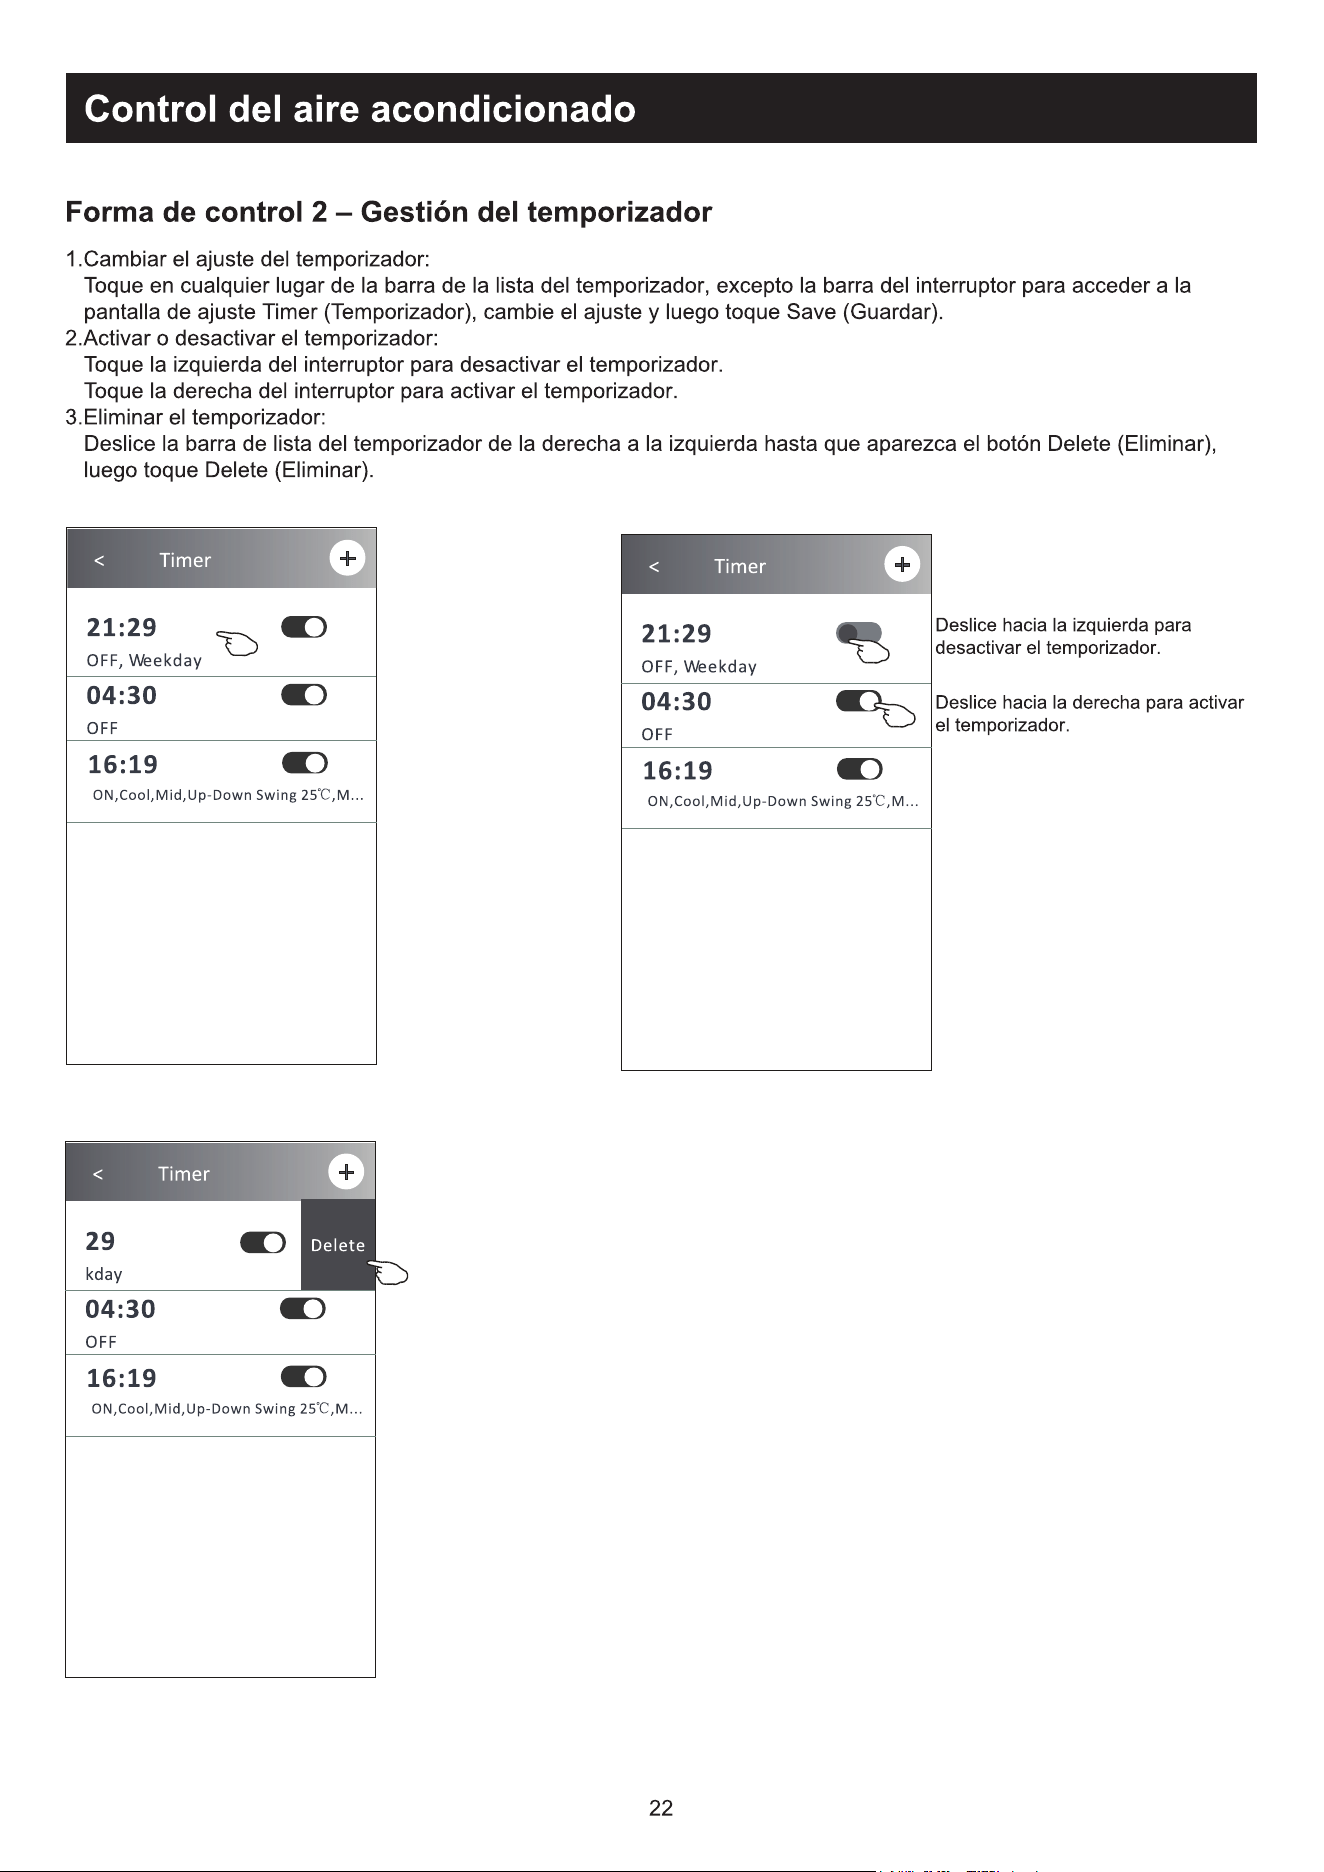
$OWHUDUFRQ¿JXUDomRGH7LPHU
Toque em qualquer lugar do Timer na barra de lista do temporizador, com exceção da barra de interruptor, para chegar
DRHFUmGHFRQ¿JXUDomRGRWHPSRUL]DGRU(PVHJXLGDDOWHUHDFRQ¿JXUDomRHWRTXHHP6DYH
2. Ativar ou desativar Timer:
Toque na esquerda do interruptor para desativar o Timer.
Toque na direita do interruptor para ativar o Timer.
3. Deletar o Timer:
Deslize a barra de lista do Timer da direita para a esquerda até que o botão Delete apareça. Em seguida, clique em
Delete.
Deslize para a esquerda para
desativar o temporizador.
Deslize para a direita para ativar o
temporizador.
)RUPXOiULRGHFRQWUROR*HVWmRGR7LPHU

23
Controlo de ar condicionado
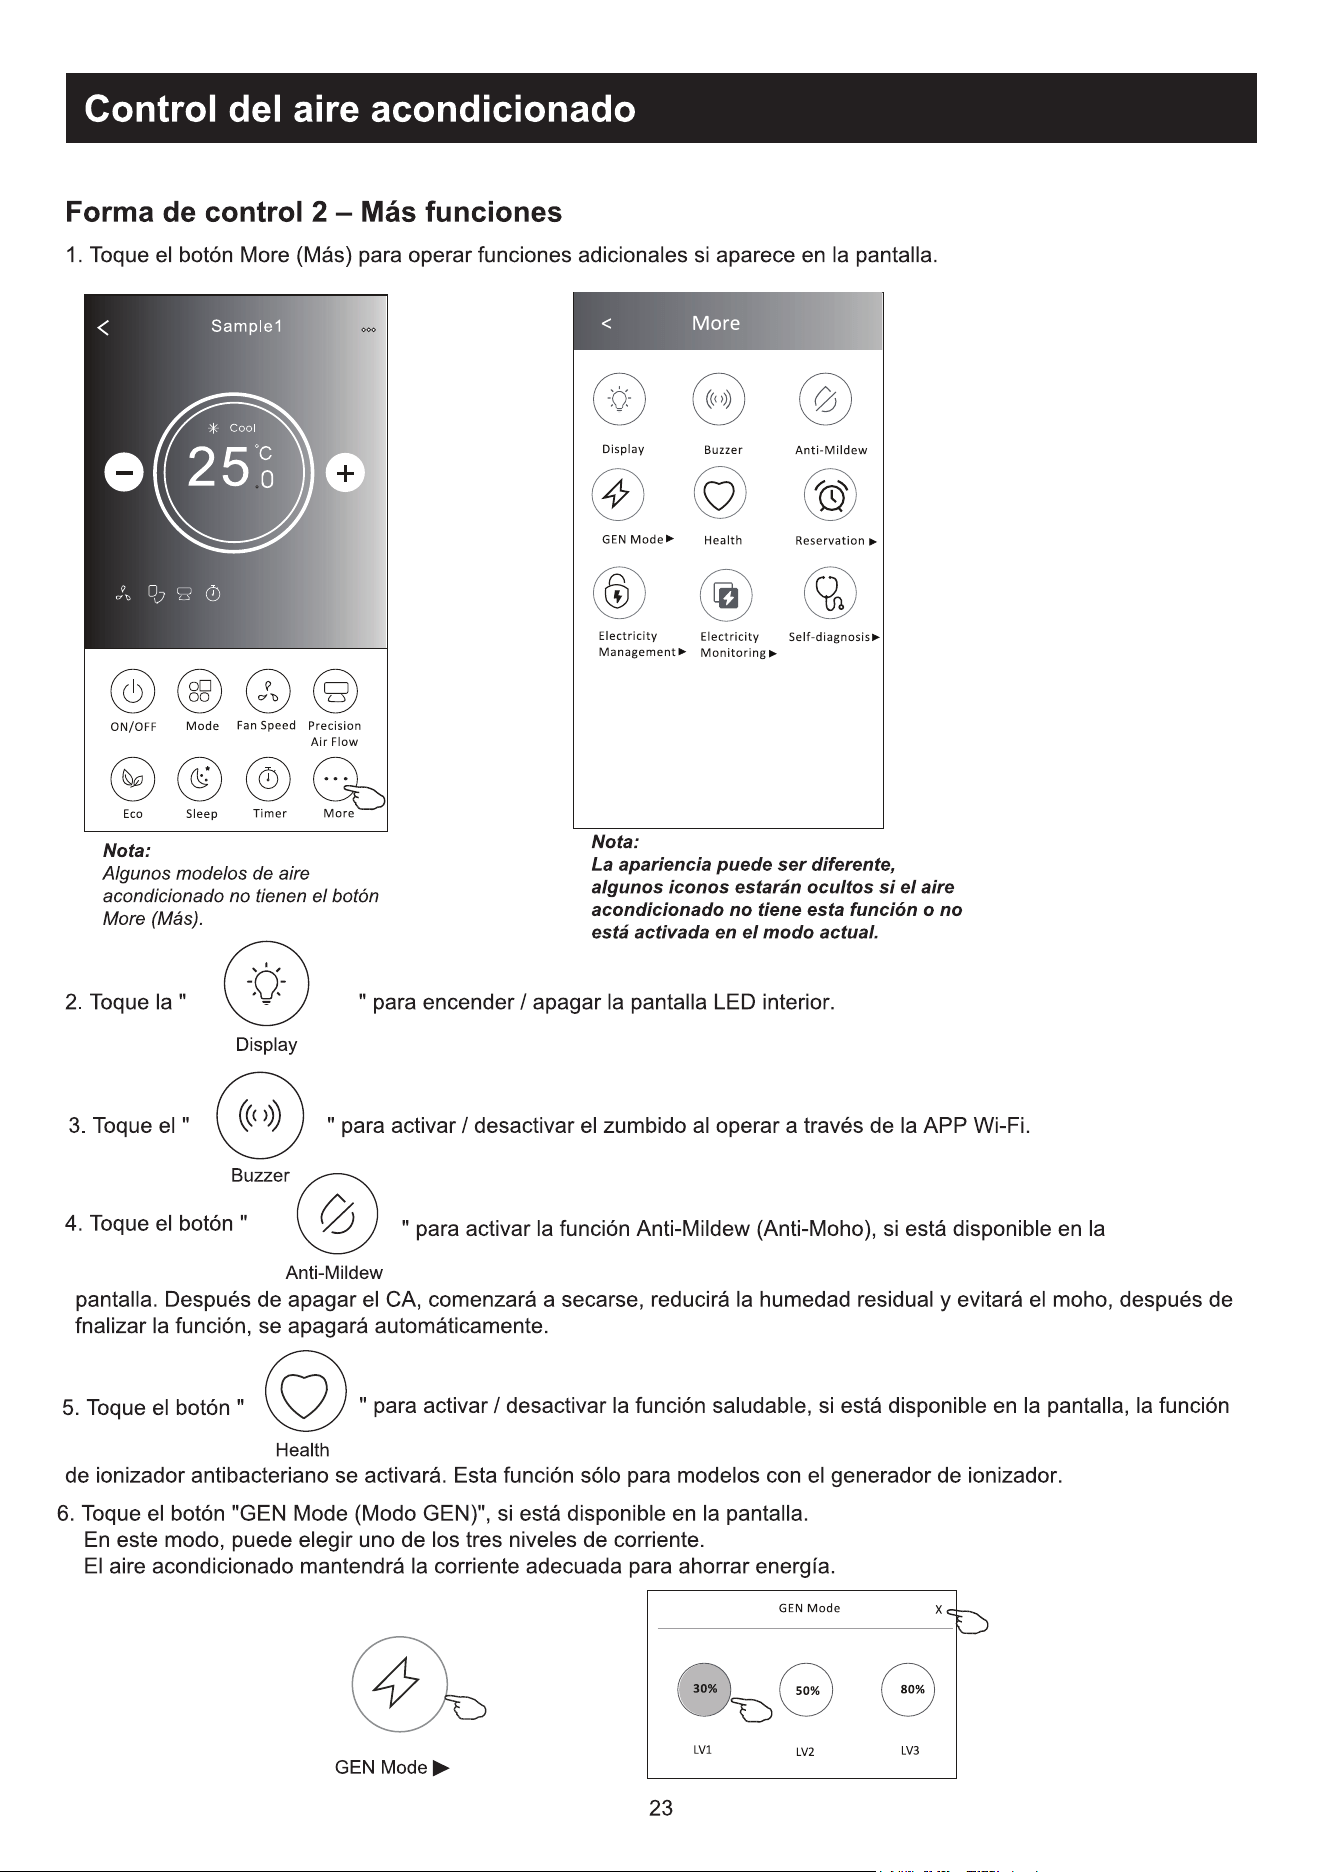
7RTXHQRERWmR0RUHSDUDFRQ¿JXUDUDVIXQo}HVDGLFLRQDLVVHDSDUHFHUHPQRHFUm
Nota: A aparência pode ser diferente; alguns ícones
estarão escondidos se o ar condicionado não tiver
essa função ou não ativar essa função no modo atual.
)RUPXOiULRGHFRQWUROR0DLVIXQo}HV
6. Toque no botão "GEN Mode" se ele aparecer no ecrã.
Nesse modo, você poderá escolher até três tipos de corrente.
O ar condicionado manterá a corrente ideal para economizar energia.
Nota:
Alguns modelos de ar condicionado
não possuem esse botão.
2. 7RTXHHP³ " para ativar ou desativar o visor interno de LED.
7RTXHQR³
" para ligar/desligar o zumbido ao operar através do APP Wi-Fi.
7RTXHQRERWmR³
" para activar a função Anti-Mildew, se estiver disponível no ecrã. Depois de AC desligar,
começará a secar, reduzirá a humidade residual e evitará o bolor, depois de terminar a função, desligar-se-á
automaticamente.
7RTXHQRERWmR³
" para ligar/desligar a função saudável, se esta estiver disponível no ecrã, activando a função
antibacteriana ionizante.
24
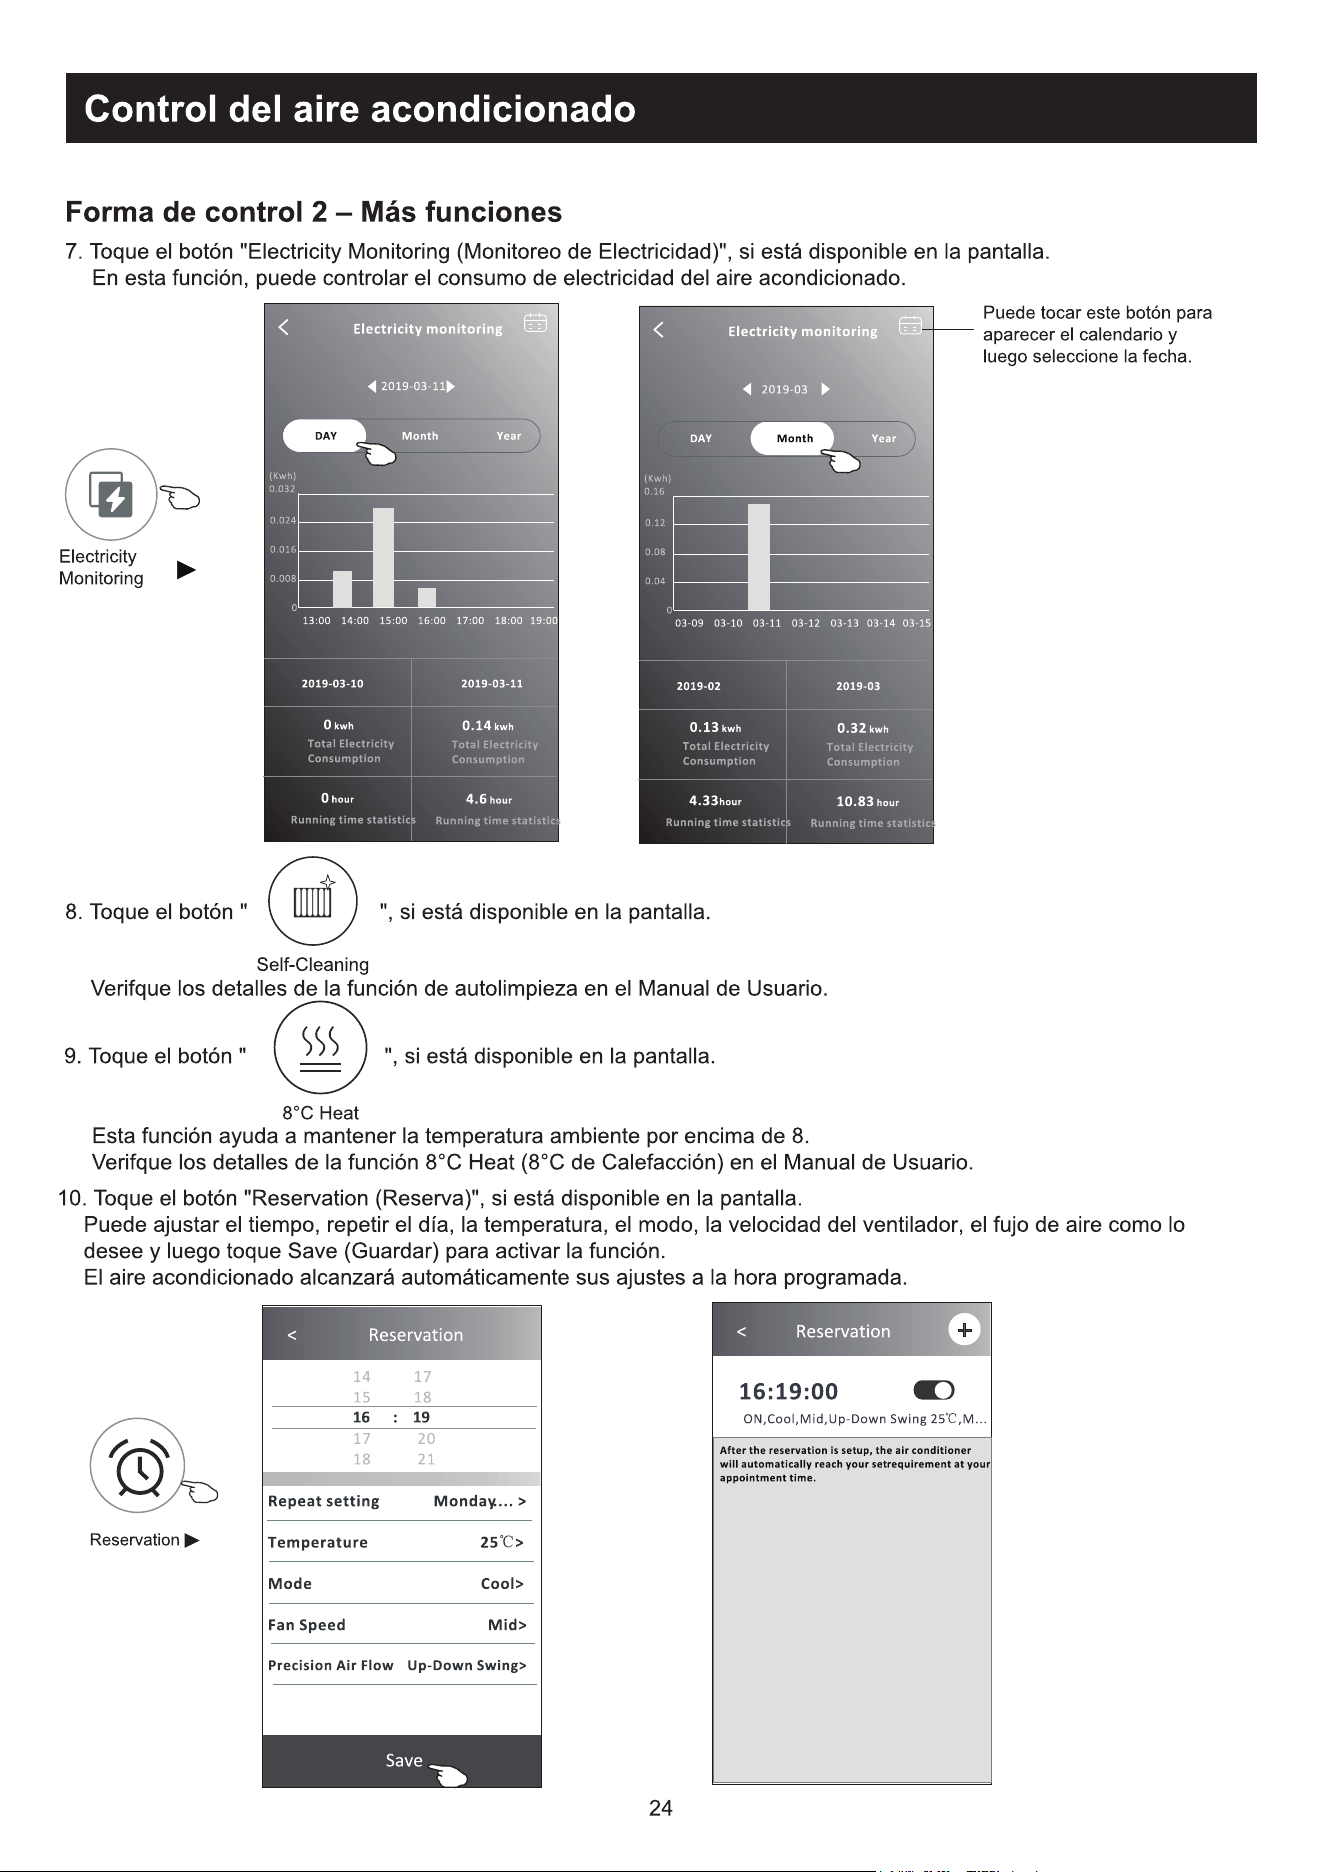
7RTXHQRERWmR³
" se ele aparecer no ecrã.
9HUL¿TXHRVGHWDOKHVGDIXQomRGHDXWROLPSH]DQRPDQXDOGHLQVWUXo}HVGRXWLOL]DGRU
9. Toque no botão "8 °C Heat" se ele aparecer no ecrã.
Essa função mantém a temperatura ambiente acima de 8 °C.
9HUL¿TXHRVGHWDOKHVGDIXQomRGHDTXHFLPHQWRD&QRPDQXDOGHLQVWUXo}HVGRXWLOL]DGRU
10. Toque no botão "Reservation" se ele aparecer no ecrã.
eSRVVtYHOGH¿QLURKRUiULRGLDVGHUHSHWLomRWHPSHUDWXUDPRGRYHORFLGDGHGRYHQWLODGRUHÀX[RGHDUFRQIRUPH
desejado, e clicar em Save para ativar a função.
2DUFRQGLFLRQDGRDXWRPDWLFDPHQWHOHUiDVVXDVFRQ¿JXUDo}HVQRKRUiULRGH¿QLGR
Controlo de ar condicionado
7. Toque no botão "Electricity monitoring" se ele aparecer no ecrã.
Com essa função, você poderá monitorar o consumo de energia do ar condicionado.
Você pode tocar nesse
botão para abrir o calendário
e, então, selecionar a data.
)RUPXOiULRGHFRQWUROR0DLVIXQo}HV
25
Controlo de ar condicionado
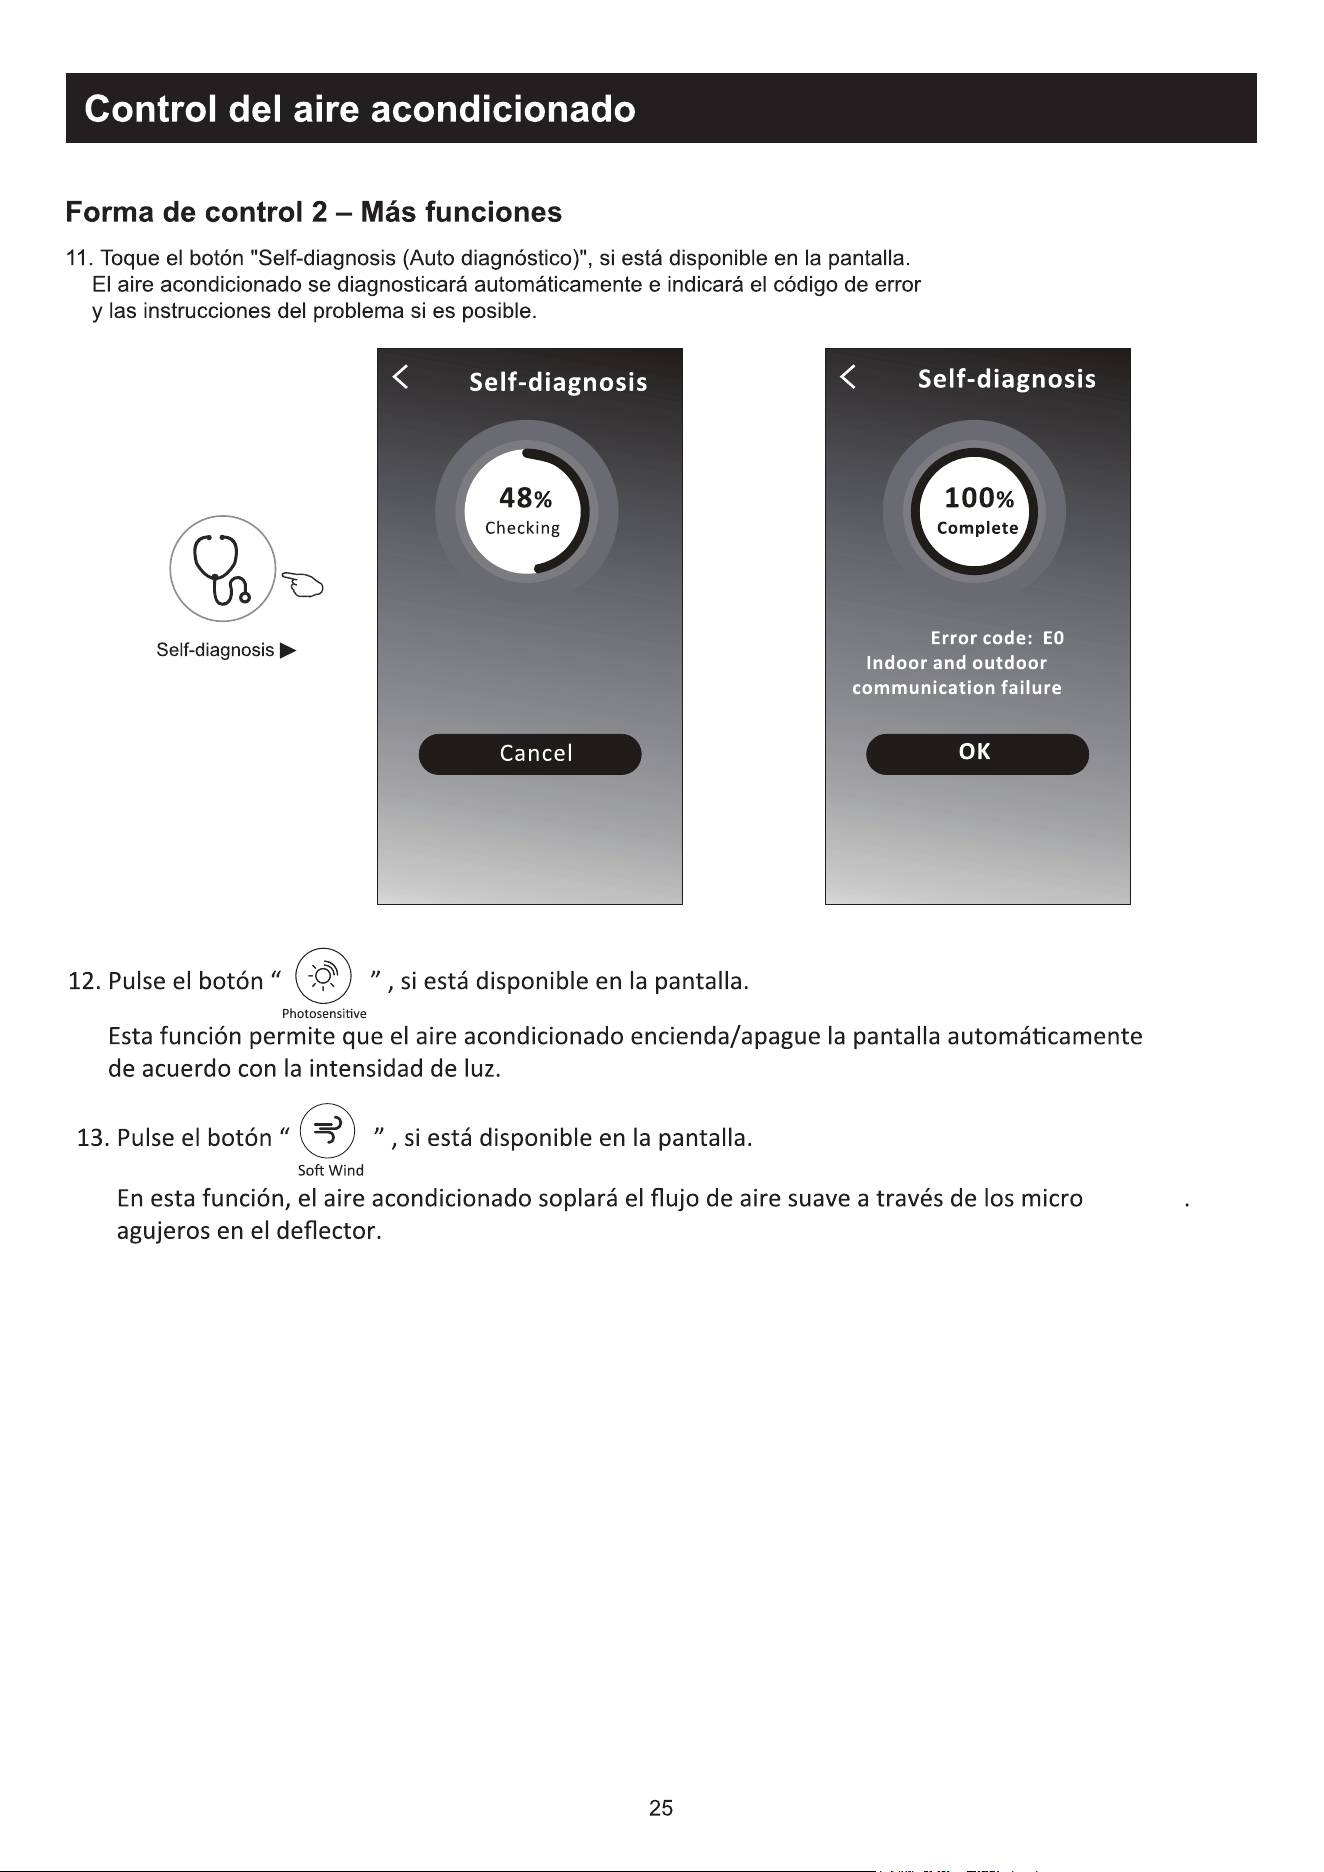
11. Toque no Self-diagnosis se ele aparecer no ecrã.
2DUFRQGLFLRQDGRVHDXWRGLDJQRVWLFDUiLQGLFDQGRRFyGLJRGHHUURHDVLQVWUXo}HVSDUDUHVROYHURSUREOHPDVHLVVR
for possível.
7RTXHQRERWmR³
" se ele aparecer no ecrã.
Essa função permitirá que o ar condicionado ligue / desligue o ecrã automaticamente de acordo com a intensidade de
luz.
7RTXHQRERWmR³
" se ele aparecer no ecrã.
1HVVDIXQomRRDUFRQGLFLRQDGRVRSUDUiDUVXDYHPHQWHQRVPLFURRULItFLRVGRGHÀHWRU
)RUPXOiULRGHFRQWUROR0DLVIXQo}HV
26
Controlo de ar condicionado
)RUPXOiULRGHFRQWUROR )RUPXOiULRGHFRQWUROR
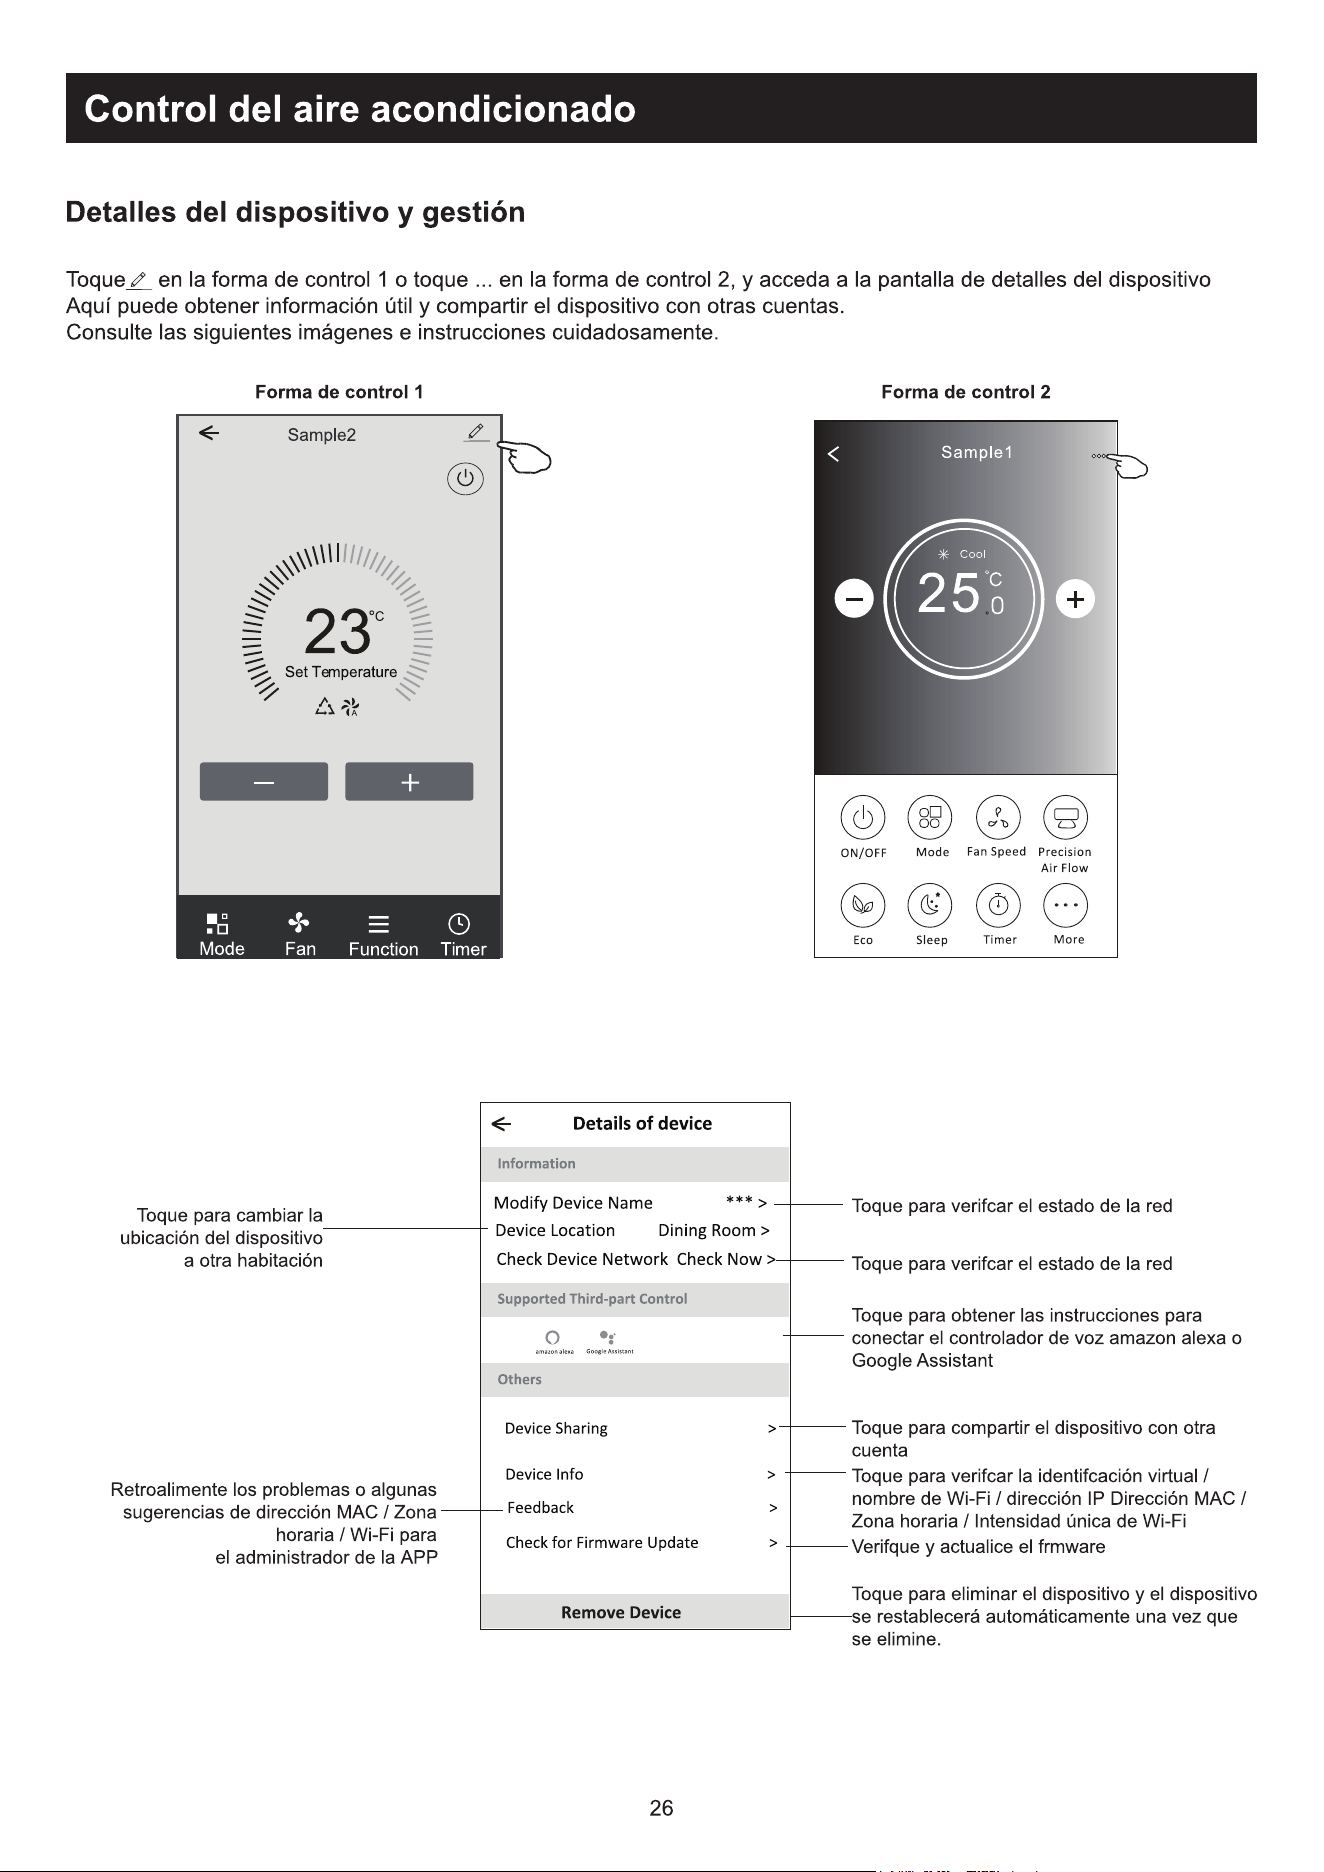
Toque para conferir o estado da rede.
Toque para conferir o estado da rede.
Toque para obter a instrução para conectar a
Amazon Alexa ou o Google Assistant voice
controller.
Informar o administrador da APP sobre os
problemas ou algumas sugestões de MAC
address/Time Zone/Wi-Fi single strength
7RTXHSDUDYHUL¿FDU9LUWXDO,':L)LQDPH,3
address MAC address/Time Zone/Wi-Fi single
strength
Toque para remover o dispositivo. Ele será
reiniciado automaticamente ao ser apagado.
Toque para compartilhar o dispositivo com outra
conta.
9HUL¿FDUHDWXDOL]DUR¿UPZDUH
Detalhes e gerenciamento de dispositivo
Toque em no formulário de controlo 1 ou toque em ... no formulário de controlo 2, entre no ecrã de detalhes do
dispositivo.
$TXLYRFrSRGHUiREWHUDOJXPDVLQIRUPDo}HV~WHLVHFRPSDUWLOKDURGLVSRVLWLYRFRPRXWUDVFRQWDV
9HUL¿TXHDVLPDJHQVHDVLQVWUXo}HVDVHJXLUFXLGDGRVDPHQWH
Toque para mudar a
localização do dispositivo para
outra sala.
27
Controlo de ar condicionado
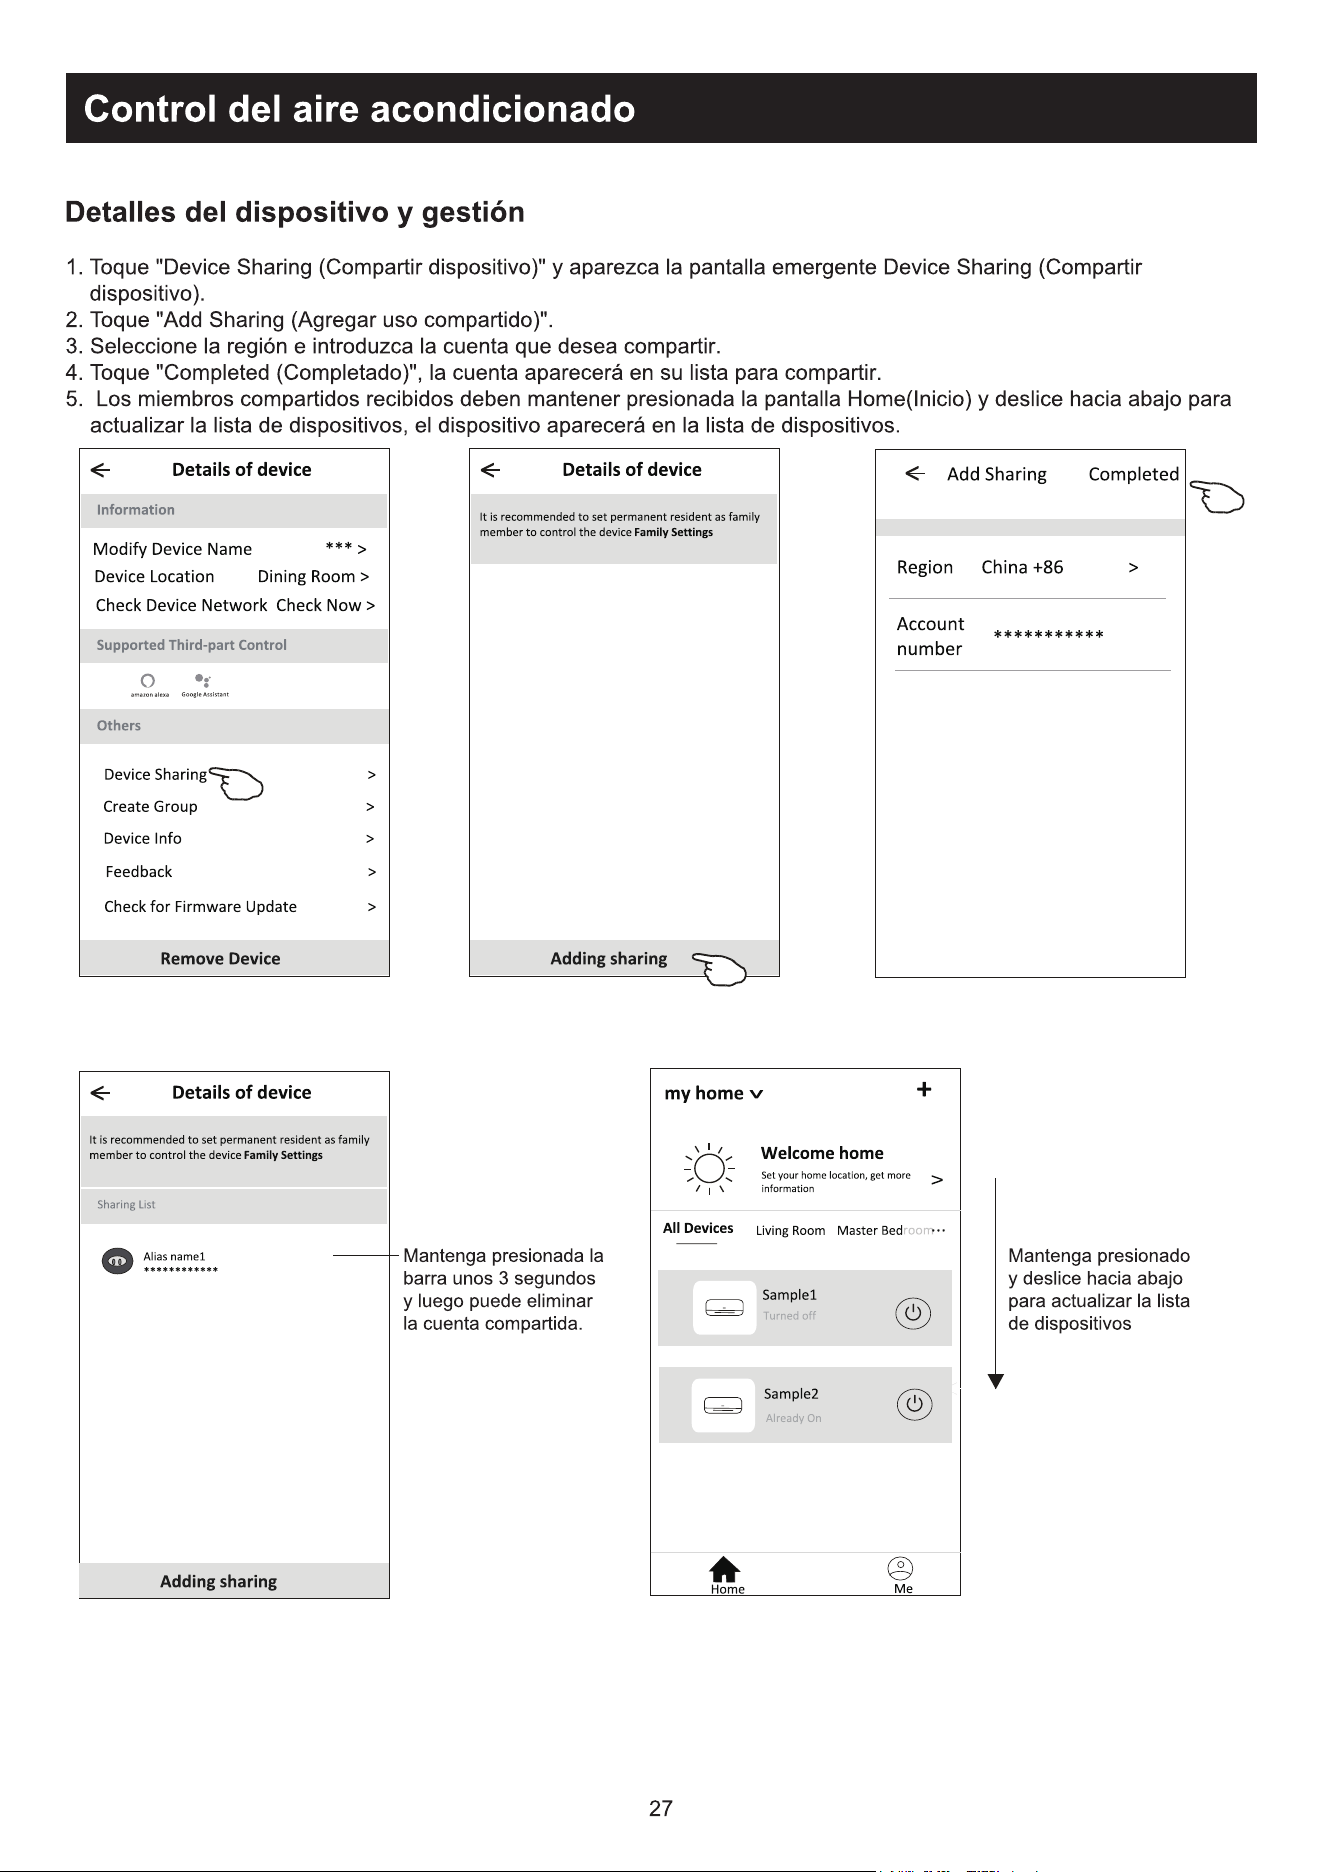
7RTXHHP³'HYLFH6KDULQJ´HDEUDRHFUm³'HYLFH6KDULQJ´
7RTXHHP³$GG6KDULQJ´
3. Selecione a região e digite a conta que deseja compartilhar.
7RTXHHP³&RPSOHWHG´$FRQWDDSDUHFHUiQDVXDOLVWDGHFRPSDUWLOKDPHQWR
5. Os membros que receberem o compartilhamento deverão tocar no ecrã principal, deslizá-la para baixo e segurar. Isso
atualizará a lista de dispositivos.
Segure a barra por
cerca de 3s. Em
seguida, você poderá
apagar a conta de
compartilhamento.
Pressione e deslize
para baixo para
atualizar a lista de
dispositivos.
Detalhes e gerenciamento de dispositivo
Como compartilhar o dispositivo com outra conta?
28
Gestão de conta
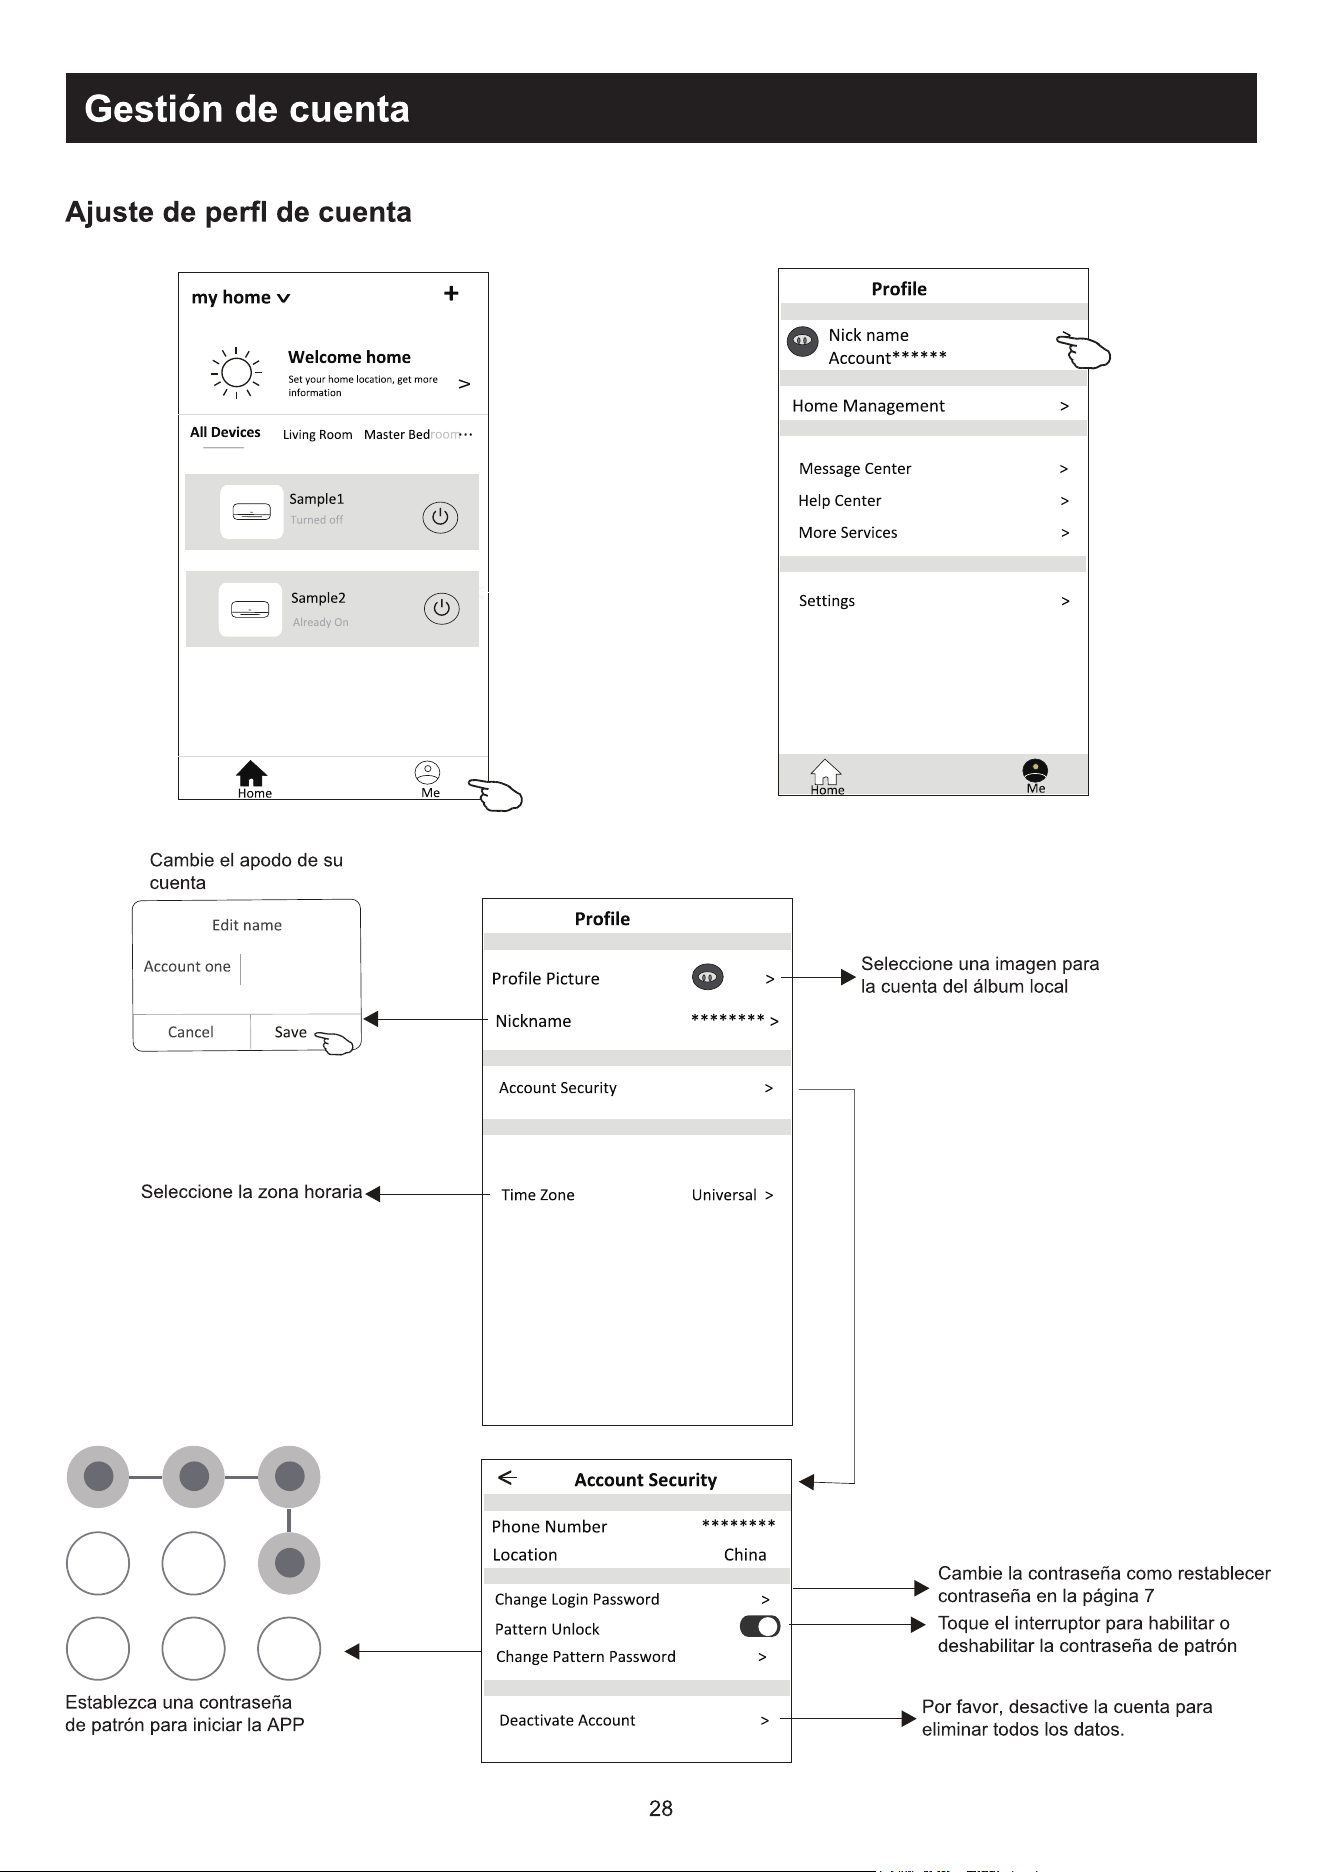
&RQ¿JXUDomRGHSHU¿OGHFRQWD
Altere o nome de
utilizador
'H¿QLUXPDVHQKDGHSDGUmR
para executar o APP.
Toque na chave para ativar ou
desativar a senha de padrão.
Desative a conta com cuidado para
que todos os dados sejam apagados.
Selecione o fuso horário
Selecione uma imagem para
a sua conta a partir do algum
local
$OWHUDUDVHQKDFRPRUHGH¿QLomR
de senha, na página 7
29
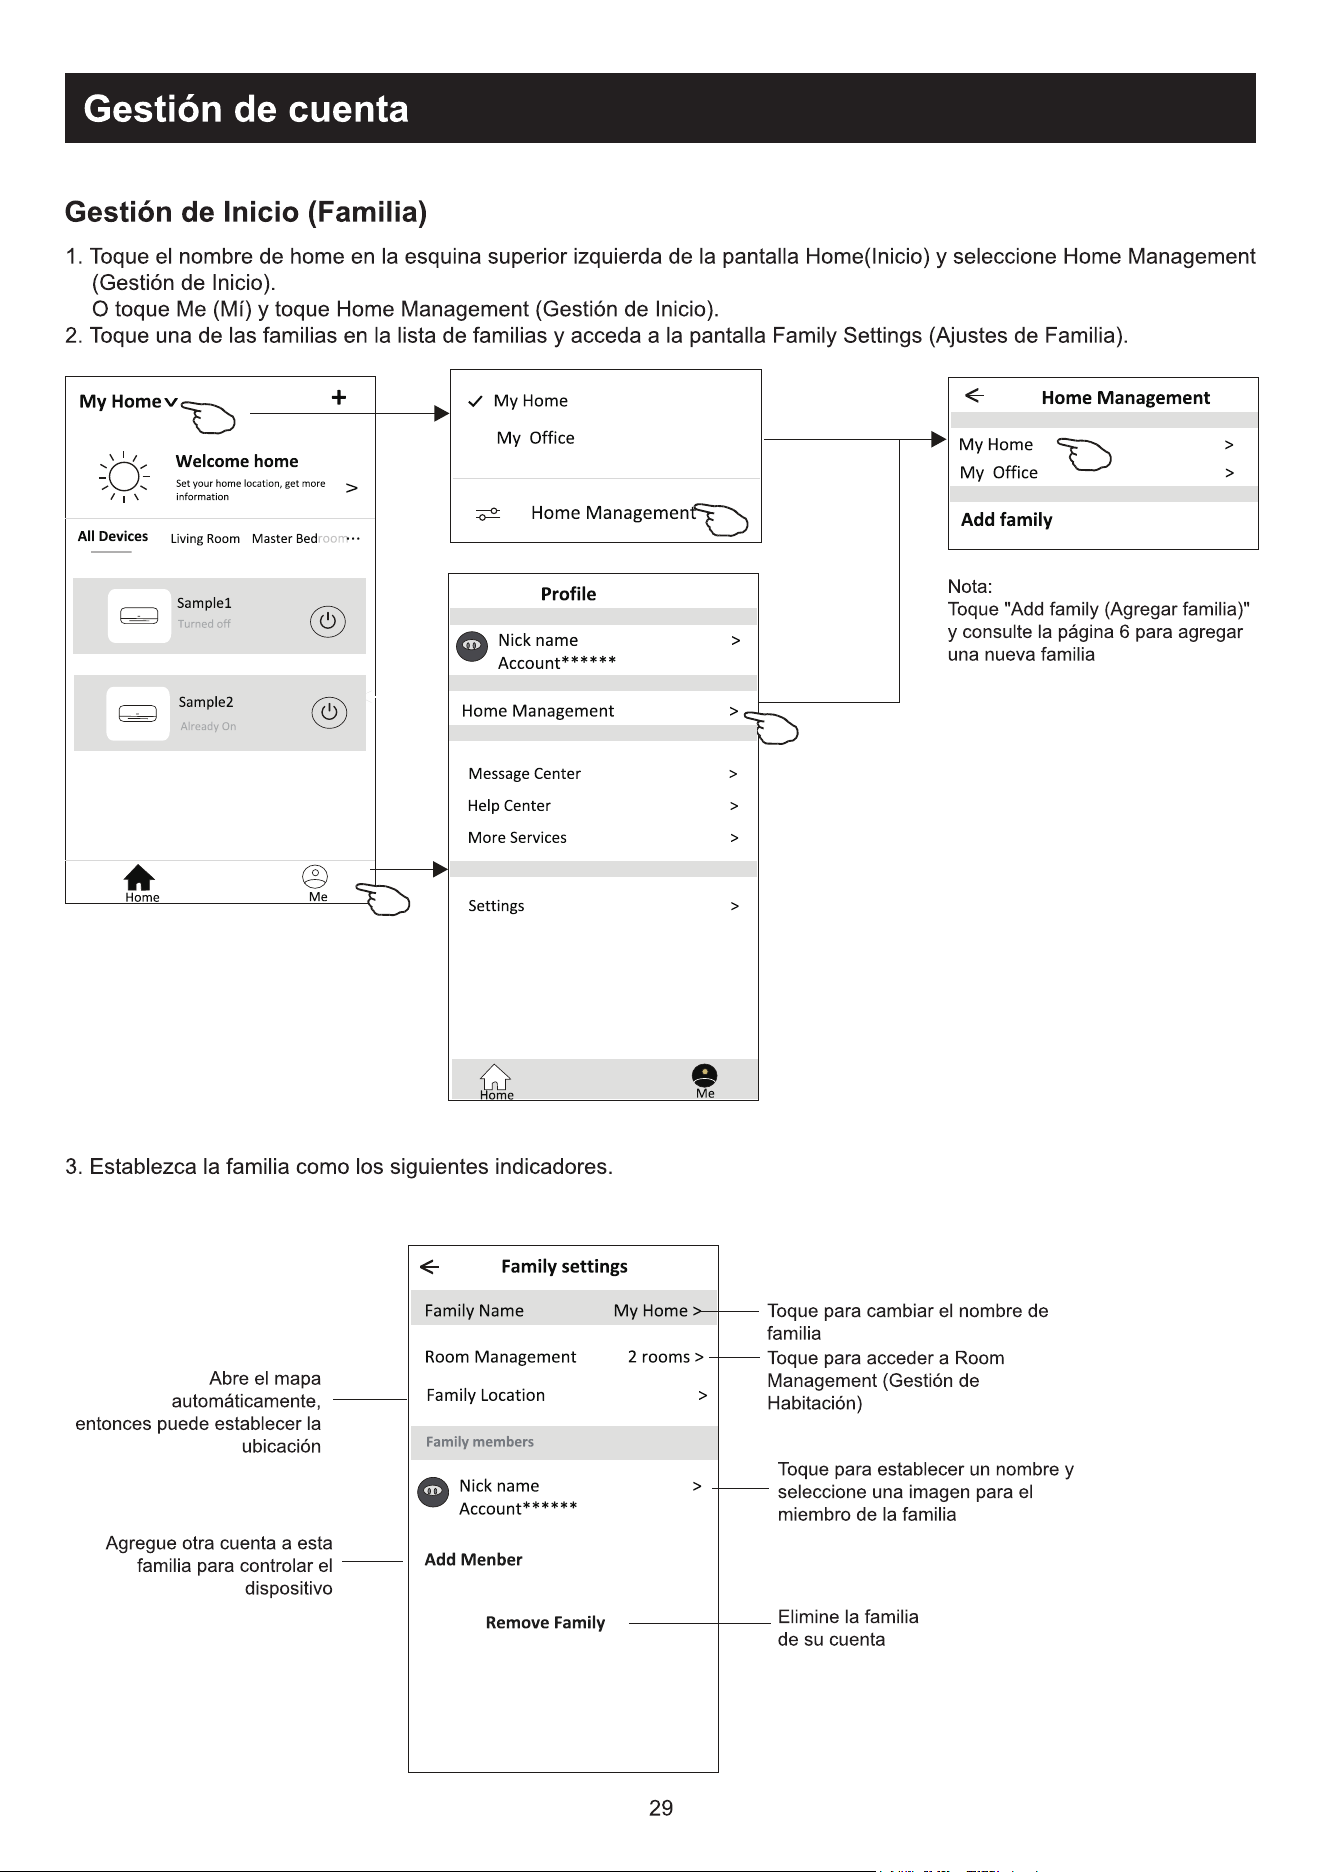
Gestão de conta
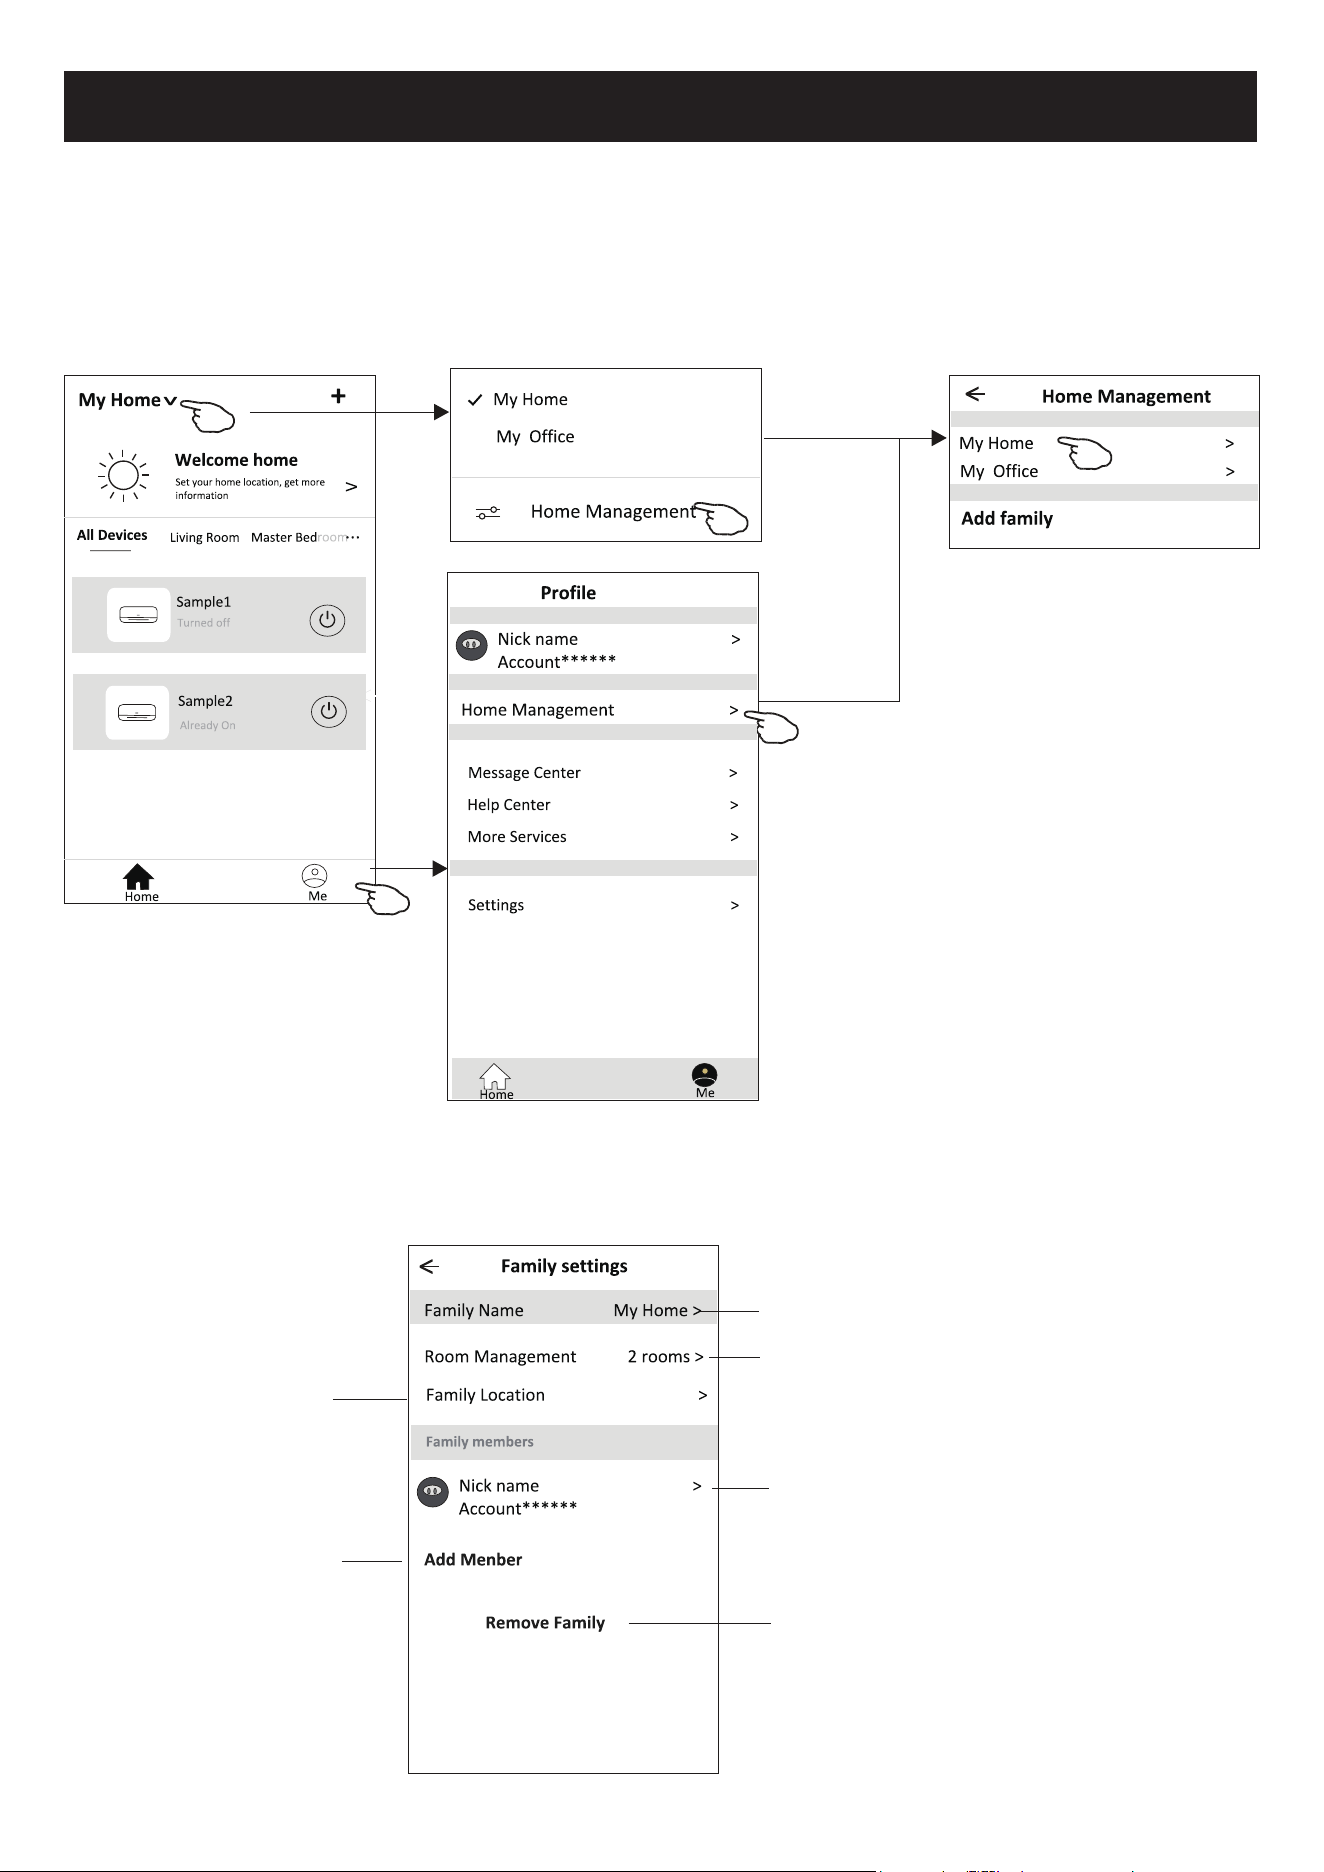
1. Toque no nome da Home no canto superior esquerdo do ecrã Principal e selecione o Home Management. Ou toque em
Me e em Home Management.
2. Toque em uma das famílias da lista de famílias e vá para o ecrã Family Settings.
Nota:
7RTXHHP$GGIDPLO\´HFRQVXOWHD
página 6 sobre adicionar uma nova
família.
Toque para renomear o nome da família.
Toque para entrar em Room Management
7RTXHSDUDGH¿QLUXPQRPHHVHOHFLRQH
uma imagem do membro da família.
Remova a família da conta.
'H¿QDDIDPtOLDGHDFRUGRFRPRVLQGLFDGRUHVDVHJXLU
*HVWmR+RPH)DPtOLD
Abra o mapa
automaticamente. Em
VHJXLGDYRFrSRGHUiGH¿QLUD
localização.
Adicione outra conta a essa
família para controlar o
dispositivo.
30
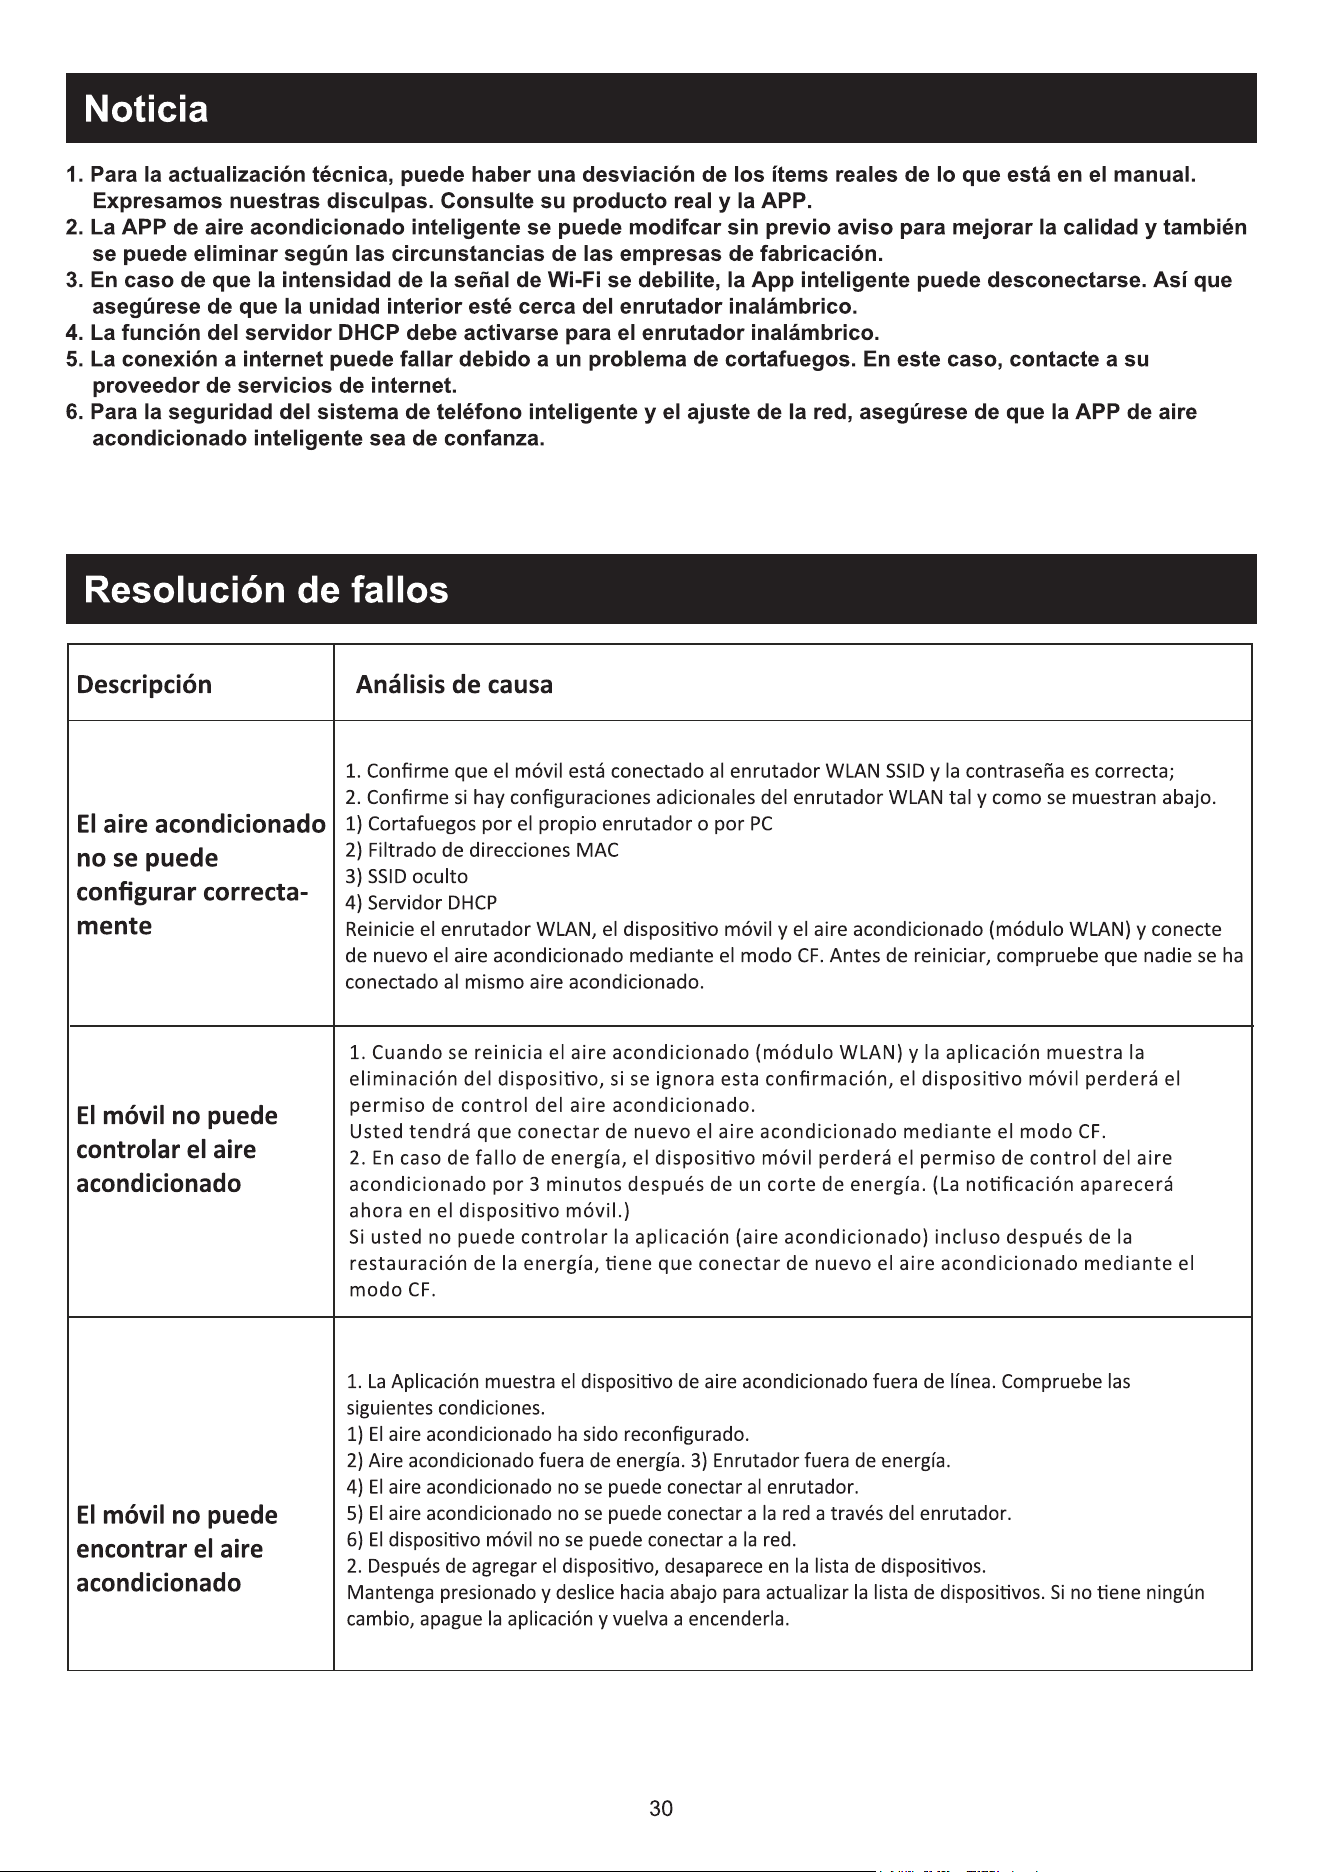
$YLVRSUpYLR
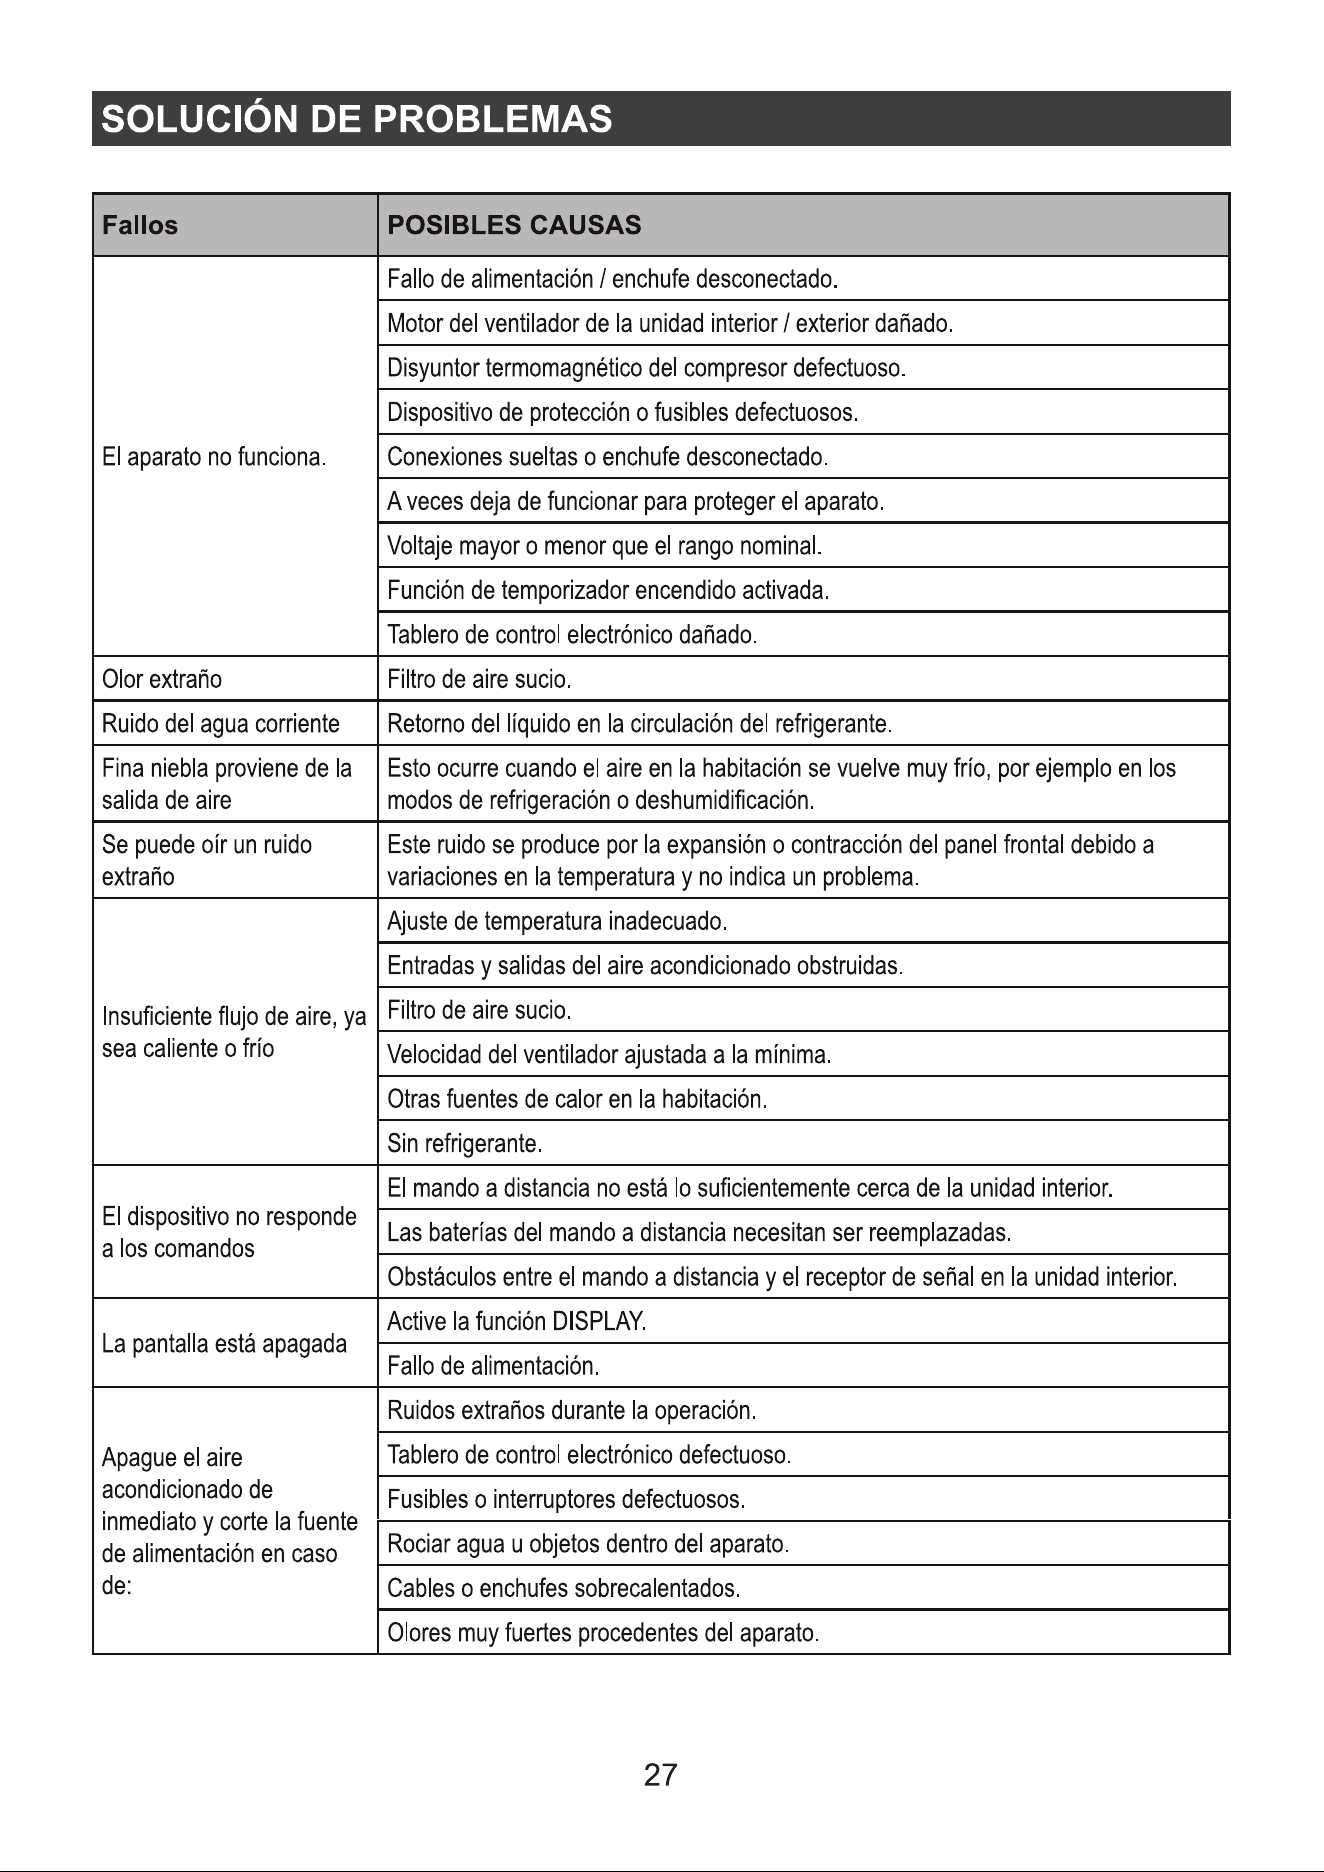
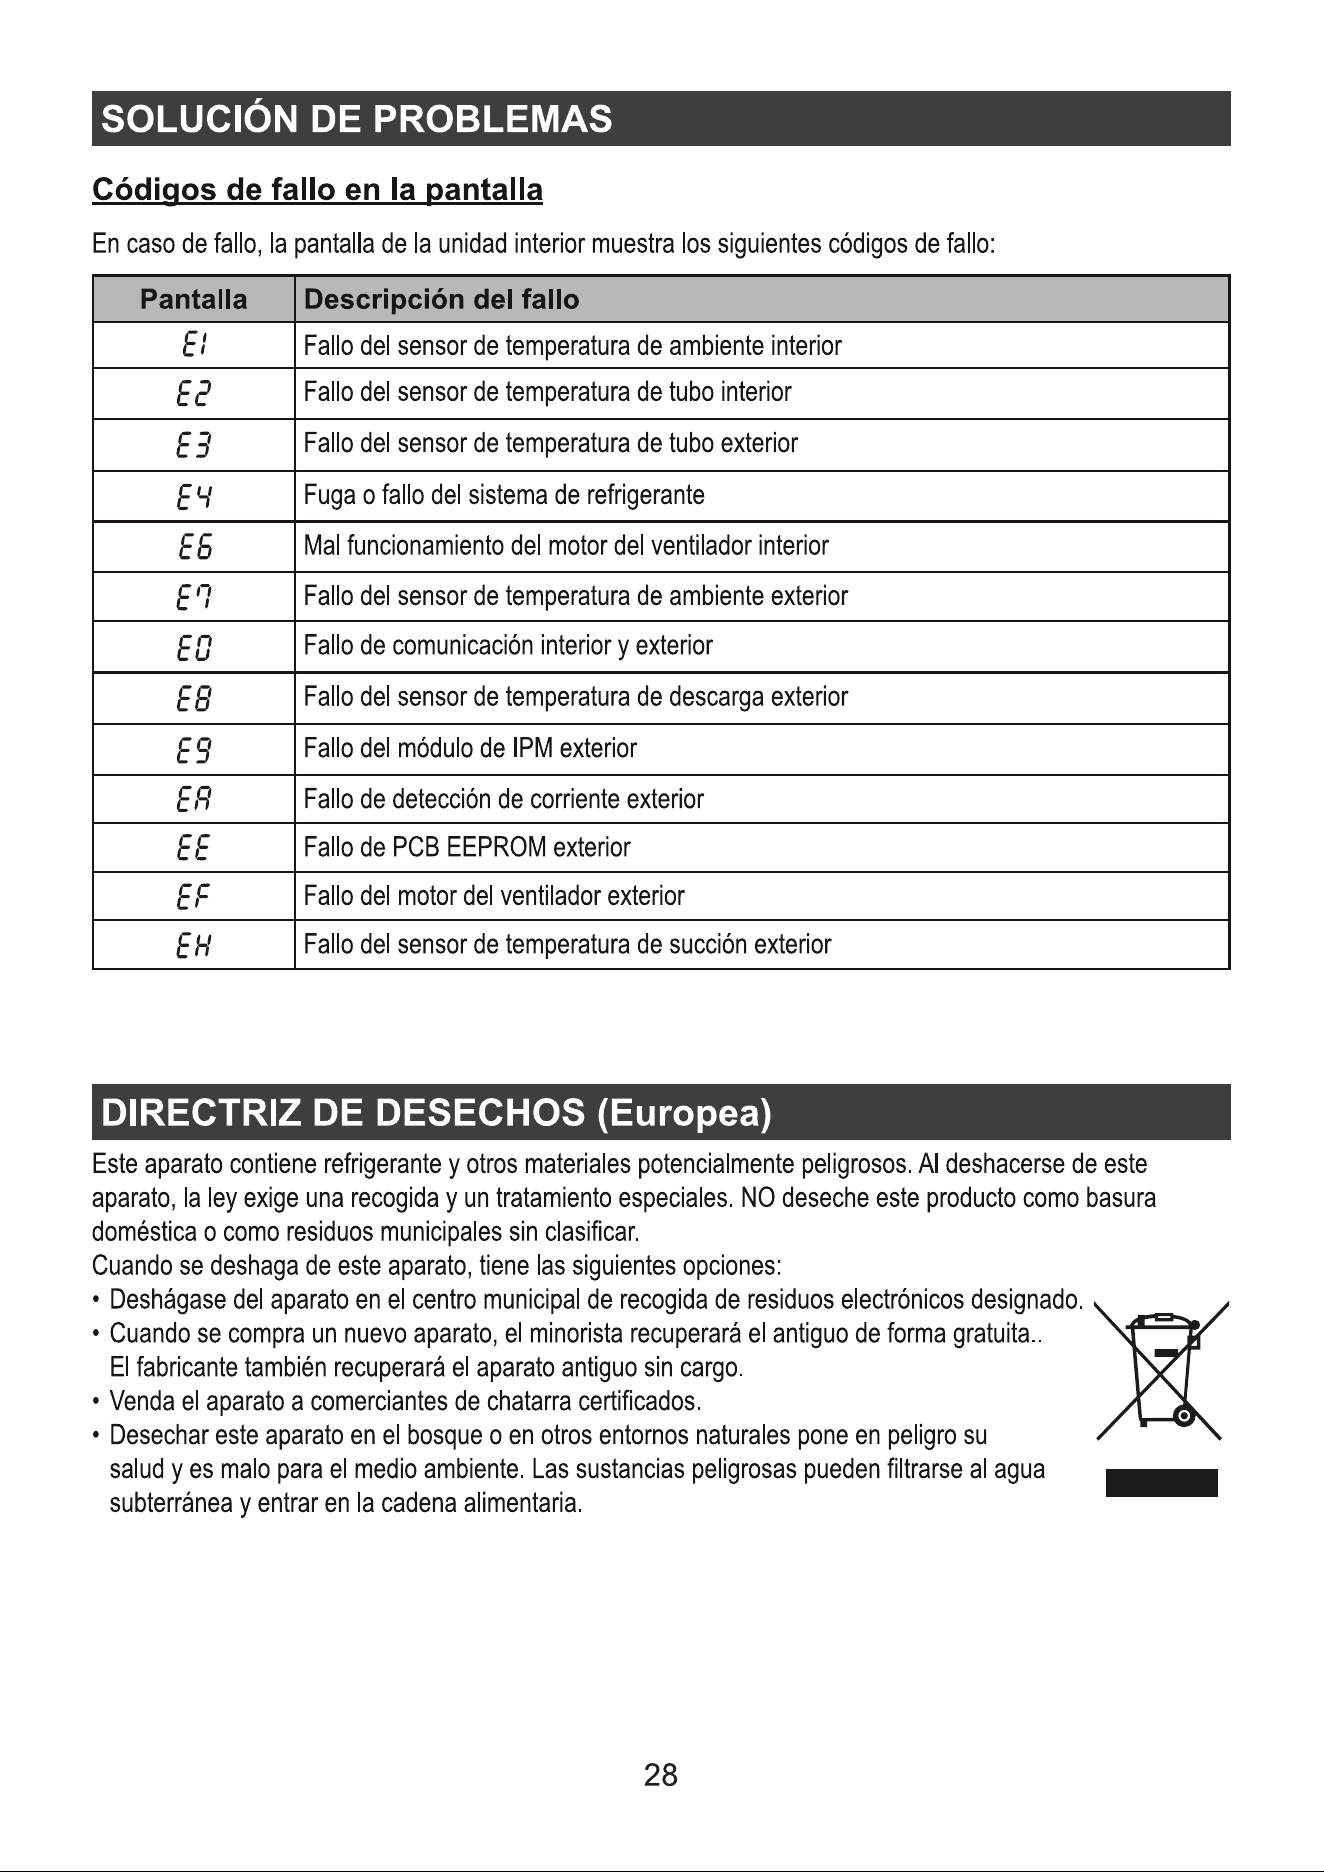
5HVROXomRGHSUREOHPDV
Descrição $QiOLVHGDFDXVD
O ar condicionado não
SRGHVHUFRQ¿JXUDGR
com sucesso
9HUL¿TXHVHRURWHDGRU:/$166,'HDVHQKDHVWmRFRUUHWRV
9HUL¿TXHVHVmRQHFHVViULDVFRQ¿JXUDo}HVDGLFLRQDLVSDUDRURWHDGRU:/$1FRQIRUPHR
mostrado abaixo.
5RWHDGRUSRU¿UHZDOOSUySULRRXSRU3&
2) Filtro de endereço MAC
3) SSID oculto
4) Servidor DHCP
5HLQLFLHRURWHDGRU:/$1RGLVSRVLWLYRPyYHOHRDUFRQGLFLRQDGRPyGXOR:/$1FRQHFWH
RDUFRQGLFLRQDGRHRPRGR&)QRYDPHQWH$QWHVGHUHLQLFLDUYHUL¿TXHVHQLQJXpPHVWi
conectado ao mesmo ar condicionado.
2WHOHPyYHOQmR
pode controlar o ar
condicionado
4XDQGRRDUFRQGLFLRQDGRPyGXOR:/$1IRUUHLQLFLDGRHR
$33PRVWUDUDUHPRomRGHGLVSRVLWLYRLJQRUDUHVVDFRQ¿UPDomRIDUiFRPTXHRGLVSRVLWLYR
PyYHOSHUFDDVSHUPLVV}HVGHFRQWURORGRDUFRQGLFLRQDGR
Será necessário conectar o ar condicionado ao modo CF novamente.
&DVRKDMDXPDIDOKDGHHQHUJLDRGLVSRVLWLYRPyYHOSHUGHUiRFRQWURORGHSHUPLVV}HVGR
DUFRQGLFLRQDGRSRUWUrVPLQXWRVDSyVXPDIDOKDGHHQHUJLD$VQRWL¿FDo}HVDJRUDVHUmR
PRVWUDGDVSDUDRGLVSRVLWLYRPyYHO
6HYRFrQmRSXGHUFRQWURODUR$33GRDUFRQGLFLRQDGRPHVPRDSyVDHQHUJLDYROWDUVHUi
necessário conectar o ar condicionado ao modo CF novamente.
2WHOHPyYHOQmR
consegue encontrar o ar
condicionado
9LVRUGRDUFRQGLFLRQDGRHVWiGHVOLJDGR9HUL¿TXHDVVHJXLQWHVFRQGLo}HV
2DUFRQGLFLRQDGRIRLUHFRQ¿JXUDGR
2) O ar condicionado está desligado. 3) Roteador sem energia.
4) O ar condicionado não se pode conectar ao roteador.
5) O ar condicionado não pode se conectar à rede pelo roteador.
2GLVSRVLWLYRPyYHOQmRSRGHVHFRQHFWDUjUHGH
$SyVDGLFLRQDURGLVSRVLWLYRVHUiUHPRYLGRGDOLVWD
Pressione e deslize para baixo para atualizar a lista de dispositivos. Se não houver mudança,
desligue o APP e tente novamente.
3DUDDWXDOL]DomRWpFQLFDSRGHKDYHUXPGHVYLRGRVLWHQVUHDLVGRTXHHVWiQRPDQXDO([SUHVVDPRVDVQRVVDV
desculpas. Consulte o seu produto e APP reais.
2$33GRFRQGLFLRQDGRUGHDULQWHOLJHQWHSRGHVHUDOWHUDGRVHPDYLVRSUpYLRSDUDDPHOKRULDGDTXDOLGDGHH
WDPEpPVHUH[FOXtGRGHSHQGHQGRGDVFLUFXQVWkQFLDVGDVHPSUHVDVGHPDQXIDWXUD
&DVRDLQWHQVLGDGHGRVLQDO:L)LVHMDHQIUDTXHFLGDR$SOLFDWLYRLQWHOLJHQWHSRGHVHUGHVFRQHFWDGR3RUWDQWR
FHUWL¿TXHVHGHTXHDXQLGDGHLQWHUQDHVWHMDSUy[LPDDRURWHDGRUVHP¿R
$IXQomRGRVHUYLGRU'+&3GHYHVHUDWLYDGDSDUDRURWHDGRUVHP¿R
$FRQH[mRFRPD,QWHUQHWSRGHIDOKDUGHYLGRDSUREOHPDVGH¿UHZDOO1HVVHFDVRHQWUHHPFRQWDWRFRPRVHX
provedor de serviços de Internet.
3DUDDVHJXUDQoDGRVLVWHPDGHWHOHPyYHOLQWHOLJHQWHHDFRQ¿JXUDomRGHUHGHFHUWL¿TXHVHGHTXHR$33GR
DUFRQGLFLRQDGRLQWHOLJHQWHVHMDFRQ¿iYHO

Kurbin Lane S.L.
Paseo del Ferrocarril 335 08860 Castelldefels BARCELONA (ESPAÑA)
Corbero es una marca registrada bajo licencia de Electrolux España S.A.
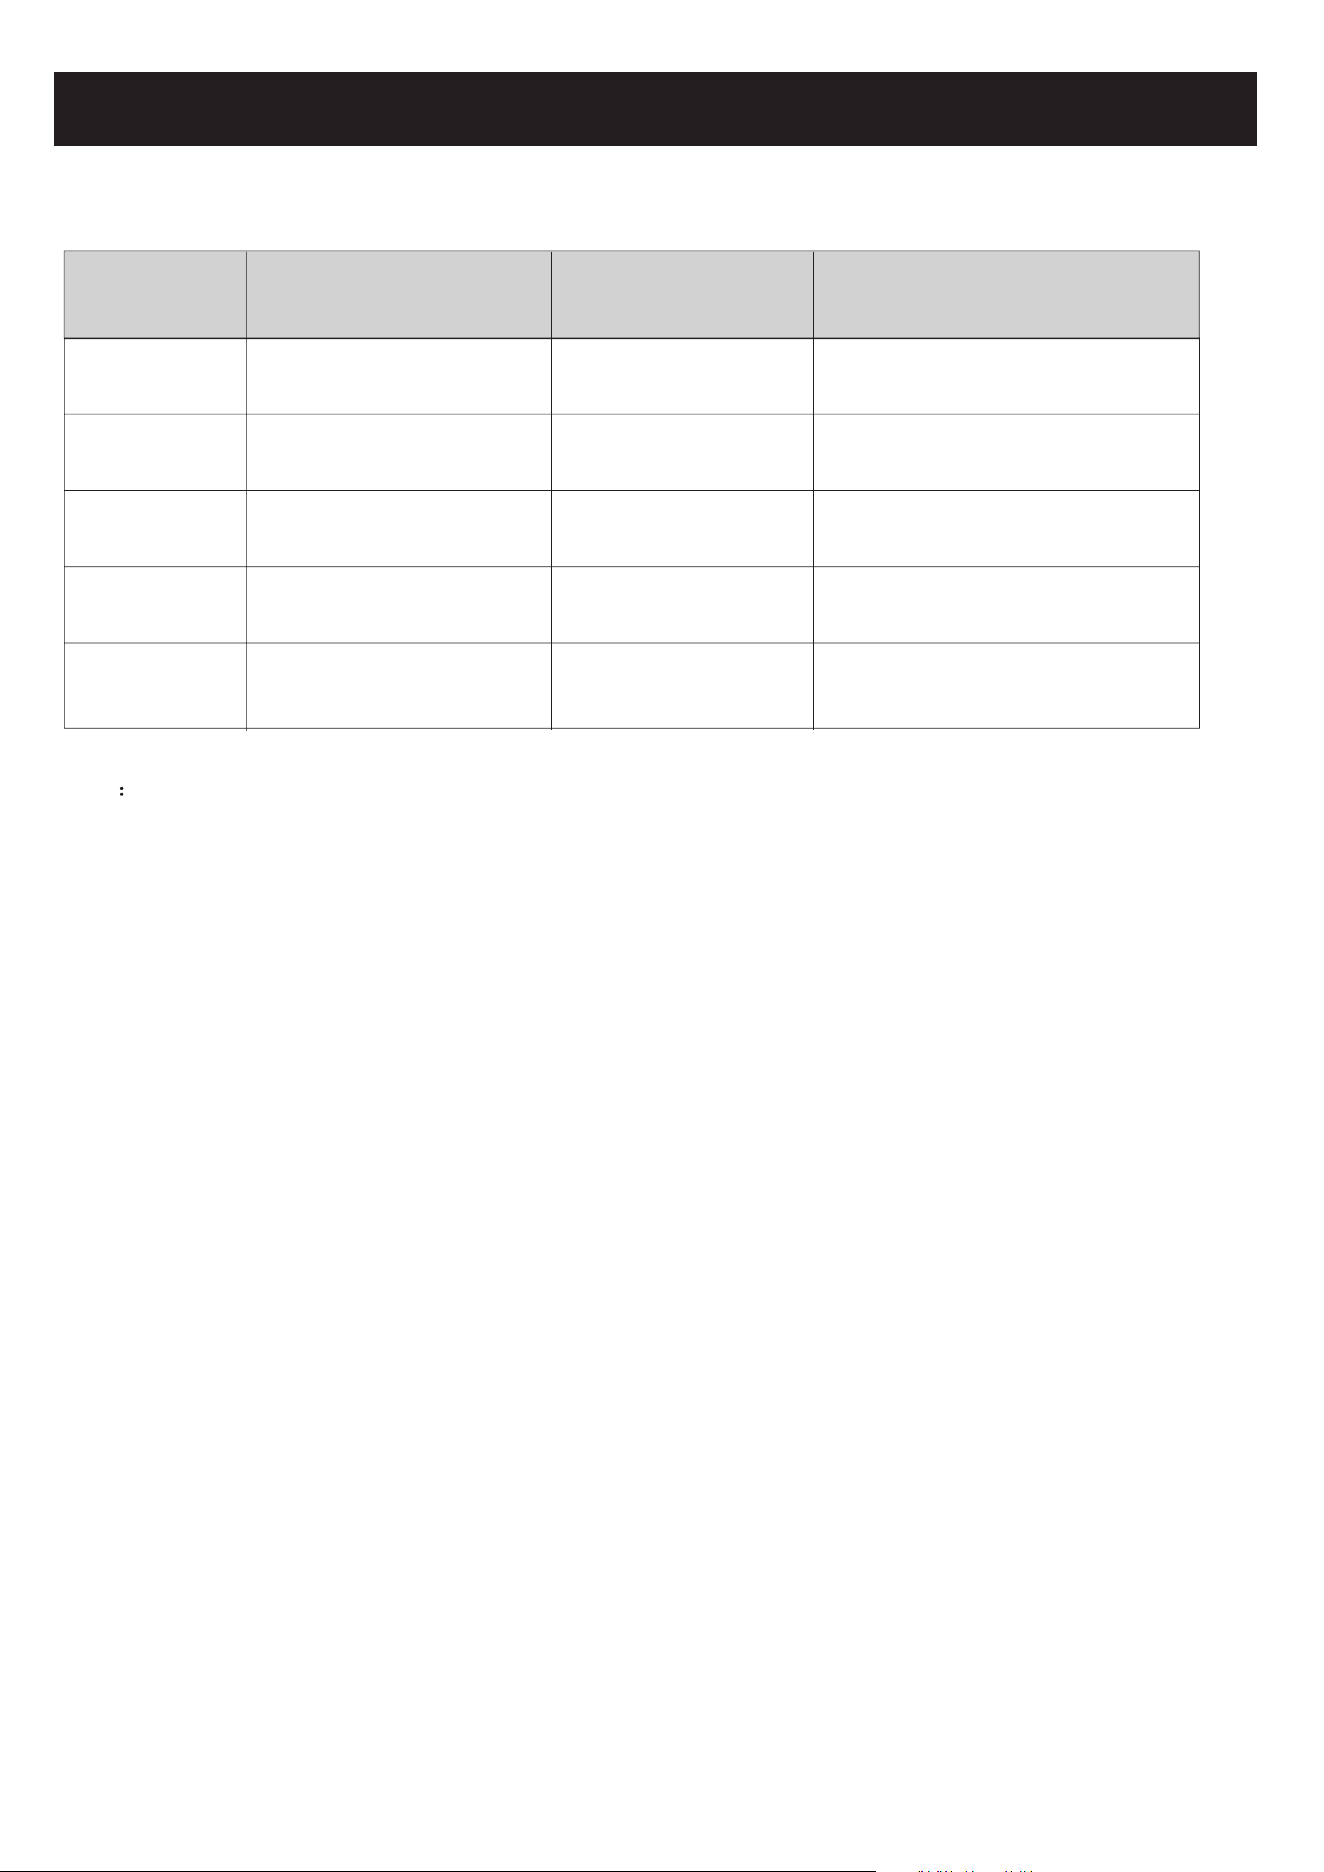
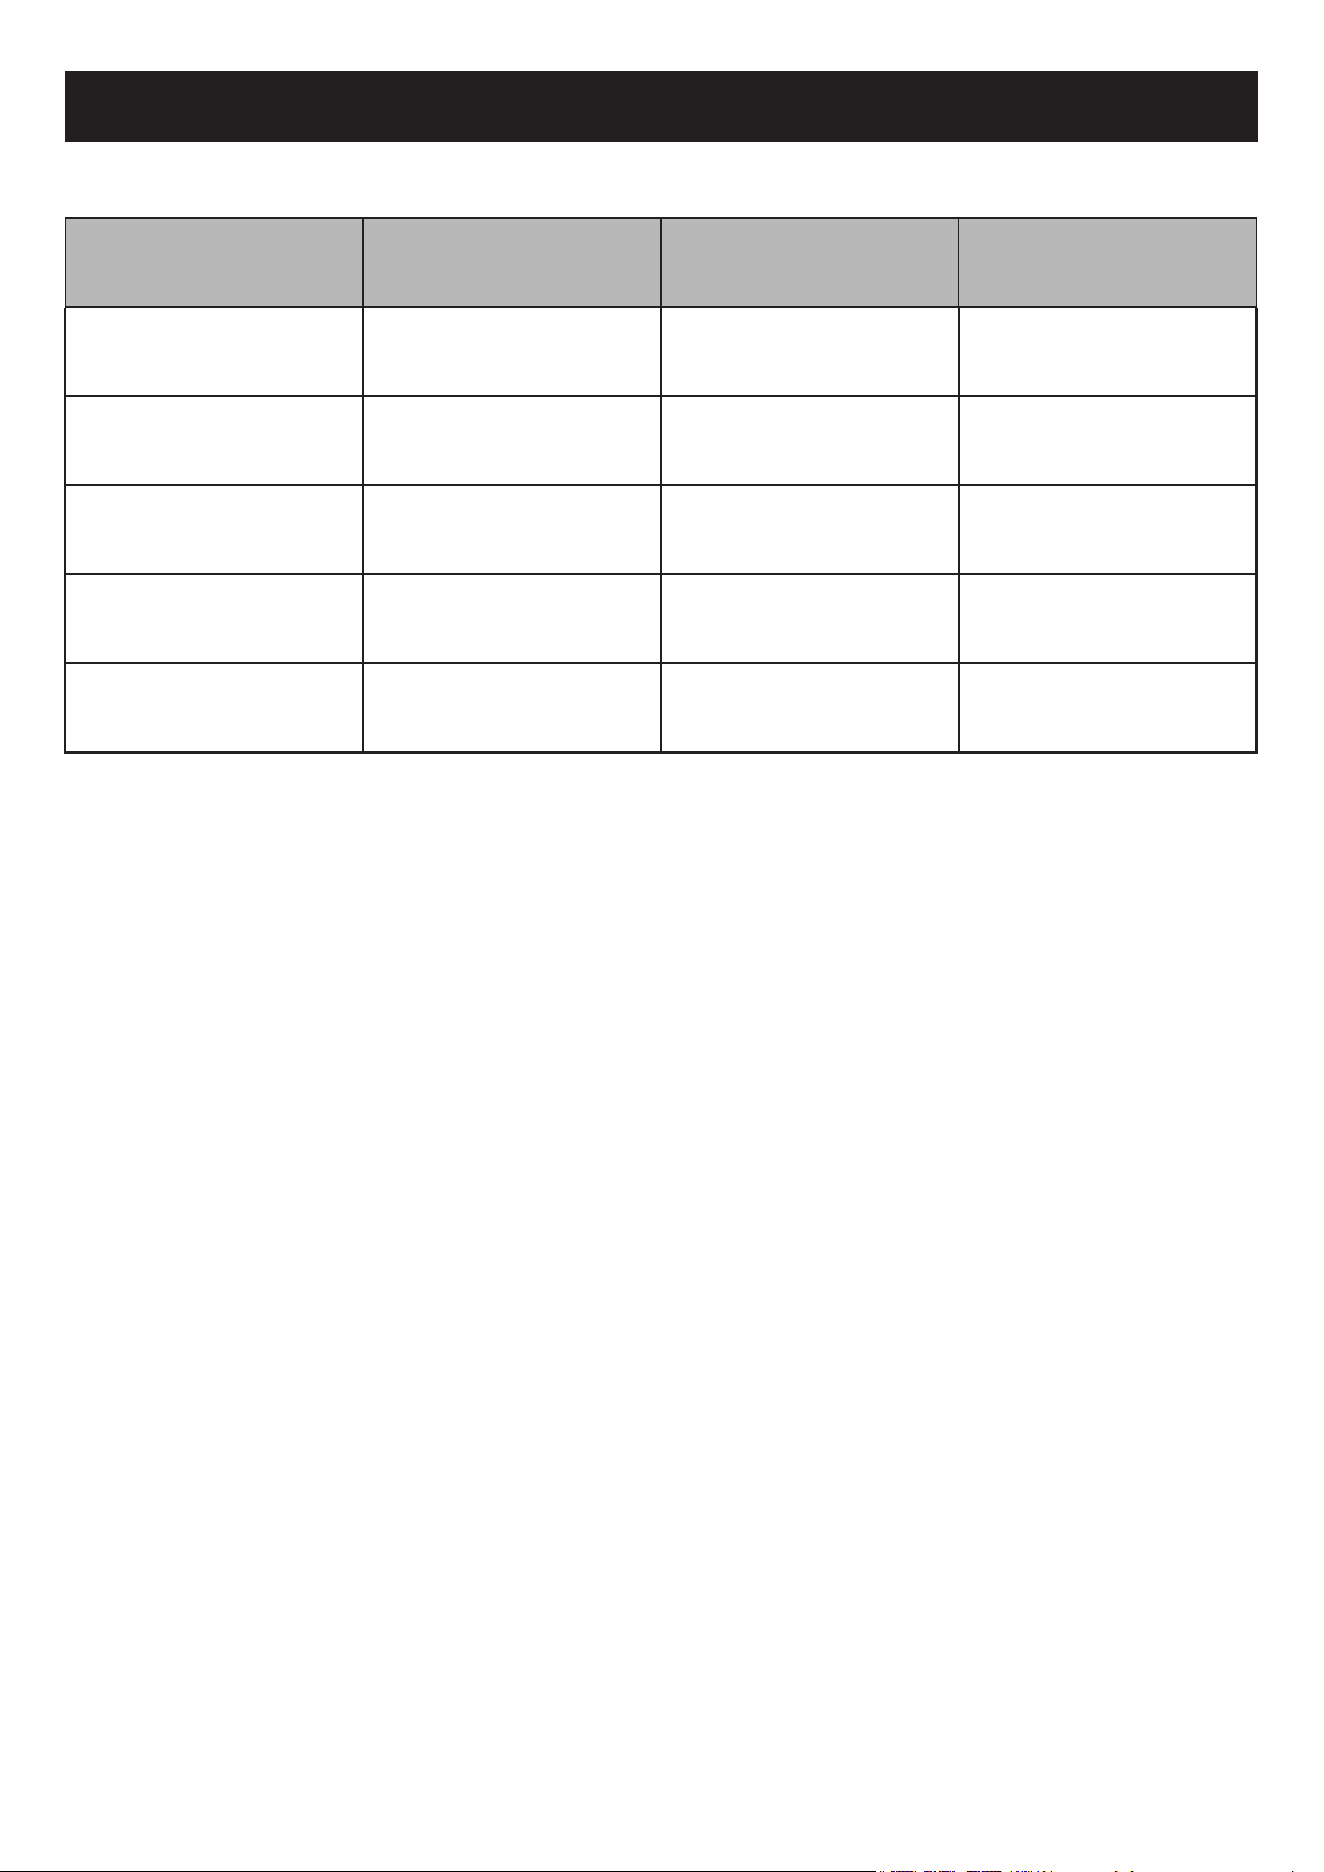
Step 3
Step 1
Operation
Steps
Step 4
Step 2
Step 5
Registration
Account
Download and
Install APP
Operation
Items
Login
Activate APP
Add Device to control
YES
YES
New Account
YES
YES
YES
NO
YES
Re-install APP
(registered before)
YES
YES
Registered Device will remain.
Operation guideline.
Please take below simple guideline instruction as reference.
Note If you registered the account and added device before, when you re-install the APP again and login,
the added device will remain .
FCC Caution (
FCC ID: 2AJCLTWAC-TYWFS)
This device complies with part 15 of the FCC Rules. Operation is subject to the following two
conditions: (1) This device may not cause harmful interference, and (2) this device must accept
any interference received, including interference that may cause undesired operation.
Any Changes or modifications not expressly approved by the party responsible for compliance
could void the user's authority to operate the equipment.
Note: This equipment has been tested and found to comply with the limits for a Class B digital
device, pursuant to part 15 of the FCC Rules. These limits are designed to provide reasonable
protection against harmful interference in a residential installation. This equipment generates
uses and can radiate radio frequency energy and, if not installed and used in accordance with
the instructions, may cause harmful interference to radio communications. However, there is
no guarantee that interference will not occur in a particular installation. If this equipment does
cause harmful interference to radio or television reception, which can be determined by turning
the equipment off and on, the user is encouraged to try to correct the interference by one or
more of the following measures:
-Reorient or relocate the receiving antenna.
-Increase the separation between the equipment and receiver.
-Connect the equipment into an outlet on a circuit different from that to which the receiver is
connected.
-Consult the dealer or an experienced radio/TV technician for help.
The distance between user and device should be no less than 20cm.
Let's get start!

CONTENTS
Wi-Fi Module specification and basic information ..............................................1
Download and Install the App.............................................................................2
Activate APP.........................................................................................................3
Registration.........................................................................................................4
Login....................................................................................................................6
Add device........................................................................................................8
Air conditioner control.......................................................................................10
Account management........................................................................................28
Trouble Shooting...............................................................................30
1. Minimum specifications on a Smart phone:
Android 5.0 version or higher
IOS 9.0 version or higher
Wi-Fi Module specification and basic information
1
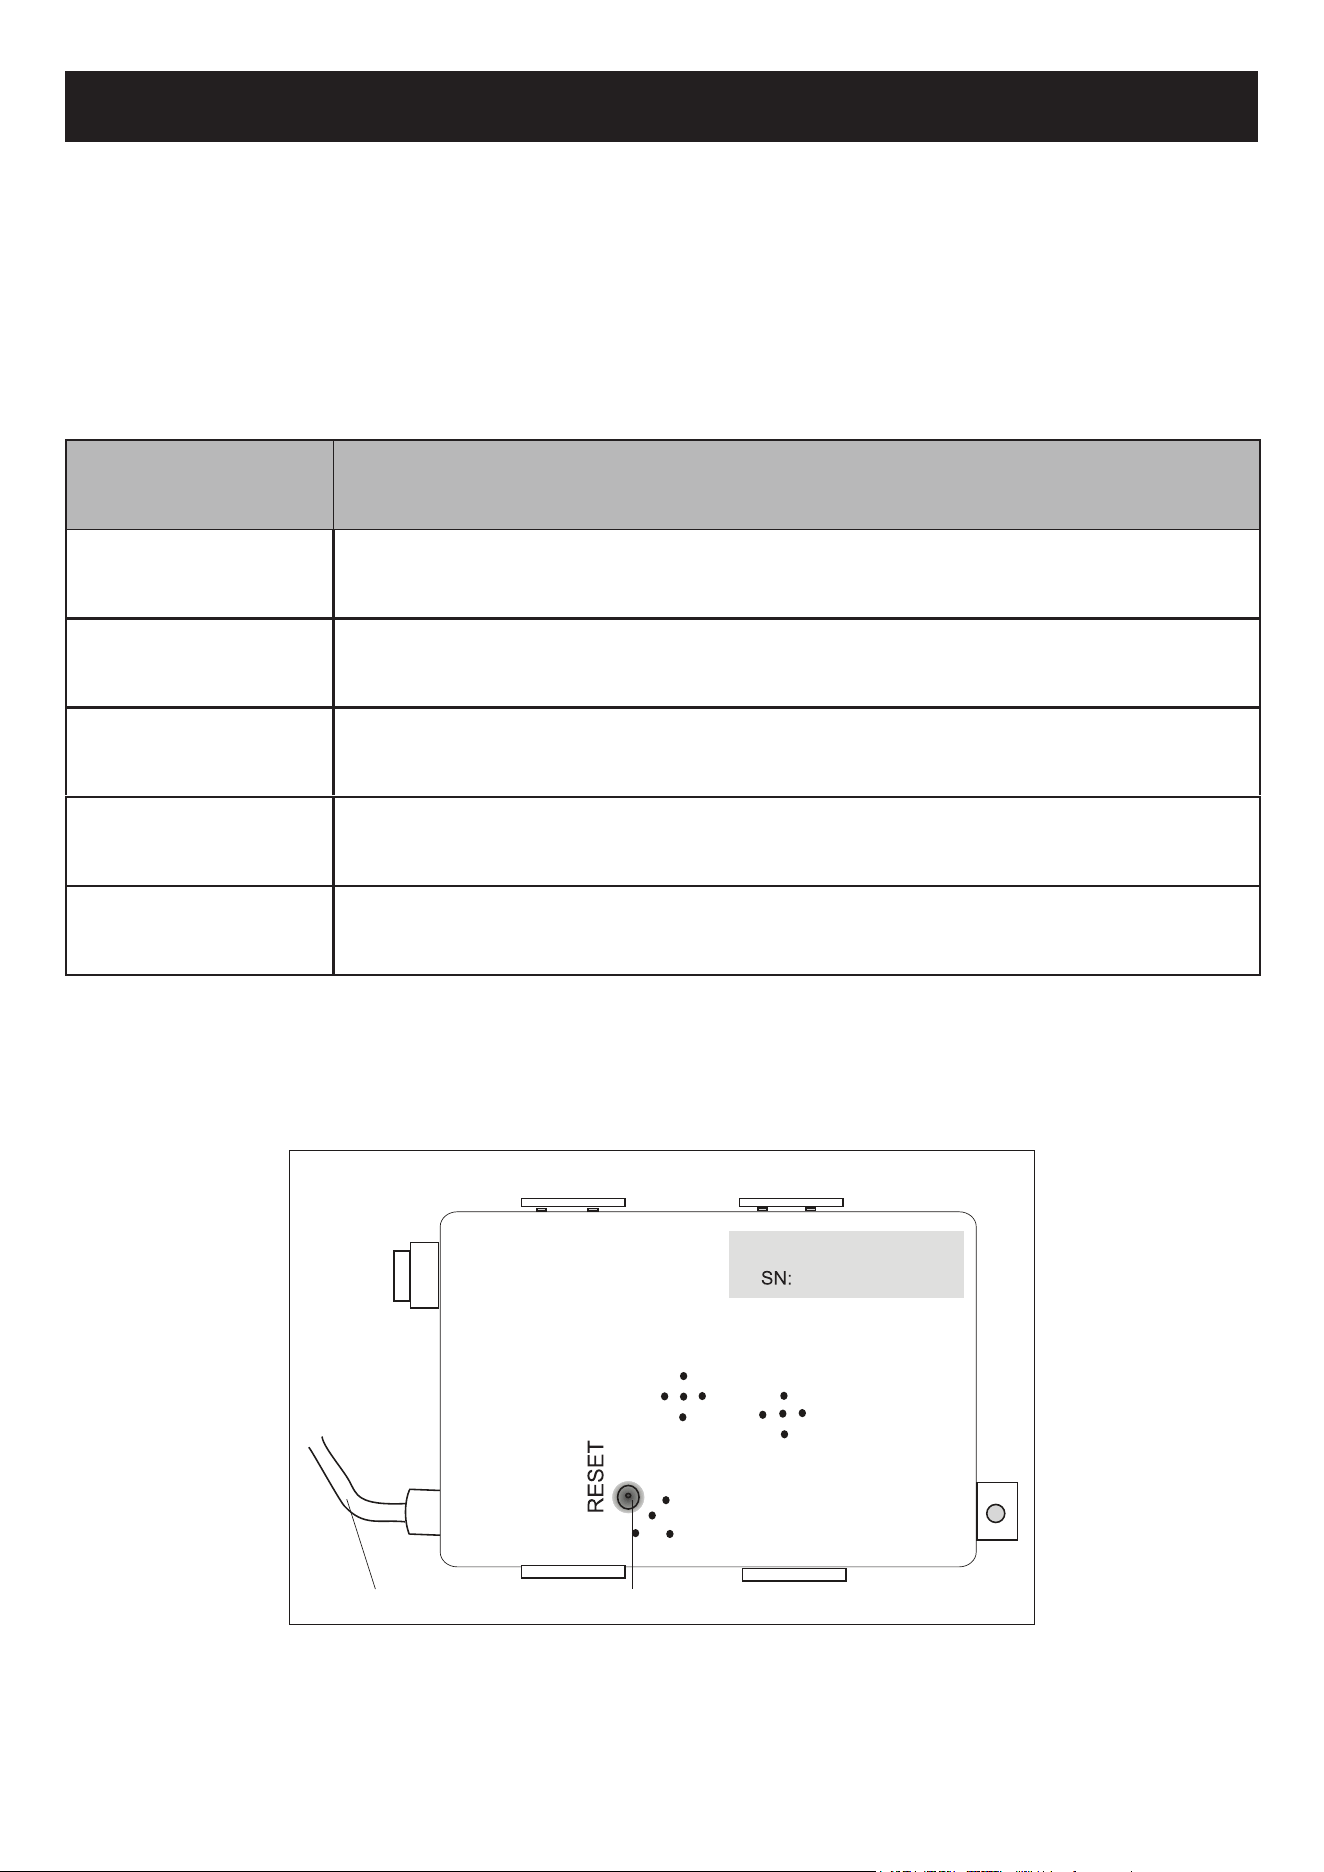
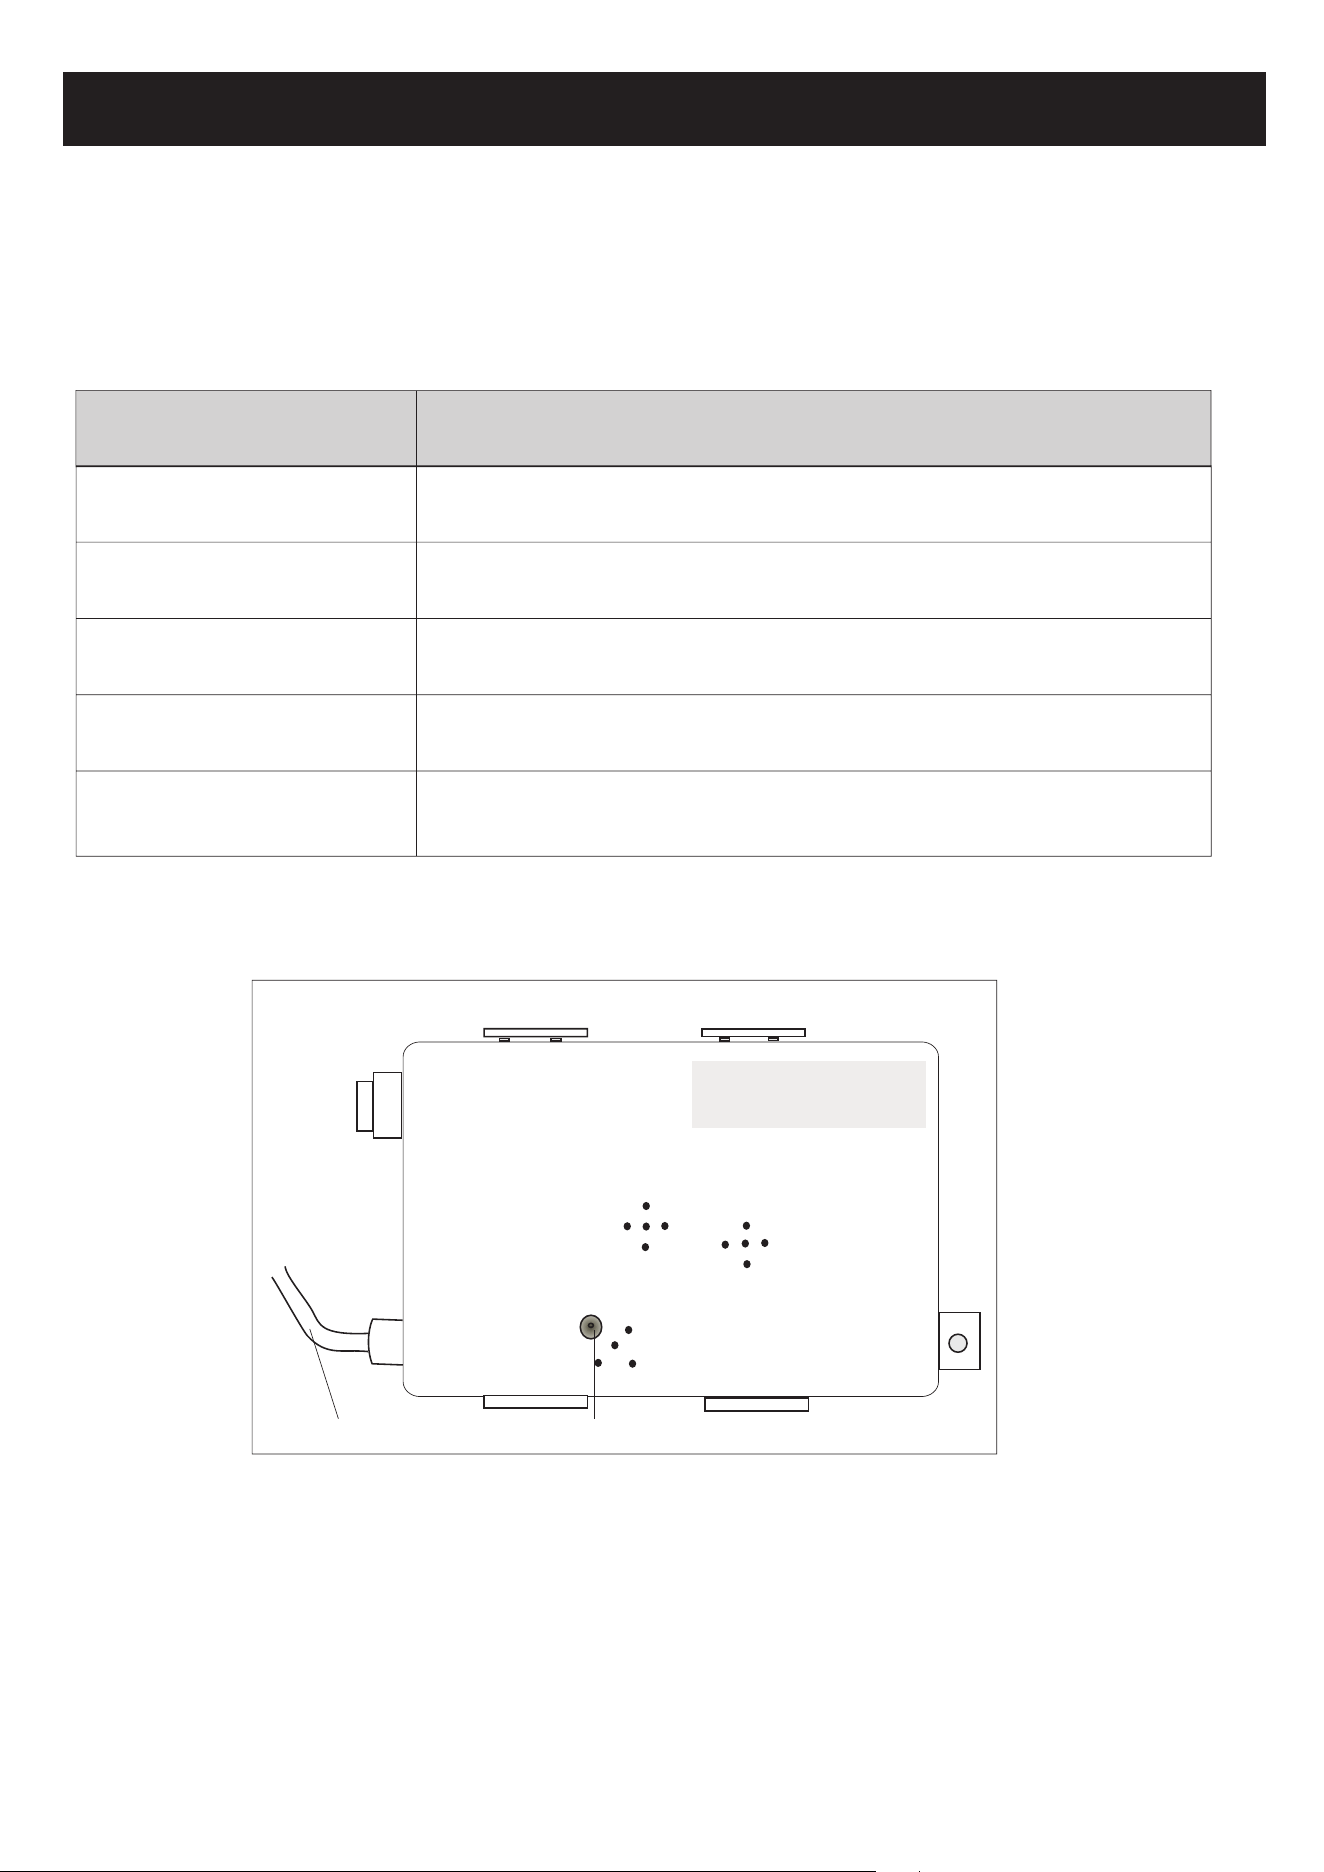
3. Wi-Fi module location and appearance in indoor unit
Open the front panel, the Wi-Fi module is nearby the electric box cover or on the panel.
RESET
SN:
Reset button
Connecting cable
2. Basic parameters for Wi-Fi module
2.400 - 2.500GHz
Protocol stack support
IEEE 802.11 b/g/n(channels 1-14)
Network frequency
Parameters
IPv4/IPv6/TCP/UDP/HTTPS/TLS/MulticastDNS
Security support
WEP/WPA/WPA2/AES128
Details
Standards of WLAN
Network type support
STA/AP/STA+AP
Download and Install the App
2
Note:
Please enable the permissions of Storage/Location/Camera for this APP when installing.
Otherwise it will have some problems when operating.
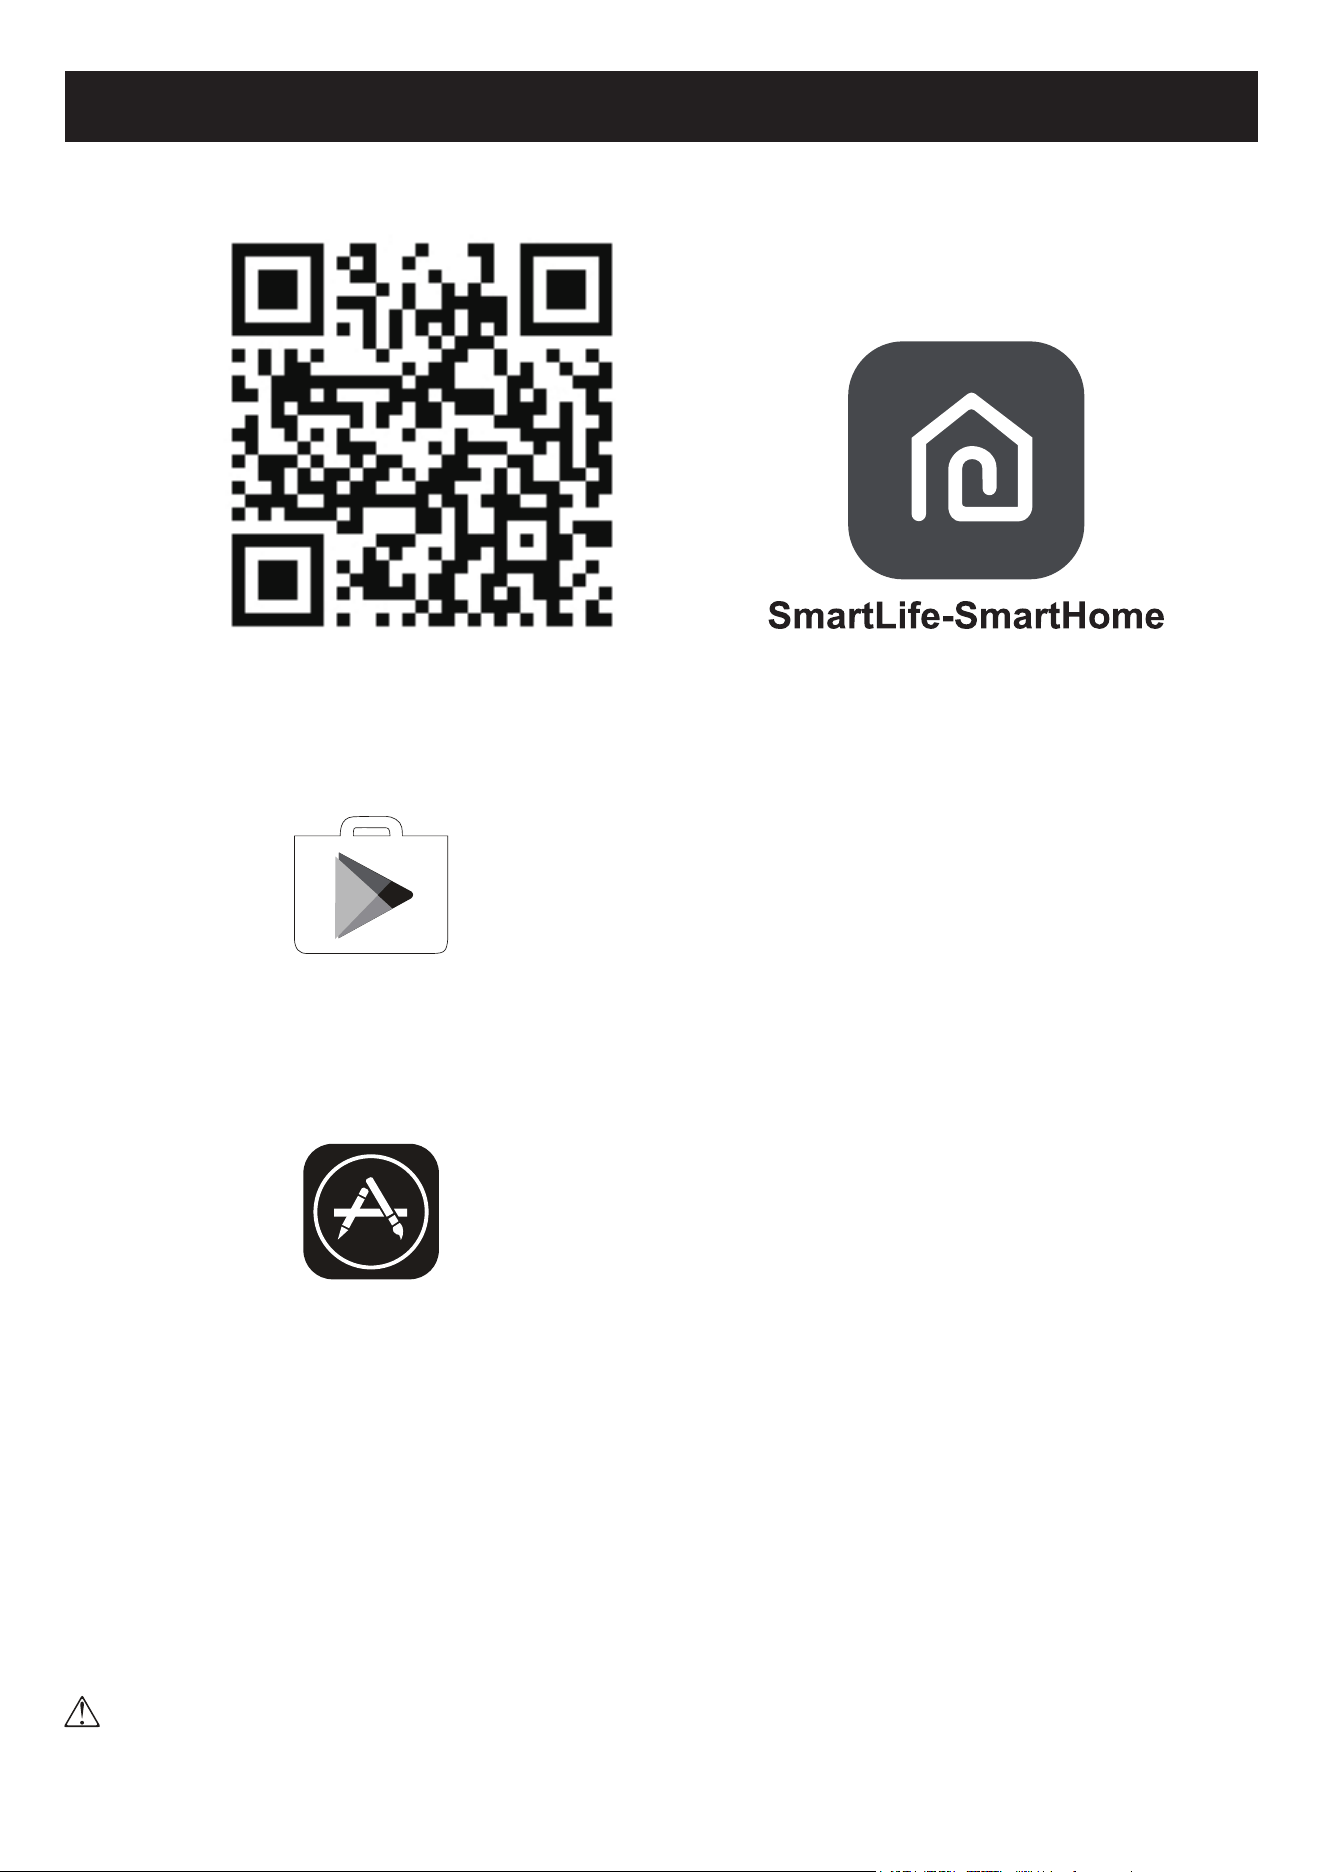
For Android smart phone
Method1: Please scan the QR code with a browser scanner, download and install the APP.
Method2: Open the Google "Play Store" on your smart phone and search
"SmartLife-SmartHome" , ownload and install the APP.
For IOS smart phone
Method1: Please scan the QR code and follow the tips to get into "AppStore", download
and install the APP.
Method2: Open the Apple "AppStore" on your smart phone and search
"SmartLife-SmartHome" , download and install the APP.
SmartLife-SmartHome
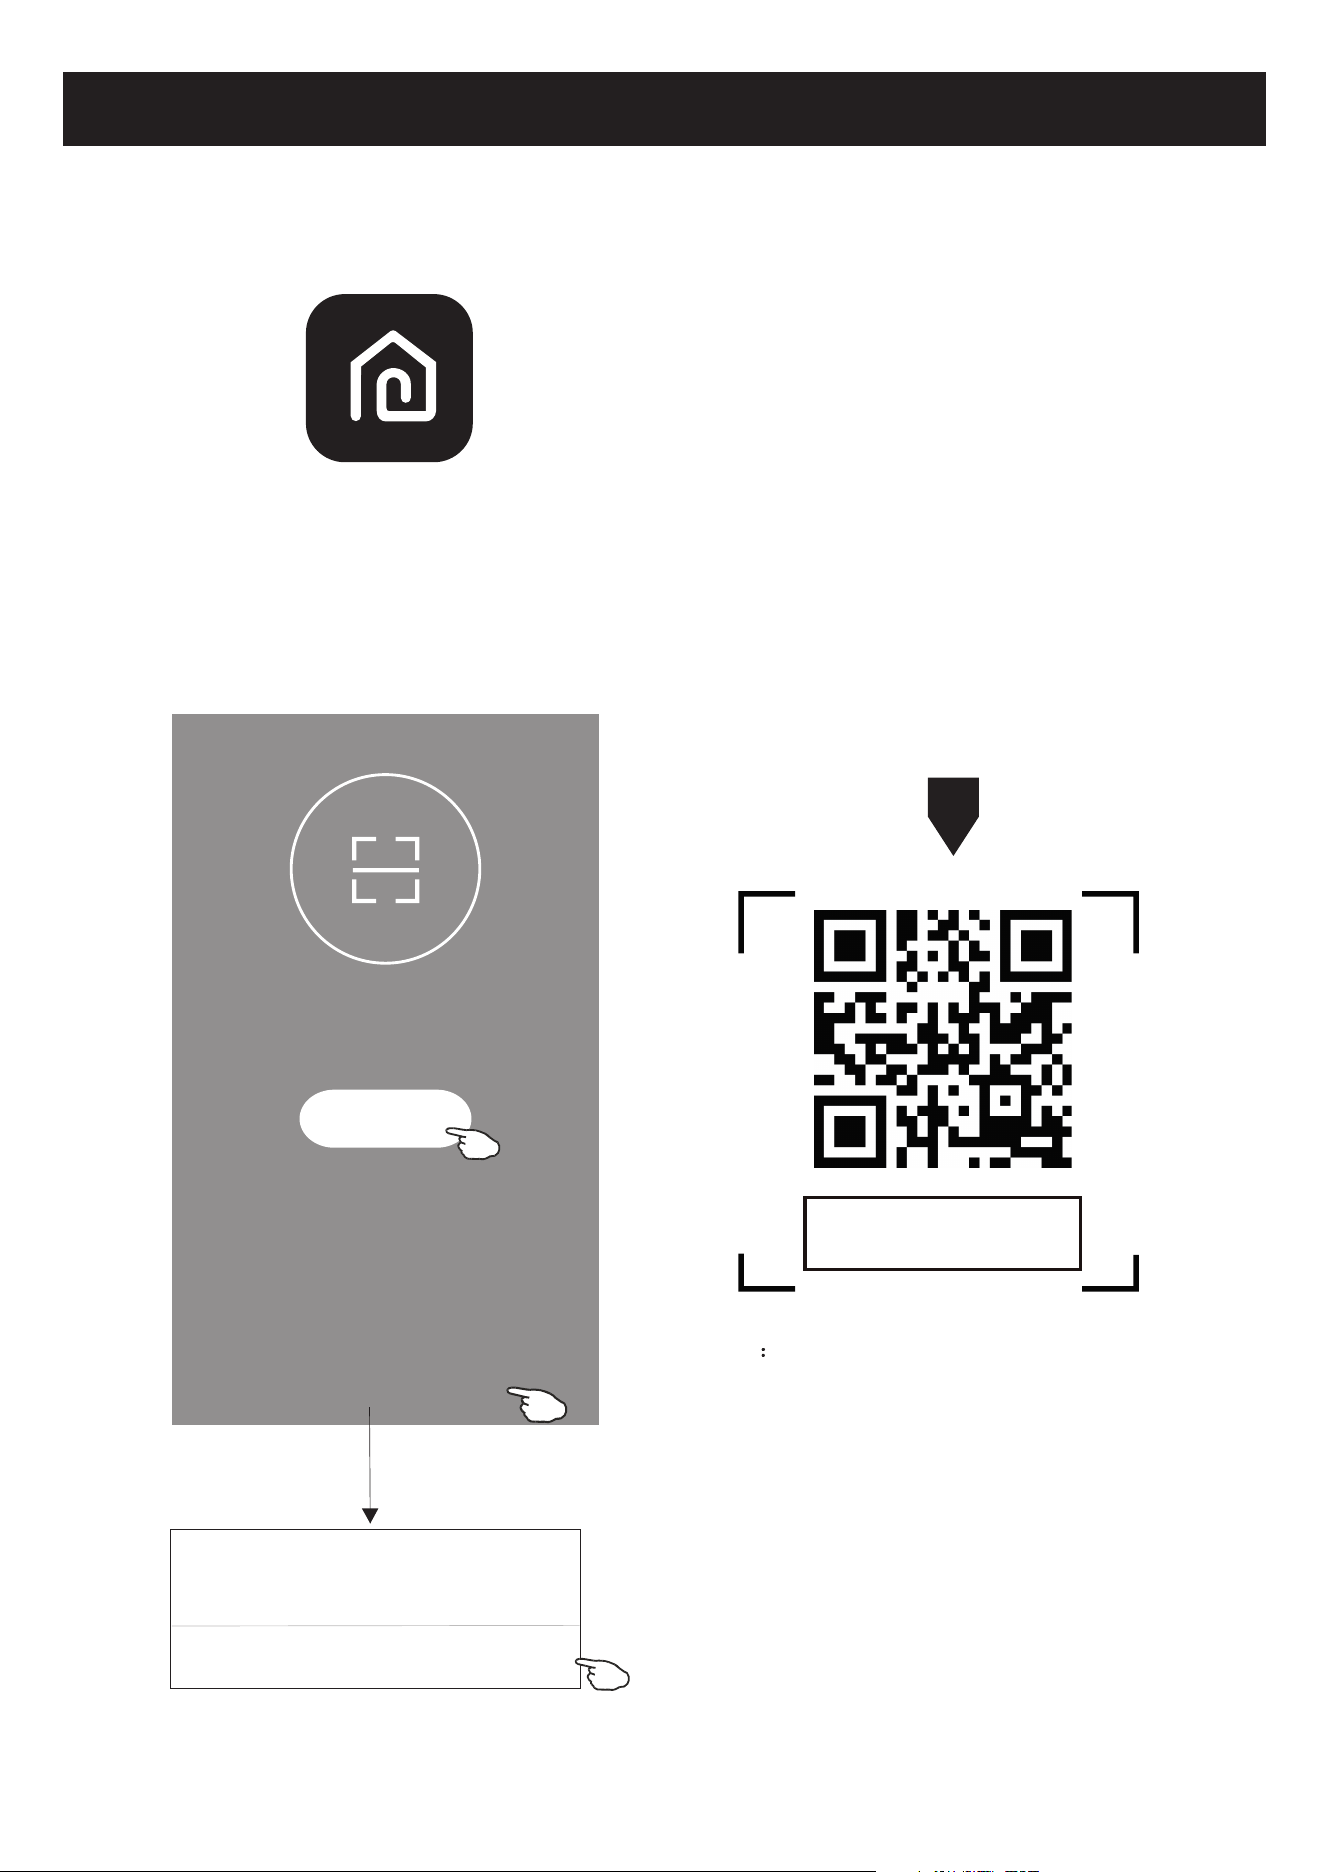
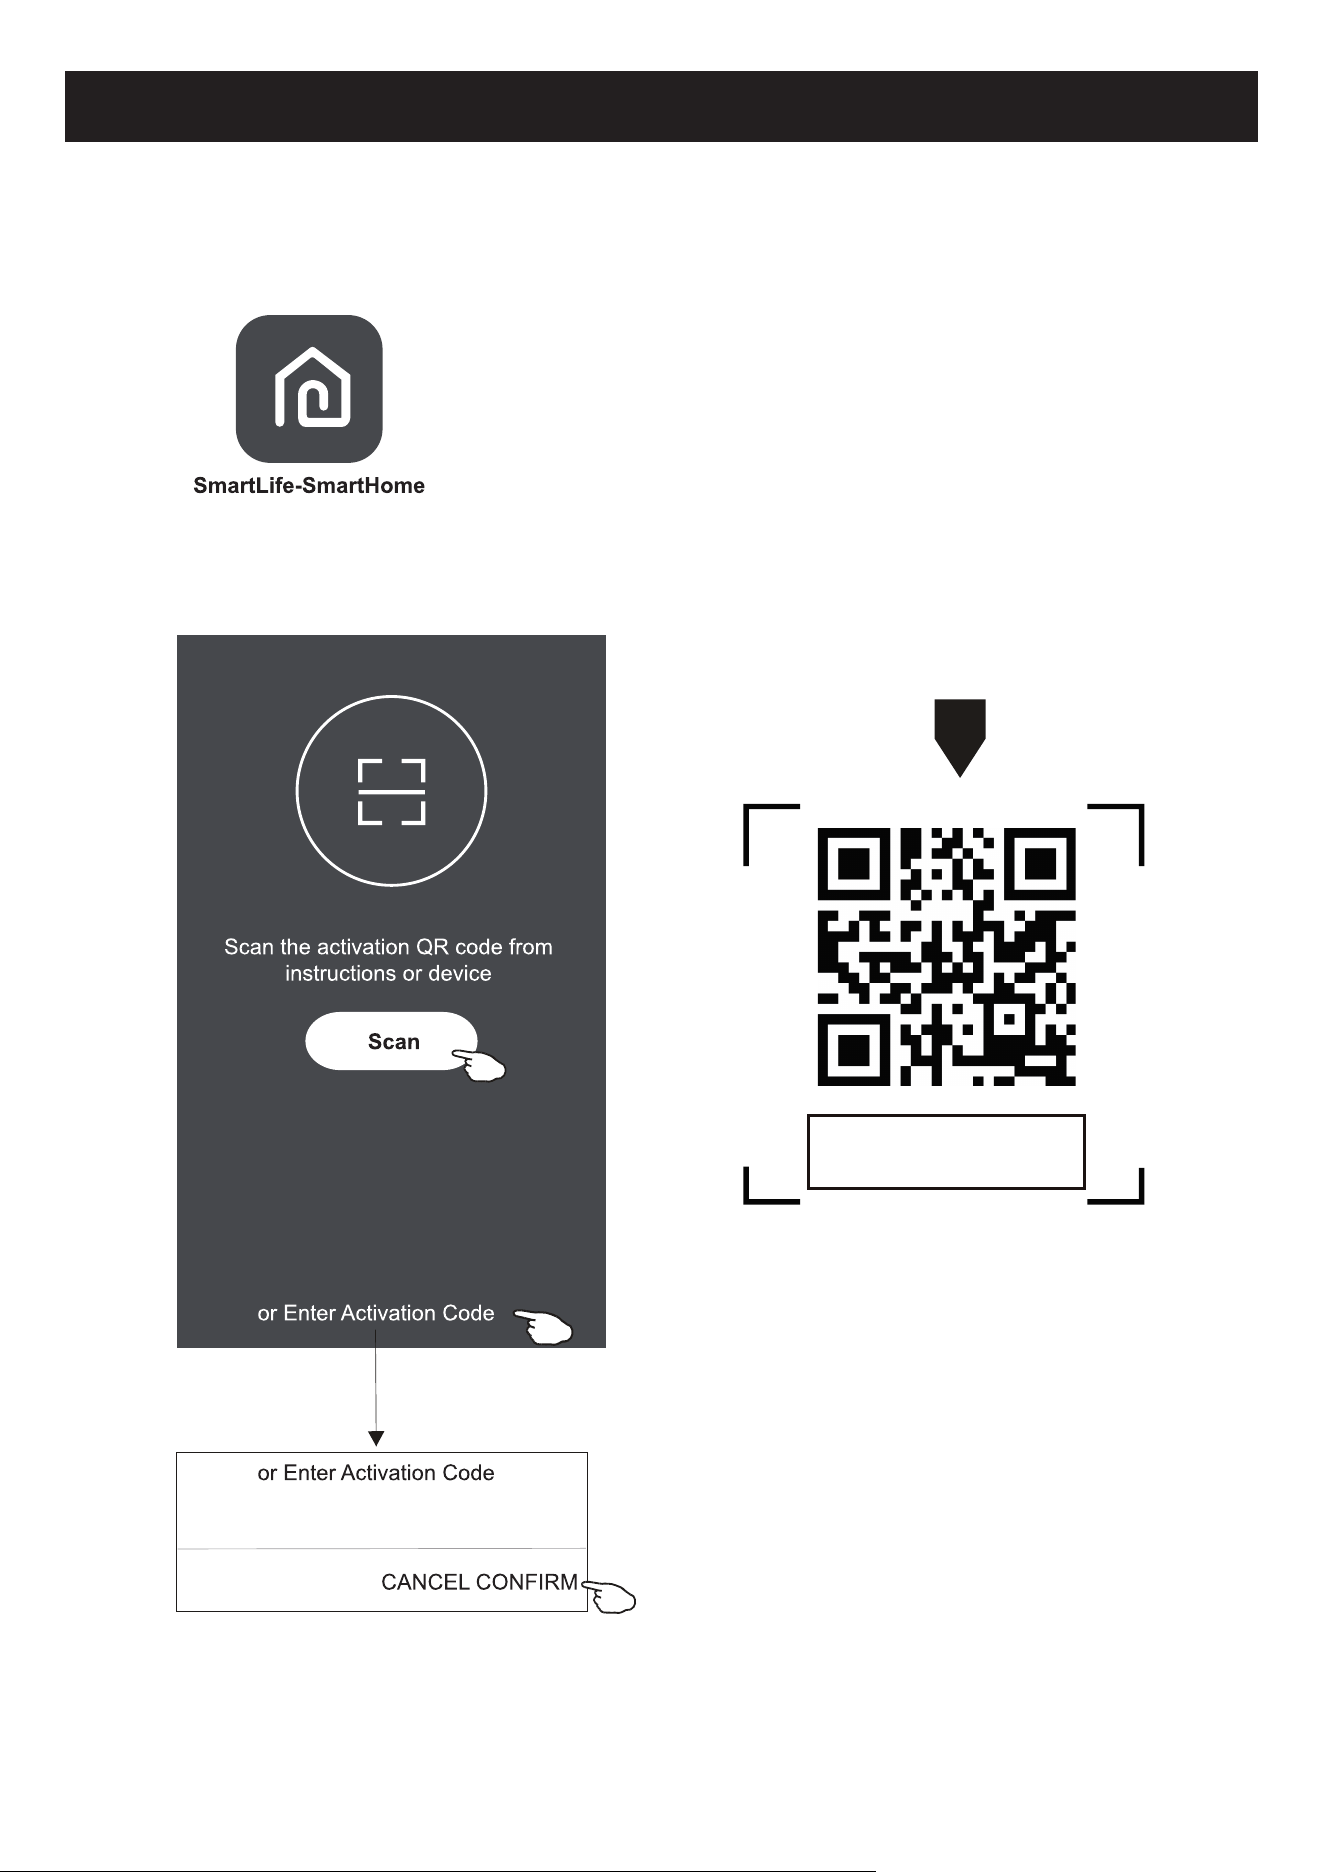
1. Launch the APP "SmartLife-SmartHome" on your smart phone.
3
Activate APP
2. Method1:Tap button "Scan" and scan the right Activate QR code
Method2: Tap "or Enter Activation Code" in bottom of the screen,
then enter the activate code and tap "CONFIRM".
SmartLife-SmartHome
Activate QR code and activation code
Note Without the QR code or activation code,
you can't active the APP and using it,
please keep them safe.
Scan
Scan the activation QR code
from instructions or device
or Enter Activation Code
or Enter Activation Code
CANCEL
CONFIRM
******
The first time the app is used, it will need activating.
Corbero

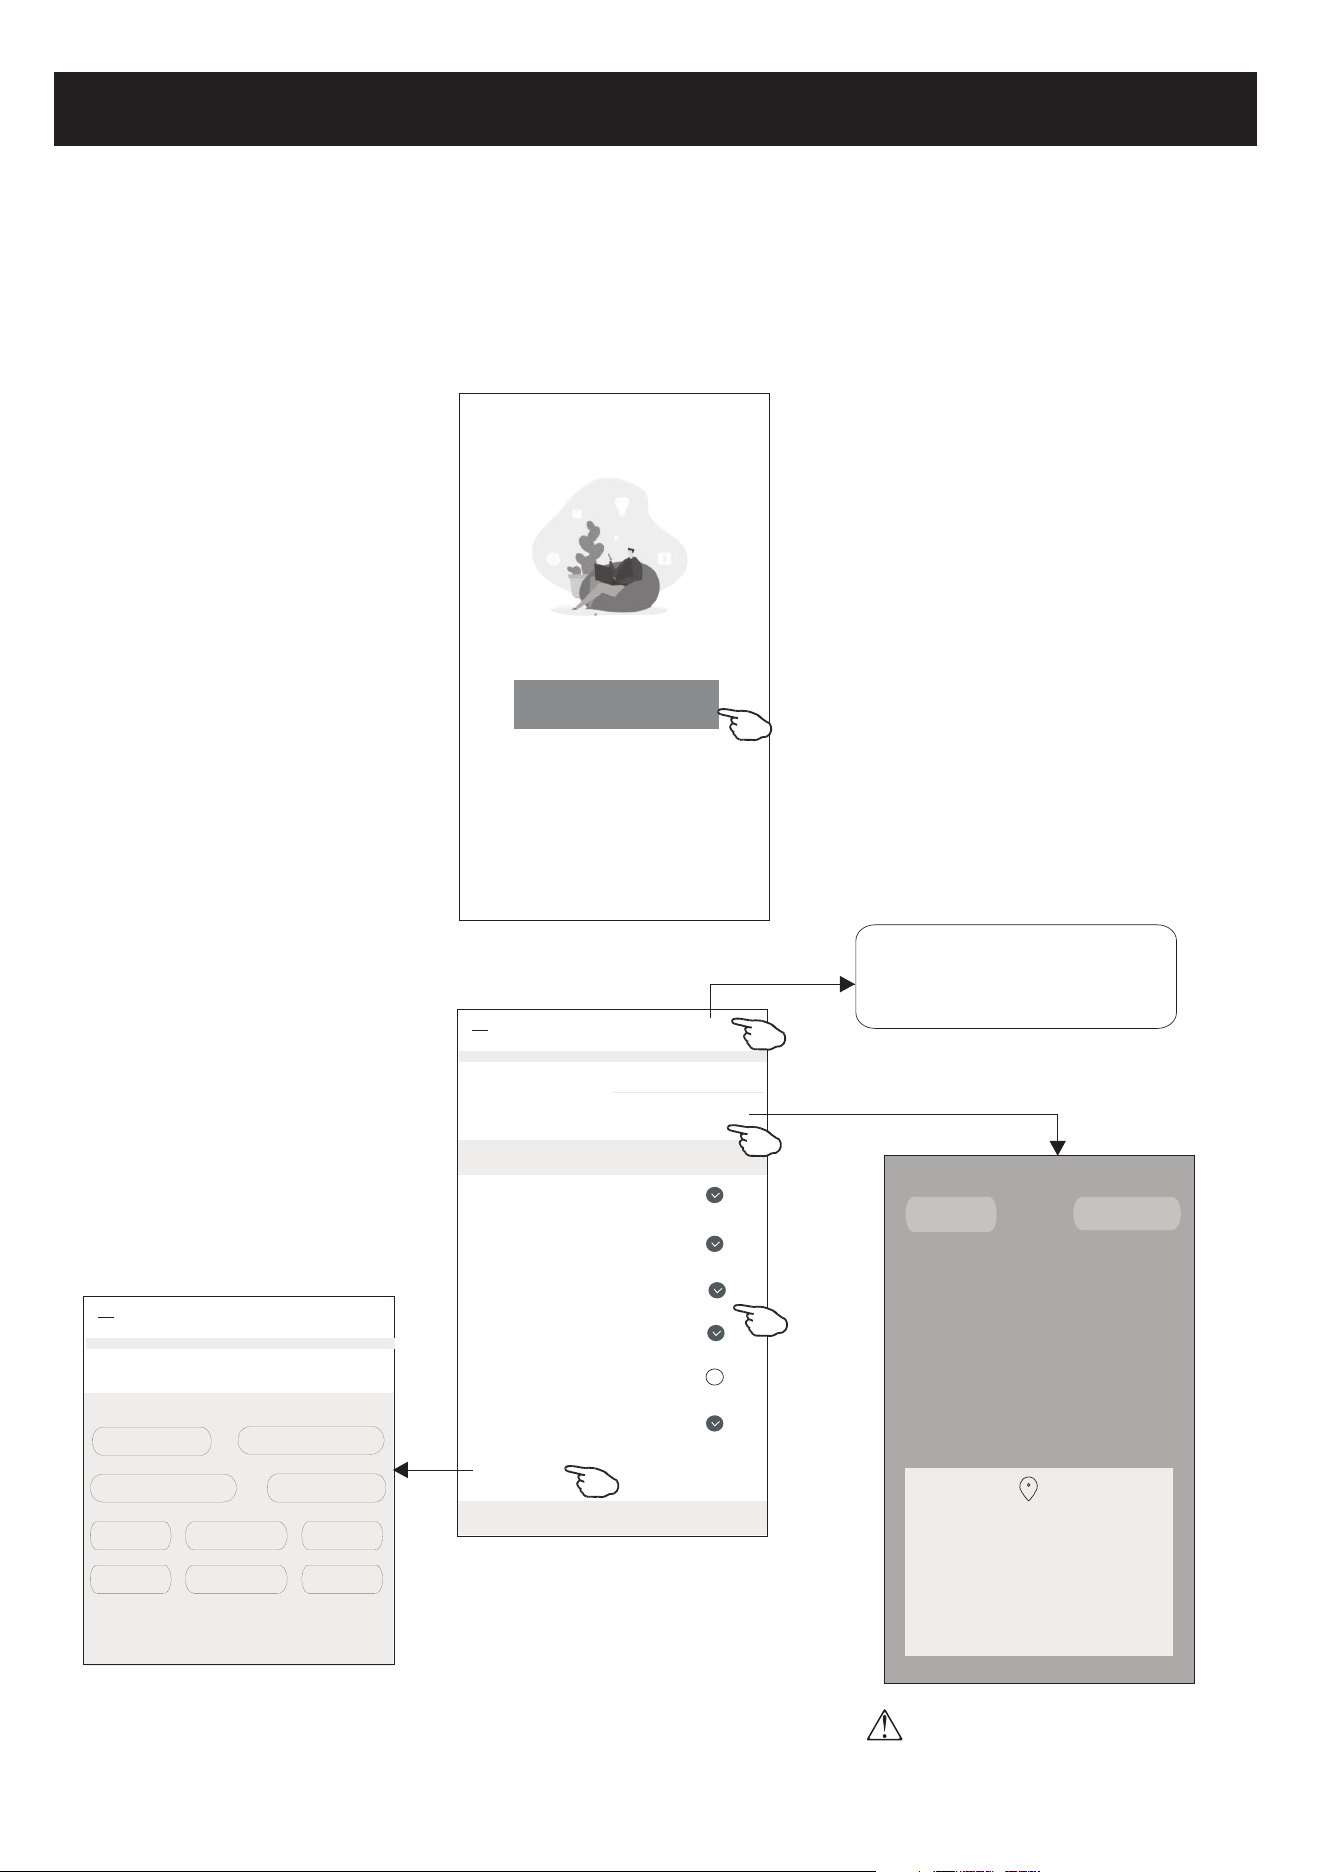
Registration
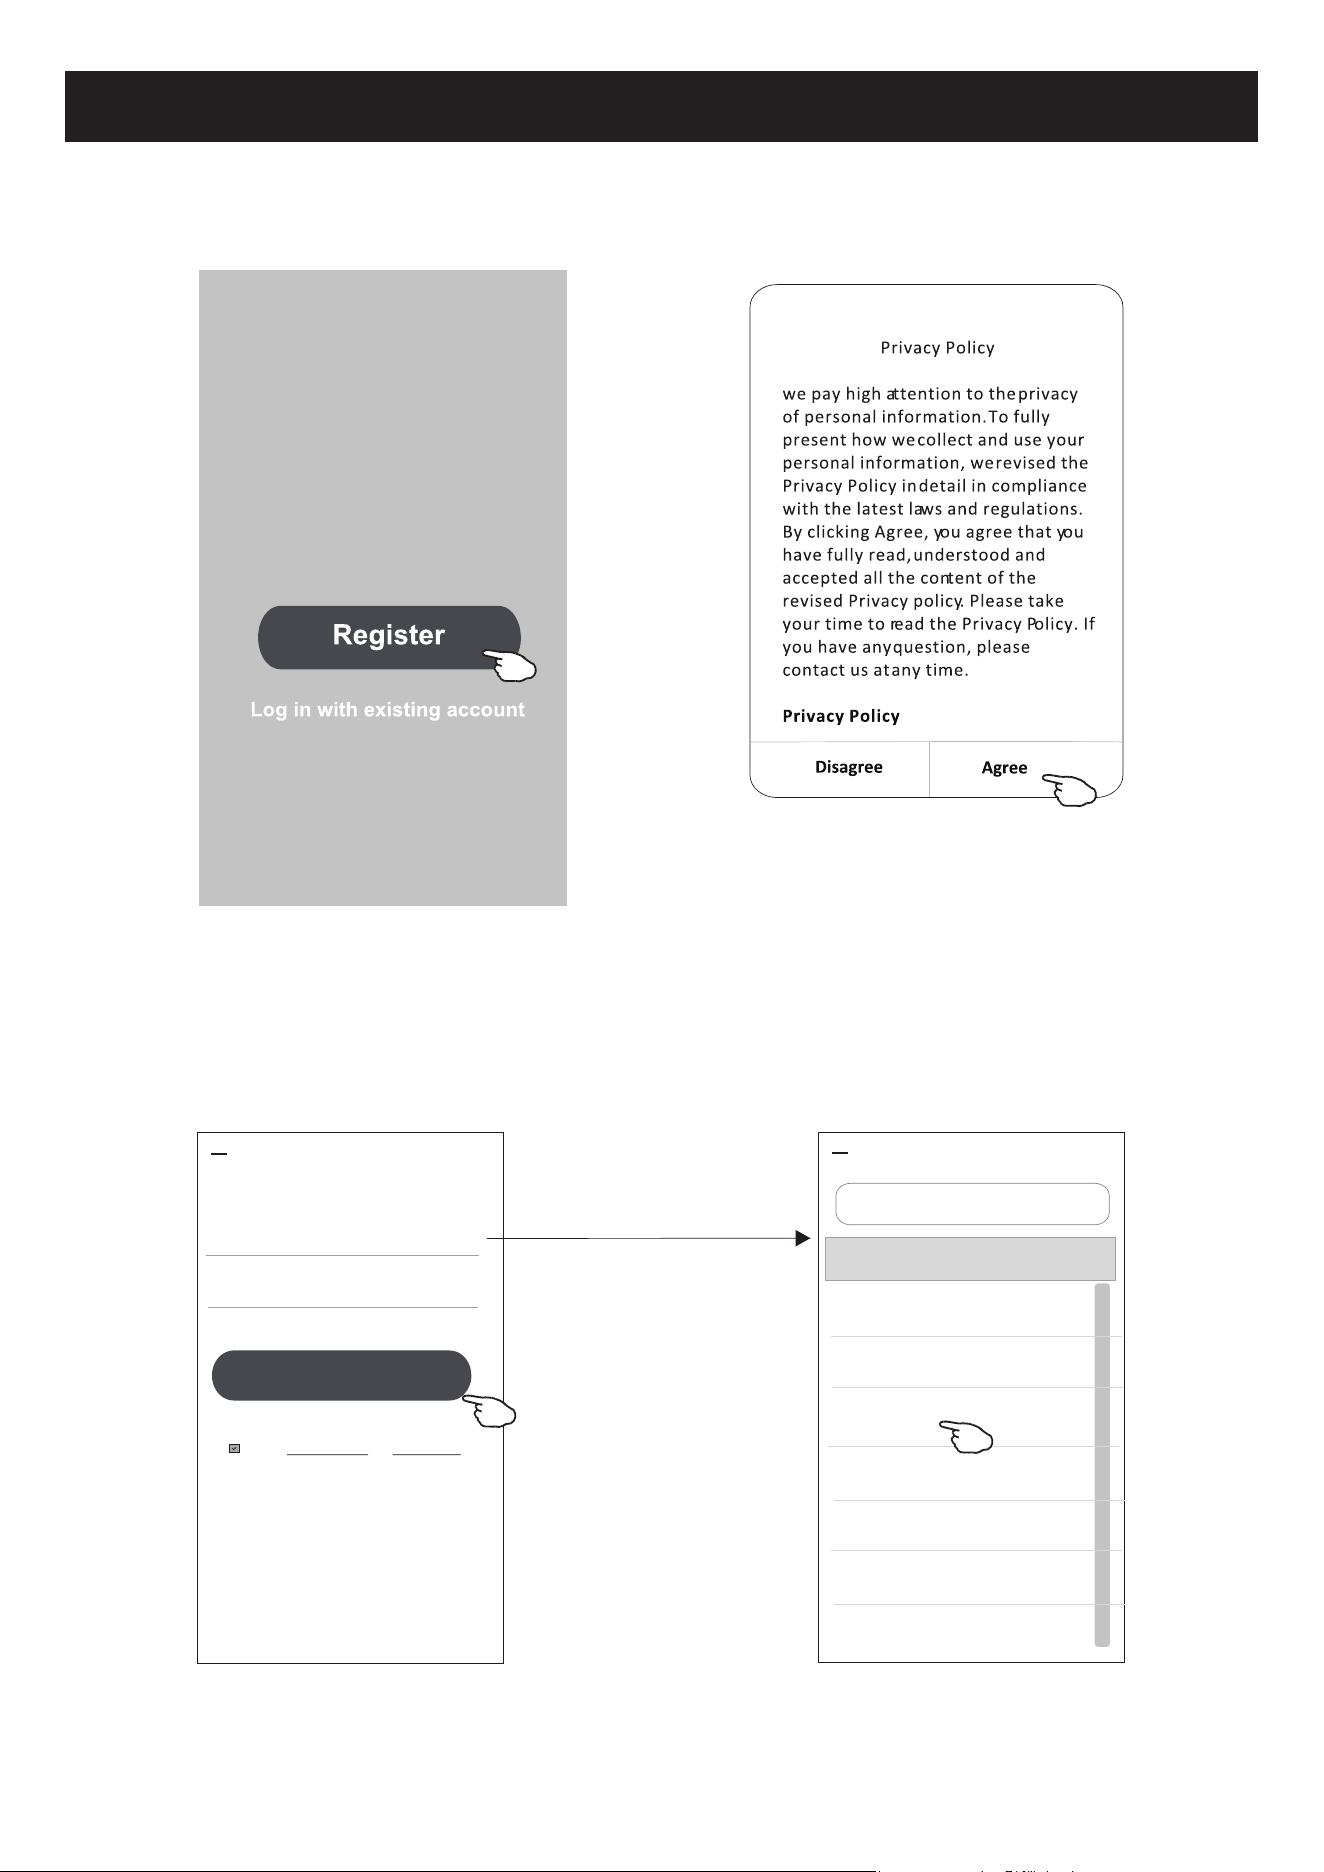
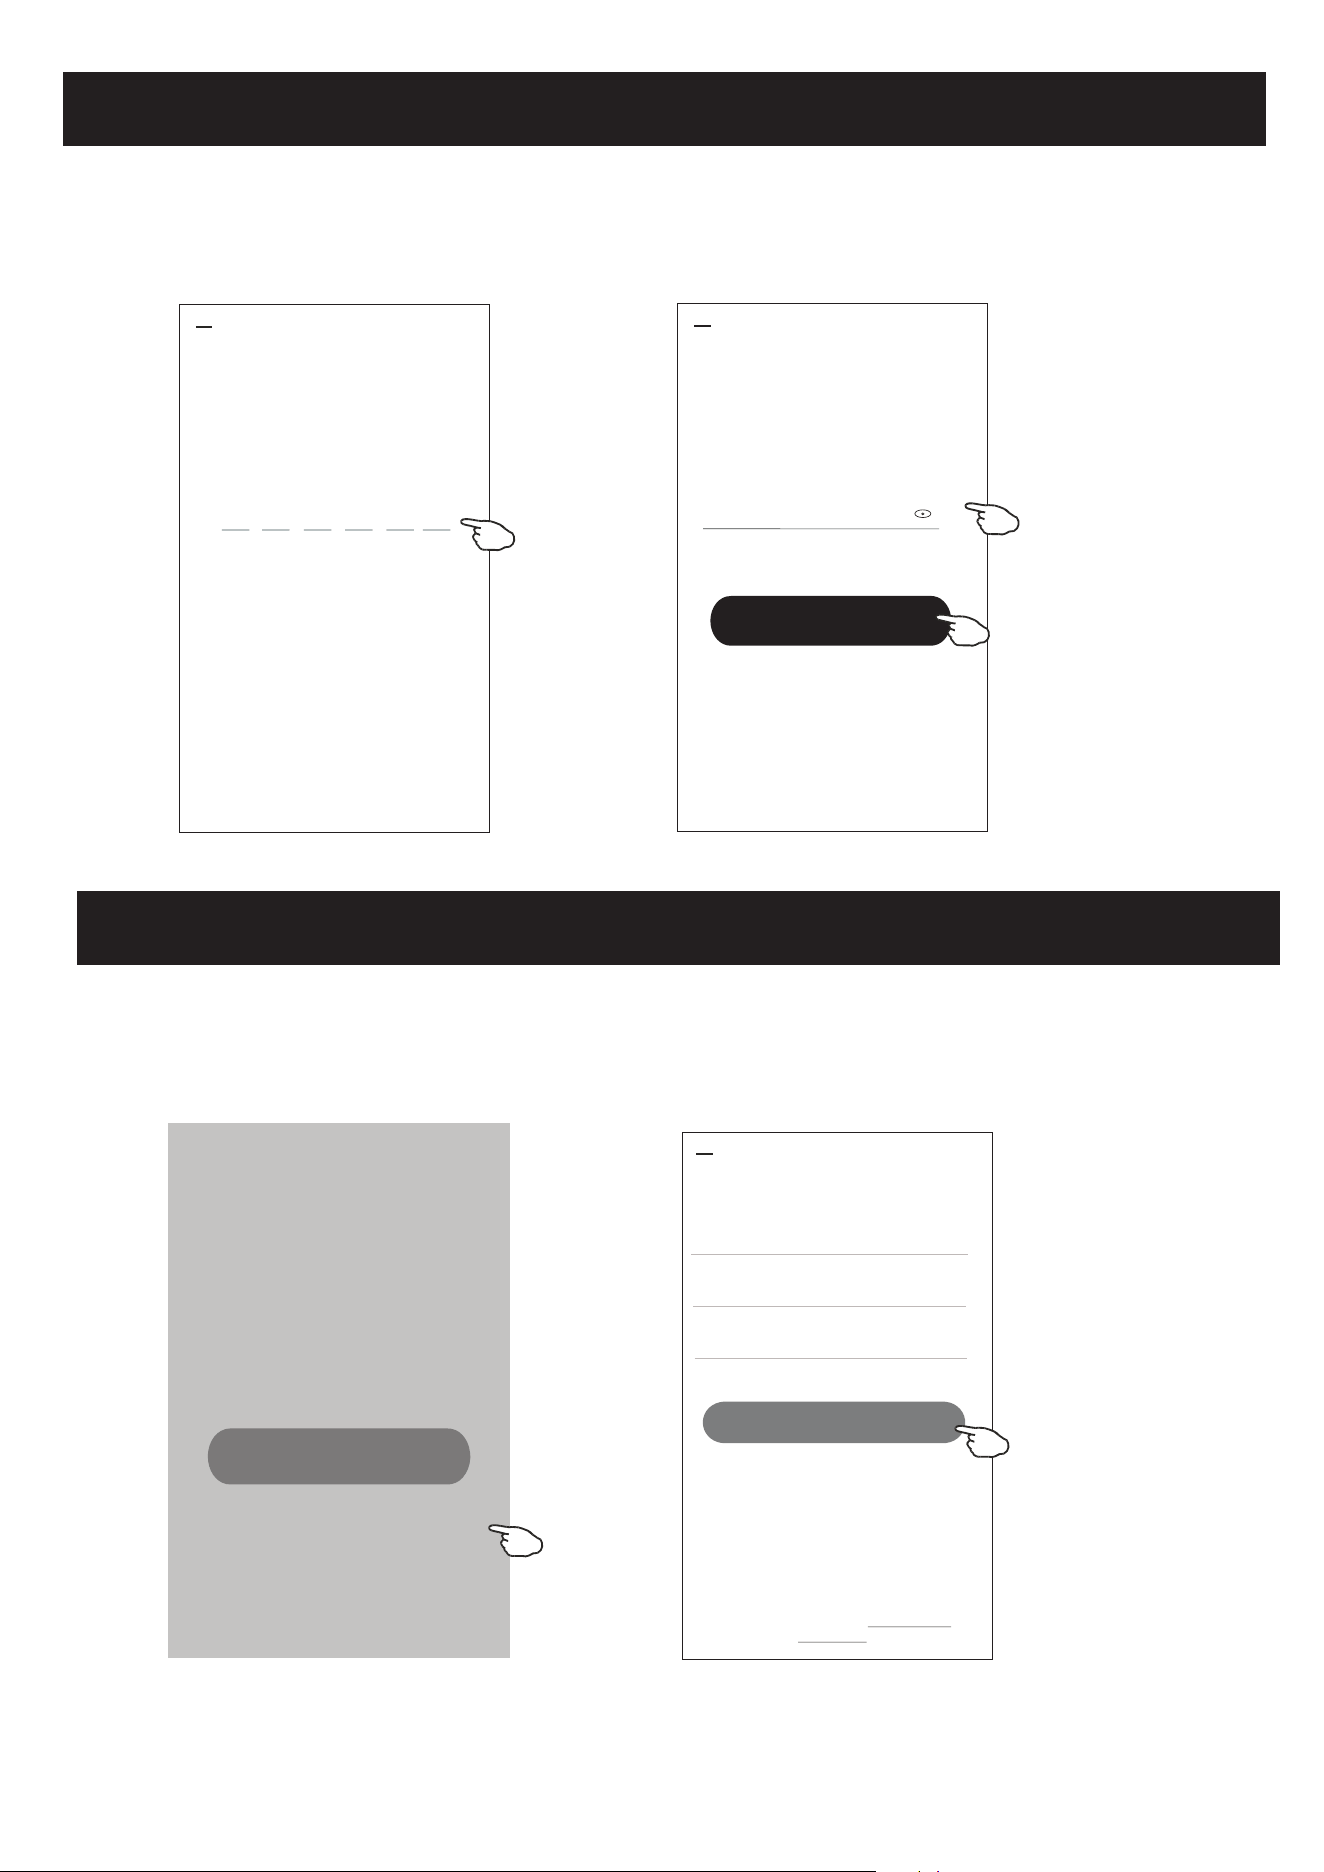
1.If you don't have any account please tap button "Register".
2.Read the Privacy Policy and tap "Agree".
4
3.Tap">" and choose the country.
4.Enter your e-mail address.
5.Tap the button "Obtain verification code".
Log in with existing account
Privacy Policy
we pay high attention to the privacy
of personal information. To fully
present how we collect and use your
personal information, we revised the
Privacy Policy in detail in compliance
with the latest laws and regulations.
By clicking Agree, you agree that you
have fully read, understood and
accepted all the content of the
revised Privacy policy. Please take
your time to read the Privacy Policy. If
you have any question, please
contact us at any time.
Privacy Policy
Disagree
Agree
#
A
B
C
D
E
F
G
H
I
J
K
L
M
N
O
P
Q
R
S
T
U
V
W
X
Y
Z
Country Choosed
A
Afghanistan
Albania
Algeria
Angola
Argentina
Armenia
Australia
Search
enter your e-mail address here
Search the country or slide the
screen up/down to find
and choose the Country.
<
Register
Resister
>
*********** X
<
I Agree User agreement and Privacy Policy
Obtain verification code
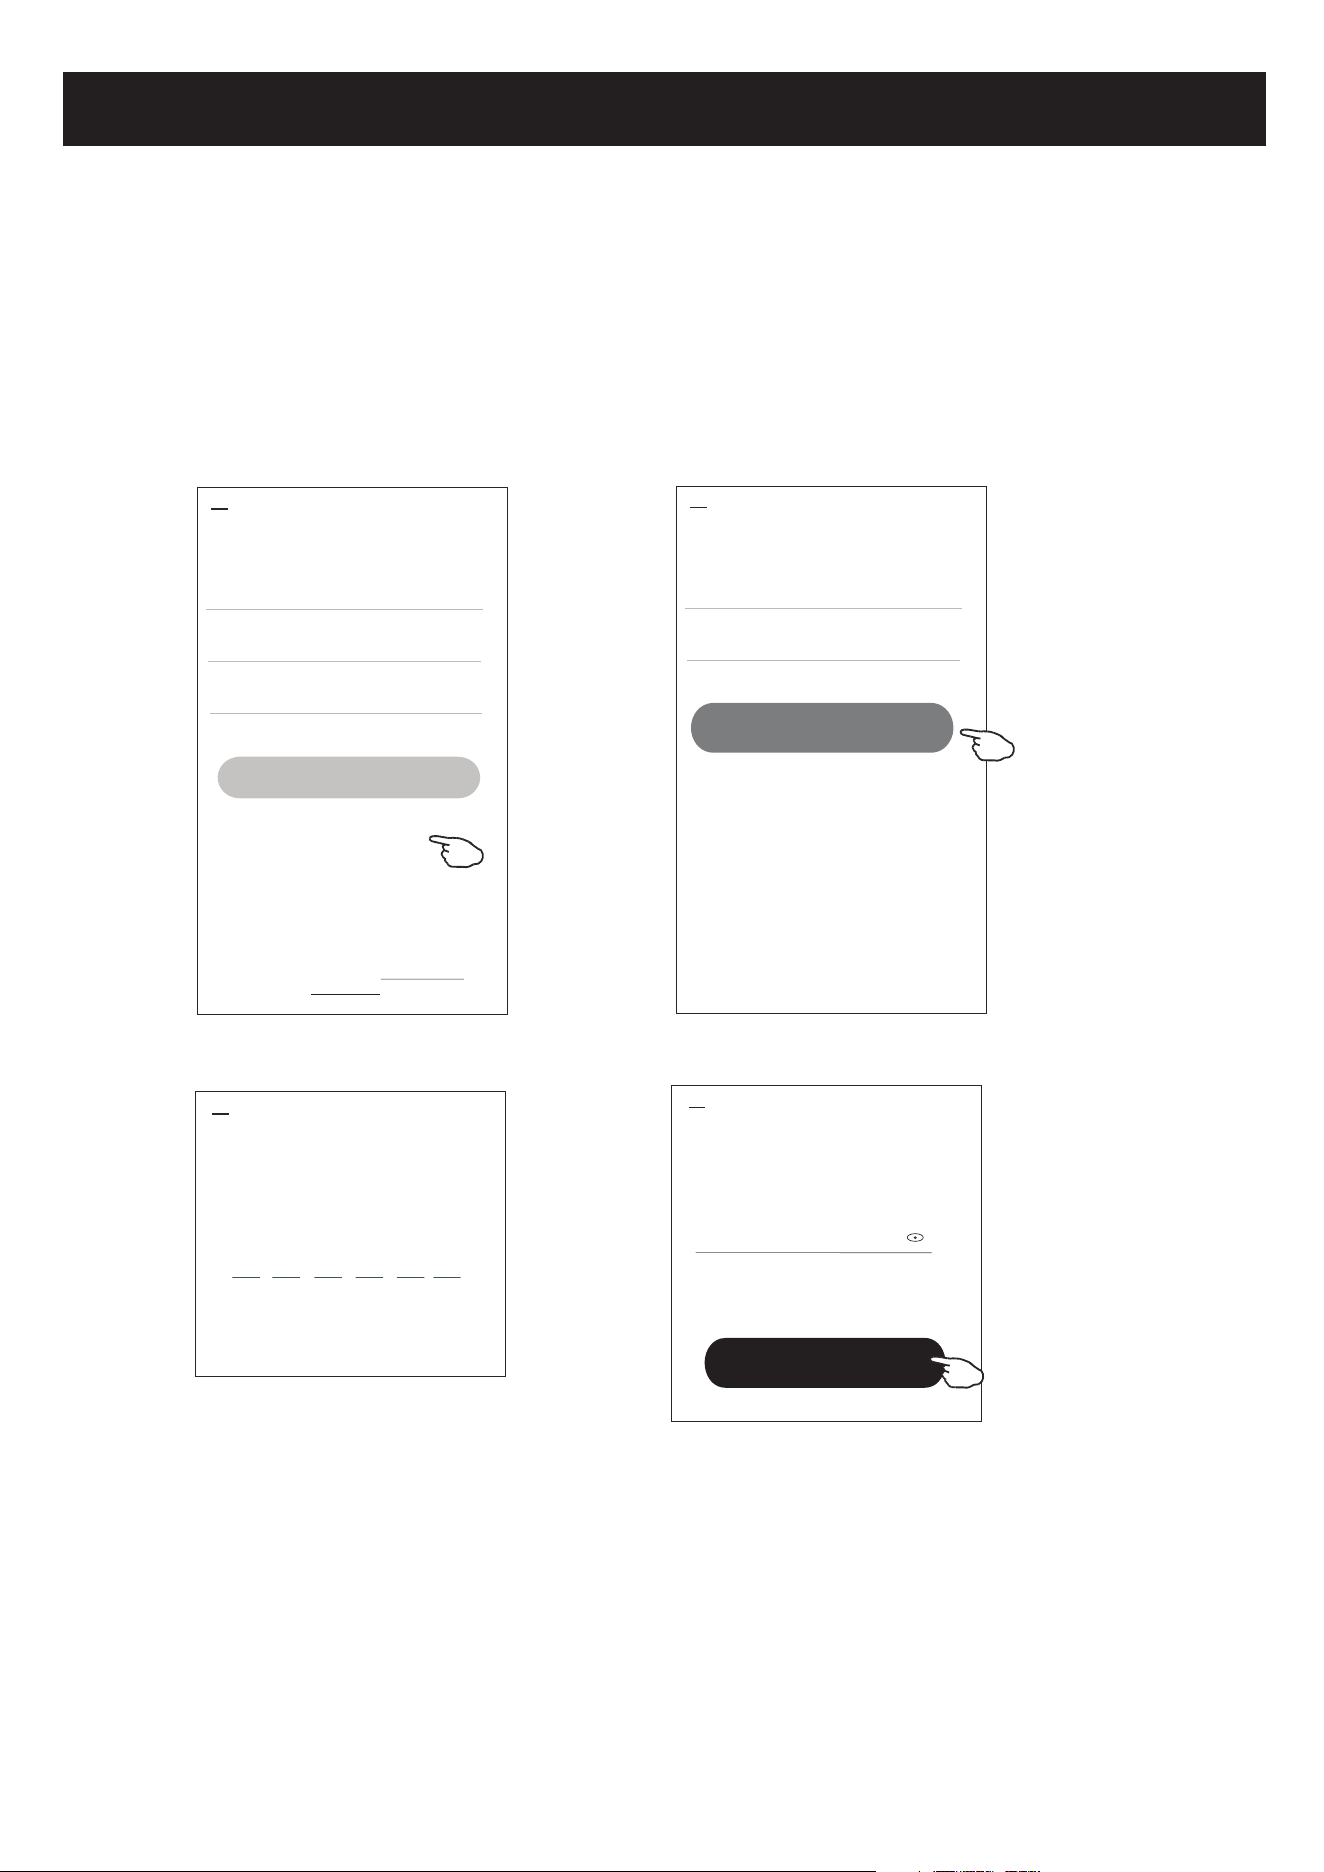
Registration
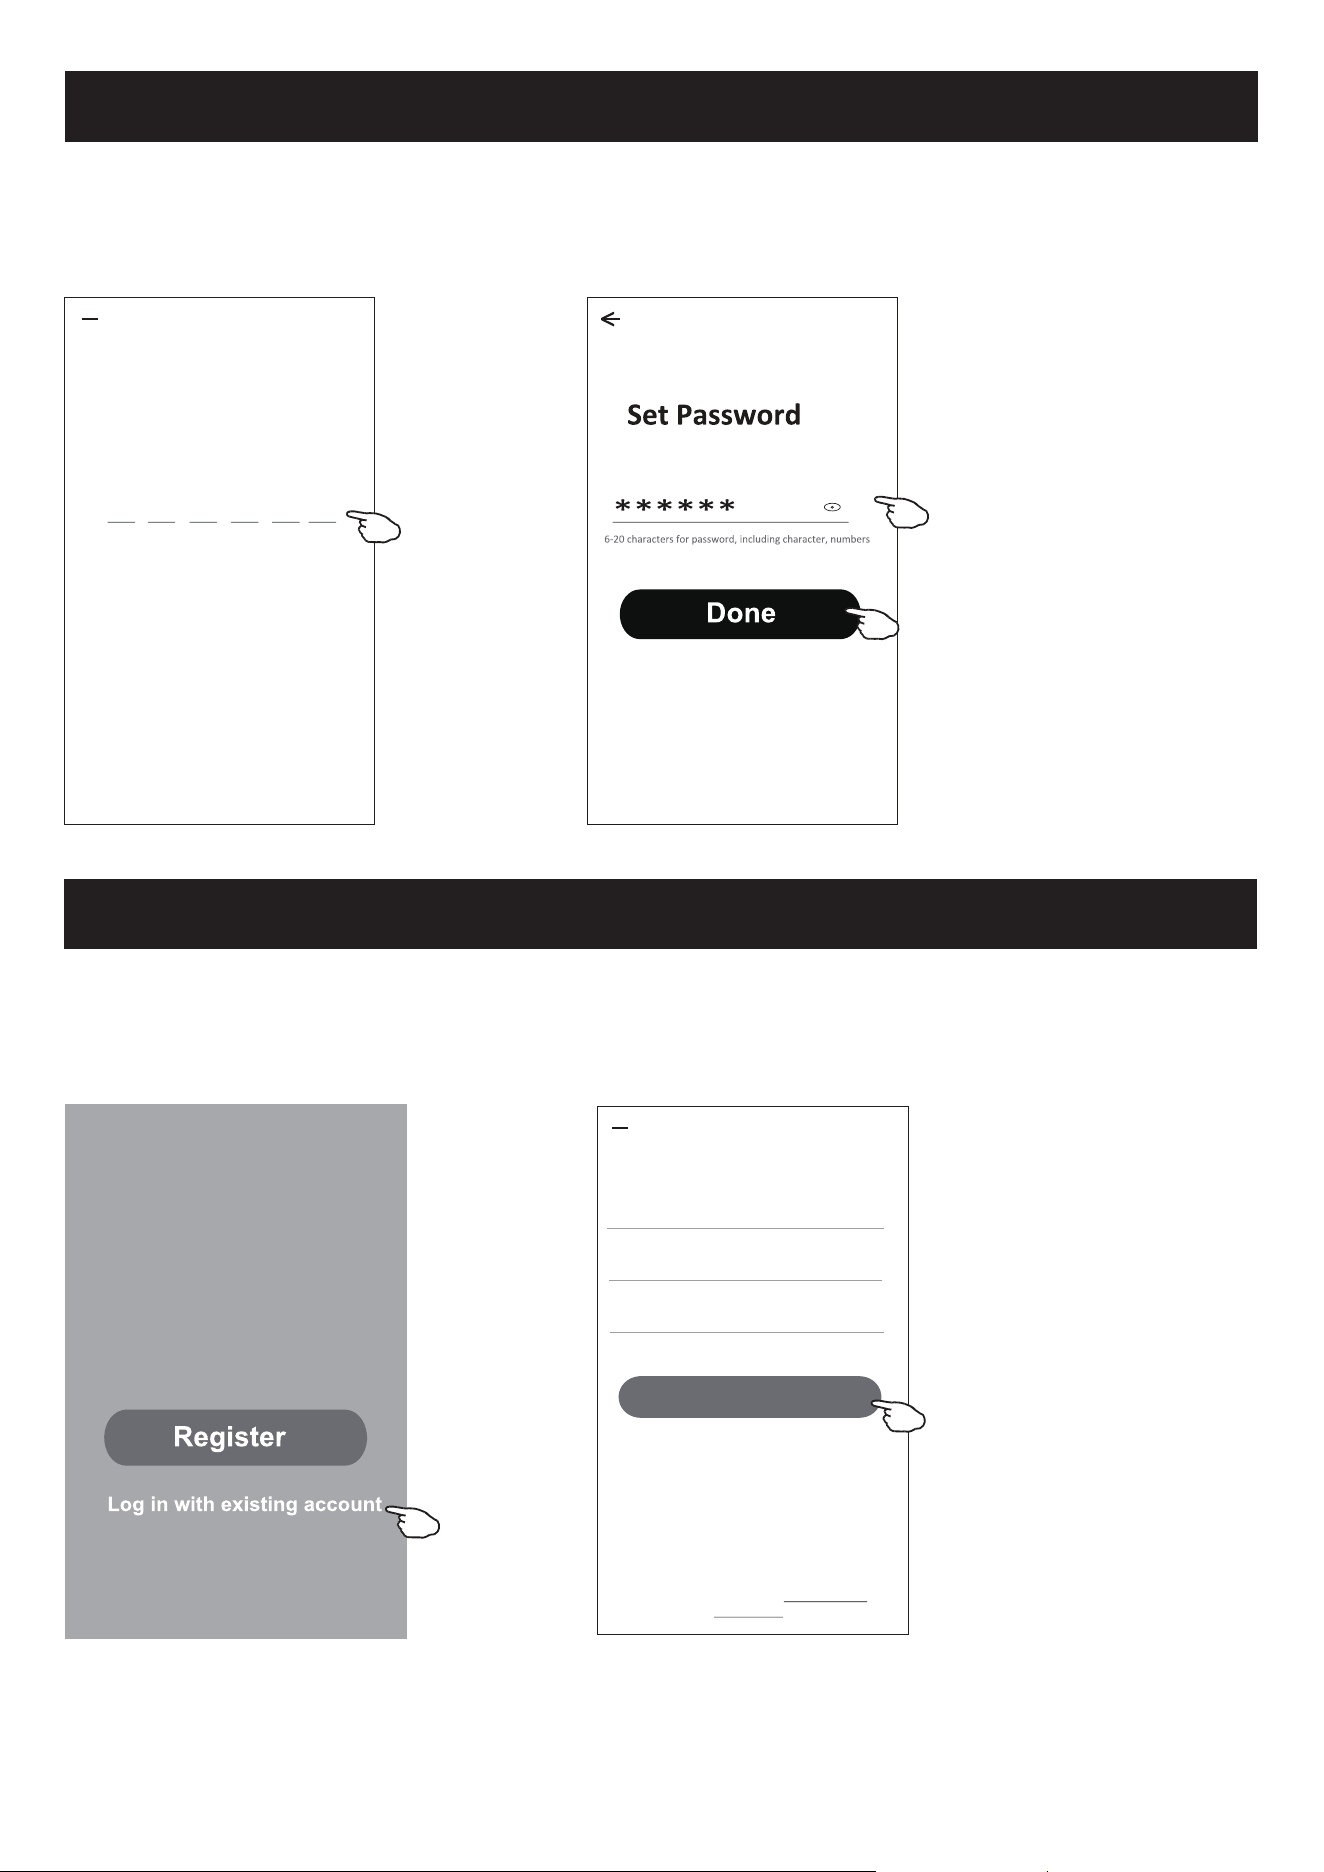
6.Enter the verification code you received from e-mail.
7.Set the Password with 6-20 characters including characters and numbers.
8.Tap "Done".
5
Set Password
6-20 characters for password, including character, numbers
******
<
Login
Login
1.Tap "Log in with existing account".
2.Enter your registered account and password.
3.Tap "Log in" button.
Log in with existing account
Register
Done
Enter verification
code
* * * * * *
<
Verification code is sent to your email:
*****@****,Resend(55s)
Login
******* >
***********
<
Login means that you agree with User Agreement and
Privacy Policy
Log in
******
Forgot password
enter the password
enter your account(e-mail) here
Living Room
Master Bedroom
Second Bedroom
Dining Room
Kitchen Study Room Porch
Balcony Kids Room Closet
Login
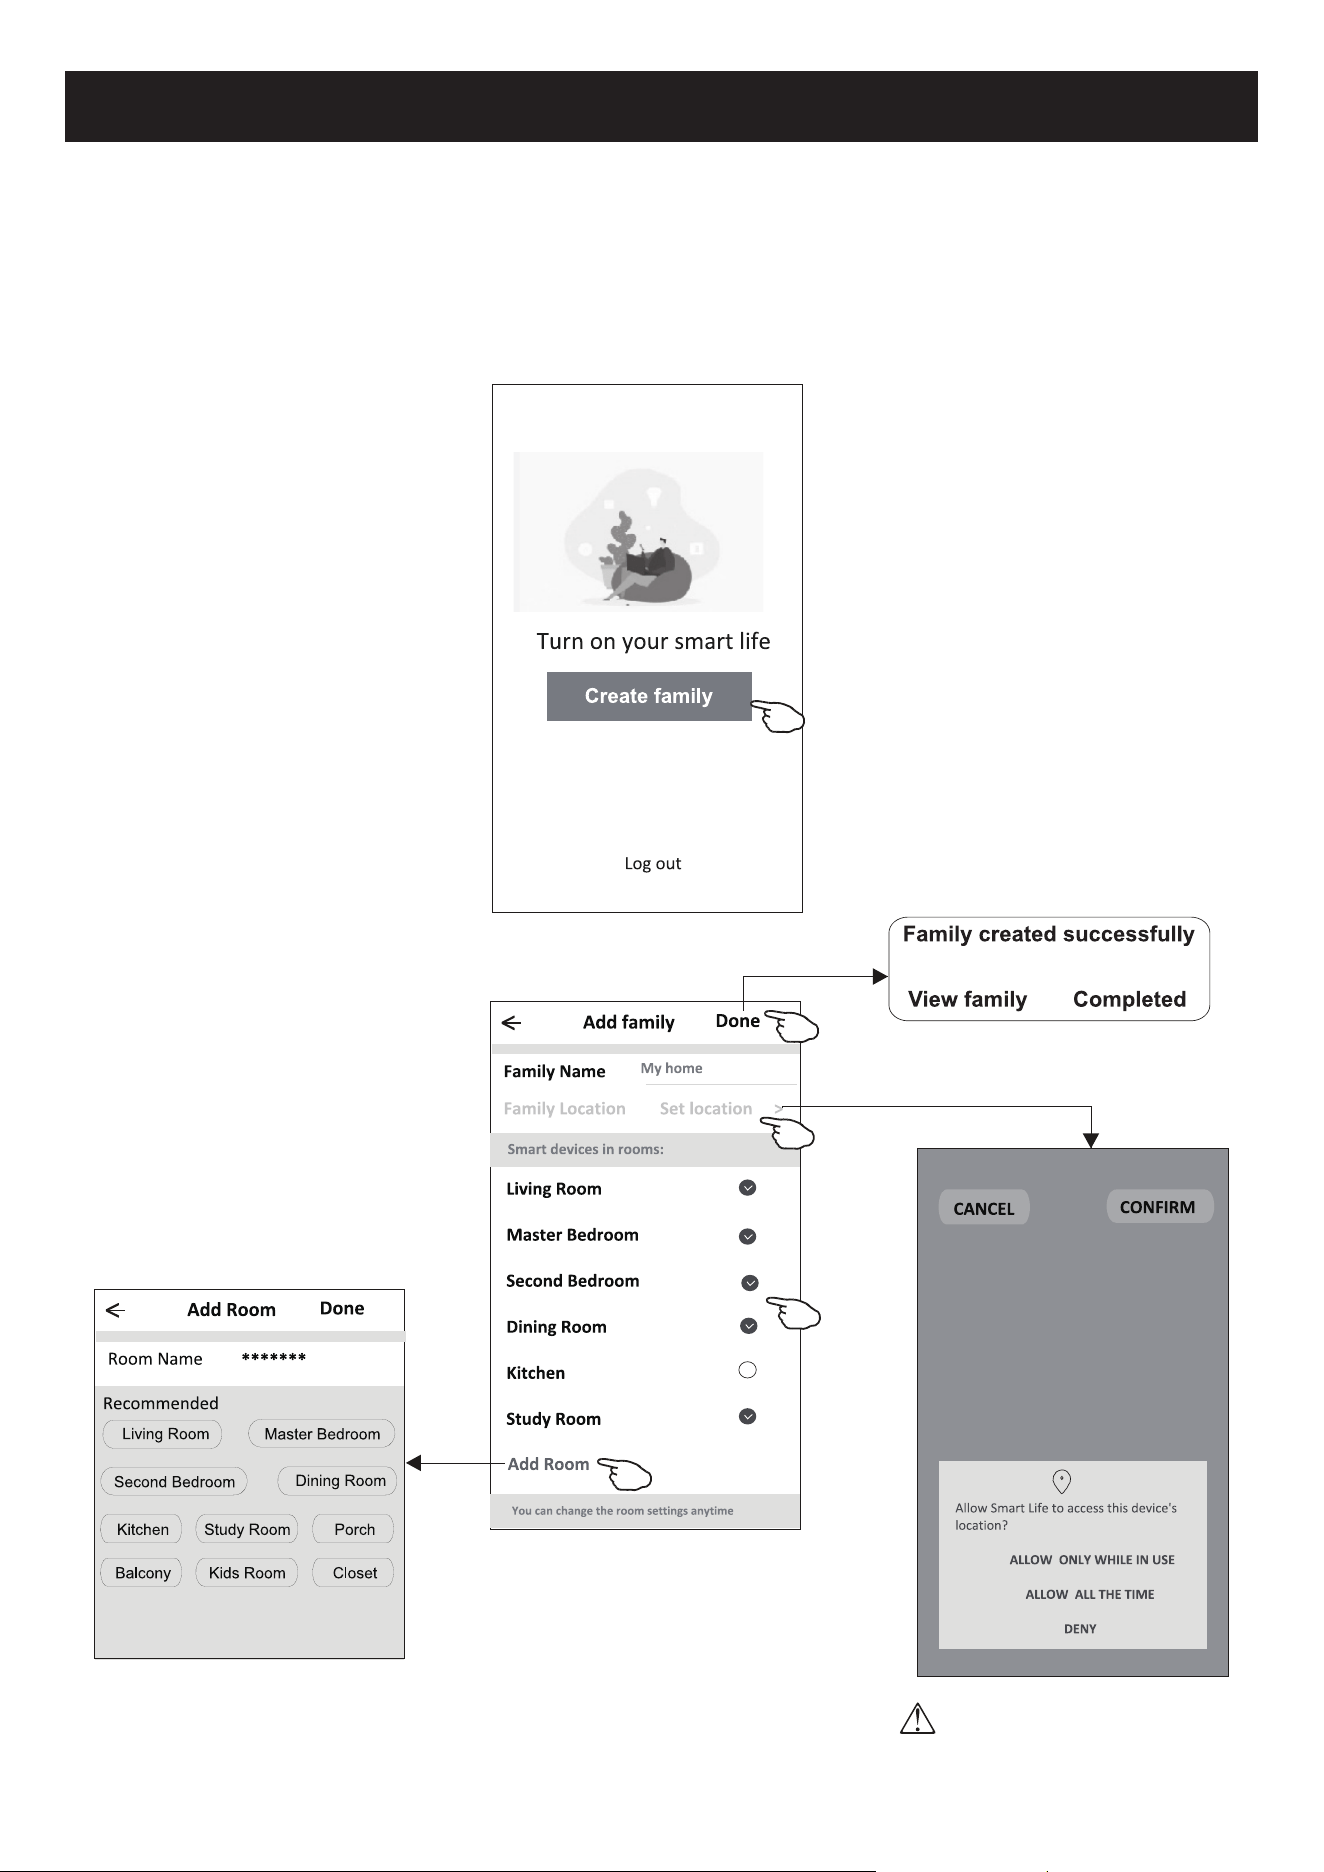
The first time the APP is used, Create family is needed:
4.Tap "Create family".
5.Make name for the family.
6.Set the location.
7.Choose default rooms or add new rooms.
8.Tap "Done" and "Completed".
Turn on your smart life
Create family
Log out
#
A
B
C
D
E
F
G
H
I
J
K
L
M
N
O
P
Q
R
S
T
U
V
W
X
Y
Z
Family Name
<
Add family
Done
Family Location Set location >
Smart devices in rooms:
Living Room
Master Bedroom
Second Bedroom
Dining Room
Kitchen
Study Room
Add Room
You can change the room settings anytime
My home
choose the recommended room
or make a new room, then tap
Done.
Room Name
<
Add Room
Done
Recommended
*******
6
#
A
B
C
D
E
F
G
H
I
J
K
L
M
N
O
P
Q
R
S
T
U
V
W
X
Y
Z
Allow Smart Life to access this device's
location?
ALLOW ONLY WHILE IN USE
ALLOW ALL THE TIME
DENY
CANCEL
CONFIRM
Note:
The app can open the map on your
phone and you can set the location
where you are.
Family created successfully
View family Completed
Login
7
Forgot the password
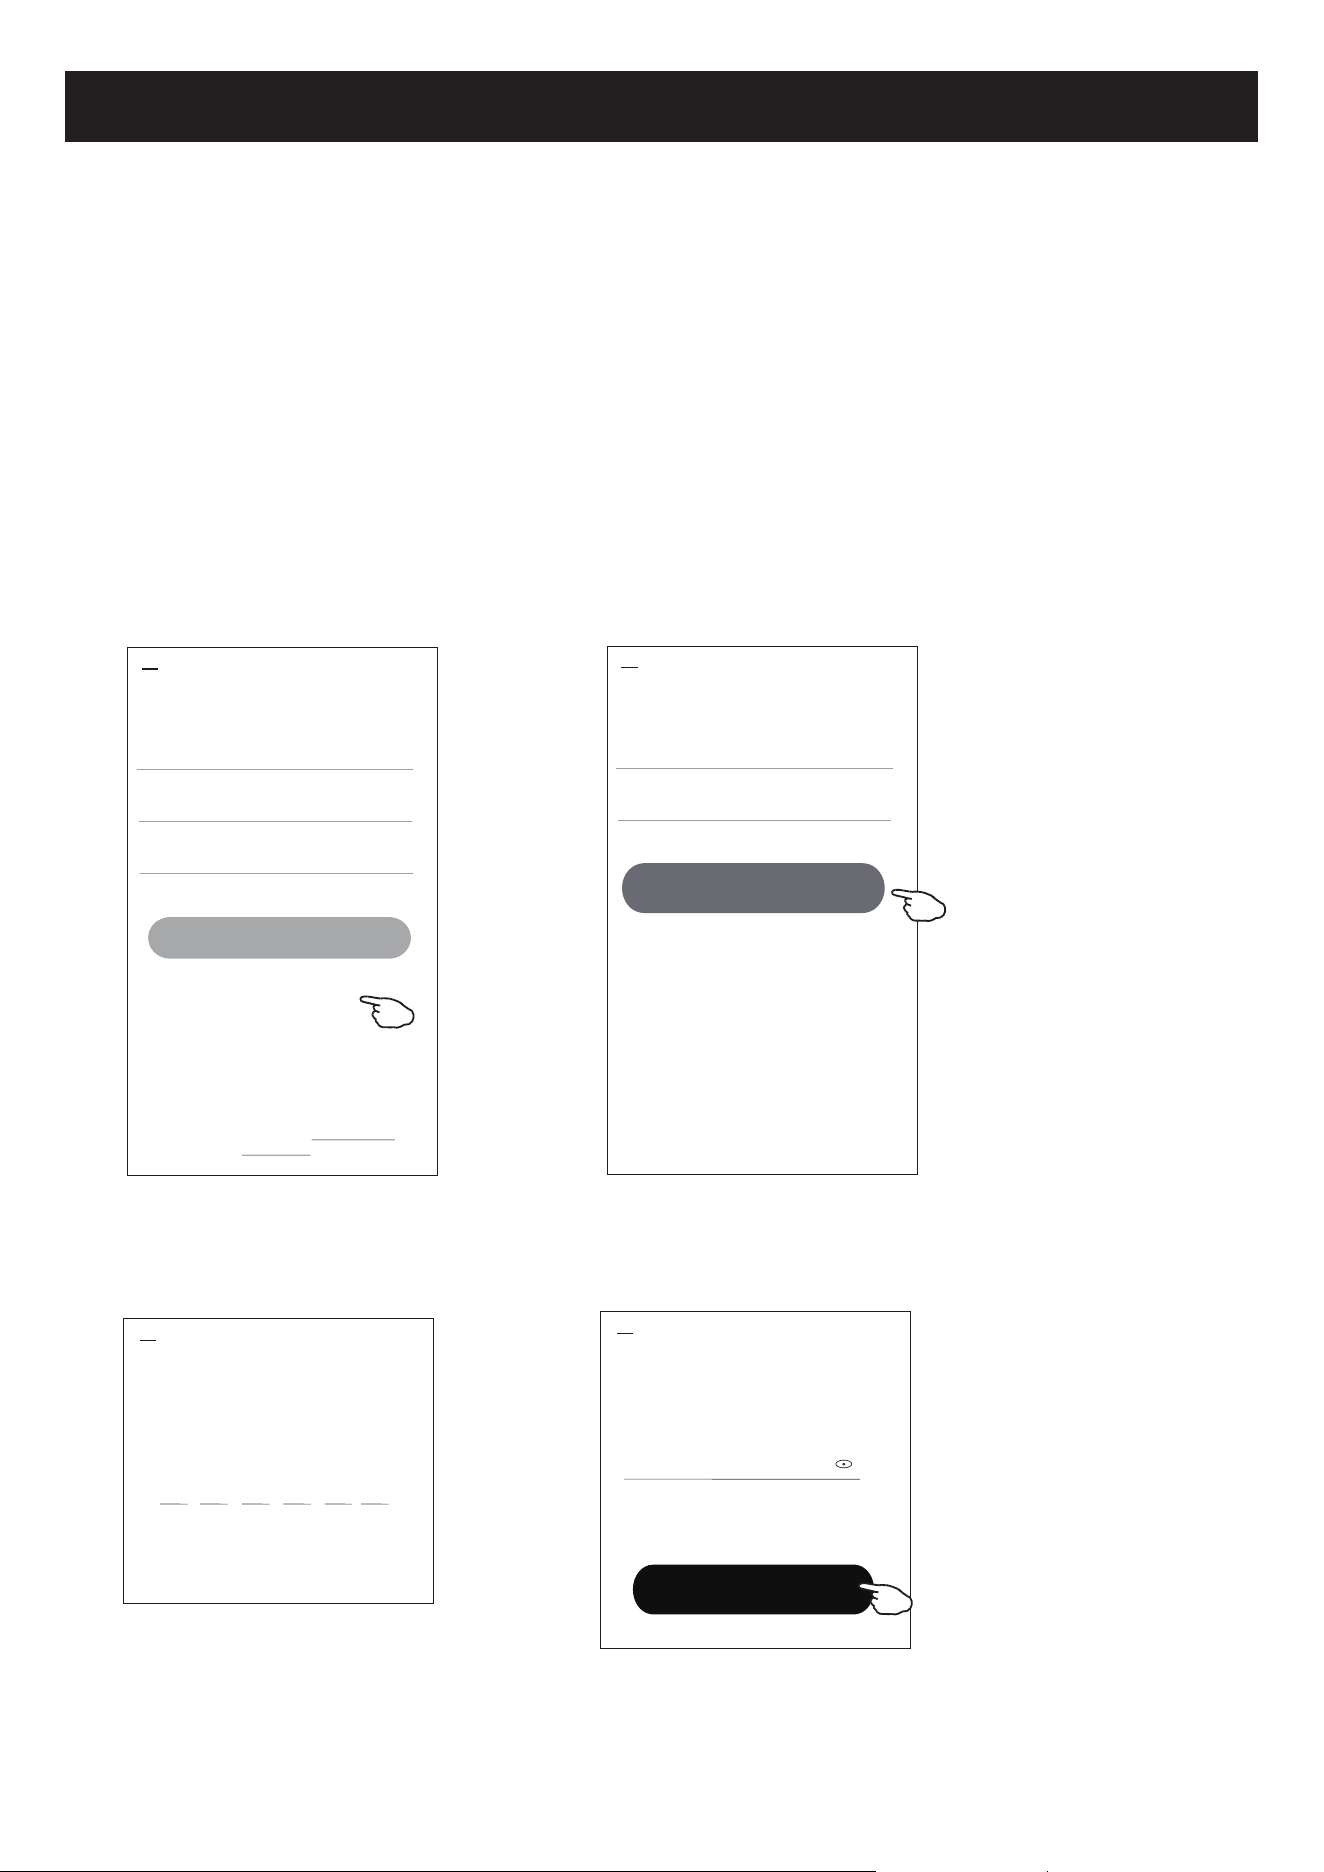
If you forgot the password or you want to reset the password, operate as below:
1.Tap "Forgot password".
2.Enter your account(e-mail address) and tap button "Obtain verification code".
3.Enter the verification code received by your e-mail.
4.Set the new password and tap button "Done".
Login
******* >
Email address
<
Log in
Password
Forgot password
Forgot password
****** >
*********** X
<
Obtain verification code
Enter verification
code
Verification code is sent to your email:
***********,Resend(55s)
* * * * * *
<
Set Password
6-20 characters for password, including character, numbers
******
<
Done
Login means that you agree with User Agreement and
Privacy Policy
8
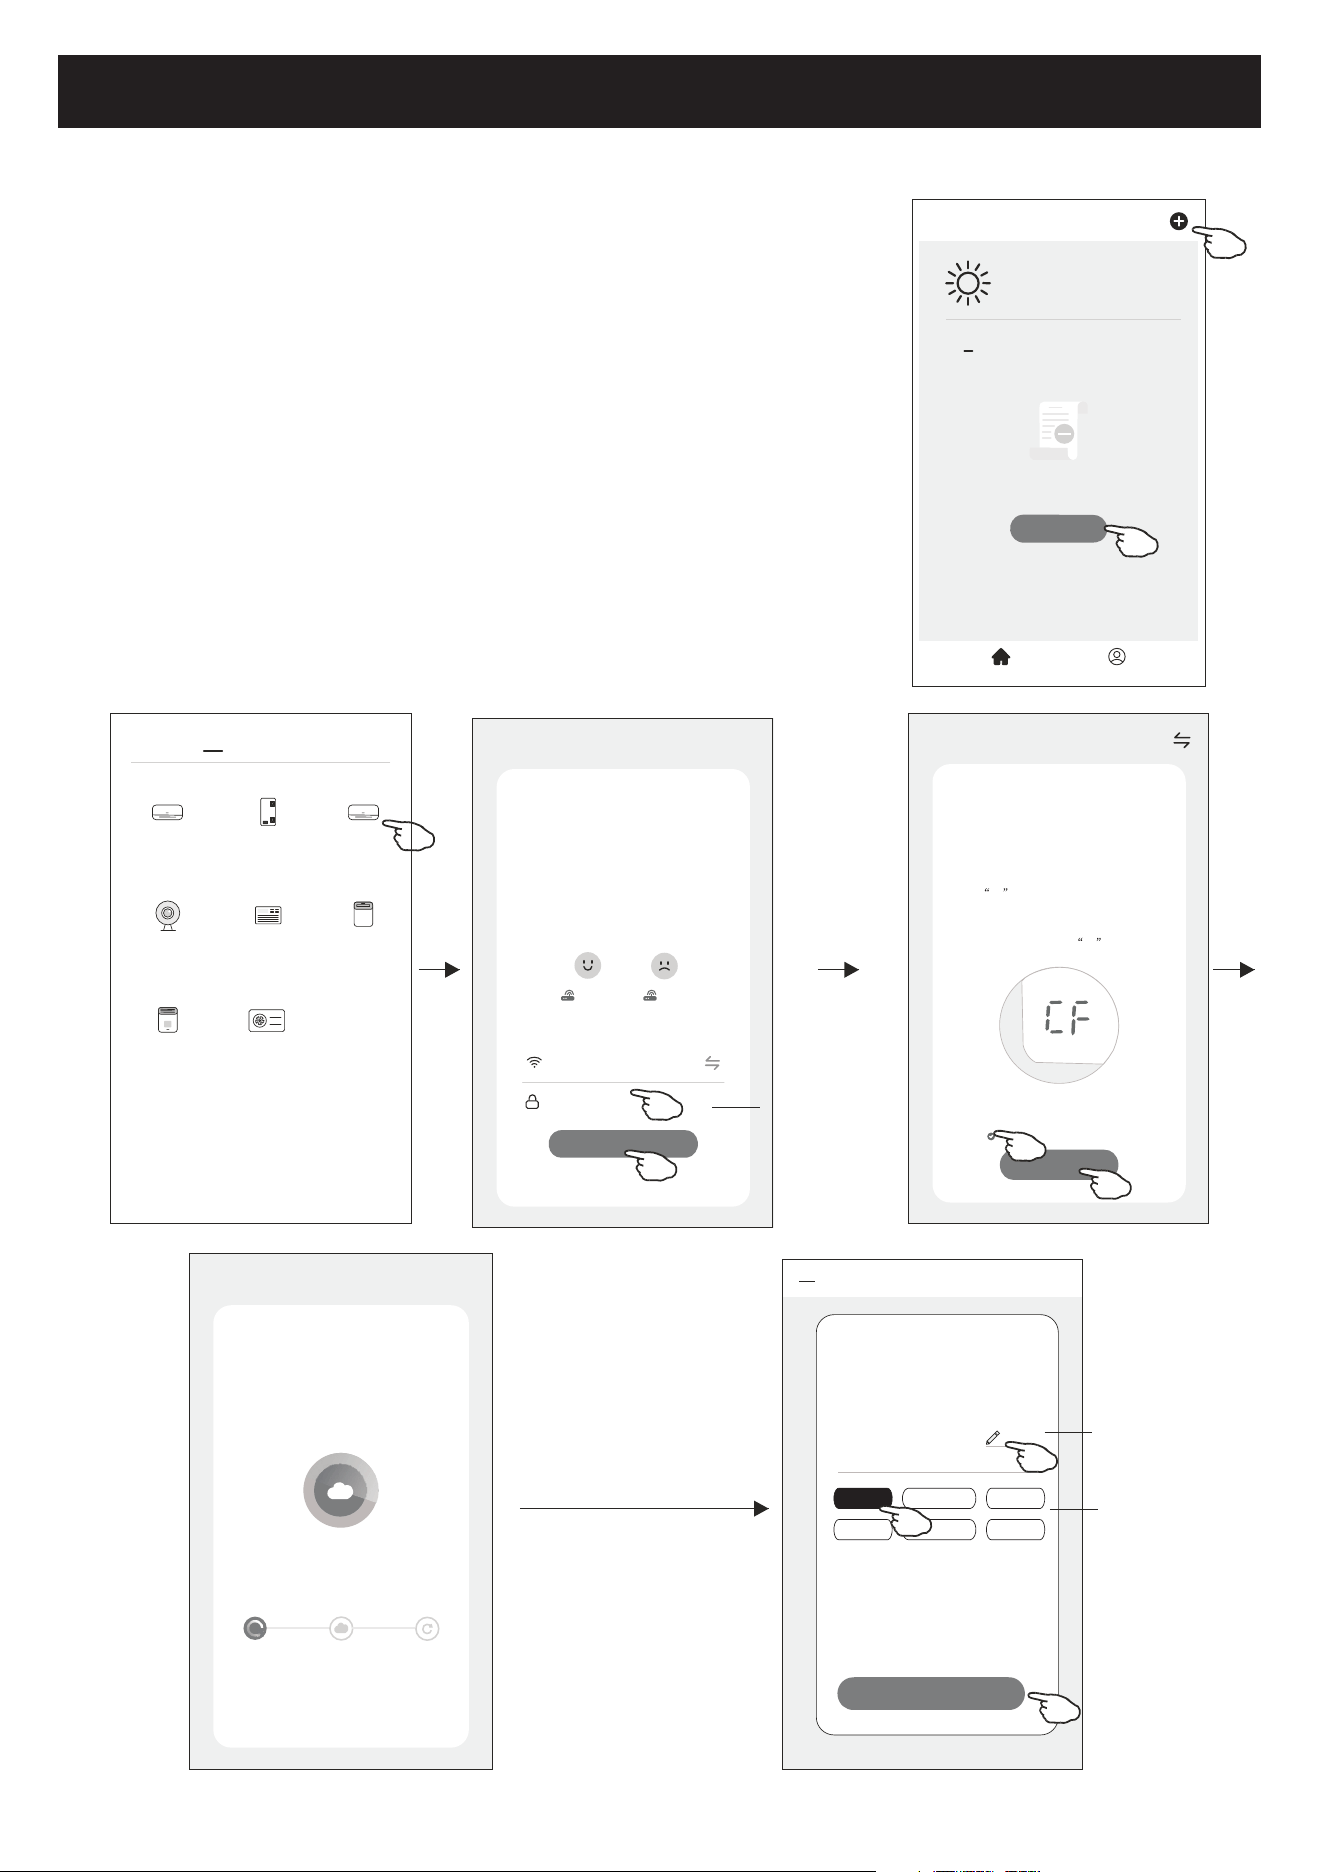
1.Power on the indoor unit, no need to launch the air conditioner.
2.Click "+" in the upper right corner of the "Home" screen
or tap "Add device" on the room which has no device.
3.Tap the "Split Air conditioner" logo.
4.Input the password of the Wi-Fi which the same as your smart
phone connected, then tap "Next".
5.Follow the comments on the next screen to reset the Wi-Fi module
then check "Confirm the device is reset" and tap"Next".
6.You can see the percent rate of connecting process, at the same time
PP","SA","AP" shining in turn on the indoor display.
"PP" means "Searching the router"
"SA" means "connected to the router"
"AP" means "connected to the server"
Add device
There are 2 modes CF(Quick connection) and AP(Access Point) for adding device.
CF mode
<
Welcome Home
Set your home location for more
information
All Devices Living Room
Master
...
Add Device
Home Me
Work office
<
No devices
CF Mode
Reset the device first.
Method1:When there is a DISPLAY key on the
remote control, press the DISPLAY key 6 times
in the time of 8 seconds; when there is no
DISPLAY key on the remote control, press the
ECO key 6 times in the time of 8 seconds until
the device beeps twice and the LCD screen
show CF .
Next
Cancel
Confirm the device is reset.
Resetting Devices
<
Method2:Press the General key 9 times in the
time of 8 seconds until the device beeps twice
and the LCD screen show CF .
Add Device
<
Device added
successfully
Sample1
Living Ro... Master Be... Second B...
Dining R... Kitchen Study Ro...
Rename the
device
Select the
location room
Done
Select 2.4 Ghz
Wi-Fi Network and
enter password
Next
Cancel
If your Wi-Fi is 5GHz, please set it to
bo 2.4GHz.Common router setting
method
2.4GHz 5GHz
*******
Password
enter password
<
Add Manually
Auto Scan
Dehumidifier
Air Conditioner
(BT+Wi-Fi)
Fresh Air
Purifier
Split Air
Conditioner
Window Type
Air Conditioner
Portable Air
Conditioner
Security
Camera
Swimming
Pool H/P
Adding device...
Cancel
Ensure that the device is powered on.
2%
Scan
devices.
Register on
Cloud.
Initialize the
devices.
9
Add device
Select 2.4 Ghz
Wi-Fi Network and
enter password
Next
Cancel
If your Wi-Fi is 5GHz, please set it to
bo 2.4GHz.Common router setting
method
2.4GHz 5GHz
*******
Password
AP Mode
Reset the device first.
Method1:When there is a DISPLAY key on the
remote control, press the DISPLAY key 6 times
in the time of 8 seconds; when there is no
DISPLAY key on the remote control, press the
ECO key 6 times in the time of 8 seconds until
the device beeps twice and the LCD screen
show AP .
Next
Cancel
Confirm the device is reset.
Resetting Devices
<
Method2:Press the General key 9 times in the
time of 8 seconds until the device beeps twice
and the LCD screen show AP .
CF Mode
AP Mode
Default
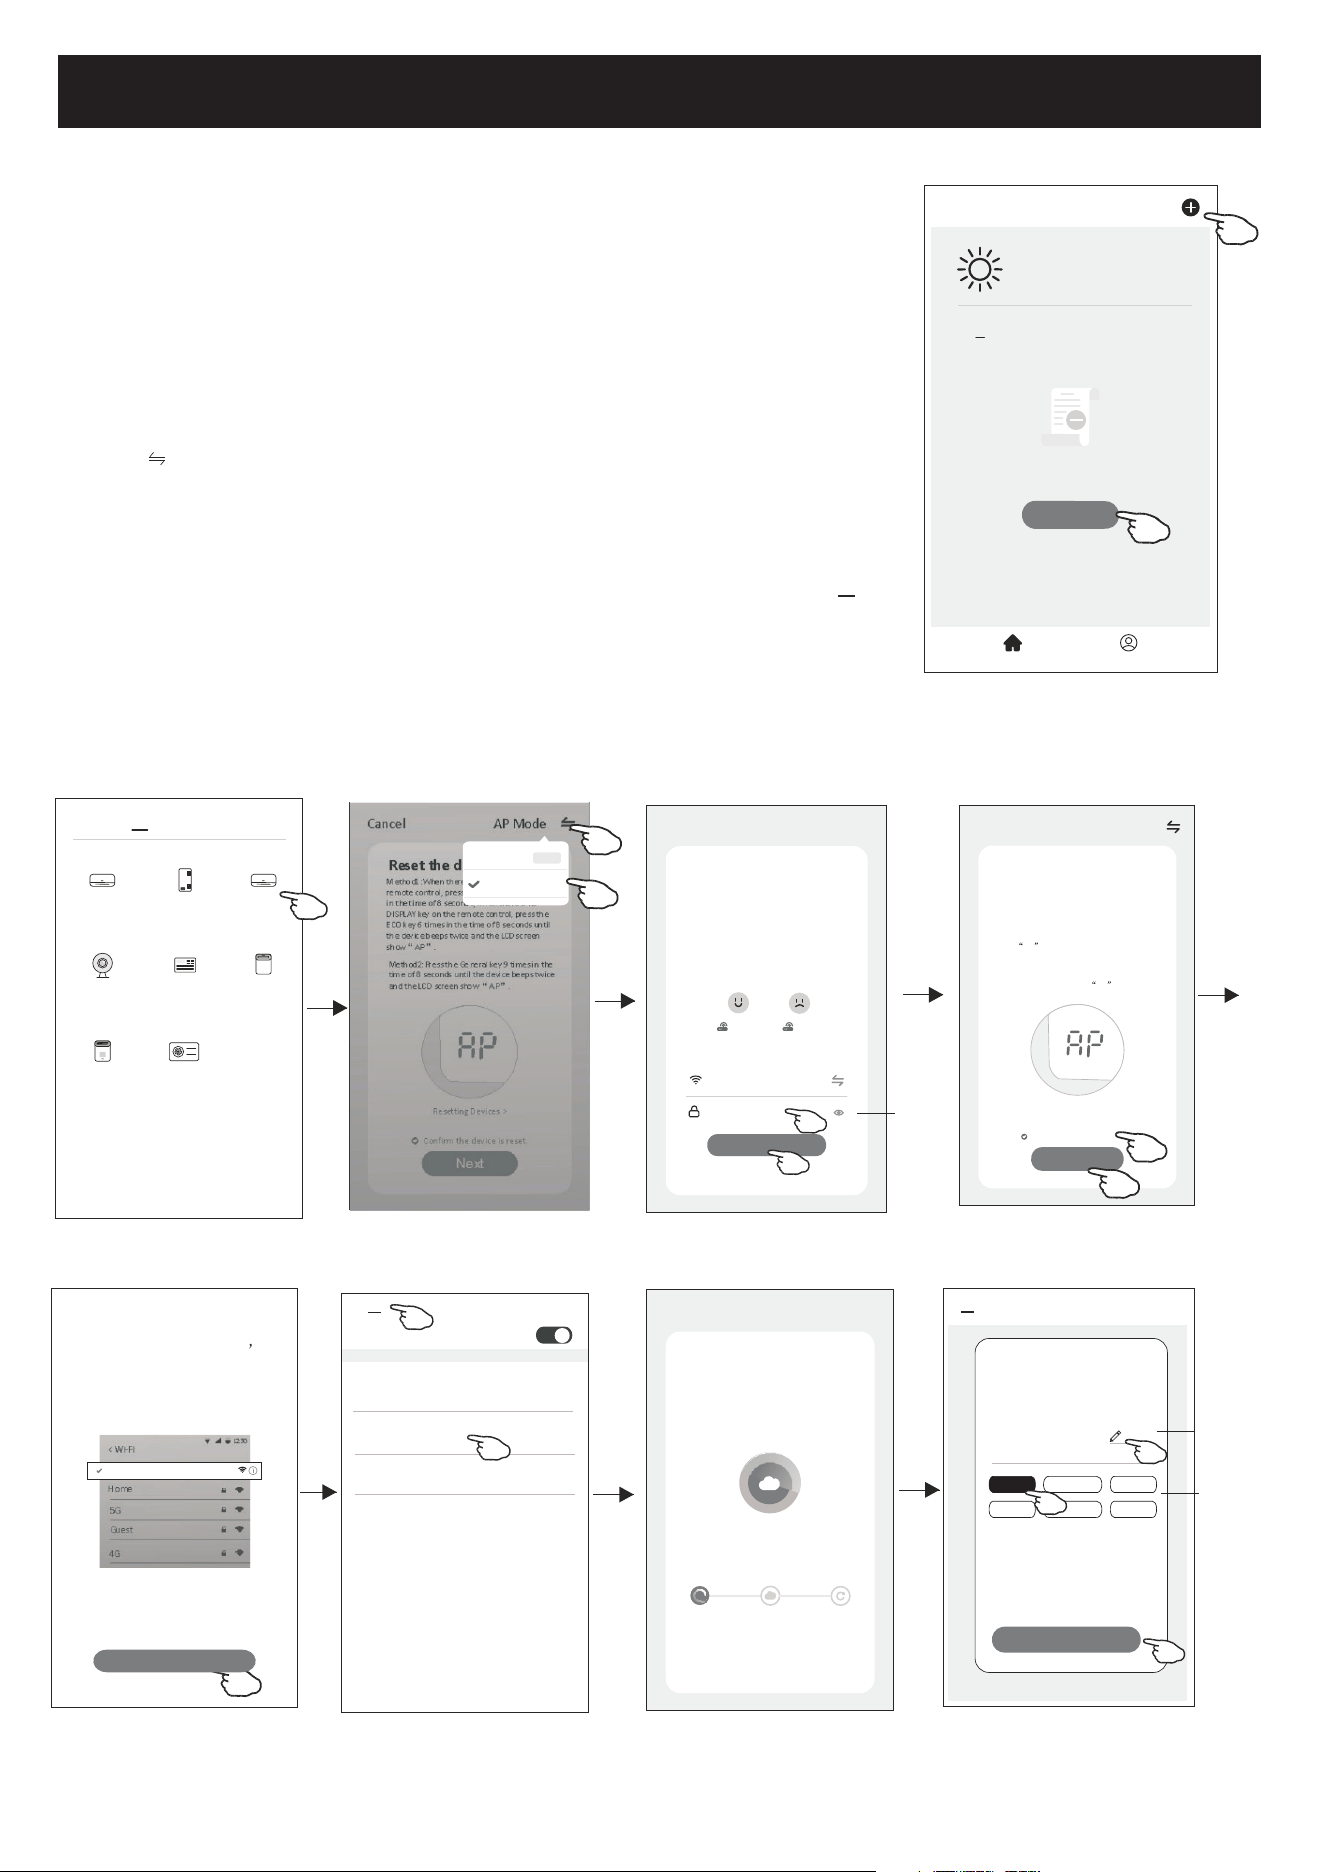
1.Power on the indoor unit, no need to launch the air conditioner.
2.Click "+" in the upper right corner of the "Home" screen
or tap "Add device" on the room which has no device.
3.Tap the "Split Air Conditioner" logo.
4.Input the password of the Wi-Fi which the same as your smart
phone connected, then tap "Next".
5.Tap in the upper right corner and choose "AP Mode"
then follow the comments on the screen to reset the Wi-Fi module
then check "Confirm the device is reset" and tap"Next".
6.Read the instruction carefully and tap "Connect now".
7.In the network setting screen, select "SmartLife-****", and tap" ".
8.You can see the percent rate of connecting process, at the same time
"PP","SA","AP" shining in turn on the indoor display.
"PP" means "Searching the router"
"SA" means "connected to the router"
"AP" means "connected to the server"
There are 2 methods to add the device.
2-AP mode
<
Add Manually
Auto Scan
Dehumidifier
Air Conditioner
(BT+Wi-Fi)
Fresh Air
Purifier
Split Air
Conditioner
Window Type
Air Conditioner
Portable Air
Conditioner
Security
Camera
Swimming
Pool H/P
<
WLAN
AVAILABLE NETWORKS
SmartLife-****
office wifi
WIFI1
<
Add Device
<
Device added
successfully
Sample1
Living Ro... Master Be... Second B...
Dining R... Kitchen Study Ro...
Done
Rename the
device
Select the
location room
<
Welcome Home
Set your home location for more
information
All Devices Living Room
Master
...
Add Device
Home Me
Work office
<
No devices
enter password
<
Connect phone to device s
wifi hotspot
Connect now
1.Please connect your phone to the hotspot
shown below
Wi-Fi
Home
5G
Guest
4G
12:30
<
SmartLife-XXXX
2.Return to this app and continue adding
devices
Confirm hot spot connecton,next
Adding device...
Cancel
Ensure that the device is powered on.
2%
Scan
devices.
Register on
Cloud.
Initialize the
devices.
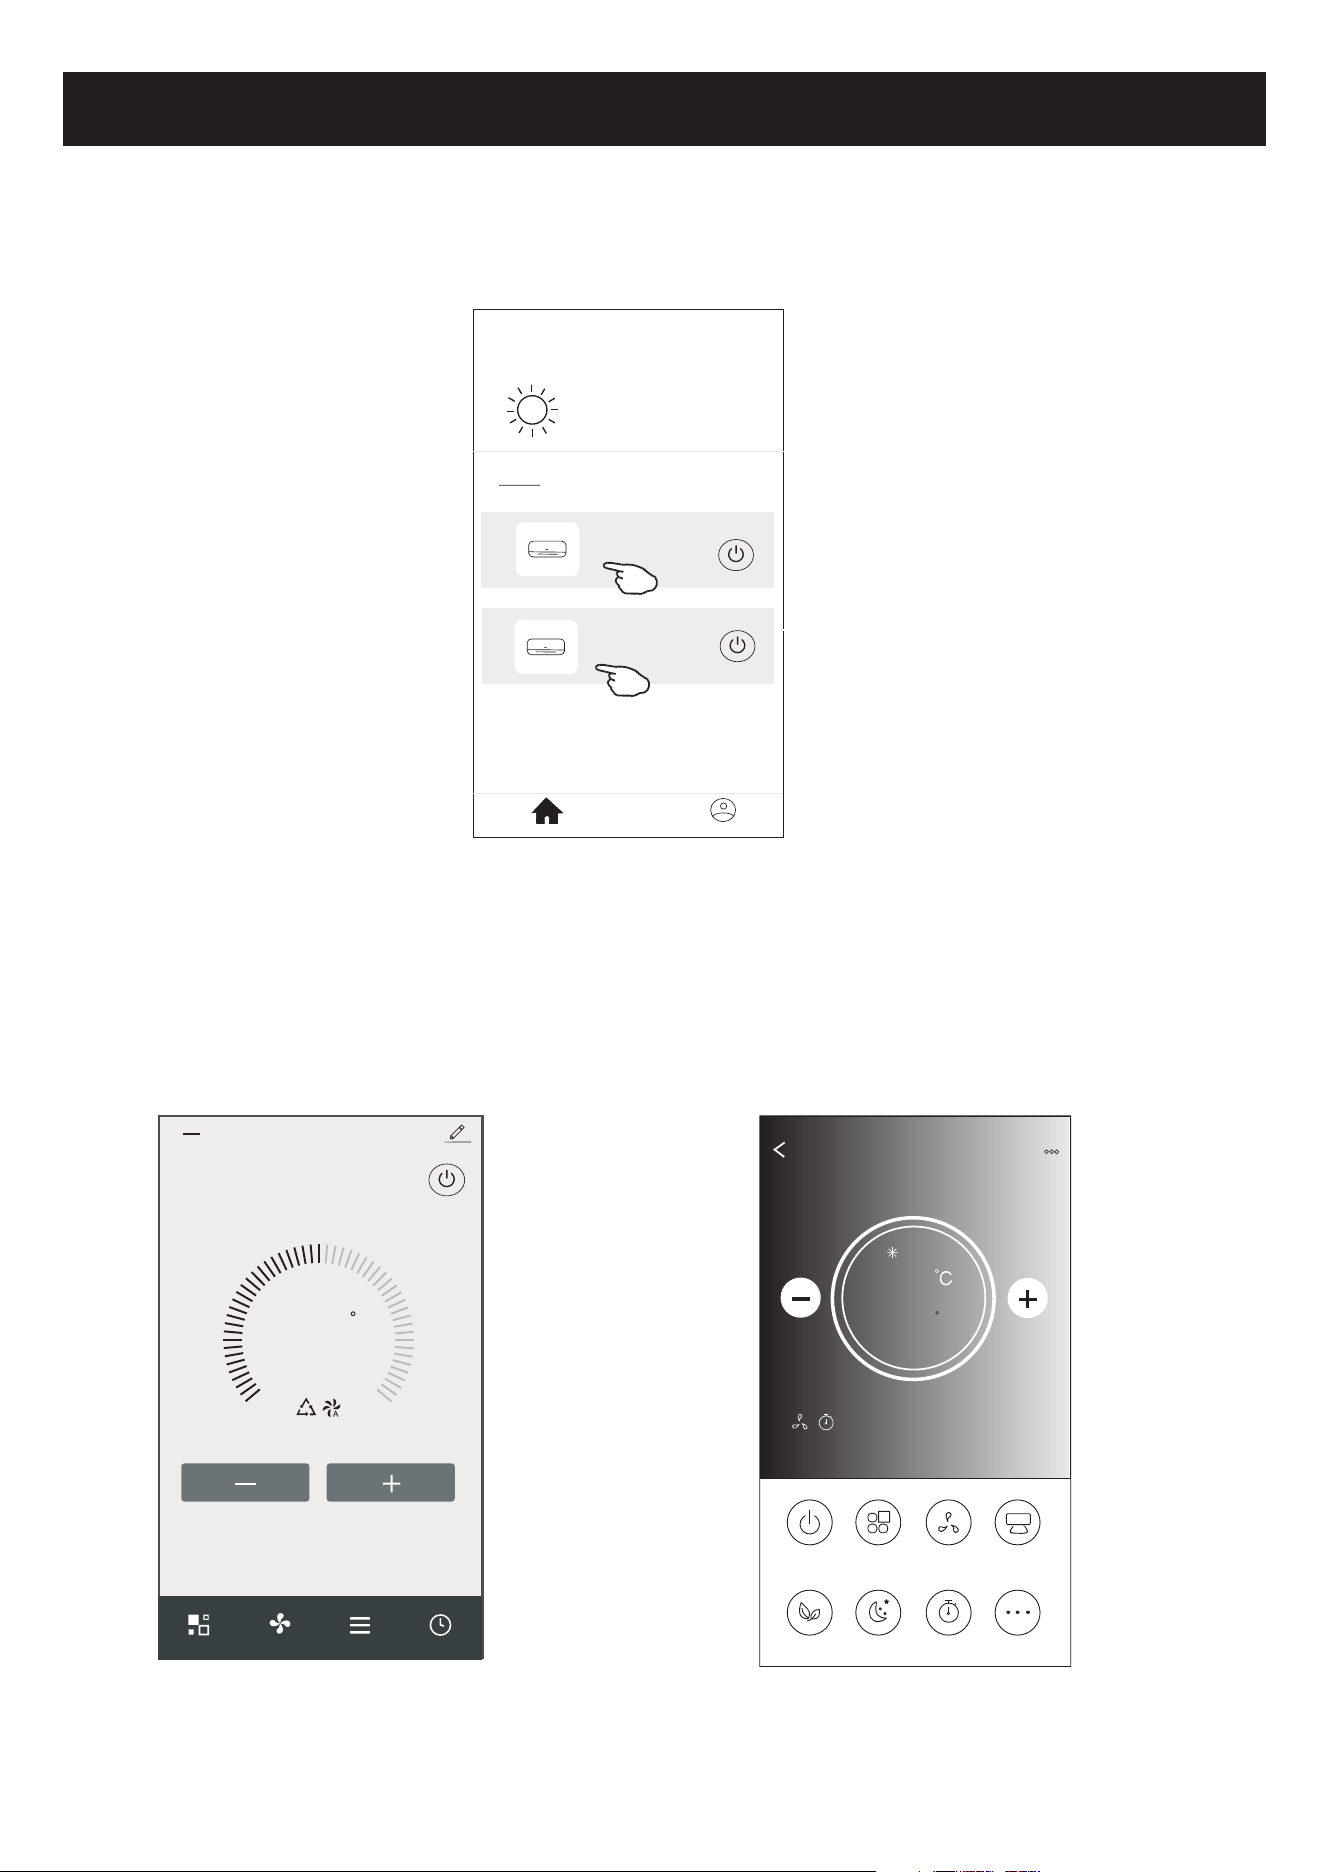
Air conditioner control
The device control screen will pop up automatically after adding the device.
The device control screen will pop up manually by tapping the device name on the home screen.
<
my home
+
>
Set your home location, get more
information
Welcome home
V
All Devices
Living Room
room
Master Bed
...
Home
Me
Sample1
Sample2
Turned off
Already On
ON/OFF
Fan Speed
Precision
Air Flow
More
Eco Sleep
Mode
Timer
Sample1
25
Cool
0
Note:
There are two different control forms base on different software or Wi-Fi module firmware.
Please read the manual carefully base on the real control interface.
23
C
Set Temperature
Timer
Function
Fan
Mode
Sample2
<
10
Control form1
Control form2
11
Air conditioner control
23
C
Set Temperature
Timer
Function
Fan
Mode
Sample2
<
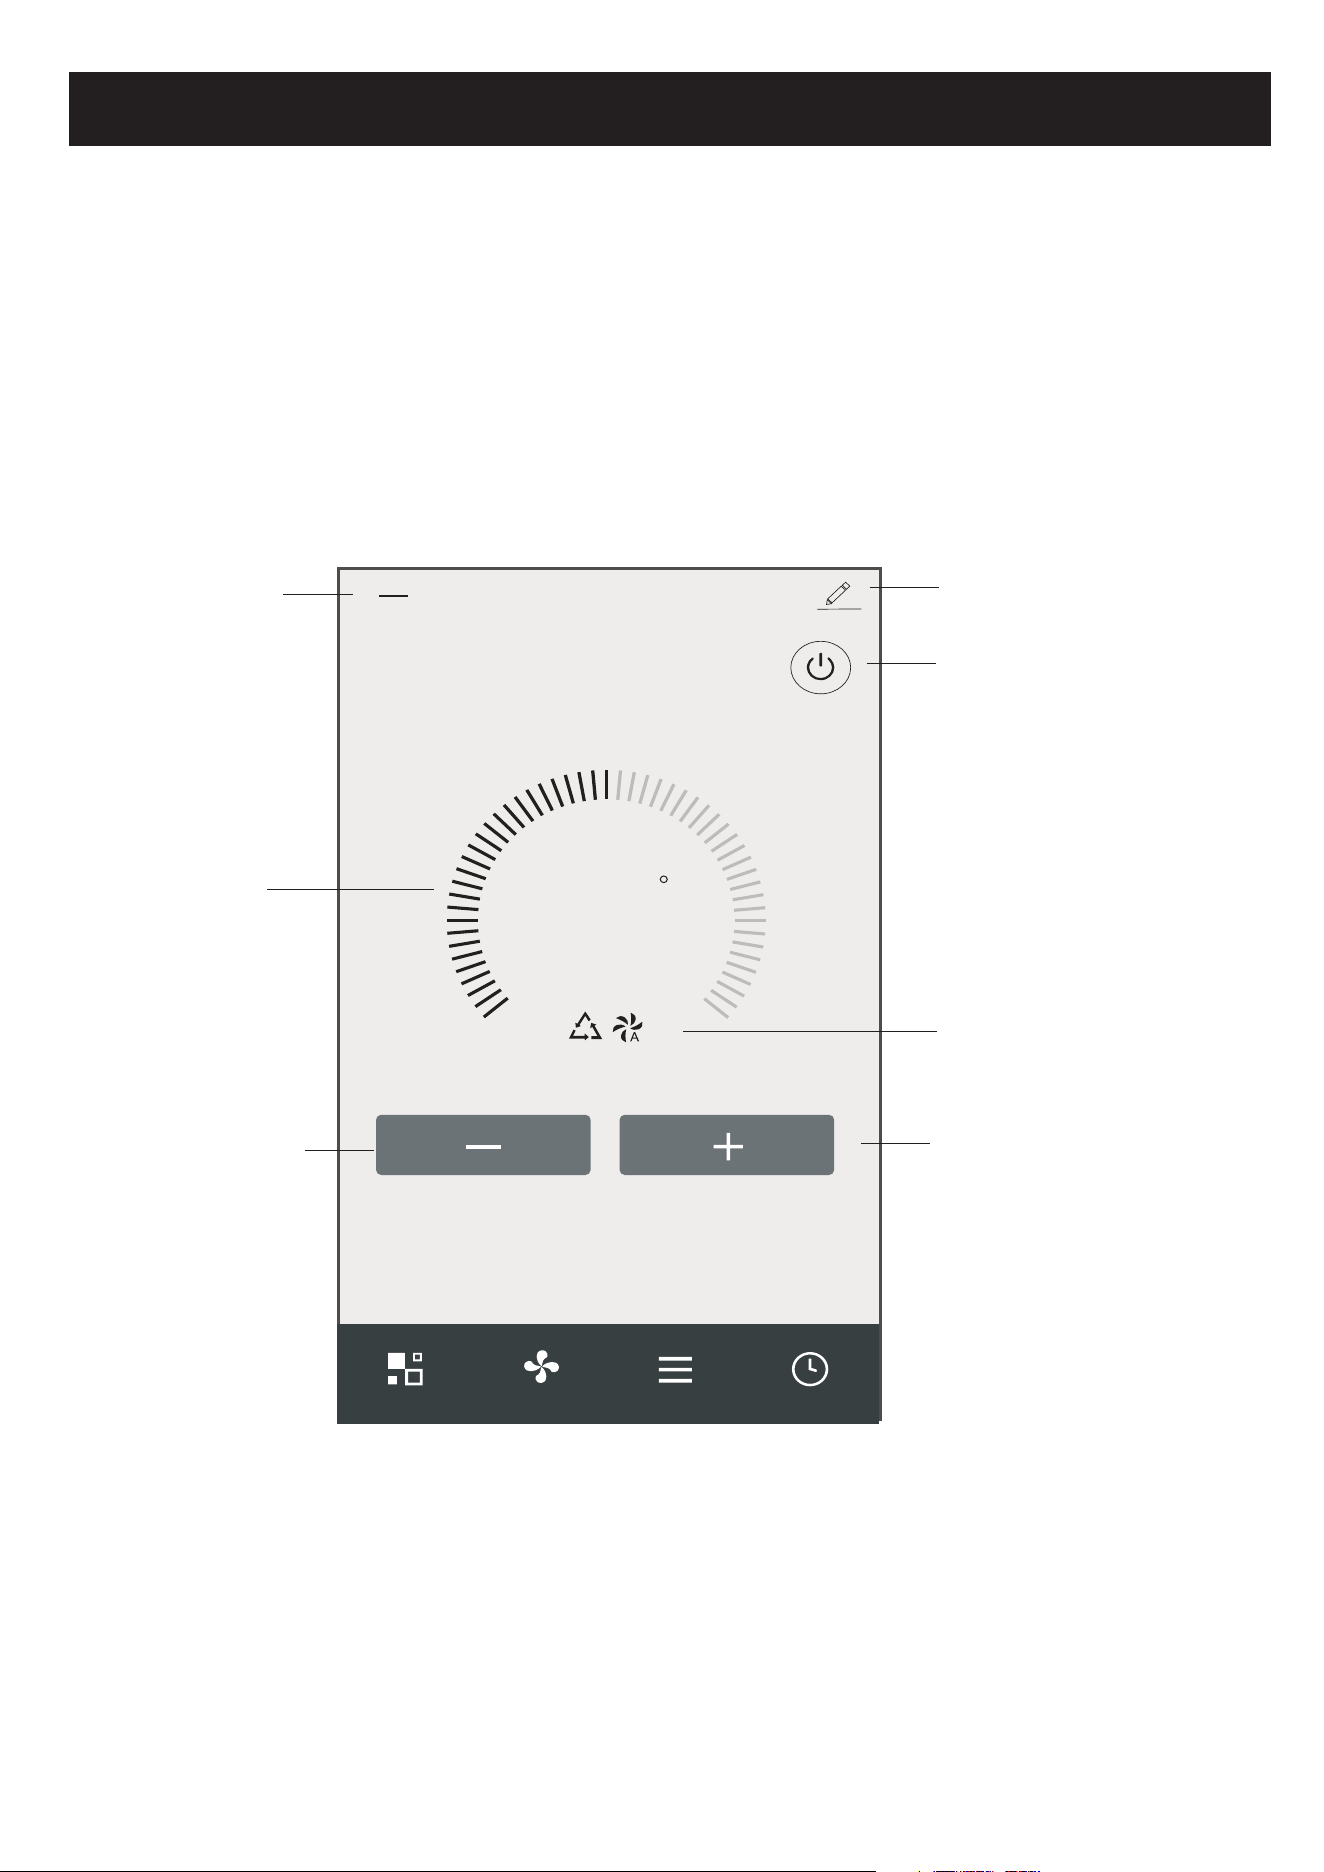
Turn ON/OFF the
air conditioner
Device details
and management
Increase the
setting temperature
Decrease the
setting temperature
The main control interface
Back to the
Home screen
Indicator of
setting temperature
Selected Mode/Fan speed/
Functions indicator
Control form1
Air conditioner control
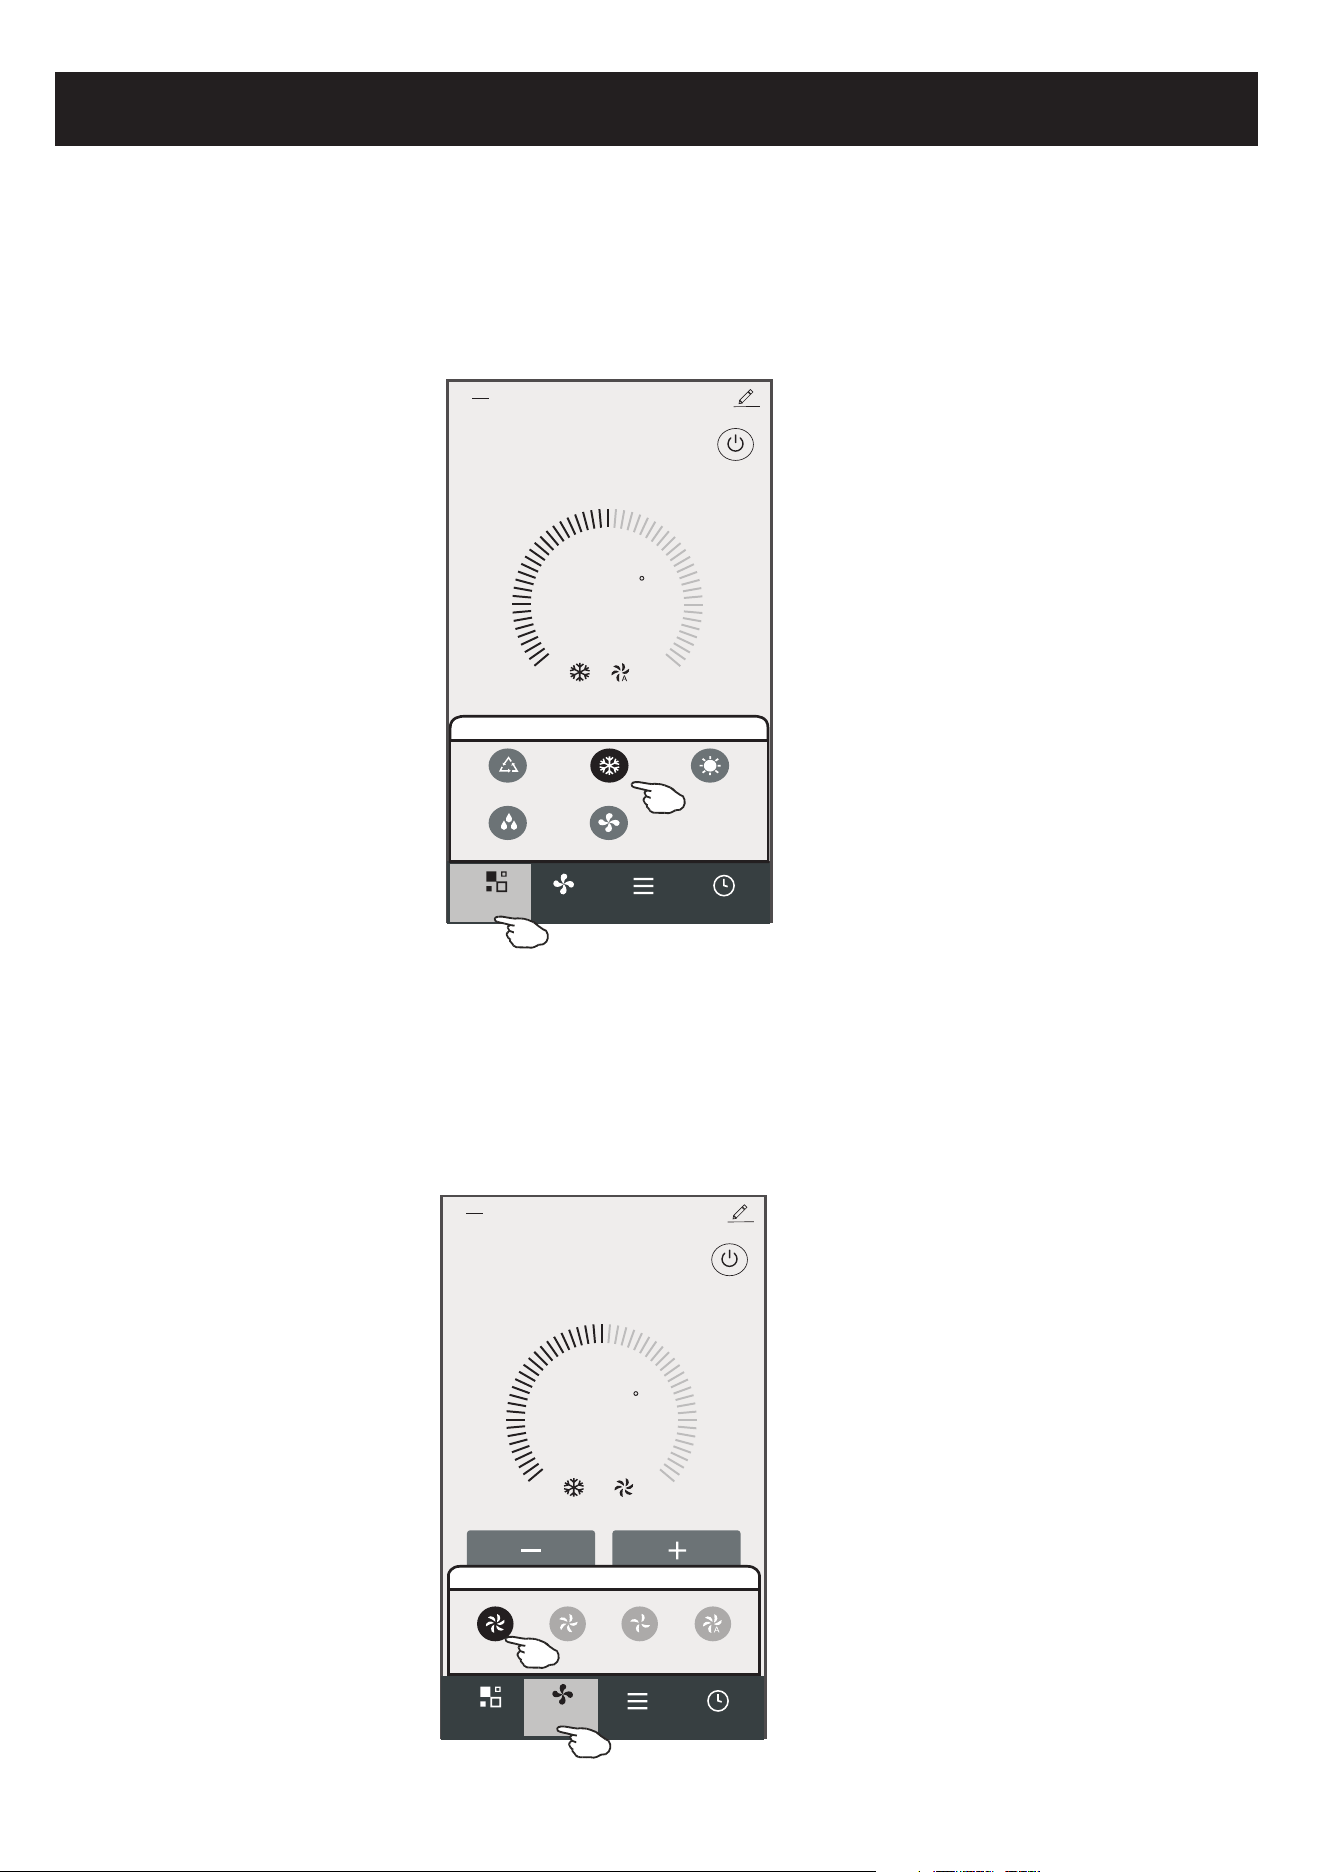
Control form1-Mode setting
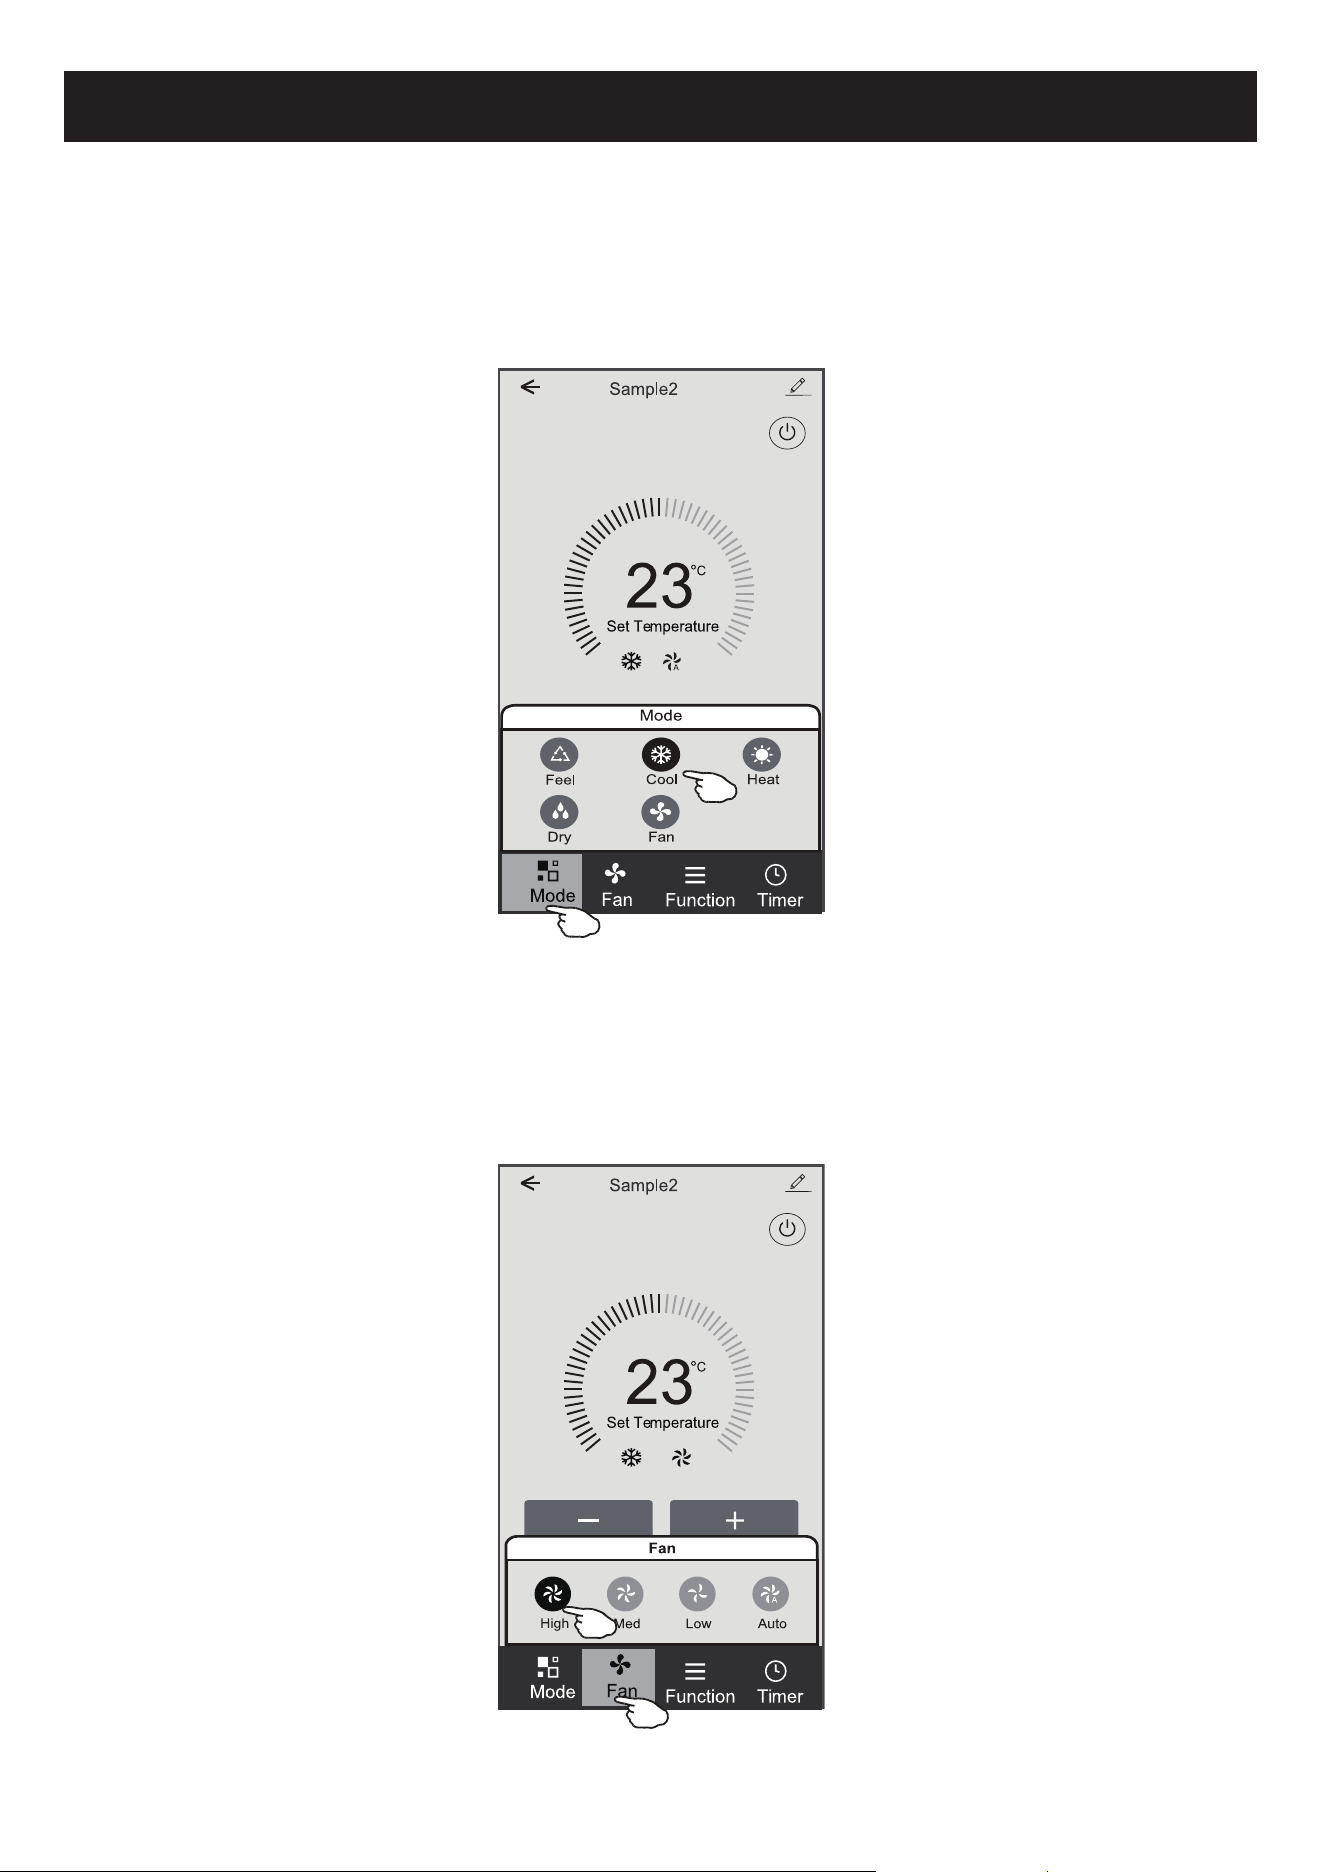
1.Tap Mode to pop up the Mode screen.
2.Select one of the mode Feel/Cool/Heat/Dry/Fan.
3.Tap anywhere around the setting temperature to cancel the Mode setting.
23
C
Set Temperature
Timer
Function
Fan
Sample2
<
Mode
FanDry
Feel
Cool Heat
Mode
Control form1-Select fan speed
23
C
Set Temperature
Timer
Function
Sample2
<
Mode
Fan
Fan
Med Low Auto
High
1.Tap Fan to pop up the Fan screen.
2.Select one of the fan speed High/med/Low/Auto.
3.Tap anywhere around the setting temperature to cancel the selection.
12
Air conditioner control
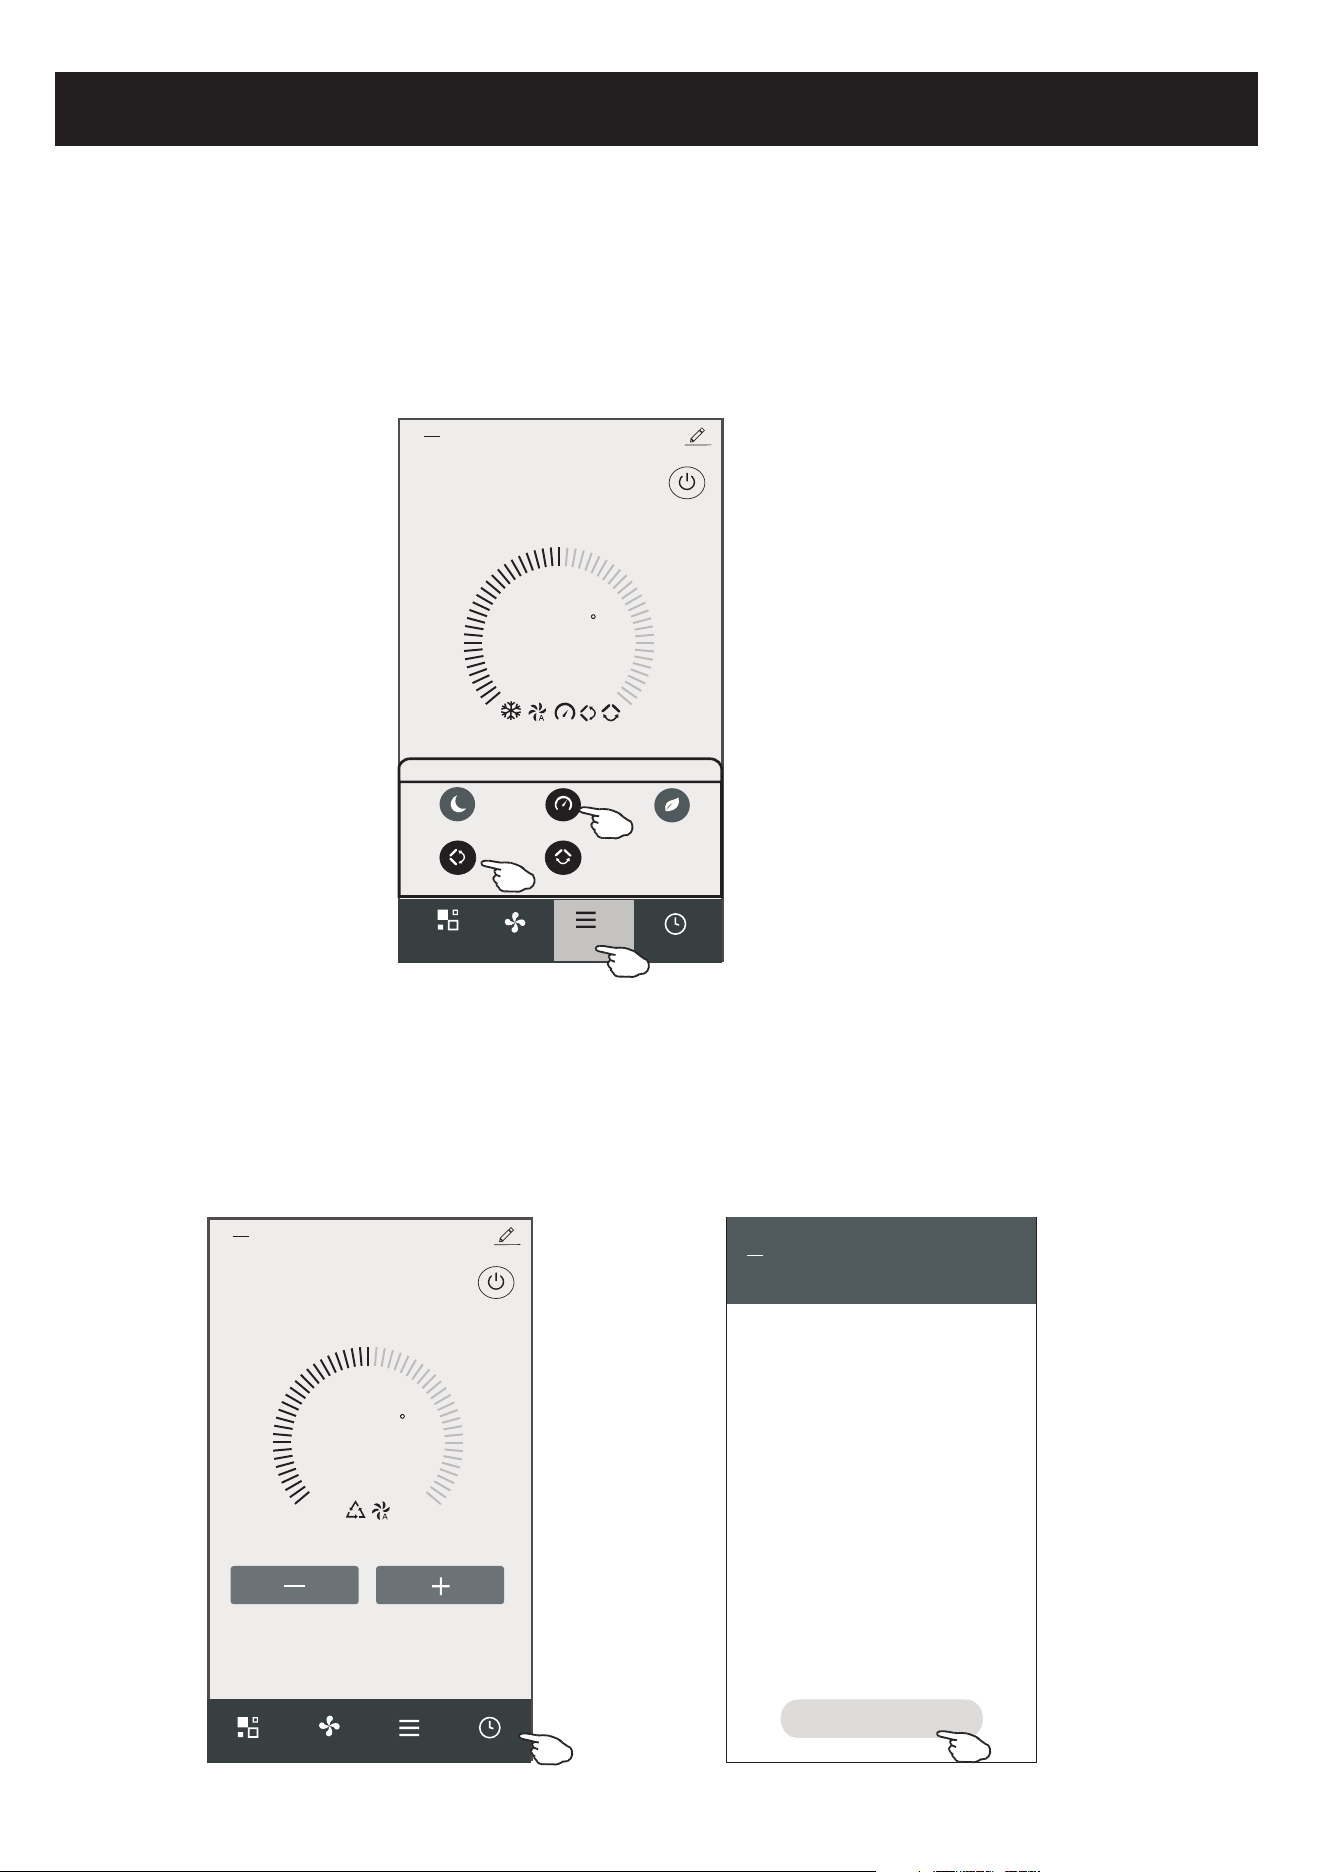
Control form1-Function setting
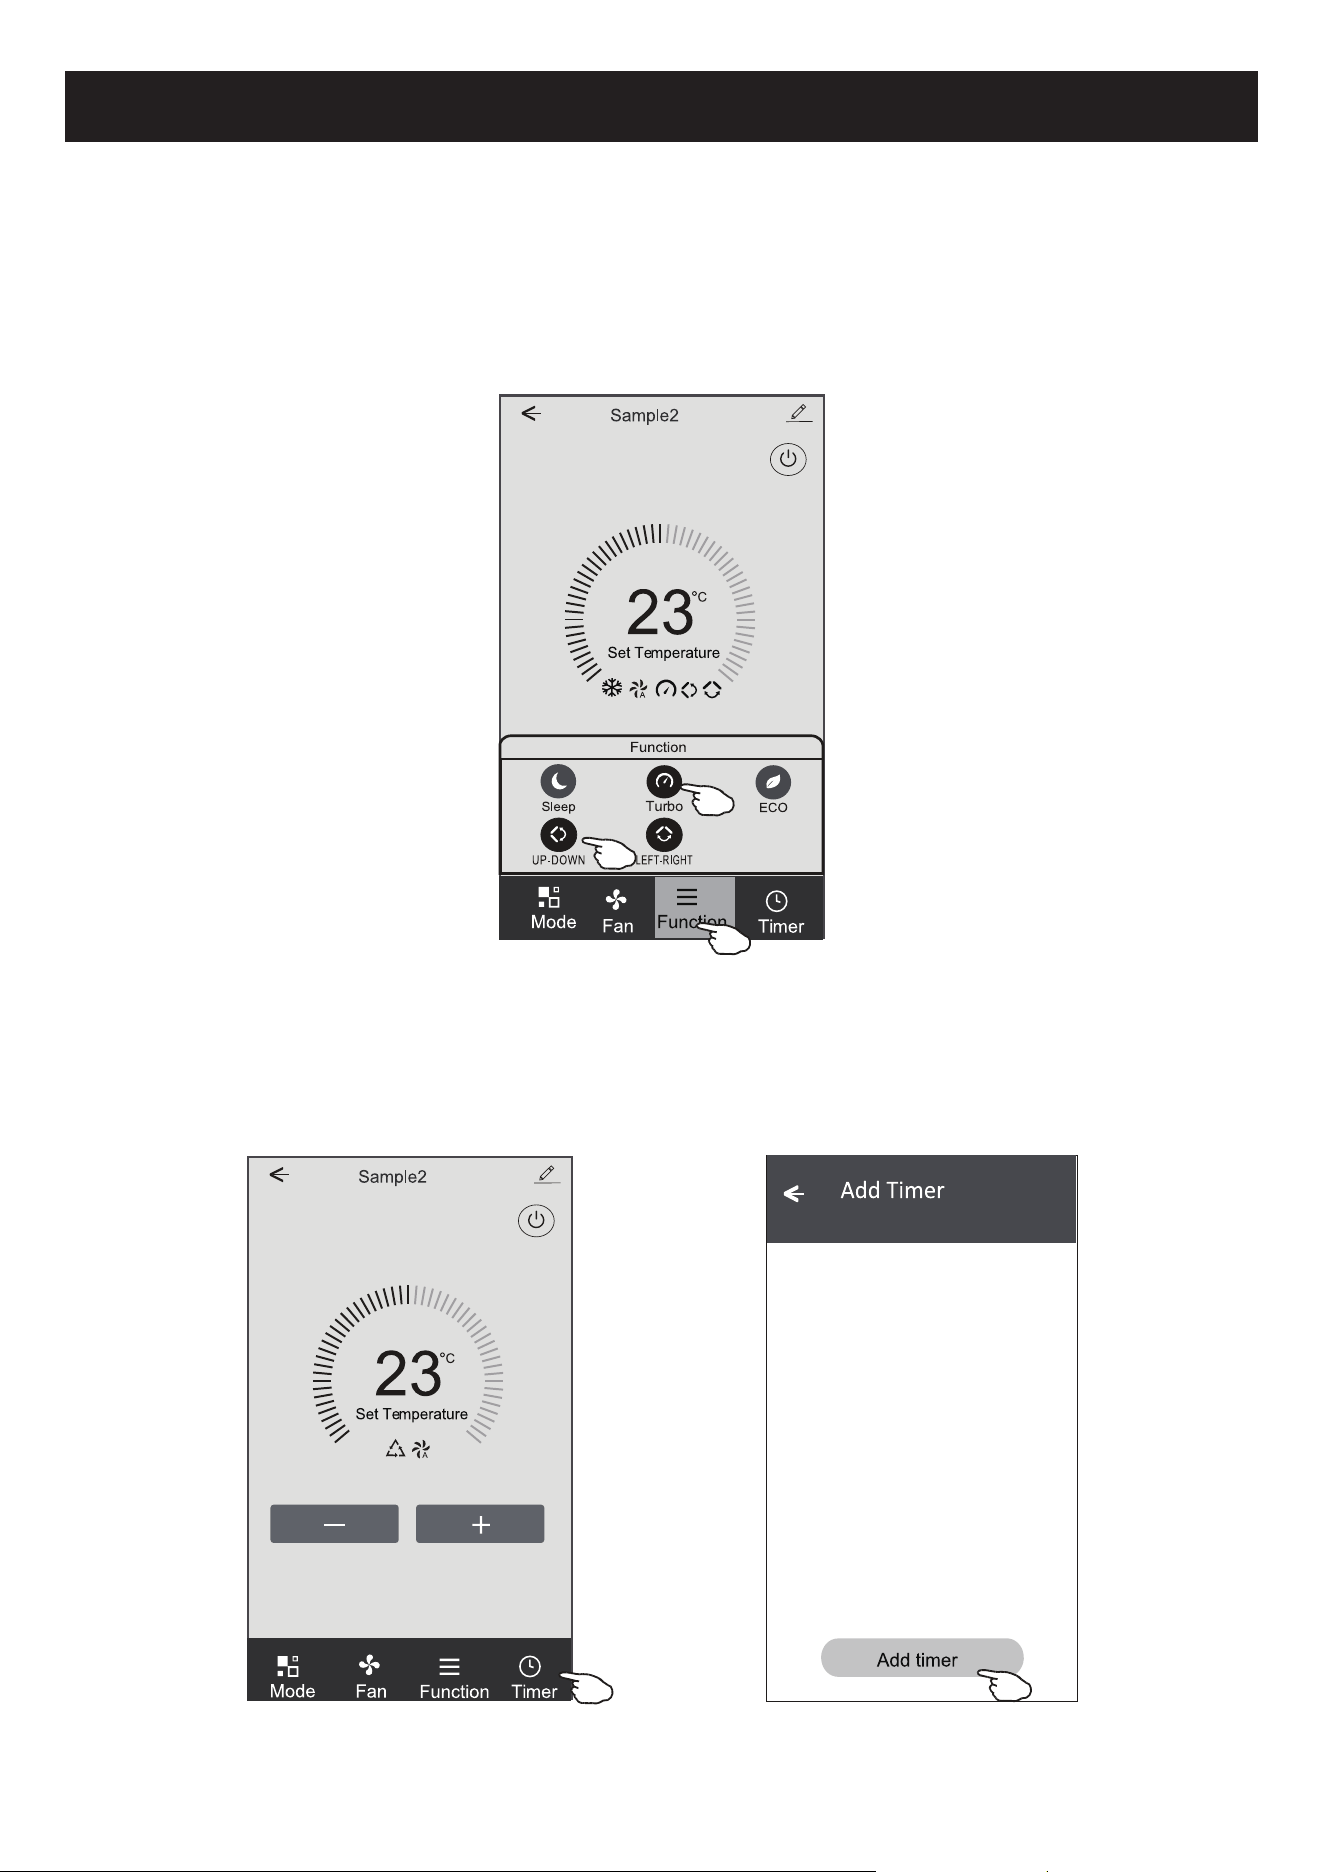
1.Tap Function to pop up the Function screen.
2.Select one of the functions Sleep/Turbo/ECO.
3.Select UP-DOWN/LEFT-RIGHT for auto swing with direction of UP-DOWN/LEFT-RIGHT.
4.Tap anywhere around the setting temperature to cancel the Function setting.
23
C
Set Temperature
Timer
Fan
Sample2
<
Mode
Control form1-Timer adding
1.Tap Timer to pop up the Add Timer screen.
2.Tap Add Timer.
13
Function
UP-DOWN
LEFT-RIGHT
Turbo
Sleep
ECO
Function
23
C
Set Temperature
Timer
Function
Fan
Mode
Sample2
<
WLAN
<
Add Timer
Add timer
Air conditioner control
Control form1-Timer adding
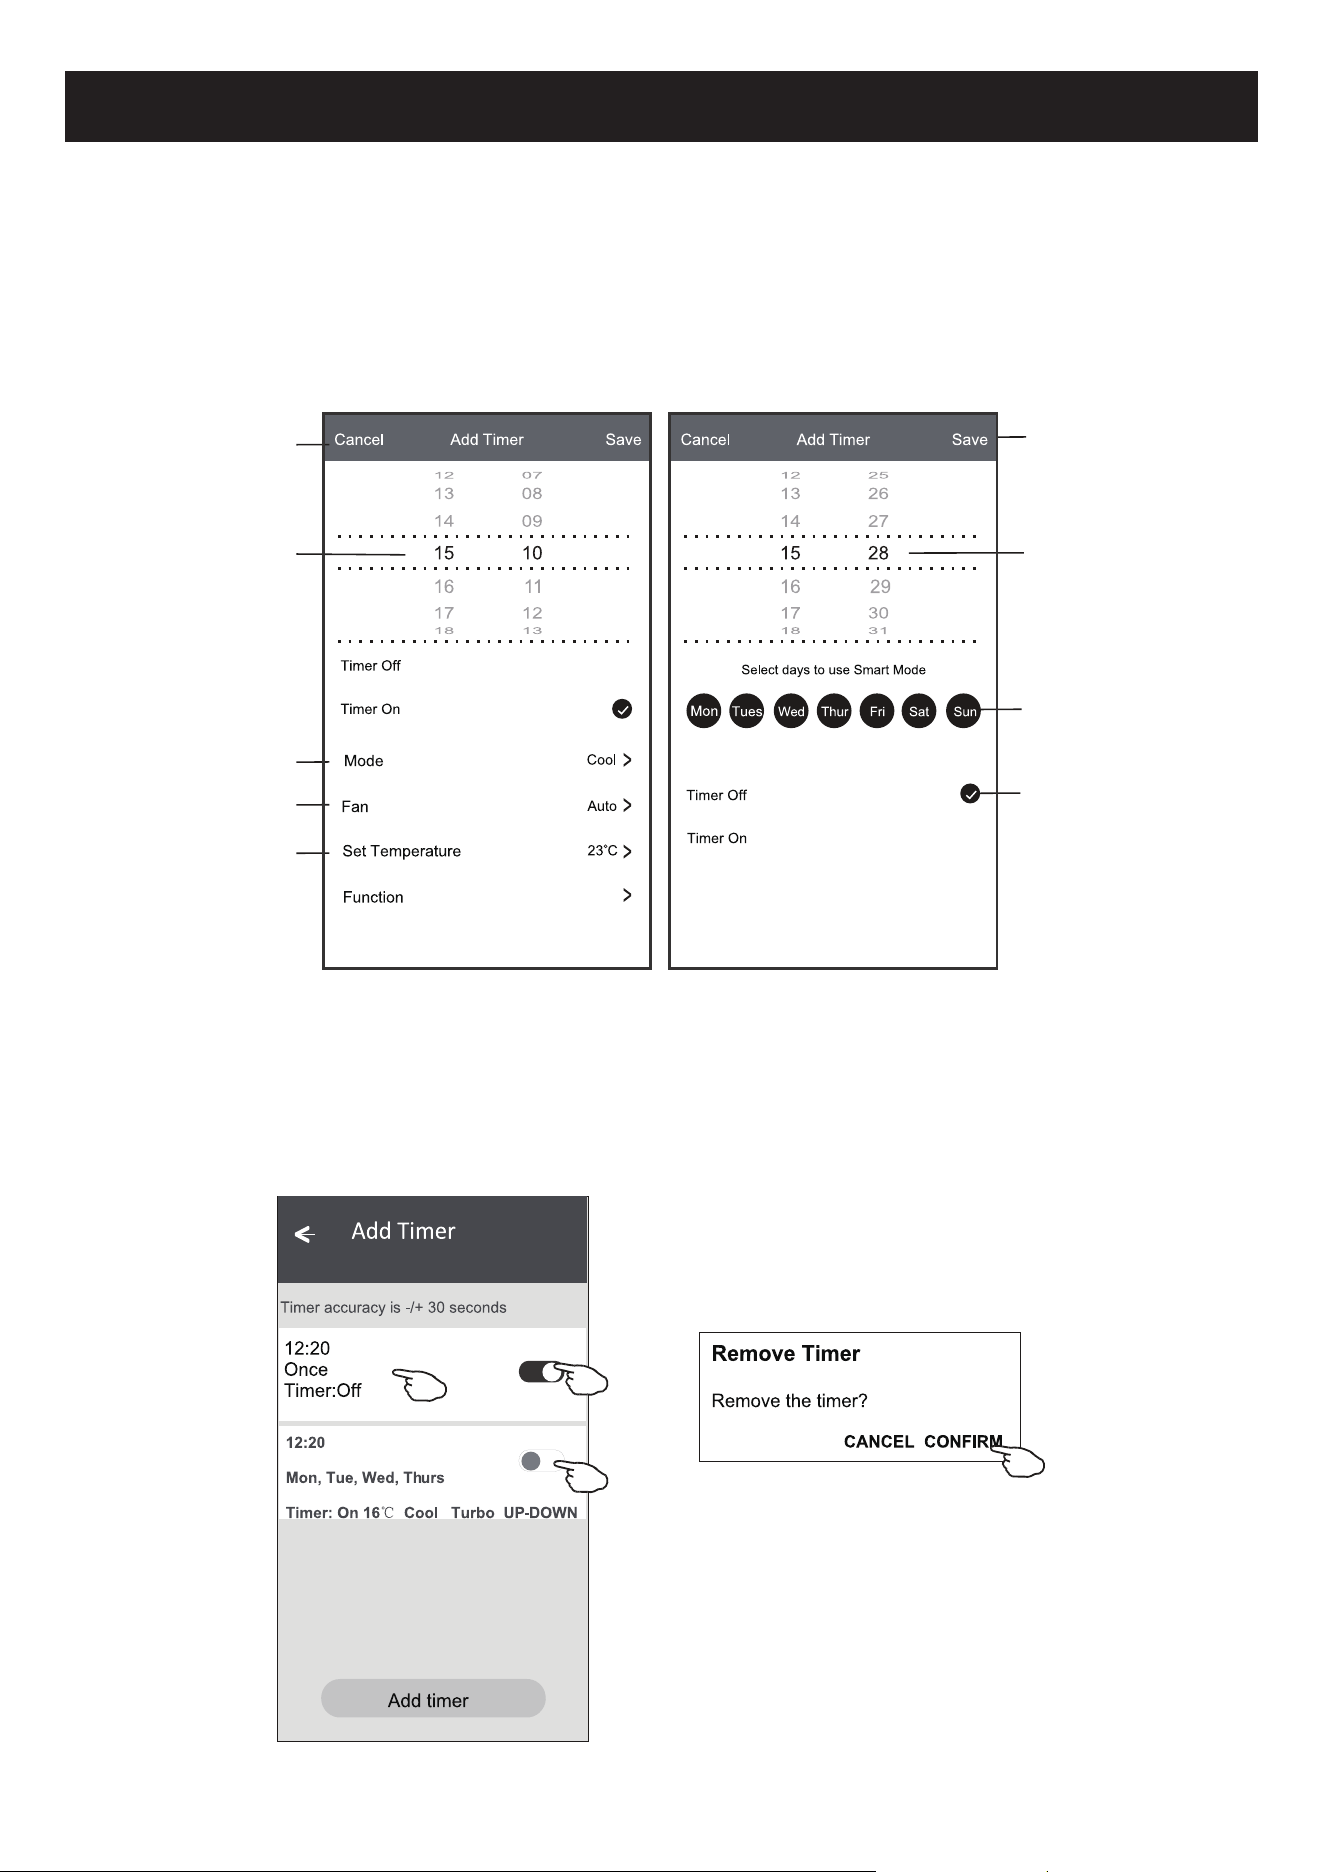
3.Select the time, select the repeat days and Timer on/off.
4.Select the Mode/Fan speed/Function and select the setting temperature for Timer on.
5.Tap Save to add the timer.
14
Hour setting
Minute setting
Mode setting
Fan Speed
setting
Weekly setting
Timer cancel
Timer submit
Temperature
setting
Timer ON/OFF
setting
Cancel Add Timer Save
15 10
14 09
13 08
12 07
16 11
17 12
18 13
Timer Off
Timer On
Mode
Fan
Set Temperature
Function
Cool
Auto
23 C
<
<
<
<
Cancel Add Timer Save
15 28
14 27
13 26
12 25
16 29
17 30
18 31
Select days to use Smart Mode
Timer Off
Mon
Tues
Wed Thur Fri Sat Sun
Timer On
Control form1-Timer Management
WLAN
<
Add Timer
Add timer
Timer accuracy is -/+ 30 seconds
12:20
Once
Timer:Off
12:20
Mon, Tue, Wed, Thurs
Timer: On 16 Cool Turbo UP-DOWN
1.Tap the bar of timer to edit the Timer like the Timer adding process.
2.Click the switch to enable or disable the Timer.
3.Holdind the bar of Timer about 3seconds and pop up the Remove Timer screen,
tap CONFIRM and remove the Timer.
Remove Timer
Remove the timer?
CANCEL CONFIRM
Timer on
Timer off
Air conditioner control
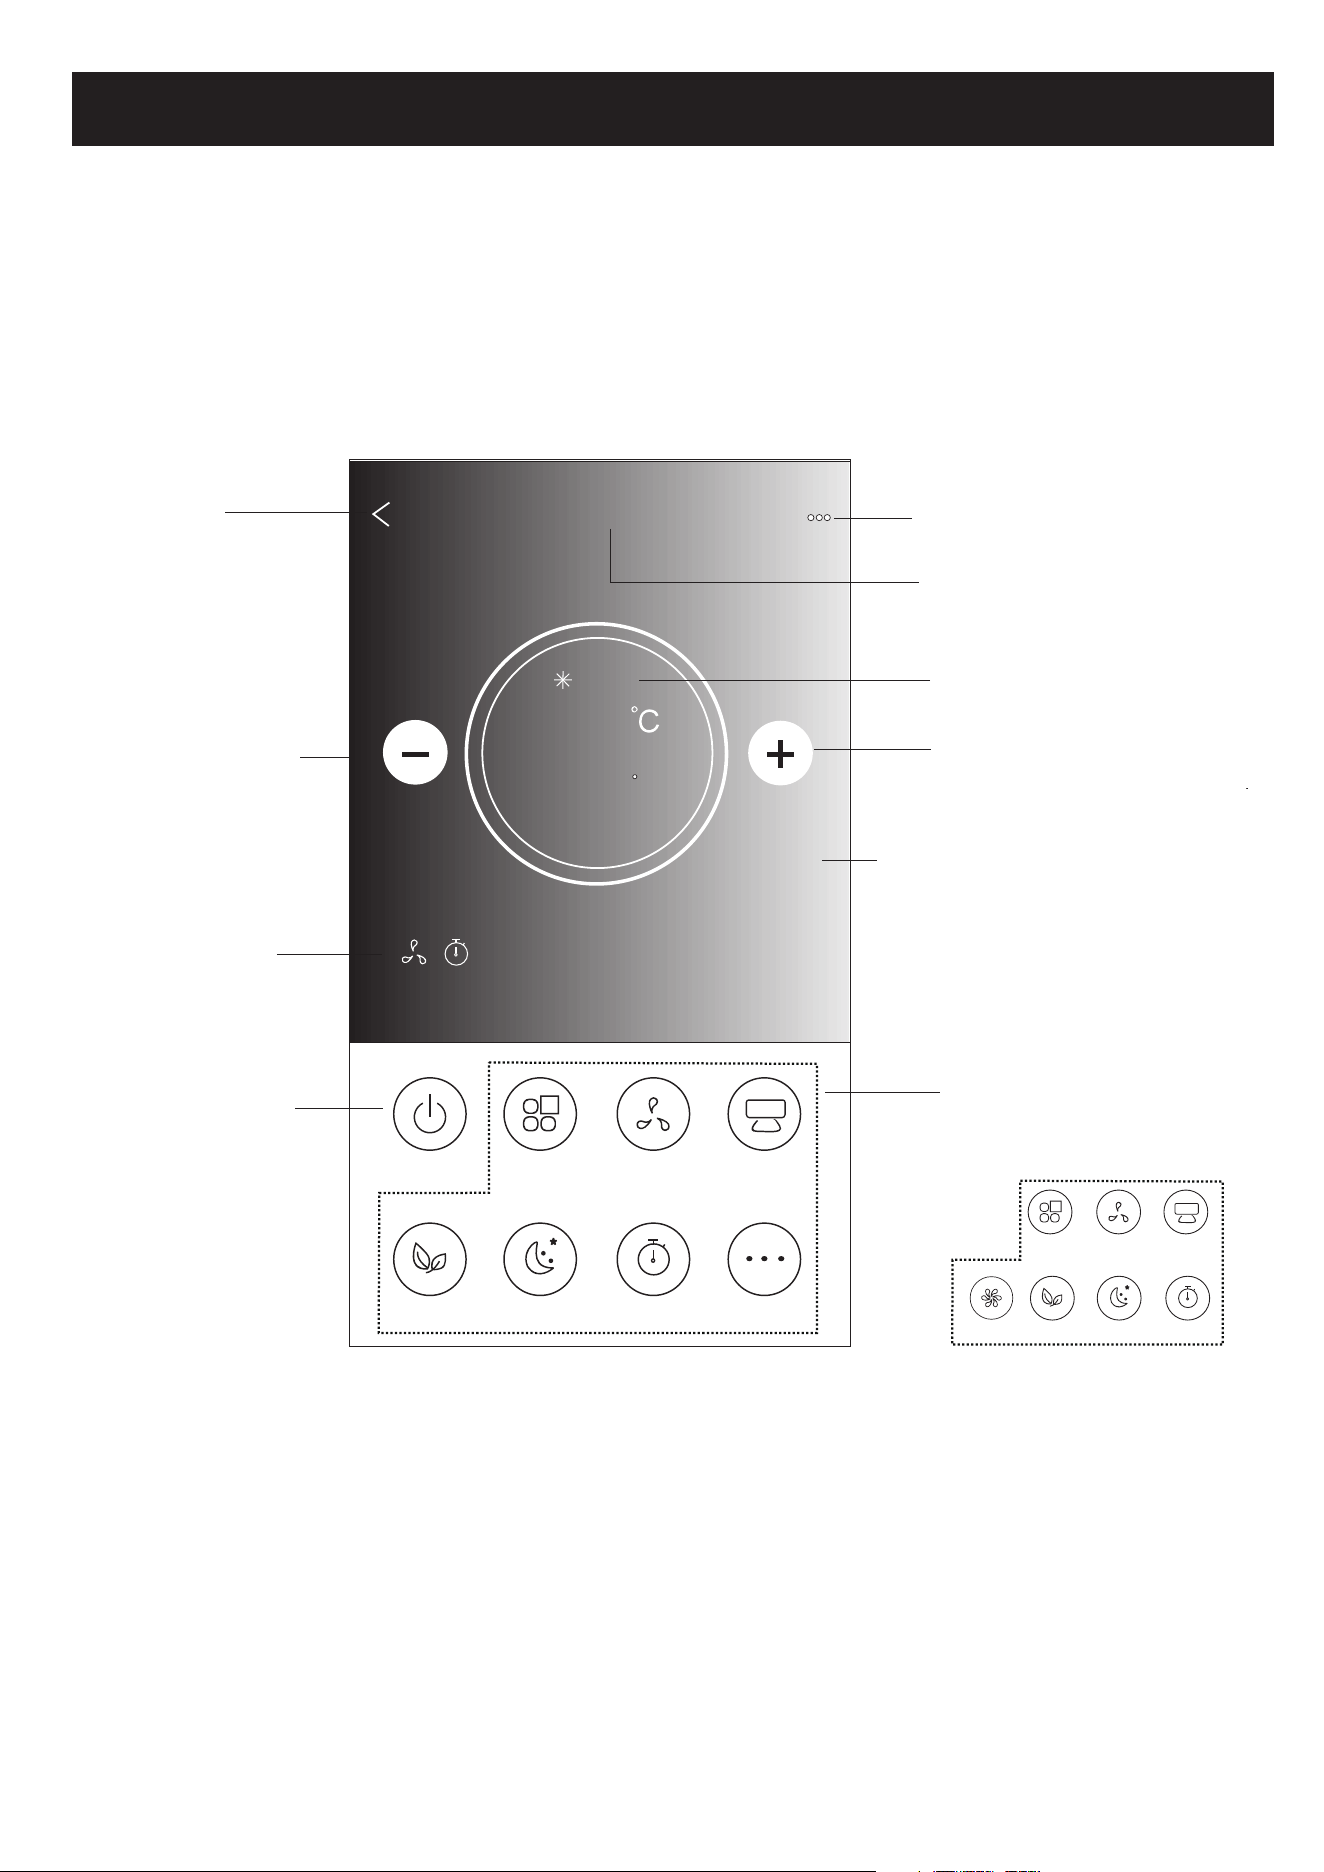
15
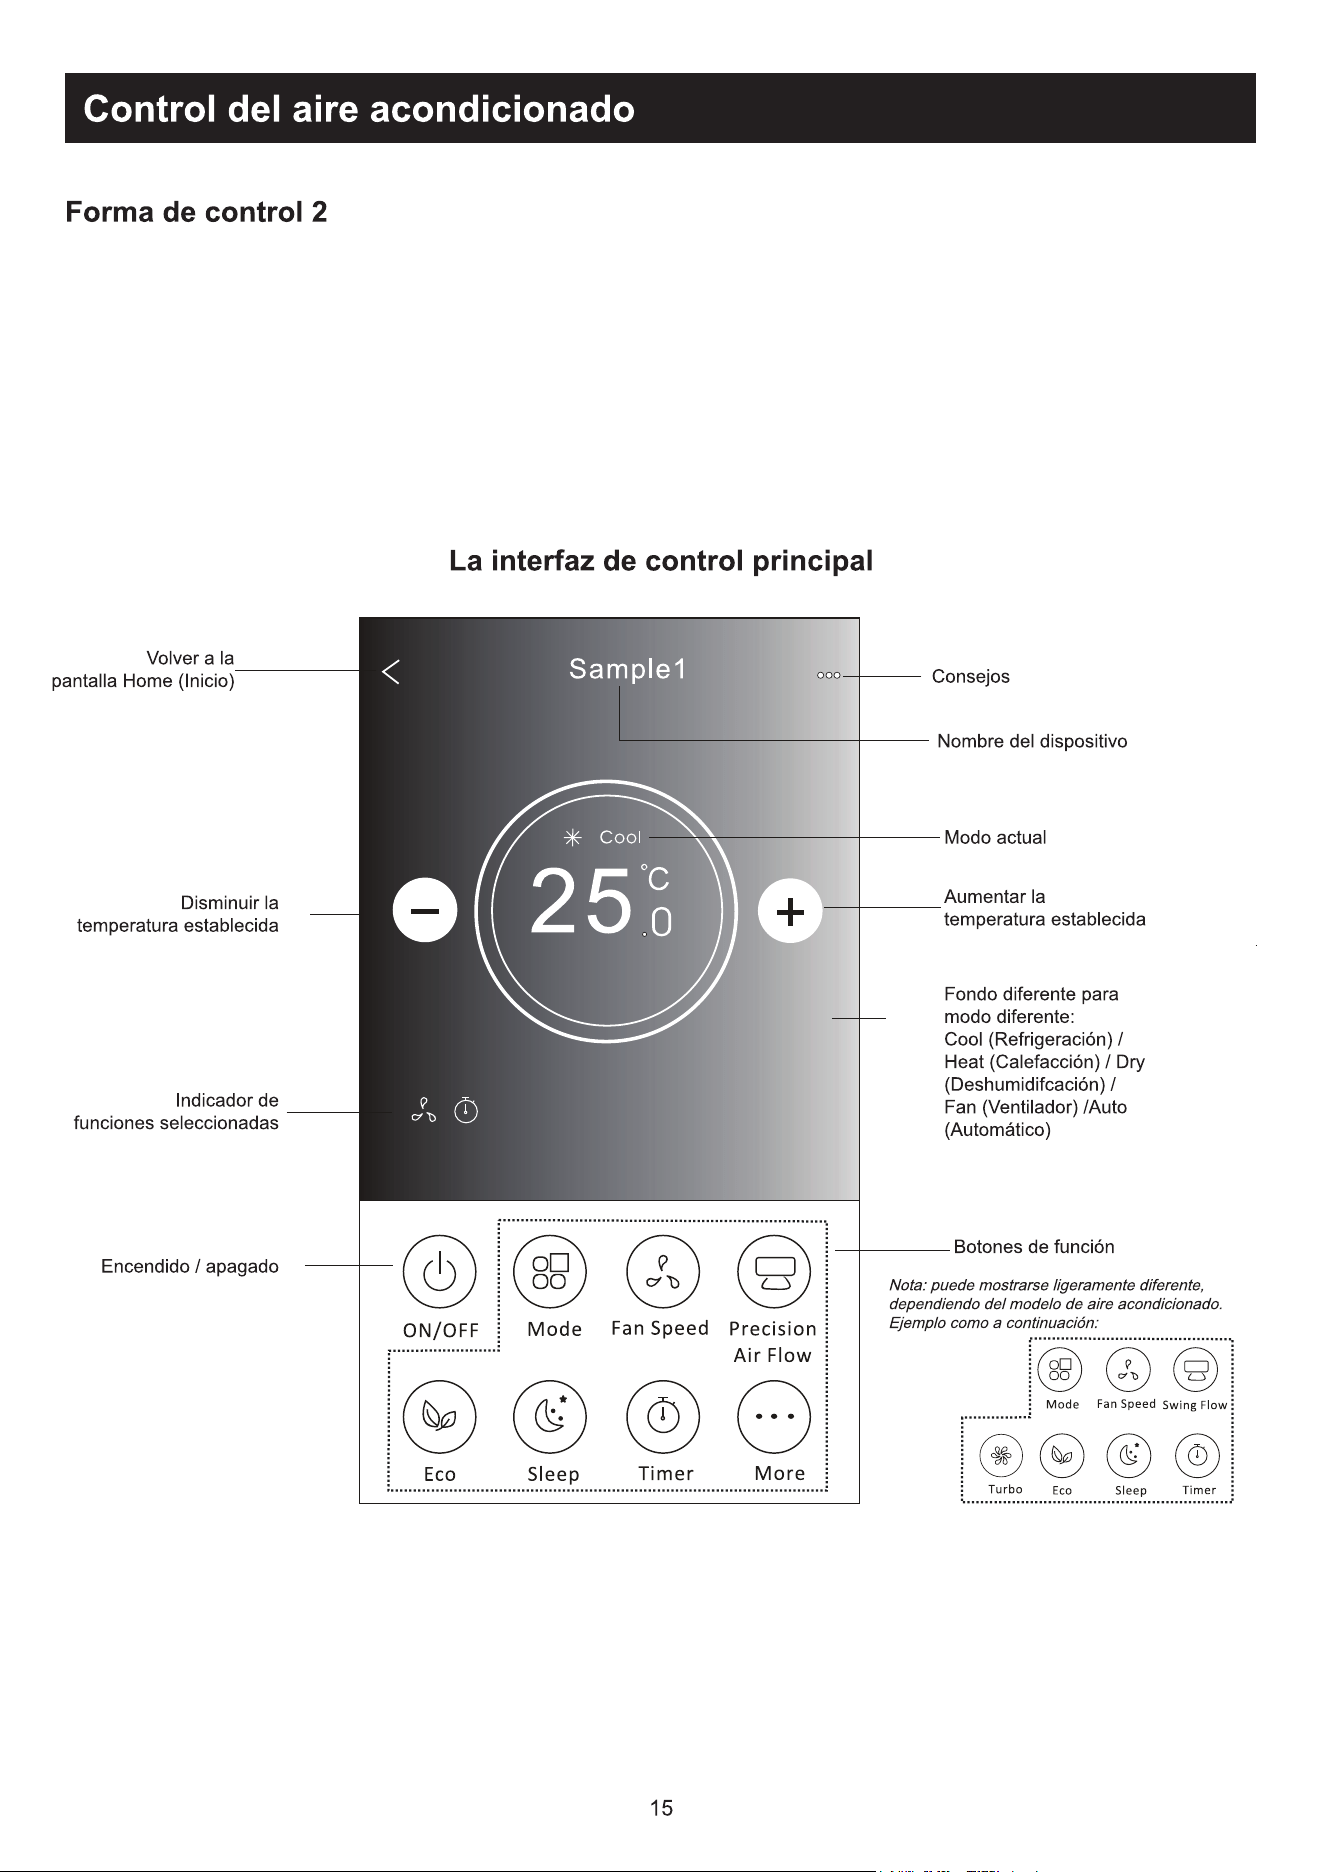
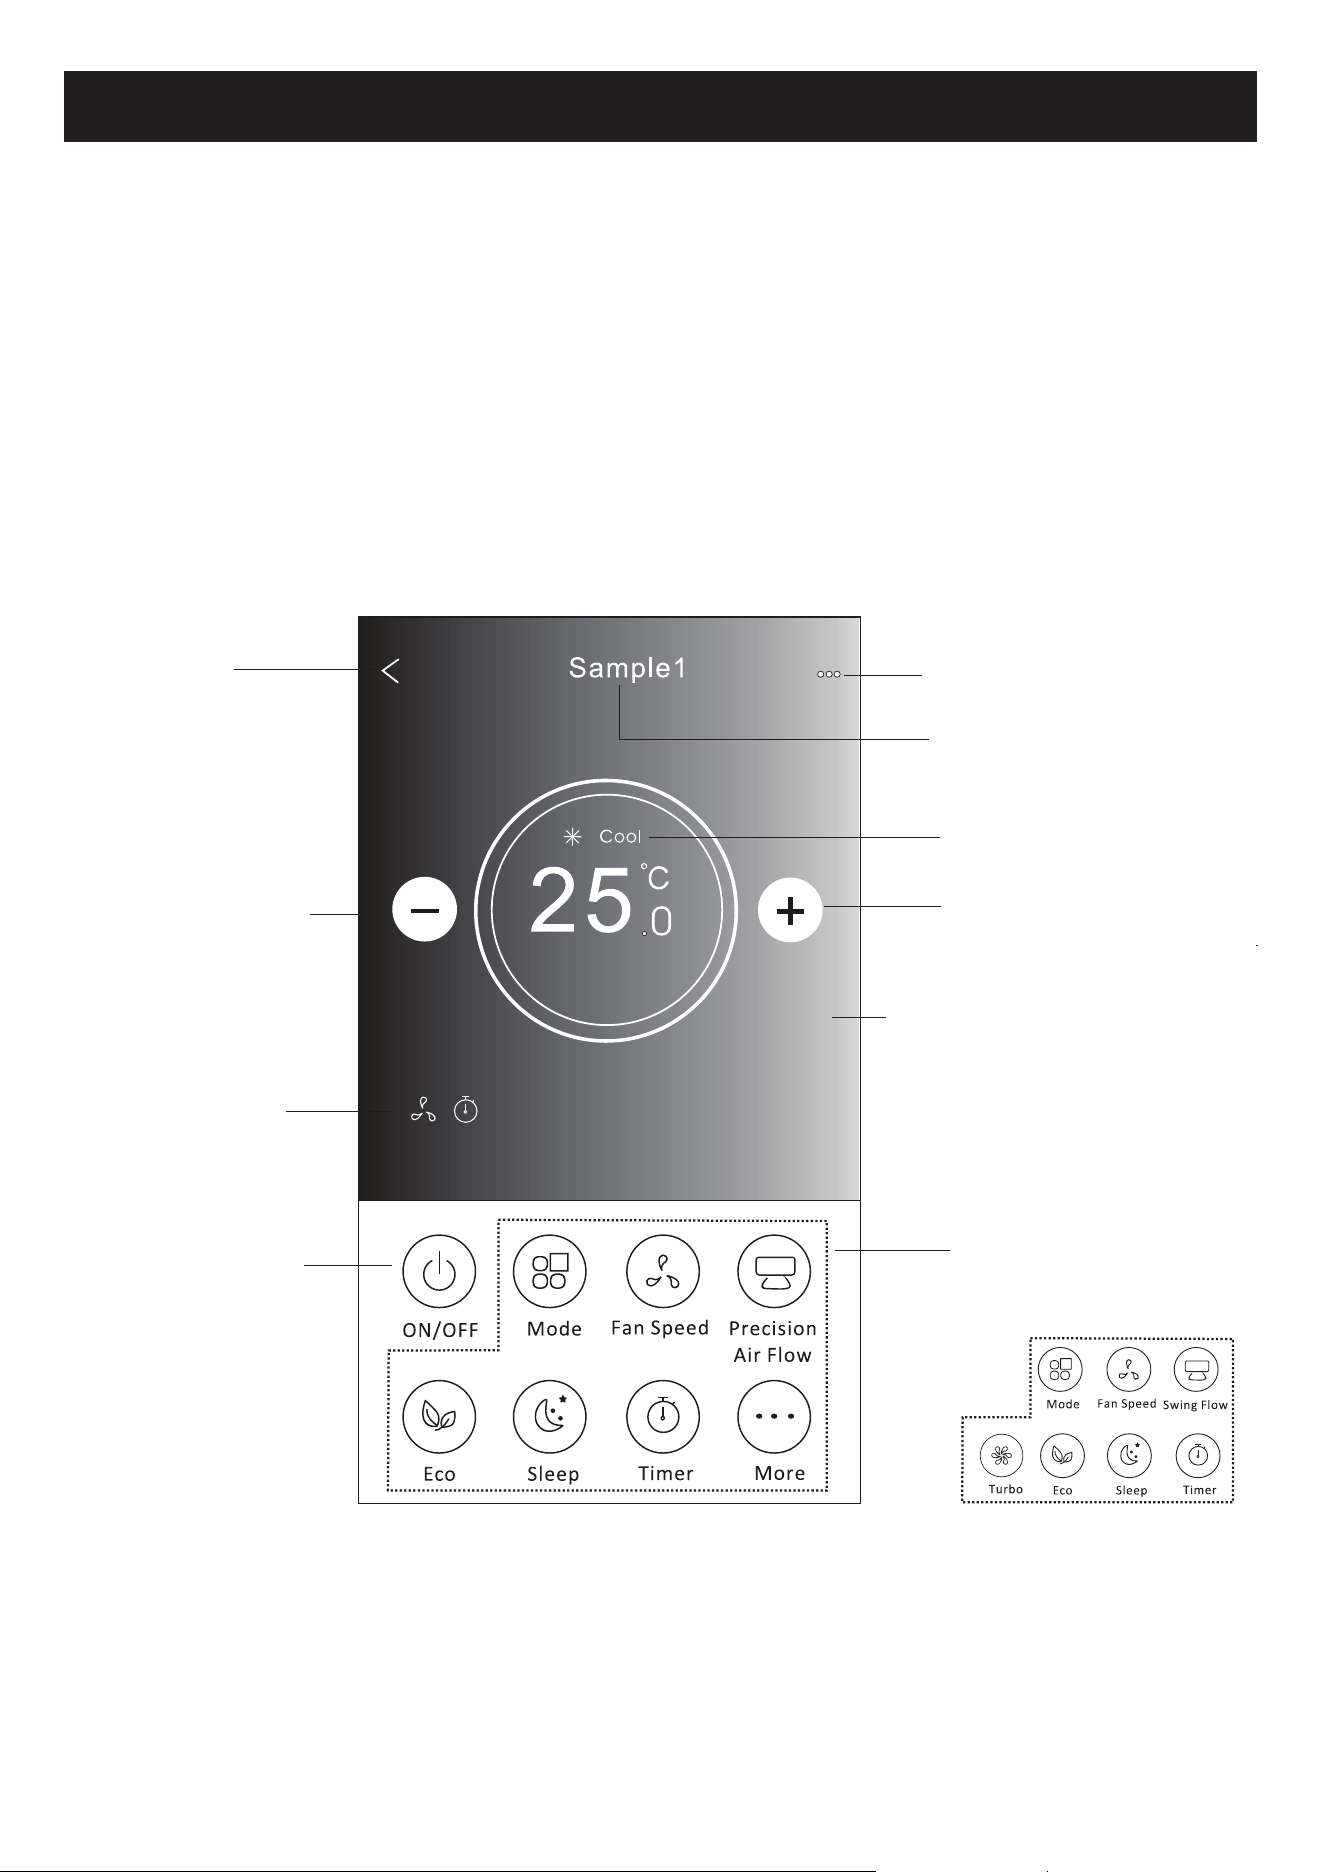
Back to the
Home screen
Name of the device
Current mode
Increase the
setting temperature
Decrease the
setting temperature
Power on/off
Selected Functions
indicator
Note: it may appear slightly different ,
depending on the air conditioner model.
Example as below:
Tips
Different background for
different mode:
Cool/Heat/Dry/Fan/Auto
ON/OFF
Fan Speed
Precision
Air Flow
More
Eco Sleep
Mode
Timer
Sample1
25
Cool
0
Fan Speed
Swing Flow
Eco Sleep
Mode
Timer
Turbo
Function Buttons
Control form2
The main control interface
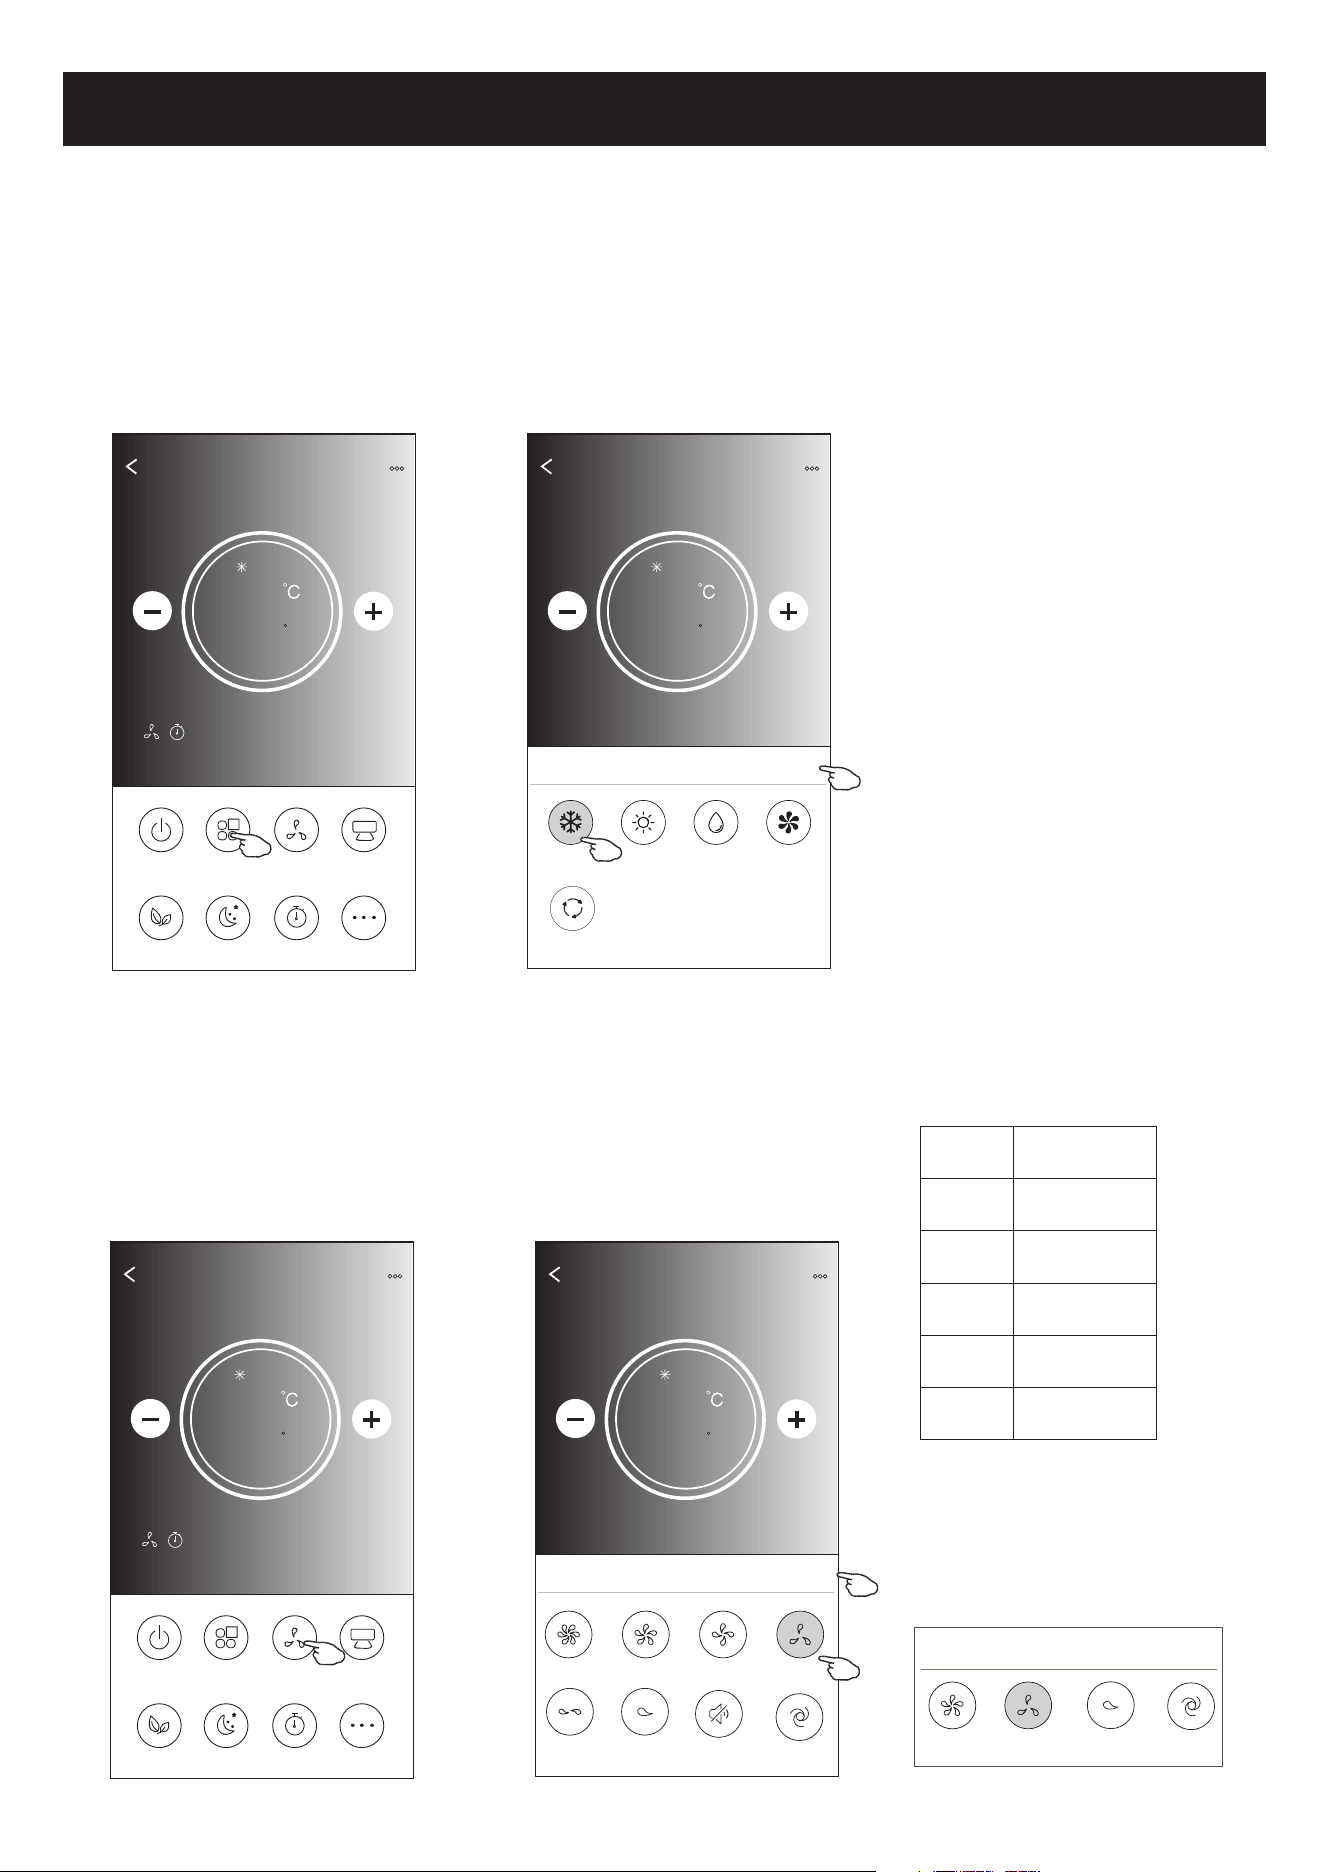
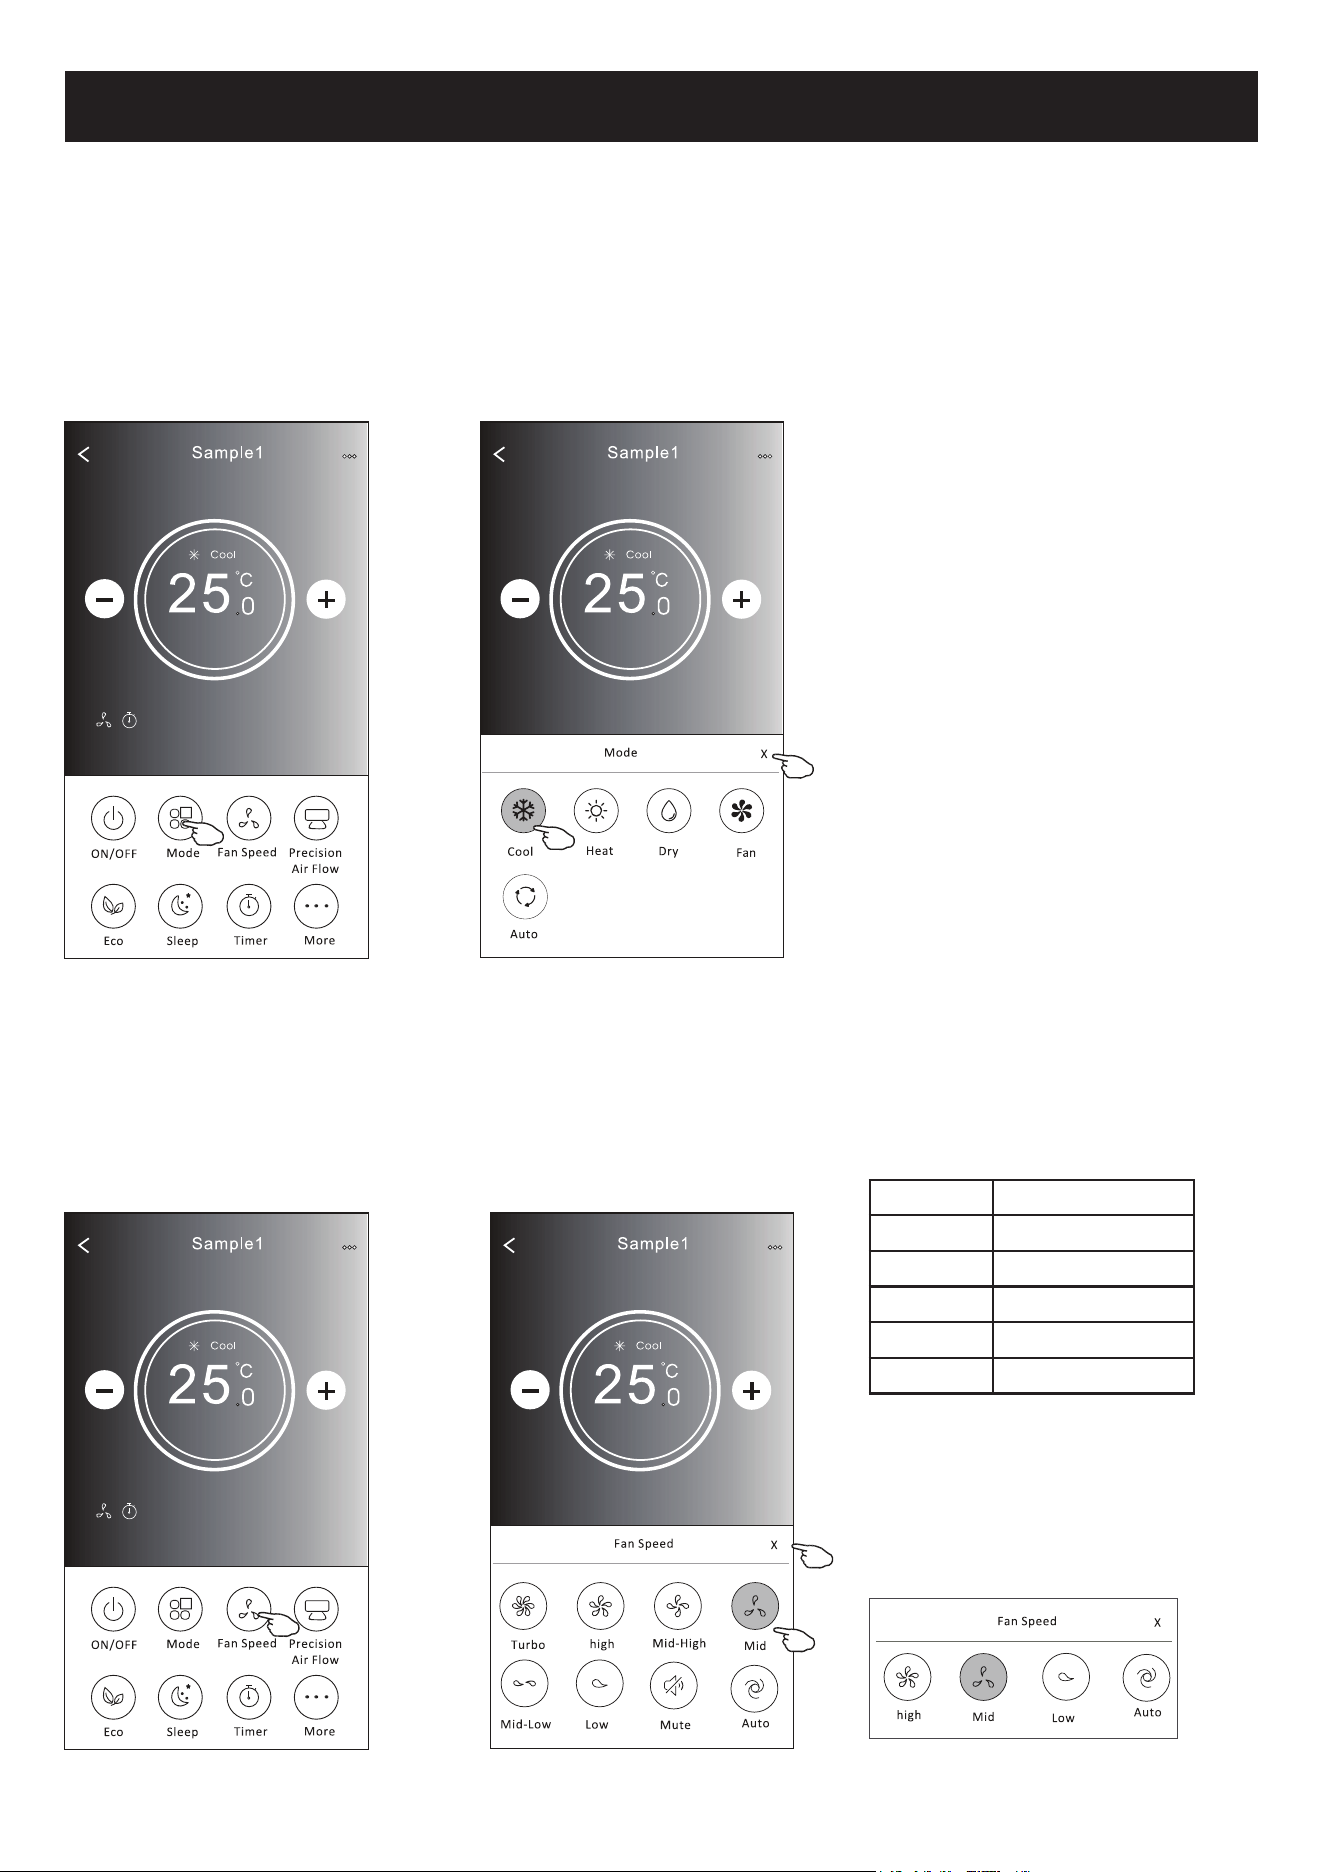
Air conditioner control
1.Tap the Mode button.
2. There are 5 modes on the Mode screen, tap one button to
set the Air conditioner working mode.
3.Tap the X button to back the main control screen.
4.The mode and background will change on the screen.
ON/OFF
Fan Speed
Precision
Air Flow
More
Eco Sleep
Mode
Timer
Sample1
25
Cool
0
Back
Sample1
25
Cool
0
Cool
Dry
Fan
Heat
Auto
Mode
X
Note: please read the details of each mode
in the user manual to control more comfortable.
ON/OFF
Fan Speed
Precision
Air Flow
More
Eco Sleep
Mode
Timer
Sample1
25
Cool
0
1.Tap the Fan speed button.
2.Choose your desired fan speed and tap it.
3.Tap the X button to back the main control screen.
4.The selected fan speed indicator will appear on the screen.
Back
Sample1
25
Cool
0
Turbo
Mid-High
Mid
high
Fan Speed
X
Mid-Low
Mute
Auto
Low
Mode Fan Speed
Cool
Fan
Dry
Heat
Auto
All speeds
All speeds
All speeds
All speeds
16
Note: Fan Speed screen may appear slightly different ,
depending on the air conditioner model.
Example as below:
Mid
high
Fan Speed
X
Auto
Low
Note:
Fan Speed can't be adjusted on Dry mode .
Control form2-Mode setting
Control form2-Fan speed selection
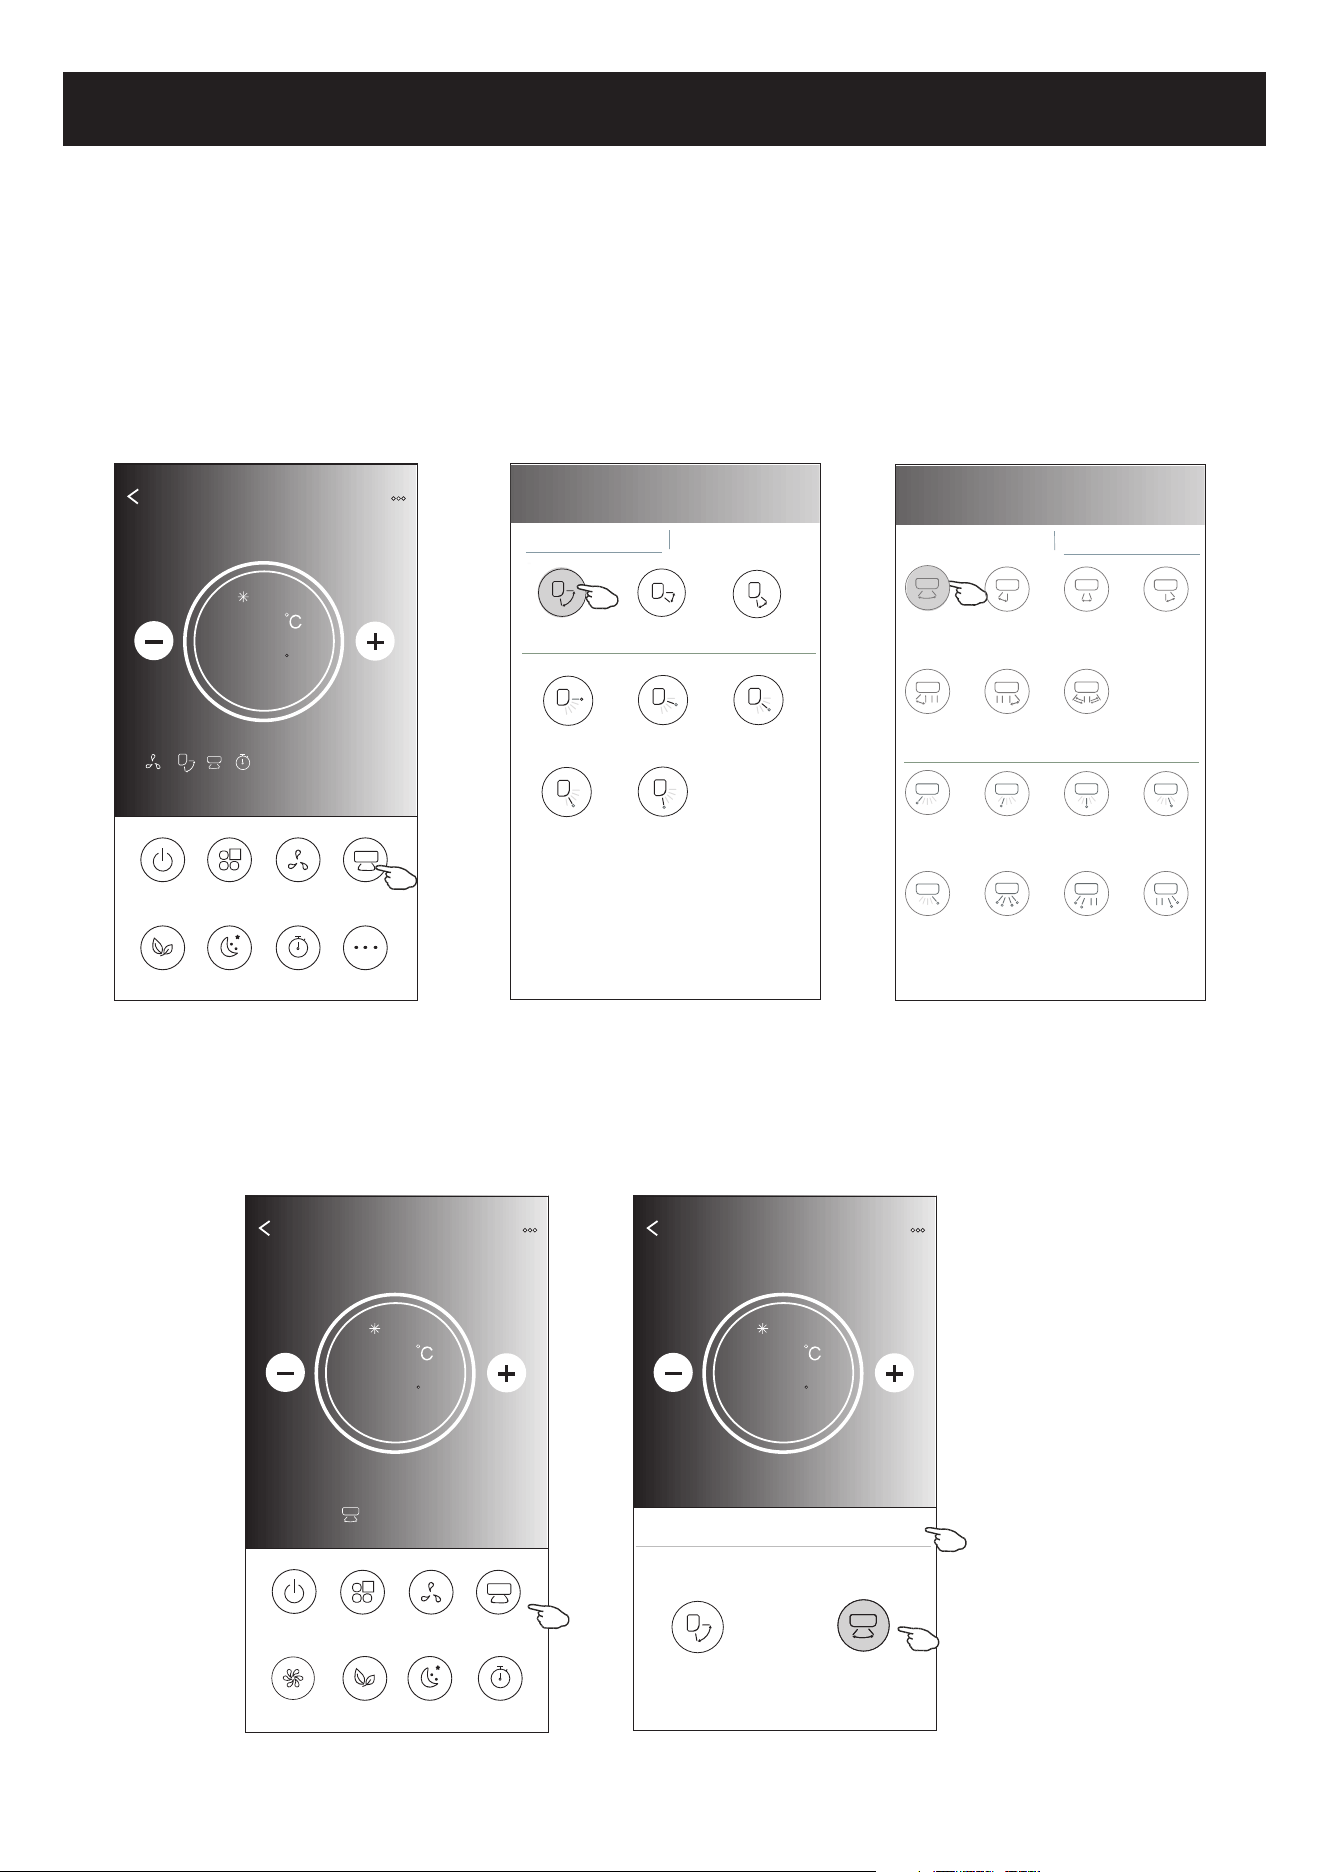
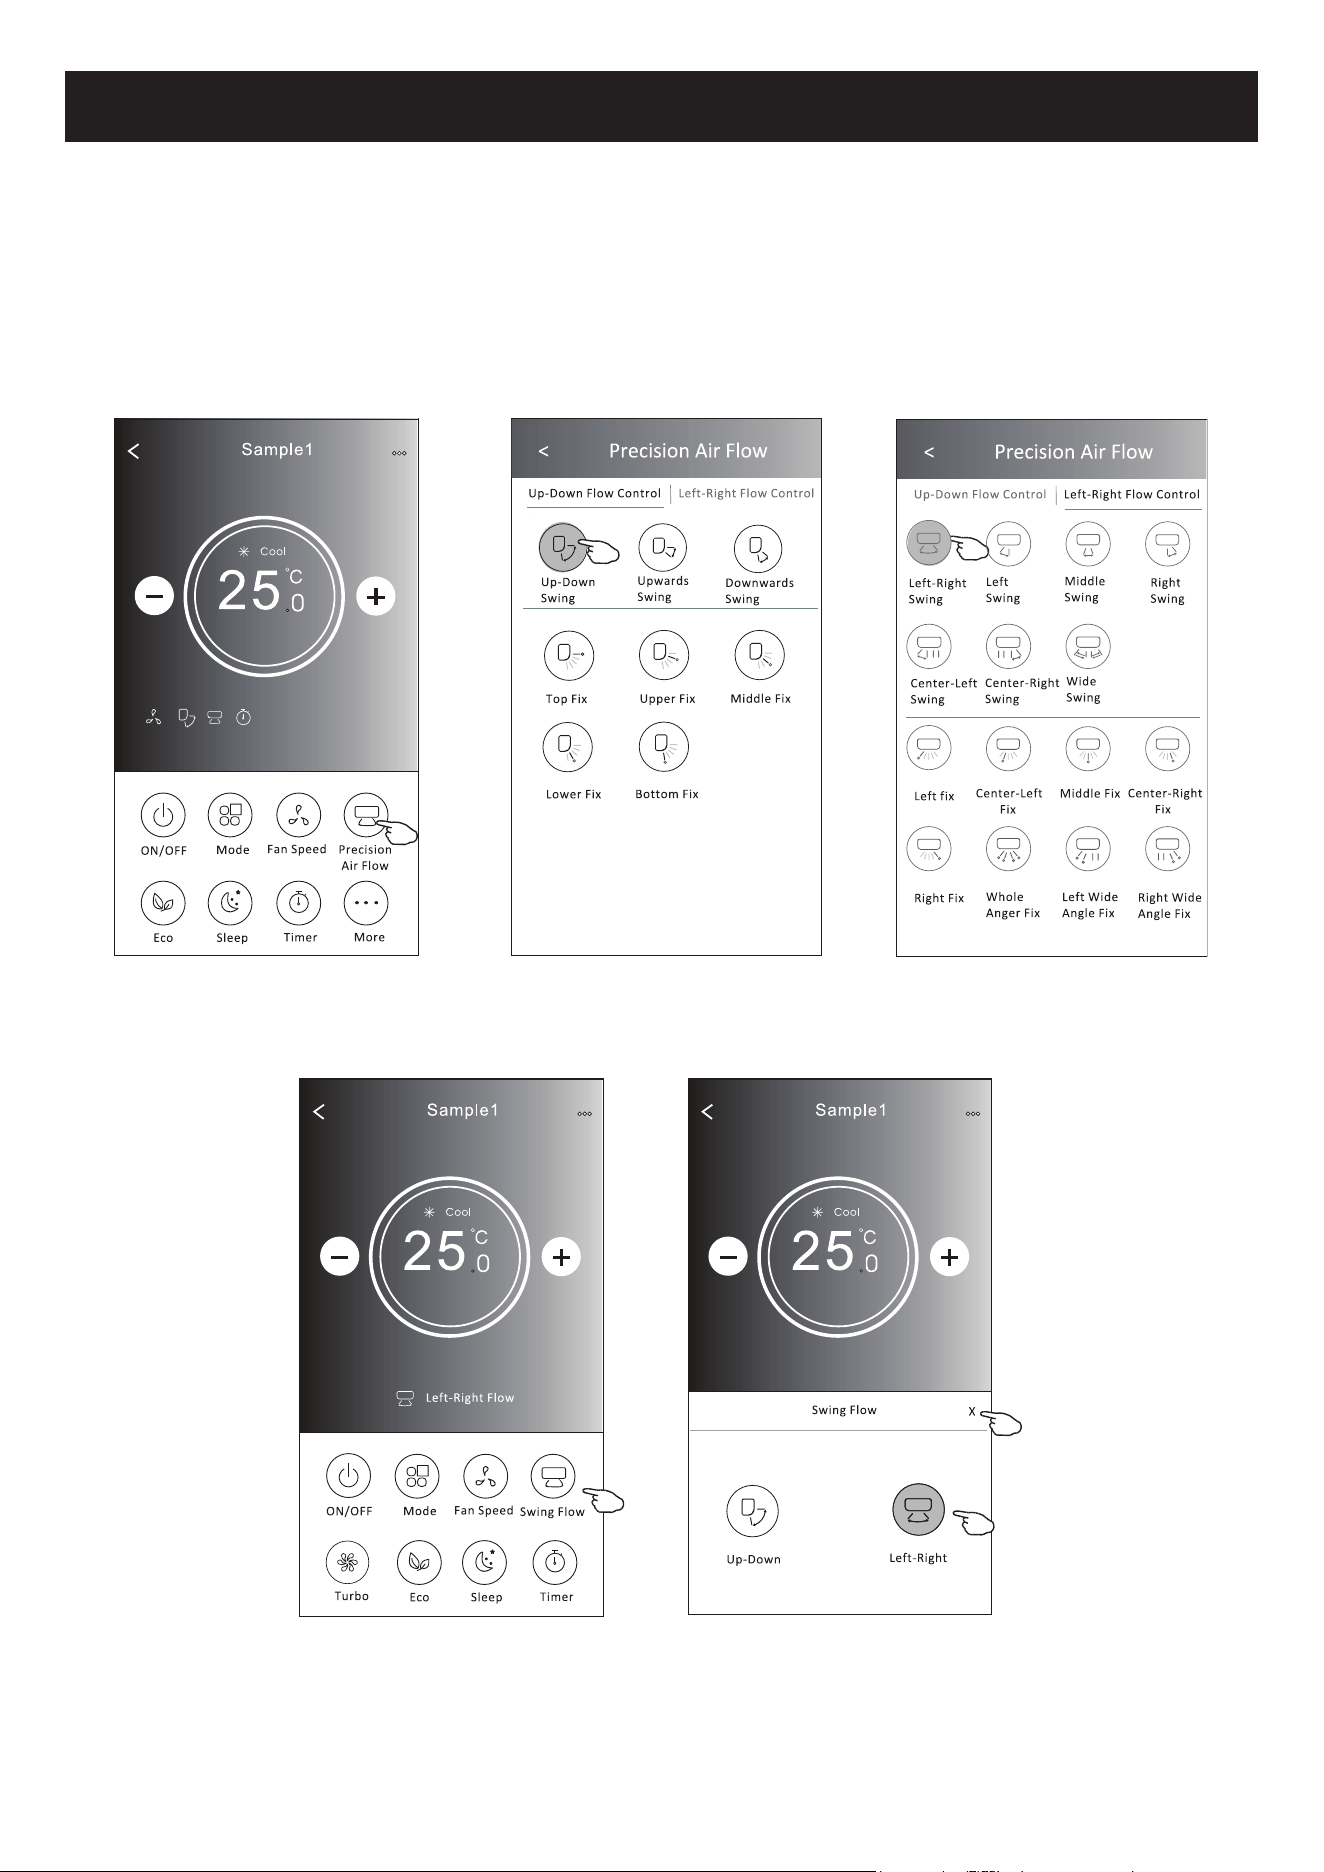
Air conditioner control
1.Tap the Precision Air Flow button or Swing Flow button.
2.Choose your desired air flow and tap it.
3.Tap the X button to back to the main control screen.
4.The selected air flow indicator will appear on the screen.
ON/OFF
Fan Speed
Precision
Air Flow
More
Eco Sleep
Mode
Timer
Sample1
25
Cool
0
17
ON/OFF
Sample1
25
Cool
0
Fan Speed
Swing Flow
Eco Sleep
Mode
Timer
Turbo
Left-Right Flow
Note: The Main control screen and Air Flow screen may appear slightly different ,
depending on the air conditioner model.Example as below:
Get verification code
< Precision Air Flow
Up-Down Flow Control Left-Right Flow Control
Downwards
Swing
Up-Down
Swing
Upwards
Swing
Middle Fix
Top Fix
Upper Fix
Lower Fix
Bottom Fix
< Precision Air Flow
Up-Down Flow Control Left-Right Flow Control
Right
Swing
Left-Right
Swing
Left
Swing
Middle
Swing
Center-Left
Swing
Center-Right
Swing
Wide
Swing
Center-Right
Fix
Left fix
Center-Left
Fix
Middle Fix
Right Wide
Angle Fix
Right Fix
Whole
Anger Fix
Left Wide
Angle Fix
Back
Sample1
25
Cool
0
Swing Flow
X
Up-Down
Left-Right
Note: For some models without auto Left-Right wind, If you active it, you will hear a beep,but no any actions.
Control form2-Air Flow control
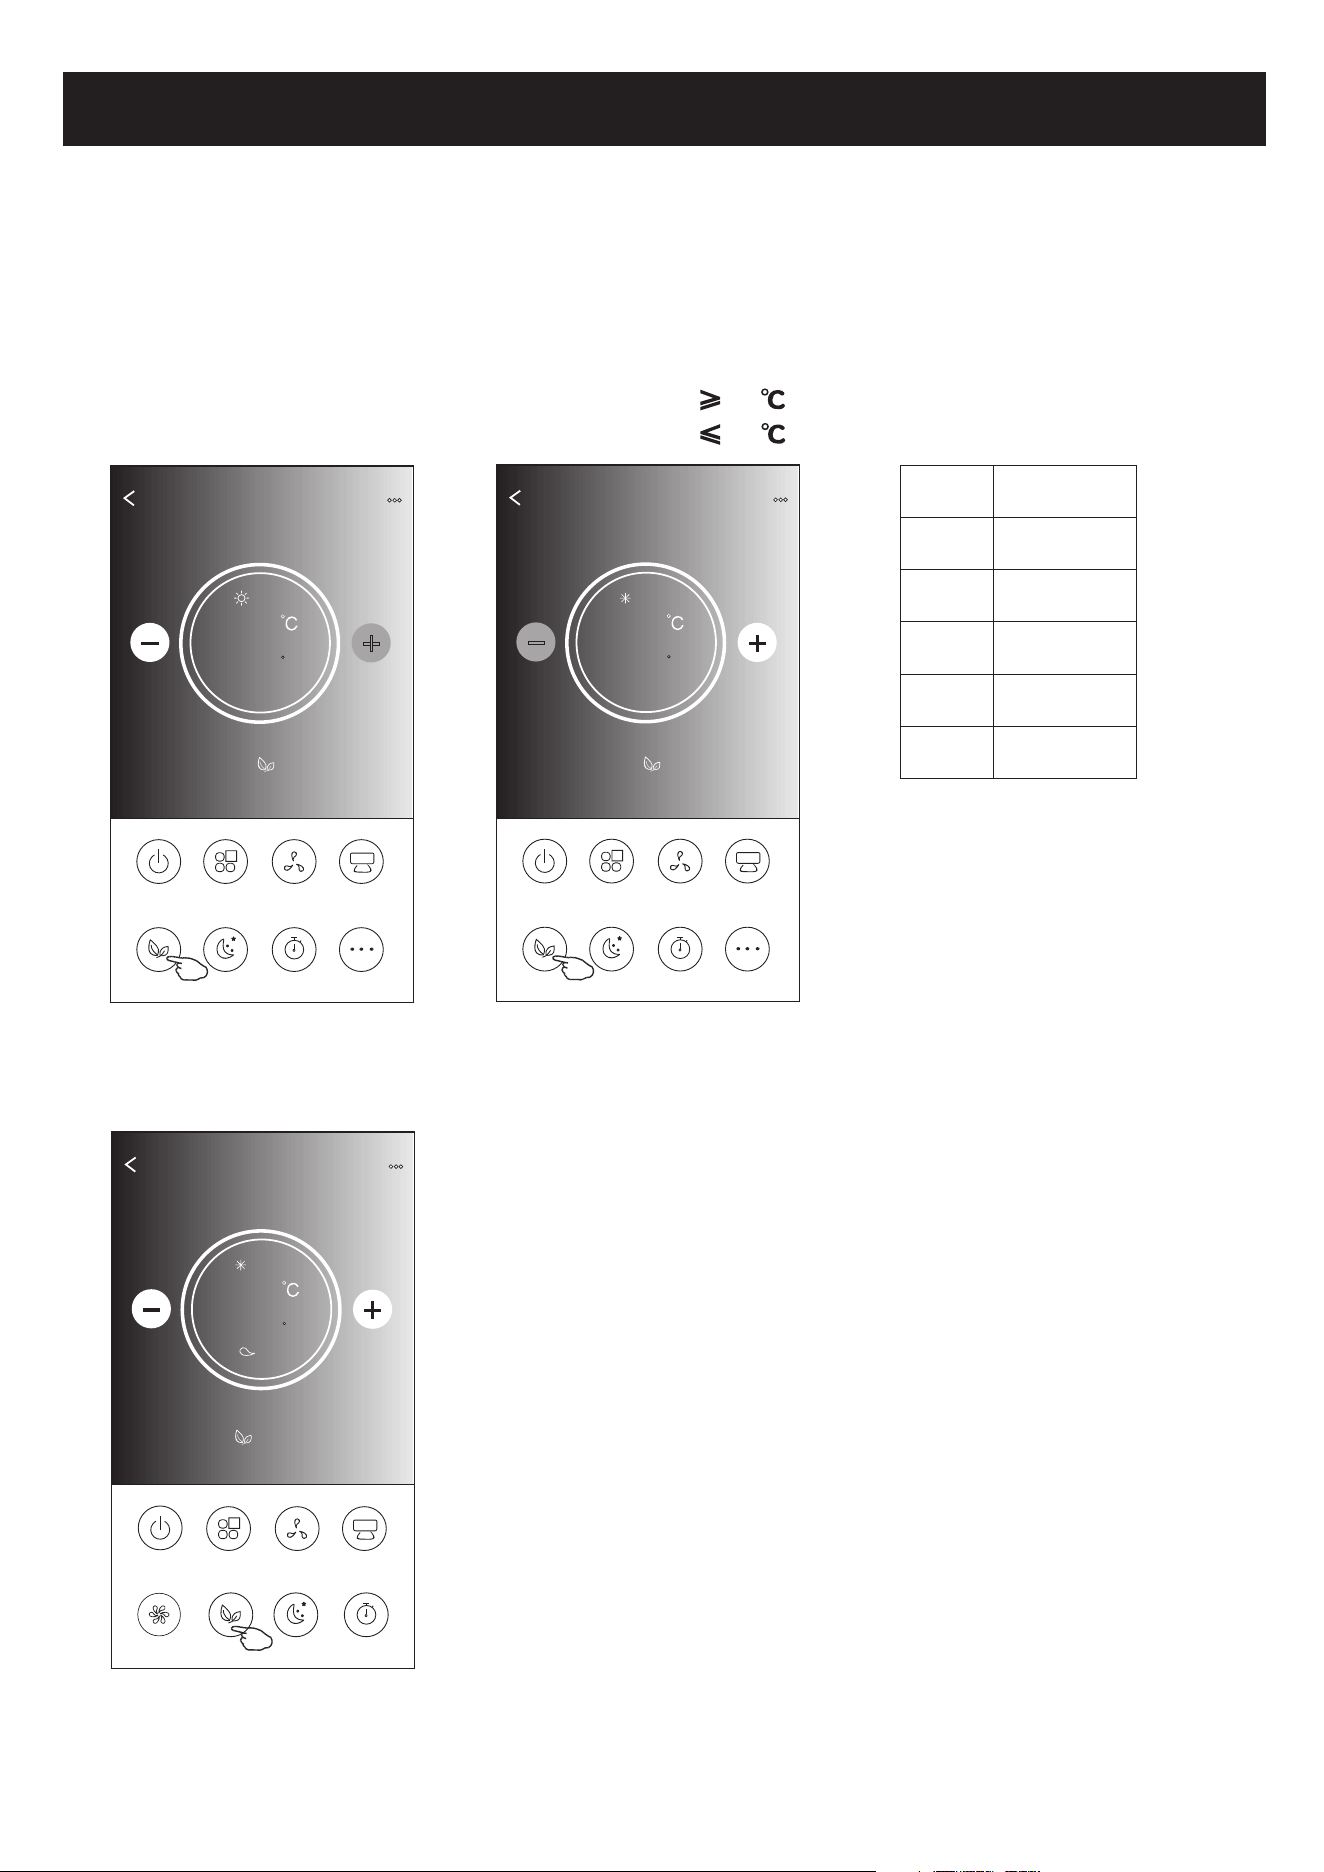
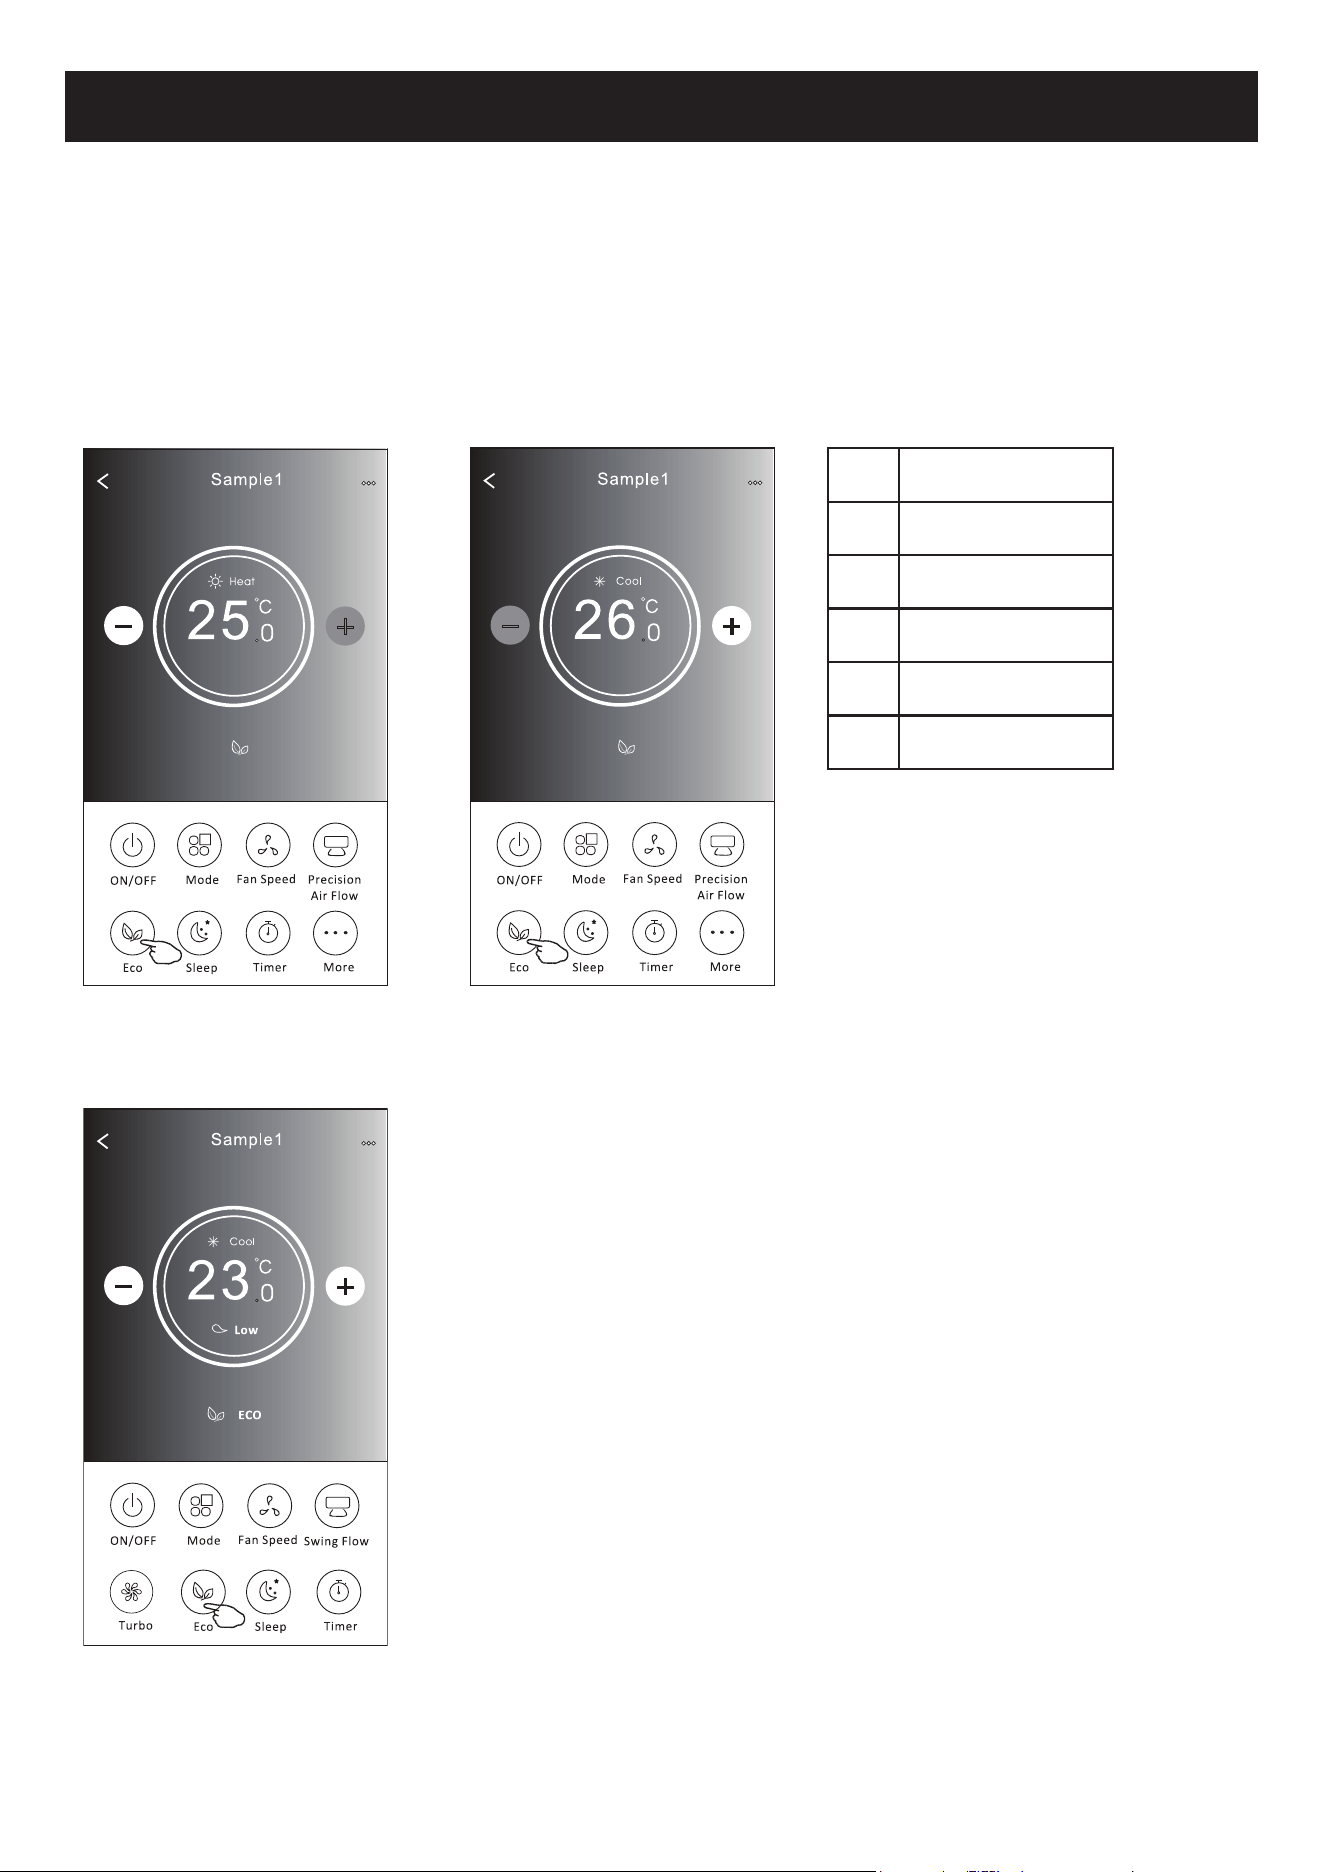
Air conditioner control
1.For Eco function, just tap the button to activate the function, the button will be lighting
and the indicator will appear on the screen.
2.Tap again to disable the function.
3.Temperature controlled for some air conditioner model:
In Cooling mode, the new setting temperature will 26 .
In heating mode, the new setting temperature will 25 .
ON/OFF
Fan Speed
Precision
Air Flow
More
Eco Sleep
Mode
Timer
Sample1
25
Heat
0
18
ON/OFF
Sample1
23
Cool
0
Fan Speed
Swing Flow
Eco Sleep
Mode
Timer
Turbo
Note: The Main control screen and ECO control method may appear slightly different ,
depending on the air conditioner model.Example as below:
ON/OFF
Fan Speed
Precision
Air Flow
More
Eco Sleep
Mode
Timer
Sample1
26
Cool
0
Mode
ECO enabled
Cool
Fan
Dry
Heat
Auto
Yes
Yes
ECO is disabled on Fan/ Dry/Auto mode .
Note:
ECO is disabled on Turbo/Sleep mode too
for some air conditioner model.
ECO
Low
Control form2-ECO function
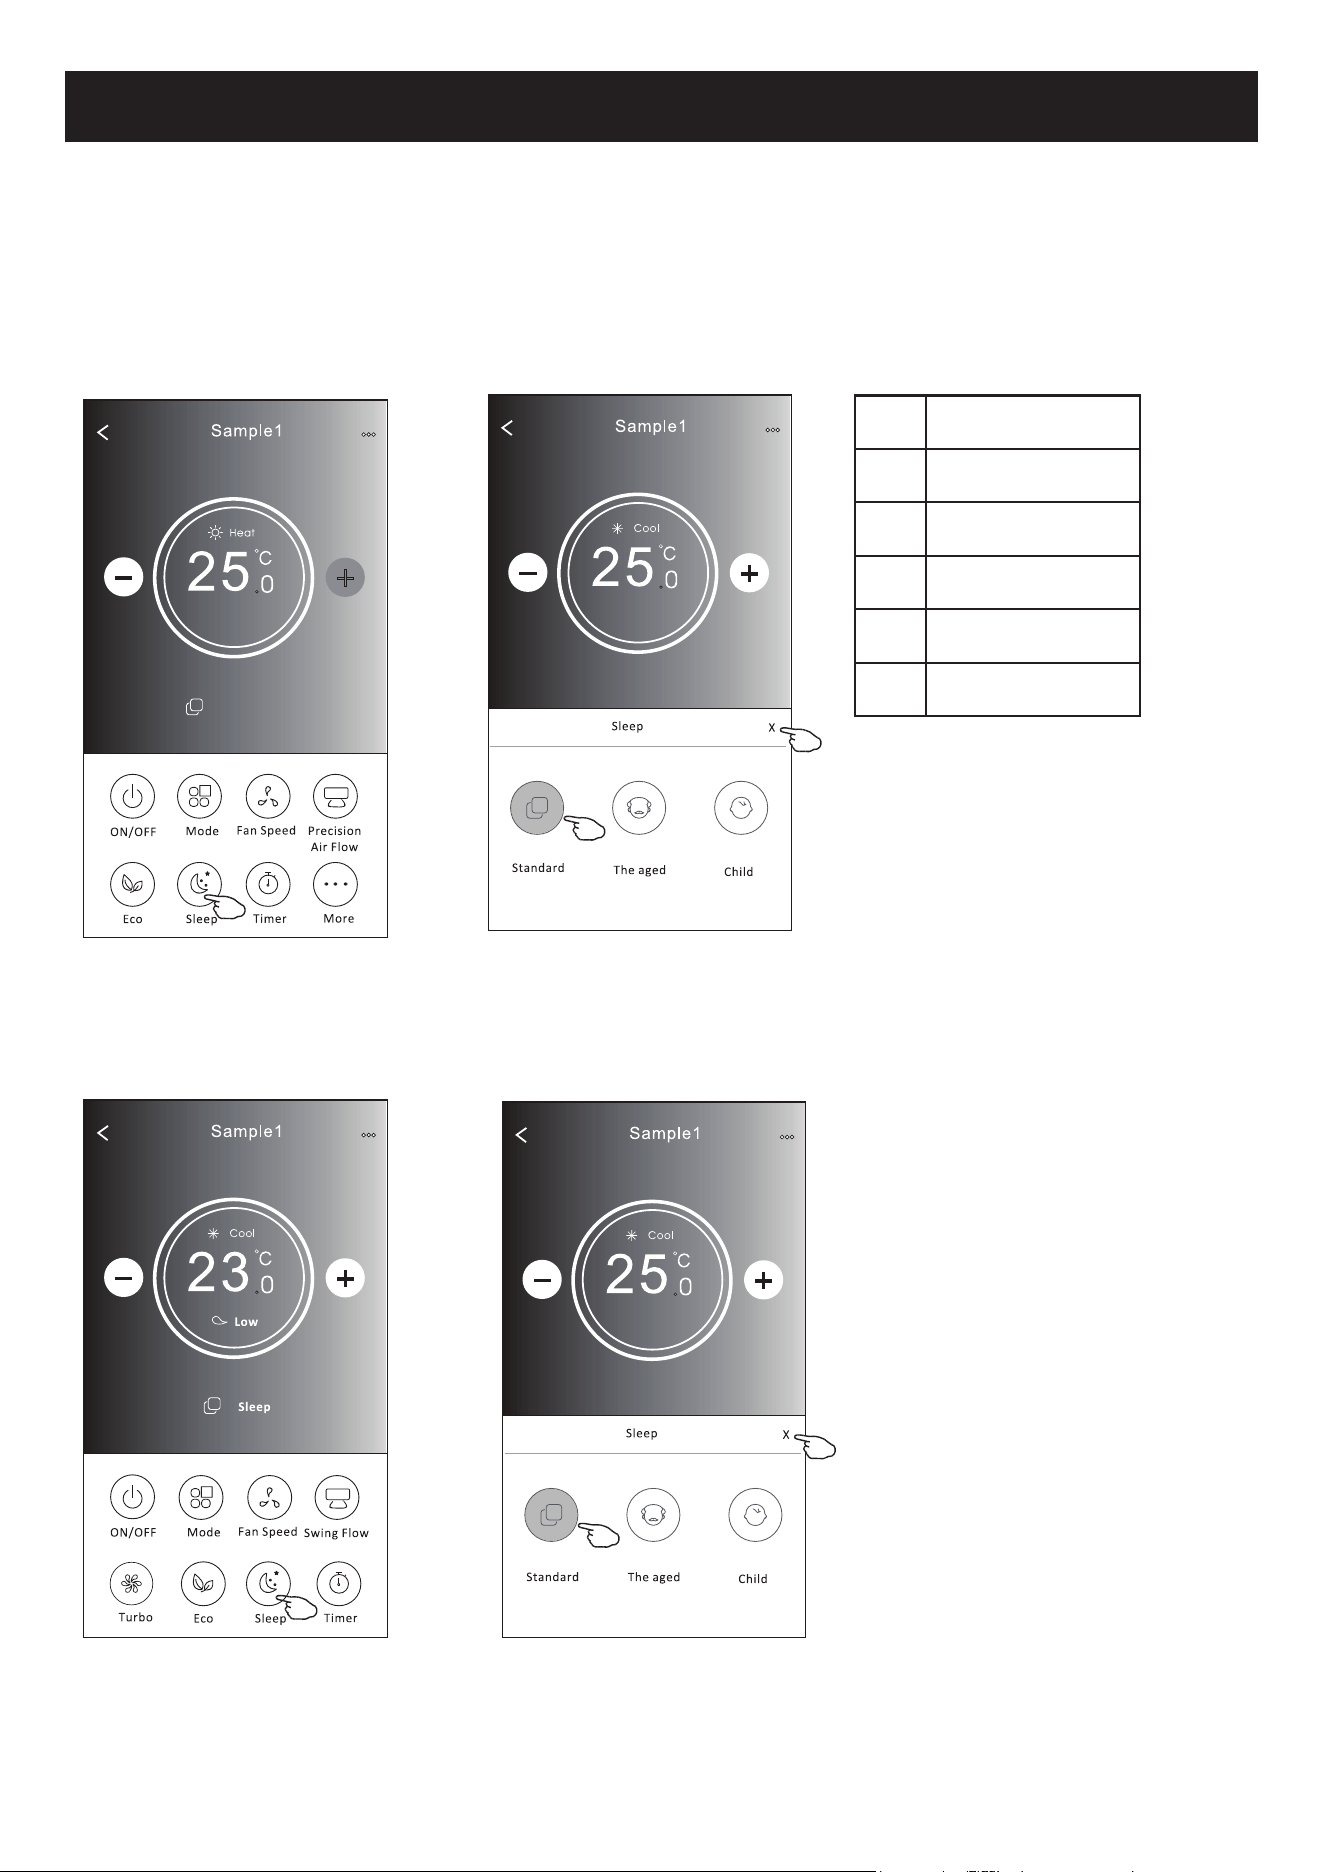
Air conditioner control
1.Tap the Sleep button.
2.Choose your desired sleep mode and tap it.
3.Tap the X button to back to the main control screen.
4.The selected sleep mode indicator will appear on the screen.
ON/OFF
Fan Speed
Precision
Air Flow
More
Eco Sleep
Mode
Timer
Sample1
25
Heat
0
19
ON/OFF
Sample1
23
Cool
0
Fan Speed
Swing Flow
Eco Sleep
Mode
Timer
Turbo
Note:
The Main control screen may appear slightly different ,depending on the air conditioner model.
Example as below:
Mode
Sleep enabled
Cool
Fan
Dry
Heat
Auto
Yes
Yes
Note:
Sleep is disabled on Turbo/Sleep mode too
for some air conditioner model..
Sleep
Low
Sleep is disabled on Fan/ Dry/Auto mode .
Back
Sample1
25
Cool
0
Sleep
X
Standard
Child
The aged
Back
Sample1
25
Cool
0
Sleep
X
Child
The aged
Standard
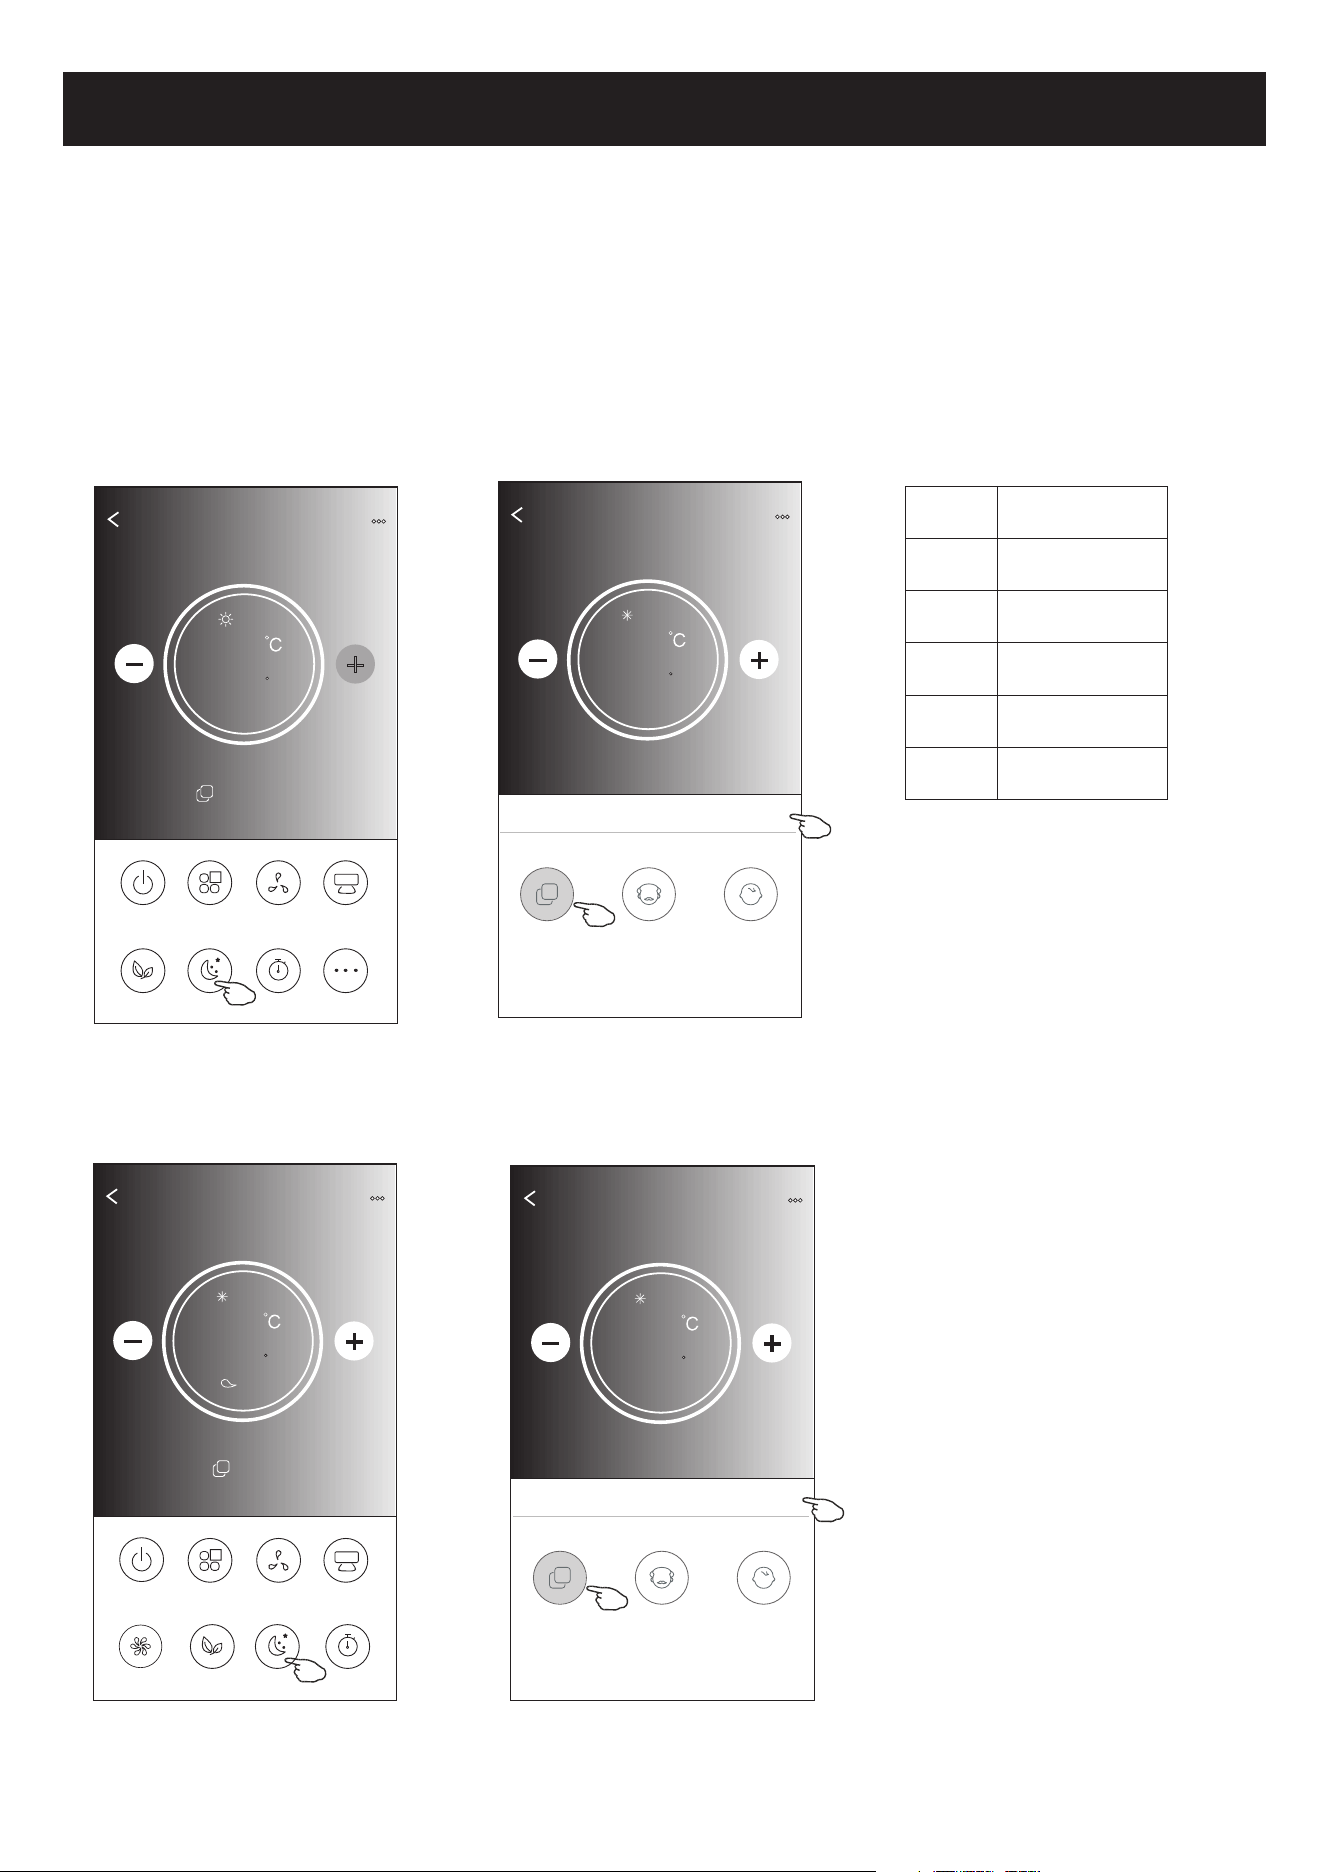
Control form2-Sleep function
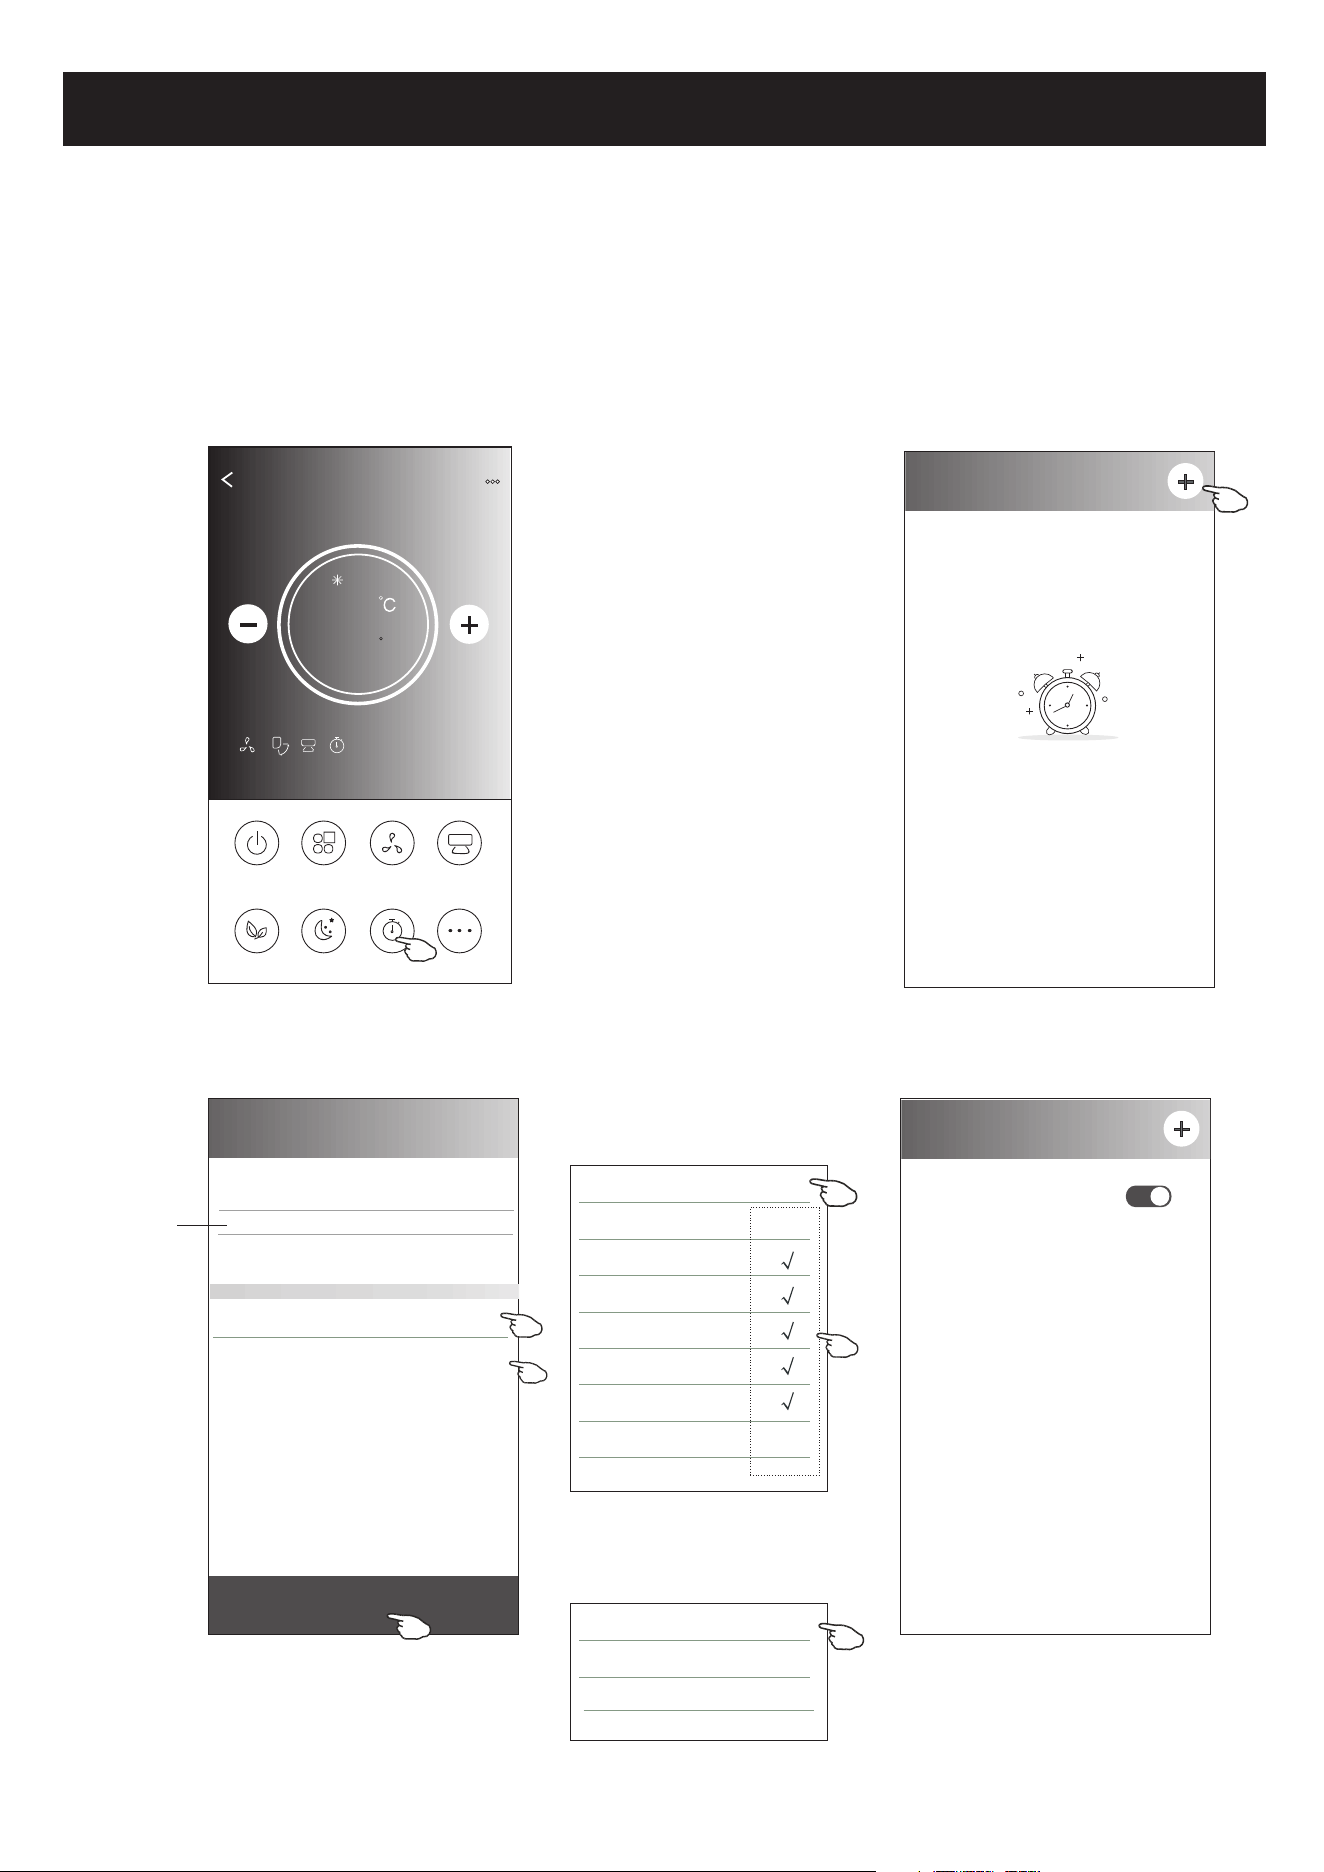
Air conditioner control
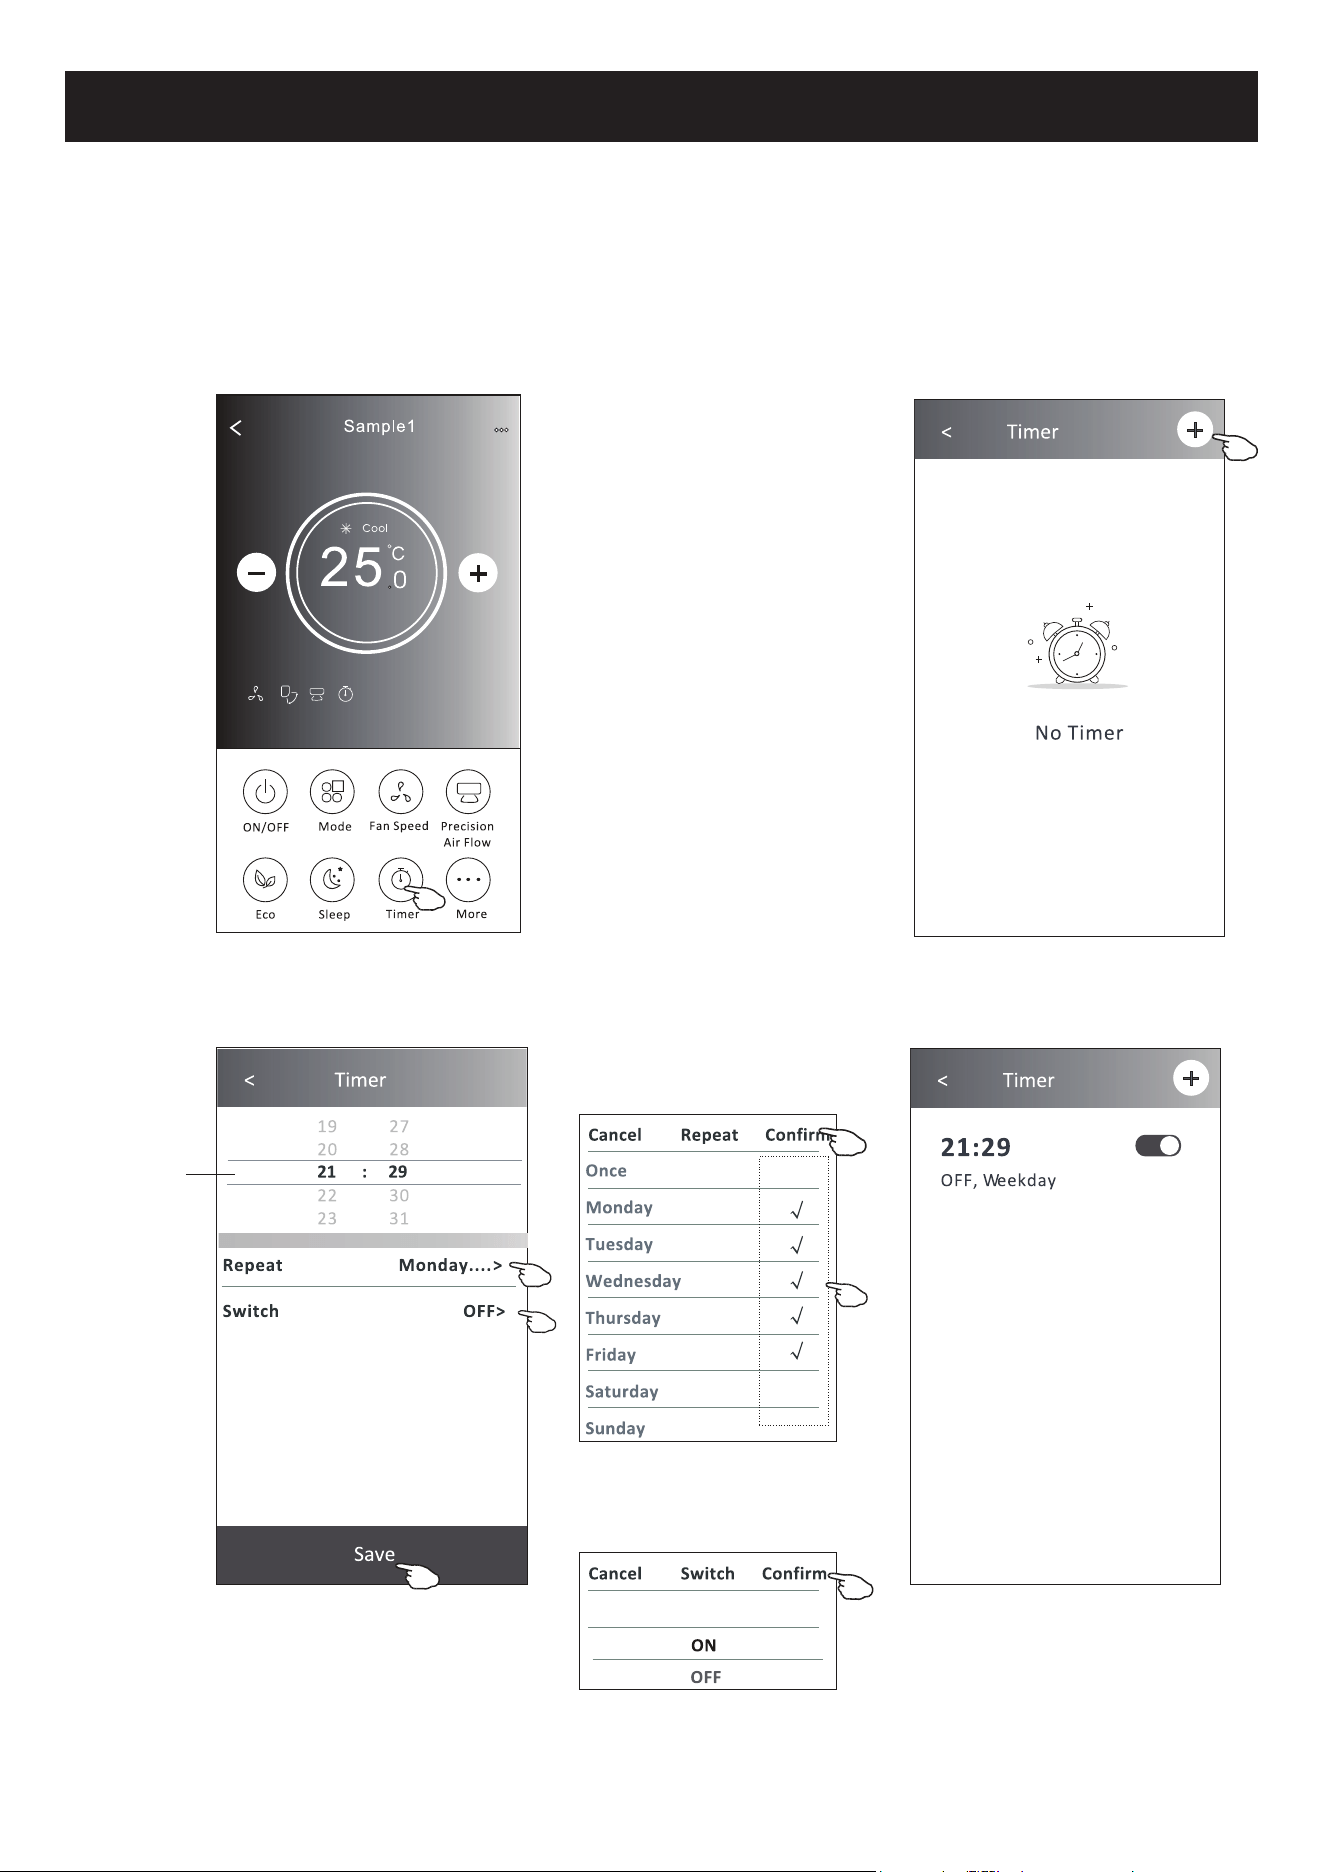
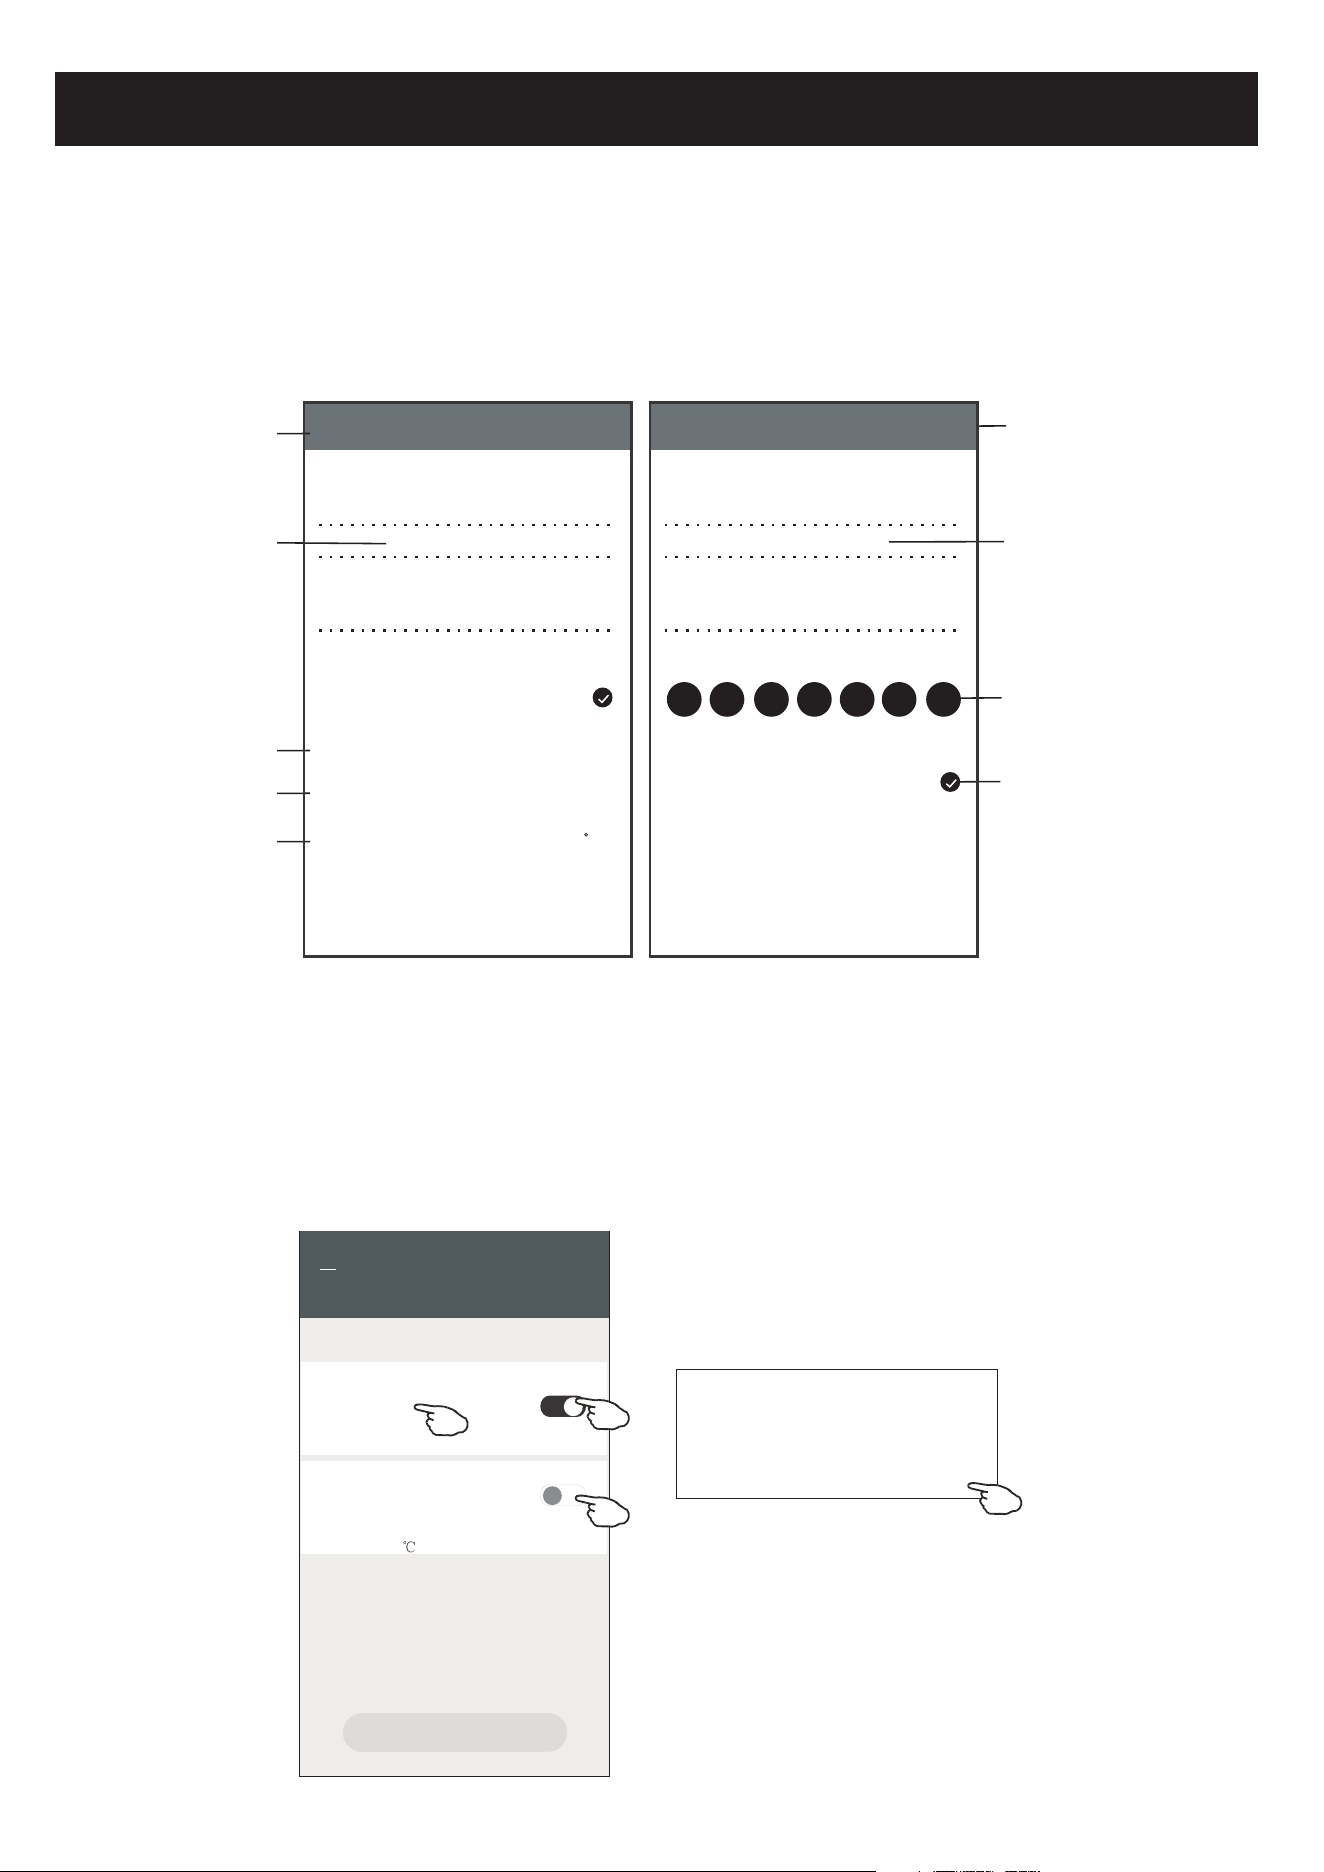
1.Tap the Timer button.
2.Tap + in the upper right corner of the Timer main screen.
3.Choose the Time/Repeat/Switch OFF then tap Save.
4.The timer(off) will appear on the Timer main screen.
ON/OFF
Fan Speed
Precision
Air Flow
More
Eco Sleep
Mode
Timer
Sample1
25
Cool
0
< Timer
No Timer
< Timer
19 27
20 28
22 30
23 31
Save
21 : 29
Repeat Monday.... >
Switch OFF>
Once
Monday
Tuesday
Wednesday
Thursday
Friday
Saturday
Sunday
Cancel Repeat Confirm
20
Slide up or down
to select time
Tap repeat > then tap your desired
repeat days or Once, then tap
Confirm your selection.
< Timer
21:29
OFF, Weekday
ON
Cancel Switch Confirm
OFF
Tap Switch > then slide the
screen to choose ON
and Confirm.
Control form2-Timer(on) setting
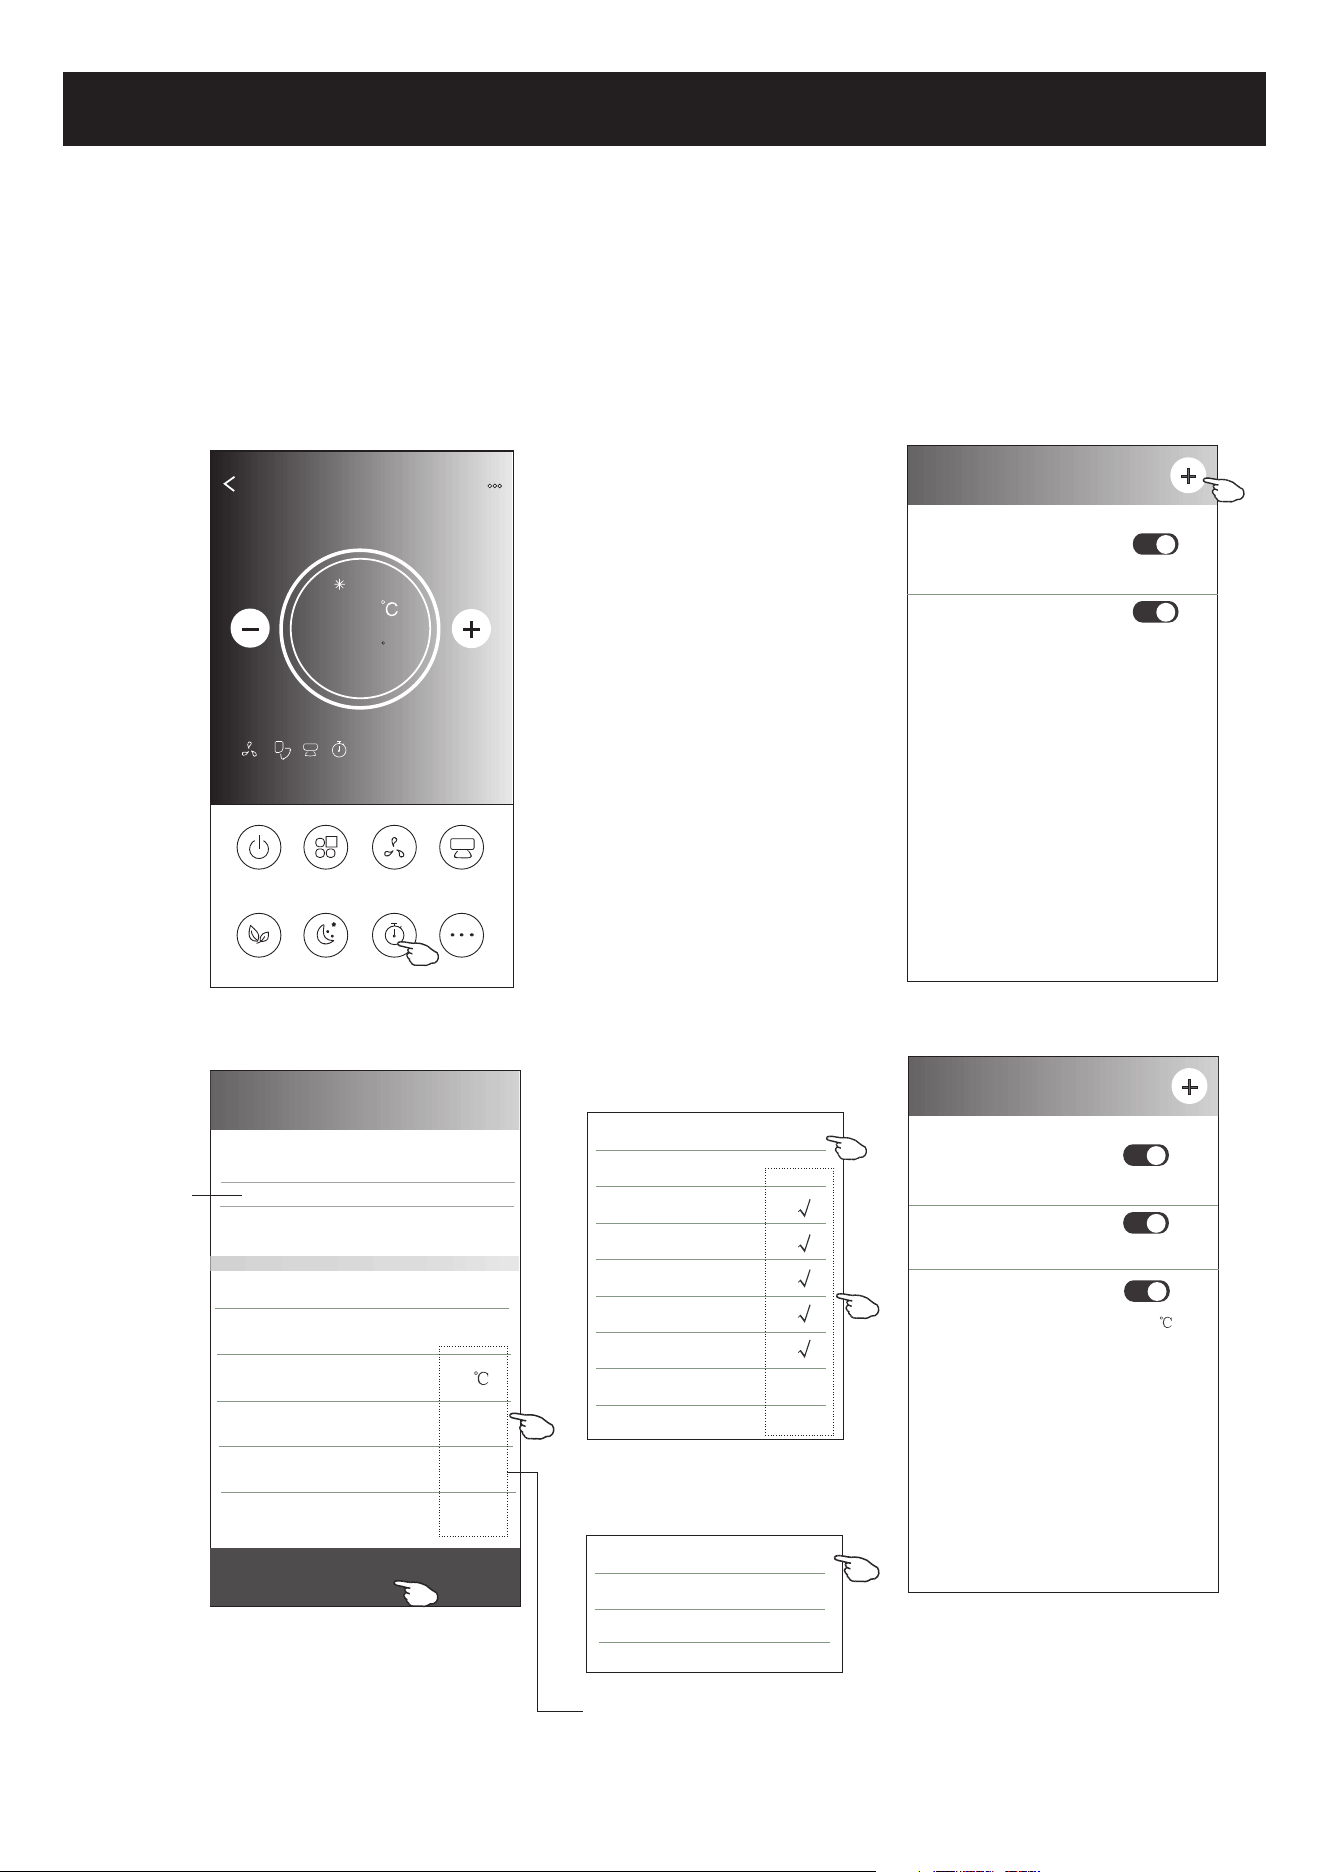
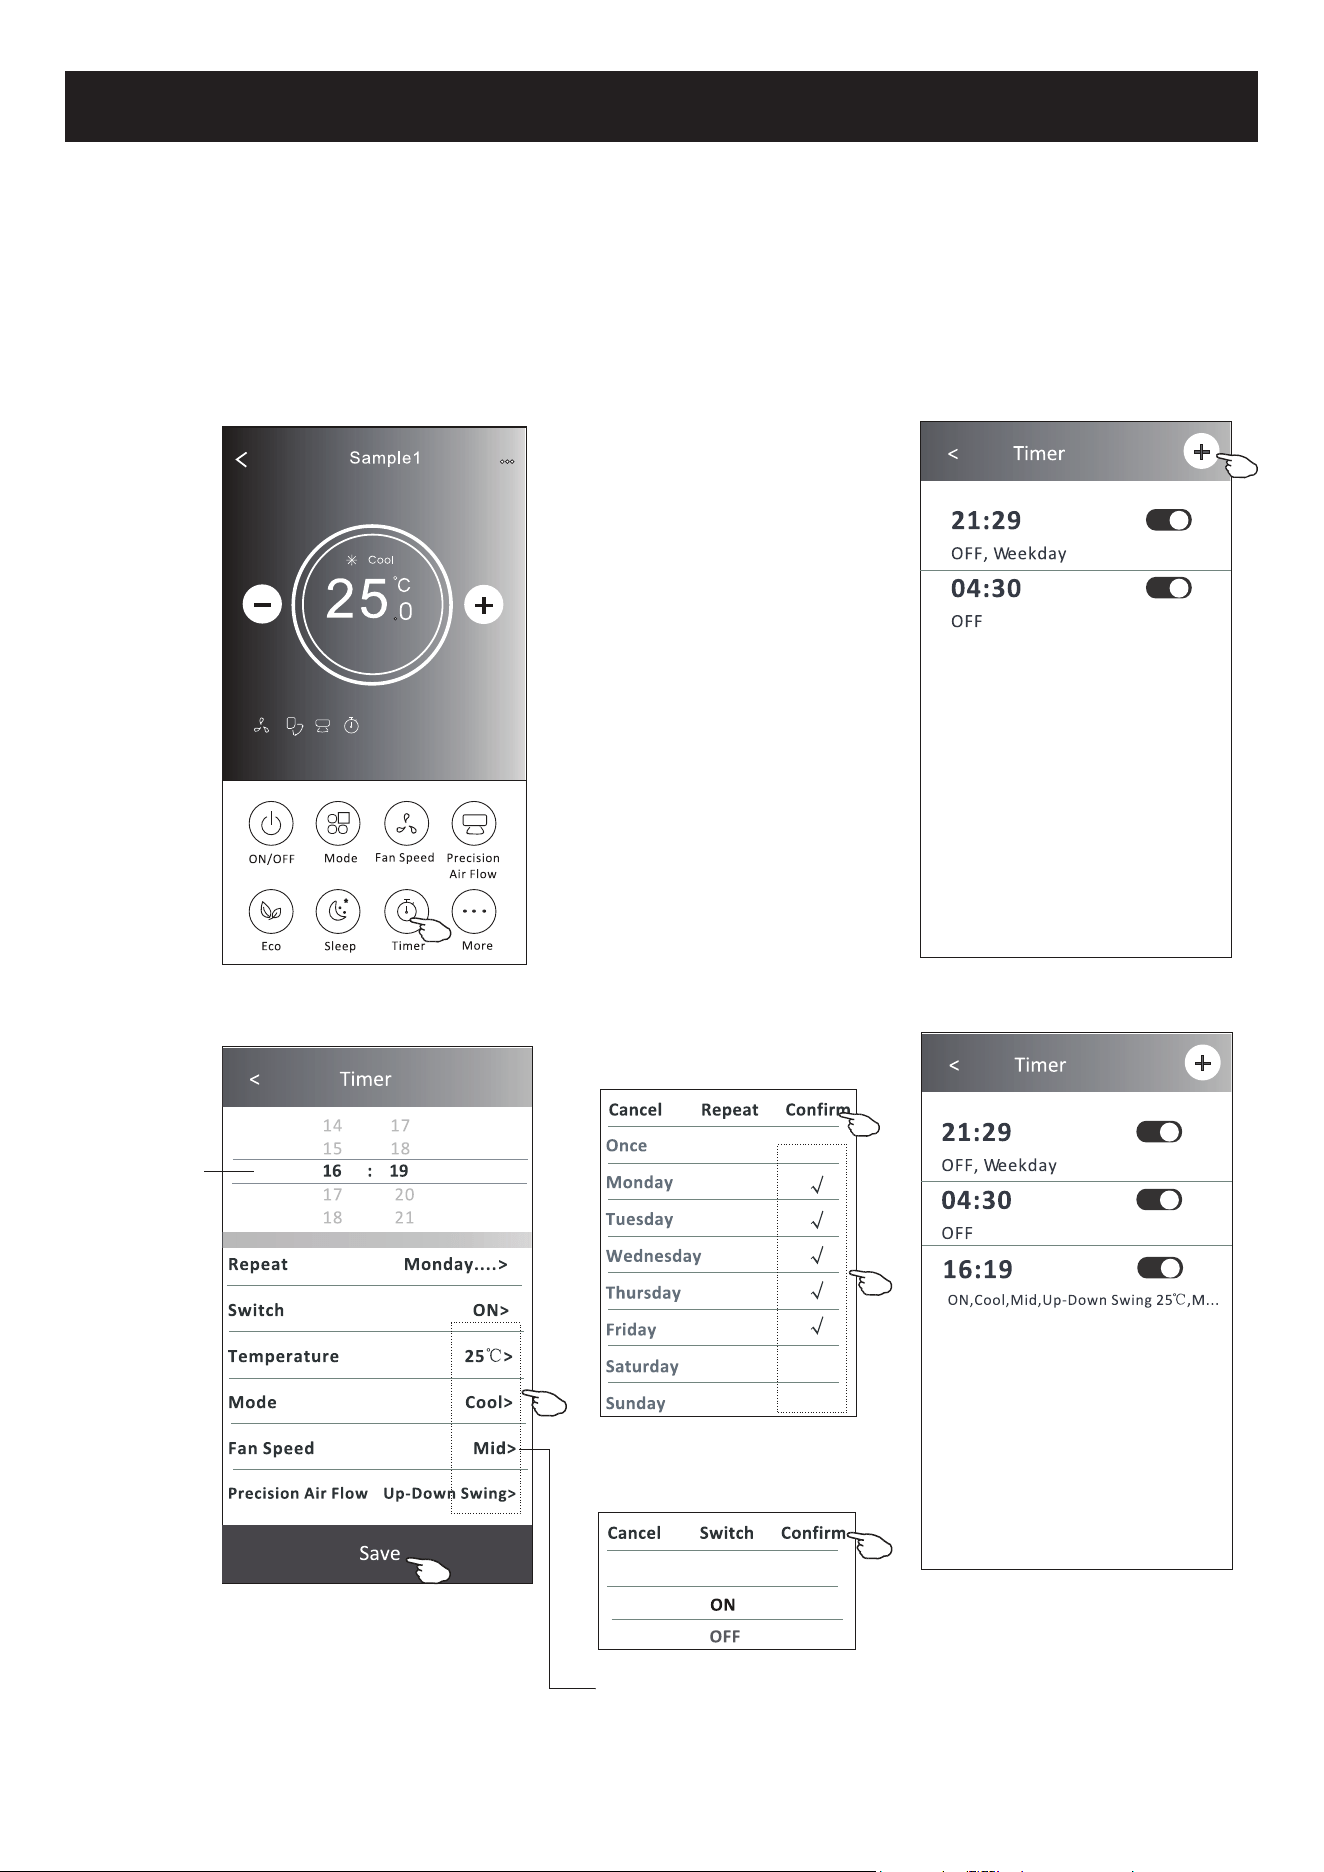
Air conditioner control
1.Tap the Timer button.
2.Tap + in the upper right corner of the Timer main screen.
3.Set the Time/Repeat Date/Switch(ON)/Temperature/Mode/
Fan speed/Air Flow as your desired and then tap Save.
4.The timer will appear on the Timer main screen.
ON/OFF
Fan Speed
Precision
Air Flow
More
Eco Sleep
Mode
Timer
Sample1
25
Cool
0
< Timer
14 17
15 18
17 20
18 21
Save
16 : 19
Repeat Monday.... >
Switch ON>
Temperature 25 >
Mode Cool>
Fan Speed Mid>
Precision Air Flow Up-Down Swing>
Slide up or down
to select time
21
Once
Monday
Tuesday
Wednesday
Thursday
Friday
Saturday
Sunday
Cancel Repeat Confirm
Tap repeat > then tap your desired
repeat days or Once, then tap
Confirm your selection.
< Timer
ON
Cancel Switch Confirm
OFF
Tap Switch > then slide the
screen to choose ON
and Confirm.
16:19
ON,Cool,Mid,Up-Down Swing 25 ,M...
< Timer
21:29
OFF, Weekday
Tap Temperature/Mode/Fan Speed/
Air Flow > one by one then set as your
desired as mentioned on the previous
chapter and tap Confirm the setting.
04:30
OFF
21:29
OFF, Weekday
04:30
OFF
Control form2-Timer(off) setting

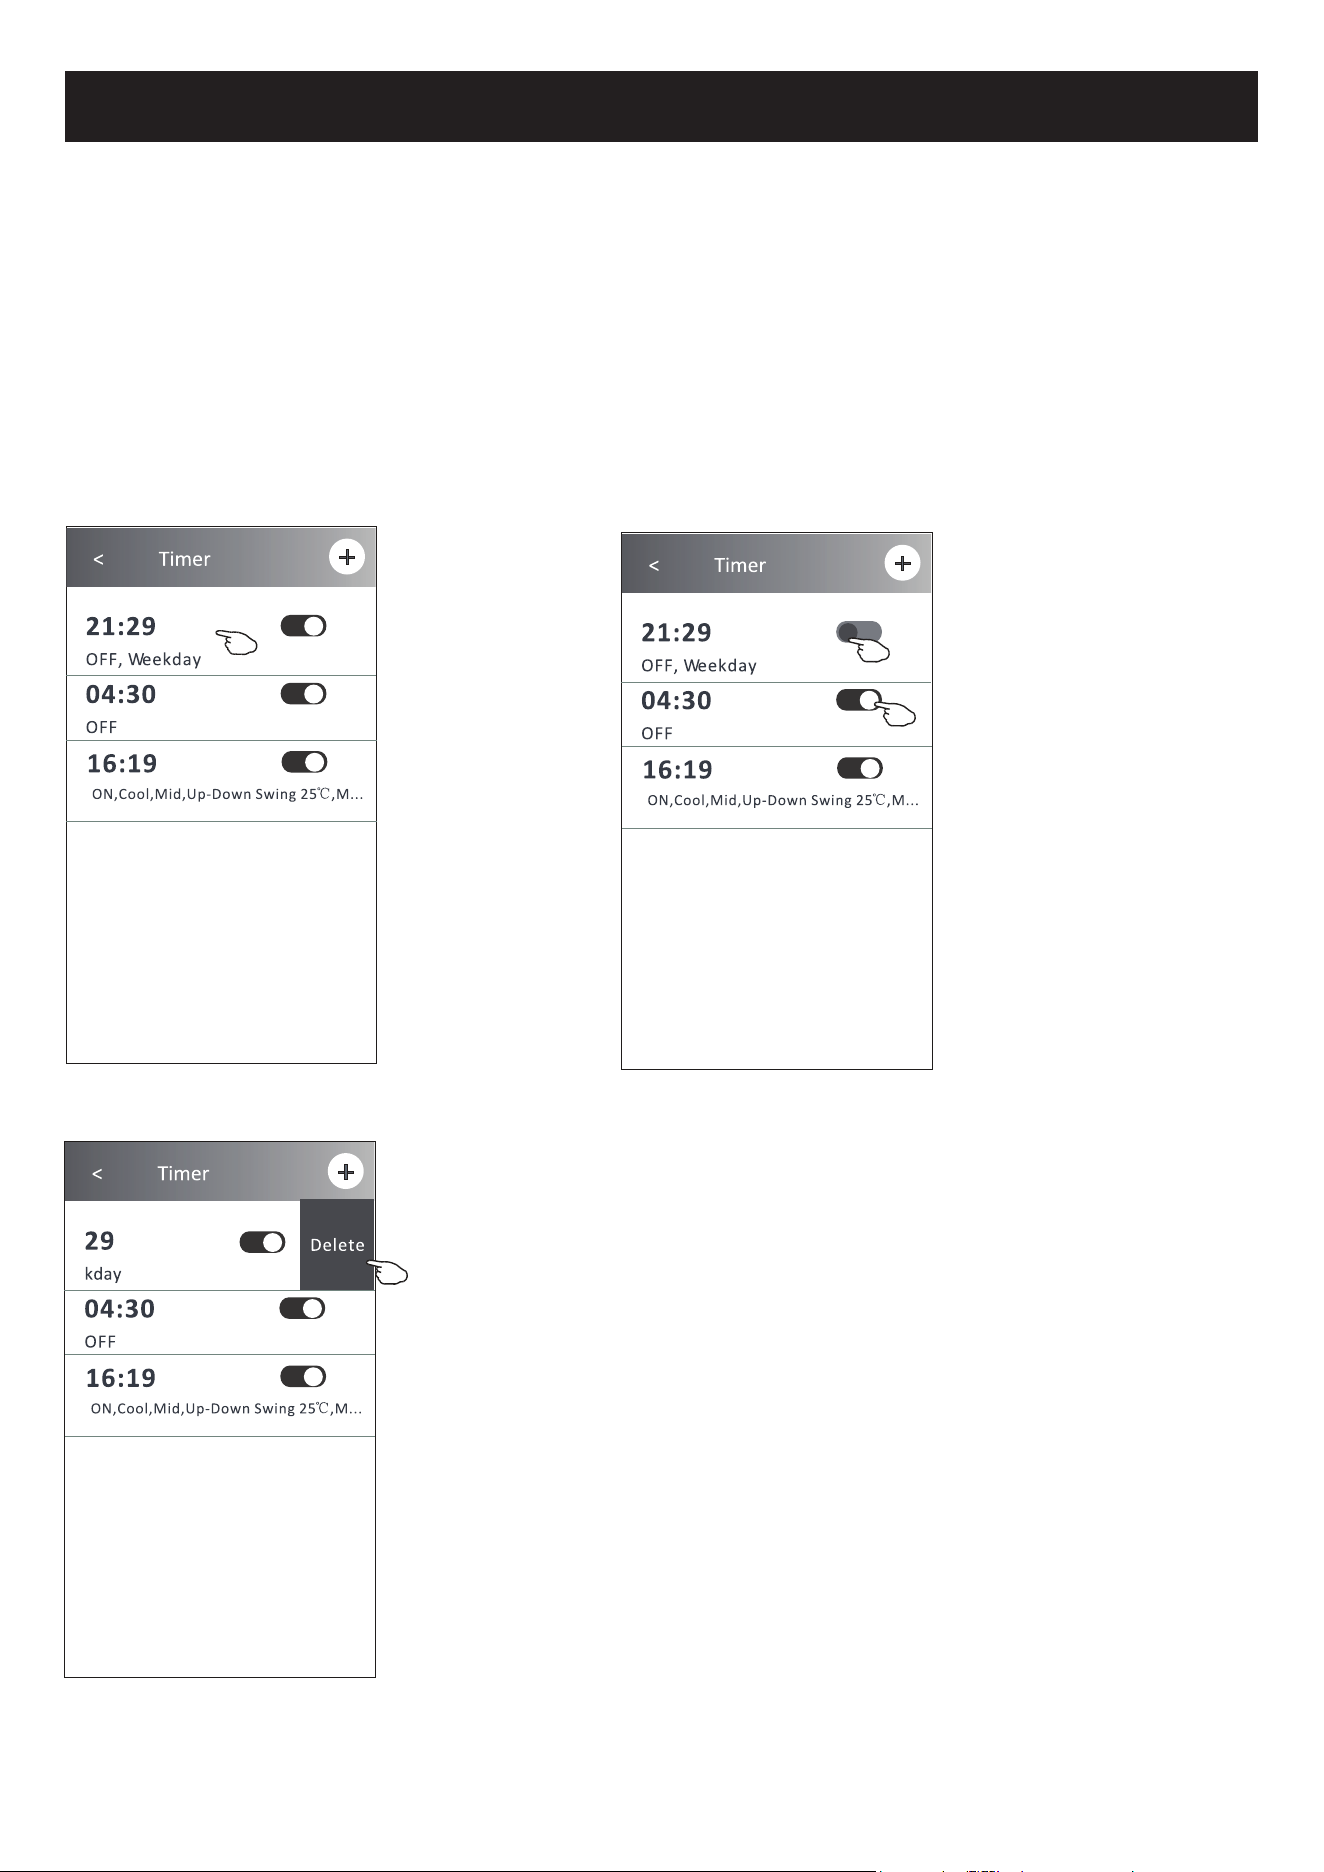
Air conditioner control
1.Change the Timer setting:
Tap anywhere of the timer list bar except the switch bar to get into the Timer
setting screen, change the setting and then tap save.
2.Enable or Disable the Timer:
Tap the left of the switch to disable the Timer.
Tap the right of the switch to enable the Timer.
3.Delete the Timer:
Slide the list bar of the Timer from right to left until Delete button appear,
then tap delete.
< Timer
16:19
ON,Cool,Mid,Up-Down Swing 25 ,M...
21:29
OFF, Weekday
04:30
OFF
22
< Timer
16:19
ON,Cool,Mid,Up-Down Swing 25 ,M...
21:29
OFF, Weekday
04:30
OFF
Slid left to disable the Timer.
Slid right to enable the Timer.
< Timer
16:19
ON,Cool,Mid,Up-Down Swing 25 ,M...
29
kday
04:30
OFF
Delete
Control form2-Timer management
Air conditioner control
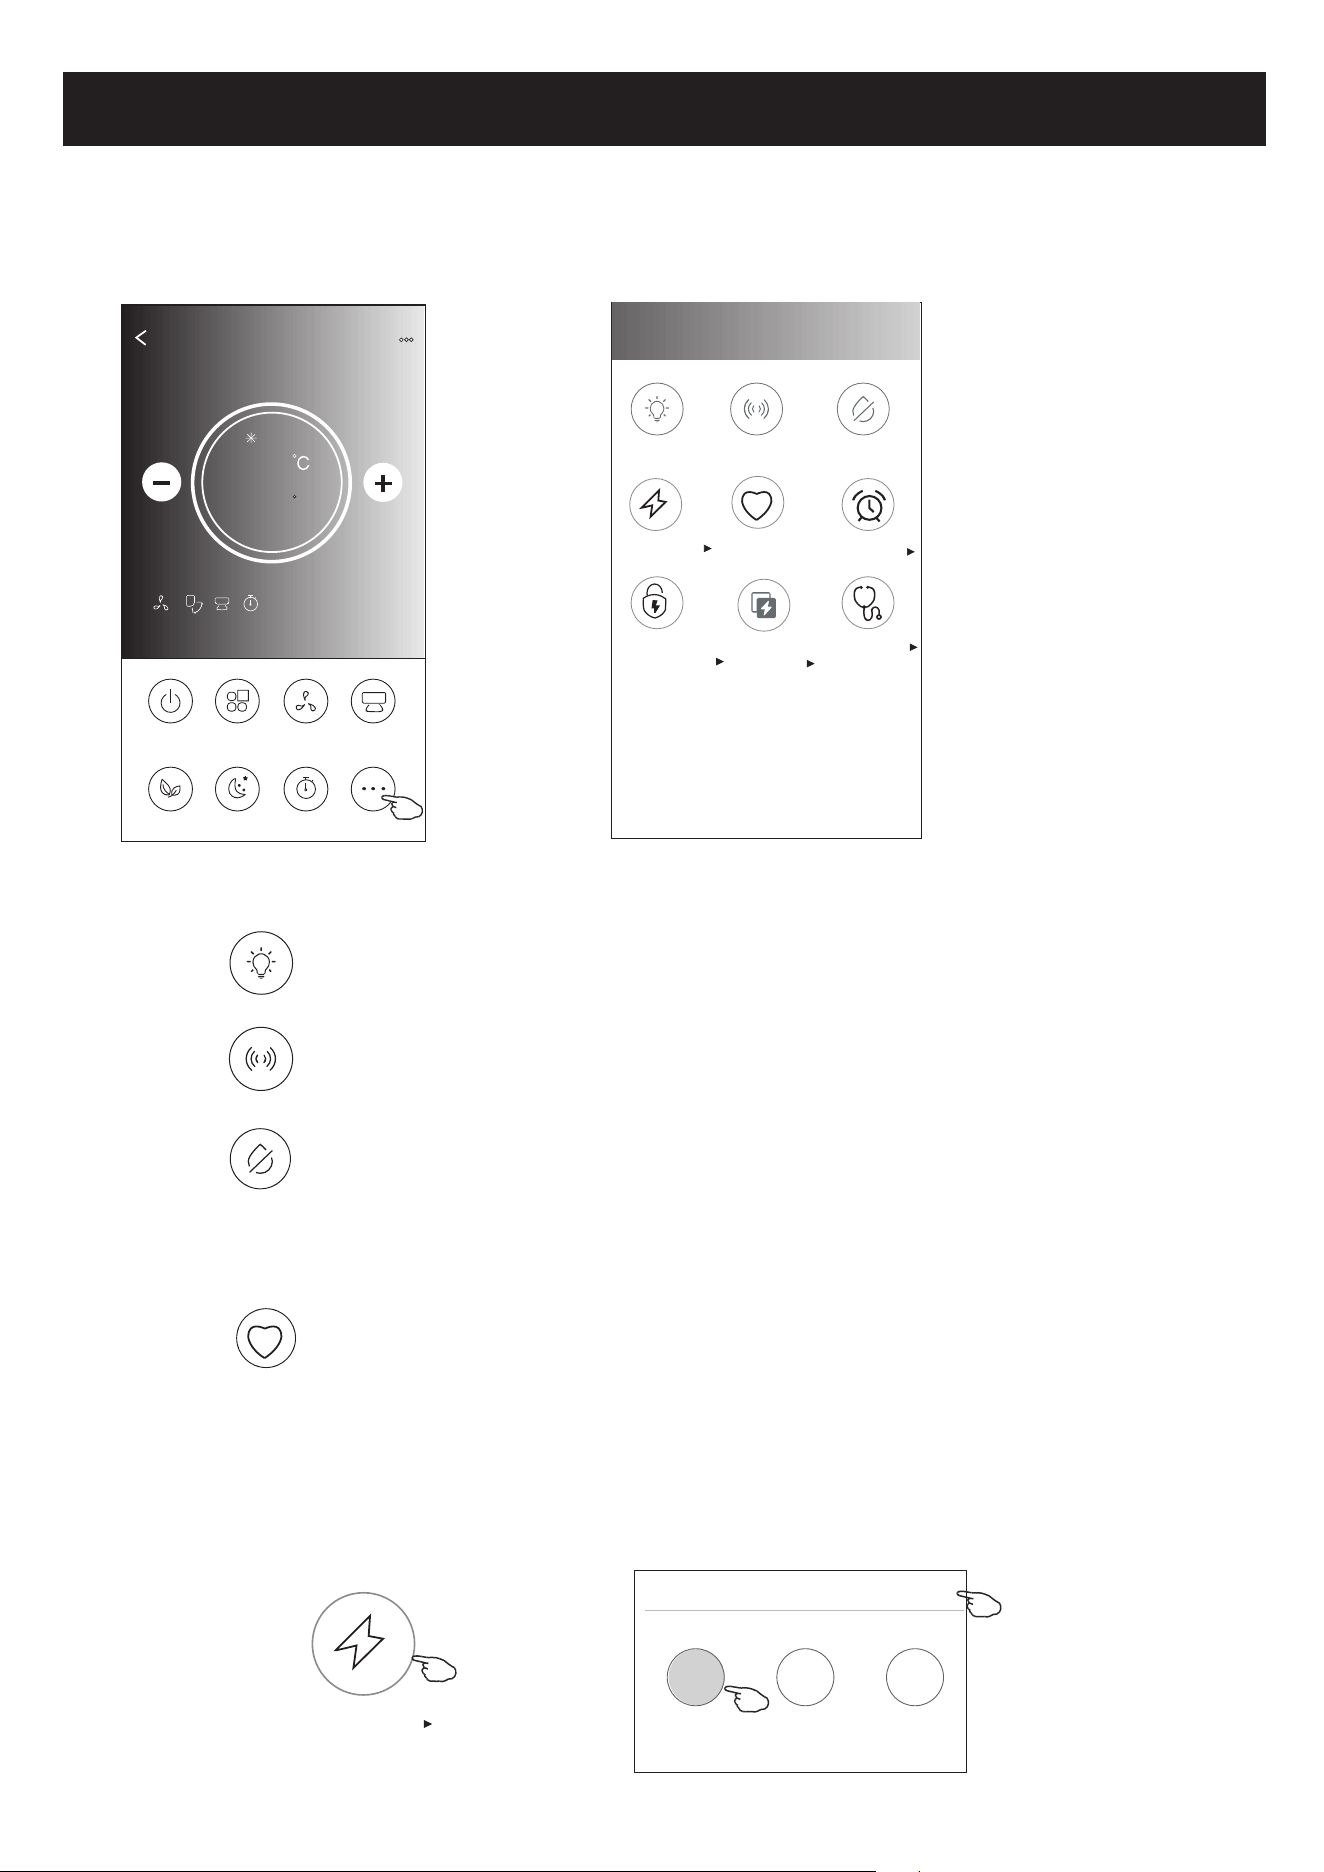
1.Tap the More button to operate additional functions if it appears on the screen.
ON/OFF
Fan Speed
Precision
Air Flow
More
Eco Sleep
Mode
Timer
Sample1
25
Cool
0
23
Note: The appearance maybe different , some icons
will be hidden if the air conditional do no have this
function or do not enable on the current mode.
< More
Buzzer
Anti-Mildew
Display
Health
Reservation
GEN Mode
Electricity
Monitoring
Self-diagnosis
Electricity
Management
2. Tap the to switch on/off the indoor LED display. " "
Display
3. Tap the to switch on/off the buzzing when operating through Wi-Fi APP." "
Buzzer
Note:
Some air conditioner model
don't have the more button.
4. Tap the " " button to activate the Anti-Mildew function, if it is available on the screen.
After AC turning off , it will start drying , reduce residual moisture and prevent mould, after function
finish, it will automatically turn off.
Anti-Mildew
Health
5. Tap the " " button to switch on/off the healthy function, if it is available on the screen.
It activate the antibacterial ioniser function.This function only for models with the ioniser generator.
Control form2-More functions
6. Tap the "GEN Mode" button, if it is available on the screen.
In this Mode, you can choose one of the three levels of current.
The air conditioner will maintain proper current to save energy.
GEN Mode
GEN Mode
X
LV1
LV3
LV2
30%
80%
50%
24
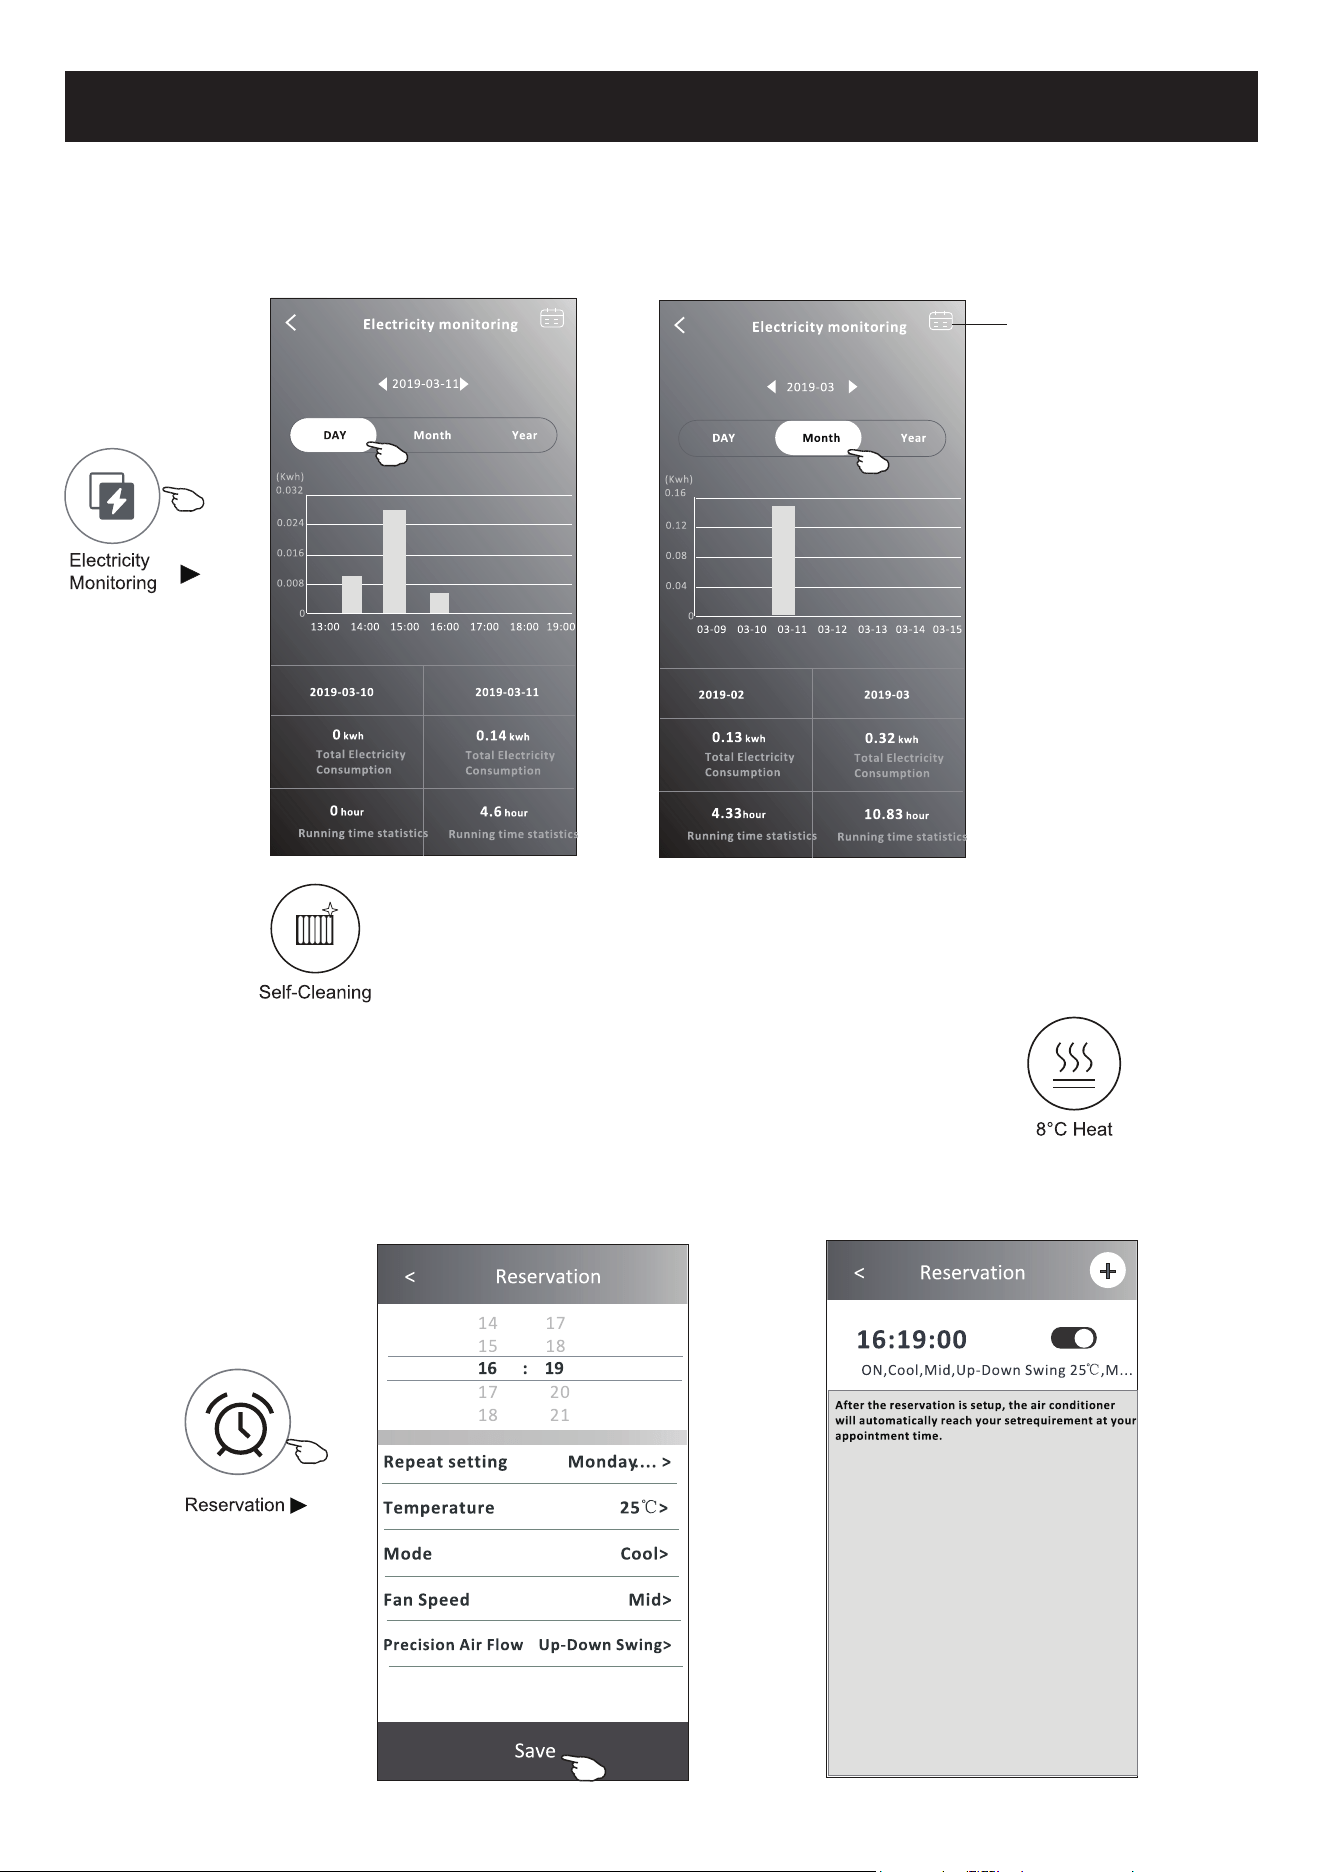
Air conditioner control
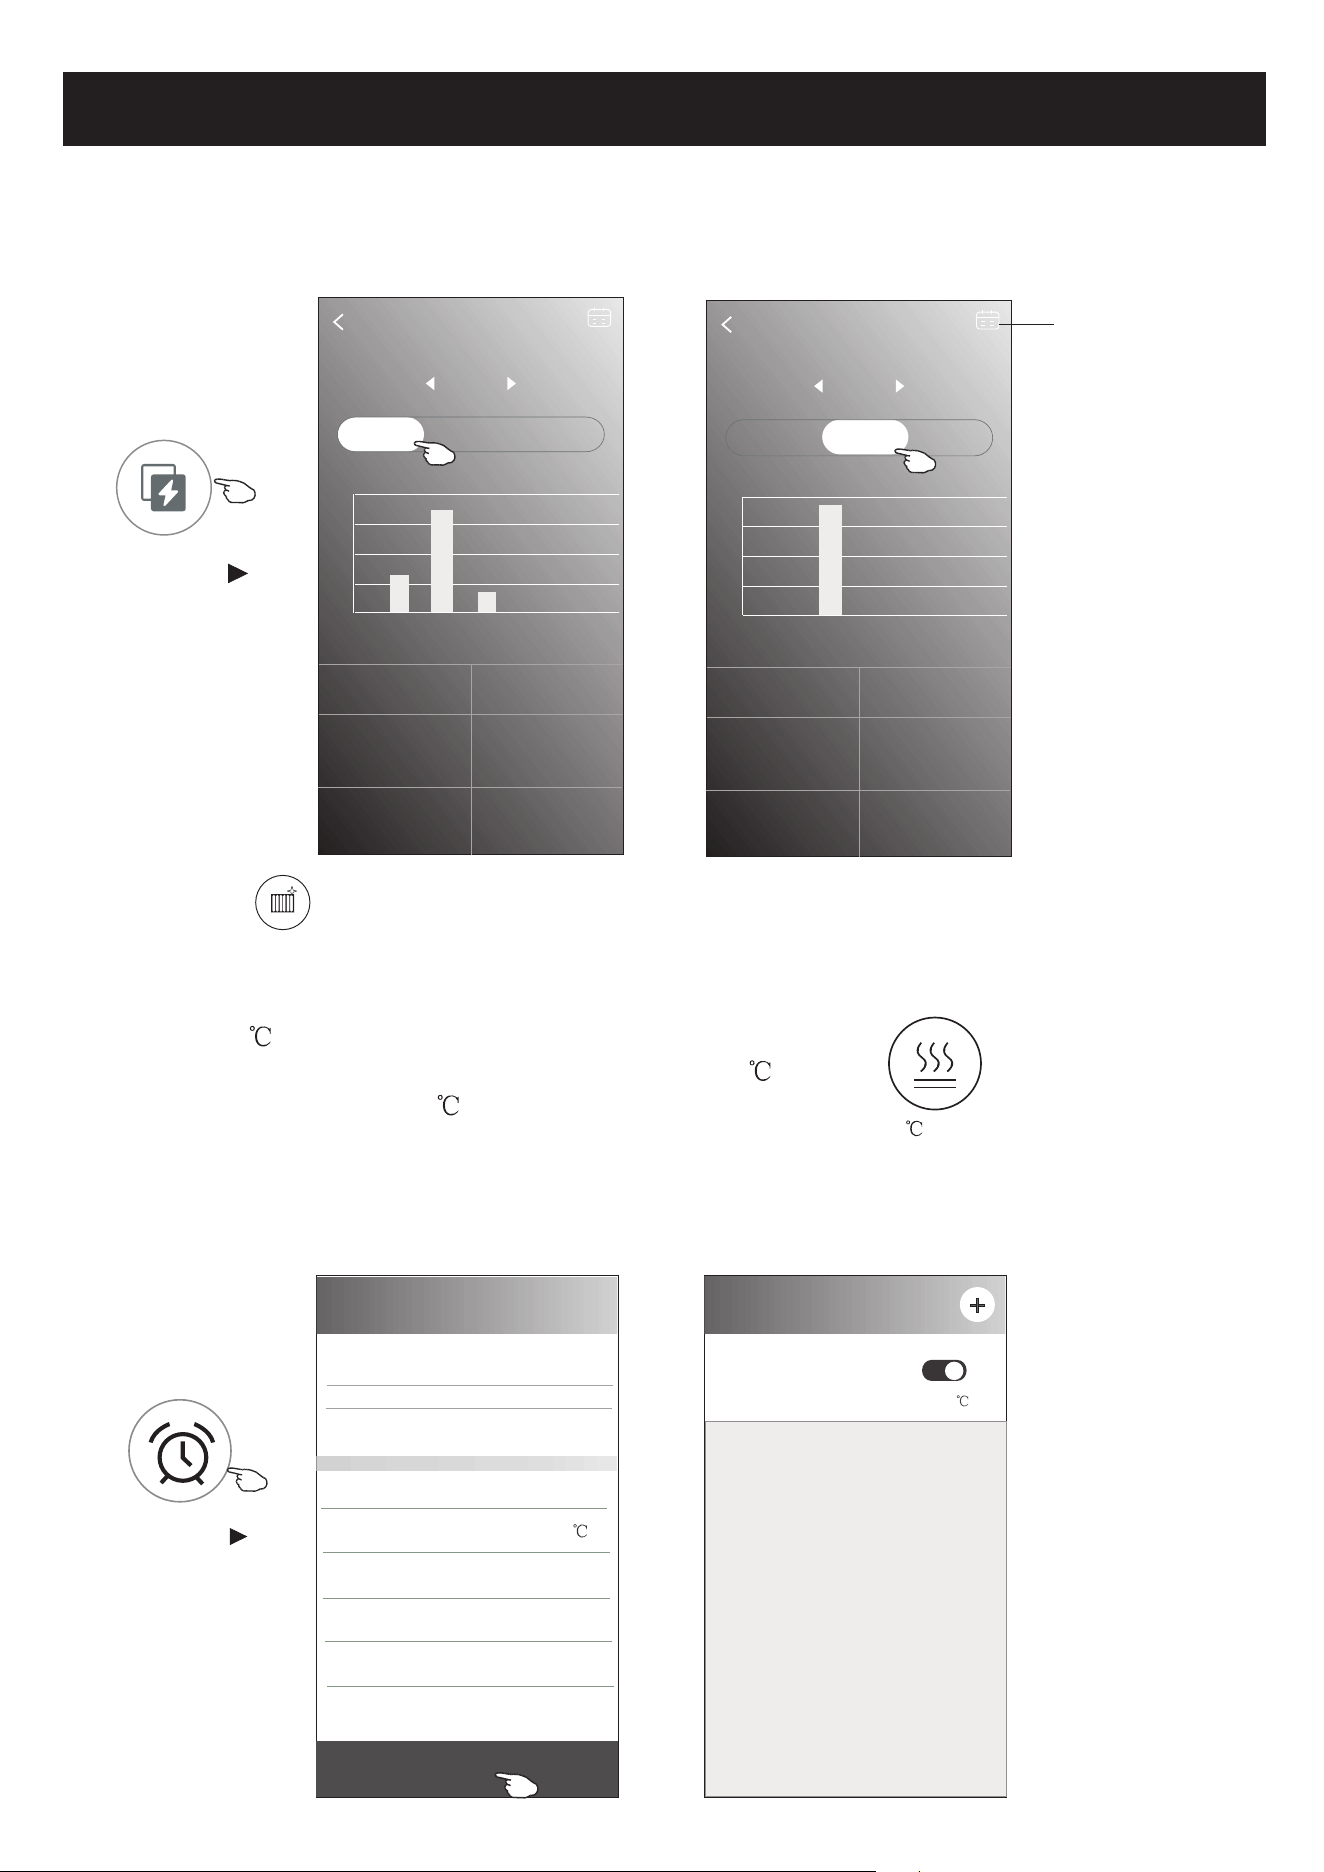
7. Tap the "Electricity Monitoring" button if it is available on the screen.
In this function, you can monitor the air conditioner electricity consumption.
Electricity monitoring
2019-03-11
DAY Month Year
2019-03-10 2019-03-11
0 kwh
Total Electricity
Consumption
0.14 kwh
Total Electricity
Consumption
4.6 hour
Running time statistics
0 hour
Running time statistics
13:00 14:00 15:00 16:00 17:00 18:00 19:00
(Kwh)
0.032
0.024
0.016
0.008
0
Electricity monitoring
2019-03
DAY Month Year
2019-02 2019-03
0.13 kwh
Total Electricity
Consumption
0.32 kwh
Total Electricity
Consumption
10.83 hour
Running time statistics
4.33hour
Running time statistics
03-09 03-10 03-11 03-12 03-13 03-14 03-15
(Kwh)
0.16
0.12
0.08
0.04
0
Electricity
Monitoring
You can tap this button to
pop up the calender then
select the date.
8. Tap the " " button, if it is available on the screen.
Check the details of the Self-Cleaning function on User Manual.
9. Tap the "8 Heat" button , if it is available on the screen.
This function help keep the room temperature over 8 .
Check the details of the 8 Heat function on User Manual.
Self-Cleaning
8 Heat
Control form2-More functions
10.Tap the "Reservation" button , if it is available on the screen.
You can set the time, repeat day, temperature, mode, fan speed, air flow as you desired
and then tap Save to activate the function.
The air conditioner will automatically reach your settings at the appointment time.
< Reservation
14 17
15 18
17 20
18 21
Save
16 : 19
Repeat setting Monday.... >
Temperature 25 >
Mode Cool>
Fan Speed Mid>
Precision Air Flow Up-Down Swing>
< Reservation
16:19:00
ON,Cool,Mid,Up-Down Swing 25 ,M...
After the reservation is set up, the air conditioner
will automatically reach your set requirement at your
appointment time.
Reservation
25
Air conditioner control
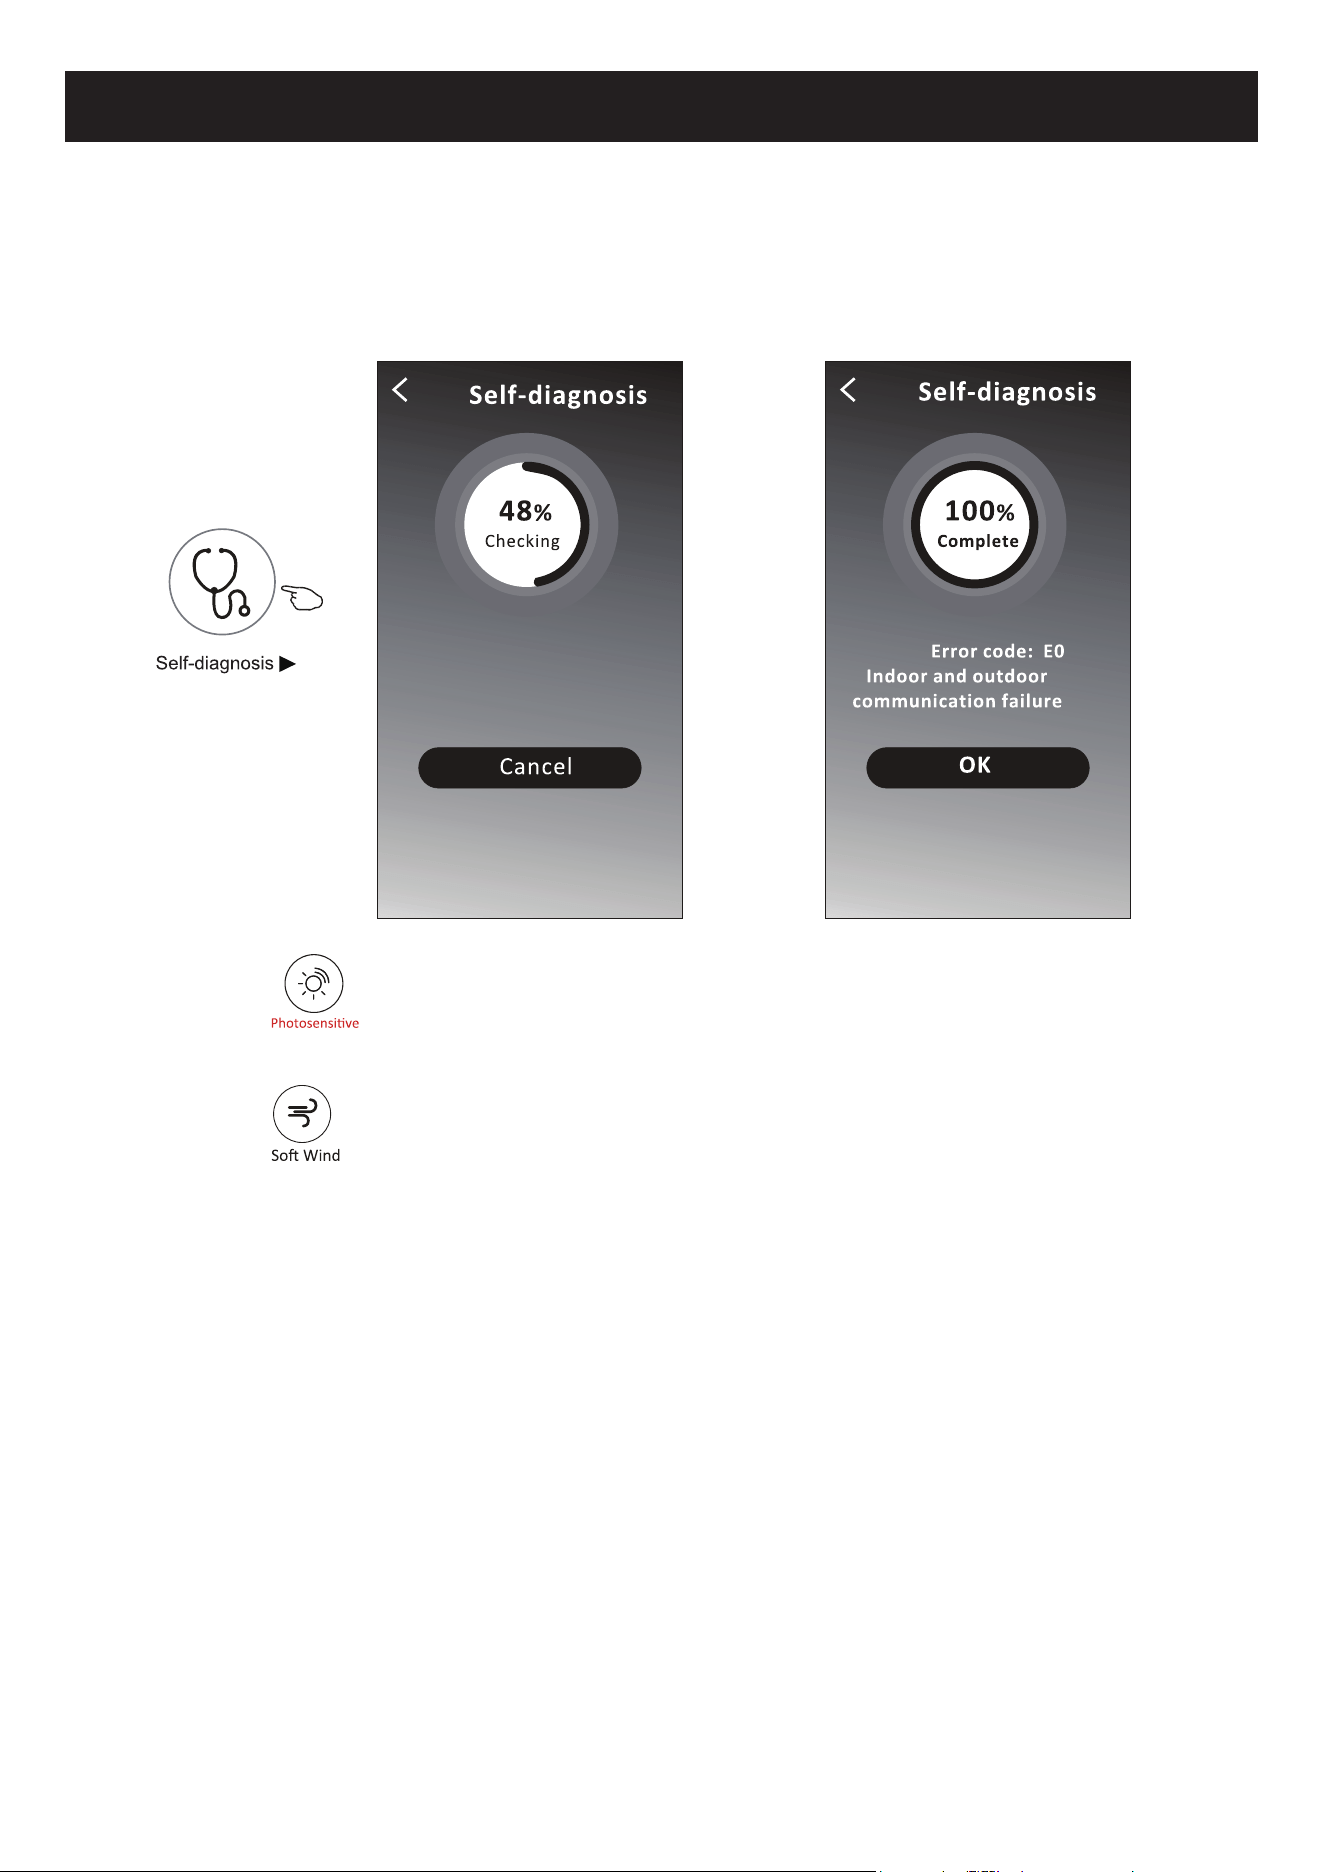
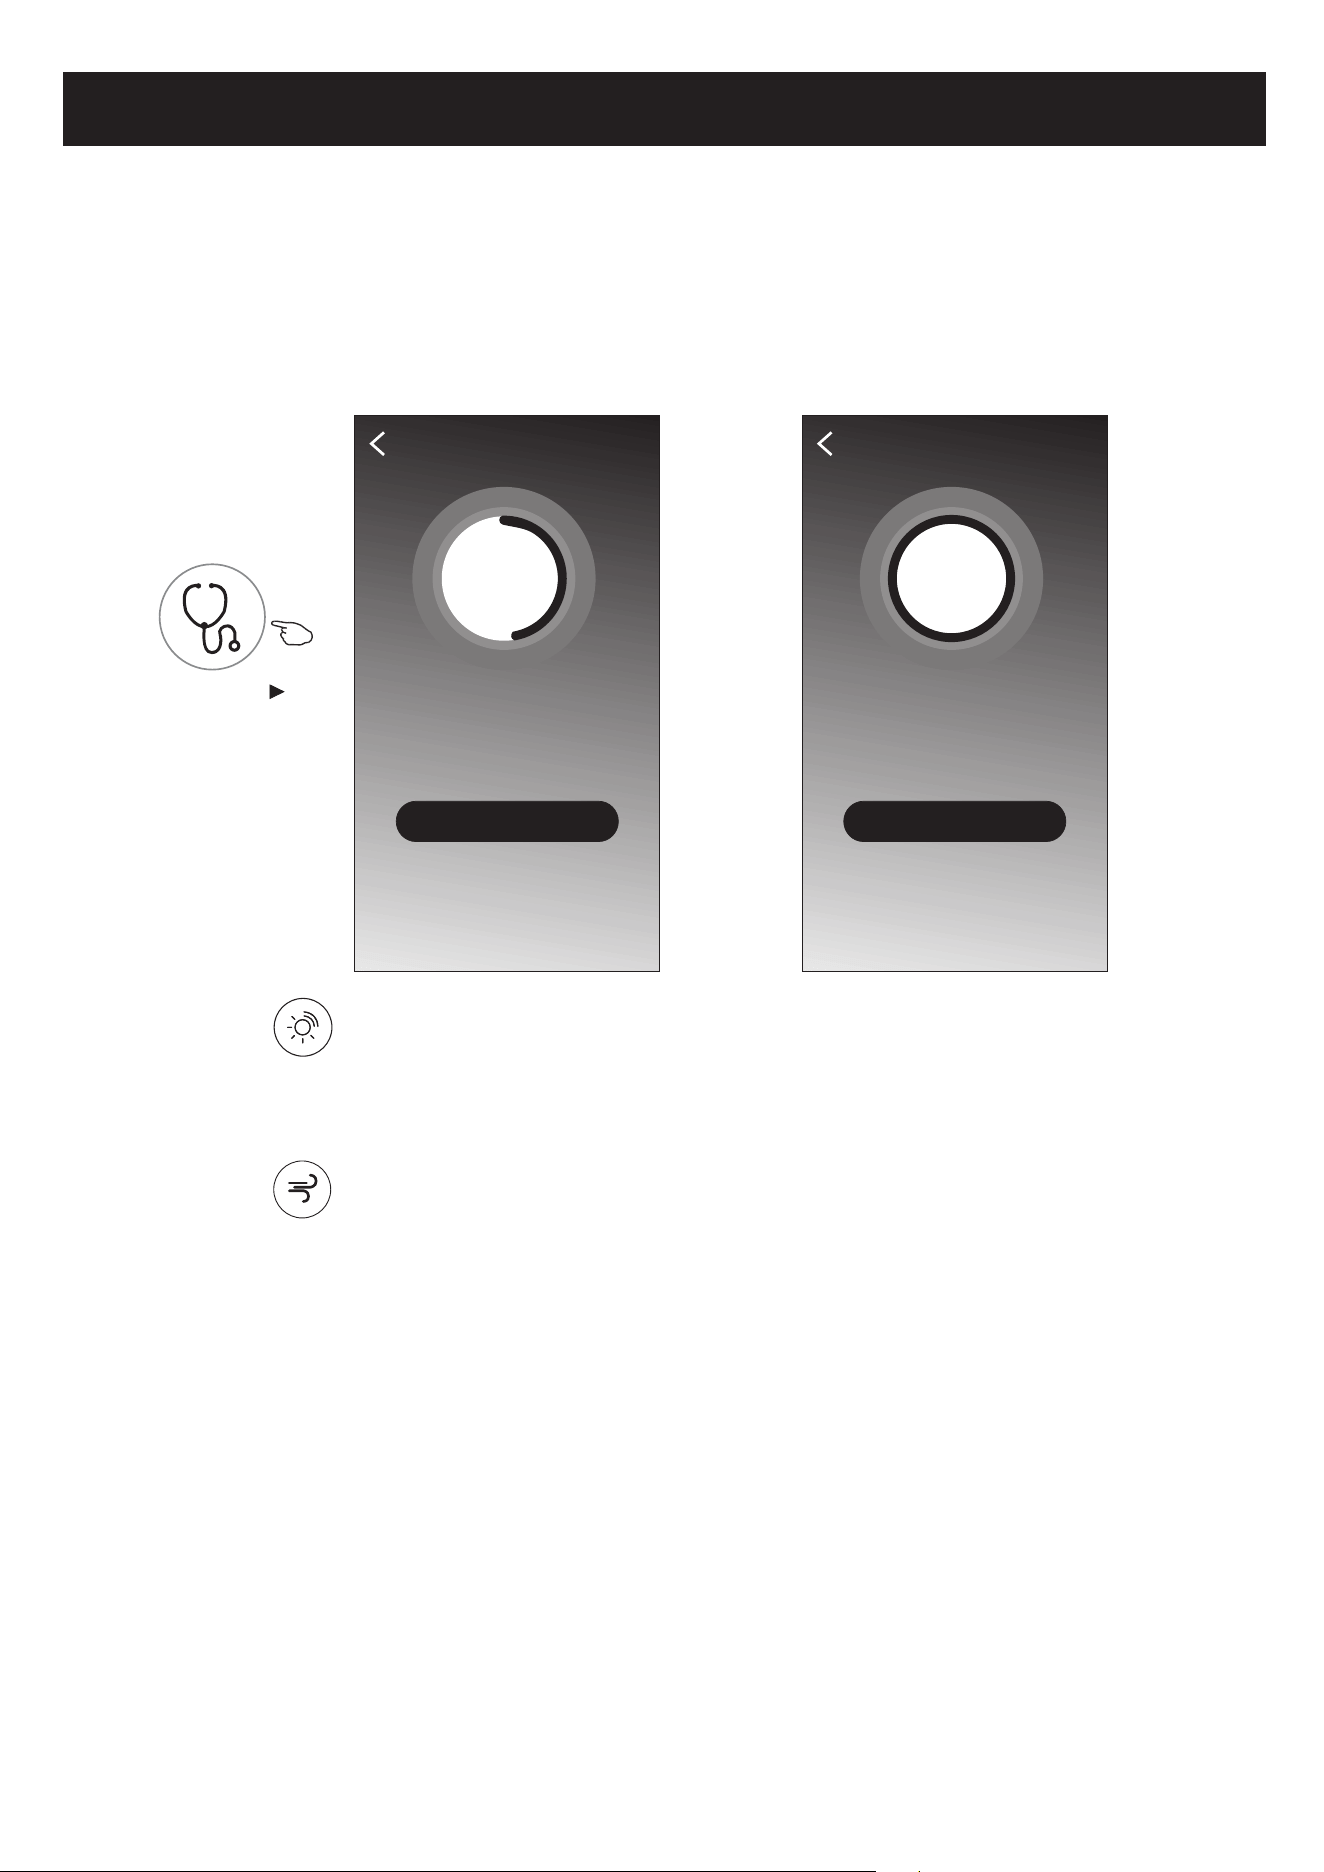
11.Tap the "Self-diagnosis" button, if it is available on the screen.
The air conditioner will automatically diagnosis itself and indicate the Error code
and the problem instructions if possible.
Self-diagnosis
48%
Checking
Cancel
48
OK
Self-diagnosis
100%
Complete
Error code: E0
Indoor and outdoor
communication failure
Self-diagnosis
Control form2-More functions
12. Tap the " " button if it is available on the screen.
13. Tap the " " button if it is available on the screen.
In this function, the air conditioner will blow soft airflow through the micro holes on the deflector.
Photosensitive
Soft Wind
This function allow the air conditioner to turn on/off the display automatically according to the
light intensity.
Air conditioner control
ON/OFF
Fan Speed
Precision
Air Flow
More
Eco Sleep
Mode
Timer
Sample1
25
Cool
0
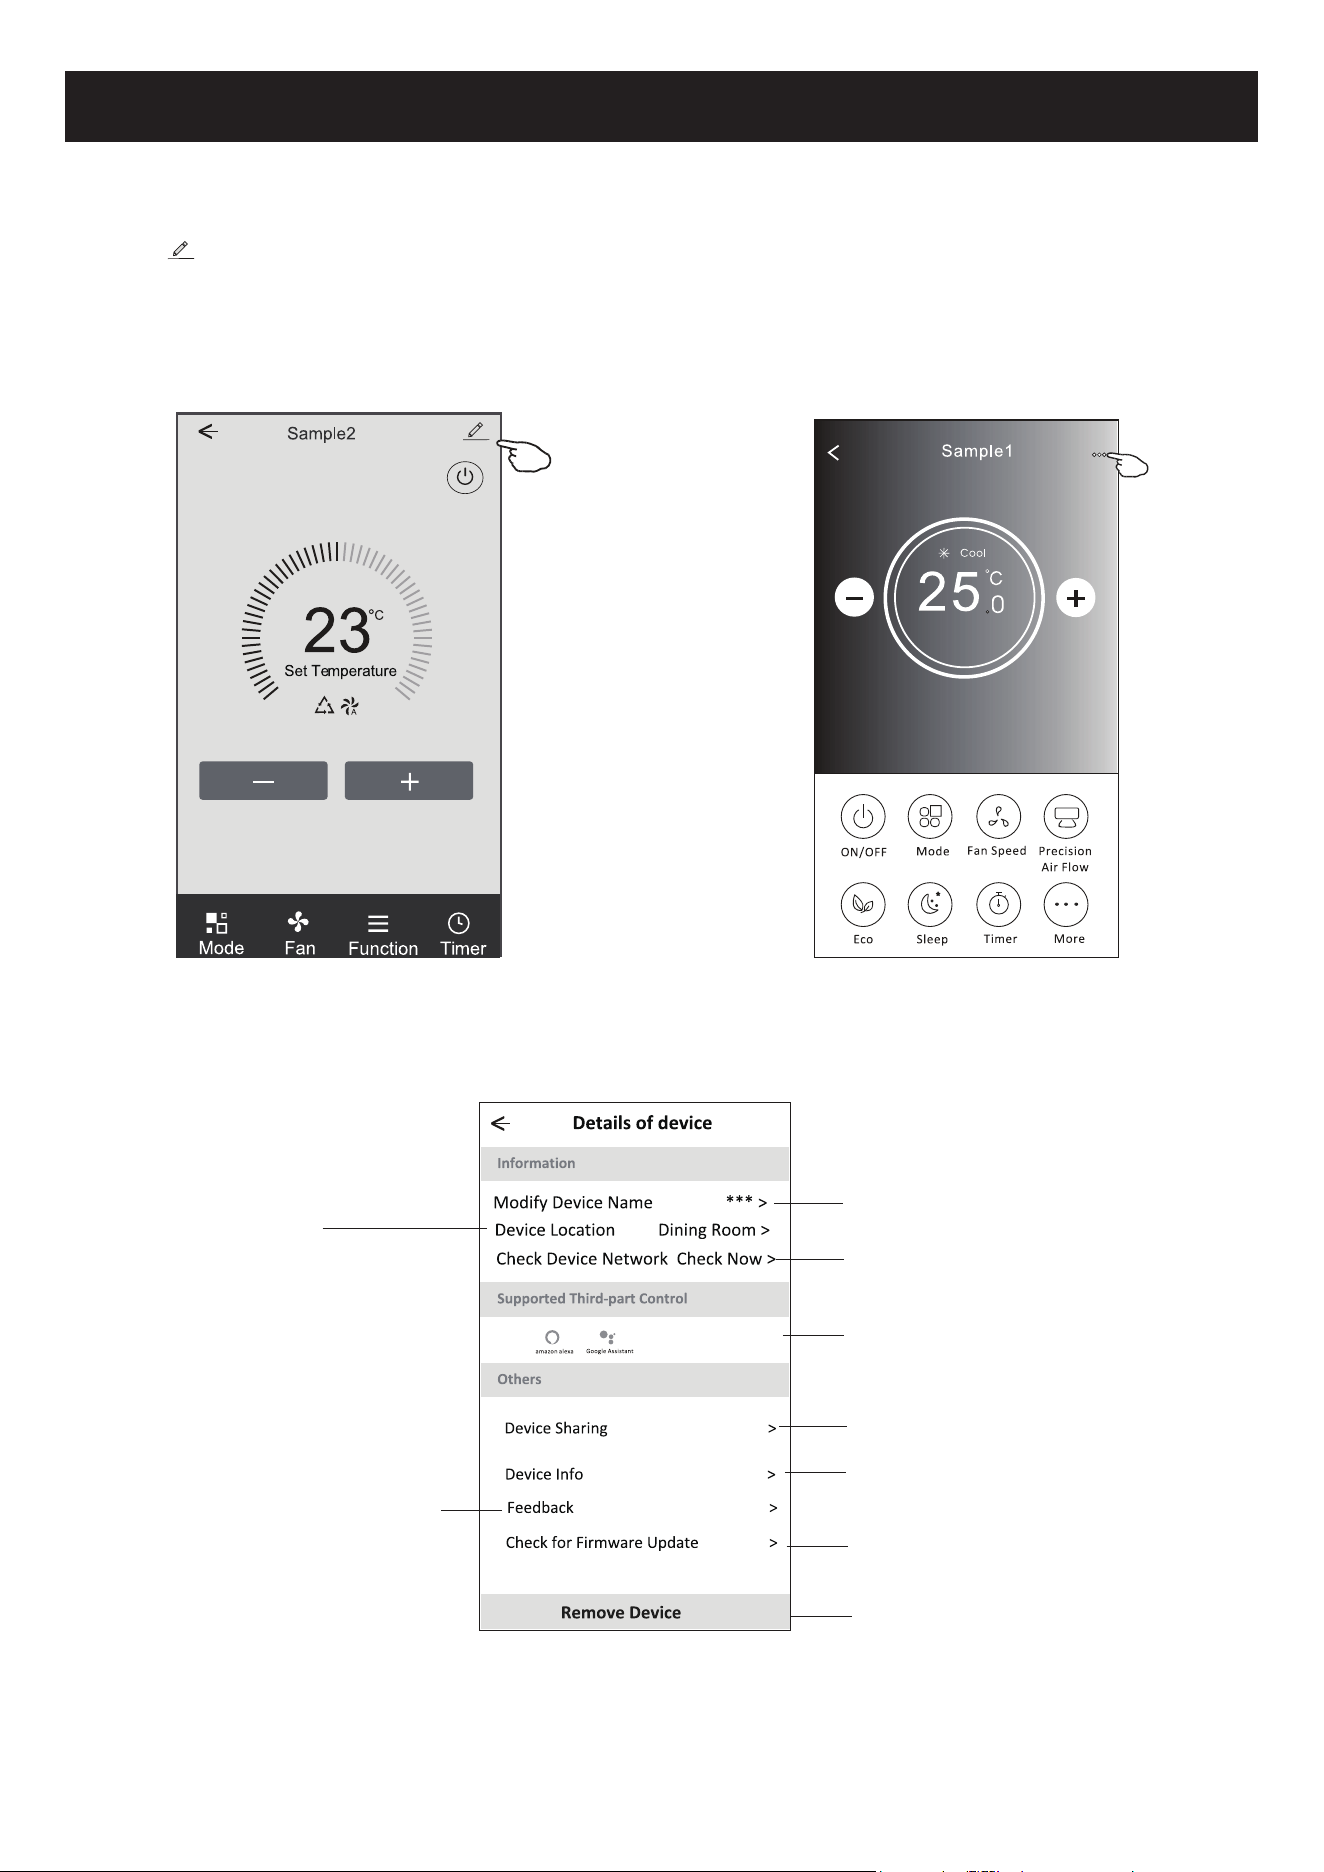
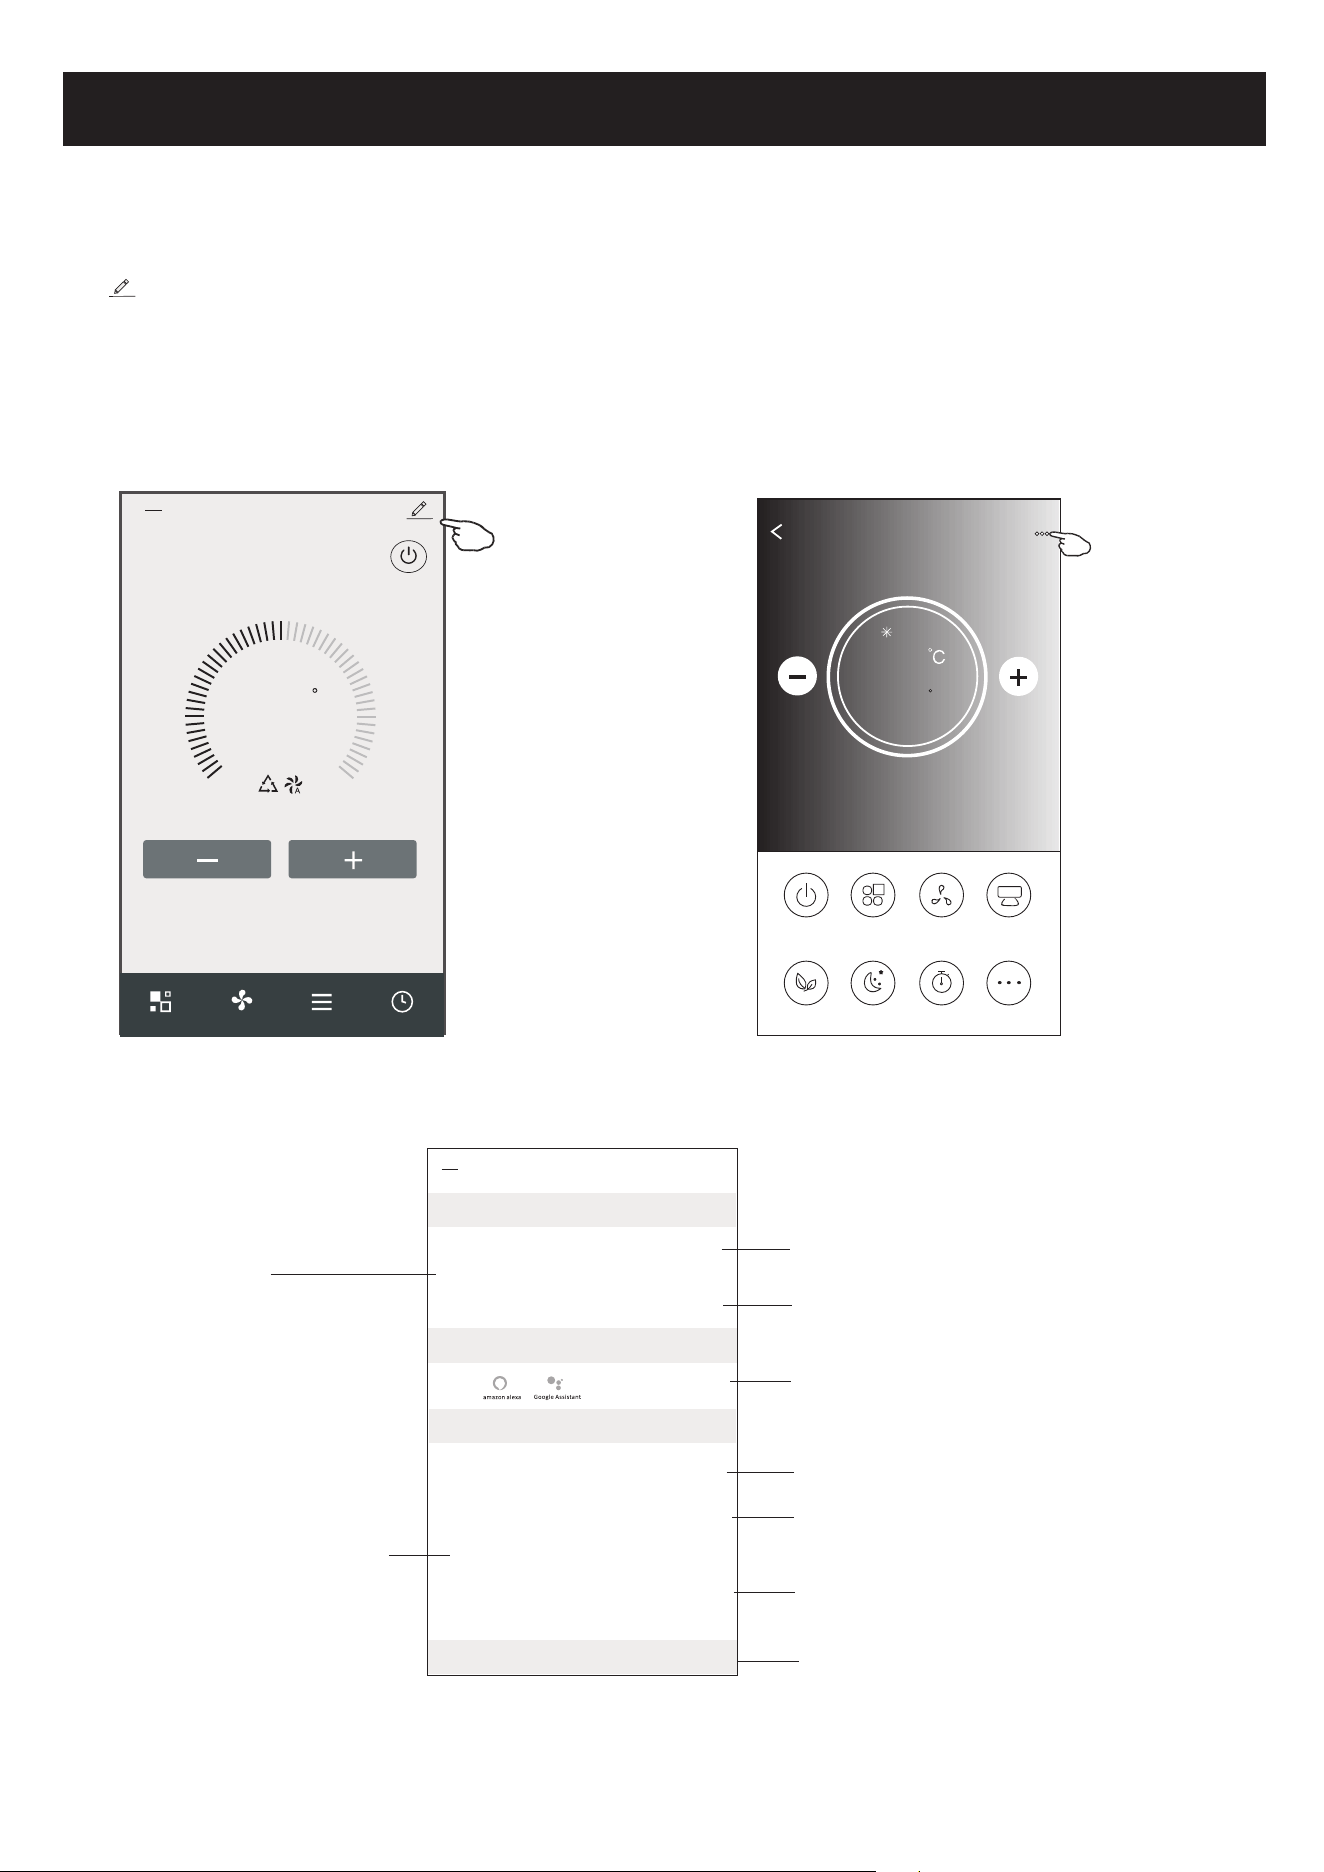
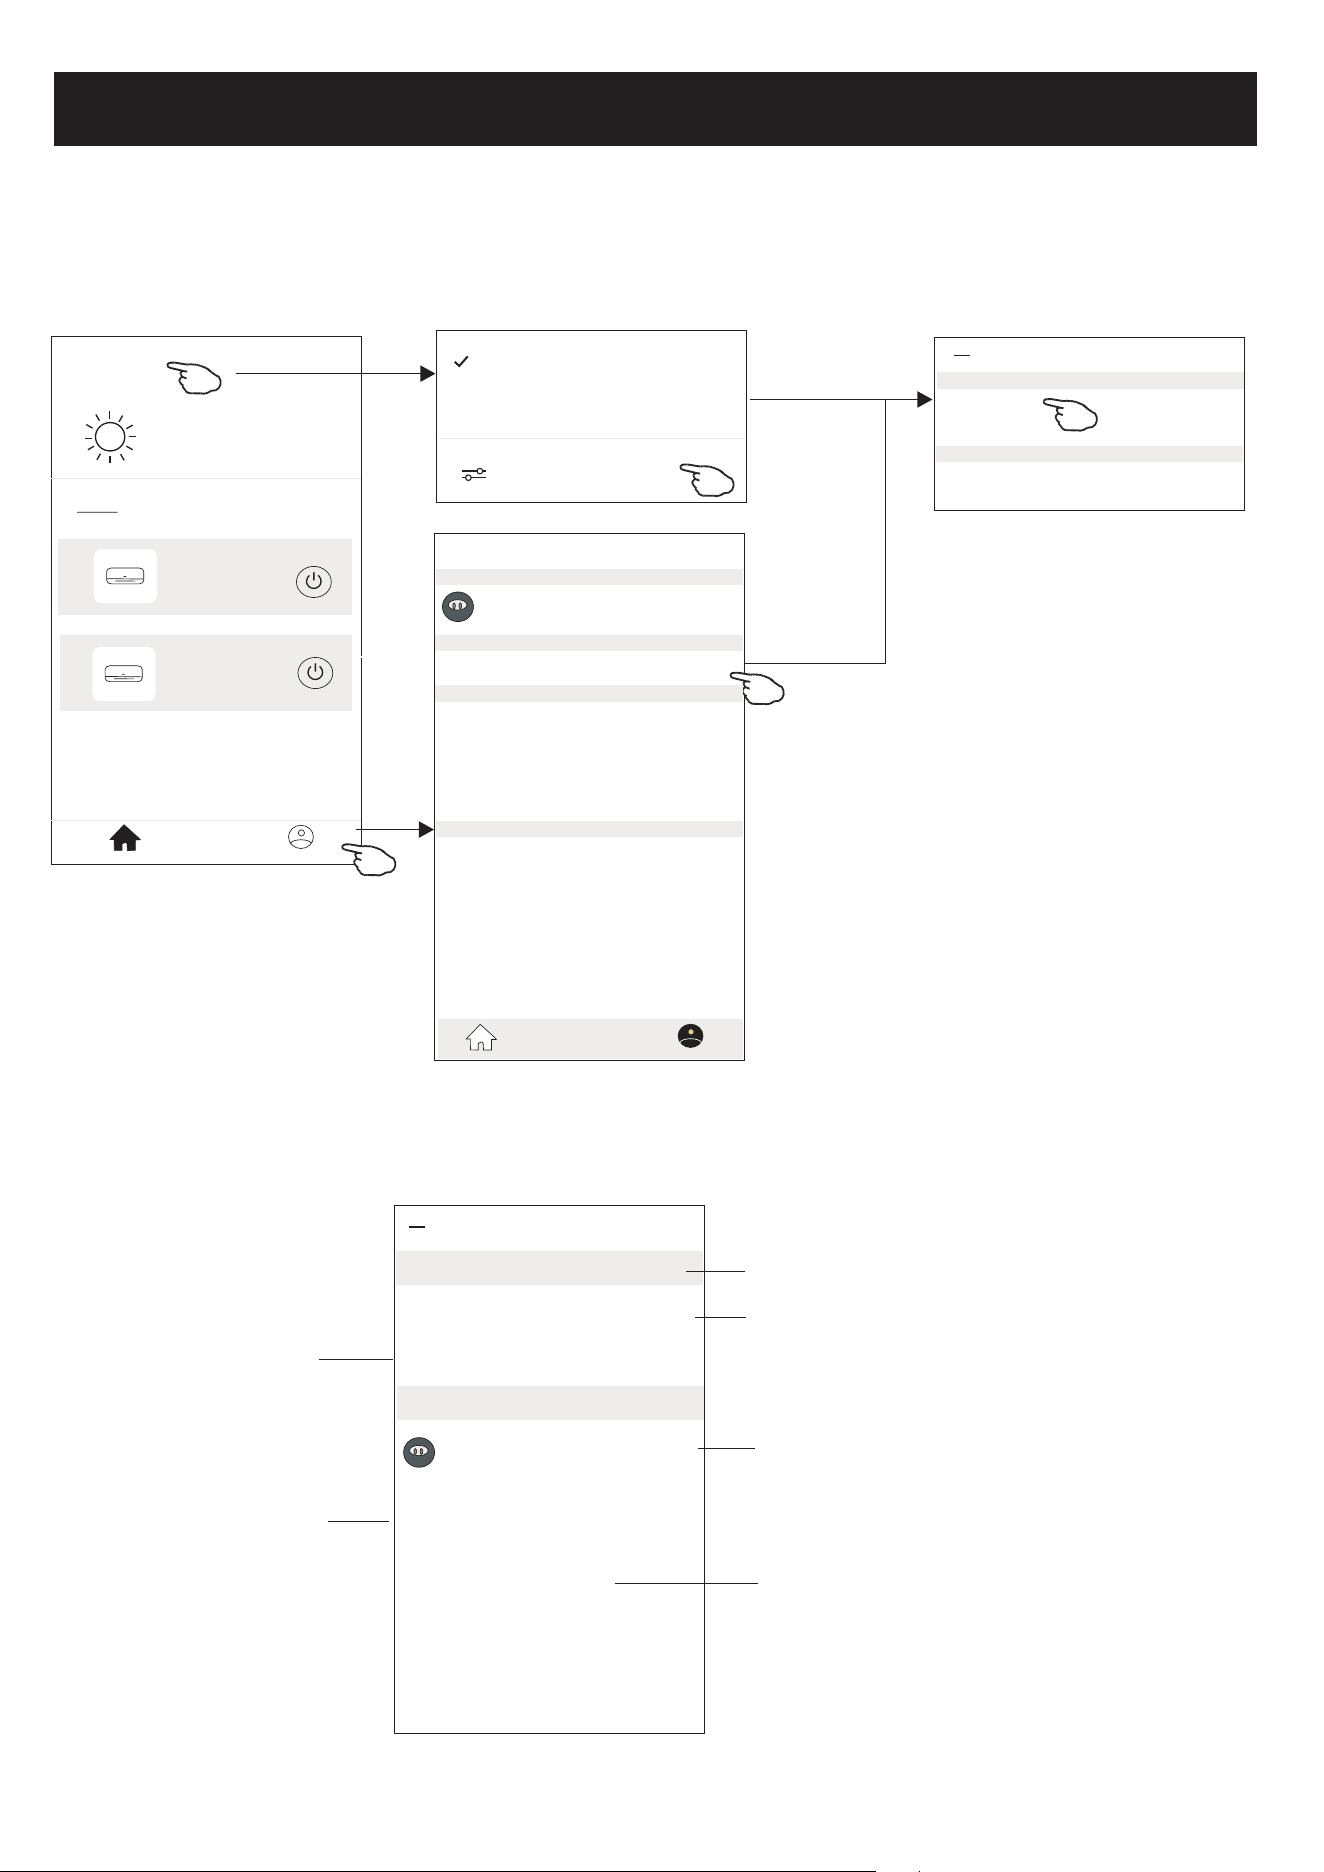
Tap on control form1 or tap ... on control form2 , get into the device details screen.
Here you can get some useful information and sharing the device to other accounts.
Check the following pictures and instructions carefully.
26
23
C
Set Temperature
Timer
Function
Fan
Mode
Sample2
<
Control form2Control form1
<
Details of device
Information
Remove Device
Supported Third-part Control
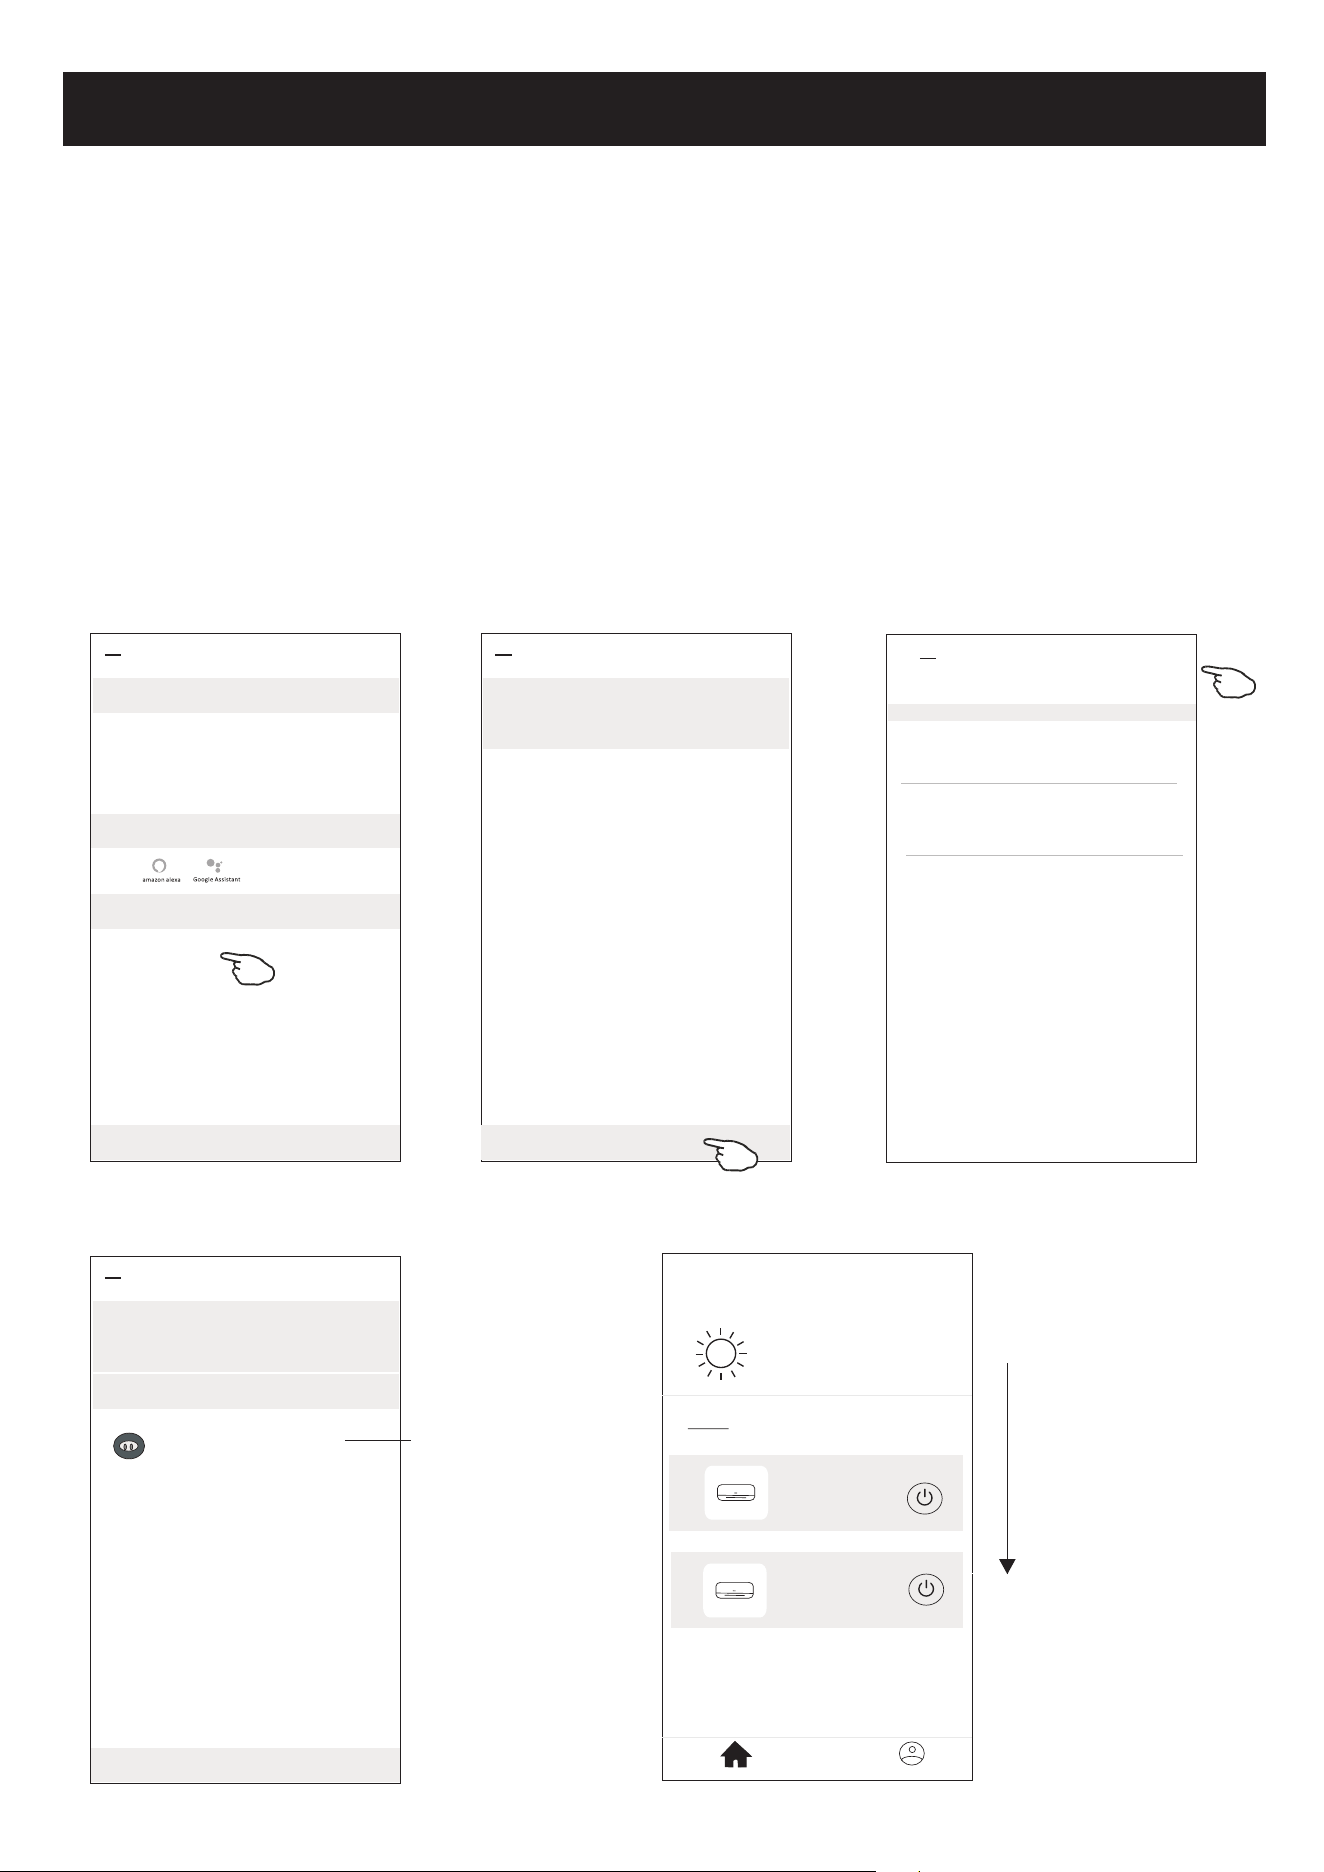
Others
Modify Device Name *** >
Device Location Dining Room >
Check Device Network Check Now >
Device Sharing >
Device Info >
Feedback >
Check for Firmware Update >
Tap to change the device
location to another room
Tap to check the network status
Tap to got the instruction for connecting the
amazon alexa or Google Assistant voice controller
Tap to check the Virtual ID/Wi-Fi name/IP address
MAC address/Time Zone/Wi-Fi single strength
Feed back the problems or some
suggestions to the APP administrator.
Check and update the firmware
Tap to remove the device and the
device will be reset automatically
once be deleted.
Tap to check the network status
Tap to sharing the device to other account
Device details and management
Air conditioner control
<
Details of device
Information
Remove Device
Supported Third-part Control
Others
Modify Device Name *** >
Device Location Dining Room >
Check Device Network Check Now >
Device Sharing >
Create Group >
Device Info >
Feedback >
Check for Firmware Update >
Device details and management
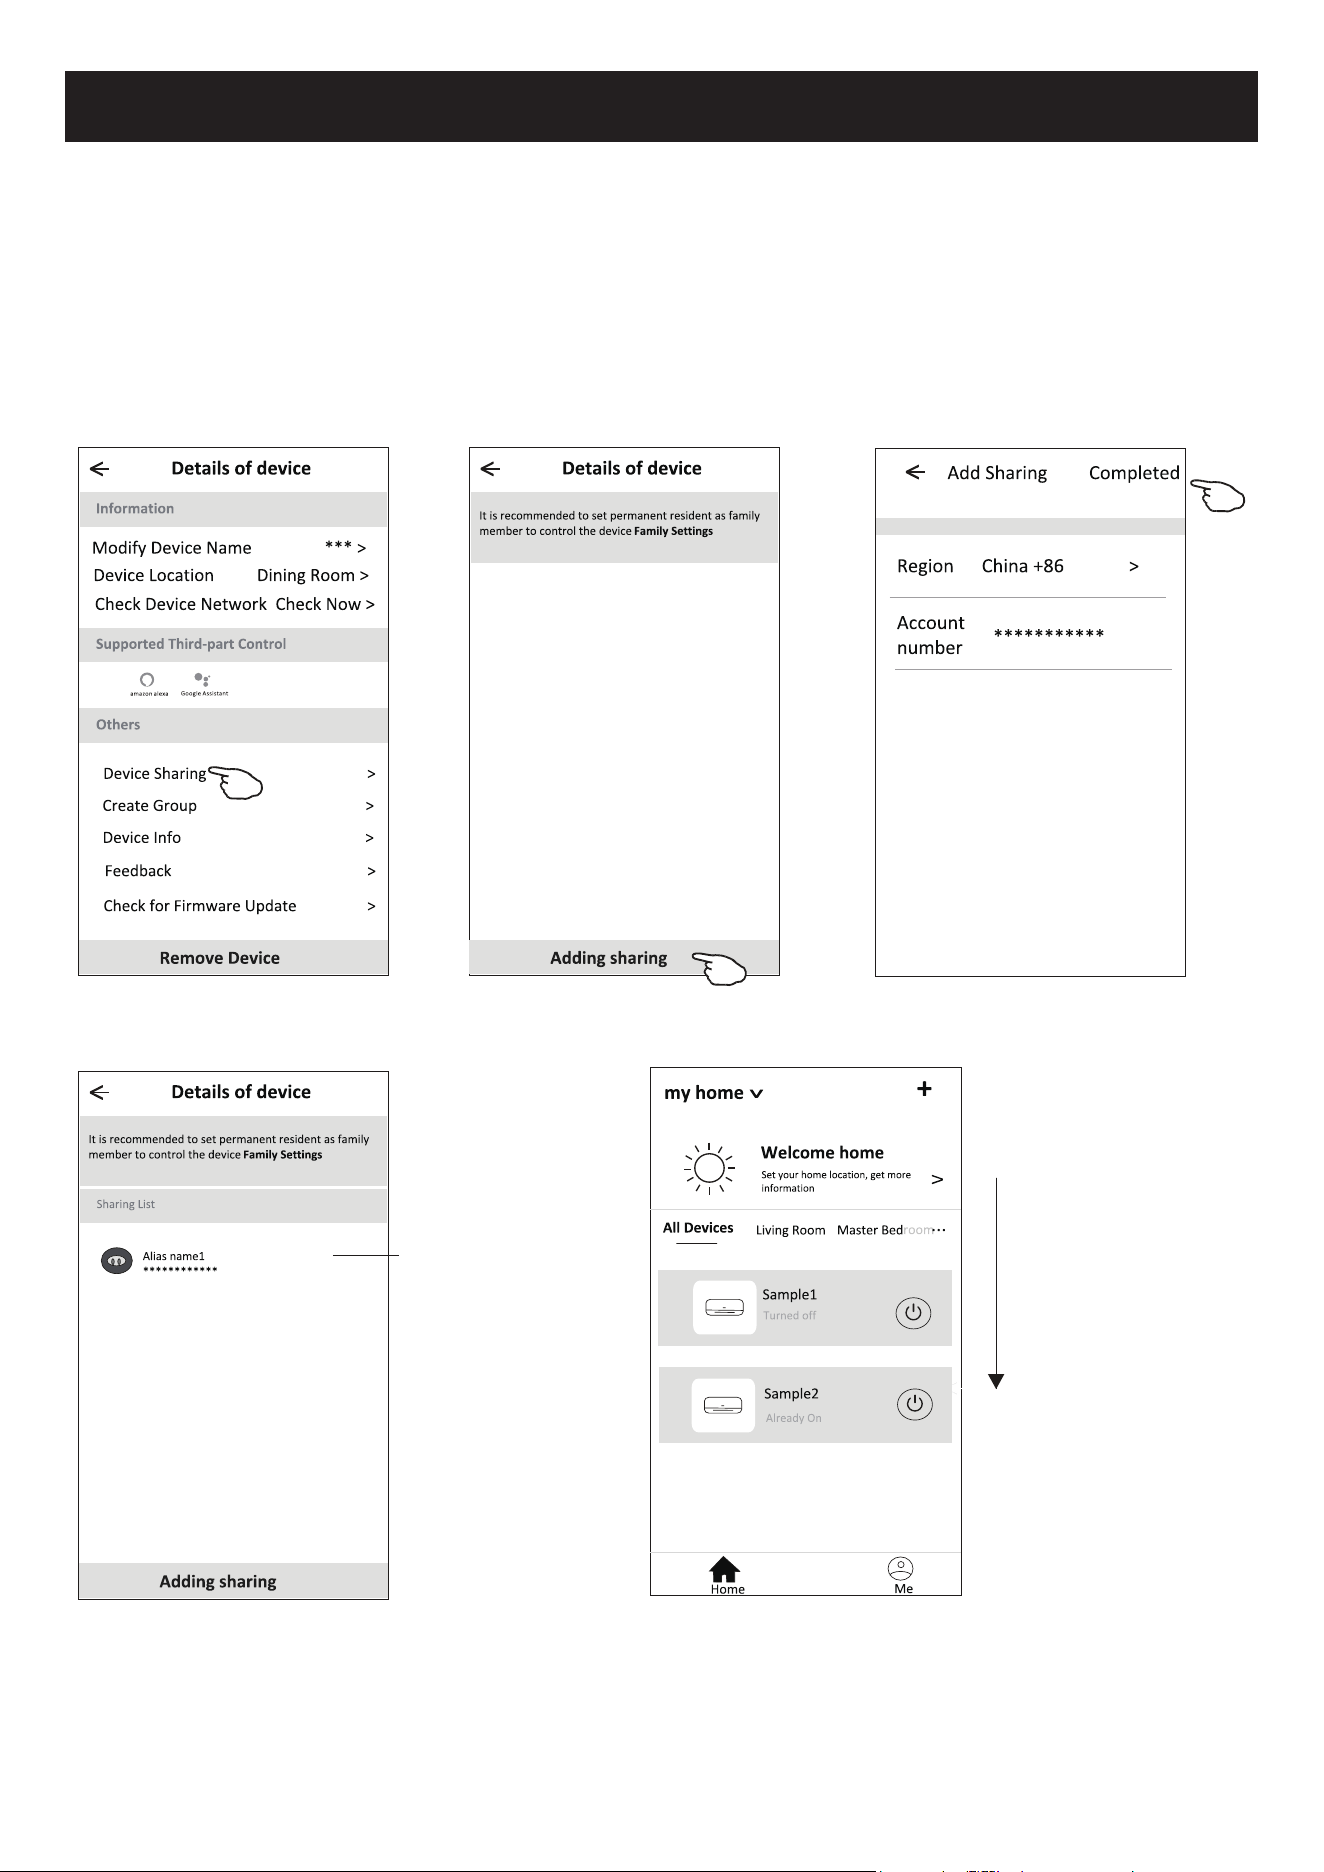
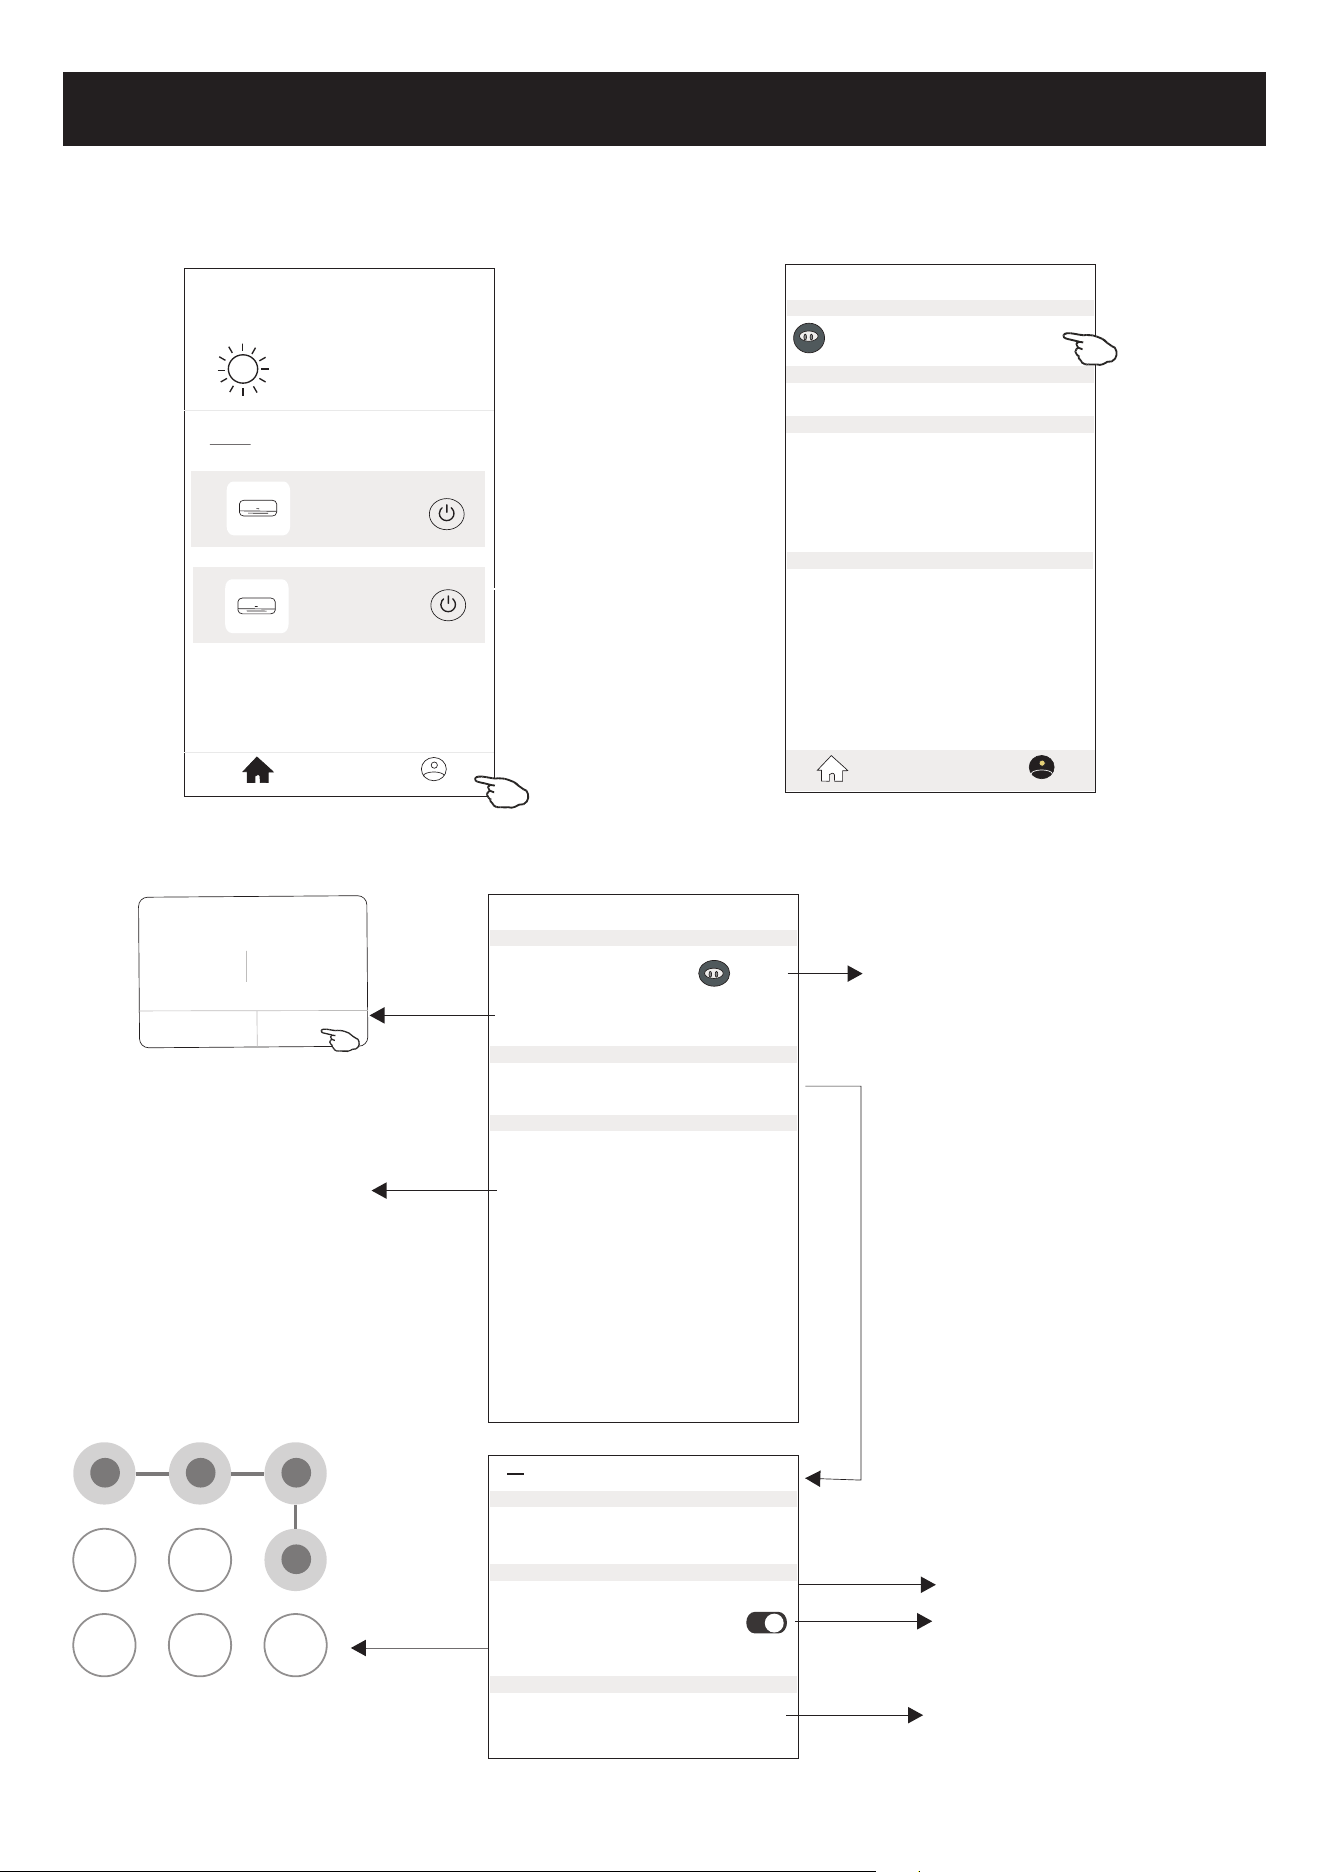
How to share the devices to other accounts?
1. Tap "Device Sharing" and pop up Device Sharing screen.
2. Tap "Add Sharing".
3. Select the region and enter the account which you want to sharing.
4. Tap "Completed", the account will appear on your sharing list.
5. The received sharing members should hold pressing the home screen and slide
down to refresh the device list, the device will appear on the device list.
<
Details of device
Adding sharing
It is recommended to set permanent resident as family
member to control the device Family Settings
<
Add Sharing Completed
Region China +86 >
Account
number
***********
<
Details of device
Adding sharing
It is recommended to set permanent resident as family
member to control the device Family Settings
Sharing List
Alias name1
************
Hold the bar about 3s
then you can delete the
sharing account.
27
<
my home
+
>
Set your home location, get more
information
Welcome home
V
All Devices
Living Room
room
Master Bed
...
Home
Me
Sample1
Sample2
Turned off
Already On
Hold on and slide down to
refresh the device list
Account management
28
<
my home
+
>
Set your home location, get more
information
Welcome home
V
All Devices
Living Room
room
Master Bed
...
Home
Me
Sample1
Sample2
Turned off
Already On
Profile
Nick name >
Account******
Message Center >
Help Center >
More Services >
Settings >
Home Management >
Home
Me
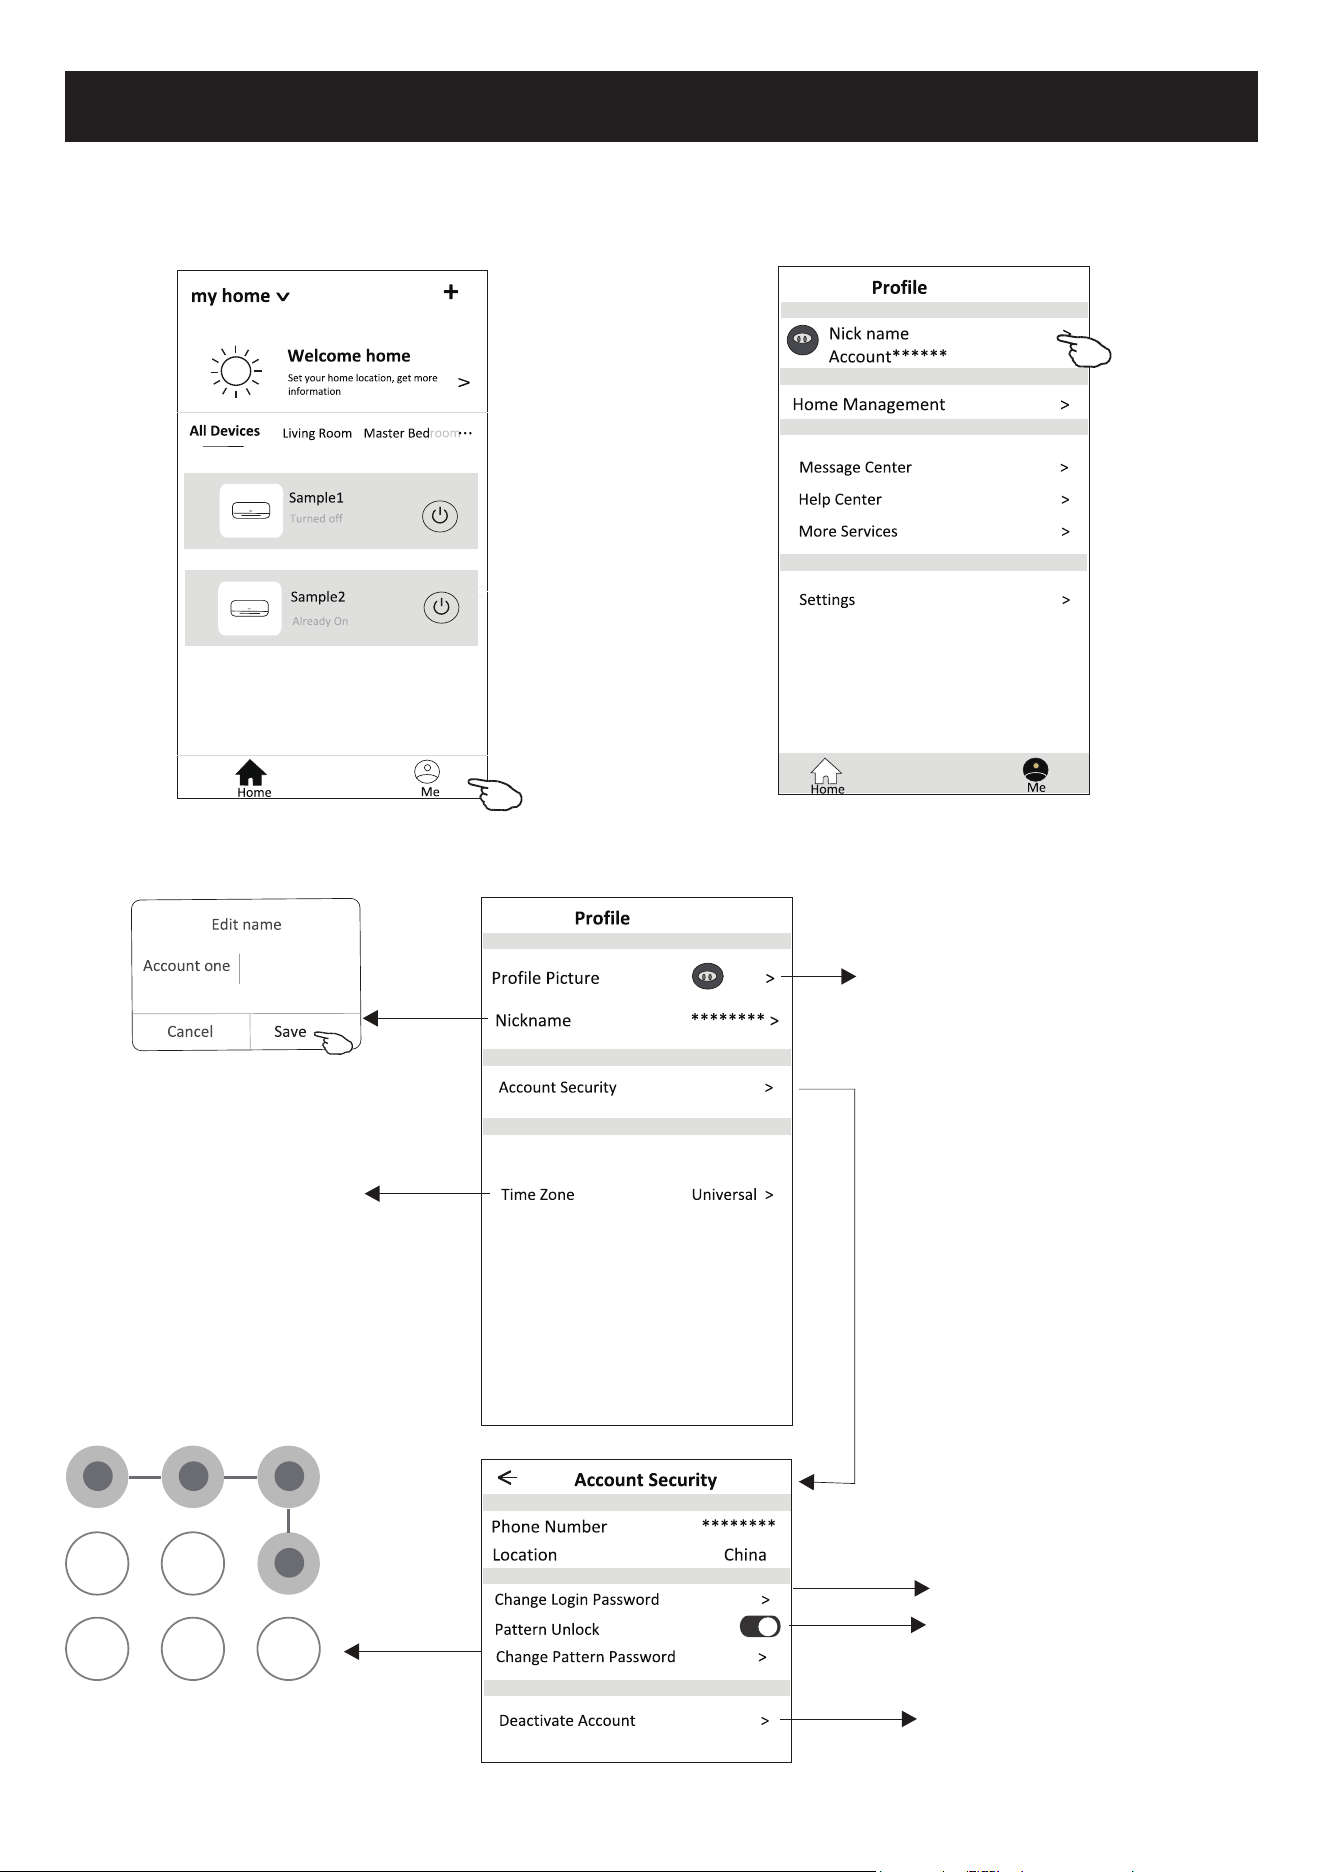
Account Profile setting
Profile
Profile Picture >
Account Security >
Time Zone Universal >
Nickname ******** >
Select a picture for the
account from local album
Edit name
Cancel Save
Account one
Select the time zone
Change the nick
name of your account
Account Security
Phone Number ********
Change Login Password >
Deactivate Account >
Location China
<
Pattern Unlock
Change Pattern Password >
Change the password
like reset password on page7
Please carefully to
deactivate the account
for all data will be deleted.
Set a pattern password
for launching the APP
Tap the switch to enable
or disable the Pattern password
Account management
Home(Family) management
29
<
My Home
+
>
Set your home location, get more
information
Welcome home
V
All Devices
Living Room
room
Master Bed
...
Home
Me
Sample1
Sample2
Turned off
Already On
Profile
Nick name >
Account******
Message Center >
Help Center >
More Services >
Settings >
Home Management >
Home
Me
Home Management
My Home >
My Office >
<
Add family
1.Tap the name of home at the left upper corner of the Home Screen and select the Home Management.
Or tap Me and tap Home Management.
2. Tap one of the families in the family list and get into Family Settings screen.
<
Family settings
Family members
Room Management 2 rooms >
Family Location >
Family Name My Home >
Remove Family
Add Menber
Nick name >
Account******
Tap to rename the family name
Tap to get into Room Management
Open the map automatically
then you can set the location
Add other account into this
family to control the device
Remove the Family
from your account
Home Management >
My Home
My Office
Tap to set a name and
select picture for the
family member
Note:
Tap "Add family"
and refer to page 6
to add a new family
3.Set the family as the following indicators.
30
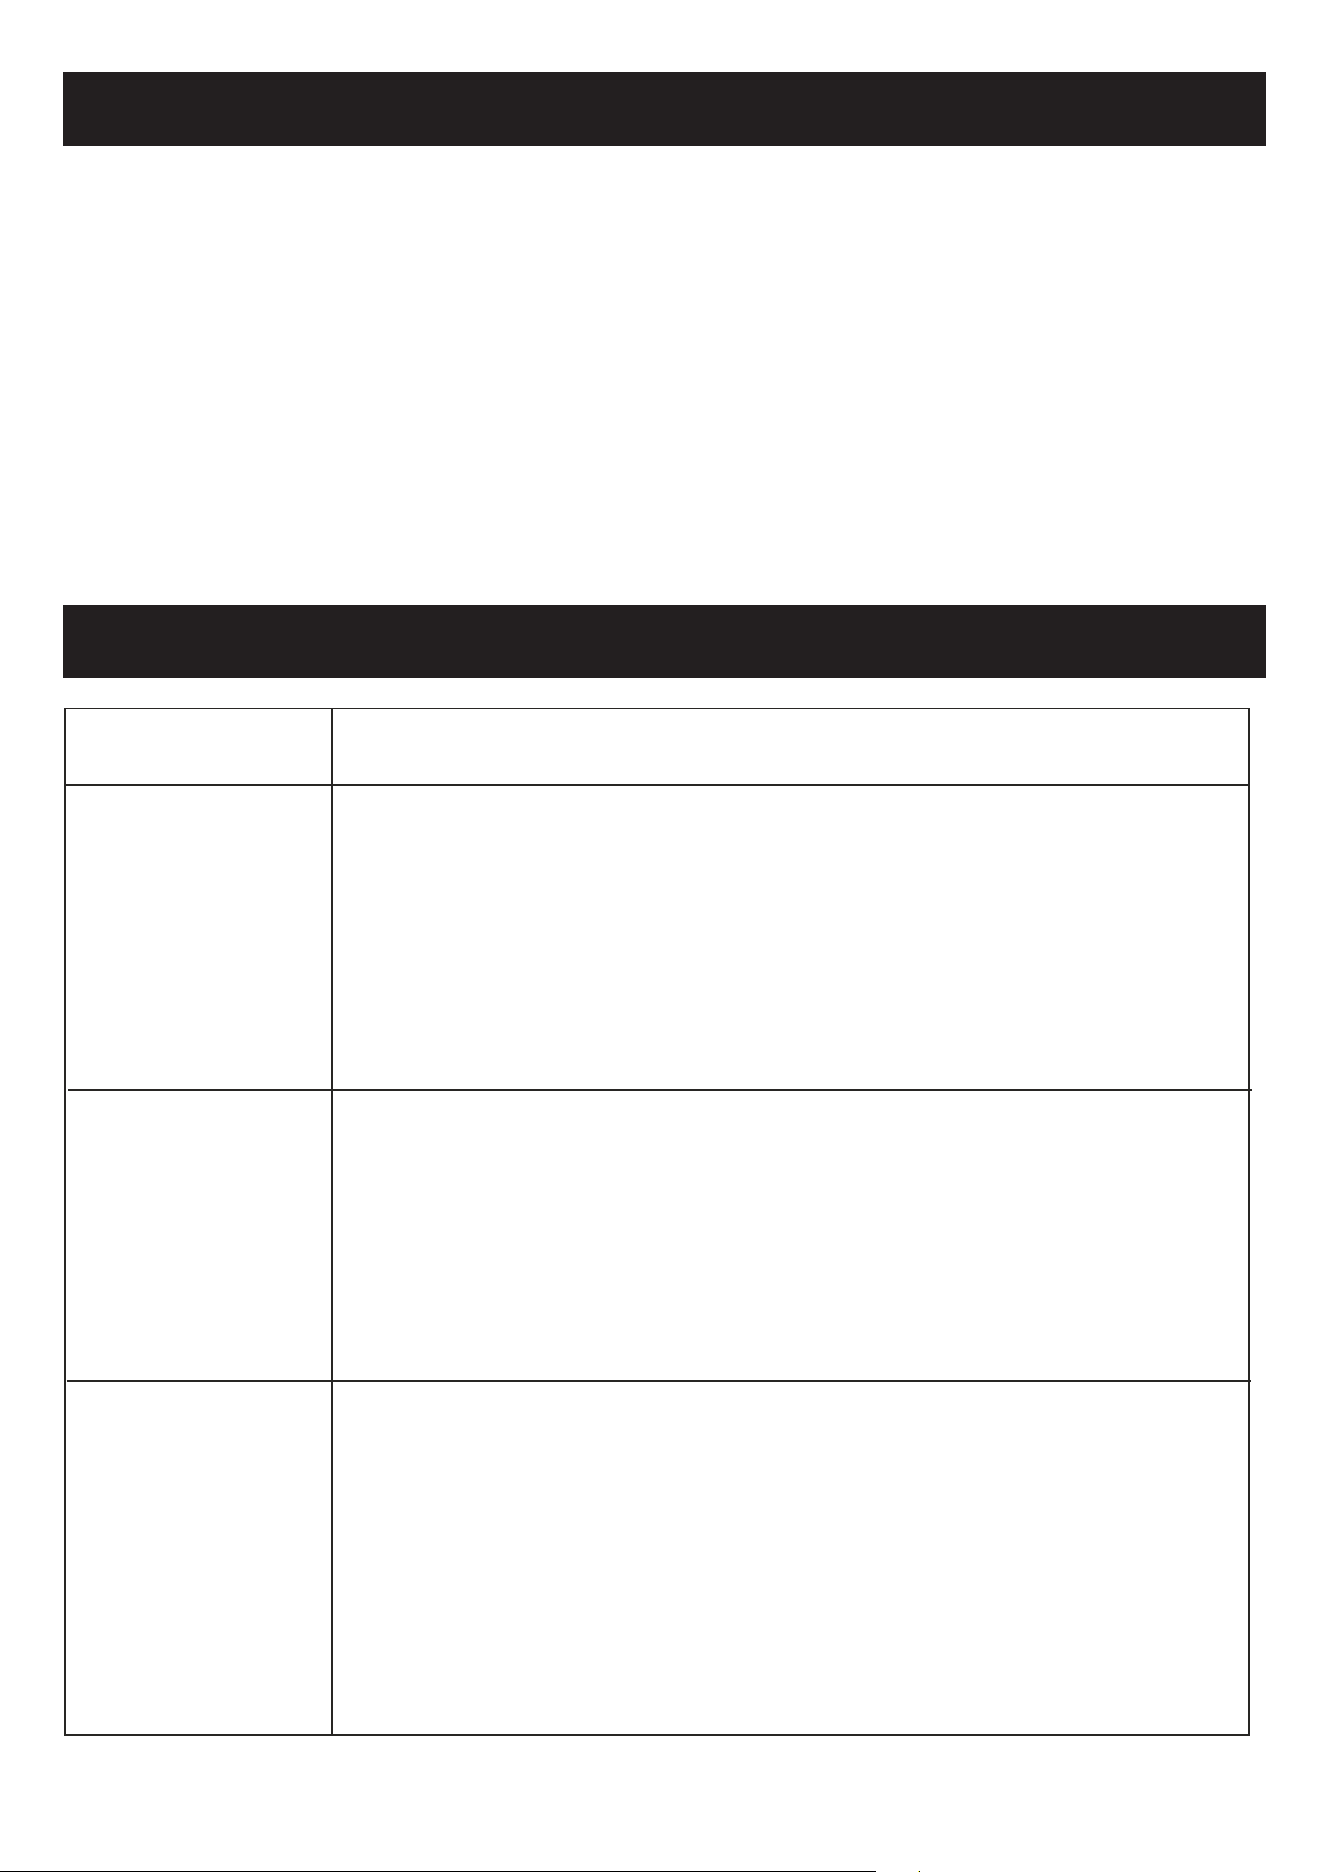
Trouble Shooting
Notice
1. For technical update, there is maybe deviation of the actual items from what is on the manual. We
express our apologies. Please refer to your actual product and APP.
2. Smart air conditioner APP can be altered without notice for quality improvement and also be deleted
depending on the circumstances of manufacturing firms .
3. In case Wi-Fi signal strength is weakened, smart App may be disconnected. So make sure the indoor
unit near to wireless router.
4. DHCP server function should be activated for wireless router.
5. The internet connection may fail because of a firewall problem. In this case, contact your internet
service provider.
6. For smart phone system security and network setting, make sure Smart air conditioner APP is trusted.
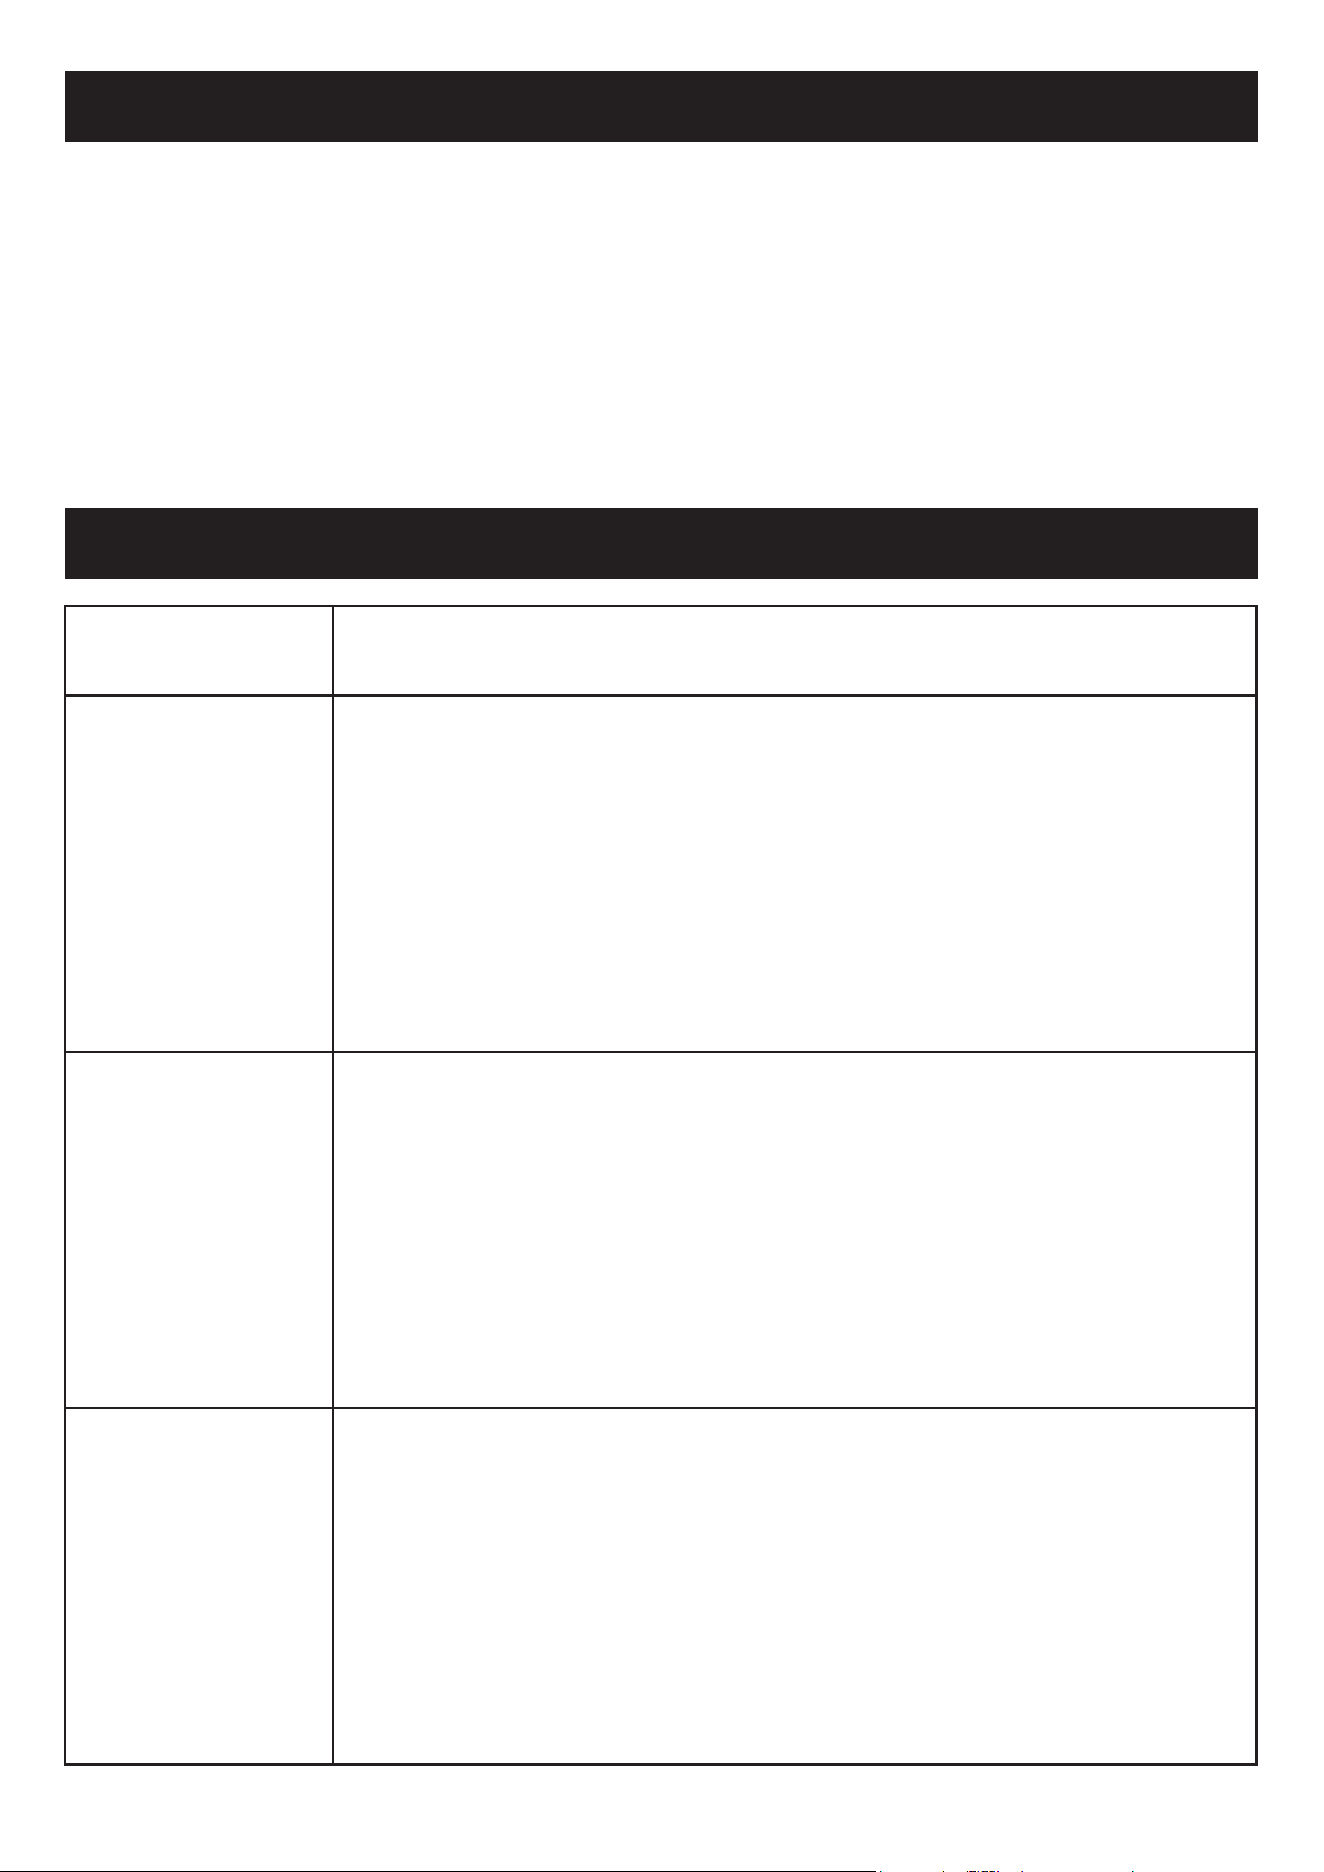
Description
Analysis of cause
Air conditioner
can't be configured
successfully
1. Check the mobile connected WLAN router SSID and password is correct;
2. Check whether there are additional settings of WLAN router as shown below.
1) Firewall by router itself or by PC
2) MAC address filtering
3) Hidden SSID
4)DHCP server
Reboot WLAN router, mobile device and air conditioner (WLAN module) and connect air
conditioner by CF mode again. Before rebooting, check nobody has already connected to
same air conditioner.
1. When air conditioner (WLAN module) is rebooted and app
displays Device remove, ignoring this confirmation will lead to mobile
device losing control permission of the air conditioner.
You will need to connect the air conditioner by CF mode again.
2. In case of power failure, mobile device will lose control permission of air
conditioner for 3 minutes after power failure. (Notification will now show
up on the mobile device.)
If you cannot control the app (air conditioner) even after power restored,
you will need to connect the air conditioner by CF mode again.
Mobile can't control
air conditioner
1. App display Air conditioner Device offline. Please check the following conditions.
1)The air conditioner has been reconfigured.
2)Air conditioner out of power.
3)Router out of power.
4)Air conditioner can't connect to router.
5)Air conditioner can't connect to network through the router.
6)Mobile device can't connect to network.
2. After adding the device, it disappears in device list .
Hold and slide down to refresh the device list. If it has no change, shut down the app and start again.
Mobile can't find air
conditioner

Kurbin Lane S.L.
Paseo del Ferrocarril 335 08860 Castelldefels BARCELONA (ESPAÑA)
Corbero es una marca registrada bajo licencia de Electrolux España S.A.

CERTIFICADO DE GARANTÍA
Imprescindible la presentación de la factura de compra acompañada del presente certificado de garantía.
Riesgos cubiertos.
Este aparato está garantizado contra cualquier defecto de funcionamiento, siempre que se destine a uso doméstico,
procediéndose a su reparación dentro del plazo de garantía y sólo por la red de SAT autorizados.
Nuestros electrodomésticos Corberó cuentan con la garantía legal del fabricante que cubre cualquier avería o defecto durante
36 meses, desde su fecha factura de 1 de enero del 2022. En caso de que fuera necesario, nosotros nos ocupamos de cualquier
posibleincidencia siempre que se deba a un componente defectuoso o fallo de fabricación.
Excepciones de garantía.
•
Que la fecha del certificado no coincida con la fecha de venta de la factura original.
•
Averías producidas por golpe, por caída o cualquier otra causa de fuerza mayor.
•
Si el aparato ha sido manipulado por personal
no autorizado.
•
Las averías producidas o derivadas como consecuencia de un uso inadecuado, por defectos de
instalación,por introducir modificaciones en el aparato que alteren su funcionamiento.
•
Puestas en marcha, mantenimiento, limpiezas, componentes sujetos a desgaste, lámparas, piezas estéticas,
oxidaciones, plásticos, gomas, carcasas y cristales.
•
Los hornos microondas (a excepción de los integrables) y los hornos sobremesa en el caso de cualquier
incidencia de
funcionamiento, deben de llevarse al servicio técnico más próximo por parte del cliente. No se
recogen ni reparan en eldomicilio.
•
Garantía termos eléctricos. Garantía de 3 años incluyendo los costes de desplazamiento y mano de obra que
correspondan de la reparación del producto, debiendo tener un mantenimiento una vez cada 12 meses.
Especialmente si Ud. ha instalado un aparato a gas, tenga presente como titular de la instalación, la obligatoriedad de
realizar una revisión completa de los equipos, (según Real Decreto 238 / 2013, del 5 abril. RITE. IT3, M. Lo termos
eléctricos y calderas que incluyen depósitos acumuladores de agua caliente, para que se aplique la prestación de la
Garantía, es obligatorio que el ánodo de magnesio esté operativo y que realice la función de protección
adecuadamente. Para ello es recomendable que el ánodo se revise bianualmente por el Servicio Oficial y sea
renovado cuando fuera necesario. Periodicidad que deberá ser anual en aquellas zonas con aguas críticas (contenido
de CaCO3 superiores a 200mg/L, es decir a partir de 20ºfH de dureza). Depósitos sin el correcto estado del ánodo de
protección, notienen la cobertura de la garantía. Independientemente del tipo de depósito o producto, todas las
válvulas de sobrepresión de calefacción o a.c.s., deberán ser canalizadas para evitar daños en Ia vivienda por
descargas de agua. La garantía del producto no asume los daños causados por Ia no canalización del agua
derramada por esta válvula.
•
Garantía de estufas de Pellets y Estufas de gas, necesario disponer de la acreditación de puesta en marcha del SAT
oficial Corberó, para beneficiarse del servicio de garantía de 3 años.
“ESTAS EXCEPCIONES ANULAN LA GARANTÍA, SIENDO LA REPARACIÓN CON CARGO AL CLIENTE”
Periodo amparado en aparatos según ley de garantias en la venta de bienes de consumo Ley vigente es “RD 7/2021”
Sevicio Técnico Oficial:
911 08 08 08
Horario de atención Lunes a Viernes de 9h00 a 19h00. Teléfono de contacto_ 911 08 08 08 Mail de contacto_ [email protected] web_
www.corbero.es
Dirección de Servicio técnico oficial_Vidal i Ribes 8-10 08950 Esplugues de Llobregat Barcelona

CERTIFICATE OF GUARANTEE
The presentation of the purchase invoice accompanied by this guarantee certificate is essential.
Covered Risks.
This appliance is guaranteed against any malfunction, provided that it is intended for domestic use, proceeding to its repair
withinthe warranty period and only by the authorized SAT network.
Our Corberó appliances have the manufacturer's legal warranty that covers any breakdown or defect for 36 months, from the
invoice date of January 1, 2022. If necessary, we take care of any possible incident whenever it is due to a defective component
ormanufacturing fault. Warranty Exceptions
Warranty Exceptions
•
That the date of the certificate does not coincide with the date of sale of the original invoice.
•
Faults produced by blow, by fall or any other cause of force majeure.
•
If the device has been manipulated by unauthorized personnel.
•
Faults produced or derived as a consequence of improper use, installation defects, or modifications to the device
that
alter its operation.
•
Start-up, maintenance, cleaning, components subject to wear, lamps, aesthetic
parts,
oxidation, plastics, rubbers, housings and crystals.
•
Microwave ovens (with the exception of built-in ones) and tabletop ovens in the event of any incident of
operation, they must be taken to the nearest technical service by the customer. They are not collected or repaired at
home.
•
Electric thermos guarantee. 3-year warranty including travel and labor costs that correspond to the repair of the
product, having to have maintenance once every 12 months. Especially if you have installed a gas appliance, keep in
mind as the owner of the installation, the obligation to carry out a complete review of the equipment, (according to
Royal Decree 238 / 2013, of April 5. RITE. IT3, M. Lo thermos electrical and boilers that include hot water storage tanks,
for the benefit of the Guarantee to apply, it is mandatory that the magnesium anode is operational and that it
performsthe protection function adequately.For this, it is recommended that the anode be checked biannually by the
Official Service and is renewed when necessary Periodicity that must be annual in those areas with critical waters
(CaCO3 content greater than 200mg/L, that is, from 20ºfH of hardness) Deposits without the correct state of the
protection anode are not covered by the warranty Regardless of the type of tank or product, all heating or DHW
overpressure valves must be channeled to avoid damage and n the house due to water discharges. The product
warranty does not cover damages caused by not channeling the water spilled by this valve.
•
Guarantee of pellet stoves , Gas Stoves, it is necessary to have the start-up accreditation from Corberó SAT, to benefit
from the 3-year guarantee service.
“THESE EXCEPTIONS VOID THE WARRANTY, THE REPAIR BEING CHARGED TO THE CUSTOMER”
Period covered in devices according to the law of guarantees in the sale of consumer goods Current law is “RD 7/2021”
Official Technical Service:
911 08 08 08
Hours of operation Monday to Friday from9h00 a 19h00. Telephone contact_ 911 08 08 08 Contact email_ info@corbero.es web_ www.corbero.es
Official Technical Service Address_Vidal i Ribes 8-10 08950 Esplugues de Llobregat Barcelona

CERTIFICADO DE GARANTIA
A apresentação da factura de compra acompanhada deste certificado de garantia é indispensável.
Riscos cobertos.
Este aparelho está garantido contra qualquer avaria, desde que se destine ao uso doméstico, reparando-o dentro do período
degarantia e apenas pela rede SAT autorizada.
Nossos eletrodomésticos Corberó têm garantia legal do fabricante que cobre qualquer avaria ou defeito por 36 meses, a partir
dadata da fatura de 1º de janeiro de 2022. Se necessário, cuidamos de qualquer eventual incidente desde que seja devido a um
componente ou fabricação defeituoso falta.
Exceções de garantia.
•
Que a data do certificado não coincida com a data de venda da fatura original.
•
Avarias causadas por pancadas, quedas ou qualquer outra causa de força maior.
•
Se o dispositivo foi adulterado por pessoal não autorizado.
•
Avarias produzidas ou derivadas como resultado de uso indevido, defeitos de instalação, fazendo alterações
no
dispositivo que alteram seu funcionamento.
•
Comissionamento, manutenção, limpeza, componentes sujeitos a desgaste, lâmpadas, peças
estéticas,
oxidação, plásticos, borrachas, invólucros e vidros.
•
Fornos de microondas (exceto os embutidos) e fornos de mesa em caso de qualquer incidência de
operação, devem ser levados ao serviço técnico mais próximo pelo cliente. Eles não são recolhidos ou reparados em
casa.
•
Garantia térmica elétrica. Garantia de 3 anos incluindo despesas de deslocação e mão-de-obra que correspondam à
reparação do produto, devendo ter manutenção a cada 12 meses. Especialmente se instalou um aparelho a gás,
tenha em atenção como proprietário da instalação, a obrigação de realizar uma revisão completa do equipamento,
(de acordocom o Decreto-Lei n.º 84/2021. Lo thermos eléctricos e caldeiras que incluam acumuladores de água
quente, para o benefício da Garantia a aplicar, é obrigatório que o ânodo de magnésio esteja operacional e que
desempenhe a função de protecção de forma adequada. ser verificado a cada dois anos no Serviço Oficial e renovado
quando necessário Periodicidade que deve ser anual nas áreas com águas críticas (teor de CaCO3 superior a 200mg/L,
ou seja, a partir de 20ºfH de dureza) Depósitos sem o estado correto do ânodo de proteção não estão cobertos pela
garantia Independentemente do tipo de tanque ou produto, todas as válvulas de aquecimento ou de
sobrepressão deágua quente sanitária devem ser canalizadas
para
evitar
danos
e na casa devido a
descargas de
água. A garantia do produto não cobre danos causadospela não canalização da água derramada por esta válvula.
Garantia das estufas a Pellets, Fogões a gás, é necessário ter a acreditação de arranque do oficial Corberó SAT, para
beneficiar do serviço de garantia de 3 anos.
“ESTAS EXCEÇÕES ANULAM A GARANTIA, SENDO A REPARAÇÃO POR CONTA DO CLIENTE.”
Período
abrangido em dispositivos de acordo com a lei de garantias na venda de bens de consumo A lei atual é "Decreto-Lei n.º 84/2021"
Serviço Técnico Oficial:
351 225 191 300
Horário de atendimento de segunda a sexta das 9h às 19h. Telefone de contato_ 351 225 191 300 Email de contato_
info@corbero.esweb_ www.corbero.es Serviço Técnico Oficial Endereço_Vidal i Ribes 8-10 08950 Esplugues de Llobregat Barcelona

CONDICIONES DE LA GARANTÍA
en Aires Acondicionados
1. La Garantía tiene la duración de tres años en el aparato y siete en el compresor (en el compresor a partir de los tres años la
garantía incluye únicamente suministro de la pieza), a partir de la fecha de suministro y/o instalación. Nadie está autorizado a
modicar el plazo de garantía ni otorgar otras garantías verbales o por escrito.
2. La Garantía cubre todos los componentes del aparato y comprende la reparación y suministro gratuito de cualquier pieza por
defectos de fabr
ica
ción. La sustitución o reparación de las piezas defectuosas no modica la duración de la garantía.
3. En caso de sustitución del aparato por defecto de fabricación, por juzgar el fabricante o su representante legal que no tiene
reparación, la garantía del nuevo aparato continuará hasta el término de la Garantía del equipo original.
4. La Garantía no cubre los componentes averiados por transporte, por falta o error de mantenimiento, por suministro de
uido eléctrico que no cumpla la normativa vigente, por manipulaciones efectuadas por operarios no autorizados o por c
ausas
no imputables al fabricante. Se excluyen también de la Garantía las intervenciones originadas por defectos de la instalación.
5. La Garantía se valida si:
a) El aparato ha sido instalado en España o Portugal de acuerdo con las normas vigentes y con las
prescripciones del manual de instalación y usuario.
b) El aparato dispone de un mantenimiento preventivo por parte del Personal de Asistencia Técnica
autorizado, según las recomendaciones del manual de instalación y usuario.
c) El aparato ha sido instalado por instalador autorizado.
6. Se considera que la Garantía prescribe por:
a) Manipulación por parte de personal no autorizado legalmente para ello.
b) Instalación eléctrica o hid
rául
ica no conforme con las normas vigentes o como se describe en el
manual de instalación y usuario.
c) Utilización de métodos diversos a los descritos en el manual de instalación y usuario o con nes
distintos a los que está destinado el aparato.
d) Imposibilidad del usuario de exhibir al personal autorizado la factura de compra y de instalación
de un instalador autorizado.
7. El importador responde ante la ley de los daños causados a personas o cosas por vicios de construcción en sus aparatos
siempre y cuando se cumplan las condiciones anteriormente expuestas. En cualquier caso, se excluyen l
os
daños causados por
la suspensión del funcionamiento del aparato.
8. Cuando el aparato deba repararse en el taller del Servicio de Asistencia Técnica indicado por el importador, los riesgos del
transporte correspondiente serán a cargo del usuario en el caso de envío directo y a cargo del SAT en el caso de retirarlo del
domicilio del Usuario. En el caso de tratarse de un cliente sin cuenta abierta en el importador, antes de la reparación deberá
realizar un pago que cubra la reparación en caso de estar fuera de la garantía por uso indebido o por una mala instalación.
9. Quedan excluido
s de la ga
rantía, por no formar parte de la misma:
- La reposición de los materiales fungibles por funcionamiento como por ejemplo, a título enunciativo
y no limitativo, el gas refrigerante, el aceite del compresor, los ltros de aceite, etc.
- Los gastos extraordinarios ocasionados por el difícil acceso a la unidad (grúas, andamios, montajes
y desmontajes de estos dispositivos, permisos, recursos preventivos, etc.), siendo responsabilidad
exclusiva del titular de la instalación garantizar un acceso seguro y suciente a la unidad/es instalada/s.
10. Las cuestiones que se suscriten como consecuencia de la aplicación o interpretación de esta garantía, deberán dirimirse
ante los tribunales de Justicia de Barcelona, con renuncia expresa a su Fuero Propio por parte del adquiriente del aparato
objeto de esta Garantía.
4FSWJDJP5ÏDOJDP0GJDJBM
Horario de atención Lunes a Viernes de 8 h a 20 h y Sábado de 9 h a 13 h. Teléfono de contacto 911 08 08 08 Mail de contacto: i[email protected] / [email protected]
Dirección de Servicio Técnico Ocial: SARETEKNIKA - Polo de Innovación Garaia, Edicio B - 20500 Arrasate - Guipuzkoa
ACCEDE A MAS INFORMACIÓN: Escaneando con la cámara de su teléfono móvil el siguiente código
QR accederá a nuestra web donde encontrará la información necesaria.
EN CASO DE AVERÍA:
Puede contactar con nuestro departamento de Servicio Técnico:
Este equipo deberá ser instalado y congurado por un técnico cualicado de acuerdo a las normas establecidas por la normativa local
en materia de salud y seguridad, como el reglamento electrotécnico de baja tensión, el código técnico de edicación y los reglamentos
locales pertinentes.

CONDICIONES DE LA GARANTÍA
en Termos y Calentadores
Horario de atención Lunes a Viernes de 8 h a 20 h y Sábado de 9 h a 13 h. Teléfono de contacto 9. Mail de contacto: [email protected] / [email protected]
Dirección de Servicio Técnico Oficial: SARETEKNIKA - Polo de Innovación Garaia, Edificio B - 20500 Arrasate - Guipuzkoa
ACCEDE A MAS INFORMACIÓN: Escaneando con la cámara de su teléfono móvil el siguiente código
QR accederá a nuestra web donde encontrará la información necesaria.
EN CASO DE AVERÍA:
Puede contactar con nuestro departamento de Servicio Técnico:
Este equipo deberá ser instalado y configurado por un técnico cualificado de acuerdo a las normas establecidas por la normativa
local en materia de salud y seguridad, como el reglamento FMFDUSP UÏDOJDP de baja tensión, el código técnico de edificación y los
reglamentos locales pertinentes.
Servicio Técnico Oficial:
Imprescindible la presentación de la factura de compra acompañada del presente certificado de garantía.
Riesgos Cubiertos.
Este aparato está garantizado contra cualquier defecto de funcionamiento, siempre que se destine a uso doméstico,
procediéndose a su reparación dentro del plazo de garantía y sólo por la red de SAT autorizados.
Nuestros electrodomésticos Corberó cuentan con la garantía legal del fabricante que cubre cualquier avería o defecto durante
36 meses, desde su fecha de 1 de enero del 2022. En caso de que fuera necesario, nosotros nos ocupamos de cualquier posible
incidencia siempre que se deba a un componente defectuoso o fallo de fabricación.
Excepciones de garantía.
• Que la fecha del certificado no coincida con la fecha de venta de la factura original.
• Averías producidas por golpe, por caída o cualquier otra causa de fuerza mayor.
• Si el aparato ha sido manipulado por personal no autorizado.
• Las averías producidas o derivadas como consecuencia de un uso inadecuado, por defectos de instalación,
por introducir modificaciones en el aparato que alteren su funcionamiento.
• Puestas en marcha, mantenimiento, limpiezas, componentes sujetos a desgaste, lámparas, piezas estéticas,
oxidaciones, plásticos, gomas, carcasas y cristales.
Garantía termos eléctricos.
Garantía de 3 años incluyendo los costes de desplazamiento y mano de obra que correspondan de la reparación del producto,
debiendo tener un mantenimiento una vez cada 12 meses. Especialmente si Ud. ha instalado un aparato a gas, tenga presente
como titular de la instalación, la obligatoriedad de realizar una revisión completa de los equipos, (según Real Decreto 238 /
2013, del 5 abril. RITE. IT3.
Este equipo deberá ser instalado y configurado por un técnico cualificado de acuerdo a las normas establecidas por la
normativa local en materia de salud y seguridad, como el reglamento electrotécnico de baja tensión, el código técnico de
edificación y los reglamentos locales pertinentes.
Los termos eléctricos y calderas que incluyen depósitos acumuladores de agua caliente, para que se aplique la prestación de la
Garantía, es obligatorio que el ánodo de magnesio esté operativo y que realice la función de protección adecuadamente. Para
ello es necesario que el ánodo se revise el mantenimiento anual por el Servicio Oficial y sea renovado cuando fuera necesario.
Debiendo ser con mayor periodicidad en aquellas zonas con aguas críticas (contenido de CaCO3 superiores a 200mg/L, es decir
a partir de 20ºfH de dureza).
Depósitos sin el correcto estado del ánodo de protección, no tienen la cobertura de la garantía. Independientemente del tipo
de depósito o producto, todas las válvulas de sobrepresión de calefacción o a.c.s., deberán ser canalizadas para evitar daños
en Ia vivienda por descargas de agua. La garantía del producto no asume los daños causados por Ia no canalización del agua
derramada por esta válvula.

WARRANTY CONDITIONS
in Air Conditioners
1. The Warranty lasts three years on the device and seven on the compressor (for the compressor after three years the warran-
ty includes only the supply of the part), starting from the date of supply and/or installation. No one is authorized to modify the
warranty period or grant other verbal or written guarantees.
2. The Guarantee covers all components of the device and includes the free repair and supply of any part due to manufacturing
defects. The replacement or repair of defective parts does not modify the duration of the warranty.
3.
In the event of replacement of the device due to a manufacturing defect, in the opinion of the manufacturer or its legal repre-
sentative that it cannot be repaired, the warranty of the new device will continue until the end of the original equipment warranty.
4. The Warranty does not cover components damaged due to transportation, lack or error in maintenance, supply of
electrical fluid that does not comply with current regulations, due to manipulations carried out by unauthorized operators or for
reasons not attributable to the manufacturer. Interventions caused by installation defects are also excluded from the Guarantee.
5. The Guarantee is validated if:
a) The device has been installed in Spain or Portugal in accordance with current regulations and with
the instructions of the installation and user manual.
b) The device has preventive maintenance by the Technical Assistance Personnel authorized, according
to the recommendations of the installation and user manual.
c) The device has been installed by an authorized installer.
6. It is considered that the Guarantee expires:
a) Tampering by personnel not legally authorized to do so.
b) Electrical or hydraulic installation not in compliance with current standards or as described in the
installation and user manual.
c) Use of methods other than those described in the installation and user manual or for purposes
other than those for which the device is intended.
d) Inability of the user to show the purchase and installation invoice to authorized personnel from
an authorized installer.
7. The importer is liable before the law for damages caused to people or things due to construction defects in their devices
as long as the conditions set out above are met. In any case, damage caused by the suspension of operation of the device is
excluded.
8. When the device must be repaired in the Technical Assistance Service workshop indicated by the importer, the correspon-
ding transportation risks will be borne by the user in the case of direct shipping and by the SAT in the case of removal from
the User’s home. In the case of a customer without an open account with the importer, before the repair you must make a
payment to cover the repair if it is outside the warranty due to improper use or poor installation.
9. They are excluded from the guarantee, as they are not part of it.:
- The replacement of consumable materials due to operation, such as, but not limited to, and not
limited to, refrigerant gas, compressor oil, oil filters, etc.
- Extraordinary expenses caused by difficult access to the unit (cranes, scaffolding, assembly and
disassembly of these devices, permits, preventive resources, etc.), being the responsibility exclusive
of the owner of the installation to guarantee safe and sufficient access to the installed unit/s.
10. The issues that arise as a consequence of the application or interpretation of this guarantee must be resolved before the
Courts of Justice of Barcelona, with express waiver of its own jurisdiction by the purchaser of the device that is the subject of
this Guarantee.
Opening hours Monday to Friday from 8 a.m. to 8 p.m. and Saturday from 9 a.m. to 1 p.m. Contact telephone nuPEHU
Official Technical Service Directorate: SARETEKNIKA - Polo de Innovación Garaia, Edificio B - 20500 Arrasate - Guipuzkoa
ACCESS MORE INFORMATION: By scanning the following QR code with your mobile phone camera
you will access our website where you will find the necessary information.
IN CASE OF BREAKDOWN: You can contact our Technical Service department:
This equipment must be installed and configured by a qualified technician in accordance with the standards established by local health
and safety regulations, such as low voltage electrotechnical regulations, technical building code and relevant local regulations.
Official technical service:
WARRANTY CONDITIONS
Electrical and Gas water heaters
It is essential to present the purchase invoice accompanied by this warranty certificate.
Covered Risks.
This appliance is guaranteed against any defect in operation, provided it is intended for domestic use, proceeding to repair it
within the warranty period and only through the authorized SAT network.
Our Corberó appliances have the manufacturer’s legal warranty that covers any breakdown or defect for 36 months, from its
date of January 1, 2022. If necessary, we will take care of any possible incident as long as it is due to a defective component
or manufacturing fault.
Warranty Exceptions.
• That the date of the certificate does not coincide with the sale date of the original invoice.
• Breakdowns caused by impact, fall or any other cause of force majeure.
• If the device has been manipulated by unauthorized personnel.
• Breakdowns produced or derived as a result of improper use, installation defects,
for introducing modifications to the device that alter its operation.
• Start-up, maintenance, cleaning, components subject to wear, lamps, aesthetic parts,
oxidations, plastics, rubber, casings and glass.
Electric water heater warranty.
3-year warranty including travel and labor costs corresponding to the repair of the product, and must have maintenance once
every 12 months. Especially if you have installed a gas appliance, keep in mind as the owner of the installation, the obligation
to carry out a complete review of the equipment (according to Royal Decree 238 / 2013, of April 5. RITE. IT3.
This equipment must be installed and configured by a qualified technician in accordance with the standards established by the
local health and safety regulations, such as the low voltage electrotechnical regulation, the technical code of building and
relevant local regulations.
For electric water heaters and boilers that include hot water storage tanks, for the Guarantee benefit to be applied, it is
mandatory that the magnesium anode is operational and that it performs the protection function adequately. To do this, it
is necessary that the anode be inspected for annual maintenance by the Official Service and renewed when necessary. This
should be done more frequently in those areas with critical waters (CaCO3 content greater than 200 mg/L, that is, from 20ºfH
hardness).
Tanks without the correct state of the protective anode do not have warranty coverage. Regardless of the type of tank or
product, all heating or DHW overpressure valves must be channeled to avoid damage to the home due to water discharges.
The product warranty does not cover damage caused by the failure to channel the water spilled through this valve.
Opening hours Monday to Friday from 8 a.m. to 8 p.m. and Saturday from 9 a.m. to 1 p.m. Contact telephone number 9. Contact email: [email protected] / [email protected]
Official Technical Service Directorate: SARETEKNIKA - Polo de Innovación Garaia, Edificio B - 20500 Arrasate - Guipuzkoa
ACCESS MORE INFORMATION: By scanning the following QR code with your mobile phone camera
you will access our website where you will find the necessary information.
IN CASE OF BREAKDOWN: You can contact our Technical Service department:
This equipment must be installed and configured by a qualified technician in accordance with the standards established by local health
and safety regulations, such as low voltage electrotechnical regulations, technical building code and relevant local regulations.
Official technical service: 9
CONDIÇÕES DE GARANTIA
em Ar Condicionado
1. A Garantia é de três anos para o aparelho e sete para o compressor (para o compressor após três anos a garantia inclui
apenas o fornecimento da peça), a partir da data de fornecimento e/ou instalação. Ninguém está autorizado a modificar o
período de garantia ou conceder outras garantias verbais ou escritas.
2. A Garantia cobre todos os componentes do dispositivo e inclui a reparação e fornecimento gratuito de qualquer peça devido
a defeitos de fabrico. A substituição ou reparação de peças defeituosas não altera a duração da garantia.
3. Em caso de substituição do aparelho por defeito de fabricação, na opinião do fabricante ou de seu representante legal de que
o mesmo não pode ser reparado, a garantia do novo aparelho continuará até o término da garantia original do equipamento.
4. A Garantia não cobre componentes danificados por transporte, falta ou erro de manutenção, fornecimento de
fluido elétrico que não esteja em conformidade com as normas vigentes, devido a manipulações realizadas por operadores
não autorizados ou por motivos não imputáveis ao fabricante. As intervenções causadas por defeitos de instalação também
estão excluídas da Garantia.
5. A Garantia é validada se:
a) O dispositivo foi instalado em Espanha ou Portugal de acordo com as normas vigentes e com as
instruções do manual de instalação e do usuário.
b) O aparelho conta com manutenção preventiva pelo Pessoal de Assistência Técnica
autorizado, conforme recomendações do manual de instalação e do usuário.
c) O dispositivo foi instalado por um instalador autorizado.
6. Considera-se que a Garantia expira:
a) Adulteração por pessoal não autorizado legalmente para fazê-lo.
b) Instalação elétrica ou hidráulica não conforme com as normas vigentes ou conforme descrito no
instalação e manual do usuário.
c) Uso de métodos diferentes daqueles descritos no manual de instalação e do usuário ou para fins
diferentes daqueles para os quais o dispositivo se destina.
d) Incapacidade do usuário de mostrar a fatura de compra e instalação ao pessoal autorizado
de um instalador autorizado.
7. O importador é responsável perante a lei pelos danos causados a pessoas ou coisas devido a defeitos de construção nos
seus dispositivos, desde que cumpridas as condições acima expostas. Em qualquer caso, estão excluídos os danos causados
pela suspensão do funcionamento do dispositivo.
8. Quando o aparelho precisar ser reparado na oficina do Serviço de Assistência Técnica indicada pelo importador, os corres-
pondentes riscos de transporte serão arcados pelo usuário no caso de envio direto e pelo SAT no caso de retirada do domicílio
do Usuário. No caso de cliente sem conta aberta no importador, antes do reparo deverá efetuar um pagamento para cobrir o
reparo caso este esteja fora da garantia por uso indevido ou má instalação.
9. Estão excluídos da garantia, pois não fazem parte dela.:
- A substituição de materiais consumíveis devido à operação, tais como, mas não se limitando a,
e não limitado a gás refrigerante, óleo de compressor, filtros de óleo, etc.
- Despesas extraordinárias causadas pela dificuldade de acesso à unidade (guindastes, andaimes, montagem
e desmontagem destes dispositivos, licenças, recursos preventivos, etc.), sendo de responsabilidade exclusivo
do proprietário da instalação para garantir acesso seguro e suficiente à(s) unidade(s) instalada(s).
10. As questões que surjam como consequência da aplicação ou interpretação desta garantia deverão ser resolvidas perante
os Tribunais de Justiça de Barcelona, com renúncia expressa à sua própria jurisdição por parte do comprador do dispositivo
objeto desta Garantia.
Serviço técnico oficial: (00 351) 707 01 01 42
Horário de funcionamento de segunda a sexta das 9h às 16h. Telefone de contato (00 351) 707 01 01 42. Email de contato: info@corbero.es / [email protected]
Diretoria Oficial de Serviço Técnico: SARETEKNIKA - Polo de Innovación Garaia, Edificio B - 20500 Arrasate - Guipuzkoa
ACESSE MAIS INFORMAÇÕES: Ao digitalizar o seguinte código QR com a câmera do seu celular
você acessará nosso site onde encontrará as informações necessárias.
EM CASO DE AVARIA:
Você pode entrar em contato com nosso departamento de Assistência Técnica:
Este equipamento deve ser instalado e configurado por um técnico qualificado de acordo com os padrões estabelecidos pelas regu-
lamentações locais de saúde e segurança, como regulamentações eletrotécnicas de baixa tensão, código técnico de construção e
regulamentações locais relevantes.

CONDIÇÕES DE GARANTIA
em garrafas térmicas e aquecedores
Serviço técnico oficial: (00 351) 707 01 01 42
ACESSE MAIS INFORMAÇÕES: Ao digitalizar o seguinte código QR com a câmera do seu celular
você acessará nosso site onde encontrará as informações necessárias.
EM CASO DE AVARIA:
Você pode entrar em contato com nosso departamento de Assistência Técnica:
Este equipamento deve ser instalado e configurado por um técnico qualificado de acordo com os padrões estabelecidos pelas regu-
lamentações locais de saúde e segurança, como regulamentações eletrotécnicas de baixa tensão, código técnico de construção e
regulamentações locais relevantes.
É imprescindível a apresentação da nota fiscal de compra acompanhada deste certificado de garantia.
Riscos Cobertos.
Este aparelho está garantido contra qualquer defeito de funcionamento, desde que se destine a uso doméstico,
procedendo à sua reparação dentro do período de garantia e apenas através da rede SAT autorizada.
Os nossos aparelhos Corberó contam com garantia legal do fabricante que cobre qualquer avaria ou defeito durante
36 meses, a partir da data de 1º de janeiro de 2022. Se necessário, cuidaremos de qualquer possível incidente, desde
que seja devido a defeito de componente ou fabricação. falta.
Exceções de garantia.
• Que a data do certificado não coincide com a data de venda da fatura original.
• Avarias causadas por impacto, queda ou qualquer outra causa de força maior.
• Se o dispositivo tiver sido manipulado por pessoal não autorizado.
• Avarias produzidas ou derivadas de uso indevido, defeitos de instalação, por
introduzir modificações no dispositivo que alterem seu funcionamento.
• Arranque, manutenção, limpeza, componentes sujeitos a desgaste, lâmpadas, peças estéticas,
oxidações, plásticos, borracha, invólucros e vidro.
Garantia do aquecedor elétrico de água.
Garantia de 3 anos incluindo despesas de viagem e mão de obra correspondentes ao reparo do produto, devendo ter
manutenção uma vez a cada 12 meses. Principalmente se instalou um aparelho a gás, tenha em atenção, como proprietário
da instalação, a obrigação de efectuar uma revisão completa do equipamento (de acordo com o Real Decreto 238/2013, de 5
de abril. RITE. IT3.
Este equipamento deve ser instalado e configurado por técnico qualificado de acordo com as normas estabelecidas pela
regulamentos locais de saúde e segurança, como o regulamento eletrotécnico de baixa tensão, o código técnico de construção
e regulamentos locais relevantes.
Nos termoacumuladores elétricos e nas caldeiras que incluam reservatórios de água quente, para que o benefício da Garantia
possa ser aplicado é obrigatório que o ânodo de magnésio esteja operacional e desempenhe adequadamente a função
de proteção. Para isso é necessário que o ânodo seja inspecionado para manutenção anual pelo Serviço Oficial e renovado
quando necessário. Isto deve ser feito com maior frequência naquelas áreas com águas críticas (teor de CaCO3 superior a
200mg/L, ou seja, a partir de dureza de 20ºfH).
Os tanques sem o estado correto do ânodo protetor não têm cobertura de garantia. Independentemente do tipo de depósito
ou produto, todas as válvulas de sobrepressão de aquecimento ou AQS devem ser canalizadas para evitar danos na habitação
devido a descargas de água. A garantia do produto não cobre danos causados pela não canalização da água derramada por
esta válvula.
Horário de funcionamento de segunda a sexta das 9h às 16h. Telefone de contato (00 351) 707 01 01 42. Email de contato: info@corbero.es / [email protected]
Diretoria Oficial de Serviço Técnico: SARETEKNIKA - Polo de Innovación Garaia, Edificio B - 20500 Arrasate - Guipuzkoa