Manual de instrucciones
Instruction manual
Manuel d’instructions
Bedienungsanleitung
Manuale di istruzioni
Manual de instruções
Instructiehandleiding
Instrukcja obsługi
Návod k použití
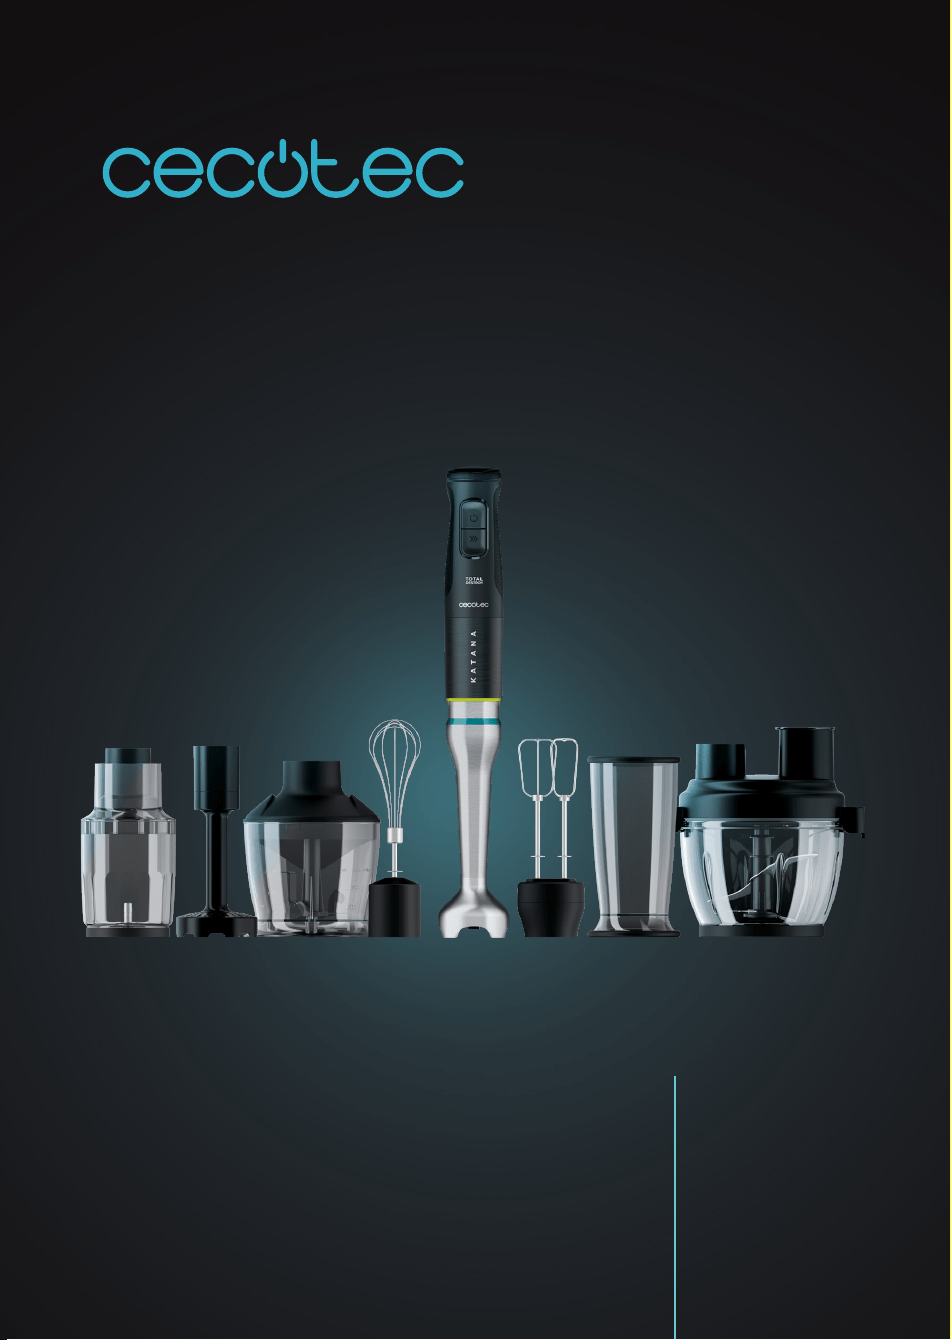
KATANA 12/ KATANA 15/ KATANA 15 TOTALDESTROY
Batidora de mano/ Hand blender

KATANA 12/KATANA 15/ KATANA 15 TOTALDESTROY
30
ENGLISH
1. PARTS AND COMPONENTS
Fig .0
1. Accessory-coupling system
2. Coupling area (*)
Blender main body (handle). Fig. 1
1. Speed knob
2. Power button
3. Turbo button
4. Main housing
5. Display (only for model 03979_Katana 15 TotalDestroy Full B Screen)
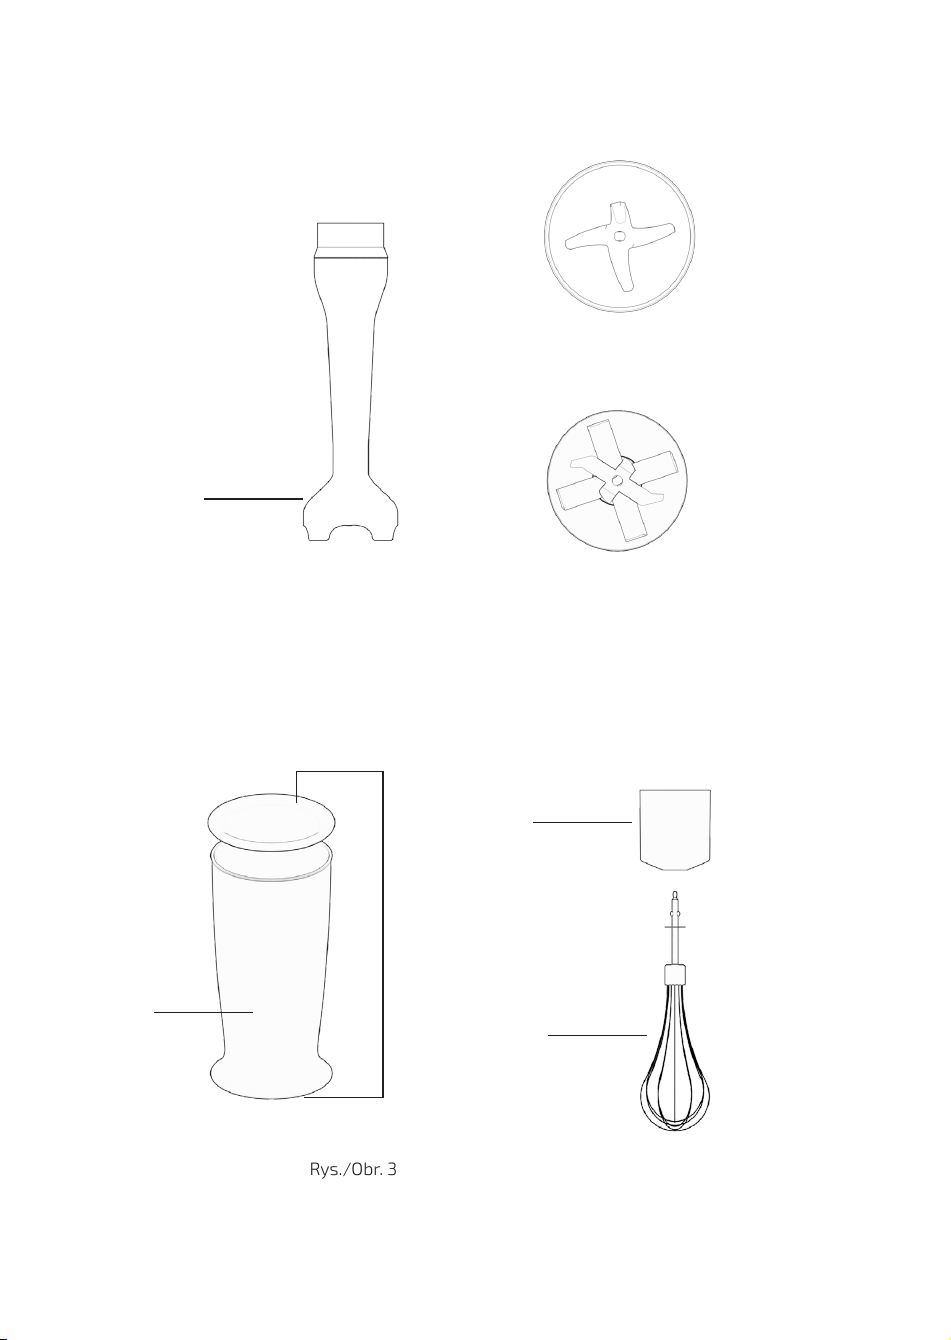
Blending shaft. Fig. 2
6. Splashproof tip
7. “Perreo Move” blades
8. “Total Destroy” blades
Blender jug. Fig. 3
9. Blender jug for blades or whisks
10. Lid – Base
Balloon whisk. Fig. 4
11. Balloon-whisk attachment
12. Balloon whisk
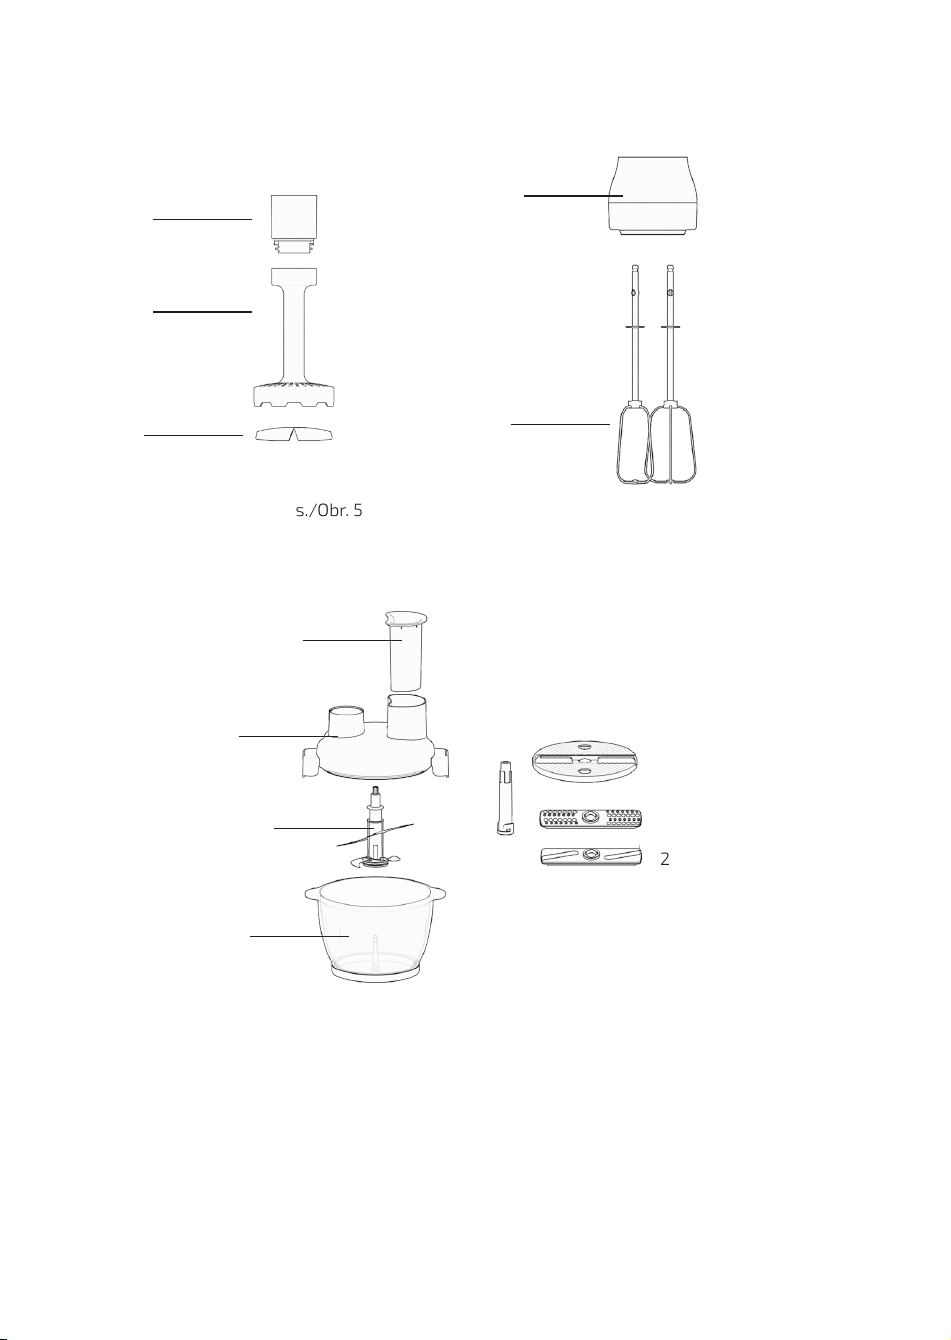
Potato masher. Fig. 5
13. Potato masher accessory
14. Potato masher
15. Blade
Whisks. Fig. 6
16. Blending whisk attachment
17. Blending whisks
Food processor. Fig. 7
18. Pusher
19. Food-processor lid/Hopper
20. Blade-disc shaft
21. Blade disc

KATANA 12/KATANA 15/ KATANA 15 TOTALDESTROY
31
ENGLISH
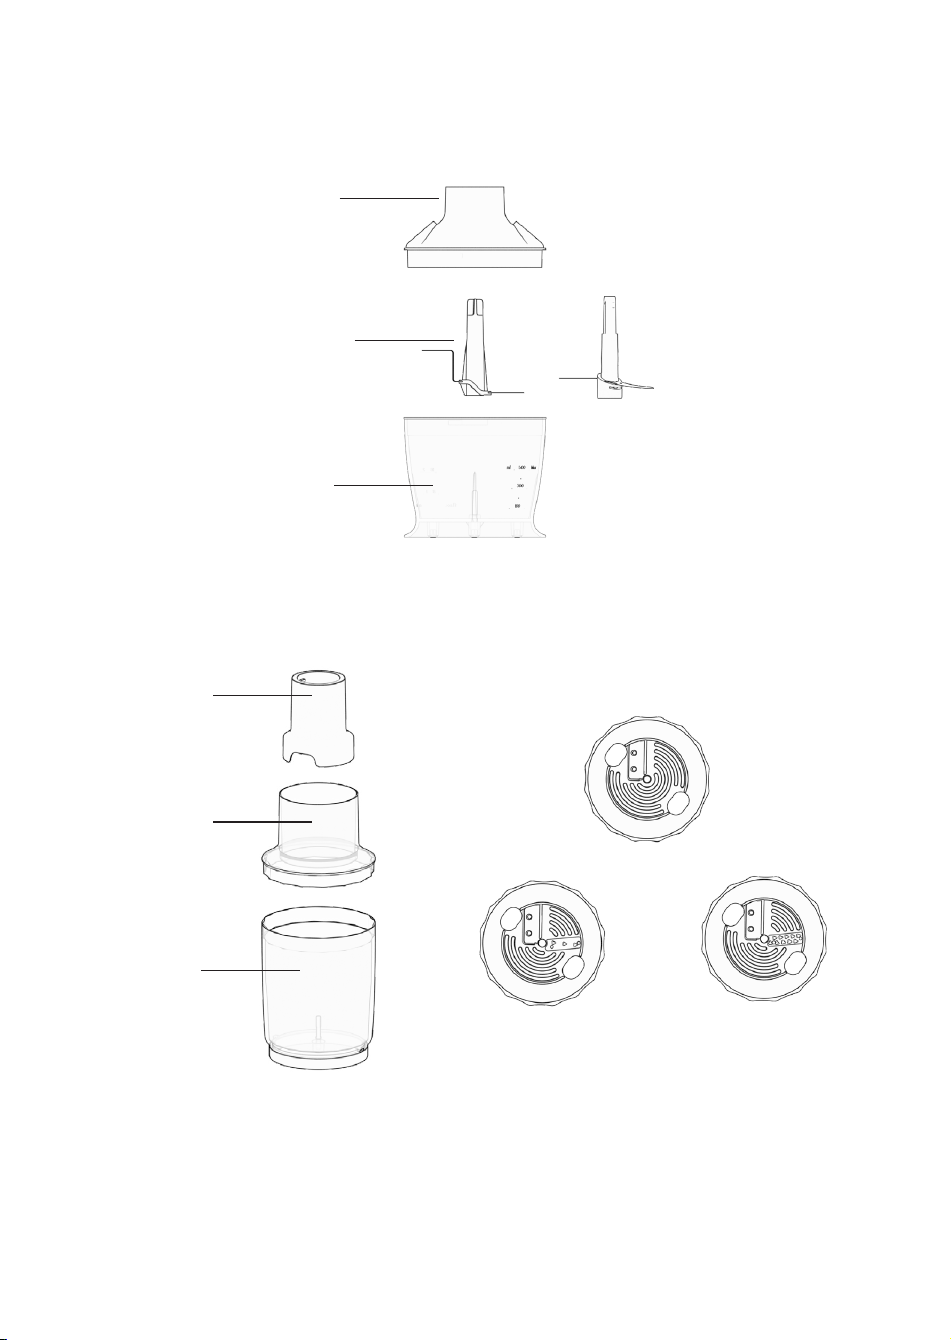
22. Grating blade
23. Slicing blade
24. Grinding blade
25. Food-processor container
Chopper. Fig. 8
26. Chopper lid
27. Chopper blade
28. Ice chopper blade
29. Chopper container
Spiraliser. Fig. 9
30. Drive unit
31. Hopper
32. Spiraliser container
33. Thick cutting disc
34. Thin cutting disc
35. Flat cutting disc
2. BEFORE USE
- This hand blender has a packaging designed to protect it during transport. Unpack the
appliance and keep the original packaging box and other packaging materials in a safe
place. It will help you prevent any damage if the product needs to be transported in the
future. In case the original packaging is disposed of, make sure all packaging materials are
recycled accordingly.
- Make sure all parts and components are included and in good conditions. If there is any
piece missing or not in good condition, immediately contact the ocial Cecotec Technical
Support Service.
- Before using this hand blender or any of its accessories, you must clean all parts that will
touch food.
Box contents:
Katana 12/15 Jar B/G/D/S blender
- Blending shaft with “Perreo Move” technology
- Blender jug with anti-slip lid-base
Katana 12/15 Cream B blender
- Blending shaft with “Perreo Move” technology
- Blender jug with anti-slip lid-base
- Balloon whisk

KATANA 12/KATANA 15/ KATANA 15 TOTALDESTROY
32
ENGLISH
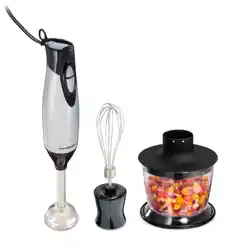
Katana 12/15 Chop B/G blender.
- Blending shaft with “Perreo Move” technology
- Blender jug with anti-slip lid-base
- Balloon whisk
- Chopper
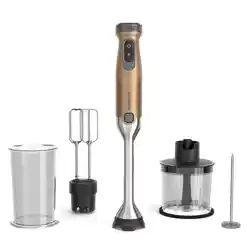
Katana 15 Smash B blender
- Blending shaft with “Perreo Move” technology
- Blender jug with anti-slip lid-base
- Balloon whisk
- Blending whisks
- Chopper
- Potato masher
Katana 15 TotalDestroy Jar B/G blender
- Blending shaft with “Perreo Move” and “TotalDestroy” technology
- Blender jug with anti-slip lid-base
Katana 15 TotalDestroy Cream B blender
- Blending shaft with “Perreo Move” and “TotalDestroy” technology
- Blender jug with anti-slip lid-base
- Balloon whisk
Katana 15 TotalDestroy Chop B blender
- Blending shaft with “Perreo Move” technology
- Blender jug with anti-slip lid-base
- Balloon whisk
- Chopper
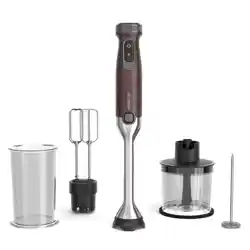
Katana 15 TotalDestroy Smash B blender
- Blending shaft with “Perreo Move” and “TotalDestroy” technology
- Blender jug with anti-slip lid-base
- Balloon whisk
- Blending whisks
- Chopper
- Potato masher
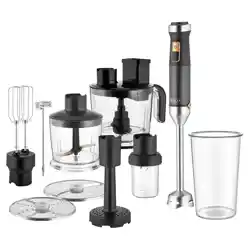
Katana 15 TotalDestroy Full B/B Screen blender
- Blending shaft with “Perreo Move” and “TotalDestroy” technology
- Blender jug with anti-slip lid-base.

KATANA 12/KATANA 15/ KATANA 15 TOTALDESTROY
33
ENGLISH
- Balloon whisk
- Blending whisks
- Potato masher
- Food processor
3. OPERATION
Blender. Fig. 0, 1, and 2
- Suitable for preparing baby food, soups, sauces, shakes, and mayonnaise.
- To improve the result obtained, the blender allows for the blade (Fig. 2) to be tilted closer
to the base of the splashproof tip (Fig. 2) thanks to the “Perreo Move” technology. Simply
press on the blender handle to lower the blade. Once the pressure is released, the blade
will return to its original position. Be careful not to put your ngers or any other part of
your body into the coupling area (Fig. 0) to avoid injury or entrapment.
Use:
1. Unwind the power cord completely.
2. Place the handle inside the blending shaft. Fig. 0
3. Plug the power cord into the outlet.
4. Hold the handle rmly, press the power button, and select the speed by turning the
blender speed knob.
5. Blend food by moving the hand blender vertically.
NOTE:
- Do not use this hand blender in containers without a at bottom or with protruding pieces.
- Do not use the hand blender with hot food.
- Do not allow food to cover the junction point between the handle and the blending shaft
of the hand blender.
- If the hand blender jams, unplug it from the mains and clean it.
- When you have nished using the hand blender, switch it o and unplug it from the mains.
Attachments
Balloon whisk
- Approximate usage time: 15 seconds.
- Suitable for whipping soft ingredients such as egg whites, cream, instant desserts, eggs,
and sugar.
- Do not try to whisk harder mixtures like margarine, as you may damage the balloon whisk.

KATANA 12/KATANA 15/ KATANA 15 TOTALDESTROY
34
ENGLISH
Balloon whisks Fig. 6
1. Place the handle inside the balloon whisks.
2. Place the food you wish to blend in a bowl. Do not whisk more than 6 egg whites or 1000
ml of cream at the same time. Do not let any liquid get above the whisks.
3. Unwind the cord completely, plug it into a power outlet, and press the power button.
Blending whisks
- Approximate usage time: 15 seconds.
- Suitable for whipping soft ingredients such as egg whites, cream, instant desserts, eggs
and sugar.
- This attachment allows you to whip stier mixtures such as margarine. However, you
must ensure that the butter or margarine is creamy.
Blending whisks. Fig. 6
1. Insert the whisks with the whisk attachment.
2. Place the handle inside the whisk attachment.
3. Place the food you wish to blend in a bowl. Do not whisk more than 6 egg whites or 1000
ml of cream at the same time. Do not let any liquid get above the whisks.
Unwind the cord completely, plug it into a power outlet, and press the power button.
Food processor. Fig. 7
- Suitable for mincing meat, cheese, vegetables, spices, bread, biscuits, and shelled soft
nuts.
- Do not try to cut hard foods such as coee beans, ice cubes, chocolate ounces, etc.
Otherwise, the blade may get damaged.
Assembling the food-processor bowl, accessories, and lid:
1. Place the food-processor bowl on a clean, stable surface, such as a countertop or table.
2. Choose one of the following food processor accessories and assemble it as detailed in
the following subsections:
- Grinding blade
- Blade holder disc + slicing blade
- Blade holder disc + grating blade
3. Install the blender body on the food processor lid.
4. Plug the blender into a power supply.
5. Choose the speed using the speed knob.
6. Insert the food through the hopper using the pusher. Do not insert ngers or any other
object into the hopper. Use only the pusher provided.
7. When you have nished using it, switch it o by releasing the power button and unplug
the device.
8. Remove the blender handle from the food processor lid and remove the lid from the bowl.

KATANA 12/KATANA 15/ KATANA 15 TOTALDESTROY
35
ENGLISH
Using the blade holder disc + grating blade:
1. Place the shaft in the centre of the food-processor bowl. Use caution when handling the
blade holder disc. Be careful not to cut yourself.
2. Insert the desired blade into the slot in the blade disc. Align the hole in the centre of the
disc with the shaft and make sure to properly x it by carefully pushing downwards.
3. Close the lid of the food-processor bowl and make sure it is properly tted and closed.
NOTE:
Be careful not to tilt the blade disc when the blade is mounted, as it may slip and fall, causing
damage to the blade.
Using the blade holder disc + slicing blade:
1. Place the shaft in the centre of the food-processor bowl. Use caution when handling the
blade holder disc. Be careful not to cut yourself.
2. Insert the desired blade into the slot in the blade disc. Align the hole in the centre of the
disc with the shaft and make sure to properly x it by carefully pushing downwards.
3. Close the lid of the food-processor bowl and make sure it is properly tted and closed.
NOTE:
Be careful not to tilt the blade disc when the blade is mounted, as it may slip and fall, causing
damage to the blade.
Using the grinding blade:
1. Handle the grinding blades with care, as they are very sharp.
2. Place the grinding blades in the centre of the food-processor bowl. Place the food inside
the food-processor bowl without exceeding the MAX mark.
3. Close the lid of the food-processor bowl and make sure it is properly tted and closed.
NOTE:
Be careful not to tilt the blade disc when the blade is mounted, as it may slip and fall, causing
damage to the blade.
Recommendations:
- Do not use the food processor with the bowl empty.
- Cut food into uniformly sized pieces for better and faster results.
- The blender cuts and mixes foods and liquids quickly, making them easier to process. Do
not forget to check the condition of the food during operation.
Spiraliser. Fig. 9
1. Insert the blender handle into the drive unit.
2. Remove the hopper and mount the blade. You can choose between several blades: thick,
thing, and at. Place the hopper inside the bowl.

KATANA 12/KATANA 15/ KATANA 15 TOTALDESTROY
36
ENGLISH
3. Place the vegetables (e.g., carrots, cucumbers, potatoes...) in the hopper.
4. Press the operating button to cut the vegetables into a spiral shape.
Press the operating button to cut the vegetables into a spiral shape. Fig. 9
1. Remove the hopper.
2. Place the cutting disc in the spiraliser container.
3. Place the hopper back on.
Chopper. Fig. 8
1. Remove the chopper lid.
2. Place the desired blade (chopper blade / ice chopper blade) on the centre shaft of the
container.
3. Reinsert the chopper lid.
4. Insert the blender handle into the chopper lid.
Potato masher. Fig. 5
1. Place the food inside a blending jar or a suciently large mixing container.
2. Plug the hand blender into a power supply.
3. Select the settings on the adjustable potato masher.
4. Select high speed on the speed dial.
5. Place the potato masher inside the ingredients and press the power button to activate it.
6. Move the potato masher gently through the ingredients until the desired texture is
achieved.
7. Switch o the hand blender by releasing the button, remove the potato masher from the
bowl and unplug the hand blender from the mains.
Turbo button
Press this button while using the device to run the device at maximum power and speed.
Note
The blender may overheat if this function is used for a long time.
Speed knob
Turn the speed dial to change the blades speed and choose whichever suits you best. Rotate
the knob clockwise to increase the speed, and anti-clockwise to decrease it.

KATANA 12/KATANA 15/ KATANA 15 TOTALDESTROY
37
ENGLISH
Comparative table
Food Maximum amount (in grams) Approximate time (in
seconds)
Meat 300 10-15
Spices 80 15
Nuts 250 15
Cheese 250 15
Bread 1 loaf 15
Hard boiled eggs 6 5
Onion 300 10
These data are approximate and depend on many dierent factors.
4. CLEANING AND MAINTENANCE
Fig. 10
Cleaning the blades
- To clean the blending shaft properly, place 300 ml of lukewarm water in the blender jug
with a little dishwashing soap, insert the blending shaft into the soapy water up to the
bottom of the blender jug, and run the blender in turbo mode in 10-second intervals. Empty
the contents of the blender jug and rell it with 300 ml of clean water and repeat the same
operation for rinsing. Repeat this process if necessary. Be cautious of splashes.
- Disconnect the device from the power supply and allow it to cool down before cleaning.
- Do not put the blending shaft in the dishwasher.
- After processing very salty food, rinse the blades with water immediately.
- Use a soft, damp cloth to clean the outside of the hand blender.
- The following parts are dishwasher safe: blending container, whisks, food-processor bowl,
grinding blade, blade holder disc, grating blade, slicing blade, pusher, potato-masher arm,
spiraliser bowl, spiraliser hopper, spiraliser cutting discs, chopper bowl, chopper blade,
and ice chopper blade.
- Do not use too much cleaning agent or descaler in your dishwasher.
- Never immerse the main body in water or other liquids.
- Never immerse the blending shaft in water or allow water to enter through the top of the
blender.

KATANA 12/KATANA 15/ KATANA 15 TOTALDESTROY
38
ENGLISH
- Do not use abrasive cleaners or scouring pads to clean the product.
- Please handle the blades carefully, they are very sharp.
- After processing coloured food, the plastic parts of the appliance may lose colour. It is
suggested to clean these parts with vegetable oil before washing them in the dishwasher.
5. TECHNICAL SPECIFICATIONS
Product reference: 03959/03962/03963/03968/03969/03970/03971/03972/03973/03975/
03976/03977/03978/03979
Product: Katana 15 TotalDestroy Jar G/Katana 15 Smash B/Katana 15 TotalDestroy Full B/
Katana 15 Jar B/Katana 15 Jar G/Katana 15 Jar D/Katana 15 TotalDestroy Jar B/Katana 15 Cream
B/Katana 15 TotalDestroy Cream B/Katana 15 Chop B/Katana 15 Chop G/Katana 15 TotalDestroy
Chop B/Katana 15 TotalDestroy Smash B/Katana 15 TotalDestroy Full B Screen
Rated power: 1500 W
220-240 V~,50 Hz
Product reference: 03960/03961/03964/03965/03966/03967/03974
Product: Katana 12 Cream B/Katana 12 Chop B/Katana 12 Jar B/Katana 12 Jar G/Katana 12 Jar D/
Katana 12 Jar S/Katana 12 Chop G
Rated power: 1200 W
220-240 V~,50 Hz
Technical specications may change without prior notication to improve product quality.
Made in China | Designed in Spain
6. DISPOSAL OF OLD ELECTRICAL AND ELECTRONIC APPLIANCES
This symbol indicates that, according to the applicable regulations, the
product and/or battery must be disposed of separately from household
waste. When this product reaches the end of its shelf life, you should dispose
of the cells/batteries/accumulators and take them to a collection point
designated by the local authorities.
Consumers must contact their local authorities or retailer for information
concerning the correct disposal of old appliances and/or their batteries.
Compliance with the above guidelines will help protecting the environment.

KATANA 12/KATANA 15/ KATANA 15 TOTALDESTROY
39
ENGLISH
7. TECHNICAL SUPPORT AND WARRANTY
Cecotec shall be liable to the end user or consumer for any lack of conformity that exists at the
time of delivery of the product under the terms, conditions, and deadlines established by the
applicable regulations.
It is recommended that repairs be carried out by qualied personnel.
If at any moment you detect any problem with your product or have any doubt, do not hesitate
to contact the ocial Cecotec Technical Support Service at +34 963 210 728.
8. COPYRIGHT
The intellectual property rights over the texts in this manual belong to CECOTEC INNOVACIONES,
S.L. All rights reserved. The contents of this publication may not, in whole or in part, be
reproduced, stored in a retrieval system, transmitted, or distributed by any means (electronic,
mechanical, photocopying, recording or similar) without the prior authorization of CECOTEC
INNOVACIONES, S.L.

Fig./Img./Abb./Rys./Obr. 0
Fig./Img./Abb./Rys./Obr. 1
1
2
3
4
5
*
1
4
6
7
8
Fig./Img./Abb./Rys./Obr. 2
Fig./Img./Abb./Rys./Obr. 3
11
12
Fig./Img./Abb./Rys./Obr. 4
10
9
13
14
15
Fig./Img./Abb./Rys./Obr. 5 Fig./Img./Abb./Rys./Obr. 6
16
17
Fig./Img./Abb./Rys./Obr. 7
18
19
20
21
22
23
24
25
21
22
23
Fig./Img./Abb./Rys./Obr. 8
26
27
28
29
Fig./Img./Abb./Rys./Obr. 9
30
31
32
35
33 34
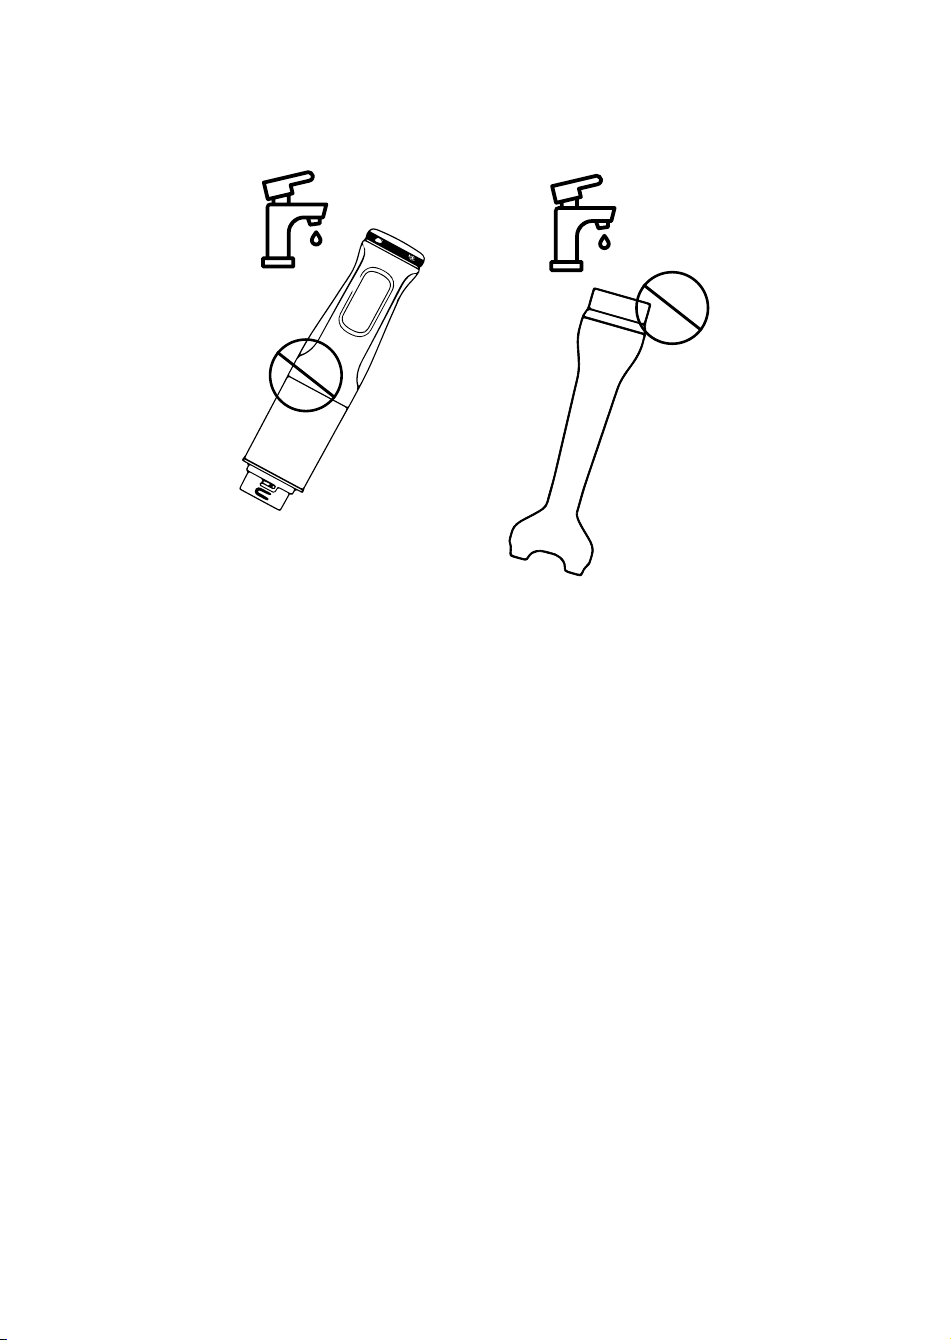
Fig./Img./Abb./Rys./Obr. 10

Cecotec Innovaciones S. L.
C/de la Pinadeta s/n, 46930
Quart de Poblet, Valencia, Spain
www.cecotec.es
EA01221207