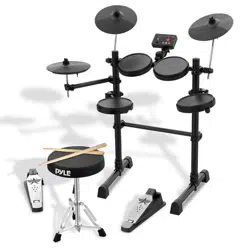
Electronic Drum Kit
Compact Drumming Machine, MIDI Computer Connection,
Quick Setup Roll-Up Design (Mac & PC Compatible)

ww w.PyleUSA.com
2
Catalog
Product Features
ASSEMBLY DIRECTORY
Drums Introduction
Crash Cymbal
Ride Cymbal
Hi-Hat
Tom Drum 1, Tom Drum 2, Tom Drum 3
Snare Drum
Bass Drum
Hi-Hat Pedal
Basic Play Method
Play with Hi-Hat and Hi-Hat pedal
Play with Bass Drum pedal
Play with Ride Cymbal
Play with Snare Drum
Host Machine Introduction
How to Use
Power and Audio Cable Connection
Turn On/O Host Machine
Turn On Drum Amp (if using a drum amp)
Choose Drum Sound Kit
Metronome Function
Pedals Adjust and Buttons Patterns Function
Pedals Adjust
Other Buttons Patterns Functions
USB MIDI
Specications
3
4
16
16
16
16
16
16
16
16
17
17
17
17
17
18
19
19
19
19
19
19
20
20
20
21
22

ww w.PyleUSA.com
3
Please read before using the product
Keep this user guide in a safe place for future reference.
Please assemble PEDKITPRO100 following ASSEMBLY DIRECTORY steps.
Product Features
Enjoy Playing
•
Connect PEDKITPRO100 electronic drum kit to drum amp.
• Adjust sound level and choose dierent sound patterns.
• Play quietly with headphone connects.
• Enjoy playing alone and not disturb others.
Simplied Control Panel Design
PEDKITPRO100 host machine control panel is designed to make everything
simple, with only one volume knob, two drum sound switch buttons, and one
metronome button.
Metronome Inside
PEDKITPRO100 with a click function, tempo adjustable.
Easy Assembly
Only 8 steps to assemble PEDKITPRO100 electronic drum kit.
Please follow ASSEMBLY DIRECTORY to assemble your drum kit.
ww w.PyleUSA.com
4
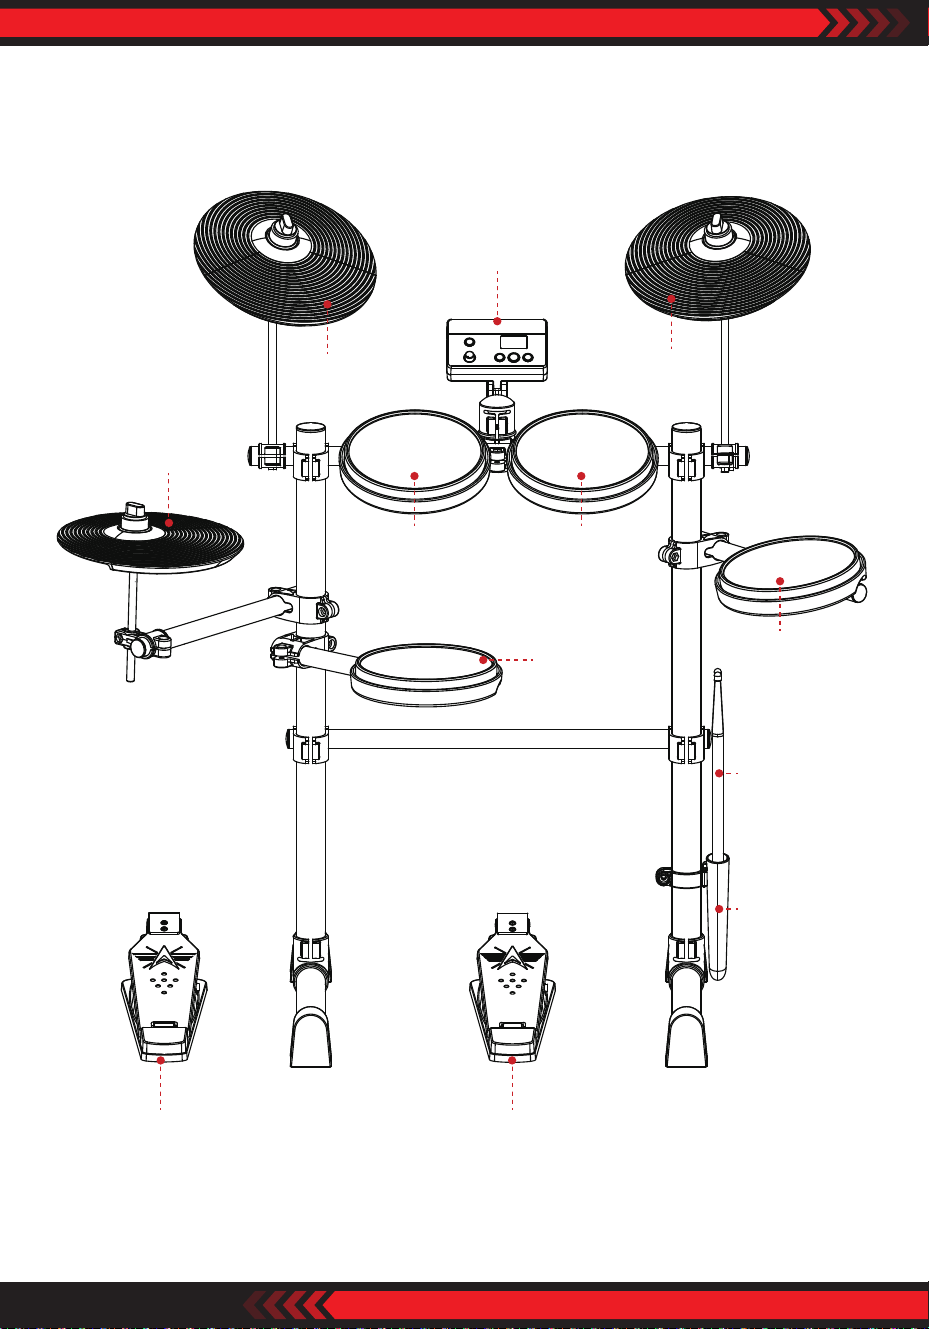
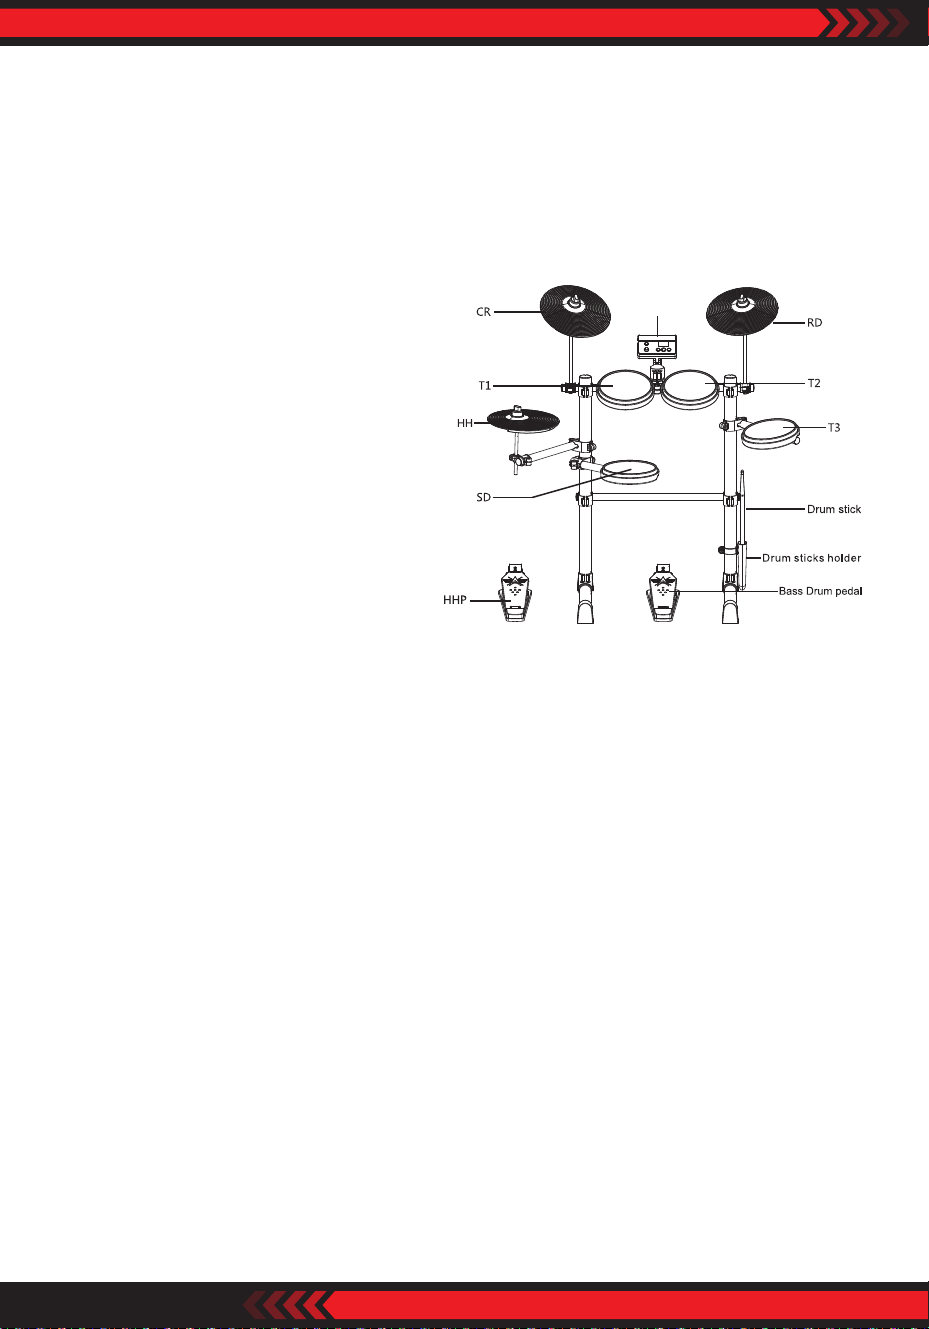
ASSEMBLY DIRECTORY
Host
T1 T2
SD
T3
RD
CR
HH
Drum stick
Drum stick
holder
HHP Bass Drum pedal
ww w.PyleUSA.com
5
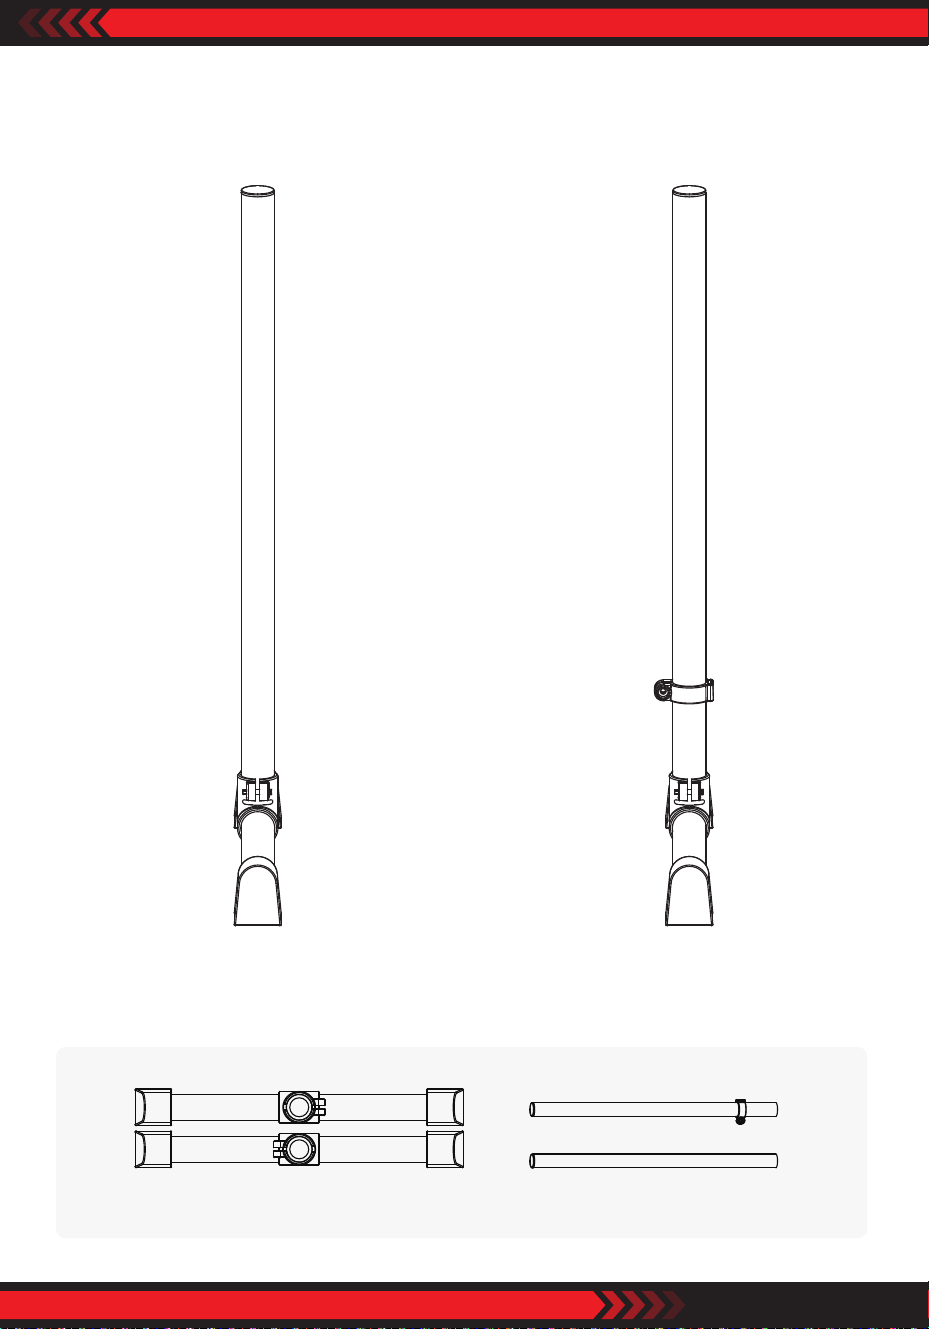
1. Feet, Stand Pipes Assembly
Parts Location
Feet
L
R
38*720 Stand pipes (2pcs)
ww w.PyleUSA.com
6
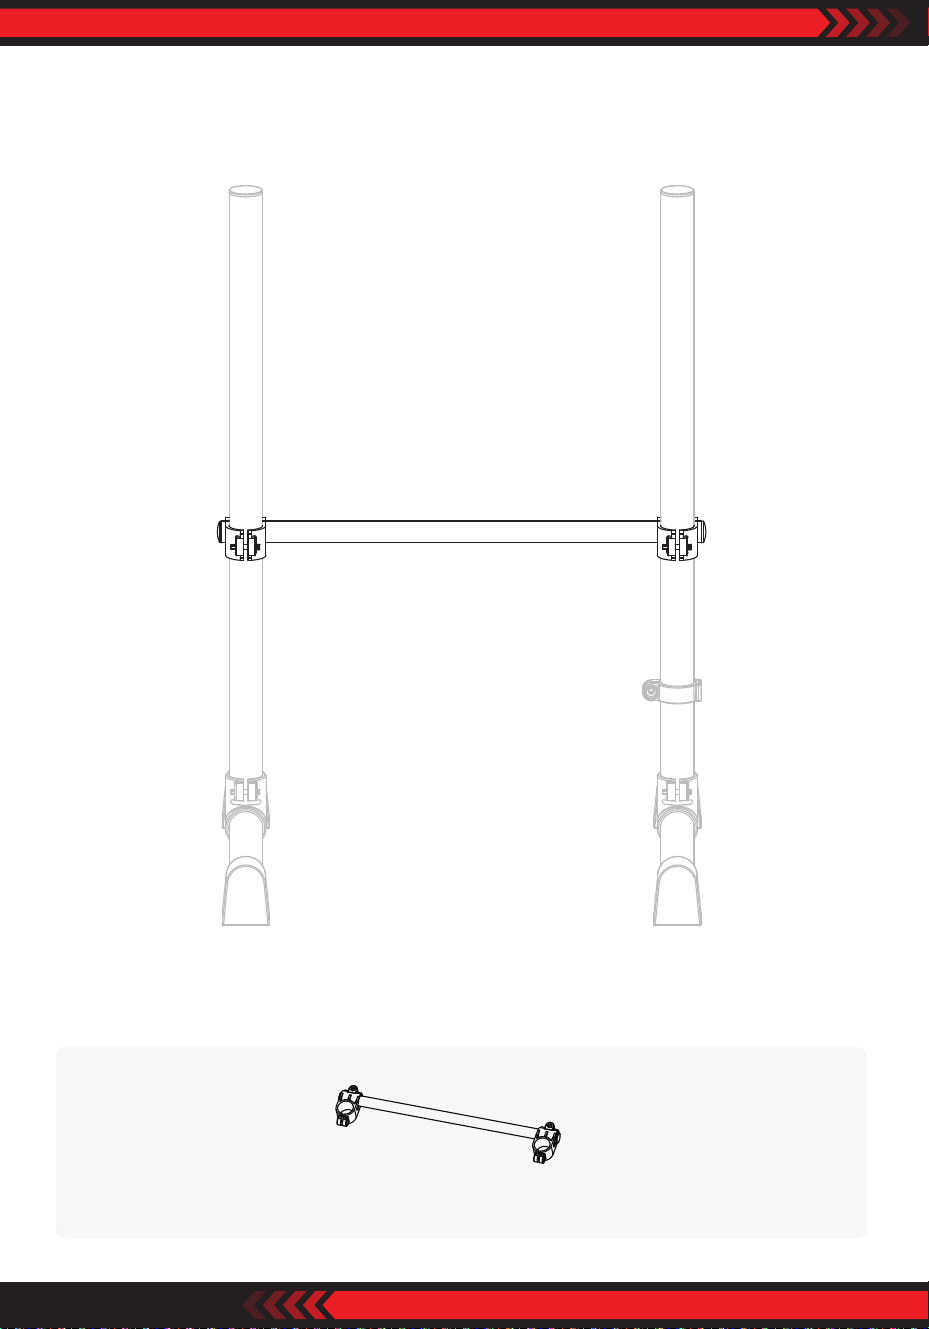
2. Inferior Transverse Pipe Assembly
Parts Location
Inferior transverse pipe
ww w.PyleUSA.com
7
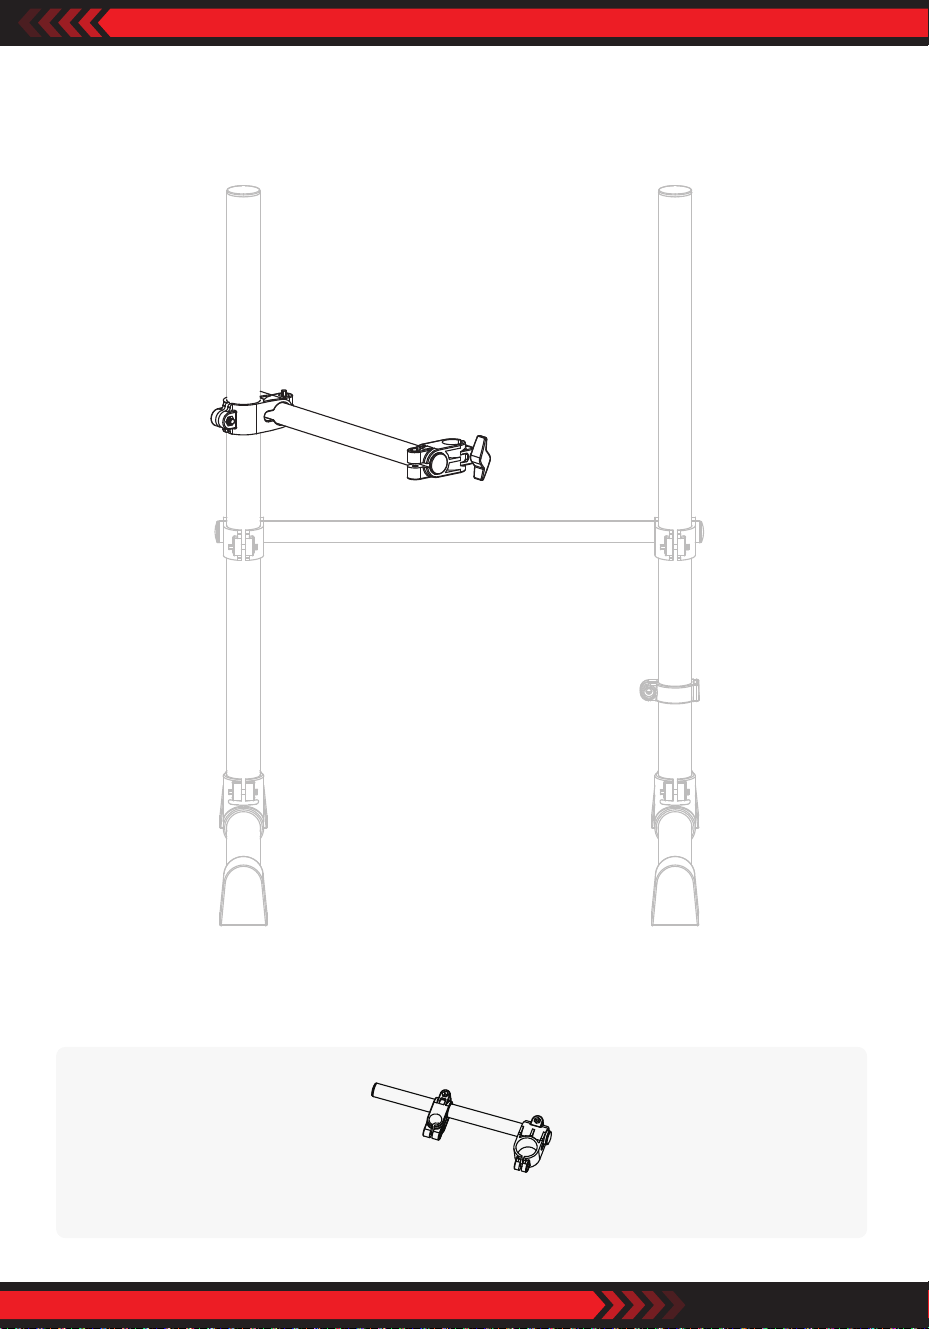
3. SD Connecting Pipe Assembly
Parts Location
SD connecting pipe
ww w.PyleUSA.com
8
4. HH Connecting Pipe Assembly
Parts Location
HH connecting pipe
ww w.PyleUSA.com
9
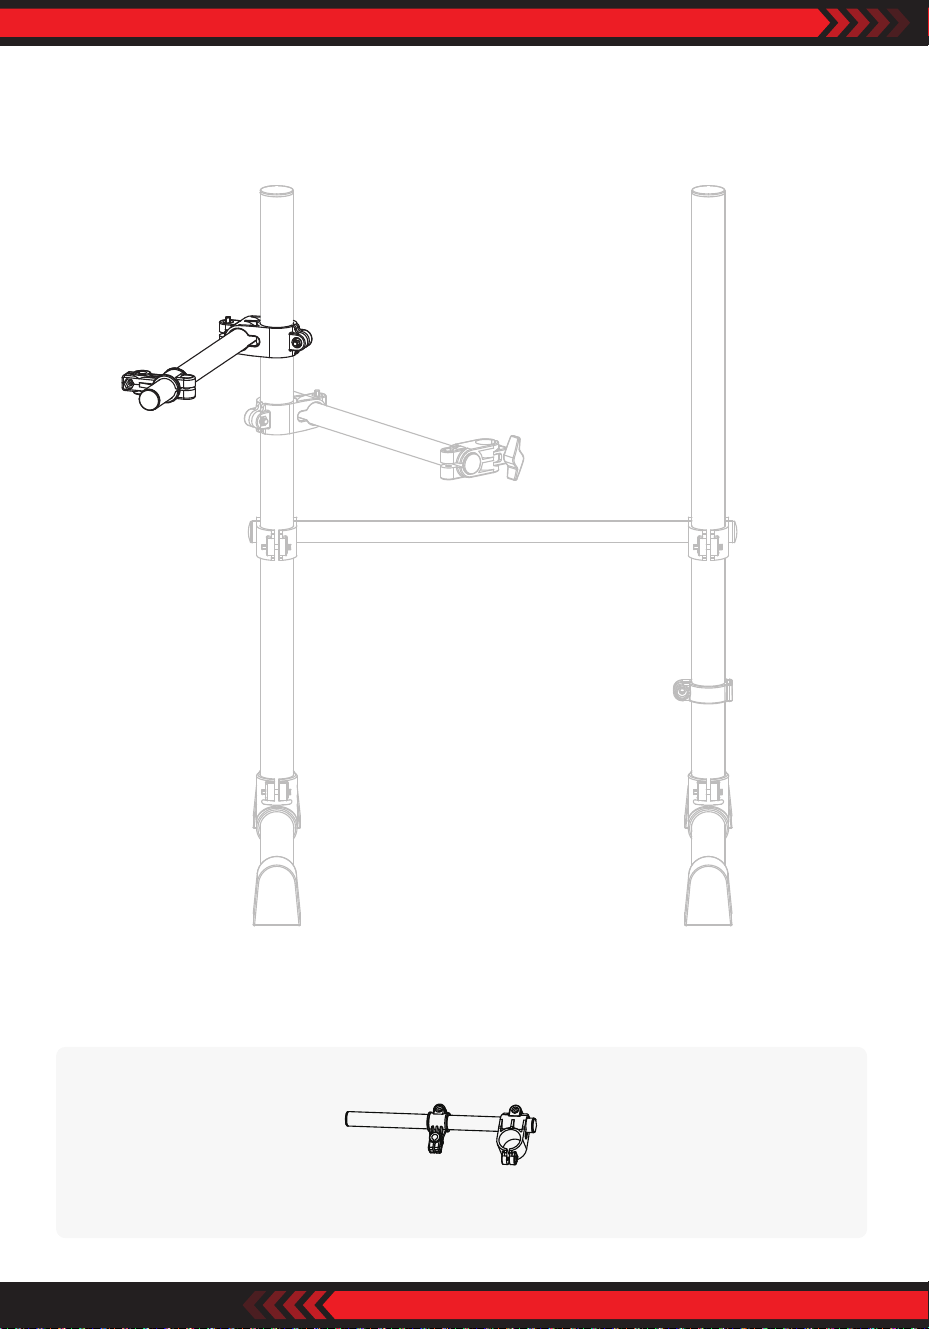
5. T3 Connecting Pipe Assembly
Parts Location
T3 connecting pipe
ww w.PyleUSA.com
10
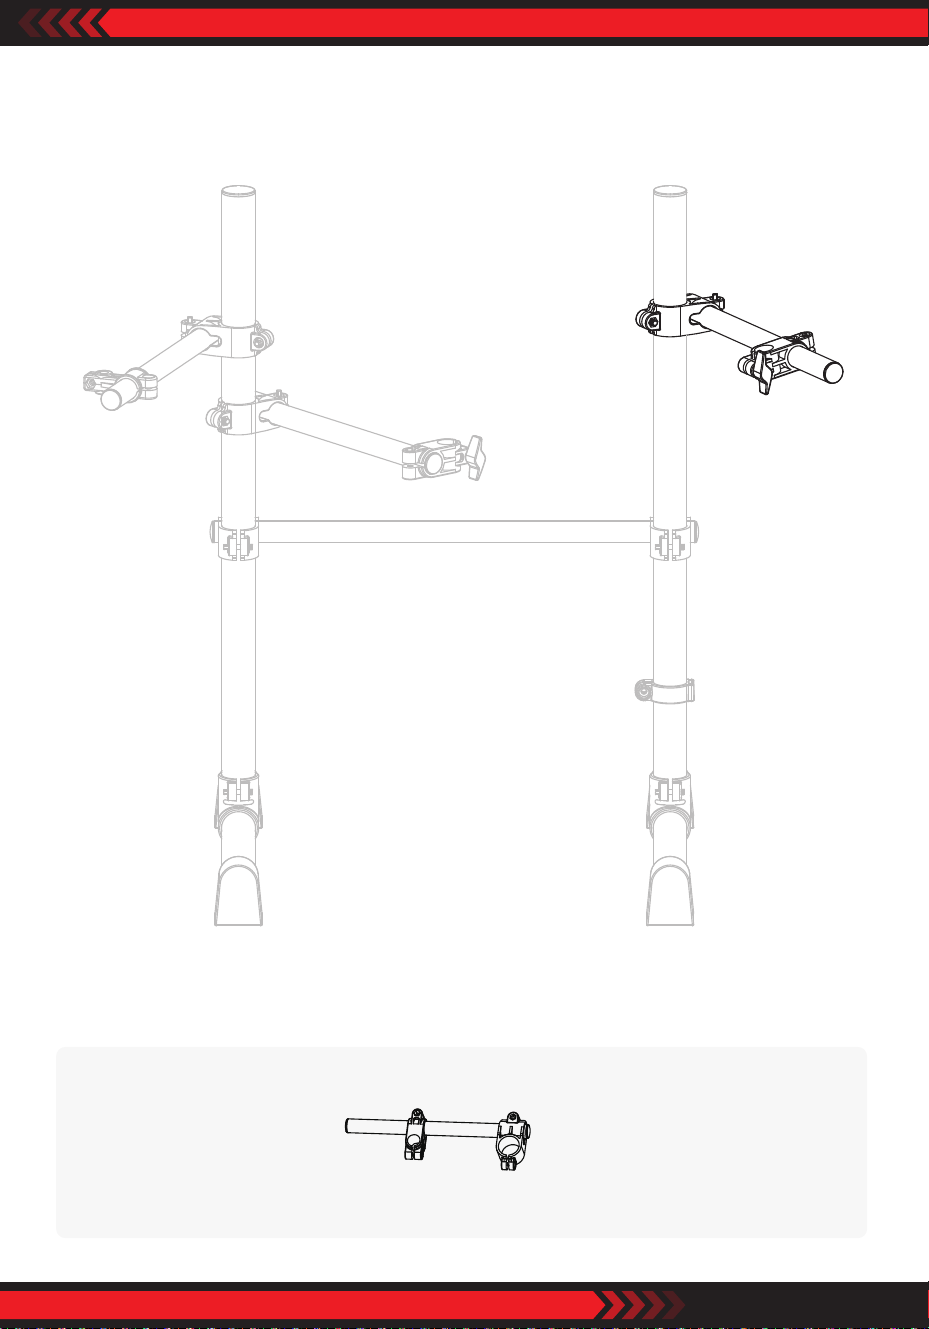
6. T1 T2 Transverse Pipe Fitting Assembly
Parts Location
T1 T2 transverse pipe tting
ww w.PyleUSA.com
11
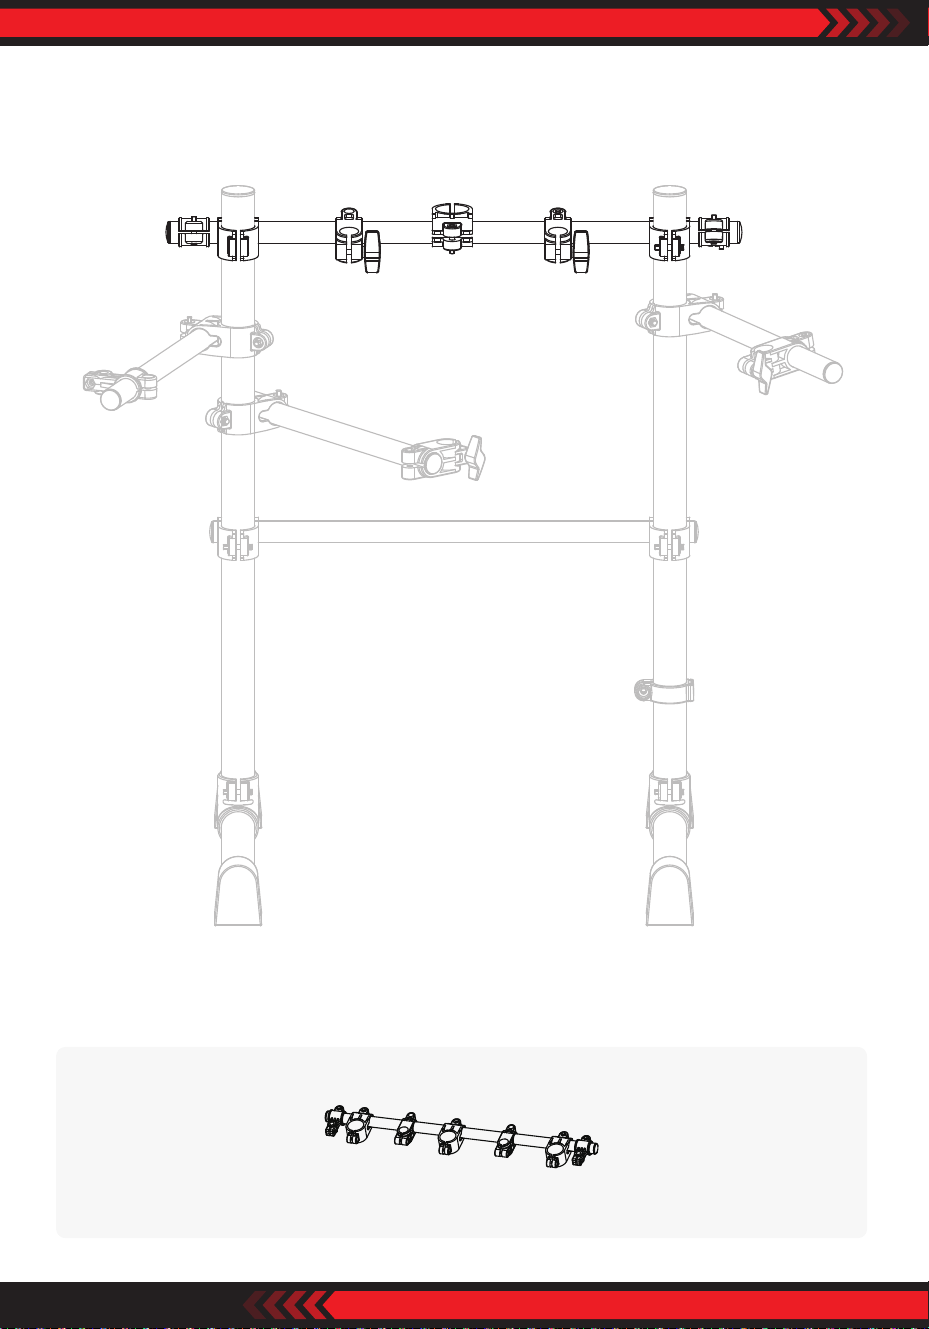
7. HH Rod, Cymbal Rods, Host Joint Assembly
Parts Location
Cymbal rodsHH rod Host joint
ww w.PyleUSA.com
12
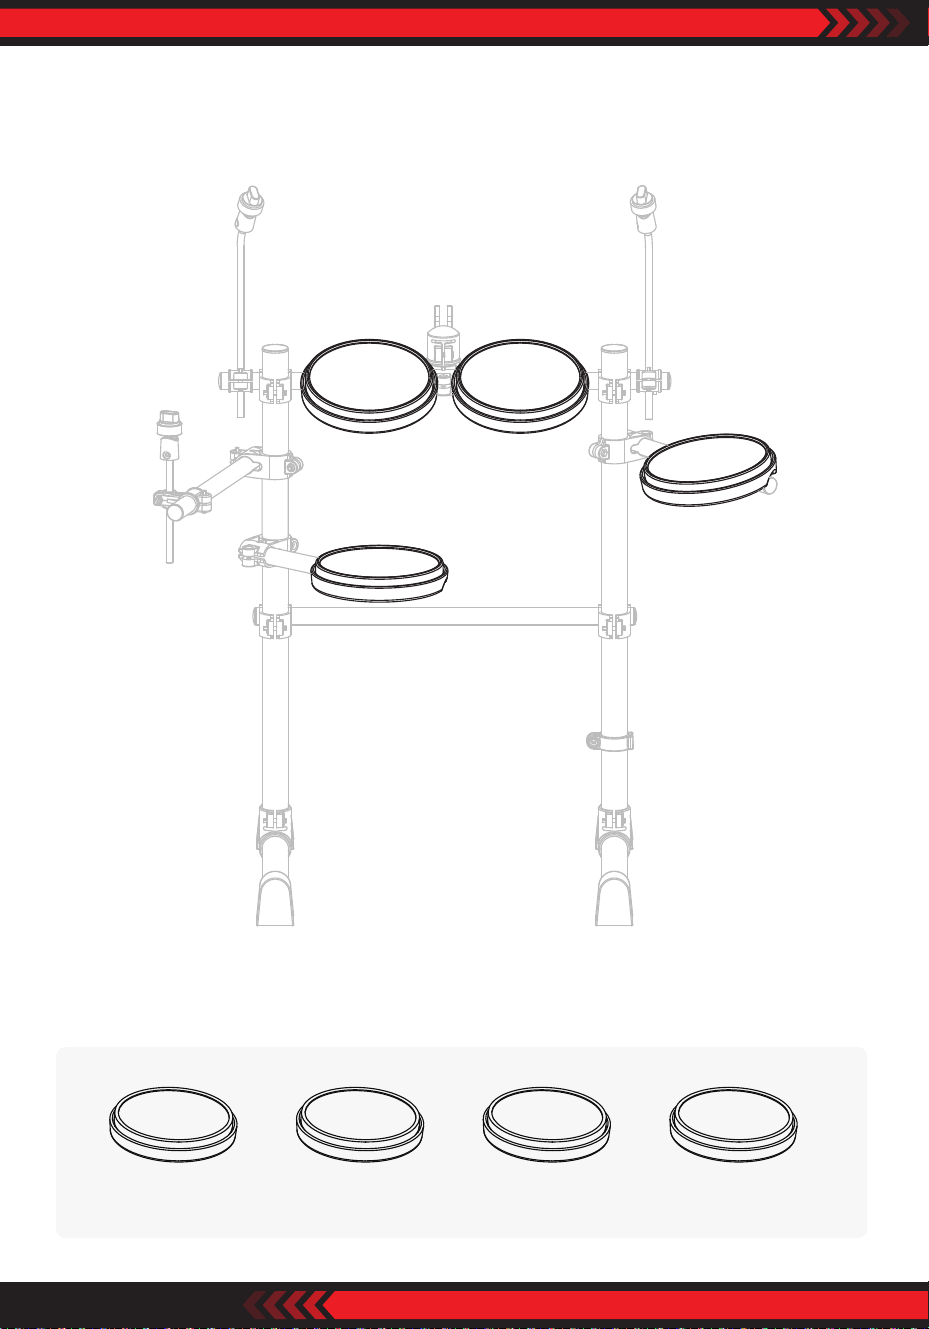
8. T1, T2 ,T3, SD Assembly
Parts Location
T3T1 SDT2
ww w.PyleUSA.com
13
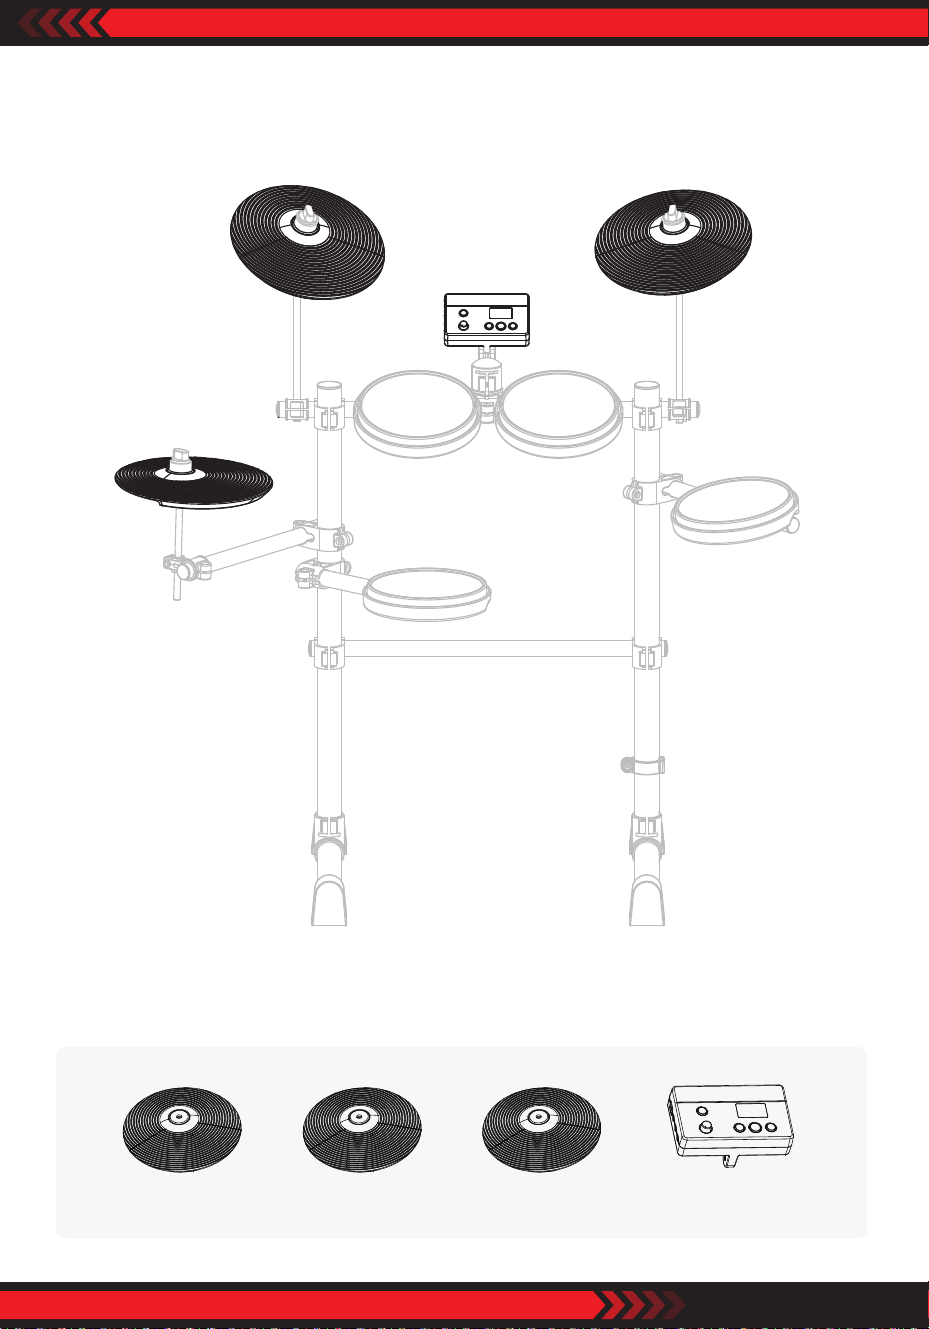
9. CR, RD, HH, Host Assembly
Parts Location
RDCR HostHH
ww w.PyleUSA.com
14
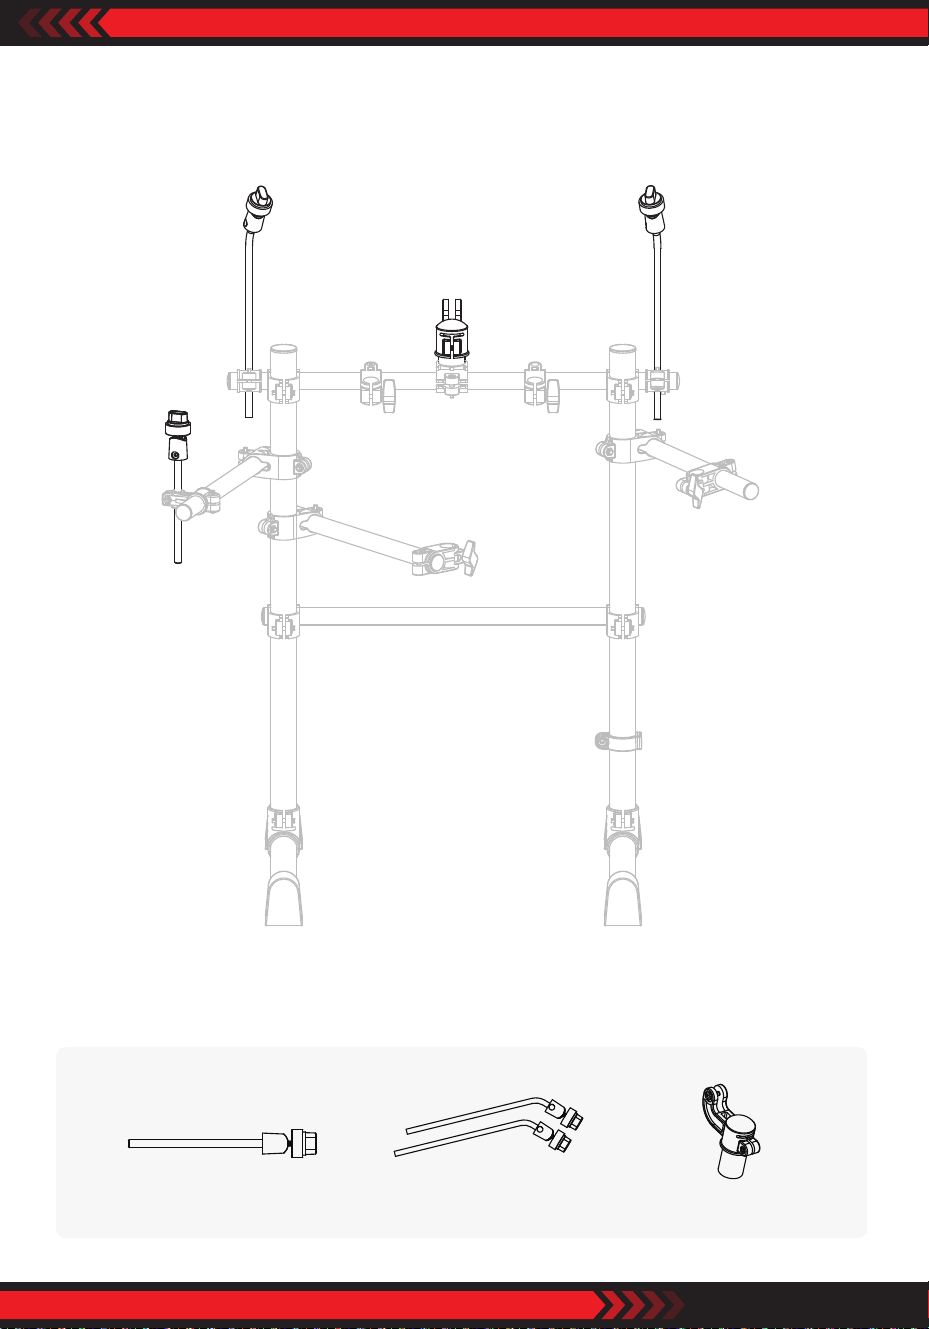
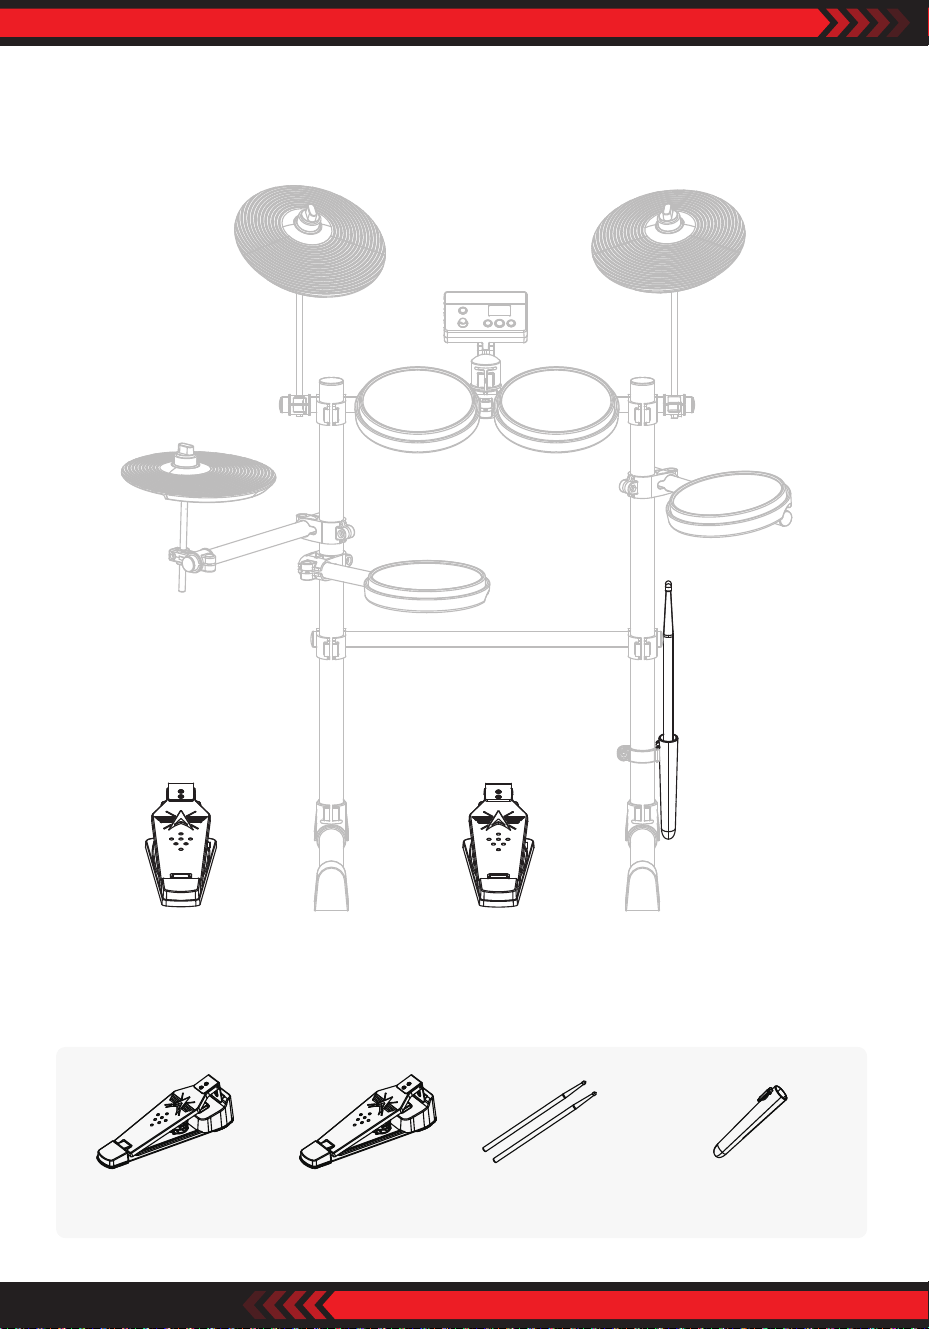
10. Bass Drum Pedal, HHP, Drum Sticks Holder Assembly
Parts Location
Drum sticksBass drum pedal Drum sticks holderHHP
ww w.PyleUSA.com
15
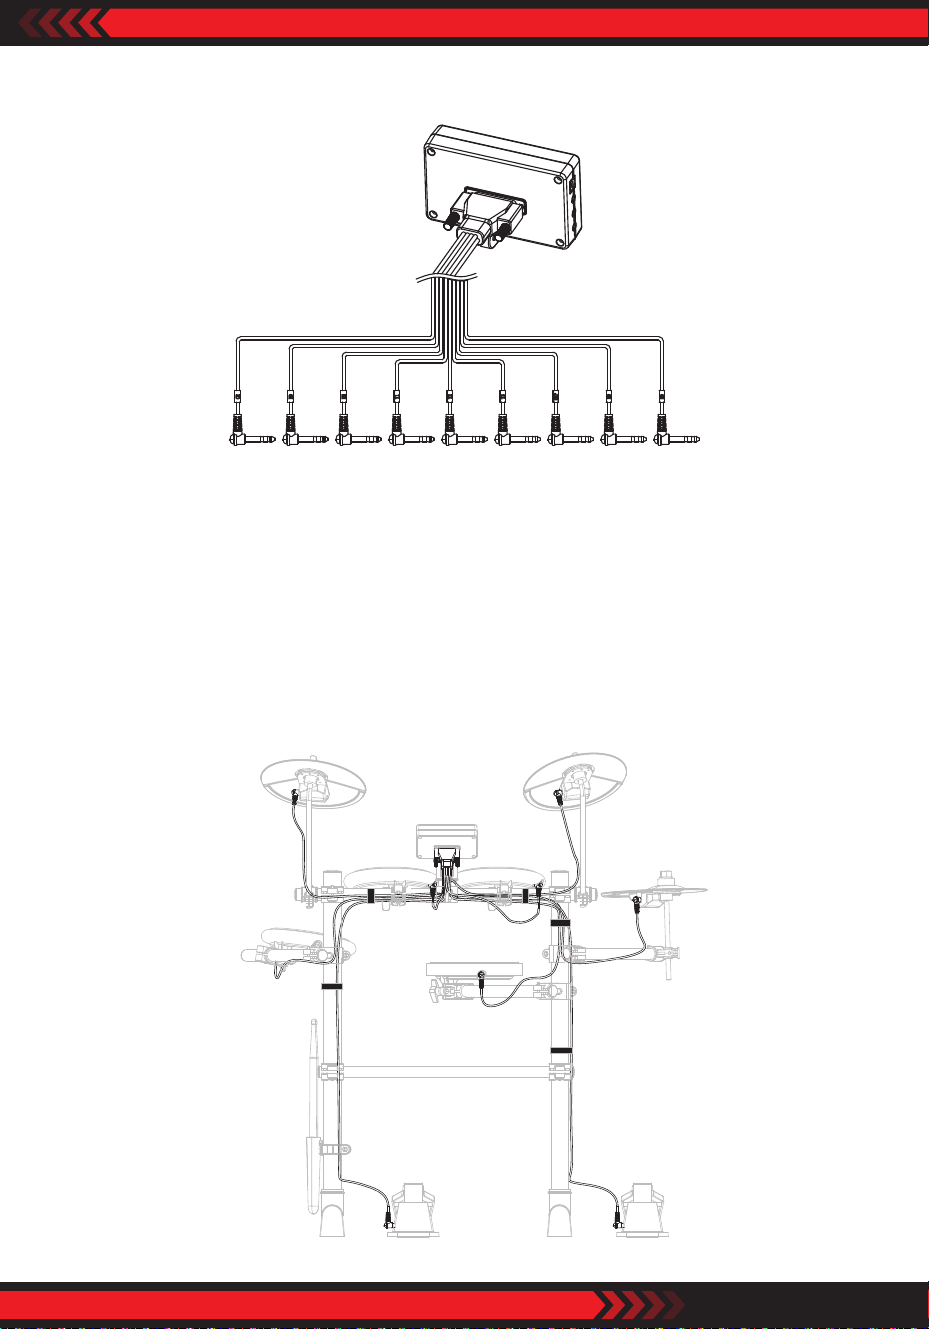
11. Audio Cables Assembly
REMARKS
1. Connect cables with the host machine rstly and fasten by screws.
2. Pay much attention to the letters on audio cable head to be matched with the
letters on drums or cymbal pads and connect.
3. To avoid unneccessary trouble, please connect cables in order:
(1) HHP, BD, (2) CR, RD, (3) HH, T3, (4) T1, T2, (5) SD
12. Fine Adjust And Fix The Cables
ww w.PyleUSA.com
16
Drums Introduction
Crash Cymbal
Mark name: CR. 10” diameter. Made from high quality silicone and plastic.
Positioned left top of drum kit. Crash cymbal has mute function.
Tom Drum 1, Tom Drum 2, Tom Drum 3
Mark name: T1, T2, T3. 8” diameter. Made from high quality silicone and plastic.
High technology of shockproof design.
Snare Drum
Mark name: SD. 8” mesh pad, with double triggers dynamics induction.
Bass Drum
Mark name: BD. Bass drum designed with only a pedal.
Hi-Hat Pedal
Mark name: HHP. Pedal made from high quality aluminum alloy.
Play with Hi-Hat to make dierence sound.
Reminder: Each Mark Name marked on each pad and cymbal audio port, and
also on each audio cable end.
Diagram 1
Host
Ride Cymbal
Mark name: RD. 10” diameter.
Made from high quality silicone and
plastic. Positioned right top of drum
kit. Ride cymbal has mute function.
Hi-Hat
Mark name: HH. 10” diameter.
Made from SD high quality silicone
and plastic. Positioned left of drum
kit.
ww w.PyleUSA.com
17
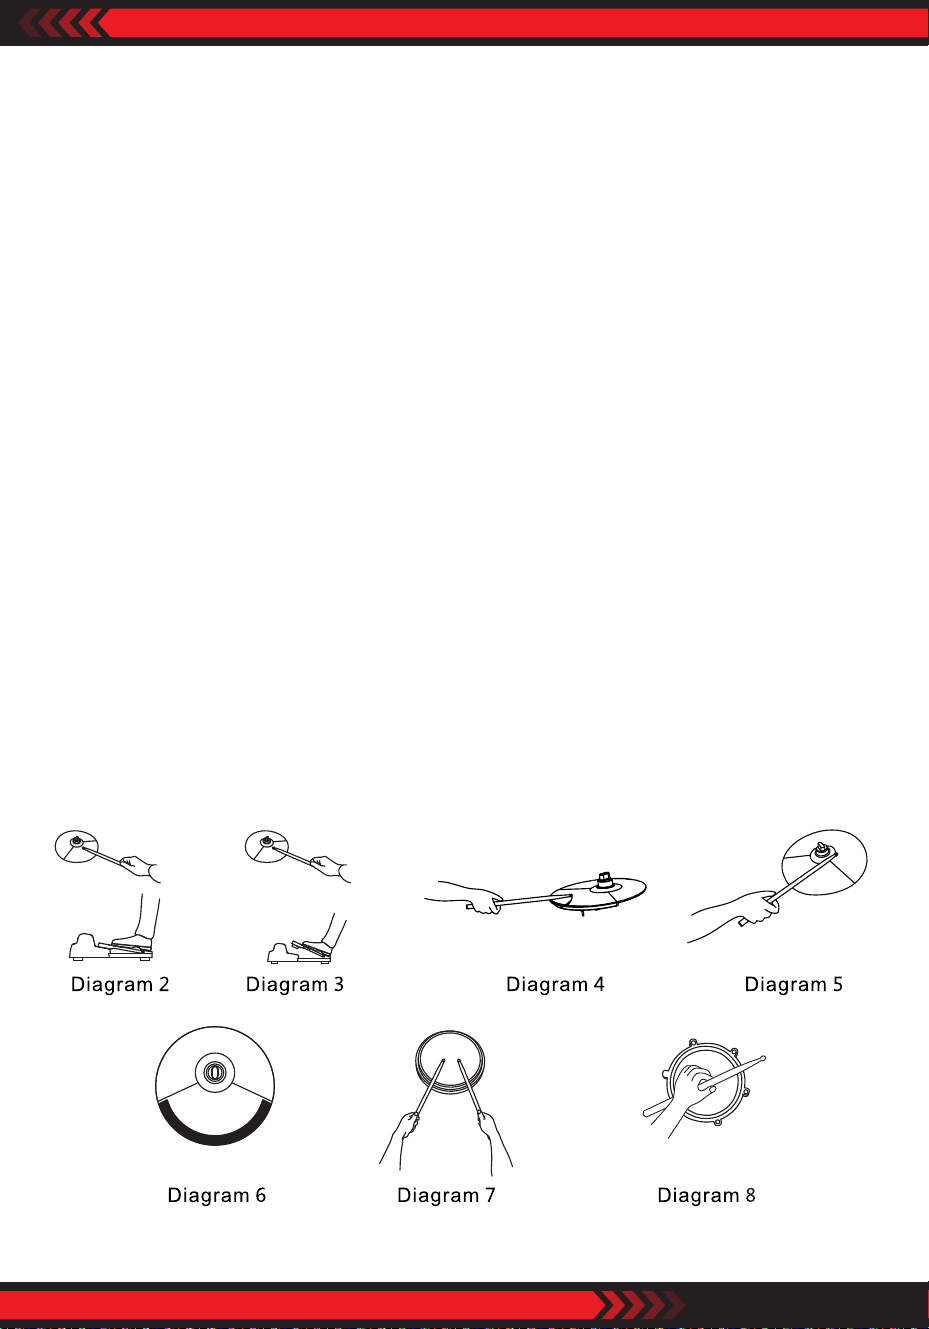
Basic Play Method
This is a brief introduction how to play with your both hands and both feet.
Play with Hi-Hat and Hi-Hat Pedal
•
Stamp down Hi-Hat pedal, hit Hi-Hat, make short sounds ‘tzi tzi ...’ , refer to
Diagram 2.
• Loose Hi-Hat pedal, hit Hi-Hat, make long sound ‘tza...’ , refer to Diagram 3.
• Play with Hi-Hat pedal alone, to make dierent strong or weak sound of ‘tza,
tza...’ based on the speed and the strength of your each stamp on the Hi-Hat
pedal.
Play with Bass Drum Pedal
Make dierent bass drum sounds based on the speed and the strength of your
each stamp on the bass drum pedal.
Play with Ride Cymbal
•
Refer to Diagram 4 tap ping to make sound of ‘ding, ding...’.
• Refer to Diagram 5 rapping to make sound of ‘dang, dang...’.
• To mute the Ride Cymbal, use your ngers to press the cymbal edge black area.
• Crash Cymbal can be also muted by the same way, refer to Diagram 6.
Play with Snare Drum
•
Refer to Diagram 7 to make sound of Da, Da ...’.
• Refer to Diagram 8 to make sound of Bang, bang ...'. side stick function only by
TDX-15S.
ww w.PyleUSA.com
18
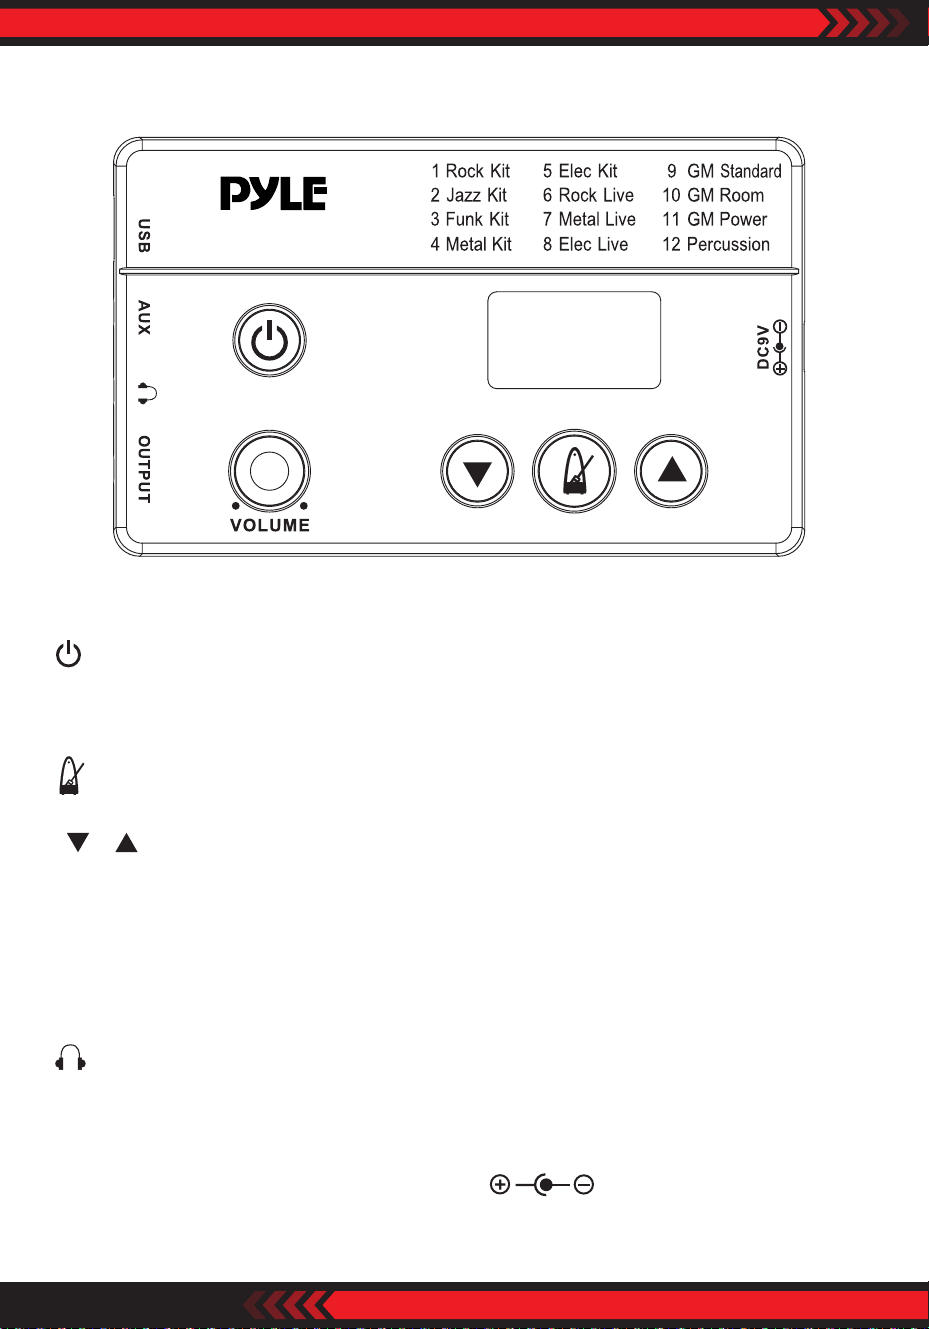
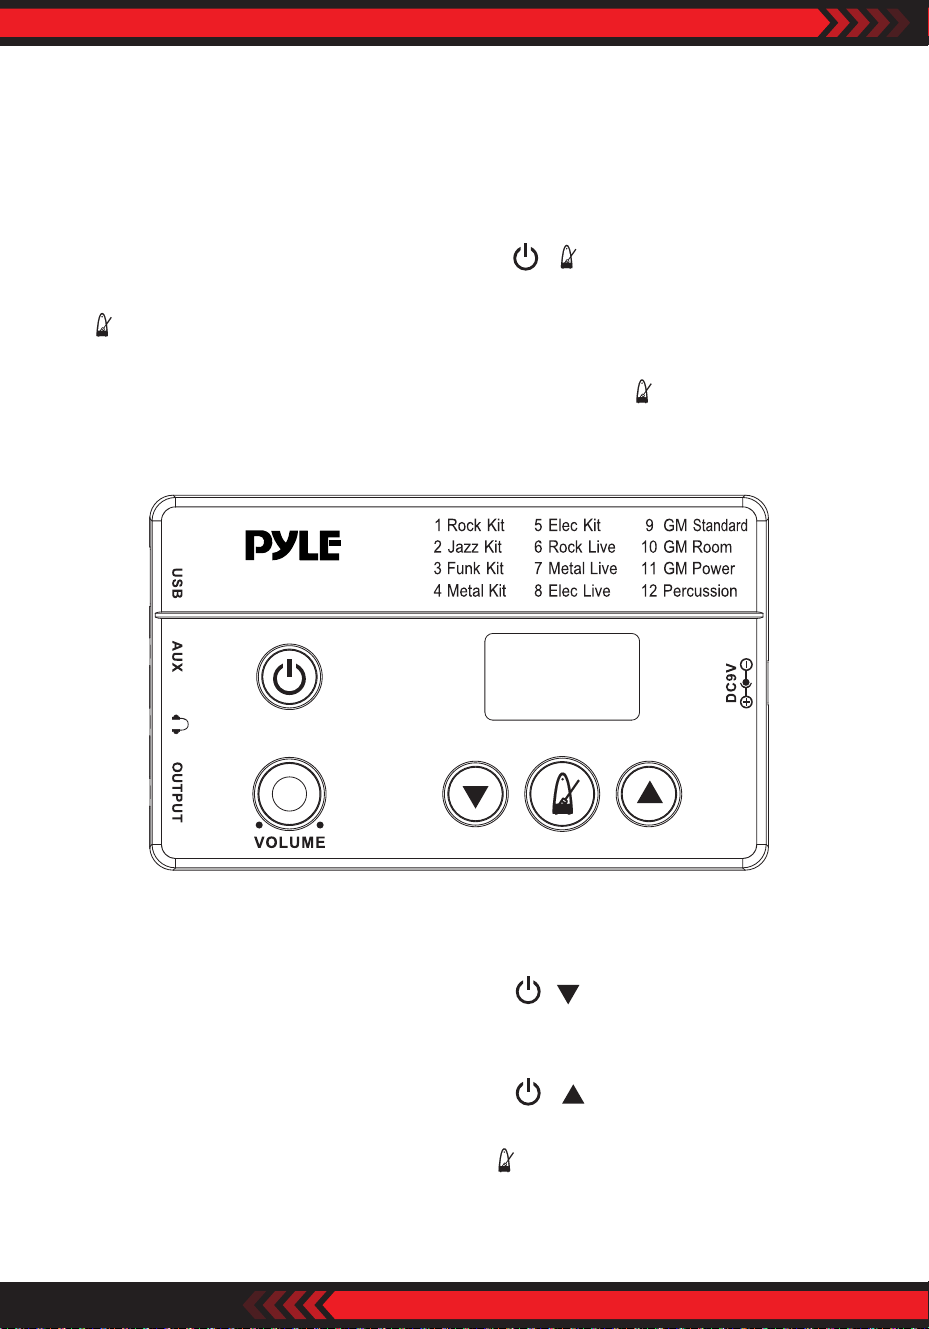
Host Machine Introduction
: Press to turn ON power/Press and hold to turn OFF power.
"VOLUME" : Control the whole drum kit volume.
: Metronome ON/OFF.
" " " " : Choose drum sound patterns. (to adjust tempo and beat when the
click is on)
"USB" : USB MIDI port (refer to page 18 for details).
"AUX" : 3.5mm gauge audio cable input.
: 3.5mm gauge earphone output.
"OUTPUT" : 3.5mm gauge audio cable output to drum amp.
"DC9V" : Connect to DC9V power adapter , negative tip.
PEDKITPRO100
Diagram 9
ww w.PyleUSA.com
19
How to Use
1. Power and Audio Cable Connection
Use the attached audio cable to connect OUTPUT of host machine to your
drum amp. Or, connect your headphone to the earphone port of Host Machine.
And then connect the power adapter to DC9V port of Host Machine.
2. Turn ON/OFF Host Machine
Press button to turn ON the machine. Press and hold the button to turn
OFF the machine.
3. Turn ON Drum Amp (if using a drum amp)
Turn ON the drum amp and adjust the drum amp volume level. Hit the drum
pad in the same time and adjust Host Machine volume control and the drum
amp volume control to make a balance.
4. Choose Drum Sound Kit
The preset drum sound kit calls Rock Kit. Turn the Switch Knob clockwise or
anti-clockwise to choose dierent sound kits.
Drum kit sound patterns
1 Rock Kit 5 Elec Kit 9 GM Standard
2 Jazz Kit 6 Rock Live 10 GM Room
3 Funk Kit 7 Metal Live 11 GM Power
4 Metal Kit 8 Elec Live 12 Percussion
5. Metronome Function
1. When power on, press button " " into metronome mode, then press " " and
" " to djust the tempo;
2. Under metronome mode, press and hold button " " for 3 seconds to choose
beat mode (presets B-4), now press " " or " " button to adjust the beat (1-8);
3. After choosing the ideal beat, press " " button, back to tempo adjustment
mode, then press " " again, back to choose dierent sound kits mode.
ww w.PyleUSA.com
20
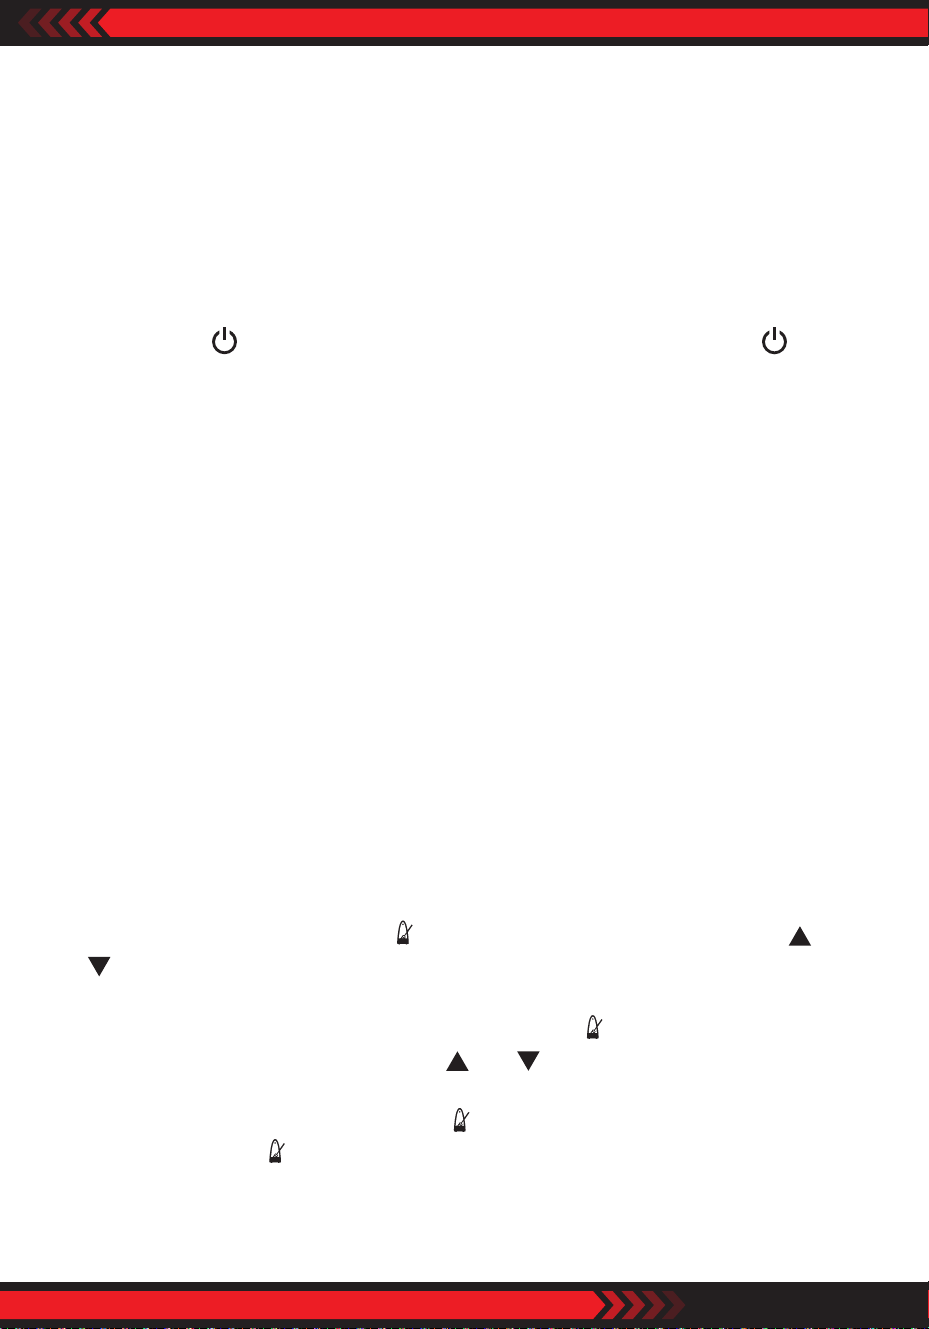
Pedals Adjust and Buttons Patterns Functions
1. Pedals Adjust
Inuenced by humidity and temperature, the sensitivity of pedals might dier.
If this happened, use buttons pattern to adjust the sensitivity by following steps.
When power OFF, press and hold buttons “ + ” to enter pedal adjust mode.
While the screen showing “bdF”, stamp down the bass drum pedal and hold,
“ ” button continuously shows green color and orange color till the bass
drum pedal setup nished, release the bass drum pedal. And then the screen
showing “HHF”, stamp down the hi-hat pedal and hold, “ ” button continuously
shows green color and orange color, and shows red color when system setup
nished, and then the host machine log out the pedal adjust mode.
2. Other Buttons Patterns Functions
1. When power OFF, press and hold buttons “ + ” to enter USB software
update function. The screen shows “UPG”, use a USB cable connecting to a
computer updating the host machine system.
2. When power OFF, press and hold buttons “ + ” to enter Factory Reset.
The screen shows “CLr”.
3. When power ON, press and hold button “ ” 3 seconds to refer system version
information. For example, if the current version is 1.0, shows “1.0”.
Diagram 10
PEDKITPRO100
ww w.PyleUSA.com
21
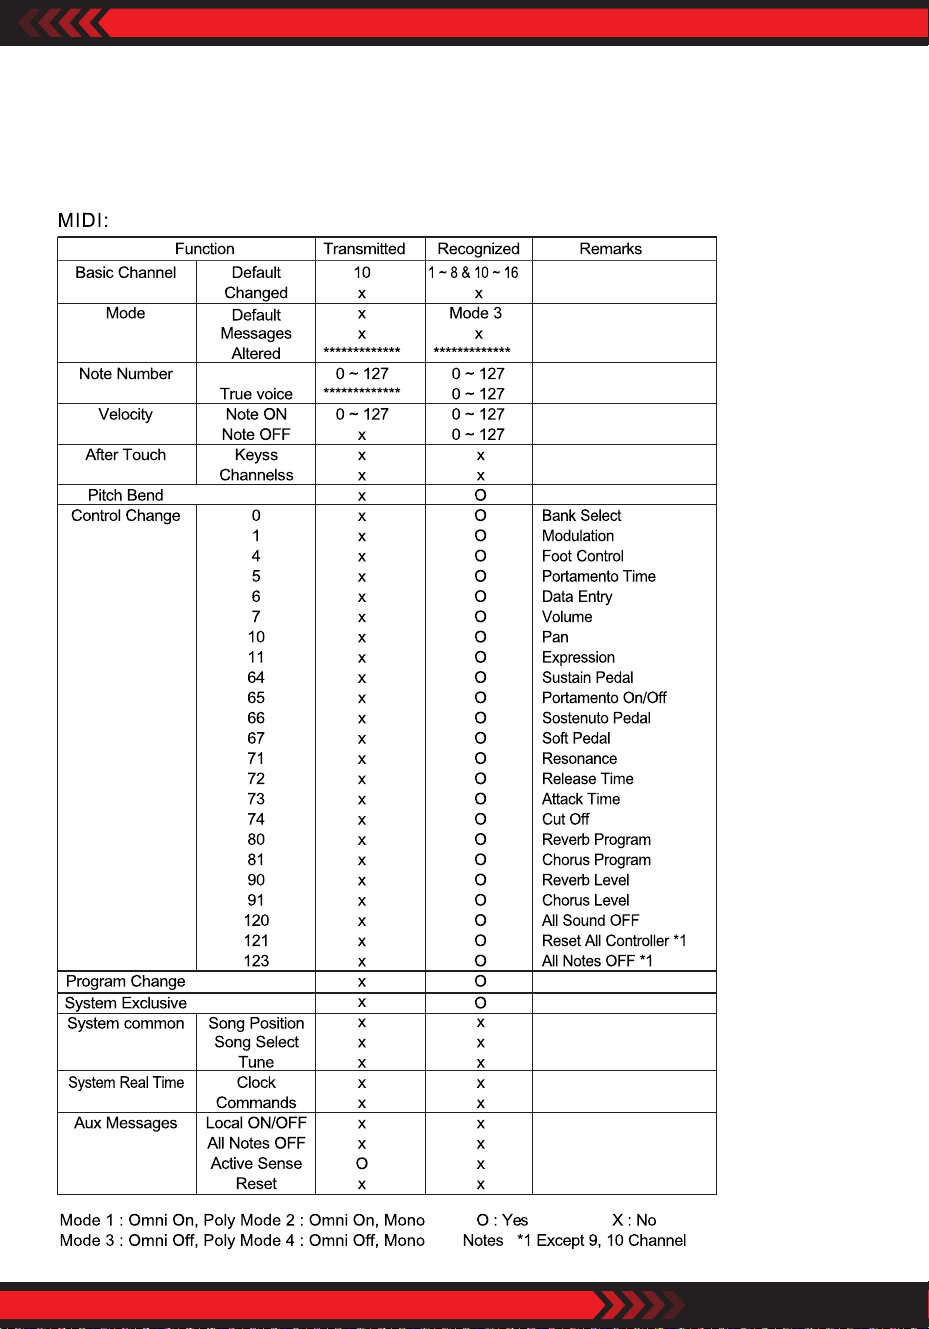
USB MIDI
Connect to your synthesizer or personal computer to play your MIDI music.
MIDI (musical instrument digital interface) format list.
ww w.PyleUSA.com
22
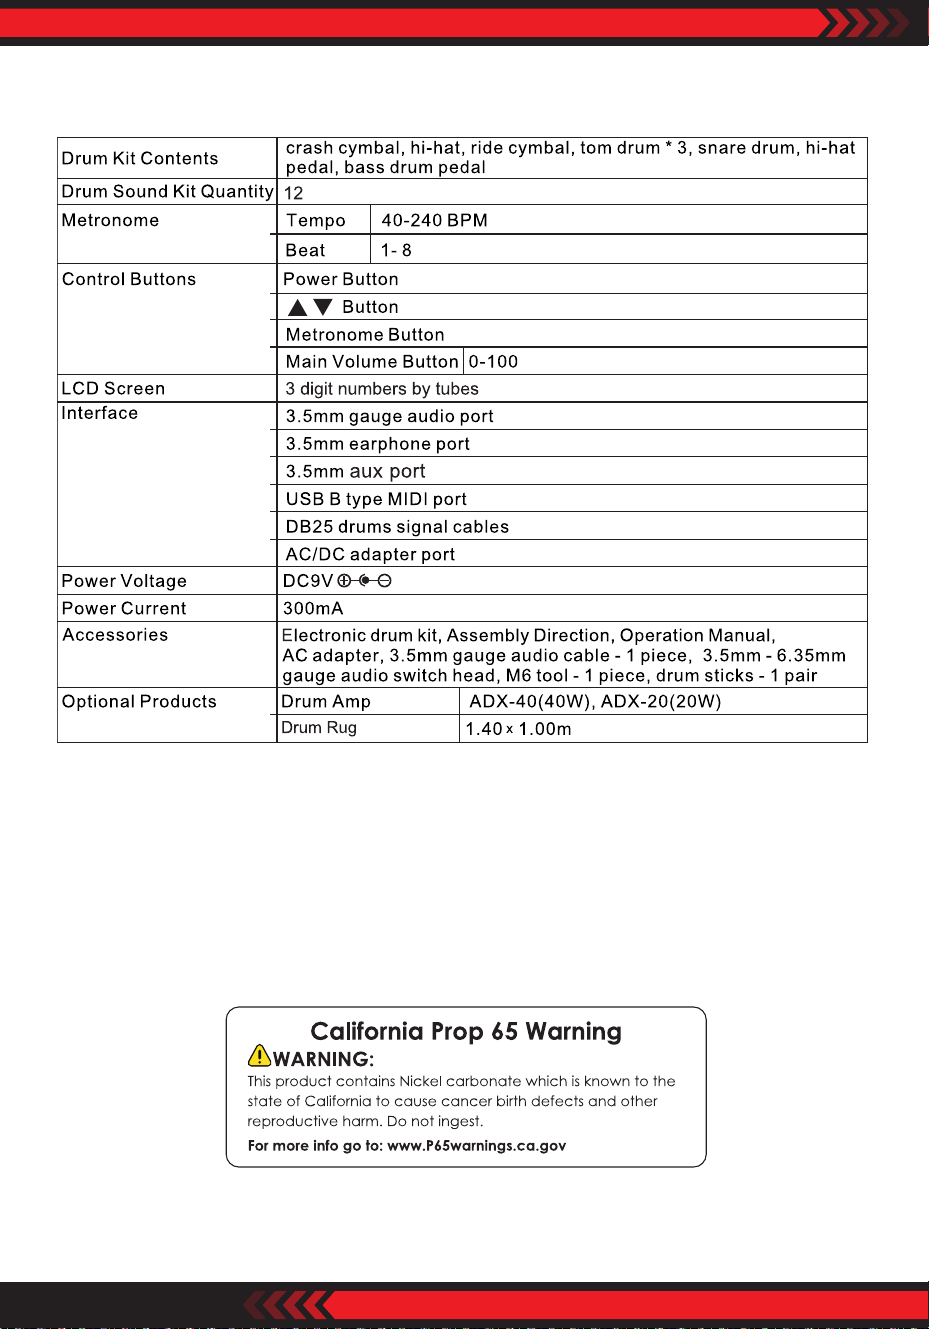
Specications
Reminder: Product information is subject to change without prior notice.

ww w.PyleUSA.com
23