USER GUIDE
DOUBLE-UP YOUR WARRANTY!
SCAN* TO REGISTER YOUR EXTRA 1 YEAR WARRANTY
* HOW? IT’S SIMPLE REALLY…
• SWITCH ON YOUR MOBILE CAMERA, POINT IT AT THE
QR CODE ON THE LEFT & TAP THE LINK THAT POPS UP
• IF THAT DOESN’T WORK, YOU’LL NEED TO DOWNLOAD & USE A QR CODE
SCANNER APP FROM YOUR PHONE’S APP STORE
6.6L DIGITAL AIR FRYER
THE HEALTHY, 11-IN-1 VERSATILE COOKING SOLUTION

To download your free online recipe guide, go to
www.bennettread.co.za
Search for the Bennett Read 6.6L Digital Air Fryer & navigate to the
product page to download the recipe guide file.

1
SAFETY PRECAUTIONS
When using any electrical appliance, basic safety precautions should always
be followed, including the following:
• Read this user guide carefully before use and save it for future reference.
• Always ensure that the voltage on the rating label corresponds to the mains
voltage in your home.
• Only connect the appliance to a power socket that has been installed
properly.
• Incorrect operation and improper use can damage the appliance and
cause injury to the user and/or property.
• The appliance is intended for household use only and is not
user-serviceable. Commercial use invalidates the warranty and the supplier
cannot be held responsible for injury or damage caused when using the
appliance for any other purpose than that intended.
• Do not block any air vents/inlets/outlets, cover the unit, or obstruct heat
dissipation.
• Keep the appliance safely out of reach of children. Close supervision is
required when any appliance is used near or by children or invalids.
• Children should be supervised to ensure that they do not play with the
appliance.
• This appliance is not intended for use by persons (including children) with
reduced physical, sensory or mental capabilities, or lack of experience and
knowledge, unless they have been given supervision or instruction
concerning the use of the appliance by a person responsible for their safety.
CONGRATULATIONS ON PURCHASING A
BENNETT READ 6.6L DIGITAL AIR FRYER.
EXTENDED WARRANTY
Your BENNETT READ 6.6L DIGITAL AIR FRYER comes with a 1 (one) year
warranty. If you register your warranty online within 14 (fourteen)
days of purchase, we will extend the warranty to 2 (two) years. To activate your
extended warranty, scan the QR code on the cover of this user guide, then tap on
the link and complete the online form. Alternatively, visit www.bennettread.co.za,
click the "Register Warranty" button at the top of the page, then complete the form
provided. We also stand behind it with a knowledgeable, dedicated Customer
Care department, so should you ever have a problem, you'll receive fast,
considerate assistance (see contact details on page 16).
This warranty applies to products used for personal or domestic use only, and
specifically excludes any malfunction or defect arising from commercial use.
READ THIS USER GUIDE CAREFULLY BEFORE USING YOUR
BENNETT READ 6.6L DIGITAL AIR FRYER.
KEEP THIS USER GUIDE FOR FUTURE REFERENCE.
PLEASE KEEP YOUR RECEIPT TO VERIFY YOUR WARRANTY.

SAFETY PRECAUTIONS
When using any electrical appliance, basic safety precautions should always
be followed, including the following:
• Read this user guide carefully before use and save it for future reference.
• Always ensure that the voltage on the rating label corresponds to the mains
voltage in your home.
• Only connect the appliance to a power socket that has been installed
properly.
• Incorrect operation and improper use can damage the appliance and
cause injury to the user and/or property.
• The appliance is intended for household use only and is not
user-serviceable. Commercial use invalidates the warranty and the supplier
cannot be held responsible for injury or damage caused when using the
appliance for any other purpose than that intended.
• Do not block any air vents/inlets/outlets, cover the unit, or obstruct heat
dissipation.
• Keep the appliance safely out of reach of children. Close supervision is
required when any appliance is used near or by children or invalids.
• Children should be supervised to ensure that they do not play with the
appliance.
• This appliance is not intended for use by persons (including children) with
reduced physical, sensory or mental capabilities, or lack of experience and
knowledge, unless they have been given supervision or instruction
concerning the use of the appliance by a person responsible for their safety.
• Before using the appliance, be sure to untie the Power Cord wrapped
around the back to avoid any potential electrical hazard.
• The appliance may only be used if it is clean, fully assembled and
operating correctly. We recommend that you check the state and working
condition of the appliance at regular intervals.
• Do not operate the unit with a damaged power cord or plug, after a
malfunction, if the unit has been dropped, or is damaged in any manner.
Return the unit to an authorised Tevo Service Facility for examination.
• If the cord or the plug is damaged, it must be replaced by the
manufacturer or a qualified person in order to avoid an electrical hazard.
• Always uncoil the power cord and ensure that it is fully extended before
plugging in and powering on the appliance.
• Never touch the appliance, the power cord or the plug with damp or wet
hands; or if you are standing on wet ground.
• Plug the appliance directly into a nearby power socket so that the plug can
be removed easily in case of emergency.
• A short cord is provided to reduce the hazards resulting from becoming
entangled in, or tripping over, a longer cord.
• Do not damage, bend, stretch, or twist the Power Cord; do not place
heavy objects on the Power Cord or clamp the Power Cord.
• Never pull on the cord to disconnect the appliance from the wall outlet;
instead, grasp the plug and pull on the plug. Always unplug the unit when
not in use, before cleaning or when adding or removing parts.
• Do not let the cord hang over the edge of a table or counter. Ensure that
the cord is not in a position where it is within reach of children or where it
can be pulled on inadvertently.
• To avoid fire hazards and electrical shock, always ensure that the plug is
clean, dry and inserted properly into the wall socket.
• Cleaning and user maintenance shall not be done by children.
• Do not let children handle or put the electrical cord into their mouths.
• Do not use an extension cord with this appliance.
• Do not carry the appliance by the Power Cord.
• To reduce the risk of electric shock, do not immerse or expose the
appliance, plug or the power cord to water or any other liquid; do not use
the appliance outdoors, in a bathroom, moving vehicle or boat, damp
area or near any source of water.
• Do not place the power cord in the sink.
• Do not use the appliance on a gas or electric cooking top, or over or near
an open flame.
• A fire may occur if the appliance is covered or touches flammable
material, including curtains, draperies, walls, and the like, when in use.
• Do not place glass or plastic dishes on top of the unit. Do not place or
store any item on top of the appliance. Do not place the Drawer on top of
the Air Fryer.
• Intended for countertop/worktop use only. Always operate the appliance
on a smooth, even, stable, clean, dry and heat-resistant surface. Do not
place the unit on a hot surface. Do not operate the appliance on top of
plastic or other non-heat-resistant surfaces. Do not place the unit on, or
allow the cord to touch hot surfaces. Do not place it near a gas or electric
burner.
• Do not place the appliance close to the edge of the countertop.
2

SAFETY PRECAUTIONS
When using any electrical appliance, basic safety precautions should always
be followed, including the following:
• Read this user guide carefully before use and save it for future reference.
• Always ensure that the voltage on the rating label corresponds to the mains
voltage in your home.
• Only connect the appliance to a power socket that has been installed
properly.
• Incorrect operation and improper use can damage the appliance and
cause injury to the user and/or property.
• The appliance is intended for household use only and is not
user-serviceable. Commercial use invalidates the warranty and the supplier
cannot be held responsible for injury or damage caused when using the
appliance for any other purpose than that intended.
• Do not block any air vents/inlets/outlets, cover the unit, or obstruct heat
dissipation.
• Keep the appliance safely out of reach of children. Close supervision is
required when any appliance is used near or by children or invalids.
• Children should be supervised to ensure that they do not play with the
appliance.
• This appliance is not intended for use by persons (including children) with
reduced physical, sensory or mental capabilities, or lack of experience and
knowledge, unless they have been given supervision or instruction
concerning the use of the appliance by a person responsible for their safety.
• Do not operate this appliance by means of an external timer,
remote-control system, or any other device that is capable of switching the
unit on automatically.
• Do not operate the unit with damp or wet hands.
• NOTE: This appliance and its accessories become hot while in use. Do not
touch any metallic parts during use or immediately after use. Use handles
or knobs. Avoid touching the elements. Take care as the appliance and its
accessories may remain hot for some time after use.
• To avoid electrical shock, do not dismantle the appliance body.
• The use of accessory attachments that are not recommended or supplied
by the manufacturer may result in injuries, fire or electric shock.
• Use the provided Air Fryer Accessories only in the Air Fryer body. Do not
place or use the Air Fryer Accessories on/in a freezer, microwave, toaster,
oven, ceramic cooktop, electric hotplate, gas burner or grill.
• Always place foods into the Drawer provided. Do not put food directly into
the inner Air Fryer cavity.
• Exercise caution and always use oven gloves when opening or removing
the Drawer, removing the Fry Tray, inserting or removing food, cookware
or accessories from the appliance.
• Please keep a safe distance from the appliance and do not put your hands
or face close. The appliance will release hot steam from air vents/outlets as
well as when opening the Drawer.
• Never place your bare hands inside the appliance or use them to remove
food, cookware or accessories when the appliance is plugged in and
switched on; or immediately after use as it will still be hot.
• Do not place the following items in the Air Fryer: non-oven proof glass,
ceramic plates, paper, cards, plastic, cloth, metal objects or other
flammable items. Only use cookware suited for high oven temperatures.
• Do not place oversized food in the Drawer. This could damage the unit,
and the food will not cook properly. Keep food away from heating
elements. Do not overfill the Drawer with food items.
• Do not add oil directly into the appliance. It is acceptable to coat foods
using a basting brush with a slight amount of oil should you require them
to brown or crisp.
• Do not use this appliance for deep-frying.
• Do not cover any parts of the Air Fryer with metal foil. This will cause the
appliance to overheat and will void the warranty.
• Never put baking or parchment paper into the Air Fryer. Air circulation
can cause the paper to move and touch heating elements.
• Keep the unit away from any explosive and/or flammable fumes.
• This appliance should only be used to cook or bake consumable food.
• Do not leave this appliance unattended during use or while connected to a
power socket. Always switch off and unplug the appliance when not in
use, before adding or removing accessories, before cleaning, or in the
event of a malfunction.
• Do not move the unit while in use.
• Extreme caution must be used when moving an appliance containing hot
oil or other hot liquids.
• Be extremely cautious when removing an accessory or dish which contains
hot oil, grease, or other hot liquids.
3

SAFETY PRECAUTIONS
When using any electrical appliance, basic safety precautions should always
be followed, including the following:
• Read this user guide carefully before use and save it for future reference.
• Always ensure that the voltage on the rating label corresponds to the mains
voltage in your home.
• Only connect the appliance to a power socket that has been installed
properly.
• Incorrect operation and improper use can damage the appliance and
cause injury to the user and/or property.
• The appliance is intended for household use only and is not
user-serviceable. Commercial use invalidates the warranty and the supplier
cannot be held responsible for injury or damage caused when using the
appliance for any other purpose than that intended.
• Do not block any air vents/inlets/outlets, cover the unit, or obstruct heat
dissipation.
• Keep the appliance safely out of reach of children. Close supervision is
required when any appliance is used near or by children or invalids.
• Children should be supervised to ensure that they do not play with the
appliance.
• This appliance is not intended for use by persons (including children) with
reduced physical, sensory or mental capabilities, or lack of experience and
knowledge, unless they have been given supervision or instruction
concerning the use of the appliance by a person responsible for their safety.
• Ensure that the unit is unplugged after each use. If the appliance is
plugged in, the unit is ON and is in Standby Mode.
• Never immerse the unit in water or any other liquid for cleaning purposes.
• In the event that food begins to burn during cooking, it is likely to create
smoke. You will notice the smoke circulating out from the air vents/outlets.
Remain calm and immediately unplug the appliance from the wall power
socket/power supply. Allow the unit to cool, dispose of the burnt food and
follow the care and cleaning instructions for the appliance as outlined in
this user guide.
• Do not clean with caustic cleaners, metal brushes or metal scouring pads.
Pieces can break off the pad and touch electrical parts, which can result in
the risk of electric shock, injury to persons or damage to property.
• Do not dispose of this unit with domestic trash. Consult your local
municipality for proper disposal procedure.
• Direct exposure to sunlight or contact with other heat-emitting appliances
can cause damage to the unit.
• Do not use this unit for anything other than its intended use as outlined in
this user guide.
• Warning: Nominal voltage is still present even when the controls are
turned off. Unplug the Air Fryer from the main power supply (wall outlet/
power supply) to permanently turn the appliance OFF.
• The manufacturer does not accept responsibility for any damage or injury
caused by improper or incorrect use, or for repairs carried out by
unauthorised personnel.
• In case of technical problems, switch off the machine and do not attempt
to repair it yourself. Return the appliance to an authorised Tevo Service
Centre for examination, adjustment or repair. Always insist on the use of
original spare parts. Failure to comply with the above-mentioned
precautions and instructions could affect the safe operation of this machine.
4
Do not touch any heated areas or heating components of this appliance.

Always ensure that the appliance is correctly assembled
before use. The Drawer must be closed properly before
operating this appliance. Do not operate this appliance
without the Drawer installed.
5
GETTING TO KNOW YOUR 6.6L DIGITAL AIR FRYER
1 - Control Panel
2 - Non-Stick Drawer
3 - Drawer Handle
4 - Air Inlet
5 - Appliance Body
6 - Non-Stick Fry Tray
7 - Air Outlet
8 - Power Cord Outlet
1
2
5
4
7
6
2
8
3
6
BEFORE FIRST USE
Take the appliance and all parts out of the packaging. Remove and discard
all packaging, stickers and/or labels from the unit. Ensure to check that all
parts are included. Clean the appliance, following the care and cleaning
instructions provided in this guide.
NOTE: This appliance may produce an odour or emit a slight amount of
smoke when switched on for the first time. This is normal and does not affect
the safety of your appliance. This process will pass as residues from the
production process are eliminated.
We recommend that you preheat the Air Fryer before cooking food in it for
the first time. Preheat without food in the Drawer by adjusting the
temperature to 200°C and the cooking time to 30 minutes. During use,
ensure ample ventilation.
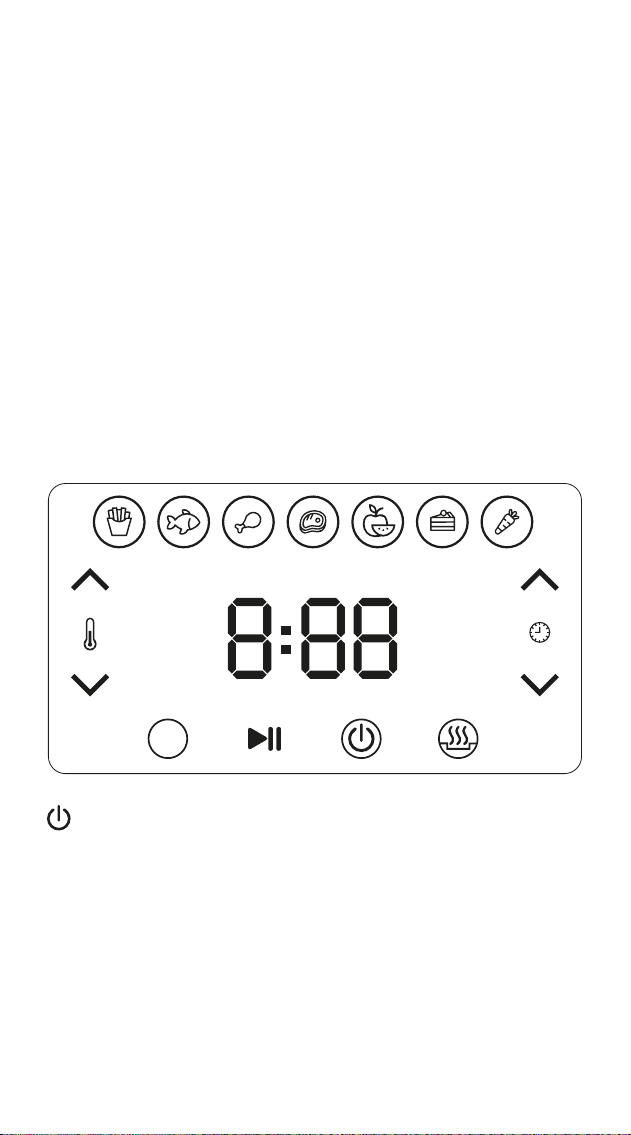
Power Icon
Once the appliance is plugged in, the unit will power ON and revert to
Standby Mode. Press the Power Icon to wake the controls from Standby
Mode. Should you wish to cancel a cycle or cancel any selections/inputs
which you have made, simply press the Power Icon to return to Standby
Mode. The unit will sound an alarm notification and will turn off
automatically after it has run its cooling down cycle. Unplug the appliance
to power the appliance OFF.
CONTROL PANEL OPERATION
°C
HRS
MIN
M

Temperature & Time Control
Touch the arrows located by the corresponding Temperature or Timer Icons
to increase or decrease the temperature and the amount of
cooking/heating time. These can be adjusted before or during a Preset
Mode to suit your preferences. The temperature is adjusted in increments of
5°C between 30°C − 200°C. Press and hold the icon to rapidly increase or
decrease the temperature or amount of cooking/heating time. The
cooking/heating time is adjusted in 1 minute increments up to 24 hours.
The temperature and cooking/heating time are conveniently shown on the
display during a cycle.
Auto Preheat
Preheating your Air Fryer prior to cooking foods will deliver the best results.
This Air Fryer is equipped with convenient Auto Preheat programming. The
Auto Preheat programming will automatically start preheating your
appliance for 5 minutes once the following Preset Modes have started their
cycles: DIY, Fries, Meat, Poultry, Vegetables, Bake and Seafood. The
appliance will not Preheat for the Keep-Warm & Dehydrate Preset Modes.
Once the appliance has woken from Standby Mode, the display is
automatically placed into the DIY Preset Mode. Should you wish to use the
DIY Preset Mode, simply adjust cooking time and temperature as needed.
Alternatively, touch the Preset Mode Icons to select one of the other Preset
Modes available. The convenient Preset Modes
automatically set the cooking or heating time time and temperature for
specific food types. They are an intelligent, one-touch solution for most
foods. It is recommended to adjust the time and temperature in line with
your recipe as well as personal taste.
Preset Modes
DEHYDRATEMEAT
BAKE
VEGETABLES KEEP-WARM
FRIES
SEAFOOD
POULTRYDIY
DIY
Press to start or pause cooking.
Start/Pause Icon
7
Start/Pause Functions
Once your desired Preset Mode has been selected and the cooking
temperature and time finalized, simply press the Start/Pause Icon once to
start the cooking/heating cycle. To pause cooking/heating during a
cooking/heating cycle, touch the Icon once. Touch the Icon again to
resume.
Cancel
To cancel any program, press the Power Icon. The unit will sound an alarm
notification and will turn off automatically after it has run its cooling down
cycle.
8
PLACEMENT OF THE AIR FRYER
When placing the Air Fryer in your kitchen, ensure that the unit is kept away
from flammable materials and that there is sufficient space around the unit of
at least 15.5cm as per the guide below:
• Between the back of the unit and the wall
• Between the sides of the unit and other objects
• Between the top of the unit and other objects
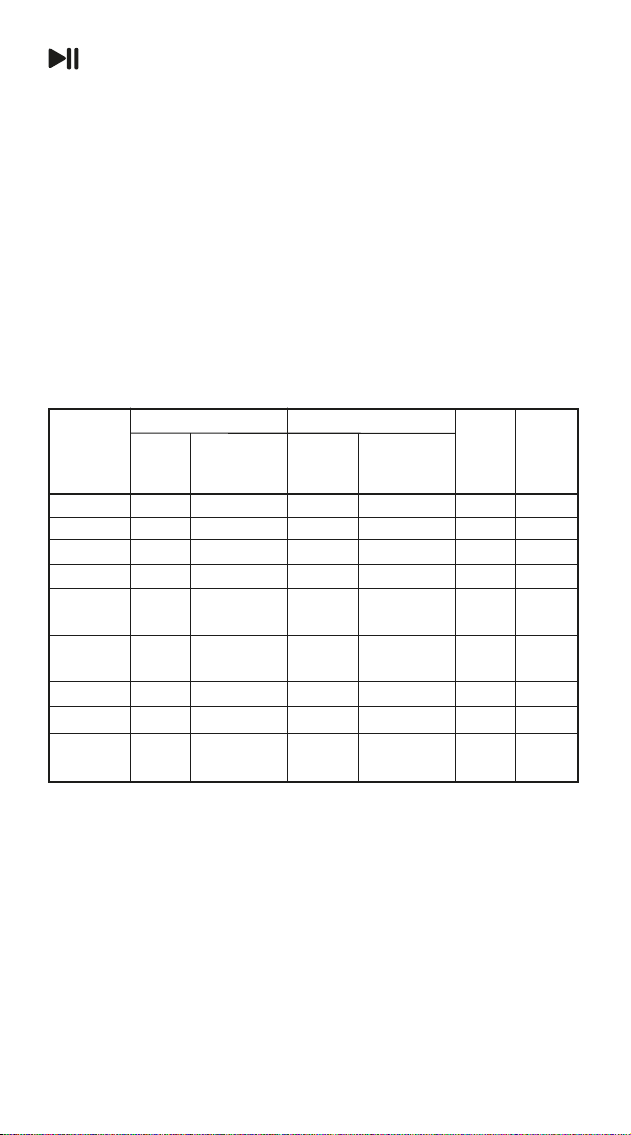
PRESET MODE GUIDE
PRESET
MODE GUIDE
1- 60 mins
1 - 60 mins
1 - 60 mins
1 - 60 mins
1 - 60 mins Yes Yes
Yes Yes
Yes Yes
Yes No
No No
Yes Yes
18 mins
15 mins
8 mins
12 mins
6 hours
25 mins
50 - 200°C
50 - 200°C
30 - 80°C
50 - 200°C
50 - 200°C
Fries
Seafood
Meat
Dehydrate
RANGE:
ADJUST IN
INCREMENTS
OF 5°C
DEFAULT
TURN
REMINDER
AUTO
PREHEAT
5 MIN
RANGE:
ADJUST IN
INCREMENTS
OF 1 MINUTE
Bake
10 mins50 - 200°C
200°C
180°C
180°C
200°C
160°C
60°C
DEFAULT
160°CVegetables
No No30 mins40 - 60°C50°CKeep-Warm
TEMPERATURE (°C)
TIMER (MINUTES)
1 - 60 mins
Yes Yes
20 mins50 - 200°C
Poultry
200°C
1 - 60 mins Yes Yes50 - 200°C
DIY
30min - 24hrs
(increments of
30 minutes)
30min - 8hrs
(increments of
30 minutes)

9
USING YOUR AIR FRYER
• Place the appliance on a stable, dry, flat surface.
• Ensure that the appliance is unplugged and switched OFF.
• Ensure that the rubber guides are securely attached to the Fry Tray. Insert
the Fry Tray into the Drawer so that it rests flat and even inside the bottom area
of the Drawer.
• Add food into the Drawer. To ensure the best results with sufficient hot air
circulation, do not overfill the Drawer with food.
• Now slide the Drawer into the appliance cavity.
• Plug the Power Cord into the wall outlet. You will notice that the appliance
enters Standby Mode.
• Press the Power Icon to wake the appliance controls.
• Press the Preset Mode Icon to select your preferred Preset Mode (skip the
Preset Mode step if you proceed with the DIY option).
• Touch the arrows located by the corresponding Temperature or Timer
Icons to increase or decrease the temperature and the amount of
cooking/heating time.
• Press the Start/Pause Icon to confirm your selections and begin the cycle.
• We recommend checking on foods halfway through the cooking process
to monitor cooking and browning progress. Turn or shake foods halfway
through the cooking process for even results. This Air Fryer will sound an
automatic reminder alarm to notify you when it is time to turn or shake
foods. Preset Modes which utilize this automatic reminder: DIY, Fries,
Meat, Poultry, Vegetables and Seafood.
To check on food, simply slide the Drawer from the appliance by using
the Drawer Handle. Shake, turn or toss ingredients in the Drawer
vigorously if needed and simply slide it back in when done. The cooking
program will pause and then automatically resume.
• Adjust temperature or time if needed.
• When the timer counts down to zero, it will sound an alarm notification
indicating that the cycle has completed. The Air Fryer will turn off
automatically after it has run its cooling down cycle. If additional air frying
is needed, simply follow the above process again.
• When you are done, remove the Drawer and place on a flat, heat-resist-
ant work area. Remove food from the Drawer and plate as desired.
• Once all food is removed from the Drawer, allow the Air Fryer to cool
down then proceed with cleaning the Air Fryer or instantly move on to your
next cooking creation.

10
NOTES:
• Always add food into the Drawer, only after the Fry Tray is correctly in
place.
• When cooking foods from frozen ensure to extend the amount of cooking
time accordingly to allow for the foods to defrost first.
• Use the Drawer Handle to remove or add the Drawer from and into the
appliance.
• Never turn the Drawer upside down with the Fry Tray inserted. Be careful
not to tilt the Drawer when removing or adding it back into the appliance.
Hot oils and fats may spill as they have collected in the Drawer during the
cooking process.
• Always remove foods from the Drawer before emptying to prevent oil
from contaminating air-fried foods.
• Always remove the Drawer from the Air Fryer and immediately rest it on
a flat, heat-resistant surface before removing food and detaching the Fry Tray
from the Drawer.
• Ensure to unplug the appliance after you have finished using it so as to
turn the appliance OFF.
USEFUL HINTS:
• Brush food slightly with some oil for crispier results.
• Par-boil potatoes before air frying when you prepare homemade chips
that you have sliced and skinned yourself.
• If you are cooking different food types consecutively, clean the Fry Tray
and Drawer between each batch. This will assist in ensuring that the taste
of the food is not affected by what was cooked in the batch before.
• Reheat leftovers in your Air Fryer for crispier, tastier results.
• Mix your seasonings with oil before adding them to your foods to prevent
them from blowing around in the Air Fryer.
• When crumbing, press the crumb mixture onto the food using your hands.
This will prevent the crumbs from blowing off the food during the cooking
cycle.
• Explore a world of exciting recipes online. There are multitudes of online
resources available globally. Experiment with foods and recipes to find
what works for you. Go to www.bennettread.co.za to download your
free recipe guide.
• For consistent browning, ensure that all ingredients are arranged in an
even layer on the Fry Tray without overlapping. If ingredients are
overlapping, make sure to turn or shake them halfway through cooking.
• Once a cooking cycle has completed and you are satisfied with the level
of cooking as well as browning, we recommend that you remove food
straight away to prevent it from over-cooking.
11
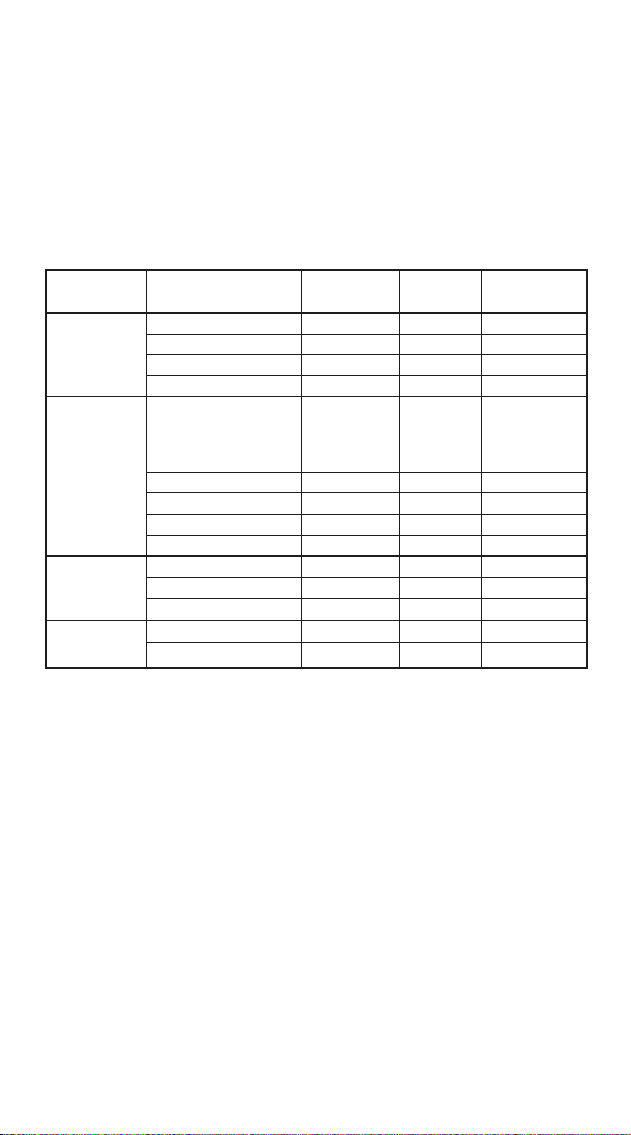
COOKING GUIDE
A handy cooking guide has been provided below. Note that the guide has
been created to provide guidelines. Food should always be monitored and
adjusted where necessary.
Cooking results may vary depending on the origin, cut, quality, freshness
and thickness of the food being cooked. Similarly, your recipe, personal
taste and preferences must be considered during cooking.
NOTES:
• Cook pork until internal meat is white. A hint of light pink is acceptable if
you do not want your meat too dry.
• Cook fish until it is opaque and easily flakes apart with a fork.
• Cook chicken until meat is completely white with clear juices.
• Cook duck until meat is completely white. A hint of light pink is
acceptable if you do not want your meat too dry.
BUILT-IN MEMORY FUNCTION
This Air Fryer features convenient Built-In Memory. Should there be a sudden
electricity outage on your property or in your residential area during the
operation of your Air Fryer, it will resume the last pre-programmed
cooking/heating cycle.
FOOD
Potatoes &
Fries
Thin Frozen Fries
300 - 700g
180°C
16 - 18 mins
18 - 20 mins
18 - 25 mins
18 - 25 mins
200°C
200°C
180°C
300 - 700g
300 - 800g
300 - 800g
Thick Frozen Fries
Homemade Fries
Homemade Potato Wedges
Meat &
Poultry
DESCRIPTION
APPROX.
COOKING
TIME
APPROX.
COOKING
TEMP.
QUANTITY
Steak
100 - 500g 180°C
Well Done:
10 mins
Medium: 8 mins
Rare: 6 mins
18 - 20 mins
18 - 20 mins
15 - 22 mins
180°C
180°C
200°C
100 - 500g
100 - 500g
100 - 500g
Hamburger Patties
Pork Chops
Chicken Breast
18 - 22 mins
180°C
100 - 500g
Chicken Drumsticks
10 - 15 mins
6 - 10 mins
200°C
200°C
100 - 500g
100 - 400g
Frozen Chicken Nuggets
Spring Rolls
10 - 15 mins
160°C
100 - 400g
Stuffed Vegetables
Snacks &
Side Dishes
Bakes &
Cakes
8 - 15 mins
160°C
400gQuiche
10 - 15 mins
200°C
300g
Muffins

12
DAILY CLEANING
• Always unplug the Air Fryer and allow it to cool before cleaning. Do not
touch
the Fry Tray, Drawer or Inner Air Fryer Cavity until it is completely cool.
• Remove the Fry Tray and Drawer after each use and wash in warm,
soapy water. Ensure to separate the Fry Tray and Drawer so that they are
cleaned separately. Oil and fats will gather on the majority of the areas.
Rinse and dry thoroughly with a clean, soft cloth and replace into the Air
Fryer before next use.
• The Fry Tray and Drawer are dishwasher-safe and can be placed in a
dishwasher for cleaning. Ensure to use the most gentle dishwasher setting
at a low temperature of no more than 60°C.
• For tough food residue, allow the Fry Tray and Drawer to soak in a warm
water and detergent mixture for 10 minutes.
• Wipe the inner Air Fryer Cavity and the appliance exterior with a damp
cloth.
• Do not use abrasive tools, cleaning aids, scouring pads or harsh
detergents as they may damage the surface of your appliance. Never use
metal utensils to remove residue or food stains as they can damage the
appliance.
• Do not immerse the appliance body in water or any other liquid. Do not
place it in the dishwasher.
• Ensure that the Drawer and Fry Tray are clean and dry before placing
back into the Air Fryer body.
TIP: Pour used oil and fats into an old jam jar and dispose of it once you
have collected a fair amount. This is environmentally friendly, and by
avoiding pouring the oils down the drain, it will ensure that your drain pipes
do not become clogged over time.
LONG TERM MAINTENANCE
As a frying and cooking appliance, oils and fats may build up inside the
cavity. You may notice excessive smoke emitting from the air outlet at the
back of the appliance over time. This is usually an indicator that the
appliance needs maintenance cleaning in accordance with the long term
maintenance guide. We recommend maintenance cleaning quarterly or as
needed.
Follow the above and below daily care and cleaning steps:
• Turn the appliance upside down so that it is resting on its upper appliance
body. This will enable you to see the inner appliance cavity and cooking
element, and to determine where oil and fat build-up is taking place.

13
• Use a soft, dry bristle brush to lightly brush stubborn build-up off the
element.
• Use a soft, disposable cleaning cloth or sponge, slightly dampened with a
small amount of detergent to finish cleaning the element and wipe clean
all accessible areas of the cavity.
• Thoroughly dry the element and cavity, ensuring that no detergent or
moisture remains before using or storing the appliance.
STORAGE
• Ensure that all parts are dry before storing.
• Never store the appliance while it is hot, still wet or dirty.
• Store the appliance in a clean, dry place.
• Never wrap the Power Cord around the appliance.
14
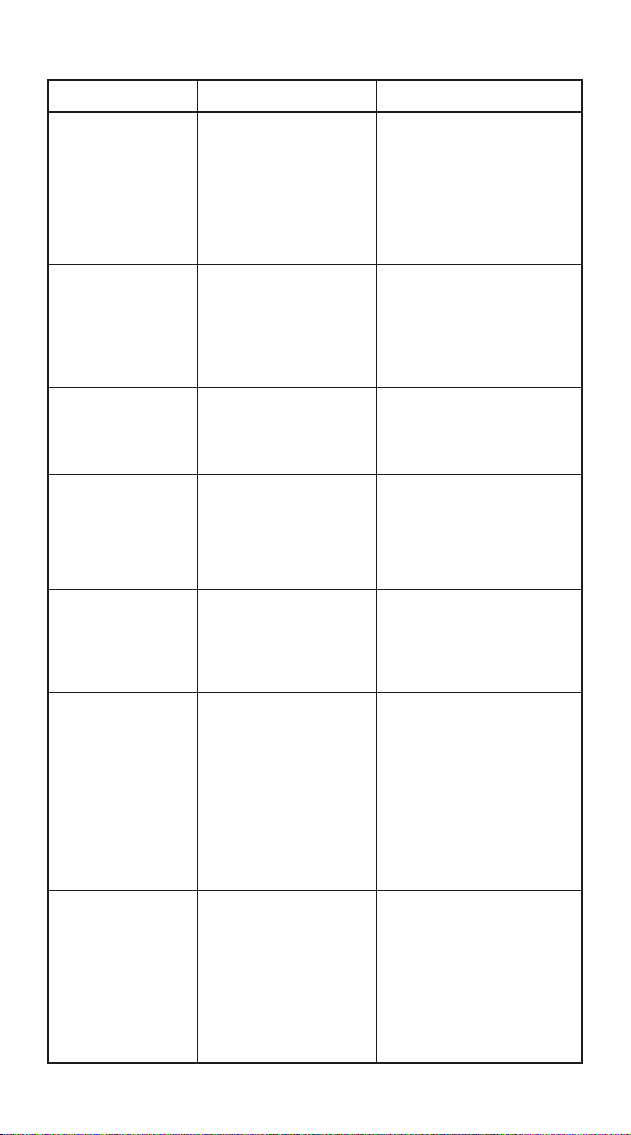
TROUBLESHOOTING
PROBLEM
Appliance does
not work.
1. The Power Cord has not
been inserted into the wall
power socket correctly.
2. Cooking selections not
completed.
3. The Start/Pause Icon was
not pressed to confirm
selections and to start the cycle.
1. Ensure that the Power Cord plug
is correctly inserted into a working
and functional wall power socket.
2. Complete cooking selections.
3. Press the Start/Pause Icon to
begin the cycle.
Food is not cooked
completely when the
timer and cooking
function have finished.
1. Too much food in the
Drawer.
2. Cooking temperature is set
too low.
3. Cooking time is too short.
1. Do not overload the Drawer
before cooking. Instead cook the
required food in separate batches.
2. Use an increased cooking
temperature when cooking.
3. Increase the cooking time
needed when cooking.
Certain foods need to be
shaken/turned/tossed during
the cooking cycle.
In the middle of the cooking cycle,
pull out the Drawer, shake well to
separate the overlapped food, then
insert the Drawer back into the
Air Fryer.
Cooked food is not
crispy or does not
appear golden brown.
Some foods require some form
of oil to crisp and turn golden
brown. This is because not all
food has natural oils or fats to
encourage crisping and
browning.
Before cooking, lightly brush or
drizzle a thin layer of oil on the
food.
The appliance is
smoking.
E1 Error
E2 Error
E3 Error
1. The appliance may smoke
when cooking exceptionally
oily foods or too much oil has
been added.
2. The Drawer has been
overloaded with too much
food or food that is too high
so it is touching the internal
cooking elements.
3. The Fry Tray and/or
Drawer may contain oil
from last use.
1. This is a normal occurrence when
cooking oily food.
2. Reduce food quantity in the
Drawer and ensure that the food
is not so large that it touches the
cooking elements.
3. Always ensure that the Fry Tray
and Drawer are clean and free from
any fat and oils before use.
1. The internal temperature
sensor is experiencing a
problem.
2. The PC Board is
experiencing a problem.
3. The appliance has
overheated.
1. Contact a Tevo Service Centre to
arrange examination of your
appliance.
2. Contact a Tevo Service Centre to
arrange examination of your
appliance.
3. The appliance has overheated.
Unplug the appliance and leave it
OFF for 30 minutes to cool down
before using it again.
Unable to insert the
Drawer back into the Air
Fryer.
1. Too much food in the
Drawer.
2. The Fry Tray is not
correctly placed in the Drawer.
1. Do not overload the Drawer
before cooking. Instead cook the
required food in separate batches.
2. Always ensure that the Fry Tray is
properly and correctly secured onto
the Drawer.
POSSIBLE CAUSE SOLUTION
Food did not cook
evenly.
15
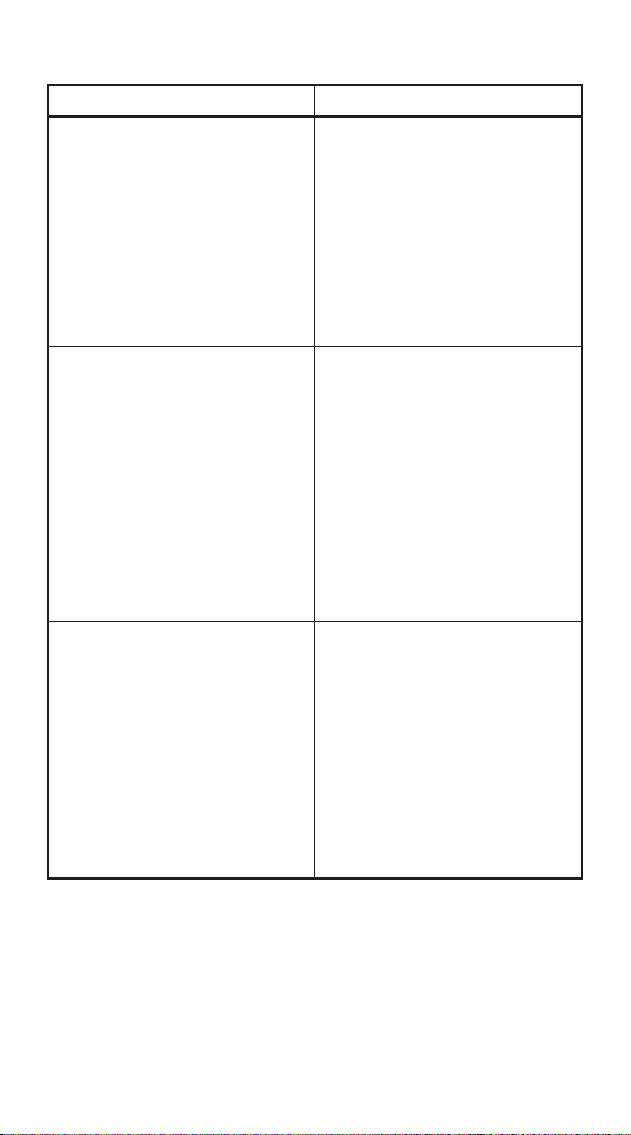
FREQUENTLY ASKED QUESTIONS
QUESTION
Why is my food burned?
For best results, check progress
throughout the cooking cycle.
Remove food when the desired
level of cooking and browning
has been achieved. Remove
food immediately after the
cooking cycle has completed to
avoid over-cooking.
When should I use the Fry
Tray?
Use the Fry Tray for crispy,
healthier results. The Fry Tray
elevates food in the Drawer so
that air can flow under and
around it to cook evenly. It also
lifts foods from the bottom of
the Drawer so that the Drawer
catches oils and fats as they
drain from foods during the
cooking process.
Can I air fry wet, battered
ingredients?
Yes, but ensure to use a proper
breading technique. It is
important to coat foods first
with flour, then egg, followed
by bread crumbs. Press
breading firmly onto the
battered ingredients so that
crumbs won't be blown off by
the fan during cooking.
ANSWER

WARRANTY
Your BENNETT READ 6.6L DIGITAL AIR FRYER is warranted against
manufacture faults for a period of 1 (one) year. If you register your
warranty online at www.bennettread.co.za within 14 (fourteen) days of
purchase, then your warranty will be extended to 2 (two) years. Bennett
Read/Tevo undertakes to repair or replace this product at no charge if
found to be defective due to a manufacturing fault during the warranty
period. This warranty excludes damage caused by misuse, neglect,
accidental damage, commercial use, incorrect installation, or work carried
out by anyone other than an authorised and qualified Bennett Read/Tevo
service technician. Bennett Read/Tevo is not liable for incidental or
consequential damages of any nature associated with the use of this
product. Bennett Read/Tevo’s liability will not exceed the purchase price
of this product.
PLEASE KEEP YOUR RECEIPT TO VERIFY YOUR WARRANTY.
This warranty applies to product used for personal or domestic use only,
and specifically excludes any malfunction or defect arising from commer-
cial use.
Replacement Parts, Warranty and Service enquiries can be made by
contacting:
Tevo (Pty) Ltd
Johannesburg (012) 740 5000
Durban (031) 570 5900
Cape Town (021) 380 0039
Customer Service Help Line: 0861 77 88 88
www.tevo.co.za
www.bennettread.co.za
16

17
SPECIFICATIONS
Model: BR6DAF2
Voltage: 220−240V~ 50/60Hz
Power: 1600W
ENVIRONMENTALLY FRIENDLY DISPOSAL
Do not dispose of electrical appliances with general municipal waste.
Hazardous substances can leak and contaminate the groundwater,
affecting the food chain and ultimately damaging the environment and
your health. Contact your local municipality for information on safe
disposal in your area.
PLEASE RECYCLE

®
EVERYDAY EXCEPTIONAL
Brought to you by:
www.tevo.co.za | info@tevo.co.za
0861 77 88 88