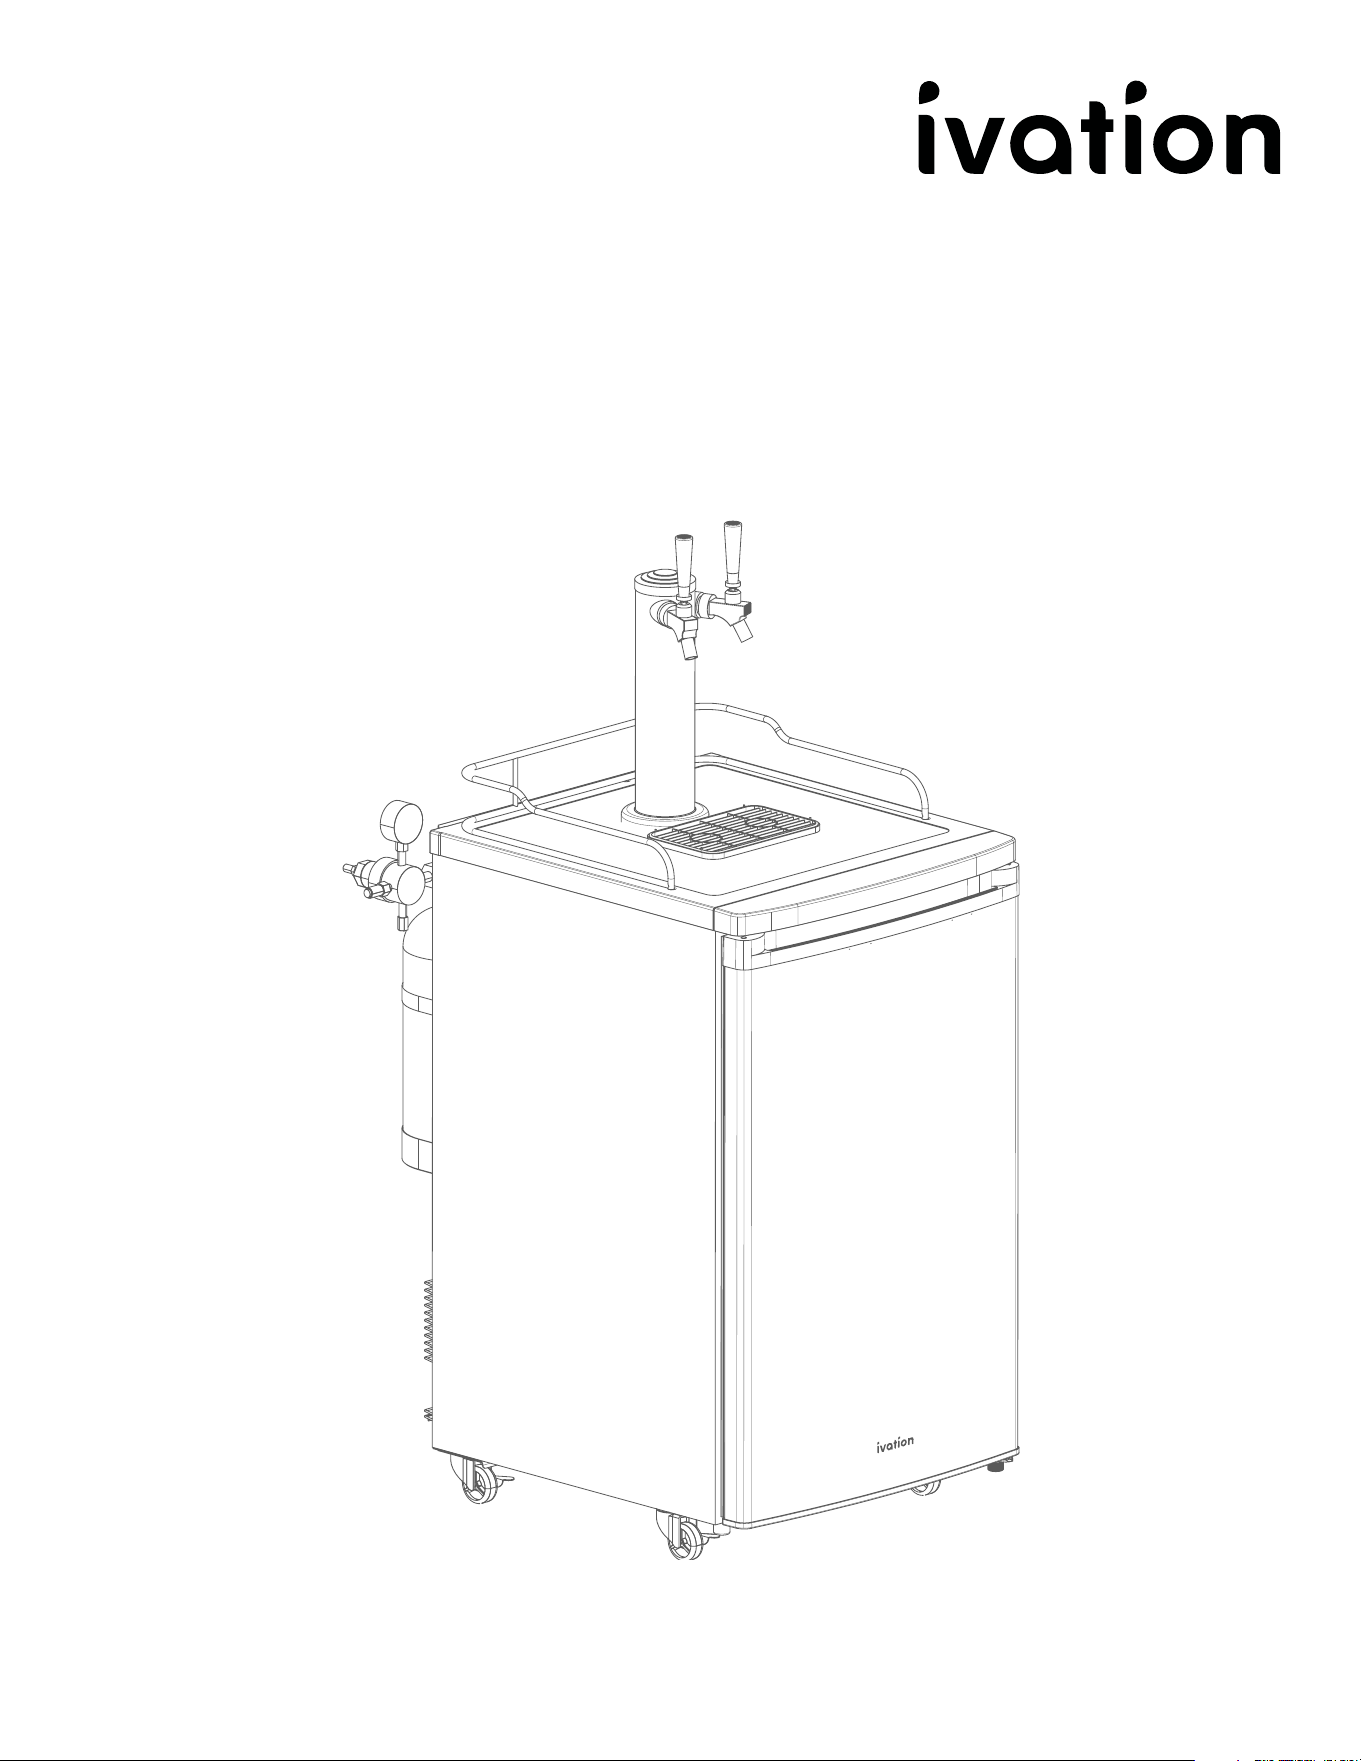
Dual-Tap Beer Kegerator
SKUS: IVBKADT491B / IVBKADT491SS
User Guide

3
FEATURES
FEATURES
• Dual-tap lines can cool and serve beer from two
kegs at once
• Cools beer from low-30’s to mid-40’s (°F)
• External CO2 tank mount for additional space
inside the refrigeration cabinet
• Automatic defrost and reversible door*
• Easily converts to a beverage cooler or regular
refrigerator with two (2) removable wire shelves
• Drip tray and guardrail help protect your floor
against spills
• Locking casters add increased maneuverability
and stability
• Includes stylish 3-inch chrome beer tap tower
*Door reversal instructions not included; please
contact Ivation® Customer Care if you need to
reverse your kegerator door

5
SAFETY PRECAUTIONS
SAFETY PRECAUTIONS
• The appliance should not be placed next to ovens, grills,
stovetops, or any other sources of high heat.
• Make sure to that all electrical, water, and drain connections for
this kegerator are installed in accordance with state and local
codes.
• You will also require a standard electrical supply (115 V AC
only, 60 Hz) that is properly grounded in accordance with the
National Electrical Code as well as local codes and ordinances.
• Make sure the kegerator is installed in accordance with local
plumbing code requirements.
• Do not bend or pinch the kegerator’s power supply cord.
• The fuse (or circuit breaker)’s size should be 15 amperes.
• Make sure that the kegerator is level when installed in order for
it to function properly. You may need to make adjustments to
ensure that it is level.
• Ensure that the pipes are not pinched, bent, or otherwise
damaged during the installation process.
• Always check the lines for leaks after connecting them.
• Never allow children to operate, play with, or crawl inside this
unit. They may become trapped and risk injury or even death.
Keep children away from the kegerator.
• If you choose to use a drainage container rather than connect
the pipes to a drain, make sure the drain select switch is set to
OFF, or else the water may overflow the drainage container.
• Although this kegerator has been tested at the factory, due to
its long-term transit and storage, make sure you discard the
first batch of ice cubes.
• Do not use solvent-based or abrasive cleaning agents on
the interior of the kegerator. These cleaners may damage or
discolor the interior.
• Do not use this kegerator for anything other than its intended
purpose.
• Try not to open the door too frequently, especially when the
weather is humid and hot. Once you open the door, make sure
to close it as soon as possible to maintain temperature stability.
• Regularly check to make sure the unit is suciently ventilated
and has adequate air circulation behind it.
• In normal temperature conditions, set the thermostat to the
middle setting if you are using it for regular refrigeration.
• If you are loading the unit with packages of fresh food to cool,
make sure the food has cooled to room temperature before
storing it in the unit.
•
If there is too much ice or frost inside the unit, it will increase
energy consumption. Make sure to clean the appliance once
7
PRODUCT OVERVIEW
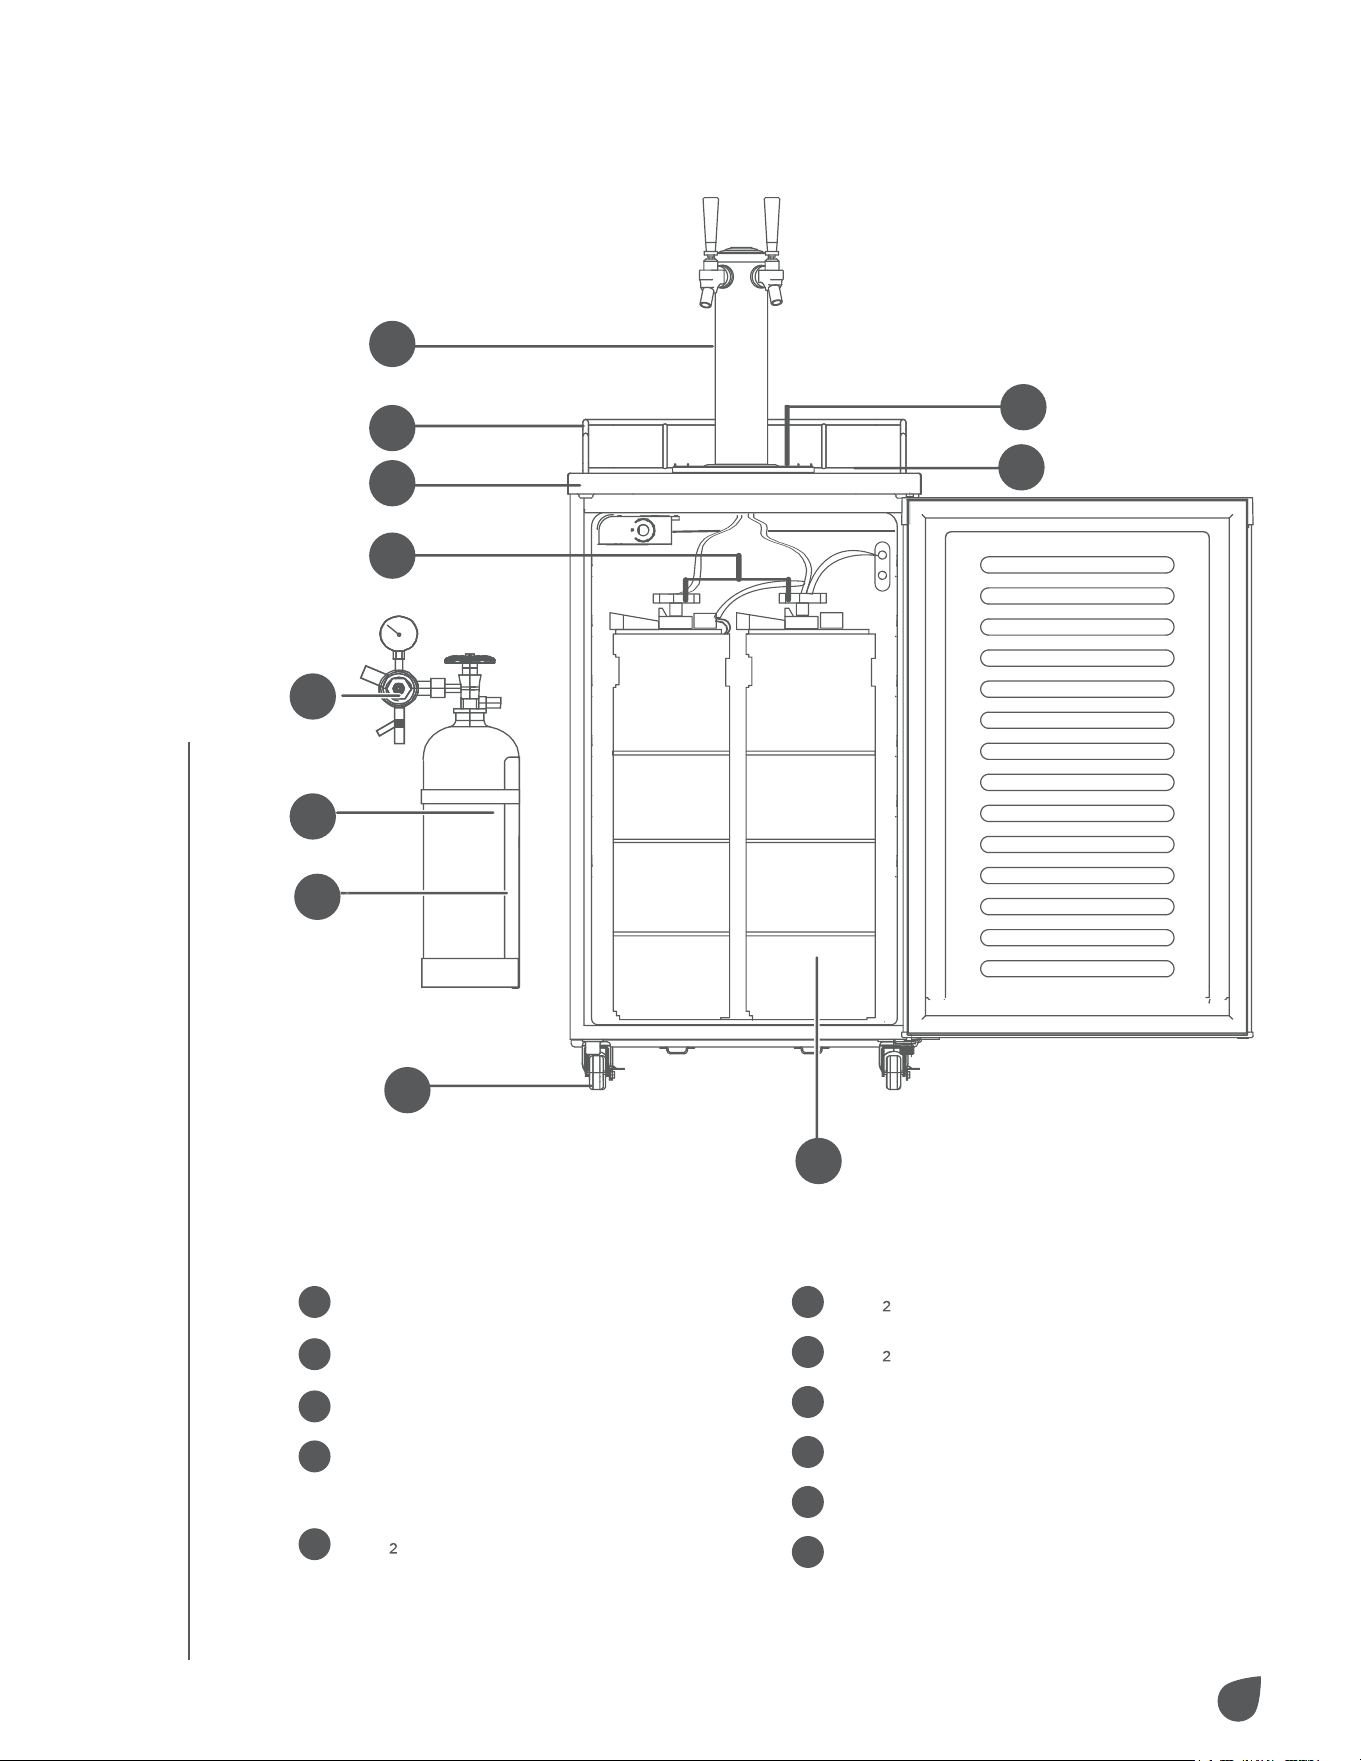
PRODUCT OVERVIEW
PARTS
1
2
3
4
8
9
10
11
6
5
7
1
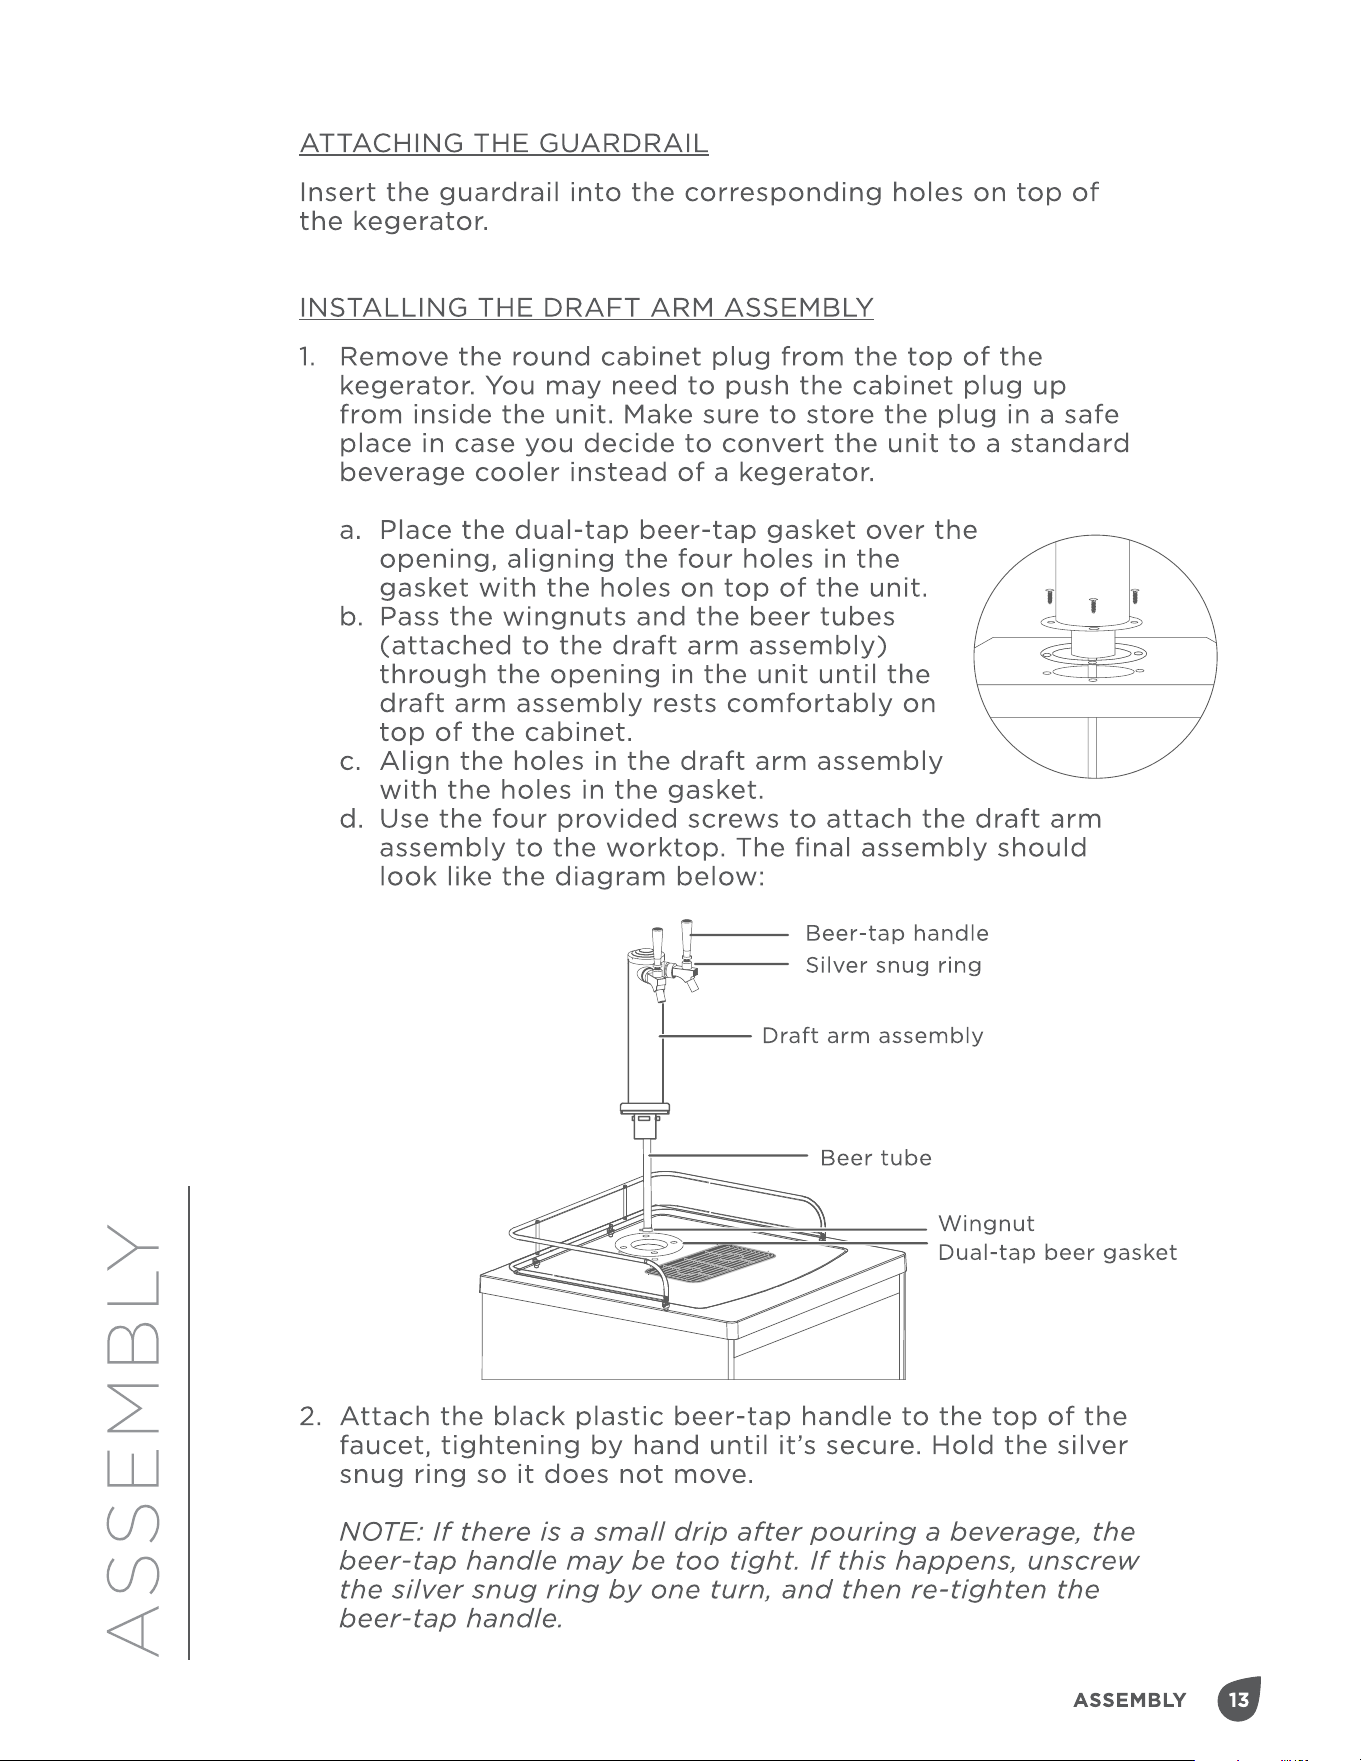
Draft arm assembly
2
Guardrail
3
Worktop
4
American Sankey Keg
Couplers
5
CO tank regulator
6
CO tank (empty)
7
CO tank holder
8
Locking casters
9
Thermostat (at rear of unit)
10
Drip tray
11
Keg
9
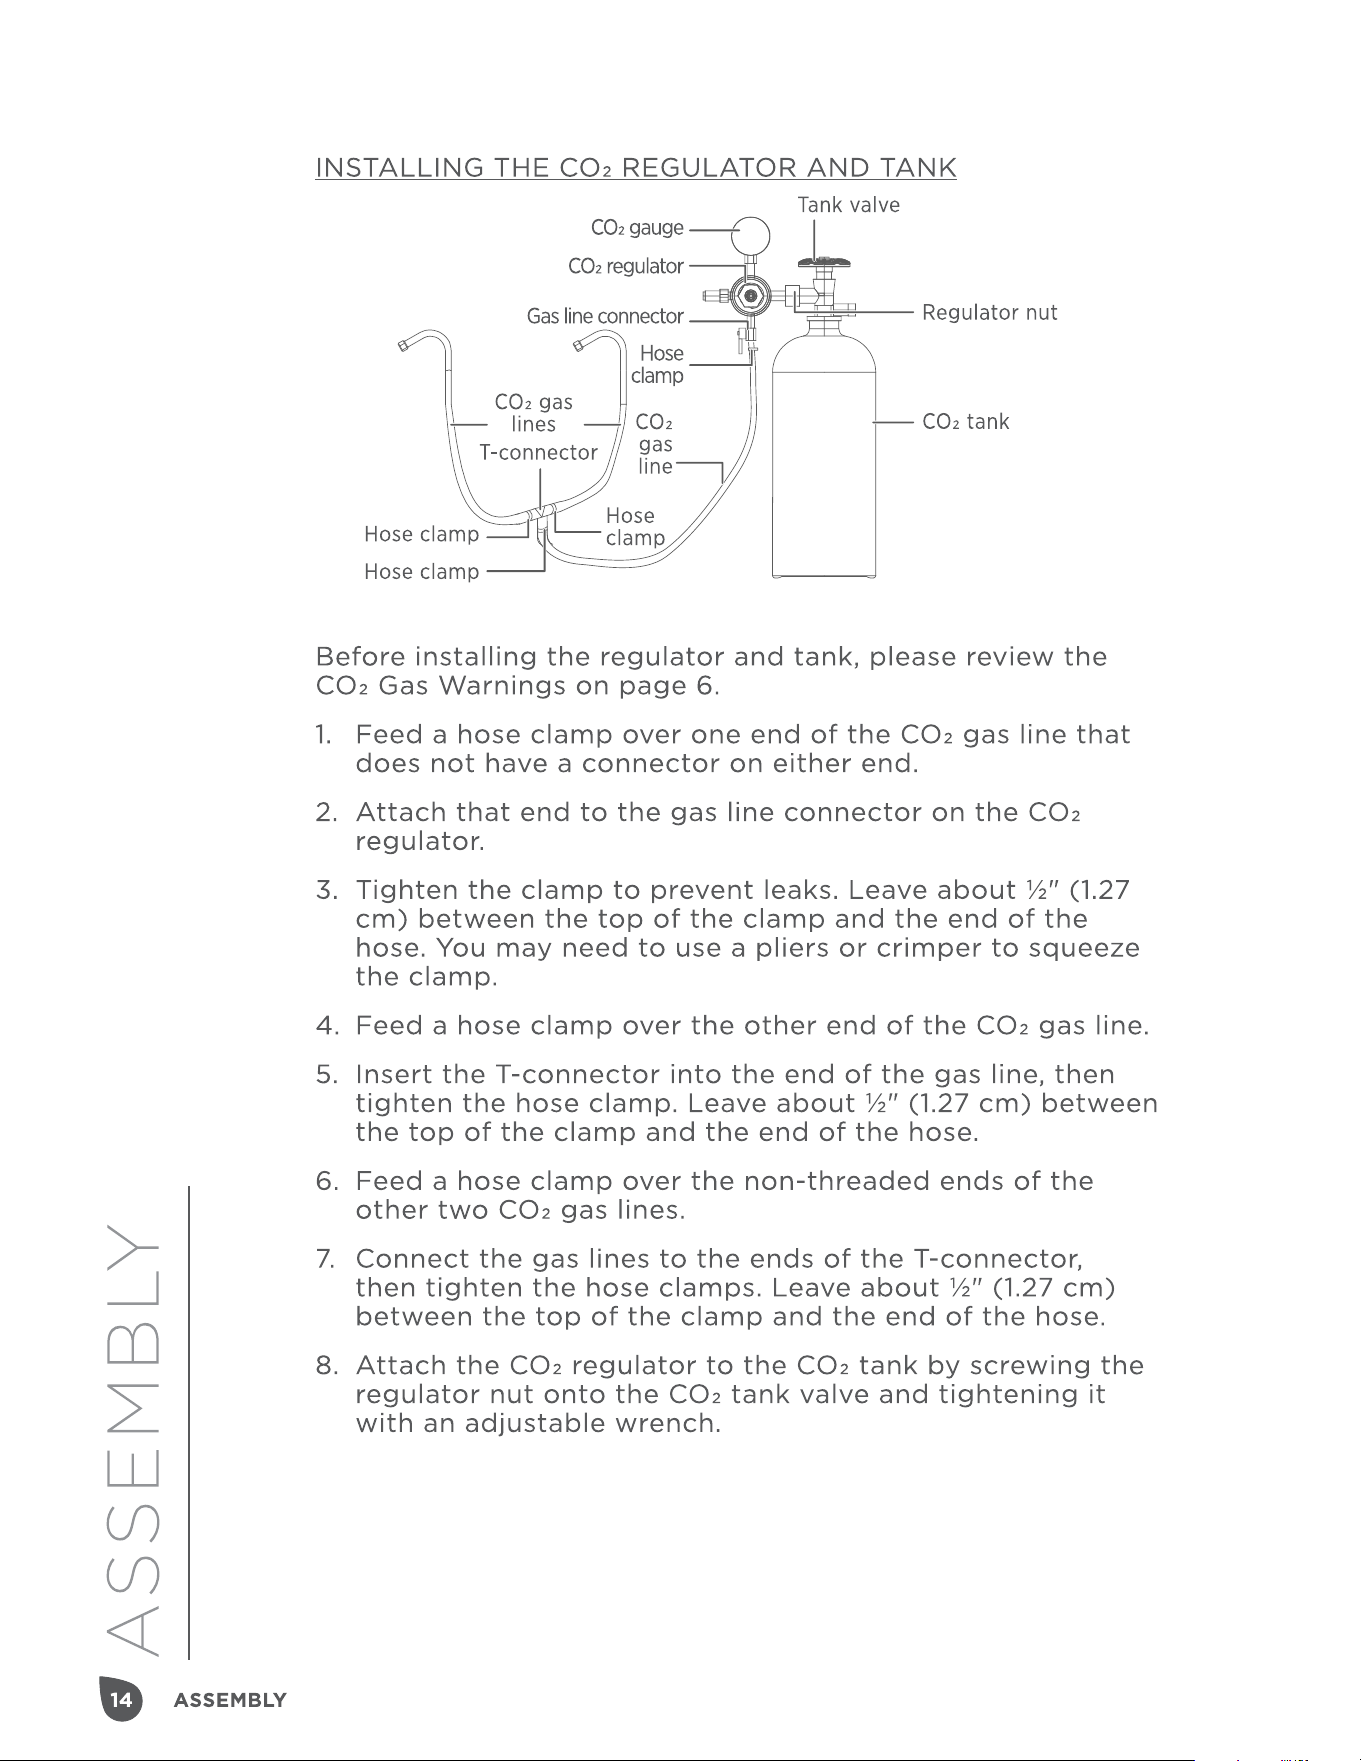
T-connector
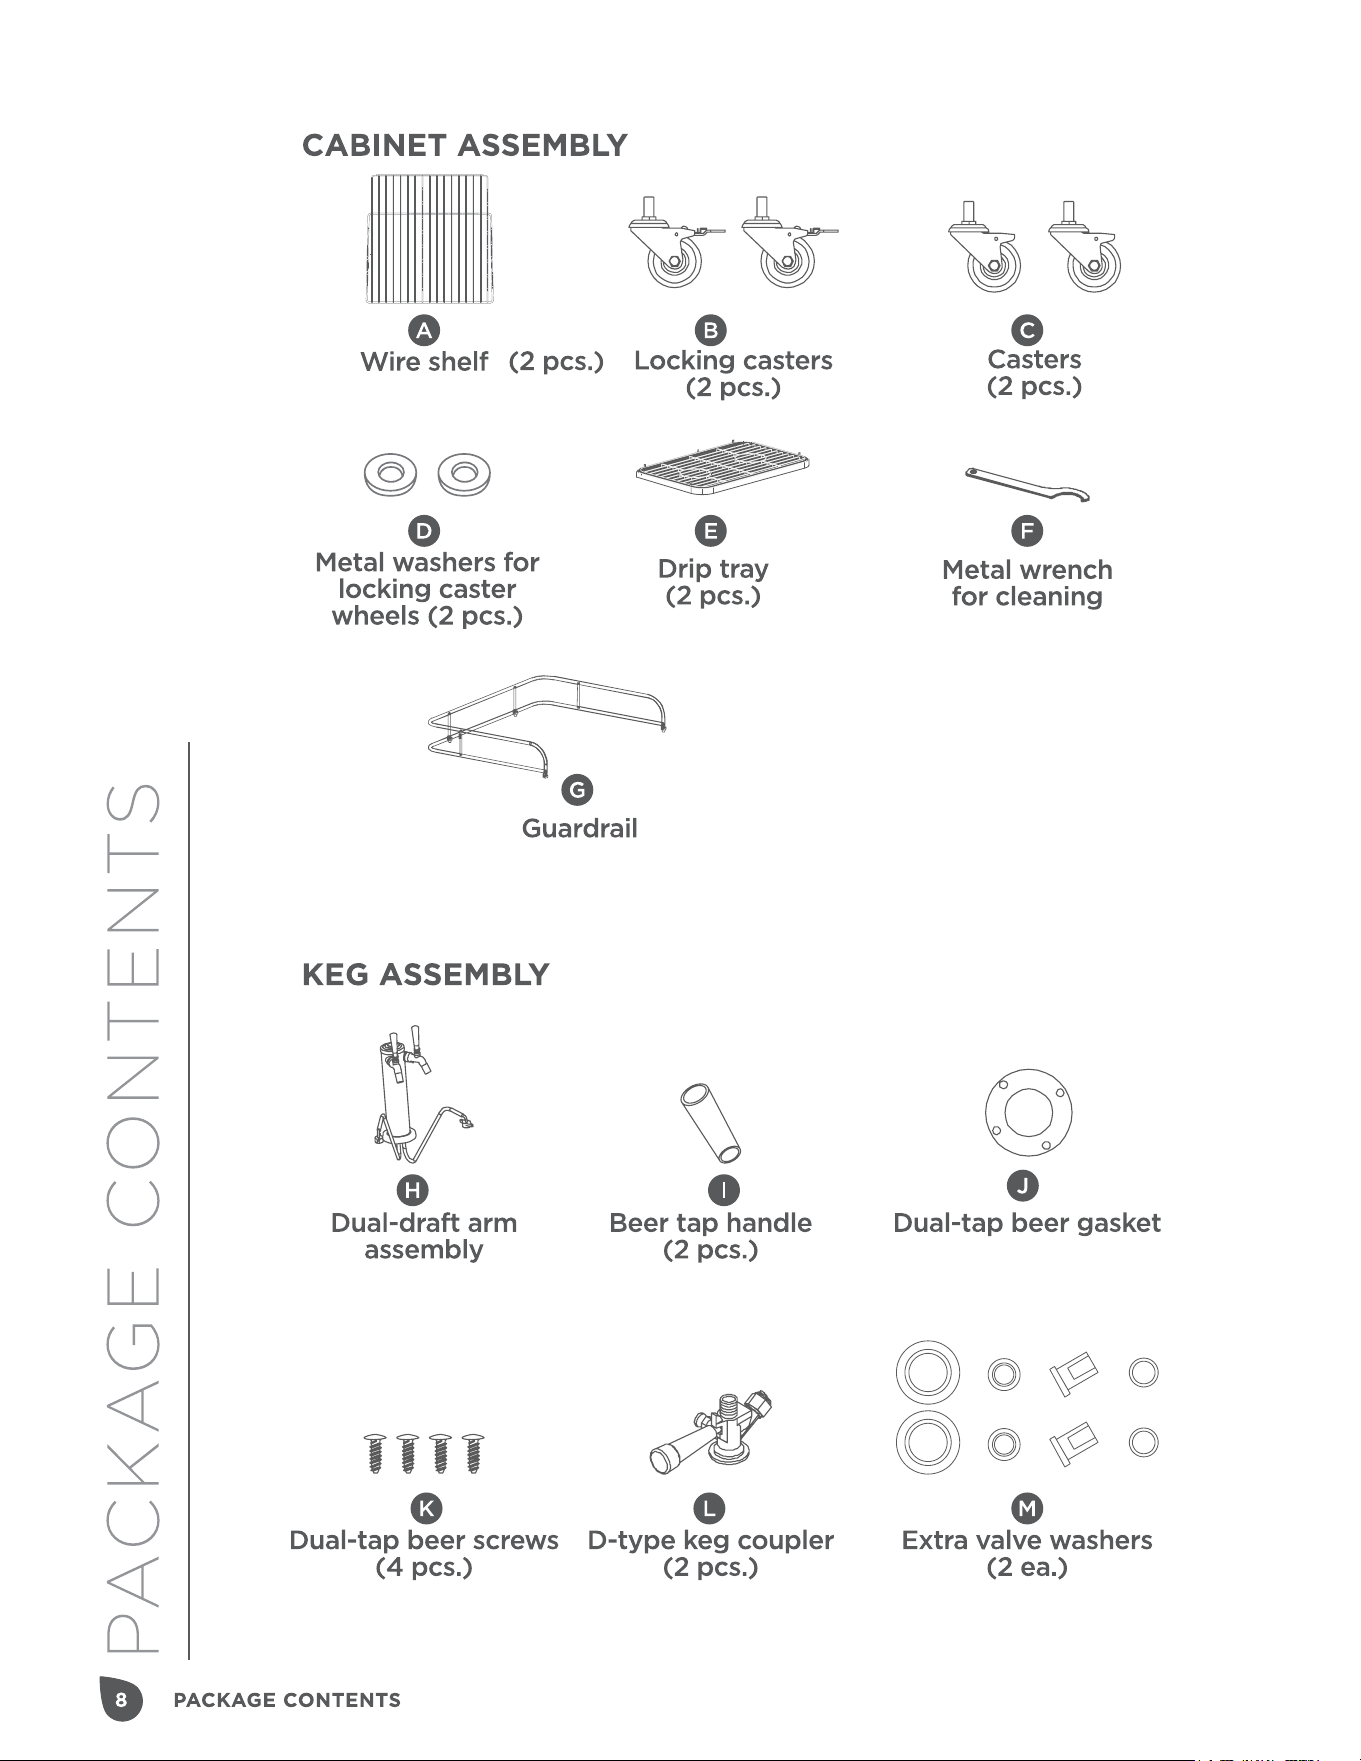
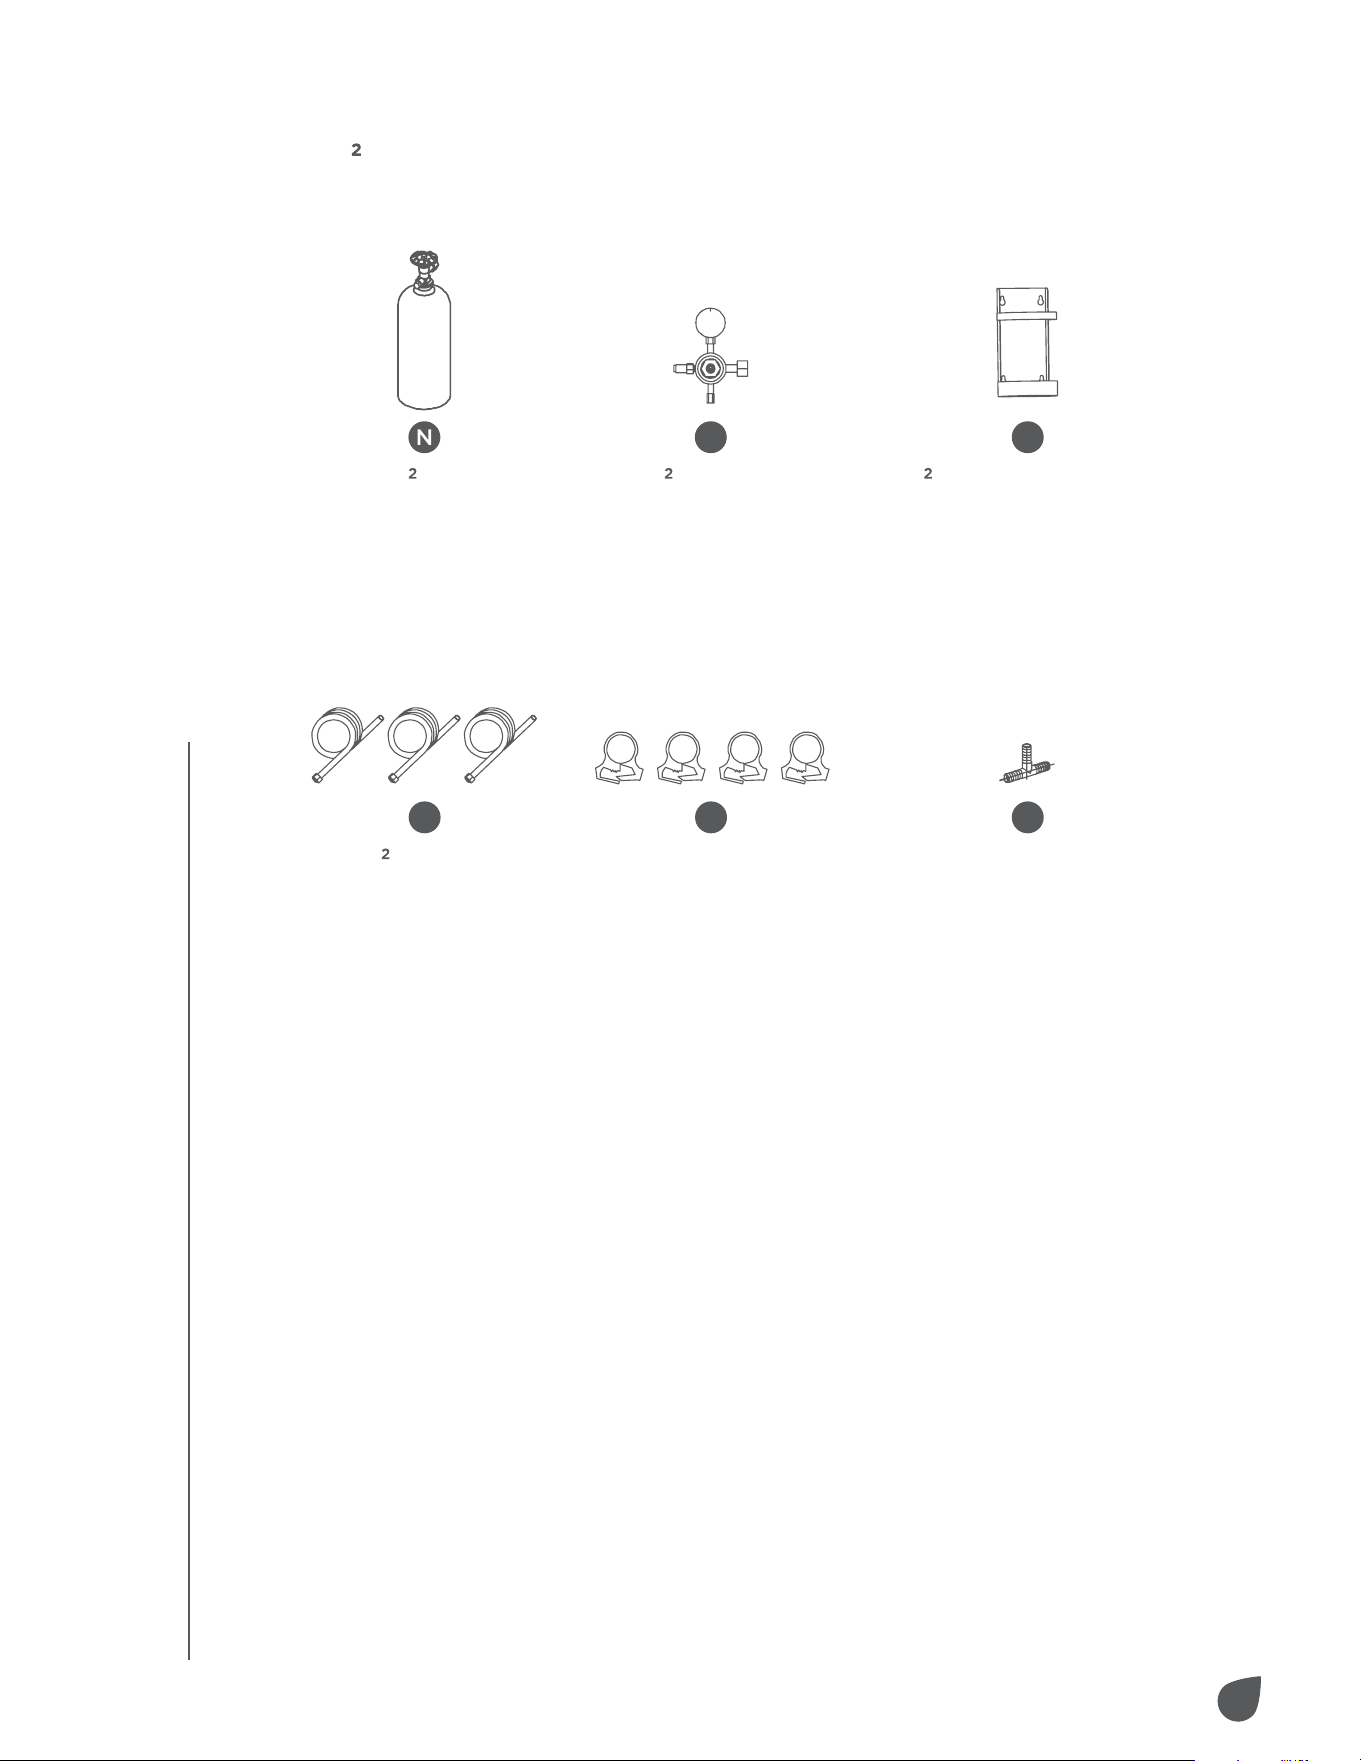
PACKAGE CONTENTS
PACKAGE CONTENTS
CO ASSEMBLY
CO tank
(empty)
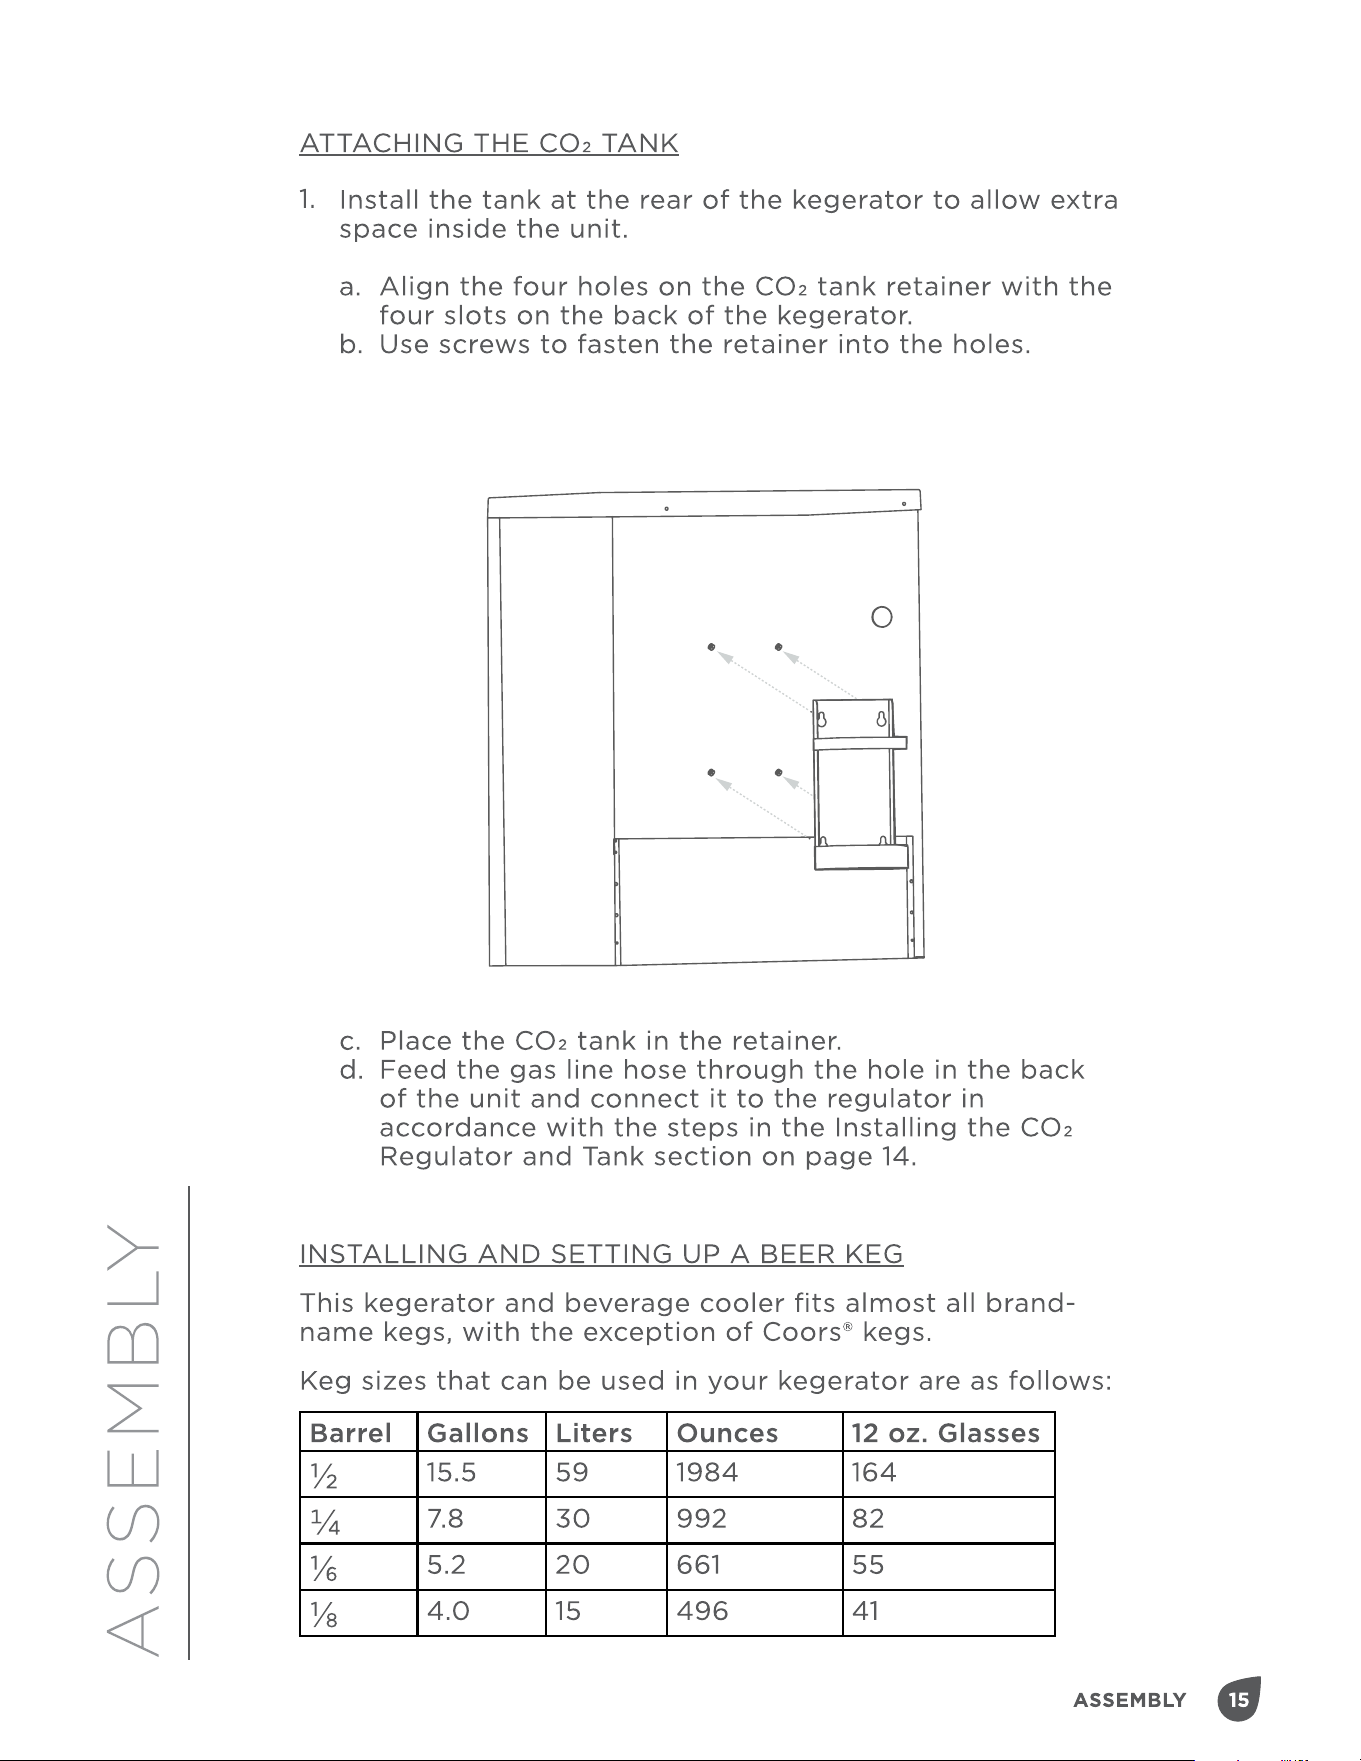
CO back tank retainer
for optional rear tank
mount
CO regulator
CO
gas lines
(3 pcs.)
Hose clamps
(4 pcs.)
O P
Q R S

11
INSTALLATION
INSTALLATION
will need to have it replaced by an authorized service center.
Contact Ivation® Customer Support if your power cord has
been damaged.
• This appliance needs to be properly grounded for your
safety. The power cord is equipped with a three-prong plug
that can be connected to a standard three-prong wall outlet
to minimize the possibility of electrical shock.
• This unit requires a standard 115/120 volt AC ~/60Hz
electrical outlet with a three-prong grounding port. Make
sure to have the wall outlet and circuit checked by a
qualified electrician before installation to ensure that it is
properly grounded.
• If you only have a two-prong outlet where you want to
install the unit, you will need to either choose a new location,
or have a qualified electrician replace the two-prong outlet
with a properly grounded three-prong outlet.
• Always secure the cord behind the kegerator. Never leave it
exposed or dangling, as this could result in product damage,
an electrical shock hazard, or other accidental injury.
• Always plug the kegerator into its own individual electrical
outlet with a voltage rating that matches its rating label. This
ensures the best performance and prevents overloading
house wiring circuits, which can cause a fire hazard from
overheating when overloaded.
• Never unplug the kegerator by yanking the power cord.
Always grip the plug firmly and pull straight out from the
outlet.
• Repair or replace immediately all power cords that have
become frayed or otherwise damaged. Do not use a cord
that has cracks or abrasion damage along its length, or
at either end. Always check the cord for damage before
plugging in the kegerator. When moving the unit, be mindful
to avoid rolling over the cord or otherwise damaging it.
• Because of potential safety hazards under certain
conditions, we strongly advise against using an extension
cord with this unit. Ivation® is not liable for any damages
or injuries that occur as a result of you using an extension
cord. If you choose to use an extension cord (which you
should not do), it absolutely must be a UL/CUL-listed, three-
wire grounding-type appliance extension cord, utilizing a
grounding-type plug, with an electrical rating of 115 volts and
at least 10 amperes. However, again, you should not use an
extension cord.

17
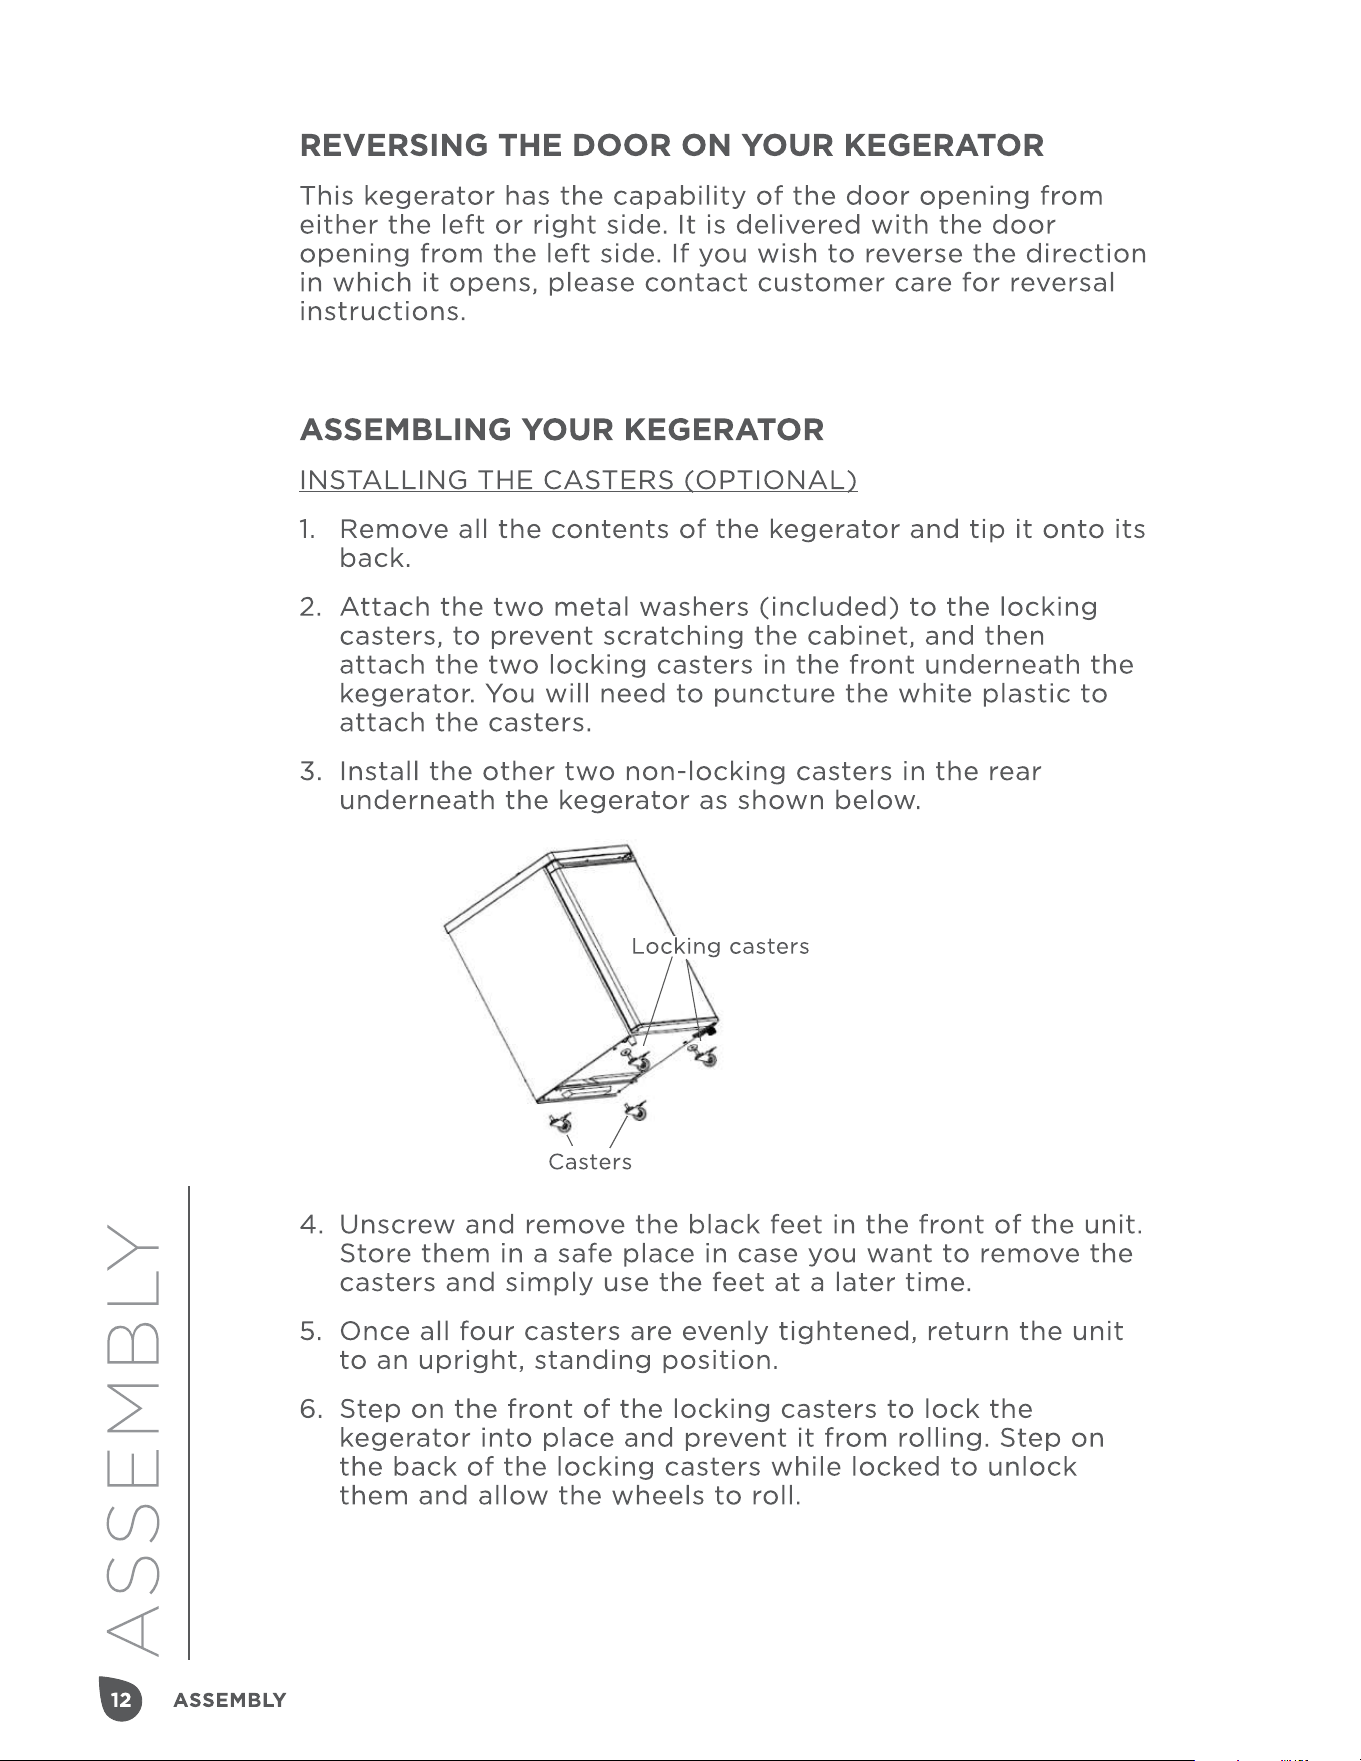
ASSEMBLY
ASSEMBLY
1. Make sure that the shut-o valve is closed (it should be
horizontal when closed, vertical when open), and then slowly
turn the main valve on the CO2 tank counter-clockwise until it
is fully open.
2. Open the shut-o valve, allowing gas to flow into the keg.
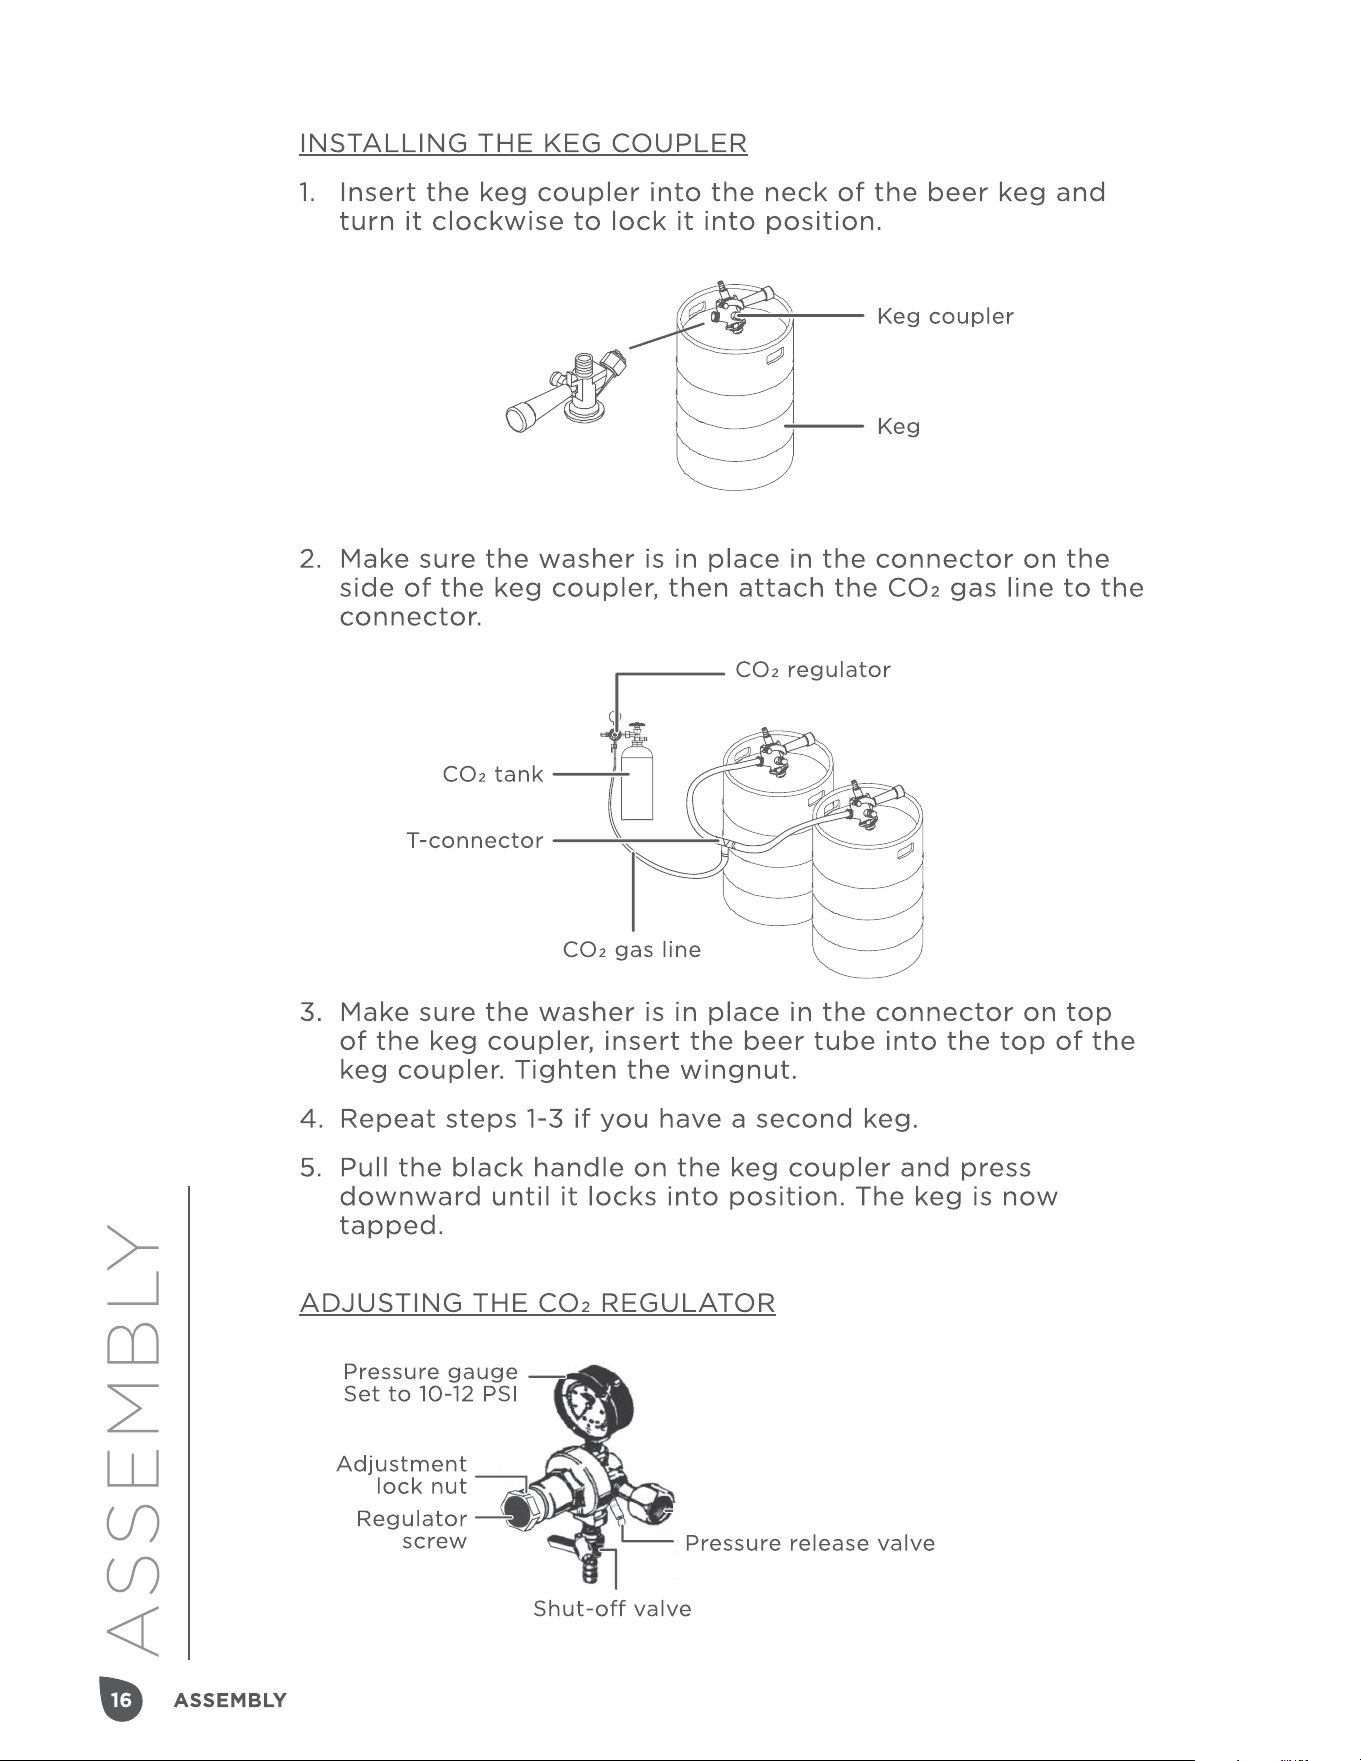
3. Release the adjustment lock nut, located behind the regulator
screw, by turning it clockwise about 5-7 turns.
4. Turn the regulator screw clockwise to increase the pressure.
You should see the needle on the pressure gauge climbing as
the pressure increases. The ideal pressure level is between 10-
12 PSI.
5. When the gauge reaches the correct pressure level, tighten
the adjustment lock nut by turning it counterclockwise.
6. Allow several minutes for the keg to pressurize. The gauge
may drop in pressure as this process completes; if this
happens, you may need to release the adjustment lock nut
and adjust the regulator screw to reach the correct pressure
level again, then retighten the adjustment lock nut.
NOTE: Make sure to listen for a hissing sound at all
connections to ensure that there are no leaks.
7. Once the keg has fully pressurized and the pressure gauge
is stable between 10-12 PSI, plug the kegerator into a 120V,
60Hz, 15A grounded outlet.
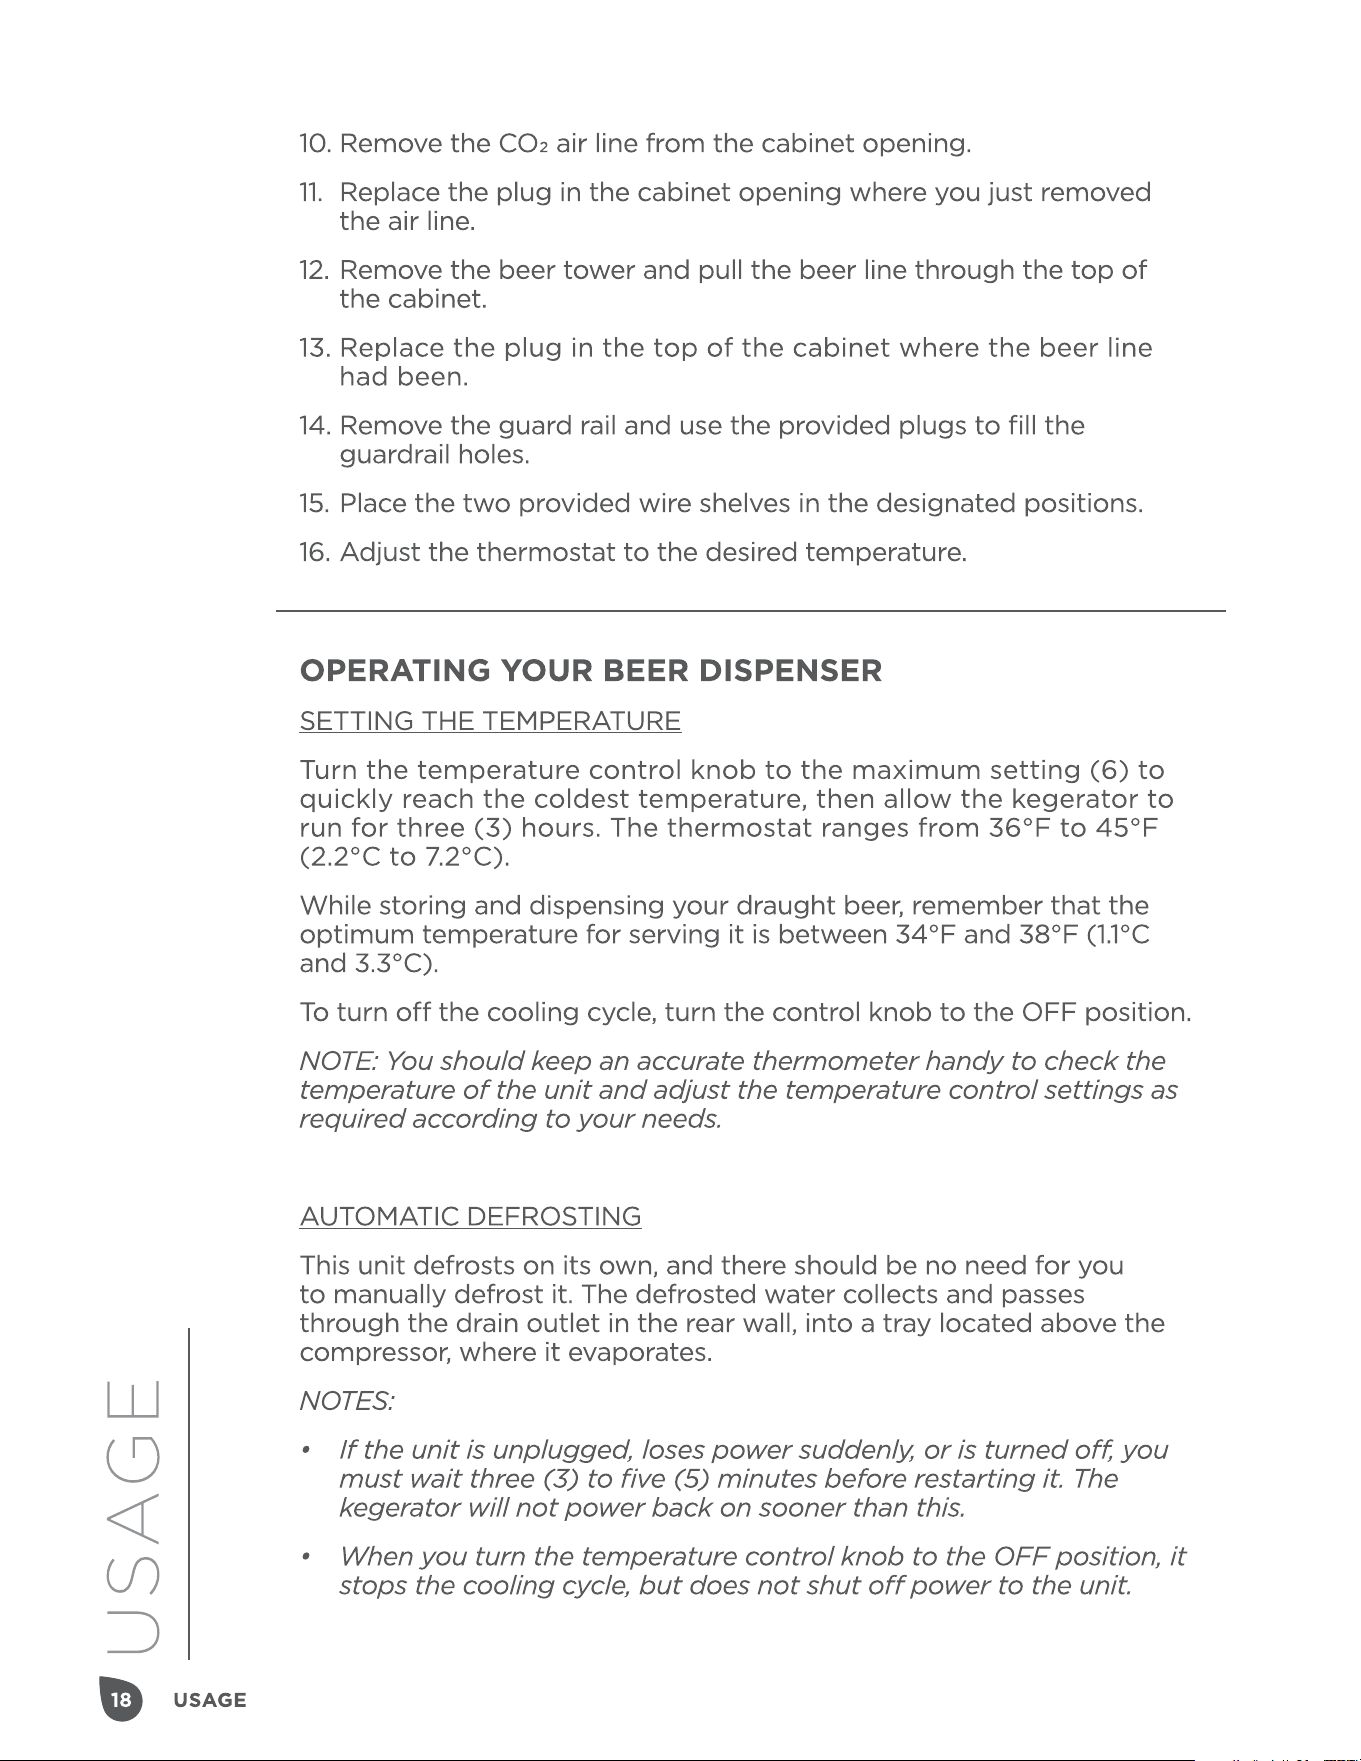
CONVERTING THE KEGERATOR TO A GENERAL
REFRIGERATOR
1. Turn the control knob to the OFF position.
2. Close the main valve on the CO2 canister.
3. Close the secondary shut-o valve on the regulator pipe.
4. Close the connection between the beer keg and the keg
coupler.
5. Drain any remaining beer from the lines.
6. Disconnect the beer line and CO2 air line from the keg
coupler.
7. Remove the beer keg and the bottom metal plate from the unit.
8. Remove the keg coupler.
9. Disconnect the air line from the CO2 canister.

19
CARE
CARE
CARE AND MAINTENANCE
CLEANING THE KEGERATOR
1. Turn the temperature control knob to OFF, unplug the
kegerator, and remove the contents.
2. Wash the inside surfaces with a solution comprised of 2 tbsp.
baking soda and 1 qt. warm water.
3. Wash the shelves and metal plate (if needed) with a mild
detergent solution.
4. Make sure to only use a damp sponge or cloth with excess
water wrung out when cleaning around areas near the controls
or any other electronic parts.
5. Wash the outside of the cabinet with warm water and a mild
liquid detergent. Rinse well and wipe the unit dry with a soft,
clean cloth.
SHORT-TERM AND LONG-TERM UNIT STORAGE
• The kegerator can be left running if not being used (e.g. while
you are on vacation) for periods of less than three (3) weeks.
• If the kegerator will not be used for periods longer than three
(3) weeks, remove the contents and unplug the power supply
cord. Thoroughly clean and dry the interior, and leave the door
open slightly to prevent odors and mold growth.
MOVING THE KEGERATOR TO A NEW LOCATION
• Remove all the contents.
• Tape down and secure any/all loose items inside the kegerator.
• Tape the door shut.
• Transport the unit to the new location, making sure that it
stays securely in the upright position. Cover the outside with a
blanket or similar item during transportation to prevent dents,
dings, and scratches.
21
TROUBLESHOOTING
TROUBLESHOOTING
Flat Beer: Foamy head disappears quickly, and/or beer lacks the usual
brewery-fresh flavor
Possible Causes Solutions & Explanations
1 Grease on the glass. Don’t wash your beer glasses together
with glasses that have been used
for milk or similar fatty substances
(including lipstick!). Make sure lipstick
has been removed from glassware if
stained.
An excess amount of germicides can
also build up and leave a greasy film on
the glass.
Where health laws permit doing so, it’s
better to steam and sterilize your beer
glasses.
Wash glasses thoroughly with a quality
detergent. DO NOT USE SOAP.
Don’t wipe glasses to dry them. Allow
glasses to air-dry by placing them on
wire or corrugated metal.
Rinse the glass in fresh, cold water
before serving beer in it. Beer is best
served in a wet glass.
2 Beer was improperly drawn into the
glass.
Always open the tap faucet quickly and
completely. Never open it partway.
Make sure you have checked to find the
best distance to keep the glass away
from the tap while drawing the beer.
The foam should create a tight, creamy
head, and the collar on the average glass
should be between ¾" and 1"high.
If beer is incorrectly drawn with no head,
it may appear to be flat, despite not
being flat.
3 Not enough pressure is being
provided to the keg lines.
Check the pressure gauge to make sure
it’s still between 10-12 PSI, and adjust if
necessary.
23
TROUBLESHOOTING
TROUBLESHOOTING
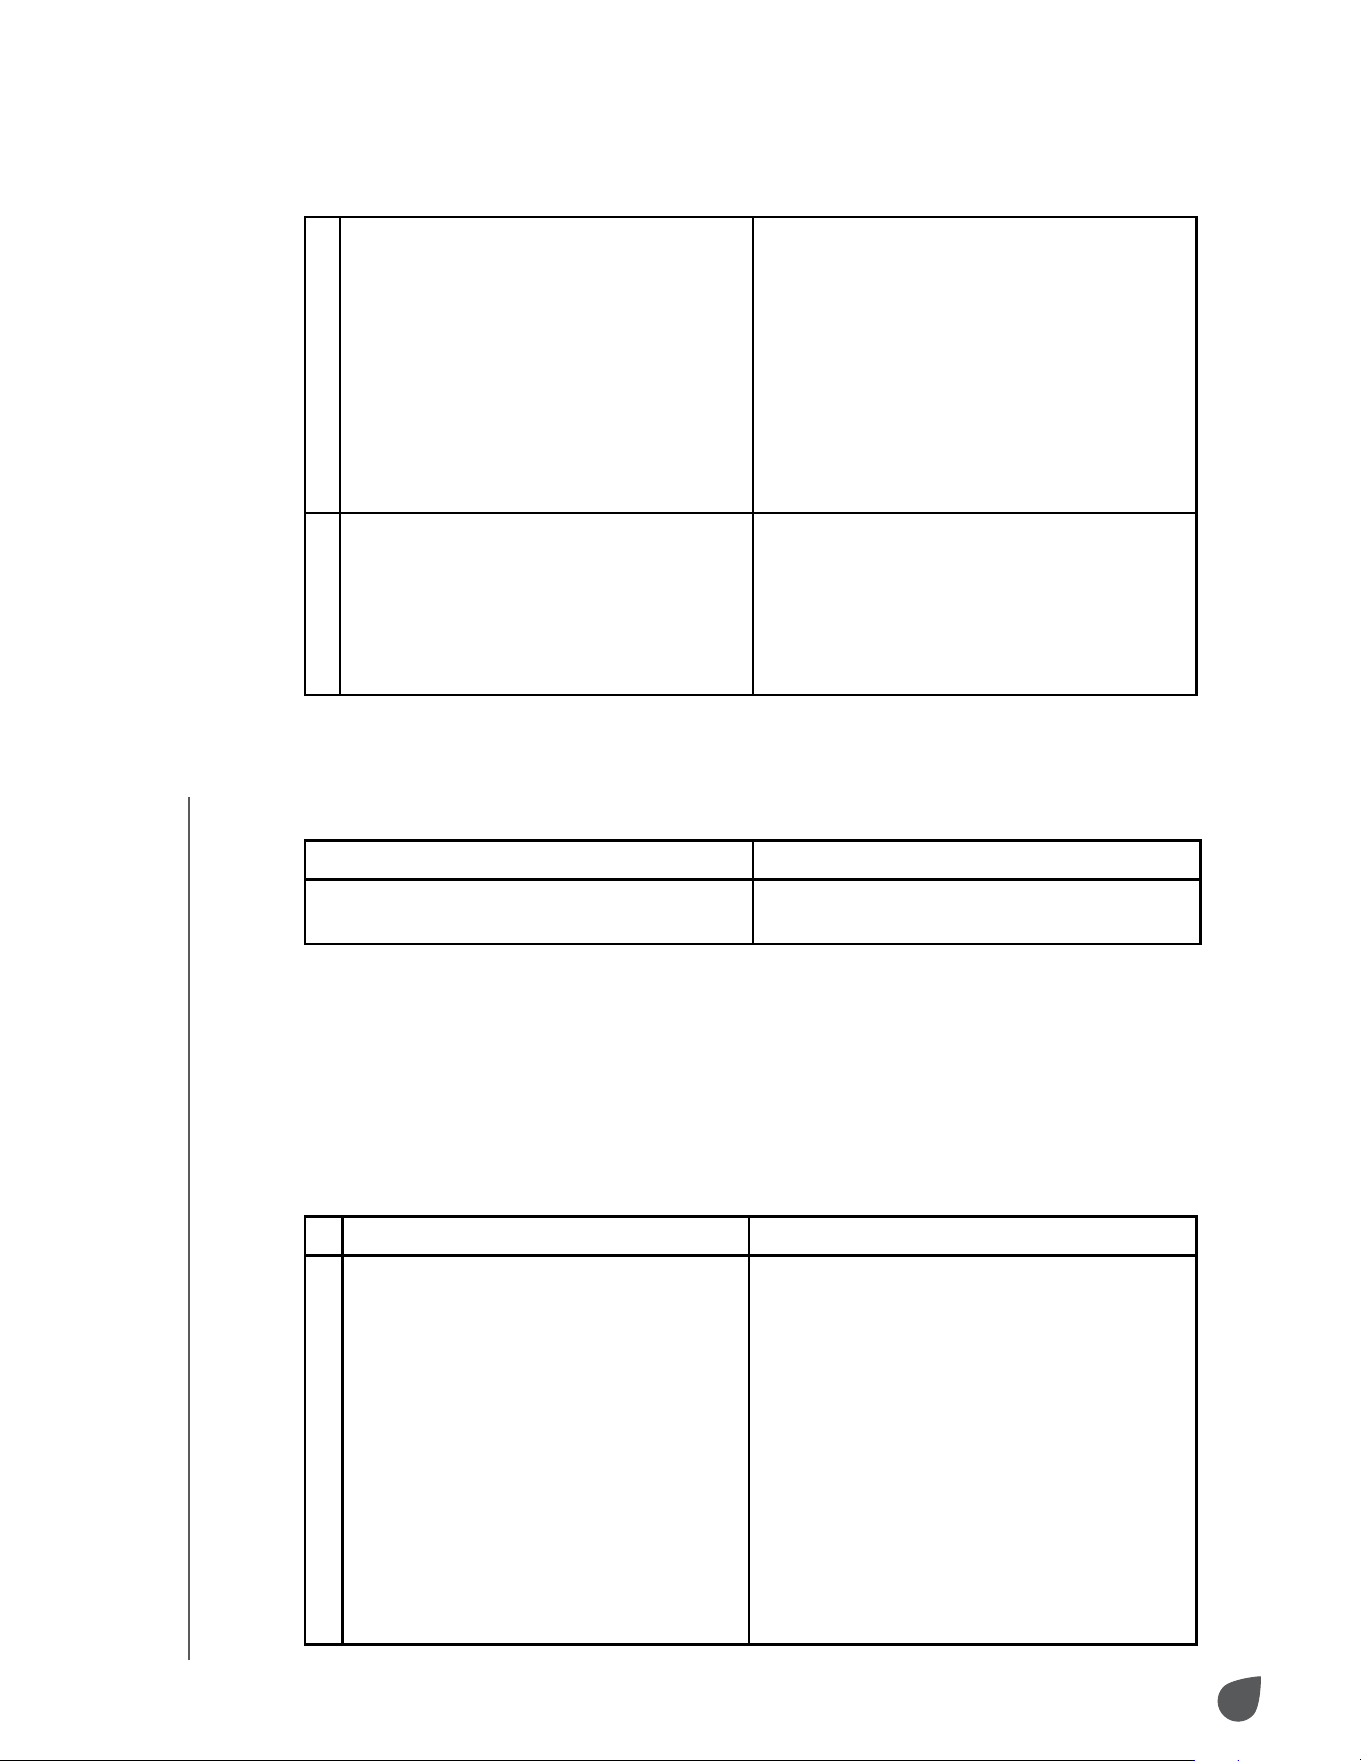
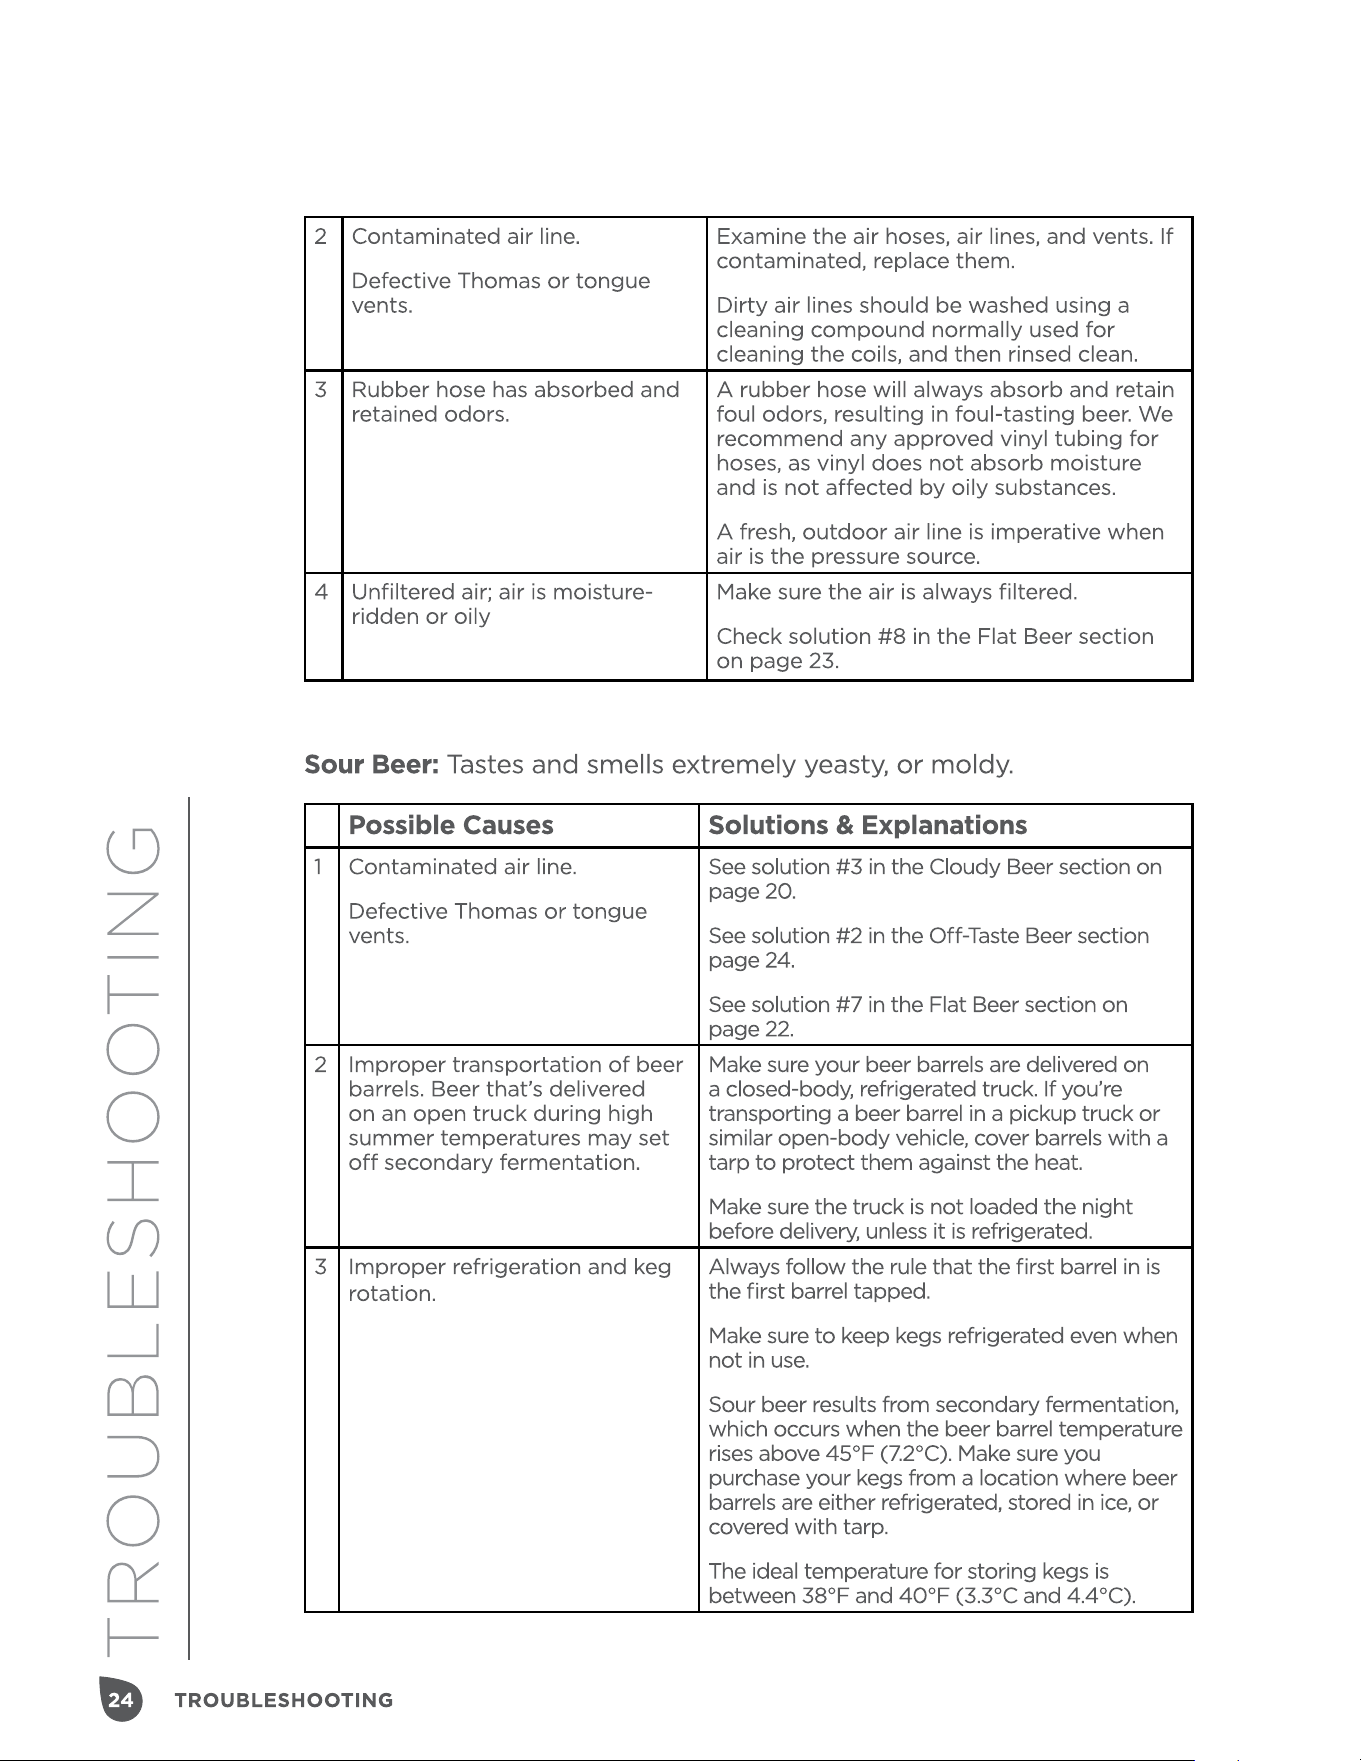
8 Moisture in the air system. If you’re using an air compressor instead
of gas as a pressure source, it is imperative
for you to have a moisture trap installed
in the pre-cooler, and you need to drain it
daily. In addition, we recommend installing
an activated charcoal filter to purify the air
before it enters the barrel.
With tank-type compressors, drain the
tank weekly.
Make sure to drain all moisture traps daily.
9 Rapid air movement through beer
being drawn.
A fan, exhaust blower drawing in air, or
blowing out air, across the bar from where
beer is being drawn, may cause the head
of foam to fall quickly. Fans or blowers
should be positioned such that air does
not move directly across where the beer is
being drawn.
Loose Foam: Large, soap-like bubbles (sometimes called fish-eyes)
are present in the foam. Foam settles quickly.
O-Taste Beer: Beer flavor is bitter and biting, sometimes completely
stinking, with a generally unpleasant taste.
NOTE: Beer lines should be flushed after each keg is emptied. Maintain clean, fresh,
sanitary conditions at the bar. Smoke, kitchen odors, bug sprays, and disinfectant will
damage the flavor of beer and make it unpalatable. These conditions may come from
an air source or from actual contact with bar glassware.
Possible Causes Solutions & Explanations
Generally is a flat beer condition. Follow the possible causes/solutions
listed in the Flat Beer section.
Possible Causes Solutions & Explanations
1 Improper cleaning or no cleaning of
the coils, hose, leads, and direct-
draw system.
Make sure to thoroughly clean coils at
least once a week.
Brush and clean the beer taps. (See
solution #2 in the Wild Beer section on
page 25.)
Scour the taps, rods, and tap-seal fitting
with detergent, and then rinse them
clean.
Direct-draw systems must also be
cleaned, same as the coil systems. 4 feet
of direct draw line accumulates as much
per foot as any other system. Make sure
the direct-draw system is clean.
25
TROUBLESHOOTING
TROUBLESHOOTING
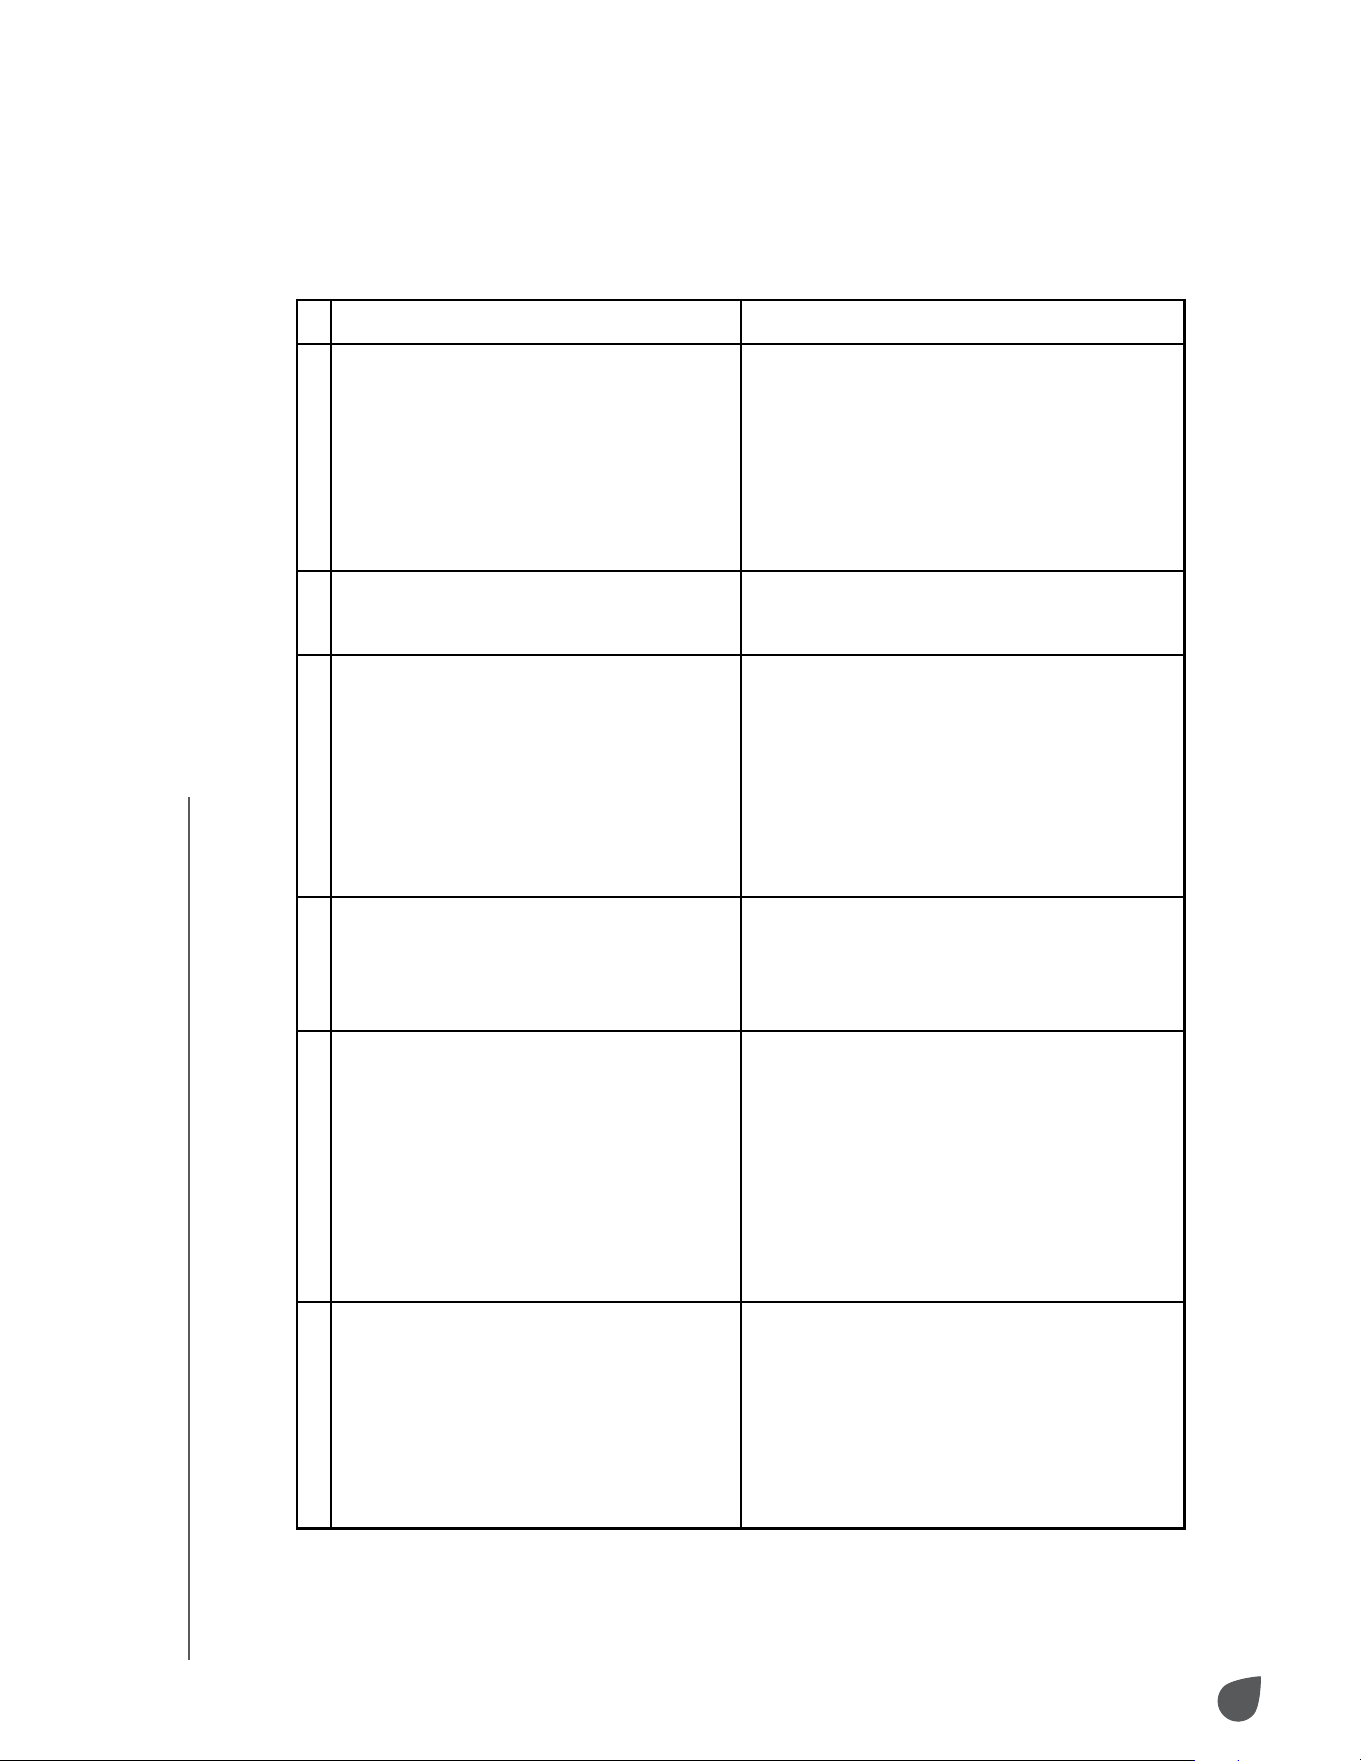
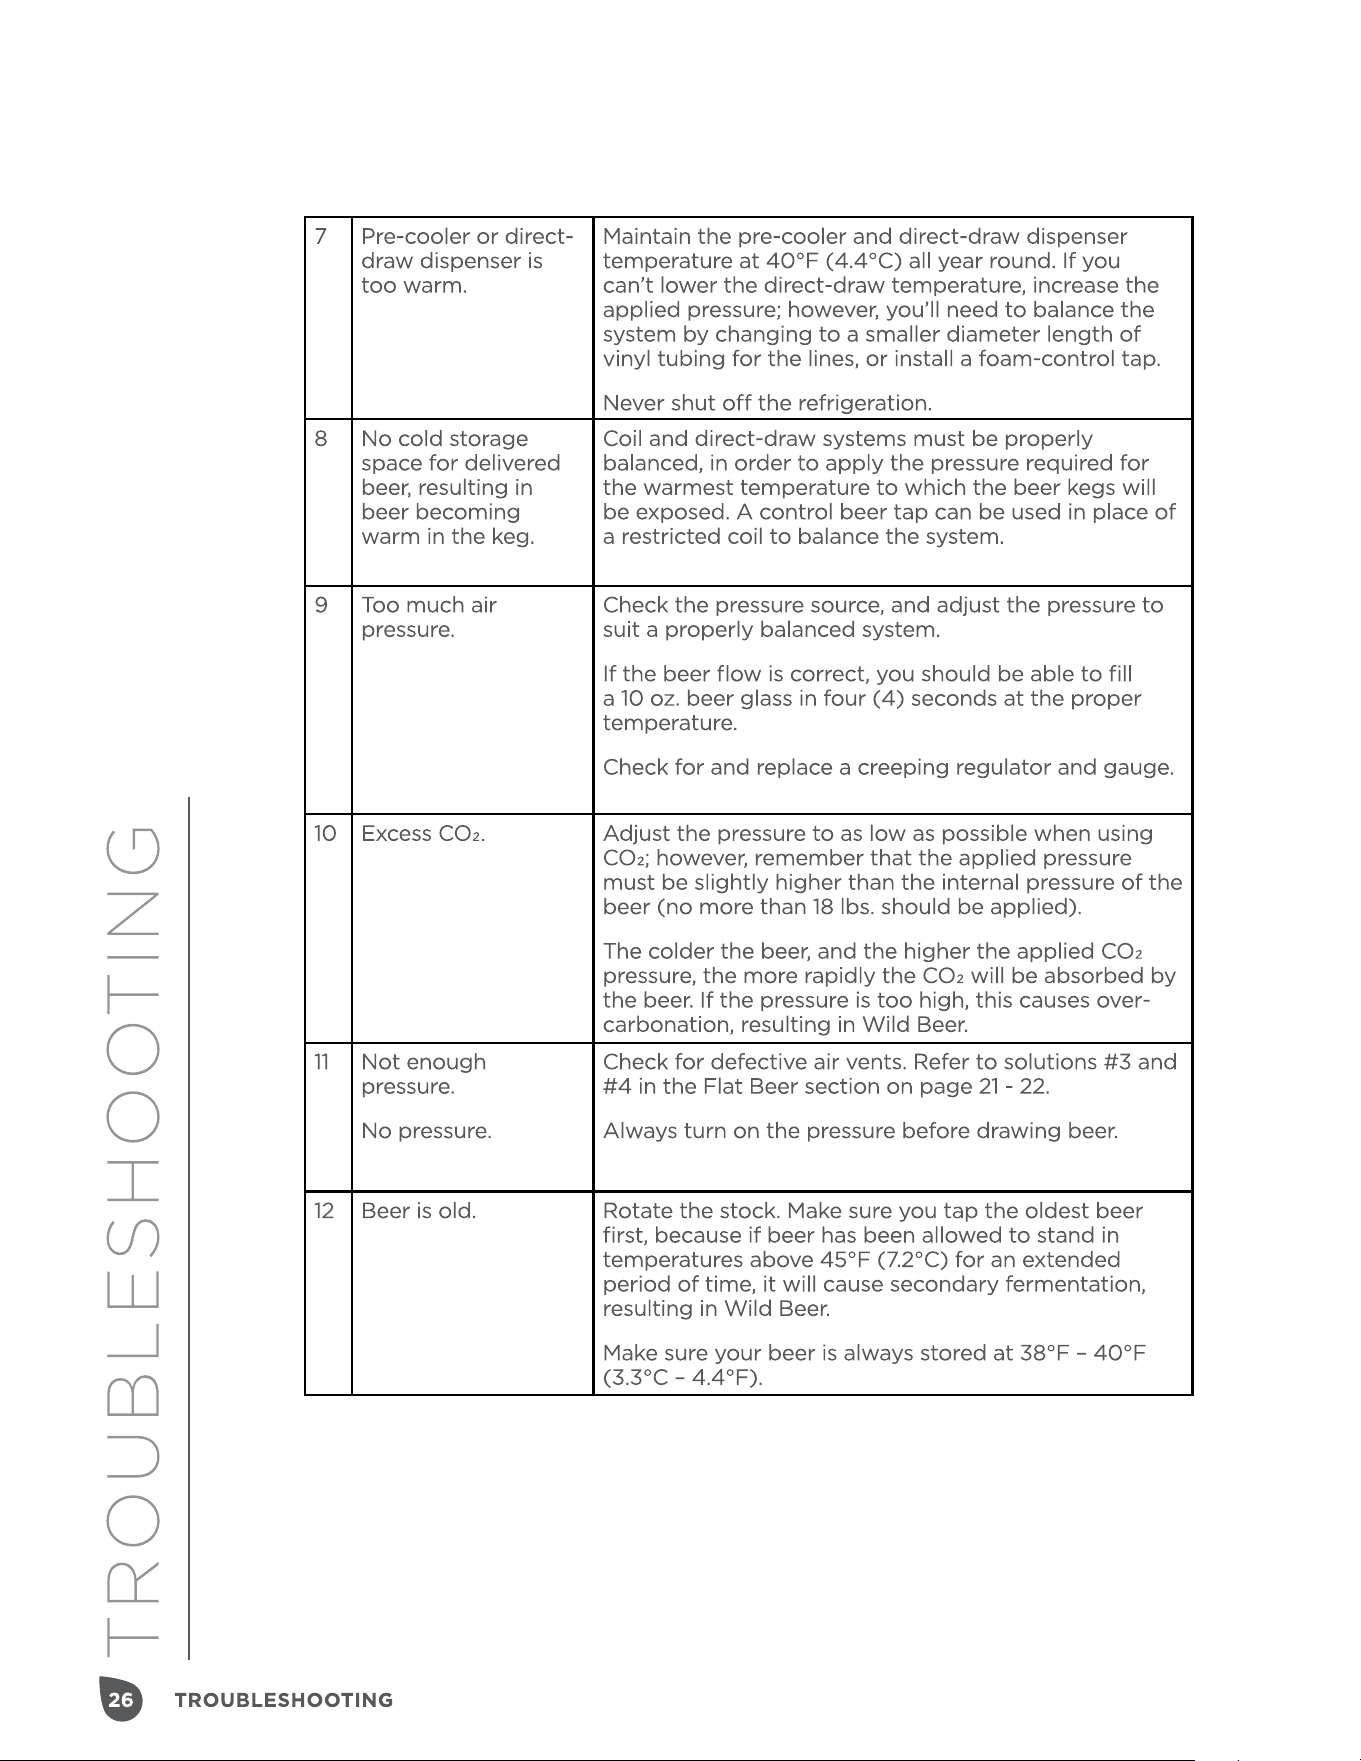
Wild Beer: Beer comes out as either all foam, or too much foam and
not enough liquid.
Possible Causes Solutions & Explanations
1 Beer was improperly drawn into
glass.
Always open the tap faucet quickly and
completely. Never open it partway.
Make sure you have checked to find the
best distance to keep the glass away
from the tap while drawing the beer.
The foam should create a tight, creamy
head, and the collar on the average
glass should be between ¾" and 1" high.
2 Yeast growth or other obstructions in
the tap.
Make sure to clean the tap spout with a
good brush every day. Scour all internal
tap parts at least once a week.
3 Kinks, dents, or twists in the coils or
direct-draw lines; or obstructions in
the lines near or behind the tap.
Check for and replace any kinked,
dented, or twisted lines from the keg to
the tap.
Check for a frayed coupling behind the
tap that may cause an obstruction.
4 Sag or trap in line. Keep all metal beer lines straight from
the barrel to the tap. Never permit the
lines to sag or droop, this can create a
trap that causes wild beer.
5 Beer too warm at the tap, in the coil
system, or in the air shaft system.
Make sure the temperature at the tap is
at least 2° colder than at the beer barrel.
In a sweet-water refrigerated or ice-
water system, make sure the faucet
shank is always submerged.
In a cold-air system, make sure the
coldest air from the blower is first
directed to the tap, and then circulated
back to the pre-cooler.
6 Hot spots in the line. Make sure all beer lines are insulated;
a long beer run must be constantly
refrigerated. Insulation helps, but
insulation is not refrigeration.
Keep all beer lines away from hot water
pipes, hot air ducts, and steam pipes. A
cold steam pipe in the summer is a hot
steam pipe in the winter.
27
TROUBLESHOOTING
TROUBLESHOOTING
Tail-End Beer: Draws well at the beginning of the barrel, but becomes
flat toward the end. This occurs more often when the beer turnover is
slow.
Other Troubleshooting
Before giving our customer service department a call, we recommend that
you check your issue against this table and try the suggested solutions.
Possible Causes Solutions & Explanations
When air is being used
as a pressure source, air
can replace the CO2 in the
beer, resulting in flat beer.
When beer is being drawn
quickly, this problem is not as
evident.
Wherever possible, you should use CO2 gas as your
pressure source.
In high-pressure systems, where CO2 gas cannot be
used, a banner air-gas blender should be installed.
This introduces a small amount of CO2 back into
the beer and helps maintain a normal CO2 content
in the beer.
Issue Possible Causes
Kegerator
does not
work.
Kegerator may not be plugged in.
Circuit breaker may have been tripped or blown a fuse.
Temperature control knob may be in the OFF position.
Kegerator
frequently
turns on
and o.
Room temperature may be warmer than normal.
The door to the kegerator may be opened too frequently.
Kegerator door may not be completely closed.
Temperature control may not be correctly set.
Door gasket may not seal properly.
Kegerator may not have the correct clearances. Ensure the area to
the rear and sides around the unit is free of obstructions.
Kegerator
vibrates.
This is a feature, not a bug.
Kegerator may be unstable, ensure that it is positioned on a level surface.
Kegerator
makes
too much
noise.
The flow of refrigerant may cause a rattling noise. This is normal.
At the end of each cooling cycle, you may hear gurgling sounds,
which are caused by the flow of refrigerant inside your kegerator.
Contraction and expansion of the inside walls during the cooling
process may also cause popping and/or crackling sounds.
Other noises may be caused by the kegerator not sitting level.
Kegerator
door does
not close
properly.
Kegerator may not be sitting level.
Door may have been reversed and not installed properly.
Door gasket may be dirty.
The shelves, metal plate, or beer keg may be out of place inside the unit.
29
GET IN TOUCH!
GET IN TOUCH!
WHAT DOES THIS WARRANTY COVER? This limited warranty covers
defects in materials and workmanship of the Ivation® dual-tap beer
kegerator (the “product”) for the Warranty Period as defined below.
WHAT DOES THIS WARRANTY NOT COVER? This limited warranty
does not cover any damage due to: (a) transportation; (b) storage;
(c) improper use; (d) failure to follow the product instructions
or to perform any preventive maintenance; (e) modifications; (f)
unauthorized repair; (g) normal wear and tear; or (h) external causes
such as accidents, abuse, or other actions or events beyond our
reasonable control.
WHAT IS THE PERIOD OF COVERAGE? This limited warranty starts
on the date of your purchase and lasts for one year (the “Warranty
Period”). The Warranty Period is not extended if we repair or replace
the product. We may change the availability of this limited warranty
at our discretion, but any changes will not be retroactive.
WHAT ARE YOUR REMEDIES UNDER THIS WARRANTY? With
respect to any defective product during the Warranty Period, we will,
at our sole discretion, either: (a) repair or replace such product (or
the defective part) free of charge or (b) refund the purchase price of
such product if an exchange unit cannot be provided.
HOW DO YOU OBTAIN WARRANTY SERVICE? To obtain warranty
service, you must contact us at 1-866-849-3049 or by email at info@
myivation.com during the Warranty Period to obtain a Defective
Merchandise Authorization (“DMA”) number. No warranty service
will be provided without a DMA number and return shipping costs to
our facilities shall be assumed by you, the purchaser. Shipping costs
of the replacement unit to you shall be assumed by us.
GET IN TOUCH!
info@myivation.com
1-866-849-3049
IVATION is a trademark of C&A IP Holdings, LLC, in the U.S, Canada, and the E.U.
All other products, brand names, company names, and logos are trademarks of their respec-
tive owners, used merely to identify their respective products, and are not meant to connote
any sponsorship, endorsement or approval.
Distributed by C&A Marketing, Inc., 114 Tived Lane East, Edison, NJ 08837
MADE IN CHINA
© 2020. C&A IP Holdings, LLC. All Rights Reserved.