V-12
Stereoanlage
Stereo System
Equipo estéreo
Chaîne stéréo
Impianto stereo
Stereo-installatie
10006663 10006664
10009511 10009512
10009513 10009514
10027657 10027658


3
DE
English 23
Español 41
Français 59
Italiano 77
Nederlands 95
Sehr geehrter Kunde,
wir gratulieren Ihnen zum Erwerb Ihres Gerätes. Lesen
Sie die folgenden Hinweise sorgfältig durch und befolgen
Sie diese, um möglichen Schäden vorzubeugen. Für
Schäden, die durch Missachtung der Hinweise und
unsachgemäßen Gebrauch entstehen, übernehmen wir
keine Haftung. Scannen Sie den QR-Code, um Zugriff
auf die aktuellste Bedienungsanleitung und weitere
Informationen rund um das Produkt zu erhalten.
INHALTSVERZEICHNIS
Technische Daten 4
Sicherheitshinweise 5
Geräteübersicht 7
Fernbedienung 8
Montage 9
Inbetriebnahme und Bedienung 11
Radio 12
CD-Player 13
Wiedergabe einer MP3-CD 14
USB/SD-Betrieb 16
BT-Betrieb (nur 10009513 & 10009514) 16
Externe Audiogeräte nutzen 16
Wecker einstellen 17
Fehlerbehebung 18
Spezielle Entsorgungshinweise für Verbraucher in Deutschland 19
Hinweise zur Entsorgung 21
Konformitätserklärung 21
4
DE
TECHNISCHE DATEN
Artikelnummer
10006663, 10006664, 10009511, 10009512,
10009513, 10009514, 10027657, 10027658
Stromversorgung
100-240 V ~ 50/60 Hz
(AC/DC-Netzteil mitgeliefert)
Batterie (Fernbedienung) CR2025 3 V Knopfzellenbatterie
Ausgangsleistung
DC 5V 1,2A
Radio (FM)
UKW 87,5–108 MHz
BT (nur 10009513, 10009514)
BT Frequenzband 2402–2480MHz
BT Sendeleistung (max.) 4 dBm
Kompatibles BT-Prol A2DP, AVRCP / BT 5.0 + EDR
USB/CARD-Host
Schnittstelle
Entspricht USB 1.1 (volle Geschwindigkeit) /
USB 2.0 (Massenspeicherklasse).
Unterstützt nur Bulk- und CBI-Protokoll.
Unterstützt Dateien MPEG 1 Schicht 3 (Nicht DRM)
Bitrate-Unterstützung MP3 (32-320 kbps)
Allgemein
Lautsprecher 7,6 cm (3,0 Zoll) Konus (2x)
Lautsprecher-Impedanz 4 Ω
Ausgangsleistung
1,0 W pro Kanal, min. RMS an 4 Ω bei
1kHz mit nicht mehr als 10% Gesamt-
oberschwingungsverzerrungen
Eingangsbuchse AUDIO IN (3,5 mm)
Ausgangsbuchse Klinkenbuchse (3,5 mm)
CD-Player
Typ Single-Disc-Multi-Play-Compact-Disc-Player
Signalauslesung
Berührungslos, 3-Strahl-Halbleiter-
Laserabtastung
D/A-Wandler Multi-Bit-D/A-Wandler
Frequenzgang 20–20.000 Hz

5
DE
SICHERHEITSHINWEISE
Allgemeine Sicherheitshinweise
VORSICHT
Verletzungsgefahr! Hören Sie nicht mit übermäßig hoher
Lautstärke Musik, da dies zu Hörschäden führen kann.
• Kinder ab 8 Jahren, psychisch, sensorisch und körperlich eingeschränkte
Menschen dürfen das Gerät nur benutzen, wenn sie vorher von einer für
sie verantwortlichen Aufsichtsperson ausführlich mit den Funktionen und
den Sicherheitsvorkehrungen vertraut gemacht wurden und die damit
verbundenen Risiken verstehen.
• Legen Sie nur CDs in das CD-Fach.
• Öffnen Sie niemals die Geräteabdeckung und versuchen Sie keinesfalls,
selbst Reparaturen am Gerät vorzunehmen.
• Wenden Sie sich für Reparaturen an hierfür qualiziertes Personal. Das
Gerät enthält keine vom Nutzer zu wartenden Gerätebestandteile.
• Eine unsachgemäße Handhabung kann zu Schäden am Gerät und zum
Erlöschen des Garantieanspruchs führen.
Stromanschluss
• Verwenden Sie ausschließlich das im Lieferumfang enthaltene Netzteil.
Die Verwendung eines anderen Netzteils kann zum Erlöschen der
Garantie und/oder irreparablen Schäden am Gerät führen.
• Ziehen Sie während Gewittern den Stecker des Geräts aus der Steckdose.
• Stellen Sie sicher, dass das Gerät ausgeschaltet wurde, bevor Sie den
Netzstecker ziehen.
• Wenn Sie eine Mehrfachsteckdose oder den Stecker als Trennvorrichtung
verwenden, sollten Sie darauf achten, dass diese immer leicht zugänglich
und betriebsbereit sind.
• Werfen Sie Batterien niemals in offenes Feuer und versuchen Sie
keinesfalls, deren Außenhülle zu öffnen.
• Batterien sind, wenn sie verschluckt werden, gesundheitsgefährdend und
sollten deshalb außerhalb der Reichweite von kleinen Kindern gelagert
werden.

6
DE
Belüftung
• Blockieren oder bedecken Sie keinesfalls die Belüftungsöffnungen, Löcher
oder Öffnungen des Geräts, mit Gegenständen wie Teppichen, Tüchern
und ähnlichem, da andernfalls die Funktionalität und/oder die Belüftung
für eine sicherer Verwendung nicht gewährleistet werden können.
• Die Unterseite des Geräts kann warm werden, wenn das Gerät über einen
längeren Zeitraum verwendet wird. Dies ist normal.
Standort
• Vergewissern Sie sich, dass das Gerät auf einer achen und stabilen
Oberäche steht.
• Stellen Sie das Gerät maximal 1,4 Meter von der nächsten Steckdose
entfernt auf. Vergewissern Sie sich, dass das Netzstromkabel und die
Lautsprecherkabel nicht zu einer Stolperfalle werden können.
• Platzieren Sie das Gerät mindestens einen Meter von anderen
elektrischen Geräten entfernt, um Störgeräusche zu vermeiden.
• Stellen Sie das Gerät so auf, dass es sich innerhalb der Reichweite von
externen BT-Geräten (beispielsweise iPod/ iPhone/iPad/ Androidgeräte/
Computer etc.) bendet. Die Reichweite beträgt (ohne Hindernisse)
maximal 10 Meter (33 Fuß).
• Achten Sie darauf, dass das Gerät genug Platz nach oben hat, so dass die
Antenne richtig ausgerichtet werden kann.
• Stellen Sie das Gerät niemals direkt auf antike oder polierte Oberächen.
Hinweise zum Laser
VORSICHT
Verletzungsgefahr! Berühren Sie niemals die optische Linse im
CD-Fach und schauen sie auch nicht in diese hinein.
• Bei diesem Gerät handelt es sich um ein Laserprodukt der Klasse 1
• Die Verwendung von nicht in der Bedienungsanleitung aufgeführten
Steuerungen oder eine nicht autorisierte Modikation des Geräts,
kann zu einer schädlichen Freisetzung von Laserstrahlung führen.

7
DE
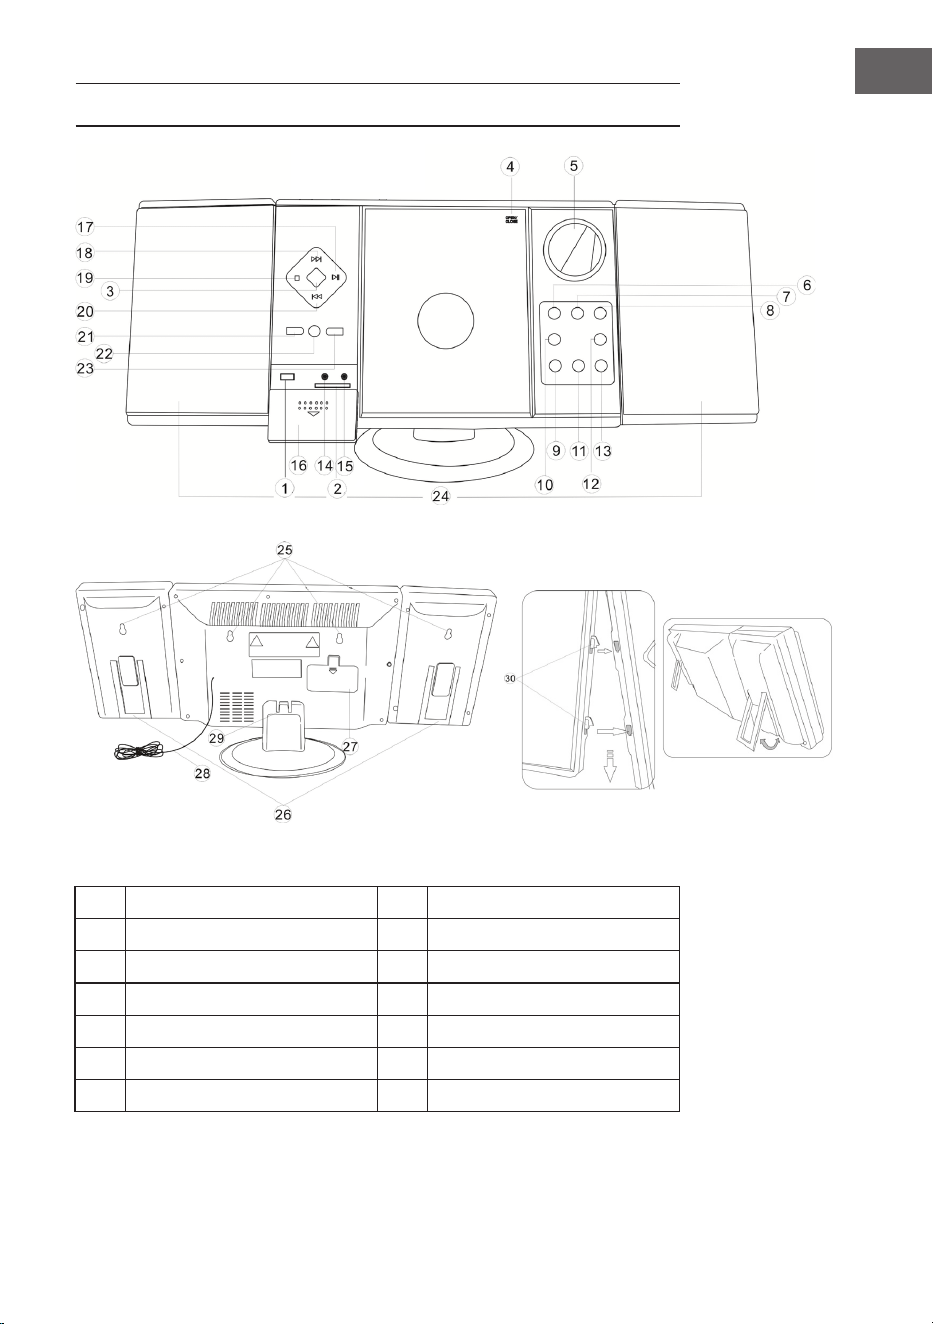
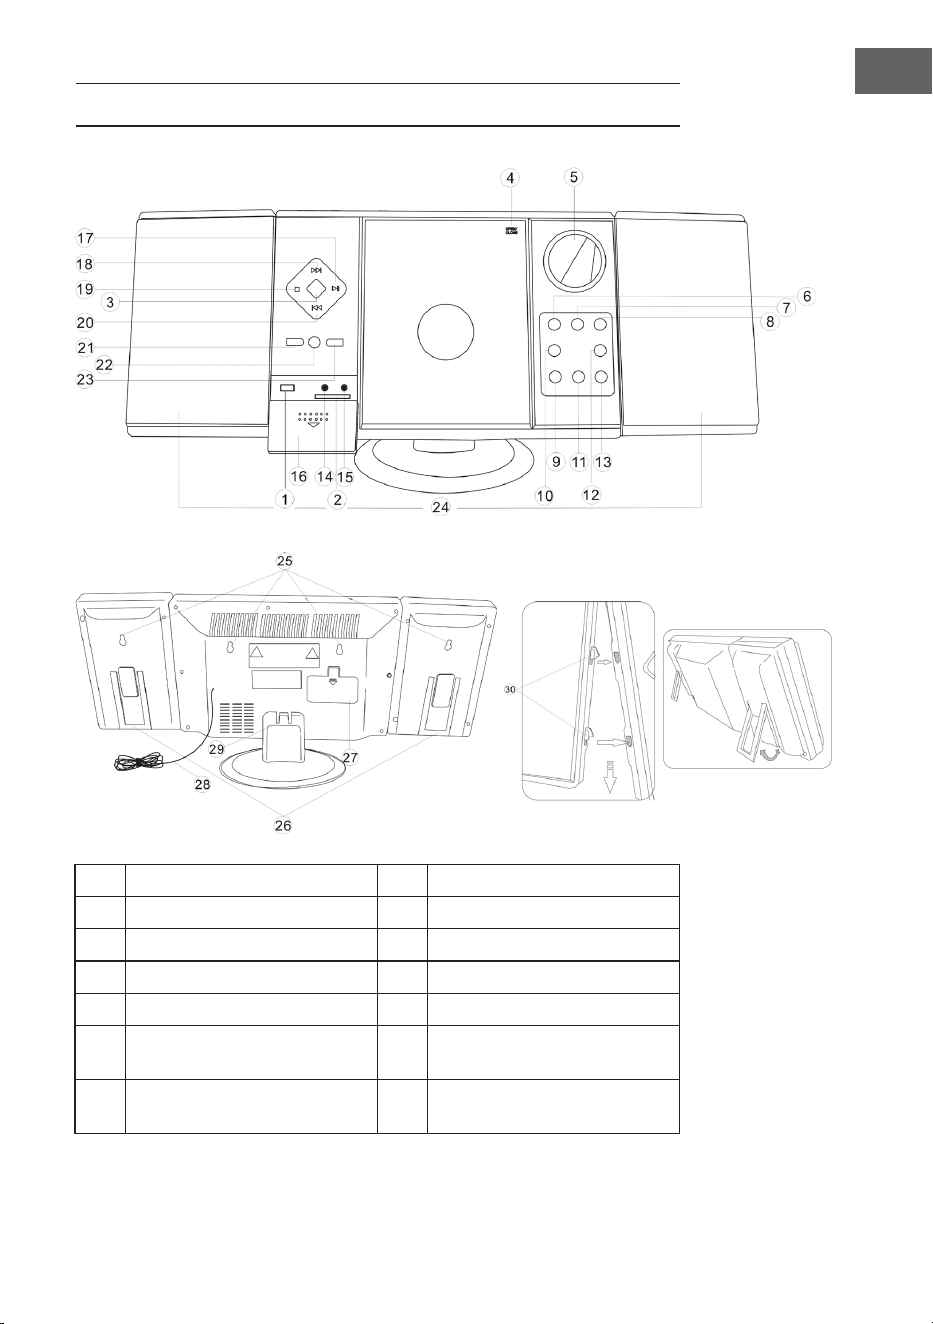
GERÄTEÜBERSICHT
1 USB-Eingang 8 Standby
2 SD-Slot 9 VOL- / Stunde
3 Moduswahl 10 Alarm stellen
4 CD-Tür 11 VOL+ / Minute
5 Display 12 Alarm an / aus
6 Sendersuche (abwärts) 13 Zeit stellen
7 Sendersuche (aufwärts) 14 Kopfhörer-Anschluss
8
DE
15 AUX-Eingang 23 Album / Preset+
16 Abdeckung 24 Lautsprecher
17 Abspielen / Pause / Scan 25 Wandmontagelöcher
18 Titelsuche vorwärts 26 Lautsprecherständer
19 Stop / Speichern 27 Batteriefach
20 Titelsuche rückwärts 28 UKW-Wurfantenne
21 Wiederholen / Prog / Preset- 29 Standfuß
22 Fernbedienungssensor 30 Lautsprecheraufhängungen
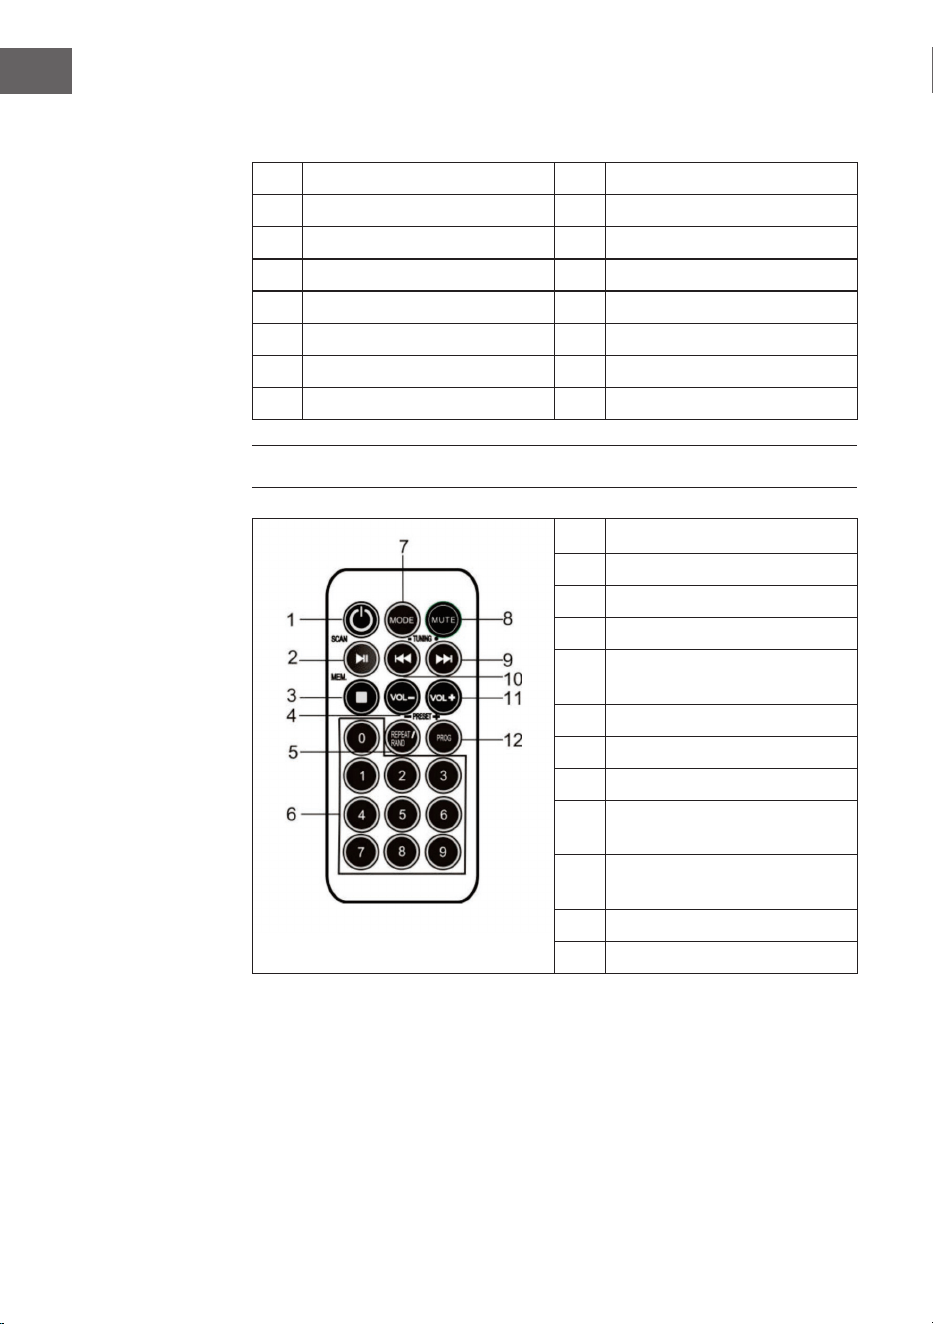
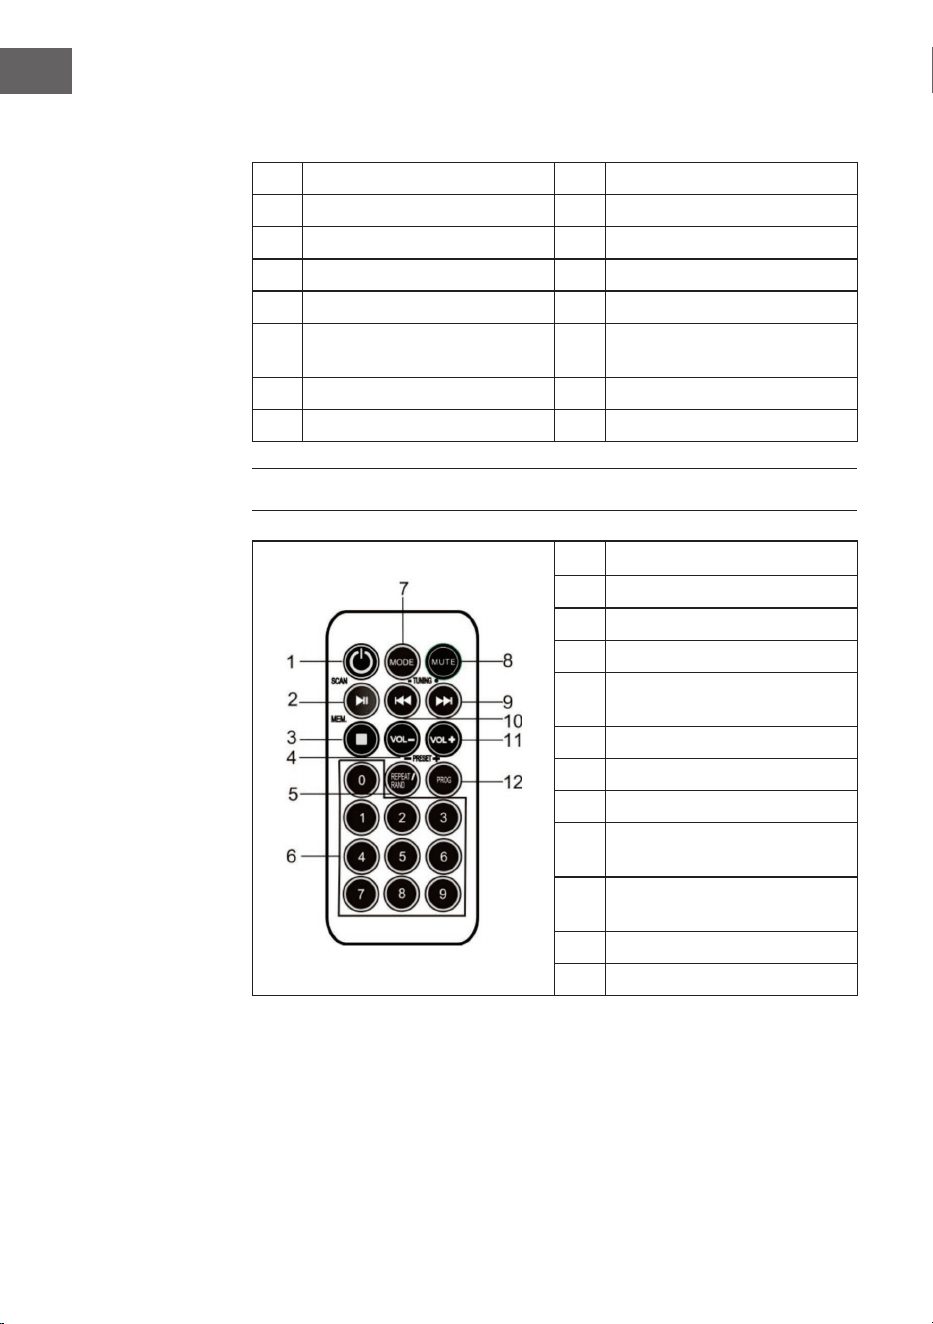
FERNBEDIENUNG
1 Standby
2 Abspielen / Pause / Scan
3 Stop / MEM.
4 Lautstärke -
5
Wiederholen /
Zufallswiedergabe / Preset-
6 Nummerntasten
7 Modus
8 Stummschalten
9
Titel vor/ Suchlauf vor/
Sender vorwärts suchen
10
Titel zurück/ Suchlauf zurück/
Sender rückwärts suchen
11 Lautstärke +
12 Prog / Preset+

9
DE
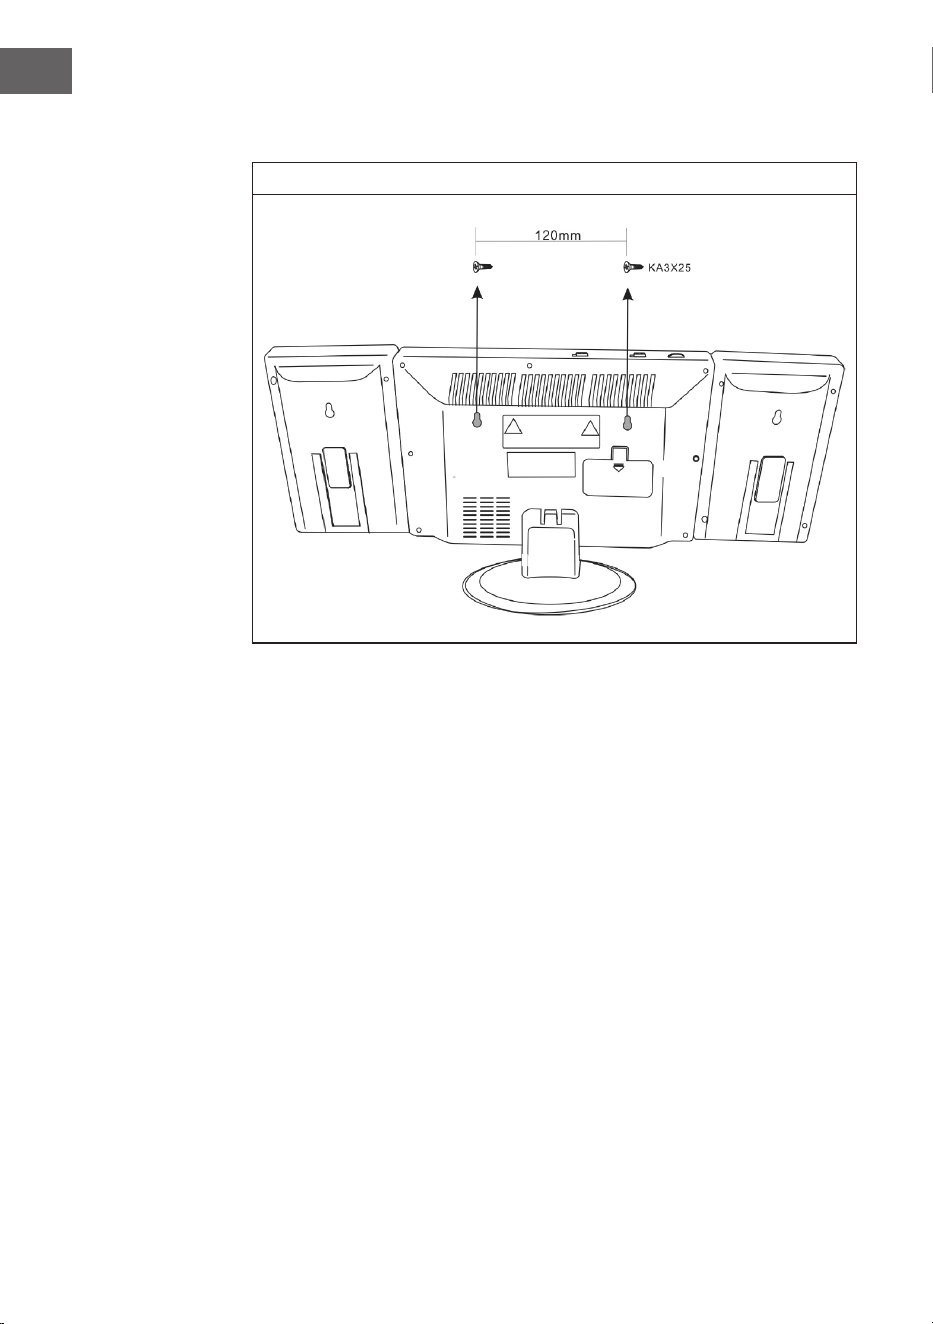
MONTAGE
Standfuß
Verbindung zwischen Lautsprechern und Haupteinheit

10
DE
Wandmontage
11
DE
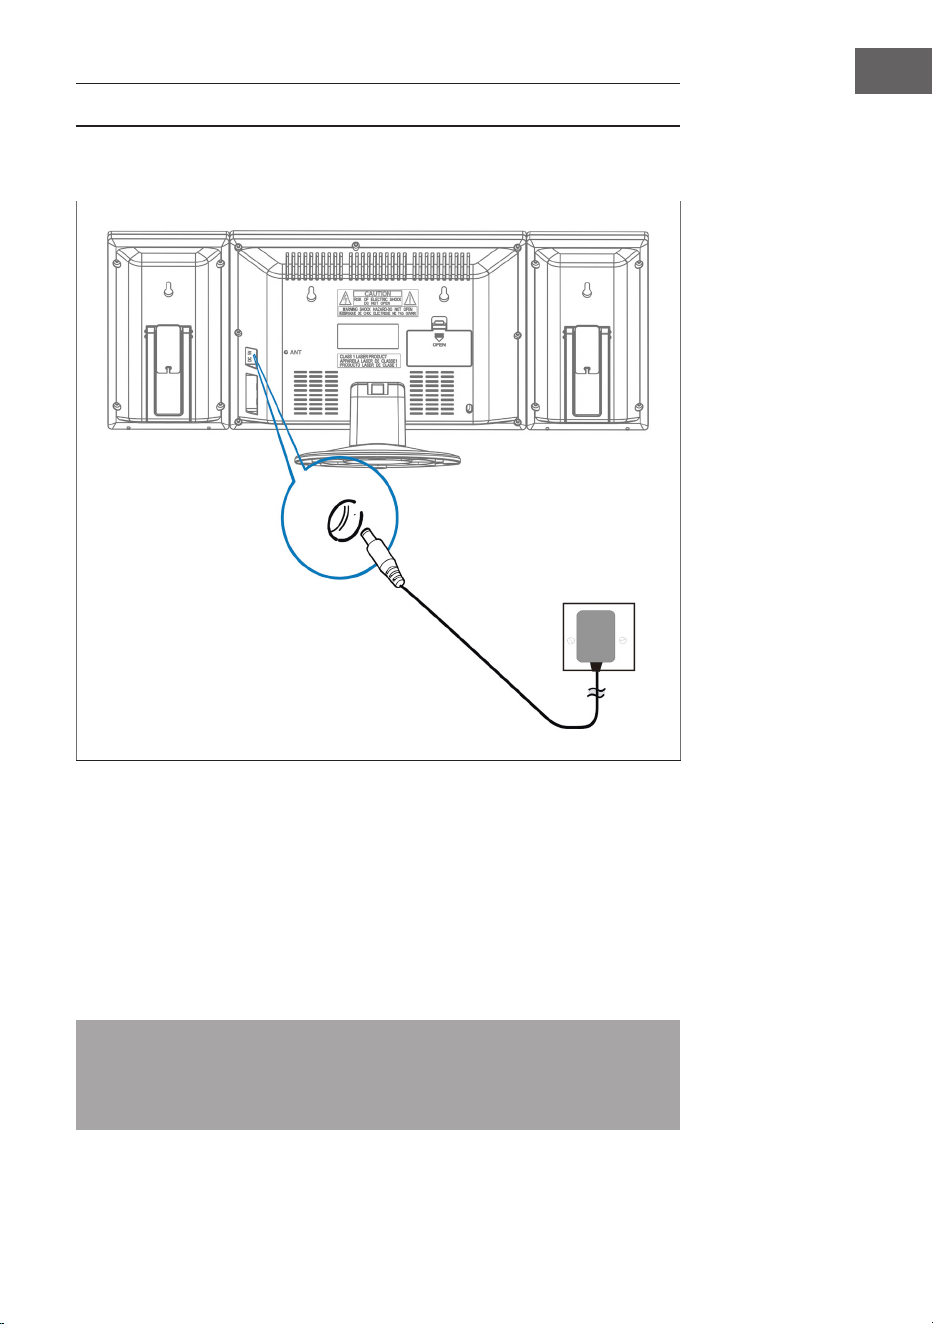
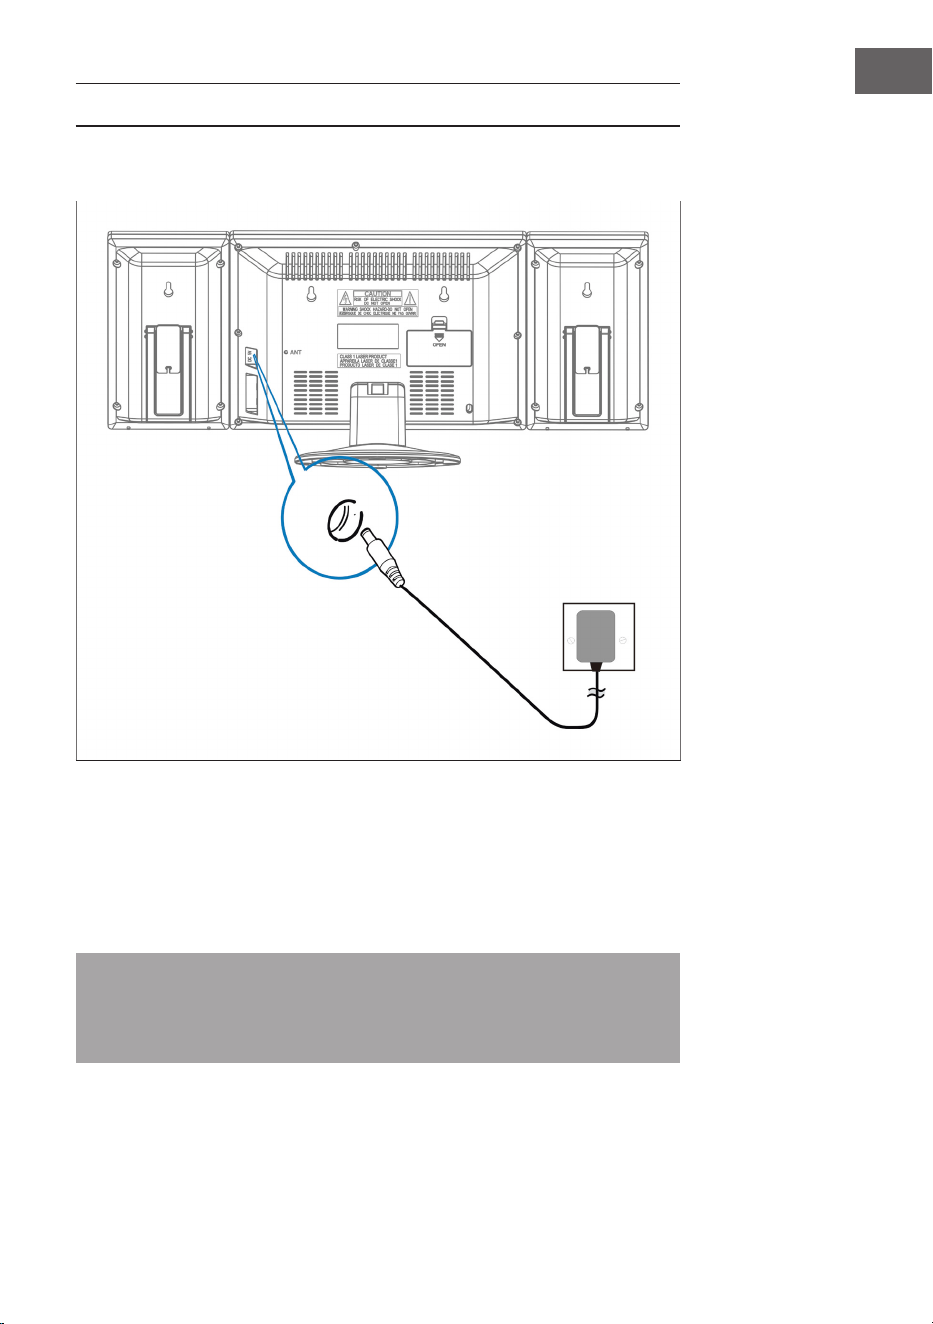
INBETRIEBNAHME UND BEDIENUNG
Anschluss des Netzteils
Stellen Sie sicher, dass der Stecker aus der Steckdose gezogen wurde, bevor
Sie irgendwelche Verbindungen herstellen. Vergewissern Sie sich, dass die
Steckdose, an die Sie das Netzteil anschließen, funktioniert und eine konstante
Stromversorgung liefert.
Batterie-Backup-System
Das System ist mit einem Batterie-Backup-System für die Uhr ausgestattet,
das von 2 Batterien (Typ AA) gespeist wird. Die Batterien sind nicht im
Lieferumfang enthalten.
Hinweis: Die Batterien können als Backup-Option installiert werden,
um die Uhrzeit der Uhr bei Stromausfall zu speichern. Im Falle eines
Stromausfalls wird die Uhrzeit nicht angezeigt, die Uhr läuft jedoch weiter,
so dass die aktuelle Zeit beim Neustart beibehalten wird.
Steckdose
und Netzteil
Dieses Ende des
Netzteils in den
Netzeingang
(DC 5V MAX 2A)
hinten am Gerät
stecken

12
DE
Einlegen der Batterien in die Fernbedienung
• Drücken Sie den Batteriefachdeckel nach unten und schieben Sie den
Deckel ab, um das Fach zu öffnen.
• Legen Sie die eine CR2025-Batterie entsprechend den
Polaritätsmarkierungen (+ und -) im Fachs und auf der Batterie ein.
• Setzen Sie den Deckel in das Fach auf, drücken Sie ihn leicht nach unten
und schieben Sie ihn nach innen, bis er einrastet.
Hinweis: Wenn die Fernbedienung für längere Zeit nicht benutzt wird,
kann es sein, dass die Batterie schwach wird und die Fernbedienung nicht
funktioniert. Ersetzen Sie die Batterie in diesem Fall bitte durch eine neue
Batterie. Die Batterie der Fernbedienung darf nicht übermäßiger Hitze wie
Sonnenschein, Feuer oder ähnlichem ausgesetzt werden.
Uhrzeit einstellen
Halten Sie im Bereitschaftszustand die TIME-Taste gedrückt, die Zeitanzeige
blinkt. Drücken Sie die Tasten VOL- /STUNDE und VOLUME +/MINUTE, um
die aktuelle Uhrzeit einzustellen.
RADIO
Hinweis: Bei der Sendersuche und beim Hören von Radiosendern wird auf
dem Display keine Frequenz angezeigt.
Automatische Sendersuche
Sie können die Funktion SCAN verwenden, um automatisch nach neuen
digitalen Radiosendern zu suchen und inaktive Sender zu entfernen.
Halten Sie die Taste PLAY / PAUSE / FM SCAN an der Stereoanlage oder auf
der Fernbedienung 2 Sekunden lang gedrückt, um [Scan] auszuwählen. Die
Anzahl der gefundenen Sender wird während der automatischen Sendersuche
angezeigt. Wenn die automatische Sendersuche beendet ist, wird der zuletzt
gehörte Sender eingestellt. Wenn der zuletzt gehörte Sender nicht mehr
verfügbar ist, wird der erste Sender in der alphabetischen Liste eingestellt.
Um einen bestimmten Radiosender manuell einzustellen, tippen Sie
wiederholt auf die Taste / an der Stereoanlage oder auf der
Fernbedienung.

13
DE
Gespeicherte Sender aufrufen
Wenn Sie sich im Radiomodus benden, können Sie die gespeicherten
Radiosender durch wiederholtes Drücken der Taste PRESET auf der
Fernbedienung aufrufen. Wenn Sie die gespeicherten Sender zum ersten Mal
aufrufen, blinkt [P01] im Display.
Hinweis: Die Uhr und die Radiosender müssen bei einer
Stromunterbrechung oder einem Stromausfall neu eingestellt werden.
[00:00] erscheint und blinkt auf den Display, um Sie darauf hinzuweisen,
dass die Stromzufuhr unterbrochen wurde und die Uhr neu eingestellt
werden muss. Nachdem Sie die Uhr neu eingestellt haben, starten Sie
erneut eine automatische Sendersuche.
CD-PLAYER
1. Schalten Sie das Gerät ein, indem Sie die Taste STANDBY drücken. Das
Display geht an.
2. Drücken Sie die MODE-Taste, um den CD-Modus zu wählen.
3. Öffnen Sie die CD-Tür, indem Sie auf Markierung OPEN/CLOSE an der CD-
Tür drücken. Legen Sie eine CD mit der Etikettenseite nach oben ein und
schließen Sie dann die CD-Tür.
4. Die Wiedergabe beginnt ab Titel 1, sobald der Player das Lesen des
Inhaltsverzeichnisses abgeschlossen hat. Das Wiedergabesymbol
erscheint durchgehend auf dem Display.
5. Drücken Sie während der Wiedergabe die Taste ABSPIELEN / PAUSE,
um die Wiedergabe zu unterbrechen. Das Wiedergabesymbol blinkt.
Drücken Sie die Taste ABSPIELEN / PAUSE erneut, um die Wiedergabe
fortzusetzen.
6. Stellen Sie mit den Tasten LAUTSTÄRKE (+/-) die gewünschte Lautstärke
ein.

14
DE
WIEDERGABE EINER MP3-CD
1. Schalten Sie das Gerät ein, indem Sie die Taste STANDBY drücken. Das
Display geht an.
2. Drücken Sie die MODE-Taste, um den CD-Modus zu wählen.
3. Öffnen Sie die CD-Tür, indem Sie auf Markierung OPEN/CLOSE an der CD-
Tür drücken. Legen Sie eine MP3-CD ein.
4. Drücken Sie die ALBUM-Taste, und die Disc-Informationen werden
angezeigt.
5. Die Wiedergabe beginnt ab Titel 1, sobald der Player das Lesen des
Inhaltsverzeichnisses abgeschlossen hat. Das Wiedergabesymbol
erscheint durchgehend auf dem Display.
6. Drücken Sie während der Wiedergabe die Taste ABSPIELEN / PAUSE,
um die Wiedergabe zu unterbrechen. Das Wiedergabesymbol blinkt.
Drücken Sie die Taste ABSPIELEN / PAUSE erneut, um die Wiedergabe
fortzusetzen.
Einen einzelnen Titel wiederholen
Wenn die Taste WIEDERHOLEN / ZUFALLSWIEDERGABE einmal gedrückt
wird, blinkt die entsprechende Anzeige im Display. Der aktuelle Titel wird
einmal wiederholt.
Alle Titel wiederholen
Wenn die Taste WIEDERHOLEN / ZUFALLSWIEDERGABE zweimal gedrückt
wird, blinkt die entsprechende Anzeige im Display. Die komplette CD wird
kontinuierlich wiederholt.
So brechen Sie die Wiederholungsfunktion ab: Drücken Sie die
Wiederholungstaste, bis die Wiederholungsanzeige aus ist.
Titel überspringen / Innerhalb eines Titels suchen
• Tippen Sie im Wiedergabe- oder Pausenmodus auf die Taste / ,
um zum nächsten Titel oder zurück zum Anfang des aktuellen Titels zu
wechseln.
• Halten Sie während der Wiedergabe die Taste / gedrückt, um mit
hoher Geschwindigkeit eine bestimmte Stelle innerhalb eines Titels zu
suchen.
15
DE
Titel in einer bestimmten Reihenfolge programmieren
Mit dieser Funktion können Musiktitel in einer programmierten Reihenfolge
abgespielt werden.
Hinweis: Das Programm kann nur im STOP-Modus eingestellt werden.
1. Drücken Sie die Taste PROG einmal. Sowohl die Programmnummer [01]
als auch die Anzeige [PROG] blinken auf dem Display.
2. Drücken Sie die Taste / , um den zu programmierende Titel
auszuwählen. Die Anzeige [PROG] blinkt, um Sie zur Bestätigung
aufzufordern.
3. Drücken Sie die Taste PROG erneut, um die Auswahl zu speichern. Die
Programmnummer springt auf [02] und blinkt zusammen mit der Anzeige
[PROG].
4. Drücken Sie die Taste / , um den nächstem zu programmierende
Titel auszuwählen. Die Anzeige [PROG] blinkt, um Sie zur Bestätigung
aufzufordern.
5. Drücken Sie die Taste PROG erneut, um Ihre zweite Auswahl zu speichern.
Wiederholen Sie die Schritte 2-4, um bis zu 20 Titel zu programmieren.
Sobald Sie den 20. Titel gespeichert haben, zeigt das Display automatisch
die programmierten Titel ein der von ihnen eingegebenen Reihenfolge an.
Am Ende der Programmdurchsicht blinken sowohl die Programmnummer
[01], als auch die Anzeige [PROG] auf dem Display.
6. Drücken Sie die Taste ABSPIELEN / PAUSE, um die programmierte
Sequenz abzuschließen und zu starten.
7. Drücken Sie auf , um während der Wiedergabe des Programms direkt
zu anderen Titeln zu gelangen. Drücken Sie zweimal auf , um zu einem
vorherigen Titel zurückzukehren.
8. Drücken Sie die Taste REPEAT / RANDOM, um einen bestimmten
Titel (Repeat1) oder alle Titel im Programm (Repeat All) wiederholt
abzuspielen.
• Der Player stoppt, wenn alle programmierten Titel einmal durchgespielt
worden sind. Um die Programmwiedergabe zu wiederholen, drücken Sie
die Taste PROG gefolgt von der Taste ABSPIELEN / PAUSE.
• Um die Programmwiedergabe abzubrechen, drücken Sie bei laufender
Programmwiedergabe zweimal die Taste STOP oder öffnen Sie die CD-Tür
im Stop-Modus.
• Drücken Sie Taste ALBUM, um das Album zu wählen. Drücken Sie die Taste
MODE, um die Tonquelle zu wechseln.
• Um den Player auszuschalten, drücken Sie die Taste STANDBY. Die
Hintergrundbeleuchtung des Displays erlischt.

16
DE
USB/SD-BETRIEB
1. Wählen Sie den USB/SD-Modus mit dem Moduswahlschalterund legen Sie
ein USB- bzw. SD- Speichermedium ein.
2. Mit dem Knopf CD/USB/SD-Umschaltung können Sie durch die
Abspielmodi CD, USB und SD rotieren. Das Display wird „USB“ oder „SD“
anzeigen, wenn der entsprechende Modus aktiv ist.
3. Die Nutzung der Funktionen Wiederholen, Programmieren, Titelsprung,
Titelsuche und Album erfolgt jeweils wie im CD-Betrieb.
4. Es besteht keine Möglichkeit, sich von einem USB- oder SD-Datenträger
wecken zu lassen.
BT-BETRIEB (NUR 10009513 & 10009514)
1. Wählen Sie BT mit der Taste MODE aus.
2. Wählen Sie die Anlage auf Ihrem BT-sendenden Gerät aus. Die Kennung
lautet „V329“. Das Passwort lautet “0000”
3. Warten Sie bis die Verbindung hergestellt ist und spielen Sie die Musik ab.
4. Die BT werden sich erinnern, die letzte Verbindung und es wird
automatisch eine Verbindung.
5. Es kann dazu führen, dass die Musik-System kann nicht an andere
anschließen, wenn es zu viele Geräte miteinander verbindet. Bitte halten
PLAY / PAUSE-Taste zwei Sekunden, um den Speicher zu reinigen.
EXTERNE AUDIOGERÄTE NUTZEN
Sie können externe Audiogeräte, wie Laptops und MP3-Player, über das Gerät
betreiben.
1. Schieben Sie die ABDECKUNG nach unten.
2. Verbinden Sie das externe Audiogerät mit der Anlage.
3. Wählen Sie AUX mit der Taste MODE aus.
4. Schalten Sie die Anlage ein.
5. Spielen Sie Musik etc. über das externe Audiogerät ab.
6. Stellen Sie eine adäquate Lautstärke beim externen Audiogerät und der
Anlage ein.
7. Schalten Sie das Gerät nach der Nutzung ab.

17
DE
WECKER EINSTELLEN
Weckzeit einstellen
1. Halten Sie den ALARM-Knopf gedrückt und drücken Sie wiederholt den
STUNDEN- KNOPF.
2. Halten Sie den ALARM-Knopf gedrückt und drücken Sie wiederholt den
MINUTEN-KNOPF.
Hinweis: Wenn die “PM”-Anzeige auf dem Display leuchtet, zeigt das Gerät
eine Uhrzeit in der zweiten Tages- hälfte an. Wenn keine PM-Anzeige
aueuchtet, zeigt das Gerät eine Uhrzeit in der ersten Tageshälfte.
Alarm ein- und ausstellen
1. Drücken Sie die Taste ALARM AN/AUS einmal. Das Alarmsymbol (Glocke)
erscheint auf dem Display und der Alarm ist aktiv.
2. Drücken Sie die Taste ALARM AN/AUS ein weiteres Mal. Das Alarmsymbol
(Glocke) erlischt und der Alarm ist ausgeschaltet.
Weckzeit prüfen
Um die Weckzeit zu prüfen, drücken Sie die Taste ALARM AN/AUS.
Radioalarm denieren
Denieren Sie eine Weckzeit, stellen Sie den Moduswahlschalterauf Radio,
stellen Sie eine Radiostation ein und passen Sie die Lautstärke an, schalten Sie
das Gerät aus.
CD-Alarm denieren
Denieren Sie eine Weckzeit, stellen Sie den Moduswahlschalterauf CD, legen
Sie eine CD ein und passen Sie die Lautstärke an, schalten Sie das Gerät aus.
Alarm mit Weckgeräusch denieren
1. Setzen Sie den Moduswahlschalterauf ALARM.
2. Mit Erreichen des Weckzeitpunktes wird das Gerät 3 Minuten lang ein
Weckgeräusch einblenden.
3. Wenn der Alarm am nächste Tag nicht eingeschaltet werden soll, drücken
Sie die Taste ALARM AN/AUS. Auf dem Display erlischt das Alarmsymbol
(Glocke).
18
DE
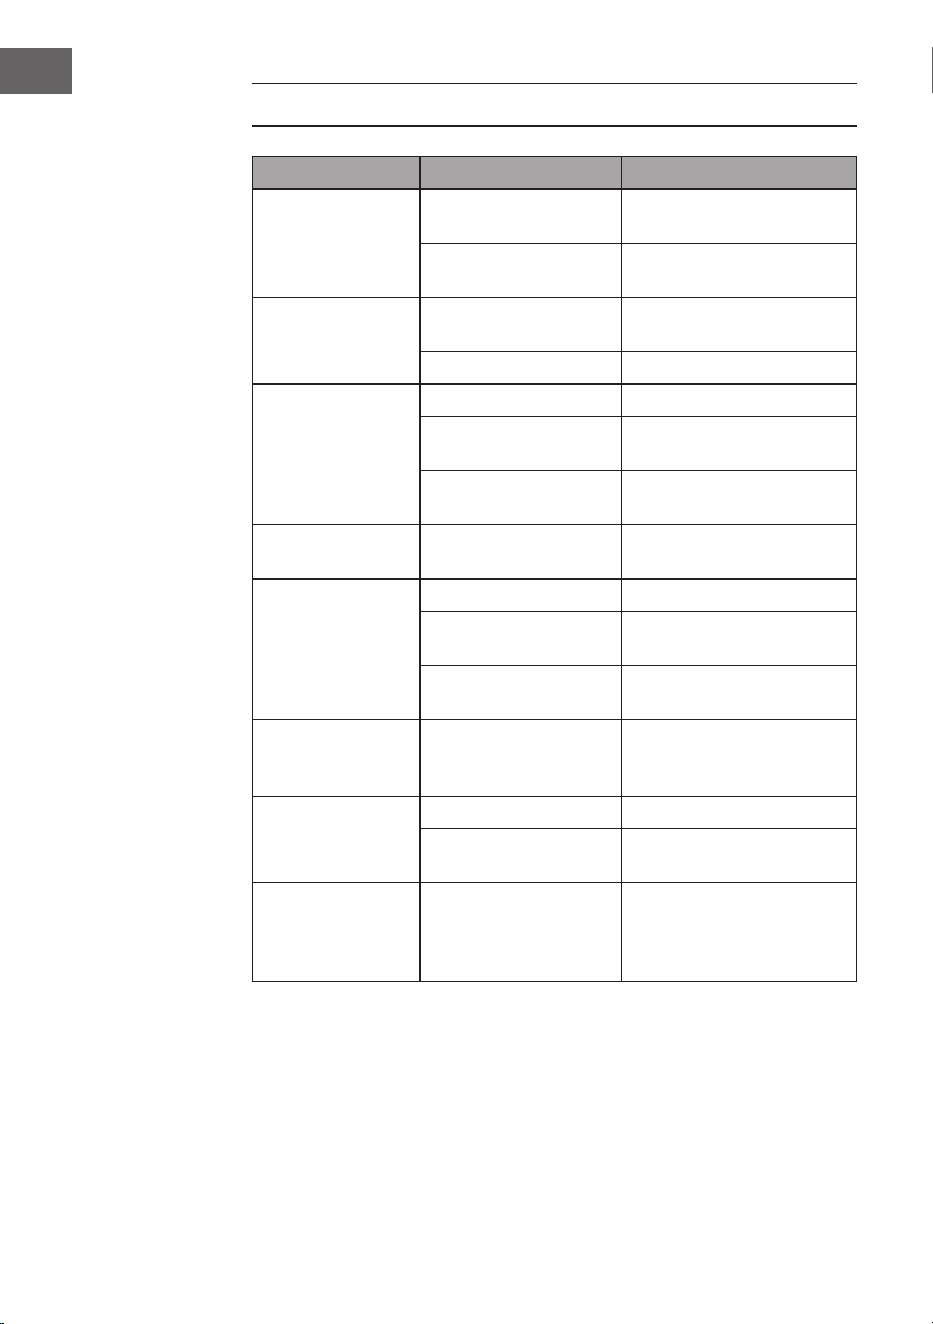
FEHLERBEHEBUNG
Problem Mögliche Ursache Lösungsansatz
Radiosignal
rauscht.
Radiostation nicht
richtig eingestellt.
Radiostation nachstellen.
Radioantenne nicht
entwickelt.
Radioantenne entwickeln
Kein
Radioempfang.
Gerät nicht im RADIO-
Modus.
Wählen Sie den RADIO-
Modus.
Lautstärke zu niedrig Lautstärke erhöhen.
CD-Laufwerk läuft
nicht.
CD-Modus nicht aktiv Wählen Sie den CD-Modus.
CD liegt nicht richtig im
Laufwerk.
Legen Sie die CD richtig ein.
CD enthält unlesbare
Daten.
Prüfen Sie die CD-Inhalte.
CD springt. CD ist zerkratzt. Reinigen Sie die CD oder
ersetzen Sie diese.
Unerwünschte
Geräusche beim
Abspielen der CD.
CD ist verschmutzt. Reinigen Sie die CD.
Linse ist verschmutzt. Reinigen Sie die Linse mit
einer Reinigungs-CD.
Externe physikalische
Einwirkungen.
Stellen Sie das Gerät um.
Verzerrter
Sound bei hoher
Laustärke.
Lautstärkeregler auf
Maximaleinstellung.
Reduzieren Sie die
Lautstärke.
Kein Weckalarm. Alarm nicht aktiv. Aktivieren Sie den Alarm.
Falsche Weckzeit. Achten Sie darauf, dass AM/
PM korrekt eingestellt ist.
Es wird keine
BT- Verbindung
aufgebaut.
Der Systemspeicher
ist voll.
Halten Sie die Taste
WIEDERGABE / PAUSE
2Sekunden gedrückt, um
den Speicher zu löschen.

19
DE
SPEZIELLE ENTSORGUNGSHINWEISE FÜR
VERBRAUCHER IN DEUTSCHLAND
Entsorgen Sie Ihre Altgeräte fachgerecht. Dadurch wird gewährleistet, dass
die Altgeräte umweltgerecht verwertet und negative Auswirkungen auf die
Umwelt und menschliche Gesundheit vermieden werden. Bei der Entsorgung
sind folgende Regeln zu beachten:
• Jeder Verbraucher ist gesetzlich verpichtet, Elektro- und
Elektronikaltgeräte (Altgeräte) sowie Batterien und Akkus
getrennt vom Hausmüll zu entsorgen. Sie erkennen die
entsprechenden Altgeräte durch folgendes Symbol der
durchgestrichene Mülltonne (WEEE Symbol).
• Sie haben Altbatterien und Altakkumulatoren, die nicht vom Altgerät
umschlossen sind, sowie Lampen, die zerstörungsfrei aus dem Altgerät
entnommen werden können, vor der Abgabe an einer Entsorgungsstelle
vom Altgerät zerstörungsfrei zu trennen.
• Bestimmte Lampen und Leuchtmittel fallen ebenso unter das Elektro- und
Elektronikgesetz und sind dementsprechend wie Altgeräte zu behandeln.
Ausgenommen sind Glühbirnen und Halogenlampen. Entsorgen Sie
Glühbirnen und Halogenlampen bitte über den Hausmüll, sofern Sie nicht
das WEEE Symbol tragen.
• Jeder Verbraucher ist für das Löschen von personenbezogenen Daten auf
dem Elektro- bzw. Elektronikgerät selbst verantwortlich.
Rücknahmepicht der Vertreiber
Vertreiber mit einer Verkaufsäche für Elektro- und Elektronikgeräte von
mindestens 400 Quadratmetern sowie Vertreiber von Lebensmitteln mit einer
Gesamtverkaufäche von mindestens 800 Quadratmetern, die mehrmals im
Kalenderjahr oder dauerhaft Elektro- und Elektronikgeräte anbieten und auf
dem Markt bereitstellen, sind verpichtet,
1 bei der Abgabe eines neuen Elektro- oder Elektronikgerätes an einen
Endnutzer ein Altgerät des Endnutzers der gleichen Geräteart, das
im Wesentlichen die gleichen Funktionen wie das neue Gerät erfüllt,
am Ort der Abgabe oder in unmittelbarer Nähe hierzu unentgeltlich
zurückzunehmen und
2 auf Verlangen des Endnutzers Altgeräte, die in keiner äußeren
Abmessung größer als 25 Zentimeter sind, im Einzelhandelsgeschäft
oder in unmittelbarer Nähe hierzu unentgeltlich zurückzunehmen; die
Rücknahme darf nicht an den Kauf eines Elektro- oder Elektronikgerätes
geknüpft werden und ist auf drei Altgeräte pro Geräteart beschränkt.

20
DE
• Bei einem Vertrieb unter Verwendung von Fernkommunikationsmitteln
ist die unentgeltliche Abholung am Ort der Abgabe auf Elektro- und
Elektronikgeräte der Kategorien 1, 2 und 4 gemäß § 2 Abs. 1 ElektroG,
nämlich „Wärmeüberträger“, „Bildschirmgeräte“ (Oberäche von mehr
als 100 cm²) oder „Großgeräte“ (letztere mit mindestens einer äußeren
Abmessung über 50Zentimeter) beschränkt. Für andere Elektro- und
Elektronikgeräte (Kategorien 3, 5, 6) ist eine Rückgabemöglichkeit in
zumutbarer Entfernung zum jeweiligen Endnutzer zu gewährleisten.
• Altgeräte dürfen kostenlos auf dem lokalen Wertstoffhof oder in
folgenden Sammelstellen in Ihrer Nähe abgegeben werden:
www.take-e-back.de
• Für Elektro- und Elektronikgeräte der Kategorien 1, 2 und 4 an bieten
wir auch die Möglichkeit einer unentgeltlichen Abholung am Ort der
Abgabe. Beim Kauf eines Neugeräts haben sie die Möglichkeit eine
Altgerätabholung über die Webseite auszuwählen.
• Batterien können überall dort kostenfrei zurückgegeben werden, wo sie
verkauft werden (z. B. Super-, Bau-, Drogeriemarkt). Auch Wertstoff- und
Recyclinghöfe nehmen Batterien zurück. Sie können Batterien auch per
Post an uns zurücksenden. Altbatterien in haushaltsüblichen Mengen
können Sie direkt bei uns von Montag bis Freitag zwischen 08:00 und
16:00 Uhr unter der folgenden Adresse unentgeltlich zurückgeben:
Chal-Tec Fulllment GmbH
Norddeutschlandstr. 3
47475 Kamp-Lintfort
• Wichtig zu beachten ist, dass Lithiumbatterien aus Sicherheitsgründen
vor der Rückgabe gegen Kurzschluss gesichert werden müssen (z. B. durch
Abkleben der Pole).
• Finden sich unter der durchgestrichenen Mülltonne auf der Batterie
zusätzlich die Zeichen Cd, Hg oder Pb ist das ein Hinweis darauf, dass die
Batterie gefährliche Schadstoffe enthält. (»Cd« steht für Cadmium, »Pb«
für Blei und »Hg« für Quecksilber).
Hinweis zur Abfallvermeidung
Indem Sie die Lebensdauer Ihrer Altgeräte verlängern, tragen Sie dazu
bei, Ressourcen efzient zu nutzen und zusätzlichen Müll zu vermeiden.
Die Lebensdauer Ihrer Altgeräte können Sie verlängern indem Sie defekte
Altgeräte reparieren lassen. Wenn sich Ihr Altgerät in gutem Zustand bendet,
könnten Sie es spenden, verschenken oder verkaufen.

21
DE
HINWEISE ZUR ENTSORGUNG
Wenn es in Ihrem Land eine gesetzliche Regelung
zur Entsorgung von elektrischen und elektronischen
Geräten gibt, weist dieses Symbol auf dem Produkt
oder auf der Verpackung darauf hin, dass dieses
Produkt nicht im Hausmüll entsorgt werden darf.
Stattdessen muss es zu einer Sammelstelle für das
Recycling von elektrischen und elektronischen Geräten
gebracht werden. Durch regelkonforme Entsorgung
schützen Sie die Umwelt und die Gesundheit
Ihrer Mitmenschen vor negativen Konsequenzen.
Informationen zum Recycling und zur Entsorgung
dieses Produkts, erhalten Sie von Ihrer örtlichen
Verwaltung oder Ihrem Hausmüllentsorgungsdienst.
Dieses Produkt enthält Batterien. Wenn es in Ihrem
Land eine gesetzliche Regelung zur Entsorgung von
Batterien gibt, dürfen die Batterien nicht im Hausmüll
entsorgt werden. Informieren Sie sich über die
örtlichen Bestimmungen zur Entsorgung von Batterien.
Durch regelkonforme Entsorgung schützen Sie die
Umwelt und die Gesundheit Ihrer Mitmenschen vor
negativen Konsequenzen.
KONFORMITÄTSERKLÄRUNG
Hersteller:
Chal-Tec GmbH, Wallstraße 16, 10179 Berlin,
Deutschland.
Importeur für Großbritannien:
Berlin Brands Group UK Limited
PO Box 42
272 Kensington High Street
London, W8 6ND
United Kingdom
Hiermit erklärt Chal-Tec GmbH, dass der
Funkanlagentyp V-12 der Richtlinie 2014/53/
EU entspricht. Der vollständige Text der EU-
Konformitätserklärung ist unter der folgenden
Internetadresse verfügbar: use.berlin/10006663


23
EN
Dear Customer,
Congratulations on purchasing this device. Please read
the following instructions carefully and follow them to
prevent possible damages. We assume no liability for
damage caused by disregard of the instructions and
improper use. Scan the QR code to get access to the
latest user manual and more product information.
CONTENTS
Technical Data 24
Safety Instructions 25
Product Overview 27
Remote Control 28
Mounting 29
Commissioning and Operation 31
Radio 32
CD Player 33
Playing an MP3 CD 34
USB/SD Operation 36
BT Mode (10009513 & 10009514 only) 36
Using External Audio Devices 36
Setting the Alarm Clock 37
Troubleshooting 38
Disposal Considerations 39
Declaration of Conformity 39

24
EN
TECHNICAL DATA
Product code
10006663, 10006664, 10009511, 10009512,
10009513, 10009514, 10027657, 10027658
Power supply
100-240 V ~ 50/60 Hz
(AC / DC power supply included)
Battery (remote control) CR2025 3 V button cell battery
Output power
DC 5V 1.2A
Radio (FM)
VHF 87.5–108 MHz
BT (only 10009513, 10009514)
BT frequency band 2402–2480MHz
BT transmission power
(max.)
4 dBm
Compatible BT prole A2DP, AVRCP / BT 5.0 + EDR
USB/CARD Host
Interface
Complies with USB 1.1 (full speed) / USB 2.0
(mass storage class).
Only supports bulk and CBI protocol.
Supports les MPEG 1 Layer 3 (Not DRM)
Bit rate support MP3 (32-320 kbps)
General
Speaker 7.6 cm (3.0") cone (2x)
Speaker impedance 4 Ω
Output power
1.0 W per channel, min. RMS at 4 Ω with 1 kHz
with not more than 10 total soft harmonic
distortions
Input socket AUDIO IN (3.5 mm)
Output socket Jack socket (3.5 mm)
CD player
Type Single disc multi-play compact disc player
Signal reading
Contactless, 3-beam semiconductor laser
scanning
D / A converter Multi-bit D / A converter
Frequency response 20–20,000 Hz

25
EN
SAFETY INSTRUCTIONS
General safety instructions
CAUTION
Risk of injury. Do not listen to music at excessive volume as this
may result in a loss of hearing.
• This device may be only used by children 8 years old or older and persons
with limited physical, sensory and mental capabilities and/ or lack of
experience and knowledge, provided that they have been instructed in
use of the device by a responsible person who understands the associated
risks.
• Only put CDs in the CD compartment.
• Never open the device cover. Do not attempt to repair the device by
yourself.
• Consult qualied personnel for repairs. The device does not contain user-
serviceable device components.
• Improper handling may damage the device and therefore void the
warranty.
Power Connection
• Use only the supplied power adapter. Use of any other adapter will void
the warranty and / or cause irreparable damage to the device.
• Unplug the device from the main power supply during thunderstorms.
• Be sure to turn off the power before unplugging the power adapter.
• If you are using a multiple socket power strip or the plug as a splitting
device, ensure that the plugs are always accessible and ready for use.
• Never throw batteries into an open re and do not attempt to open their
outer shells.
• Batteries are harmful if swallowed and should therefore be stored out of
the reach of small children.

26
EN
Ventilation
• Do not block or cover the ventilation holes, vents, or openings of the unit
with anything, such as carpet, cloth, or similar, as otherwise the openings
may not be able to ensure functionality and / or ventilation for safe use.
• The bottom of the unit may become warm if the unit is used for an
extended period of time. This is normal.
Location
• Make sure the unit is standing on a at and stable surface.
• Do not place the device more than 4.5 feet (1.4 meters) away from the
nearest outlet. Make sure that the power adapter and speaker cords do
not create a tripping hazard.
• Place the device at least 3.25 feet (1 meter) away from other electrical
devices in order to avoid noise interference.
• Place the device within the range of external BT devices (for example,
iPod/ iPhone / iPad / Android devices / computers, etc.). The range is
(without obstacles) a maximum of 33 feet (10 meters).
• Make sure the device has enough room for the antenna to be properly
aligned.
• Never place the unit directly on antique or polished surfaces.
Notes on the laser
CAUTION
Risk of injury. Never touch the optical lens in the CD
compartment or look directly into it.
• This device is a Class 1 laser product
• The use of controls not listed in the operating instructions or unauthorized
modication of the unit may result in the harmful release of laser
radiation.
27
EN
PRODUCT OVERVIEW
1 USB input 8 Standby
2 SD card slot 9 VOL- / hour
3 MODE selector switch 10 Alarm set
4 CD door 11 VOL+ / minute
5 Display 12 Alarm on / off
6 Channel search (downwards) 13 Time set
7 Channel search (upwards) 14 Headphone connection

28
EN
15 AUX input 23 Album / Preset+
16 Cover 24 Loudspeaker
17 Play / Pause / Scan 25 Wall mounting holes
18 Skip title / search forward 26 Speaker stand
19 Stop / Memory 27 Battery compartment
20 Skip title / search backwards 28 FM pigtail antenna
21 Repeat / Prog / Preset- 29 Stand foot
22 Remote control sensor 30 Speaker suspensions
REMOTE CONTROL
1 Standby
2 Play / Pause / Scan
3 Stop / MEM.
4 Volume -
5
REPEAT / RANDOM /
PRESET -
6 Number keys
7 MODE
8 MUTE
9
Skip/search forward /
TUNING +
10
Skip/search backward /
TUNING -
11 Volume +
12 Prog / Preset+

29
EN
MOUNTING
Pedestal
Connection between speakers and main unit

30
EN
Wall mounting
31
EN
COMMISSIONING AND OPERATION
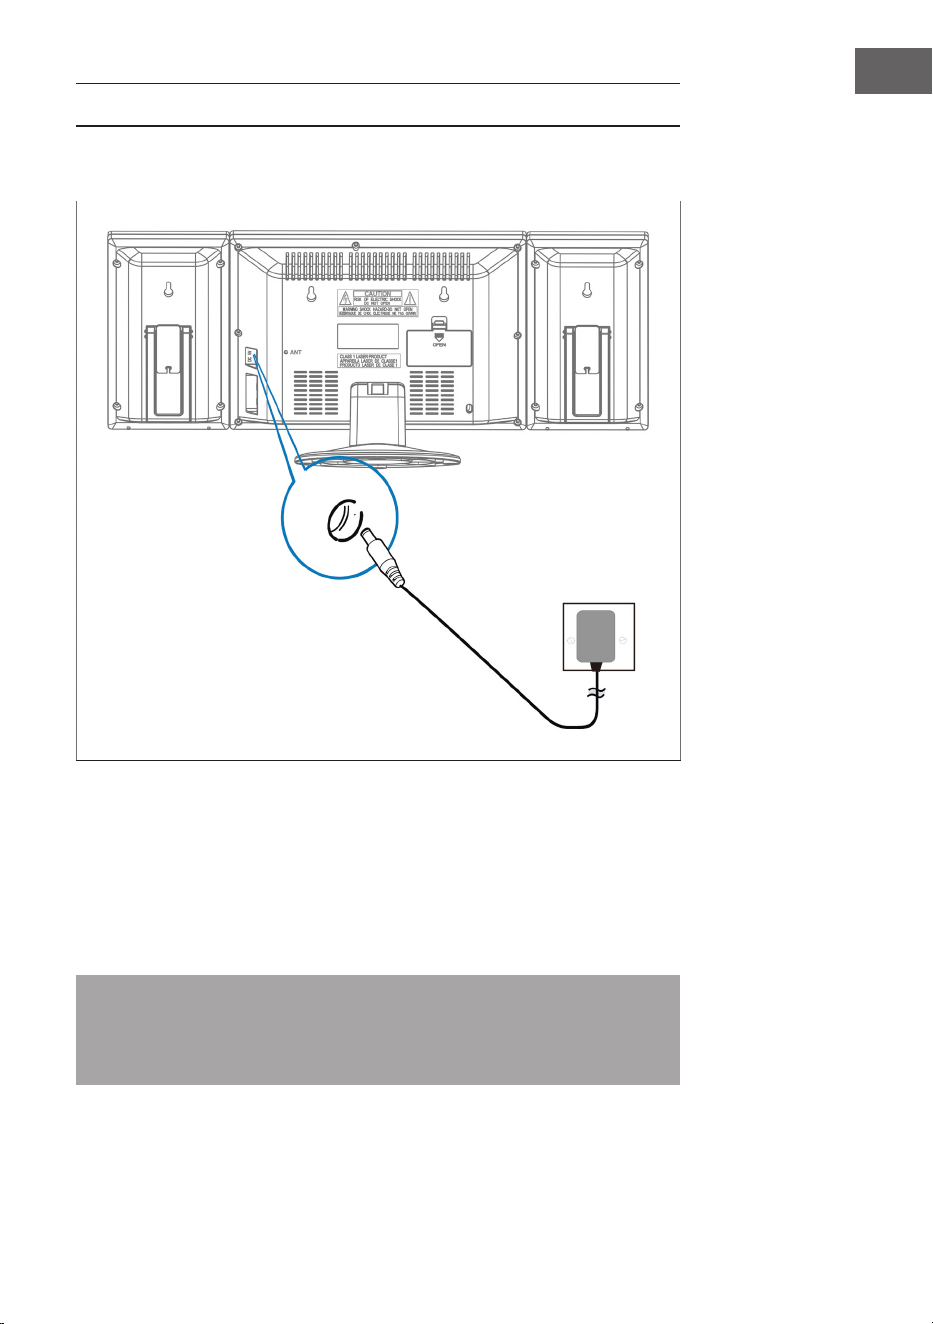
Connecting the power supply unit
Make sure that the plug has been removed from the socket before making
any connections. Make sure that the socket to which you connect the power
supply is working and providing a constant power supply.
Battery backup system
The system is equipped with a battery backup system for the clock, powered
by 2 batteries (type AA). The batteries are not included.
Note: The batteries can be installed as a backup option to store the time of
the clock in case of a power failure. In the event of a power failure, the time
will not be displayed but the clock will continue to run so that the current
time is retained when restarting.
Socket and
power supply
unit
Plug this end of the
mains adapter into
the mains input
(DC 5V MAX 2A)
at the back of the unit

32
EN
Inserting the batteries in the remote control
• Push down the battery compartment cover and slide the cover off to open
the compartment.
• Insert one CR2025 battery according to the polarity markings (+ and -) in
the compartment and on the battery.
• Place the lid in the compartment, press it down gently and slide it inwards
until it clicks into place.
Note: If the remote control is not used for a long time, the battery may
become weak and the remote control may not work. If this happens,
replace the battery with a new one. Do not expose the battery of the
remote control to excessive heat such as sunshine, re or the like.
Setting the time
In standby mode, press and hold the TIME key and the time display ashes.
Press the VOL- /Hour and VOLUME +/MINUTE buttons to set the current
time.
RADIO
Note: When searching for stations or listening to radio stations, no
frequency is shown on the display.
Automatic station search
You can use the Scan function to automatically search for new digital radio
stations and remove inactive stations.
Press and hold the PLAY / PAUSE / FM SCAN button on the stereo system or
on the remote control for 2 seconds to select [Scan]. The number of stations
found is displayed during the automatic station search. When the automatic
station search is nished, the last station listened to is tuned in. If the last
station listened to is no longer available, the rst station in the alphabetical list
is set.
To set a particular radio station manually, press the / button on the
stereo system or on the remote control repeatedly.

33
EN
Calling up saved stations
When you are in radio mode, you can access the stored radio stations by
pressing the PRESET key on the remote control repeatedly. When you access
the preset stations for the rst time, [P01] blinks on the display.
Note: The clock and the radio stations must be reset if there is a power
interruption or power failure. 00:00] appears and blinks on the display to
remind you that the power has been interrupted and the clock must be
reset. After you have reset the clock, start an automatic station search
again.
CD PLAYER
1. Switch on the machine by pressing the STANDBY key. The display goes on.
2. Press the MODE button to select the CD mode.
3. Open the CD door by pressing the OPEN/CLOSE mark on the CD door.
Insert a CD with the label side facing up and then close the CD door.
4. Playback will start from track 1 once the player has nished reading the
table of contents. The playback icon appears continuously on the display.
5. During playback, press the Play / Pause button to pause the playback. The
playback icon blinks. Press the Play / Pause key again to resume playback.
6. Adjust the desired volume with the VOLUME (+/-) keys.
34
EN
PLAYING AN MP3 CD
1. Switch on the machine by pressing the STANDBY key. The display goes on.
2. Press the MODE button to select the CD mode.
3. Open the CD door by pressing the OPEN/CLOSE mark on the CD door.
Insert an MP3 CD.
4. Press the ALBUM key and the disc information is displayed.
5. Playback will start from track 1 when the player has nished reading
the table of contents. The playback symbol appears continuously on the
display.
6. During playback, press the PLAY / PAUSE key to pause the playback.
The playback icon ashes. Press the PLAY / PAUSE key again to resume
playback.
Repeating a single title
If you press the REPEAT / RANDOM key once, the corresponding indicator
ashes on the display. The current track is repeated once.
Repeating all tracks
If you press the REPEAT / RANDOM key twice, the corresponding indicator
blinks on the display. The complete CD is repeated continuously.
To Cancel Repeat Function: Press the Repeat Button until the repeat indicator
is off.
Skip track / Search within a track
• In playback or pause mode, tap the / button to move to the next
track or back to the beginning of the current track.
• During playback, press and hold the / button to search for a
specic position within a title at high speed.

35
EN
Programming titles in a specic order
This function allows you to play music tracks in a programmed order.
Note: The programme can only be set in STOP mode.
1. Press the PROG key once. Both the program number [01] and [PROG]
blink on the display.
2. Press the / key to select the title to be programmed. The [PROG]
indicator blinks to prompt you to conrm.
3. Press the PROG key again to save the selection. The program number
jumps to [02] and blinks with the [PROG] indicator.
4. Press the / key to select the next title to be programmed. The
[PROG] indicator blinks to prompt you to conrm.
5. Press the PROG key again to save your second selection. Repeat steps 2-4
to program up to 20 titles. Once you have saved the 20th title, the display
automatically shows the programmed titles in the order you entered them.
At the end of program viewing, both the program number [01] and [PROG]
blink on the display.
6. Press the PLAY / PAUSE key to nish and start the programmed sequence.
7. Press the key to go directly to other titles while the program is playing.
Press twice to return to a previous title.
8. Press the REPEAT / RANDOM button to play a specic track (Repeat 1) or
all tracks in the program (Repeat All) repeatedly.
• The player stops when all programmed titles have been played through
once. To repeat programme playback, press the PROG key followed by the
PLAY / PAUSE key.
• To cancel the programme playback, press the STOP key twice while the
programme is playing or open the CD door in stop mode.
• Press the ALBUM key to select the album. Press the MODE key to change
the audio source.
• To switch off the player, press the STANDBY key. The display backlight
goes out.

36
EN
USB/SD OPERATION
1. Select the USB/SD mode with the MODE button and insert a USB or SD
memory device.
2. Use the CD/USB/SD button to rotate through CD, USB and SD play
modes. The display will show „USB“ or „SD“ if the corresponding mode is
active.
3. The repeat, programming, track skip, track search and album functions are
used in the same way as in CD mode.
4. It is not possible to wake up from a USB or SD data medium.
BT MODE (10009513 & 10009514 ONLY)
1. Select BT with the MODE button.
2. Select the installation on your BT sending device. The identier is „V329“.
The password is „0000“.
3. Wait until the connection is established and play the music.
4. The BT will remember the last connection and it will automatically connect
5. It may cause the music system to be unable to connect to others if there
are too many devices connected together. Please hold PLAY / PAUSE
button for two seconds to clean the memory.
USING EXTERNAL AUDIO DEVICES
You can use it to power external audio devices such as laptops and MP3
players.
1. Slide the cover down.
2. Connect the external audio device to the system.
3. Select AUX with the MODE button.
4. Switch on the system.
5. Play music etc. on the external audio device.
6. Set the volume of the external audio device and the system to an adequate
level.
7. Switch off the device after use.

37
EN
SETTING THE ALARM CLOCK
Setting the alarm time
1. Press and hold the ALARM button and press the HOUR BUTTON
repeatedly.
2. Press and hold the ALARM button and press the MINUTE button
repeatedly.
Note: When the „PM“ indicator lights up on the display, the unit shows a
time in the second half of the day. If no PM display is lit up, the unit shows a
time in the rst half of the day.
Setting the alarm on and off
1. Press the ALARM ON/OFF key once. The alarm symbol (bell) appears on
the display and the alarm is active.
2. Press the ALARM ON/OFF key once more. The alarm symbol (bell)
disappears and the alarm is switched off.
Checking the alarm time
To check the alarm time, press the ALARM ON/OFF key.
Dening a radio alarm
Dene an alarm time, set the MODE button to Radio, tune in a radio station
and adjust the volume, switch off the unit.
Dening a CD alarm
Dene an alarm time, set the MODE button to CD, insert a CD and adjust the
volume, switch off the unit.
Dene alarm with wake-up sound
1. Set the MODE button to ALARM.
2. When the alarm time is reached, the unit will sound an alarm for 3 minutes.
3. If you do not want the alarm to be switched on the next day, press the
ALARM ON/OFF key. The alarm symbol (bell) disappears from the display.
38
EN
TROUBLESHOOTING
Problem Possible cause Approach
The radio signal
roars.
Radio station not
correctly set.
Readjust the radio station.
Radio antenna not
developed.
Develop radio antenna
No radio reception. Device not in RADIO
mode.
Select the RADIO mode.
Volume too low Increase the volume.
CD drive is not
running.
CD mode not active Select the CD mode.
CD is not properly
seated in the drive.
Insert the CD correctly.
CD contains
unreadable data.
Check the contents of the
CD.
CD jumps. CD is scratched. Clean the CD or replace it.
Unwanted noise
when playing the
CD.
CD is dirty. Clean the CD.
Lens is dirty. Clean the lens with a
cleaning CD.
External physical
inuences.
Move the machine.
Distorted sound at
high volume.
Volume control set to
maximum setting.
Reduce the volume.
No wake-up alarm. Alarm not active. Activate the alarm.
Wrong alarm time. Make sure that AM/PM is
set correctly.
No BT connection
is established.
The system memory
is full.
Press and hold the PLAY /
PAUSE key for 2 seconds to
clear the memory.

39
EN
DISPOSAL CONSIDERATIONS
If there is a legal regulation for the disposal of electrical
and electronic devices in your country, this symbol
on the product or on the packaging indicates that this
product must not be disposed of with household waste.
Instead, it must be taken to a collection point for the
recycling of electrical and electronic equipment. By
disposing of it in accordance with the rules, you are
protecting the environment and the health of your
fellow human beings from negative consequences. For
information about the recycling and disposal of this
product, please contact your local authority or your
household waste disposal service.
This product contains batteries. If there is a legal regulation
for the disposal of batteries in your country, the batteries
must not be disposed of with household waste. Find out
about local regulations for disposing of batteries. By
disposing of them in accordance with the rules, you are
protecting the environment and the health of your fellow
human beings from negative consequences.
DECLARATION OF CONFORMITY
Manufacturer:
Chal-Tec GmbH, Wallstrasse 16, 10179 Berlin,
Germany.
Importer for Great Britain:
Berlin Brands Group UK Limited
PO Box 42
272 Kensington High Street
London, W8 6ND
United Kingdom
Hereby, Chal-Tec GmbH declares that the radio equipment
type V-12 is in compliance with Directive 2014/53/EU. The
full text of the EU declaration of conformity is available at
the following internet address: use.berlin/10006663
For Great Britain: Hereby, Chal-Tec GmbH declares
that the radio equipment type V-12 is in compliance with
the relevant statutory requirements. The full text of the
declaration of conformity is available at the following
internet address: use.berlin/10006663


41
ES
Estimado cliente:
Le felicitamos por la adquisición de este producto. Lea
atentamente el siguiente manual y siga cuidadosamente
las instrucciones de uso con el n de evitar posibles
daños. La empresa no se responsabiliza de los daños
ocasionados por un uso indebido del producto o por haber
desatendido las indicaciones de seguridad. Escanee el
código QR para obtener acceso al manual de usuario más
reciente y otra información sobre el producto:
ÍNDICE
Datos técnicos 42
Indicaciones de seguridad 43
Descripción del aparato 45
Mando a distancia 46
Montaje 47
Puesta en marcha y funcionamiento 49
Radio 50
Reproductor de CD 51
Reproducción de un CD MP3 52
Funcionamiento del USB/SD 54
BT operación (sólo 10009513 Y 10009514) 54
Usando dispositivos de audio externos 54
Ajuste de la alarma 55
Solución de errores 56
Retirada del aparato 57
Declaración de conformidad 57

42
ES
DATOS TÉCNICOS
Número de artículo
10006663, 10006664, 10009511, 10009512,
10009513, 10009514, 10027657, 10027658
Suministro eléctrico
100-240 V ~ 50/60 Hz
(fuente de alimentación AC/DC incluida)
Batería (mando a
distancia)
Pila de botón CR2025 de 3 V
Potencia de salida
DC 5V 1,2A
Radio FM
UKW 87,5 – 108 MHz
BT (solo 10009513, 10009514)
Banda de frecuencia BT 2402-2480 MHz
Potencia de transmisión
BT (máx.)
4 dBm
Perl BT compatible A2DP, AVRCP / BT 5.0 + EDR
USB/CARD-Host
Interfaz
Corresponde a USB 1.1 (velocidad máxima) /
USB 2.0 (clase de almacenamiento masivo).
Sólo admite el protocolo bulk y CBI.
Admite archivos MPEG 1 Layer 3 (sin DRM)
Soporte de tasas de bits MP3 (32-320 kbps)
General
Altavoz Cono de 7,6 cm (3,0 pulgadas) (2x)
Impedancia del altavoz 4 Ω
Potencia de salida
1,0 por canal, min RMS en 4 Ω por 1 KHz con
más del 10% total de la distorsión armónica
Puerto de entrada AUDIO IN (3,5MM)
Toma de salida Toma de corriente (3,5 mm)
Reproductor de CD
Tipo Single-disco-multi-play-compact-disc-player
Lectura de la señal
Escaneo láser semiconductor sin contacto de
3haces
Convertidor D/A Convertidor D/A de varios bits
Respuesta en frecuencia 20–20.000 Hz

43
ES
INDICACIONES DE SEGURIDAD
Advertencias generales de seguridad
ATENCIÓN
Riesgo de lesiones. No escuche la música a un volumen
demasiado alto, pues podría provocar daños auditivos.
• Este aparato puede ser utilizado por niños mayores de 8 años y personas
con discapacidades físicas, sensoriales y mentales y/o con falta de
experiencia y conocimientos, siempre y cuando hayan sido instruidos
sobre el uso del aparato y comprendan los peligros y riesgos asociados.
• Introduzca solo CD en el compartimento.
• Nunca abra la tapa del aparato ni intente realizar usted mismo
reparaciones en el mismo.
• Contacte con personal cualicado en caso de reparaciones. El aparato no
contiene ninguna pieza que pueda ser reparada por el usuario.
• Un uso inadecuado puede provocar daños en el aparato y conllevaría a la
cancelación de la garantía.
Toma para suministro eléctrico
• Utilice exclusivamente la fuente de alimentación contenida en el envío. El
uso de otra fuente de alimentación puede provocar la cancelación de la
garantía y/o daños irreparables en el aparato.
• En caso de tormenta, desconecte el enchufe de la toma de corriente.
• Asegúrese de que el aparato esté apagado antes de desconectar el
enchufe.
• Si utiliza una base múltiple o el enchufe como dispositivo de desconexión,
debe tener en cuenta que siempre deba estar accesible y listo para
funcionar.
• Nunca tire las pilas al fuego ni intente abrir la carcasa protectora.
• Las pilas son nocivas si se ingieren y deben guardarse fuera del alcance de
los niños.

44
ES
Ventilación
• Nunca bloquee ni tape los oricios de ventilación, agujeros o aperturas
del aparato con objetos como alfombras, paños o similares, pues podrían
poner en riesgo su funcionalidad y/o ventilación en cuanto a un uso seguro.
• La parte inferior del aparato puede calentarse si se utiliza durante un
periodo de tiempo prolongado. Se trata de un fenómeno normal.
Lugar de instalación
• Asegúrese de que el aparato se sitúe sobre una supercie estable y plana.
• Coloque el aparato a un máximo de 1,4 metros de la toma de corriente más
cercana. Asegúrese de que el cable de alimentación y el cable del altavoz
no provoquen tropiezos.
• Coloque el aparato al menos a un metro de otros dispositivos eléctricos
para evitar interferencias.
• Coloque el aparato de tal manera que se encuentre dentro del alcance de
los dispositivos BT (por ejemplo iPod/iPhone/iPad/dispositivos Android/
ordenador, etc.). El alcance (sin obstáculos) es de un máximo de 10 metros
(33 pies).
• Asegúrese de que el aparato tenga suciente espacio hacia arriba para que
la antena se pueda orientar correctamente.
• Nunca coloque el aparato sobre supercies antiguas o enceradas.
Indicaciones sobre el láser
ATENCIÓN
Riesgo de lesiones. Nunca toque la lente óptica del
compartimento del CD y no la mire directamente.
• Este aparato es un producto láser de clase 1.
• El uso de mandos no incluidos en el manual de instrucciones o la ejecución
de modicaciones no autorizadas del aparato puede provocar la liberación
de radiación láser.

45
ES
DESCRIPCIÓN DEL APARATOT
1 Entrada USB 8 Standby
2 Entrada SD 9 Volumen - / hora
3 Selector de funciones 10 Alarma jada
4 Tapa del CD 11 Volumen + /minuto
5 Pantalla 12 Encender/apagar alarma
6 Sintonizador (hacia abajo) 13 Tiempo jada
7 Sintonizador (hacia arriba) 14 Entrada auriculares

46
ES
15 Entrada AUX 23 Album/preset+
16 Tapa 24 Altavoz
17 Play/pausa/escan 25
Agujeros para el montaje en
pared
18
Búsqueda de pista hacia
adelante
26 Apoyo del altavoz
19 Stop/guardar 27 Pilas
20 Búsqueda de pista hacia atrás 28 Antena UKW
21 Repetir/programar/congurar 29 Pie
22 Sensor del mando a distancia 30 Colgadores del altavoz
MANDO A DISTANCIA
1 Standby
2 Play/pausa/scan
3 Stop/memoria
4 Volumen -
5 Repetir/aleatorio/preset
6 Teclas numéricas
7 Modo
8 Silencio
9
Pista/buscar emisora hacia
adelante
10
Pista/buscar emisora hacia
atrás
11 Volumen +
12 Programar / Preset +

47
ES
MONTAJE
Pie
Conexión entre los altavoces y la unidad principal
48
ES
Montaje en la pared
49
ES
PUESTA EN MARCHA Y FUNCIONAMIENTO
Conectando la fuente de alimentación
Asegúrese de que el enchufe se ha retirado de la toma antes de hacer
cualquier conexión. Asegúrese de que la toma de corriente a la que conectas el
adaptador de CA funciona y proporciona un suministro de energía constante.
Sistema de respaldo de pilas
El sistema está equipado con un sistema de respaldo de baterías para el reloj,
el cual es alimentado por 2 pilas (tipo AA). Las pilas no están incluidas.
Nota: Las pilas pueden ser instaladas como una opción de respaldo, para
salvar la hora del reloj en caso de un corte de energía. En caso de un fallo
de alimentación, no se muestra la hora, pero el reloj sigue funcionando de
manera que la hora actual se mantiene al reiniciarse.
Enchufe y
fuente de
alimentación
Enchufe este
extremo de la fuente
de alimentación en
la entrada de la red
(DC5V MAX 2A) en la
parte posterior de la
unidad

50
ES
Insertar las pilas en el mando a distancia
• Empuje la tapa del compartimento de las pilas y deslícela para abrir el
compartimento.
• Inserte una pila CR2025 de acuerdo con las marcas de polaridad (+ y -) en
el compartimento y en la pila.
• Coloca la tapa en el compartimento, presiónala suavemente y deslízala
hasta que encaje en su sitio.
Nota: Si no se utiliza el mando a distancia durante mucho tiempo, es posible
que la pila se agote y que el mando a distancia no funcione. En este caso,
por favor, cambie la pila por una nueva. No exponga la pila del mando a
distancia a un calor excesivo, como el sol, el fuego o similares.
Ajustar la hora
En el modo de espera, mantenga pulsado el botón TIME, la pantalla de la hora
parpadeará. Presione los botones VOL- / HOUR y VOLUME +/MINUTE para
ajustar la hora actual.
RADIO
Nota: Cuando se buscan emisoras o se escuchan emisoras de radio, no se
muestra ninguna frecuencia en la pantalla.
Búsqueda automática de la emisora
Puede usar la función SCAN para buscar automáticamente nuevas estaciones
de radio digitales y eliminar las emisoras inactivas.
Mantenga pulsado el botón PLAY / PAUSE / FM SCAN del sistema de audio
o del mando a distancia durante 2 segundos para seleccionar [Escanear]. El
número de emisoras encontradas se muestra durante la búsqueda automática
de estaciones. Cuando la búsqueda automática de emisoras termine, se
sintonizará la última emisora escuchada. Si la última emisora escuchada ya no
está disponible, se sintoniza la primera emisora de la lista alfabética.
Para sintonizar manualmente una emisora de radio especíca, pulse el botón
/ del equipo de sonido o del mando a distancia repetidamente.

51
ES
Recuperar las emisoras almacenadas
En el modo de radio, puede acceder a las emisoras de radio preseleccionadas
pulsando repetidamente el botón PRESET del mando a distancia. Cuando se
accede a las emisoras preseleccionadas por primera vez, [P01] parpadea en la
pantalla.
Nota: El reloj y las estaciones de radio deben ser reseteados en caso de una
interrupción de la energía o de un fallo en la alimentación. 00:00] aparece y
parpadea en la pantalla para recordarle que la energía ha sido interrumpida
y que el reloj necesita ser reajustado. Después de reiniciar el reloj, inicie
una búsqueda automática de la estación de nuevo.
REPRODUCTOR DE CD
1. Encienda la unidad pulsando el botón STANDBY. La pantalla se enciende.
2. Presione el botón MODE para seleccionar el modo CD.
3. Abra la puerta del CD pulsando la marca de ABRIR/CERRAR de la puerta
del CD. Inserte un CD con la cara de la etiqueta hacia arriba y luego cierre
la puerta del CD.
4. La reproducción comienza desde la pista 1 cuando el jugador deja de leer
la tabla de contenidos. El icono de reproducción aparece continuamente
en la pantalla.
5. Durante la reproducción, pulse el botón PLAY / Pause para detener la
reproducción. El icono de reproducción parpadea. Presione el botón
PLAY / PAUSE de nuevo para reanudar la reproducción.
6. Ajuste el nivel de volumen deseado con los botones VOLUME (+/-).

52
ES
REPRODUCCIÓN DE UN CD MP3
1. Encienda la unidad pulsando el botón STANDBY. La pantalla se enciende.
2. Presione el botón MODE para seleccionar el modo CD.
3. Abra la puerta del CD pulsando la marca de ABRIR/CERRAR de la puerta
del CD. Inserte un CD de MP3.
4. Presione el botón del ÁLBUM y la información del disco se muestra.
5. La reproducción comienza desde la pista 1 al leer el CD. El icono de
reproducción aparece continuamente en la pantalla.
6. Presione el botón PLAY / PAUSE durante la reproducción para detener la
reproducción. El icono de reproducción parpadea. Presione el botón
PLAY / PAUSE de nuevo para reanudar la reproducción.
Para repetir una sola pista
Cuando se pulsa una vez el botón REPEAT / RECEIVE, el indicador
correspondiente parpadea en la pantalla. La pista actual se repite una vez.
Repita todas las pistas
Cuando se pulsa dos veces el botón REPEAT / RECEIVE, el indicador
correspondiente parpadea en la pantalla. El CD completo se repite
continuamente.
Para cancelar la función de repetición: Presione el botón de repetición hasta
que el indicador de repetición se apague.
Saltar las pistas / Buscar dentro de una pista
• En el modo de reproducción o pausa, toque el botón / para pasar
a la siguiente pista o volver al principio de la pista actual.
• Durante la reproducción, mantenga pulsado el botón / para
buscar una posición especíca dentro de un título a alta velocidad.

53
ES
Programar pistas en un orden especíco
Esta función permite que las pistas de música se reproduzcan en un orden
programado.
Nota: El programa sólo se puede ajustar en el modo STOP.
1. Presione el botón PROG una vez. Tanto el número de programa [01] como
el [PROG] parpadearán en la pantalla.
2. Presione el botón / para seleccionar la canción que se va a
programar. El indicador [PROG] parpadeará para pedirle que conrme.
3. Presione el botón PROG de nuevo para guardar la selección. El número de
programa saltará a [02] y parpadeará con la pantalla [PROG].
4. Pulse el botón / para seleccionar la siguiente pista a programar. La
pantalla [PROG] parpadeará para pedirle que conrme.
5. Presione el botón PROG de nuevo para guardar su segunda selección.
Repita los pasos 2-4 para programar hasta 20 canciones. Una vez que
haya guardado la vigésima pista, la pantalla mostrará automáticamente
las pistas programadas en el orden que haya introducido. Al nal de la
revisión del programa, tanto el número de programa [01] como el [PROG]
parpadearán en la pantalla.
6. Presione la tecla PLAY / PAUSE para completar e iniciar la secuencia
programada.
7. Presione el botón para moverse directamente a otros títulos mientras
el programa se está reproduciendo. Presione dos veces para volver a
una pista anterior.
8. Pulse el botón REPEAT / RANDOM para reproducir repetidamente una
pista especíca (Repetir 1) o todas las pistas del programa (Repetir todo).
• El reproductor se detiene cuando todas las pistas programadas se han
reproducido una vez. Para repetir la reproducción del programa, pulse la
tecla PROG seguida de la tecla PLAY / PAUSE.
• Para cancelar la reproducción del programa, presione el botón STOP dos
veces mientras el programa se está reproduciendo o abra la puerta del CD
en el modo de parada.
• Presione el botón ALBUM para seleccionar el álbum. Presione el botón
MODE para cambiar la fuente de audio.
• Para apagar el reproductor, pulse el botón STANDBY. La luz de fondo de la
pantalla se apaga.

54
ES
FUNCIONAMIENTO DEL USB/SD
1. Seleccione el modo USB/SD con el INTERRUPTOR DE SELECCIÓN DE
FUNCIONES e inserte un dispositivo de memoria USB o SD.
2. Utilice el botón de conmutación CD/USB/SD para girar a través de los
modos de reproducción de CD, USB y SD. La pantalla mostrará „USB“ o
„SD“ cuando el modo correspondiente esté activo.
3. Las funciones de repetición, programación, salto, búsqueda y álbum se
utilizan de la misma manera que en el modo CD.
4. No hay posibilidad de despertarse con los medios USB o SD.
BT OPERACIÓN (SÓLO 10009513 Y 10009514)
1. Seleccione BT con el botón MODE.
2. Seleccione el sistema en su dispositivo de transmisión de BT. El
identicador es „V329“. La contraseña es “0000“.
3. Espere hasta que se establezca la conexión y ponga la música.
4. El BT recordará la última conexión y establecerá automáticamente una
conexión.
5. Puede ser que el sistema de música no pueda conectarse a otros si hay
demasiados dispositivos juntos. Por favor, mantenga pulsado el botón
PLAY / PAUSE durante dos segundos para limpiar la memoria.
USANDO DISPOSITIVOS DE AUDIO EXTERNOS
Puede operar dispositivos de audio externos como computadoras portátiles y
reproductores de MP3 a través del dispositivo.
1. Deslice la cubierta hacia abajo.
2. Conecte el dispositivo de audio externo al sistema.
3. Seleccione AUX con el botón MODE.
4. Enciende el sistema.
5. Reproduzca música, etc. a través del dispositivo de audio externo.
6. Ajuste el volumen del dispositivo de audio externo y el sistema encendido.
7. Apague la unidad después de su uso.

55
ES
AJUSTE DE LA ALARMA
Ajustar la hora de la alarma
1. Mantenga presionado el botón de ALARMA y pulse el BOTÓN DE HORA
repetidamente
2. Mantenga pulsado el botón de ALARMA y pulse el botón de MINUTO
repetidamente.
Nota: Cuando el indicador „PM“ se enciende en la pantalla, la unidad
muestra una hora en la segunda mitad del día. Si no se enciende el indicador
PM, la unidad muestra una hora en la primera mitad del día.
Encender y apagar la alarma
1. Presione el botón de ALARMA ON/OFF una vez El símbolo de la alarma
(campana) aparece en la pantalla y la alarma está activa.
2. Presione el botón de encendido/apagado de la alarma una vez más. El
símbolo de la alarma (campana) se apaga y la alarma se apaga.
Comprobando la hora de la alarma
Para comprobar la hora de la alarma, pulse el botón de encendido/apagado de
la alarma.
Denir la alarma de radio
Dena una hora de alarma, ponga el interruptor de selección de funciones en
la radio, sintonice una emisora de radio y ajuste el volumen, apague la unidad.
Denir la alarma de CD
Dena una hora de alarma, ponga el interruptor de selección de funciones en
CD, inserte un CD y ajuste el volumen, apague la unidad.
Denir la alarma con el sonido del despertador
1. Ponga el interruptor de selección de funciones en alarma.
2. Cuando se alcance la hora de la alarma, la unidad se encenderá durante 3
minutos.
3. Si no quiere que la alarma suene al día siguiente, pulse el botón de
encendido/apagado de la alarma. El símbolo de la alarma (campana)
desaparece de la pantalla.

56
ES
SOLUCIÓN DE ERRORES
Problema Posible causa Solución
La señal de radio
está retumbando.
La emisora de radio no
está correctamente
ajustada.
Reajuste la estación de
radio.
Antena de radio no
extendida.
Extienda la antena de radio
No hay señal El aparato no está en el
modo radio
Seleccione el modo radio
El volumen está muy
bajo
Suba el volumen
El CD no funciona El modo CD no está
activado
Seleccione el modo CD
El CD no está bien
puesto
Coloque el CD
correctamente
El CD no se puede leer Compruebe el estado del
CD
El CD salta El CD está rayado Limpie el CD o sustitúyalo
SE oyen ruidos
indeseados
durante la
reproducción del
CD
El CD está sucio Limpie el CD o sustitúyalo
La lentilla está sucia Limpie la lente con un CD
limpiador
Agentes físicos
externos.
Cambie el dispositivo.
Sonido
distorsionado a
alto volumen.
Control de volumen al
máximo.
Reduzca el volumen.
No hay
despertador
La alarma no está
activada
Active al alarma
Hora de alarma
equivocada
Asegúrese de si es AM o
PM.
No se ha
establecido
ninguna conexión
con el BT.
La memoria del sistema
está llena.
Mantenga pulsado el botón
PLAY / PAUSE durante 2
segundos para borrar la
memoria.

57
ES
RETIRADA DEL APARATO
Si en su país existe una disposición legal relativa a la
eliminación de aparatos eléctricos y electrónicos, este
símbolo estampado en el producto o en el embalaje
advierte que no debe eliminarse como residuo
doméstico. En lugar de ello, debe depositarse en un
punto de recogida de reciclaje de aparatos eléctricos y
electrónicos. Una gestión adecuada de estos residuos
previene consecuencias potencialmente negativas
para el medio ambiente y la salud de las personas.
Puede consultar más información sobre el reciclaje y
la eliminación de este producto contactando con su
administración local o con su servicio de recogida de
residuos.
Este producto contiene baterías. Si en su país existe
una disposición legal relativa a la eliminación de
baterías, estas no deben eliminarse como residuo
doméstico. Infórmese sobre la normativa vigente
relacionada con la eliminación de baterías. Una gestión
adecuada de estos residuos previene consecuencias
potencialmente negativas para el medio ambiente y la
salud de las personas.
DECLARACIÓN DE CONFORMIDAD
Fabricante:
Chal-Tec GmbH, Wallstraße 16, 10179 Berlín,
Alemania.
Importador para Gran Bretaña:
Berlin Brands Group UK Limited
PO Box 42
272 Kensington High Street
London, W8 6ND
United Kingdom
Por la presente, Chal-Tec GmbH declara que el tipo de
equipo radioeléctrico V-12 es conforme con la Directiva
2014/53/UE. El texto completo de la declaración UE de
conformidad está disponible en la dirección Internet
siguiente: use.berlin/10006663


59
FR
Chère cliente, cher client,
Toutes nos félicitations pour l’acquisition de ce nouvel
appareil. Veuillez lire attentivement et respecter les
instructions de ce mode d’emploi an d’éviter d’éventuels
dommages. Nous ne saurions être tenus pour responsables
des dommages dus au non-respect des consignes et à la
mauvaise utilisation de l’appareil. Scannez le QR-Code
pour obtenir la dernière version du mode d‘emploi et des
informations supplémentaires concernant le produit.
SOMMAIRE
Fiche technique 60
Consignes de sécurité 61
Aperçu de l‘appareil 63
Télécommande 64
Montage 65
Mise en marche et utilisation 67
Radio 68
Lecteur CD 69
Lecture d‘un CD MP3 70
Utilisation avec USB/SD 72
Utilisation de BT (uniquement 10009513 & 10009514) 72
Utilisation d‘appareils audio externes 72
Réglage de l‘alarme 73
Résolution des problèmes 74
Conseils pour le recyclage 75
Déclaration de conformité 75
60
FR
FICHE TECHNIQUE
Numéro d'article
10006663, 10006664, 10009511, 10009512,
10009513, 10009514, 10027657, 10027658
Alimentation
100-240 V ~ 50/60 Hz
(Adaptateur secteur AC/DC fourni)
Pile (télécommande) Pile bouton CR2025 3 V
Puissance de sortie
CC 5V 1,2A
Radio (FM)
FM 87,5 – 108 MHz
BT (seulement 10009513, 10009514)
Bande de fréquence BT 2402-2480 MHz
Puissance d'émission BT
(max)
4 dBm
Prols BT compatibles A2DP, AVRCP / BT 5.0 + EDR
Port USB/ lecteur de cartes SD
Interface
Conforme à USB 1.1 (pleine vitesse) / USB 2.0
(classe de stockage de masse).
Prend uniquement en charge le protocole en
masse et CBI.
Fichiers compatibles MPEG 1 Layer 3 (pas DRM)
Prise en charge du débit
binaire
MP3 (32-320 kbps)
Général
Enceinte Cône de 7,6 cm (3,0 pouces) (2x)
Impédance des enceintes 4 Ω
Puissance de sortie
1,0 W par canal, minimum RMS sous 4 Ω à 1 kHz
avec pas plus de 10% de distorsion harmonique
totale
Prise d'entrée AUDIO IN (3,5 mm)
Prise de sortie Prise jack (3,5 mm)
Lecteur CD
Type
Lecteur de disques compacts multi-lecture à
disque unique
Lecture du signal
Balayage laser à semi-conducteur à 3 faisceaux
sans contact
Convertisseur N / A Convertisseur N / A multi-bits
Plage de fréquence 20–20.000 Hz

61
FR
CONSIGNES DE SÉCURITÉ
Consignes générales de sécurité
ATTENTION
Risque de blessures ! n‘écoutez pas de musique à trop fort
volume, car cela peut endommager votre audition.
• Cet appareil peut être utilisé par des enfants de 8 ans ou plus et des
personnes ayant des capacités physiques, sensorielles et mentales limitées
et / ou dénuées d‘expérience et de connaissances, à condition d‘avoir été
instruits au fonctionnement de l‘appareil par une personne responsable et
d‘en comprendre les risques associés.
• Ne mettez que des CD dans le lecteur CD.
• N‘ouvrez jamais le capot de l‘appareil et n‘essayez pas de le réparer vous-
même.
• Consultez un personnel qualié pour les réparations. L‘appareil ne contient
aucun élément réparable par l‘utilisateur.
• Une mauvaise manipulation peut endommager l‘appareil et annuler la
garantie.
Branchement
• Utilisez uniquement l’adaptateur secteur fourni. L‘utilisation de tout
autre adaptateur peut annuler la garantie et / ou causer des dommages
irréparables à l‘appareil.
• Pendant les orages, débranchez l‘appareil de la prise de courant.
• Veillez à éteindre l‘appareil avant de débrancher le cordon d‘alimentation.
• Si vous avez une prise multiple ou utilisez la che pour débrancher
l‘appareil, veillez à ce qu‘elles soient toujours facilement accessibles et
prêtes à fonctionner.
• Ne jetez jamais les piles au feu et n‘essayez pas de les ouvrir.
• Une pile avalée est dangereuse la santé. Les piles doivent donc être
rangées hors de la portée des jeunes enfants.

62
FR
Ventilation
• Ne pas obstruer ni couvrir les ouvertures de ventilation, les trous ou
les ouvertures de l‘appareil avec des objets tels que des tapis, tissus et
similaires, car la fonctionnalité et/ou la ventilation en toute sécurité ne
pourraient pas être garanties.
• Le bas de l‘appareil peut chauffer s‘il est utilisé pendant une période
prolongée. Cela est normal.
Emplacement
• Assurez-vous que l‘appareil repose sur une surface plane et stable.
• Ne placez pas l’appareil à plus de 1,4 mètre de la prise la plus proche.
Assurez-vous que le cordon d‘alimentation et les câbles d‘enceintes ne
présentent aucun risque de chute.
• Placez l’appareil à au moins un mètre de tout autre équipement électrique
pour éviter les parasites.
• Congurez l’appareil pour qu’il se trouve à portée des appareils BT
externes (tels qu‘un iPod / iPhone / iPad / appareils Android / ordinateurs,
etc.). La portée (sans obstacles) est de 10 mètres (33 pieds) au maximum.
• Assurez-vous que le périphérique dispose de sufsamment d‘espace vers
le haut pour pouvoir diriger correctement l‘antenne.
• Ne placez jamais l‘appareil directement sur des surfaces anciennes ou
cirées.
Remarques concernant le laser
ATTENTION
Risque de blessure ! Ne jamais toucher ou regarder dans
l‘objectif optique du compartiment CD.
• Cet appareil est un produit laser de classe 1
• L‘utilisation de commandes autres que celles mentionnées dans le mode
d‘emploi ou toute modication non autorisée de l‘appareil peut entraîner
la libération dangereuse de rayons laser.
63
FR
APERÇU DE L‘APPAREIL
1 Entrée USB 8 Veille
2 Lecteur SD 9 VOL- / heure
3 Sélecteur de fonction 10 Régler alarme
4 Tiroir CD 11 VOL+ / Minute
5 Écran 12 Alarme marche/ arrêt
6
Recherche de stations (vers
le bas)
13 Régler heure
7
Recherche de stations (vers
le haut)
14 Prise casque
64
FR
15 Entrée AUX 23 Album / Preset+
16 Cache 24 Enceinte
17 Lecture / Pause / Scan 25 Trou de montage mural
18 Recherche de titre vers l'avant 26 Support d'enceinte
19 Stop / mémoire 27 Compartiment à piles
20
Recherche de titre vers
l'arrière
28 Antenne FM
21 Répétition / Prog / Preset- 29 Pied
22 Capteur de télécommande 30 Suspensions de haut-parleurs
TÉLÉCOMMANDE
1 Veille
2 Lecture / Pause / Scan
3 Stop / MEM.
4 Volume -
5
Répétition / Lecture aléatoire
/ Preset-
6 Touches numériques
7 Mode
8 Fonction muet
9
Recherche de titre / station
vers l'avant
10
Recherche de titre / station
vers l'arrière
11 Volume +
12 Prog / Preset+

65
FR
MONTAGE
Pied
Connexion entre les enceintes et l‘unité principale

66
FR
Montage mural

67
FR
MISE EN MARCHE ET UTILISATION
Branchement de l‘adaptateur secteur
Vériez que la che est débranchée de la prise avant d‘effectuer toute
connexion. Assurez-vous que la prise électrique sur laquelle vous branchez
l‘adaptateur secteur fonctionne et fournit une alimentation constante.
Système de pile de secours
Le système est équipé d‘un système de batterie de secours pour l‘horloge,
alimenté par 2 piles (type AA). Les piles ne sont pas incluses.
Remarque : Les piles peuvent être installées comme option de secours
pour conserver le réglage de l‘heure en cas de panne de courant. En cas de
panne de courant, l‘heure ne sera pas afchée, mais l‘horloge continuera à
fonctionner an que l‘heure actuelle soit conservée lors du redémarrage.
Prise et
adaptateur
secteur
Branchez cette
extrémité du bloc
d‘alimentation dans
l‘entrée d‘alimentation
(DC 5V MAX 2A) à
l‘arrière de l‘appareil

68
FR
Insertion des piles dans la télécommande
• Appuyez sur le couvercle du compartiment des piles et faites glisser le
couvercle pour ouvrir le compartiment.
• Insérez la pile CR2025 en respectant le Marquage de polarité (+ et -) dans
le compartiment et sur la pile.
• Placez le couvercle sur le compartiment, appuyez légèrement dessus et
faites-le glisser vers l‘intérieur jusqu‘à ce qu‘il s‘enclenche.
Remarque : Si vous n‘utilisez pas la télécommande pendant une longue
période, la pile peut faiblir et la télécommande peut ne pas fonctionner.
Dans ce cas, veuillez remplacer la pile par une neuve. La pile de la
télécommande ne doit pas être exposée à une chaleur excessive telle que la
lumière du soleil, le feu ou autre.
Réglage de l‘heure
En mode veille, appuyez sur TIME et maintenez-le, l‘afchage de l‘heure
clignote. Appuyez sur VOL- / HEURE et VOLUME + / MINUTE pour régler
l‘heure actuelle.
RADIO
Remarque : Aucune fréquence n‘apparaît sur l‘afchage lors de la recherche
d‘une station ou de l‘écoute de stations de radio.
Recherche automatique de stations
Utilisez la fonction SCAN pour rechercher automatiquement de nouvelles
stations de radio numériques et supprimer les stations inactives.
Appuyez sur PLAY / PAUSE / FM SCAN sur la chaîne stéréo ou la
télécommande et maintenez-le pendant 2 secondes pour sélectionner [Scan].
Le nombre de stations trouvées s‘afche pendant la recherche automatique
de stations. Lorsque la recherche automatique des stations est terminée,
la dernière station écoutée est lue. Si la dernière station écoutée n‘est plus
disponible, la première station de la liste alphabétique est lue.
Pour régler manuellement une station de radio spécique, appuyez plusieurs
fois sur / sur la chaîne stéréo ou la télécommande.

69
FR
Rappel d‘une station mémorisée
En mode radio, rappelez les stations mémorisées en appuyant plusieurs fois
sur la touche PRESET de la télécommande. Lorsque vous appelez les stations
mémorisées pour la première fois, [P01] clignote sur l‘afchage.
Remarque : L‘horloge et les stations de radio doivent être réinitialisées
en cas de panne de courant. [00:00] apparaît et clignote sur l‘écran pour
vous informer que l‘alimentation a été interrompue et que l‘horloge doit
être réinitialisée. Après avoir réglé à nouveau l‘horloge, recommencez une
recherche automatique de stations.
LECTEUR CD
1. Allumez l‘appareil en appuyant sur la touche STANDBY. L‘écran s‘allume.
2. Appuyez sur MODE pour sélectionner le mode CD.
3. Ouvrez le tiroir à CD en appuyant sur la marque OPEN / CLOSE sur le
tiroir à CD. Insérez un CD avec l‘étiquette vers le haut, puis fermez le tiroir
à CD.
4. La lecture commence à partir de la piste 1 dès que le lecteur a ni de lire la
table des matières. Le symbole de lecture apparaît en continu sur l‘écran.
5. Pendant la lecture, appuyez sur PLAY / PAUSE pour interrompre la lecture.
Le symbole de lecture clignote. Appuyez à nouveau sur PLAY / PAUSE pour
reprendre la lecture.
6. Réglez le volume souhaité avec les touches VOLUME (+/-).
70
FR
LECTURE D‘UN CD MP3
1. Allumez l‘appareil en appuyant sur la touche STANDBY. L‘écran s‘allume.
2. Appuyez sur MODE pour sélectionner le mode CD.
3. Ouvrez le tiroir à CD en appuyant sur la marque OPEN / CLOSE sur le
tiroir à CD. Insérez un CD MP3.
4. Appuyez sur ALBUM pour afche les informations du disque.
5. La lecture commence à partir de la piste 1 dès que le lecteur a ni de lire la
table des matières. Le symbole de lecture apparaît en continu sur l‘écran.
6. Pendant la lecture, appuyez sur PLAY / PAUSE pour interrompre la lecture.
Le symbole de lecture clignote. Appuyez à nouveau sur PLAY / PAUSE pour
reprendre la lecture.
Répétition d‘un seul titre
Appuyez une fois sur REPEAT / LECTURE ALÉATOIRE, le témoin
correspondant clignote sur l‘afchage. La piste actuelle est répétée une fois.
Répétition de tous les titres
Appuyez deux fois sur REPEAT / LECTURE ALÉATOIRE, le témoin
correspondant clignote sur l‘afchage. Le CD entier est répété indéniment.
Pour interrompre la répétition : appuyez sur la touche de répétition jusqu‘à
quitter la fonction.
Saut de titre / recherche à l‘intérieur d‘un titre
• En mode lecture ou pause, appuyez sur la touche / pour passer à
la piste suivante ou revenir au début de la piste actuelle.
• Maintenez la touche / pendant la lecture pour rechercher un
point spécique dans une piste à grande vitesse.

71
FR
Programmation d‘une liste de lecture
Cette fonction vous permet de lire des titres dans un ordre choisi.
Remarque : Le programme ne peut être réglé qu‘en mode STOP.
1. Appuyez une fois sur PROG. Le numéro de programme [01] et l‘indication
[PROG] clignotent sur l‘afchage.
2. Appuyez sur la touche / pour sélectionner la piste à programmer.
L‘indicateur [PROG] clignote pour demander une conrmation.
3. Appuyez à nouveau sur PROG pour enregistrer la sélection. Le numéro de
programme passe à [02] et clignote en même temps que le témoin [PROG].
4. Appuyez sur la touche / pour sélectionner la piste suivante à
programmer. Le témoin [PROG] clignote pour demander une conrmation.
5. Appuyez à nouveau sur PROG pour enregistrer votre deuxième sélection.
Répétez les étapes 2 à 4 pour programmer jusqu‘à 20 pistes. Dès que vous
avez sauvegardé la 20e piste, l‘écran afche automatiquement les pistes
programmées dans l‘ordre que vous avez entré. À la n de la présentation
de la liste programmée, le numéro de programme [01] et le témoin [PROG]
clignotent sur l‘afchage.
6. Appuyez sur PLAY / PAUSE pour terminer et démarrer la séquence
programmée.
7. Appuyez sur pour passer directement à d‘autres pistes pendant la
lecture du programme. Appuyez deux fois sur pour revenir à une piste
précédente.
8. Appuyez sur le bouton REPEAT / RANDOM pour lire en boucle une piste
spécique (Repeat 1) ou toutes les pistes du programme (Repeat All).
• Le lecteur s‘arrête lorsque toutes les pistes programmées ont été lues une
fois. Pour répéter la lecture du programme, appuyez sur PROG puis sur
PLAY / PAUSE.
• Pour annuler la lecture du programme, appuyez deux fois sur STOP
pendant la lecture du programme ou ouvrez le tiroir du CD en mode
d‘arrêt.
• Appuyez sur ALBUM pour sélectionner l‘album. Appuyez sur MODE pour
changer la source sonore.
• Pour mettre le lecteur hors tension, appuyez sur STANDBY. Le
rétroéclairage de l‘écran s‘éteint.

72
FR
UTILISATION AVEC USB/SD
1. Sélectionnez le mode USB / SD avec le sélecteur de fonction et insérez un
support de stockage USB ou SD.
2. Avec le bouton CD / USB / SD, vous pouvez faire alterner entre les modes
de lecture CD, USB et SD. L‘écran afchera „USB“ ou „SD“ lorsque le mode
correspondant est actif.
3. Les fonctions de répétition, de programme, de saut de piste, de recherche
de piste et d‘album s‘utilisent de la même manière qu‘en mode CD.
4. Il n‘y a aucun moyen de vous réveiller à partir d‘un périphérique de
stockage USB ou SD.
UTILISATION DE BT (UNIQUEMENT 10009513 &
10009514)
1. Sélectionnez BT avec le bouton MODE.
2. Sélectionnez le système sur votre appareil d‘envoi BT. L‘identiant est
„V329“. Le mot de passe est „0000“
3. Attendez que la connexion soit établie et écoutez la musique.
4. Le BT se souviendra de la dernière connexion et se connectera
automatiquement.
5. Cela peut empêcher le système musical de se connecter à d‘autres
appareils s‘il se connecte à trop d‘appareils. Maintenez PLAY / PAUSE
pendant deux secondes pour vider la mémoire.
UTILISATION D‘APPAREILS AUDIO EXTERNES
Vous pouvez utiliser des appareils audio externes tels que des ordinateurs
portables et des lecteurs MP3 avec l‘appareil.
1. Faites glisser le COUVERCLE vers le bas.
2. Connectez le périphérique audio externe au système.
3. Sélectionnez AUX à l’aide du bouton MODE.
4. Allumez le système.
5. Écoutez de la musique, etc. sur le périphérique audio externe.
6. Réglez le volume du périphérique audio externe et du système à un niveau
adéquat.
7. Éteignez l‘appareil après utilisation.

73
FR
RÉGLAGE DE L‘ALARME
Réglage de l‘heure de l‘alarme
1. Maintenez le bouton ALARME et appuyez sur le bouton HEURE à
plusieurs reprises.
2. Maintenez le bouton ALARME et appuyez sur le bouton MINUTE à
plusieurs reprises.
Remarque : Lorsque l‘indicateur „PM“ s‘allume, l‘appareil afche une heure
dans la seconde moitié de la journée. Si aucun indicateur PM ne s‘allume,
l‘appareil afche une heure dans la première moitié de la journée.
Activer et désactiver l‘alarme
1. Appuyez une fois sur ALARME ON / OFF. Le symbole d‘alarme (cloche)
apparaît sur l‘écran et l‘alarme est active.
2. Appuyez à nouveau sur ALARME ON / OFF. Le symbole d‘alarme (cloche)
s‘éteint et l‘alarme est désactivée.
Vérication de l‘heure de l‘alarme
Pour vérier l‘heure de l‘alarme, appuyez sur ALARME ON / OFF.
Dénir l‘alarme radio
Dénir une heure d‘alarme, régler le sélecteur de fonction sur radio, régler une
station de radio et régler le volume, éteindre l‘appareil.
Dénir l‘alarme CD
Dénir une heure d‘alarme, régler le sélecteur de fonction sur CD, insérer un
CD et régler le volume, éteindre l‘appareil.
Dénir une alarme avec un son de réveil
1. Réglez le sélecteur de fonction sur ALARME.
2. Lorsque l‘heure de l‘alarme est atteinte, l‘appareil afche un son d‘alarme
pendant 3 minutes.
3. Si vous ne voulez pas que l‘alarme se déclenche le jour suivant, appuyez sur
ALARME ON / OFF. Le symbole d‘alarme (cloche) disparaît de l‘écran).
74
FR
RÉSOLUTION DES PROBLÈMES
Problème Cause possible Solution
Parasites sur le
signal radio.
La station de radio est
mal réglée.
Ajuster la station de radio.
L'antenne radio n'est
pas déployée.
Déployez l'antenne radio
Pas de réception
radio.
L'appareil n'est pas en
mode Radio.
Choisissez e mode radio.
Volume trop faible Augmentez le volume.
Le lecteur de CD
ne fonctionne pas.
Le mode CD n'est pas
activé
Choisissez le mode CD.
Le CD n'est pas
correctement inséré
dans le lecteur.
Insérez correctement le CD.
Le CD contient des
données illisibles.
Vériez le contenu du CD.
Le CD saute. Le CD est rayé Nettoyez ou remplacez le
CD.
Bruits indésirables
lors de la lecture
du CD.
CD est sale. Nettoyez le CD.
La lentille est sale. Nettoyez la lentille avec un
CD de nettoyage.
Inuences physiques
externes.
Déplacez l'appareil.
Son déformé à
volume élevé.
Volume réglé au
maximum.
Réduisez le volume.
Pas d'alarme de
réveil.
L'alarme n'est pas
active.
Activez l'alarme.
Vous vous êtes trompé
en réglant l'heure.
Assurez-vous que AM / PM
est correctement réglé.
Aucune connexion
BT n'est établie.
La mémoire système
est pleine.
Maintenez PLAY / PAUSE
pendant 2 secondes pour
effacer la mémoire.

75
FR
CONSEILS POUR LE RECYCLAGE
S‘il existe une réglementation pour l‘élimination ou le
recyclage des appareils électriques et électroniques
dans votre pays, ce symbole sur le produit ou sur
l‘emballage indique que cet appareil ne doit pas
être jeté avec les ordures ménagères. Vous devez le
déposer dans un point de collecte pour le recyclage des
équipements électriques et électroniques. La mise au
rebut conforme aux règles protège l‘environnement
et la santé de vos semblables des conséquences
négatives. Pour plus d‘informations sur le recyclage
et l‘élimination de ce produit, veuillez contacter votre
autorité locale ou votre service de recyclage des
déchets ménagers.
Ce produit contient des piles. S‘il existe une
réglementation pour l‘élimination ou le recyclage
des piles dans votre pays, vous ne devez pas les jeter
avec les ordures ménagères. Renseignez-vous sur les
dispositions locales relatives à la collecte des piles
usagées. La mise au rebut conforme aux règles protège
l‘environnement et la santé de vos semblables des
conséquences négatives.
DÉCLARATION DE CONFORMITÉ
Fabricant :
Chal-Tec GmbH, Wallstraße 16, 10179 Berlin,
Allemagne.
Importateur pour la Grande Bretagne :
Berlin Brands Group UK Limited
PO Box 42
272 Kensington High Street
London, W8 6ND
United Kingdom
Le soussigné, Chal-Tec GmbH, déclare que l’équipement
radioélectrique du type V-12 est conforme à la directive
2014/53/UE. Le texte complet de la déclaration UE de
conformité est disponible à l’adresse internet suivante :
use.berlin/10006663


77
IT
Gentile cliente,
La ringraziamo per aver acquistato il dispositivo. La
preghiamo di leggere attentamente le seguenti istruzioni
per l’uso e di seguirle per evitare possibili danni. Non ci
assumiamo alcuna responsabilità per danni scaturiti da
una mancata osservazione delle avvertenze di sicurezza
e da un uso improprio del dispositivo. Scansionare il
codice QR seguente, per accedere al manuale d’uso più
attuale e per ricevere informazioni sul prodotto.
INDICE
Dati tecnici 78
Avvertenze di sicurezza 79
Descrizione del prodotto 81
Telecomando 82
Montaggio 83
Messa in funzione e utilizzo 85
Radio 86
Lettore CD 87
Riproduzione di un CD MP3 88
Funzionamento USB/SD 90
Funzionamento BT (Solo 10009513 & 10009514) 90
Utilizzare i dispositivi audio esterni 90
Come impostare la sveglia 91
Correzione degli errori 92
Smaltimento 93
Dichiarazione di conformità 93

78
IT
DATI TECNICI
Numero articolo
10006663, 10006664, 10009511, 10009512,
10009513, 10009514, 10027657, 10027658
Alimentazione
100-240 V ~ 50/60 Hz
(alimentatore AC/DC incluso)
Batteria (telecomando) Batteria a bottone CR2025 da 3 V
Potenza di uscita
DC 5V 1,2A
Radio (FM)
FM FM 87.5 - 108 MHz
BT (solo per 10009513, 10009514)
Banda di frequenza BT 2402–2480MHz
Potenza di trasmissione
BT (max.)
4 dBm
Prolo BT compatibile A2DP, AVRCP / BT 5.0 + EDR
USB/CARD-Host
Interfaccia
Equivalente a USB 1.1 (velocità completa)/USB
2.0 (classe dei supporti di memoria)
Supporta solo protocolli Bulk e CBI
File supportati MPEG 1 Layer 3 (non DRM)
Supporto bitrate MP3 (32-320 kbps)
Generici
Altoparlanti Cono da 7,6 cm (3.0 pollici) (2x)
Impedenza altoparlanti 4 Ω
Potenza di uscita
1,0 W per canale, min. RMS a 4 Ω per 1kHz con
non oltre il 10% delle distorsioni armoniche
totali
Ingresso AUDIO IN (3,5 mm)
Uscita Jack (3,5 mm)
Lettore CD
Tipologia Single-Disc-Multi-Play-Compact-Disc-Player
Lettura segnale
Senza contatto, lettura laser a 3 raggi
semiconduttore
Trasformatore D/A Trasformatore D/A multi-bit
Risposta in frequenza 20–20.000 Hz

79
IT
AVVERTENZE DI SICUREZZA
Avvertenze di sicurezza generiche
ATTENZIONE
Pericolo di lesione! Non ascoltare la musica a volume
eccessivamente altro, in quanto può provocare danni all’udito.
• Questo dispositivo può essere utilizzato da bambini a partire da 8 anni
e da persone con limitate capacità siche e psichiche o con conoscenza
ed esperienza limitate, solo se sono stati istruiti sulle modalità d’uso e
comprendono i rischi e i pericoli connessi.
• Inserire solo CD nel vano per CD.
• Non aprire mai le coperture del dispositivo e non cercare di eseguire
riparazioni in modo autonomo.
• Per eventuali riparazioni, rivolgersi a personale qualicato. Il dispositivo
non contiene componenti che necessitano di manutenzione da parte
dell’utente.
• Una gestione impropria può causare danni al dispositivo e la perdita di
validità della garanzia.
Collegamento alla rete elettrica
• Utilizzare esclusivamente il trasformatore incluso in consegna. L’utilizzo di
un altro trasformatore può causare la perdita di validità della garanzia e/o
provocare danni irreparabili al dispositivo.
• Staccare la spina dalla presa elettrica durante temporali.
• Assicurarsi che il dispositivo sia spento prima di staccare la spina.
• Se si utilizza una presa elettrica multipla o se si utilizza la spina come
separatore, è necessario assicurarsi che queste siano sempre facilmente
accessibili e pronte all’uso.
• Non gettare mai batterie nel fuoco e non cercare assolutamente di aprire il
rivestimento esterno.
• Le batterie possono nuocere alla salute se vengono ingerite e devono
quindi essere conservate fuori dalla portata dei bambini.

80
IT
Ventilazione
• Non bloccare in nessun caso le fessure di ventilazione, i fori o le aperture
del dispositivo con oggetti, come tappeti, teli e similari, altrimenti non
possono essere garantite funzionalità e/o ventilazione per un utilizzo
sicuro.
• Il lato inferiore del dispositivo può diventare caldo dopo utilizzi prolungati.
Questo è del tutto normale.
Luogo di posizionamento
• Assicurarsi che il dispositivo si trovi su una supercie piana e stabile.
• Posizionare il dispositivo a un massimo di 1,4 metri dalla presa elettrica
più vicina. Assicurarsi che non si corra il rischio di inciampare nel cavo di
alimentazione e negli altoparlanti.
• Posizionare il dispositivo ad almeno un metro da altri elettrodomestici, per
evitare rumori di disturbo.
• Posizionare il dispositivo in modo che si trovi entro portata per dispositivi
BT esterni (ad es. iPod/iPhone/iPad/dispositivi Android/computer/ecc.). La
portata (senza ostacoli) è di massimo 10 metri (33 piedi).
• Assicurarsi che il dispositivo abbia sufciente spazio a disposizione verso
l’alto per poter estrarre correttamente l’antenna.
• Non posizionare il dispositivo direttamente su superci antiche o lucidate.
Avvertenze sul laser
ATTENZIONE
Pericolo di lesione! Non toccare mai la lente ottica nel vano dei
CD e non guardare direttamente al suo interno.
• Questo dispositivo è un prodotto laser di classe 1.
• Un utilizzo diverso da quelli descritti nel manuale d’uso o una modica
al dispositivo non autorizzata possono causare l’emissione di raggi laser
dannosi.

81
IT
DESCRIZIONE DEL PRODOTTO
1 Ingresso USB 8 Standby
2 Slot SD 9 VOL- / Ora
3 Selettore di funzione 10 Impostare allarme
4 Sportello CD 11 VOL+ / Minuti
5 Display 12 Allarme on / off
6
Ricerca emittenti (verso il
basso)
13 Impostare l’ora
7 Ricerca emittenti (verso l’alto) 14 Collegamento cufe

82
IT
15 Ingresso AUX 23 Album / Preset+
16 Copertura 24 Altoparlante
17 Play / Pause / Scan 25 Fori per montaggio a parete
18 Ricerca brani avanti 26 Sostegno per altoparlanti
19 Stop / Memorizza 27 Vano pile
20 Ricerca brani indietro 28 Antenna FM
21 Ripeti / Prog / Preset- 29 Piedistallo
22 Sensore telecomando 30 Sospensioni per altoparlanti
TELECOMANDO
1 Standby
2 Play / Pause / Scan
3 Stop / MEM.
4 Volume -
5
Ripeti / Ripetizione casuale /
Preset-
6 Tasti numerici
7 Mode
8 Mute
9
Cerca in avanti il brano/
l’emittente
10
Cerca indietro il brano/
l’emittente
11 Volume +
12 Prog / Preset+

83
IT
MONTAGGIO
Piedistallo
Collegamento tra gli altoparlanti e l’unità principale

84
IT
Montaggio a parete
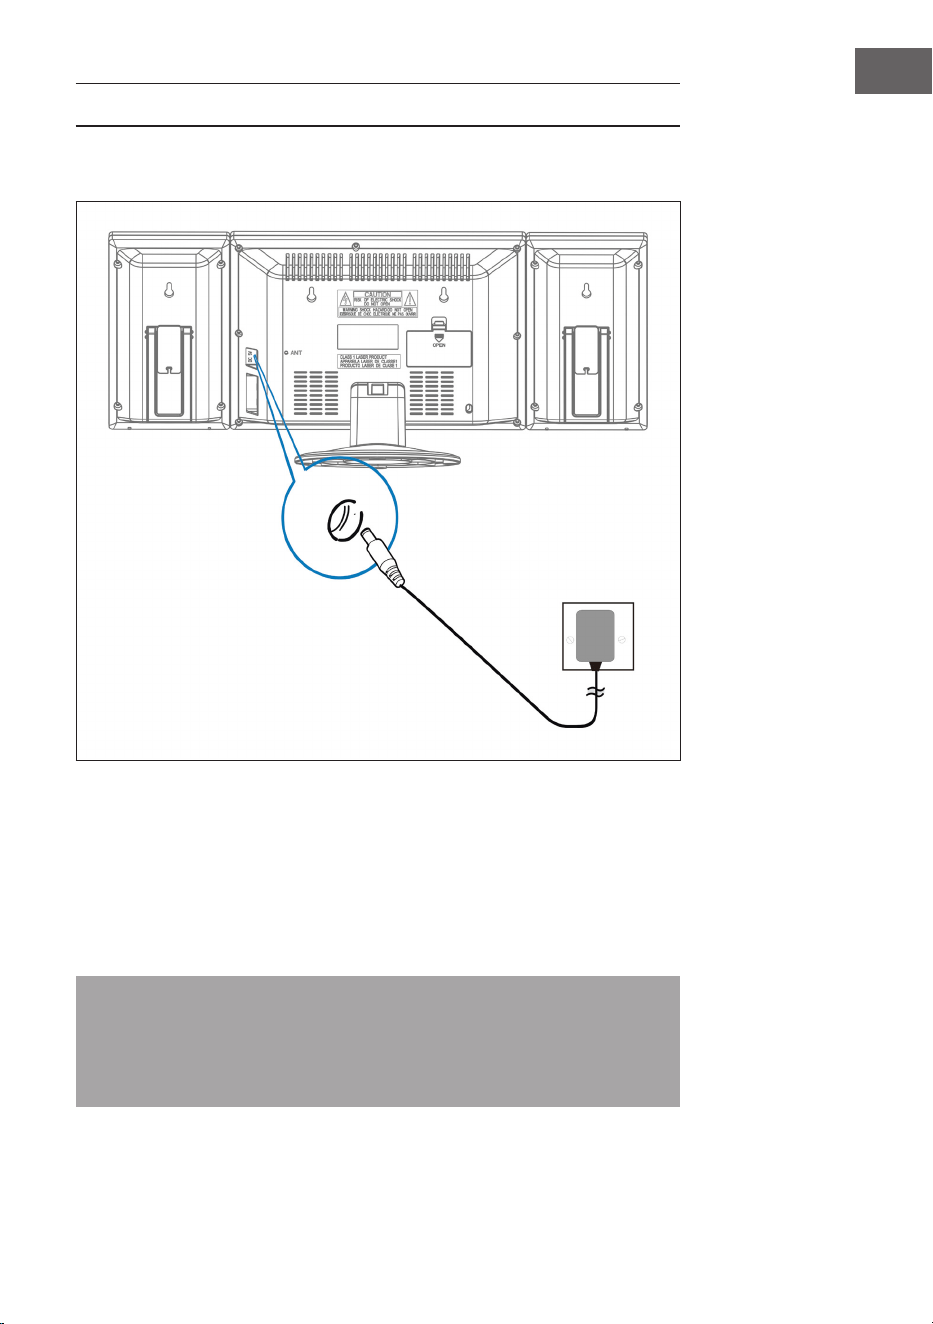
85
IT
MESSA IN FUNZIONE E UTILIZZO
Collegamento del cavo d’alimentazione
Prima di instaurare un collegamento assicurarsi che la spina sia stata tolta
dalla presa di corrente, che quest’ultima funzioni e che fornisca costantemente
energia elettrica.
Sistema di backup della pila
Il sistema dispone di un sistema di backup della pila per l’orologio, alimentato
da due batterie (tipo AA) non incluse nel volume di consegna.
Nota: le pile possono essere montate come opzione di backup per
salvare l’orario dell’orologio durante un blackout. Se si dovesse vericare
un’interruzione di corrente non verrà mostrata l’ora, ma l’orologio
continuerà a funzionare in modo tale da mantenere l’orario attuale al
riavvio.
Presa e
alimentatore
Inserire questa
estremità del cavo
nell’ingresso di rete
(DC 5V MAX 2A)
sul retro del
dispositivo

86
IT
Inserire le pile nel telecomando
• Spingere il coperchio del vano pile verso il basso e rimuoverlo per aprire il
vano.
• Inserire la pila CR2025 seguendo la polarità corretta (+ e -) nel vano e sulla
batteria.
• Richiudere il vano con il coperchio premendolo leggermente verso il basso
e farlo scivolare verso l’interno nché non scatta in posizione.
Nota: se il telecomando non viene usato per un certo periodo di tempo,
può succedere che la pila si esaurisca e che il telecomando non funzioni. In
questo caso la pila va sostituita. Non esporre la batteria al caldo eccessivo
come raggi solari, fuoco o simili.
Come impostare l’ora
In modalità standby tenere premuto il tasto TIME: la spia dell’ora lampeggia.
Premere i tasti VOL-/ORA e VOLUME +/MINUTE per impostare l’ora attuale.
RADIO
Nota: sul display non appare la frequenza durante la ricerca e l’ascolto
dell’emittente.
Premere più volte MODE per passare da una modalità all’altra (radio / CD /
USB / AUX / BT).
Ricerca automatica dell’emittente (FM Scan)
Si può usare la funzione FM SCAN per cercare automaticamente nuove
stazioni radio digitali e per rimuovere quelle inattive.
Tenere premuto per 2 secondi il tasto PLAY / PAUSE / FM SCAN sull’impianto
stereo o sul telecomando per selezionare [Scan]. Sul display appare la quantità
di stazioni trovate durante la ricerca automatica. Una volta terminata la ricerca
viene impostata l’emittente ascoltata per ultima. Se non è più disponibile, viene
impostata la prima stazione nell’elenco alfabetico.
Per impostare manualmente una determinata stazione radio, digitare più volte
il tasto / sull’impianto stereo o sul telecomando.

87
IT
Come accedere alle emittenti salvate
Quando si è in modalità radio si può accedere alle emittenti radio salvate
premendo più volte il tasto PRESET sull’impianto stereo o sul telecomando.
Quando si accede per la prima volta alle emittenti salvate sul display lampeggia
[P01].
Nota: l’orologio e le emittenti radio devono essere reimpostati dopo
un’interruzione di corrente elettrica o un blackout. [00] lampeggia sul
display per ricordare che la corrente è stata interrotta e che l’ora va
nuovamente impostata. Dopodiché bisogna avviare una nuova ricerca
automatica delle stazioni.
LETTORE CD
1. Accendere il dispositivo premendo il tasto STANDBY. Il display si accende.
2. Premere il tasto MODE per selezionare la modalità CD.
3. Aprire il vano CD premendo OPEN/CLOSE sullo sportello. Inserire un
disco musicale con il lato stampato sul lato superiore e poi chiudere lo
sportello.
4. La riproduzione inizia dal brano 1 non appena il lettore ha nito di leggere
l’indice. Sul display appare continuamente il simbolo play.
5. Durante la riproduzione premere il tasto PLAY/PAUSE per interrompere
la riproduzione. Il simbolo play lampeggia. Premere nuovamente il tasto
PLAY/PAUSE per proseguire la riproduzione.
6. Impostare il volume desiderato con i tasti VOLUME (+/-).

88
IT
RIPRODUZIONE DI UN CD MP3
1. Accendere il dispositivo premendo il tasto STANDBY. Il display si accende.
2. Premere il tasto MODE per selezionare la modalità CD.
3. Aprire il vano CD premendo OPEN/CLOSE sullo sportello e inserire un CD
MP3.
4. Quando si preme il tasto ALBUM vengono visualizzate le informazioni del
disco.
5. La riproduzione inizia dal brano 1 non appena il lettore ha nito di leggere
l’indice. Sul display appare continuamente il simbolo play.
6. Durante la riproduzione premere il tasto PLAY/PAUSE per interrompere
la riproduzione. Il simbolo play lampeggia. Premere nuovamente il tasto
PLAY/PAUSE per proseguire la riproduzione.
Ripetere soltanto un brano
Quando si preme una volta il tasto RIPETIZIONE / RIPRODUZIONE
CASUALE, sul display appare il simbolo corrispondente. Il brano attuale viene
ripetuto una volta.
Ripetere tutti i brani
Quando si preme due volte il tasto RIPETIZIONE / RIPRODUZIONE
CASUALE, sul display appare il simbolo corrispondente. Tutto il CD viene
riprodotto continuamente.
Per interrompere la ripetizione: premere il tasto ripetizione nché la spia
sparisce.
Saltare i brani / Cercare all’interno di un brano
• Premere in modalità ripetizione o pausa il tasto / per saltare al
prossimo brano o all’inizio di quello attuale.
• Tenere premuto il tasto / durante la riproduzione per cercare
velocemente una posizione particolare all’interno del brano.

89
IT
Come programmare il brano in una determinata sequenza
Con questa funzione è possibile riprodurre i brani musicali seguendo una
sequenza programmata.
Nota: il programma può essere impostato solo in modalità STOP.
1. Premere una volta il tasto PROG. Sul display lampeggiano il numero del
programma [01] e la spia [PROG].
2. Premere il tasto / per selezionare il brano da programmare. La
spia [PROG] lampeggia ed esorta a confermare.
3. Premere nuovamente il tasto PROG per salvare la selezione. Appare il
numero del programma [02], che lampeggia insieme alla spia [PROG].
4. Premere il tasto / per selezionare il prossimo brano da
programmare. La spia [PROG] lampeggia ed esorta a confermare.
5. Premere nuovamente il tasto PROG per memorizzare la seconda
selezione. Ripetere i punti 2-4 per programmare no a 20 brani. Dopo aver
memorizzato il 20° brano, sul display appaiono automaticamente i brani
programmati nella sequenza impostata. Dopo aver ripassato i programmi,
lampeggiano sia il numero del programma [01] sia la spia [PROG] sul
display.
6. Premere il tasto PLAY / PAUSE per terminare la sequenza programmata e
iniziare.
7. Premere per accedere direttamente ad altri brani durante la
riproduzione del programma. Premere due volte per tornare al brano
precedente.
8. Premere il tasto REPEAT / RANDOM per riprodurre ripetutamente un
brano specico (Repeat 1) o tutti i brani del programma (Repeat All).
• Il lettore si ferma quando tutti i brani programmati sono stati riprodotti.
Per ripetere la riproduzione dei programmi premere il tasto PROG seguito
da PLAY / PAUSE.
• Per interrompere la riproduzione dei programmi premere due volte il tasto
STOP durante la riproduzione oppure aprire lo sportello CD in modalità
Stop.
• Premere il tasto ALBUM per selezionare l’album. Premere il tasto MODE
per cambiare la sorgente acustica.
• Per spegnere il lettore premere il tasto STANDBY. La retroilluminazione
del display sparisce.

90
IT
FUNZIONAMENTO USB/SD
1. Selezionare la modalità USB/SD con il SELETTORE DI FUNZIONE e
inserire un supporto di memoria USB o SD.
2. Con l’interruttore CD/USB/SD ruotare all’interno delle modalità di
riproduzione CD, USB e SD. Sul display appare “USB” o “SD” quando la
modalità corrispondente è attiva.
3. L’utilizzo delle funzioni Ripetizione, Programmazione, Saltare brano,
Ricerca brano e Album avviene come per il funzionamento del CD.
4. Non sussiste la possibilità di farsi svegliare da un supporto dati USB o SD.
FUNZIONAMENTO BT (SOLO 10009513 &
10009514)
1. Selezionare BT con il tasto MODE.
2. Selezionare l’impianto sul proprio dispositivo che trasmette BT. Il nome è
“V329” e la password “0000”.
3. Aspettare nché è stato instaurato un collegamento e riprodurre la
musica.
4. Il BT memorizza l’ultimo collegamento e lo instaura automaticamente.
5. Può capitare che l’impianto stereo non riesca a collegarsi con altri sistemi
perché ci sono troppi dispositivi connessi. Tenere premuto il tasto PLAY /
PAUSE per due secondi per ripulire la memoria.
UTILIZZARE I DISPOSITIVI AUDIO ESTERNI
È possibile usare i dispositivi audio esterni, come portatili e lettori MP3,
tramite l’impianto stereo.
1. Spingere il COPERCHIO verso il basso.
2. Collegare il dispositivo audio esterno all’impianto.
3. Selezionare AUX con il tasto MODE.
4. Accendere l’impianto.
5. Riprodurre la musica tramite il dispositivo audio esterno.
6. Impostare il volume adeguato sul dispositivo audio esterno e
sull’impianto.
7. Spegnere il dispositivo dopo l’uso.

91
IT
COME IMPOSTARE LA SVEGLIA
Come impostare l’ora
1. Tenere premuto il tasto ALARM e premere ripetutamente il tasto ORA.
2. Tenere premuto il tasto ALARM e premere ripetutamente il tasto
MINUTI.
Nota: se sul display lampeggia il simbolo “PM”, signica che il dispositivo
indica l’orario riguardante la seconda metà della giornata. Se il simbolo PM
non lampeggia, signica che il dispositivo indica l’ora riguardante la prima
metà della giornata.
Come accendere e spegnere la sveglia
1. Premere una volta il tasto ALARM ON/OFF. Il simbolo dell’allarme
(campana) appare sul display a signicare che l’allarme è inserito.
2. Premere un’altra volta il tasto ALARM ON/OFF. Il simbolo dell’allarme
(campana) scompare a signicare che l’allarme è disinserito.
Vericare l’orario della sveglia
Per vericare l’orario della sveglia premere il tasto ALARM ON/OFF.
Denire l’allarme della radio
Denire l’orario della sveglia, posizionare il SELETTORE DI FUNZIONE su
radio, impostare una stazione e regolare il volume. Spegnere il dispositivo.
Denire l’allarme del CD
Denire l’orario della sveglia, posizionare il SELETTORE DI FUNZIONE su CD,
inserire un CD e regolare il volume. Spegnere il dispositivo.
Denire l’allarme con il suono della sveglia
1. Posizionare il SELETTORE DI FUNZIONE su ALARM.
2. Quando raggiunge l’orario della sveglia, il dispositivo aumenterà il suono
per 3 minuti.
3. Se il giorno seguente non si desidera più inserire l’allarme, premere il tasto
ALARM ON/OFF. Sul display scompare il simbolo dell’allarme (campana).
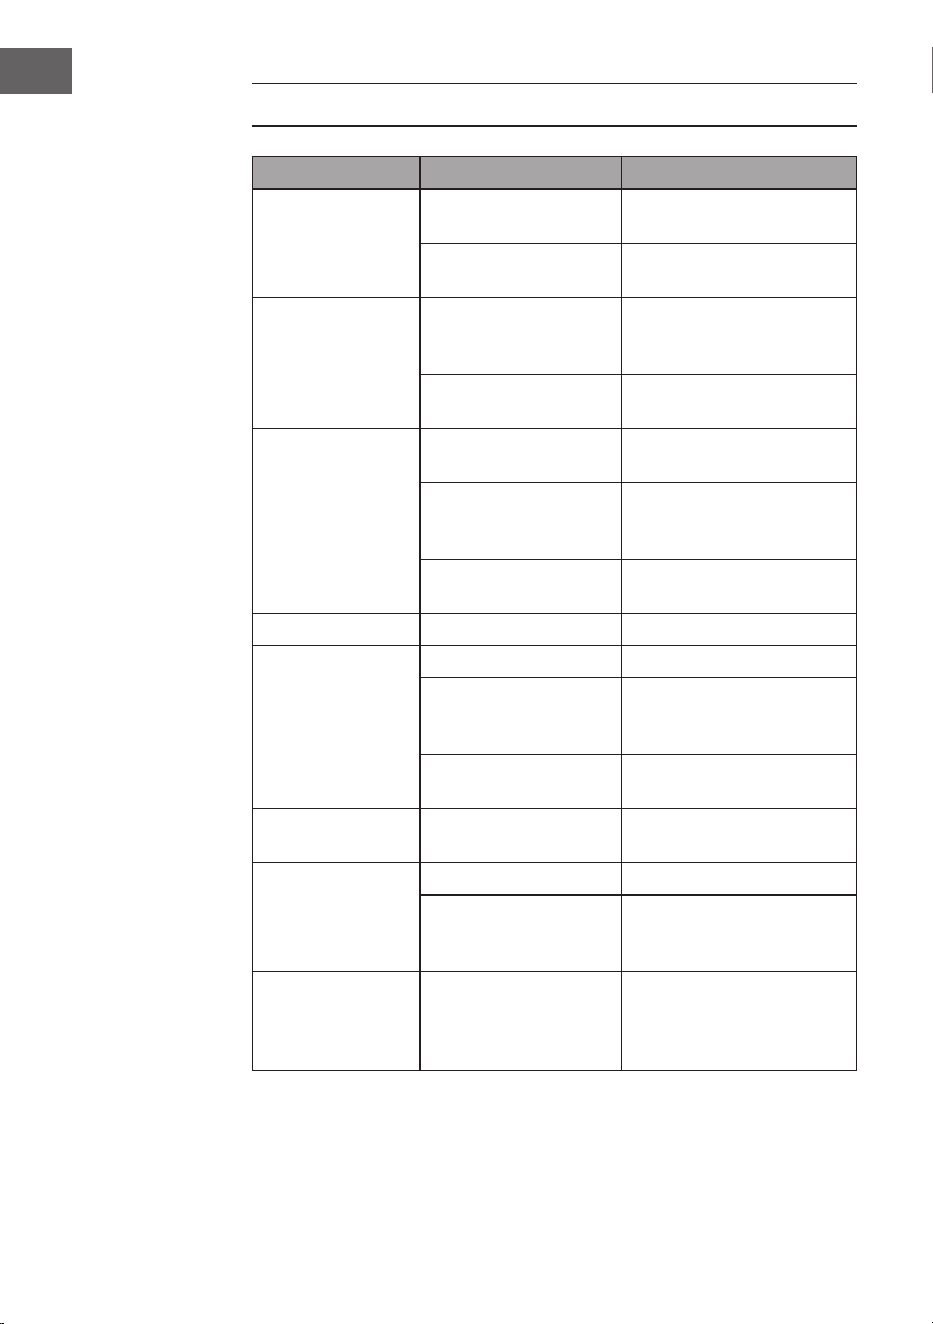
92
IT
CORREZIONE DEGLI ERRORI
Problema Possibile causa Soluzione
Il segnale radio fa
dei fruscii.
La stazione radio non è
ben impostata.
Reimpostare la stazione
radio.
L’antenna radio non è
dispiegata.
Dispiegare l’antenna.
La radio non riceve. Il dispositivo non si
trova in modalità
RADIO.
Selezionare la modalità
RADIO.
Il volume è troppo
basso.
Aumentare il volume.
L’unità per CD non
funziona.
La modalità CD non è
attiva.
Selezionare la modalità CD.
Il CD non è inserito
correttamente
nell’unità.
Inserire correttamente il
CD.
Il CD contiene dei dati
illeggibili.
Vericare i contenuti del
CD.
Il CD salta. Il CD è grafato. Pulire il CD o sostituirlo.
Rumori
indesiderati
durante la
riproduzione del
CD.
Il CD è sporco. Pulire il CD.
La lente è sporca. Pulire la lente con una
soluzione detergente per
CD.
Inuenze siche
esterne.
Spostare il dispositivo.
Suono distorto e
volume alto.
Il volume è impostato al
massimo.
Abbassare il volume.
Non suona
l’allarme.
L’allarme non è attivo. Attivare l’allarme.
Orario della sveglia
sbagliato.
Assicurarsi che AM/
PM siano impostati
correttamente.
Non si instaura il
collegamento BT.
La memoria del sistema
è piena.
Tenere premuto il tasto
RIPETIZIONE / PAUSA per
2 secondi per cancellare la
memoria.

93
IT
SMALTIMENTO
Se nel proprio paese si applicano le regolamentazioni
inerenti lo smaltimento di dispositivi elettrici ed
elettronici, questo simbolo sul prodotto o sulla
confezione segnala che questi prodotti non possono
essere smaltiti con i riuti normali e devono essere
portati a un punto di raccolta di dispositivi elettrici ed
elettronici. Grazie al corretto smaltimento dei vecchi
dispositivi si tutela il pianeta e la salute delle persone
da possibili conseguenze negative. Informazioni
riguardanti il riciclo e lo smaltimento di questi prodotti
si ottengono presso l’amministrazione locale oppure il
servizio di gestione dei riuti domestici.
Il prodotto contiene batterie. Se nel proprio paese si
applicano le regolamentazioni inerenti lo smaltimento
di batterie, non possono essere smaltite con i normali
riuti domestici. Preghiamo di informarvi sulle
regolamentazioni vigenti sullo smaltimento delle
batterie. Grazie al corretto smaltimento dei vecchi
dispositivi si tutela l’ambiente e la salute delle persone
da conseguenze negative.
DICHIARAZIONE DI CONFORMITÀ
Produttore:
Chal-Tec GmbH, Wallstraße 16, 10179 Berlino,
Germania.
Importatore per la Gran Bretagna:
Berlin Brands Group UK Limited
PO Box 42
272 Kensington High Street
London, W8 6ND
United Kingdom
Il fabbricante, Chal-Tec GmbH, dichiara che il tipo di
apparecchiatura radio V-12 è conforme alla direttiva
2014/53/UE. Il testo completo della dichiarazione
di conformità UE è disponibile al seguente indirizzo
Internet: use.berlin/10006663


95
NL
Geachte klant,
hartelijk gefeliciteerd met de aanschaf van dit apparaat.
Lees de hierna volgende handleiding aandachtig door
en volg de instructies op om schade te voorkomen. Voor
schade veroorzaakt door het niet in acht nemen van
de instructies of door onjuist gebruik nemen wij geen
verantwoordelijkheid. Scan de QR code voor toegang tot
de meest actuele gebruikershandleiding en voor meer
informatie rondom het artikel.
INHOUDSOPGAVE
Technische gegevens 96
Veiligheidsinstructies 97
Overzicht apparaat 99
Afstandsbediening 100
Montage 101
Ingebruikname en bediening 103
Radio 104
CD speler 105
Afspelen van een mp3-CD 106
USB/SD gebruik 108
BT gebruik (alleen 10009513 & 10009514) 108
Externe audio-apparatuur gebruiken 108
Wekker programmeren 109
Problemen oplossen 110
Instructies voor afvoer 111
Verklaring van overeenstemming 111
96
NL
TECHNISCHE GEGEVENS
Artikelnummer
10006663, 10006664, 10009511, 10009512,
10009513, 10009514, 10027657, 10027658
Stroomvoorziening
100-240 V ~ 50/60 Hz
(AC/DC stroomkabel inclusief)
Batterij
(afstandsbediening)
CR2025 3V knoopcel
Uitgangsvermogen
DC 5V 1,2A
Radio (FM)
FM 87,5–108 MHz
BT gebruik (alleen 10009513 & 10009514)
BT frequentie 2402–2480MHz
BT zendvermogen (max.) 4 dBm
Compatibel BT proel A2DP, AVRCP / BT 5.0 + EDR
USB/ CARD Host
Interface
Komt overeen met USB 1.1 (full speed) / USB 2.0
(massaopslag)
Ondersteunt alleen bulk en CBI protocol.
Ondersteunt bestanden MPEG-1 laag 3 (geen DRM)
Bitrate ondersteuning MP3 (32-320 kbps)
Algemeen
Luidspreker 7,6 cm (3,0 inch) conus (2x)
Luidsprekerimpedantie 4 Ω
Uitgangsvermogen
1,0 W per kanaal, min. RMS met 4 Ω bij 1kHz
met niet meer dan 10% totale harmonische
vervorming
Input aansluitingen AUDIO IN (3,5 mm)
Output aansluitingen Klink (3,5 mm)
CD speler
Type Single disc multiplayer compact disc speler
Signaalaezing
Contactloos scannen door halfgeleider laser
met 3 stralen
D/A converter Multibit D/A converter
Frequentie 20–20.000 Hz

97
NL
VEILIGHEIDSINSTRUCTIES
Algemene veiligheidsinstructies
WAARSCHUWING
Letselgevaar! Luister niet naar muziek met een te hoog volume
daar dit tot gehoorschade kan leiden.
• Kinderen vanaf 8 jaar en personen met een beperkte lichamelijke,
sensorische en/of geestelijke gezondheid mogen het apparaat alleen
gebruiken wanneer ze van tevoren door een voor hen verantwoordelijke
persoon uitvoerig met de functies en veiligheidsinstructies van het
apparaat vertrouwd zijn gemaakt en de hieraan verbonden risico's
begrijpen.
• Plaats uitsluitend CD's in de CD lader.
• Open nooit de klep van het apparaat en probeer in geen geval zelf
reparaties uit te voeren.
• Neem voor reparaties contact op met hiervoor gekwaliceerd personeel.
Het apparaat bevat geen bestanddelen die door de gebruiker moeten
worden onderhouden.
• Een onjuist gebruik van het apparaat kan schade veroorzaken en tot
verlies van de garantie leiden.
Stroomaansluiting
• Gebruik uitsluitend de inbegrepen stroomkabel met stekker. Het gebruik
van een andere stekker of kabel kan tot verlies van de garantie en/of tot
onherstelbare schade leiden.
• Neem tijdens onweer de stekker van het apparaat uit stopcontact.
• Zorg ervoor dat het apparaat uitgeschakeld is voordat u de stekker uit het
stopcontact haalt.
• Wanneer u een stekkerdoos met meerdere stopcontacten of de stekker
als scheidingssysteem gebruikt dient u erop te letten dat deze altijd
gemakkelijk toegankelijk en klaar voor gebruik zijn.
• Gooi batterijen nooit in een open vuur en probeer nooit het externe
omhulsel te openen.
• Batterijen vormen een gevaar voor de gezondheid wanneer ze ingeslikt
worden en dienen derhalve buiten het bereik van kinderen te worden
gehouden.

98
NL
Ventilatie
• Blokkeer of bedek de ventilatieopeningen, gaten of andere openingen van
het apparaat niet met objecten, zoals tapijt, kleedjes en dergelijke, omdat
anders de functionaliteit en/of de ventilatie voor een veilig gebruik niet
kunnen worden gegarandeerd.
• De onderkant van het apparaat kan warm worden wanneer het apparaat
gedurende langere tijd gebruikt wordt. Dit is normaal.
Standplaats
• Zorg ervoor dat het apparaat op een plat en stabiel oppervlak staat.
• Plaats het apparaat maximaal 1,4 meter van het stopcontact. Zorg ervoor
dat de stroom- en luidsprekerkabels geen struikelgevaar vormen.
• Plaats het apparaat minimaal een meter van andere elektrische apparaten
om storing te voorkomen.
• Plaats het apparaat zo dat het binnen het bereik van externe BT apparaten
(bijv. iPod/ iPhone/ iPad/ Android apparaten/ computer, enz.) staat. Het
bereik is (zonder hindernissen) maximaal 10 meter (33 voet).
• Let erop dat het apparaat voldoende plaats naar boven heeft zodat de
antenne goed uitgetrokken kan worden.
• Plaats het apparaat nooit op antieke of gepolijste oppervlaktes.
Informatie over de laser
VOORZICHTIG
Letselgevaar! Raak de optische lens in het CD compartiment
nooit aan en kijk hier niet naar binnen.
• Het gaat bij dit toestel om een klasse 1 laserproduct.
• Het gebruik van andere bedieningselementen dan die in de
handleiding worden genoemd of een niet geautoriseerde modicatie
van het apparaat kan leiden tot een schadelijke blootstelling aan
laserstraling.
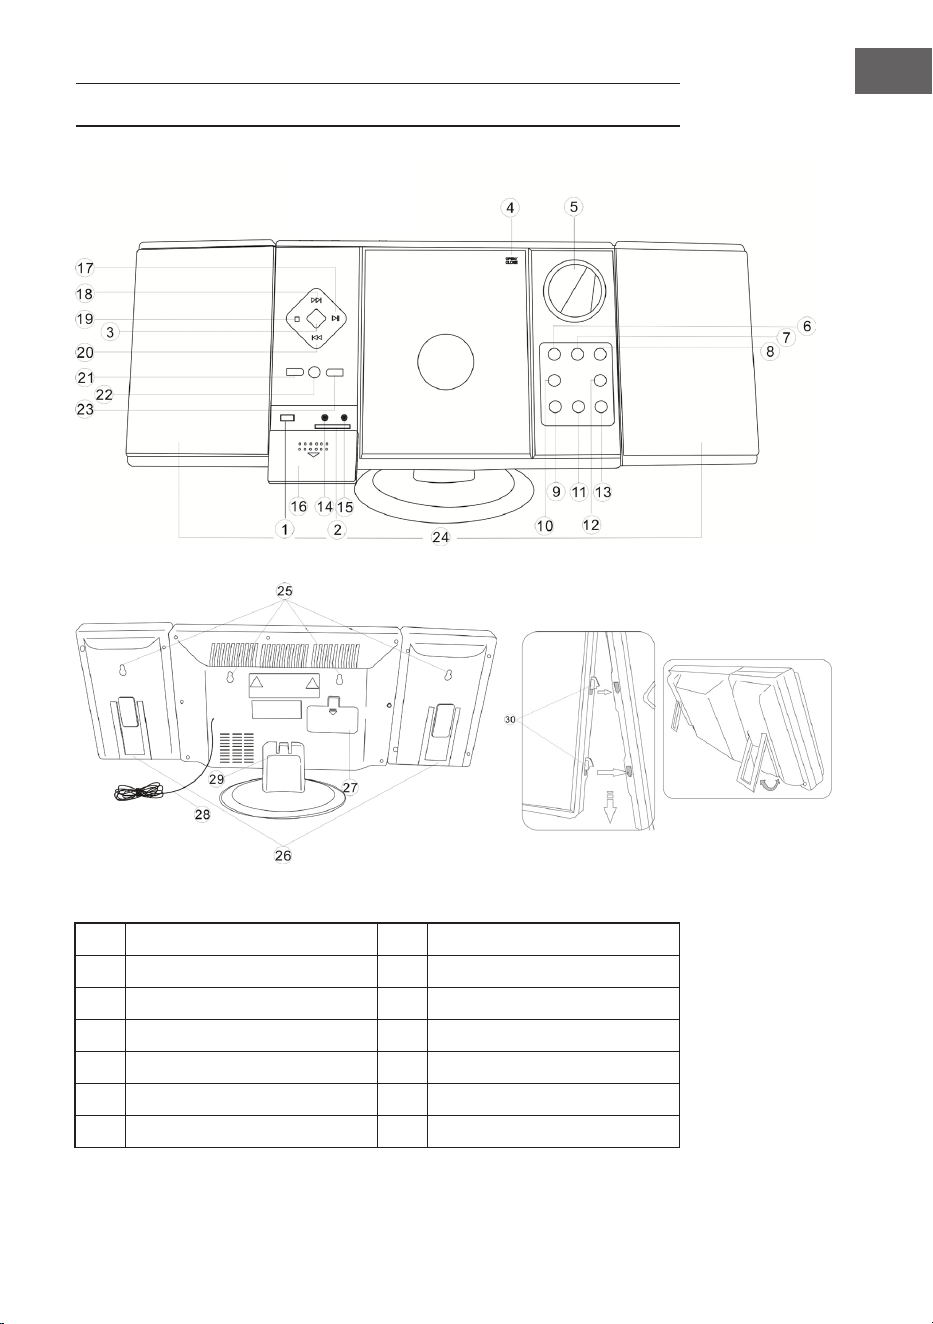
99
NL
OVERZICHT APPARAAT
1 USB ingang 8 Stand-by
2 SD sleuf 9 VOL - / uur
3 Functieschakelaar 10 Alarm instellen
4 CD klep 11 VOL + / minuut
5 Display 12 Alarm aan / uit
6 Zenders zoeken (omlaag) 13 Tijd instellen
7 Zenders zoeken (omhoog) 14 Koptelefoonaansluiting

100
NL
15 AUX ingang 23 Album / Preset +
16 Afdekking 24 Luidspreker
17 Play / Pauze / Scan 25 Wandmontagegaten
18 Titel zoeken vooruit 26 Luidsprekerstandaard
19 Stop / Opslaan 27 Batterijcompartiment
20 Titel zoeken terug 28 FM antenne
21 Repeat / Prog / Preset - 29 Standvoet
22 Sensor afstandsbediening 30 Luidsprekerbeugels
AFSTANDSBEDIENING
1 Stand-by
2 Play / Pauze / Scan
3 Stop / MEM.
4 Volume -
5
Repeat / Random play /
Preset -
6 Nummertoetsen
7 Modus
8 Mute
9
Titel / Volgende zender
zoeken
10 Titel / Vorige zender zoeken
11 Volume +
12 Prog / Preset +
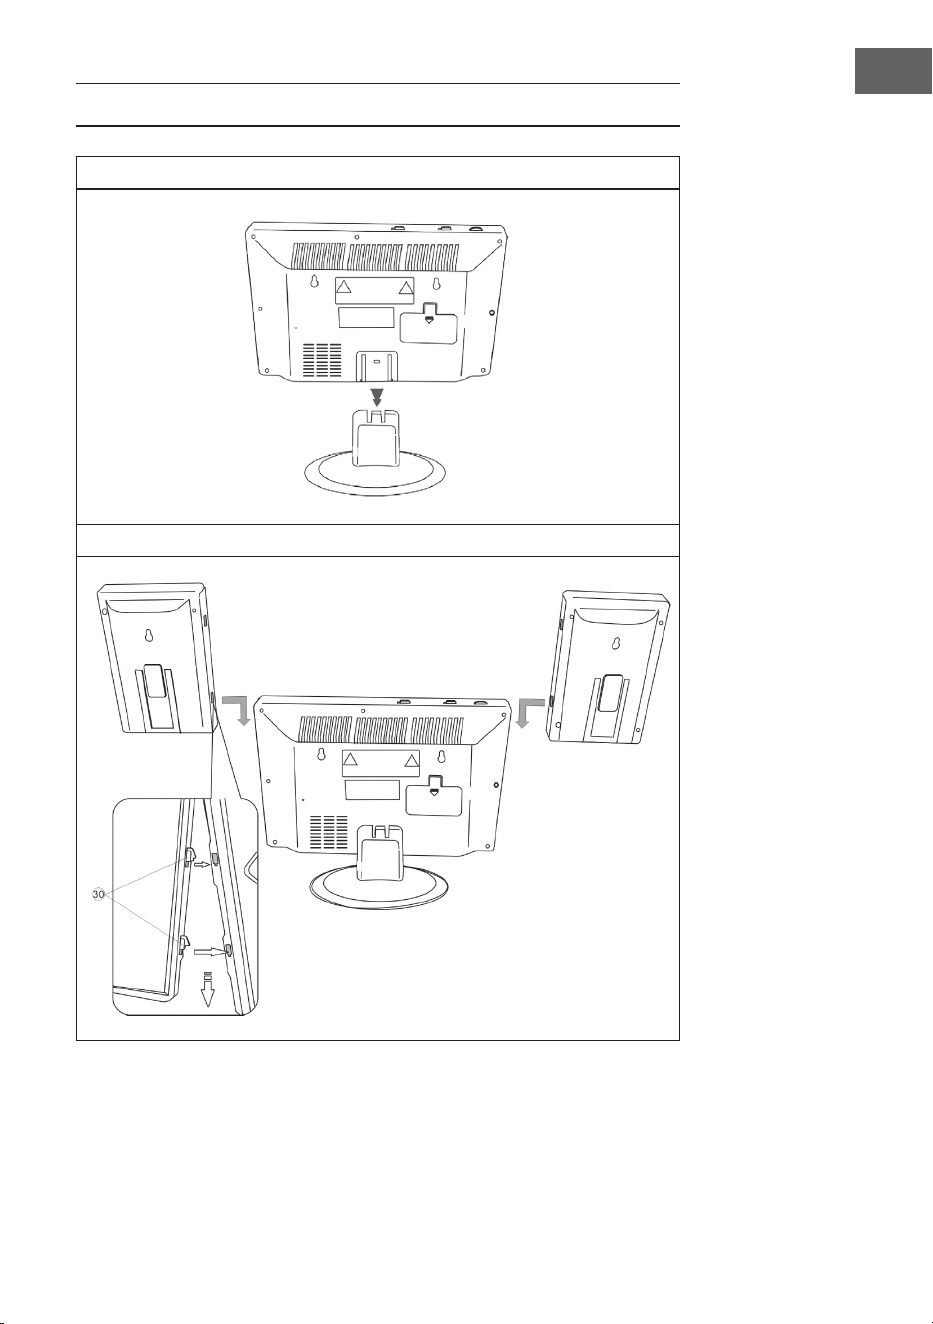
101
NL
MONTAGE
Standvoet
Verbinding tussen luidsprekers en basiseenheid

102
NL
Wandmontage

103
NL
INGEBRUIKNAME EN BEDIENING
Aansluiting stroomkabel
Zorg ervoor dat de stekker uit het stopcontact is gehaald voordat u een
verbinding maakt. Zorg ervoor dat het stopcontact, waarop u de stroomkabel
aansluit, functioneert en een constante stroomvoorziening levert.
Back-up systeem batterij
Het systeem is voorzien van een back-up systeem voor de batterijen van de
klok, gevoed door 2 batterijen (type AA). Deze batterijen zijn niet inbegrepen.
Tip: de batterijen kunnen worden geplaatst als back-up optie om de tijd
bij een stroomstoring op te slaan. In geval van een stroomstoring wordt de
tijd niet meer weergegeven maar loopt desondanks door zodat wanneer de
storing opgeheven is de actuele tijd direct zichtbaar is.
Stopcontact en
stroomkabel
Plaats het uiteinde
van de stroomkabel in
de hiervoor bestemde
ingang
(DC 5V MAX 2A)
achterin het apparaat.

104
NL
Plaatsen van batterijen in de afstandsbediening
• Druk het deksel van het compartiment naar beneden en schuif de deksel
weg om het vak te openen.
• Plaats een CR2025 batterij overeenkomstig de polariteitsmarkeringen (+
en -) in het vak en op de batterij.
• Plaats de deksel in het begin van het vak, druk hem licht naar beneden en
schuif hem naar binnen tot hij vastklikt.
Info: wanneer de afstandsbediening gedurende langere tijd niet wordt
gebruikt kan het zijn dat de batterij zwak wordt en de afstandsbediening
niet meer werkt. Vervang de batterij in dit geval door een nieuwe. De
batterij van de afstandsbediening mag niet blootgesteld worden aan
overmatige hitte door, bijvoorbeeld, zonlicht, vuur, e.d.
Klok instellingen
Houdt in gebruiksklare toestand de TIME toets ingedrukt totdat de
tijdweergave knippert. Druk op de toetsen VOL - / UUR en VOLUME + /
MINUUT om de actuele tijd in te stellen.
RADIO
Info: bij het zoeken naar zenders en bij het luisteren naar radiozenders
wordt op het display geen frequentie weergegeven.
Automatische zenderzoekopdracht
U kunt de functie SCAN gebruiken om automatisch naar nieuwe digitale
radiozenders te zoeken en inactieve zenders te verwijderen.
Houdt de toets PLAY / PAUZE / FM SCAN 2 seconden lang ingedrukt op
de installatie of de afstandsbediening om [Scan] te selecteren. Het aantal
gevonden zenders wordt tijdens de automatische zoekopdracht weergegeven.
Wanneer de automatische zenderzoekopdracht is afgelopen, wordt de laatst
gehoorde zender ingesteld. Wanneer de laatst gehoorde zender niet meer
beschikbaar is, wordt de eerste zender in de alfabetische lijst ingesteld.
Om een bepaalde radiozender handmatig in te stellen drukt u herhaaldelijk op
de toets / op de stereo-installatie of de afstandbediening.

105
NL
Opgeslagen zenders oproepen
Wanneer u zich in radiomodus bevindt kunt u de opgeslagen radiozenders
oproepen door herhaaldelijk op de toets PRESET op de afstandsbediening te
drukken. Wanneer u de opgeslagen zender voor het eerst oproept knippert
[P01] in het display.
Info: de klok en de radiozenders moeten bij een stroomonderbreking of
-uitval opnieuw worden geprogrammeerd. In het display verschijnt en
knippert [00:00] om u erop te wijzen dat de stroomtoevoer onderbreken
is en de klok opnieuw moet worden ingesteld. Wanneer u de klok opnieuw
heeft ingesteld start u een automatische zenderzoekopdracht.
CD SPELER
1. Schakel het apparaat in door op STANDBY te drukken. Het display gaat
aan.
2. Druk op MODE om de CD modus te kiezen.
3. Open de CD lader door op OPEN/CLOSE te drukken. Plaats een CD met
het etiket naar boven en sluit dan de lader.
4. Het afspelen begint met titel 1 zodra de speler de inhoudsopgave gelezen
heeft. Het afspeelsymbool verschijnt doorgaand in het display.
5. Druk tijdens de weergave op PLAY/ PAUZE om het afspelen te
onderbreken. Het afspeelsymbool knippert. Druk opnieuw op PLAY/
PAUZE om door te gaan met afspelen.
6. Gebruik de toetsen VOLUME (+ en -) om het gewenste volume in te
stellen.

106
NL
AFSPELEN VAN EEN MP3-CD
1. Schakel het apparaat in door op STANDBY te drukken. Het display gaat
aan.
2. Druk op MODE om de CD modus te kiezen.
3. Open de CD lader door op OPEN/CLOSE te drukken. Plaats een mp3-CD.
4. Druk op ALBUM om de discinformatie weer te geven.
5. Het afspelen begint met titel 1 zodra de speler de inhoudsopgave gelezen
heeft. Het afspeelsymbool verschijnt doorgaand in het display.
6. Druk tijdens de weergave op PLAY/ PAUZE om het afspelen te
onderbreken. Het afspeelsymbool knippert. Druk opnieuw op PLAY/
PAUZE om door te gaan met afspelen.
Een individuele titel herhalen.
Wanneer de toets -REPEAT/ RANDOM PLAY eenmaal wordt ingedrukt
knippert de betreffende indicator op het display. De actuele titel wordt
eenmaal herhaald.
Alle titels herhalen.
Wanneer de toets -REPEAT/ RANDOM PLAY tweemaal wordt ingedrukt
knippert de betreffende indicator op het display. De hele CD wordt nu
continue herhaald.
Zo onderbreekt u de repeat functie: druk op de repeat functietoets tot de
indicator verdwenen is.
Titel overslaan / In een titel zoeken
• Druk in weergave- of pauze-modus op / om naar de volgende titel
of om terug naar begin van de huidige titel te gaan.
• Houdt tijdens het afspelen de toets / ingedrukt om met hoge
snelheid een specieke plaats (zin/ refrein) in een titel te zoeken.

107
NL
Titels in een specieke volgorde programmeren
Met deze functie kunnen muziektitels in een geprogrammeerde volgorde
worden afgespeeld.
Info: dit programma is alleen beschikbaar in STOP modus.
1. Druk eenmaal op PROG. Zowel het programmanummer [01] als ook de
indicator (PROG) knipperen op het display.
2. Druk op / om de te programmeren titel te selecteren. [PROG]
knippert en vraagt u zo te bevestigen.
3. Druk opnieuw op PROG om de selectie op te slaan. Het
programmanummer spring op [02] en knippert samen met de indicator
[PROG].
4. Druk op / om de volgende te programmeren titel te selecteren.
[PROG] knippert en vraagt u zo te bevestigen.
5. Druk opnieuw op PROG om uw tweede keuze op te slaan. Herhaal stappen
2-4 om tot 20 titels te programmeren. Zodra u de twintigste titel heeft
opgeslagen laat het display automatisch de geprogrammeerde titels aan in
de door u ingestelde volgorde. Zowel het programmanummer [01] als ook
de indicator (PROG) knipperen aan het einde op het display.
6. Druk op PLAY / PAUZE om de geprogrammeerde reeks af te sluiten en te
starten.
7. Druk op om tijdens het afpelen van het programma direct naar andere
titels te gaan. Druk tweemaal op om naar een vorige titel terug te
keren.
8. Druk op de REPEAT/RAND knop om een specieke track (Repeat 1) of alle
tracks in het programma (Repeat All) herhaaldelijk af te spelen.
• De speler stopt wanneer alle geprogrammeerde titels eenmaal zijn
afgespeeld. Om het afspelen te herhalen drukt u op PROG gevolgd door
PLAY / PAUZE.
• Om de weergave te onderbreken drukt u tijdens het afspelen tweemaal op
STOP of u opent na eenmaal drukken de CD lader.
• Druk op ALBUM om het gewenste album te selecteren. Druk op MODE
om de audiobron te wijzigen.
• Om de speler uit te schakelen drukt u op STANDBY. De
achtergrondverlichting van het display dooft.

108
NL
USB/SD GEBRUIK
1. Kies met functieschakelaar de functie USB/SD en plaats een USB stick of
SD kaart.
2. Met de toets CD/USB/SD kunt u wisselen tussen de afspeelmodi SD, USB
en SD. Het display geeft met 'USB' of 'SD' aan welke modus actief is.
3. Het gebruik van de functies Repeat, Programmeren, Skip, Zoeken en
Album werkt net zoals bij CD gebruik.
4. Het is niet mogelijk een USB of SD als alarm in te stellen.
BT GEBRUIK (ALLEEN 10009513 & 10009514)
1. Selecteer BT met de MODE-knop.
2. Kies de installatie op het BT zendtoestel. Het kenmerk is 'V329'. Het
wachtwoord is '0000'
3. Wacht tot de verbinding gemaakt is en speel dan uw muziek af.
4. De BT zal de laatste verbinding onthouden en automatisch opnieuw
verbinding maken.
5. Dit kan ertoe leiden dat het systeem zich niet met anderen kan verbinden
wanneer er teveel apparaten met elkaar verbonden zijn. Houdt PLAY /
PAUZE twee seconden ingedrukt om het geheugen te wissen.
EXTERNE AUDIO-APPARATUUR GEBRUIKEN
U kunt externe audio-apparatuur, zoals laptops en mp3 spelers, via het
apparaat laten spelen.
1. Sluit de KLEP naar beneden.
2. Verbindt het externe audio-apparaat met de installatie.
3. Selecteer AUX met de knop MODE.
4. Zet de installatie aan.
5. Speel muziek enz. via het externe audio-apparaat af.
6. Stel het volume van het externe audio-apparaat en de installatie op het
juiste niveau in.
7. Zet het apparaat na gebruik uit.

109
NL
WEKKER PROGRAMMEREN
Wektijd programmeren
1. Houdt de ALARM toets ingedrukt en druk herhaaldelijk op UUR.
2. Houdt de ALARM toets ingedrukt en druk herhaaldelijk op MINUUT.
Info: wanneer de 'PM' indicator oplicht in het display laat het apparaat de
tijd in de tweede helft van de dag zien. Wanneer geen PM zichtbaar is, laat
het apparaat de tijd in de eerste helft van de dag zien.
Alarm aan- en uitzetten
1. Druk eenmaal op ALARM AAN/UIT. Het alarmsymbool (klok) verschijnt in
het display en het alarm is actief.
2. Druk nogmaals op ALARM AAN/UIT. Het alarmsymbool (klok) verdwijnt
en het alarm is uitgeschakeld.
Wektijd controleren
Om de wektijd te controleren drukt u op ALARM AAN/UIT.
Radioalarm instellen
Stel een wektijd in, zet de FUNCTIESCHAKELAAR op radio, stel een
radiostation in, pas het volume aan en schakel het apparaat vervolgens uit.
CD-alarm instellen
Stel een wektijd in, zet de FUNCTIESCHAKELAAR op CD, plaats een CD en
pas het volume aan, schakel het apparaat vervolgens uit.
Alarm met weksignaal instellen
1. Zet de FUNCTIESCHAKELAAR op ALARM.
2. Wanneer het tijstip bereikt is laat het apparaat 3 minuten lang een
weksignaal horen.
3. Wanneer het alarm de volgende dag niet hoeft af te lopen drukt u op
ALARM AAN/UIT. Op het display verdwijnt het alarmsymbool (klok).
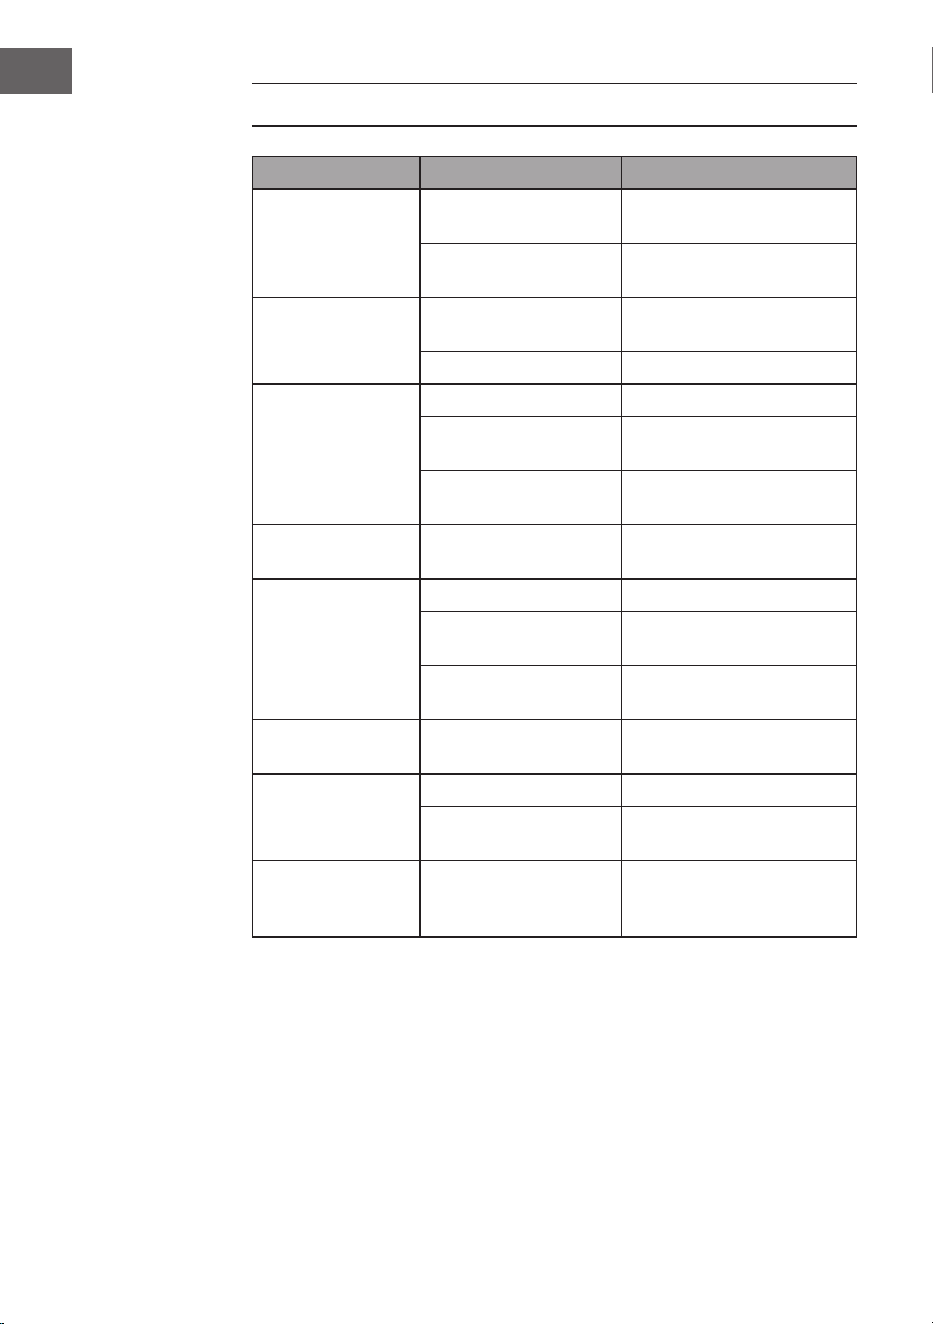
110
NL
PROBLEMEN OPLOSSEN
Probleem Mogelijke oorzaak Mogelijke oplossing
Radiosignaal
stoort.
Radiostation niet goed
afgesteld.
Radiostation opnieuw
afstellen.
Radio-antenne niet
afgerold/ uitgetrokken.
Radio-antenne afrollen/
uittrekken.
Geen radio-
ontvangst.
Apparaat niet in RADIO
modus.
Selecteer RADIO modus.
Volume te laag. Verhoog volume.
CD speler loopt
niet.
CD modus niet actief. Selecteer CD modus.
CD niet correct
geplaatst.
Plaats de CD op de juiste
manier.
CD bevat onleesbare
data.
Controleer de inhoud van
de CD.
CD slaat nummers
over.
CD bevat krassen. Reinig of vervang de CD.
Ongewenste
geluiden tijdens
het afspelen van
een CD.
CD is vuil. Reinig de CD.
De lens is vuil. Reinig de lens met een
reinigingsdisc.
Externe fysieke
effecten.
Draai het toestel om.
Vervormd geluid
bij hoog volume.
Volumeknop op
maximale instelling.
Reduceer het volume.
Geen wekalarm. Alarm niet actief. Activeer het alarm.
Verkeerde wektijd. Let erop dat AM/PM
correct is ingesteld.
Hij maakt geen BT
verbinding.
Het systeemgeheugen
is vol.
Houdt de PLAY / PAUZE
toets 2seconden ingedrukt
om het geheugen te wissen.

111
NL
INSTRUCTIES VOOR AFVOER
Wanneer in uw land een wettelijke regeling geldt
voor het afvoeren van elektrische en elektronische
apparaten, wijst het hiernaast afgebeelde symbool,
op het product zelf of op de verpakking, erop dat het
betreffende product niet met het huisvuil afgevoerd
mag worden. In plaats daarvan dient het naar een
centraal depot voor het recyclen van elektrische en
elektronische apparaten te worden gebracht. Door het
afval volgens de voorschriften af te voeren beschermt
u het milieu en de gezondheid van uw medemensen
tegen de negatieve consequenties. Informatie over
recycling en de afvoer van dit product ontvangt u van
uw gemeente of van uw plaatselijke grondstoffen- en
afvaldienst.
Dit artikel bevat batterijen. Wanneer in uw land
een wettelijke regeling geldt voor het afvoeren van
batterijen, mogen deze niet met het normale huisvuil
worden weggegooid. Informeer naar de plaatselijke
regelgeving inzake de gescheiden afvoer van batterijen.
Door de batterijen volgens de voorschriften af te
voeren beschermt u het milieu en de gezondheid van
uw medemensen tegen de negatieve consequenties.
VERKLARING VAN OVEREENSTEMMING
Fabrikant:
Chal-Tec GmbH, Wallstraße 16, 10179 Berlijn,
Duitsland.
Importeur voor Groot-Brittannië:
Berlin Brands Group UK Limited
PO Box 42
272 Kensington High Street
London, W8 6ND
United Kingdom
Härmed försäkrar Chal-Tec GmbH att denna typ av
radioutrustning V-12 överensstämmer med direktiv
2014/53/EU.Den fullständiga texten till EU-försäkran
om överensstämmelse nns på följande webbadress:
use.berlin/10006663