Operating Instructions
Model : Max
Model Name
20
16
12
8
4
Min.
600
300
200
100
400
500
20
16
12
8
4
Min.
600
3
0
0
200
100
400
500
20
1
6
12
8
4
Min.
600
300
200
100
400
500
-1-
- 3 -
Fig.3
-2-
How To Use
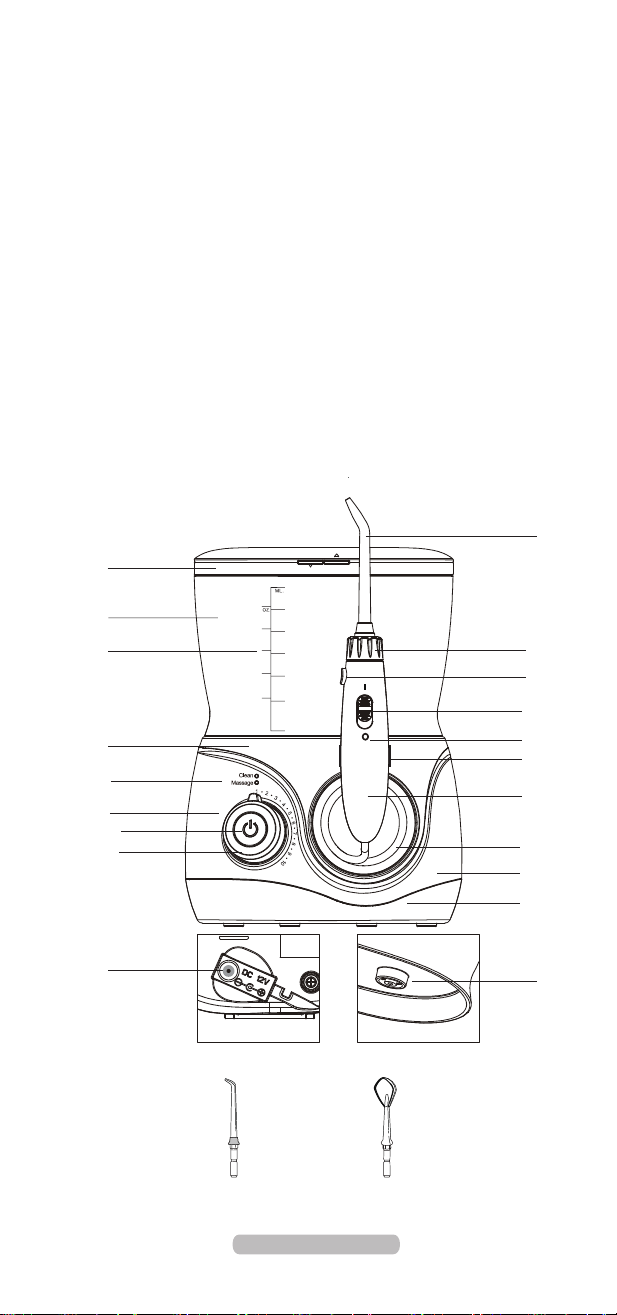
Know Your Product
Accessories
Fig.1
Inserting Nozzle
Tank Valve
knob: Pressure adjust
Inserting & Removing Nozzle
Fig.4
1
2
Nozzle Case
DC Jack Plug
Water Tank
Housing Top
Mode indicator
Pressure Mark
Button: Power/Mode
Nozzle
Release Button
Pause Switch
On/off Mark
Handle Holder
Handle
Pipe
Housing
Housing Bottom
Volume Mark
Nozzle knob
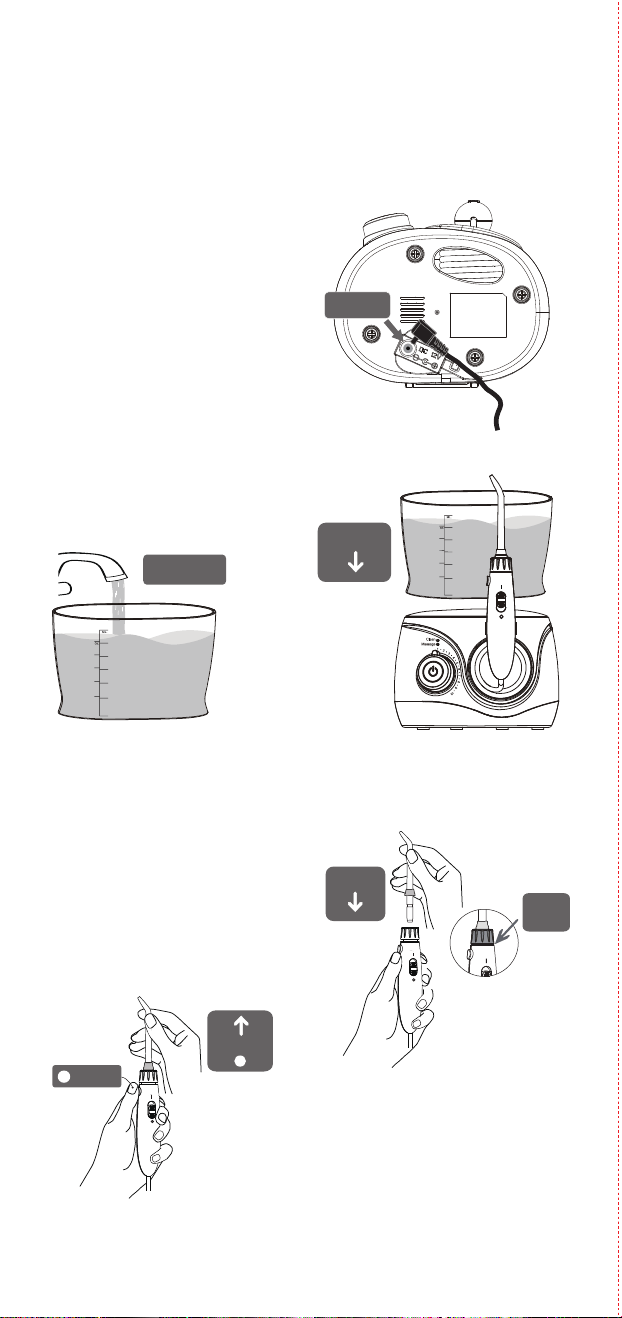
1. Insert the plug into the jack
at the bottom of the base and plug
in the adaptor cord with an electrical
outlet.(Fig.1)
2. Take the Nozzle Case off.
3. Fill the water tank with water,
no warmer than 40ºC. Do not pour
in salt, tooth-paste or chemicals in
the tank. Place the tank on the top of
main unit and press down firmly.
(Fig.2-1&Fig2-2)
Insert the tip into the center of the
handle. A small sound would indicate
once the nozzle is attached with the
handle.
Pull the tip out gently to confirm the tip
is locked firmly.(Fig.3)
Removing Nozzle
Press the release button on the
top end of the handle and pull
the nozzle out lightly by hand.
(Fig.4)
Maintenance Note
Problem
Motor is not running
Water does not
come out
The tank is empty
Fill the tank up
Water pressure is
very low
Dirt stuck in the nozzle
Clean or replace with a new nozzle
The nozzle is deformed
Dirt stuck in the tank
valve
Clean the valve and fill the tank
with pure water
-4-
- 6 -
- 5 -
- 7 -
Functional Tip
Troubleshoot
Water pressure under
the lowest setting
Slide the switch to adjust pressure
Make sure the adapter is firmly
connected to the outlet and the unit.
Possible Cause Solution
Unit is not working
Make sure the outlet and unit
power is on
Replace with a new nozzle
The valve is lost
The valve isn’t installed
in place
Replace with a new tank valve
Tank leaks
Take off the valve and reinstall
again
Tip head is worn
Replace with a new nozzle
Tear in Pocket tip
head
Fig.11
Pocket Tip
Fig.14
Fig.15
Orthodontic Tip
Fig.13
Fig.12
Tongue Scraper
Tank valve does not
open
Press down the tank, or
reassemble the tank valve
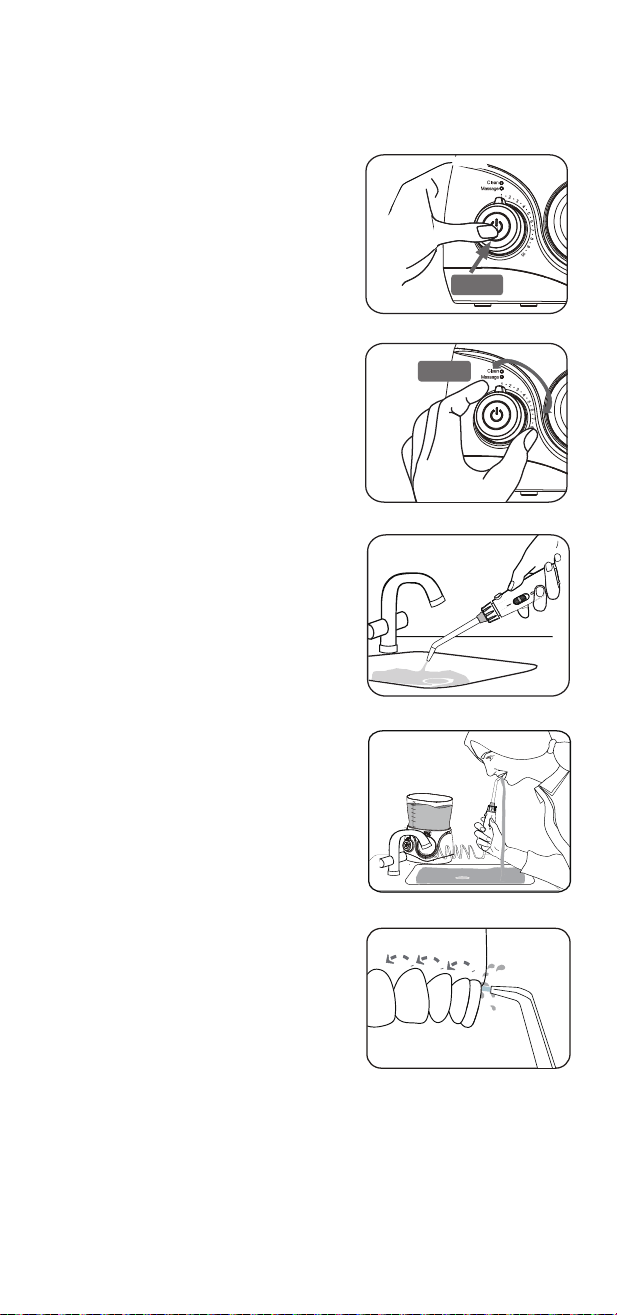
How to use the water flosser
Fig.7-2
Fig.10
Fig.6
Fig.8
Fig.7-1
You can end through the below methods:
1: Auto shut-off turns off after 2- minute cycle gets completed.
2: Turn it off by pressing the main button.
After use
Note:
Do not power on the device before placing the nozzle into your mouth. During
first use, we suggest you to choose the lower pressure and then gradually increase
the water pressure over time.
1. Hold the handle and point the nozzle to
the sink. Then press down the main button
to power on the device . (Fig.6)
Press the button again to select the mode
you desire. (Clean or Massage),
Working mode:
Clean: For cleaning in 30 Seconds interval
time.
Massage: For cleaning and massaging
the gums.
Mode indicator:
A blue light will flash while switching the mode
2. Rotate the knob to adjust the water pressure.
Push the pause switch to “ o ”
position to pause the water flow .
(Fig.7-1&Fig.7-2)
3. Adjust the direction of the nozzle by rotating
the nozzle knob.
4. Bend over to the sink and place the tip
at your mouth and push the pause
switch to “ I ” position to enjoy flossing.
(Slightly close your mouth to avoid the
water splashing.) (Fig.8)
5. Position the water jet flow at 90⁰
angle to the teeth and gum. (Fig.9)
6. Move the water jet slowly along the teeth.
The unit will continue to work till 2-minute
cycle is completed or you turn it off .
Fig .9
90°
1. Take off the water tank and drain out
the water after use.
2. Push the pause switch to “ I ” position,
and power on to drain the residual water from
the device. Push the pause switch
to “ 0 ” position again .
3. Turn off the device and wipe it with a
soft dry cloth.(Fig.10)
4. Press down the release button and
remove the nozzle. Then place it into
the nozzle case. (Fig.11)
5. Unplug the adapter.
When you want to clean your tongue,
gently place the tongue scraper
onto the center midline of your tongue
surface about halfway back with light
water pressure setting first and then gradually
increase the pressure as needed. (Fig.12)
The orthodontic tip is specially designed for
people wearing braces. It will clean the hard
to reach areas around and in braces.
1: Aim water stream at 90⁰ to the
tooth at the gum-line and start with the last
molar (back tooth);
2: Slowly slide the tip along with the
gum-line and pause briefly to clean the area
between teeth and all around orthodontic braces.
3: Repeat until you have finished cleaning
the inside and outside of all your teeth.
(Fig.13)
The pocket tip is specifically designed for
the cleaning of periodontal pockets.
To use the pocket tip, it is a must to set
the device to the lowest pressure setting.
1. Place the soft tip against a tooth at
45⁰ angle and gently place
the tip under the gum- line. Then
insert into the pocket. (Fig.14)
2. Turn the unit on and continue tracing
along the gum-line until all periodontal
pockets are treated.(Fig.15)
Note:
This tip must be used only with the lowest
water pressure to extend life of soft tip as it is easily broken.
Use only water or neutral cleaning agent to clean the device. Never use caustic
or abrasive agents (e.g., vinegar or lime scale removers), since they may
damage the device. Do not wash using hot water of over 40 ºC. Keep the
device away from high temperature area and avoid direct sunlight.
Main unit
1. Remove the water tank and drain the remains water inside the device.
2. Clean by using a soft cloth with liquid soap and dry with a soft dry cloth.
3. Do not submerge the main unit in water to clean.
Handle
1. Wash with water and dry up with a soft cloth.
2. Do not bend, pull or twist the water hose.
Water tank
1. Wash with water and wipe with a soft dry cloth.
2. Make sure the water tank is inverted and firmly fixed to store.
Nozzle
1. Wash with water and wipe with a soft dry cloth.
2. Place the nozzle in the storage compartment.
3. Replace once every 6 months for Standard nozzle and tongue scraper,
and once every 3 months for other tips.
Charging adaptor
Wipe the metal part of the power plug with a dry cloth once every 6 months.
20
16
12
8
4
Min.
600
3
0
0
200
100
400
500
20
16
12
8
4
Min.
600
3
0
0
200
100
400
500
Storage
Small
gap
20
1
6
1
2
8
4
Min.
600
30
0
2
0
0
100
400
500
Fig.2-2
Fig.2-1
20
1
6
1
2
8
4
Min .
600
30
0
2
0
0
100
400
500
Fill water
Place
Insert
Pull out
Press
Plug in
Storage
Standard Nozzle
x 3pcs
Tongue Scraper
x 1pc
Replace every 6 months
20
16
12
8
4
Min .
600
3
0
0
200
100
400
500
20
16
12
8
4
Min .
600
3
0
0
200
100
400
500
Press
Rotate
1 YEAR
Place the device on a flat surface and make sure the cord is dry and is
not damage.
Imported & Marketed by:
Universal Corporation Limited
Sikkim Commerce House, 4/1, Middleton Street, Kolkata-700071
Tabletop Oral Irrigator
AGARO Max Tabletop Oral irrigator 600
Max (Item No - 33441)
Caution
● Children and individuals with reduced physical, sensory or mental
capabilities need to be supervised by adults or need to be given
adequate instructions prior to usage. Not suitable for children below
8 years of age
● The battery must be removed from the appliance before it is scrapped
● Do not fill the tank with water warmer than 40ºC
● Please do not use it if you lose the nozzle
● Do not use for any purpose other than oral cleaning
● Keep nozzle away from small children
● People who experience tooth or gum pain should not use
this device without consulting a dentist
● Do not press the nozzle too firmly against your teeth or gum.
Doing so may injure your gum
Customer purchasing from online need to produce the online partner's Invoice copy to claim the warranty.
The following conditions are not included in the warranty:
-Damage caused by improper use.
-Ageing and wearing out caused by normal use.
-Problems occurred due to use for other purposes or improper use.
-T & C apply.
Operating Instructions
Model : Max
Model Name
20
16
12
8
4
Min.
600
300
200
100
400
500
20
16
12
8
4
Min.
600
3
0
0
200
100
400
500
20
1
6
12
8
4
Min.
600
300
200
100
400
500
-1-
- 3 -
Fig.3
-2-
How To Use
Know Your Product
Accessories
Fig.1
Inserting Nozzle
Tank Valve
knob: Pressure adjust
Inserting & Removing Nozzle
Fig.4
1
2
Nozzle Case
DC Jack Plug
Water Tank
Housing Top
Mode indicator
Pressure Mark
Button: Power/Mode
Nozzle
Release Button
Pause Switch
On/off Mark
Handle Holder
Handle
Pipe
Housing
Housing Bottom
Volume Mark
Nozzle knob
1. Insert the plug into the jack
at the bottom of the base and plug
in the adaptor cord with an electrical
outlet.(Fig.1)
2. Take the Nozzle Case off.
3. Fill the water tank with water,
no warmer than 40ºC. Do not pour
in salt, tooth-paste or chemicals in
the tank. Place the tank on the top of
main unit and press down firmly.
(Fig.2-1&Fig2-2)
Insert the tip into the center of the
handle. A small sound would indicate
once the nozzle is attached with the
handle.
Pull the tip out gently to confirm the tip
is locked firmly.(Fig.3)
Removing Nozzle
Press the release button on the
top end of the handle and pull
the nozzle out lightly by hand.
(Fig.4)
Maintenance Note
Problem
Motor is not running
Water does not
come out
The tank is empty
Fill the tank up
Water pressure is
very low
Dirt stuck in the nozzle
Clean or replace with a new nozzle
The nozzle is deformed
Dirt stuck in the tank
valve
Clean the valve and fill the tank
with pure water
-4-
- 6 -
- 5 -
- 7 -
Functional Tip
Troubleshoot
Water pressure under
the lowest setting
Slide the switch to adjust pressure
Make sure the adapter is firmly
connected to the outlet and the unit.
Possible Cause Solution
Unit is not working
Make sure the outlet and unit
power is on
Replace with a new nozzle
The valve is lost
The valve isn’t installed
in place
Replace with a new tank valve
Tank leaks
Take off the valve and reinstall
again
Tip head is worn
Replace with a new nozzle
Tear in Pocket tip
head
Fig.11
Pocket Tip
Fig.14
Fig.15
Orthodontic Tip
Fig.13
Fig.12
Tongue Scraper
Tank valve does not
open
Press down the tank, or
reassemble the tank valve
How to use the water flosser
Fig.7-2
Fig.10
Fig.6
Fig.8
Fig.7-1
You can end through the below methods:
1: Auto shut-off turns off after 2- minute cycle gets completed.
2: Turn it off by pressing the main button.
After use
Note:
Do not power on the device before placing the nozzle into your mouth. During
first use, we suggest you to choose the lower pressure and then gradually increase
the water pressure over time.
1. Hold the handle and point the nozzle to
the sink. Then press down the main button
to power on the device . (Fig.6)
Press the button again to select the mode
you desire. (Clean or Massage),
Working mode:
Clean: For cleaning in 30 Seconds interval
time.
Massage: For cleaning and massaging
the gums.
Mode indicator:
A blue light will flash while switching the mode
2. Rotate the knob to adjust the water pressure.
Push the pause switch to “ o ”
position to pause the water flow .
(Fig.7-1&Fig.7-2)
3. Adjust the direction of the nozzle by rotating
the nozzle knob.
4. Bend over to the sink and place the tip
at your mouth and push the pause
switch to “ I ” position to enjoy flossing.
(Slightly close your mouth to avoid the
water splashing.) (Fig.8)
5. Position the water jet flow at 90⁰
angle to the teeth and gum. (Fig.9)
6. Move the water jet slowly along the teeth.
The unit will continue to work till 2-minute
cycle is completed or you turn it off .
Fig .9
90°
1. Take off the water tank and drain out
the water after use.
2. Push the pause switch to “ I ” position,
and power on to drain the residual water from
the device. Push the pause switch
to “ 0 ” position again .
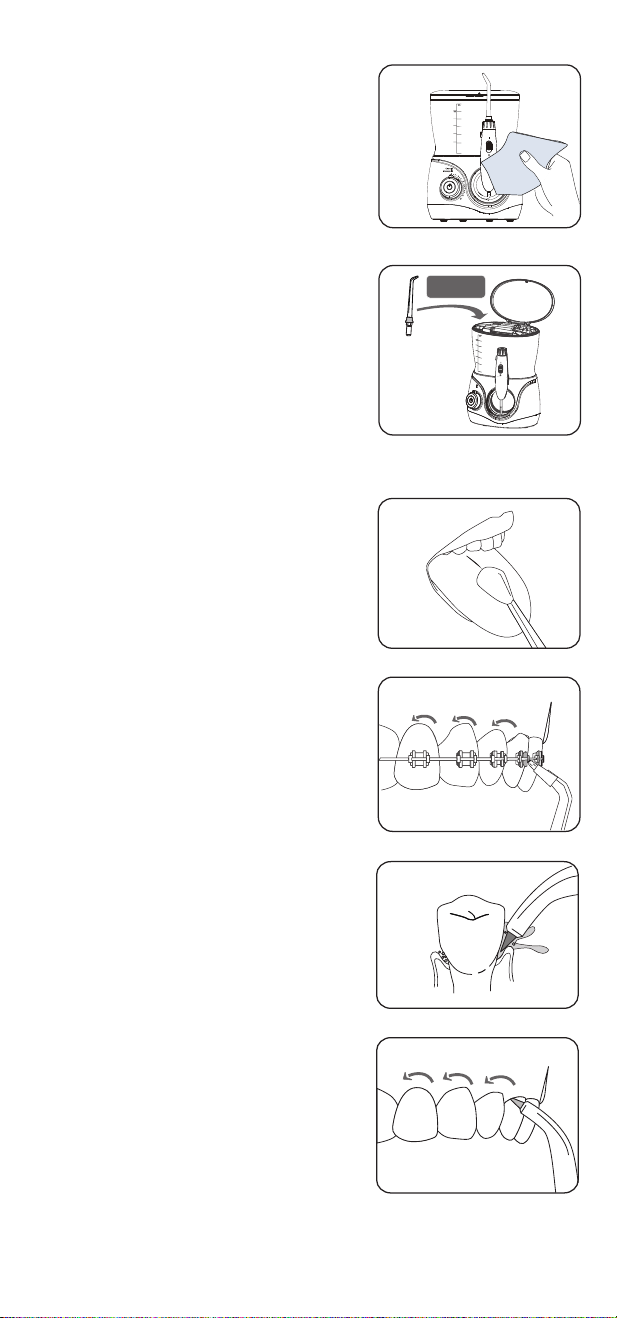
3. Turn off the device and wipe it with a
soft dry cloth.(Fig.10)
4. Press down the release button and
remove the nozzle. Then place it into
the nozzle case. (Fig.11)
5. Unplug the adapter.
When you want to clean your tongue,
gently place the tongue scraper
onto the center midline of your tongue
surface about halfway back with light
water pressure setting first and then gradually
increase the pressure as needed. (Fig.12)
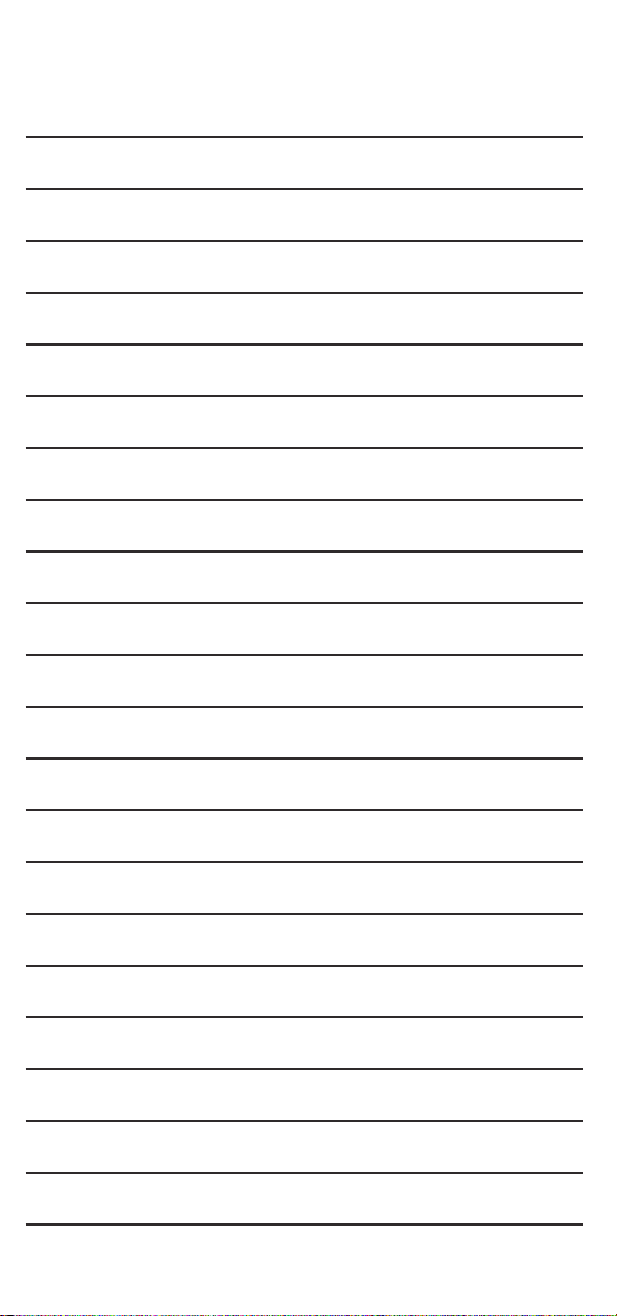
The orthodontic tip is specially designed for
people wearing braces. It will clean the hard
to reach areas around and in braces.
1: Aim water stream at 90⁰ to the
tooth at the gum-line and start with the last
molar (back tooth);
2: Slowly slide the tip along with the
gum-line and pause briefly to clean the area
between teeth and all around orthodontic braces.
3: Repeat until you have finished cleaning
the inside and outside of all your teeth.
(Fig.13)
The pocket tip is specifically designed for
the cleaning of periodontal pockets.
To use the pocket tip, it is a must to set
the device to the lowest pressure setting.
1. Place the soft tip against a tooth at
45⁰ angle and gently place
the tip under the gum- line. Then
insert into the pocket. (Fig.14)
2. Turn the unit on and continue tracing
along the gum-line until all periodontal
pockets are treated.(Fig.15)
Note:
This tip must be used only with the lowest
water pressure to extend life of soft tip as it is easily broken.
Use only water or neutral cleaning agent to clean the device. Never use caustic
or abrasive agents (e.g., vinegar or lime scale removers), since they may
damage the device. Do not wash using hot water of over 40 ºC. Keep the
device away from high temperature area and avoid direct sunlight.
Main unit
1. Remove the water tank and drain the remains water inside the device.
2. Clean by using a soft cloth with liquid soap and dry with a soft dry cloth.
3. Do not submerge the main unit in water to clean.
Handle
1. Wash with water and dry up with a soft cloth.
2. Do not bend, pull or twist the water hose.
Water tank
1. Wash with water and wipe with a soft dry cloth.
2. Make sure the water tank is inverted and firmly fixed to store.
Nozzle
1. Wash with water and wipe with a soft dry cloth.
2. Place the nozzle in the storage compartment.
3. Replace once every 6 months for Standard nozzle and tongue scraper,
and once every 3 months for other tips.
Charging adaptor
Wipe the metal part of the power plug with a dry cloth once every 6 months.
20
16
12
8
4
Min.
600
3
0
0
200
100
400
500
20
16
12
8
4
Min.
600
3
0
0
200
100
400
500
Storage
Small
gap
20
1
6
1
2
8
4
Min.
600
30
0
2
0
0
100
400
500
Fig.2-2
Fig.2-1
20
1
6
1
2
8
4
Min .
600
30
0
2
0
0
100
400
500
Fill water
Place
Insert
Pull out
Press
Plug in
Storage
Standard Nozzle
x 3pcs
Tongue Scraper
x 1pc
Replace every 6 months
20
16
12
8
4
Min .
600
3
0
0
200
100
400
500
20
16
12
8
4
Min .
600
3
0
0
200
100
400
500
Press
Rotate
1 YEAR
Place the device on a flat surface and make sure the cord is dry and is
not damage.
Imported & Marketed by:
Universal Corporation Limited
Sikkim Commerce House, 4/1, Middleton Street, Kolkata-700071
Tabletop Oral Irrigator
AGARO Max Tabletop Oral irrigator 600
Max (Item No - 33441)
Caution
● Children and individuals with reduced physical, sensory or mental
capabilities need to be supervised by adults or need to be given
adequate instructions prior to usage. Not suitable for children below
8 years of age
● The battery must be removed from the appliance before it is scrapped
● Do not fill the tank with water warmer than 40ºC
● Please do not use it if you lose the nozzle
● Do not use for any purpose other than oral cleaning
● Keep nozzle away from small children
● People who experience tooth or gum pain should not use
this device without consulting a dentist
● Do not press the nozzle too firmly against your teeth or gum.
Doing so may injure your gum
Customer purchasing from online need to produce the online partner's Invoice copy to claim the warranty.
The following conditions are not included in the warranty:
-Damage caused by improper use.
-Ageing and wearing out caused by normal use.
-Problems occurred due to use for other purposes or improper use.
-T & C apply.
Operating Instructions
Model : Max
Model Name
20
16
12
8
4
Min.
600
300
200
100
400
500
20
16
12
8
4
Min.
600
3
0
0
200
100
400
500
20
1
6
12
8
4
Min.
600
300
200
100
400
500
-1-
- 3 -
Fig.3
-2-
How To Use
Know Your Product
Accessories
Fig.1
Inserting Nozzle
Tank Valve
knob: Pressure adjust
Inserting & Removing Nozzle
Fig.4
1
2
Nozzle Case
DC Jack Plug
Water Tank
Housing Top
Mode indicator
Pressure Mark
Button: Power/Mode
Nozzle
Release Button
Pause Switch
On/off Mark
Handle Holder
Handle
Pipe
Housing
Housing Bottom
Volume Mark
Nozzle knob
1. Insert the plug into the jack
at the bottom of the base and plug
in the adaptor cord with an electrical
outlet.(Fig.1)
2. Take the Nozzle Case off.
3. Fill the water tank with water,
no warmer than 40ºC. Do not pour
in salt, tooth-paste or chemicals in
the tank. Place the tank on the top of
main unit and press down firmly.
(Fig.2-1&Fig2-2)
Insert the tip into the center of the
handle. A small sound would indicate
once the nozzle is attached with the
handle.
Pull the tip out gently to confirm the tip
is locked firmly.(Fig.3)
Removing Nozzle
Press the release button on the
top end of the handle and pull
the nozzle out lightly by hand.
(Fig.4)
Maintenance Note
Problem
Motor is not running
Water does not
come out
The tank is empty
Fill the tank up
Water pressure is
very low
Dirt stuck in the nozzle
Clean or replace with a new nozzle
The nozzle is deformed
Dirt stuck in the tank
valve
Clean the valve and fill the tank
with pure water
-4-
- 6 -
- 5 -
- 7 -
Functional Tip
Troubleshoot
Water pressure under
the lowest setting
Slide the switch to adjust pressure
Make sure the adapter is firmly
connected to the outlet and the unit.
Possible Cause Solution
Unit is not working
Make sure the outlet and unit
power is on
Replace with a new nozzle
The valve is lost
The valve isn’t installed
in place
Replace with a new tank valve
Tank leaks
Take off the valve and reinstall
again
Tip head is worn
Replace with a new nozzle
Tear in Pocket tip
head
Fig.11
Pocket Tip
Fig.14
Fig.15
Orthodontic Tip
Fig.13
Fig.12
Tongue Scraper
Tank valve does not
open
Press down the tank, or
reassemble the tank valve
How to use the water flosser
Fig.7-2
Fig.10
Fig.6
Fig.8
Fig.7-1
You can end through the below methods:
1: Auto shut-off turns off after 2- minute cycle gets completed.
2: Turn it off by pressing the main button.
After use
Note:
Do not power on the device before placing the nozzle into your mouth. During
first use, we suggest you to choose the lower pressure and then gradually increase
the water pressure over time.
1. Hold the handle and point the nozzle to
the sink. Then press down the main button
to power on the device . (Fig.6)
Press the button again to select the mode
you desire. (Clean or Massage),
Working mode:
Clean: For cleaning in 30 Seconds interval
time.
Massage: For cleaning and massaging
the gums.
Mode indicator:
A blue light will flash while switching the mode
2. Rotate the knob to adjust the water pressure.
Push the pause switch to “ o ”
position to pause the water flow .
(Fig.7-1&Fig.7-2)
3. Adjust the direction of the nozzle by rotating
the nozzle knob.
4. Bend over to the sink and place the tip
at your mouth and push the pause
switch to “ I ” position to enjoy flossing.
(Slightly close your mouth to avoid the
water splashing.) (Fig.8)
5. Position the water jet flow at 90⁰
angle to the teeth and gum. (Fig.9)
6. Move the water jet slowly along the teeth.
The unit will continue to work till 2-minute
cycle is completed or you turn it off .
Fig .9
90°
1. Take off the water tank and drain out
the water after use.
2. Push the pause switch to “ I ” position,
and power on to drain the residual water from
the device. Push the pause switch
to “ 0 ” position again .
3. Turn off the device and wipe it with a
soft dry cloth.(Fig.10)
4. Press down the release button and
remove the nozzle. Then place it into
the nozzle case. (Fig.11)
5. Unplug the adapter.
When you want to clean your tongue,
gently place the tongue scraper
onto the center midline of your tongue
surface about halfway back with light
water pressure setting first and then gradually
increase the pressure as needed. (Fig.12)
The orthodontic tip is specially designed for
people wearing braces. It will clean the hard
to reach areas around and in braces.
1: Aim water stream at 90⁰ to the
tooth at the gum-line and start with the last
molar (back tooth);
2: Slowly slide the tip along with the
gum-line and pause briefly to clean the area
between teeth and all around orthodontic braces.
3: Repeat until you have finished cleaning
the inside and outside of all your teeth.
(Fig.13)
The pocket tip is specifically designed for
the cleaning of periodontal pockets.
To use the pocket tip, it is a must to set
the device to the lowest pressure setting.
1. Place the soft tip against a tooth at
45⁰ angle and gently place
the tip under the gum- line. Then
insert into the pocket. (Fig.14)
2. Turn the unit on and continue tracing
along the gum-line until all periodontal
pockets are treated.(Fig.15)
Note:
This tip must be used only with the lowest
water pressure to extend life of soft tip as it is easily broken.
Use only water or neutral cleaning agent to clean the device. Never use caustic
or abrasive agents (e.g., vinegar or lime scale removers), since they may
damage the device. Do not wash using hot water of over 40 ºC. Keep the
device away from high temperature area and avoid direct sunlight.
Main unit
1. Remove the water tank and drain the remains water inside the device.
2. Clean by using a soft cloth with liquid soap and dry with a soft dry cloth.
3. Do not submerge the main unit in water to clean.
Handle
1. Wash with water and dry up with a soft cloth.
2. Do not bend, pull or twist the water hose.
Water tank
1. Wash with water and wipe with a soft dry cloth.
2. Make sure the water tank is inverted and firmly fixed to store.
Nozzle
1. Wash with water and wipe with a soft dry cloth.
2. Place the nozzle in the storage compartment.
3. Replace once every 6 months for Standard nozzle and tongue scraper,
and once every 3 months for other tips.
Charging adaptor
Wipe the metal part of the power plug with a dry cloth once every 6 months.
20
16
12
8
4
Min.
600
3
0
0
200
100
400
500
20
16
12
8
4
Min.
600
3
0
0
200
100
400
500
Storage
Small
gap
20
1
6
1
2
8
4
Min.
600
30
0
2
0
0
100
400
500
Fig.2-2
Fig.2-1
20
1
6
1
2
8
4
Min .
600
30
0
2
0
0
100
400
500
Fill water
Place
Insert
Pull out
Press
Plug in
Storage
Standard Nozzle
x 3pcs
Tongue Scraper
x 1pc
Replace every 6 months
20
16
12
8
4
Min .
600
3
0
0
200
100
400
500
20
16
12
8
4
Min .
600
3
0
0
200
100
400
500
Press
Rotate
1 YEAR
Place the device on a flat surface and make sure the cord is dry and is
not damage.
Imported & Marketed by:
Universal Corporation Limited
Sikkim Commerce House, 4/1, Middleton Street, Kolkata-700071
Tabletop Oral Irrigator
AGARO Max Tabletop Oral irrigator 600
Max (Item No - 33441)
Caution
● Children and individuals with reduced physical, sensory or mental
capabilities need to be supervised by adults or need to be given
adequate instructions prior to usage. Not suitable for children below
8 years of age
● The battery must be removed from the appliance before it is scrapped
● Do not fill the tank with water warmer than 40ºC
● Please do not use it if you lose the nozzle
● Do not use for any purpose other than oral cleaning
● Keep nozzle away from small children
● People who experience tooth or gum pain should not use
this device without consulting a dentist
● Do not press the nozzle too firmly against your teeth or gum.
Doing so may injure your gum
Customer purchasing from online need to produce the online partner's Invoice copy to claim the warranty.
The following conditions are not included in the warranty:
-Damage caused by improper use.
-Ageing and wearing out caused by normal use.
-Problems occurred due to use for other purposes or improper use.
-T & C apply.
Operating Instructions
Model : Max
Model Name
20
16
12
8
4
Min.
600
300
200
100
400
500
20
16
12
8
4
Min.
600
3
0
0
200
100
400
500
20
1
6
12
8
4
Min.
600
300
200
100
400
500
-1-
- 3 -
Fig.3
-2-
How To Use
Know Your Product
Accessories
Fig.1
Inserting Nozzle
Tank Valve
knob: Pressure adjust
Inserting & Removing Nozzle
Fig.4
1
2
Nozzle Case
DC Jack Plug
Water Tank
Housing Top
Mode indicator
Pressure Mark
Button: Power/Mode
Nozzle
Release Button
Pause Switch
On/off Mark
Handle Holder
Handle
Pipe
Housing
Housing Bottom
Volume Mark
Nozzle knob
1. Insert the plug into the jack
at the bottom of the base and plug
in the adaptor cord with an electrical
outlet.(Fig.1)
2. Take the Nozzle Case off.
3. Fill the water tank with water,
no warmer than 40ºC. Do not pour
in salt, tooth-paste or chemicals in
the tank. Place the tank on the top of
main unit and press down firmly.
(Fig.2-1&Fig2-2)
Insert the tip into the center of the
handle. A small sound would indicate
once the nozzle is attached with the
handle.
Pull the tip out gently to confirm the tip
is locked firmly.(Fig.3)
Removing Nozzle
Press the release button on the
top end of the handle and pull
the nozzle out lightly by hand.
(Fig.4)
Maintenance Note
Problem
Motor is not running
Water does not
come out
The tank is empty
Fill the tank up
Water pressure is
very low
Dirt stuck in the nozzle
Clean or replace with a new nozzle
The nozzle is deformed
Dirt stuck in the tank
valve
Clean the valve and fill the tank
with pure water
-4-
- 6 -
- 5 -
- 7 -
Functional Tip
Troubleshoot
Water pressure under
the lowest setting
Slide the switch to adjust pressure
Make sure the adapter is firmly
connected to the outlet and the unit.
Possible Cause Solution
Unit is not working
Make sure the outlet and unit
power is on
Replace with a new nozzle
The valve is lost
The valve isn’t installed
in place
Replace with a new tank valve
Tank leaks
Take off the valve and reinstall
again
Tip head is worn
Replace with a new nozzle
Tear in Pocket tip
head
Fig.11
Pocket Tip
Fig.14
Fig.15
Orthodontic Tip
Fig.13
Fig.12
Tongue Scraper
Tank valve does not
open
Press down the tank, or
reassemble the tank valve
How to use the water flosser
Fig.7-2
Fig.10
Fig.6
Fig.8
Fig.7-1
You can end through the below methods:
1: Auto shut-off turns off after 2- minute cycle gets completed.
2: Turn it off by pressing the main button.
After use
Note:
Do not power on the device before placing the nozzle into your mouth. During
first use, we suggest you to choose the lower pressure and then gradually increase
the water pressure over time.
1. Hold the handle and point the nozzle to
the sink. Then press down the main button
to power on the device . (Fig.6)
Press the button again to select the mode
you desire. (Clean or Massage),
Working mode:
Clean: For cleaning in 30 Seconds interval
time.
Massage: For cleaning and massaging
the gums.
Mode indicator:
A blue light will flash while switching the mode
2. Rotate the knob to adjust the water pressure.
Push the pause switch to “ o ”
position to pause the water flow .
(Fig.7-1&Fig.7-2)
3. Adjust the direction of the nozzle by rotating
the nozzle knob.
4. Bend over to the sink and place the tip
at your mouth and push the pause
switch to “ I ” position to enjoy flossing.
(Slightly close your mouth to avoid the
water splashing.) (Fig.8)
5. Position the water jet flow at 90⁰
angle to the teeth and gum. (Fig.9)
6. Move the water jet slowly along the teeth.
The unit will continue to work till 2-minute
cycle is completed or you turn it off .
Fig .9
90°
1. Take off the water tank and drain out
the water after use.
2. Push the pause switch to “ I ” position,
and power on to drain the residual water from
the device. Push the pause switch
to “ 0 ” position again .
3. Turn off the device and wipe it with a
soft dry cloth.(Fig.10)
4. Press down the release button and
remove the nozzle. Then place it into
the nozzle case. (Fig.11)
5. Unplug the adapter.
When you want to clean your tongue,
gently place the tongue scraper
onto the center midline of your tongue
surface about halfway back with light
water pressure setting first and then gradually
increase the pressure as needed. (Fig.12)
The orthodontic tip is specially designed for
people wearing braces. It will clean the hard
to reach areas around and in braces.
1: Aim water stream at 90⁰ to the
tooth at the gum-line and start with the last
molar (back tooth);
2: Slowly slide the tip along with the
gum-line and pause briefly to clean the area
between teeth and all around orthodontic braces.
3: Repeat until you have finished cleaning
the inside and outside of all your teeth.
(Fig.13)
The pocket tip is specifically designed for
the cleaning of periodontal pockets.
To use the pocket tip, it is a must to set
the device to the lowest pressure setting.
1. Place the soft tip against a tooth at
45⁰ angle and gently place
the tip under the gum- line. Then
insert into the pocket. (Fig.14)
2. Turn the unit on and continue tracing
along the gum-line until all periodontal
pockets are treated.(Fig.15)
Note:
This tip must be used only with the lowest
water pressure to extend life of soft tip as it is easily broken.
Use only water or neutral cleaning agent to clean the device. Never use caustic
or abrasive agents (e.g., vinegar or lime scale removers), since they may
damage the device. Do not wash using hot water of over 40 ºC. Keep the
device away from high temperature area and avoid direct sunlight.
Main unit
1. Remove the water tank and drain the remains water inside the device.
2. Clean by using a soft cloth with liquid soap and dry with a soft dry cloth.
3. Do not submerge the main unit in water to clean.
Handle
1. Wash with water and dry up with a soft cloth.
2. Do not bend, pull or twist the water hose.
Water tank
1. Wash with water and wipe with a soft dry cloth.
2. Make sure the water tank is inverted and firmly fixed to store.
Nozzle
1. Wash with water and wipe with a soft dry cloth.
2. Place the nozzle in the storage compartment.
3. Replace once every 6 months for Standard nozzle and tongue scraper,
and once every 3 months for other tips.
Charging adaptor
Wipe the metal part of the power plug with a dry cloth once every 6 months.
20
16
12
8
4
Min.
600
3
0
0
200
100
400
500
20
16
12
8
4
Min.
600
3
0
0
200
100
400
500
Storage
Small
gap
20
1
6
1
2
8
4
Min.
600
30
0
2
0
0
100
400
500
Fig.2-2
Fig.2-1
20
1
6
1
2
8
4
Min .
600
30
0
2
0
0
100
400
500
Fill water
Place
Insert
Pull out
Press
Plug in
Storage
Standard Nozzle
x 3pcs
Tongue Scraper
x 1pc
Replace every 6 months
20
16
12
8
4
Min .
600
3
0
0
200
100
400
500
20
16
12
8
4
Min .
600
3
0
0
200
100
400
500
Press
Rotate
1 YEAR
Place the device on a flat surface and make sure the cord is dry and is
not damage.
Imported & Marketed by:
Universal Corporation Limited
Sikkim Commerce House, 4/1, Middleton Street, Kolkata-700071
Phone: 1800-120-7897, Email: [email protected]
Tabletop Oral Irrigator
AGARO Max Tabletop Oral irrigator 600
Max (Item No - 33441)
Caution
● Children and individuals with reduced physical, sensory or mental
capabilities need to be supervised by adults or need to be given
adequate instructions prior to usage. Not suitable for children below
8 years of age
● The battery must be removed from the appliance before it is scrapped
● Do not fill the tank with water warmer than 40ºC
● Please do not use it if you lose the nozzle
● Do not use for any purpose other than oral cleaning
● Keep nozzle away from small children
● People who experience tooth or gum pain should not use
this device without consulting a dentist
● Do not press the nozzle too firmly against your teeth or gum.
Doing so may injure your gum
Customer purchasing from online need to produce the online partner's Invoice copy to claim the warranty.
The following conditions are not included in the warranty:
-Damage caused by improper use.
-Ageing and wearing out caused by normal use.
-Problems occurred due to use for other purposes or improper use.
-T & C apply.