Instruction
& Recipe
Booklet
For your safety and continued enjoyment of this product, always
read the instruction book carefully before using.
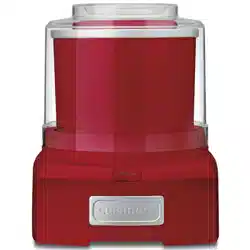
1-Pint Wonder
Ice Cream Maker
ICE-M10 SERIES

2
IMPORTANT
SAFEGUARDS
When using an electrical appliance, basic safety
precautions should always be followed to reduce
the risk of fire, electric shock, and/or injury, including
the following:
READ ALL INSTRUCTIONS BEFORE USING.
1. To protect against risk of electric shock, do not
place cord, plug, or motor drive assembly of
appliance in water or any other liquid.
2. This appliance is not intended for use by
persons (including children) with reduced
physical, sensory, or mental capabilities, or lack
of experience and knowledge, unless they are
closely supervised and instructed concerning
use of the appliance by a person responsible for
their safety. Close supervision is necessary
when any appliance is used by or near children.
Children should be supervised to ensure that
they do not play with the appliance.
3. Turn the appliance OFF, then unplug from the
outlet when not in use, before assembling or
disassembling parts, and before cleaning. To
unplug, grasp the plug and pull from the outlet.
Never pull from the power cord.
4. Avoid contact with moving parts. Keep hands,
hair, and clothing, as well as spatulas and other
utensils, away during operation to reduce the
risk of injury and/or damage to the appliance.
5. Do not operate any appliance with a damaged
cord or plug, or after the appliance malfunctions
or is dropped or damaged in any manner.
Contact the manufacturer at their customer
service telephone number for information on
examination, repair, or adjustment.
6. The use of attachments not recommended by
Cuisinart may cause fire, electric shock, or risk
of injury.
7. Do not use outdoors.
8. Do not let cord hang over edge of table or
counter, or touch hot surfaces.
9. Keep hands and utensils out of freezer bowl
while in use to reduce the risk of injury to
persons or to the appliance itself. DO NOT USE
SHARP OBJECTS OR UTENSILS INSIDE THE
FREEZER BOWL! Sharp objects will scratch and
damage the inside of the freezer bowl. A rubber
spatula or wooden spoon may be used when the
appliance is in the OFF position.
10. This appliance is for household use. Any
servicing other than cleaning and user
maintenance should be done only by authorized
Cuisinart repair personnel.
11. Do not use the freezer bowl over flames, hot
plates, or stoves. Do not expose to heat source.
Do not wash in dishwasher; doing so may cause
a risk of fire, electric shock, or injury.
12. Do not operate your appliance in an appliance
garage, or under a wall cabinet. When storing in
an appliance garage, always unplug the unit from
the electrical outlet. Not doing so could create a
risk of fire, especially if the appliance touches
the walls of the garage or the door touches the
unit as it closes.
13. Remove mixing paddle from ice cream maker
before washing. Do not place on or near a hot
gas or electric burner, or in a heated oven.
14. Do not use appliance for other than its intended
use.
SAVE THESE
INSTRUCTIONS
FOR HOUSEHOLD
USE ONLY
NOTICE
This appliance has a polarized plug (one blade is
wider than the other). To reduce the risk of electric
shock, this plug will fit in a polarized outlet only one
way. If the plug does not fit fully in the outlet, reverse
the plug. If it still does not fit, contact a qualified
electrician. Do not attempt to defeat this safety
feature.
SPECIAL CORD SET
INSTRUCTIONS
A short power-supply cord is provided to reduce the
risks resulting from becoming entangled in or
tripping over a longer cord. Longer extension cords
may be used if care is exercised in their use.
If a long, polarized extension cord is used, the
marked electrical rating of the extension cord should
be at least as great as the electrical rating of the
appliance, and the longer cord should be arranged
so that it will not drape over the countertop or
tabletop, where it can be pulled on by children or
animals, or tripped over.
CAUTION
•
Do not immerse motor drive assembly in water.
• To reduce the risk of fire or electric shock,
do not disassemble the motor drive assembly.
Note: The motor drive assembly does not contain
any user-serviceable parts.
• Repairs should be made only by authorized
personnel.
• Check voltage to be sure that the voltage
indicated on the name plate agrees with your
voltage.
• Never clean with scouring powders or hard
implements.
3
3
4
5
6
7
8
9
10
1
2
TABLE OF CONTENTS
Important Safeguards ...................... 2
Features and Benefits ...................... 3
Before Using for the First Time............... 3
Freezing Time and Bowl Preparation .......... 4
Operating Instructions...................... 4
Adding Ingredients ........................ 4
Safety Feature . . . . . . . . . . . . . . . . . . . . . . . . . . . . 4
Cleaning,Storage and Maintenance ........... 4
Warranty..................................5
Recipes ..................................6
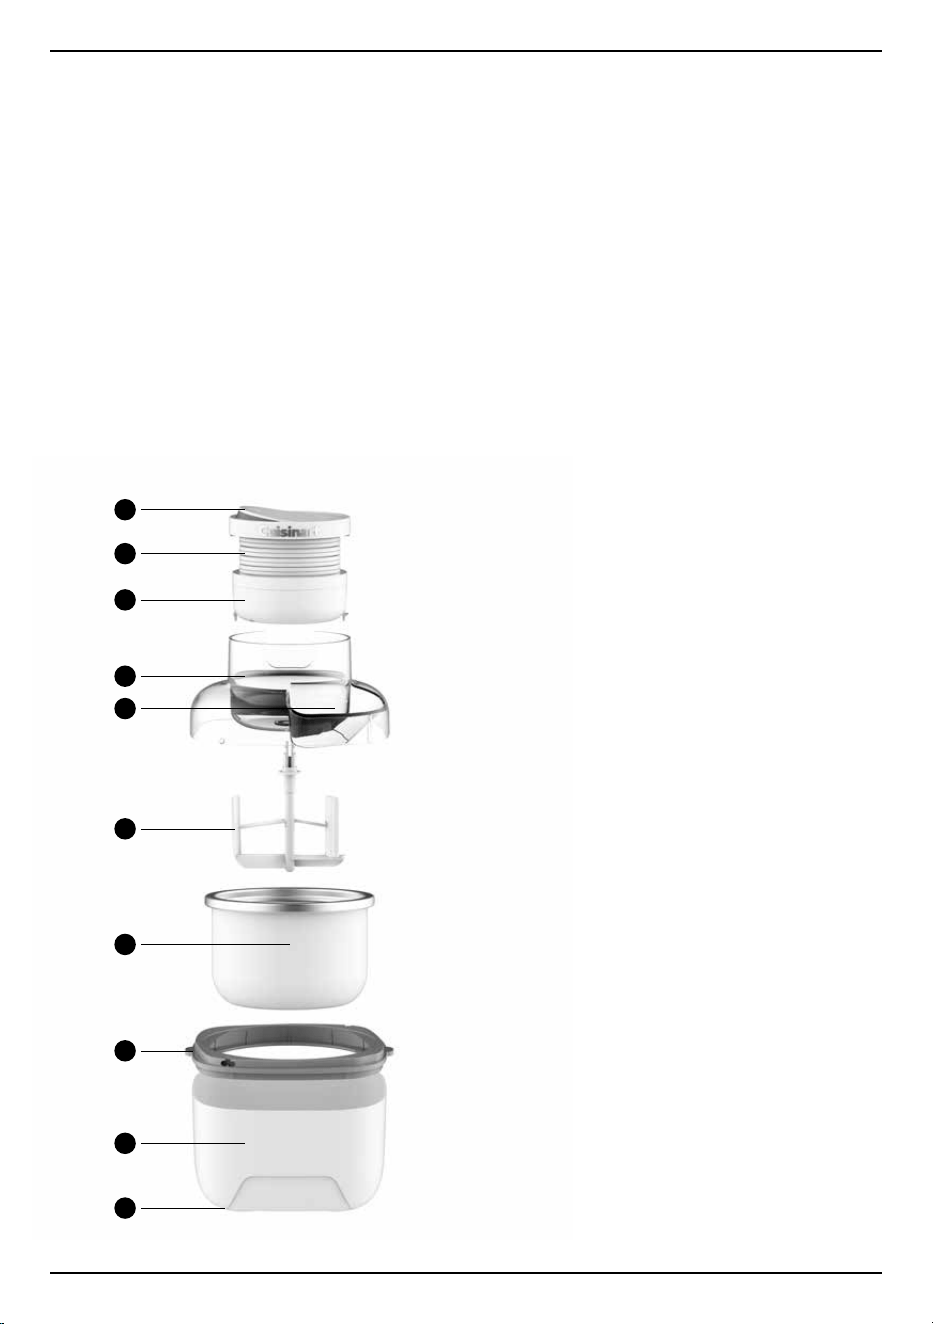
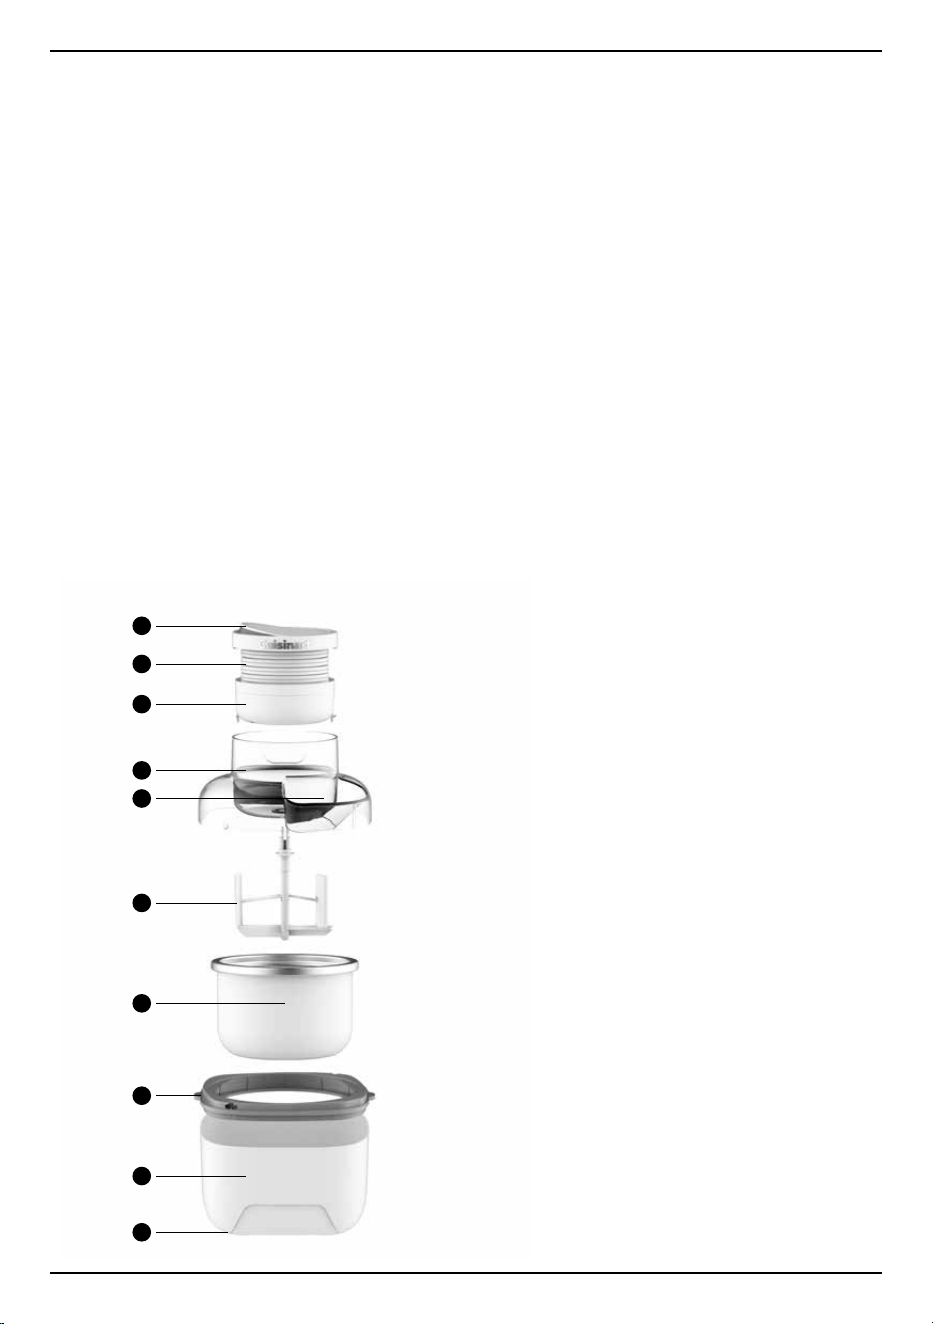
FEATURES
AND BENEFITS
1. On/Off Switch
2. Mess-Free Cord Wrap
Cord wraps safely around the motor drive assembly
when the unit is not in use to keep counters neat.
3. Motor Drive Assembly
Contains the motor that powers the mixing paddle
to make ice cream.
4. Lid
Transparent to let you watch the freezing process as it
progresses. Lid is designed to easily lock to the freezer
bowl collar.
5. Ingredient Funnel
Used to add the ice cream mix after turning the ice
cream maker on, and to add ingredients like chips
or nuts without interrupting the freezing cycle.
6. Mixing Paddle
Mixes and aerates ingredients in freezer bowl to create
ice cream.
7. Freezer Bowl
Contains cooling liquid between a double-insulated
wall to create fast and even freezing. Double wall keeps
the bowl cool and at an even temperature.
8.
Freezer Bowl Collar
Holds the freezer bowl securely, and lifts to allow
for clean and easy bowl removal.
9. Base
9. Anti-Slip Rubber Feet
BEFORE USING FOR
THE FIRST TIME
Remove all packaging materials from the ice cream maker.
Wash the lid, freezer bowl, base and mixing paddle in
warm, soapy water to remove any dust or residue from
the manufacturing and shipping process. DO NOT immerse
the motor drive assembly in water. Wipe it with a moist
cloth. DO NOT clean any of the parts with abrasive cleaners
or hard implements.

4
FREEZING TIME AND
BOWL PREPARATION
The freezer bowl must be completely frozen before you
begin your recipe. Before freezing, wash and dry the
bowl. The length of time needed to reach the frozen
state depends on how cold your freezer is. It is
recommended that you place the freezer bowl in the
back of your freezer where it is coldest. Be sure to
place the freezer bowl on a flat surface in its upright
position for even freezing.
Generally, freezing time is between 16 and 24 hours.
Shake the bowl to determine whether it is completely
frozen. If you do not hear the liquid within the bowl
moving, the cooling liquid is therefore frozen. For the
most convenient frozen desserts and drinks, leave
your freezer bowl in the freezer at all times. Use the
bowl immediately after removing from the freezer. It
will begin to quickly defrost once it has been removed
from the freezer.
Reminder: Your freezer should be set to 0°F to
ensure proper freezing of all foods.
OPERATING
INSTRUCTIONS
1. Place the freezer bowl in the freezer for at least 24
hours before using the ice cream maker.
2. Place the freezer bowl collar on the base and put
the base on a clean, flat surface. Remove the
freezer bowl from the freezer and put it in the base.
NOTE: The bowl will begin to defrost quickly once
it has been removed from the freezer. Use
immediately after removing from the freezer.
3. Pull the motor drive assembly out from the lid by
pressing the locking tabs at the bottom, unwrap
the cord, slide the motor drive assembly back into
the lid, and connect the mixing paddle to the motor
drive assembly.
4. Place the assembled lid/motor drive assembly on
the freezer bowl, aligning the arrow on the freezer
bowl collar and the outer rib on the lid. Twist
clockwise to lock.
5. Plug the ice cream maker into a power outlet
and press the switch to the ON position (I).
The mixing paddle will begin to turn either
clockwise or counterclockwise. NOTE: Ice cream
mix must be added to the freezer bowl through
the ingredient funnel after the unit is turned on.
6. Pour the ice cream mix through the ingredient
funnel. NOTE: The ice cream mix should be well
chilled. When pouring ice cream mix through the
ingredient funnel, DO NOT fill the freezer bowl
higher than ¾ inch from the top of the freezer bowl,
or exceed 1¼ cups. The ice cream will increase in
volume during the churning process.
7. Ice cream will be done in approximately 20
minutes. The time depends on the recipe and
the volume of the ice cream you make. When the
ice cream is ready, press the switch to the OFF
position (O) and unplug the ice cream maker.
NOTE: Lid and paddle may swivel back and forth
after ice cream mix has hardened. This is a normal
condition. If this happens, turn off the unit and
check the ice cream mix hardness.
8. If you desire a firmer consistency, transfer the ice
cream to an airtight container and store it in the
freezer for two or more hours. NOTE: Do not store
ice cream in the freezer bowl. Ice cream will stick
to the sides of the freezer bowl and may damage
the bowl. Store only in a freezer-safe airtight
container.
9. Ensure the unit is unplugged, remove the paddle,
pull the motor drive assembly out of the lid by
pressing the locking tabs at the bottom, re-wrap
the cord, and then slide the motor drive assembly
back into the lid for easy and hassle-free storage.
ADDING INGREDIENTS
Ingredients such as chips and nuts should be added
about 15 minutes into the freezing process. Once the
dessert has begun to thicken, add up to
1
/
3
cup of
chopped ingredients through the ingredient funnel.
Nuts and other ingredients should be no larger than
¼ inch.
SAFETY FEATURE
The Cuisinart
®
1-Pint Wonder Ice Cream Maker is
equipped with a safety feature that automatically
stops the unit if the motor overheats. This may occur
if the ice cream is extremely thick, if the unit has been
running for an excessively long period of time, or if
added ingredients (nuts, etc.) are in extremely large
pieces. To reset the unit, put the On/Off switch in the
OFF position (O) and unplug the unit. Let the unit cool
off. After a few minutes, you may turn the unit back
on and continue making the dessert.
CLEANING, STORAGE
AND MAINTENANCE
Cleaning
Clean the lid, freezer bowl, base, and mixing paddle
in warm soapy water. DO NOT PUT FREEZER BOWL
IN THE DISHWASHER. DO NOT CLEAN WITH
ABRASIVE CLEANSERS OR IMPLEMENTS. Wipe the
motor drive assembly clean with damp cloth. DO
NOT immerse the motor drive assembly in water,
or wash it under tap water. Dry all parts thoroughly.
Storage
DO NOT put freezer bowl in freezer if bowl is wet.
DO NOT store lid, mixing paddle, base, or motor drive
assembly in freezer. You may store the freezer bowl in
the freezer for convenient, immediate use. Do not
store frozen desserts in the freezer bowl in the freezer.
Transfer frozen desserts to a freezer-safe, airtight
container for longer storage in the freezer.
Maintenance
Any other servicing should be performed by an
authorized service representative.

5
WARRANTY
Limited Three-Year Warranty
This warranty is available only to U.S. consumers
who purchase products directly from Cuisinart
or an authorized Cuisinart
®
reseller. You are a
consumer if you own a Cuisinart
®
1-Pint Wonder
Ice Cream Maker that was purchased at retail
for personal, family, or household use. Except
as otherwise required under applicable law,
this warranty is not available to retailers or other
commercial purchasers owners, or consumers
who purchase from unauthorized Cuisinart
®
resellers. We warrant that your Cuisinart
®
1-Pint
Wonder Ice Cream Maker will be free of defects
in materials and workmanship under normal
home use for 3 years from the date of original
purchase.
We recommend that you visit our website,
https://cuisinart.registria.com for a fast,
efficient way to complete your product
registration. However, product registration does
not eliminate the need for the consumer to
maintain the original proof of purchase in order
to obtain the warranty benefits. In the event that
you do not have proof of purchase date, the
purchase date for purposes of this warranty will
be the date of manufacture.
CALIFORNIA RESIDENTS ONLY
California law provides that for In-Warranty
Service, California residents have the option of
returning a nonconforming product (A) to the
store where it was purchased or (B) to another
retail store that sells Cuisinart products of the
same type. The retail store shall then, according
to its preference, either repair the product, refer
the consumer to an independent repair facility,
replace the product, or refund the purchase price
less the amount directly attributable to the
consumer’s prior usage of the product. If neither
of the above two options results in the
appropriate relief to the consumer, the consumer
may then take the product to an independent
repair facility, if service or repair can be
economically accomplished. Cuisinart and not
the consumer will be responsible for the
reasonable cost of such service, repair,
replacement, or refund for nonconforming
products under warranty. California residents
may also, according to their preference, return
nonconforming products directly to Cuisinart for
repair or, if necessary, replacement by calling our
Consumer Service Center toll-free at 1-800-726-
0190. Cuisinart will be responsible for the cost of
the repair, replacement, and shipping and
handling for such nonconforming products
under warranty.
HASSLE-FREE REPLACEMENT WARRANTY
Your ultimate satisfaction in Cuisinart products
is our goal, so if your Cuisinart
®
1-Pint Wonder
Ice Cream Maker should fail within the generous
warranty period, we will repair it or, if necessary,
replace it at no cost to you. To obtain a return
shipping label, please visit us at https://www.
cuisinart.com/customer-care/product-
assistance/product-inquiry. Or call our toll-free
customer service department at 1-800-726-0190
to speak with a representative.
Your Cuisinart
®
1-Pint Wonder Ice Cream Maker
has been manufactured to the strictest
specifications and has been designed for use
only in 120-volt outlets and only with authorized
accessories and replacement parts. This
warranty expressly excludes any defects or
damages caused by attempted use of this unit
with a converter, as well as use with accessories,
replacement parts or repair service other than
those authorized by Cuisinart. This warranty
does not cover any damage caused by accident,
misuse, shipment or other than ordinary
household use. This warranty excludes all
incidental or consequential damages. Some
states do not allow the exclusion or limitation of
these damages, so these exclusions may not
apply to you. You may also have other rights,
which vary from state to state.
Important: If the nonconforming product is to be
serviced by someone other than Cuisinart’s
Authorized Service Center, please remind the
servicer to call our Consumer Service Center at
1-800-726-0190 to ensure that the problem is
properly diagnosed, the product is serviced with
the correct parts, and to ensure that the product
is still under warranty.

6
RECIPE TIPS
The recipes that follow offer you a variety of options
for delicious frozen desserts. You may create or use
recipes of your own, as long as they yield no more
than 1 pint.
• Ice cream from the Cuisinart
®
1-Pint Wonder Ice
Cream Maker use pure, fresh ingredients. Because
of this, the desserts and frozen drinks do not have
the same characteristics as commercially prepared
frozen desserts and drinks. Most store-bought
versions use gums and preservatives to make them
firmer. If you desire a firmer consistency,
transfer the dessert to an airtight container
and store in the freezer until desired
consistency is reached, usually two or more
hours.
• For best results, the mixture should be chilled
overnight before using. Or, chill the recipe over an
ice bath, until it is completely cooled, before using.
• Prior to freezing, most recipes may be stored in the
refrigerator for up to 3 days.
• You may substitute lower fat creams (e.g., half and
half), milk (reduced fat or lowfat) as well as non-
dairy milks (soy, rice) for the heavy cream and
whole milk used in many recipes. However, keep in
mind that the higher the fat content, the richer and
creamier the result. Using lower-fat substitutes may
change the taste, consistency and texture of the
dessert. When substituting, be sure to use the same
volume of the substitute as you would have used of
the original item. For example, if the recipe calls for
two cups of cream, use a total of two cups of the
substitute (such as 1 cup cream, 1 cup whole milk).
• You may substitute artificial sweeteners for sugar.
If the recipe is to be precooked, add the sweetener
after the heating process is complete and the
ingredients have cooked. Stir the mixture thoroughly
to dissolve the sweetener.
• In recipes that use alcohol, add the alcohol during
the last two minutes of the freezing process.
Otherwise, the alcohol may impede the freezing
process.
• The Cuisinart recipes listed below will yield up to
1 pint of dessert. When pouring ingredients in
through the ingredient funnel, DO NOT fill the
freezer bowl higher than ¾-inch from the top of
the freezer bowl. The ingredients will increase in
volume during the freezing process.
• When making consecutive recipes, be sure the
freezer bowl is completely frozen before each use.
Additional freezer bowls may be purchased on the
Cuisinart website (www.cuisinart.com).
• Make sure mixing paddle and lid/motor drive
assembly are in place before turning on machine.
RECIPES
Simple Vanilla Ice Cream......................7
Simple Chocolate Ice Cream ..................7
Mixed Berry Ice Cream .......................7
Peanut Butter Cup with Marshmallow Swirl
Ice Cream..................................8
Banana Cream Pie Ice Cream..................8
Brownie Sundae Ice Cream....................8
Marshmallow Cereal Milk Ice Cream ............9
Black Sesame Cookies and Cream Ice Cream ....9
Jelly Doughnut Ice Cream ....................9
Sweet Cream Birthday Cake Ice Cream .........10
Strawberry Cheesecake Ice Cream ............10
Peaches and Cinnamon Streusel
Oat Milk Ice Cream .........................10
Dark Chocolate Sorbet ......................11
Mango Sorbet .............................11

7
Simple Vanilla Ice Cream
This ice cream can easily be dressed up by adding
your favorite chopped candies or sprinkles at the end
of churning.
Makes about 1¾ cups
1
/
3
cup whole milk
¼ cup granulated sugar
Small pinch salt
2
/
3
cup heavy cream
1 teaspoon pure vanilla extract
1
/
3
cup chopped mix-ins (chopped candies,
crushed cookies, sprinkles), optional
1. Put the milk, sugar, and salt in a small mixing bowl.
Whisk until the sugar is dissolved. Stir in the heavy
cream and vanilla. Cover and refrigerate at least 2
hours, preferably overnight.
2. Turn on the Cuisinart
®
ice cream maker. Whisk the
ice cream base, and then pour the mixture into
the freezer bowl through the ingredient funnel.
Churn until thickened, about 20 minutes. If using
an optional mix-in, gradually add through the funnel
a few minutes before the end of churning time.
3. The ice cream will have a soft, creamy texture.
For a firmer consistency, transfer the ice cream to
an airtight container and place in freezer for about
2 hours. Remove from the freezer about 15 minutes
before serving.
Simple Chocolate Ice Cream
While this ice cream is easy to prepare, the flavor
and richness of the chocolate is anything
but simple in taste.
Makes about 1¾ cups
¼ cup cocoa powder, sifted
2 tablespoons granulated sugar
2 tablespoons packed light or dark brown sugar
Pinch salt
1
/
3
cup whole milk
2
/
3
cup heavy cream
½ teaspoon pure vanilla extract
1. In a small bowl, whisk together the cocoa, sugars,
and salt. Add the milk and, using a hand mixer on
low speed or a whisk, mix until the sugars are
dissolved. Stir in the heavy cream and vanilla. Cover
and refrigerate at least 2 hours, preferably overnight.
2. Turn on the Cuisinart
®
ice cream maker. Whisk the
ice cream base, and then pour the mixture into the
freezer bowl through the ingredient funnel. Churn
until thickened, 15 to 20 minutes.
3. The ice cream will have a soft, creamy texture.
For a firmer consistency, transfer the ice cream to
an airtight container and place in freezer for about
2 hours. Remove from the freezer about 15 minutes
before serving.
Mixed Berry Ice Cream
Best made when berries are at their peak of freshness,
this ice cream is light, sweet, and fruity.
Makes about 1¾ cups
½ cup fresh berries (a mixture of raspberries,
blackberries, and blueberries works well)
¼ cup whole milk
¼ cup granulated sugar
Pinch salt
½ cup heavy cream
½ teaspoon pure vanilla extract
1. Put the berries into the work bowl of a food
processor fitted with the chopping blade. Pulse until
finely chopped. Reserve in the work bowl.
2. Put the milk, sugar, and salt in a small mixing bowl.
Mix, using a hand mixer on low speed or a whisk,
until the sugar is dissolved. Stir in the heavy cream
and vanilla. Stir in the reserved berries and their
juices. Cover and refrigerate at least 2 hours,
preferably overnight.
3. Turn on the Cuisinart
®
ice cream maker. Whisk the
ice cream base, and then pour the mixture into
the freezer bowl through the ingredient funnel.
Churn until thickened, 15 to 20 minutes. The ice
cream will have a soft, creamy texture. For a firmer
consistency, transfer the ice cream to an airtight
container and place in the freezer for about 2 hours.
Remove from the freezer about 15 minutes
before serving.
* Frozen thawed mixed berries may be substituted
if fresh are not available.

8
Peanut Butter Cup with Marshmallow
Swirl Ice Cream
All the best flavors of some favorite candy bars,
this ice cream is so rich and creamy, you won't be able
to put it down.
Makes about 2 cups
1
/
3
cup good-quality peanut butter
¼ cup granulated sugar
Pinch salt
1
/
3
cup whole milk
2
/
3
cup heavy cream
½ teaspoon pure vanilla extract
¼ cup chopped chocolate peanut butter
cup candies
¼ cup marshmallow crème
2 tablespoons fudge sauce
1. In a small mixing bowl, use a hand mixer on low
speed to combine the peanut butter, sugar, and salt
until smooth. Add the milk and mix on low speed
until the sugar is dissolved, 1 to 2 minutes. Stir in
the heavy cream and vanilla. Cover and refrigerate
a minimum of 2 hours, preferably overnight.
2. Turn on the Cuisinart
®
ice cream maker. Whisk the
ice cream base, and then pour the mixture into the
freezer bowl through the ingredient funnel. Churn
until thickened, about 15 minutes. Five minutes
before churning is completed, add the chopped
candy through the ingredient funnel.
3. Once the candies are mixed into the ice cream,
turn the unit off, and remove the lid and paddle.
Gently swirl in the marshmallow crème and fudge
sauce.
4. The ice cream will have a soft, creamy texture.
For a firmer consistency, transfer the ice cream
to an airtight container and place in the freezer
for about 2 hours. Remove from the freezer about
15 minutes before serving.
Banana Cream Pie Ice Cream
The creaminess of this ice cream comes from
a combination of the condensed milk, cream cheese,
and banana. It mimics the silky custard filling
of a banana cream pie.
Makes about 1¾ cups
½ cup heavy cream
½ cup (about ¼ standard can) sweetened
condensed milk
2 ounces (¼ standard package) cream cheese,
cut into 4 pieces, room temperature
Pinch salt
1 very ripe banana, divided, half left uncut,
the other half diced and refrigerated until
being used
½ teaspoon pure vanilla extract
1 full sheet graham cracker, chopped
1. Put the heavy cream, sweetened condensed milk,
cream cheese, salt, and undiced half of the banana
into a blender jar, in the order listed. Pulse a few
times and then blend on Low, if available, until
smooth. Transfer to a container, cover, and chill for
a minimum of 2 hours, preferably overnight.
2. Turn on the Cuisinart
®
ice cream maker. Whisk the
ice cream base, and then pour the mixture into the
freezer bowl through the ingredient funnel. Churn
until thickened, about 15 minutes. Five minutes
before churning is completed, gradually add the
diced banana and graham cracker pieces. Continue
churning until sufficiently thickened, about 20
minutes total.
3. The ice cream will have a soft, creamy texture.
For a firmer consistency, transfer the ice cream
to an airtight container and place in the freezer
for about 2 hours. Remove from the freezer about
15 minutes before serving.
Brownie Sundae Ice Cream
Allow Cuisinart to put all of the ingredients together
for this take on the classic brownie sundae.
Makes about 2 cups
1
/
3
cup whole milk
¼ cup granulated sugar
Small pinch salt
2
/
3
cup heavy cream
1 teaspoon pure vanilla extract
¼ cup crumbled brownies, chilled
2 tablespoons halved maraschino cherries
2 tablespoons chocolate fudge sauce
Whipped cream, optional
1. Put the milk, sugar, and salt into a small mixing
bowl. Whisk until the sugar is dissolved. Stir in the
heavy cream and vanilla. Cover and refrigerate at
least 2 hours, preferably overnight.
2. Turn on the Cuisinart
®
ice cream maker. Whisk the
ice cream base, and then pour the mixture into the
freezer bowl through the ingredient funnel. Churn
until thickened, about 15 to 20 minutes.

9
3. About 5 minutes before the end of the freezing time,
add the crumbled brownies, then the cherries
through the ingredient funnel.
4. Once the mixture has thickened, about 20 minutes
in total, turn the unit off, remove the cover and
paddle, and then stir in the fudge sauce.
5. Serve immediately, with whipped cream if desired.
Marshmallow Cereal Milk
Ice Cream
Perfect for kids, or to relive your childhood dreams,
this ice cream is a sweet treat that will be loved by all.
Makes about 1
2
/
3
cups
½ cup whole milk
½ cup marshmallow cereal, plus
1
/
3
cup for
mixing in while churning
¼ cup granulated sugar
Small pinch salt
2
/
3
cup heavy cream
1 teaspoon pure vanilla extract
1. Put the milk and ½ cup of the cereal into a large
liquid measuring cup or small bowl. Allow to steep
for 45 minutes. Pour into a fine-mesh strainer
placed over a small bowl, pressing on the cereal
to extract as much liquid as possible but being
careful not to force the cereal through the strainer.
(The flavored milk can be made up to 3 days in
advance and stored in the refrigerator.)
2. Put the flavored milk into a small mixing bowl.
Add the sugar and salt, and whisk until the sugar
is dissolved. Stir in the heavy cream and vanilla.
Cover and refrigerate at least 2 hours, preferably
overnight.
3. Turn on the Cuisinart
®
ice cream maker. Whisk the
ice cream base, and then pour the mixture into the
freezer bowl through the ingredient funnel. Churn
until thickened, 15 to 20 minutes.
4. After about 15 minutes, gradually add the remaining
1
/
3
cup cereal through the funnel.
5. The ice cream will have a soft, creamy texture.
For a firmer consistency, transfer the ice cream
to an airtight container and place in freezer for
about 2 hours. Remove from the freezer about
15 minutes before serving.
Black Sesame
Cookies and Cream Ice Cream
Black sesame paste adds a nutty flavor and eye-catching
color to the classic cookies and cream.
Makes about 1¾ cups
1
/
3
cup whole milk
¼ cup granulated sugar
Small pinch salt
2
/
3
cup heavy cream
1 teaspoon pure vanilla extract
2 tablespoons black sesame paste
½ cup finely crushed chocolate sandwich
cookies
1. Put the milk, sugar, and salt into a medium mixing
bowl. Whisk well until the sugar is dissolved. Stir in
the heavy cream, vanilla, and black sesame paste.
Cover and refrigerate at least 2 hours, preferably
overnight.
2. Turn on the Cuisinart
®
ice cream maker.
Whisk the ice cream base, and then pour the
mixture into the freezer bowl through the ingredient
funnel. Churn until thickened, 15 to 20 minutes.
Gradually add the crushed cookies through the
ingredient funnel a few minutes before the end
of churning time.
3. The ice cream will have a soft, creamy texture.
For a firmer consistency, transfer the ice cream
to an airtight container and place in the freezer
for about 2 hours. Remove from the freezer about
15 minutes before serving.
Jelly Doughnut Ice Cream
So tasty, you may just eat it for breakfast!
Makes about 1¾ cups
1
/
3
cup whole milk
¼ cup granulated sugar
Small pinch salt
2
/
3
cup heavy cream
1 teaspoon pure vanilla extract
1 tablespoon strawberry jam
½ cup doughnuts (plain cake work well),
cut into small cubes and chilled
1. Put the milk, sugar, and salt into a medium mixing
bowl. Whisk well until the sugar is dissolved. Stir in
the heavy cream and vanilla. Cover and refrigerate
at least 2 hours, preferably overnight.
2. Turn on the Cuisinart
®
ice cream maker. Whisk the
ice cream base, and then pour the mixture into the

10
freezer bowl through the ingredient funnel. Churn
until thickened, 15 to 20 minutes. Gradually add the
strawberry jam and cubed doughnuts through the
ingredient funnel a few minutes before the end of
churning time.
3. The ice cream will have a soft, creamy texture. For a
firmer consistency, transfer the ice cream to an
airtight container and place in the freezer for about
2 hours. Remove from the freezer about 15 minutes
before serving.
Sweet Cream Birthday Cake
Ice Cream
Full of sprinkles and bits of vanilla cake, this ice cream
is something to celebrate!.
Makes about 1¾ cups
½ cup heavy cream
Small pinch salt
½ teaspoon pure vanilla extract
½ cup sweetened condensed milk
2 ounces cream cheese, room temperature
½ cup yellow cake, cut into small cubes
and chilled
1 teaspoon rainbow sprinkles
1. Put the heavy cream, salt, vanilla, sweetened
condensed milk, and cream cheese into a blender
jar in the order listed. Blend just until the cream
cheese is fully incorporated, being careful not to
overblend. Transfer to a small bowl, cover, and
refrigerate at least 2 hours, preferably overnight.
2. Turn on the Cuisinart
®
ice cream maker. Whisk the
ice cream base, and then pour the mixture into the
freezer bowl through the ingredient funnel. Churn
until thickened, 15 to 20 minutes. Gradually add the
cake and sprinkles through the ingredient funnel
a few minutes before the end of churning time.
3. The ice cream will have a soft, creamy texture. For a
firmer consistency, transfer the ice cream to an
airtight container and place in the freezer for about
2 hours. Remove from the freezer about 15 minutes
before serving.
Strawberry Cheesecake Ice Cream
All the elements of a strawberry cheesecake—cream
cheese, strawberries, and graham crackers—will lead
you to think that you are really having a slice of cake.
Makes about 1¾ cups
4 ounces (½ standard package) cream cheese,
cut into 4 pieces, room temperature
1
/
3
cup granulated sugar
Pinch salt
1
/
3
cup whole milk
¾ teaspoon pure vanilla extract
1 tablespoon sour cream or plain yogurt, room
temperature
1
/
3
cup sliced strawberries
1½ full sheets graham cracker, chopped
1. Put the cream cheese, sugar, and salt into a
medium mixing bowl. Using a hand mixer, beat until
creamy. Gradually add the milk and vanilla, mixing
until smooth. Stir in the sour cream or yogurt. Cover
and chill for a minimum of 2 hours, preferably
overnight.
2. Turn on the Cuisinart
®
ice cream maker. Whisk the
ice cream base, straining if the mixture appears
to have lumps. Pour the mixture into the freezer
bowl through the ingredient funnel, and churn until
thickened, about 15 minutes. Five minutes before
churning is completed, gradually add the
strawberries and graham cracker pieces through
the ingredient funnel. Continue churning until
sufficiently thickened, about 20 minutes total.
3. The ice cream will have a soft, creamy texture. For a
firmer consistency, transfer the ice cream to an
airtight container and place in the freezer for about
2 hours. Remove from the freezer about 15 minutes
before serving.
Peaches and Cinnamon Streusel
Oat Milk Ice Cream
This oat milk-based ice cream has swirls
of peach jam and cinnamon oat streusel.
Makes about 1¾ cups
2
/
3
cup extra creamy oat milk
2 tablespoons light corn syrup
¼ cup plus 1 tablespoon light brown sugar,
divided
Small pinch salt
1 teaspoon pure vanilla extract

11
¼ teaspoon xanthan gum
1 teaspoon grapeseed oil
1
/
3
cup chopped canned peaches
¼ cup rolled oats
¼ cup unbleached all-purpose flour
1 teaspoon ground cinnamon
4 tablespoons (½ stick) unsalted butter,
cut into ¼ inch cubes and chilled
2 tablespoons peach jam
1. Heat the oat milk in a small saucepan until lightly
simmering. Put the heated milk, corn syrup, ¼ cup
of the brown sugar, salt, vanilla, xanthan gum,
grapeseed oil, and peaches into a blender jar in
the order listed. Blend until the mixture is smooth.
Transfer to a small bowl, cover, and refrigerate at
least 2 hours, preferably overnight.
2. Preheat the oven to 325°F. In a small bowl,
combine the oats, flour, cinnamon, and remaining
1 tablespoon brown sugar. Add the butter. Using
your fingers or a fork, mash the butter into the
oat-flour mixture until there are no dry bits left
and the mixture is crumbly. Spread the mixture on
a sheet pan lined with parchment paper. Bake until
golden-brown, about 20 minutes. Let the oat
streusel cool completely, and then reserve.
3. Turn on the Cuisinart
®
ice cream maker. Whisk the
ice cream base, and then pour the mixture into the
freezer bowl through the ingredient funnel. Churn
until thickened, about 20 minutes. Gradually add 2
tablespoons of the oat streusel and the peach jam
through the funnel a few minutes before the end of
churning time. Note: only a couple of tablespoons
will be needed for this recipe. The remainder can be
stored in an airtight container in the freezer for up to
two months. It can be used for more ice cream,
or even stirred into yogurt or oatmeal.
4. The ice cream will have a soft, creamy texture.
For a firmer consistency, transfer the ice cream to
an airtight container and place in the freezer for
about 2 hours. Remove from the freezer about 15
minutes before serving.
Dark Chocolate Sorbet
Rich and creamy, our Dark Chocolate Sorbet
is a real dairy-free treat.
Makes about 1½ cups
1 cup water
½ cup granulated sugar
Pinch salt
½ cup cocoa powder, sifted
½ teaspoon pure vanilla extract
1. Prepare a simple syrup by combining the water,
sugar, and salt in a medium saucepan and cooking
over medium-low heat, until the sugar is fully
dissolved.
2. Remove the saucepan from the heat and gradually
add the cocoa powder, whisking until smooth. Add
the vanilla and stir to combine. Transfer to a
container. Cover and refrigerate 2 to 3 hours, or
overnight.
3. Turn on the Cuisinart
®
ice cream maker. Pour the
sorbet base into the freezer bowl through the
ingredient funnel. Churn until thickened, about 25
minutes.
4. The sorbet will have a soft, creamy texture. For a
firmer consistency, transfer the sorbet to an airtight
container and place in the freezer for about 2 hours.
Remove from the freezer about 15 minutes before
serving.
Mango Sorbet
Refreshing, sweet, and full of flavor, mango sorbet
is always sure to please.
Makes 1½ cups
1½ cups diced fresh mango
¼ cup water
¼ cup granulated sugar
½ teaspoon grated fresh lime zest
½ teaspoon fresh lime juice
Pinch kosher salt
1. Place all ingredients in a blender jar in the order
listed. Blend on High until completely smooth.
2. Transfer to a container. Cover and refrigerate 2 to 3
hours, or overnight.
3. Turn on the Cuisinart
®
ice cream maker. Pour the
sorbet base into the freezer bowl through the
ingredient funnel. Churn until thickened, about 15
minutes.
4. The sorbet will have a soft, creamy texture. For a
firmer consistency, transfer the sorbet to an airtight
container and place in the freezer for about 2 hours.
Remove from the freezer about 15 minutes before
serving.

©2024 Cuisinart
Glendale, AZ 85307
Printed in China
24CE089884
IB-18260
Manual de
instrucciones
& Libro de recetas
Para su seguridad y para disfrutar plenamente de este
producto, siempre lea atentamente las instrucciones
antes del uso.
Máquina para
hacer helados
1-Pint Wonder
SERIE ICE-M10

2
MEDIDAS DE
SEGURIDAD
IMPORTANTES
Al usar aparatos eléctricos, siempre se deben tomar
precauciones básicas de seguridad para reducir el
riesgo de incendio, descarga eléctrica o lesiones,
entre ellas las siguientes:
LEA TODAS LAS INSTRUCCIONES ANTES
DEL USO.
1. Para reducir el riesgo de descarga eléctrica,
no sumerja el cable, el enchufe ni el bloque-motor
en agua u otros líquidos.
2. Los niños o las personas que carezcan de la
experiencia o de los conocimientos necesarios
para manipular el aparato, o aquellas cuyas
capacidades físicas, sensoriales o mentales estén
limitadas, no deben usar el aparato sin la
supervisión o la dirección de una persona
responsable por su seguridad. Supervise el uso
de este aparato con cuidado cuando sea usado
por o cerca de niños. No deje que los niños
jueguen con este aparato.
3. Apague y desenchufe el aparato cuando no esté
en uso, antes de instalar/quitar piezas y antes de
limpiarlo. Para desenchufar, agarre el enchufe y
jálelo de la toma de corriente. Nunca jale el cable.
4. Evite el contacto con las piezas móviles. Para
reducir el riesgo de lesiones personales o daños
a la máquina, mantenga los dedos, cabello, ropa,
espátulas y otros utensilios lejos del aparato
durante el funcionamiento.
5. No use este aparato si el cable o el enchufe están
dañados, después de un mal funcionamiento,
después de una caída, o si está dañado; Llame al
servicio de atención al cliente del fabricante para
obtener información sobre cómo hacer revisar,
reparar o ajustar el aparato.
6. El uso de accesorios no recomendados por
Cuisinart presenta un riesgo de incendio,
descarga eléctrica o lesiones personales.
7. No lo use en exteriores.
8. No deje que el cable cuelgue de la encimera o
de la mesa, ni que tenga contacto con superficies
calientes.
9. Para reducir el riesgo de lesiones personales
o daños a la máquina, mantenga las manos y
utensilios fuera del tazón congelador durante el
funcionamiento. NUNCA INTRODUZCA OBJETOS
O UTENSILIOS PUNZANTES/AFILADOS EN EL
TAZÓN CONGELADOR; esto puede rayar y dañar
el interior del tazón. Puede usar una espátula de
goma o una cuchara de madera, siempre que el
aparato esté apagado.
10. Este aparato es para uso doméstico solamente.
Toda operación de mantenimiento, excepto la
limpieza y el mantenimiento por parte del usuario,
debe ser llevada a cabo por personal de servicio
autorizado.
11. No coloque el tazón congelador sobre un
quemador a gas o eléctrico caliente, ni en un
horno caliente. No lo exponga a ninguna fuente
de calor. No lo lave en el lavavajillas; esto
presenta un riesgo de incendio, descarga
eléctrica o lesiones personales.
12. No haga funcionar el aparato debajo o dentro
de un armario/gabinete. Siempre desenchufe
el aparato antes de almacenarlo en un armario/
gabinete. Dejar el aparato enchufado representa
un riesgo de incendio, especialmente si este toca
las paredes o la puerta del armario/gabinete
cuando se cierra.
13. Retire el agitador del tazón congelador antes
de lavarlo. No coloque el aparato sobre o cerca
de un quemador a gas o de un hornillo eléctrico
caliente, ni en un horno caliente.
14. Solo use este aparato para el uso previsto.
GUARDE ESTAS
INSTRUCCIONES
PARA USO
DOMÉSTICO
SOLAMENTE
AVISO
El cable de este aparato cuenta con un enchufe
polarizado (una pata es más ancha que la otra).
Como medida de seguridad, aquel enchufe se podrá
enchufar de una sola manera en las tomas de
corriente polarizadas. Si no entra en la toma de
corriente, inviértalo. Si aun así no entra
completamente, comuníquese con un electricista.
No intente modificar esta función de seguridad.
USO DE ALARGADORES
El cable provisto con este aparato es corto, para
reducir el peligro de que alguien se enganche o
tropiece con un cable más largo. Se puede usar un
cable alargador/de extensión, siempre que respete
las precauciones siguientes.
La clasificación nominal del cable alargador/de
extensión debe ser por lo menos igual a la del
aparato. El cable más largo debe ser acomodado
de tal manera que no cuelgue de la encimera/mesa,
donde puede ser jalado por niños o causar tropiezos.
PRECAUCIÓN
•
No sumerja el bloque-motor en agua.
• Para reducir el riesgo de incendio o descarga
eléctrica, no desarme el bloque-motor.
Nota: El bloque-motor no contiene ninguna pieza
que pueda ser reparada/reemplazada por el
usuario.
3
3
4
5
6
7
8
9
10
1
2
• Las reparaciones deben ser realizadas por
personal autorizado.
• Compruebe que el voltaje indicado en la placa de
datos del aparato corresponda con el voltaje de
suministro.
• Nunca limpie el aparato con productos/materiales
abrasivos o utensilios duros.
ÍNDICE
Medidas de seguridad importantes .............2
Piezas y características ..................... 3
Antes del primer uso ....................... 3
Preparación/congelamiento del tazón .......... 4
Instrucciones de uso ....................... 4
Adición de ingredientes secos.................4
Mecanismo de seguridad.....................4
Limpieza, almacenamiento y mantenimiento..... 5
Garantía ..................................6
Recetas ..................................7
PIEZAS Y
CARACTERÍSTICAS
1. Botón de encendido/apagado
2. Espacio para enrollar el cable
El cable se enrolla de forma segura alrededor del
bloque-motor cuando el aparato no está en uso para
mantener las encimeras ordenadas.
3. Bloque-motor
Encierra el motor que acciona el agitador.
4. Tapa
Transparente, para poder observar el proceso de
preparación. Especialmente diseñada para fijarse
fácilmente al collarín del tazón congelador.
5. Embudo
Usado para agregar la mezcla de helado después de
encender el aparato, o agregar ingredientes extra, tales
como chispas de chocolate o fruto seco, sin
interrumpir el ciclo de preparación.
6. Agitador
Mezcla los ingredientes e incorpora aire para preparar
el postre helado.
7. Tazón congelador
Contiene un líquido congelante en una pared de doble
aislamiento La pared doble mantiene el tazón frío, a
una temperatura constante.
8.
Collarín del tazón congelador
Sujeta firmemente el tazón congelador, y se levanta
para retirarlo limpia y fácilmente.
9. Base
9. Pies de goma antideslizantes
ANTES DEL PRIMER
USO
Retire el aparato del material de embalaje. Lave la tapa, el
tazón congelador, la base y el agitador en agua tibia con
jabón para quitar el polvo o cualquier residuo que se hayan
acumulado durante el proceso de fabricación y el envío. NO
sumerja el bloque-motor en agua. Límpielo con un paño
húmedo. NO limpie ninguna de las piezas del aparato con
limpiadores/materiales abrasivos o utensilios duros.

4
PREPARACIÓN/
CONGELAMIENTO
DEL TAZÓN
CONGELADOR
Compruebe que el tazón congelador esté completamente
congelado
antes de empezar a preparar la receta.
Lave y seque el tazón antes de congelarlo. El tiempo
necesario para congelar el tazón depende de qué tan
frío esté su congelador. Se recomienda colocar el
tazón en el fondo del congelador, donde es más frío.
Para un congelamiento uniforme, cerciórese de
colocar el tazón congelador sobre una superficie
plana, en posición vertical.
Generalmente, el tiempo de congelación es entre
16 y 24 horas. Para saber si el tazón está
completamente congelado, agítelo. Si no escucha
ningún movimiento de líquido, entonces el tazón
está listo para su uso. Para que el tazón siempre
esté listo, se recomienda guardarlo en el congelador.
Use el tazón inmediatamente después de sacarlo
del congelador, ya que comenzará a descongelarse
rápido.
NOTA: El congelador debe estar a una temperatura
de 0°F (-18°C) para asegurar el congelamiento
adecuado de toda comida.
INSTRUCCIONES
DE USO
1. Congele el tazón congelador por al menos 24
horas antes del uso.
2. Coloque el collarín del tazón congelador en la
base, y coloque esta sobre una superficie plana
y limpia. Retire el tazón congelador del congelador
y colóquelo en la base. NOTA: El tazón comenzará
a descongelarse al sacarlo del congelador; úselo
inmediatamente.
3. Separe el bloque-motor de la tapa, presionando
las patas de bloqueo en la parte inferior. Desenrolle
el cable, vuelva a introducir el bloque-motor en la
tapa y conecte el agitador al bloque-motor.
4. Coloque el conjunto tapa/bloque-motor sobre
el tazón congelador, alineando la flecha en el
collarín y la protuberancia exterior en la tapa.
Gire en sentido horario para bloquear.
5. Enchufe el aparato y ponga el botón de encendido/
apagado en la posición “I”; el agitador empezará
a girar. NOTA: La base del helado debe añadirse
después de que el agitador empiece a girar.
6. Vierta la base del helado en el embudo. NOTA: La
base del helado debe estar helada. NO llene el
tazón congelador hasta más de ¾in(2cm) de la
orilla, ni exceda 1¼ tazas (295 ml), ya que el
helado se expande durante el proceso de
congelamiento.
7. El helado estará listo en aprox. 25 minutos,
dependiendo de la receta y de la cantidad
preparada. Cuando el helado esté listo, ponga el
botón de encendido/apagado en la posición “O”
y desenchufe el aparato. Es posible que tapa y el
agitador sigan girando hacia delante y hacia atrás
después de que la mezcla de helado se haya
endurecido; esto es normal. Apague el aparato y
compruebe la consistencia de la mezcla.
8. Si prefiere que el helado tenga una consistencia
más firme, póngalo en un recipiente hermético y
congélelo por un mínimo de 2 horas. NOTA: No
guarde el helado en el tazón congelador; se pegará
a las paredes del tazón, lo que puede dañarlo.
Guarde el helado en un recipiente hermético apto
para congelación.
9. Con el aparato desenchufado, quite el agitador y
separe el bloque-motor de la tapa, presionando las
patas de bloqueo en la parte inferior. Enrolle el
cable y vuelva a introducir el bloque-motor en la
tapa.
ADICIÓN DE
INGREDIENTES EXTRA
Los ingredientes extra tales como las chispas de
chocolate y las nueces/frutos secos deben ser
agregados aprox. 15 minutos antes del final del ciclo
de preparación. Una vez que el postre helado haya
empezado a espesarse, agregue hasta
1
/
3
de taza
de ingredientes extra picados por el embudo.
NOTA: El tamaño de los ingredientes extra no debe
exceder ¼in(5mm).
MECANISMO DE
SEGURIDAD
La máquina para hacer helados 1-Pint Wonder de
Cuisinart
®
cuenta con un sistema de seguridad que la
apaga automáticamente en caso de recalentamiento
del motor. Esto puede ocurrir si la preparación es
demasiado espesa, si el aparato ha estado
funcionando por un tiempo excesivo o si el tamaño
de los ingredientes extra (nueces, etc.) es demasiado
grande. Para reiniciar el aparato, apague (“O”) y
desenchúfelo. Deje que se enfríe por unos minutos.
A continuación, enciéndalo nuevamente.

5
LIMPIEZA,
ALMACENAMIENTO
Y MANTENIMIENTO
Limpieza
Lave la tapa, el tazón congelador, la base y el
agitador en agua tibia con jabón. NUNCA LAVE EL
TAZÓN CONGELADOR EN EL LAVAVAJILLAS. NO
USE PRODUCTOS/MATERIALES ABRASIVOS NI
UTENSILIOS DUROS PARA LIMPIARLO. Limpie el
bloque-motor con un paño ligeramente húmedo. NO
sumerja el bloque-motor en agua, ni lo lave con agua
corriente. Seque todas las piezas con cuidado.
Almacenamiento
NO guarde el tazón congelador en el congelador si
está mojado.
NO guarde la tapa, el agitador, la base ni el bloque-
motor en el congelador. Guarde el tazón congelador
en el congelador para que siempre esté listo cuando
lo necesite. No guarde los postres helados en el
tazón congelador; Guárdelos en un recipiente
hermético para optimizar su tiempo de conservación.
Mantenimiento
Cualquier otro servicio debe ser realizado por un
técnico autorizado.

6
GARANTÍA
Garantía limitada de tres años
Esta garantía es válida solo en los Estados
Unidos, para los consumidores que hayan
comprado este producto directamente a Cuisinart
o a un revendedor autorizado de Cuisinart. Usted
es un consumidor si posee una máquina para
hacer helados 1-Pint Wonder de Cuisinart
®
que
haya sido comprada en una tienda para uso
personal, familiar o casero. A menos que la ley
aplicable exija lo contrario, esta garantía no es
para los minoristas u otros consumidores/
compradores comerciales, ni propietarios/
consumidores que hayan comprado este
producto a revendedores no autorizados por
Cuisinart. Cuisinart garantiza este producto contra
todo defecto de materiales o fabricación durante
3 años después de la fecha de compra original,
siempre que haya sido usado para uso doméstico
y de acuerdo con las instrucciones.
Se recomienda llenar el formulario de registro
disponible en https://cuisinart.registria.com a
fin de facilitar la verificación de la fecha de
compra original de este producto. Sin embargo,
no es necesario registrar el producto para recibir
servicio bajo esta garantía. En ausencia de
prueba de la fecha de compra, el período de
garantía será calculado a partir de la fecha de
fabricación del producto.
RESIDENTES DE CALIFORNIA
La ley del estado de California ofrece dos
opciones bajo el período de garantía. Los
residentes del estado de California pueden
devolver el producto defectuoso (A) a la tienda
donde lo compraron o (B) a otra tienda que venda
productos Cuisinart
®
de este tipo. La tienda
podrá, a su elección, reparar el producto, referir al
consumidor a un centro de servicio
independiente, sustituir el producto, o reembolsar
al consumidor el precio de compra menos la
cantidad directamente atribuible al uso anterior
del producto por el consumidor. Si estas dos
opciones no satisfacen al consumidor, podrá
llevar el aparato a un centro de servicio
independiente, siempre que se pueda arreglar o
reparar el aparato de manera económica.
Cuisinart (no el consumidor) será responsable por
los gastos de servicio, reparación, sustitución o
reembolso de los productos defectuosos bajo
garantía. Los residentes de California también
pueden, si lo desean, mandar el producto
defectuoso directamente a Cuisinart para que sea
reparado o sustituido. Para esto, se debe llamar a
nuestro servicio de atención al cliente al 1-800-
726-0190. Cuisinart será responsable por los
gastos de reparación, reemplazo, manejo y envío
de los productos defectuosos durante el período
de garantía.
GARANTÍA DE REEMPLAZO SIN
DIFICULTADES
Su máxima satisfacción es nuestra prioridad, así
que, si este producto Cuisinart
®
falla dentro del
generoso período de garantía, lo repararemos o,
de ser necesario, lo reemplazaremos, sin costo
alguno para usted. Para obtener una etiqueta de
devolución, visítenos en https://www.cuisinart.
com/customer-care/product-assistance/
product-inquiry. O llame sin cargo a nuestro
servicio de atención al cliente, al 1-800-726-0190,
para hablar con un representante.
Este producto satisface las más altas exigencias
de fabricación y ha sido diseñado para funcionar
con 120V, usando accesorios y repuestos
autorizados solamente. Esta garantía excluye
expresamente los defectos o daños causados por
accesorios, piezas o reparaciones no autorizados
por Cuisinart, así como los defectos o daños
causados por el uso de un convertidor de voltaje.
Esta garantía no cubre el uso comercial o
industrial del producto, y no es válida en caso de
daños causados por mal uso, negligencia o
accidente. Esta garantía excluye todos los daños
incidentales o consecuentes. Algunos Estados no
permiten la exclusión o limitación de daños
incidentales o consecuentes, de modo que las
limitaciones mencionadas pueden no regir para
usted. Usted puede tener otros derechos que
varían de un Estado a otro.
Importante: Si debe llevar el producto
defectuoso a un centro de servicio no autorizado,
por favor informe al personal del centro de
servicio que deben llamar al servicio de atención
al cliente de Cuisinart, al 1-800-726-0190, a fin de
diagnosticar el problema correctamente, usar las
piezas correctas para repararlo y comprobar que
el producto aún esté bajo garantía.

7
CONSEJOS DE
PREPARACIÓN
Las recetas a continuación ofrecen una variedad de
opciones para preparar deliciosos postres helados.
Usted puede crear o usar sus propias recetas,
siempre y cuando no rindan más de 1 pinta (475ml).
• Los postres helados preparados con la máquina
para hacer helados 1-Pint Wonder de Cuisinart
®
emplean ingredientes frescos y puros; por lo tanto,
no tienen las mismas características que los
postres y las bebidas helados comerciales, los
cuales muchas veces contienen gomas y
conservantes para darles firmeza. Para conseguir
una consistencia más firme, coloque el postre
helado en un recipiente hermético y congélelo
hasta que adquiera la consistencia deseada, por
lo general 2 horas o más.
• Para obtener resultados óptimos, refrigere los
ingredientes de la mezcla por una noche o enfríelos
completamente en un baño de hielo antes de
empezar la preparación.
• La mayoría de las mezclas pueden refrigerarse por
un máximo de 3 días.
• Puede sustituir la crema líquida para batir y la leche
entera usadas en muchas recetas con cremas bajas
en grasa (p.ej., crema líquida “half-and-half”), leche
baja en grasa/semidescremada/semidesnatada,
leche sin grasa/descremada/desnatada, e incluso
leche vegetal (soya, arroz. etc.) en muchas recetas.
Sin embargo, tenga presente que mientras más alto
sea el contenido de grasa de los ingredientes, más
rico y cremoso será el resultado. Usar sustitutos
bajos en grasa puede cambiar el sabor, la
consistencia y textura del postre. Cuando sustituya
ingredientes, cerciórese de usar el mismo volumen
del sustituto que del ingrediente original. Por
ejemplo: Si la receta incluye 2 tazas (475ml) de
crema, use un total de 2 tazas (475ml) de sustituto
(p.ej., 1 taza de crema y 1 taza de leche entera).
• Puede sustituir el azúcar con edulcorantes
artificiales.
Si es necesario precocinar la receta, añada el
edulcorante después de la cocción. Revuelva bien
la mezcla para que el edulcorante se disuelva.
• Si la receta incluye alcohol, agregue este en los
últimos dos minutos del ciclo, ya que el alcohol
puede impedir el proceso de congelación.
• Nuestras recetas permiten preparar hasta 1 pinta
(475ml) de postre helado. NO llene el tazón
congelador hasta más de ¾in(2cm) de la orilla,
ya que los ingredientes se expanden durante el
proceso de congelamiento.
• Cuando prepare recetas consecutivas, compruebe
que el tazón esté completamente congelado antes
de cada ciclo. Para comprar tazones congeladores
adicionales, visite www.cuisinart.com.
• Compruebe que el agitador y la tapa/bloque-motor
estén correctamente puestos antes de encender el
aparato.

8
RECETAS
Helado de vainilla simple ......................8
Helado de chocolate simple....................8
Helado de frutas del bosque ...................9
Helado de dulces de chocolate/mantequilla
de maní con crema de malvavisco...............9
Helado con sabor a tarta de crema de banana ....10
Helado “sundae de brownies” . . . . . . . . . . . . . . . . .10
Helado de leche de cereal con malvavisco .......10
Helado de “galletas y cremas” y ajonjolí negro ....11
Helado con sabor a dona de mermelada.........11
Helado “pastel de cumpleaños”................11
Helado con sabor a pastel de queso de fresa .....12
Helado de leche de avena con sabor
a Streusel de durazno y canela ................12
Sorbete de chocolate negro...................13
Sorbete de mango ..........................13
Helado de vainilla simple
Para “personalizar” este helado clásico, añada dulces/
caramelos picados o granas en los últimos minutos
del ciclo de preparación.
Rinde aprox. 1¾ tazas (415ml)
1
/
3
taza (80ml) de leche entera
¼ taza (50 g) de azúcar granulada
1 pizca pequeña de sal
2
/
3
taza (160ml) de crema líquida para batir
(“heavy cream”)
1 cucharadita (5ml) de extracto natural
de vainilla
1
/
3
taza de ingredientes extra (p. ej., dulces/
caramelos picados, galletas picadas, granas),
opcional
1. Colocar la leche, el azúcar y la sal en un tazón
pequeño; batir hasta que el azúcar se haya disuelto.
Agregar la crema líquida y la vainilla; combinar.
Cubrir y refrigerar por un mínimo de 2 horas
(preferiblemente por toda la noche).
2. Encender el aparato. Batir la mezcla y verterla en el
tazón congelador. Dejar que se mezcle por aprox. 20
minutos. Añada los ingredientes extra (opcional) en
los últimos minutos de la mezcla.
3. NOTA: El helado tendrá una consistencia suave y
cremosa. Si desea que sea más firme, ponerlo en un
recipiente hermético y congelarlo por aprox. 2 horas.
Sacarlo del congelador aprox. 15 minutos antes de
servir.
Helado de chocolate simple
Aunque este helado es fácil de preparar, el sabor
y la riqueza del chocolate es todo menos sencillo.
Rinde aprox. 1¾ tazas (415ml)
¼ taza (30 g) de cacao en polvo, tamizado
2 cucharadas (25 g) de azúcar granulada
2 cucharadas llenas (25 g) de azúcar rubia
(azúcar de caña integral) o morena
1 pizca de sal
1
/
3
taza (80ml) de leche entera
2
/
3
taza (160ml) de crema líquida para batir
(“heavy cream”)
½ cucharadita de extracto natural de vainilla
1. Colocar el cacao en polvo, los azúcares y la sal en un
tazón mediano; batir para combinar. Agregar la leche
y mezclar, usando una batidora de mano a velocidad
baja, hasta que el cacao y los azúcares se hayan
disueltos. Agregar la crema líquida y la vainilla;
combinar. Cubrir y refrigerar por un mínimo de 2
horas (preferiblemente por toda la noche).

9
2. Encender el aparato. Batir la mezcla y verterla en el
tazón congelador. Dejar que se mezcle por 15-20
minutos, hasta que se espese.
3. NOTA: El helado tendrá una consistencia suave y
cremosa. Si desea que sea más firme, ponerlo en un
recipiente hermético y congelarlo por aprox. 2 horas.
Sacarlo del congelador aprox. 15 minutos antes de
servir.
Helado de frutas del bosque
Un helado ligero y dulce con delicioso sabor
a fresas, aún mejor cuando las frutas del bosque
están de temporada.
Rinde aprox. 1¾ tazas (415ml)
½ taza de frutas del bosque mixtas (p. ej.,
frambuesas, moras y arándanos azules)
frescas
¼ taza (60ml) de leche entera
¼ taza (50 g) de azúcar granulada
1 pizca de sal
½ taza (120ml) de crema líquida para batir
(“heavy cream”)
½ cucharadita de extracto natural de vainilla
1. Colocar las frutas en el bol de una procesadora de
alimentos equipada con cuchilla de metal. Pulsar
para picar finamente. Reservar.
2. Colocar la leche, el azúcar y la sal en un tazón
pequeño; Mezclar, usando una batidora de mano
a velocidad baja, hasta que el azúcar se haya
disuelto. Agregar la crema líquida y la vainilla;
combinar. Agregar las frutas y su jugo. Cubrir y
refrigerar por un mínimo de 2 horas (preferiblemente
por toda la noche).
3. Encender el aparato. Batir la mezcla y verterla en el
tazón congelador. Dejar que se mezcle por 15-20
minutos, hasta que se espese. Nota: El helado tendrá
una consistencia suave y cremosa. Si desea que sea
más firme, ponerlo en un recipiente hermético y
congelarlo por aprox. 2 horas. Sacarlo del
congelador aprox. 15 minutos antes de servir.
* También puede usar frutas del bosque congeladas,
descongeladas.
Helado de dulces de chocolate/
mantequilla de maní
con crema de malvavisco
No será capaz de dejar este helado rico y cremoso con
los mejores sabores de sus dulces favoritos.
Rinde aprox. 2 tazas (475 ml)
1
/
3
taza (85 g) de mantequilla de maní
de buena calidad
¼ taza (50 g) de azúcar granulada
1 pizca de sal
1
/
3
taza (80ml) de leche entera
2
/
3
taza (160ml) de crema líquida para batir
(“heavy cream”)
½ cucharadita de extracto natural de vainilla
¼ taza (40 g) de dulces de chocolate y
mantequilla de maní picados
¼ taza (120ml) de crema de malvavisco
2 cucharadas (30ml) de salsa de chocolate
1. Colocar la mantequilla de maní, el azúcar y la sal en
un tazón pequeño; mezclar, usando una batidora de
mano a velocidad baja, hasta obtener una mezcla
suave. Agregar la leche y mezclar a velocidad baja
por aprox. 1-2 minutos, hasta que el azúcar se haya
disuelto. Agregar la crema líquida y la vainilla;
combinar. Cubrir y refrigerar por un mínimo de 2
horas (preferiblemente por toda la noche).
2. Encender el aparato. Batir la mezcla y verterla en el
tazón congelador. Dejar que se mezcle por aprox. 15
minutos. Añadir los dulces en los últimos 5 minutos
del ciclo.
3. Apagar y retirar el agitador. Agregar la crema de
malvavisco y la salsa de chocolate y revolver
suavemente.
4. NOTA: El helado tendrá una consistencia suave y
cremosa. Si desea que sea más firme, ponerlo en un
recipiente hermético y congelarlo por aprox. 2 horas.
Sacarlo del congelador aprox. 15 minutos antes de
servir.

10
Helado con sabor a tarta
de crema de banana
La cremosidad de este helado proviene de una
combinación de leche condensada, queso crema y
banana. Simula el sedoso relleno de natillas de una tarta
de crema de banana.
Rinde aprox. 1¾ tazas (415ml)
½ taza (120ml) de crema líquida para batir
(“heavy cream”)
½ taza (120ml) de leche condensada
(aprox. ¼ de lata)
2 onzas (55 g) de queso crema, a temperatura
ambiente, cortado en 4 pedazos
1 pizca de sal
1 banana muy madura, una mitad entera y la
otra mitad picada y refrigerada hasta el
momento de usar
½ cucharadita de extracto natural de vainilla
1 hoja entera de galleta Graham, picada
1. Colocar la crema líquida, la leche condensada, el
queso crema, la sal y la mitad de banana entera en la
jarra de una licuadora, en el orden indicado. Pulsar
unas cuantas veces, y luego procesar a velocidad
baja hasta obtener una mezcla suave. Poner la
mezcla en un recipiente, cubrir y refrigerar por un
mínimo de 2 horas (preferiblemente por toda la
noche).
2. Encender el aparato. Batir la mezcla y verterla en el
tazón congelador. Dejar que se mezcle por aprox.
15 minutos. Cinco minutos antes del final, añadir
poco a poco la media banana y las galletas picadas.
Dejar que se siga mezclando hasta que se espese al
gusto, aprox. 20 minutos en total.
3. NOTA: El helado tendrá una consistencia suave y
cremosa. Si desea que sea más firme, ponerlo en un
recipiente hermético y congelarlo por aprox. 2 horas.
Sacarlo del congelador aprox. 15 minutos antes de
servir.
Helado “sundae de brownies”
Deje que Cuisinart reúna todos los ingredientes para esta
versión del clásico sundae de brownie.
Rinde aprox. 2 tazas (475 ml)
1
/
3
taza (80ml) de leche entera
¼ taza (50 g) de azúcar granulada
1 pizca pequeña de sal
2
/
3
taza (160ml) de crema líquida para batir
(“heavy cream”)
1 cucharadita de extracto natural
de vainilla
¼ taza (30 g) de brownies desmenuzados,
helados
2 cucharadas de cerezas Marrasquino partidas
por la mitad
2 cucharadas de salsa de chocolate
Crema batida, para servir (opcional)
1. Colocar la leche, el azúcar y la sal en un tazón
pequeño; batir hasta que el azúcar se haya disuelto.
Agregar la crema líquida y la vainilla; combinar.
Cubrir y refrigerar por un mínimo de 2 horas
(preferiblemente por toda la noche).
2. Encender el aparato. Batir la mezcla y verterla en el
tazón congelador. Dejar mezclar por 15-20 minutos,
hasta que se espese.
3. Unos 5 minutos antes del final, agregar poco a poco
los brownies desmenuzados y las cerezas.
4. Cuando la mezcla esté espesa (unos 20 minutos en
total), apagar, abrir la tapa y agregar la salsa de
chocolate; revolver suavemente.
5. Servir inmediatamente, con crema batida si desea.
Helado de leche de cereal
con malvavisco
Perfecto para los niños o para revivir los recuerdos
de la infancia, este helado es una delicia que les
encantará a todos.
Rinde aprox. 1
2
/
3
tazas (395ml)
½ taza (120ml) de leche entera
½ taza de cereal de malvavisco +
1
/
3
para
agregar al helado
¼ taza (50 g) de azúcar granulada
1 pizca pequeña de sal
2
/
3
taza (160ml) de crema líquida para batir
(“heavy cream”)
1 cucharadita de extracto natural
de vainilla
1. Colocar la leche y ½ taza del cereal en una taza
medidora grande o un tazón pequeño. Dejar remojar
por 45 minutos. Colar con un colador de malla fina,
presionando el cereal para extraer el líquido, pero
teniendo cuidado de no dejarlo pasar. La leche
aromatizada puede prepararse con hasta 3 días de
anticipación y refrigerarse hasta el momento de usar.
2. Colocar la leche aromatizada en un tazón pequeño.
Agregar el azúcar y la sal, y revolver hasta que el
azúcar se haya disuelto. Agregar la crema líquida y la
vainilla; combinar. Cubrir y refrigerar por un mínimo
de 2 horas (preferiblemente por toda la noche).

11
3. Encender el aparato. Batir la mezcla y verterla en el
tazón congelador. Dejar que se mezcle por 15-20
minutos, hasta que se espese.
4. Después de aprox. 15 minutos, agregar
1
/
3
de taza
del cereal.
5. NOTA: El helado tendrá una consistencia suave y
cremosa.
Si desea que sea más firme, ponerlo en un recipiente
hermético y congelarlo por aprox. 2 horas. Sacarlo
del congelador aprox. 15 minutos antes de servir.
Helado de “galletas y cremas”
y ajonjolí negro
La pasta de ajonjolí negro añade un sabor a nuez y un
color llamativo al clásico helado de galletas y crema.
Rinde aprox. 1¾ tazas (415ml)
1
/
3
taza (80ml) de leche entera
¼ taza (50 g) de azúcar granulada
1 pizca pequeña de sal
2
/
3
taza (160ml) de crema líquida para batir
(“heavy cream”)
1 cucharadita de extracto natural
de vainilla
2 cucharadas de pasta de ajonjolí/sésamo
negro
½ taza (75 g) de “sándwiches de chocolate”
finamente picados
1. Colocar la leche, el azúcar y la sal en un tazón
mediano; batir hasta que el azúcar se haya disuelto.
Agregar la crema líquida, la vainilla y el la pasta de
ajonjolí. Cubrir y refrigerar por un mínimo de 2 horas
(preferiblemente por toda la noche).
2. Encender el aparato. Batir la mezcla y verterla en el
tazón congelador. Dejar que se mezcle por 15-20
minutos, hasta que se espese. Unos minutos antes
del final, agregar poco a poco las galletas picadas.
3. NOTA: El helado tendrá una consistencia suave y
cremosa. Si desea que sea más firme, ponerlo en un
recipiente hermético y congelarlo por aprox. 2 horas.
Sacarlo del congelador aprox. 15 minutos antes de
servir.
Helado con sabor a dona
de mermelada
¡Tan sabroso que puede que se lo
coma para el desayuno!
Rinde aprox. 1¾ tazas (415ml)
1
/
3
taza (80ml) de leche entera
¼ taza (50 g) de azúcar granulada
1 pizca pequeña de sal
2
/
3
taza (160ml) de crema líquida para batir
(“heavy cream”)
1 cucharadita (5ml) de extracto natural de
vainilla
1 cucharadas de mermelada de fresa
½ taza de cubos de dona, helada
1. Colocar la leche, el azúcar y la sal en un tazón
mediano; batir hasta que el azúcar se haya disuelto.
Agregar la crema líquida y la vainilla; combinar.
Cubrir y refrigerar por un mínimo de 2 horas
(preferiblemente por toda la noche).
2. Encender el aparato. Batir la mezcla y verterla en el
tazón congelador. Dejar que se mezcle por 15-20
minutos, hasta que se espese. Unos minutos antes
del final, agregar poco a poco la dona picada.
3. NOTA: El helado tendrá una consistencia suave y
cremosa. Si desea que sea más firme, ponerlo en un
recipiente hermético y congelarlo por aprox. 2 horas.
Sacarlo del congelador aprox. 15 minutos antes
de servir.
Helado “pastel de cumpleaños”
¡Lleno de granas multicolor y trocitos de tarta de vainilla,
este helado es algo para celebrar!.
Rinde aprox. 1¾ tazas (415ml)
½ taza (120ml) de crema líquida para batir
(“heavy cream”)
1 pizca pequeña de sal
½ cucharadita de extracto natural de vainilla
½ taza (60ml) de leche condensada
2 onzas (55 g) de queso crema, a temperatura
ambiente
½ taza de cubos de pastel amarillo, helado
3 cucharaditas de granas multicolor
1. Colocar la crema líquida, la sal, la vainilla, la leche
condensada y el queso crema en la jarra de una
licuadora, en el orden indicado. Licuar justo hasta
que el queso crema se haya incorporado, teniendo
cuidado de no licuar demasiado. Poner la mezcla en

12
un recipiente pequeño, cubrir y refrigerar por 2 horas
o más (preferiblemente por toda la noche).
2. Encender el aparato. Batir la mezcla y verterla en el
tazón congelador. Dejar que se mezcle por 15-20
minutos, hasta que se espese. Unos minutos antes
del final, agregar poco a poco el pastel y las granas.
3. NOTA: El helado tendrá una consistencia suave y
cremosa. Si desea que sea más firme, ponerlo en un
recipiente hermético y congelarlo por aprox. 2 horas.
Sacarlo del congelador aprox. 15 minutos antes de
servir.
Helado con sabor a pastel
de queso de fresa
Todos los elementos de un pastel de queso con fresas
(queso crema, fresas y galletas Graham) le harán pensar
que en realidad se está comiendo un trozo de pastel.
Rinde aprox. 1¾ tazas (415ml)
4 onzas (115 g) de queso crema, a temperatura
ambiente, cortado en 4 pedazos
1
/
3
taza (135 g) de azúcar granulada
1 pizca de sal
1
/
3
taza (80ml) de leche entera
¾ cucharadita de extracto natural de vainilla
1 cucharada de crema agria o yogur natural,
a temperatura ambiente
1
/
3
taza (65 g) de rodajas de fresa
1½ hojas enteras de galletas Graham, picadas
1. Colocar el queso crema, el azúcar y la sal en un
tazón mediano. Batir, usando una batidora de mano,
hasta conseguir una mezcla cremosa. Agregar
gradualmente la leche y la vainilla, mezclando hasta
obtener una mezcla suave. Agregar la crema agría o
el yogur; combinar. Cubrir y refrigerar por un mínimo
de 2 horas (preferiblemente por toda la noche).
2. Encender el aparato. Batir la base de helado y colarla
si parece grumosa. Verter la mezcla en el tazón
congelador y dejar que se mezcle por aprox. 15
minutos, hasta que se espese. Unos 5 minutos antes
del final, agregar poco a poco las fresas y las
galletas picadas. Dejar que se siga mezclando hasta
que se espese al gusto, aprox. 20 minutos en total.
3. NOTA: El helado tendrá una consistencia suave y
cremosa. Si desea que sea más firme, ponerlo en un
recipiente hermético y congelarlo por aprox. 2 horas.
Sacarlo del congelador aprox. 15 minutos antes de
servir.
Helado de leche de avena con sabor
a Streusel de durazno y canela
Este helado a base de leche de avena tiene espirales de
mermelada de durazno y streusel de avena y canela.
Rinde aprox. 1¾ tazas (415ml)
2
/
3
taza (160ml) de leche de avena extracremosa
2 cucharadas de jarabe de maíz claro
½ taza + 1 cucharada (60 g) de azúcar rubia
(azúcar de caña integral)
1 pizca pequeña de sal
1 cucharadita de extracto natural de vainilla
¼ cucharadita de goma xantana
1 cucharadita de aceite de semilla de uva
1
/
3
taza (25 g) de duraznos enlatados picados
¼ taza (20 g) de copos de avena
¼ taza (30 g) de harina común
1 cucharadita de canela en polvo
4 cucharadas (55 g) de mantequilla sin sal,
en cubitos pequeños, helada
2 cucharadas de mermelada de duraznos
1. Calentar la leche de avena en una cacerola pequeña
hasta que empiece a hervir. Colocar la leche caliente,
el jarabe de maíz, ¼ de taza (50g) del azúcar, la sal,
la vainilla, la goma xantana, el aceite de semilla de
uva y los duraznos en la jarra de una licuadora, en el
orden indicado. Licuar hasta conseguir una mezcla
suave. Poner la mezcla en un recipiente pequeño,
cubrir y refrigerar por 2 horas o más (preferiblemente
por toda la noche).
2. Precalentar el horno a 325°F (165°C). Colocar la
avena, la harina, la canela y la cuchara restante de
azúcar en un tazón pequeño; revolver para combinar.
Agregar la mantequilla. Usando sus dedos o un
tenedor, aplastar la mantequilla en el mezcla de
avena/harina hasta que no queden trozos secos y la
mezcla esté desmenuzable. Esparcir la mezcla en
una placa para hornear forrada con papel sulfurizado.
Hornear por aprox. 20 minutos, hasta que esté bien
dorado. Dejar que el streusel se enfríe
completamente y reservar.
3. Encender el aparato. Batir la mezcla y verterla en el
tazón congelador. Dejar que se mezcle por aprox. 20
minutos. Unos minutos antes del final, agregar poco
a poco 2 cucharadas del streusel y la mermelada de
durazno. NOTA: Esta receta requiere solo 2
cucharadas de streusel. El resto puede conservarse
en un recipiente hermético en el congelador por un
máximo de dos meses. Puede usarse para preparar
más helado, o añadir a yogurt o avena.
4. NOTA: El helado tendrá una consistencia suave y
cremosa. Si desea que sea más firme, ponerlo en un
recipiente hermético y congelarlo por aprox. 2 horas.
Sacarlo del congelador aprox. 15 minutos antes de
servir.

13
Sorbete de chocolate negro
Rico y cremoso, nuestro sorbete de chocolate negro es
una auténtica delicia sin lácteos.
Rinde aprox. 1½ tazas (355 ml)
1 taza (235ml) de agua
½ taza (100 g) de azúcar granulada
1 pizca de sal
½ taza (60 g) de cacao en polvo, tamizado
½ cucharadita de extracto natural de vainilla
1. Preparar un jarabe simple: Colocar el agua, el azúcar
y la sal en una cacerola mediana; calentar a fuego
medio hasta que el azúcar se haya disuelto por
complete.
2. Retirar la cacerola del fuego y agregar gradualmente
el cacao en polvo, batiendo hasta conseguir una
mezcla suave. Agregar la vainilla y revolver para
combinar. Guardar la mezcla en un recipiente. Cubrir
y refrigerar por 2-3 horas, o más.
3. Encender el aparato. Verter la mezcla en el tazón
congelador Dejar que se mezcle por aprox. 25
minutos.
4. El sorbete tendrá una consistencia suave y cremosa.
Si desea que sea más firme, ponerlo en un recipiente
hermético y congelarlo por aprox. 2 horas. Sacarlo
del congelador aprox. 15 minutos antes de servir.
Sorbete de mango
Refrescante, dulce y lleno de sabor, el sorbete de mango
siempre es un placer.
Rinde 1½ tazas (355ml)
1½ tazas (aprox. 375g) de cubos de mango fresco
¼ taza (60ml) de agua
¼ taza (50 g) de azúcar granulada
½ cucharadita de ralladura de lima/limón verde
fresca
½ cucharada de jugo de lima/limón verde fresco
1 pizca de sal kosher
1. Colocar todos los ingredientes en la jarra de la
licuadora, en el orden indicado. Licuar a velocidad
alta hasta obtener una mezcla suave.
2. Guardar la mezcla en un recipiente. Cubrir y refrigerar
por 2-3 horas, o más.
3. Encender el aparato. Verter la mezcla en el tazón
congelador Dejar que se mezcle por aprox. 15
minutos.
4. El sorbete tendrá una consistencia suave y cremosa.
Si desea que sea más firme, ponerlo en un recipiente
hermético y congelarlo por aprox. 2 horas. Sacarlo
del congelador aprox. 15 minutos antes de servir.

14
©2024 Cuisinart
Glendale, AZ 85307
Impreso en China
24CE089884
IB-18260