MANUAL
Waste Disposer
WDD075TA1AM
WDD075TA1BO
WDD075TA2MS
WDD100TA1AM
WDD100TA1BO
WDD100TA2MS

Safety Information ..................................................................................................... 3
Grounding Instructions ............................................................................................. 3
Tools and Materials You May Need ....................................................................... 4
Spare Parts and Exploded View ............................................................................ 4
Important Safety Instructions ................................................................................ 5
Removal of Old Unit ..................................................................................................... 6
Getting Ready, Disassembly of the Mounting Unit ....................................... 7
Installation of Mounting Assembly with Plumber’s Putty ......................... 8
Installation of Mounting Assembly without Plumber’s Putty ................ 9
Electrical Connection ................................................................................................. 10
Attaching the Drain Elbow Instructions ............................................................. 11
Connecting Disposer to Mount Assembly and Sink ....................................... 12
Air Switch Installation .................................................................................................. 13
Operation Instructions ............................................................................................... 14
Cleaning and Maintenance ..................................................................................... 15
Troubleshooting ........................................................................................................... 16
Exploded Diagram ...................................................................................................... 17
Warranty ......................................................................................................................... 18
Customer Care Card .................................................................................................. 19
Table of Contents
2
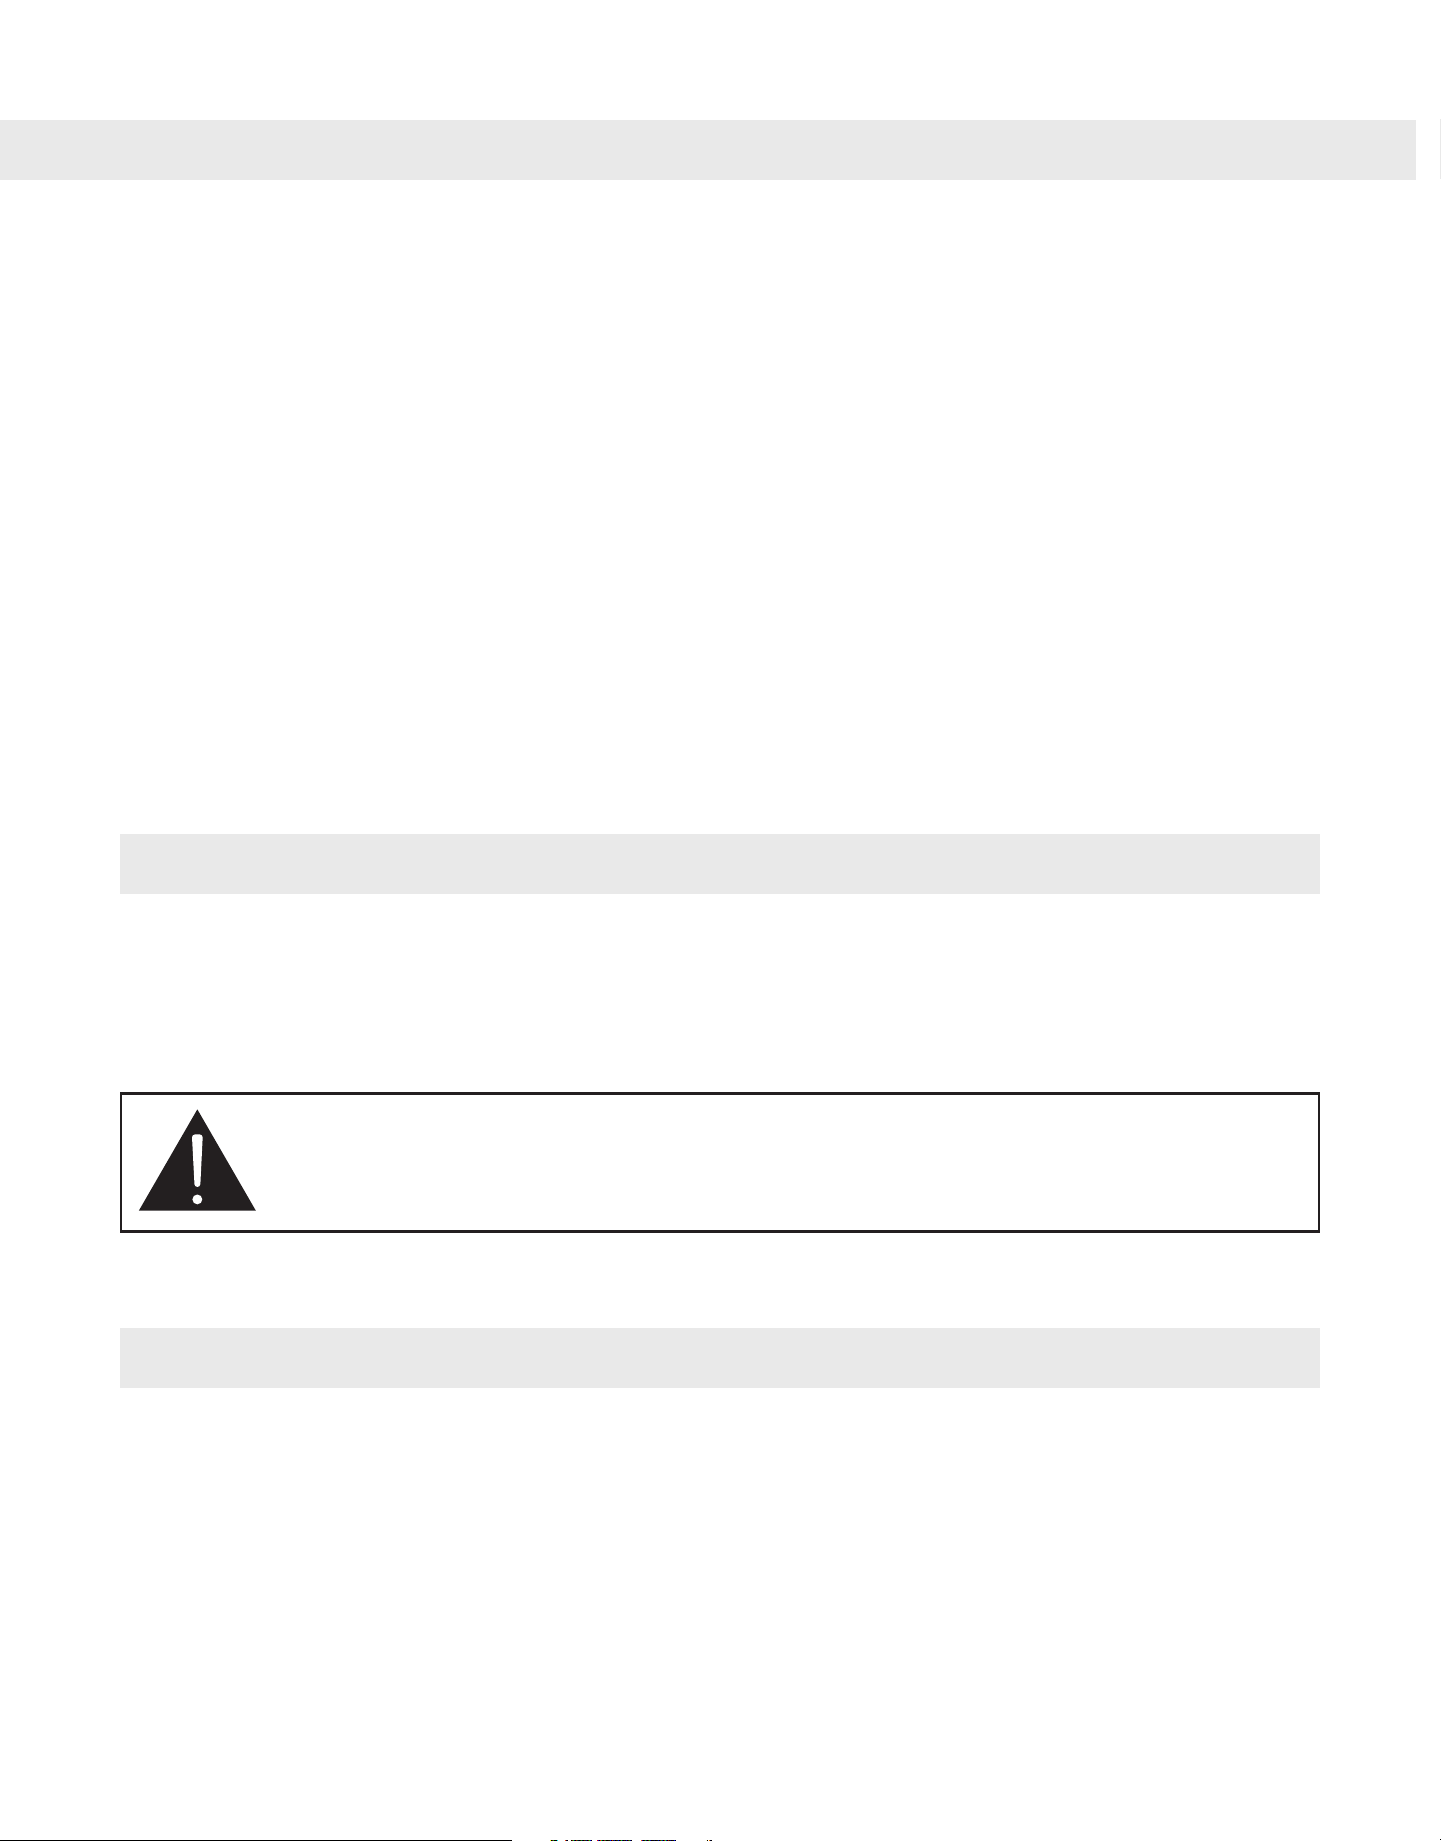
WARNING: When using electric disposers, basic precautions are always to be followed,
including the following:
1)
2)
3)
4)
5)
6)
7)
8)
GROUNDING INSTRUCTIONS
This disposer must be grounded to reduce the risk of electric shock in the event of a malfunction
or breakdown. Grounding provides a path of least resistance for electric current. This disposer is
equipped with a cord having an equipment-grounding conductor and a grounding plug. The plug
must be plugged into an outlet that is properly installed and grounded in accordance with all local
codes and ordinances.
WARNING - Improper connection of the equipment-grounding conductor can result in a risk of electric
shock. Check with a qualied electrician or serviceman if you are in doubt as to whether the disposer is
properly grounded. If the plug provided with the disposer does not t the outlet, do not modify the plug,
check with a certied electrician.
See insert for specific information about your new disposer
NOTE:
This Food Waste Disposer has been designed to operate on 120 Volt, 60Hz exclusively.
IMPORTANT:
Read all instructions thoroughly. Keep this guide for future reference.
CAUTION: Be Sure to review SAFETY INSTRUCTIONS FIRST PERTAINING TO A RISK OF FIRE,
ELECTRICAL SHOCK OR INJURY TO PERSONS before using disposer.
SAFETY INFORMATION
Read all the instructions before using the disposer.
To reduce the risk of injury, close supervision is required when a disposer is used near children.
Do not put fingers or hands into a disposer.
Disconnect the Waste Disposer from the receptacle or turn the Breaker OFF in the Breaker
panel before attempting to clear a jam or remove an object from the disposer.
When attempting to loosen a jam in a disposer, use a long wooden object such as a wooden
spoon or a wooden handle.
When attempting to remove objects from a disposer use long-handled tongs or pliers.
To reduce the risk of injury by materials that are expellable by a disposer, do not put the
following into a disposer:
a. Clam or oyster shells
b. Caustic drain cleaners or similar products
c. Glass, china, or plastic
d. Large whole bones
e. Metal such as bottle caps, tin cans, or utensils
f. Hot grease or other hot liquids
When not operating a disposer, leave the drain cover or stopper in place to reduce the risk of
objects falling into the disposer.
3
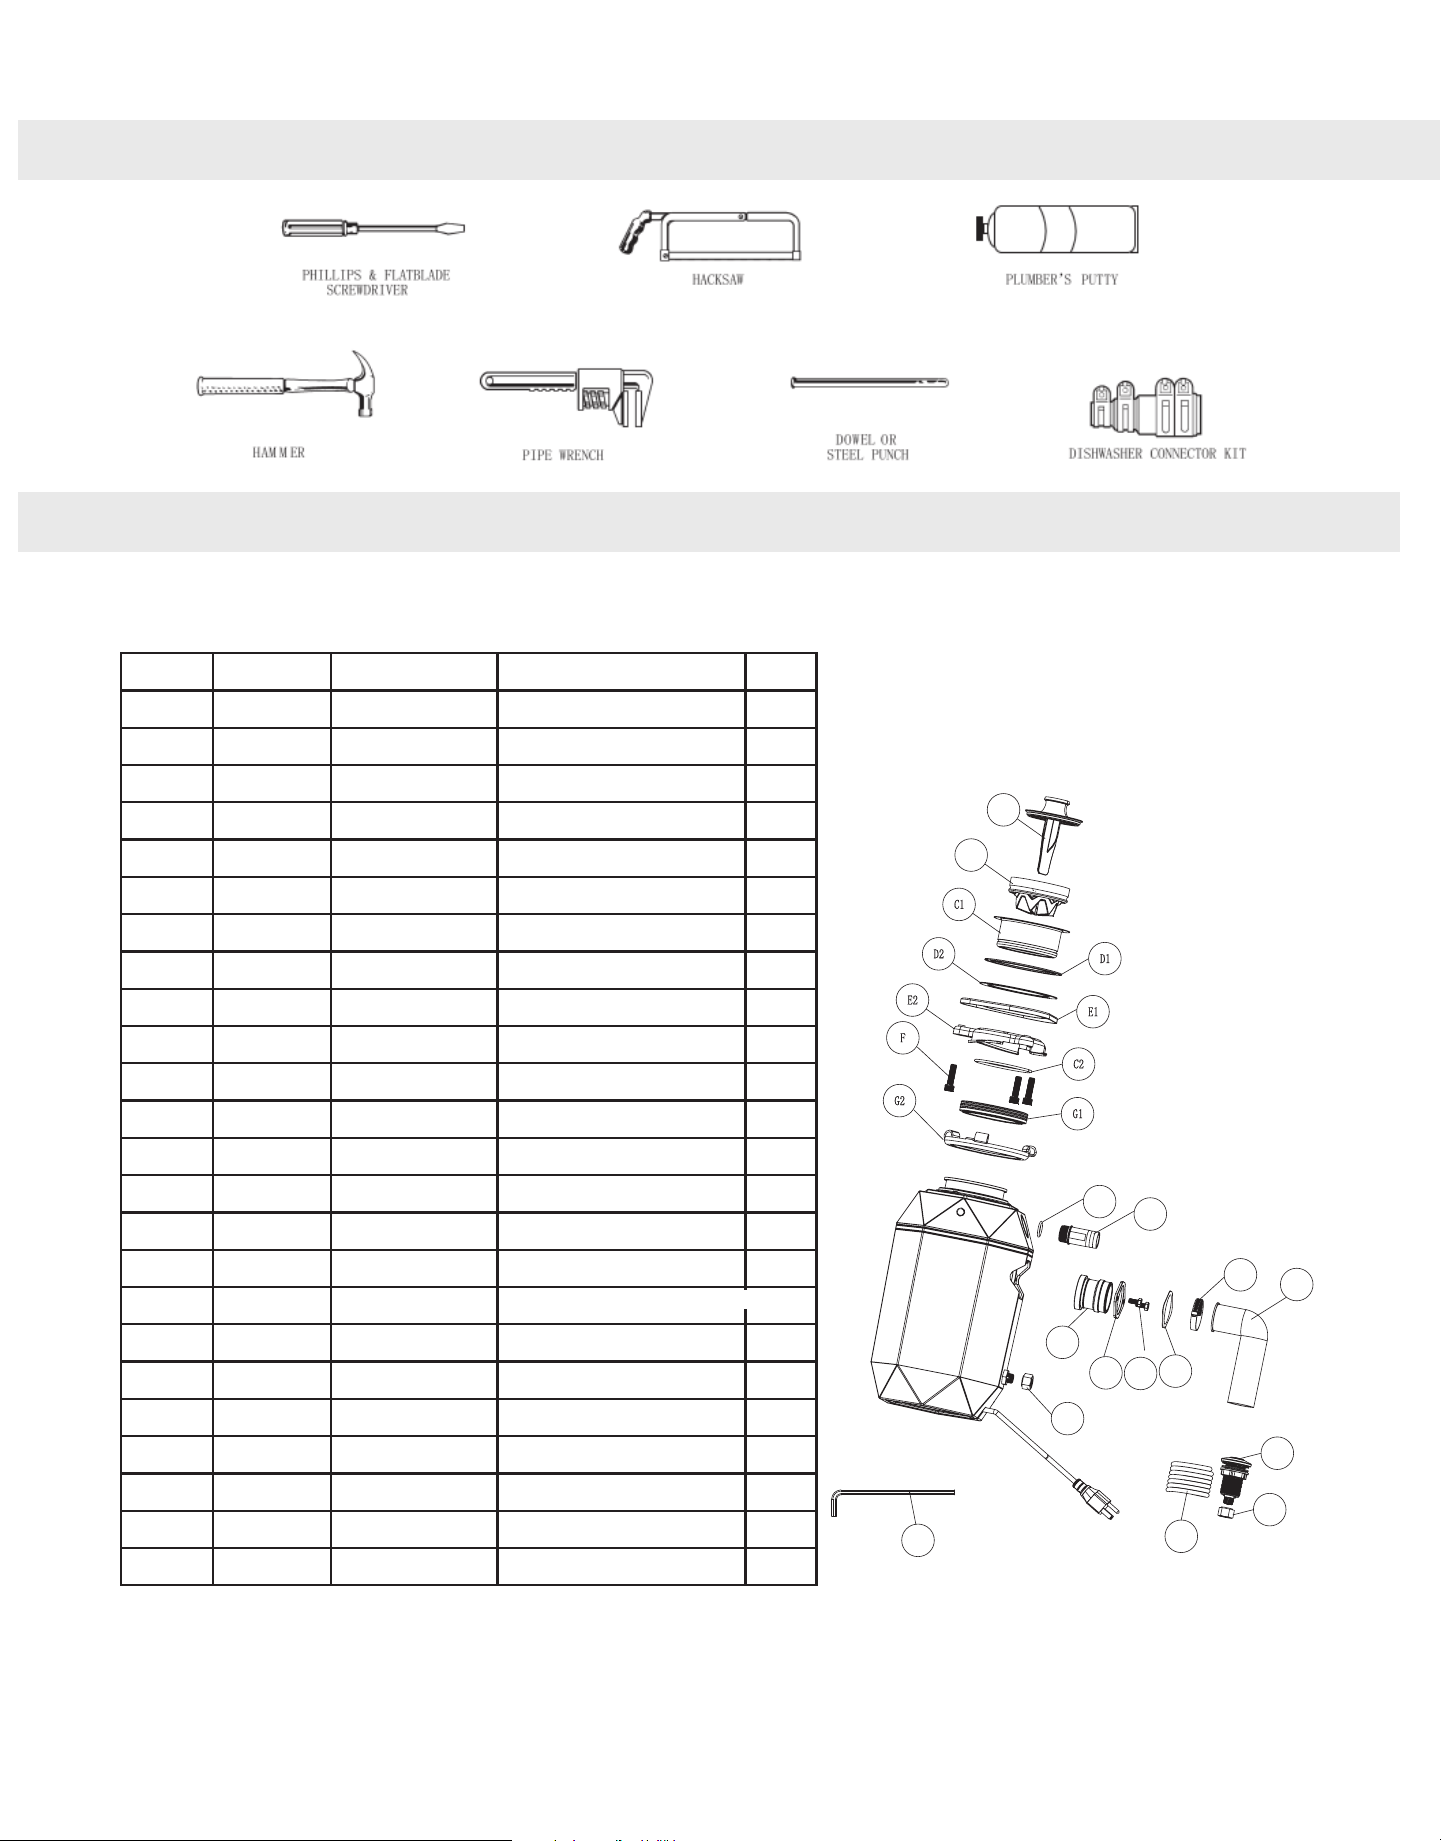
Tools and Materials You May Need
Spare Parts List and Exploded View
If you find any part missing please call: 1 (866) 231 8893
Or email us at: mysupport@fornoworld.com
Please do not return this Waste Disposer to the store before calling.
Please open your box very carefully and take out all the components.
You should have received all the parts listed below.
A
B
C1
D2
D1
E1
C2
E2
F
G2
G1
H1
H2
J1
J2 J3
J4
L1
L4
L2
L3
M
K1
K2
4
Part Name Qty
Stopper 1
Splash Guard 1
Sink Flange 1
Snap Ring 1
Rubber Washer 1
Fiber Washer 1
Backup Flange 1
Upper Mounting Ring 1
Mounting Screws (M8) 3
Cushion 1
Lower Mounting Ring 1
O Ring 1
Dishwasher Connector 1
Rubber Collar 1
Steel Flange 1
Flange Screws (M8) 1
Collar Sticker 1
Elbow Clamp 1
Drain Elbow 1
Strain Relief Nut 1 1
Push Button 1
Strain Relief Nut 2 1
Air Tube 1
Hex Wrench 1
1
Part No.
A
B
C1
C2
D1
D2
E1
E2
F
G1
G2
H1
H2
J1
J2
J3
J4
K1
K2
L1
L2
L3
L4
M
Part Name Kit Name
WDSPA
WDSPAB
WDSPC Sink Flange Kit
WDSPC Sink Flange Kit
WDSPD Gasket Kit
WDSPD Gasket Kit
WDSPE Upper Mount Kit
WDSPE Upper Mount Kit
WDSPF
WDSPG Lower Mount Kit
WDSPG Lower Mount Kit
WDSPH Dishwasher Kit
WDSPH Dishwasher Kit
WDSPJ Collar Kit
WDSPJ Collar Kit
WDSPJ Collar Kit
WDSPJ Collar Kit
WDSPK Drain Kit
WDSPK Drain Kit
WDSPL Button Kit
WDSPL Button Kit
WDSPL Button Kit
WDSPL Button Kit
WDSPM

IMPORTANT SAFETY INSTRUCTIONS
INSTRUCTIONS PERTAINING TO A RISK OF FIRE, ELECTRIC SHOCK OR INJURY TO PERSONS.
SAVE THESE INSTRUCTIONS.
Read all instructions before using the appliance.
To reduce the risk of injury, close supervision is necessary when an appliance is used near
children.
Do not put fingers or hands into a waste disposer.
Unplug or turn the Breaker OFF in the Breaker panel before attempting to clear a jam or
remove an object from the disposer.
When attempting to loosen a jam in a waste disposer, use a long wooden object such as a
wooden spoon or a wooden handle.
When attempting to remove objects from a waste disposer use long-handled tongs or pliers.
To reduce the risk of injury by materials that may be expelled by a waste disposer, do not put
the following into a disposer: clam or oyster shells; caustic drain cleaners or similar products;
glass, china or plastic; large whole bones; metal, such as bottle caps, tin cans, aluminum foil
or utensils; hot grease or other hot liquids; whole cornhusks.
When not operating a disposer, leave the stopper in place to reduce the risk of objects falling
into the disposer.
DO NOT operate disposer unless splash guard is in place.
For proper grounding instructions see the ELECTRICAL CONNECTION portion of this manual.
WARNING - When using electrical appliances, basic precautions should always to followed,
including the following below:
1.
2.
3.
4.
5.
6.
7.
8.
9.
10.
5
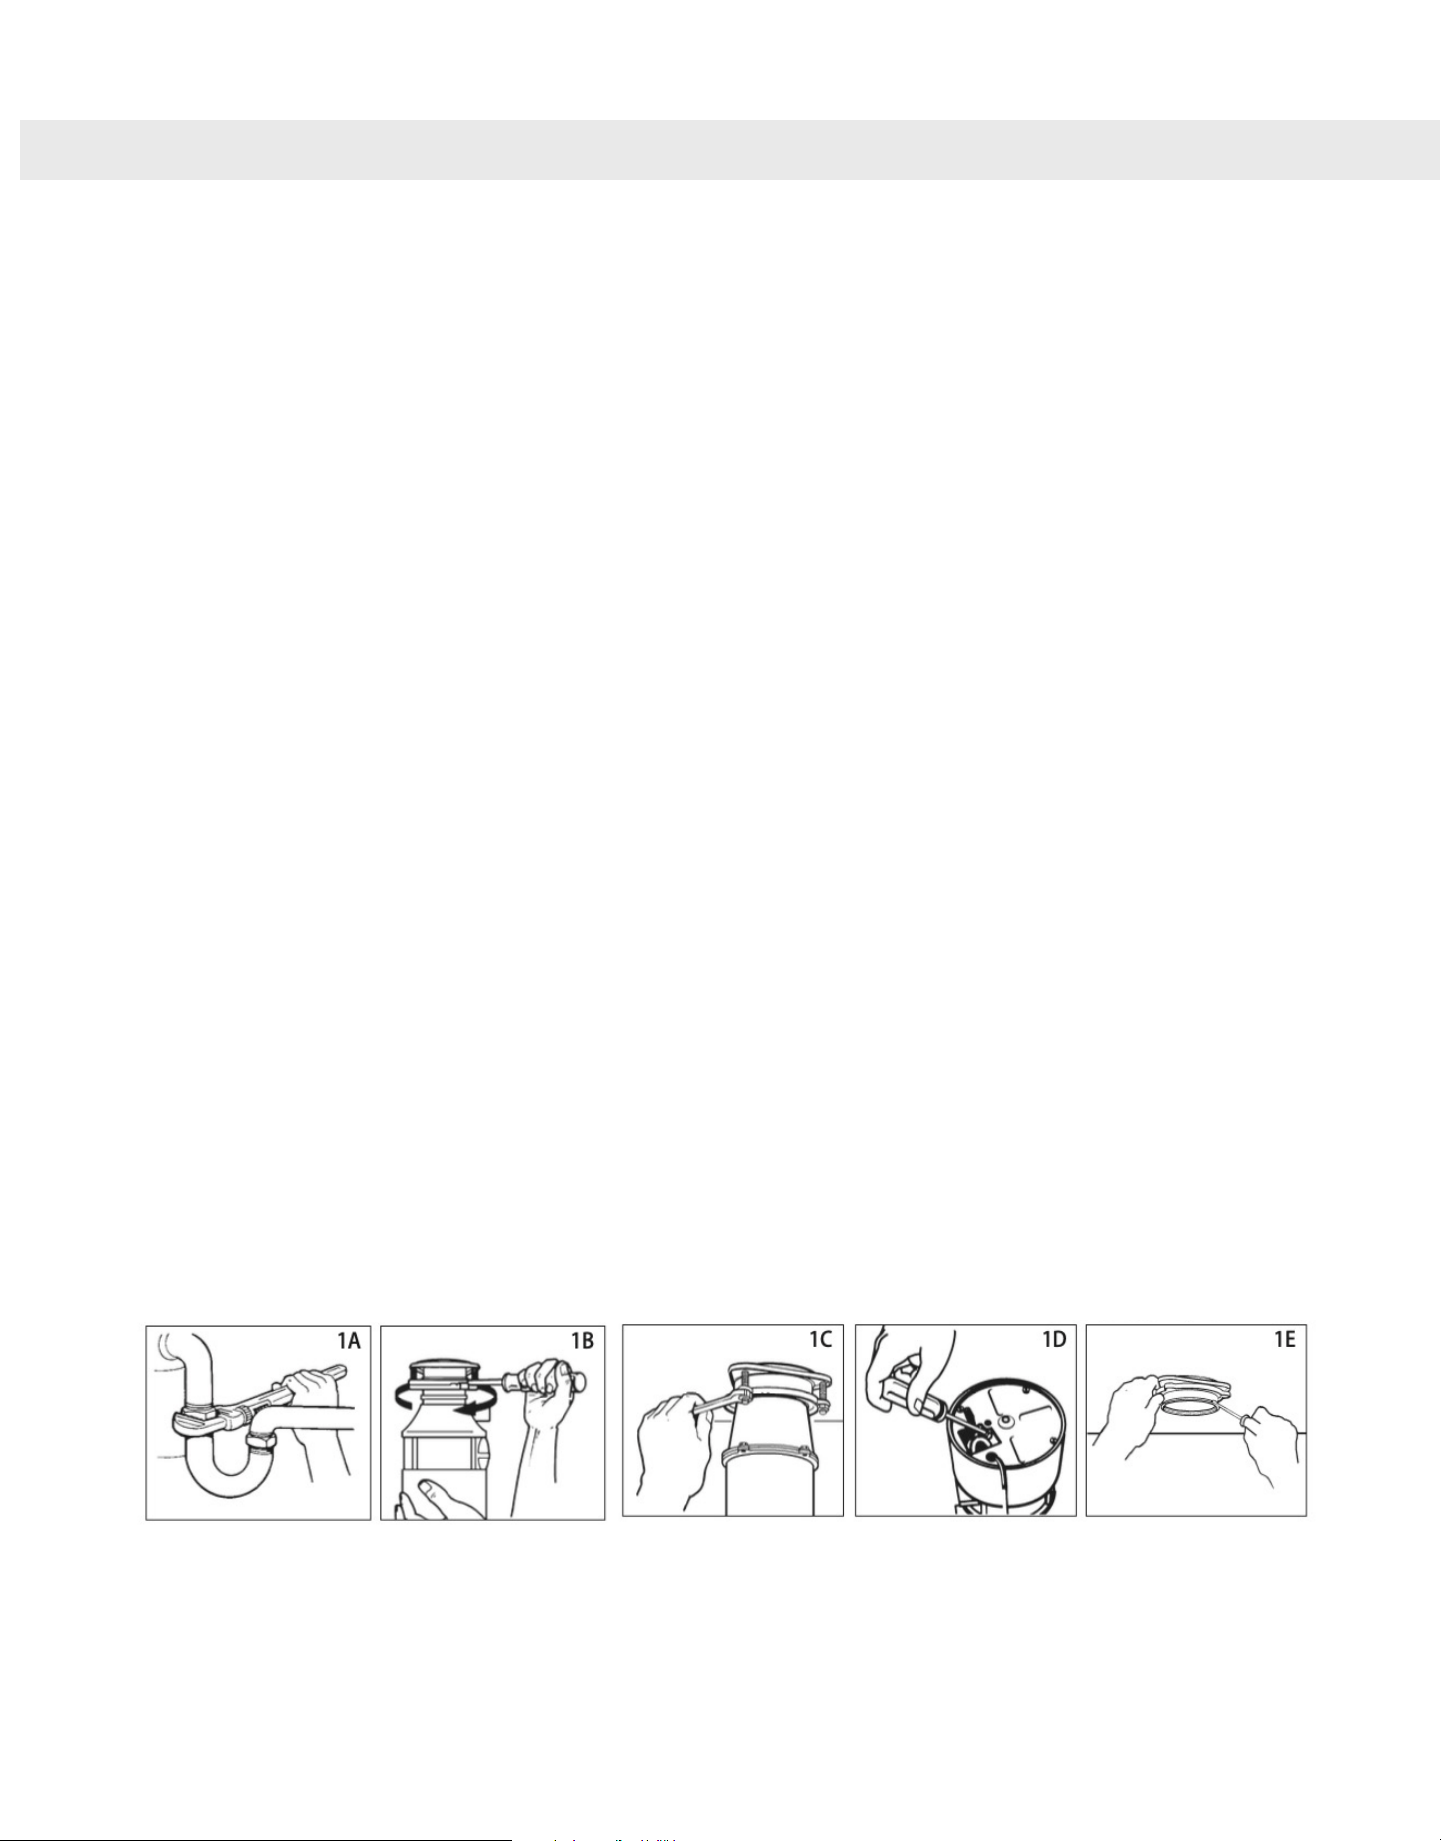
1. REMOVAL OF OLD UNIT
GENERAL INSTRUCTIONS, YOUR MODEL MAY VARY.
Before starting this step, turn off electrical power at the circuit breaker or fuse box.
If your old mount is the same as the mount on your new disposer, just reverse the
assembly instructions found in section 3. If your new mount system is different,
follow these instructions:
I. Use a pipe wrench to disconnect drain line where it attaches to disposer discharge
tube (see 1A).
II. Remove disposer from sink flange by turning mount ring to the left clockwise (see 1B).
If you are unable to turn the mount ring, tap on one of the extensions from the ring
with a hammer. Some mounting systems have hoops. Inserting a screwdriver into one
of the hoops will provide additional leverage for turning the mount ring (see 1B).
Some disposers may require the removal or loosening of nuts from the mount screws
(see 1C). Some disposers may require the removal of a clamp.
Caution: Be sure to support the disposer while performing this step or it may fall when
the mounting ring is disconnected from the mounting assembly. If your disposer is
hard wired (metal shielded cable not utilizing a wall plug), complete steps C and D.
If you utilize a plug- in cord, go on to step V.
III. When disposer is removed, turn upside down and remove electrical cover plate
(see 1D).
IV. Use screwdriver to remove green ground wire. Remove wire nuts from black and
white power wires and separate disposer wires from power cable wires. Loosen
screws on cable clamp and separate cable from disposer.
V. To remove remaining mount system from the sink, loosen mount screws, push mount
ring up. Under it is the snap ring. Use screwdriver to pop off ring (see 1E). Remove
mount ring, protector ring and gasket from sink flange. Some mounts will require the
unscrewing of a large ring holding the sink flange in place. Pull sink flange up through
sink and clean off old putty from sink.
IMPORTANT: Unless you have a new home, this is a good time to clean out the trap and
drain lines by running a drain auger or plumber’s snake before installing your new
disposer.
6
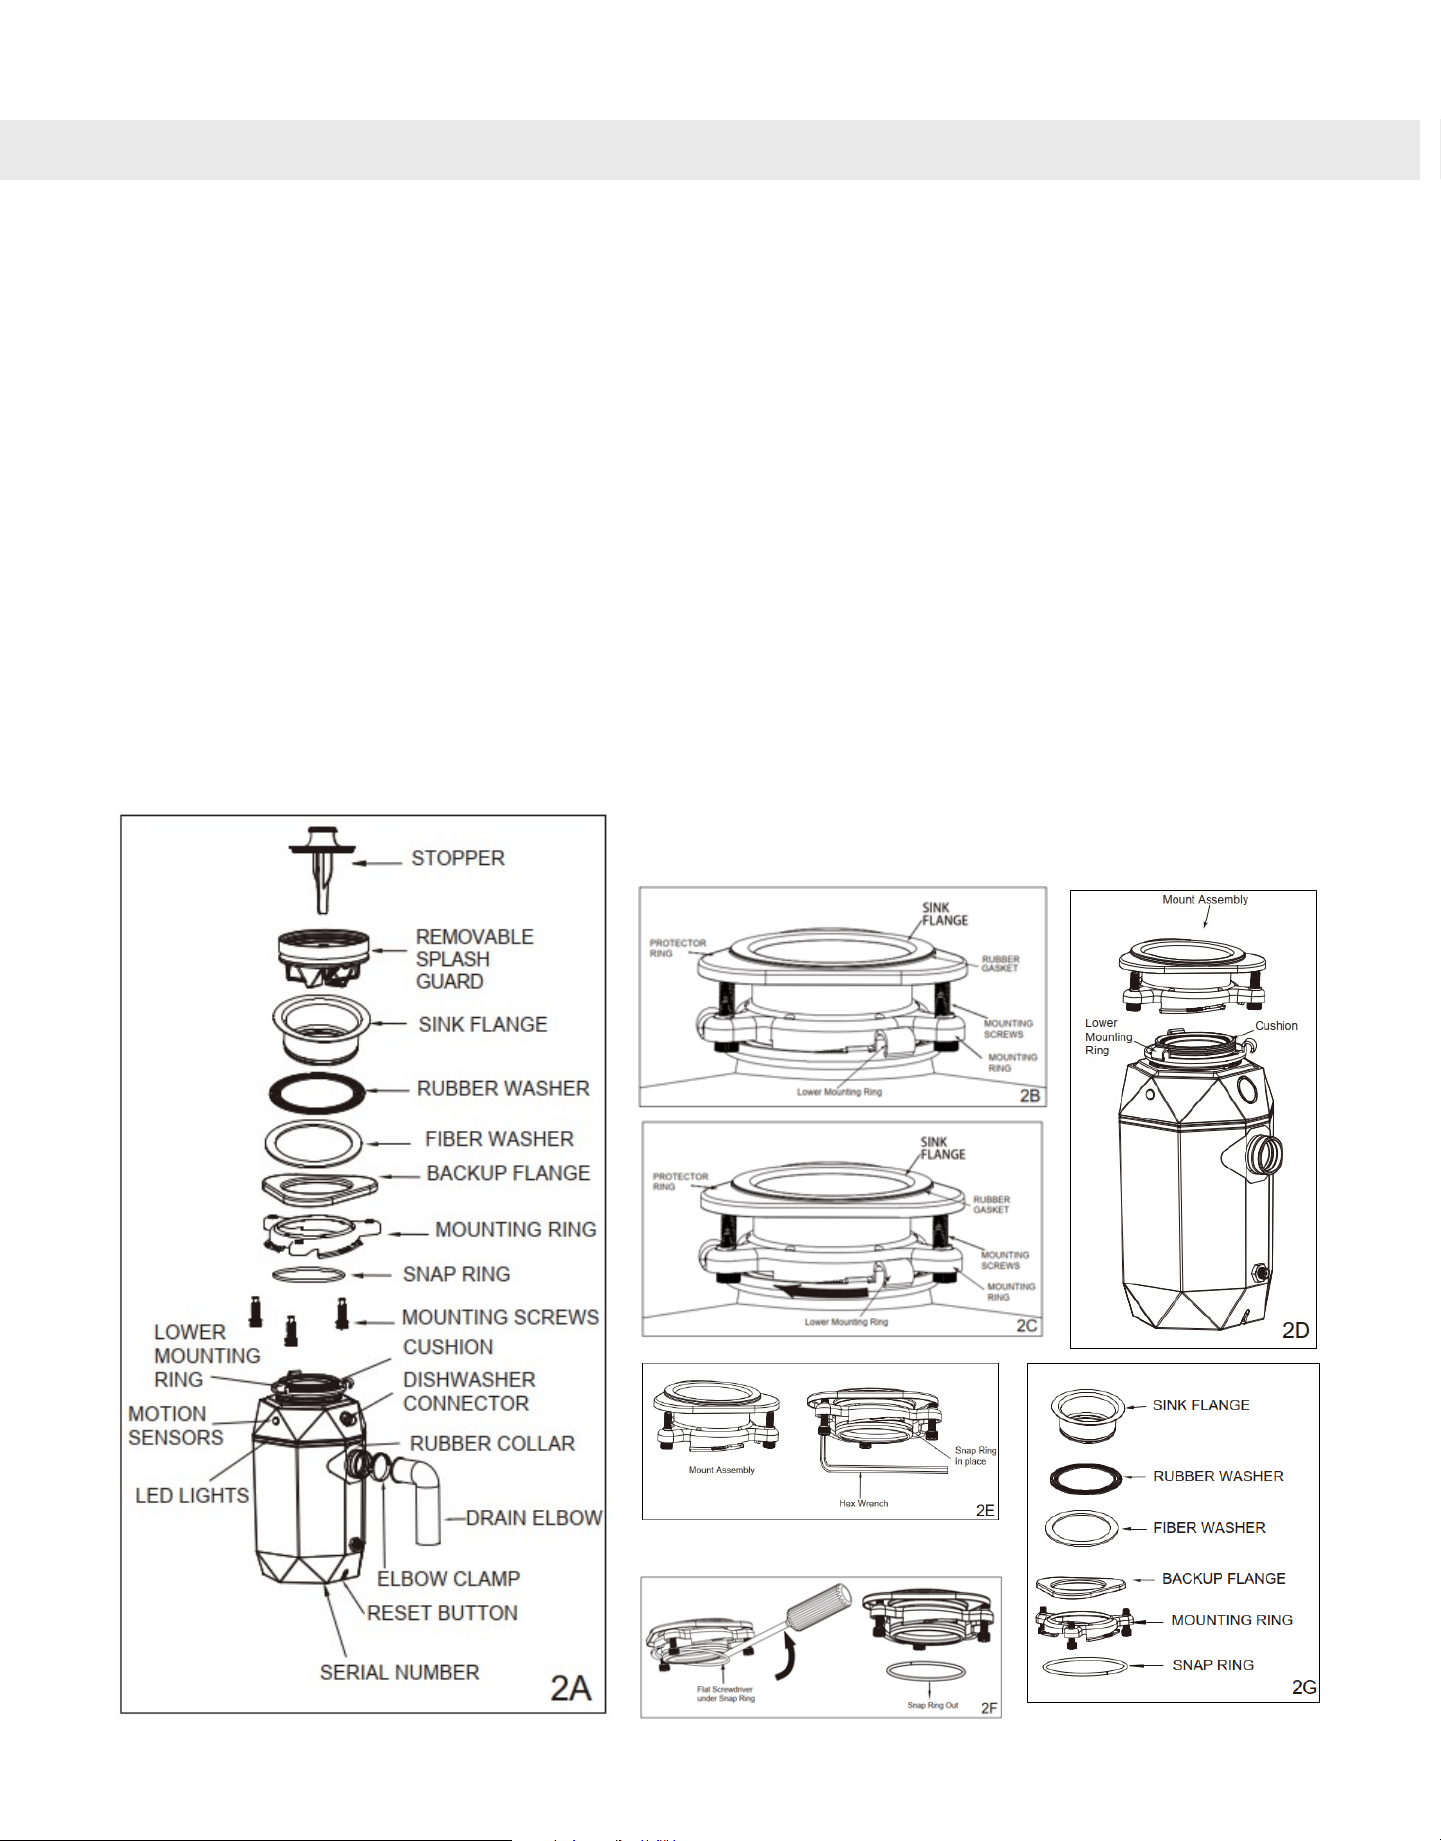
2. GETTING READY, DISASSEMBLING THE MOUNTING ASSEMBLY
READ COMPLETELY BEFORE STARTING
NOTE: Pay close attention to the order of mount assembly parts, as they have been cor-
rectly assembled by the factory. (See 2A and 2B)
I. Disassemble the mounting assembly, as it has been shipped, by turning the lower
Mounting Ring counterclockwise (see 2C) until the Mount Assembly becomes free
(2D). You can use the Hex Wrench or a screw driver in any of the 3 hoops if you need
some leverage.
II. Using the Hex Wrench unscrew counterclockwise the 3 Mounting Screws in the Mount
Assembly until about half way and expose the Snap Ring (2E).
III. Using a Flat Screwdriver get under the Snap Ring and Pry it out (2F).
IV. Disassemble the Mount Assembly keeping all the parts (2G).
YOUR DISPOSER COMES WITH A 3-BOLT MOUNT SYSTEM
7

3. INSTALLATION OF MOUNTING ASSEMBLY WITH PLUMBER’S PUTTY
READ COMPLETELY BEFORE STARTING
You can install the Mounting Assembly WITH or WITHOUT Plumber’s Putty. Depending
on the installation you want to do, the order of the gaskets is different. Installation WITH
Plumber’s Putty (3A) is preferred for all installations. In some thin Stainless Steel Sink
installations you will need to do it WITHOUT Plumber’s Putty (4A), in this case go to
Chapter 4.
I. Be sure your sink is clean.
II. Pack the underside rim of the sink flange with plumber’s putty (see 3B). Position the
sink flange in the sink waste hole so it is centered and readable as you look into your sink.
Push the sink flange firmly into the sink opening to make a good seal. DO NOT move or
rotate the sink flange once seated or the seal may be broken.
III. Take the remaining portion of the mount assembly, as it was set aside following the
sequence of diagram 3A. Make sure that the flat side of the Backup Flange is towards the
Gaskets.
IV. From under the sink, while holding the sink flange firmly with one hand, place the
Snap Ring and push it into the groove of the sink flange (3C).
V. Line up the screws in the Mounting Ring with the projections of the Backup Flange.
VI. Tighten the 3 mounting screws evenly with the Hex Wrench (see 3D).
DO NOT OVERTIGHTEN! Trim off excess putty.
8
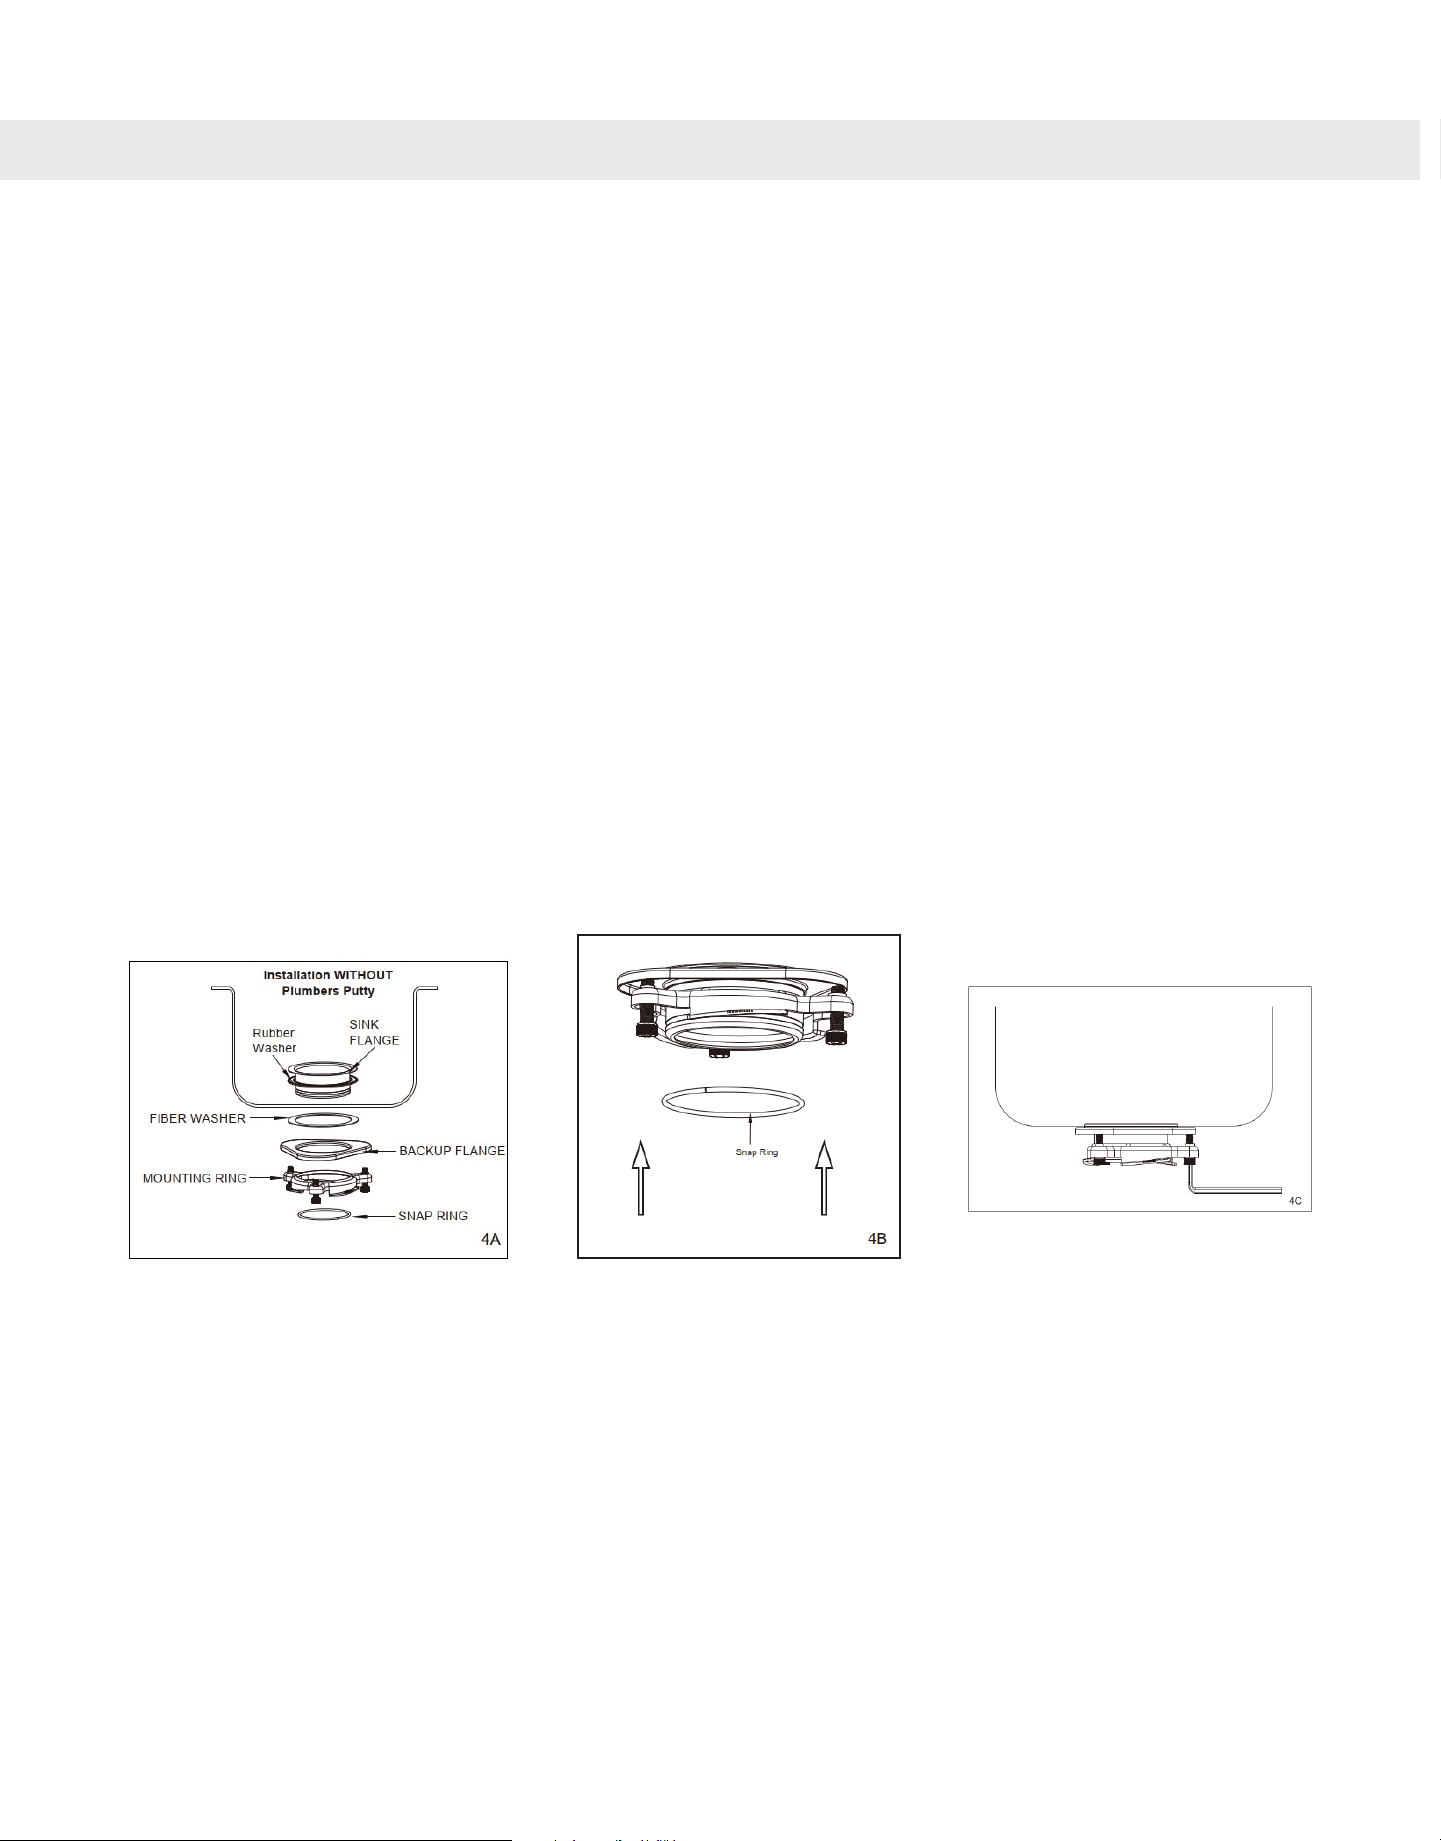
4. INSTALLATION OF MOUNTING ASSEMBLY WITHOUT PLUMBER’S PUTTY
READ COMPLETELY BEFORE STARTING
I. Be sure your sink is clean.
II. Install the Rubber Washer onto the Sink Flange.
III. Position the sink flange in the sink waste hole so it is centered and readable as you
look into your sink.
IV. Take the remaining portion of the mount assembly, as it was set aside following the
sequence of diagram 4A. Make sure that the flat side of the Backup Flange is towards
the Fiber Washer.
V. From under the sink, while holding the sink flange firmly with one hand, place the
Snap Ring and push it into the groove of the sink flange (4B).
VI. Line up the screws in the Mounting Ring with the projections of the Backup Flange.
VII. Tighten the 3 mounting screws evenly with the Hex Wrench (see 4C).
DO NOT OVERTIGHTEN!
9

5. ELECTRICAL CONNECTIONS
Now is the time to record the SERIAL NUMBER
(located on the bottom of the disposer) onto the warranty card.
IF YOU ARE NOT FAMILIAR WITH ELECTRICAL POWER AND PROCEDURES,
CALL A QUALIFIED ELECTRICIAN.
WARNING : IMPROPER CONNECTION OF THE EQUIPMENT-GROUNDING CONDUCTOR CAN RESULT IN A RISK
OF ELECTRIC SHOCK. CHECK WITH A QUALIFIED ELECTRICIAN OR SERVICEMAN IF YOU ARE IN DOUBT AS TO
WHETHER THE APPLIANCE IS PROPERLY GROUNDED. DO NOT MODIFY THE PLUG PROVIDED WITH THE
APPLIANCE IF IT WILL NOT FIT THE OUTLET. HAVE A PROPER OUTLET INSTALLED BY A QUALIFIED ELECTRICIAN.
THIS WASTE DISPOSER IS EQUIPPED WITH A GROUNDED PLUG-IN POWER CORD.
This appliance must be grounded. In the event of a malfunction or breakdown, grounding
provides a path of least resistance for electric current to reduce the risk of electric shock.
This appliance is equipped with a cord having an equipment-grounding conductor and
a grounding plug. The plug must be plugged into an appropriate outlet that is properly
installed and grounded in accordance with all local codes and ordinances.
CONSULT WITH A CERTIFIED ELECTRICIAN IF IN DOUBT OF YOUR OUTLET OR
RECEPTACLE OR IF THERE IS NO GROUND.
TURN OFF THE CIRCUIT BREAKER BEFORE ATTEMPTING ANY ELECTRICAL REPAIR.
IMPORTANT: Keep your Waste disposer UNPLUGGED and the circuit breaker OFF
until you have completed ALL your plumbing installations and tests.
GROUNDING INSTRUCTIONS
10
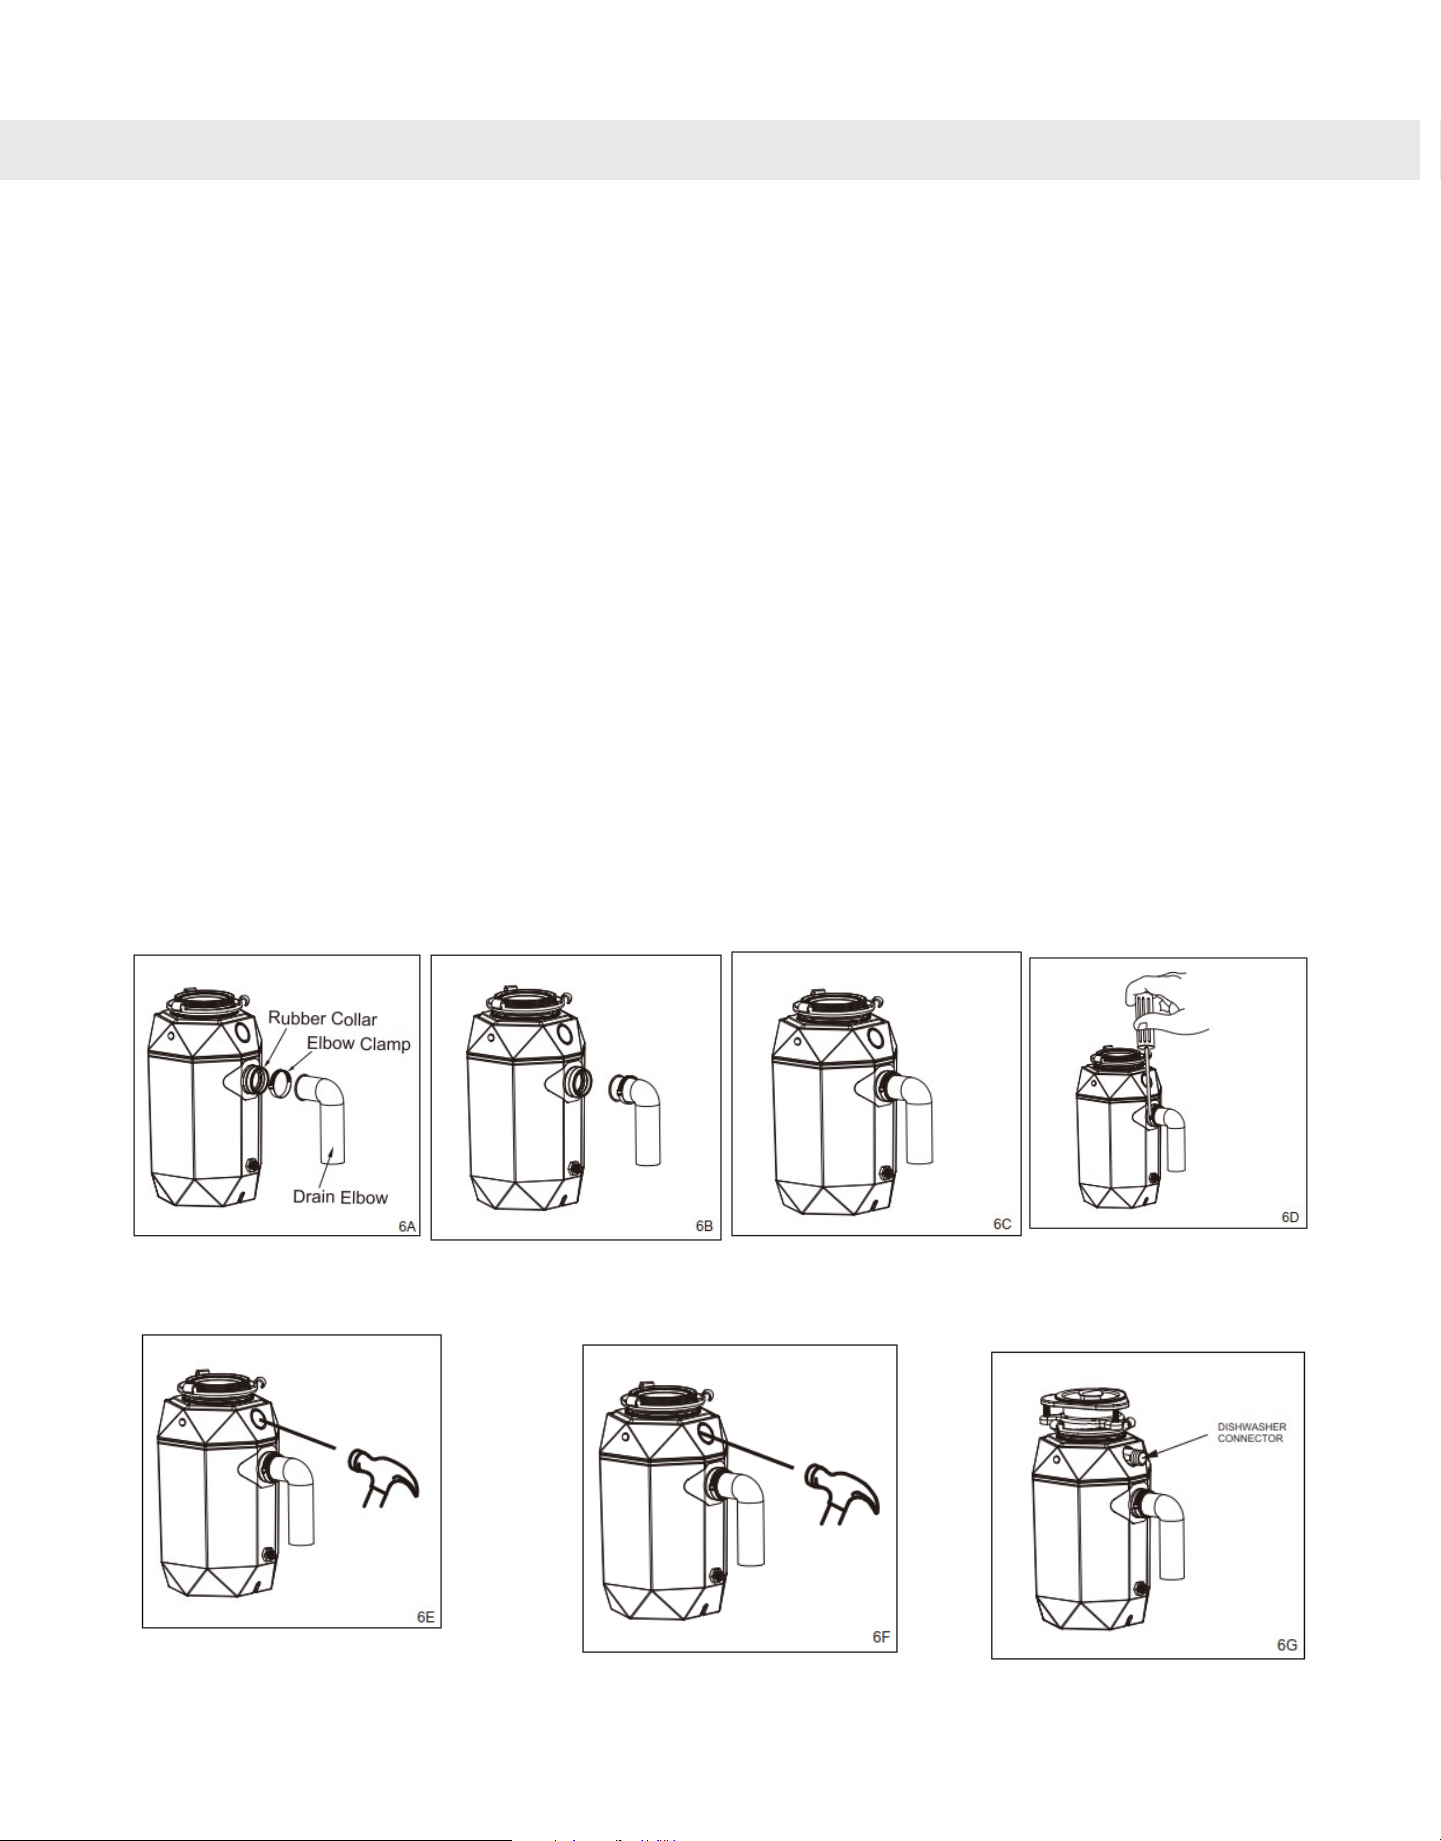
6. ATTACHING DRAIN ELBOW INSTRUCTIONS
1. Place loose Elbow Clamp on Drain Elbow (6B)
II. Push Elbow until the rim on the elbow fits well into the inside groove of the Rubber
Collar. Use water to lubricate if necessary. Fit the Elbow Clamp onto the Rubber Collar
outside groove (6C).
III. Tighten the Clamp with a screwdriver. DO NOT OVERTIGHTEN.
IV. Connect waste elbow to the disposer (see 5A), proceed to step 6 and then connect
bottom of the elbow by tightening the slip nut (see 5B).
V. If you are connecting to a dishwasher, using a blunt instrument (steel punch or
wooden dowel), knock out entire plug (see 6E) on the outside housing. Do not use a
screwdriver or sharp instrument.
VI. Then with the same punch knock out the plug in the grinding chamber (6F). When
knockout plug falls into disposer, you may remove it or simply grind it up when the
disposer is used. This will not damage the disposer in any way.
VII. Install the Dishwasher Connector supplied (6G).
11
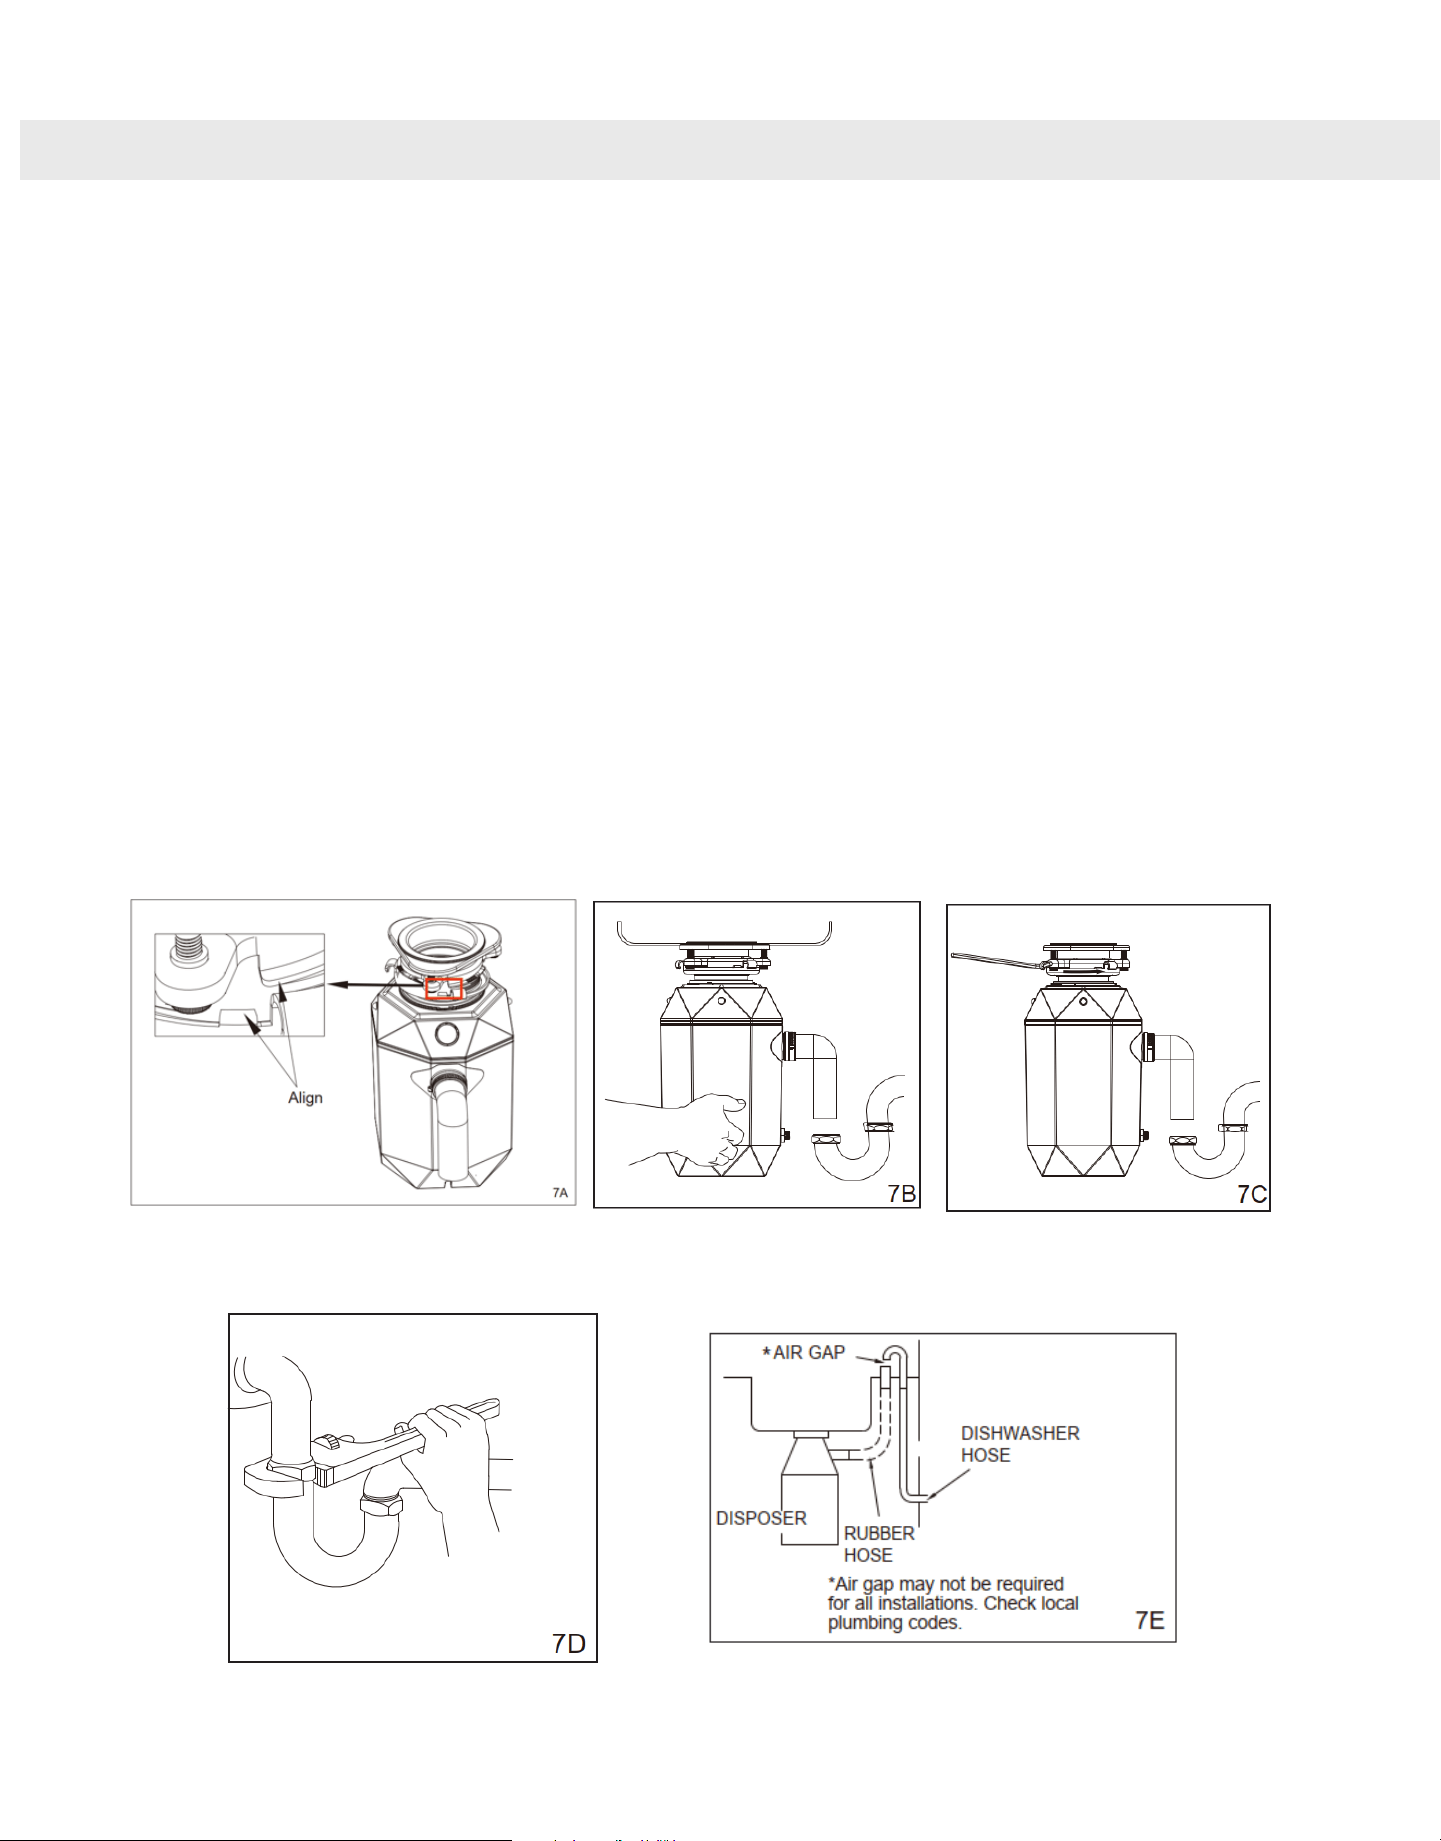
7. CONNECTING DISPOSER TO MOUNT ASSEMBLY AND SINK
I. Lift the disposer below the Mount Assembly.
II. Align the Lower Mounting Ring with the notches in the Mounting Ring (7A). Turn
Lower Mounting Ring clockwise (to the right) until it is engaged. You should be able to
leave the Waste Disposer hanging at this stage.
III. Turn the Waste Disposer to align with the trap (7B).
IV. Holding the Waste Disposer in place turn Lower Mounting Ring using a screwdriver or
the Hex Wrench clockwise (to the right) until it is fully engaged and locks in place (7C).
V. Connect Drain Elbow to the trap and tighten the slip nut (see 7D).
VI. If you are connecting to a dishwasher, connect the dishwasher hose now (7E). Tighten
the Elbow Clamp.
VII. Make sure all plumbing connections are tight and in accordance with all plumbing
codes and ordinances. Run water and check for leaks.
12
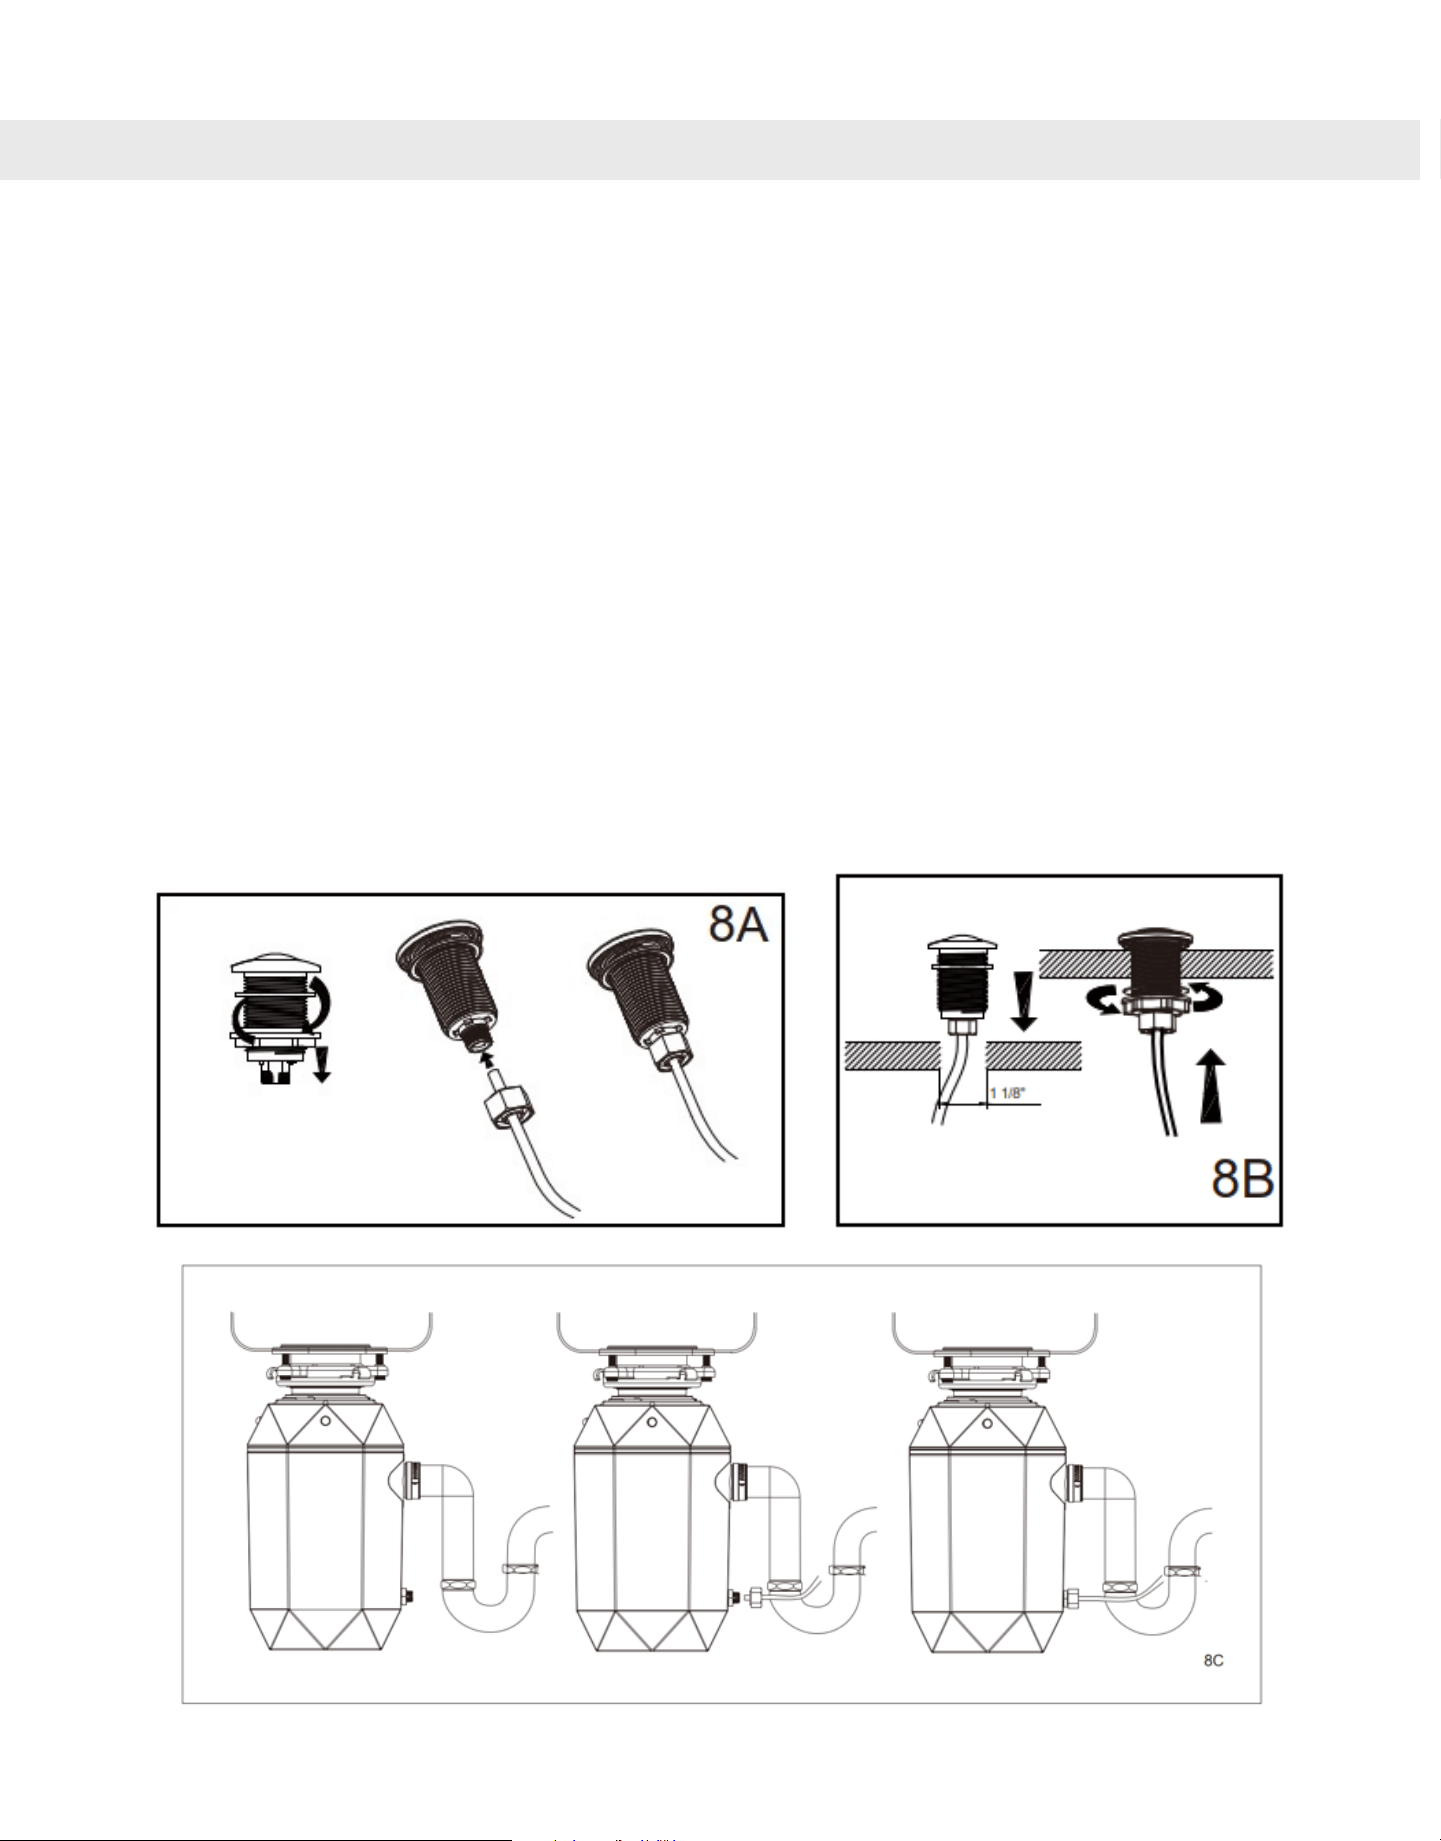
8. AIR SWITCH INSTALLATION
I. Feed the PVC tube through one of the Strain Release Nuts that are supplied in the
plastic bag. Push the end of the PVC tube onto the spout of the push button. Hand
tighten the Strain Release Nut (See 8A).
II. Drill a 1 1/8” to 1 3/8” hole into the kitchen countertop, or the corner of the sink, or the
front apron of the counter at the most convenient point for use. Some sinks may
already have a suitable hole in them which can be exposed by removing the cap.
III. Fit the push button with the tube in the hole and then hand tighten the nut to secure
(See 8B).
IV. Lay out the PVC Tube so that it reaches the area where the air switch is in the Waste
Disposer (located below the Rubber Collar). Avoid kinks in the tube and see that it will
be out of the way in the counter. Cut if necessary.
VI. Feed the other end of the PVC tube through the other Strain Release Nut you received
in the plastic bag. Push the end of the PVC tube onto the spout of the Air Switch.
Hand tighten the Strain Release Nut 1 (See 8C).
13

9. OPERATING INSTRUCTIONS
I. Turn breaker switch on.
II. Plug in the Waste Disposer.
III. Remove stopper. Turn on a medium flow of cold water.
IV. Press the Push Button. The Anti-Jam Impellers make a clicking sound as they swing
into place, this indicates normal operation. The motor should be turning now at full
speed and ready to be used.
V. Scrape in waste.
VI. Waste that you can put into the Waste Disposer: food table scraps, peelings, rinds,
seeds, pits, small bones and coffee grounds. To speed up waste disposer, cut or break
up large bones, rinds and cobs. Large bones and fibrous husks require considerable
grinding time. You might consider throwing them away with other trash. Do not be
alarmed if the disposer slows down while grinding. The disposer is actually increasing
torque (grinding power) and is operating under normal conditions.
VII. Waste that you cannot put into the Waste Disposer: plastic, plastic wrap, any metal,
wires, tie straps, tin cans, bottle caps, glass, china, leather, cloth, rubber, string or rope,
clam and oyster shells, aluminum foil or feathers. If you are in doubt of any waste,
don’t put it in the waste disposer, throw it away with other trash.
VIII. Let water and disposer run for approximately 15 seconds after shredding stops. This
assures that all waste is thoroughly flushed through trap and drain.
IX. Turn Waste Disposer OFF by pressing again the Push Button.
X. It is not recommended to use hot water while running disposer. Cold water will keep
waste and fats solid so disposer can flush away particles.
XI. Your Waste Disposer is equipped with a Motion Activated Band of LED Lights. This
Band will light up as soon as it senses any motion as long as your Waste Disposer is
plugged in. The lights will go off automatically 1 minute after the sensors stop
detecting any movement. As the sensors are infrared, they are colour sensitive so
they will react slower with dark clothes. If you experience some delay in the lights
turning on, you can do a slow wave in front of any of the 3 Motion Sensors.
1. Be sure disposer is empty before using your dishwasher so it may drain properly.
2. You may want to leave the stopper in the drain when not in use to prevent utensils
and foreign objects from falling into the disposer.
3. If your LED lights turn OFF while you still need the light, you can do a slow wave in
front of any of the 3 Motion Sensors.
TIPS FOR SUCCESSFUL OPERATION
14

10. CLEANING AND MAINTENANCE
• DO NOT ATTEMPT TO LUBRICATE YOUR DISPOSER!
• The motor is permanently lubricated. The disposer is self cleaning and scours its
internal parts with each use.
• NEVER put lye or chemical drain cleaners into the disposer, as they cause serious
corrosion of metal parts if used, resulting damage can be easily detected and all
warranties are void.
• Mineral deposits from your water and waste can form on the stainless steel turntable,
giving the appearance of rust. DO NOT BE ALARMED, the stainless steel turntables
used will not corrode.
15
OPERATING INSTRUCTIONS (Continued)
TIPS FOR SUCCESSFUL OPERATION
I. Be sure to use cold water when disposing of food waste, it helps keep the oils solid.
II. Your disposer is ruggedly built to give you many years of service. It will handle all
normal food waste. It will NOT grind or dispose of such items as metal (forks, knives),
plastic, tin cans, bottle caps, glass, china, leather, cloth, rubber, string, hair, clam and
oyster shells, aluminum foil or feathers. These items can damage your waste disposer.
III. Be sure disposer is empty before using your dishwasher so it may drain properly.
IV. You may want to leave the stopper in the drain when not in use to prevent utensils
and foreign objects from falling into the disposer.
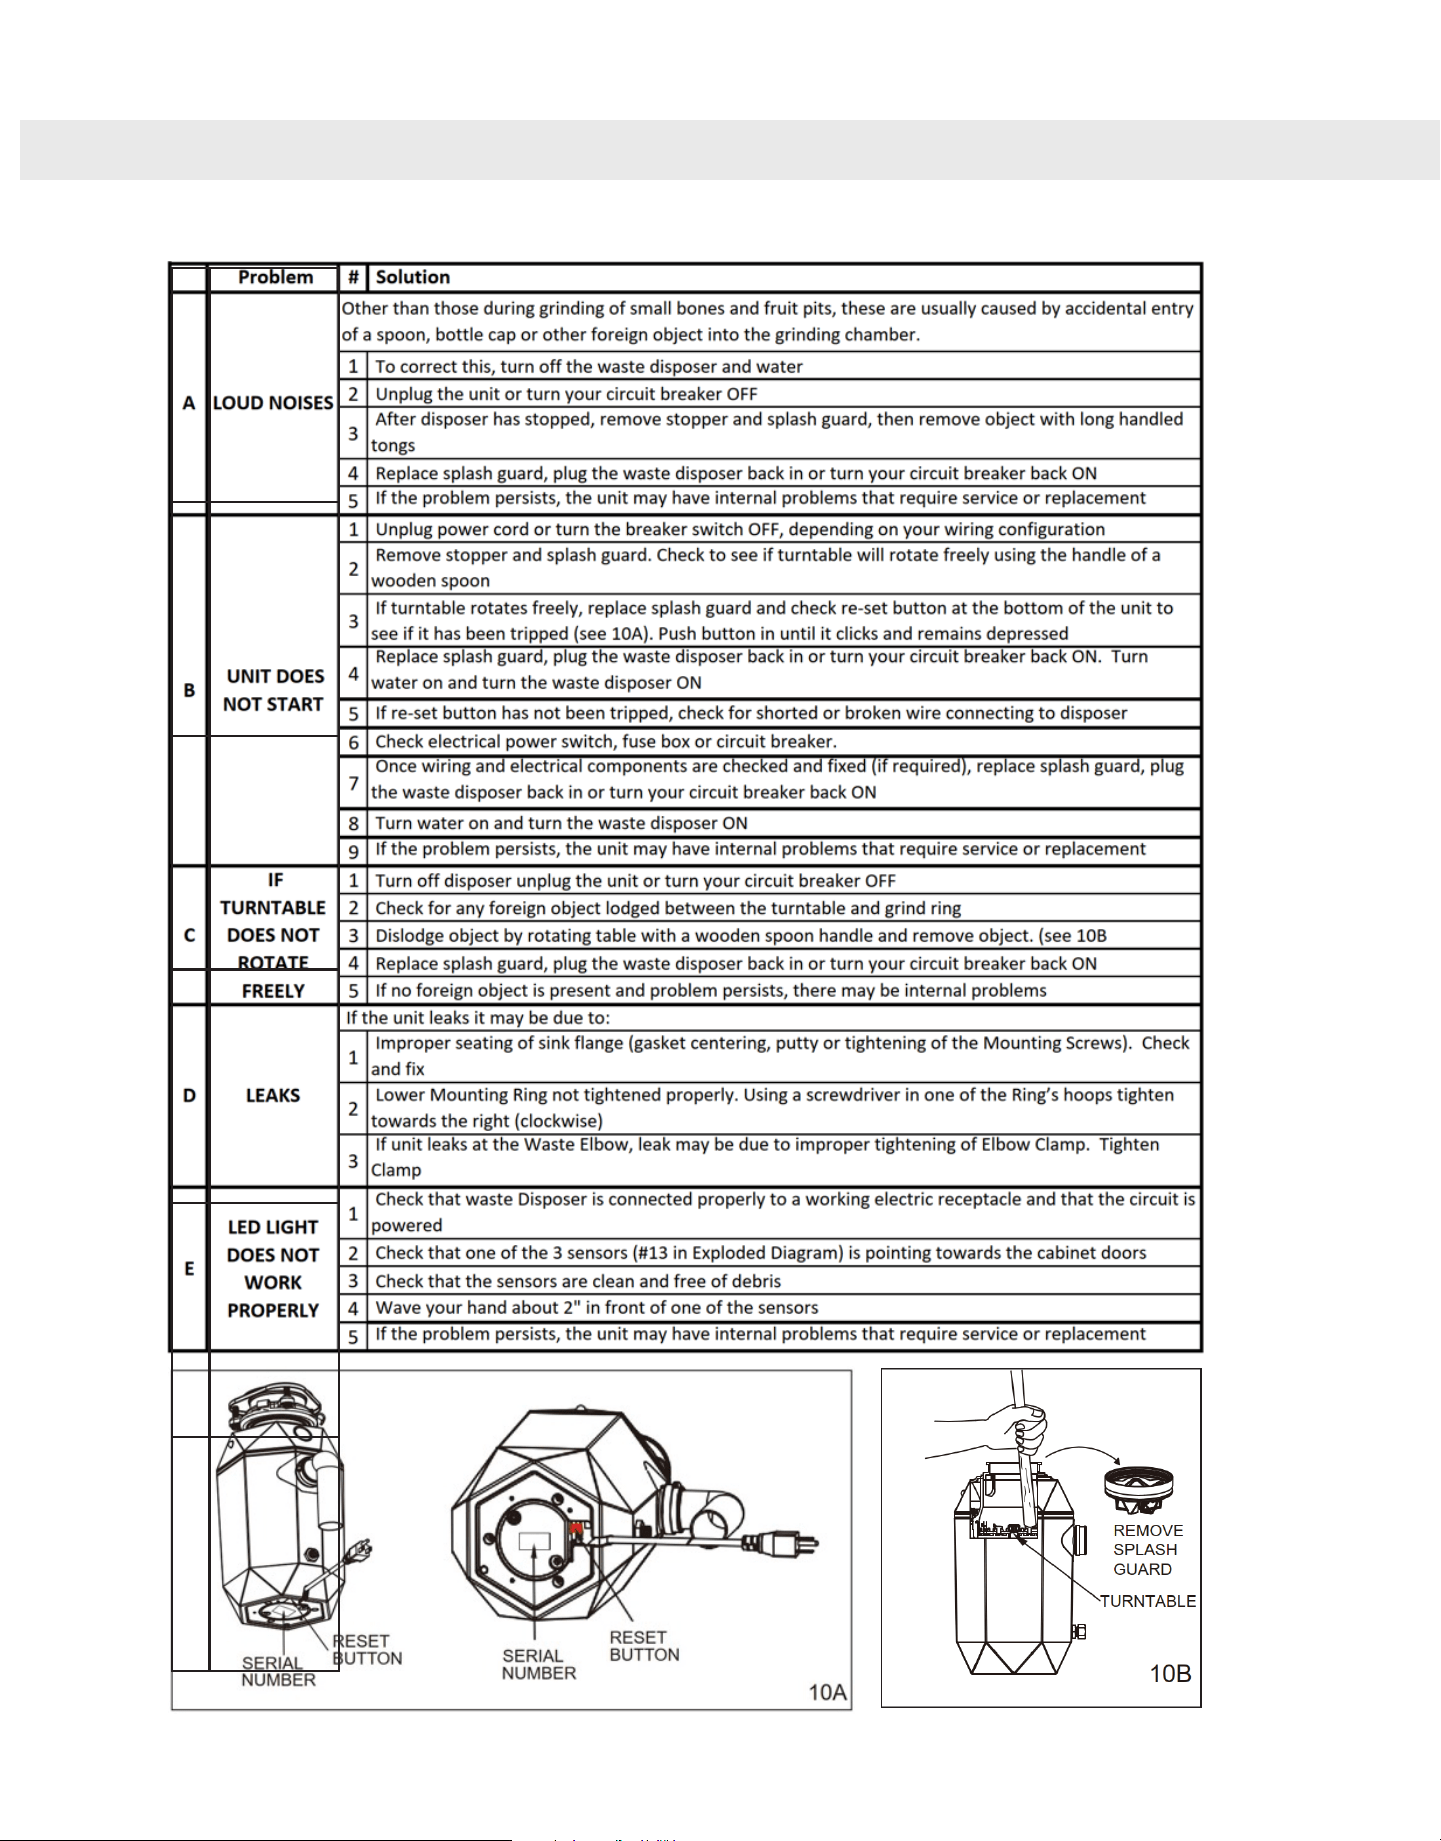
11. TROUBLE SHOOTING
Before seeking repair or replacement, we recommend that you review the following:
16
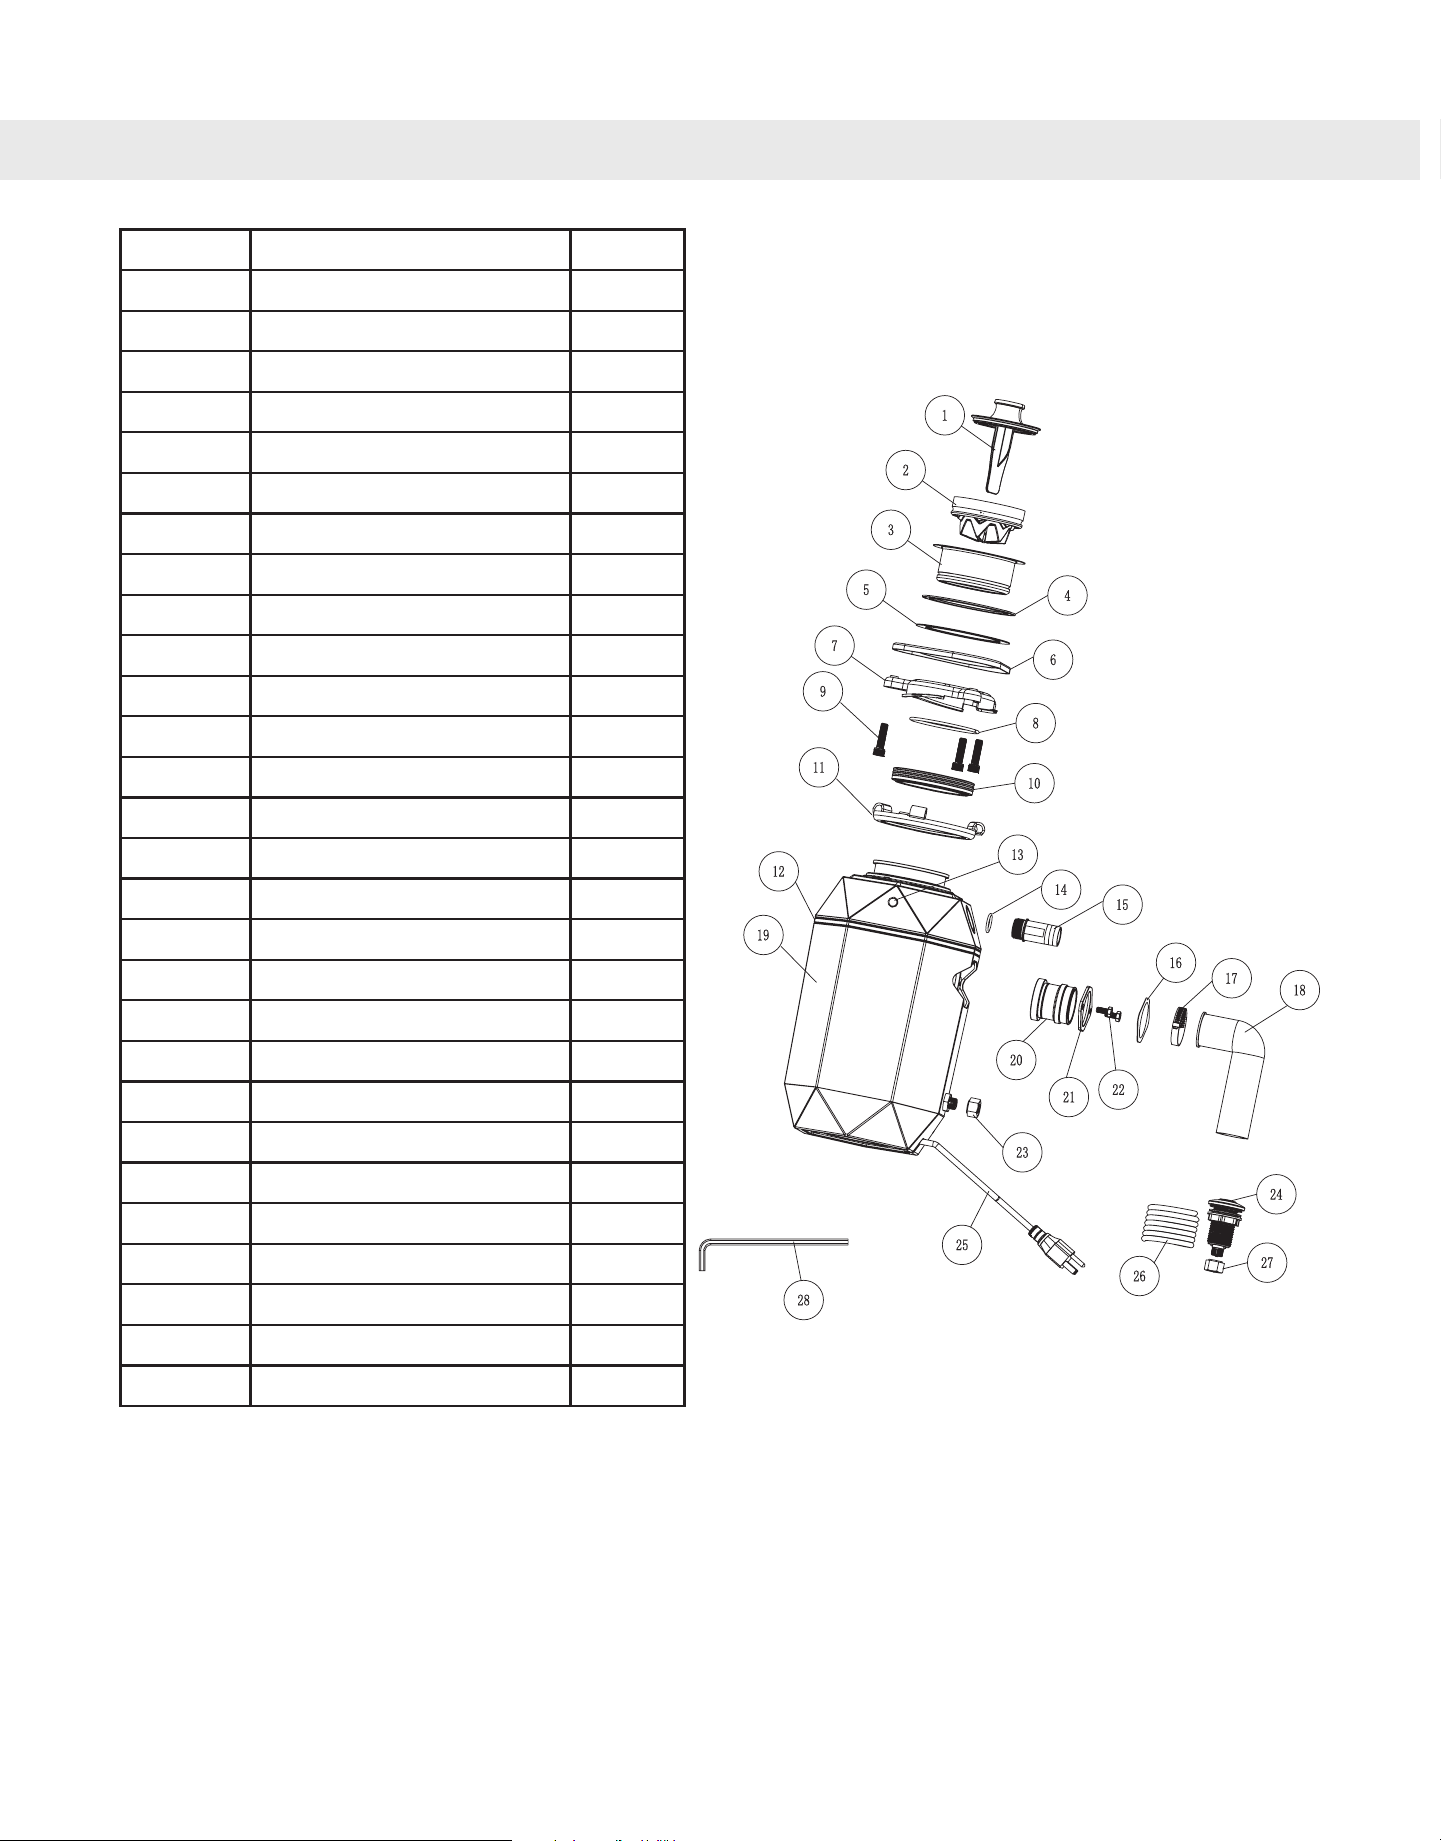
12. EXPLODED DIAGRAM
17
Item No. Part Name Quantity
1 Stopper 1
2 Splash Guard 1
3 Sink Flange 1
4 Rubber Washer 1
5 Fiber Washer 1
6 Backup Flange 1
7 Mounting Ring 1
8 Snap Ring 1
9 Mounting Screws (M8) 3
10 Cushion 1
11 Lower Mounting Ring 1
12 LED Light Band 1
13 Motion Sensors 3
14 O Ring 1
15 Dishwasher Connector 1
16 Collar Sticker 1
17 Elbow Clamp 1
18 Drain Elbow 1
19 Housing 1
20 Rubber Collar 1
21 Steel Flange 1
22 Flange Screws (M6) 1
23 Strain Relief Nut 1 1
24 Push Button 1
25 Power Cord and Plug 1
26 Air Tube 1
27 Strain Relief Nut 2 1
28 Hex Wrench 1

WARRANTY
CTM Maison Elite Inc. grants this limited warranty to the original purchaser of this Waste
Disposer from the date of purchase. Proof of purchase is required when requesting any
warranty assistance.
Motor, Limited 10 YEARS: If any part of your Waste Disposer motor fails during your first
10 years of ownership due to a defect in material or workmanship, as determined solely by
CTM Maison Elite Inc., we will provide you with a replacement motor. If no replacement
motor can be provided for your Waste Disposer, we will provide a comparable or superior
replacement motor or Waste Disposer at our sole discretion.
Other Parts, Limited One Year: CTM Maison Elite Inc. warrants that all other parts, to be
free from defects in workmanship and material at the time of manufacture for a period of
one year. We agree to send a replacement part without charge or at our option replace it
with a comparable or superior part.
To the extent permitted by law, CTM Maison Elite Inc. disclaims any and all warranties,
including but not limited to those of merchantability and fitness for a particular purpose.
There is no other express warranty. The duration of any implied warranty which cannot be
disclaimed is limited to the period specified in the express warranty. Some states do not
allow a limitation on how long an implied warranty lasts. The time limitation may not ap-
ply to you. Some states do not allow the exclusion of incidental or consequential damag-
es, so the above limitation may not apply to you. This warranty gives specific legal rights.
You may also have other rights which vary from state to state. The retailer shall not be
liable for incidental, consequential, or damages arising out of or in connection with prod-
uct use or performance except as may otherwise be accorded by law.
This limited warranty is non-transferable and only to the original purchaser of this Waste
Disposer and will be void if unit is removed from its original installation.
This warranty does not cover: ordinary wear and tear, minor cosmetic blemishes, batteries,
light bulbs, refurbished units, Waste Disposers that are not owned by the original pur-
chaser, acts of God, changes in finish including rusting, pitting, corroding, tarnishing, or
peeling. A certain amount of noise is normal and will not be considered a defect.
Damage to any part by accident, misuse, abuse, improper installation, improper care and
maintenance, improper electric supply or power surge, failure to follow the instructions in
the enclosed manual or by any modification to the unit are not covered by this warranty.
All costs of shipping parts, removing, repair labour and reinstalling the product are not
covered by this warranty. Please do not ship your Waste Disposer or any parts to
CTM Maison Elite Inc. Shipment will not be accepted.
This warranty supersedes all prior warranties.
FOR WARRANTY PURPOSES PLEASE REGISTER YOUR PRODUCT.
18

Customer Care
19
Thank you for purchasing a FORNO ACQUA product. Please read the entire instruction manual before operating your new
appliance for the rst time. Whether you are an occasional user or an expert, it will be benecial to familiarize yourself with
the safety practices, features, operation and care recommendations of your appliance. Both the model number and serial
number are listed on the product. For warranty purposes, you will also need the date of purchase. Record this information
below for future reference.
Record this information below for future reference.
Product Information Service Information
Model Number: _______________________________________________
Use these numbers in any
correspondence or services calls
concerning your appliance.
If you received a damaged
appliance, immediately contact the
dealer (or builder) that sold you the
appliance.
Save time and money. Before
you call for service, check the
Troubleshooting Guide. It lists the
causes of minor operating problems
that you can correct yourself.
Serial Number: ________________________________________________
Date of Purchase: _____________________________________________
Purchase Address And Phone: ___________________________________
____________________________________________________________
____________________________________________________________
CUSTOMER SERVICE:
Keep the instruction manual handy to answer your questions. If you don’t understand something or you
need more assistance, please call our Customer Service: 1-866-231-8893 or email: mysupport@fornoworld.com
Our contact : CTM Maison Elite Inc.
11420 Albert Hudon, Montréal, Québec H1G 3J6, Canada
The instruction manual can be downloaded from www.fornoworld.com or you can tap on the FORNO
World App to review the manual on your phone.