ColorCast Background LED Light
SERENE
Current USA, Inc. www.current-usa.com
Current USA, Inc.
2640 Business Park DDr.
Vista, CA 92081
760-727-7011
Models
: 9053, 9054
Light must be rapidly
blinking to connect. If not
already blinking, press and
hold the button on the
controller for nine seconds
to put light in pairing mode.
VITA
Tap Add Device or the + sign, then select
“ColorPlus Aquarium LED” and confirm. Then
enter your Wi-Fi network & password.
This device Contains
Transmitter Module
FCC ID:2ANDL-CB3S
IC: 23243-CB3S
1. Never attempt repairs yourself, return the device to an
authorized repair facility for service or discard.
2. Carefully examine light after installation and BEFORE
plugging it into the GFCI wall outlet. Be sure there is
NO water or moisture on the light.
3. Never plug in a wet cord. If a plugged in light or
socket does get wet, DO NOT TOUCH IT. Instead,
promptly disconnect the fuse or circuit breaker that
supplies power to the light.
4. Never operate a light that is damaged or malfunctioning,
discontinue use immediately and return or discard.
5. This is NOT a toy. Close supervision is required when any
appliance is used by or near children.
6. Always unplug fixture when not in use, before putting on
or taking off parts, and before cleaning. Never pull the
cord to unplug from GFCI.
7. Do not use this light for anything other than its intended
use.
8. Ensure light is securely installed before supplying power
to the unit.
9. Do not use with an extension cord.
10. Do not look directly into the LEDs.
READ AND FOLLOW ALL SAFETY INSTRUCTIONS
Drip Loops should always be used to help prevent
water from traveling along the cord and coming into
contact with an electrical outlet.
Drip loops must always be
below the level of the outlet.
If the plug or outlet does get
wet, DO NOT TOUCH the cord.
Disconnect the fuse or circuit
breaker that supplies power.
Risk of Electric Shock. ONLY plug into a GFCI protected
receptacle. If one is not provided, contact a certified
electrician for proper installation.
GFCI Protected
AC Outlet
Ensure use of drip
loop for all cables
LIMITED WARRANTY
Current USA, Inc. warrants this product against defects in materials
and workmanship of a period of ONE (1) YEAR from the date of
original retail purchase and is not transferable.
Warranty on all Products, including Aquariums, is limited to
replacement of the product and does not cover fish loss, personal
injury, property loss or direct, incidental or consequential damage
arising to the use of this product.
Note: Current-USA, Inc. One-Year Limited Warranty does not cover
damage caused by the following: improper installation, saltwater
corrosion, electrical surges, or modifications.
This warranty does not apply if the product has been damaged by
accident, abuse, misuse or misapplication or if the product has been
modified without the written permission of Current-USA, Inc.; or if
any Current-USA, Inc. logos have been removed or defaced
.
THE WARRANTY AND REMEDIES SET FORTH ABOVE ARE
EXCLUSIVE AND IN LIEU OF ALL OTHERS, WHETHER ORAL
OR WRITTEN, EXPRESS OR IMPLIED. CURRENT USA, INC.
SPECIFICALLY DISCLAIMS ANY AND ALL IMPLIED WARRANTIES,
INCLUDING BUT NOT LIMITED TO LOST PROFITS, DOWNTIME,
GOODWILL, DAMAGE TO OR REPLACEMENT OF EQUIPMENT
AND PROPERTY, AND ANY COSTS OF RECOVERING ANIMALS,
PLANTS, TANKS OR OTHER AQUARIUM RELATED ITEMS AND/
OR EQUIPMENT. CURRENT USA, INC. IS NOT RESPONSIBLE
FOR SPECIAL, INCIDENTAL, OR CONSEQUENTIAL DAMAGES
RESULTING FROM ANY BREACH OF WARRANTY, OR
REPLACEMENT OF EQUIPMENT OR PROPERTY, OR ANY
COSTS OF RECOVERING OR REPRODUCING ANY EQUIPMENT,
ANIMALS OR PLANTS USED OR GROWN WITH CURRENT USA,
INC. PRODUCTS. Some jurisdictions do not allow the exclusion or
limitation of incidental or consequential damages or exclusions of
implied warranties, so the above limitations or exclusions may not
apply to you. This warranty gives you specific legal rights, and you
may also have other rights that vary form jurisdiction to jurisdiction.
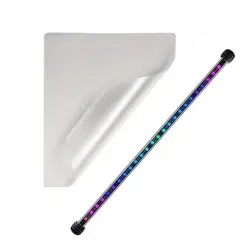
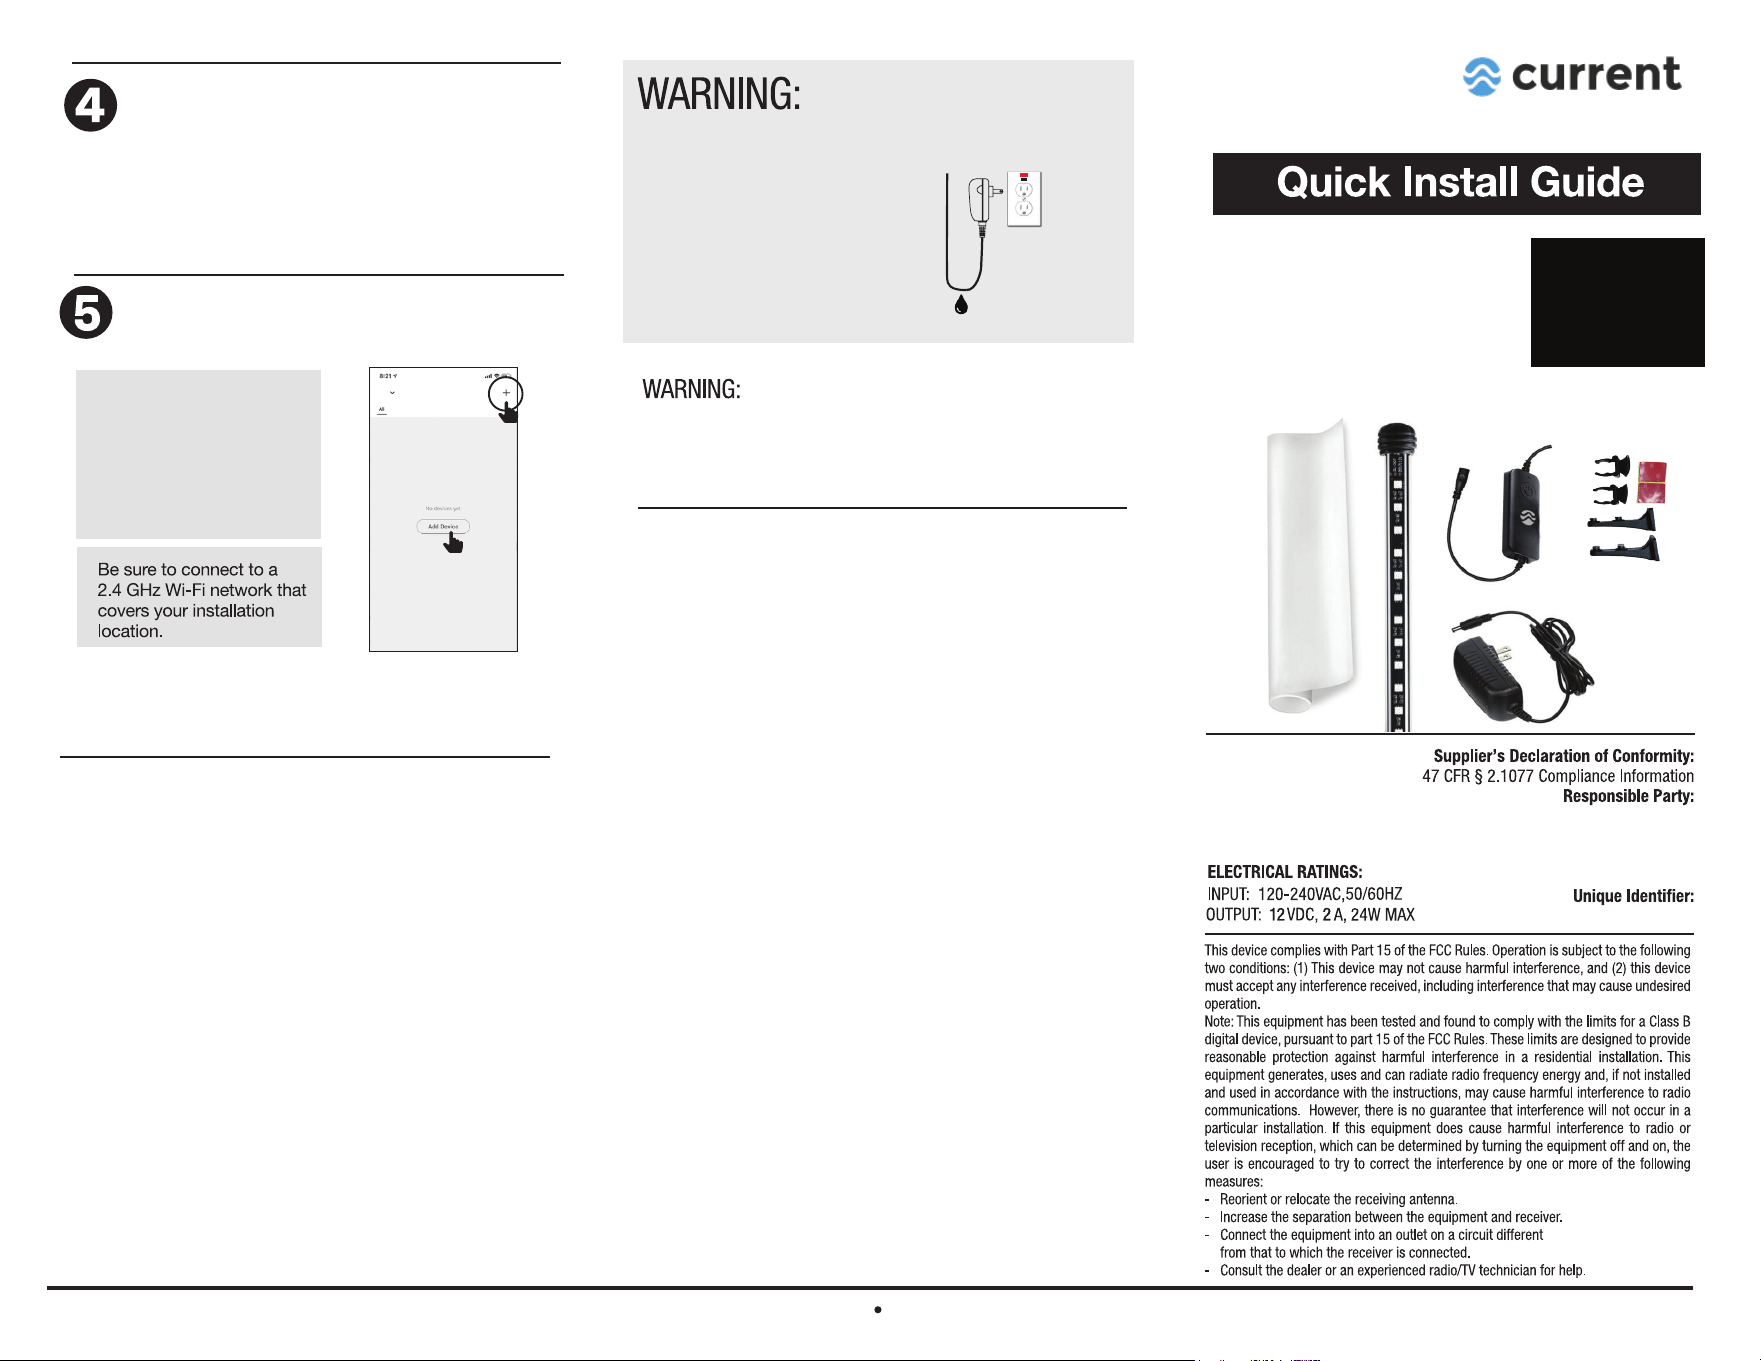
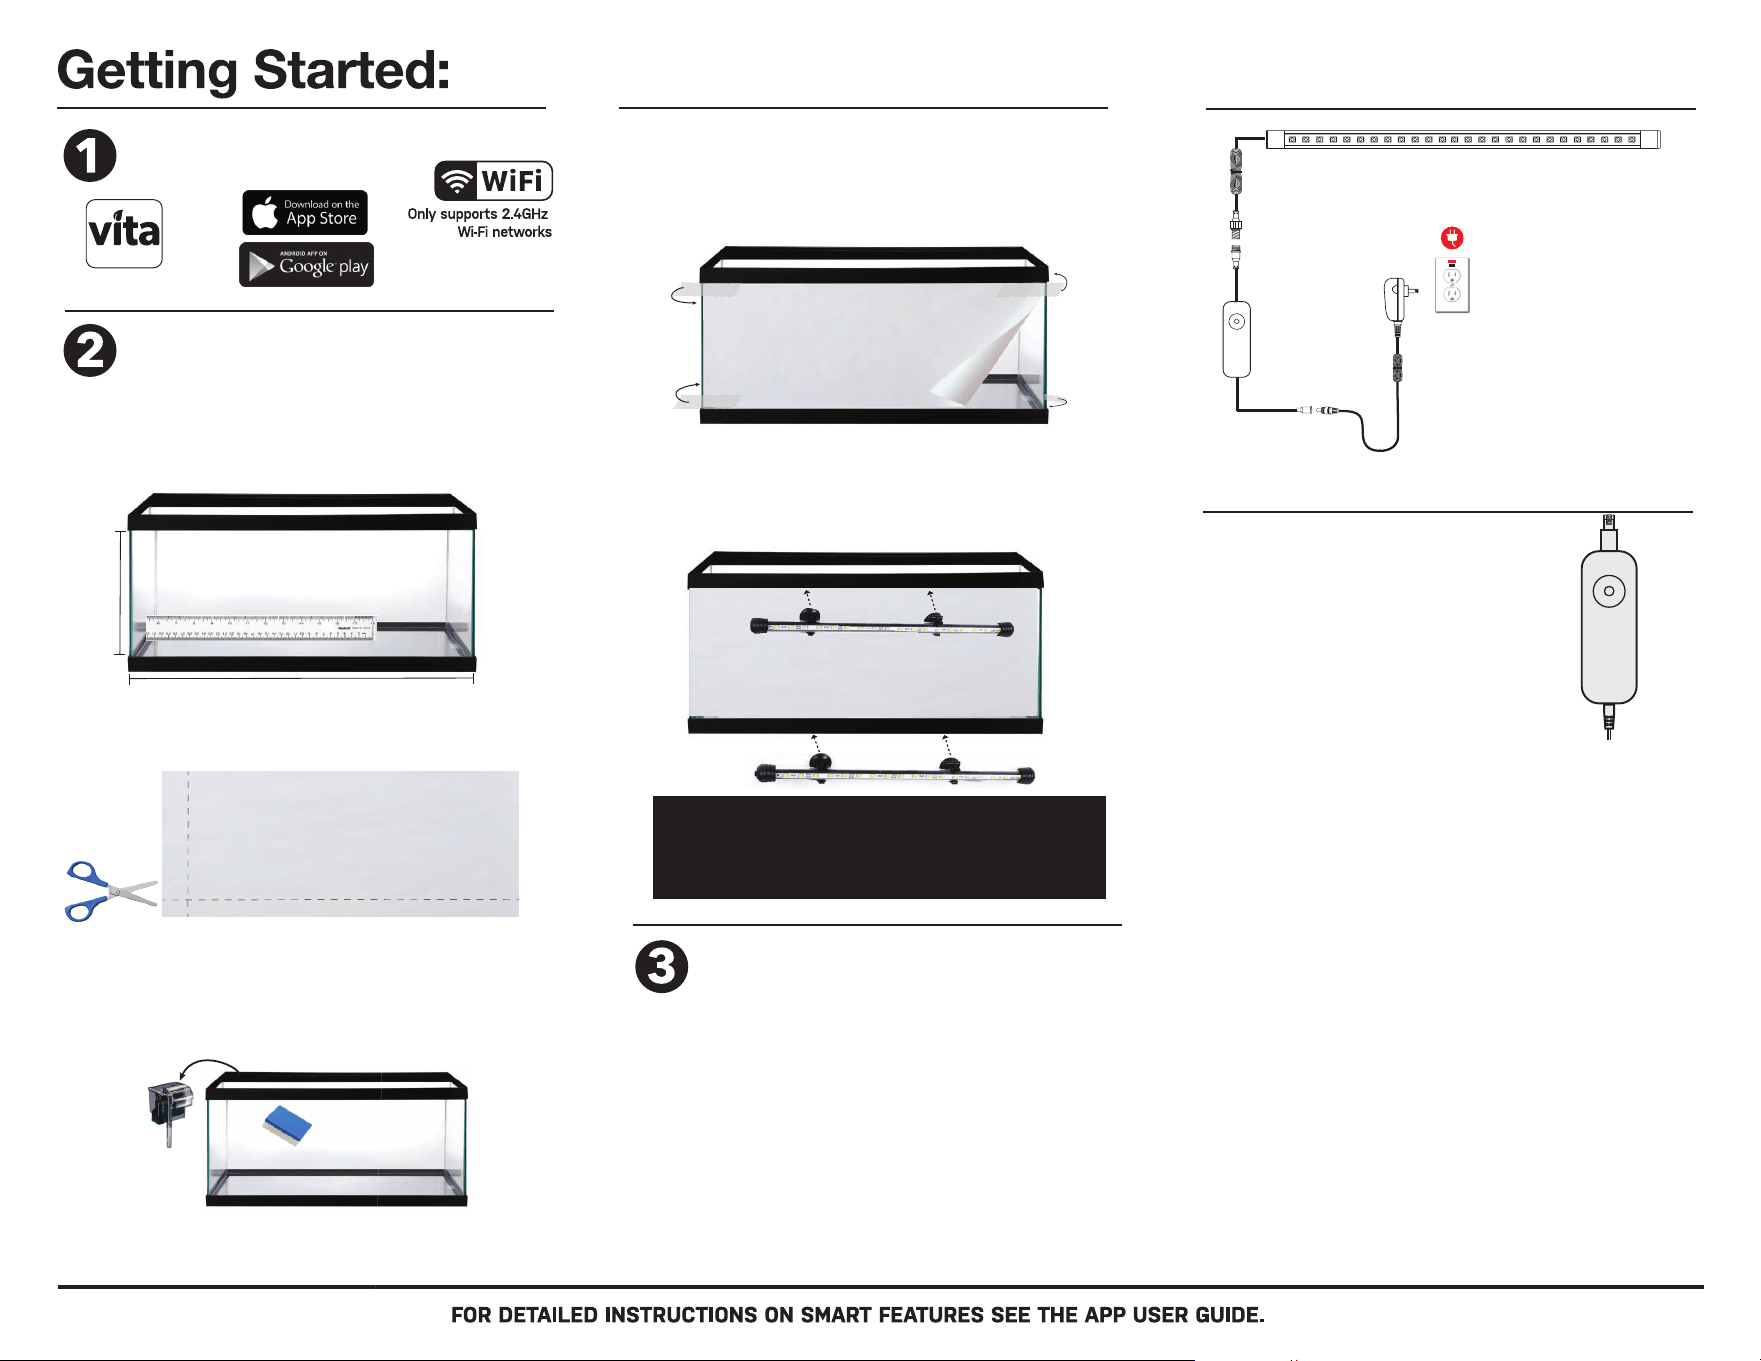
What’s Included:
1 ea. - ColorCast LED Light
1 ea. - Frosted Glass Background Film
1 ea. - Inline LED Controller
1 ea. - 12V DC Power Supply
2 ea. - Suction Cup Light Clips
2 ea. - Cabinet Mount Clips w/Screws
2 ea. - Adhesive Tape
NOTE: If you are missing
any components, please
contact us at:
DO NOT RETURN TO
RETAILER
Launch and use the Aquatic VITA
app to complete the set up.
- Open the VITA app.
- Complete the requested information to
create a new account, or sign into your
existing account.
App will connect controller to your mobile device,
connection can take 30-60 seconds. Visit
www.aquaticvita.com for additional tips and help.
IMPORTANT SAFETY INSTRUCTIONS
Download the Aquatic VITA app
on your smart device
AquaticVITA App
Attach Frosted Glass Background Film
- Connect the 3-pin plug on the light fixture to the matching
3-pin plug on the LED controller,
- Connect the male DC plug from the power supply to the LED
controller.
- Plug power supply into a GFCI protected AC outlet ensuring a
drip loop is in place.
- Rotate LED light so LED’s point up towards back of aquarium.
For more information, check the App User Guide at
www.aquaticvita.com for help
.
NOTE: The only tools required for basic installation
are a pair of scissors and clear tape.
H
L
lightly mark cutting lines using a pencil.
STEP 1: Unroll and flatten background film. Measure length
(L) and height (H) of glass aquarium panel. (glass only, don’t
include the plastic frame.) Lightly mark cutting lines with pencil.
STEP 2: Using sharp scissors, carefully cut background film to
size. You can also use a razor blade & straight edge to cut/trim.
STEP 3: Clean glass panel. Remove any hang-on filters or other
accessories from back of aquarium. Use a cloth/sponge and
freshwater (NO SOAP or CHEMICALS) & clean back glass panel.
Dry with cloth towel.
We recommend cleaning the inside tank glass of any algae.
You are now ready to use the LED light via the
inline LED controller.
To activate smart mobile app features, proceed to steps
4 & 5. When in Smart Wi-Fi pairing mode, the LED light
will blink. Note: the light will stop blinking after 3 minutes
or when controlled via the inline controller.
LED Controller Button:
Manual Scene control:
- Press 2x to display Sunset fade scene.
- Press 3x to display Sunshine fade scene.
- Press 4x to display Stream fade scene.
- Press 5x to display Enhance scene.
- Press 6x to display Panorama scene.
- Press 7x to display Focus scene.
WARNING:
LED Controller is NOT waterproof.
Keep in a dry place away from
dripping water or where it may
drop into water.
Main control features:
- Press once (1x) to turn ON, light will display
default Blue color spectrum.
- Press and hold button 3 seconds to turn
light OFF.
*To reset controller for pairing with the Vita app
and mobile device, press and hold button for
9 seconds - LED light will blink red when ready
for pairing and connection.
STEP 4: Attach film with clear tape. Start at one side of aquarium
and attach background film to outer back glass panel using clear
tape at each corner (textured side facing in & smooth glossy side
facing out.) Unroll film, covering entire back glass panel, tape edge
to other side of aquarium, ensuring film is tight against glass.
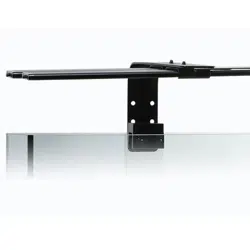
STEP 5: Attach Background LED Light. Moisten suction cups,
position Background LED light in desire location on plastic frame,
then press firmly to attach to aquarium frame. We recommend
mounting it to the bottom frame for best lighting effects.
NOTE: For rimless aquariums installations
and/or cabinet brackets, visit
www.current-usa.com/colorcast-led-guide
Connection Guide
GFCI Protected
AC Outlet
Ensure use of drip
loop for all cables
12V DC
Power
Supply
LED
Controller