PRECAUTIONS - 3991477B351/C
e
PRECAUTIONS 39
General safety instructions 39
Appliance purpose 43
This user manual 43
Manufacturer’s liability 43
Identification plate 43
Disposal 44
Energy efficiency technical data 44
To save energy 44
Information on power consumption in off/stand-
by mode 44
How to read the user manual 44
DESCRIPTION 45
General description 45
Accessories 46
Other parts 47
Optional accessories (can be purchased
separately) 48
USE 48
Preliminary operations 48
Using the accessories 48
Using the barbecue 49
Error warning 50
Cooking advice 50
Meat (direct grilling) 50
Meat (indirect grilling) 50
Vegetables and fish (direct grilling) 50
Cooking information tables 50
CLEANING AND MAINTENANCE 67
Cleaning the appliance 67
INSTALLATION 68
Electrical connection 69
Section cut from the countertop 70
Instructions for the installer 73
We advise you to read this manual carefully, which contains all the instructions for
maintaining the appliance’s aesthetic and functional qualities. For further information on the
product: www.smeg.com
PRECAUTIONS
General safety instructions
• ATTENTION: This symbol
indicates that the
appliance's surfaces and
accessible parts become
very hot during use. These
parts should not be touched
without taking the
necessary precautions.
• ATTENTION: During use,
the appliance and its
accessible parts become
very hot. Never touch the
heating elements during
use, keep children and pets
away from the appliance.
• Never try to put out a fire or
flames with water: turn off
the appliance and smother
the flames with a lid or a
fire blanket.
• This appliance may only be
used by children aged 8
years and over, and by
people of reduced physical,
sensory or mental capacity,
or lacking in experience in
the use of electrical
appliances, provided that
they are supervised or have
been given instructions on
the safe use of the
appliance and of the
hazards associated with it.
• Children must not play with
the appliance.
• Keep children below the
age of 8 away from the
appliance unless they are

40 - PRECAUTIONS 91477B351/C
constantly supervised.
• Keep children under the age
of 8 away from the
appliance when it is in use.
• Ensure that the power
socket intended for the
appliance is easily
accessible.
• Do not immerse the power
cord in water or other
liquids. Electric shock
hazard.
• Cleaning and maintenance
must not be carried out by
unsupervised children.
• The use of accessories not
provided or recommended
by the manufacturer may
cause injury.
• When using the appliance,
wear heat-resistant gloves
(conforming to EN407).
• The cooking process must
always kept under control.
A short cooking process
must be continuously
monitored.
•Always exercise caution
when handling hot fats and
liquids.
• Fats and oils can catch fire
if they overheat. Do not
leave the appliance
unattended while preparing
foods containing oils or fats.
If fats or oils catch fire,
never put water on them.
• Do not fill the grease drip
trays with liquids or
flammable material.
• Do not place refractory
stones or lava stones under
the electric heating
elements.
• Do not place aluminium
items in the grease drip-
trays.
• Do not insert pointed metal
objects (cutlery or utensils)
into the slots in the
appliance.
• Only use dry oven mitts;
moist items in contact with
hot surfaces can cause
steam burns.
• Do not pour water directly
onto very hot grates.
• Switch off the appliance
immediately after use.
• Do not pull the cable to
unplug the appliance (if
installed).
• Never move the appliance
during use.
• Do not wear loose clothing
when using the appliance.
• Always keep hold of the lid
when lowering it.
• CHARCOAL OR SIMILAR
FUELS MUST NOT BE
USED WITH THIS
APPLIANCE.
• DO NOT USE OR STORE
FLAMMABLE MATERIALS
NEAR THE APPLIANCE.
•DO NOT USE AEROSOLS
IN THE VICINITY OF THIS
APPLIANCE WHILST IT IS
IN USE.
• DO NOT MODIFY THIS
APPLIANCE.
• Always wear personal
protective equipment (PPE)
before carrying out any

PRECAUTIONS - 4191477B351/C
e
work on the appliance
(installation, maintenance,
positioning or moving).
• Do not clean the appliance
if it is still hot or in
operation.
• Before performing any work
on the appliance, switch off
the main power supply.
• Installation and servicing
should be carried out by
qualified personnel in
accordance with current
standards.
• Do not try to repair the
appliance yourself or
without the assistance of a
qualified technician.
• If the power cable becomes
damaged, contact technical
support immediately to
arrange for it to be replaced
in order to avoid possible
hazards.
• Do not cook on the grate if it
is damaged, as fats and oils
may come into contact with
the electrical element,
creating a fire or electric
shock risk.
• Do not use the appliance
while in a state of physical
or mental impairment.
• Do not obstruct ventilation
openings and heat
dispersal slots.
• Do not sit on the appliance.
• WARNING: Never leave the
appliance unattended
when cooking using fats or
oils. Risk of fire. Be very
careful.
• Risk of fire: do not place any
items on the cooking
surfaces.
• Do not spray any products
near the appliance.
• DO NOT FOR ANY
REASON USE THE
APPLIANCE AS A SPACE
HEATER.
• Do not use plastic
kitchenware or containers
for cooking.
• Any stainless steel exposed
to the elements will require
attention and care
throughout its lifespan to
maintain its shine and
structural integrity.
• Do not use steam jets to
clean the appliance.
• Do not clean with
pressurised water.
• Do not use rough or
abrasive materials or sharp
metal scrapers.
• Do not use cleaning
products containing
chlorine, ammonia or
bleach on parts made of
steel or that have metallic
surface finishes (e.g.
anodizing, nickel- or
chromium-plating).
• Do not use the handle to lift
or move this appliance.
• Keep power supply cables
away from water and
heated surfaces.
• Regularly inspect the power
supply cable to ensure it is
not damaged. The
appliance must not be used

42 - PRECAUTIONS 91477B351/C
of the cable is damaged.
• Never use this appliance for
purposes other than food
preparation.
• After each use, clean the
grates and drip trays with
warm, soapy water.
• Never wash the grates in
the dishwasher.
• Up to 1000 ml of water can
be added to each grease
drip-tray through the slits in
the open grill. WARNING:
When water comes into
contact with the hot grill, it
may cause splashes of
boiling liquid and instant
steam, posing a risk of
burns. Be very careful.
• Excess fat in the drip tray
can cause a fire during
cooking. After each use of
the appliance, empty and
clean the drip tray.
• If the fat should catch fire,
close the lid, turn off the
appliance by rotating the
knob to the 0 position,
disconnect it from the
power outlet, and leave the
lid closed until the flames
are extinguished.
• The grease drip-trays are
dishwasher-safe.
• Disconnect the appliance
from the power outlet when
not in use, before cleaning,
and during maintenance.
• After cleaning, ensure that
removable components and
heating elements are
correctly positioned.
• The use of non-original
accessories may cause
damage to the appliance.
• If the appliance is installed
on a dedicated trolley, store
it indoors when not in use.
• This appliance may only be
installed outdoors.
• This appliance must not be
installed on a pedestal.
• In the event of overheating
of the electronic
components, the
appliance's performance
may be reduced. In some
instances, the appliance
may switch itself off. Wait
for the temperature to
decrease; the appliance will
restart automatically.
• To avoid potential
overheating, the appliance
must not be installed
behind a decorative door or
a panel.
• It should be installed and
connected in compliance
with current installation
regulations.
• When connecting this
appliance to the power
supply, ensure that the
supply voltage matches the
rated voltage listed on the
appliance’s label.
• Have the electrical
connection performed by
authorised technicians.
• The appliance must be
connected to an earthed
socket in compliance with
electrical system safety

PRECAUTIONS - 4391477B351/C
e
standards.
• Do not exceed the power
rating of the power outlet.
• The appliance must be
powered through a residual
current device (RCD) with a
rated residual operating
current not exceeding
30mA.
• Use cables that can
withstand temperatures of
at least 90°C.
• The tightening torque of the
screws of the terminal
supply wires must be 1.5 -
2 Nm.
• Veneers, adhesives or
plastic coatings on adjacent
furniture should be
temperature-resistant.
• If operation is not optimal,
DO NOT ATTEMPT TO
REPAIR THE APPLIANCE,
but contact the nearest
Authorised Service Centre.
• Do not pull the cable to
unplug the appliance from
the general power plug.
• This appliance can be used
up to a maximum altitude of
2,000 metres above sea
level.
•If cooking for over an hour
at a power level higher than
8, the lid must be kept
closed.
• This appliance must be
protected from rain if used
outdoors.
• Never use the appliance
outdoors in case of bad
weather.
• Remove any traces of liquid
from the lid (if fitted) before
opening.
• The appliance is not
designed to operate with
external timers or with
remote-control systems.
Appliance purpose
This appliance is intended for
cooking food in the home
environment. Every other use
is considered improper. It
must also not be used:
• In kitchen areas provided
for employees in shops,
offices and other work
environments
• in farms/farmhouses.
• By guests in hotels, motels
and other types of
residential environments
• In bed and breakfasts
• on boats, campervans, or
caravans
This user manual
• This user manual is an integral part of
the appliance and must therefore be
kept in its entirety and within the user's
reach for the whole working life of the
appliance.
• Read this user manual carefully before
using the appliance.
Manufacturer’s liability
The manufacturer declines all liability for
damage to persons or property caused by:
• use of the appliance other than that
specified;
• failure to comply with the instructions in
the user manual;
• tampering with any part of the
appliance;
• use of non-original spare parts.
Identification plate
The identification plate bears the technical
data, serial number and brand name of the
appliance. Do not remove the identification

44 - PRECAUTIONS 91477B351/C
plate for any reason.
Disposal
This appliance conforms to the WEEE
European directive (2012/19/EU) and
must be disposed of separately from
other waste at the end of its service life.
The appliance does not contain substances
in quantities sufficient to be considered
hazardous to health and the environment,
in accordance with current European
directives.
To dispose of the appliance:
• Cut the power cable and remove it.
• Deliver the appliance to the appropriate
recycling centre for electrical and
electronic equipment waste, or return it
to the retailer when purchasing an
equivalent product, on a one for one
basis.
Our appliances are packaged in non-
polluting and recyclable materials.
• Deliver the packing materials to the
appropriate recycling centre.
Energy efficiency technical data
Information in accordance with the
European energy labelling and ecodesign
regulations is contained in a separate
document accompanying the product
instructions.
These data are present in the "Product
information sheet" that can be downloaded
from the website at the page dedicated to
the product in question.
To save e n e rgy
• Unless otherwise indicated on the
package, defrost frozen foods before
cooking them.
• Stop cooking a few minutes before the
time normally used. Cooking will
continue for the remaining minutes with
the heat which has accumulated inside
the oven.
• Reduce any opening of the lid to a
minimum to avoid heat dispersal.
Information on power
consumption in off/stand-by
mode
Technical data on the appliance's power
consumption in off/stand-by mode can be
found at www.smeg.com under the page
corresponding to the product in question.
How to read the user manual
This user manual uses the following reading
conventions:
Power voltage
Danger of electrocution
• Disconnect the mains power supply.
• Unplug the appliance.
Plastic packaging
Danger of suffocation
• Do not leave the packaging or any part
of it unattended.
• Do not let children play with the plastic
bags.
Warning/Caution
Information/Advice
DESCRIPTION - 4591477B351/C
e
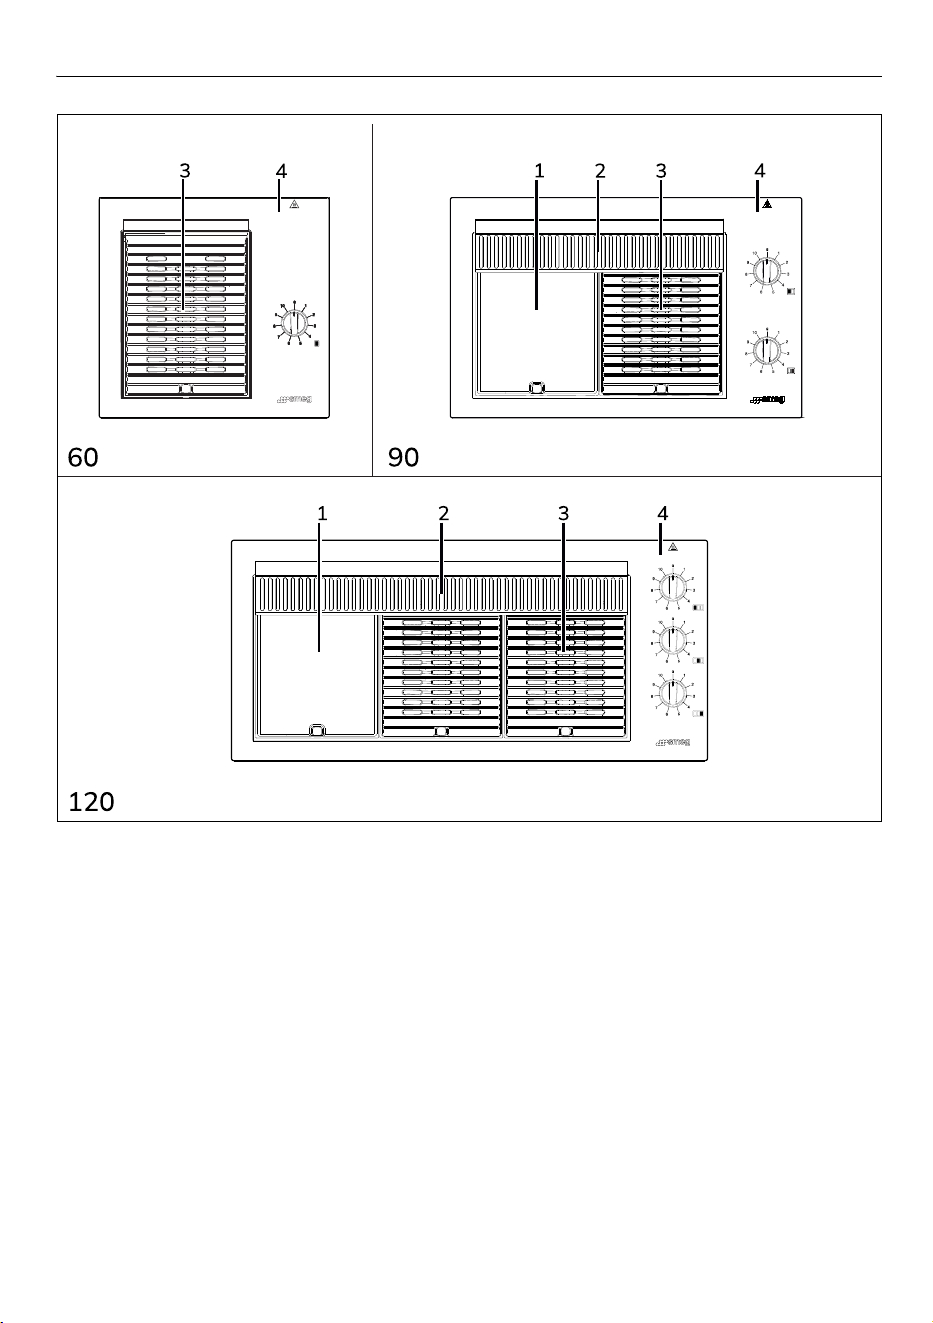
DESCRIPTION
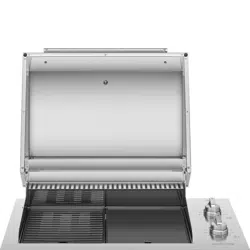
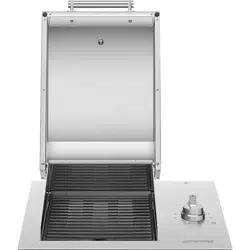
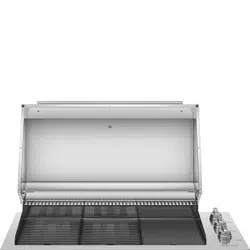
General description
1 Closed “teppanyaki” grill
2 Keep warm rack
3 Open ribbed grill
4 Control panel
46 - DESCRIPTION 91477B351/C
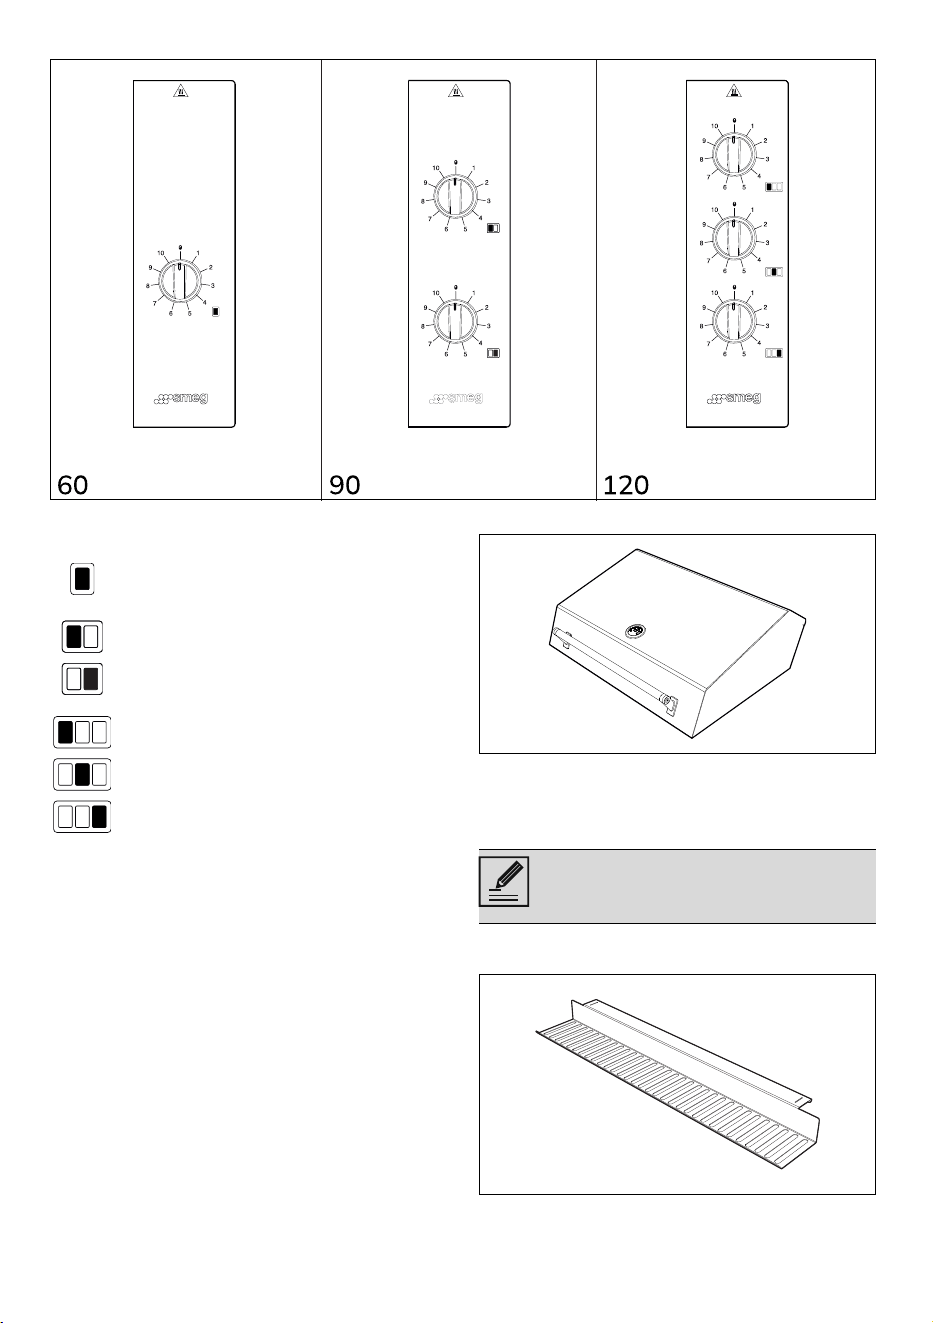
Control Panel
Cooking zones area
60
Cooking zone
90
Left cooking zone
Right cooking zone
120
Left cooking zone
Central cooking zone
Right cooking zone
Accessories
• Not all accessories are available on
some models.
• The accessories intended to come into
contact with food are made of materials
that comply with the provisions of
current legislation.
• The original supplied or optional
accessories can be purchased
separately. Use only original accessories
supplied by the manufacturer.
Lid
Useful for indirect cooking, helping to
stabilise the temperature inside the
barbecue, ensuring even cooking and
retaining moisture in foods for a longer time.
Rack for keeping food warm (only on the
90 and 120 models)
The lid is removable for proper
cleaning. See “CLEANING AND
MAINTENANCE” section

DESCRIPTION - 4791477B351/C
e
Useful for keeping cooked food warm.
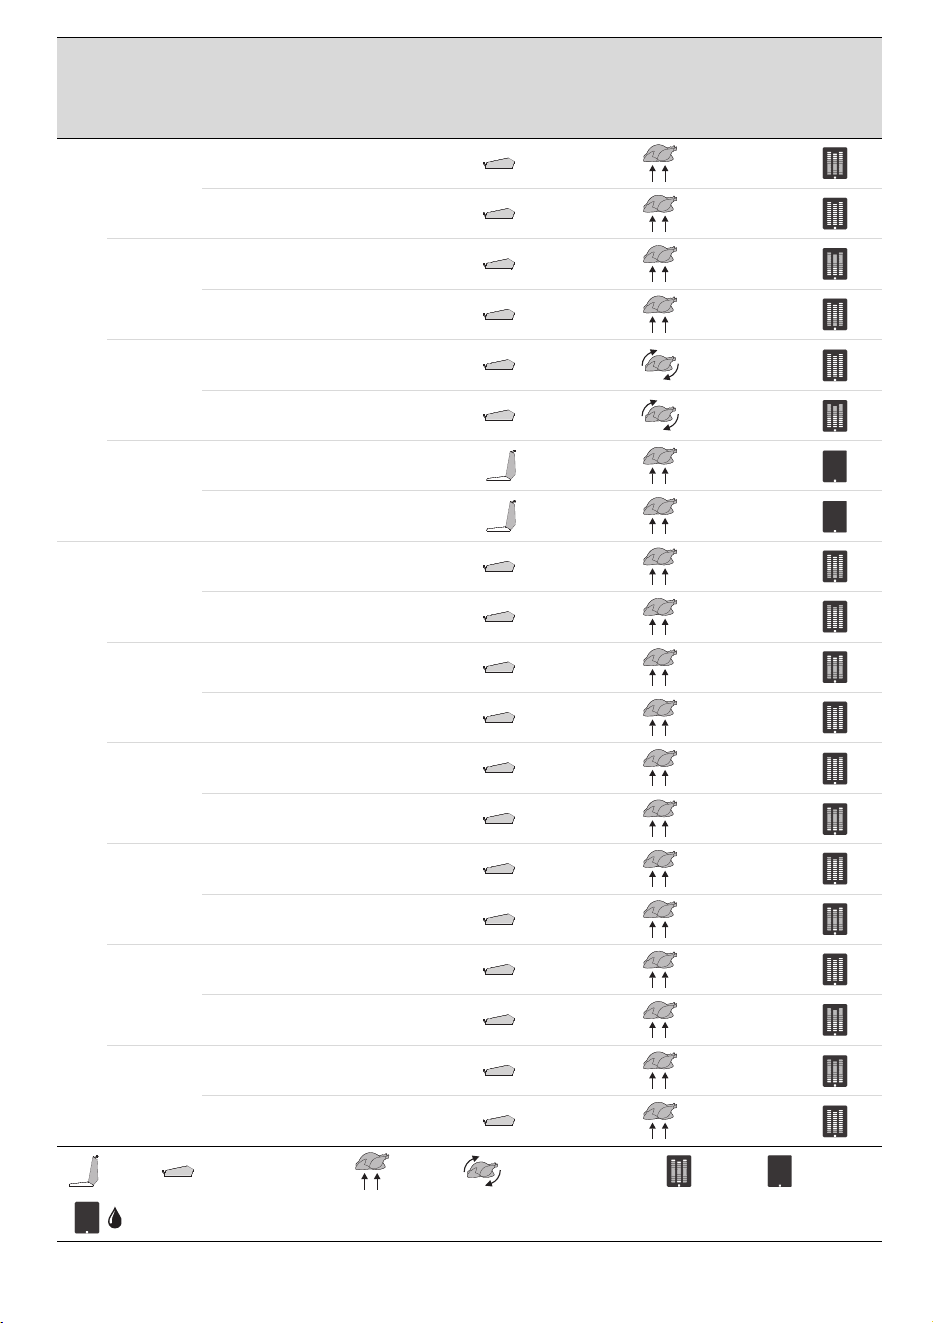
Open ribbed grill
Useful for rapid cooking of meat, fish and
vegetables directly on the grill, bringing out
their flavour through direct exposure.
Closed teppanyaki grill
Useful for rapid cooking of meat, fish and
vegetables, directly on the grill, providing
light dishes with their nutritional content
intact.
Grease drip-tray
Useful for collecting residues produced
during food cooking.
Heating element support bracket (only on
the 90 and 120 models)
Useful for supporting tilting heating
elements and also preventing movement of
the grease drip-rays.
Other parts
Analogue thermometer
Located on top of the lid, useful for
detecting the temperature inside
.
Splash guard
Useful for effective protection against
splashes and sprays during use of the
appliance
.
The keep-warm rack is removable
for proper cleaning. See the
“CLEANING AND MAINTENANCE”
section
The racks are removable and easy
to clean. See the “CLEANING AND
MAINTENANCE” section
The racks are removable and easy
to clean. See section “CLEANING
AND MAINTENANCE”
The trays are removable and
dishwasher-safe. See the
“CLEANING AND MAINTENANCE”
section
The bracket is removable to allow
for the removal of the grease dip-
trays and the cleaning of the
internal basin. See the “CLEANING
AND MAINTENANCE” section
48 - USE 91477B351/C
Microswitch
It detects whether the appliance's lid is
open or closed, useful for adjusting settings
and ensuring the ideal temperature on the
grill.
Tilting heating element
Crucial component of the appliance that
generates heat for cooking, equipped with a
probe for electronic temperature control of
the cooking rack.
Optional accessories (can be
purchased separately)
Grate for indirect cooking(only on the 90
and 120 models)
Useful for enabling even cooking without
burning the surface of the food. We
recommend using the grate for slow
cooking.
Wireless Probe
Useful for precisely cooking meat of various
cuts and sizes. The probe ensures that the
food is perfectly cooked by monitoring the
core temperature of the food.
Smoker box
Useful or smoking and enhancing the
flavours of the meat.
Utensil kit
Useful for facilitating the cooking process
safely and effectively.
USE
Preliminary operations
• Remove any protective film from the
outside or inside of the appliance,
including accessories.
• Remove any labels (apart from the
technical data plate) from the
accessories and shelves.
• Remove and wash all the appliance
accessories (see "CLEANING AND
MAINTENANCE” section).
First heating
Heat the appliance at maximum power for
at least one hour to remove any
manufacturing residues. (See “Using the
barbecue”)
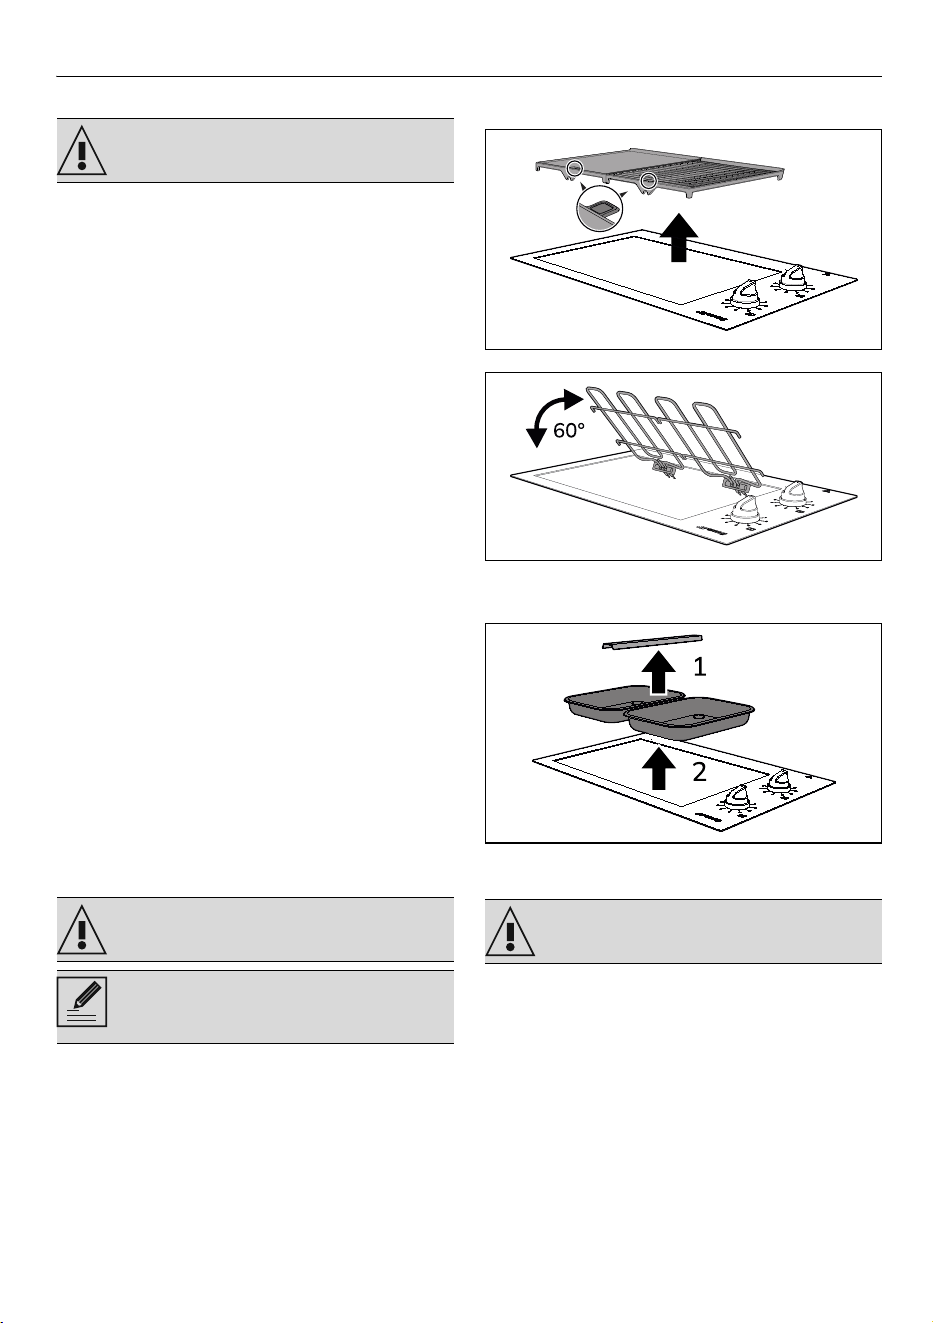
Using the accessories
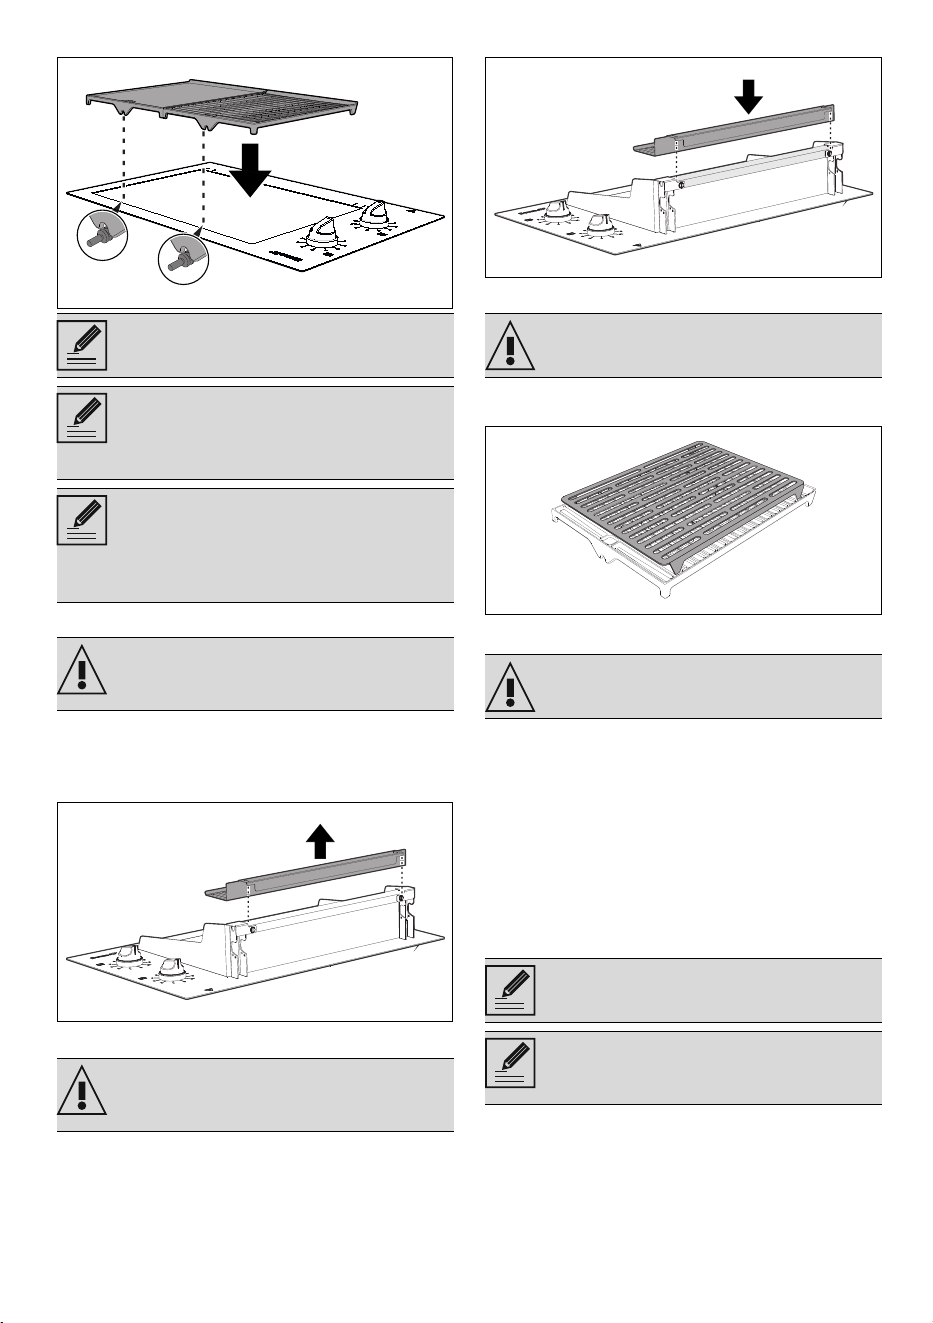
Racks
The grates must be assembled as shown in
See General safety instructions.
USE - 4991477B351/C
e
the figure below.
Removing the keep warm rack
It is possible to use the appliance without
the keep warm rack.
1. Lift the warming rack upwards, as
shown in the diagram.
Placement of the warming rack
It is possible to use the warming rack to
keep the cooked food hot.
1. Place the warming rack in its slot.
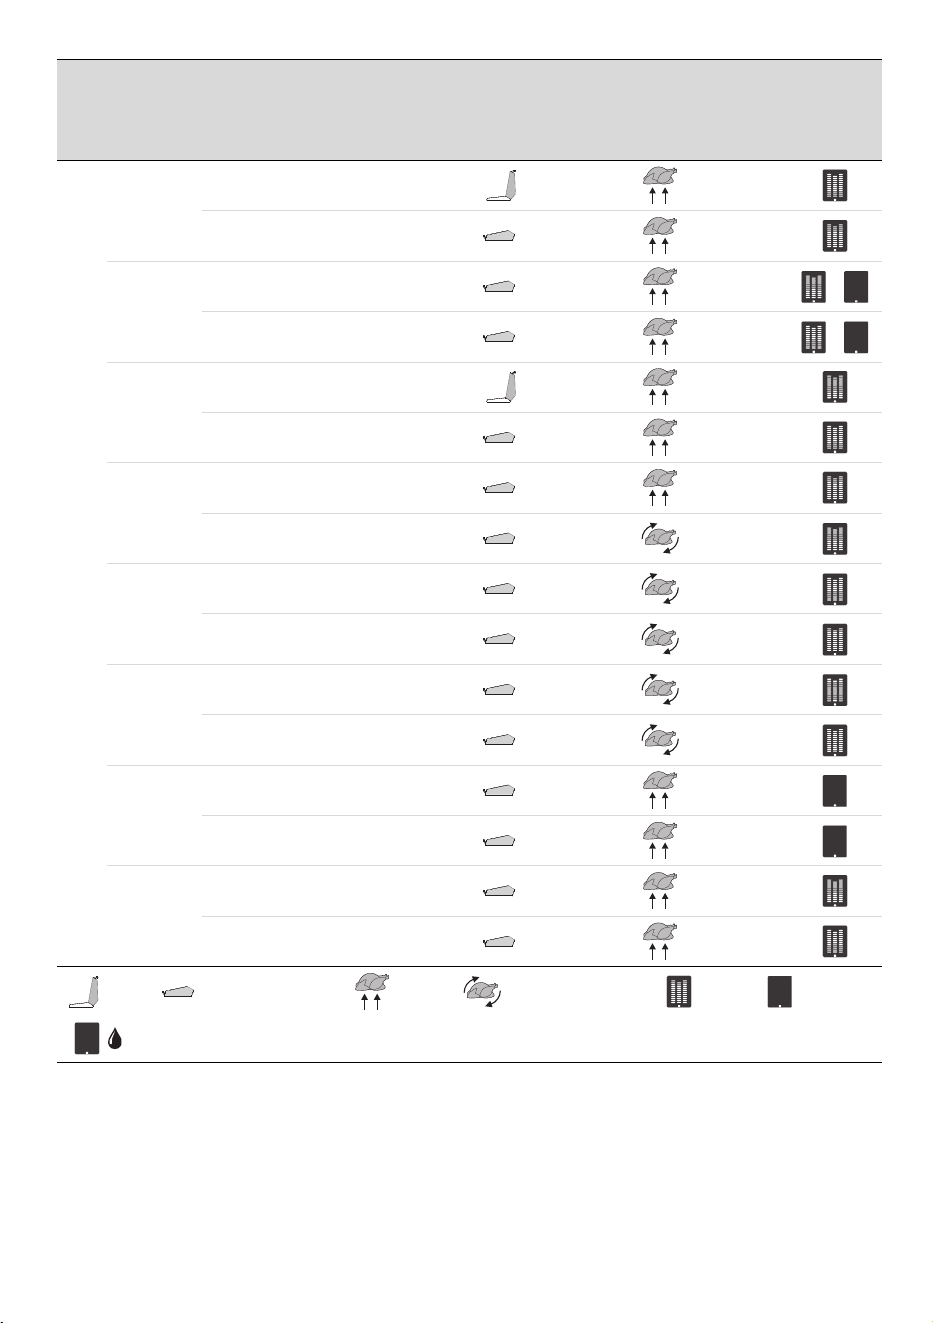
Grill position for indirect cooking
Place the indirect cooking grill on top of the
open ridged rack, as shown in the figure.
Using the barbecue
Switching on the appliance
All the appliance’s controls are located
together on the control panel. The relevant
zone is indicated next to each knob.
To switch on the appliance:
1. Connect the appliance to the mains
power supply.
2. Rotate the knob clockwise or anti-
clockwise to set the desired power level.
Preheating stage
Cooking itself is preceded by a preheating
stage, which allows the appliance to heat to
the cooking power more quickly.
This stage is indicated by the flashing of the
knob LED.
At the end of the preheating phase, the LED
remains lit to indicate that the appliance is
Gently insert grates and trays into
the oven until they come to a stop.
Clean the grates before using them
for the first time to remove any
residue left by the manufacturing
process.
Proceed with cooking only with the
grates in position to avoid danger to
the user or damage to the
appliance's appearance and
functionality.
The keep warm rack should only be
removed when the appliance has
cooled down.
Before placing the warming rack in
its position, wait until the appliance
is completely cool.
Wear heat-resistant gloves.
See General safety instructions.
Preheat the appliance with the lid
closed.
We recommend switching on all
electric heating elements to speed
up the preheating time.

50 - USE 91477B351/C
operating in cooking mode.
Switching off the appliance
To turn off the appliance, turn the knobs to
the 0 setting.
We strongly recommend disconnecting the
appliance from the electrical network if it is
not to be used for an extended period.
Error warning
If the appliance malfunctions or operates
incorrectly, the appliance emits a series of
beeps. Turn the knob to 0, wait a few
minutes and try to use the appliance again.
If the problem persists, contact technical
support.
Cooking advice
General advice
• It is not possible to shorten cooking
times by increasing the temperature (the
food could be overcooked on the outside
and undercooked on the inside).
• Cooking times vary according to the
thickness and quality of the food and to
consumer taste.
• During indirect grilling, the lid must be
left closed.
Meat (direct grilling)
The cooking time varies depending on the
thickness of the food and personal taste.
For best results when grilling, brown the
outside at maximum heat then use the
knobs to turn down to a medium / minimum
setting to allow the meat to cook right
through without burning on the outside. The
electric heating elements adjust their power
according to the previously set level,
maintaining a consistent temperature that
ensures even cooking and helps retain more
flavour in the meat.
Meat (indirect grilling)
After preheating with the electric heating
elements at maximum power and with the
lid closed, place the meat on the grill for
indirect cooking (only on the 60 and 90
models), or in the central cooking area at a
lower power setting, while the adjacent
zones are set to a higher power (only on the
120 models).
Naturally, it takes considerably longer than
direct grilling, but excellent results will be
assured.
Large pieces of meat or fish such as roasts,
whole chickens, lamb and other particularly
thick/fat cuts are suitable for indirect grilling.
Vegetables and fish (direct grilling)
Arrange the vegetables and/or fish on the
grill after preheating, finish cooking as
indicated and recommended in the
cookbook.
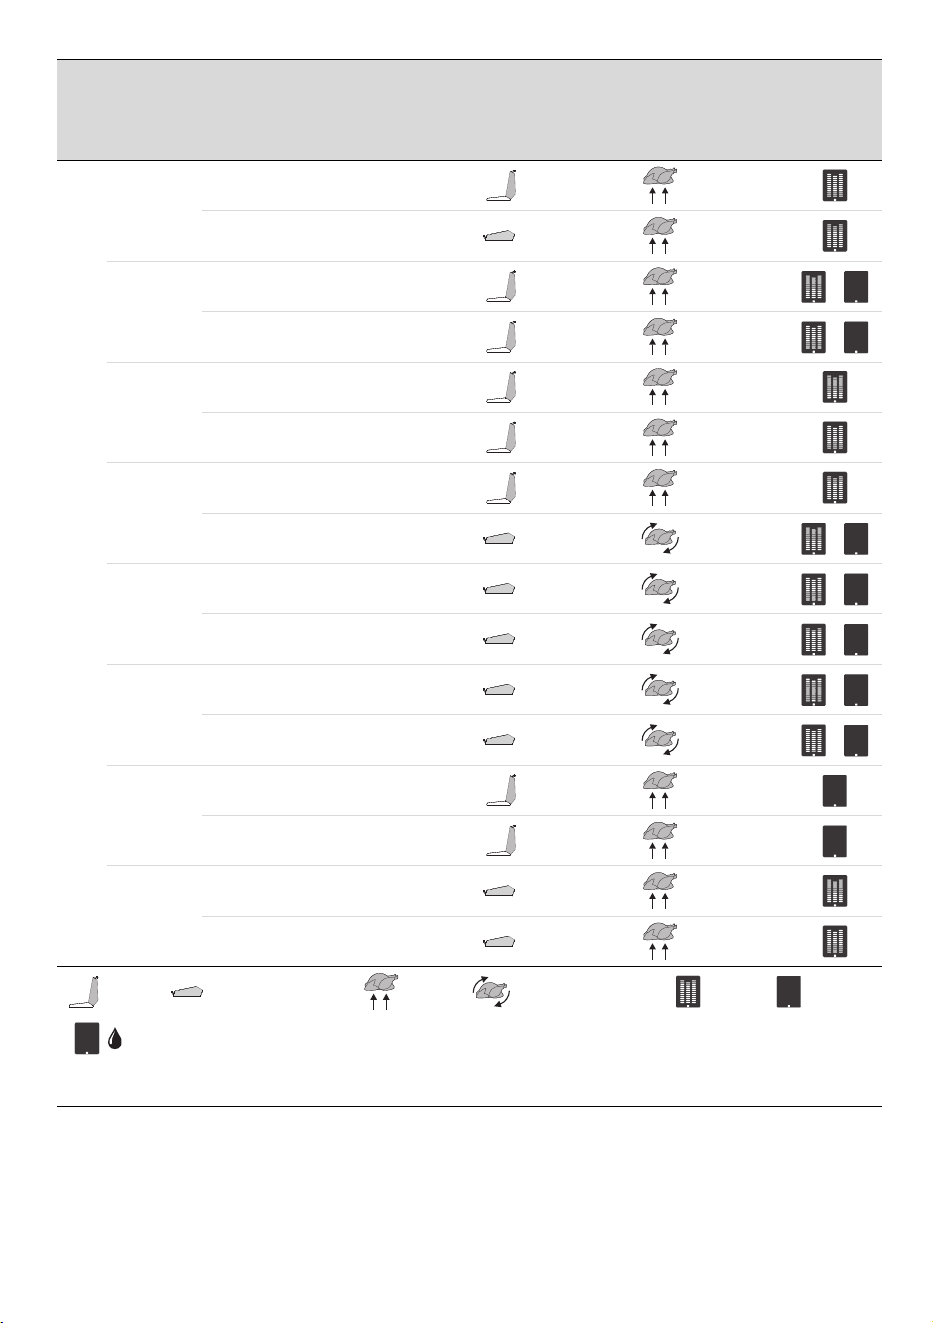
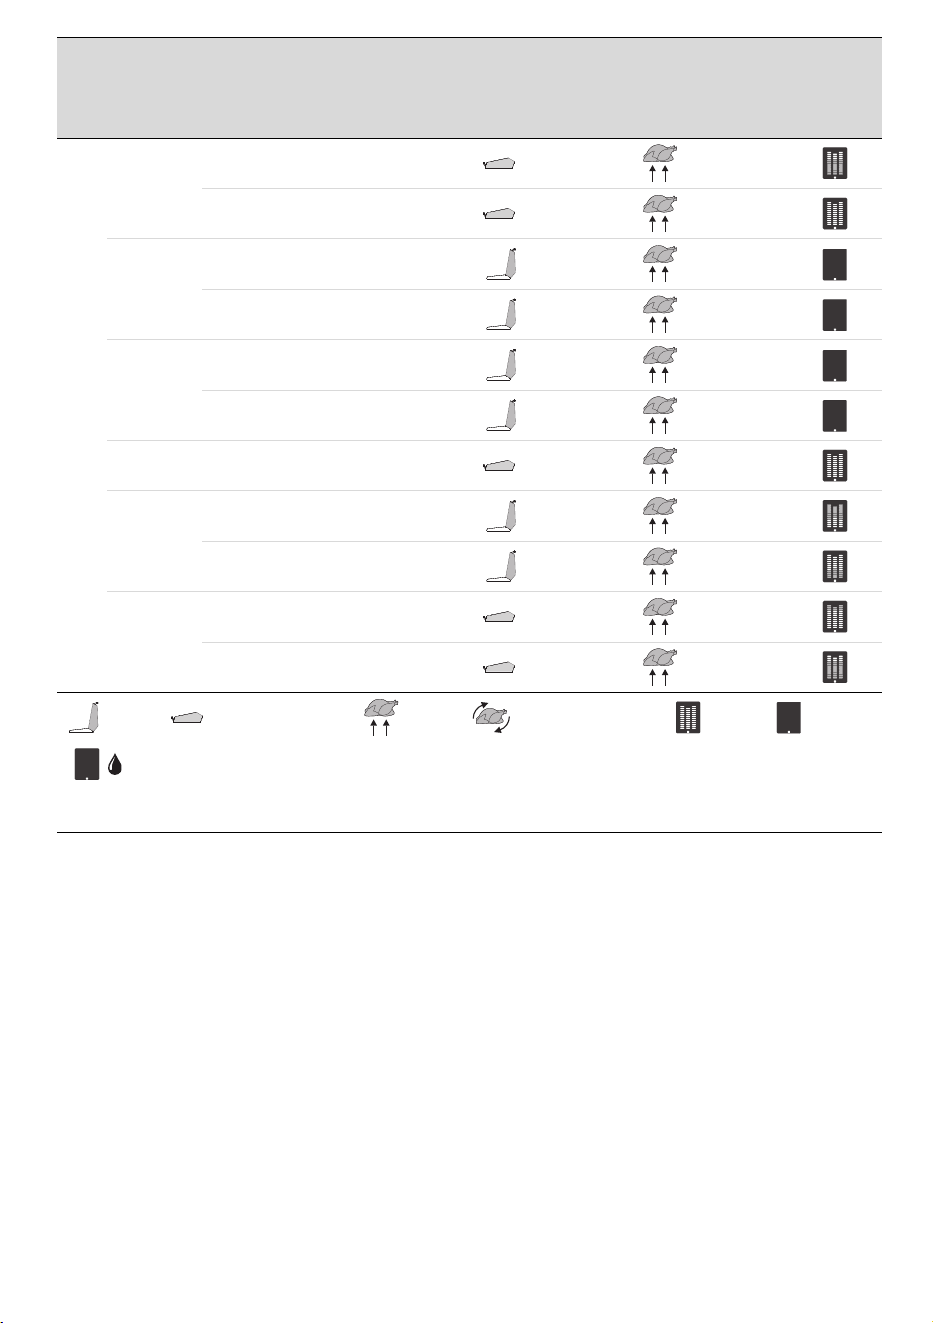
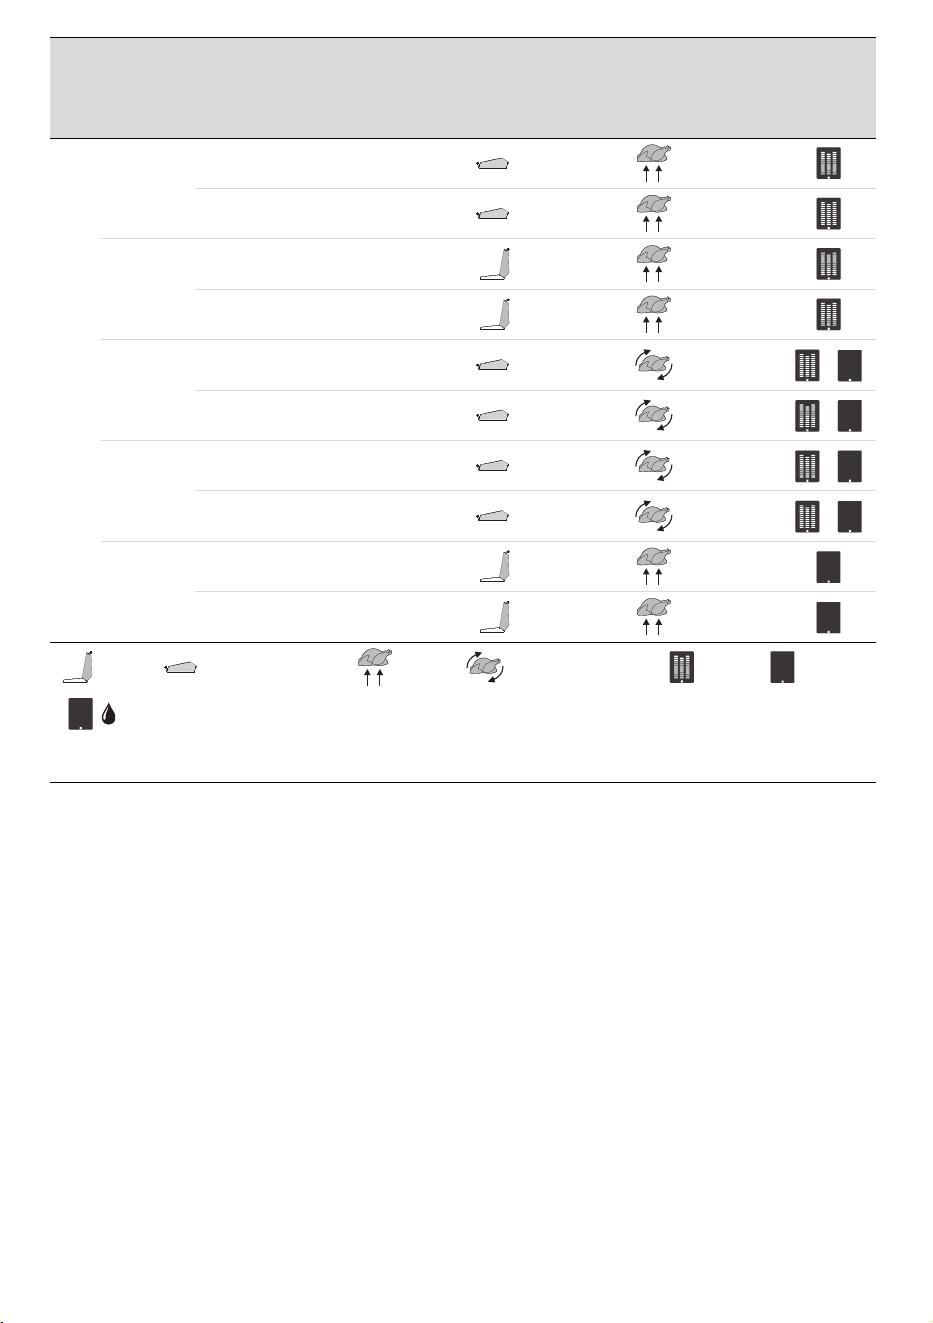
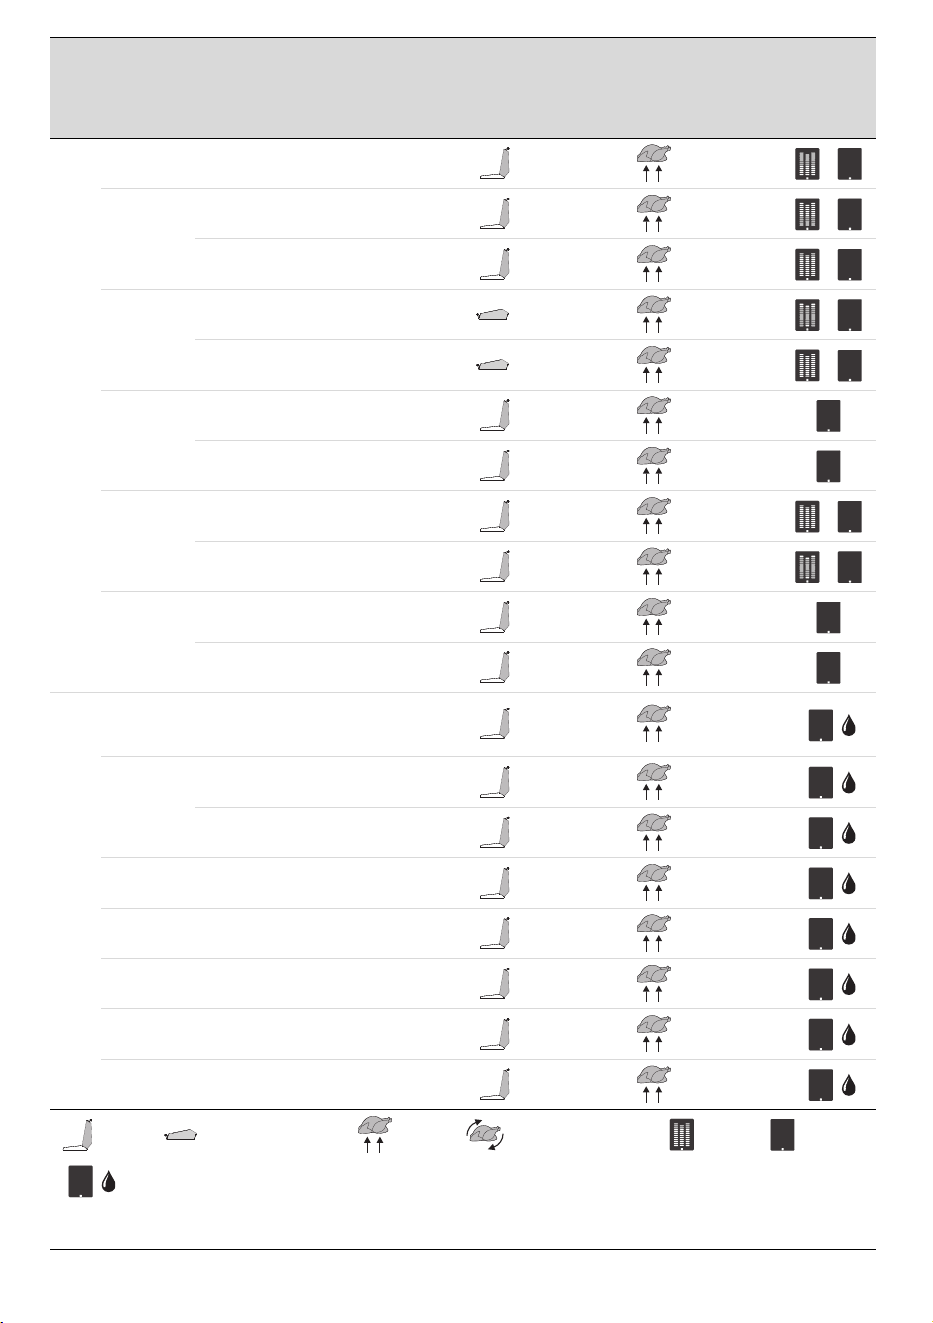
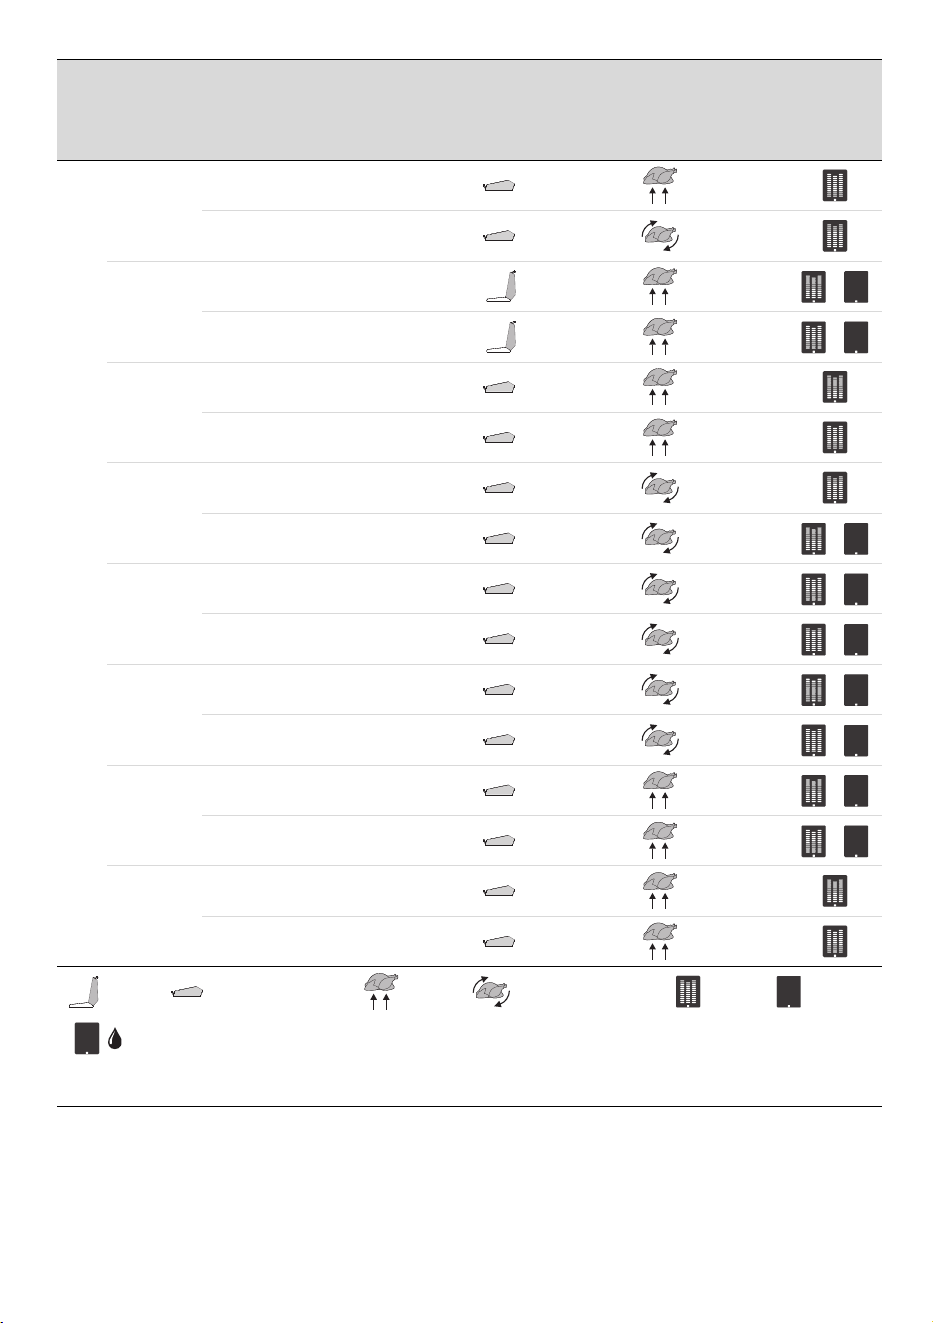
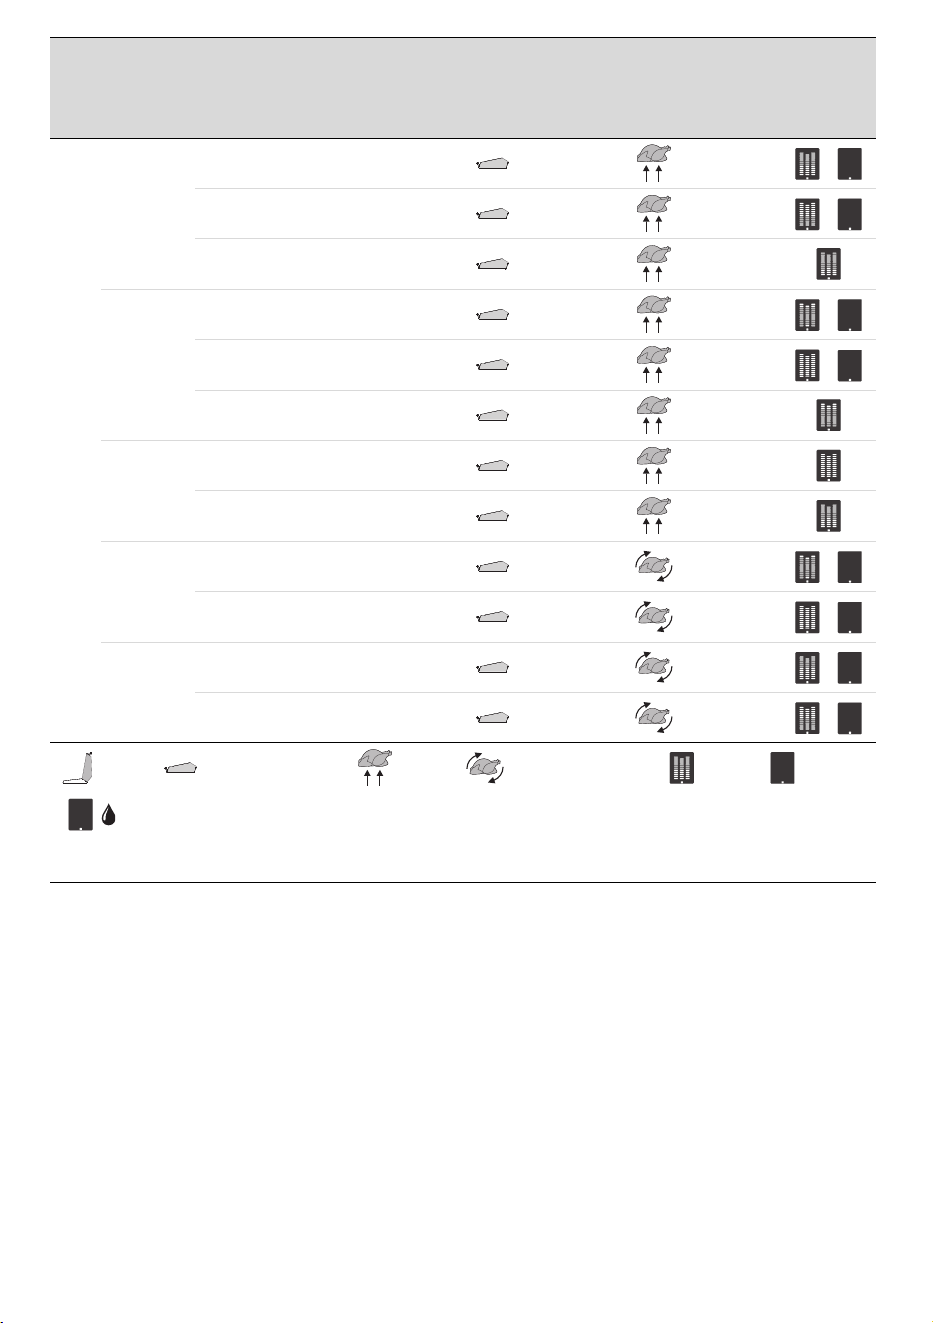
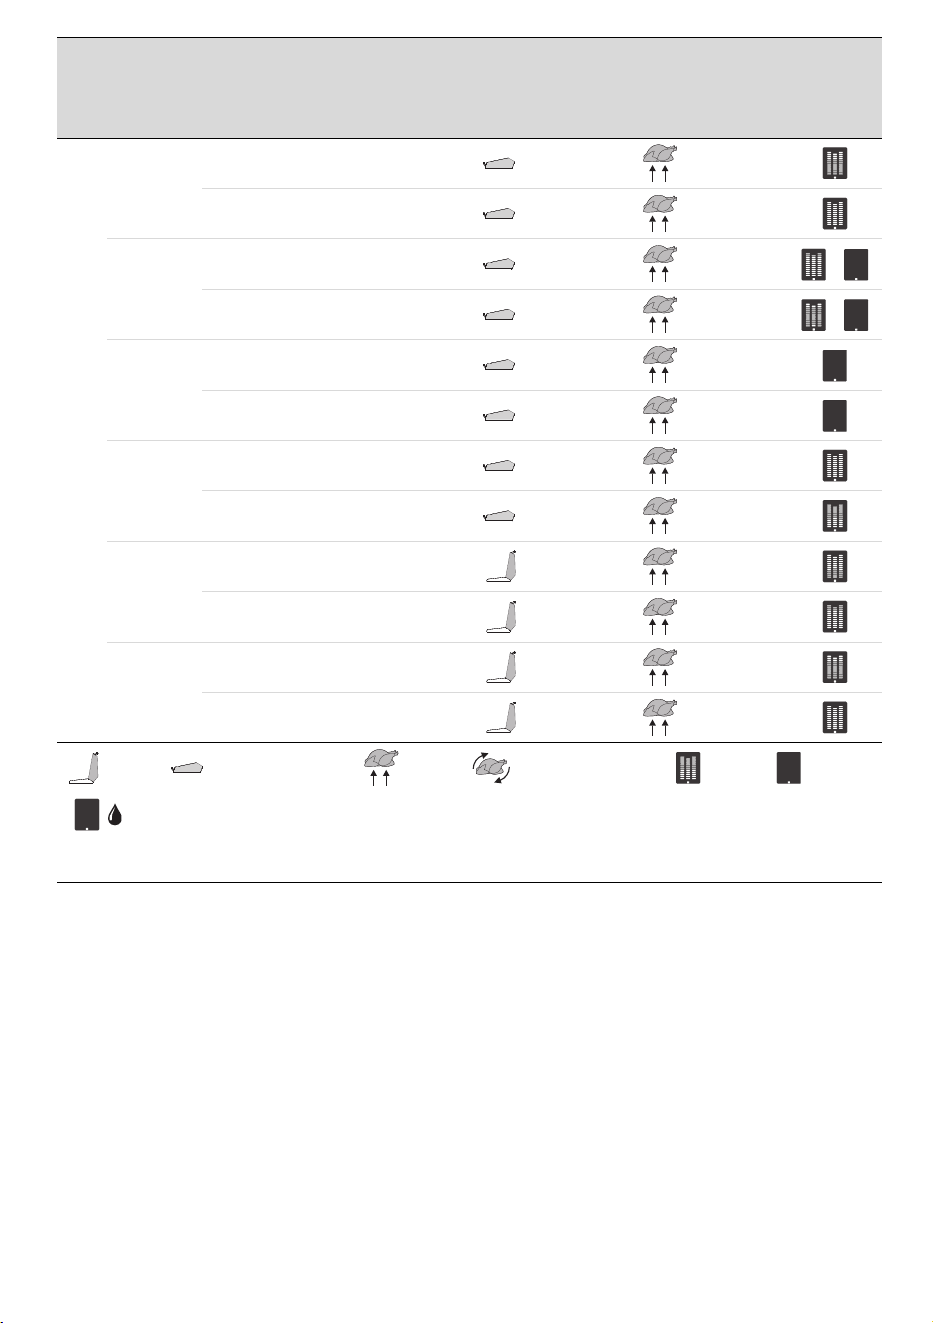
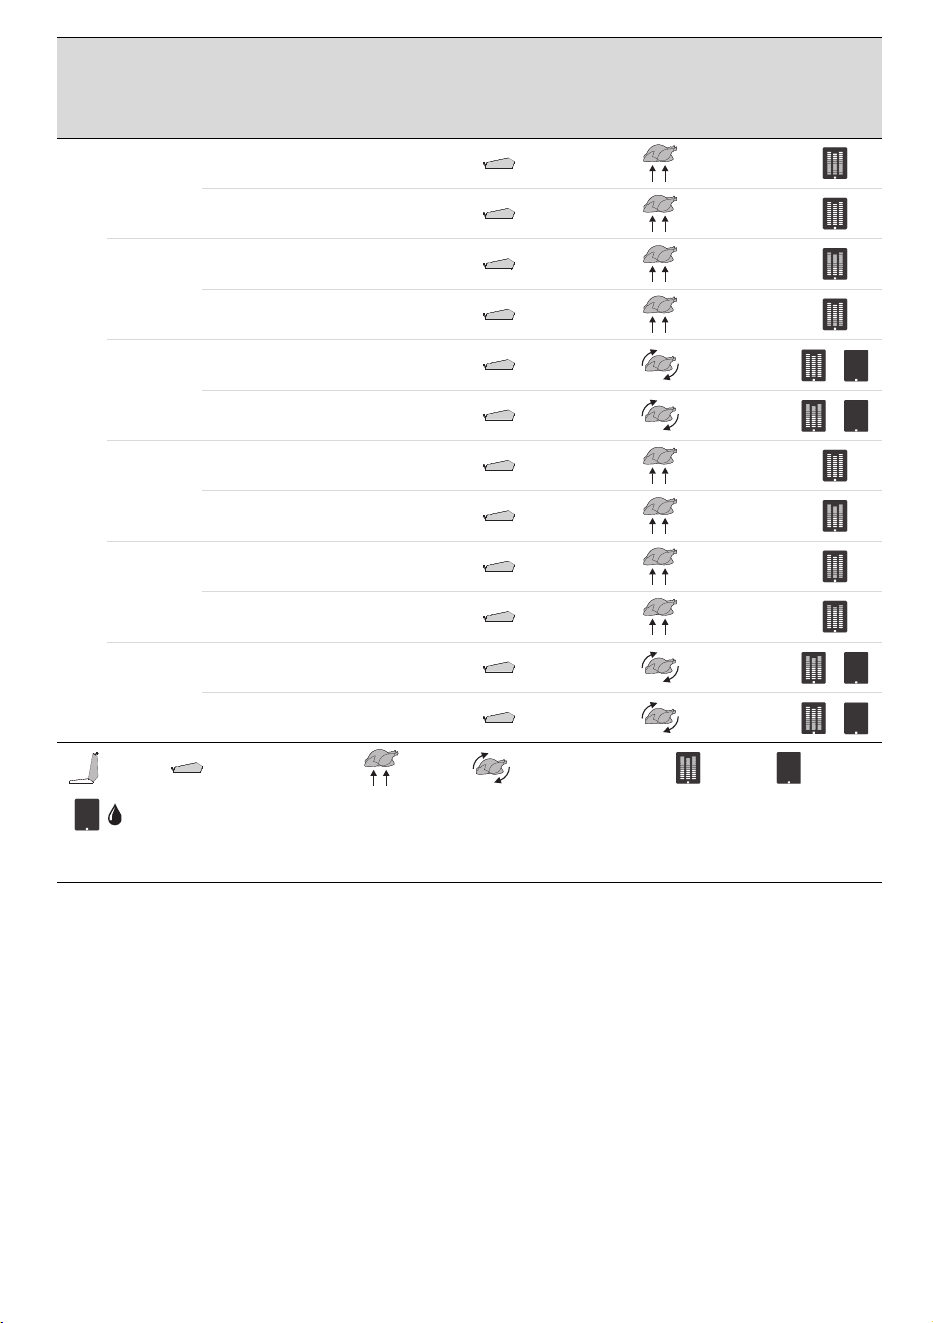
Cooking information tables
Below are illustrative cooking tables for
each individual model. The cooking times
for beef, lamb and pork are given for
medium-cooked meat. The cooking times
for poultry are given for well-cooked meat.
Before using it again, check that the
power cord is not damaged.
We recommend preheating the
appliance to the maximum setting
with the lid closed.
If cooking for over an hour at a
power level higher than 8, the lid
must be kept closed.
If cooking at a power level higher
than 8, the lid must be closed at the
end of cooking.
USE - 5191477B351/C
e
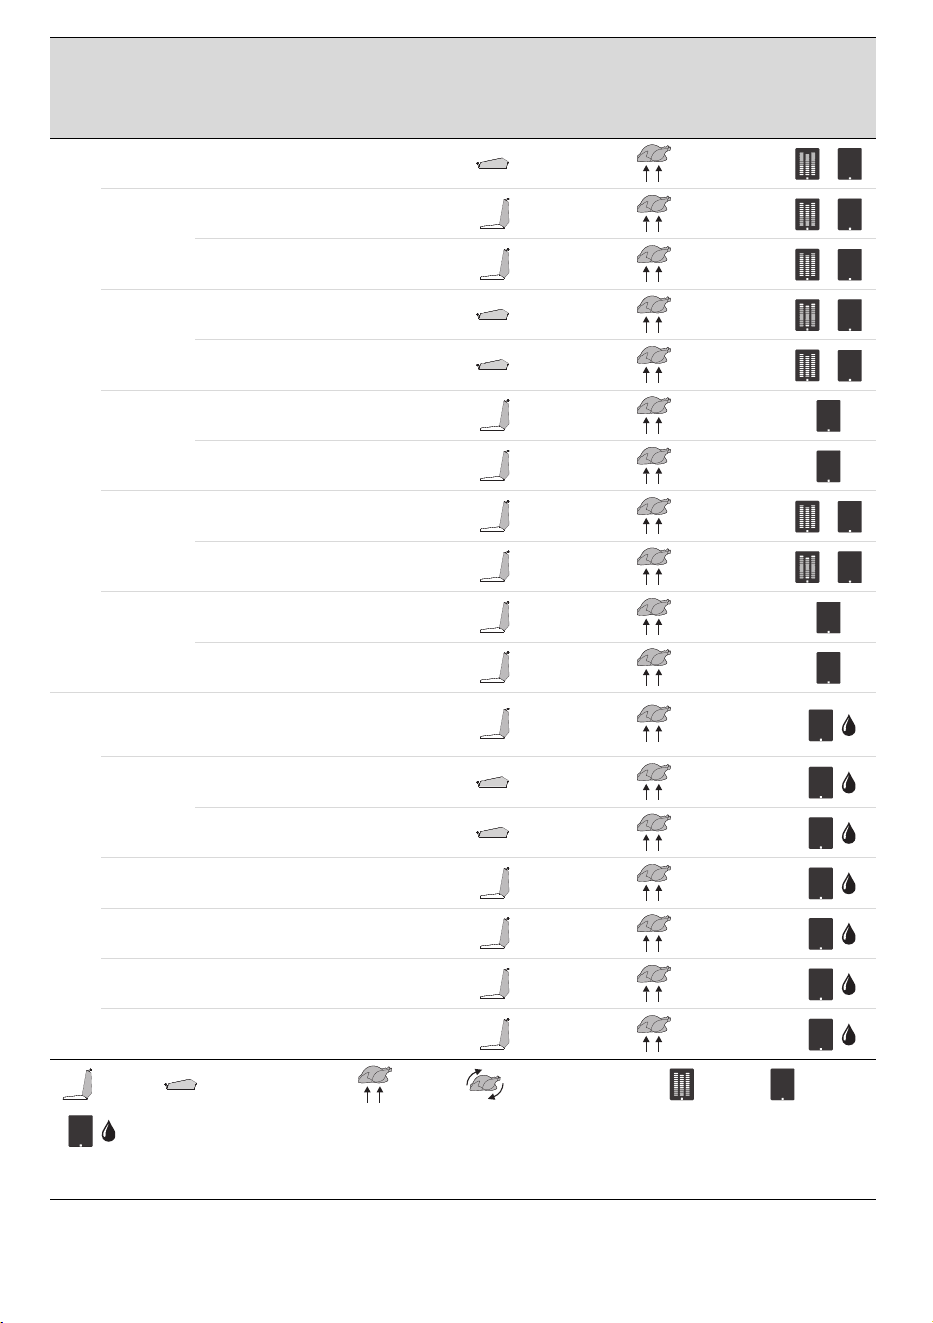
Barbecue cooking (60 model)
Category
Food
Weight
(kg)
Browning
level
(power)
Browning
time
(minutes)
Using the lid
Cooking le-
vel
(power)
Cooking
type
Cooking
time
(minutes)
Using the
grill
Beef
Beef
steaks
0.280 - - 10 9’
0.650 10 6’ 8 11’
Sausages
0.060 - - 10 9’
/
0.180 - - 10 15’
/
Ribs
0.300 - - 10 7’
0.450 10 6’ 8 9’
T-bone
steak
1 10 16’
1.5 10 10’ 7 54’
Half fillet
steak
0.800 10 8’ 6 30’
1.100 10 8’ 6 41’
Whole
fillet
1.300 10 8’ 6 37’
1.700 10 8’ 6 65’
Hamburge
rs
0.130 - - 10 6’
0.230 - - 10 10’
Meat for
Doner
kebab
0.200 - - 9 14’
0.300 - - 9 18’
open closed direct indirect open closed
After preheating, it is recommended to oil the closed Teppanyaki grill.

52 - USE 91477B351/C
Lamb
Chops
0.085 - - 10 6’
0.110 - - 10 9’
0.170 10 6’ 8 12’
Chops
0.070 - - 10 6’
0.100 - - 10 9’
0.170 10 6’ 8 12’
Steaks
0.350 - - 10 6’
0.600 10 6’ 6 12’
Fish
Whole fish
0.500 - - 10 17’
0.700 - - 10 19’
Fillets
0.100 - - 10 5’
0.250 - - 10 7’
Cubes (for
kebabs)
0.130 - - 10 10’
0.210 - - 10 14’
Lobster
(whole)
0.450 - - 10 14’
Lobster
tails
0.100 - - 10 8’
Oysters (in
their
shells)
0.070 - - 10 6’
0.100 - - 10 8’
Category
Food
Weight
(kg)
Browning
level
(power)
Browning
time
(minutes)
Using the lid
Cooking le-
vel
(power)
Cooking
type
Cooking
time
(minutes)
Using the
grill
open closed direct indirect open closed
After preheating, it is recommended to oil the closed Teppanyaki grill.
USE - 5391477B351/C
e
Pork
Chops
0.200 - - 10 9’
0.400 - - 10 14’
Sausages
0.090 - - 7 14’
0.180 - - 9 25’
Chops
0.350 - - 5 135’
0.750 - - 5 150’
Bacon
0.50 - - 8 4/5’
0.100 - - 8 4/5’
Poultry
Boneless
chicken
breast
0.160 - - 10 15’
0.300 - - 10 21’
Turkey
fillet
steaks
0.150 - - 10 11’
0.250 - - 10 16’
Grilled
chicken
(whole)
1.100 - - 8 34’
2.400 - - 8 64’
Chicken
thighs
0.090 10 5’ 7 12’
0.300 10 5’ 7 34’
Chicken
thighs
0.075 10 5’ 7 11’
0.220 10 5’ 7 22’
Cockerel
(whole)
0.600 - - 8 24’
1.100 - - 8 34’
Category
Food
Weight
(kg)
Browning
level
(power)
Browning
time
(minutes)
Using the lid
Cooking le-
vel
(power)
Cooking
type
Cooking
time
(minutes)
Using the
grill
open closed direct indirect open closed
After preheating, it is recommended to oil the closed Teppanyaki grill.
54 - USE 91477B351/C
Vegetables
Corn on
the cob
0.225 - - 10 12’
/
Courgette
s
0.200 - - 9 10’
/
0.600 - - 9 10’
/
Peppers
0.200 - - 9 19’
/
0.400 - - 9 19’
/
Onions
0.200 - - 8 12’
0.500 - - 8 16’
Aubergine
0.200 - - 9 11’
/
0.500 - - 9 11’
/
Potato
cakes
0.080 - - 8 14’
0.150 - - 8 14’
Other
Pancakes /
Banana
Pancakes
-- - 7 2’/3’
French
toast
2.5 cm - - 7 8’
4 cm - - 7 15’
Fried eggs 0.050 - - 7 2’
Omelette - - - 7 2’
Naan
bread
0.080 - - 10 2’
Piadina
(unleaven
0.100 - - 10 2’
Category
Food
Weight
(kg)
Browning
level
(power)
Browning
time
(minutes)
Using the lid
Cooking le-
vel
(power)
Cooking
type
Cooking
time
(minutes)
Using the
grill
open closed direct indirect open closed
After preheating, it is recommended to oil the closed Teppanyaki grill.
USE - 5591477B351/C
e
Barbecue cooking (90 model)
Category
Food
Weight
(kg)
Browning
level
(power)
Browning
time
(minutes)
Using the lid
Cooking le-
vel
(power)
Cooking
type
Cooking
time
(minutes)
Using the
grill
Beef
Beef
steaks
0.280 - - 10 8’
0.650 10 6’ 7 11’
Sausages
0.60 - - 10 8’
/
0.180 - - 10 13’
/
Ribs
0.200 - - 10 7’
0.300 10 6’ 6 9’
T-bone
steak
1.000 10 7’ 6 11’
1.500 10 10’ 10 + 7 * 56’
/
Half fillet
steak
0.600 10 8’ 10 + 6 * 27’
/
1.100 10 8’ 10 + 6 * 36’
/
Whole
fillet
1.000 10 8’ 10 + 6 * 42’
/
2.000 10 8’ 10 + 6 * 61’
/
Hamburge
rs
0.130 - - 10 5’
0.230 - - 10 9’
Meat for
Doner
kebab
0.200 - - 8 19’
0.300 - - 8 24’
open closed direct indirect open closed
After preheating, it is recommended to oil the closed Teppanyaki grill.
* The lower power level should be set in the zone with the grill for indirect cooking. From time to time,
the food should be rotated to ensure more even cooking.

56 - USE 91477B351/C
Lamb
Chops
0.085 - - 10 5’
/
0.110 - - 10 9’
/
0.190 10 6’ 10 11’
Chops
0.070 - - 10 5’
/
0.100 - - 10 9’
/
0.170 10 6’ 6 11’
Steaks
0.350 - - 10 6’
0.750 10 6’ 6 12’
Thighs
1.800 10 10’ 8 + 4 * 120’
/
2.200 10 10’ 8 + 4 * 145’
/
Shoulder
1.300 10 8’ 8 + 4 * 250’
/
1.600 10 8’ 8 + 4 * 295’
/
Category
Food
Weight
(kg)
Browning
level
(power)
Browning
time
(minutes)
Using the lid
Cooking le-
vel
(power)
Cooking
type
Cooking
time
(minutes)
Using the
grill
open closed direct indirect open closed
After preheating, it is recommended to oil the closed Teppanyaki grill.
* The lower power level should be set in the zone with the grill for indirect cooking. From time to time,
the food should be rotated to ensure more even cooking.
USE - 5791477B351/C
e
Fish
Whole fish
0.500 - - 10 16’
0.700 - - 10 20’
Fillets
0.100 - - 10 5’
0.240 - - 10 7’
Cubes (for
kebabs)
0.130 - - 10 8’
0.230 - - 10 10’
Lobster
(whole)
0.600 - - 10 12’
Lobster
tails
0.120 - - 10 8’
0.150 - - 10 9’
Oysters (in
their
shells)
0.050 - - 10 7’
0.075 - - 10 8’
Category
Food
Weight
(kg)
Browning
level
(power)
Browning
time
(minutes)
Using the lid
Cooking le-
vel
(power)
Cooking
type
Cooking
time
(minutes)
Using the
grill
open closed direct indirect open closed
After preheating, it is recommended to oil the closed Teppanyaki grill.
* The lower power level should be set in the zone with the grill for indirect cooking. From time to time,
the food should be rotated to ensure more even cooking.
58 - USE 91477B351/C
Pork
Chops
0.200 - - 8 13’
0.400 - - 8 25’
Sausages
0.060 - - 7 15’
0.180 - - 7 23’
Pork loin
0.500 10 7’ 10 + 7 * 45’
/
0.8 10 7’ 10 + 7 * 62’
/
Chops
0.750 - - 7 + 5 * 160’
/
2.000 - - 7 + 5 * 180’
/
Bacon
0’110 - - 9 4’ - 5’
0.200 - - 9 4’ - 5’
Category
Food
Weight
(kg)
Browning
level
(power)
Browning
time
(minutes)
Using the lid
Cooking le-
vel
(power)
Cooking
type
Cooking
time
(minutes)
Using the
grill
open closed direct indirect open closed
After preheating, it is recommended to oil the closed Teppanyaki grill.
* The lower power level should be set in the zone with the grill for indirect cooking. From time to time,
the food should be rotated to ensure more even cooking.

USE - 5991477B351/C
e
Poultry
Boneless
chicken
breast
0.160 - - 10 15’
0.310 - - 10 23’
Turkey
fillet
steaks
0.150 - - 10 10’
0.250 - - 10 14’
Grilled
chicken
(whole)
1.000 10 8’ 10 + 7 * 62’
/
3.000 10 8’ 10 + 7 * 165’
/
Chicken
thighs
0.100 10 4’ 10 + 7 * 9’
0.300 10 4’ 10 + 7 * 30’
Chicken
thighs
0.075 10 4’ 10 + 7 * 14’
0.220 10 4’ 10 + 7 * 48’
Cockerel
(whole)
0.500 10 6’ 10 + 7 * 36’
/
1.500 10 6’ 10 + 7 * 58’
/
Category
Food
Weight
(kg)
Browning
level
(power)
Browning
time
(minutes)
Using the lid
Cooking le-
vel
(power)
Cooking
type
Cooking
time
(minutes)
Using the
grill
open closed direct indirect open closed
After preheating, it is recommended to oil the closed Teppanyaki grill.
* The lower power level should be set in the zone with the grill for indirect cooking. From time to time,
the food should be rotated to ensure more even cooking.
60 - USE 91477B351/C
Vegetables
Corn on
the cob
0.225 - - 10 12’
/
Courgette
s
0.200 - - 10 8’
/
0.800 - - 10 8’
/
Peppers
0.200 - - 8 24’
/
0.800 - - 8 24’
/
Onions
0.200 - - 8 11’
0.800 - - 8 14’
Aubergine
0.300 - - 10 9’
/
0.900 - - 10 9’
/
Potato
cakes
0.080 - - 8 14’
0.150 - - 8 14’
Other
Pancakes /
Banana
Pancakes
-- 8 2’
French
toast
2.5 cm 7 8’
4 cm - - 7 12’
Fried eggs 0.050 - - 8 2’
Scrambled
eggs
0.150 - - 6 2’
Omelette 0.170 - - 7 3’
Naan
bread
0.080 - - 10 2’
Piadina
(unleaven
0.100 - - 10 2’
Category
Food
Weight
(kg)
Browning
level
(power)
Browning
time
(minutes)
Using the lid
Cooking le-
vel
(power)
Cooking
type
Cooking
time
(minutes)
Using the
grill
open closed direct indirect open closed
After preheating, it is recommended to oil the closed Teppanyaki grill.
* The lower power level should be set in the zone with the grill for indirect cooking. From time to time,
the food should be rotated to ensure more even cooking.
USE - 6191477B351/C
e
Barbecue cooking (120 model)
Category
Food
Weight
(kg)
Browning
level
(power)
Browning
time
(minutes)
Using the lid
Cooking le-
vel
(power)
Cooking
type
Cooking
time
(minutes)
Using the
grill
Beef
Beef
steaks
0.280 - - 10 8’
0.650 10 6’ 8 + 0 * 12’
Sausages
0.060 - - 10 8’
/
0.180 - - 10 13’
/
Ribs
0.200 - - 10 7’
0.300 10 6’ 8 7’
T-bone
steak
0.750 10 10’ 8 + 0 * 15’
1.100 10 10’ 8 + 0 * 59’
/
Half fillet
steak
0.800 10 8’ 8 + 0 * 33’
/
1.100 10 8’ 8 + 0 * 45’
/
Whole
fillet
1.300 10 8’ 8 + 0 * 41’
/
2.100 10 8’ 8 + 0 * 65’
/
Hamburge
rs
0.130 - - 10 6’
/
0.230 - - 10 9’
/
Meat for
Doner
kebab
0.200 - - 8 18’
0.300 - - 8 23’
open closed direct indirect open closed
After preheating, it is recommended to oil the closed Teppanyaki grill.
* The lower power level should be set on the central cooking zone, while the higher power level should
be used on the left and right cooking zones.
62 - USE 91477B351/C
Lamb
Chops
0.085 - - 10 5’
/
0.110 - - 10 9’
/
0.190 10 8’ 10 9’
Chops
0.070 - - 10 5’
/
0.100 - - 10 9’
/
0.170 10 6’ 8 9’
Steaks
0.350 - - 10 6’
0.750 10 6’ 10 15’
Thighs
1.800 10 8’ 8 + 1 * 110’
/
2,200 10 8’ 8 + 1 * 130’
/
Shoulder
1.300 10 8’ 8 + 1 * 240’
/
1.800 10 8’ 8 + 1 * 280’
/
Category
Food
Weight
(kg)
Browning
level
(power)
Browning
time
(minutes)
Using the lid
Cooking le-
vel
(power)
Cooking
type
Cooking
time
(minutes)
Using the
grill
open closed direct indirect open closed
After preheating, it is recommended to oil the closed Teppanyaki grill.
* The lower power level should be set on the central cooking zone, while the higher power level should
be used on the left and right cooking zones.
USE - 6391477B351/C
e
Fish
Whole fish
0.300 - - 10 12’
0.600 - - 10 18’
Fillets
0.120 - - 10 5’
/
0.140 - - 10 7’
/
Cubes (for
kebabs)
0.130 - - 10 8’
0.230 - - 10 11’
Lobster
(whole)
0.400 - - 10 10’
0.600 - - 10 12’
Lobster
tails
0.120 - - 10 8’
0.150 - - 10 9’
Oysters (in
their
shells)
0.050 - - 10 7’
0.120 - - 10 10’
Category
Food
Weight
(kg)
Browning
level
(power)
Browning
time
(minutes)
Using the lid
Cooking le-
vel
(power)
Cooking
type
Cooking
time
(minutes)
Using the
grill
open closed direct indirect open closed
After preheating, it is recommended to oil the closed Teppanyaki grill.
* The lower power level should be set on the central cooking zone, while the higher power level should
be used on the left and right cooking zones.

64 - USE 91477B351/C
Pork
Chops
0.200 - - 8 14’
0.400 - - 8 24’
Sausages
0.060 - - 7 14’
0.180 - - 7 25’
Pork loin
0.900 10 8’ 8 + 0 * 55’
/
1.300 10 8’ 8 + 0 * 62’
/
Chops
0.750 - - 8 + 1 * 160’
/
2.000 - - 8 + 1 * 180’
/
Bacon
0’110 - - 9 4’ - 5’
0.200 - - 9 4’ - 5’
Category
Food
Weight
(kg)
Browning
level
(power)
Browning
time
(minutes)
Using the lid
Cooking le-
vel
(power)
Cooking
type
Cooking
time
(minutes)
Using the
grill
open closed direct indirect open closed
After preheating, it is recommended to oil the closed Teppanyaki grill.
* The lower power level should be set on the central cooking zone, while the higher power level should
be used on the left and right cooking zones.
USE - 6591477B351/C
e
Poultry
Boneless
chicken
breast
0.140 - - 10 12’
0.340 - - 10 21’
Turkey
fillet
steaks
0.150 - - 10 8’
0.250 - - 10 12’
Grilled
chicken
(whole)
1.200 10 8’ 8 + 0 * 71’
/
3.200 10 8’ 8 + 0 * 136’
/
Chicken
thighs
0.100 10 4’ 6 19’
0.200 10 4’ 6 25’
Chicken
thighs
0.150 10 4’ 5 41’
0.210 10 4’ 5 61’
Cockerel
(whole)
0.500 10 6’ 8 + 0 * 36’
/
1.500 10 6’ 8 + 0 * 59’
/
Category
Food
Weight
(kg)
Browning
level
(power)
Browning
time
(minutes)
Using the lid
Cooking le-
vel
(power)
Cooking
type
Cooking
time
(minutes)
Using the
grill
open closed direct indirect open closed
After preheating, it is recommended to oil the closed Teppanyaki grill.
* The lower power level should be set on the central cooking zone, while the higher power level should
be used on the left and right cooking zones.
66 - USE 91477B351/C
Vegetables
Corn on
the cob
0.225 - - 10 12’
/
Courgette
s
0.200 - - 10 8’
/
0.800 - - 10 8’
/
Peppers
0.200 - - 8 24’
/
0.800 - - 8 24’
/
Onions
0.200 - - 8 11’
0.800 - - 8 14’
Aubergine
0.300 - - 10 9’
/
0.900 - - 10 9’
/
Potato
cakes
0.080 - - 8 14’
0.150 - - 8 14’
Other
Pancakes /
Banana
Pancakes
-- 8 2’
French
toast
2.5 cm - - 7 8’
4 cm 7 12’
Fried eggs 0.050 - - 8 2’
Omelette 0.170 - - 7 3’
Naan
bread
0.080 - - 10 2’
Piadina
(unleaven
0.100 - - 10 2’
Category
Food
Weight
(kg)
Browning
level
(power)
Browning
time
(minutes)
Using the lid
Cooking le-
vel
(power)
Cooking
type
Cooking
time
(minutes)
Using the
grill
open closed direct indirect open closed
After preheating, it is recommended to oil the closed Teppanyaki grill.
* The lower power level should be set on the central cooking zone, while the higher power level should
be used on the left and right cooking zones.
CLEANING AND MAINTENANCE - 6791477B351/C
e
CLEANING AND MAINTENANCE
Cleaning the appliance
Cleaning the surfaces
To keep the surfaces in good condition, they
should be cleaned regularly after use. Let
them cool first.
When cleaning or polishing stainless steel,
always follow the original finish lines.
Ordinary daily cleaning
Always and only use specific products that
do not contain abrasives or chlorine-based
acids.
Pour the product onto a damp cloth and
wipe the surface, rinse thoroughly and dry
with a soft cloth or a microfibre cloth.
Food stains or residues
Use normal, non-abrasive products and a
wooden or plastic tool, if necessary. Rinse
thoroughly and dry with a soft cloth or a
microfibre cloth.
Do not allow residues of sugary foods (such
as jam) to set inside the oven. If left to set
for too long, they might damage the enamel
lining of the oven.
Racks
For best results, clean the grids while they
are still warm.
Wearing heat-resistant gloves, scrub them
with a brass-bristle brush to remove any
food residue. Complete cleaning by
washing the grills with a degreasing
detergent, rinse and dry thoroughly.
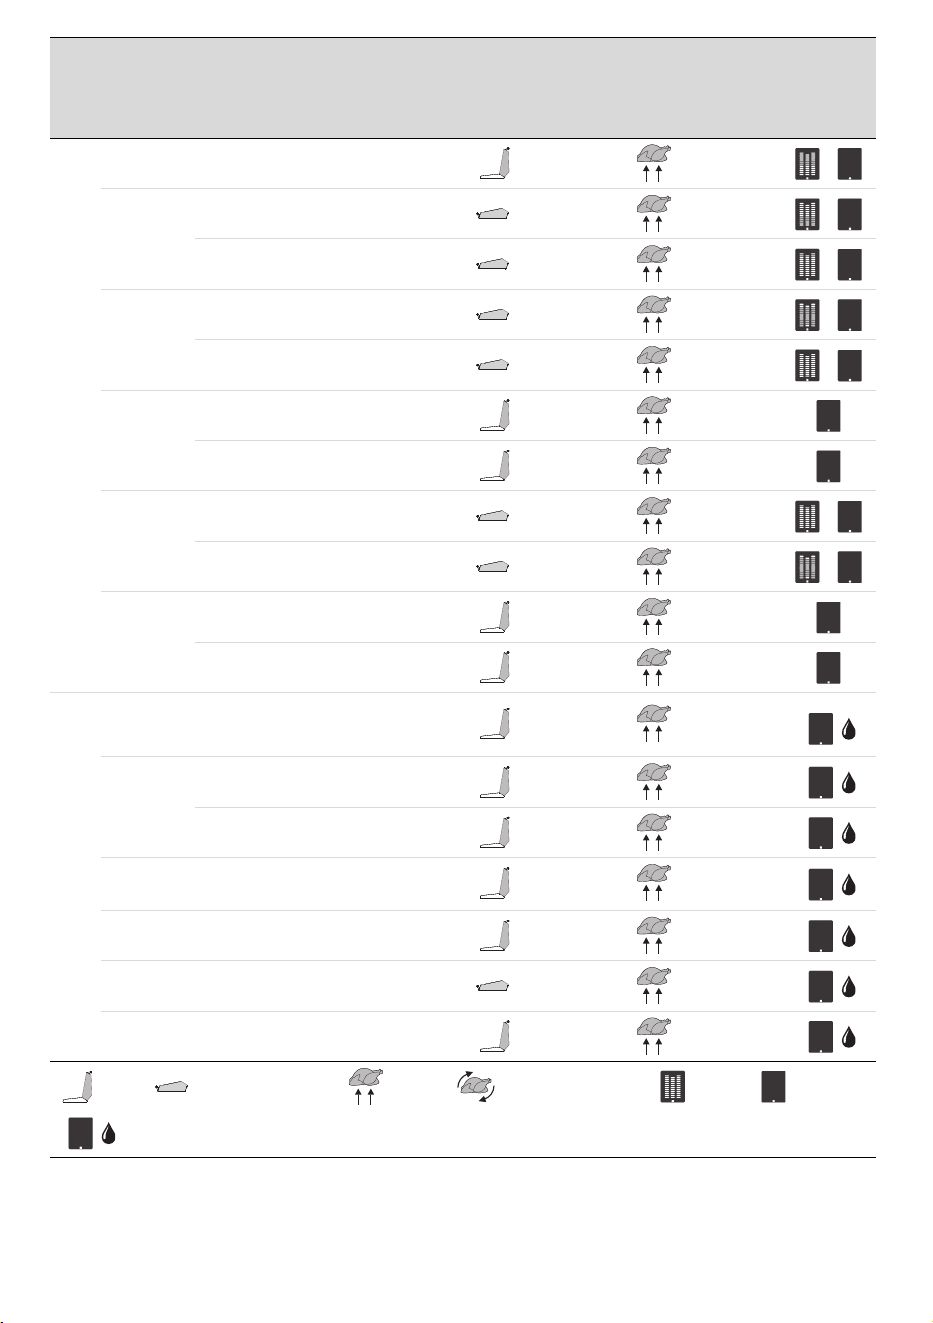
Removing the grease drip-tray
Remove the racks, lift the tilting heating
elements, and remove the support brackets
for the elements (if present).
1. Remove the racks from the indicated
position as shown in the figure.
2. Lift the heating elements until they stop.
3. Remove the heating element support
brackets (1) and then remove the grease
drip-trays (2).
Removing the lid (only on the 90 and 120
models)
Unscrew the screws, remove the steel
brackets, and then the cover.
See General safety instructions.
Before cleaning, wait for the
appliance to cool down completely.
Following the removal of the grease
drip-tray, it is possible to clean the
internal basin.
Before cleaning, wait for the
appliance to cool down completely.
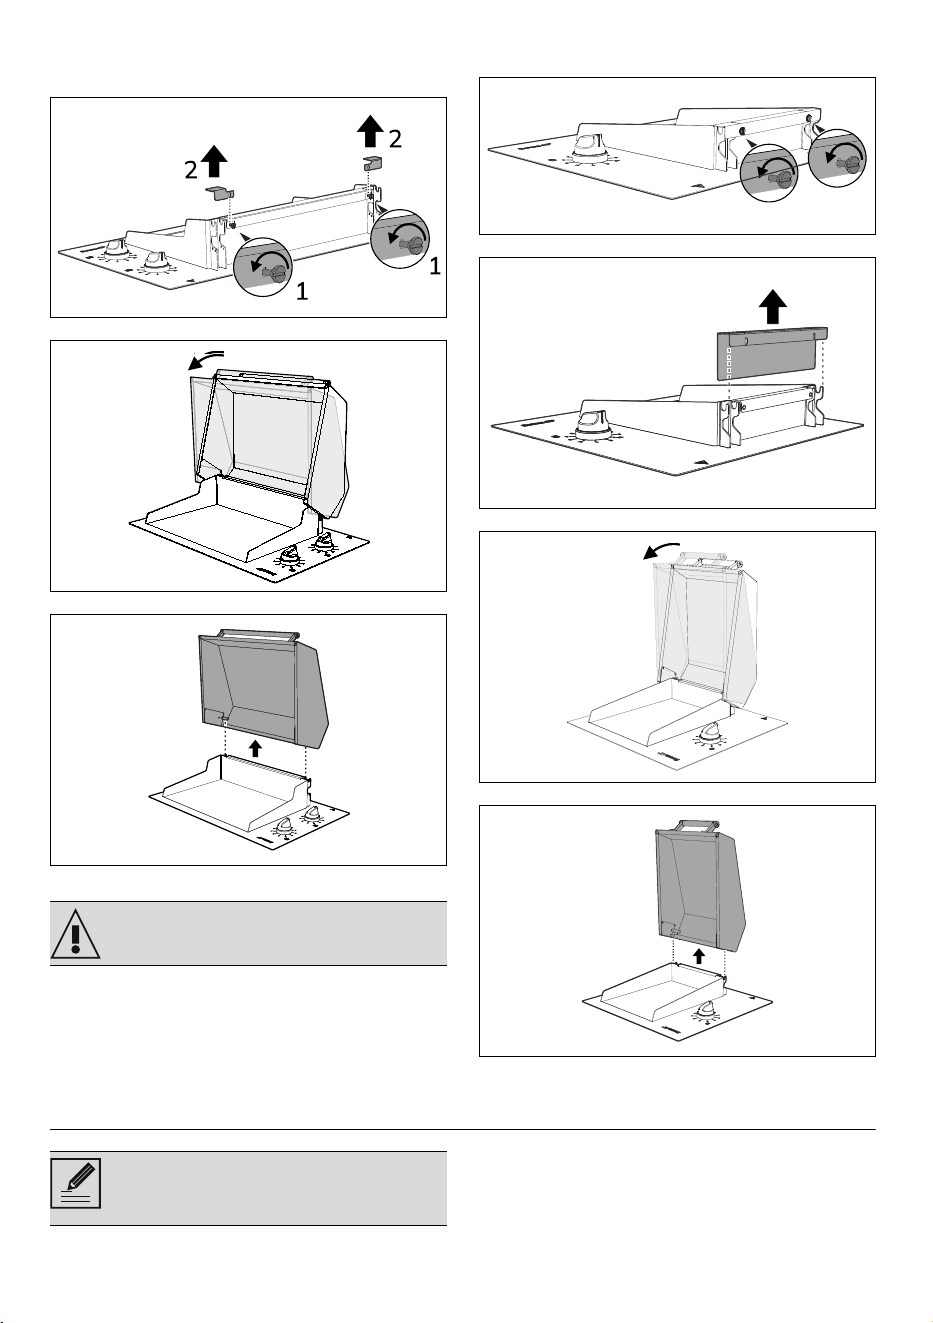
68 - INSTALLATION 91477B351/C
1. Unscrew the screws (1) on the back of
the appliance using a coin, and remove
the steel brackets (2).
2. Slightly tilt the lid into a vertical position.
3. Lift the lid upwards to remove it.
Removing the lid (only on 60 model)
Unscrew the screws, remove the steel
brackets, and then the cover.
1. Unscrew the screws on the back of the
appliance using a coin..
2. Remove the steel brackets.
3. Slightly tilt the lid into a vertical position.
4. Lift the lid upwards to remove it.
INSTALLATION
Before cleaning, wait for the
appliance to cool down completely.
The appliance must be installed by a
qualified technician and according
to the regulations in force.
INSTALLATION - 6991477B351/C
e
Electrical connection
General information
Check the mains characteristics against the
data indicated on the plate.
The identification plate bearing the
technical data, serial number and brand
name is visibly positioned on the appliance.
Do not remove this plate for any reason.
The appliance must be connected to ground
using a wire that is at least 20 mm longer
than the other wires.
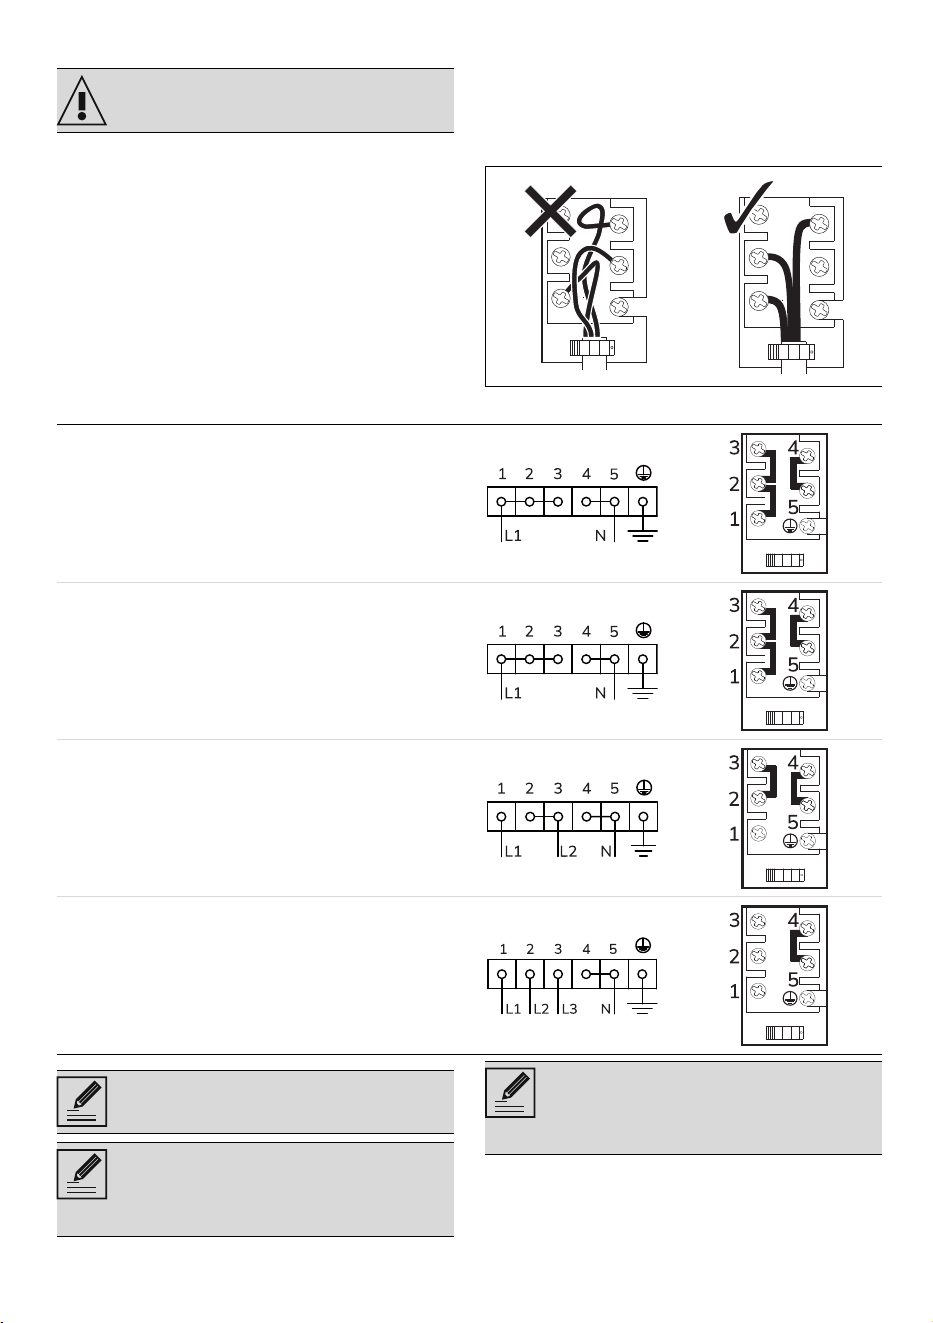
Terminal block connection
Arrange the cables in an orderly manner to
avoid overlapping or contact with any
jumpers. The cables must be of the correct
length to avoid build-up/twisting inside the
terminal box.
The appliance can work in the following modes:
Fixed connection
Fit the power line with an all-pole circuit
breaker with a contact separation distance
sufficient to provide complete disconnection
See General safety instructions.
220-240 V ~
3 x 1.5 mm ²
three-core cable
only models
60 and 90
220-240 V ~
3 x 2.5 mm ²
three-core cable
only model 120
380-415 V 2N~
4 x 2,5 mm ²
four-core cable
only model 120
380-415 V 3N~
5 x 1.5 mm ²
five-core cable
only model 120
The values indicated refer to the
cross-section of the internal lead.
The power cables are sized taking
into account the coincidence factor
(in compliance with standard EN
60335-2-6).
Always use the supplied jumper for
each connection, if any. The
connection between terminals 4 and
5 must always be made.
70 - INSTALLATION 91477B351/C
in category III overvoltage conditions,
pursuant to installation regulations.
For the Australian/New Zealand market:
The circuit breaker incorporated in the fixed
connection must comply with AS/NZS 3000.
Connection with plug and socket
Make sure that the plug and socket are of
the same type.
Avoid using adapters, gang sockets or
shunts as these could cause overheating
and a risk of burns.
Section cut from the countertop
Safety instructions for positioning and
installation
• Installation can be carried out on various
materials such as masonry, metal, solid
wood or plastic laminated wood as long
as they are heat resistant (>90°C).
• Veneers, adhesives or plastic coatings
on adjacent furniture should be
temperature-resistant (>90°C),
otherwise they might warp over time.
• If the unit does not have the required
cut-out, it must be made through
carpentry and/or masonry work, to be
carried out by a qualified technician.
• Respect the minimum clearances for the
cut-out at the rear, as indicated in the
installation instructions.
• To ensure the long-term integrity of the
worktop, follow the manufacturer’s
instructions to ensure the minimum
radius is maintained and check if any
reinforcements are necessary.
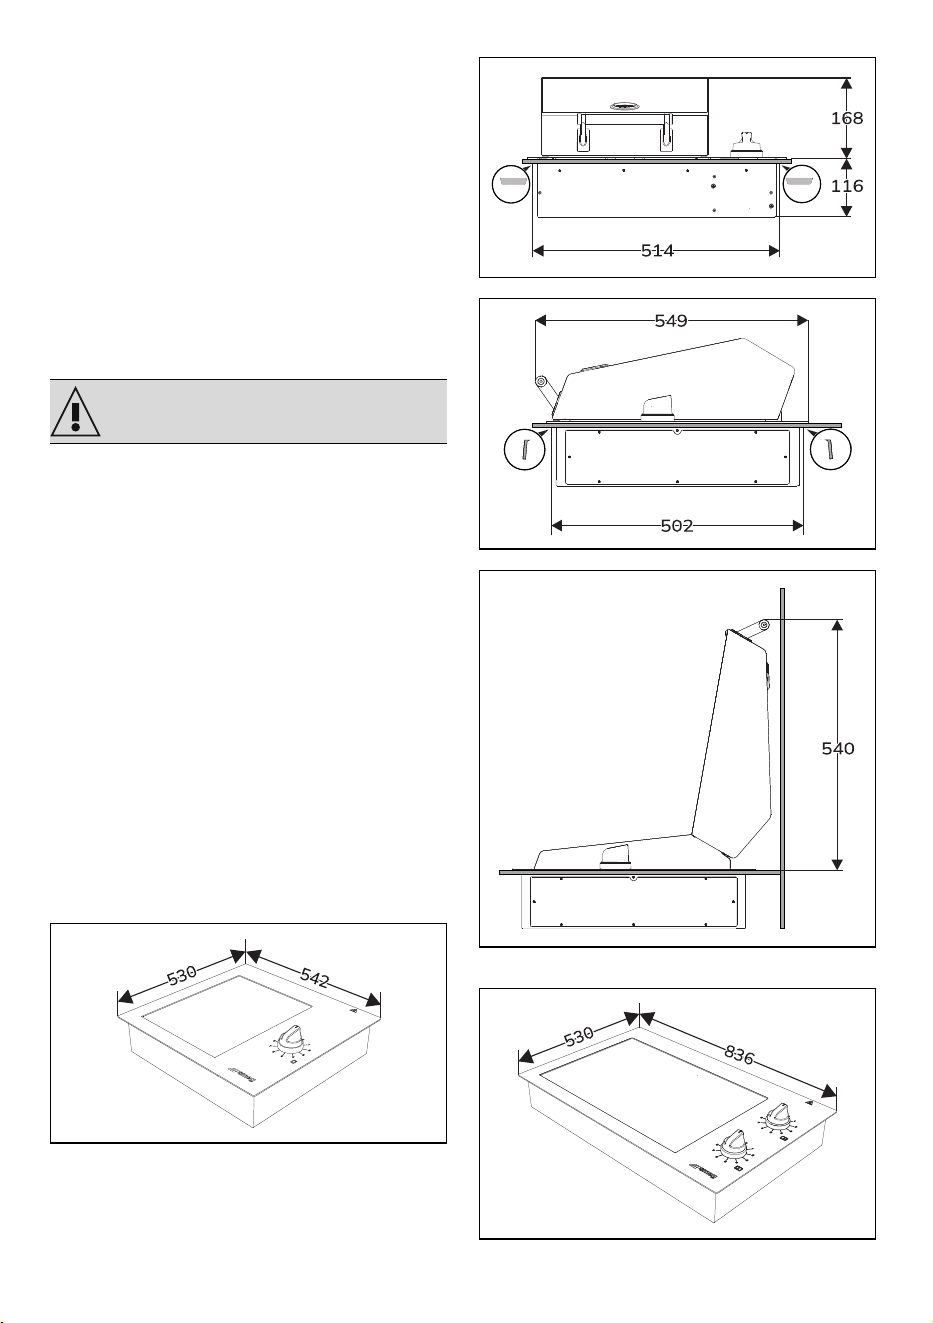
Appliance overall dimensions (mm)
BBQE60X
BBQE90X
See General safety instructions.
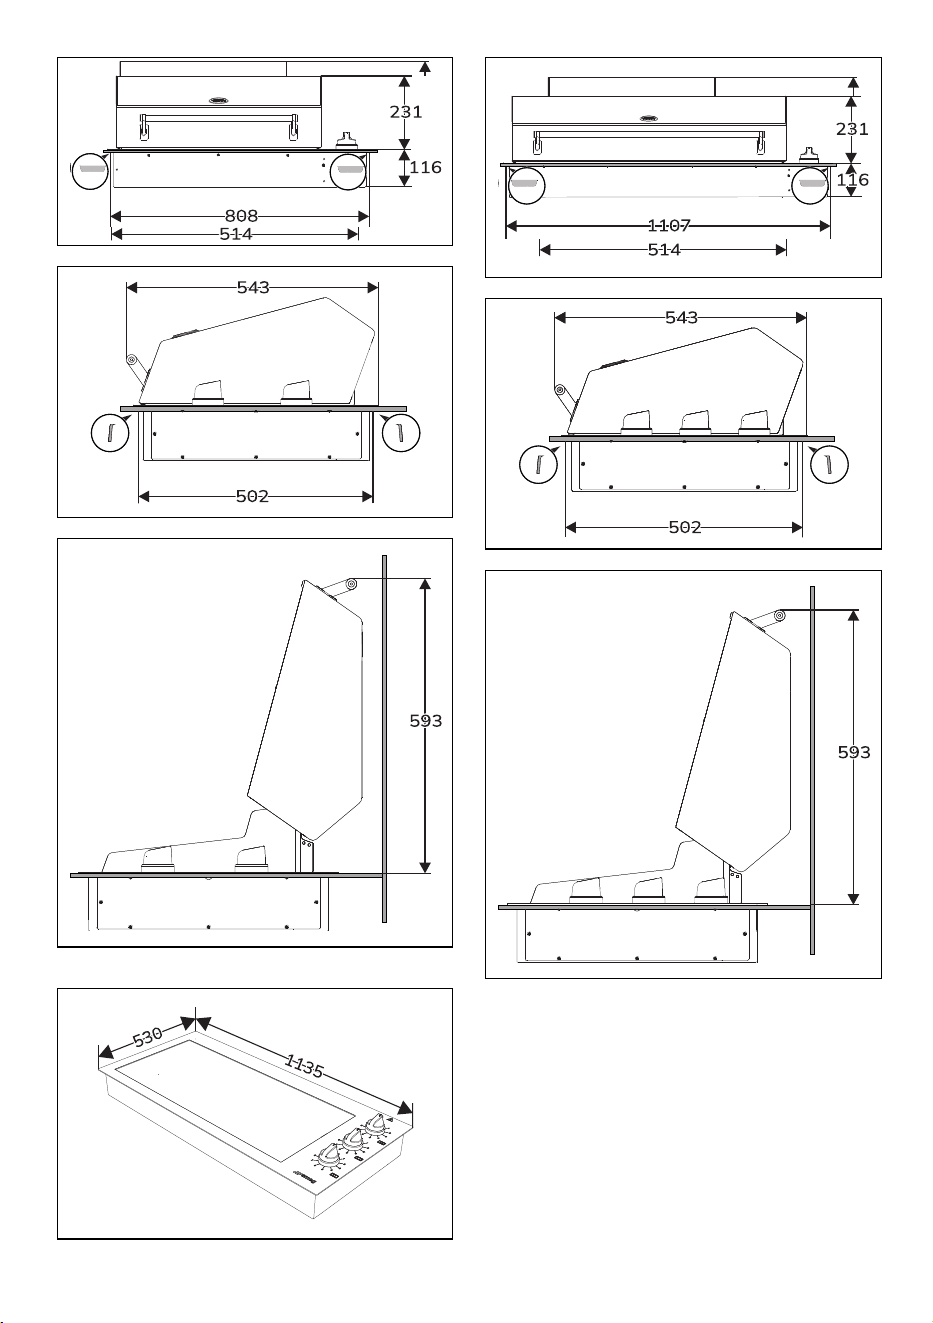
INSTALLATION - 7191477B351/C
e
BBQE12X
72 - INSTALLATION 91477B351/C
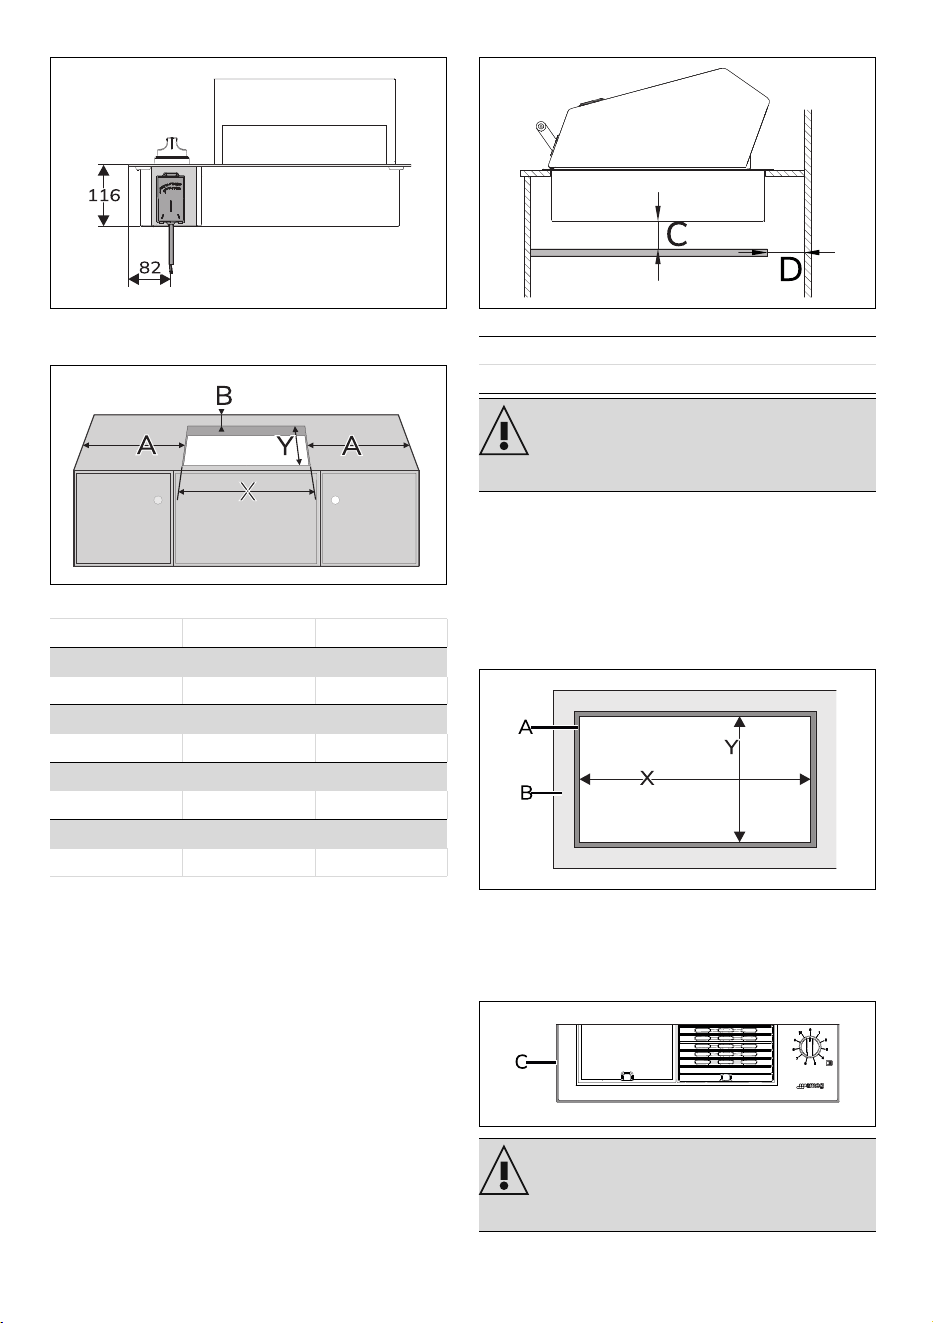
Electrical connection position (mm)
Built-in cabinet dimensions (mm)
Built-in under the barbecue
If there are other units below the appliance,
a double wooden base must be installed at
a minimum distance of 70 mm from the
underside of the appliance to prevent
accidental contact. The double-layer base
may only be removed using special tools.
Work top seal
To prevent liquid from seeping between the
appliance frame and the worktop, apply the
supplied adhesive seal along the entire
perimeter of the worktop.
1. Refer to the dimensions shown in the
diagram, ensuring that all sides of the
inner seal (A) are flush with the cut-out.
2. Use light pressure to make the seal stick
to the edge around the hole cut in the
worktop (B).
3. Carefully trim the surplus away from
edge (C) beyond the seal.
BBQE60X BBQE90X BBQE12X
X (mm)
517 - 522 811 - 816 1110 - 1115
Y (mm)
505 - 510 505 - 510 505 - 510
A (mm)
min. 200 min. 200 min. 200
B (mm)
min. 78 min. 78 min. 78
C min. 70 mm
D max. 50 mm
Failure to install the double-layer
wooden base exposes the user to
possible accidental contact with
sharp or hot parts.
Do not use silicone to secure the
hob. This would make it impossible
to remove the hob without
damaging it.

INSTALLATION - 7391477B351/C
e
Instructions for the installer
• If you use a plug (if present) to connect
to the power supply, the plug must be
accessible after installation.
• Do not bend or trap the power cable.
• The appliance must be installed
according to the installation diagrams.
• If the appliance does not work correctly
after having carried out all the checks,
contact your local Authorised Service
Centre.
• Once the appliance has been installed,
please explain to the user how to use it
correctly.