TACX
®
ALPINE
Owner’s Manual

© 2025 Garmin Ltd. or its subsidiaries
All rights reserved. Under the copyright laws, this manual may not be copied, in whole or in part, without the written consent of Garmin. Garmin reserves the right to change
or improve its products and to make changes in the content of this manual without obligation to notify any person or organization of such changes or improvements. Go to
www.garmin.com for current updates and supplemental information concerning the use of this product.
Garmin
®
, the Garmin Logo, and Tacx
®
are trademarks of Garmin Ltd. or its subsidiaries, registered in the USA and other countries. These trademarks may not be used without the
express permission of Garmin.
The BLUETOOTH
®
word mark and logos are owned by the Bluetooth SIG, Inc. and any use of such marks by Garmin is under license. Other trademarks and trade names are those of
their respective owners.
This product is ANT+
®
certified. Visit www.thisisant.com/directory for a list of compatible products and apps.
M/N: A04820
智慧互動式坡度模擬器
爬坡模拟器
IC: 1792A-04820

Table of Contents
Getting Started................................. 1
Tacx Alpine Assembly
Instructions...................................... 2
Installation Kits........................................2
Installing the Tacx Alpine....................... 4
Connecting the Power Cable and
Calibrating the Tacx Alpine.....................7
Checking for Clearance...........................8
Training..........................................10
Tacx Training App................................. 10
Going for a Ride.....................................12
Device Information......................... 13
Standby Mode....................................... 13
Device Care and Storage...................... 13
Specifications........................................13
物質宣言................................................ 14
Troubleshooting............................. 14
Updating the Tacx Alpine Software..... 14
When should I calibrate the Tacx
Alpine?................................................... 14
The Tacx Alpine is not responding...... 15
Why are all the LEDs flashing?............. 15
How do I mount my tablet?.................. 15
What size is my thru axle?.................... 15
Table of Contents i

Getting Started
WARNING
See the Important Safety and Product Information guide in the product box for product warnings and other
important information.
NOTICE
The Tacx Alpine gradient simulator is compatible with the Tacx NEO 3M and Tacx NEO 2T trainers after you
update the trainer to the latest software.
• Read the instructions before you attach your bike to the Tacx Alpine.
• Scan the QR code with the camera on your phone, and follow the Tacx Training app instructions.
TIP: The Tacx Training app includes device setup, videos, and software updates (Pairing the Tacx Alpine with
Your Trainer and the App, page12).
You should keep the software for your Tacx device up to date. Software updates provide changes and
improvements to privacy, security, and features.
• For the best experience, use the Tacx Alpine only while it is plugged in.
• For best results, use the Tacx Alpine with a firm mat or low pile carpet. Avoid soft and high pile carpet.
NOTE: A bike with a wheelbase of 1,165 mm or greater may not fit on a standard Tacx training mat.
• Go to support.garmin.com for help and information, such as product manuals, frequently asked questions,
videos, and customer support.
Getting Started 1
Tacx Alpine Assembly Instructions
Installation Kits
The Tacx Alpine includes two separate installation kits, labeled
A
and
B
.
Your Trainer Installation Kit Thru Axle Sizes Quick Release Axle Sizes
Tacx NEO 3M Trainer
See Installing the Tacx
Alpine, page4.
A
Tacx Alpine installa
tion kit
142 or 148 mm thru axle
130 or 135 mm quick
release axle
Tacx NEO 2T Trainer
Assembly requires both
installation kits.
A
Tacx Alpine installa
tion kit
B
Tacx NEO 2T installa
tion kit
142 or 148 mm thru axle
130 or 135 mm quick
release axle
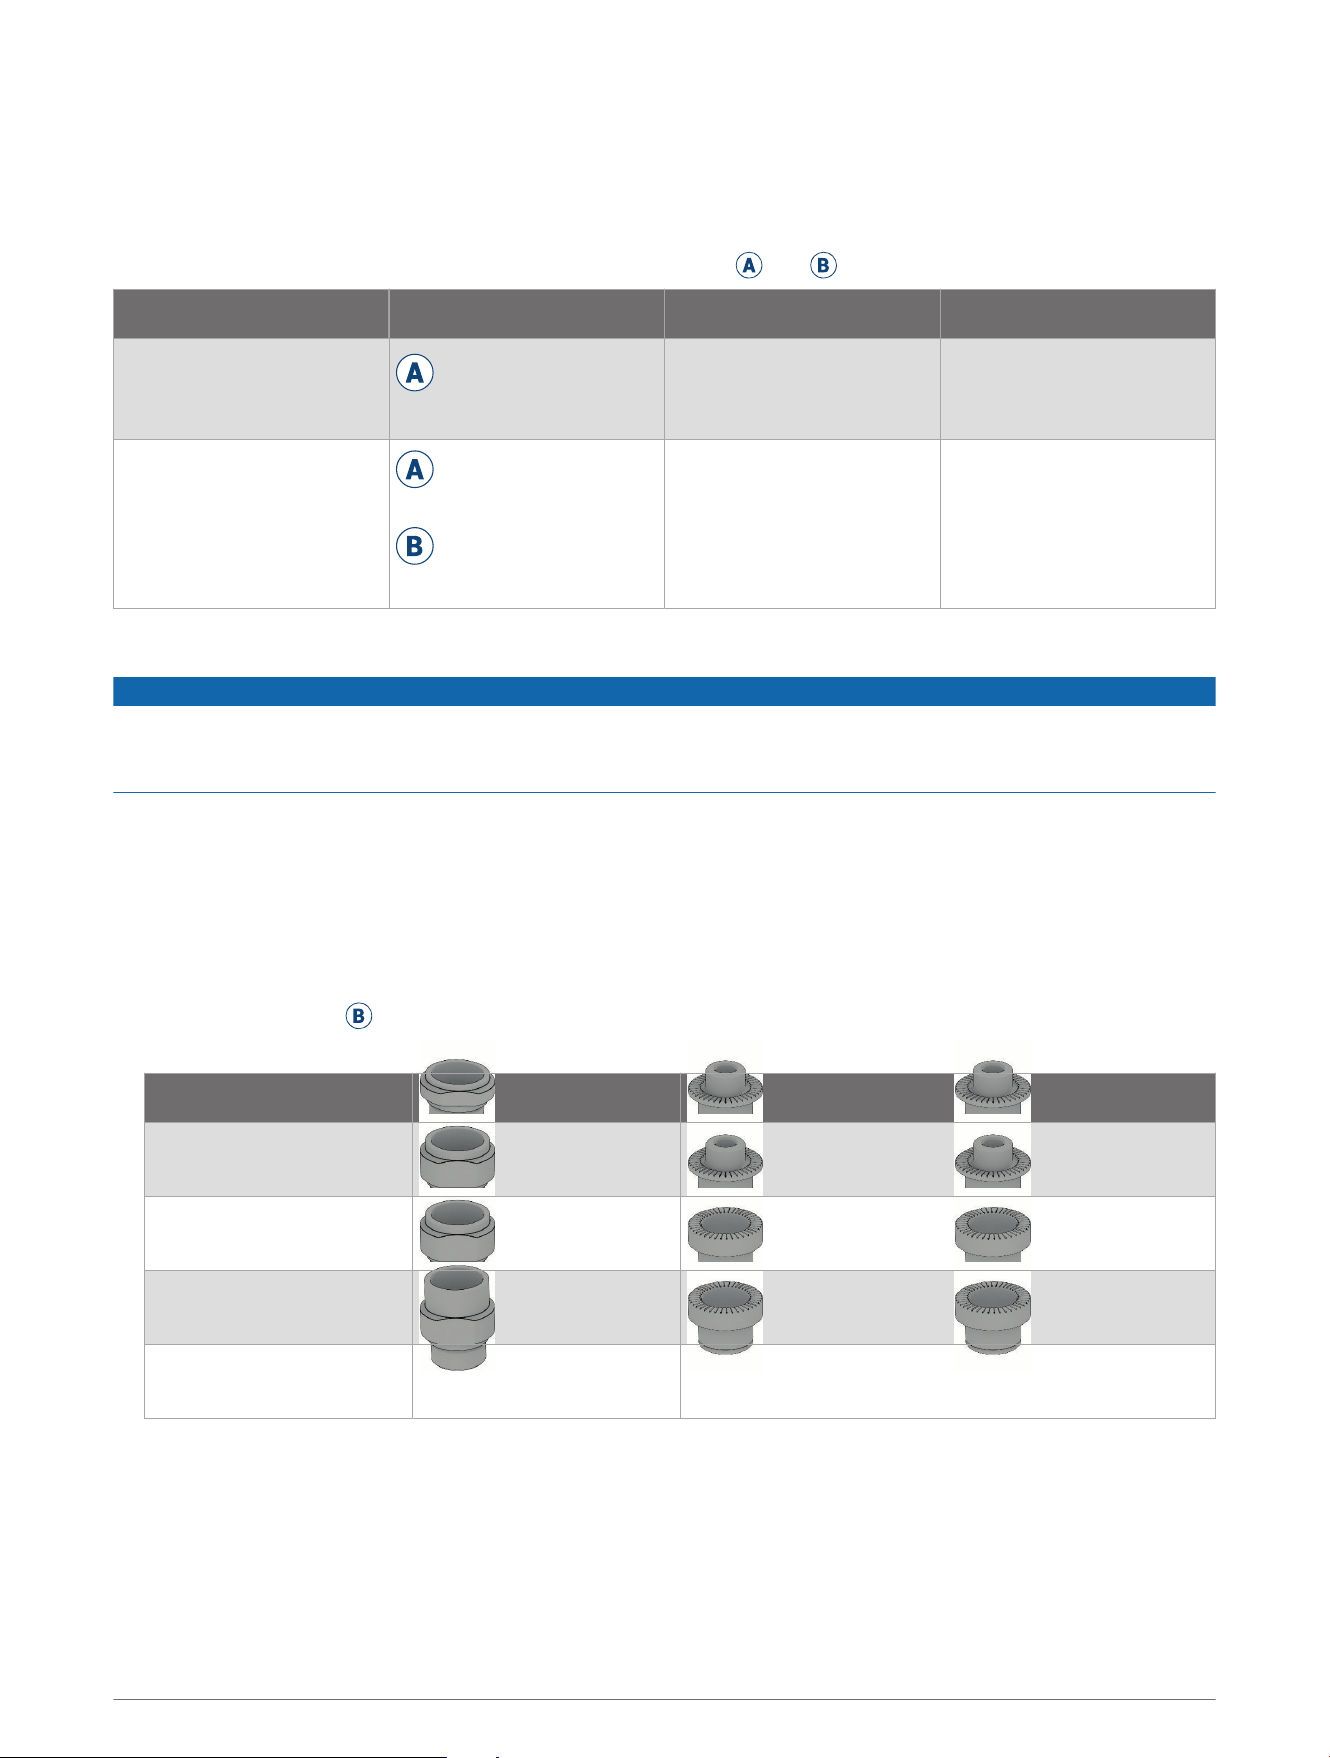
Installing the Rotatable End Caps for the Tacx NEO 2T Trainer
NOTICE
The Tacx Alpine is compatible with the Tacx NEO 2T trainer, but you must install the new, rotatable end caps on
both sides of the trainer. The old end caps and spacer (for disk brakes) are not compatible. Using the old parts
could lead to property damage.
If you have a Tacx NEO 3M trainer, see Installing the Tacx Alpine, page4.
1 Remove your bike from the Tacx NEO 2T trainer.
2 Select an option:
• If you have a quick release axle, use a 5 mm hex key to remove both end caps.
• If you have a thru axle, use a 17 mm wrench to remove both end caps.
NOTE: Some wrenches may not fit, and you may need to remove the cassette.
3 Open installation kit
B
, and take out the blue tool, spacer, and Driveside 5-6Nm locknut.
4 Use the table to choose the correct parts for your axle type.
Axle End Cap Support Rotatable End Caps (2)
130 mm quick release
axle
QR 130 QR QR
135 mm quick release
axle
QR 135 | Thru-Axle 142 QR QR
142 mm thru axle
QR 135 | Thru-Axle 142 Thru-Axle 12mm Thru-Axle 12mm
148 mm thru axle
Thru-Axle 148 Thru-Axle 12mm Thru-Axle 12mm
2 Tacx Alpine Assembly Instructions
5 On the non-drive side of the trainer, use the blue tool to install the end cap support .
NOTE: If you have disk brakes, you must install the new spacer to provide clearance between the trainer
and the brake caliper.
6 On the drive side of the trainer, use the blue tool to install the Driveside 5-6Nm locknut .
You can hand tighten the locknut using the blue tool. When using a torque wrench, Garmin
®
recommends a
maximum torque of 6 N-m (4.4 lbf-ft.) for the locknut.
7 Install both rotatable end caps .
8 Install your bike on the Tacx NEO 2T trainer according to the owner's manual.
9 Sit on the trainer, and pedal a few times.
TIP: The new rotatable end caps can stay on the Tacx NEO 2T trainer even when riding without the Tacx
Alpine.
Tacx Alpine Assembly Instructions 3
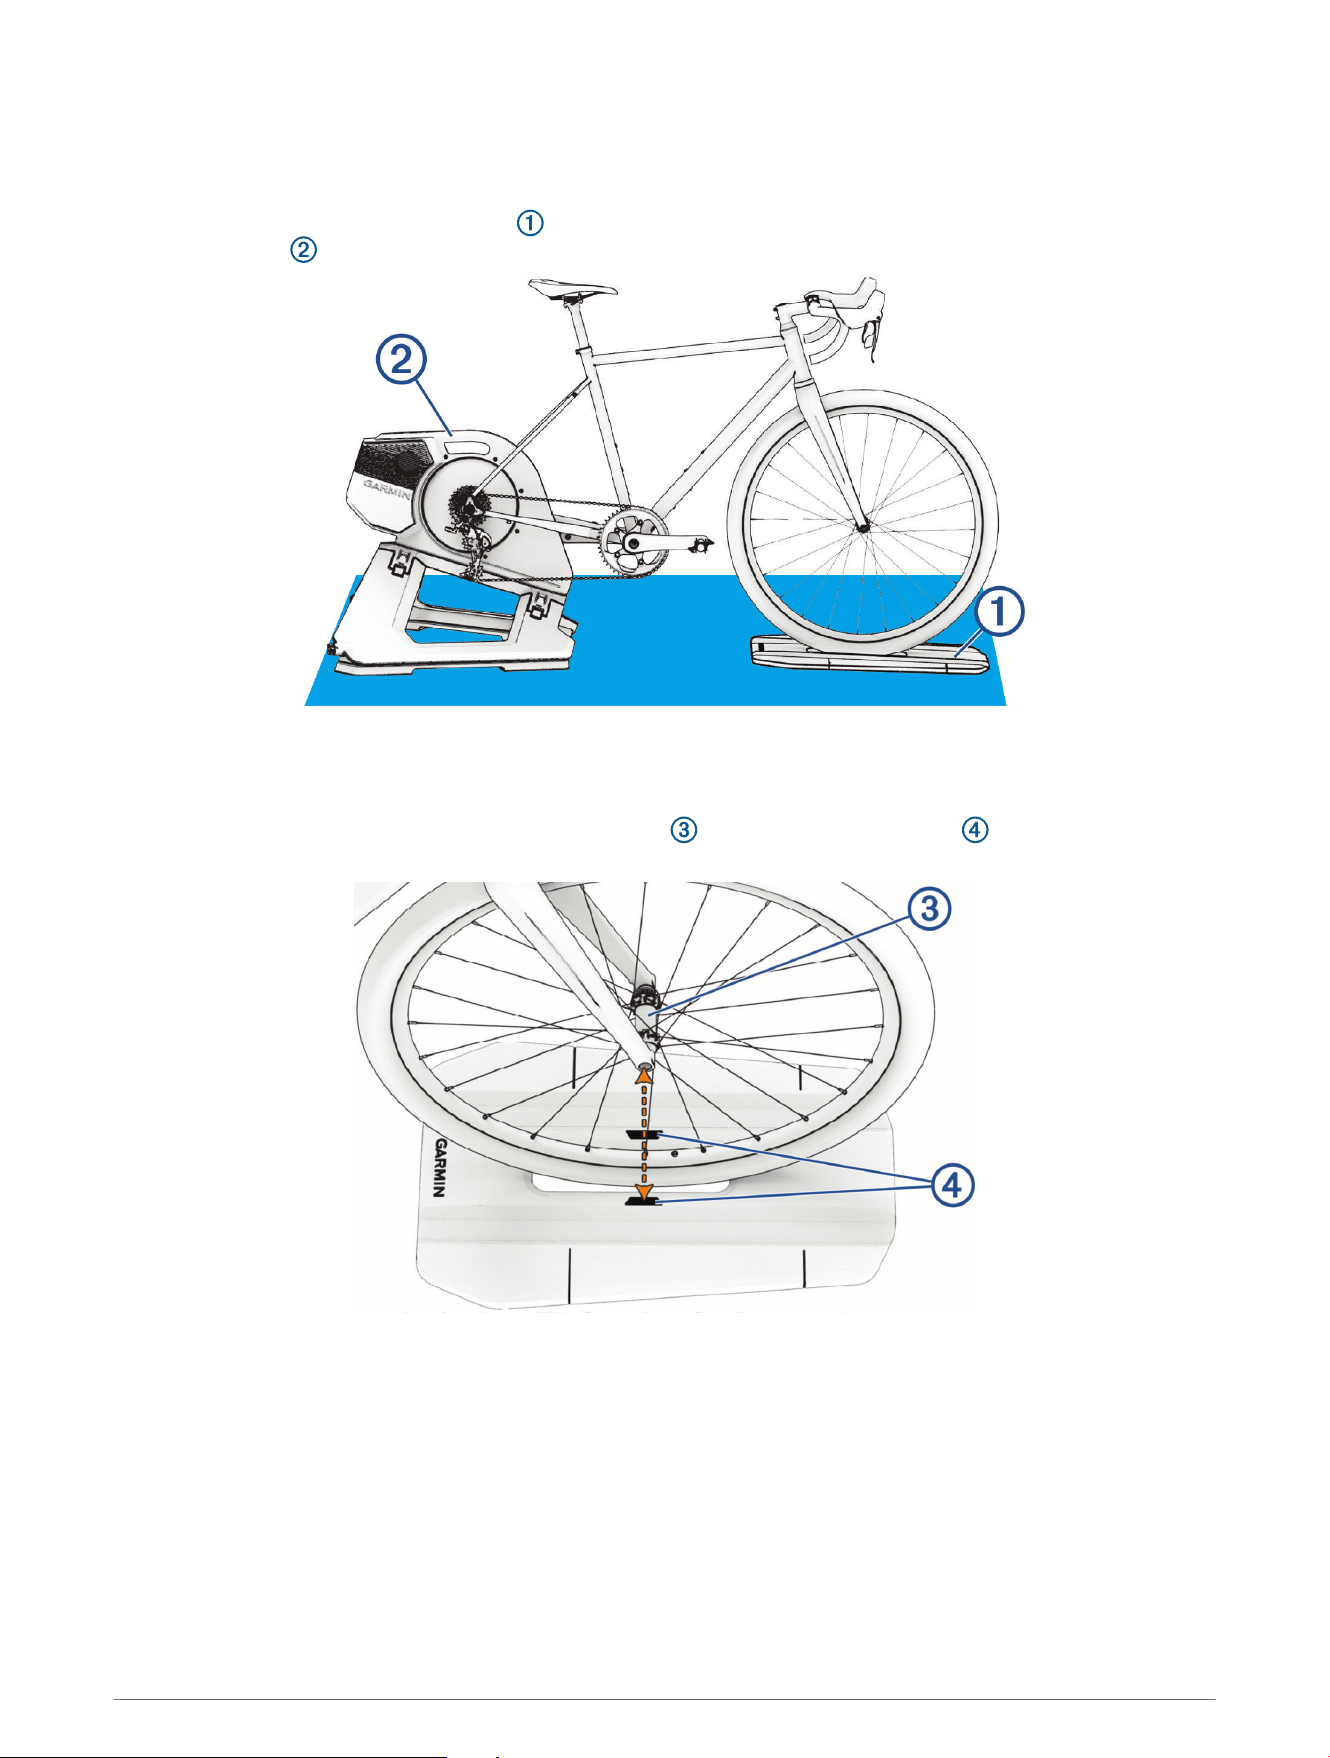
Installing the Tacx Alpine
Positioning the Motion Base
Before you can position the motion base , you must have your bike installed on a compatible trainer such as
the Tacx NEO 3M .
1 Remove the front wheel support.
2 Place the motion base under the front wheel.
3 Bring the Tacx Alpine near the front of your bike so you can easily roll it onto the motion base.
4 Align the motion base with the hub of the front wheel above the alignment zone , ideally near the
center.
5 If you are using a training mat, adjust the bike and trainer so the front of the motion base aligns with the front
of your training mat (optional).
4 Tacx Alpine Assembly Instructions
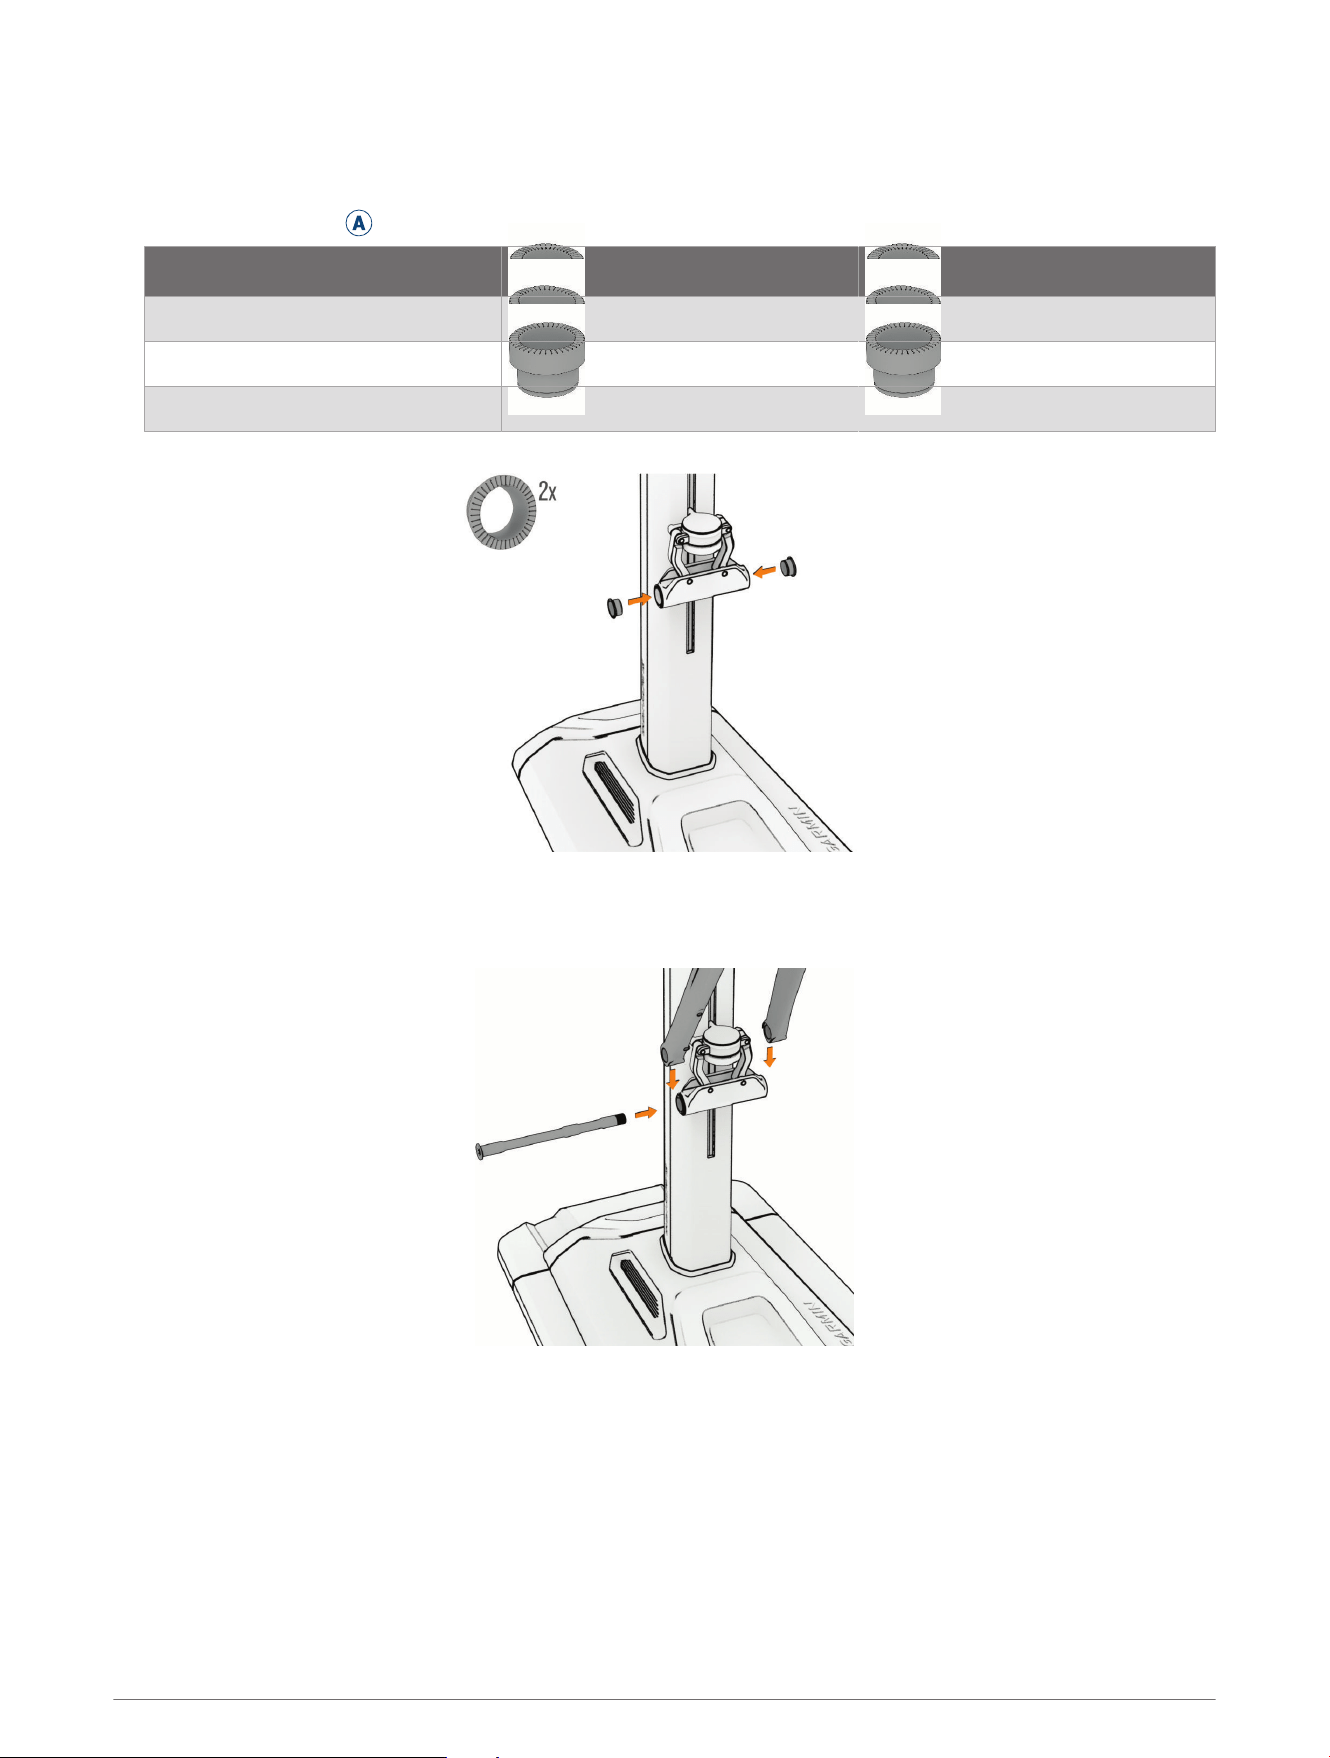
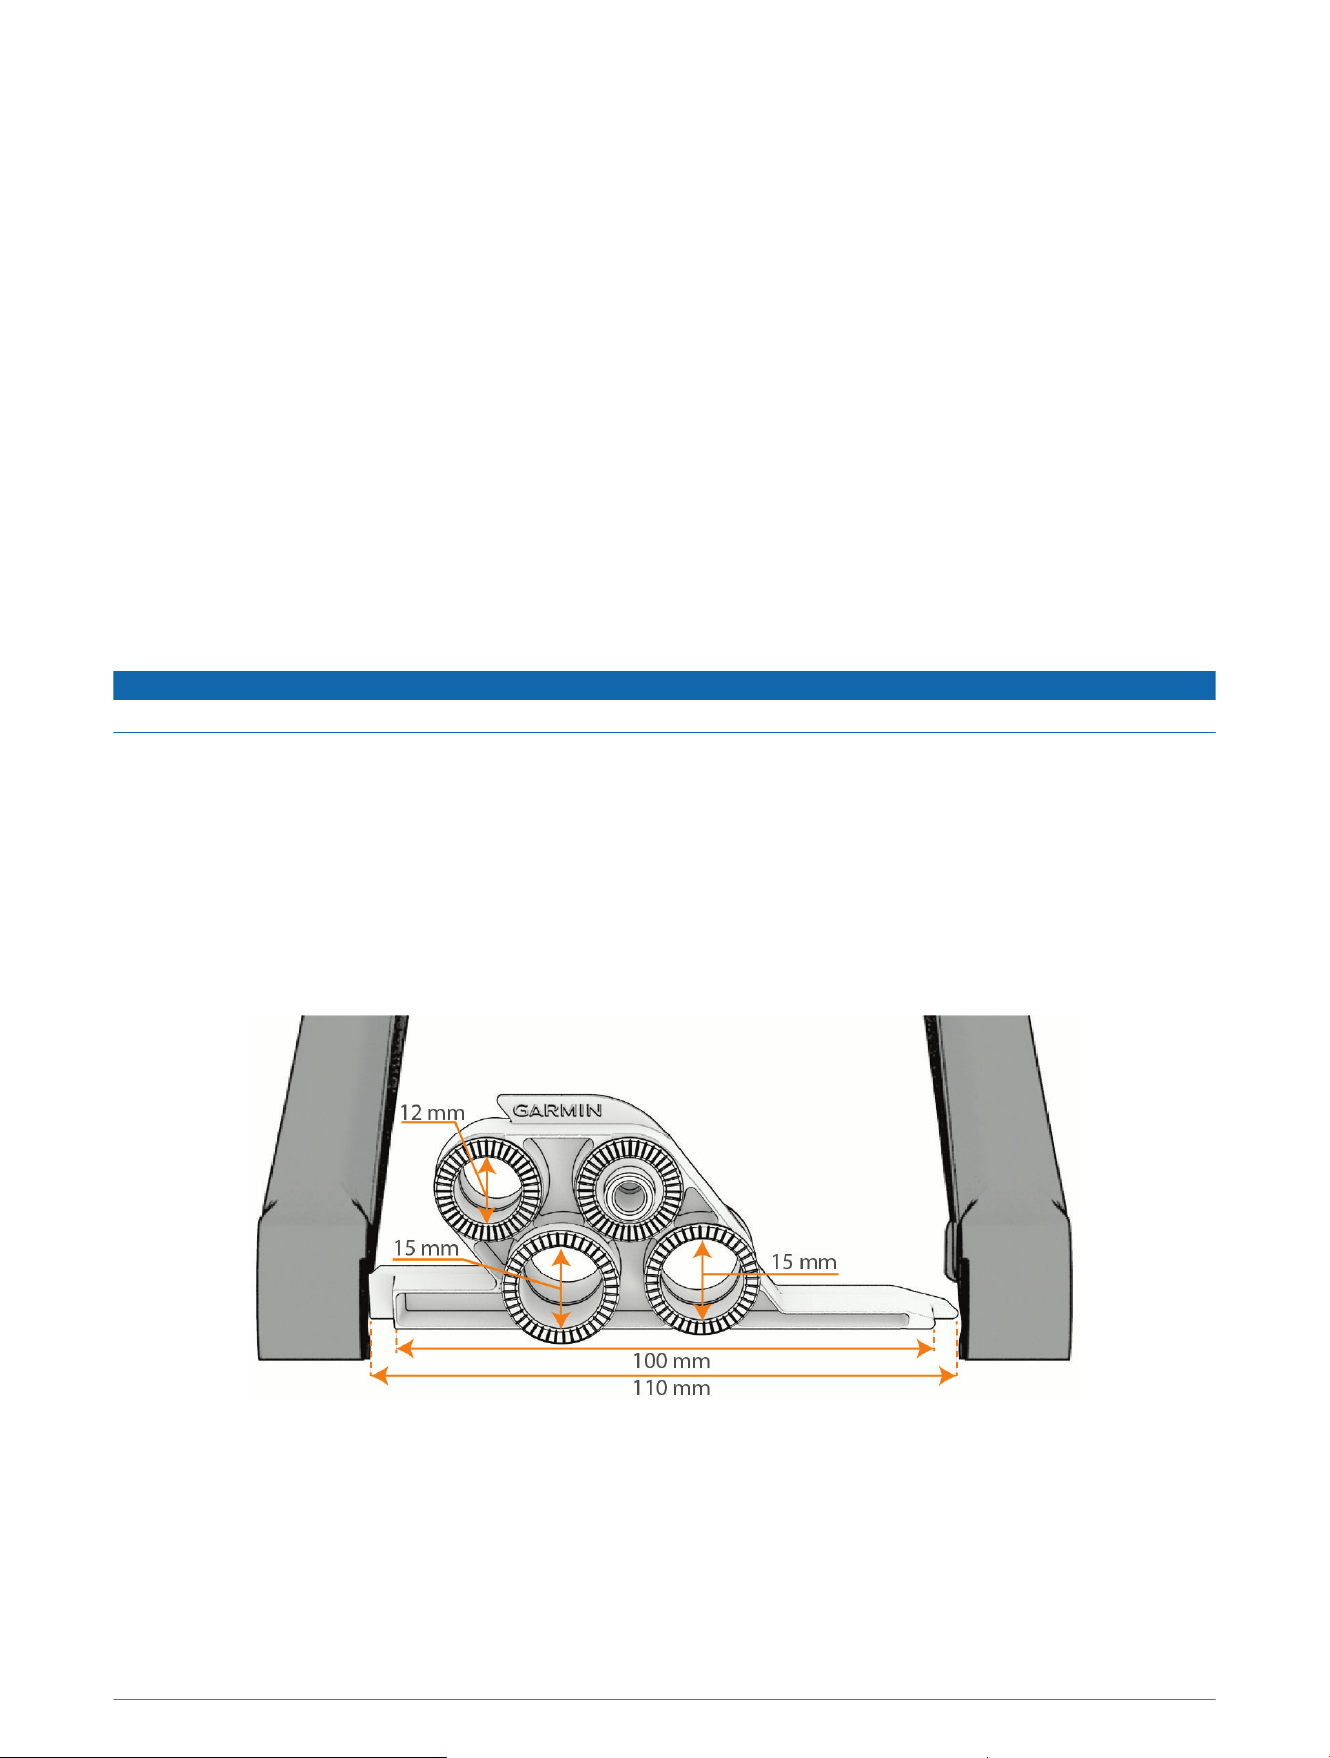
Attaching Your Thru Axle Bike
The Tacx Alpine is compatible with a bike that uses a 12 or 15 mm thru axle (What size is my thru axle?,
page15). If you have a quick release axle, go to Attaching Your Quick Release Axle Bike, page6.
1 Open installation kit
A
, and choose the correct rotatable end caps for your axle type.
Axle Rotatable End Caps (2)
Thru-Axle 12x100
Thru-Axle 15x100
Thru-Axle 15x110
2 Snap the rotatable end caps into the Tacx Alpine.
3 Remove the front wheel from your bike, and hold the frame.
4 Roll the Tacx Alpine onto the motion base, and align the bike fork with the rotatable end caps.
5 Insert the axle, and hand tighten.
6 Tighten the axle to the torque specification indicated on the axle or in your bike owner's manual.
Tacx Alpine Assembly Instructions 5
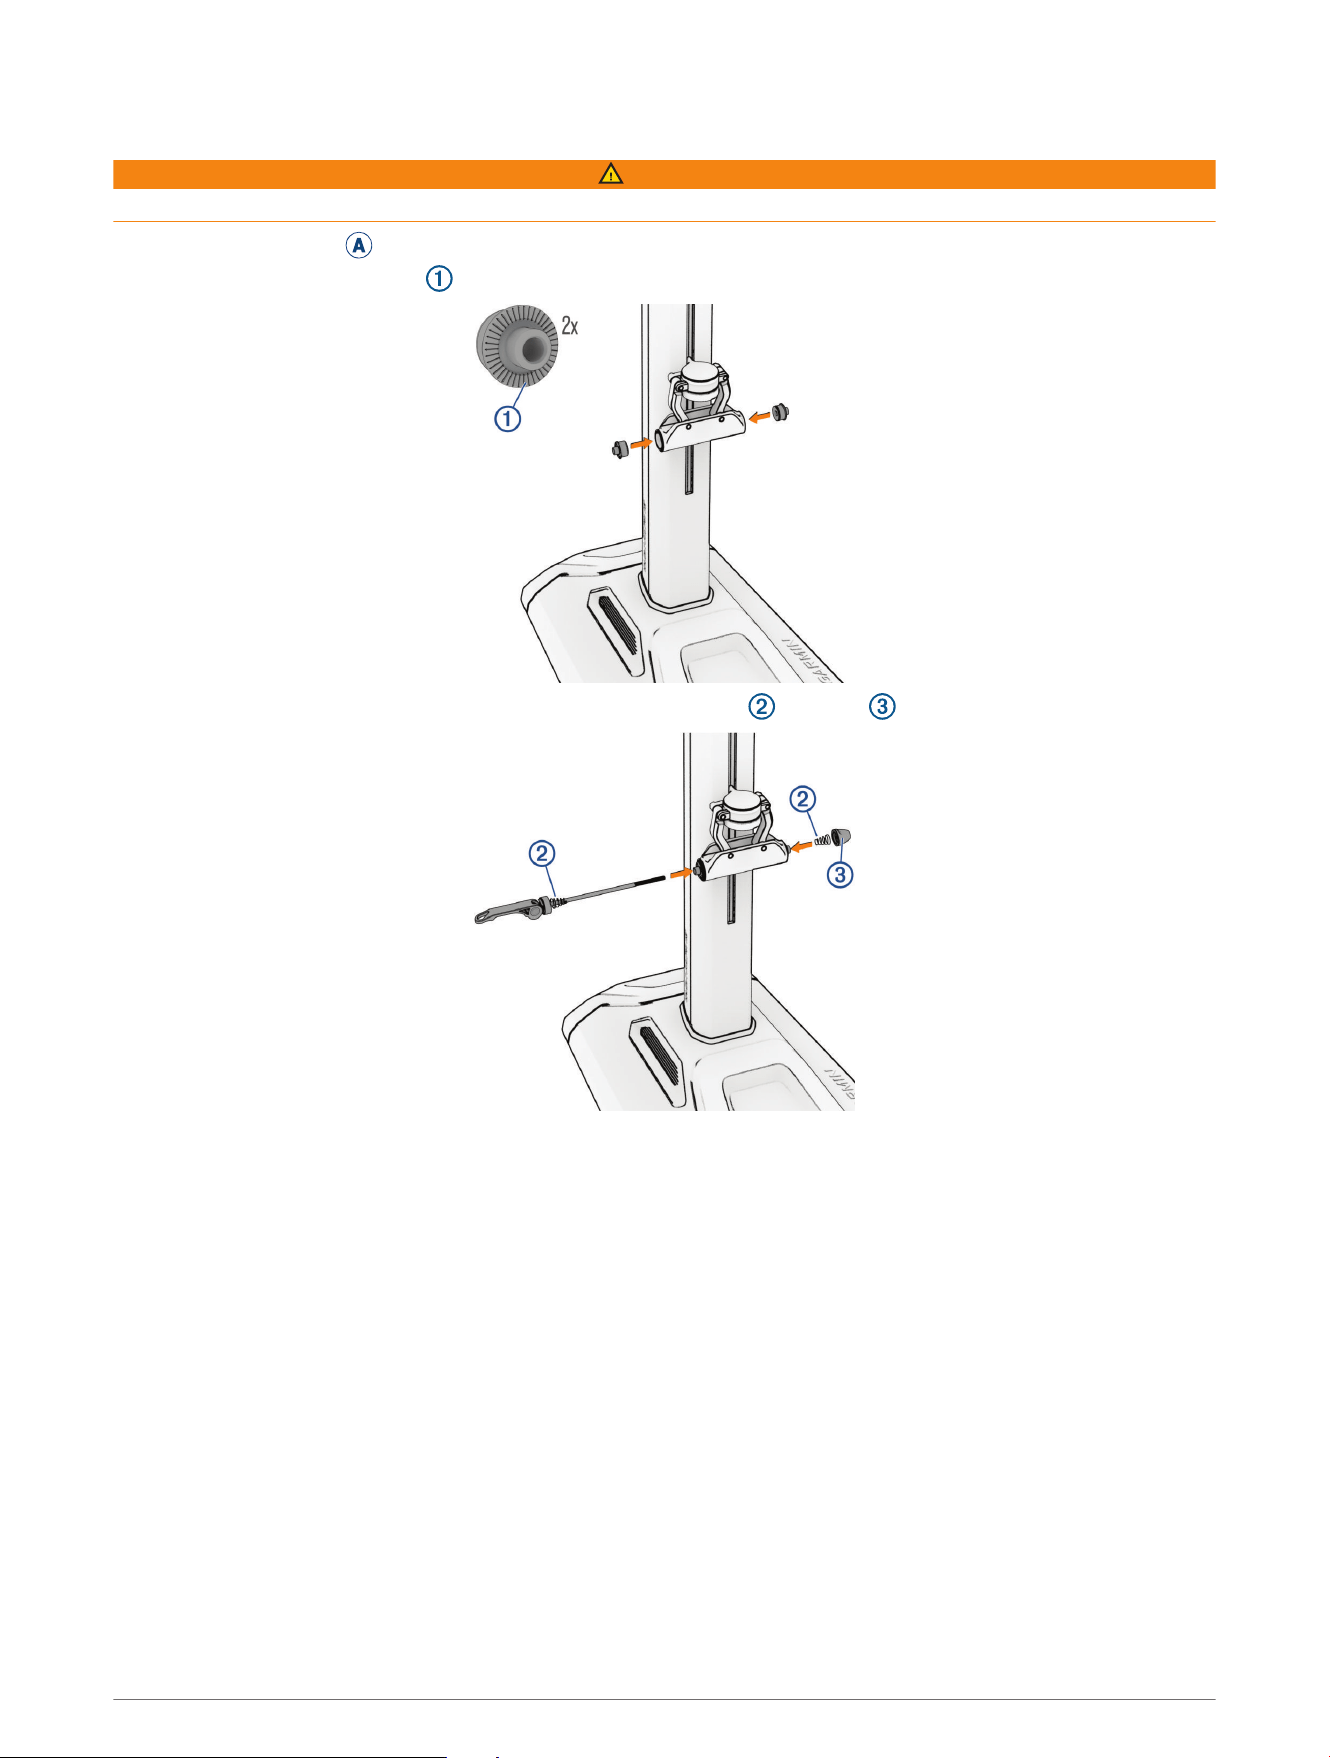
Attaching Your Quick Release Axle Bike
WARNING
Failure to tighten and firmly close the quick release handle may result in injury or property damage.
1 Open installation kit
A
, and select the QR rotatable end caps and quick release axle.
2 Snap the rotatable end caps into the Tacx Alpine.
3 Install the quick release skewer, conical springs on each side , and cap .
4 Hand tighten the cap, leaving enough room for the bike fork.
5 Remove the front wheel from your bike, and hold the frame.
6 Roll the Tacx Alpine onto the motion base, and place the bike fork on the axle.
7 Tighten the cap, and close the quick release handle.
6 Tacx Alpine Assembly Instructions
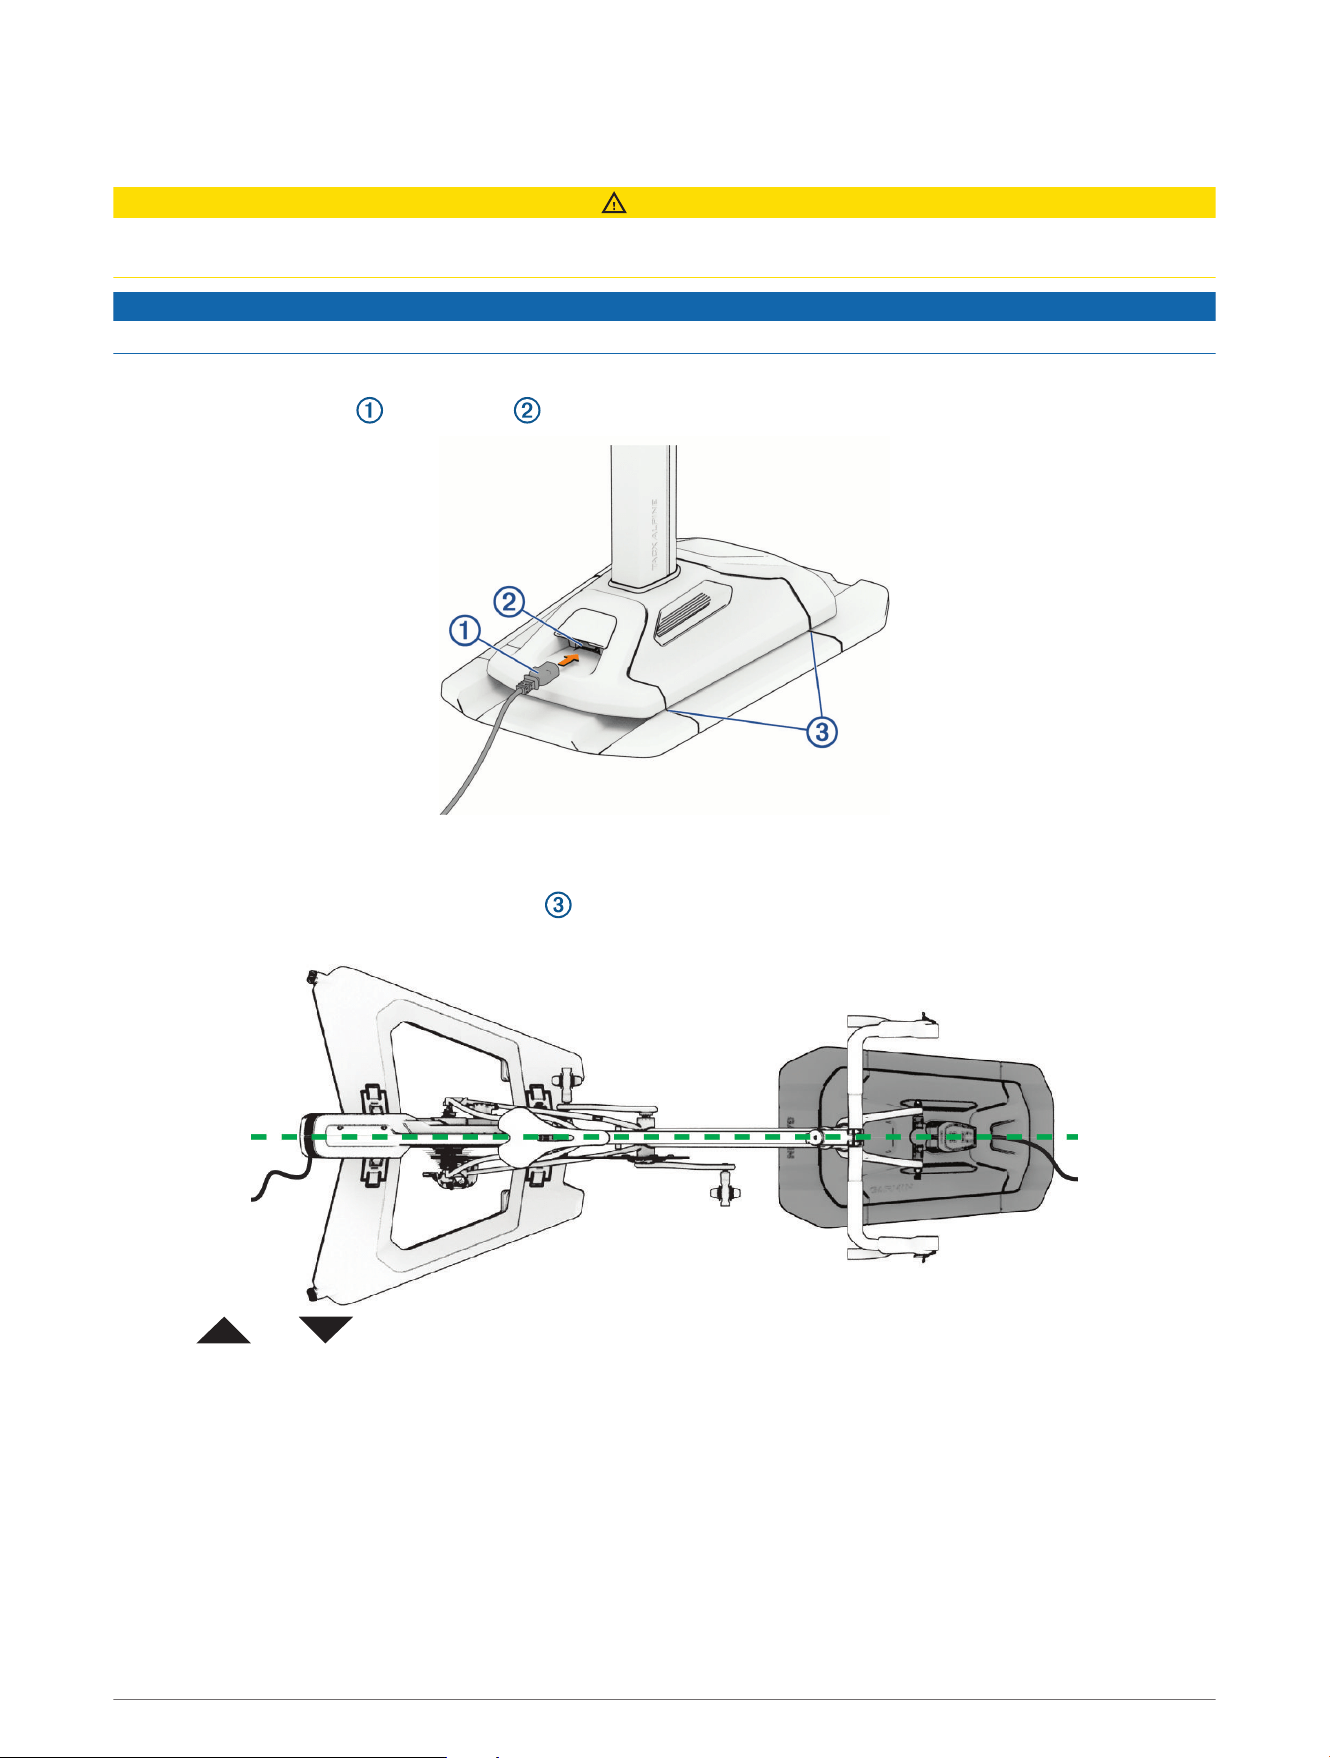
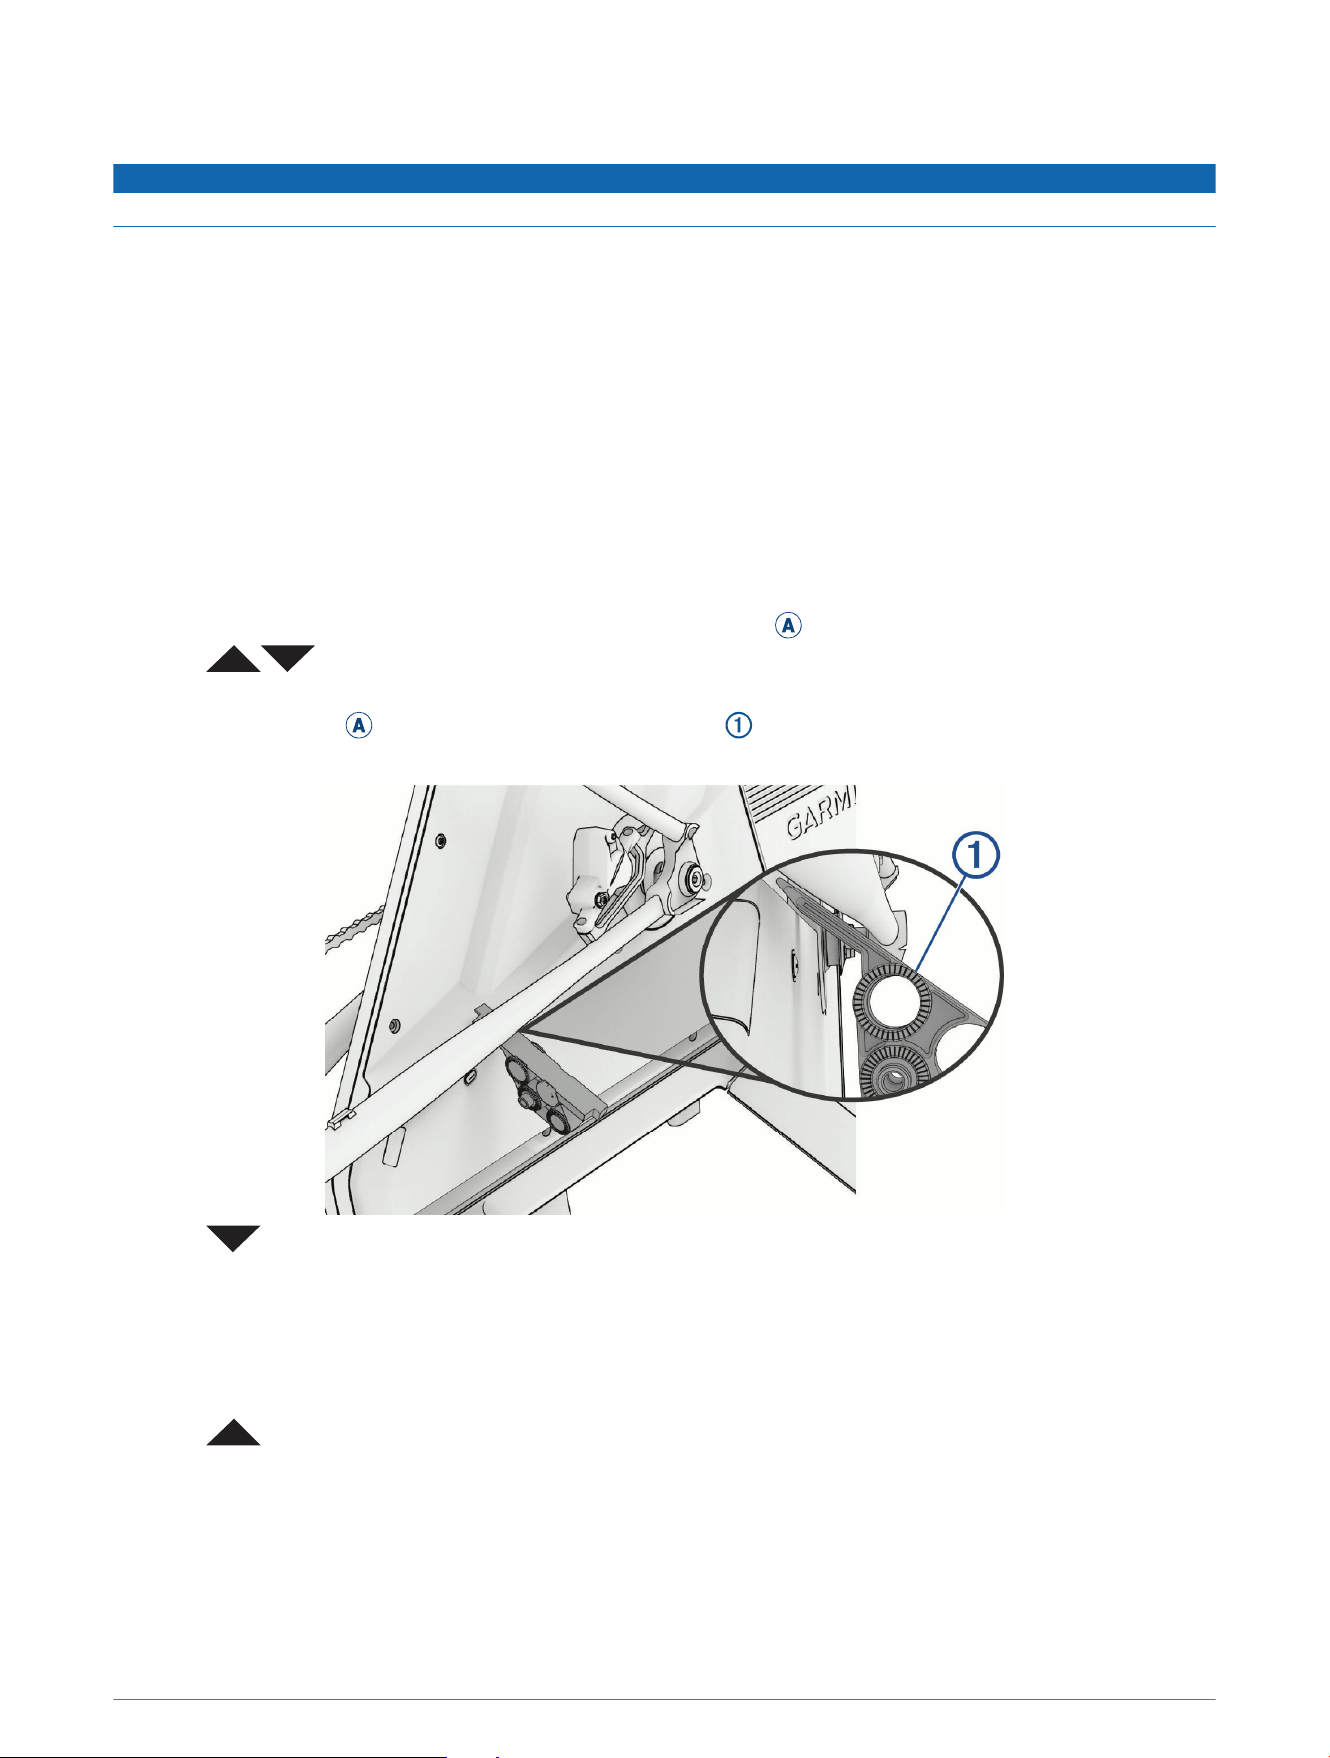
Connecting the Power Cable and Calibrating the Tacx Alpine
CAUTION
The power cable is in the product box. Do not attempt to use a third-party power cable or adapter with the Tacx
Alpine, because this could lead to personal injury or damage to the trainer.
NOTICE
Do not attempt to sit on the bike during calibration, because this could lead to possible property damage.
The first time you plug in the Tacx Alpine, the AUTO LED flashes slowly and calibration is required.
1 Plug the power cable into the port .
2 Plug the power cable into a standard wall outlet.
The power cable should have enough slack to freely move with the Tacx Alpine.
3 Align the Tacx Alpine lines with the lines on the motion base.
4 Align the trainer, bike frame, handlebar, and Tacx Alpine.
5 Hold and at the same time, for 6 seconds.
6 When all three of the LEDs flash, release the buttons to start the calibration.
All of the LEDs flash slowly during calibration. The Tacx Alpine goes up and back to level. When the LEDs
stop flashing, calibration is complete.
Tacx Alpine Assembly Instructions 7
Checking for Clearance
NOTICE
Failure to perform one or more of the following actions could result in possible property damage.
• Ensure no objects obstruct the power cables.
• Route the power cables so that they will not interfere with the trainer or the Tacx Alpine during use.
• Check for clearance around the bike chain stay and bike fork in all height positions and while turning the
handlebars.
• Get on the bike, and ride in manual mode (Going for a Ride, page12).
The AUTO LED is off.
• Ensure there is adequate ceiling height while riding.
• If necessary, go to the Tacx Training app, and set grade limits.
Checking the Chain Stay Clearance
Before you perform this clearance check, you must set the correct bike wheelbase and trainer in the Tacx
Training app.
TIP: You can use the measuring tape included in the installation kit
A
.
1 Press at the same time to return the Tacx Alpine to 0% grade.
2 Observe the smallest distance between the trainer and chain stay.
3 Open installation kit
A
, and select the compatibility gauge .
You should be able to fit the gauge between the trainer and the chain stay.
4 Press , checking the clearance each time you press the button.
You can also control the grade manually using the Tacx Training app in the device settings.
5 Repeat step 4 while monitoring the clearance between the trainer and chain stay:
• If at any time the gauge cannot fit between the two parts, go to step 6.
• If the two parts are clear from 0% to -10% grade, go to the next clearance task (Checking the Bike Fork
Clearance, page9).
6 Press , and note the grade.
TIP: The Tacx Training app displays the grade.
7 In the Tacx Training app, go to the Tacx Alpine settings.
8 Select Grade > Grade Range.
9 Use the slider to set the minimum grade.
8 Tacx Alpine Assembly Instructions
Checking the Bike Fork Clearance
You will need the compatibility gauge from installation kit
A
.
1 Press until the Tacx Alpine is in the lowest position.
NOTE: The minimum grade is either -10% or a custom value (Checking the Chain Stay Clearance, page8).
2 Rotate the handlebar as far as possible (in both directions and on both sides), and insert the gauge between
the fork and the Tacx Alpine.
If the gauge fits between the two parts, in both directions, no further action is required. If the clearance check
fails, continue to step 3.
3 Open installation kit
A
, and select the protective strips.
TIP: Garmin recommends cleaning your bike fork before placing the protective strips.
4 Place the protective strips on your bike fork where the bike fork is closest to the Tacx Alpine.
Tacx Alpine Assembly Instructions 9

Training
Tacx Training App
You can download the Tacx Training app to your compatible phone, tablet, or computer.
• Ride exciting courses without leaving your home.
• Create your own rides, workouts, and more.
• Manage your training, customize the default settings, and diagnose issues.
• Sync your indoor training data with your Garmin Connect
™
account.
• Update your device software (Updating the Tacx Alpine Software, page14).
10 Training
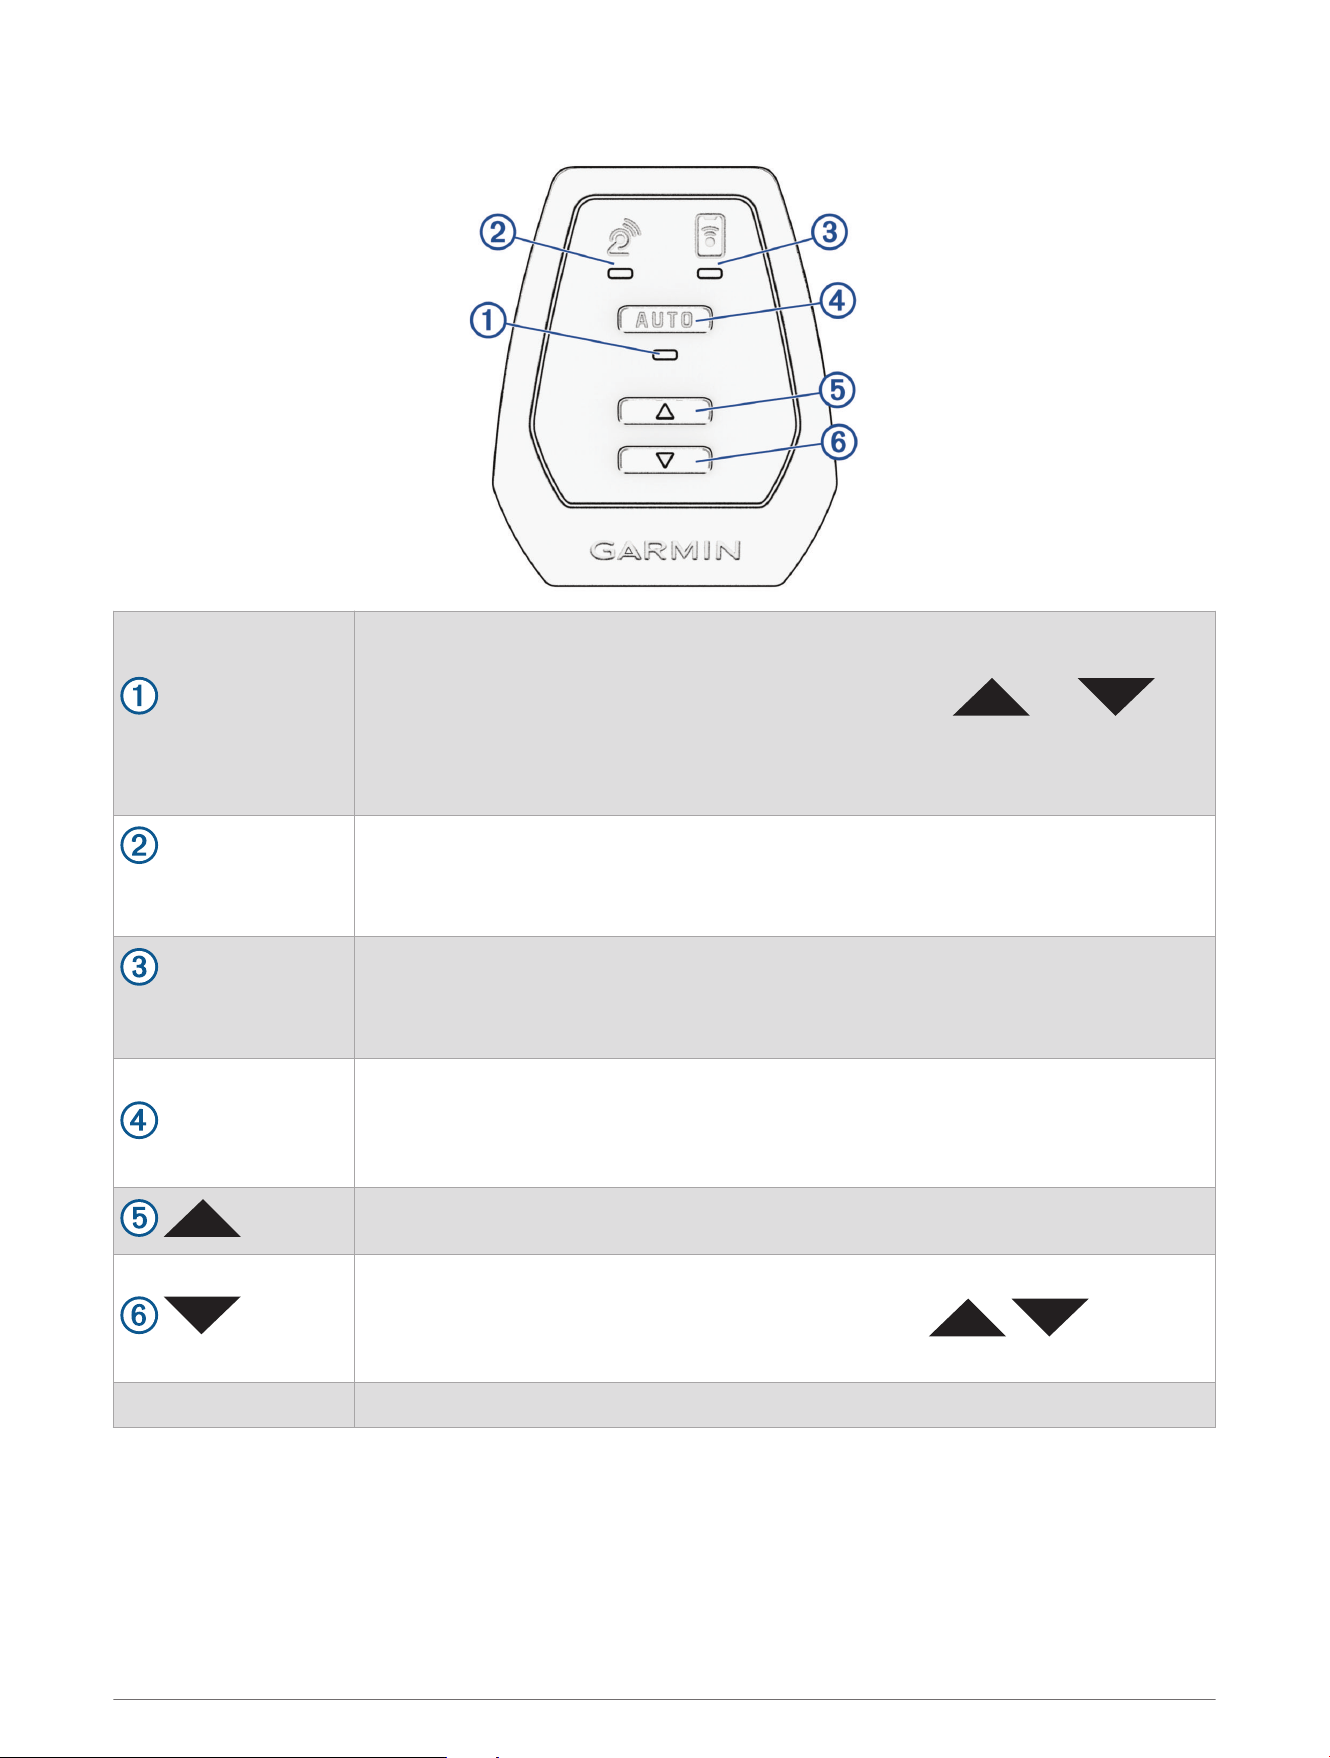
Status LEDs and Buttons
Training mode LED
Automatic training mode (LED is on) means that the Tacx Alpine automatically
follows the grade of the course.
Manual training mode (LED is off) means that you must use and to
control the slope.
Slowly flashing LED means that the Tacx Alpine requires calibration (When should I
calibrate the Tacx Alpine?, page14).
Trainer connection
LED
Solid LED means that the Tacx Alpine is connected to the trainer.
Flashing LED means that the Tacx Alpine is searching for the trainer.
Mobile device connec
tion LED
Solid LED means that the Tacx Alpine is connected to the app.
Flashing LED means that the Tacx Alpine is searching for the app.
AUTO
Press to switch between automatic and manual training modes.
Hold for 3 seconds to put the device into pairing mode.
Hold for 10 to 15 seconds to perform a factory reset (The Tacx Alpine is not
responding, page15).
Press to manually increase the slope.
Press to manually decrease the slope.
TIP: To return the Tacx Alpine to 0% grade, you can press at the
same time.
Troubleshooting For more information, see Troubleshooting, page14.
Training 11
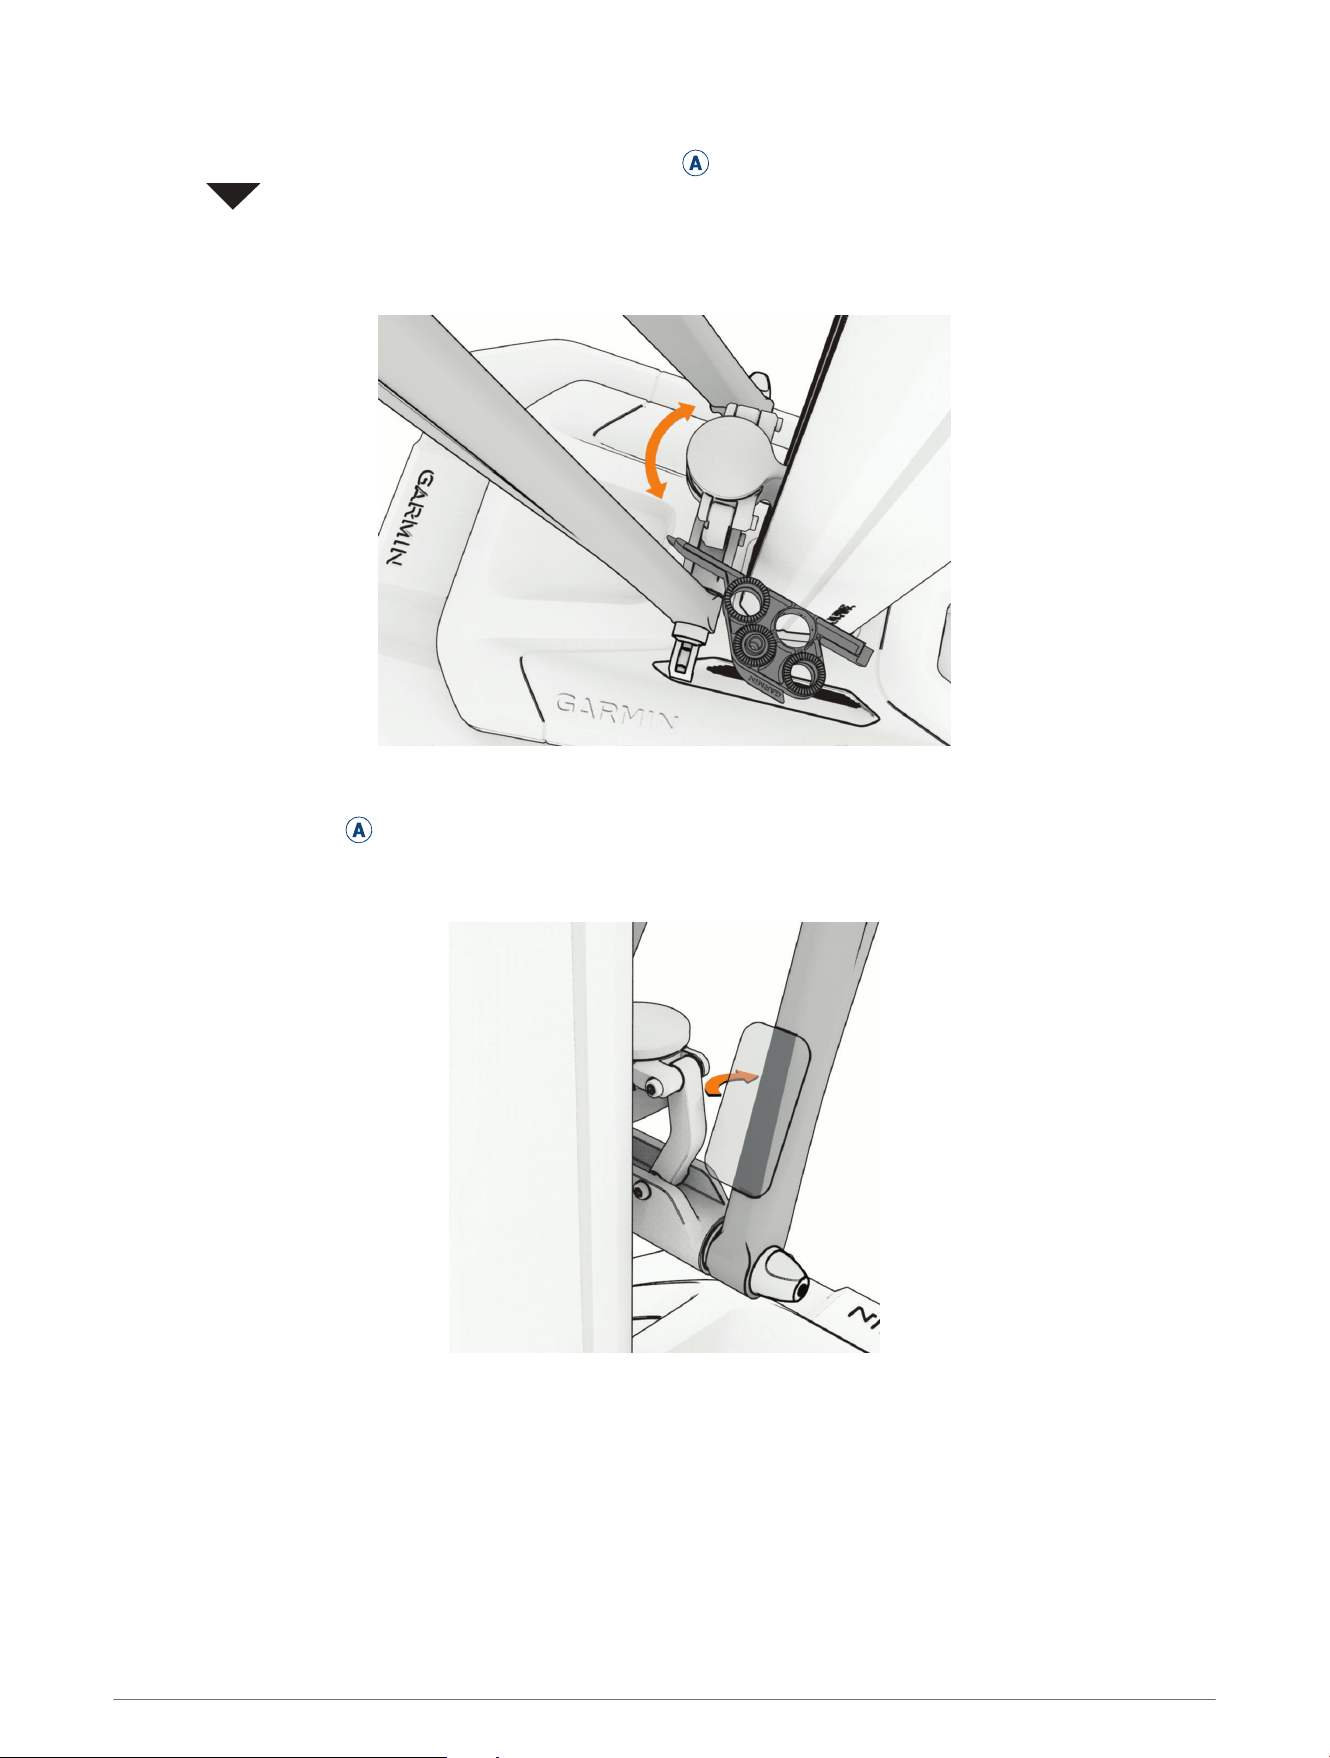
Going for a Ride
Your first ride with the Tacx Alpine should be a short, manual training ride. You should get comfortable with the
operation of the controls and riding positions.
1 If you have a Tacx NEO 3M trainer, unlock the motion plates.
TIP: You must rotate each knob toward , until it clicks.
2 On the Tacx Alpine, press AUTO to turn off the LED and enable manual training mode.
3 Start pedaling slowly.
4 Press or to raise and lower the front of your bike.
TIP: To return the Tacx Alpine to 0% grade, you can press at the same time.
5 Rotate the handlebars to the right and left.
Tips for Riding and Training
• For the best experience, use the Tacx Alpine only while it is plugged in.
• Use the Tacx Training app to set your correct wheelbase, type of trainer, and other training preferences.
TIP: You can use the measuring tape included in the installation kit
A
.
• Avoid sprinting when the motion plates are enabled. You can sprint when the motion plates are locked.
• If you are using the Tacx NEO 2T trainer without motion plates, you will notice a slight positive offset to the
slope.
You can change this in the device settings of the Tacx Training app.
• If you feel motion sickness while riding, try these options:
◦ Focus your vision on a point in front of your bike.
◦ Watch a training video while riding.
◦ Drink plenty of water before and during your ride.
◦ Stop riding until you feel better, and try again.
Pairing the Tacx Alpine with Your Trainer and the App
For optimal performance and training features, Garmin recommends pairing the Tacx Alpine with your
compatible trainer and the Tacx Training app.
1 Connect your compatible Tacx trainer to external power.
2 Pair your compatible Tacx trainer with the Tacx Training app.
3 Update the trainer software, if there is an update available.
4 From the Tacx Training app, select Settings > Device Manager.
5 Wake up the trainer, and put it in pairing mode.
6
On the Tacx Alpine, hold AUTO for 3 seconds.
After you release the button, all of the LEDs flash quickly, and then the and LEDs flash while the Tacx
Alpine searches for the trainer and the app. When connected, the and LEDs are solid.
7 On the Tacx Training app, tap on the Tacx Alpine to pair, and wait for the connected device to turn green.
8 On the Tacx Alpine, press AUTO so the LED is solid.
Automatic training mode means that the Tacx Alpine automatically follows the grade of the course.
9 Select a course.
10 Start pedaling.
12 Training
Device Information
Standby Mode
After 10 minutes of inactivity, the Tacx Alpine goes into standby mode, and Bluetooth
®
connections are stopped.
You can wake up the device by pressing a button or turning the handlebar (Status LEDs and Buttons, page11).
Device Care and Storage
WARNING
See the Important Safety and Product Information guide in the product box for product warnings and other
important information.
• Unplug the device when it is not in use.
• If your trainer has motion plates, check the alignment, and lock the motion plates when the trainer is not in
use.
• Wipe off the device after every use.
• Clean the device before storing it.
Specifications
Power supply
Use the included power cable.
From 100 to 240 V, 50/60 Hz
Standby power consumption
<0.5 W
After 10 min. of inactivity, the device goes into standby mode.
Operating temperature range From -10º to 40ºC (from 14º to 104ºF)
Storage temperature range From -20º to 60ºC (from -4º to 140ºF)
Wireless frequency and transmit power 2.4 GHz @ 8.32 dBm
Maximum rider weight 120 kg (264 lb.)
Device Information 13
物質宣言
部件名称
有毒有害物质或元素
铅 汞 镉 六价铬 多溴联苯
多溴二苯
醚
邻苯二甲酸
二(2-乙基
己)酯
邻苯二甲
酸丁苄酯
邻苯二甲
酸二丁酯
邻苯二甲
酸二异丁
酯
印刷电路板组
件
金属零件
电缆 电缆组件
连接器
塑料和橡胶零
件
本表格依据 SJ/T11364 的规定编制。
: 代表此种部件的所有均质材料中所含的该种有害物质均低于
(GB/T26572) 规定的限量
: 代表此种部件所用的均质材料中, 至少有一类材料其所含的有害物质高于
(GB/T26572) 规定的限量
* 该产品说明书应提供在环保使用期限和特殊标记的部分详细讲解产品的担保使用条件。
产品
Troubleshooting
Updating the Tacx Alpine Software
Before you can update the device software, you must pair your Tacx Alpine with the latest version of the Tacx
Training app (Pairing the Tacx Alpine with Your Trainer and the App, page12).
1 Plug the power cable into a standard wall outlet (Connecting the Power Cable and Calibrating the Tacx Alpine,
page7).
2 Open the Tacx Training app on your phone or tablet.
TIP: You should check the battery level of your phone or tablet.
3 Select Settings > Device Manager.
4 Select your Tacx Alpine.
5 Select Firmware Update > Update.
On the Tacx Alpine, all LEDs glow in sequence, clockwise, during a software update.
6 Wait while the software update finishes.
TIP: Do not unplug the device or switch between apps while the software is updating.
This can take a couple of minutes.
When should I calibrate the Tacx Alpine?
If the device has been stored for several months, or if you install a new bike or trainer, you should calibrate the
Tacx Alpine (Connecting the Power Cable and Calibrating the Tacx Alpine, page7).
Before you ride, complete these actions:
• On the Tacx Alpine, check the AUTO LED. A slowly flashing LED means that the device needs calibration.
• On the Tacx Training app, check for a calibration message.
14 Troubleshooting
The Tacx Alpine is not responding
If the Tacx Alpine stops responding, you can reset the device to the factory settings.
1 Hold AUTO for 15 seconds.
2 When all the LEDs flash quickly, release the button.
3 Wait for the device to reset.
All LEDs glow in sequence, counter clockwise, during a factory reset.
After the factory reset is complete, you must calibrate the Tacx Alpine (Connecting the Power Cable and
Calibrating the Tacx Alpine, page7).
You must also pair the Tacx Alpine with your compatible trainer and the Tacx Training app (Pairing the Tacx
Alpine with Your Trainer and the App, page12).
Why are all the LEDs flashing?
When all the Tacx Alpine LEDs are slowly flashing at the same time, a hardware error is present.
1 Stop riding, and get off the bike.
2 Open the Tacx Training app for details.
How do I mount my tablet?
NOTICE
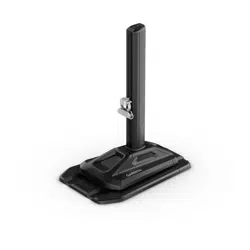
The Tacx tablet stand (T2098) can interfere with the Tacx Alpine leading to possible product damage.
• If you have the Tacx tablet stand (T2098), move the stand away from all Tacx Alpine parts and check for
clearance.
• Use the Tacx bracket for tablets (T2092).
• Go to buy.garmin.com for compatible accessories.
What size is my thru axle?
Most axles have the size printed or etched on the axle. The most common sizes are 12 x 100 mm, 15 x 100 mm,
and 15 x 110 mm. To determine the diameter, you can insert the axle into the endcaps. To determine the length,
you can hold the compatibility gauge between the bike fork.
Troubleshooting 15

support.garmin.com
GUID-E25FC468-3214-482C-9068-E458485CFC48 v1June 2025