
TESLA 3 ELECTRIC MOTOR FRONT BUSH
REMOVAL/INSTALLATION TOOL
MODEL NO: VS478
Thank you for purchasing a Sealey product. Manufactured to a high standard, this product will, if used according to these instructions,
and properly maintained, give you years of trouble free performance.
IMPORTANT: PLEASE READ THESE INSTRUCTIONS CAREFULLY. NOTE THE SAFE OPERATIONAL REQUIREMENTS, WARNINGS & CAUTIONS. USE
THE PRODUCT CORRECTLY AND WITH CARE FOR THE PURPOSE FOR WHICH IT IS INTENDED. FAILURE TO DO SO MAY CAUSE DAMAGE AND/OR
PERSONAL INJURY AND WILL INVALIDATE THE WARRANTY. KEEP THESE INSTRUCTIONS SAFE FOR FUTURE USE.
1. SAFETY
9 Always read the instructions carefully before using the tool.
NOTE: This tool kit is for MANUAL operation ONLY.
8 Ensure the sockets are installed in a straight line on the bushing housing.
9 DO NOT use a power tool or impact tool to operate this tool kit.
9 Always ensure tool installation is securely connected before removing/installing the bushings.
9 Ensure the working area has adequate lighting.
9 Keep children and unauthorized persons away from the working area.
9 Keep working area clean and tidy, dry and free from unrelated materials.
8 DO NOT allow untrained persons to use this tool kit.
8 DO NOT use this equipment for any purpose it is not intended for.
8 DO NOT attempt to alter / modify the equipment as this will invalidate
your warranty.
2. SPECIFICATION
Model No: ................................................................... VS478
Nett weight: ................................................................... 1.8kg
3. CONTENTS
4. OPERATION
NOTE: Always keep spindle well lubricated.
NOTE: DO NOT use power tools / impact tools.
4.1. REMOVE OLD BUSHING
4.1.1. Locate the bushing house (Fig. 1).
4.1.2. Installthereceivingsleeveonthespindleandthexingnut.
4.1.3. Insert the spindle and receiving sleeve through the central hole on the bushing (Fig. 2).
4.1.4. On the other side of the bushing, insert the pushing sleeve through the spindle.
4.1.5. Screw in the turning nut on the spindle until the nut reaches the pushing sleeve.
4.1.6. Make sure that all the tool parts are aligned with the bushing central line (as the dotted line shows on Fig 3).
4.1.7. Usetwo27mmspanners.Onetoholdonthexingnut,andanotheroneforturning(Fig.3).
4.1.8. Turn the nut clockwise and the pushing sleeve will gradually push the old bushing out of the bushing housing.
Refer to
instruction
manual
Wear eye
protection
Wear protective
clothing
VS478 Issue:1 17/12/24
Original Language Version
© Jack Sealey Limited
Wear protective
gloves
Wear protective
footwear
Fig.1
Fig.2
Fig.3
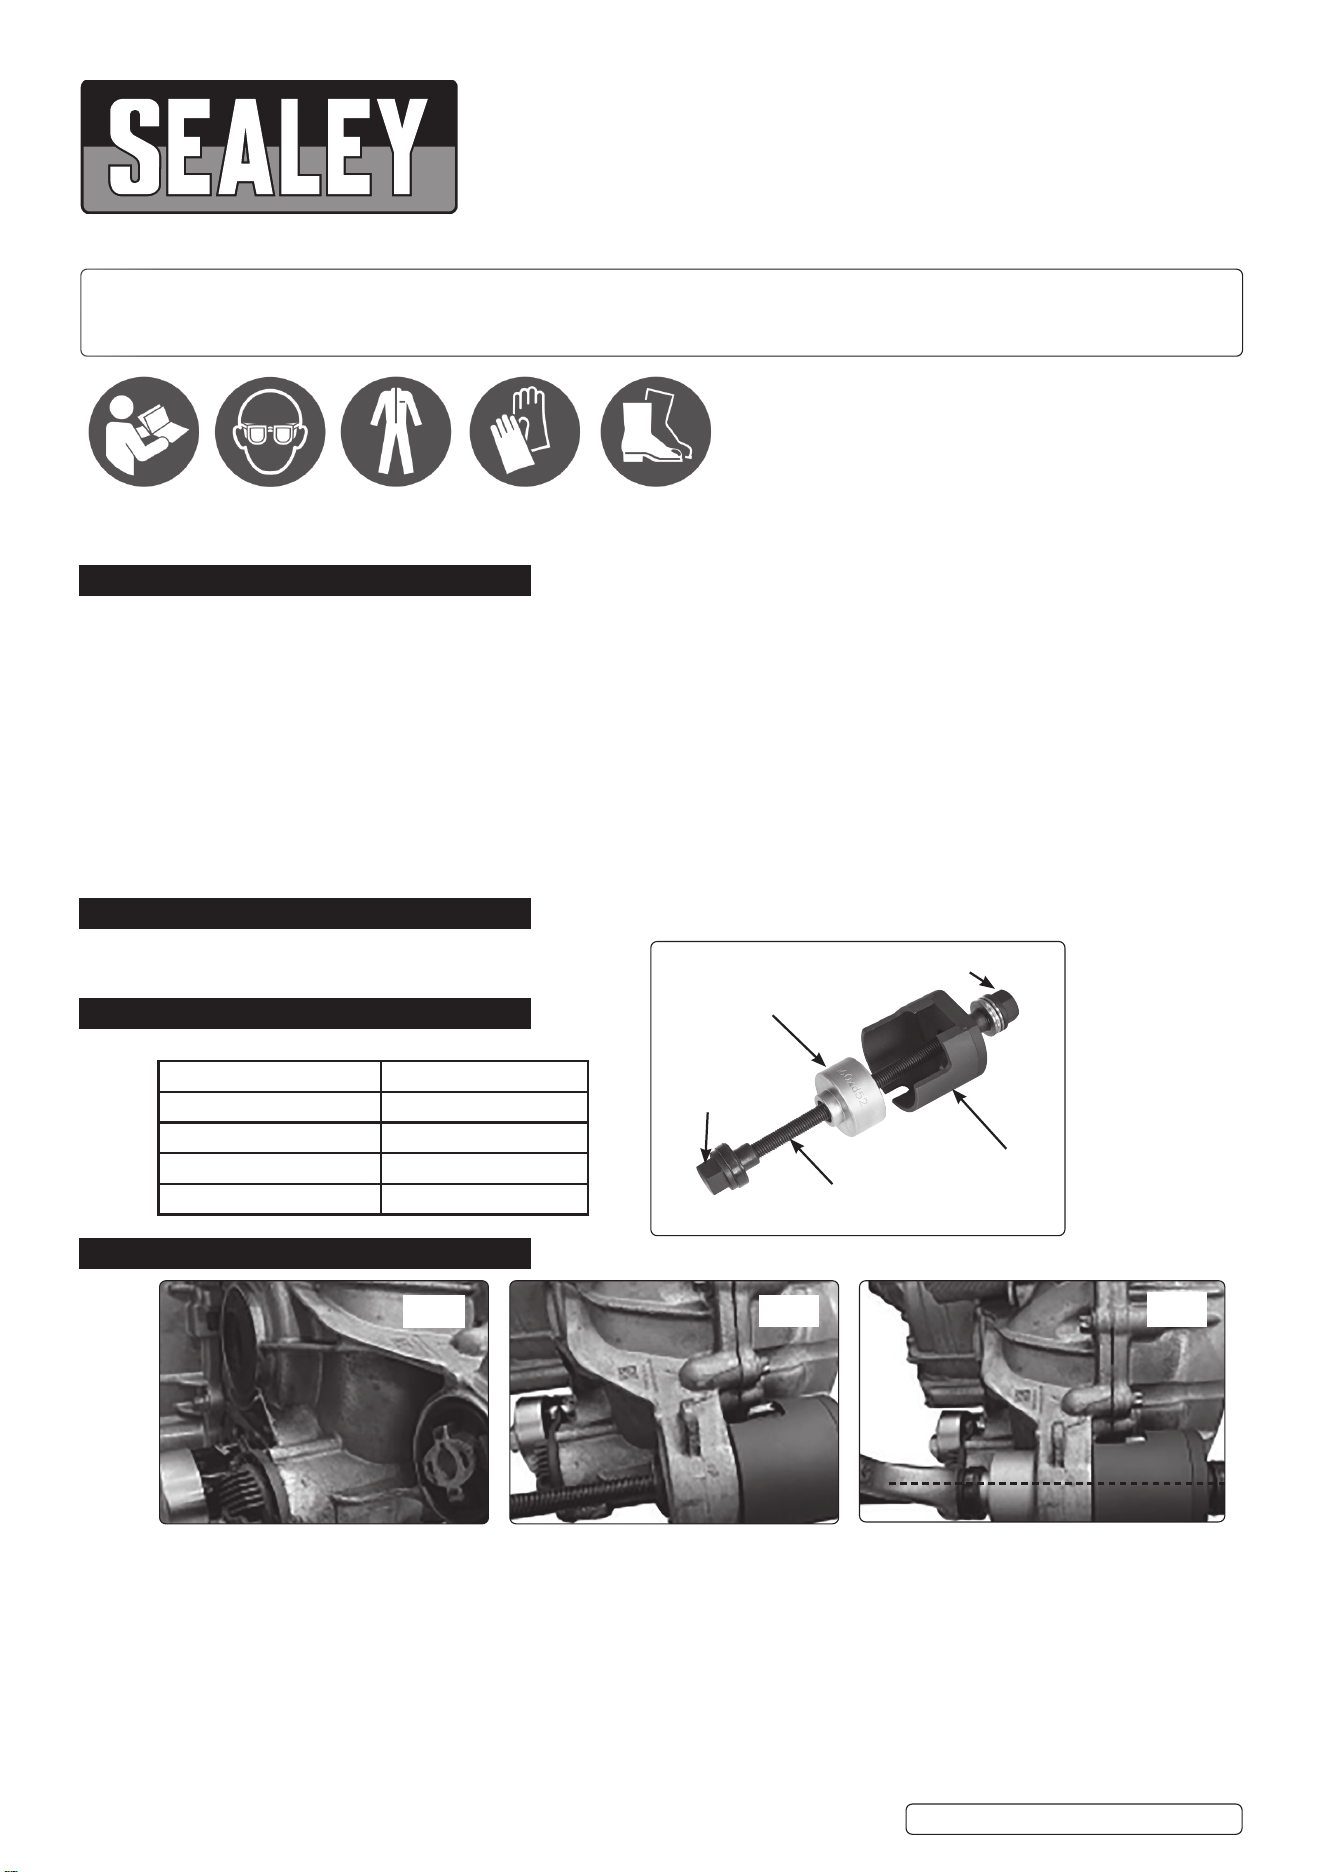
Turning nut
Receiving sleeve
Spindle
Fixingnut
Pushing sleeve
DESCRIPTION PART NUMBER
Turning nut VS478-04
Receiving sleeve VS478-03
Pushing sleeve VS478-02
Spindlec/wxingnut VS478-01

4.2. INSTALL NEW BUSHING
4.2.1. Installthereceivingsleeveonthespindleandthexingnut.
4.2.2. Insert the spindle and receiving sleeve through the central hole on the bushing (Fig. 2).
4.2.3. On the other side of the bushing, insert a new bushing and the pushing sleeve through the spindle.
4.2.4. Screw in the turning nut on the spindle until the nut reaches the pushing sleeve.
4.2.5. Makesurethatallthetoolpartsarealignedwiththebushingcentreline(g.3).
4.2.6. Usetwo27mmspanners.Onetoholdonthexingnut,andanotheroneforturning.
4.2.7. Turn the nut clockwise and the pushing sleeve will gradually push the new bushing into the bushing housing.
5. MAINTENANCE
5.1. Regularly check the condition of the equipment. DO NOT use if any sign of damage.
5.2. Clean the unit with gentle detergent and soft dry cloth. DO NOT use abrasive/aggressive cleaning materials to avoid surface damage.
5.3. Lightly oil all components.
6. END OF LIFE
6.1. Dispose of unit in accordance with the Environment Protection footer (below) and local/national guidelines.
.
Original Language Version
© Jack Sealey Limited
VS478 Issue:1 17/12/24
Sealey Group, Kempson Way, Suffolk Business Park, Bury St Edmunds, Suffolk. IP32 7AR
01284 757500 sales@sealey.co.uk www.sealey.co.uk
ENVIRONMENT PROTECTION
Recycle unwanted materials instead of disposing of them as waste. All tools, accessories and packaging should be sorted, taken to
a recycling centre and disposed of in a manner which is compatible with the environment. When the product becomes completely
unserviceable and requires disposal, drain any fluids (if applicable) into approved containers and dispose of the product and fluids
according to local regulations.
Note: It is our policy to continually improve products and as such we reserve the right to alter data, specifications and component parts
without prior notice.
Important: No Liability is accepted for incorrect use of this product.
Warranty: Guarantee is 12 months from purchase date, proof of which is required for any claim.
REGISTER YOUR
PURCHASE HERE

