
Creative
Consumer
Products
BFH20 Bathroom Fan Heater
2 3
English Manual
Manuel d’utilisation en français
Gebrauchsanleitung auf Deutsch
Manual de Instrucciones en Español
Manuale D’istruzioni In Italiano
Instrukcja obsługi. Polski
4
15
26
37
48
59
Contents
4 5
English Manual
Safety Instructions
• This appliance is for indoor/household use only. Do not use outdoors.
• This appliance is not designed for commercial or industrial use;
it is for household use only.
• Make sure the voltage is the same as that indicated on the rating plate of the
appliance.
• This appliance is not intended for use by persons (including children) with reduced
physical, sensory or mental capabilities, or lack of experience and knowledge,
unless they have been given supervision or instruction concerning use of the
appliance by a person responsible for their safety.
• Children should be closely supervised at all times to
ensure that they do not play with the appliance.
• Only use the heater out of the reach of children because the unit may get very hot.
• If either the appliance or power cable are damaged, return it to Duronic for service or
repair by professional technician.
• Never try to replace the parts and repair the unit by yourself.
• Never open and repair the machine yourself. Do not modify the machine in any way
that is not described in the instructions for use.
• The machine contains live parts. Repairs may only be carried out by Duronic,
using original spare parts and accessories.
• Always operate the appliance on a dry, smooth, even and stable surface.
• Do not place the unit on a damaged wall or a wall covered in damp/mould.
• Do not operate the machine or handle the plug with wet hands.
• Do not immerse in water or other liquids.
• Cleaning should be done as per instructions in this manual.
• Do not insert or allow any foreign object to enter any intake or outlet opening,
as this may cause an electric shock, re or damage to the appliance.
• Keep the appliance and cable away from sources of heat,
sharp objects or anything that might cause damage.
The heater must not be located immediately below a plug socket.
In order to avoid overheating, do not cover the heater.
• Do not use this heater in the immediate surroundings of a bath,
a shower or a swimming pool.
• Ensure the appliance is always switched off before
connecting it to the mains power supply.
• Switch off the power supply and unplug the appliance whenever it is not in use,
before cleaning it or carrying out any maintenance.
• To disconnect the appliance, switch it “OFF”,
and then remove the plug from the socket.
Do not pull the cable to unplug it.
• Do not operate in areas where petrol,
paint or other ammable liquids are used or stored.
• To prevent a possible re hazard, do not block the air intakes or the outlet in any way.

6 7
Safety Instructions (Continued)
Technical Specications
• Do not touch the hot surfaces.
• Always ensure that your hands are dry before operating or adjusting any switch on the
product or touching the plug and socket.
• Do not leave this appliance unattended when it is in use.
• The most common cause of overheating is deposits of dust or uff in the appliance.
Ensure these deposits are removed regularly by disconnecting the appliance and then
vacuum cleaning the air vents and grills.
• Do not place the heater on a carpet or put the cable under a carpet.
• Place the cable in such a way that it is not in any high trafc area to avoid it being
tripped over or stood on.
• Do not put the heater away until it has cooled down completely. Store the heater in
cool dry location when not in use.
• This product is only suitable for well insulated spaces or occasional use.
• Some parts of this product can become very hot and cause burns.
Particular attention has to be given where children and vulnerable people are
present.
If the machine is operated with a defective or damaged mains cable,
there is a potential danger of fatal electric shock.
Never use a machine which is damaged or has a damaged mains cable.
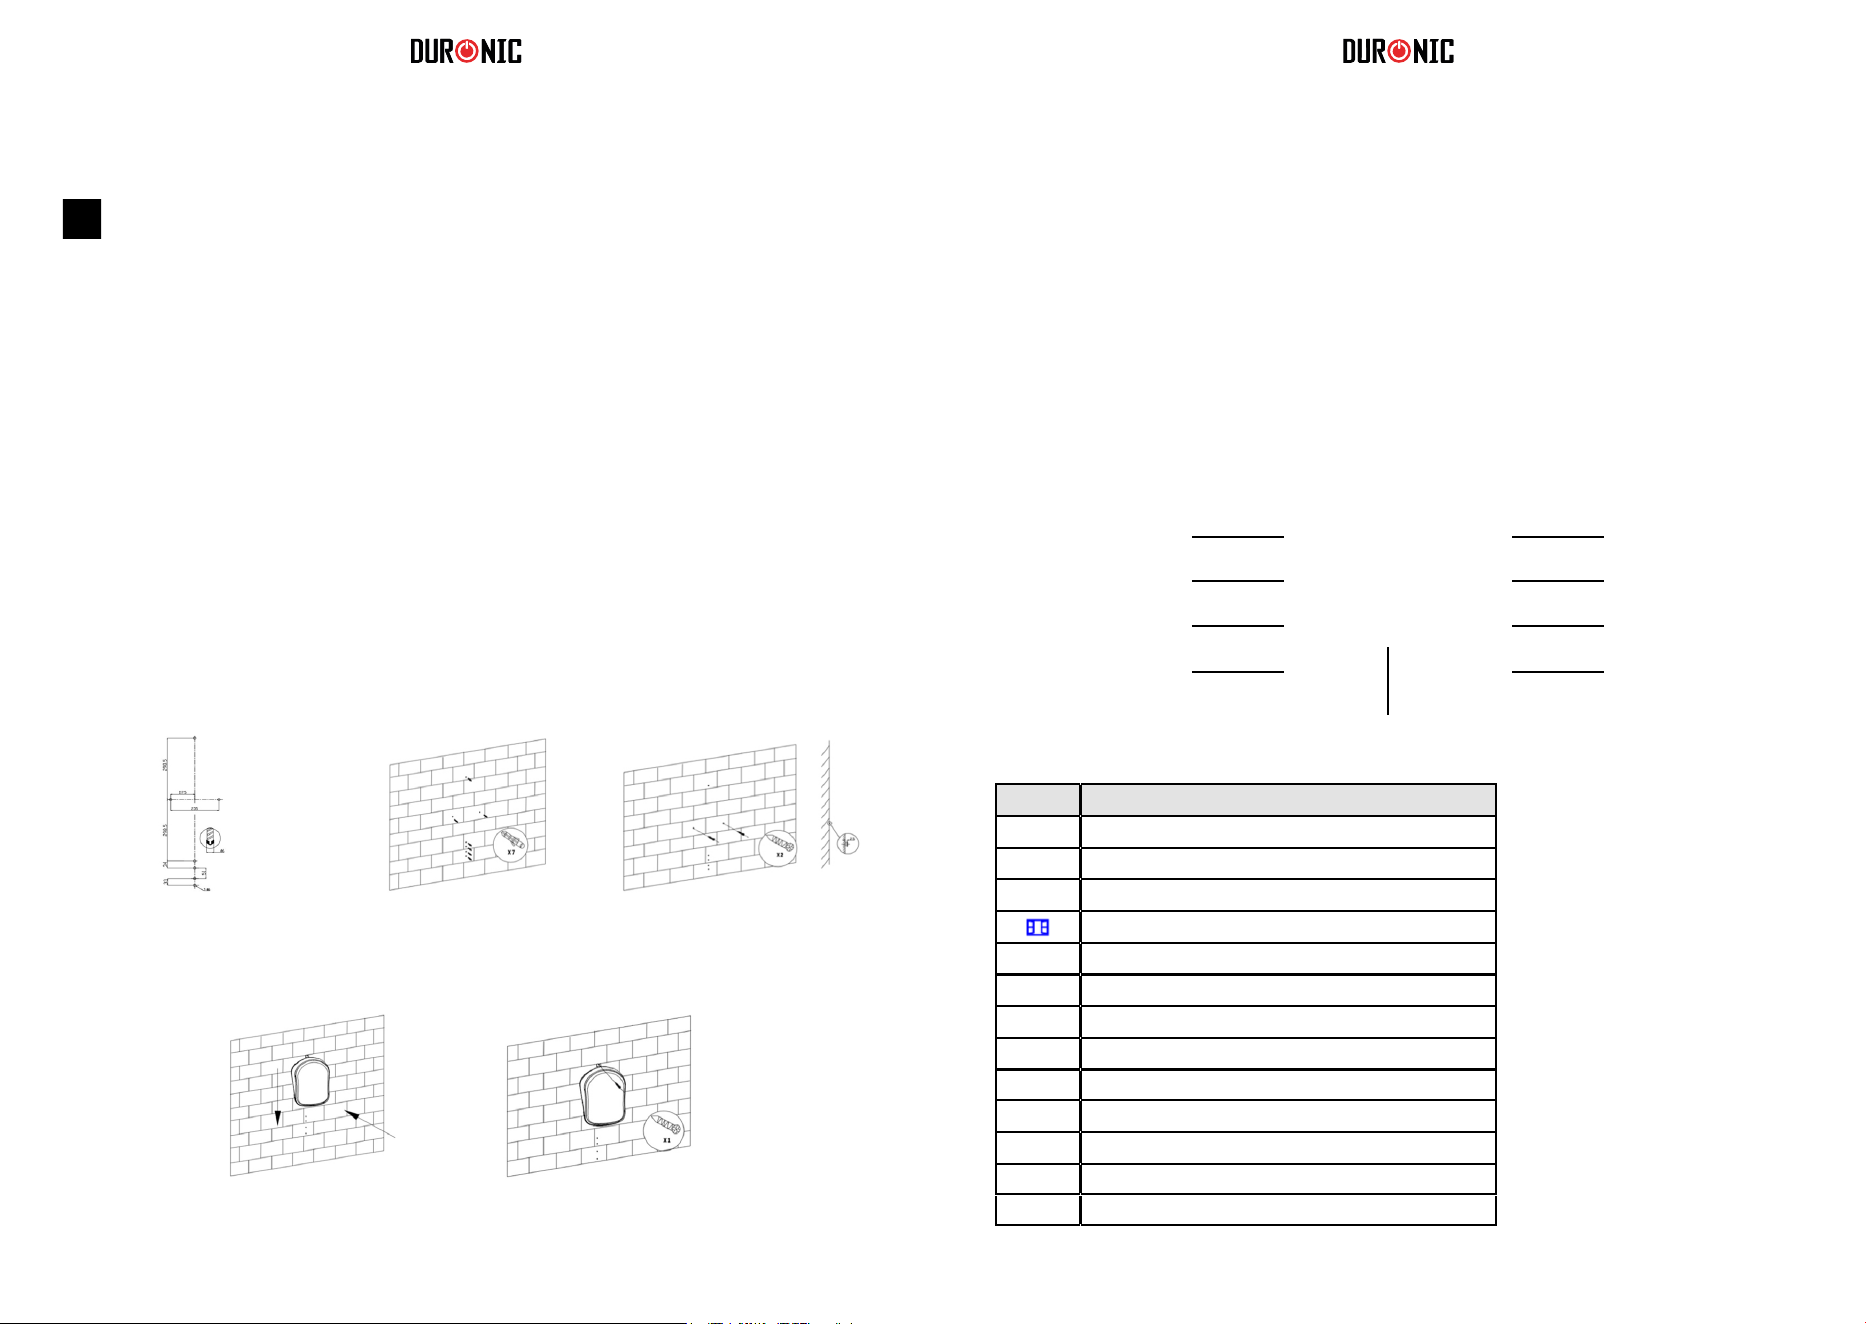
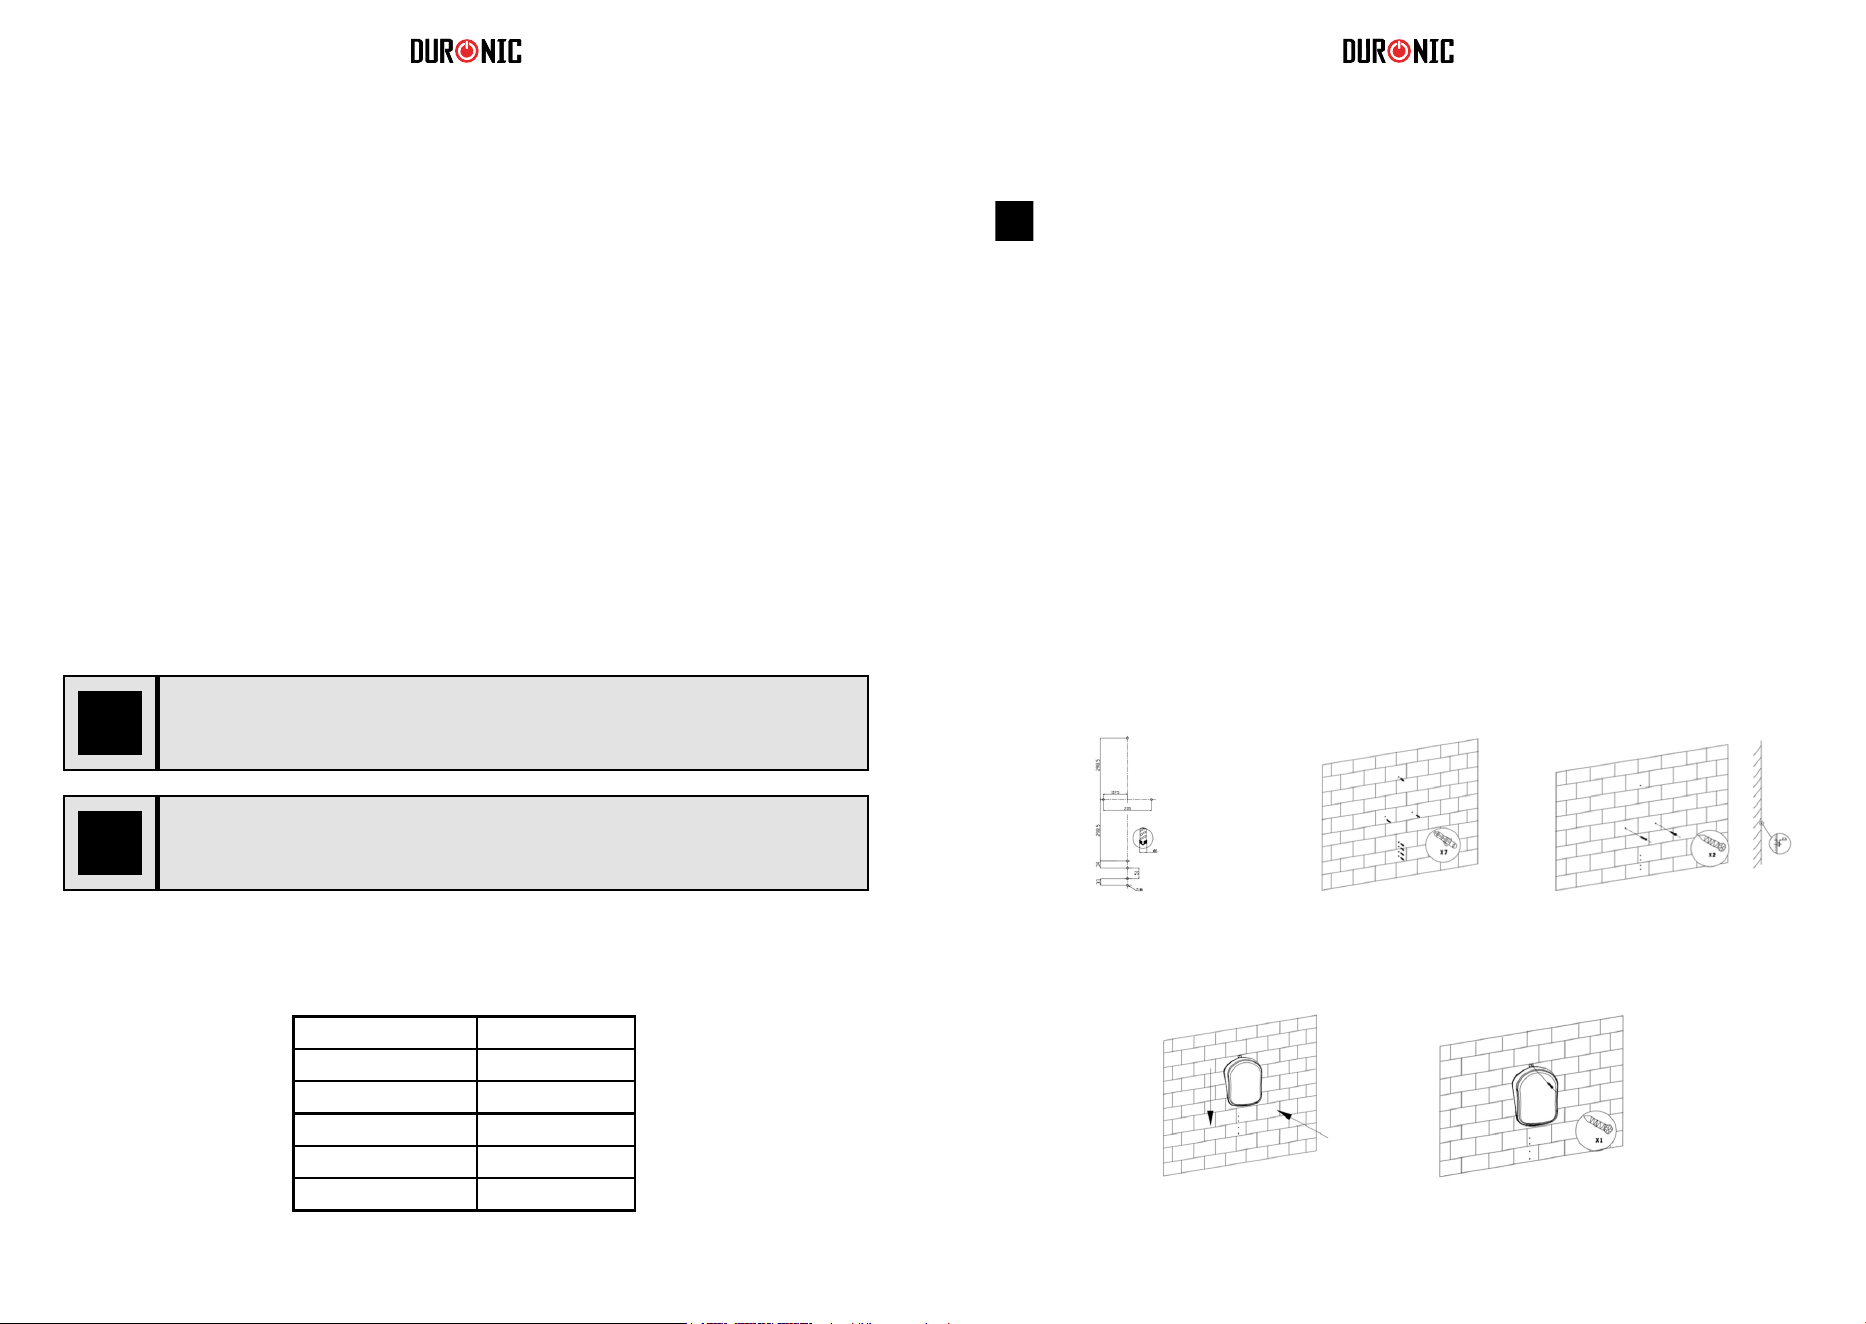
Installation
As a general guideline, please see the below diagrams which
illustrate how and where to install the heater safely.
In order to avoid a hazard for very young children, this heater should be
installed so that the lowest part of it is 120cm above the oor.
Model BFH20
Rated Voltage 220 - 240V
Rated Frequency 50-60Hz
Rated Power 2000W
Protective Class II
IP Code IP24
This heater should be installed in accordance
with the British IET BS 7671 Regulations.
Step 1 Step 2
Step 4 Step 5
Step 3

8 9
Operation Setting up the heater
Connecting the Power
The main power ON/OFF (0/I) switch is located on the back of the heater.
To connect the power supply to the heater, push this switch to the ON (I) position.
There is a “D” sound and the screen will display in full for 3 seconds,
then heater enters into standby mode.
If you wish to disconnect the power supply,
push ON/OFF (0/I) button again and switch to OFF (0).
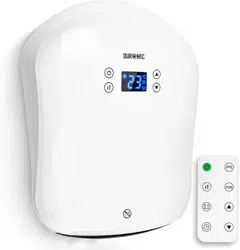
Reading the Digital Display
ProgramOn/ Standby
Modes: P1/ P2/ P3/ P4/ P5/ UP
Power setting
Up arrow: timer/ temperatureWindow open detection
Down arrow: timer/ temperatureTimer
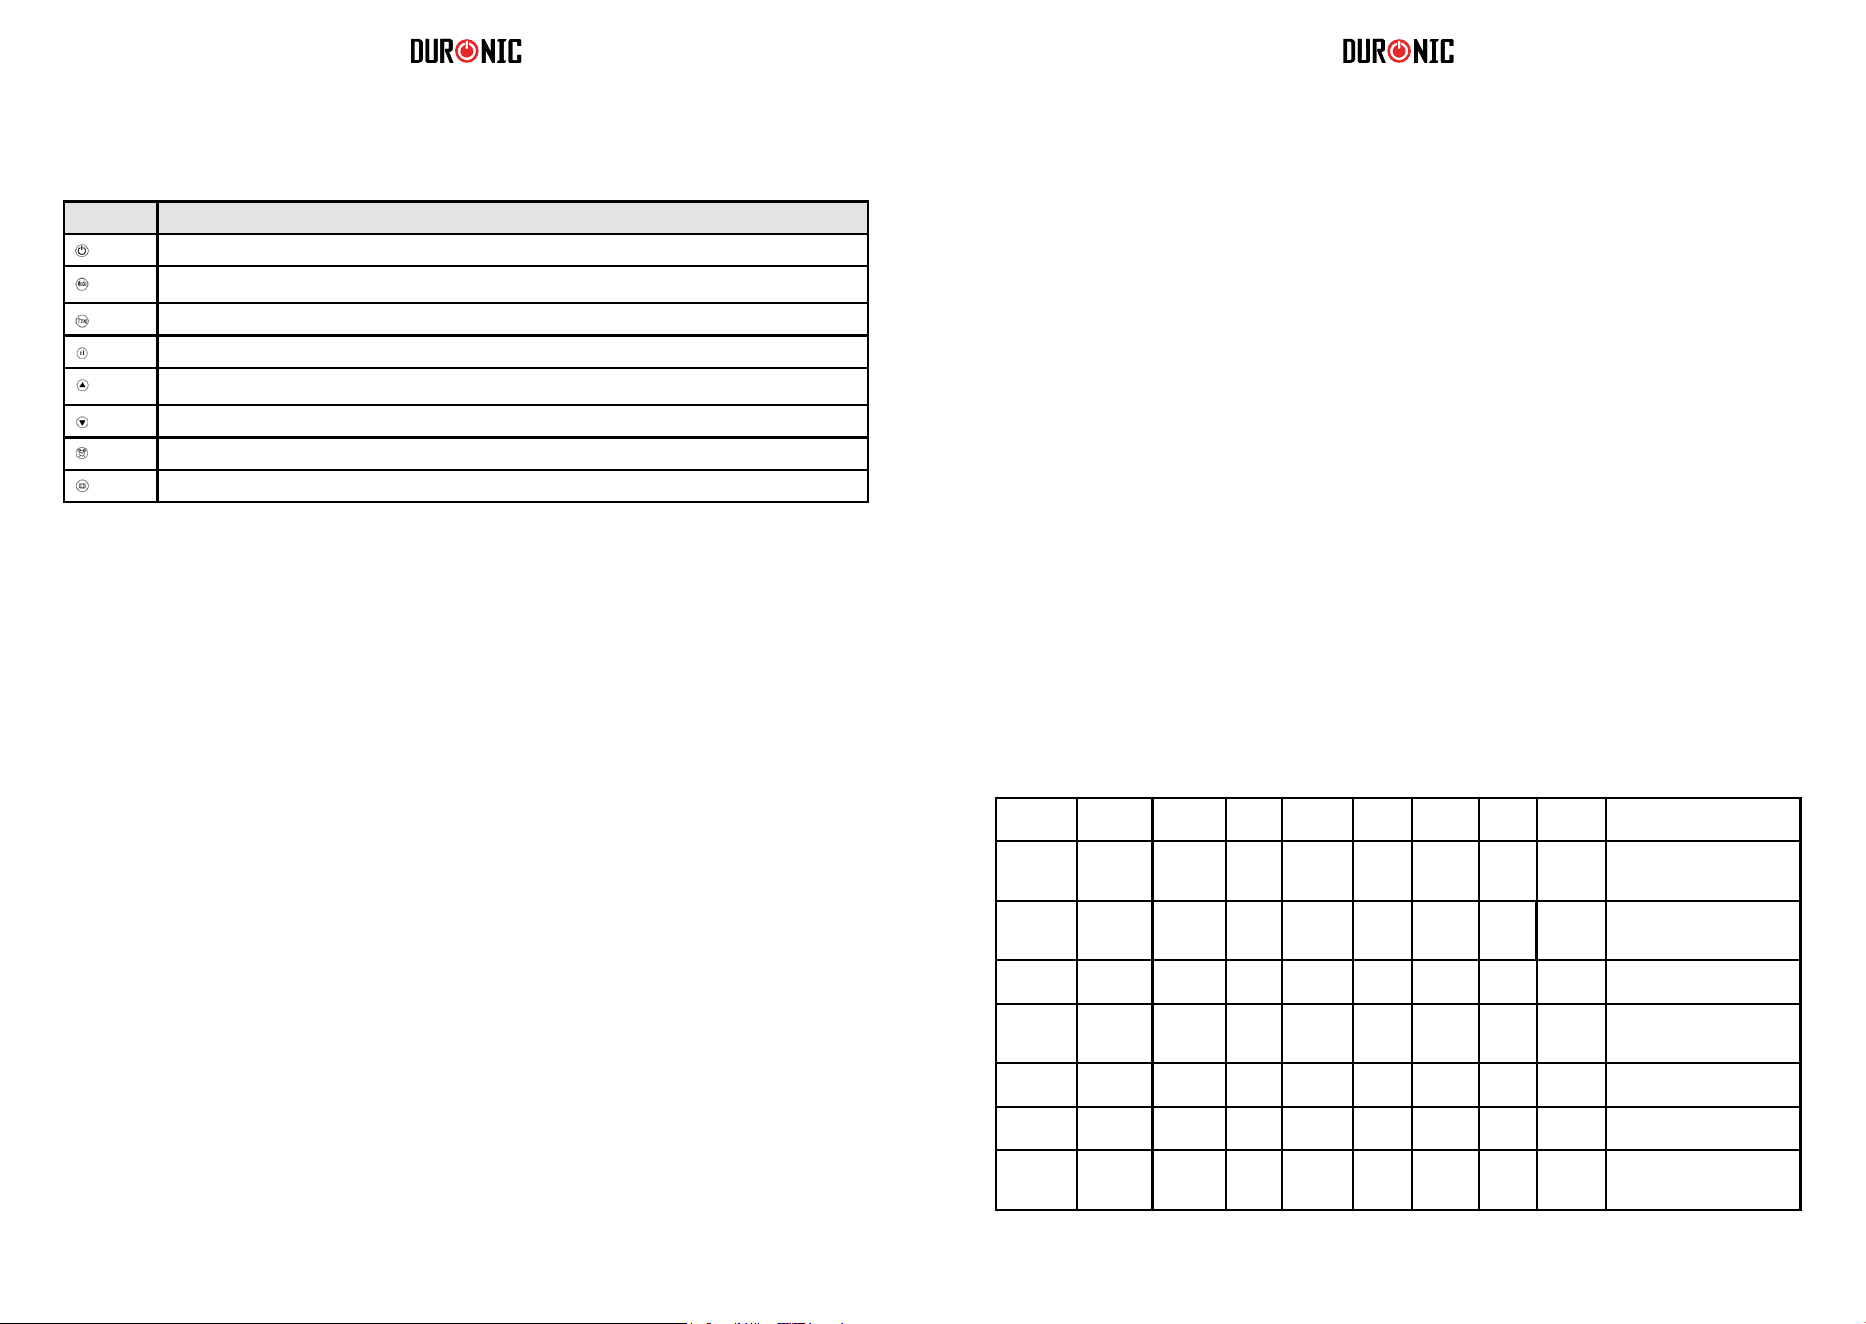
LED Display
Icon Referred to in manual as Meaning
Full Sun Icon Working at full power = 2000W
Half sun Icon Working at half power = 1000W
Snowake Icon Anti-Frost Function
Window Icon Window open detection function
Timer Icon Reverse timer function
[ ] Child Lock Icon Child lock function
d1 D1 Day 1/ Monday
d2 D2 Day 2/ Tuesday
d3 D3 Day 3/ Wednesday
d4 D4 Day 4/ Thursday
d5 D5 Day 5/ Friday
d6 D6 Day 6/ Saturday
d7 D7 Day 7/ Sunday
Buttons Reffered to in manual as
On/ standby button
Mode button
Program button
Power setting button
Up-arrow button
Down-arrow button
Timer button
Window open detection button
1. Turning the Heater On and Off
2. Set the current day and time
To switch on the fan heater, press the on/standby button once.
t will immediately power on and you will hear it running, and it will start to blow out warm air.
OFF: To switch the heater off again, press the same on/standby button to put it into standby mode.
Set the day of the week
a) Switch the heater on.
b) Long-press the timer button for 3 seconds.
c) The screen will rst display d1 and start to ash.
d) Press the up-arrow or down-arrow to set the day of the week
it currently is from d1, d2, d3, d4, d5, d6, d7.
e) After selecting the day, press the timer button once to conrm.
Set the clock
f) Next, the heater enters into the time/clock setting.
A numbered digit ashes on the screen.
g) Set the hour: Press the up-arrow button or down-arrow button to set the
current correct hour among 00-23 in the cycle.
h) When you have chosen the hour, press the timer button once to conrm.
i) Set the minutes: Press the up-arrow button or down-arrow button to set the
current correct minutes from 0-59.
j) Press the timer button once to conrm.
k) Finally, when both the hour and minutes have been set,
press the timer button once to conrm and save the settings.
After setting the time, allow the digital screen to return back to the standard screen.
To check if the current day and time is set currently, press the timer button once; the screen will
automatically show the information in this order: Day, Hour, Minutes in turns within 1 second of each
other, then, the screen will switch back to the ambient temperature display.
10 11
3. Setting the power level
Changing from full power to half power (2000W to 1000W):
a) Switch on the heater.
b) The screen will display the full sun icon which means it is on full-power mode and will
work at 2000W.
c) To change the power level to half-power, press the power setting button once.
This will change from the full sun icon (2000W) to the half sun icon (1000W).
d) Do nothing more and after a few seconds it will automatically save the setting for you.
e) To switch it back to full-power, follow the same steps.
Straight after setting the power level, set the temperature.
a) Press the up-arrow button or down-arrow button to customise the temperature setting.
b) Select a temperature between 5°C and 35°C.
As soon as you land on the number you wish to select, do nothing more and after 5 seconds
it will automatically save the setting for you.
To help you manage the heat in your home, there are 6 different modes to choose from.
Each have a pre-set pattern to program the heater to go on and off throughout the day.
• P1, P2, P3, P4, P5 are the factory default programs that have already been set for you. Each
follows a different pattern to accommodate for a range of preferences.
Please see the chart below for more information on this.
• UP is the program that you can customise to set a working period/mode to suit your
requirements.
4. Setting the temperature
5. Selecting a pre set mode
Per Week Program
Mode
Anti
frost
Comfort Anti
frost
Comfort Anti
frost
Comfort Anti
frost
Best suited for
Days (1-7) P1 00:00-
24:00
Consistent all-day
comfort; for everyday use
continuously.
Days (1-5) P2 00:00-
06:30
06:30-
08:30
08:30-
17:00
17:00-
22:30
22:30-
24:00
Ideal for family who work on
weekdays and at home on
weekends.
Days
(6-7)
P2 00:00-
07:30
07:30-
10:00
10:00-
12:00
12:00-
14:00
14:00-
17:00
17:00-
22:30
22:30-
24:00
Days (1-5) P3 00:00-
06:00
06:00-
17:00
17:00-
24:00
Ideal for in an ofce where it
is occupied during weekdays
and empty on the weekend.
Days
(6-7)
P3 00:00-
24:00
Days (1-7) P4 00:00-
06:00
06:00-
22:00
22:00-
24:00
Ideal for a commercial place
where it is occupied all day.
Days (1-7) P5 00:00-
24:00
Constant anti-frost, ideal
for family who go out for a
long time.
6. Timer setting
7. Setting the customised Program (UP)
Pre-Set Modes
* *Anti-frost: default mode to keep the room at a temperature of at least 5 to prevent frost.
* *Comfort: this setting is customised by the user when they set up their heater.
This is an option to set a countdown timer to switch off the heater after a certain amount of time. For
instance, if you set it for 2 hours it will stay on for this time and then switch off into standby mode
automatically.
Set the Timer
a) Press the mode button and select P1.
b) Press the timer button quickly two times. The timer icon will ash on the screen.
c) Press the up-arrow button or down-arrow button to select an amount of time you would
like the heater to be on for. You can choose from 1-24 hours.
d) Stop on the number you want to select and do nothing else. After 5 seconds it will
automatically save the setting.
The timer icon will stop ashing and appliance will then start a countdown to turn the heater off.
Cancel the Timer: If you want to cancel the timer setting, press the timer button twice quickly again.
The timer icon will disappear from the screen to conrm that it has been cancelled.
To select a mode
• Switch on the heater.
• Press the mode button to select a pre-set mode from P1, P2, P3, P4, P5, UP in cycle.
You can set your own customised program for the heater to come on and off at specic times
throughout the day. In the UP mode you can set one, two or three periods of time per day for the
heater to go on and off (in comfort mode). Remember, ‘comfort mode’ is the power/temperature that
you set at the beginning. It can be changed by following the steps in section no.3.
a) Switch the heater on.
b) Press the mode button and select the UP mode.
c) Press the program button.
d) The screen will display d1 to begin setting for the rst day of the week.
You can start here or select a different day to program if you wish to skip this day.
e) On your chosen day, press the up-arrow button or down-arrow button once to set the
times for the 1st working period for this day;
the screen will display d1 and the full sun icon will ash.
f) Press the up-arrow button or down-arrow button once again to select the start time.
g) Select an hour (between 0 to 23) when you would like the heater to switch on. When you
have the correct hour selected, press the timer button to conrm.
h) The screen will then prompt you to set a nish time.

12 13
Cleaning and Maintenance
Storing
1. Always disconnect the appliance and let it cool down completely
before carrying out any maintenance.
2. Use a vacuum cleaner to remove dust on the inlet and outlet surfaces.
3. Clean the outside of the heater with a damp (well wrung) cloth and then dry it with a dry cloth
4. Never immerse the heater in water, nor let water drip into or onto the heater.
1. Always disconnect the heater and allow it to cool down completely before storing.
2. Always give the heater a clean to remove dust and
other deposits before you put it away in storage.
3. If you plan to not use the heater for a long period of time, put the heater and the instruction
manual back into the original box/packaging and store in a dry, well ventilated place.
4. Do not place any heavy items on top of the box during storage as this may damage the heater.
8. Child Lock Function
For added safety there is a child lock function to prevent any settings being altered while the heater is
on.
To Add the Child Lock
Long press the up-arrow button and down-arrow button simultaneously at the same time for 3
seconds to activate the child lock function. The digital screen will show [ ] to conrm that the child lock
is activated. While child lock is in place, no buttons can be used.
To Remove the Child Lock
To remove the child lock, long press the up-arrow button and down-arrow button
simultaneously at the same time for 3 seconds again.
9. Windown Open Detection Function
How does the Window Open Detection Function work?
When the heater senses that the room temperature has dropped 5°C or more over 30 minutes,
the heater will assume that there is a window open and will stop heating up.
This is to preserve energy and prevent the heater working constantly to heat a room that cannot be
heated. When it detects a window is open, the window icon will stop ashing and instead stay
illuminated to remind the user to close the window/door. After closing the window/door,
10. Reverting to the Default Setting
To reset the heater settings to their factory default settings:
• Disconnect power
• Press and hold the down-arrow button
• Reconnect to power
• The heater will then recover to the default settings
To Check the UP Settings
• Press the program button to check each day’s setting. Press the timer button to choose which
day among d1 to d7. When left untouched for more than 2 minutes,
the screen will quit the program mode and change back to the main screen again.
• Press the timer button at rst instead of the up-arrow button or down-arrow button, you can skip
the steps to keep the appliance in anti-frost mode.
• While the heater is working during comfort mode, you can change the power setting by press-
ing the power setting button to switch between the full sun icon (2000W) and the half sun icon
(1000W).
i) Press the up-arrow button or down-arrow button to select an hour and press the timer
button to conrm.
The heater will automatically enter into the 2nd working period setting for
you to set or change if you wish to. The screen will display 2 and the full sun icon
will ash.
Using the method mentioned above, you may set the 2nd and the 3rd working periods.
j) Any gaps in the times you have set will automatically become “anti-frost mode” (which is
similar to a standby mode)
k) If you do not want to set more than one working period, simply press the timer button to
save your setting.
l) Continue to press the timer button to conrm every setting you make on each day.
m) When the d1 has been set, it will automatically turn to d2.
In the same way, you can set times for d1, d2, d3, d4, d5, d6 and d7.
n) Long press the program button for 3 seconds to check the UP mode settings.
Using the Window Open Detection
When the heater is switched on, press the window open detection button once to activate
window open detection and the window icon will ash on the screen.
To cancel this function, press the window open detection button again to cancel the setting and the
window icon will disappear.
14 15
Warranty
1 Year Guarantee from Shine-mart Ltd, Trademark owners of Duronic Products.
NOTE: THESE STATEMENTS DO NOT AFFECT YOUR STATUTORY RIGHTS AS A
CONSUMER
This product has been manufactured under the strictest or quality control procedures, and
using the highest quality of materials, to ensure excellent performance and reliability. It will
give very good and long lasting service, provided it is properly used and maintained. The
product is guaranteed for 1 years from the date of original purchase. If any defect arises due
to a faulty materials or poor workmanship, the faulty product must be returned to the original
place of purchase. Refund or replacement is at the discretion of that company.
Duronic Products are offered with a 1 year guarantee under the following conditions:
1. The product must be returned to the retailer with original proof of purchase.
2
. T
he product must be installed and used in accordance with the instruction
s
c
ontained in this operating manual.
3
. I
t must be used only for domestic purposes.
4. It does not cover wear and tear, malicious damage, misuse, neglect,
inexpert repairs or consumable parts.
5
. S
hine-Mart Ltd has no responsibilities for accidental or consequential loss or damage.
6
. S
hine-Mart Ltd are not liable to carry out any type of servicing work
,
u
nder the guarantee
7
. V
alid in the UK only
Imported by Shine-Mart Ltd, RM3 8SB
Information on waste Disposal for Consumers of
Electrical & Electronic Equipment.
This mark on a product and/or accompanying documents indicates that when it
is to be disposed of, it must be treated as Waste
Electrical & Electronic Equipment, (WEEE).
Any WEEE marked products must not be mixed with general household waste,
but kept separate for the treatment, recovery and recycling of the materials used.
For proper treatment, recovery and recycling; please take all WEEE marked
waste to your Local Authority Civic waste site,
where it will be accepted free of charge.
If customers dispose of Waste Electrical & Electronic Equipment correctly, they
will be helping to save valuable resources and preventing any potential negative
effects upon human health and the environment, of any hazardous materials that
the waste may contain.
Manuel d’utilisation en français
16 17
Instructions de sécurité
•
- Cet appareil est destiné à un usage domestique uniquement. N’utilisez pas
l’appareil à l’extérieur.
- Cet appareil n’est pas conçu pour être utilisé dans un environnement industriel ou
commercial.
- Assurez-vous que le voltage de l’appareil corresponde à celui utilisé dans votre
localité.
- Cet appareil n’est pas conçu pour être utilisé par les personnes, y compris les
enfants, dont les capacités sensorielles ou physiques sont limitées, à moins qu’elle
ne soit sous supervision de la personne responsable de leur sécurité.
- Veuillez-vous assurer de placer l’appareil hors de portée des enfants. Si l’appareil
n’est pas hors de portée des enfants, ceux-ci doivent rester sous supervision à tout
moment pour éviter qu’ils ne jouent pas avec l’appareil.
- Si l’appareil ou le câble d’alimentation est endommagé, veuillez contacter le service
client de Duronic ou tout technicien qualifié.
- Ne tentez jamais de remplacer ou réparer l’appareil par vous-même. N’ouvrez
jamais l’appareil par vous-même. Ne modifiez pas l’appareil pour un usage différent
que celui décrit dans ce manuel.
- L’appareil contient des éléments mobiles, les réparations doivent uniquement être
effectuées par Duronic en utilisant des pièces et accessoires originaux.
- Utilisez toujours l’appareil sur une surface stable, sèche et plate.
- Ne placez pas l’appareil sur un mur endommagé ou sur lequel le taux d’humidité
serait élevé.
- N’utilisez pas l’appareil et ne le manipulez pas avec des mains humides.
- N’immergez pas l’appareil dans l’eau ou tout autre liquide.
- Le nettoyage de l’appareil devrait se faire selon les instructions données dans ce
manuel.
- N’insérez pas d’objets à travers le produit, cela pourrait provoquer un risque
d’électrocution, d’incendie ou pourrait endommager l’appareil.
- Gardez l’appareil et le câble d’alimentation hors de portée d’éventuelles sources de
chaleur ou de tout objet qui pourrait endommager l’appareil.
- L’appareil ne doit pas être placé au-dessus ou en-dessous d’une prise de courant
pour éviter tout accident. Afin d’éviter toute surchauffe de l’appareil, ne recouvrez pas
l’appareil.
- N’utilisez pas l’appareil juste à côté d’une baignoire, d’une douche ou d’une piscine.
- Assurez-vous que l’appareil soit éteint avant de le brancher.
- Eteignez l’appareil et débranchez-le lorsqu’il n’est pas utilisé, avant de procéder au
nettoyage ou toute opération de maintenance.
- Pour débrancher l’appareil, veuillez arrêter au préalable l’appareil en utilisant
l’interrupteur placé au dos.
- Ne tirez pas le câble lorsque vous tentez de débrancher l’appareil.
- N’utilisez pas l’appareil à proximité d’une source de produits à base de pétrole, de
peinture ou tout autre liquide inflammable.
Instructions de sécurité
Spécifications techniques
- Assurez-vous que vos mains soient sèches avant d’utiliser ou d’appuyer sur
l’interrupteur.
- Ne laissez pas l’appareil sans supervision lorsqu’il n’est pas en utilisation.
- L’une des principales causes qui pourrait expliquer une éventuelle surchauffe vient
des dépôts de poussières et bouloches qui pourraient s’accumuler. Assurez-vous que
tous ces dépôts soient retirés régulièrement à l’aide d’un aspirateur. Veuillez
néanmoins vous assurer d’avoir bien débrancher l’appareil au préalable.
- N’utilisez pas l’appareil sur un tapis et ne placez pas le câble d’alimentation sous un
tapis.
- Faites courir le câble d’alimentation de façon à ce qu’il reste en dehors du passage.
- Ne rangez pas l’appareil jusqu’à ce qu’il ait complètement refroidi. Rangez l’appareil
dans un environnement sec lorsqu’il n’est pas utilisé.
- Certains éléments de cet appareil peuvent chauffer et provoquer d’éventuelles
brulures. Veuillez rester vigilent si l’appareil est utilisé à proximité de personnes
vulnérables, les enfants y compris.
Si le câble d’alimentation est endommagé, l’appareil pourrait présenter
un risque d’électrocution. N’utilisez jamais l’appareil si un quelconque
élément est endommagé.
Afin d’éviter tout danger pour les très jeunes enfants, veuillez placer
l’appareil à une distance minimum de 120 cm au-dessus du sol.
Modèle
BFH20
Voltage nominal
220 - 240V
Fréquence nominale
50-60Hz
Puissance nominale
2000W
Classe de protection
II
Code IP
IP24
18 19
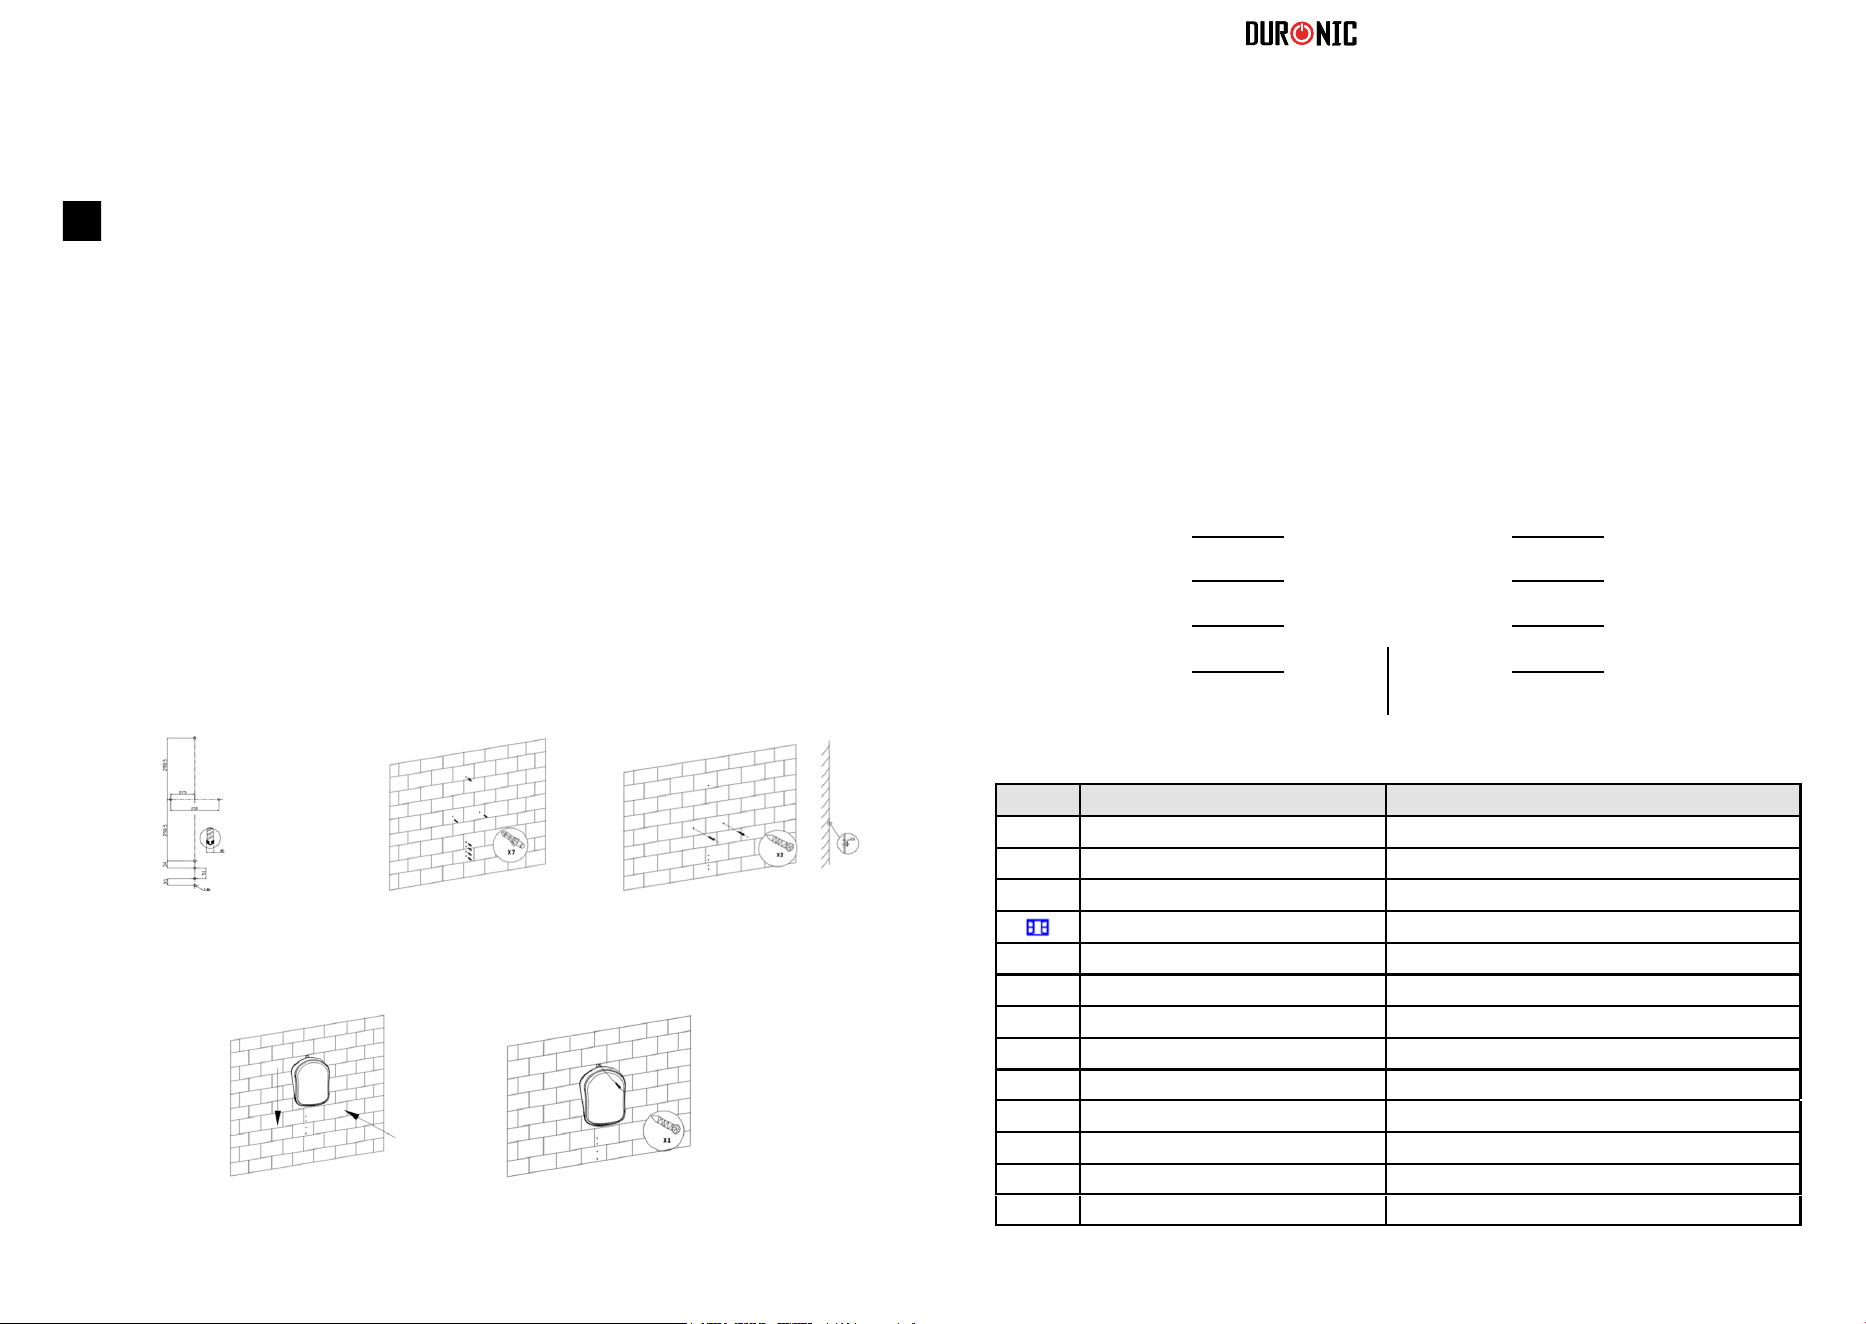
Installation
En règle générale, veuillez suivre les diagrammes suivant
pour illustrer comment et où installer l’appareil en toute
sécurité.
Cet appareil devrait être installé en suivant les recommandations
d’installation des produits électriques qui s’appliquent dans votre localité.
Etape 1 Etape 2
Etape 4 Etape 5
Etape 3
Utilisation
Premiers pas
Appuyez sur l’interrupteur placé au dos de l’appareil pour l’allumer afin de le
mettre en position ON. L’appareil émettra un petit son et l’écran s’allumera
pendant 3 secondes avant de se mettre en veille. Si vous souhaitez débranchez
l’appareil, appuyez d’abord sur l’interrupteur afin de le mettre en position OFF.
Lecture de l’écran
ProgrammeON / Mise en veille
Modes: P1/P2/P3/P4/P5/UP
Indicateur de puissance
Flèche du haut, minuteur, température
Détecteur de fenêtre ouverte
Flèche du bas, minuteur, température
Minuteur
Ecran LED
Icône Explication
Puissance 1 = 2000W
Puissance 2 = 1000W
Fonction anti-gel
Détecteur de fenêtre ouverte
Minuterie
[ ]
Protection enfants
d1
Jour 1 / Lundi
d2
Jour 2 / Mardi
d3
Jour 3 / Mercredi
d4
Jour 4 / Jeudi
d5
Jour 5 / Vendredi
d6
Jour 6 / Samedi
d7
Jour 7 / Dimanche

20 21
Paramétrage du chauffage
1.
Touches Désigné dans le manuel par
Touche ON / Mise en veille
Touche de mode
Touche de programmation
Touche de réglage de la puissance
Touche du haut
Touche du bas
Touche du
Touche du détecteur de fenêtre ouverte
minuteur
Allumer et éteindre l’appareil
2. Paramétrer l’horloge
Pour allumer l’appareil, appuyez sur la touche ON / Mise en veille. L’appareil s’allumera
immédiatement et commencera à expulser de l’air chaud.
Pour éteindre l’appareil, appuyez de nouveau sur la touche ON / Mise en veille, l’appareil
continuera à expulser de l’air chaud pendant une minute avant de s’éteindre.
Pour ajuster le jour de la semaine :
A. Allumez l’appareil.
B. Appuyez pendant plusieurs secondes sur la touche du minuteur. L’appareil affichera
D1 qui clignotera sur l’écran.
C. Appuyez sur la touche du haut ou du bas pour paramétrer le jour de la semaine.
D. Après avoir sélectionné le bon jour, appuyez sur la touche du minuteur pour confirmer la
sélection.
Après avoir sélectionné le jour, vous pourrez alors ajuster l’horloge interne :
F. Un chiffre clignotera sur l’écran, ce chiffre correspond à l’heure.
G. Appuyez sur la touche du haut ou du bas pour sélectionner la bonne heure (00h à 24h).
H. Après avoir sélectionné la bonne heure, appuyez sur la touche du minuteur pour confirmer la
sélection. Les minutes doivent ensuite être ajustées.
I. Veuillez répéter le processus
précédent pour sélectionner l’heure exacte (00 à 59 min)
J. Appuyez sur la touche du minuteur pour confirmer la sélection.
K.
Appuyez
à nouveau
sur
la
touche
du
minuteur
pour
sauvegarder
les paramètres.
Autrement,
répétez
à partir de l’étape D.
Après avoir finalisé le paramétrage, l’affichage retournera à l’écran d’accueil. Pour vérifier si les
informations ont bien été sauvegardées, appuyez sur la touche du minuteur, l’écran fera alors
défiler les informations tour à tour (jour, heure, minute). L’écran retournera ensuite sur l’écran
d’accueil et affichera la température ambiante.
3.
Paramétrage de la puissance.
Modification de la puissance :
A. Allumez l’appareil.
B. Si l’icône de puissance 1 s’affiche, l’appareil fonctionne à pleine puissance (2000W). A
puissance 2, l’appareil fonctionne à puissance réduite (1000W).
C. Pour changer la puissance, appuyez simplement sur la touche de réglage de la
puissance, l’appareil changera alors la puissance.
D. La puissance sélectionnée sera automatiquement sauvegardée et l’écran retournera
sur l’écran d’accueil.
Après avoir modifié la puissance, vous avez la possibilité de modifier la température ambiante. Appuyez
à nouveau sur la touche de réglalge de la puissance pour rentrer dans ce paramétrage puis :
A. Appuyez sur la touche du haut ou du bas pour paramétrer la température.
B. Vous pouvez choisir une température comprise entre 5°C et 35°C. Une fois
paramétré, l’appareil retournera automatiquement sur l’écran d’accueil après 5
secondes.
Pour vous aider à profiter du fonctionnement de cet appareil, 6 modes de fonctionnement peuvent
être choisis. Chacun est ajusté pour différentes situations en fonction de votre mode de vie.
Vous avez le choix de choisir entre le programme P1 / P2 / P3 / P4 / P5 qui sont paramétrés
par défaut. Si vous souhaitez enregistrer votre propre programme, ceci est possible grâce au
mode UP.
4.
Paramétrage de la température
5.
Sélection d’un mode préprogrammé
Par semaine
Mode
Antigel Comfort Antigel Comfort Antigel
Comfort
Antigel Idéal pour :
Jours (1-7)
P1 00:00-
24:00
Fournir une température
confortable toute la journée.
Jours (1-5)
P2 00:00-
06:30
06:30-
08:30
08:30-
17:00
17:00-
22:30
22:30-
24:00
Les familles ou les
professionnels qui travaillent la
semaine et non le weekend.
Jours
(6-7)
P2 00:00-
07:30
07:30-
10:00
10:00-
12:00
12:00-
14:00
14:00-
17:00
17:00-
22:30
22:30-
24:00
Jours (1-5)
P3 00:00-
06:00
06:00-
17:00
17:00-
24:00
Un environnement
professionnel, occupé durant la
semaine et non le weekend.
Jours
(6-7)
P3 00:00-
24:00
Jours (1-7)
P4 00:00-
06:00
06:00-
22:00
22:00-
24:00
Fournir une température
constante toute la journée.
Jours (1-7)
P5 00:00-
24:00
Fournir une sécurité
antigel en permanence.
Modes de fonctionnement

22 23
6.
Fonction minuteur
7.
Paramétrage du programme customisable
* *Antigel: La température antigel correspond à une température minimum de 5°C.
* *Comfort: La température de confort est paramétrable par l’utilisateur en fonction de ses
préférences (5°C à 35°C).
Cette option permet de faire fonctionner l’appareil pendant une période prédéterminée. Si vous
faites fonctionner l’appareil pendant une période de 2 heures par exemple, l’appareil se mettra
automatiquement en veille au terme de ces 2 heures.
Paramétrage de la minuterie
A. Appuyez sur la touche de mode et sélectionnez le programme P1.
B. Appuyez sur la touche du minuteur 2 fois, cette touche clignotera.
C. Appuyez sur la touche du haut et la touche du bas pour paramétrer la durée durant laquelle
l’appareil devra fonctionner.
D. Une fois que vous avez sélectionné la durée, ne pressez aucune touche, la minuterie
sera automatiquement sauvegardée après 5 secondes. La touche du minuteur clignotera et
l’appareil commencera le décompte.
Annulation de la minuterie: Si vous souhaitez annuler la minuterie, appuyez simplement sur la
touche du minuteur 2 fois. L’icône de la minuterie disparaitra et l’appareil retournera sur l’écran de
base.
Pour sélectionner un mode :
- Allumez l’appareil.
- Appuyez sur la touche de mode puis choisissez le mode de fonctionnement souhaité.
Vous pouvez paramétrer votre propre programme afin que l’appareil s’allume et s’éteigne à des
heures prédéfinies. L’appareil fonctionnera alors en mode « confort », c’est-à-dire à la température
initialement définie au préalable. Vous pouvez modifier cette température en suivant l’étape 3 et 4.
A.
B.
C.
D.
Allumez l’appareil.
Appuyez sur la touche mode et sélectionnez le mode UP.
Appuyez sur la touche de programmation.
L’appareil affichera D1 pour commencer le paramétrage d’un jour.
Appuyez sur la touche du haut et du bas pour sélectionner le jour à paramétrer (D1 = Lundi par exemple).
E.
Appuyez sur la touche du haut et bas pour sélectionner l’heure de démarrage.
Sélectionnez une heure comprise entre 0 et 23 pour paramétrer l’allumage de l’appareil. Lorsque la
bonne heure est sélectionnée, appuyez sur la touche du minuteur.
F.
Vous devrez ensuite paramétrer l’heure à laquelle l’appareil devrait s’arrêter.
G.
H.
8.
Sécurité pour enfants
Pour des raisons de sécurité, cet appareil est doté d’une sécurité pour enfants, afin d’éviter qu’ils ne
puissent pas modifier le fonctionnement de l’appareil.
Pour activer cette sécurité, appuyez longuement sur la touche du haut et la touche du bas en même
temps pendant 3 secondes. L’écran affichera l’élément suivant : [ ] pour confirmer que la sécurité est
active. Lorsque cette fonction est active, aucune touche ne fonctionnera.
Pour désactiver cette fonction, appuyez simplement à nouveau sur la touche du haut et la touche du
bas en même temps pendant 3 secondes.
Pour vérifier le paramétrage du programme UP
- Appuyez sur la touche de programmation pour vérifier le paramétrage effectué. Appuyez sur la
touche du minuteur pour vérifier le paramétrage du jour 1 , 2, 3, etc. Si vous n’appuyez sur
aucune touche, l’appareil retournera à l’écran d’accueil après une période de 2 minutes.
Notes :
Lorsque l’appareil est en fonctionnement en mode confort, vous pouvez changer la puissance de
l’appareil en appuyant sur la touche de réglage de la puissance sans affecter les autres réglages
effectués.
I. Appuyez sur la touche du haut ou du bas pour sélectionner une heure et appuyez sur
la touche du minuteur pour confirmer l’heure. Vous pouvez désormais paramétrer la
seconde et troisième période de fonctionnement pour cette même journée en suivant les
mêmes instructions décrites ci-dessus.
J. Toute période creuse durant laquelle l’appareil n’est pas censé fonctionner
sera automatiquement en mode antigel.
K. Si vous ne souhaitez pas paramétrer de seconde ou troisième période de
fonctionnement, appuyez simplement sur la touche du minuteur pour passer au
paramétrage suivant.
L. Une fois le paramétrage du premier jour effectué, vous serez automatiquement invité à
paramétrer les autres jours. Répétez les instructions décrites ci-dessus jusqu’à ce que tout soit
paramétré selon vos préférences. Tous les paramètres seront automatiquement sauvegardés.
M. Pour modifier ou passer en revue les paramètres, appuyez pendant trois secondes
sur la touche de programmation pour passer chaque jour en revue.
24 25
Nettoyage et maintenance
Rangement
1.
Débranchez toujours l’appareil et laissez-le refroidir.
2.
Utilisez un aspirateur pour retirer la poussière qui pourrait s’être déposé autour de l’entrée ou la sortie d’air.
3.
Nettoyez les parois extérieures avec un tissu humide, puis un tissu sec pour retirer toute trace d’humidité.
4.
N’immergez jamais l’appareil dans l’eau et ne laissez pas de l’eau s’infiltrer dans le chauffage.
1.
Lorsque vous ne comptez pas utiliser l’appareil pendant une période prolongée, veuillez débranchez
l’article et assurez-vous que l’appareil soit refroidi avant de le retirer.
2.
Retirez toujours la poussière et autres débris qui pourraient s’être déposés avant de le ranger.
3.
Veuillez ranger l’appareil dans un espace sec et ventilé avec tous ses accessoires.
4.
Ne placez pas d’articles plus lourds au-dessus de cet appareil, cela pourrait l’endommager.
9.
Détecteur de fenêtre ouverte
Comment est-ce que le détecteur de fenêtre ouverte fonctionne ?
Lorsque le thermostat détecte que la température ambiante descend de 5°C en l’espace de 30
minutes, l’appareil assumera qu’une fenêtre a été ouverte et arrêtera donc son fonctionnement.
Cette fonction a pour but d’économiser l’énergie et d’éviter que l’appareil tente de chauffer une
pièce qui ne pourra pas être « réchauffée ». Lorsque la fonction est activée, l’icône de détecteur
de fenêtre ouverte présente sur l’écran s’illuminera.
10.
Réinitialiser l’appareil
Pour réinitialiser les paramètres par défaut, veuillez :
- Débranchez l’appareil.
- Appuyez longuement sur la touche du bas.
- Rebranchez l’appareil.
-
L’appareil est réinitialisé.
Comment utiliser cette fonction ?
Si l’appareil est allumé, appuyez sur la touche du détecteur de fenêtre ouverte lorsque vous
souhaitez interrompre le fonctionnement de l’appareil momentanément. Si cette fonction s’est
activée d’elle-même ou si vous souhaitez arrêter cette fonction, appuyez de nouveau sur cette
touche après avoir fermé la fenêtre en question et cette icône s’arrêtera de s’illuminer.
Garantie
Garantie et service après-vente
1 an de garantie de la part de Shine-Mart Ltd, propriétaire de la marque Duronic.
NOTE : CES DÉCLARATIONS N’AFFECTENT EN RIEN VOTRE DROIT STATUTAIRE EN
TANT QUE CONSOMMATEUR
Ce produit a été produit en suivant les procédures de contrôle de qualité les plus strictes en
utilisant des matériaux de qualité pour assurer une excellente durabilité et performance. Cet
appareil vous offrira de longues années de service tant que vous l'utilisez correctement et
suivez les instructions de maintenance présentées dans ce manuel. Ce produit est garanti
pour 1 an à partir de la date originelle d’achat. Si ce produit était endommagée en raison d’un
problème électrique ou d’une fabrication imparfaite,
le produit défectueux peut être remplacé au vendeur à la discrétion de la marque sous
conditions:
1. Le produit doit être retourné avec la preuve originale d’achat.
2. Le produit doit être installé et utilisé en accord avec les instructions contenues dans ce
manuel d’utilisation.
3. Le produit doit être réservé à un usage privé.
4. La garantie ne protège pas contre les dommages dus à l’usure normale, l’utilisation
malveillante, la mauvaise utilisation, la négligence, les réparations conduites par des
non-experts ainsi que les pièces consommables.
5. Shine-Mart Ltd ne porte pas de responsabilité pour tout dommage ou perte accidentel ou
conséquent causé par ce produit.
6. Shine-Mart Ltd se dégage de toute responsabilité en matière de réparation durant la
période de garantie.
7. Valide dans toute l’Union Européenne.
Ce produit est fourni avec une prise européenne
Importé
par Shine-Mart Ltd, RM3 8SB.
Ce symbole apparaît sur le produit et/ou les documents accompagnant ce
produit pour indiquer que pour procéder à la destruction de ce produit, celui-ci
doit être traité comme un déchet électrique et électronique (WEEE).
Les produits marqués WEEE ne doivent être mélangés avec les déchets
ménagers et doivent être séparés pour traitement et recyclage des composants.
An de traiter et recycler ce produit, veuillez déposer tous les composants
marqués WEEE au site de recyclage le plus proche où ce produit sera repris
gratuitement. Si les clients jettent les déchets électriques et électroniques
WEEE correctement, ce geste aidera la préservation de ressources précieuses
et prévient les potentiels effets négatifs que ces composants ou tout autre
composant dangereux ont sur la santé humaine et l’environnement.
Suivez-nous sur
www.duronic.com @duronic_france Duronic France @Duronic_France
26 27
Gebrauchsanleitung auf Deutsch
Sicherheitshinweise
• Dieses Gerät
ist nur für den Gebrauch im Inneren bzw. im Haushalt bestimmt, nicht im
Freien benutzen.
• Dieses Gerät ist nicht für den gewerblichen oder industriellen Gebrauch bestimmt.
• Dieses Gerät ist nicht zur Verwendung durch Personen (einschließlich Kinder) mit
eingeschränkten körperlichen, sensorischen oder geistigen Fähigkeiten oder mangelnder
Erfahrung und mangelndem Wissen bestimmt, es sei denn, sie wurden von einer für ihre
Sicherheit verantwortlichen Person beaufsichtigt oder in die Verwendung des Geräts
eingewiesen.
• Verwenden Sie das Heizgerät immer außerhalb der
Reichweite von Kindern, da das Gerät
sehr heiß
werden kann.
• Wenn das Gerät oder das Netzkabel beschädigt sind, senden Sie es zur Wartung oder
Reparatur an einen Fachmann oder an Duronic.
• Öffnen und
reparieren Sie das Gerät niemals selbst. Verändern Sie das Gerät in keiner
Weise, die nicht in der Gebrauchsanweisung beschrieben ist.
• Beschädigte Versorgungskabel müssen aus Sicherheitsgründen vom Hersteller, von
seinem Kundendienst oder von einer entsprechend qua- lifizierten Person ausgewechselt
werden.
• Betreiben Sie das Gerät immer auf einer trockenen, glatten, ebenen und stabilen Oberfläche.
• Stellen Sie das Gerät nicht auf eine beschädigte oder mit Feuchtigkeit oder Schimmel
bedeckte Wand.
• Tauchen Sie das Gerät nicht ins Wasser oder andere Flüssigkeiten.
• Die Reinigung sollte gemäß den Anweisungen in diesem Handbuch erfolgen.
• Lassen Sie nicht zu, dass Fremdkörper in die Einlass- oder Auslassöffnung gelangen, da
dies zu einem elektrischen Schlag führen oder das Gerät beschädigen kann.
• Halten Sie das Gerät und das Kabel von Wärmequellen, scharfen Gegenständen oder
anderen Gegenständen fern, die Schäden verursachen können.
• Das Heizgerät darf sich nicht unmittelbar unter einer Steckdose befinden. Decken
Sie die Heizung nicht ab, um eine Überhitzung zu vermeiden.
• Verwenden Sie dieses
Heizgerät nicht in unmittelbarer Nähe einer Badewanne,
einer Dusche oder eines Waschbeckens.
• Stellen Sie sicher, dass das Gerät immer ausgeschaltet ist, bevor Sie es an das
Stromnetz anschließen.
• Schalten Sie das Geräts bei Nichtbenutzung, vor der Reinigung oder wenn Sie
Wartungsarbeiten durchführen, aus.
• Um das Gerät vom Stromnetz zu trennen, schalten
Sie es aus und ziehen Sie den
Stecker aus der Steckdose. Ziehen Sie nicht am Kabel selbst, dieses oder den Stecker
nicht zu beschädigen.
• Betreiben Sie das Gerät nicht in Bereichen, in denen Benzin, Farbe oder andere
brennbare Flüssigkeiten verwendet
oder gelagert werden.
• Stellen Sie sicher, dass die Spannung mit der auf dem Typenschild des Geräts
angegebenen Spannung übereinstimmt.
28
29
Installation
Als allgemeine Richtlinie sehen Sie sich bitte die folgenden
Abbildungen an, welche veranschaulichen, wie und wo die
Heizung sicher installiert werden kann.
Zusätzlich zu den Vorschriften dieser Anleitung muss die Installation die geltenden
europäischen und nationalen Normen - wie VDE 0100 für
Deutschland. Die Installation muss den gültigen Normen und den anerkann- ten
Fachregeln des Landes, in dem der Heizkörper installiert wird,
entsprechen.
Schritt 1 Schritt 2
Schritt 4 Schritt 5
Schritt 3
Sicherheitshinweise (Fortsetzung)
Technische Spezifikationen
• Blockieren Sie auf keinen Fall die Lufteinlässe oder den Auslass.
• Berühren Sie nicht die heißen Oberflächen.
• Stellen Sie immer sicher, dass Ihre Hände trocken sind, bevor Sie den Schalter am Gerät
betätigen oder den Stecker sowie die Steckdose berühren.
• Lassen Sie das Gerät während des Gebrauchs nicht unbeaufsichtigt.
• Die häufigste Ursache für Überhitzung sind Staub- oder Fusselablagerungen im Gerät.
Stellen Sie sicher, dass diese Ablagerungen regelmäßig entfernt werden, indem Sie
das Gerät vom Stromnetz trennen und anschließend die Lüftungsschlitze und das
Gitter saugen.
• Stellen Sie das Heizgerät nicht auf einen Teppich und legen Sie das Kabel nicht unter einen
Teppich.
• Platzieren Sie das Kabel so, dass niemand darüber stolpern oder darauf stehen kann.
• Stellen Sie das Heizgerät erst dann weg, wenn es vollständig abgekühlt ist. Lagern Sie das
Heizgerät bei Nichtbenutzung an einem kühlen und trockenen Ort.
• Dieses Produkt ist nur für gut isolierte Räume oder gelegentlichen Gebrauch geeignet.
• Einige Teile dieses Produkts können sehr heiß werden und Verbrennungen verursachen.
Besondere Aufmerksamkeit ist geboten, wenn Kinder und schutzbedürftige Personen
anwesend sind.
Wird das Gerät mit einem defekten oder beschädigten Netzkabel betrieben,
besteht die Gefahr eines tödlichen Stromschlags. Verwenden Sie niemals
ein Gerät, das beschädigt ist oder ein defektes Netzkabel hat.
Vermeiden Sie die Gefahr bei kleinen Kindern indem Sie das
Heizgerät so installieren, dass der unterste mindestens Teil 120
cm über dem Boden liegt.
BFH20
220 - 240V
50-60Hz
2000W
II
IP24
Typ
Nennspannung
Nennfrequenz
Nennleistung
Schutzklasse
IP Code

30 31
Heizung programmieren
On/ Standby Schalter
Timer
1.
Schalter Im Handbuch bezeichnet als
Modus
Programm
Leistungseinstellung
Aufwärtspfeil
Abwärtspfeil
Fensteröffnungserkennung
2.
Ein- und Ausschalten der Heizung
Stellen Sie den aktuellen Tag und die Uhrzeit ein
EIN: Um den Heizlüfter einzuschalten, drücken Sie die On-/Standby-Taste einmal. Er
schaltet sich sofort ein und Sie hören, dass warme Luft rausgeblasen wird.
STANDBY: Um die Heizung wieder auszuschalten, drücken Sie die gleiche
On-/Standby-Taste, um sie in den Standby-Modus zu versetzen.
a)
Einstellung des Wochentages
b)
c)
Heizung einschalten.
Halten Sie die Timer-Taste 3 Sekunden lang gedrückt.
Der Bildschirm zeigt zuerst d1 an und beginnt dann zu blinken.
d)
Drücken Sie den Aufwärts- oder Abwärtspfeil, um den korrekten
Wochentag (d1, d2, d3, d4, d5, d6, d7) einzustellen.
e)
Drücken Sie nach Auswahl des Tages noch einmal die
Timer-Taste, um die Auswahl zu bestätigen.
Einstellung der Uhrzeit
f)
Als nächstes wechselt die Heizung in die Zeit / Uhrzeit-Einstellung. Eine
nummerierte Ziffer blinkt auf dem Bildschirm.
Einstellung der Stunde: Drücken Sie den Aufwärts- oder Abwärtspfeil,
um die aktuelle Stunde zwischen 00 und 23 einzustellen.
Sobald Sie die Stunde ausgewählt haben, drücken Sie die
Timer-Taste einmal, um die Auswahl zu bestätigen.
Einstellung der Minuten: Drücken Sie den Aufwärts- oder Abwärtspfeil,
um die aktuellen Minuten von 0-59 einzustellen.
Zur Bestätigung, drücken Sie die Timer-Taste einmal.
Haben Sie sowohl die Stunden als auch die Minuten eingestellt, drücken
Sie die Timer-Taste einmal, um die Einstellungen zu speichern.
g)
h)
i)
j)
k)
Lassen Sie nach dem Einstellen der Uhrzeit und des Tages den digitalen Bildschirm zum
Standardbildschirm zurückkehren. Drücken Sie einmal die Timer-Taste, um zu überprüfen, ob
Uhrzeit und Tag richtig eingestellt sind. Der Bildschirm zeigt die Informationen in folgender
Reihenfolge an: Tag, Stunde, Minuten, abwechselnd innerhalb einer Sekunde. Anschließend
kehrt der Bildschirm zur Anzeige der Umgebungstemperatur zurück.
Betrieb
Anschließen der Stromversorgung
Der Hauptschalter zum Ein- und Ausschalten (0/I) befindet sich auf der
Rückseite des Heizgeräts. Schieben Sie diesen Schalter in die Position ON
(I), um das Netzteil an die Heizung anzuschließen. Es ertönt ein „D“ -Ton
und der Bildschirm wird 3 Sekunden lang vollständig angezeigt.
Anschließend wechselt die Heizung in
den Standby-Modus. Wenn Sie die Stromversorgung trennen möchten,
drücken Sie die Taste auf der Rückseite ON / OFF (0/I) erneut und schalten
Sie sie auf OFF (0).
Ablesen der Digitalanzeige
ProgrammOn/ Standby
Timer
LED Display
Leistungseinstellung
Fensteröffnungserkennung
Abwärtspfeil: Timer / Temperatur
Aufwärtspfeil: Timer / Temperatur
Modi: P1/ P2/ P3/ P4/ P5/ UP
Volle Leistung = 2000W
Halbe Leistung = 1000W
Timer Icon
[ ]
d1 D1
d2 D2
d3 D3
d4 D4
d5 D5
d6 D6
d7 D7
Symbol Im Handbuch bezeichnet als Bedeutung
Volle Sonne
Halbe Sonne
Schneeflocke
Fenster
Kindersicherung
Tag 1/ Montag
Tag 2/ Dienstag
Tag 3/ Mittwoch
Tag 4/ Donnerstag
Tag 5/ Freitag
Tag 6/ Samstag
Tag 7/ Sonntag
Frostschutzmodus
Offenes Fenster erkannt
Countdown Timer Funktion
Kindersicherungsfunktion eingeschalten

32 33
6.
7.
Timer einstellen
Einstellung des benutzerdefinierten Programms (UP)
* * Anti-Frost: Standardmodus, um den Raum auf einer Temperatur von mindestens 5 ° C zu
halten und so Frost zu vermeiden.
* * Komfort: Diese Einstellung wird vom Benutzer beim Einrichten der Heizung angepasst.
Sowohl die Leistung als auch die Temperatur können für den „Komfortmodus“ geändert werden.
a)
Mit dieser Option können Sie einen Countdown-Timer einstellen, damit die Heizung nach einer
bestimmten Zeitspanne von selbst auf Standby-Modus schaltet. Wenn Sie es beispielsweise für 2
Stunden einstellen, bleibt es für diese Zeit eingeschalten und schaltet sich dann automatisch in
den Standby-Modus.
Timer einstellen
b)
Drücken Sie die Modus-Taste und wählen Sie P1.
Drücken Sie die Timer-Taste zweimal schnell. Das Timer-Symbol blinkt auf dem Bildschirm.
Drücken Sie den Aufwärts- bzw. Abwärtspfeil, um die Zeitspanne auszuwählen, für die die Heizung
eingeschaltet sein soll. Sie können zwischen 1-24 Stunden wählen.
Halten Sie an der Nummer an, die Sie auswählen möchten, und drücken Sie nichts
anderes. Nach 5 Sekunden wird die Einstellung automatisch gespeichert.
c)
d)
•
Auswahl der Modi
•
Heizung einschalten.
Drücken Sie die Modus-Taste, um aus einem der voreingestellten Modi P1, P2, P3,
P4, P5 und UP auszuwählen.
Sie können Ihr individuelles Programm (UP) für das Ein- und Ausschalten der Heizung zu bestimmten
Tageszeiten einstellen. Im UP-Modus können Sie eine, zwei oder drei Zeitperioden pro Tag (im
Komfortmodus) einstellen. Denken Sie daran, dass der Komfortmodus die Leistung / Temperatur ist, die
Sie zu Beginn eingestellt haben. Sie kann durch Befolgen der Schritte in Abschnitt 3 geändert werden.
a) Heizung einschalten.
b) Drücken Sie die Modus-Taste und wählen Sie den UP-Modus aus.
c) Drücken Sie die Programmtaste.
d) Auf dem Bildschirm wird d1 angezeigt, um die Einstellung für den ersten Wochentag zu beginnen. Sie
können entweder bei d1 beginnen oder einen anderen Tag für die Programmierung auswählen.
e) Drücken Sie an dem von Ihnen ausgewählten Tag einmal die Aufwärts- oder Abwärtspfeiltaste, um die
Zeiten für die erste Zeitperiode für diesen Tag festzulegen. Auf dem Bildschirm wird d1 angezeigt und
das Symbol "volle Sonne" blinkt.
f) Drücken Sie die Aufwärts- oder die Abwärtspfeiltaste erneut, um die Startzeit auszuwählen.
g) Wählen Sie eine Stunde (zwischen 0 und 23), zu der die Heizung eingeschaltet werden soll. Sobald
Sie die von Ihnen gewünschte Stunde ausgewählt haben, drücken Sie zur Bestätigung die
Timer-Taste.
h) Der Bildschirm fordert Sie dann auf, eine Endzeit einzustellen.
3.
Einstellung der Leistungsstufe
Wechsel von voller zu halber Leistung (2000W bis 1000W):
a)
b)
c)
Heizung einschalten.
Auf dem Bildschirm wird das Symbol „volle Sonne“ angezeigt. Dies bedeutet, dass
sich das Gerät im Vollleistungsmodus befindet, d.h. mit 2000 Watt arbeitet.
Drücken Sie die Leistungseinstellungstaste einmal, um die Leistungsstufe auf die
halbe Leistung zu reduzieren.
d)
e)
a)
Das volle Sonnensymbol (2000 W) wechselt auf das halbe Sonnensymbol (1000 W).
Warten Sie ein paar Sekunden und die Einstellung wird automatisch gespeichert.
Befolgen Sie die gleichen Schritte, um wieder auf die volle Leistung umzuschalten.
Drücken Sie die Aufwärts- oder Abwärtspfeiltaste, um die Temperatureinstellung
anzupassen.
b)
Wählen Sie eine Temperatur zwischen 5 ° C und 35 ° C.
Sobald Sie auf der Nummer landen, die Sie auswählen möchten, drücken Sie
nichts mehr und nach 5 Sekunden wird die Einstellung automatisch für Sie gespeichert.
Sie können zwischen 6 verschiedenen Modi auswählen, um die Wärme in Ihrem Zuhause
besser zu kontrollieren. Jedes hat ein voreingestelltes Muster, um die Heizung so zu
programmieren, dass sie sich den ganzen Tag ein- und ausschaltet.
•
P1, P2, P3, P4, P5 sind die werkseitig eingestellten Standardprogramme. Jedes folgt
einem anderen Muster, um eine Reihe von Vorlieben zu berücksichtigen. Weitere
Informationen hierzu finden Sie in der folgenden Tabelle.
•
4.
UP ist das Programm, das Sie anpassen können, um ein Programm
entsprechend Ihren Anforderungen einzustellen.
5.
Einstellung der Temperatur
Stellen Sie unmittelbar nach dem Einstellen der Leistungsstufe die Temperatur ein.
Auswählen eines voreingestellten Modus
Anti
Frost
P1 00:00-
24:00
Tage (1-5) P2 00:00-
06:30
06:30-
08:30
08:30-
17:00
17:00-
22:30
22:30-
24:00
Tage
(6-7)
P2 00:00-
07:30
07:30-
10:00
10:00-
12:00
12:00-
14:00
14:00-
17:00
17:00-
22:30
22:30-
24:00
Tage (1-5) P3 00:00-
06:00
06:00-
17:00
17:00-
24:00
Ideal für ein Büro, welches
unter der Woche besetzt ist.
Tage
(6-7)
P3 00:00-
24:00
Tage (1-7) P4 00:00-
06:00
06:00-
22:00
22:00-
24:00
Tage (1-7) P5 00:00-
24:00
Voreingestellte Modi
Pro Woche Programm Anti
Frost
Anti
Frost
Anti
Frost
Komfort Komfort Komfort Am besten geeignet für:
Tage (1-7)
Gleichmäßiger Komfort für den
ganzen Tag, für den täglichen
ununterbrochenen Gebrauch.
Ideal für jene, die unter der
Woche zu Hause sind.
Ideal für jene, die die Heizung
Täglich und die ganze Woche
benutzen.
Konstantes Anti-Frost
Programm, ideal für jene,
die viel unterwegs sind.
Ideal für jene, die meistens nur
am Wochenende zu Hause
sind.
Das Timer-Symbol hört auf
zu blinken und das Gerät startet den Countdown.
Timer abbrechen: Wenn Sie die Timer-Einstellung abbrechen möchten, drücken Sie die
Timer-Taste erneut zweimal schnell.
Verschwindet das Timer-Symbol vom Bildschirm, ist dies die Bestätigung, dass es abgebrochen
wurde.

34 35
1.
Reinigung und Instandhaltung
Lagerung
2.
3.
Trennen Sie das Gerät immer vom Stromnetz und lassen Sie es vollständig abkühlen, bevor Sie
Wartungsarbeiten durchführen.
Verwenden Sie einen Staubsauger, um Staub aus den Einlass- und Auslassflächen zu entfernen.
Reinigen Sie die Außenseite des Heizgeräts mit einem feuchten (gut ausgewrungenen) Tuch und
trocknen Sie sie anschließend mit einem trockenen Tuch.
Tauchen Sie das Heizgerät niemals in Wasser und lassen Sie kein Wasser in oder auf das
Heizgerät tropfen.
4.
1. Trennen Sie das Heizgerät immer vom Stromnetz und lassen Sie es vollständig abkühlen,
bevor Sie es wegräumen.
2. Reinigen Sie das Heizgerät immer, um Staub und andere Ablagerungen zu entfernen, bevor Sie
es lagern.
3. Wenn Sie das Heizgerät längere Zeit nicht benutzen, legen Sie das Heizgerät und die
Bedienungsanleitung am besten in die Originalverpackung zurück und bewahren Sie es an
einem trockenen, gut belüfteten Ort, auf.
4. Stellen Sie während der Lagerung keine schweren Gegenstände auf den Karton, da dies die
Heizung beschädigen kann.
9. Fensteröffnungserkennungsfunktion
Wie funktioniert die Fensteröffnungserkennung?
Stellt das Heizgerät fest, dass die Raumtemperatur innerhalb von 30 Minuten um 5°C oder
mehr gefallen ist, geht es davon aus, dass ein Fenster geöffnet ist, und stoppt das Heizen.
Dies dient zur Energieeinsparung und Verhinderung, dass die Heizung ständig arbeitet,
vorallem um einen Raum zu heizen, der nicht beheizt werden kann. Wenn erkannt wird, dass
ein Fenster geöffnet ist, hört das Fenstersymbol auf zu blinken und leuchtet stattdessen
konstant, um den Benutzer daran zu erinnern, das Fenster / die Tür zu schließen. Drücken
Sie nach dem Schließen des Fensters / der Tür die Fensteröffnungserkennungstaste, um die
Heizung darüber zu informieren, dass sie weiterarbeiten kann.
So setzen Sie die Heizungseinstellungen auf die Werkseinstellungen zurück:
10. Zurücksetzen auf Standardeinstellung
•
•
Trennen Sie die Stromversorgung.
Halten Sie die Abwärtspfeiltaste gedrückt.
Schließen Sie das Gerät wieder an die Stromversorgung an. Die Heizung wird auf die
Standardeinstellungen zurückgesetzt.
•
Verwenden der Fensteröffnungserkennung
Wenn die Heizung eingeschaltet ist, drücken Sie die Fensteröffnungserkennungstaste
einmal, um diese zu aktivieren. Das Fenstersymbol blinkt auf dem Bildschirm.
Um diese Funktion abzubrechen, drücken Sie die Fensteröffnungserkennungstaste erneut,
um die Einstellung abzubrechen. Das Fenstersymbol wird ausgeblendet.
8. Kindersicherung
Für zusätzliche Sicherheit hat das Gerät eine Kindersicherung, welche verhindert, dass
Einstellungen bei eingeschaltetem Heizgerät geändert werden
Einstellung der Kindersicherung
Halten Sie die Aufwärts- und Abwärtspfeil-Taste gleichzeitig für 3 Sekunden gedrückt, um die
Kindersicherung zu aktivieren. Der Bildschirm zeigt folgendes Symbol an [], um zu bestätigen, dass die
Kindersicherung aktiviert ist. Während die Kindersicherung aktiviert ist, können keine Tasten verwendet
werden.
Entfernung der Kindersicherung
Um die Kindersicherung zu entfernen, halten Sie die Aufwärts- und Abwärtspfeil-Taste erneut
gleichzeitig für 3 Sekunden gedrückt.
Überprüfung der UP-Einstellungen
•Drücken
Sie die Programmtaste, um die Einstellungen für jeden Tag zu überprüfen. Drücken Sie die
Timer-Taste, um den Tag zwischen d1 und d7 auszuwählen. Bei Nichtberührung des Bildschirms für
länger als 2 Minuten, wird der Programm-Modus verlassen und man kehrt zum Hauptbildschirm
zurück.
• Drücken Sie zuerst die Timer-Taste anstelle der Aufwärts-, Abwärtspfeiltaste. Sie können die Schritte
überspringen, um das Gerät im Frostschutzmodus zu halten.
• Während die Heizung im Komfortmodus arbeitet, können Sie die Leistungseinstellung ändern, indem
Sie die Leistungseinstellungstaste drücken, um zwischen dem Symbol für volle Sonne (2000 W) und
dem Symbol für halbe Sonne (1000 W) zu wechseln.
• Anti-Frost: Unabhängig von der eingestellten Zeit zeigt das Heizgerät das Schneeflockensymbol an
und hält die Raumtemperatur automatisch auf einem Minimum von 5°C.
i) Drücken Sie die Aufwärts- oder Abwärtspfeiltaste, um eine Stunde auszuwählen zu der die
Heizung ausgeschaltet werden soll und drücken Sie die Timer-Taste, um diese Auswahl zu bestätigen.
Das Heizgerät wechselt automatisch in die Einstellung für die 2. Zeitperiode, die Sie einstellen oder
ändern können, wenn Sie dies wünschen. Auf dem Bildschirm wird 2 angezeigt und das Symbol für die
volle Sonne blinkt.
Mit der oben genannten Methode können Sie die 2. und 3. Zeitperiode einstellen.
j) Alle Perioden die nicht von Ihnen als Zeitspanne angegeben wurden, sind automatisch im
„Anti-Frost-Modus“ (ähnlich einem Standby-Modus).
k) Wenn Sie nicht mehr als eine Zeitperiode einstellen möchten, drücken Sie einfach die Timer-Taste,
um Ihre Einstellung zu speichern.
l) Drücken Sie die Timer-Taste noch einmal, um alle Einstellungen zu bestätigen, die Sie an jedem Tag
vornehmen.
m) Sobald d1 eingestellt wurde, springt der Bildschirm automatisch zu d2.
Alle Tage d1, d2, d3, d4, d5, d6 und d7 werden genauso wie oben beschrieben eingestellt.
n) Halten Sie die Programmtaste 3 Sekunden lang gedrückt, um die Einstellungen des UP-Modus zu
überprüfen.
36 37
Manual De Instrucciones En Español
Shine-Mart Ltd, der Markeninhaber von Duronic Produkten, bietet 1 Jahr Gewährleistung.
HINWEIS: DIESE BEDINGUNGEN BEEINFLUSSEN IHRE GESETZLICHE RECHTE ALS
VERBRAUCHER NICHT
Dieses Produkt wurde unter strengen Qualitätskontrollen produziert und aus hochwertigen
Materialien hergestellt, um ausgezeichnete Leistung und Zuverlässigkeit zu gewährleisten.
Sofern das Produkt korrekt benutzt und gewartet wird, kann eine langlebige Lebensdauer
erwartet werden.
Das Produkt hat eine Gewährleistung von einem Jahr ab Kaufdatum. Beim Auftreten eines
Schadens, der von fehlerhalten Materialien oder Verarbeitung verursacht wurde, sollte das
defekte Produkt an den ursprünglichen Verkäufer zurückgegeben werden. Die Erstattung oder
Umtausch erfolgt nach Vorschriften des Unternehmens.
Duronic Produkte haben 1 Jahr Gewährleistung unter folgenden Bedingungen:
1. Das Produkt muss mit dem Kaufnachweis zurückgegeben werden.
2. Das Produkt muss unter den Anweisungen und Anleitungen installiert und benutzt worden
sein.
3. Es muss ausschließlich für den Hausgebrauch genutzt worden sein.
4. Natürliche Abnutzung oder Verschleiß, böswillige Beschädigung, Missbrauch,
Vernachlässigung und unsachgemäße Reparaturen sind von der Gewährleistung
ausgeschlossen.
5. Shine-Mart Ltd übernimmt keine Verantwortung für zufällige oder Folgeschäden.
6. Shine-Mart Ltd ist nicht für Wartungsarbeiten zuständig. Diese fallen nicht unter die
Gewährleistung.
7. Gültig in der EU
Dieses Produkt ist mit tted CE geprüfte Typ-F
Euro Stecker/BS Stecker ausgestattet
Von Shine-Mart Ltd, RM3 8SB importiert
Information über Abfalllagerung für Verbraucher von elektronischen Geräten.
Dieses Zeichen auf dem Produkt und/oder auf mitgelieferte Dokumenten
zeigt, dass, wenn eine Entsorgung erfolgt, das Gerät an einer Elektro- und
Elektronikgeräte-Abfall-Sammelstelle (WEEE) abgegeben werden muss.
Um eine weitere Behandlung und Weiterverarbeitung der Materialien zu
gewährleisten dürfen diese WEEE-markierten Produkte nicht mit dem
Hausmüll vermischt werden.
Für die korrekte Behandlung, Aufbereitung und Wiederverwendung geben Sie
alle WEEE-markierten Produkte zur kommunalen Abfallbeseitigungsanlage.
Dort können Sie diese kostenlos abgeben.
Wenn die Beseitigung von Elektro-und Elektronik-Altgeräten korrekt
durchgeführt wird, tragen Sie zur Gewinnung von wertvollen Ressourcen
bei, sowie einer möglichen Vermeidung von negativen Auswirkungen auf
Gesundheit und Umwelt.
Gewährleistung

38 39
•
Instrucciones de seguridad
Utilice este aparato en un espacio interior/doméstico. No se recomienda su uso
en el exterior.
Este aparato no se ha creado con un fin comercial o industrial. Su uso es
doméstico.
Antes de conectar el aparato a la toma de corriente, asegúrese de que el voltaje
que se indica en la etiqueta de clasificación energética corresponde al de su
hogar.
No se recomienda la operación de este aparato por personas adultas o niños con
capacidades físicas, sensoriales o mentales reducidas a menos que se
encuentren bajo la supervisión de una persona responsable de su seguridad.
Mantenga este aparato fuera del alcance de los niños y asegúrese de que no
juegan con este.
No utilice el calefactor cerca de los niños ya que corre el riesgo de que se pongan
en contacto con una unidad muy caliente.
Nunca utilice el aparato si el cable o la unidad no funcionan correctamente. Si el
calefactor o el cable se ha estropeado, devuélvalo al servicio de Duronic o
póngase en contacto con un técnico profesional para repararlo.
No intente reemplazar alguna pieza o reparar el aparato usted mismo.
Nunca desmonte el aparato con el fin de arreglarlo usted. No realice
modificaciones que no se describan en el manual de instrucciones ya que el
aparato contiene piezas móviles. Duronic es el responsable de las reparaciones
puesto que se necesitan recambios y accesorios de la marca original.
Utilice el aparato sobre una superficie plana, estable y resistente al calor.
No coloque el aparato en una pared con grietas, humedad o moho.
No conecte o desconecte el aparato de la corriente con las manos mojadas.
Nunca sumerja el aparato en agua u otros líquidos.
La limpieza de este calefactor debe realizarse según se indica en las
instrucciones.
No deje que se introduzca nada en este aparato ya que podría causar una
descarga eléctrica, fuego o podría estropear el calefactor.
El calefactor no debe colocarse justo debajo de una toma de corriente. Para evitar
que se sobrecaliente, no lo cubra con nada.
No use este calefactor cerca de una bañera, una ducha o una piscina.
Asegúrese de que el aparato está apagado antes de conectarlo a la toma de
corriente principal.
Tras su uso, cuando se vaya a limpiar o cambiar de sitio, desconecte siempre el
aparato de la toma de corriente.
Para desconectarlo, pulse «OFF», después desconecte el enchufe sin tirar del
cable.
No lo use en zonas donde haya gasolina, pintura o líquidos inflamables.
Para evitar riesgo de incendio, no bloquee las entradas y salidas de ventilación.
•
•
•
•
•
•
•
•
•
•
•
•
•
•
•
•
•
•
Características técnicas
•
•
•
No toque las superficies calientes de la unidad.
No conecte o desconecte el aparato de la corriente ni lo configure con las manos
mojadas.
Mientras esté en funcionamiento, no se olvide de supervisarlo.
La causa más común de un sobrecalentamiento se debe a los residuos de polvo o
pelusas. Por este motivo, es importante limpiar regularmente el aparato. Para
hacerlo, solo hay que desconectarlo y aspirar las ranuras de ventilación.
No instale el calefactor sobre una alfombra. Tampoco deje que su cable quede bajo
una alfombra.
Coloque el cable de tal manera que no sea un estrobo para así evitar que se
tropiece con él o que cuelgue.
Espere a que el calefactor se enfríe completamente para poder guardarlo en un
lugar sin humedad y ventilado.
Este calefactor solo es apto para un uso puntual en espacios cerrados.
Algunas partes de este producto pueden volverse muy calientes por lo que si se
tocan corre el riesgo de sufrir quemaduras. No olvide siempre supervisar a los niños
y a las personas con capacidades reducidas cuando usen este aparato.
•
•
•
•
•
Tenga en cuenta que si se usa el calefactor y algún cable está dañado o
estropeado, corre el riesgo de sufrir una descarga eléctrica mortal.
Nunca use un aparato electrónico estropeado.
Para evitar que este aparato sea un peligro para los niños más
pequeños, se aconseja instalarlo a una altura mínima de 120 cm por
encima del suelo.
BFH20
220 - 240V
50-60Hz
2000W
II
Código IP IP24
Modelo
Voltaje
Frecuencia
Potencia
Protección
•
40 41
Instalación
A modo de obtener una idea general, se adjunta el siguiente
esquema que ilustra cómo y dónde se puede instalar el
calefactor de forma segura.
Este calefactor deberá instalarse según se indica en la Normalización Española
UNE-HD 60364-7-753:2015 para las Instalaciones eléctricas de baja tensión.
Paso 1 Paso 2
Paso 4 Paso 5
Paso 3
Funcionamiento
Encender el calefactor
El botón principal de encendido/apagado (ON/OFF) se sitúa en la parte
trasera del calefactor. Para encenderlo, solo tiene que ponerlo en la
posición ON.
Escuchará un sonido y la pantalla de control LED se encenderá unos
segundos antes de activarse el modo de espera (standby).
Antes de desenchufarlo de la toma de corriente, pulse el interruptor y
colóquelo en la posición OFF.
Lectura de la pantalla de control LED
Lectura de la pantalla de control LED
ProgramaOn/ Standby
Modos: P1/ P2/ P3/ P4/ P5/ UP
Control de potencia
Detención de ventana abierta
Temporizador
Pantalla de control LED
Botón flecha arriba:
temporizador/temperatura
Botón flecha abajo:
temporizador/temperatura
Icon
Funciona a máxima potencia = 2000W
Funciona a media potencia = 1000W
[ ]
d1 D1 Día 1/ Lunes
d2 D2 Día 2/ Martes
d3 D3 Día 3/ Miércoles
d4 D4 Día 4/ Jueves
d5 D5 Día 5/ Viernes
d6 D6 Día 6/ Sábado
d7 D7 Día 7/ Domingo
Nombrado en el manual como Significado
Icono Sol Entero
Icono Sol Medio
Icono Nieve
Icono Ventana
Icono Temporizador
Icono Bloqueo Niños
Función anticongelado
Función detectora de ventana abierta
Función cuenta atrás
Función bloqueo de seguridad para niños
42 43
Configuración
1.
Botón Nombrado en el manual como
Botón On/Standby
Botón Modo
Botón Programa
Botón Control de Potencia
Botón Flecha Arriba
Botón Flecha Abajo
Botón Temporizador
Botón Detención de ventana abierta
2.
Encender y apagar el calefactor
Programar el día y la hora
Para encender el calefactor, presione el Botón On/Standby.
Al encenderse, escuchará cómo empieza a funcionar y notará cómo expulsa el aire caliente.
Para apagarlo, solo tendrá que pulsar el mismo botón de nuevo.
a)
Programar el día de la semana
b)
c)
Encienda el calefactor.
Mantenga pulsado el Botón Temporizador 3 segundos.
Verá aparecer en la pantalla parpadeando «d1».
Presione los botones de las fechas para configurar el día de la
semana correctamente.
Después de seleccionar el día, presione el Botón Temporizador para
confirmar.
d)
e)
Programar la hora
f)
A continuación, el calefactor pasa a la configuración de la hora. Verá
una serie de dígitos parpadear en la pantalla.
Configure la hora: presione los botones de las fechas para establecer
la hora (00-23h).
Una vez haya hecho esto, presione el Botón Temporizador para
confirmar.
Configurar los minutos: presione los botones de las fechas para
establecer los minutos (0-59).
Presione el Botón Temporizador para confirmar.
Por último, presione el Botón Temporizador una vez más para
confirmar y guardar los cambios.
g)
h)
i)
j)
k)
Tras configurar la hora, espere a que la pantalla vuelva a su menú principal. Para comprobar que
el día y la hora se han configurado correctamente, presione el Botón Temporizador una vez para
que la información le aparezca en el siguiente orden en turnos de 1 segundo: Día, Hora, Minutos.
Después, la pantalla volverá a mostrar la temperatura ambiente.
3.
Programar el nivel de potencia
a)
Cambiar de potencia máxima a media (de 2000W a 1000W)
b)
c)
Encienda el calefactor.
La pantalla mostrará el Icono Sol Entero que indica que está funcionando a
potencia máxima (2000 W).
Para cambiarlo a potencia media, presione el Botón Control de Potencia una vez.
El Icono Sol Entero (2000 W) cambiará a Icono Sol Medio (1000 W).
No necesita presionar ningún botón de confirmación para guardar los cambios ya
que se autoguardan.
Si desea volver a la potencia máxima, siga los pasos indicados de nuevo.
d)
e)
a)
Después de programar el nivel de potencia, configure la temperatura.
Presione el Botón Flecha Arriba y el Botón Flecha Abajo para configurar la temperatura a
su gusto.
Seleccione una temperatura entre 5º y 35º.
Una vez llegue al número que desee, espere 5 segundos y se guardará
automáticamente.
b)
Para ayudarle a controlar la calefacción, hay 6 modos diferentes predeterminados con los
cuales el calefactor se enciende y apaga a lo largo del día.
•
P1, P2, P3, P4 y P5 son los programas predeterminados entre los que puedes escoger.
Cada uno sigue un patrón diferente que se adapta según una serie de preferencias.
•
4.
UP es el modo que puedes personalizar para establecer un programa que se
ajuste a tus necesidades.
5.
Programar la temperatura
Modos predeterminados
Confort Confort Confort
Días (1-7) P1 00:00-
24:00
Días (1-5) P2 00:00-
06:30
06:30-
08:30
08:30-
17:00
17:00-
22:30
22:30-
24:00
Días
(6-7)
P2 00:00-
07:30
07:30-
10:00
10:00-
12:00
12:00-
14:00
14:00-
17:00
17:00-
22:30
22:30-
24:00
Días (1-5) P3 00:00-
06:00
06:00-
17:00
17:00-
24:00
Ideal para una oficina en la
que solo se trabaja entre
semana.
Días
(6-7)
P3 00:00-
24:00
Días (1-7) P4 00:00-
06:00
06:00-
22:00
22:00-
24:00
Días (1-7) P5 00:00-
24:00
Pre-Set Modes
Por semana
Modo
Anti-
congelado
Anti-
congelado
Anti-
congelado
Anti-
congelado
Recomendado para
Confort constante todo el
día. Para un uso
continuado.
Ideal para los que trabajan
entresemana y se quedan en
casa los fines de semana.
Ideal para un sitio comercial
donde haya gente todo el rato.
Anticongelado constante, para
los que salen de casa durante
un periodo largo de tiempo

44
45
6.
7.
Configurar el temporizador
Configuración del programa personalizado (UP)
*Anticongelado: modo predeterminado que mantiene la habitación al menos a 5
grados para evitar la congelación.
*Confort: el usuario configura este modo cuando programa el calefactor. Tanto la
potencia como la temperatura se pueden cambiar al «modo confort».
a)
Se trata de una opción con la que se puede establecer una cuenta atrás para que el calefactor se
apague automáticamente después de cierto tiempo. Es más, si se programa para funcionar
durante dos horas, funcionará durante ese periodo de tiempo y después cambiará al modo
standby por sí solo.
Programar el temporizador
b)
Presione el Botón Modo y seleccione P1.
Presione dos veces rápidamente el Botón Temporizador. Verá parpadear el Icono
Temporizador en la pantalla.
Con ayuda de los botones de las flechas, establezca el tiempo que desea que su
calefactor funcione. Puede elegir entre 1 y 24 horas.
El Icono Temporizador dejará de parpadear y seguidamente el calefactor empezará la
cuenta atrás para apagarse.
c)
d)
Cancelar el temporizador: si desea cancelar la configuración del temporizador, presione el Botón
Temporizador dos veces rápidamente. El Icono Temporizador desaparecerá de la pantalla para
confirmar que se ha cancelado.
•
Para seleccionar un modo:
Encienda el calefactor y presione el Botón Modo para seleccionar un modo
predeterminado (P1, P2, P3, P4, P5 o UP).
Puede configurar su propio modo personalizado para que el calefactor se encienda y
apague en momentos específicos a lo largo del día. En el modo UP puede establecer 1, 2
o 3 periodos de tiempo en los que el calefactor se encenderá y apagará (en el modo
confort). Recuerde: el modo confort es la potencia/temperatura que usted estableció al
principio. Puede cambiarse si sigue los pasos explicados en la sección 3.
a)
b)
c)
Encienda el calefactor.
Presiona el Botón Modo y seleccione el modo UP.
Presione el Botón Programa.
Verá que aparece el icono d1 en la pantalla para seleccionar el primer día de la
semana. Puede empezar aquí o seleccionar un día diferente para programar si
desea omitir el presente día.
Para seleccionar el día, use los botones de las flechas para fijar las horas del
primer periodo de funcionamiento del presente día. En la pantalla aparecerá el
icono d1 y el Icono Sol Entero parpadeará.
Para seleccionar la hora de comienzo, use los botones de las flechas otra vez.
Seleccione la hora (entre 0 y 23) a la que le gustaría que se encendiera el
calefactor. Presione el Botón Temporizador para confirmar la hora.
A continuación, tendrá que establecer una hora de finalización.
d)
e)
f)
g)
h)
Para asegurar una mayor seguridad, se ha programado este calefactor con una función de
bloqueo de seguridad para niños para prevenir que los niños cambien los modos mientras el
calefactor está encendido.
Activar el bloqueo para niños
8. Función bloqueo de seguridad para niños
Mantenga pulsado de forma simultánea el botón flecha arriba y el botón fecha abajo al mismo
tiempo durante 3 segundos para activar el bloqueo para niños. Aparecerá x en la pantalla para
confirmar que se ha activado. Mientras este bloqueo esté activado, ningún botón funcionará.
Desactivar el bloqueo para niños
Para desactivar el bloqueo para niños, mantenga pulsado de forma simultánea el
Botón Flecha Arriba y el Botón Fecha Abajo al mismo tiempo durante 3 segundos.
Revisión de los ajustes del modo UP
Presione
el Botón Programa para comprobar la configuración de cada día. Presione el Botón
Temporizador para seleccionar el día entre d1 y d7. Si no se vuelve a tocar durante 2 minutos, se
desactivará el Modo Programa y volverá a la pantalla principal.
En primer lugar, presione el Botón Temporizador en lugar de las los botones de fechas. Puede
saltarse estos pasos para que el calefactor mantenga el modo anticongelado.
Mientras el calefactor está en funcionamiento durante el modo confort, puede cambiar los ajustes
de potencia presionando el Botón Potencia para elegir entre el Icono Sol Entero (2000 W) y el
Icono Sol Medio (1000W).
Modo anticongelación: independientemente del periodo establecido, el calefactor mostrará el
Icono Nieve en pantalla y mantendrá la habitación en una temperatura mínima de 5º de forma
automática.
•
•
i)
Con ayuda de los botones de las flechas, seleccione una hora y presione el Botón
Temporizador para confirmar. Automáticamente, el calefactor pasará a la configuración
del segundo periodo si desea cambiarlo.
Aparecerá un 2 en la pantalla y el Icono Sol Entero parpadeará. Use estos mismos
pasos para establecer si lo desea el segundo y tercer periodo de funcionamiento.
Cualquier intervalo entre los tiempos que establezca pasará de forma automática al
modo anticongelación (similar al modo standby).
Si no desea establecer más de un periodo de funcionamiento, simplemente presione el
Botón Temporizador para guardar sus cambios.
Para confirmar los cambios que realice en cada día presione el Botón Temporizador.
Cuando se haya configurado el d1, pasará al d2 automáticamente y así sucesivamente
con el resto de días.
Mantenga pulsado durante 3 segundos el Botón Programa para revisar la configuración
del modo UP.
j)
k)
l)
m)
n)
•
46 47
1.
Limpieza y mantenimiento
Almacenamiento
2.
3.
Desconecte el calefactor y deje que se enfríe completamente.
Use una aspiradora para remover el polvo y los residuos que queden en las superficies.
Limpie la superficie exterior del calefactor con un paño húmedo bien escurrido. Después
asegúrese de secarlo bien.
Nunca sumerja el calefactor en agua, ni deje que este se ponga en contacto con líquidos.
1.
Antes de guardar el calefactor, compruebe que se ha enfriado completamente.
Asegúrese de limpiar el polvo y los residuos que haya antes de guardarlo.
Si no va a usar el calefactor durante un largo periodo de tiempo, guarde el calefactor y el
manual de instrucciones en su caja de embalaje y colóquela en un lugar sin humedad y
ventilado.
No coloque objetos pesados sobre la caja ya que correrá el riesgo de estropear el calefactor.
2.
3.
4.
9. Función detectora de ventana abierta
¿Cómo funciona?
Cuando el calefactor detecta que la temperatura ha descendido 5º o más en 30 minutos, el
calefactor interpretará esto como que hay una ventana abierta, por lo que dejará de calentar.
Su funcionamiento es así para poder preservar energía y evitar que el calefactor esté
constantemente calentando una habitación que no debe.
Cuando se detecta que hay una ventana abierta, el Icono Ventana dejará de parpadear para
mantenerse iluminado de manera que el usuario pueda verlo y cerrar la ventana/puerta
abierta. Una vez se haya cerrado, presione el Botón Ventana para que el calefactor que
puede volver a funcionar.
10. Volver a los ajustes predeterminados
•
•
•
•
Uso de la detención de ventana abierta
Cuando el calefactor está encendido, presione el Botón Detención de ventana abierta para
activar esta función. El icono ventana parpadeará.
Para cancelar está función, presione el botón detención de ventana abierta de nuevo para
cancelar la configuración. El Icono Ventana desaparecerá.
NOTA: ESTAS DECLARACIONES NO AFECTAN SUS DERECHOS LEGALES COMO
CONSUMIDOR
Este producto ha sido fabricado bajo las más estrictas control de calidad y utilizando
materiales de
alta calidad para asegurar conabilidad y excelente funcionamiento. Le dará buen servicio y
una larga duración, siempre y cuando se utilice correctamente y sea bien mantenido.
El producto está garantizado por 1 año desde la fecha de compra original. Si surge
cualquier defecto debido a un error/defecto de fábrica o mano de obra, entonces el producto
debe ser devuelto al lugar original de compra. Reembolso o reemplazo es a discreción de la
compañía.
Productos Duronic se ofrecen con una garantía de 1 año bajo las siguientes condiciones:
1. El producto debe ser devuelto al vendedor con comprobante de compra original.
2. El producto debe instalarse y usarlo según las instrucciones
contenidas en este manual.
3. Este aparato es únicamente de uso doméstico.
4. No cubre desgaste, daños maliciosos, uso indebido, negligencia,
reparaciones inexpertas o partes consumibles.
5. Shine-Mart Ltd no será responsable por cualquier daño consecuente,
accidentes o pérdidas.
6. Shine-Mart Ltd no es responsable ah llevar a cabo cualquier tipo de
servicio, bajo la garantía.
7. Valido solamente dentro de la (EU).
Este producto esta equipado con enchufe/fusible Europeo
Importado por Shine-Mart Ltd, RM3 8SB
Información sobre la eliminación de residuos para los consumidores
de equipos eléctricos y eléctricos:
Esta marca en un producto y/o documentos adjuntos indica que cuando se va a
desechar, se debe tratar como equipos residuos eléctricos y electrónicos (RAEE)
Cualquier producto marcado (RAEE) no debe ser mezclado con la basura
doméstica, sino separado para el tratamiento, recuperación y reciclaje
de los materiales utilizados.
Para el tratamiento adecuado, recuperación y reciclaje; por favor, tome todos los
productos (RAEE) y llévelo al sitio de residuos de su
Autoridad Local, donde será aceptado de forma gratuita.
Si los clientes desechan los residuos eléctricos y electrónicos correctamente,
ayudar a ahorrar valiosos recursos y prevenir los efectos negativos sobre la salud
humana y el medio ambiente, de materiales peligrosos que pueden
contener los residuos
Garantía
Desconecte la potencia.
Presione y mantenga pulsado el Botón Fecha Abajo.
Vuelva a conectar la potencia.
El calefactor volverá a tener su configuración predeterminada.
Para resetear el calefactor a sus ajustes predeterminados:
4.
48 49
Manuale D’istruzioni In Italiano
Istruzioni di sicurezza
• Questo apparecchio è progettato solo per uso interno / domestico. Non utilizzareall'aperto.
• Questo apparecchio non è progettato per uso commerciale o industriale; solo per uso
domestico.
• Accertarsi che la tensione elettrica sia la stessa indicata sulla targhetta dei
dati tecnici dell'apparecchio.
• Questo apparecchio non è destinato all'uso da parte di persone (compresi i bambini)
con ridotte capacità fisiche, sensoriali, mentali o mancanza di esperienza e
conoscenza, a meno che non siano supervisione o istruiti sull'uso dell'apparecchio da
parte di una persona responsabile della loro sicurezza.
• I bambini devono essere attentamente sorvegliati in ogni momento per assicurarsi che
non giochino con l'apparecchio.
• Utilizzare l’apparecchio fuori dalla portata dei bambini perché l'unità potrebbe
riscaldarsi e causare ustioni.
• Se l'apparecchio o il cavo di alimentazione sono danneggiati, restituirlo a Duronic per
assistenza o riparazione da parte di un tecnico professionista.
• Non tentare di sostituire pezzi o riparare l'unità da soli.
• Non riparare mai l’apparecchio da soli. Non modificare/utilizzare l’apparecchio in modo
non descritto nelle istruzioni per l'uso. Le riparazioni possono essere eseguite esclusivamente
da Duronic, utilizzando ricambi e accessori originali.
• Utilizzare sempre su una superficie asciutta, liscia, uniforme e stabile. Non collocare l'unità su
una parete danneggiata o coperta da umidità / muffa.
• Non utilizzare l’apparecchio o toccare la spina con le mani bagnate.
• Non immergere in acqua o altri liquidi. La pulizia deve essere eseguita secondo le istruzioni in
questo manuale.
• Non inserire o consentire l'ingresso di oggetti estranei, poiché potrebbe causare scosse
elettriche, incendi o danni all'apparecchio.
• Tenere l'apparecchio e il cavo lontano da fonti di calore, oggetti appuntiti o qualsiasi cosa che
possa danneggiare l'apparecchio.
• Il termoventilatore elettrico non deve essere posizionata sotto una presa di corrente.
• Per evitare il surriscaldamento, non coprire Il termoventilatore elettrico.
• Non utilizzare il termoventilatore nelle immediate vicinanze di una vasca da bagno, una doccia
o una piscina.
• Assicurarsi che l'apparecchio sia sempre spento prima di collegarlo alla rete elettrica.
• Scollegare il cavo d’alimentazione e spegnere l'apparecchio ogni volta che non viene utilizzato,
prima di pulirlo o eseguire qualsiasi intervento di manutenzione.
• Per scollegare l'apparecchio, posizionare il pulsante su “OFF”, quindi rimuovere la spina dalla
presa. Non tirare il cavo per scollegarlo.
• Non utilizzare in luoghi in cui vengono utilizzati o conservati benzina, vernice o altri liquidi
infiammabili.
• Per prevenire un possibile rischio di incendio, non bloccare in alcun modo le prese d'aria o
l'uscita d'aria.
• Non toccare le superfici calde.

50 51
Installazione
Utilizzare gli schemi seguenti che illustrano come e dove
installare il termoventilatore elettrico in modo sicuro.
IMPORTANTE: questo termoventilatore elettrico deve essere
installato in conformità con il regolamento italiano CEI 64-8.
Istruzioni di sicurezza
Specifiche tecniche
1° passo 2° passo 3° passo
4° passo 5° passp
• Assicurarsi sempre che le mani siano asciutte prima di toccare, regolare qualsiasi
interruttore sul prodotto o toccare la presa elettrica.
• Non lasciare mai il prodotto in costudito durante l’utilizzo .
• La causa più comune di surriscaldamento sono i depositi di polvere nell'apparecchio.
Assicurarsi che questi depositi vengano rimossi regolarmente scollegando l'apparecchio
e quindi aspirando le prese d'aria e le griglie. Utilizzare gli schemi seguenti che illustrano
come e dove installare il termoventilatore elettrico in modo sicuro.
• Non collocare il cavo sotto un tappeto. Posizionare il cavo in modo tale che non si trovi
in una zona molto trafficata della casa per evitare che si possa inciampare.
• Prima di conservare il termoventilatore aspettare che si sia completamente
raffreddato. Conservare il termoventilatore in un luogo fresco e asciutto quando non
in uso.
• Questo prodotto è adatto solo per spazi ben isolati o per un uso occasionale.
ATTENZIONE - Alcune parti di questo prodotto possono diventare molto calde e
causare ustioni.
Se l’apparecchio viene utilizzata con un cavo d’alimentazione
difettoso o danneggiato, persiste un potenziale pericolo di scossa
elettrica mortale.
Per evitare rischi per bambini molto piccoli, questo termoventilatore
deve essere installata in modo che la parte più bassa di esso sia a
120 cm dal pavimento.
Modello BFH20
220 - 240V
50-60Hz
2000W
II
Codice IP
IP24
Tensione nominale
Frequenza nominale
Classe di protezione
Watt
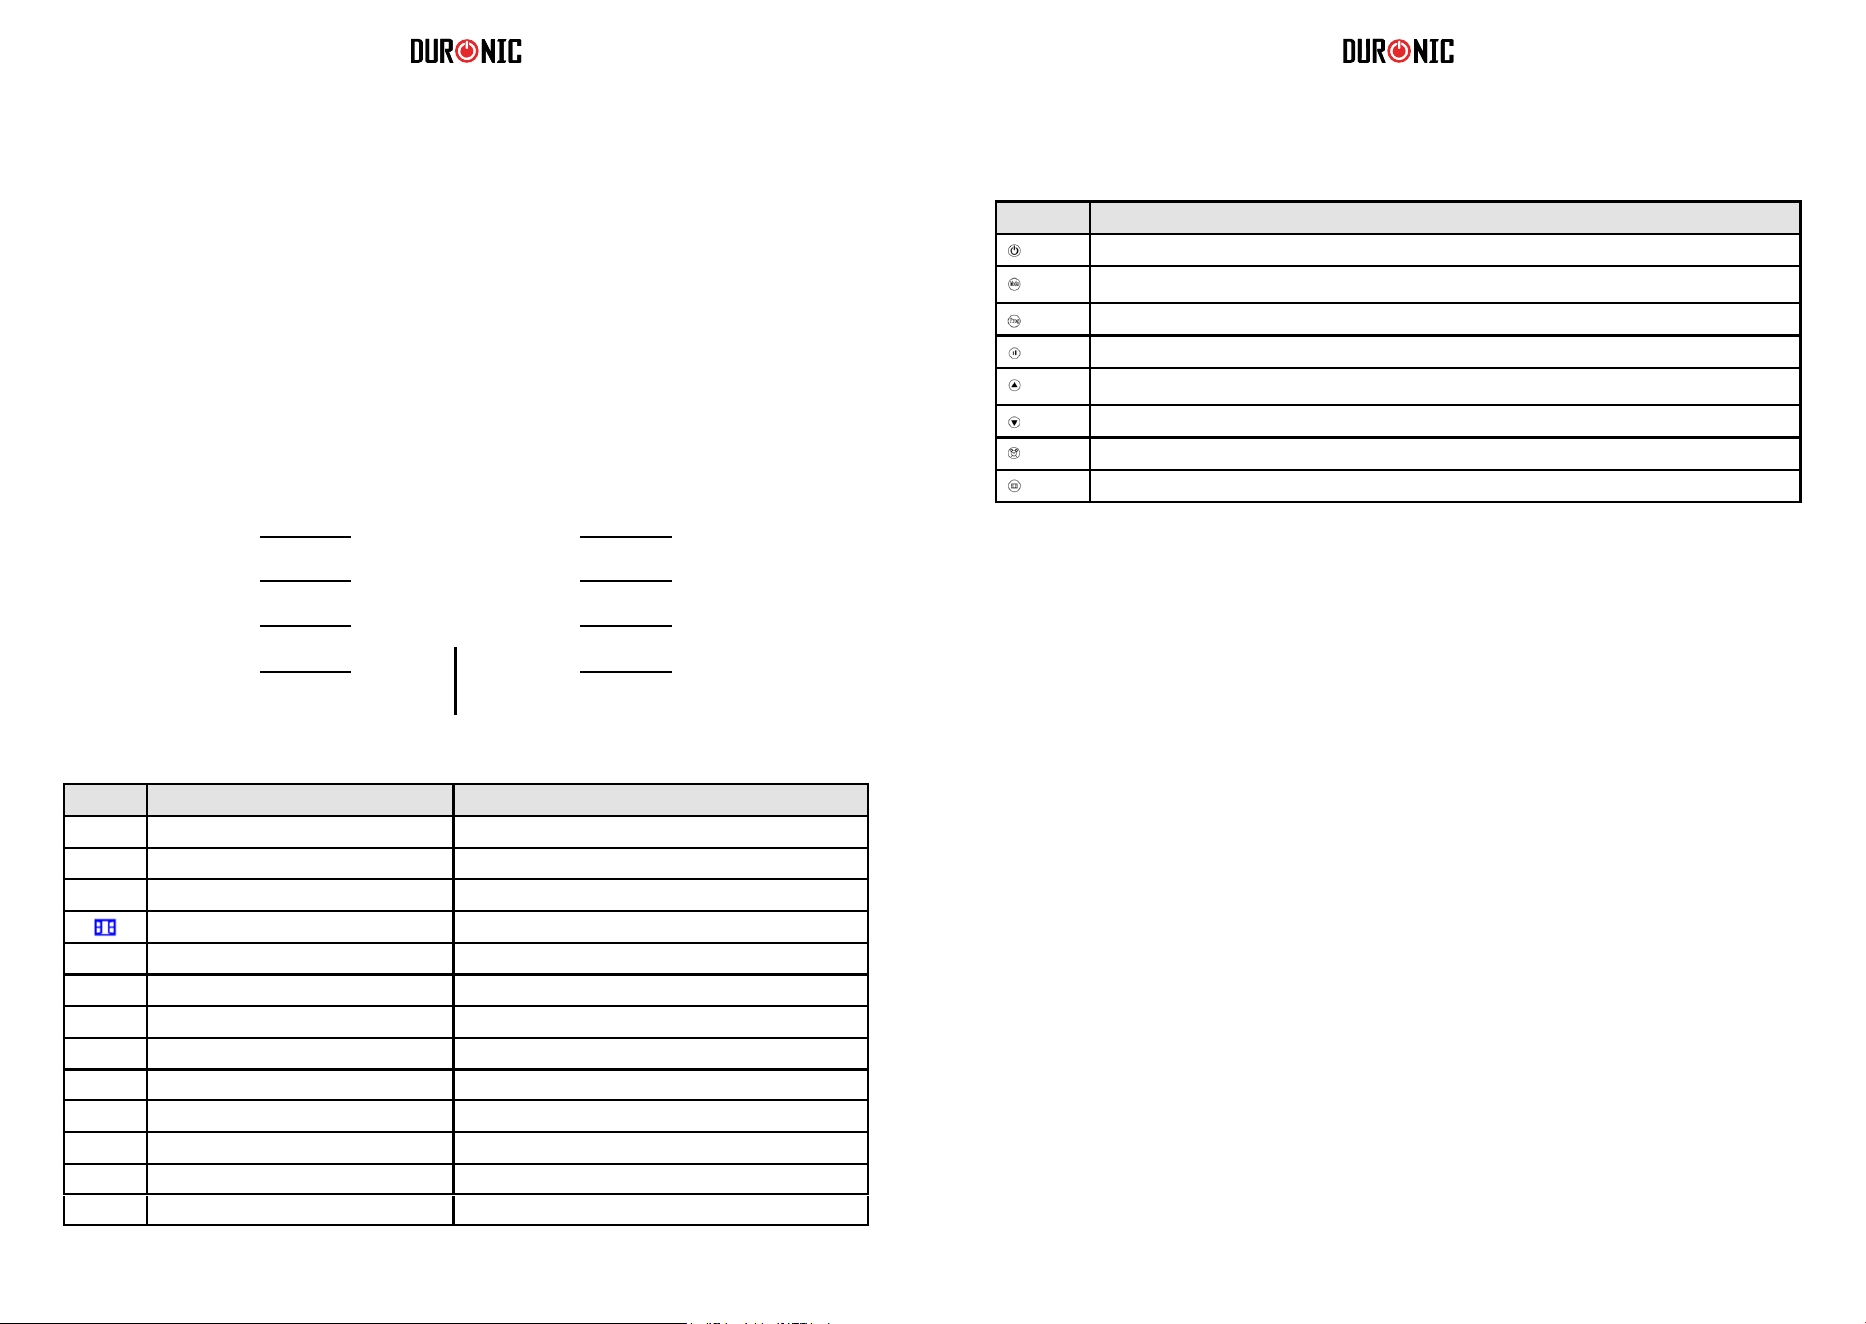
52 53
Impostare il termoventilatore elettrico
1.
Pulsante Riferito al Manuale come
Pulsante on / standby
Pulsante modalità
Pulsante programma
Pulsante potenza
Pulsante freccia verso l’alto
Pulsante freccia verso il basso
Pulsante timer
Pulsante rilevamento apertura finestra
2.
Accensione e spegnimento del termoventilatore
Impostare la data e ora
ON: per accendere il termoventilatore premere una volta il pulsante on / standby. Si
accenderà immediatamente e inizierà ad emettere aria calda.
Standby: per spegnere il termoventilatore premere il pulsante on / standby
a)
Impostare il giorno corrente della settimana
b)
c)
Accendere il termoventilatore.
Tenere premuto il pulsante timer per 3 secondi.
Lo schermo inizierà a lampeggiare.
d)
Premere il pulsante freccia verso l’alto o freccia verso il basso per
selezionare il giorno della settimana tra d1, d2, d3, d4, d5, d6, d7.
e)
Dopo aver selezionato il giorno corretto, premere il pulsante timer per
confermare e salvare la modifica.
Impostare l’ora
f)
Successivamente, è necessario impostare l’ora. Sullo schermo lampeggerà
una cifra numerica.
Impostare le ore: premere
il
pulsante freccia verso l’alto o freccia verso il basso per
impostare l'ora corrente tra 00-23.
g)
h)
i)
Dopo aver selezionato le ore, premere una volta il pulsante timer per salvare la modifica.
Impostare
i
i minuti: Premere il pulsante freccia verso l'alto o basso
impostare i minuti tra 0-59.
Dopo aver selezionato i minuti, premere una volta il pulsante timer per
confermare e salvare la modifica.
Dopo aver impostato l'orario, premere una volta il pulsante timer per
confermare la modifica e salvarla.
j)
k)
Per verificare se il giorno e l'ora sono impostati correttamente, premere una volta il pulsante
timer; lo schermo mostrerà automaticamente le informazioni in questo ordine: giorno, ora, minuti
a turno entro 1 secondo l'uno dall'altro, dopo di che lo schermo tornerà alla visualizzazione della
temperatura ambiente.
Funzionamento
Collegare alla presa elettrica
L'interruttore di accensione / spegnimento principale (0 / I) si trova sul retro del
termoventilatore. Per accendere il termoventilatore posizionare l’interruttore in
posizione ON (I).
Verrà emesso un suono acustico e il display si accenderà per alcuni secondi per
poi entrare in modalità standby.
Se si desidera spegnere il termoventilatore, premere nuovamente il pulsante ON
/ OFF (0 / I) e posizionare su OFF (0).
Display digitale
On/ Standby
Timer
Display a LED
Rilevatore di finestre
aperte
Impostazioni
di potenza
Programma
Modalità: P1/ P2/ P3/ P4/ P5/ UP
Freccia verso l’alto: per
timer e temperatura
Freccia verso il basso: per
timer e temperatura
[ ]
d1 D1
d2 D2
d3 D3
d4 D4
d5 D5
d6 D6
d7 D7
Icona Riferito nel Manuale come Significato
Icona sole intero
Icona mezzo sole
Icona fiocco di neve
Icona finestra
Icona timer
Icona blocco bambini
Funzionamento a massima potenza= 2000 W
Funzionamento a metà potenza = 1000 W
Funzione antigelo
Funzione di rilevamento apertura finestra
Funzione timer
Icona blocco bambini
Giorno 1 / Lunedì
Giorno 2 / Martedì
Giorno 3 / Mercoledì
Giorno 4 / Giovedì
Giorno 5 / Venerdì
Giorno 6 / Sabato
Giorno 7 / Domenica

54 55
6.
7.
Funzione timer
Impostazione del programma personalizzabile (UP)
* * Antigelo: Modalità predefinita per mantenere l'ambiente a una temperatura di almeno 5 ° C per
prevenire il gelo.
* * Comfort: Questa impostazione è personalizzata dall'utente quando imposta la proprio
termoventilatore. Sia la potenza che la temperatura possono essere modificate per la "modalità comfort".
a)
Questa è un’opzione per impostare un conto alla rovescia che spegnerà automaticamente il
termoventilatore. Ad esempio, se lo si imposta per 2 ore, rimarrà acceso per il tempo selezionato
per poi entrare in modalità standby.
Impostare il timer
b)
Premere il pulsante modalità e selezionare P1.
c)
Premere rapidamente il pulsante timer due volte. L'icona del timer lampeggerà sullo schermo.
Premere il pulsante freccia su o freccia giù per selezionare l'intervallo di tempo tra 1-24 ore.
d)
Fermarsi sul numero di ore che si vuole selezionare. Dopo 5 secondi, salverà
automaticamente l'impostazione.
Annulla il timer:
•
Selezionare una modalità
Se si desidera annullare l'impostazione del timer, premere di nuovo rapidamente due volte il pulsante
del timer. L'icona del timer scompare dallo schermo per confermare che l’impostazione è stata
annullata.
•
Accendere il termoventilatore.
Premere il pulsante modalità per selezionare una modalità preimpostata tra P1, P2,P3, P4, P5,
UP.
È possibile impostare il programma personalizzabile (UP) per l’accensione e spegnimento della stufa in
orari specifichi. Nella modalità UP è possibile impostare uno, due o tre periodi di tempo al giorno per
l'accensione e lo spegnimento della stufa (in modalità comfort). Ricorda che la "modalità comfort" è la
potenza / temperatura impostata all'inizio. Può essere modificata seguendo i passaggi nella sezione n. 3.
a)
b)
Accendere il termoventilatore.
Premere il pulsante modalità
e selezionare la modalità UP.
c)
d)
Premere il pulsante programma.
Lo schermo visualizzerà d1 per iniziare l'impostazione per il primo giorno della settimana.
e)
Se desiderato selezionare un giorno diverso.
Nel giorno prescelto, premere una volta il pulsante freccia su o freccia giù per impostare
gli orari per il 1 ° periodo lavorativo per questo giorno; lo schermo visualizzerà d1 e l'icona
del sole pieno lampeggerà.
Premere nuovamente il pulsante freccia su o freccia giù per selezionare l’orario dell’avvio.
f)
g)
Selezionare un'ora (tra 0 e 23) quando si desidera che si accenda. Una volta selezionata l'ora
corretta, premere il pulsante timer per confermare.
Lo schermo chiederà quindi di impostare un orario di fine.
h)
3.
Impostazione del livello di potenza
Impostare la potenza da 2000 W a 1000 W
a)
b)
c)
Accendere il termoventilatore.
Lo schermo mostrerà l'icona del sole intero, il che significa che è in modalità
massima 2000 W.
Per modificare il livello di potenza, premere una volta il pulsante di impostazione della
potenza. Dopo di che cambierà dall'icona del sole intero (2000 W) all'icona del mezzo sole
(1000 W).
d)
e)
a)
La modifica verrà salvata automaticamente.
Per impostare il termoventilatore nuovamente a 2000 W, ripetere i passaggi indicati
precedentemente.
Premere il pulsante freccia su o freccia giù per selezionare la temperatura desiderata.
b)
Selezionare una temperatura tra 5 °C e 35 ° C. La temperatura desiderata verrà
salvata automaticamente dopo 5 secondi.
•
P1, P2, P3, P4, P5 sono i
programmi predefiniti che sono già stati impostati. Ognuno
segue un modello diverso per adattarsi a una serie di preferenze. Per ulteriori informazioni,
consultare la tabella seguente.
•
4.
UP è il programma che può essere personalizzato per impostare un periodo /
modalità in base alle proprie esigenze.
5.
Impostare la temperatura
Dopo aver selezionato la potenza, impostare la temperatura.
Selezione di una modalità preimpostata
Ci sono 6 modalità preimpostate tra cui scegliere. Ognuno ha uno schema
preimpostato per programmare l'accensione e lo spegnimento del termoventilatore
durante il giorno.
Comfort Comfort Comfort
Giorni (1-7)
P1 00:00-
24:00
Giorni (1-5)
P2 00:00-
06:30
06:30-
08:30
08:30-
17:00
17:00-
22:30
22:30-
24:00
Giorni (6-7)
P2 00:00-
07:30
07:30-
10:00
10:00-
12:00
12:00-
14:00
14:00-
17:00
17:00-
22:30
22:30-
24:00
Giorni (1-5)
P3 00:00-
06:00
06:00-
17:00
17:00-
24:00
Ideale per un ufficio in
funzione durante i giorni feriali
e vuoto nel fine settimana.
Giorni (6-7)
P3 00:00-
24:00
Giorni (1-7)
P4 00:00-
06:00
06:00-
22:00
22:00-
24:00
Giorni (1-7)
P5 00:00-
24:00
Modalità
Giorni della
settimana
Programma
Anti
gelo
Anti
gelo
Anti
gelo
Anti
gelo
Adatto per
Comfort costante durante
l'intera giornata; per uso
quotidiano continuo.
Ideale per coloro che lavorano
nei giorni feriali e sono casa
durante il fine settimana.
Per un locale commerciale
attivo tutto il giorno.
Costante antigelo, ideale per
persone che mancano per un
lungo periodo di tempo.

56 57
Pulizia e manutenzione
Conservazione
1. Scollegare sempre il termoventilatore e lasciarlo raffreddare completamente prima
di eseguire qualsiasi intervento di manutenzione.
2. Utilizzare un’aspirapolvere per rimuovere la polvere.
3. Pulire l'esterno del termoventilatore con un panno umido (ben strizzato), quindi
asciugarlo con un panno asciutto. Non immergere mai il termoventilatore in acqua,
né lasciare che goccioli dentro o sopra il riscaldatore.
1. Scollegare sempre il termoventilatore e lasciarlo raffreddare completamente prima di riporlo.
2. Prima di riporlo, pulire sempre il termoventilatore per rimuovere polvere e altri depositi.
3. Se si prevede di non utilizzare il termoventilatore per un lungo periodo di tempo, riporre il
termoventilatore e il manuale di istruzioni nella confezione originale e riporli in un luogo asciutto
e ben ventilato.
4. Non collocare oggetti pesanti sopra la scatola poiché ciò potrebbe danneggiare il
termoventilatore.
9. Funzione di rilevamento apertura finestra
Come funziona la funzione di rilevamento apertura finestra?
Se la temperatura scende di 5 °C o più in 30 minuti, il termoventilatore deduce che sia stata
aperta una finestra e interrompe il funzionamento.
Quando il termoventilatore rileva una finestra aperta, l'icona della finestra smette di lampeggiare e
rimane illuminata per ricordare all'utente di chiudere la finestra / porta. Dopo aver chiuso la finestra
/ porta, premere il pulsante di rilevamento apertura finestra per informare il termoventilatore che la
finestra è stata chiusa.
10. Ripristino delle impostazioni predefinite
Se è necessario ripristinare le impostazioni del termoventilatore:
•
•
Scollegare dalla presa di corrente.
Tenere premuto il pulsante freccia in giù.
Ricollegare alla presa di corrente.
Il termoventilatore ripristinerà le impostazioni predefinite.
•
•
Utilizzare la funzione di rilevamento apertura finestra
Quando il termoventilatore è acceso, premere una volta il pulsante di rilevamento apertura
finestra, per attivare la modalità. L’icona inizierà a lampeggiare sullo schermo.
Per disabilitare la funzione, premere nuovamente il pulsante di rilevamento apertura finestra.
L’icona della finestra scomparirà.
Come impostare il blocco per bambini
Tenere premuto contemporaneamente il pulsante freccia su e il pulsante freccia giù per 3
secondi. Lo schermo mostrerà [ ] per confermare che il blocco bambini è attivato.
8. Funzione blocco per bambini
Per garantire maggiore sicurezza, è presente una funzione di blocco per bambini che impedisce di
modificare qualsiasi impostazione mentre il termoventilatore è in funzione.
Come disabilitare la funzione blocco per bambini
Per disabilitare il blocco per bambini, tenere premuto contemporaneamente il pulsante freccia su e il
pulsante freccia giù per 3 secondi.
Per verificare le impostazioni UP:
•
Premi il pulsante programma per verificare le impostazioni di ogni giorno. Premere il
pulsante timer per scegliere il giorno tra d1 e d7. Se non viene toccato per più di 2
minuti, lo schermo esce dalla modalità programma e torna alla schermata principale.
•
Premendo prima il pulsante timer anziché il pulsante freccia su o freccia giù, è possibile
saltare i passaggi per mantenere il termoventilatore in modalità antigelo.
•
Mentre il termoventilatore si trova modalità comfort, è possibile modificare l'impostazione di
potenza premendo il pulsante di impostazione della potenza (2000 W o 1000 W).
Modalità antigelo: indipendentemente dal periodo impostato, il termoventilatore visualizzerà
l'icona del fiocco di neve e manterrà automaticamente la temperatura ambiente a un
minimo di 5 °C.
i)
Premere il pulsante freccia su o freccia giù per selezionare un'ora e premere il pulsante
timer per confermare.
Il termoventilatore entrerà automaticamente nella seconda giornata impostazione per poterla
modificare, se lo si desidera. Sullo schermo visualizzerà 2 e l'icona del sole intero
lampeggerà.
Utilizzando il metodo sopra menzionato, è possibile impostare il 2° e 3° periodo lavorativo.
j)
k)
Eventuali mancanze nei tempi impostati vengono impostati automaticamente "modalità
antigelo" (che è simile ad una modalità standby).
l)
Se non si desidera impostare più di un programma, premere semplicemente timer per
salvare le impostazioni.
m)
Continuare a premere il pulsante timer per confermare impostazione.
Una volta impostato d1, verrà visualizzato automaticamente d2. Allo stesso modo, è
n)
possibile impostare i tempi per d3, d4, d5, d6 e d7.
Tenere premuto il pulsante programma per 3 secondi per verificare le
impostazioni della modalità UP.
58 59
Instrukcja obsługi. Polski
Questo prodotto è garantito per una durata determinata con il distributore a partire dalla data
di acquisto contro ogni difetto derivante da difetti di fabbricazione o dei materiali. Questa
garanzia non copre difetti o danni derivanti da installazione impropria, uso improprio o usura
anomala del prodotto.
L’apparecchio deve essere restituito nella sua confezione originale e accompagnato dalla
ricevuta e deve essere stato utilizzato in modo corretto. È importante rispettare le istruzioni
per l’uso e le precauzioni di sicurezza indicate di seguito. Inoltre, non possiamo garantire
l’apparecchio se è stato modicato o riparato dall’acquirente o da terzi.
1 anno di garanzia da Shine-Mart Ltd, proprietari del marchio commerciale Duronic.
NOTA: QUESTE DICHIARAZIONI NON INFLUISCONO SUI DIRITTI LEGALI DEL
CONSUMATORE
Questo prodotto è stato realizzato con le rigorose procedure del controllo qualità, e
utilizzando materiali di altissima qualità, per garantire afdabilità e prestazioni eccellenti.
Vi regalerà un servizio ottimo e a lungo termine, purchè venga opportunamente usata e
mantenuta. Il prodotto è garantito per 1 anno dalla data di acquisto. Se sorge qualche difetto
a causa di materiali difettosi o scarsa manodopera, il prodotto difettoso dovrà essere restituito
al luogo originale di acquisto. Il rimborso o la sostituzione sono a discrezione dell’azienda. I
prodotti Duronic offrono 1 anno di garanzia alle seguenti condizioni:
1. Il prodotto deve essere restituito al rivenditore con la prova d’acquisto originale
2. Il prodotto deve essere installato e usato seguendo le istruzioni contenute nel manuale.
3. Il prodotto va utilizzato solo per scopi domestici. Non è da utilizzarsi per uso commerciale.
4. La garanzia non copre usura, danni volontari, abuso, negligenza, riparazioni
inesperte o consumo dei materiali.
5. Shine-Mart Ltd non è responsabile per Danni accidentali o consequenziali.
6. Shine-Mart Ltd non è tenuta a eseguire qualsiasi tipo di riparazione, ai sensi
della garanzia.
7. Termini validi in tutta l’unione europea *Ci riserviamo il diritto di modicare le sopracitate
condizioni Per parti di ricambio si prega di consultare il sito www.duronic.com
Corretto smaltimento del prodotto.
Qusto prodotto è inclusivo di spina certicata CE
importata da Shine-Mart Ltd, RM3 8SB
Questo segno su un prodotto o su documenti indica che quando deve essere
smaltito, deve essere trattato come i riuti elettrici ed elettronici (WEEE)
Tutti I prodotti marcati WEEE non devono essere buttati nei riuti domenistici
generici, ma separati per il trattamento, il recupero
e il riciclaggio dei materiali utilizzati.
Per un corretto trattamento, recupero e riciclaggio; si prega di portare tutti I
prodotti marcati WEEE al Vostro centro smaltimenti riuti autorizzato, dove
saranno accettati gratuitamente.
Se i consumatori sono propensi allo smaltimento corretto di riuti elettrici ed
elettronici, aiuteranno a salvare risorse importanti e a prevenire i potenziali
effetti negativi sulla salute umana e sull’ambiente di tutti i materiali pericolosi
che i riuti possono contenere.
Garanzia

60 61
•
Bezpieczeństwo użytkowania
Urządzenie przeznaczone wyłącznie do użytku domowego. Nie stosuj na świeżym
powietrzu.
Urządzenie nie zostało zaprojektowane do użytku komercyjnego lub
przemysłowego, a jedynie do zastosowania w gospodarstwach domowych.
Przed podłączeniem urządzenia do gniazdka upewnij się, czy napięcie domowej
sieci elektrycznej jest zgodne z napięciem oznaczonym na tabliczce znamionowej.
Urządzenie nie jest przeznaczone do obsługi przez osoby (również dzieci) o
ograniczonych zdolnościach fizycznych, sensorycznych i psychicznych oraz z
niewystarczającą wiedzą i doświadczeniem, chyba że znajdują się pod opieką lub
zostały przeszkolone w zakresie użytkowania urządzenia przez osobę
odpowiedzialną za ich bezpieczeństwo.
Dzieci powinny znajdować się pod stałym nadzorem, aby nie bawiły się
urządzeniem.
Podczas pracy urządzenie mocno się nagrzewa. Użytkuj poza zasięgiem dzieci.
Nigdy nie włączaj urządzenia, gdy przewód zasilający lub wtyczka są uszkodzone.
Zwróć urządzenie do Duronic w celu naprawy lub skontaktuj się z
wykwalifikowanym technikiem.
Nigdy nie próbuj samodzielnie wymieniać części lub naprawiać urządzenia.
Nigdy nie próbuj samodzielnie rozkręcać lub naprawiać urządzenia. Nigdy
niemodyfikuj urządzenia w sposób jaki nie jest zgodny z instrukcją użytkowania.
Urządzenie zawiera części czynne. Naprawy mogą być wykonywane jedynie przez
Duronic, przy użyciu oryginalnych części zamiennych i akcesoriów.
Użytkuj urządzenie na suchej, płaskiej i stabilnej powierzchni.
Nie montuj urządzenia na uszkodzonej ścianie lub miejscu pokrytym grzybem i
pleśnią.
Nie operuj urządzenie lub wtyczki mając mokre ręce.
Nie zanurzaj urządzenia w wodzie lub innych płynach.
Czyszczenie urządzenia powinno zostać wykonane zgodnie z instrukcją zawartą w
dokumencie.
Nie wkładaj i nie pozwalaj, aby jakikolwiek obcy przedmiot dostał się do
jakiegokolwiek otworu wlotowego lub wylotowego, ponieważ może to spowodować
porażenie prądem, pożar lub uszkodzenie urządzenia.
Urządzenie, w tym przewód zasilający, trzymaj z dala od źródeł ciepła, ostrych
przedmiotów lub czegokolwiek, co może spowodować jego uszkodzenie. Grzejnik
nie może znajdować się bezpośrednio pod gniazdem elektrycznym. Aby uniknąć
przegrzania, nie zakrywaj urządzenia.
Nie stosuj urządzenia w bezpośrednim otoczeniu wanny, prysznica lub basenu.
Upewnij się, czy urządzenie jest wyłączone przed podłączeniem do gniazdka
zasilającego.
Wyłącz urządzenie i odłącz od zasilania za każdym razem, gdy go nie używasz,
przenosisz lub przystępujesz do czyszczenia lub pielęgnacji.
Wyłącz urządzenie ustawiając włącznik w pozycji wyłączony (0) i odłącz z
gniazdka. Nigdy nie pociągaj za przewód zasilający, aby odłączyć urządzenie od
zasilania.
•
•
•
•
•
•
Bezpieczeństwo użytkowania (Cd.)
•
Specyfikacja Techniczna
Nie dotykaj gorących powierzchni.
•
Zawsze upewnij się, czy twoje ręce są suche, przed przystąpieniem do obsługi,
zmiany ustawień, wyłączenia / wyłączenia urządzenia lub dotknięciem wtyczki lub
gniazdka zasilającego.
•
Nie pozostawiaj włączonego urządzenia bez nadzoru.
•
Najczęstszą przyczyną przegrzania urządzenia są osady kurzu lub innych
zanieczyszczeń. Upewnij się, że wszystkie zanieczyszczenia są regularnie usuwane.
Odłącz urządzenie od zasilania i dokładnie odkurz otwory wentylacyjne i siatkę
ochronną.
•
Nie umieszczaj urządzenia na powierzchniach dywanowych lub nie przeprowadzaj
przewodu zasilającego pod ich powierzchnią.
•
Umieść kabel zasilający w taki sposób, aby wyeliminować ryzyko potknięcia się
lub stanięcia na nim.
•
Nie odstawiaj urządzenia, dopóki nie jest całkowicie schłodzone. Przechowuj grzejnik
w chłodnym, suchym pomieszczeniu, kiedy nie jest użytkowany.
•
Urządzenie jest odpowiednie tylko do dobrze izolowanych pomieszczeń lub
okazjonalnego stosowania.
•
Niektóre z elementów urządzenia bardzo się nagrzewają i mogą wywołać
oparzenia.
Zachowaj ostrożność, gdy dzieci lub osoby o niepełnosprawne znajdują się w
pobliżu.
Jeżeli urządzenie jest użytkowane z uszkodzonym lub wadliwym
przewodem zasilającym, istnieje ryzyko wystąpienia śmiertelnego
porażenia prądem.
•
•
•
•
•
•
•
•
•
•
•
•
•
•
Aby zapobiec uszkodzeniom ciała
w przypadku małych dzieci,
urządzenie powinno być instalowane min. 120 cm powyżej powierzchni
podłogi.
Model BFH20
Napięcie znamionowe
220 - 240V
Częstotliwość
50-60Hz
Moc znamionowa
2000W
Klasa ochrony
II
Stopień ochrony
IP24
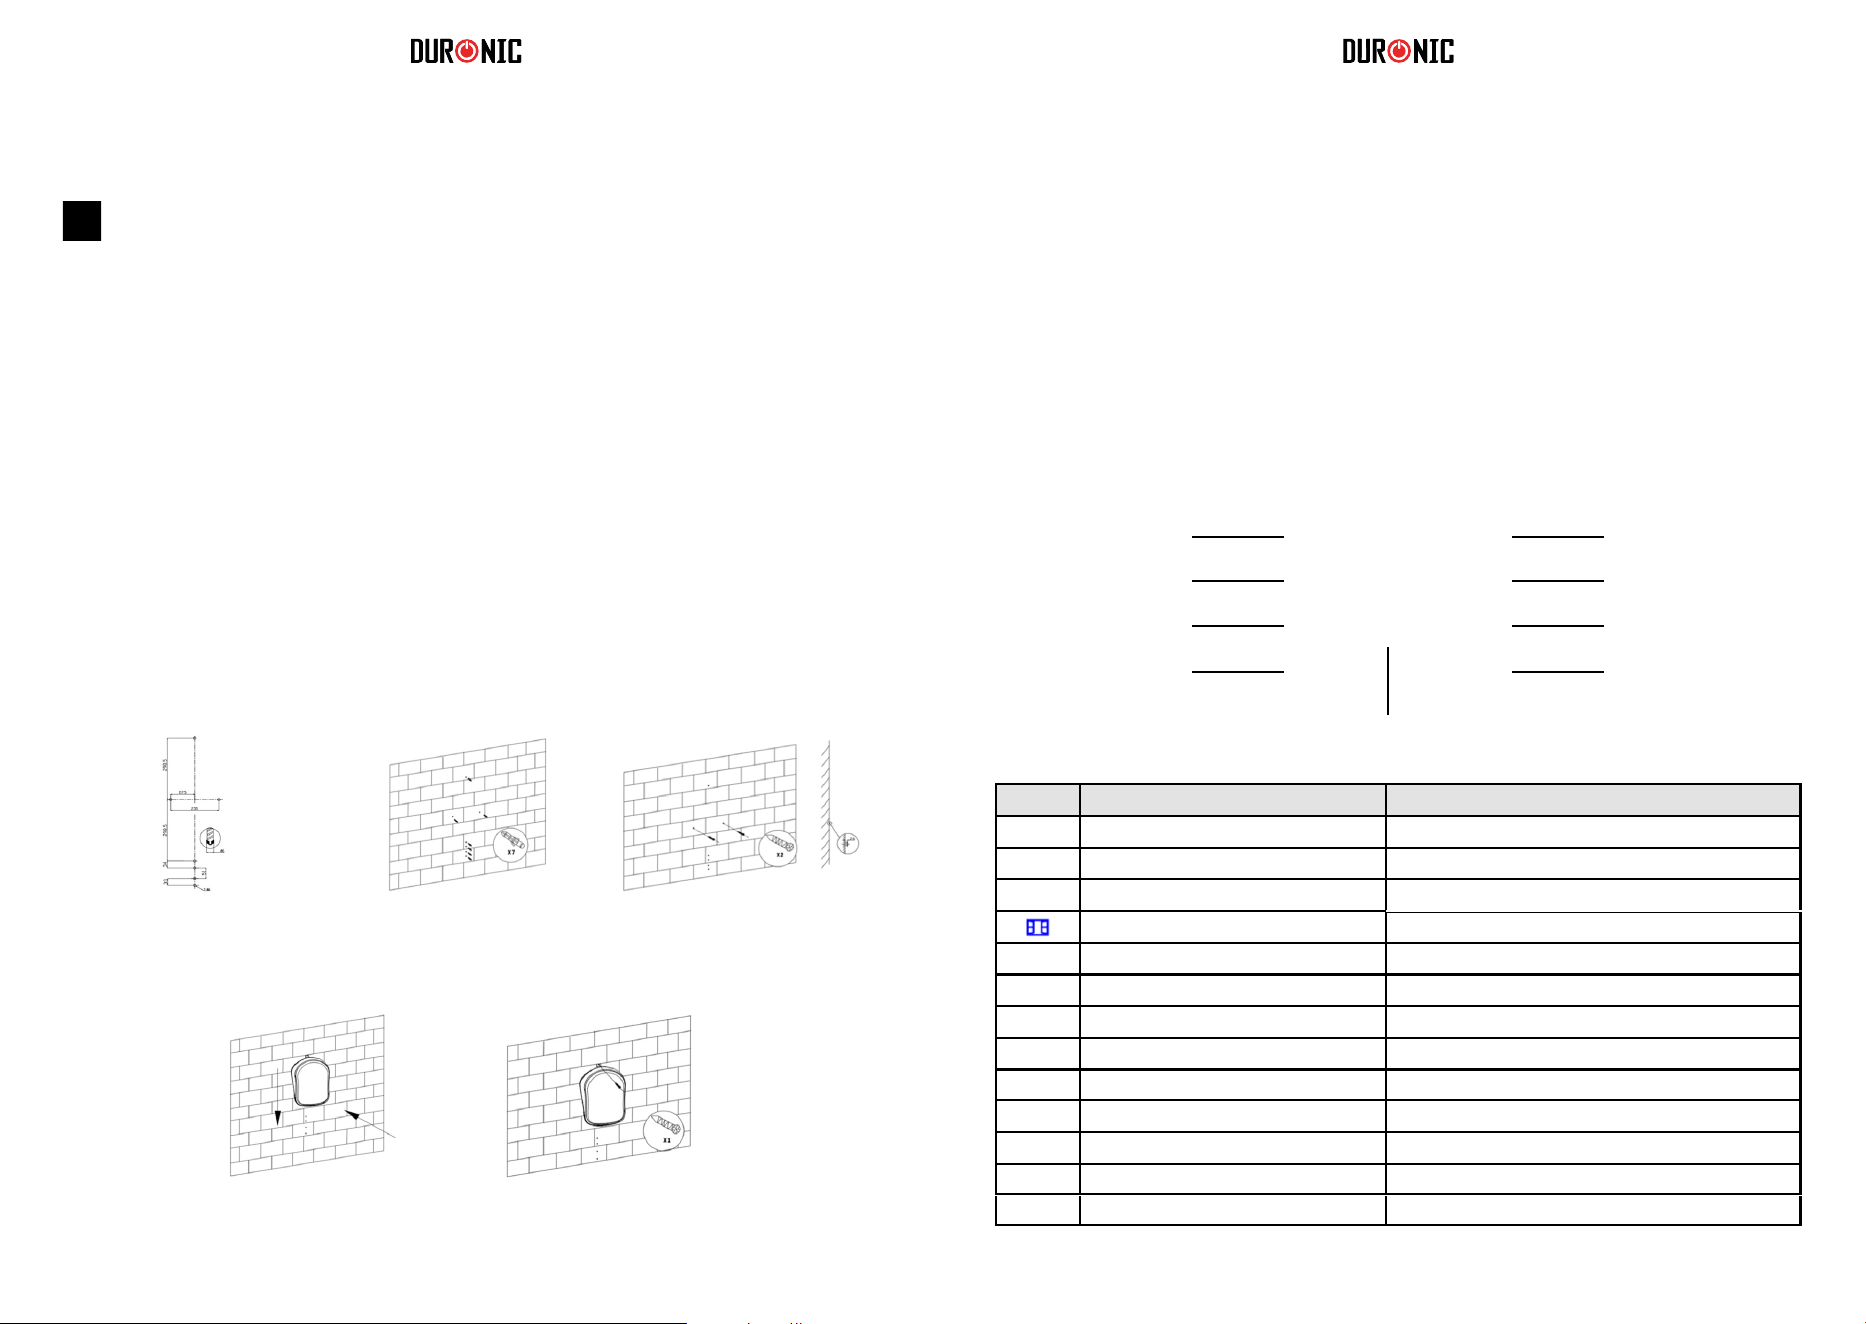
62 63
Instalacja
Zapoznaj się z poniższymi diagramami, które prezentują
generalne wytyczne dot. miejsca i sposobu montażu
urządzenia.
MONTAŻ URZĄDZENIA NALEŻY PRZEPROWADZAĆ W
OPARCIU O NORMY OBOWIĄZUJĄCE W DANYM KRAJU.
Krok 1 Krok 2
Krok 4 Krok 5
Krok 3
Obsługa
Podłączanie do zasilania
Główny włącznik (0/I) jest zlokalizowany z tyłu grzejnika. Aby uruchomić
urządzenie ustaw włącznik w pozycji (I). Usłyszysz sygnał dźwiękowy,
ekran uruchomi się całkowicie po 3 sek., a grzejnik przejdzie w stan
gotowości. Jeżeli chcesz wyłączyć urządzenie, przesuń włącznik w
pozycję "wyłączony" - 0.
Oznaczenia wyświetlacza
Włącznik/ stan gotow.
Regulacja mocy
Detekcja otwartego okna
Programator czasowy,
zatwierdzenie ustawień
Wyświetlacz LED
Programator
Programy: P1/ P2/ P3/ P4/ P5/ UP
Strzałka w górę Programator
/ Temperatura
Strzałka w dół
Programator / Temperatura
[ ]
d1 D1
d2 D2
d3 D3
d4 D4
d5 D5
d6 D6
d7 D7
Ikona Określony w instrukcji jako Znaczenie
Ikona pełnego słońca
Ikona połowy słońca
Ikona śnieżynki
Ikona otwartego okna
Ikona programatora czasowego
Ikona blokady rodzicielskiej
Praca na maksymalnej mocy = 2000W
Praca na połowie mocy = 1000W
Tryb: zapobieganie zamrażaniu
Detektor otwartego okna
Zmiana czasu pracy
Tryb blokady przeciw dzieciom
Dzień 1 / Poniedziałek
Dzień 2 / Wtorek
Dzień 3 / Środa
Dzień 4 / Czwartek
Dzień 5 / Piątek
Dzień 6 / Sobota
Dzień 7 / Niedziela
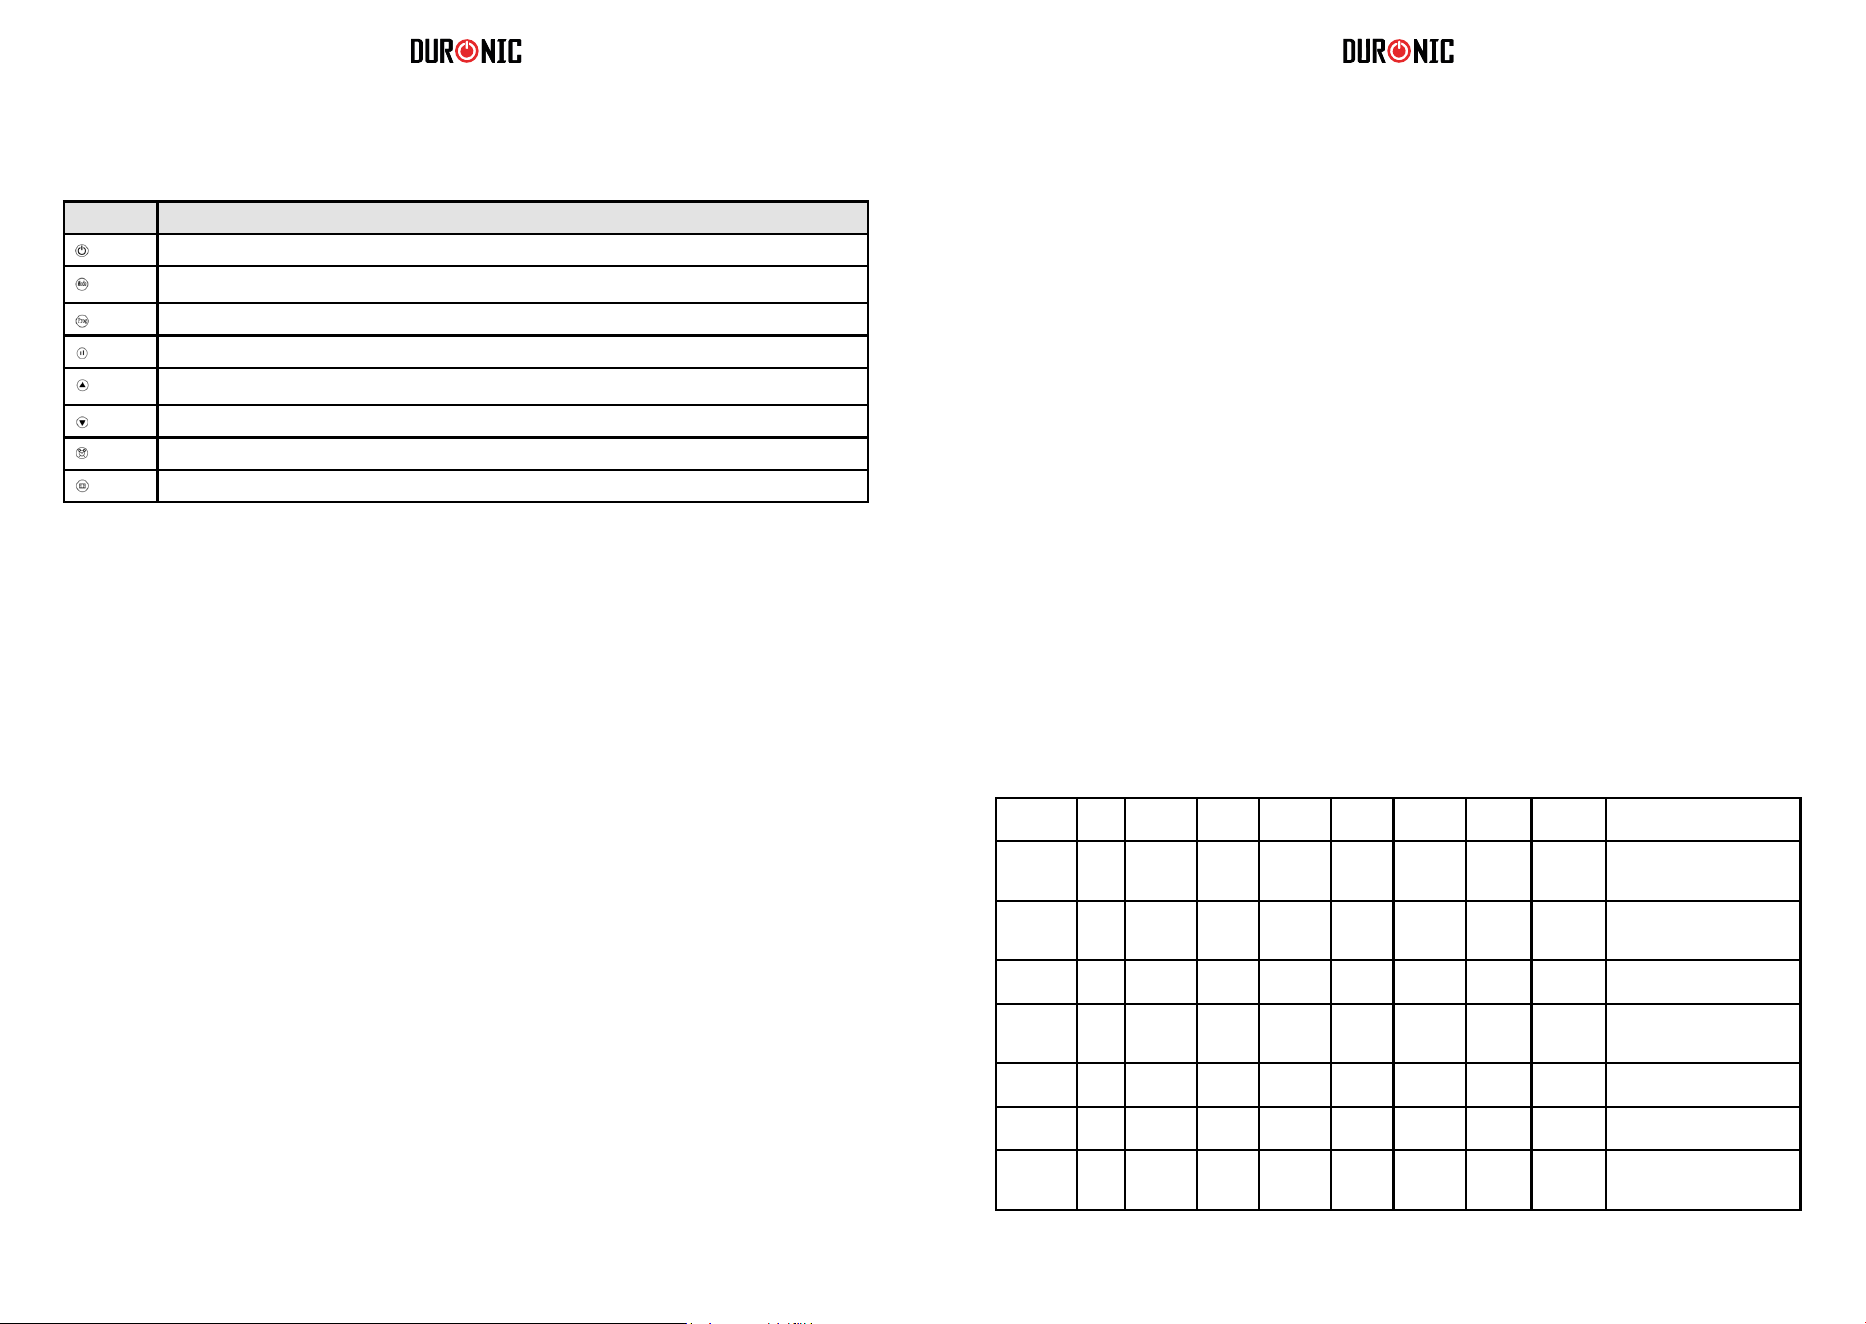
64 65
Ustawienie grzejnika
1.
Przycisk Określony w instrukcji jako
Włącznik
Przycisk "Mode"
Przycisk "Prog"
Przycisk regulacji mocy
Strzałka w górę
Strzałka w dół
Przycisk programatora czasowego
Przycisk detekcji otwartego okna
2.
Włączanie / Wyłączanie grzejnika
Ustawianie aktualnej daty i czasu
Włączanie: przyciśnij włącznik jednokrotnie.
Usłyszysz, że urządzenie od razu zaczęło pracować i podgrzewać pomieszczenie.
a)
Wyłączanie: ponownie przyciśnij włącznik, a urządzenie przejdzie w stan gotowości.
Ustawianie dnia tygodnia
Włącz urządzenie.
b)
c)
Przyciśnij dłużej (3 sek.) przycisk programatora czasowego
Na ekranie zacznie mrugać ikona d1.
d)
Przyciśnij strzałkę w górę lub w dół, aby ustawić właściwy dzień tygodnia. (Oznaczenia od
d1 do d7 odpowiadają dniom tygodnia.)
e)
Po wybraniu właściwego dnia tygodnia, ponownie naciśnij przycisk programatora
czasowego, aby zatwierdzić ustawienia.
Ustawianie czasu
f) Po zatwierdzeniu dnia tygodnia urządzenie przejdzie w tryb ustawiania godziny. Liczby
zaczną mrugać na ekranie.
Ustawienie godziny: Przy użyciu przycisków strzałki w górę lub strzałki w dół ustaw
aktualną godzinę. Godzina jest wyświetlana w cyklu 00-23.
Po ustawieniu godziny naciśnij przycisk programatora czasowego, aby zatwierdzić
ustawienia. Ustawienie minut: Przy użyciu przycisków strzałki w górę lub strzałki w dół
ustaw czas co do minuty. Minuty są wyświetlane w cyklu 00-59.
Gdy godziny i minuty są prawidłowo ustawione, przyciśnij ponownie przycisk programatora
czasowego, aby zatwierdzić wprowadzone ustawienia.
g)
h)
i)
j)
k)
Po ustawieniu czasu pozwól wyświetlaczowi powrócić do standardowego wyglądu ekranu. Aby
sprawdzić, czy czas i data są prawidłowo ustawione, przyciśnij przycisk programatora czasowego
jednokrotnie, na ekranie pojawią się informacje wyświetlane wg następującej kolejności: dzień,
godzina, minuty, w odstępie ok. 1 sek. Następnie wyświetlacz powróci do widoku temperatury
3.
Regulacja poziomu mocy
a)
Regulacja w zakresie: pełna moc (2000W), połowa mocy (1000W).
b)
c)
Włącz urządzenie.
Na ekranie pojawi się ikona pełnego słońca, co oznacza, że urządzenie będzie
pracowało z maksymalną mocą (2000W).
Aby zmienić ustawienia na połowę mocy, przyciśnij przycisk regulacji mocy jednokrotnie.
d)
Spowoduje to zmianę ikony z pełnego słońca (2000W) na ikonę połowy słońca (1000W).
e)
a)
Po kilku sekundach bezczynności, ostatnie ustawienia zostaną automatycznie zapisane.
Aby przywrócić pełną moc, powtórz powyższe czynności.
Po ustwieniu mocy, przejdź do ustawiania temperatury.
Przyciśnij strzałkę w górę lub strzałkę w dół, aby ustawić temperaturę pomieszczenia.
b)
Wybierz pomiędzy 5°C and 35°C.
Gdy ustawiłeś właściwą temperaturę nie musisz zatwierdzać ustawień dodatkowych
przyciskiem. Po 5 sek. bezczynności ustawienia te zostaną automatycznie zapisane.
Aby ułatwć zarządzanie temperaturą w twoim domu, masz do wyboru 6 programów. Każdy z
programów ma wstępnie zapisane ustawienia, które ułatwią kontrolę temperatury w ciągu dnia.
•
Programy: P1, P2, P3, P4, P5, są fabrycznie wbudowanymi ustawieniami grzewczymi.
Każdy z nich ma inne ustawienia. Zapoznaj się z poniższą tabelą, aby wybrać wygodne dla
siebie ustawienia.
UP - to program, który możesz samodzielnie dostosować zgodnie z trybem, który
odpowiada Twoim potrzebom.
•
4.
5.
Ustawianie temperatury
Wybór wstępnie zapisanych programów.
P1 00:00-
24:00
P2 00:00-
06:30
06:30-
08:30
08:30-
17:00
17:00-
22:30
22:30-
24:00
P2 00:00-
07:30
07:30-
10:00
10:00-
12:00
12:00-
14:00
14:00-
17:00
17:00-
22:30
22:30-
24:00
P3 00:00-
06:00
06:00-
17:00
17:00-
24:00
Idealny dla biur, gdzie w ciągu
dni roboczych przebywają
ludzie, a w weekend są puste.
P3 00:00-
24:00
P4 00:00-
06:00
06:00-
22:00
22:00-
24:00
P5 00:00-
24:00
Wbudowane programy
Dni
tygodnia
Najlepszy dla:
Stały, całodzienny
komfort
Idealny dla rodziny, która
pracuje w ciągu tygodnia, a w
weekend przebywa w domu.
Idealny dla rodzin, w których
ludzie przebywają cały dzień.
Idealny dla rodziny, która
wyjechała na dłuższy czas (zap.
zamarzaniu w trybie ciągłym).
7 Dni
(d1- d7)
7 Dni
(d1- d7)
2 Dni
(d6-d7)
5 Dni
(d1-d5)
2 Dni
(d6-d7)
5 Dni
(d1-d5)
7 Dni
(d1- d7)
Prog.
Komfort Komfort
Komfort
Zap.
zamarzaniu
Zap.
zamarzaniu
Zap.
zamarzaniu
Zap.
zamarzaniu

66 67
6.
7.
Programator czasowy
Ustawianie własnego programu (UP).
* *Zapobieganie zamarzaniu: tryb, który pozwala utrzymać temperaturę przynajmniej 5°C, aby
zapobiec zamarzaniu.
* *Komfort: temperatura ustalana przez użytkownika podczas programowania grzejnika.
W trybie komfortu zarówno temperatura, jak i moc urządzenia mogą zostać zmienione.
a)
Jest możliwe ustawienie programatora czasowego, który wyłączy urządzenie po określonym
czasie. Np. jeżeli ustawisz programator na 2 godz., grzejnik wyłączy się po tym czasie i przejdzie
w stan gotowości.
Ustawianie programatora czasowego
b)
Przyciśnij przycisk "Mode" i wybierz program P1.
Szybko dwukrotnie przyciśnij przycisk programatora czasowego. Ikona
programatora czasowego zacznie mrugać na wyświetlaczu.
Przyciśnij strzałkę w dół lub strzałkę w górę, aby wybrać czas po jakim
urządzenie ma zostać wyłączone. Możesz wybrać pomiędzy 1-24 godz.
Po kilku sekundach bezczynności, ostatnie ustawienia zostaną automatycznie
zapisane.
c)
d)
Ikona programatora czasowego przestanie mrugać, a urządzenie zacznie odliczać czas do
wyłączenia urządzenia.
Anulowanie prog. czasowego: Jeżeli chcesz wyłączyć programator, przyciśnij programator
czasowy dwa razy w szybkim tempie. Ikona programatora czasowego przestanie się świecić, co
jest jednoznaczne z wyłączeniem timera.
•
Wybór programu
Włącz urządzenie..
•
Przyciśnij przycisk "Mode", aby wybrać pomiędzy programami P1, P2, P3, P4, P5, UP.
Możesz ustawić swój własny program, aby grzejnik był uruchomiony o określonym czasie w
ciągu dnia. W programie UP możesz ustawić jeden, dwa lub trzy okresy komfortu na jeden
dzień, które będą odpowiadać za wyłączenie grzejnika. Pamiętaj, że "komfort" to ustawienia
temperatury i mocy jakie wprowadziłeś na samym początku. Mogą one zostać zmienione
zgodnie z wytycznymi w pkt. 3 i 4.
a)
b)
Włącz urządzenie.
c)
Przyciśnij przycisk "Mode" i wybierz program UP.
Przyciśnij przycisk "Prog".
d)
Na ekranie pojawi się d1, co oznacza, że możesz wprowadzić ustawienia dla tego dnia. Możesz
zacząć wprowadzać swoje ustawienia od dnia d1 lub przejść do innego dnia tygodnia.
e)
Na wybranym przez siebie dniu, przyciśnij strzałkę w górę lub strzałkę w dół
jednokrotnie, aby ustawić pierwszy okres pracy (komfortu);
Na ekranie będzie wyświetlane d1 oraz ikona pełnego słońca zacznie mrugać.
f)
g)
Ponownie przyciśnij strzałkę w górę lub strzałkę w dół, aby wybrać czas rozpoczęcia 1-go okresu.
Wybierz godzinę (od 0 do 23), o której chciałabyś uruchomić grzejnik. Po wybraniu prawidłowej
godziny, przyciśnij przycisk programatora czasowego, aby zatwierdzić wybór.
Ekran automatycznie przejdzie do wyświetlania godziny zakończenia.
h)
Urządzenie jest wyposażone w blokadę rodzicielską, aby zapobiec zmianie ustawień, gdy
urządzenie jest włączone.
Uruchamianie blokady rodzicielskiej
Jednocześnie przyciśnij strzałkę w górę i dół przez ok. 3 sek., aby uruchomić blokadę. Na
wyświetlaczu pojawi się oznaczenie [ ], co potwierdza aktywację blokady. W tym momencie,
żadne z przycisków nie mogą zostać użyte.
8. Blokada rodzicielska
Usuwanie blokady rodzicielskiej
Aby usunąć blokadę rodzicielską, jednocześnie przyciśnij strzałkę w górę i strzałkę w dół.
Sprawdzenie ustawień programu UP.
• Przyciśnij przycisk "Prog", aby sprawdzić ustawienia poszczególnych dni. Przyciśnij przycisk
programatora czasowego, aby przełączyć pomiędzy poszczególnymi dniami (d1 - d7). Po 2 min.
bezczynności, widok wyświetlacza przejdzie do widoku podstawowego.
•
Przyciśnij przycisk prog. czasowego zamiast strzałki w górę lub w dół, aby pominąć krok
ustawiania godzin pracy i pozostawić urządzenie w trybie zapob. zamarzaniu.
Kiedy grzejnik jest uruchomiony w trybie komfortu, możesz zmienić ustawienia mocy przyciskając
przycisk regulacji mocy, aby wybrać pomiędzy ikoną pełnego słońca (2000W) a ikoną połowy
słońca (1000W).
Tryb zapobiegania zamarzaniu: niezależnie od ustawionego czasu pracy, na ekranie pojawia się
ikona śnieżynki, a temperatura pomieszczenia będzie utrzymywana na poziomie min. 5°C.
•
i)
Przyciśnij strzałkę w górę lub w dół, aby wybrać godzinę. Przyciśnij przycisk prog.
czasowego, aby zatwierdzić ustawienia pierwszego okresu pracy dla tego dnia. Na
ekranie zostanie wyświetlone d1, a ikona pełnego słońca zacznie mrugać.
Przy użyciu powyższych wskazówek możesz ustawić drugi i trzeci okres pracy
urządzenia.
j)
k)
Wszystkie przerwy pomiędzy ustawionymi okresami będą odpowiadać za tryb
zapobiegania zamarzaniu, który jest podobny do stanu gotowości.
Jeżeli nie chcesz ustawiać kolejnych okresów pracy, przyciśnij przycisk programatora
czasowego, aby zapisać ustawienia.
Używaj przycisku programatora czasowego, do zatwierdzenia wszystkich
wprowadzonych zmian, dla każdego z dni tygodnia.
Kiedy dzień d1 zostanie ustawiony, urządzenie automatycznie przejdzie do dnia d2. W
ten sam sposób możesz ustawić czas dla dnia d1, d2, d3, d4, d5, d6, d7.
Przyciśnij przycisk "Prog" przez ok. 3 sek., aby sprawdzić ustawienia w trybie UP.
l)
m)
n)
68 69
1.
Czyszczenie i pielęgnacja
Przechowywanie
2.
3.
Przed przystąpieniem do czyszczenia lub przenoszenia urządzenia zawsze odłącz grzejnik i
odstaw do całkowitego ochłodzenia.
Użyj odkurzacza, aby usunąć kurz z otworów wlotowych i wylotowych.
Przeczyść obudowę urządzenia wilgotną, dobrze wyciśniętą ściereczką i przetrzyj do sucha
suchą ścierką.
Nigdy nie zanurzaj urządzenia w wodzie. Nie dopuszczaj, aby krople dostawały się na lub do
grzejnika.
4.
1.
Zawsze odłącz grzejnik i odstaw do całkowitego ochłodzenia przed odstawieniem do
przechowywania.
Zawsze oczyść urządzenie z kurzu i brudu, przed odstawieniem do przechowywania.
Jeżeli nie będziesz korzystać z grzejnika przez dłuższy czas, przełóż grzejnik oraz instrukcję
obsługi do oryginalnego pudełka i przechowuj w suchym, dobrze wentylowanym pomieszczeniu.
Nie dawaj żadnych ciężkich elementów na górę pudełka, ponieważ może to spowodować
uszkodzenie grzejnika.
2.
3.
4.
9. Usuwanie blokady rodzicielskiej
Aby usunąć blokadę rodzicielską, jednocześnie przyciśnij strzałkę w górę i
strzałkę w dół.
Kiedy temperatura pomieszczenia utrzymuje się poniżej 5°C powyżej 30 min., wtedy zostanie
uruchomiony detektor otwartego okna, a grzejnik wyłączy się.
Funkcja ta zapobiega stratom energii oraz chroni grzejnik przed ciągłą pracą, w sytuacji, gdy
wymagana temperatura jest niemożliwa do osiągnięcia. Gdy detekcja zostanie uruchomiona, ikona
otwartego okna przestanie mrugać, a zacznie być wyświetlana sposób ciągły, aby zasygnalizować
konieczność zamknięcia okna lub drzwi. Przyciśnij przycisk otwartego okna, jeżeli grzejnik może
kontynuować pracę.
10. Przywracanie ustawień fabrycznych
W celu zresetowania ustawień do ustawień fabrycznych:
•
•
Wyłącz urządzenie.
•
Przyciśnij dłużej strzałkę w dół.
•
Używanie detekcji otwartego okna
Włącz zasilanie.
Grzejnik powróci do ustawień fabrycznych.
Kiedy grzejnik jest włączony przyciśnij przycisk detekcji otwartego okna jednokrotnie, aby
aktywować funkcję. Ikona otwartego okna zacznie mrugać.
Aby wyłączyć funkcję, ponownie przyciśnij detekcję otwartego okna. Ikona otwartego okna
zniknie.
1 Rok Gwarancji rmy Shine-Mart LTD, marki handlowej Duronic Products.
UWAGA: ten dokument nie wpływa na twoje ustawowe prawo jako konsumenta.
Ten produkt został wykonany zgodnie z restrykcyjnymi normami kontroli i wyk orzystuje
najwyższej jakości materiały dla uzyskania doskonałej wydajności i niezawodności.
Długotrwałość produkuy zostaje osiągnięta przez właściwe użytkowanie i konserwację.
Gwarancja obejmuje 1 rok od daty zamówienia. Jeżeli jakikolwiek defekt powstanie ze
względu na wadliwość materiału lub niewłaściwe wykonanie to uszkodzony produkt
m
usi
zostać dostarczony do miejsca, z którego został zamówiony. Zwrot pieniędzy lub
wymiana
produktu jest w gestii rmy.
Duronic Products oferuje jeden rok gwarancji na podstawie poniż szych warunków:
1. Produkt musi zostać zwrócony do sprzedawcy z oryginalnym dowodem zakupu.
2. Produkt był instalowany i użytkowany zgodnie z instrukcją obsługi.
3. Produkt użytkowany był wyłącznie w celach domowych.
4. Gwarancja nie obejmuje naturalnego zużycia się produktu, celowego uszkodzenia,
niewłaściwego użycia, zaniedbania, niewłaściwych napraw lub części eksploatacyjnych.
5. Shine-Mart Ltd. nie ponosi odpowiedzialności za przypadkowe albo celowe zgubienie
produktu lub jego uszkodzenie.
6. Firma Shine-Mart Ltd nie jest zobowiązana do przeprowadzania jakichkolwiek prac
serwisowych w ramach gwarancji.
7. Obowiązuje na obszarze Unii Europejskiej.
Informacja o odpadach i utylizacja dla użytkowników sprzętu elektrycznego i
elektronicznego.
Usuwanie wyeksploatowanych urządzeń elektrycznych i elektronicznych (dotyczy
krajów Unii Europejskiej i innych krajów europejskich z wydzielonymi systemami
zbierania odpadów). Ten symbol na produkcie lub jego opakowaniu oznacza, że
produkt nie powinien być zaliczany do odpadów domowych. Należy go przekazać
do odpowiedniego punktu, który zajmuje się zbieraniem i recyklingiem urządzeń
elektrycznych i elektronicznych. Prawidłowe usunięcie produktu zapobiegnie
potencjalnym negatywnym konsekwencjom dla środowiska naturalnego i zdrowia
ludzkiego, których przyczyną mogłoby być niewłaściwe usuwanie produktu.
Recykling materiałów pomaga w zachowaniu surowców naturalnych.
Ten produkt jest wyposażony we wbudowaną wtyczkę typu Euro-Plug / BS z
certykatem CE importowaną przez Shine-Mart Ltd, RM3 8SB
Warunki Gwarancji