Operating Instructions
(original instructions)
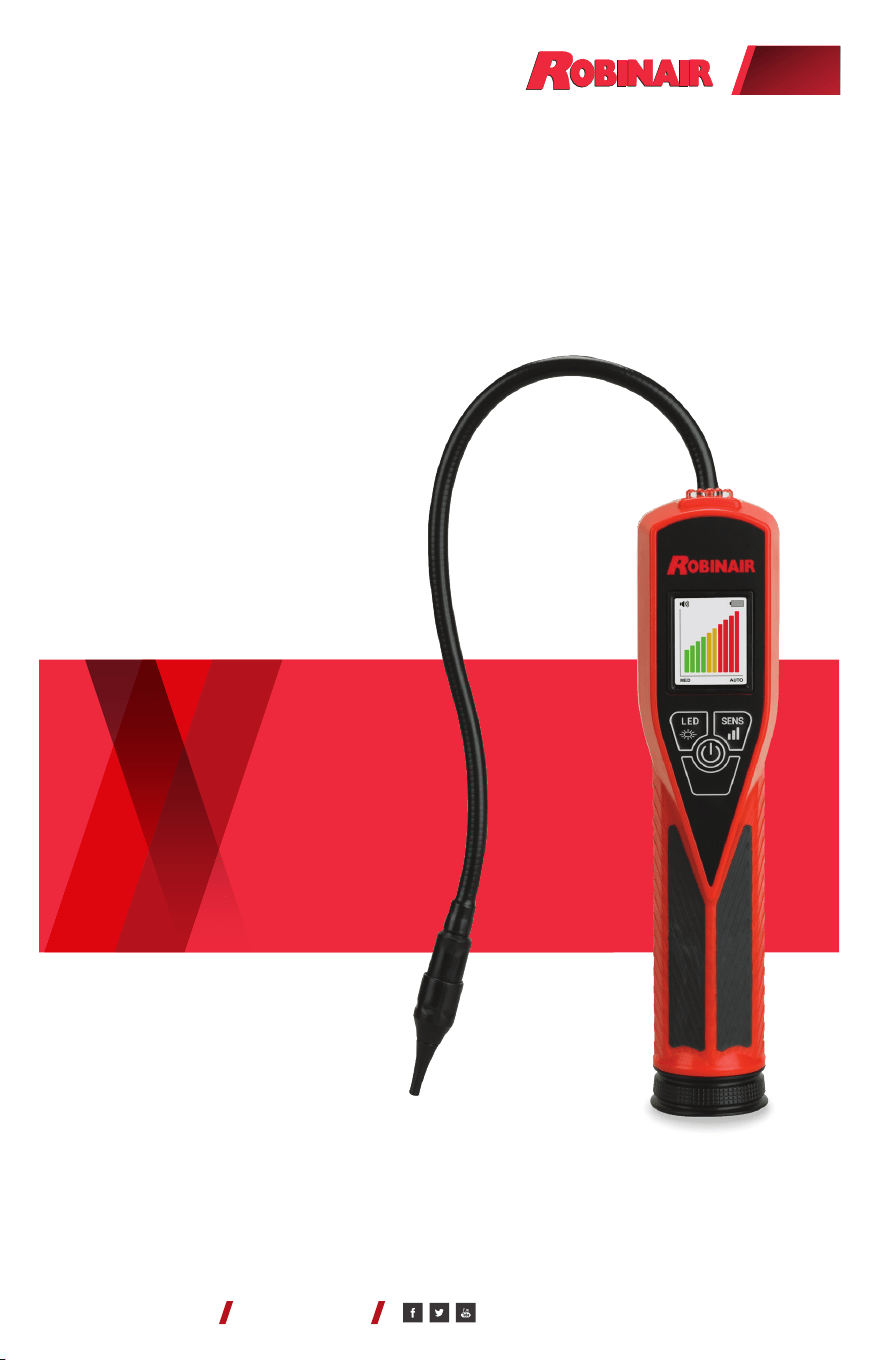
Model: LD5
Dual Mode Refrigerant
Gas Leak Detector
ROBINAIR.COM 800.533.6127
(en-US)

Introduction ......................................3
Features .........................................3
LD5 Control Panel ................................4
Operating Instructions ............................4
Inspection Light Operation ........................5
Leak Size Indicator ...............................6
Automatic & Manual Calibration ...................7
Adjusting Sensitivity Levels .......................7
Leak Test Vial ....................................8
Maintenance .....................................8
User Interface Displays ......................... 10
Product Specications .......................... 11
EN14624/2005 Test Specications .............. 11
Product Application Ambient .................... 11
Cross Sensitivity to Automotive Chemicals ....... 12
Replacement Parts ............................. 12
Product Cleaning Instructions ................... 13
Return For Repair Policy & Warranty Policy ....... 13
Contents
LD5 OPERATORS MANUAL
PAGE 2
© Bosch Automotive Service Solutions Inc. / Robinair / October 2020

Introduction
The LD5 features a long life solid electrolyte semiconductor sensor
technology that is designed to detect all CFC, HCFC, HFC, and HFO
refrigerants including R-1234YF (HFO), R-134A (HFC), R-410A (HFC),
R-22 (HCFC), R-407C (HFC), R-507 (HFC), R-12 (CFC), R-404C (HFC).
The LD5 is designed to detect all SNAP approved refrigerant blends.
The LD5’s unique graphic color LCD display and sweep mode function
conveys messages, graphics and prompts giving the A/C technician
real-time information to help locate the source of the leak and ensure
the leak detector is always at optimal performance. The LED inspection
light aids the technician to locate and inspect all A/C suspect ttings and
components while searching.
The LD5 does not require rechargeable batteries
Features
Unique color graphic LCD display
Long life, stable sensor
R1234yf sensitivity .015 oz/yr
R134a sensitivity .05 oz/yr
Certied to SAE J2791, J2913, ASHRAE 173-2012, EN14624-2012
Automatic calibration and reset to ambient
User friendly message and error screens
Hi intensity LED inspection light
3 adjustable sensitivity levels
Low battery indicator
True mechanical pump
Uses 4 AA alkaline batteries
CE Certied
Comfortable Santoprene handle grip
2-year warranty includes sensor
LD5 OPERATORS MANUAL
PAGE 3
© Bosch Automotive Service Solutions Inc. / Robinair / October 2020
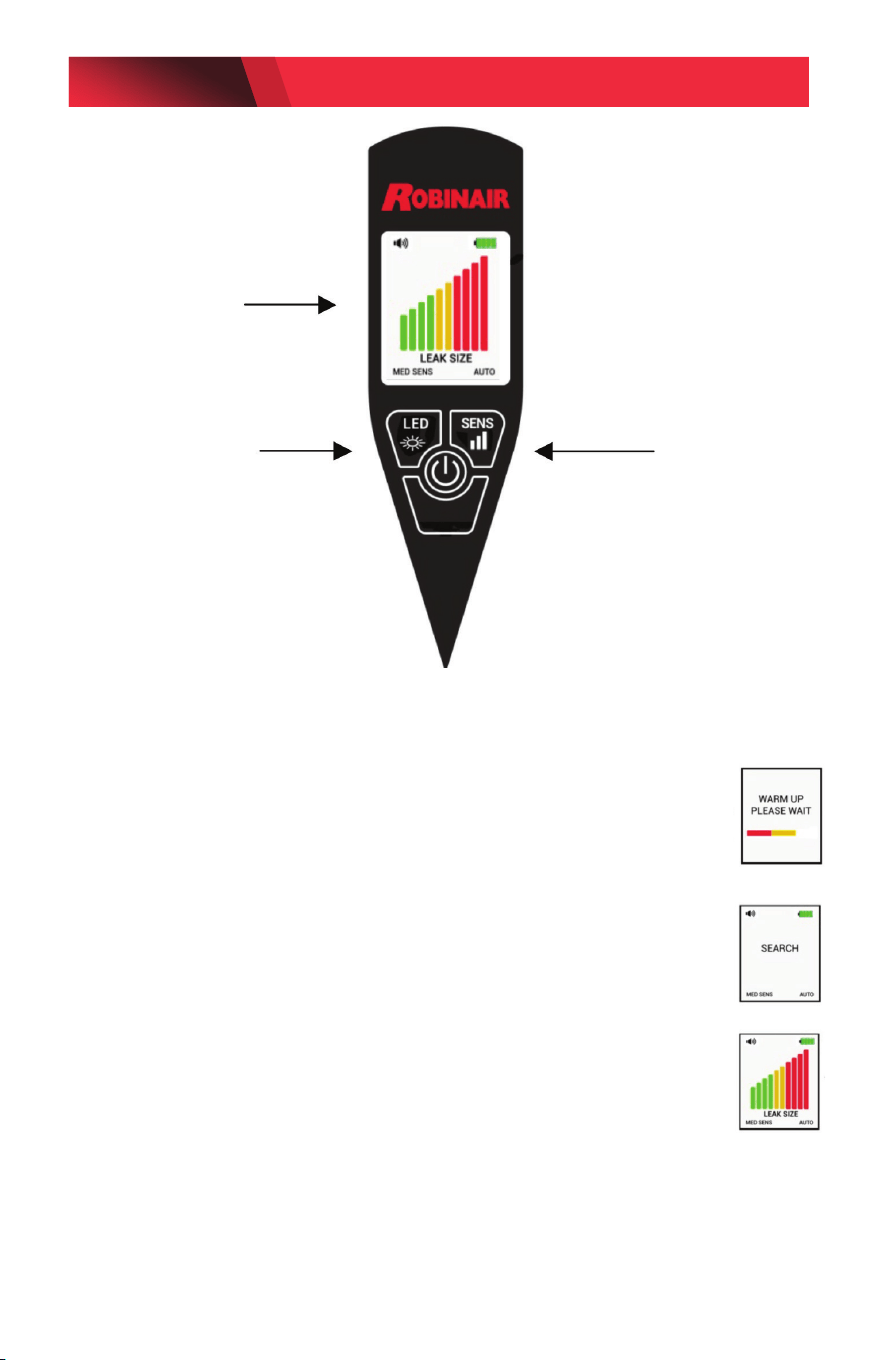
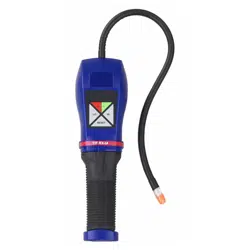
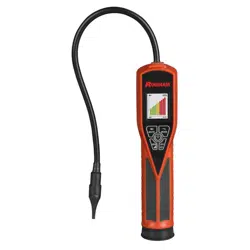
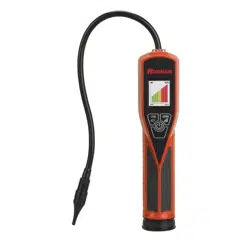
LD 5 Control Panel
Operating Instructions
1. Turn On: Press the ON/OFF button once to turn on and again to turn off.
NOTE: For SAE J2913 sensitivity setting hold down ON/OFF button until
R1234yf Mode is displayed.
2. Warm Up: The detector automatically starts heating the sensor.
During the heating cycle, the LCD display will display the mes-
sage “WARM UP” with a progress bar (see gure). Warm up is
usually less than 20 seconds.
3. Search: The display will show “SEARCH” and the audio “beep”
will begin to sound. Move the probe tip towards a suspected
refrigerant leak at the rate of less than 2 inches (~50 mm) per
second, no more than 1/4 inch (~5 mm) away from the suspect-
ed source.
4. Detection: If a leak exists, the sound will increase in rate and fre-
quency, and the display will show the bar graph indication of the
leak size.
NOTE: The leak detector responds to changes in refrigerant concentra-
tion. When detection occurs, move the probe away from the source and
back again to conrm the leak source. The detector alarm will reset if the
probe is held xed at the source (see Automatic Calibration Feature).
Color Graphic LCD Display with
messages and graphics
LED Inspection Light
Sensitivity Level Indicators
LD5 OPERATORS MANUAL
PAGE 4
© Bosch Automotive Service Solutions Inc. / Robinair / October 2020
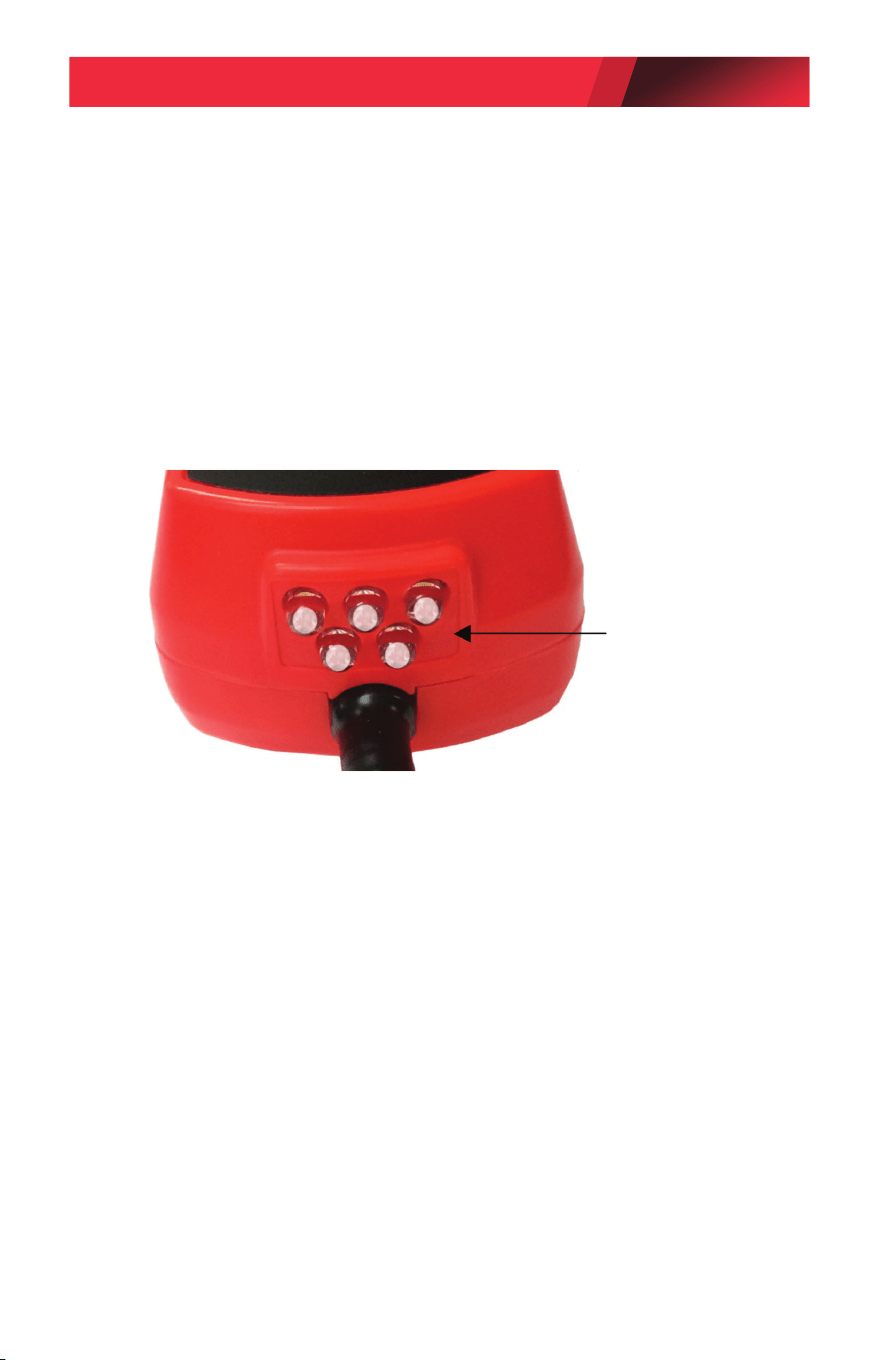
Inspection Light Operation
1. Turn on the white LED light by pressing the LED button once.
(See control panel on page 4).
2. Holding the leak detector approximately 10” to 14” away, shine the
LED light beam slowly over the components, hoses, and metal lines that
make up the A/C system.
3. I
nspect all A/C ttings, hoses and components for excessive wear
or damage
.
Auto Shut-off
The LED Inspection Lights will automatically shut off after 5 minutes.
This will ensure proper battery life in case the LED lights are left on
inadvertently.
5 White LED
Inspection Lights
LD5 OPERATORS MANUAL
PAGE 5
© Bosch Automotive Service Solutions Inc. / Robinair / October 2020
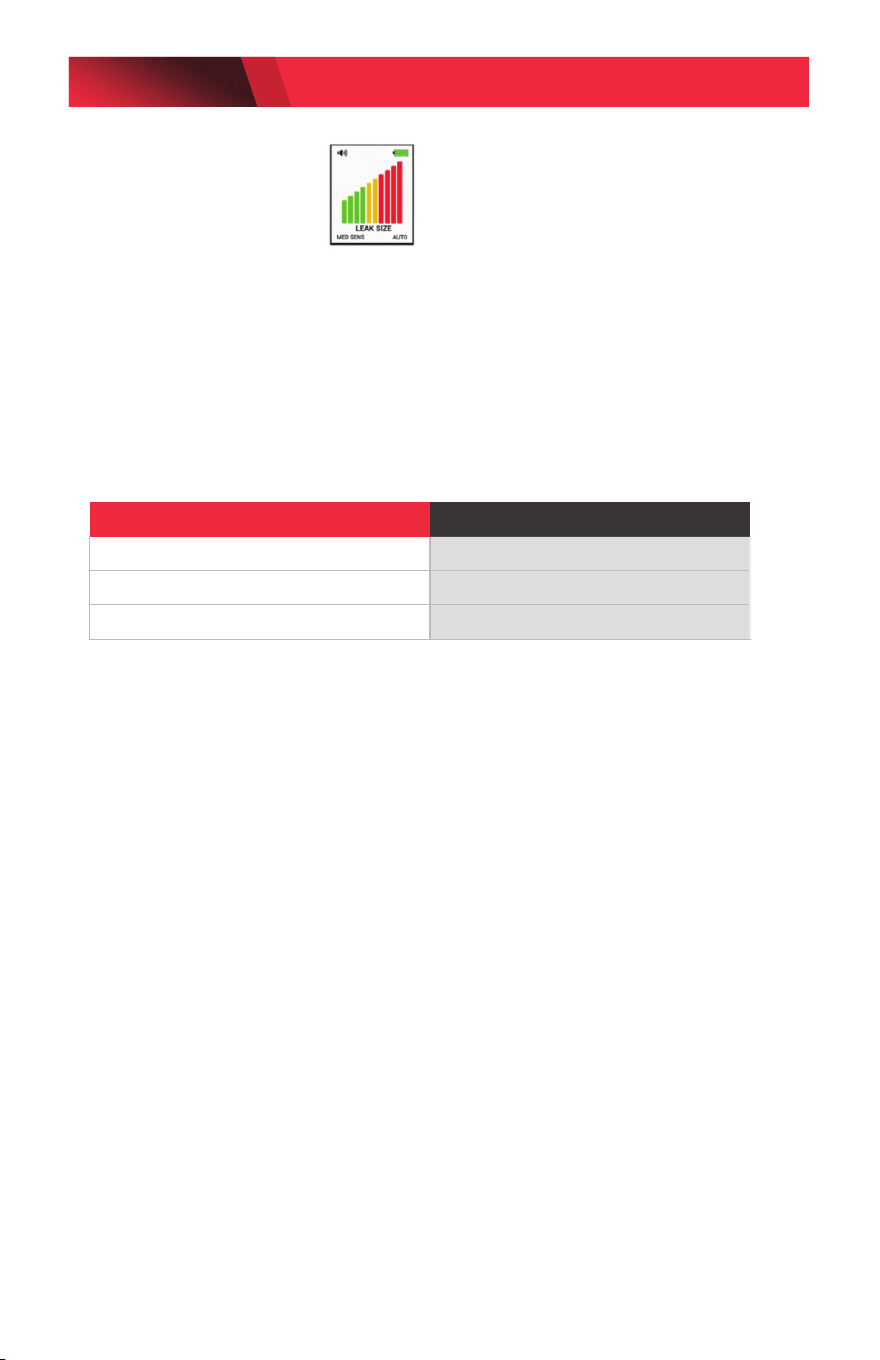
Leak Size
Indicator
The LCD bar-graph leak size indicator remains off normally but once a
leak is detected, a number of bars will be displayed. The number will
continue to increase or decrease depending on the amount of refrigerant
sensed. The display will be the same for all HFC and HCFC refrigerants
regardless of the sensitivity setting.
The maximum value will be displayed once the leak source has been
located. The table below can be used to approximate the size of leak:
Maximum No. Bars Displayed Leak Size (oz/yr)
1-4 (green color) < 0.1
5-6 (yellow color) 0.1 to 0.5
7-10 (red color) > 0.5
LD5 OPERATORS MANUAL
PAGE 6
© Bosch Automotive Service Solutions Inc. / Robinair / October 2020

Automatic and Manual Calibration
To allow the user to nd the leak source easily, the detector will calibrate
itself either automatically (default) or manually to the ambient and reset
the alarm as soon as there is detection
In Automatic mode the detector will automatically reset the alarm. In
Manual mode, the detector will continue to alarm if gas is detected until
the user presses the SENS button to reset the alarm. Both modes allow
the user to get closer to the leak source without the detector continually
alarming. In Automatic mode, once the source of the leak is found, the
detector will not alarm again until the probe is moved away from the
source and back again. In Manual mode, once the source of the leak is
found, the detector will continue to alarm at the source until the SENS
button is pressed.
To use the detector in Manual Calibration mode: Press and hold the SENS
Selector and release when the AUTO icon is replaced by MAN on the dis-
play. To return to Automatic Calibration, press and hold the SENS button
and do not release until the AUTO icon is displayed.
Note: the sensitivity levels can only be changed in Automatic Cal-
ibration mode. To change sensitivity levels while in Manual mode,
return to Automatic mode, select the desired level and return back
to Manual mode.
Adjusting Sensitivity Levels
In addition to the automatic calibration, the audio alarm trigger level can
be set by the user to 3 different sensitivity levels (LO, MED, HI). If the de-
tector is continuously alerting while pulled away from the suspected area
of the leak, the sensitivity level can be adjusted so the detector will only
alert when the sensor is close to the source of the leak.
The Leak Detector will default to the MED sensitivity level automatically
once the unit comes out of the warm up cycle. To change sensitivity levels,
press the SENS once for HI sensitivity and again for LO sensitivity.
LD5 OPERATORS MANUAL
PAGE 7
© Bosch Automotive Service Solutions Inc. / Robinair / October 2020
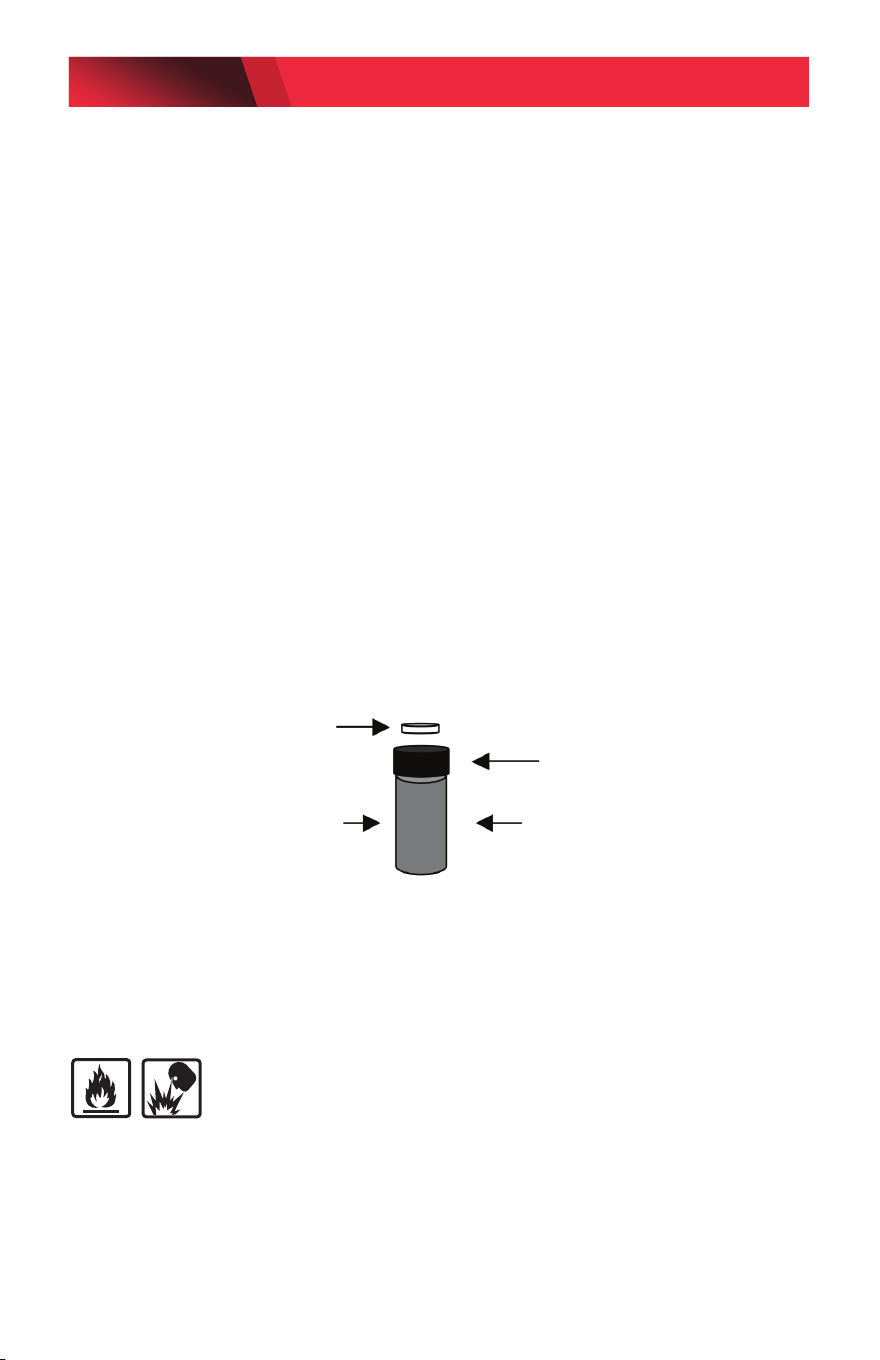
Leak Test Vial
The leak detector comes with a Leak Test Vial that allows the user to verify
the detector is performing properly. Check the expiration date on the vial
before testing the leak detector.
To test:
1. Remove the colored label dot on the center of the screw cap to expose
the vent hole. (see g. below)
2. Turn on the detector and allow the unit to complete the warm up cycle.
Set sensitivity level to HIGH.
3. Place the sensor close to the hole in the the Leak Test Vial. The beep
rate should increase and the Leak Size Indicator should display 3-6 bars
indicating that the sensor and electronics are working properly.
NOTE: The leak detector responds to changes in refrigerant concentration.
When detection occurs, move the probe away from the source and back
again to conrm the leak source. The detector alarm will reset if the probe
is held xed at the source (see Automatic Calibration Feature).
Leak Test VialExpiration Date on Label
Remove label dot over
vent hole before testing.
Vial Cap with Vent Hole
MAINTENANCE
Batteries
WARNING: RISK OF FIRE OR EXPLOSION -
Use AA alkaline batteries only in this product. Using the wrong type of
battery could result in a re or explosion.
LD5 OPERATORS MANUAL
PAGE 8
© Bosch Automotive Service Solutions Inc. / Robinair / October 2020
MAINTENANCE (Batteries - continued)
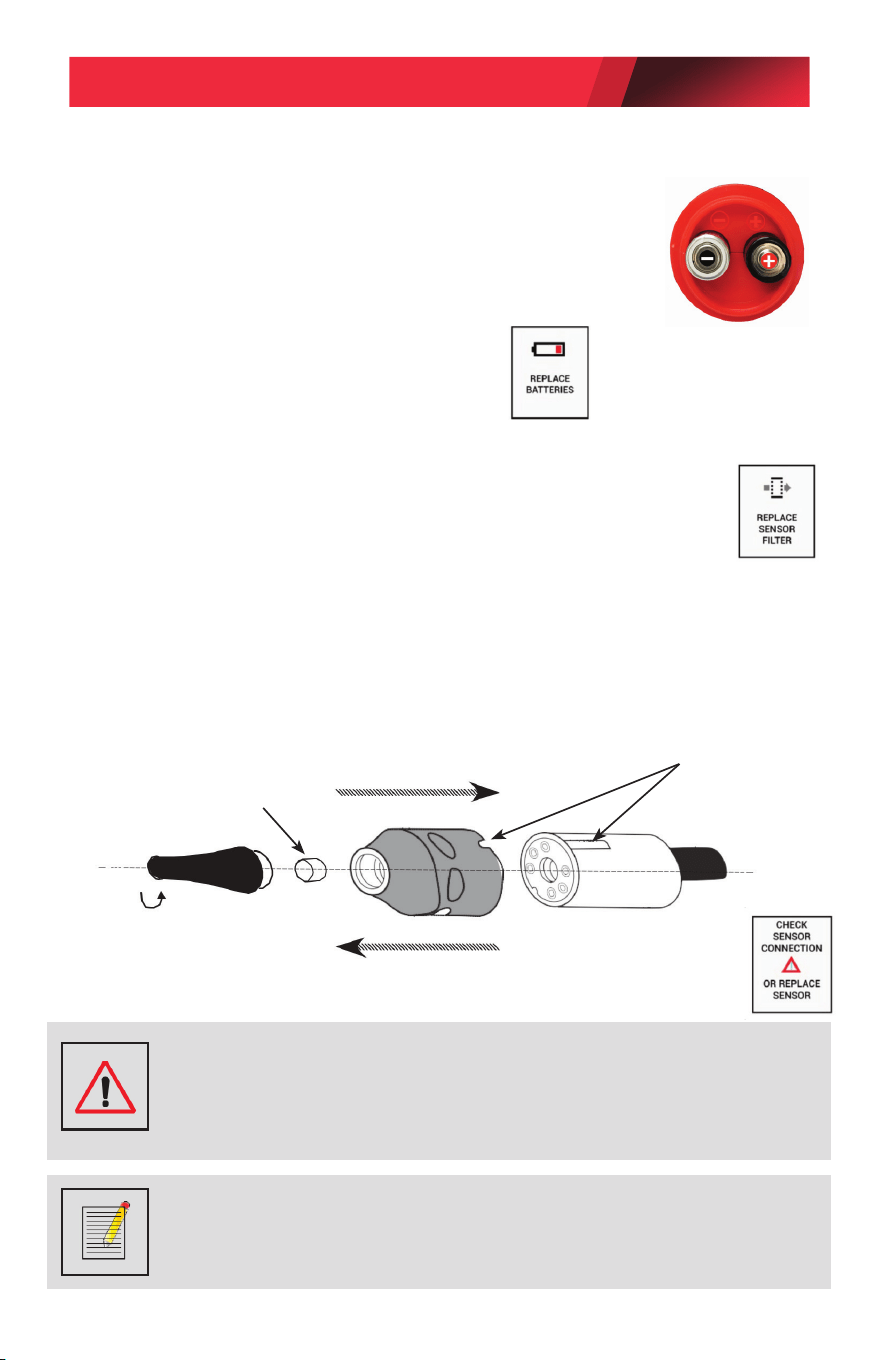
Install Batteries: Unscrew the battery cover located at the
base of the unit as shown. Install four AA alkaline batteries
into the battery compartment in the direction noting the
polarity mark on the inside of the battery compartment for
proper battery orientation as shown.
Replace batteries when the display shows
the message REPLACE BATTERIES.
Sensor & Sensor Filter
Replace Filter: Unscrew sensor tip as shown to replace lter. Re-
place lter when it becomes visible dirty or when the display shows
“REPLACE SENSOR FILTER.” The LD5 will keep track of the number
of hours of usage and alert the user when it is time to replace it.
Replace Sensor: Remove sensor by pulling it out of the socket.
Install the new sensor by aligning the keyway notch in the sensor
cover with the raised keyway on the sensor socket holder (see gure
below).
Note: Do not force sensor into socket. Misalignment can damage the
sensor pins.
Important: The instrument’s software is designed to alert the user if the sensor is dislodged
or defective. If the sensor is not fully inserted into the six-pin socket, or if it is defective, the
instrument will not come out of the “Warm Up” mode for proper operation when the power
button is turned on. In this case, the message screen as shown on the right will be displayed.
Additionally, if the instrument becomes unstable during its operation, it is an indication that
the sensor may be defective.
Note: If the leak detector has been out of use for an extended period, weeks or months, the
following action is recommended. Power on the instrument and allow it to come out of warm
up, and then run it with the sensitivity level in the (Hi) high position for several minutes before
testing it with the Leak Test Vial. This action will guarantee that the sensor is fully conditioned
for maximum response to refrigerant gas.
Unscrew tip to
replace lter.
Keyway
Alignment
Filter
Push straight on (do not twist) TO INSTALL sensor.
Pull straight out (do not twist) TO REMOVE sensor.
LD5 OPERATORS MANUAL
PAGE 9
© Bosch Automotive Service Solutions Inc. / Robinair / October 2020
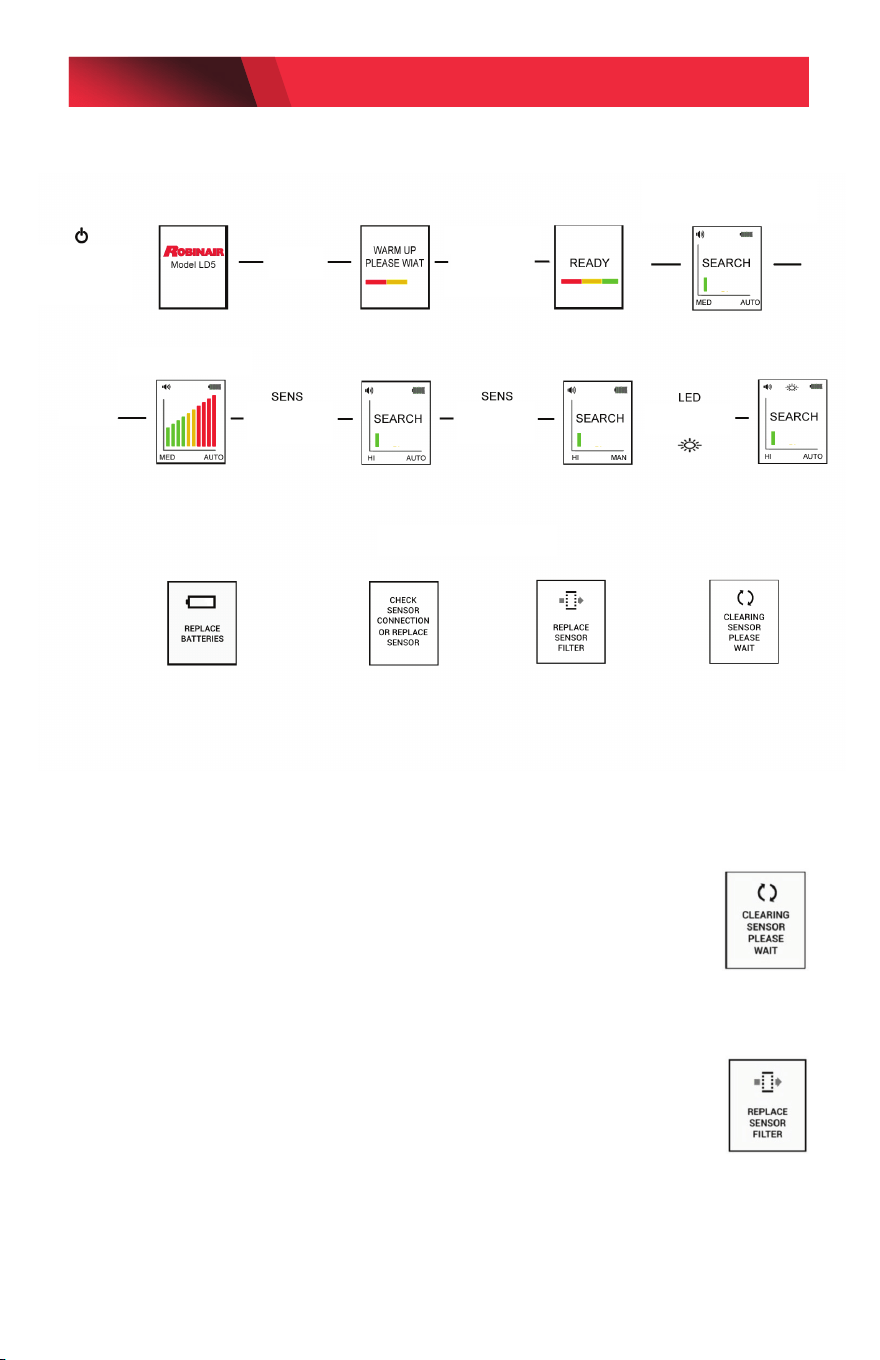
Sensor Clearing Message
Note: Sensor Clearing Message is displayed when sensor be-
comes saturated with a very large concentration of gas during
which time the sensor will not function optimally. Recovery is
normally less than 10 seconds.
Replace Sensor Filter Message
Note: Replace Sensor Filter Message is displayed when the
detector’s timer registers approximately 30 hours of accumulated
use. Press the appropriate button when prompted “DONE” or
“LATER” on the display. If “DONE” is selected, the detector will
reset to zero hours. If “LATER” is selected the detector will continue to
prompt the user to replace the lter after each subsequent use until “DONE”
is selected.
User Interface Displays
Power on; unit
displays logo
and model for 3
seconds
Detection
Rapid beep rate (alarm)
when leak is detected
Press to change
sensitivity level
LO MED Hi
Hold down
to change
Auto/Manual
Press for
Inspection LED
MESSAGE SCREENS
No Sound
Warm up
Normal beep rate
Unit is ready
after 20 seconds
Unit begins Searching
“SEARCH” and 1st bar blink
Default is MED and AUTO
LD5 OPERATORS MANUAL
PAGE 10
© Bosch Automotive Service Solutions Inc. / Robinair / October 2020

Product Specications
Model No. LD5
Name Leak Detector, Refrigerant Gas
Sensitivity .05 oz/yr R134a, .0123 oz/yr R1234yf
Sensor Life > 10 years
Response Time Instantaneous
Power Supply 4 AA Alkaline batteries
Battery Life 4 hours continuous
Warm up time < 20 seconds
LCD Display 128 X 160 full color graphic display
Probe Length 17 inches
Weight, lbs 1.5 lbs
Warranty 2 years (includes sensor)
EN14624/2005 Test Specications
Minimum/Maximum 1 gm/yr minimum, >50 gm/yr
Sensitivity Threshold (fixed) maximum
Minimum/Maximum 3 gm/yr minimum, >50 gm/yr
Sensitivity Threshold (moving) maximum
Minimum Detection Time Approx. 1 second
(1gm/yr)
Clearing Time Approx. 9 seconds after exposure
to >50 gm/yr
Minimum Threshold after 1 gm/yr
Maximum Exposure
Sensitivity Threshold in 1 gm/yr
Polluted Atmosphere
Calibration Frequency 1/yr check with calibrated leak
standard
Product Application Ambient
• Indoor/Outdoor Use
• Temperature Range: -24—125°F (-31—52°C)
• Humidity Range: <95% Non-Condensing
• Altitude: <10,000 ft.
• Pollution Degree 4
• Protection Grade: IP51
LD5 OPERATORS MANUAL
PAGE 11
© Bosch Automotive Service Solutions Inc. / Robinair / October 2020
Cross Sensitivity to Automotive Chemicals
Some automotive solvents and chemicals have similar hydrocarbon prop-
erties as R134a and may elicit a positive response. Before leak checking,
clean up any chemicals in the list below that elicit a positive response.
Replacement Parts
Chemical Name/Brand Response
Rain-X Windshield Wash Fluid Y
Ford Spot Remover (wet) Y
Ford Rust Inhibitor Y
Ford Gasket Adhesive (wet) Y
Loctite Natural Blue Degreaser (diluted) Y
Ford Brake Parts Cleaner Y
Ford Silicone Rubber (uncured) N
Motorcraft Antifreeze heated to 160 degrees F N (partial)
Gunk Liquid Wrench Y
Ford Silicone Lubricant N
Ford Pumice Lotion (with solvent) Y
Ford Motorcraft Brake Fluid Y
Ford Carburetor Cleaner Y
Dextron Transmission Fluid heated to 160 degrees F N
Quaker State Motor Oil heated to 160 degrees F N
Item Part Number
Sensor with Filter SP01957183
Sensor Filters (5 pack) SP01964946
Leak Test Vial SP01964945
Sensor Tip SP01964944
Parts Kit (includes sensor, test vial & lter kit) SP01957182
Carrying Case SP01957181
LD5 OPERATORS MANUAL
PAGE 12
© Bosch Automotive Service Solutions Inc. / Robinair / October 2020

Product Cleaning Instructions
Remove surface dust by wiping with a dry cloth.
Return for Repair Policy & Warranty Policy
Every effort has been made to provide reliable, superior quality products.
However, in the event your instrument requires repair, call the Robinair
Technical Hotline below for instructions.
Robinair warrants the LD5 Refrigerant Gas Leak Detector to be free of
defects in materials and workmanship for a period of two years from
the date of purchase. Robinair shall, at its option, repair or replace, at no
charge, such products which, under normal conditions of use and service,
prove to be defective in material and/or workmanship. This warranty
applies to all repairable instruments that have not been tampered with or
damaged through improper use including unauthorized opening of the
unit. Please ship warranty units that require repair freight prepaid to Ser-
vice Center along with proof of purchase, return address, phone number
and/or email address.
Robinair shall not be liable for any incidental, consequential, special or
punitive damages arising from the sale or use of any products, whether
such claim is in contract or not. No attempt to alter, modify
or amend this warranty shall be effective unless authorized in writing by
an ocer of Robinair.
THIS WARRANTY IS IN LIEU OF ALL OTHER WARRANTIES OR REP-
RESENTATIONS, EXPRESS OR IMPLIED, INCLUDING ANY WARRANTY
IMPLIED BY LAW, WHETHER FOR MERCHANTABILITY OR FITNESS FOR
A PARTICULAR PURPOSE OR OTHERWISE AND SHALL BE EFFECTIVE
ONLY FOR THE PERIOD THAT THIS EXPRESS WARRANTY IS EFFECTIVE.
SOME STATES AND JURISDICTIONS DO NOT ALLOW LIMITATIONS ON
IMPLIED WARRANTIES, SO THE ABOVE LIMITATIONS MAY NOT APPLY
TO YOU.
Tech Services: 800-822-5561
LD5 OPERATORS MANUAL
PAGE 13
© Bosch Automotive Service Solutions Inc. / Robinair / October 2020

NOTES
LD5 OPERATORS MANUAL
PAGE 14
© Bosch Automotive Service Solutions Inc. / Robinair / October 2020

NOTES
LD5 OPERATORS MANUAL
PAGE 15
© Bosch Automotive Service Solutions Inc. / Robinair / October 2020

655 Eisenhower Drive
Owatonna, MN 55060 USA
Technical Services: 1-800-822-5561
Fax: 1-866-259-1241
Customer Service: 1-800-533-6127
Fax: 1-800-322-2890
www.robinair.com
581641 REV F
© Bosch Automotive Service Solutions Inc.