
Instruction Manual
Manual de instrucciones
10-in-1
6qt Electric Multi-Cooker
Olla eléctrica multiuso
10 en 1 de 6 cuartos

The kitchen is my family’s happy
place. It’s where we cook and eat
and bake and laugh and share our
most beautiful moments together.
That’s what inspired the creation
of Beautiful, my new collection
of easy-to-use kitchenware that
you’ll want to keep out on your
kitchen counter. So whether
your kitchen has flour all over
the place from a kid's baking
session or you’re throwing an adult
dinner party, I hope every step will
be simple, delicious and beautiful!
www.beautifulbydrew.com

Section 1: Safety
Important Safeguards
............................................ 4-5
Additional Important Safeguards ................................. 6-7
Notes on the Plug ................................................ 8
Notes on the Cord ................................................ 8
Plasticizer Warning ............................................... 8
Electric Power .................................................... 8
Section 2: Instructions
Getting To Know Your 10-in-1 6qt Electric Multi-Cooker ........... 10
Touch-Activated Display Control Panel ............................ 11
Before Using for the First Time .................................. 12
Operation ........................................................ 12
Multi-Cooker Cycle Temp/Time Chart ............................... 14
USDA Cooking Guidelines.......................................... 14
7 Beautiful Multi-Cooker Functions ............................... 15
Sear / Sauté / Shallow Fry ...................................... 15
Slow Cook ....................................................... 16
Braise ........................................................... 17
Simmer .......................................................... 18
Steam ............................................................ 18
Rice ............................................................. 20
Keep Warm / Buffet Service ...................................... 22
User Maintenance Instructions .................................... 23
Non-Stick Aluminum Cooking Pan Care ............................. 23
Cleaning Instructions ............................................ 24
Storing Instructions ............................................. 24
Warranty ...................................................... 25-26
Table of Contents

Índice
Sección 1: Seguridad
Medidas importantes de seguridad
............................. 28-30
Medidas importantes de seguridad adicionales .................. 31-32
Notas sobre el enchufe .......................................... 32
Notas sobre el cable ............................................ 33
Advertencia sobre el acabado .................................... 33
Alimentación eléctrica ........................................... 33
Sección 2: Instrucciones
Conozca su olla eléctrica multiuso 10 en 1 de 6 cuartos ......... 35
Panel de control de pantalla de activación táctil ................ 36
Antes del primer uso ............................................ 37
Funcionamiento ................................................... 38
Tabla de temperaturas/tiempos de ciclo de la olla multiuso ....... 39
Pautas de cocina del USDA ....................................... 40
7 funciones de la olla multiuso Beautiful ........................ 40
Sellar / Saltear / Fritado supercial ............................ 40
Cocción lenta .................................................... 42
Asar ............................................................. 43
Fuego lento ...................................................... 44
Vapor ............................................................ 44
Arroz ............................................................ 46
Mantener caliente / Servicio bufé ................................ 49
Instrucciones de mantenimiento para el usuario ................... 50
Cuidado de la olla de cocción de aluminio antiadherente ......... 50
Instrucciones de cuidado y limpieza .............................. 50
Instrucciones de almacenamiento .................................. 51
Garantía ...................................................... 52-53
Section 1
Safety
1

4
IMPORTANT SAFEGUARDS
When using electrical appliances, basic safety precautions
should always be followed including the following:
1. READ ALL INSTRUCTIONS.
2. Read all instructions before using.
3. Do not touch hot surfaces. Use potholders when removing
lid or handling hot base handles or hot containers.
4. To protect against electrical shock do not immerse
cord, plugs, or appliance in water or other liquid.
5. This appliance is not intended for use by persons
(including children) with reduced physical, sensory
or mental capabilities, or lack of experience and
knowledge, unless they have been given supervision or
instruction concerning use of the appliance by a person
responsible for their safety.
6. Close supervision is necessary when any appliance is
used by or near children. Children should be supervised
to ensure they do not play with the appliance.
7. This Electric Multi-Cooker is intended for countertop
use only.
WARNING: Spilled food can cause serious burns. Keep
appliance and cord away from children. Never drape cord
over edge of counter. Never use outlet below counter and
never use with an extension cord.
8. Unplug from outlet when not in use and before cleaning.
Allow to cool before putting on or taking off parts.

5
9. Do not operate any appliance with a damaged cord or
plug or after the appliance malfunctions, or has been
damaged in any manner. Contact Consumer Service.
NOTE: DO NOT ATTEMPT TO REPAIR THE UNIT YOURSELF. THIS
WILL VOID THE WARRANTY.
10. The use of accessory attachments not recommended by the
appliance manufacturer may cause injuries.
11. Do not use outdoors.
12. Do not let cord hang over edge of table or counter, or
touch hot surfaces.
13. Do not place on or near a hot gas or electric burner, or
in a heated oven.
14. Extreme caution must be used when moving an appliance
containing hot oil or other hot liquids.
CAUTION: To protect against damage or electric shock, do
not cook in the Electric Multi-Cooker base unit. Cook only
in the cooking pan provided.
15. To disconnect, press , then remove plug from wall outlet.
16. Do not use appliance for other than intended use.
17. Do not use it for deep frying foods.
18. Intended for countertop use only.
WARNING: Spilled food can cause serious burns. Keep
appliance and cord away from children.Never drape cord
over edge of counter, never use outlet below counter, and
never use with an extension cord.

6
FOR HOUSEHOLD
USE ONLY
SAVE THESE
INSTRUCTIONS
ADDITIONAL IMPORTANT
SAFEGUARDS
CAUTION HOT SURFACES: This appliance generates heat and
escaping steam during use. Avoid placing bare hands or face
over the aluminum lid’s steam hole. Proper precautions
must be taken to prevent the risk of burns, res or other
injury to persons or damage to property.
LID CAUTION: To prevent personal injury or steam burns due
to hot water condensation inside the lid, when replacing
the lid, ALWAYS turn the steam hole to the back. ALWAYS
wear protective oven mitts when lifting the hot lid.
ESCAPING STEAM IS HOT! Be careful when removing or lifting
lid. Hot water condensation may be created under the lid.
ALWAYS HANDLE WITH CARE. Always tilt the lid away from
hands and face.

7
1. All users of this appliance must read and understand
this Instruction Manual before operating or cleaning
this appliance.
2. If this appliance falls or accidentally becomes
immersed in water, unplug it from the wall outlet
immediately. Do not reach into the water!
3. When using this appliance, provide adequate air space
above and on all sides for air circulation. Do not
operate this appliance while it is touching or near
curtains, wall coverings, clothing, dishtowels or other
ammable materials.
4. Do not leave this appliance unattended during use.
5. If this appliance begins to malfunction during use,
press , then immediately unplug the cord. Do not use
or attempt to repair a malfunctioning appliance!
6. The cord to this appliance should be plugged into a
120V AC electrical wall outlet only.
7. Do not use this appliance in an unstable position.
8. Sear and saute in the cooking pan. The cooking pan is
safe to use on the stovetop or may be used in the oven
with temperatures up to 400°F.

8
NOTES ON THE PLUG
This appliance has a polarized plug (one blade is wider
than the other). To reduce the risk of electric shock,
this plug will t in a polarized outlet only one way.
If the plug does not t fully into the outlet, reverse
the plug. If it still does not t, contact a qualied
electrician. Do not modify the plug in any way.
NOTES ON THE CORD
The provided short power-supply cord should be used to
reduce the risk resulting from becoming entangled in or
tripping over a longer cord. Do not use an extension cord
with this product.
PLASTICIZER WARNING
CAUTION: To prevent plasticizers from migrating to the
nish of the counter top or table top or other furniture,
place non-plastic coasters or place mats between the
appliance and the nish of the counter top or table top.
Failure to do so may cause the nish to darken; permanent
blemishes may occur, or stains can appear.
ELECTRIC POWER
If the electrical circuit is overloaded with other appliances,
your appliance may not operate properly. It should be operated
on a separate electrical circuit from other appliances.

Section 2
Instructions
2
10
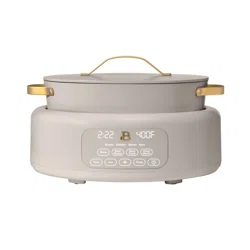
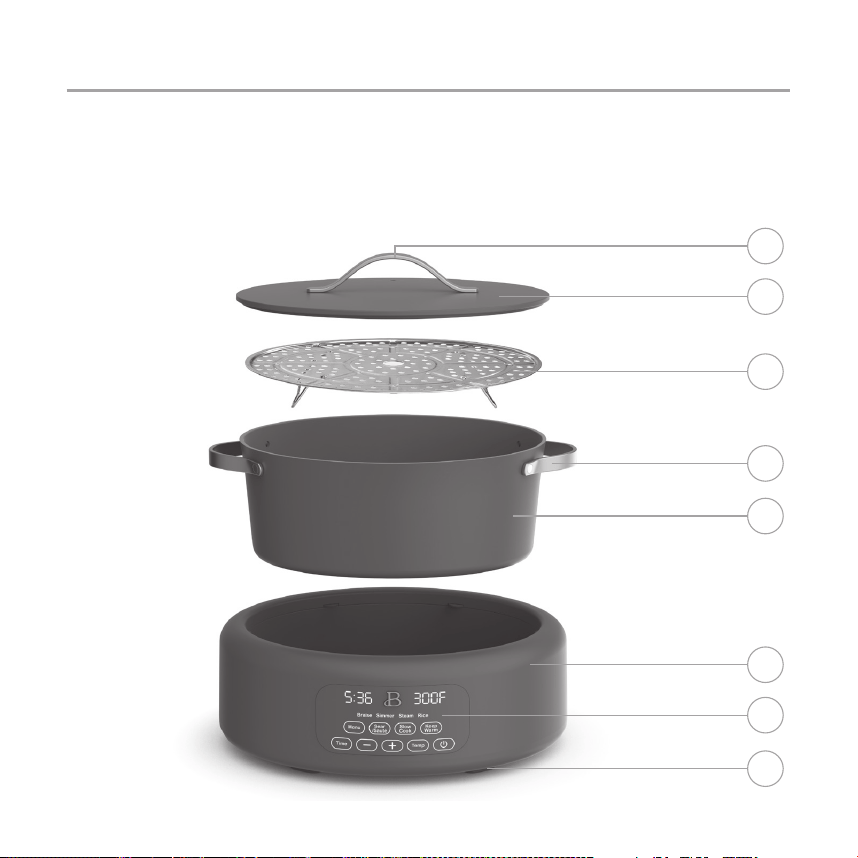
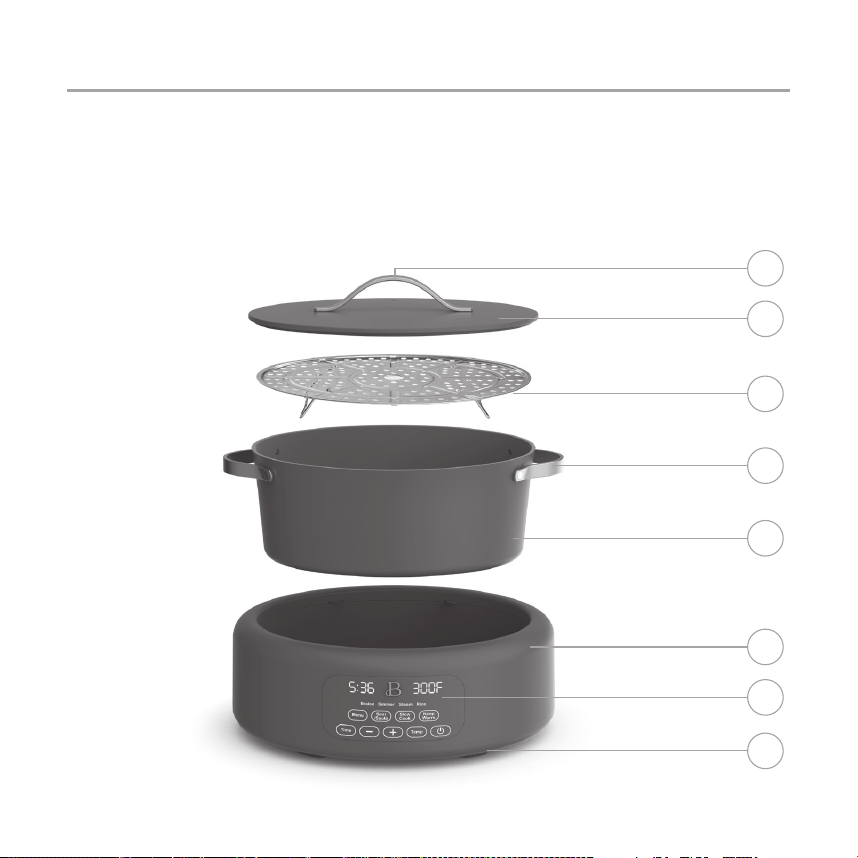
10-in-1 6qt Electric Multi-Cooker
Product may vary slightly from illustration.
1
2
4
6
5
3
7
8
1.Lid Handle
2.Aluminum Lid with Steam Hole
3.Steam Tray with Feet
4.Cooking Pan Handles
5. Oven-Safe, Non-Stick Cooking Pan
6.Base Unit
7.Control Panel
8.Non-Skid Feet
9.Polarized Plug (not shown)
11
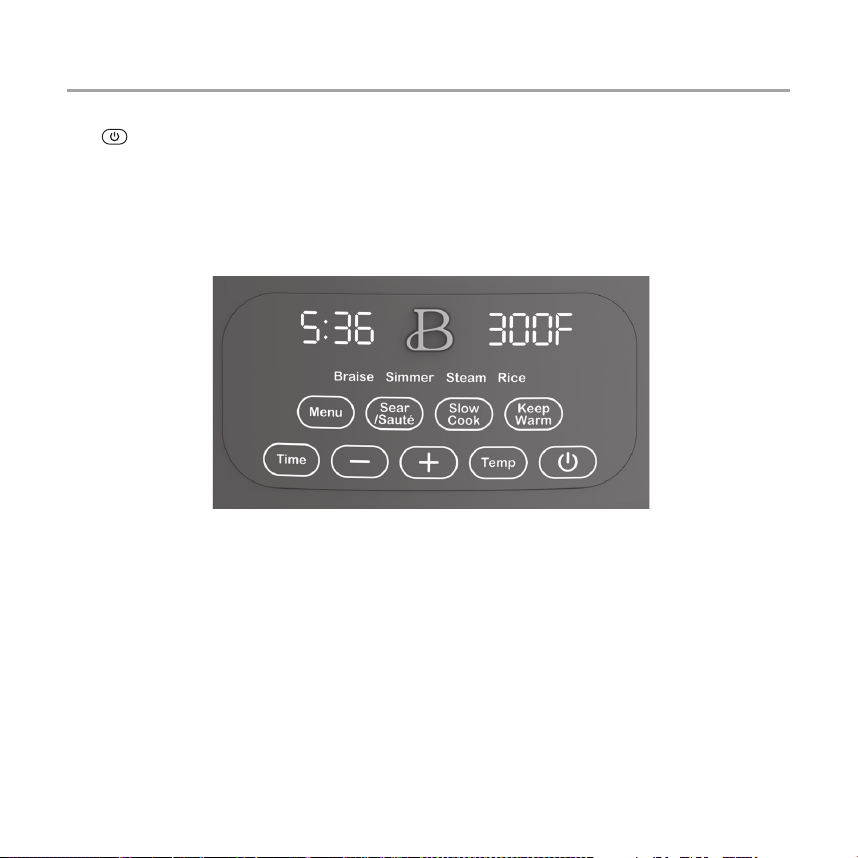
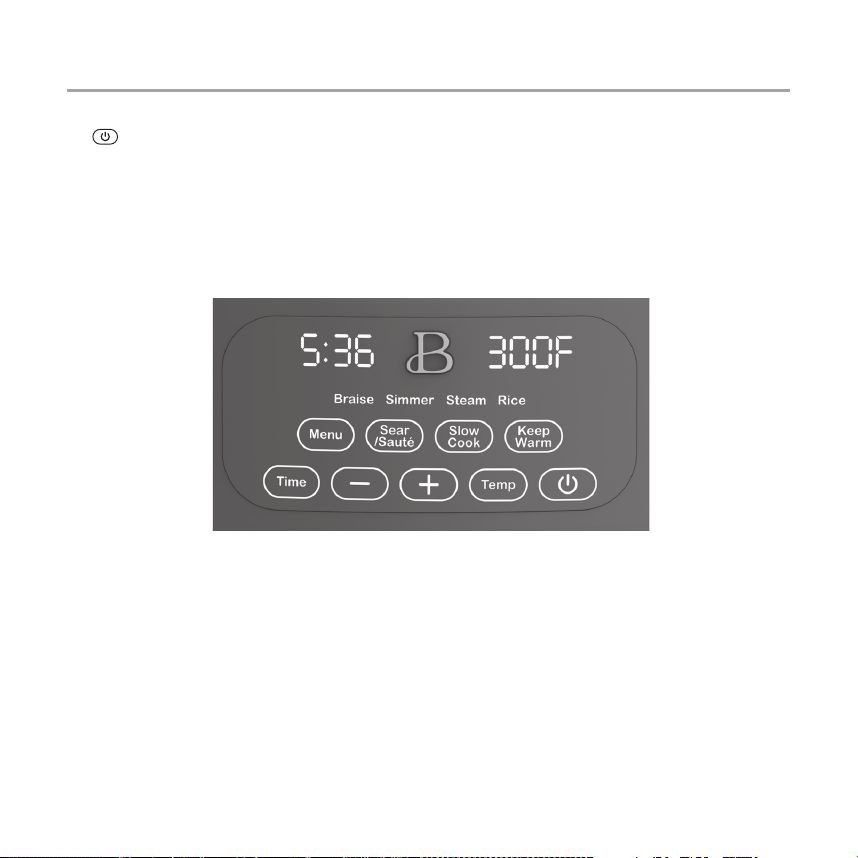
Touch-Activated Display Control Panel
A screen that only shows up when you need it.
The
illuminates when active and vanishes when not in use.
1. Choose from 7 cooking functions: SEAR/SAUTE, SLOW COOK, BRAISE, SIMMER,
STEAM, RICE, KEEP WARM.
2. TIME and TEMP are automatically programmed, but may be changed. See the
Multi-Cooker Cycle Temp/Time Chart for default and variable TIMES and TEMPS.

12
Before Using for the First Time
1. Carefully unpack your Multi-Cooker and remove all packaging materials.
2. Wash and rinse the cooking pan, lid, and steaming tray in warm, soapy
water. Dry thoroughly and replace inside the base unit. Wipe the base
unit with a clean, dry cloth.
3. Place the base unit on a sturdy, clean, at working surface.
4. It is necessary to operate the Multi-Cooker one time before adding food
to the cooking pan. Pour 4 cups of water into the cooking pan and place
it inside the base unit. Cover with the lid.
5. Plug cord into a 120V AC outlet. A tone will sound. The button will
illuminate and then pulse slowly on and off.
6. Press A tone will sound. MENU, SEAR/SAUTE, SLOW COOK and KEEP WARM
buttons illuminate.
7. Press SEAR/SAUTE then TEMP. Press + to increase TEMP to 400°F.
8. Press . The Multi-Cooker will display PrE (preheat) until temperature
is reached. A tone will sound. TIME will begin to count down.
NOTE: You will notice a slight odor; this is normal and should quickly disappear.
9. When TIME expires (00:00), 3 tones will sound. COOL will appear as the
Multi-Cooker counts down from 03:00 minutes. When TIME expires (00:00),
the Multi-Cooker will turn OFF automatically.
10. Wearing oven mitts, grasp the lid handle carefully and remove the lid.
Grasp the cooking pot lid handles carefully to lift and remove the cooking
pan from the base unit. Pour out the hot water from the cooking pan.
11. Rinse cooking pan, dry thoroughly and replace inside the base unit.
Operation
IMPORTANT! To preserve the cooking pan’s non-stick coating, use nylon, plastic,
wooden or rubber utensils. NEVER cut food on the cooking pan’s surface.
NOTE: The pot is not suitable for induction.
NOTE: Browning at the bottom of the pot is normal depending on the usage.
1. Prepare recipe according to instructions.

13
2. Place food into the cooking pan and cover with lid. For best results, do
not over-ll the cooking pan. The cooking pan should be at least half-
lled. When cooking soups or stews, allow a 2-inch space between the
food and the top of the cooking pan to allow ingredients to simmer.
3. When cooking a meat and vegetable combination, place the vegetables in
the cooking pan rst. Then add the meat and other ingredients.
4. Plug cord into a 120V AC outlet. A tone will sound, the button will
illuminate and then pulse slowly on and off.
5. Press . A tone will sound. MENU, SEAR/SAUTE, SLOW COOK and KEEP WARM
buttons illuminate and remain active for 3 minutes. Press any of these
buttons to activate.
6. To enable BRAISE, SIMMER, STEAM, or RICE, press the MENU button. BRAISE
will illuminate and become active.
7. To access next functions, press the MENU button until SIMMER, STEAM, or
RICE illuminates.
8. Press TIME and then + or - to change default TIME. Press TEMP and then +
or - to change default TEMP.
9. Press to begin.
NOTE: See the Multi-Cooker Cycle Temp/Time Chart for default and variable
TEMPS and TIMES.
10. When TIME expires (00:00), 3 tones will sound. The Multi-Cooker advances
to default 02:00 hour KEEP WARM which is adjustable from 0:30 minutes to
12:00 hours.
11. When KEEP WARM TIME expires (00:00) the Multi-Cooker will turn OFF
automatically.
12. Using oven mitts, carefully remove the cooking pan from the Multi-Cooker.
Do not touch the base unit or cooking pan until completely cooled.
13. Allow the Multi-Cooker to cool completely before cleaning.
14. Unplug the Multi-Cooker when not in use.
NOTE: You can stop the working process at any time by pushing the button and
holding for 2 seconds, the units will beep 1 time then go to sleep mode.

14
Multi-Cooker Cycle Temp/Time Chart
FUNCTION DEFAULT TEMP DEFAULT TIME ADJUSTABLE
TEMP RANGE
ADJUSTABLE
TIME RANGE
Sear/Saute 350 °F 00:05 150 °F - 400 °F 00:01 - 00:30
Slow Cook
LO 06:00 - 00:30 - 12:00
HI 04:00 - 00:30 - 12:00
Braise 2 03:00 1 - 2 - 3 00:30 - 08:00
Simmer 2 00:15 1 - 2 - 3 00:05 - 01:00
Steam Non-adjustable 00:20 Non-adjustable 00:10 - 01:00
Rice 1 Non-adjustable 1 - 2 Non-adjustable
Keep Warm Non-adjustable 04:00 Non-adjustable 00:30 - 12:00
USDA Cooking Guidelines
PLEASE NOTE: The USDA recommends that meats such as beef and lamb, etc. should
be cooked to an internal temperature of 145°F/63°C. Pork should be cooked to an
internal temperature of 160°F/71°C and poultry products should be cooked to an
internal temperature of 170°F/77°C - 180°F/82°C to be sure any harmful bacteria
has been killed. When reheating meat/poultry products, they should also be
cooked to an internal temperature of 165°F/74°C.

15
7 Beautiful Multi-Cooker Functions
SEAR / SAUTÉ / SHALLOW FRY
NOTE: SEAR/SAUTE TIME is adjustable from 00:01 minute to 00:30 minutes. SEAR/
SAUTE TEMP is adjustable from 150°F to 400°F.
CAUTION: DO NOT USE COOKING SPRAYS. Cooking sprays can cause build- up and may
affect the non-stick performance of your Multi-Cooker cooking pan.
NOTE: Butter and olive oil have lower smoke points. To avoid burning, be sure to
lower the temperature.
1. When heating oil, always remove the lid. Add 1 to 3 tablespoons butter,
oil, or shortening to the cooking pan The amount of fat used will vary
according to recipe and type or amount of food to be prepared.
2. Pan searing foods creates a layer of avor and texture. Brown foods
quickly on default TEMP heat using a minimal amount of oil.
3. Sauté or pan sear food rapidly in the uncovered using a small quantity
of fat. If oil smokes, immediately press for 2 seconds and allow
Multi-Cooker to cool.
4. To shallow fry, use 1 to 2 cups of vegetable oil or peanut oil for
frying. Start cooking using default TEMP heat. Adjust as needed.
5. When TIME expires (00:00), 3 tones will sound. COOL will appear as the
Multi-Cooker counts down from 03:00 minutes. When TIME expires (00:00), the
Multi-Cooker will turn automatically to sleeping mode.
CAUTION: To prevent personal injury, wear protective oven mitts when lifting
food out of hot oil.
NOTE : You can stop the working process at any time by pushing the
button and
holding for 2 seconds, the units will beep 1 time then go to sleep mode.
BEAUTIFUL TIPS TO SHALLOW FRY IN YOUR MULTI-COOKER
• Avoid oil splatter. Make sure food is dry before frying.
• Batter coat food in our, breadcrumbs or crushed nuts for best results.
• For crispier results, allow breaded foods to rest on a wire rack at room
temperature for 20 to 30 minutes before frying so the coating has time
to set and dry.

16
• When frying breaded cheese and some breaded foods, refrigerate before frying.
• Never crowd the cooking pan. Overcrowding results in a lower oil
temperature which causes food to steam, instead of fry.
• Food is ready to turn when the bubbles dissipate.
• Use tongs or a spatula to turn fried food. Continue to fry until done to
your satisfaction.
• Always use an instant-read thermometer to check the temperature of the
food. See USDA Guidelines in this Instruction Manual.
• Drain the fried food on paper towels as soon as it comes out of the oil.
SLOW COOK
NOTE: SLOW COOK TIME is adjustable from 00:30 minutes to 12:00 hours. SLOW
COOK TEMP is adjustable from LO to HI.
1. Slow Cook is a long cooking technique utilizing low temperatures to
infuse avor and is ideal for stews, chili, long-cooking beans, soups,
sauces, or cooking tougher cuts of meat.
2. Following your favorite Slow Cook recipes, cook on LO or HI setting.
Check food periodically for desired doneness.
3. Select Slow cook mode, adjust your time and your desired cooking
temperature Lo (Low) or Hi (Hight)
4. Press the power button, cooking will begin, and time will count down.
At the completion of this cycle, when TIME expires (00:00), 3 beeps will
sound as the Multi Cooker automatically advances to Warm function for 2 hours.
NOTE: You can stop the working process at any time by pushing the
button
and holding for 2 seconds, the units will beep 1 time then go to sleep mode.
BEAUTIFUL TIPS TO SLOW COOK IN YOUR MULTI-COOKER
• Less tender, cheaper cuts of meat are better candidates for slow cooking
than more expensive varieties.
• Before Slow Cooking, pan sear fatty meats to add avor and color to slow
cooked meals.
• Whole herbs and spices avor better in slow cooking than crushed or ground.
• Foods cut into uniform pieces will cook faster and more evenly than
foods left whole such as roast or poultry.

17
• Root vegetables such as carrots, potatoes, turnips and beets require
longer cooking time than many meats. Be sure to place them on the bottom
of the cooking pan and cover them with liquid.
• Add fresh dairy products (milk, sour cream or yogurt) prior to serving.
BRAISE
NOTE: BRAISE TIME is adjustable from 00:30 minutes up to 08:00 hours. BRAISE
TEMP is adjustable from 1 LOW, 2 MEDIUM, to 3 HIGH.
1. Press the MENU button once to activate BRAISE (default). BRAISE will be
illuminated.
2. Always pan sear foods before braising. Removed seared foods from the pan.
3. Add a vegetable avor base such as sofrito (onion, garlic, tomatoes),
mirepoix (onion, carrot, celery), or the Cajun Holy Trinity (onion,
celery, green bell pepper) to the cooking pan. Add braising liquid.
Using a wooden turner, scrape up the avorful browned bits to deglaze.
Return the seared meat and juices to the cooking pan.
IMPORTANT: Add enough liquid to cover half the meat. MEAT SHOULD NOT BE
FULLY SUBMERGED.
4. Adjust your time and your desired cooking mode 1, 2 or 3.
5. Press the power button, cooking will begin, and time will count down.
6. Cover with the lid. Braise as specied in recipe, or until food is done.
Check during cooking and add more liquid as necessary.
At the completion of this cycle, when TIME expires (00:00), 3 beeps will
sound as the Multi Cooker automatically advances to Warm function for 2 hours.
IMPORTANT: DO NOT LET COOKING PAN BOIL DRY.
HINT! The cooking pan is oven-safe up to 400°F. Remove the cooking pan from
the base unit and transfer to an oven broiler for top browning.
NOTE : You can stop the working process at any time by pushing the
button and
holding for 2 seconds, the units will beep 1 time then go to sleep mode.

18
SIMMER
NOTE: SIMMER TIME is adjustable from 00:05 minutes to 00:60 minutes. SIMMER
TEMP is adjustable from 1 LOW, 2 MEDIUM, to 3 HIGH.
CAUTION: The simmer function shall be processed without lid.
1. Press the MENU button until SIMMER is illuminated.
2. Always pan sear foods before simmering. Removed seared foods from the pan.
3. Add liquid or prepare a sauce as directed in your recipe.
4. Using a wooden turner, scrape up the avorful browned bits to deglaze.
Return the seared meat and juices to the cooking pan.
5. Adjust your time and your desired cooking mode 1, 2 or 3.
6. Press the power button, cooking will begin, and time will count down.
7. Simmer food for the directed length of time or until food is done. Check
during cooking and add more liquid, as necessary.
At the completion of this cycle, when TIME expires (00:00), 3 beeps will
sound as the Multi Cooker automatically advances to Warm function for 2 hours.
HINT! The cooking pan is oven-safe up to 400°F. Remove the cooking pan from
the base unit and transfer to an oven broiler for top browning.
NOTE : You can stop the working process at any time by pushing the
button and
holding for 2 seconds, the units will beep 1 time then go to sleep mode.
STEAM
NOTE: STEAM TIME is adjustable from 00:10 minutes to 01:00 hour. STEAM TEMP
is not adjustable.
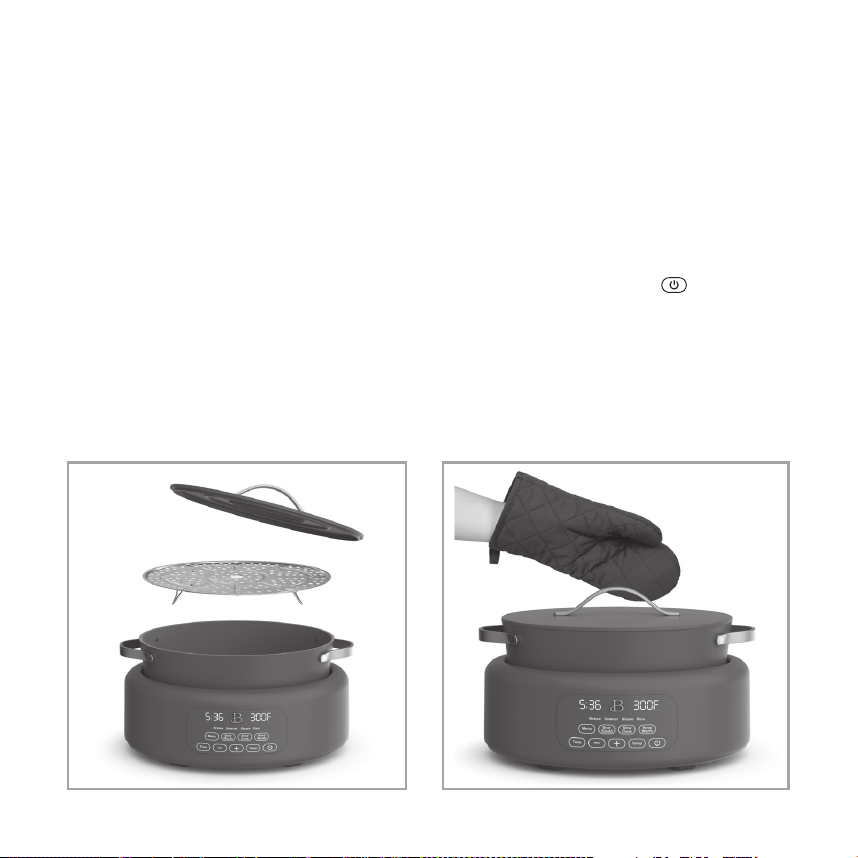
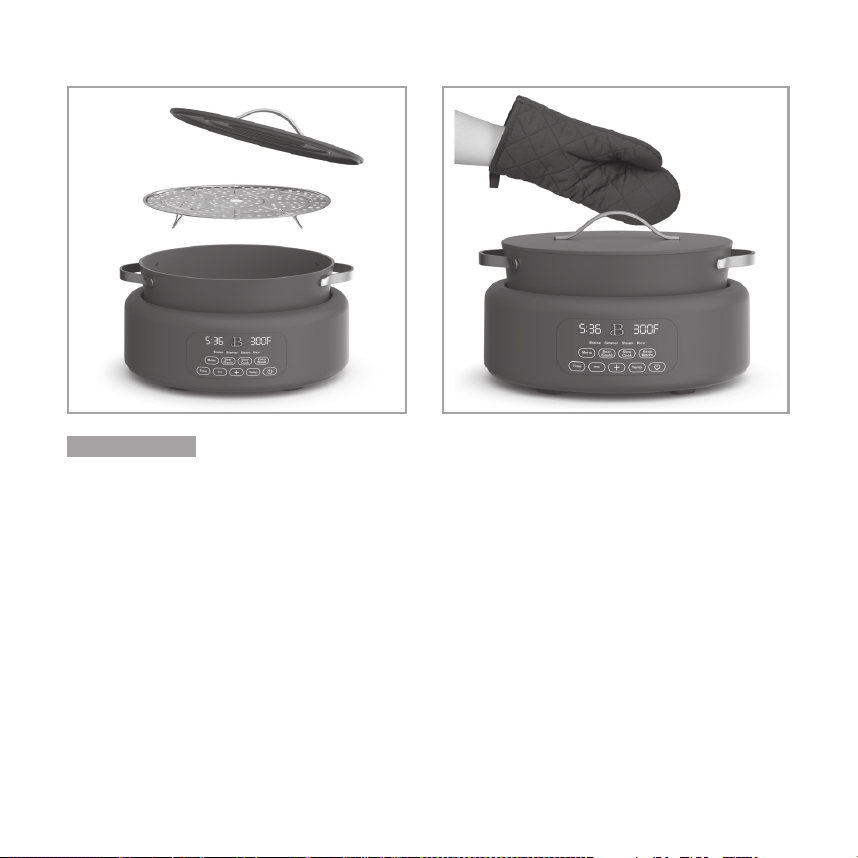
1. Unfold the feet of the steaming tray and insert into the cooking pan.
(Figure 1). Add 3 cups water.
2. Press the MENU button until STEAM is illuminated.
3. Steam fresh or frozen vegetables, greens, fresh sh and shellsh,
sausage, chicken, egg custards, buns.
4. Peel vegetables when appropriate, or scrub them well. Keep in mind that
hard vegetables such as potatoes and beets hold their shape better when
the peel is left intact.
5. Arrange food in a single layer on the steaming tray. Cover with the lid.
Steam according to the recipe.
19
6. Adjust your desired cooking time
7. Press the power button, cooking will begin, and time will count down.
At the completion of this cycle, when TIME expires (00:00), 3 beeps will
sound then go to sleep mode.
LID CAUTION: Avoid contact with the steam hole in the lid. To prevent
personal injury or steam burns due to hot water condensation inside the
lid, wear protective oven mitts when lifting the hot lid. (Figure 2).
ESCAPING STEAM IS HOT! BE CAREFUL WHEN REMOVING OR LIFTING LID. HOT WATER
CONDENSATION MAY BE CREATED UNDER THE LID. ALWAYS HANDLE WITH CARE. Always
tilt the lid away from hands and face.
NOTE : You can stop the working process at any time by pushing the
button and
holding for 2 seconds, the units will beep 1 time then go to sleep mode.
BEAUTIFUL TIPS TO STEAM IN YOUR MULTI-COOKER
• Check liquid level periodically to make sure the cooking pan is not dry.
• Liquids such as broth, wine, beer, water, as well as boil seasonings,
etc. may be added during cooking.
Figure 2Figure 1

20
RICE
NOTE: RICE TIME is not adjustable. RICE has two programs available : Program
1 for white rice and program 2 for brown rice.
1. Press the MENU button until RICE is illuminated.
2. To rinse rice pour the desired amount of raw rice into a separate
container. Rinse until the rinse water runs clear.
NOTE: Depending on the type of rice, 1 cup of raw rice makes approximately
2 cups of cooked rice. This Multi-Cooker has the capacity for up to 7 cups
of raw rice (around 14 cups cooked).
NOTE: 1 cup equals 8 Oz/ 236ml.
3. For estimated times and rice to water/cooking liquid quantities, please
refer to the RICE COOKING CHARTS that follow.
4. Place the washed rice into the cooking pan, then add the corresponding
amount of cooking liquid. Add the lid.
5. Select 1 or 2 using TEMP depending of your choice of white rice or brown rice.
6. Press .The Multi-Cooker will display a moving graphic during the
cooking stage. When the rice is done cooking, the Multi-Cooker will beep
3 times and will automatically advance to 01:00 hour KEEP WARM mode.
8. For ufer rice, allow the cooked rice sit for 10 minutes before
stirring or removing to allow the steam to nish the cooking process.
9. Carefully open the lid. Use a non-metal long-handle utensil to scoop and
mix the rice well. Allow all steam to escape.
NOTE : When cooking rice, water may spill over.
NOTE : You can stop the working process at any time by pushing the
button and
holding for 2 seconds, the units will beep 1 time then go to sleep mode.

21
WHITE RICE COOKING CHART
NOTE: Raw rice and water/liquid volume may be adjusted to taste on subsequent
rice cookings. 1 cup equals 8 Oz/ 236ml.
RAW WHITE RICE WATER CUPS TIME MINUTES APPROX. COOKED YIELD (CUPS)
1 Cup 2 25-30 2
2 Cup
3 30-35 4
3 Cup 4 35-40 6
4 Cup 5 38-43 8
5 Cup 6 40-45 10
6 Cup 7 43-48 12
7 Cup 8 45-50 14
BROWN RICE COOKING CHART
RAW BROWN RICE WATER CUPS TIME MINUTES APPROX. COOKED YIELD (CUPS)
1 Cup 2-1/4 45-50 2
2 Cup
3-1/4 48-53 4
3 Cup 4-3/4 50-55 6
4 Cup 6-1/4 60-70 8
5 Cup 7-3/4 70-75 10
6 Cup 9-1/4 75-80 12
7 Cup 10-3/4 80-90 14

22
BEAUTIFUL TIPS TO COOK RICE IN YOUR MULTI-COOKER
• When cooking wild rice, add 25% to 50% more water to cook thoroughly.
Follow package instructions.
• If your rice is dry or hard/chewy when the Multi-Cooker advances to KEEP
WARM, add 1/2 to 1 cup of water and stir through. The additional water and
cooking time will soften the rice.
• When the Multi-Cooker advances to KEEP WARM, open the lid and stir the
rice to check the consistency. If cooked rice is soggy, close the lid and
continue to KEEP WARM for 10 to 30 minutes as needed. Remove the lid and
stir periodically to release excess moisture.
• When a recipe calls for salt, use kosher salt. It has no impurities or
additives and dissolves easily. Increase the recipe quantity to 1-1/2 times
more kosher salt than table salt.
• Stocks, broths, and bullion can be used in place of water to add avor and
improve texture when cooking rice.
• Do not leave cooked rice in the Multi-Cooker on KEEP WARM for more than
2 hours.
KEEP WARM (BUFFET SERVICE)
NOTE: KEEP WARM TIME is adjustable from 00:30 minutes to 12:00 hours. KEEP
WARM TEMP is not adjustable.
1. Press TIME and then + or - to adjust while KEEP WARM is active.
2. Your 6 Qt. Multi-Cooker is an elegant addition to any table. Add food at
serving temperature to the cooking pan, then use KEEP WARM function to serve.
3. Press TIME and then + or - to increase or decrease TIME up to 12:00 hours.
4. Stir food occasionally.
5. When TIME expires (00:00), 3 tones will sound. The Multi-Cooker will
turn OFF automatically.
NOTE : You can stop the working process at any time by pushing the
button and
holding for 2 seconds, the units will beep 1 time then go to sleep mode.

23
User Maintenance Instructions
This appliance requires little maintenance. It contains no user serviceable
parts. Do not try to repair it yourself. Any servicing requiring disassembly
other than cleaning, must be performed by a qualied appliance repair technician.
1. The cooking pan is oven-safe up to 400ºF. Remove the cooking pan from
the base unit and transfer to an oven broiler for top browning.
Non-Stick Aluminum Cooking Pan Care
WARNING: ALWAYS USE POT HOLDERS OR OVEN MITTS WHEN HANDLING HOT COOKING PAN
AND LID.
• DO NOT place hot cooking pan on counter top. Use a protective trivet.
• DO NOT use cooking pan to pop corn, caramelize sugar, or make candy.
• DO NOT use abrasive cleaners, scouring pads, or any object that will
scratch the cookware or base unit.
• DO NOT use or repair any base unit, cooking pan or lid that is chipped,
cracked, or broken.
• NEVER heat the cooking pan when it is empty as this may damage the non-
stick coating.
• The non-stick cooking pan may become black on the external bottom when it
is used in dishwasher. We recommend to wash the non-stick cooking pan by
hand for better results.

24
Cleaning Instructions
CAUTION: NEVER IMMERSE BASE UNIT OR CORD IN WATER OR OTHER LIQUID.
1. Always unplug and allow the Electric Multi-Cooker to cool completely
before cleaning.
2. The non-stick cooking pan, lid and steam tray may be washed in the dishwasher.
To clean by hand, wash in warm, soapy water. Rinse and dry thoroughly.
NOTE: The non-stick cooking pan may become black on the external bottom when
it is used in dishwasher. We recommend to wash the non-stick cooking pan by
hand for better results.
3. If food sticks to the cooking pan, ll with warm soapy water and allow
to soak before cleaning . A paste of baking soda may be used with a
plastic scouring pad.
4. To remove water spots or mineral deposits, wipe cooking pan with
distilled white vinegar. For difcult stains, pour a small amount into
the cooking pan and allow to soak.
5. Wipe interior and exterior of the base unit with a soft, slightly damp
cloth or sponge. Never use abrasive cleansers or scouring pads to clean
the base unit, as they may damage the surfaces.
Storing Instructions
1. Never store Electric Multi-Cooker while it is hot or wet. Make sure all
parts are clean and dry before storing.
2. Store appliance in its box or in a clean, dry place.
3. To store, assemble with cooking pan and steam tray inside the base unit.
Add the lid.
4. Never wrap cord tightly around the appliance; keep it loosely coiled.

25
Limited Two-Year Warranty
Sensio Inc. dba Made by Gather™
hereby warrants that for a period
of TWO YEARS from the date of
purchase, this product will be free
from mechanical defects in material
and workmanship, and for 90 days in
respect to non-mechanical parts. At
its sole discretion, Sensio Inc. dba
Made by Gather™ will either repair
or replace the product found to be
defective, or issue a refund on the
product during the warranty period.
The warranty is only valid for
the original retail purchaser from
the date of initial retail purchase
and is not transferable.
Keep the original sales receipt,
as proof of purchase isrequired
to obtain warranty validation.
Retail stores selling this product
do not have the right to alter,
modify, or in any way revise the
terms and conditions of the warranty.
Exclusions:
The warranty does not cover normal
wear of parts or damage resulting
from any of thefollowing: negligent
use of the product, use of improper
voltage or current, improper routine
maintenance, use contrary to the
operating instructions, disassembly,
repair, or alteration by anyone
other than qualied Sensio Inc.
dba Made by Gather™ personnel.
Also, the warranty does not cover
Acts of God such as re, oods,
hurricanes, or tornadoes.
Sensio Inc. dba Made by Gather™ shall
not be liable for any incidental or
consequential damages caused by the
breach of any express or implied
warranty. Apart from the extent
prohibited by applicable law, any
implied warranty of merchantability
or tness for a particular purpose
is limited in time to the duration
of the warranty. Some states,
provinces or jurisdictions do not
allow the exclusion or limitation
of incidental or consequential
damages, or limitations on how
long an implied warranty lasts,
and therefore, the above exclusions
or limitations may not apply to you.
The warranty covers specic legal
rights which may vary by state,
province and/or jurisdiction.

26
How To Obtain Warranty Service
You must contact Customer Service at
our toll-free number: 1-877-775-3564.
A Customer Service Representative
will attempt to resolve warranty
issues over thephone. If the
Customer Service Representative
is unable to resolve the problem,
you will be provided with a case
number and asked to return the
product to Sensio Inc. dba
Made by Gather™ Attach a tag to the
product that includes: your name,
address, daytime contact telephone
number, case number, and description
of the problem.
Also, include a copy of the original
sales receipt. Carefully package
the tagged product with the sales
receipt, and send it (with shipping
and insurance prepaid) to SENSIO
Inc.’s address. Sensio Inc.
dba Made by Gather™ shall bear
no responsibility or liability
for the returned product while
in transit to Sensio Inc.
dba Made by Gather™ Customer
Service Center.

1
Sección 1
Seguridad

28
MEDIDAS IMPORTANTES
DE SEGURIDAD
Al usar electrodomésticos, se deben tener en cuenta
precauciones de seguridad básicas, como las siguientes:
1. LEA TODAS LAS INSTRUCCIONES.
2. Lea todas las instrucciones antes de usar.
3. No toque supercies calientes. Use agarraderas cuando
retire la tapa o manipule asas de base calientes o
recipientes calientes.
4. Para evitar una descarga eléctrica, no sumerja el cable,
los enchufes ni el aparato en agua u otro líquido.
5. Este aparato no está concebido para ser utilizado
por personas (incluidos niños) con capacidades
físicas, sensoriales o mentales reducidas; o con
falta de experiencia y conocimiento, a menos que sean
supervisados o reciban instrucciones relativas al uso
del aparato por una persona responsable de su seguridad.
6. Es necesaria una estrecha supervisión cuando los niños
utilizan un aparato o si este se utiliza cerca de ellos.
Se debe supervisar a los niños para asegurarse de que
no jueguen con el aparato.
7. Esta olla eléctrica multiuso está diseñada solo para
ser usada sobre mesada.
ADVERTENCIA: Los alimentos que se derraman pueden provocar
quemaduras graves. Mantenga el aparato y el cable fuera del

29
alcance de los niños. Nunca deje colgar el cable sobre el
borde de la mesada. Nunca use un tomacorriente debajo de la
mesada y nunca use un cable de extensión.
8. Desenchufe el aparato del tomacorriente cuando no lo
utilice y antes de limpiarlo. Deje enfriar antes de
poner o quitar piezas.
9. No utilice un aparato con un cable o enchufe dañados,
después de una avería o si se dañó de cualquier manera.
Póngase en contacto con Servicio de Atención al Cliente.
NOTA: NO INTENTE REPARAR LA UNIDAD POR SU CUENTA. ESTO
ANULARÁ LA GARANTÍA.
10. El uso de accesorios que no cuenten con la
recomendación del fabricante del aparato puede
ocasionar lesiones.
11. No utilice en exteriores.
12. No deje que el cable cuelgue sobre el borde de una mesa
o un mostrador, ni que toque supercies calientes.
13. No lo coloque sobre un hornillo eléctrico o a gas
caliente o cerca de uno, ni en un horno caliente.
14. Debe tener mucho cuidado al mover cualquier aparato que
contenga aceite caliente u otros líquidos calientes.
PRECAUCIÓN: Para protegerse contra daños o descargas
eléctricas, no cocine en la unidad base de la olla eléctrica
multiuso. Cocine solo en la olla de cocción suministrada.
15. Para desconectar, presione , luego saque el enchufe
del tomacorriente.
16. No utilice el aparato para un uso que no sea el previsto.

30
17. No lo use para freír alimentos en abundante aceite.
18. Sólo para usar en encimeras.
ADVERTENCIA: Los alimentos que se derraman pueden provocar
quemaduras graves. Mantenga el aparato y el cable fuera del
alcance de los niños. Nunca coloque el cable sobre el borde de
la encimera, nunca use el tomacorriente que está por debajo de
la encimera y nunca lo use con un cable de extensión.
SOLO PARA USO
DOMÉSTICO
GUARDE ESTAS
INSTRUCCIONES

31
MEDIDAS DE SEGURIDAD
IMPORTANTES
ADICIONALES
PRECAUCIÓN, SUPERFICIES CALIENTES: Este aparato genera
calor y vapor durante el uso. Evite colocar las manos
descubiertas o el rostro sobre el oricio de vapor en
la tapa de aluminio. Se deben tomar las precauciones
adecuadas para prevenir el riesgo de quemaduras, incendios
u otros daños personales o materiales.
PRECAUCIÓN CON LA TAPA: Para evitar lesiones personales o
quemaduras de vapor debido a condensación de agua caliente
dentro de la tapa, cuando vuelva a colocar la tapa, SIEMPRE
coloque el oricio de vapor hacia atrás. Use SIEMPRE
guantes de cocina protectores cuando vaya a levantar la
tapa caliente. ¡EL VAPOR QUE ESCAPA ESTÁ CALIENTE! Tenga
cuidado al quitar o levantar la tapa. Se puede crear
condensación de agua caliente debajo de la tapa. MANIPULAR
SIEMPRE CON CUIDADO. Incline siempre la tapa en dirección
opuesta a las manos y el rostro.
1. Todos los usuarios de este aparato deben leer y
comprender el manual de instrucciones antes de utilizar
o limpiar el aparato.
2. Si este aparato cae o por accidente se sumerge en agua,
desenchúfelo de inmediato del tomacorriente. ¡No toque
el agua!

32
3. Proporcione un espacio adecuado por encima y alrededor
del aparato para la circulación del aire cuando lo está
utilizando. No opere este aparato mientras esté en contacto
con cortinas, revestimientos de paredes, ropa, paños de
cocina u otros materiales inamables, ni cerca de ellos.
4. No deje este aparato sin supervisión mientras esté en uso.
5. Si este aparato comienza a fallar durante el uso,
presione y desenchufe de inmediato el cable. ¡No use ni
intente reparar un aparato averiado!
6. El cable de este aparato se debe enchufar solamente a
un tomacorriente de 120 V de CA.
7. No utilice este aparato en una posición inestable.
8. Selle y saltee en la olla de cocción. La olla de cocción
es apta para usar en la estufa o puede usarse en el
horno con temperaturas de hasta 400 °F
NOTAS SOBRE EL ENCHUFE
Este aparato posee un enchufe polarizado (una clavija es
más ancha que la otra). Para reducir el riesgo de descarga
eléctrica, este enchufe encajará en un tomacorriente
polarizado en un solo sentido. Si el enchufe no entra
completamente en el tomacorriente, gire el enchufe. Si
aun así no encaja, contacte a un técnico electricista
calicado. No modique el enchufe de ninguna manera.

33
NOTAS SOBRE EL CABLE
Se debe utilizar el cable de alimentación corto
suministrado para reducir el riesgo de enredarse o
tropezarse con un cable largo. No utilice un cable de
extensión con este producto.
ADVERTENCIA SOBRE EL ACABADO
PRECAUCIÓN: Para evitar que el acabado del mostrador o
de la mesa u otros muebles se dañe, coloque posavasos o
manteles individuales que no sean de plástico entre el
electrodoméstico y el acabado del mostrador o de la mesa.
No hacerlo puede provocar el oscurecimiento del acabado,
generar desperfectos permanentes u ocasionar la aparición
de manchas.
ALIMENTACIÓN ELÉCTRICA
Si el circuito eléctrico está sobrecargado con otros
aparatos, este aparato podría no funcionar correctamente.
Debe utilizarse en un circuito eléctrico diferente al de
otros electrodomésticos.

2
Sección 2
Instrucciones
35
2
Olla eléctrica multiuso 10 en 1 de 6 cuartos
El producto puede diferir ligeramente del que aparece en la ilustración.
1
2
4
6
5
3
7
8
1.Asa de la tapa
2. Tapa de aluminio con
oricio de vapor
3.Bandeja de vapor con patas
4.Asas de la olla de cocción
5. Olla de cocción antiadherente
apta para el horno
6.Unidad base
7.Panel de control
8.Patas antideslizantes
9. Enchufe polarizado
(no se muestra)
36
Panel de control de pantalla de activación táctil
Una pantalla que solo aparece cuando la necesita.
El
se enciende cuando está activo y desaparece cuando no se usa.
1. Elija una de las 7 funciones de cocción: SEAR/SAUTE (Sellar/Saltear), SLOW
COOK (Cocción lenta), BRAISE (Asar), SIMMER (Fuego lento), STEAM (Vapor),
RICE (Arroz), KEEP WARM (Mantener caliente).
2. El tiempo y la temperatura se programan automáticamente pero se pueden
cambiar. Consulte la tabla de temperaturas/tiempos de ciclo de la olla
multiuso para conocer tiempo y temperaturas predeterminados y variables.

37
Antes del primer uso
1. Saque con cuidado la olla multiuso del empaque y retire todo el material
de embalaje.
2. Lave y enjuague la olla de cocción, la tapa y la bandeja de vapor con
agua tibia y jabón. Seque bien y vuelva a colocarla dentro de la unidad
base. Limpie la unidad base con un paño seco y limpio.
3. Coloque la base del Sartén extensible 5 en 1 sobre una supercie plana,
limpia y resistente.
4. Es necesario hacer funcionar la olla multiuso una vez antes de cocinar
alimentos en la olla de cocción. Vierta 4 tazas de agua en la olla de
cocción y colóquela dentro de la unidad base. Cubra con la tapa.
5. Enchufe el cable en un tomacorriente de 120 V CA. Se emitirá un sonido.
El botón se iluminará y luego pulsará lentamente.
6. Presione . Se emitirá un sonido. Los botones MENU, SEAR/SAUTE, SLOW
COOK y KEEP WARM se iluminarán.
7. Presione SEAR/SAUTE y luego TEMP. Presione + para aumentar la temperatura
a 400 °F.
8. Presione . La olla multiuso mostrará PrE (precalentamiento) hasta
alcanzar la temperatura. Se emitirá un sonido. El tiempo comenzará la
cuenta regresiva.
NOTA: Notará un ligero olor; esto es normal y debería desaparecer rápidamente.
9. Cuando termine el tiempo (00:00), sonarán 3 tonos. Aparecerá COOL
mientras la olla multiuso hace la cuenta regresiva de 03:00 minutos.
Cuando termine el tiempo (00:00), la olla multiuso se APAGARÁ
automáticamente.
10. Con guantes para horno, tome la tapa con cuidado y quítela. Tome las
asas de la tapa de la olla de cocción para levantar y quitar la olla de
cocción de la unidad base. Vierta el agua caliente de la olla de cocción.
11. Enjuague la olla de cocción, séquela completamente y vuelva a colocarla
dentro de la unidad base.

38
Funcionamiento
¡IMPORTANTE! Para preservar el revestimiento antiadherente de la olla de
cocción, utilice utensilios de nailon, plástico, madera o caucho. NUNCA corte
alimentos sobre la supercie de la olla de cocción.
NOTA: La olla no es apta para cocinas por inducción.
NOTA: El dorado en la parte inferior de la olla es normal según el uso.
1. Prepare la receta según las instrucciones.
2. Coloque el alimento en la olla de cocción y cubra con la tapa. Para
obtener mejores resultados, no llene de más la olla de cocción. La olla
de cocción debe estar al menos llena hasta la mitad. Cuando cocine
sopas o guisos, deje un espacio de 2 pulgadas entre la comida y la
parte superior de la olla de cocción para permitir que los ingredientes
hiervan a fuego lento.
3. Cuando cocine una combinación de carne y verduras, coloque primero
las verduras en la olla de cocción. Luego agregue la carne y los
otros ingredientes.
4. Enchufe el cable en un tomacorriente de 120 V CA. Sonará un tono, el
botón se iluminará y luego pulsará lentamente.
5. Presionez . Se emitirá un sonido. Los botones MENU, SEAR/SAUTE, SLOW
COOK y KEEP WARM se iluminarán y permanecerán activos por 3 minutos.
Presione cualquiera de estos botones para activar su función.
6. Para habilitar las funciones BRAISE (Asar), SIMMER (Fuego lento), STEAM
(Vapor) o RICE (Arroz), presione el botón MENU. BRAISE se iluminará y
permanecerá activo.
7. Para acceder a las siguientes funciones, presione el botón MENU hasta
que se iluminen SIMMER, STEAM o RICE.
8. Presione TIME y luego presione + o - para cambiar el tiempo
predeterminado. Presione TEMP y luego presione + o - para cambiar la
temperatura predeterminada.
9. Presione para comenzar.
NOTA: Consulte la tabla de temperaturas/tiempos de ciclo de la olla multiuso
para conocer tiempo y temperaturas predeterminados y variables.

39
10. Cuando termine el tiempo (00:00), sonarán 3 tonos. La olla multiuso
pasará a la función KEEP WARM (mantener caliente) con el tiempo
predeterminado de 02:00, el cual puede ajustarse desde 0:30 minutos
hasta 12:00 horas.
11. Cuando pase el tiempo (00:00) de KEEP WARM la olla multiuso se APAGARÁ
automáticamente.
12. Usando guantes para horno, retire con cuidado la olla de cocción de la
olla multiuso. No toque la unidad base ni la olla de cocción hasta que
se hayan enfriado por completo.
13. Deje que se enfríe la olla multiuso por completo antes de limpiarla.
14. Desenchufe la olla multiuso cuando no esté en uso.
NOTA: Puede detener el proceso de trabajo en cualquier momento manteniendo
presionado el botón por 2 segundos; las unidades emitirá 1 tono y, luego,
ingresarán al modo de reposo.
Tabla de temperaturas/tiempos de ciclo de la olla multiuso
FUNCIÓN
TEMPERATURA
PREDETERMINADA
HORA
PREDETERMINADA
RANGO DE
TEMPERATURA
AJUSTABLE
INTERVALO
DE TIEMPO
AJUSTABLE
Sellar/
Saltear
350 °F 00:05 150 °F - 400 °F 00:01 - 00:30
Cocción
lenta
LO 06:00 - 00:30 - 12:00
HI 04:00 - 00:30 - 12:00
Asar 2 03:00 1 - 2 - 3 00:30 - 08:00
Fuego lento 2 00:15 1 - 2 - 3 00:05 - 01:00
Vapor No ajustable 00:20 No ajustable 00:10 - 01:00
Arroz 1 No ajustable 1 - 2 Non-adjustable
Mantener
caliente
No ajustable 04:00 No ajustable 00:30 - 12:00

40
Pautas de cocina del USDA
TENGA EN CUENTA: El USDA recomienda que las carnes como res y cordero, etc. se
cocinen a una temperatura interna de 145 °F/63 °C. El cerdo se debe cocinar
a una temperatura interna de 160 °F/71 °C y las aves se deben cocinar a una
temperatura interna de 170 °F/77 °C - 180 °F/82 °C para garantizar que se mueran
las bacterias perjudiciales. Al recalentar productos cárnicos/avícolas, también
deben cocinarse a una temperatura interna de 165 °F/74 °C.
7 funciones de la olla multiuso Beautiful
SEAR (Asar) / SAUTÉ (Saltear) / SHALLOW FRY (Freído supercial)
NOTA: El tiempo de la función SEAR/SAUTE puede ajustarse desde 00:01 minutos
hasta 00:30 minutos. La temperatura de la función SEAR/SAUTE puede ajustarse de
150 °F a 400 °F.
PRECAUCIÓN: NO USE AEROSOLES PARA COCINAR. Los aerosoles para cocinar pueden causar
acumulación y afectar el rendimiento antiadherente de la olla multiuso de cocción.
NOTA: La mantequilla y el aceite de oliva tienen puntos de humo más bajos. Para
evitar quemar los alimentos, asegúrese de bajar la temperatura.
1. Para calentar el aceite, siempre quite la tapa. Agregue 1 a 3 cucharadas
de manteca, aceite o grasa a la olla de cocción. La cantidad de grasa
usada varía en dependencia de la receta y el tipo o cantidad de
alimentos a preparar.
2. Dorar los alimentos en la olla crea una capa de sabor y textura. Dore
los alimentos rápidamente a un nivel de temperatura predeterminado usando
una cantidad mínima de aceite.
3. Saltee o dore los alimentos rápidamente en la olla sin la tapa usando
una cantidad mínima de grasa. Si el aceite genera humo, de inmediato
presione por 2 segundos y deje que la olla multiuso se enfríe.
4. Para freír supercialmente, use de 1 a 2 tazas de aceite vegetal
o aceite de maní para freír. Comience a cocinar con la temperatura
predeterminada. Haga los ajustes necesarios.
5. Cuando termine el tiempo (00:00), sonarán 3 tonos. Aparecerá COOL
mientras la olla multiuso hace la cuenta regresiva de 03:00 minutos.
Cuando termine el tiempo (00:00), la olla multiuso pasará automáticamente
al modo de reposo.

41
PRECAUCIÓN: Para evitar lesiones personales, use guantes protectores para horno
cuando saque los alimentos del aceite caliente.
NOTA: Puede detener el proceso de trabajo en cualquier momento manteniendo
presionado el botón
por 2 segundos; las unidades emitirá 1 tono y, luego,
ingresarán al modo de reposo.
CONSEJOS DE BEAUTIFUL PARA FRITADO SUPERFICIAL EN SU OLLA MULTIUSO
• Evitar las salpicaduras de aceite. Asegúrese de que los alimentos estén
secos antes de freír.
• Rebozar los alimentos con harina, pan rallado o nueces trituradas para
obtener mejores resultados.
• Para que queden más crujientes, permita que los alimentos empanizados
reposen sobre una rejilla a temperatura ambiente durante 20 a 30 minutos
antes de freírlos para que el empanizado pueda asentarse y secarse.
• Al freír los empanizados con queso y algunos alimentos empanizados,
refrigere antes de freír.
• Nunca llenar por completo la olla de cocción. Una mayor cantidad de
alimentos causa que baje la temperatura del aceite lo que hace que los
alimentos se cocinen al vapor, en lugar de freírlos.
• Los alimentos estarán listos para voltear cuando las burbujas se disipen.
• Usar pinzas o una espátula para voltear los alimentos fritos. Continúe
friendo hasta que queden a su gusto.
• Utilizar siempre un termómetro de lectura instantánea para vericar
la temperatura de los alimentos. Consulte las pautas del USDA en este
Manual de instrucciones.
• Escurrir los alimentos fritos en toallas de papel tan pronto como los
saque del aceite.

42
SLOW COOK (COCCIÓN LENTA)
NOTA: El tiempo de la función SLOW COOK puede ajustarse desde 00:30 minutos
hasta 12:00 horas. La temperatura de la función SLOW COOK puede ajustarse
entre LO (Baja) y HI (Alta).
1. La cocción lenta es una técnica de cocción prolongada que utiliza
bajas temperaturas para infundir sabor y es ideal para guisos, chiles,
legumbres de cocción lenta, sopas, salsas o para la cocción lenta de
cortes de carnes más duras.
2. Siguiendo sus recetas favoritas de cocción lenta, cocine en el ajuste LO
o HI. Verique los alimentos periódicamente para ver si están listos.
3. Seleccione el modo de cocción lenta, ajuste el tiempo y la temperatura
de cocción deseada Lo (Baja) o Hi (Alta).
4. Presione el botón; se iniciará la cocción y el tiempo comenzará la
cuenta regresiva.
Al completar cualquier ciclo, cuando se termina el tiempo (00:00), sonarán 3
tonos mientras la olla multiuso lenta pasa automáticamente a la función Warm
por 2 horas.
NOTA: Puede detener el proceso de trabajo en cualquier momento manteniendo
presionado el botón por 2 segundos; las unidades emitirá 1 tono y, luego,
ingresarán al modo de reposo.
CONSEJOS DE BEAUTIFUL PARA COCCIÓN LENTA EN SU OLLA MULTIUSO
• Los cortes de carne menos blandos y más baratos son mejores candidatos
para cocinar a fuego lento que las variedades más caras.
• Antes de la cocción lenta, dore las carnes grasosas para agregar sabor y
color a las comidas cocidas lentamente.
• Las hierbas y especias enteras saben mejor cocinadas a fuego lento que
trituradas o molidas.
• Los alimentos cortados en trozos del mismo tamaño se cocinarán más
rápido y de manera más uniforme que los alimentos que se dejan enteros,
como el asado o un pollo.
• Las hortalizas de raíz como zanahorias, papas, nabos y betabeles requieren
un tiempo de cocción más prolongado que muchas carnes. Asegúrese de
colocarlos en el fondo de la olla de cocción y cúbralos con líquidos.
• Agregue productos lácteos frescos (leche, crema agria o yogur) antes de servir.

43
BRAISE (ASAR)
NOTA: El tiempo de la función BRAISE puede ajustarse desde 00:30 minutos
hasta 08:00 horas. La temperatura de la función BRAISE puede ajustarse en 1
Bajo, 2 Medio o 3 Alto.
1. Presione el botón MENU una vez para activar BRAISE (predeterminado). Se
iluminará BRAISE.
2. Siempre fría los alimentos antes de asarlos. Quite los alimentos asados
de la olla.
3. Agregue una base de sabor vegetal como sofrito (cebolla, ajo y tomates),
mirepoix (cebolla, zanahoria, apio) o la Santísima Trinidad de cajún
(cebolla, apio, morrón verde) a la olla de cocción. Agregue líquido de
asar. Con un volteador de madera, raspe los restos dorados y sabrosos
para hacer una salsa. Vuelva a llevar la carne sellada y los jugos a la
olla de cocción.
IMPORTANTE: Agregue líquido suciente para cubrir la mitad de la carne. LA
CARNE NO DEBE QUEDAR SUMERGIDA POR COMPLETO.
4. Ajuste el tiempo y el modo de cocción deseado: 1, 2 o 3.
5. Presione el botón; se iniciará la cocción y el tiempo comenzará la
cuenta regresiva.
6. Cubra con la tapa. Ase como se especica en la receta o hasta que esté
lista la comida. Verique durante la cocción y agregue más líquido,
según sea necesario.
Al completar cualquier ciclo, cuando se termina el tiempo (00:00), sonarán 3
tonos mientras la olla multiuso lenta pasa automáticamente a la función Warm
por 2 horas.
IMPORTANTE: NO DEJE QUE LA OLLA DE COCCIÓN HIERVA HASTA QUEDARSE SECA.
¡CONSEJO! La olla de cocción es apta para el horno hasta los 400 °F. Quite
la olla de cocción de la unidad base y llévela a un asador de horno para el
dorado superior.
NOTA: Puede detener el proceso de trabajo en cualquier momento manteniendo
presionado el botón por 2 segundos; las unidades emitirá 1 tono y, luego,
ingresarán al modo de reposo.

44
SIMMER (FUEGO LENTO)
NOTA: El tiempo de la función SIMMER puede ajustarse desde 00:05 minutos
hasta 00:60 minutos. La temperatura de la función SIMMER puede ajustarse en
1 Bajo, 2 Medio o 3 Alto.
PRECAUCIÓN: La función de fuego lento se realiza sin tapa.
1. Presione el botón MENU hasta que se ilumine SIMMER.
2. Siempre fría los alimentos antes de asarlos. Quite los alimentos asados
de la olla.
3. Agregue líquidos o prepare una salsa como se indica en su receta.
4. Con un volteador de madera, raspe los restos dorados y sabrosos para
hacer una salsa. Vuelva a llevar la carne sellada y los jugos a la olla
de cocción.
5. Ajuste el tiempo y el modo de cocción deseado: 1, 2 o 3.
6. Presione el botón; se iniciará la cocción y el tiempo comenzará la
cuenta regresiva.
7. Cocine a fuego lento los alimentos durante el tiempo indicado o hasta
que estén listos. Verique durante la cocción y agregue más líquido,
según sea necesario. Al completar cualquier ciclo, cuando se termina el
tiempo (00:00), sonarán 3 tonos mientras la olla multiuso lenta pasa
automáticamente a la función Warm por 2 horas.
¡CONSEJO! La olla de cocción es apta para el horno hasta los 400 °F. Quite
la olla de cocción de la unidad base y llévela a un asador de horno para el
dorador superior.
NOTA: Puede detener el proceso de trabajo en cualquier momento manteniendo
presionado el botón por 2 segundos; las unidades emitirá 1 tono y, luego,
ingresarán al modo de reposo.
STEAM (VAPOR)
NOTA: El tiempo de la función STEAM puede ajustarse desde 00:10 minutos
hasta 01:00 hora. La temperatura de la función STEAM no se puede ajustar.
1. Despliegue las patas de la bandeja de vapor e insértela en la olla de
cocción. (Figura 1). Añada 3 tazas de agua.
2. Presione el botón MENU hasta que se ilumine la función STEAM.

45
3. Cocine al vapor vegetales frescos o congelados, verduras, pescados y
mariscos frescos, salchichas, pollo, natillas de huevos, panecillos.
4. Pele las verduras cuando sea apropiado o lávelas bien. Tenga en cuenta
que las verduras duras como las papas y las remolachas mantienen mejor
su forma cuando la cáscara se deja intacta.
5. Acomode los alimentos en una sola capa en la bandeja de cocción al
vapor. Cubra con la tapa. Siga las indicaciones de cocción al vapor
según la receta.
6. Ajuste el tiempo de cocción deseado.
7. Presione el botón; se iniciará la cocción y el tiempo comenzará la
cuenta regresiva.
Al completar cualquier ciclo, cuando se termina el tiempo (00:00), sonarán 3
tonos y ,luego, ingresarán al modo de reposo.
PRECAUCIÓN CON LA TAPA: Evite el contacto con el oricio de vapor en la
tapa. Para evitar lesiones personales o quemaduras por el vapor debido a la
condensación del agua caliente dentro de la tapa, use guantes protectores
para horno cuando levante la tapa caliente. (Figura 2).
¡EL VAPOR QUE ESCAPA ESTÁ CALIENTE! TENGA CUIDADO AL QUITAR O LEVANTAR
LA TAPA. SE PUEDE CREAR CONDENSACIÓN DE AGUA CALIENTE DEBAJO DE LA TAPA.
MANIPULAR SIEMPRE CON CUIDADO. Incline siempre la tapa en dirección opuesta
a las manos y el rostro.
NOTA: Puede detener el proceso de trabajo en cualquier momento manteniendo
presionado el botón por 2 segundos; las unidades emitirá 1 tono y, luego,
ingresarán al modo de reposo.
CONSEJOS DE BEAUTIFUL PARA COCCIÓN AL VAPOR EN SU OLLA MULTIUSO
• Verique el nivel de líquido periódicamente para asegurarse de que la
olla de cocción no esté seca.
• Se pueden agregar líquidos como caldos, vino, cerveza, agua, así como
condimentos para hervir, etc., durante la cocción.
46
Figura 2Figura 1
RICE (ARROZ)
NOTA: El tiempo de la función RICE no se puede ajustar. RICE tiene dos
programas disponibles: El programa 1 para arroz blanco y el programa 2 para
arroz integral.
1. Presione el botón MENU hasta que se ilumine la función RICE.
2. Para enjuagar el arroz, vierta la cantidad deseada de arroz crudo en un
recipiente aparte. Enjuague hasta que el agua de enjuague salga clara.
NOTA: Según el tipo de arroz, 1 taza de arroz crudo rinde aproximadamente
2 tazas de arroz cocido. Esta olla multiuso tiene la capacidad de cocinar
hasta 7 tazas de arroz crudo (unas 14 tazas cocido).
NOTA: 1 taza es igual a 8 oz/236 ml.
3. Para conocer las cantidades estimadas de arroz en agua/líquido de
cocción, consulte las TABLAS DE COCCIÓN DE ARROZ a continuación.
4. Coloque el arroz lavado en la olla de cocción; luego agregue la cantidad
correspondiente de líquido de cocción. Ponga la tapa.
5. Seleccione 1 o 2 con TEMP según el tipo de arroz: blanco o integral.

47
6. Presione . La olla multiuso mostrará un gráco en movimiento durante la
etapa de cocción. Cuando el arroz está cocido, la olla multiuso emitirá 3
tonos y pasará automáticamente al modo KEEP WARM con 01:00 hora.
7. Para un arroz más esponjoso, deje reposar el arroz cocido durante 10
minutos antes de revolver o retirar para permitir que el vapor termine
el proceso de cocción.
8. Abra con cuidado la tapa. Use un utensilio no metálico de asa larga para
cucharear y mezclar bien el arroz. Deje que escape todo el vapor. NOTA:
Cuando cocine arroz, puede derramar agua.
NOTA: Puede detener el proceso en cualquier momento manteniendo presionado
el botón por dos segundos; las unidades emitirá 1 tono y luego ingrese al
modo de reposo.
TABLA DE COCCIÓN DE ARROZ BLANCO
NOTA: El arroz crudo y el volumen de agua/líquido se pueden ajustar al gusto en
cocciones de arroz posteriores. 1 taza es igual a 8 oz/236 ml.
ARROZ BLANCO
CRUDO
TAZAS DE AGUA TIEMPO EN
MINUTOS
ARROZ COCIDO APROX.
(TAZAS)
1 Taza 2 25-30 2
2 Tazas
3 30-35 4
3 Tazas 4 35-40 6
4 Tazas 5 38-43 8
5 Tazas 6 40-45 10
6 Tazas 7 43-48 12
7 Tazas 8 45-50 14

48
TABLA PARA COCINAR ARROZ INTEGRAL
ARROZ INTEGRAL
CRUDO
TAZAS DE AGUA TIEMPO EN
MINUTOS
ARROZ COCIDO APROX.
(TAZAS)
1 Taza 2-1/4 45-50 2
2 Taza
3-1/4 48-53 4
3 Taza 4-3/4 50-55 6
4 Taza 6-1/4 60-70 8
5 Taza 7-3/4 70-75 10
6 Taza 9-1/4 75-80 12
7 Taza 10-3/4 80-90 14
CONSEJOS DE BEAUTIFUL PARA COCINAR ARROZ EN SU OLLA MULTIUSO
• Cuando cocine arroz silvestre, agregue entre un 25 % y un 50 % más de agua
para cocinar completamente. Siga las instrucciones del paquete.
• Si su arroz está seco o duro/gomoso cuando la olla multiuso pasa a KEEP
WARM, agregue 1/2 a 1 taza de agua y mezcle bien. El agua y el tiempo de
cocción adicionales ablandarán el arroz.
• Cuando la olla arrocera avance a KEEP WARM, abra la tapa y revuelva el
arroz para vericar la consistencia. Si el arroz cocido está empapado,
cierre la tapa y continúe en KEEP WARM durante 10 a 30 minutos, según sea
necesario. Quite la tapa y revuelva periódicamente para liberar el exceso
de humedad.
• Cuando una receta requiera sal, use sal kosher. No tiene impurezas ni
aditivos y se disuelve fácilmente. Aumente la cantidad de la receta a 1 1/2
veces más sal kosher que sal de mesa.
• Se pueden usar consomés, caldos y lingotes en lugar de agua para agregar
sabor y mejorar la textura al cocinar arroz.
• No deje el arroz cocido en la olla multiuso en KEEP WARM por más de 2 horas.

49
KEEP WARM (MANTENER CALIENTE) PARA SERVICIO BUFÉ
NOTA: El tiempo de la función KEEP WARM puede ajustarse desde 00:30 minutos
hasta 12:00 horas. La temperatura de la función KEEP WARM no se puede ajustar.
1. Presione TIME y luego + o - para ajustar mientras KEEP WARM está activo.
2. La olla multiuso de 6 cuartos es una adición elegante a cualquier mesa.
Agregue alimentos a la temperatura de servir a la olla de cocción, luego
use la función KEEP WARM para servir.
3. Presione TIME y luego + o - para aumentar o disminuir el tiempo hasta
12:00 horas.
4. Revuelva los alimentos de vez en cuando.
5. Cuando termine el tiempo (00:00), sonarán 3 tonos. La olla multiuso se
APAGARÁ automáticamente.
NOTA: Puede detener el proceso de trabajo en cualquier momento manteniendo
presionado el botón por 2 segundos; las unidades emitirá 1 tono y, luego,
ingresarán al modo de reposo.

50
Instrucciones de mantenimiento para el usuario
Este aparato requiere poco mantenimiento. No contiene piezas que el
usuario pueda reparar. No intente repararla por cuenta propia. Cualquier
mantenimiento que requiera desarmarlo, aparte de la limpieza, debe ser
realizado por un técnico calicado en reparación de electrodomésticos.
1. La olla de cocción es apta para el horno hasta los 400 °F. Quite
la olla de cocción de la unidad base y llévela a un asador de horno
para el dorador superior.
Cuidado de la olla de cocción antiadherente de aluminio
ADVERTENCIA: UTILICE SIEMPRE AGARRADERAS PARA OLLAS O GUANTES PARA HORNO AL
MANIPULAR LA TAPA Y OLLA DE COCCIÓN CALIENTE.
• NO coloque la olla de cocción caliente sobre la mesada. Utilice
una base protectora.
• NO use la olla de cocción para hacer palomitas de maíz, caramelizar azúcar
o hacer dulces.
• NO use limpiadores abrasivos, estropajos ni ningún objeto que pueda rayar
los utensilios de cocina o la unidad base.
• NO use ni repare la unidad base, olla de cocción o tapa si está astillada,
agrietada o rota.
• NUNCA caliente la olla de cocción cuando esté vacía ya que podría dañar el
revestimiento antiadherente.
• La olla de cocción antiadherente puede volverse negra en la parte inferior
externa cuando se la pone en el lavavajillas. Recomendamos lavar la olla de
cocción antiadherente a mano para obtener mejores resultados.
Instrucciones de limpieza
PRECAUCIÓN: NUNCA SUMERJA LA UNIDAD BASE O EL CABLE EN AGUA U OTRO LÍQUIDO.
1. Desenchufe siempre y deje que se enfríe la olla eléctrica multiuso por
completo antes de limpiarla.
2. La olla de cocción antiadherente, la tapa y la bandeja de vapor pueden
lavarse en el lavavajillas. Lávelos a mano con agua tibia y jabón.
Enjuague y seque bien.

51
NOTA: La olla de cocción antiadherente puede volverse negra en la parte
inferior externa cuando se la pone en el lavavajillas. Recomendamos lavar la
olla de cocción antiadherente a mano para obtener mejores resultados.
3. Si se pega comida a la olla de cocción, llénela con agua tibia y jabón
y déjela en remojo antes de limpiarla. Se puede usar una pasta de
bicarbonato de sodio con un estropajo de plástico.
4. Para eliminar las manchas de agua o los depósitos minerales, limpie
la olla de cocción con vinagre blanco destilado. Para las manchas
difíciles, vierta una pequeña cantidad de vinagre en la olla de cocción
y déjela en remojo.
5. Limpie el interior y el exterior de la unidad base con un paño o una
esponja suave y ligeramente humedecida. Nunca use limpiadores abrasivos o
estropajos para limpiar la unidad base, ya que pueden dañar las supercies.
Instrucciones de almacenamiento
1. Nunca almacene la olla eléctrica multiuso mientras esté caliente o
húmeda. Asegúrese de que todas las piezas estén limpias y secas antes de
guardarlas.
2. Guarde el aparato en su caja o en un lugar limpio y seco.
3. Para almacenar, ensamble con la olla de cocción y la bandeja de vapor
dentro de la unidad base. Ponga la tapa.
4. Nunca enrolle el cable de forma que quede apretado alrededor del
aparato; manténgalo enrollado suelto.

52
Garantía limitada de dos años
Mediante la presente, Sensio Inc.
dba Made by Gather™. garantiza que,
durante el plazo de DOS AÑOS a partir
de la fecha de compra, este producto
no presentará defectos mecánicos en
el material ni en la mano de obra, y
durante 90 días, no los presentará en
las piezas no mecánicas. A su entera
discreción, Sensio Inc. dba Made by
Gather™ que resulte defectuoso, o
emitirá un reembolso por el producto
durante el plazo de garantía.
Esta garantía es válida únicamente
para el comprador minorista
original a partir de la fecha de
compra minorista inicial y no es
transferible. Conserve el recibo
de compra original, ya que se exige
una prueba de compra para obtener
la validación de la garantía. Las
tiendas minoristas no tienen derecho
a alterar, modicar ni corregir
de ninguna manera los términos y
condiciones de la garantía.
Exclusiones:
La garantía no cubre el desgaste
normal de las piezas ni el daño
ocasionado por cualquiera de las
siguientes causas: uso negligente
del producto, uso de un voltaje o
corriente incorrectos, mantenimiento
de rutina inadecuado, uso
contrario al de las instrucciones
de funcionamiento, desarmado,
reparación o alteración a cargo
de personas que no sean miembros
del personal calicado de Sensio
Inc. dba Made by Gather™ Asimismo,
la garantía no cubre actos de
la naturaleza, como incendios,
inundaciones, huracanes o tornados.
Sensio Inc. dba Made by Gather™
no asumirá responsabilidad por
daños incidentales o resultantes
ocasionados por la violación
de cualquier garantía expresa
o implícita. Salvo en la medida
en que lo prohíban las leyes
aplicables, cualquier garantía
implícita de comerciabilidad o
aptitud para un propósito particular
se limita temporalmente a la
duración de la garantía. Algunos
estados, provincias o jurisdicciones
no permiten la exclusión ni la
limitación de daños incidentales
o resultantes, o limitaciones
sobre la duración de una garantía
implícita y, por lo tanto, es posible
que las exclusiones o limitaciones
mencionadas no le correspondan.
La garantía cubre derechos legales
especícos que pueden variar de
un estado, una provincia o una
jurisdicción a otros.

53
Cómo obtener el servicio de garantía
Debe comunicarse con el Servicio
de atención al cliente a nuestro
número telefónico gratuito:
1-877-775-3564. Un representante
del Servicio de atención al cliente
intentará resolver los problemas
referidos a la garantía por
teléfono. Si este no puede resolver
el problema, le proporcionarán un
número de caso y le solicitarán que
devuelva el producto a Sensio Inc.
dba Made by Gather™ Adhiera una
etiqueta al producto que incluya:
su nombre, dirección, número
telefónico de contacto durante el
día, número de caso y descripción
del problema. Además, incluya una
copia del recibo de compra original.
Envuelva cuidadosamente el producto
etiquetado con el recibo de compra,
y envíelo (con el envío y el seguro
prepagados) a la dirección de Sensio
Inc. dba Made by Gather™. Sensio
Inc. dba Made by Gather™ no asumirá
obligación ni responsabilidad
alguna por el producto devuelto que
esté en el trayecto hacia el Centro
de servicio al cliente de Sensio
Inc. dba Made by Gather™


INSIDE back cover

BACK Cover
19534, 19535, 19536, 19537, 19538, 19539, 19600, 19773 R11
Sensio Inc.
dba Made by Gather™
New York, NY 10016/USA
www.beautifulbydrew.com