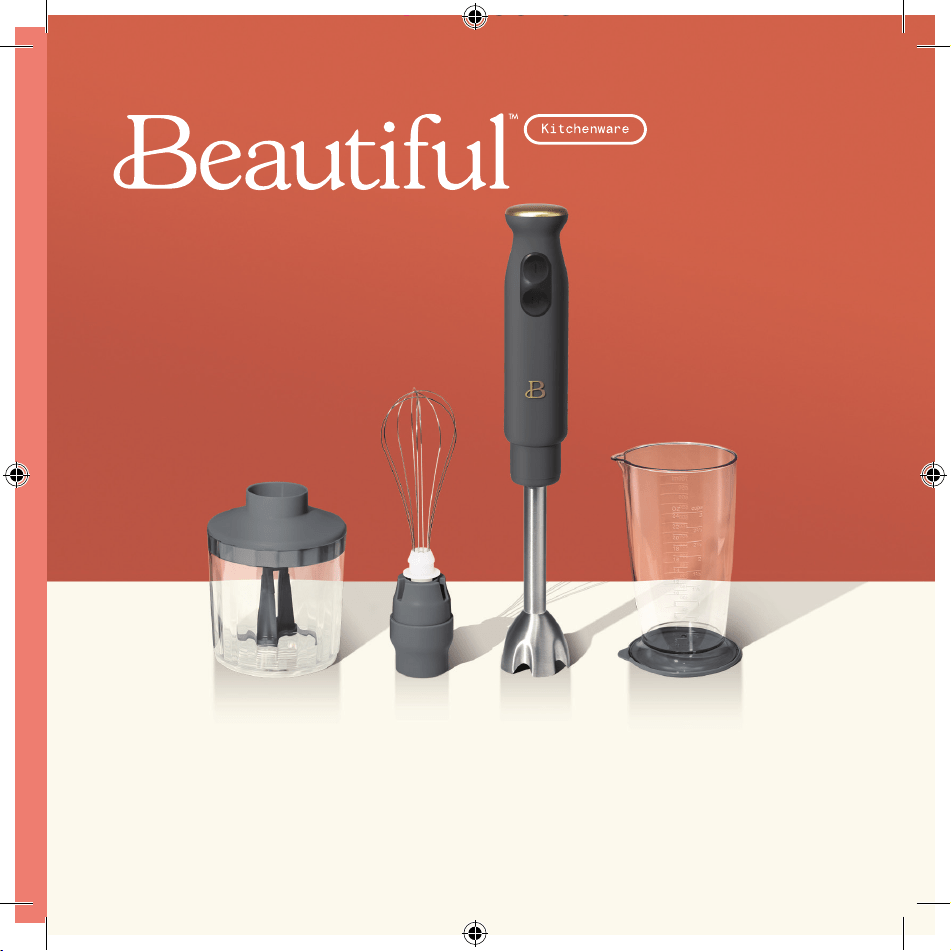
FRONT Cover
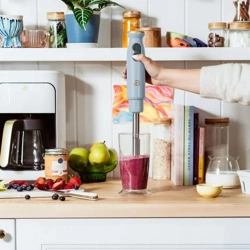
Hand Blender
2 Speeds with Attachments
Instruction Manual
Licuadora de mano
Dos velocidades, con accesorios
Manual de instrucciones
19105, 19106, 19107, 19108, 19128 BTFL Immersion Blender IM r5.indd 119105, 19106, 19107, 19108, 19128 BTFL Immersion Blender IM r5.indd 1 2021-12-13 9:17 AM2021-12-13 9:17 AM
The kitchen is my family’s happy
place. It’s where we cook and eat
and bake and laugh and share our
most beautiful moments together.
That’s what inspired the creation
of Beautiful, my new collection
of easy-to-use kitchenware that
you’ll want to keep out on your
kitchen counter. So whether
your kitchen has flour all over
the place from a kid's baking
session or you’re throwing an adult
dinner party, I hope every step will
be simple, delicious and beautiful!
www.cookwithbeautiful.com
19105, 19106, 19107, 19108, 19128 BTFL Immersion Blender IM r5.indd 219105, 19106, 19107, 19108, 19128 BTFL Immersion Blender IM r5.indd 2 2021-12-13 9:17 AM2021-12-13 9:17 AM

Table of Contents
Section 1: Safety
Important Safeguards ............................................ 4-7
Notes on the Plug ................................................ 7
Notes on the Cord ................................................ 8
Electric Power .................................................... 8
Section 2: Instructions
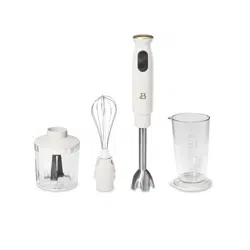
Getting to Know Your Hand Blender ............................ 10-11
Before Using for the First Time .................................. 12
Operation ........................................................ 13
Blender Blade Attachment Assembly ............................. 13-14
Hand Blender: For Beautiful Results .............................. 14
Whisk Attachment Assembly ........................................ 15
Whisk: For Beautiful Results ..................................... 16
Chopper Attachment Assembly ..................................... 17
Chopper: For Beautiful Results ................................... 18
Hand Blender Assembly ........................................... 19
User Maintenance Instructions .................................... 20
Care & Cleaning Instructions ..................................... 20
Storing Instructions ............................................. 21
Warranty ...................................................... 22-23
19105, 19106, 19107, 19108, 19128 BTFL Immersion Blender IM r5.indd 119105, 19106, 19107, 19108, 19128 BTFL Immersion Blender IM r5.indd 1 2021-12-13 9:17 AM2021-12-13 9:17 AM

Índice
Sección 1: Seguridad
Medidas de seguridad importantes ............................. 25-28
Notas sobre el enchufe .......................................... 29
Notas sobre el cable ......................................... 29-30
Potencia eléctrica ............................................... 30
Sección 2: Instrucciones
Conozca su licuadora de mano ................................. 32-33
Antes del primer uso ............................................ 34
Funcionamiento ................................................... 35
Ensamblaje del accesorio de la cuchilla de la licuadora ...... 35-36
Licuadora de mano: Para obtener resultados Beautiful .......... 36-37
Ensamblaje del accesorio de cortar ............................ 37-38
Batidor: Para obtener resultados Beautiful .................... 38-39
Ensamblaje del accesorio para cortar .......................... 39-40
Cortador: Para obtener resultados Beautiful ...................... 40
Ensamblaje de licuadora de mano ................................. 41
Instrucciones de mantenimiento para el usuario ................... 42
Instrucciones de limpieza y cuidado ........................... 42-43
Instrucciones de almacenamiento .................................. 43
Garantía ...................................................... 44-45
19105, 19106, 19107, 19108, 19128 BTFL Immersion Blender IM r5.indd 219105, 19106, 19107, 19108, 19128 BTFL Immersion Blender IM r5.indd 2 2021-12-13 9:17 AM2021-12-13 9:17 AM

Section 1
Safety
1
19105, 19106, 19107, 19108, 19128 BTFL Immersion Blender IM r5.indd 319105, 19106, 19107, 19108, 19128 BTFL Immersion Blender IM r5.indd 3 2021-12-13 9:17 AM2021-12-13 9:17 AM

4
IMPORTANT SAFEGUARDS
When using electrical appliances, basic safety precautions
should always be followed including the following:
1. READ ALL INSTRUCTIONS.
2. To protect against electrical shock, do not put the
motor body, cord or electrical plug of this Hand
Blender in water or other liquid. The detachable
blending shaft of this appliance has been designed for
immersion into water or other liquids. Never submerge
any other portion of this unit. If the motor body falls
into liquid, remove immediately. Do not reach into the
liquid without unplugging the unit rst.
3. The appliance is not intended for use by Children
or by persons with reduced physical, sensory, or mental
capabilities, or lack of experience and knowledge.
4. Close supervision is necessary when any appliance is
used by or near children. Children should be supervised
to ensure that they do not play with the appliance.
5. Release the speed button to turn off the hand blender.
Unplug from outlet when not in use, before putting on
or taking off attachments and before cleaning.
To unplug, grasp plug and pull from electrical outlet.
Never pull cord.
CAUTION: AVOID CONTACT WITH MOVING PARTS.
19105, 19106, 19107, 19108, 19128 BTFL Immersion Blender IM r5.indd 419105, 19106, 19107, 19108, 19128 BTFL Immersion Blender IM r5.indd 4 2021-12-13 9:17 AM2021-12-13 9:17 AM

5
6. Do not operate any appliance with a damaged cord or
plug or after the appliance malfunctions, or has been
damaged in any manner. Contact Consumer Service for
information on examination, repair, or adjustment.
NOTE: DO NOT ATTEMPT TO REPAIR THE UNIT YOURSELF.
THIS WILL VOID THE WARRANTY.
7. The use of accessories or attachments, including
canning jars, not recommended by the manufacturer
may cause a risk of injury to persons.
8. Do not use outdoors.
9. Do not use for other than intended use.
10. Do not let cord hang over edge of table or counter.
11. Do not let cord contact hot surfaces, including the
stove.
CAUTION: NEVER process boiling liquids. Allow to
cool rst and use care when blending hot liquids.
Fill a tall container no more than halfway, and process
small quantities at a time to reduce spillage and
avoid injury.
WARNING: To avoid damage to the chop/grind “S” blade,
do not chop or grind hard items such as frozen foods,
ice, nutmeg, hard spices, rice, chocolate bars or
coffee beans.
19105, 19106, 19107, 19108, 19128 BTFL Immersion Blender IM r5.indd 519105, 19106, 19107, 19108, 19128 BTFL Immersion Blender IM r5.indd 5 2021-12-13 9:17 AM2021-12-13 9:17 AM

6
12. Keep hands, hair, clothing and utensils away from
attachments and any moving blades while processing
food to reduce the risk of severe injury to persons or
damage to the Hand Blender. A scraper or spatula may be
used but must be used only when the Hand Blender is not
running.
CAUTION: Blades are SHARP. Handle the stainless steel
blending blade with care. Do not place your bare ngers
inside the blade guard.
CAUTION: Always handle the chop/grind “S” blade attachment
by the blade stem when assembling, removing or cleaning.
13. Check chopper bowl for presence of foreign objects
before using.
14. Be certain the chopper bowl lid is securely locked onto
the chopper bowl before operating the Hand Blender.
15. Remove the 8-inch stainless steel shaft, attachment
collar and whisk, or chop/grind “S” blade and chopper
bowl lid from the motor body before washing.
16. Always disconnect the blender from the outlet if it is
left unattended and before assembling, disassembling
or cleaning.
17. Save these instructions
18. To reduce the risk of injury, never place cutting blade
on base without rst putting bowl properly in place.
19. Care shall be taken when handling the sharp cutting
blades, emptying the bowl and during cleaning.
19105, 19106, 19107, 19108, 19128 BTFL Immersion Blender IM r5.indd 619105, 19106, 19107, 19108, 19128 BTFL Immersion Blender IM r5.indd 6 2021-12-13 9:17 AM2021-12-13 9:17 AM

7
20. Switch off the appliance and disconnect from outlet
before changing accessories or approaching parts that
move in use.
21. This appliance shall not be used by children. Keep the
appliance and its cord out of reach of children.
22. Be careful if hot liquid is poured into the food
processor or blender as it can be ejected out of the
appliance due to a sudden steaming.
SAVE THESE
INSTRUCTIONS
FOR HOUSEHOLD USE
ONLY
NOTES ON THE PLUG
This appliance has a polarized plug (one blade is wider
than the other). To reduce the risk of electric shock, this
plug will t in a polarized outlet only one way. If the
plug does not t fully into the outlet, reverse the plug.
If it still does not t, contact a qualied electrician.
Do not modify the plug in any way.
19105, 19106, 19107, 19108, 19128 BTFL Immersion Blender IM r5.indd 719105, 19106, 19107, 19108, 19128 BTFL Immersion Blender IM r5.indd 7 2021-12-13 9:17 AM2021-12-13 9:17 AM

8
NOTES ON THE CORD
a) A short power-supply cord (or detachable power-supply
cord) is to be provided to reduce risks resulting from
becoming entangled in or tripping over a longer cord.
b) Longer detachable power-supply cords or extension cords
are available and may be used if care is exercised in
their use.
c) If a long detachable power-supply cord or extension
cord is used:
1) The marked electrical rating of the detachable power-
supply cord or extension cord should be at least as
great as the electrical rating of the appliance;
2) If the appliance is of the grounded type, the extension
cord should be a UL polarized plug 2-wire cord;
3) The longer cord should be arranged so that it will not
drape over the countertop or table top where it can be
pulled on by children or tripped over.
ELECTRIC POWER
If the electrical circuit is overloaded with other
appliances, your appliance may not operate properly.
It should be operated on a separate electrical circuit
from other appliances.
19105, 19106, 19107, 19108, 19128 BTFL Immersion Blender IM r5.indd 819105, 19106, 19107, 19108, 19128 BTFL Immersion Blender IM r5.indd 8 2021-12-13 9:17 AM2021-12-13 9:17 AM

Section 2
Instructions
2
19105, 19106, 19107, 19108, 19128 BTFL Immersion Blender IM r5.indd 919105, 19106, 19107, 19108, 19128 BTFL Immersion Blender IM r5.indd 9 2021-12-13 9:17 AM2021-12-13 9:17 AM

10
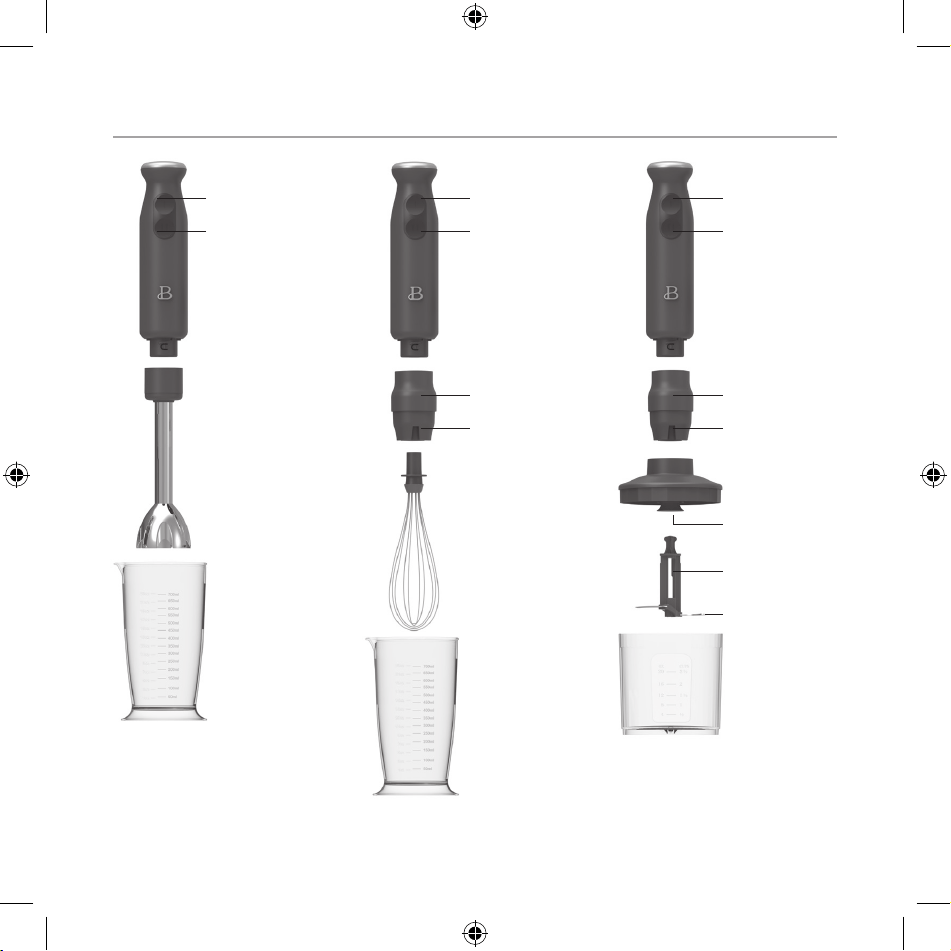
Getting to Know Your Hand Blender
Product may vary slightly from illustrations.
2
3
4
5
6
1
7
8
9
10
11
12
19105, 19106, 19107, 19108, 19128 BTFL Immersion Blender IM r5.indd 1019105, 19106, 19107, 19108, 19128 BTFL Immersion Blender IM r5.indd 10 2021-12-13 9:17 AM2021-12-13 9:17 AM

11
1. Extra-Long 5-Foot Electrical Cord (not shown).
Enables you to blend soups and sauces directly in the saucepan.
2. LOW Speed (
) Button. Press and quickly release to PULSE.
Hold button for continuous action. When the button is released,
processing will STOP.
3. HIGH Speed (
) Button. Press and quickly release to PULSE. Hold for
continuous high speed action. When the button is released, processing
will STOP.
4. Motor Body with Ergonomic Handle. Easy to grip.
5. 8-inch Stainless Steel Shaft to reach inside deep vessels.
6. Stainless Steel Blender Blade with Blade Guard. The stainless housing
partially covers the blade and keeps splashing to a minimum.
7. Attachment Collar with Notches. Line up notches for a snug and secure
t to the motor body. Use for whisk and chopper assembly.
8. Chopper Bowl Lid. Fits and assembles easily onto the chopper bowl.
9. Chop/Grind “S” Blade w/Stem. Chop, mince and grind with ease.
WARNING: “S” Blade is sharp!!! Always handle the “S” Blade by its stem.
10. 2 1/2 Cups/20 oz Chopper Bowl
11. 3-cup/24 oz Measuring Cup. Microwave and dishwasher-safe. Use to blend
drinks, shakes, salad dressings, egg whites, and more. Designed for easy
gripping and drip-free pouring.
12. Whisk Attachment. Use to whip cream and egg whites.
19105, 19106, 19107, 19108, 19128 BTFL Immersion Blender IM r5.indd 1119105, 19106, 19107, 19108, 19128 BTFL Immersion Blender IM r5.indd 11 2021-12-13 9:17 AM2021-12-13 9:17 AM

12
Before Using for the First Time
1. Read all Operation instructions carefully.
2. Carefully unpack the Hand Blender parts and attachments. Remove all
packaging materials and any labels from the outer surfaces.
CAUTION: Blades are SHARP. Handle the stainless steel blending blade
with care. Do not place your bare ngers inside the blade guard.
CAUTION: Always handle the chop/grind “S” blade attachment by the stem
when assembling, removing or cleaning.
3. Wipe the Hand Blender motor body with a clean, damp cloth to
remove any dirt or dust. Dry thoroughly with a soft absorbent cloth.
Handle carefully.
4. Wash the stainless steel shaft, chopper bowl, chopper bowl lid, chop/
grind “S” blade, attachment collar, whisk attachment and beaker by hand
or in the top rack of your dishwasher.
5. Dry thoroughly before use.
CAUTION: To protect against electric shock, NEVER immerse the Hand
Blender motor body or allow cord to come into contact with water or
other liquids.
19105, 19106, 19107, 19108, 19128 BTFL Immersion Blender IM r5.indd 1219105, 19106, 19107, 19108, 19128 BTFL Immersion Blender IM r5.indd 12 2021-12-13 9:17 AM2021-12-13 9:17 AM

13
Operation
Blender Blade Attachment Assembly (Figure 1)
1. Place the motor body and 8-inch stainless steel shaft on a at, clean
work area.
2. Align the arrow (
) on the motor body with the 8-inch blender blade’s
stainless steel shaft’s UNLOCK (
) icon.
3. Turn the shaft clockwise until the LOCK (
) icon is directly under
the arrow ( ) and both pieces are locked together.
4. Plug the power-supply cord into a 120V AC electrical wall outlet.
NOTE: The extra-long 5-foot electrical cord enables you to blend soups
and sauces directly in the saucepan.
IMPORTANT: To avoid splattering and over-processing, begin at LOW speed
(
), then increase speed to HIGH speed ( ) as needed.
5. Place food to be processed into the beaker or any tall cooking or mixing
container.
6. Insert the blending shaft deep into the bottom of the container.
Blend ingredients with a gentle lift and lower motion.
7. Press and quickly release either speed button for PULSE action.
8. Press and hold the LOW speed (
) button to begin blending.
When the button is released, blending will STOP.
9. For a consistently fast speed, press and hold the HIGH speed (
)
button.
10. When the button is released, the Hand Blender will turn OFF.
IMPORTANT: If food becomes lodged around the blending blade or the blade
guard, release the speed button and unplug the Hand Blender.
Turn to unlock and remove the stainless steel shaft from the motor body.
Use a kitchen brush to clear debris and rinse well under running water.
Assemble unit and continue processing.
19105, 19106, 19107, 19108, 19128 BTFL Immersion Blender IM r5.indd 1319105, 19106, 19107, 19108, 19128 BTFL Immersion Blender IM r5.indd 13 2021-12-13 9:17 AM2021-12-13 9:17 AM

14
11. When processing is complete, and the blades are completely stopped,
lift the Hand Blender out of the beaker or blending container.
With the Stainless Steel Shaft with blender blade in one hand, and the
motor body in the other, turn the arrow (
) on the motor body counter-
clockwise until it aligns with the UNLOCK (
) icon and separate the
Stainless Steel Shaft.
WARNING: To avoid splattering, make sure the blade has completely
stopped.
12. Unplug the Hand Blender from the outlet when not in use and before
cleaning.
Hand Blender: For Beautiful Results.
• To avoid over-processing, release the speed button and periodically check
food consistency.
• NEVER process boiling liquids. ALWAYS remove the saucepan from the heat
before blending. Foods must be cooled slightly before blending.
• The long electrical cord and long 8-inch shaft allows you to process
ingredients directly in the saucepan. This makes blending soups and
sauces very easy.
• Cut food in uniform sizes to ensure consistently smooth results while
puréeing and blending.
• Liquids to be added to soups and purées should be warm to ensure
even blending.
• WARNING: This Hand Blender is not designed to operate continuously
for more than 1 minute. Allow the motor to rest for 1 minute before
resuming.
• When processing dry, thick or heavy mixtures, never mix for more
than 15 seconds. Stop processing ingredients and stir by hand
before continuing.
• DO NOT place the stainless steel shaft into the chopper bowl to process
ingredients.
19105, 19106, 19107, 19108, 19128 BTFL Immersion Blender IM r5.indd 1419105, 19106, 19107, 19108, 19128 BTFL Immersion Blender IM r5.indd 14 2021-12-13 9:17 AM2021-12-13 9:17 AM

15
Whisk Attachment Assembly (Figure 2)
1. Place the motor body, attachment collar and whisk on a at,
clean work area.
2. Insert the stem of the whisk into the attachment collar. Press rmly
until the whisk locks into the collar.
3. Align the arrow (
) on the motor body with the attachment collar’s
UNLOCK (
) icon.
4. Turn the shaft clockwise until the LOCK (
) icon is directly under
the arrow ( ) and both pieces are locked together.
5. Plug the power-supply cord into a 120V AC electrical wall outlet.
IMPORTANT: To avoid splattering and over-processing, begin at LOW speed
(
), then increase speed to HIGH speed ( ) as needed.
6. Place food to be processed into the beaker or any tall cooking
or mixing container.
7. Insert the whisk attachment so that it skims the surface of the
ingredients.
8. Press and quickly release either speed button for PULSE action.
9. Press and hold LOW speed (
) button to blend at slower speeds.
When the button is released, blending will STOP. Increase speed setting
as needed.
10. For a consistently fast speed, press and hold the HIGH speed (
)
button. Blend ingredients with a gentle lift and lower motion.
11. When the button is released, the Hand Blender will turn OFF.
12. When processing is complete, and the whisk has completely stopped,
lift the whisk attachment out of the beaker or blending container.
With the collar with whisk in one hand, and the motor body in the other,
turn the arrow (
) on the motor body counter-clockwise until it aligns
with the UNLOCK (
) icon and separate the collar with whisk, and then
pull the whisk out off collar to separate the whisk.
WARNING: To avoid splattering, make sure the whisk has completely
stopped.
13. Unplug the Hand Blender from the wall outlet when not in use
and before cleaning.
19105, 19106, 19107, 19108, 19128 BTFL Immersion Blender IM r5.indd 1519105, 19106, 19107, 19108, 19128 BTFL Immersion Blender IM r5.indd 15 2021-12-13 9:17 AM2021-12-13 9:17 AM

16
Whisk: For Beautiful Results.
• Use a sufciently deep, and wide container with room to move the whisk
through the ingredients.
• To keep the mixing bowl stable, set the mixing bowl on a damp cloth
during whisking.
• To avoid damage to the whisk attachment, do not allow the whisk to hit
the bottom or sides of mixing bowl while using the whisk.
• Always use fresh chilled cream and fresh eggs at room temperature to
achieve greater and more stable volume when whisking.
• Use the whisk attachment at lower speeds to whisk eggs for scrambled
eggs or uffy omelets.
• Always use the whisk attachment at the highest speed when whisking egg
whites and cold cream.
• To ensure the best whipped cream, chill both the glass or metal bowl
and the whisk attachment.
• Use a deep bowl with a rounded bottom to whip cold cream. Hold the whisk
attachment so that it skims the surface; whip until the cream begins to
thicken. Immerse the whisk totally into the cream.
• To keep the whipped cream from “breaking”, add a whipped cream
stabilizer such as instant pudding or Oetker®Whip It.™
• Do not attempt to make egg white meringues on a rainy or very humid day.
• Always make sure the whisk and mixing bowl are completely clean and free
of fat before whisking egg whites.
• To help stabilize egg whites, add 1/8 teaspoon of cream of tartar per
egg white prior to whisking. (If using a copper bowl omit the cream
of tartar.)
• Whisk egg whites until soft peaks form; then add sugar very slowly.
Do not over-whisk.
19105, 19106, 19107, 19108, 19128 BTFL Immersion Blender IM r5.indd 1619105, 19106, 19107, 19108, 19128 BTFL Immersion Blender IM r5.indd 16 2021-12-13 9:17 AM2021-12-13 9:17 AM

17
Chopper Attachment Assembly (Figure 3)
1. Place the chopper bowl, chop/grind “S” blade, and chopper bowl lid
on a at, clean work area.
2. Mount the center of the chop/grind “S” blade onto the chopper bowl’s
center pin.
3. Add food to be processed into the chopper bowl.
4. Add the chopper bowl lid to the chopper bowl. Make sure the center of
the "S" Blade Connector ts securely over the “S” blade stem.
5. Before assembling the attachment collar on chopper lid, keep the "S"
blade connector vertical.
6. Align the arrow (
) on the motor body with the attachment collar's
UNLOCK (
) icon.
7. Turn the shaft clockwise until the LOCK (
) icon is directly under
the arrow (
) and both pieces are locked together.
8. Insert the “S” Blade connector into the attachment collar. Line up
notches for a perfect t. Press and assemble the collar and lid.
9. Plug the power-supply cord into a 120V AC electrical wall outlet.
IMPORTANT: To avoid over-processing, press and quickly release either
speed button for PULSE action.
10. Press and hold the LOW speed (
) button to chop at slower speeds.
When the button is released, chopping will STOP. Increase speed setting
as needed.
11. For a consistently fast speed, press and hold the HIGH speed
(
) button.
12. When the button is released, lift the motor body and attached collar,
and then lift and remove the lid. With the collar in one hand, and the
motor body in the other, turn the arrow (
) on the motor body
counter-clockwise until it aligns with the UNLOCK (
) icon and
separate the collar.
13. Unplug the Hand Blender from the wall outlet when not in use
and before cleaning.
19105, 19106, 19107, 19108, 19128 BTFL Immersion Blender IM r5.indd 1719105, 19106, 19107, 19108, 19128 BTFL Immersion Blender IM r5.indd 17 2021-12-13 9:17 AM2021-12-13 9:17 AM

18
Chopper: For Beautiful Results
• Freeze meats or sh partially before processing to ensure chopped
(not pulverized) results.
• To avoid damage to the chop/grind “S” blade, do not chop or grind hard
items such as frozen foods, ice, nutmeg, hard spices, rice, chocolate
bars or coffee beans.
• To avoid over-processing, release the speed button and check food
consistency periodically.
• Although the chopper bowl’s non-slip feet will help to stabilize the
bowl during chopping, it is recommended that while chopping, it is best
to hold the motor body handle in one hand, and brace the chopping bowl
with the other.
• NEVER process boiling liquids or extremely hot foods in the
chopper bowl.
• Cut food in uniform sizes to ensure faster, evenly textured results.
• Do not operate the chopper attachment continuously for more than
1 minute. Allow the motor to rest for 1 minute between each use.
19105, 19106, 19107, 19108, 19128 BTFL Immersion Blender IM r5.indd 1819105, 19106, 19107, 19108, 19128 BTFL Immersion Blender IM r5.indd 18 2021-12-13 9:17 AM2021-12-13 9:17 AM
19
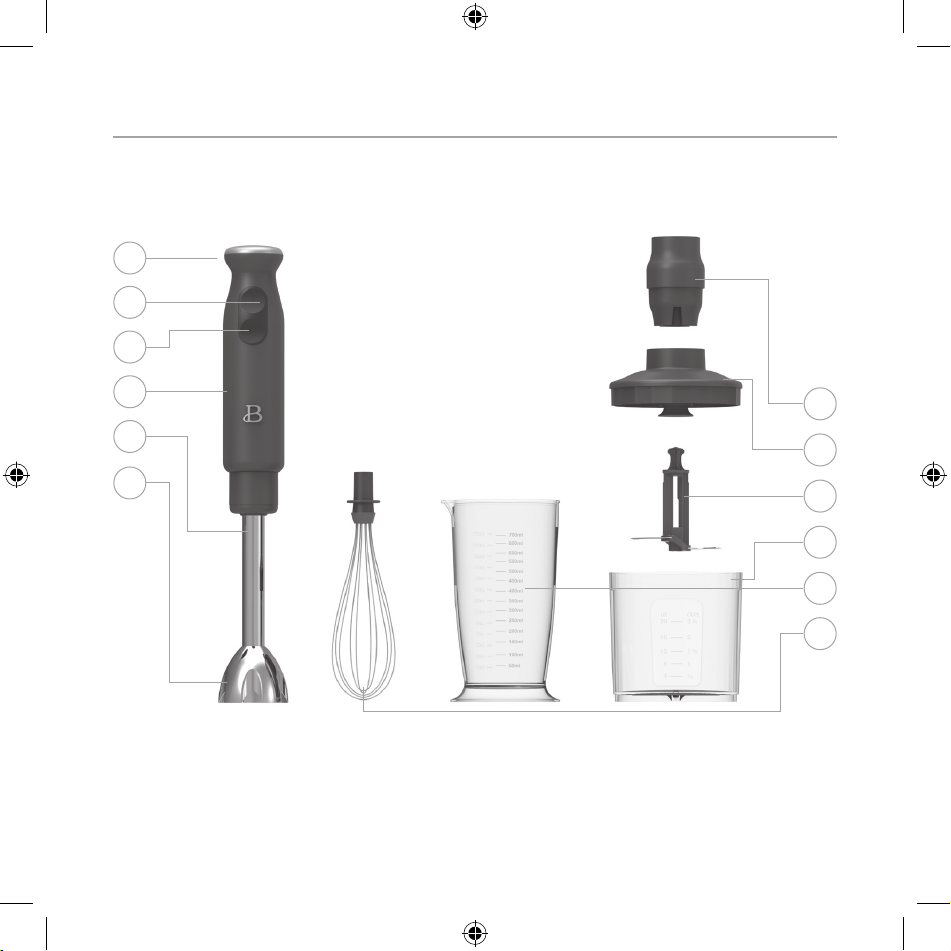
Hand Blender Assembly
Fig. 1 Fig. 2 Fig. 3
LOW (I)
Button
HIGH (II)
Button
Motor Body
8-inch
Stainless
Steel
Shaft
Blender Blade
Measuring
Cup
LOW (I)
Button
HIGH (II)
Button
Motor Body
Attachment
Collar
Notch
Whisk
Attachement
Measuring
Cup
LOW (I)
Button
HIGH (II)
Button
Motor Body
Attachment
Collar
Notch
Chopper Bowl
Lid
"S" Blade
Connector
“S” Blade
Stem
Chop/Grind
“S” Blade
Chopper
Bowl
19105, 19106, 19107, 19108, 19128 BTFL Immersion Blender IM r5.indd 1919105, 19106, 19107, 19108, 19128 BTFL Immersion Blender IM r5.indd 19 2021-12-13 9:17 AM2021-12-13 9:17 AM

20
User Maintenance Instructions
This appliance requires little maintenance. It contains no user serviceable
parts. Do not try to repair it yourself. Contact a qualied appliance repair
technician if the product requires servicing.
Care & Cleaning Instructions
CAUTION: Never immerse the power base, plug or cord in water or any other
liquid.
NOTE: Do not soak the detachable blending shaft or attachment collar in water
because lubricant on the gears and bearing may wash away.
1. Always unplug the Hand Blender before cleaning.
2. Hand Blender: Rinse the 8-inch stainless steel shaft under warm running
water after each use.
3. If food becomes lodged around the blending blade or the blade guard,
immerse the blending blade in a large bowl of water and continue
blending.
4. If this does not clear the food, release the speed button and unplug the
Hand Blender. Turn to unlock and remove the stainless steel shaft from
the motor body. Use a kitchen brush to clear debris and rinse well under
running water.
CAUTION: BLADE IS SHARP! Do not place your bare ngers near the blade.
5. Whisk Attachment: Rinse the whisk attachment under warm running water
after each use.
6. Turn to unlock and remove the attachment collar. Grasp rmly and pull to
remove whisk attachment. Rinse whisk under running water.
7. Chopper Attachment: Unlock and remove the chopper bowl lid; carefully
lift the chop/grind “S” blade by the stem up and off the center pin.
Clean the blade using a kitchen brush.
8. Rinse the chop/grind “S” blade, chopper bowl and lid under running water
after each use.
9. The 8-inch stainless steel shaft, whisk attachment, chopper bowl,
chopper bowl lid, “S” blade, and beaker are top-rack dishwasher safe.
19105, 19106, 19107, 19108, 19128 BTFL Immersion Blender IM r5.indd 2019105, 19106, 19107, 19108, 19128 BTFL Immersion Blender IM r5.indd 20 2021-12-13 9:17 AM2021-12-13 9:17 AM

21
10. Wipe the motor body with a damp cloth or sponge. Dry thoroughly.
WARNING: DO NOT IMMERSE THE MOTOR BODY IN WATER.
Storing Instructions
1. Unplug and clean the Hand Blender and all parts and attachments.
2. Never wrap cord tightly around the appliance. Never place any stress
on cord, especially where the cord enters the power base, as this could
cause the cord to fray and break.
3. Assemble the Hand Blender body to the 8-inch stainless steel shaft. Lock
the whisk attachment into the attachment collar. Assemble the chopper
bowl, chop/grind “S” blade and chopper bowl lid following the detailed
procedures previously outlined in this instruction manual.
4. Store the Hand Blender and attachments in its original box
or in a clean, dry place.
19105, 19106, 19107, 19108, 19128 BTFL Immersion Blender IM r5.indd 2119105, 19106, 19107, 19108, 19128 BTFL Immersion Blender IM r5.indd 21 2021-12-13 9:17 AM2021-12-13 9:17 AM

22
Limited Two-Year Warranty
Sensio Inc. dba Made by Gather™
hereby warrants that for a period
of TWO YEARS from the date of
purchase, this product will be free
from mechanical defects in material
and workmanship, and for 90 days in
respect to non-mechanical parts. At
its sole discretion, Sensio Inc. dba
Made by Gather™ will either repair
or replace the product found to be
defective, or issue a refund on the
product during the warranty period.
The warranty is only valid for
the original retail purchaser from
the date of initial retail purchase
and is not transferable.
Keep the original sales receipt,
as proof of purchase isrequired
to obtain warranty validation.
Retail stores selling this product
do not have the right to alter,
modify, or in any way revise the
terms and conditions of the warranty.
Exclusions:
The warranty does not cover normal
wear of parts or damage resulting
from any of thefollowing: negligent
use of the product, use of improper
voltage or current, improper routine
maintenance, use contrary to the
operating instructions, disassembly,
repair, or alteration by anyone
other than qualied Sensio Inc.
dba Made by Gather™ personnel.
Also, the warranty does not cover
Acts of God such as re, oods,
hurricanes, or tornadoes.
Sensio Inc. dba Made by Gather™ shall
not be liable for any incidental or
consequential damages caused by the
breach of any express or implied
warranty. Apart from the extent
prohibited by applicable law, any
implied warranty of merchantability
or tness for a particular purpose
is limited in time to the duration
of the warranty. Some states,
provinces or jurisdictions do not
allow the exclusion or limitation
of incidental or consequential
damages, or limitations on how
long an implied warranty lasts,
and therefore, the above exclusions
or limitations may not apply to you.
The warranty covers specic legal
rights which may vary by state,
province and/or jurisdiction.
19105, 19106, 19107, 19108, 19128 BTFL Immersion Blender IM r5.indd 2219105, 19106, 19107, 19108, 19128 BTFL Immersion Blender IM r5.indd 22 2021-12-13 9:17 AM2021-12-13 9:17 AM

23
How To Obtain Warranty Service:
You must contact Customer Service at
our toll-free number: 1-877-775-3564.
A Customer Service Representative
will attempt to resolve warranty
issues over thephone. If the
Customer Service Representative is
unable to resolve the problem, you
will be provided with a case number
and asked to return the product to
Made by Gather Attach a tag to the
product that includes: your name,
address, daytime contact telephone
number, case number, and description
of the problem.
Also, include a copy of the original
sales receipt. Carefully package
the tagged product with the sales
receipt, and send it (with shipping
and insurance prepaid) to SENSIO
Inc.’s address. Made by Gather shall
bear no responsibility or liability
for the returned product while in
transit to SENSIO Inc.’s Customer
Service Center.
19105, 19106, 19107, 19108, 19128 BTFL Immersion Blender IM r5.indd 2319105, 19106, 19107, 19108, 19128 BTFL Immersion Blender IM r5.indd 23 2021-12-13 9:17 AM2021-12-13 9:17 AM

24
Sección 1
Seguridad
1
19105, 19106, 19107, 19108, 19128 BTFL Immersion Blender IM r5.indd 2419105, 19106, 19107, 19108, 19128 BTFL Immersion Blender IM r5.indd 24 2021-12-13 9:17 AM2021-12-13 9:17 AM

25
MEDIDAS DE SEGURIDAD
IMPORTANTES
Al usar electrodomésticos, se deben seguir siempre las
precauciones básicas, entre ellas:
1. LEER TODAS LAS INSTRUCCIONES.
2. Para protegerse contra descargas eléctricas, no ponga
el cuerpo del motor, el cable o el enchufe eléctrico de
esta licuadora de mano en agua u otro líquido. El eje
de batir desmontable de este aparato ha sido diseñado
para sumergirlo en agua u otros líquidos. Nunca sumerja
ninguna otra parte de esta unidad. Si el cuerpo del
motor cae en líquido, retírelo inmediatamente. No
introduzca la mano en el líquido sin antes desenchufar
la unidad.
3. El aparato no está destinado a ser utilizado por niños
o por personas con capacidades físicas, sensoriales
o mentales reducidas, o falta de experiencia y
conocimiento.
4. No deje este aparato sin supervisión mientras está en
uso. Los niños deben ser supervisados para asegurarse
de que no juegue con el aparato.
1
19105, 19106, 19107, 19108, 19128 BTFL Immersion Blender IM r5.indd 2519105, 19106, 19107, 19108, 19128 BTFL Immersion Blender IM r5.indd 25 2021-12-13 9:17 AM2021-12-13 9:17 AM

26
5. Suelte el botón de velocidad para apagar la licuadora
de mano. Desenchufe del tomacorriente cuando no esté en
uso, antes de ponerse o quitarse los accesorios y antes
de limpiar. Para desenchufar, agarre por el enchufe y
tire del tomacorriente. Nunca tire del cable.
PRECAUCIÓN: EVITE EL CONTACTO CON LAS PIEZAS EN
MOVIMIENTO.
6. No utilice ningún aparato que tenga un cable o enchufe
dañados, o después de que el aparato funcione de manera
incorrecta o se haya dañado de alguna manera. Para
ponerse en contacto con el Servicio al Cliente para
información sobre examinar, reparar o el ajustar.
NOTA: NO INTENTAR REPARAR LA UNIDAD POR CUENTA PROPIA.
ESTO ANULARÁ LA GARANTÍA.
7. El uso de accesorios o aditamentos, incluidos frascos
para conservas, no recomendados por el fabricante puede
causar un riesgo de lesiones personales.
8. No utilizar el electrodoméstico en exteriores.
9. No use este aparato en usos para los que no está
diseñado.
10. No deje que el cable cuelgue del borde de la mesa
o mostrador.
11. No permita que el cable entre en contacto con
supercies calientes, incluida la estufa.
PRECAUCIÓN: NUNCA procese líquidos hirviendo. Déjelos
enfriar primero y tenga mucho cuidado al mezclar los
19105, 19106, 19107, 19108, 19128 BTFL Immersion Blender IM r5.indd 2619105, 19106, 19107, 19108, 19128 BTFL Immersion Blender IM r5.indd 26 2021-12-13 9:17 AM2021-12-13 9:17 AM

27
líquidos calientes. Llene un recipiente alto a no más
de la mitad y procese pequeñas cantidades a la vez para
reducir los derrames y evitar lesiones.
ADVERTENCIA: Para evitar dañar la cuchilla en forma
de “S” para cortar/triturar no pique ni triture cosas
duras como alimentos congelados, hielo, nuez moscada,
especias duras, arroz crudo, barras de chocolate o
granos de café.
12. Mantenga las manos, el cabello, la ropa y los
utensilios alejados de los accesorios y de las
cuchillas en movimiento mientras procesa los alimentos
para reducir el riesgo de lesiones graves a las
personas o daños a la licuadora de mano. Puede usar un
raspador o una espátula, pero solo cuando la licuadora
de mano está detenida.
PRECAUCIÓN: Las cuchillas están AFILADAS. Manipule con
cuidado la cuchilla mezcladora de acero inoxidable para
mezclar. No coloque los dedos dentro del protector de la
cuchilla.
PRECAUCIÓN: Siempre manipule el accesorio de la cuchilla
en forma de “S” para cortar/triturar por el vástago de la
cuchilla para montarla, desmontarla o lavarla.
13. Verique la presencia de objetos extraños en el
recipiente de la cortadora antes de usarla.
14. Asegúrese de que la tapa del recipiente de la cortadora
esté bien cerrada en el recipiente de la misma antes de
operar la licuadora de mano.
19105, 19106, 19107, 19108, 19128 BTFL Immersion Blender IM r5.indd 2719105, 19106, 19107, 19108, 19128 BTFL Immersion Blender IM r5.indd 27 2021-12-13 9:17 AM2021-12-13 9:17 AM

28
15. Quite el eje de acero inoxidable de 8 pulgadas, el
collar para accesorio de sujeción y el batidor, o la
cuchilla en forma de “S” para cortar/triturar y la tapa
del recipiente del cortador del cuerpo del motor antes
de lavar.
16. Desconecte siempre la licuadora del suministro de
electricidad si se la deja sin supervisión y antes de
montarla, desmontarla o limpiarla.
17. Guarde estas instrucciones
18. Para reducir el riesgo de lesiones, no coloque nunca
la cuchilla de corte en la base sin haber colocado antes
el bol correctamente.
19. Se debe tener cuidado cuando se manipulen las cuchillas
losas, se vacíe el plato hondo y durante su limpieza.
20. Apague el aparato y desconéctelo del suministro de
electricidad antes de cambiarle accesorios o cuando se
acerque a las partes que se mueven cuando está en uso.
21. Este aparato no debe ser utilizado por niños. Mantenga
el aparato y su cable fuera del alcance de los niños.
22. Tenga cuidado si se vierte líquido caliente en la
procesadora o la licuadora ya que puede ser expulsado
del aparato debido a un vapor repentino.
GUARDAR ESTAS
INSTRUCCIONES
19105, 19106, 19107, 19108, 19128 BTFL Immersion Blender IM r5.indd 2819105, 19106, 19107, 19108, 19128 BTFL Immersion Blender IM r5.indd 28 2021-12-13 9:17 AM2021-12-13 9:17 AM

29
SOLO PARA USO
DOMÉSTICO
NOTAS SOBRE EL ENCHUFE
Este electrodoméstico tiene un enchufe polarizado (una
pata es más ancha que la otra). Para reducir el riesgo
de descargas eléctricas, este enchufe encaja de una sola
manera en un tomacorriente polarizado. Si el enchufe no
encaja bien en el tomacorriente, darlo vuelta. Si aun así
no encaja, comunicarse con un electricista calicado.
No realizar ningún tipo de modicación al enchufe.
NOTAS SOBRE EL CABLE
a) Se debe utilizar un cable de alimentación corto
(o un cable de alimentación desconectable) para reducir
el riesgo de enredarse o tropezar con uno más largo.
b) Existen cables de alimentación desconectables más
largos o prolongadores y pueden usarse si se hace con
precaución.
c) Si se utiliza un cable de alimentación desconectable más
largo o un prolongador, tenga en cuenta lo siguiente:
1) La capacidad eléctrica nominal del cable de
alimentación desconectable o prolongador debe ser al
menos igual
a la capacidad eléctrica del electrodoméstico.
19105, 19106, 19107, 19108, 19128 BTFL Immersion Blender IM r5.indd 2919105, 19106, 19107, 19108, 19128 BTFL Immersion Blender IM r5.indd 29 2021-12-13 9:17 AM2021-12-13 9:17 AM

30
2) Si el aparato se conecta a un panel eléctrico de
suelo, el cable de extensión debe ser un cable de 2
entradas para un enchufe polarizado UL;
3) El cable más largo debe estar dispuesto de manera
que no cuelgue de la encimera o de la mesa, ya que
puede ser jalado por niños, o cualquier persona
podría tropezarse.
POTENCIA ELÉCTRICA
Si el circuito eléctrico está sobrecargado por el uso
de otros electrodomésticos, es posible que no funcione
correctamente.
Esta unidad debe funcionar en un circuito eléctrico
separado de otros electrodomésticos.
19105, 19106, 19107, 19108, 19128 BTFL Immersion Blender IM r5.indd 3019105, 19106, 19107, 19108, 19128 BTFL Immersion Blender IM r5.indd 30 2021-12-13 9:17 AM2021-12-13 9:17 AM

Sección 2
Instrucciones
2
19105, 19106, 19107, 19108, 19128 BTFL Immersion Blender IM r5.indd 3119105, 19106, 19107, 19108, 19128 BTFL Immersion Blender IM r5.indd 31 2021-12-13 9:17 AM2021-12-13 9:17 AM
32
Conozca su licuadora de mano
El producto puede diferir ligeramente del que aparece en las ilustraciones.
2
3
4
5
6
1
7
8
9
10
11
12
19105, 19106, 19107, 19108, 19128 BTFL Immersion Blender IM r5.indd 3219105, 19106, 19107, 19108, 19128 BTFL Immersion Blender IM r5.indd 32 2021-12-13 9:17 AM2021-12-13 9:17 AM

33
1. Cable eléctrico extralargo de 5 pies. Le permite mezclar sopas y salsas
directamente en la cacerola.
2. Botón de BAJA velocidad (
). Presione y suelte rápidamente para PULSAR.
Mantenga pulsado el botón para una acción continua. Cuando se suelta el
botón, el procesamiento se DETENDRÁ.
3. Botón de ALTA velocidad (
). Presione y suelte rápidamente para
PULSAR. Mantenga presionado para una acción continua de alta velocidad.
Cuando se suelta el botón, el procesamiento se DETENDRÁ.
4. Cuerpo del motor con mango ergonómico. Fácil de agarrar.
5. Eje de acero inoxidable de 8 pulgadas para llegar al interior de
recipientes profundos.
6. Cuchilla de licuadora de acero inoxidable con protector de cuchilla. La
carcasa de acero inoxidable cubre parcialmente la hoja y mantiene las
salpicaduras al mínimo.
7. Collar para accesorio con muescas. Alinee las muescas para un ajuste
apretado y seguro al cuerpo del motor. Utilizar para jar el batidor y
el cortador.
8. Tapa del recipiente para cortar. Se adapta y se monta fácilmente en el
recipiente para cortar.
9. Cuchilla en forma de “S” para cortar/triturar con vástago. Corta, pica y
tritura con facilidad.
ADVERTENCIA: ¡La cuchilla en forma de “S” está alada! Manipule siempre
la cuchilla en forma de “S” por su vástago.
10. Recipiente de cortar de 2 1/2 tazas/20 oz.
11. Taza medidora de 3 tazas/24 oz. Apto para microondas y lavavajillas.
Utilizar para mezclar bebidas, batidos, aderezos para ensaladas, claras
de huevo y otros. Diseñado para un fácil agarre y un vertido sin goteo.
12. Accesorio para batir. Utilizar para batir nata y claras de huevo.
19105, 19106, 19107, 19108, 19128 BTFL Immersion Blender IM r5.indd 3319105, 19106, 19107, 19108, 19128 BTFL Immersion Blender IM r5.indd 33 2021-12-13 9:17 AM2021-12-13 9:17 AM

34
Antes del primer uso
1. Lea atentamente todas las instrucciones de funcionamiento.
2. Desembale con cuidado las piezas y los accesorios de la licuadora de
mano. Quite todos los materiales de embalaje y las etiquetas de las
supercies exteriores.
PRECAUCIÓN: Las cuchillas están AFILADAS. Manipule con cuidado la cuchilla
mezcladora de acero inoxidable para mezclar. No coloque los dedos dentro del
protector de la cuchilla.
PRECAUCIÓN: Siempre manipule el accesorio de la cuchilla en forma de “S” para
cortar/triturar por el vástago de la cuchilla para montarla, desmontarla o
lavarla.
3. Limpie el cuerpo del motor de la licuadora de mano con un paño limpio
y húmedo para eliminar la suciedad o el polvo. Seque bien con un paño
absorbente suave. Manipule con cuidado.
4. Lave el eje de acero inoxidable, el recipiente de cortar, la tapa del
recipiente de cortar, la cuchilla en forma de “S” para cortar/triturar,
el collar para accesorio, el accesorio para batir y la jarra a mano o en
la rejilla superior de su lavavajillas.
5. Seque bien antes de usar.
PRECAUCIÓN: Para protegerse contra descargas eléctricas, NUNCA sumerja el
cuerpo del motor de la licuadora de mano ni permita que el cable entre
en contacto con agua u otros líquidos.
19105, 19106, 19107, 19108, 19128 BTFL Immersion Blender IM r5.indd 3419105, 19106, 19107, 19108, 19128 BTFL Immersion Blender IM r5.indd 34 2021-12-13 9:17 AM2021-12-13 9:17 AM

35
Funcionamiento
Ensamblaje del accesorio de la cuchilla de la licuadora (Figura 1)
1. Coloque el cuerpo del motor y el eje de acero inoxidable de 8 pulgadas
en un área de trabajo plana y limpia.
2. Alinee la echa (
) en el cuerpo del motor con el icono de DESBLOQUEO
(
) del eje de acero inoxidable de la cuchilla de la licuadora
de 8 pulgadas.
3. Gire el eje a las agujas del reloj hasta que el icono de BLOQUEO (
)
esté directamente debajo de la echa (
) y ambas piezas estén
bloqueadas juntas.
4. Enchufe el cable de alimentación en un tomacorriente de pared de
120 V CA.
NOTA: El cable eléctrico extralargo de 5 pies le permite mezclar sopas
y salsas directamente en la cacerola.
IMPORTANTE: Para evitar salpicaduras y el procesamiento excesivo,
comience a BAJA velocidad (
), luego aumente la velocidad a ALTA ( )
según sea necesario.
5. Coloque los alimentos que se van a procesar adentro de la jarra o en
cualquier recipiente alto para cocinar o mezclar.
6. Inserte el eje de licuado hasta el fondo del recipiente. Licue los
ingredientes con un movimiento suave de elevación y descenso.
7. Presione y suelte rápidamente cualquiera de los botones de velocidad para
realizar la acción de PULSAR.
8. Mantenga presionado el botón de BAJA velocidad (
) para comenzar a
licuar. Cuando se suelta el botón, se DETENDRÁ la licuadora.
9. Para una velocidad rápida constante, mantenga presionado el botón de
velocidad ALTA (
).
10. Cuando se suelta el botón, la licuadora de mano se apagará.
IMPORTANTE: Si los alimentos se pegan alrededor de la cuchilla o el
protector de la cuchilla, suelte el botón de velocidad y desenchufe
la licuadora de mano. Gire para desbloquear y quitar el eje de acero
19105, 19106, 19107, 19108, 19128 BTFL Immersion Blender IM r5.indd 3519105, 19106, 19107, 19108, 19128 BTFL Immersion Blender IM r5.indd 35 2021-12-13 9:17 AM2021-12-13 9:17 AM

36
inoxidable del cuerpo del motor. Use un cepillo de cocina para limpiar
los restos y enjuague bien con agua corriente. Ensamble la unidad y
continúe procesando.
11. Cuando el procesamiento esté completo y las cuchillas estén completamente
detenidas, saque la licuadora de mano de la jarra de inmersión o del
recipiente de batir.
Con el
eje de acero inoxidable con cuchilla licuadora en una mano, y el cuerpo
del motor en la otra, gire la echa ( ) en el cuerpo del motor en
sentido antihorario hasta que se alinee con el icono DESBLOQUEAR (
)
y quite el eje de acero inoxidable.
ADVERTENCIA: Para evitar salpicaduras, asegúrese de que la cuchilla se
haya detenido por completo.
12. Desenchufe la licuadora de mano del tomacorriente cuando no esté en uso
y antes de limpiarla.
Licuadora de mano: Para obtener resultados Beautiful
• Para evitar el procesamiento excesivo, suelte el botón de velocidad y
verique periódicamente la consistencia de los alimentos.
• NUNCA procese líquidos hirviendo. SIEMPRE quite la cacerola del fuego
antes de licuar. Los alimentos deben enfriarse un poco antes de
licuarlos.
• El cable eléctrico largo y el eje largo de 8 pulgadas le permiten
procesar los ingredientes directamente en la cacerola. Esto hace que
mezclar sopas y salsas sea muy fácil.
• Corte los alimentos en trozos de tamaño uniforme para asegurar
resultados consistentemente blandos mientras hace puré y licúa.
• Los líquidos que se agregarán a las sopas y purés deben estar tibios
para garantizar una mezcla uniforme.
• ADVERTENCIA: Esta licuadora de mano no está diseñada para funcionar
de forma continua durante más de 1 minuto. Deje que el motor descanse
durante 1 minuto antes de continuar.
• Cuando procese mezclas secas, espesas o concentradas, nunca mezcle
durante más de 15 segundos. Deje de procesar los ingredientes y revuelva
a mano antes de continuar.
19105, 19106, 19107, 19108, 19128 BTFL Immersion Blender IM r5.indd 3619105, 19106, 19107, 19108, 19128 BTFL Immersion Blender IM r5.indd 36 2021-12-13 9:17 AM2021-12-13 9:17 AM

37
• NO coloque el eje de acero inoxidable en el recipiente de la cortadora
para procesar ingredientes.
Ensamblaje del accesorio de cortar (Figura 2)
1. Coloque el cuerpo del motor, el collar para accesorio y el batidor en un
área de trabajo plana y limpia.
2. Inserte el vástago del batidor en el collar para accesorio. Presione
rmemente hasta que el batidor quede bloqueado en el collar.
3. Alinee la echa (
) en el cuerpo del motor con el icono de DESBLOQUEO
(
) del collar para accesorio.
4. Gire el eje a las agujas del reloj hasta que el icono de BLOQUEO (
) esté directamente debajo de la echa ( ) y ambas piezas estén
bloqueadas juntas.
5. Enchufe el cable de alimentación en un tomacorriente de pared de 120 V
CA.
IMPORTANTE: Para evitar salpicaduras y el procesamiento excesivo,
comience a BAJA velocidad (
), luego aumente la velocidad a ALTA ( )
según sea necesario.
6. Coloque los alimentos que se van a procesar adentro de la jarra o en
cualquier recipiente alto para cocinar o mezclar.
7. Inserte el accesorio para batir de modo que roce la supercie de los
ingredientes.
8. Presione y suelte rápidamente cualquiera de los botones de velocidad
para realizar la acción de PULSAR.
9. Mantenga presionado el botón de BAJA velocidad (
) para mezclar a
velocidades más lentas. Cuando se suelta el botón, se DETENDRÁ la
licuadora. Aumente el ajuste de velocidad según sea necesario.
10. Para una velocidad rápida constante, mantenga presionado el botón de
velocidad ALTA (
). Licue los ingredientes con un movimiento suave de
elevación y descenso.
11. Cuando se suelta el botón, la licuadora de mano se apagará.
12. Cuando el procesamiento esté completo y el batidor se haya detenido por
completo, saque el accesorio batidor de la jarra o recipiente de batir.
Con el collar con accesorio para batir en una mano y el cuerpo del
motor en la otra, gire la echa (
) en el cuerpo del motor en sentido
19105, 19106, 19107, 19108, 19128 BTFL Immersion Blender IM r5.indd 3719105, 19106, 19107, 19108, 19128 BTFL Immersion Blender IM r5.indd 37 2021-12-13 9:17 AM2021-12-13 9:17 AM

38
antihorario hasta que se alinee con el icono DESBLOQUEAR ( ) y quite
el collar con accesorio para batir, y luego saque el accesorio para
batir del collar para separar el accesorio para batir.
ADVERTENCIA: Para evitar salpicaduras, asegúrese de que el batidor se
haya detenido por completo.
13. Desenchufe la licuadora de mano del tomacorriente cuando no esté en uso
y antes de limpiarla.
Batidor: Para obtener resultados Beautiful
• Use un recipiente lo sucientemente profundo y ancho con espacio para
mover el batidor a través de los ingredientes.
• Para mantener estable el recipiente para mezclar, coloque el mismo sobre
un paño húmedo al batir.
• Para evitar dañar el accesorio batidor, no permita que el batidor
golpee el fondo o los lados del recipiente para mezclar mientras usa el
batidor.
• Utilice siempre nata fresca y huevos frescos a temperatura ambiente para
lograr un volumen mayor y más estable al batir.
• Use el accesorio para batir a velocidades más bajas para batir huevos
para cocinar huevos revueltos o tortillas esponjosas.
• Utilice siempre el accesorio para batir a la máxima velocidad al batir
claras de huevo y crema fría.
• Para asegurar la mejor crema batida, enfríe tanto el recipiente de
vidrio o metal como el accesorio para batir.
• Use un recipiente hondo con fondo redondeado para batir la crema fría.
Sostenga el accesorio para batir de manera que roce la supercie; batir
hasta que la crema comience a espesarse. Sumerja el batidor totalmente
en la nata.
• Para evitar que la crema batida se “rompa”, agregue un estabilizador de
crema batida como pudín instantáneo o Oetker®Whip It.™
• No intente hacer merengues de clara de huevo en un día lluvioso o muy
húmedo.
• Siempre asegúrese de que el batidor y el tazón para mezclar estén
completamente limpios y sin grasa antes de batir las claras de huevo.
19105, 19106, 19107, 19108, 19128 BTFL Immersion Blender IM r5.indd 3819105, 19106, 19107, 19108, 19128 BTFL Immersion Blender IM r5.indd 38 2021-12-13 9:17 AM2021-12-13 9:17 AM

39
• Para ayudar a estabilizar las claras de huevo, agregue 1/8 de
cucharadita de crémor tártaro por clara de huevo antes de batir.
(Si usa un recipiente de cobre, omita el crémor tártaro).
• Batir las claras de huevo hasta que se formen picos suaves; luego
agregue el azúcar muy lentamente. No batir demasiado.
Ensamblaje del accesorio para cortar (Figura 3)
1. Coloque el recipiente de cortar, la cuchilla en forma de “S” para
cortar/triturar y la tapa del recipiente de cortar en un área de trabajo
plana y limpia.
2. Monte el centro de la cuchilla en forma de “S” para cortar/triturar en
el pasador central del recipiente de cortar.
3. Agregue los alimentos que se procesarán en el recipiente de cortar.
4. Póngale la tapa al recipiente de cortar. Asegúrese de que el centro del
terminal eléctrico de la cuchilla en forma de "S" encaje de forma segura
en el vástago de la cuchilla en forma de "S".
5. Antes de montar el collar base en el ensamblaje de corte, mantenga el
terminal eléctrico de la cuchilla en forma de "S" vertical.
6. Alinee la echa (
) en el cuerpo del motor con el icono de DESBLOQUEO
(
) del collar para accesorio.
7. Gire el eje a las agujas del reloj hasta que el icono de BLOQUEO (
) esté directamente debajo de la echa ( ) y ambas piezas estén
bloqueadas juntas.
8. Inserte el terminal eléctrico de la cuchilla en forma de "S" en el
collar base. Alinee las muescas para que queden bien ajustadas. Presione
y acople el collar base al ensamblaje de corte.
9. Enchufe el cable de alimentación en un tomacorriente de pared de 120 V
CA.
IMPORTANTE: Para evitar el procesamiento excesivo, presione y suelte
rápidamente cualquiera de los botones de velocidad para realizar la
acción de PULSAR.
10. Mantenga presionado el botón de velocidad BAJA (
) para cortar a
velocidades más lentas. Cuando se suelta el botón, el corte se DETENDRÁ.
Aumente el ajuste de velocidad según sea necesario.
19105, 19106, 19107, 19108, 19128 BTFL Immersion Blender IM r5.indd 3919105, 19106, 19107, 19108, 19128 BTFL Immersion Blender IM r5.indd 39 2021-12-13 9:17 AM2021-12-13 9:17 AM

40
11. Para una velocidad rápida constante, mantenga presionado el botón de
velocidad ALTA ( ).
12. Cuando se suelta el botón, levante el cuerpo del motor y el collar
para accesorio, y luego levante y retire la tapa. Con el collar para
accesorio en una mano y el cuerpo del motor en la otra, gire la echa (
) en el cuerpo del motor en sentido antihorario hasta que se alinee
con el icono DESBLOQUEAR (
) y quite el collar para accesorio.
13. Desenchufe la licuadora de mano del tomacorriente cuando no esté en uso
y antes de limpiarla.
Cortador: Para obtener resultados Beautiful
• Congele las carnes o pescados parcialmente antes de procesarlos para
asegurar que se obtengan trozos cortados (no pulverizados).
• Para evitar dañar la cuchilla en forma de “S” para cortar/triturar no
pique ni triture cosas duras como alimentos congelados, hielo, nuez
moscada, especias duras, arroz crudo, barras de chocolate o granos de
café.
• Para evitar el procesamiento excesivo, suelte el botón de velocidad y
verique la consistencia de los alimentos periódicamente.
• Aunque las patas antideslizantes del recipiente de cortar ayudarán a
estabilizar el mismo durante el corte, se recomienda que al cortar es
mejor sujetar el mango del cuerpo del motor con una mano y sujetar el
recipiente con la otra mano.
• NUNCA procese líquidos hirviendo o alimentos extremadamente calientes en
el recipiente de cortar.
• Corte los alimentos en trozos de tamaño uniforme para asegurar
resultados consistentemente blandos mientras hace puré y licúa.
• No opere el accesorio de cortar de forma continua durante más de 1
minuto. Deje que el motor descanse durante 1 minuto entre cada uso.
19105, 19106, 19107, 19108, 19128 BTFL Immersion Blender IM r5.indd 4019105, 19106, 19107, 19108, 19128 BTFL Immersion Blender IM r5.indd 40 2021-12-13 9:17 AM2021-12-13 9:17 AM
41
Ensamblaje de licuadora de mano
Fig. 1 Fig. 2 Fig. 3
Botón BAJA (I)
Botón ALTA (II)
Cuerpo del
motor
Eje de acero
inoxidable de
8 pulgadas
Cuchilla
licuadora
Jarra con
pico
Botón BAJA (I)
Botón ALTA (II)
Cuerpo del
motor
Collar para
accesorio
Muesca
Accesorio
para batir
Jarra con
pico
Botón BAJA (I)
Botón ALTA (II)
Cuerpo del
motor
Collar para
accesorio
Muesca
Tapa del
recipiente
de cortar
Conector de
cuchilla en "S"
Vástago de la
cuchilla en "S"
Cortar/triturar
de la cuchilla
en "S"
Recipiente
para cortar
19105, 19106, 19107, 19108, 19128 BTFL Immersion Blender IM r5.indd 4119105, 19106, 19107, 19108, 19128 BTFL Immersion Blender IM r5.indd 41 2021-12-13 9:17 AM2021-12-13 9:17 AM

42
Instrucciones de mantenimiento para el usuario
Este electrodoméstico necesita poco mantenimiento. No contiene piezas que el
usuario pueda reparar. Cualquier tipo de mantenimiento, aparte de la limpieza,
que requiera desarmar el aparato, debe ser realizado por un técnico calicado
que repare electrodomésticos.
Instrucciones de limpieza y cuidado
PRECAUCIÓN: Nunca sumerja la base del motor, el enchufe o el cable en agua ni en
ningún otro líquido.
NOTA: No deje en remojo el pie procesador desmontable o el collar base porque se
puede remover el lubricante de los engranajes y los rodamientos.
1. Desenchufe siempre la licuadora de mano antes de limpiarla.
2. Licuadora de mano: Enjuague el eje de acero inoxidable de 8 pulgadas con
agua corriente tibia después de cada uso.
3. Si se pegan restos de comida alrededor de la cuchilla de licuar o del
protector de la cuchilla, sumerja la cuchilla de licuar en un recipiente
grande con agua y continúe licuando.
4. Si esto no elimina los restos de comida, suelte el botón de velocidad y
desenchufe la licuadora de mano. Gire para desbloquear y quitar el eje
de acero inoxidable del cuerpo del motor. Use un cepillo de cocina para
limpiar los restos y enjuague bien con agua corriente.
PRECAUCIÓN: ¡LA CUCHILLA ESTÁ AFILADA! No coloque los dedos cerca la
cuchilla.
5. Accesorio para batir: Enjuague el accesorio para batir con agua
corriente tibia después de cada uso.
6. Gírelo para desbloquear y quitar el collar para accesorio. Sujete
rmemente y tire para quitar el accesorio batidor. Enjuague el batidor
con agua corriente.
7. Accesorio de cortar: Desbloquee y quite la tapa del recipiente de
cortar; levante con cuidado la cuchilla en forma de “S” para cortar/
triturar por el vástago hacia arriba y quite del pasador central. Limpie
la cuchilla con un cepillo de cocina.
8. Enjuague la cuchilla en forma de “S” para cortar/triturar, el recipiente
19105, 19106, 19107, 19108, 19128 BTFL Immersion Blender IM r5.indd 4219105, 19106, 19107, 19108, 19128 BTFL Immersion Blender IM r5.indd 42 2021-12-13 9:17 AM2021-12-13 9:17 AM

43
de cortar y la tapa con agua corriente después de cada uso.
9. El eje de acero inoxidable de 8 pulgadas, el accesorio para batir, el
recipiente de cortar, la tapa del recipiente de cortar, la cuchilla en
"S" y la jarra son aptos para el lavavajillas en la rejilla superior.
10. Limpie el cuerpo del motor con un paño húmedo o una esponja. Seque bien.
ADVERTENCIA: NO SUMERJA EL CUERPO DEL MOTOR EN AGUA.
Instrucciones de almacenamiento
1. Desenchufe y limpie la licuadora de mano y todas las piezas y
accesorios.
2. Nunca enrolle el cable con fuerza alrededor del aparato. Nunca ejerza
tensión sobre el cable, especialmente donde el cable entra en la base de
alimentación, ya que esto podría hacer que el cable se deshilache y se
rompa.
3. Monte el cuerpo de la licuadora de mano en el eje de acero inoxidable
de 8 pulgadas. Bloquee el accesorio para batir en el collar para
accesorio. Ensamble el recipiente de cortar, la cuchilla en forma de
“S” para cortar/triturar y la tapa del recipiente para cortar siguiendo
los procedimientos detallados anteriormente descritos en este manual de
instrucciones.
4. Guarde la licuadora de mano y los accesorios en su caja original o en un
lugar limpio y seco.
19105, 19106, 19107, 19108, 19128 BTFL Immersion Blender IM r5.indd 4319105, 19106, 19107, 19108, 19128 BTFL Immersion Blender IM r5.indd 43 2021-12-13 9:17 AM2021-12-13 9:17 AM

44
Garantía limitada de dos años
Mediante la presente, Sensio Inc.
dba Made by Gather™. garantiza que,
durante el plazo de DOS AÑOS a partir
de la fecha de compra, este producto
no presentará defectos mecánicos en
el material ni en la mano de obra, y
durante 90 días, no los presentará en
las piezas no mecánicas. A su entera
discreción, Sensio Inc. dba Made by
Gather™ que resulte defectuoso, o
emitirá un reembolso por el producto
durante el plazo de garantía.
Esta garantía es válida únicamente
para el comprador minorista
original a partir de la fecha de
compra minorista inicial y no es
transferible. Conserve el recibo
de compra original, ya que se exige
una prueba de compra para obtener
la validación de la garantía. Las
tiendas minoristas no tienen derecho
a alterar, modicar ni corregir
de ninguna manera los términos y
condiciones de la garantía.
Exclusiones:
La garantía no cubre el desgaste
normal de las piezas ni el daño
ocasionado por cualquiera de las
siguientes causas: uso negligente
del producto, uso de un voltaje o
corriente incorrectos, mantenimiento
de rutina inadecuado, uso
contrario al de las instrucciones
de funcionamiento, desarmado,
reparación o alteración a cargo
de personas que no sean miembros
del personal calicado de Sensio
Inc. dba Made by Gather™ Asimismo,
la garantía no cubre actos de
la naturaleza, como incendios,
inundaciones, huracanes o tornados.
Sensio Inc. dba Made by Gather™
no asumirá responsabilidad por
daños incidentales o resultantes
ocasionados por la violación
de cualquier garantía expresa
o implícita. Salvo en la medida
en que lo prohíban las leyes
aplicables, cualquier garantía
implícita de comerciabilidad o
aptitud para un propósito particular
se limita temporalmente a la
duración de la garantía. Algunos
estados, provincias o jurisdicciones
no permiten la exclusión ni la
limitación de daños incidentales
o resultantes, o limitaciones
sobre la duración de una garantía
implícita y, por lo tanto, es posible
que las exclusiones o limitaciones
mencionadas no le correspondan.
La garantía cubre derechos legales
especícos que pueden variar de
un estado, una provincia o una
jurisdicción a otros.
19105, 19106, 19107, 19108, 19128 BTFL Immersion Blender IM r5.indd 4419105, 19106, 19107, 19108, 19128 BTFL Immersion Blender IM r5.indd 44 2021-12-13 9:17 AM2021-12-13 9:17 AM

45
Cómo obtener el servicio de garantía
Debe comunicarse con el Servicio
de atención al cliente a nuestro
número telefónico gratuito:
1-877-775-3564. Un representante
del Servicio de atención al cliente
intentará resolver los problemas
referidos a la garantía por
teléfono. Si este no puede resolver
el problema, le proporcionarán un
número de caso y le solicitarán que
devuelva el producto a Sensio Inc.
dba Made by Gather™ Adhiera una
etiqueta al producto que incluya:
su nombre, dirección, número
telefónico de contacto durante el
día, número de caso y descripción
del problema. Además, incluya una
copia del recibo de compra original.
Envuelva cuidadosamente el producto
etiquetado con el recibo de compra,
y envíelo (con el envío y el seguro
prepagados) a la dirección de Sensio
Inc. dba Made by Gather™. Sensio
Inc. dba Made by Gather™ no asumirá
obligación ni responsabilidad alguna
por el producto devuelto que esté
en el trayecto hacia el Centro de
servicio al cliente de Sensio Inc.
dba Made by Gather™
19105, 19106, 19107, 19108, 19128 BTFL Immersion Blender IM r5.indd 4519105, 19106, 19107, 19108, 19128 BTFL Immersion Blender IM r5.indd 45 2021-12-13 9:17 AM2021-12-13 9:17 AM

19105, 19106, 19107, 19108, 19128 BTFL Immersion Blender IM r5.indd 4619105, 19106, 19107, 19108, 19128 BTFL Immersion Blender IM r5.indd 46 2021-12-13 9:17 AM2021-12-13 9:17 AM

19105, 19106, 19107, 19108, 19128 BTFL Immersion Blender IM r5.indd 4719105, 19106, 19107, 19108, 19128 BTFL Immersion Blender IM r5.indd 47 2021-12-13 9:17 AM2021-12-13 9:17 AM

INSIDE back cover
19105, 19106, 19107, 19108, 19128 BTFL Immersion Blender IM r5.indd 4819105, 19106, 19107, 19108, 19128 BTFL Immersion Blender IM r5.indd 48 2021-12-13 9:17 AM2021-12-13 9:17 AM

INSIDE back cover
19105, 19106, 19107, 19108, 19128 BTFL Immersion Blender IM r5.indd 4919105, 19106, 19107, 19108, 19128 BTFL Immersion Blender IM r5.indd 49 2021-12-13 9:17 AM2021-12-13 9:17 AM

BACK CoverBACK Cover
19105, 19106, 19107, 19108, 19128 BTFL Immersion Blender IM r5.indd 5019105, 19106, 19107, 19108, 19128 BTFL Immersion Blender IM r5.indd 50 2021-12-13 9:17 AM2021-12-13 9:17 AM