
www.philips.com/welcome
CRD50
V2.00
User Manual (English)

ii
Safety Instructions
Safety precautions and maintenance
WARNING: Use of controls, adjustments or procedures other than those specied in this documentation may result in exposure to
shock, electrical hazards and/or mechanical hazards.
Read and follow these instructions when connecting and using your OPS Module:
Operation:
• KeeptheOPSModuleoutofdirectsunlightandawayfromstovesoranyotherheatsources.
• RemoveanyobjectthatcouldfallintoventilationholesorpreventpropercoolingoftheOPSModule’selectronics.
• Donotblocktheventilationholesonthecabinet.
• WhenpositioningtheOPSModule,makesurethepowerplugandoutletareeasilyaccessible.
• WhenturningofftheOPSModulebydetachingthepowercord,wait6secondsbeforere-attachingthepowercordfornormaloperation.
• EnsuretheuseofanapprovedpowercordprovidedbyPhilipsatalltimes.Ifyourpowercordismissing,pleasecontactyourlocalservicecenter.
• DonotsubjecttheOPSModuletoseverevibrationorhighimpactconditionsduringoperation.
• DonotknockordroptheOPSModuleduringoperationortransportation.
• Fordoorsorcoversintendedtoberemovedbyoperatorforinstallationofaccessorydevices.Instructionsshallbeprovidedforthecorrectremoval
andreinstallationofthedoor.
Maintenance:
• UnplugtheOPSModuleifyouarenotgoingtouseitforanextensiveperiodoftime.
• UnplugtheOPSModuleifyouneedtocleanitwithaslightlydampcloth.Thescreenmaybewipedwithadryclothwhenthepowerisoff.However,
neveruseorganicsolvent,suchas,alcohol,orammonia-basedliquidstocleanyourOPSModule.
• Toavoidtheriskofshockorpermanentdamagetotheset,donotexposetheOPSModuletodust,rain,wateroranexcessivelymoistenvironment.
• IfyourOPSModulebecomeswet,wipeitwithdryclothassoonaspossible.
• IfaforeignsubstanceorwatergetsinyourOPSModule,turnthepoweroffimmediatelyanddisconnectthepowercord.Thenremovetheforeign
substanceorwater,andsendtheunittothemaintenancecenter.
• DonotstoreorusetheOPSModuleinlocationsexposedtoheat,directsunlightorextremecold.
• InordertomaintainthebestperformanceofyourOPSModuleandensurealongerlifetime,westronglyrecommendusingtheOPSModuleina
locationthatfallswithinthefollowingtemperatureandhumidityranges.
- Temperature:0-40°C32-104°F
- Humidity:20-80%RH
Service:
• Thecasingcovershouldbeopenedonlybyqualiedservicepersonnel.
• Ifthereisanyneedforrepairorintegration,pleasecontactyourlocalservicecenter.
• DonotleaveyourOPSModuleunderdirectsunlight.
IfyourOPSModuledoesnotoperatenormally,havingfollowedtheinstructionssetoutinthisdocument,pleasecontactatechnicianor
yourlocalservicecenter.

iii
Read and follow these instructions when connecting and using your OPS Module:
• UnplugtheOPSModuleifyouarenotgoingtouseitforanextensiveperiodoftime.
• UnplugtheOPSModuleifyouneedtocleanitwithaslightlydampcloth.Thescreenmanybewipedwithadryclothwhenthe
powerisoff.However,neverusealcohol,solventsorammonia-basedliquids.
• ConsultaservicetechnicianiftheOPSModuledoesnotoperatenormallywhenyouhavefollowedtheinstructionsinthismanual.
• Thecasingcovershouldbeopenedonlybyqualiedservicepersonnel.
• KeeptheOPSModuleoutofdirectsunlightandawayfromstovesoranyotherheatsources.
• RemoveanyobjectthatcouldfallintotheventsorpreventpropercoolingoftheOPSModule’selectronics.
• Donotblocktheventilationholesonthecabinet.
• KeeptheOPSModuledry.Toavoidelectricshock,donotexposeittorainorexcessivemoisture.
• WhenturningofftheOPSModulebydetachingthepowercableorDCpowercord,waitfor6secondsbeforere-attachingthe
powercableorDCpowercordfornormaloperation.
• ToavoidtheriskofshockorpermanentdamagetothesetdonotexposetheOPSModuletorainorexcessivemoisture.
• WhenpositioningtheOPSModule,makesurethepowerplugandoutletareeasilyaccessible.
EU Declaration of Conformity
ThisdevicecomplieswiththerequirementssetoutintheCouncilDirectiveontheApproximationoftheLawsoftheMemberStatesrelatingto
ElectromagneticCompatibility(2014/30/EU),Low-voltageDirective(2014/35/EU),RoHSdirective(2011/65/EU)andRadioEquipmentDirective(2014/53/
EU).
ThisproducthasbeentestedandfoundtocomplywiththeharmonizedstandardsforInformationTechnologyEquipment,theseharmonizedstandards
publishedunderDirectivesofOfcialJournaloftheEuropeanUnion.
Warning:
ThisequipmentiscompliantwithClassAofEN55032/CISPR32.Inaresidentialenvironmentthisequipmentmaycauseradiointerference.
Federal Communications Commission (FCC) Notice (U.S. Only)
NOTE:ThisequipmenthasbeentestedandfoundtocomplywiththelimitsforaClassAdigitaldevice,pursuanttopart15ofthe
FCCRules.Theselimitsaredesignedtoprovidereasonableprotectionagainstharmfulinterferencewhentheequipmentisoperated
inacommercialenvironment.Thisequipmentgenerates,uses,andcanradiateradiofrequencyenergyand,ifnotinstalledandusedin
accordancewiththeinstructionmanual,maycauseharmfulinterferencetoradiocommunications.Operationofthisequipmentina
residentialareaislikelytocauseharmfulinterferenceinwhichcasetheuserwillberequiredtocorrecttheinterferenceathisown
expense.
Changesormodicationsnotexpresslyapprovedbythepartyresponsibleforcompliancecouldvoidtheuser’sauthoritytooperatethe
equipment.
UseonlyanRFshieldedcablethatwassuppliedwiththedisplaywhenconnectingthisdisplaytoacomputerdevice.
Topreventdamagewhichmayresultinreorshockhazard,donotexposethisappliancetorainorexcessivemoisture.
ThisdevicecomplieswithPart15oftheFCCRules.Operationissubjecttothefollowingtwoconditions:(1)Thisdevicemaynotcauseharmful
interference,and(2)thisdevicemustacceptanyinterferencereceived,includinginterferencethatmaycauseundesiredoperation.
iv
Polish Center for Testing and Certication Notice
Theequipmentshoulddrawpowerfromasocketwithanattachedprotectioncircuit(athree-prongsocket).Allequipmentthatworkstogether(computer,
display,printer,andsoon)shouldhavethesamepowersupplysource.
Thephasingconductoroftheroom’selectricalinstallationshouldhaveareserveshort-circuitprotectiondeviceintheformofafusewithanominalvalue
nolargerthan16amperes(A).
Tocompletelyswitchofftheequipment,thepowersupplycablemustberemovedfromthepowersupplysocket,whichshouldbelocatednearthe
equipmentandeasilyaccessible.
Aprotectionmark“B”conrmsthattheequipmentisincompliancewiththeprotectionusagerequirementsofstandardsPN-93/T-42107andPN-89/
E-06251.
Electric, Magnetic and Electromagnetic Fields (“EMF”)
1. Wemanufactureandsellmanyproductstargetedatconsumers,which,likeanyelectronicapparatus,ingeneralhavetheabilitytoemitandreceive
electromagneticsignals.
2. OneofourleadingBusinessPrinciplesistotakeallnecessaryhealthandsafetymeasuresforourproducts,tocomplywithallapplicablelegal
requirementsandtostaywellwithintheEMFstandardsapplicableatthetimeofproducingtheproducts.
3. Wearecommittedtodevelop,produceandmarketproductsthatcausenoadversehealtheffects.
4. Weconrmthatifitsproductsarehandledproperlyfortheirintendeduse,theyaresafetouseaccordingtoscienticevidenceavailabletoday.
5. WeplayanactiveroleinthedevelopmentofinternationalEMFandsafetystandards,enablingustoanticipatefurtherdevelopmentsinstandardization
forearlyintegrationinitsproducts.

v
North Europe (Nordic Countries) Information
Placering/Ventilation
VARNING:
FÖRSÄKRADIGOMATTHUVUDBRYTAREOCHUTTAGÄRLÄTÅTKOMLIGA,NÄRDUSTÄLLERDINUTRUSTNINGPÅPLATS.
Placering/Ventilation
ADVARSEL:
SØRGVEDPLACERINGENFOR,ATNETLEDNINGENSSTIKOGSTIKKONTAKTERNEMTTILGÆNGELIGE.
Paikka/Ilmankierto
VAROITUS:
SIJOITALAITESITEN,ETTÄVERKKOJOHTOVOIDAANTARVITTAESSAHELPOSTIIRROTTAAPISTORASIASTA.
Plassering/Ventilasjon
ADVARSEL:
NÅRDETTEUTSTYRETPLASSERES,MÅDUPASSEPÅATKONTAKTENEFORSTØMTILFØRSELERLETTEÅNÅ.
China RoHS
电子电气产品有害物质限制使用标识要求 (中国Ro
HS法规标识要求) 产品中有害物质的名称及含量。
零部件名称
有害物质
铅
(Pb)
汞
(Hg)
镉
(Cd)
六价铬
(Cr (VI))
多溴联苯
(PBB)
多溴二苯醚
(PBDE)
塑料外框 O O O O O O
后壳 O O O O O O
电路板组件* X O O O O O
其他线材 X O O O O O
*:电路板组件包括印刷电路板及其构成的零部件,如电阻、电容、集成电路、连接器等。
本表格依据SJ/T 11364的规定编制。
O: 表示该有害物质在该部件所有均质材料中的含量均在
GB/T 26572 标准规定的限量要求以下.
X: 表示该有害物质至少在该部件的某一均质材料中的含量超出
GB/T 26572 标准规定的限量要求.
上 表 中 打“ X”
的部件中,应功能需要,部分有害物质含量超出GB/T 26572规定的限量要求,但是符合欧盟
RoHS法规要求(属于豁免部分)。
备注:上表仅做为范例,实际标示时应依照各产品的实际部件及所含有害物质进行标示。

vi
10
環保使用期限
此標識指期限(十年),電子电气產品中含有的有害物質在正常使用的條件下不會發生外泄或突變,
電子电气產品用戶使用該電子电气產品不會對環境造成嚴重污染或對其人身、財產造成嚴重損害的期限。
《废弃电器电子产品回收处理管理条例》提示性说明
为了更好地关爱及保护地球,当用户不再需要此产品或产品寿命终止时,请遵守国家废弃电器电子产品
回收处理相关法律法规,将其交给当地具有国家认可的回收处理资质的厂商进行回收处理。
娤⌈
㨢᳸$䵥ᵥ⍿Ʋ◦䏝㯹䉭❁ᳫ濕媣ᵥ⍿⊭侻廞ノ㒞䵽䏳ⴰㄮƲ◦店䢋⾃濕⊭侻斾堿䏦ヵ
⪷ⴰㄮ悅⊔⩜⊭圊䕂㉨㑻Ʋ
單元
限用物質及其化學符號
鉛
(Pb)
汞
(Hg)
鎘
(Cd)
六價鉻
(Cr
+6
)
多溴聯苯
(PBB)
多溴二苯醚
(PBDE)
塑料外框 ○ ○ ○ ○ ○ ○
後殼 ○ ○ ○ ○ ○ ○
電路板組件
-
○
○
○
○
○
其他線材 - ○ ○ ○ ○ ○
備考1.〝○〞係指該項限用物質之百分比含量未超出百分比含量基準值。
備考2.〝-〞係指該項限用物質為排除項目。
警語 : 使用過度恐傷害視力。
注意事項 :
(1) 使用30分鐘請休息10分鐘。
(2) 未滿2歲幼兒不看螢幕,2歲以上每天看螢幕不要超過1小時。
警告使用者 :
此為甲類資訊技術設備 , 於居住環境中使用時 , 可能會造成射頻擾動 , 在此種情況下 , 使用者會被要
求採取某些適當的對策。
vii
Turkey RoHS:
TürkiyeCumhuriyeti:EEEYönetmeliğineUygundur
Ukraine RoHS:
ОбладнаннявідповідаєвимогамТехнічногорегламентущодообмеженнявикористаннядеякихнебезпечнихречовинвелектричномута
електронномуобладнанні,затвердженогопостановоюКабінетуМіністрівУкраїнивід3грудня2008№1057
End-of-Life Disposal
YournewPublicInformationDisplaycontainsmaterialsthatcanberecycledandreused.Specializedcompaniescanrecycleyourproducttoincreasethe
amountofreusablematerialsandtominimizetheamounttobedisposedof.
PleasendoutaboutthelocalregulationsonhowtodisposeofyouroldOPSModulefromyourlocalPhilipsdealer.
(For customers in Canada and U.S.A.)
Thisproductmaycontainleadand/ormercury.Disposeofinaccordancetolocal-stateandfederalregulations.Foradditionalinformationonrecycling
contactwww.eia.org(ConsumerEducationInitiative)
Waste Electrical and Electronic Equipment-WEEE
Attention users in European Union private households
Thismarkingontheproductoronitspackagingillustratesthat,underEuropeanDirective2012/19/EUgoverningusedelectricaland
electronicappliances,thisproductmaynotbedisposedofwithnormalhouseholdwaste.Youareresponsiblefordisposalofthis
equipmentthroughadesignatedwasteelectricalandelectronicequipmentcollection.Todeterminethelocationsfordroppingoffsuch
wasteelectricalandelectronic,contactyourlocalgovernmentofce,thewastedisposalorganizationthatservesyourhouseholdorthe
storeatwhichyoupurchasedtheproduct.
Attention users in United States:
PleasedisposeofaccordingtoallLocal,StateandFederalLaws.Forthedisposalorrecyclinginformation,contact:www.mygreenelectronics.comorwww.
eiae.org.
End of Life Directives-Recycling
YournewPublicInformationDisplaycontainsseveralmaterialsthatcanberecycledfornewusers.
PleasedisposeofaccordingtoallLocal,State,andFederallaws
Restriction on Hazardous Substances statement (India)
Thisproductcomplieswiththe“E-Waste(Management)Rules,2016”CHAPTERV,rule16,sub-rule(1).WhereasNewElectricalandElectronic
EquipmentandtheircomponentsorconsumablesorpartsorsparesdonotcontainLead,Mercury,Cadmium,HexavalentChromium,polybrominated
biphenylsandpolybrominateddiphenylethersbeyondamaximumconcentrationvalueof0.1%byweightinhomogenousmaterialsforlead,mercury,
hexavalentchromium,polybrominatedbiphenylsandpolybrominateddiphenylethersandof0.01%byweightinhomogenousmaterialsforcadmium.
exceptofexemptionssetinSchedule2oftheRule.
E-Waste Declaration for India
Thissymbolontheproductoronitspackagingindicatesthatthisproductmustnotbedisposedofwithyourotherhouseholdwaste.
Insteaditisyourresponsibilitytodisposeofyourwasteequipmentbyhandingitovertoadesignatedcollectionpointfortherecycling
ofwasteelectricalandelectronicequipment.Theseparatecollectionandrecyclingofyourwasteequipmentatthetimeofdisposal
willhelptoconservenaturalresourcesandensurethatitisrecycledinamannerthatprotectshumanhealthandtheenvironment.
FormoreinformationaboutE-wastepleasevisithttp://www.india.philips.com/about/sustainability/recycling/index.pageandtoknow
whereyoucandropoffyourwasteequipmentforrecyclinginIndiapleasecontactonbelowgivencontactdetails.
Helplinenumber:1800-425-6396(MondaytoSaturday,9a.m.to5:30pm)
CentralizedE-wastecollectioncenter
Address:TPVTechnologyIndiaPrivateLimited,
59,MaheswariNagar,1stMainRoad,MahadevapuraPost,WhiteeldRoad
Bangalore,Karnataka,PIN:560048,Tel:080-3023-1000
E-mail:[email protected]

viii
Information for EAC
Month and year of manufacturing please refer information in Rating label.
Name and location of manufacturer ООО “Профтехника”
Адрес: 3-й Проезд Марьиной рощи, 40/1 офис 1. Москва, 127018, Россия
Importer and information
Наименование организации: ООО “Профтехника”
Адрес: 3-й Проезд Марьиной рощи, 40/1 офис 1. Москва, 127018, Россия
Контактное лицо: Наталья Астафьева,
+7 495 640 20 20
nat@profdisplays.ru

ix
Table Of Contents
1. Unpacking and Installation .......................................................1
1.1. Unpacking
.........................................................................................1
1.2. PackageContents........................................................................1
1.3. InstallationNotes.........................................................................1
1.4. InstallinginDisplay......................................................................2
1.5. Input/OutputTerminals.............................................................3
2. Operation ....................................................................................4
2.1. WatchtheConnectedVideoSource...............................4
2.2. ChangePictureFormat............................................................4
2.3. Overview..........................................................................................4
3. Signage display ............................................................................6
3.1. Setting
.................................................................................................6
3.2. Wi-Fi(ShowupwhenpluginWi-Fidongle)...............6
3.3. Ethernet.............................................................................................6
3.4. SignageDisplay..............................................................................7
3.5. Display...........................................................................................15
3.6. Storage
............................................................................................15
3.7. Security
...........................................................................................16
3.8. Languages&input....................................................................16
3.9. Date&time.................................................................................17
3.10. Developeroptions...................................................................17
3.11. About
..............................................................................................17
3.12. LegalInformation......................................................................18
3.13. Supplementary
...........................................................................18
4. USB device compatibility ....................................................... 21
5. Cleaning .................................................................................... 23
6. Technical Specications ......................................................... 24
1
1. Unpacking and Installation
1.1. Unpacking
• Thisproductispackedinacarton,togetherwiththestandardaccessories.
• Anyotheroptionalaccessorieswillbepackedseparately.
• Afteropeningthecarton,ensurethatthecontentsarecompleteandingoodcondition.
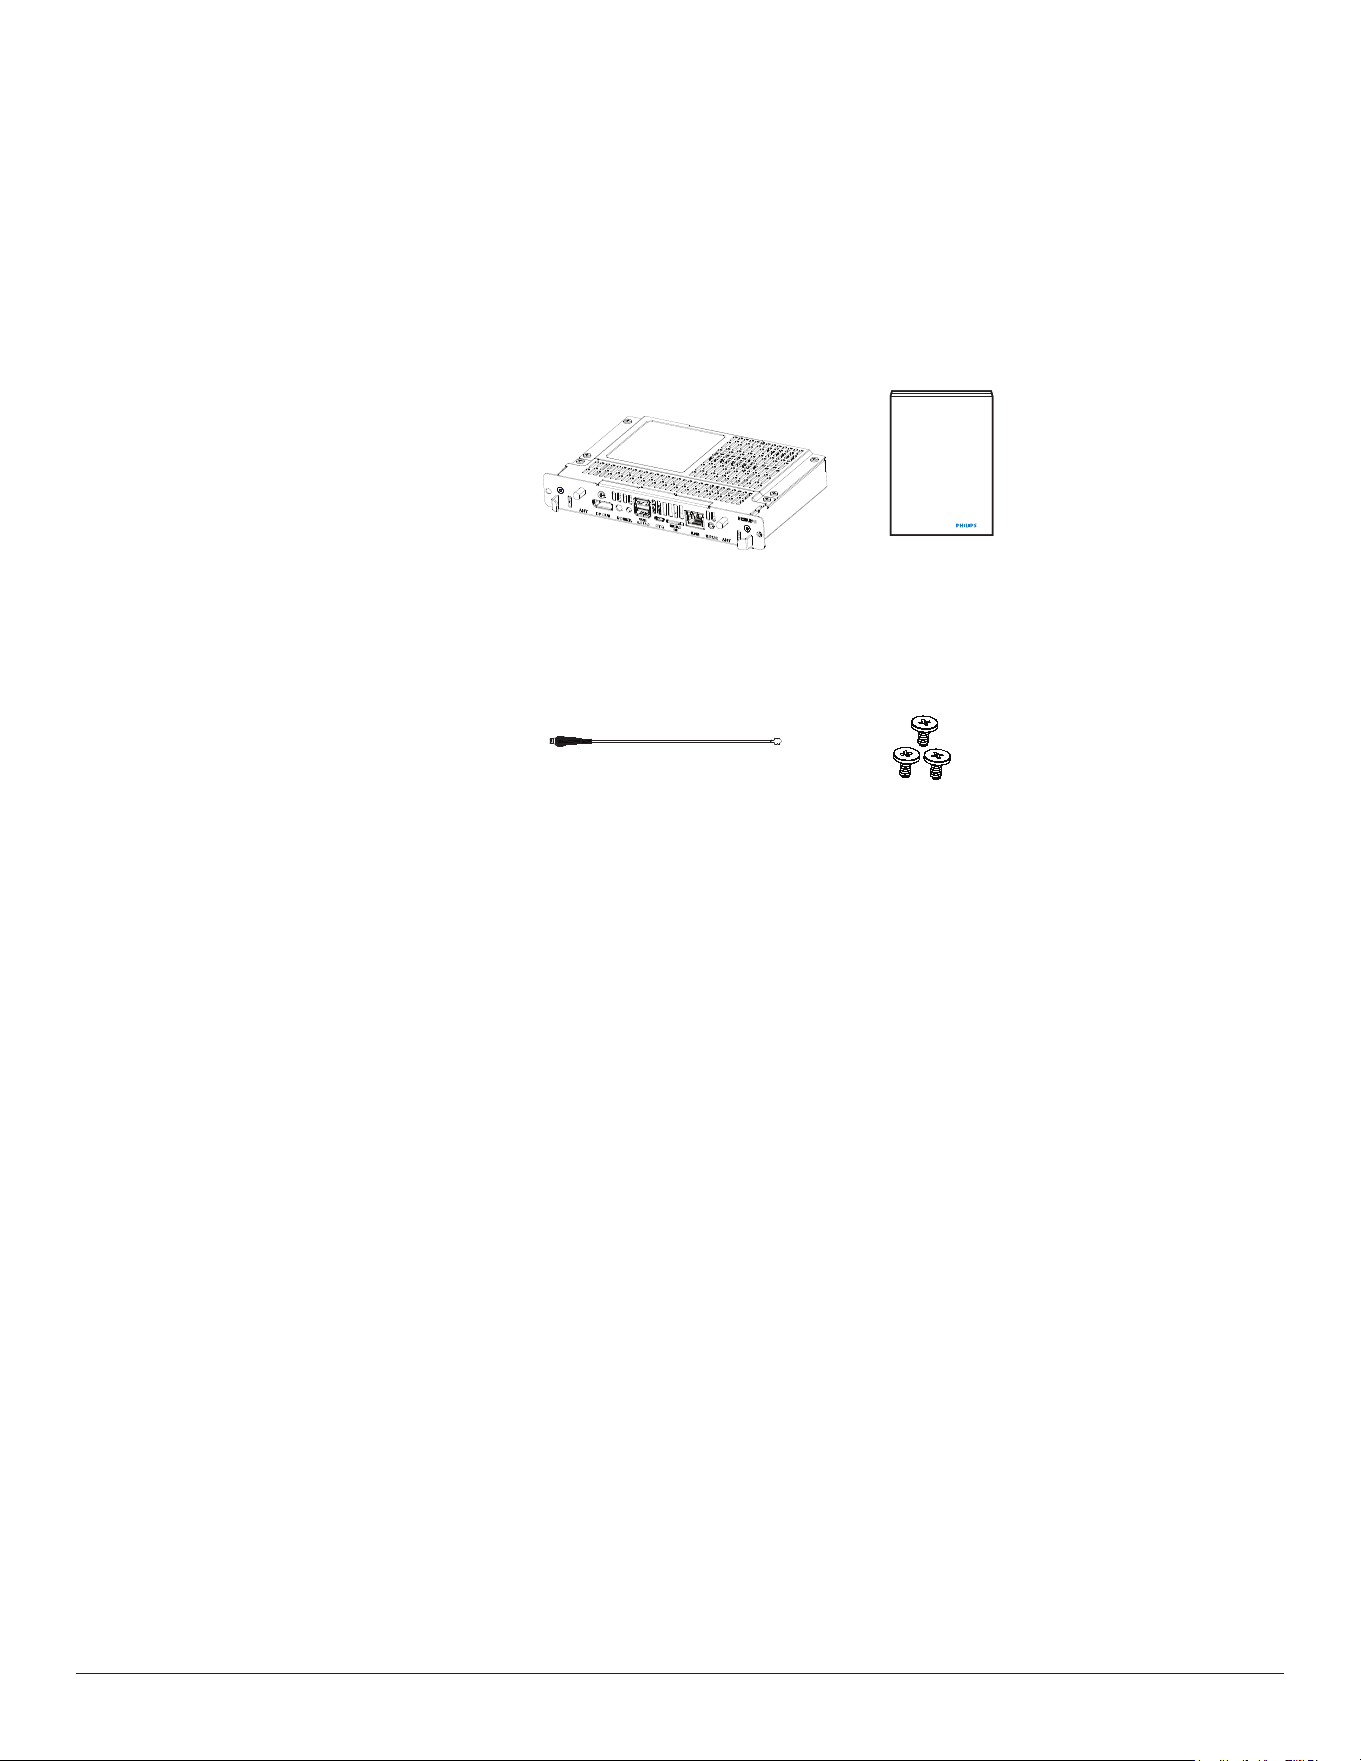
1.2. Package Contents
Pleaseverifythatyoureceivedthefollowingitemswithyourpackagecontent:
• CRD50
•
Quickstartguide
• Antennacablex2
• M2screwx3
Quick start guideCRD50
Antenna cable x 2
M2
*Differencesaccordingtoregions
Displaydesignandaccessoriesmaydifferfromthoseillustratedabove.
NOTES:
•
Forallotherregions,applyapowercordthatconformstotheACvoltageofthepowersocketandhasbeenapprovedbyandcomplieswiththe
safetyregulationsoftheparticularcountry(TypeH05W-F,2Gor3G,0.75or1mm
2
shouldbeused).
• YoumightliketosavethepackageOPSModuleandpackingmaterialforshippingtheOPSModule.
1.3. Installation Notes
• Duetothehighpowerconsumption,alwaysusetheplugexclusivelydesignedforthisproduct.Ifanextendedlineisrequired,pleaseconsultyour
serviceagent.
• Avoidinstallingtheproductinthekitchen,bathroomoranyotherplaceswithhighhumiditysoasnottoshortentheservicelifeoftheelectronic
components.
•
Theproductcannormallyoperateonlyunder3000minaltitude.Ininstallationsataltitudesabove3000m,someabnormalitiesmaybeexperienced.
2
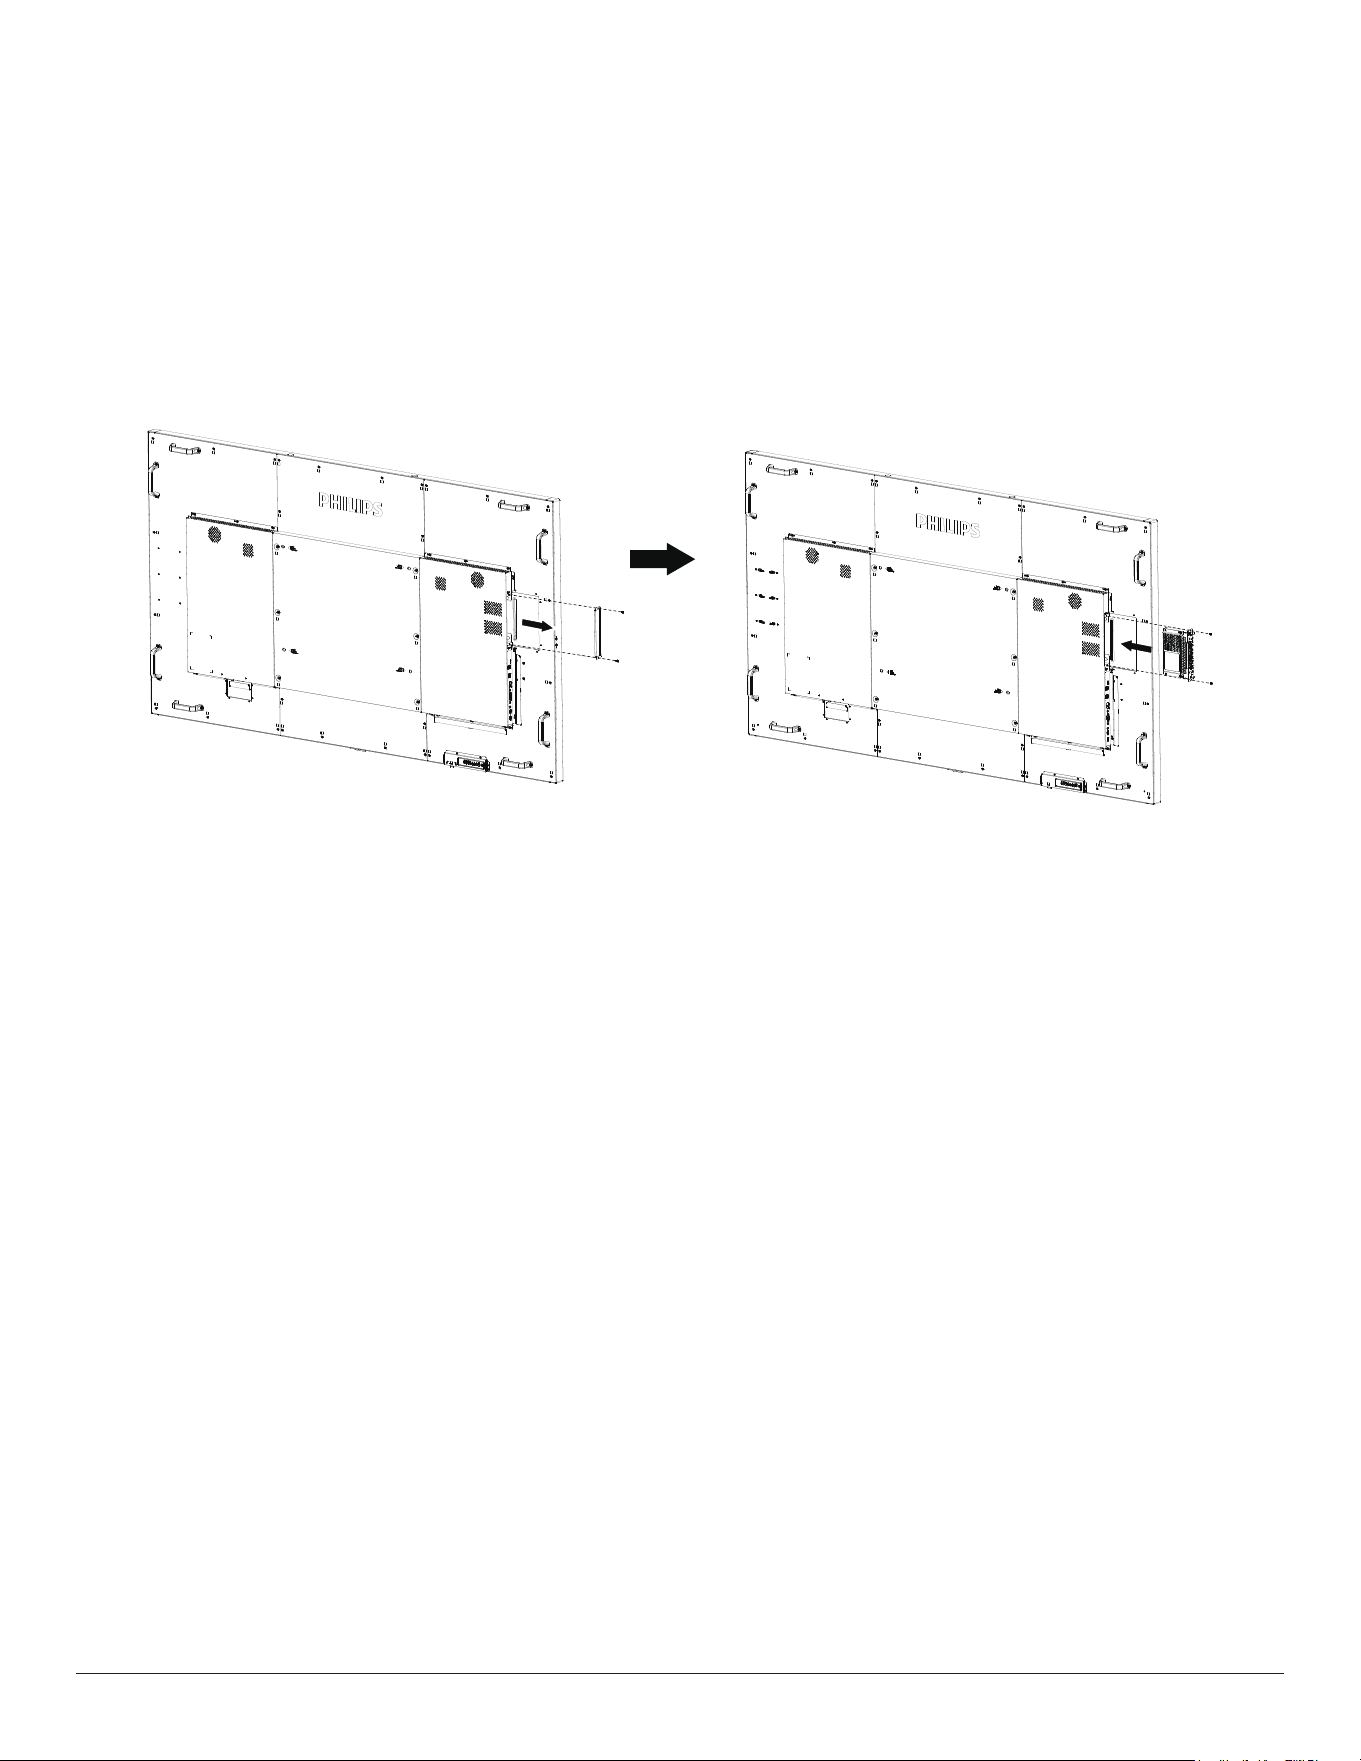
1.4. Installing in Display
To install CRD50:
1. Ensureyourdisplayispoweredoff.
2. RemovethescrewsofOPScoverfromthedisplay.
3. AfterinsertingtheCRD50inthedisplay,tightenthescrews.
3
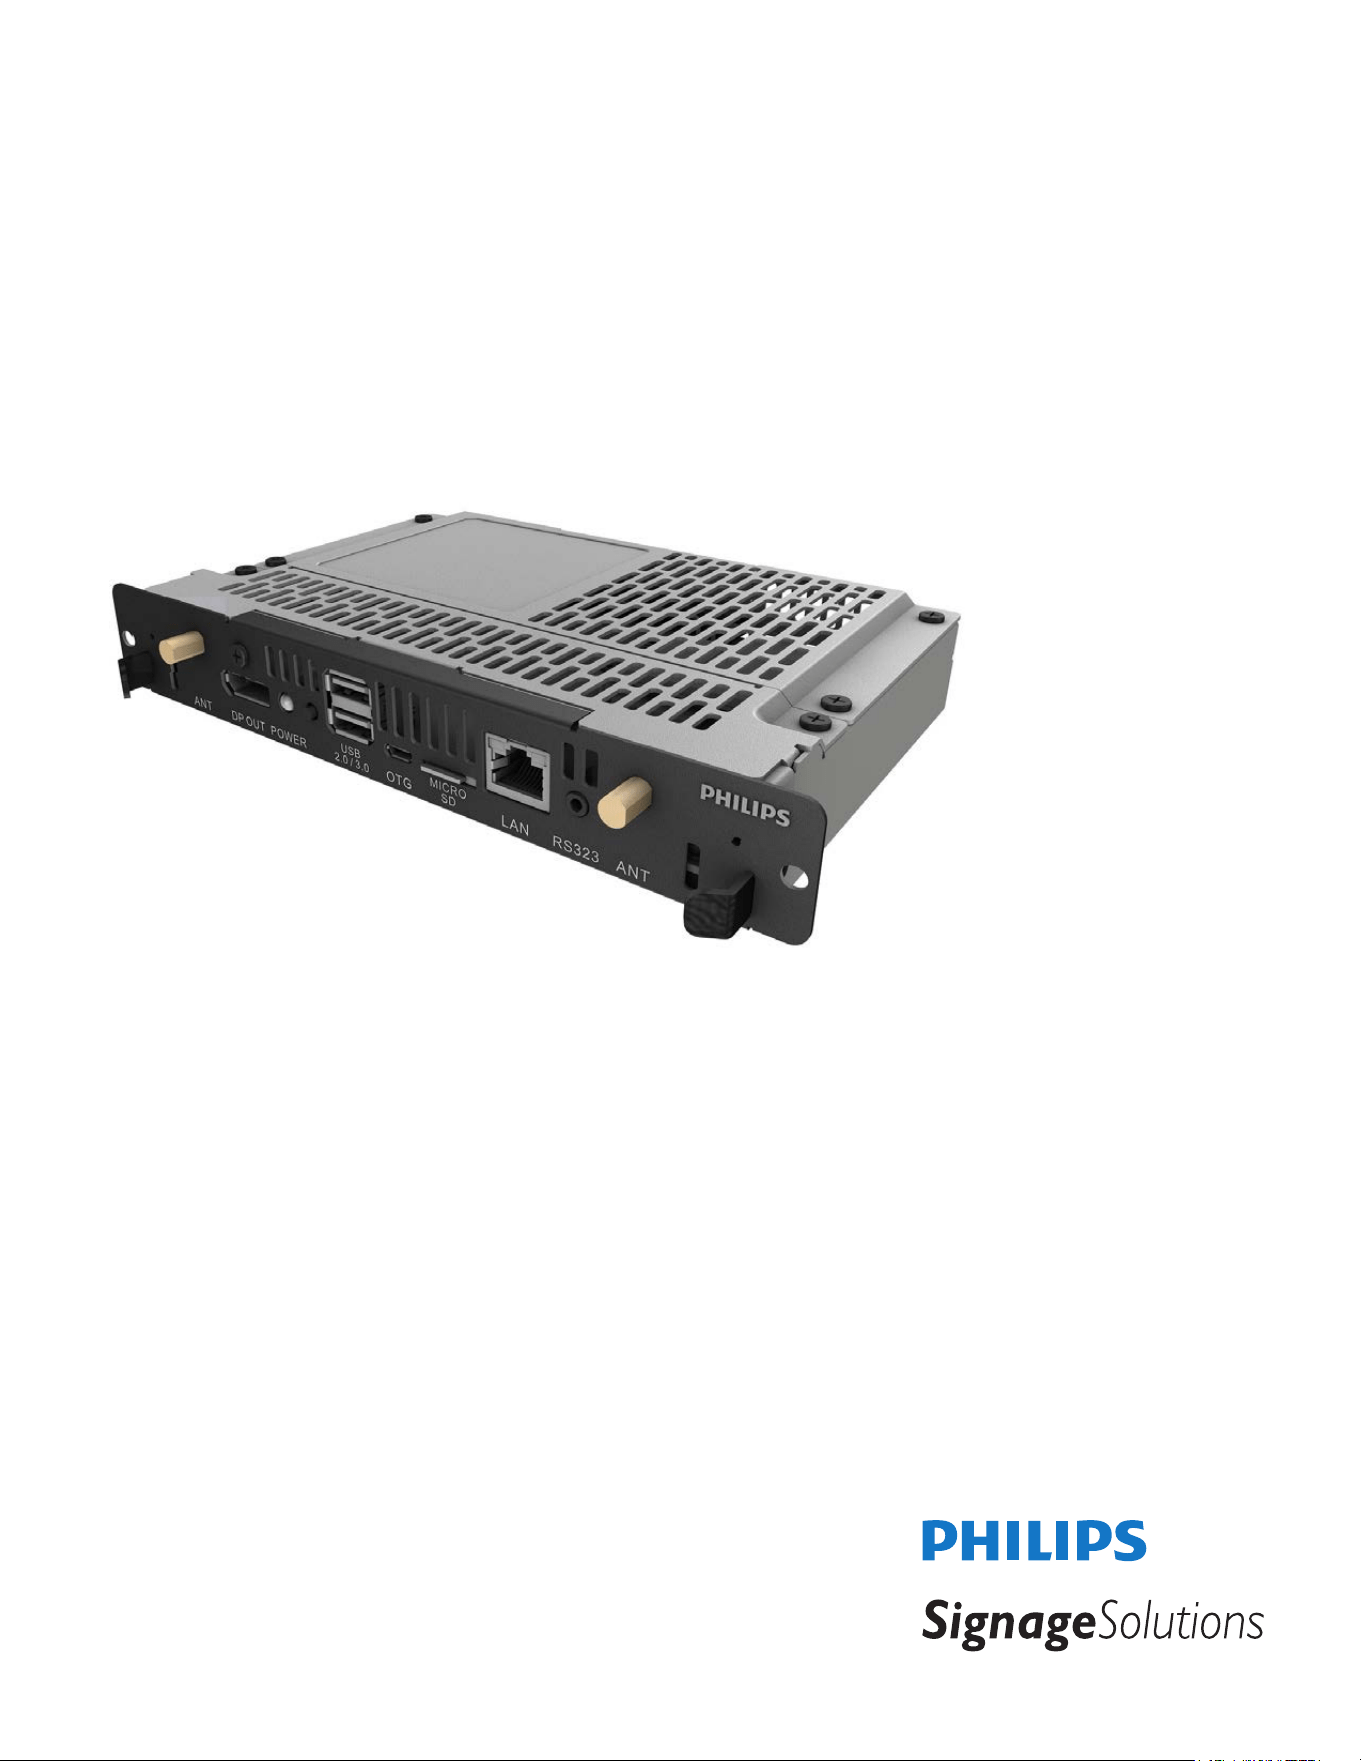
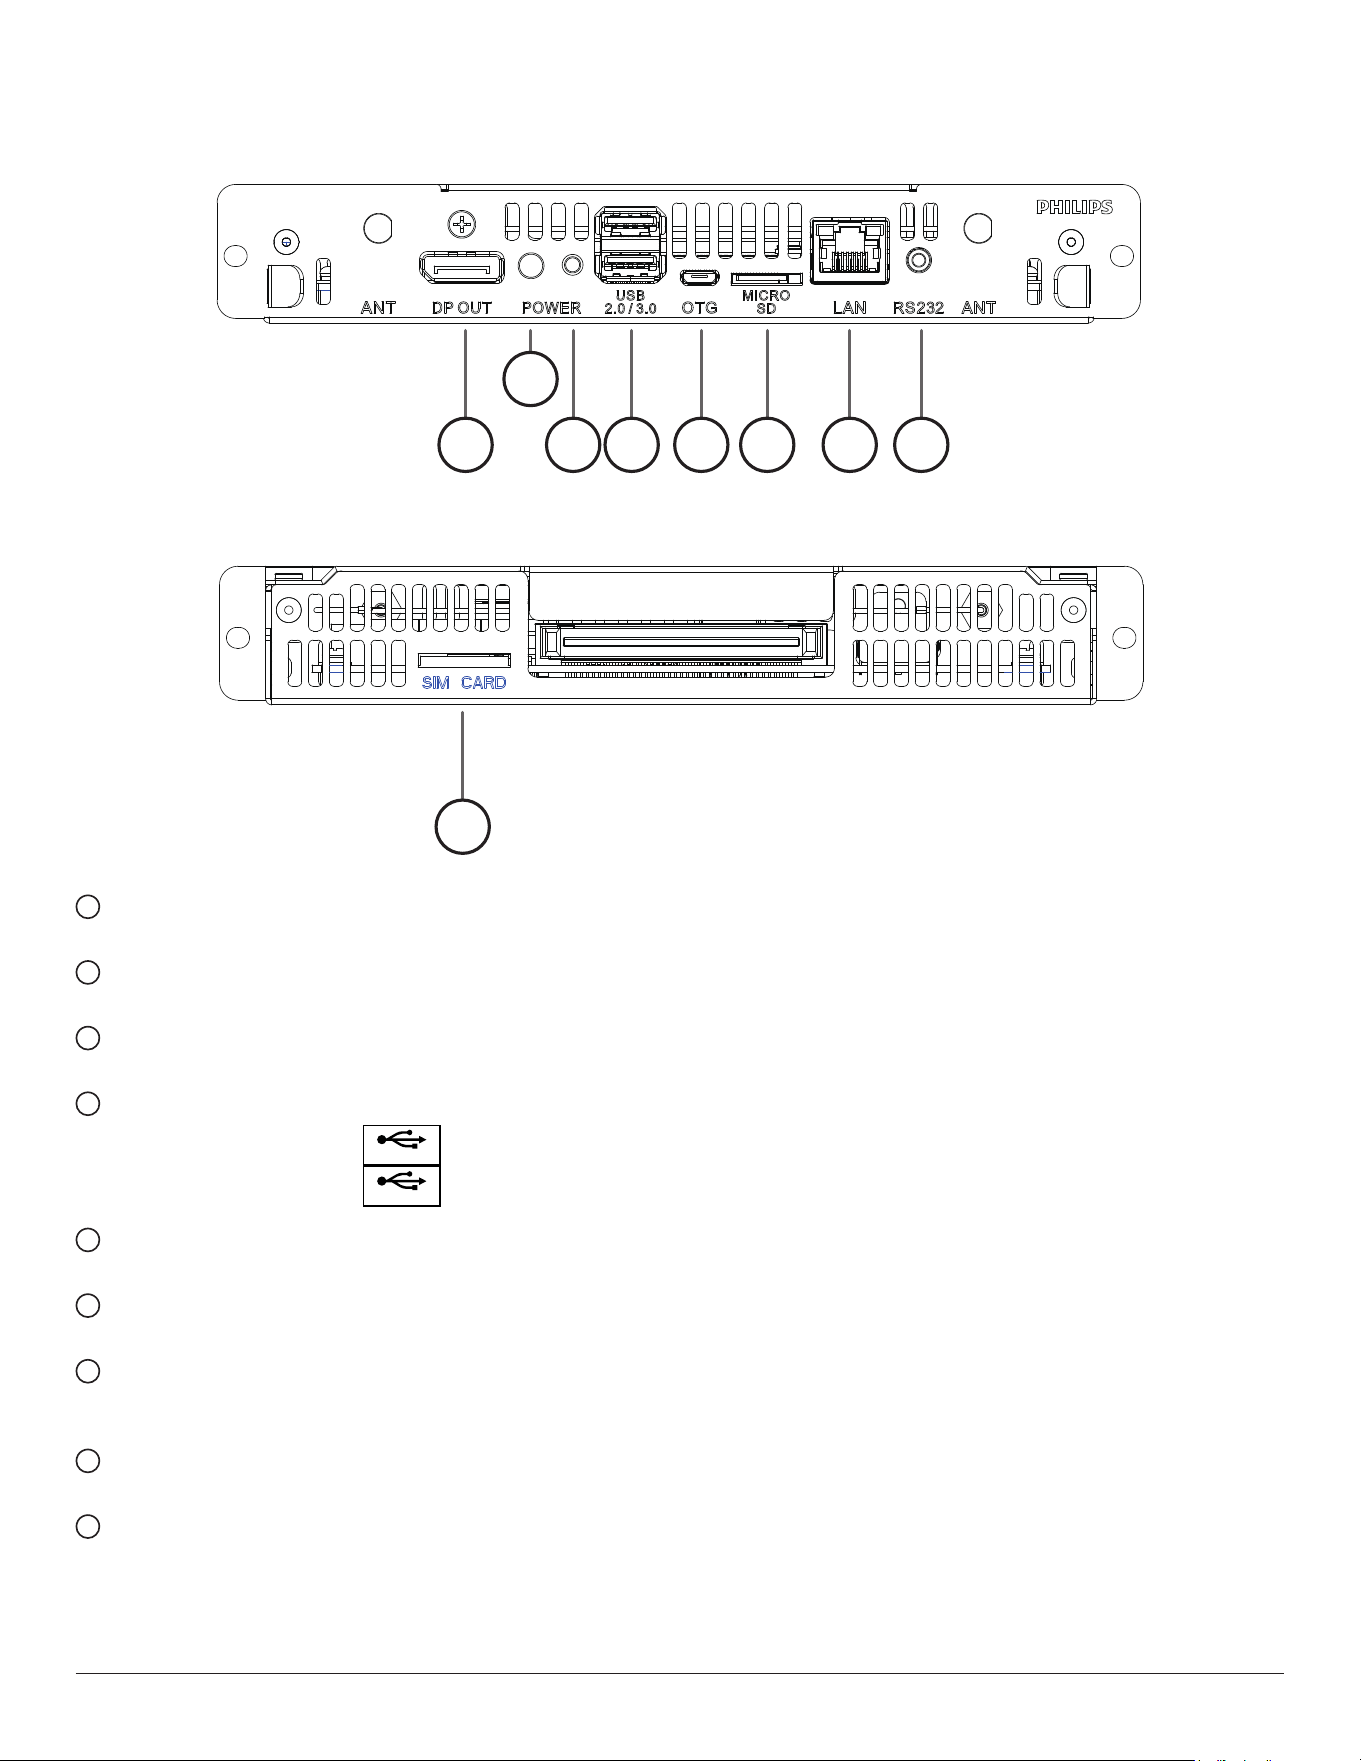
1.5. Input/Output Terminals
1 3
2
4 5 6 7 8
9
1
DisplayPort OUT
DisplayPortvideooutput.
2
Power Indicator
Showthepowerindicator.
3
Power Button
PressthisbuttontoturntheCRD50on/off.
4
USB 2.0 / 3.0 PORT
InsertyourUSBstoragedevice
USB 2.0
USB 3.0
5
OTG
Forservice(updateFWordebug).
6
MICRO SD CARD
InsertyourMICROSDCARD.
7
LAN
LANcontrolfunctionfortheuseofremotecontrolsignalfrom
controlcenter.
8
RS232C
RS232Cnetworkinput/outputfortheloop-throughfunction.
9
SIM CARD
InsertyourSIMCARD.
4
2. Operation
NOTE: Thecontrolbuttondescribedinthissectionismainlyonthe
remotecontrolunlessspeciedotherwise.
2.1. Watch the Connected Video Source
1. Press
[ ] SOURCEbutton.
2. Press[ ]
or[ ]buttontochooseadevice,thenpress[ ]
button.
2.2. Change Picture Format
Youcanchangethepictureformattosuitthevideosource.Eachvideo
sourcehasitsavailablepictureformats.
Theavailablepictureformatsdependonthevideosource:
1. Press[ ] FORMATbutton.
2. Press[ ]
or[ ]buttontochooseapictureformat,thenpress
[
]button.
• PCmode:{Full}/{4:3}/{1:1}/{16:9}/{21:9}/{Custom}.
•
Videomode:{Full}/{4:3}/{1:1}/{16:9}/{21:9}/{Custom}.
2.3. Overview
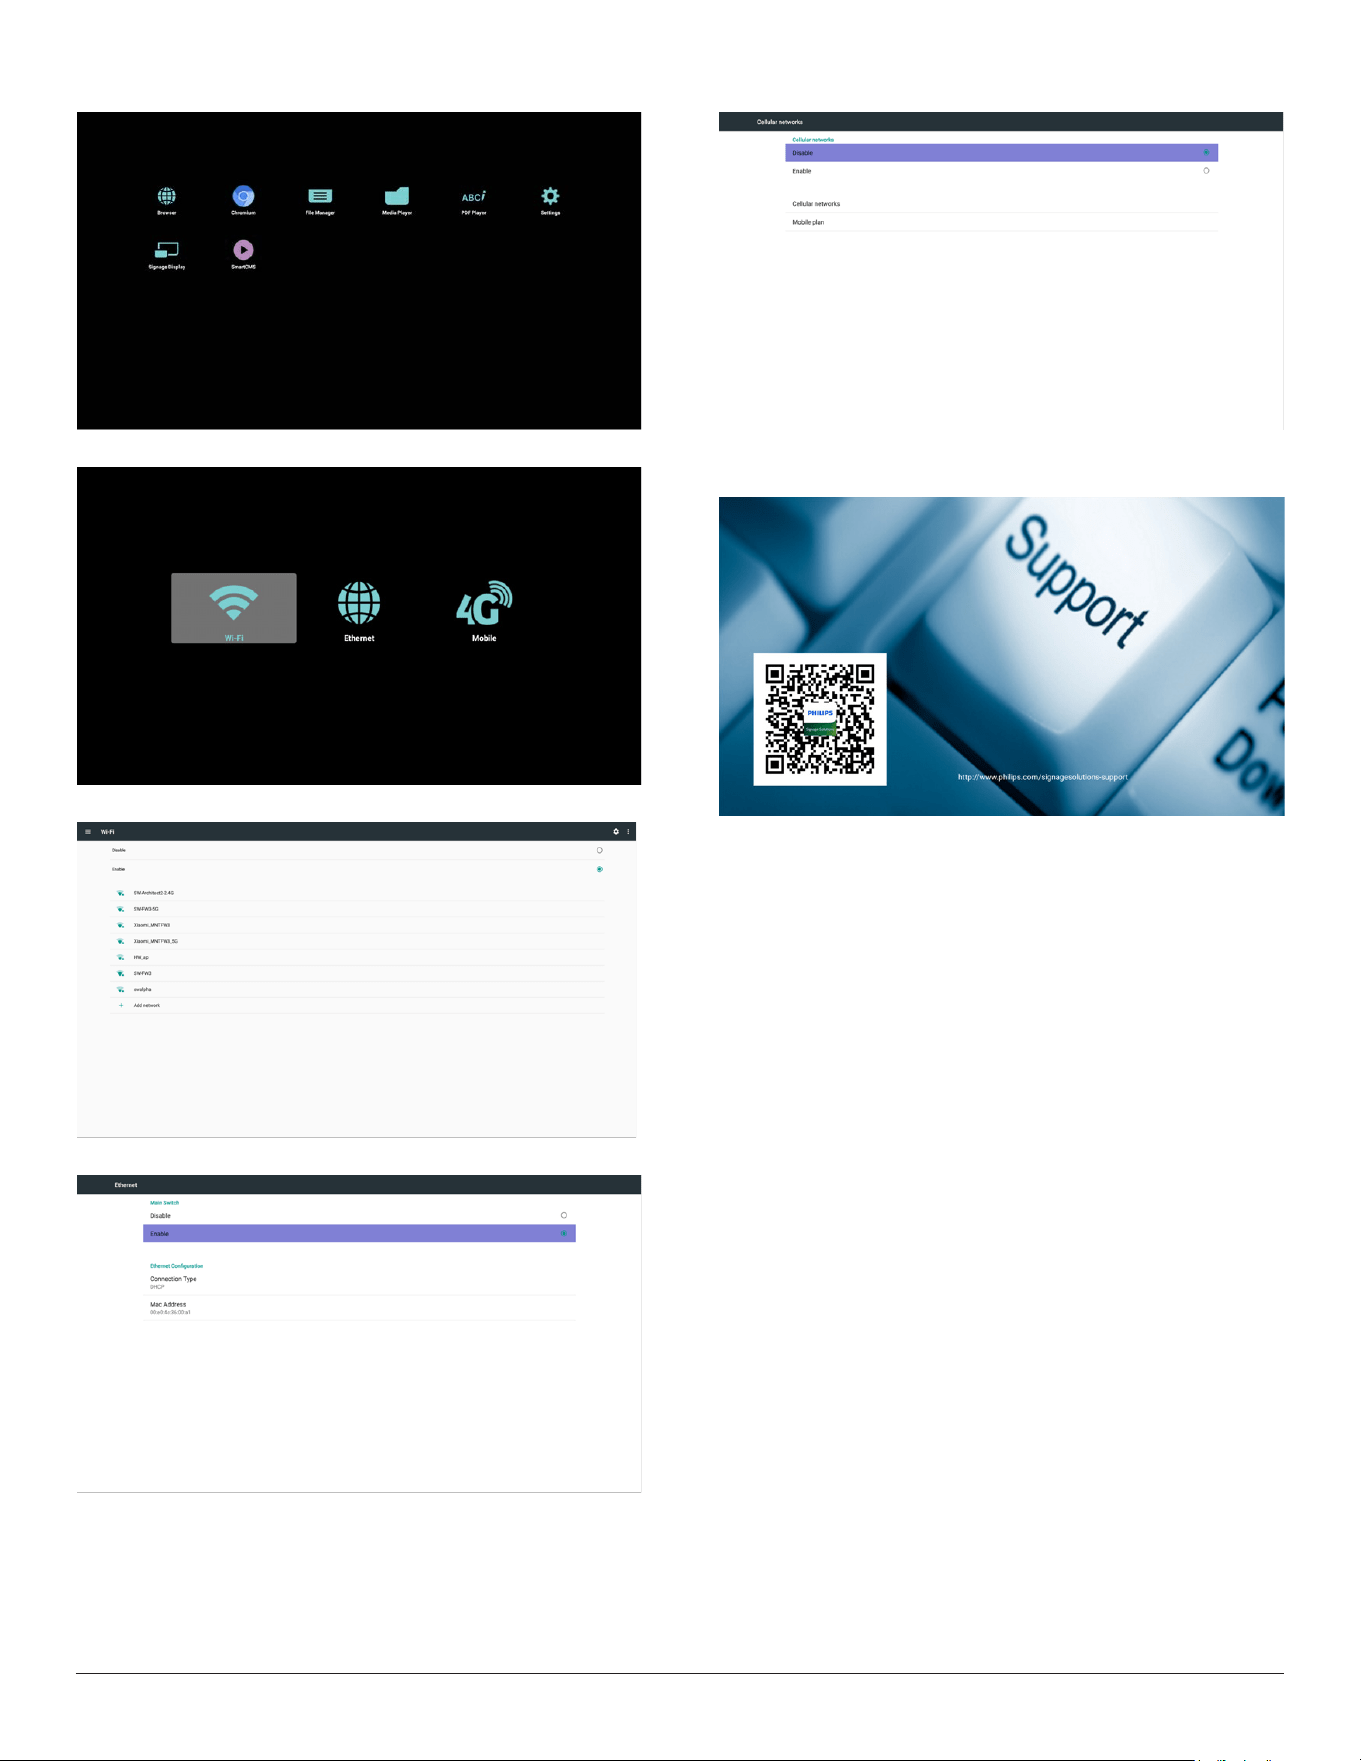
1. Androidlauncher:
• Androidlauncherasbelow:
(SourceisoneofBrowser,MediaPlayer,PDFPlayer,SmartCMS
andCustomAPKs)
Whenbootinganimationnished,launchercanappear.Ifa
sourcewasselected,thenitwilllaunchtheselectedsource
immediately.Ifnosourceselected,thenitgoestothefollowing
page.
• Forafewseconds,itwillbeablackscreen.
Note:anytime,systemwillshowthefollowingpictureifnoHID
inputdevice(USBkeyboardormouse),canbedetectedby
system.
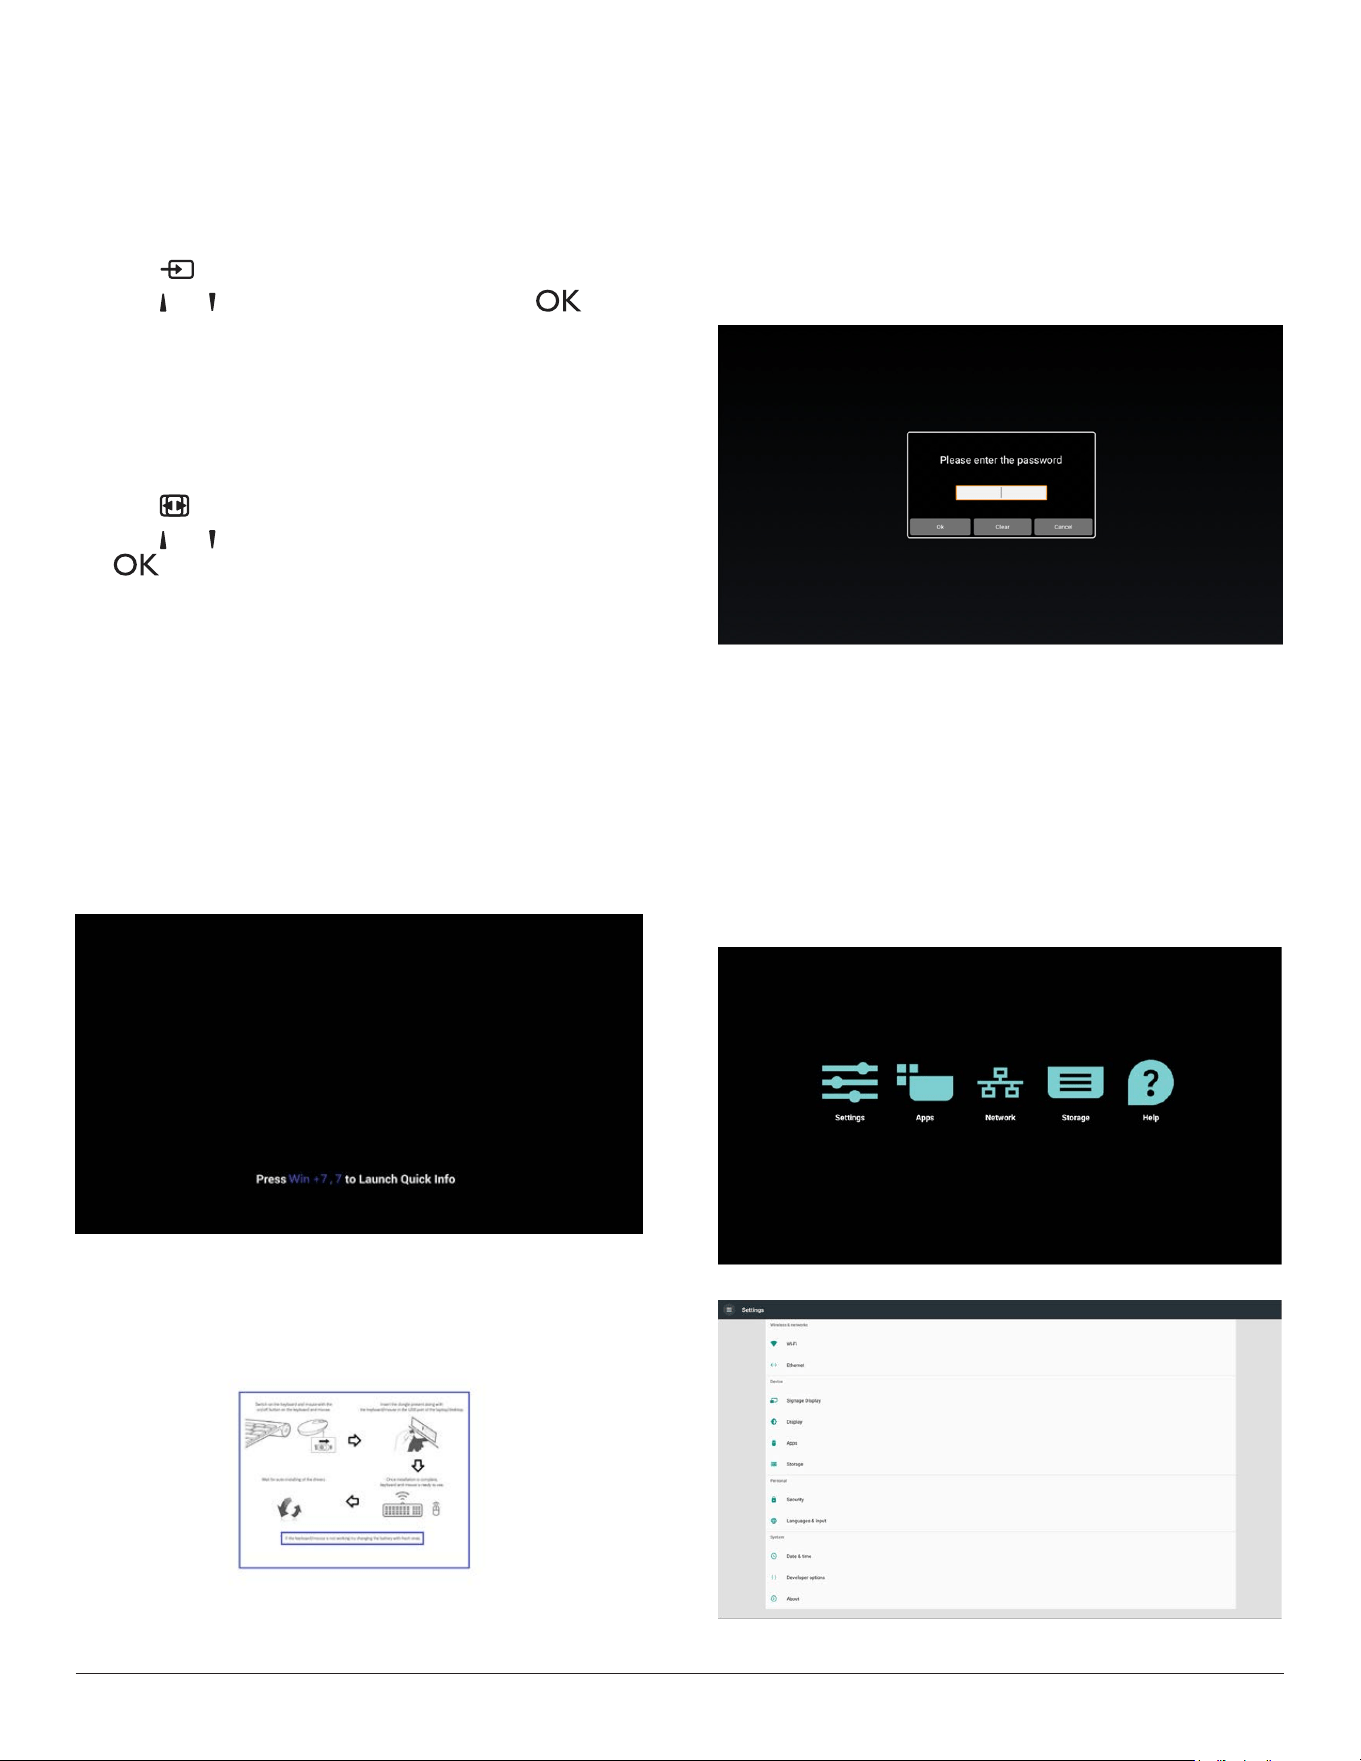
2. Adminmode:
• Youcanpress“WIN,1,8,8,8”tostartupadminmode.(Or
byup/downdragging,verticaldistance>screenheight/4to
startupadminPINqueryfortouchhostPD.)Youhavetoinput
passwordbeforeAdminmode.
Note:Defaultpasswordis0000
Inputcorrectpasswordforvalidation,thenyoucanSelect
Settings >> Signage Display >> System tools >> Password
tochangepassword.
• Adminmodewillshowveicons:“Settings”,“Apps”,“Network”,
“Storage”and“Help”.
• Whenyouleaveadminmode,systemwillreturntoLauncher.
1)Homepageofadminmode,thispagehasveitems:“Settings”,
“Apps”,“Network”,“Storage”and“Help”.
Settings:gotosettingsapp.
Applications:showallapps.
Network:setWi-,EthernetandMobilenetwork(optional).
Storage:gotostoragepage
Help:displayQRcode.
2.)Settingspage:
5
3.)Applicationpage:
4
)
Networkpage
4.1)Wi-Fipage
4.2)
Ethernetpage
4.3)CellularNetwork(Optional,ifdevicehasGSM/LTEmodule)
5)Helppage:
DisplayQRcodepage.
6
3. Signage display
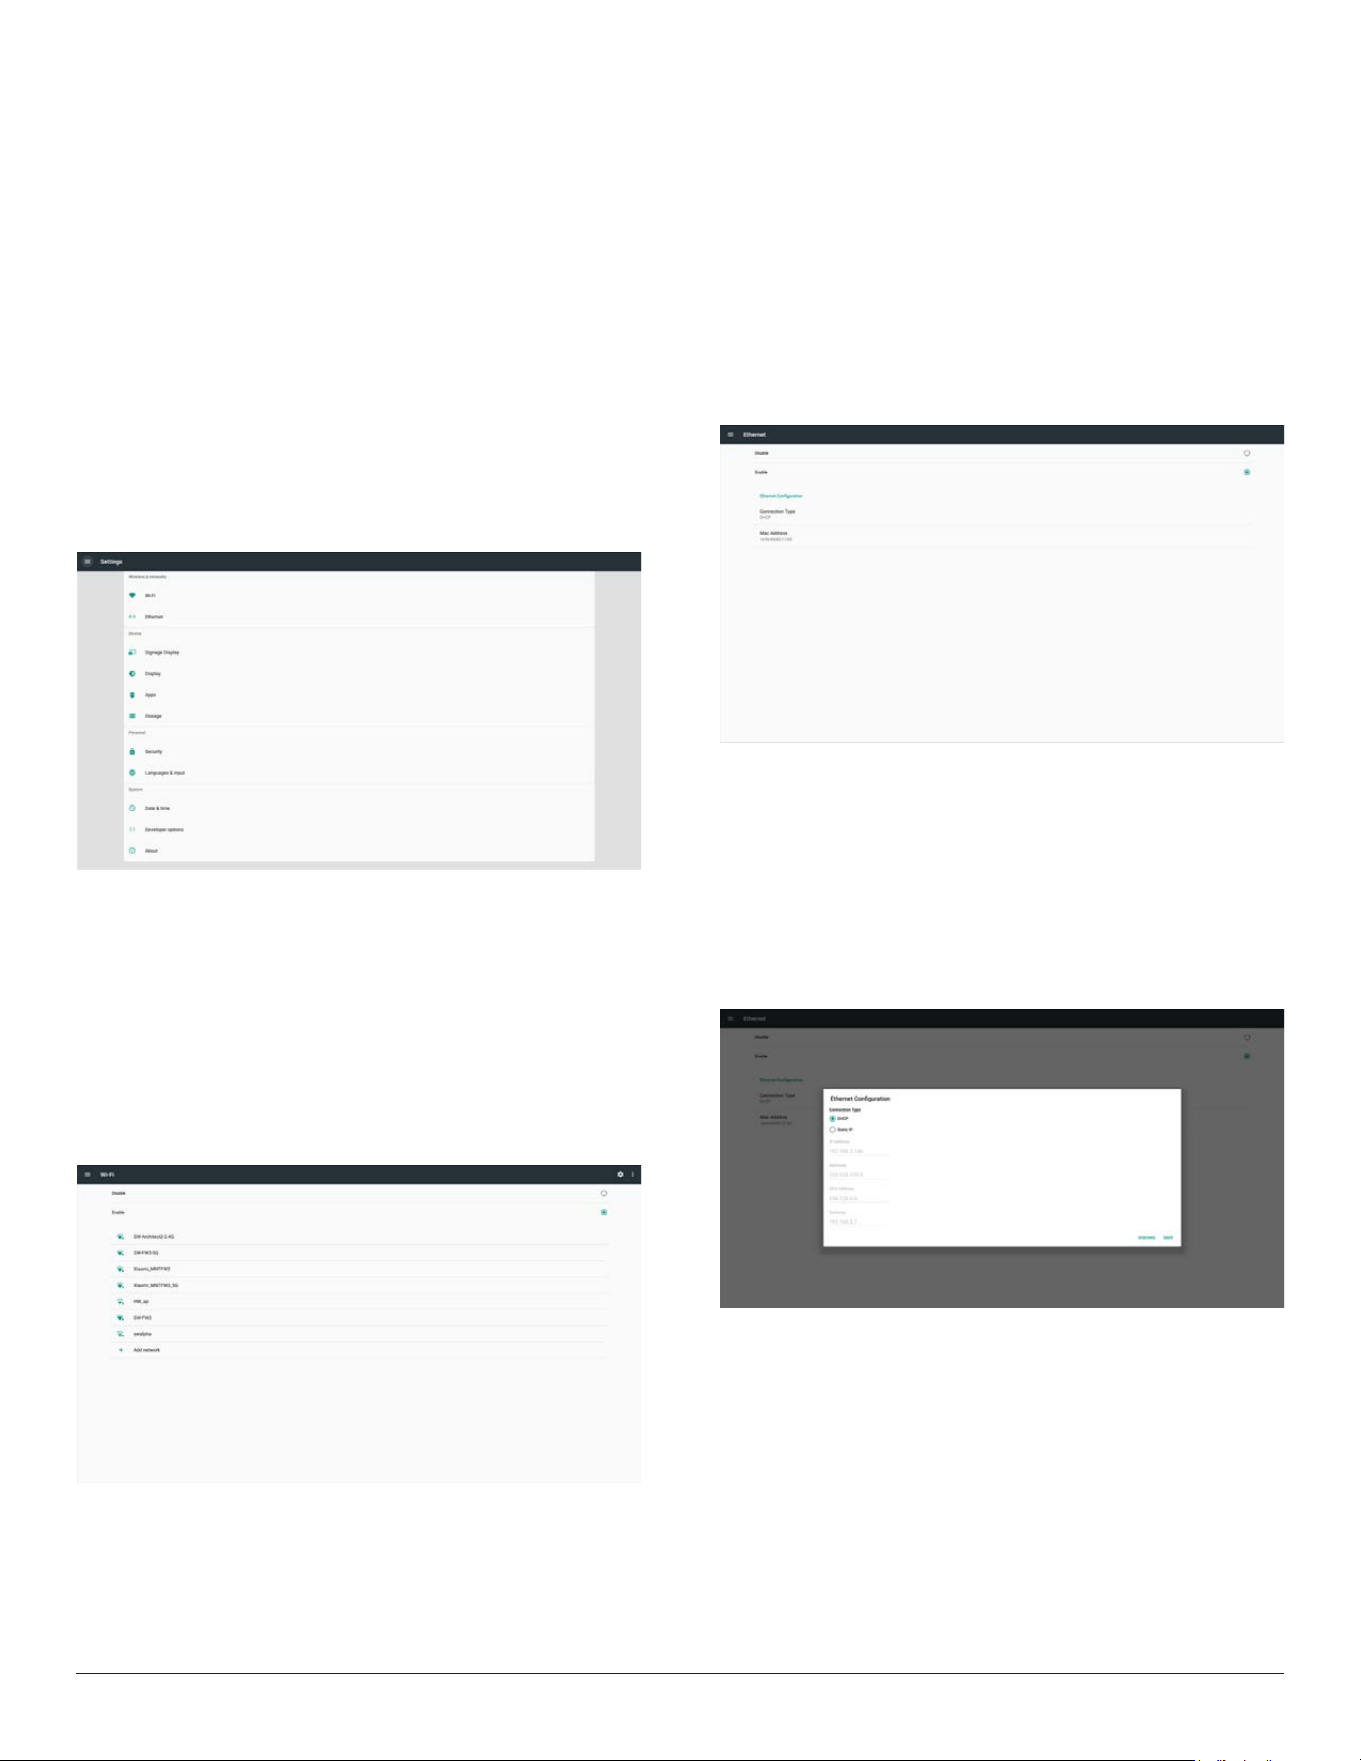
3.1. Setting
Mainitems:
(1)Wi-Fi(ShowupwhenpluginWi-Fidongle)
(2)Ethernet
(3)SignageDisplay
(4)Display
(5)Apps
(6)Storage
(7)Security
(8)Language&input
(9)Date&time
(10)Developeroptions
(11)About
3.2. Wi-Fi (Show up when plug in Wi-Fi
dongle)
ViaEnable/DisabletocontrolWi-FiOn/OFF.AfterEnable,thescreen
willlistallavailableWi-FiAP.
Note:
1. EthernetwillbedisableautomaticallyifWi-Fiturnonandconnect
tonetwork.
2. AparticularmodelofWi-Fimoduleisrequired.Pleaseconsultthe
dealerorservicetechnicianforhelp.
3.3. Ethernet
Enable/Disabletoturnon/offEthernet
AfterenableEthernet,thesettingswillshow:
(1)ConnectionType(Availableconnectiontype:DHCP/StaticIP)
A.DHCP
B.StaticIP
C.IPAddress
D.Netmask
E.DNSAddress
F.Gateway
(2)MacAddress
Note:
EthernetwillbedisabledautomaticallywhenWi-Fionandconnectto
network.
3.3.1. DHCP
DHCPmode:
(1)CannotmodifyIPAddress,Netmask,DNSAddressandGateway.
(2)Ifconnectsuccessfully,itwilldisplaycurrentnetwork
conguration.
7
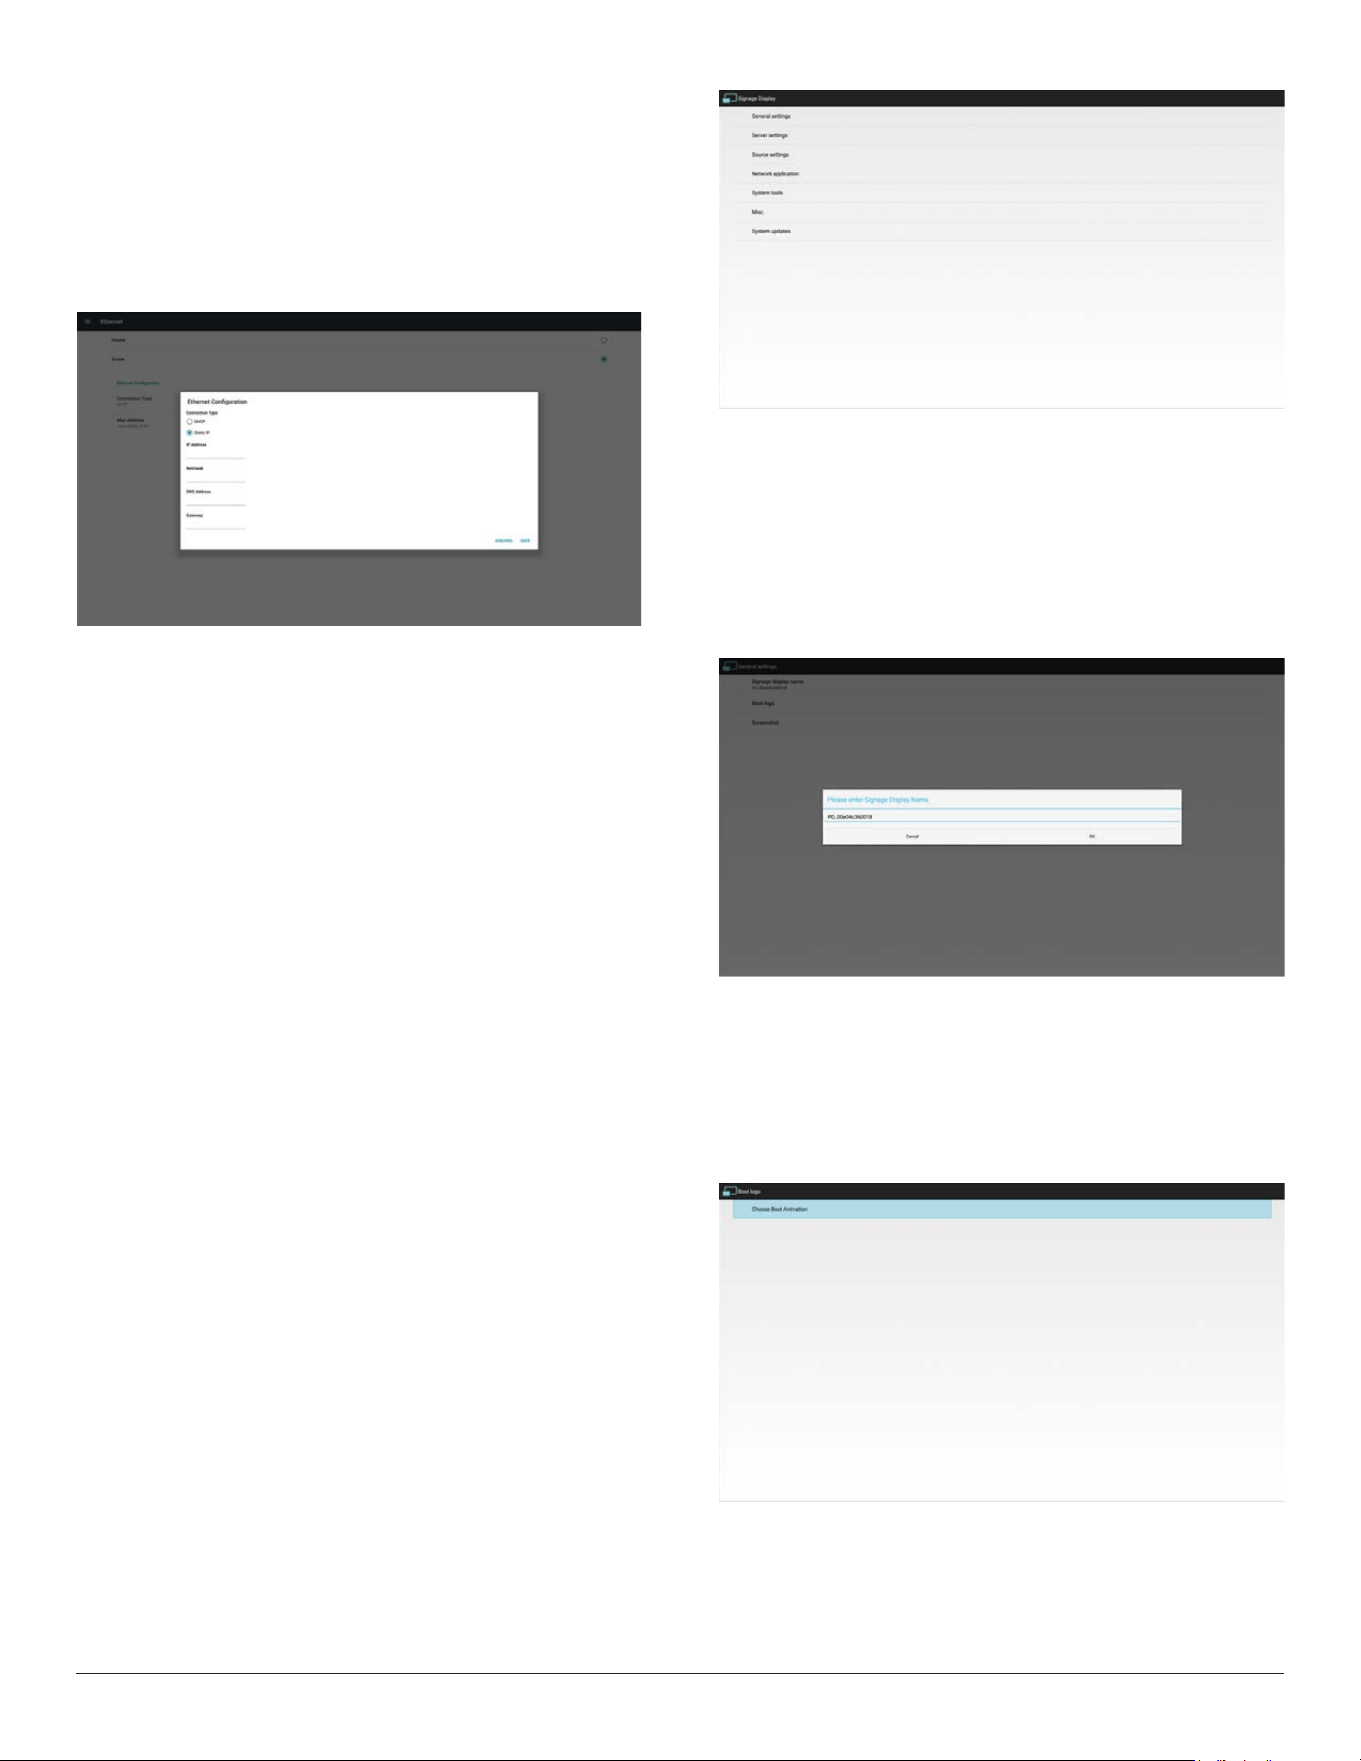
3.3.2. Static IP
InStaticIPmode,usercaninputIPAddress,Netmask,DNSaddressand
Gateway
Note:
IPaddress,netmask,DNSaddressandgatewayaddressinputlimitation
(1)Format:
I.
number0-9
II. decimalpoint“.”
3.4. Signage Display
Divideinto4groups:GeneralSettings/ServerSettings/SourceSettings
/Security
(1)GeneralSettings
A. SignageDisplayName
B. BootLogo
C. Screenshot
(2)ServerSettings
A. EmailNotication
B. FTP
(3)SourceSettings
A. MediaPlayer
B. Browser
C. CMND&Play
D. PDFPlayer
E. CustomApp
F. BootonSource
(4)Networkapplication
A. Proxy
B.
PlatformWebAPI
C. SICPNetworkPort
(5) Systemtools
A. ClearStorage
B. Reset
C. Import&Export
D. Clone
E. Security
(6)Misc.
A. TeamViewerSupport
(7)Systemupdates
A. LocalUpdate
3.4.1. General Settings
1. SignageDisplayName
SetupPDname“PD_”+EthernetMacAddress.
Note:
Inputlimitation:
(1)length:Max36characters
(2)format:nolimit
BootLogo
TochangeAndroidbootlogo,usercanchangetotheirownboot
logoanimationle.
Note:
(1)Bootanimationlename:bootanimzation.zip
(2)Willpop-upawindowforusertoselectUSBandSDcard.No
priorityissue.
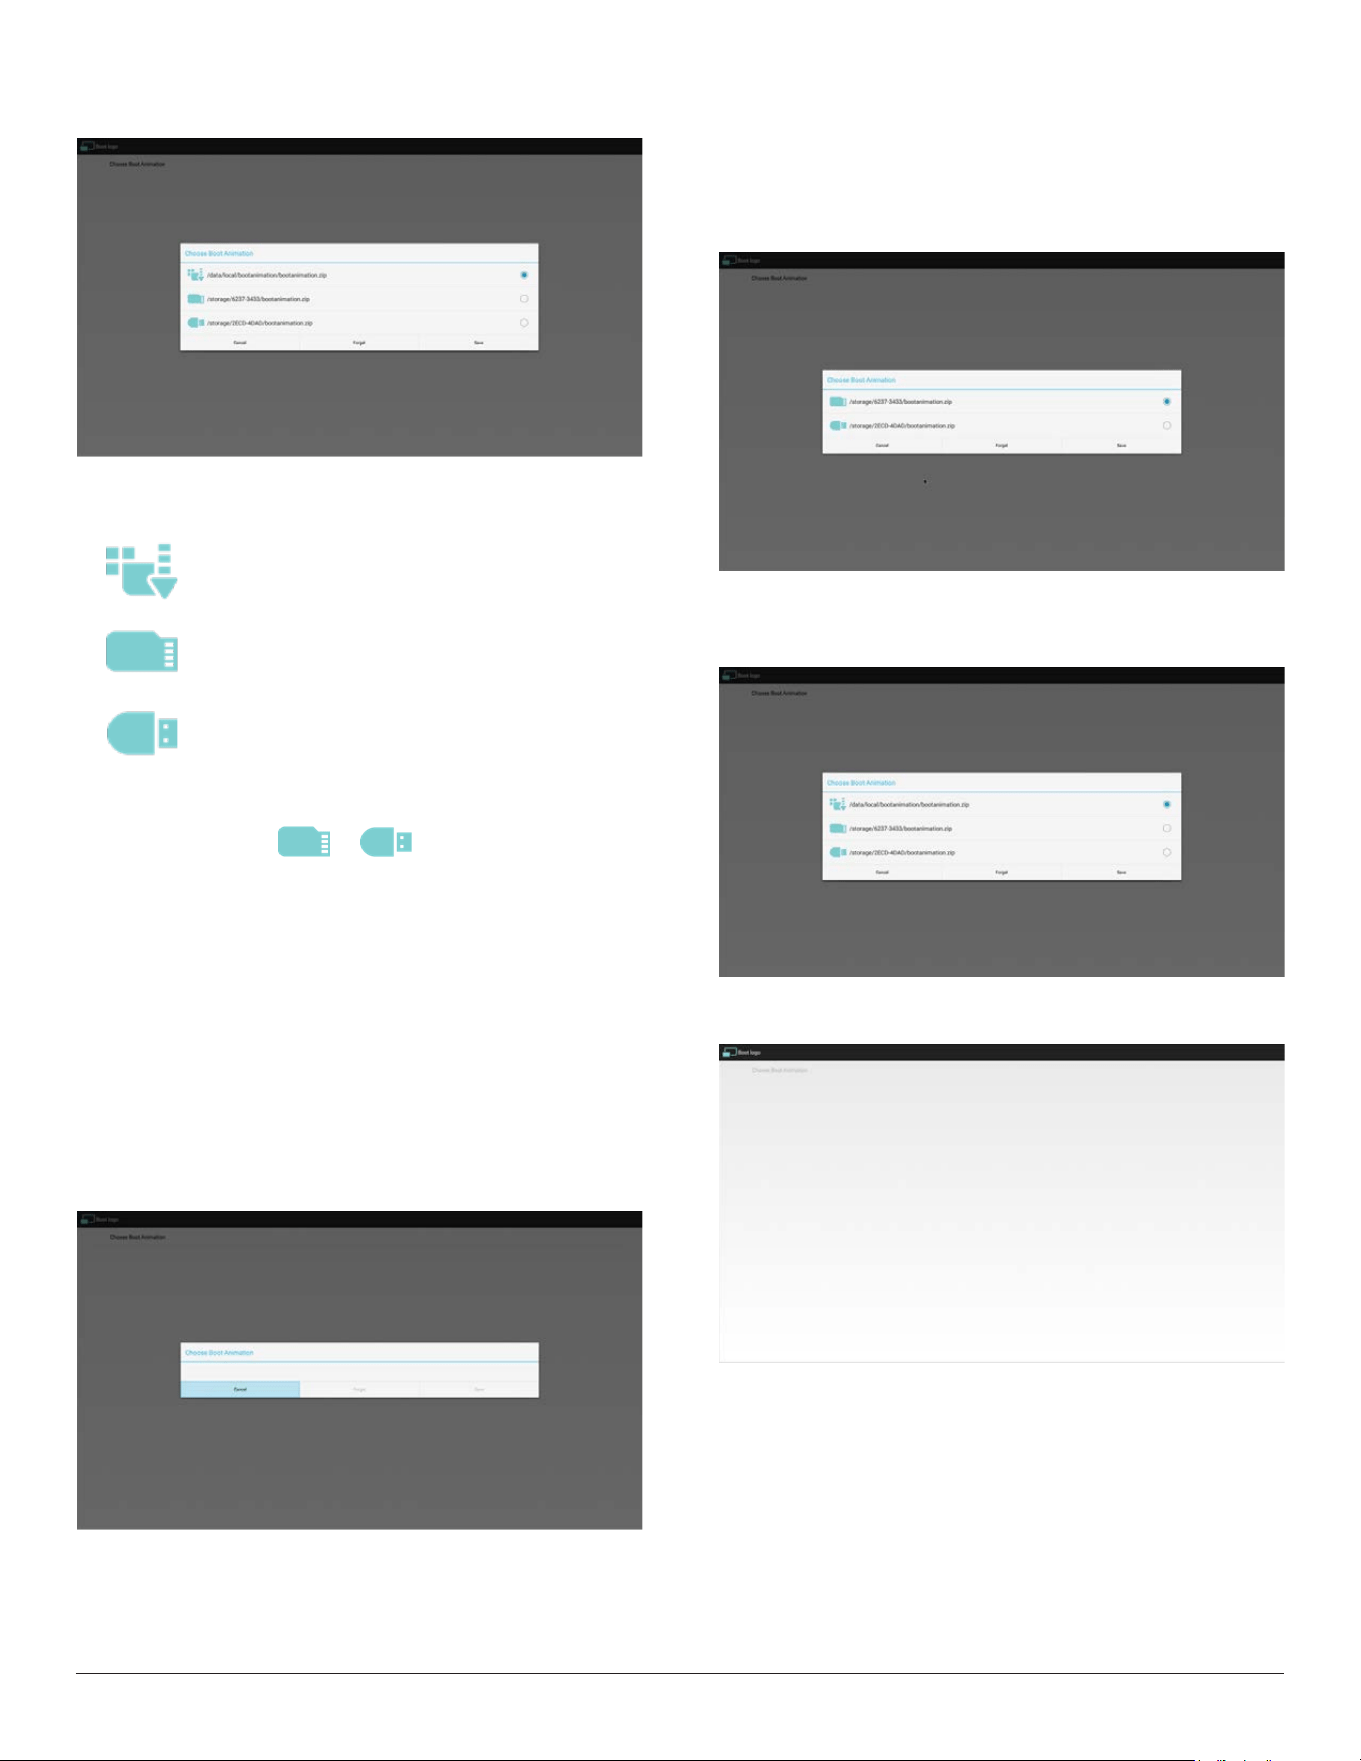
8
2)Whenbootlogoisselected,PDwillcheckifthereis
bootanimzation.zipintheUSBandSDcard.
Functionintroduction:
a. Optiondescription
Usecustomizedbootanimationlewhichis
copiedfromSDcardorUSB
UsebootanimationsleunderSDcard
UsebootanimationsleunderUSB
b. Save
Iftheoptionfocuson or ,pressSavekeytosavethe
bootanimzation.ziplefromtheSDcardorUSBto/data/localand
setitasbootlogo.
c. Forget
PressForgetkeytodelete/data/local/bootanimzation.zipandnot
showbootlogo.
d. Cancel
Closethedialoguewithoutanychanges.
Scenariointroduction:
Case1
Theuserdon’tselectcustomizedbootlogo.PDdoesnotndany
bootanimzation.zipleunderSDandUSB.Thelistwillbeblank.Save
andForgetbuttonwillbegrayedout.
Case2
Theuserputcustomizedbootanimzation.zipleintheSDandUSB.
ThedefaultpriorityisSDcard,sothePDwillautomaticallyselect
theleintheSDcardonly.TheleintheUSBdrivewillbeignored.
Incasethebootanimzation.zipisonlyintheUSBdrive,thenthePD
willselecttheleintheUSBdrive(astheSDcardhasnole).
Case3
Theuserselectscustomizedbootlogo,thescreenwillshow/data/
local/bootanimzation.zip.
3)IfOSDmenuLogoitemisOnorOff,theuserscannotchoose
bootanimationinAndroidsettings.
2. Screenshot
ViaEnable/DisabletocontrolscreenshotOn/Off.
AfterEnable,usercansetscreenshottimeslotandsavepath.
Note:
Timeslotofdeletionandscreenshot:
(1)Willdeletepictureatinitialtime0sec.
(2)Willscreenshotatrst40sec.
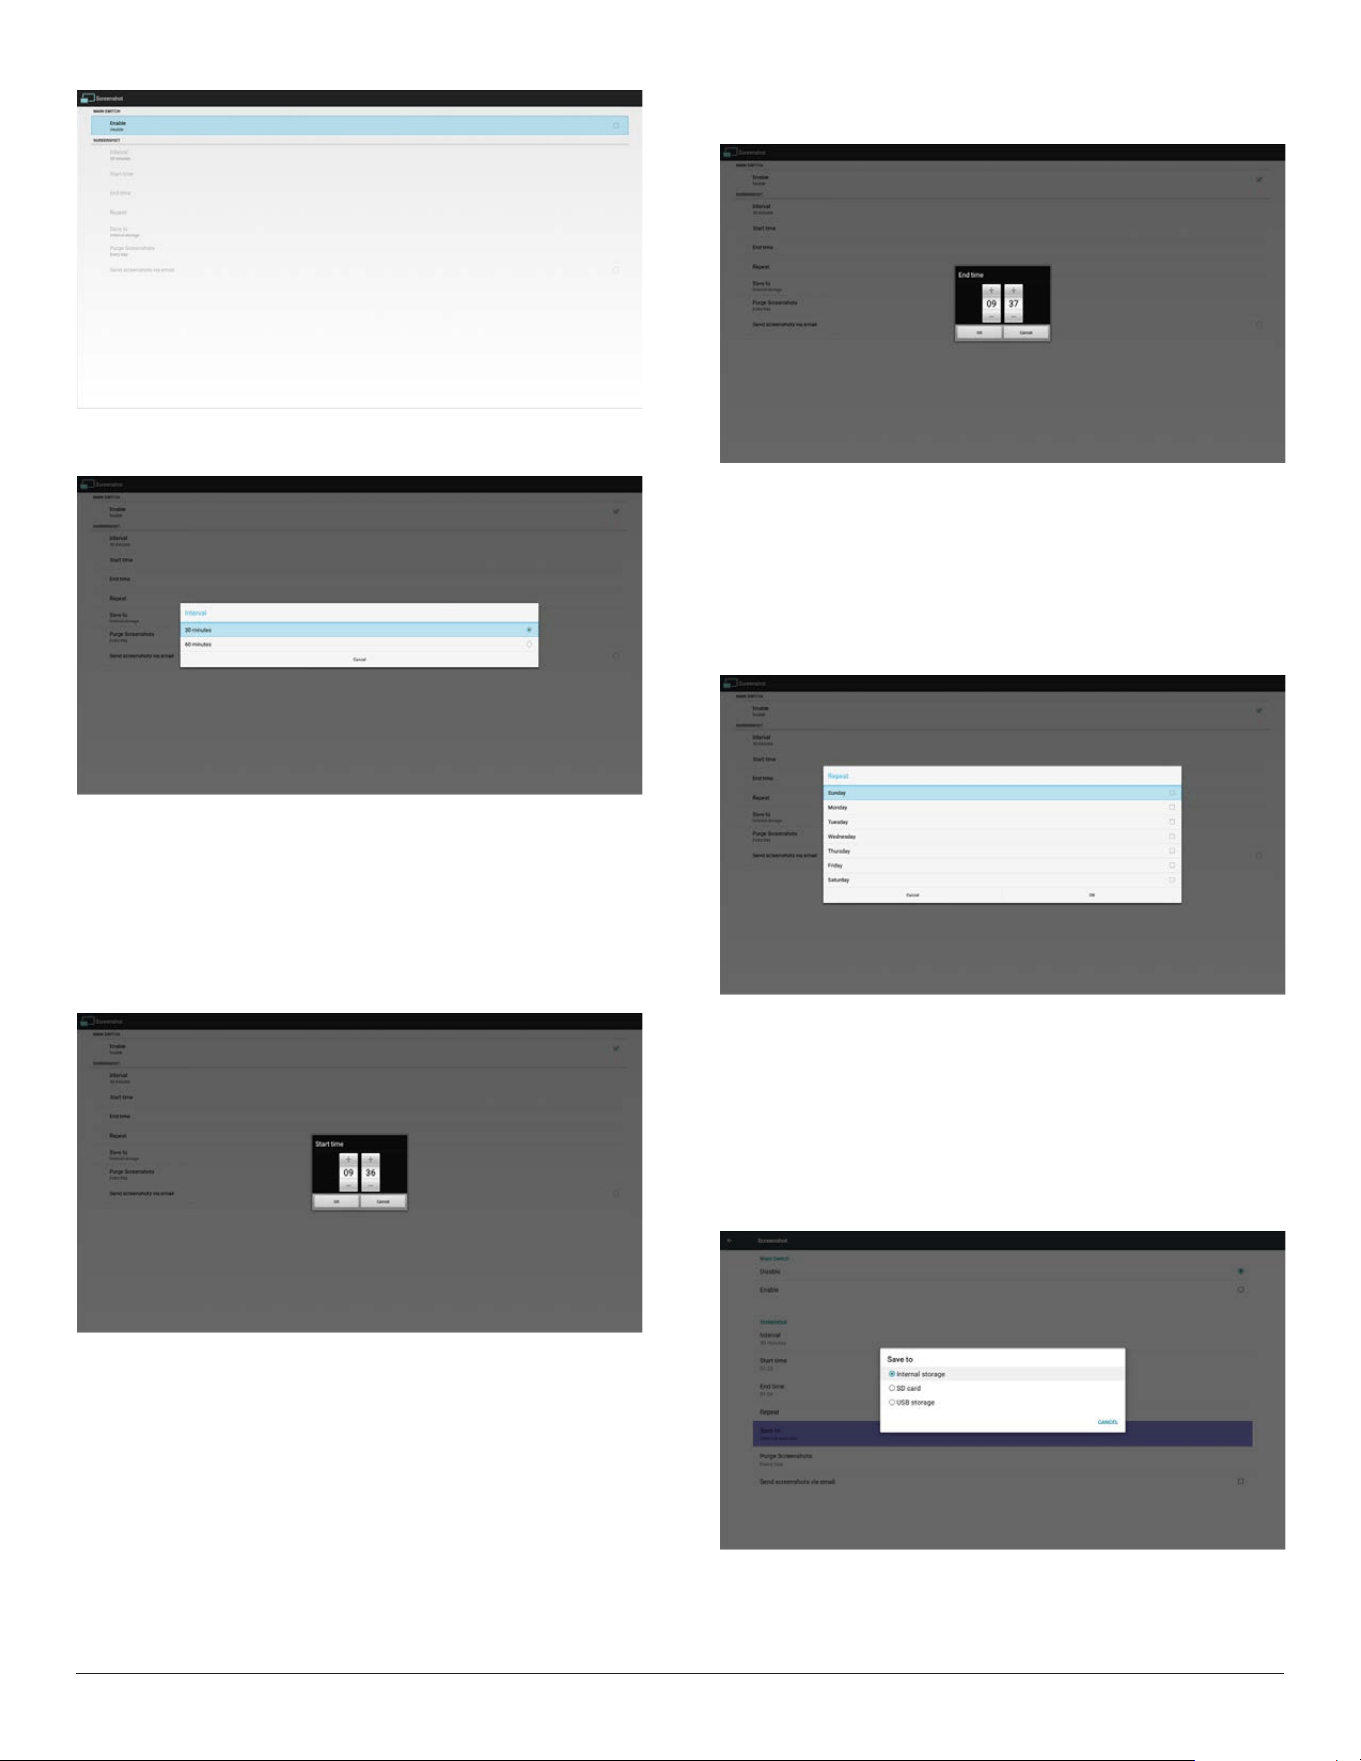
9
1)Interval
Setupintervaltimeframe.30minsor60mins.
2)StartTime
Setupscreenshotstarttime.
Note:
(1)Ifnostarttime,thescreenwillshowcurrenttimeautomatically
(2)JustpressBackkeytoexitdialogforSetup
(3)StarttimecannotbenewerthanEndtime.ItwillshowError
toast.
3)EndTime
Set up screenshot End time
Note:
(1)IfnoEndtime,thescreenwillshowcurrenttimeautomatically
(2)StarttimecannotbenewerthanEndtime.Itwillshowerror
toast.
4)Repeat
Setscreenshotrepeatcycle.Usercanchoosescreenshottimeframe.
(Multipleselection)
5)Saveto
Setupscreenshotsavepath.Internalstorage,SDcardorUSB
storage.)
Note:
Picturestoragepath
(1)Inrootofinternalstorage/usbstorage/sdcard,PDwillcreate
folderautomatically.
(2)Thepicturewillsavetophilips/Screenshot/.
10
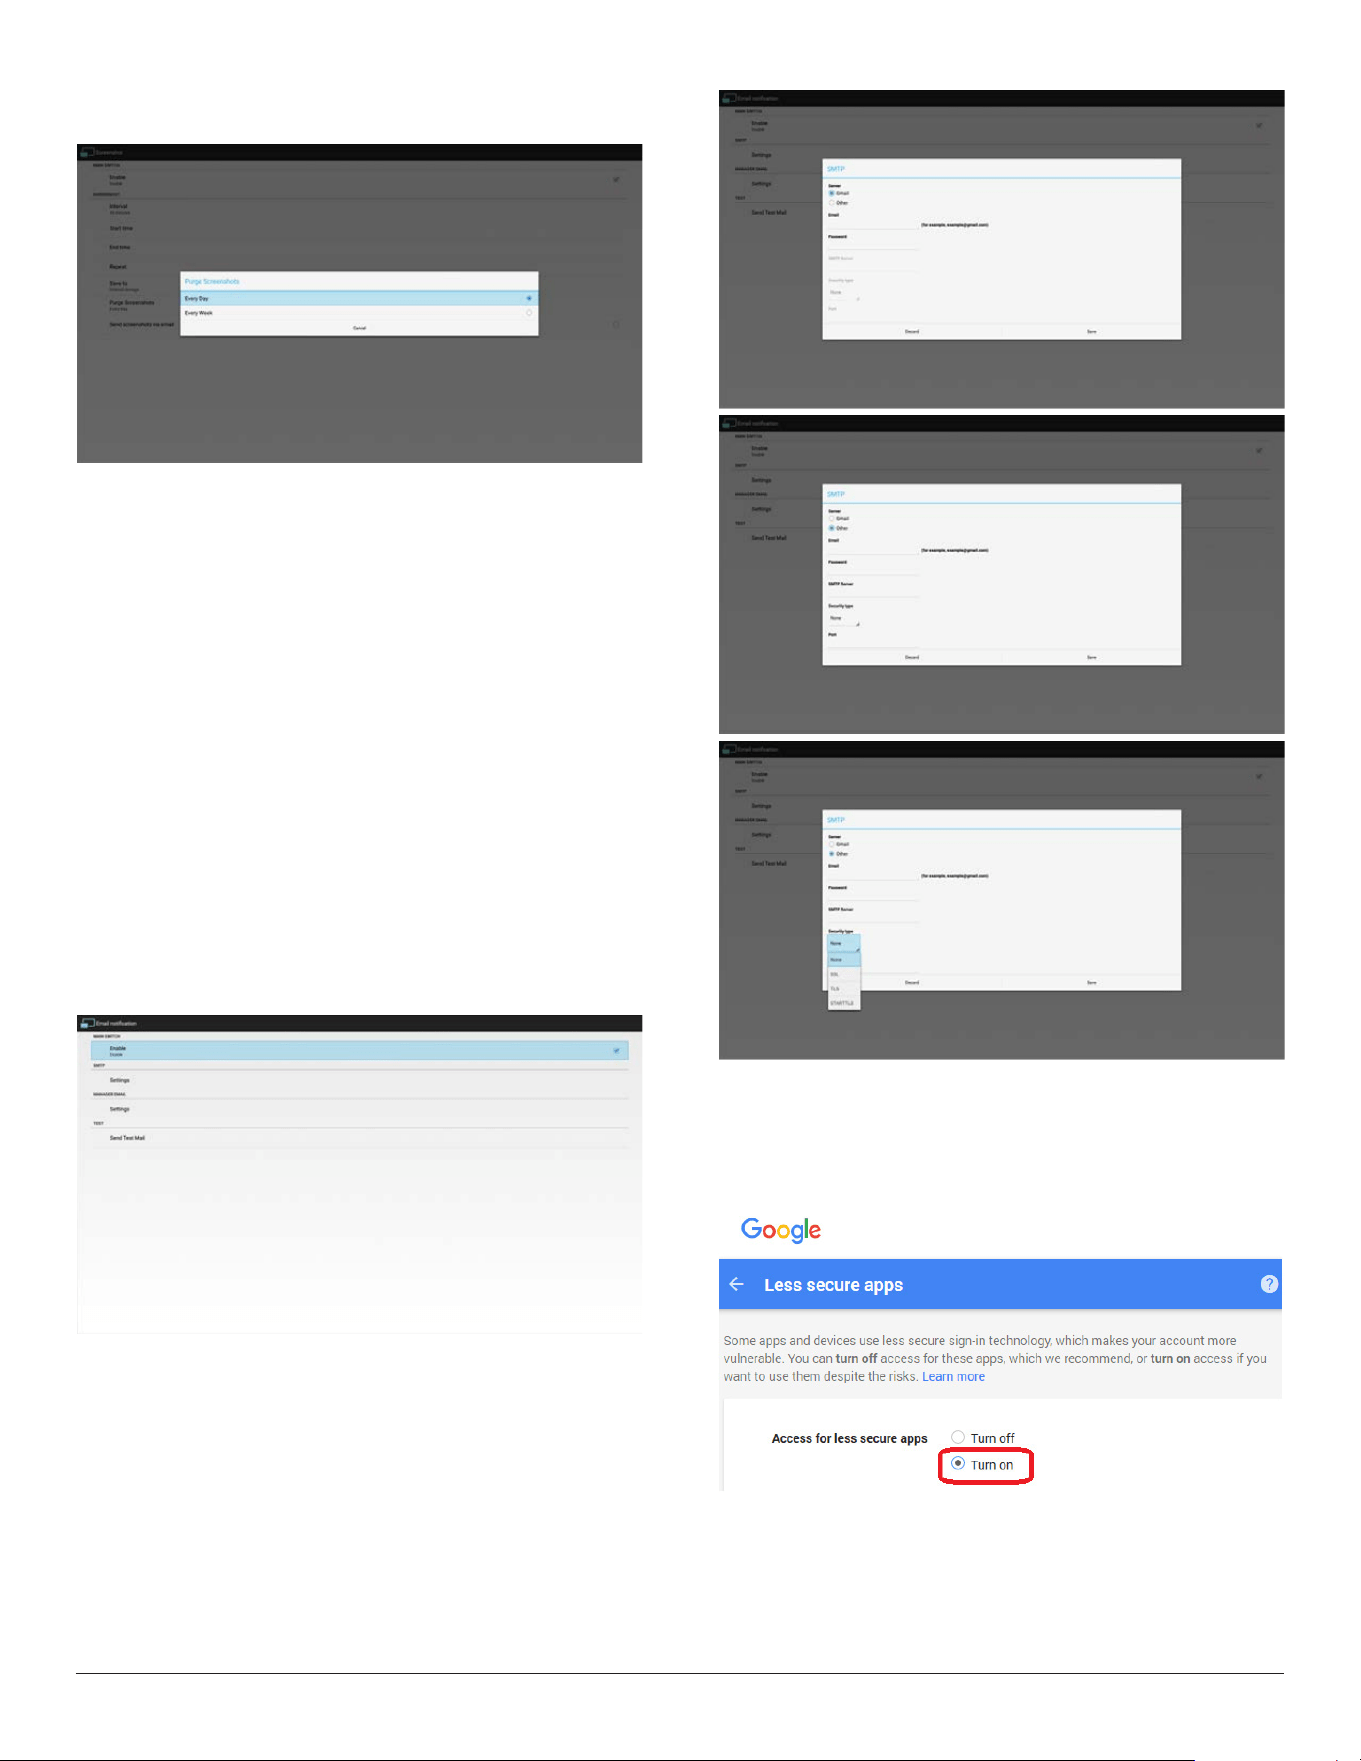
6)PurgeScreenshots
Setuppurgetimeframe.OnedayorOneweek.
(7) Sendscreenshotsviaemail
Aftercheckthisitem,itwillsendscreenshottoemailofadministrator
PleaserefertoEmailnotication
Note:
PleaseconrmEmailsettingisdone.
Eachscreenshotwillbesentimmediately.
3.4.2. Server Settings
1. EmailNotication
ViaEnable/DisabletocontrolEmailOn/Off.
AfterEnable,usercansetupEmailnoticationconguration.
Thefollowingeventsareautomaticallysentmailtomanager.
(1)Critical:Someandroidsystemwarningmessage
(2)Mediaplayer:Playlistisempty,ormedialenotsupport…
(3)Browser:Playlistisempty..
(4)CMND&Play:Nocontent
(5)Pdfplayer:Playlistisempty
(6)Ftp:someonelogintosystem
1)SMTP
SetSMTPconguration)
UsercansetGmailaccountorothermailaccount.
UsercanselectothermailaccountandsetupSMTPserver,Security
typeandportitem
Note
Passwordinputlimitation
(1)Length:6-20characters
(2)Format:nolimit
(3)unavailableport:5000
Gmailsafetysetting
IfGmailisnotworkingwhensettingiscomplete,pleasetestGmail
accountviaPCandlinkbelowURL
https://www.google.com/settings/security/lesssecureapps
Andconrm“Accessforlesssecureapps”itemisTurnOn.

11
YahooEmailSecuritySetting
IfYahooEmailisnotworkingwhensettingcomplete,pleaseconrm
“Allowappsthatuselesssecuresignin”itemisenabled.
2)ManagerEmail
SetupReceivermailaccount
3)Test
SendTestMail
TotestGmailaccountreceive/sendfunction.
Note
(1)WhenEmailisDisable,“SendTestMailButton”buttonwillgray
out
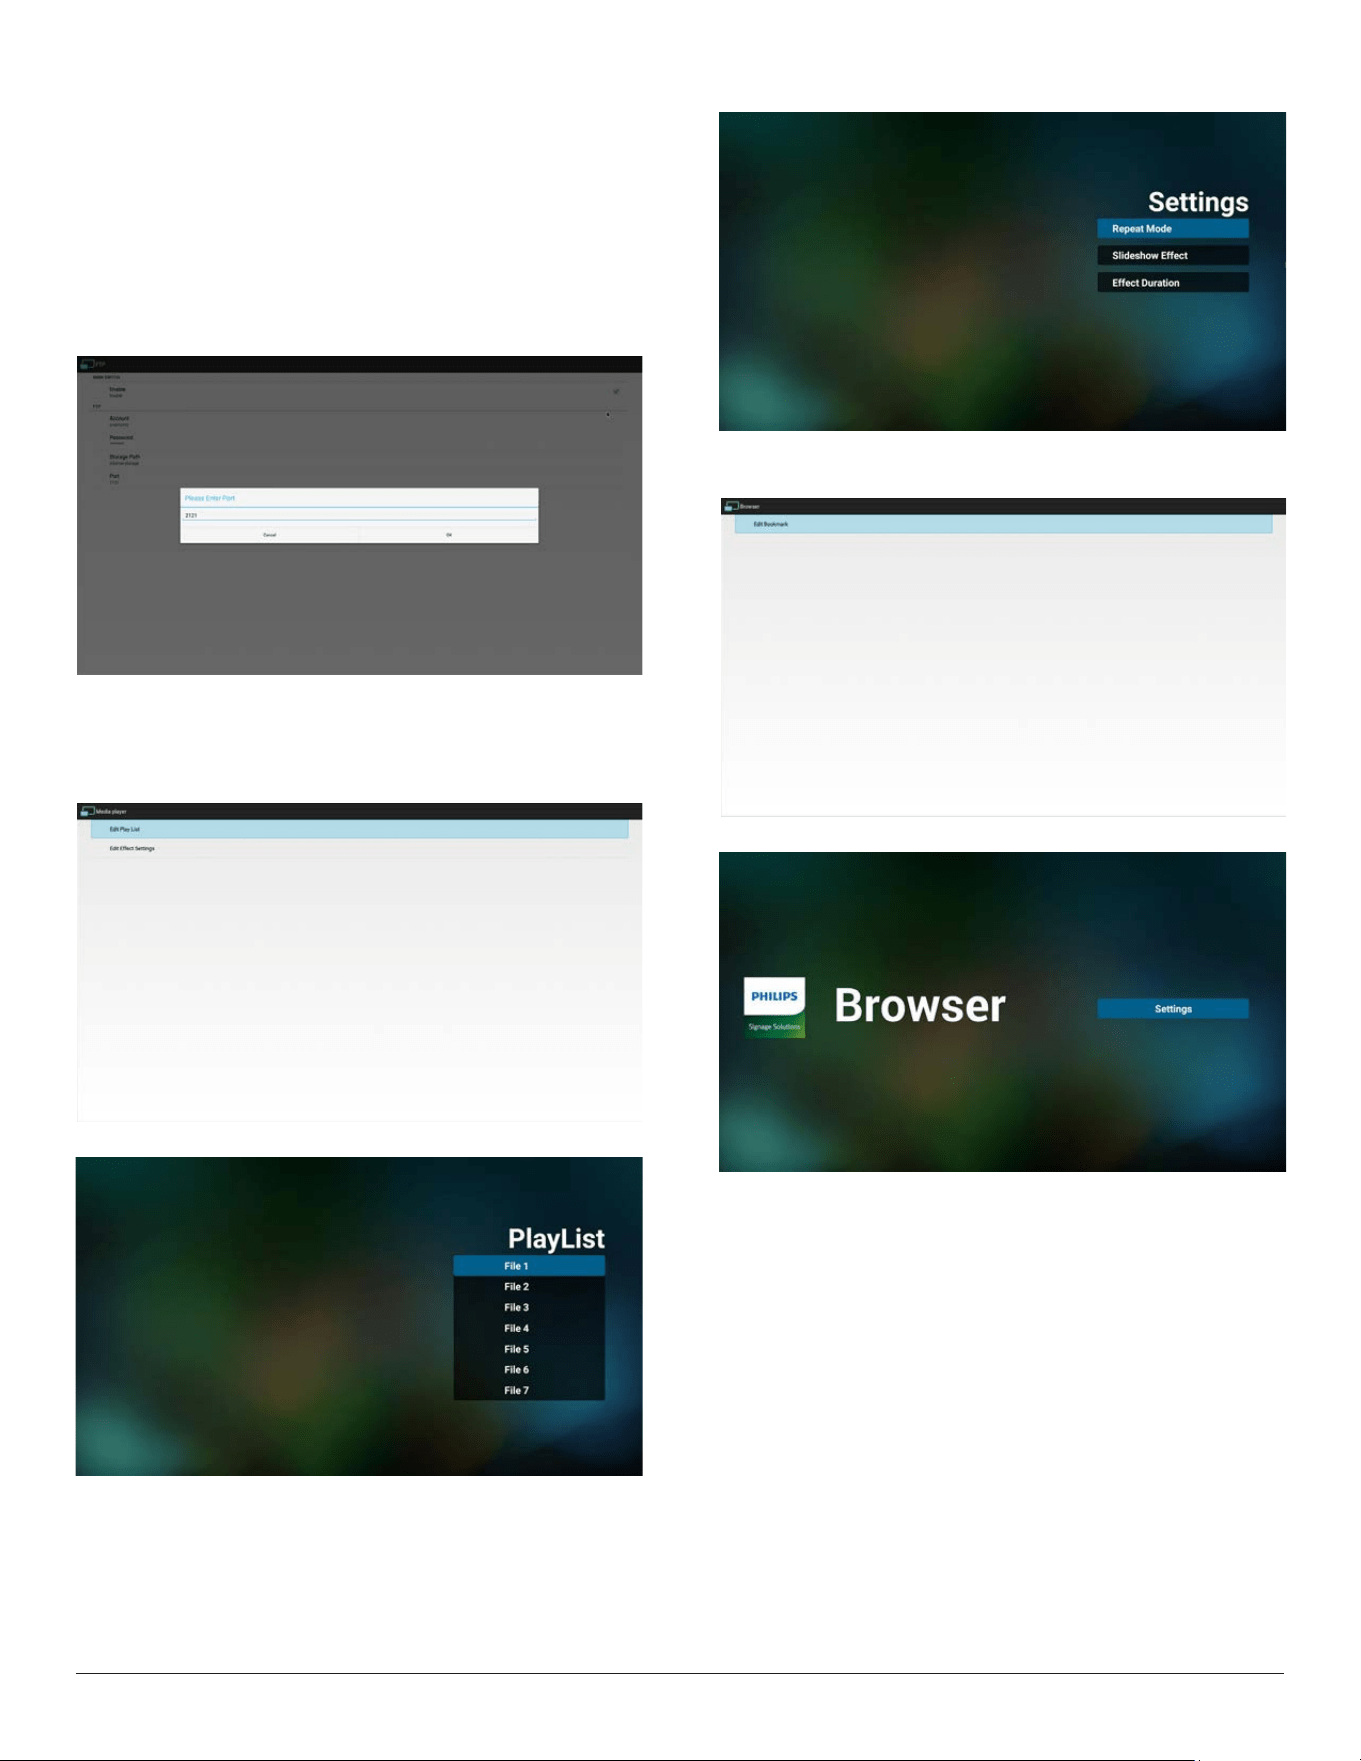
2. FTP
ViaEnable/DisabletocontrolFTPOn/Off.Aftersetup,PDcanshare
FTPles.
1)Account
SetupFTPaccount
Note:
Inputlimitation
(1)Length:4-20characters
(2)Format:
I. Englisha-zandA-Z
II. Number0-9
2)Password
SetupFTPpassword.
Note:
Inputlimitation
(1)Length:6-20characters
(2)Format:
I. Englisha-zandA-Z
II. Number0-9
FTPpassworddisplay
(1)Willshow“*”symboltoinsteadpasswordifsetuppasswordvia
remotecontrol.
(2)Aftersetup,thepasswordtextwillshowas“*”symbol.
3)StoragePath
Showdefaultpath:Internalstorage
Note:
CanonlydisplayInternalstorage,cannotbemodied.(Onlyshow
path)
12
4)Port
SetupFTPportnumber.Default:2121
Note:
Inputlimitation
(1)Length:Max5characters
(2)Range:1024~65535
(3)Format:Number0-9
(4)Unavailableport:5000
(5)Theportnumbermustmorethan1024
3.4.3. Source Settings
1. MediaPlayer
CanEditMediaPlayerplaylistandeffectsettings.
(1)OpenMediaPlayerPlayerListeditpage.
(2)OpenMediaPlayerslideshoweffecteditpage.
2. Browser
CaneditBookmarkconguration.
(1)OpenBrowsersettingpage.
3. CMND&Play
1)Server
SetupCMND&Playserveraddress
2)Account
SetupCMND&Playaccount
3)PINCode
SetupCMND&PlayPINcode
(4)Version
Therearetwooptions,Ver.2andVer.3
Ver.2
Use2.0/2.2agreement
Ver.3
Use3.0/3.1agreement
(5)Content
Thereare3optionsforselection:(1)Internalstorage(2)SDcard
storage(3)USBstorage
13
WhenVer.2,Server/Account/PINcodewillbegrayandunavailable
.
WhenVer.3,Server/Account/PINcodeisavailable.
4. PDFPlayer
CaneditPDFPlayerPlayListandEffectSettings.
(1)OpenPDFPlayerPlayerListeditpage.
(2)OpenPDFPlayereffecteditpage.
5. CustomApp
UsercansetuptheapplicationforCustomerSource.
Note
Displaypre-installedapp.anduserinstalledapp..
OSDmenuoperation:
RCU:Source->Custom
IfsetupcustomerAPK,PDwillopencustomerappwhenswitchsource
toCustomermode.
IfnosetupcustomerAPK,PDwillopendefaultappSignageDisplay,
whenswitchsourcetoCustomermode.
Functionintroduction
(1)Save
SelectAppandpressSavekeytosaveit.
(2)Forget
PressForgetkeytocleanpreviousstoreddata
(3)Cancel
Nochange,closewindowdirectly
Ifnocustomerinstalledapk,thelistwillbeblank.
Nooptionforchoose.SaveandForgetkeywillbegrayand
unavailable.
14
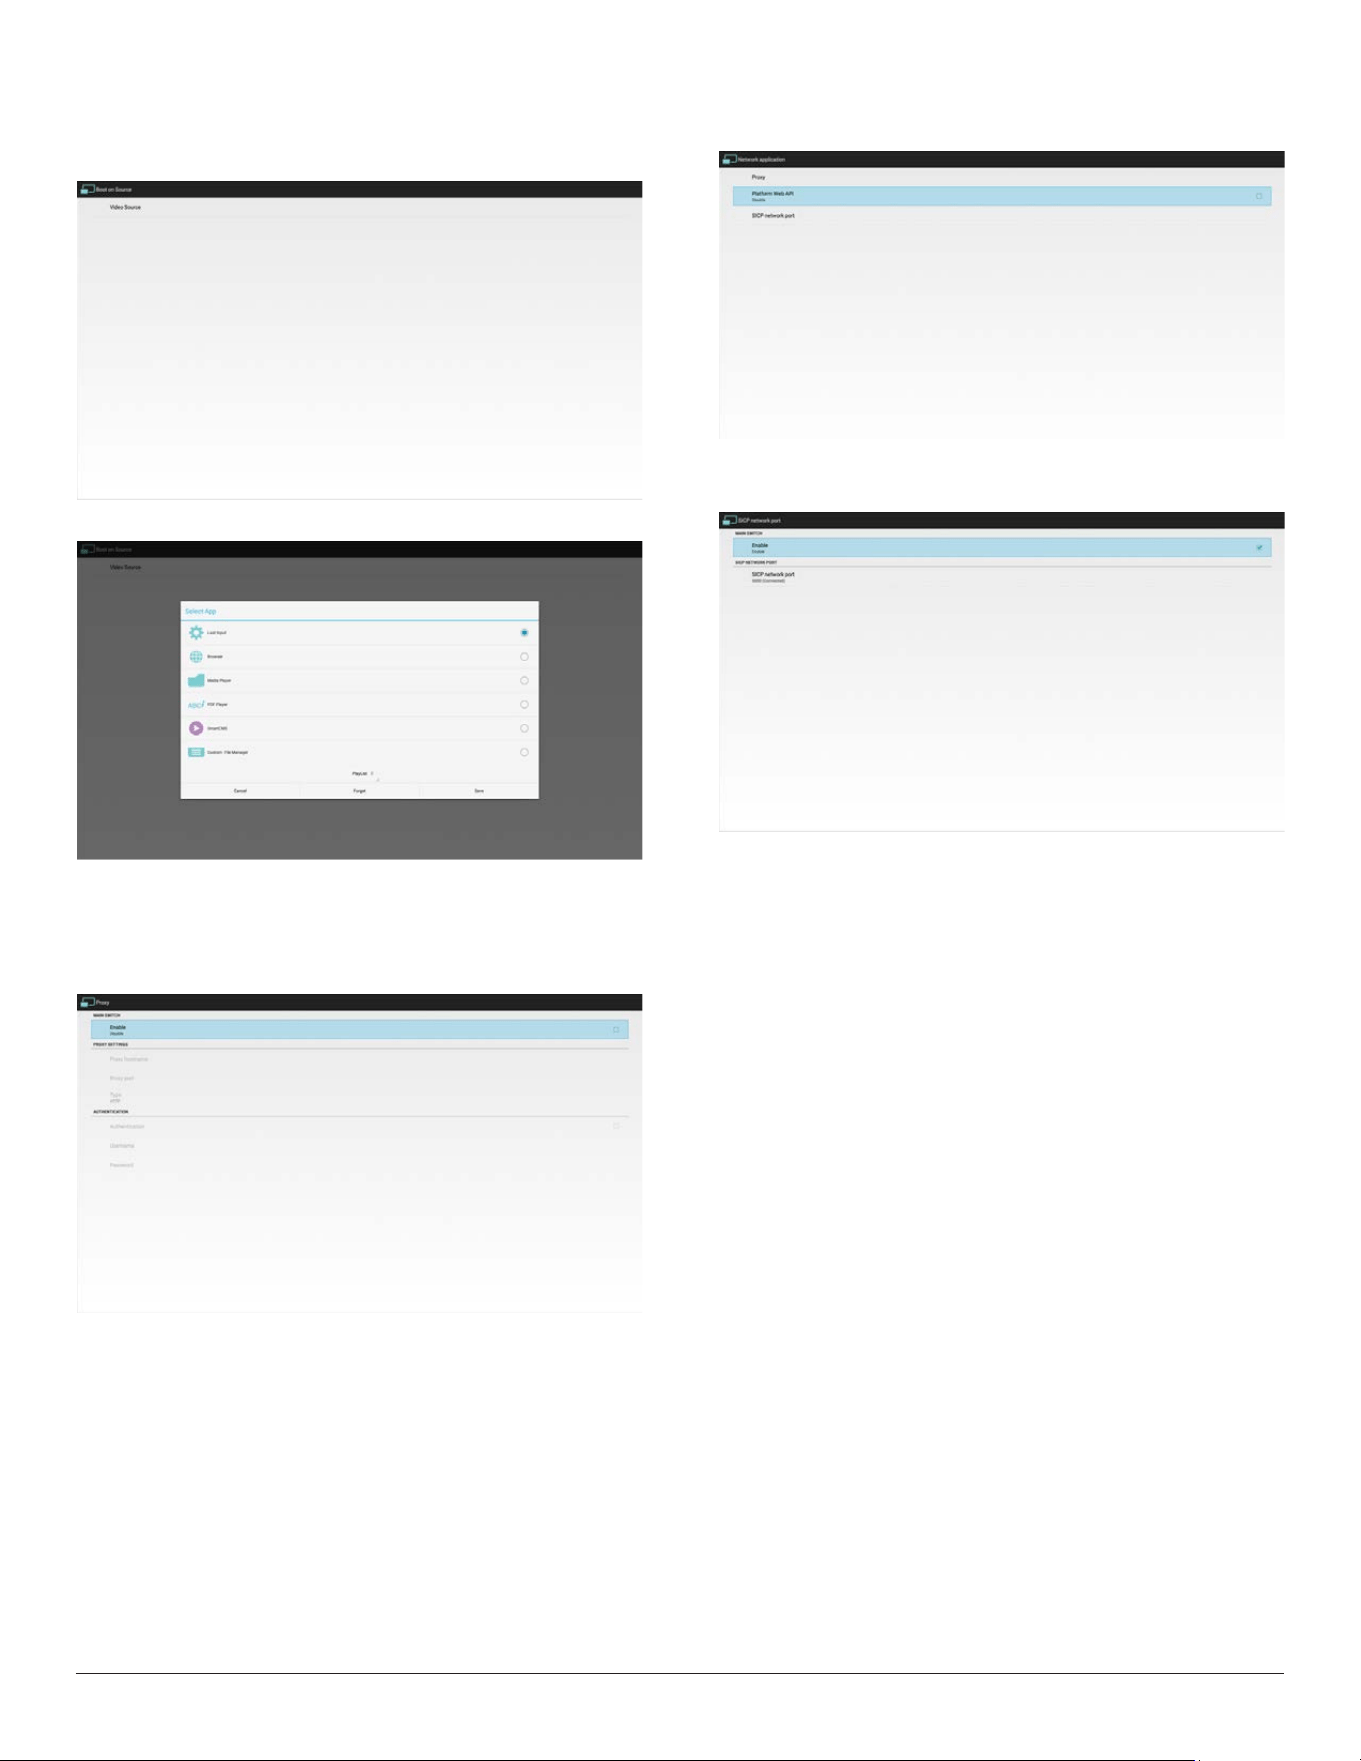
6. BootonSource
UsercansetuptheapplicationforAndroidbootonSource.
SelectVideoSource
OpenthepagetoseclecttheAPKforandroidbootonsource.
3.4.4. Network application
1. Proxy
EntertheHostandPortoftheproxyserver.
2. PlatformWebAPI
Enable/DisablePlatformWebAPI.
3. SICPnetworkport
ChangeSICPNetworkPort.Portrangeis1025~65535.
3.4.5. System Tools
Systemtoolshave4mainfunctions.
(1) ClearStorage
ThepurposeistoclearalldatainPhilipsfolders.Ithas4modesto
cleanthedate.
(2) FactoryReset
FactoryResetcanrecovertoFactorydefaultsettings.
(3) Import&Export
ThefunctionofImport&Exportsystemsettings.
Note
1).Savedlename:
a.settings_global.xml
b.settings_secure.xml
c.settings_system.xml
d.signage_settings.db
e.AndroidPDMediaPlayerData.db
f. AndroidPDPdfData.db
g.AndroidPDUrlListData.db
h.smartcms.db
2).WillsavetoPhilipsfolderinstorage.
3).IfnoPhilipsfolderexistsinUSBorSDcard,itwillbecreated
automatically.
(4) CloneMediaFiles
Clonemedialefrominternal,SDorUSBPhilipsfolder.
(5) ExternalStorage
Lock/Unlockexternalstorage.
15
(6) Password
Thisistoallowusertochangeadminmodepassword(pincode)
3.4.6. Misc.
1. TeamViewerSupport
Enable/DisableTeamViewersupport.
3.4.7. System update
1. Localupdate
(1)Willautomaticallysearchupdate.zipinUSBorSDcard.Iffoundwill
beshownupinlistforuserselection.
Note
a.OnlysupportAndroidFullimage.
b.Filenameshouldbeupdate.zip
c.Theleshouldbelocatedinrootofstorage.
(2)Afterselectingupdate.ziple,systemwillrestartandstartupdating.
(3)Ifupdate.zipisnotfound.Thedialogis“nocontent”.(OKbuttonwill
begrayed.)
3.5. Display
Usercanmodifythefontsize,canchoose:Small/Normal/Large/Huge
3.6. Storage
DisplaycurrentOPSAndroidstorageinformation.
Note
(1)UseroptionkeyonRCUtoshowsettingoption
16
SDCARDandUSBSTORAGE:
NeedtoinsertSDcardorUSB,theinformationwillshowuptotal
spaceandavailableofSDcardorUSBstorage.
Apps
Displayapplicationsinformation.
3.7. Security
1. SIMcardlock
Setup/DisableSIMPINcode.
Note:
(1)Onlyshowupwhen4Gmoduleisconnected
2. Credentialstorage
(1)Storagetype
(2)Trustedcredentials
(3)InstallfromSDcard
(4)Clearcredentials
3.8. Languages & input
Setupsystemlanguage.
Addlanguageinsetupscreen.
17
3.9. Date & time
Setupdate,timeandtimezone.Setuptimezonerstandthengo
setupdate&time.Aftertimezonesetup,thengosetupdate&time.
Note:
1. If“Automaticdate&time”isenabled,thesetupofdateandtimewill
bedisabledandwilluseNTPservertime.
2. Disable“Automaticdate&time”,tosetupthedateandtime.
Android’sdatecanbesetfrom2017/1/1to2037/12/31.
3.10. Developer options
Androiddeveloperoptions.
3.11. About
MaininfoinAbout:
(1)Systemupdates
(2)Legalinformation
(3)Androidversion
(4)Kernelversion
(5)Buildnumber
3.11.1. System updates
1. Willautomaticallysearchupdate.zipinUSBorSDcard.
Willbeshowninlistforuserselectioniffound
2. Afterselectingupdate.ziple,PDwillrestartandstartupdating.
3. Ifupdate.zipisnotfound,thedialogis“nocontent”andtheOK
buttonwillbegrayedout.
Note:
(1)OnlysupportAndroidFullimage.
(2)Filenameshouldbeupdate.zip.
(3)Theleshouldbelocatedinrootofstorage.
18
3.12. Legal Information
Showtheopensourcelicenses.
3.13. Supplementary
3.13.1. Quick Info
Youcanpresskeyboard“Win+7,7”tostartupquickinfo.(Orbyleft/
rightdragging,horizontaldistance>screenwidth/5tostartupquickinfo
wheninLauncherforTouchhostPD)
Quickinfowillshow“Network”and“MonitorInformation”,asbelow:
Note:
Operationhours:Itisupdatedeveryminute.
3.13.2. How to custom an Android boot
animation?
1. Overview
TheAndroidbootanimationisusedscripttoloadPNGleswhen
thedeviceboots.Itiscontainedwithinanuncompressedziplecalled
Bootanimzation.zip.
2. InsidetheBootanimzation.ziple
TheBootanimzation.zipasfollow:
• Theimagefolder(ContainsPNGimagesnamedinincremental
numbers)
• Thedesc.txtle
(1)Theimagefolder
ThesecontainPNGimagesnamedinnumbers,startingfrom
somethinglike0000.pngor0001.pngandproceedingwith
incrementsof1.Therehastobeatleastonefolderandthereisno
knownupperlimittothenumberoffolders.
(2)Thedesc.txtle
Thisledeneshowtheimagesinthefolder(s)aredisplayedduring
thebootanimation,inthefollowingformat:
- WidthHeightFrame-rate
- modeLoopdelay-timeFolder1
- modeLoopdelay-timeFolder2
Anexampleofadesc.txtleis:
- 1920108030
- p10part0
- p00part1
a.Therstline
1920and1080denethewidthandheightofthescreen
resolution.
30istheframerateinfps(framespersecond)i.e.numberof
imagestodisplaypersecond.
b.Thesecondandthirdlineshaveasameformat.
Therst‘p’denesplaymodeisimmediatelystopplayingwhen
bootcomplete.
Thenumberafter‘p’denesrepeatmode
- specifying0wouldmakethepartloopindefinitelytillthe
devicehasbootcomplete.
- specifying1wouldmakethepartplaybackonce.
Thenextnumberdenesthedelaytime(ms).Forexample,ifset
10,whenallimageleshasbeenplayback,systemwilldelay10ms.
Thepart0andpart1areimagefoldername.
Theaboveexample,thebootanimationwillplayataresolutionof1920
by1080pixels,ataframerateof30fps,startingwiththecontentsof
part0folderandafterplayingtheminoneloop,switchingtocontents
ofpart1folderandplayingthemcontinuouslytillthedeviceboot
complete.
19
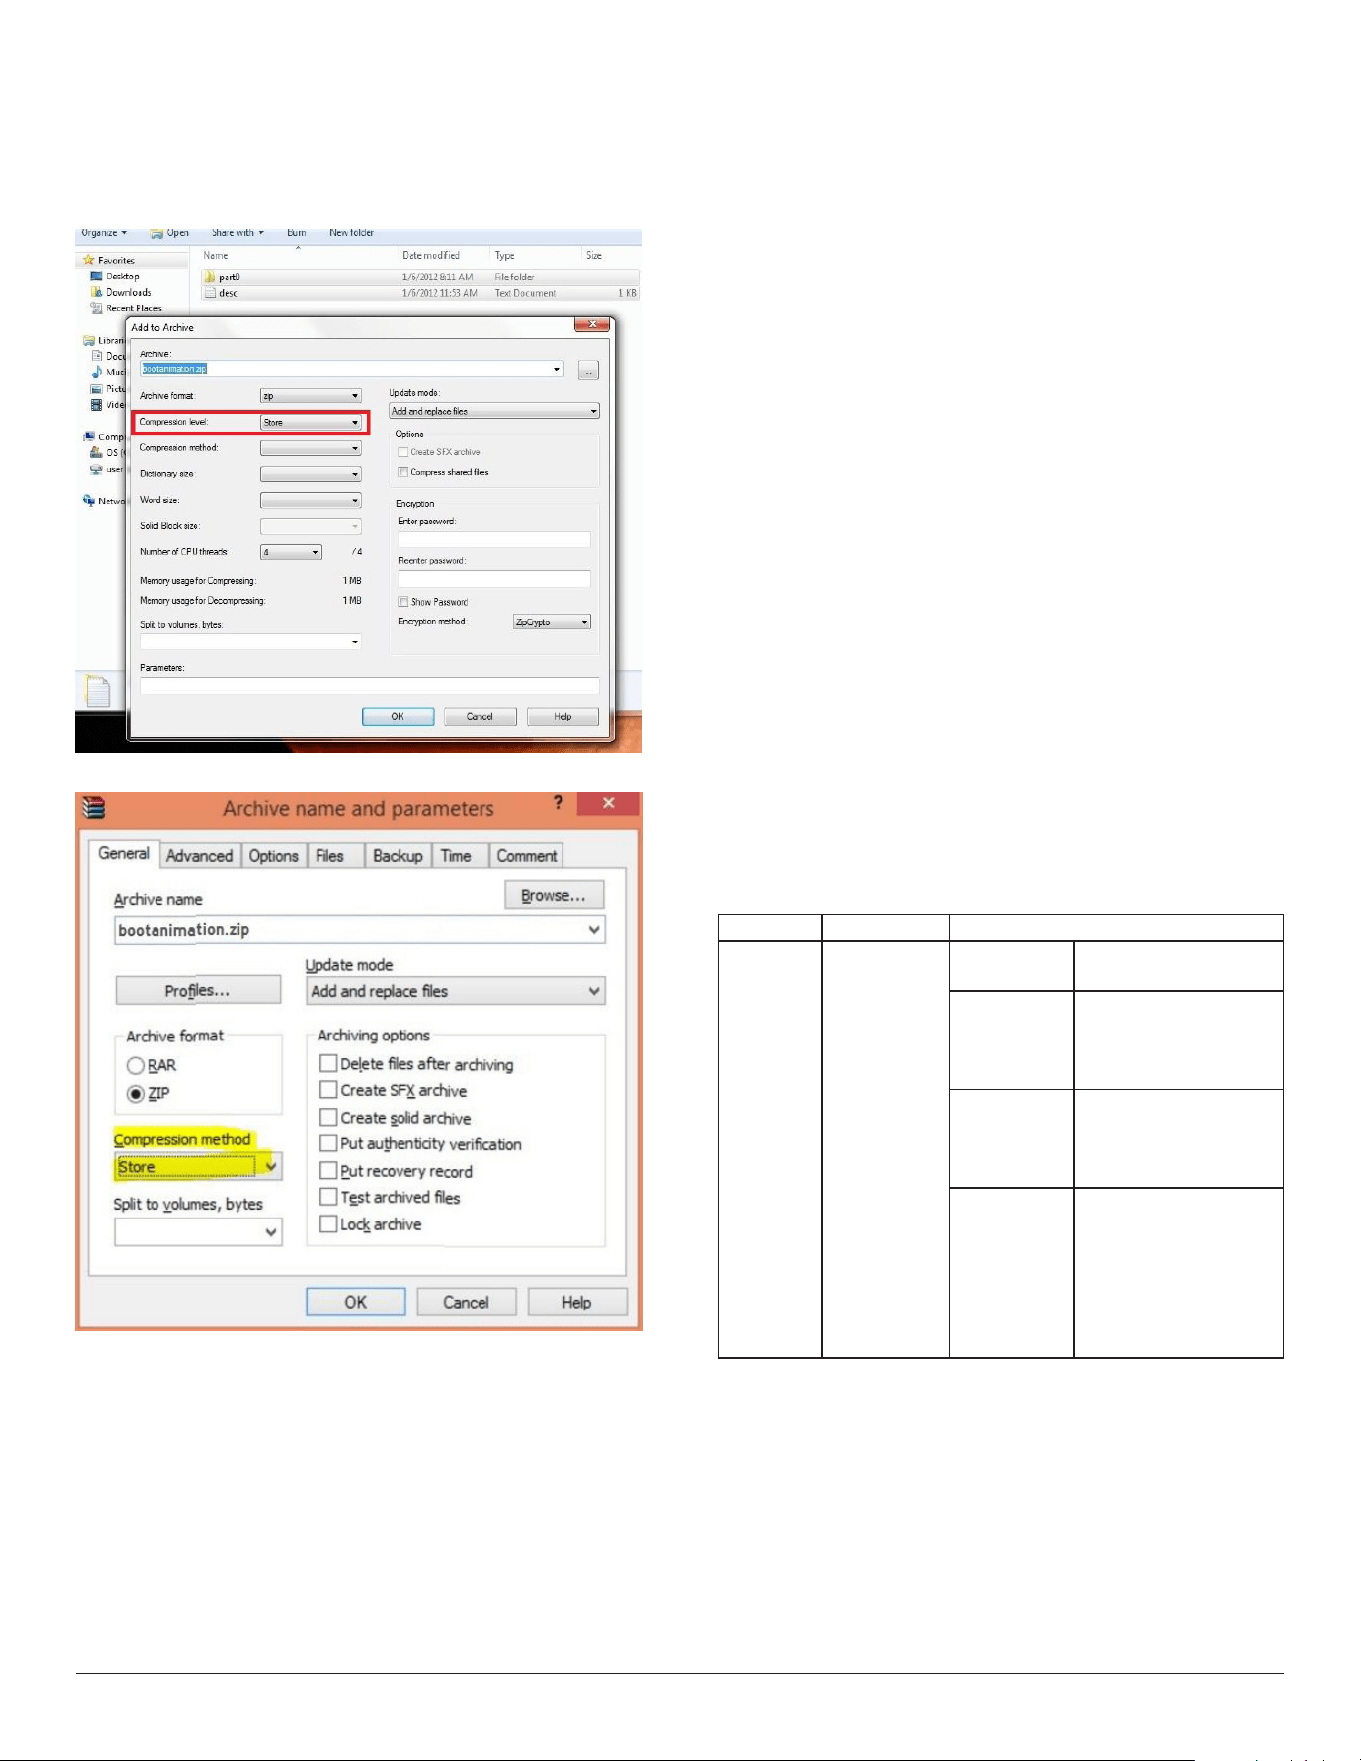
3. Ziple:
Selecteverything(imagefoldersanddesc.txt)insidetheBootanimzation
folderandzipthemintoanewuncompressed zip archiveusingyour
favoritecompressionutilitylike7ziporWinRARandsoon.
Ifusing7zip,setcompressionlevelto“Store”
IfusingWinRAR,set“Compressionmethod”to“Store”
orelsebootanimzationWON’Twork
4. Applythecustombootanimzation
Procedure:
(1).Putyourcustombootanimztion.zipleintoexternalSDcardor
USBandplugintoPhillipsPDplatform.
(2.)MakesuretheLogooptionisenabled.
PressHomekeyonRCU:OSDmenu->Conguration2->Logo
->set“on”
(3.)Presscombinationkey“Home+1888”onRCUtogotoAdmin
mode:
Settings->SignageDisplay->GENERALSETTINGS->BootLogo
(4).Thesystemwillndthebootanimzation.zipinexternalSDcard
orUSBautomaticallyandcopyitto/data/local
(5.)Oncestep1~4hasbeendone,restartthesystem.Thenew
customizedbootanimationshouldbedisplayedduringboottime.
3.13.3. How to Install Android app?
Thereare3waystoinstallyourownandroidapp.
(a)ViaFileManagerinAdminMode
1.Ifyouhaveapkalready
1.1copyyourapktoUSBdiskorSDcard,andthenplugthem
intoPhilipsAndroidSignageDisplay.
1.2GotoAdminMode>Apps>FileManager
1.3UsingFileManagerandndoutyourapkandthenyoucan
install.Justpress“ok”ontheselectedapk.
2.DownloadapkbyChromiumbrowser,andthengoto<internal
storagepath>/Download/byFileManager.
2.1Therestofstepsisthesameasabove.Pleasenote,eachmodel
mayhavedifferent<internalstoragepath>.
(b)ViaAdbShell
1.MakesurethatyourPCcanconnecttoPhilipsAndroidSignage
Displayusingadb.
2.Prepareyourapkinafolder(forexample,C:\apkfolder)onPC.
3.Executethefollowinginstructionbycommandlinetool.
C:\apkfolder>adbinstall-rapk_name.apk
(c)ViaCustomizedIntent
1.Ifyoudevelopanapkwhichcandownloadanyandroidapp,then
yourapkcanissueacustomizedintent.
2.Givingtheapknameandthepathitwasstored.Thesystemwill
helpyoutoinstallbyprogram.
Description Intent Parameters
SwUpdate
php.intent.
action.
UPDATE_APK
lePath
Theabsolutelepath
includingthelename.
Keep
Indicatethatyouwant
tokeeptheleornot
afterupdating.Thedefault
valueisfalse.
packageName
Thetargetpackage
youwanttolaunch
automaticallyafter
updating.
activityName
Thetargetactivity
youwanttolaunch
automaticallyafter
updating.Butifcurrent
topactivityisnot
activityName,nothing
happened.
Forexample,
Intentintent=newIntent();
intent.setAction(“php.intent.action.UPDATE_APK”);
intent.putExtra(“lePath”,“/sdcard/Download/apk_name.apk”);
intent.putExtra(“keep”,true);
intent.putExtra(“packageName”,“com.example.apk_name”);
intent.putExtra(“activityName”,“com.example.apk_name.MainActivity”);
sendBroadcast(intent);

20
3.13.4. How to connect with platform Web API?
PDhasalocalwebservertoprovideWebAPIforcustomergettingPD
informationinJSONformat.
1. APIsspecications
- Protocol:HTTP
- Method:GET
- Domain:localhost
- Port:9988
- URI:/platform/getinfo
2. APIRequestURL
- http://localhost:9988/platform/getinfo
3.
APIResponse
- Status
Status Code Description
Success 0
Requestsuccess
Error 1 Requestfailure
- ResultinJSONformat
• interfaces:listallofnetworkinterface’sMACaddress
• family:theaddress-familywithinanIPv4orIPv6
• mac:networkinterface’sMACaddress
• ip:networkinterface’sIPaddress
• currentip:currentIPaddressofdevice
• sn:serialnumberofdevice
• model:modelnameofdevice
• version:versionofWebAPI
- JSONsample
{
status:"success",
code:0,
decsription:"success",
result:
{
"version":"1.0",
"currentip":"172.17.3.4",
"sn":"123456",
"model":"PDModelName",
"interfaces":[
{
"family":"IPv6",
"ip":"fe80::84ea:d74b:1167:aa69",
"mac":"a4:4e:31:9c:79:e0"
},
{
"family":"IPv4",
"ip":"172.17.3.4",
"mac":"a4:4e:31:9c:79:e0"
}
]
}
}

21
4. USB device compatibility
USB Multimedia Codec Formats
Video Decode
Type VideoCodec Container Decode Encode Channel
Remark
MPEG1/2 MPEG1/2 FileFormat:DAT,MPG,VOB,TS V
SupportedImageSize:48x48pixelsto1920x1088pixels
MaximumFrameRate:30fps
MaximumBitRate:80Mbps
AudioCodec:MP2,MP3
MPEG-4 MPEG4
FileFormat:AVI,MKV,MP4,MOV,
3GP
V
SupportedImageSize:48x48pixelsto1920x1088pixels
MaximumFrameRate:30fps
MaximumBitRate:38.4Mbps
AudioCodec:MP2,MP3,AAC,PCM,
(1)NotsupportMSMPEG4v1/v2/v3
(2)NotsupportGMC(globalmotioncompensation)
H.263 H.263 FileFormat:3GP,MOV,MP4 V
SupportedImageSize:SQCIF(128x96),
QCIF(176x144),
CIF(352x288),4CIF(704x576)
MaximumFrameRate:30fps
MaximumBitRate:38.4Mbps
AudioCodec:MP3
(1)NotsupportH.263+
H.264 H.264
FileFormat:AVI,MKV,MP4,MOV,
3GP,TS,FLV
V
SupportedImageSize:48x48pixelsto1920x1088pixels
MaximumFrameRate:30fps
MaximumBitRate:57.2Mbps
AudioCodec:MP2,MP3,AAC,PCM
(1)NotsupportMBAFF
GOOGLE
VP8
VP8
FileFormat:WEBM V
SupportedImageSize:48x48pixelsto1920x1088pixels
MaximumFrameRate:30fps
MaximumBitRate:38.4Mbps
AudioCodec:OggVorbis
MotionJPEG MJPEG FileFormat:AVI,MOV V
SupportedImageSize:48x48pixelsto1920x1088pixels
MaximumFrameRate:30fps
MaximumBitRate:38.4Mbps
AudioCodec:MP2,MP3,AAC,PCM
Audio Decode
Type AudioCodec Container Decode Encode Channel Remark
MPEGAudio
MPEG1/2/2.5Audio
Layer1/2/3
Decode:MP1,MP2,MP3 V 2
BitRate:8kbps~320Kbps,CBRandVBR
SamplingRate:8KHZ~48KHz
Windows
MediaAudio
WMAVersion4,4.1,
7,8,9,wmapro
Decode:WMA V 2
BitRate:8kbps~320Kbps
SamplingRate:8KHZ~48KHz
Non-supportWMAPro,losslessandMBR
AACAudio
MAIN,ADIF,ATDS
HeaderAAC-LC
andAAC-HE
FileFormat:AAC,M4A V 5.1
BitRate:N/A
SamplingRate:8KHZ~48KHz

22
Image Decode
Type ImageCodec Photo Decode Encode Channel Remark
JPEG
JFIFleformat1.02 FileFormat:JPG,JPEG V Decode:Resolution48X48to8176X8176
(1)NotSupportNon-interleavedScan
(2)SoftwaresupportSRGBJPEG
(3)SoftwaresupportAdobeRGBJPEG
BMP BMP FileFormat:BMP V MaximumSupportedImageSize:4096x4096pixels
GIF GIF FileFormat:GIF V ResolutionNoRestriction
PNG PNG FileFormat:PNG V ResolutionNoRestriction
NOTES:
•
Soundorvideomaynotworkifthecontentshaveastandardbitrate/framerateabovethecompatibleFrame/seclistedinthetableabove.
• VideocontentwithaBitrateorFrameratelargerthantheratespeciedinthetableabovecancausechoppyvideoduringplayback.

23
5. Cleaning
Cabinet Cleaning Instructions
Before cleaning, please unplug from power source!
• Ifthecabinetbecomesdirty,wipethecabinetwithasoft,drycloth.
• Ifthecabinetisextremelydirty,soakalint-freeclothinamilddetergentsolution.Wringtheclothtoremoveasmuchmoistureaspossible.Wipe
thecabinet.Useanotherdryclothtowipeoveruntilthesurfaceisdry.
• DonotallowanywaterordetergenttocomeintocontactwiththesurfaceoftheOPSModule.Ifwaterormoisturegetsinsidetheunit,
operatingproblems,electricalandshockhazardsmayresult.
• Donotscratchorhitthecabinetwithngersorhardobjectsofanykind.
• Donotusevolatilesubstancessuchasinsertsprays,solventsandthinnersonthecabinet.
• DonotplaceanythingmadefromrubberorPVCnearthecabinetforanyextendedperiodsoftime.
• Makesuretheventilationholesarefreefromdustorotherobjects,inorderforfreeair-ow.

24
6. Technical Specifications
In/Out Terminals:
Item Specications
RS232C 2.5mmPhonejackx1 RS232CIn/Out
RJ-45 RJ-45Jackx1(8pin) 10/100/1000LANPort
Displayportout DisplayportJackx1
(20pin)
DigitalRGB:TMDS(Video+Audio)
MAX:
Video-720p,1080p,1920x1080/60Hz(WUXGA)
Audio-48KHz/2Channel(L+R)
SupportsLPCMonly
USBInput USB2.0TypeAx1
USB3.0TypeAx1
USB2.0
USB3.0
General:
Item Specications
PowerInput DC12V-19V(FromOPSSlot)
PowerConsumption(Max) 20WWhenUSBmaximumloading
PowerConsumption(typ.) <10W
PowerConsumption(Off) <0.5W
Dimensions[WxHxD] 200.0x30.0x135.0mm
Weight 0.6Kg
GrossWeight 1Kg
Environmental Condition:
Item Specications
Temperature Operational 0~40°C
Storage -20~60°C
Humidity Operational 20~80%RH(Nocondensation)
Storage 5~95%RH(Nocondensation)
Altitude Operational 0~3,000m
Storage/Shipment 0~9,000m

2018 © Koninklijke Philips N.V. All rights reserved.
Philips and the Philips Shield Emblem are registered trademarks of
Koninklijke Philips N.V. and are used under license from
Koninklijke Philips N.V.
Specications are subject to change without notice.