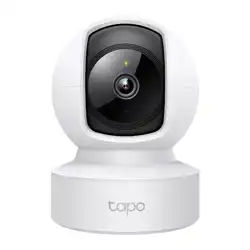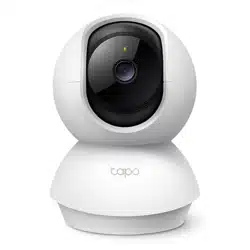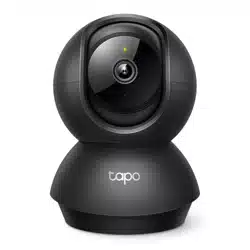

Tapo App User Guide
For Tapo Indoor/Outdoor Cameras*
*Features and UI displays may vary from models and app versions.
©2024 TP-Link 1910013578 REV1.0.0

Contents
About This Guide ················································· 1
Introduction to Tapo App 3.0 ··························2
Set Up Your Camera ···········································3
Main Device Controls ········································4
Home Page ························································· 4
Home Settings ·················································· 4
Notications ······················································· 5
Grid View or List View ··································· 5
Remove Your Device ····································· 6
Share, Favorite/Unfavorite, or Relocate
Your Device ························································· 6
Camera Live View ················································ 7
Live View ······························································ 7
Pan & Tilt ······························································ 8
Privacy Mode ···················································· 9
Playback & Download ·································· 9
Camera Settings ···············································10
Camera Settings ··········································· 10
Device Info ······················································· 10
Detection ·························································· 11
Alarm ··································································· 16
Storage & Recording ·································· 16
Pan & Tilt ··························································· 17
Video & Display ············································· 18
Status LED ······················································· 22
Spotlight Settings ········································ 23
Floodlight Settings ······································ 24
Notications ···················································· 25

Advanced Settings ······································ 25
Share Device ·················································· 26
Add to Home ·················································· 26
Reboot Camera ············································· 27
Remove Camera ··········································· 27
Cameras Page ··················································· 28
Cameras ···························································· 28
Cloud Activity ················································· 28
Home Mode / Away Mode ······················· 29
Smart Actions ····················································30
Me Page ······························································· 33
Manage Your Account ······························· 33
Tapo Care ························································· 33
Playback & Download ································ 34
Camera Memory ··········································· 34
Firmware Update ·········································· 35
Notications ···················································· 35
Device Sharing ·············································· 35
Link Tapo with Kasa ···································· 36
Widgets ····························································· 36
Third-Party Services ·································· 37
1
About This Guide
This guide provides a brief introduction to the Tapo app and Tapo Indoor Cameras & Tapo Outdoor Cameras.
Please note that features available in Tapo may vary by model and software version. Tapo availability may also vary by region. All images, steps, and
descriptions in this guide are only examples and may not reect your actual experience.
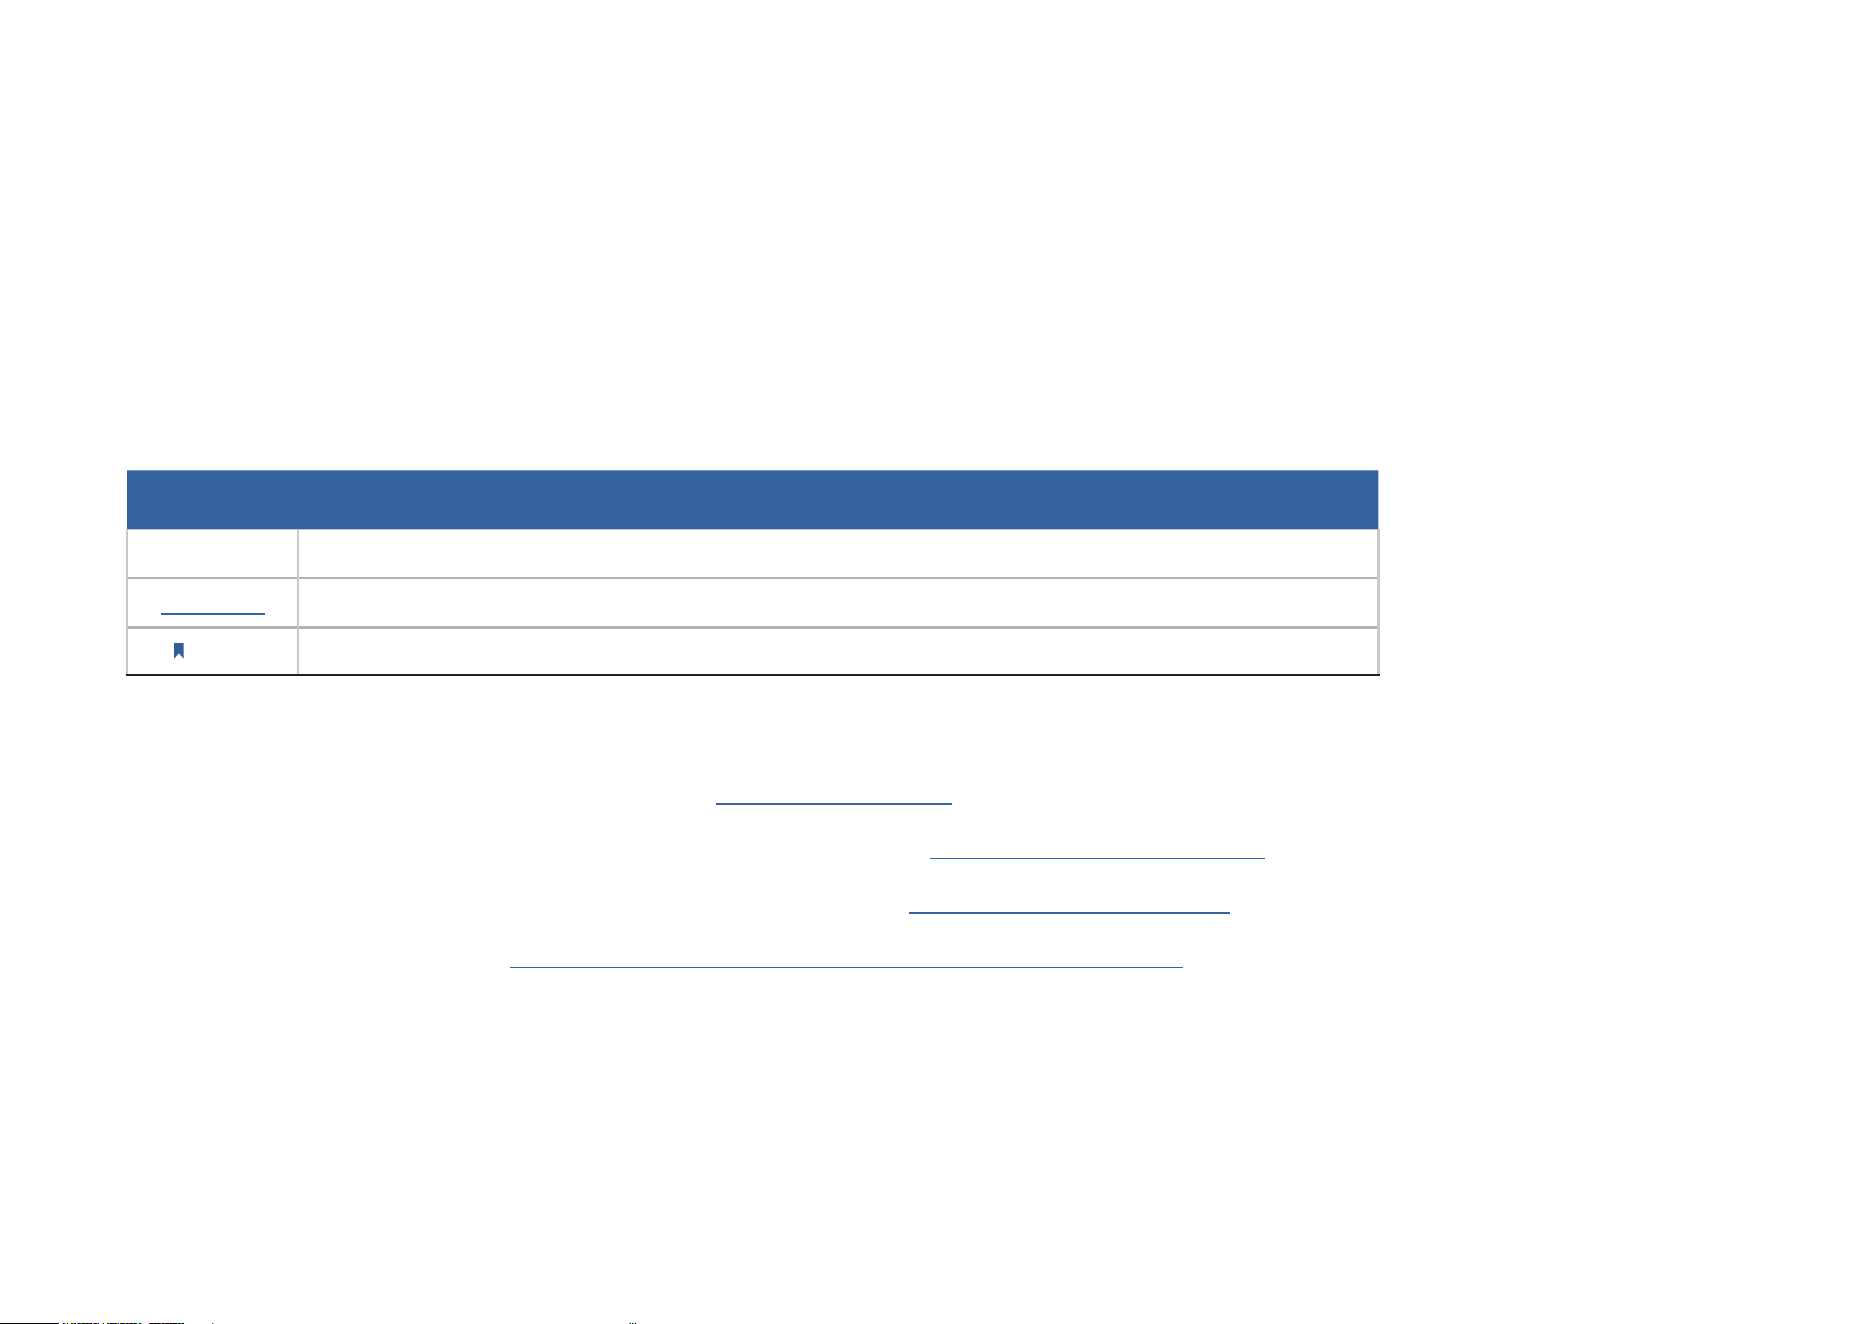
Conventions
In this guide, the following convention is used:
Convention Description
Blue
Key information appears in blue, including management page text such as menus, items, buttons and so on.
Underline
Hyperlinks are in blue and underlined. You can click to redirect to a website.
Note:
Ignoring this type of note might result in a malfunction or damage to the device.
More Info
• Specications can be found on the product page at https://www.tapo.com.
• Our Technical Support and troubleshooting information can be found at https://www.tapo.com/support/.
• A Technical Community is provided for you to discuss our products at https://community.tp-link.com.
• The setup video can be found at https://www.tp-link.com/support/setup-video/#cloud-cameras.
2
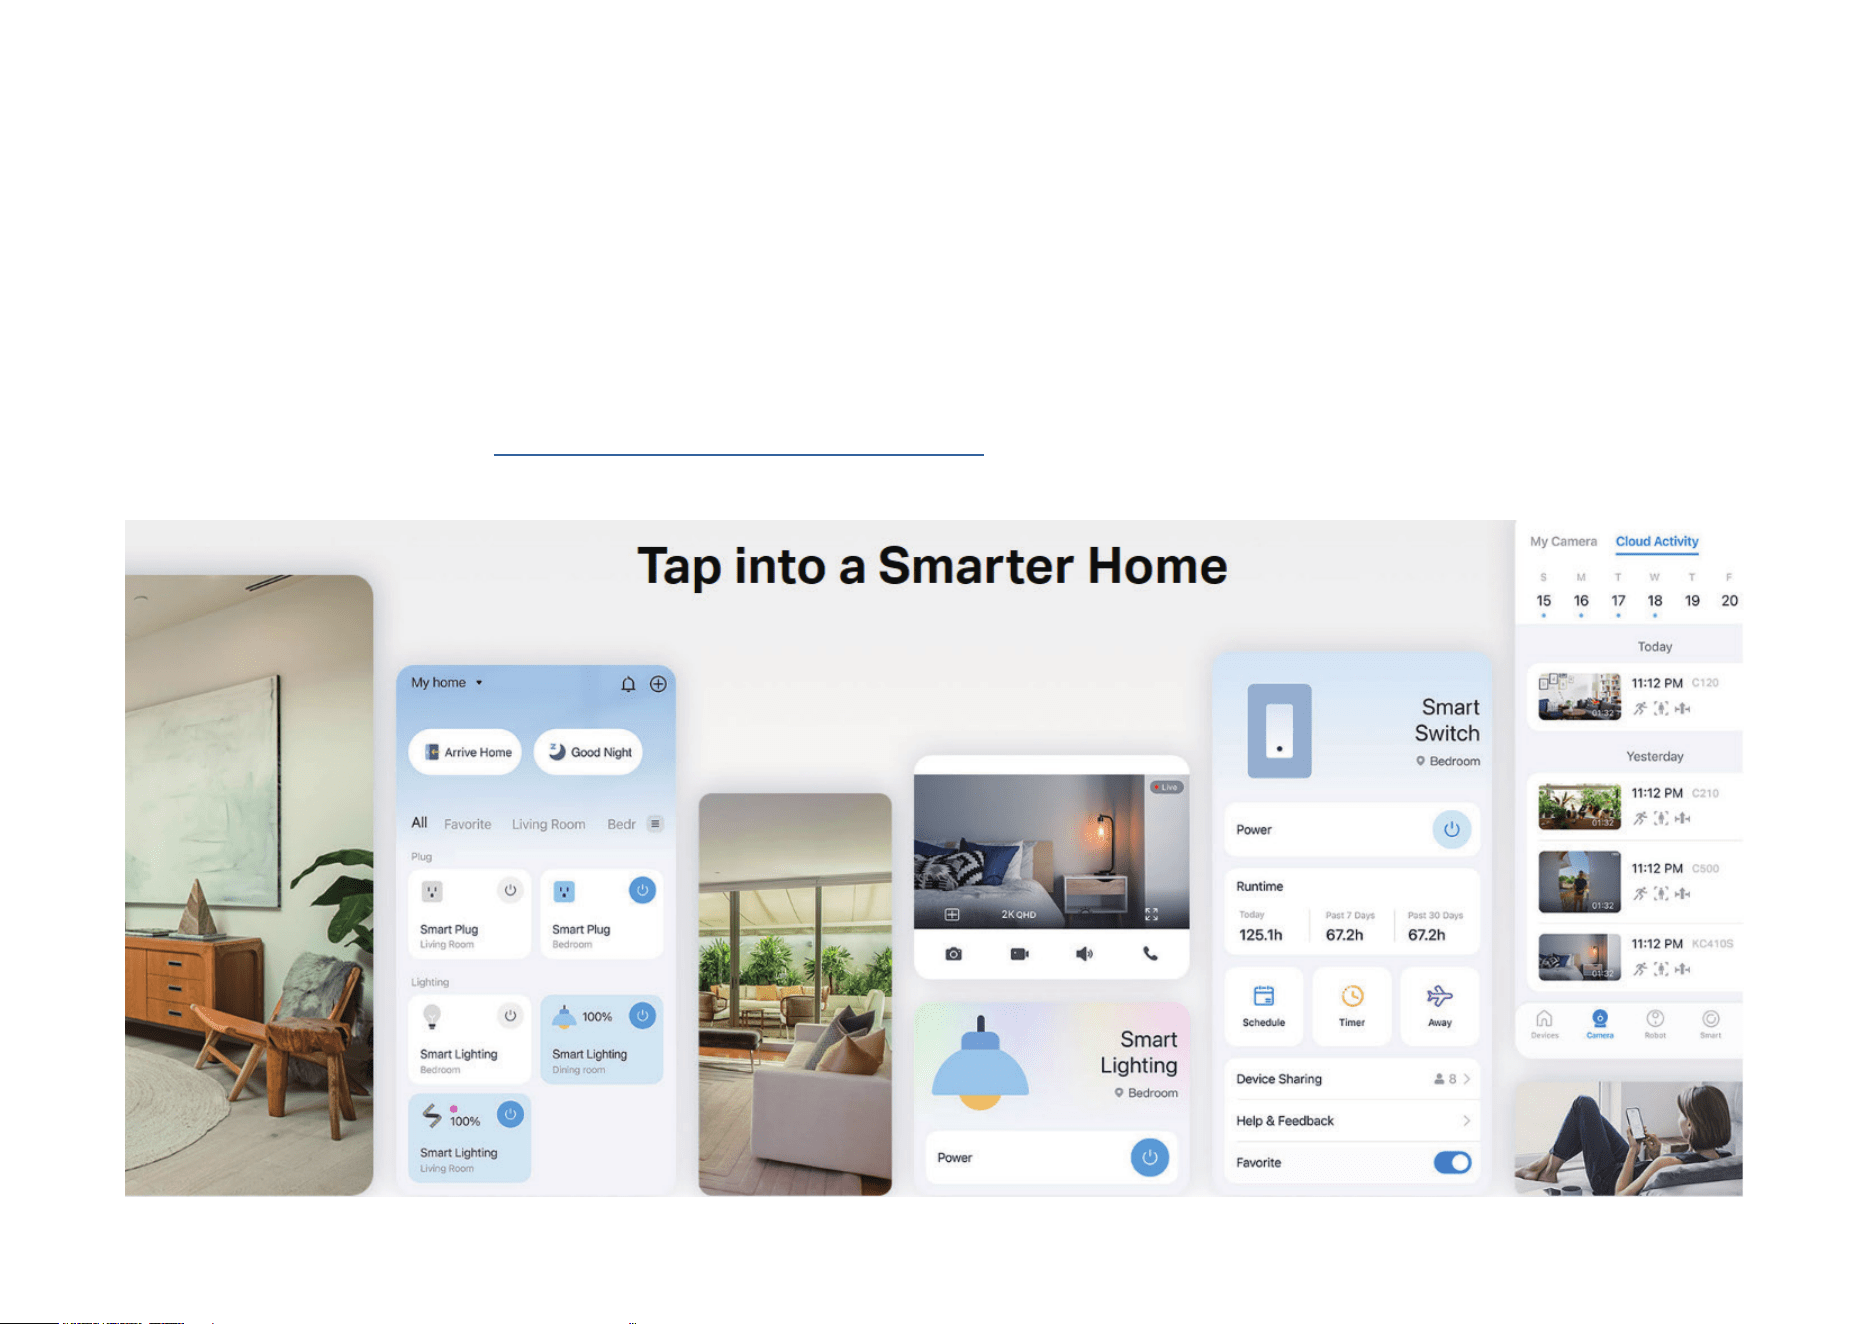
Introduction to Tapo App 3.0
Tapo aims to help you live a smarter, easier, and more secure life. In the past few years, we are constantly striving to enhance customer experience and
provide the best products and services possible. Marking a signicant milestone, we're thrilled to introduce Tapo app 3.0. Dive into its new features!
• Better Looking – The brand-new UI brings a fresh experience.
• More User-Friendly – Optimized interaction and functions enable easy conguration.
• More Compatible – Tapo app 3.0 supports Kasa devices.
Know more about Tapo app 3.0 at https://www.tp-link.com/landing/tapo-app-v3/.
3
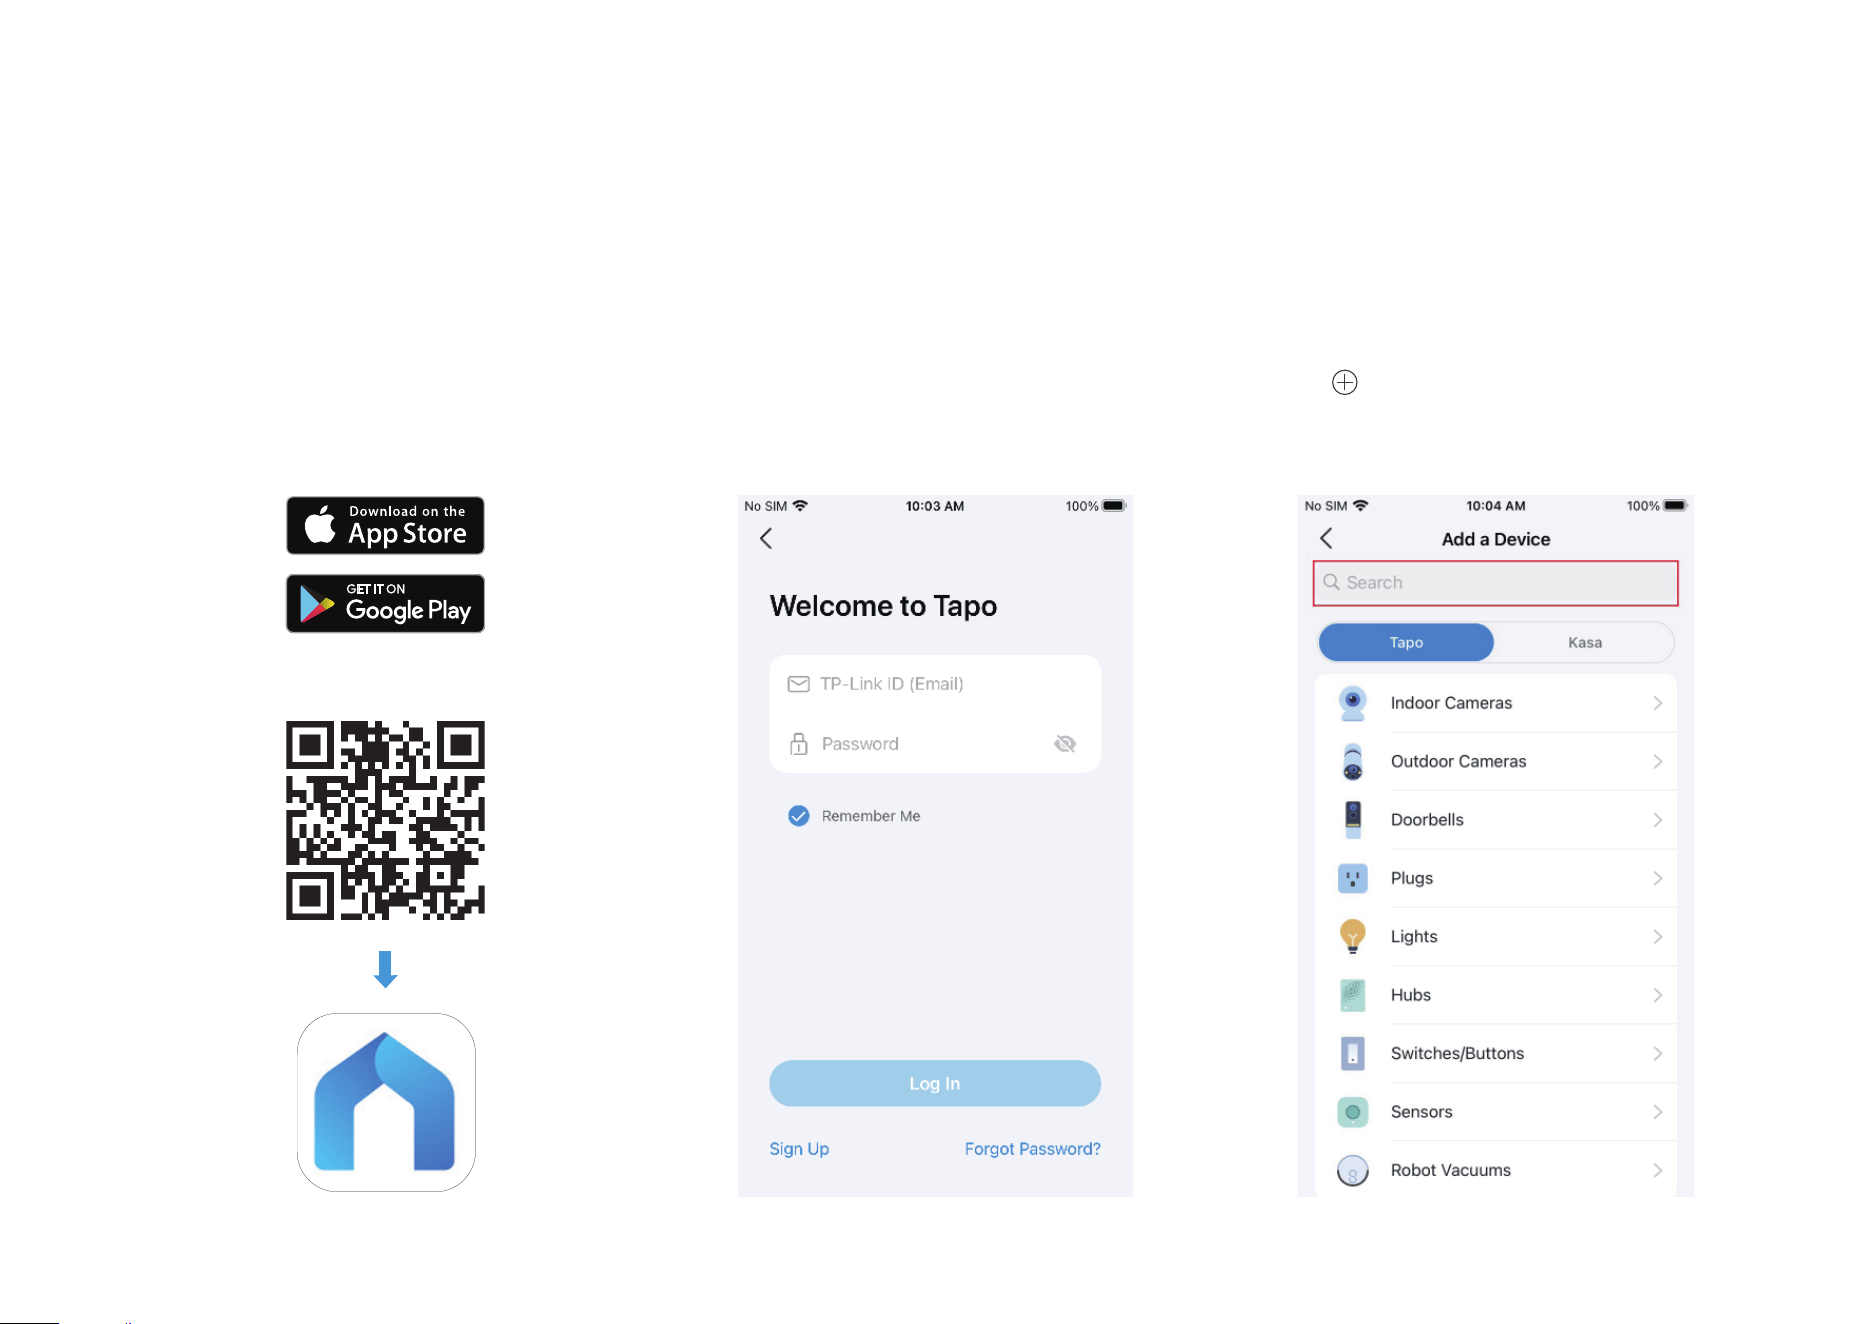
Set Up Your Camera
Follow the steps below to get started with your new camera.
Step 1. Download Tapo App
Get the Tapo app from the App Store or
Google Play, or by scanning the QR code
below.
Step 2. Log In
Open the app, and log in with your TP-Link ID.
If you don't have an account, create one rst.
Step 3. Add Your Camera
Tap the button > Add Device in the app
and search for your model. Follow the app
instructions to complete the setup.
OR
4
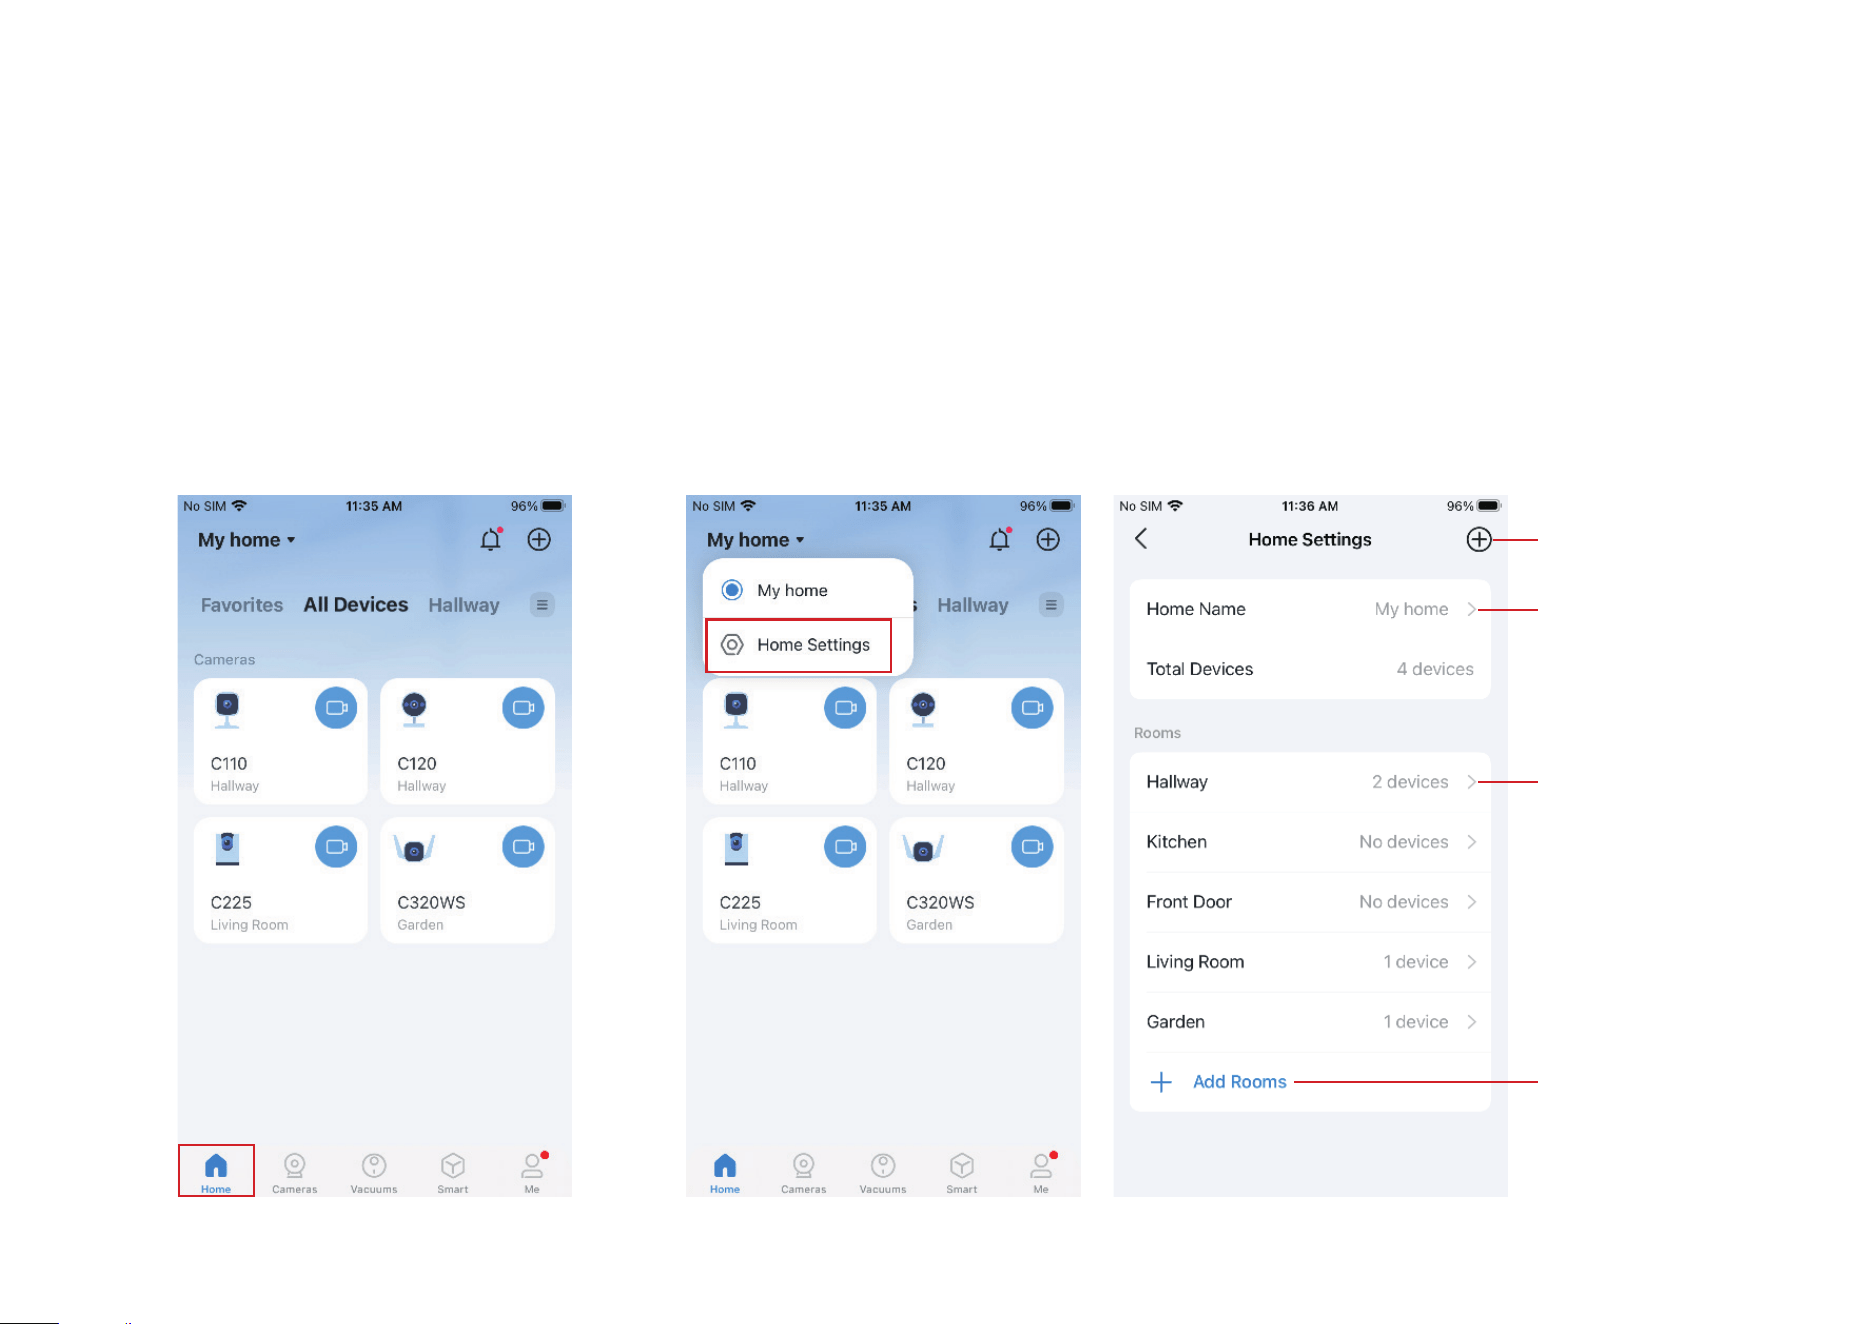
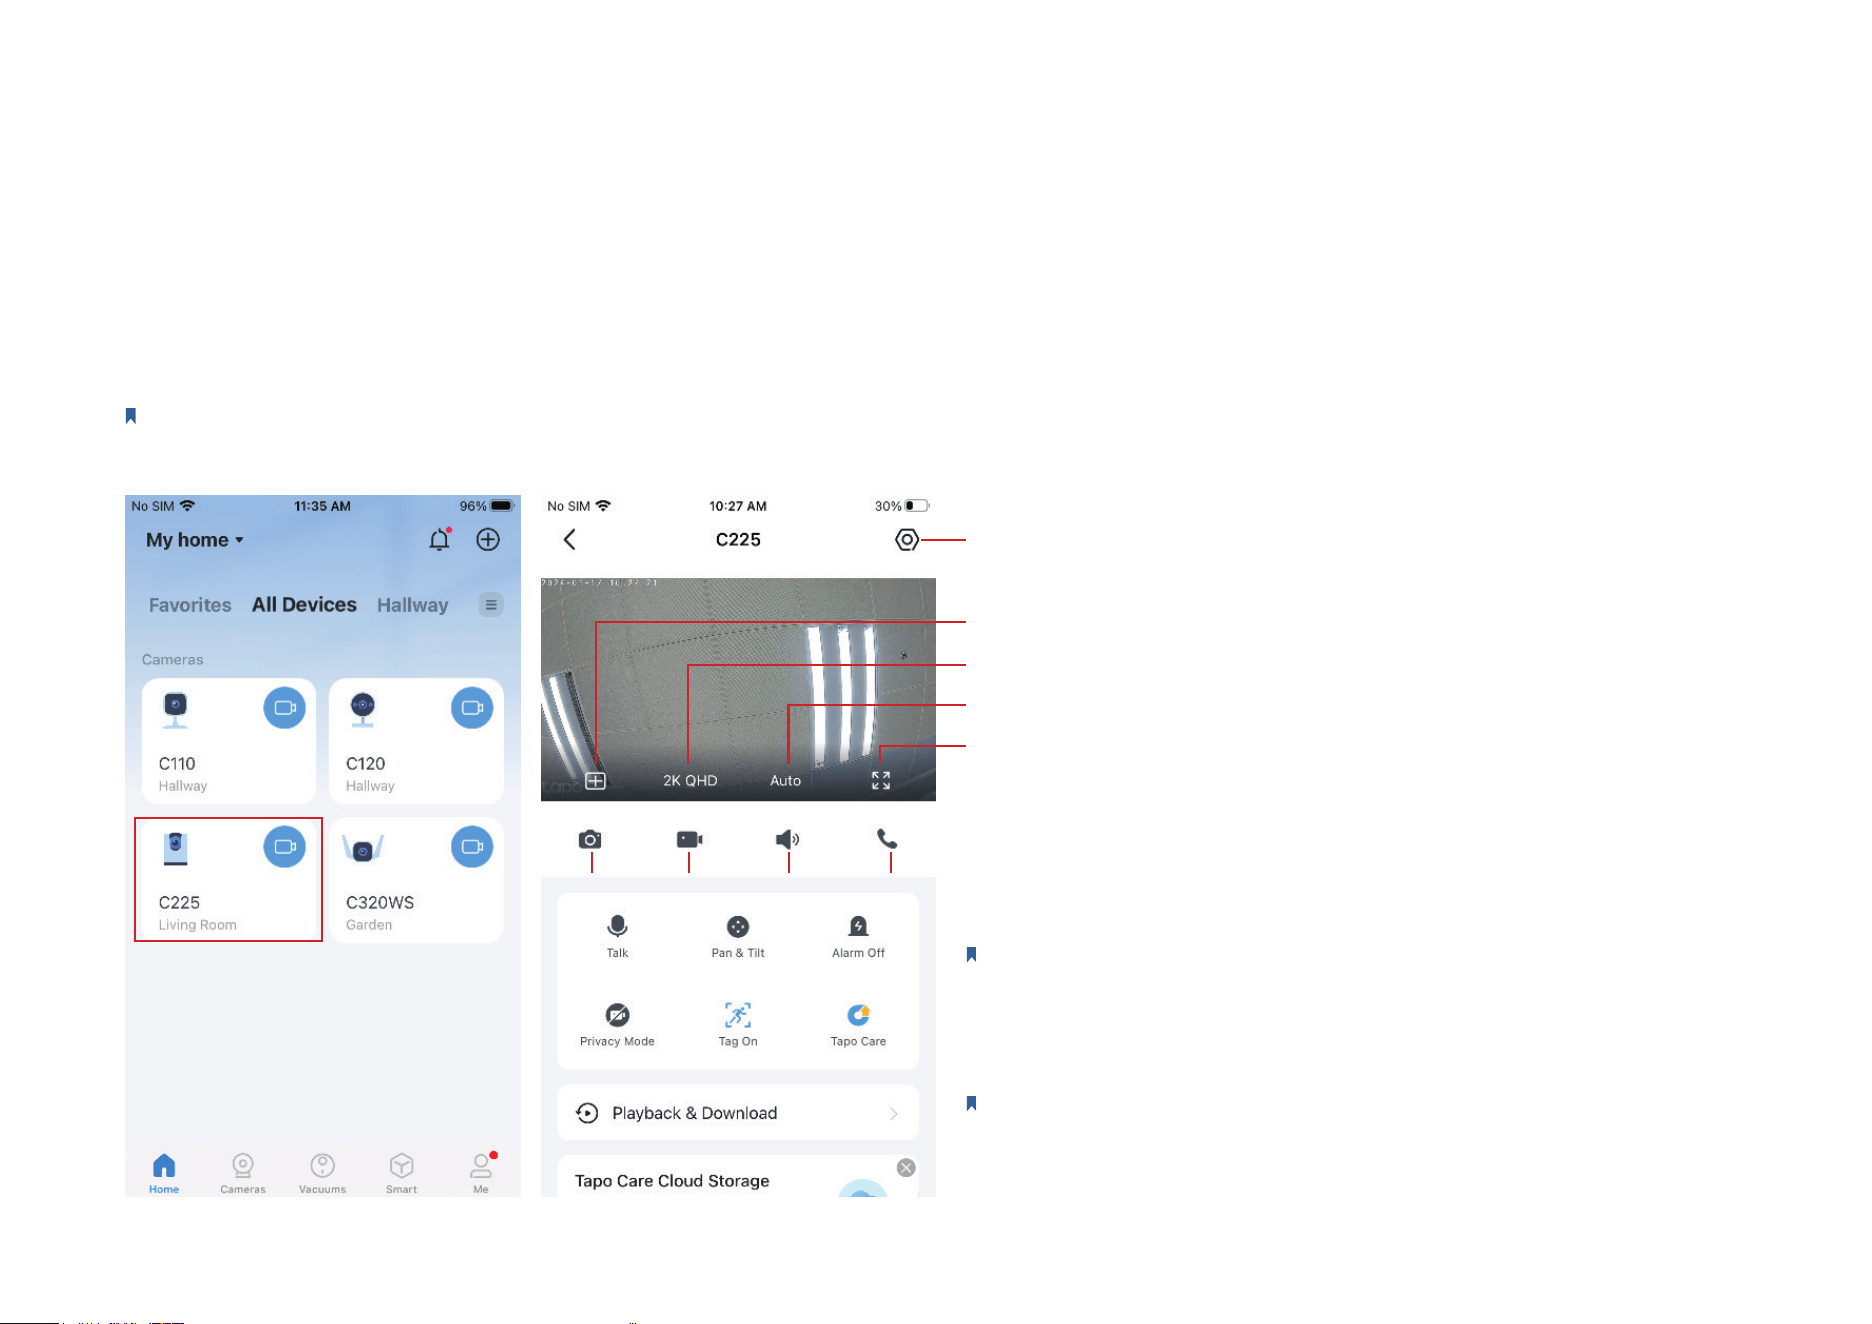
Main Device Controls
After you successfully set up your smart camera, on the home page of Tapo app, you can view and manage all devices that you've added to Tapo.
Home Page
You can see all your smart devices listed on
the Home page.
Home Settings
Tap My home, go to Home Settings, and you can edit Home Name and manage devices in dierent
rooms. You can also Add A Home or Add Rooms.
Tap to add a new
home
Tap to edit your
home name
Tap to add rooms
in your home
Tap to edit this
room name,
remove/add
devices in this
room, or delete
this room
5
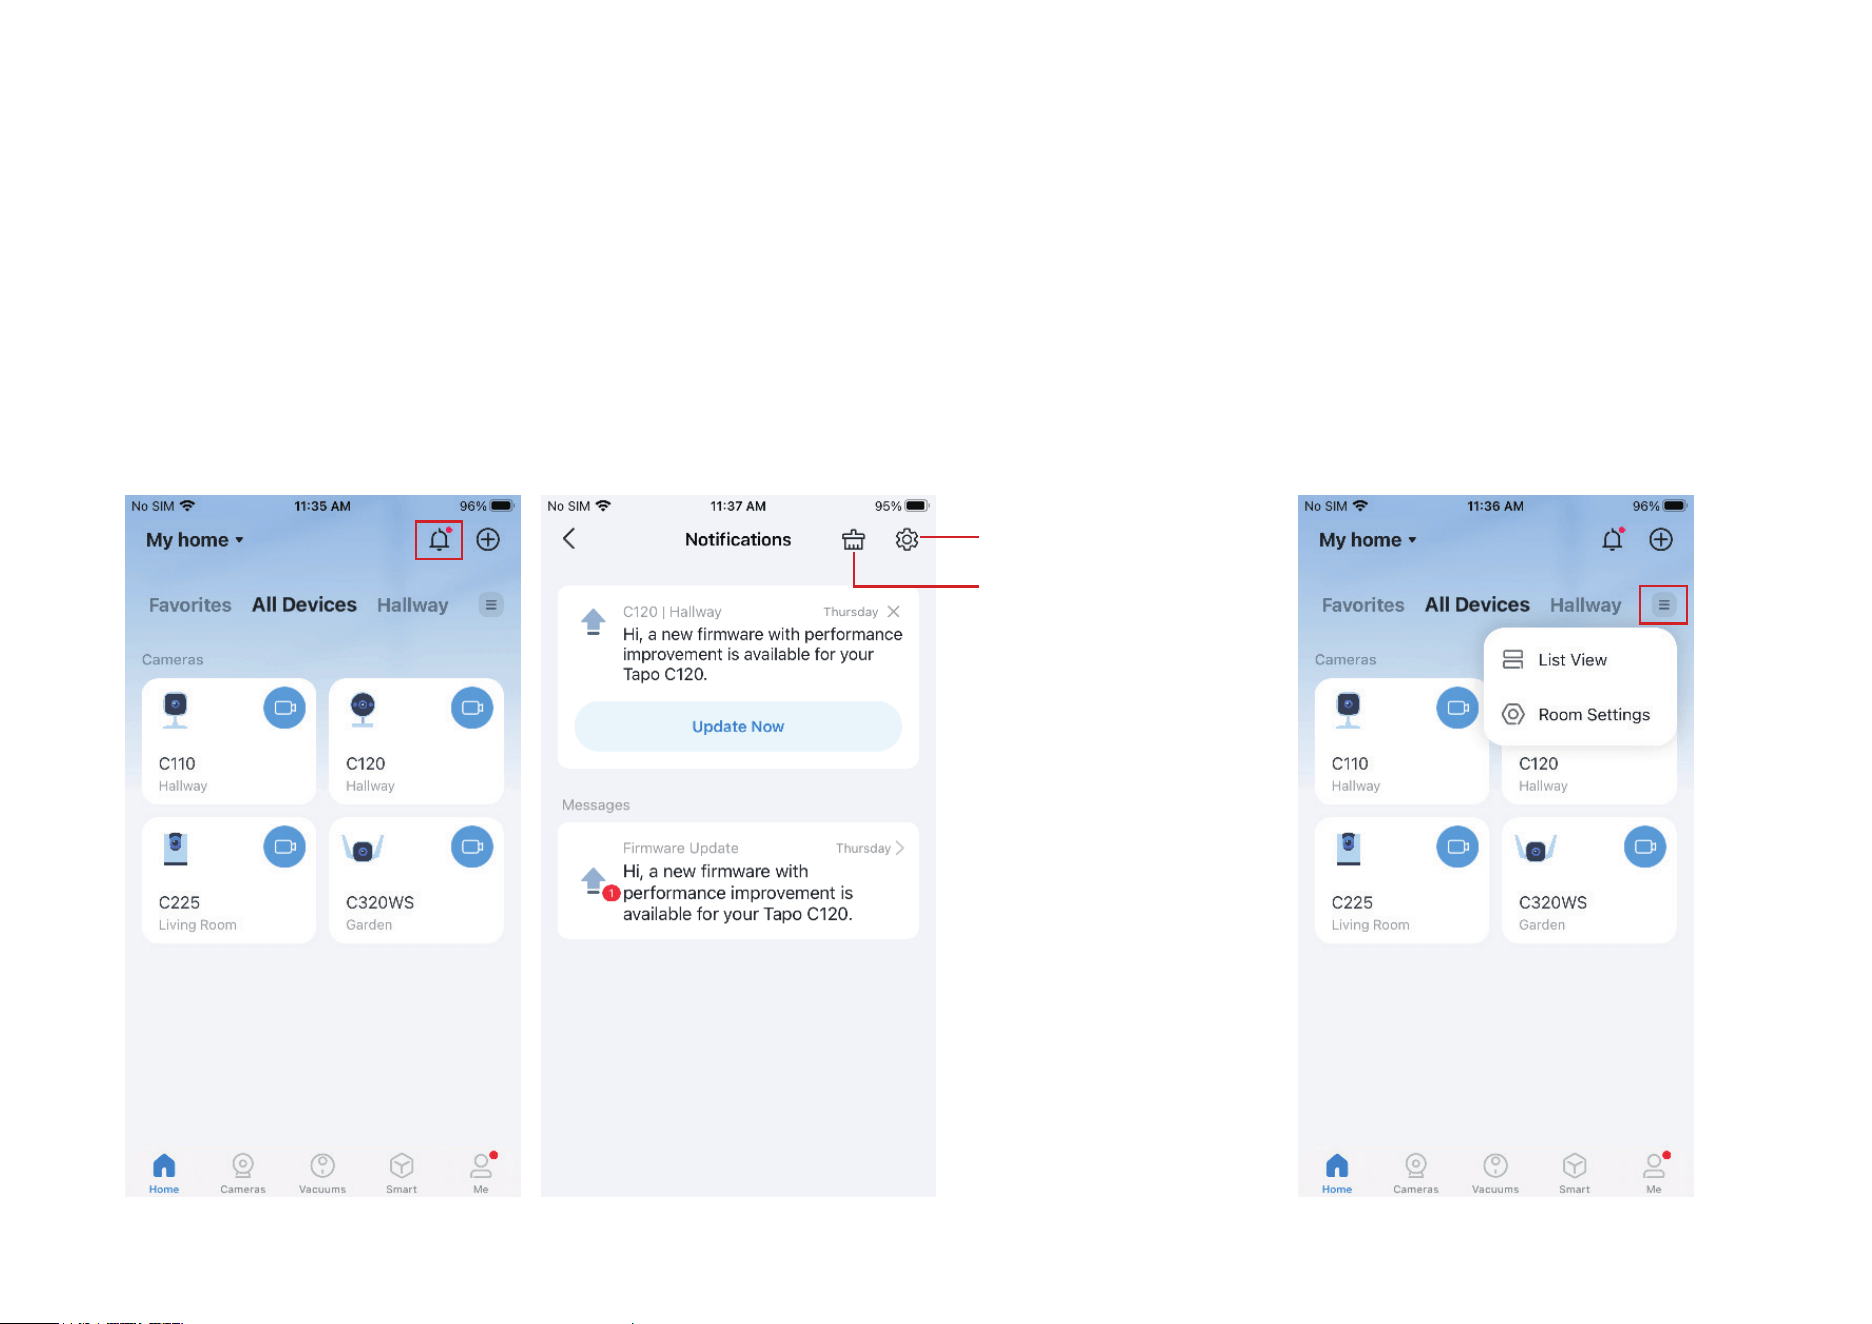
Notications
Tap the bell icon and you can check all notications here.
Grid View or List View
Tap the hamburger icon and you can change
all devices to list view or grid view.
Tap to mark all
messages as read
Tap to change
notication settings
6
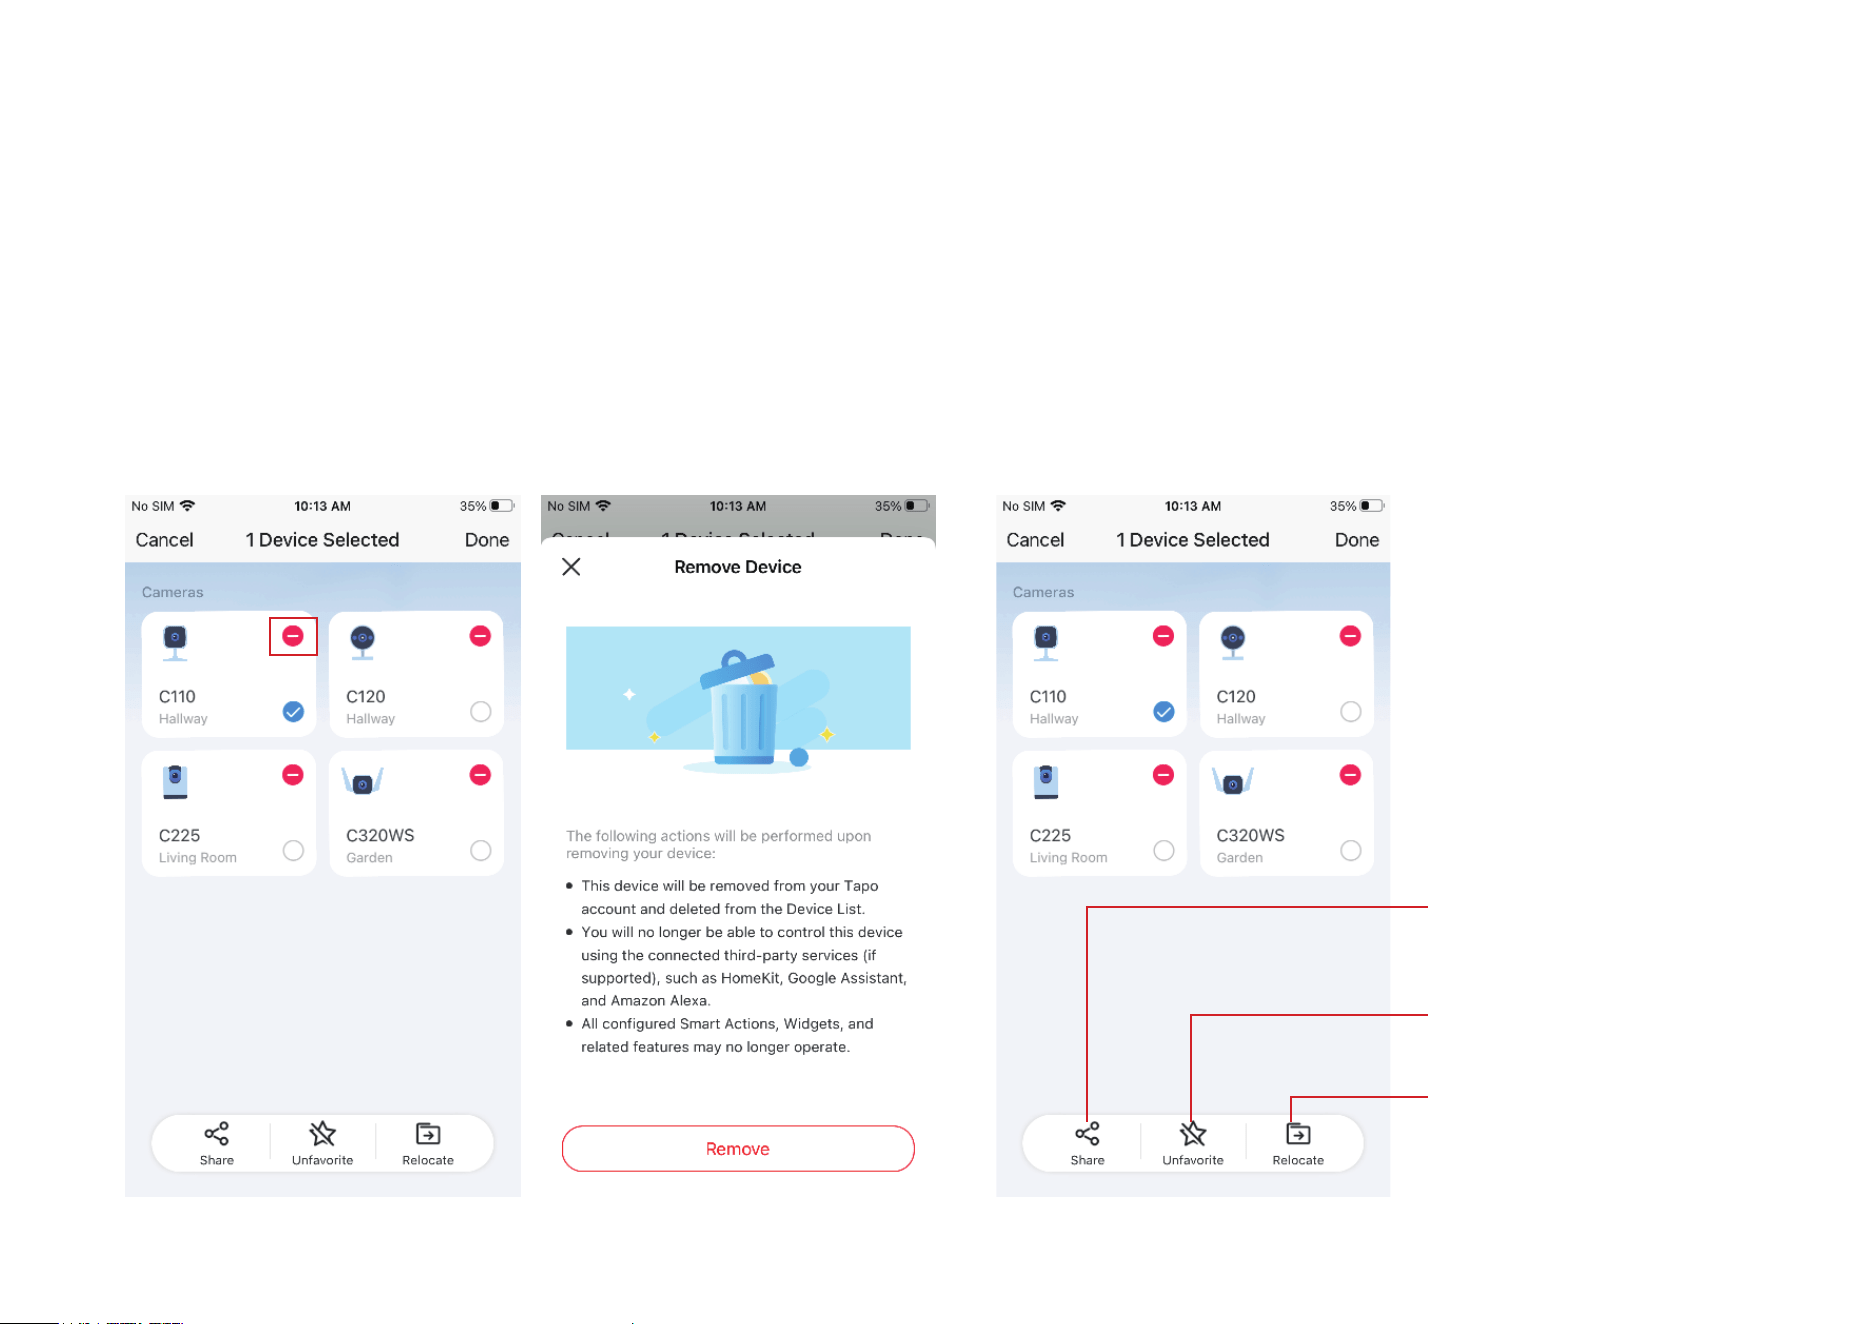
Remove Your Device
Long press the device card and the minus icon appears. Tap the minus icon
in the device card to remove this device. Then the removed device will be
reset to factory settings.
Share, Favorite/Unfavorite, or Relocate Your Device
Long press the device card and a menu appears on the bottom. You
can share, favorite/unfavorite, or relocate the selected devices.
Tap to share the selected
device to your families.
Tap to favorite or unfavorite
the selected device.
Tap to relocate the selected
device.
7
Camera Live View
On the home page of Tapo app, you can tap your smart camera to enter the live view page.
Live View
Here is a brief introduction to icons and features on the camera live view page. The icons on the live screen will appear after you tap the screen once.
Note: Here we take Tapo C225 V2 as an example. Icons and features on the live view page may vary from dierent models.
Tap to enter camera settings page.
Multi-Screen: View live videos from multiple cameras at the same time.
Tap to switch the video quality.
Tap to switch the video mode to Day Mode, Night Mode, or Auto.
Full Screen: Tap for a full screen display.
Screenshot Record Adjust volume Voice call
Screenshot: Save captures to Download.
Record: Save recordings to Memory.
Voice Call or Talk: Communicate with loved ones.
Pan & Tilt: Rotate your camera to monitor every angle of your room.
Note: Only Pan/Tilt cameras have this feature.
Alarm O: Turn it on to get noticed when motion is detected.
Privacy Mode: Enable to shut down the surveillance for privacy protection.
Tag On: Display the person/pet/vehicle tag on the screen of your camera.
Note: Only some specic models have this feature.
Tapo Care: It is a comprehensive service with unlimited cloud storage.
Playback & Download: Check all recordings and saved moments.
8
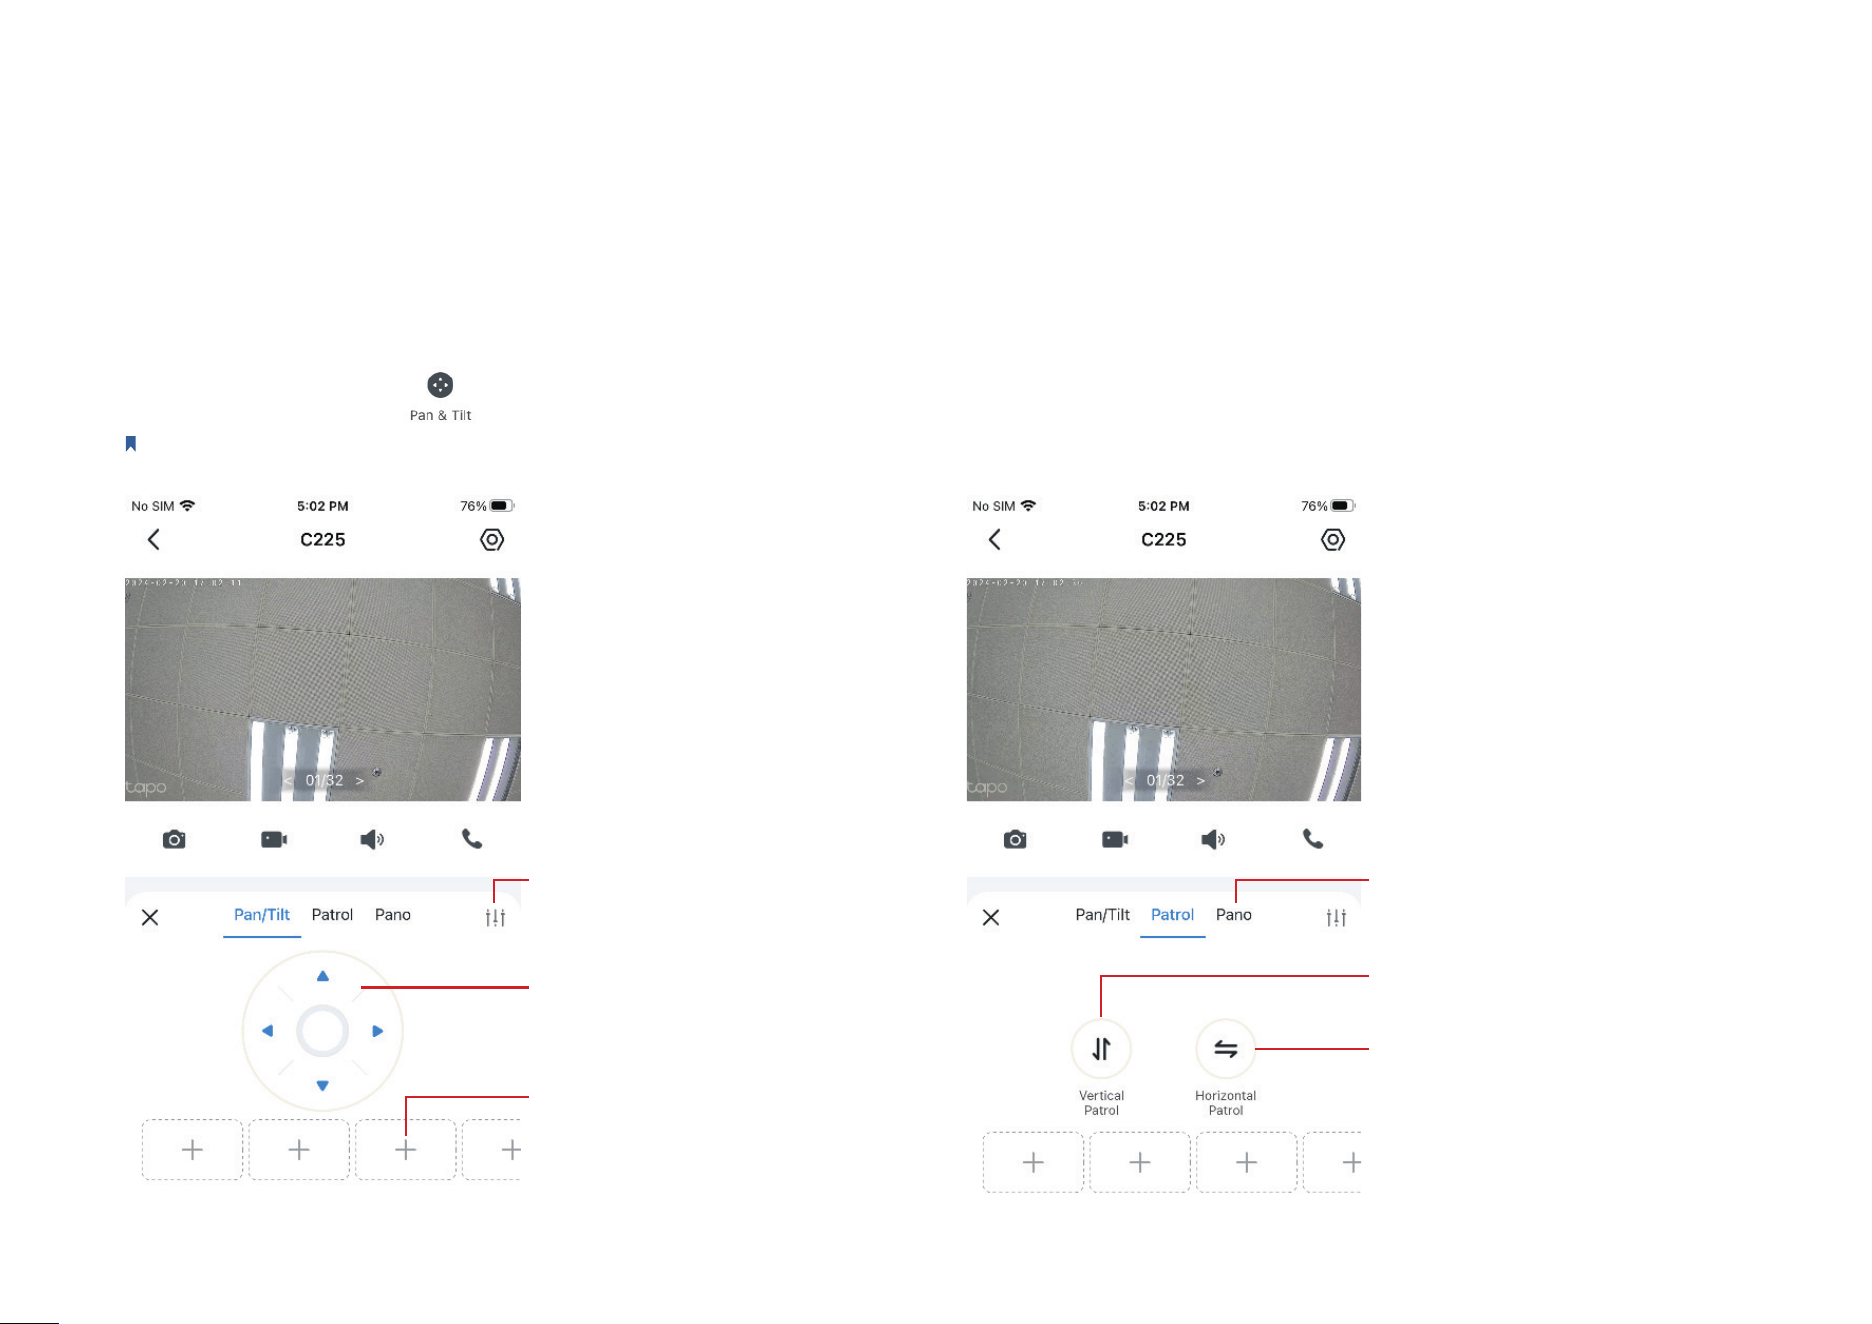
Pan & Tilt
On the live view page, tap and the control panel appears. Tap on the Pan/Tilt, Patro, or Pano panel to control your camera to move.
Note: Only Pan/Tilt cameras have this feature. Here we take Tapo C225 V2 as an example.
Set how many degrees the camera
will move per tap of Pan/Tilt.
Control the camera to move up,
down, left, or right.
Control the camera to persistently
move up and down.
Select an angle and create a
panoramic path.
Control the camera to persistently
move from left to right.
Ta p
+
to add a viewpoint. Then
you can quickly rotate your camera
to the marked direction with just a
tap.

9
Privacy Mode
On the live view page, tap to enable Privacy Mode.
When Privacy Mode is active, streaming and recording
functions will be disabled to protect your privacy.
Playback & Download
On the live view page, tap Play & Download. You can playback recordings stored in cloud
storage or a microSD card. You can also download the photos and videos you take.
Note: For local recording, insert a microSD card and initialize it on the Tapo app rst.
Slow down
or speed up
Tapo Care
cloud service
microSD card
storage
Play Mute Screenshot
Full Screen
Select or Filter
Record Clip
10
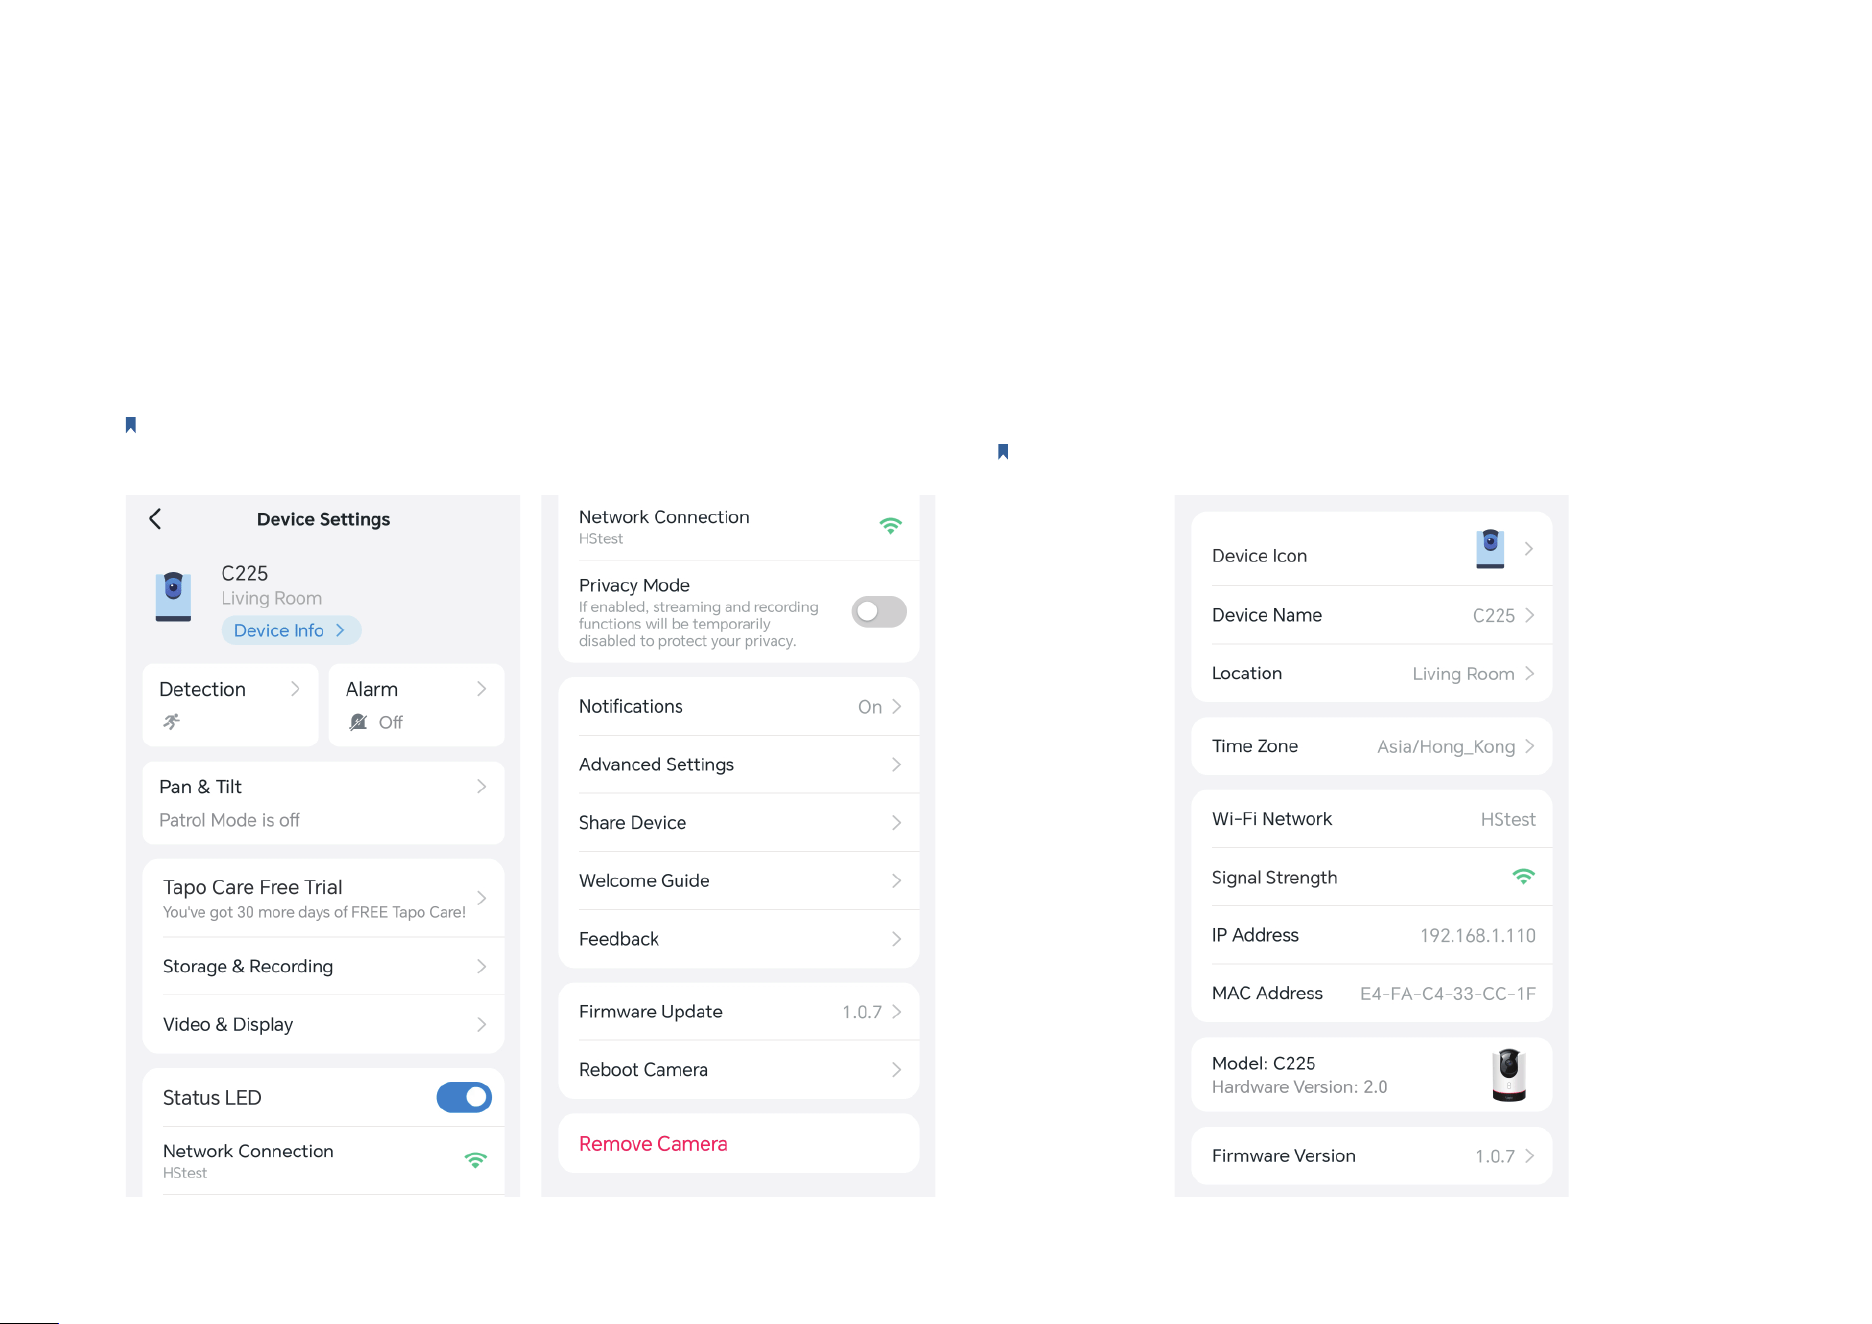
Camera Settings
On the live view page of your Tapo camera, you can tap the gear icon to enter the camera settings page.
Camera Settings
You can tap any card and change the settings to meet your various needs.
Note: Here we take Tapo C225 V2 as an example. Features on the settings page may
vary from dierent models.
Device Info
You can change the device icon, name, location, and time zone. Also
you can check the basic information of your camera.
Note: Here we take Tapo C225 V2 as an example.
11
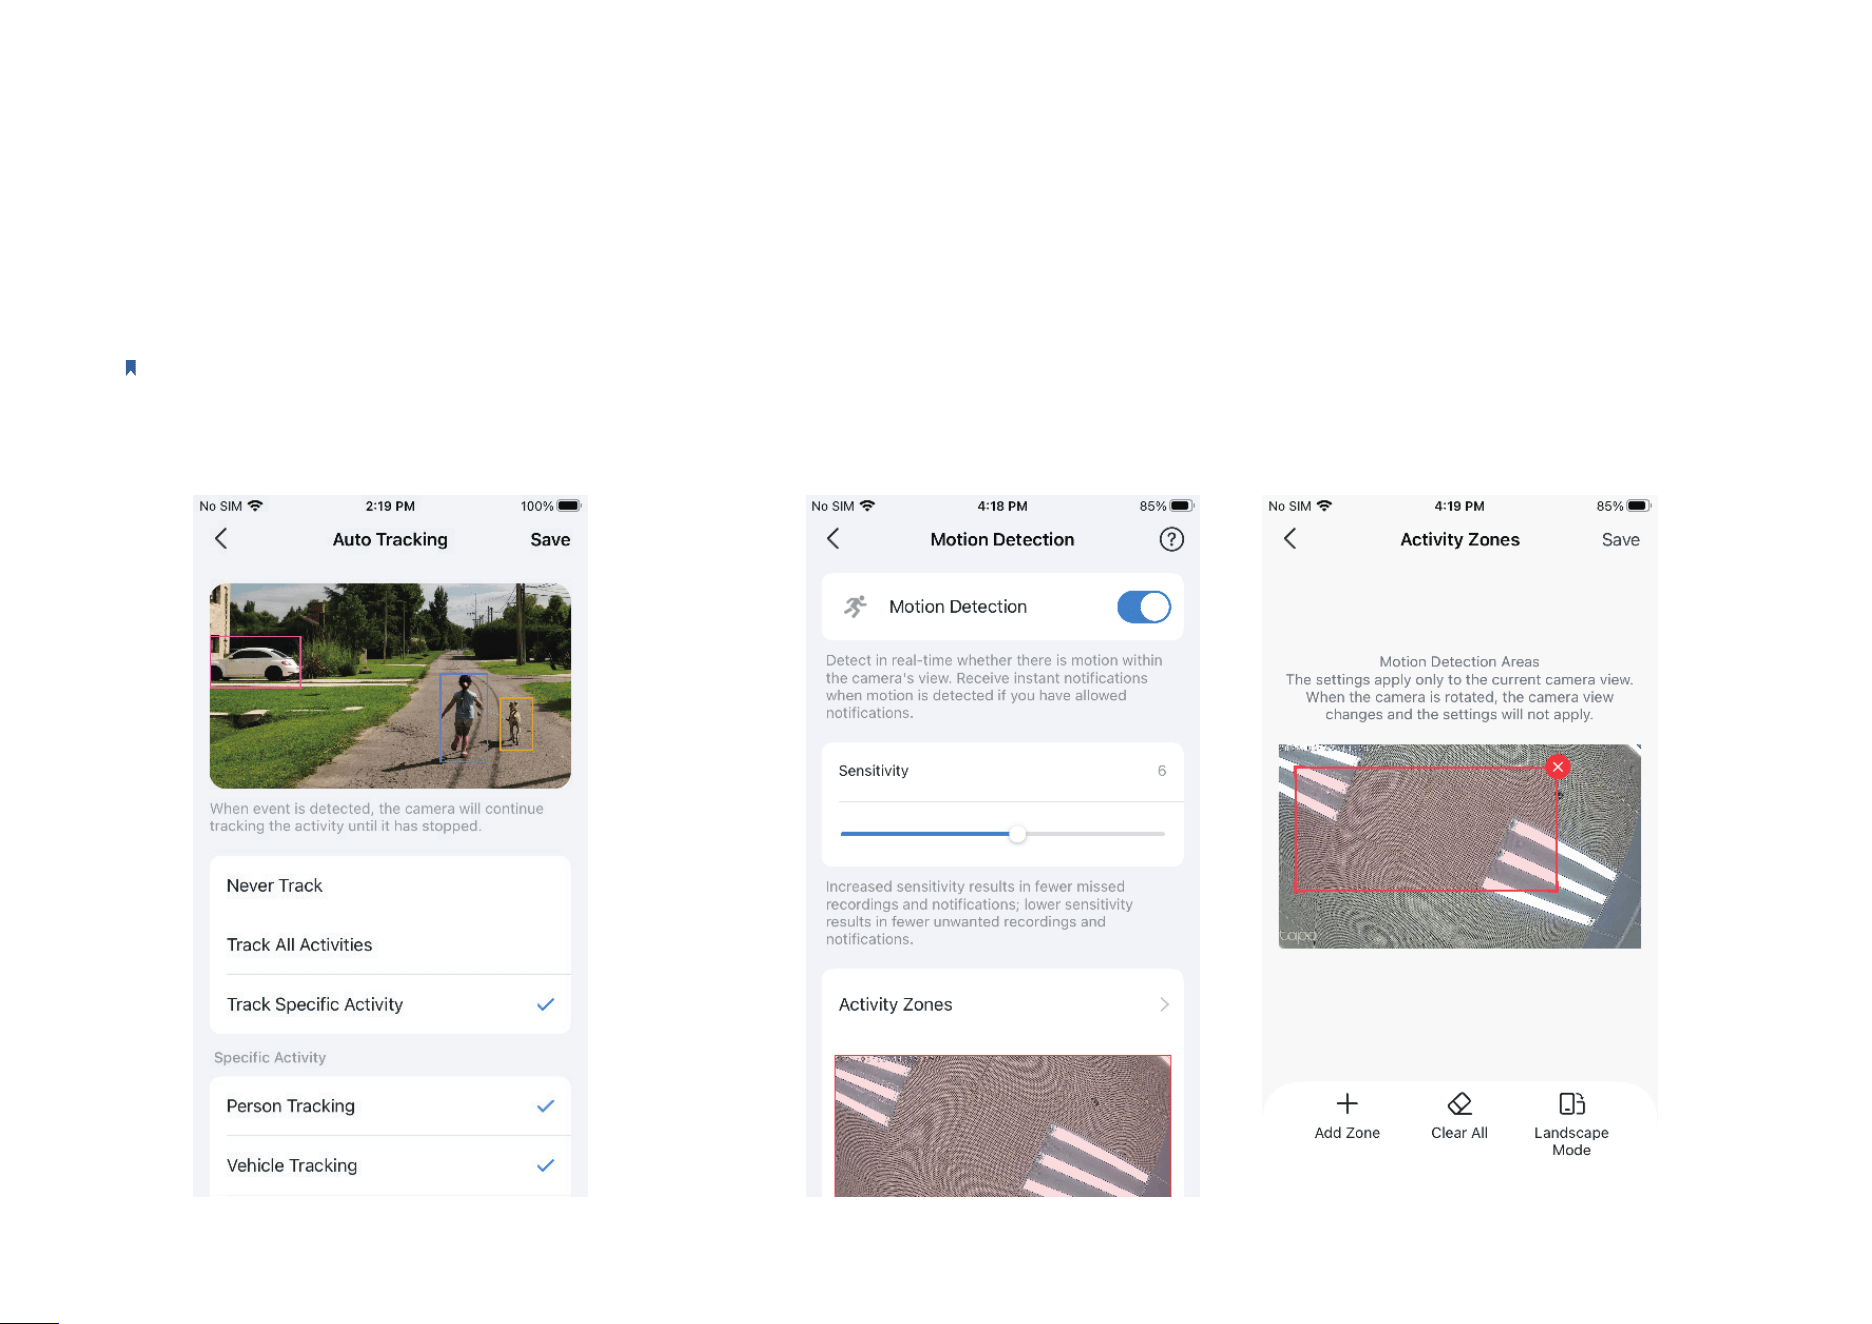
Detection
Note: Here we take Tapo C225 V2 as an example. Features on the detection page may vary from dierent models.
Motion Detection
When enabled, the camera will detect in real-time whether there is motion within the camera's
view, notifying you with Notication on. You can adjust Sensitivity, and add Activity Zones.
Auto Tracking
Enable it when you want your Pan/Tilt camera to
track a specic activitity or all until it has stopped.
12
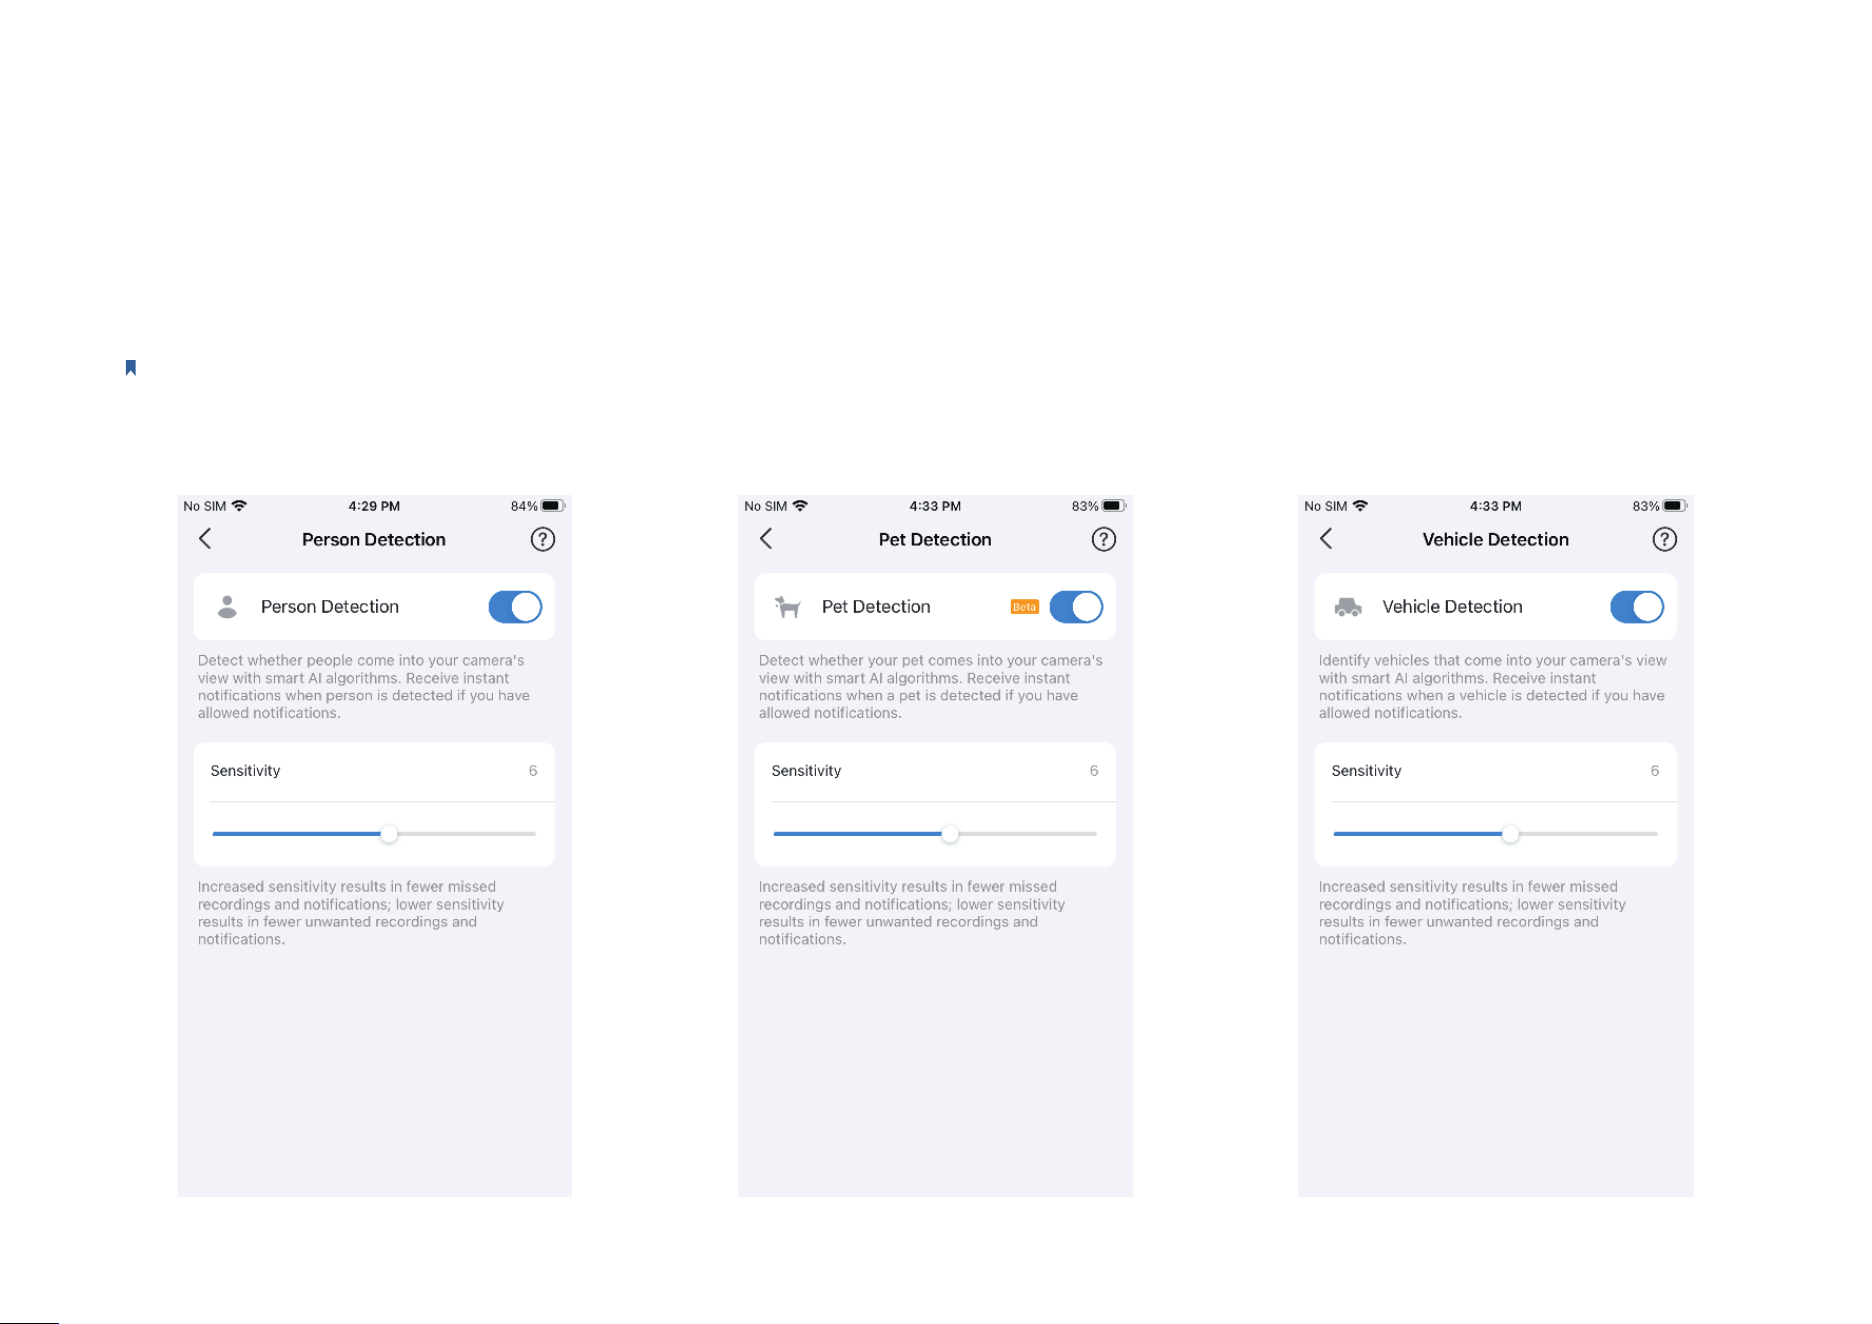
Detection
Note: Here we take Tapo C225 V2 as an example. Features on the detection page may vary from dierent models.
Person Detection / Pet Detection / Vehicle Detection
When enabled, the camera will detect whether people/pets/vehicles that come into your camera's view, notifying you with Notication on. You can
adjust Sensitivity.
13
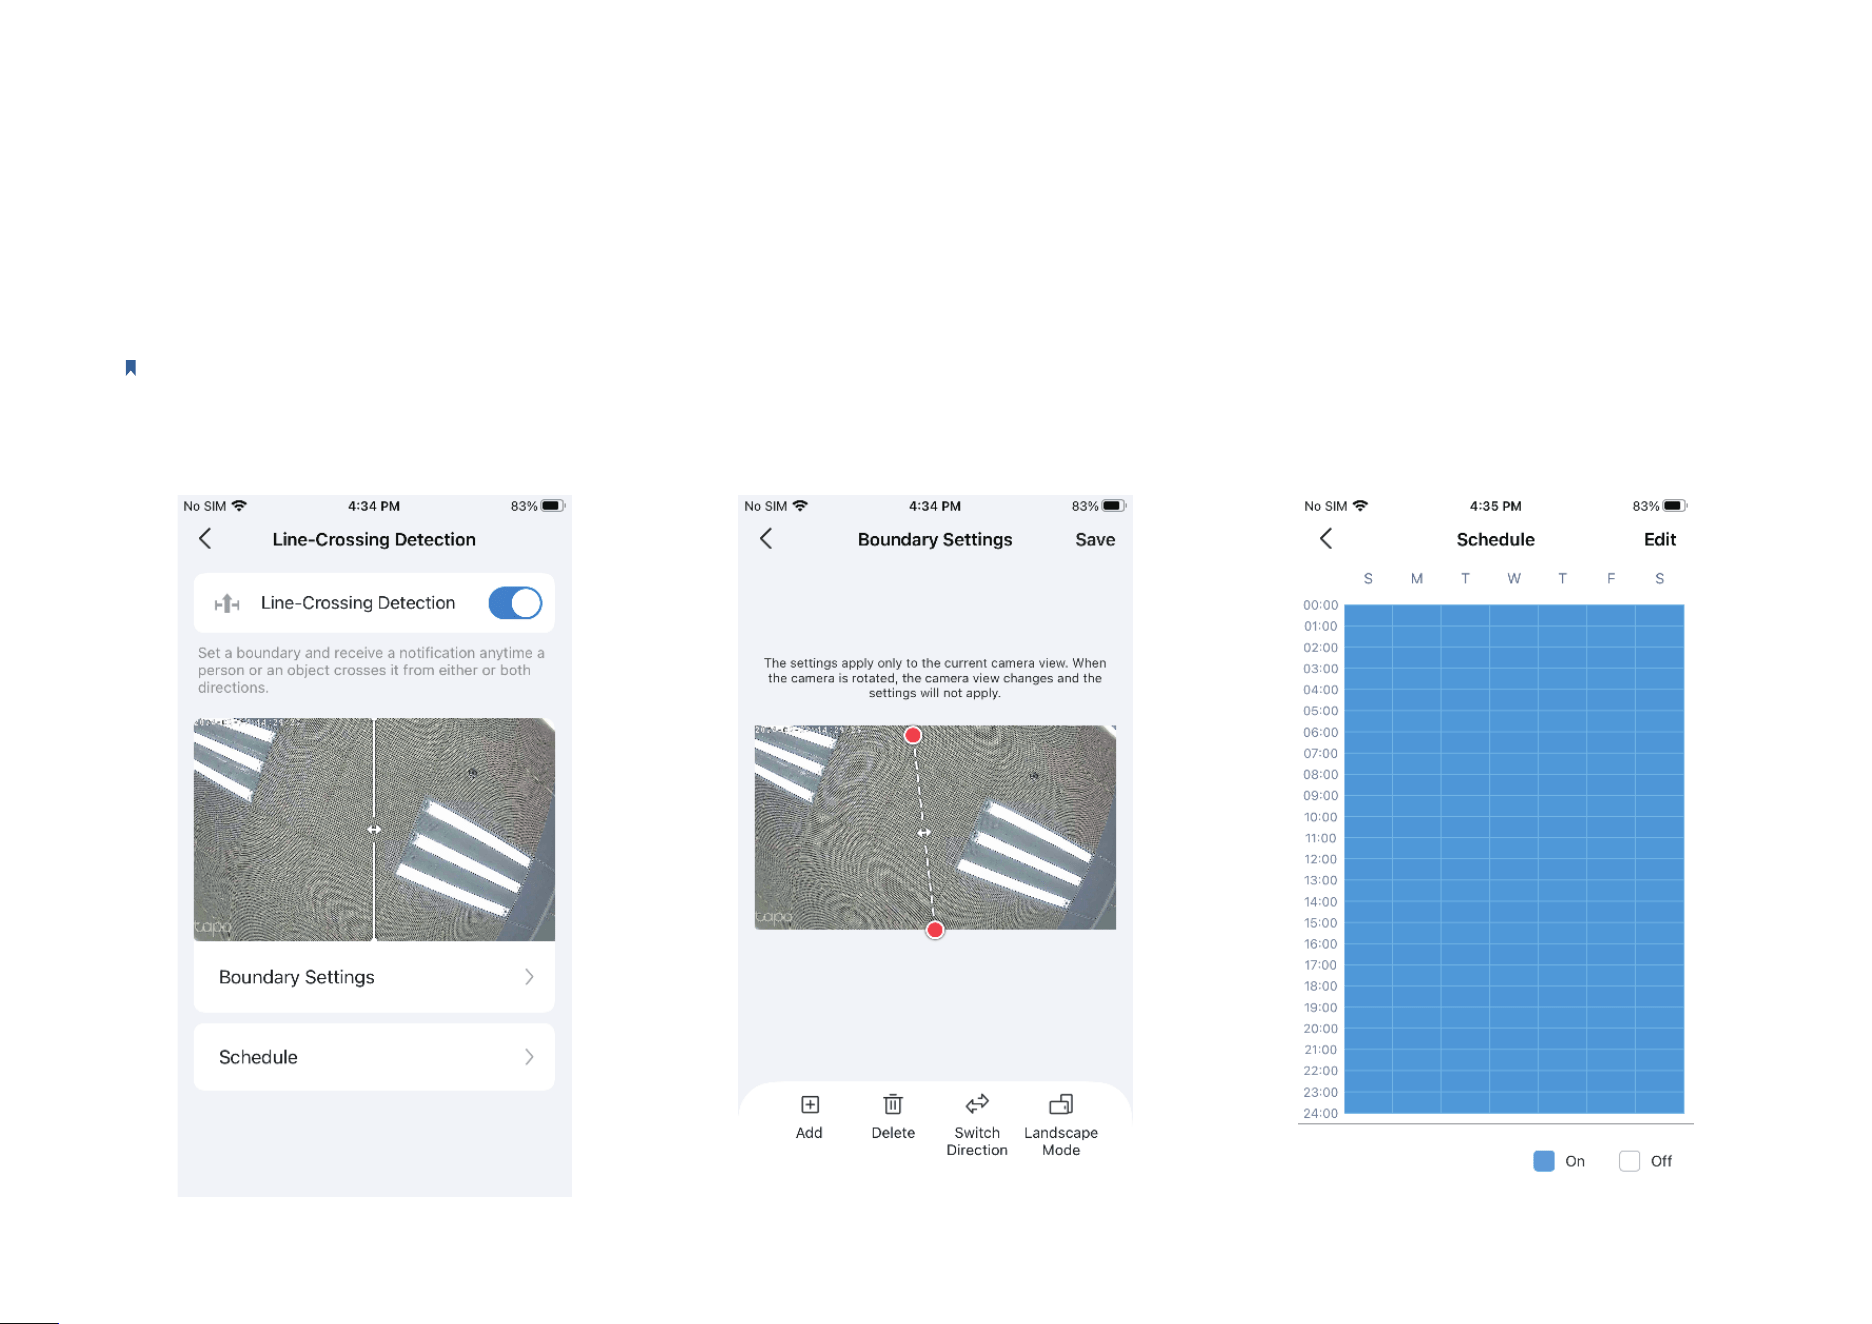
Detection
Note: Here we take Tapo C225 V2 as an example. Features on the detection page may vary from dierent models.
Line-Crossing Detection
Set a boundary and receive a notication anytime a person or an object crosses it from either or both directions. You can change Boundary Settings
and edit Schedule.
14
Detection
Note: Here we take Tapo C225 V2 as an example. Features on the detection page may vary from dierent models.
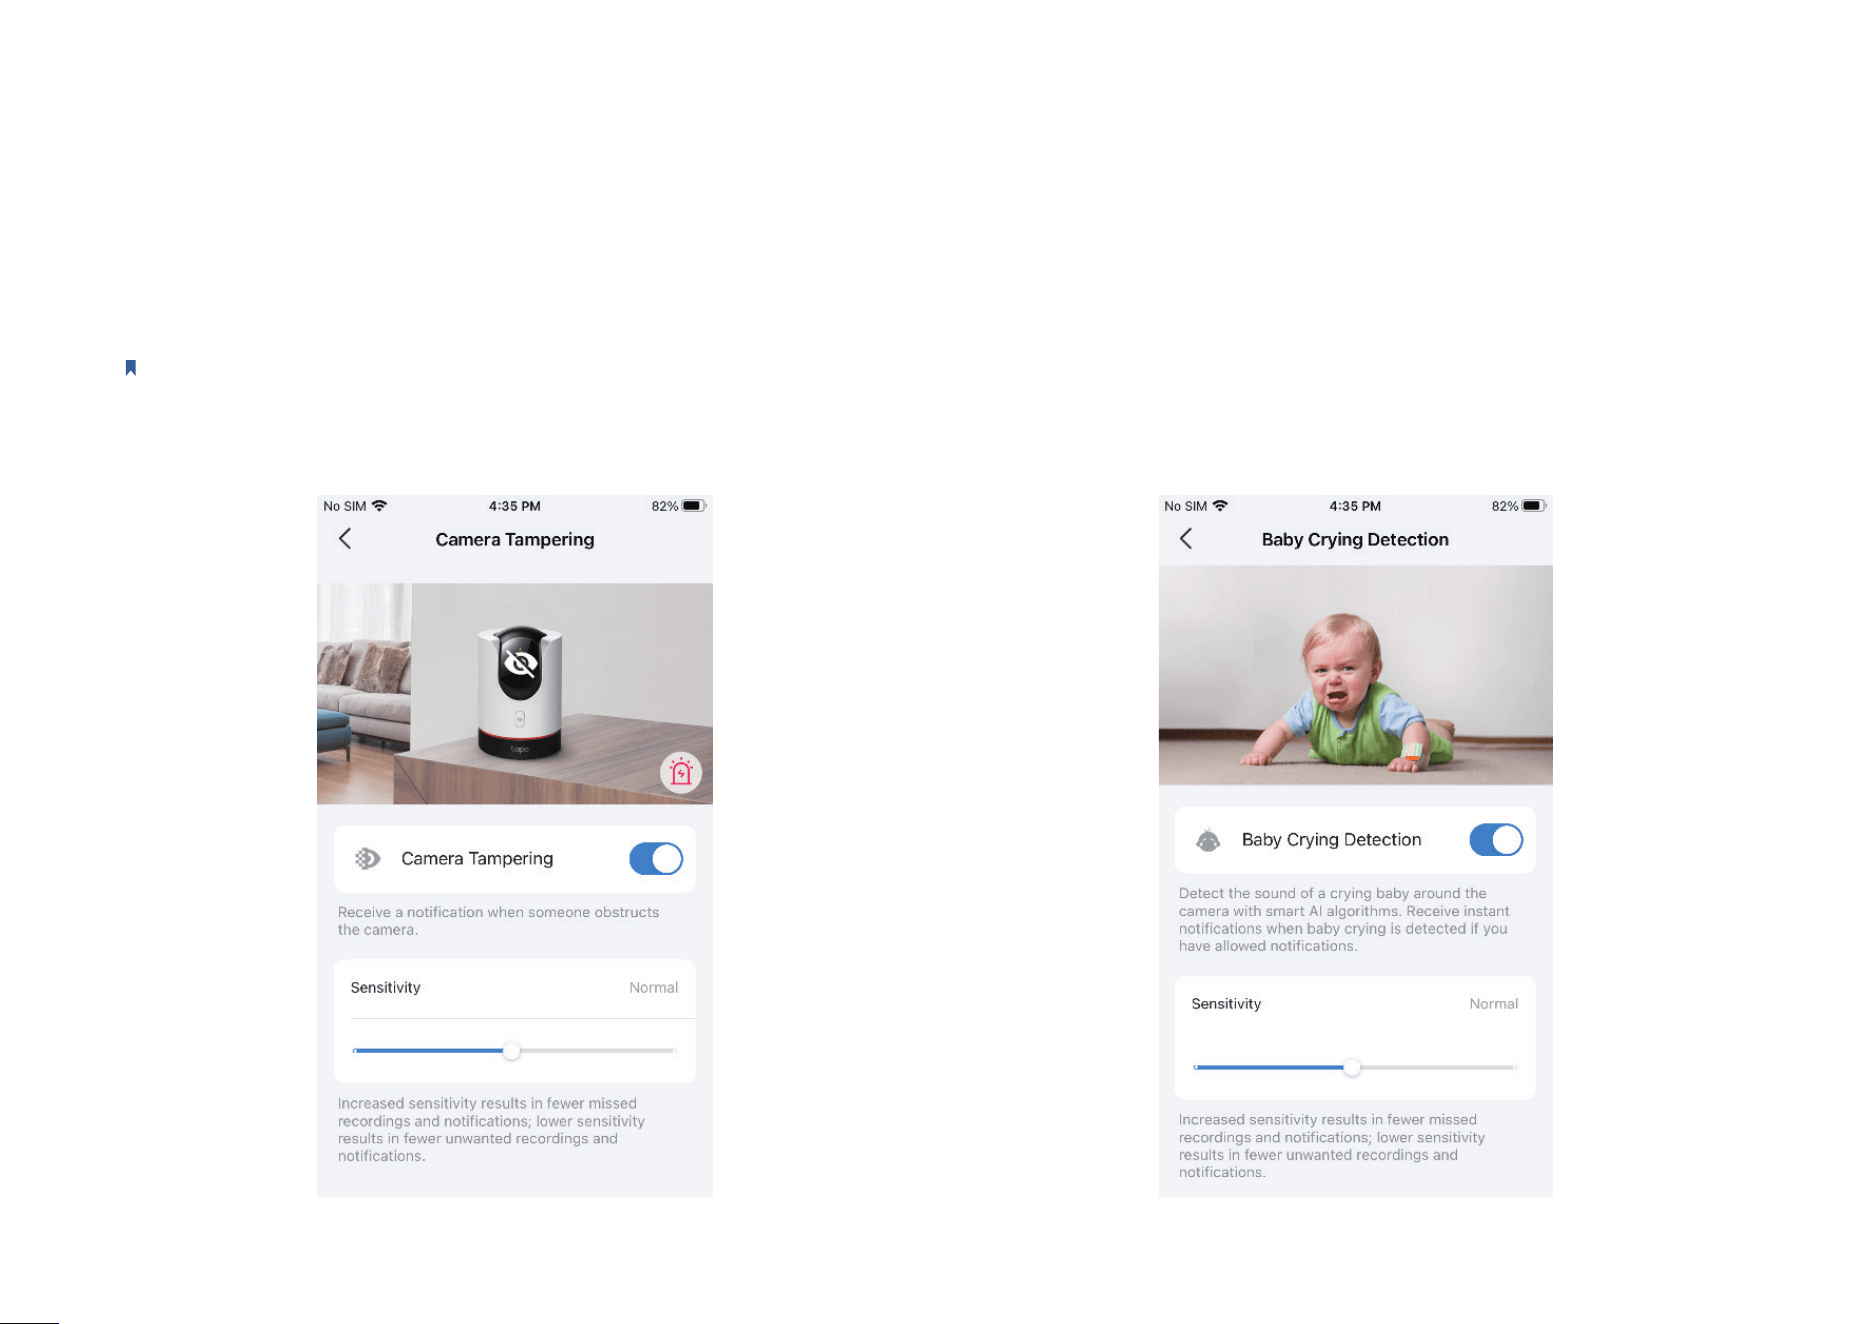
Baby Crying Detection
Enable to detect the sound of a crying baby around the camera,
notifying you with Notication on. You can adjust Sensitivity.
Camera Tampering
When enabled, you will receive a notication when someone obstructs
the camera. You can adjust Sensitivity.
15
Detection
Note: Here we take Tapo C225 V2 as an example. Features on the detection page may vary from dierent models.
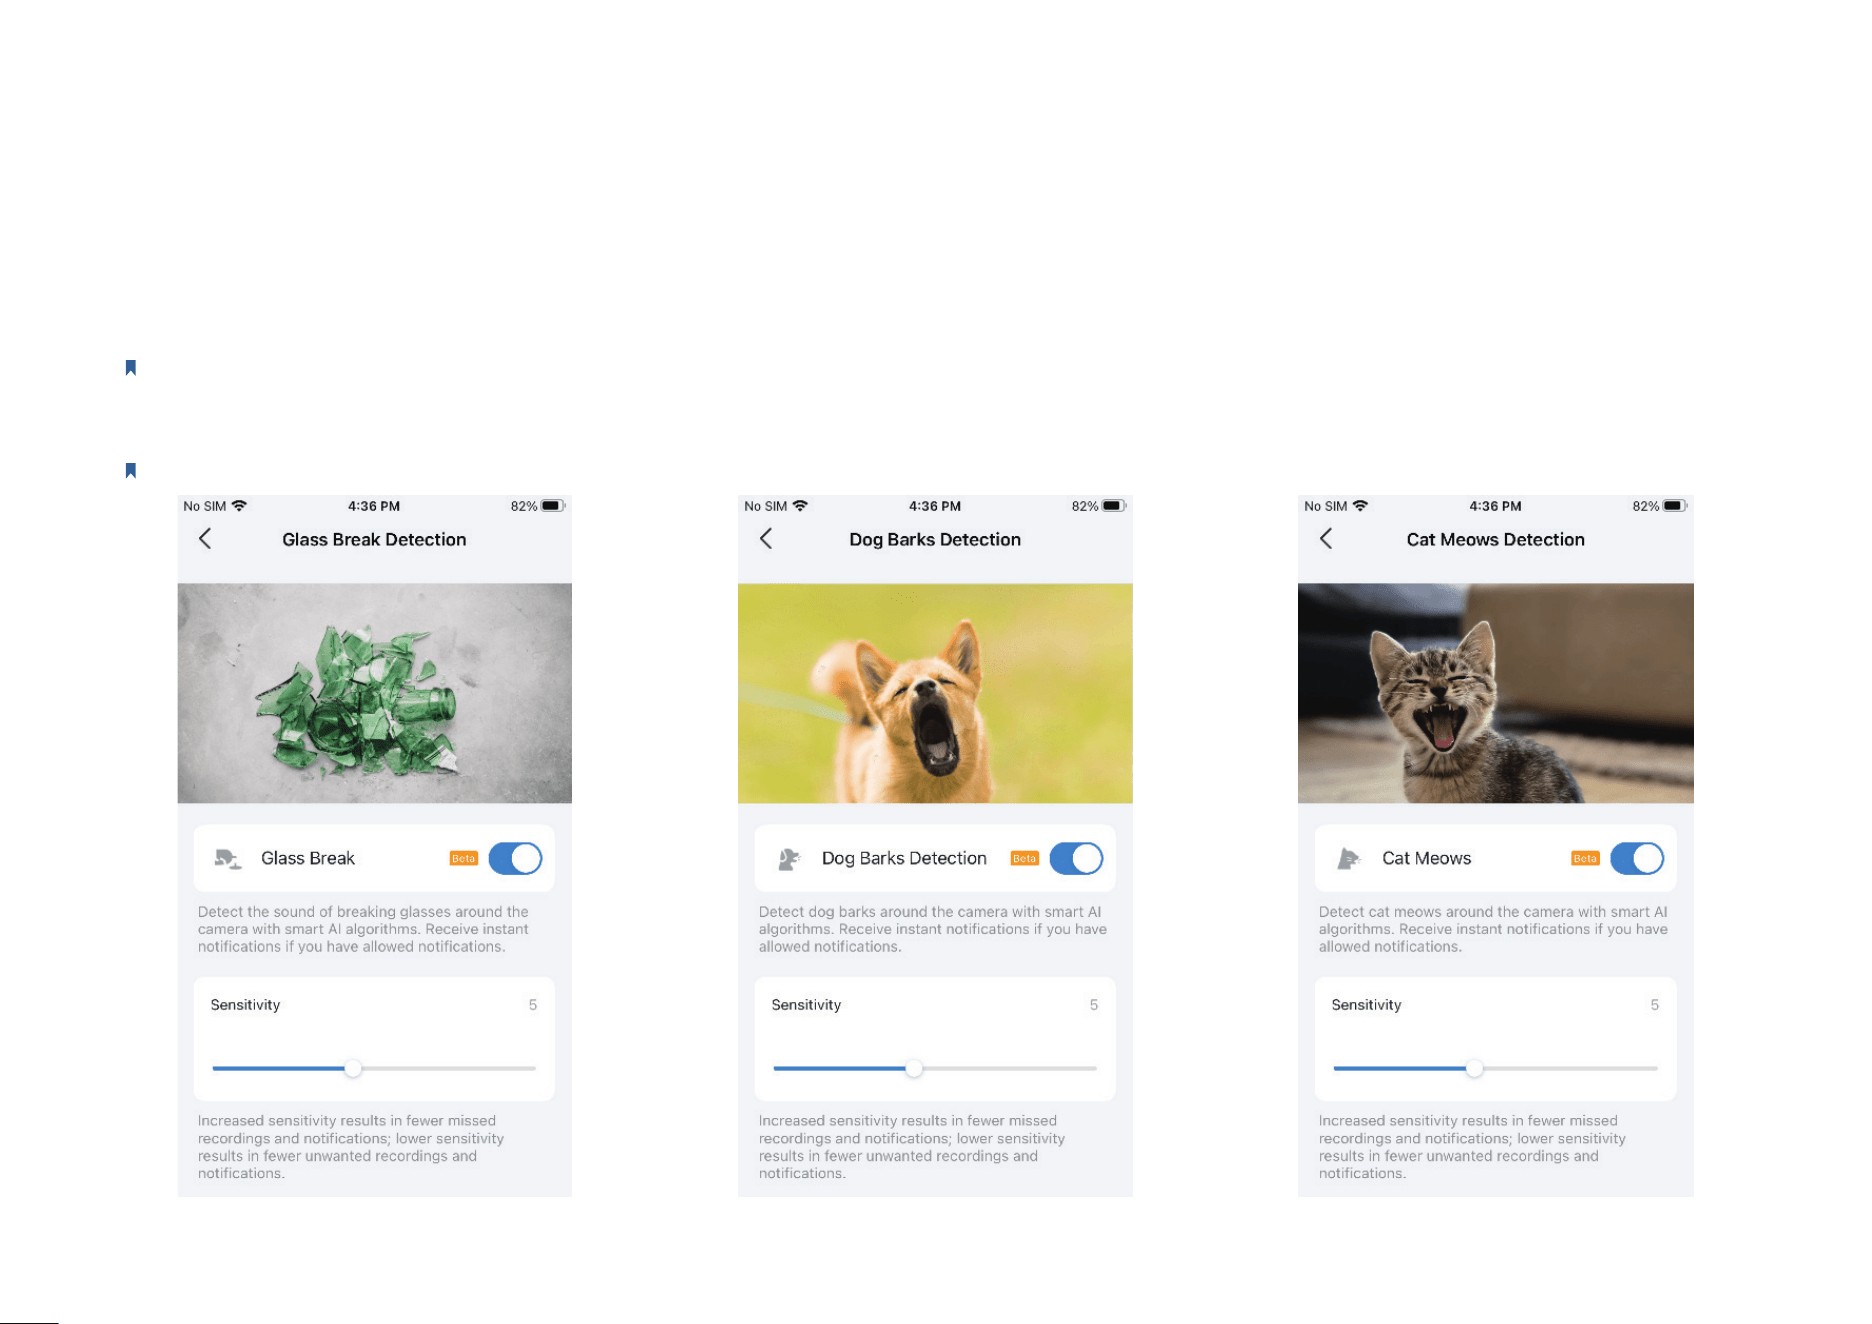
Glass Break Detection / Dog Barks Detection / Cat Meows Detection
Enable to detect the sound of breaking glasses, dog barks, and cat meows around the camera, notifying you with Notication on. You can adjust Sensitivity.
Note: Glass Break Detection, Dog Barks Detection, and Cat Meows Detection are beta versions.
16
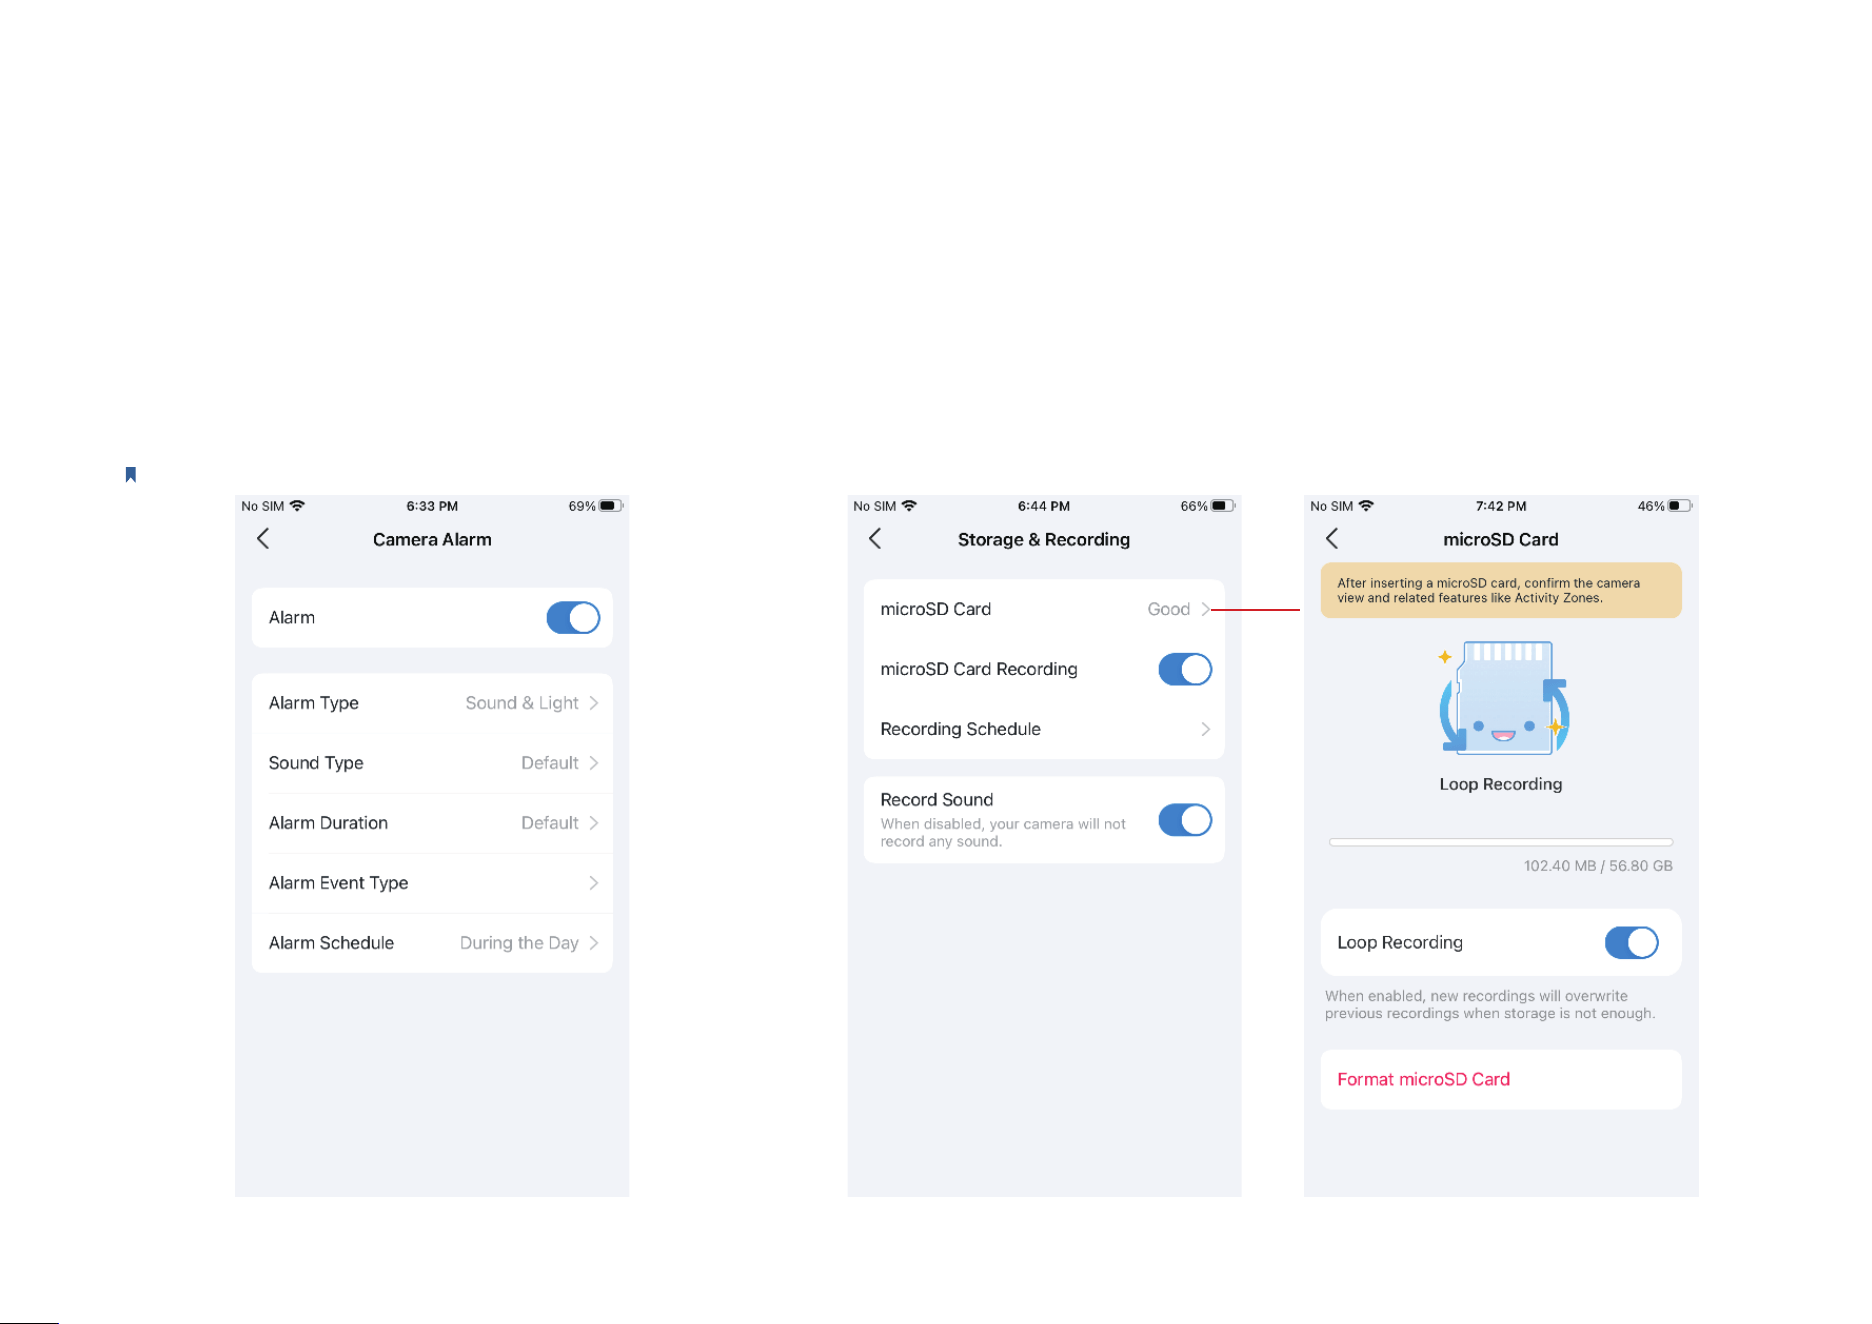
Alarm
You can enable Alarm. Then you can change Alarm Type/
Sound Type/Alarm Duration, select Alarm Event Type,
and choose Alarm Schedule.
Note: Here we take Tapo C225 V2 as an example.
Storage & Recording
You can enable microSD Card Recording, set Recording Schedule, and enable Record
Sound as needed. If you tap mircroSD Card, you can check the storage capacity, enable
Loop Recording, and Format microSD card.
17
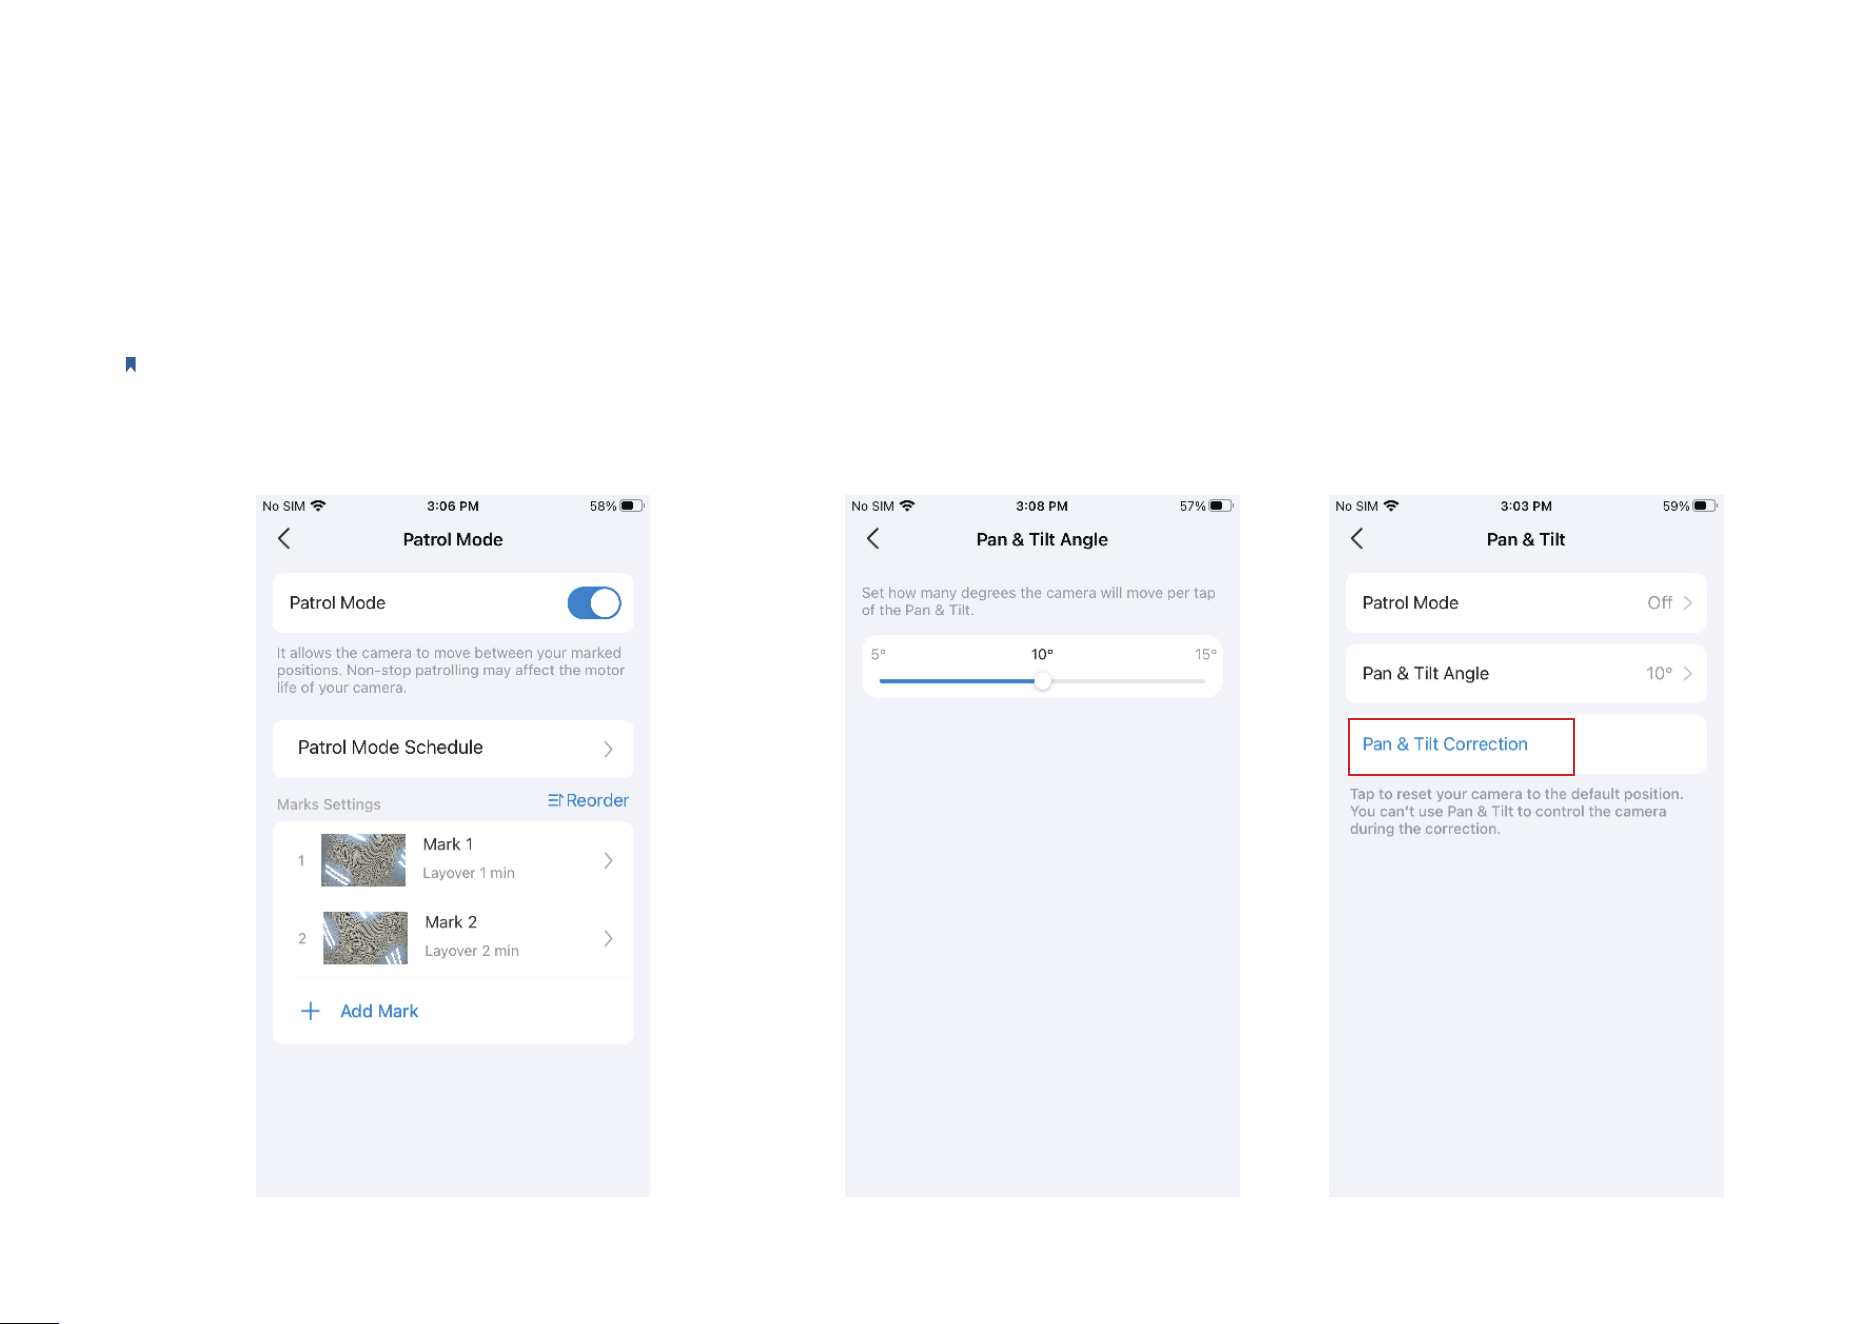
Pan & Tilt
Note: Only Pan/Tilt cameras have this feature. Here we take Tapo C225 V2 as an example.
Pan & Tilt Angel
Set how many degrees the camera will
move per tap of the Pan & Tilt.
Pan & Tilt Correction
Tap to reset your camera to the default
position.
Patrol Mode
It allows the camera to move between your marked positions.
Follow the guide https://www.tp-link.com/support/faq/3945/.
18
Video & Display
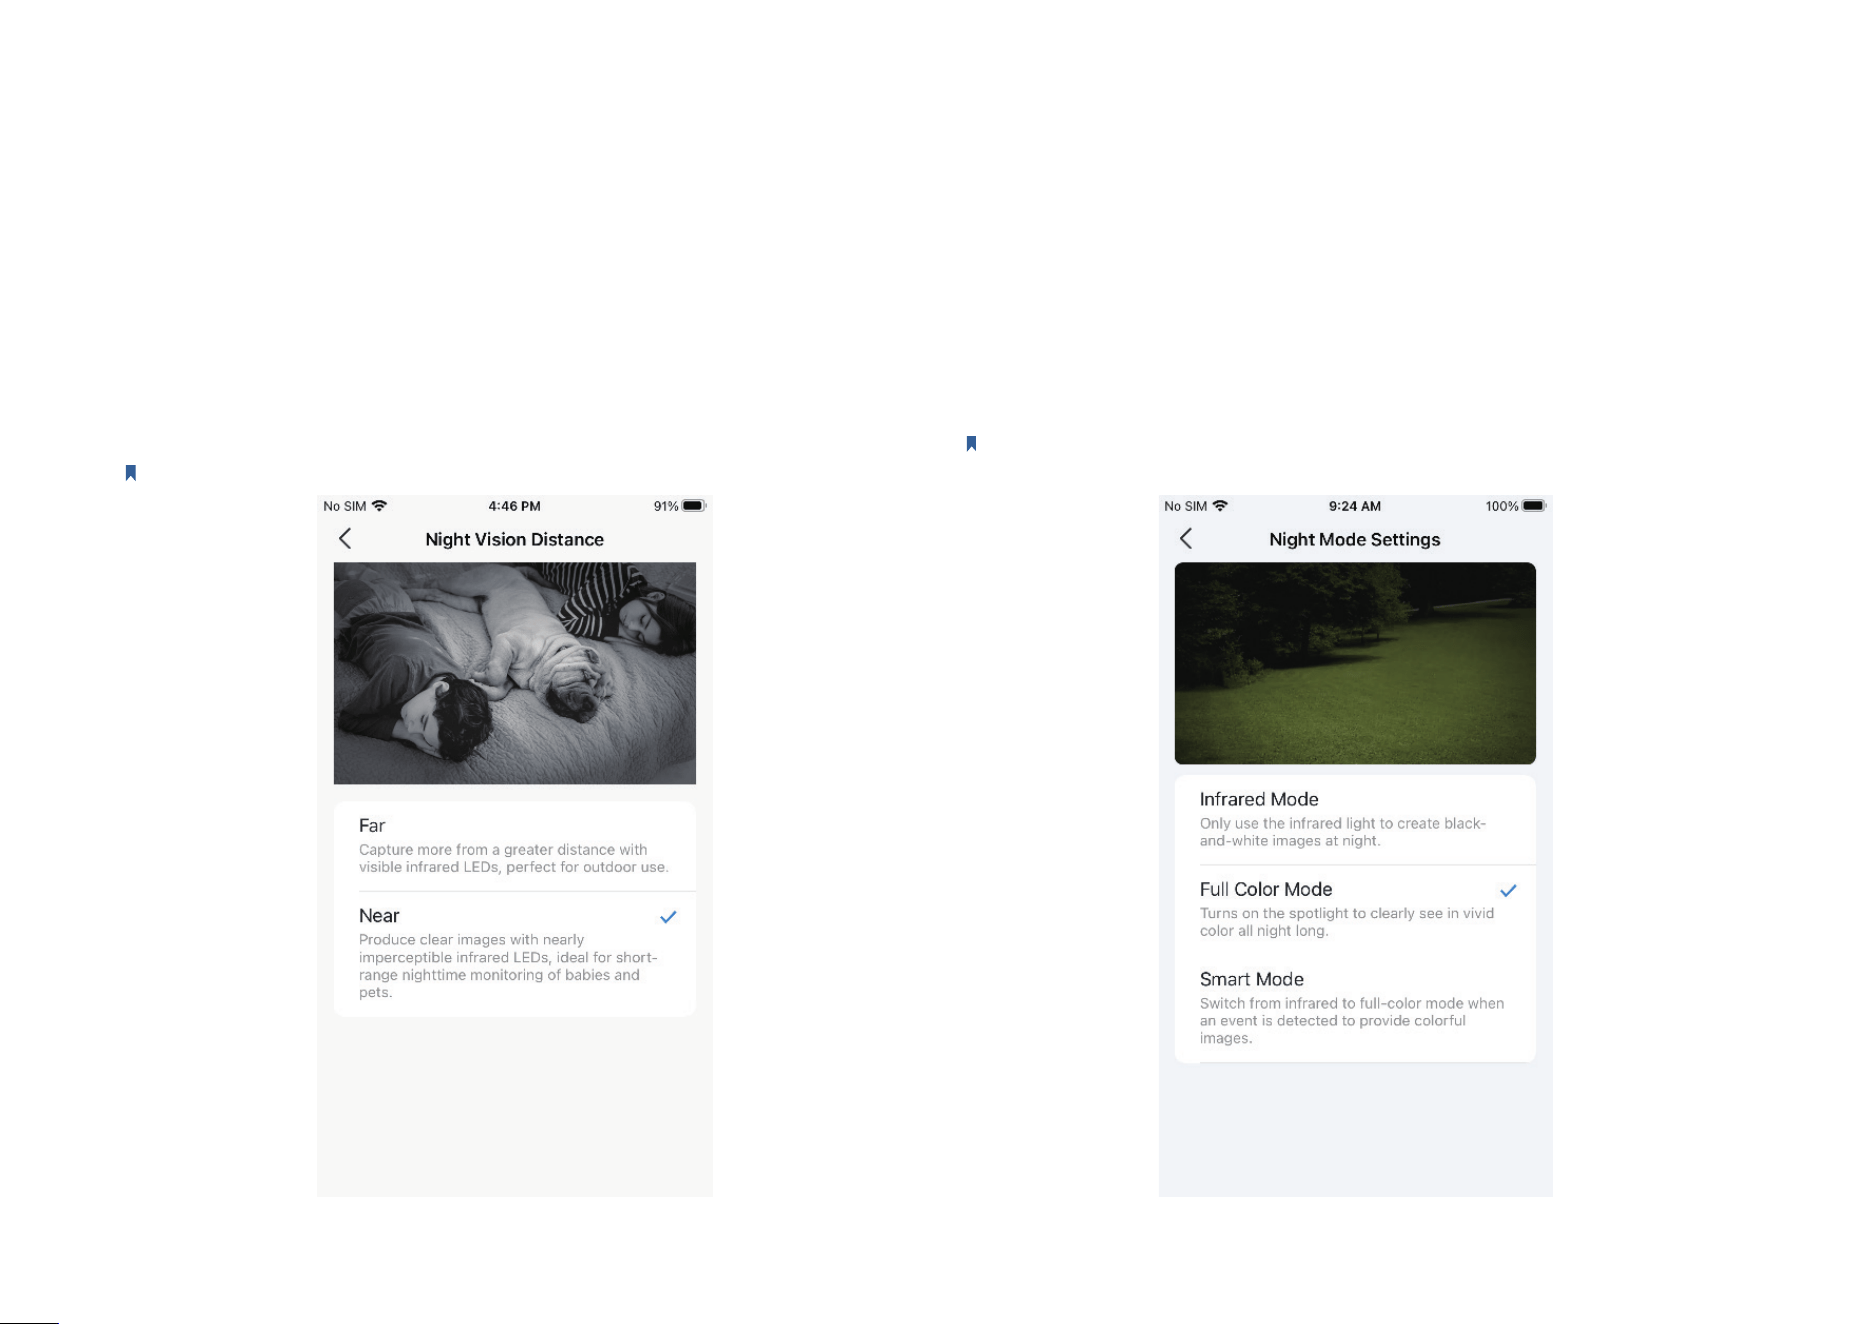
Night Mode Settings
Choose from Infrared Mode, Full Color Mode, or Smart Mode as needed.
Note: Only cameras with spotlights can switch the night mode. Here we take Tapo
C320WS as an example.
Night Vision Distance
Choose Far or Near as needed. If you want the camera to emit invisible
IR lights in low-light condition, choose Near.
Note: Here we take Tapo C225 V2 as an example.
19
Video & Display
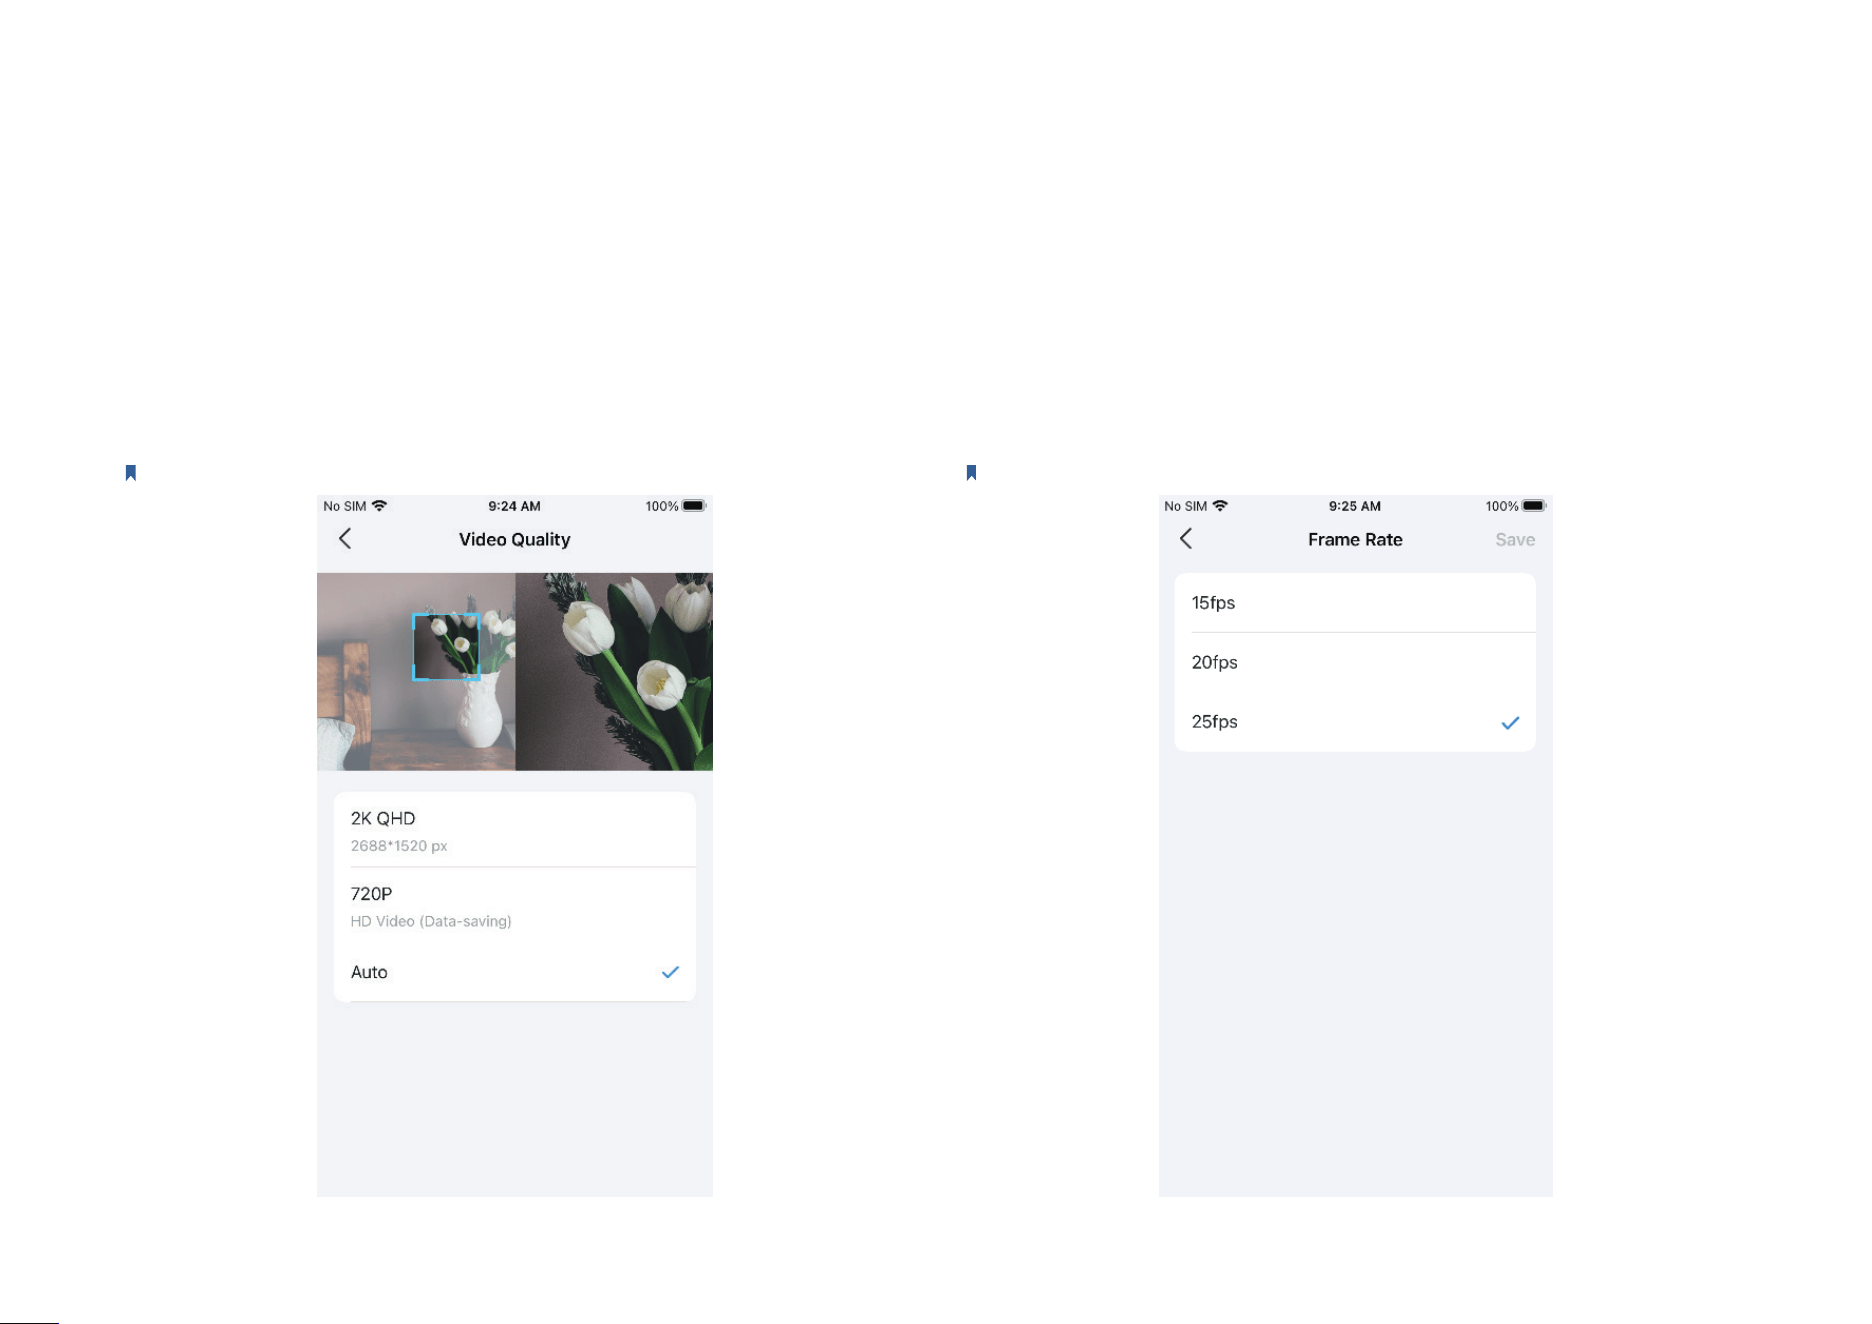
Frame Rate
Switch Frame Rate as needed. Higher frame rates result in larger le
sizes and increased bandwidth requirements.
Note: Here we take Tapo C225 V2 as an example.
Video Quality
Switch Video Quality as needed. Higher video quality requires a better
internet connection and larger storage capacity.
Note: Here we take Tapo C225 V2 as an example.
20
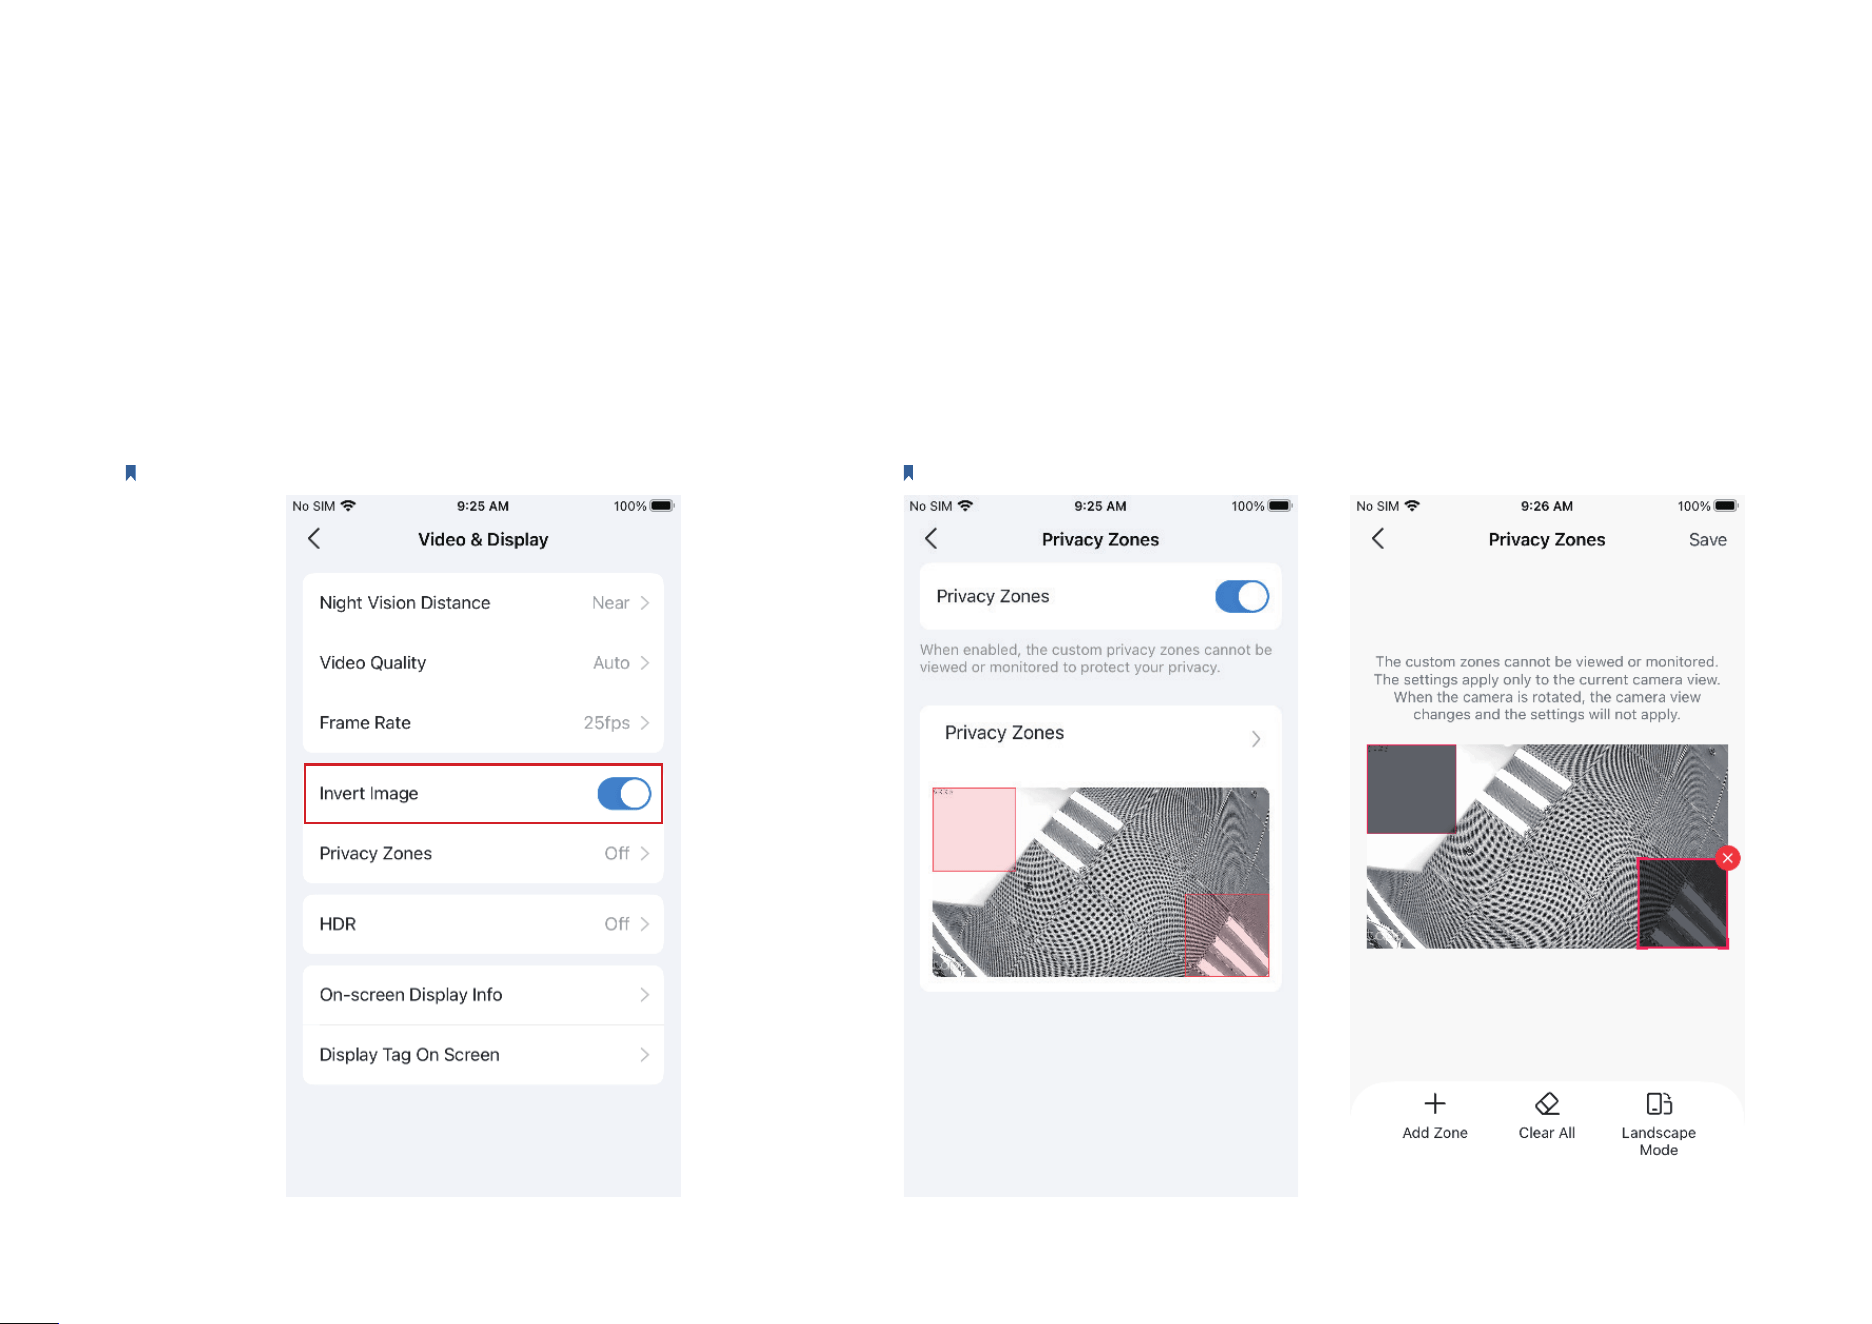
Video & Display
Invert Image
Toggle on Invert Image if the camera video image is upside down
on the Tapo app.
Note: Here we take Tapo C225 V2 as an example.
Privacy Zones
Enable Privacy Zones and add privacy zones. The custom zones cannot be
viewed or monitored to protect your privacy.
Note: Here we take Tapo C225 V2 as an example.
21
Video & Display
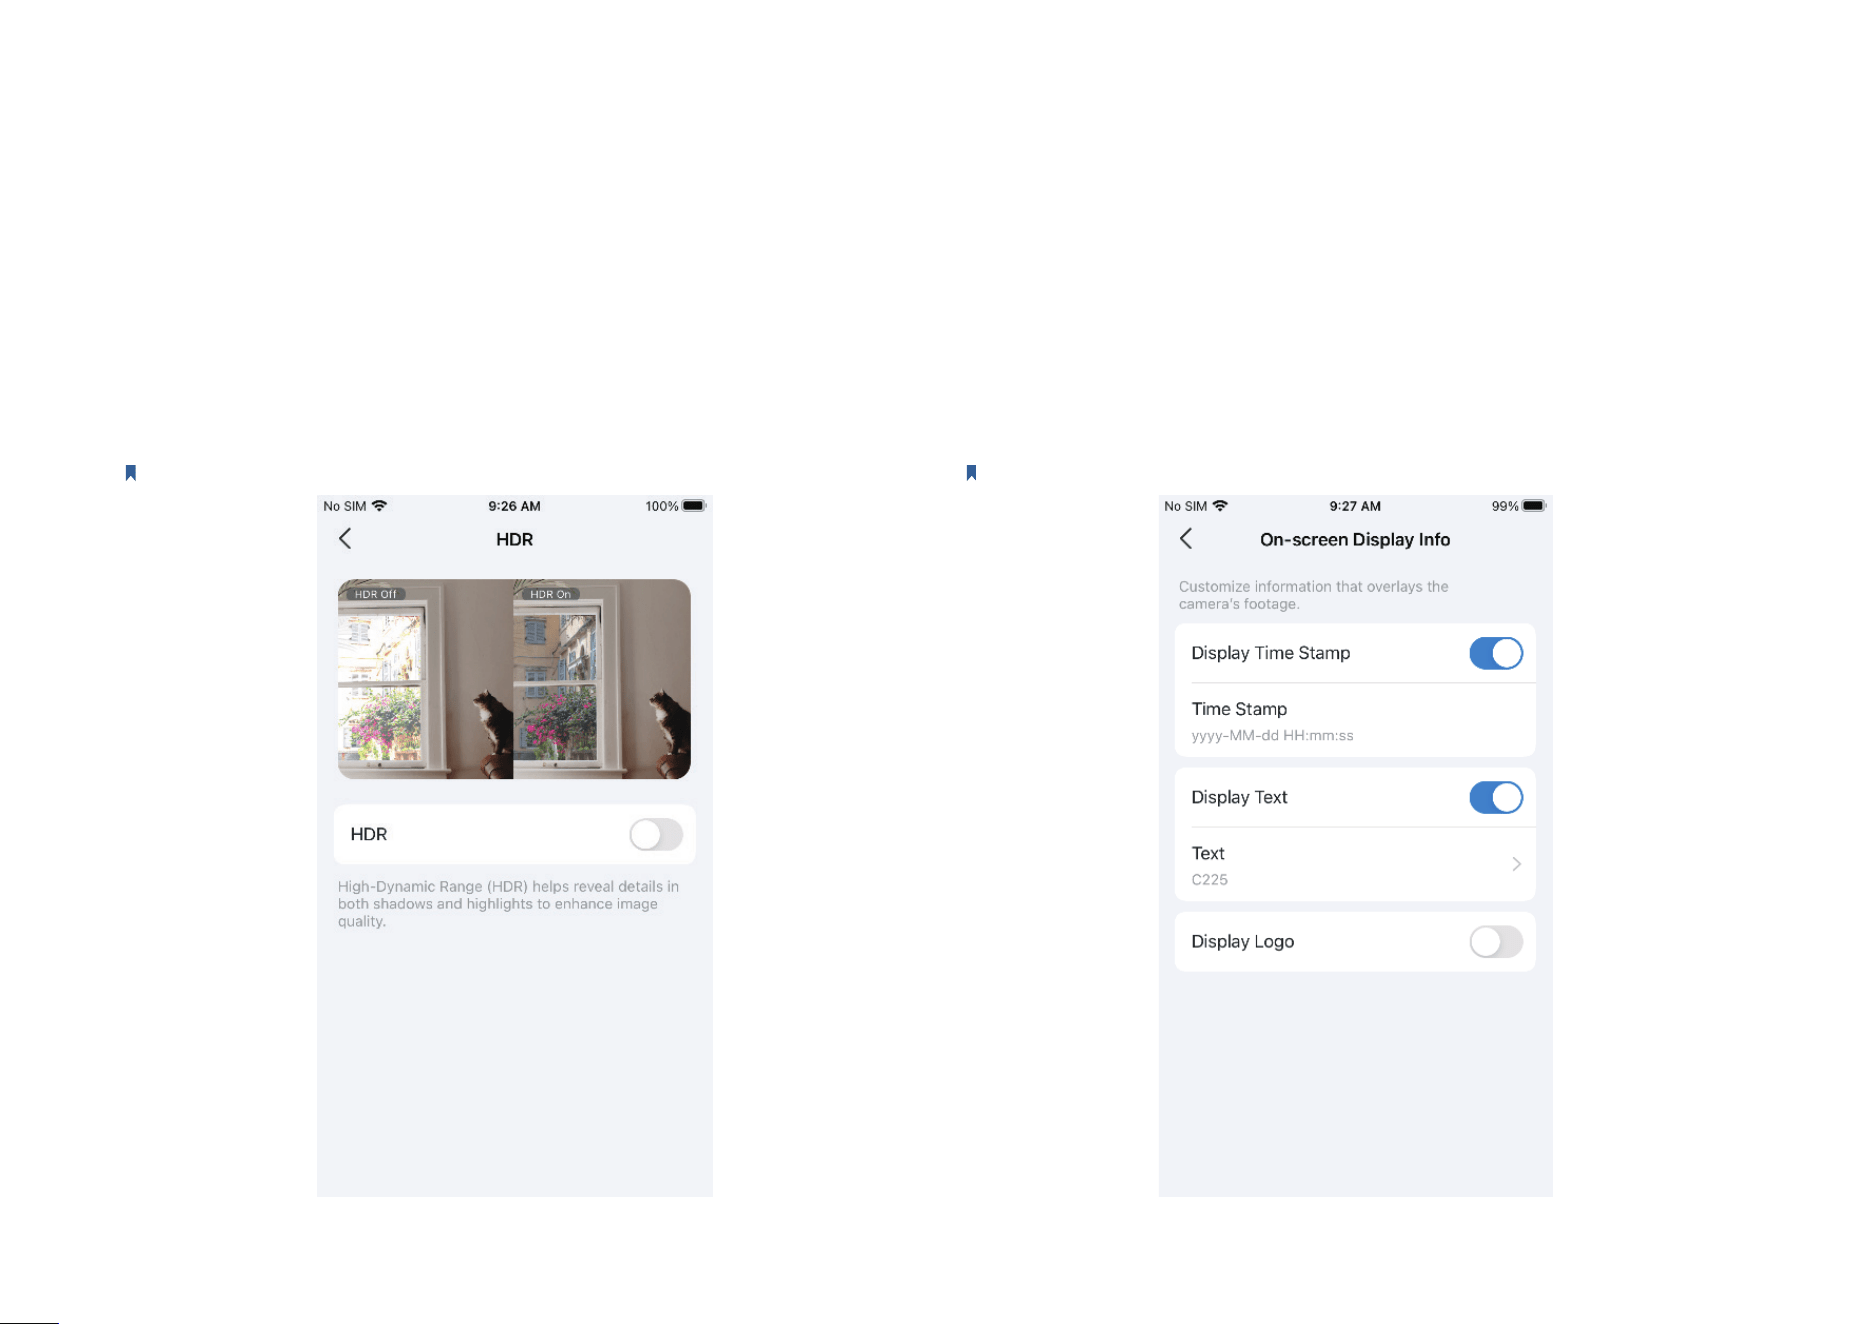
On-screen Display Info
Customize information that overlays the camera's footage, including the
time stamp, customizable text, and Tapo logo.
Note: Here we take Tapo C225 V2 as an example.
HDR
Enable HDR (High-Dynamic Range) to help reveal details in both shadow
and highlights to enhance image quality.
Note: Here we take Tapo C225 V2 as an example.
22
Video & Display
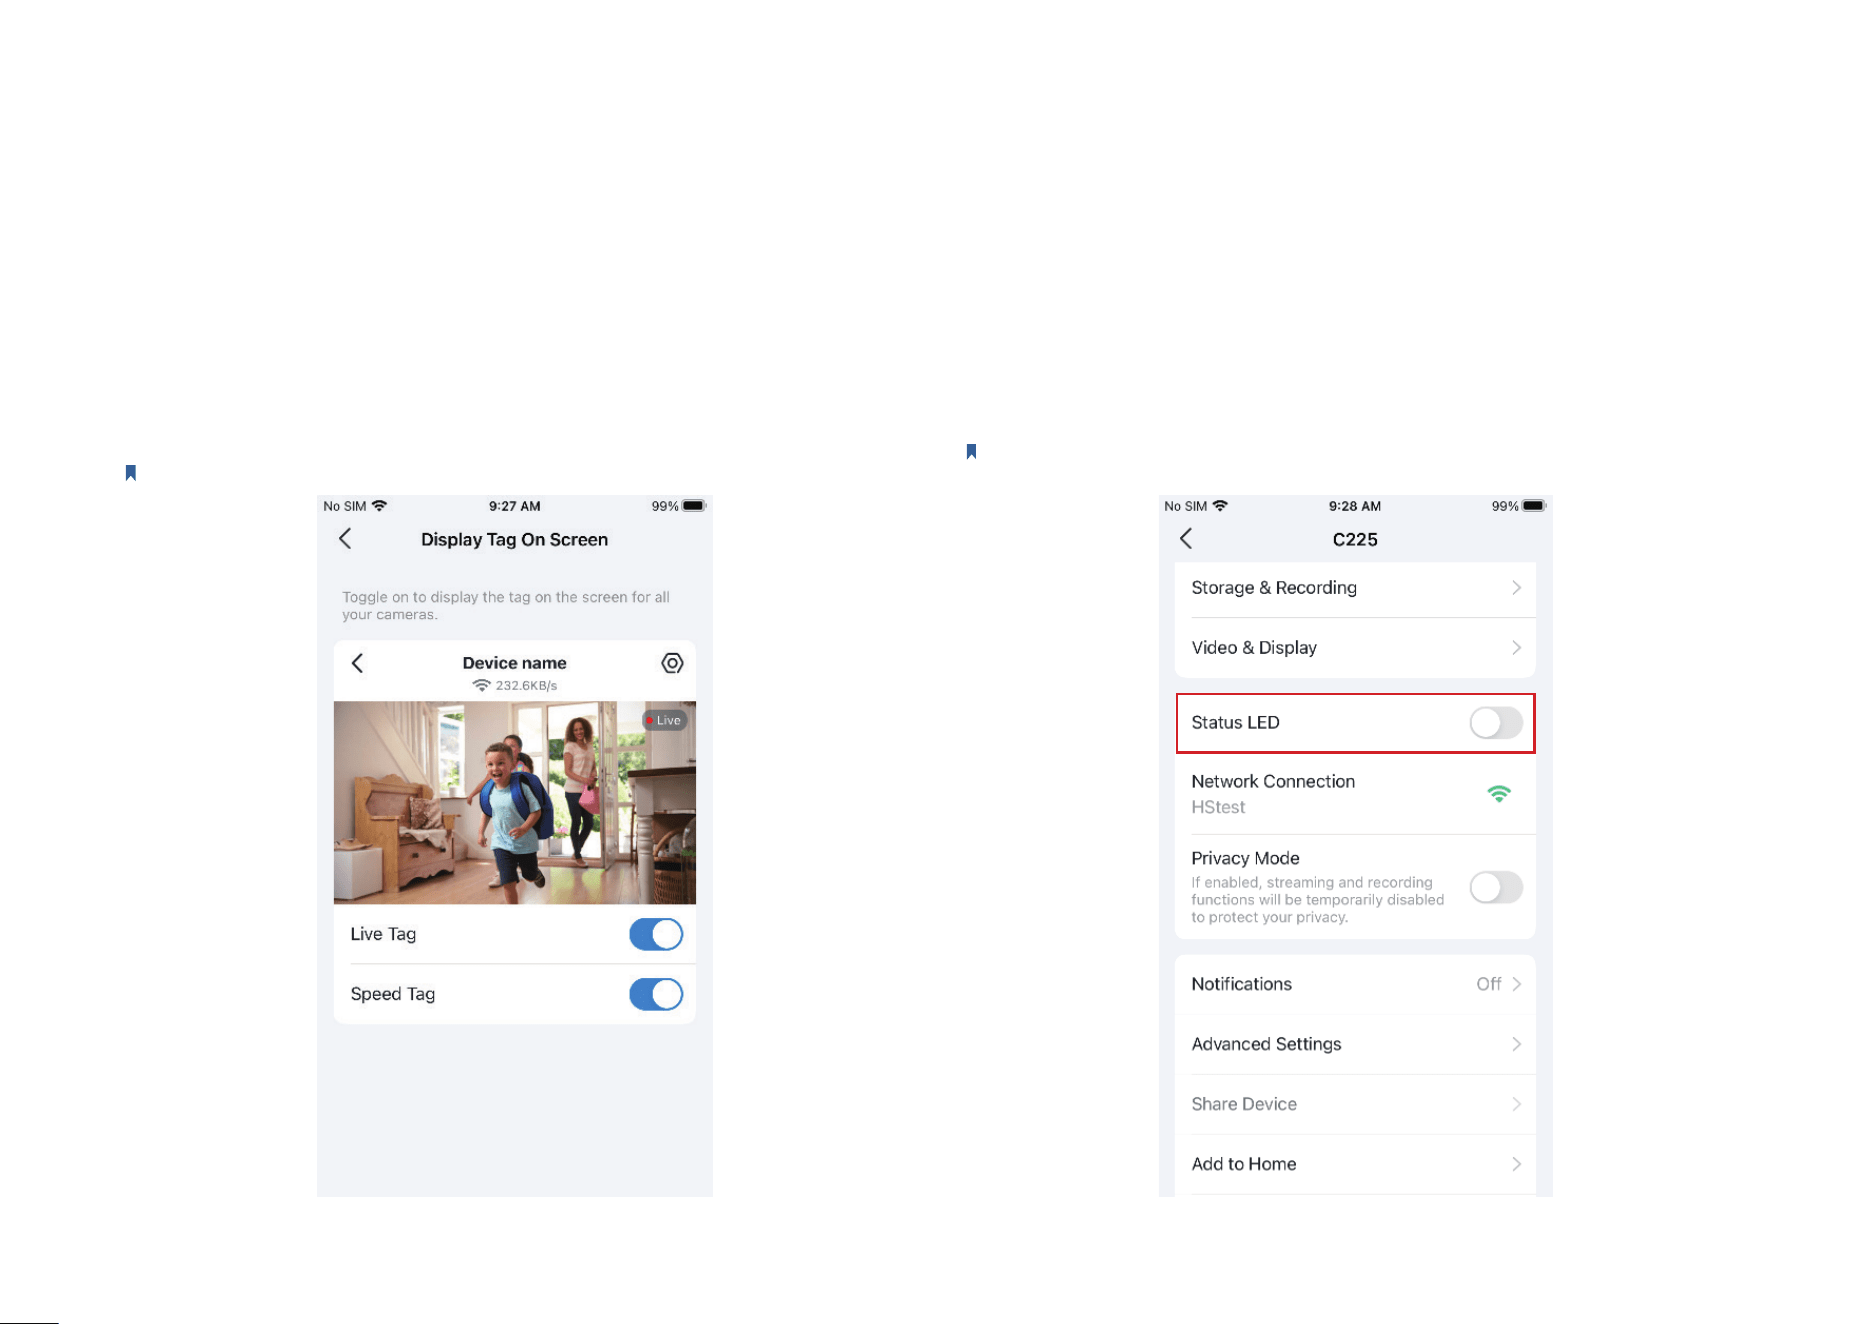
Display Tag On Screen
Toggle on to display Live Tag and Speed Tag on the screen for all your
cameras.
Note: Here we take Tapo C225 V2 as an example.
Status LED
Toggle o Status LED if you want the camera to work with the system
LED o to avoid attention.
Note: Here we take Tapo C225 V2 as an example.
23
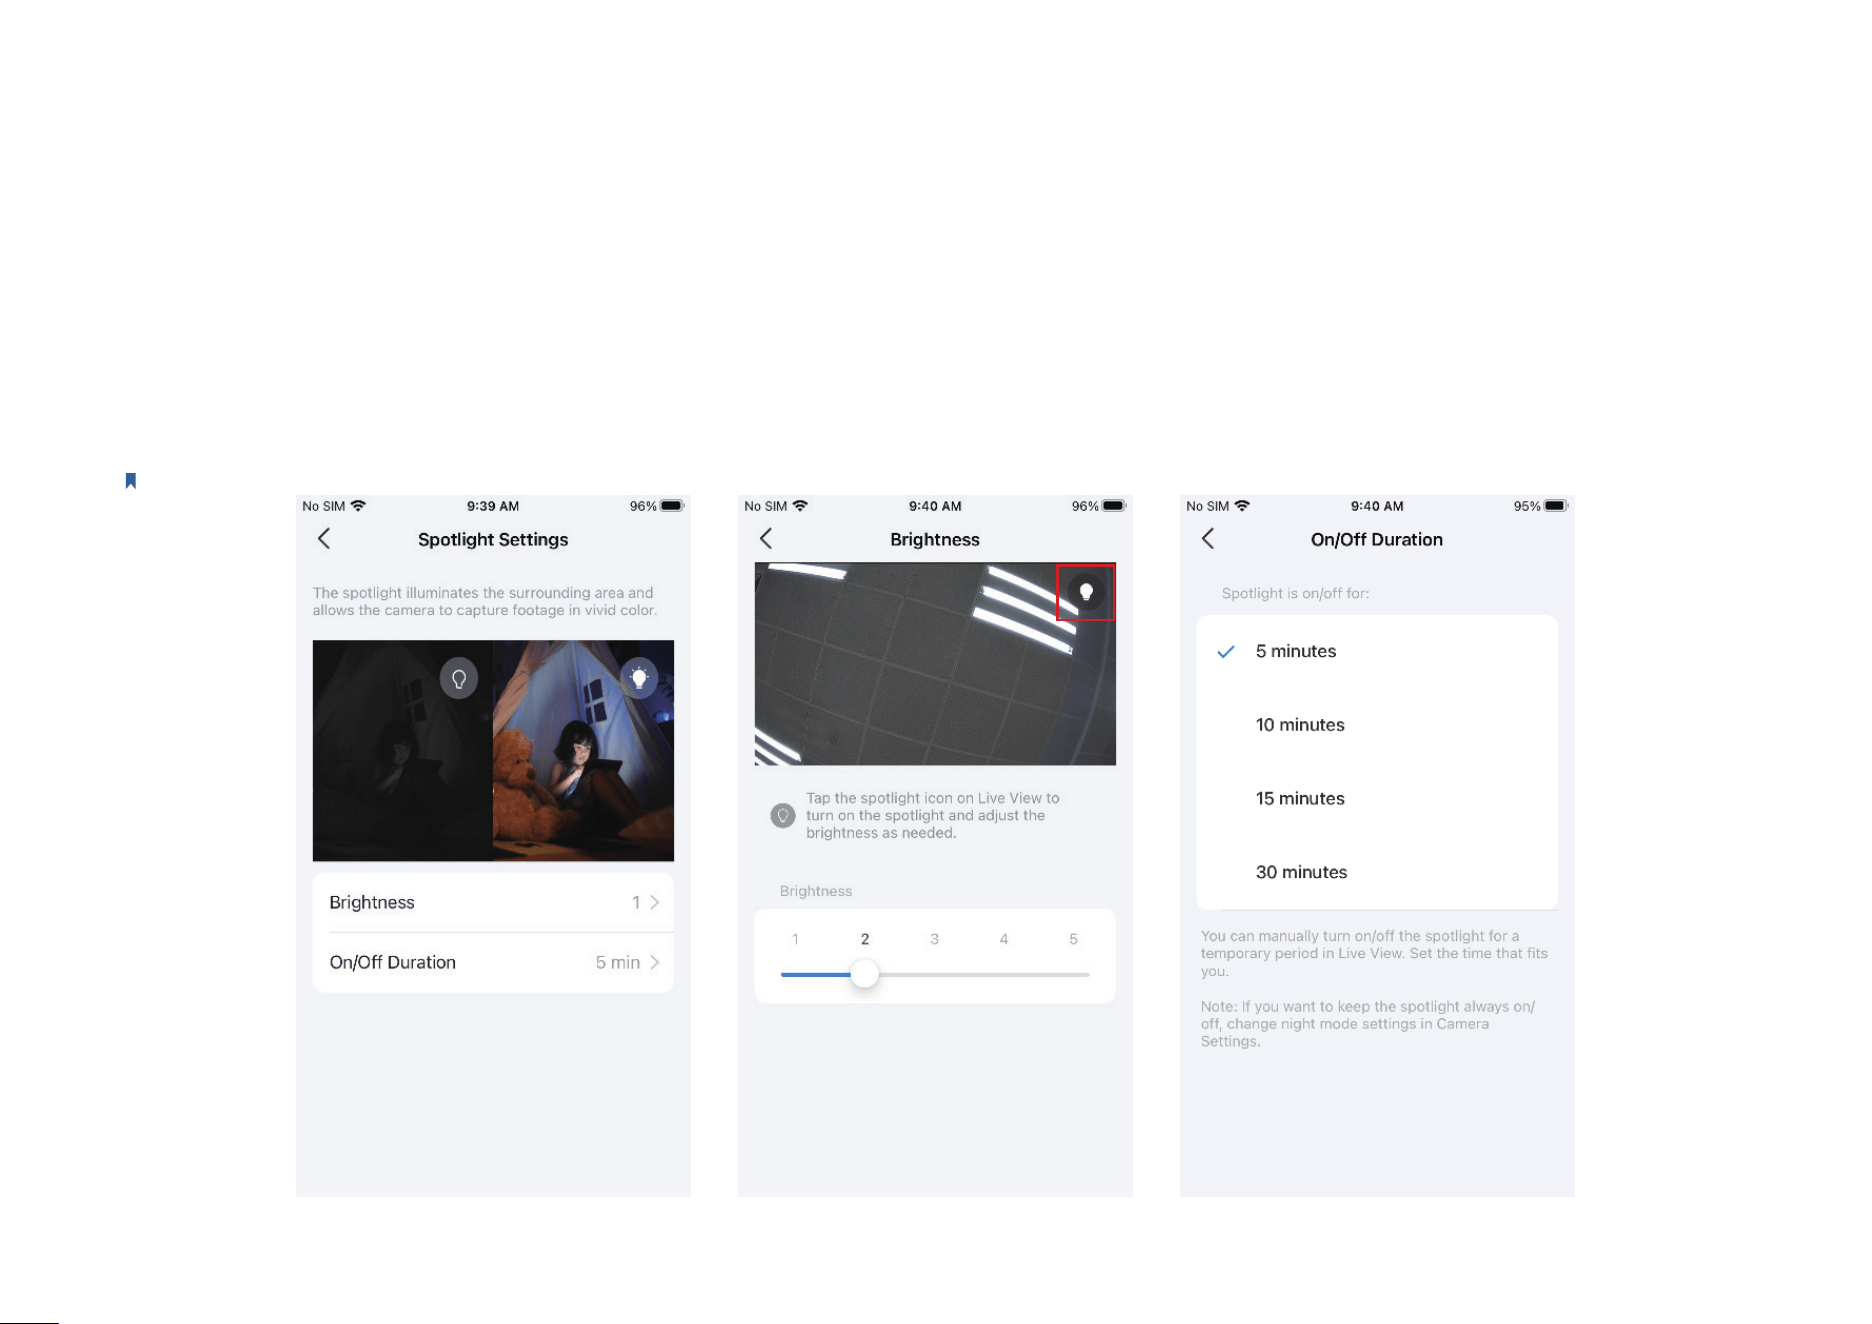
Spotlight Settings
Tap the spotlight icon on the Live View page to turn on/o the spotlights and adjust the Brightness of spotlights. Then set the On/O Duration time
that ts you. To keep spotlights always on/o, change night mode settings in Camera Settings. The illuminated spotlights allow the camera to capture
footage in vivid color.
Note: Only cameras equipped with white lights or spotlights have this feature. Here we take Tapo C320WS as an example.
24
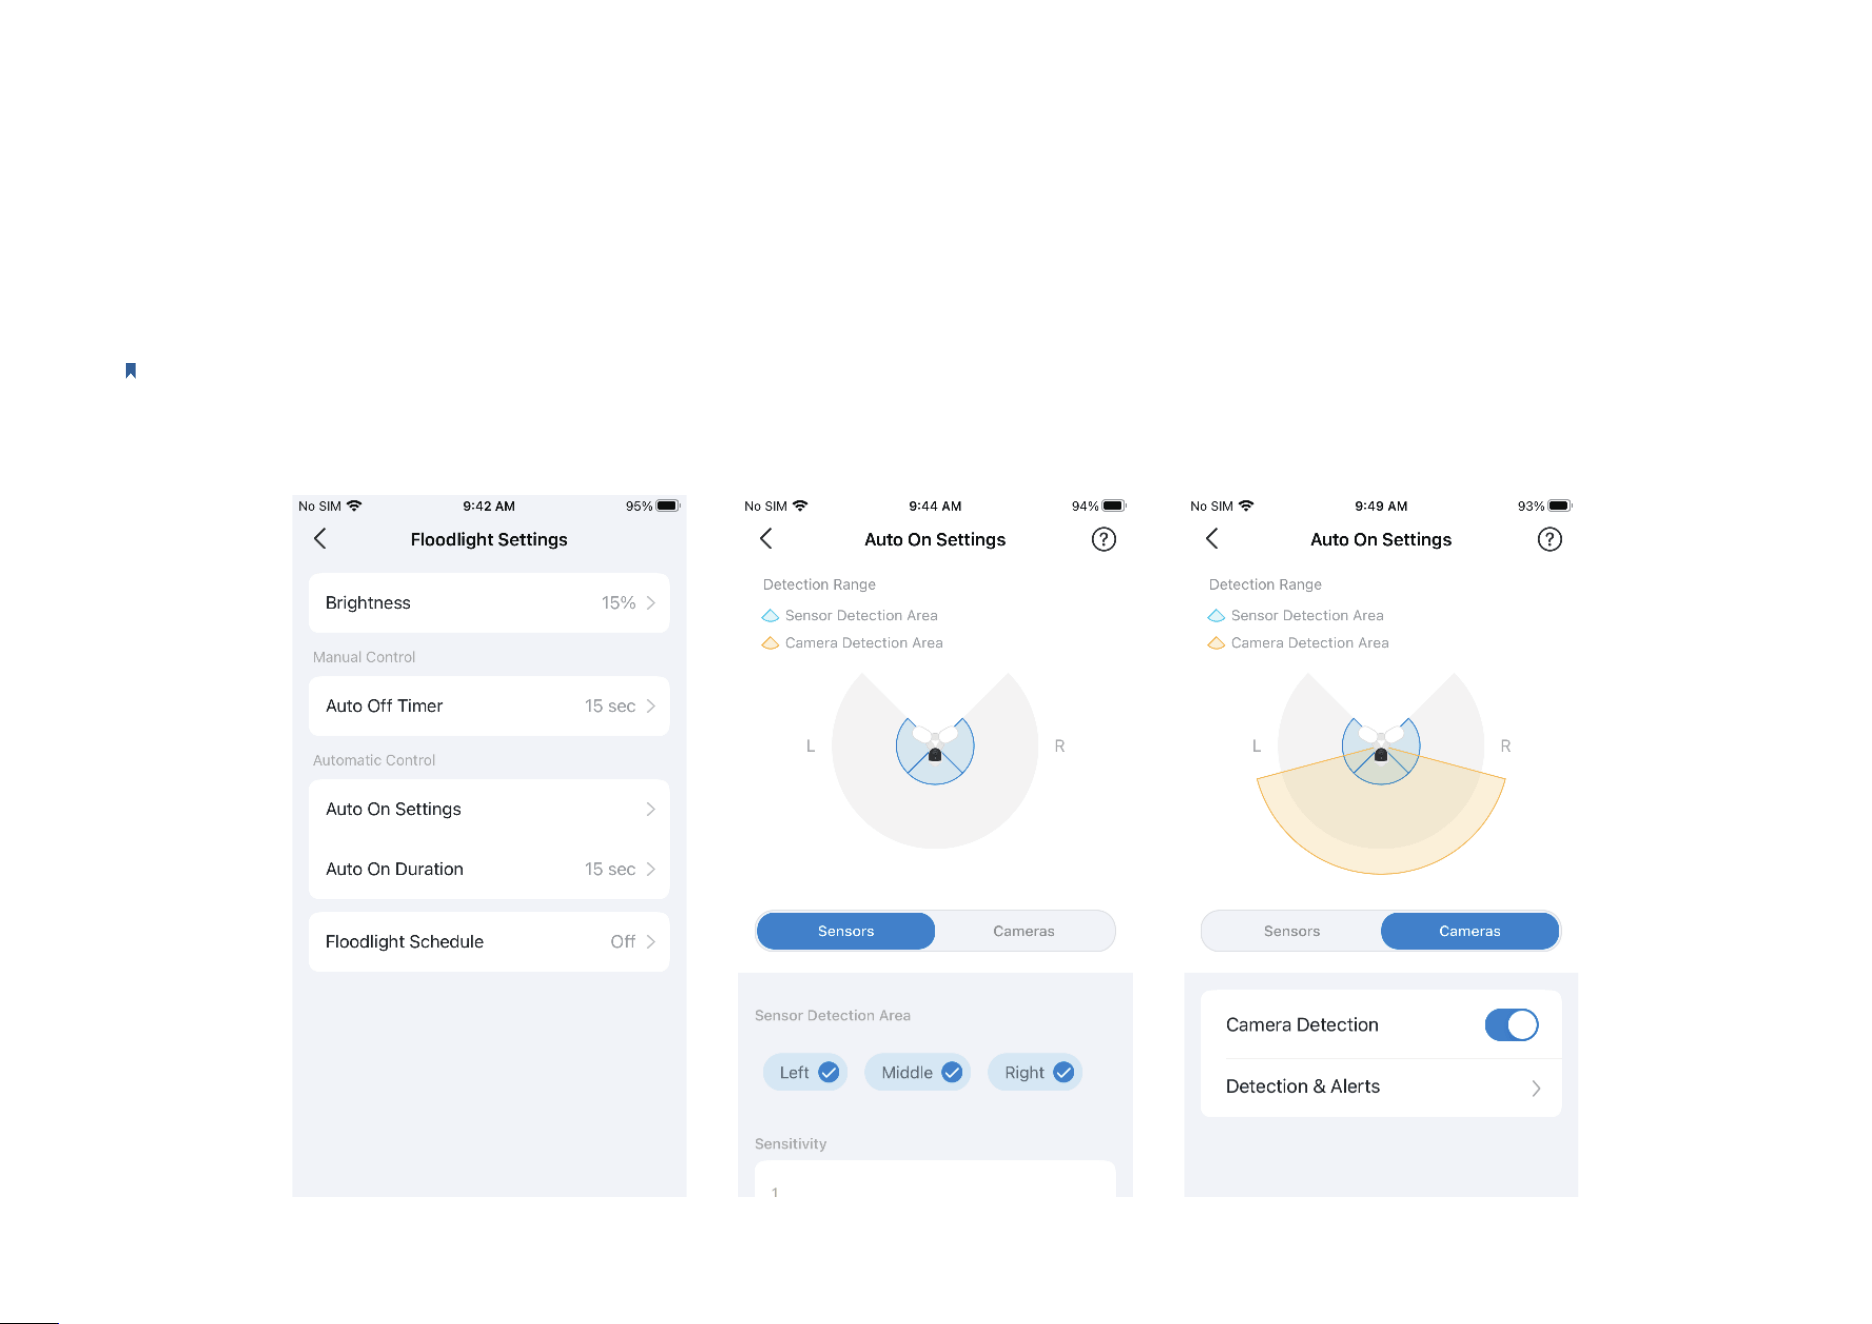
Floodlight Settings
Note: Only oodlight cameras have this feature.
Tap the spotlight icon on Live View page to turn on/o oodlights and adjust Brightness as needed. When Auto O Timer enabled, the oodlights will
be turned o after a set period of time.
Floodlights will turn on once the motion sensor or camera detects an event. You can change Auto On Settings, choose a duration, and set the schedule.
25
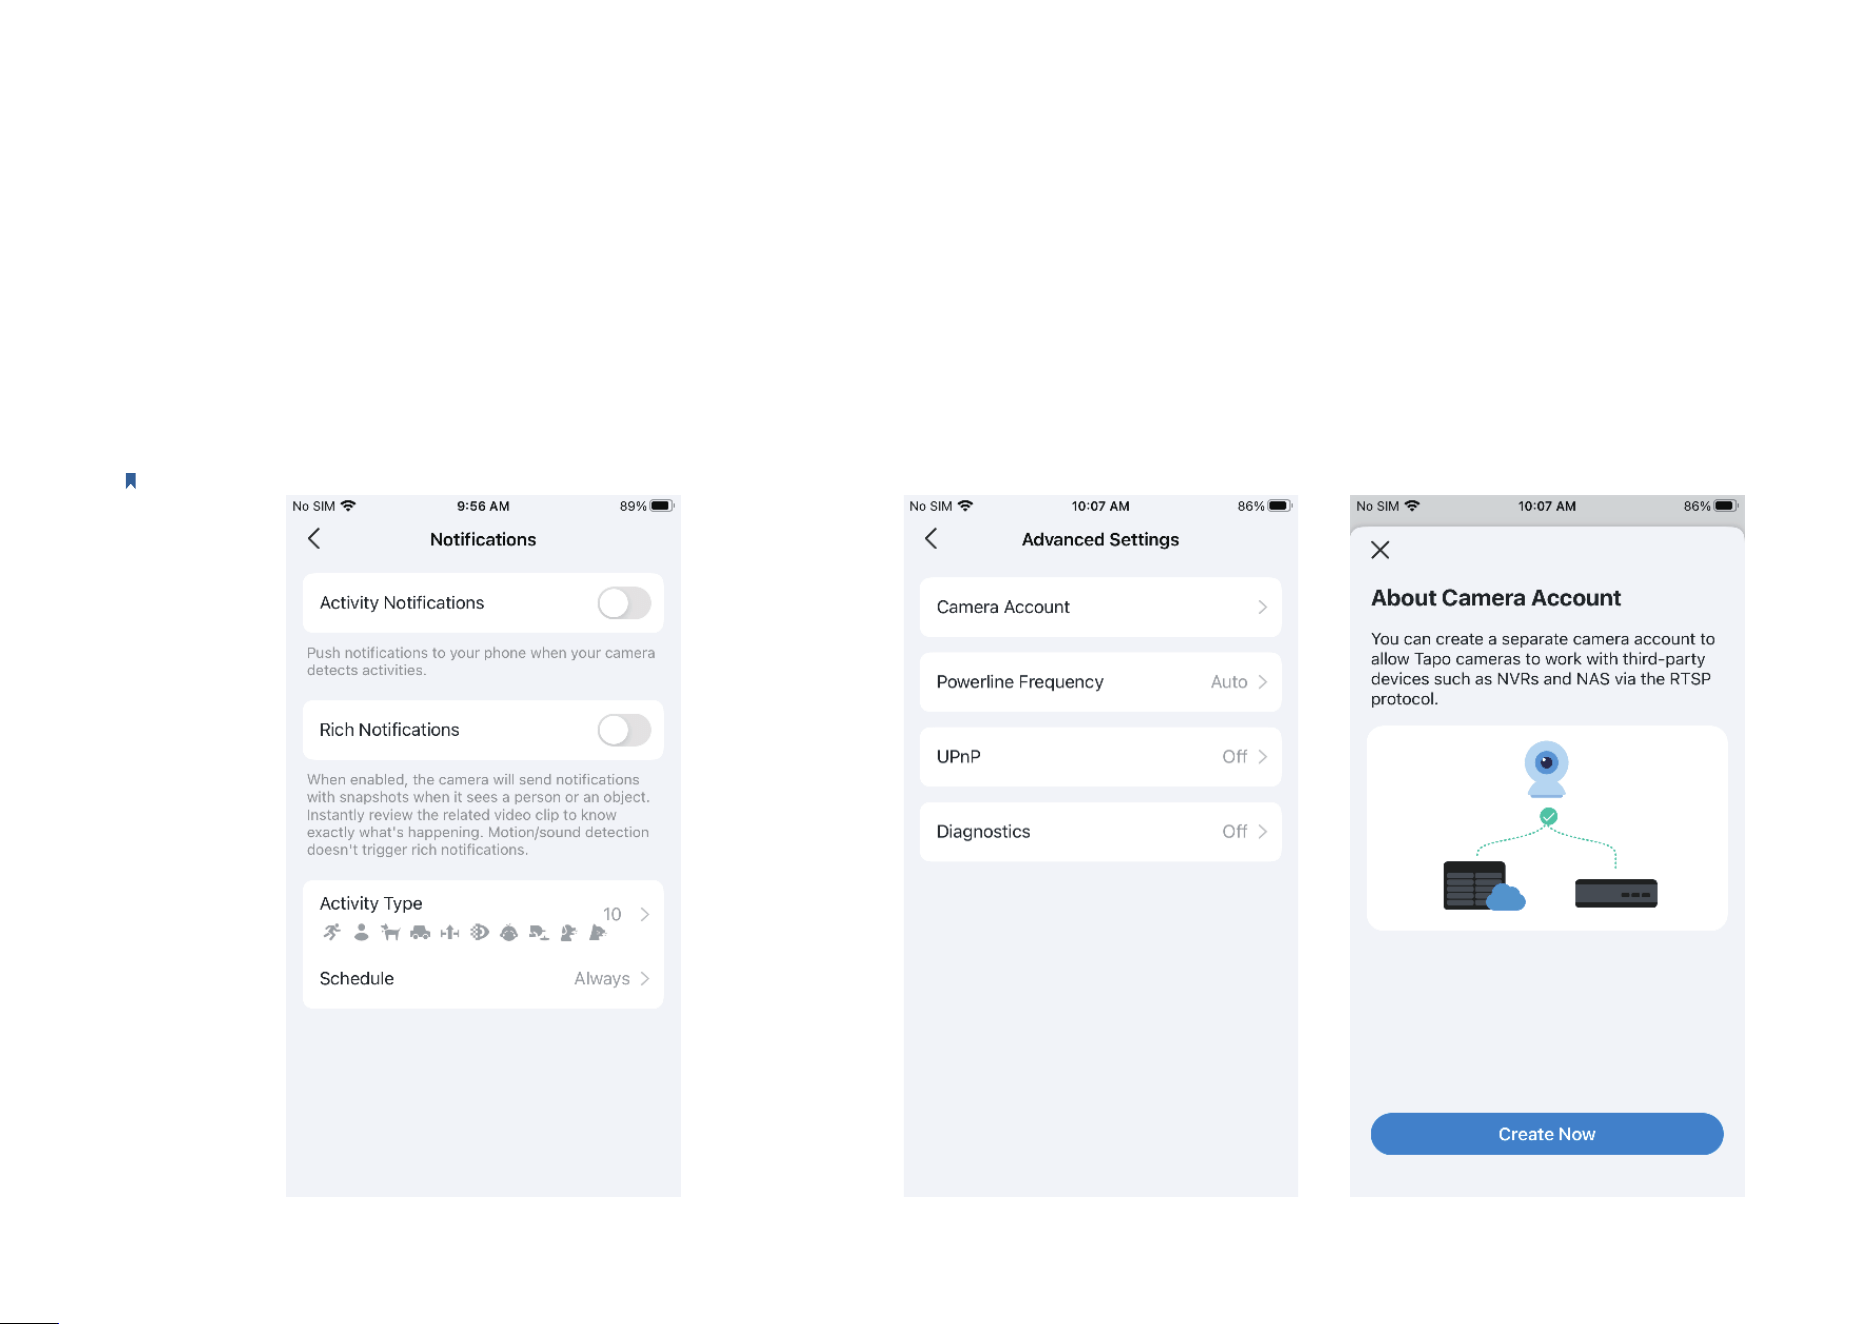
Notications
Toggle on Activity Notications and Rich Notications (A Paid
Tapo Care Service) as needed. Choose Activity Type and set the
Schedule for which and when you want to receive push notications.
Note: Here we take Tapo C225 V2 as an example.
Advanced Settings
Go to Camera Account and you can follow the app guide to create an account
for camera login via third-party portals.
You can also change Powerline Frequency, and turn on UPnP or Diagnostics as
needed.
26
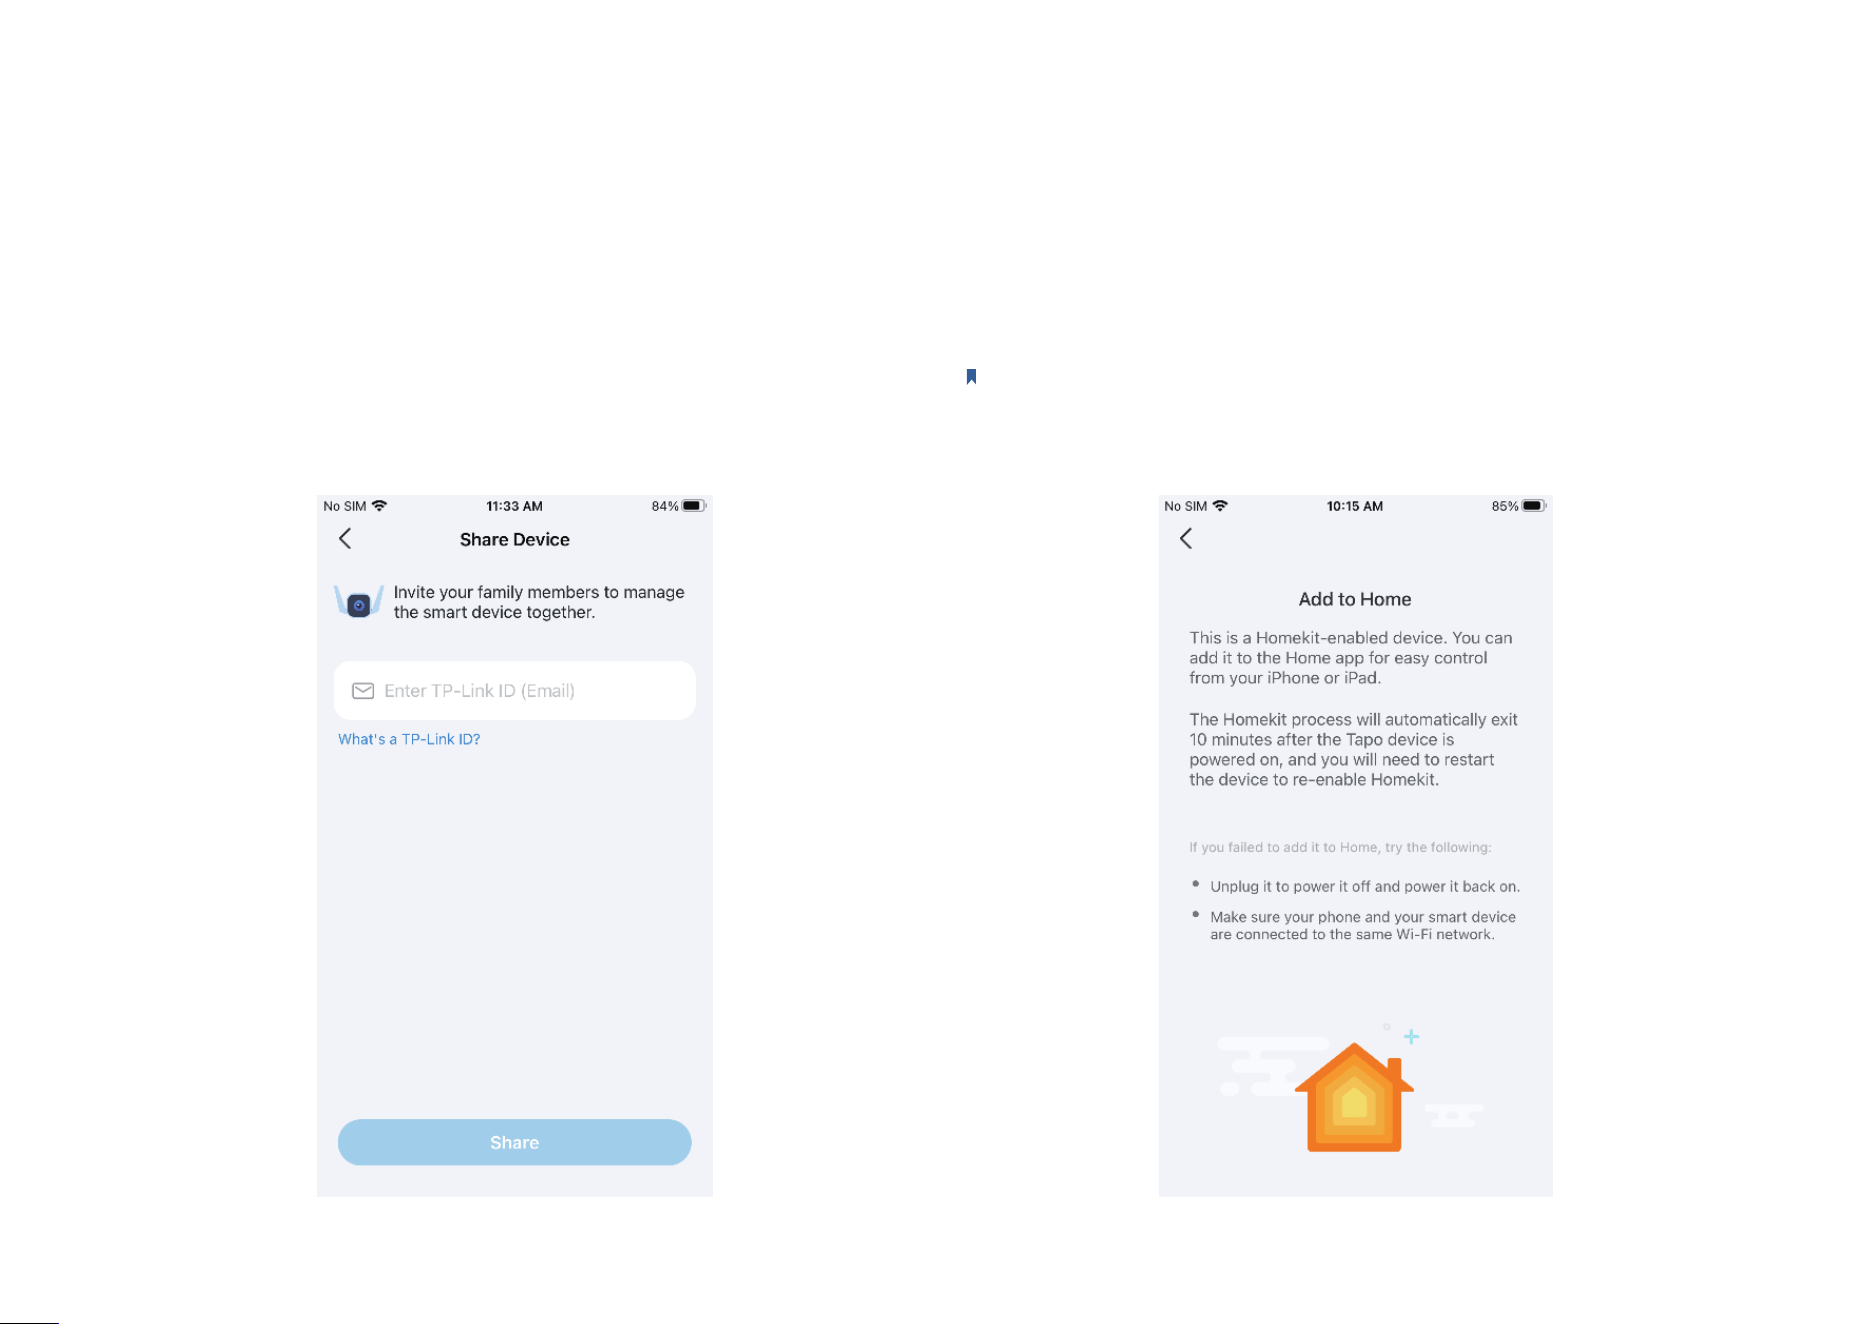
Share Device
Tap Share to invite your family members to manage the smart device
together.
Add to Home
Note: Only HomeKit-enabled cameras have this feature.
Tap Add to Home and follow the app guide to add a HomeKit-enabled
camera to the Home app for easy control form your iPhone or iPad.
27
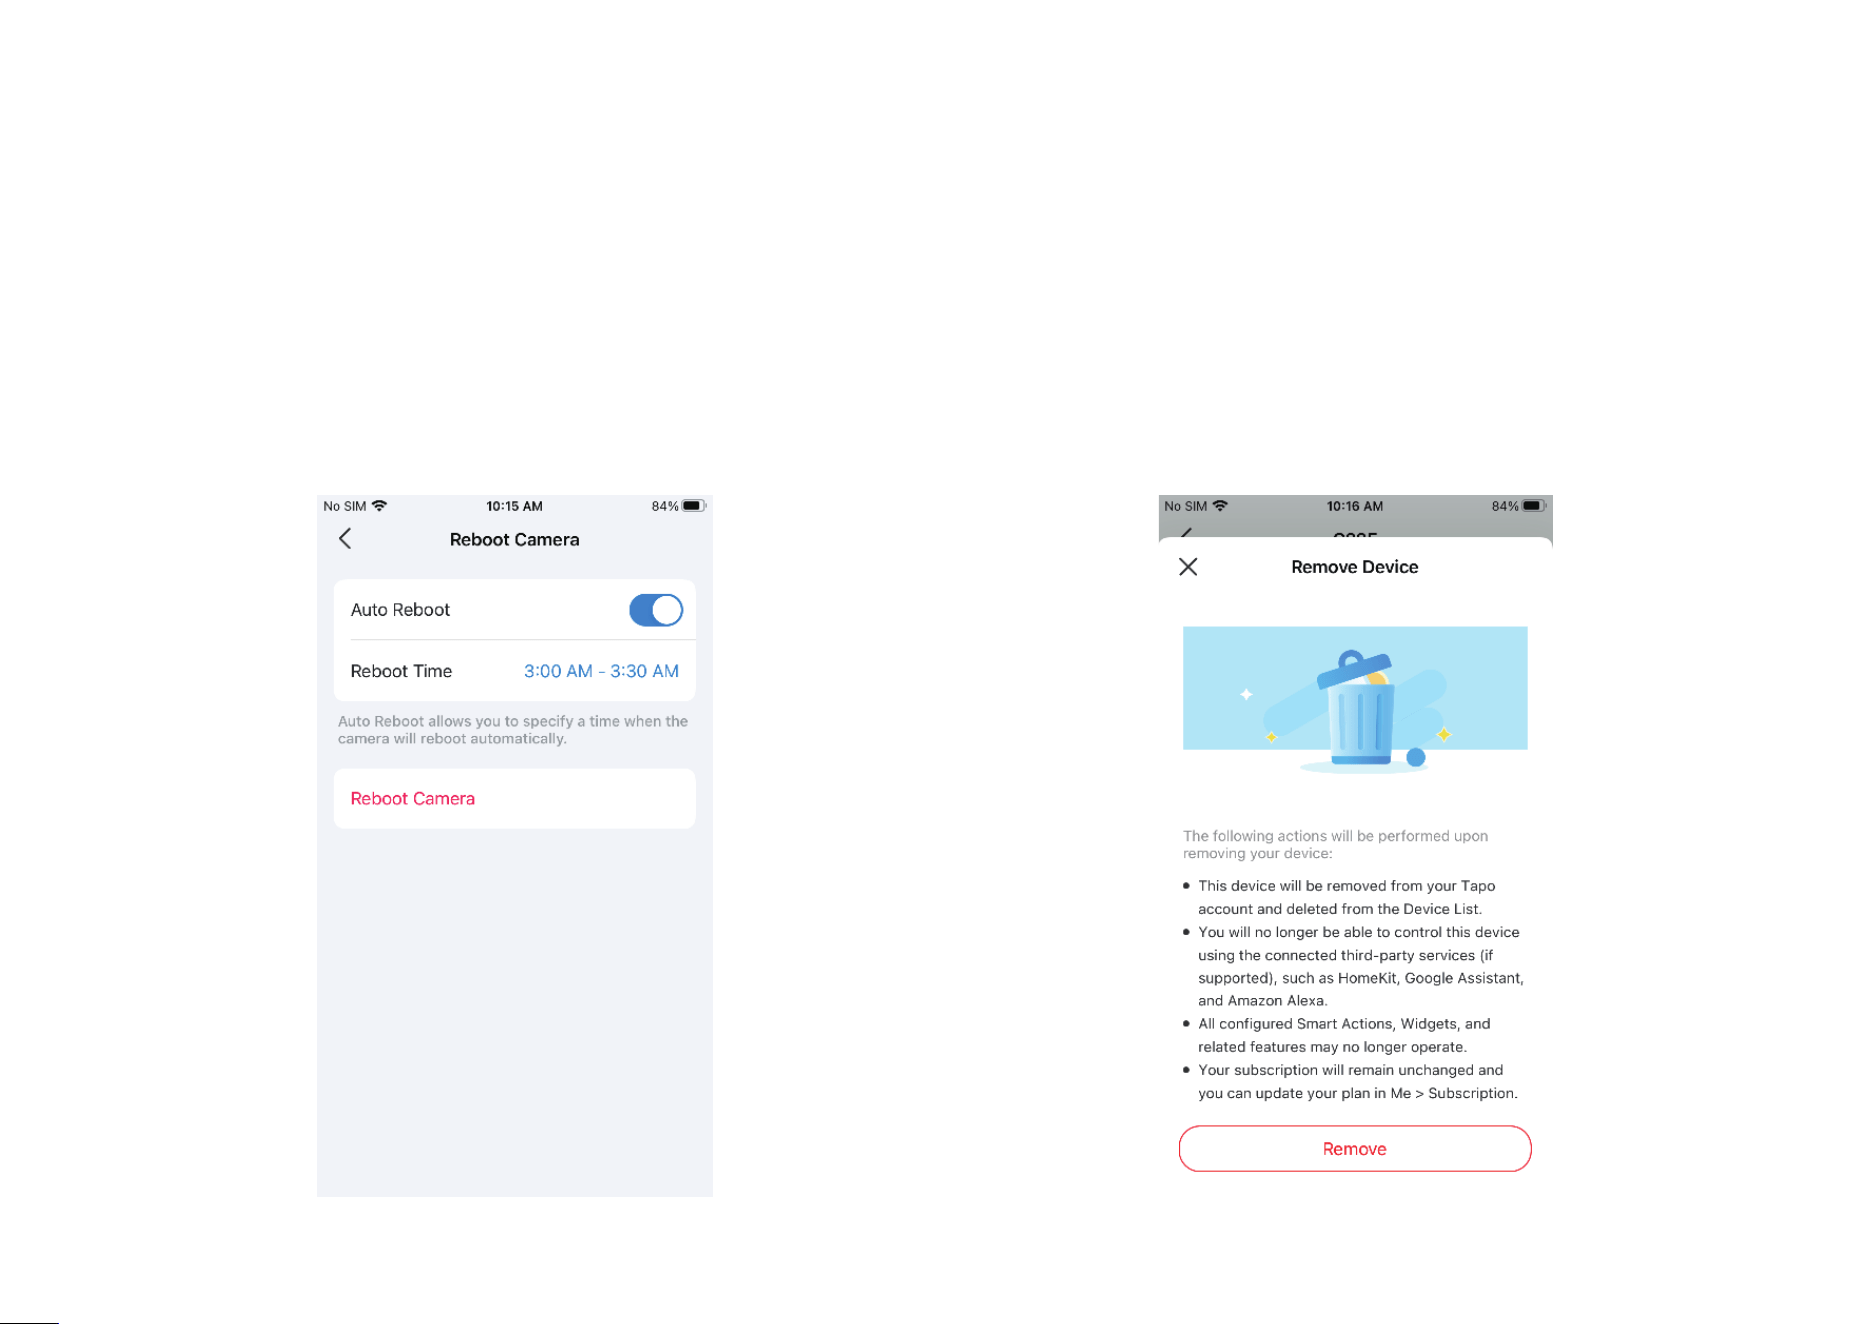
Remove Camera
If you Remove Camera, the camera will be reset to factory settings. You
can also remove the device on Home page.
Reboot Camera
Enable Auto Reboot and set a Reboot Time, so that the camera will
reboot automatically to maintain optimal performance. You can also tap
Reboot Camera to restart your device instantly.
28
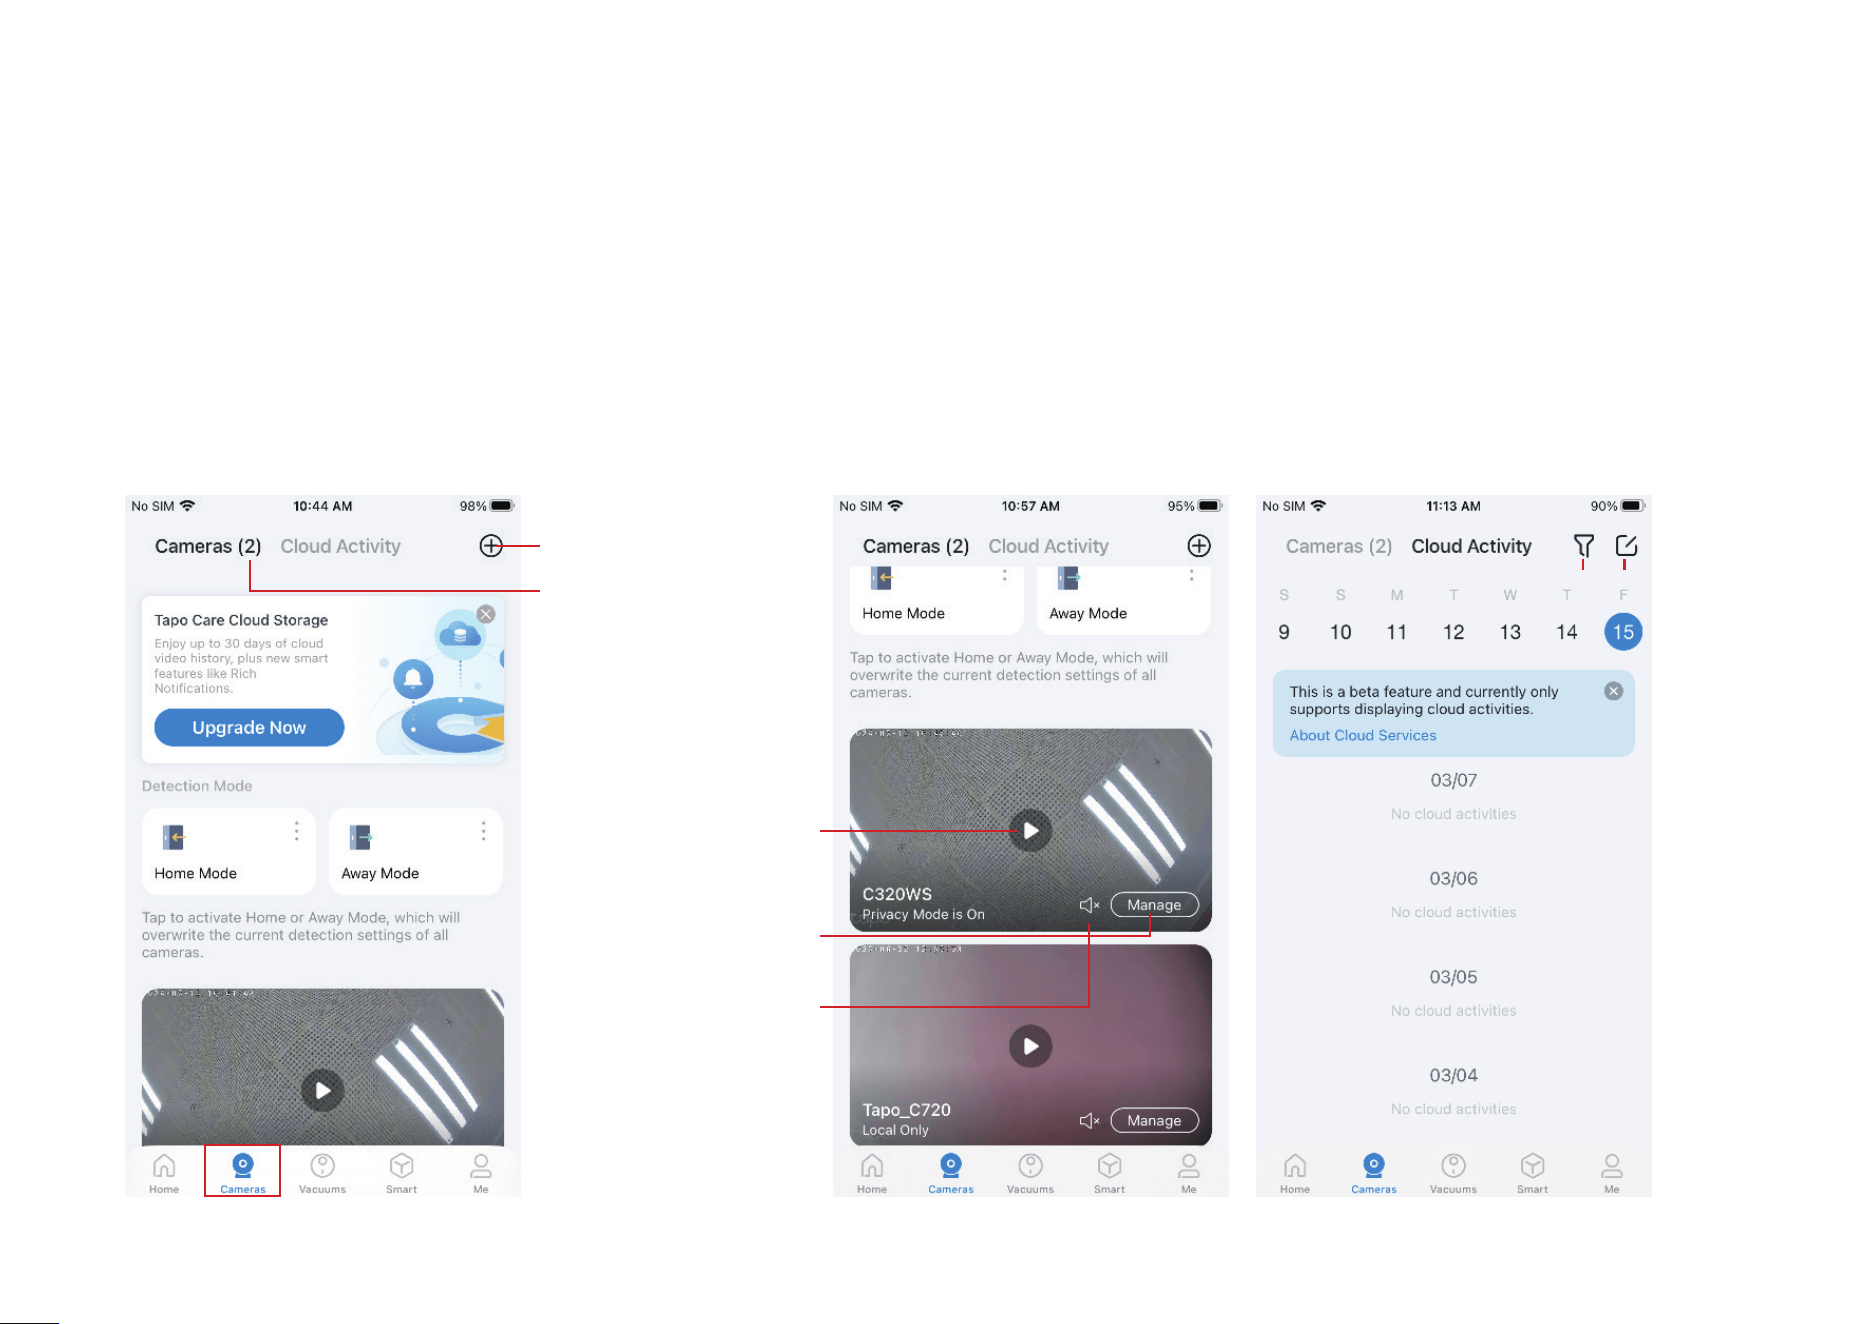
Cameras Page
Tapo app provides a shortcut to subscribe to Tapo Care cloud storage, activate Home or Away mode, live view all your cameras, and manage Cloud
Activities.
Cameras
Open the Tapo app, tap Open the Tapo app, tap CamerasCameras on the bottom to enter the page. Here is a brief introduction to on the bottom to enter the page. Here is a brief introduction to
features and icons on Cameras page. features and icons on Cameras page.
Cloud Activity
Tap Tap Cloud ActivityCloud Activity on the top, then you can on the top, then you can
check, lter, and delete cloud activities as check, lter, and delete cloud activities as
needed.needed.
Tap to add a new camera
Show the number of all
added cameras
Tap to start live view on
this page
Tap to enter the camera's
live view page
Unmute or mute
camera's microphone
Filter Select to delete
29
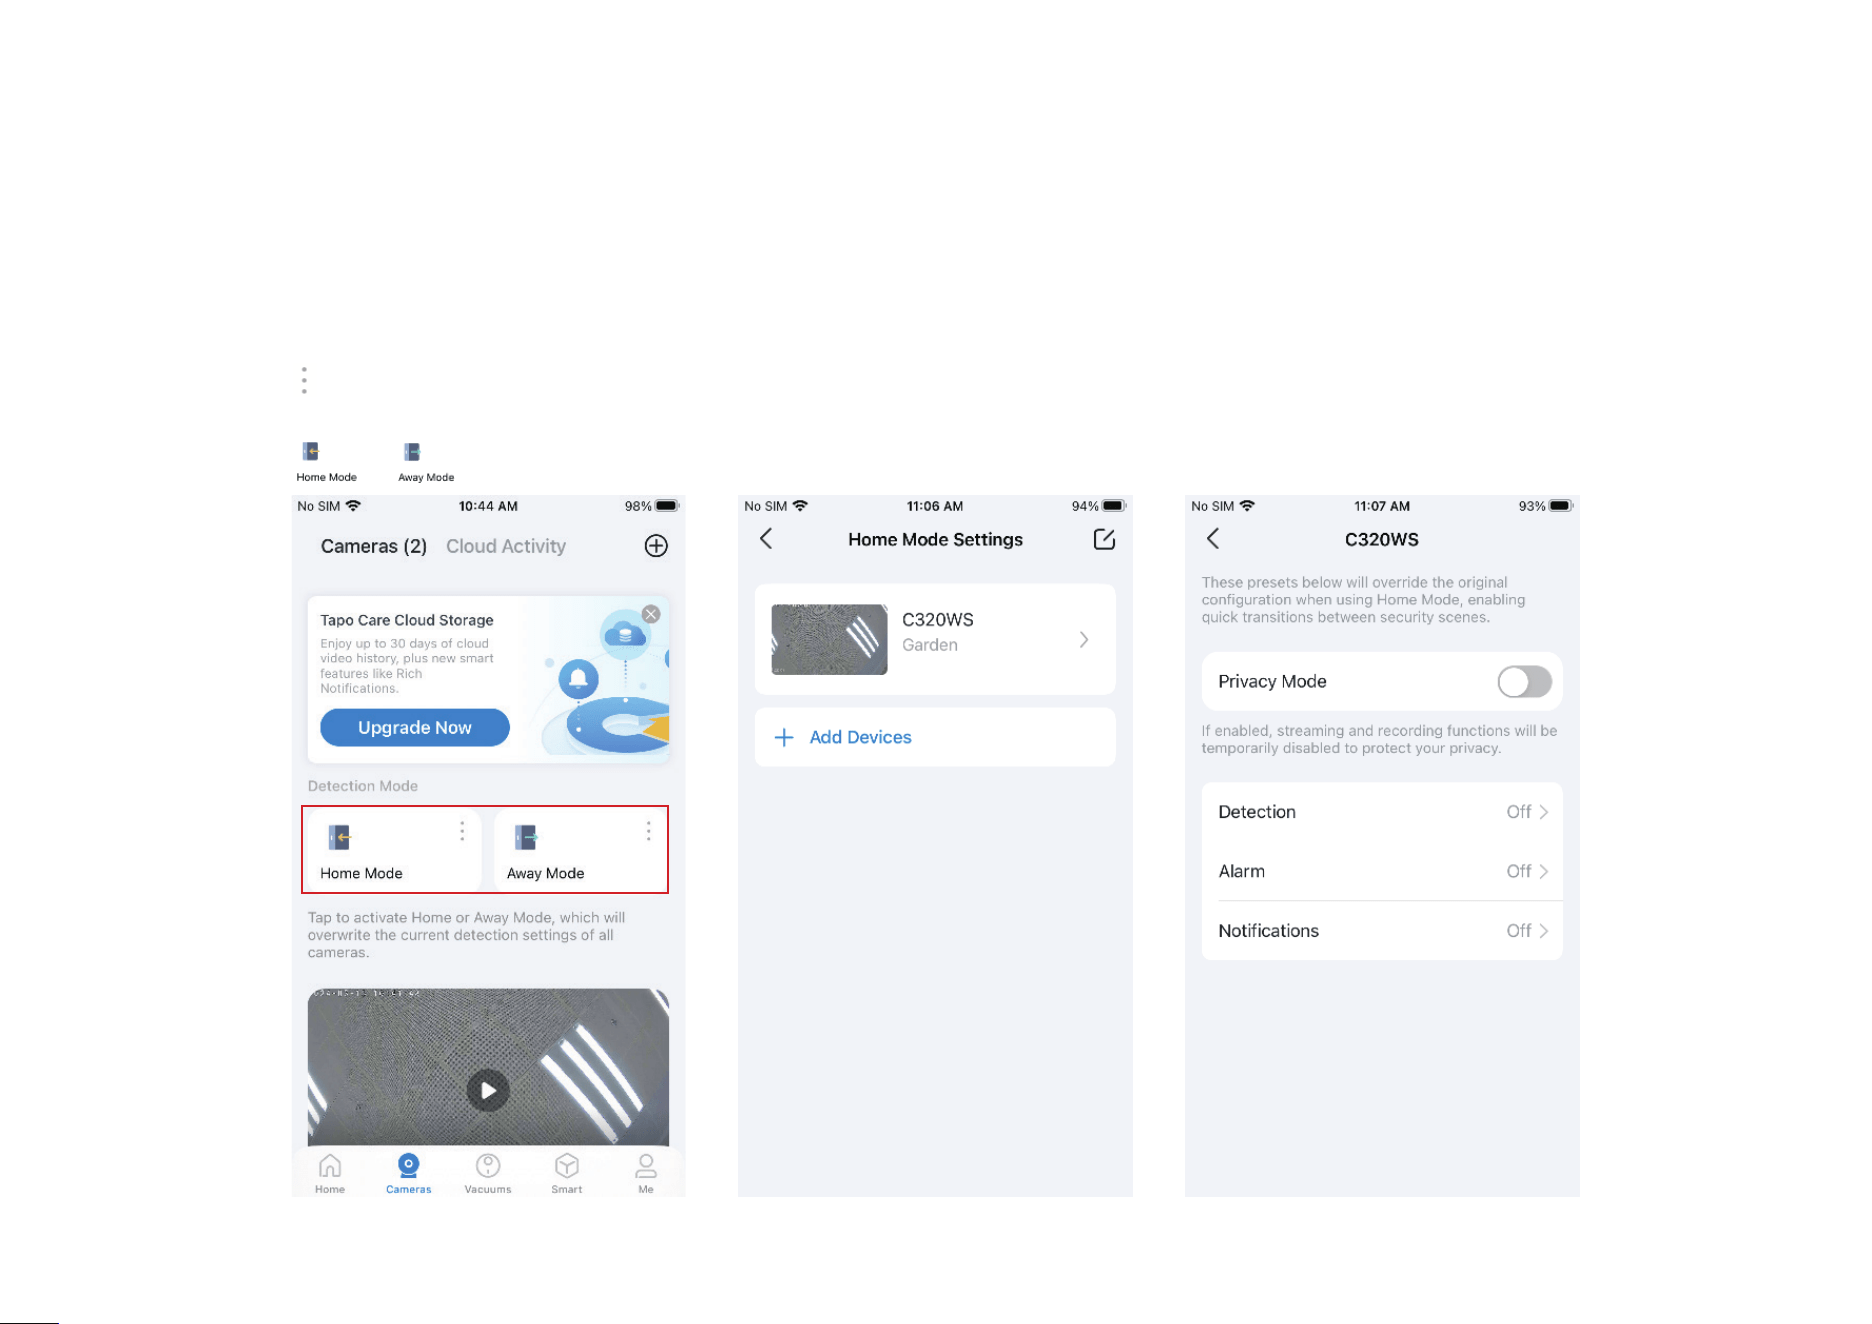
Home Mode / Away Mode
Step 1: Tap the icon to enter Home Mode Settings or Away Mode Settings. Add cameras you want to apply preset Detection & Alerts settings.
Step 2: Tap the added camera to congure Detection, Alarm and Notications settings as needed.
Step 3: Tap the
or icon to activate Home or Away Mode, which will overwrite the current detection settings of all cameras.
30
Smart Actions
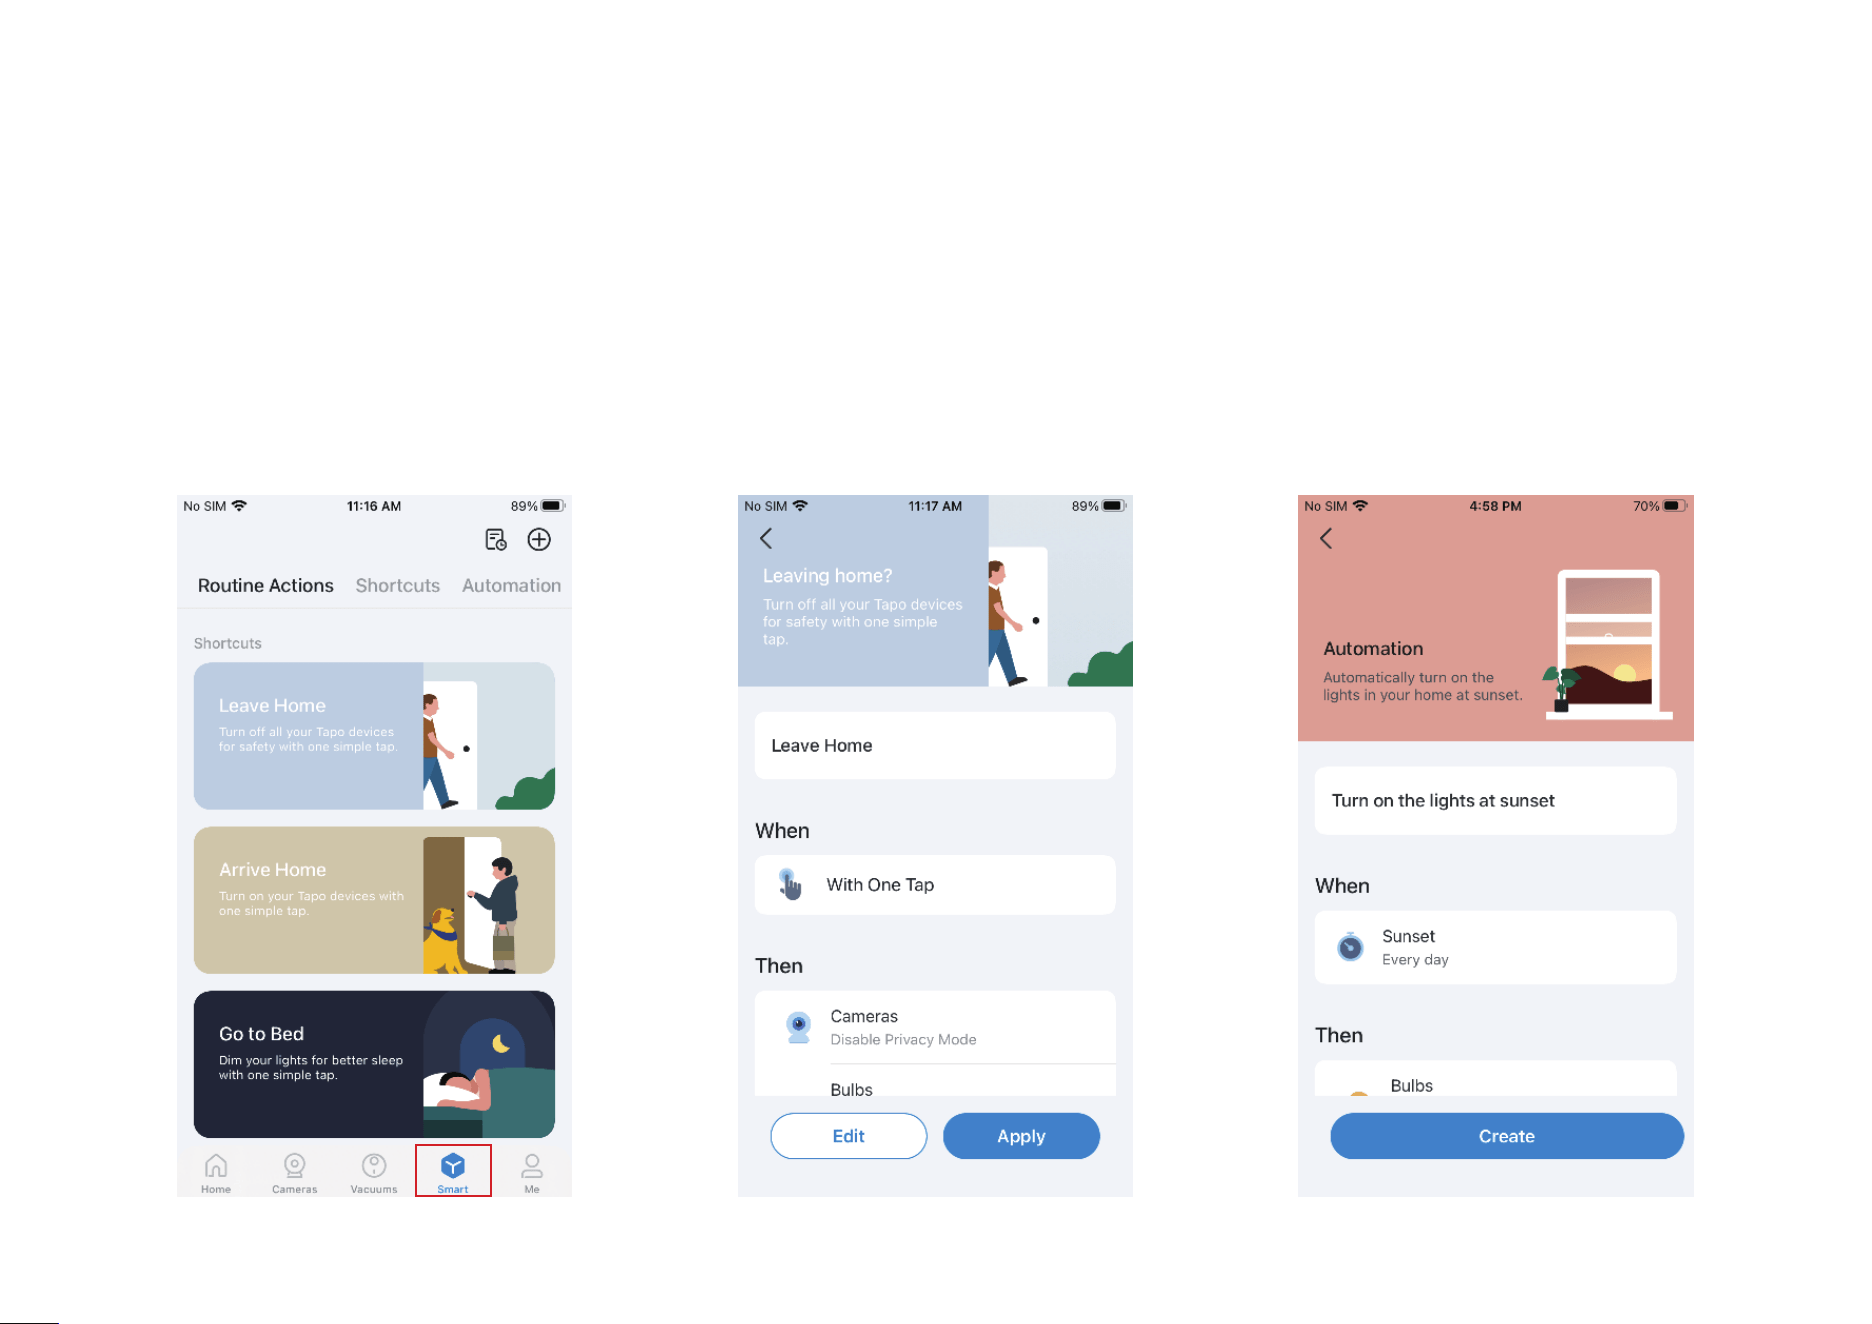
Smart Actions automate repetitive tasks, allowing you to blaze through tedium with utmost ease. Set everything up once and never have to worry about
it again. With Smart Actions, giving your home that level of intelligence is a snap. Shortcut lets you perform an action with a simple tap. Automation
allows you to automate tasks to be performed at a set time. e.g. Turn on the lamp plugged into your Tapo smart plug when your camera detects motion.
Option 1: Edit based on the routine actions
1. Open the Tapo app, tap 1. Open the Tapo app, tap SmartSmart on the on the
bottom to enter the smart actions page.bottom to enter the smart actions page.
2. Under 2. Under Routine ActionsRoutine Actions, tap an action. Tap , tap an action. Tap EditEdit to change the settings as needed and tap nge the settings as needed and tap ApplyApply
to save changes.to save changes.

31
Option 2: Create your own shortcuts
1. Under 1. Under ShortcutsShortcuts, tap + on the top right to , tap + on the top right to
add a simple and smart action.add a simple and smart action.
2. Add an action and choose whether to delay 2. Add an action and choose whether to delay
the action. the action.
3. Name your shortcut and choose an icon. 3. Name your shortcut and choose an icon.
Tap Tap DoneDone to save all the settings. to save all the settings.

32
Option 3: Create your own actions
1. Under 1. Under AutomationAutomation, tap + on the top right to , tap + on the top right to
add a simple and smart action.add a simple and smart action.
2. 2. Name the new action. Tap + to add conditions
(
WhenWhen) like the trigger time, and tap + to add
tasks (Then) like turning on the switch.
3. 3. Name your automation and set the eective
time for the automation. Tap Done to save all
the settings.
33
Me Page
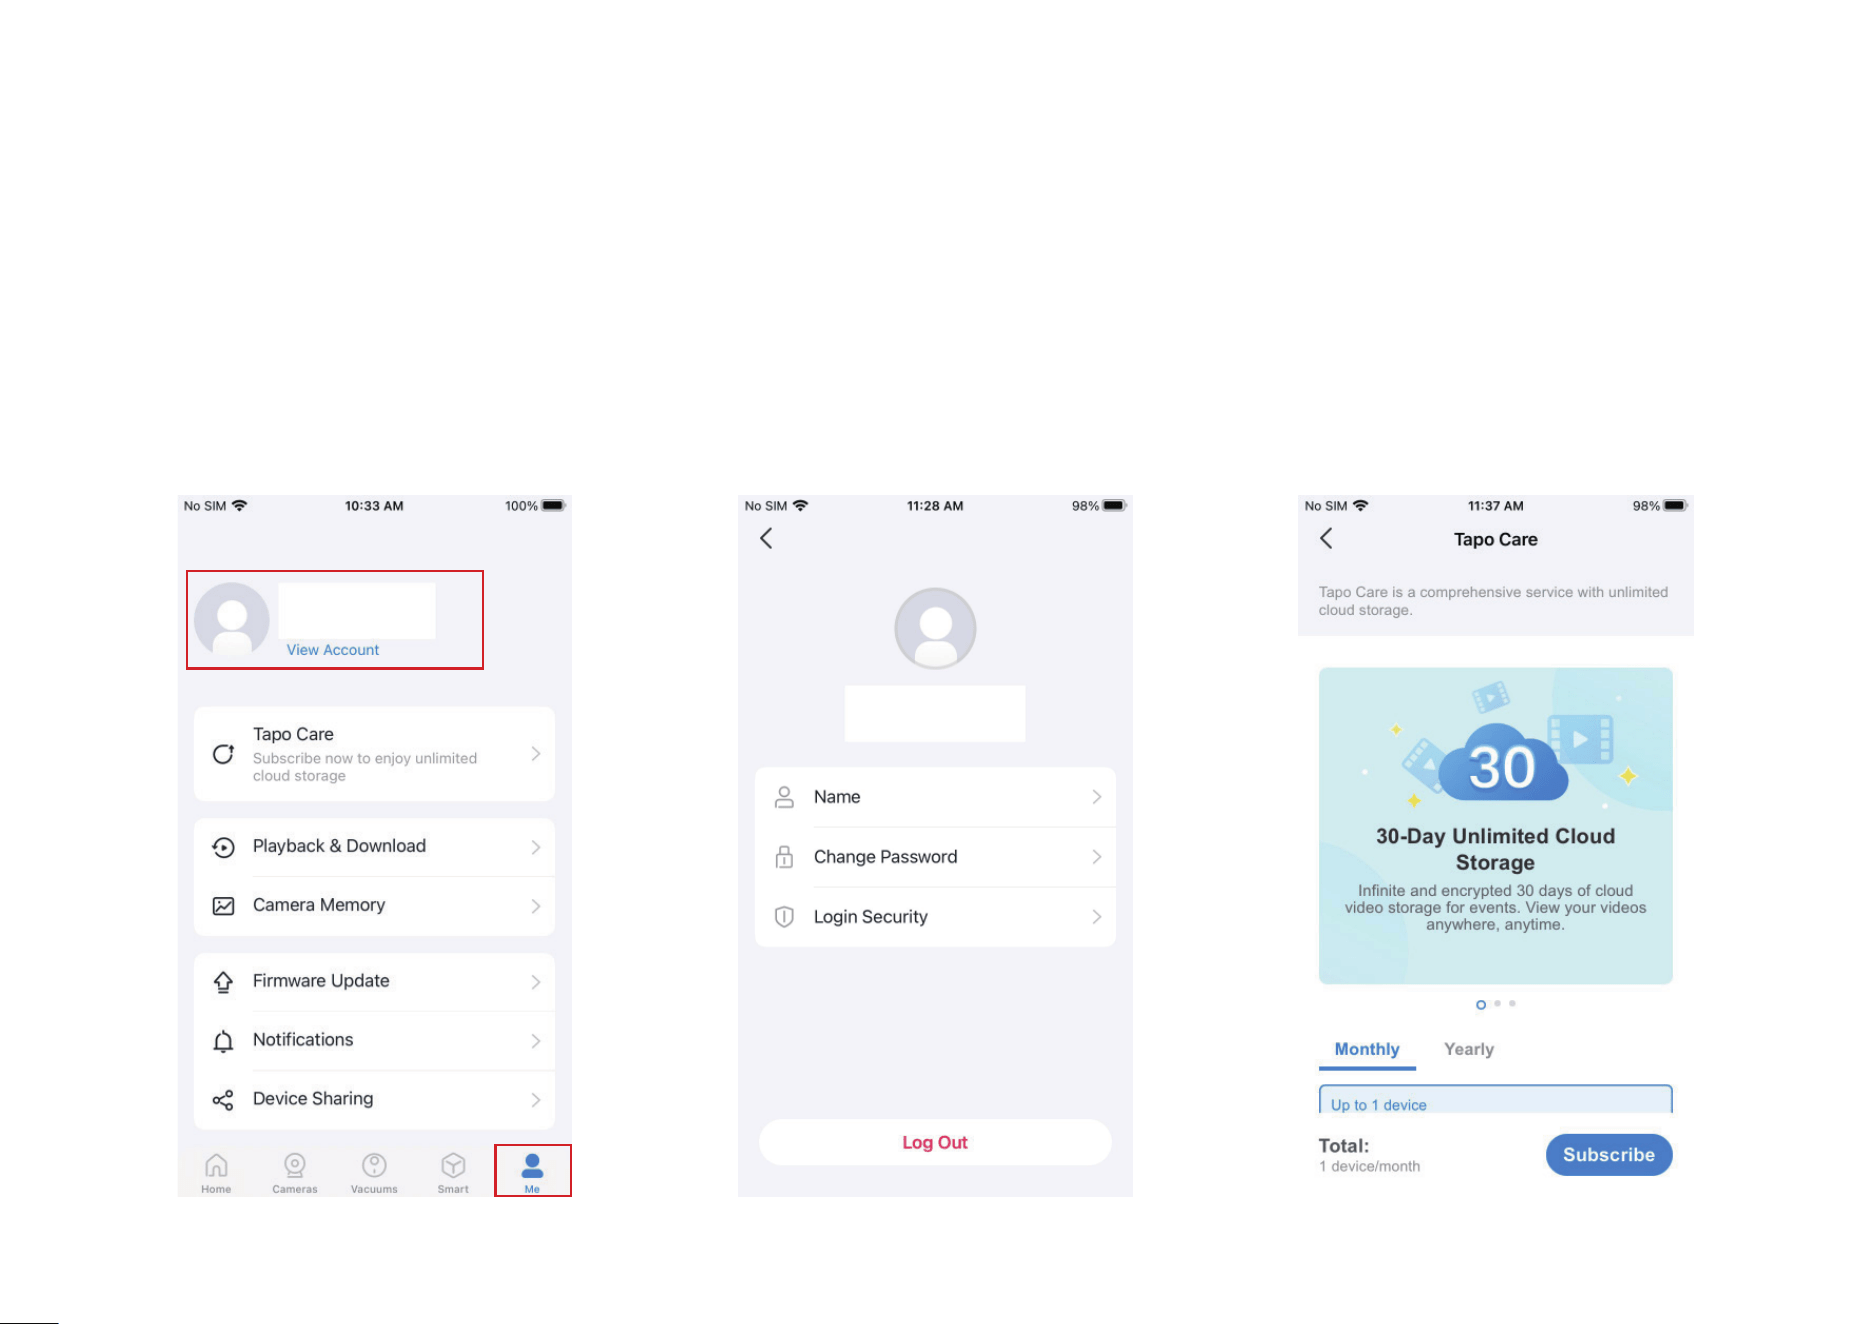
The Tapo app oers a list of advanced features to fulll diverse smart home needs.
Manage Your Account
Open the Tapo app, tap Me on the bottom to enter the page. Then you can tap your avatar or
account to change the avatar, name, password, and login security.
Tapo Care
Tapo Care is a comprehensive service with
unlimited cloud services and advanced
features. You can subscribe to the advanced
plan for your Tapo cameras.
34
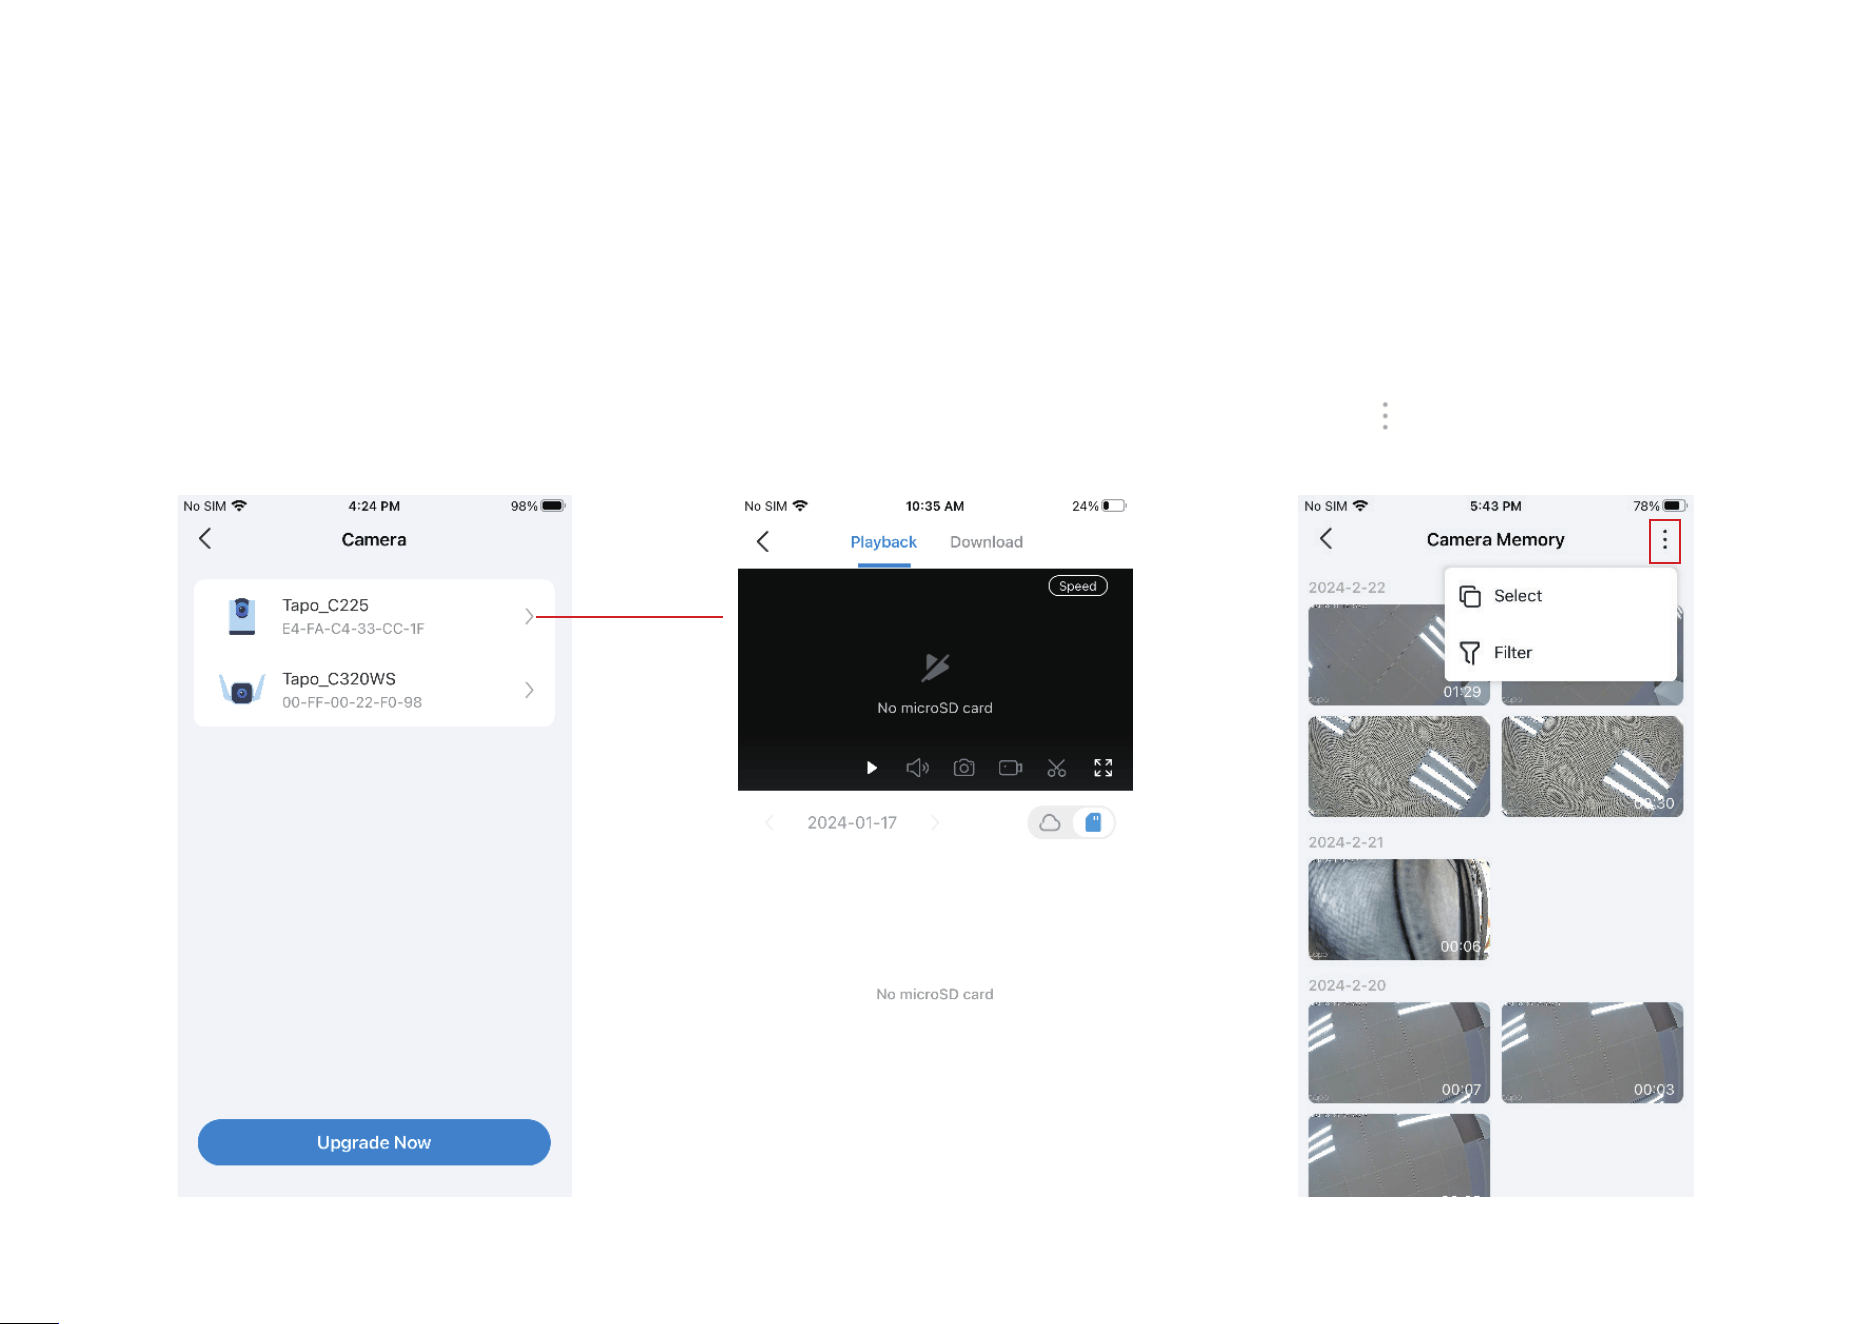
Camera Memory
All saved recordings appear in Memory. You
can tap the
icon to manage and lter the
recordings.
Playback & Download
You can tap any of your Tapo cameras to enter the camera's Playback & Download page. If you tap
Upgrade Now, the Tapo Care page appears.
35
Notications
Turn on Notications to allow Tapo to show
alerts on the Lock Screen, Banners, and
Notication Center as needed.
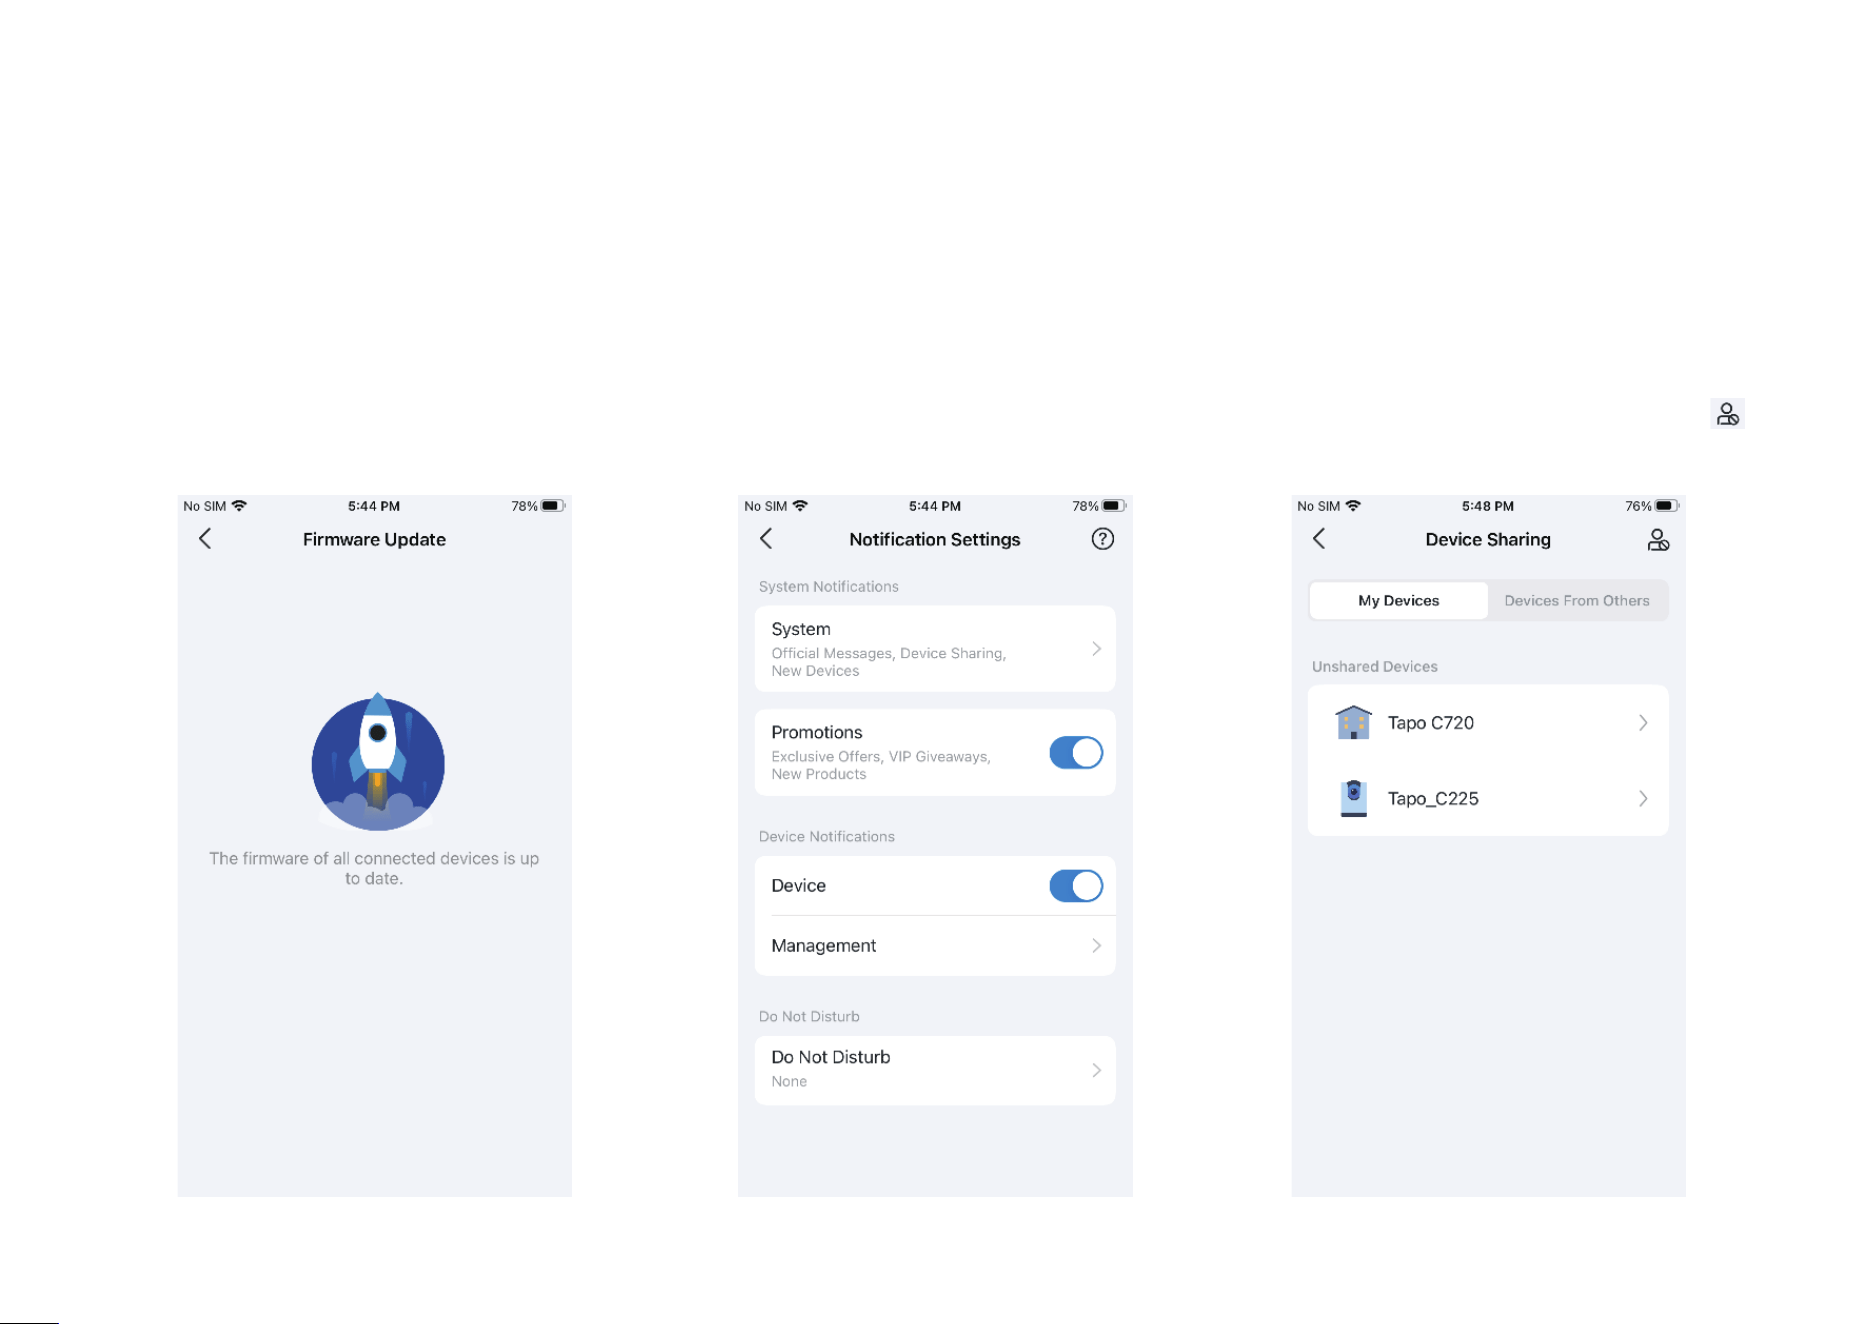
Firmware Update
Tap to check if any rmware updates are
available on this page and update your
devices as instructed.
Device Sharing
Share your Tapo device with your families and
check the devices shared by others. Tap the
icon to add a bothering inviter to the Deny List.
36
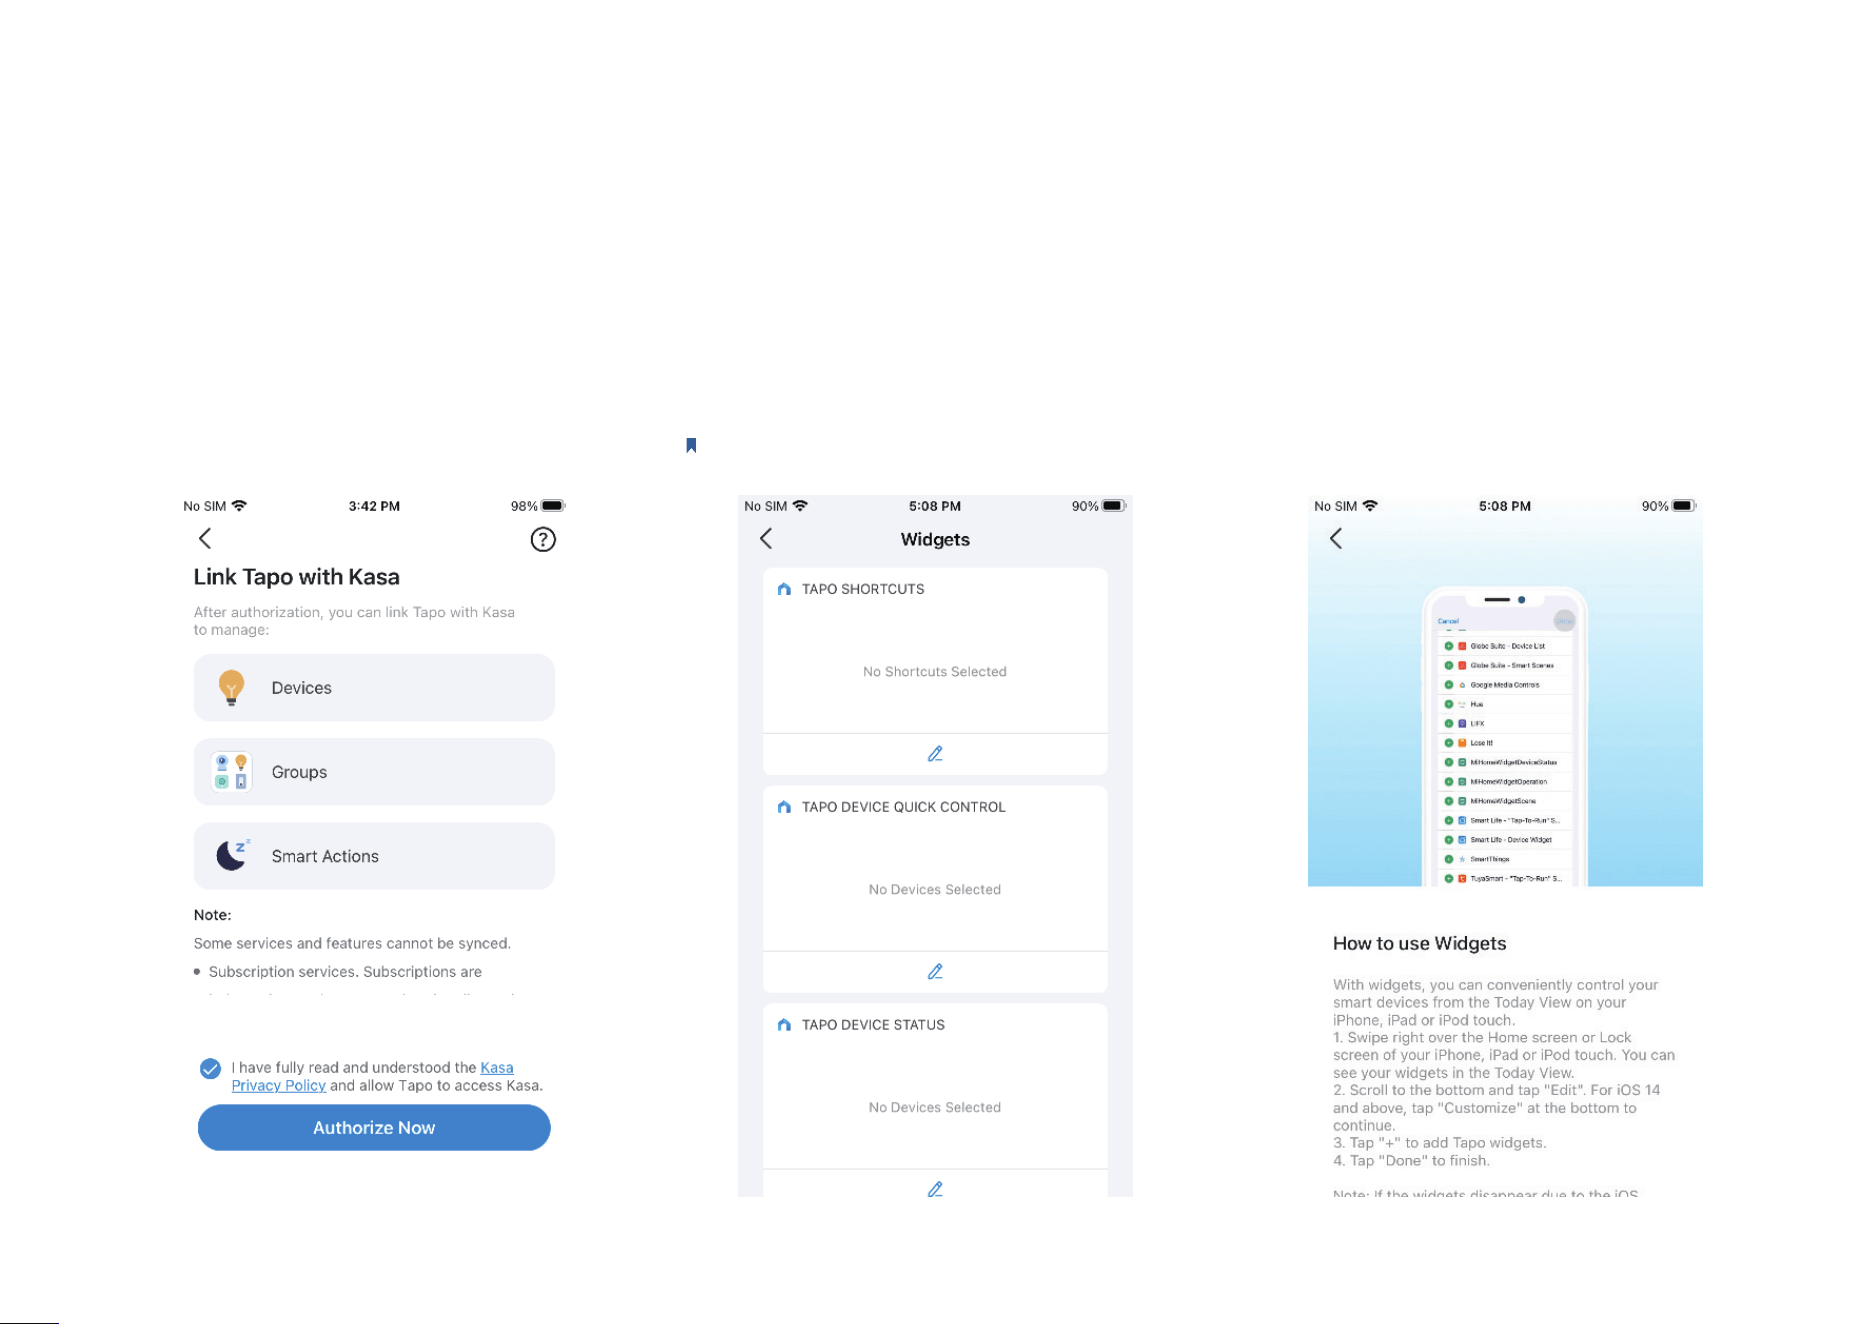
Link Tapo with Kasa
You can manage Kasa devices, groups, and
smart actions in the Tapo app. Tap Authorize
Now to allow Tapo to access Kasa.
Widgets
With Widgets, you can conveniently control your smart device from the home screen on Android
devices or the Today View on iOS devices.
Note: For detailed instructions, please refer to https://www.tp-link.com/support/faq/3313/.
37
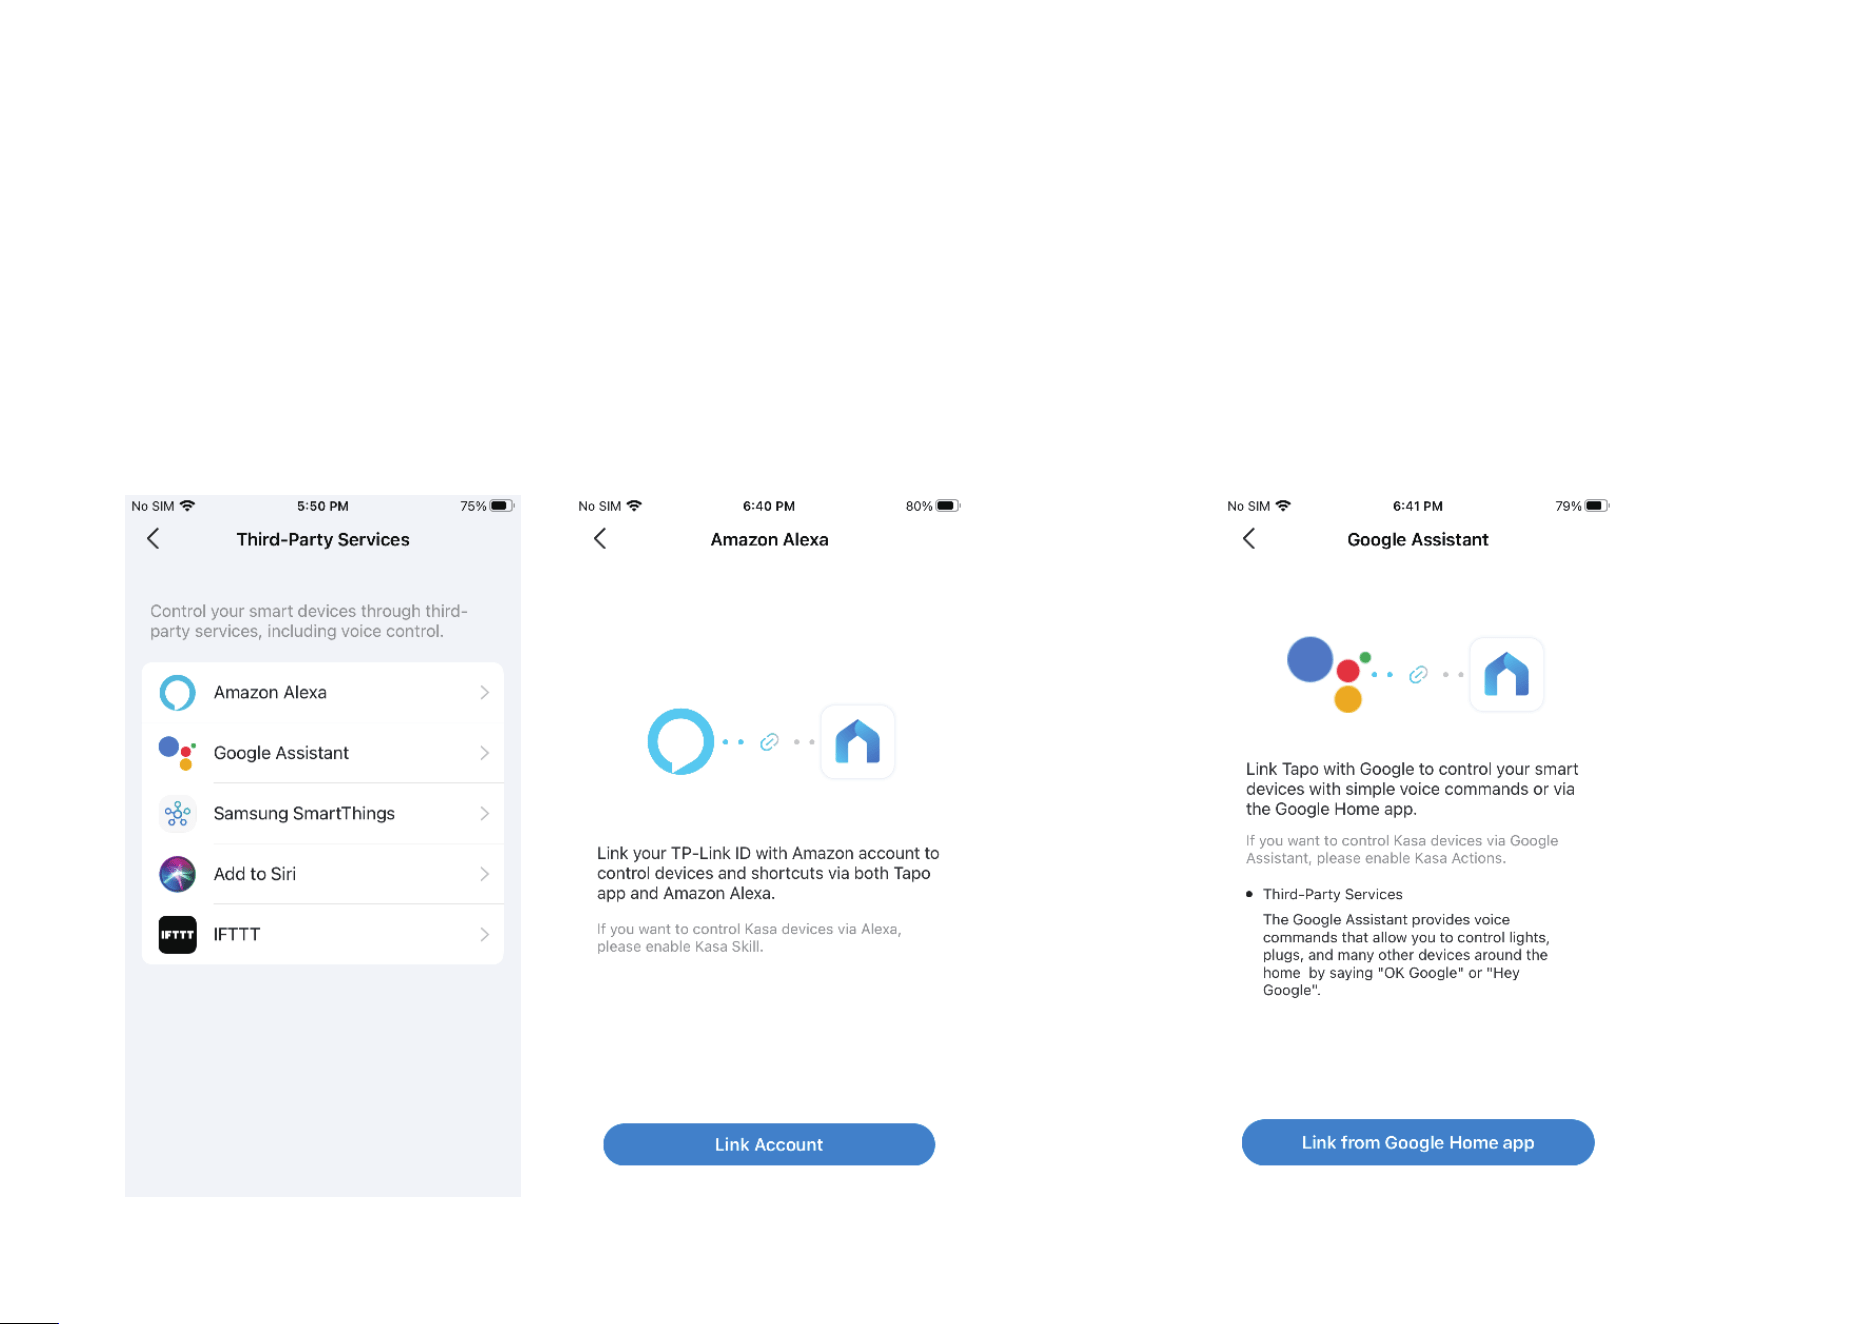
Third-Party Services
You can control your smart devices through third-party services, including voice control.
Amazon Alexa
Follow the guide https://www.tp-link.com/hk/support/faq/2780/.
Google Assistant
Follow the guide https://www.tp-link.com/hk/support/faq/2779/.
38
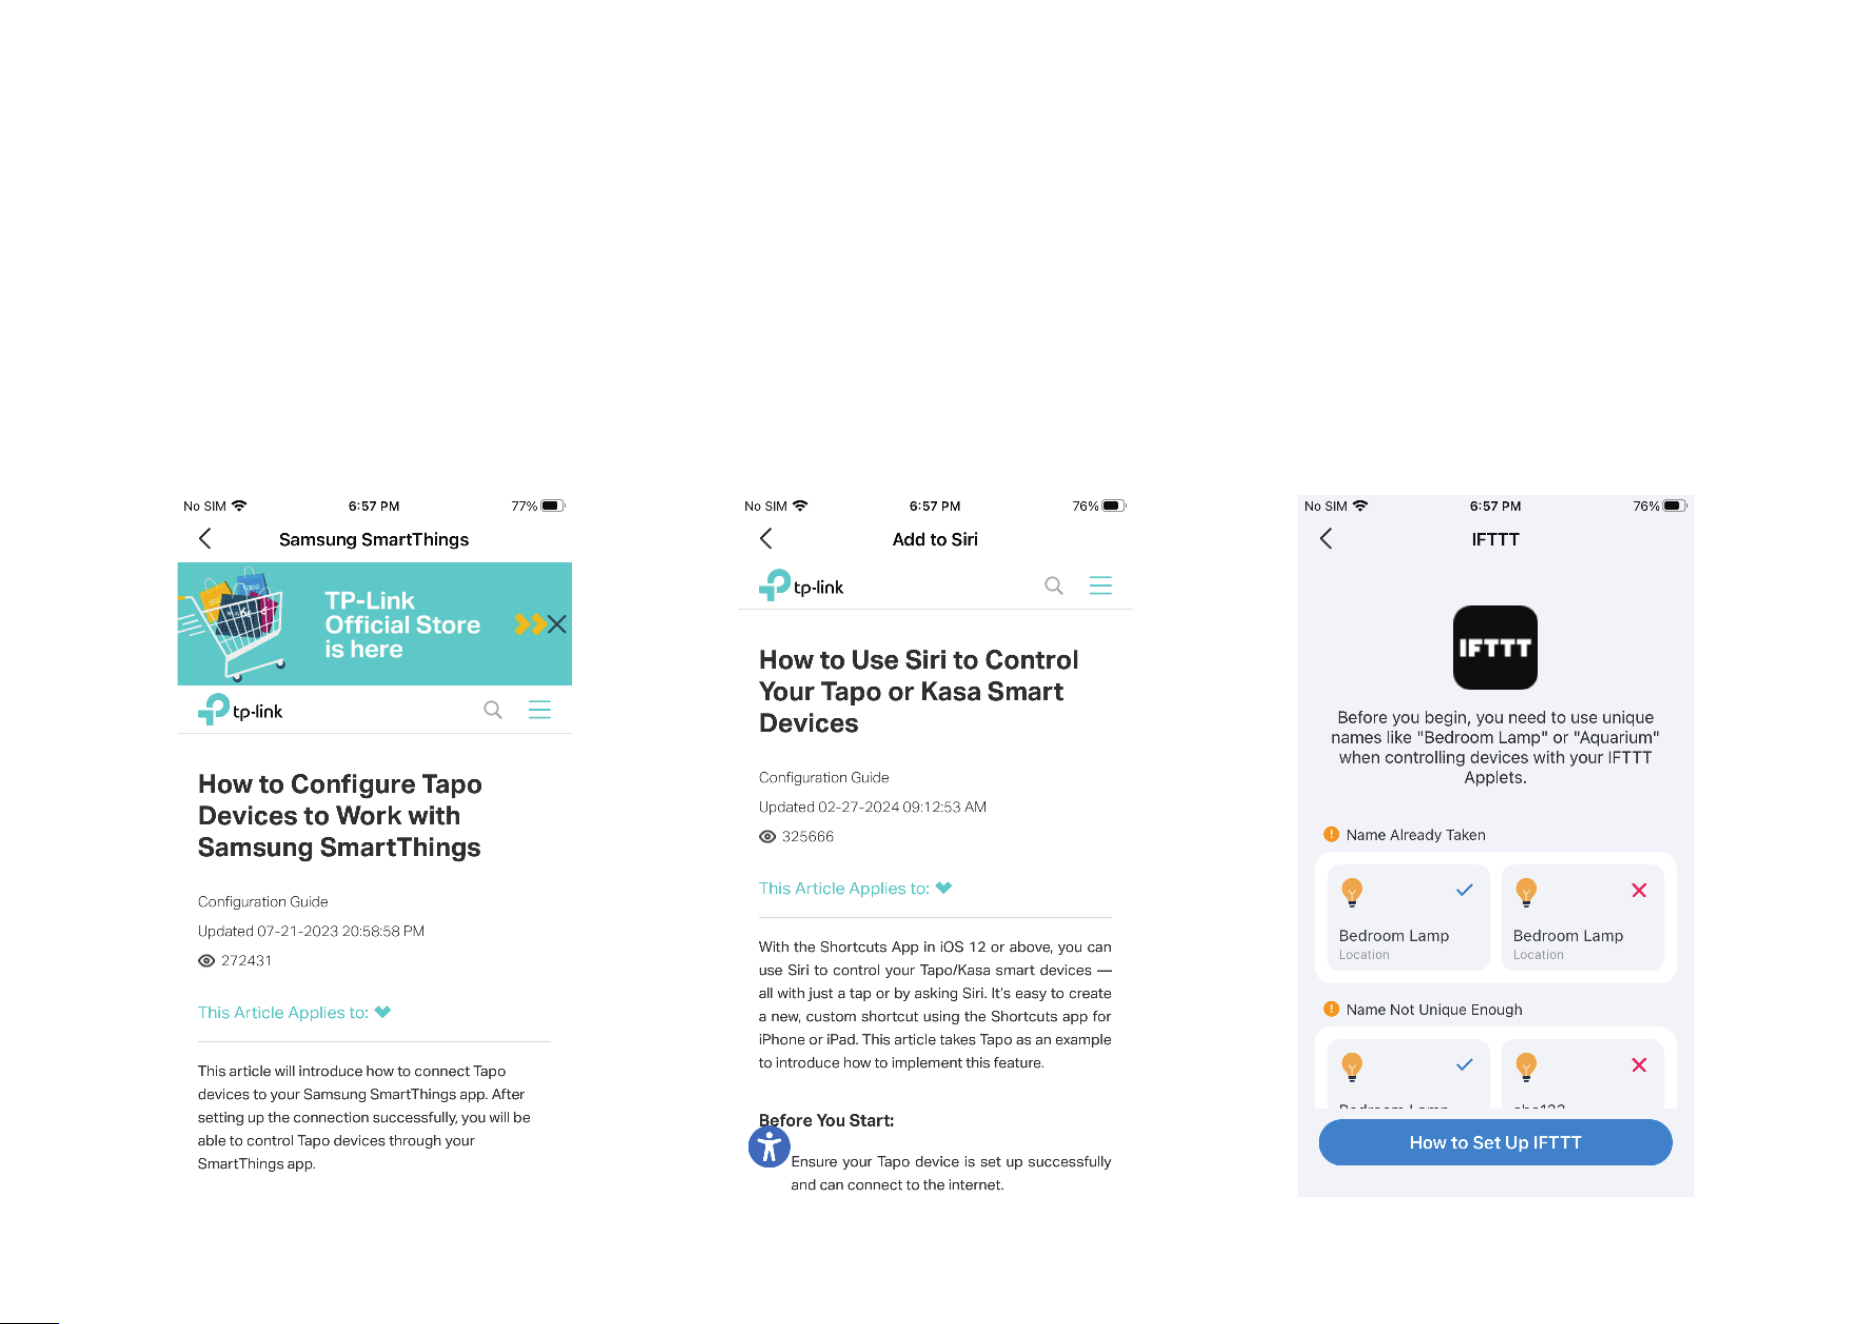
Third-Party Services
You can control your smart devices through third-party services, including voice control.
Samsung SmartThings / Add to Siri / IFTTT
You can tap the one as needed, then follow the detailed instructions on the Tapo to complete the connection. Add to Siri is for iOS devices only.