EDGE
®
EXPLORE 2
Owner’s Manual

© 2022 Garmin Ltd. or its subsidiaries
All rights reserved. Under the copyright laws, this manual may not be copied, in whole or in part, without the written consent of Garmin. Garmin reserves the right to change
or improve its products and to make changes in the content of this manual without obligation to notify any person or organization of such changes or improvements. Go to
www.garmin.com for current updates and supplemental information concerning the use of this product.
Garmin
®
, the Garmin logo, ANT+
®
, Auto Lap
®
, Auto Pause
®
, Edge
®
, inReach
®
, VIRB
®
, and Virtual Partner
®
are trademarks of Garmin Ltd. or its subsidiaries, registered in the USA
and other countries. Connect IQ
™
, Firstbeat Analytics
™
, Garmin Connect
™
, Garmin Express
™
, HRM-Dual
™
, HRM-Fit
™
, HRM-Pro
™
, Index
™
, Rally
™
, tempe
™
, Varia
™
, and Vector
™
are
trademarks of Garmin Ltd. or its subsidiaries. These trademarks may not be used without the express permission of Garmin.
Android
™
is a trademark of Google Inc. Apple
®
and Mac
®
are trademarks of Apple, Inc., registered in the U.S. and other countries. The BLUETOOTH
®
word mark and logos are owned
by the Bluetooth SIG, Inc. and any use of such marks by Garmin is under license. Bosch
®
is a registered trademark of Robert Bosch GmbH. The Cooper Institute
®
, as well as any
related trademarks, are the property of The Cooper Institute. Shimano
®
is a registered trademark of Shimano, Inc. Windows
®
and Windows NT
®
are registered trademarks of Microsoft
Corporation in the United States and other countries. Other trademarks and trade names are those of their respective owners.
This product is ANT+
®
certified. Visit www.thisisant.com/directory for a list of compatible products and apps.
M/N: A04457, B04457

Table of Contents
Introduction......................................1
Device Overview...................................... 1
Home Screen Overview....................... 3
Viewing Widgets.................................. 3
Viewing Glances.................................. 4
Using the Touchscreen....................... 4
Locking the Touchscreen................ 4
Acquiring Satellite Signals...................... 5
Navigation........................................ 5
Going for a Ride....................................... 5
Locations................................................. 6
Marking Your Location........................ 6
Saving Locations from the Map......... 6
Navigating to a Location..................... 6
Navigating Back to Start..................... 7
Starting a Ride From a Shared
Location............................................... 7
Navigating to a Shared Location
During a Ride........................................8
Stopping Navigation............................ 8
Editing Locations................................. 8
Deleting a Location............................. 8
Sharing a Location From a Map Using
the Garmin Connect App..................... 9
Reporting a Hazard..............................9
Courses.................................................. 10
Planning and Riding a Course.......... 10
Creating and Riding a Round-Trip
Course................................................ 11
Creating a Course from a Recent
Ride.................................................... 11
Following a Course From Garmin
Connect.............................................. 12
Tips for Riding a Course................... 12
Viewing Course Details..................... 12
Displaying a Course on the Map... 12
Using ClimbPro.................................. 13
Climb Categories........................... 13
Course Options.................................. 14
Rerouting a Course............................14
Stopping a Course............................. 14
Deleting a Course.............................. 14
Map Settings......................................... 14
Map Appearance Settings................ 14
Changing the Map Orientation......... 15
Map Themes...................................... 15
Route Settings....................................... 15
Selecting an Activity for Route
Calculation......................................... 15
Connected Features....................... 15
Pairing Your Phone............................... 16
Bluetooth Connected Features............ 16
Safety and Tracking Features...........17
Incident Detection......................... 17
Assistance..................................... 18
Adding Emergency Contacts........ 18
Viewing Your Emergency
Contacts......................................... 18
Requesting Assistance................. 18
Turning Incident Detection On and
Off................................................... 18
Cancelling an Automated
Message.........................................18
Sending a Status Update After an
Incident.......................................... 19
LiveTrack........................................ 19
Turning On LiveTrack................ 19
Starting a GroupTrack
Session....................................... 20
Live Event Sharing......................... 21
Turning On Live Event Sharing.. 21
GroupRide...................................... 21
Starting a GroupRide Session... 21
Joining a GroupRide Session.... 23
Sending a GroupRide
Message..................................... 23
GroupRide Map Status.............. 24
Leaving a GroupRide Session... 24
Tips for GroupRide Sessions.... 24
Spectator Messaging.................... 24
Blocking Spectator Messages.. 25
Setting the Bike Alarm...................25
Playing Audio Prompts on Your
Phone............................................. 25
Listening to Music............................. 25
Training..........................................25
Training Indoors.................................... 25
Pairing Your Indoor Trainer...............26
Using an Indoor Trainer.................... 26
Table of Contents i

Setting Resistance.........................26
Setting the Simulated Grade......... 26
Setting Target Power.....................26
Setting a Training Target...................... 27
Racing a Previous Activity.................... 27
My Stats......................................... 27
Performance Measurements............... 27
About VO2 Max. Estimates...............27
Getting Your VO2 Max. Estimate.. 28
Tips for Cycling VO2 Max.
Estimates....................................... 28
Recovery Time................................... 29
Viewing Your Recovery Time........ 29
Turning Off Performance
Notifications...................................... 29
Viewing Your Fitness Age................. 29
Viewing Intensity Minutes.................29
Personal Records.................................. 29
Viewing Your Personal Records....... 30
Reverting a Personal Record............ 30
Deleting a Personal Record.............. 30
Training Zones...................................... 30
Setting Up Your User Profile................. 30
Wireless Sensors............................31
Pairing Your Wireless Sensors............. 32
Wireless Sensor Battery Life................ 32
Setting Your Heart Rate Zones.............32
About Heart Rate Zones................... 32
Fitness Goals..................................... 33
Training with Power Meters................. 33
Setting Your Power Zones................ 33
Calibrating Your Power Meter.......... 33
Pedal-Based Power........................... 33
Updating the Rally System Software
Using the Edge Bike Computer......... 34
Situational Awareness.......................... 34
Using the Varia Camera Controls..... 34
Enabling the Green Threat Level
Tone................................................... 35
eBike Training........................................35
Viewing eBike Sensor Details........... 35
inReach Remote.................................... 35
Using the inReach Remote............... 35
History........................................... 35
Viewing Your Ride................................. 36
Viewing Your Time in Each Training
Zone................................................... 36
Deleting a Ride...................................36
Viewing Data Totals.............................. 36
Deleting Data Totals..........................37
Garmin Connect.................................... 37
Garmin Connect+ Subscription........ 38
Sending Your Ride to Garmin
Connect.............................................. 38
Data Recording...................................... 38
Data Management................................ 38
Connecting the Device to Your
Computer........................................... 38
Transferring Files to Your Device..... 38
Deleting Files..................................... 39
Disconnecting the USB Cable........... 39
Customizing Your Device................39
Connect IQ Downloadable Features.... 39
Downloading Connect IQ Features
Using Your Computer........................ 39
Updating Your Activity Profile.............. 40
Adding a Data Screen........................40
Adding a Music Control Data
Screen............................................ 41
Editing a Data Screen........................ 41
Rearranging Data Screens................ 41
Alerts and Prompts Settings............ 42
Setting Range Alerts...................... 42
Setting Recurring Alerts................ 42
Auto Lap®.......................................... 43
Marking Laps by Position............. 43
Marking Laps by Distance.............43
Marking Laps by Time................... 43
Customizing the Lap Banner........ 44
Using Auto Pause.............................. 44
Starting the Timer Automatically..... 44
Changing the Satellite Setting.......... 44
Using Auto Sleep............................... 44
Using Auto Scroll............................... 45
Phone Settings...................................... 45
Guest Mode........................................... 45
Enabling Guest Mode........................ 45
Disabling Guest Mode....................... 45
System Settings.................................... 46
Display Settings................................. 46
ii Table of Contents

Using the Backlight........................46
Customizing the Glances.................. 46
Customizing the Widget Loop.......... 46
Data Recording Settings................... 46
Data Averaging for Cadence or
Power............................................. 47
Changing the Units of Measure........ 47
Turning the Device Tones On and
Off.......................................................47
Changing the Device Language........ 47
Time Zones........................................ 47
Device Information......................... 48
Charging the Device.............................. 48
About the Battery.............................. 48
Installing the Standard Mount.............. 49
Releasing the Edge............................ 49
Attaching a Tether.................................50
Edge Power Mount Overview............... 50
Installing the Edge Power Mount..... 51
Required Cables................................ 53
Edge Power Mount Status LED........ 53
Specifications........................................54
Product Updates................................... 54
Updating the Software Using the
Garmin Connect App......................... 54
Updating the Software Using Garmin
Express.............................................. 54
Viewing Device Information................. 54
Viewing Regulatory and Compliance
Information........................................ 54
Device Care............................................55
Cleaning the Device...........................55
Edge Power Mount Device Care...........55
Cleaning the Edge Power Mount...... 55
Cleaning the USB Port....................... 55
Troubleshooting............................. 56
Resetting the Edge Bike Computer...... 56
Restoring the Default Settings......... 56
Clearing User Data and Settings...... 56
Exiting Demo Mode............................... 56
Maximizing Battery Life........................ 56
Turning On Battery Saver Mode....... 56
My phone will not connect to the
device..................................................... 57
Improving GPS Satellite Reception...... 57
My device is in the wrong language.....57
Calibrating the Barometric Altimeter... 57
Setting Your Elevation....................... 57
Temperature Readings......................... 58
Replacement O-rings............................ 58
Getting More Information..................... 58
Appendix........................................ 58
Data Fields............................................. 58
VO2 Max. Standard Ratings................. 60
Heart Rate Zone Calculations.............. 61
Wheel Size and Circumference............ 61
Table of Contents iii

Introduction
WARNING
See the Important Safety and Product Information guide in the product box for product warnings and other
important information.
Always consult your physician before you begin or modify any exercise program.
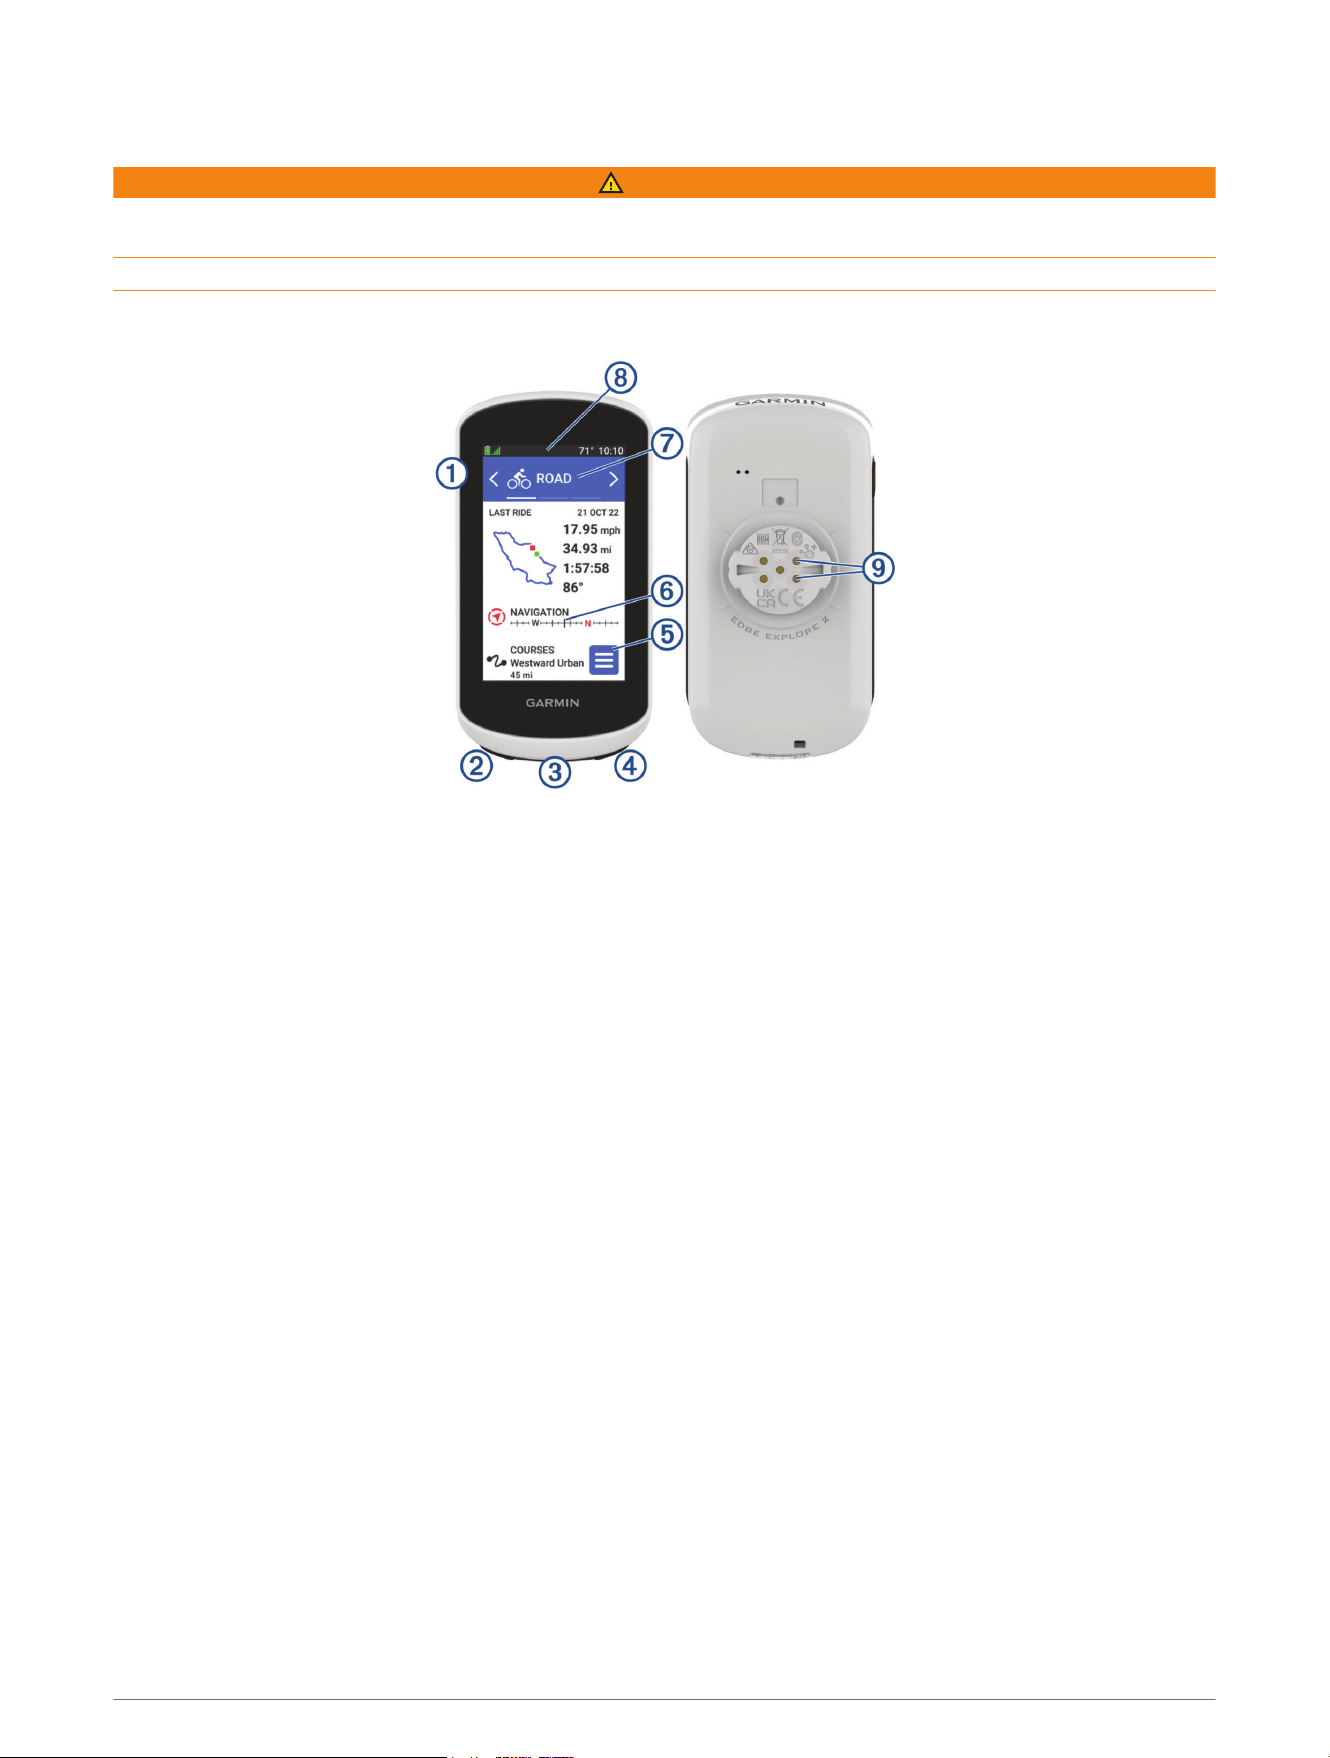
Device Overview
Introduction 1
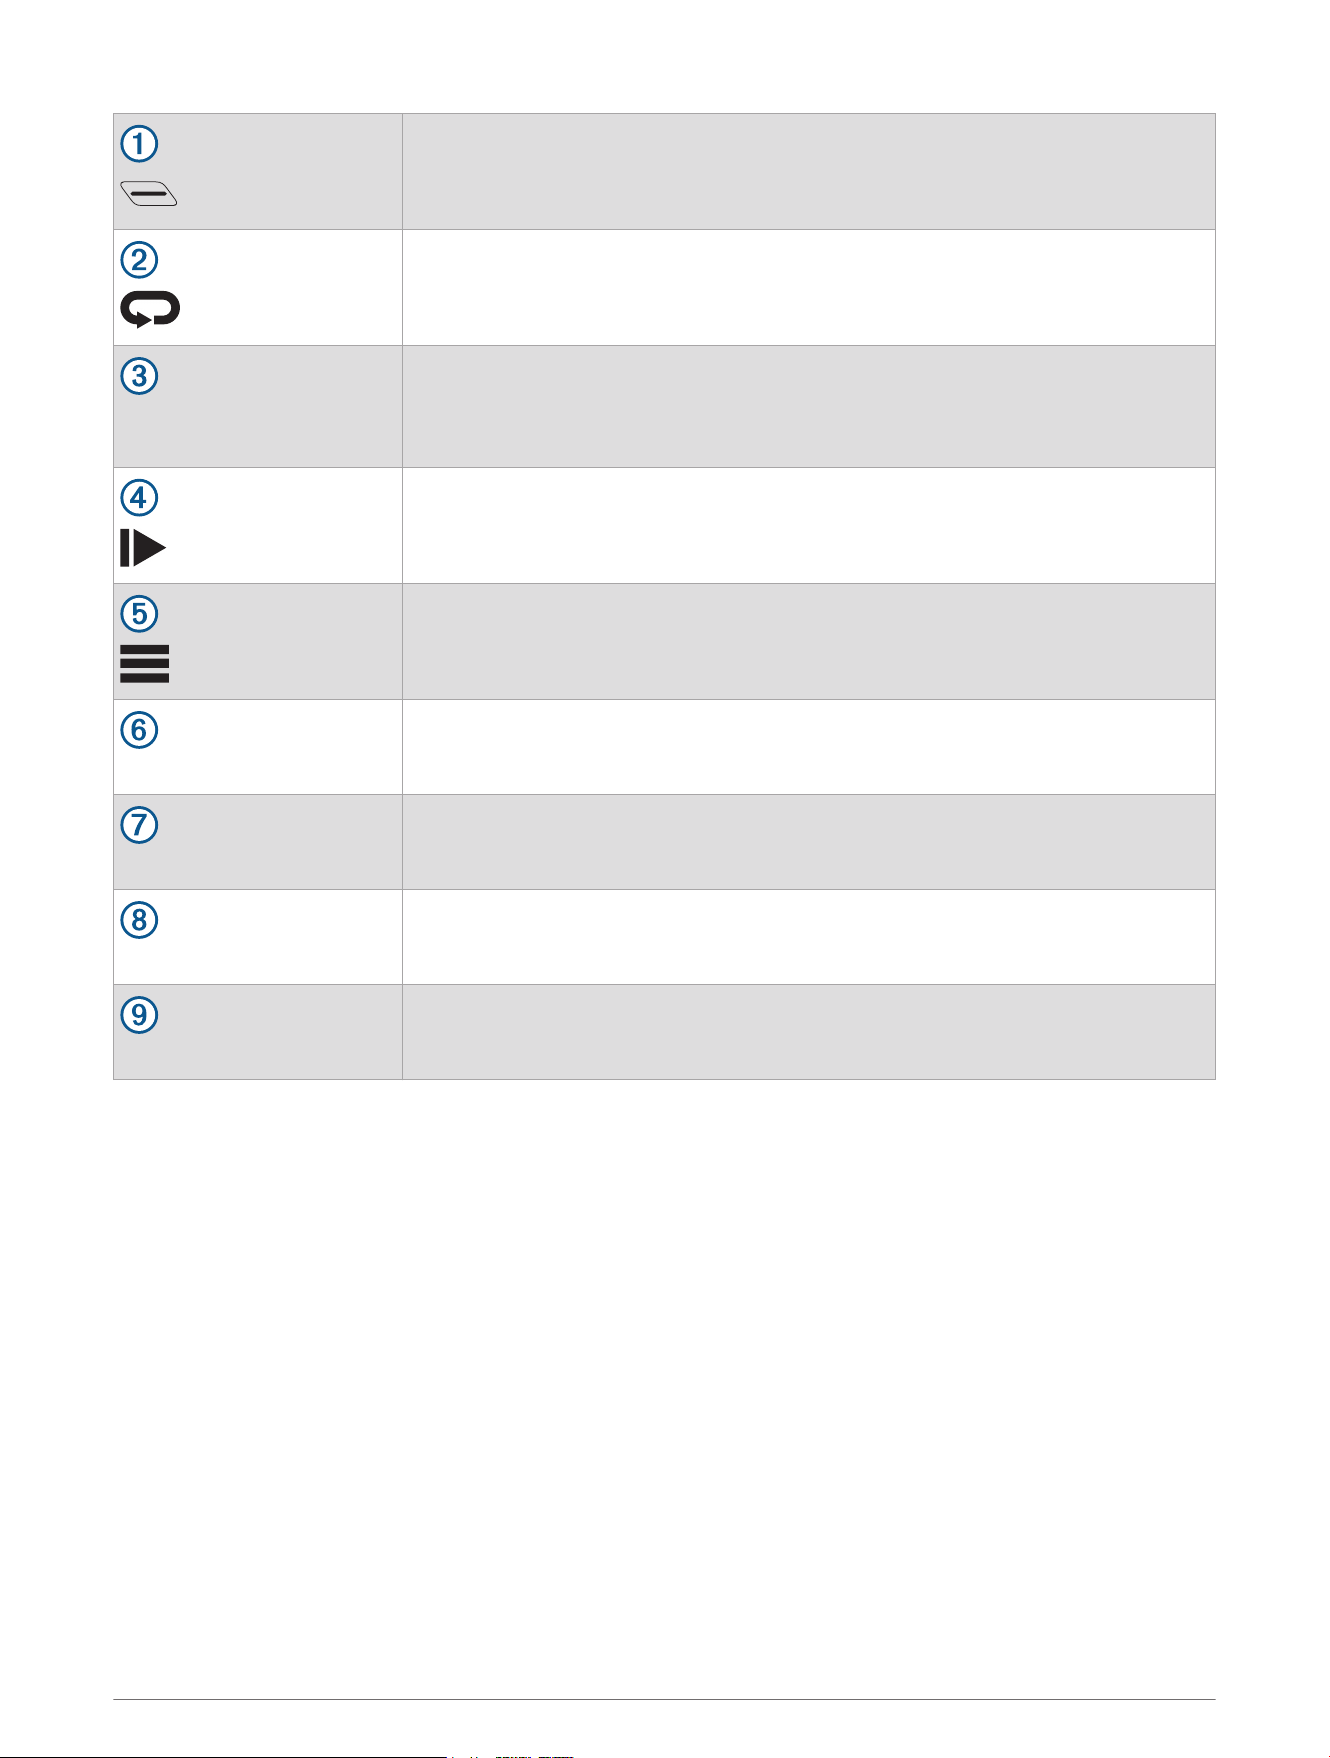
Press to enter sleep mode and wake the device.
Hold to turn the device on and off and lock the touchscreen.
Press to mark a new lap.
USB port (under weather
cap)
Lift the weather cap to charge the device or connect it to a computer.
Replace the weather cap to prevent damage to the USB port.
Press to start and stop the activity timer.
Select to open the main menu.
Glances
Swipe up or down on the home screen to view the glances.
Select to open the glance or menu.
Activity profile
Swipe left or right to change the activity profile.
Select to open the activity profile.
Widgets
Swipe down from the top of the screen to view the widgets, then swipe left or
right to view more widgets.
Electrical contacts
Charge using an external power accessory.
NOTE: Not available on all models.
NOTE: Go to buy.garmin.com to purchase optional accessories.
2 Introduction
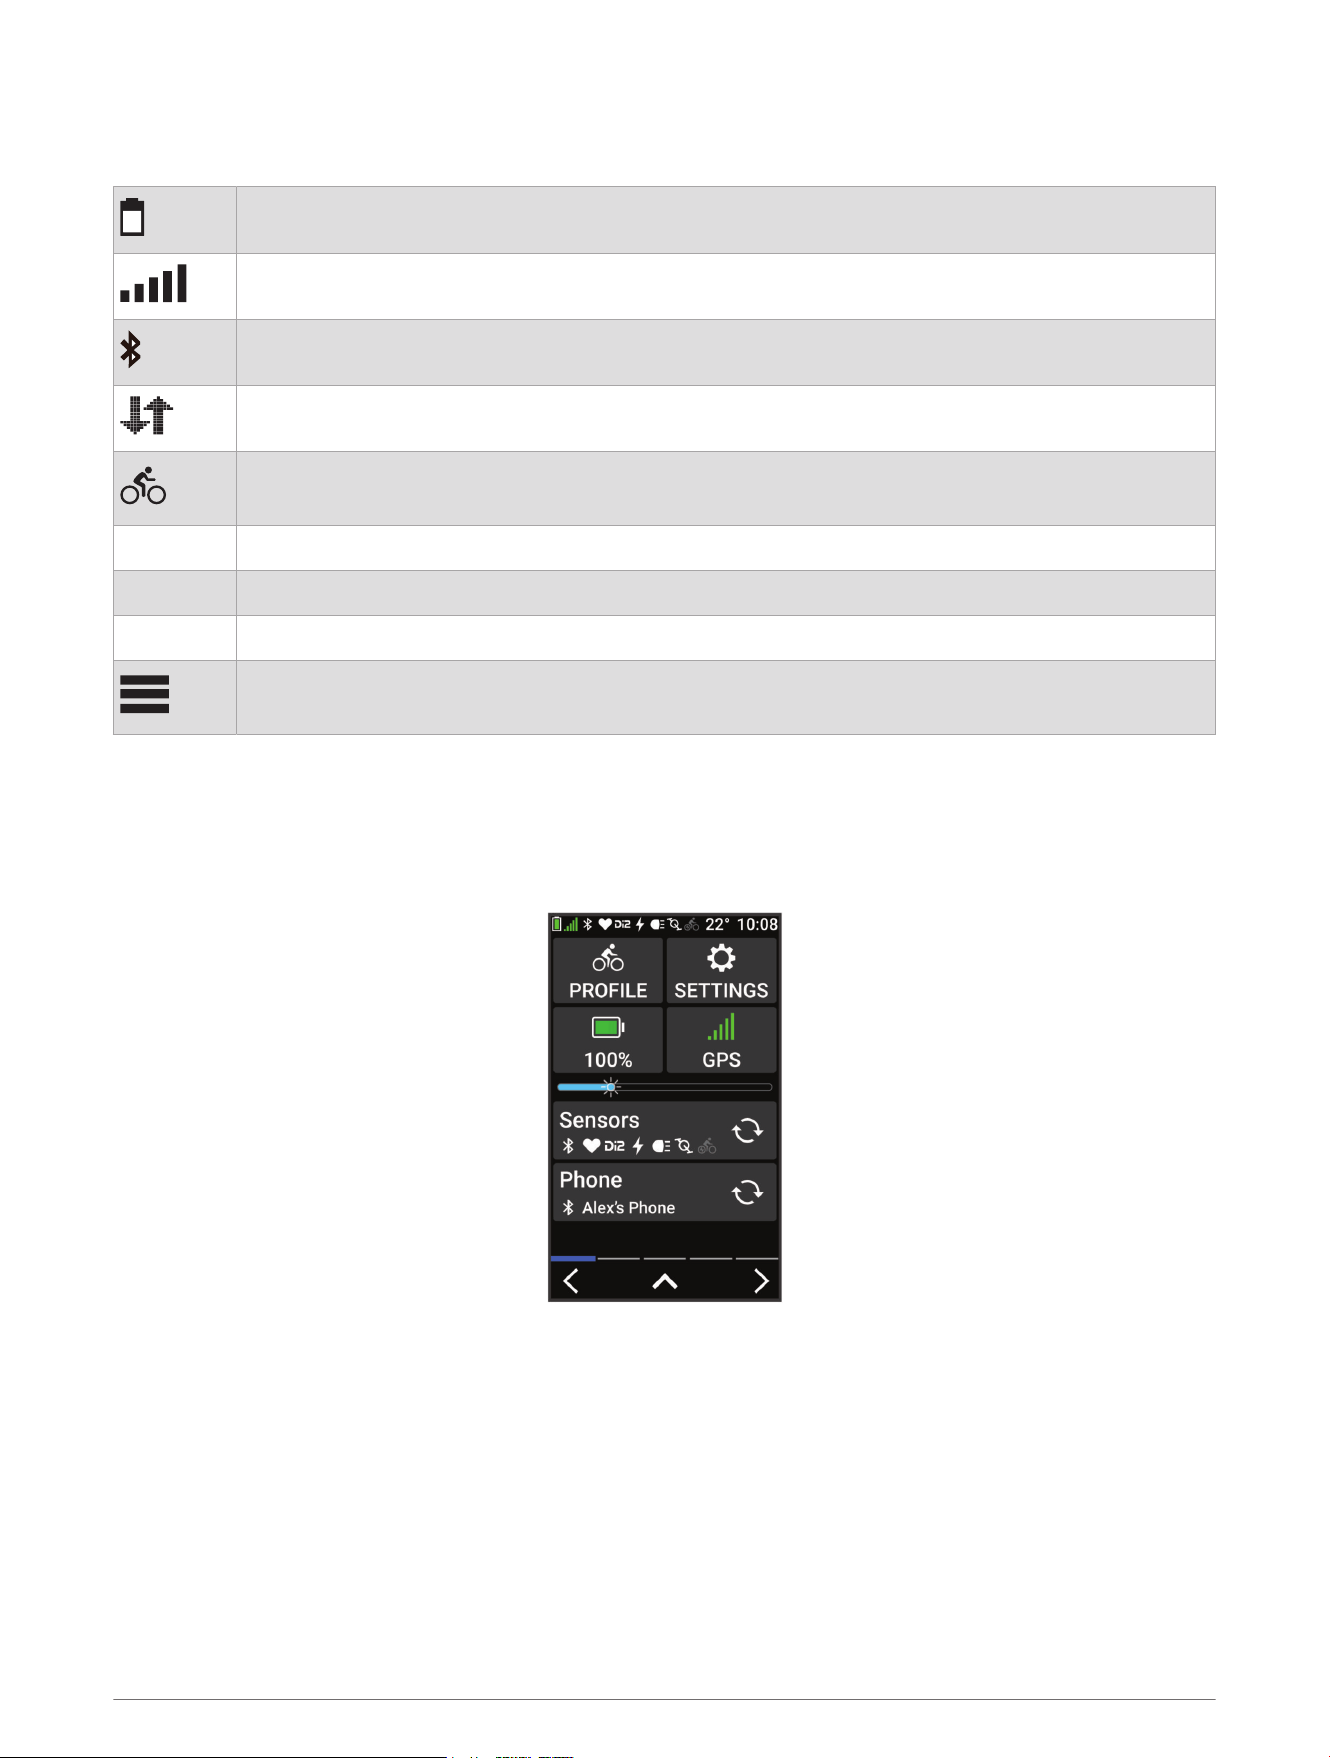
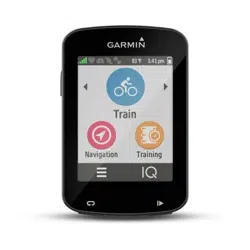
Home Screen Overview
The home screen gives you quick access to all the features of the Edge bike computer.
Battery status
GPS signal strength
Bluetooth
®
status
Sync in progress
Select to go for a ride.
Use the arrows to change the biking profile.
Navigation Select to browse the map, mark a location, search for locations, points of interest, or addresses.
Courses Select to create a new course or access a saved course.
History Select to access your previous rides and totals.
Select to access connected features, personal records, contacts, and settings.
Select to access your Connect IQ
™
apps, widgets, and data fields.
Viewing Widgets
Your device is preloaded with several widgets, and more are available when you pair your device with a phone or
other compatible device.
1 From the home screen or during a ride, swipe down from the top of the screen.
The status widget appears. A flashing icon means the device is searching for a signal. A solid icon means
the signal was found or the sensor is connected. You can select any icon to change the settings.
2 Swipe left or right to view more widgets.
The next time you swipe down to view the widgets, the last widget you viewed appears.
Introduction 3
Viewing Glances
Glances provide quick access to health data, activity information, built-in sensors, and more.
• From the home screen, swipe up.
The device scrolls through the glances.
• Select a glance to view additional information.
• Select to customize the glances (Customizing the Glances, page46).
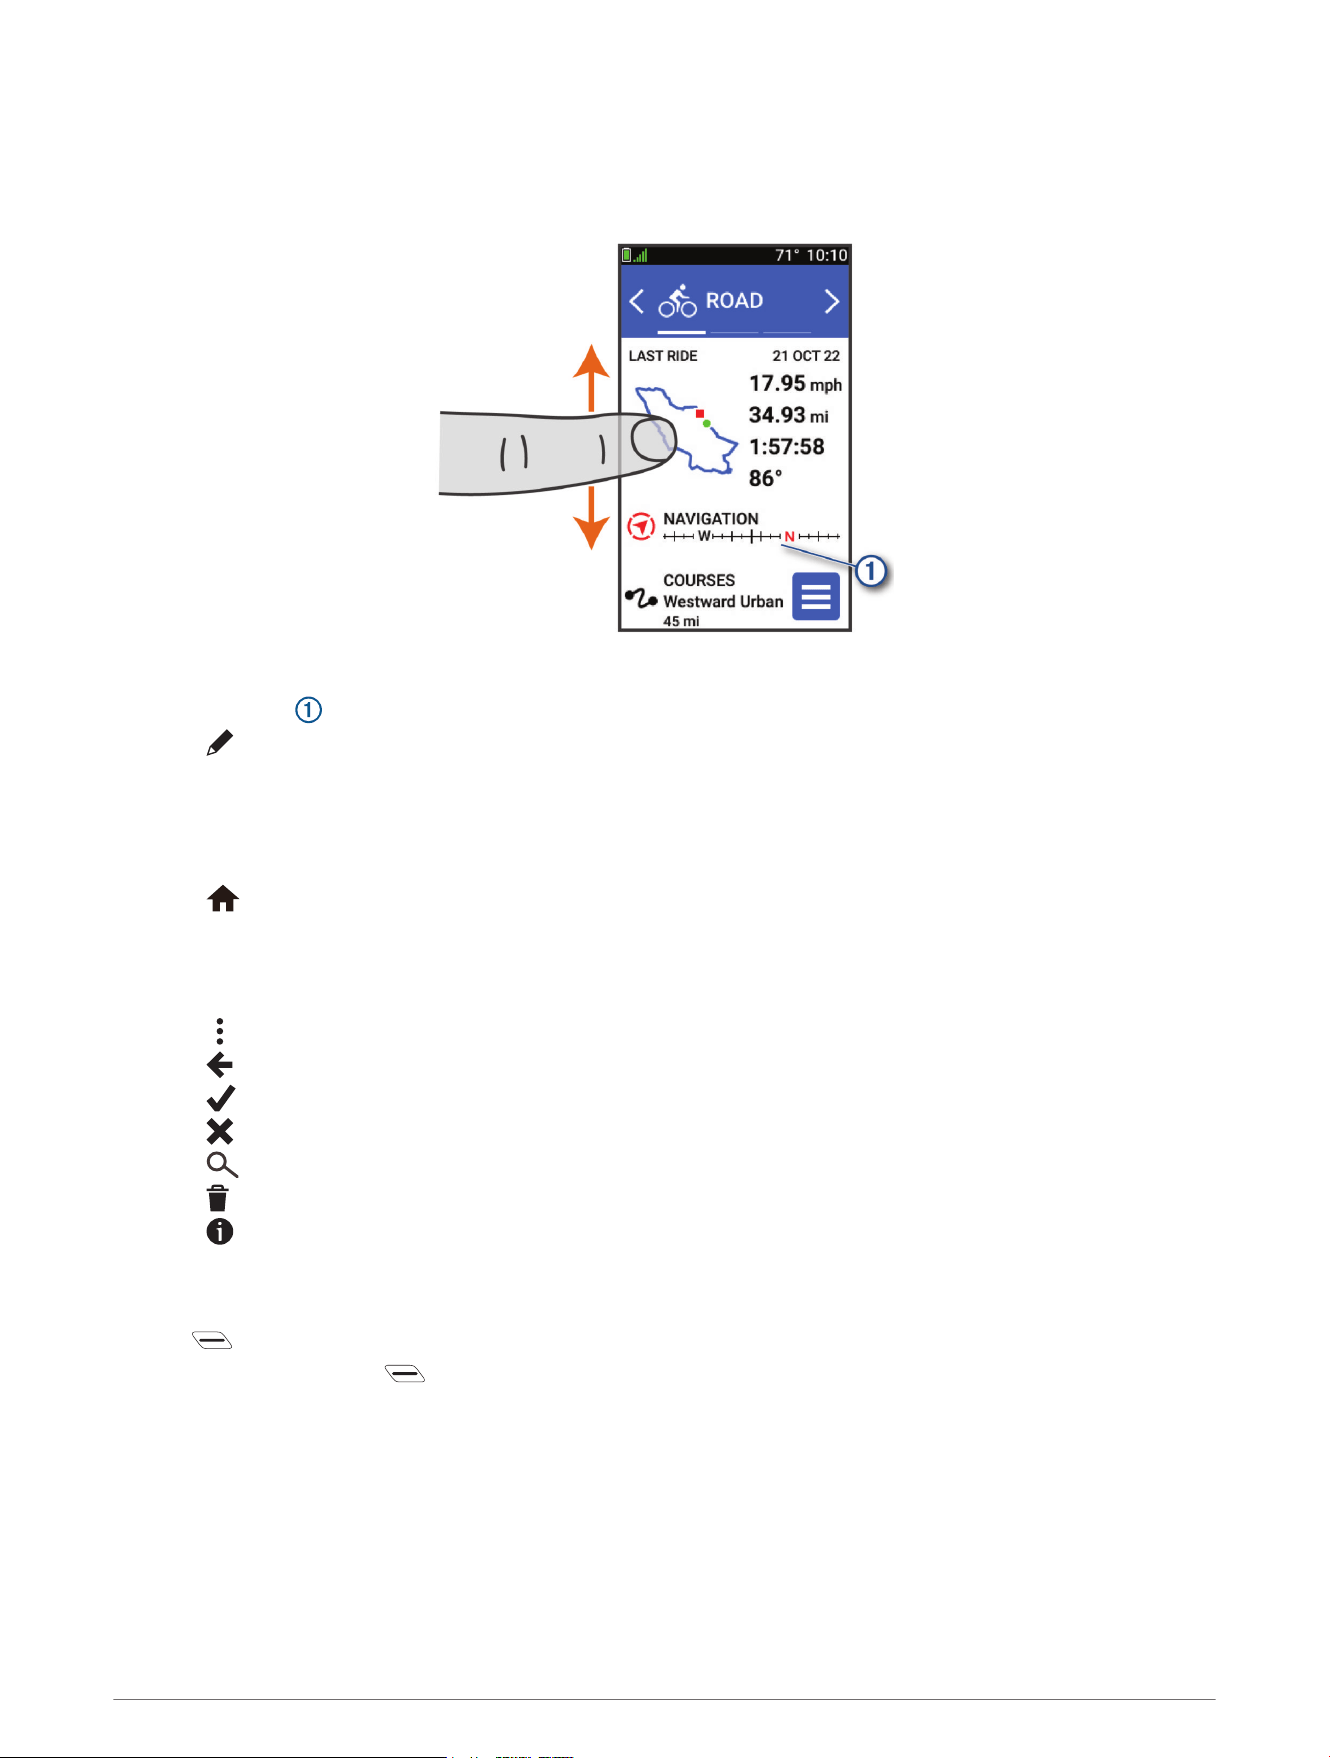
Using the Touchscreen
• When the timer is running, tap the screen to view the timer overlay.
The timer overlay allows you to return to the home screen during a ride.
• Select to return to the home screen.
• Swipe or select the arrows to scroll.
• From the home screen, swipe up to view the glances.
• From the home screen or ride screen, swipe down to view the widgets.
• Select to open a menu.
• Select to return to the previous page.
• Select to save your changes and close the page.
• Select to close the page and return to the previous page.
• Select to search near a location.
• Select to delete an item.
• Select for more information.
Locking the Touchscreen
You can lock the screen to prevent inadvertent screen touches.
• Hold , and select Lock Screen.
• During an activity, select .
4 Introduction
Acquiring Satellite Signals
The device may need a clear view of the sky to acquire satellite signals. The time and date are set automatically
based on the GPS position.
TIP: For more information about GPS, go to www.garmin.com/aboutGPS.
1 Go outdoors to an open area.
The front of the device should be oriented toward the sky.
2 Wait while the device locates satellites.
It may take 30–60 seconds to locate satellite signals.
Navigation
Navigation features and settings also apply to navigating courses (Courses, page10).
• Locations and finding places (Locations, page6)
• Planning a course (Courses, page10)
• Route settings (Route Settings, page15)
• Map settings (Map Settings, page14)
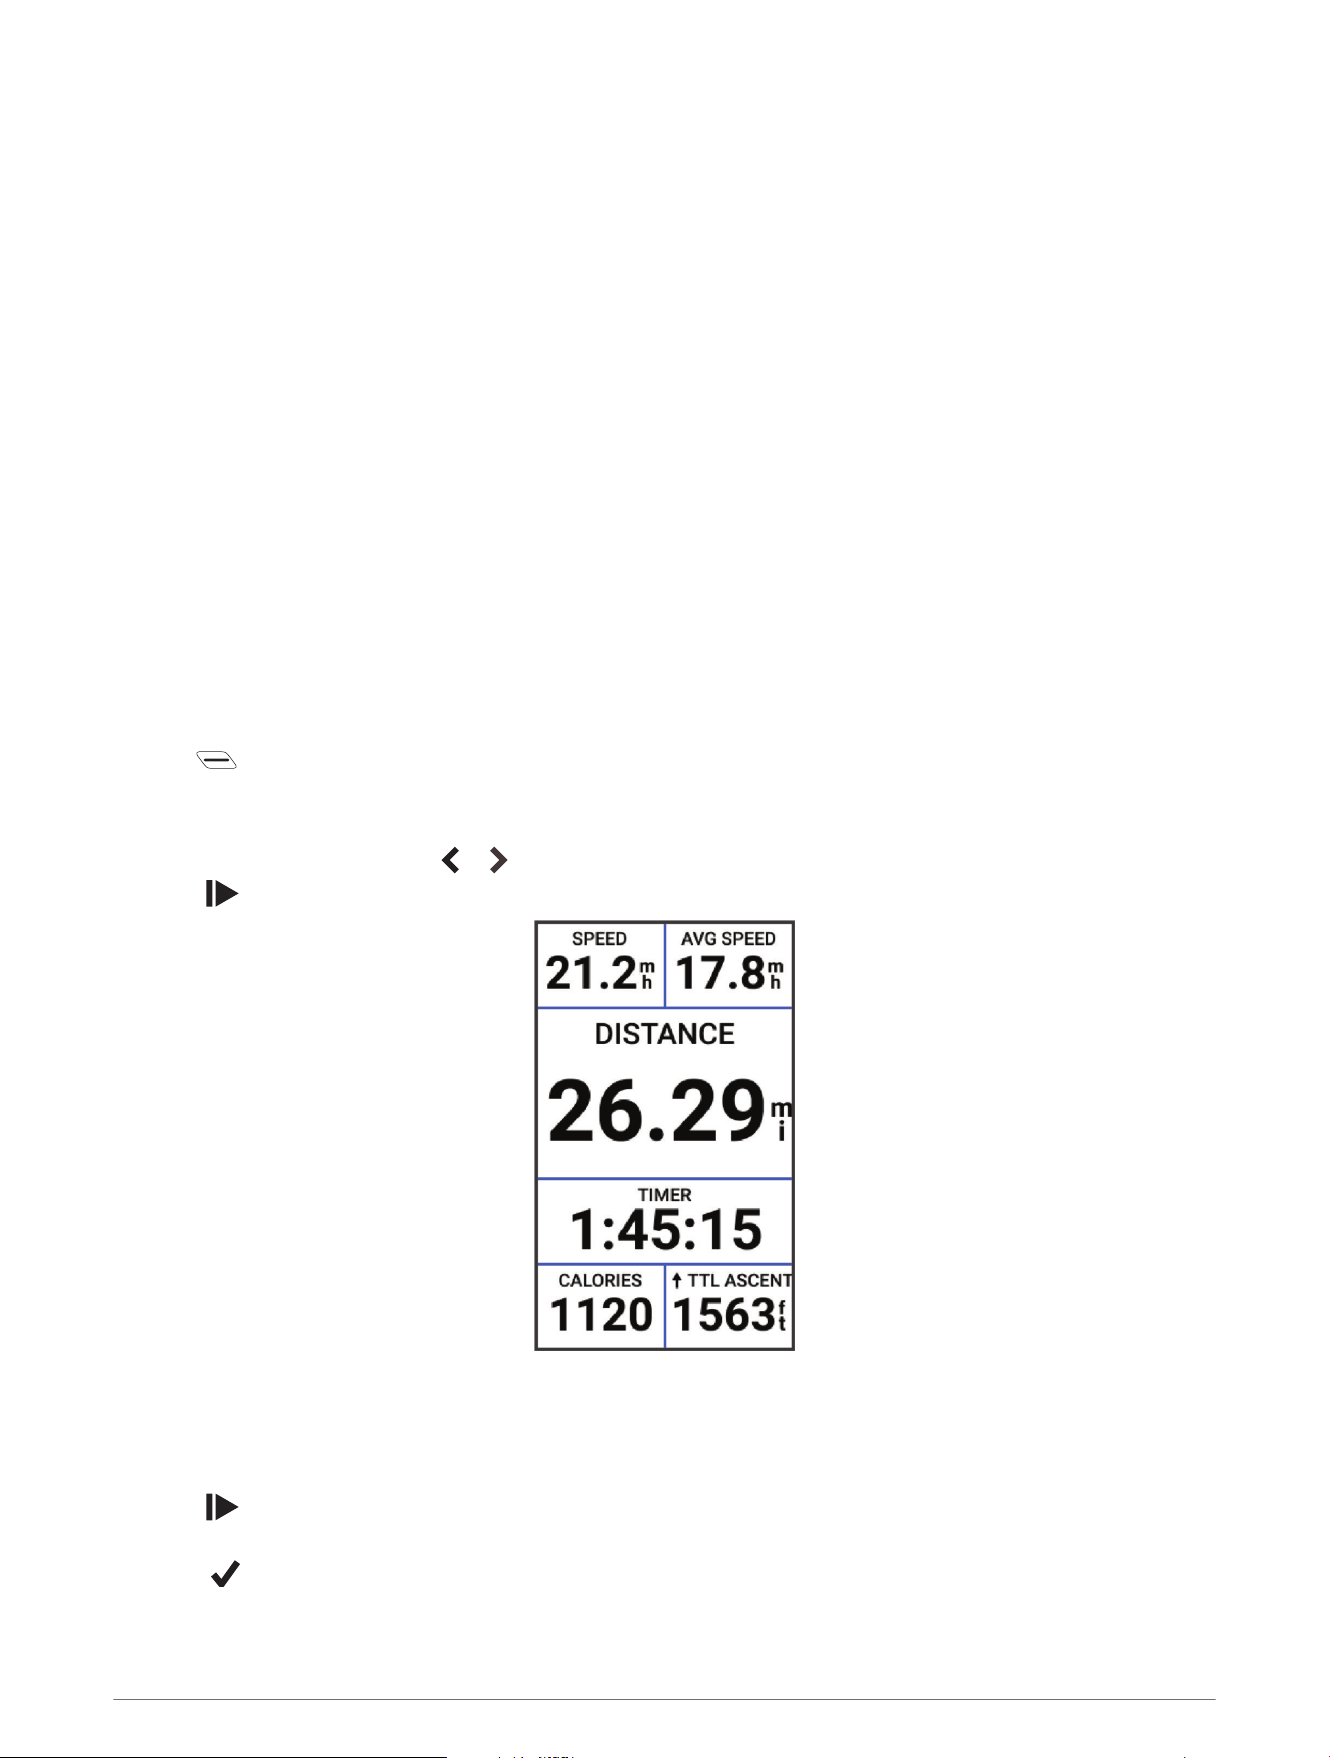
Going for a Ride
If you are using a wireless sensor or accessory, it can be paired and activated during initial setup (Pairing Your
Wireless Sensors, page32).
1 Hold to turn on the device.
2 Go outside, and wait while the device locates satellites.
The satellite bars turn green when the device is ready.
3 From the home screen, select or to change the biking profile.
4 Press to start the activity timer.
NOTE: History is recorded only while the activity timer is running.
5 Swipe left or right to view additional data screens.
You can swipe down from the top of the data screens to view the widgets.
6 If necessary, tap the screen to view status overlay data (including battery life) or return to the home screen.
7 Press to stop the activity timer.
8 Select Save.
9 Select .
Navigation 5
Locations
You can record and store locations in the device.
Marking Your Location
Before you can mark a location, you must locate satellites.
If you want to remember landmarks or return to a certain spot, you can mark a location.
1 Go for a ride.
2 Select Navigation > > Mark Location > .
Saving Locations from the Map
1 Select Navigation > Browse Map.
2 Browse the map for the location.
3 Select the location.
Location information appears at the top of the map.
4 Select the location information.
5 Select > Save Location > .
Navigating to a Location
TIP: You can use the LOCATION SEARCH glance to perform a quick search from the home screen. If necessary,
you can add the glance to the glance loop (Customizing the Glances, page46).
1 Select Navigation.
2 Select an option:
• Select Browse Map to navigate to a location on the map.
• Select Courses to navigate using a saved course (Courses, page10).
• Select Search to navigate to a point of interest, city, address, intersection, or known coordinates.
TIP: You can select to enter specific search information.
• Select Saved Locations to navigate to a saved location.
• Select Recent Finds to navigate to one of the last 50 locations you have found.
• Select > Searching near: to narrow your search area.
3 Select a location.
4 Select Ride.
5 Follow the on-screen instructions to your destination.
6 Navigation
Navigating Back to Start
At any point during your ride, you can return to the starting point.
1 Go for a ride.
2 At any time, swipe down from the top of the screen, and on the controls widget, select Back to Start.
3 Select Along Same Route or Most Direct Route.
4 Select Ride.
The device navigates you back to the starting point of your ride.
Starting a Ride From a Shared Location
You can use the Garmin Connect
™
app to share a location from Apple
®
Maps to your Edge bike computer, and
navigate to that location (Sharing a Location From a Map Using the Garmin Connect App, page9).
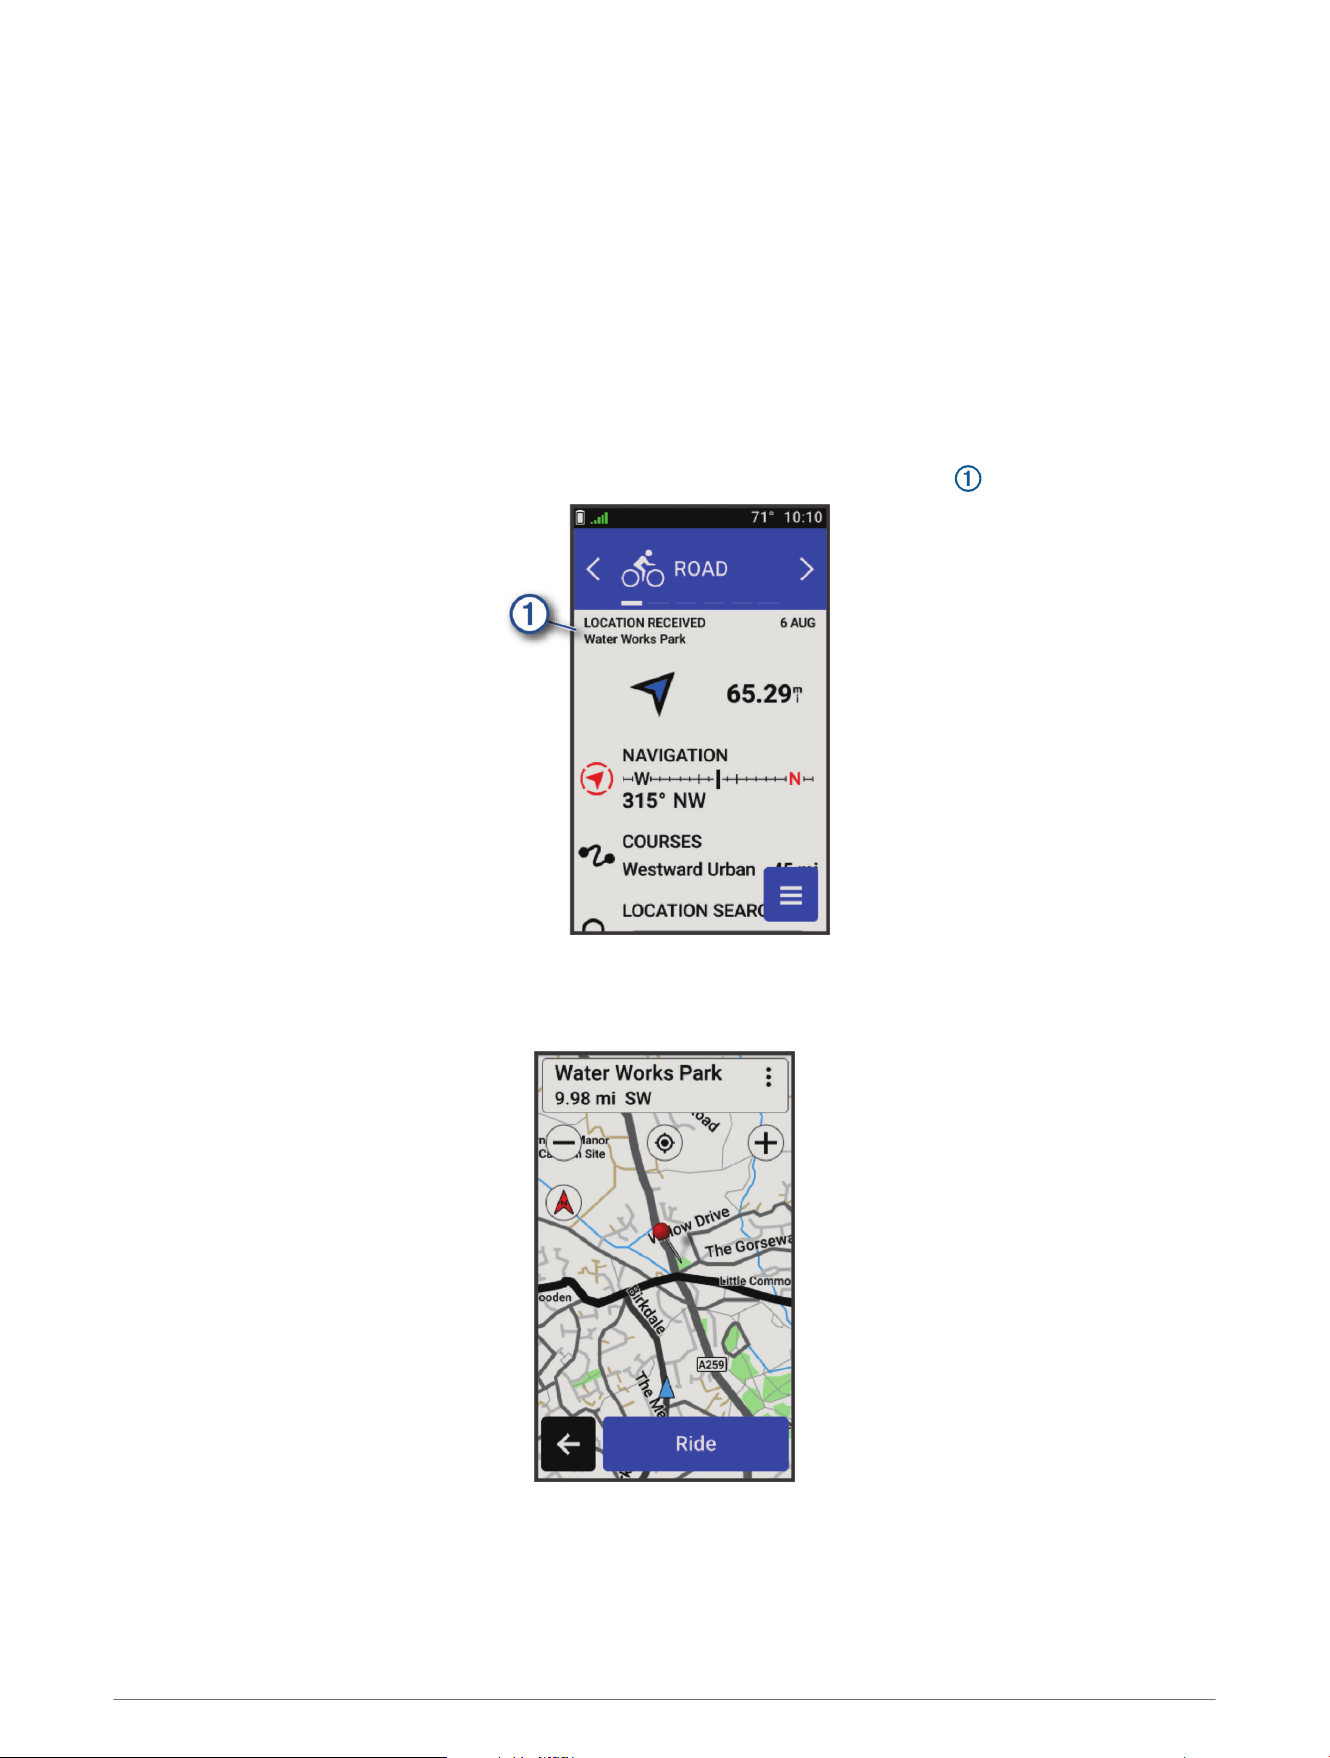
1 Select the shared location information from the dynamic area on the home screen .
Your Edge bike computer displays a map with the shared location name and its coordinates.
TIP: The location is saved in the Navigation > Recent Finds menu.
2 Select Ride.
3 Follow the on-screen instructions to proceed to your destination.
Navigation 7
Navigating to a Shared Location During a Ride
This feature is designed for rides using GPS. If you are riding with an Indoor activity profile where navigation is
disabled, select to dismiss the notification.
TIP: The location is saved in the Navigation > Recent Finds menu.
You can receive shared locations on your Edge bike computer and navigate to those locations (Sharing a
Location From a Map Using the Garmin Connect App, page9).
1 Start a ride (Going for a Ride, page5).
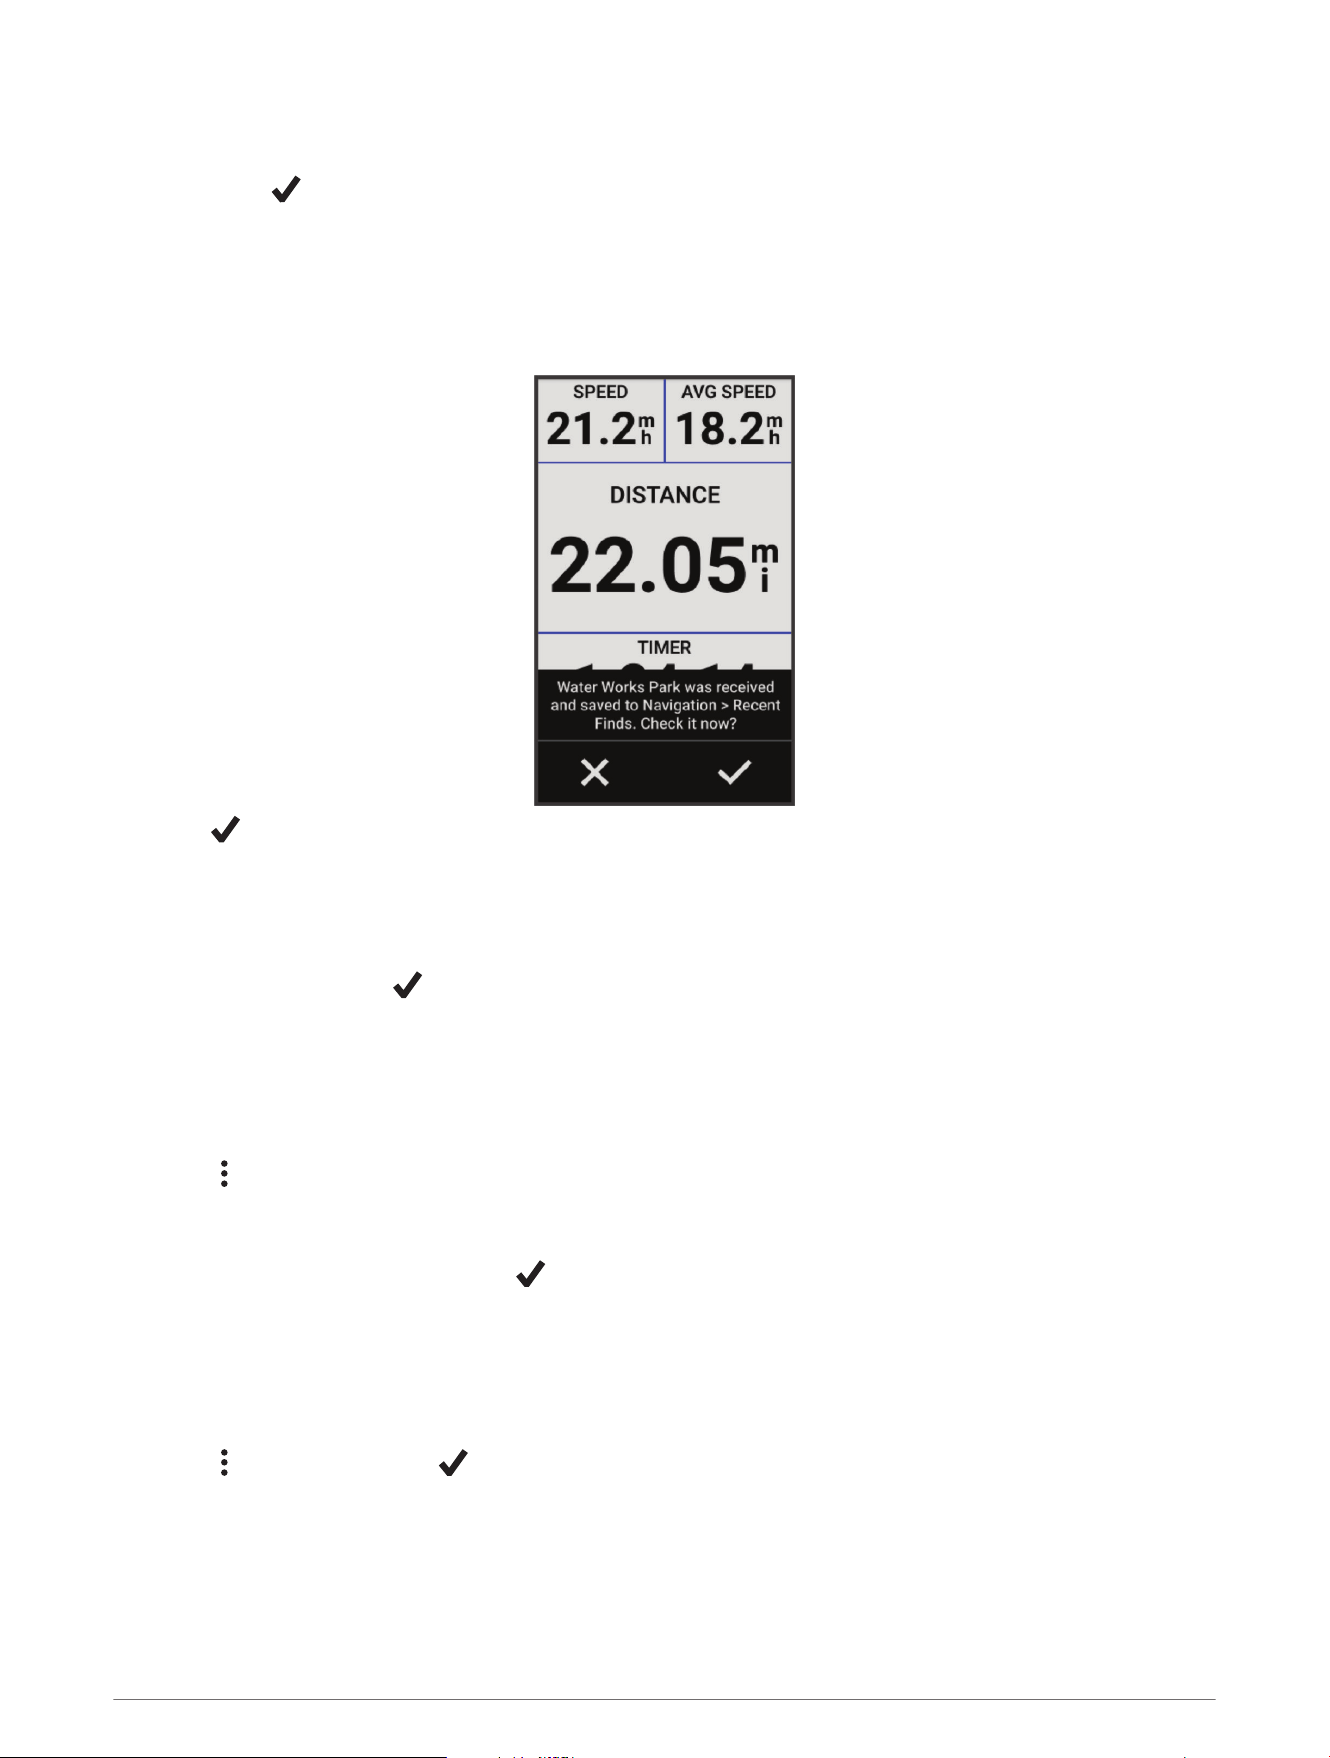
Your Edge bike computer displays a notification indicating the name of a shared location.
2 Select to navigate to the shared location.
3 Follow the on-screen instructions to proceed to your destination.
Stopping Navigation
1 Tap the screen.
2 Select Stop Navigation > .
Editing Locations
1 Select Navigation > Saved Locations.
2 Select a location.
3 Select the information bar at the top of the screen.
4 Select .
5 Select an attribute.
For example, select Change Elevation to enter a known altitude for the location.
6 Enter the new information, and select .
Deleting a Location
1 Select Navigation > Saved Locations.
2 Select a location.
3 Select the location information at the top of the screen.
4 Select > Delete Location > .
8 Navigation
Sharing a Location From a Map Using the Garmin Connect App
NOTICE
It is your responsibility to use discretion when sharing location information with others. Always ensure you are
aware of and comfortable with the individual with whom you share location information.
NOTE: This feature is available only if your course-compatible Garmin
®
device is connected to an iPhone
®
device
using Bluetooth technology.
You can share location information and data from Apple Maps to your compatible Garmin device.
1 From Apple Maps, select a location.
2 Select > .
3 If necessary, from the Garmin Connect app, select the Garmin device.
A notification appears in the Garmin Connect app indicating that the location in now available on your device
(Starting a Ride From a Shared Location, page7).
Reporting a Hazard
WARNING
This feature allows users to submit information about potential hazards on their ride. Garmin makes no
representations about the accuracy, completeness, or timeliness of information submitted by users. Remain
aware of your surroundings and defer to any posted guidance available during your ride. Failure to remain aware
of your surroundings could result in property damage or personal injury.
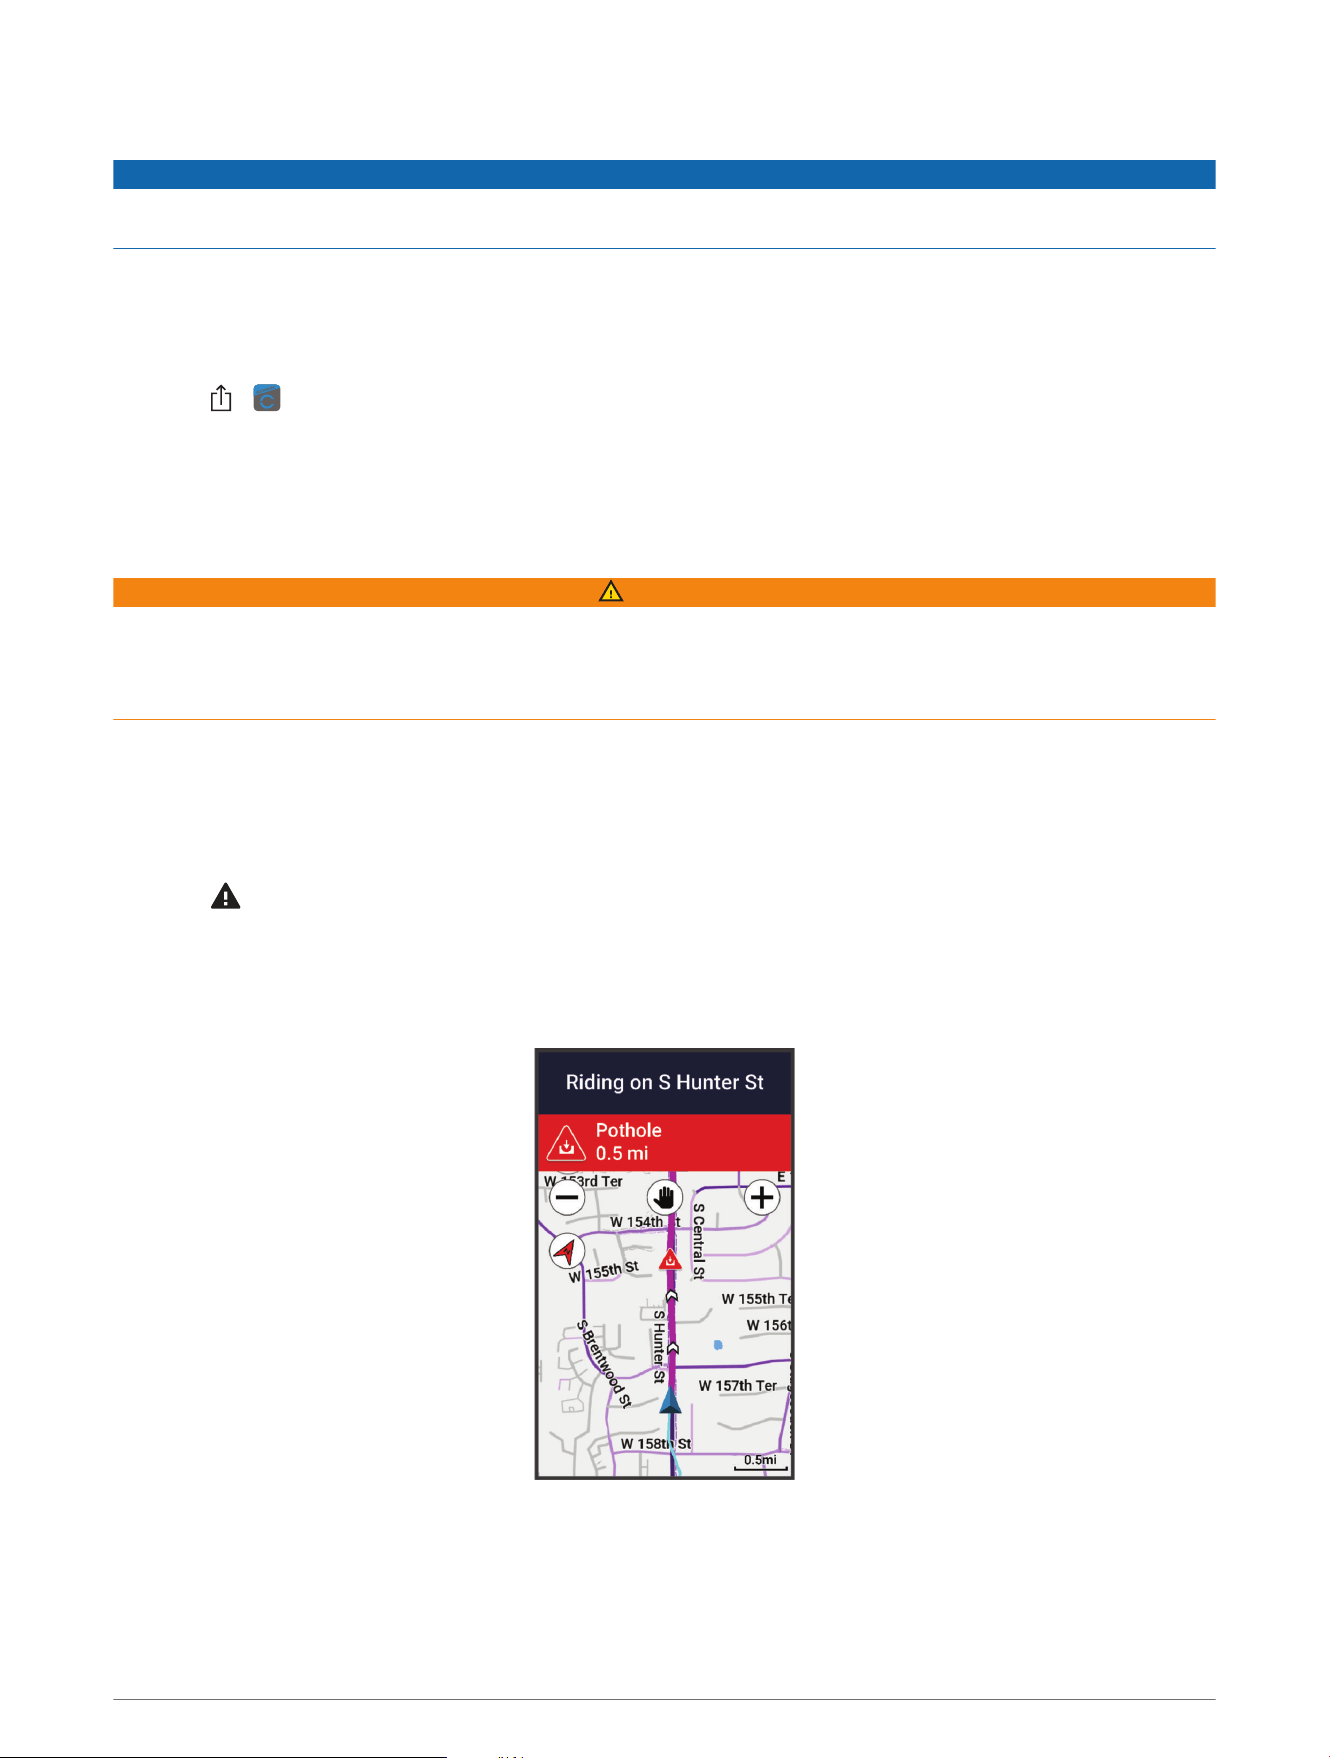
At any point during your ride, you can report a hazard that might be hazardous to cyclists, such as potholes,
unleashed dogs, or fallen trees. You can also confirm a hazard on the Edge bike computer, or report that a
hazard is no longer present. Hazards expire after they have not been reported for a period of time.
1 Go for a ride (Going for a Ride, page5).
2 Tap the screen to view the timer overlay.
3 Select .
4 Select the type of hazard.
5 Select Report.
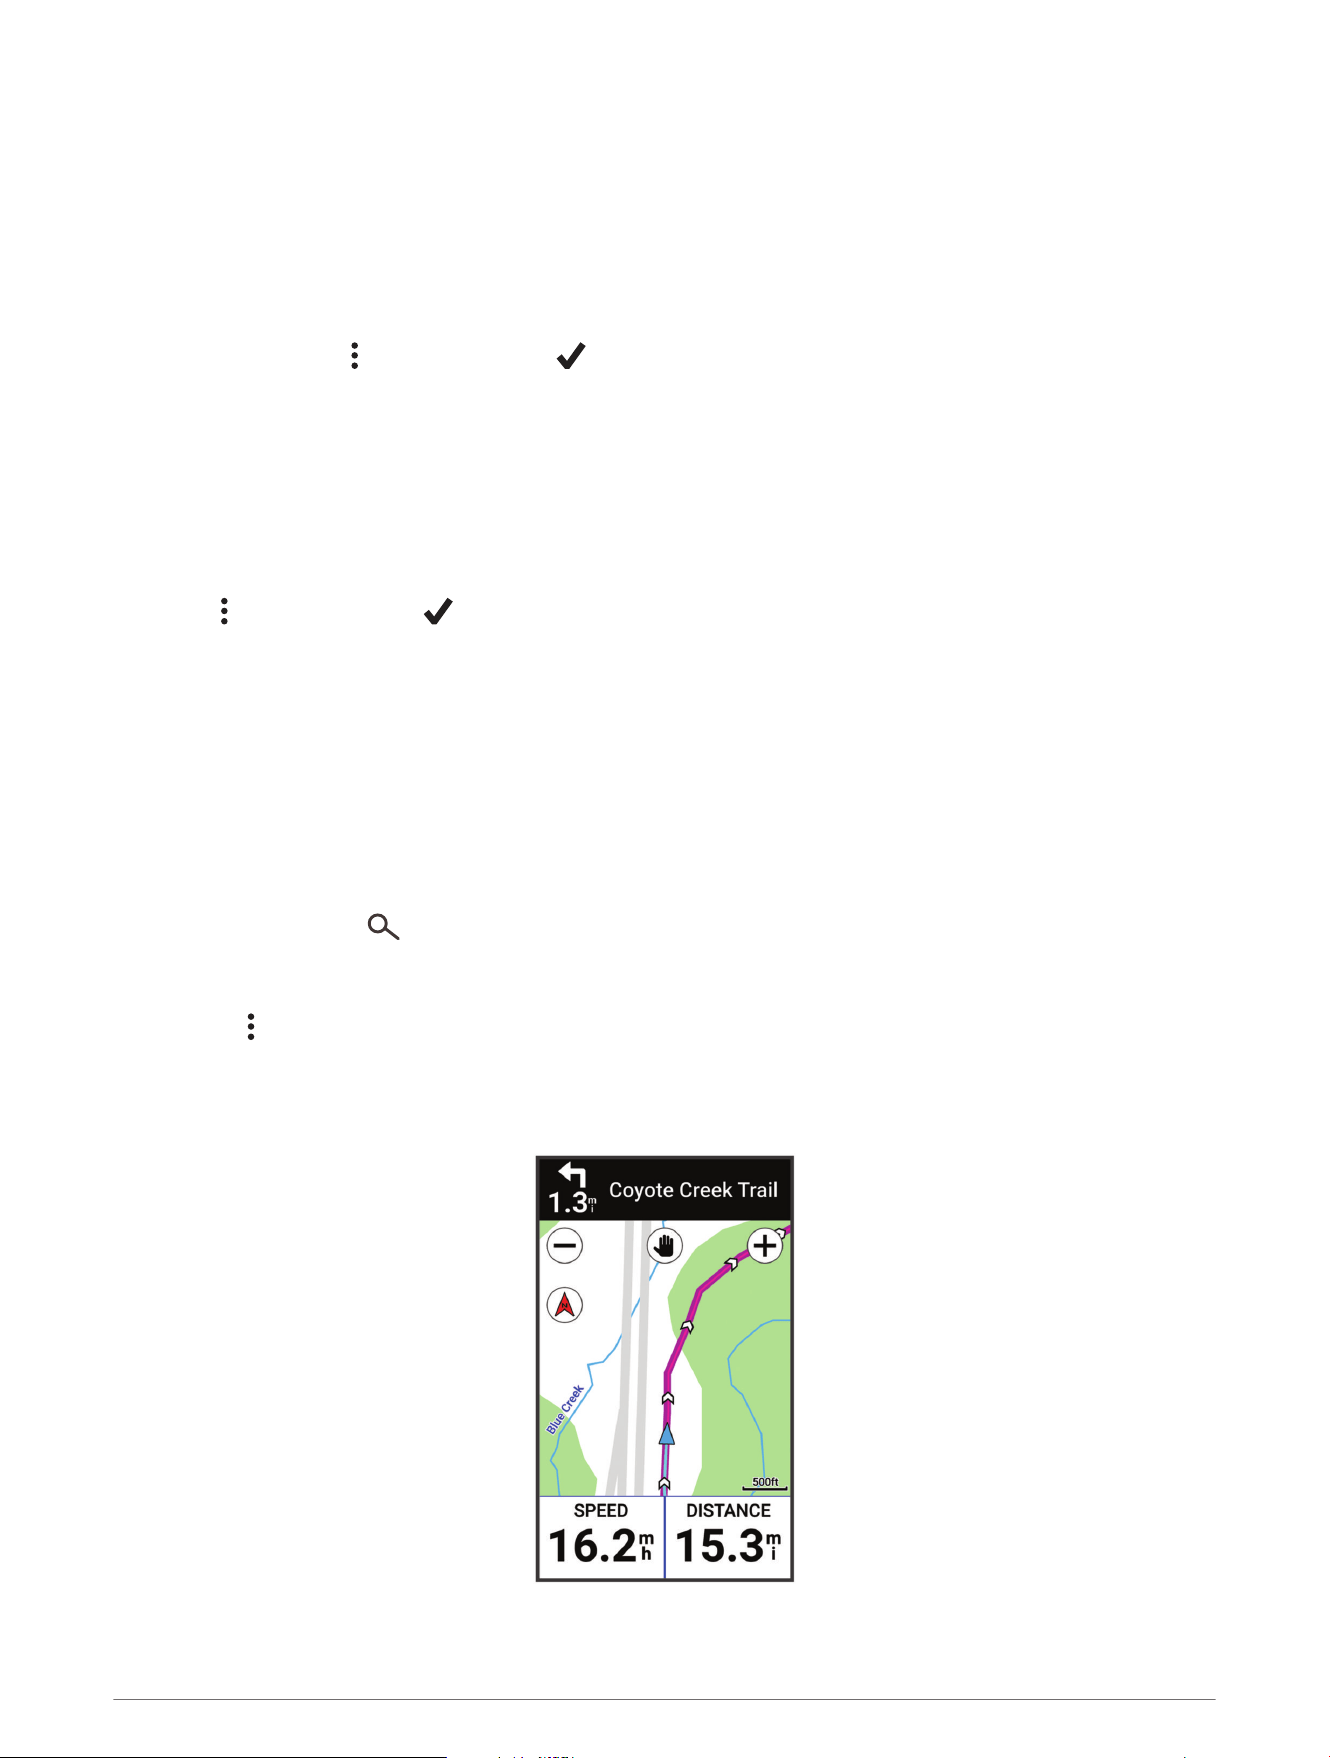
The hazard appears on the navigation map, and the Edge bike computer gives an audible alert (Alerts and
Prompts Settings, page42).
Navigation 9
Courses
You can send a course from your Garmin Connect account to your device. After it is saved to your device, you
can navigate the course on your device. You can also create and save a custom course directly on your device.
You can follow a saved course simply because it is a good route. For example, you can save and follow a
bike-friendly commute to work.
TIP: You can send courses to your device from third-party apps when you link your accounts or use a Connect
IQ app. Go to apps.garmin.com for more information about Connect IQ apps.
Planning and Riding a Course
You can create and ride a custom course. A course is a sequence of waypoints or locations that leads you to
your final destination.
TIP: You can also create a custom course in the Garmin Connect app and send it to your device (Following a
Course From Garmin Connect, page12).
1 Select Courses > > Course Creator.
2 Select an option:
• To select your current location on the map, select Current Location.
• To select a location on the map, select Use Map, and select a location.
• To select a saved location, select Saved & Recent > Saved Locations, and select a location.
• To select a location for which you recently searched, select Saved & Recent > Recent Finds, and select a
location.
• To browse for and select a point of interest, select Points of Interest, and select a nearby point of interest.
• To select a city, select Cities, and select a nearby city.
• To select an address, select Search Tools > Addresses, and enter the address.
• To select an intersection, select Search Tools > Intersections, and enter the street names.
• To use coordinates, select Search Tools > Coordinates, and enter the coordinates.
3 If prompted, select to add the location to the course.
A map of the course appears.
4 From the map, select an option to continue adding locations:
• Select > to add another location using the map.
• Select to search for another location.
• Select to undo the previously added location.
5 Repeat steps 2 through 4 until you have selected all locations for the route.
6 If necessary, swipe up from the bottom of the screen, and select an option:
• Hold on a location, and drag it to reorder the list.
• Swipe left and select to remove a location.
7 If necessary, select an option:
• To calculate the route with the same route back to the start location, select > Out and Back.
• To calculate the route with a different route back to the start location, select > Loop to Start.
8 Select Save.
9 Enter a name for the course.
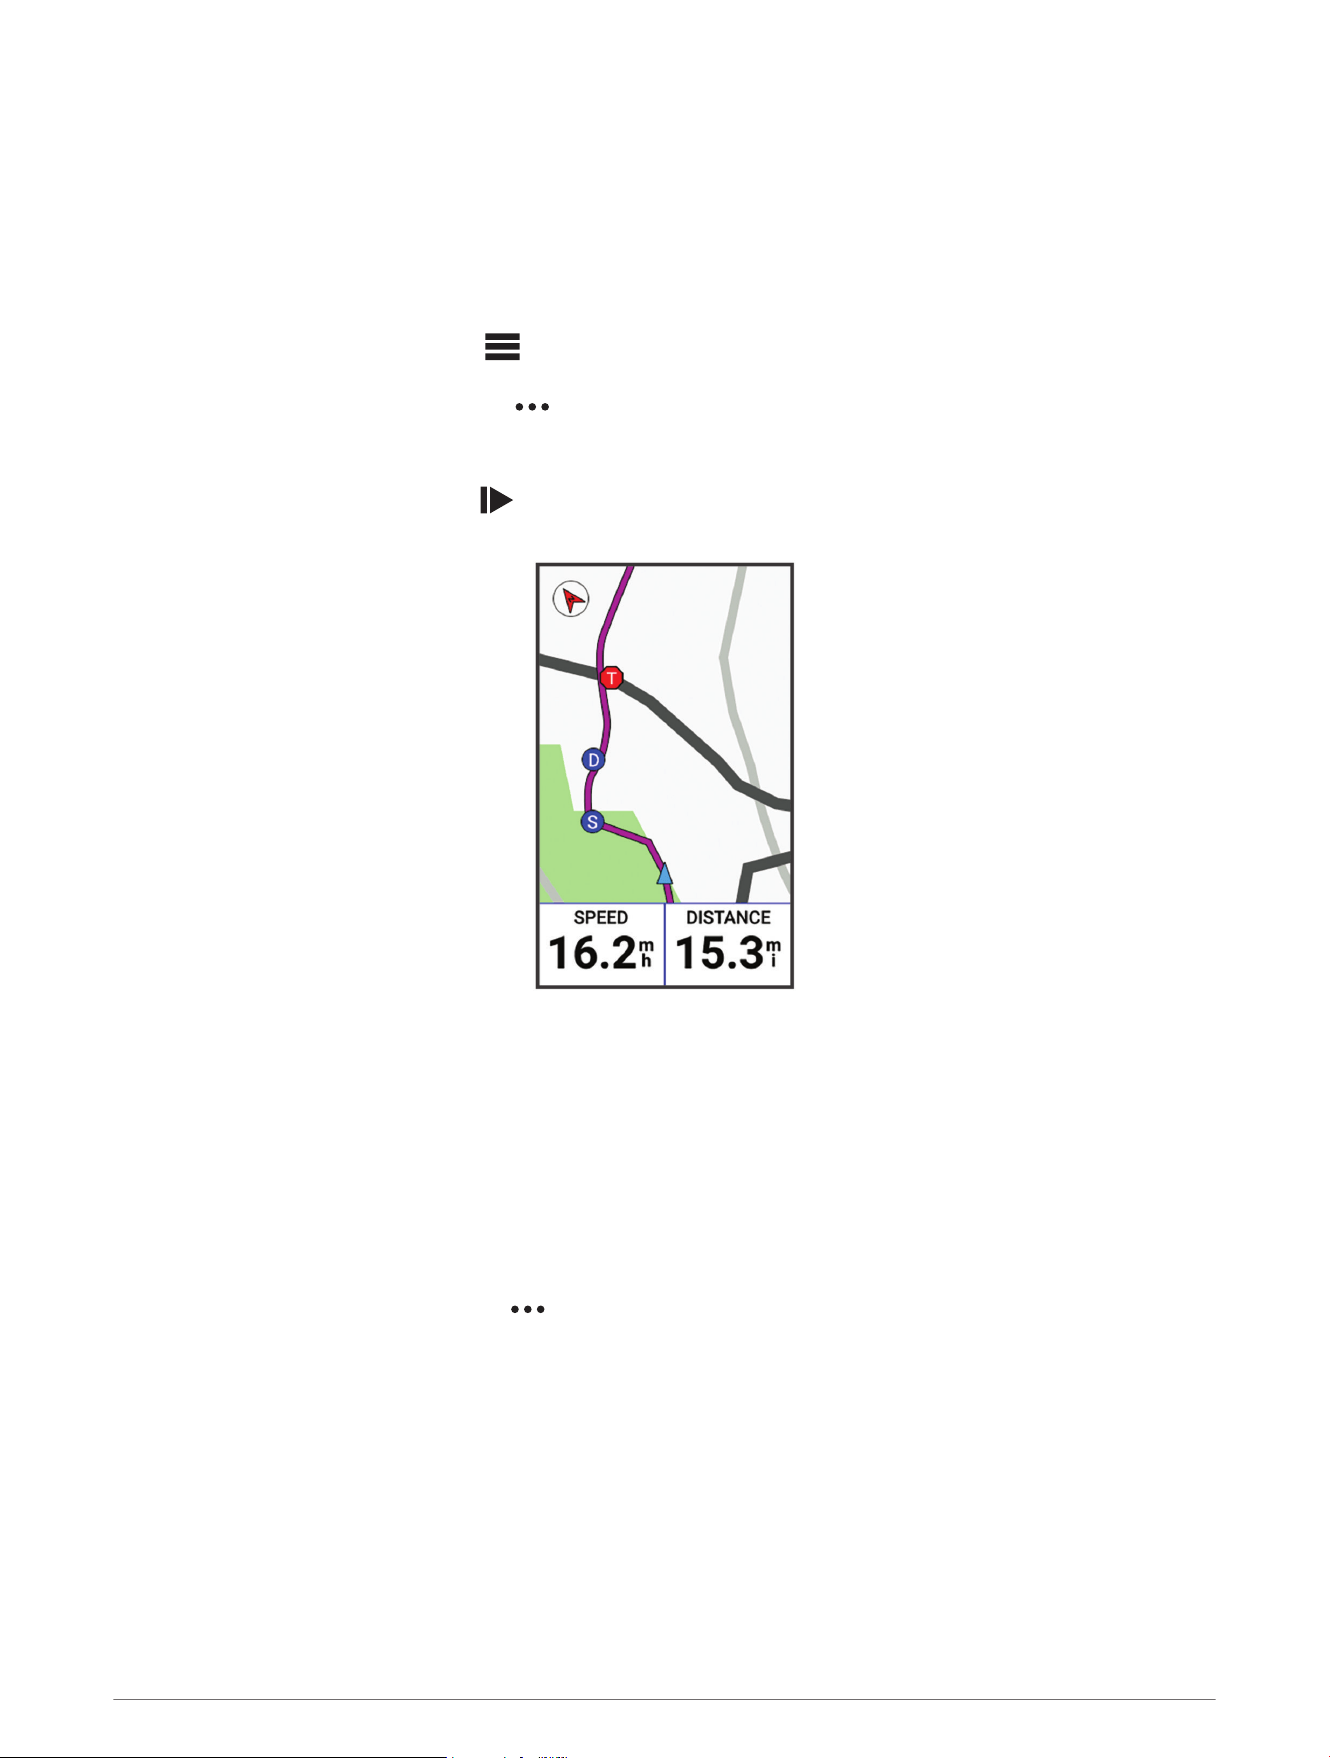
10 Select > Ride.
10 Navigation

Creating and Riding a Round-Trip Course
The device can create a round-trip course based on a specified distance, starting location, and direction of
navigation.
1 Select Courses > > Round-Trip Course.
2 Select Distance, and enter the total distance for the course.
3 Select Start Location.
4 Select an option:
• To select your current location, select Current Location.
• To select a location on the map, select Use Map, and select a location.
• To select a saved location, select Saved Locations, and select a location.
• To select a location for which you recently searched, select Recent Finds, and select a location.
• To browse for and select a point of interest, select Points of Interest, and select a nearby point of interest.
• To select an address, select Search Tools > Addresses, and enter the address.
• To select an intersection, select Search Tools > Intersections, and enter the street names.
• To use coordinates, select Search Tools > Coordinates, and enter the coordinates.
5 Select Start Direction, and select a direction heading.
6 Select Search.
TIP: You can select to search again.
7 Select a course to view it on the map.
TIP: You can select and to view the other courses.
8 Select Save > Ride.
Creating a Course from a Recent Ride
You can create a new course from a ride you saved on this Edge device.
1 Select History > Rides.
2 Select a ride.
3 Select > Save Ride as Course.
4 Enter a name for the course, and select .
Navigation 11

Following a Course From Garmin Connect
Before you can download a course from Garmin Connect, you must have a Garmin Connect account (Garmin
Connect, page37).
1 Select an option:
• Open the Garmin Connect app.
• Go to connect.garmin.com.
2 Create and save a new course, or select an existing course.
3 Select an option:
• On the Garmin Connect app, select .
• On the Garmin Connect website, select Send to Device.
4 Select your Edge bike computer.
5 Select an option:
• Sync your device with the Garmin Connect app.
• Sync your device using the Garmin Express
™
application.
On your device, the course appears on the dynamic area of the home screen.
6 Select the course.
NOTE: If necessary, you can select Courses to select a different course.
7 Select Ride.
Tips for Riding a Course
• Use turn guidance (Course Options, page14).
• If you include a warmup, press to begin the course, and warm up as normal.
• Stay away from your course path as you warm up.
When you are ready to begin, head toward your course. When you are on any part of the course path, a
message appears.
• Scroll to the map to view the course map.
If you stray from the course, a message appears.
Viewing Course Details
1 Select Courses.
2 Select a course.
3 Select an option:
• Select the course to view the course on the map.
• Select the climbs graph to view details and elevation plots for each climb.
• Select Summary to view details about the course.
Displaying a Course on the Map
For each course saved to your device, you can customize how it appears on the map. For example, you can
set your commute course to always display on the map in yellow. You can have an alternate course display in
green. This allows you to see the courses while you are riding, but not follow or navigate a particular course.
1 Select Courses.
2 Select the course.
3 Select .
4 Select Always Display to make the course appear on the map.
5 Select Color, and select a color.
6 Select Course Points to include course points on the map.
The next time you ride near the course, it appears on the map.
12 Navigation
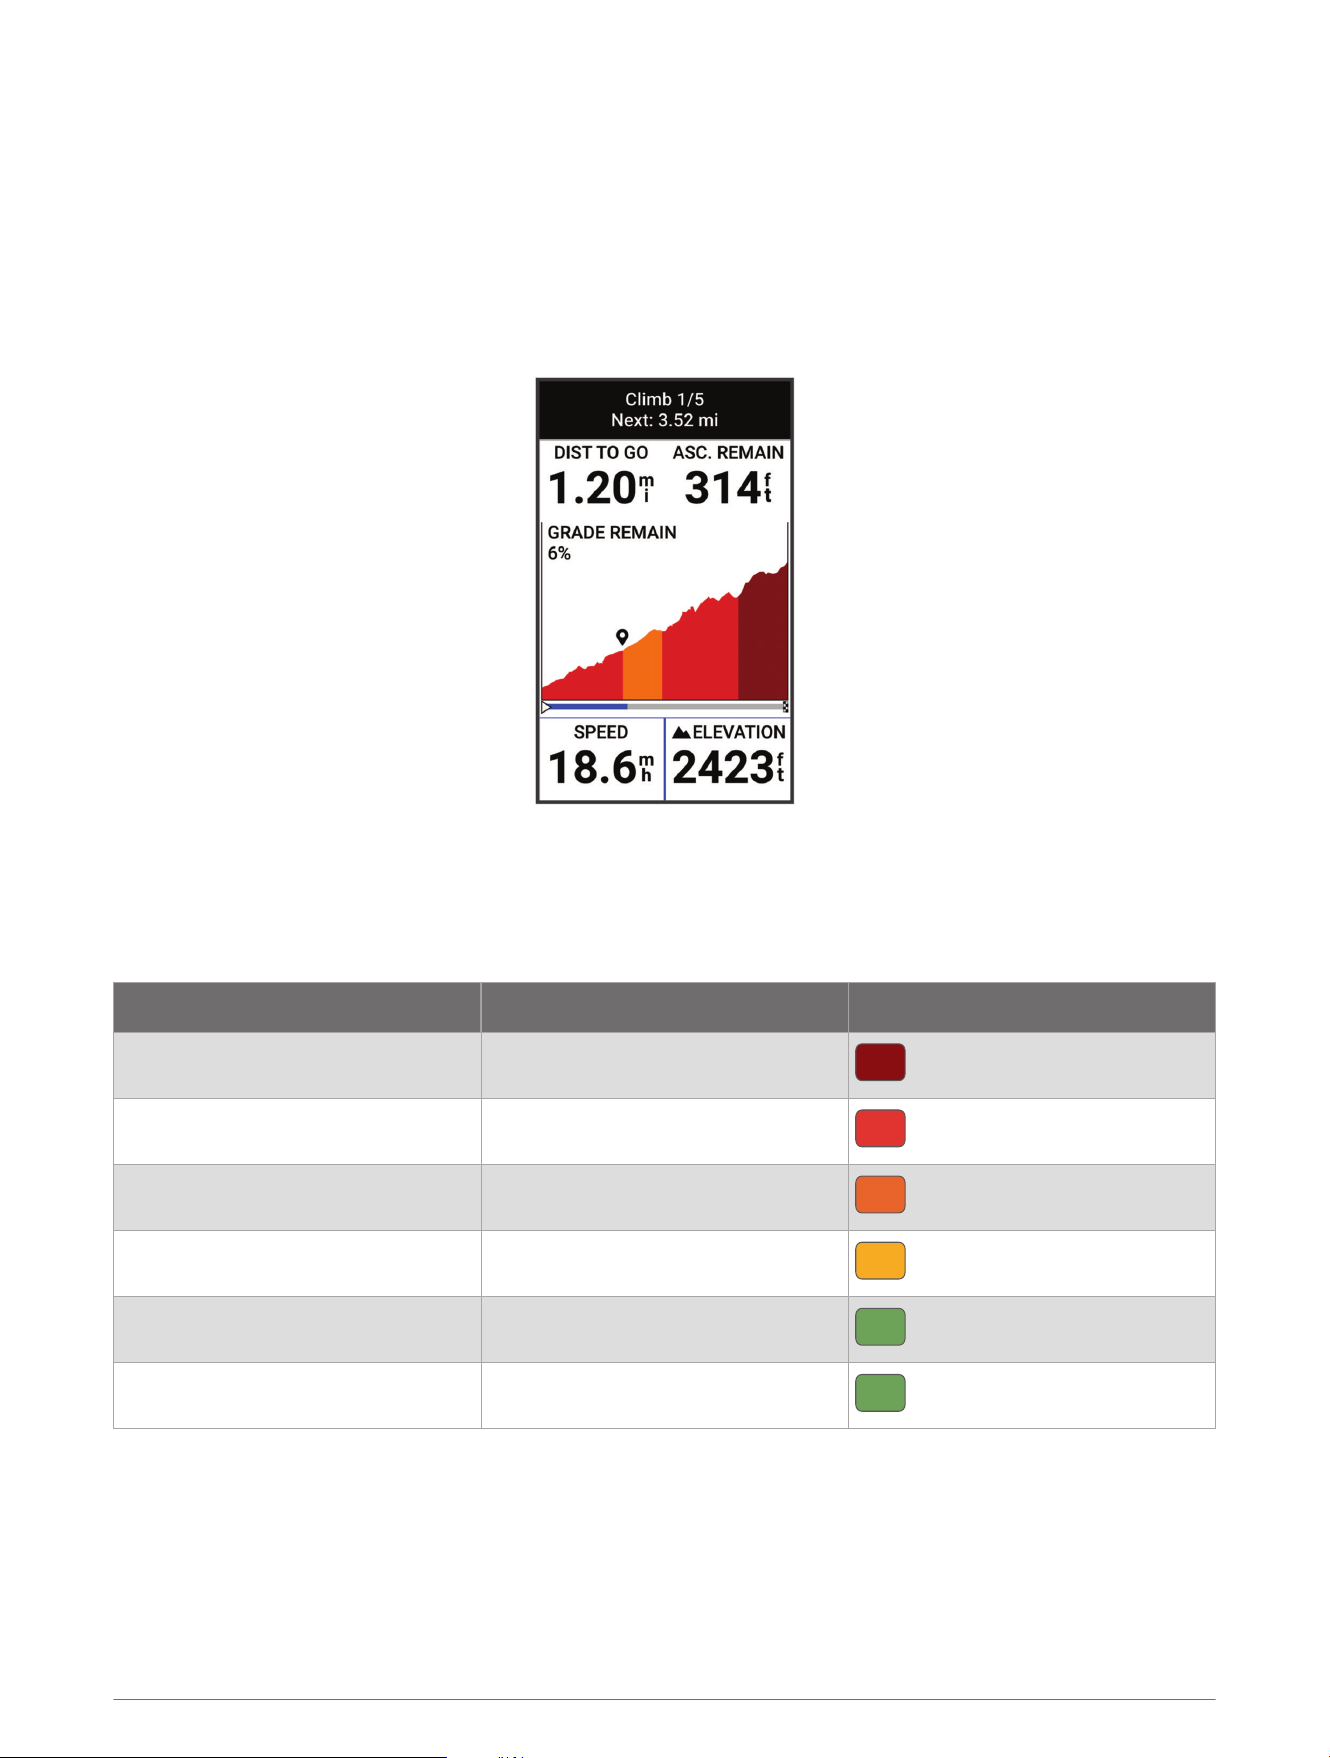
Using ClimbPro
The ClimbPro feature helps you manage your effort for the upcoming climbs on a course. You can view details
about the climbs, including when they occur, average gradient, and total ascent. The climb categories, based on
length and gradient, are indicated by color (Climb Categories, page13).
1 Enable the ClimbPro feature for the activity profile (Updating Your Activity Profile, page40).
2 Review the climbs and course details for the course (Viewing Course Details, page12).
3 Start following a saved course (Courses, page10).
At the start of a climb, the ClimbPro screen appears automatically.
After you save the ride, you can view the climb splits in your ride history.
Climb Categories
Climb categories are determined by climb score, which is calculated using the grade multiplied by the length of
the climb. A climb must have a length of at least 500 meters and an average grade of at least 3 percent to be
considered a climb.
Category Climb Score Color
Hors Category (HC) Greater than 80,000
Category 1 Greater than 64,000
Category 2 Greater than 32,000
Category 3 Greater than 16,000
Category 4 Greater than 8,000
Uncategorized Greater than 1,500
Navigation 13

Course Options
Select Courses > .
Turn Guidance: Enables or disables turn prompts.
Off Course Warnings: Alerts you if you stray from the course.
Search: Allows you to search for saved courses by name.
Sort: Allows you to sort saved courses by name, distance, or date.
Delete: Allows you to delete all or multiple saved courses from the device.
Rerouting a Course
You can choose how the device recalculates the route when you go off course.
When you go off course, select an option:
• To pause navigation until you get back on course, select Pause Navigation.
• To choose from rerouting suggestions, select Re-route.
NOTE: The first rerouting option is the shortest route back to the course and starts automatically after 10
seconds.
Stopping a Course
1 Scroll to the map.
2 Swipe down from the top of the screen, and scroll to the controls widget.
3 Select Stop Course > .
Deleting a Course
1 Select Navigation > Courses.
2 Swipe left on a course.
3 Select .
Map Settings
Select > Activity Profiles, select a profile, and select Navigation > Map.
Orientation: Sets how the map is shown on the page.
Auto Zoom: Automatically selects a zoom level for the map. When Off is selected, you must zoom in or out
manually.
Guide Text: Sets when the turn-by-turn navigation prompts are shown (requires routable maps).
Appearance: Customizes the appearance settings on the map (Map Appearance Settings, page14).
Map Information: Enables or disables the maps currently loaded on the device.
Map Appearance Settings
Select > Activity Profiles, select a profile, and select Navigation > Map > Appearance.
Map Theme: Adjusts the appearance of the map for your ride type. (Map Themes, page15)
Popularity Map: Highlights popular roads or trails for your ride type. The darker the road or trail, the more
popular.
Map Detail: Sets the level of detail shown on the map.
History Line Color: Allows you to change the line color of the path you have traveled.
Advanced: Allows you to set zoom levels and text size, and enable shaded relief and contours.
Reset Map Default: Resets the map appearance to the default settings.
14 Navigation
Changing the Map Orientation
1 Select > Activity Profiles.
2 Select a profile.
3 Select Navigation > Map > Orientation.
4 Select an option:
• Select North Up to show north at the top of the page.
• Select Track Up to show your current direction of travel at the top of the page.
Map Themes
You can change the map theme to adjust the appearance of the map for your ride type.
Select > Activity Profiles, select a profile, and select Navigation > Map > Appearance > Map Theme.
Classic: Uses the classic Edge map color scheme, with no additional theme applied.
High Contrast: Sets the map to display data with higher contrast, for better visibility in challenging
environments.
Mountain Biking: Sets the map to optimize trail data in mountain biking mode.
Route Settings
Select > Activity Profiles, select a profile, and select Navigation > Routing.
Popularity Routing: Calculates routes based on the most popular rides from Garmin Connect.
Routing Mode: Sets the transportation method to optimize your route.
Calculation Method: Sets the method used to calculate your route.
Lock on Road: Locks the position icon, which represents your position on the map, onto the nearest road.
Avoidance Setup: Sets the road types to avoid while navigating.
Course Recalculation: Automatically recalculates the route when you deviate from the course.
Route Recalculation: Automatically recalculates the route when you deviate from the route.
Selecting an Activity for Route Calculation
You can set the device to calculate the route based on activity type.
1 Select > Activity Profiles.
2 Select a profile.
3 Select Navigation > Routing > Routing Mode.
4 Select an option to calculate your route.
For example, you can select Road Cycling for on-road navigation or Mountain Biking for off-road navigation.
Connected Features
WARNING
While cycling, do not interact with the display to enter information or to read or reply to messages, because
doing so can cause a distraction that could lead to an accident causing serious personal injury or death.
Connected features are available for your Edge bike computer when you connect the bike computer to a
compatible phone using Bluetooth technology.
Connected Features 15

Pairing Your Phone
To use the connected features of the Edge bike computer, it must be paired directly through the Garmin Connect
app, instead of from the Bluetooth settings on your phone.
1 Hold to turn on the device.
2 If this is the first time you have turned on the device, select a device language.
The next screen prompts you to pair with your phone.
3 Scan the QR code with your phone, and follow the on-screen instructions to complete the pairing and setup
process.
4 If necessary, to manually enter pairing mode, swipe down from the home screen to view the status widget,
and select Phone > Pair Smartphone (Viewing Widgets, page3).
NOTE: If you are pairing a new phone, select the name of the previously paired phone, and select to forget
the phone. Pair Smartphone appears after you forget the previously paired phone.
After you pair successfully, a message appears, and your bike computer syncs automatically with your phone.
Bluetooth Connected Features
The Edge device has several Bluetooth connected features for your compatible phone using the Garmin
Connect and Connect IQ apps. Go to www.garmin.com/apps for more information.
Activity uploads to Garmin Connect: Automatically sends your activity to Garmin Connect as soon as you finish
recording the activity.
Audio prompts: Allows the Garmin Connect app to play status announcements on your phone during a ride.
Bike alarm: Allows you to enable an alarm that sounds on the device and sends an alert to your phone when the
device detects motion.
Connect IQ downloadable features: Allows you to download Connect IQ features from the Connect IQ app.
Course downloads from Garmin Connect: Allows you to search for courses on Garmin Connect using your
phone and send them to your device.
Find my Edge: Locates your lost Edge device that is paired with your phone and currently within range.
Messages: Allows you to reply to an incoming call or text message with a preset text message. This feature is
available with compatible Android
™
phones.
Music controls: Allows you to use your device to control music playback on your phone.
Notifications: Displays phone notifications and messages on your device.
Safety and tracking features: (Safety and Tracking Features, page17)
Social media interactions: Allows you to post an update to your favorite social media website when you upload
an activity to Garmin Connect.
Weather updates: Sends real-time weather conditions and alerts to your device.
16 Connected Features
Safety and Tracking Features
CAUTION
The safety and tracking features are supplemental features and should not be relied on as a primary method to
obtain emergency assistance. The Garmin Connect app does not contact emergency services on your behalf.
NOTICE
To use these features, the Edge Explore 2 device must have GPS enabled and be connected to the Garmin
Connect app using Bluetooth technology. You can enter emergency contacts in your Garmin Connect account.
The Edge Explore 2 device has safety and tracking features that must be set up with the Garmin Connect app.
For more information about safety and tracking features, go to www.garmin.com/safety.
Assistance: Allows you to send a message with your name, LiveTrack link, and GPS location (if available) to
your emergency contacts.
Incident detection: When the Edge Explore 2 device detects an incident during certain outdoor activities, the
device sends an automated message, LiveTrack link, and GPS location (if available) to your emergency
contacts.
LiveTrack: Allows friends and family to follow your races and training activities in real time. You can invite
followers using email or social media, allowing them to view your live data on a web page.
Live Event Sharing: Allows you to send messages to friends and family during an event, providing real-time
updates.
NOTE: This feature is available only if your device is connected to a compatible Android phone.
GroupRide: Allows you to create and access shared courses, group messaging, and live location data with other
riders.
GroupTrack: Allows you to keep track of your connections using LiveTrack directly on screen and in real time.
Incident Detection
CAUTION
Incident detection is a supplemental feature available only for certain outdoor activities. Incident detection
should not be relied on as a primary method to obtain emergency assistance. The Garmin Connect app does not
contact emergency services on your behalf.
NOTICE
Before you can enable incident detection on your device, you must set up emergency contact information in
the Garmin Connect app. Your paired phone must be equipped with a data plan and be in an area of network
coverage where data is available. Your emergency contacts must be able to receive text messages (standard
text messaging rates may apply).
When an incident is detected by your Edge device with GPS enabled, the Garmin Connect app can send an
automated text message and email with your name and GPS location, if available, to your emergency contacts.
A message appears on your device and paired phone indicating your contacts will be informed after 30 seconds
have elapsed. If assistance is not needed, you can cancel the automated emergency message.
Connected Features 17
Assistance
CAUTION
Assistance is a supplemental feature and should not be relied on as a primary method to obtain emergency
assistance. The Garmin Connect app does not contact emergency services on your behalf.
NOTICE
Before you can enable the assistance feature on your device, you must set up emergency contact information
in the Garmin Connect app. Your paired phone must be equipped with a data plan and be in an area of network
coverage where data is available. Your emergency contacts must be able to receive text messages (standard
text messaging rates may apply).
When your Edge device with GPS enabled is connected to the Garmin Connect app, you can send an automated
text message with your name and GPS location, if available, to your emergency contacts.
A message appears on your device indicating your contacts will be informed after a countdown has elapsed. If
assistance is not needed, you can cancel the message.
Adding Emergency Contacts
Emergency contact phone numbers are used for the safety and tracking features.
1 From the Garmin Connect app, select .
2 Select Safety & Tracking > Safety Features > Emergency Contacts > Add Emergency Contacts.
3 Follow the on-screen instructions.
Your emergency contacts receive a notification when you add them as an emergency contact, and can accept or
decline your request. If a contact declines, you must choose another emergency contact.
Viewing Your Emergency Contacts
Before you can view your emergency contacts on your device, you must set up your rider information and
emergency contacts in the Garmin Connect app.
Select > Safety & Tracking > Emergency Contacts.
Your emergency contacts' names and phone numbers appear.
Requesting Assistance
NOTICE
Before you can request assistance, you must enable GPS on your Edge device and set up emergency contact
information in the Garmin Connect app. Your paired phone must be equipped with a data plan and be in an area
of network coverage where data is available. Your emergency contacts must be able to receive emails or text
messages (standard text messaging rates may apply).
1 Hold for five seconds to activate the assistance feature.
The device beeps and sends the message after the five-second countdown is complete.
TIP: You can select before the countdown is complete to cancel the message.
2 If necessary, select Send to send the message immediately.
Turning Incident Detection On and Off
NOTE: Your paired phone must be equipped with a data plan and be in an area of network coverage where data
is available.
1 Select > Safety & Tracking > Incident Detection.
2 Select the activity profile to enable incident detection.
NOTE: Incident detection is enabled by default for certain outdoor activities. Depending on the terrain and
your riding style, false positives can occur.
Cancelling an Automated Message
When an incident is detected by your device, you can cancel the automated emergency message on your device
or your paired phone before it is sent to your emergency contacts.
Before the end of the 30-second countdown, hold Press and hold to cancel..
18 Connected Features
Sending a Status Update After an Incident
Before you can send a status update to your emergency contacts, your device must detect an incident and send
an automated emergency message to your emergency contacts.
You can send a status update to your emergency contacts informing them you are not in need of assistance.
1 Swipe down from the top of the screen, and swipe left or right to view the controls widget.
2 Select Incident Detected > I'm Okay.
A message is sent to all emergency contacts.
LiveTrack
NOTICE
It is your responsibility to use discretion when sharing location information with others. Always ensure you are
aware of and comfortable with the rider with whom you share your location information.
The LiveTrack feature lets you share your cycling activities with contacts from your phone and your social
media accounts. While you are sharing, viewers can track your current location and view your live data on a web
page in real time.
To use this feature, the Edge Explore 2 device must have GPS enabled and be connected to the Garmin Connect
app using Bluetooth technology.
Turning On LiveTrack
Before you can start your first LiveTrack session, you must set up contacts in the Garmin Connect app.
1 Select > Safety & Tracking > LiveTrack.
2 Select an option:
• Select Auto Start to start a LiveTrack session each time you start this type of activity.
• Select LiveTrack Name to update the name of your LiveTrack session. The current date is the default
name.
• Select Recipients to view recipients.
• Select Course Sharing if you want your recipients to see your course.
• Select Spectator Messaging if you want to allow your recipients to send you text messages during your
cycling activity (Spectator Messaging, page24).
• Select Extend LiveTrack to extend viewing of the LiveTrack session for 24 hours.
3 Select Start LiveTrack.
Recipients can view your live data on a Garmin Connect tracking page.
Connected Features 19
Starting a GroupTrack Session
Before you can start a GroupTrack session, you must have a phone with the Garmin Connect app paired to your
device (Pairing Your Phone, page16).
NOTE: This feature is required for group rides with the Edge Explore , and earlier bike computers.
For Edge 1040, 840, 540 and later bike computers, use the GroupRide feature (Starting a GroupRide Session,
page21).
During a ride, you can see the riders in your GroupTrack session on the map.
1 On the Edge bike computer, select > Safety & Tracking > LiveTrack > GroupTrack to enable viewing
connections on the map screen and message notifications.
2 From the Garmin Connect app, select > Safety & Tracking > LiveTrack > Settings > GroupTrack > All
Connections.
3 Select Start LiveTrack.
4 On the Edge bike computer, press , and go for a ride.
5 Scroll to the map to view your connections.
You can tap an icon on the map to view location and heading information for other riders in the GroupTrack
session.
6 Scroll to the GroupTrack list.
You can select a rider from the list, and that rider appears centered on the map.
Tips for GroupTrack Sessions
The GroupTrack feature allows you to keep track of other riders in your group using LiveTrack directly on the
screen. All riders in the group must be your connections in your Garmin Connect account.
• Ride outside using GPS.
• Pair your Edge Explore 2 bike computer with your phone using Bluetooth technology.
• From the Garmin Connect app, select > Connections, and select to update the list of riders for your
GroupTrack session.
• Make sure all of your connections pair to their phones and start a LiveTrack session in the Garmin Connect
app.
• Make sure all your connections are in range (40km or 25mi.).
• During a GroupTrack session, scroll to the map to view your connections.
• Stop riding before you attempt to view location and heading information for other riders in the GroupTrack
session.
20 Connected Features
Live Event Sharing
Live event sharing allows you to send messages to friends and family during an event, providing real-time
updates including cumulative time and last lap time. Before the event, you can customize the list of recipients
and the message content in the Garmin Connect app.
Turning On Live Event Sharing
Before you can use live event sharing, you must set up the LiveTrack feature in the Garmin Connect app.
NOTE: LiveTrack features are available when your device is connected to the Garmin Connect app using
Bluetooth technology, with a compatible Android phone.
1 Turn on your Edge bike computer.
2 In the Garmin Connect app, select > Safety & Tracking > Live Event Sharing.
3 Select Devices, and select your Edge bike computer.
4 Select the toggle switch to enable Live Event Sharing.
5 Select Done.
6 Select Recipients to add people from your contacts.
7 Select Message Options to customize the message triggers and options.
8 Go outside, and select a GPS biking profile on your Edge Explore 2 bike computer.
Live event sharing is enabled for 24 hours.
GroupRide
WARNING
While cycling, always maintain awareness of your surroundings, and operate the bicycle in a safe manner.
Failure to do so could result in serious injury or death.
NOTICE
It is your responsibility to use discretion when sharing location information with other riders. Always ensure you
are aware of and comfortable with the riders with whom you share your location information.
With the GroupRide feature on your Edge bike computer, you can create and access shared courses, group
messaging, and live location data with other riders with compatible devices.
Starting a GroupRide Session
Before you can start a GroupRide session, you must have a phone with the Garmin Connect app paired to your
device (Pairing Your Phone, page16).
1 Scroll to the GroupRide glance.
2 Select to agree to sharing your live location with other riders.
3 Select Create GroupRide.
4 Select Name, Date, or Start Time to edit the information (optional).
5 Select Add Course to share a course with other riders.
You can select from your saved courses, or you can select to create a new course (Courses, page10).
Connected Features 21
6 Select Generate Code.
Your Edge bike computer generates a code that you can send to other riders.
7 Select > Share Code > .
8 Open the Garmin Connect app, and select View Code > Share.
9 Select the method for sharing the code with other riders.
The Garmin Connect app shares the GroupRide code with your contacts.
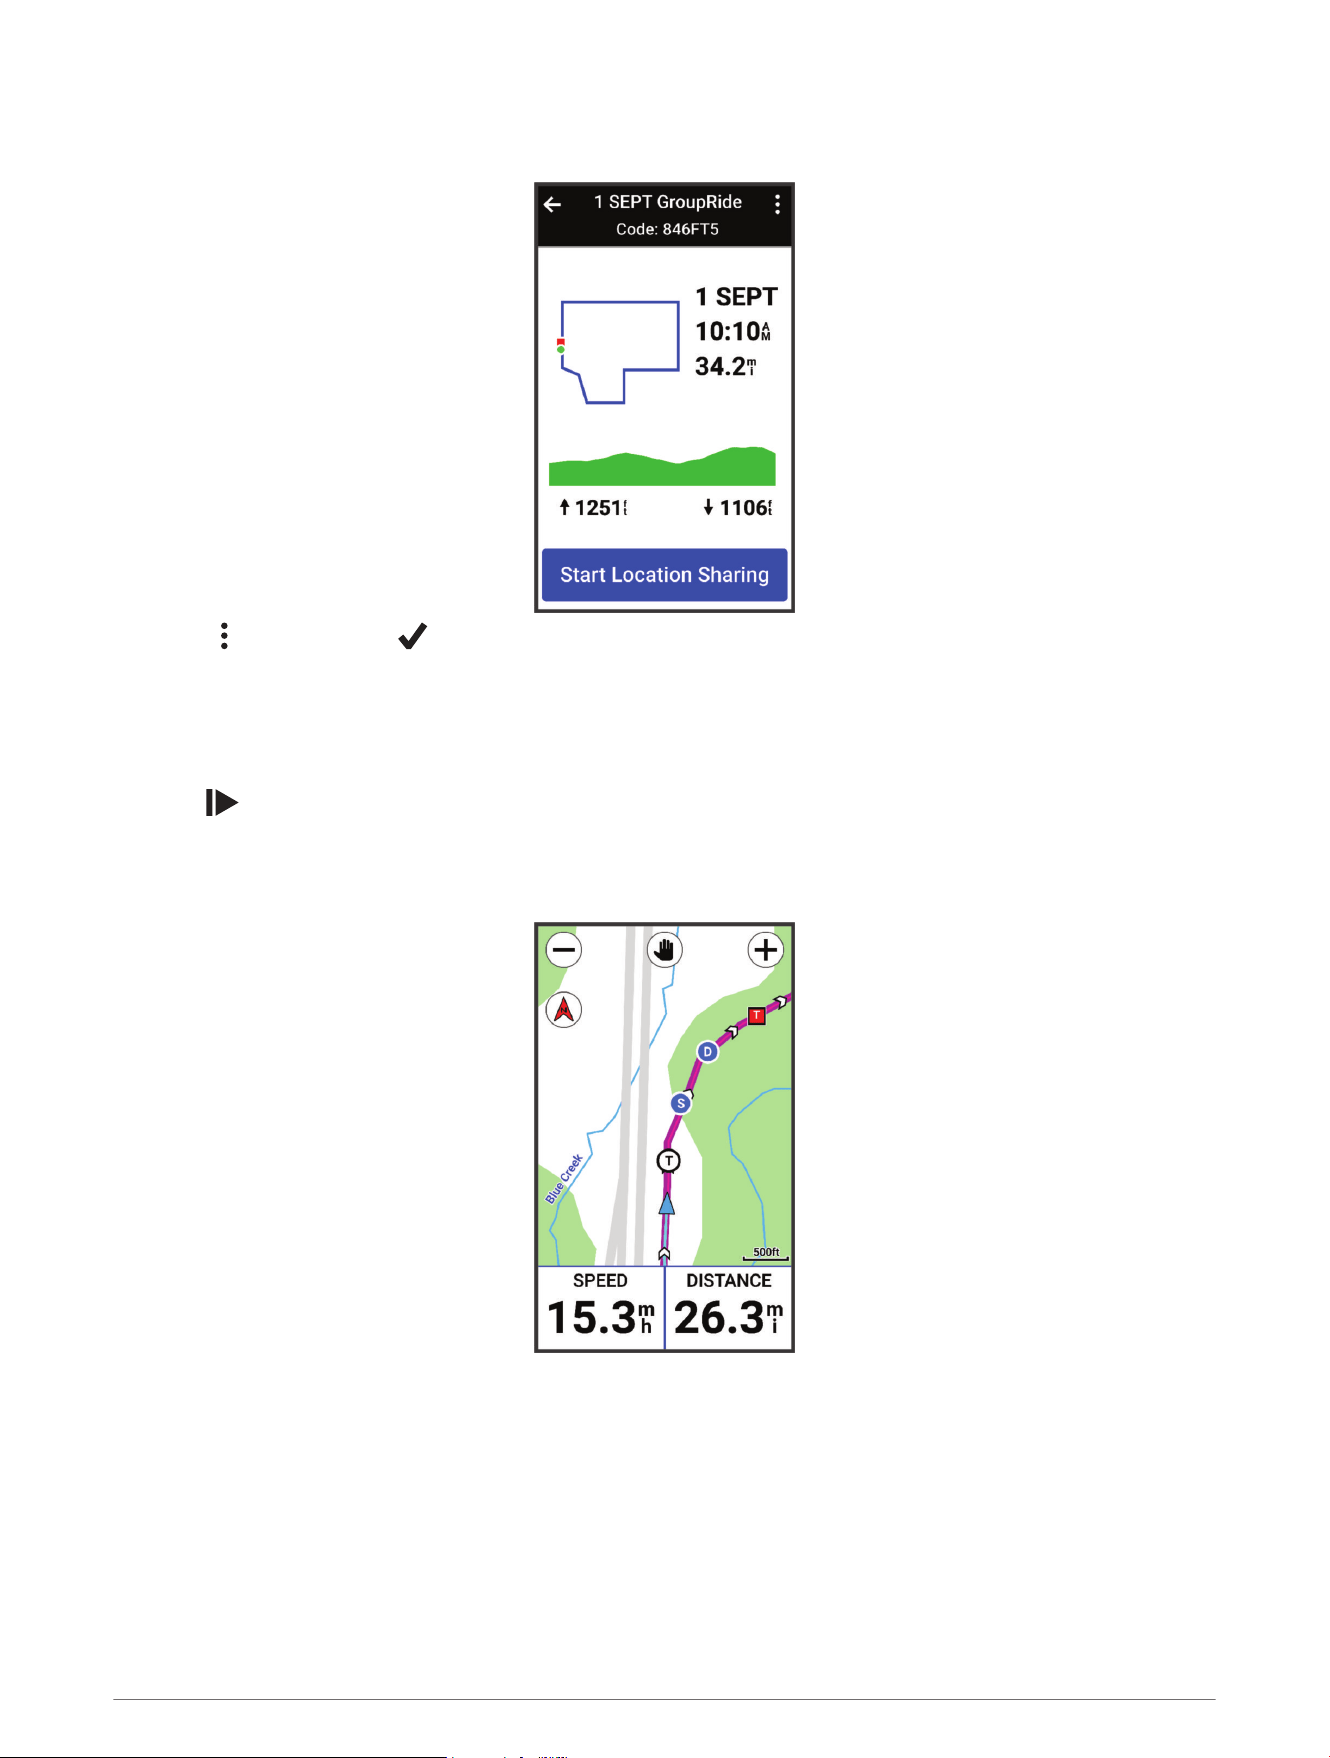
10 On the Edge bike computer, select Start Location Sharing.
11 Press , and go for a ride.
The GroupRide data screen is added to the data screens for the active profile.
12 Select a rider from the GroupRide data screen to view their position on the map, or scroll to the map to view
all riders (GroupRide Map Status, page24).
You can tap an icon on the map to view location, heading, and status information for other riders during the
GroupRide session.
22 Connected Features

Joining a GroupRide Session
You can join a GroupRide session on your Edge bike computer when the GroupRide code is shared with you. You
can enter the code prior to the start of the ride.
1 Scroll to the GroupRide glance.
TIP: You can add the GroupRide glance to the glance loop (Customizing the Glances, page46).
2 Select Enter Code.
3 Enter the 6-digit code, and select .
Your Edge bike computer automatically downloads the course.
4 On the day of the ride, select Start Location Sharing.
5 Press , and go for a ride.
Sending a GroupRide Message
You can send a message to other riders during a GroupRide session.
1 From the GroupRide data screen on your Edge bike computer, select > .
2 Select an option:
• Select a message from the list of preset text responses.
• Select Type Message to send a customized message.
NOTE: You can customize the preset text responses in the device settings in the Garmin Connect app. After
customizing settings, you must sync your data to apply the changes to your Edge bike computer.
NOTE: You can scroll up to the top of the message screen to view older messages, including any messages
sent before you joined the GroupRide session (Joining a GroupRide Session, page23).
Connected Features 23
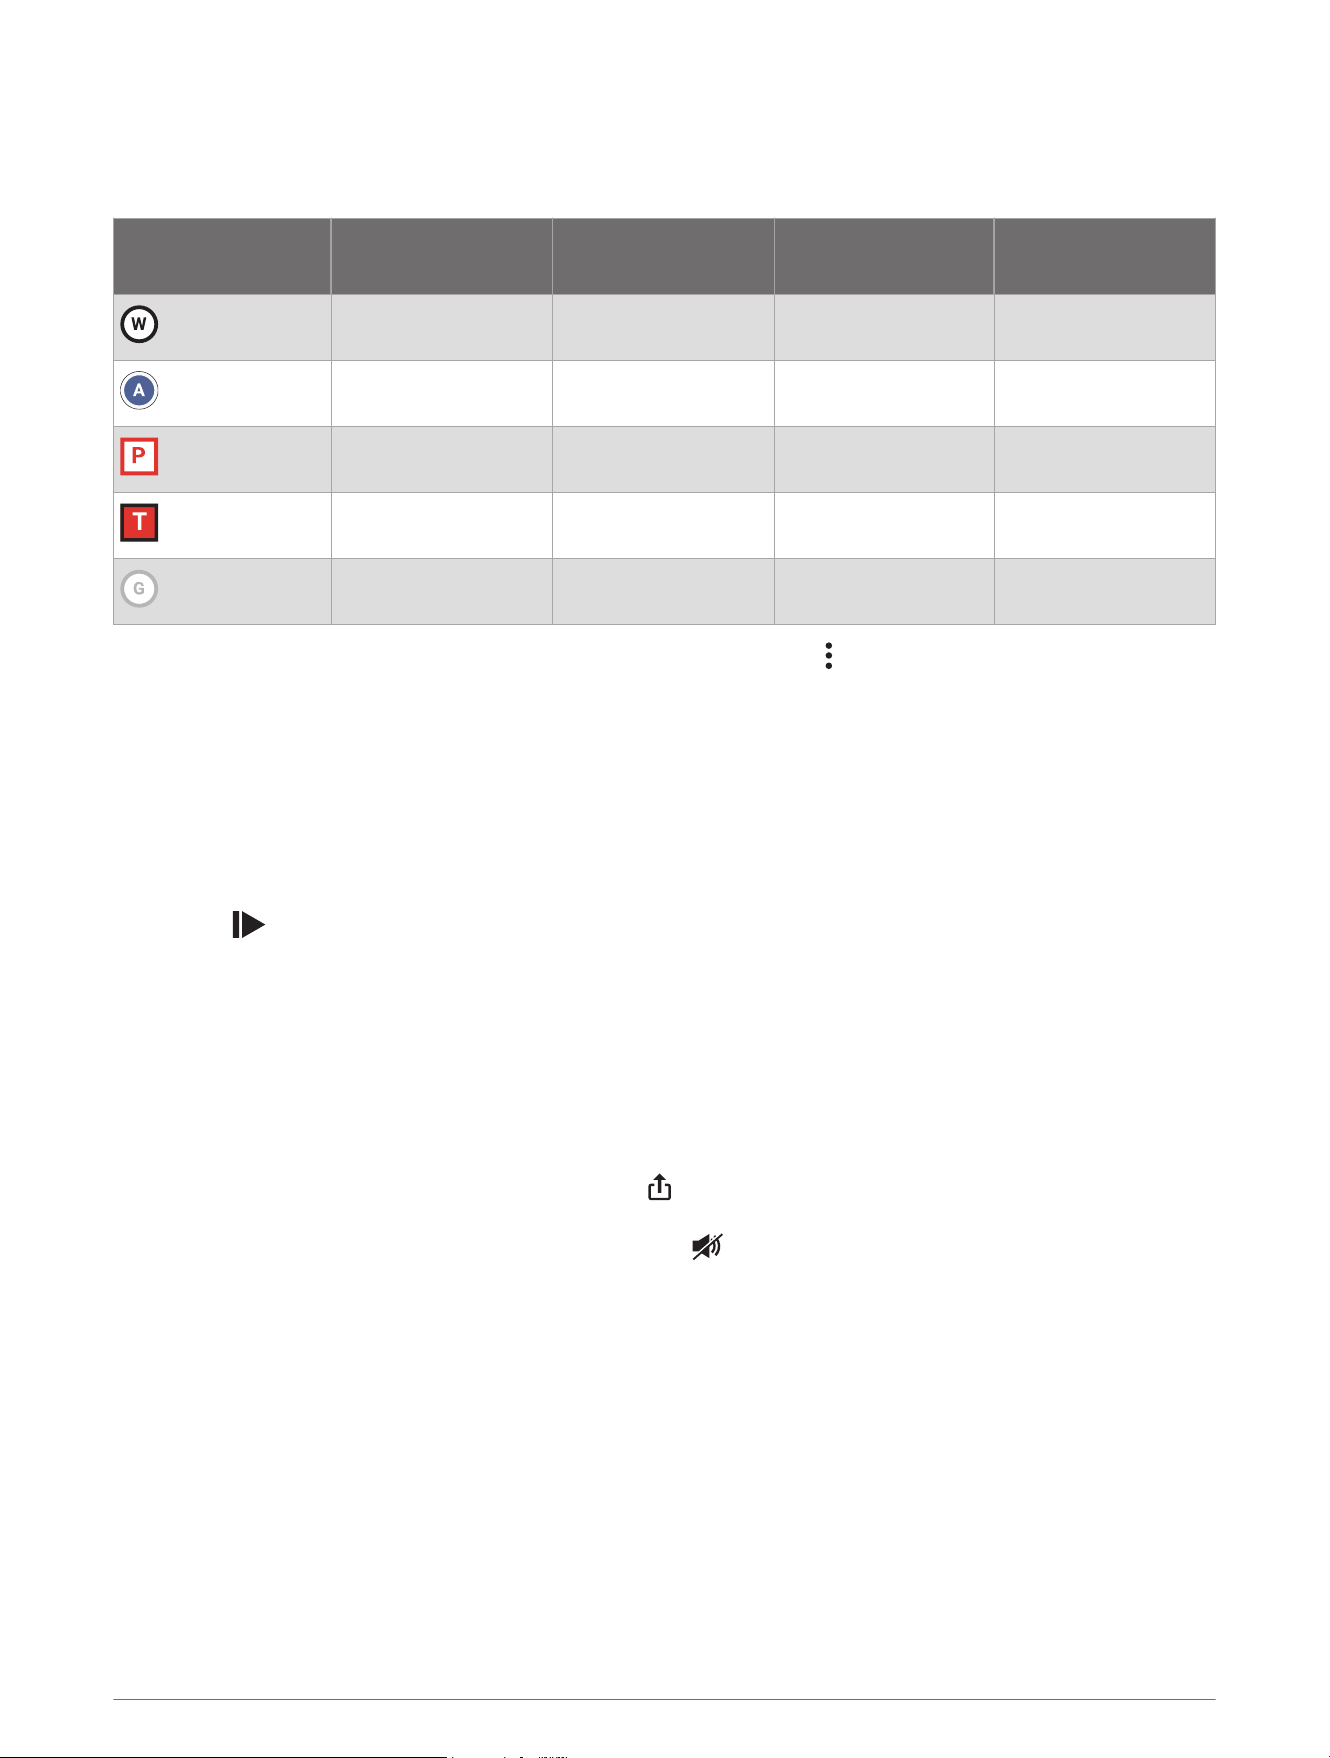
GroupRide Map Status
During a ride, you can see the riders in your GroupRide session on the map.
TIP: The letters inside the map icons correspond to the initials of the rider's first name.
Icon Shape Color Moving
Connected on the
Garmin Connect App
Circle White Yes No
Circle Blue Yes Yes
Square White No No
Square Red No Yes
Circle Gray Unknown Unknown
NOTE: To customize the map settings, from the GroupRide page select .
Leaving a GroupRide Session
In order for your Edge bike computer to remove you from the other riders' maps and lists, you must have an
active internet connection.
You can leave a GroupRide session anytime.
Select an option:
• During the ride, swipe down to view the controls widget, and select Leave GroupRide.
• From the GroupRide page, select Leave GroupRide.
• Press > Save to stop the activity time and complete your activity.
TIP: The Edge bike computer automatically removes the GroupRide session when it expires (Tips for
GroupRide Sessions, page24).
Tips for GroupRide Sessions
• Ride outside using GPS.
• Pair your compatible Edge bike computer with your phone using Bluetooth technology.
• Group riders can add a GroupRide session to their device at any time, and then join the session on the day of
the ride. Sessions expire 24 hours after the start time.
• To share the GroupRide code during the ride, select from the GroupRide data screen on the Edge bike
computer.
• When you receive a GroupRide message, you can select to mute all message prompts for that GroupRide
session.
• The rider list refreshes every 15 seconds and shows details for the 25 closest riders within 40 km (25 mi). To
view additional riders outside the 40 km (25 mi) radius, select Show More.
• During the ride, swipe down to view the controls widget for more options.
• Stop riding before you attempt to view location and heading information for other riders in the GroupRide
session (GroupRide Map Status, page24).
Spectator Messaging
NOTE: Your paired phone must be equipped with a data plan and be in an area of network coverage where data
is available.
Spectator messaging is a feature that allows your LiveTrack followers to send you text messages during your
cycling activity. You can set up this feature in the LiveTrack settings of the Garmin Connect app.
24 Connected Features
Blocking Spectator Messages
If you want to block spectator messages, Garmin recommends turning them off before you start the activity.
Select > Safety & Tracking > LiveTrack > Spectator Messaging.
Setting the Bike Alarm
You can turn on the bike alarm when you are away from your bike, such as on a stop during a long ride. You can
control the bike alarm from your device or the device settings in the Garmin Connect app.
1 Select > Safety & Tracking > Bike Alarm.
2 Create or update your passcode.
When you disable the bike alarm from your Edge device, you are prompted to enter the passcode.
3 Swipe down from the top of the screen, and on the controls widget, select Set Bike Alarm.
If the device detects motion, it sounds an alarm and sends an alert to your connected phone.
Playing Audio Prompts on Your Phone
Before you can set up audio prompts, you must have a phone with the Garmin Connect app paired to your Edge
bike computer.
You can set the Garmin Connect app to play motivational status announcements on your phone during a ride or
other activity. Audio prompts include the lap number and lap time, navigation, power, pace or speed, and heart
rate data. During an audio prompt, the Garmin Connect app mutes the primary audio of the phone to play the
announcement. You can customize the volume levels on the Garmin Connect app.
1 From the Garmin Connect app, select .
2 Select Garmin Devices.
3 Select your device.
4 Select Audio Prompts.
Listening to Music
WARNING
Do not listen to music while cycling on public roadways, as this can cause distraction leading to an accident
resulting in personal injury or death. It is the user's responsibility to know and understand local laws and
regulations relating to headphone usage while cycling.
You can control music playback on your phone from your Edge bike computer.
1 On your phone, start playing a song or playlist.
2 Select an option:
• Swipe down from the top of the Edge bike computer to view the widgets and then swipe left or right to
view the music controls widget.
NOTE: You can add options to the widget loop (Customizing the Widget Loop, page46).
• Swipe left or right to view the music controls data screen (Adding a Music Control Data Screen, page41).
3 Start listening to music from your paired phone.
You can control music playback on your phone from your Edge bike computer.
Training
Training Indoors
The device includes an indoor activity profile where GPS is turned off. When GPS is turned off, speed and
distance are not available unless you have a compatible sensor or indoor trainer that sends speed and distance
data to the device.
Training 25

Pairing Your Indoor Trainer
1 Bring the Edge bike computer within 3m (10ft.) of the indoor trainer.
2 Select the indoor biking profile.
3 On the indoor trainer, start pedaling or press the pairing button.
For more information, see the owner's manual for your indoor trainer.
4 On the Edge bike computer, a message appears.
NOTE: If you don't see a message, select > Sensors > Add Sensor.
5 Follow the on-screen instructions.
When the indoor trainer is paired with your Edge bike computer using ANT+
®
technology, the indoor trainer
appears as a connected sensor. You can customize your data fields to display sensor data.
Using an Indoor Trainer
Before you can use a compatible indoor trainer, you must pair the trainer with your device using ANT+
technology (Pairing Your Indoor Trainer, page26).
Not all features and settings are available for every indoor trainer. For more information, see the owner's manual
for your trainer.
You can use your device with an indoor trainer to simulate resistance while following a course or activity. While
using an indoor trainer, GPS is turned off automatically.
1 Select > Training > Smart Trainer.
2 Select an option:
• Select Free Ride to manually adjust the resistance level.
• Select Follow a Course to follow a saved course (Courses, page10).
• Select Follow an Activity to follow a saved ride (Going for a Ride, page5).
• If available, select Set Grade, Set Resistance, or Set Target Power to customize your ride.
NOTE: The trainer resistance changes based on the course or ride information.
3 Select a course or activity.
4 Select Ride.
5 Press to start the activity timer.
Setting Resistance
1 Select > Training > Smart Trainer > Set Resistance.
2 Select or to set the resistance force applied by the trainer.
3 Press to start the activity timer.
4 If necessary, select or to adjust the resistance during your activity.
Setting the Simulated Grade
1 Select > Training > Smart Trainer > Set Grade.
2 Select or to set the simulated grade applied by the trainer.
3 Press to start the activity timer.
4 If necessary, select or to adjust the simulated grade during your activity.
Setting Target Power
1 Select > Training > Smart Trainer > Set Target Power.
2 Set the target power value.
3 Press to start the activity timer.
The resistance force applied by the trainer is adjusted to maintain a constant power output based on your
speed.
4 If necessary, select or to adjust the target power during your activity.
26 Training

Setting a Training Target
1 Select Training > Set a Target.
2 Select an option:
• Select Distance Only to select a preset distance or enter a custom distance.
• Select Distance and Time to select a distance and time target.
• Select Distance and Speed to select a distance and speed target.
The training target screen appears, indicating your estimated finish time. The estimated finish time is based
on your current performance and the time remaining.
3 Select .
4 Press to start the activity timer.
5 After you complete your activity, press , and select Save.
Racing a Previous Activity
You can race a previously recorded activity or saved course.
1 Select > Training > Race an Activity.
2 Select an option:
• Select Ride History.
• Select Saved Courses.
3 Select the activity or course.
4 Select Ride.
5 Press to start the activity timer.
My Stats
The Edge Explore 2 bike computer can track your personal statistics and calculate performance measurements.
Performance measurements require a compatible heart rate monitor, power meter, or smart trainer.
Performance Measurements
These performance measurements are estimates that can help you track and understand your training activities
and race performances. The measurements require a few activities using wrist-based heart rate or a compatible
chest heart rate monitor. Cycling performance measurements require a heart rate monitor and a power meter.
These estimates are provided and supported by Firstbeat Analytics
™
. For more information, go to
www.garmin.com/performance-data.
NOTE: The estimates may seem inaccurate at first. The device requires you to complete a few activities to learn
about your performance.
VO2 max.: VO2 max. is the maximum volume of oxygen (in milliliters) you can consume per minute per kilogram
of body weight at your maximum performance. Your device displays heat and altitude corrected VO2 max.
values when you are acclimating to high heat environments or high altitude.
Recovery time: The recovery time displays how much time remains before you are fully recovered and ready for
the next hard workout.
About VO2 Max. Estimates
VO2 max. is the maximum volume of oxygen (in milliliters) you can consume per minute per kilogram of body
weight at your maximum performance. In simple terms, VO2 max. is an indication of athletic performance and
should increase as your level of fitness improves. VO2 max. estimates are provided and supported by Firstbeat.
You can use your Garmin device paired with a compatible heart rate monitor and power meter to display your
cycling VO2 max. estimate.
My Stats 27
Getting Your VO2 Max. Estimate
Before you can view your VO2 max. estimate, you must put on the heart rate monitor, install the power meter,
and pair them with your device (Pairing Your Wireless Sensors, page32). For the most accurate estimate,
complete the user profile setup (Setting Up Your User Profile, page30), and set your maximum heart rate
(Setting Your Heart Rate Zones, page32).
NOTE: The estimate may seem inaccurate at first. The device requires a few rides to learn about your cycling
performance.
1 Ride at a steady, high intensity for at least 20 minutes.
2 After your ride, select Save.
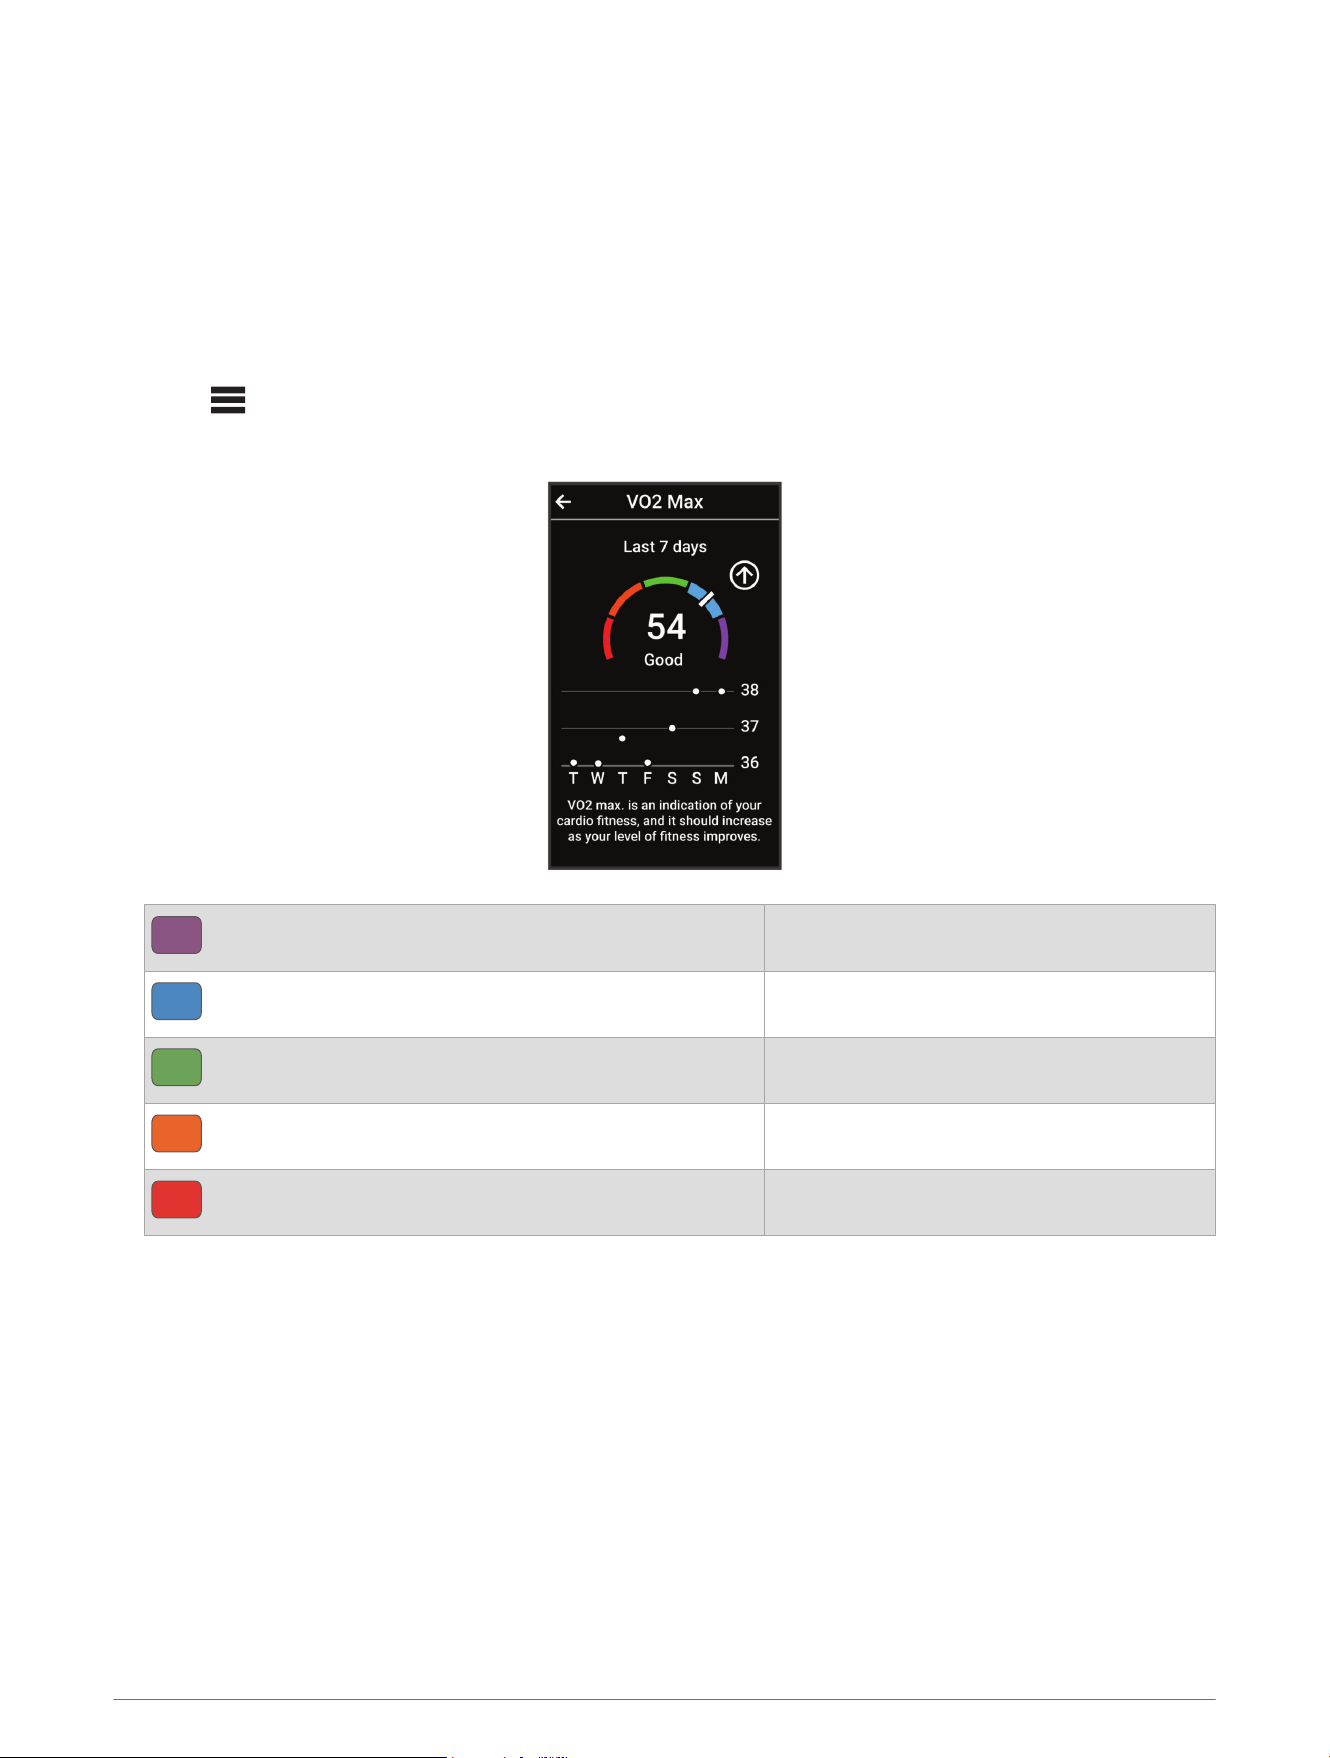
3 Select > My Stats > VO2 Max.
Your VO2 max. estimate appears as a number and position on the color gauge.
Purple
Superior
Blue
Excellent
Green
Good
Orange
Fair
Red
Poor
VO2 max. data and analysis is provided with permission from The Cooper Institute
®
. For more information,
see the appendix (VO2 Max. Standard Ratings, page60), and go to www.CooperInstitute.org.
Tips for Cycling VO2 Max. Estimates
The success and accuracy of the VO2 max. calculation improves when your ride is a sustained and moderately
hard effort, and where heart rate and power are not highly variable.
• Before your ride, check that your device, heart rate monitor, and power meter are functioning properly, paired,
and have good battery life.
• During your 20 minute ride, maintain your heart rate at greater than 70% of your maximum heart rate.
• During your 20 minute ride, maintain a fairly constant power output.
• Avoid rolling terrain.
• Avoid riding in groups where there is a lot of drafting.
28 My Stats

Recovery Time
You can use your Garmin device with wrist-based heart rate or a compatible chest heart rate monitor to display
how much time remains before you are fully recovered and ready for the next hard workout.
NOTE: The recovery time recommendation uses your VO2 max. estimate and may seem inaccurate at first. The
device requires you to complete a few activities to learn about your performance.
The recovery time appears immediately following an activity. The time counts down until it is optimal for you to
attempt another hard workout. The device updates your recovery time throughout the day based on changes in
sleep, stress, relaxation, and physical activity.
Viewing Your Recovery Time
Before you can use the recovery time feature, you must have a Garmin device with wrist-based heart rate or a
compatible chest heart rate monitor paired with your device (Pairing Your Wireless Sensors, page32). If your
device was packaged with a heart rate monitor, the device and sensor are already paired. For the most accurate
estimate, complete the user profile setup (Setting Up Your User Profile, page30), and set your maximum heart
rate (Setting Your Heart Rate Zones, page32).
1 Select > My Stats > Recovery > > Enable.
2 Go for a ride.
3 After your ride, select Save.
The recovery time appears. The maximum time is 4 days, and the minimum time is 6 hours.
Turning Off Performance Notifications
Performance notifications are turned on by default. Some performance notifications are alerts that appear upon
completion of your activity. Some performance notifications appear during an activity or when you achieve a
new performance measurement, such as a new VO2 max. estimate.
1 Select > My Stats > Performance Notifications.
2 Select an option.
Viewing Your Fitness Age
Before the device can calculate an accurate fitness age, you must complete the user profile setup in the Garmin
Connect app.
Your fitness age gives you an idea of how your fitness compares with a person of the same sex. Your device
uses information, such as your age, body mass index (BMI), resting heart rate data, and vigorous activity history
to provide a fitness age. If you have an Index
™
scale, your device uses the body fat percentage metric instead of
BMI to determine your fitness age. Exercise and lifestyle changes can impact your fitness age.
Select > My Stats > Fitness Age.
Viewing Intensity Minutes
Before the device can calculate your intensity minutes, you must pair your device and go for a ride with a
compatible heart rate monitor (Pairing Your Wireless Sensors, page32).
To improve your health, organizations such as the World Health Organization recommend at least 150 minutes
per week of moderate intensity activity or 75 minutes per week of vigorous intensity activity. The Edge bike
computer, when paired with a heart rate monitor, tracks your time spent participating in moderate to vigorous
activities, your weekly intensity minutes goal, and progress toward your goal.
Select > My Stats > Intensity Minutes.
Personal Records
When you complete a ride, the device displays any new personal records you achieved during that ride. Personal
records include your fastest time over a standard distance, longest ride, and most ascent gained during a ride.
When paired with a compatible power meter, the device displays the maximum power reading recorded during a
20-minute period.
My Stats 29

Viewing Your Personal Records
Select > My Stats > Personal Records.
Reverting a Personal Record
You can set each personal record back to the one previously recorded.
1 Select > My Stats > Personal Records.
2 Select a record to revert.
3 Select Previous Record > .
NOTE: This does not delete any saved activities.
Deleting a Personal Record
1 Select > My Stats > Personal Records.
2 Select a personal record.
3 Select > .
Training Zones
• Heart rate zones (Setting Your Heart Rate Zones, page32)
• Power zones (Setting Your Power Zones, page33)
Setting Up Your User Profile
You can update your sex, age, weight, and height settings. The device uses this information to calculate
accurate ride data.
1 Select > My Stats > User Profile.
2 Select an option.
30 My Stats
Wireless Sensors
Your Edge bike computer can be paired and used with wireless sensors using ANT+ or Bluetooth technology
(Pairing Your Wireless Sensors, page32). After the devices are paired, you can customize the optional data
fields (Adding a Data Screen, page40). If your device was packaged with a sensor, they are already paired.
For information about specific Garmin sensor compatibility, purchasing, or to view the owner's manual, go to
buy.garmin.com for that sensor.
Sensor Type Description
eBike
You can use your device with your eBike and view bike data, such as battery and shifting
information, during your rides (Viewing eBike Sensor Details, page35).
Edge Remote
You can control your Edge bike computer with the Edge remote, including starting the activity
timer, marking laps, and scrolling through data screens.
Heart Rate
You can use an external sensor, such as the HRM 200, HRM 600, HRM-Dual
™
, HRM-Fit
™
, or
HRM-Pro
™
series heart rate monitor, to view heart rate data during your activities.
inReach
Remote
The inReach
®
remote function allows you to control your inReach satellite communicator using
your Edge bike computer (Using the inReach Remote, page35).
Lights
You can use Varia
™
smart bike lights to improve situational awareness. With a Varia headlight
camera, you can also take photos and record video during a ride (Using the Varia Camera
Controls, page34).
Power
You can use the Rally
™
or Vector
™
power meter bike pedals to view power data on your device.
You can adjust the power zones to match your goals and abilities (Setting Your Power Zones,
page33), or use range alerts to be notified when you reach a specified power zone (Setting
Range Alerts, page42).
Radar
You can use a Varia rearview bike radar to improve situational awareness and send alerts about
approaching vehicles. With a Varia radar camera tail light, you can also take photos and record
video during a ride (Using the Varia Camera Controls, page34).
Shimano E-
Bike
You can use your bike computer with your Shimano
®
eBike system and view bike data, such as
battery and shifting information, during your rides (Viewing eBike Sensor Details, page35).
Smart
Trainer
You can use your bike computer with an indoor bike smart trainer to simulate resistance while
following a course or ride (Using an Indoor Trainer, page26).
Speed/
Cadence
You can attach speed or cadence sensors to your bike and view the data on your bike computer
during your ride. If necessary, you can manually enter your wheel circumference (Wheel Size
and Circumference, page61).
Tempe
You can attach the tempe
™
temperature sensor to a secure strap or loop where it is exposed to
ambient air, so it provides a consistent source of accurate temperature data.
VIRB
The VIRB
®
remote function allows you to control your VIRB action camera using your bike
computer.
Wireless Sensors 31

Pairing Your Wireless Sensors
The first time you connect a wireless sensor to your device using ANT+ or Bluetooth technology, you must pair
the device and sensor. After they are paired, the Edge bike computer connects to the sensor automatically when
you start an activity and the sensor is active and within range. For more information about connection types, go
to www.garmin.com/hrm_connection_types.
NOTE: If your device was packaged with a sensor, they are already paired.
1 Put on the heart rate monitor, install the sensor, or press the button to wake up the sensor.
NOTE: See your wireless sensor owner's manual for pairing information.
2 Bring the device within 3m (10ft.) of the sensor.
NOTE: Stay 10m (33ft.) away from other riders' sensors while pairing.
3 Select > Sensors > Add Sensor.
4 Select an option:
• Select a sensor type.
• Select Search All to search for all nearby sensors.
A list of available sensors appears.
5 Select one or more sensors to pair with your device.
6 Select Add.
When the sensor is paired with your device, the sensor status is Connected. You can customize a data field
to display sensor data.
Wireless Sensor Battery Life
After you go for a ride, battery life levels for the wireless sensors that were connected during the activity appear.
The list is sorted by battery level.
Setting Your Heart Rate Zones
The device uses your user profile information from the initial setup to determine your heart rate zones. You can
manually adjust the heart rate zones according to your fitness goals (Fitness Goals, page33). For the most
accurate calorie data during your activity, you should set your maximum heart rate, resting heart rate, and heart
rate zones.
1 Select > My Stats > Training Zones > Heart Rate Zones.
2 Enter your maximum and resting heart rate values.
The zone values update automatically, but you can also edit each value manually.
3 Select Based On:.
4 Select an option:
• Select BPM to view and edit the zones in beats per minute.
• Select % Max. to view and edit the zones as a percentage of your maximum heart rate.
• Select % HRR to view and edit the zones as a percentage of your heart rate reserve (maximum heart rate
minus resting heart rate).
About Heart Rate Zones
Many athletes use heart rate zones to measure and increase their cardiovascular strength and improve their
level of fitness. A heart rate zone is a set range of heartbeats per minute. The five commonly accepted
heart rate zones are numbered from 1 to 5 according to increasing intensity. Generally, heart rate zones are
calculated based on percentages of your maximum heart rate.
32 Wireless Sensors

Fitness Goals
Knowing your heart rate zones can help you measure and improve your fitness by understanding and applying
these principles.
• Your heart rate is a good measure of exercise intensity.
• Training in certain heart rate zones can help you improve cardiovascular capacity and strength.
If you know your maximum heart rate, you can use the table (Heart Rate Zone Calculations, page61) to
determine the best heart rate zone for your fitness objectives.
If you do not know your maximum heart rate, use one of the calculators available on the Internet. Some gyms
and health centers can provide a test that measures maximum heart rate. The default maximum heart rate is
220 minus your age.
Training with Power Meters
• Go to www.garmin.com/cycling for a list of power meters that are compatible with your Edge bike computer
(such as Rally and Vector systems).
• For more information, see the owner's manual for your power meter.
• Adjust your power zones to match your goals and abilities (Setting Your Power Zones, page33).
• Use range alerts to be notified when you reach a specified power zone (Setting Range Alerts, page42).
• Customize the power data fields (Adding a Data Screen, page40).
Setting Your Power Zones
The values for the zones are default values and may not match your personal abilities. You can manually adjust
your zones on the device or using Garmin Connect. If you know your functional threshold power (FTP) value, you
can enter it and allow the software to calculate your power zones automatically.
1 Select > My Stats > Training Zones > Power Zones.
2 Enter your FTP value.
3 Select Based On:.
4 Select an option:
• Select watts to view and edit the zones in watts.
• Select % FTP to view and edit the zones as a percentage of your functional threshold power.
• Select Configuration to edit the number of power zones.
Calibrating Your Power Meter
Before you can calibrate your power meter, you must install it, pair it with your device, and ensure the power
meter is actively transmitting data.
For calibration instructions specific to your power meter, see the manufacturer's instructions.
1 Select > Sensors.
2 Select your power meter.
3 Select Calibrate.
TIP: Keep your power meter active until the message appears.
4 Follow the on-screen instructions.
Pedal-Based Power
Rally measures pedal-based power.
Rally measures the force you apply a few hundred times every second. Rally also measures your cadence or
rotational pedaling speed. By measuring the force, the direction of force, the rotation of the crank arm, and time,
Rally can determine power (watts). Because Rally independently measures left and right leg power, it reports
your left-right power balance.
NOTE: The single-sensing Rally system does not provide left-right power balance.
Wireless Sensors 33
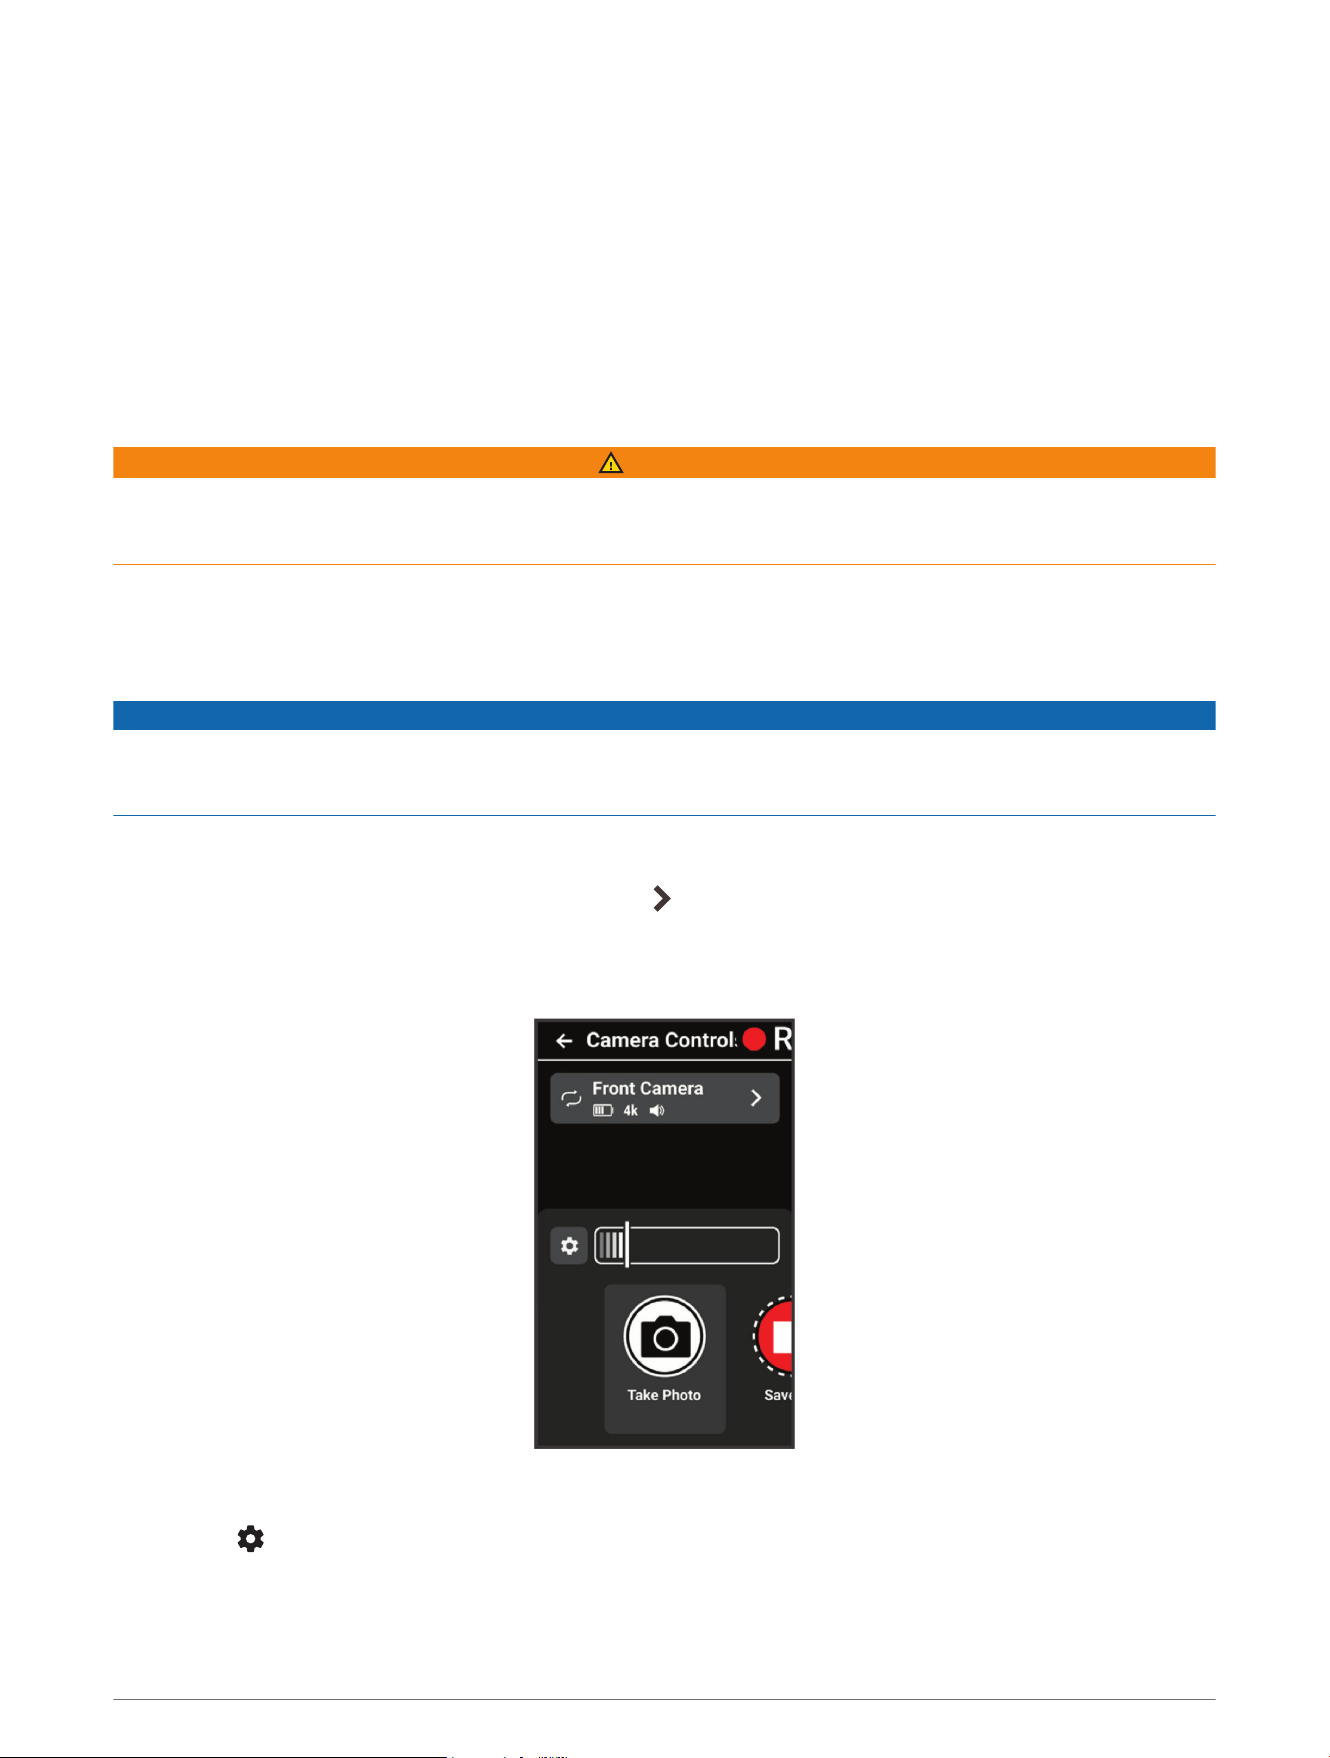
Updating the Rally System Software Using the Edge Bike Computer
Before you can update the software, you must pair your Edge bike computer with your Rally system.
1 Send your ride data to your Garmin Connect account (Sending Your Ride to Garmin Connect, page38).
Garmin Connect automatically looks for software updates and sends them to your Edge bike computer.
2 Bring your Edge bike computer within range (3m) of the power meters.
3 Rotate the crank arm a few times. The Edge bike computer prompts you to install all pending software
updates.
4 Follow the on-screen instructions.
Situational Awareness
WARNING
The Varia line of cycling awareness products can improve situational awareness. They are not a replacement
for cyclist attentiveness and good judgment. Always maintain awareness of your surroundings, and operate the
bicycle in a safe manner. Failure to do so could result in serious injury or death.
Your Edge bike computer can be used with the Varia line of cycling awareness products (Wireless Sensors,
page31). See the owner's manual for your accessory for more information.
Using the Varia Camera Controls
NOTICE
Some jurisdictions may prohibit or regulate the recording of video, audio, or photographs, or may require that
all parties have knowledge of the recording and provide consent. It is your responsibility to know and follow all
laws, regulations, and any other restrictions in jurisdictions where you plan to use this device.
Before you can use the Varia camera controls, you must pair the accessory with your bike computer (Pairing
Your Wireless Sensors, page32).
1 Tap the screen to view the timer overlay, and select .
TIP: You can also control the camera using the quick action buttons on the timer overlay.
The bike computer displays the camera controls, as well as the recording mode, battery status, video
resolution, and audio status of all connected cameras.
2 Select an option:
• Select Headlight Camera or Radar Camera to customize the camera settings.
• Select to customize the quick action buttons that appear on the timer overlay.
• Select Take Photo, Save Clip, or Film Ride.
34 Wireless Sensors

Enabling the Green Threat Level Tone
Before you can enable the green threat level tone, you must pair the device with a compatible Varia rearview
radar device and enable tones.
You can enable a tone that plays when your radar transitions to the green threat level.
1 Select > Sensors.
2 Select your radar device.
3 Select Sensor Details > Alert Settings.
4 Select the Green Threat Level Tone toggle switch.
eBike Training
Before you can use a compatible eBike, such as a Shimano eBike system, you must pair it with your Edge device
(Pairing Your Wireless Sensors, page32). You can customize the optional eBike data screen and data fields
(Adding a Data Screen, page40).
Viewing eBike Sensor Details
1 Select > Sensors.
2 Select your eBike.
3 Select an option:
• To view eBike details, such as the odometer or travel distance, select Sensor Details > eBike Details.
• To view eBike error messages, select .
See the eBike owner's manual for more information.
inReach Remote
The inReach remote function allows you to control your inReach satellite communicator using your Edge bike
computer. Go to buy.garmin.com for more information about compatible devices.
Using the inReach Remote
1 Turn on the inReach satellite communicator.
2 On your Edge bike computer, select > Sensors > Add Sensor > inReach.
3 Select your inReach satellite communicator, and select Add.
4 From the home screen, swipe down, and swipe left or right to view the inReach remote widget.
5 Select an option:
• To send a preset message, select > Send Preset, and select a message from the list.
• To send a text message, select > Start Conversation, select the message contacts, and enter the
message text or select a quick text option.
• To view the timer and distance traveled during a tracking session, select > Start Tracking.
• To send an SOS message, select SOS.
NOTE: You should only use the SOS function in a real emergency situation.
History
The history glance on your Edge Explore 2 bike computer includes time, distance, calories, speed, lap data,
elevation, and optional information about sensors using ANT+ technology.
NOTE: History is not recorded while the activity timer is stopped or paused.
When the device memory is full, a message appears. The device does not automatically delete or overwrite your
history. Upload your history to your Garmin Connect account periodically to keep track of all your ride data.
History 35

Viewing Your Ride
1 From the home screen, swipe up or down to view the history glance.
NOTE: You may need to add the glance to your home screen (Customizing the Glances, page46).
2 Select the history glance.
3 Select Rides.
4 Select a ride.
5 Select an option.
Viewing Your Time in Each Training Zone
Before you can view your time in each training zone, you must pair your device with a compatible heart rate
monitor or power meter, complete an activity, and save the activity.
Viewing your time in each heart rate and power zone can help you adjust your training intensity. You can adjust
your power zones (Setting Your Power Zones, page33) and your heart rate zones (Setting Your Heart Rate Zones,
page32) to match your goals and abilities. You can customize a data field to display your time in training zones
during your ride (Adding a Data Screen, page40).
1 From the home screen, swipe up or down to view the history glance.
NOTE: You may need to add the glance to your home screen (Customizing the Glances, page46).
2 Select the history glance.
3 Select Rides.
4 Select a ride.
5 Select Summary.
6 Select an option:
• Select HR Zones.
• Select Power Zones.
Deleting a Ride
1 From the home screen, swipe up or down to view the history glance.
NOTE: You may need to add the glance to your home screen (Customizing the Glances, page46).
2 Select the history glance.
3 Select Rides.
4 Swipe a ride to the left and select .
Viewing Data Totals
You can view the accumulated data you have saved to the device, including the number of rides, time, distance,
and calories.
1 From the home screen, swipe up or down to view the history glance.
NOTE: You may need to add the glance to your home screen (Customizing the Glances, page46).
2 Select the history glance.
3 Select Totals.
36 History
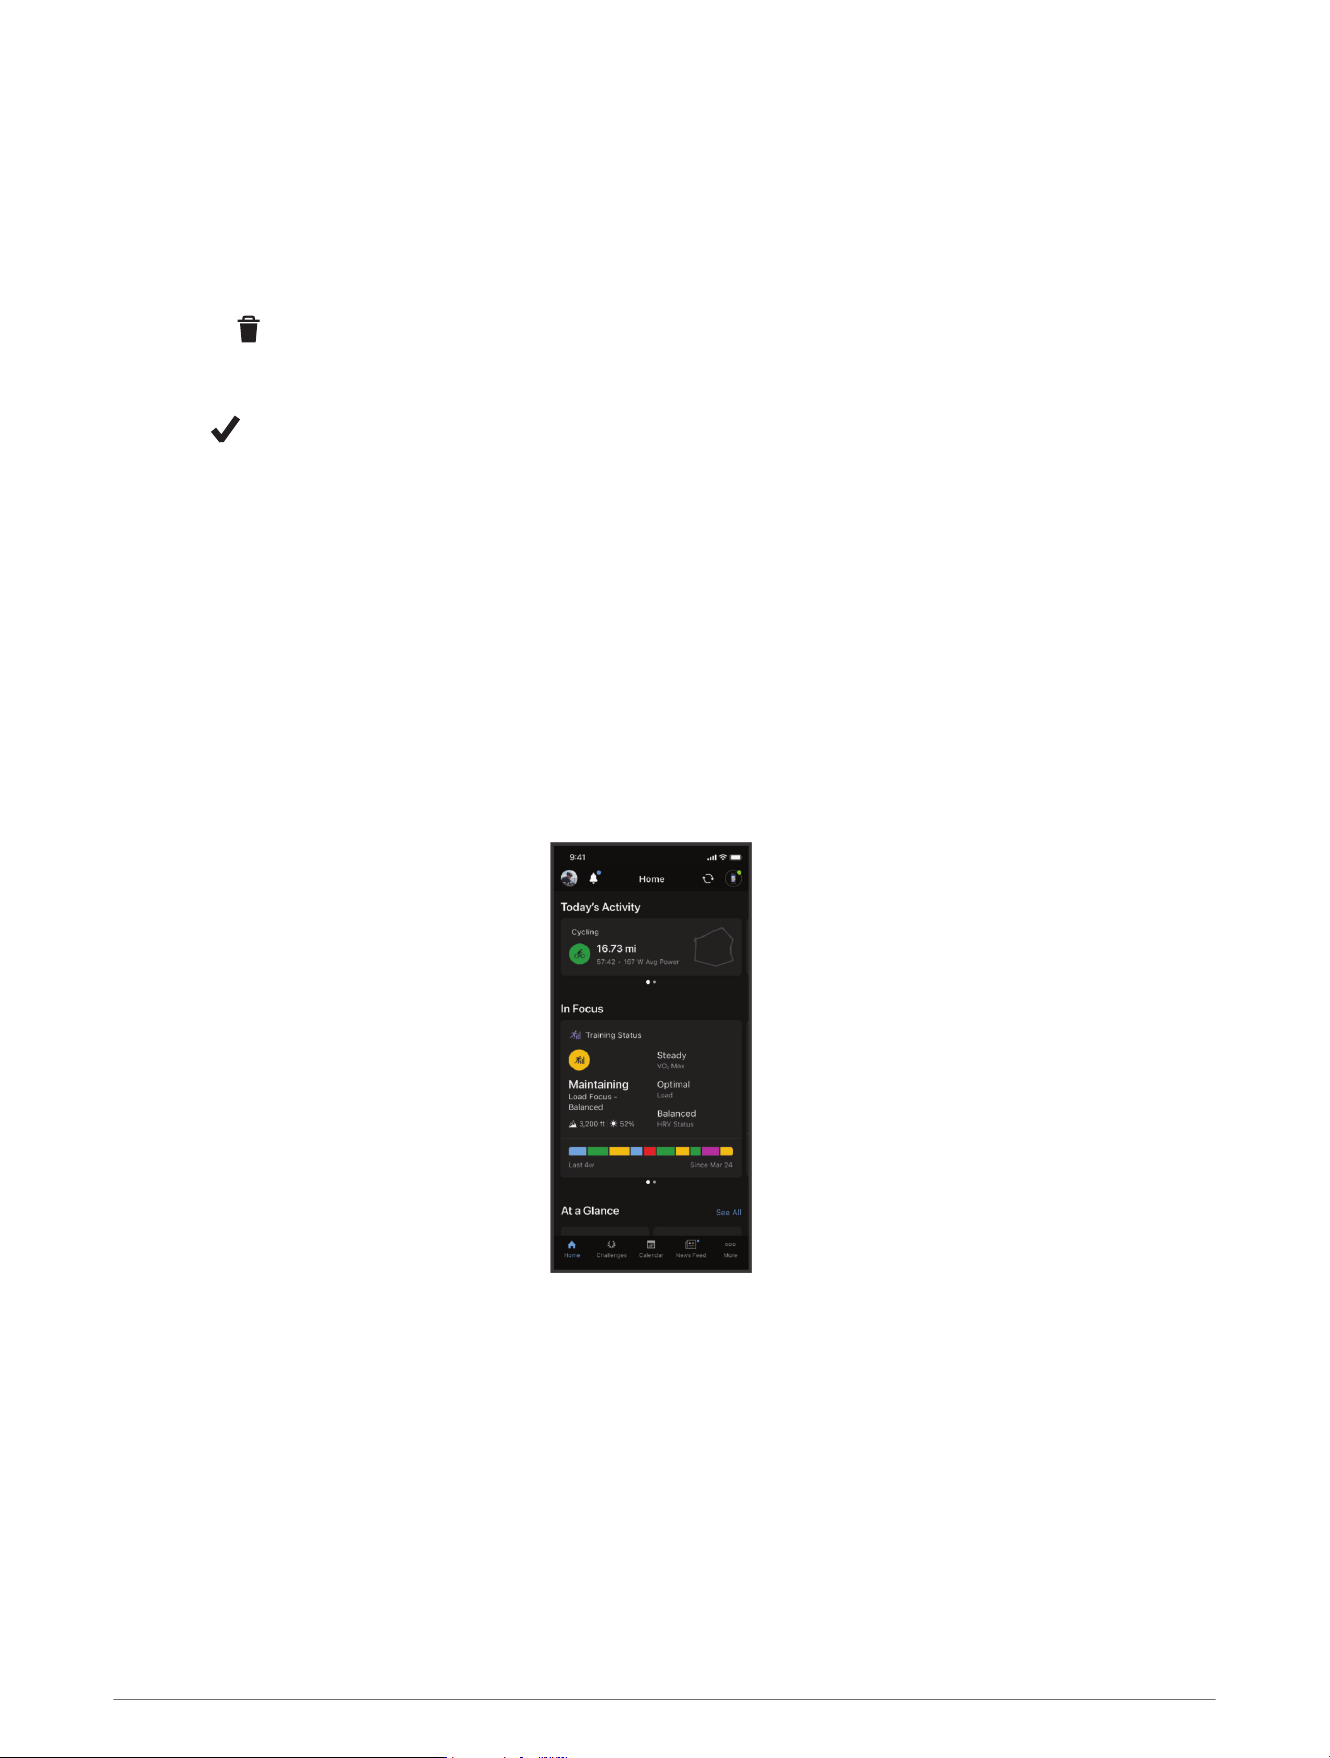
Deleting Data Totals
1 From the home screen, swipe up or down to view the history glance.
NOTE: You may need to add the glance to your home screen (Customizing the Glances, page46).
2 Select the history glance.
3 Select Totals.
4 Select an option:
• Select to delete all data totals from the history.
• Select an activity profile to delete accumulated data totals for a single profile.
NOTE: This does not delete any saved activities.
5 Select .
Garmin Connect
You can connect with your friends on Garmin Connect. Garmin Connect gives you the tools to track, analyze,
share, and encourage each other. Record the events of your active lifestyle including rides, runs, walks, swims,
hikes, triathlons, and more.
You can create your free Garmin Connect account when you pair your device with your phone using the Garmin
Connect app, or you can go to connect.garmin.com.
Store your activities: After you complete and save an activity with your device, you can upload that activity to
Garmin Connect and keep it as long as you want.
Analyze your data: You can view more detailed information about your activity, including time, distance,
elevation, heart rate, calories burned, cadence, an overhead map view, pace and speed charts, and
customizable reports.
NOTE: Some data requires an optional accessory such as a heart rate monitor.
Share your activities: You can connect with friends to follow each other's activities or share links to your
activities.
Manage your settings: You can customize your bike computer and user settings on your Garmin Connect
account.
History 37

Garmin Connect+ Subscription
You can enhance the data, connections, and training available on your Garmin Connect account with a Garmin
Connect+ subscription. To sign up, you can download the Garmin Connect app from the app store on your
phone, or go to connect.garmin.com.
Active Intelligence (AI): Receive AI insights about your data and activities.
LiveTrack+: Send LiveTrack text messages, receive a personalized profile page, and view previous LiveTrack
sessions.
Performance dashboard: View your training data your way with customized charts and graphs.
Social features: Gain access to exclusive badges, badge challenges, and double points for challenges. You can
update your profile avatar with customizable frames.
Sending Your Ride to Garmin Connect
• Sync your Edge bike computer with the Garmin Connect app on your phone.
• Use the USB cable that came with your Edge bike computer to send ride data to your Garmin Connect
account on your computer.
Data Recording
The device records points every second. Recording points every second provides an extremely detailed track
and uses more of the available memory.
For information about data averaging for cadence and power, see Data Averaging for Cadence or Power,
page47.
Data Management
Connecting the Device to Your Computer
NOTICE
To prevent corrosion, thoroughly dry the USB port, the weather cap, and the surrounding area before charging or
connecting to a computer.
1 Pull up the weather cap from the USB port.
2 Plug one end of the cable into the USB port on the device.
3 Plug the other end of the cable into a computer USB port.
Your device appears as a removable drive in This PC on Windows
®
computers and as an available disk on
Mac
®
computers.
Transferring Files to Your Device
1 Connect the device to your computer.
Depending on your computer operating system, the device appears as either a portable device, a removable
drive, or a removable volume.
NOTE: Mac operating systems do not detect the device by default. You must use Garmin Express software
to interact with files on your device.
2 On your computer, open the file browser.
3 Select a file.
4 Select Edit > Copy.
5 Open the portable device, drive, or volume for the device.
6 Browse to a folder.
NOTE: Most file types have a named folder within the Garmin folder.
7 Select Edit > Paste.
The file appears in the list of files in the device memory.
38 History

Deleting Files
NOTICE
If you do not know the purpose of a file, do not delete it. Your device memory contains important system files
that should not be deleted.
1 Open the Garmin drive or volume.
2 If necessary, open a folder or volume.
3 Select a file.
4 Press the Delete key on your keyboard.
NOTE: If you are using an Apple computer, you must empty the Trash folder to completely remove the files.
Disconnecting the USB Cable
If your device is connected to your computer as a removable drive or volume, you must safely disconnect your
device from your computer to avoid data loss. If your device is connected to your Windows computer as a
portable device, it is not necessary to safely disconnect the device.
1 Complete an action:
• For Windows computers, select the Safely Remove Hardware icon in the system tray, and select your
device.
• For Apple computers, select the device, and select File > Eject.
2 Disconnect the cable from your computer.
Customizing Your Device
Connect IQ Downloadable Features
You can add Connect IQ features to your device from Garmin and other providers using the Connect IQ app.
Data Fields: Allow you to download new data fields that present sensor, activity, and history data in new ways.
You can add Connect IQ data fields to built-in features and pages.
Widgets: Provide information at a glance, including sensor data and notifications.
Apps: Add interactive features to your device, such as new outdoor and fitness activity types.
Downloading Connect IQ Features Using Your Computer
1 Connect the device to your computer using a USB cable.
2 Go to apps.garmin.com, and sign in.
3 Select a Connect IQ feature, and download it.
4 Follow the on-screen instructions.
Customizing Your Device 39

Updating Your Activity Profile
You can customize three activity profiles. You can customize your settings and data fields for a particular
activity or trip.
TIP: You can also customize the activity profiles from the device settings in the Garmin Connect app.
1 Select > Activity Profiles.
2 Select a profile.
3 If necessary, select to edit the name and color for the profile.
4 Select an option:
• Select Data Screens to customize the data screens and data fields (Adding a Data Screen, page40).
• Select Climbs > ClimbPro to enable the ClimbPro feature (Using ClimbPro, page13).
• Select Climbs > Climb Detection to customize which types of climbs the device detects.
• Select Alerts and Prompts to customize your activity alerts (Alerts and Prompts Settings, page42).
• Select Alerts and Prompts > Sharp Bend Warnings to enable navigation warning messages for difficult
turns.
• Select Alerts and Prompts > High Traffic Road Warnings to enable navigation warning messages for high
traffic roads.
• Select Alerts and Prompts > Lap to set how laps are triggered (Marking Laps by Position, page43).
• Select Timer > Auto Pause to change when the activity timer automatically pauses (Using Auto Pause,
page44).
• Select Timer > Timer Start Mode to customize how the device detects the start of a ride and
automatically starts the activity timer (Starting the Timer Automatically, page44).
• Select Navigation > Map to customize the map settings (Map Settings, page14).
• Select Navigation > Routing to customize the routing settings (Route Settings, page15).
• Select Navigation > Navigation Prompts to show turn-by-turn navigation prompts as text or on the map.
• Select Satellite Systems to turn off GPS (Training Indoors, page25) or change the satellite setting
(Changing the Satellite Setting, page44).
• Select Auto Sleep to automatically enter sleep mode after five minutes of inactivity (Using Auto Sleep,
page44).
All changes are saved to the activity profile.
Adding a Data Screen
1 Select > Activity Profiles.
2 Select a profile.
3 Select Data Screens > Add New > Data Screen.
4 Select a category, and select one or more data fields.
TIP: For a list of all the available data fields, go to Data Fields, page58.
5 Select .
6 Select an option:
• Select another category to select more data fields.
• Select .
7 Select or to change the layout.
8 Select .
9 Select an option:
• Tap a data field, then tap another data field to rearrange them.
• Double-tap a data field to change it.
10 Select .
40 Customizing Your Device
Adding a Music Control Data Screen
You can customize a data screen to display music controls and real-time data, such as your lap time or total
ascent (Listening to Music, page25).
1 Select > Activity Profiles.
2 Select a profile.
3 Select Data Screens > Add New > Music Controls.
4 Hold and drag the data screen up or down to change the location of the data screen in the loop (optional).
5 Select > Music Controls > Layout and Data Fields.
6 Select an option:
• Tap a data field, then tap another data field to rearrange them.
• Double-tap a data field to change it.
7 Select .
The added music data screen appears in the list of data screens for the profile (Rearranging Data Screens,
page41).
Editing a Data Screen
1 Select > Activity Profiles.
2 Select a profile.
3 Select Data Screens.
4 Select a data screen.
5 Select Layout and Data Fields.
6 Select or to change the layout.
7 Select .
8 Select an option:
• Tap a data field, then tap another data field to rearrange them.
• Double-tap a data field to change it.
9 Select .
Rearranging Data Screens
1 Select > Activity Profiles.
2 Select a profile.
3 Select Data Screens > > Reorder.
4 Hold on a data screen and drag it to a new location.
5 Select .
Customizing Your Device 41

Alerts and Prompts Settings
You can use alerts to train toward specific time, distance, calorie, heart rate, cadence, and power goals. You can
also set up navigation alerts. Alert settings are saved with your activity profile.
Select > Activity Profiles, select a profile, and select Alerts and Prompts.
Sharp Bend Warnings: Enables alerts for difficult turns.
High Traffic Road Warnings: Enables alerts for high traffic areas.
Road Hazard Warnings: Enables alerts for road hazards, such as potholes or obstructions.
Unpaved Road Warnings: Enables alerts for unpaved roads, such as those with dirt or gravel.
Lap: Sets how laps are triggered (Marking Laps by Position, page43).
Time Alert: Sets an alert for a specified time (Setting Recurring Alerts, page42).
Distance Alert: Sets an alert for a specified distance (Setting Recurring Alerts, page42).
Calorie Alert: Sets an alert when you have burned a specified number of calories.
Heart Rate Alert: Sets the device to alert you when your heart rate is above or below a target zone (Setting
Range Alerts, page42).
Cadence Alert: Sets the device to alert you when your cadence is above or below a custom range of reps per
minute (Setting Range Alerts, page42).
Power Alert: Sets the device to alert you when your power threshold is above or below a target zone (Setting
Range Alerts, page42).
Turn Around Alert: Sets an alert to indicate when you should turn around during your ride.
Eat Alert: Sets an alert to notify you to eat at a specified time or distance.
Drink Alert: Sets an alert to notify you to drink at a specified time or distance.
Connect IQ Alerts: Enables alerts that have been set up in Connect IQ apps.
Setting Range Alerts
If you have an optional heart rate monitor, cadence sensor, or power meter, you can set up range alerts. A range
alert notifies you when the device measurement is above or below a specified range of values. For example,
you can set the device to alert you when your cadence is below 40RPM and over 90RPM. You can also use a
training zone for the range alert (Training Zones, page30).
1 Select > Activity Profiles.
2 Select a profile.
3 Select Alerts and Prompts.
4 Select Heart Rate Alert, Cadence Alert, or Power Alert.
5 Select the minimum and maximum values, or select zones.
Each time you exceed or drop below the specified range, a message appears. The device also beeps if audible
tones are turned on (Turning the Device Tones On and Off, page47).
Setting Recurring Alerts
A recurring alert notifies you each time the device records a specified value or interval. For example, you can set
the device to alert you every 30 minutes.
1 Select > Activity Profiles.
2 Select a profile.
3 Select Alerts and Prompts.
4 Select an alert type.
5 Turn on the alert.
6 Enter a value.
7 Select .
Each time you reach the alert value, a message appears. The device also beeps if audible tones are turned on
(Turning the Device Tones On and Off, page47).
42 Customizing Your Device

Auto Lap
®
Marking Laps by Position
You can use the Auto Lap feature to mark the lap at a specific position automatically. This feature is helpful for
comparing your performance over different parts of a ride (for example, a long climb or training sprints). During
courses, you can use the By Position option to trigger laps at all of the lap positions saved in the course.
1 Select > Activity Profiles.
2 Select a profile.
3 Select Alerts and Prompts > Lap.
4 Turn on the Auto Lap alert.
5 Select Auto Lap Trigger > By Position.
6 Select Lap At.
7 Select an option:
• Select Lap Press Only to trigger the lap counter each time you press and each time you pass any of
those locations again.
• Select Start and Lap to trigger the lap counter at the GPS location where you press and at any location
during the ride where you press .
• Select Mark and Lap to trigger the lap counter at a specific GPS location marked before the ride and at
any location during the ride where you press .
8 If necessary, customize the lap data fields (Adding a Data Screen, page40).
Marking Laps by Distance
You can use the Auto Lap feature to mark the lap at a specific distance automatically. This feature is helpful for
comparing your performance over different parts of a ride (for example, every 10 miles or 40 kilometers).
1 Select > Activity Profiles.
2 Select a profile.
3 Select Alerts and Prompts > Lap.
4 Turn on the Auto Lap alert.
5 Select Auto Lap Trigger > By Distance.
6 Select Lap At.
7 Enter a value.
8 Select .
9 If necessary, customize the lap data fields (Adding a Data Screen, page40).
Marking Laps by Time
You can use the Auto Lap feature to mark the lap at a specific time automatically. This feature is helpful for
comparing your performance over different parts of a ride (for example, every 20 minutes).
1 Select > Activity Profiles.
2 Select a profile.
3 Select Alerts and Prompts > Lap.
4 Turn on the Auto Lap alert.
5 Select Auto Lap Trigger > By Time.
6 Select Lap At.
7 Select the hours, minutes, or seconds value.
8 Select or to enter a value.
9 Select .
10 If necessary, customize the lap data fields (Adding a Data Screen, page40).
Customizing Your Device 43

Customizing the Lap Banner
You can customize the data fields that appear in the lap banner.
1 Select > Activity Profiles.
2 Select a profile.
3 Select Alerts and Prompts > Lap.
4 Turn on the Auto Lap alert.
5 Select Custom Lap Banner.
6 Select a data field to change it.
Using Auto Pause
You can use the Auto Pause
®
feature to pause the timer automatically when you stop moving or when your
speed drops below a specified value. This feature is helpful if your ride includes stop lights or other places
where you need to slow down or stop.
NOTE: History is not recorded while the activity timer is stopped or paused.
1 Select > Activity Profiles.
2 Select a profile.
3 Select Timer > Auto Pause.
4 Select an option:
• Select When Stopped to pause the timer automatically when you stop moving.
• Select Custom to pause the timer automatically when your speed drops below a specified value.
5 If necessary, customize optional time data fields (Adding a Data Screen, page40).
Starting the Timer Automatically
This feature automatically detects when your device has acquired satellites and is moving. It starts the activity
timer or reminds you to start the activity timer so you can record your ride data.
1 Select > Activity Profiles.
2 Select a profile.
3 Select Timer > Timer Start Mode.
4 Select an option:
• Select Manual, and select to start the activity timer.
• Select Prompted to display a visual reminder when you reach the start notice speed.
• Select Auto to start the activity timer automatically when you reach the start speed.
Changing the Satellite Setting
For increased performance in challenging environments and faster GPS position location, you can enable
Multi-GNSS. Using GPS and another satellite together reduces battery life more quickly than using only GPS.
1 Select > Activity Profiles.
2 Select a profile.
3 Select Satellite Systems.
4 Select an option.
Using Auto Sleep
You can use the Auto Sleep feature to automatically enter sleep mode after 5 minutes of inactivity. During sleep
mode, the screen is turned off and sensors, Bluetooth technology, and GPS are disabled.
1 Select > Activity Profiles.
2 Select a profile.
3 Select Auto Sleep.
44 Customizing Your Device
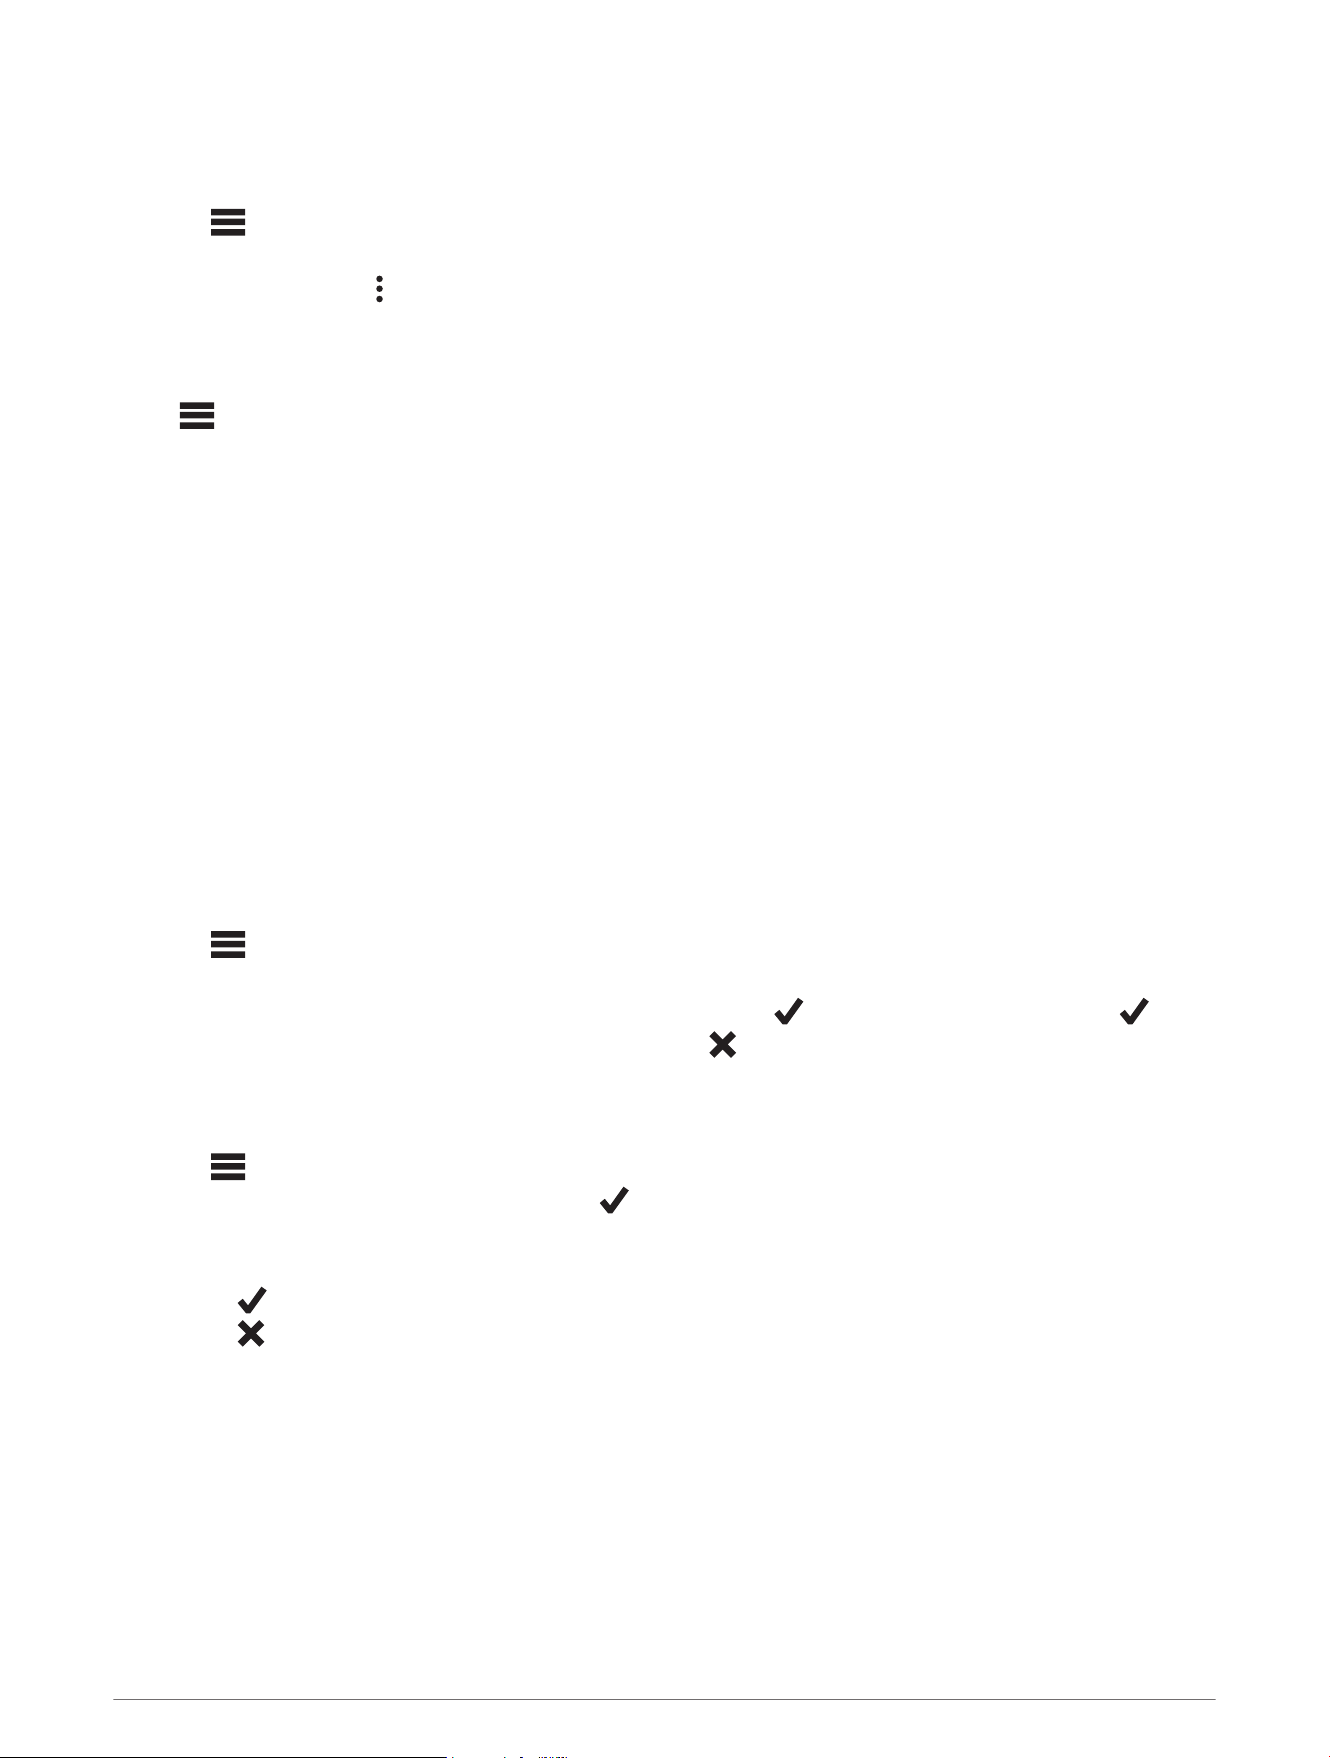
Using Auto Scroll
You can use the Auto Scroll feature to automatically cycle through all of the training data screens while the
timer is running.
1 Select > Activity Profiles.
2 Select a profile.
3 Select Data Screens > > Auto Scroll.
4 Select a display speed.
Phone Settings
Select > Phone.
Enable: Enables Bluetooth.
NOTE: Other Bluetooth settings appear only when you enable Bluetooth technology.
Friendly Name: Allows you to enter a friendly name that identifies your devices with Bluetooth.
Pair Smartphone: Connects your device with a compatible Bluetooth enabled phone. This setting allows you to
use Bluetooth connected features, including LiveTrack and activity uploads to Garmin Connect.
Sync Now: Allows you to sync your device with your compatible phone.
Smart Notifications: Allows you to enable phone notifications from your compatible phone.
Missed Notifications: Displays missed phone notifications from your compatible phone.
Text Reply Signature: Enables signatures in your text message replies. This feature is available with compatible
Android phones.
Guest Mode
The guest mode feature allows you to limit the features and settings available before sharing the device with a
guest user.
Enabling Guest Mode
1 Select > Guest Mode > Enable.
2 Select an option:
• To enable guest mode and require a code to disable it, select , enter a 4-digit code, and select .
• To enable guest mode without requiring a code, select .
The device limits the settings available for customization.
Disabling Guest Mode
1 Select > Guest Mode > Enable.
2 If necessary, enter the 4-digit code, and select .
NOTE: After three incorrect attempts, you are prompted to enter the universal unlock code: Garmin.
3 Select an option:
• Select to restore the device settings used before guest mode was enabled.
• Select to keep the device settings used while guest was enabled.
Customizing Your Device 45

System Settings
Select > System.
• Display Settings (Display Settings, page46)
• Widget Settings (Customizing the Widget Loop, page46)
• Data Recording Settings (Data Recording Settings, page46)
• Unit Settings (Changing the Units of Measure, page47)
• Tone Settings (Turning the Device Tones On and Off, page47)
• Language Settings (Changing the Device Language, page47)
Display Settings
Select > System > Display.
Brightness: Sets the backlight brightness.
Backlight Timeout: Sets the length of time before the backlight turns off.
Color Mode: Sets the device to display day or night colors. You can select the Auto option to allow the device to
set day or night colors automatically based on the time of day.
Screen Capture: Allows you to save the image on the device screen when you press .
Using the Backlight
You can tap the touchscreen to turn on the backlight.
NOTE: You can adjust the backlight timeout (Display Settings, page46).
1 From the home screen or a data screen, swipe down from the top of the screen.
2 Select , and use the slider bar to manually adjust the brightness.
Customizing the Glances
1 Scroll to the bottom of the home screen.
2 Select .
3 Select an option:
• Select to add a glance to the glance loop.
• Select to drag the glance up or down to change the location of the glance in the glance loop.
• Swipe left on a glance, and select to remove the glance from the glance loop.
Customizing the Widget Loop
You can change the order of widgets in the widget loop, remove widgets, and add new widgets.
1 Select > System > Widgets.
2 Select an option:
• Select to add a widget to the widget loop.
• Select to drag the widget up or down to change the location of the widget in the widget loop.
• Swipe left on a widget, and select to remove the widget from the widget loop.
Data Recording Settings
Select > System > Data Recording.
Cadence Averaging: Controls whether the device includes zero values for cadence data that occur when you are
not pedaling (Data Averaging for Cadence or Power, page47).
Power Averaging: Controls whether the device includes zero values for power data that occur when you are not
pedaling (Data Averaging for Cadence or Power, page47).
Log HRV: Sets the device to record your heart rate variability during an activity.
46 Customizing Your Device

Data Averaging for Cadence or Power
The non-zero data-averaging setting is available if you are training with an optional cadence sensor or power
meter. The default setting excludes zero values that occur when you are not pedaling.
You can change the value of this setting (Data Recording Settings, page46).
Changing the Units of Measure
You can customize units of measure for distance and speed, elevation, temperature, weight, position format,
and time format.
1 Select > System > Units.
2 Select a measurement type.
3 Select a unit of measure for the setting.
Turning the Device Tones On and Off
Select > System > Tones.
Changing the Device Language
Select > System > Language.
Time Zones
Each time you turn on the device and acquire satellites or sync with your phone, the device automatically
detects your time zone and the current time of day.
Customizing Your Device 47
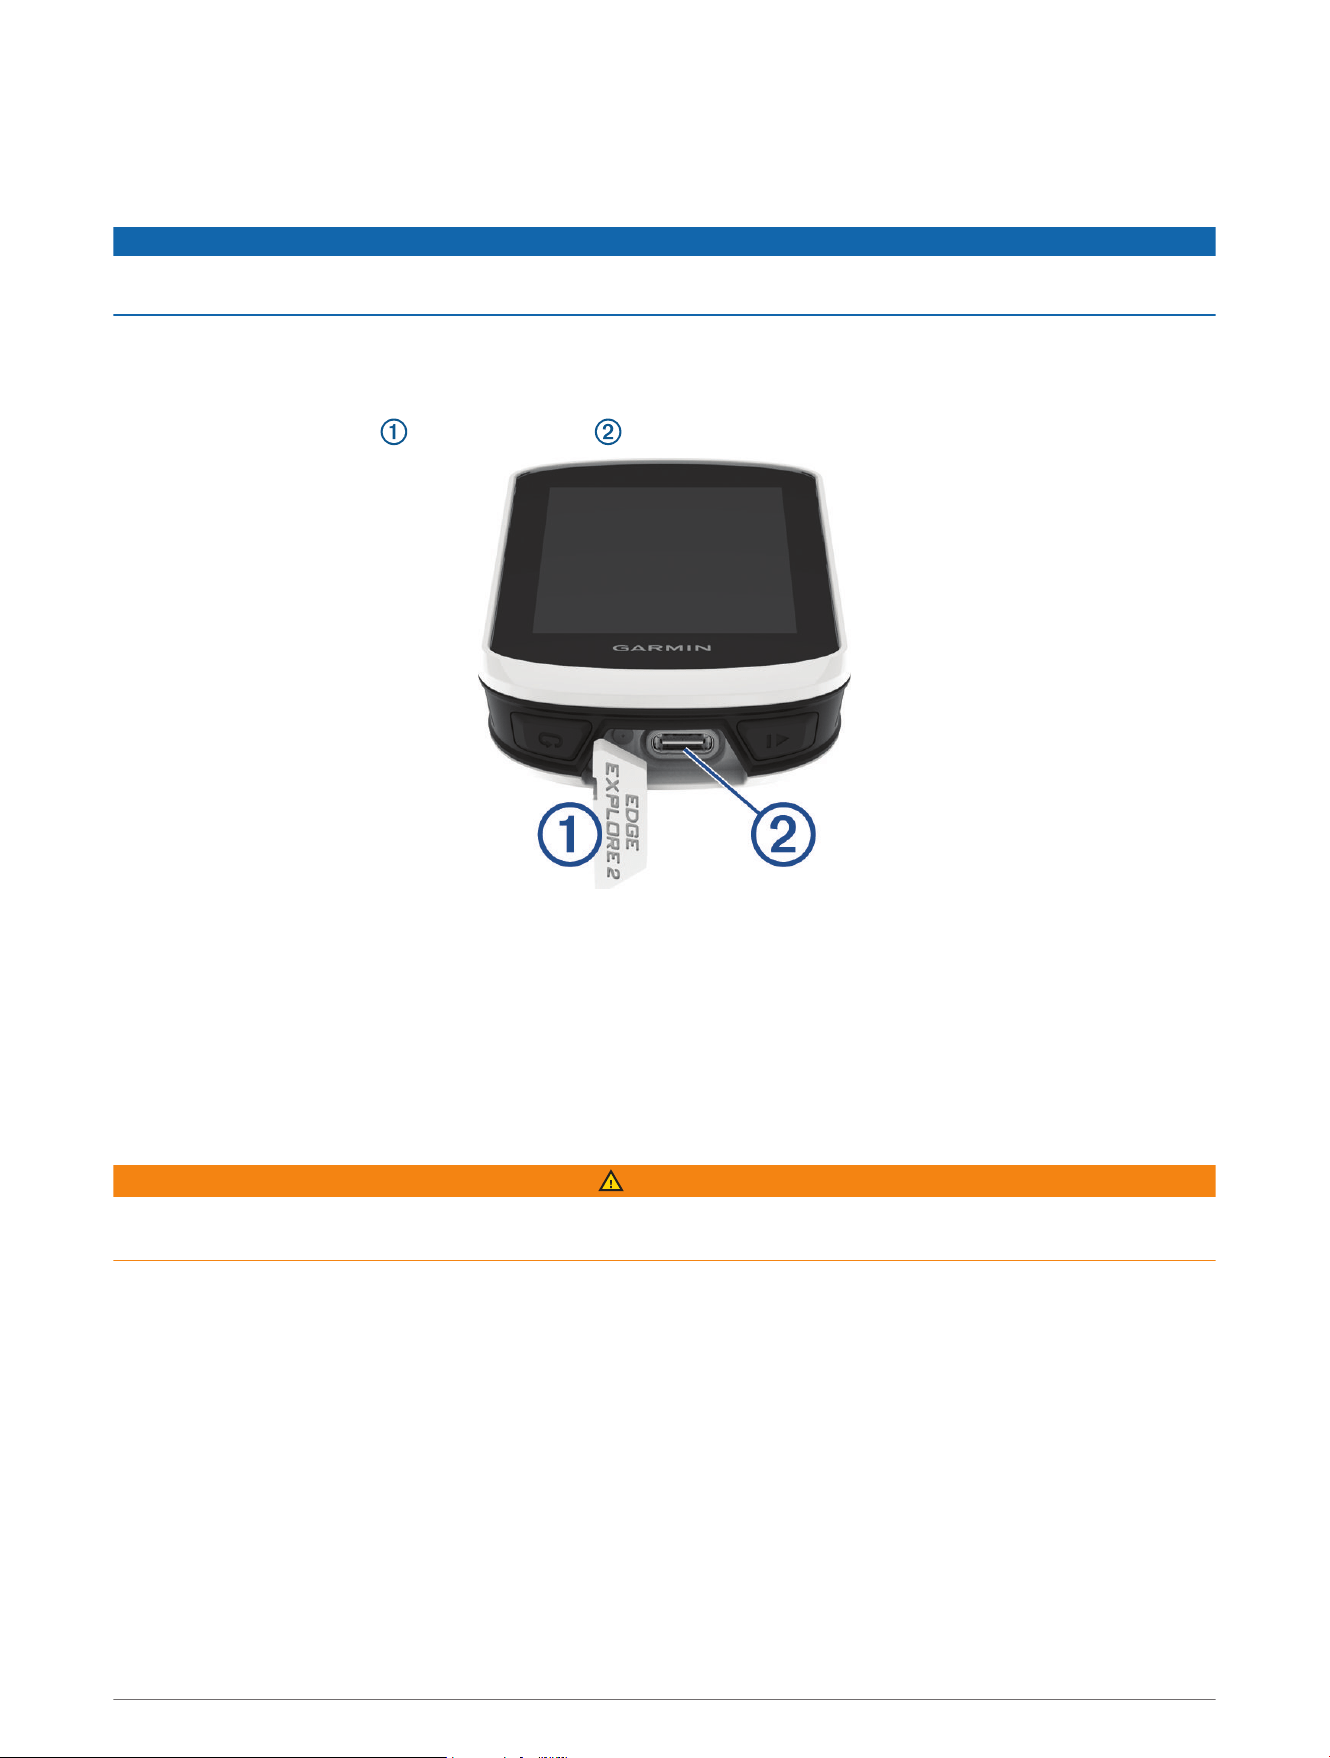
Device Information
Charging the Device
NOTICE
To prevent corrosion, thoroughly dry the USB port, the weather cap, and the surrounding area before charging or
connecting to a computer.
The device is powered by a built-in lithium-ion battery that you can charge using a standard wall outlet or a USB
port on your computer.
NOTE: The device will not charge when outside the approved temperature range (Specifications, page54).
1 Pull up the weather cap from the USB port .
2 Plug the small end of the USB cable into the USB port on the device.
3 Plug the large end of the USB cable into an AC adapter or a computer USB port.
4 Plug the AC adapter into a standard wall outlet.
When you connect the device to a power source, the device turns on.
5 Charge the device completely.
After you charge the device, close the weather cap.
About the Battery
WARNING
This device contains a lithium-ion battery. See the Important Safety and Product Information guide in the product
box for product warnings and other important information.
48 Device Information
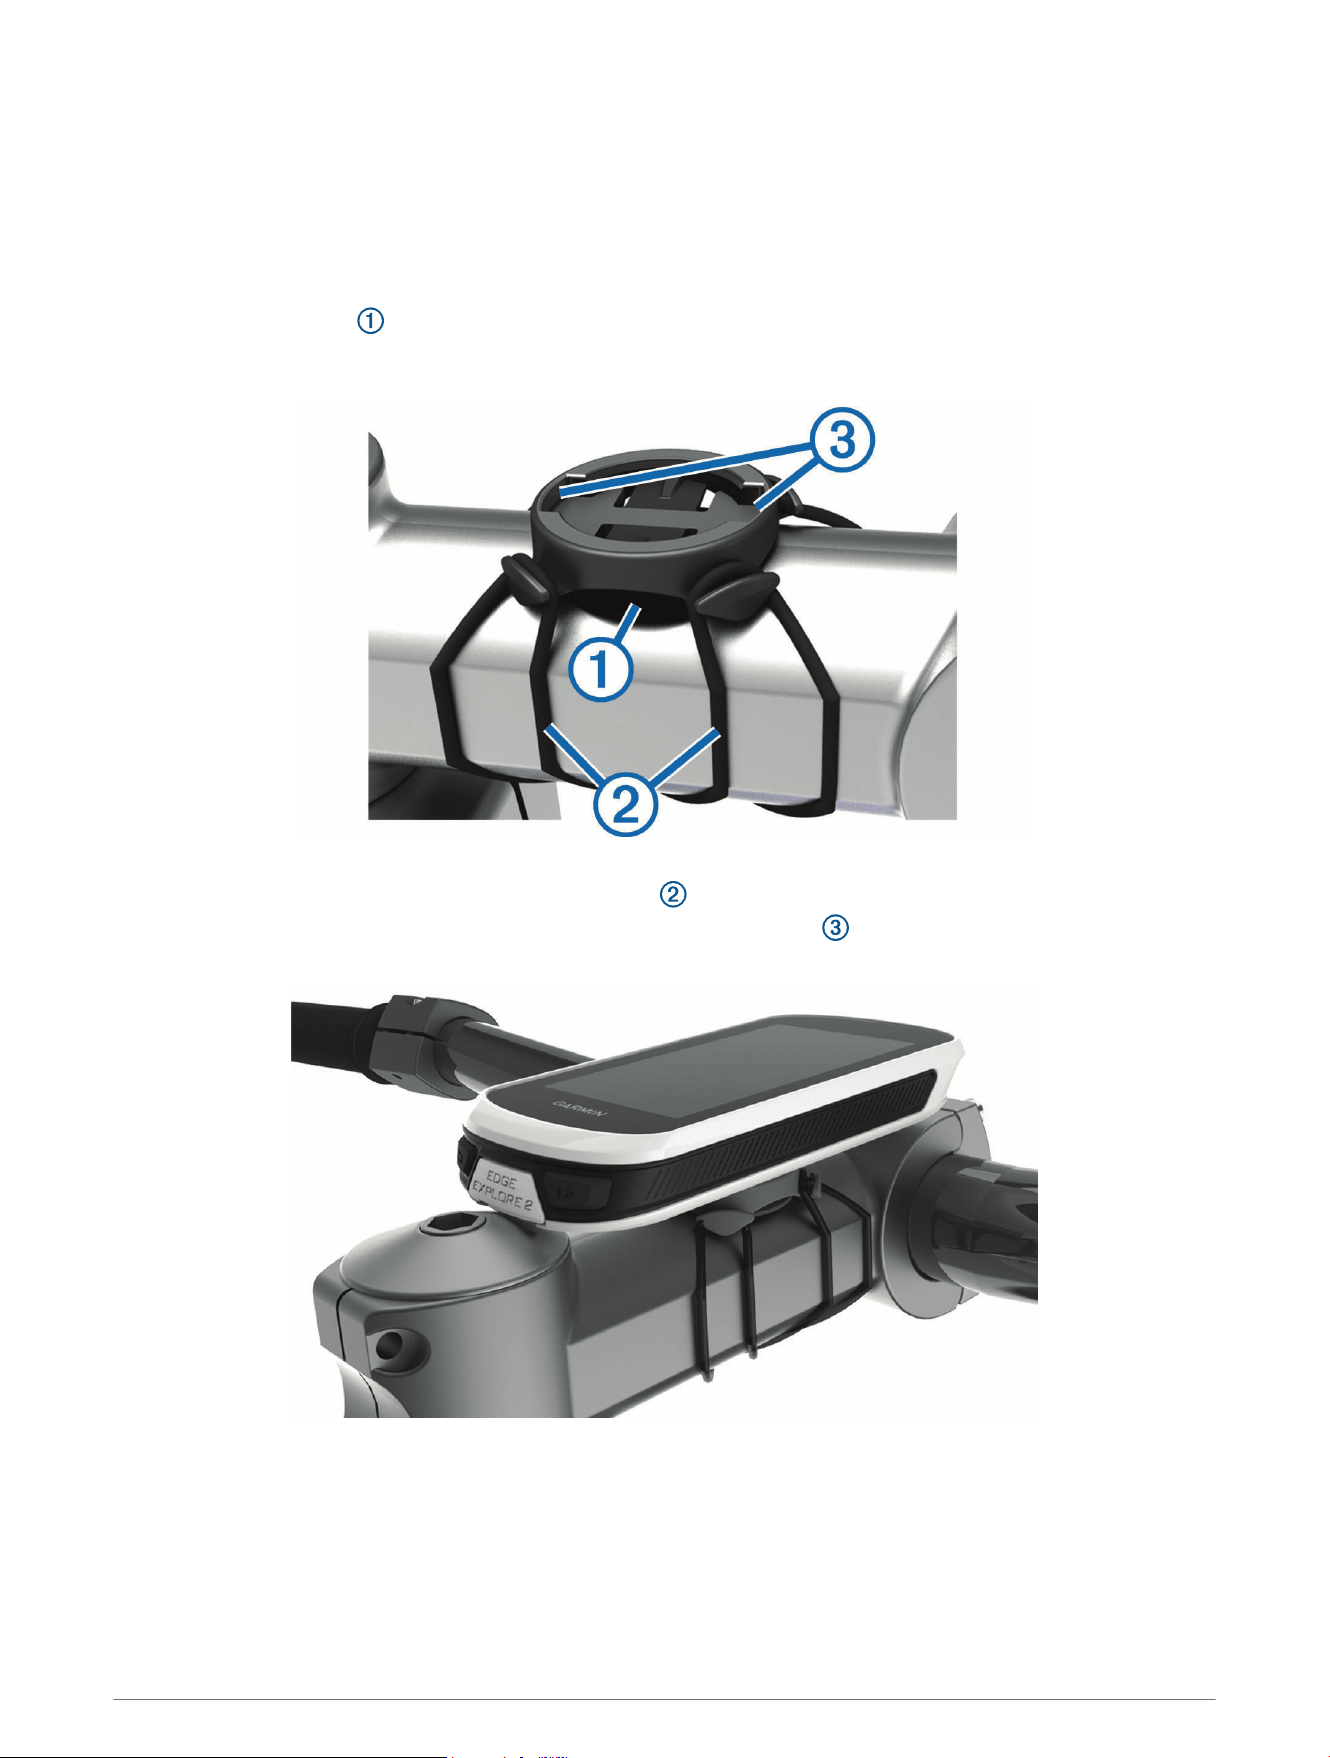
Installing the Standard Mount
For the best GPS reception and screen visibility, position the bike mount so the device is horizontal to the
ground and the front of the device is oriented toward the sky. You can install the bike mount on the stem or the
handlebar.
NOTE: If you do not have this mount, you can skip this task.
1 Select a secure location to mount the device where it does not interfere with the safe operation of your bike.
2 Place the rubber disk on the back of the bike mount.
Two rubber disks are included, and you can select the disk that best fits your bike. The rubber tabs align with
the back of the bike mount so it stays in place.
3 Place the bike mount on the bike stem.
4 Attach the bike mount securely using the two bands .
5 Align the tabs on the back of the device with the bike mount notches .
6 Press down slightly and turn the device clockwise until it locks into place.
Releasing the Edge
1 Turn the Edge clockwise to unlock the device.
2 Lift the Edge off the mount.
Device Information 49
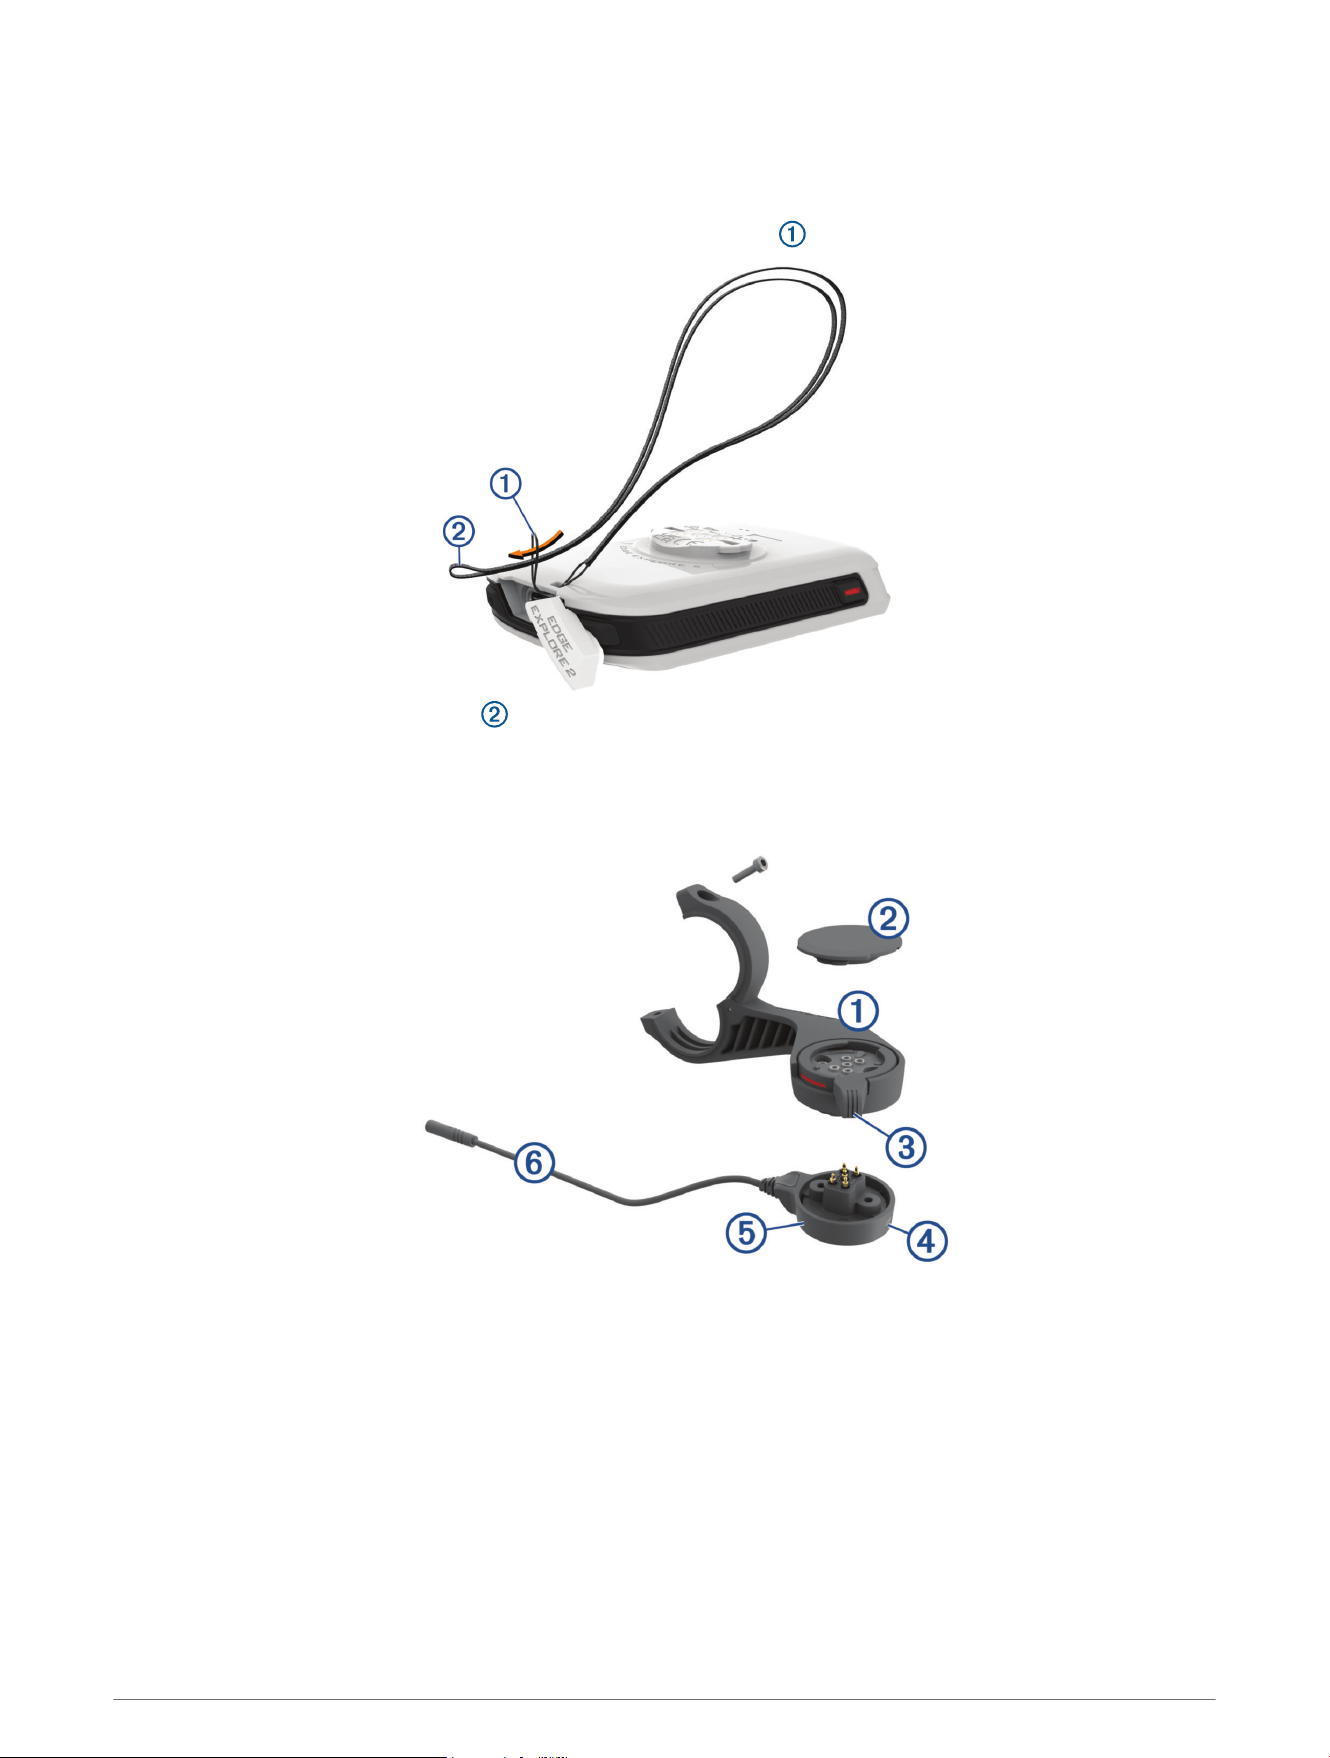
Attaching a Tether
You can use the optional tether to secure the Edge device to your bike handlebar.
1 Pull up the weather cap from the USB port.
2 Starting from the back of the device, insert the loop of the tether through the slot in the device.
3 Thread the other end of the tether through the loop, and pull it tight.
4 Close the weather cap, making sure that the tether aligns with the notch.
Edge Power Mount Overview
50 Device Information
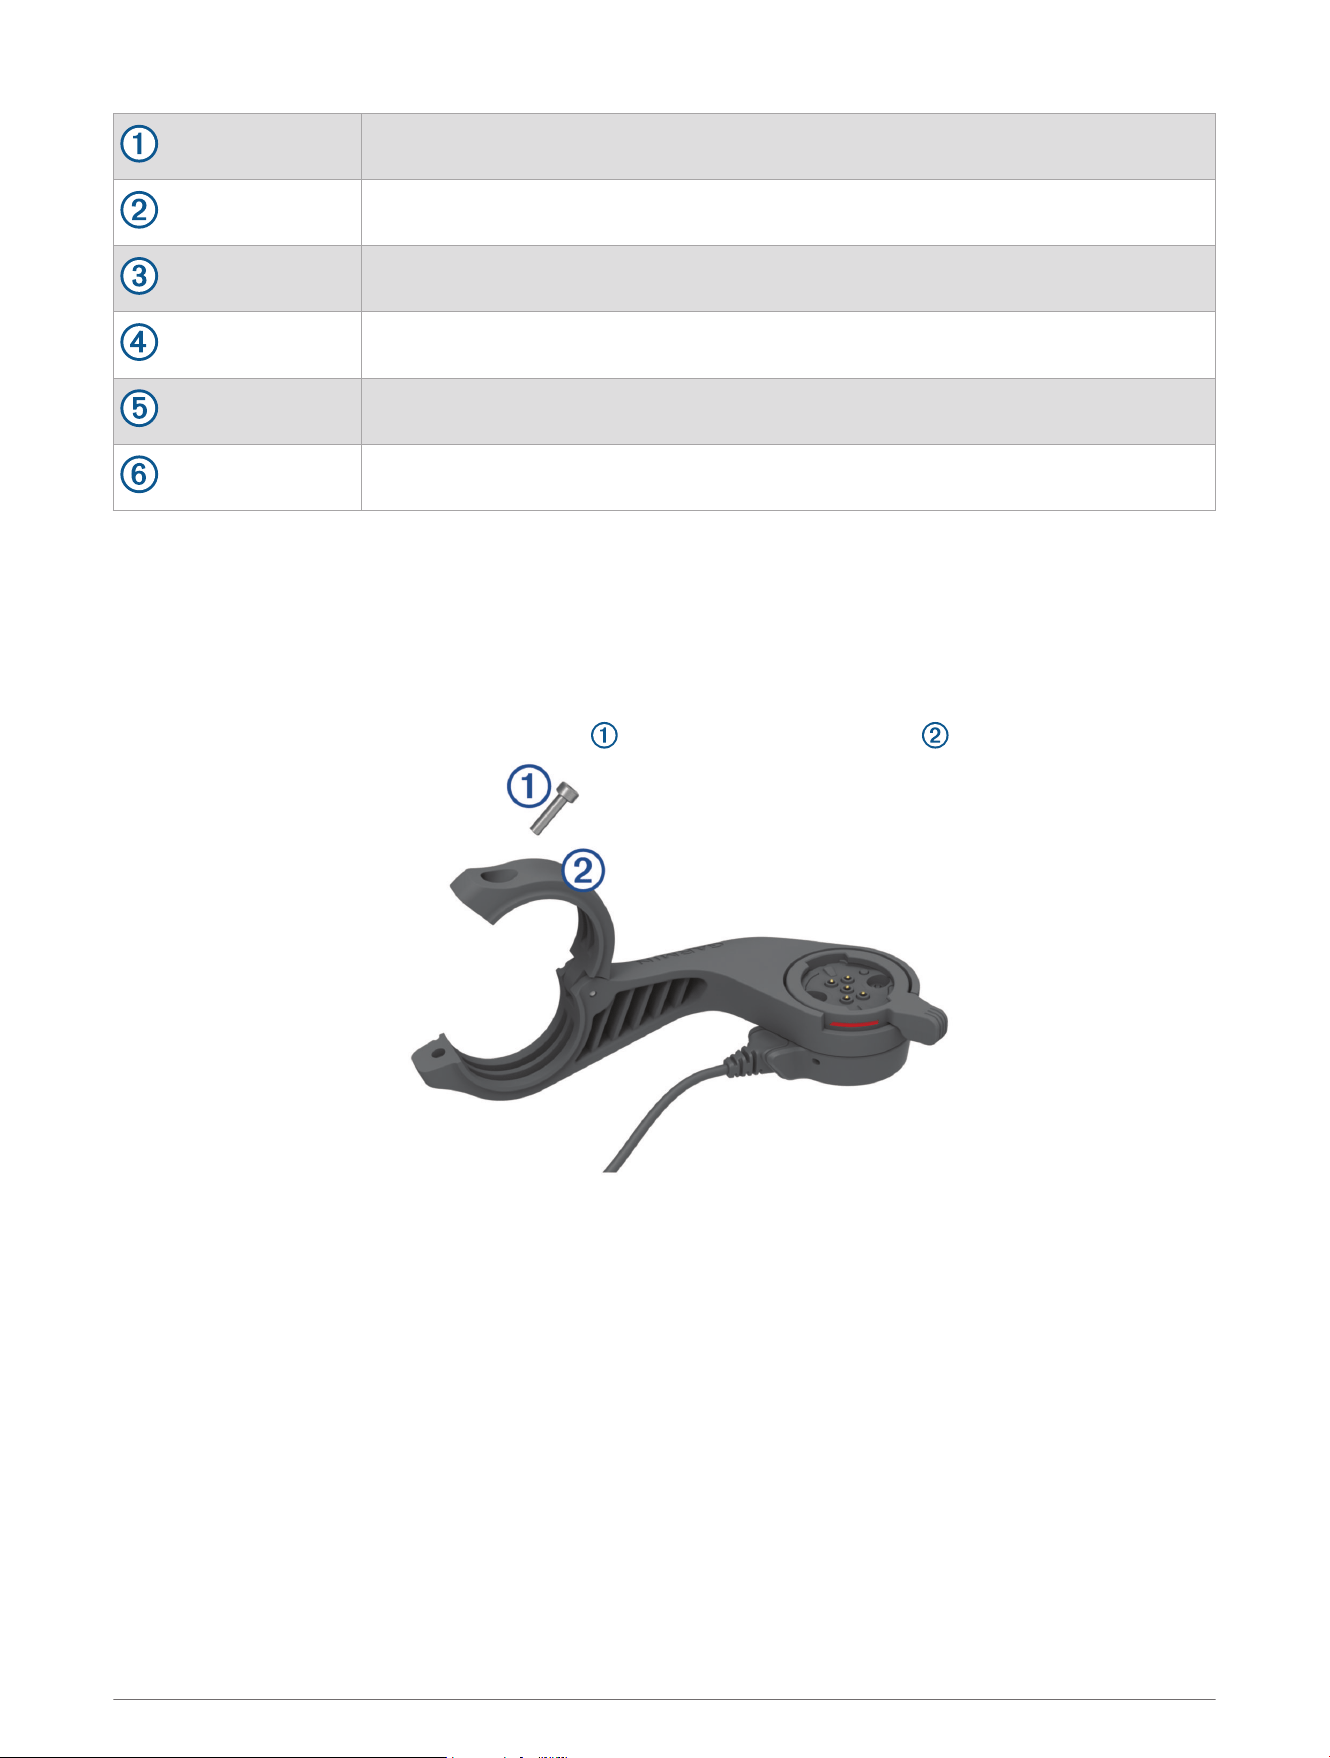
Out-front mount
Weather cap
Locking ring
Status LED
Power pod
Power pod cable
Installing the Edge Power Mount
You can use the power mount to install your Edge device and connect it to your eBike. Garmin recommends that
you adjust the mount for the Edge viewing angle before you connect the cable to your eBike.
NOTE: If you do not have this mount, you can skip this task.
1 Select a secure location to mount the Edge device where it does not interfere with the safe operation of your
eBike.
2 Use the 2.5 mm hex key to remove the screw from the handlebar connector .
3 Place a rubber pad around the handlebar:
• If the handlebar diameter is 25.4mm, use the thicker pad.
• If the handlebar diameter is 31.8mm, use the thinner pad.
• If the handlebar diameter is 35 mm, do not use a rubber pad.
4 Place the handlebar connector around the rubber pad.
NOTE: You should align the contours on the rubber pad with the grooves on the inside of the handlebar
connector.
Device Information 51
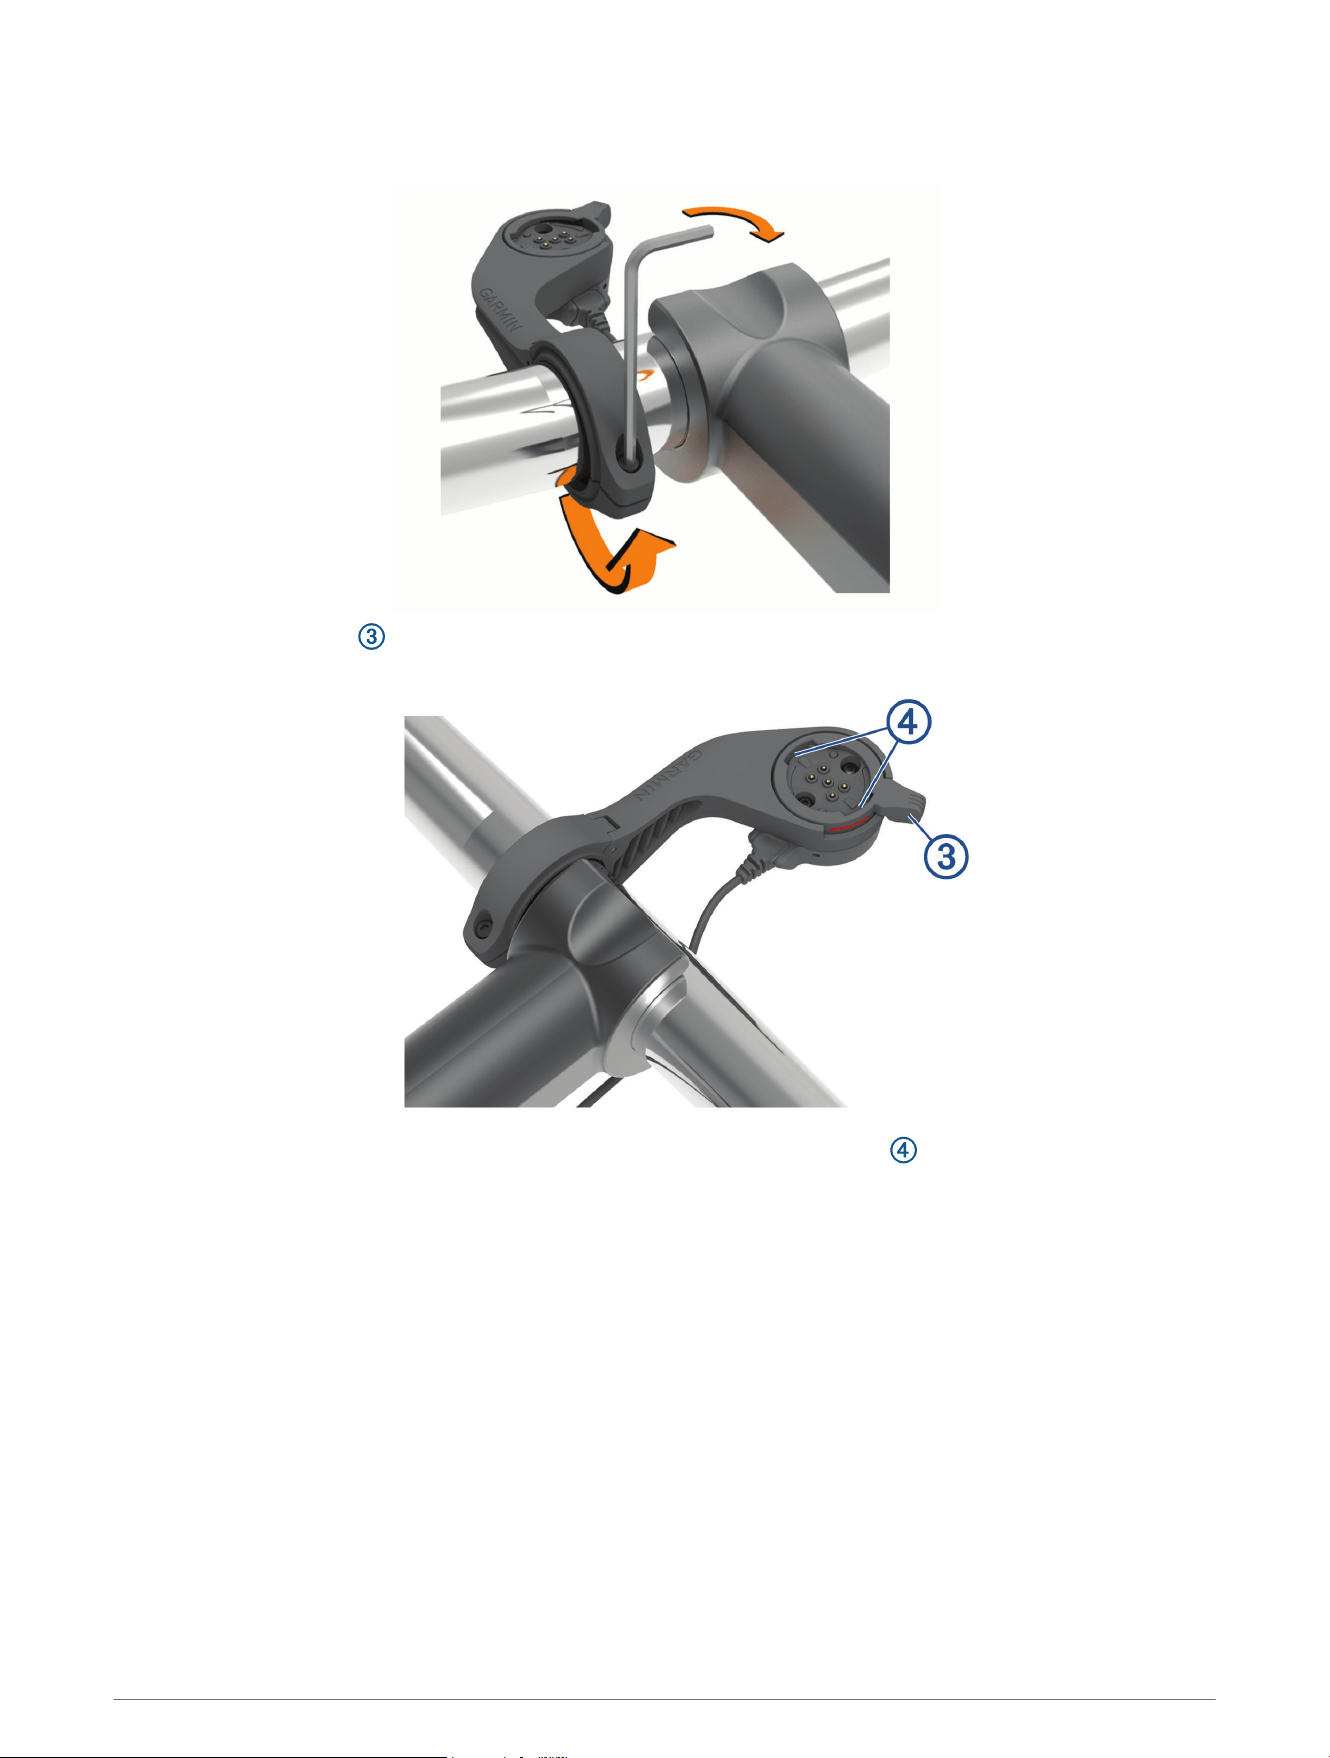
5 Replace the screw, and use the 2.5 mm hex key to tighten the screw until the mount is secure.
NOTE: You should check the tightness of the screw periodically.
6 Open the locking ring .
NOTE: The locking ring is in the open position when the red line is visible on the side of the mount.
7 Align the tabs on the back of the Edge device with the eBike mount notches .
52 Device Information
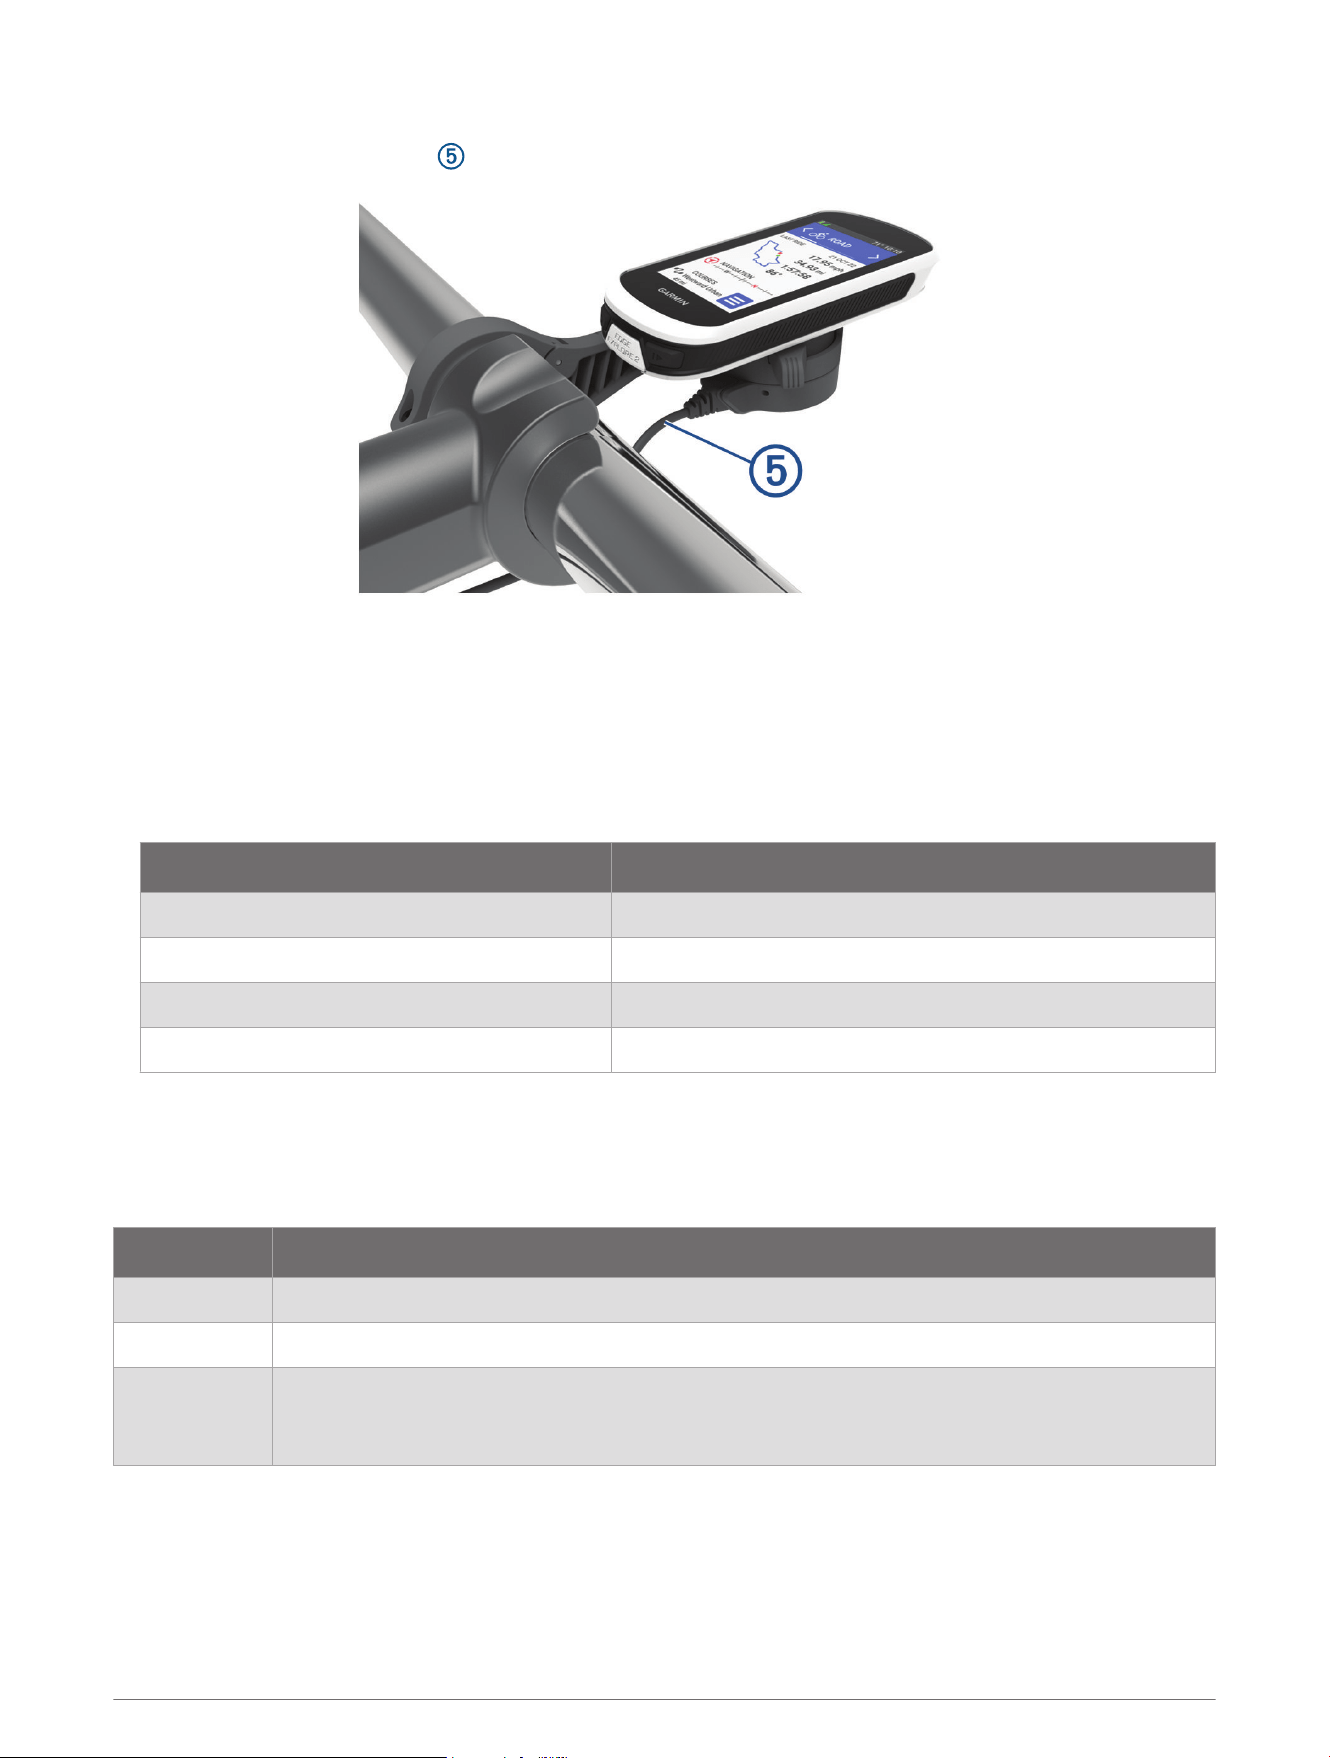
8 Press down slightly and close the lever to lock the Edge device into the mount.
9 Connect the power pod cable to the compatible power cable on your eBike (Required Cables, page53).
Required Cables
In order to complete the installation, you must purchase one of these compatible cables:
• Bosch
®
power mount accessory cable
• Shimano power mount accessory cable
NOTE: Garmin recommends having a bike technician trim the compatible Shimano cable to the correct
length.
Wire Color Wire Function
Red Power
Yellow Power
Blue Ground
Black Ground
• USB-A power mount accessory cable
NOTE: If you have trouble installing and wiring the mount, Garmin recommends visiting a bike service store for
assistance.
Edge Power Mount Status LED
LEDActivity Status
Solid green The power mount is connected to power, but it is not connected to an Edge device.
Flashing green The power mount is connected to the Edge device and is charging.
Flashing red
An error occurred. Unplug the power mount, and remove the Edge device. Plug the power
mount in again, and install the Edge device. If the red flashing continues, contact Product
Support.
Device Information 53

Specifications
Battery type Rechargeable, built-in lithium-ion battery
Battery life Up to 16 hr.
Operating temperature range
From -20º to 60ºC (from -4º to 140ºF)
NOTE: Battery life may be reduced when operating between -20º to 0ºC.
Charging temperature range From 0º to 45ºC (from 32º to 113ºF)
Wireless frequency 2.4GHz @ 20 dBm maximum
Water rating IEC 60529 IPX7
1
Product Updates
Your device automatically checks for updates when paired with a phone using Bluetooth technology. You can
manually check for updates from the system settings (System Settings, page46). On your phone, install the
Garmin Connect app.
This provides easy access to these services for Garmin devices:
• Software updates
• Map updates
NOTE: Map updates are available through Garmin Express.
• Data uploads to Garmin Connect
• Product registration
Updating the Software Using the Garmin Connect App
Before you can update your device software using the Garmin Connect app, you must have a Garmin Connect
account, and you must pair the device with a compatible smartphone (Pairing Your Phone, page16).
Sync your device with the Garmin Connect app.
When new software is available, the Garmin Connect app automatically sends the update to your device.
Updating the Software Using Garmin Express
Before you can update your device software, you must have a Garmin Connect account, and you must download
the Garmin Express application.
1 Connect the device to your computer using the USB cable.
When new software is available, Garmin Express sends it to your device.
2 Follow the on-screen instructions.
3 Do not disconnect your device from the computer during the update process.
Viewing Device Information
You can view device information, such as the unit ID, software version, and license agreement.
Select > System > About > Copyright Info.
Viewing Regulatory and Compliance Information
The label for this device is provided electronically. The e-label may provide regulatory information, such as
identification numbers provided by the FCC or regional compliance markings, as well as applicable product and
licensing information.
1 Select .
2 Select System > Regulatory Info.
1
The device withstands incidental exposure to water of up to 1m for up to 30min. For more information, go to www.garmin.com/waterrating.
54 Device Information
Device Care
NOTICE
Do not store the device where prolonged exposure to extreme temperatures can occur, because it can cause
permanent damage.
Never use a hard or sharp object to operate the touchscreen, or damage may result.
Avoid chemical cleaners, solvents, sunscreen, and insect repellents that can damage plastic components and
finishes.
Secure the weather cap tightly to prevent damage to the USB port.
Avoid extreme shock and harsh treatment, because it can degrade the life of the product.
Cleaning the Device
NOTICE
Even small amounts of sweat or moisture can cause corrosion of the electrical contacts when connected to a
charger. Corrosion can prevent charging and data transfer.
1 Wipe the device using a cloth dampened with a mild detergent solution.
2 Wipe it dry.
After cleaning, allow the device to dry completely.
Edge Power Mount Device Care
NOTICE
Secure the weather cap tightly to prevent damage to the exposed contacts.
Keep the components clean and free of debris.
Do not store the device where prolonged exposure to extreme temperatures can occur, because it can cause
permanent damage.
Avoid chemical cleaners, solvents, sunscreen, and insect repellents that can damage plastic components and
finishes.
Avoid extreme shock and harsh treatment, because it can degrade the life of the product.
Replace components with Garmin parts only. See your Garmin dealer or the Garmin website.
Contact your local waste disposal department to dispose of the power mount in accordance with applicable
local laws and regulations.
Cleaning the Edge Power Mount
• Clear mud and dirt from the weather cap area and exposed contacts.
• While the weather cap is installed, hold the device under running water.
After cleaning, allow the device to dry completely.
Cleaning the USB Port
1 Turn off the device and disconnect the device from power.
2 Clean the USB port using a soft, clean, lint-free cloth or cotton swab.
NOTE: If necessary, you can lightly dampen the cloth or cotton swab with isopropyl alcohol.
3 Allow the device to dry completely before you connect it to power.
Device Information 55

Troubleshooting
Resetting the Edge Bike Computer
If the bike computer stops responding, you may need to reset it. This does not erase any of your data or
settings.
Hold for 12 seconds.
The bike computer resets and turns on.
Restoring the Default Settings
You can restore the default configuration settings and activity profiles. This will not remove your history or
activity data, such as rides and courses.
Select > System > Device Reset > Reset Default Settings > .
Clearing User Data and Settings
You can clear all user data and restore the device to its initial setup. This removes your history and data, such as
rides and courses, and resets the device settings and activity profiles. This will not remove any files you added
to the device from your computer.
Select > System > Device Reset > Delete Data and Reset Settings > .
Exiting Demo Mode
Demo mode shows a preview of features on your Edge bike computer.
1 Press eight times.
2 Select .
Maximizing Battery Life
• Turn on Battery Saver (Turning On Battery Saver Mode, page56).
• Decrease the backlight brightness (Using the Backlight, page46) or shorten the backlight timeout (Display
Settings, page46).
• Turn on the Auto Sleep feature (Using Auto Sleep, page44).
• Turn off the Phone wireless feature (Phone Settings, page45).
• Select the GPS setting (Changing the Satellite Setting, page44).
• Remove wireless sensors that you no longer use.
Turning On Battery Saver Mode
Battery saver mode allows you to adjust the settings to extend the battery life for longer rides.
1 Select > Battery Saver > Enable.
2 Select an option:
• Select Reduce Backlight to reduce the backlight brightness.
• Select Hide Map to hide the map screen.
NOTE: When this option is enabled, navigation turn prompts still appear.
• Select Satellite Systems to change the satellite setting.
The estimated battery life remaining appears at the top of the screen.
After your ride, you should charge your device and disable battery saver mode to use all the device features.
56 Troubleshooting

My phone will not connect to the device
If your phone will not connect to the device, you can try these tips.
• Turn off your phone and your device, and turn them back on again.
• Enable Bluetooth technology on your phone.
• Update the Garmin Connect app to the latest version.
• Remove your device from the Garmin Connect app and the Bluetooth settings on your phone to retry the
pairing process.
• If you bought a new phone, remove your device from the Garmin Connect app on the phone you intend to
stop using.
• Bring your phone within 10m (33ft.) of the device.
• On your phone, open the Garmin Connect app, select , and select Garmin Devices > Add Device to enter
pairing mode.
• Swipe down on the home screen to view the status widget, and select Phone > Pair Smartphone to manually
enter pairing mode.
Improving GPS Satellite Reception
• Frequently sync the device to your Garmin account:
◦ Connect your device to a computer using the USB cable and the Garmin Express application.
◦ Sync your device to the Garmin Connect app using your Bluetooth enabled phone.
While connected to your Garmin account, the device downloads several days of satellite data, allowing it to
quickly locate satellite signals.
• Take your device outside to an open area away from tall buildings and trees.
• Remain stationary for a few minutes.
My device is in the wrong language
1 Select .
2 Scroll down to the second-to-last item in the list, and select it.
3 Scroll down to the eighth item in the list, and select it.
4 Select your language.
Calibrating the Barometric Altimeter
Your device was already calibrated at the factory, and the device uses automatic calibration at your GPS starting
point by default. You can manually calibrate the barometric altimeter if you know the correct elevation.
1 Select > System > Altimeter.
2 Select an option:
• To calibrate automatically from your GPS starting point, select Auto Cal..
• To enter the current elevation manually, select Calibrate > Enter Manually.
• To enter the current elevation from the digital elevation model (DEM), select Calibrate > Use DEM.
• To enter the current elevation from your GPS starting point, select Calibrate > Use GPS.
Setting Your Elevation
If you have accurate elevation data for your present location, you can manually calibrate the altimeter on your
device.
1 Select Navigation > > Set Elevation.
2 Enter the elevation, and select .
Troubleshooting 57

Temperature Readings
The device may display temperature readings that are higher than the actual air temperature if the device is
placed in direct sunlight, held in your hand, or is charging with an external battery pack. Also, the device will take
some time to adjust to significant changes in temperature.
Replacement O-rings
Replacement bands (O-rings) are available for the mounts.
NOTE: Use Ethylene Propylene Diene Monomer (EPDM) replacement bands only. Go to http://buy.garmin.com,
or contact your Garmin dealer.
Getting More Information
• Go to support.garmin.com for additional manuals, articles, and software updates.
• Go to buy.garmin.com, or contact your Garmin dealer for information about optional accessories and
replacement parts.
Appendix
Data Fields
Some data fields require ANT+ or Bluetooth accessories to display data. Some data fields appear in more than
one category on the device.
TIP: You can also customize the data fields from the device settings in the Garmin Connect app.
%Max Heart Rate: The percentage of maximum heart rate.
24-Hour Maximum Temperature: The maximum temperature recorded in the last 24hours from a compatible
temperature sensor.
24-Hour Minimum Temperature: The minimum temperature recorded in the last 24hours from a compatible
temperature sensor.
3s Power: The 3-second moving average of power output.
Asc. to Next Course Pt.: The remaining ascent to the next point on the course.
Ascent Remaining: During a course, the remaining ascent when you are using an elevation target.
Assist Mode: The current eBike assistance mode.
Avg Cadence: Cycling. The average cadence for the current activity.
Avg Heart Rate: The average heart rate for the current activity.
Avg Lap Time: The average lap time for the current activity.
Avg Power: The average power output for the current activity.
Avg Speed: The average speed for the current activity.
Battery Level: The remaining battery power.
Battery Status: The remaining battery power of a bike light accessory.
Beam Angle Status: The headlight beam mode.
Cadence: Cycling. The number of revolutions of the crank arm. Your device must be connected to a cadence
accessory for this data to appear.
Cadence Graph: A line graph showing your cycling cadence values for the current activity.
Calories: The amount of total calories burned.
Course Pt. Distance: The remaining distance to the next point on the course.
Destination Location: The position of your final destination.
Dist. to Point: The remaining distance to the next point.
Distance: The distance traveled for the current track or activity.
58 Appendix

Distance to Destination: The remaining distance to the final destination. You must be navigating for this data to
appear.
Distance to Next: The remaining distance to the next waypoint on the route. You must be navigating for this
data to appear.
eBike Battery: The remaining battery power of an eBike.
Elapsed Time: The total time recorded. For example, if you start the activity timer and ride for 10 minutes, then
stop the timer for 5 minutes, then start the timer and ride for 20 minutes, your elapsed time is 35 minutes.
Elevation: The altitude of your current location above or below sea level.
Elevation Graph: A line graph showing your current elevation, total ascent, and total descent for the current
activity.
ETA at Destination: The estimated time of day when you will reach the final destination (adjusted to the local
time of the destination). You must be navigating for this data to appear.
ETA at Next: The estimated time of day when you will reach the next waypoint on the route (adjusted to the local
time of the waypoint). You must be navigating for this data to appear.
GPS Signal Strength: The strength of the GPS satellite signal.
Grade: The calculation of rise (elevation) over run (distance). For example, if for every 3m (10ft.) you climb you
travel 60m (200ft.), the grade is 5%.
Heading: The direction you are moving.
Heart Rate: Your heart rate in beats per minute (bpm). Your device must be connected to a compatible heart
rate monitor.
Heart Rate Graph: A line graph showing your current, average, and maximum heart rate values for the current
activity.
Heart Rate Zone: The current range of your heart rate (1 to 5). The default zones are based on your user profile
and maximum heart rate (220 minus your age).
Kilojoules: The accumulated work performed (power output) in kilojoules.
Lap Ascent: The vertical distance of ascent for the current lap.
Lap Cadence: Cycling. The average cadence for the current lap.
Lap Descent: The vertical distance of descent for the current lap.
Lap Distance: The distance traveled for the current lap.
Lap Heart Rate: The average heart rate for the current lap.
Lap Power: The average power output for the current lap.
Laps: The number of laps completed for the current activity.
Lap Speed: The average speed for the current lap.
Lap Time: The stopwatch time for the current lap.
Light Mode: The light network configuration mode.
Lights Connected: The number of connected lights.
Max. Power: The top power output for the current activity.
Max. Speed: The top speed for the current activity.
Next Waypoint: The next point on the route. You must be navigating for this data to appear.
Odometer: A running tally of distance traveled for all trips. This total does not clear when resetting the trip data.
Power: The current power output in watts.
Power Graph: A line graph showing your current, average, and maximum power output values for the current
activity.
Power Zone: The current range of power output (1 to 7) based on your FTP or custom settings.
Shifting Advice: The recommendation to shift up or down based on your current effort. Your eBike must be in
manual shifting mode.
Smart Travel Range: The estimated remaining distance the eBike will provide assistance, taking into account
the local terrain.
Appendix 59
Speed: The current rate of travel.
Speed Graph: A line graph showing your speed for the current activity.
Sunrise: The time of sunrise based on your GPS position.
Sunset: The time of sunset based on your GPS position.
Temperature: The temperature of the air. Your body temperature affects the temperature sensor.
Time of Day: The time of day based on your current location and time settings (format, time zone, daylight
saving time).
Timer: The stopwatch time for the current activity.
Time to Destination: The estimated time remaining before you reach the destination. You must be navigating
for this data to appear.
Time to Next: The estimated time remaining before you reach the next waypoint in the route. You must be
navigating for this data to appear.
Time to Point: The remaining time to the next point.
Total Ascent: The total elevation distance ascended since the last reset.
Total Descent: The total elevation distance descended since the last reset.
Trainer Controls: During a workout, the resistance force applied by an indoor trainer.
Travel Range: The estimated distance you can travel based on the current eBike settings and remaining battery
power.
VO2 Max. Standard Ratings
These tables include standardized classifications for VO2 max. estimates by age and sex.
Males Percentile 20–29 30–39 40–49 50–59 60–69 70–79
Superior 95 55.4 54 52.5 48.9 45.7 42.1
Excellent 80 51.1 48.3 46.4 43.4 39.5 36.7
Good 60 45.4 44 42.4 39.2 35.5 32.3
Fair 40 41.7 40.5 38.5 35.6 32.3 29.4
Poor 0–40 <41.7 <40.5 <38.5 <35.6 <32.3 <29.4
Females Percentile 20–29 30–39 40–49 50–59 60–69 70–79
Superior 95 49.6 47.4 45.3 41.1 37.8 36.7
Excellent 80 43.9 42.4 39.7 36.7 33 30.9
Good 60 39.5 37.8 36.3 33 30 28.1
Fair 40 36.1 34.4 33 30.1 27.5 25.9
Poor 0–40 <36.1 <34.4 <33 <30.1 <27.5 <25.9
Data reprinted with permission from The Cooper Institute. For more information, go to www.CooperInstitute.org.
60 Appendix

Heart Rate Zone Calculations
Zone
% of Maximum Heart
Rate
Perceived Exertion Benefits
1 50–60% Relaxed, easy pace, rhythmic breathing
Beginning-level aerobic training,
reduces stress
2 60–70%
Comfortable pace, slightly deeper
breathing, conversation possible
Basic cardiovascular training, good
recovery pace
3 70–80%
Moderate pace, more difficult to hold
conversation
Improved aerobic capacity, optimal
cardiovascular training
4 80–90%
Fast pace and a bit uncomfortable,
breathing forceful
Improved anaerobic capacity and
threshold, improved speed
5 90–100%
Sprinting pace, unsustainable for long
period of time, labored breathing
Anaerobic and muscular endurance,
increased power
Wheel Size and Circumference
When used for cycling, your speed sensor automatically detects your wheel size. If necessary, you can manually
enter your wheel circumference in the speed sensor settings.
The tire size for cycling is marked on both sides of the tire. You can measure the circumference of your wheel or
use one of the calculators available on the internet.
Appendix 61

support.garmin.com
GUID-E67DE53E-5B08-4903-9767-F58973BC1829 v6July 2025