
Model No.: JC-125DB
Read this booklet thoroughly before using
and save it for future reference
Web: www.electacticshop.com
Email: [email protected]
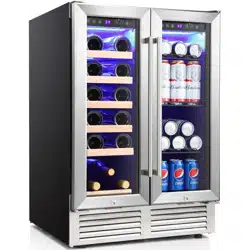
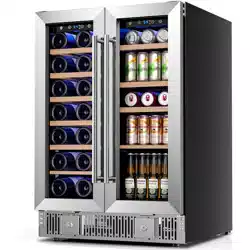
WINE & BEVERAGE COOLER
FOR BUILT-IN INSTALLATION
INSTRUCTION MANUAL
Scan the QR code to watch
the product videos


CONTENTS
Important Safeguards ······················ 1
························ 3
Name Of The Parts
·························· 4
Product Feature
························
4
How to install the handle
·················
7
Storing the wine bottle and beverage can
······················
8
Starting and running your unit
···························
8
Operation panel
······················ 4Before Putting Into Use
······················ 4Tips For Energy Saving
··························· 4How To Install
·························· 5How To Operate
······················ 9Clean And Maintenance
······················· 10Troubleshooting Guide

IMPORTANT SAFEGUARDS 1
Before using the electrical appliance, there are some basic safety precautions to be
followed:
The appliance must be correctly installed and connected to the power supply in
accordance with the installation instructions before it is used. (See: “HOW TO
INSTALL”).
Use this appliance only for its intended purpose as described in this owner’s manual.
This appliance is intended to be used in household and similar scenarios such as
staff kitchen areas in shops, offices and other working environments;
farm houses, hotels, motels and other residential environments;
bed and breakfast type environments;
catering and similar non-retail applications.
The main power supply must be properly grounded.
This appliance must be positioned where the plug is accessible. Never unplug the unit
often by pulling on the power cord. Always grasp the plug firmly and pull it straight out
from the outlet.
Do not use an extension cord as this can negatively affect the performance of the unit.
If you must use an extension cord, use only those corresponding to the appliance’s
power consumption rating to prevent overheating. Keep extension cords clear of
walkways to avoid tripping risks.
When transporting the unit, keep the unit in the upright position. Do not tilt it beyond
45° or place the unit in upside down position. Do not tip over.
Do not touch the cooled surfaces while the appliance operates, especially not with wet
hands, because the skin may stick to the cold surfaces.
If the unit fails to cool properly, dispose of spoiled food as needed.
Unplug your unit before cleaning or before making any repairs.
NOTE: If for any reason this product requires repair, we strongly recommend that a certi-
fied technician perform the service. Repairs made by non-qualified personnel will void
the warranty.
Do not defrost the appliance with other electric devices (hair dryer etc.) and never scrape
the ice or frost layer with sharp tools.
Warning: Do not damage the refrigerant circuit.
The rating plate is inside the appliance or outside on its rear or side wall.
This appliance is not intended for use by persons with reduced physical, sensory or
mental capabilities, or lack of experience and knowledge, unless they have been given
supervision or instruction concerning the proper use of the appliance. Children should be
supervised to ensure that they do not play with the unit.
It is recommended that the wine cooler is positioned away from any combustible sourc-
es such as gas, petrol, alcohol, lacquer and banana oil, etc. The aforementioned objects
should not be stored in the wine cooler under any circumstances.
SAVE THESE INSTRUCTION
HOUSEHOLD USE ONLY
S
IMPORTANT SAFEGUARDS 2
Do not run cord over carpeting or other heat insulators. Do not cover the cord. Keep cord
away from traffic areas, and do not submerge it in water. If the supply cord is damaged, it
must be replaced by the manufacturer or its service agent or a similarly qualified person
in order to avoid a hazard. Repair or replace the cords that have become frayed or other-
wise damaged immediately. Do not use a cord that shows any signs of crack or abrasion.
Warning: Keep all ventilation openings clear of obstruction, including that in the appli-
ance enclosure or in the built-in structure.
Warning: Do not use mechanical device or other means other than those recommended
by the manufacturer to accelerate the defrosting process.
Warning: Do not damage the refrigerant circuit.
Warning: Do not use electrical appliances inside the food storage compartments of the
appliance, unless they are recommended by the manufacturer.
Warning: Do not operate the appliance in the presence of explosive fumes. Do not use
the flame or make up fire near the unit.
Please dispose of the appliance according to local regulations as the appliance contains
flammable gas and refrigerant.
All refrigeration products contain refrigerants, which under the guidelines of federal law
must be removed before disposal. It is the consumer's responsibility to comply with
federal and local regulations when disposing of this product.
DANGER-Risk of Fire or Explosion. FLAMMABLE REFRGERANT used. Do not use mechanical
device to defrost the unit. Do not puncture the refrigerant tubing.
DANGER-Risk of Fire or Explosion. FLAMMABLE REFRIGERANT used. Consult repair manu-
al/owner’s guide before attempting to service this product. All safety precautions must
be followed.
DANGER-Risk of Fire or Explosion. FLAMMABLE REFRIGERANT used. Dispose of the unit in
accordance with the federal or local regulations.
CAUTION – Risk Of Fire Or Explosion due to puncture of refrigerant tubing. Follow han-
dling instructions carefully. Flammable Refrigerant Used.
Safety instruction for refrigerant
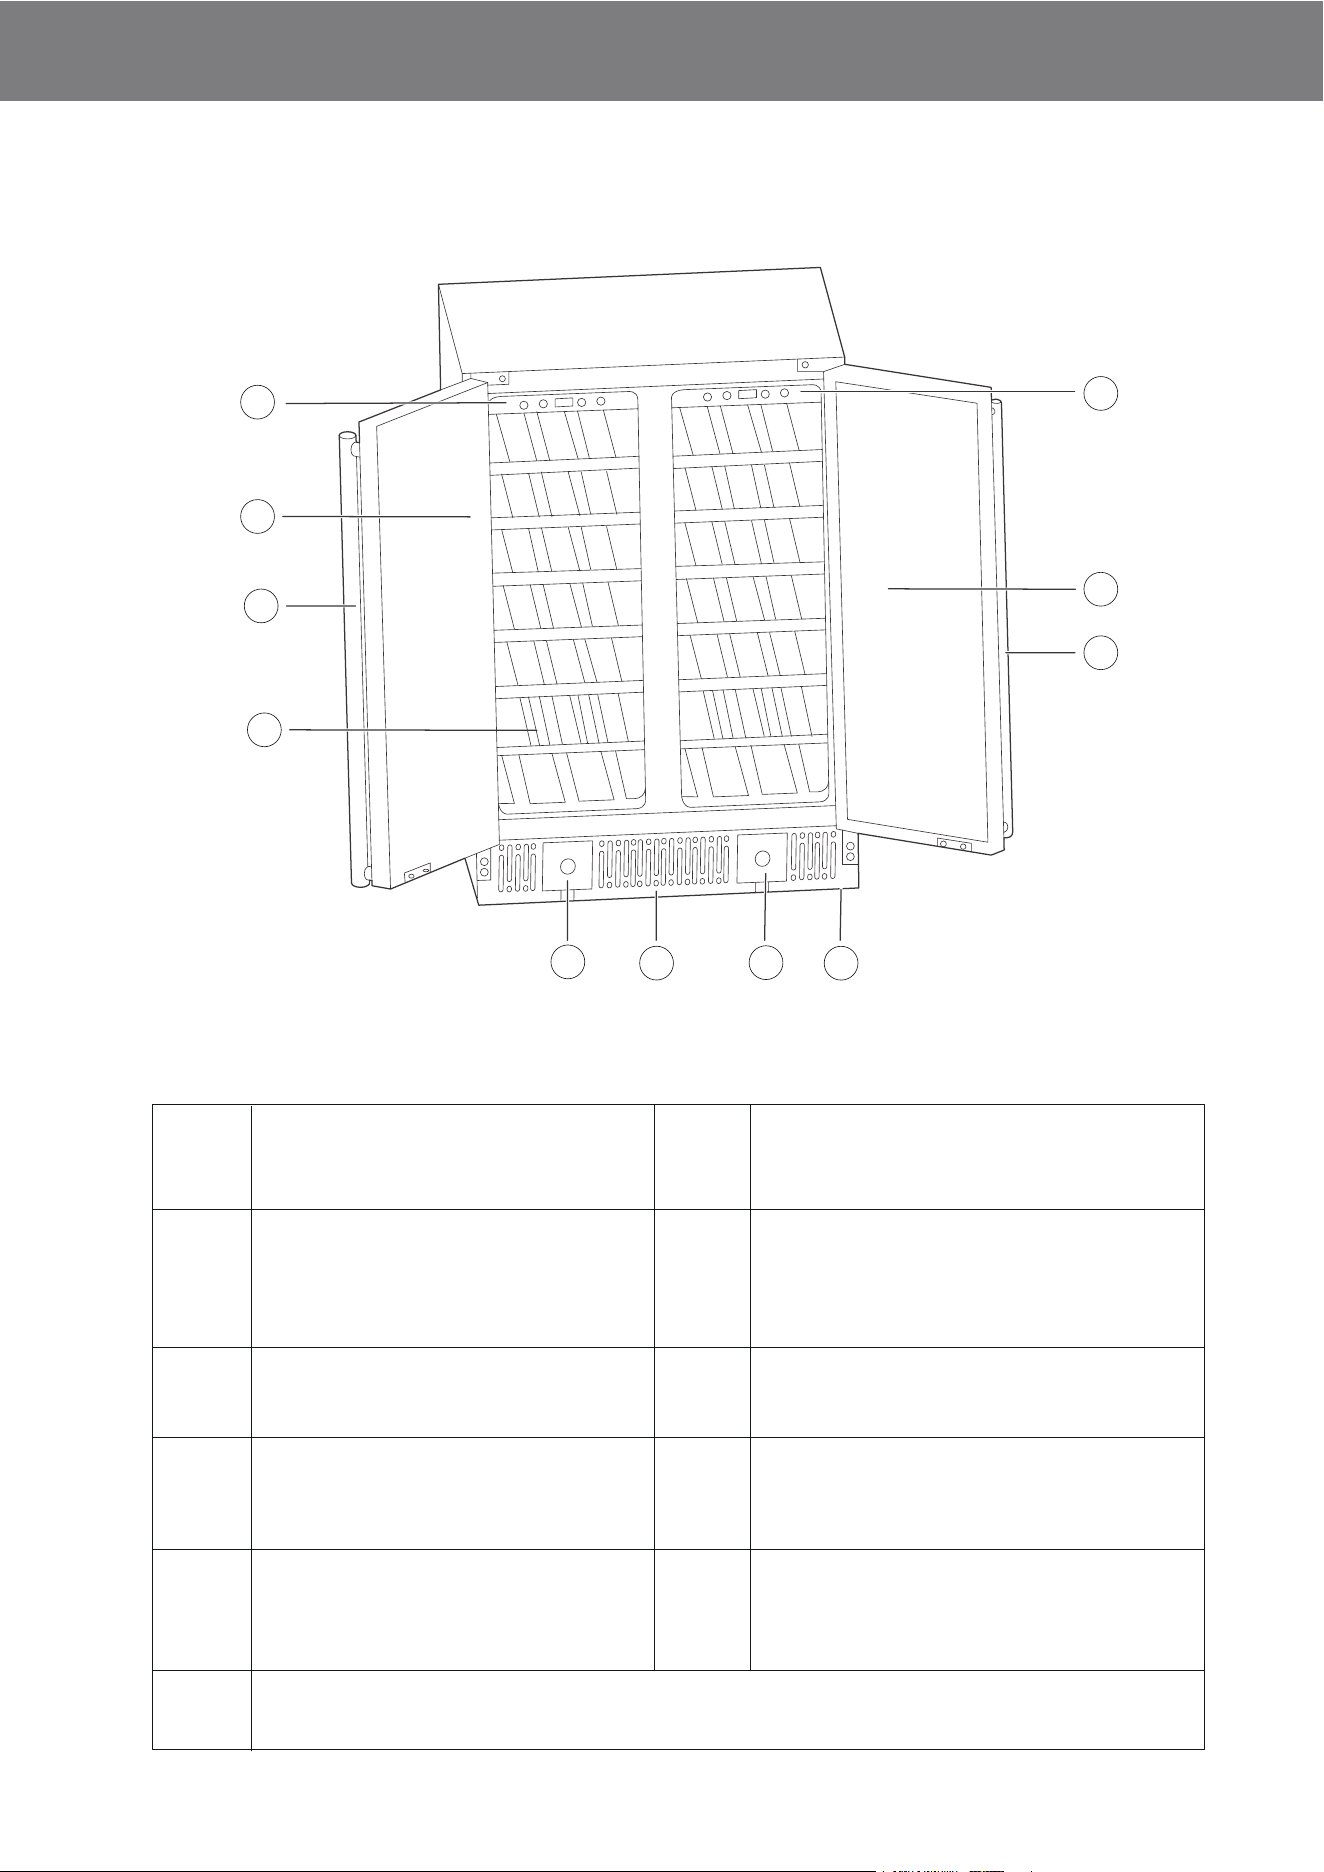
NAME OF THE PARTS 3
Left door handle
(need to be assembled
by yourself)
Removable wine bottle
or can shelf
Hot air outlet frame
Height adjustable feet
(underneath, not shown)
Right door handle (need to
be assembled by yourself)
Left door Lock
Right door lock
Glass door on the
right compartment
3
5
7
Operation panel of the right compartment
9
11
1
Operation panel of the
left compartment
Glass door of the left
compartment
2
4
6
8
10
1
2
3
4
5
6
7
8
9
10
11

PRODUCT FEATURE
BEFORE PUTTING INTO USE
TIPS FOR ENERGY SAVING
HOW TO INSTALL
4
1. Transparent glass door, luxury out looking, elegant design, easy operating.
2. Left and right compartment Dual-zone cooling.
3. Low noise, high energy efficiency, updated quick cooling system.
4. Smart touch-button control panel for operation.
Before connecting the appliance to the power supply, let the unit stand upright for 4 hours,
which will reduce the possibility of the cooling system malfunctioning due to improper
handling.
Keep the unit doors closed as much as possible, particularly in warm or humid conditions.
Maintain adequate ventilation around the back and sides of the unit.
Allow warm wine bottle or beverage can to cool to room temperature before placing in
the unit.
Do not obstruct the front hot air outlet frame.
Clean your unit thoroughly before putting into use. (See “Clean and Maintenance”)
Refer to the parts diagram on the third page to insure proper positioning of internal com-
ponents.
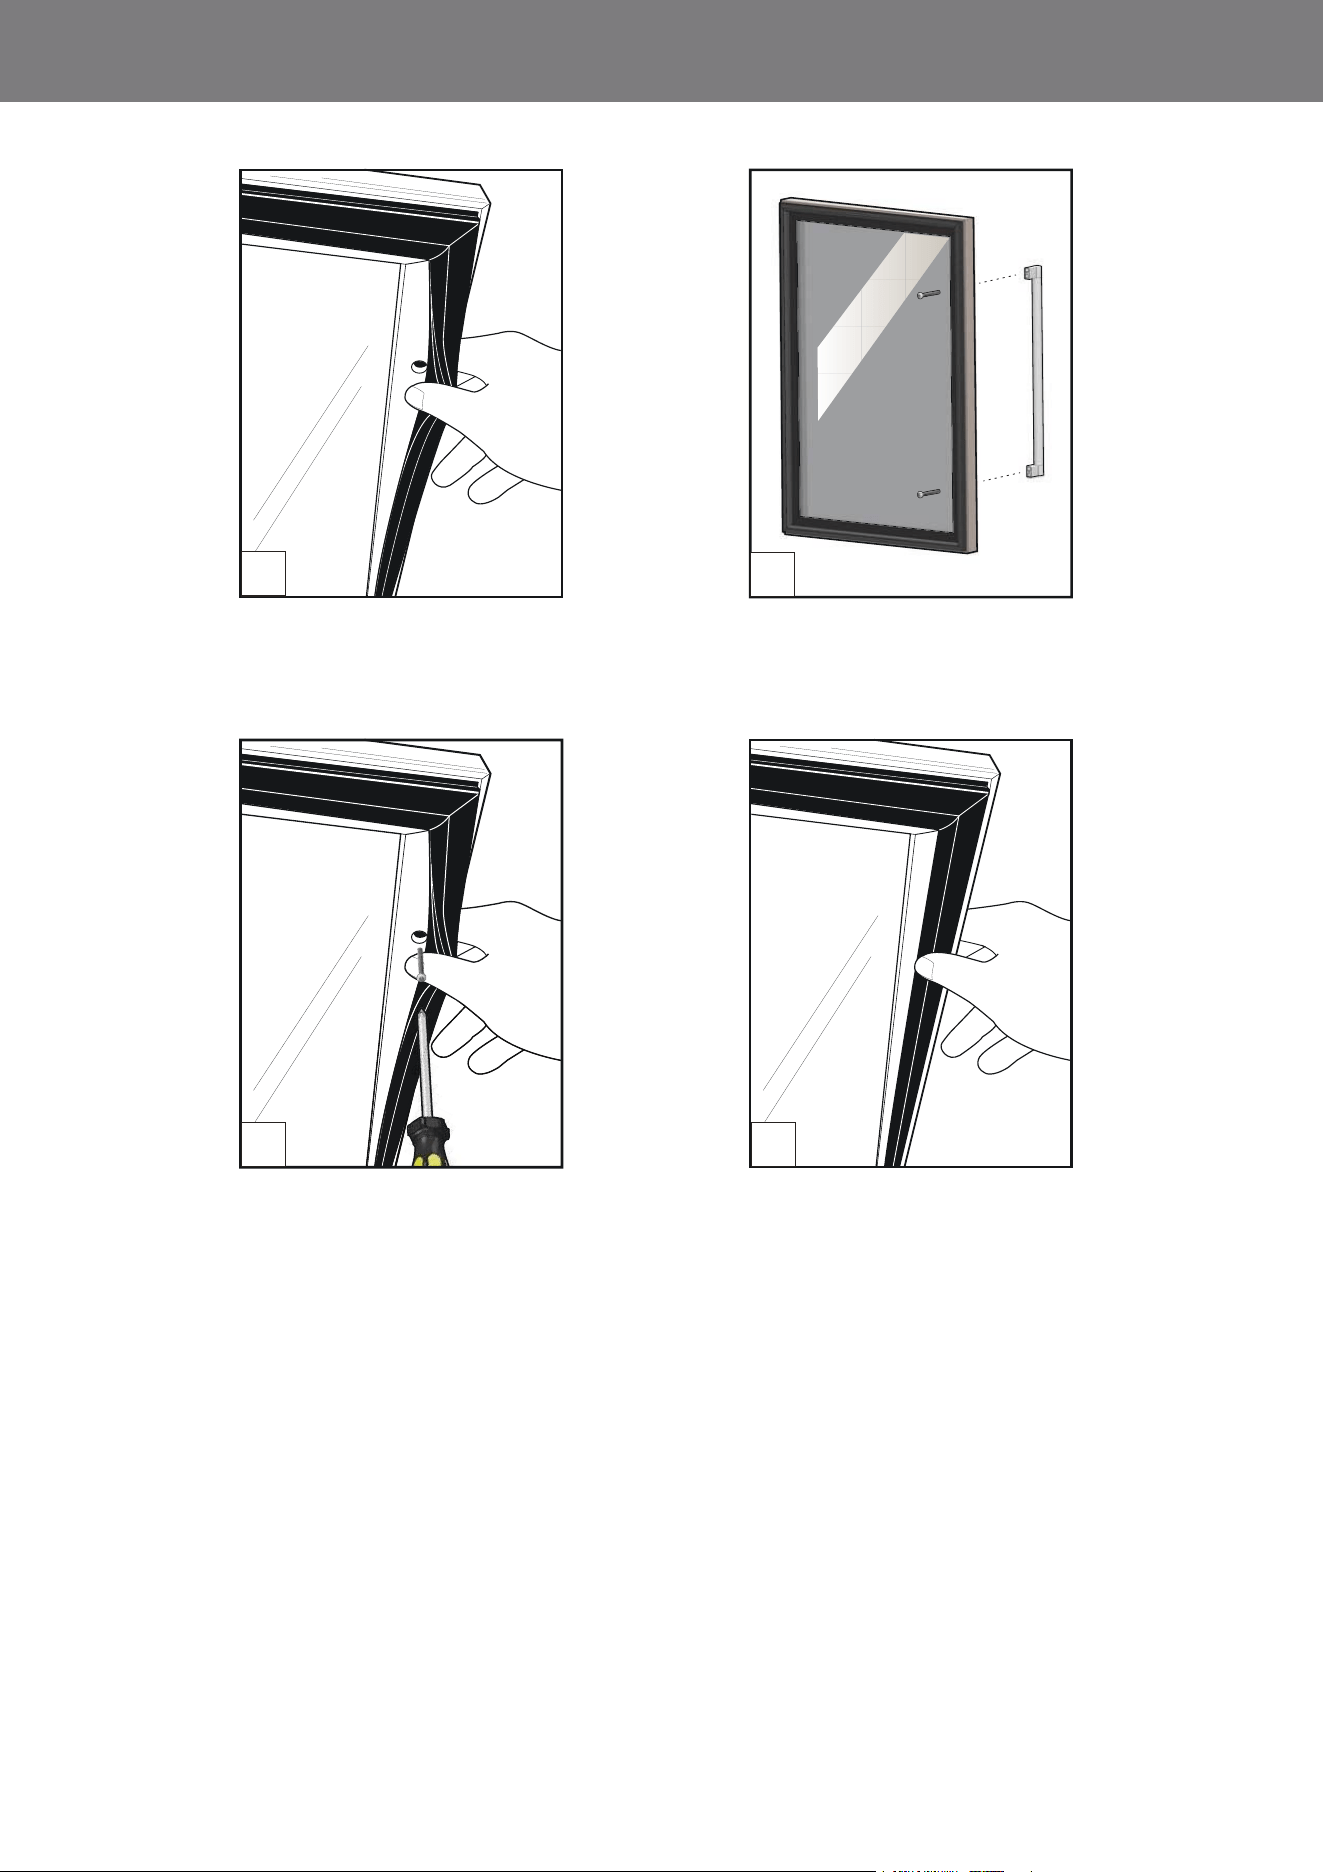
HOW TO INSTALL THE HANDLE
Before installing the appliance, please install the door handle as follows:
IMPORTANT: NEVER LAY THE WINE AND BEVERAGE CENTER ON ITS BACK.
The compressor and motor components are installed at the back of the unit and may easily be
damaged if the wine and beverage center is placed on its back.
IMPORTANT: DO NOT USE STAINLESS STEEL HANDLE TO MOVE OR LIFT THE UNIT.
HOW TO INSTALL 5
Carefully pull back the gasket from the interior door
frame as indicated. Insert screws into holes on
back side of door under the door gasket. Position
the handle on the outside of the glass door.
Gently press and thread the gasket back into
the slot on the door frame. Ensure the gasket is
properly seated prior to using the unit.
The stainless steel handle can be easily attached
to the left side of the glass door with two
enclosed screws.
Tighten both screws until the door handle is flush
with the stainless steel frame. Take care not to
over tighten the screws, as this may damage the
handle or frame.
2
3
4
1
Note: This appliance can either stand alone or be built in. The front grille must be not
obstructed.
Install the unit in a location away from extreme heat and cold. This unit should be far
away from the heating source, such as stoves, heater, or radiators, and should be pre-
vented from direct sunlight. Allow sufficient clearance between the unit and sidewall so
the door will open without obstruction.
Place the unit on a level surface that will be strong enough to support the unit when it is
fully loaded. Carpeting or other soft or uneven surfaces are not recommended. You can
adjust the front feet located at the bottom of the unit to level your cooler.
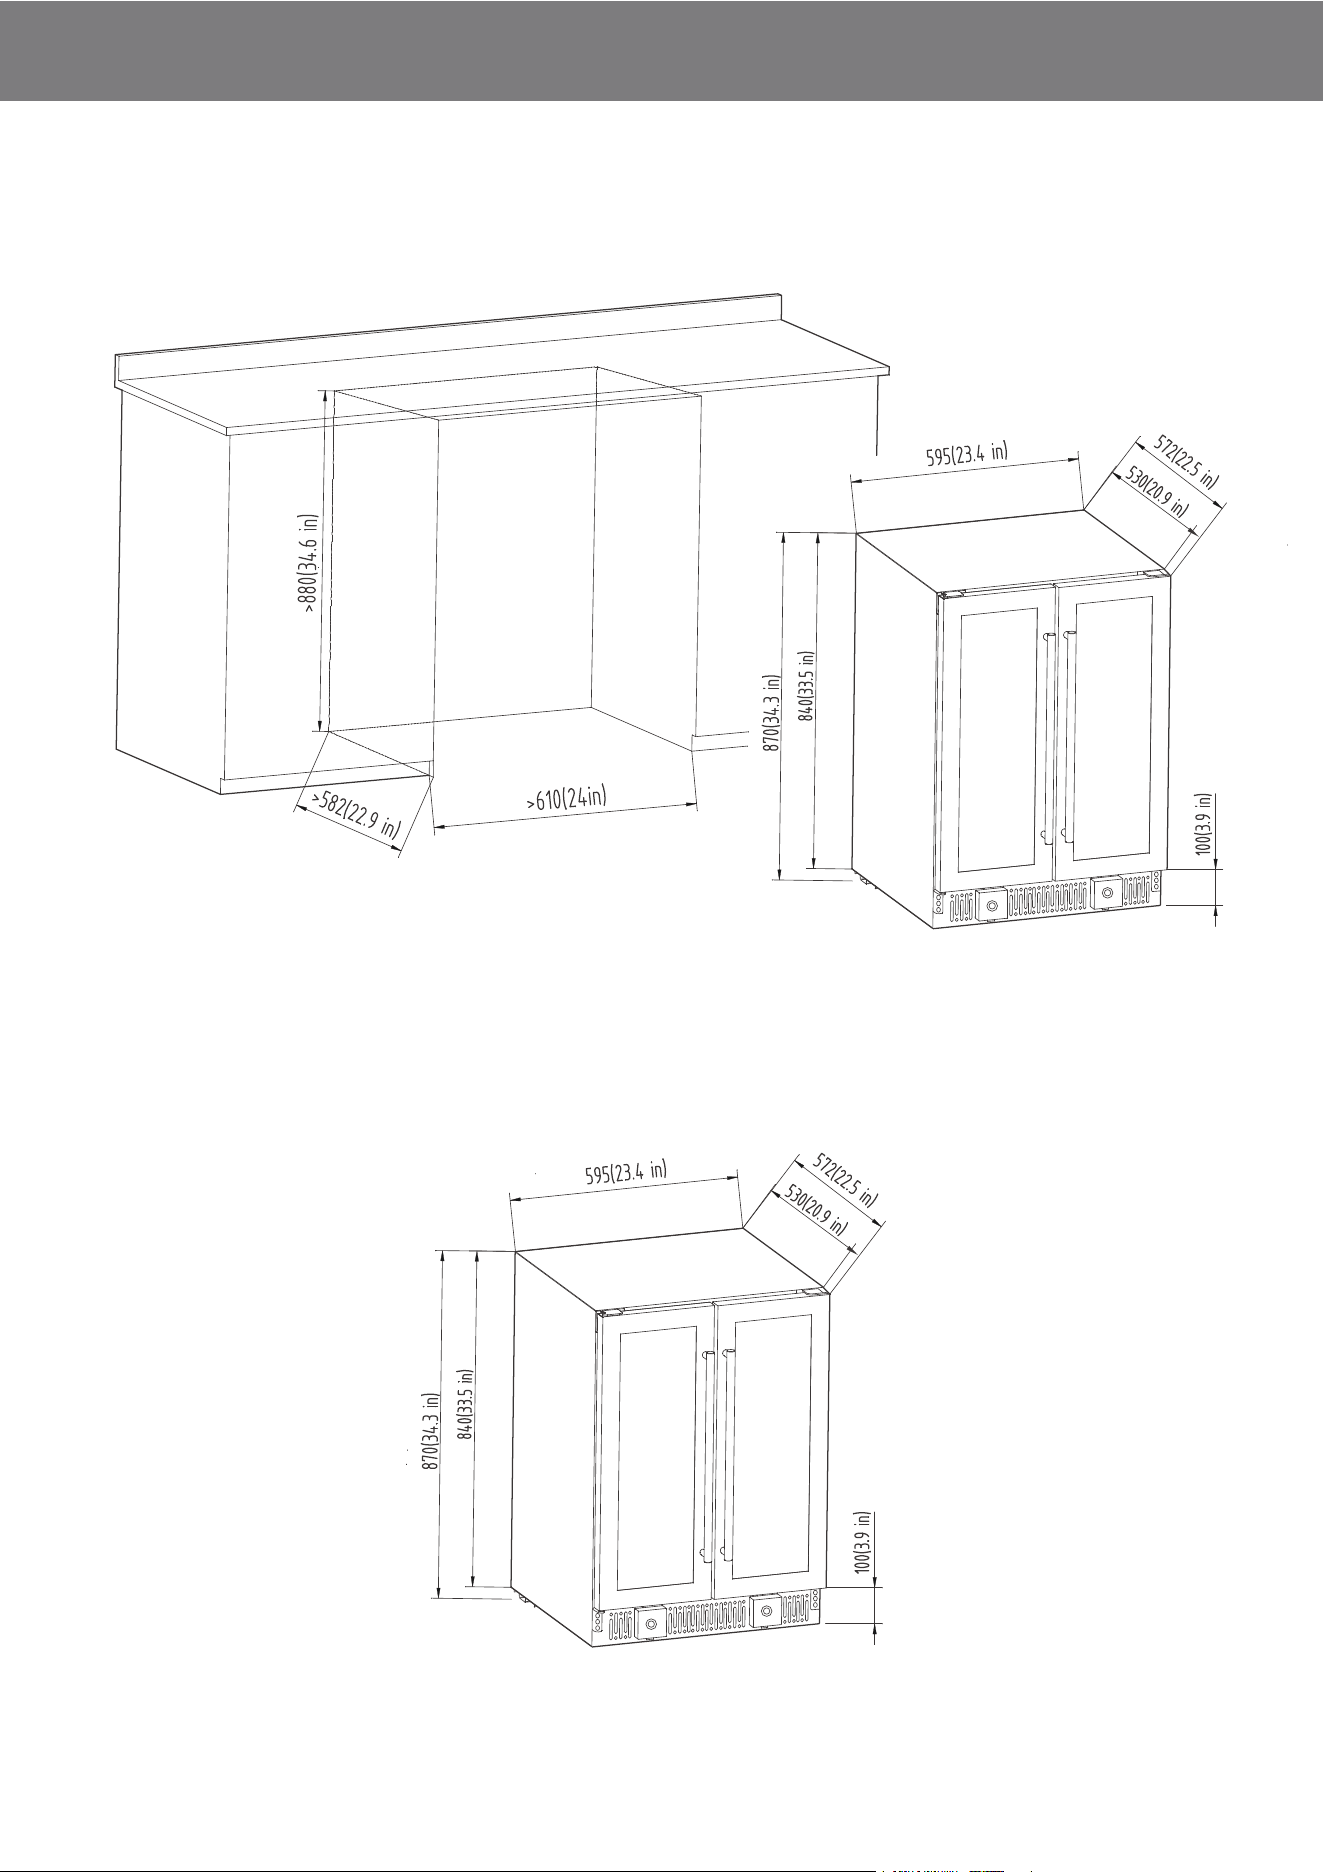
HOW TO INSTALL 6
For free standing installation, it’s suggested to allow 2 inches of space between the unit’s
side, rear and the wall. In addition, sufficient clearance (160°) should be maintained to
allow the glass door to open properly.
The appliance must be correctly connected to the power supply, 115V/60Hz, certainly
grounded.
For under-counter built-in installation, please following the following diagram, and leave
enough space for the unit.
HOW TO INSTALL
HOW TO OPERATE
7
Do not store explosive substances such as aerosol cans with a flammable propellant in
this appliance.
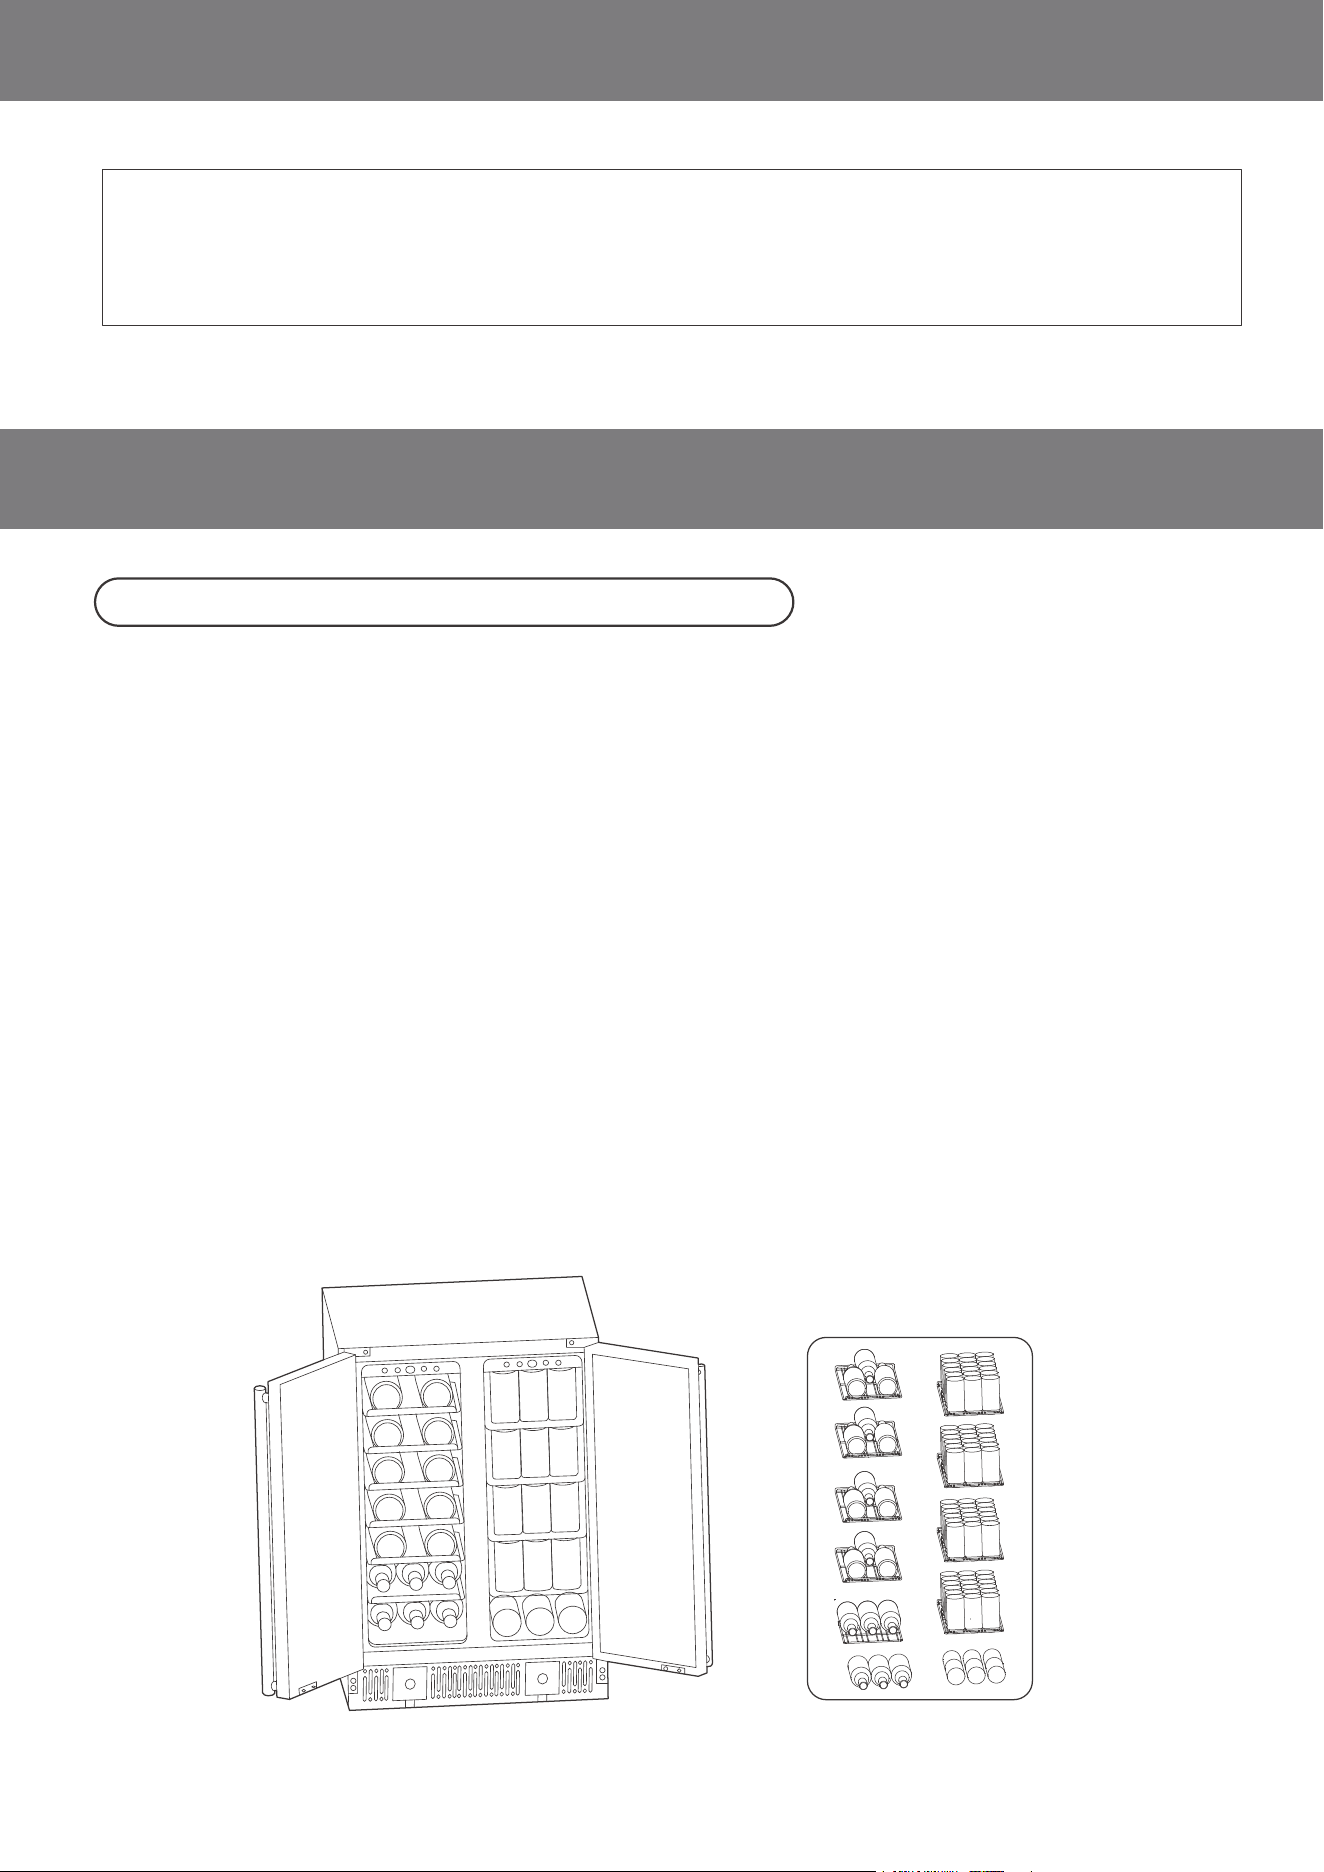
Please refer to the following picture when placing the wine bottles and beverage can
inside the cooling compartment. For Maximum loading, normally, left compartment is for
wine bottle storing and right for beverage can storing.
Wines should be laid on shelves in sealed containers to avoid leakage.
Do not overload.
Do not open the door unnecessarily or leave the door ajar.
Do not cover the shelf with any material such as aluminium foil as this will impede air
circulation within the cabinet.
Note that you can lock the door to avoid children accidentally straying into. Insert the
attached key into the door lock on the bottom front of the appliance and rotate clockwise
for one and a half cycles to lock the door.
After a period of time of leaving the door open, there will be an alarm sound.
The unit is not designed to be installed in an outside area such as a garage or a porch.
Ambient temperatures of below 50°F or above 90°F will hinder the performance of the
appliance.
Storing the Wine Bottle & Beverage Can
HOW TO OPERATE 8
Note: If the unit is brought in from outside in the winter season, give it a few hours to warm
up to the room temperature before plugging it in. Also, after transportation and moving of
the unit, please wait for at least 4 hours before plugging it in.
1.Remove the packaging material.
2.Clean the unit thoroughly. Wipe the outside with a soft dry cloth, the interior with a clean
moist cloth.
3.Connect the power cord to a standard wall outlet, you will hear a beep, which is normal.
And the display on the control panel will revert to actual internal temperature.
4.Do not put wines or beverages into the wine cooler within two hours after the power on.
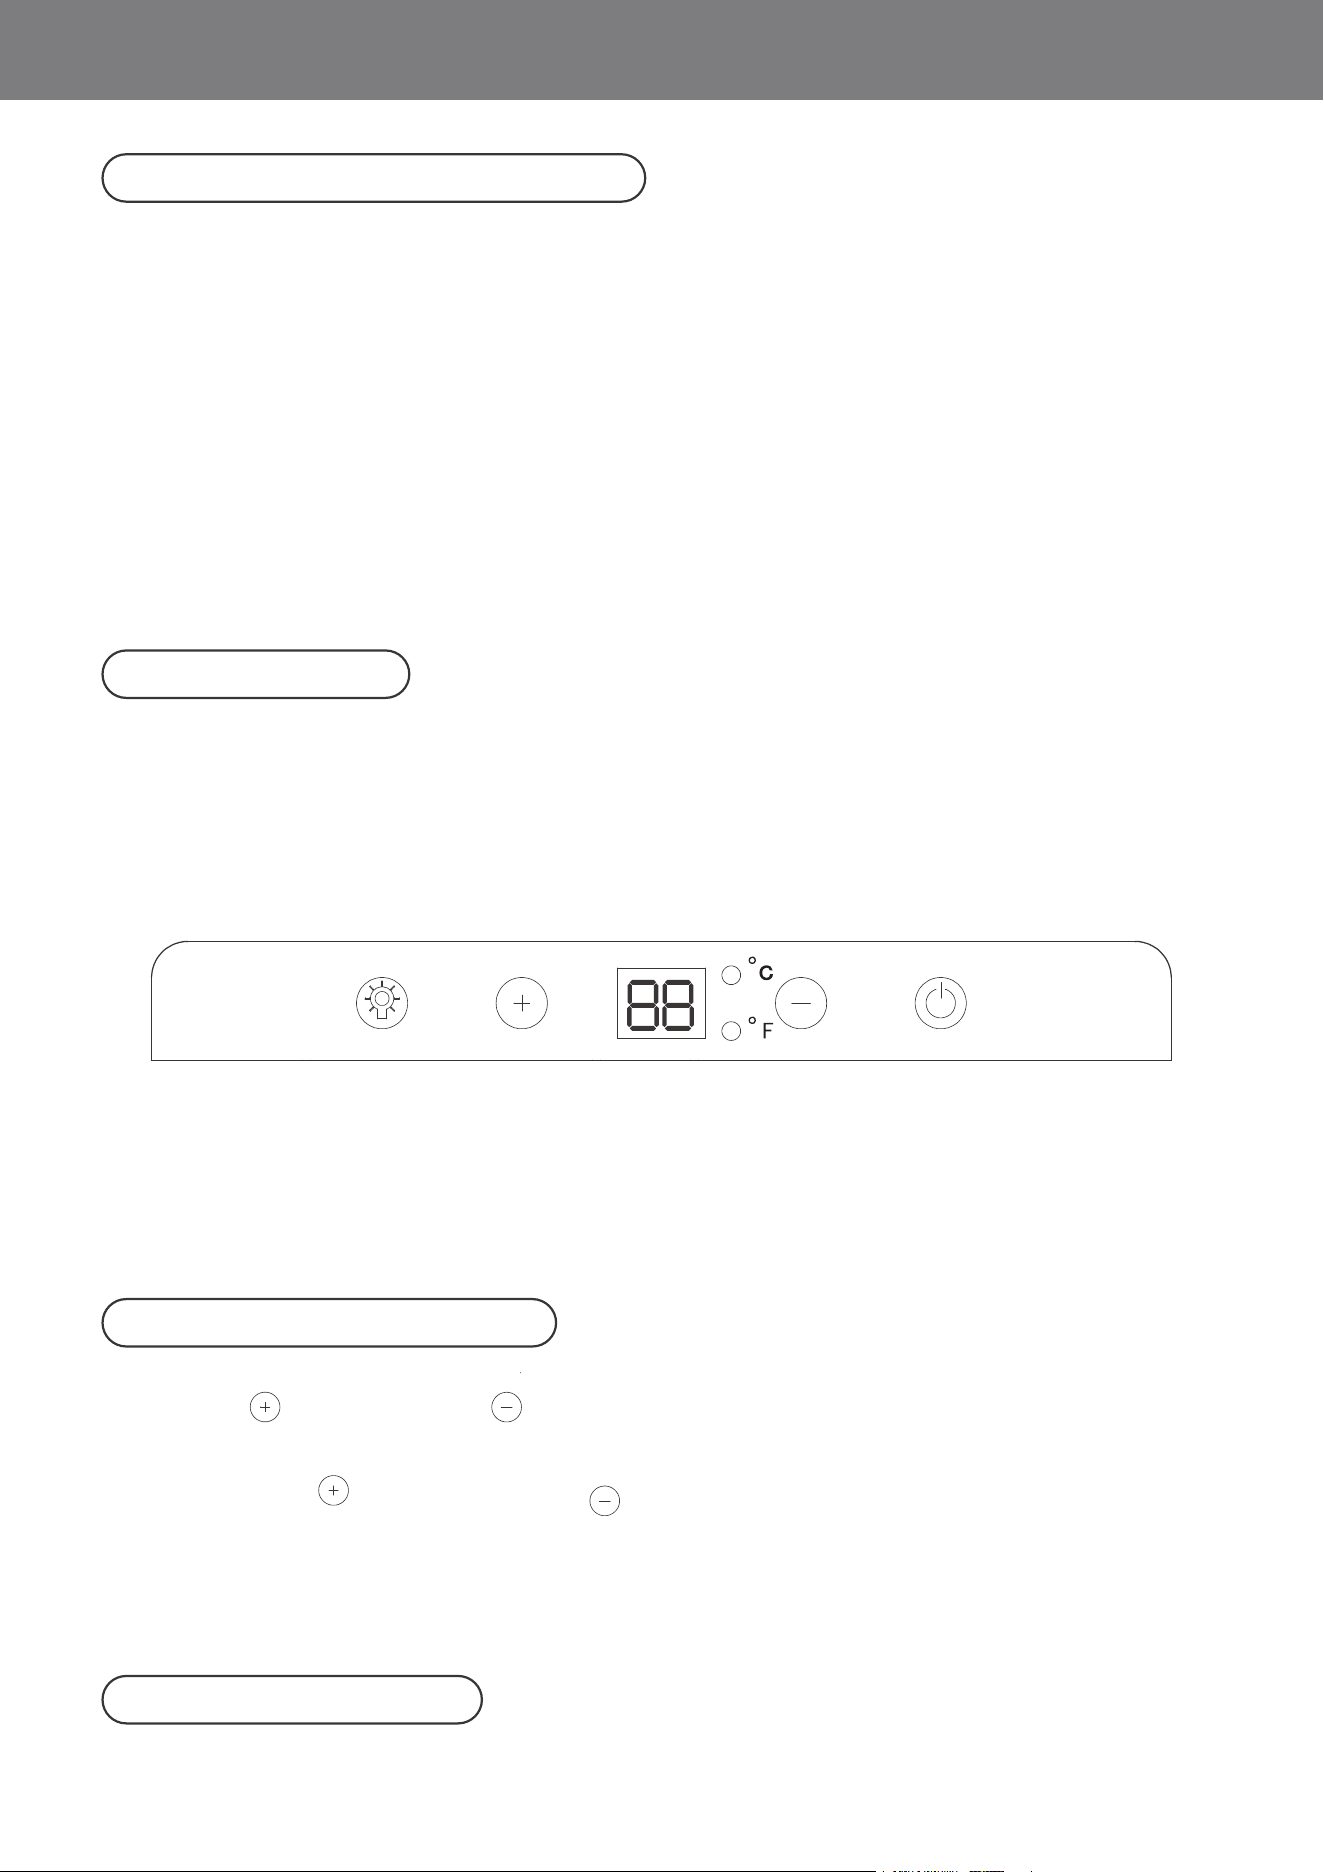
Both cooling compartment are designed with an operational panel to let you set the unit
easily, which is installed on the top of the inner liner.
Note: The left control panel is only for left cooling compartment, and the right control panel
is only for the right compartment.
There are four buttons and a temperature display window on each operation panel, letting
you operate you unit at your desired way. And the same button has the same function on
the two control panels.
Press the ” ” button or the ” “ button to adjust the set temperature to your desired
value. With each pressing, the temperature will change 1 Fahrenheit or 1 Centigrade.
Note: Press the" " button and the " " button at same time for more than 3 seconds, the
temperature unit can convert between Fahrenheit and Centigrade.
Setting Range: 37-61 Fahrenheit/3-16 Centigrade.
The default setting is 39 Fahrenheit/4 Centigrade.
Starting and Running the Unit
Operation Panel
Temperature Adjustment
Interior Light Control
HOW TO OPERATE
CLEAN AND MAINTENANCE
9
The unit has built in with the LED light in the cooling compartment. When you open the glass
door, The LED light will be totally on, again close the door, the LED light will be off.
Also this LED light is controlled by the light button “ ” on the control panel. If you want to
cancel the lighting function, press this button for more than 3 seconds, the LED light will be
turned off and will not be activated no matter the door opens or closes. Only to press the
“ ” button for more than 3 seconds again, the lighting function will recover.
Note: For maximum energy efficiency, leave the light off when not viewing your collection.
1. The unit should be cleaned on a regular basis.
WARNING: Do not clean your unit with flammable fluids. The fumes can create a fire hazard
or explosion.
WARNING: Before cleaning the unit, be sure to unplug the unit first.
WARNING: Do not pour down water or let the whole unit submerge in water, for which will
wet the inside electrical parts.
Cleaners: Never use harsh, abrasive cleaners, heavy-duty cleaners or solvents on any sur-
face.
Exterior: Wipe with damp, sudsy cloth, rinse and dry. For stubborn stains and for periodic
waxing, use silicon wax.
Refrigeration Section: Wash shelves and other removable parts in warm sudsy water, rinse
and dry. Wash interior with baking soda solution (3 tablespoons to I liter of water) or warm
sudsy water, rinse and dry.
Magnetic Door Seals: Wash with warm sudsy water.
2. It is necessary to have an adequate ventilation space around the unit in order to attain
proper performance and dissipation of heat, to maintain efficiency and low power con-
sumption. Clearance of a minimum 2 inches should be maintained at the rear and sides of
the unit. And especially do not obstruct the front hot air outlet frame. (See: “HOW TO
INSTALL”)
Plug on the unit for the first time, both the cooling compartment will start to run according
to the default temperature setting.
Press the ON/OFF button for more than 3 seconds, it will turn off the cooling function of the
corresponding cooling compartment. Short press the ON/OFF button of this compartment, it
will start to run again.
Note: Wait 3-5 minutes before restarting if you have unphlgged the unit. The unit may fail to
operate properly if restarted too quickly.
ON/OFF Controlt
CLEAN AND MAINTENANCE
TROUBLESHOOTING GUIDE
10
3. Do not modify the power cord under any circumstance to allow the unit to be plugged
into a non-grounded outlet. To avoid heat damage to the power cord, please ensure that it
does not come in proximity or in direct contact with the compressor of the unit.
4. Please avoid installing the unit in a location where the appliance will come in contact with
water or exceed moisture to minimize rusting of metal parts.
5. The unit should not be installed near any heat source or in a location where it will come in
direct contact with the sunlight.
6. The components, if need to be replaced, should be replaced with same components, and
should be replaced by the manufacturer or its service agent or a similarly qualified person
in order to minimize the risk of possible ignition and to avoid decreasing the cooling perfor-
mance due to incorrect parts or improper service.
WHAT TO DO …
When the unit is not in use for a prolonged period:
Remove the plug from the outlet.
Remove all contents from the unit.
Dry the interior and leave the door open for a few days.
When the unit does not work:
Check if there is a power failure.
Check if the power plug is plugged into the power outlet.
Check that the fuse has not blown in the main supply circuit.
When you wish to move the unit:
Secure all movable parts and contents. (Package them separately if necessary.)
Transport the unit only in an upright position. In any other position you may damage the
compressor.
If the unit seems too warm inside:
Check to see that the door is closing properly and the door seal is not damaged.
Check that the interior circulation is not obstructed by having too many goods stored.
(The cooler is overloaded)

When the defrosting water overflows inside the unit and onto the floor:
Check that the drain pipe and the drain hose are not clogged.
Check that the drain pan is housed properly.
When condensation forms on the outside of the unit:
Condensation may form on the outside when the humidity level is too high such as
during a wet season, the same result as the condensation formed when chilled water is
poured into a glass. Therefore, this does not indicate a failure. Wipe it dry with a dry cloth.
If the unit starts making any unusual noises:
Is it wobbling? Re-level it and check if it now operates normally.
Have any objects fallen behind the unit? If so, remove them and check if it now operates
normally.
Are any containers inside the unit vibrating or resonating? If so, rearrange them then
check it now operates normally.
TROUBLESHOOTING GUIDE 11
Did you store anything hot, without first cooling it to room temperature?
Is there sufficient clearance around all sides and above the unit?
Did you set the temperature too high?