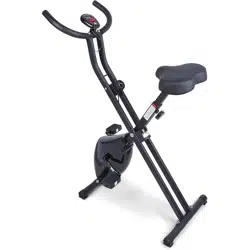
MINI EXERCISE BIKE
Operation Manual

Important Safety Warnings
1. TECHNICAL SPECIFICATIONS
Product Name: Mini Exercise Bike
Class: H.C (Household use), DIN EN ISO
20957-1/DIN EN957-5.
Weight: 100 Kg / 220 Pounds Max
Internal Processor:
Number of Batteries: 1 piece
Battery Type: AAA (1.5V)
Computer Functions: TIME (T) / DISTANCE (D) /Count (C) / Total
Count (T-C) /Calories (CAL)
Pedal Strap Width: Manual Adjustment
Resistance Setting: Rotate left to decrease resistance and rotate right
to increase resistance.
CONTENT
Read and keep the operating instructions
1. Accidental injury or damage may occur. Keep this manual for future
reference.
2. Failure to follow this instruction manual may result in serious injury or
damage to the arm and leg trainer.
3. If you pass the arm and leg trainer to third parties, be sure to include
this user manual.
1. TECHNICAL SPECIFICATIONS
1
2. SAFETY INSTRUCTIONS
2
3. DRAWING
4
4. ASSEMBLY INSTRUCTIONS
5
5. FUNCTION BUTTON
7
6. TRAINING
8
7. TROUBLESHOOTING PROBLEMS
12
8. MAINTENANCE,CLEANING AND CARE
12
9. DISPOSAL INSTRUCTIONS
13
10. COMPLAINTS & WARRANTIES
14
1

CAUTION - CHILD DANGER:
2. SAFETY INSTRUCTIONS
Batteries can be fatal if swallowed. Therefore, keep batteries out of
the reach of children. If a battery has been swallowed, medical help
must be sought immediately.
Children do not recognize the danger that this product can pose.
Therefore, keep children away from this product. The product is not a
toy.
The product should be stored in a place inaccessible to children and
pets.
If you allow a child to use the product, do not leave the child
unattended with the product. Make the appropriate settings on the
product yourself and supervise the exercise process.
Make sure that the packaging material does not get into the hands
of children. There is a risk of suffocation!
The manufacturer or retailer assumes no liability for damage caused
by improper or incorrect use.
•
•
•
•
•
•
CAUTION - RISK OF INJURY:
Do not use a damaged or defective product. In this case, contact a
specialist workshop or our customer service.
Before each use, check the product to ensure that it is in perfect
condition. Defective parts must be replaced immediately, otherwise
function and safety will be impaired.
Make sure that no more than one person uses the product at the
same time.
Always use the product on a horizontal, level, non-slip and solid
surface. Never use it near water and, for safety reasons, keep a
clearance of one meter to the side and two meters behind the
product around it.
Keep arms and legs away from moving parts.
Do not insert materials into existing openings in the product.
•
•
•
•
•
•
CAUTION - PRODUCT DAMAGE :
Do not make any changes to the product and only use the original,
Spare Parts.
•
2

Only have repairs carried out in a specialist workshop or similar.
Only qualified persons should carry out repairs.
If this product is improperly repaired, it can pose considerable
dangers to the user.
Protect the product from splashes of water, moisture, high
temperatures and direct sunlight.
•
•
•
•
•
•
•
•
•
•
Batteries can explode if overheated.
Do not heat the batteries or throw them into an open fire.
Do not short-circuit the batteries.
Be sure to insert the batteries with the correct polarity (+ and –).
Do not charge non-rechargeable batteries.
Remove batteries when they are dead or when you will not be using
the product for a long time.
CAUTION - HANDLING INSTRUCTIONS
BATTERIES: Danger of explosion!
This will help you avoid damage that can result from leakage.
Batteries must not be charged or reactivated by any other means,
taken apart, thrown into fire or short-circuited. There is a RISK OF
EXPLOSION!
It is preferable to use alkaline batteries as they last longer than
conventional zinc-carbon batteries.
Battery replacement becomes necessary as soon as the display
becomes weak or completely fades.
Always replace all old batteries with new ones and pay attention to
the correct polarity when inserting them.
•
•
•
•
•
•
The assembly of the product must be carried out carefully and by
an adult. If in doubt, enlist the help of another technically
skilled person.
Before you start assembling the product, read the assembly steps
carefully and look at the assembly drawing.
CAUTION - ASSEMBLY INSTRUCTIONS
3
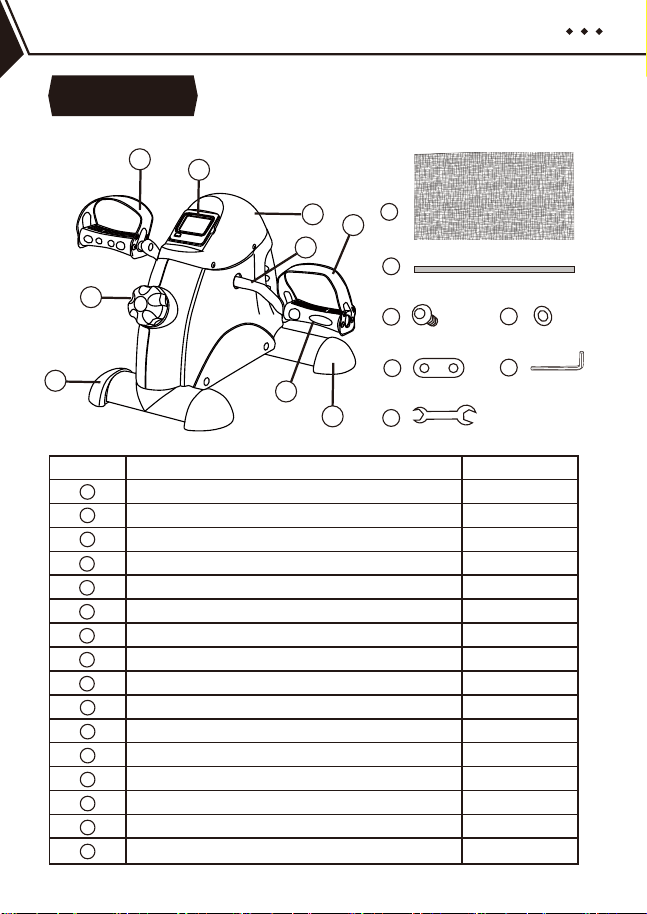
3. DRAWING
Number QuantityDescription
Main Body
Front Stabilizer
Rear Stabilizer
Right Pedal
Left Pedal
Display Screen
Resistance Adjustment Knob
Crank Arm
Adjustable Pedal Strap
Anti-slip Pad
Anti-slip Strap
Hex Bolt M6
Washer Φ16
Base Reinforcement
L-shaped Hex Screwdriver
Wrench
1
2
3
4
5
6
7
8
9
10
11
12
13
14
15
16
1
1
1
1
1
1
1
2
2
1
1
4
4
2
1
1
4
10
11
12
13
14
15
16
5
6
1
8
9
7
3
4
2
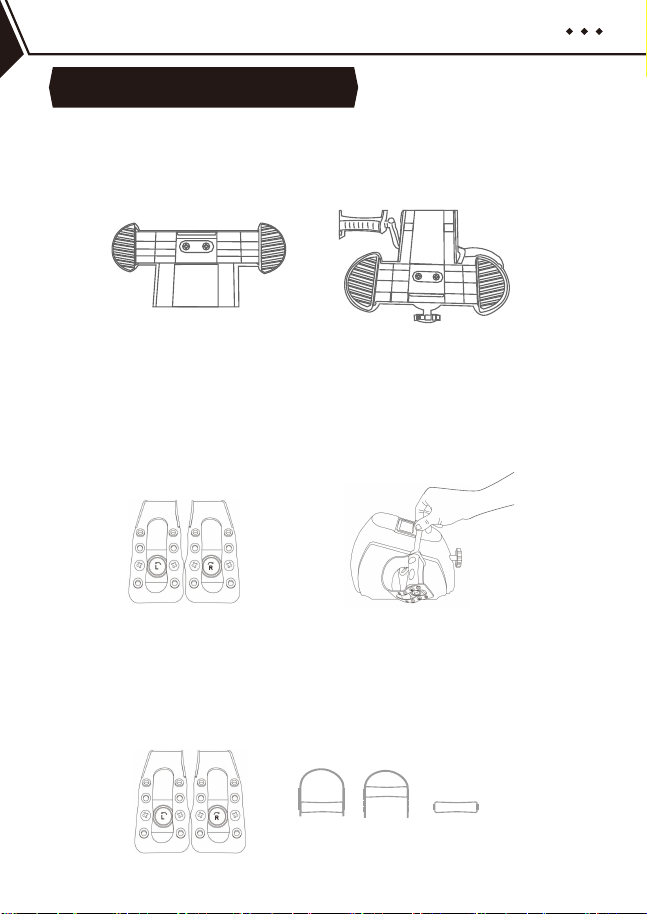
4. ASSEMBLY INSTRUCTIONS
4.3 Pedal Installation:
Caution: Pay attention to the direction of the arrow on the pedal ④/⑤
when installing. Fix the pedals (④ & ⑤). The right pedal is marked R,
connect it to the right end of the crank arm marked R, following the
direction of the arrow on the right pedal ④. The left pedal ⑤ is marked
L, it should be threaded to the crank arm in the direction of the arrow
on the right pedal ⑤.
4.4 Adjusting the width of pedal strap Use the Phillips screwdriver to
remove the screws from the pedal strap ⑨. Adjust the strap to a
comfortable width and tighten the screws. If none of the specified
widths fit your foot size, you can remove the adjustment strap and use
the pedal separately.
Max Min Remove the strap
5
4.1 Fix the front stabilizer ② to the
main body ① with ② sets of hex bolts
⑫ and washers ⑬.
4.2 Fix the rear stabilizer ③ to
the main body ① in the same
way.
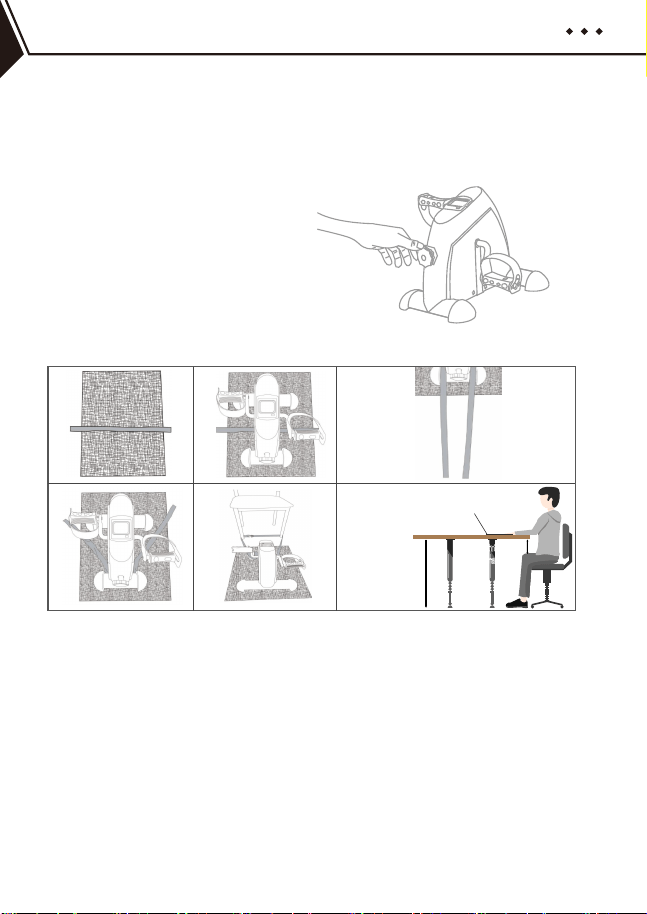
4.5 Resistance setting:
Turn left to decrease resistance and right to increase resistance.
Note: The product's resistance setting has no level. When adjusting
the resistance, if it is difficult to turn, the resistance reaches the
maximum or minimum value at this time. Please stop turning to avoid
damaging the resistance mechanism.
4.6 Use of anti-slip pad and strap.
Step 2: Put the assembled machine on it.
Step 3: Place the ends of the anti-slip strap on the rear stabilizer ③ on both
sides of the machine
Step 4: Pass the anti-slip strap under the rear stabilizer ③ and wrap it twice
around the rear stabilizer ③.
Step 5: Finally, attach the anti-slip tape to the leg of the chair.
When used under a table, there should be at least 13 inches/33cm of
knee-to-table height clearance.
Tips: For Use Under Desk
6
Step 1: Lay the anti-slip pad flat on the place where it will be used, and put
the anti-slip strap on the anti-slip pad.
1 2
4 5
3
Tips
Height
Clearance
Table Height
13inch/
33cm

Press the red button to turn on the
computer. You can select the desired
function by pressing the red button.
Each time you press the red button,
you switch to the next function.
The display contains 5 functions:
T (time), D (distance), C (COUNT number), T-C (T-COUNT total number)
and CA (calories), which you can select one by one with the red button.
To reset the training data, press and hold the red button for 5-8 seconds.
5. FUNCTION BUTTON
SCAN TIME DIS COUNT
T-COUNT CALORIES
STP
T D C T-CCA
SCAN
0:00
TIME(T)
Automatically measures the time as soon as
you start exercising.0:00~99:59 MIN
DISTANCE(D)
Shows the distance covered in the training.
0.0~999.9 ML (KM)
Number of Laps(C)
Display the number of pedal laps 0~9999
Display the total number of pedal laps
0~9999
Total Laps(T-C)
Calories(CAL)
Shows the calories burned during training.
This is an estimated value.0.0~999.9 KCAL
AUTO ON/ OFF
SCAN
The monitor turns on automatically when
the exercise machine is operated. If you
don't pedal for 4 minutes, the monitor will
turn off automatically.
Press the 'Mode' button repeatedly until a
triangle appears in the upper left corner
of the display next to 'Scan'. All functions
and values are now displayed one after
the other on the display. The next function
is displayed after approx. 6 seconds.
7
The calculation of calories burned is anestimation and should not
be considered medically reliable. We suggest consulting your
doctor or dietician to adapt your diet and energy consumption
depending on your physical condition, and the sporting activities
you intend to be involved in. We also recommend that you consult
your doctor prior to beginning any new exercise.
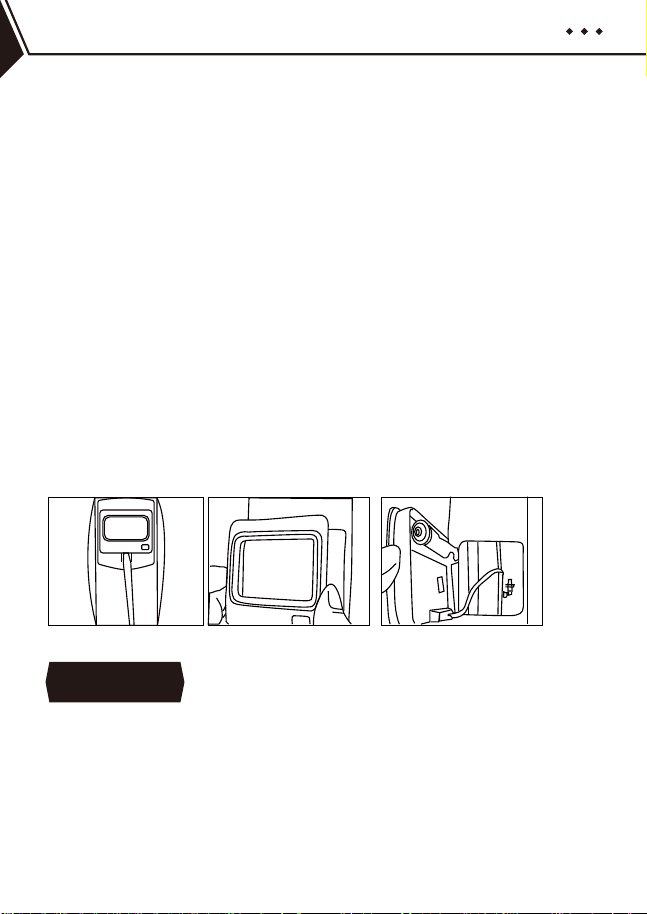
IMPORTANT:
INSERTING THE BATTERIES
1. You can pry it out from below the display screen using a
screwdriver
2. Insert 1 AAA battery with correct polarity into the compartment.
3. If the display is unreadable or only a few segments are visible,
remove the battery and wait 15 seconds before inserting a new
battery. Dispose of dead batteries in accordance with local
regulations. The monitor display will clear when the battery is
removed.
All recommendations within these operating instructions are aimed
exclusively at healthy people and not at people with cardiovascular
diseases. All tips are only rough suggestions for a training program.
If necessary, consult your doctor for advice according to your
personal needs.
6. TRAINING
TRAINING TIPS:
8

The following pages explain in detail how to use your new exercise
equipment and serve to clarify the basics of fitness training. In
order to achieve your set training goal, it is essential that you use
this manual as a guide to inform yourself about important points on
the general development of a training program and the precise use
of the device. We therefore ask you to read these points through in
full and to give them the utmost attention.
The level of physical exertion during exercise must be higher than
normal exertion, but not cause shortness of breath or fatigue. A
good guide to training effectiveness is your heart rate.The heart
rate should be at a level of 70% to 85% of your maximum heart
rate during training. During the first week your heart rate should be
below 70% of your maximum heart rate during training. During the
following weeks and months, your heart rate should slowly
increase to a higher level of 85% of your maximum heart rate. As
your physical condition improves, your exercise requirements must
increase. This can be achieved by increasing the exercise duration
and/or the difficulty level. If you want to measure and track your
heart rate manually, you can use the following methods:a) Pulse
control measurement in the usual way (e.g. feeling your pulse on
your wrist and counting the beats for one minute).b) Pulse control
measurement with suitable and calibrated pulse measuring
devices (available in drugstores and pharmacies).
In order to achieve noticeable physical and health improvements,
the following factors should be considered before determining the
amount of exercise required.
PUTTING A TRAINING PROGRAM TOGETHER
INTENSITY
9

Each training session should consist of 3 training phases:
● Warm-up phase
● Training phase
● Cool down period
TRAINING PHASES
During the "warm-up phase" your body temperature and oxygen
consumption should be increased slowly. This can be achieved by
doing gymnastic exercises or stretching for 5 to 10 minutes. After
the warm-up the actual training should begin ("training phase"). The
training intensity should be low for the first few minutes and then
increased to the appropriate training intensity for a period of 15 to
30 minutes. In order to calm the circulation after the training phase
and to prevent muscle cramps and tension, you should insert a
"cooling-off" phase after the training phase. In this phase, which
should last about 5 to 10 minutes, do 30 seconds of stretching
exercises and/or light gymnastic exercises.
The key to a successful exercise program is regularity. Choose a
committed time and place for each training day and also prepare
yourself mentally for your training session. lt's best to train when
you're in a good moood and always focus on your training goal.
With regular training you will see improvements every day and see
how you are getting closer and closer to your personal training
goals.
MOTIVATION
These are very general training tips. These have no medical value
and are only used to provide information on different types of
training.To develop a personalized detailed training program,
consult an expert. Individuals who have heart problems or other
medical conditions that could be aggravated by an unusual or
improper exercise program or activity MUST consult their physician
prior to engaging in any type of exercise.
10

When training, everyone has a different goal. Some are driven by
a desire to build muscle, while others are looking for a way to
improve their physique and overall health. Muscles respond to
impulses; the higher the impulse, the stronger the result. In
layman's terms, this means that when a muscle has to make a
great effort, it will grow in size to be able to make the same effort
in the future. In contrast, muscles that need to exert effort over a
longer period of time begin to shrink in size in order to be able to
sustain the effort over a longer period of time.
When training, everyone needs to define their personal goals and
then stick to those goals.
In order to lose weight, it is necessary to burn fat.
Our body only burns body fat when the last sugar reserve has been
used up.
A long workout is therefore apt to first use up all the sugar in your
blood and then burn body fat. To trigger this process, exercise on
your machine for 30-40 minutes with the resistance dial set to a
very low level.
WEIGHT LOSS
To build muscles, they have to be trained hard. Set the resistance
adjustment knob (46) to a very high level and pedal hard. An
interesting variation is interval training.
MUSCLE BUILDING
This method alternates between short, high-intensity efforts and
longer, very low-intensity efforts.
This variant combines the advantages of the training goals "muscle
building" and "weight loss".
11

Your heart rate reading may be inaccurate. Over training could
result in serious injury or death. If you get dizzy, stop the exercise
immediately.
WARNING!
Most experts recommend a combination of healthy eating, which is
consistent with the exercise goal, and exercise three to five times a
week. A typical adult needs to exercise twice a week to maintain
his/her current fitness level. To improve condition and change body
weight, a person must do at least 3 training sessions per week.
REGULARITY
7. TROUBLE SHOOTING
Problem
Screen does not display
Solution
Replace the batteries with new ones.
Check the cables leading to the
remove the batteries and reinsert
them after one minute.
Screen Display Wrong
8. MAINTENANCE, CLEANING AND CARE
After assembly and before using the device, check that all
bolts/nuts are fully and correctly tightened.
Clean the device regularly with a slightly damp cloth and a mild
detergent. Empty batteries are hazardous waste; please dispose
of them according to regulations and never with normal
household waste.
•
•
12
If you no longer want to use the device, first remove the batteries
from the computer and dispose of them separately as special
waste.
•
9. DISPOSAL INSTRUCTIONS
Packaging materials are raw materials and can be
reused. Separate the packaging by type and, in the
interest of the environment, dispose of it properly. You
can also get more information from your responsible
administration.
Batteries do not belong in household waste
As an end user, you are legally obliged to return used
batteries. You can hand in your old batteries at the
public collection points in your community or wherever
batteries of the type in question are sold.
Old devices do not belong in the household
waste
Also dispose of old devices properly! In doing so, you
contribute to environmental protection.Your local
administration will inform you about collection points
and opening times
13

DISPOSAL NOTE
This device complies with the WEEE Directive 2012/19/EU on
Waste Electrical and Electronic
Equipment (WEEE). This device complies with the European
Electromagnetic Compatibility (EMC) Directive 2014/30/EU and its
amendments and the Low Voltage Directive (LVD) 2014/35/EU and
its amendments. This symbol (the crossed-out wheeled bin) means
that in the UK and EU this product should not be mixed with other
household waste. To avoid possible harm to the environment or
human health from uncontrolled waste disposal, please dispose of
it responsibly to promote sustainable reuse of material sources. To
return your used device, please use the return and collection
systems or contact customer service for more recycling and WEEE
information.
10. COMPLAINTS & WARRANTIES
For technical questions, information about our products and for
ordering spare parts, our service team available as follows:
Please ensure that you have the following information to hand.
• Operation manual
• Model number (this can be found on the cover of this manual)
• Description of accessories
• Accessory number
• Proof of purchase with date of purchase
• Order number
WARRANTY TERMS
• The manufacturer's product guarantee period is 2
years.
• Failure to follow the company's usage guidelines
will void all product warranties
14

IMPORTANT NOTE:
Please do not send your product to our address without a request
from our service team. The costs and risk of loss for unsolicited
mailings are borne by the sender. We reserve the right to refuse to
accept unsolicited consignments or to return the corresponding
goods to the sender freight collect or at the sender's expense.
UK REP
Company: OBERO INTERNATIONAL LIMITED
Contact: Mr. Tian
Email: [email protected]
Address: Unit 1, Kiwi Park Commerce Way, Trafford Park,
Manchester, M17 1HW, United Kingdom
(Importer)
Manufacturer: SHENZHEN RBU TECHNOLOGY GROUP CO., LTD
Address: No.2016 Xuegang Road, Gangtou Community, Bantian
Street, Longgang District, Shenzhen, China
Importer & Distributor: AGM USA, LLC
Address:
3690 E. Jurupa Street, Ontario, CA 91761, USA
For more information please contact us at: [email protected]
15
Warning: Keep the appliance and its cord out of reach of children
less than 8 years