Hi! Let’s Get Started.
QL-Series
Window Air Conditioner
User Manual


Table of Contents
Other Features
.....................................................................................................................................
19
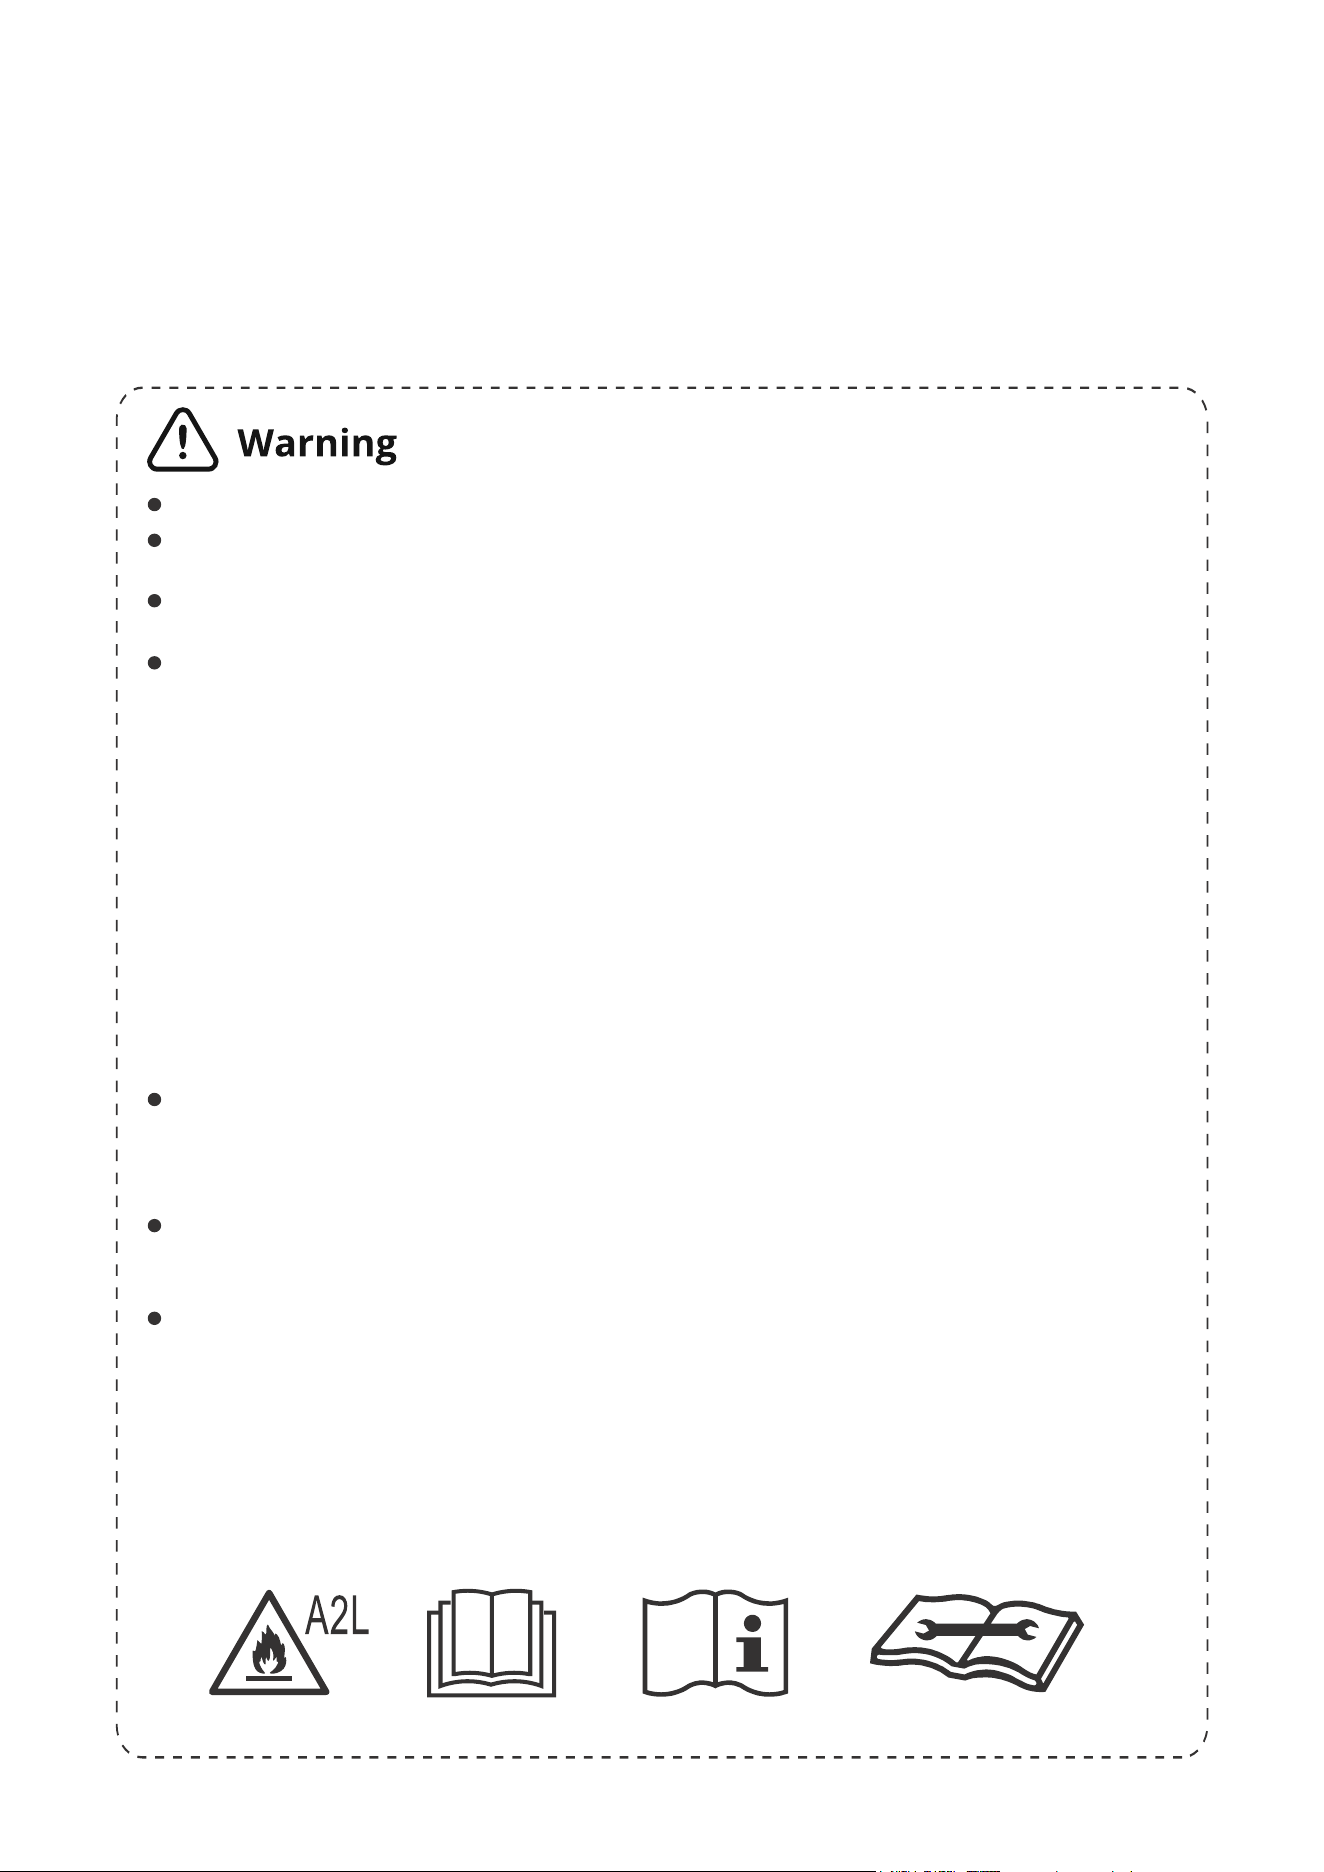
Important Safety Information (Please Review Before Use)
3
What’s in the Box
..........................................................
...................................
...........................................................
4
Introduction
7
Operating Instructions
............................................................................................................................
.........................................................................................................................
...........................
...................................
..............................................................
10
11
Setup & Installation
...............................................................................................................................
...................................................................................................................................
13
Maintenance
..............................................................................................................................
20
......................................................................................................................
Trouble shooting
..............................................................................................................................
Register and Protect Your Purchase
2
TCL Home App Setup
Warranty Information
8
21
24
3
Product Replacement
Free 1-time replacement if product cannot be fixed.
TCL Parts & Service
Genuine TCL parts & factory certified service.
No Deductible
$0 out of pocket expense.
Priority Service
.emit dnuora-nrut dipar dna gnippihs eerF
Extended Manufacturer Coverage
PROTECT
PLUS
Benefits & Description
Up To 4 Years
3-5 Days
3-5 Days
Up To 4 Years
Or register online at www.tclusa.com/register
Need help? Visit photoregister.com/help or
text HELP to 71403
Accidental Damage Protection
Coverage for drops, breaks and spills starts after 30 days.
TCL-WACDGT
Register and protect your purchase
Reglster easlly with your smartphone
Text a photo of
the camera icon to 71403
Add a TCL Protection Plan when you register your product
and be covered from life’s mishaps
Thank you for choosing TCL. We want your ownership experience to bring you as much joy as
the product you purchased does, so we’e offering you a special price on TCL Protection Plans
when you purchase during registration. Add a TCL Protection Plan within your first 30 days of
ownership to receive the best value and we’ll make sure nothing gets in the way of you enjoying
your new product
Extended parts & labor coverage for manufacturer defects.
*Extended service plans (i.e., “protect”and “plus”plans) are only offered in the United
States (US). All TCL products continue to offer a limited consumer warranty in both the US
and Canada. Please refer to the warranty section in this guide for additional details on
warranty information.
3
IMPORTANT SAFETY INSTRUCTIONS
Before installing and using your air conditioner, please read this owner’s manual carefully. Store
this manual in a safe place for future reference.
Your safety and the safety of others is very important to us. Please pay attention to all safety
messages outlined in this owner’s manual.
WARNING: To reduce the risk of fire, electrical shock or injury when using your air conditioner,
follow the following basic precautions:
ELECTRICAL REQUIREMENTS
The electrical ratings for your air conditioner are listed on the model and serial number label
located on the front right hand side of theunit (when facing the front).
REGISTER YOUR APPLIANCE
You can register your appliance online by going to register.tcl.com
Be sure to retain your original sales receipt. A valid proof of purchase is required for all warranty
claims.
BATTERY WARNING STATEMENT
Do not mix old and new batteries and do not mix alkaline, standard (carbon-zinc) or rechargeable
(ni-cad, ni-mh, etc.) batteries
RECOMMENDED GROUND METHOD
For your personal safety, this air conditioner must be grounded. This air conditioner is equipped
with a 3 prong power supply cord with a grounded plug. To minimize the possibility of electrical
shock, the cord must be plugged into a 3 prong outlet and grounded in accordance with all local
codes and ordinances. If a 3 prong outlet is not available,it is the customer’s responsibility to
have a properly grounded 3 prong outlet installed by a qualified electrician.
4
Document your model and serial numbers here:
Model #__________________________ Serial #________________________________
You can locate your 20 digit serial number underneath the bar code (On the right hand side
of the AC).
Electrical Shock Hazard
Plug into a grounded 3 prong outlet.
Do not remove the ground prong.
Do not use an adapter
Do not use an extension cord.
Failure to follow these instructions
can resultin death, fire, or electrical
shock
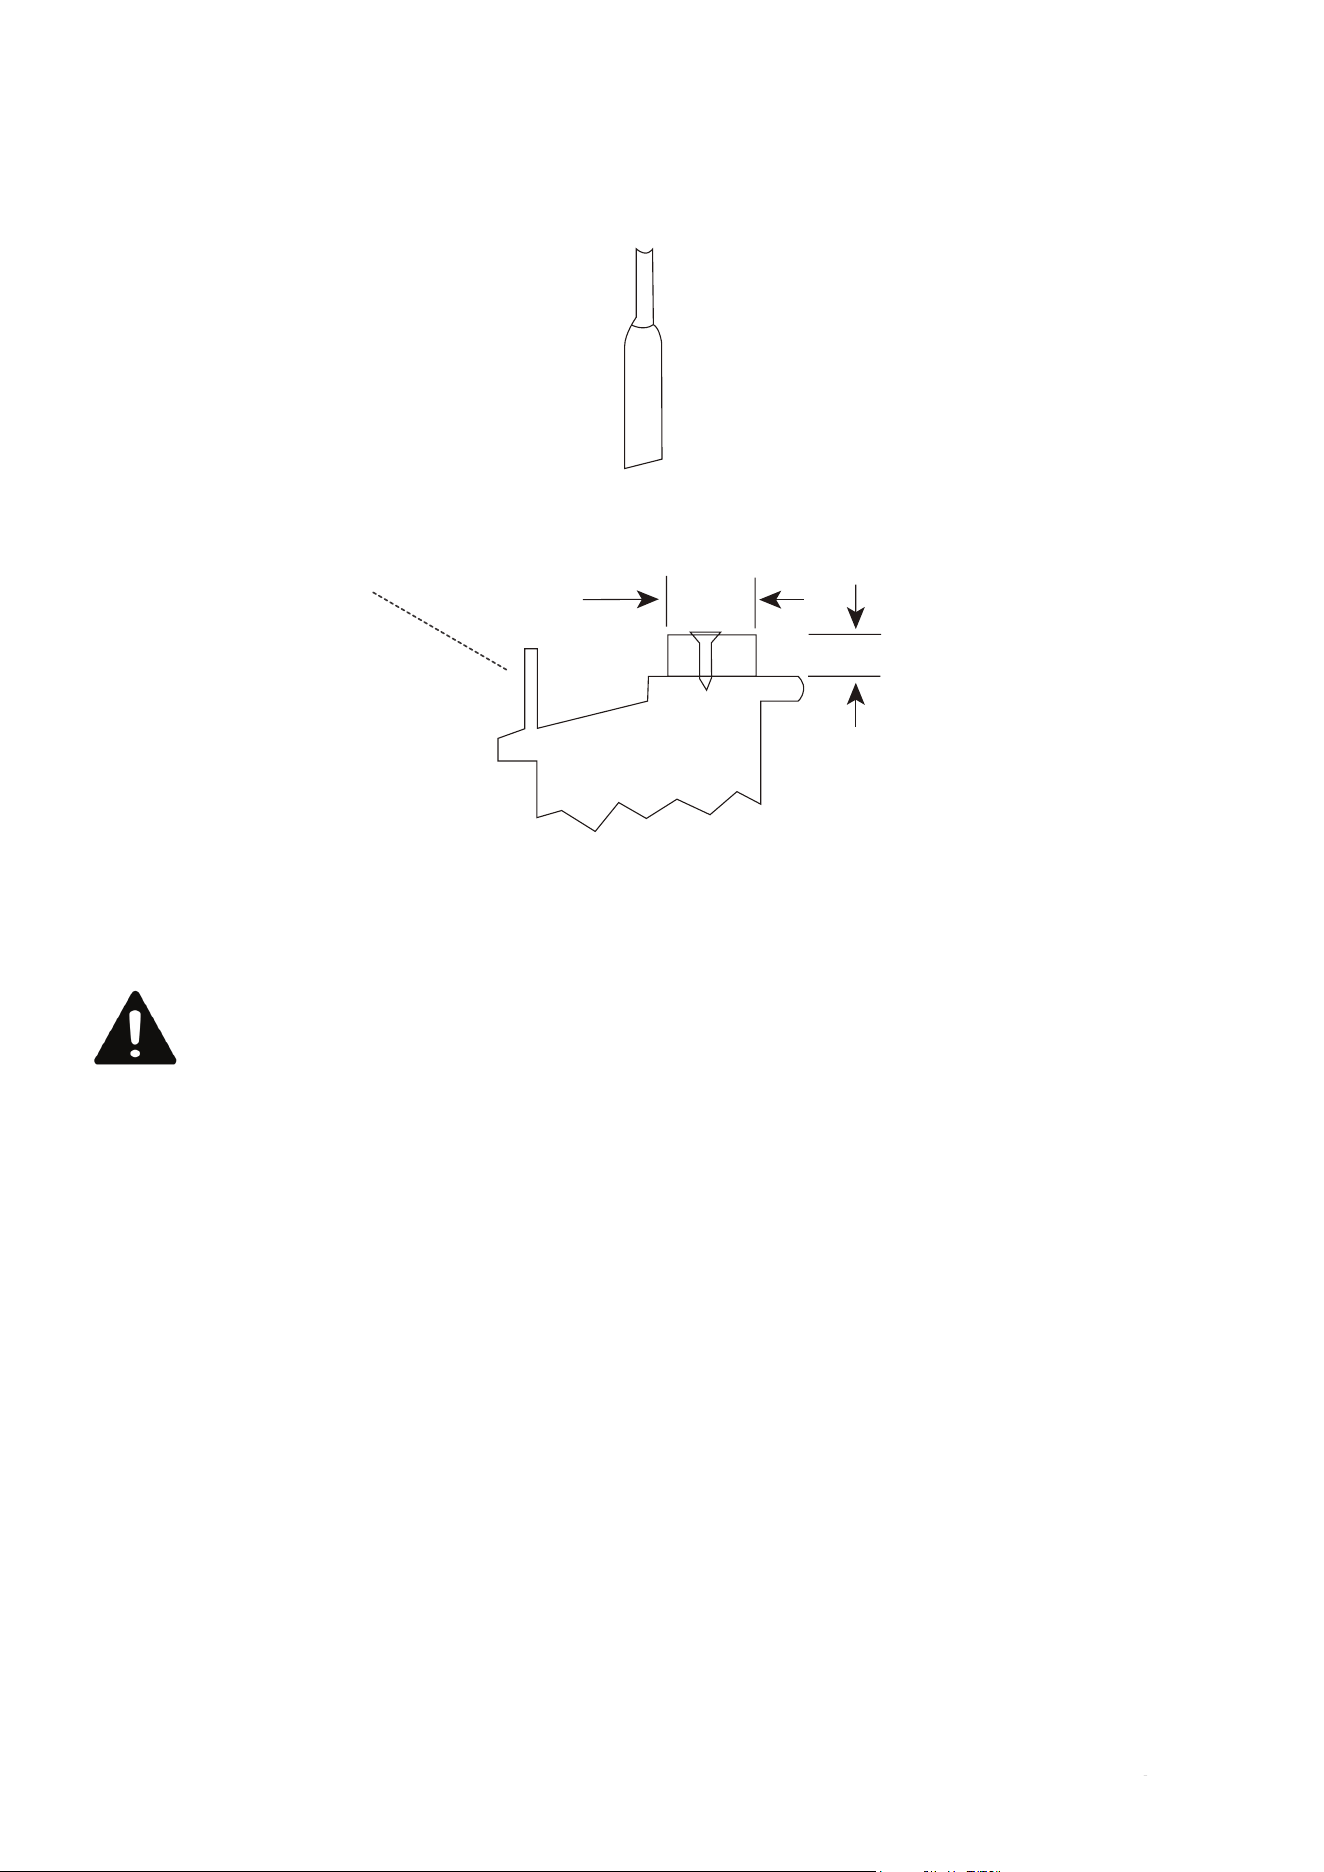
• (8K-12K) (0-12 amps)
• 8K (10 amp time-delay fuse or circuit breaker)
• 10K (13 amp time-delay fuse or circuit breaker)
• 12K (15 amp time-delay fuse or circuit breaker)
• Use on single outlet circuit only
Wiring Requirements Power Supply Cord
WARNING
Specific electrical requirements are shown in the
diagram below.Follow there quirements below for the
type of plug on the power supply cord.
DO NOT RETURN TO STORE
TCL SUPPORT:
support.tcl.com/us
1-800-825-6747
contact us first
with any questions
WE ARE
READY TO
HELP
Do not use means to accelerate the defrosting process or to clean, other than those
recommended by the manufacturer;
The appliance shall be stored in a room without continuously operating ignition sources
(for example: open flames, an operating gas appliance or an operating electric heater.
Do not pierce or burn.
• Be aware that refrigerants may not contain an odour.
• information for handling, installation, cleaning, servicing and disposal of refrigerant.
• a warning to keep any required ventilation openings clear of obstruction.
• a notice that servicing shall be performed only as recommended by the manufacturer.
• Information for qualification of workers
• Information on servicing
• Repairs to sealed components
• Repairs to Intrinsically safe components
• Cabling
• Detection of flammable refrigerants
• Removal and evacuation
• Charging procedures
• Decommissioning, labelling and recovery
Please contact the nearest after-sale service center when maintenance is necessary.
At the time of maintenance, the maintenance personnel must strictly comply with the
Operation Manual provided by the corresponding manufacturer and any non-
professional is prohibited to maintain the air conditioner.
The handling, installation, storage, servicing and disposal must comply with the ]
provisions of gas-related national laws and regulations, and also national wiring
regulation.
It is necessary to clear away the refrigerant in the system when maintaining or
scrapping an air conditioner. Be aware that refrigerants may not contain an odour.
This appliance is not intended for use by persons (including children) with reduced
physical, sensory or mental capabilitiesor supervision or instruction concerning use of
the appliance by a person responsible for their safety.
Children should be supervised to ensure that they do not play with the appliance.
Unit operation limits: Outdoor side 61~110, 80%RH, indoor side 61~90, 80%RH.
5
Introduction to Refrigerants R32
Please read the manual before installation,using,maintenance.
The refrigerants used for air conditioners are environmentally friendly hydrocarbons R32.
This kind of erant is combustible and odorless. Moreover, it can burn and explode under certain
condition. However, there will be no risk of burning and explosion if you comply with the following
table to install your air conditioner in a room with an appropriate area and use it correctly.
Compared with ordinary refrigerants, Refrigerant R32 is environmentally friendly and do not
destroy the ozone sphere and that itsvalue of greenhouse effect is also very low.
Installation Safety Principles
1. Site Safety
Open Flames Prohibited
Ventilation Necessary
2. Operation Safety
Open Flames Prohibited
Must wear protective clothing and
anti-static gloves
3. Installation Safety
• Refrigerant Leak Detector
• Appropriate Installation Location
The left picture is the schematic diagram
of a refrigerant leak detector.
Please note that:
1. The installation site should be in a well-ventilated area.
2. When installing an air conditioner, it is necessary to take appropriate anti-static measures such
as wear anti-static clothing and/or gloves.
3. Installation or maintenance location should not be surrounded by obstacles or close to any
heat source, flammable, and/or explosive areas or objects.
4. If the product suers refrigerant leak during the installation, all personnel should go out till the
refrigerant leaks completely for 15 minutes.If the product is damaged, a professional must carry
such damages product back to the maintenance station. It is prohibited to weld therefrigerant pipe
or conduct other operations on the contaminated site.
5. The air conditioner unit needs to sit on a flat even surface.
6. It is necessary to avoid the places where there are other electrical products, power switch
plugs and sockets, kitchen cabinet, bed, sofa and other valuables directly under the lines on two
sides of the indoor unit.
7. Any ventilation openings of unit should be free from obstructions.
Mind Static Electricity Don`t use mobile phone
6
7
7
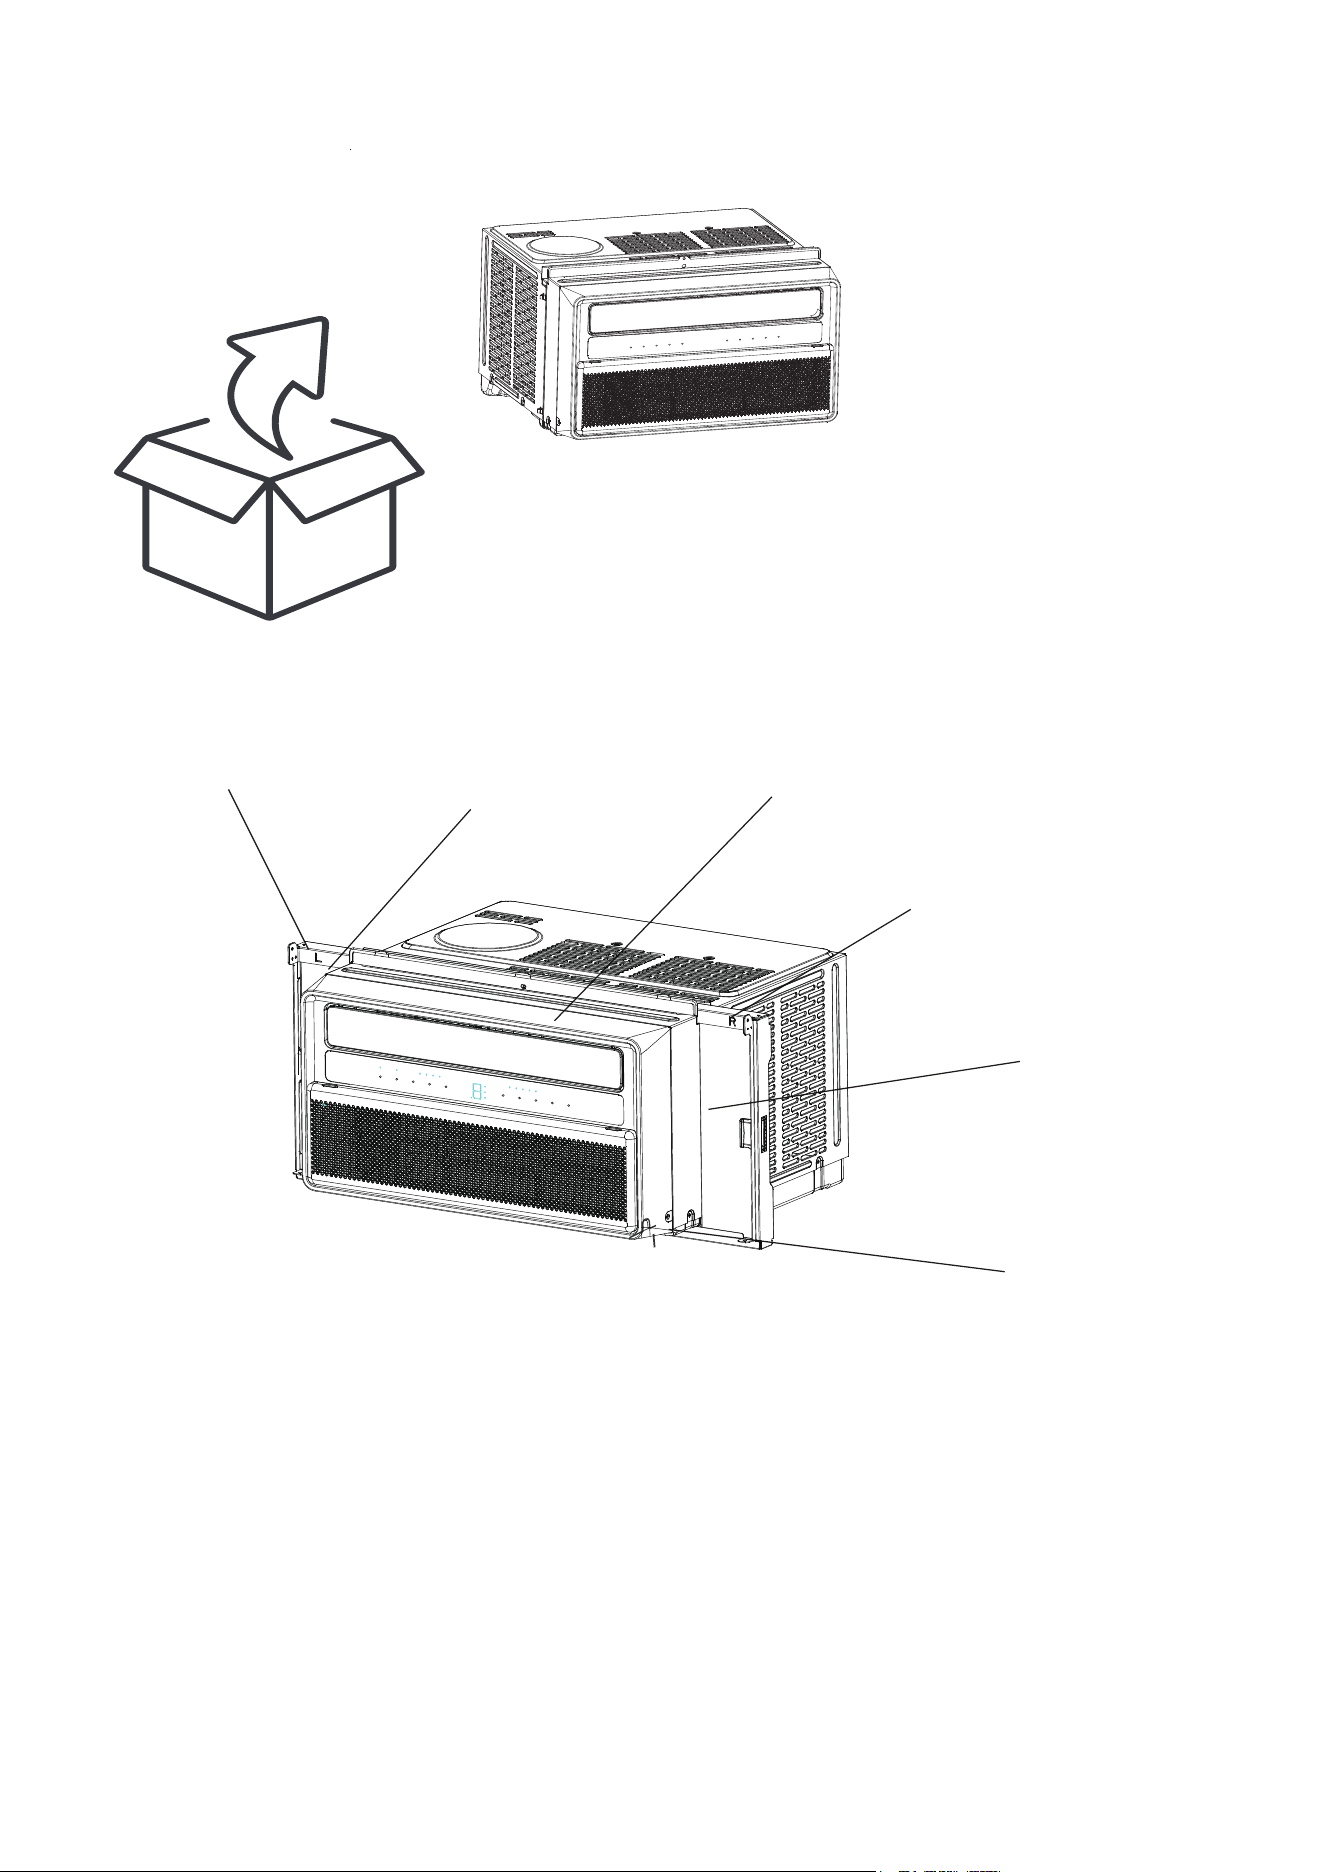
12
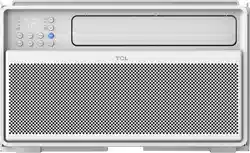
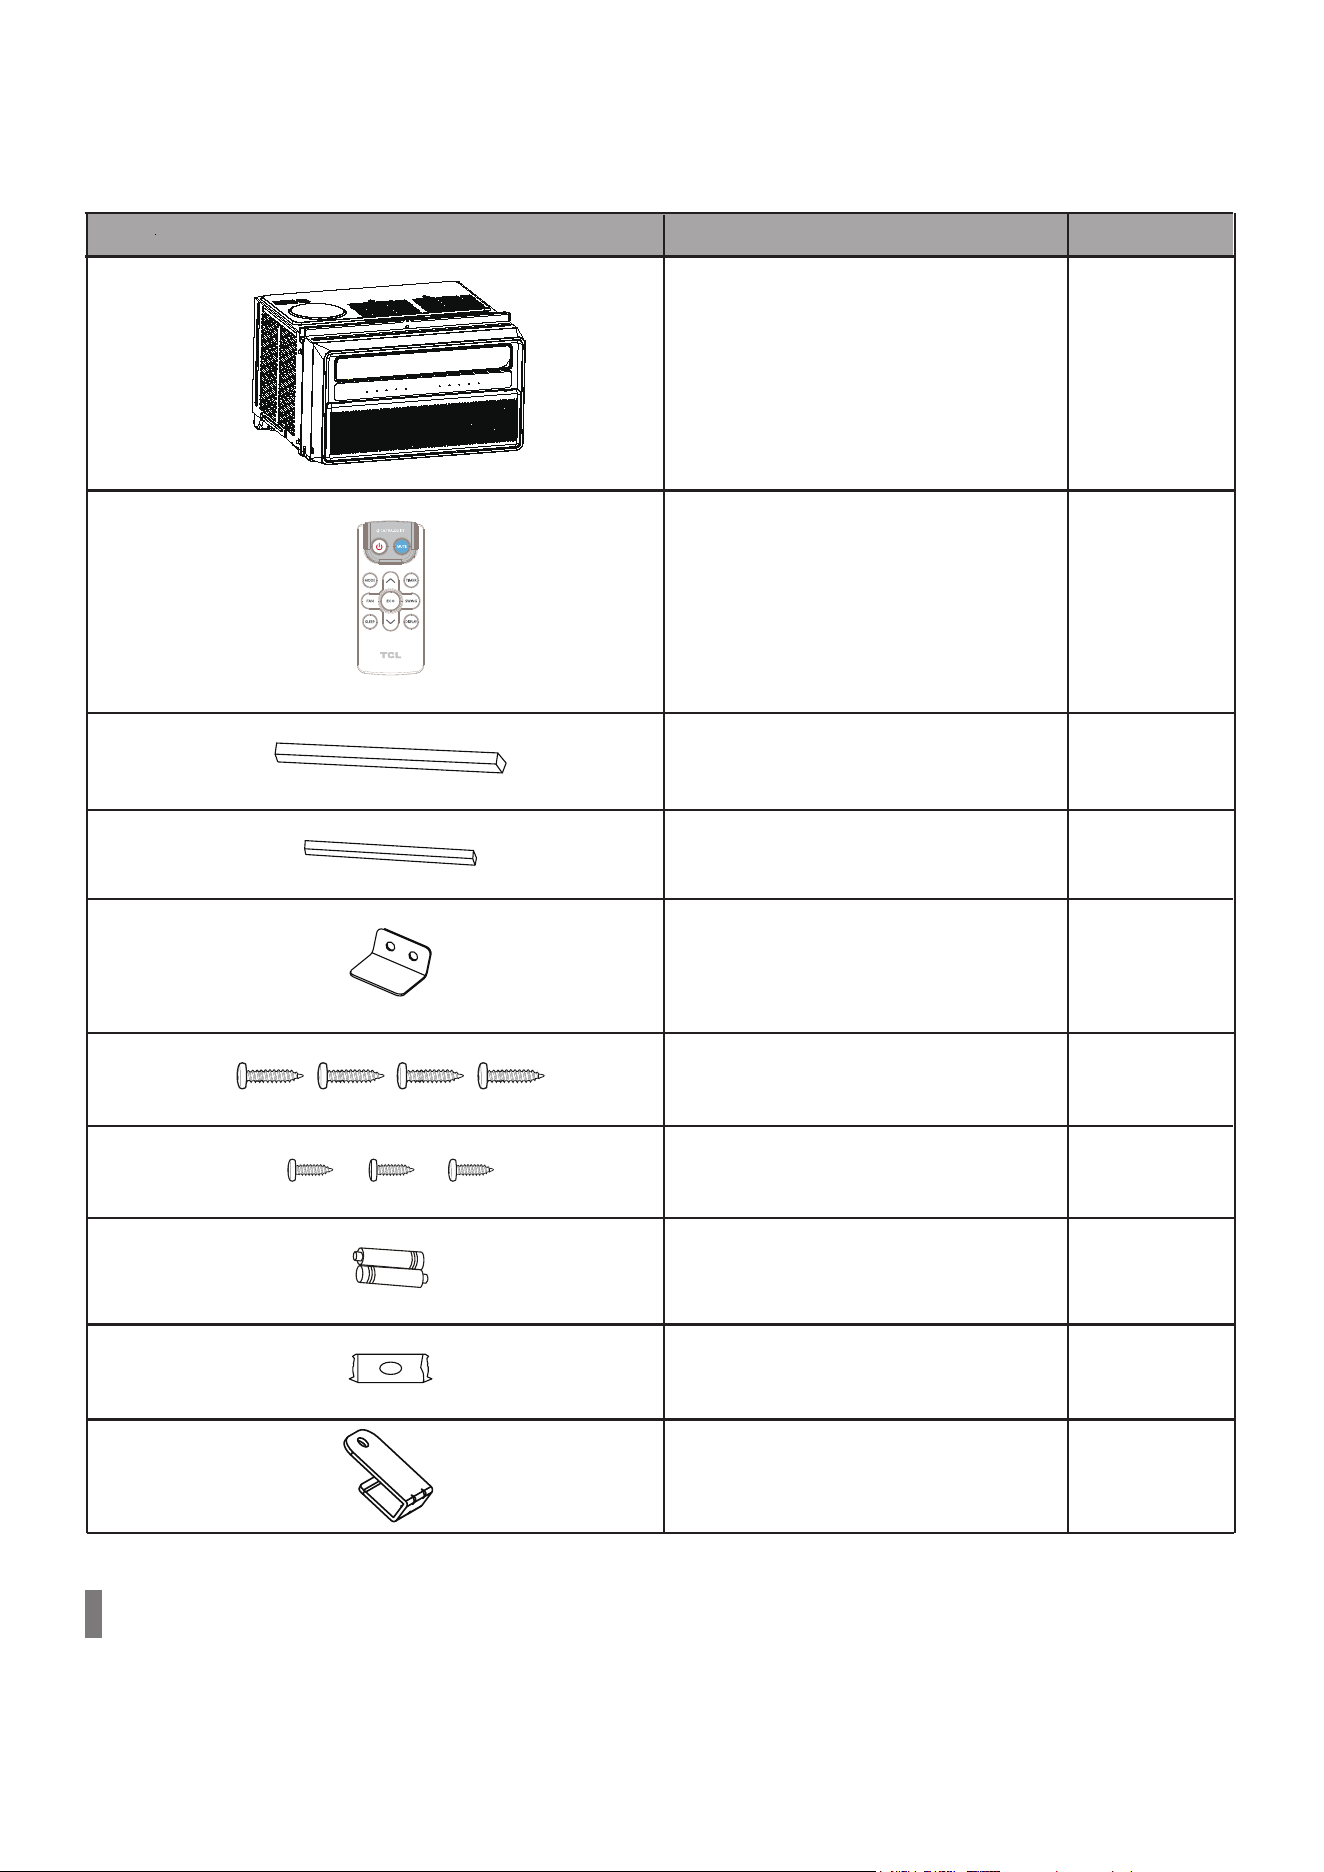
What’s in the Box
Open the carton and remove the below parts.
APPEARANCE
PART NAME
QUANTITY
Window Air Conditioner
1
Remote Control
1
Long Foam Seal
(Non-Adhesive)
1
Long Foam Seal
(Adhesive)
1
Security Bracket
1
¾” Screw
4
½” Screw
3
Remote Control Battery
2
Modelling Material (Plasticene)
1
Note: Illustrations in this manual are for explanatory purposes only. Product design and
aesthetics may vary. Please search the entire package for the contents listed above as they
may be packaged on top or underneath the main AC unit.
Installation bracket
4
(Atuxiliary in some special
window, not necessary.)
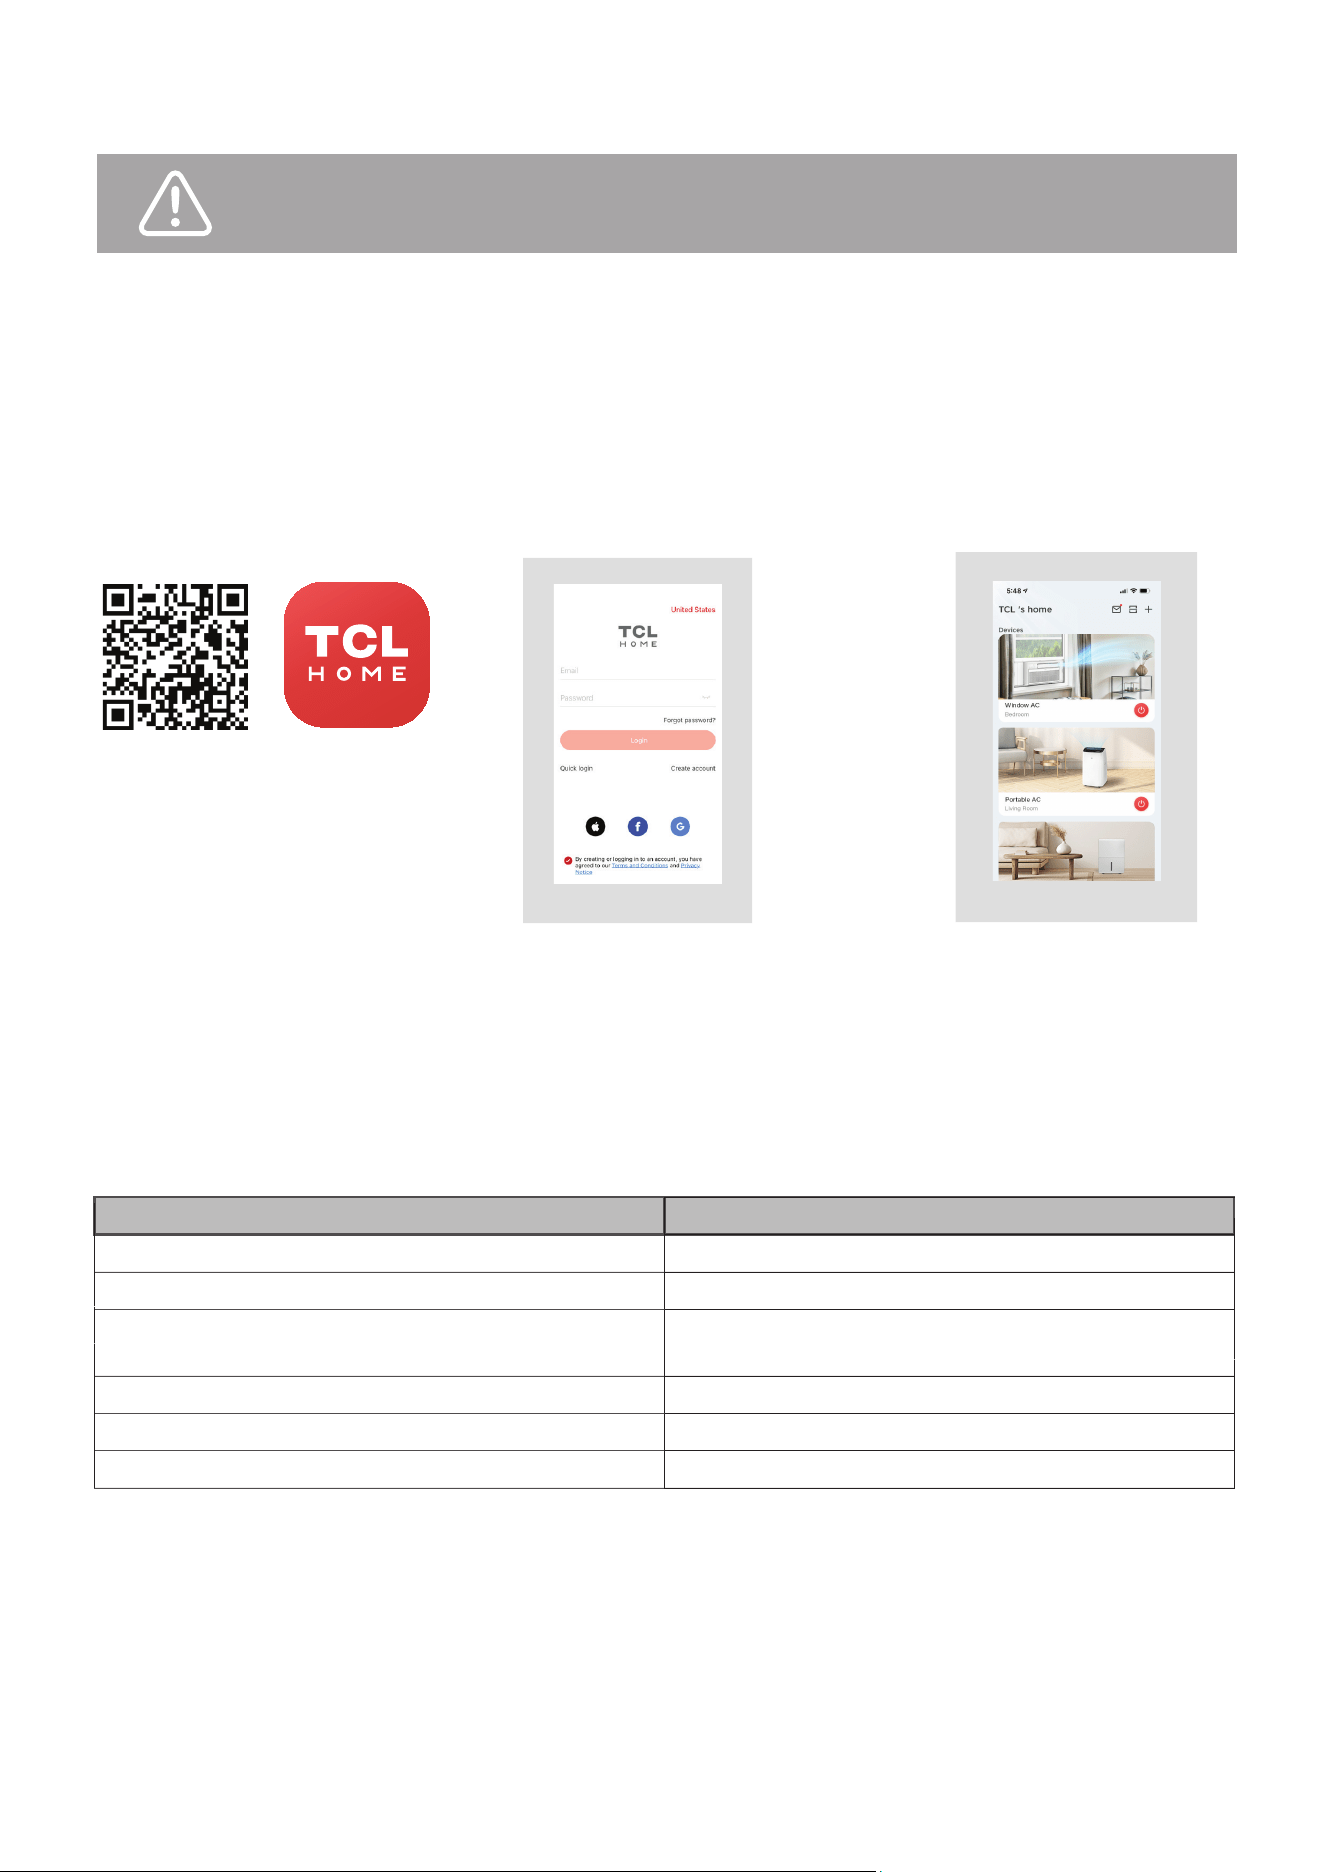
WiFi App Installation
(for WiFi models only)
TCL Home App Setup (Smart Phone Required)
Step 1: Download & Install
the TCL Home App
Scan the QR code below or
search for the TCL Home
App in the Apple or Google
app store. Download and
open the app.
Step 2: Create an Account
Once you have opened
the app, select “Create
account.” You will then be
sent a verification code to
your email. Input the code
and continue.
Step 3: Add Your Device
Select the “Add Devices”
button and follow the in-app
instructions to complete the
setup.
Note: The App only supports the 2.4 GHz WiFi band (all routers have a 2.4 GHz band).
Please connect to the 2.4 GHz band before you begin the app setup process.
Smart ecosystems and their companion speakers can only support matter when using these
ersions or newer.
Device
Version
Alexa App
2.2.536317
Alexa Echo Device
9094439556
Android
Google Play: 22.36.15
Google Home: 2.58.24.1
Google Home Hub
1.56.324896
iPhone
iOS 16.5
Apple Home Pod
16.5
Matter Setup (Smart Phone OR Smart Speaker Required)
TCL Home App Setup
8

Step 1: Getting Started (For Android & iOS Smart Phones: TCL Home App OR Smart Speakers)
• Method 1 – Smart Speaker Required: Open the Google or
Apple app store on your smart phone and search for your
smart speaker’s companion app if not already downloaded
(Amazon Alexa, Google Home, SmartThings, Apple Home).
• Method 2: Using the camera function on your smartphone, scan
the QR code below or search TCL Home in Google or Apple
app store and download the TCL Home App (it does not
require the use of a smart speaker and has more features).
Note: The App only supports the 2.4 GHz WiFi band (all routers have a 2.4 GHz band).
Please connect to the 2.4 GHz band before you begin the app setup process.
Step 2: Connect Your Air Conditioner to Matter
1. Ensure your smart phone and smart speaker are connected to your WiFi network. If you do not
have a smart speaker, please use the TCL Home App you downloaded from the previous
section.
2. Turn on Bluetooth on your mobile device.
3. Press “Display” or “Eco” 6 times on the remote controller OR press and hold “Mode” & “^” for 3s.
The device will beep twice and show “CF” after a few seconds.
4. Open the Amazon Alexa, Google Home, SmartThings, Apple Home or TCL Home app on your
mobile device.
5. Tap the “+” and “Add Device/A ccessory” or tap “+Add” in your app, select
your Matter device, and scan the Matter QR code found on the side of
the device. Then, follow the in-app instructions to complete setup.
• If setting up without a smart speaker using the TCL Home App, please
select the device titled “Matter Window AC”. Once completed, you
can control your device through the TCL Home App, Smart Assistant
App, or Smart Speaker.
......
9
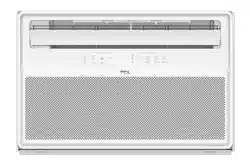
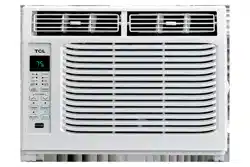
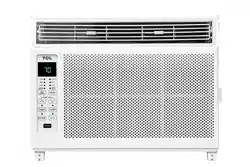
Introduction
For remote control model
10
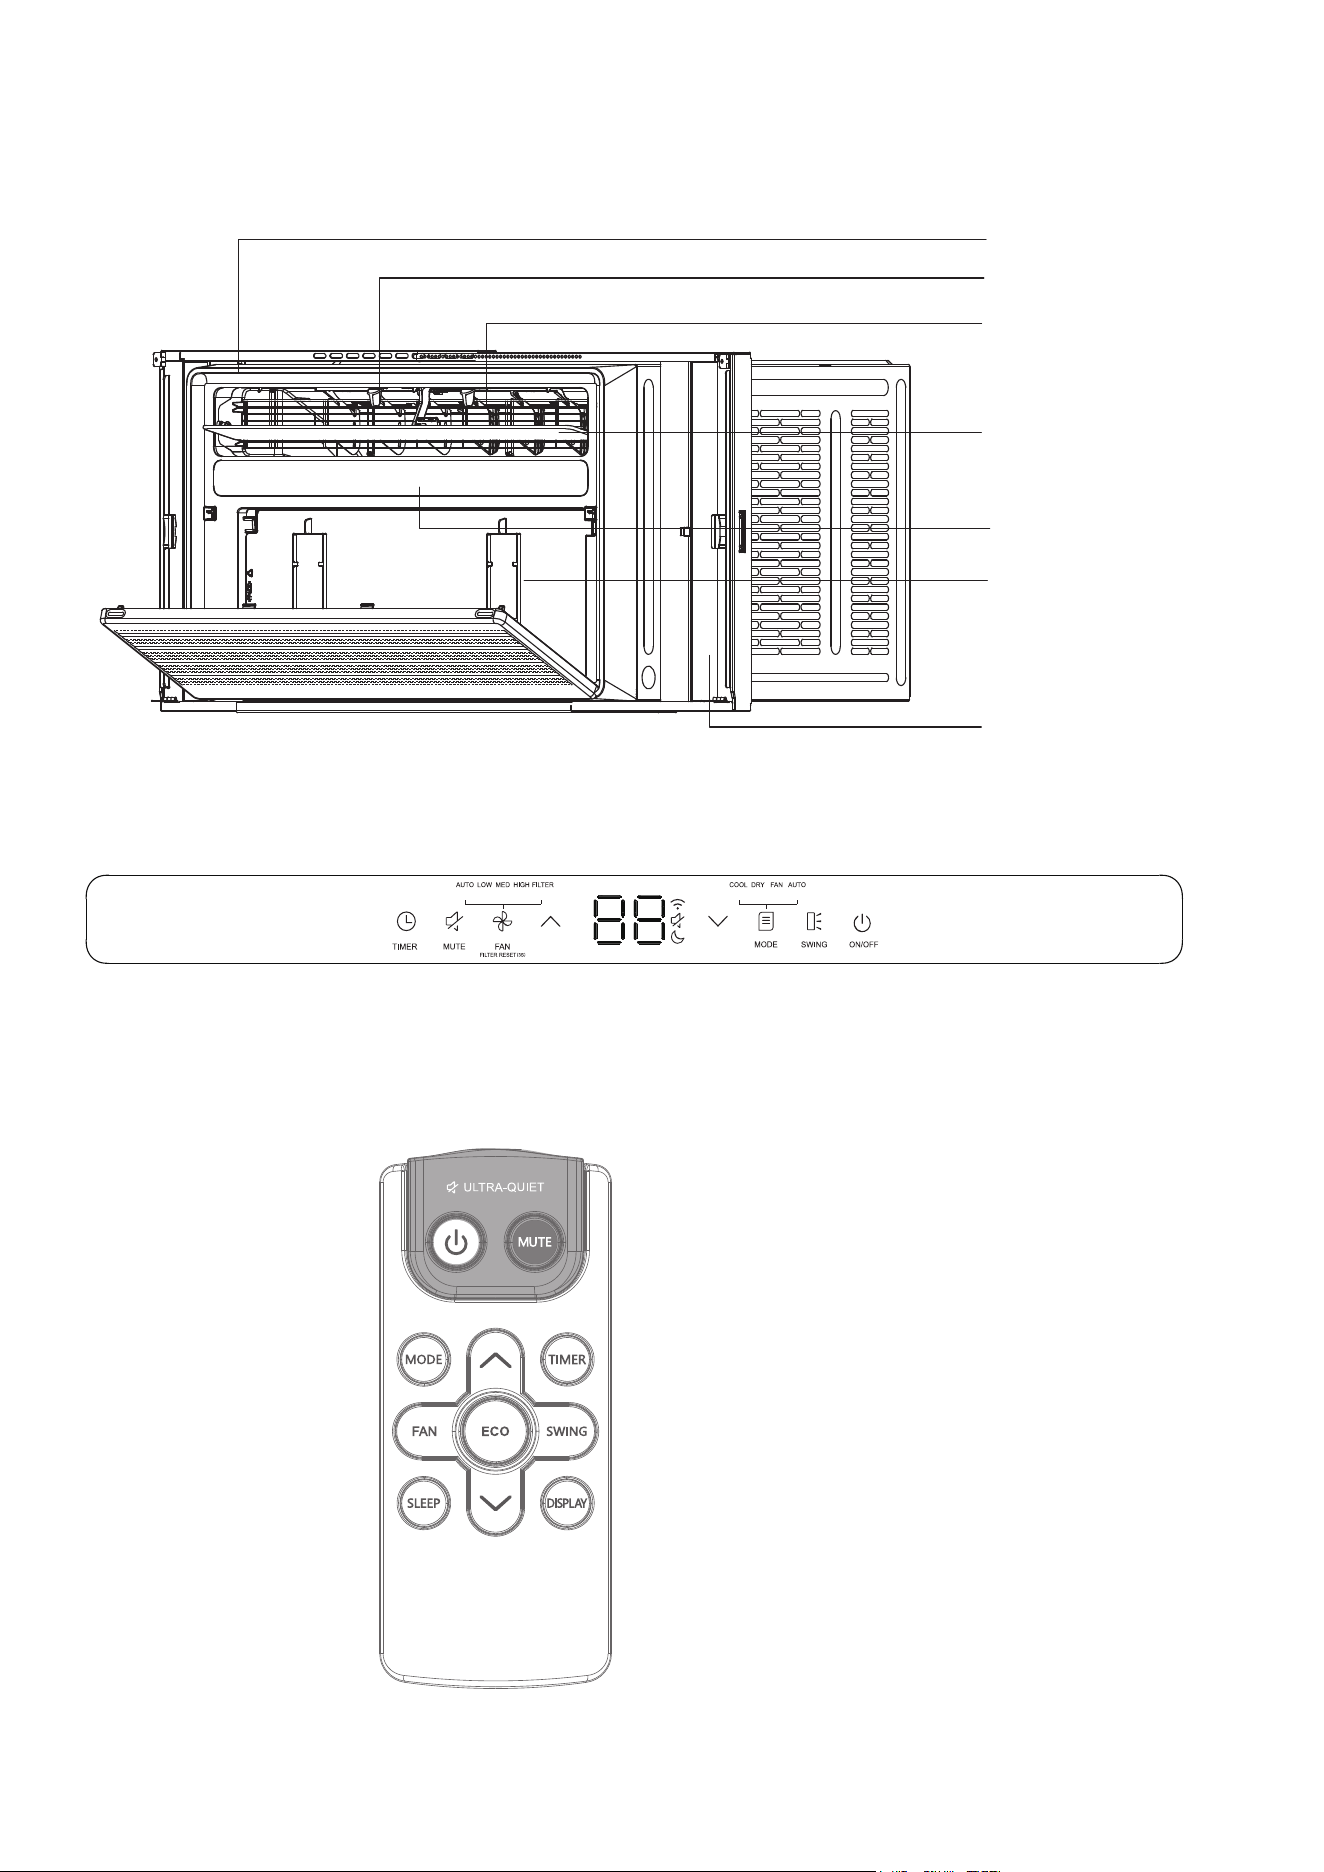
Front Panel
Air Louver
Grid Guard
Vane
Display Board
Air Filter
Telescopic Curtain Assy
Attention
1) The design and some function of
remote control may vary according
to the model.
2) The shape and position of buttons and
indicators may vary according to the
model, but their function is the same.
3) The unit confirms the correct reception
of each press button with a beep.
Remote Controller
Control Panel
Operating Instructions
For remote control model
You can easily operate this air conditioner by pressing the relevant button on the control panel or
remote.
Adjust fan speed (Auto,Low, Med, High)
NOTE: Fan speed setting is available in Auto,Cool, and Fan modes only.
Select to adjust the airflow direction by swinging the louver vertically.
Increase the air conditioning temperature.
Decrease the air conditioning temperature.
Switch between Cool/Dry/Fan/Auto mode.
Turn on the air conditioner or switch to standby.
Indication symbols of LED on control panel
Indicates Automatic, Low, Medium , and High fan speeds, respectively.
Indicates that there is a WiFi connection.
Indicates the unit is in MUTE mode.
Indicates the unit is in Sleep mode.
Indicates Cool, Dry, Fan, Auto and mode, respectively.
Description:
1) Above LED lights on when the relevant mode is in used.
2) In Eco mode, when the desired temperature is reached, the compressor will turn off and the
fan will continue to run for 3 minutes before turning off. The fan will turn on for 1-minute at every
5-minute interval until the room temperature is above the set temperature, at which time the
compressor turns back on and continues cooling.
3) When the running time reaches 500 hours, the filter reminder will light up to indicate the filter
needs to be cleaned. Press the Filter button to reset the filter reminder. Please see the
maintenance section of this manual for filter cleaning instructions.
11
Timer on or Timer off the unit.
Indicat es the unit is in MUTE mode
Long press 3 seconds to reset filter reminder
NOTE:Fan speed setting is availble in Auto, Cool, and Fan modes only.
Long press 3 seconds to turn on/off Eco mode.
14
12
For more information on how to use the remote and other functions of your air conditioning unit,
or to understand how each mode works, please refer to the next few pages.
Battery Replacement
The air conditioner comes with two batteries for the included remote control. Please be sure to
insert them correctly for proper use of the remote.
Tips for Using the Remote
1.
The remote must be used within 26ft of the unit
2.
The unit will make a sound when it receives the remote’s signal
3.
Curtains, other materials, and even direct sunlight can interfere with the infrared signal receiver.
4.
Press “MODE” and “ ^ ” and hold for 3s to r
eset the wifi setting.
Note:
•
•
Do not leave batteries in the remote if you do not plan on using the device for more than 2
months
•
Follow your local city ordinances for information on proper disposal of old and used batteries.
Do not dispose of batteries in unsorted municipal waste.
ECO MODE
Designed to save energy
while keeping your room
at the set temperature.
SWING
Start and pause vent
oscillation.
TIMER
Set a Timer to turn the air
MUTE
Select Mute to lower the
operating volume to its
quietest setting.
POWER
MODE
Cycle through Cool, Dry,
Fan, and Auto modes.
FAN SPEED
Adjust the fan speed (Low,
Medium, High, Auto)
SLEEP MODE
Designed to save energy
while your sleep.
UP/DOWN
Increased or decrease the
temperature/Timer.
DISPLAY
display.
Press and hold f or 3s to
switch between
°F/°C.
13
Setup & Installation
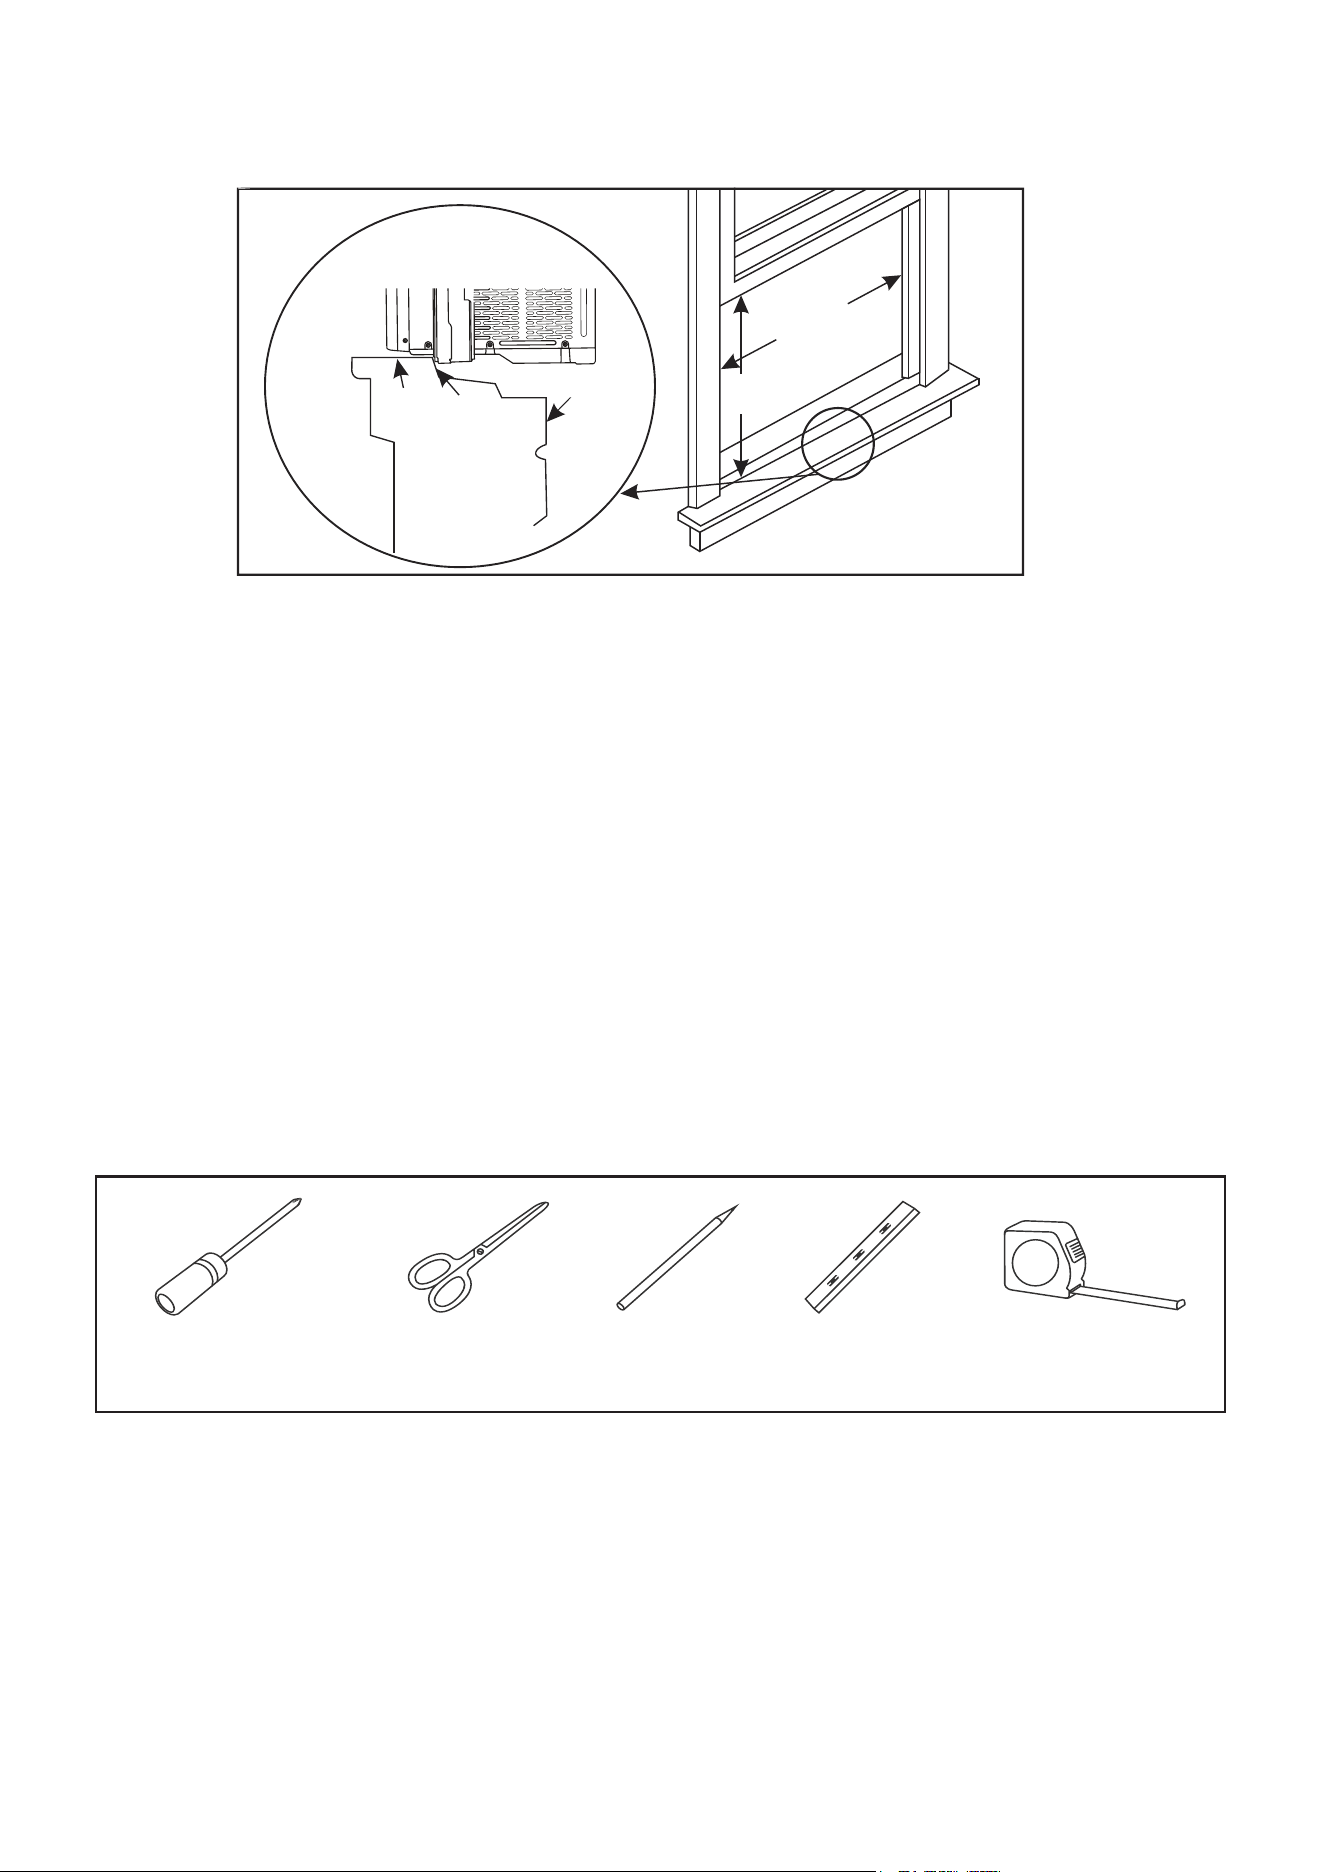
Window Requirements
NOTE:
1. Save the product packaging and installation instructions for future reference.
2. Store the air conditioner in the product box during winter or when not in use.
Interior
Wall
Stool
Silll
Offse
Exterior
Wall
14.5 inch
368 mm
25-36 inch
645-915 mm
Gettng Started
Phillips
screwdrive
r
Scissor
s
or knife
Pencil Leve
l
Ruler or
tape measu
re
SUGGESTED TOOLS FOR INSTALLATION(Not included)
CAUTI
ON
:
Heavy object. Team handling is required during the installation process.
1. This air conditioner is designed to be installed in a standard single-hung or double-hung
window with a window width between 25" and 36"(645mm - 915mm).
2. The air conditioner can be installed without the side panels to fit in a narrow window
opening. See the window dimensions. If the air conditioner is installed on a window with
a width of 645-720mm, the air conditioner must be installed to the right and the right
bracket must be abut on the air conditioner, otherwise the air conditioner will not
operate normally.
3. The lower sash (the lower part of the window that moves up and down) must allow for
14.5" of vertical clearance when open.
4. All supporting parts must be secured to firm wood, masonry or metal.
5. The electrical outlet must be within reach of the power cord.
14
1. Removing All the Packaging
CAUTION
:
NOTE
:
Left curtain frame,
pre-assembled
in factory.
Carefully remove all the packaging straps and wraps from the air conditioner and accessories.
left curtain
pre-assembled
in factory.
Top channel,
pre-assembled
in factory.
Right curtain frame,
pre-assembled
in factory.
Right curtain,
pre-assembled
in factory.
Bottom channel,
pre-assembled
in factory.
When handling the unit, be careful to avoid cuts from the sharp metal edges and aluminum fins
on the front and rear coils.
To be easy installation, both the left and right curtains, curtain frames, top channel, and bottom
channel, are pre-assembled in factory.
If this behavior is not desired, the drain cap at the rear of the AC can be removed to drain a
portion of the water.Doing so may lessen the efficiency of the AC.A minimal amount of water will
still remain in the drain pan.
15
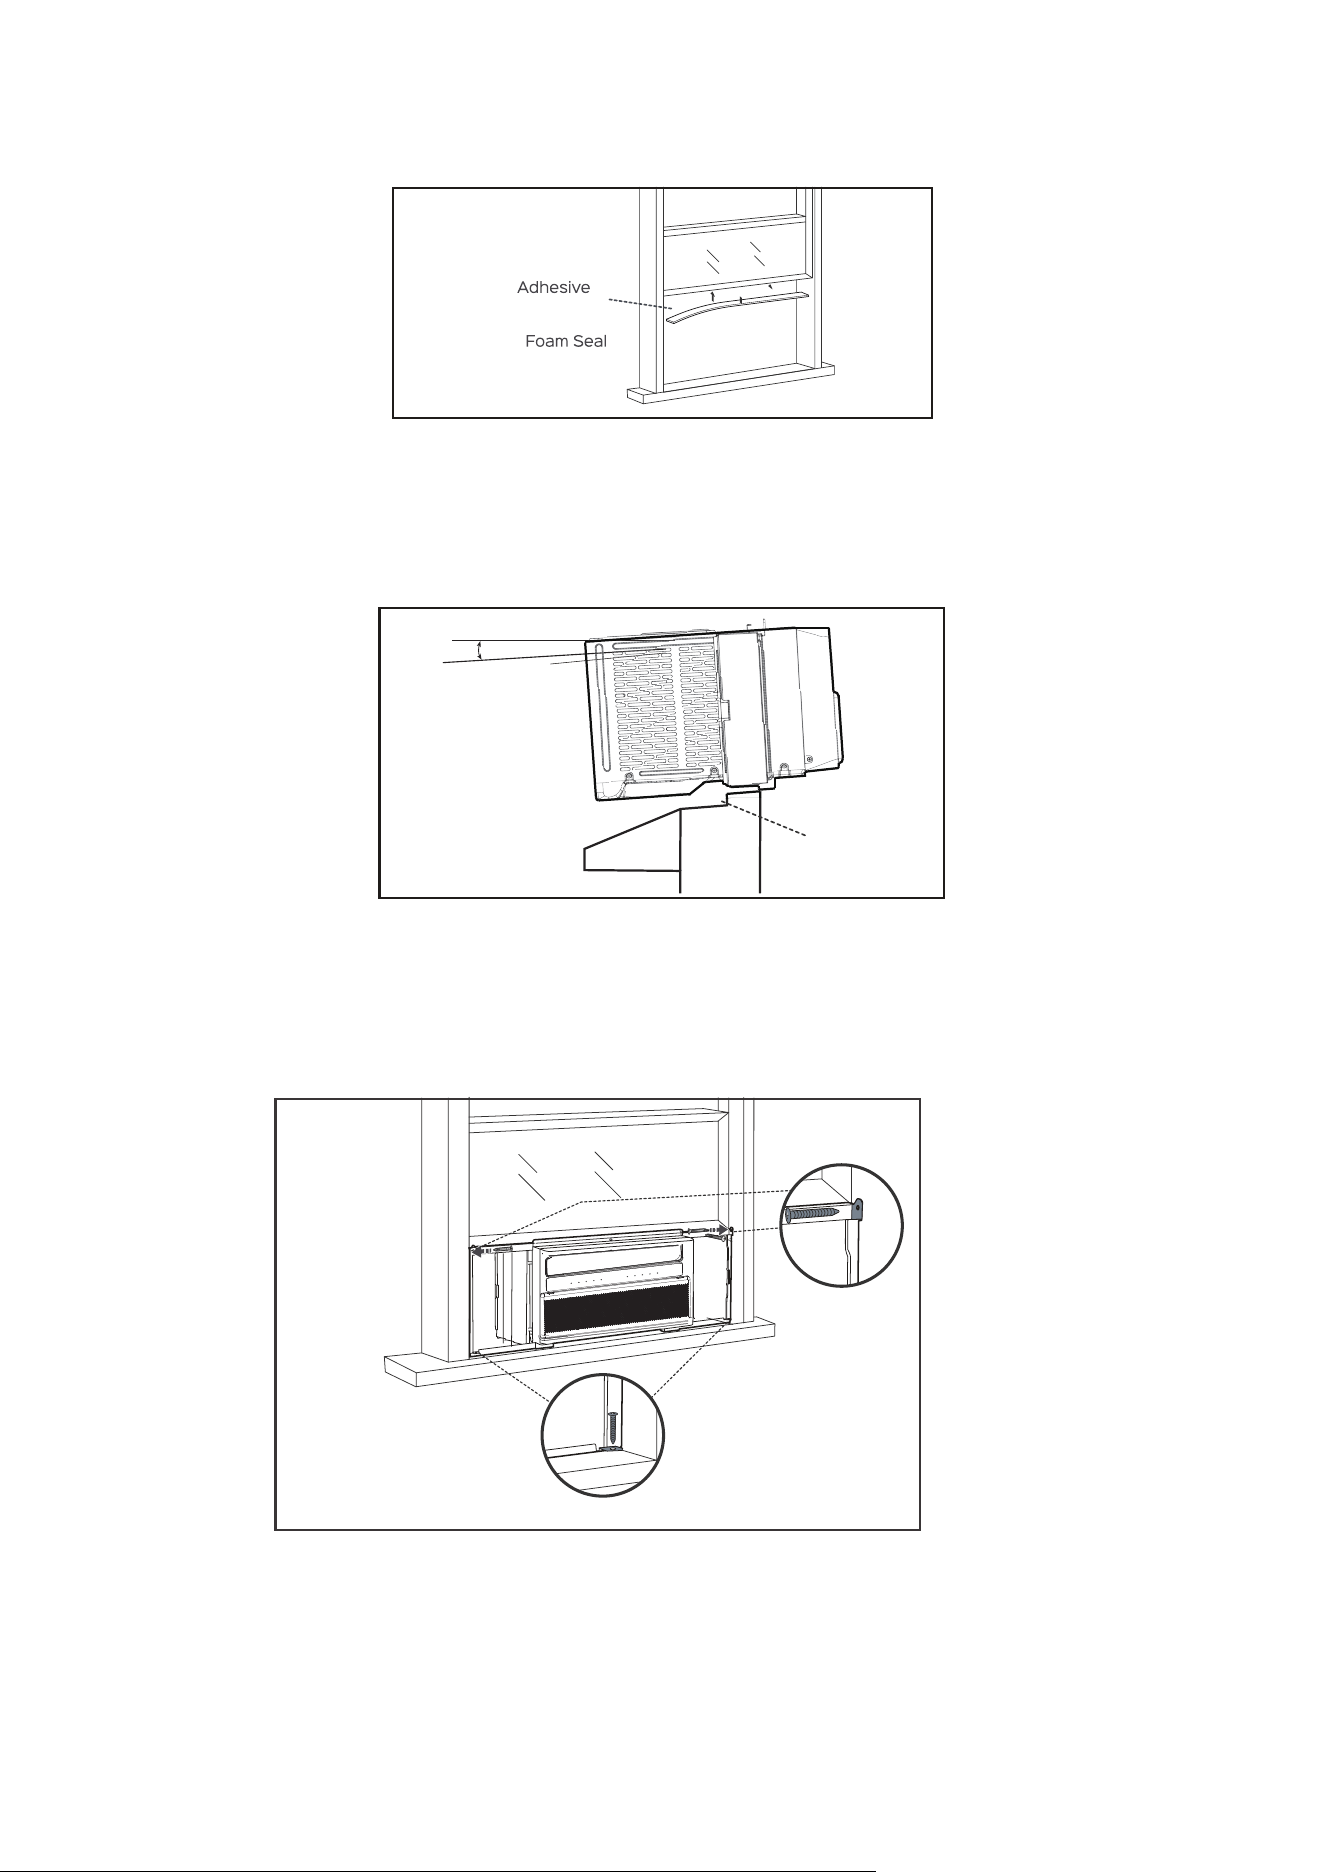
2.Applying the Adhesive Foam Seal
Measure the length of the upper window frame, trim the adhesive foam seal to the appropriate
length and apply as shown.
Carefully lift the air conditioner with a helper to the windowsill and pull down the sash, making
sure the air conditioner is centered and its bottom rail is flush against the windowsill.
o
About 3
Outside Inside
Bo�o
m
Rail
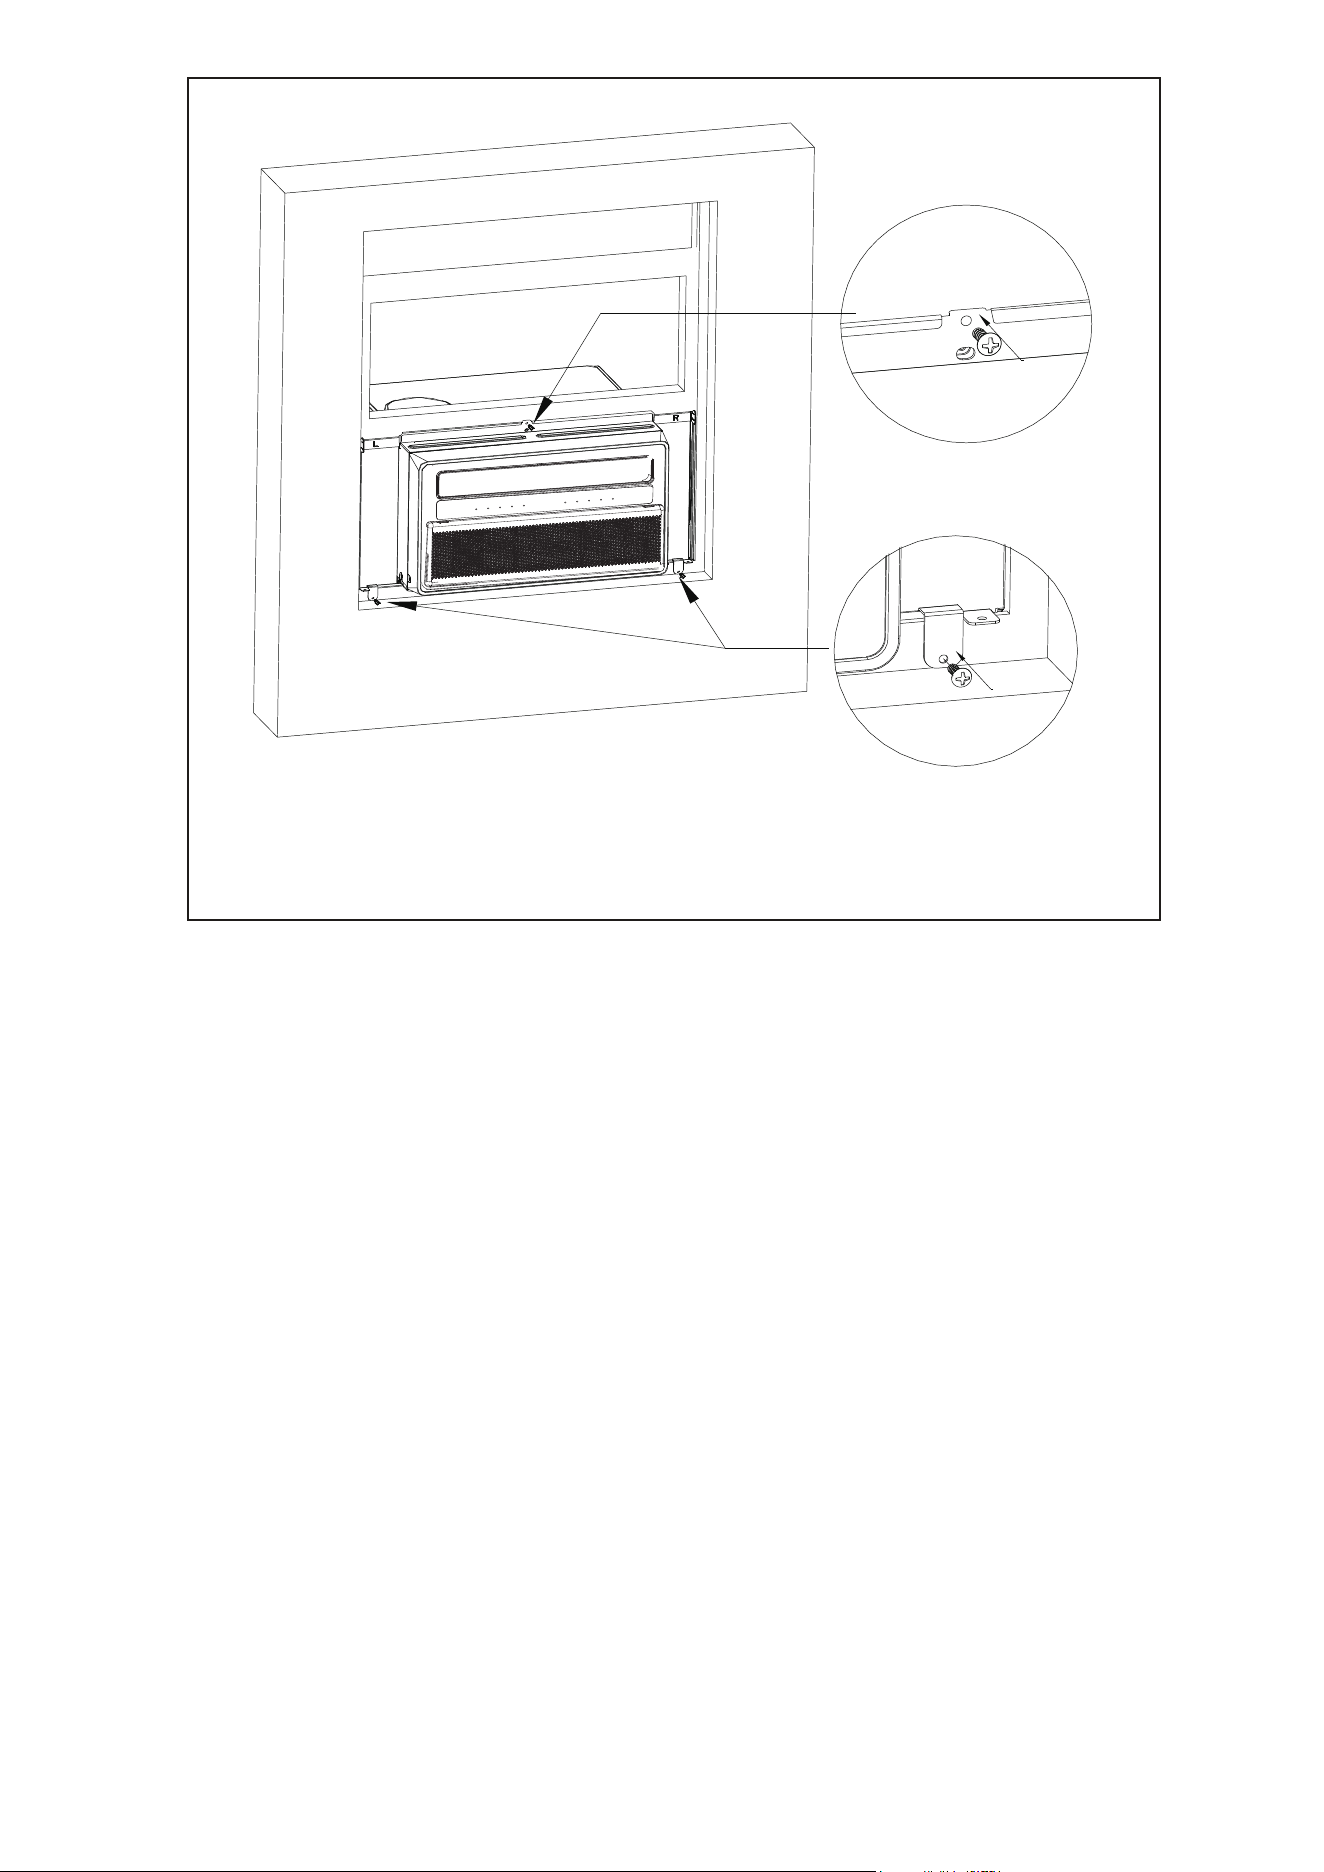
4.Securing the Side Brackets
Extend the side brackets from both sides of the air condiitoner onto the left and right window
frames and secure by installing four 3 /4" screws as shown.
3 /4" Screws *4
NOTE:
Fix the upper screws first, then the lower screws.
3.Placing Inside an Open Window
16
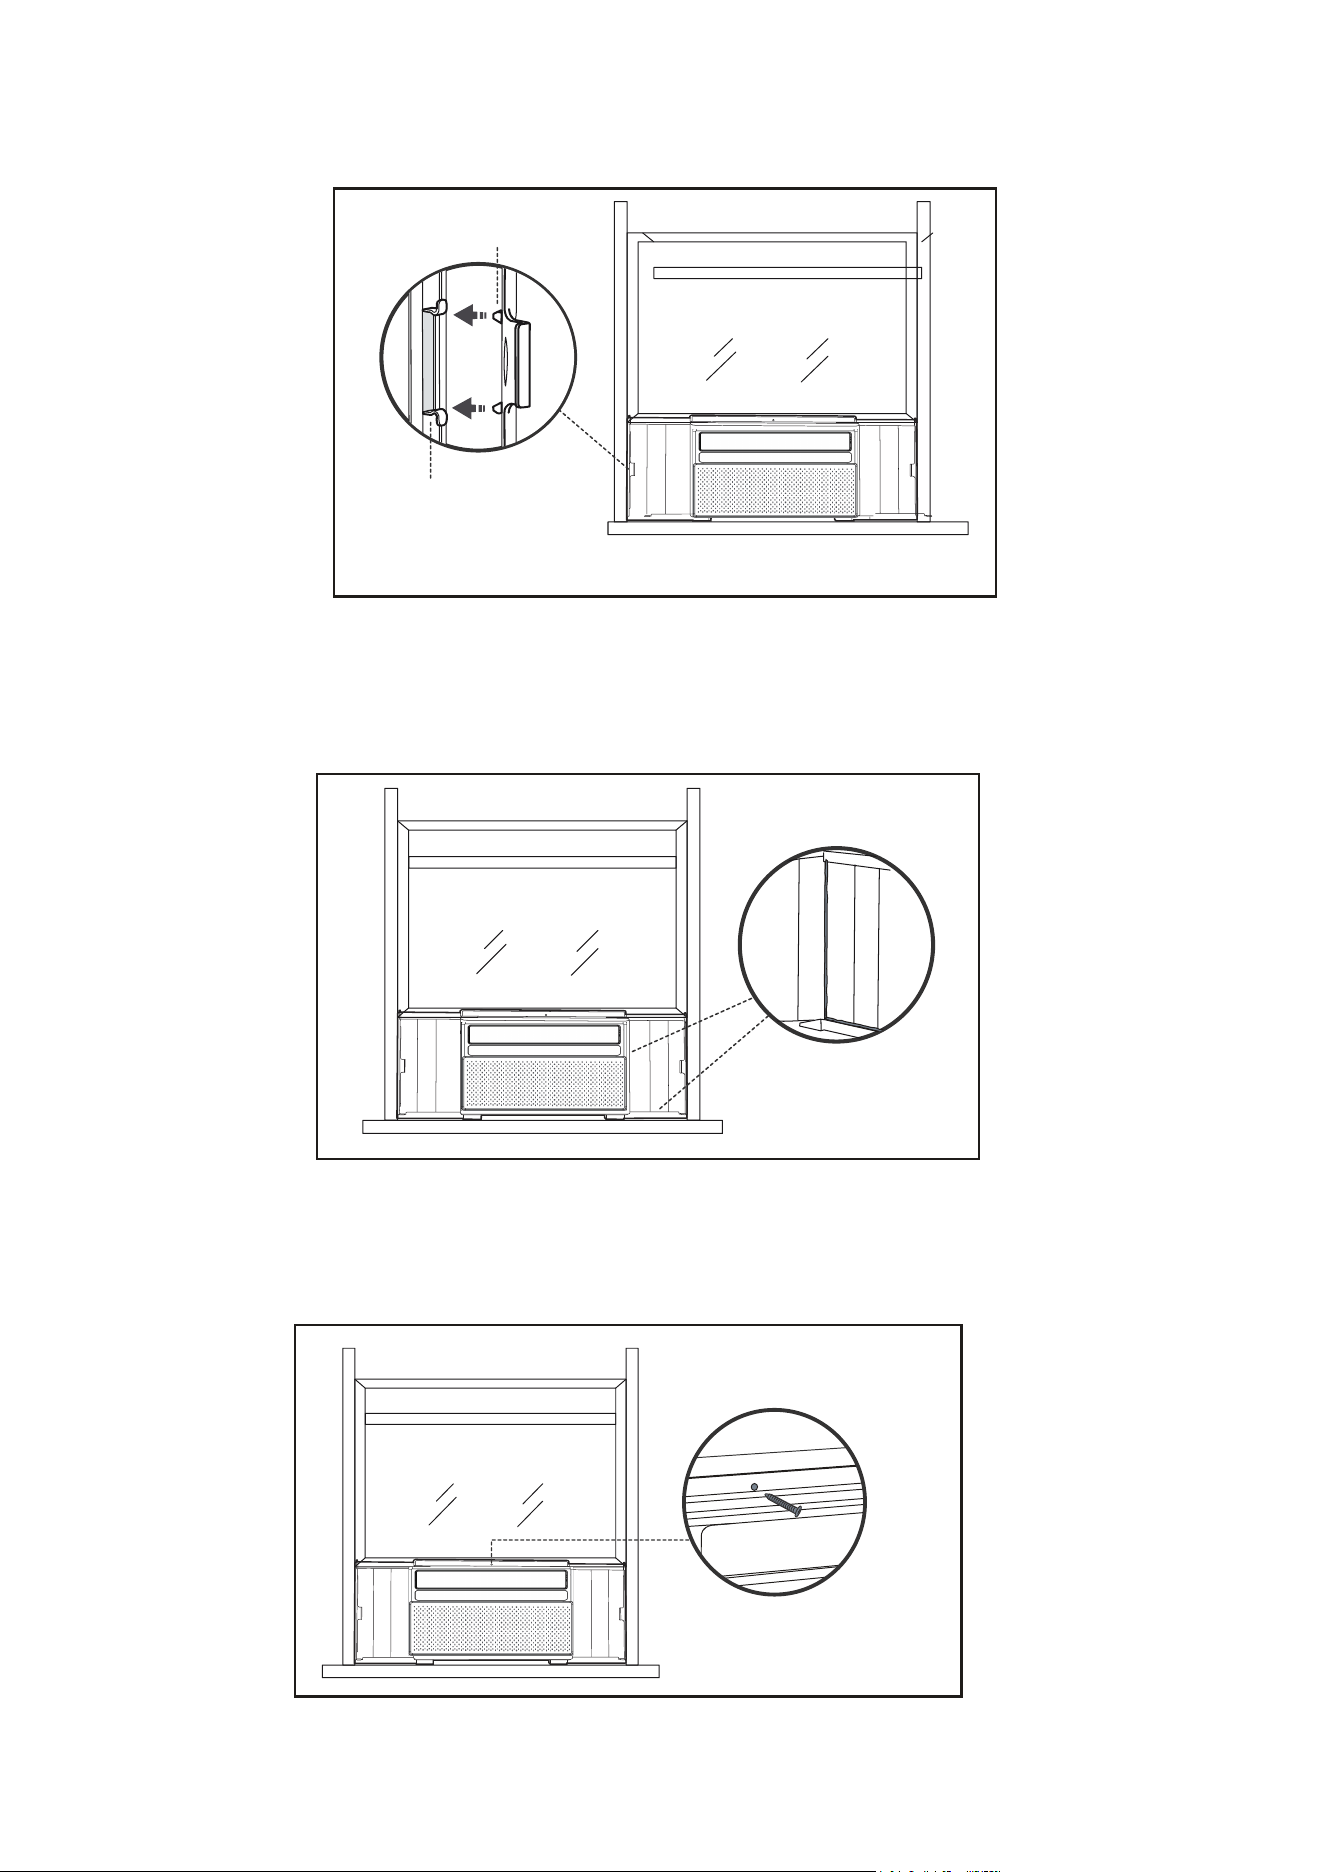
5.Securing the Side Panels
Pull the side panels inwards to align with the brackets, then secure onto
the sides by snapping the juttng points onto the locking pins.
Locking Pins
Jutting Points
6.Sealing the Crevices with Plasticene (Optional)
Fill the crevices between the side brackets and panels with the included plasticene.
7.Installing the Screw Into the Top Rail
Install the 1 / 2" screw into the top rail of the air conditioner.
Top Rail
1 / 2 Screw * 1"
17
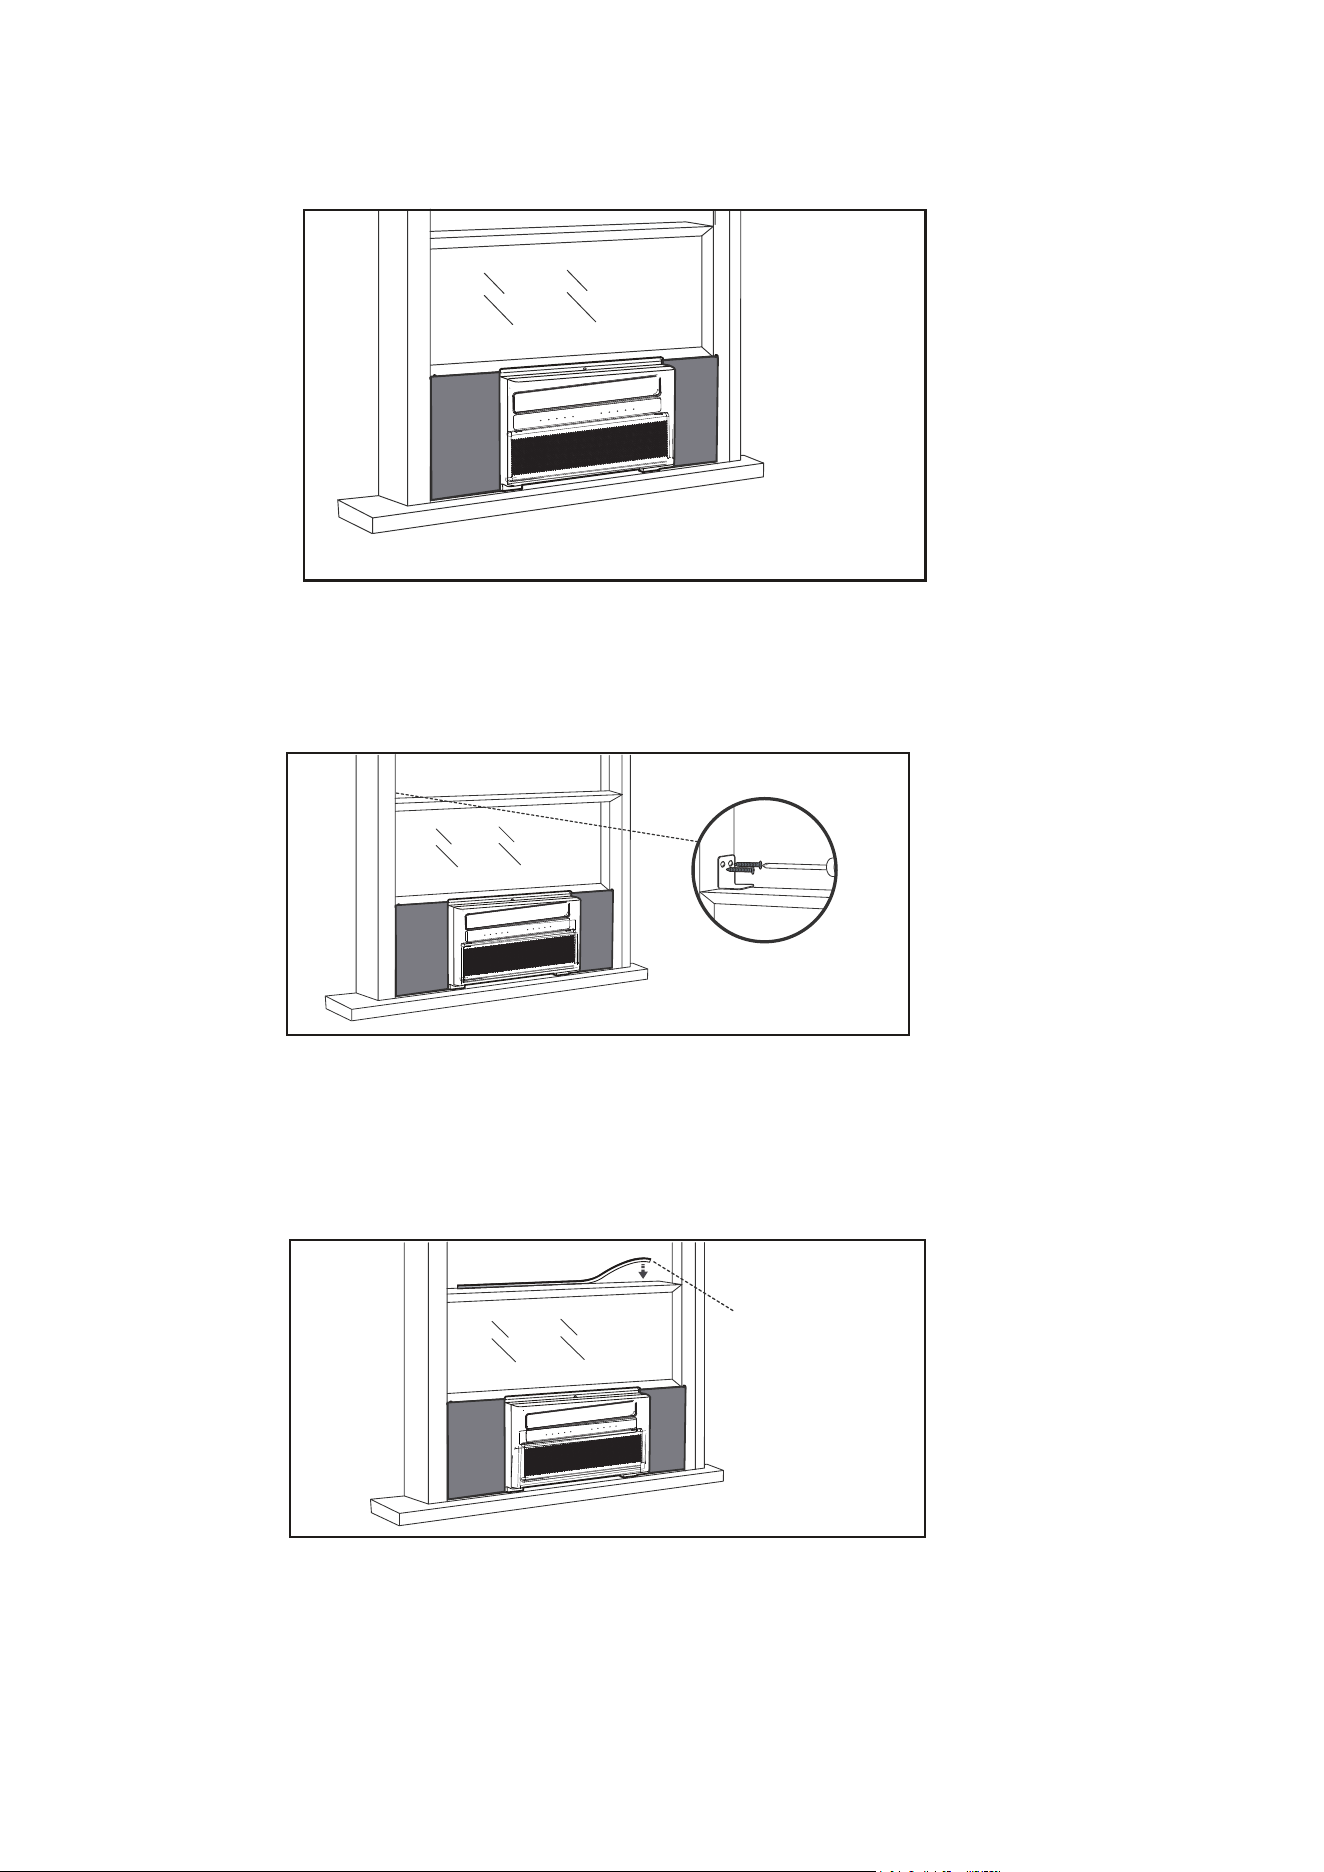
8.Applying the Panel Seals(optional)
Measure the length extended by the side panels, trim the panel seals to the appropriate length,
peel off the backings and apply on the panels on both sides.
Panel
Seals * 2
9.Installing the Security Bracket
10.Filling the Gap Between Sashes
CAUTION:
Attach the security bracket on top of the window sash and secure with two 1 / 2" screws.
1 / 2
S
crew * 2"
Trim the non-adhesive foam seal to the appropriate length and insert between the window sashes.
Non-Adhesive
Foam Seal
When open the window, besure that the fixed screws are avaliable from the curtain to the window
frame.
18
If AC is Blocked by Storm Window Frame
1. Add wood as shown above or remove store window frame/obstruction before installing the
window air conditioner.
2. If the Storm Window Frame must remain, be sure the drain holes or slots are not caulked or
painted shut.Accumulated rainwater or condensation must be allowed to drain out.
CAUTION
For some special window frame, as too thin or too thick, you may need to use the
back-up lock frame to do the additional fixed.
If the AC unit can not be screw-fixed well by the steel frame holes, you must use the
back-up lock frame to do the additional fixed, as the aluminum alloy window.
SASH
INSIDE
1- 1/ 2”min
(38mm)
Storm window
frame or other
obstruction
Board thickness as
required, for proper
pitch to rear, along
entire sill.
Fasten with nails or
screws.
OUTSIDE
1. Install the screw into the top channel of the AC unit, and screw into the window frame.
2. Select two suitable back-up using lock frames, fix them at the bottom of steel frame near the
sides with screws.
3. If needed, you can use the other two back-up using lock frames to do the additional fix at the
top area.
19
Other Features
Filter Reminder
When the running time reaches 500 hours, the filter reminder will light up to indicate the filter
needs to be cleaned. Press and hold the Filter button for 5 seconds to reset the filter reminder.
Please see the maintenance section of this manual for filter cleaning instructions.
Display Auto Off
• Display will dim after 30 seconds (or after 15 seconds in sleep mode)
• Wake up the display by pressing any button
Memory
If the air conditioner is turned off but stays connected to the power,it will resume the previous
settings (except the timer setting) when it is turned on again.
Drain Water
This unit was designed to collect moisture from condensation in a collection pan in the base of
the unit. The collected water is distributed by the rear fan on to the condenser coil. This aids in
the overall efficiency of the unit.
Screw the top channel
into the window frame
with 3 /4 screw."
Screw the back-up lock
frame into the window
frame with 3 /4 screws,
both sides at the bottom.
"
It is normal to hear the water sloshing around when the fan is spinning.
If this behavior is not desired, the drain cap at the rear of the AC can be removed to drain a
portion of the water.Doing so may lessen the efficiency of the AC.A minimal amount of water will
still remain in the drain pan.
Window Requir
20
Inside
Outside
Maintenance
Care and Cleaning
Clean your air conditioner occasionally to keep it looking new. Before cleaning, be sure to
unplug the unit from any and all power sources to prevent electric shock or fire hazards.
Air Filter
The air filter should be checked at least once every month to see if it needs cleaning. Never
use hot water over 104°F (40°C) to clean the air filter. Never attempt to operate the unit without
the air filter. Trapped particles and dust can build up over time, which can result in decreased
airflow and can cause the coils to accumulate frost. To clean the air filter:
1. Pull the grille out from the indents on both sides at the front and remove the filter inside.
2. Wash the filter using liquid dish soap and warm water. Rinse the filter thoroughly. Gently
shake the filter to remove excess water.
3. Let the filter dry completely before placing it into the air conditioner.
Note: If you do not wish to wash the filter, you may vacuum the filter to remove the dust and
other particles.

Cabinet Cleaning
To clean the air conditioner’s cabinet:
• Using a cloth dampened in a solution of warm water and mild liquid soap, wipe down the unit
and the front panel. Then, using a clean dampened cloth, make sure to wipe down the unit to
remove all excess soap and continue to dry.
• Never use harsh cleaners, wax, or polish on the cabinet front.
• Be sure to wring out excess water from the cloth before wiping round the control. Excess water
may damage the unit.
Storage
If you want to store the unit when not in use, we recommend removing the drain plug at the back
of the unit and slightly tilting the unit towards the rear to drain any water in the pan in a safe
manner. Next, clean the unit and then store it back in the original packaging or box until next use.
21
All New TCL Product Models including LCD/LED Televisions, Sound Bars, and Appliances
including Window Air Conditioners, Portable and Through-The-Wallir Air Conditioners,
Dehumidifiers, Air Purifiers, and Robot Vacuums (each individually referred to as a “Product” or
“Unit”, and together referred to as the “Products”).
What your warranty covers:
Defects in materials or workmanship to the original owner of
New Products (Non-Commercial Use)
For how long after your purchase: One (1) year from date of purchase for parts and labor for
New Products (Commercial Use)
For how long after your purchase:
Six (6) months from date of purchase for parts and
Commercial use includes, but is not limited to, the use of this Product in a commercial or business
environment, the use of this Product in an institution or for institutional purposes, or other
commer cial purposes including rental purposes.
What we will do
At TCL’s discretion, (1) pay an Authorized TCL Service Center for both labor charges and parts
to repair your Product, or (2) replace your Product with a new or refurbished/remanufactured
equivalent value Product. The decision to repair or replace will be made solely by TCL. See
section entitled “How to get service.”
How to get service
Before submitting a request for warranty service, please visit support.tcl.com for helpful
FAQs and additional troubleshooting suggestions.
To get warranty service, contact TCL Customer Support by visiting support.tcl.com/contact-us.
Please have your Product type, model number, serial number, and ZIP code ready.
Troubleshooting and prior approval from a TCL representative MUST occur before sending in
your Product to a TCL Service Center.
A representative must troubleshoot your problem over the telephone,via chat, or through e-mail
before receiving service. If it is determined that your
Unit requires service, the service location
will be at the sole discretion of TCL based upon the Limited Warranty Statement.
Warranty Information
this TCL Product when purchased as new from an Authorized Dealer of TCL brand Products in
the United States and packaged with this warranty statement.
non-commercial use.
labor for commercial use.
At the sole discretion of TCL, television screen sizes 43-inches and smaller will either be
repaired at an Authorized TCL Service Center or directly exchanged for a new or refurbished/
re-certified Unit. At thesole discretion of TCL, television screen sizes 44-inches or larger will
either be repaired or directly exchanged fo
r a new or refurbished/re-certified Unit at an

22
At the sole discretion of TCL, television screen sizes 43-inches and smaller will either be
repaired at an Authorized TCL Service Center or directly exchanged for a new or refurbished/
re-certified Unit. At thesole discretion of TCL, television screen sizes 44-inches or larger will
either be repaired or directly exchanged for a new or refurbished/re-certified Unit at an
Authorized TCL Service Center or in-home. At the sole discretion of TCL, Sound Bars, and
Appliances including Window Air Conditioners, Portable and Through-The-Wall Air Conditioners,
Dehumidifiers, Air Purifiers, an
d Robot Vacuums will either be repaired or directly exchanged
for a new or refurbished/re-certified Unit at an Authorized TCL Service Center or in-home. In
the event of a service visit where the on-site technician, in his-her sole discretion, deems the
home or property conditions to be hazardous and/or unsafe, TCL reserves the right to cancel
or re-schedule the service visit, or opt for an exchange of the in-warranty Unit for a refurbished/
recertified Unit in lieu of the in home service visit.
TCL is not responsible for transportation costs for warranty coverage, including but not limited
to Unit repair or replacement, to
the Authorized TCL Service Center or TCL-designated
address. However, TCL will pay for return shipping to a United States address only. TCL will
provide instructions for packaging and shipping the Unit to the Authorized TCL Service Center
or TCL-designated address. Units that are improperly packed and damaged during shipping
are not covered under your limited Product warranty.
What your warranty does not cover
A Unit sold in “As-Is”, “Used”, “Factory Reconditioned”, “Factory Re-Certified”, or “Refurbished”,
condition or with faults.
Proof of purchase in the form of a bill of sale or receipted invoice from an Authorized Dealer
which is evidence that the Product is within the warranty period must be presented to obtain
warranty service.
In the event that a Unit is to be replaced, a picture of the back of the Unit showing the model
and serial number and picture of the Product issue itself may be required.
PRE-AUTHORIZATION MUST BE OBTAINED BEFORE (1) SENDING ANY PRODUCT TO
AN AUTHORIZED TCL SERVICE CENTER, OR (2) OBTAINING ANY IN-HOME REPAIR/
REPLACEMENT/RENTAL SERVICES.
Damage caused by transportation or handling, including damage during shipment from a
Retailer (please contact your Retailer for assistance).
Extended Service Plans purchased from Retailers. Please contact your Retailer for assistance.
Customer instruction. (Your Owner’s Manual describes how to install, adjust, and operate your
Unit. Any additional information should be obtained from your Authorized Dealer).
Service calls to your home for delivery or pick-up, installation, instruction, replacement of
house fuses, connection of house wiring or plumbing, or to correct unauthorized repairs.
Installation and related adjustments, or damage resulting from installation.
Damage resulting from non-approved installation or repair methods.
Failure of the Product to perform due to signal reception problems not caused by your Unit, or
due to power failures or interruptions, or inadequate electrical service.
Damage from misuse, abuse, neglect, insects, normal wear and tear, cosmetic damage,
mishandling, faulty installation, inadequate electrical wiring, or power line surges.
Damage caused by operating the Product in a corrosive or wet atmosphere.
Markings or images on the television’s panel resulting from viewing fixed images (including but
not limited to certain 4:3 images on wide screen televisions, or data or images in fixed screen
locations from banners, video games, or certain broadcast networks).
Units that have original factory serial numbers that are unreadable or missing, or that have been
changed, defaced, or altered in any manner.
Batteries.
A television that has been modified or incorporated into other Products, or that has had the
serial number removed or altered.
Use of accessories or components that are not compatible with this Product.
A Unit purchased or serviced outside of the United States.

LIMITATION OF WARRANTY
Acts of nature or God (as illustrative examples and for the avoidance of doubt, such acts of
nature or God include but are not limited to damage caused by earthquakes, fires, lightning,
or flood whether caused by nature or humans).
Special, incidental, or consequential damages.
THE WARRANTY STATED ABOVE IS THE ONLY WARRANTY APPLICABLE TO THIS
PRODUCT. NO VERBAL OR
WRITTEN INFORMATION GIVEN BY TTE TECHNOLOGY, INC. DBA TCL NORTH AMERICA,
ITS AGENTS OR EMPLOYEES SHALL CREATE A GUARANTY OR IN ANY WAY INCREASE
OR MODIFY THE SCOPE OF THIS WARRANTY.
REPAIR OR REPLACEMENT AS PROVIDED UNDER THIS WARRANTY IS THE EXCLUSIVE
REMEDY OF THE CONSUMER. TTE TECHNOLOGY, INC. DBA TCL NORTH AMERICA
SHALL NOT BE LIABLE FOR SPECIAL, INCIDENTAL, OR CONSEQUENTIAL DAMAGES
RESULTING FROM THE USE OF THIS PRODUCT OR ARISING OUT OF ANY BREACH OF
ANY EXPRESS OR IMPLIED WARRANTY ON THIS PRODUCT. THIS DISCLAIMER OF
WARRANTIES AND LIMITED WARRANTY ARE GOVERNED BY THE LAWS OF THE STATE
OF CALIFORNIA. EXCEPT TO THE EXTENT PROHIBITED BY APPLICABLE LAW, ANY
IMPLIED WARRANTY OF MERCHANTABILITY OR FITNESS FOR A PARTICULAR PURPOSE
ON THIS PRODUCT IS LIMITED TO THE APPLICABLE WARRANTY AND WARRANTY
PERIOD SET FORTH ABOVE. THIS WARRANTY IS SUBJECT TO CHANGE WITHOUT
NOTICE. PLEASE VISIT WWW.TCL.COM TO VIEW THE MOST CURRENT VERSION.
How State Law relates to this warranty
Some states may not allow the exclusion or limitation of incidental or consequential damages,
or limitations on how long an implied warranty lasts, so the above limitations or exclusions may
not apply to you.
This warranty gives you specific legal rights, and you also may have other rights that vary from
state to state.
If you purchased your Unit outside of the United States or seek warranty service coverage outside
of the United States, this warranty does not apply. Contact your dealer for warranty information.
Service calls which do not involve defective materials or workmanship are not covered by this
limited warranty. Costs of such service calls are the sole responsibility of the purchaser.
Costs of shipping the Unit to the Authorized TCL Service Center or TCL-designated address.
TCL will pay for return shipping to the customer to a United States address only.
23
Trouble shooting
24
PROBLEM POSSIBLE CAUSES SOLUTIONS
The air conditioner
will not start
The air conditioner is unplugged
Make sure the air conditioner plug
is pushed completely into the outlet.
The fuse is blown/circuit breaker is
tripped
Check the house fuse/circuit breaker
box and replace the fuse or reset the
breaker.
• The unit will automatically restart
when power is restored.
• There is a protective time delay
(approx. 3 minutes) to prevent
tripping and overloading the
compressor. For this reason, the unit
may not start normal cooling for 3
minutes after it is turned back on.
Power failure
The current interrupter device is
tripped
• Press the RESET button located on
the power cord plug.
• If the RESET button will not stay
engaged, discontinue use of the
airconditioner and contact a qualified
service technician.
The air conditioner
does not cool as it
should
Air flow is restricted
Make sure there are no curtains,
blinds or furniture blocking the front
of the air conditioner.
The temperature control may not
be set correctly.
Lower the set thermostat
temperature.
The air filter is dirty
Clean the filter. Refer to
MAINTENANCE.
The room may be too warm
Please allow time for the room to
cool down after turning on the air
conditioner.
Cold air is escaping
Check for open furnace registers
and cold air returns.
The cooling coils are frozen
Switch to high fan speed and set the
thermostat to a higher temperature.
Temperature sensor is not well
situated.
Temperature sensor behind the air
filter is touching the coil. Try to move
it so it does not contact the cold coil.
25
The air conditioner
is freezing up
Ice blocks the air flow and stops the
air conditioner from cooling the
room
Switch to high fan speed and set the
thermostat to a higher temperature.
The batteries are inserted
incorrectly
Replace the batteries.The batteries may be dead
The remote control
is not working
Check the position of the batteries.
Water is dripping
outside
Hot and humid weather This is normal.
Water is dripping
INSIDE when the
unit is cooling
The air conditioner is not
correctly tilted outside
Improper installation. Tilt air
conditioner slightly to the outside
to allow water drainage. Refer to
installation instructions.
Water is dripping
INSIDE when the
unit is cooling
Moisture removed from the air is
draining into the base pan
This is normal for a short period in
areas with low humidity and normal
for a longer period in areas with high
humidity
Noise when the
unit starts
A "da-da" sound may occur for 30
seconds when the unit is turned
on due to the compressor starting.
This is normal.


35
Need more help? / ¿Necesitas más ayuda? / Besoin d’aide ?
support.tcl.com
1-800-825-6747
TCL and the TCL Logo are owned by TCL Corporation
and under license to TTE Technology, Inc.