Instruction Booklet
Model: HG1788
smokeless grill

IMPORTANT SAFEGUARDS
When using electrical appliances, basic safety precautions should always
be followed including the following:
1. Read all instructions.
2. DO NOT touch hot surfaces. Use handles or knobs
3. To protect against electrical hazards, do not immerse cord, plugs,
or the appliance in water or other liquid.
4. Close supervision is necessary when any appliance is used by or near
children. Children should be supervised to ensure that they do not
play with the appliance.
5. This appliance is not intended for use by persons (including children)
with reduced physical, sensory or mental capabilitiesor lack of
experience and knowledge, unless they have been given supervision
or instruction concerning the use of the appliance by a person
responsible for their safety.
6. Unplug from outlet when not in use and before cleaning. Allow to cool
before putting on or taking off parts, and before cleaning the
appliance.
7. DO NOT operate any appliance with a damaged cord or plug or after
the appliance malfunctions, or is dropped or damaged in any manner.
Return appliance to the manufacturer for examination, repair or
electrical or mechanical adjustment.
8. The use of accessories or attachments not recommended may cause
hazards.
9. DO NOT use outdoors.
10. DO NOT let cord hang over edge of table or counter, or touch hot
surfaces.
11. DO NOT place on or near a hot gas or electric burner, or in a heated
oven.
12. Extreme caution must be used when moving an appliance containing
hot liquids. DO NOT move the unit when it is still hot.
13. Prior to connecting or disconnecting plug from wall outlet, turn any
control to “Off”.
14. This appliance is for Household Use Only. DO NOT use appliance for
other than its intended use.
15. DO NOT leave unit unattended while in use.
16. DO NOT touch the metallic parts of the unit while the appliance is
operating. These can become very hot.
17. Always unplug grill immediately after using and allow to cool before
cleaning and storing.
18. Always place grill on a heat resistant surface.
2
19. Never place anything between the grill plate and the food i.e.:
dish,aluminum foil, etc.
20. CAUTION: This appliance generates heat during use. Proper
precautionsmustbetakentopreventtheriskofburns,resorother
damage to property caused by touching the sides or top while in use
or during cooling.
SAVE THESE INSTRUCTIONS
HOUSEHOLD USE ONLY
GROUNDED PLUG
To reduce the risk of electric shock this appliance has a grounded plug
(2bladesand1pin).Iftheplugdoesnottfullyintotheelectricaloutlet
contactaqualiedelectrician.Donotmodifythepluginanywayoruse
an adaptor.
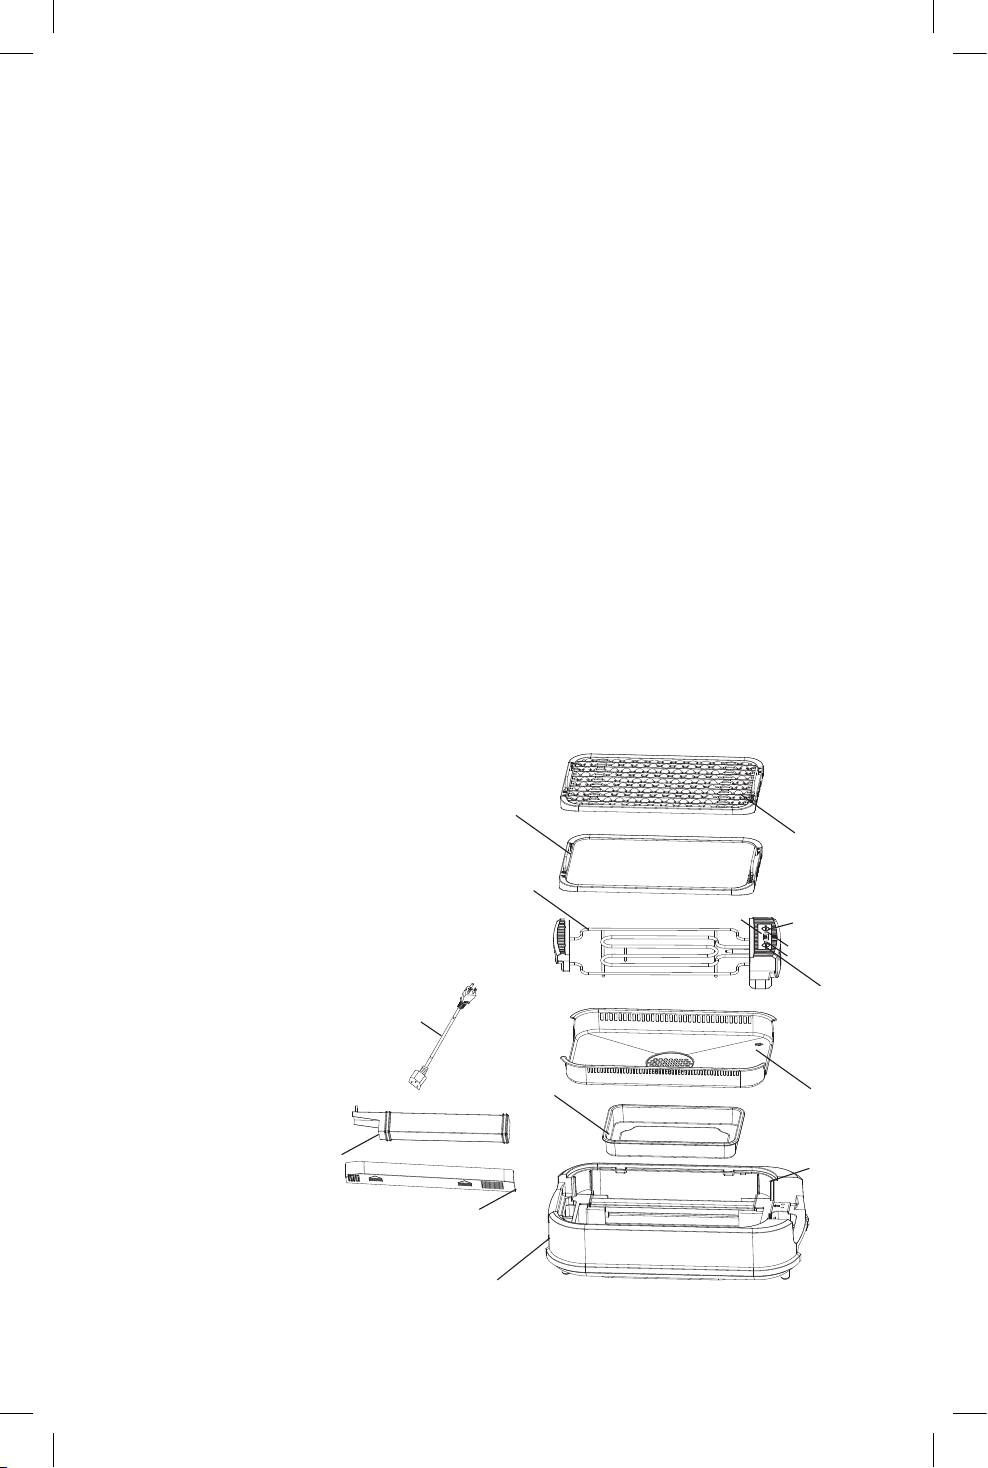
DESCRIPTION OF PARTS
1.Base
2.Safety Cut Off Switch
3.Fan
4.Fan Cover
5.Water Tray
6.Drip Tray
7.Control Panel
a)Power
b)Temperature Increase
c)Temperature Decrease
d)Fan On/Off
8.Element
9.Grill Plate
10.Griddle Plate
11.Detachable Power Cord
3
1
2
3
4
5
6
7
9
10
8
11
7a
7b
7c
7d

BEFORE FIRST USE
1. Remove all packaging.
2. Wash the Grill & Griddle Plates, Drip Tray, and Water Tray in warm
soapy water or in the dishwasher to remove any residue from the
manufacturing process.
Never use any metal objects, scouring pads or harsh abrasive
cleansers on the cooking surface.
3. Wipe the Base, Control Panel, and Element with a damp cloth and dry
thoroughly with paper towels before use.
NEVER IMMERSE THE CONTROL PANEL, ELEMENT, FAN, OR
THE POWER CORD IN WATER OR ANY OTHER LIQUID.
4. Beforecookingforthersttime,thenon-stickCookingPlatesmust
be‘seasoned’.Brushasmallamountofoil,butterormargarine
on the Cooking Plates and wipe off excess with a paper towel. Your
appliance is now ready to use.
ASSEMBLY
1. Always unplug the unit before assembly and disassembly.
2. PlacetheBaseonaat,levelsurface.
3. Fill the Water Tray with water and place in the bottom of the Base.
NOTE:DonotlltheWaterTrayabovetheMAXllline.
4. Place the Drip Tray on the unit, aligning the arrows on the Drip Tray
with the arrows on the Base.
NOTE: The unit will not operate if the Drip Tray is not installed
correctly on the Safety Cut Off Switch.
5. Place the Control Panel/Element on the unit.
6. Place the Grill or Griddle Plate on top of the Element.
HOW TO USE
1.Placetheunitonaat,levelsurface,closetoa120Voltwalloutlet.
2. Follow the Assembly Instructions listed above.
3.EnsuretheWaterTrayislledwithwater.NOTE: The Water helps
with the smoke extraction. Always use the Water Tray when cooking.
Do not move or hit the unit during use as this will cause water to spill
inside and could cause damage to the unit.
4. Connect the Power Cord to the Grill and then plug into the wall outlet.
The display will light up for 1 second and then the Red Power Light
willbeginashing.Theunitisnowinstandbymode.
5. Press the Power Button to turn the unit on.
6. Press the Fan Button to turn the Fan on.
NOTE: Do not operate the Grill without the fan on as it will cause
greasetobuild-upinsideandcanaffectperformance.
7. Select the desired temperature by pressing the Temperature Increase
arrow.
4

8. The Grill is ready to use when the display reaches the set
temperature.
9. Place your food on the cooking surface. Follow the Cooking Guides on
Page 5 and 6 as a guide on cooking temperature.
10.Whennishedcooking,pressthePowerButtonandunplugfromthe
wall outlet and allow to cool.
11.Follow the Care and Cleaning section to clean after each use.
Internal Temperature Guide
It is recommended meat and poultry be cooked to the following internal
temperatures to be sure any harmful bacteria has been killed.
Food Suggested Internal Temperature
Ground Turkey/Chicken 165˚F/74˚C
GroundBeef,Lamb,Pork,Veal 160˚F/71˚C
Whole Turkey/Chicken 180˚F/82˚C;170˚F/77˚C
for the breast
Goose and Duck 180˚F/82˚C
FreshBeef,Veal,Lamb 145˚F/63˚C
Fresh Pork 160˚F/71˚C
Re-heatingmeat&poultry 165˚F/74˚C
COOKING GUIDES
The following table is a guide. The amount of time depends upon the
thickness and desired degree of doneness of food.
Grill Temperature Chart
Food Temperature
Chicken breast, boneless 350˚F(175˚C)
Chops:Lamb,Pork,Veal 350˚F(175˚C)
Fish 350˚F(175˚C)
Hamburgers 400˚F(205˚C)
Shrimp 350˚F(175˚C)
Spare ribs 350˚F(175˚C)
Steak 350˚F(175˚C)
5

Griddle Temperature Chart
Food Temperature
Bacon 350˚F(175˚C)
Eggs 300˚F(150˚C)
French Toast 375˚F(190˚C)
Grill Cheese Sandwiches 350˚F(175˚C)
Hash Browns 350˚F(175˚C)
Pancakes 375˚F(190˚C)
Sausages 325˚F(160˚C)
HELPFUL HINTS
1. For best browning results and grill marks when cooking hamburgers,
steaks, hot dogs, sausages, chicken and other meats, adjust the
Temperature Control to the maximum setting (446°F/230°C).
2. Use a low or medium setting (212°F/100°C to 320°F/160°C) to reheat
previously cooked foods, keep food warm or to grill more delicate
food,likesh.
3. If desired when grilling, brush barbecue sauce on food during the last
5 to 10 minutes of cooking.
4. Par-boilribsbeforegrilling.
5. For best results, it is recommended to use a paper towel and dry meat
or poultry before grilling.
6. Infuseyourfoodswithdifferentavorsbyaddingingredientssuchas
lemon and herbs to the Water Tray when cooking.
7. To avoid transfer of bacteria from raw foods always use separate
utensils and dishes when handling raw and cooked foods.
8. Preheat to the desired temperature, especially when cooking foods
that may run. (Ex: eggs and pancakes).
9. When using oil on the Griddle, do not add more than 2 tbsp/30 ml. Oil
should be added before preheating the Griddle.
10.To use the Griddle as a warming tray set the control to 212°F/100°C.
11.If you do not wish to use oil when cooking, you should season the Grill
& Griddle Plate by brushing the surface with a light coating of
vegetable oil. Let the oil remain on the surface for a few minutes then
wipe with a dry paper towel. Preheat to the desired temperature and
the Grill & Griddle is ready to use.
12.Do not use metal utensils on the Grill or Griddle Plate as they may
scratchthenon-sticksurface.Useplasticorrubberutensils.Donot
cut food on the Grill or Griddle Plate.
6

13.Do not operate the unit for longer than 2 hours. If longer use is
necessary, unplug from the wall outlet and allow to cool for
approximately 30 minutes. Dispose of any waste from Drip Tray and
Water Tray before reusing.
CARE AND CLEANING
1. Turn all controls off then unplug the unit from the wall outlet and allow
to cool completely.
2. Remove the Power Cord from the Grill socket. If necessary, wipe the
Control Panel and Cord with a damp cloth.
IMPORTANT: NEVER IMMERSE THE CONTROL PANEL,
ELEMENT OR THE POWER CORD IN WATER OR ANY OTHER
LIQUID.
3. Remove the Grill & Griddle Plates, Drip Tray, and Water Tray and
dispose of any waste.
4. Wash the Grill & Griddle Plates, Drip Tray, and Water Tray in warm
soapy water or in the dishwasher.
NOTE: For stubborn spots, use a soft plastic mesh pad or other
productsthatare‘safeforcleaningnon-sticksurfaces’.Rinsewith
clear water and dry thoroughly. Never use any metal objects, scouring
pads or harsh abrasive cleansers on the cooking surface.
5. Remove the Fan after each use. Clean by turning the unit
upside down. Remove the Fan Cover and pull the Fan upward. It is
recommended to wipe the Fan exterior with a damp cloth and the Fan
interior with cotton swabs. Place the Fan back in place by aligning the
Fan’swireleadswiththeholesinthebase.
6. After each thorough cleaning, the Grill and Griddle Plates should be
seasoned. Brush the cooking surface with a light coating of vegetable
oil. Allow the oil to remain on the surface for a few minutes, then wipe
with a paper towel.
7. All servicing, other than cleaning, should be performed by an
authorized service representative. See Warranty section.
NOTE:Withrepeatuse,thenon-stickcoatingonthegrillandgriddle
maychangecolor.Thisisnormalandwillnotaffectthenon-stick
properties.
RECIPES:
Grilling times for the recipes below will depend on the thickness and
temperature of the food. Check the progress after a few minutes to avoid
overcooking.
7

The Perfect Hamburger
1lb (450g) ground beef
salt and pepper
1tbsp.(15ml) nelydicedgreenpepper
2tbsp.(30ml) nelydicedonion
1 tbsp. (15 ml) Worcestershire sauce
2 tbsp. (30 ml) fresh bread crumbs or rolled oats
1 egg
1tbsp.(15ml) nelychoppedparsley
1.Pre-heatGrill.
2. Brush with oil if desired.
3.Mixallingredientstogetherandshapeintopattiesofequalsize.
4.Followdirectionsinthe‘HowtoUse’section.
5.Cookforabout3-5minuteseachsideoruntiltheinternaltemperature
reaches 160°F/71°C (for medium).
Increase cooking time if the hamburger patties are thick.
Easy Barbecue Chicken
1/2 cup (125 ml) oil
2 tbsp. (30 ml) lemon juice
1/2 tsp. (3 ml) salt
freshly ground black pepper
sprigs of fresh rosemary
6 boneless chicken breasts
1.Mixrst5ingredientstogether.
2. Add chicken breasts and marinade for at least two hours, turning
frequently.
3.PreheatGrill.Followdirectionsinthe‘HowtoUse’section.
It is recomended to reach an internal temperature of 165°F/74°C.
Cooking time will depend on the thickness of the chicken.
Baste often during cooking.
8

Grilled Vegetables
Thick slices of zucchini, onions, large
mushrooms, squash, eggplant, etc.
1 tsp. (5 ml) olive oil (optional)
1 tsp. (5 ml) balsamic vinegar
1/4 tsp. (1.5 ml) soya sauce
1. Preheat Grill.
2.Mixoliveoil,balsamicvinegarandsoyasauce.
3. Toss vegetables in oil mixture.
4.PlaceonGrillandfollowthedirectionsinthe‘HowtoUse’section.
Cook for approximately 4 minutes.
Herb Grilled Salmon Fillets
1 lb. (450 g) Salmon Fillets (skin on)
LemonDillMarinade:
1/3 cup (85 ml) olive oil
1/4 cup (60 ml) lemon juice
2tbsp.(30ml) choppedfreshdill(2tsp.-10mldried)
1 tsp. (5 ml) grated lemon rind
1/4 tsp. (1.5 ml) salt and pepper
1. Preheat Grill.
2. Cut salmon into 4 pieces.
3. Whisk marinade ingredients together in a shallow baking dish.
4.Addllets,coverandmarinadeforupto30minutesintherefrigerator.
5. Place on Grill.
6.Followthedirectionsinthe‘HowtoUse’section.
7. Baste frequently.
Grilled Tuna Tataki With Asian Sesame Crust
4 6 oz. (170 g) tuna steaks
1/2cup(125ml) low-sodiumsoysauce
1/4 cup (60 ml) chopped scallions, white and light green part
2 tbsp. (30 ml) fresh lemon juice
1 tsp. (5 ml) sesame oil
1 tsp. (5 ml) grated fresh ginger
9

1/2 cup (125 ml) sesame seeds, white and black combined,
or white only
1/2 tsp. (2.5 ml) cornstarch
1.Inalargezip-topbag,combinethesoysauce,choppedscallions,
lemonjuice,sesameoilandfreshginger.Mixeverythingaroundinthe
bag until it is well combined. Add the tuna steaks, turning within the
bag to coat them completely with the marinade.
2. Press the excess air out of the bag, seal and let marinate in the
refrigerator for about 20 minutes.
3. Preheat your grill to the highest temperature setting.
4. Place the sesame seeds on a plate or a shallow dish.
5. Remove the tuna steaks from the marinade bag, brushing the
scallions off the steaks and reserving the marinade.
6. One at a time, coat the tuna steaks in the sesame seeds on all sides,
pressingtheseedsintothesteaksothey’llstick.
7.Followthedirectionsinthe‘HowtoUse’section.
8.Spraythegrilllightlywithoilornon-sticksprayandplacethetuna
steaks on the grill.
9. Grill for about 3 minutes (longer if you prefer your tuna cooked
through).
10.Carefullyipthetunasteakswithapairoftongsafter3minutesand
cook for 3 minutes on the other side.
11.Remove from grill and keep warm.
12.Meanwhile,pourthemarinadeintoasmallsaucepanandbringto
a boil. Add the cornstarch, stirring with a whisk. Cook for about 3 to 4
minutes, until the sauce thickens.
13.To serve, slice the tuna steaks on the diagonal into thin slices. Fan
the slices on a plate and drizzle with the sauce.
Herb Grilled Sweet Potato Fries
6 large sweet potatoes
Pinch Salt
5 tbsp. (75 ml) olive oil
2 tsp. (10 ml) garlic powder
2 tsp. (10 ml) oregano
2tsp.(10ml) nelychoppedfreshthymeleaves
2tbsp.(30ml) freshat-leafparsley,nelychopped
1. Place the potatoes in a large pot of cold water, add 2 tablespoons of
saltandcookuntilpotatoesaretender,butstillrm,about15minutes.
Drain and let cool slightly.
10

2. Preheat the grill to high.
3. While the potatoes are cooling, mix 2 tablespoons of the oil add the
garlic, oregano and thyme in a bowl. Toss the cooled potatoes with the
mixture.
4. Slice each potato in half lengthwise then slice each half into 3 or 4
wedges, depending on the size.
5. Brush the wedges with the remaining 3 tablespoons of oil and season
with salt.
6.Followthedirectionsinthe‘HowtoUse’section.
7. Grill until lightly golden brown and just cooked through, about 6
minutes.
8. Remove to a platter and immediately toss with the remaining mixture
and chopped parsley.
Grilled Pork Tenderloin With Apricot Glaze
BBQ Rub & Pork
2 pork tenderloins, trimmed of fat
and silver skin
1 tbsp. (15 ml) paprika
2 tsp. (10 ml) salt
1 tsp. (5 ml) black pepper
1 tsp. (5 ml) ground rosemary
1/2 tsp. (2.5 ml) granulated garlic
Apricot Glaze
2/3 cup (150 ml) apricot jam
1/2 cup (70 ml) rice vinegar
1 clove garlic, minced
1tsp.(5ml) nebrownsugar
1 tsp. (5 ml) Honey
1 tsp. (5 ml) reserved BBQ Rub
1. For the BBQ rub, stir all the dry ingredients together. Set aside a
teaspoon of this for the glaze.
2. Preheat the grill on medium
3.Followthedirectionsinthe‘HowtoUse’section.
4. Rub the two pork tenderloins with the BBQ rub and grill until they
reach an internal temperature of 160° F (71°C), turning the pork
occasionally.
5. While the pork is grilling, prepare the glaze.
11

Apricot Glaze
1. Heat all ingredients over medium heat, whisking until evenly blended.
2. During the last 10 minutes of grilling, baste the pork generously with
the glaze.
3. Any remaining glaze can be returned to a simmer and then used as a
sauce.
4. To serve, let the pork rest for 10 minutes before slicing and serving.
12

13
A short supply cord is provided to reduce the hazards of becoming
entangled in or tripping over a long cord. Extension cords may be used
if care is exercised in their use. If an extension cord is used, the marked
electrical rating of the detachable power-supply cord or extension cord
should be at least as great as the electrical rating of the appliance. If
the appliance is of the grounded type, the extension cord should be a
grounded 3-wire cord. The extension cord should be arranged so that
it will not drape over the counter top or table top, where it can be pulled
on by children or tripped over.
This warranty does not include the cost of shipping, which is to be borne by the
customer.
LIMITED WARRANTY
**The original sales receipt is the only acceptable proof of purchase**
Salton Appliances (1985) Corp. warrants that this appliance shall be free from defects
in material and workmanship for a period of five (5) years from the date of original
purchase. Salton Appliances (1985) Corp., at its sole discretion during this warranty
period, will repair or replace a defective product or issue a refund. Any refund to the
purchaser will be at a pro-rated value based on the remaining period of the warranty.
All liability is limited to the amount of the purchase price. This warranty covers normal
domestic usage and does not cover damage which occurs in shipment or failure
which results from alteration, accident, misuse, abuse, glass breakage, neglect,
improper maintenance, use contrary to the operating instructions or commercial use.
This warranty is not available to retailers or other commercial purchasers or owners.

TO OBTAIN PROMPT WARRANTY SERVICE:
Contact one of our many Service Centers found on our website
ww
w.salton.com/customer-care
or
Secu
rely package and return the appliance to us. Please enclose:
• Original p
roof of purchase
•
The completed form below with a $12.50 Return Shipping & Handling fee –
either a cheque, money order or credit card (A personal cheque will delay return
shipping by 2-3 weeks)
For added p
rotection, we suggest that you use an insured delivery service with
tracking information when
returning your product. Salton Appliances (1985) Corp.
will not be held
responsible for in-transit damage or for packages that are not r
eceived.
This warranty does not include the cost of shipping, which is to be bo
rne by the
custome
r.
Name
Add
ress
City
Prov/State Postal/Zip Code
Daytime Phone No.
Email
P
roduct defect:
T
ype of payment Cheque/Money Order □ Visa □ MasterCard □
Name on ca
rd Expiry Date CSV No
Ca
rd No.
T
o contact our Customer Service Department:
Salton Appliances (1985) Corp.
81A Brunswick,
E-mail: [email protected]
Dolla
rd-des-Ormeaux, Quebec H9B 2J5
Canada
www.salton.com
Fax: 514-685-8300
Telephone: 514-685-3660 (Ext. 226)