
Technical Support and E-Warranty Certificate
www.vevor.com/support
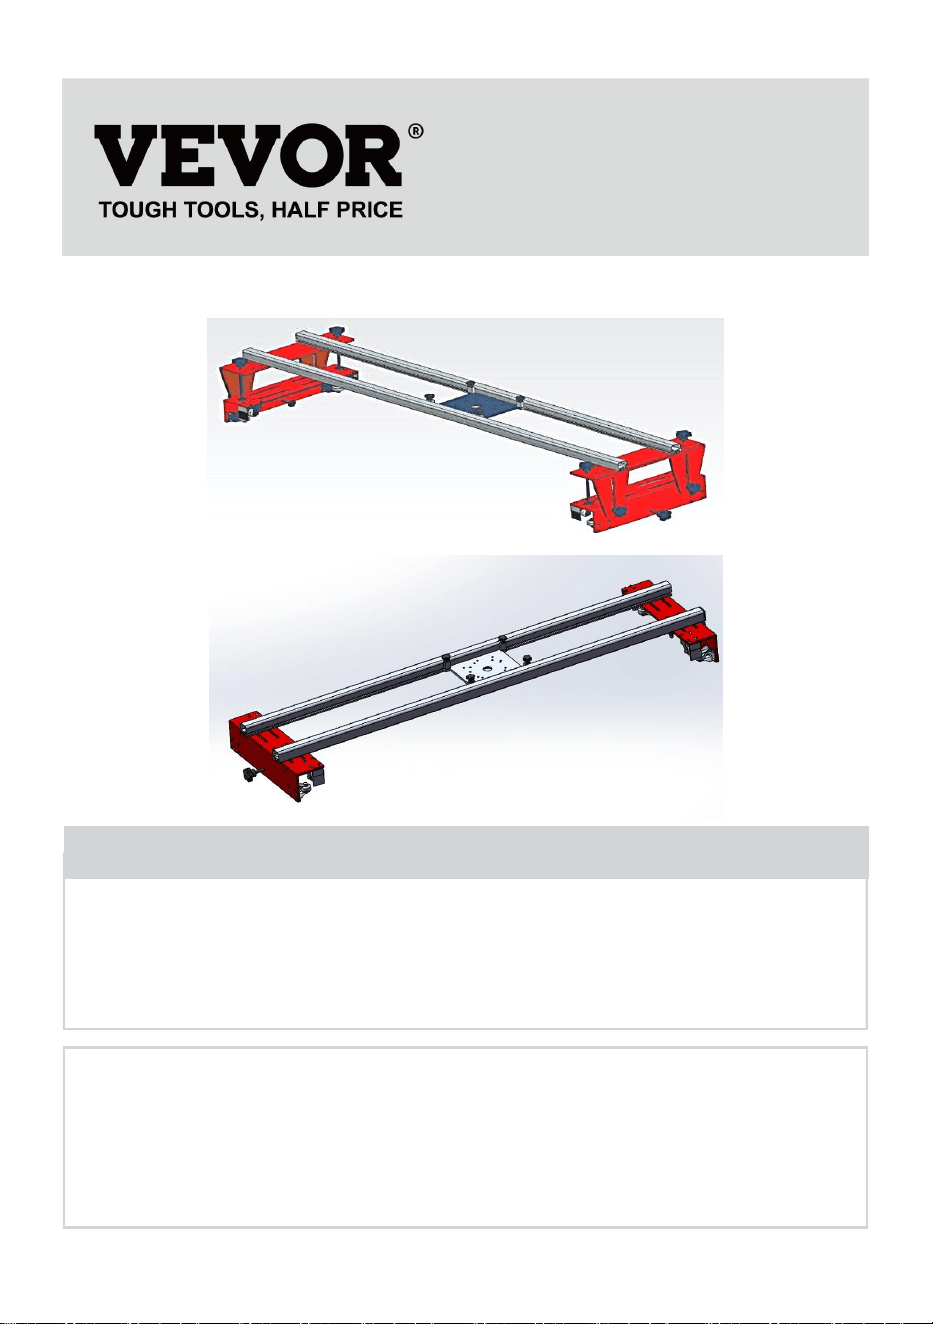
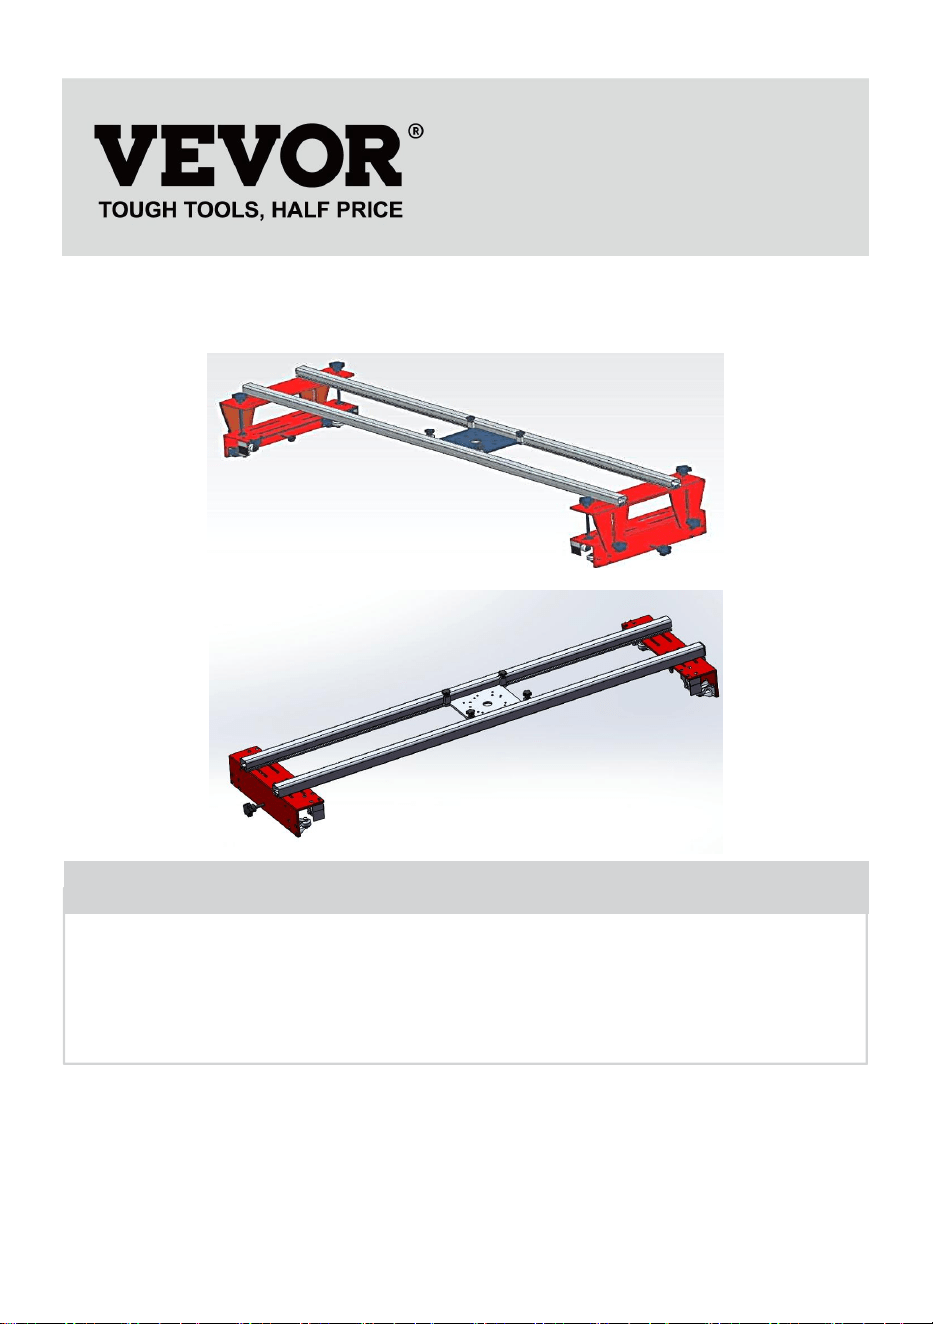
LARGE ROUTER SLED
USER MANUAL
MODEL: YS64-001S,YS60-001
We continue to be committed to provide you tools with competitive price.
"Save Half", "Half Price" or any other similar expressions used by us only represents an
estimate of savings you might benefit from buying certain tools with us compared to the major
top brands and does not necessarily mean to cover all categories of tools offered by us. You
are kindly reminded to verify carefully when you are placing an order with us if you are
actually saving half in comparison with the top major brands.

MODEL:YS64-001S,YS60-001
Have product questions? Need technical support? Please feel free to
contact us:
Technical Support and E-Warranty Certificate
www.vevor.com/support
NEED HELP? CONTACT US!
LARGE ROUTER SLED

This is the original instruction, please read all manual instructions
carefully before operating. VEVOR reserves a clear interpretation of our
user manual. The appearance of the product shall be subject to the
product you received. Please forgive us that we won't inform you again if
there are any technology or software updates on our product.
Warning-To reduce the risk of injury, user must read
instructions manual carefully.
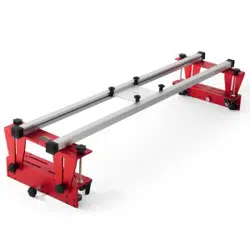
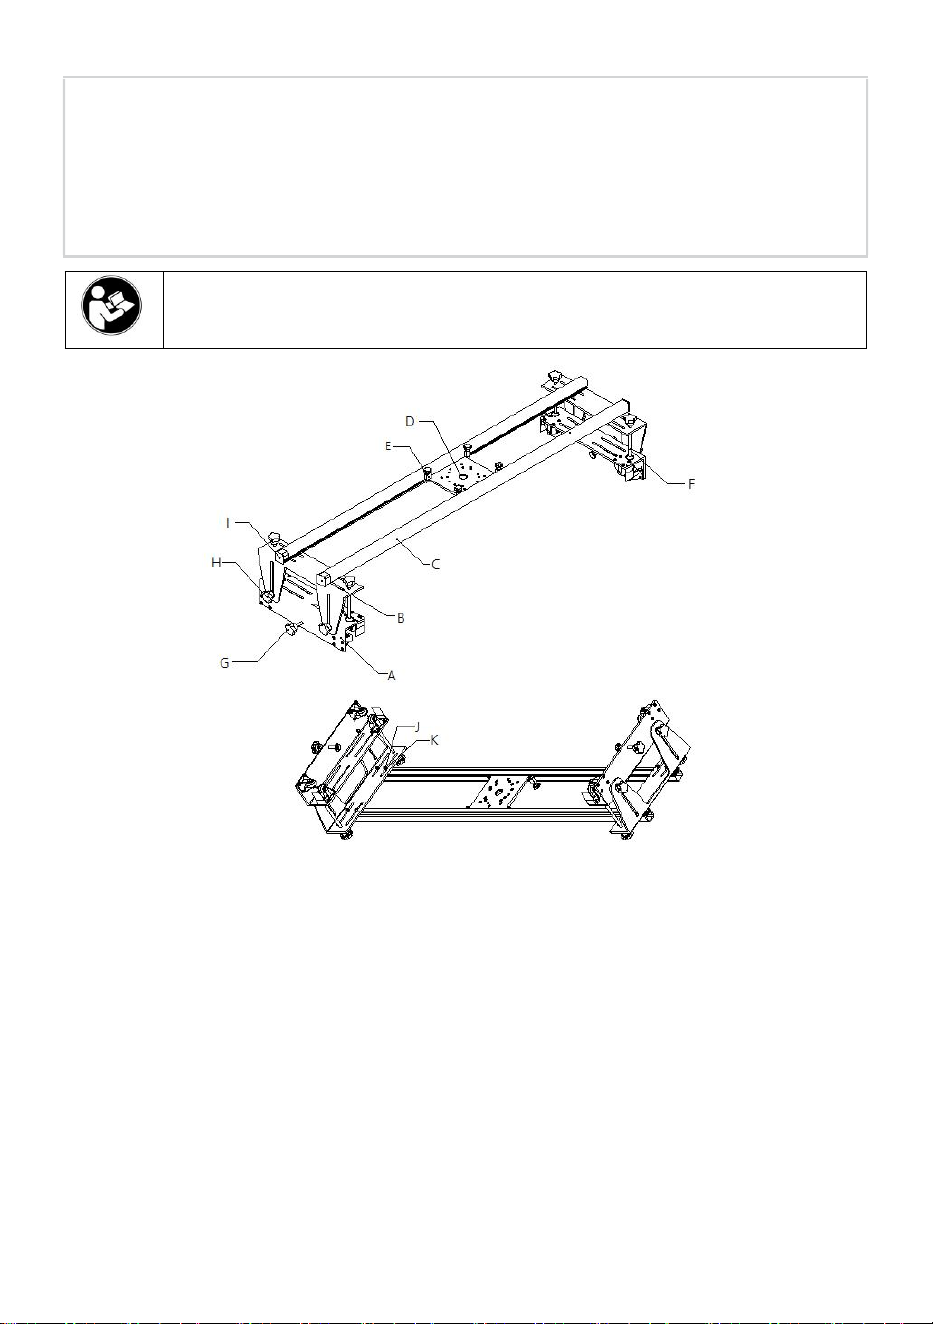
PARTS LIST
MODEL:YS64-001S、YS60-001
NO
Description
YS64-001S
YS60-001
Graph
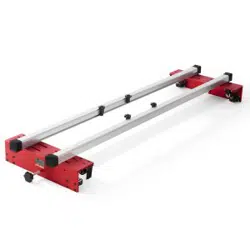
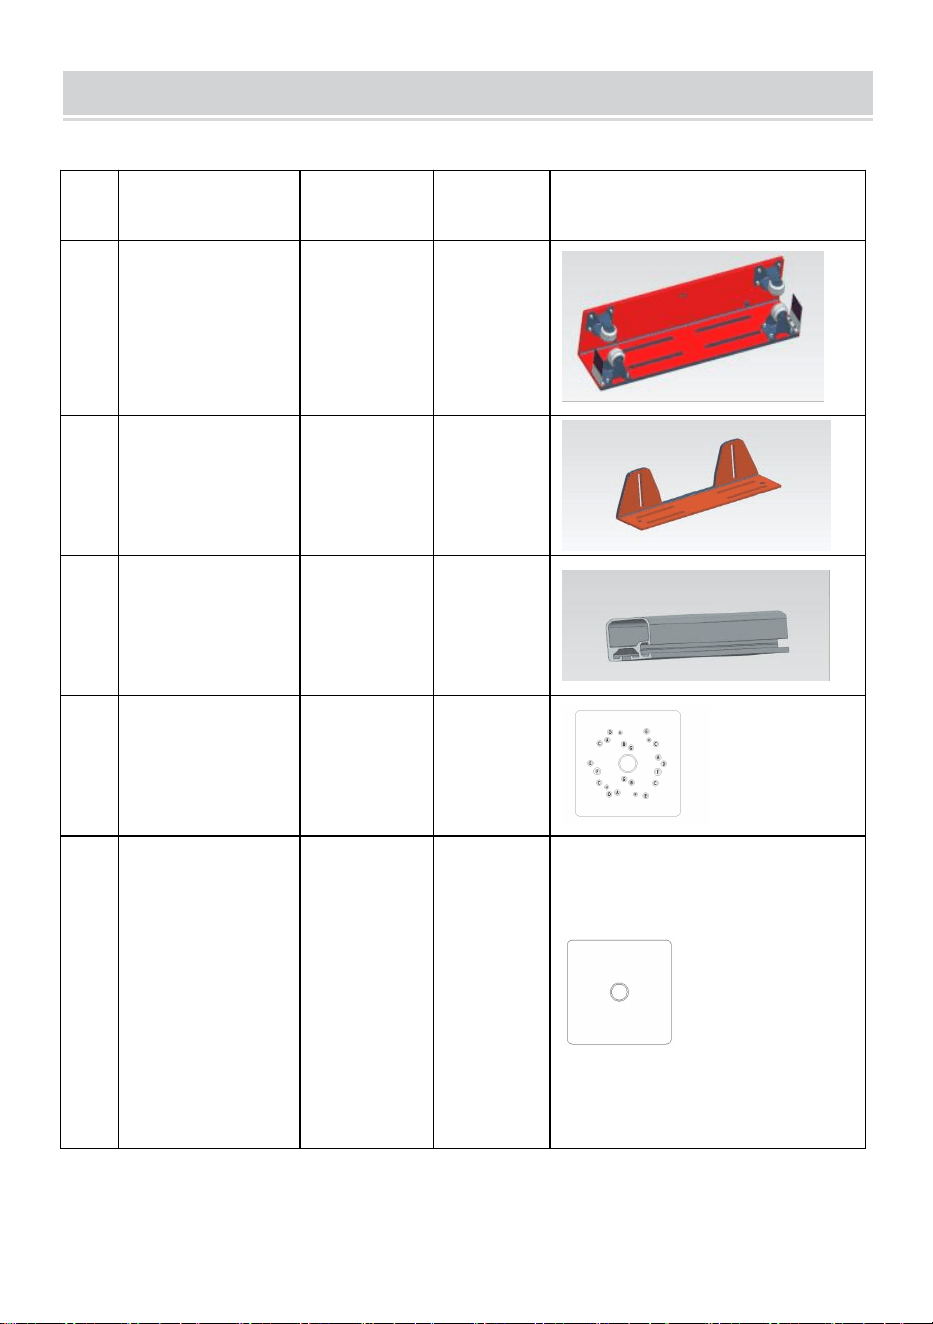
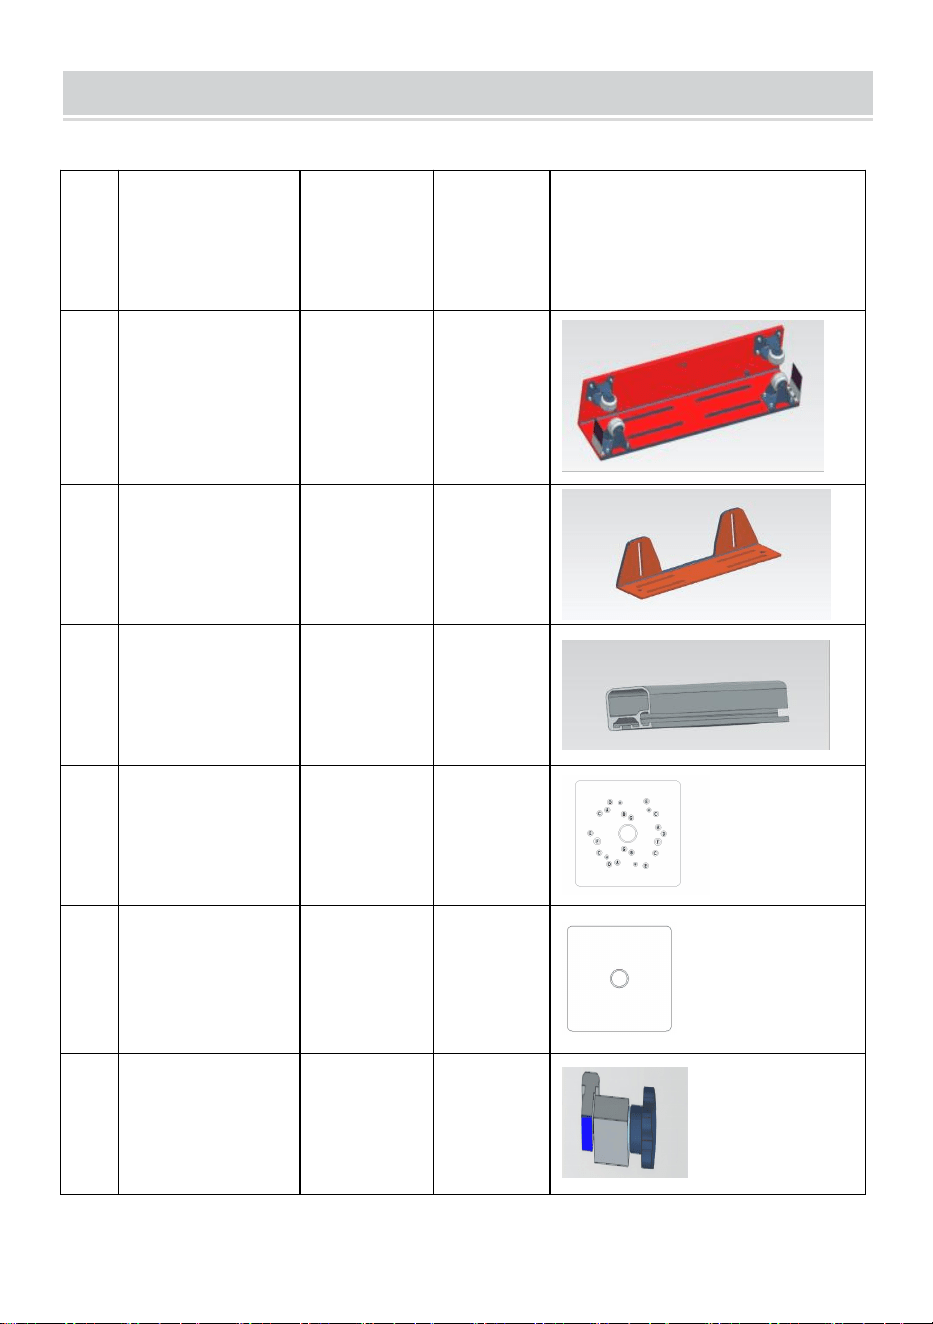
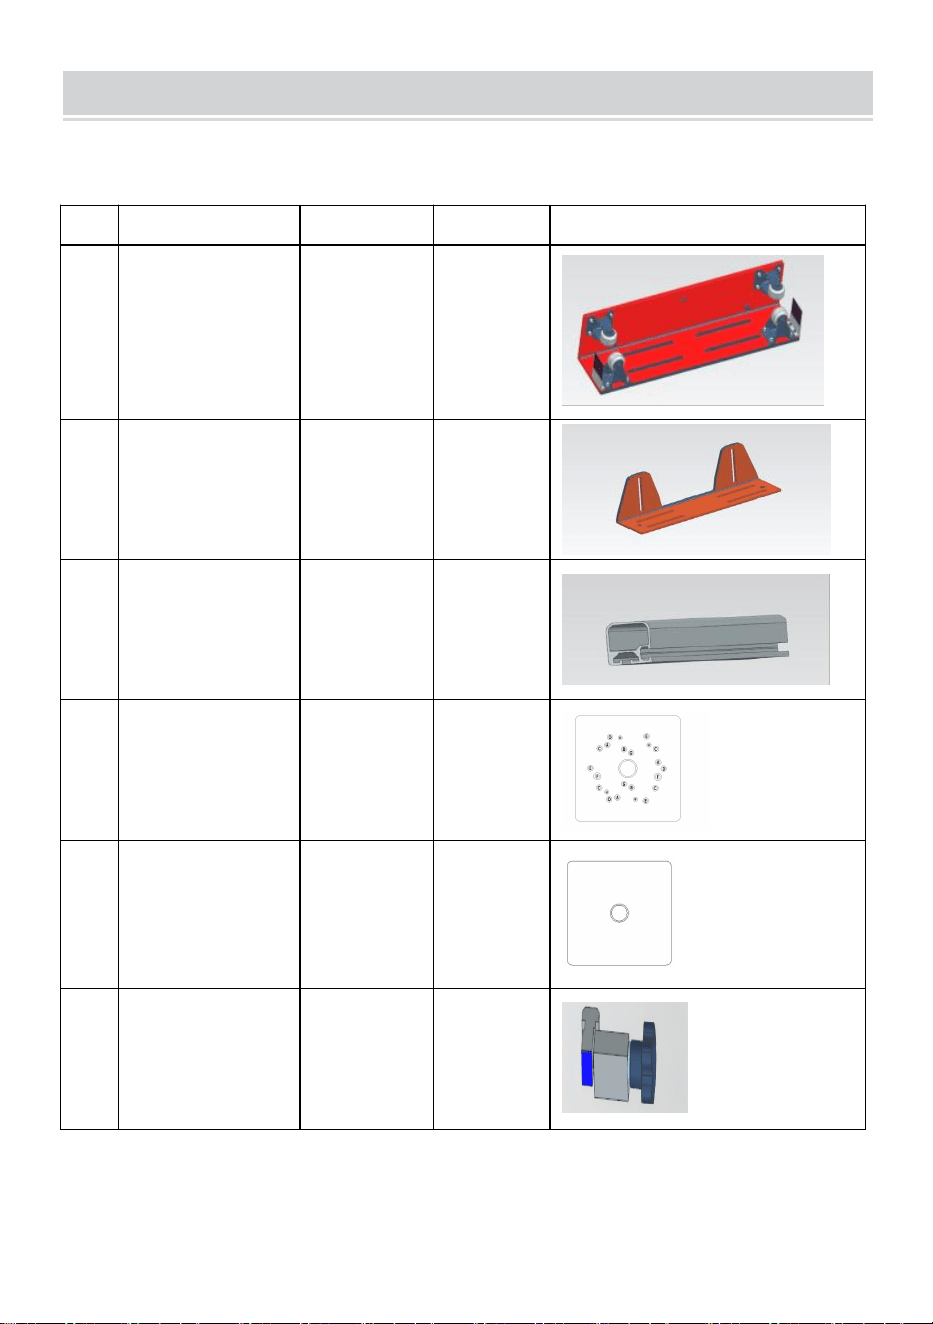
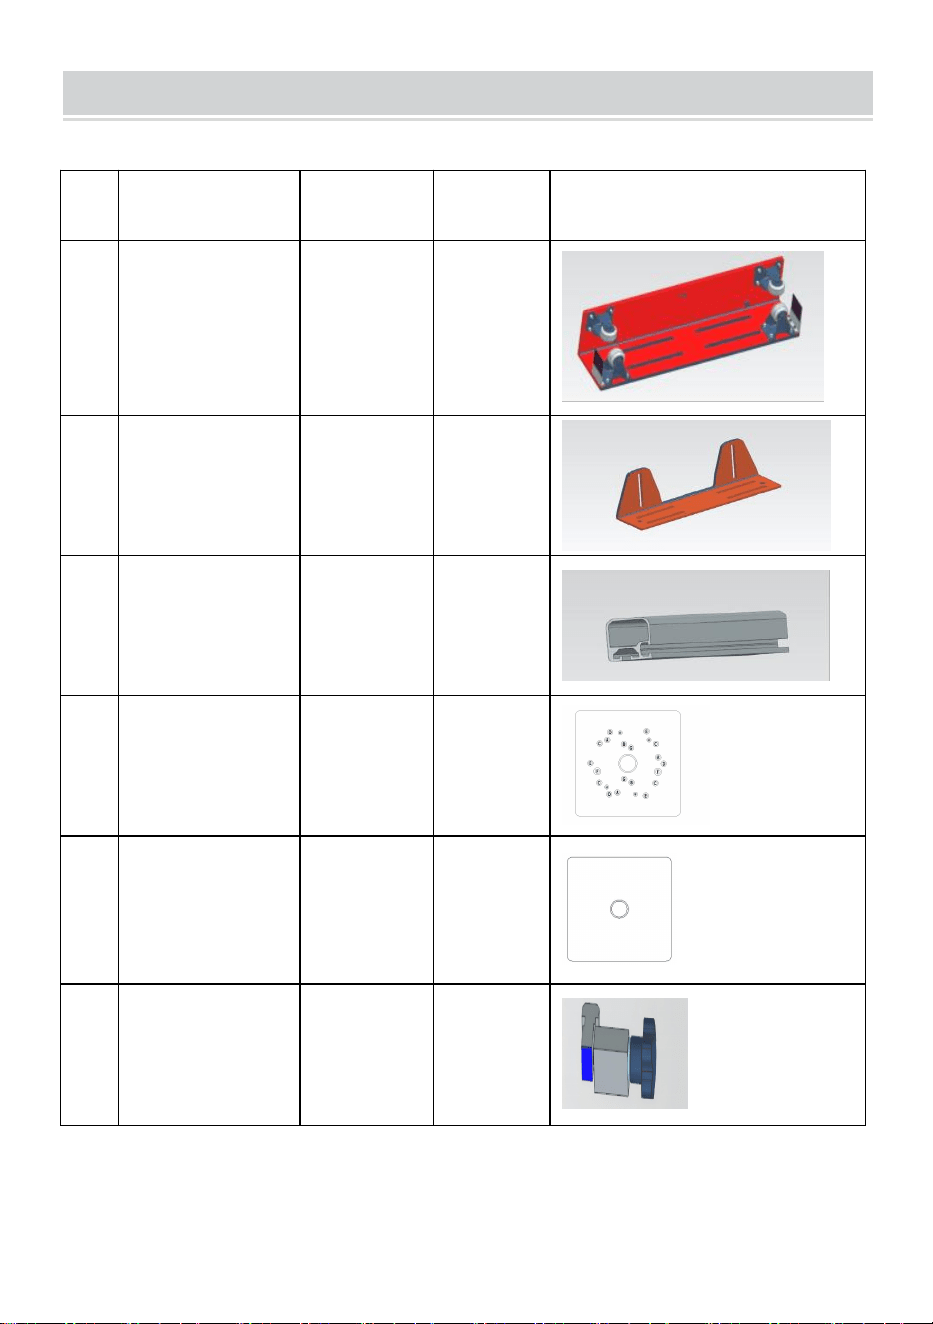
A
Slide Plate
2pcs
2pcs
B
L-Carriage
2pcs
0

C
Aluminum
Extrusion Trail
2pcs
2pcs
D1
Fixed Plate with
Holes
1pc
0
D2
Fixed Plate
1pc
0
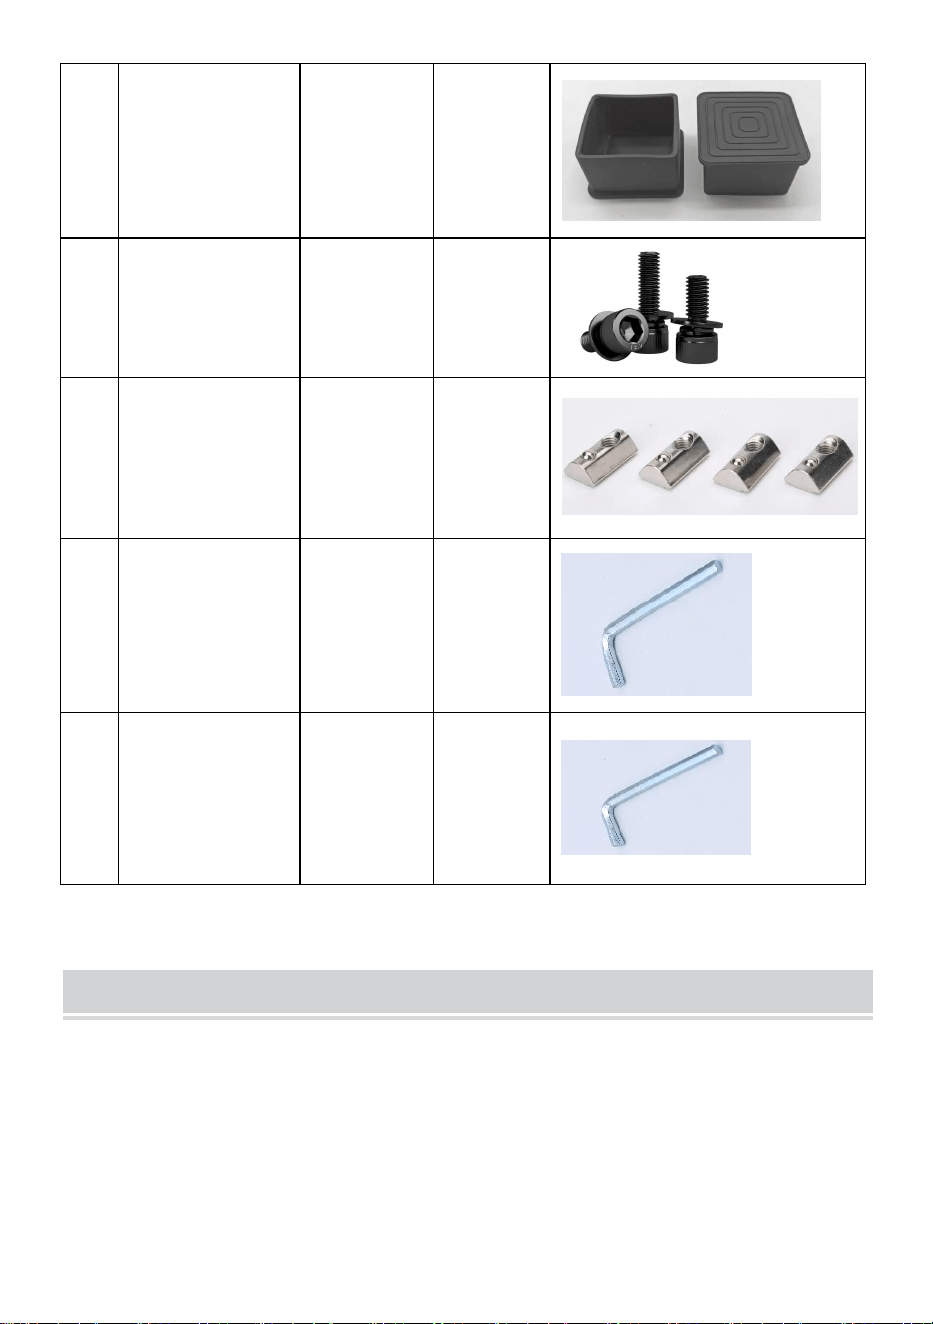
E
Trail Limit
Clamps
4pcs
4pcs
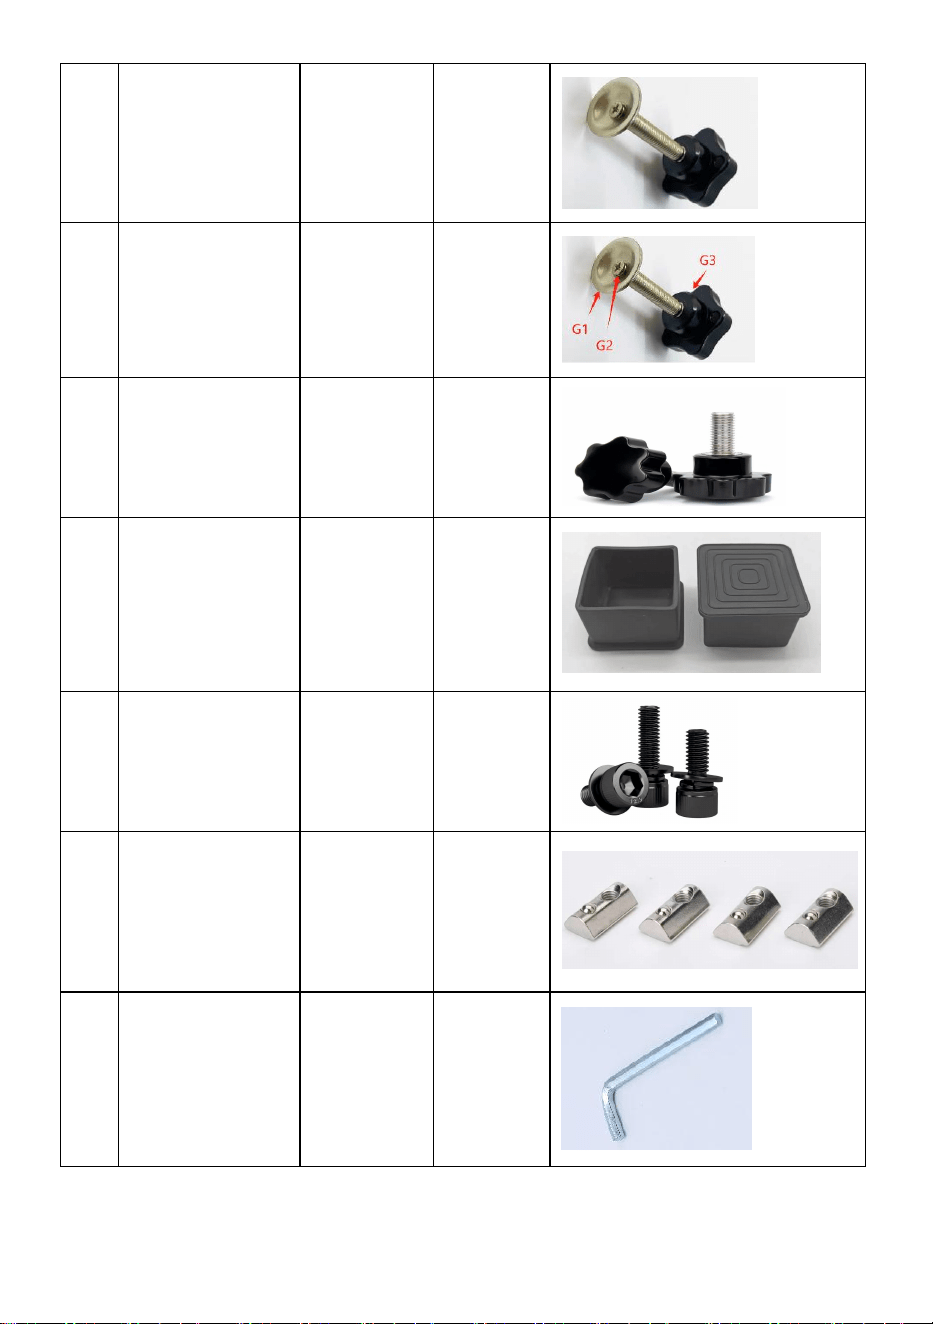
F
Extended Star
Knob
M10*140mm
4pcs
0
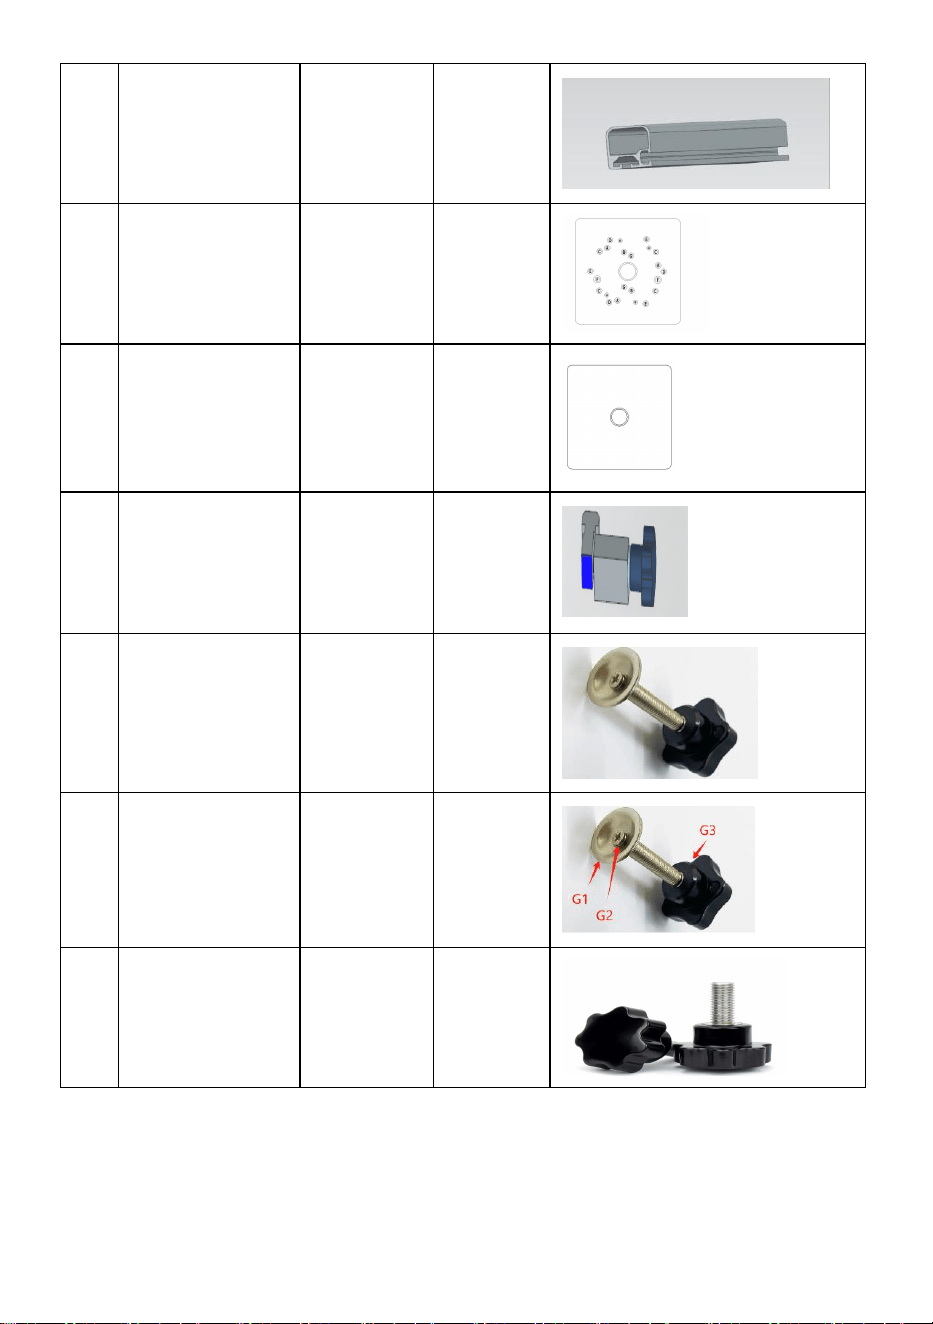
G
Star Knob
M10*70mm
2pcs
2pcs
H
Star Knob
M10*20mm
4pcs
0
INSTALL
MODEL:YS64-001S,
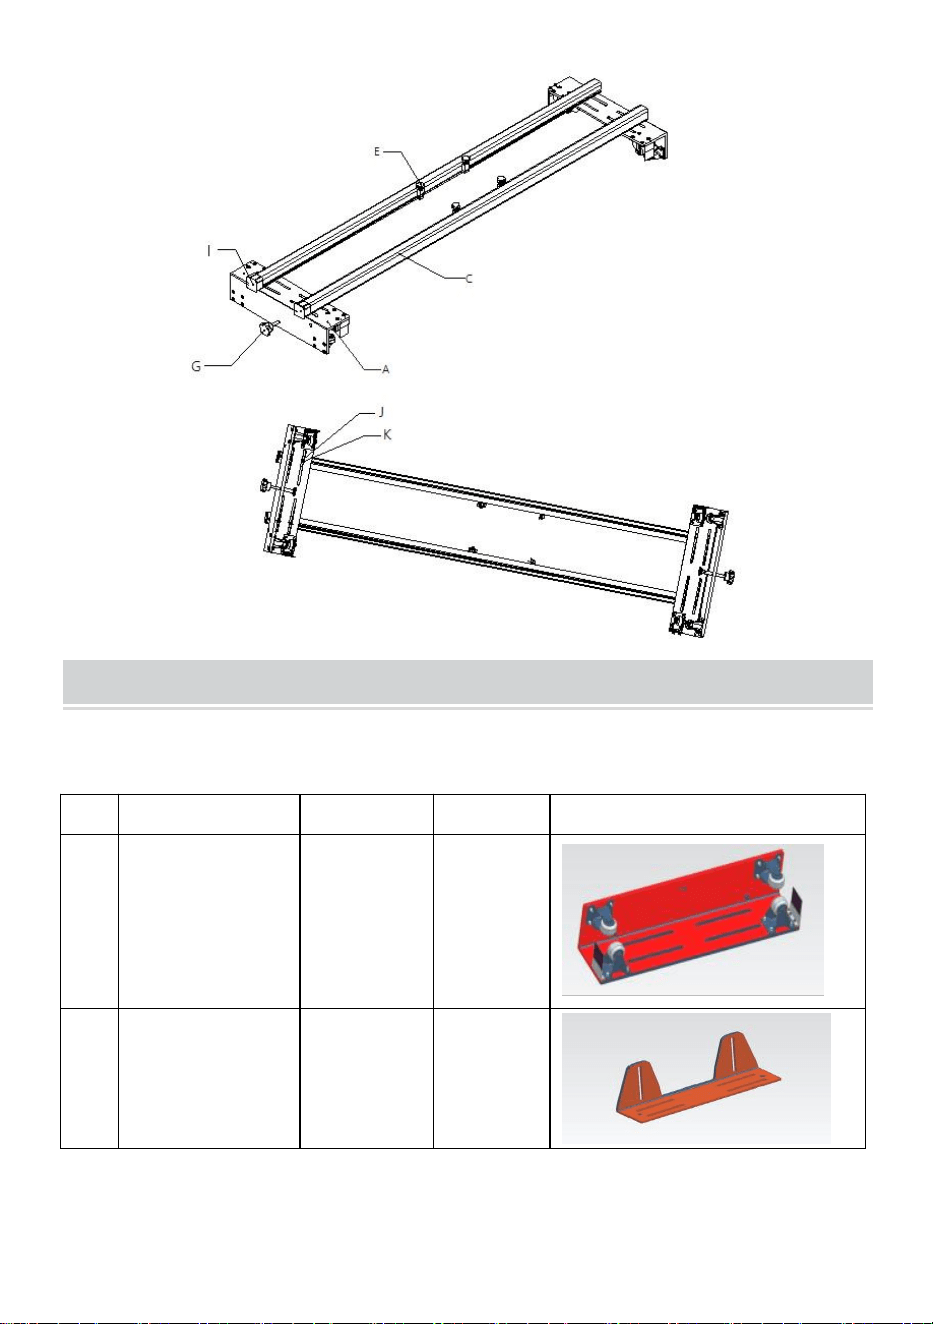
I
Trail Corner
Protectors
4pcs
4pcs
J
Hexagonal Nut
M6*15mm
8pcs
8pcs
K
Elastic nut
8pcs
8pcs
L
Wrench M6
1pc
1pc
M
Wrench M1.5
1pc
1pc
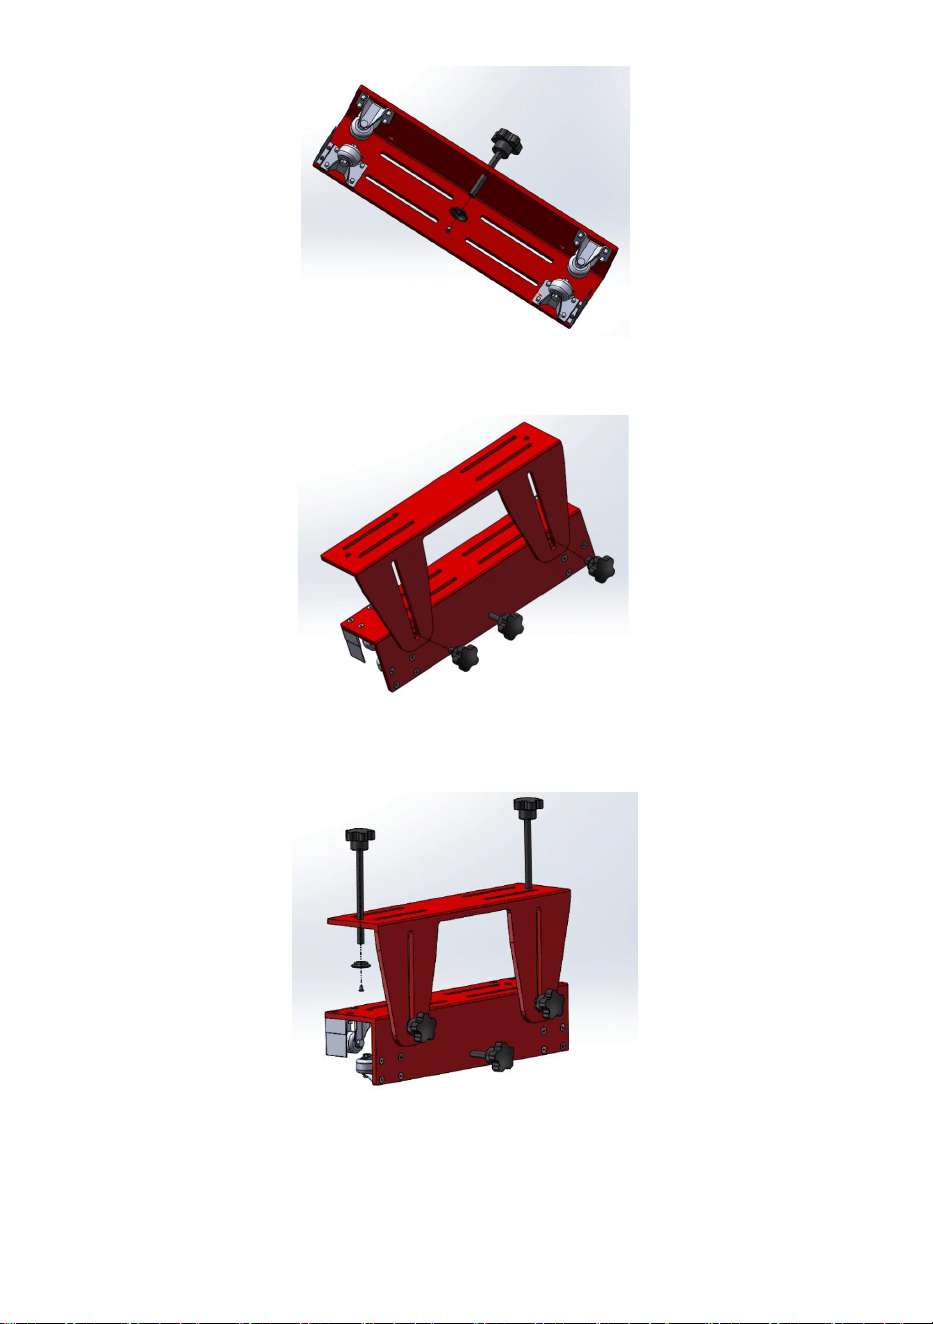
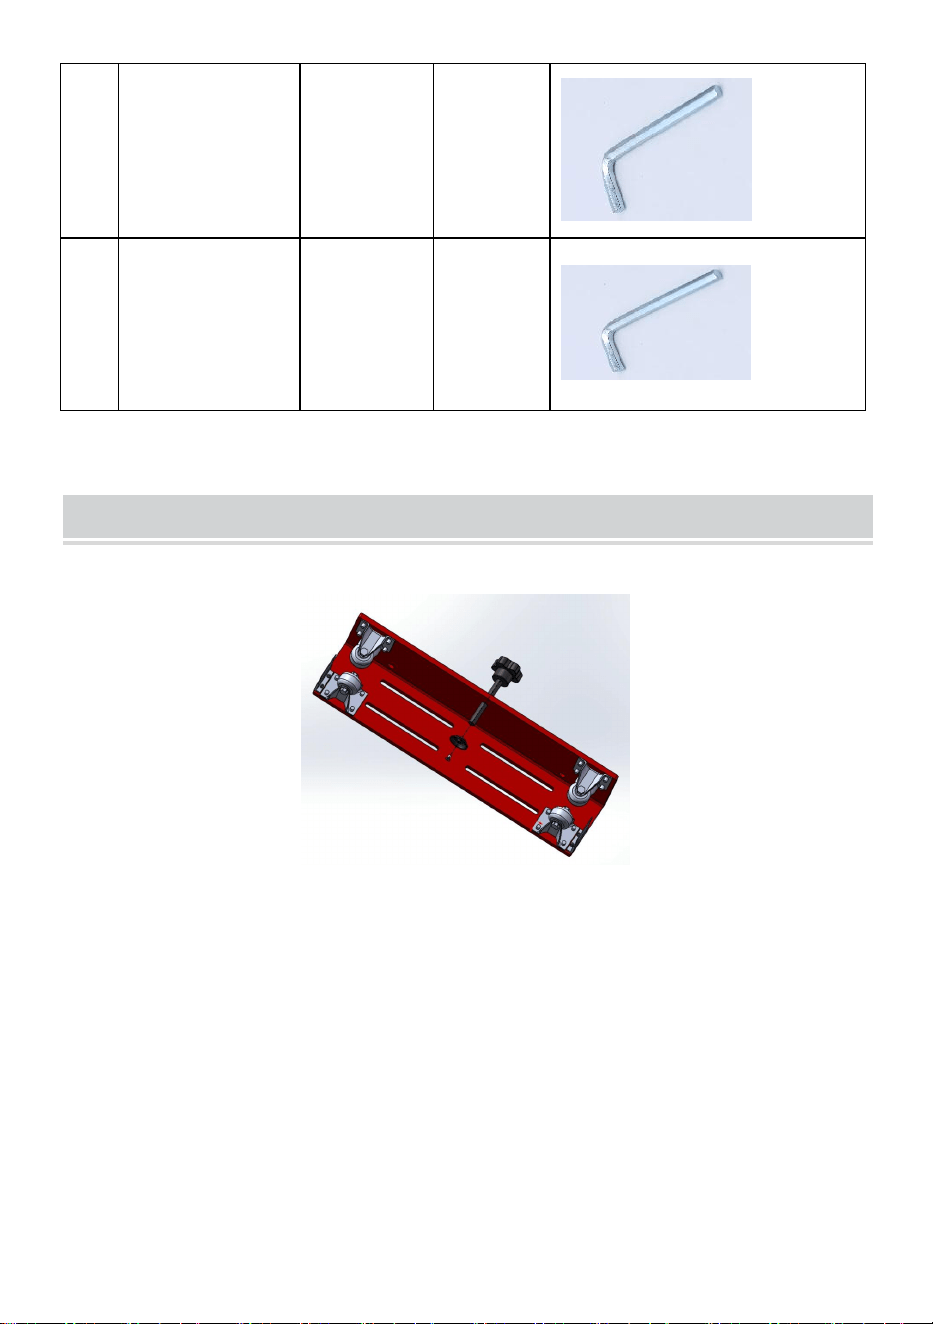
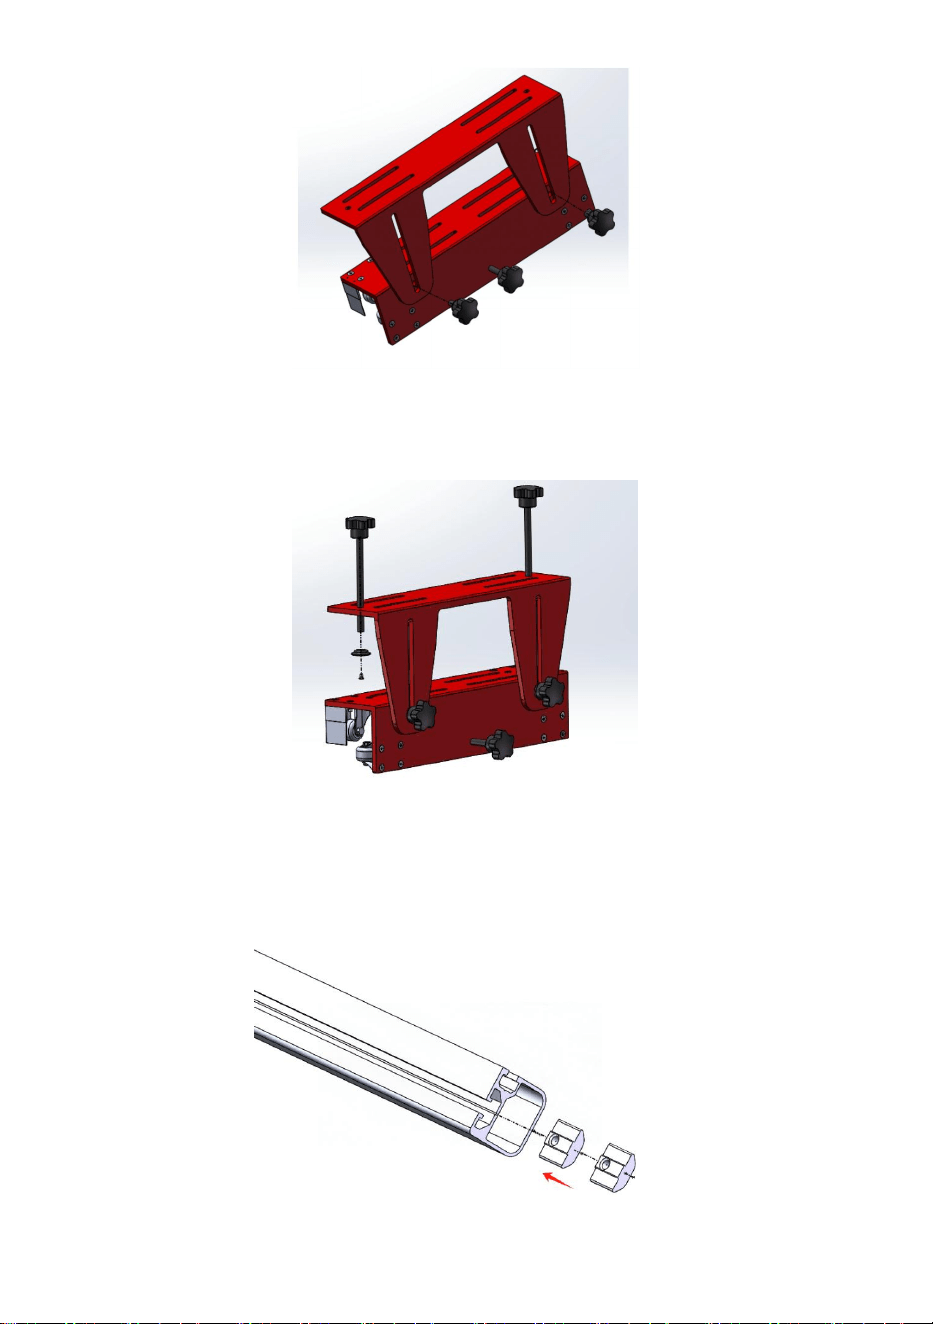
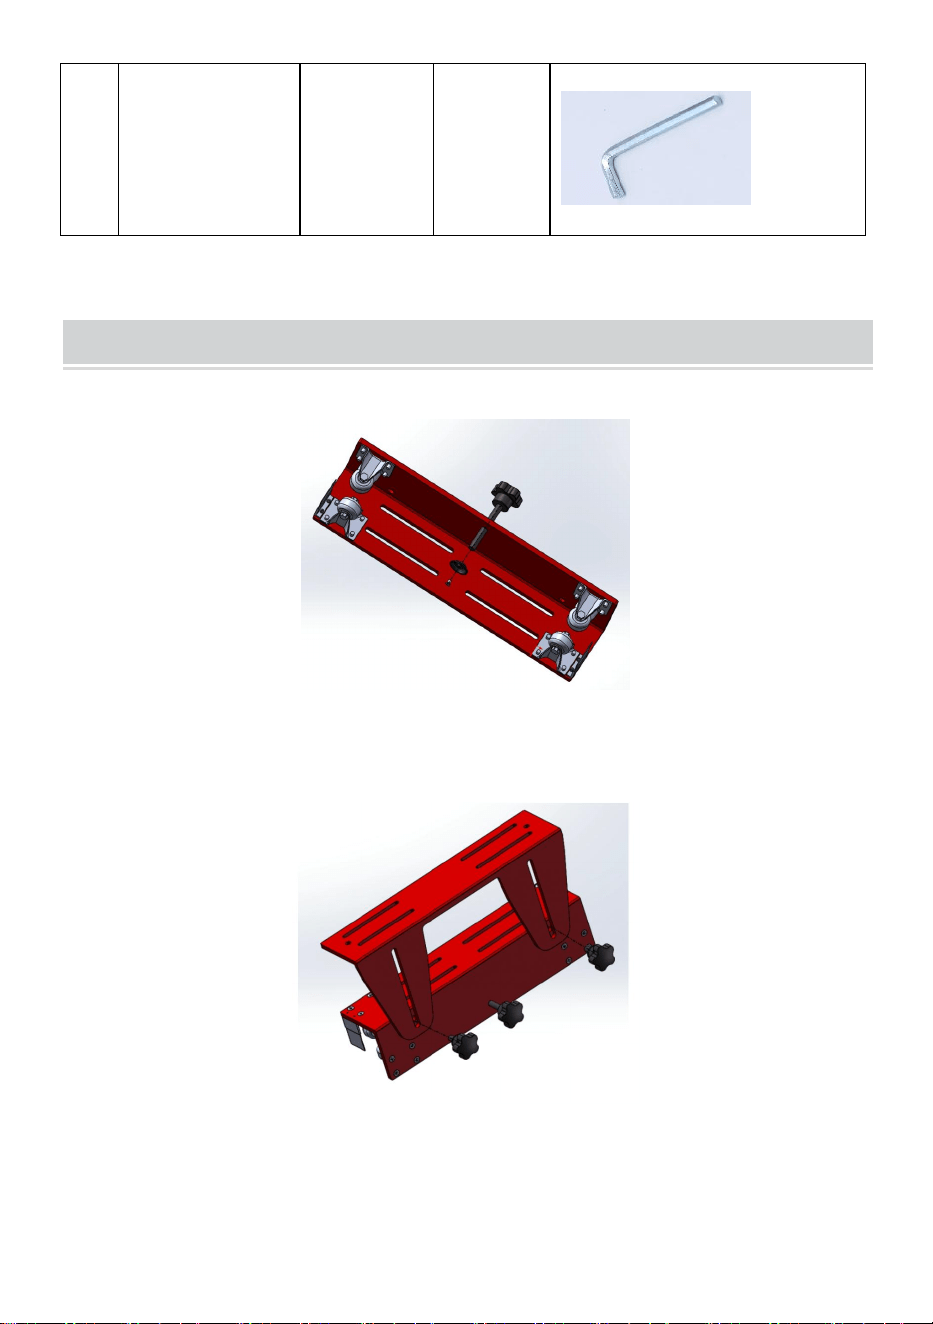
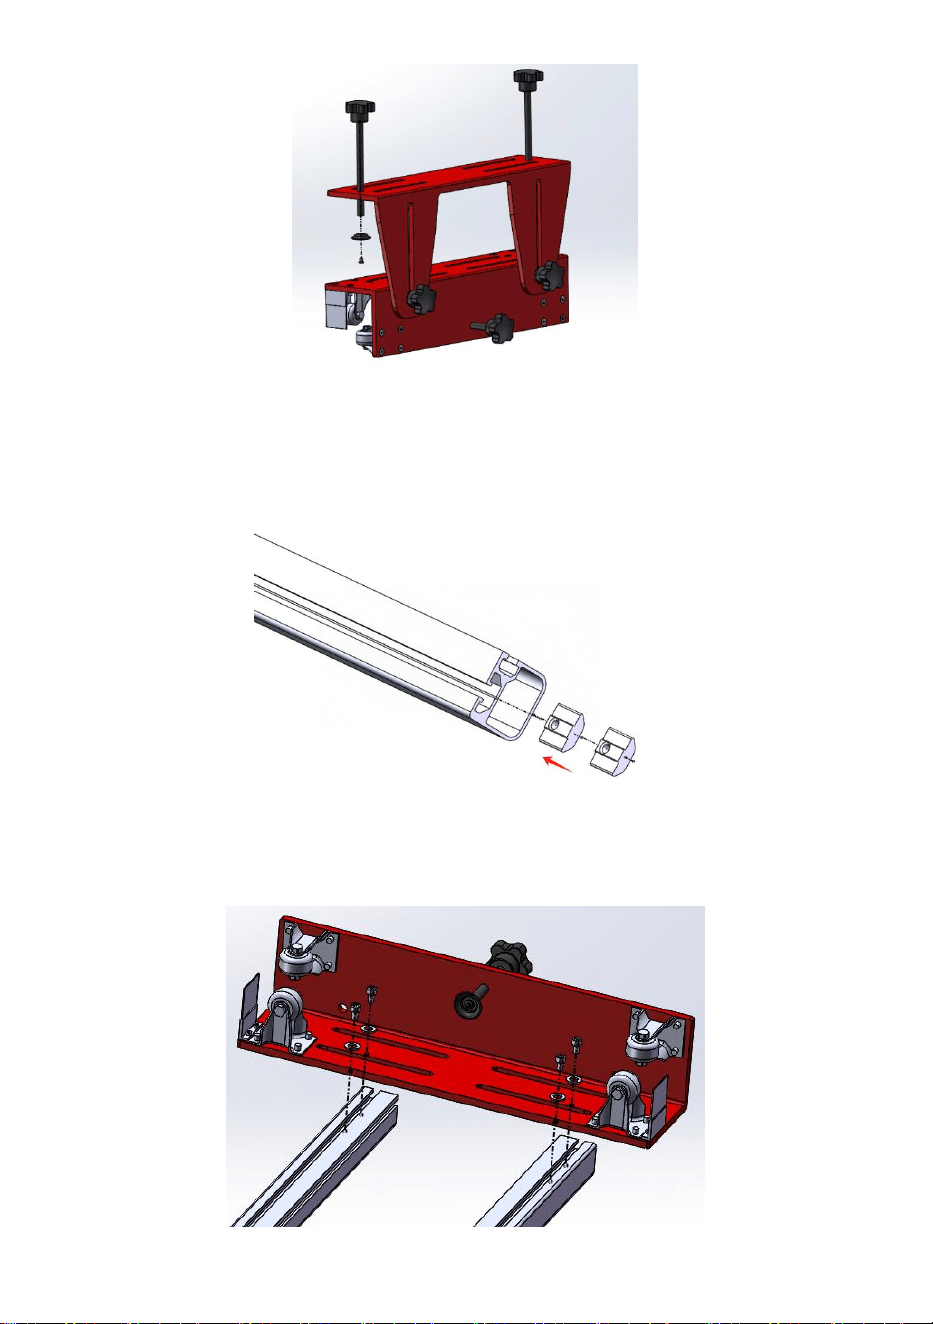
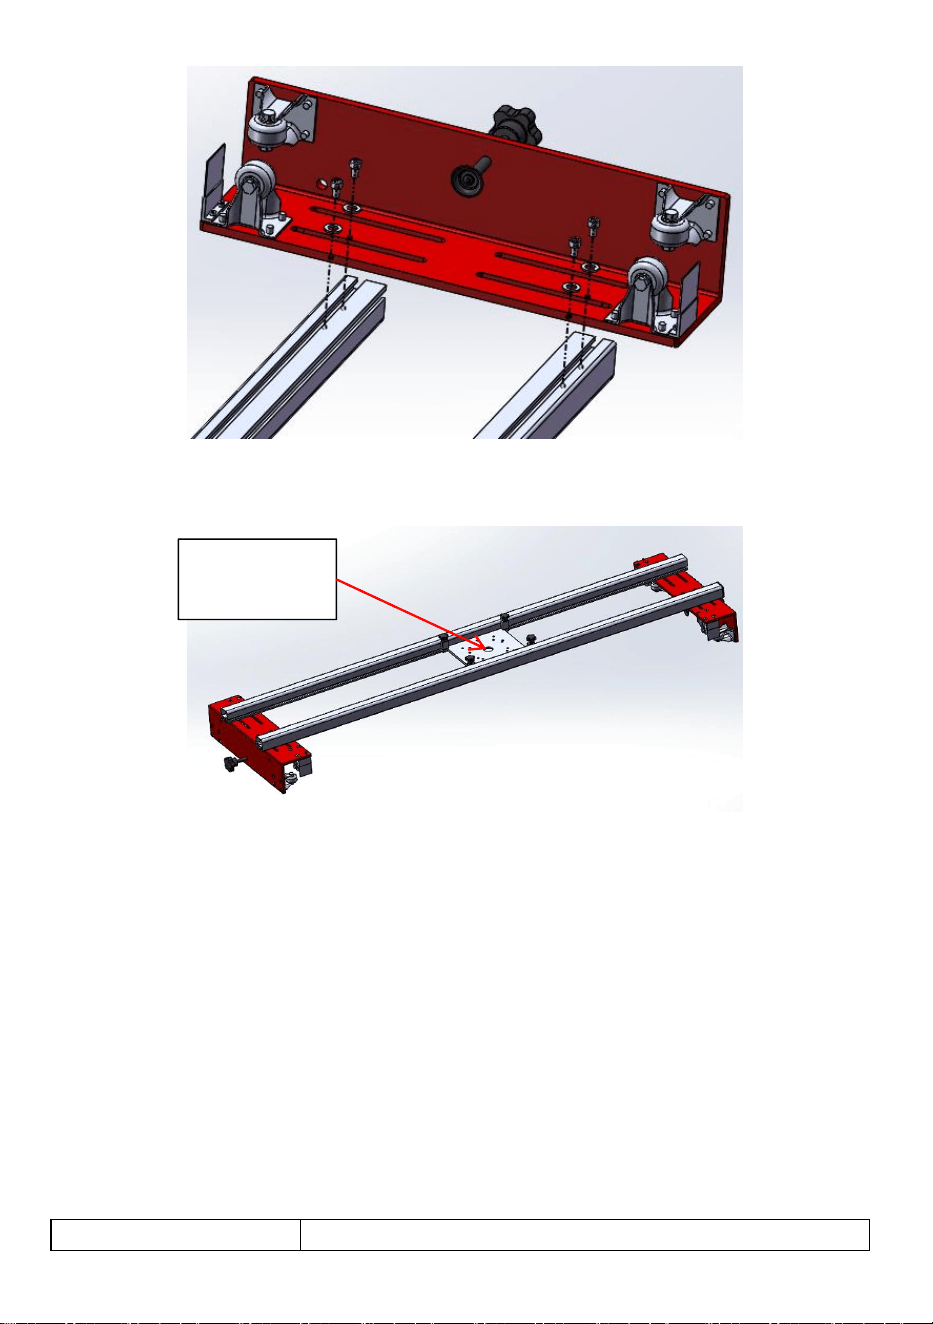
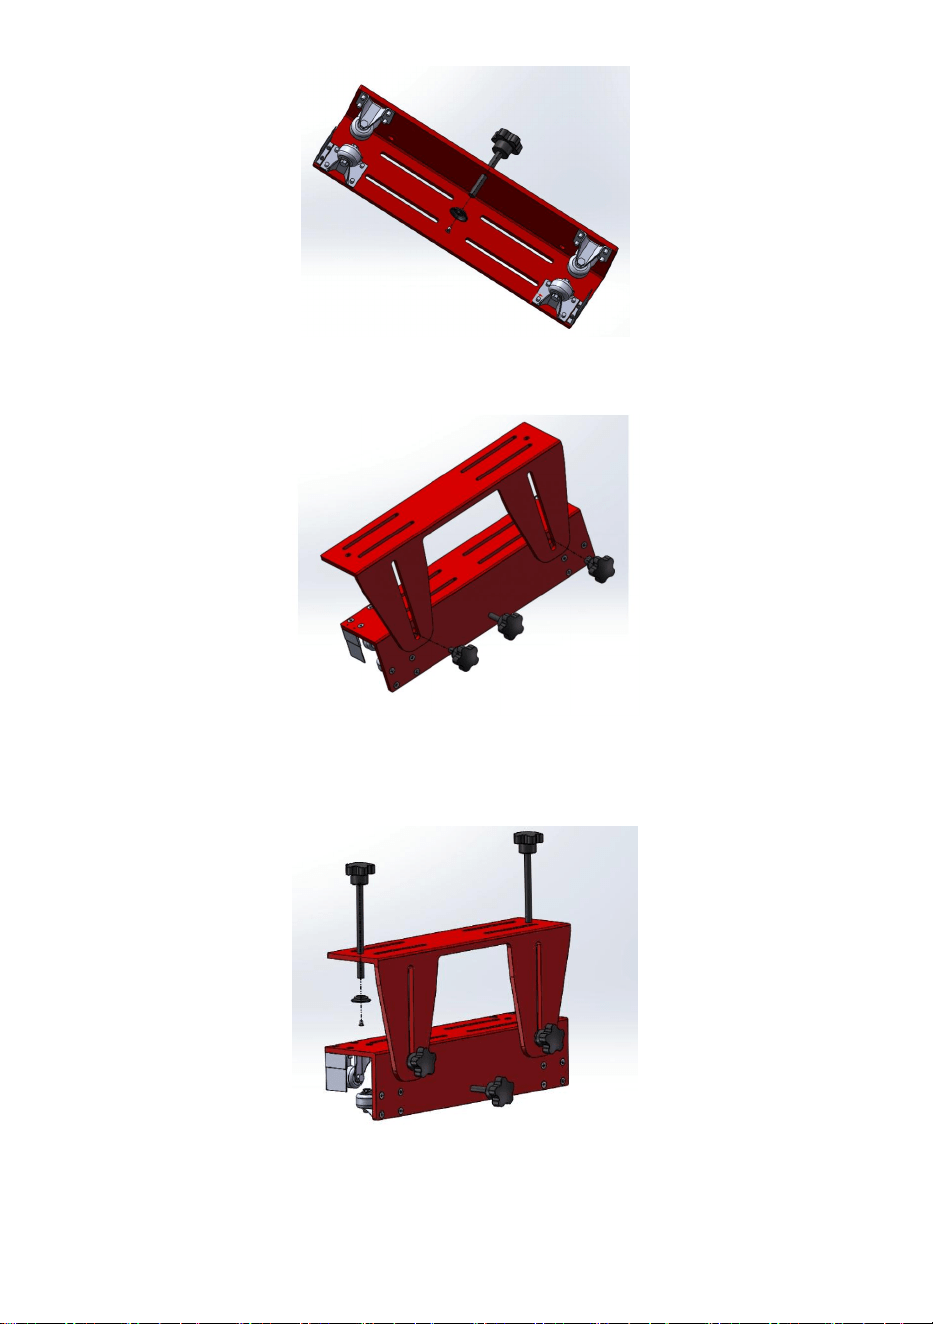
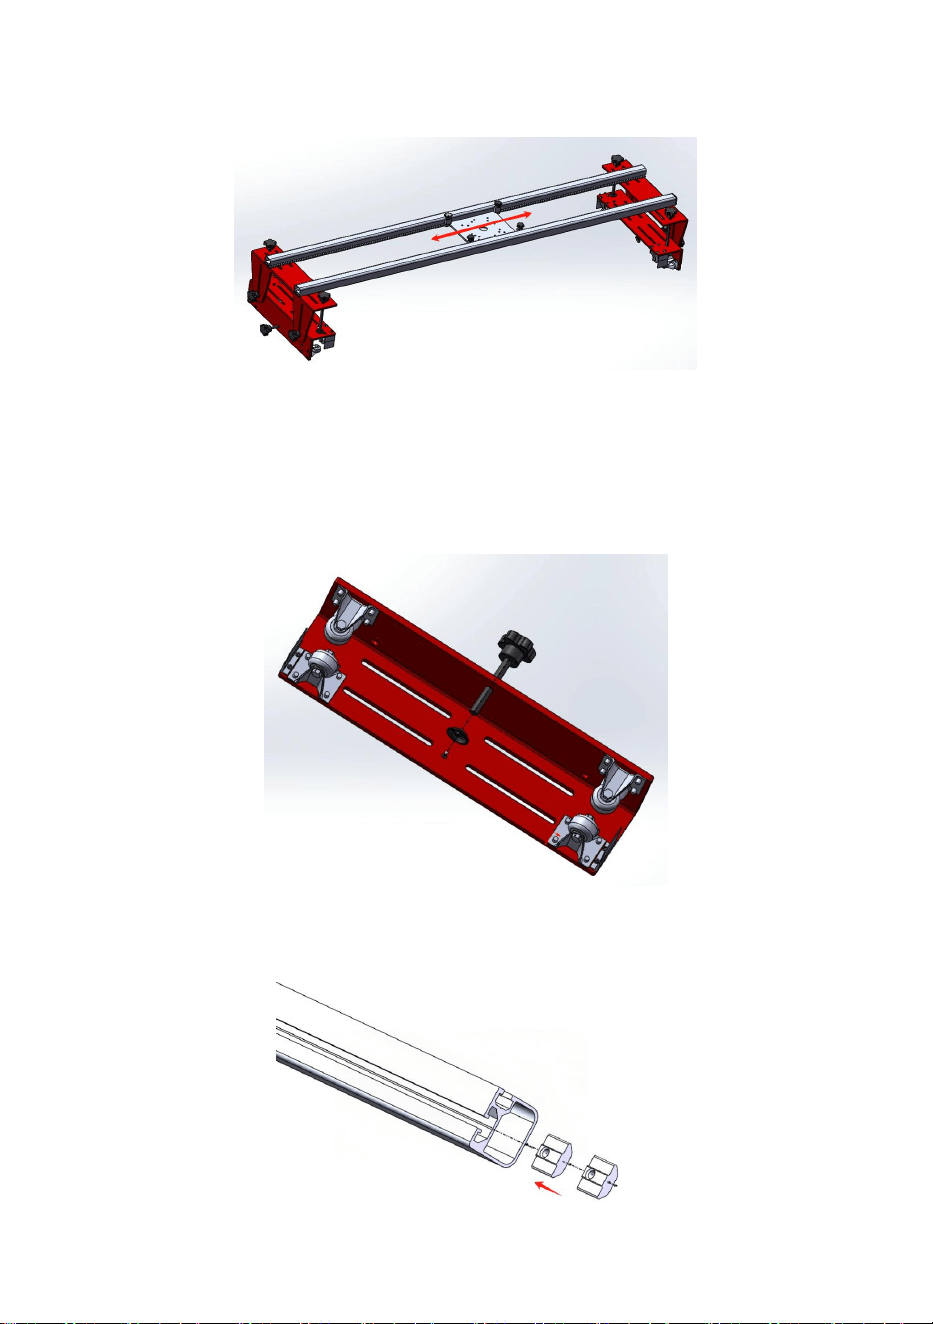
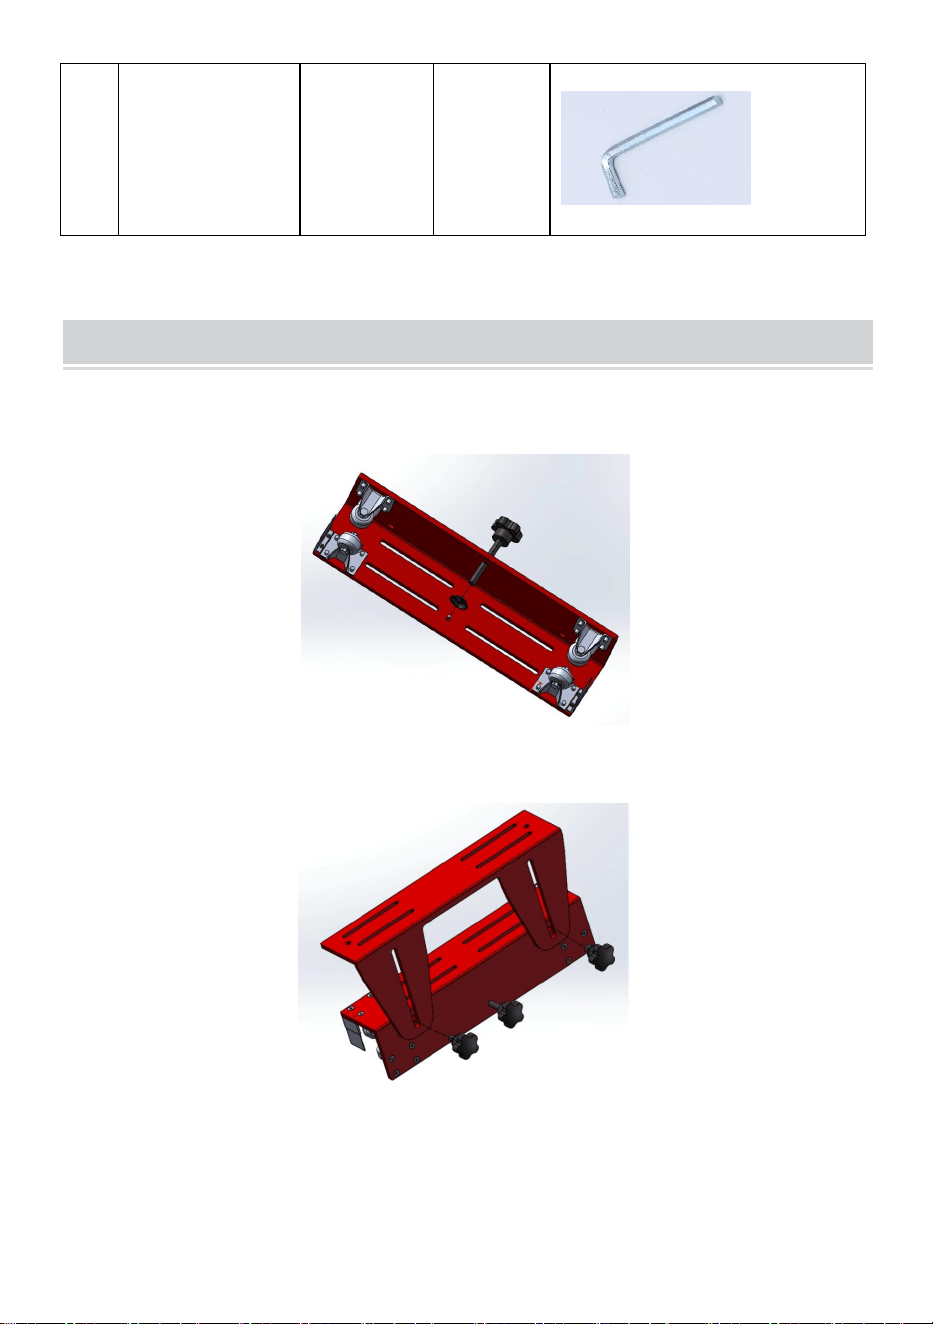
Install Star Knob M10*70mm on the Slide Plate as shown.
There are 2 positions
Tighten Slide Plate and L-Carriage with Star Knob M6*15mm ,as shown.
There are 2 positions.
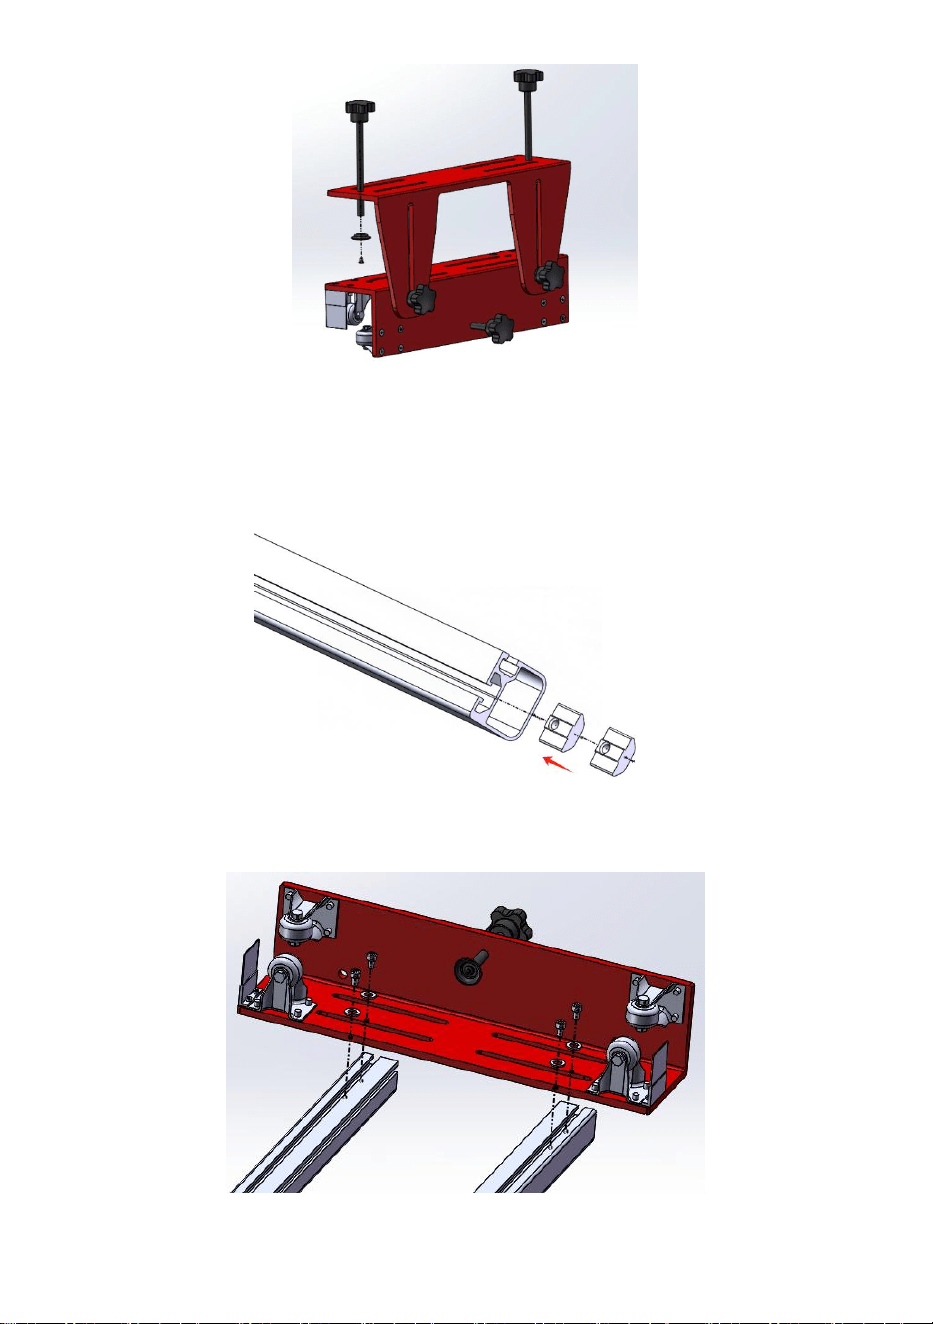
Install Extended Star Knob M10*140mm on the L-Carriage,as shown.
There are 2 positions.
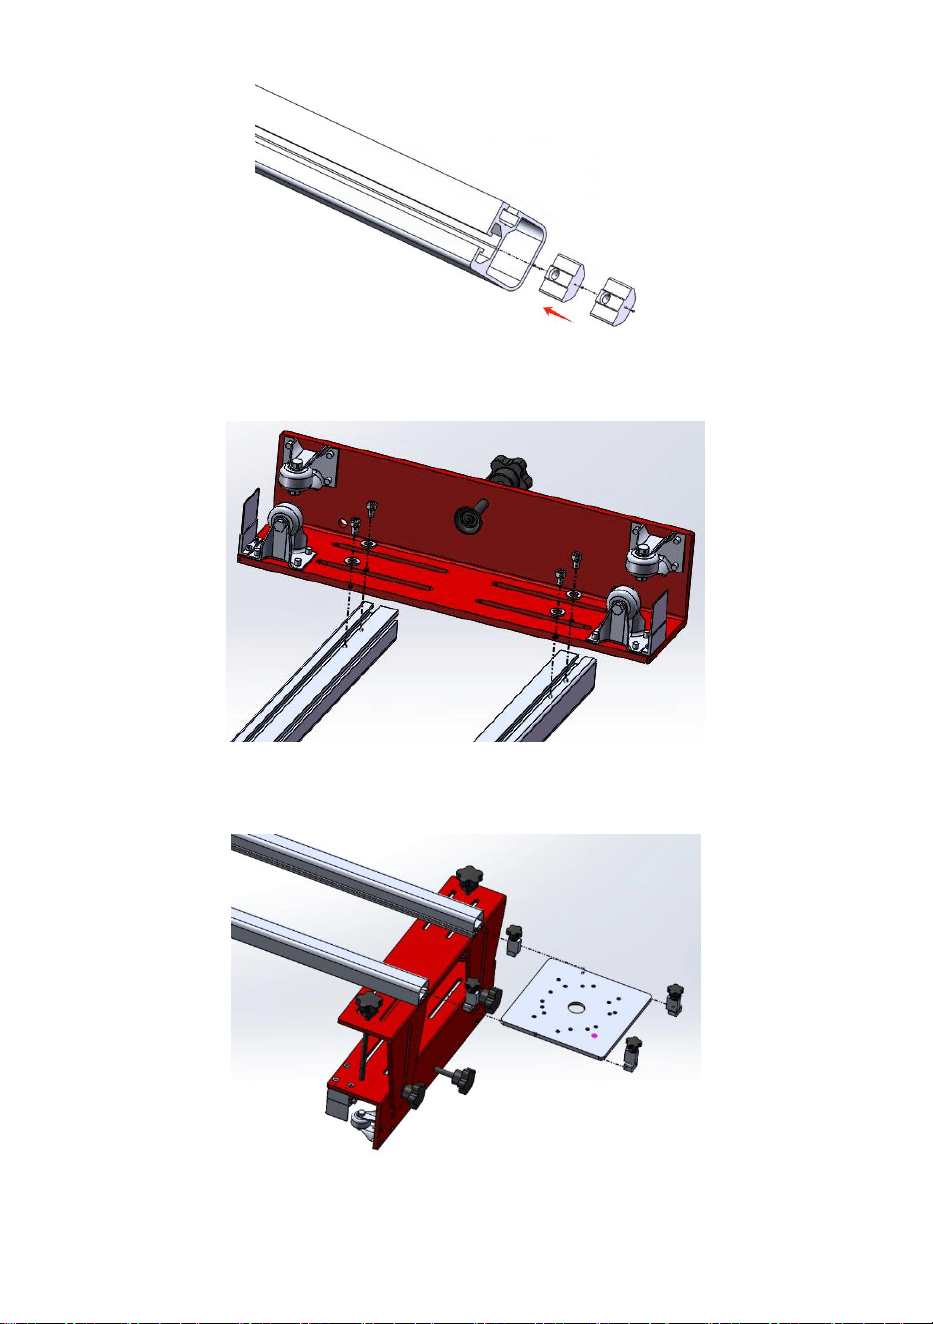
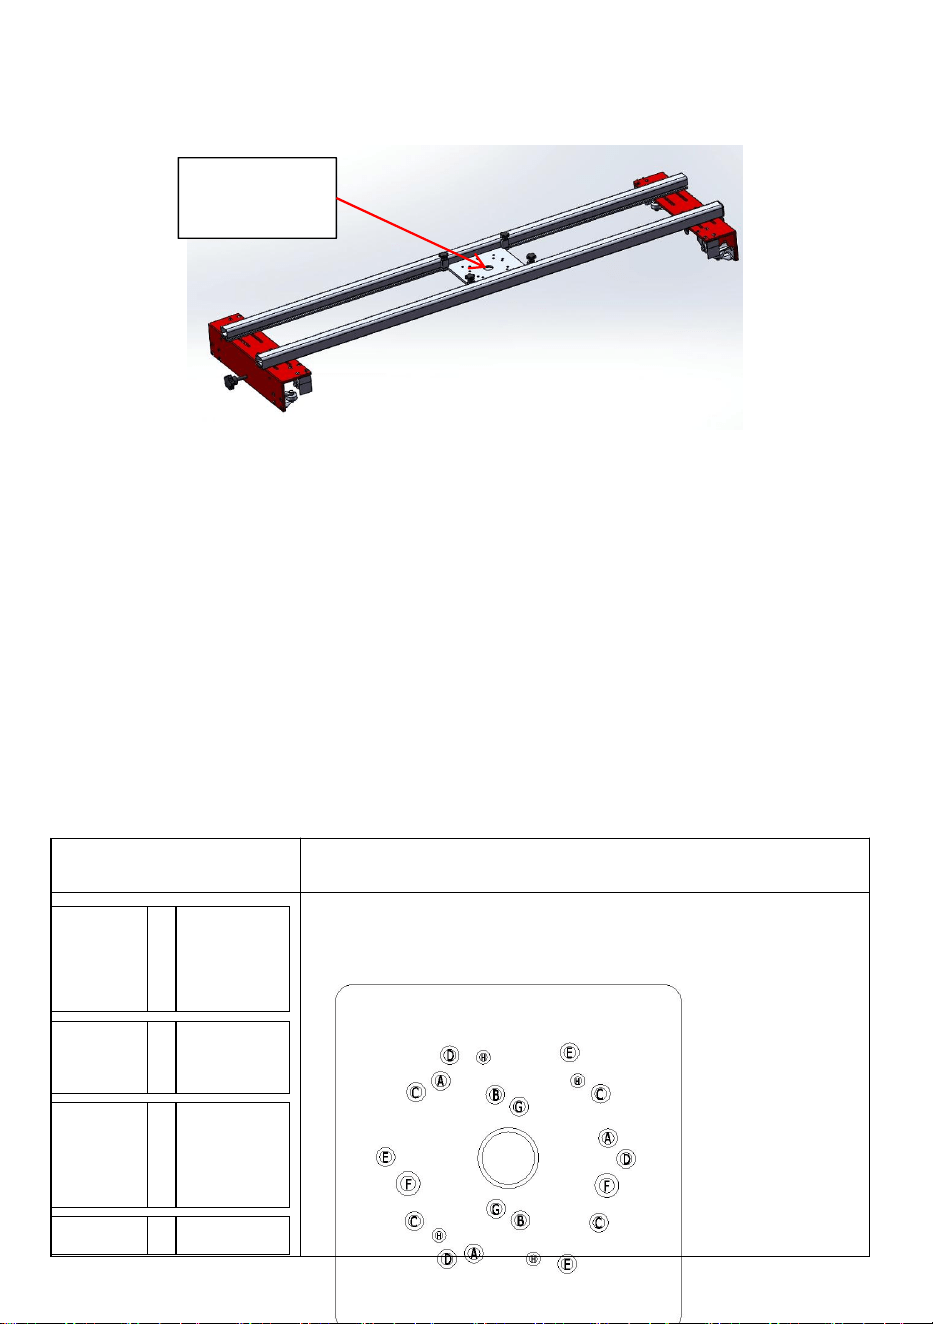
Put the Elastic nuts into the slot on the surface Aluminum Extrusion Trail,
four per rail. Mind the nut direction
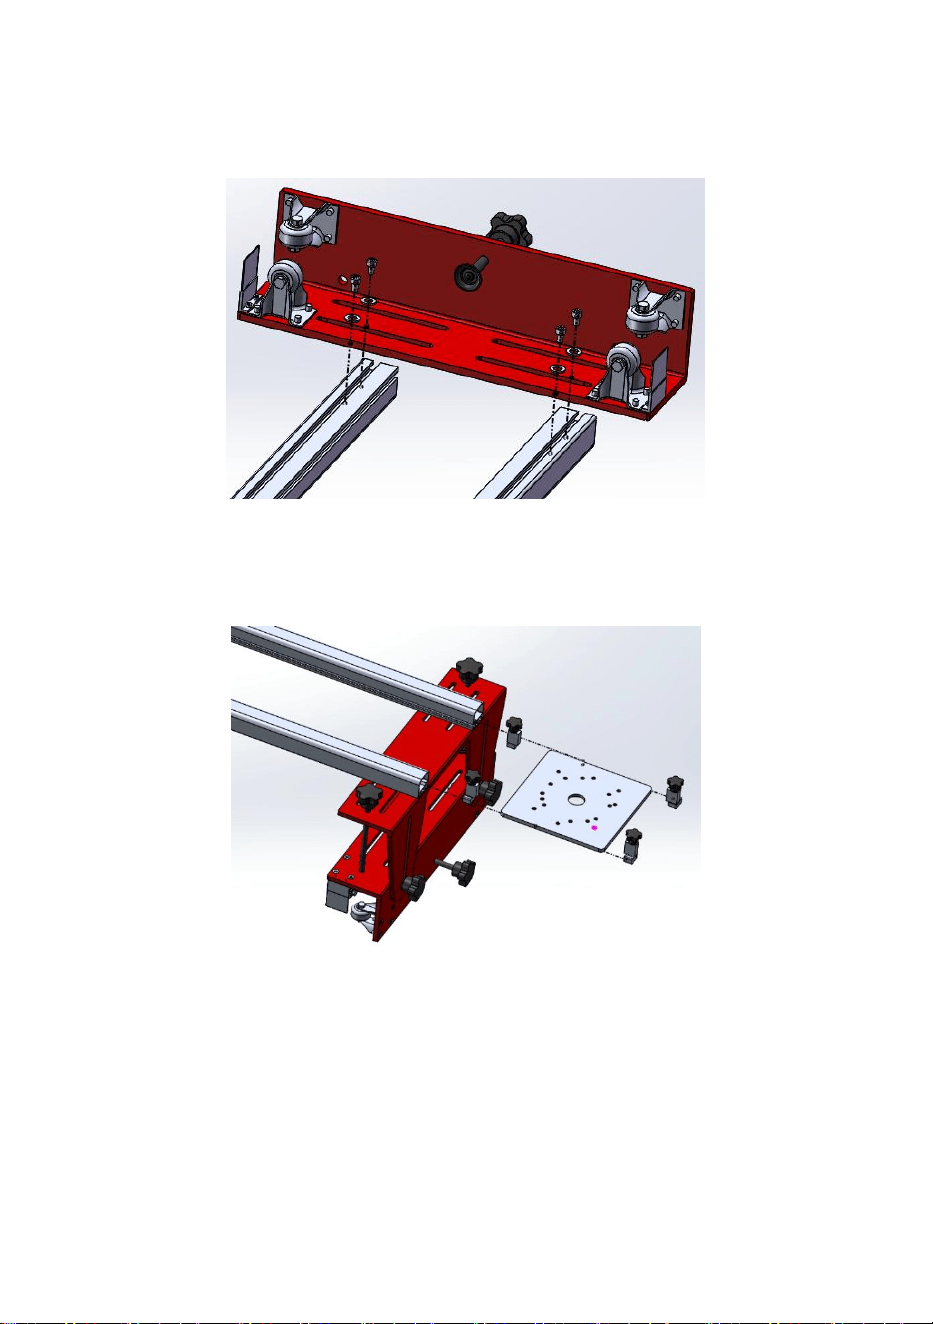
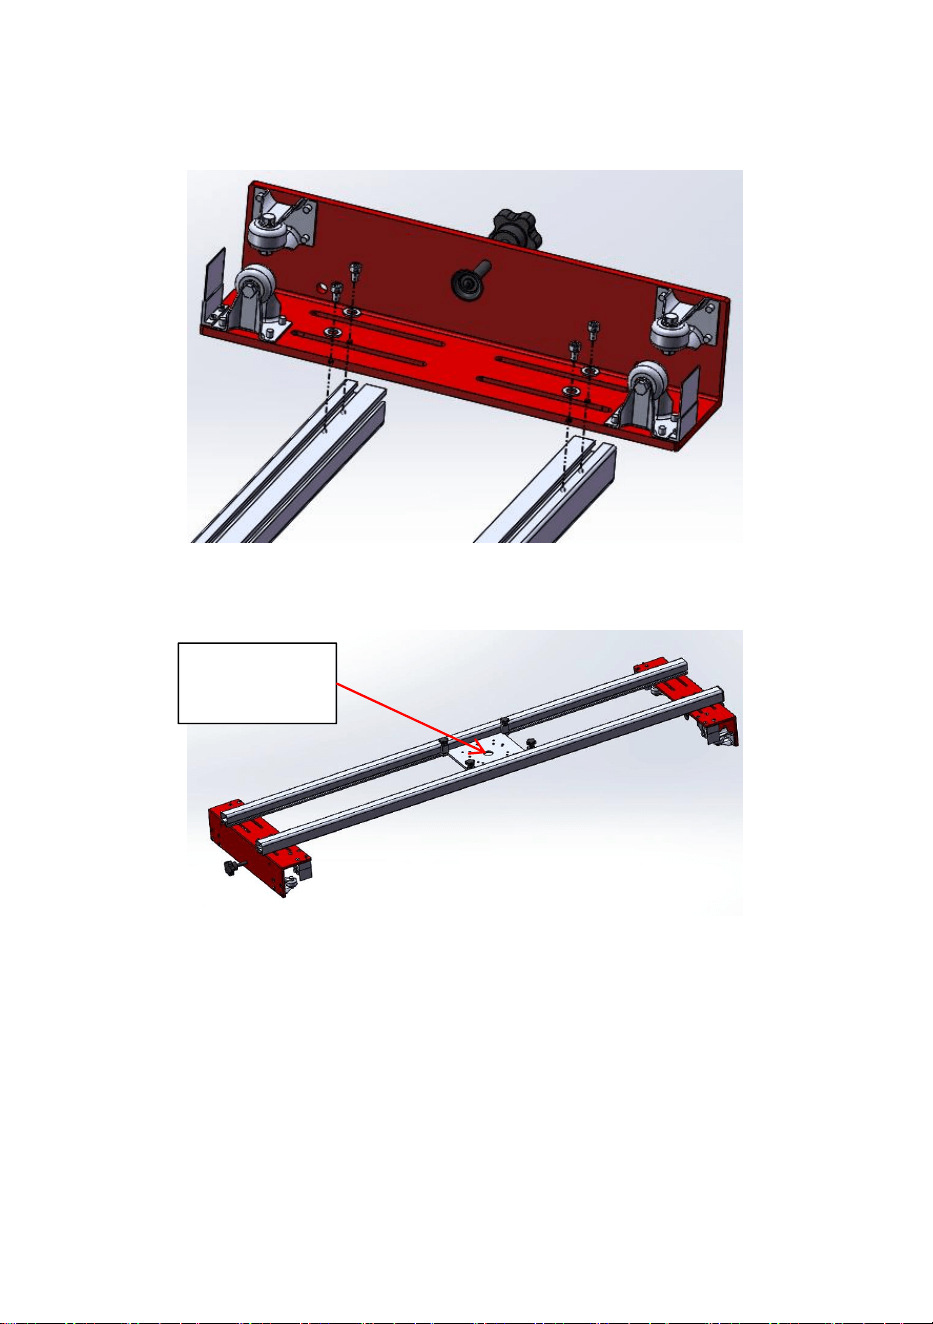
Align the Elastic nuts with the Hexagonal Nut M6*15mm of the L-Carriage
And then fasten it with a Wrench M6 in and lock.
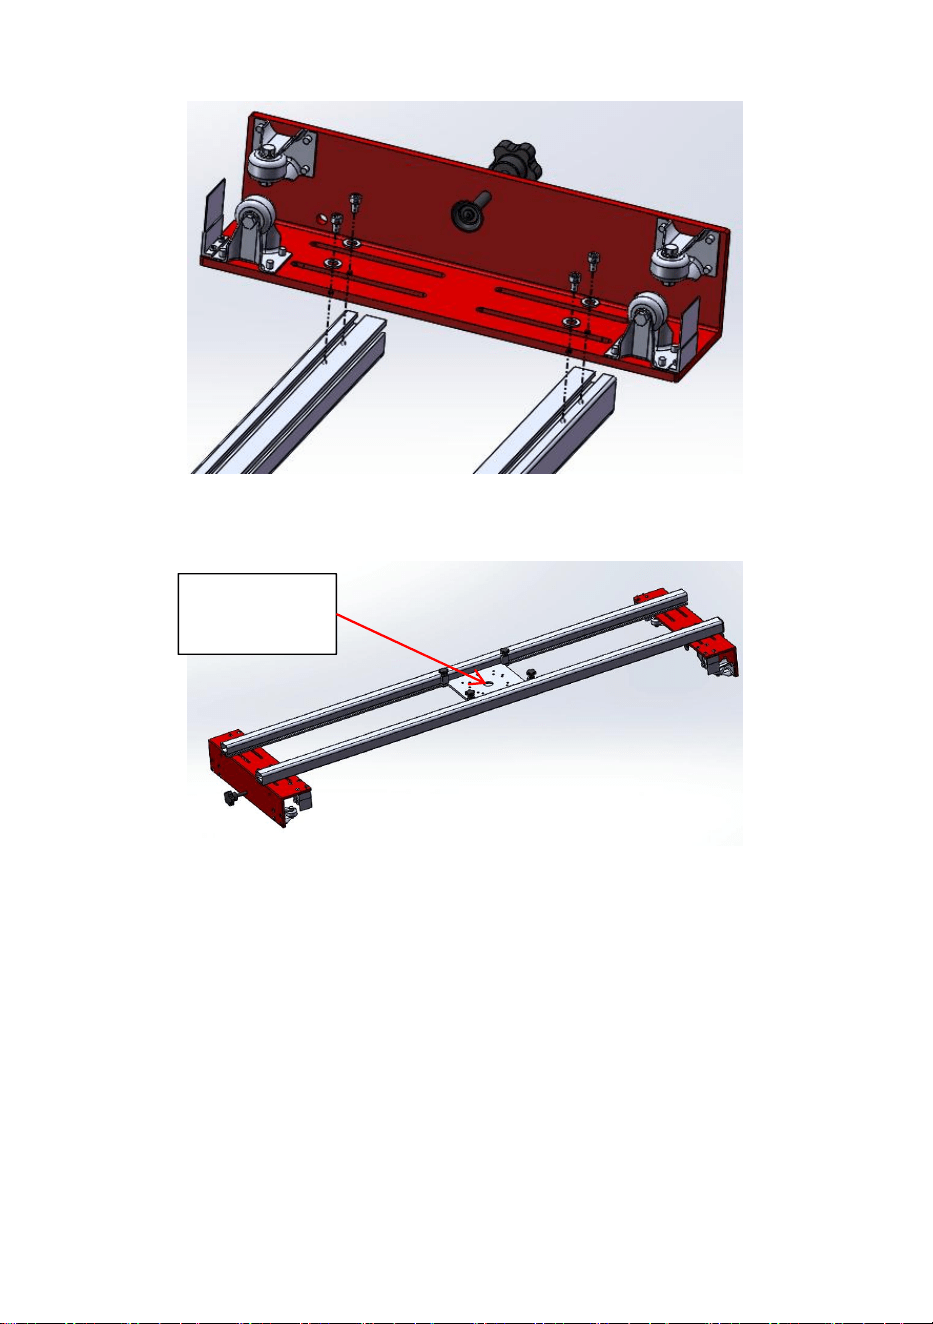
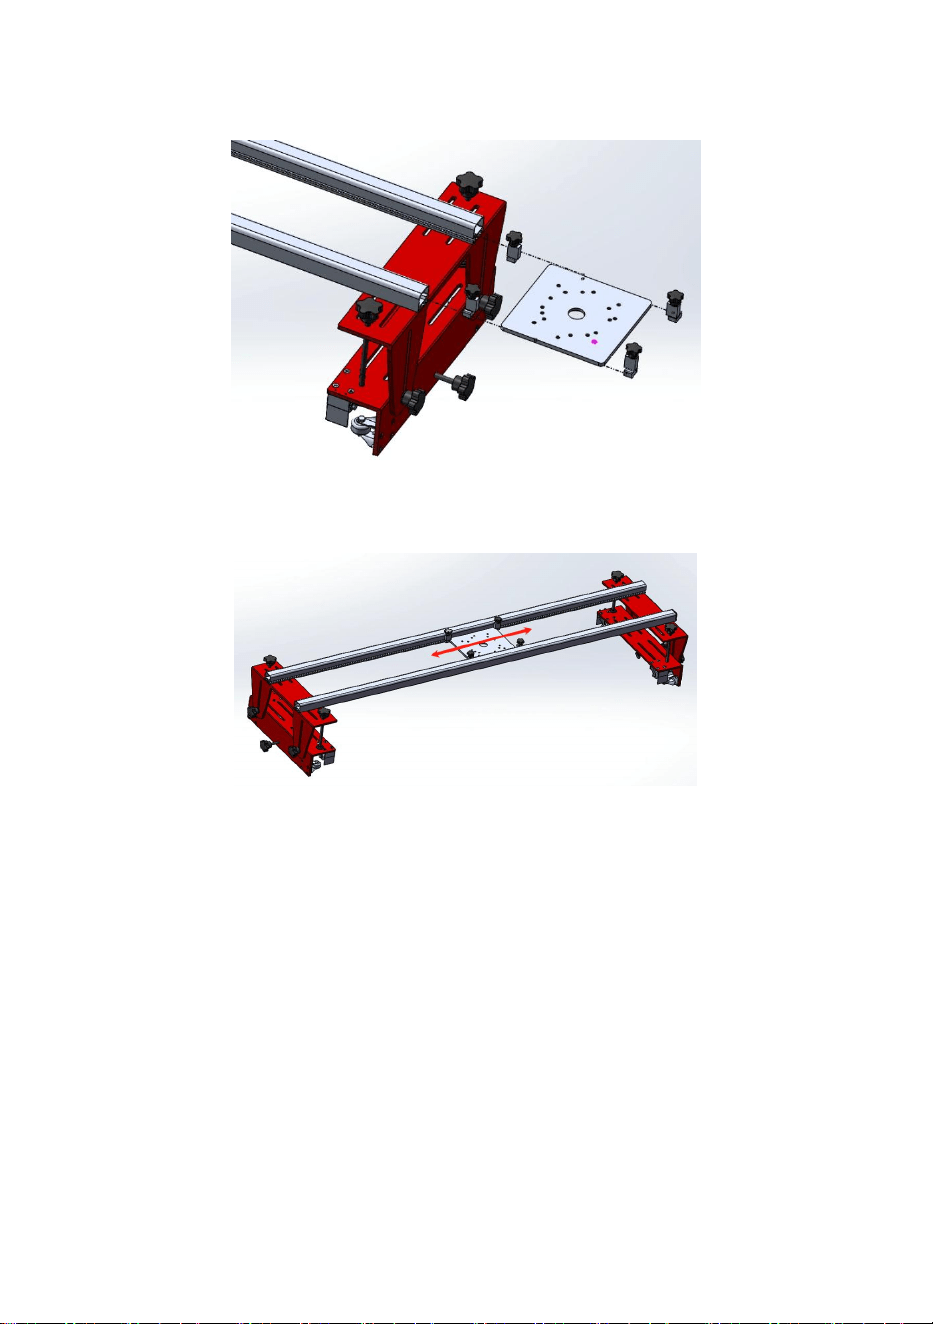
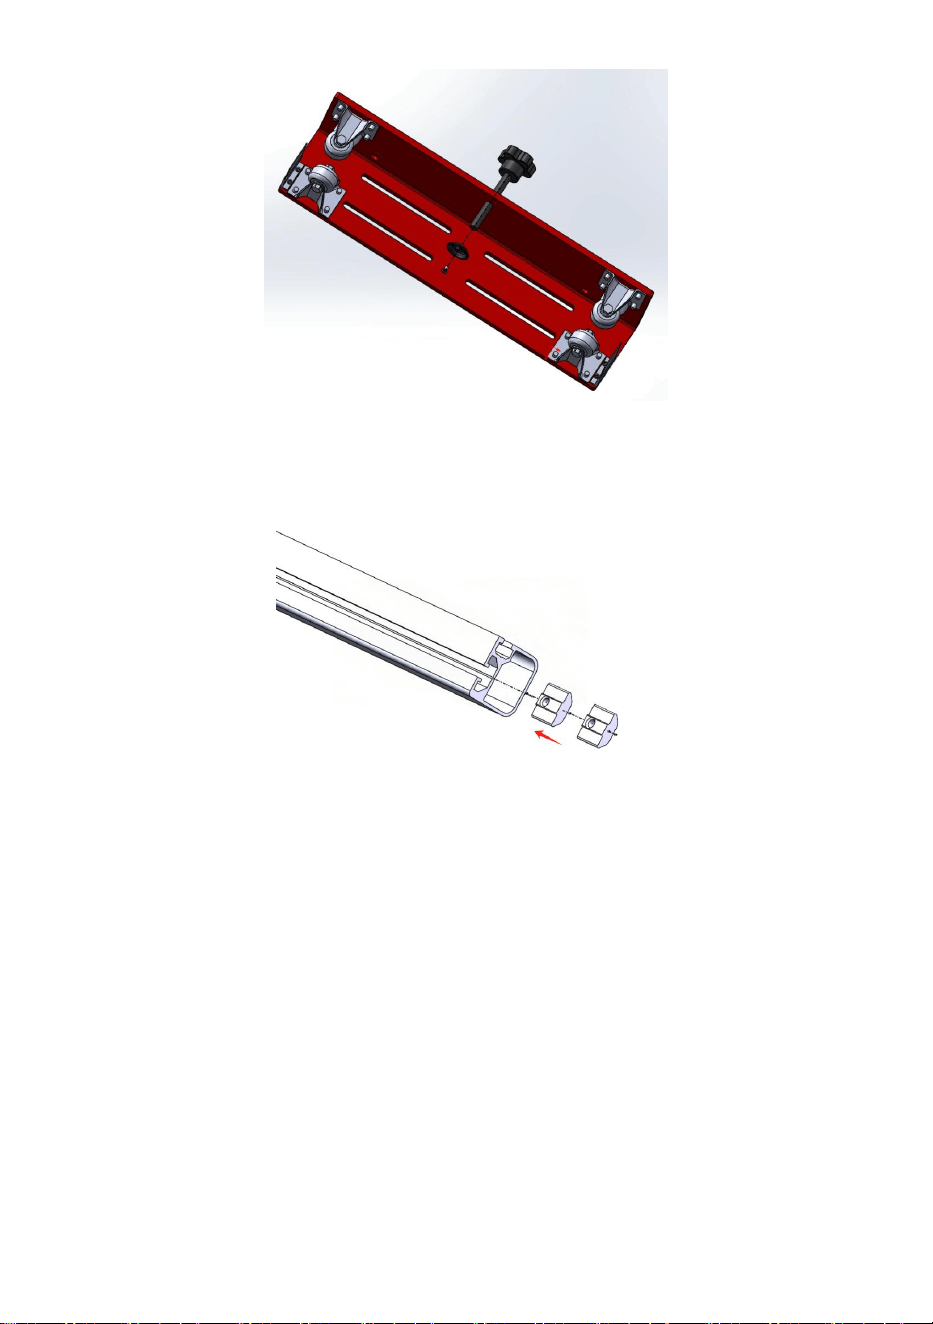
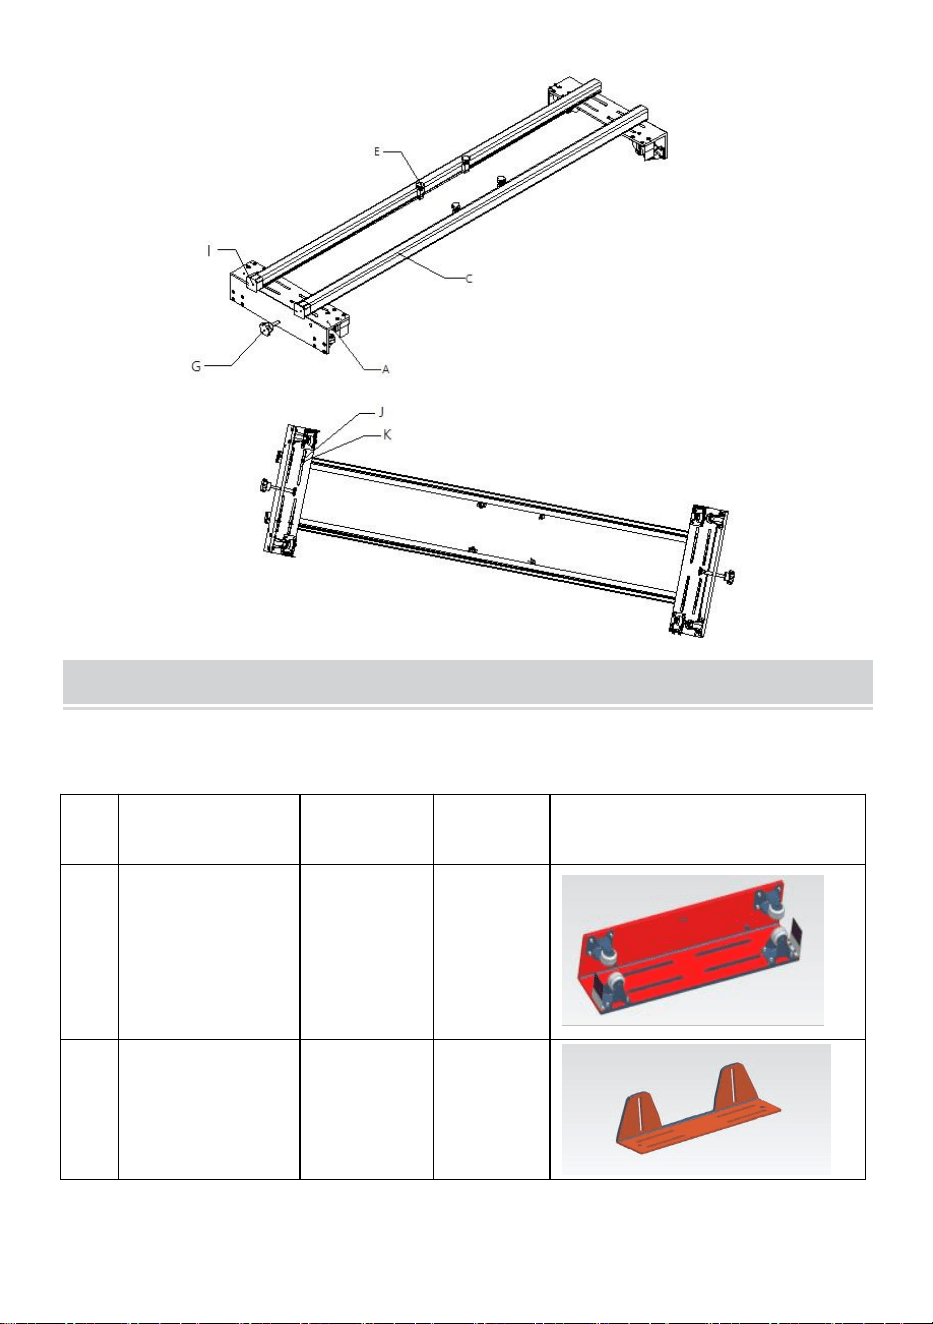
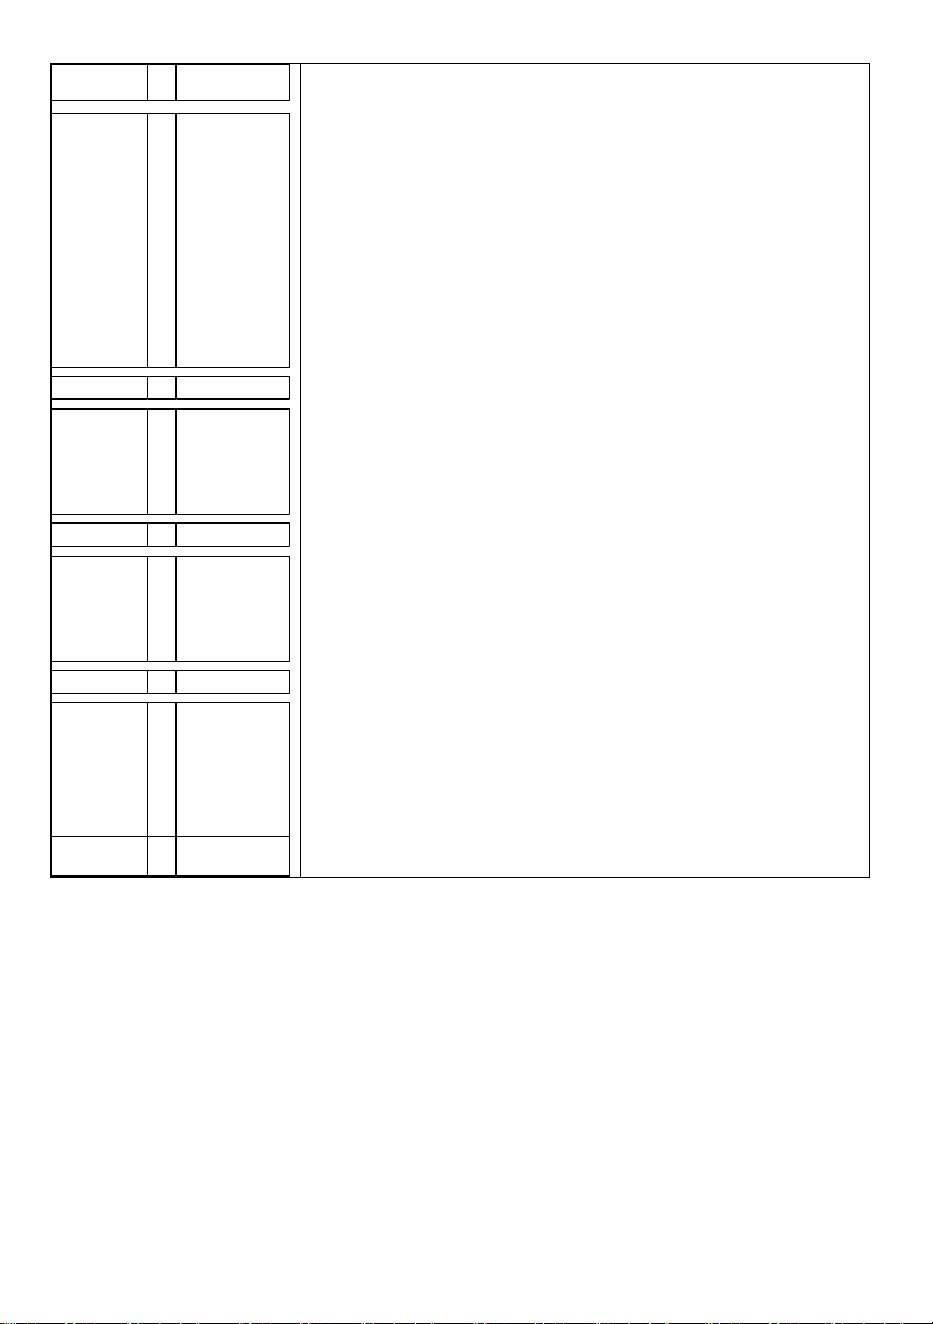
Install Fixed Plate with Holes and Trail Limit Clamps into the slots of the
aluminum profile as shown,

When it is necessary to keep the left and right positions of the router on the
guide rail, tightened the star knobs to control the left and right sliding of the
router flio board.
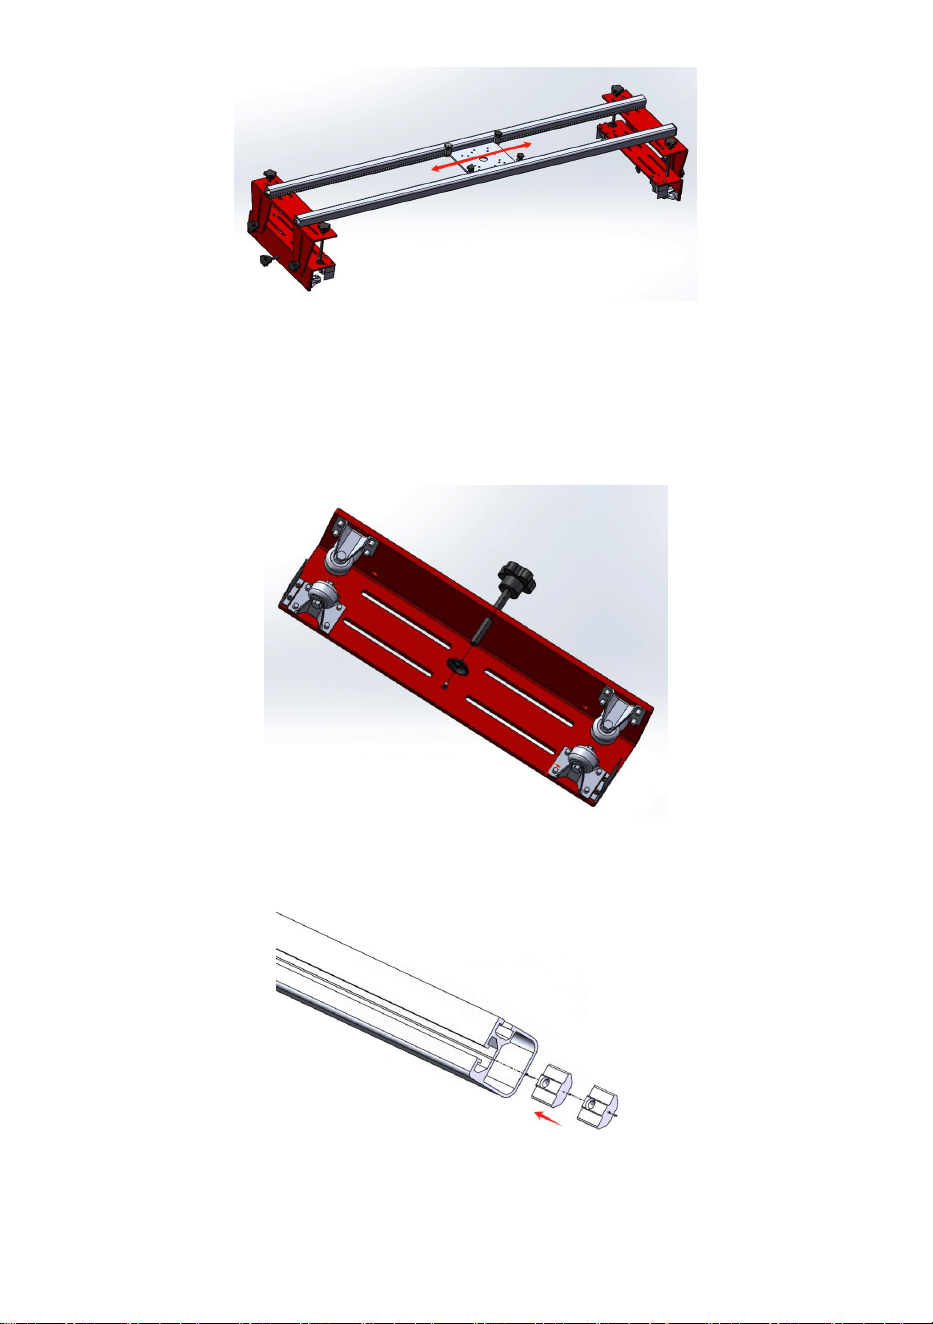
Model: YS60-001
Install Star Knob M10*70mm on the Slide Plate as shown.
There are 2 positions
Put the elastic nuts into the slot on the surface Aluminum Extrusion Trail,
four per rail.
Mind the nut direction
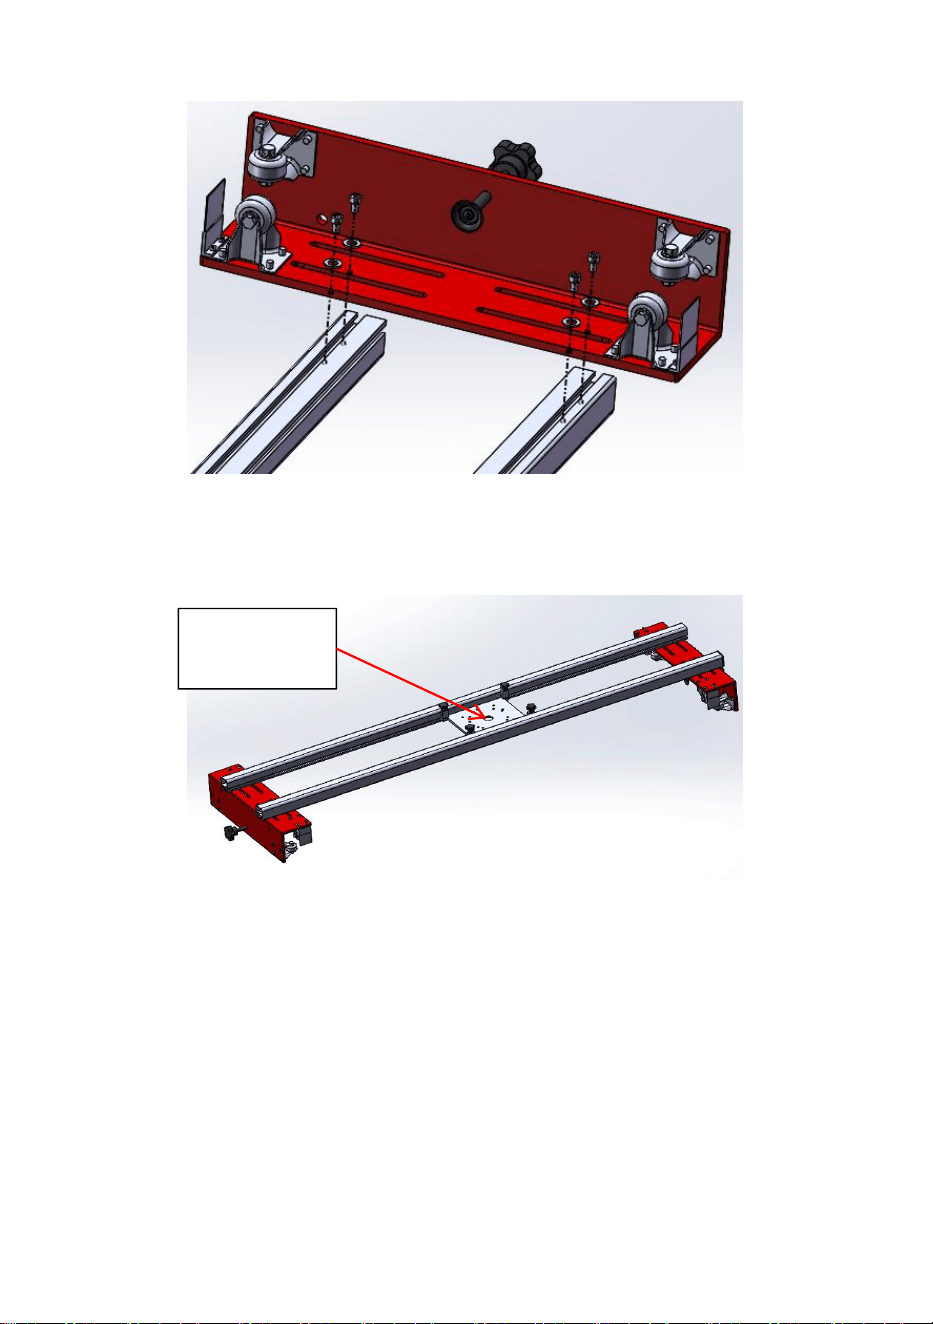
Align the Elastic nuts with the Hexagonal Nut M6*15mm of the L-Carriage
And then fasten it with a Wrench M6 in and lock.
Install Fixed Plate with Holes and Trail Limit Clamps into the slots of the
aluminum profile as shown,
No include
Fixed Plate
Edge trimming
machine model
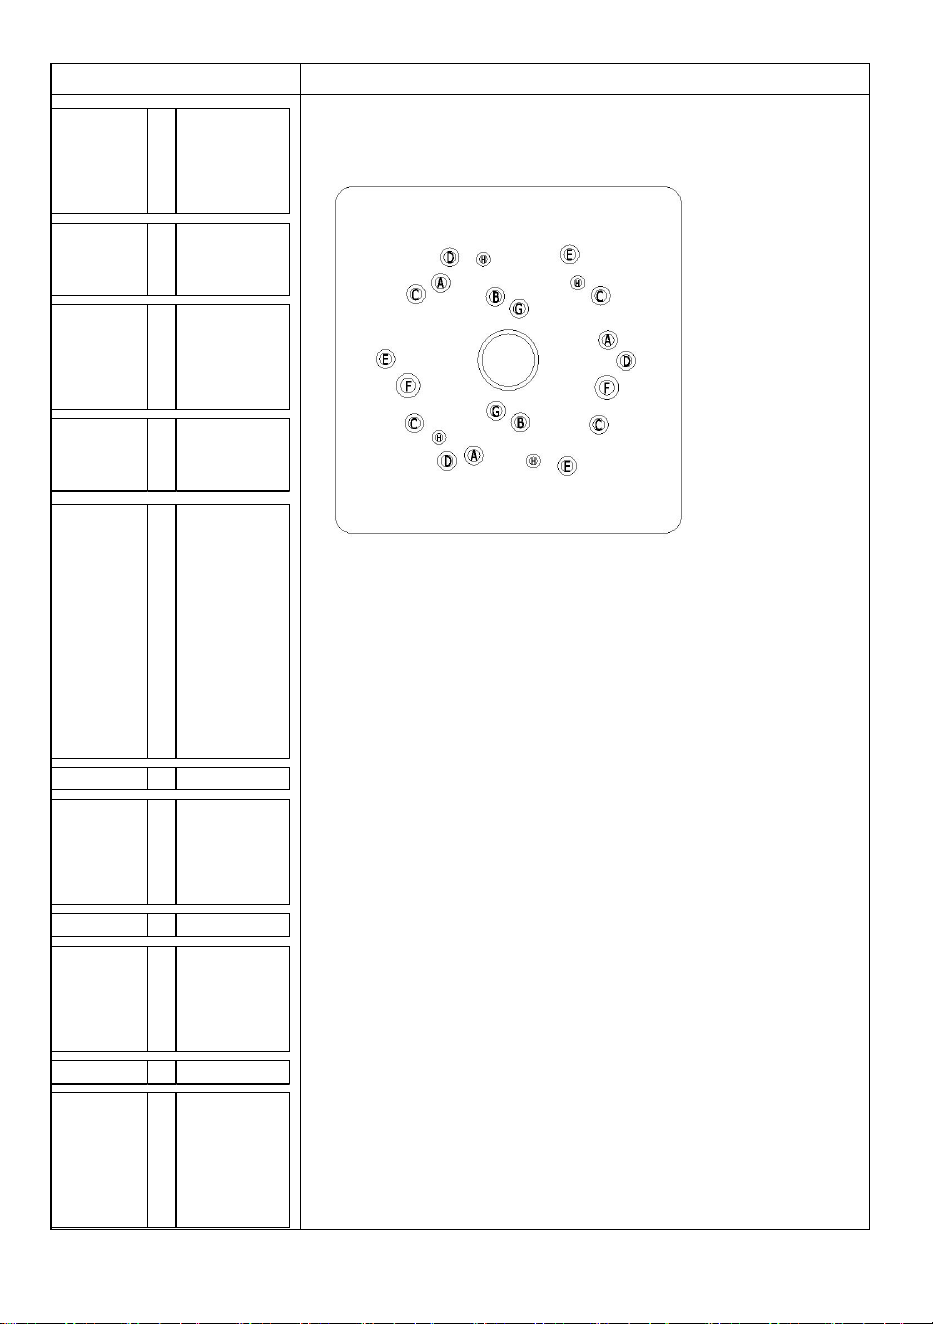
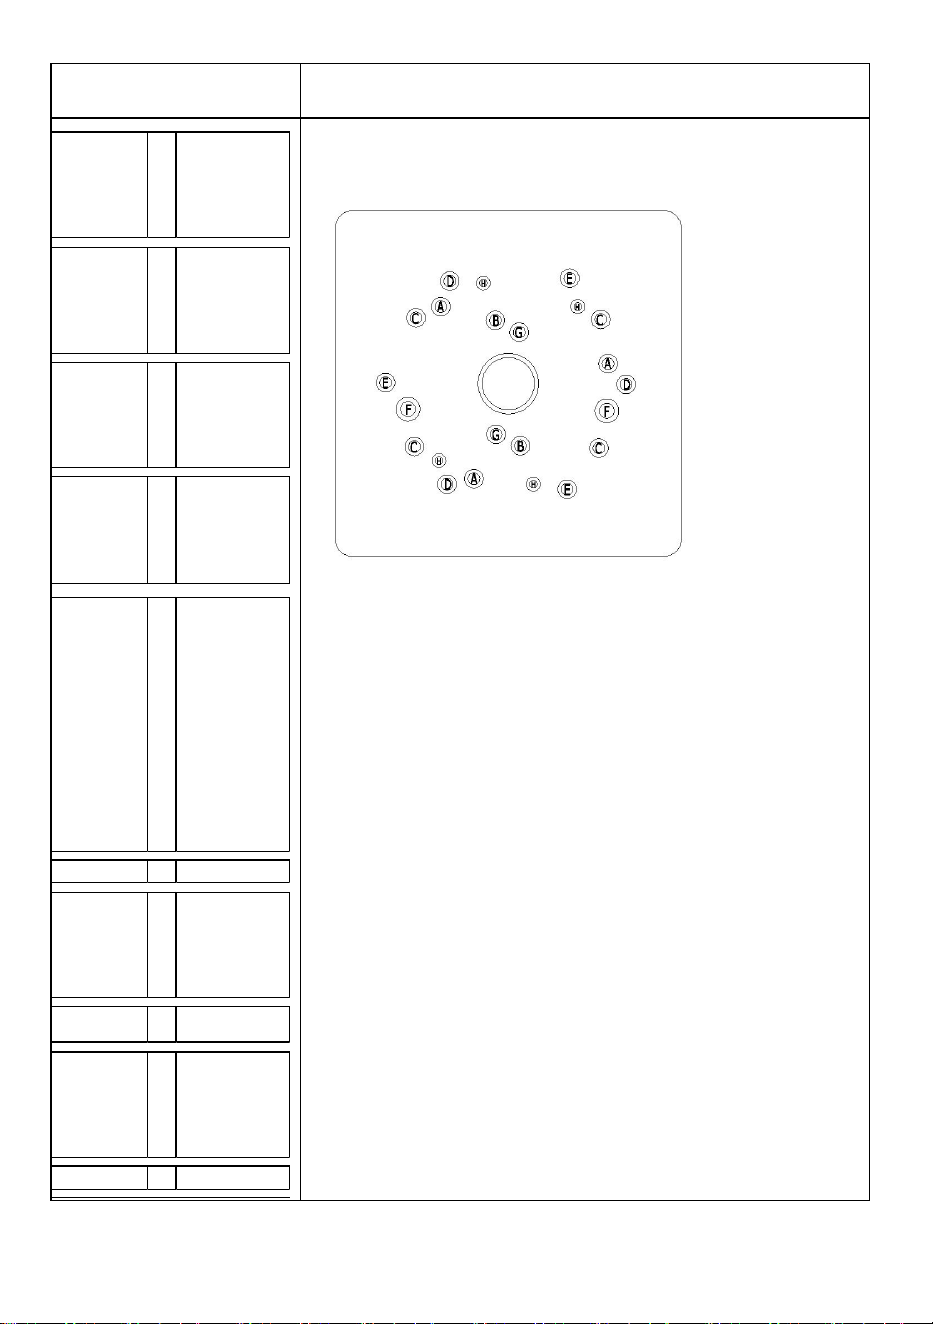
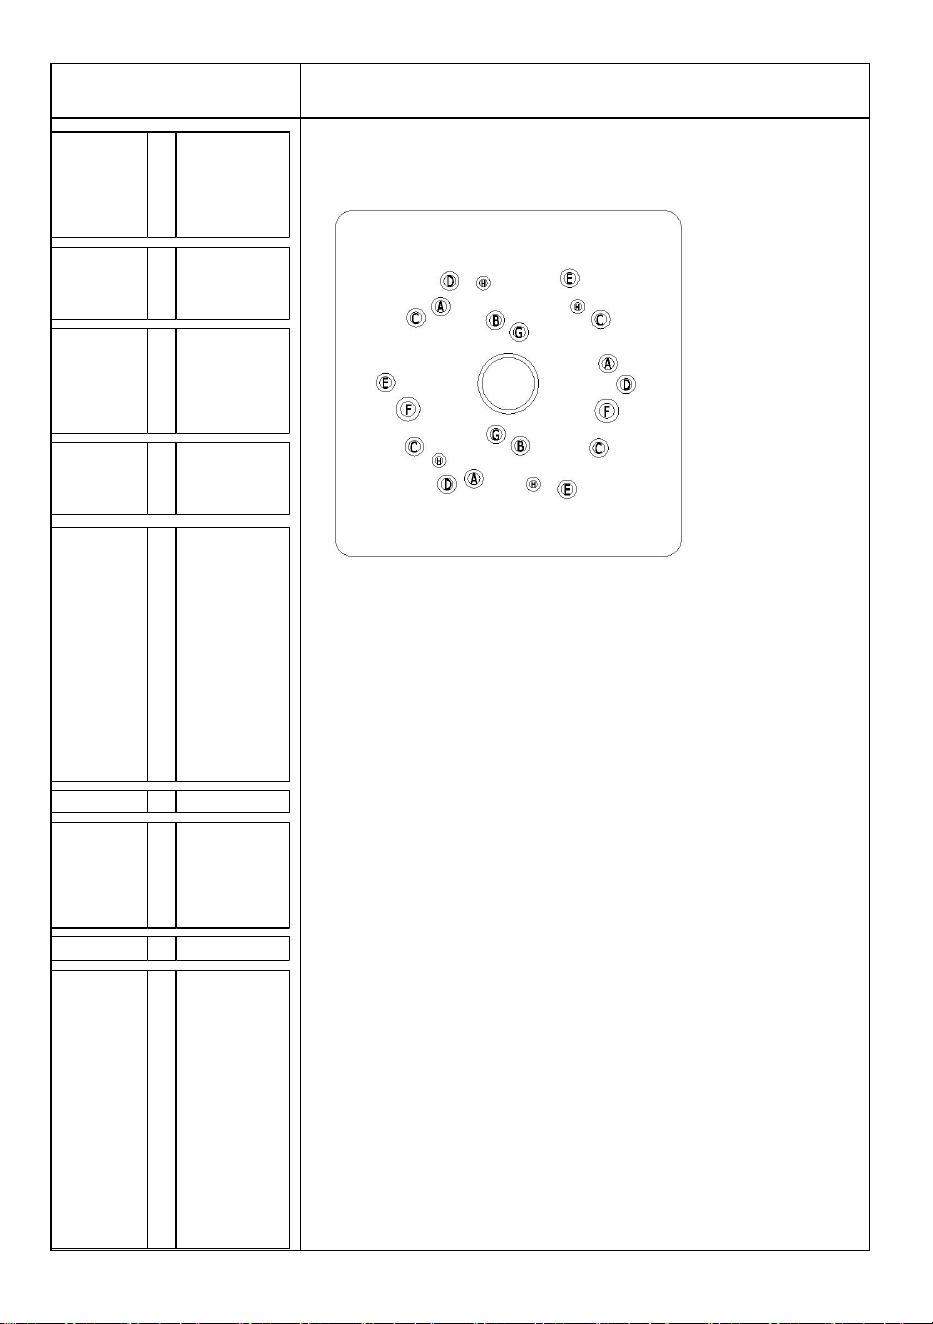
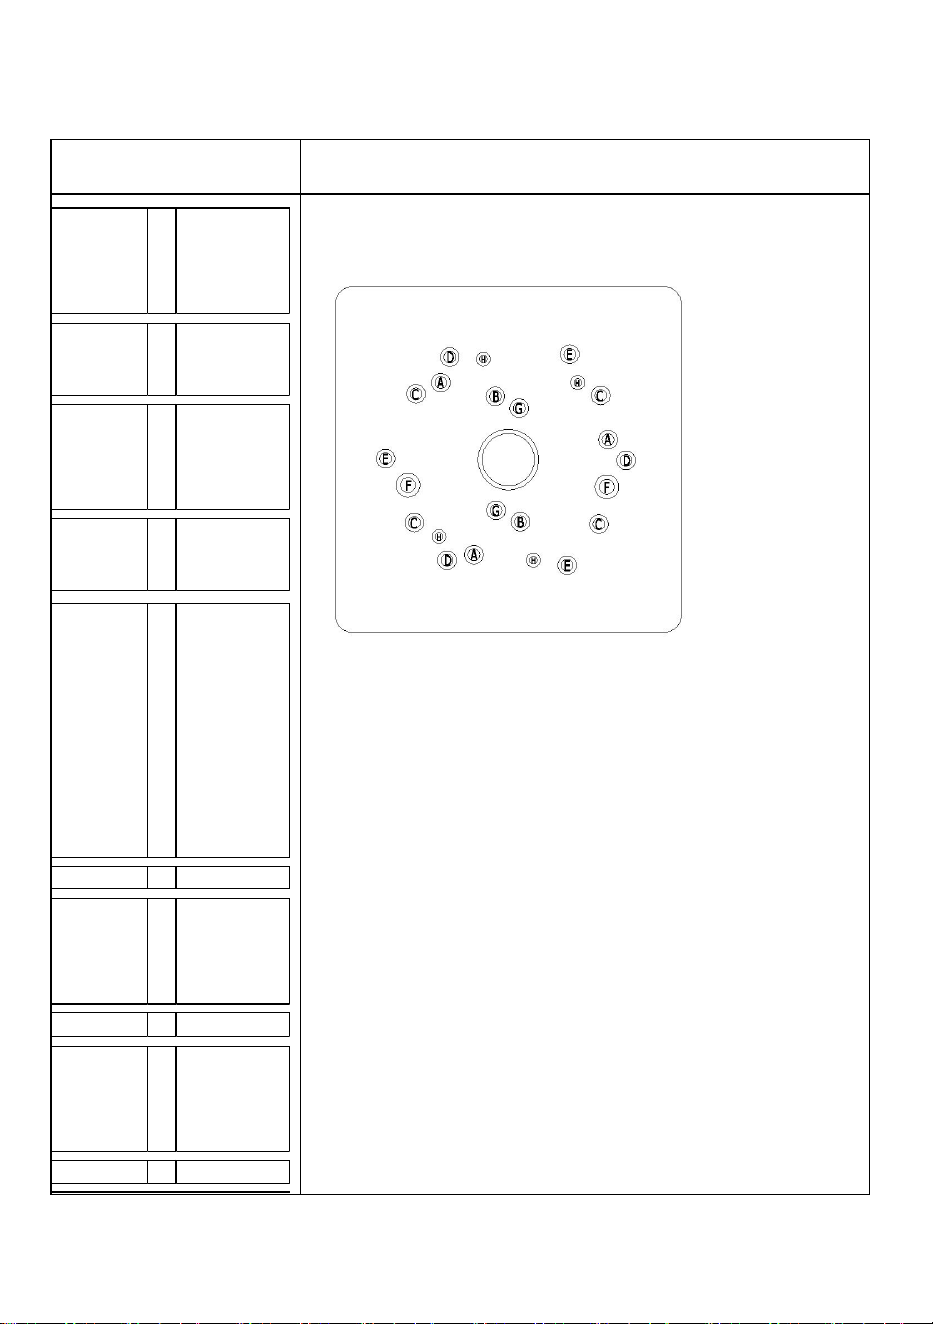
Bottom plate hole position
Porter cable
A
A
A
690 Series
7529
8529
Ryob
B
Most Models
Bosch
B
A
A
1615
1617
1618
Makita
B
Most Models
Sears
C
D
D
E
D
B
B
315275000
315175040
315175050
315175.060
315175070
315275100
315275110
Fein
F
FT1800
Miwaukee
A
A
A
5615
5616
5619
Freud
B
FT2000F
Hitachi
G
G
G
M8V
RT12
M12V
ELU
F
177
Dewalt
F
F
A
A
621
625
616 Senies
618 Senies
Vover
H
0700C
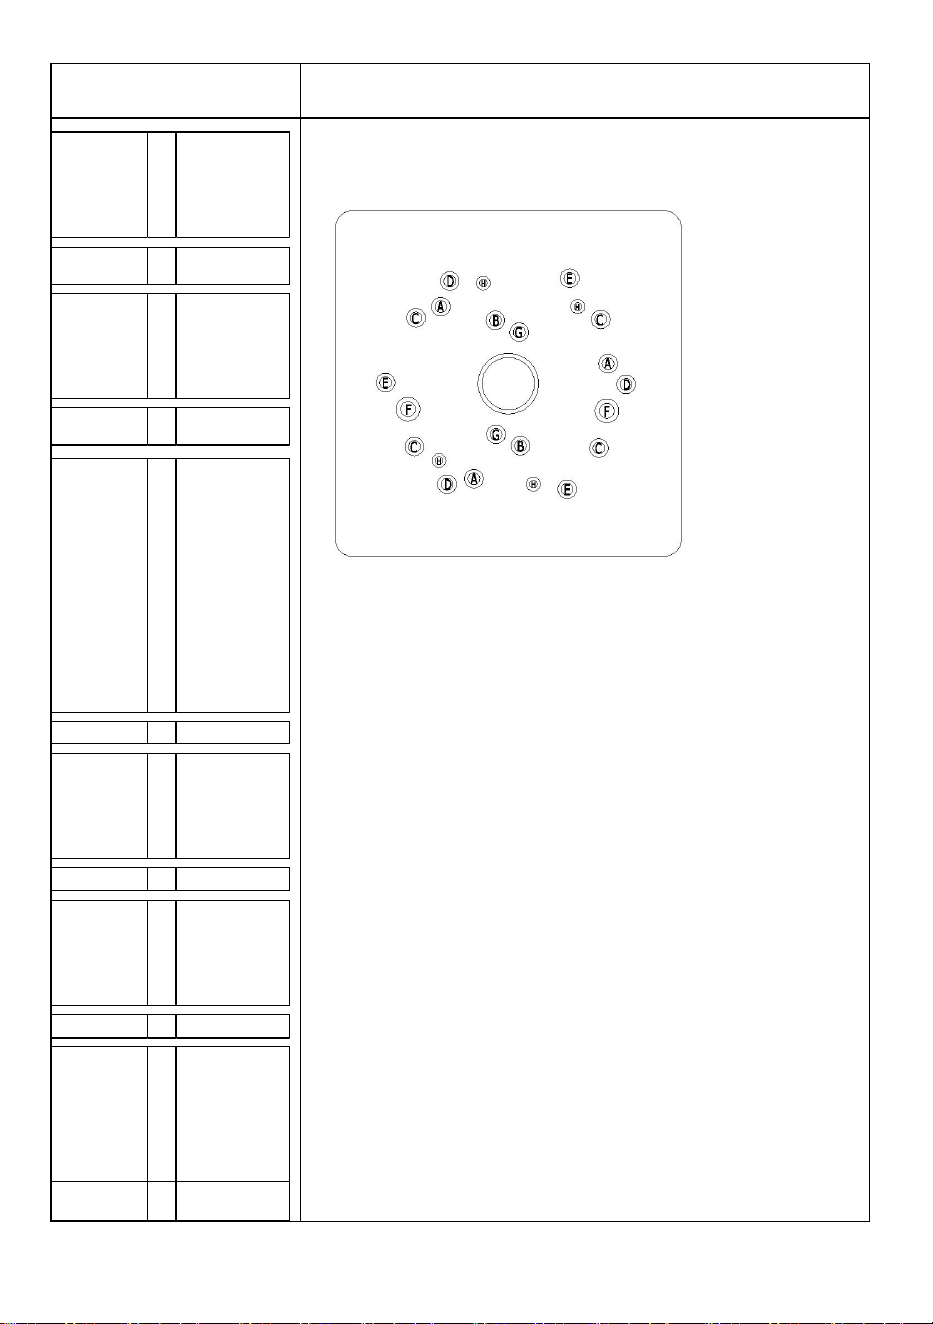
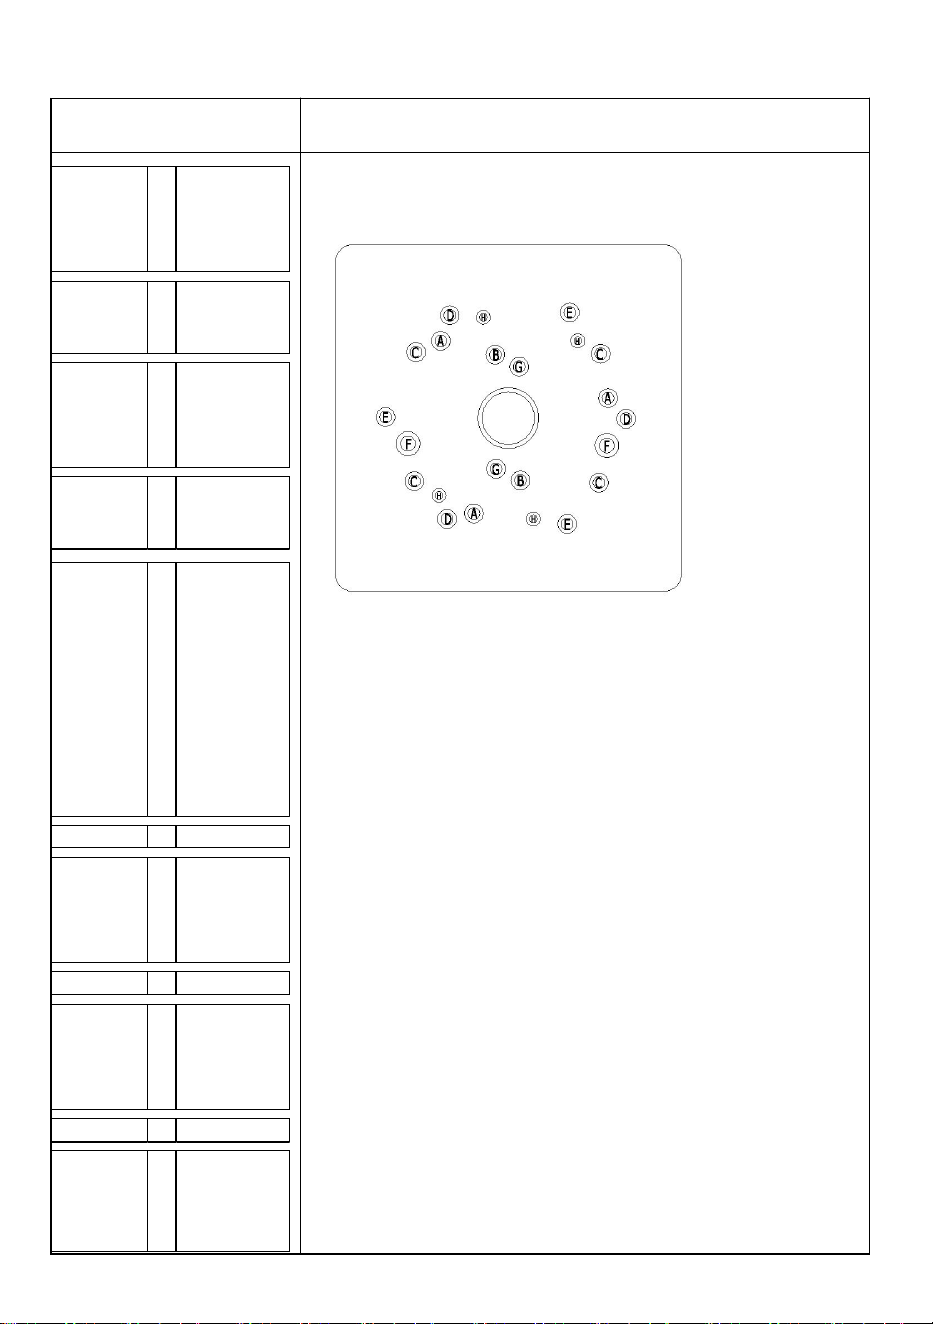
Please confirm if the perforated bottom plate
matches the model of your trimming machine.
If it is not suitable, you can use the matching
blank bottom plate (9.8 * 9.8 ") to drill holes and
DIY according to the specific model of the
trimming machine


Technique Certificat d'assistance et de garantie électronique
www.vevor.com/support
GRAND TRAÎNEAU POUR ROUTEUR
MANUEL D'UTILISATION
MODÈLE : YS64-001S, YS60-001
We continue to be committed to provide you tools with competitive price.
"Save Half", "Half Price" or any other similar expressions used by us only represents an
estimate of savings you might benefit from buying certain tools with us compared to the major
top brands and does not necessarily mean to cover all categories of tools offered by us. You
are kindly reminded to verify carefully when you are placing an order with us if you are
actually saving half in comparison with the top major brands.
MODÈLE : YS64-001S, YS60-001
Have product questions? Need technical support? Please feel free to
contact us:
Technical Support and E-Warranty Certificate
www.vevor.com/support
NEED HELP? CONTACT US!
This is the original instruction, please read all manual instructions
carefully before operating. VEVOR reserves a clear interpretation of our
user manual. The appearance of the product shall be subject to the
product you received. Please forgive us that we won't inform you again if
there are any technology or software updates on our product.
LARGE ROUTER SLED

Avertissement - Pour réduire le risque de blessure, l'utilisateur
doit lire attentivement le manuel d'instructions.

PARTS LIST
MODÈLE : YS64-001S, YS60-001
NO
N
Description
YS64-001S
YS60-001
Graphique
UN
Plaque
coulissante
2 pièces
2 pièces
B
L- Transport
2 pièces
0
C
Aluminium
Parcours
d'extrusion
2 pièces
2 pièces
D1
Plaque fixe
avec trous
1 pièce
0
D2
Plaque fixe en
retard
1 pièce
0
E
Lampes Trail
Limit C
4 pièces
4 pièces

F
Bouton étoile
allongé
M10*140mm
4 pièces
0
G
Bouton étoile
M10* 7 0 mm
2 pièces
2 pièces
H
Bouton étoile
M 10 * 20 mm
4 pièces
0
je
Protecteurs
d'angle de
sentier
4 pièces
4 pièces
J
Écrou
hexagonal
M6*15mm
8 pièces
8 pièces
K
Écrou élastique
8 pièces
8 pièces
L
Clé M6
1 pièce
1 pièce

INSTALL
MODÈLE : YS64-001S,
Installez le bouton étoile M10*70mm sur la plaque coulissante comme
indiqué.
Il y a 2 postes
Serrez la plaque coulissante et le chariot en L avec l'étoile Bouton M6*15
mm, comme indiqué.
Il y a 2 positions.
M
Clé M 1,5
1 pièce
1 pièce

Installez le bouton étoile étendu M10*140mm sur le chariot en L , comme
indiqué.
Il y a 2 positions.
Placez les écrous élastiques dans la fente de la surface en aluminium
Piste d'extrusion , quatre par rail . Faites attention au sens de l'écrou

Alignez les écrous élastiques avec l' écrou hexagonal M6*15mm du chariot
en L, puis fixez-le avec une clé M6 et verrouillez.
Installez la plaque fixe avec les trous et les lampes Trail Limit C dans les
fentes du profilé en aluminium comme indiqué.
Lorsqu'il est nécessaire de maintenir les positions gauche et droite de la
toupie sur le rail de guidage, resserré l'étoile boutons pour contrôler le
coulissement gauche et droit de la toupie carte flio.
Modèle: YS60-001

Installez le bouton étoile M10*70mm sur la plaque coulissante comme
indiqué.
Il y a 2 postes
Placez les écrous élastiques dans la fente de la surface en aluminium
Piste d'extrusion , quatre par rail .
Faites attention au sens de l'écrou

Alignez les écrous élastiques avec l' écrou hexagonal M6*15mm du chariot
en L, puis fixez-le avec une clé M6 et verrouillez.
Installez la plaque fixe avec les trous et les lampes Trail Limit C dans les
fentes du profilé en aluminium comme indiqué.
Modèle de machine à
Position du trou de la plaque inférieure
No include
Fixed Plate
tailler les bordures
Câble Porter
UN
UN
UN
690 Série
7529
8529
Ryob
B
La plupart des
modèles
Bosch
B
UN
UN
1615
1617
1618
Makita
B
La plupart des
modèles
Sears
C
D
D
E
D
B
B
315275000
315175040
315175050
315175.060
315175070
315275100
315275110
Féin
F
FT1800
Miwaukee
UN
UN
UN
5615
5616
5619
Freud
B
FT2000F
Hitachi
G
G
G
M8V
RT12
M12V
ÉLU
F
177
Dewalt
F
F
UN
UN
621
625
616 Séniors
618 Séniors
Veuillez confirmer si la plaque inférieure
perforée correspond au modèle de votre
machine à découper. Si elle ne convient pas,
vous pouvez utiliser la plaque inférieure vierge
correspondante (9,8 * 9,8 ") pour percer des
trous et bricoler selon le modèle spécifique de
la machine à découper

Vover
H
0700C


Technisch Support und E-Garantie-Zertifikat
www.vevor.com/support
GROßER ROUTERSCHLITTEN
BENUTZERHANDBUCH
MODELL: YS64-001S, YS60-001
We continue to be committed to provide you tools with competitive price.
"Save Half", "Half Price" or any other similar expressions used by us only represents an
estimate of savings you might benefit from buying certain tools with us compared to the major
top brands and does not necessarily mean to cover all categories of tools offered by us. You
are kindly reminded to verify carefully when you are placing an order with us if you are
actually saving half in comparison with the top major brands.

MODELL: YS64-001S, YS60-001
Have product questions? Need technical support? Please feel free to
contact us:
Technical Support and E-Warranty Certificate
www.vevor.com/support
NEED HELP? CONTACT US!
This is the original instruction, please read all manual instructions
carefully before operating. VEVOR reserves a clear interpretation of our
user manual. The appearance of the product shall be subject to the
product you received. Please forgive us that we won't inform you again if
there are any technology or software updates on our product.
LARGE ROUTER SLED

Warnung: Um das Verletzungsrisiko zu verringern, muss der
Benutzer die Bedienungsanleitung sorgfältig lesen.
PARTS LIST
MODELL: YS64-001S, YS60-001
NE
IN
Beschreibung
YS64-001S
YS60-001
G raph
A
Gleitplatte
2 Stück
2 Stück
B
L - Wagen
2 Stück
0
C
Aluminium
Extrusionsspur
2 Stück
2 Stück
T1
(T1
)
Feste Platte mit
Löchern
1 Stck.
0
T2
-
De
r
zw
eit
e
Ta
g
Feste Platte
1 Stck.
0

E
Trail Limit C-
Lampen
4 Stück
4 Stück
F
Verlängerter
Sterngriff
M10*140mm
4 Stück
0
G
Sternknopf
M10* 7 0mm
2 Stck.
2 Stck.
H
Sternknopf
M 10 * 20 mm
4 Stck.
0
IC
H
Trail-Eckensch
utz
4 Stück
4 Stück
J
Sechskantmutt
er
M6 x 15 mm
8 Stück
8 Stück
K
Elastische
Mutter
8 Stück
8 Stück
INSTALL
MODELL: YS64-001S,
Montieren Sie den Sterngriff M10 x 70 mm wie gezeigt auf der
Gleitplatte.
Es gibt 2 Positionen
M
Schraubenschl
üssel M6
1 Stück
1 Stück
M
Schraubenschl
üssel M 1,5
1 Stück
1 Stück
Gleitplatte und L - Schlitten mit Stern festziehen Knopf M6 x 15 mm, wie
abgebildet.
Es gibt 2 Positionen.
Installieren Sie den erweiterten Sterngriff M10 x 140 mm auf dem L -
Wagen , wie gezeigt.
Es gibt 2 Positionen.
Setzen Sie die elastischen Muttern in den Schlitz auf der Oberfläche
Aluminium Extrusionsspur , vier pro Schiene . Achten Sie auf die
Mutternrichtung
Richten Sie die elastischen Muttern mit der Sechskantmutter M6*15mm
des L-Schlittens aus, befestigen Sie sie anschließend mit einem
Schraubenschlüssel M6 und verriegeln Sie sie.
Installieren Sie die feste Platte mit Löchern und die Trail Limit C -Lampen
wie gezeigt in den Schlitzen des Aluminiumprofils.
Wenn es notwendig ist, die linke und rechte Position des Routers auf der
Führungsschiene beizubehalten, verschärft der Star Knöpfe zur Steuerung
des Links- und Rechtsgleitens des Routers Flio-Board.
Modell: YS60-001
Montieren Sie den Sterngriff M10 x 70 mm wie gezeigt auf der Gleitplatte.
Es gibt 2 Positionen
Setzen Sie die elastischen Muttern in den Schlitz auf der Oberfläche
Aluminium Extrusionsspur , vier pro Schiene .
Achten Sie auf die Mutternrichtung
Richten Sie die elastischen Muttern mit der Sechskantmutter M6*15mm
des L-Schlittens aus, befestigen Sie sie anschließend mit einem
Schraubenschlüssel M6 und verriegeln Sie sie.
Installieren Sie die feste Platte mit Löchern und die Trail Limit C -Lampen
wie gezeigt in den Schlitzen des Aluminiumprofils.
No include
Fixed Plate
Kantenbeschneidem
aschine Modell
Position der Löcher in der Bodenplatte
Porter-Kabel
A
A
A
690 Serie
7529
8529
Ryob
B
Die meisten
Modelle
Bosch
B
A
A
1615
1617
1618
Makita
B
Die meisten
Modelle
Sears
C
D
D
E
D
B
B
315275000
315175040
315175050
315175.060
315175070
315275100
315275110
Fein
F
FT1800
Miwaukee
A
A
A
5615
5616
5619
Freud
B
FT2000F
Hitachi
G
G
G
M8V
RT12
M12V
ELU
F
177
Dewalt
F
F
A
621
625
616 Senies
Bitte bestätigen Sie, ob die perforierte
Bodenplatte zum Modell Ihrer Trimmmaschine
passt. Wenn sie nicht passt, können Sie die
passende leere Bodenplatte (9,8 * 9,8 Zoll)
verwenden, um Löcher zu bohren und
entsprechend dem spezifischen Modell der
Trimmmaschine selbst zu bauen.

A
618 Senies
Vover
H
0700C


Tecnico Supporto e certificato di garanzia elettronica
www.vevor.com/support
GRANDE SLITTA PER FRESATRICE
MANUALE D'USO
MODELLO: YS64-001S, YS60-001
We continue to be committed to provide you tools with competitive price.
"Save Half", "Half Price" or any other similar expressions used by us only represents an
estimate of savings you might benefit from buying certain tools with us compared to the major
top brands and does not necessarily mean to cover all categories of tools offered by us. You
are kindly reminded to verify carefully when you are placing an order with us if you are
actually saving half in comparison with the top major brands.

MODELLO: YS64-001S, YS60-001
Have product questions? Need technical support? Please feel free to
contact us:
Technical Support and E-Warranty Certificate
www.vevor.com/support
NEED HELP? CONTACT US!
This is the original instruction, please read all manual instructions
carefully before operating. VEVOR reserves a clear interpretation of our
user manual. The appearance of the product shall be subject to the
product you received. Please forgive us that we won't inform you again if
there are any technology or software updates on our product.
LARGE ROUTER SLED

Attenzione: per ridurre il rischio di lesioni, l'utente deve leggere
attentamente il manuale di istruzioni.
PARTS LIST
MODELLO: YS64-001S, YS60-001
NO
Descrizione
CODICE
ARTICOLO
:
YS64-001S
CODICE
ARTICOL
O:
YS60-001
Grafico
UN
Piastra
scorrevole
2 pezzi
2 pezzi
B
L- Carrozza
2 pezzi
0
C
Alluminio
Percorso di
estrusione
2 pezzi
2 pezzi
La
1a
Piastra fissa
con fori
1 pz.
0
La
D2
P. fisso in
ritardo
1 pz.
0
E
Lampade Trail
Limit C
4 pezzi
4 pezzi
F
Pomello a stella
esteso
M10*140mm
4 pezzi
0
G
Pomello a stella
M10 * 70mm
2 pezzi
2 pezzi
H
Pomello a stella
Misura 10 * 20
mm
4 pezzi
0
IO
Protezioni per
angoli di
percorso
4 pezzi
4 pezzi
J
Dado
esagonale
M6*15mm
8 pezzi
8 pezzi
E
Dado elastico
8 pezzi
8 pezzi
L
Chiave M6
1 pz.
1 pz.
INSTALL
MODELLO: YS64-001S,
Installare la manopola a stella M10*70mm sulla piastra scorrevole
come mostrato.
Ci sono 2 posizioni
Serrare la piastra scorrevole e il carrello a L con la stella Manopola M6*15
mm, come mostrato.
Ci sono 2 posizioni.
M
Chiave M 1.5
1 pz.
1 pz.

Installare la manopola a stella estesa M10*140mm sul carrello a L , come
mostrato.
Ci sono 2 posizioni.
Inserire i dadi elastici nella fessura sulla superficie Alluminio Pista di
estrusione , quattro per rotaia . Fai attenzione alla direzione del dado
Allineare i dadi elastici con il dado esagonale M6*15mm del carrello a L,
quindi fissarlo con una chiave M6 e bloccare.
Installare la piastra fissa con fori e le lampade Trail Limit C nelle fessure
del profilo in alluminio come mostrato.
Quando è necessario mantenere le posizioni sinistra e destra del router
sulla guida, serrato la stella manopole per controllare lo scorrimento a
sinistra e a destra del router scheda flio.
Modello: Codice articolo: YS60-001

Installare la manopola a stella M10*70mm sulla piastra scorrevole come
mostrato.
Ci sono 2 posizioni
Inserire i dadi elastici nella fessura sulla superficie Alluminio Pista di
estrusione , quattro per rotaia .
Fai attenzione alla direzione del dado

Allineare i dadi elastici con il dado esagonale M6*15mm del carrello a L,
quindi fissarlo con una chiave M6 e bloccare.
Installare la piastra fissa con fori e le lampade Trail Limit C nelle fessure
del profilo in alluminio come mostrato.
Modello di macchina
Posizione del foro della piastra inferiore
No include
Fixed Plate
per rifilatura dei
bordi
Cavo di
Porter
UN
UN
UN
690 Serie
7529
8529
Risaia
B
La maggior
parte dei
modelli
Bosch
B
UN
UN
1615
1617
1618
Makita
B
La maggior
parte dei
modelli
Mare
C
D
D
E
D
B
B
315275000
315175040
315175050
315175.060
315175070
315275100
315275110
Fein
F
FT1800
Miwaukee
UN
UN
UN
5615
5616
5619
Freud
B
Modello
FT2000F
Hitachi
G
G
G
M8V
RT12
M12V
ELU
F
177
Si prega di confermare se la piastra inferiore
perforata corrisponde al modello della
macchina di rifinitura. Se non è adatta, è
possibile utilizzare la piastra inferiore vuota
corrispondente (9,8 * 9,8 ") per praticare fori e
fai da te in base al modello specifico della
macchina di rifinitura

Dewalt
F
F
UN
UN
621
625
616 Seni
618 Seni
Sopra
H
0700C


Técnico Certificado de soporte y garantía electrónica
www.vevor.com/support
TRINEO DE FRESADO GRANDE
MANUAL DEL USUARIO
MODELO: YS64-001S, YS60-001
We continue to be committed to provide you tools with competitive price.
"Save Half", "Half Price" or any other similar expressions used by us only represents an
estimate of savings you might benefit from buying certain tools with us compared to the major
top brands and does not necessarily mean to cover all categories of tools offered by us. You
are kindly reminded to verify carefully when you are placing an order with us if you are
actually saving half in comparison with the top major brands.

MODELO: YS64-001S, YS60-001
Have product questions? Need technical support? Please feel free to
contact us:
Technical Support and E-Warranty Certificate
www.vevor.com/support
NEED HELP? CONTACT US!
This is the original instruction, please read all manual instructions
carefully before operating. VEVOR reserves a clear interpretation of our
user manual. The appearance of the product shall be subject to the
product you received. Please forgive us that we won't inform you again if
there are any technology or software updates on our product.
LARGE ROUTER SLED

Advertencia: Para reducir el riesgo de lesiones, el usuario
debe leer atentamente el manual de instrucciones.
PARTS LIST
MODELO: YS64-001S、 YS60-001
NO
Descripción
YS64-001S
YS60-001
Gráfica
A
Placa
deslizante
2 piezas
2 piezas
B
L- Carro
2 piezas
0
do
Aluminio
Pista de
extrusión
2 piezas
2 piezas
D1
Placa fija con
agujeros
1 pieza
0
D2
Placa fija
1 pieza
0
mi
Lámparas Trail
Limit C
4 piezas
4 piezas

F
Perilla de
estrella
extendida
M10*140 mm
4 piezas
0
GR
AM
O
Perilla de
estrella
M10* 7,0 mm
2 piezas
2 piezas
yo
Perilla de
estrella
M10 * 20mm
4 piezas
0
I
Protectores de
esquinas para
senderos
4 piezas
4 piezas
Yo
Tuerca
hexagonal
M6*15 mm
8 piezas
8 piezas
K
Tuerca elástica
8 piezas
8 piezas
yo
Llave M6
1 pieza
1 pieza

INSTALL
MODELO: YS64-001S,
Instale la perilla de estrella M10*70 mm en la placa deslizante como
se muestra.
Hay 2 posiciones
Apriete la placa deslizante y el carro L con estrella Perilla M6*15 mm,
como se muestra.
Hay 2 posiciones.
ME
TR
O
Llave M 1,5
1 pieza
1 pieza
Instale la perilla de estrella extendida M10*140 mm en el carro L , como se
muestra.
Hay 2 posiciones.
Coloque las tuercas elásticas en la ranura de la superficie de aluminio.
Pista de extrusión , cuatro por riel . Tenga cuidado con la dirección de la
tuerca

Alinee las tuercas elásticas con la tuerca hexagonal M6*15 mm del carro L
y luego fíjela con una llave M6 y bloquéela.
Instale la placa fija con orificios y las abrazaderas de límite de recorrido en
las ranuras del perfil de aluminio como se muestra.
Cuando sea necesario mantener las posiciones izquierda y derecha del
enrutador en el riel guía, apretado La estrella Perillas para controlar el
deslizamiento hacia la izquierda y la derecha del enrutador tablero flio.
Modelo: YS60-001

Instale la perilla de estrella M10*70 mm en la placa deslizante como se
muestra.
Hay 2 posiciones
Coloque las tuercas elásticas en la ranura de la superficie de aluminio.
Pista de extrusión , cuatro por riel .
Tenga cuidado con la dirección de la tuerca
Alinee las tuercas elásticas con la tuerca hexagonal M6*15 mm del carro L
y luego fíjela con una llave M6 y bloquéela.
Instale la placa fija con orificios y las abrazaderas de límite de recorrido en
las ranuras del perfil de aluminio como se muestra.
Modelo de máquina
Posición del orificio de la placa inferior
No include
Fixed Plate
recortadora de
cantos
Cable de
portero
A
A
A
690 Serie
7529
8529
Ryob
B
La mayoría de
los modelos
Bosch
B
A
A
1615
1617
1618
Makita
B
La mayoría de
los modelos
Sears
do
D
D
mi
D
B
B
315275000
315175040
315175050
315175.060
315175070
315275100
315275110
Fina
F
FT1800
Miwaukee
A
A
A
5615
5616
5619
Freud
B
FT2000F
Hitachi
GR
AM
O
GR
AM
O
GR
AM
M8V
RT12
M12V
Confirme si la placa inferior perforada coincide
con el modelo de su máquina recortadora. Si
no es adecuada, puede utilizar la placa inferior
en blanco correspondiente (9,8 * 9,8 ") para
perforar los agujeros y hacer bricolaje según el
modelo específico de la máquina recortadora.

O
ELU
F
177
Dewalt
F
F
A
A
621
625
616 Senies
618 Senies
Vuelve
yo
0700C


Techniczny Wsparcie i certyfikat e-gwarancji
www.vevor.com/support
DUŻE SANKI FREZARSKIE
INSTRUKCJA OBSŁUGI
MODELE: YS64-001S, YS60-001
We continue to be committed to provide you tools with competitive price.
"Save Half", "Half Price" or any other similar expressions used by us only represents an
estimate of savings you might benefit from buying certain tools with us compared to the major
top brands and does not necessarily mean to cover all categories of tools offered by us. You
are kindly reminded to verify carefully when you are placing an order with us if you are
actually saving half in comparison with the top major brands.

MODELE: YS64-001S, YS60-001
Have product questions? Need technical support? Please feel free to
contact us:
Technical Support and E-Warranty Certificate
www.vevor.com/support
NEED HELP? CONTACT US!
This is the original instruction, please read all manual instructions
carefully before operating. VEVOR reserves a clear interpretation of our
user manual. The appearance of the product shall be subject to the
product you received. Please forgive us that we won't inform you again if
there are any technology or software updates on our product.
LARGE ROUTER SLED

Ostrzeżenie: Aby zminimalizować ryzyko obrażeń, użytkownik
powinien uważnie przeczytać instrukcję obsługi.

PARTS LIST
MODELE: YS64-001S, YS60-001
NI
E
Opis
YS64-001S
YS60-001
Wykres
A
Płytka ślizgowa
2 szt.
2 szt.
B
L- Wózek
2 szt.
0
C
Aluminium
Szlak
wytłaczania
2 szt.
2 szt.
D1
Stała płyta z
otworami
1 szt.
0
D2
Naprawiono P
późno
1 szt.
0
mi
Lampy Trail
Limit C
4 szt.
4 szt.

F
Pokrętło
gwiazdkowe
przedłużone
M10*140mm
4 szt.
0
G
Gałka
Gwiazdkowa
M10* 7 0mm
2 szt.
2 szt.
H
Gałka
Gwiazdkowa
Średnica 10 *
20mm
4 szt.
0
I
Ochraniacze
narożników
szlaku
4 szt.
4 szt.
J
Nakrętka
sześciokątna
M6*15mm
8szt
8szt
K
Nakrętka
elastyczna
8szt
8szt
L
Klucz M6
1 szt.
1 szt.

INSTALL
MODELE: YS64-001S,
Zamontuj pokrętło gwiazdkowe M10*70mm na płycie przesuwnej, jak
pokazano.
Są 2 pozycje
Dokręć płytkę ślizgową i wózek L za pomocą gwiazdy Pokrętło M6*15 mm,
jak pokazano.
Są 2 stanowiska.
M
Klucz M 1,5
1 szt.
1 szt.

Zamontuj przedłużone pokrętło gwiazdowe M10*140mm na belce
poprzecznej L , jak pokazano.
Są 2 stanowiska.
Włóż nakrętki E do szczeliny na powierzchni aluminium Ścieżka
wytłaczania , cztery na szynę . Zwróć uwagę na kierunek nakrętki

Wyrównaj nakrętki elastyczne z nakrętką sześciokątną M6*15 mm wózka L,
a następnie dokręć je kluczem M6 i zablokuj.
Zamontuj płytę stałą z otworami i lampami Trail Limit C w szczelinach
profilu aluminiowego, jak pokazano na rysunku .
Gdy zachodzi potrzeba utrzymania lewej i prawej pozycji frezarki na szynie
prowadzącej, zaciśnięty gwiazda pokrętła do sterowania przesuwaniem
routera w lewo i prawo deska flio.
Model: YS60-001
Zamontuj pokrętło gwiazdkowe M10*70mm na płycie przesuwnej, jak
pokazano.
Są 2 pozycje
Umieść nakrętki elastyczne w szczelinie na powierzchni aluminium
Ścieżka wytłaczania , cztery na szynę .
Zwróć uwagę na kierunek nakrętki

Wyrównaj nakrętki elastyczne z nakrętką sześciokątną M6*15 mm wózka L,
a następnie dokręć je kluczem M6 i zablokuj.
Zamontuj płytę stałą z otworami i lampami Trail Limit C w szczelinach
profilu aluminiowego, jak pokazano na rysunku .
Model maszyny do
Pozycja otworu w płycie dolnej
No include
Fixed Plate

przycinania krawędzi
Kabel
Portera
A
A
A
690 Szereg
7529
8529
Ryob
B
Większość
modeli
Bosh
B
A
A
1615
1617
1618
Makita
B
Większość
modeli
Sears
C
D
D
mi
D
B
B
315275000
315175040
315175050
315175.060
315175070
315275100
315275110
Fein
F
FT1800
Miwaukee
A
A
A
5615
5616
5619
Freud
B
FT2000F
Hitachi
G
G
G
M8V
RT12
M12V
ELU
F
177
Dewalt
F
F
A
A
621
625
616 Sennies
618 Sennies
Proszę potwierdzić, czy perforowana dolna
płyta pasuje do modelu Twojej maszyny do
przycinania. Jeśli nie jest odpowiednia, możesz
użyć pasującej pustej dolnej płyty (9,8 * 9,8")
do wywiercenia otworów i samodzielnego
montażu zgodnie ze szczegółowym modelem
maszyny do przycinania.

Zazdrość
H
0700C


Technisch Ondersteuning en E-garantiecertificaat
www.vevor.com/support
GROTE ROUTERSLEE
GEBRUIKERSHANDLEIDING
MODEL: YS64-001S, YS60-001
We continue to be committed to provide you tools with competitive price.
"Save Half", "Half Price" or any other similar expressions used by us only represents an
estimate of savings you might benefit from buying certain tools with us compared to the major
top brands and does not necessarily mean to cover all categories of tools offered by us. You
are kindly reminded to verify carefully when you are placing an order with us if you are
actually saving half in comparison with the top major brands.
MODEL: YS64-001S, YS60-001
Have product questions? Need technical support? Please feel free to
contact us:
Technical Support and E-Warranty Certificate
www.vevor.com/support
NEED HELP? CONTACT US!
LARGE ROUTER SLED
This is the original instruction, please read all manual instructions
carefully before operating. VEVOR reserves a clear interpretation of our
user manual. The appearance of the product shall be subject to the
product you received. Please forgive us that we won't inform you again if
there are any technology or software updates on our product.
Waarschuwing: om het risico op letsel te verkleinen, moet de
gebruiker de gebruiksaanwijzing zorgvuldig lezen.
PARTS LIST
MODEL: YS64-001S、 YS60-001
NE
E
Beschrijving
YS64-001S
YS60-001
Grafiek
A
Schuifplaat
2 stuks
2 stuks
B
L- Wagen
2 stuks
0
C
Aluminium
Extrusiepad
2 stuks
2 stuks
D1
Vaste plaat met
gaten
1 stuk
0
D2
Vaste P laat
1 stuk
0
Ik
Trail Limit C-
lampen
4 stuks
4 stuks
F
Verlengde
sterknop
M10*140mm
4 stuks
0
G
Sterknop
M10* 7 0mm
2 stuks
2 stuks
H
Sterknop
M 10 * 20mm
4 stuks
0

INSTALL
MODEL: YS64-001S,
I
Trail
hoekbescherm
ers
4 stuks
4 stuks
J
Zeskantmoer
M6*15mm
8 stuks
8 stuks
Ik
Elastische
moer
8 stuks
8 stuks
Ik
Moersleutel M6
1 stuk
1 stuk
M
Moersleutel M
1.5
1 stuk
1 stuk
Monteer de sterknop M10*70mm op de schuifplaat zoals afgebeeld.
Er zijn 2 posities
Draai de glijplaat en de L -wagen vast met de ster Knop M6*15 mm, zoals
afgebeeld.
Er zijn 2 posities.
Installeer de verlengde sterknop M10*140mm op de L - wagen , zoals
afgebeeld.

Er zijn 2 posities.
Plaats de elastische moeren in de sleuf op het aluminium oppervlak
Extrusiepad , vier per rail . Let op de richting van de moer
Lijn de elastische moeren uit met de zeskantmoer M6*15mm van de
L-wagen en draai deze vervolgens vast met een sleutel M6 en vergrendel.
Installeer de vaste plaat met gaten en Trail Limit C- lampen in de sleuven
van het aluminium profiel zoals afgebeeld.
Wanneer het nodig is om de linker- en rechterpositie van de router op de
geleiderail te houden, aangescherpt de ster knoppen om de linker- en
rechterschuif van de router te regelen flio-bord.
Model: YS60-001
Monteer de sterknop M10*70mm op de schuifplaat zoals afgebeeld.
Er zijn 2 posities
Plaats de elastische moeren in de gleuf op het aluminium oppervlak
Extrusiepad , vier per rail .
Let op de richting van de moer
Lijn de elastische moeren uit met de zeskantmoer M6*15mm van de
L-wagen en draai deze vervolgens vast met een sleutel M6 en vergrendel.
Installeer de vaste plaat met gaten en Trail Limit C- lampen in de sleuven
van het aluminium profiel zoals afgebeeld.
No include
Fixed Plate
Model van
kantenfreesmachine
Positie van het gat in de bodemplaat
Porterkabel
A
A
A
690 Serie
7529
8529
Rijst
B
De meeste
modellen
Bosch
B
A
A
1615
1617
1618
Makita
B
De meeste
modellen
Zeehond
en
C
D
D
Ik
D
B
B
315275000
315175040
315175050
315175.060
315175070
315275100
315275110
Fijn
F
FT1800
Miwaukee
A
A
A
5615
5616
5619
Freud
B
FT2000F
Hitachi
G
G
G
M8V
RT12
M12V
ELU
F
177
Controleer of de geperforeerde bodemplaat
overeenkomt met het model van uw
trimmachine. Als dit niet het geval is, kunt u de
bijpassende blanco bodemplaat (9,8 * 9,8")
gebruiken om gaten te boren en zelf te maken
volgens het specifieke model van de
trimmachine

Dewalt
F
F
A
A
621
625
616 Senies
618 Senies
Voor
H
0700C


Teknisk Support och e-garanticertifikat
www.vevor.com/support
STOR ROUTERSLÄDE
ANVÄNDARMANUAL
MODELL: YS64-001S, YS60-001
We continue to be committed to provide you tools with competitive price.
"Save Half", "Half Price" or any other similar expressions used by us only represents an
estimate of savings you might benefit from buying certain tools with us compared to the major
top brands and does not necessarily mean to cover all categories of tools offered by us. You
are kindly reminded to verify carefully when you are placing an order with us if you are
actually saving half in comparison with the top major brands.

MODELL: YS64-001S, YS60-001
Have product questions? Need technical support? Please feel free to
contact us:
Technical Support and E-Warranty Certificate
www.vevor.com/support
NEED HELP? CONTACT US!
This is the original instruction, please read all manual instructions
carefully before operating. VEVOR reserves a clear interpretation of our
user manual. The appearance of the product shall be subject to the
product you received. Please forgive us that we won't inform you again if
there are any technology or software updates on our product.
LARGE ROUTER SLED

Varning - För att minska risken för skada måste användaren
läsa instruktionerna noggrant.
PARTS LIST
MODELL: YS64-001S, YS60-001
IN
GA
Beskrivning
YS64-001S
YS60-001
G raph
A
Glidplatta
2 st
2 st
B
L- C bröllop
2 st
0
C
Aluminium
Extrudering
Trail
2 st
2 st
D1
Fast P late med
H oles
1 st
0
D2
Fast P sent
1 st
0
E
Trail Limit C-
lampor
4 st
4 st

F
Förlängd
stjärnknopp
M10*140mm
4 st
0
G
Stjärnknopp
M10* 7 0mm
2 st
2 st
H
Stjärnknopp
M 10 * 20 mm
4 st
0
jag
Trail Hörnskydd
4 st
4 st
J
Sexkantig
mutter
M6*15mm
8 st
8 st
K
Elastisk mutter
8 st
8 st
L
Skiftnyckel M6
1 st
1 st
INSTALL
MODELL: YS64-001S,
Installera Star Knob M10*70mm på glidplattan enligt bilden.
Det finns 2 positioner
Dra åt glidplattan och L- C -vagnen med stjärna Knopp M6*15 mm ,som
visas.
Det finns 2 positioner.
M
Skiftnyckel M
1.5
1 st
1 st
Installera Extended Star Knob M10*140mm på L -C -vagnen , som bilden
visar.
Det finns 2 positioner.
Sätt in de E lastiska muttrarna i skåran på aluminiumytan Extrusion Trail ,
fyra per skena . Tänk på nötriktningen

Rikta in de elastiska muttrarna med sexkantsmuttern M6*15mm på
L-vagnen och fäst den sedan med en skiftnyckel M6 i och lås.
Installera den fasta plattan med hål och Trail Limit C- lampor i slitsarna på
aluminiumprofilen enligt bilden ,
När det är nödvändigt att hålla överfräsens vänstra och högra position på
styrskenan, åtdragna stjärnan rattar för att styra vänster och höger glidning
av routern fliobräda.
Modell: YS60-001

Installera Star Knob M10*70mm på glidplattan enligt bilden.
Det finns 2 positioner
Sätt de elastiska muttrarna i skåran på ytan Aluminium Extrusion Trail ,
fyra per skena .
Tänk på nötriktningen
Rikta in de elastiska muttrarna med sexkantsmuttern M6*15mm på
L-vagnen och fäst den sedan med en skiftnyckel M6 i och lås.
Installera den fasta plattan med hål och Trail Limit C- lampor i slitsarna på
aluminiumprofilen enligt bilden ,
Kantskärningsmaski
n modell
Bottenplattans hålposition
Porter kabel
A
A
A
690 Serie
7529
8529
Ryob
B
De flesta
modeller
Bosch
B
A
A
1615
1617
1618
Makita
B
De flesta
No include
Fixed Plate
modeller
Sears
C
D
D
E
D
B
B
315275000
315175040
315175050
315175.060
315175070
315275100
315275110
Fein
F
FT1800
Miwaukee
A
A
A
5615
5616
5619
Freud
B
FT2000F
Hitachi
G
G
G
M8V
RT12
M12V
ELU
F
177
Dewalt
F
F
A
A
621
625
616 Senies
618 Senies
Vover
H
0700C
Kontrollera om den perforerade bottenplattan
matchar din trimmaskins modell. Om det inte är
lämpligt kan du använda den matchande
tomma bottenplattan (9,8 * 9,8 ") för att borra
hål och göra DIY enligt den specifika modellen
av trimningsmaskinen