1
SMART CONTROLLER MANUAL
MDR 2i Pressure Switch Guide
Digital Smart Controller - Pressure Switch
2
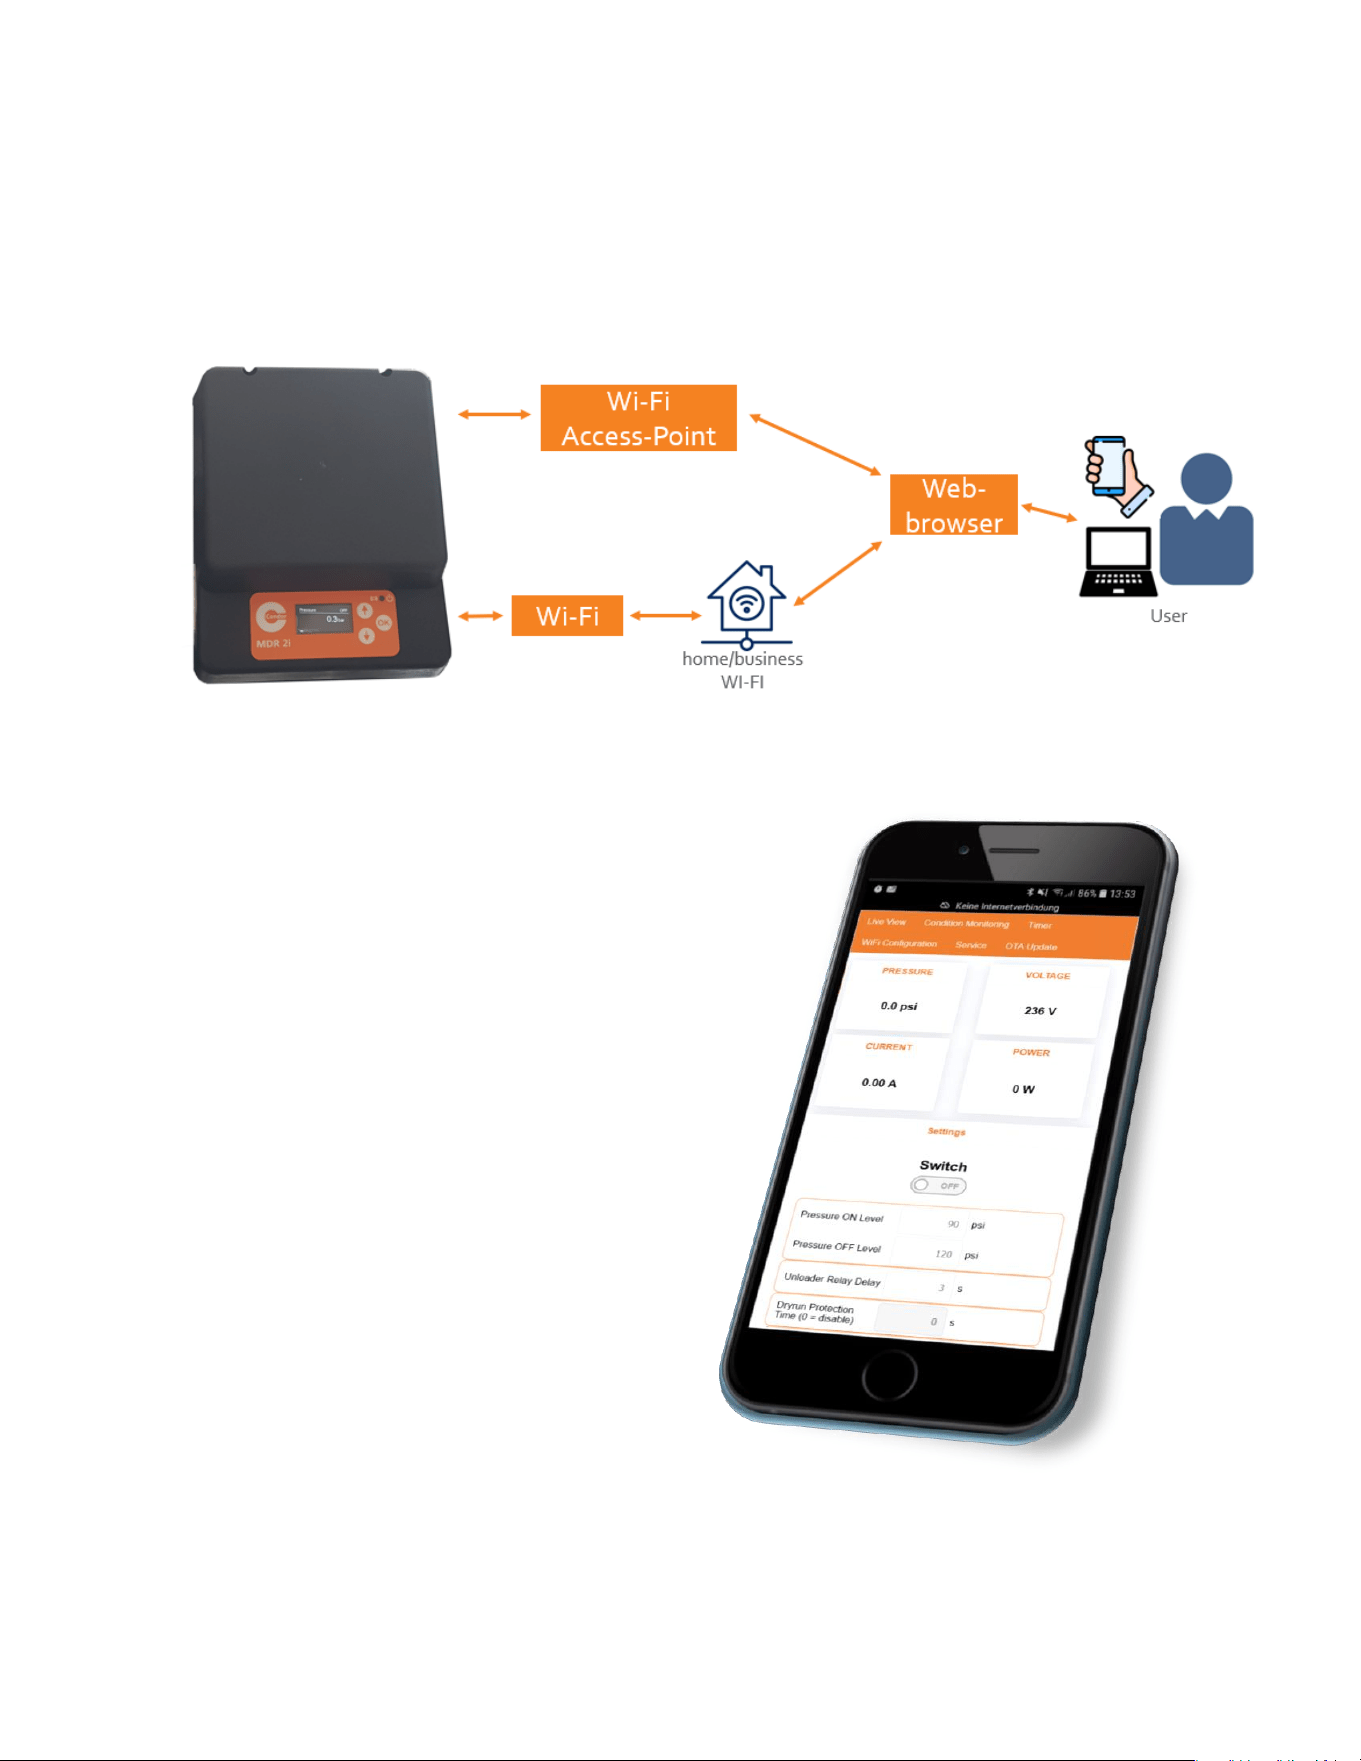
MDR2i OLED Network Connectivity Overview Options
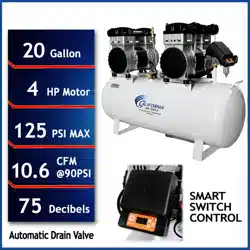
Air Compressor models which feature
the MDR2i OLED Smart Switch may be
connected to mobile phones, tablets,
notebooks, or computers. The switch can
be used as an access point or can be
connected to a Wi-Fi network.
This allows many air compressor features
and parameters to be entered and
controlled comfortably. Furthermore,
remote monitoring is also possible.
NOTE: Conguration using a standard web
browser is the easiest & fastest way to
connect to the air compressor (page 4).
3
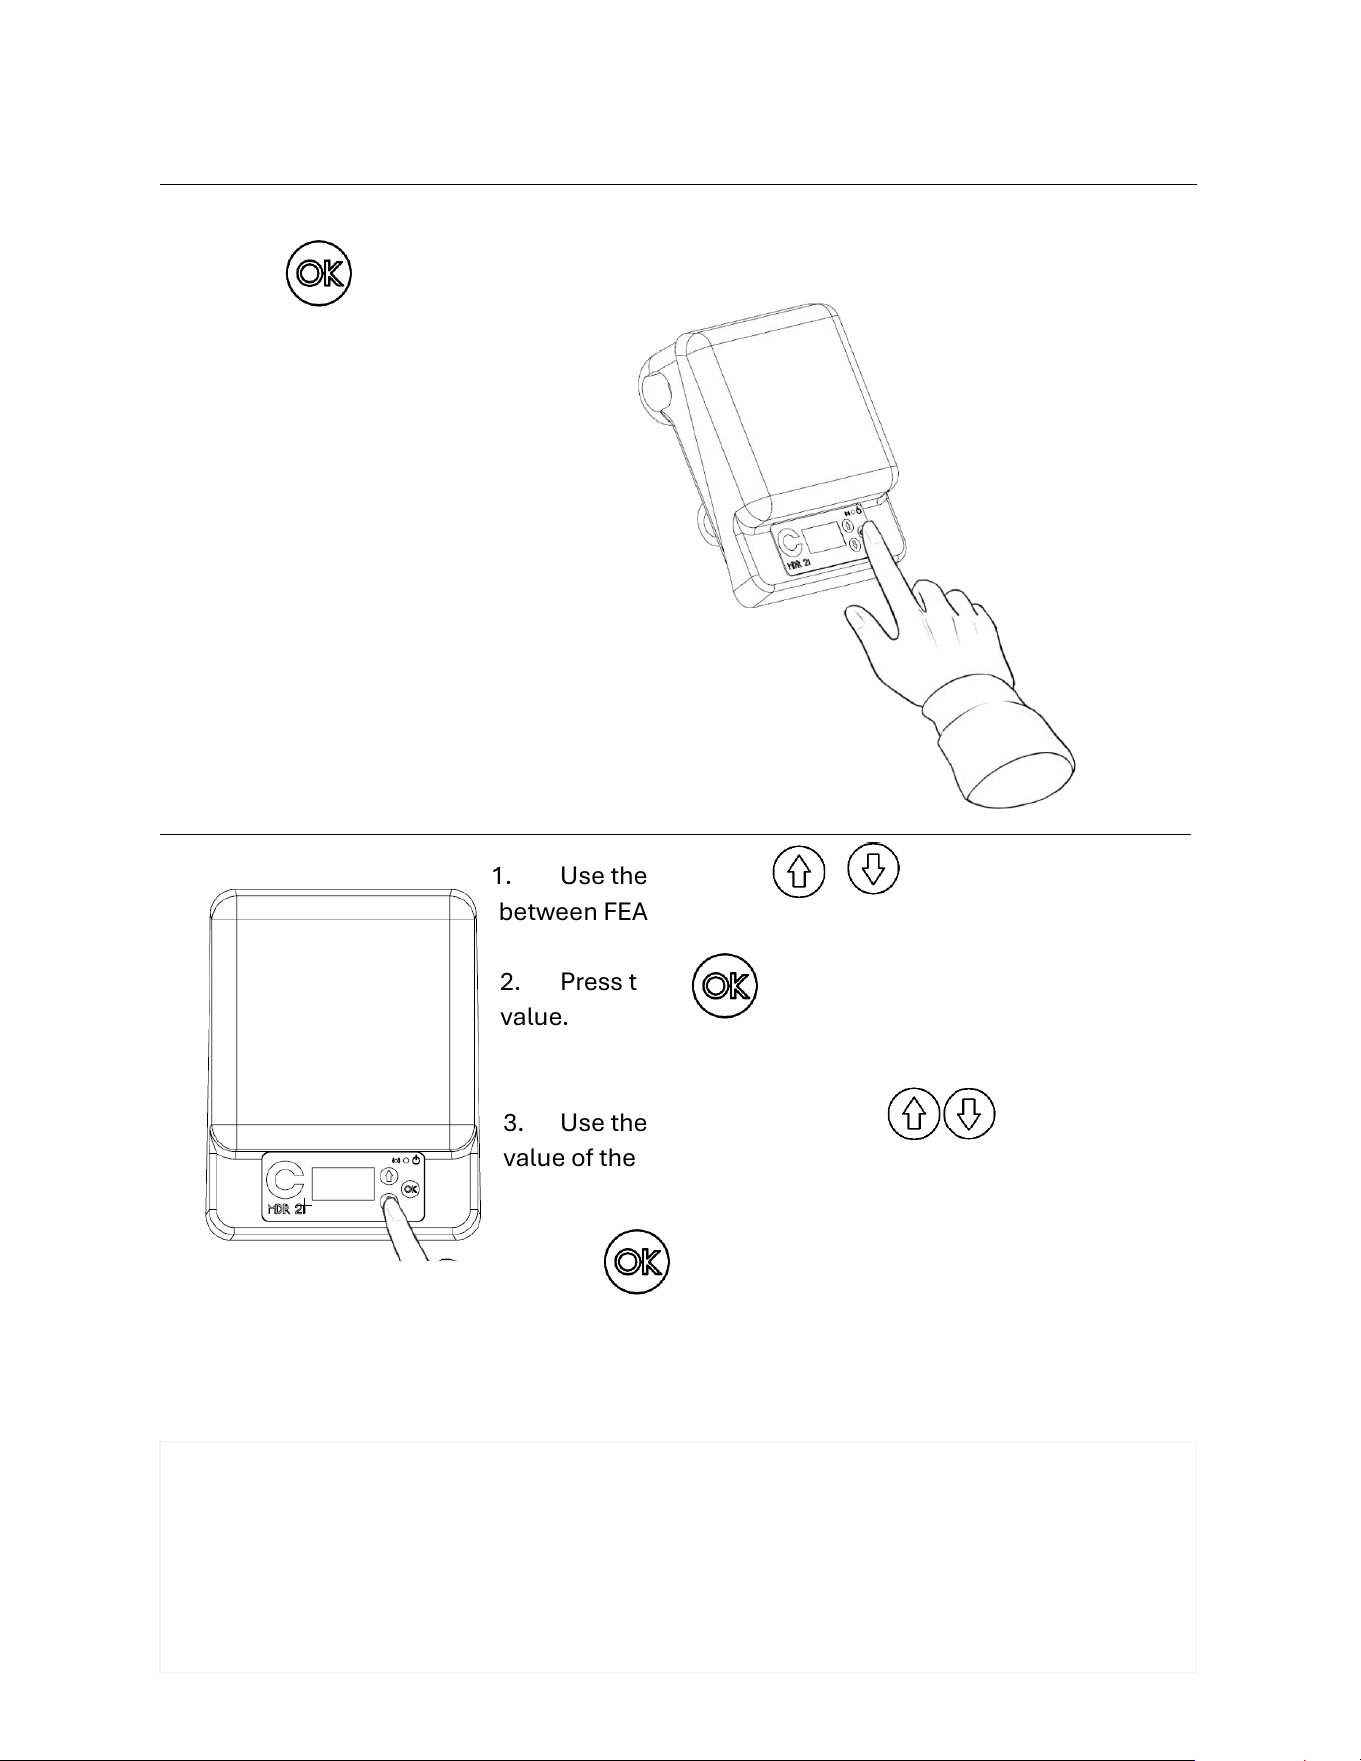
I - TURN ON/OFF____________________________________________________________________________
HOLD the button for 4 seconds to turn ON and OFF
II - FEATURE SELECTION/EDITING___________________________________________________________
1. Use the ARROW BUTTONS to navigate
between FEATURES.
2. Press the BUTTON to EDIT the FEATURES
value.
3. Use the ARROW BUTTONS to change the
value of the FEATURE when you are EDITING.
4. Press to SET the new FEATURE value and STOP
EDITING.
The features available on screen are as follows:
o Main (ON/OFF)
o Wireless Network [Choose the connection mode: AP-Mode, ON, OFF]
o Programmable Timer [Turn timetable operation ON or OFF]
o Switch-O Pressure [Select Unit Shutdown Pressure, MAX 125 PSI]
o Switch-On Pressure [Select the unit's re-start pressure, MIN 3 PSI]
o Overcurrent Limit [Select the current limit allowed on the equipment]
4
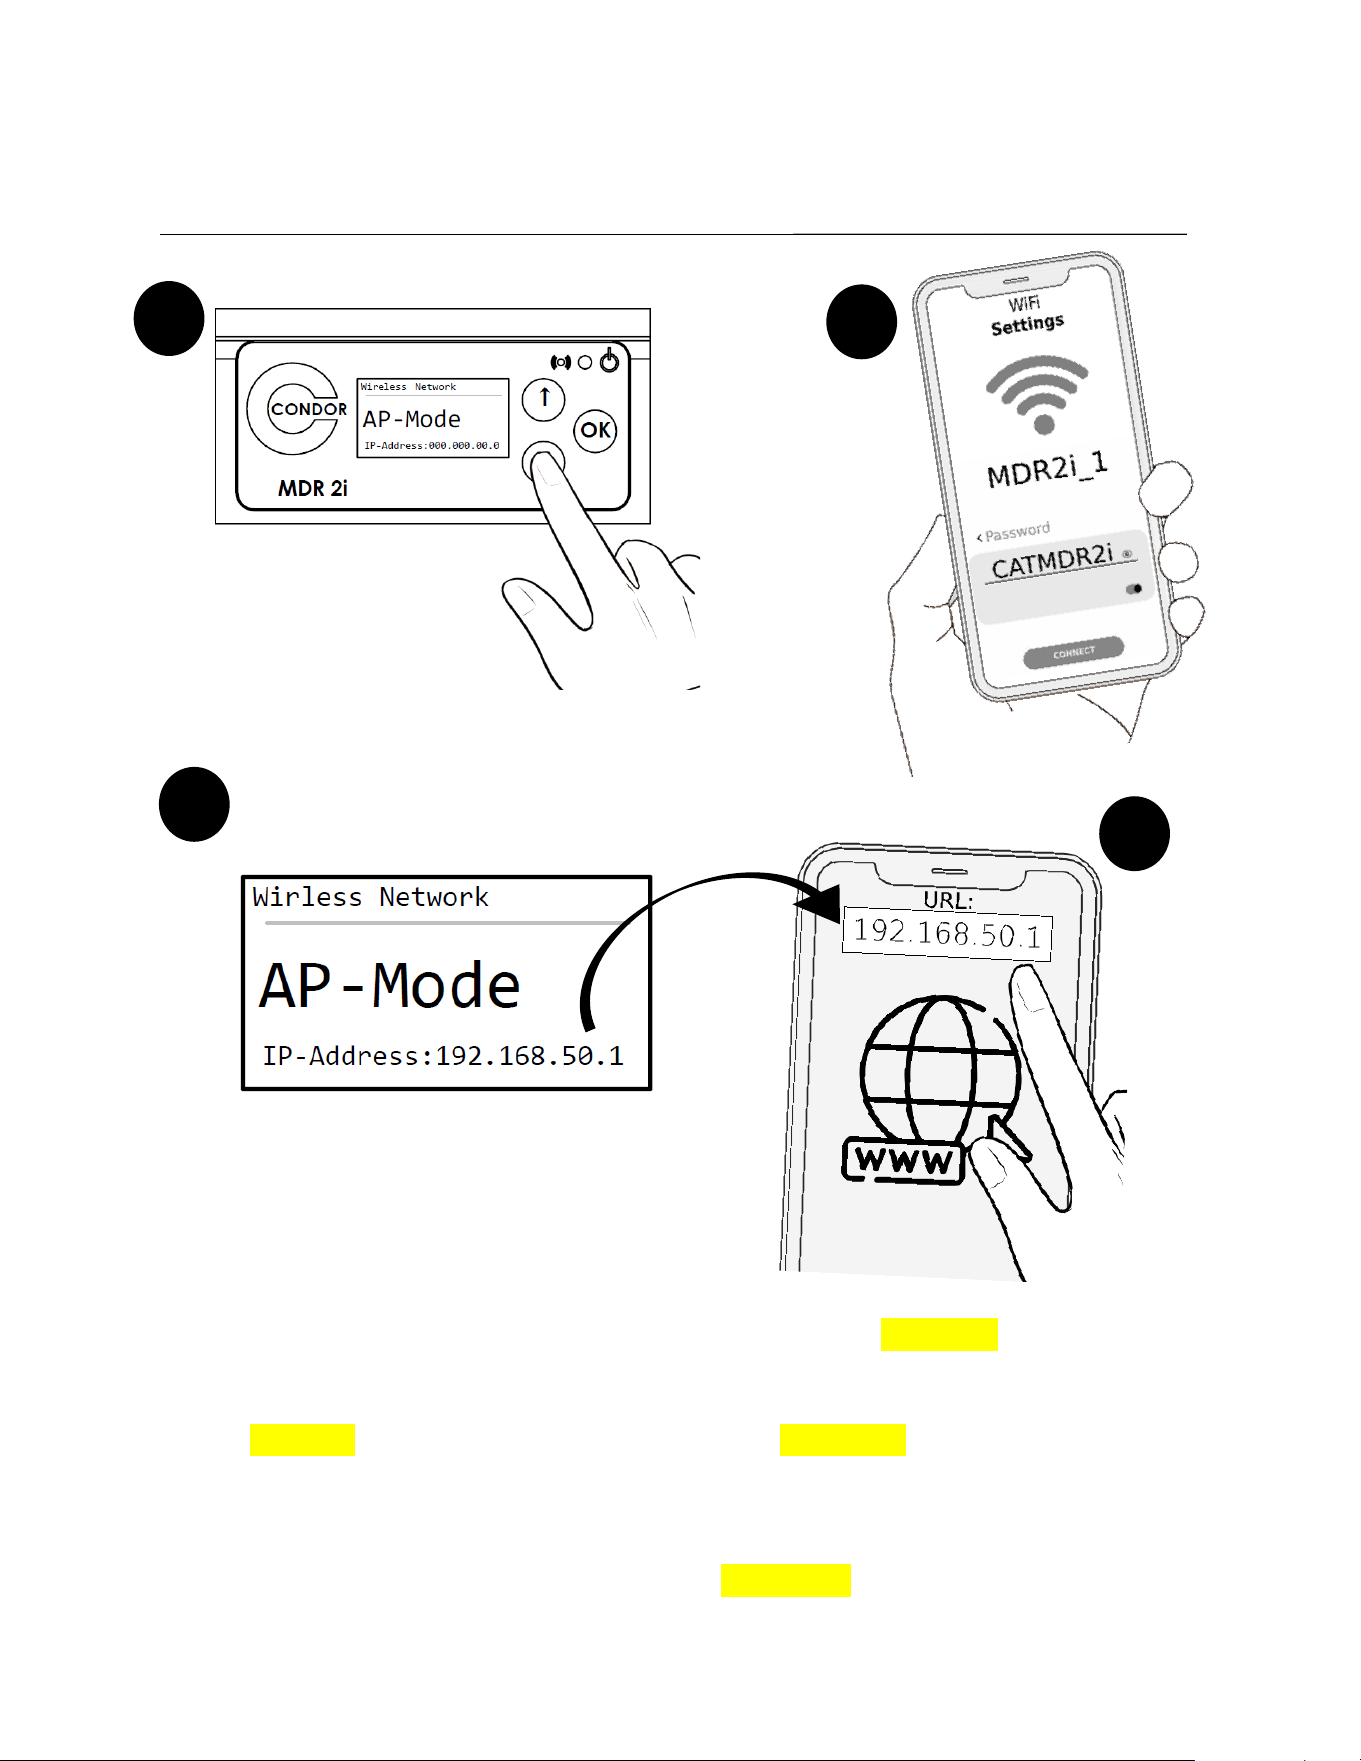
III- CONNECT YOUR DEVICE________________________________________________________________
1. Look for the "Wireless Network" feature. Select and set "AP-MODE" for the feature
value.
2. Go to your device (PC, Laptop, or SmartPhone) and open WiFi settings. Find the
"MDR2i_1" network and enter the PASSWORD "CATMDR2i" to connect.
3. Go to the MDR 2i Pressure Switch, go to the "Wireless Network" feature, and identify
the IP address displayed at the bottom of the screen (i.e. xxx.xxx.xx.x)
4. Open the web browser on your device (Chrome, Firefox, Safari, etc.) and enter the IP
address in the browser directory (URL: i.e. xxx.xxx.xx.x)
2
1
3
4
5
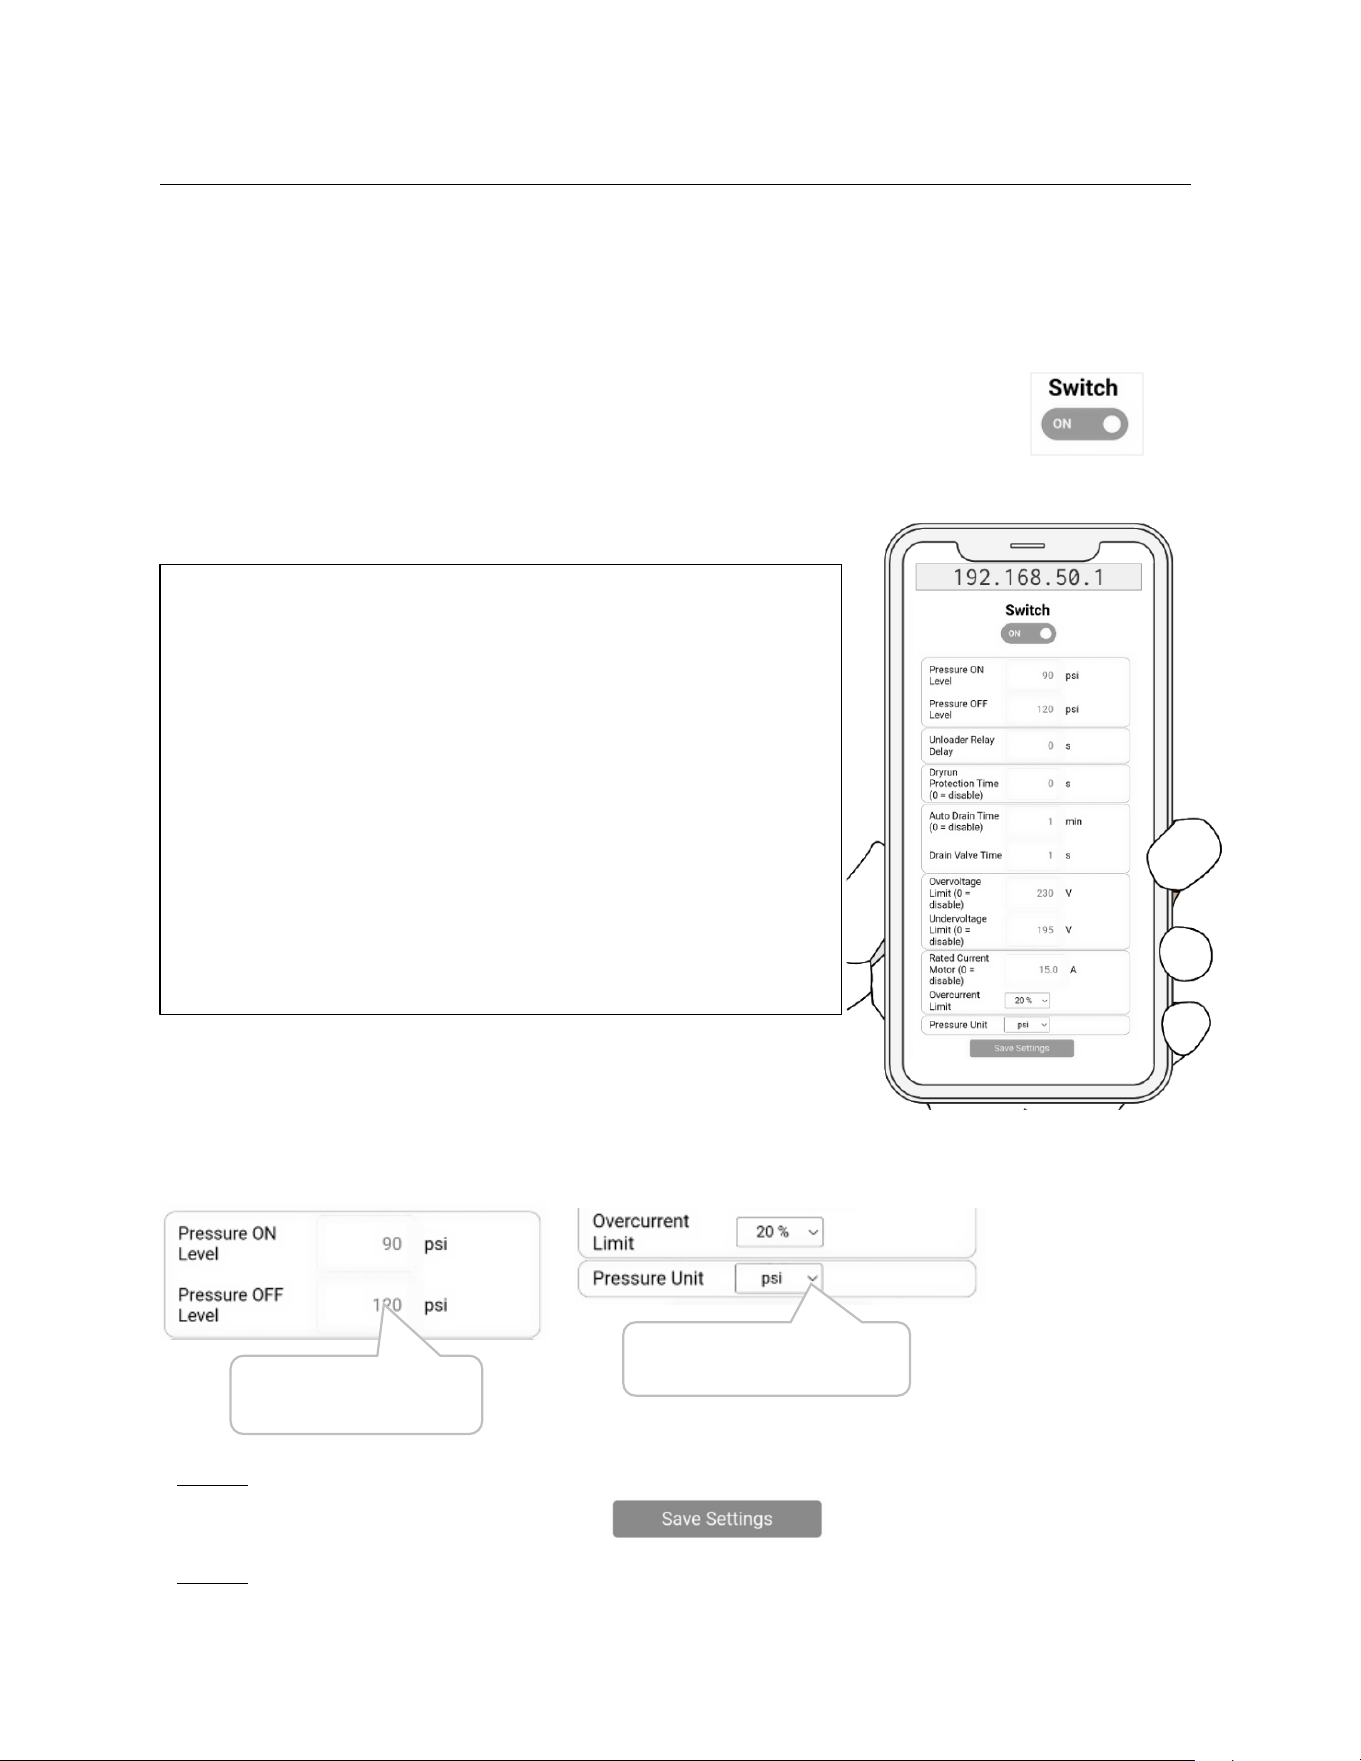
IV – CONTROL WITH YOUR DEVICE__________________________________________________________
Once connected, your device should display the compressor control interface, which is
made up of tabs (shown at the top) that in turn contain the dierent features of the Smart
Controller.
By default, the user is directed to the Live View tab which contains the unit's digital switch
to turn the compressor ON or OFF [SCROLL DOWN IF YOU DONT SEE THE SWITCH]
Pressure and real-time electrical data are also displayed, as well as the key features of the
Smart Controller:
• Pressure ON Level: Select the unit's re-start
pressure
• Pressure OFF Level: Select Unit Shutdown Pressure
• Unloader Relay Delay: Delay time for activation of
the unloader valves during compressor start-up. It
allows the initial load to be reduced.
• AutoDrain Time: Select the time between each drain;
Drain Timer.
• Drain Valve Time: Set the valve opening time on each
drain.
• Overcurrent Limit: Choose the current limit allowed
on the unit. It acts like a breaker.
• Pressure Unit: Choose between [bar] and [PSI]
Congure by typing the value, or select from predened options,
depending on the feature.
Type to change the value of
the feature
Change the values by choosing
the desired option
NOTE: When you enter invalid data, the control interface will display a note, mentioning the
error and under what conditions you should enter the value for the feature.
NOTE: Remember to save the settings after you make the desired changes. This option is
located at the bottom of the interface.
6
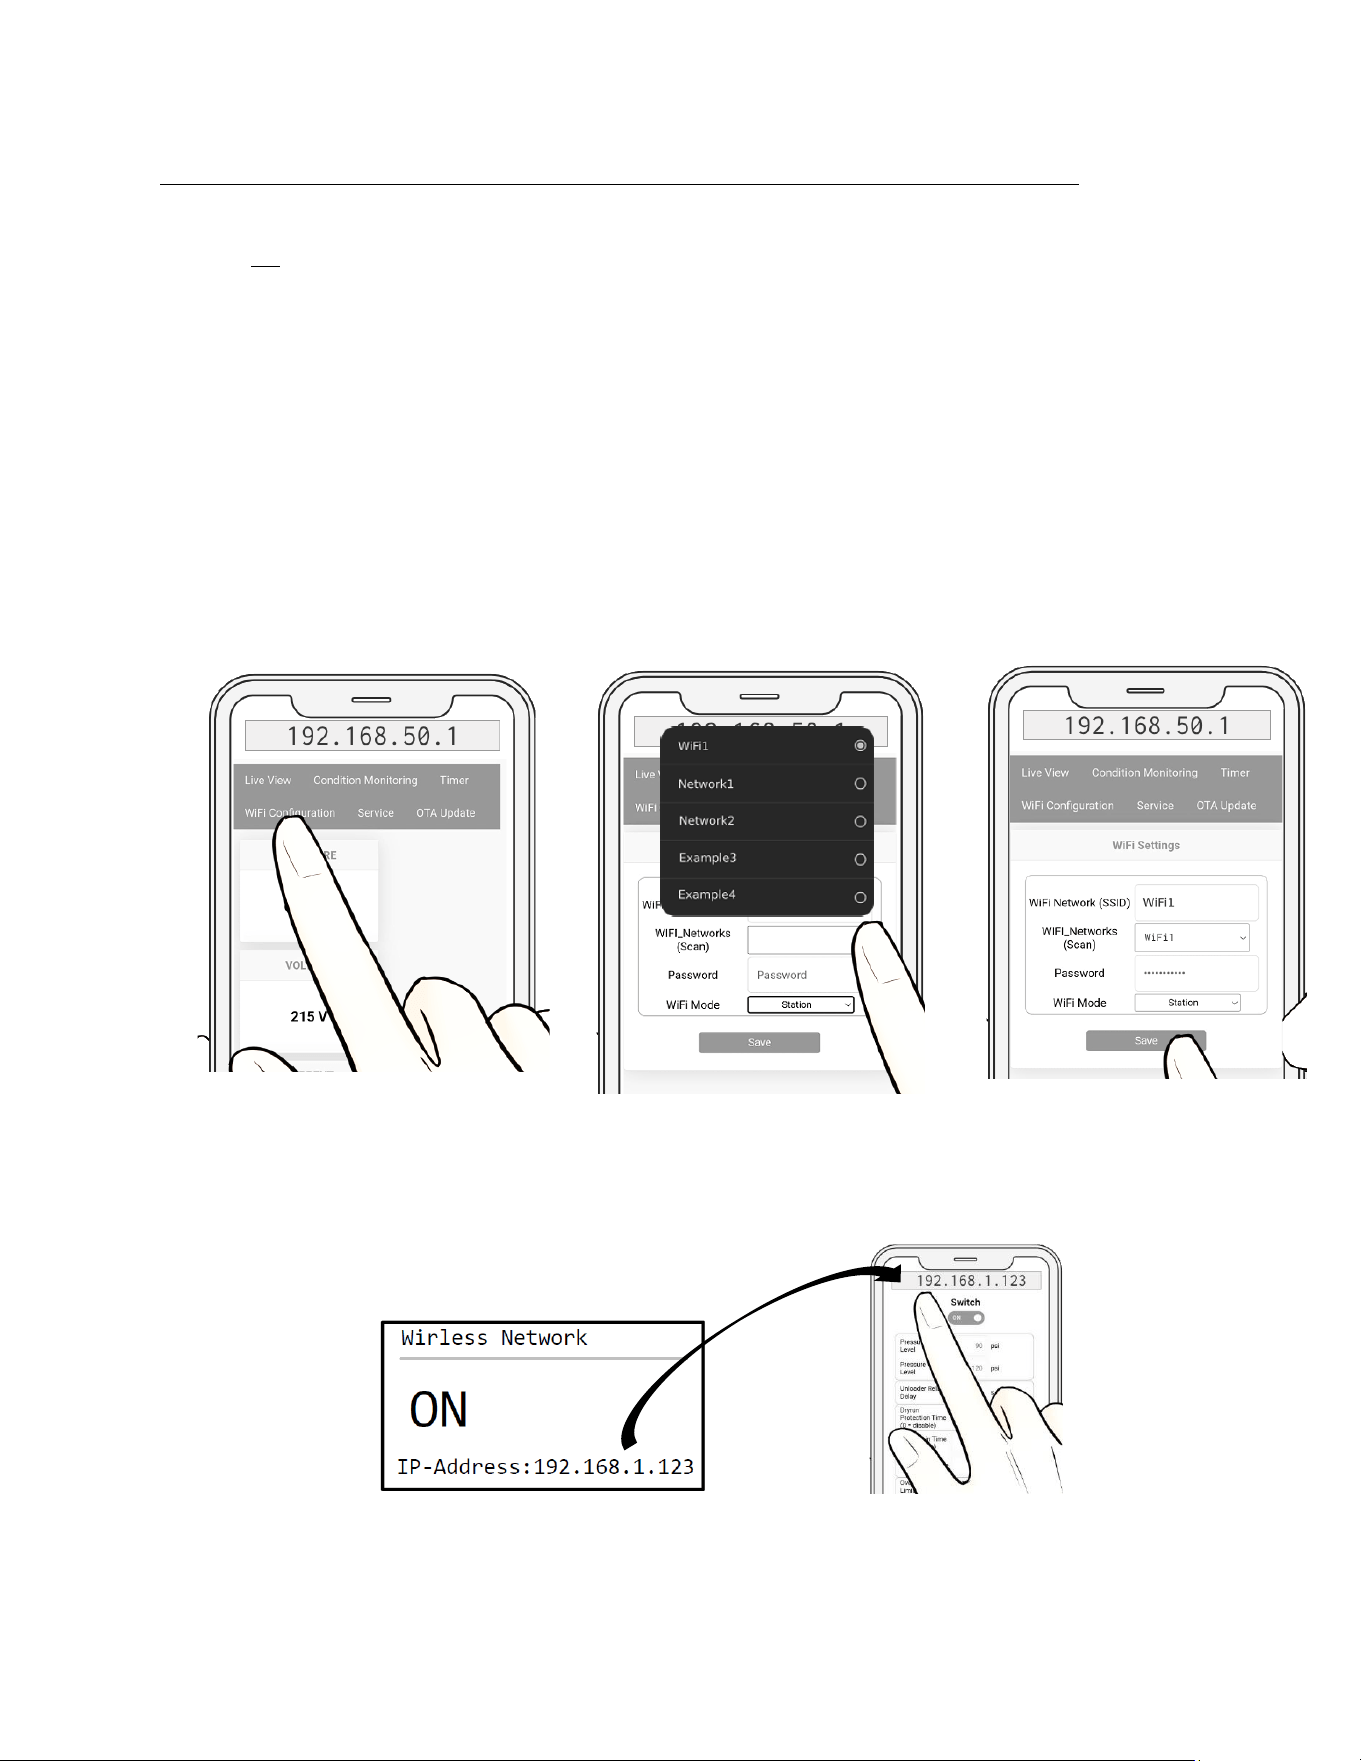
V – CONNECT A ROUTER__________________________________________________________
NOTE: You must have your device previously paired to the Smart Controller before proceeding. See
Chapter III.
1. Using your device, head to the control interface and go to the "WiFi Conguration"
tab
2. Go to the "WiFi Mode" option and choose "Station" mode.
3. The interface will display the "WIFI_Networks (Scan)" option which detects the 5
closest networks. Find and choose your ROUTER's network.
NOTE: Verify that the information in the "WiFi Network (SSID)” section matches that of
"WIFI Networks (Scan)". If not, manually enter the network name. Otherwise, the pair to the
ROUTER will fail.
4. Enter your ROUTER's network password and SAVE.
5. The Smart Controller will be restarted. After this, go to the Smart Controller screen,
go to "Wireless Network" and verify that you are in "ON" mode and a valid IP
address has been generated. (must be a dierent IP than 0.0.0.0)
6. Go to your device and connect it to your router's WiFi network (your internet).
7
7. Now open the browser on your device and enter the IP address displayed by the
Smart Controller (mentioned in step 5).
VI – SET DATE & TIME__________________________________________________________
Set date and time for the Smart Controller.
This conguration can only be done using your device, it is not possible to congure directly on the
Smart Controller. If you have not paired your device to the Smart Controller, please read Chapter III
rst.
1. Using your device (Smartphone, PC, Laptop, etc.) go to the Smart Controller's control
interface.
2. Go to the "Service" tab.
3. Go to the "DATE/TIME" section and set the date and time.
4. Press "Set Date/Time" to save the information.
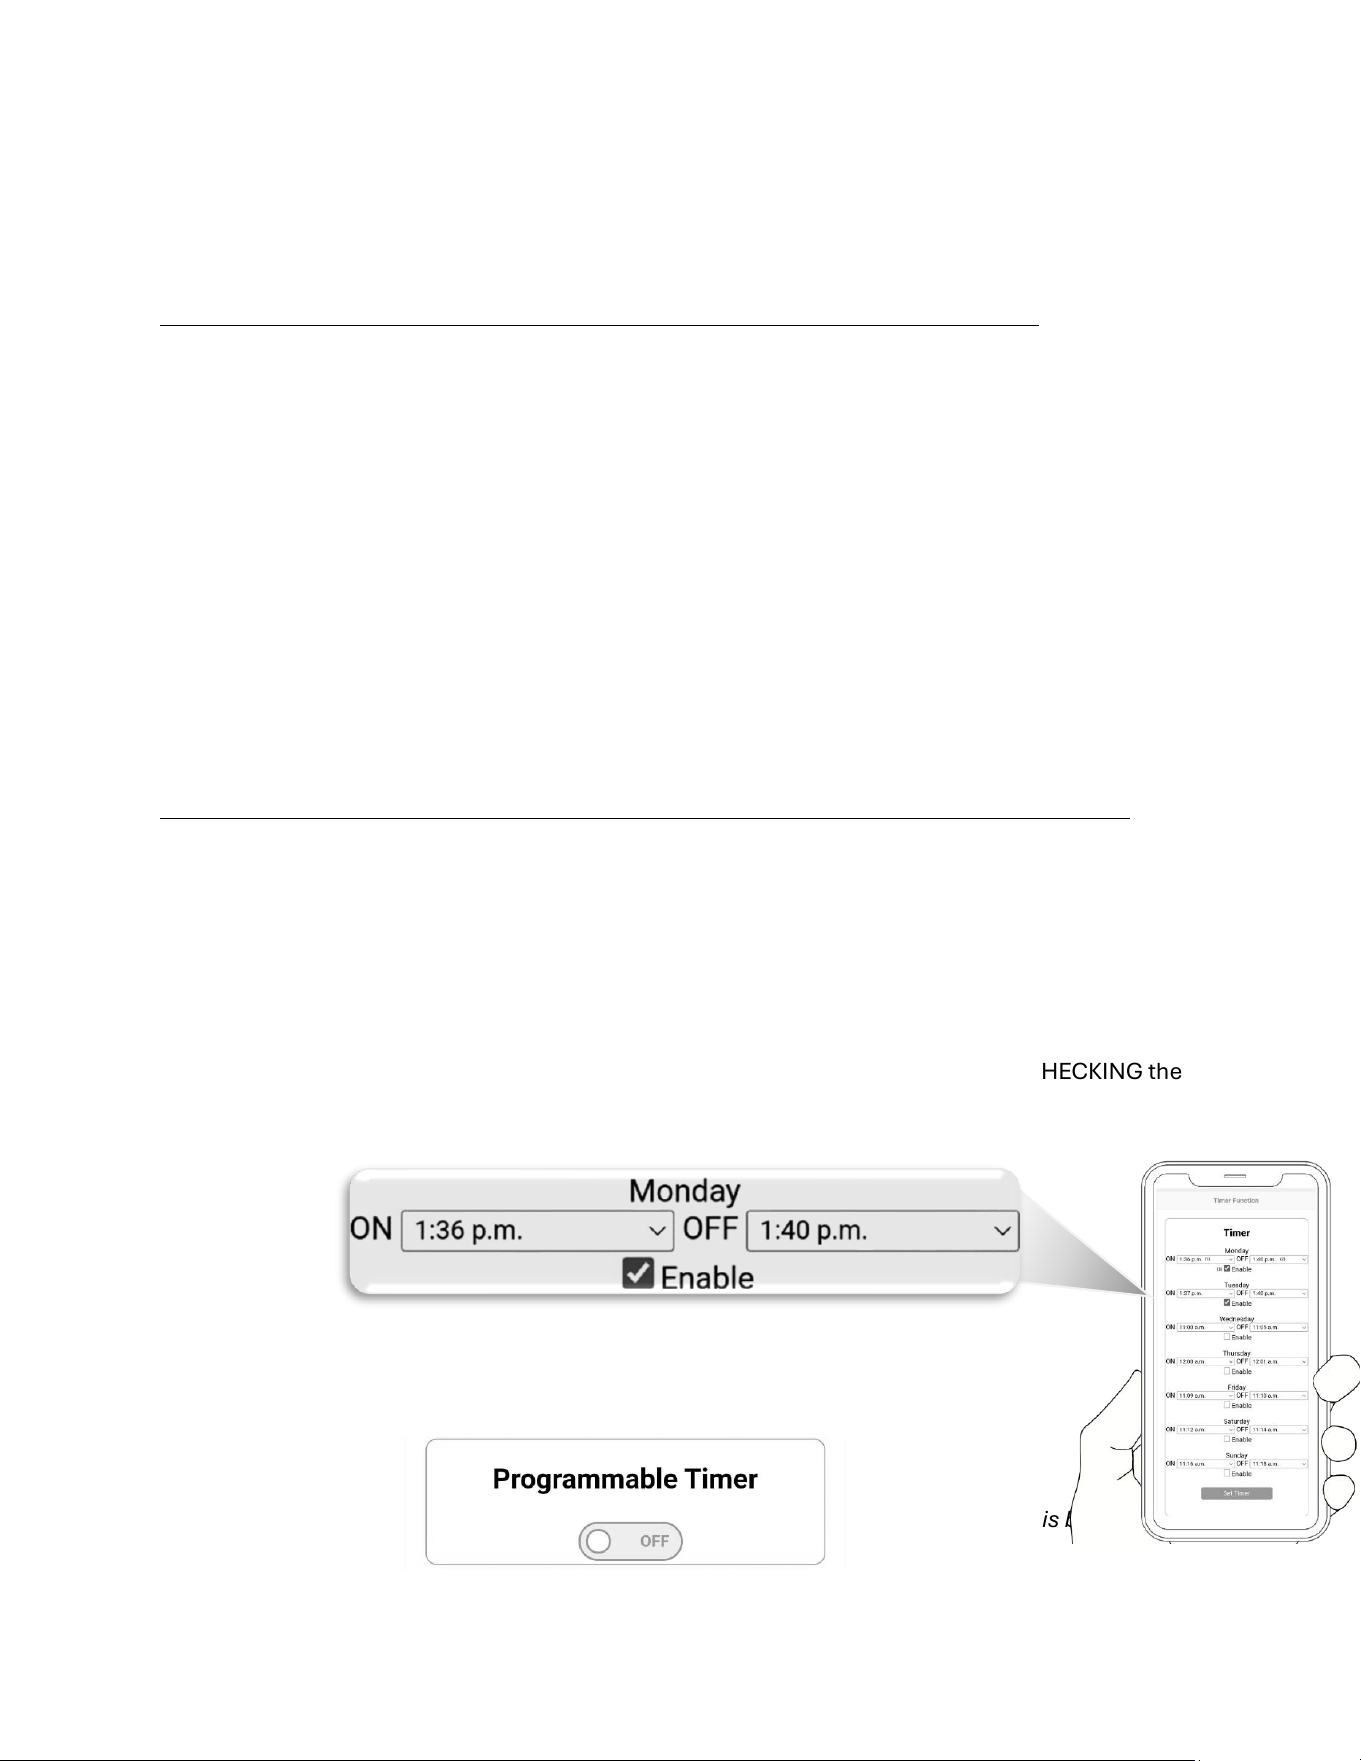
VII – PROGRAMMABLE TIMER__________________________________________________________
The Smart Controller has the "PROGRAMMABLE TIMER" feature, which manages the use of the
compressor according to date and time, allowing or denying its use.
1. Using your device (SmartPhone, PC, Laptop, etc.) go to the Smart Controller's control
interface.
2. Enter the "Timer" tab.
3. Set the duty cycle on each day of the week.
• Enable the days of the week that the compressor is required to work BY CHECKING the
"Enable" box
• Select the job's ON and OFF time for each day
4. Press "Set Timer" to save the information.
5. Use the "Programmable Timer" switch to enable or disable this feature.
The function of the switch (ON/OFF) will remain the same, regardless of the Timer. This both on the
interface and directly from the Smart Controller.
8
VIII – FIRMWARE UPDATE__________________________________________________________
The rmware of your Smart Controller can be updated, improving important aspects to make the
device and its control more eicient.
Check your rmware version:
1. Use your device and enter the Smart Controller's control interface
2. Go to the "Condition Monitoring" tab.
3. Note in the "Device Info" box the date and time shown in the "Build Time"
section.
4. Go to [ WEBSITE ] and verify that the date of your rmware matches the one
shown on the web.
If your rmware is outdated, continue:
1. Download the rmware le from the WEBSITE. (Download or transfer to the
device you use the Smart Controller with)
2. Go to the control interface and go to the "OTA Update" tab
3. Select "Browse..." to browse to the rmware le
4. Select the le and press "Update Firmware"
The Smart Controller will start uploading the le and when it nishes it will restart the computer.
Wait a few seconds before handling the equipment again.
IX – MAINTENCE____________________________________________________________________________
The Smart Controller can count the hours worked for each component and also its on/o cycles.
This will allow you to determine a replacement prior to the total deterioration of any of the
components. Grab your device and head to the Smart Controller's
control interface.
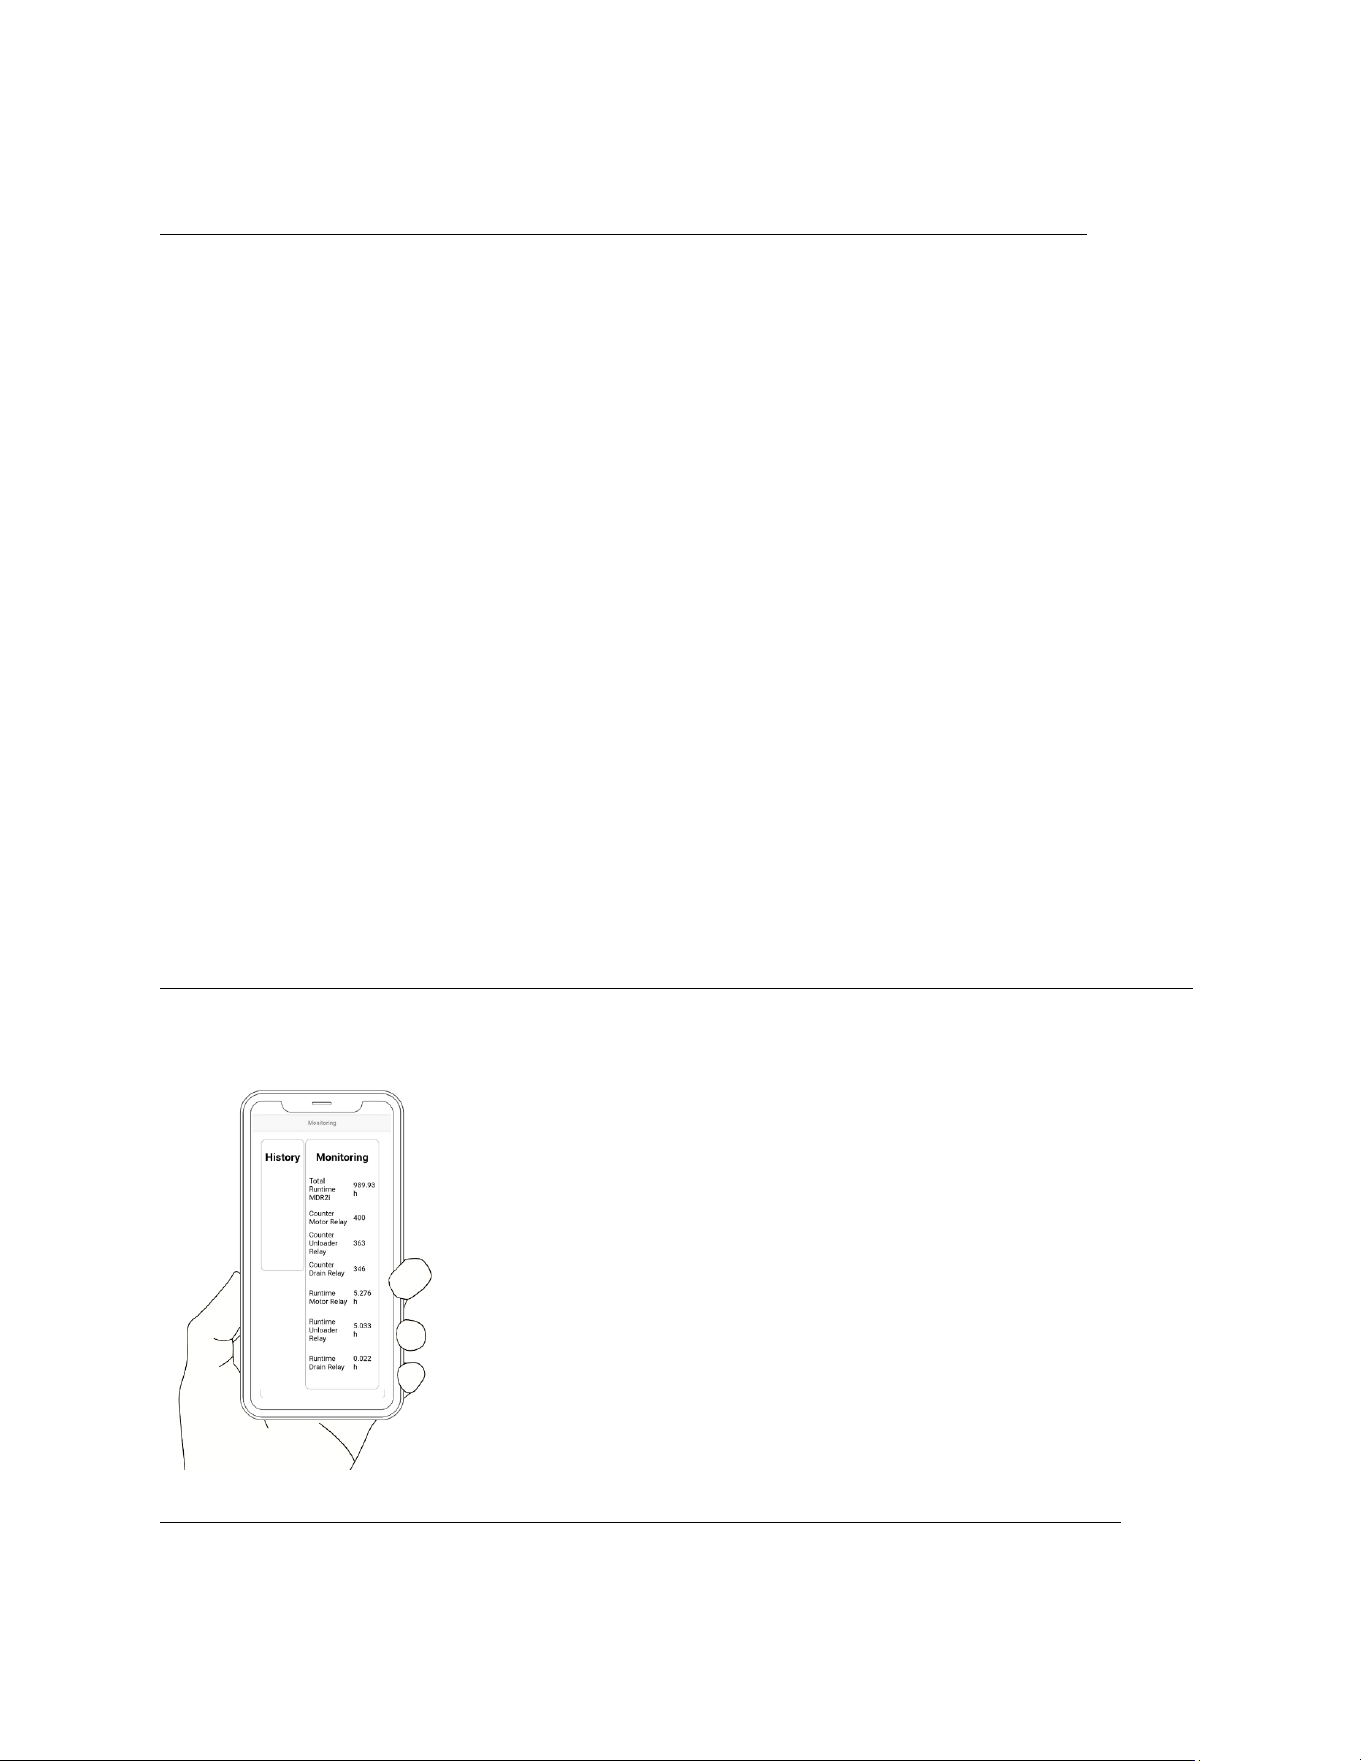
1. Go to the "Condition Monitoring" tab.
2. See the "Monitoring" section
1. Total Runtime: Time count for the Smart Controller.
2. Counter Motor Relay: Worked cycles of the Motor.
3. Counter Unloader Relay: Cycles worked from the Unloader Valve.
4. Counter Drain Relay: Worked cycles of the drain valve.
5. Runtime Motor Relay: Motor Hours Worked.
6. Runtime Unloader Relay: Unloader Valve Hours Worked.
7. Runtime Drain Relay: Drain valve hours worked.
X – RESET____________________________________________________________________________
Go to the Smart Controller control interface>>>"Service">>Actions>Trigger Restart.
