
User Manual
Product:
WHIR10KG
© 2024 RVM Australia Pty Ltd. All Rights Reserved

Contents
Safety Information
Important Safety Instructions..................................................................1-3
Electrical Requirements..............................................................................3
Setup & Operation
Installation Guide.........................................................................................3
Parts & Features...........................................................................................4
Operation..................................................................................................5-6
Cleaning & Care............................................................................................7
Support & Warranty
Troubleshooting..........................................................................................8
Peace of Mind Guarantee...........................................................................10
Warranty................................................................................................11-13

Important Safety Instructions
© 2024 RVM Australia Pty Ltd. All Rights Reserved
1
DANGER
WARNING
1. Read all instructions carefully before using this appliance.
2. Always turn the power o at the power outlet before you insert or remove the power plug.
Remove by grasping the plug and do not pull on the cord.
3. DANGER: Do not operate the appliance if:
• the power cord or plug is split, melted or damaged;
• the appliance has malfunctioned;
• the appliance has been damaged in any manner.
If any of the above incidents occur, return your appliance to the nearest authorised service
center for examination, repair or adjustment.
4. DANGER: Do not attempt to disassemble, adjust or repair the appliance yourself.
5. DANGER: Do not under any circumstances immerse the power cord, mains plug or appliance
body in water or any other liquid.
6. DANGER: Ejected steam from this appliance is extremely hot and therefore should be avoided.
Never direct the steam towards yourself or other people as this may cause burns or scalding.
7. DANGER: Do not operate the appliance on clothes that are being worn by yourself or others.
Always remove the clothing and iron on a suitable surface and never whilst the clothing is being
worn.
Immediate hazards which WILL result in severe personal injury or
death.
8. WARNING: Use handle grip and buttons only as some surfaces may become warm whilst the
appliance is in use. Avoid touching the hot sole plate.
9. WARNING: If the power cord is damaged, it must be replaced by the manufacturer, its service
agent or a similarly qualified person in order to avoid a hazard.
10. WARNING: Do not cover the appliance whilst in operation.
11. WARNING: Ensure the appliance and it’s accessories are cleaned regularly and according to the
Cleaning & Care instructions within this user manual.
12. WARNING: Incorrect operation and improper use may damage the appliance or parts thereof,
and cause severe personal injury.
13. WARNING: Combustible materials such as paper, curtains, tablecloths, kitchen towels etc.
should not be placed near the appliance whilst in operation or after.
14. WARNING: Do not place the appliance with the sole plate facing curtains or other flammable
materials.
15. WARNING: Always ensure your hands are dry before handling the power cord plug or switching
on the power outlet.
Hazards or unsafe practices which COULD result in severe personal
injury or death.

Important Safety Instructions
2
16. CAUTION: Close supervision is necessary when this appliance is used near children.
17. CAUTION: Keep the appliance and its power cord out of reach of children.
18. CAUTION: Ensure that the temperature dial is in the “OFF” position and that the steam control is
set to the “0” position after each use.
19. CAUTION: Wait for the appliance to cool before moving. Carry only by the handle.
20. CAUTION: Always remove the plug from the power outlet before filling the water reservoir.
21. CAUTION: Allow 30 minutes to cool down after use before cleaning and storing.
22. CAUTION: Never fill the appliance with water directly from the tap, use the water beaker instead.
23. CAUTION: The appliance should not be left unattended whilst connected to the power outlet.
Unplug the appliance from the power outlet:
• before cleaning;
• before filling the water reservoir;
• immediately after use;
• when moving to storage;
• when not in use.
24. This appliance is not intended to be operated by means of an external timer or separate remote-
control system.
25. Never carry or hang the appliance by it’s power cord.
26. Avoid scratching the sole plate on zippers, buttons or hooks etc.
27. Do not permit the power cord or plug to touch hot objects like the hot sole plate or allow the
power cord to lay across the appliance.
28. This appliance is deemed for use indoors only.
29. Children should not play with the appliance.
30. Always use this appliance with a power outlet of the voltage (A.C. only) marked on the rating
label of the appliance.
31. Do not use the appliance for any purpose other than its intended use.
32. Do not overfill the appliance past the “MAX” line on the water tank.
33. Do not place your appliance on or near a hot gas flame, electric element, heated oven or any hot
surface.
34. Do not leave the iron connected to power unattended in the vicinity of children or pets where it
could be knocked o an ironing board.
35. Do not allow the power cord to hang over the edge of a table or bench top.
36. Do not place anything on top of the appliance.
37. Ensure the appliance is used and rested on it’s heel stand on a horizontal, even, stable and heat-
resistant surface.
38. Do not use fragrances , fabric softeners, starch, cleaning agents, vinegar or any other chemical
liquids in the water tank.
CAUTION
Hazards or unsafe practices which COULD result in minor personal
injury.

Electrical Requirements
Installation Guide
© 2024 RVM Australia Pty Ltd. All Rights Reserved
3
Do not attempt to modify the power cord or plug in any way.
If the power cord is too short, do not use an extension cord. Have a qualified electrician or serviceman
install an outlet near the appliance.
Westinghouse recommends the use of a residual current device (RCD) with a tripping current that
does not exceed 30mA in the electrical circuit supplying power to all appliances
Neither Westinghouse nor the retailer can accept any liability for damage to the product or personal
injury as a result of a failure to observe the electrical connection procedures or instructions within
this manual.
1. Carefully remove the appliance from the box.
2. Remove any packaging around the appliance and power cord. Do not remove any warning
labels.
3. Clean the appliance and it’s accessories, following the Cleaning & Care instructions within this
manual.
4. Ensure to read the Operation instructions within this manual before your first use, and always
follow these instructions when operating the appliance.
Important Safety Instructions
39. This appliance is not intended for use by persons (including children) with reduced physical,
sensory or metal capabilities or lack of experience and knowledge unless they have been
given supervision or instruction concerning use of the appliance in a safe way by the person
responsible for their safety, and understand the hazards involved.
40. This appliance is intended to be used in private households and not in applications such as:
• sta kitchen areas, oces and other working environments;
• farm houses;
• by guests in hotels, motels and other residential type environments;
• bed and breakfast type environments;
• commercial environments.
41. We recommend using distiled water to reduce the amount of scale build-up within the
appliance. Do not use chemically distilled water.
42. Empty the water tank after every use. Use caution, as this water will be hot after operation.

Parts & Features
4
1. Sole Plate.
2. Water Inlet
Cover.
3. Water Tank.
4. Temperature
Display.
5. Steam Control
Lever.
6. Steam Burst
Button.
7. Power Cord
Protector.
8. Heel Stand.
1
2
3
5
6
7
4
8
A. Temperature Settings.
B. Increase Button.
C. High Steam Suggested.
D. Low Steam Suggested.
E. Auto Shut-O Icon.
F. Standby Icon.
G. Decrease Button.
A
B
C
D
E
F
G

Operation
© 2024 RVM Australia Pty Ltd. All Rights Reserved
5
Before your first use of the appliance, ensure the below initial process is completed.
1. Remove any stickers or protective foil from the Sole Plate. Clean the Sole Plate with a soft cloth.
Avoid scratching the Sole Plate with any sharp or abrasive objects.
2. Tilt the unit to a 45 degree angle (from resting position on the heel stand) and lift the Water
Inlet Cover. Using the water beaker, pour water into the water inlet opening until ‘MAX’ level is
reached within the Water Tank.
3. Connect the plug to the power outlet and press the Increase Button until you have selected the
“Linen” setting on the Temperature Display. The “Linen” icon will flash, indicating that the iron is
heating up. Have the iron stand up on its heel rest on a stable and heat-resistant surface. Once
the “Linen” icon illuminates without flashing, the set temperature has been reached.
4. Move the Steam Control Lever to the steam icon and steam will start to come out of the steam
holes on the Sole Plate. Perform the first ironing on an old towel or old clothing piece, as there
may be dust remaining in the tank from the manufacturing process. Once the Water Tank runs
empty and no more steam is produced, the initial process is complete.
Note: The iron has been treated for protection during manufacturing and transport, and as a result,
the iron may emit vapours when switched on for the first time. This is normal and should cease after
a short while.
Filling the iron with Water
Make sure the iron is not plugged in. Tilt the unit to a 45 degree angle (from resting position on the
heel stand) and lift the Water Inlet Cover. Using the water beaker, pour water into the water inlet
opening until “MAX” level is reached.
Using Your iron for Dry Ironing
1. Insert the plug into a power outlet and turn the power on.
2. Ensure the Steam Control Lever is in the far left position (= No steam).
3. Use the Increase and Decrease Buttons to select the desired setting on the Temperature Display
according to the ironing recommendation on your garment label. The selected temperature
setting icon will flash to indicate that the iron is heating up or cooling down to your selected
temperature setting. Once the iron has reached your selected temperature setting, the selected
icon will illuminate without flashing.
Note: When changing the temperature setting from higher to lower temperature, allow the appliance
some time to reach the lower temperature before using it on the garment.
Note: If the garment consists of several types of fabric or fibers, select the ironing temperature
according to the requirements of the most delicate fabric.
Note: Before ironing, always read the garment manufacturer’s label and adjust the temperature
setting accordingly Note: If you are unsure of what temperature setting your garment requires, test
on an inconspicuous part of the garment in case the iron is too hot for the fabric type.
Note: When ironing most fabric types, iron on the inside of the garment to prevent overheating, which
creates a shine on the fabric.

Operation
6
Steam Ironing
1. Fill the Water Tank.
2. Use the Increase Button to set the temperature setting to either “Cotton” or “Linen” and wait
until the appliance heats up and the temperature setting icon illuminates without flashing.
3. Set the Steam Control Lever to the steam icon. The steam level will adjust based on the selected
temperature setting (more steam for Linen, less for Cotton).
Note: Steaming is generally not recommended for synthetic fabrics such as nylon and polyester.
Always follow the garment manufacturer’s instructions.
Using The Steam Burst
The Steam Burst feature can be used for both dry and steam ironing at high creases on heavy fabrics.
1. Fill the Water Tank.
2. Use the Increase Button to set the temperature setting to “Cotton” or “Linen” and wait until the
appliance heats up and the temperature setting icon illuminates without flashing.
3. Set the Steam Control Lever to the steam icon and press the Steam Burst Button to release a
powerful burst of steam from the Sole Plate.
Note: To prevent water droplets appearing from the Sole Plate do not press the Steam Burst Button
continuously for more than 5 seconds. Keep a brief interval between uses for optimal results.
Note: The steam burst can also be applied when the iron is in an upright position. This ‘vertical steam’
feature is ideal for removing creases on curtains, hanging suits etc.
Anti-Drip System
Your iron is equipped with an anti-drip system which is designed to prevent water from escaping
through the Sole Plate when using lower iron temperatures, thus helping to avoid water marks on
your garments.
Note: During use, the anti-drip system may emit a clicking sound, particularly during heat up or
when the iron is cooling down. This is normal and indicates that the anti-drip system is functioning
correctly.
DANGER: Ejected steam from this appliance is extremely hot and therefore should be avoided. Never
direct the steam towards yourself or other people as this may cause burns or scalding.
DANGER: Do not operate the appliance on clothes which are being worn by yourself or others. Always
remove the clothing and iron on a suitable surface and never whilst the clothing is being worn.
Note: If you feel the fabric catch whilst passing the iron over it, the iron should be removed
immediately as the temperature setting is too high for the fabric.
Note: If you have several things to iron, start with the fabric that needs the coolest temperature
setting and work up to the one that requires the hottest temperature. This saves time and prevents
accidental melting or scorching.

© 2024 RVM Australia Pty Ltd. All Rights Reserved
7
After Each Use
1. Remove the plug from the power outlet and ensure that the Steam Control Lever is on the far left
position (= no steam).
2. Allow the appliance to cool down approximately 30 minutes before handling or cleaning. Avoid
touching the Sole Plate when hot.
3. Empty the water tank after each use. Use caution when emptying the water tank as the water
inside may be hot.
4. Wipe the Sole Plate with a soft, damp cloth and non-abrasive (liquid) cleaner and dry thoroughly.
5. If burnt fibers are stuck to the Sole Plate, dampen a soft cloth with vinegar and wipe o.
6. The exterior of the appliance may be wiped clean with a damp cloth. Do not use solvents or
bleach as this may damage the finish of the appliance.
To Clean The Steam Holes
Use a cotton wool tip moistened with distilled water to remove any build-up that may have blocked
the steam holes. Use caution not to scratch or damage the Sole Plate.
Using The Self-Clean Function
The self-clean function is useful in preventing scale build-up in your iron. Use the self clean function
regularly, at least once a month or more frequently, especially in hard water areas.
1. Make sure the iron is not plugged in and that the Steam Control Lever is set to the far left
position (= no steam).
2. Fill the Water Tank to the “MAX” level. Do not add vinegar or other chemicals.
3. Plug in the appliance and set the temperature setting to “Linen”. Wait until the appliance heats
up and the “Linen” icon illuminates without flashing. Switch o the Iron.
4. Unplug the iron from the power outlet. Hold the iron over a sink with the Sole Plate facing down.
5. Press and hold the Steam Control Lever to the far right to activate the self cleaning feature.
Gently shake the iron to and fro whilst holding the lever to the far right.
6. Steam and boiling hot water will eject from the holes on the Sole Plate. Impurities, scale and
flakes (if any) will be flushed out.
7. Release the lever as soon as all the water in the tank has been used up (no more steam is being
produced). Repeat the process as necessary.
8. Once the self-clean is done, plug the appliance back in and set the temperature setting to “Linen”
again to allow the Sole Plate to dry.
9. Switch o the iron and unplug it from the power outlet.
10. Move the iron over a piece of cloth, e.g., an old towel, to remove any water stains that may have
formed on the Sole Plate.
11. Allow the iron to cool down fully before storing.
Cleaning & Care
If none of the above solves the problem, DO NOT try to adjust or repair the appliance yourself.
Should you be unable to contact your place of purchase for assistance or resolution, call our
customer service centre at:
Australia:
1300 883 109 /
Mon-Fri 8:00am - 4:00pm WST
8
Troubleshooting
Before calling for service, if the appliance fails to operate:
• Check that the appliance is plugged in correctly and securely. If it is not, remove the plug from
the power outlet, wait 10 seconds and then plug it back in correctly and securely.
• Inspect your home’s circuit breakers to see if any have blown or tripped. If these seem to be
working correctly, test another appliance in the same power outlet to ensure the power outlet is
working correctly. If appropriate, test the appliance in another power outlet within your house.
• Ensure that you have read and followed all instructions within this manual, including but not
limited to the instructions within the following segments of this manual:
» Important Safety Instructions;
» Electrical Requirements;
» Installation Guide;
» Operation;
» Cleaning & Care.
• Review the below Troubleshooting chart and attempt to remedy the issue if appropriate/
applicable in your situation.
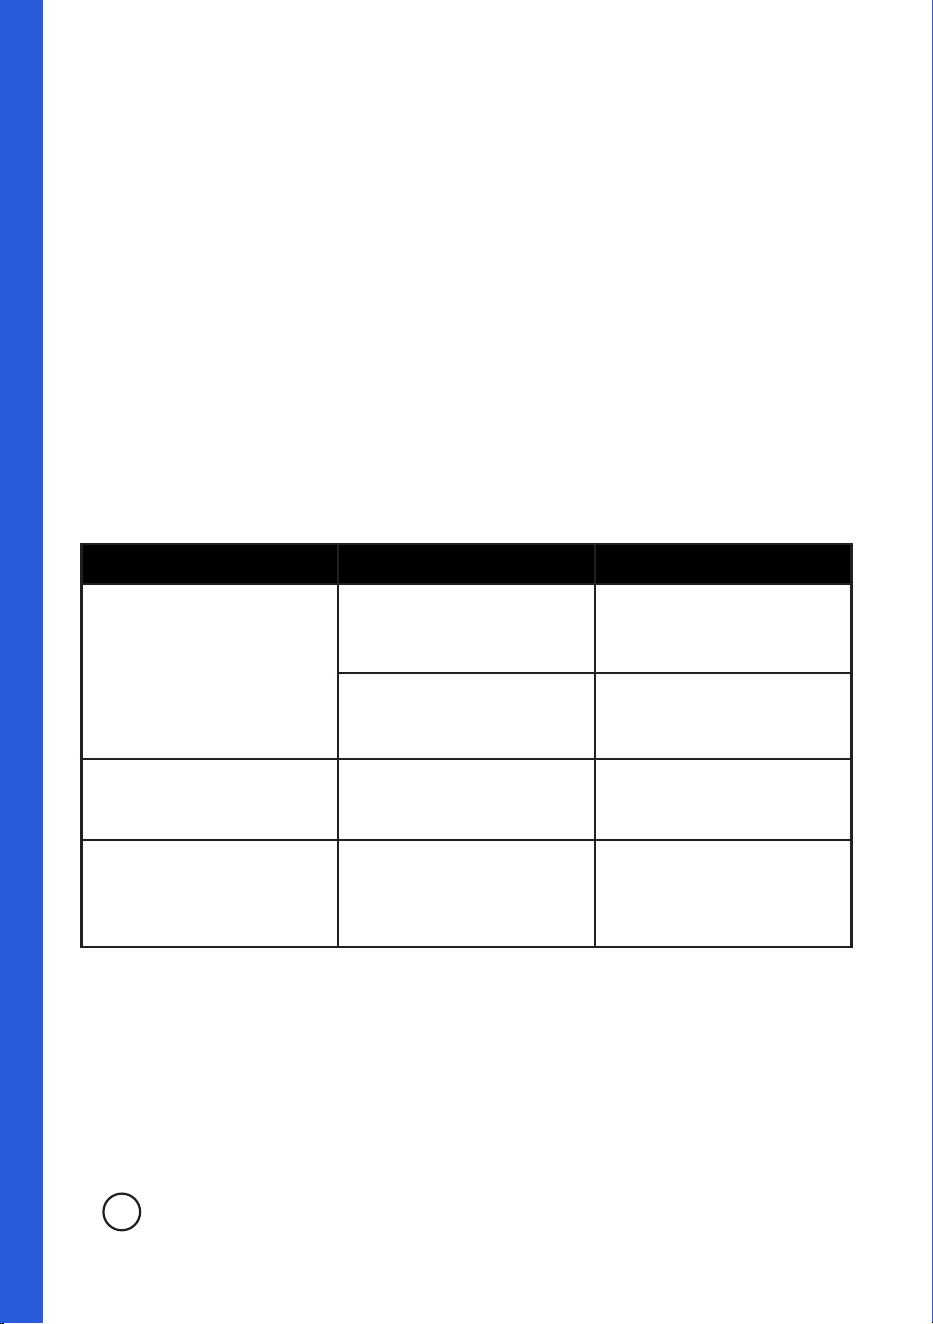
TROUBLE POSSIBLE CAUSE POSSIBLE REMEDY
Water is leaking from the Sole
Plate.
The temperature setting is set
too low for steam.
Increase the temperature
selected to a suitable level for
steam (Cotton or Linen).
The water tank is overfilled
past the “MAX” line.
Pour out the excess water
from the tank using the Self
Clean feature.
The iron is not producing
enough steam.
Steam holes are blocked.
Clean the steam holes as
per the Cleaning & Care
instructions on page 8.
The Steam Burst is no longer
working.
Water level in the Water Tank
is too low.
Carefully fill the Water Tank
up to the “MAX” level and try
again once the iron returns to
temperature.
New Zealand:
0508 776 546 /
Mon-Fri 8:30am - 4:30pm NZDT

New Zealand:
0508 776 546 /
Mon-Fri 8:30am - 4:30pm NZDT
Visit our website for FAQ’s, helpful tips &
hints or to leave a review.

Peace of Mind Guarantee
Our Westinghouse small appliances are backed by a 12 month guarantee as part of our dedication to
provide quality products for our customers. This means that if you purchase a Westinghouse small
appliance which has a manufacturer defect/fault, or does not meet the seller’s specifications as a
result of a defect/fault, then the seller will either repair or replace the unit, or refund the purchase
price of the unit at their own discretion (refer to clause 4 of the Limited Warranty).
This does not apply to products which have been misused/abused, poorly maintained or serviced,
damaged due to negligent handling, accidentally damaged or normal wear and tear. Ensure to follow
all instructions within this instruction manual, including the Cleaning & Care section for correct
maintenance. (See page 7)
Your warranty does not cover the following:
• Damage caused by power surges, voltage supply issues, power dips or usage of the
incorrect voltage.
• Damage caused by service or modification of the unit which are not performed by
authorised service centres or personnel.
• Damage caused by the use of accessories, attachments, consumables, parts or devices which
are not produced for the product by Westinghouse and it’s licensees.
• Damage caused by exposure of the product to abnormally corrosive conditions.
• Damage caused by incorrect or improper operation and/or installation.
• Damage caused by a failure to follow additional instructions.
• Products which have had the serial number and/or rating label removed.
• Usage of the product which are outside of the intended applications (refer to page 1-2).
• Freight costs incurred during a claim, consumables, loss, damage or accessories which require
periodic replacement by nature (filters, seals etc.).
How to claim under this warranty:
1. Carefully check the operating instructions, user manual and the terms of this warranty;
2. Have the model and serial number of the appliance available;
3. Have the proof of purchase (e.g. receipt) available;
4. Return the unit to place of purchase;
5. If unable to return to the place of purchase, call our service centre on 1300 883 109.
If your warranty claim is accepted, the product may be replaced with a similar or refurbished unit
or repaired using refurbished parts. If your warranty claim is not accepted, the seller will inform you
and provide any further options which are available in your situation. If the product is to be repaired
or shipped as a result of this, you will be responsible for the cost of repair and/or any freight charges
incurred.
10
To register your product, view the most up-to-date user manuals and FAQ’s, visit the product page by
scanning the QR code on your product’s cord label.

Limited Warranty
11
1. Nothing in this Warranty aects the Consumer’s rights under the Australian Consumer Law. The
benefits to the Consumer under this Warranty are in addition to the rights and remedies of the
buyer under any Consumer Guarantees. The Australian Consumer Law requires that we confirm
that:
Our goods come with guarantees that cannot be excluded under the Australian Consumer
Law. You are entitled to a replacement or refund for a major failure and for compensation for
any other reasonably foreseeable loss or damage. You are also entitled to have the goods
repaired or replaced if the goods fail to be of acceptable quality and the failure does not amount
to a major failure.
2. Subject to Clause 1, the Seller warrants that Westinghouse branded products will be free of
manufacturing defects and will perform to the Seller’s specifications subject to the following
clauses.
3. The benefit of this Warranty extends only to the owner of the property in which the Products
manufactured or supplied by the Seller are installed and used by the owner for the duration of
the Warranty Period under standard domestic applications.
4. The Warranty commences on the date of the purchase of the product and continues for the
benefit of the Owner for the Warranty Period. If within the Warranty Period a manufacturing
defect is discovered in the Product, or the Product fails to perform to the Seller’s specifications
as a result of some defect in material or workmanship in the Product, then the Seller will at its
own discretion:
a. Repair or replace the Product at the cost of the Seller. Goods repaired or replaced under this
Warranty will be warranted for the remaining period of the Warranty. Products presented
for repair may be replaced by refurbished products of the same type rather than being
repaired. Refurbished parts may be used to repair the products.
b. Refund the purchase price paid by the consumer.
5. The Warranty does not apply to Product that :
a. Has failed due to excessive wear and tear beyond what is considered to be reasonable.
b. Has been misused or neglected.
c. Has been damaged accidentally or by acts of God including fire and flooding.
d. Has been used or operated contrary to operating or maintenance instructions.
e. Has been damaged by the Consumer or a third party authorised to act for the consumer in
transit from the Sellers store to the Consumer.
f. Has been modified, altered or tampered with by unauthorized persons.
g. Damage caused by insects or vermin and claims based on the presence of insects or
vermin.
h. Has been used in commercial situations or applications.
© 2024 RVM Australia Pty Ltd. All Rights Reserved

Limited Warranty
It also excludes breakables such as glass and ceramic items, consumable items such as those
that require periodic replacement as part of the ordinary use, lack of care or maintenance of
the product or as directed by the instruction booklet, minor cosmetic issues (including, without
limitation, paint and coatings) and normal wear and tear, and does not cover the cost of claiming
under the warranty or transporting the goods to and from the place of purchase.
6. In order to make a claim under the Warranty, the Owner must, where possible return the goods
to the Seller’s store at the Owner’s cost. Proof of purchase must be supplied in all cases.
7. The seller will examine any returned Products and if the Seller determines that there is an
apparent defect through no fault of the Owner, the Seller will:
a. Make note of the Owner’s contact details including the Owner’s telephone number which
the owner can be contacted during business hours, postal address and e-mail address.
b. Make note of the defects reported by the Owner.
c. Take back the defective goods from the owner and determine within a reasonable time
through dialogue with the Seller whether the goods are defective.
d. Advise the owner within a reasonable time frame whether it accepts or rejects the Product
claim.
e. If the Seller accepts the return of the Product, the Seller must arrange to have
i. The Product repaired or,
ii. Replace the damaged or faulty Product or,
iii. Refund the purchase price.
Note that repairs or replacements may be done with refurbished items or parts, or replaced with
a similar item.
8. The Seller will not accept any returned Product which has not been returned strictly in
accordance with this Warranty.
12

© 2024 RVM Australia Pty Ltd. All Rights Reserved
13
Limited Warranty
9. For the purpose of this Warranty:
a. Australian Consumer Law means the law as set out in Schedule 2 of the Competition and
Consumer Act 2010 (Cth).
b. Consumer means the Purchaser of goods from the seller.
c. Consumer means a Consumer as that term is set out in section 3 of the Australian
Consumer Law.
d. Consumer Guarantees means the guarantees under the Australian Consumer Law.
e. Implied terms means any guarantees, conditions, warranties or other terms implied by any
Australian Commonwealth, State or Territory laws, (excluding the Australian Consumer
Law) or the law of any other jurisdiction.
f. Owner has the meaning set out in clause 3.
g. Warranty means this warranty.
h. Product means the Product/s bought by the Owner from the Seller that fall under this
warranty.
i. Warranty Period means:
i. In relation to Cast Iron Cookware: 3 Year Limited Warranty
ii. In relation to Non-Stick Cookware: 3 Year Limited Warranty
iii. In relation to Cooking Utensils: 3 Year Limited Warranty
iv. In relation to Knives/Knife Block Sets: 3 Year Limited Warranty
v. In relation to Stainless Steel Cookware: 10 Year Limited Warranty
vi. In relation to Chopping boards: 1 Year Limited Warranty
vii. In relation to Small Appliances: 1 Year Limited Warranty

www.westinghousesmallappliances.com.au
1300 883 109
13 Merino Entrance, Cockburn Central 6164, WA
and Westinghouse are trademarks of Westinghouse Electric Corporation.
Used under license by RVM Australia Pty Ltd.