www.klarstein.com
VAPORCHEF
Dampfbackofen
Steam Oven
Horno de vapor
Four à vapeur
Forno a vapore
10036173 10036174


3
DE
Sehr geehrter Kunde,
wir gratulieren Ihnen zum Erwerb Ihres Gerätes. Lesen Sie
die folgenden Hinweise sorgfältig durch und befolgen Sie
diese, um möglichen Schäden vorzubeugen. Für Schäden,
die durch Missachtung der Hinweise und unsachgemäßen
Gebrauch entstehen, übernehmen wir keine Haftung. Scannen
Sie den folgenden QR-Code, um Zugriff auf die aktuellste
Bedienungsanleitung und weitere Informationen rund um das
Produkt zu erhalten.
INHALTSVERZEICHNIS
Produktdatenblatt (10036173)4
Produktdatenblatt (10036174)5
Sicherheitshinweise6
Geräteübersicht8
Hinweise zu den Einschüben9
Bedienfeld und Tastenfunktionen10
Displayanzeigen und Programme11
Weitere Bedienfunktionen16
Menü (Rezepte)18
Reinigung und Pege19
Fehlerbehebung20
Spezielle Entsorgungshinweise für Verbraucher in Deutschland22
Hinweise zur Entsorgung24
Hersteller & Importeur (UK)24
TECHNISCHE DATEN
Artikelnummer 10036173 10036174
Stromversorgung 220-240 V ~ 50/60 Hz
Leistung 2100-2400 W 1900-2200 W
Dampf-Leistung 1100 W 950 W
Max. Füllmenge Wassertank 1,45 l 1,45 l
English 23
Français 43
Español 63
Italiano 83
Nederlands 103
4
DE
PRODUKTDATENBLATT (10036173)
Angaben nach 65/2014
Warenzeichen des Lieferanten: Klarstein
Modellkennung des Lieferanten: 10036173
Energieefzienzindex (EEI cavity): 94,1
Energieefzienzklasse: A
Energieverbrauch pro Zyklus für jeden Garraum im konventionellen Modus
und im Umluft-Modus in kWh: 0,64/0,65 kWh
Zahl der Garräume: 1
Wärmequelle(n) des Garraums: Strom
Volumen des Garraums in Liter: 31 l
Angaben nach 66/2014
Symbol Wert Einheit
Modellkennung
10036173
Art des Backofens
Elektrobackofen
Masse des Gerätes
M 21, 8 kg
Anzahl der Garräume
1
Wärmequelle je Garraum (Strom oder Gas)
Strom
Volumen je Garraum
V 31 L
Energieverbrauch (Strom) bei der Erhitzung
einer Standardbeladung im Garraum eines
Elektrobackofens während eines Zyklus
im konventionellen Modus je Garraum
(elektrische Endenergie)
EC
Elektrischer
Ofen
0,64 kWh/Zyklus
Energieverbrauch bei der Erhitzung einer
Standardbeladung im Garraum eines
Elektrobackofens während eines Zyklus
im Umluftmodus je Garraum (elektrische
Endenergie)
EC
Elektrischer
Ofen
0,65 kWh/Zyklus
Energieverbrauch bei der Erhitzung einer
Standardbeladung im Garraum eines
Gasbackofens während eines Zyklus im
konventionellen Modus je Garraum (Gas-
Endenergie)
EC Gasofen -
MJ/Zyklus
kWh/Zyklus
(1)
Energieverbrauch bei der Erhitzung einer
Standardbeladung im Garraum eines
Gasbackofens während eines Zyklus im
Umluftmodus je Garraum (Gas-Endenergie)
EC Gasofen -
MJ/Zyklus
kWh/Zyklus
(1)
Energieefzienzindex je Garraum
EEI Ofen 94,1
(1) 1 kWh/Zyklus = 3,6 MJ/Zyklus.
5
DE
PRODUKTDATENBLATT (10036174)
Angaben nach 65/2014
Warenzeichen des Lieferanten: Klarstein
Modellkennung des Lieferanten: 10036174
Energieefzienzindex (EEI cavity): 87,7
Energieefzienzklasse: A
Energieverbrauch pro Zyklus für jeden Garraum im konventionellen Modus
und im Umluft-Modus in kWh: 0,59/0,57 kWh
Zahl der Garräume: 1
Wärmequelle(n) des Garraums: Strom
Volumen des Garraums in Liter: 24 l
Angaben nach 66/2014
Symbol Wert Einheit
Modellkennung
10036174
Art des Backofens
Elektrobackofen
Masse des Gerätes
M 19,5 kg
Anzahl der Garräume
1
Wärmequelle je Garraum (Strom oder Gas)
Strom
Volumen je Garraum
V 24 L
Energieverbrauch (Strom) bei der Erhitzung
einer Standardbeladung im Garraum eines
Elektrobackofens während eines Zyklus
im konventionellen Modus je Garraum
(elektrische Endenergie)
EC
Elektrischer
Ofen
0,59 kWh/Zyklus
Energieverbrauch bei der Erhitzung einer
Standardbeladung im Garraum eines
Elektrobackofens während eines Zyklus
im Umluftmodus je Garraum (elektrische
Endenergie)
EC
Elektrischer
Ofen
0,57 kWh/Zyklus
Energieverbrauch bei der Erhitzung einer
Standardbeladung im Garraum eines
Gasbackofens während eines Zyklus im
konventionellen Modus je Garraum (Gas-
Endenergie)
EC Gasofen -
MJ/Zyklus
kWh/Zyklus
(1)
Energieverbrauch bei der Erhitzung einer
Standardbeladung im Garraum eines
Gasbackofens während eines Zyklus im
Umluftmodus je Garraum (Gas-Endenergie)
EC Gasofen -
MJ/Zyklus
kWh/Zyklus
(1)
Energieefzienzindex je Garraum
EEI Ofen 87,7
(1) 1 kWh/Zyklus = 3,6 MJ/Zyklus.
6
DE
SICHERHEITSHINWEISE
Allgemeine Hinweise
• Spülen Sie das Gehäuse niemals mit ießendem Wasser ab, um die elektrischen
Komponenten nicht zu beschädigen.
• Lassen Sie kein Wasser oder andere Flüssigkeiten in das Gerät eindringen, um
einen Stromschlag zu vermeiden.
• Kinder ab 8 Jahren, psychisch, sensorisch und körperlich eingeschränkte Menschen
dürfen das Gerät nur benutzen, wenn sie vorher von einer für sie verantwortlichen
Aufsichtsperson ausführlich mit den Funktionen und den Sicherheitsvorkehrungen
vertraut gemacht wurden und die damit verbundenen Risiken verstehen.
• Beaufsichtigen Sie Kinder, damit diese nicht mit dem Gerät spielen.
• Die Reinigung und Wartung des Geräts darf von Kindern nur unter Aufsicht
durchgeführt werden.
• Prüfen Sie vor der Benutzung die angegebene Spannung auf dem Typenschild.
Schließen Sie das Gerät nur an Steckdosen an, die der Spannung des Geräts
entsprechen.
• Verwenden Sie dieses Gerät nicht, wenn der Stecker, das Netzkabel oder das
Gerät beschädigt ist.
• Falls das Netzkabel oder der Stecker beschädigt sind, müssen sie vom Hersteller,
einem autorisierten Fachbetrieb oder einer ähnlich qualizierten Person ersetzt
werden.
• Fassen Sie den Stecker oder das Bedienfeld nicht mit nassen Händen an.
• Stellen Sie dieses Gerät nicht auf oder in die Nähe von Tischdecken, Vorhängen,
Tapeten oder andere brennbare Materialien und Gegenstände.
• Installieren Sie das Gerät auf einer trockenen, achen Oberäche und lassen
Sie um das Gerät herum mindestens 10 cm Platz zu allen Seiten, damit die Luft
ausreichend zirkulieren kann. Stellen Sie keine Gegenstände auf das Gerät.
• Lassen Sie das Gerät während des Gebrauchs nicht unbeaufsichtigt.
VORSICHT
Verbrennungsgefahr! Beim Öffnen der Ofentür kann heißer Dampf
austreten. Halten Sie einen Sicherheitsabstand ein, um ein Verbrühen zu
vermeiden.
• Stecken Sie keine Fremdkörper in den Türsicherungsschalter der Ofentür.
• Verwenden Sie ausschließlich die für diesen Ofen empfohlene Temperatursonde.
• Verwenden Sie zur Reinigung keinen Dampfreiniger.
• Vergewissern Sie sich, dass das Gerät ausgeschaltet ist, und ziehen Sie den
Netzstecker aus der Steckdose, bevor Sie die Lampe austauschen, um einen
Stromschlag zu vermeiden.
• Das Gerät darf nicht in einen Schrank eingebaut werden, da es sich sonst überhitzt.

7
DE
Hinweise zum sicheren Gebrauch
VORSICHT
Verbrennungsgefahr! Während des Gebrauchs wird das Gerät heiß.
Achten Sie darauf, dass Sie die Heizelemente im Inneren des Ofens
nicht berühren und benutzen Sie Ofenhandschuhe.
• Ziehen Sie vor der Reinigung den Stecker aus der Steckdose und lassen Sie das
Gerät komplett abkühlen.
• Schließen Sie das Gerät nicht an Steckdosen an, an die bereits andere
Küchengeräte angeschlossen sind.
• Reinigen Sie die Türscheibe des Ofens mit einem weichen und feuchten Tuch.
Verwenden Sie keine Scheuermittel oder Metallschaber, da sie die Oberäche
zerkratzen.
• Schließen Sie das Gerät nicht an externe Zeitschaltuhren oder ferngesteuerte
Steckdosen an.
• Prüfen Sie vor dem Gebrauch, ob Ihr Kochgeschirr für dieses Gerät geeignet ist.
Wir empfehlen Ihnen, hitzebeständige Glasbehälter oder Keramikbehälter zu
benutzen. Befüllen Sie den Behälter maximal auf zwei Drittel.
• Überfüllen Sie nicht den Wassertank. Orientieren Sie sich beim Befüllen an der
MAX-Markierung im Tank.
• Stellen Sie keine Behälter auf die geöffnete Ofentür.
• Erhitzen Sie keine Lebensmittel in einem versiegelten Behälter, da der Behälter
sonst explodieren kann. Füllen Sie die Lebensmittel vor der Erwärmung in ein
hitzebeständiges Gefäß um.

8
DE
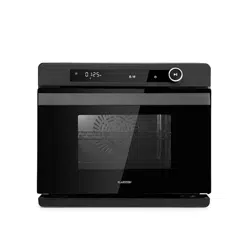
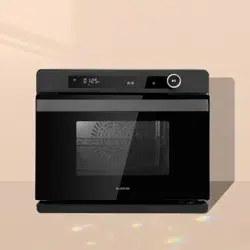
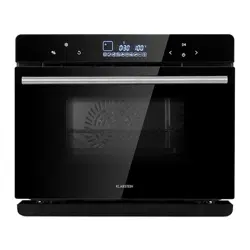
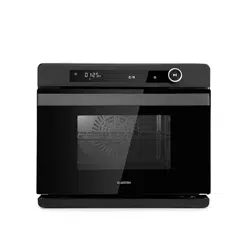
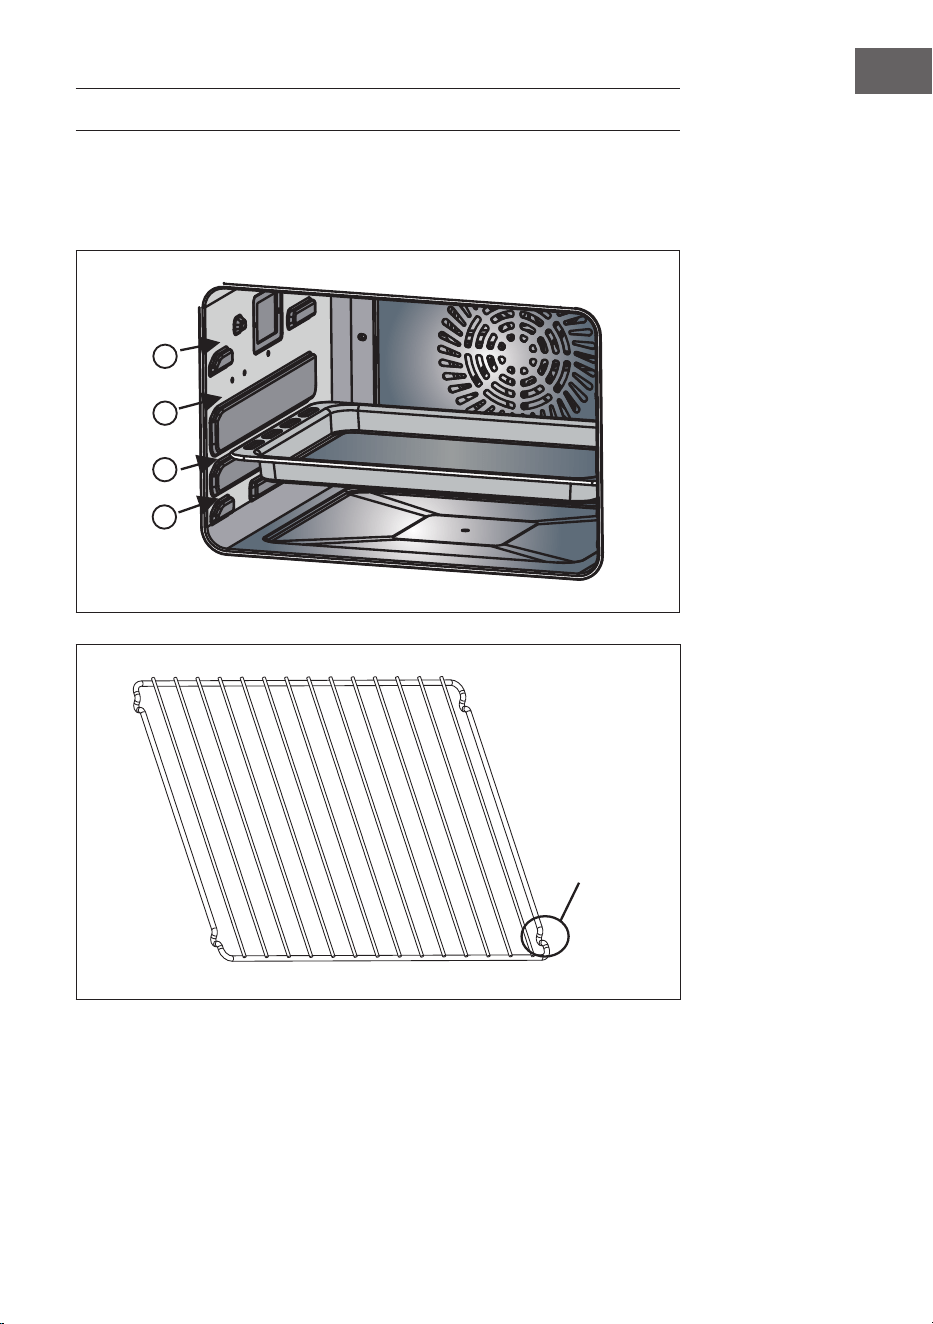
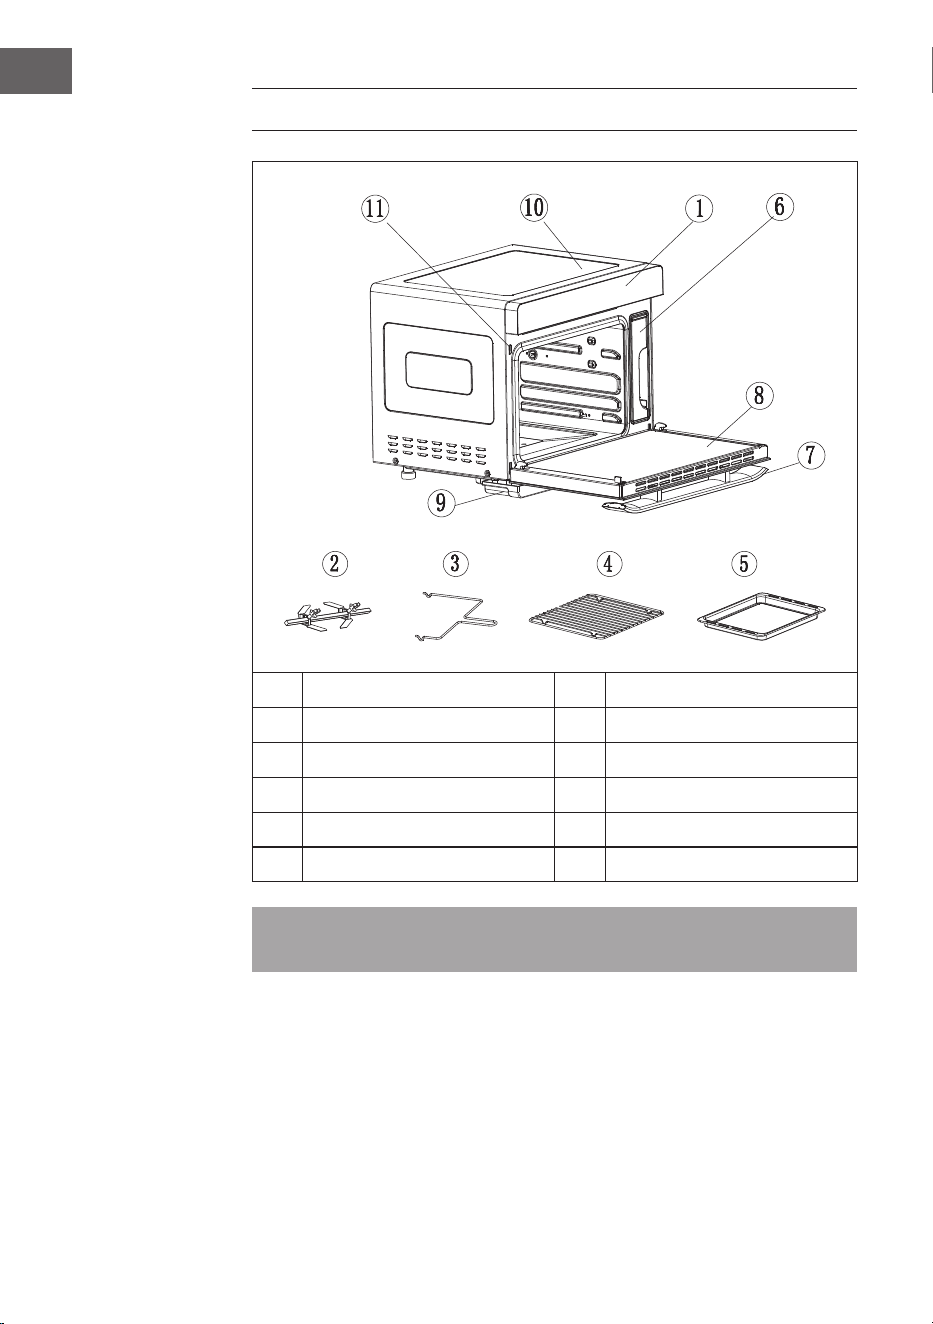
GERÄTEÜBERSICHT
1
Bedienfeld
7
Griff
2
Drehspieß (40 l/36 l)
8
Tür
3
Drehspießgriff (40 l/36 l)
9
Wasserauffangschale
4
Grillrost
10
Gehäuse
5
Backblech
11
Türschalter
6
Wassertank
Hinweis: Achten Sie darauf, dass der Wasserstand im Wassertank immer über der
Mindestmarkierung liegt. Lassen Sie den Wassertank die ganze Zeit im Backofen
stehen, während das Gerät in Betrieb ist.
9
DE
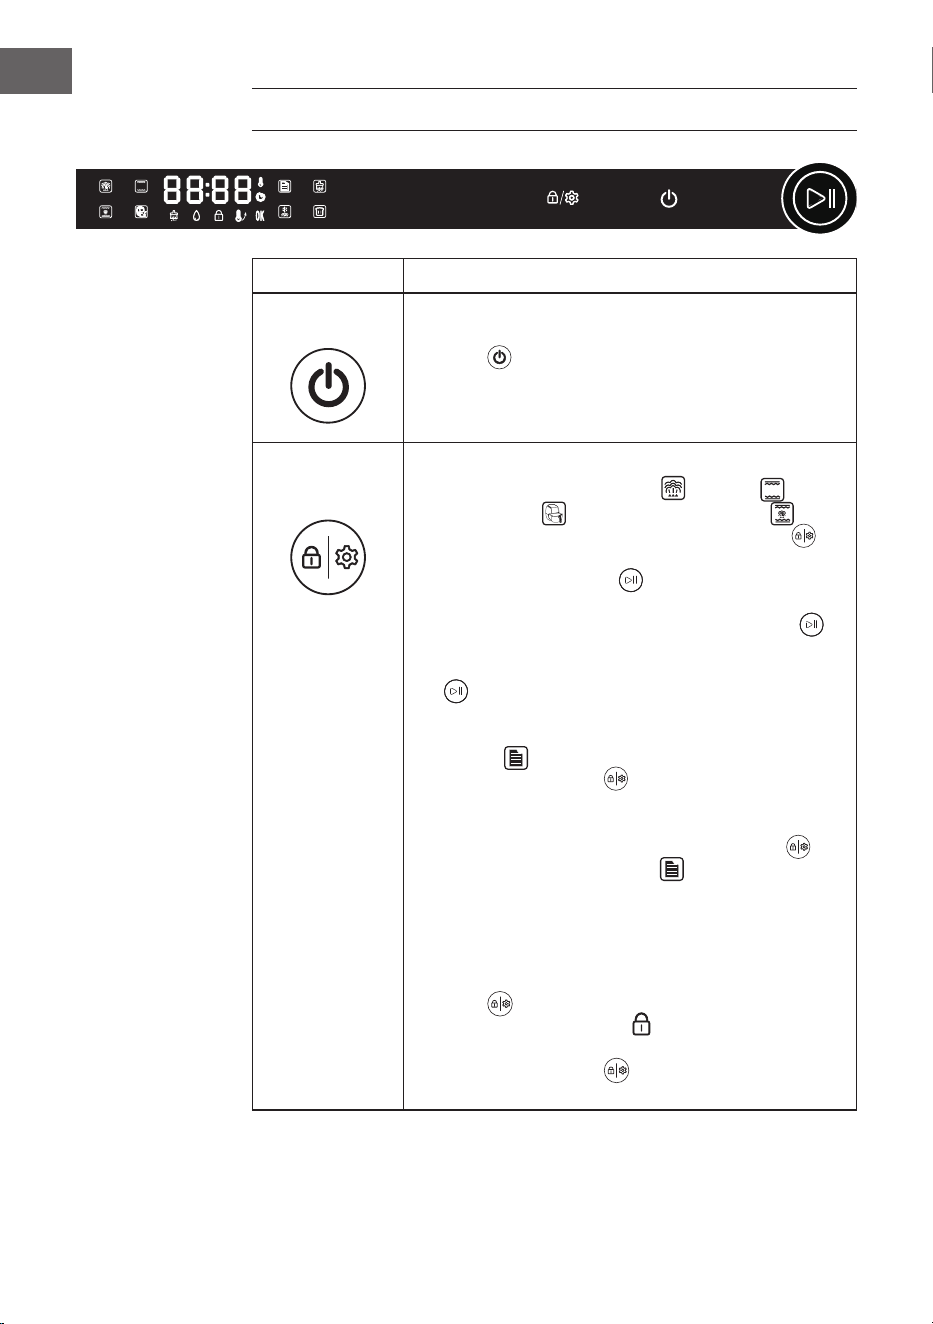
HINWEISE ZU DEN EINSCHÜBEN
Es gibt vier Einschub-Ebenen. Wählen Sie den passenden Einschub je nach Gericht
oder Rezept aus. Achten Sie darauf, dass der Bogen am Grillrost nach unten zeigt und
schieben Sie ihn in der gewünschten Einschub-Ebene in den Backofen.
1
2
3
4
Bogen
10
DE
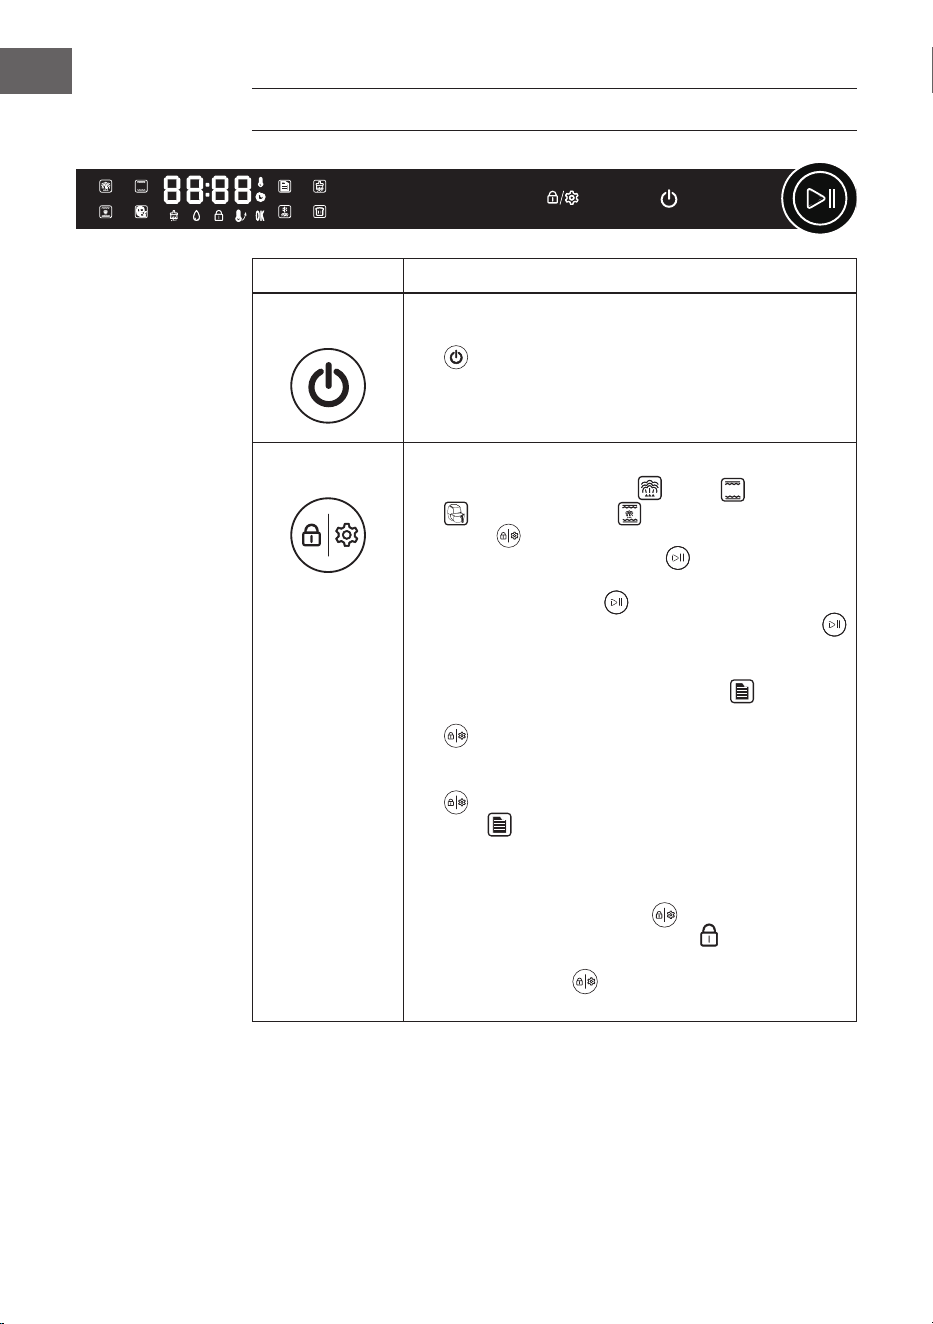
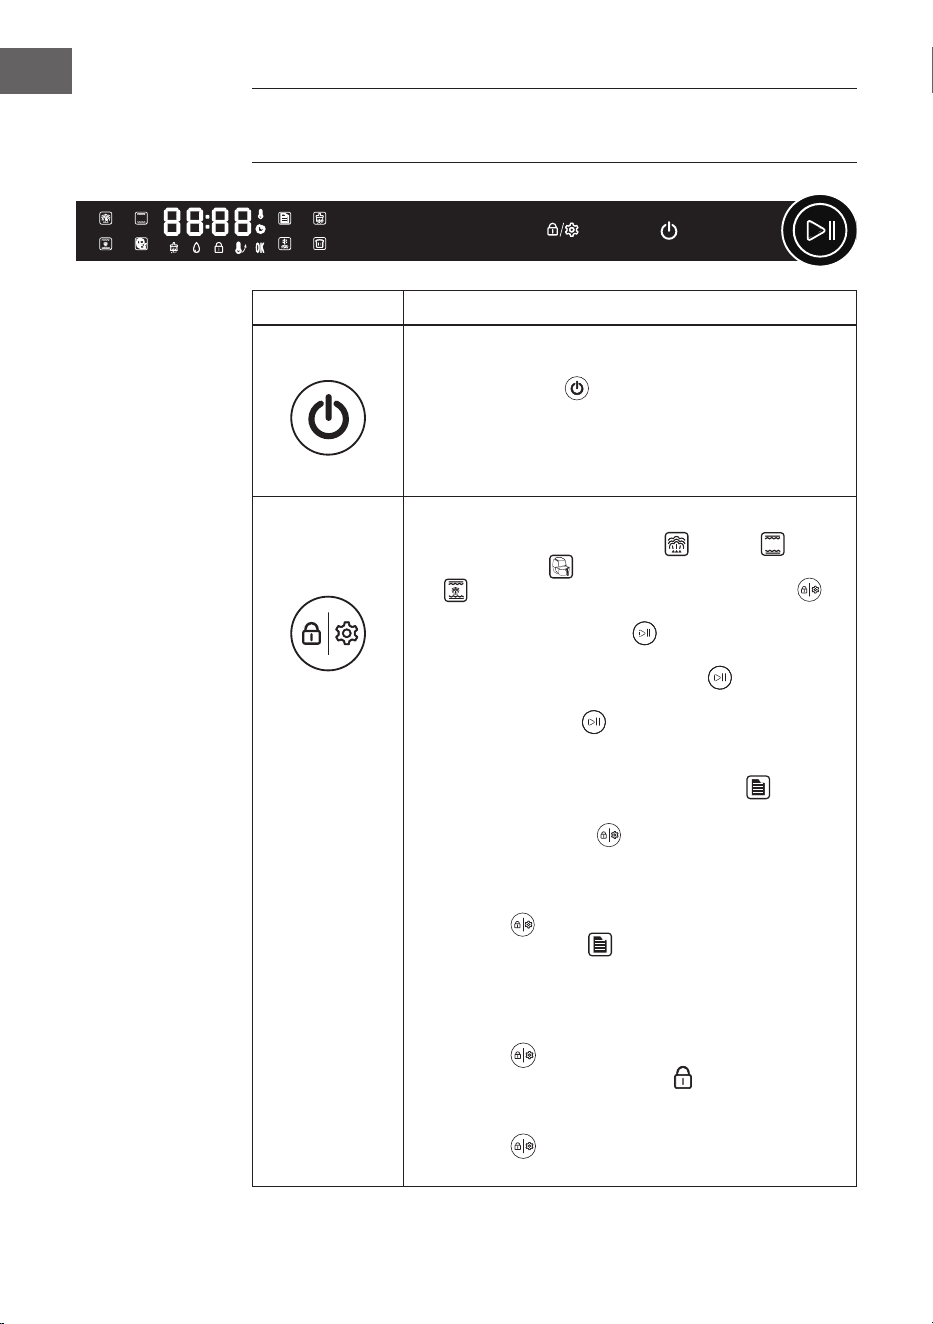
BEDIENFELD UND TASTENFUNKTIONEN
Tasten Funktionsbeschreibung
Ein/Aus
• Nach dem ersten Einschalten ertönt ein Piepton und die
Leuchtanzeige leuchtet auf. Drücken Sie nun die [Ein/Aus-
Taste] , um in die Funktionsauswahl zu gelangen.
• Wird innerhalb von 5 Minuten keine Funktion ausgewählt,
werden alle Einstellungen gelöscht und das Gerät wird in
den Standbymodus versetzt.
Einstellungen/
Kindersicherung
1. Einstellungen:
• In den Programmen„Dämpfen“ , „Grillen“ ,
„Luftfrittieren“ oder „Grillen und Dämpfen“
leuchtet die [Einstellungen/Kindersicherung-Taste]
auf. Wenn Sie die Taste drücken, blinken die Zeit-LED und
der [Start/Pause-Regler] gleichzeitig auf. Drehen Sie
den Regler, um die Temperatur und die Zeit einzustelllen.
Drücken Sie anschließend den [Start-Pause-Regler] ,
um die Einstellung zu bestätigen. Wenn Sie zu lange
warten, blinken die Zeit-LED und der [Start-Pause-Regler]
gleichzeitig 5Sekunden lang auf und anschließend
wird die Einstellung automatisch bestätigt und gespeichert.
• Wenn Sie nach dem Einschalten des Geräts das Programm
„Menü“ auswählen, leuchtet die [Einstellungen/
Kindersicherung-Taste] auf. Mit dieser Taste kann die
Garzeit entsprechend der Lebensmittelmenge eingestellt
werden. Dies ist nur einmal für ein Rezept möglich, dann
erlischt die [Einstellungen/Kindersicherung-Taste] und
die Zeit kann für diesen Modus nicht erneut eingestellt
werden.
2. Kindersicherung:
• Die Kindersicherung kann in allen Programmen aktiviert
werden. Drücken Sie die [Einstellungen/Kindersicherung-
Taste] (wenn Sie leuchtet) 3Sekunden lang. Die
[Kindersicherung-Anzeige] leuchtet auf, das heißt, die
Kindersicherung ist aktiviert. Wenn Sie die [Einstellungen/
Kindersicherung-Taste] erneut 3Sekunden lang
drücken, wird die Kindersicherung deaktiviert.
11
DE
Tasten Funktionsbeschreibung
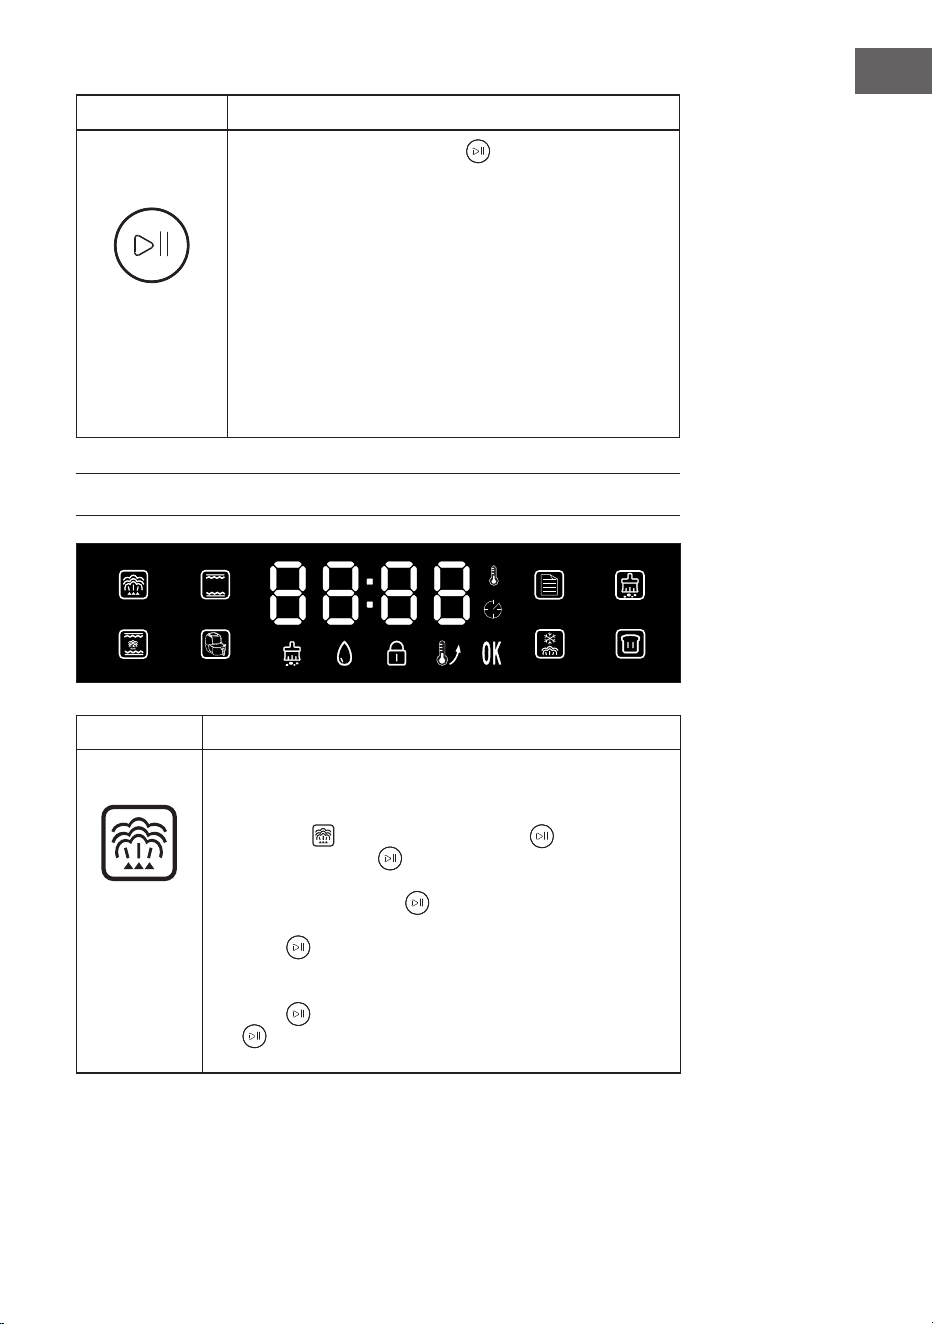
Start/Pause
(Regler)
• Drücken Sie zum Starten oder Pausieren des Geräts den
[Start/Pause-Regler] .
• Drehen Sie den [Start/Pause-Regler], um eines der
nachfolgenden Programme auszuwählen: „Dämpfen“,
„Grillen“, „Grillen und Dämpfen“, „Luftfrittieren“, „Menü“,
„Reinigung“, „Auftauen“ oder „Fermentieren“.
• Drehen Sie den [Start/Pause-Regler], um die Zeit und
die Temperatur in den verschiedenen Programmen und
Funktionen einzustellen.
• Wenn der [Start/Pause-Regler] blinkt, kann durch Drücken
oder Drehen des Reglers die Einstellung der gewählten
Programme oder Funktionen bestätigt oder angepasst
werden.
• Wenn das Gerät in Betrieb ist, leuchtet der [Start/Pause-
Regler].
DISPLAYANZEIGEN UND PROGRAMME
Programme Funktionsbeschreibung
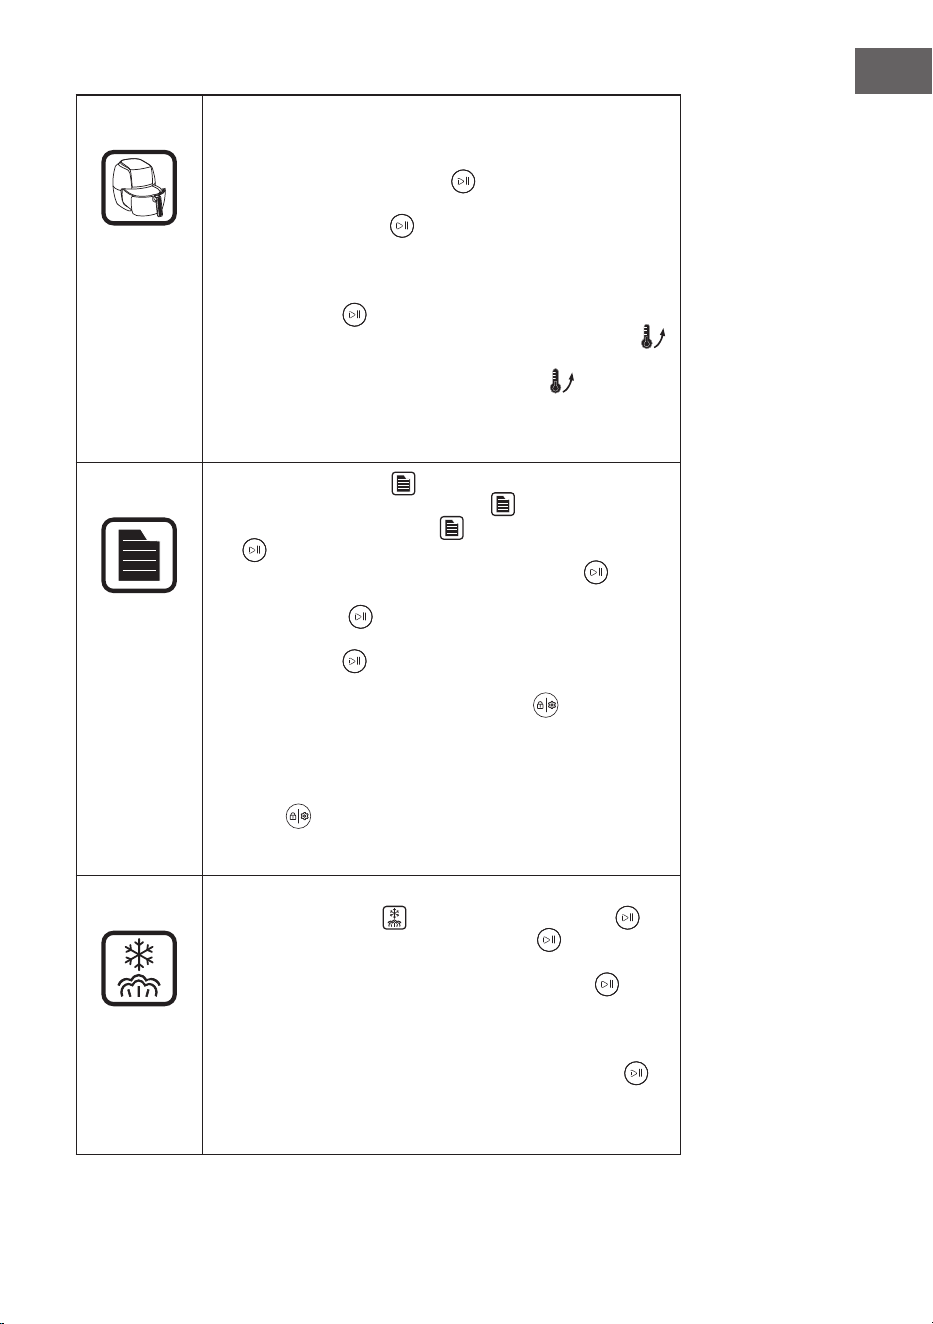
Dämpfen
• Die Hauptfunktion ist „Dämpfen“. Die voreingestellte Zeit
beträgt 30 Minuten und die Temperatur 100°C.
• Wenn Sie das Programm „Dämpfen“ auswählen, blinken
die [Dämpfen-Anzeige] und der [Start/Pause-Regler]
auf. Drücken Sie den [Start/Pause-Regler] , um die
Programmauswahl zu bestätigen und in den Einstellmodus zu
gelangen.
• Mit dem Regler kann anschließend eine Zeit zwischen
1Minute und 2Stunden eingestellt werden. Drücken Sie den
[Start/Pause-Regler] , um die Zeiteinstellung zu bestätigen.
Nun könnnen Sie die Temperatureinstellung vornehmen. Es
kann eine Temperatur zwischen 100°C und 110°C eingestellt
werden. Drücken Sie nach der Temperatureinstellung zum
Bestätigen den [Start/Pause-Regler] . Wenn Sie nun erneut
den [Start/Pause-Regler] drücken, startet das Gerät den
Betrieb und der Countdown beginnt.
12
DE
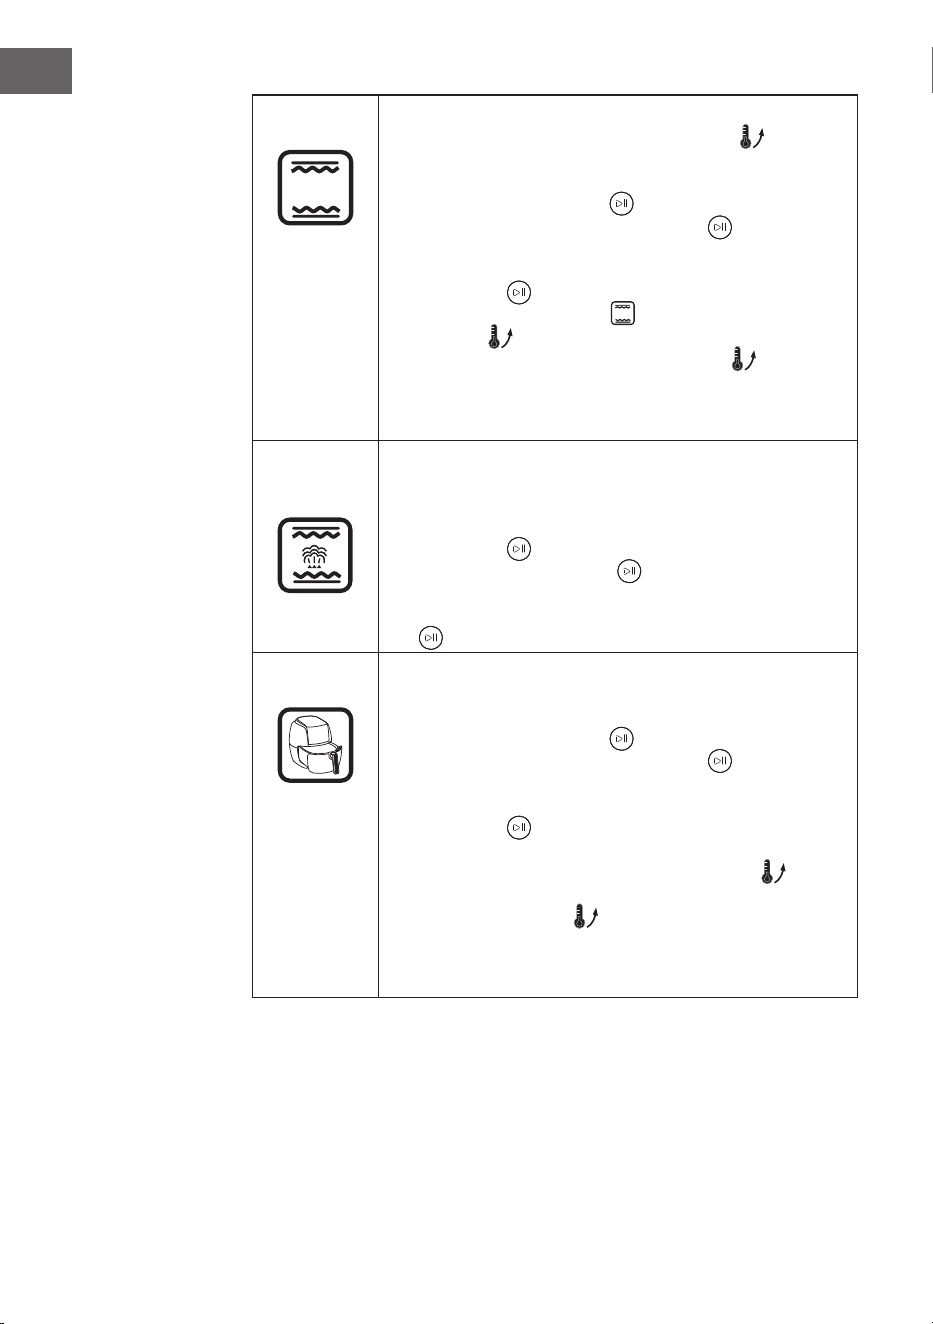
Grillen
• Im Programm „Grillen“ werden sowohl Ober- als auch
Unterhitze genutzt. Teil des Programms ist die Funktion
„Vorheizen“ . Warten Sie ab, bis das Vorheizen beendet
ist, bevor Sie Lebensmittel in den Backofen hinein geben. Die
voreingestellte Zeit beträgt 30 Minuten und die Temperatur
180 °C.
• Mit dem [Start/Pause-Regler] kann eine Zeit zwischen
1Minute und 2 Stunden eingestellt werden. Drücken Sie den
[Start/Pause-Regler] , um die Zeiteinstellung zu bestätigen.
Nun könnnen Sie die Temperatureinstellung vornehmen.
Es kann eine Temperatur zwischen 100°C und 230 °C
eingestellt werden. Drücken Sie zum Bestätigen den [Start/
Pause-Regler] . Das Gerät startet den Betrieb.
• Nachdem das Programm „Grillen“ gestartet wurde,
leuchtet die [Vorheizen-Anzeige] auf. Der Ofen wird nun
vorgeheizt. Sobald das Vorheizen beendet ist, erlischt die
[Vorheizen-Anzeige] und das Gerät piept 10Mal, um Sie
daran zu erinnern, Lebensmittel in den Ofen zu legen. Sobald
das Vorheizen beendet ist, wird die Grillfunktion automatisch
gestartet.
Grillen und
Dämpfen
• Die Hauptfunktion dieses Programms ist die Grillfunktion.
Zusätzlich zur Grillfunktion gibt der Ofen etwas Dampf ab.
So werden die Lebensmittel schneller gegart, ohne dabei
auszutrocknen. Die voreingestellte Zeit beträgt 30 Minuten
und die Temperatur 180°C. Mit dem [Start/Pause-Regler]
kann eine Zeit zwischen 1Minute und 2Stunden eingestellt
werden. Drücken Sie den [Start/Pause-Regler] , um
die Zeiteinstellung zu bestätigen. Nun könnnen Sie die
Temperatureinstellung vornehmen. Es kann eine Temperatur
zwischen 120°C und 230 °C eingestellt werden. Drücken
Sie zum Bestätigen den [Start/Pause-Regler] . Das Gerät
startet nun den Betrieb.
13
DE
Luftfrittieren
• Bei der Luftfrittierfunktion läuft der hintere Heizer mit Umluft.
Die voreingestellte Zeit beträgt 30 Minuten und die Temperatur
180 °C.
• Mit dem [Start/Pause-Regler] kann eine Zeit zwischen
1Minute und 2 Stunden eingestellt werden. Drücken Sie den
[Start/Pause-Regler] , um die Zeiteinstellung zu bestätigen.
Nun könnnen Sie die Temperatureinstellung vornehmen.
Es kann eine Temperatur zwischen 100°C und 230 °C
eingestellt werden. Drücken Sie zum Bestätigen den [Start/
Pause-Regler] . Das Gerät startet nun den Betrieb.
• Wenn das Gerät startet, leuchtet die [Vorheizen-Anzeige]
auf. Der Backofen wird nun vorgeheizt. Sobald das Vorheizen
beendet ist, erlischt die [Vorheizen-Anzeige] und das
Gerät piept 10Mal, um Sie daran zu erinnern, Lebensmittel in
den Ofen zu legen. Sobald das Vorheizen beendet ist, startet
der Countdown der Luftfrittierfunktion automatisch.
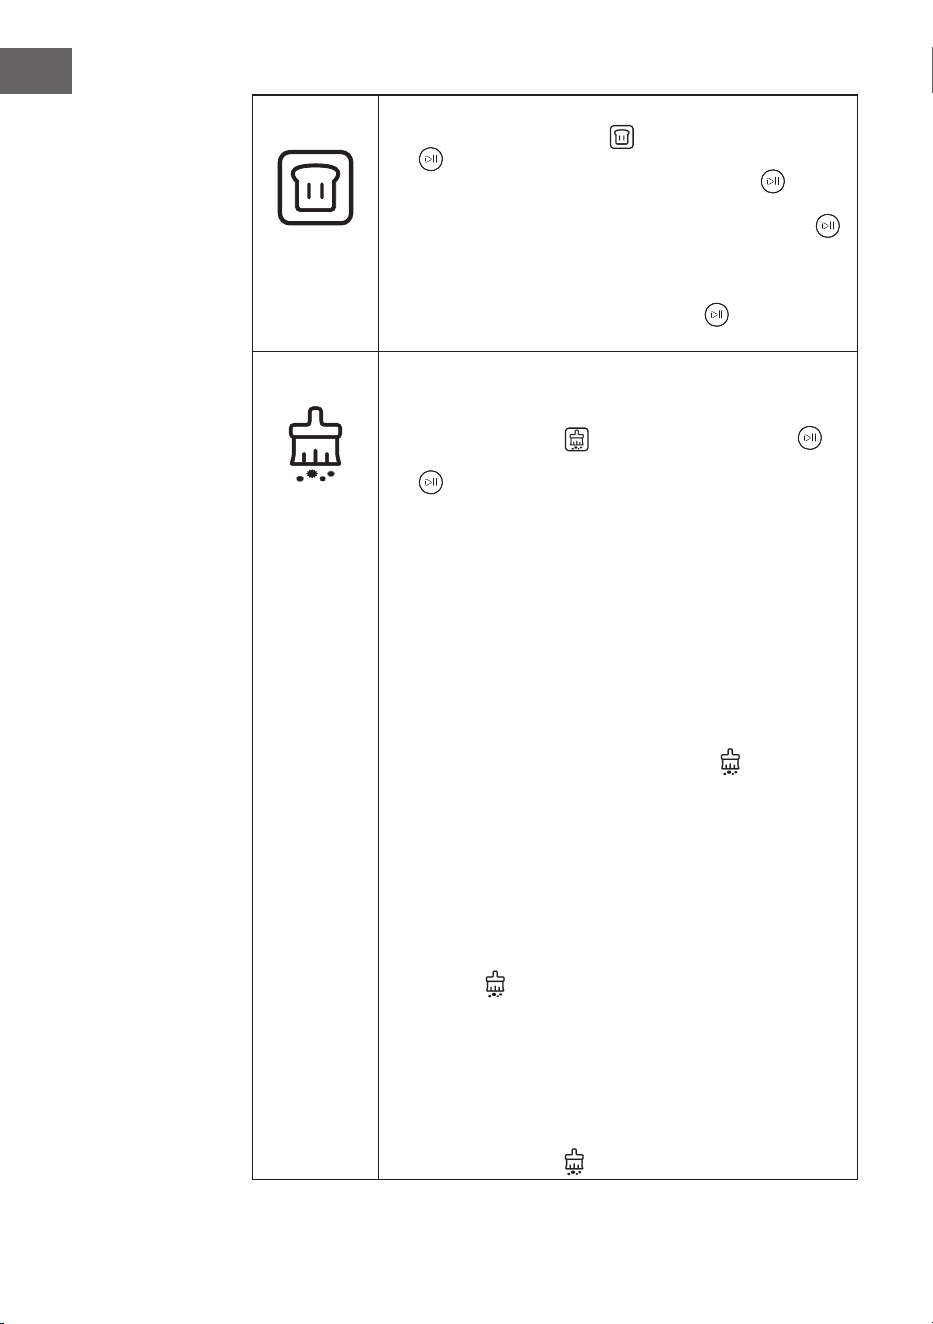
Menü
• Mit der [Menü-Taste] können Sie aus 31 Rezepten
auswählen. Wenn die [Menü-Taste] gedrückt wird,
blinken die [Menü-Anzeige] und der [Start/Pause-Regler]
gleichzeitig auf. Auf dem LED-Bildschirm wird „F-00“
angezeigt. Drücken Sie den [Start/Pause-Regler] , um
in die Menüauswahl zu gelangen. Durch Drehen des [Start/
Pause-Reglers] werden die Rezepte nacheinander
angezeigt („F-01“, „F-02“… „F-31“). Drücken Sie den [Start/
Pause-Regler] , um ein Rezept auszuwählen.
• Wenn ein Rezept ausgewählt wurde, leuchtet nach dem Start
die [Einstellungen/Kindersicherung-Taste] auf. Mit dieser
Taste kann die Garzeit entsprechend der Lebensmittelmenge
angepasst werden. Für ein Rezept kann die Zeit während des
Betriebs jeweils nur einmal eingestellt werden. Anschließend
erlischt die Beleuchtung der [Einstellungen/Kindersicherung-
Taste] und die Zeit kann nicht noch einmal angepasst
werden, bis der Garvorgang des ausgewählten Rezepts
beendet ist.
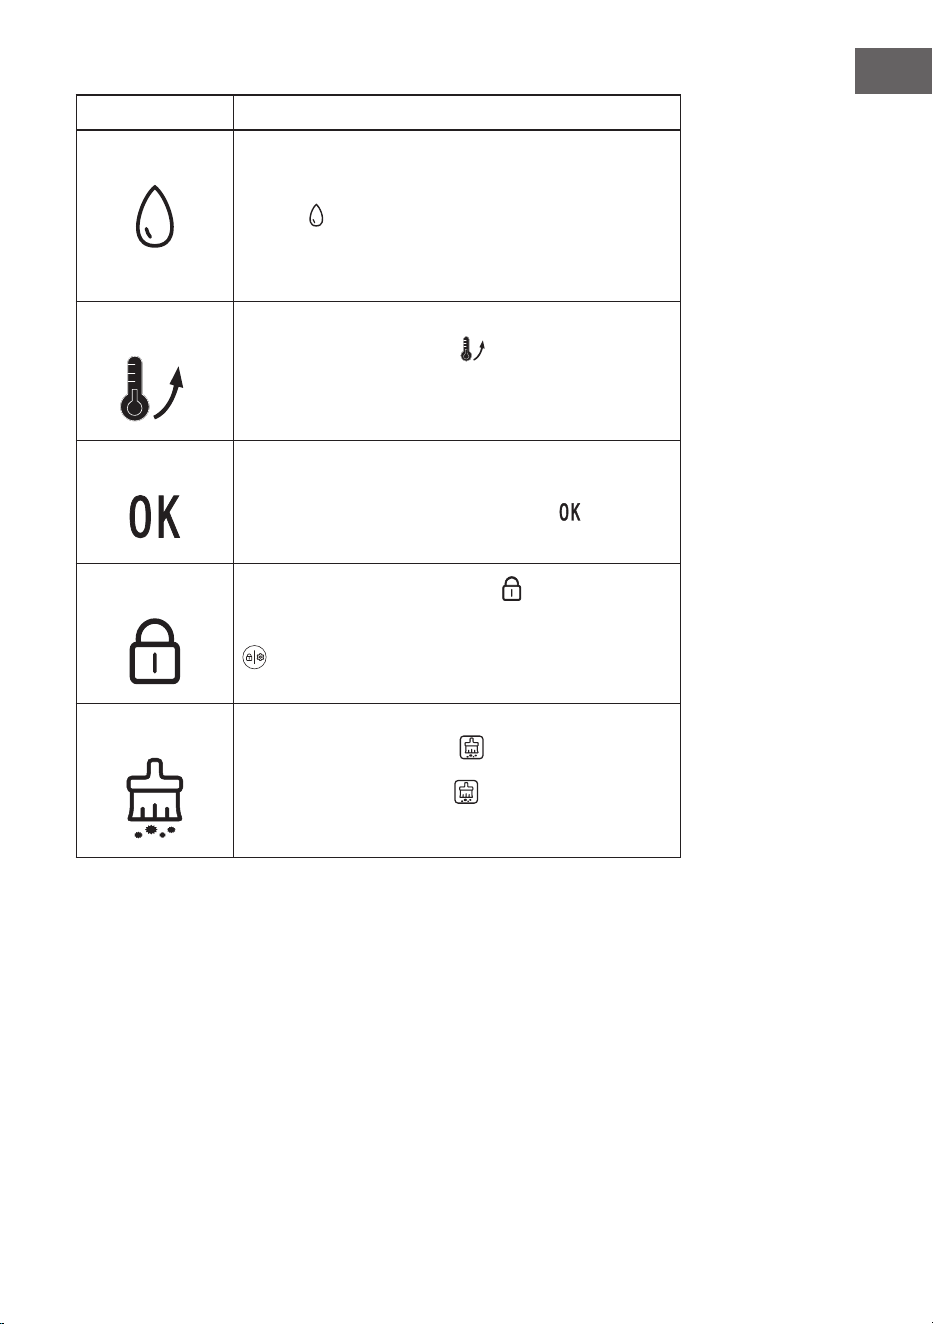
Auftauen
• Wenn Sie die Funktion „Auftauen“ auswählen, blinken die
[Auftauen-Anzeige] und der [Start/Pause-Regler]
auf. Drücken Sie den [Start/Pause-Regler] und drehen
Sie ihn, um eine Zeit zwischen 5 Minuten und 2 Stunden
einzustellen. Drücken Sie den [Start/Pause-Regler] ,
um die Zeiteinstellung zu bestätigen. Nun könnnen Sie die
Temperatureinstellung vornehmen. Es kann eine Temperatur
zwischen 50°C und 60 °C eingestellt werden. Drücken Sie
anschließend zum Bestätigen den [Start/Pause-Regler] .
Das Gerät startet nun den Betrieb mit dem Countdown.
• Die voreingestellte Zeit beträgt 20Minuten und die Temperatur
55 °C.
14
DE
Fermentieren
• Wenn Sie die Funktion „Fermentieren“ auswählen, leuchten
die [Fermentieren-Anzeige] und der [Start/Pause-Regler]
auf. Die voreingestellte Zeit beträgt 40Minuten und die
Temperatur 40 °C. Mit dem [Start/Pause-Regler] kann
anschließend eine Zeit zwischen 5 Minuten und 2Stunden
eingestellt werden. Drücken Sie den [Start/Pause-Regler]
, um die Zeiteinstellung zu bestätigen. Nun könnnen Sie die
Temperatureinstellung vornehmen. Es kann eine Temperatur
zwischen 30°C und 50 °C eingestellt werden. Drücken Sie
zum Bestätigen den [Start/Pause-Regler] . Das Gerät
startet nun den Betrieb.
Reinigung
• Die Reinigungsfunktion kann nach der Verwendung des
Backofens zur Entfernung von Kalk genutzt werden. Wenn Sie
das Programm „Reinigung“ ausgewählt haben, leuchten die
[Reinigung-Anzeige] und der [Start/Pause-Regler]
auf. Drücken Sie zum Bestätigen den [Start/Pause-Regler]
und wählen Sie den gewünschten Reinigungsmodus „C1“
oder „C2“ aus.
C-1: Kalkentfernung vom Dampfgenerator in 50 Minuten
C-2: 25 Minuten und 100 °C zur Reinigung der Ofenhöhle
oder zum Desinzieren von Geräten.
Kalkentfernung im Reinigungsmodus „C-1“:
1. Wenn die Gesamtbetriebszeit des Heizrohrs des Verdampfers
100 Stunden erreicht hat, erinnert Sie das Gerät daran,
dass der Kalk vom Verdampfer entfernt werden muss (die
Entkalkungsfunktion kann jederzeit automatisch von Ihnen
gestartet werden). Die [Reinigung-Anzeige] blinkt auf.
2. Bereiten Sie die Entkalkungslösung in einem Verhältnis von
1:8 (Entkalker:Wasser) zu. Schütten Sie die Lösung nach
dem sorgfältigen Vermischen in den Wassertank. Der Pegel
der Entkalkungslösung muss über der Minimalmarkierung des
Wassertanks liegen.
3. Wenn noch 20 Minuten verbleiben, erinnert Sie das Gerät
daran, den Wassertank aus dem Gerät zu entnehmen,
die darin verbleibende Entkalkungslösung auszuschütten
und durch sauberes Wasser zu ersetzen. Die [Reinigung-
Anzeige] blinkt auf und das Gerät piept mehrfach.
Nachdem der Wassertank wieder eingesetzt wurde, wird
die Reinigung fortgesetzt. Wenn noch 10 Minuten verleiben,
erinnert Sie das Gerät daran, den Wassertank aus dem
Gerät zu entnehmen und das darin enthaltene Wasser durch
sauberes Wasser zu ersetzen. Wenn der Wassertank wieder
eingesetzt wurde, setzt das Gerät die Reinigung fort. Wenn
der Entkalkungsvorgang abgeschlossen ist, leuchtet die
[Reinigung-Anzeige] permanent auf.
15
DE
Displayanzeigen Funktionsbeschreibung
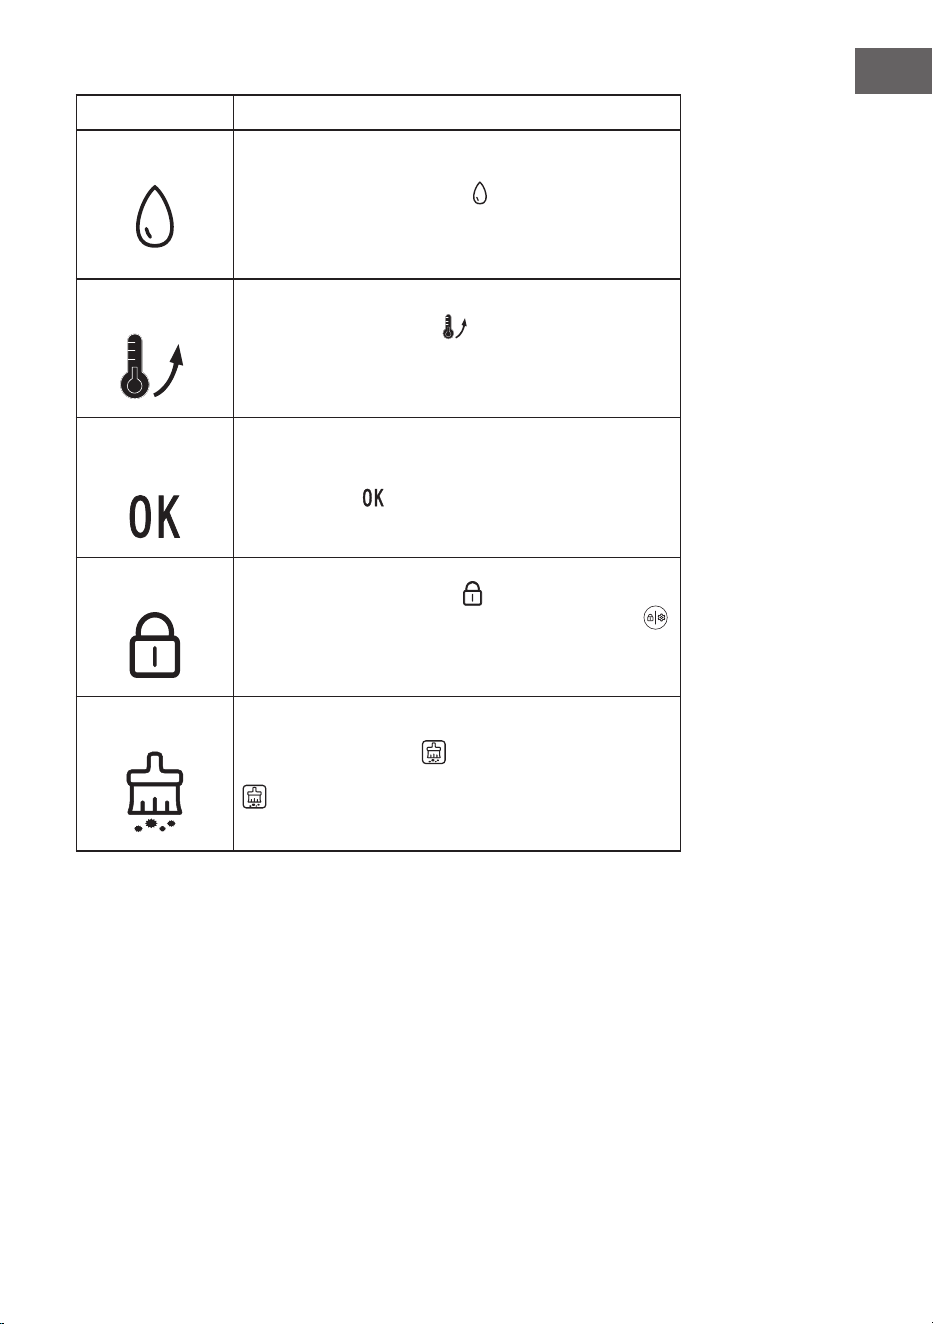
Wenig Wasser
Wenn das Gerät in einem beliebigen Programm gestartet wird
und sich kein oder sehr wenig Wasser im Wassertank bendet,
stoppt der Backofen den Betrieb und die [Wenig Wasser-
Anzeige]
.
blinkt auf. Das Gerät piept 10 Mal. Alle Tasten
sind deaktiviert. Nachdem Sie den Wassertank mit Wasser
befüllt haben, nimmt der Backofen wieder den Betrieb auf und
der Garvorgang wird fortgesetzt.
.
Vorheizen
Wenn die [Vorheizen-Anzeige] aueuchtet, wird der
Backofen vorgeheizt. Sobald der Vorheizvorgang beendet ist,
erlischt die Anzeige.
Programmende
Wenn ein Programm abgeschlossen ist, wird auf dem
Bildschirm „END“ angezeigt und die Anzeige leuchtet auf.
Kindersicherung
Wenn die [Kindersicherung-Anzeige] aueuchtet, bedeutet
dies, dass die Kindersicherung aktiviert ist. Drücken Sie
3Sekunden lang die [Einstellungen/Kindersicherung-Taste]
, um die Kindersicherung zu deaktivieren. Die Anzeige
erlischt.
Reinigung
Wenn die [Reinigung-Anzeige] kontinuierlich
aueuchtet, bedeutet dies, dass das Gerät gerade entkalkt
wird. Die [Reinigung-Anzeige] erlischt, sobald der
Entkalkungsvorgang abgeschlossen ist.
16
DE
WEITERE BEDIENFUNKTIONEN
Garvorgang 1. Pause
• Wenn das Gerät in Betrieb ist und Sie den [Start/Pause-
Regler] drücken, blinken die Zeit-LED-Leuchte und
der [Start/Pause-Regler] auf. Der Garvorgang wird
unterbrochen, der Countdown wird zeitweise gestoppt
und der Bildschirm zeigt weiterhin den Betriebsstatus an.
Wenn Sie den [Start/Pause-Regler] erneut drücken,
wird der Garvorgang fortgesetzt, bis der Countdown
abgelaufen ist.
• Wenn Sie die Ofentür während des Garvorgangs öffnen,
wird der Garvorgang unterbrochen, der Countdown wird
zeitweise gestoppt und der Bildschirm zeigt weiterhin
den Betriebsstatus an. Die Zeit-LED und der [Start/Pause-
Regler] blinken auf. Wenn Sie die Ofentür wieder
schließen, wird der Garvorgang fortgesetzt, bis der
Countdown abgelaufen ist.
2. Zeit- und Temperatureinstellung
Während des Garvorgangs können Sie die Garzeit und die
Temperatur folgendermaßen anpassen:
• Wenn Sie die [Einstellungen/Kindersicherung-Taste]
drücken, blinken die Ziffern der Minutenanzeige auf.
Stellen Sie die Minuten durch Drehen des [Start/Pause-
Reglers] ein und bestätigen Sie Ihre Eingabe durch
Drücken des [Start/Pause-Reglers] . (Hinweis: Es ist
nicht möglich, die Stunden einzustellen.)
• Nach dem Einstellen der Minuten können Sie die
Temperatur durch Drehen des [Start/Pause-Reglers]
einstellen. Drücken Sie zum Bestätigen Ihrer
Eingabe den [Start/Pause-Regler] . Sollte keine
Temperaturanpassung notwendig sein, können Sie auch
direkt nach dem Einstellen der Minuten den [Start/Pause-
Regler] drücken.
• Nachdem Sie im Menü ein Rezept ausgewählt
haben, leuchtet nach dem Start die [Einstellungen/
Kindersicherung-Taste] auf. Mit dieser Taste können
Sie die Garzeit entsprechend der Lebensmittelmenge
anpassen. Für ein Rezept kann die Zeit jeweils nur einmal
eingestellt werden, dann erlischt die Beleuchtung der
[Einstellungen/Kindersicherung-Taste] . Ein erneutes
Anpassen der Garzeit ist nicht möglich.

17
DE
Innen beleuchtung
• Wenn der Backofen gestartet wird, ist die
Innenbeleuchtung 3 Minuten lang eingeschaltet und geht
dann automatisch wieder aus.
• Wenn die Ofentür geöffnet wird, geht die
Innenbeleuchtung an und schaltet sich nach 3 Minuten
automatisch wieder aus. Wenn Sie die Ofentür schließen,
geht die Innenbeleuchtung ebenfalls nach 3 Minuten aus.
• Wenn Sie im Standbymodus oder während des Betriebs
den Regler einmal drehen, geht die Innenbeleuchtung für
3 Minuten an und schaltet sich dann automatisch wieder
aus.
Tür öffnen und
schließen
• Wenn Sie während des Betriebs die Ofentür öffnen,
stoppt das Gerät und pausiert. Sobald Sie die Tür wieder
schließen, wird der Betrieb automatisch fortgesetzt.
Ende des
Garvorgangs
• Wenn der Backofen den Garvorgang beendet hat, piept
das Gerät 10Mal auf. Auf dem Bildschirm wird „END“
und angezeigt. Das bedeutet, der Garvorgang oder
das Rezept ist beendet.
18
DE
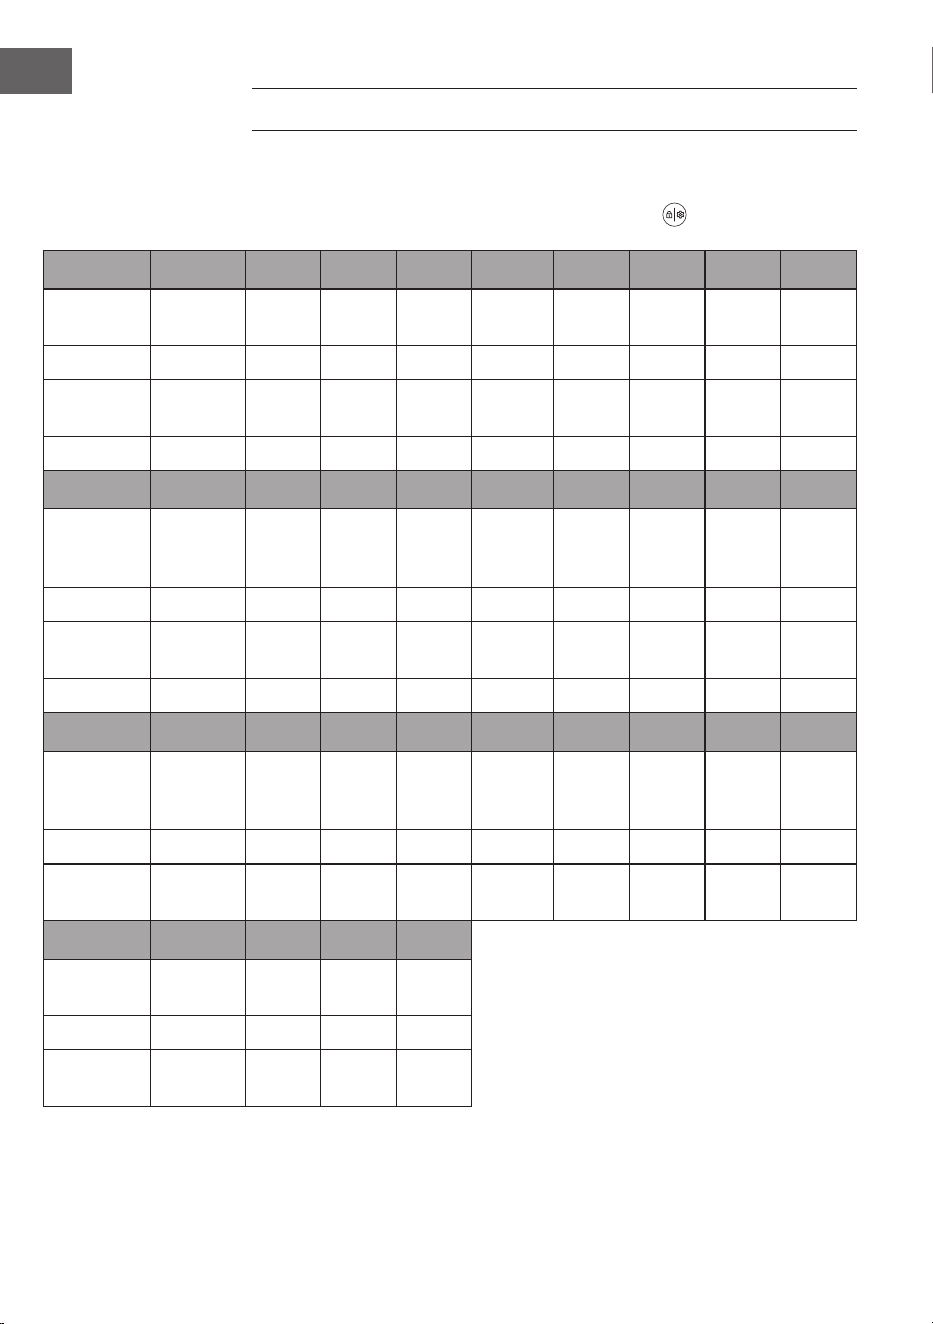
MENÜ (REZEPTE)
Die in der Tabelle aufgelisteten Einstellungen für die einzelnen Lebensmittel dienen
lediglich der Orientierung. Wenn mehr Lebensmittel gegart werden sollen oder
Lebensmittel auf mehreren Ebenen platziert werden, muss die Garzeit angepasst
werden. Passen Sie die Zeit mit der [Einstellungen/Kindersicherung-Taste] an.
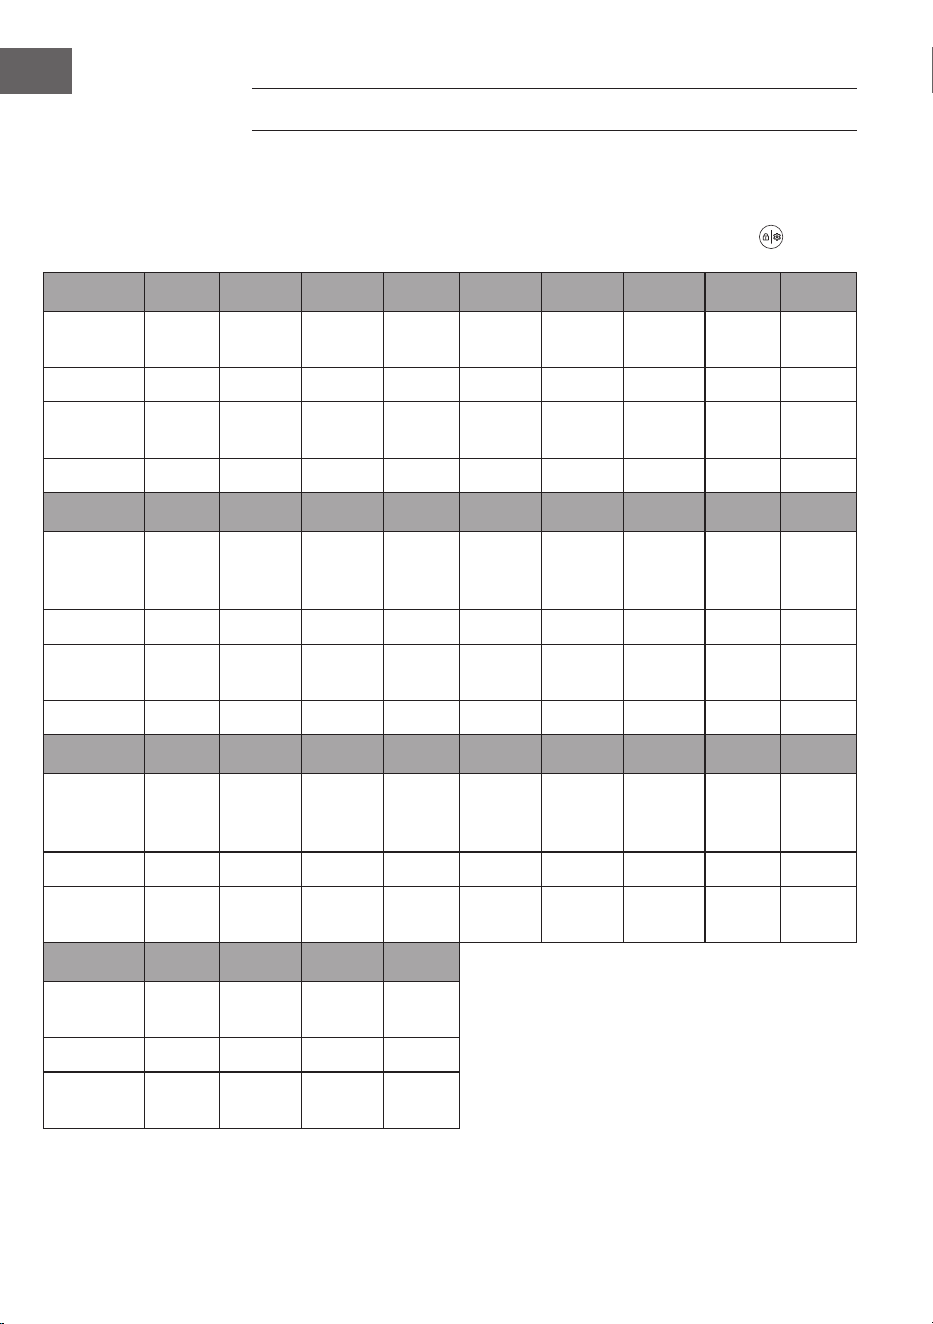
Code F-01 F-02 F-03 F-04 F-05 F-06 F-07 F-08 F-09
Lebensmittel
Dämpf-
Gemüse
Dämpf-
Reis
Dämpf-
Fisch
Dämpf-
Shrimps
Dämpf-
Krabben
Dämpf-
Eier
Dämpf-
Huhn
Dämpf-
Papaya
Röst-
Huhn
Zeit (min) 16 50 20 15 30 18 30 35 45
Temperatur
(°C)
100 100 100 100 100 100 100 100 230
Gewicht (g) 600 200 600 500 800 300 800 400 1000
Code F-10 F - 11 F -12 F - 13 F - 14 F-15 F-16 F - 17 F -18
Lebensmittel
Röst-
Steak
Röst-
Hammel
Röst-
Rippen
Röst-
Lachs
Röst-
Hähn chen-
keulen
Röst-
Hähn chen-
ügel
Röst-
Makrele
Röst-
Pommes
Röst-
Shrimps
Zeit (min) 13 35 20 22 26 23 20 18 15
Temperatur
(°C)
230 200 210 210 210 210 220 220 18 0
Gewicht (g) 600 600 500 400 750 500 600 500 400
Code F-19 F-20 F -21 F-22 F-23 F-24 F-25 F-26 F-27
Lebensmittel
Röst-
Wurs
Röst-
Speck
Röst-
Pizza
Mini-
Pizza
Baguette
Gugel-
hupf
Joghurt-
Käse-
kuchen
Blätter-
teig
Kekse
Zeit (min) 13 11 22 18 16 50 60 32 14
Temperatur
(°C)
200 200 180 180 18 0 15 0 150 18 0 18 0
Code F-28 F-29 F-30 F -31
Lebensmittel
Eier-
kuchen
Geröstete
Mandeln
Geröstete
Walnuss
Joghurt
machen
Zeit (min) 22 10 12 480
Temperatur
(°C)
18 0 14 0 160 45

19
DE
REINIGUNG UND PFLEGE
• Schalten Sie das Gerät vor der Reinigung aus und ziehen Sie den Netzstecker aus
der Steckdose.
• Reinigen Sie die Geräteoberäche nicht mit Metallwerkzeugen oder
Scheuermitteln, da die Beschichtung dadurch beschädigt werden könnte.
• Reinigen Sie das Ofeninnere regelmäßig. Entfernen Sie Lebensmittel oder
Fettspritzer an der Innenwand des Ofens mit einem feuchten Tuch. Bei hartnäckigen
Verschmutzungen kann zusätzlich eine milde Reinigungslösung verwendet werden.
• Es wird empfohlen, den Wassertank mit Trinkwasser oder mit destilliertem Wasser
zu befüllen. Bei der Verwendung von Leitungswasser kommt es nach längerer
Verwendung des Geräts zu Kalkrückständen.
• Überprüfen Sie den Wassertank regelmäßig. Nehmen Sie ihn horizontal heraus.
Reinigen Sie ihn und trocknen Sie ihn mit einem weichen Tuch ab. Setzen Sie den
Wassertank nach der Reinigung wieder in die ursprüngliche Position zurück.
• Entfernen Sie nach dem Beenden des Garvorgangs das Restwasser im Wassertank.
• Reinigen Sie die Ofendichtung regelmäßig mit einem weichen und trockenen Tuch.
• Ziehen Sie den Netzstecker aus der Steckdose, reinigen Sie das gesamte Gerät,
entleeren Sie den Wassertank und stellen Sie das Gerät an einen sauberen und
trockenen Ort, wenn Sie dieses über einen längeren Zeitraum nicht verwenden.
• Das Gerät muss bei Fehlfunktionen vom Hersteller, dem Kundendienst oder einer in
ähnlicher Weise qualizierten Person repariert werden. Versuchen Sie niemals, die
Reparatur selbst durchzuführen.
• Reinigen Sie die Glastür des Geräts nicht mit aggressiven Reinigungsmitteln oder
scharfen Metallschabern, da das Glas dadurch beschädigt werden könnte.
• Ziehen Sie den Netzstecker aus der Steckdose, bevor Sie das Gerät reinigen oder
die Glühbirne austauschen.
• Verwenden Sie zur Reinigung des Geräts keinen Dampfreiniger.
20
DE
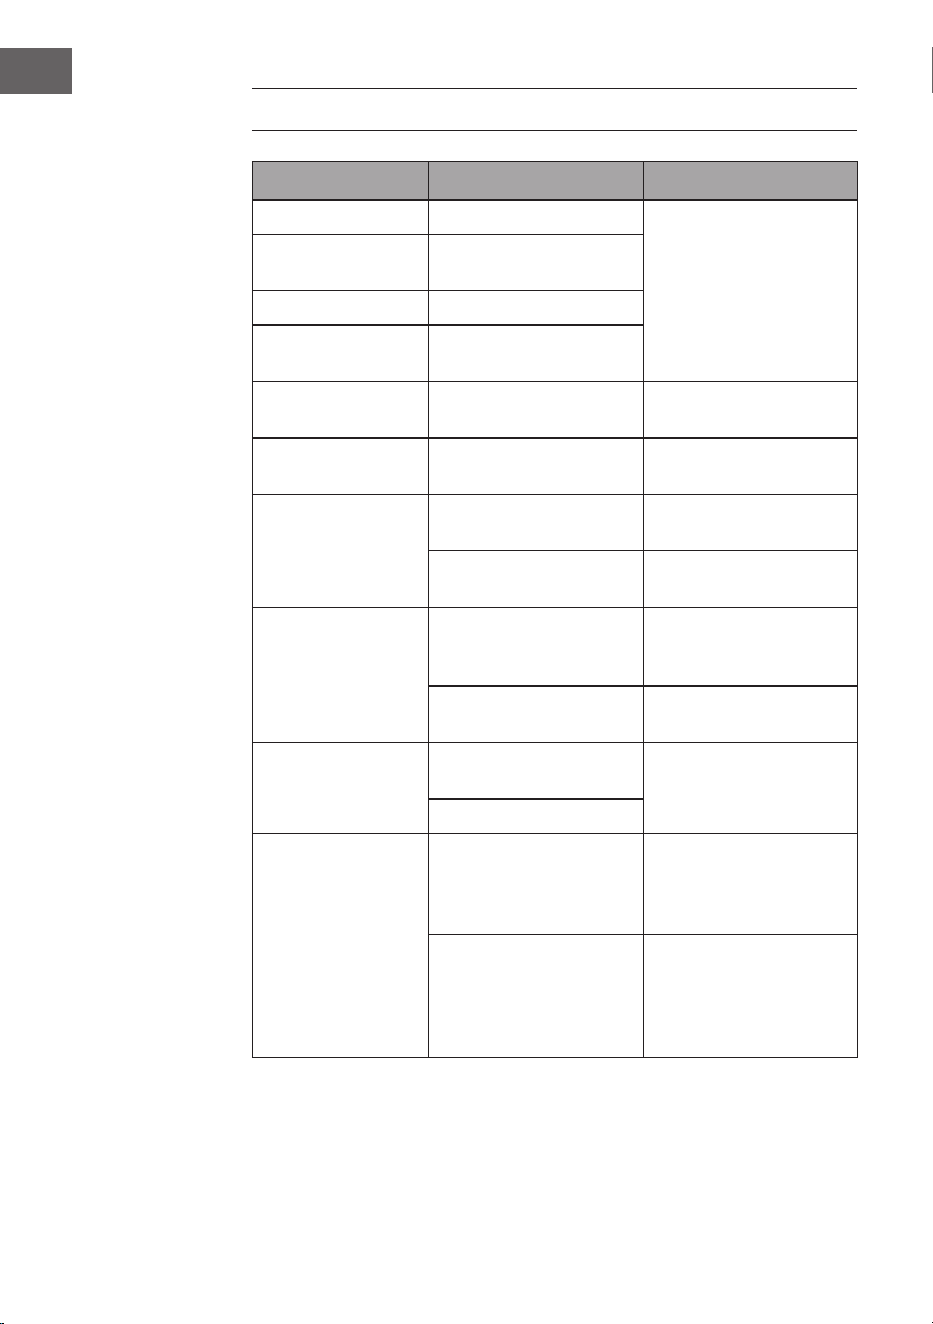
FEHLERBEHEBUNG
Problem Mögliche Ursache Lösungsansatz
E01 Fehler des Oberhitzesensors Stoppen Sie den Betrieb,
öffnen Sie die Ofentür
und lassen Sie das Gerät
10Minuten abkühlen.
Starten Sie das Gerät neu
oder kontaktieren Sie den
Kundendienst.
E02
Kurzschluss des
Oberhitzesensors
E03 Fehler des Unterhitzesensors
E04
Kurzschluss des
Unterhitzesensors
E05
Fehler des
Verdampfersensors
Kontaktieren Sie den
Kundendienst.
E06
Kurzschluss des
Verdampfersensors
Kontaktieren Sie den
Kundendienst.
Auf dem Bildschirm
wird nichts angezeigt.
Überprüfen Sie, ob der
Netzstecker eingesteckt ist.
Stecken Sie den Netzstecker
in die Steckdose.
Der Bildschirm ist defekt.
Kontaktieren Sie den
Kundendienst.
Die Ofenlampe
leuchtet nicht.
Die Ofenlampe ist defekt.
Ersetzen Sie die Ofenlampe
oder kontaktieren Sie den
Kundendienst.
Die Fassung ist defekt.
Kontaktieren Sie den
Kundendienst.
Der Lüfter läuft nicht.
Die Kontakte sind
beschädigt.
Kontaktieren Sie den
Kundendienst.
Der Lüfter ist defekt.
Die Tasten reagieren
nicht.
Das Bedienfeld ist kaputt
oder die Tastensperre ist
aktiv.
Deaktivieren Sie die
Tastensperre oder
kontaktieren Sie den
Kundendienst.
Die Zeitanzeige blinkt, alle
anderen Tasten reagieren
nicht.
Stellen Sie sicher, dass sich
im Wassertank genügend
Wasser bendet und
er richtig in das Gerät
eingesetzt wurde.

21
DE
Problem Mögliche Ursache Lösungsansatz
Kein Dampf
Der Wasserzulauf ist
blockiert.
Kontaktieren Sie den
Kundendienst.
Die Verdampfer-Heizung ist
defekt.
Der Wassereinlass ist defekt.
Das Gerät funktioniert
nicht.
Die Ofentür ist nicht richtig
geschlossen.
Schließen Sie die Ofentür.
Der Türverschluss ist defekt.
Kontaktieren Sie den
Kundendienst.
Dampf entweicht aus
dem Ofen.
Die Ofentür ist nicht richtig
geschlossen.
Schließen Sie die Tür richtig.
Die Türdichtung des Ofens
sitzt nicht richtig oder ist
beschädigt.
Ersetzen Sie die Türdichtung
oder wenden Sie sich an
den Kundendienst.
Wenn der Druck im
Ofeninneren zu groß ist, gibt
das Gerät Dampf ab.
Das ist normal.
22
DE
SPEZIELLE ENTSORGUNGSHINWEISE FÜR
VERBRAUCHER IN DEUTSCHLAND
Entsorgen Sie Ihre Altgeräte fachgerecht. Dadurch wird gewährleistet, dass die
Altgeräte umweltgerecht verwertet und negative Auswirkungen auf die Umwelt und
menschliche Gesundheit vermieden werden. Bei der Entsorgung sind folgende Regeln
zu beachten:
• Jeder Verbraucher ist gesetzlich verpichtet, Elektro- und Elektro-
nikaltgeräte (Altgeräte) sowie Batterien und Akkus getrennt vom
Hausmüll zu entsorgen. Sie erkennen die entsprechenden Altgeräte
durch folgendes Symbol der durchgestrichenen Mülltonne (WEEE-
Symbol).
• Sie haben Altbatterien und Altakkumulatoren, die nicht vom Altgerät umschlossen
sind, sowie Lampen, die zerstörungsfrei aus dem Altgerät entnommen werden
können, vor der Abgabe an einer Entsorgungsstelle vom Altgerät zerstörungsfrei zu
trennen.
• Bestimmte Lampen und Leuchtmittel fallen ebenso unter das Elektro- und
Elektronikgesetz und sind dementsprechend wie Altgeräte zu behandeln.
Ausgenommen sind Glühbirnen und Halogenlampen. Entsorgen Sie Glühbirnen
und Halogenlampen bitte über den Hausmüll, sofern sie nicht das WEEE-Symbol
tragen.
• Jeder Verbraucher ist für das Löschen von personenbezogenen Daten auf dem
Elektro- bzw. Elektronikgerät selbst verantwortlich.
Rücknahmepicht der Vertreiber
Vertreiber mit einer Verkaufsäche für Elektro- und Elektronikgeräte von mindestens 400
Quadratmetern sowie Vertreiber von Lebensmitteln mit einer Gesamtverkaufsäche von
mindestens 800 Quadratmetern, die mehrmals im Kalenderjahr oder dauerhaft Elektro-
und Elektronikgeräte anbieten und auf dem Markt bereitstellen, sind verpichtet,
1. bei der Abgabe eines neuen Elektro- oder Elektronikgerätes an einen Endnutzer ein
Altgerät des Endnutzers der gleichen Geräteart, das im Wesentlichen die gleichen
Funktionen wie das neue Gerät erfüllt, am Ort der Abgabe oder in unmittelbarer
Nähe hierzu unentgeltlich zurückzunehmen und
2. auf Verlangen des Endnutzers Altgeräte, die in keiner äußeren Abmessung größer
als 25 Zentimeter sind, im Einzelhandelsgeschäft oder in unmittelbarer Nähe hierzu
unentgeltlich zurückzunehmen; die Rücknahme darf nicht an den Kauf eines Elektro-
oder Elektronikgerätes geknüpft werden und ist auf drei Altgeräte pro Geräteart
beschränkt.

23
DE
• Bei einem Vertrieb unter Verwendung von Fernkommunikationsmitteln ist die
unentgeltliche Abholung am Ort der Abgabe auf Elektro- und Elektronikgeräte der
Kategorien 1, 2 und 4 gemäß § 2 Abs. 1 ElektroG, nämlich „Wärmeüberträger“,
„Bildschirmgeräte“ (Oberäche von mehr als 100 cm²) oder „Großgeräte“
(letztere mit mindestens einer äußeren Abmessung über 50Zentimeter) beschränkt.
Für andere Elektro- und Elektronikgeräte (Kategorien 3, 5 und 6) ist eine
Rückgabemöglichkeit in zumutbarer Entfernung zum jeweiligen Endnutzer zu
gewährleisten.
• Altgeräte dürfen kostenlos auf dem lokalen Wertstoffhof oder in folgenden
Sammelstellen in Ihrer Nähe abgegeben werden: www.take-e-back.de
• Für Elektro- und Elektronikgeräte der Kategorien 1, 2 und 4 bieten wir auch die
Möglichkeit einer unentgeltlichen Abholung am Ort der Abgabe an. Beim Kauf
eines Neugeräts haben Sie die Möglichkeit, eine Altgerätabholung über die
Webseite auszuwählen.
• Batterien können überall dort kostenfrei zurückgegeben werden, wo sie verkauft
werden (z. B. Super-, Bau-, Drogeriemarkt). Auch Wertstoff- und Recyclinghöfe
nehmen Batterien zurück. Sie können Batterien auch per Post an uns zurücksenden.
Altbatterien in haushaltsüblichen Mengen können Sie direkt bei uns von Montag bis
Freitag zwischen 08:00 und 16:00 Uhr unter der folgenden Adresse unentgeltlich
zurückgeben:
Chal-Tec Fulllment GmbH
Norddeutschlandstr. 3
47475 Kamp-Lintfort
• Wichtig zu beachten ist, dass Lithiumbatterien aus Sicherheitsgründen vor der
Rückgabe gegen Kurzschluss gesichert werden müssen (z. B. durch Abkleben der
Pole).
• Finden sich unter der durchgestrichenen Mülltonne auf der Batterie zusätzlich die
Zeichen Cd, Hg oder Pb ist das ein Hinweis darauf, dass die Batterie gefährliche
Schadstoffe enthält. (»Cd« steht für Cadmium, »Pb« für Blei und »Hg« für
Quecksilber.)
Hinweis zur Abfallvermeidung
Indem Sie die Lebensdauer Ihrer Altgeräte verlängern, tragen Sie dazu bei, Ressourcen
efzient zu nutzen und zusätzlichen Müll zu vermeiden. Die Lebensdauer Ihrer Altgeräte
können Sie verlängern, indem Sie defekte Altgeräte reparieren lassen. Wenn sich
Ihr Altgerät in gutem Zustand bendet, könnten Sie es spenden, verschenken oder
verkaufen.

24
DE
HINWEISE ZUR ENTSORGUNG
Wenn es in Ihrem Land eine gesetzliche Regelung zur
Entsorgung von elektrischen und elektronischen Geräten
gibt, weist dieses Symbol auf dem Produkt oder auf der
Verpackung darauf hin, dass dieses Produkt nicht im
Hausmüll entsorgt werden darf. Stattdessen muss es zu
einer Sammelstelle für das Recycling von elektrischen
und elektronischen Geräten gebracht werden. Durch
regelkonforme Entsorgung schützen Sie die Umwelt und die
Gesundheit Ihrer Mitmenschen vor negativen Konsequenzen.
Informationen zum Recycling und zur Entsorgung dieses
Produkts, erhalten Sie von Ihrer örtlichen Verwaltung oder
Ihrem Hausmüllentsorgungsdienst.
HERSTELLER & IMPORTEUR (UK)
Hersteller:
Chal-Tec GmbH, Wallstraße 16, 10179 Berlin, Deutschland.
Importeur für Großbritannien:
Berlin Brands Group UK Limited
PO Box 42
272 Kensington High Street
London, W8 6ND
United Kingdom
23
EN
Dear Customer,
Congratulations on purchasing this device. Please read the
following instructions carefully and follow them to prevent
possible damages. We assume no liability for damage caused
by disregard of the instructions and improper use. Scan the QR
code to get access to the latest user manual and more product
information.
CONTENTS
Product Data Sheet (10036173)24
Product Data Sheet (10036174)25
Safety Instructions26
Product Overview28
Shelves Installation29
Control Panel and Button Functions30
Displays and Programmes31
Additional Operating Functions36
Menu (Recipes)38
Cleaning and Care39
Troubleshooting40
Disposal Considerations42
Manufacturer & Importer (UK)42
TECHNICAL DATA
Item number 10036173 10036174
Power supply 220-240 V ~ 50/60 Hz
Power consumption 2100-2400 W 1900-2200 W
Steam power 1100 W 950 W
Max. lling quantity water tank 1.45 l 1.45 l

24
EN
PRODUCT DATA SHEET (10036173)
Information according to 65/2014
Supplier’s trade mark: Klarstein
Supplier’s model identier: 10036173
Energy efciency index(EEI cavity ): 94.1
Energy efciency class: A
Energy consumption per cycle in conventional mode and in fan-forced
convection mode in kWh: 0,64/0,65 kWh
Number of cavities: 1
Heat source: Electricity
Volume of the cavity in litres: 31 l
Information according to 66/2014
Symbol Value Unit
Model identication
10036173
Type of oven
Domestic electric oven
Mass of the appliance
M 21. 8 kg
Number of cavities
1
Heat source per cavity (electricity or gas)
Electricity
Volume per cavity
V 31 L
Energy consumption (electricity) required
to heat a standardised load in a cavity of
an electric heated oven during a cycle in
conventional mode per cavity (electric nal
energy)
EC
electric
cavity
0.64 kWh/cycle
Energy consumption required to heat a
standardised load in a cavity of an electric
heated oven during a cycle in fan-forced
mode per cavity (electric nal energy)
EC
electric
cavity
0.65
Energy consumption required to heat a
standardised load in a gas-red cavity of an
oven during a cycle in conventional mode per
cavity (gas nal energy)
EC
gas
cavity
-
MJ/cycle
kWh/cycle
(1)
Energy consumption required to heat a
standardised load in a gas-red cavity of an
oven during a cycle in fan-forced mode per
cavity (gas nal energy)
EC
gas
cavity
-
MJ/cycle
kWh/cycle
(1)
Energy Efciency Index per cavity
EEI cavity 94.1
(1) 1 kWh/cycle = 3.6 MJ/cycle.
25
EN
PRODUCT DATA SHEET (10036174)
Information according to 65/2014
Supplier’s trade mark: Klarstein
Supplier’s model identier: 10036174
Energy efciency index(EEI cavity ): 87.7
Energy efciency class: A
Energy consumption per cycle in conventional mode and in fan-forced
convection mode in kWh: 0,59/0,57 kWh
Number of cavities: 1
Heat source: Electricity
Volume of the cavity in litres: 24 l
Information according to 66/2014
Symbol Value Unit
Model identication
10036174
Type of oven
Domestic electric oven
Mass of the appliance
M 19.5 kg
Number of cavities
1
Heat source per cavity (electricity or gas)
Electricity
Volume per cavity
V 24 L
Energy consumption (electricity) required
to heat a standardised load in a cavity of
an electric heated oven during a cycle in
conventional mode per cavity (electric nal
energy)
EC
electric
cavity
0.59 kWh/cycle
Energy consumption required to heat a
standardised load in a cavity of an electric
heated oven during a cycle in fan-forced
mode per cavity (electric nal energy)
EC
electric
cavity
0.57
Energy consumption required to heat a
standardised load in a gas-red cavity of an
oven during a cycle in conventional mode per
cavity (gas nal energy)
EC
gas
cavity
-
MJ/cycle
kWh/cycle
(1)
Energy consumption required to heat a
standardised load in a gas-red cavity of an
oven during a cycle in fan-forced mode per
cavity (gas nal energy)
EC
gas
cavity
-
MJ/cycle
kWh/cycle
(1)
Energy Efciency Index per cavity
EEI cavity 87.7
(1) 1 kWh/cycle = 3.6 MJ/cycle.
26
EN
SAFETY INSTRUCTIONS
General Information
• Never wash the cabinet with running water to prevent damage to the electrical
components.
• To prevent electric shock, do not allow water or other liquids to enter the appliance.
• Children over the age of 8 and persons with reduced physical, sensory or mental
capabilities or those with a lack of experience and knowledge may only use the
appliance if they are instructed on how to do so by a person responsible for their
safety, or if they are supervised and understand the hazards associated with the use
of the appliance.
• Keep children supervised so that they do not play with the appliance.
• Cleaning and maintenance of the appliance may only be carried out by children
under supervision.
• Check the voltage specied on the rating plate before use. Only connect the
appliance to sockets that match the voltage of the appliance.
• Do not use this appliance if the plug, power cord, or appliance is damaged.
• If the power cord or plug is damaged, it must be replaced by the manufacturer, an
authorized service centre, or a similarly qualied person.
• Do not allow children to play with the appliance.
• Do not handle the plug or control panel with wet hands.
• Do not place this appliance on or near tablecloths, curtains, wallpaper or other
combustible materials and objects.
• Install the appliance on a dry, at surface and leave at least 10 cm of space
around the appliance on all sides so that the air can circulate sufciently. Do not
place any objects on top of the appliance.
• Do not leave the appliance unattended during use.
CAUTION
Danger of burns! Hot steam may escape when the oven door is
opened. Keep a safe distance to avoid scalding.
• Do not stuff any foreign matter into door lock switch of the oven door.
• The recommended temperature probe to this oven must be used
• Do not use a steam cleaner for cleaning.
• Make sure that the appliance is switched off and unplug the mains plug from the
socket before replacing the lamp to avoid electric shock.
• Do not install the appliance in a cabinet, as it may overheat.
27
EN
Instructions for Safe Use
CAUTION
Danger of burns! The appliance becomes hot during use. Take care not
to touch the heating elements inside the oven and use oven gloves.
• Before cleaning, unplug the appliance from the wall outlet and allow it to cool
completely.
• Do not plug the appliance into an outlet that is already connected to other kitchen
appliances.
• Clean the door panel of the oven with a soft and damp cloth. Do not use abrasives
or metal scrapers as they will scratch the surface.
• Do not connect the appliance to external timers or remotely controlled power
sockets.
• Before use, check that your cookware is suitable for this appliance. We recommend
that you use heat-resistant glass containers or ceramic containers. Fill the container
to a maximum of two thirds.
• Do not overll the water tank. When lling, use the MAX mark in the tank as a
guide.
• Do not place any containers on the open oven door.
• Do not heat food in a sealed container, otherwise the container may explode.
Transfer the food into a heat-resistant container before heating.
28
EN
PRODUCT OVERVIEW
1
Control panel
7
Handle
2
Rotisserie (40 l/36 l)
8
Door
3
Rotisserie handle (40 l/36 l)
9
Water tray
4
Grill
10
Body
5
Baking tray
11
Door switch
6
Water tank
Note: Make sure that the water level in the water tank is always above the minimum
mark. Leave the water tank in the oven all the time the appliance is in operation.

29
EN
SHELVES INSTALLATION
There are four layers of shelves. Select the appropriate shelf according to the dish or
recipe. Make sure that the bulge on the grill rack is pointing downwards and slide it into
the oven at the desired shelf layer.
1
2
3
4
Bulge
30
EN
CONTROL PANEL AND BUTTON FUNCTIONS
Buttons Function Description
Power On/Off
• After switching on for the rst time, a beep sounds and the
indicator light lights up. Now press the [On/Off button]
to enter the function selection mode.
• If no function is selected within 5 minutes, all settings are
deleted and the appliance is put into standby mode.
Setup/Child Lock
1. Setup:
• In the programmes “Steam“ , “Grill“ , “Air Fryer
or “Grill and Steam“ , the [Setup/Child Lock
button] lights up. When you press the button, the Time-
LED and the [Start/Pause knob] ash simultaneously.
Turn the knob to set the temperature and time. Then press
the [Start/Pause knob] to conrm the setting. If you
wait too long, the time LED and the [Start/Pause knob]
ash simultaneously for 5 seconds and then the setting is
automatically conrmed and saved.
• When you select the “Menu“ programme after
switching on the appliance, the [Setup/Child Lock button]
lights up. This button can be used to set the cooking
time according to the amount of food. This is only possible
once for a recipe, then the [Settings/Child Lock button]
goes out and the time cannot be set again for that
mode .
2. Child Lock:
• The child lock can be activated in all programmes. Press
the [Setup/Child Lock button] (when it is lit) for
3seconds. The [Child Lock indicator] lights up, which
means the child lock is activated. If you press the [Setup/
Child Lock button] , again for 3 seconds, the child lock
is deactivated.
31
EN
Buttons Function Description
Start/Pause
(Knob)
• Press the [Start/Pause knob] to start or pause the
appliance.
• Turn the [Start/Pause knob] to select one of the following
programmes: “Steam”, “Grill”, “Grill and Steam”,
“Air Fryer”, “Menu”, “Cleaning”, “Unfreezing” or
“Fermenting”.
• Turn the [Start/Pause knob] to set the time and temperature
in the different programmes and functions.
• When the [Start/Pause knob] is ashing, pressing or
turning the knob conrms or adjusts the setting of the
selected programmes or functions.
• When the appliance is in operation, the [Start/Pause
knob] lights up
DISPLAYS AND PROGRAMMES
Programmes Function Description
Steam
• The main function is steaming. The preset time is 30 minutes
and the temperature is 100 °C.
• When you select the "Steam" programme, the [Steam
indicator] and the [Start/Pause knob] ash. Press the
[Start/Pause knob] to conrm the programme selection
and enter the setting mode.
• The [Start/Pause knob] can then be used to set a time
between 1 minute and 2 hours. Press the [Start/Pause
knob] to conrm the time setting. Now you can set the
temperature. A temperature between 100 °C and 110 °C can
be set. After setting the temperature, press the [Start/Pause
knob] to conrm. If you now press the [Start/Pause knob]
again, the appliance starts operation and the countdown
begins.
32
EN
Grill
• In the "Grill" programme, both top and bottom heat are used.
Part of the programme is the "Preheat" function . Wait until
the preheating is nished before putting food into the oven. The
preset time is 30 minutes and the temperature is 180 °C.
• Use the [Start/Pause knob] to set a time between 1minute
and 2 hours. Press the [Start/Pause knob] to conrm the
time setting. Now you can set the temperature. A temperature
between 100 °C and 230 °C can be set. Press the [Start/
Pause knob] to conrm. The appliance starts operation.
• After the "Grill" programme has been started, the [Preheat
indicator] lights up. The oven is now preheating. Once
preheating is nished, the [Preheat indicator] goes off and
the appliance beeps 10 times to remind you to put food in the
oven. As soon as preheating is nished, the grill function starts
automatically.
Grill and
Steam
• The main function of this programme is the grill function. In
addition to the grill function, the oven emits some steam. This
cooks the food faster without drying it out. The preset time is
30minutes and the temperature is 180 °C. Use the [Start/
Pause knob] to set a time between 1 minute and 2 hours.
Press the [Start/Pause knob] to conrm the time setting.
Now you can set the temperature. A temperature between
120°C and 230 °C can be set. Press the [Start/Pause knob]
to conrm. The appliance will now start operation.
Air Fryer
• In the “Air Fryer“ function, the rear heater runs with circulating
air. The preset time is 30 minutes and the temperature is
180°C.
• Use the [Start/Pause knob] to set a time between 1minute
and 2 hours. Press the [Start/Pause knob] to conrm the
time setting. Now you can set the temperature. A temperature
between 100 °C and 230 °C can be set. Press the [Start/
Pause knob] to conrm. The appliance will now start
operation.
• When the appliance starts, the [Preheat indicator] lights
up. The oven is now preheating. When preheating is nished,
the [Preheat indicator] goes off and the appliance
beeps 10 times to remind you to put food in the oven. Once
preheating is nished, the countdown of the “Air Fryer“
function starts automatically.
33
EN
Menu
• You can select from 31 recipes with the [Menu button] .
When the [Menu button] is pressed, the [Menu indicator]
and the [Start/Pause knob] ash simultaneously.
“F-00“ is shown on the LED display. Press the [Start/Pause
knob] to enter the menu selection. Turn the [Start/Pause
knob] to display the recipes one after the other (“F-01“,
“F-02“ ... “F-31“). Press the [Start/Pause knob] to select
a recipe.
• When a recipe is selected, the [Setup/Child Lock button]
lights up after the start. This button can be used to adjust the
cooking time according to the amount of food. For a recipe,
the time can only be adjusted once at a time during operation.
Afterwards, the [Setup/Child Lock button] light goes out
and the time cannot be adjusted again until the cooking of the
selected recipe is nished.
Unfreezing
• When you select the “Unfreezing“ function, the [Unfreezing
indicator] and the [Start/Pause knob] ash. Press
the [Start/Pause knob] and turn it to set a time between
5 minutes and 2 hours. Press the [Start/Pause knob] to
conrm the time setting. Now you can set the temperature.
A temperature between 50 °C and 60 °C can be set. Then
press the [Start/Pause knob] to conrm. The appliance
now starts operation with the countdown.
• The preset time is 20 minutes and the temperature is 55 °C.
Fermenting
• When you select the “Fermenting“ function, the [Fermenting
indicator] and the [Start/Pause knob] light up. The
preset time is 40 minutes and the temperature is 40 °C.
The [Start/Pause knob] can then be used to set a time
between 5 minutes and 2 hours. Press the [Start/Pause
knob] to conrm the time setting. Now you can set the
temperature. A temperature between 30 °C and 50 °C
can be set. Press the [Start/Pause knob] to conrm. The
appliance will now start operation.
34
EN
Cleaning
• The cleaning function can be used to remove scale after
using the oven. When you have selected the “Cleaning“
programme, the [Cleaning indicator] and the [Start/Pause
knob] light up. Press the [Start/Pause knob] to conrm
and select the desired cleaning mode “C1“ or “C2“.
C-1: Scale removal from the steam generator in 50 minutes.
C-2: 25 minutes and 100 °C for cleaning the oven cavity or
disinfecting appliances.
Scale removal in cleaning mode “C-1”:
1. When the total operating time of the evaporator's heating pipe
has reached 100 hours, the appliance reminds you that the
scale must be removed from the evaporator (the descaling
function can be started automatically by you at any time). The
[Cleaning indicator] ashes.
2. Prepare the descaling solution in a ratio of 1 : 8 (descaler:
water). Pour the solution into the water tank after mixing it
carefully. The level of the descaling solution must be above the
minimum mark of the water tank.
3. When 20 minutes remain, the appliance reminds you to
remove the water tank from the appliance, pour out the
descaling solution remaining in it and replace it with clean
water. The [Cleaning indicator] ashes and the appliance
beeps several times. After the water tank has been replaced,
cleaning continues. When 10 minutes remain, the appliance
reminds you to remove the water tank from the appliance and
replace the water inside with clean water. When the water
tank has been replaced, the appliance continues cleaning.
When the descaling process is completed, the [Cleaning
indicator] lights up permanently.
35
EN
Display indicators Functional description
Lack of Water
If the appliance is started in any programme and there is no
or very little water in the water tank, the oven stops operating
and the [Lack of Water indicator]
.
ashes. The appliance
beeps 10 times. All buttons are deactivated. After you have
lled the water tank with water, the oven resumes operation
and cooking continues.
.
Preheat
When the [Preheat indicator] lights up, the oven is
preheating. As soon as the preheating process is nished, the
indicator goes out.
End of
Programme
When a programme is completed, the display shows “END“
and the indicator lights up.
Child Lock
When the [Child Lock indicator] lights up, it means that the
child lock is activated. Press the [Setup/Child Lock button]
for 3 seconds to deactivate the child lock. The display goes
out.
Cleaning
If the [Cleaning indicator] lights up continuously, it means
that the appliance is being descaled. The [Cleaning indicator]
goes out as soon as the descaling process is completed.
36
EN
ADDITIONAL OPERATING FUNCTIONS
Cooking Process 1. Pause
• When the appliance is in operation and you press the
[Start/Pause knob] , the time LED light and the [Start/
Pause knob] ash. The cooking process is paused,
the countdown is temporarily stopped and the display
continues to show the operating status. If you press the
[Start/Pause knob] again, cooking will continue until
the countdown has nished.
• If you open the oven door during cooking, the cooking
process is interrupted, the countdown is temporarily
stopped and the display continues to show the operating
status. The time LED and the [Start/Pause knob]
ash. When you close the oven door again, the cooking
process will continue until the countdown is over.
2. Time and Temperature setting
During cooking, you can adjust the cooking time and
temperature as follows:
• When you press the [Setup/Child Lock button] , the
digits of the minutes display ash. Set the minutes by
turning the [Start/Pause knob] and conrm your entry
by pressing the [Start/Pause knob] . (Note: It is not
possible to set the hours).
• After setting the minutes, you can set the temperature
by turning the [Start/Pause knob] . Press the [Start/
Pause knob] to conrm your entry. If no temperature
adjustment is necessary, you can also press the [Start/
Pause knob] directly after setting the minutes.
• After you have selected a recipe in the Menu ,
the [Setup/Child Lock button] lights up after the
start. With this button you can adjust the cooking time
according to the amount of food. The time can only be
adjusted once for each recipe, then the [Setup/Child Lock
button] light goes out. It is not possible to adjust the
cooking time again.

37
EN
Inside Lighting
• When the oven is started, the furnace light is on for
3minutes and then goes off again automatically.
• When you open the oven door, the furnace light comes
on and then switches off again automatically after
3minutes. When you close the oven door, the furnace
light also goes off after 3 minutes.
• If you turn the knob once in standby mode or during
operation, the furnace light comes on for 3 minutes and
then switches off again automatically.
Open and Close
Door
• If you open the oven door during operation, the
appliance stops and pauses. As soon as you close the
door again, operation resumes automatically.
End of Cooking
• When the oven has nished cooking, the appliance beeps
10 times. The display shows „END“ and . This means
the cooking process or recipe is nished.
38
EN
MENU (RECIPES)
The settings listed in the table for the different foods are for reference only. If more food
is to be cooked or food is placed on more than one layer, the cooking time must be
adjusted. Adjust the time with the [Setup/Child Lock button] .
Code F-01 F-02 F-03 F-04 F-05 F-06 F-07 F-08 F-09
Food Style
Steam
Vegetable
Steam
Rice
Steam
Fish
Steam
Shrimp
Steam
Crab
Steam
Eggs
Steam
Chicken
Steam
Papaya
Roast
Chicken
Time (min.) 16 50 20 15 30 18 30 35 45
Temperature
(°C)
100 100 100 100 100 100 100 100 230
Weight (g) 600 200 600 500 800 300 800 400 1000
Code F-10 F - 11 F -12 F - 13 F - 14 F -15 F -16 F -17 F -18
Food Style
Roast
Steak
Roast
Muttons
Roast
Ribbs
Roast
Salmon
Roast
Chicken
legs
Roast
Chicken
wings
Roast
Saury
Roast
Chips
Roast
Shrimp
Time (min.) 13 35 20 22 26 23 20 18 15
Temperature
(°C)
230 200 210 210 210 210 220 220 180
Weight (g) 600 600 500 400 750 500 600 500 400
Code F -19 F-20 F -21 F-22 F-23 F-24 F-25 F-26 F-27
Food Style
Roast
Sausages
Roast
Bacon
Roast
Pizza
Mini
Pizza
Baguette
bread
Chiffon
cake
Yoghurt
cheese
cake
Puff Cookies
Time (min.) 13 11 22 18 16 50 60 32 14
Temperature
(°C)
200 200 18 0 18 0 18 0 15 0 15 0 18 0 18 0
Code F-28 F-29 F-30 F -31
Food Style Egg tart
Roast
Almond
Roast
Walnut
Make
Yoghurt
Time (min.) 22 10 12 480
Temperatur
(°C)
18 0 14 0 160 45

39
EN
CLEANING AND CARE
• Before cleaning, switch off the appliance and disconnect the mains plug from the
socket.
• Do not clean the surface of the appliance with metal tools or abrasive cleaners as
this may damage the coating.
• Clean the inside of the oven regularly. Remove food or grease splashes on the
inside wall of the oven with a damp cloth. For stubborn dirt, a mild cleaning solution
can also be used.
• It is recommended to ll the water tank with drinking water or distilled water. If tap
water is used, limescale residue will occur after prolonged use of the appliance.
• Check the water tank regularly. Remove it horizontally. Clean it and dry it with a soft
cloth. After cleaning, put the water tank back in its original position.
• Remove any residual water in the water tank after you have nished cooking.
• Clean the oven seal regularly with a soft and dry cloth.
• Unplug the appliance from the mains, clean the entire appliance, empty the water
tank and place the appliance in a clean and dry place if you are not going to use it
for a long period of time.
• The appliance must be repaired by the manufacturer, the after-sales service or a
similarly qualied person if it malfunctions. Never attempt to carry out the repair
yourself.
• Do not clean the glass door of the appliance with aggressive cleaning agents or
sharp metal scrapers as this may damage the glass.
• Unplug the appliance from the mains before cleaning the appliance or replacing
the light bulb.
• Do not use a steam cleaner to clean the appliance.

40
EN
TROUBLESHOOTING
Problem Possible Cause Suggested Solution
E01
Open circuit of the top
sensor
Stop operation, open the
oven door and let the
appliance cool down for
10 minutes. Restart the
appliance or contact the
customer service.
E02
Short circuit of the top
sensor
E03
Open circuit of the bottom
sensor
E04
Short circuit of the bottom
sensor
E05
Open circuit of the
evaporating heater sensor
Contact the customer
service.
E06
Short circuit of the
evaporating heater sensor
Contact the customer
service.
No display is shown
on the screen.
Check that the mains plug is
plugged in.
Insert the mains plug into the
socket.
Display panel is in poor
contact.
Contact the customer
service.
The oven lamp does
not light up.
The oven lamp is damaged.
Replace the oven lamp or
contact the customer service.
Poor contact.
Contact the customer
service.
Fan does not work
Poor contact. Contact the customer
service.
Fan is damaged
No response from the
buttons.
The control panel is broken
or the key lock is active.
Deactivate the key lock or
contact the customer service.
The time LED ashes, all
other buttons do not react.
Make sure that there is
enough water in the water
tank and that it is correctly
inserted into the appliance.
No steam
Water pipe is blocked.
Contact the customer
service.
Evaporator heater is
damaged.
Water intake system is
damaged.
41
EN
Problem Possible Cause Suggested Solution
Steam oven does not
work.
Door is not closed tightly. Close the door properly.
Poor contact of door control
switch.
Contact the customer
service.
Steam leakage from
oven door
Door is not closed tightly Close the door properly.
Door sealant is off or
damaged.
Replace the door seal or
contact the customer service.
The oven releases steam
when steam pressure is too
big.
That is normal.

42
EN
DISPOSAL CONSIDERATIONS
If there is a legal regulation for the disposal of electrical
and electronic devices in your country, this symbol on the
product or on the packaging indicates that this product must
not be disposed of with household waste. Instead, it must be
taken to a collection point for the recycling of electrical and
electronic equipment. By disposing of it in accordance with
the rules, you are protecting the environment and the health of
your fellow human beings from negative consequences. For
information about the recycling and disposal of this product,
please contact your local authority or your household waste
disposal service.
MANUFACTURER & IMPORTER (UK)
Manufacturer:
Chal-Tec GmbH, Wallstrasse 16, 10179 Berlin, Germany.
Importer for Great Britain:
Berlin Brands Group UK Limited
PO Box 42
272 Kensington High Street
London, W8 6ND
United Kingdom

43
FR
Chère cliente, cher client,
Toutes nos félicitations pour l’acquisition de ce nouvel appareil.
Veuillez lire attentivement et respecter les instructions de ce mode
d’emploi an d’éviter d’éventuels dommages. Nous ne saurions
être tenus pour responsables des dommages dus au non-respect
des consignes et à la mauvaise utilisation de l’appareil. Scannez
le QR-Code pour obtenir la dernière version du mode d’emploi
ainsi que d’autres informations concernant le produit.
SOMMAIRE
Fiche de données produit (10036173)44
Fiche de données produit (10036174)45
Consignes de sécurité46
Aperçu de l‘appareil48
Remarques sur les inserts49
Panneau de commande et fonctions des touches50
Voyants à l‘écran et programmes51
Autres fonctions56
Menu (recettes)58
Nettoyage et entretien59
Résolution des problèmes60
Conseils pour le recyclage62
Fabricant et importateur (UK)62
FICHE TECHNIQUE
Numéro d'article 10036173 10036174
Alimentation 220-240 V ~ 50/60 Hz
Puissance 2100-2400 W 1900-2200 W
Puissance de la vapeur 1100 W 950 W
Capacité max. du réservoir
d'aeu
1,45 l 1,45 l
44
FR
FICHE DE DONNÉES PRODUIT (10036173)
Données selon 65/2014
Marque commerciale du fournisseur : Klarstein
Identiant du modèle du fournisseur : 10036173
Indice d‘efcacité énergétique (four IEE) : 94,1
Classe d‘efcacité énergétique : A
Consommation d‘énergie par cycle pour chaque compartiment de cuisson
en mode conventionnel et en mode convection en kWh : 0,64/0,65 kWh
Nombre de compartiments de cuisson : 1
Source (s) de chaleur de l‘espace de cuisson : électricité
Volume de l‘espace de cuisson en litres : 31 l
Données selon 66/2014
Symbole Valeur Unité
Identication du modèle
10036173
Type de four
Four électrique
Dimensions de l'appareil
M 21, 8 kg
Nombre d'espaces de cuisson
1
Source de chaleur par espace de cuisson
(électricité ou gaz)
Électricité
Capacité des espaces de cuisson
V 31 L
Consommation d'énergie (électrique) lors
du chauffage d'une charge standard dans
l'espace de cuisson d'un four électrique
pendant un cycle en mode conventionnel par
espace de cuisson (énergie nale électrique)
EC Four
électrique
0,64 kWh/cycle
Consommation d'énergie lors du chauffage
d'une charge standard dans l'espace de
cuisson d'un four électrique pendant un cycle
en mode chaleur tournante par espace de
cuisson (énergie nale électrique)
EC Four
électrique
0,65 kWh/cycle
Consommation d'énergie lors du chauffage
d'une charge standard dans l'espace de
cuisson d'un four au gaz pendant un cycle en
mode conventionnel par espace de cuisson
(énergie nale gaz)
EC four à
gaz
-
MJ/cycle
kWh/cycle
(1)
Consommation d'énergie lors du chauffage
d'une charge standard dans l'espace de
cuisson d'un four au gaz pendant un cycle
en mode chaleur tournante par espace de
cuisson (énergie nale gaz)
Four à gaz
EC
-
MJ/cycle
kWh/cycle
(1)
Indice efcacité énergétique espace cuisson
Four EEI 94,1
(1) 1 kWh/cycle = 3,6 MJ/ cycle.
45
FR
FICHE DE DONNÉES PRODUIT (10036174)
Données selon 65/2014
Marque commerciale du fournisseur : Klarstein
Identication du modèle du fournisseur : 10036174
Indice d‘efcacité énergétique (four EEI) : 87,7
Classe d‘efcacité énergétique : A
Consommation d‘énergie par cycle pour chaque espace de cuisson en
mode conventionnel et en mode convection en kWh : 0,59/0,57 kWh
Nombre d‘espaces de cuisson : 1
Source (s) de chaleur de l‘espace de cuisson : électricité
Volume des espaces de cuisson en litres : 24 l
Données selon 66/2014
Symbole Valeur Unité
Identication du modèle
10036174
Type de four
Four électrique
Dimensions de l'appareil
M 19,5 kg
Nombre d'espaces de cuisson
1
Source de chaleur par espace de cuisson
(électricité ou gaz)
Électricité
Capacité des espaces de cuisson
V 24 L
Consommation d'énergie (électrique) lors
du chauffage d'une charge standard dans
l'espace de cuisson d'un four électrique
pendant un cycle en mode conventionnel par
espace de cuisson (énergie nale électrique)
EC Four
électrique
0,59 kWh/cycle
Consommation d'énergie lors du chauffage
d'une charge standard dans l'espace de
cuisson d'un four électrique pendant un cycle
en mode chaleur tournante par espace de
cuisson (énergie nale électrique)
EC Four
électrique
0,57 kWh/cycle
Consommation d'énergie lors du chauffage
d'une charge standard dans l'espace de
cuisson d'un four au gaz pendant un cycle en
mode conventionnel par espace de cuisson
(énergie nale gaz)
EC four à
gaz
-
MJ/cycle
kWh/cycle
(1)
Consommation d'énergie lors du chauffage
d'une charge standard dans l'espace de
cuisson d'un four au gaz pendant un cycle
en mode chaleur tournante par espace de
cuisson (énergie nale gaz)
Four à gaz
EC
-
MJ/cycle
kWh/cycle
(1)
Indice efcacité énergétique espace cuisson
Four EEI 87, 7
(1) 1 kWh/cycle = 3,6 MJ/ cycle.
46
FR
CONSIGNES DE SÉCURITÉ
Consignes générales
• Pour éviter d’endommager les composants électriques, ne rincez jamais le boîtier à
l’eau courante.
• Pour éviter les chocs électriques, ne faites jamais pénétrer de l’eau ou d’autres
liquides dans l’appareil.
• Les enfants à partir de 8 ans, les personnes ayant un handicap mental, sensoriel
et physique ne peuvent utiliser l’appareil que s’ils ont été parfaitement familiarisés
avec les fonctions et les précautions de sécurité par un responsable, et s’ils
comprennent les risques associés.
• Surveillez les enfants pour qu’ils ne jouent pas avec l’appareil.
• Le nettoyage et l’entretien de l’appareil ne peuvent être effectués par des enfants
que sous surveillance.
• Vériez la tension indiquée sur la plaque signalétique avant utilisation. Ne
connectez l’appareil qu’à des prises qui correspondent à la tension de l’appareil.
• N’utilisez pas cet appareil si la che, le cordon d’alimentation ou l’appareil est
endommagé.
• Si le cordon d’alimentation ou la che est endommagé, il doit être remplacé par le
fabricant, un spécialiste agréé ou une personne de qualication similaire.
• Ne manipulez pas la che ou le panneau de commande avec les mains mouillées.
• Ne placez pas cet appareil sur ou à proximité de nappes, rideaux, papiers peints
ou autres matériaux et objets inammables.
• Installez l’appareil sur une surface sèche et plane et laissez au moins 10 cm
d’espace tout autour de l’appareil pour que l’air puisse circuler correctement. Ne
posez aucun objet sur l’appareil.
• Ne laissez pas l’appareil en marche sans surveillance.
ATTENTION
Risque de brûlure ! De la vapeur chaude peut s’échapper lorsque la
porte du four est ouverte. Gardez une distance de sécurité pour éviter
les brûlures.
• N’insérez aucun corps étranger dans l’interrupteur de sécurité sur la porte du four.
• Utilisez uniquement la sonde de température recommandée pour ce four.
• N’utilisez pas de nettoyeur vapeur.
• Pour éviter tout choc électrique, coupez l’alimentation et débranchez le cordon de
la prise avant de remplacer la lampe.
• L’appareil ne doit pas être encastré dans une armoire, sinon il surchauffera.

47
FR
Conseils pour une utilisation sûre
ATTENTION
Risque de brûlure ! Pendant le fonctionnement, l’appareil devient très
chaud. Veillez à ne pas toucher les éléments chauffants à l’intérieur du
four et utilisez des gants de cuisine.
• Avant le nettoyage, retirez la che de la prise et laissez l’appareil refroidir
complètement.
• Ne branchez pas l’appareil sur des prises déjà occupées par d’autres appareils de
cuisine.
• Nettoyez la vitre de la porte du four avec un chiffon doux et humide. N’utilisez pas
de nettoyants abrasifs ou de grattoirs métalliques car ils rayeraient la surface.
• Ne connectez pas l’appareil à des minuteries externes ou à des prises
télécommandées.
• Avant utilisation, vériez que votre ustensile de cuisine convient à cet appareil.
Nous vous recommandons d’utiliser des récipients en verre ou en céramique
résistant à la chaleur. Remplissez le récipient aux deux tiers au maximum.
• Ne remplissez pas trop le réservoir d’eau. Lors du remplissage, utilisez le marquage
MAX dans le réservoir comme guide.
• Ne placez pas de récipients sur la porte du four ouverte.
• Ne chauffez pas les aliments dans un contenant scellé, sinon le contenant pourrait
exploser. Avant de chauffer, transférez les aliments dans un récipient résistant à la
chaleur.

48
FR
APERÇU DE L‘APPAREIL
1
Panneau de commande
7
Poignée
2
Rôtissoire (40 l/36 l)
8
Porte
3
Poignée de rôtissoire (40 l/36 l)
9
Bac de récupération d'eau
4
Grille de cuisson
10
Boîtier
5
Plaque de cuisson
11
Contacteur de porte
6
Réservoir d'eau
Remarque : Vériez que le niveau d‘eau du réservoir est toujours au-dessus du
repère minimum. Laissez le réservoir d‘eau dans le four tout le temps pendant que
l‘appareil est en marche.

49
FR
REMARQUES SUR LES INSERTS
Quatre niveaux d‘insertion sont disponibles. Sélectionnez le bon insert en fonction du
plat ou de la recette. Vériez que les pieds courbés de la grille sont vers le bas et faites-
la glisser dans le four au niveau requis.
1
2
3
4
Pieds
courbés
50
FR
PANNEAU DE COMMANDE ET FONCTIONS DES
TOUCHES
Touches Description de la fonction
Marche /Arrêt
• Après la première mise sous tension, un bip retentit et
le voyant lumineux s‘allume. Appuyez maintenant sur
[Marche / Arrêt] pour accéder à la sélection de
fonction.
• Si aucune fonction n‘est sélectionnée dans les 5 minutes,
tous les paramètres sont supprimés et l‘appareil passe en
mode veille.
Paramètres /
verrouillage
parental
1. Paramètres :
• Dans les programmes „Vapeur“ , „Griller“ ,
„Friture à l‘air“ ou „Griller et cuire à la vapeur“
, la touche [Paramètres / verrouillage parental]
s‘allume. Appuyez sur le bouton, le voyant de l‘heure et
la touche [Départ / Pause] clignotent simultanément.
Tournez le cadran pour régler la température et l‘heure.
Appuyez ensuite sur [Départ / Pause] pour conrmer
le réglage. Si vous attendez trop longtemps, la LED Time
et [Départ / Pause] clignotent simultanément pendant
5 secondes puis le réglage est automatiquement conrmé
et enregistré.
• Si vous sélectionnez le programme „Menu“ après la
mise sous tension de l‘appareil, la touche [Paramètres /
verrouillage parental] s‘allume. Cette touche permet
de régler le temps de cuisson en fonction de la quantité
d‘aliments. Ceci n‘est possible qu‘une seule fois pour
une recette, puis le [bouton Paramètres / verrouillage
parental] s‘éteint et vous ne pouvez plus régler la
durée pour ce mode .
2. Verrouillage parental
• Le verrouillage parental peut être activé dans tous les
programmes. Appuyez sur [Paramètres / Verrouillage
parental] (s‘il est allumé) pendant 3 secondes. Le
témoin de [verrouillage parental] s‘allume, c‘est-à-dire
que le Verrouillage parental est activé. Si vous appuyez
à nouveau sur la touche [Paramètres / Verrouillage
parental] pendant 3 secondes, le Verrouillage
parental est désactivé.

51
FR
Touches Description de la fonction
Start/Pause
(molette)
• Pour démarrer ou mettre en pause l‘appareil, appuyez sur
[Départ / Pause] .
• Tournez la commande [Départ / Pause] pour sélectionner
l‘un des programmes suivants : „Vapeur“, „Griller“,
„Griller et cuire à la vapeur“, „Frire à l‘air“, „Menu“,
„Nettoyage“, „Décongélation“ ou „Fermentation“.
• Tournez la Commande [Départ / Pause] pour régler la
durée et la température dans les divers programmes et
fonctions.
• Si la commande [Départ / Pause] clignote, vous pouvez
conrmer ou ajuster le réglage des programmes ou
fonctions sélectionnés en appuyant ou en tournant la
commande.
• Lorsque l‘appareil est en marche, la commande [Départ /
Pause] s‘allume.
VOYANTS À L‘ÉCRAN ET PROGRAMMES
Programmes Description de la fonction
Vapeur
• La fonction principale est „vapeur“. La durée préréglée est de
30 minutes et la température est de 100 °C.
• Si vous sélectionnez le programme „Cuisson à la vapeur“, le
voyant de [cuisson à la vapeur] et la commande [Départ /
Pause] clignotent. Appuyez sur [Départ / Pause] pour
conrmer la sélection du programme et pour entrer dans le
mode de réglage.
• Vous pouvez alors régler une durée comprise entre 1 minute
et 2 heures avec le contrôleur. Appuyez sur [Départ / Pause]
pour conrmer le réglage de la durée. Vous pouvez
maintenant régler la température entre 100 °C et 110 °C.
Après avoir réglé la température, appuyez sur [Départ /
Pause] pour conrmer. Si vous appuyez à nouveau sur
[Départ / Pause] , l‘appareil commence à fonctionner et le
compte à rebours commence.
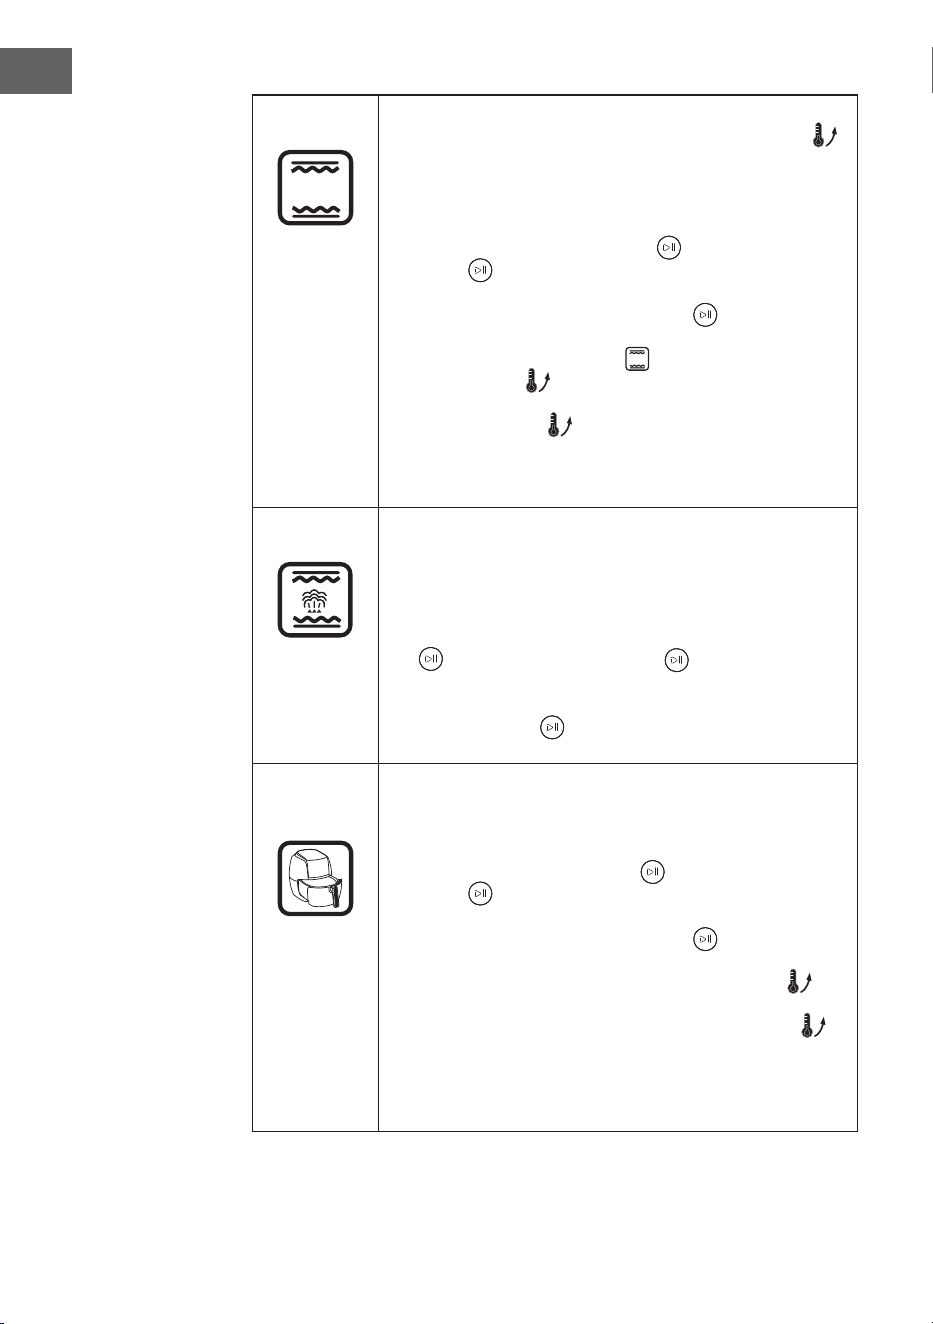
52
FR
Grillades
• Le programme „Gril“ utilise la chaleur de voûte et de sole.
Une partie du programme est la fonction „préchauffage“ .
Attendez la n du préchauffage avant de mettre les aliments
dans le four. La durée préréglée est de 30 minutes et la
température de 180 °C.
• Vous pouvez régler une durée comprise entre 1 minute et
2heures avec le [Départ / Pause] . Appuyez sur [Départ/
Pause] pour conrmer le réglage de la durée. Vous
pouvez maintenant régler la température entre 100 °C et
230 °C. Appuyez sur [Départ / Pause] pour conrmer.
L‘appareil commence à fonctionner.
• Une fois le programme „Gril“ lancé, le voyant de
[préchauffage] s‘allume. Le four est maintenant
préchauffé. Dès que le préchauffage est terminé, le voyant
de [préchauffage] s‘éteint et l‘appareil émet 10 bips
pour vous dire de mettre les aliments dans le four. Dès
que le préchauffage est terminé, la fonction grill démarre
automatiquement.
Gril et vapeur
• La fonction principale de ce programme est la fonction
gril. En plus de la fonction gril, le four produit de la vapeur.
Cela signie que les aliments cuisent plus rapidement sans
se dessécher. La durée préréglée est de 30 minutes et la
température de 180 °C. Vous pouvez régler une durée
comprise entre 1 minute et 2 heures avec [Départ / Pause]
. Appuyez sur [Départ / Pause] pour conrmer le
réglage de la durée. Vous pouvez maintenant régler une
température comprise entre 120 °C et 230 °C. Appuyez sur
[Départ / Pause] pour conrmer. L‘appareil commence
maintenant à fonctionner.
Friture à l‘air
chaud
• Avec la fonction de friture à l‘air chaud, le chauffage arrière
fonctionne avec la convection. La durée préréglée est de
30minutes et la température de 180 °C.
• Vous pouvez régler une durée comprise entre 1 minute et
2heures avec [Départ / Pause] . Appuyez sur [Départ/
Pause] pour conrmer le réglage de la durée. Vous
pouvez maintenant régler une température entre 100 °C et
230 °C. Appuyez sur [Départ / Pause] pour conrmer.
L‘appareil commence maintenant à fonctionner.
• Lorsque l‘appareil démarre, le voyant [préchauffage]
s‘allume. Le four préchauffe maintenant. Dès que le
préchauffage est terminé, le voyant dev [préchauffage]
s‘éteint et l‘appareil émet 10 bips pour vous dire de mettre les
aliments dans le four. Dès que le préchauffage est terminé,
le compte à rebours de la fonction de friture à l‘air chaud
démarre automatiquement.
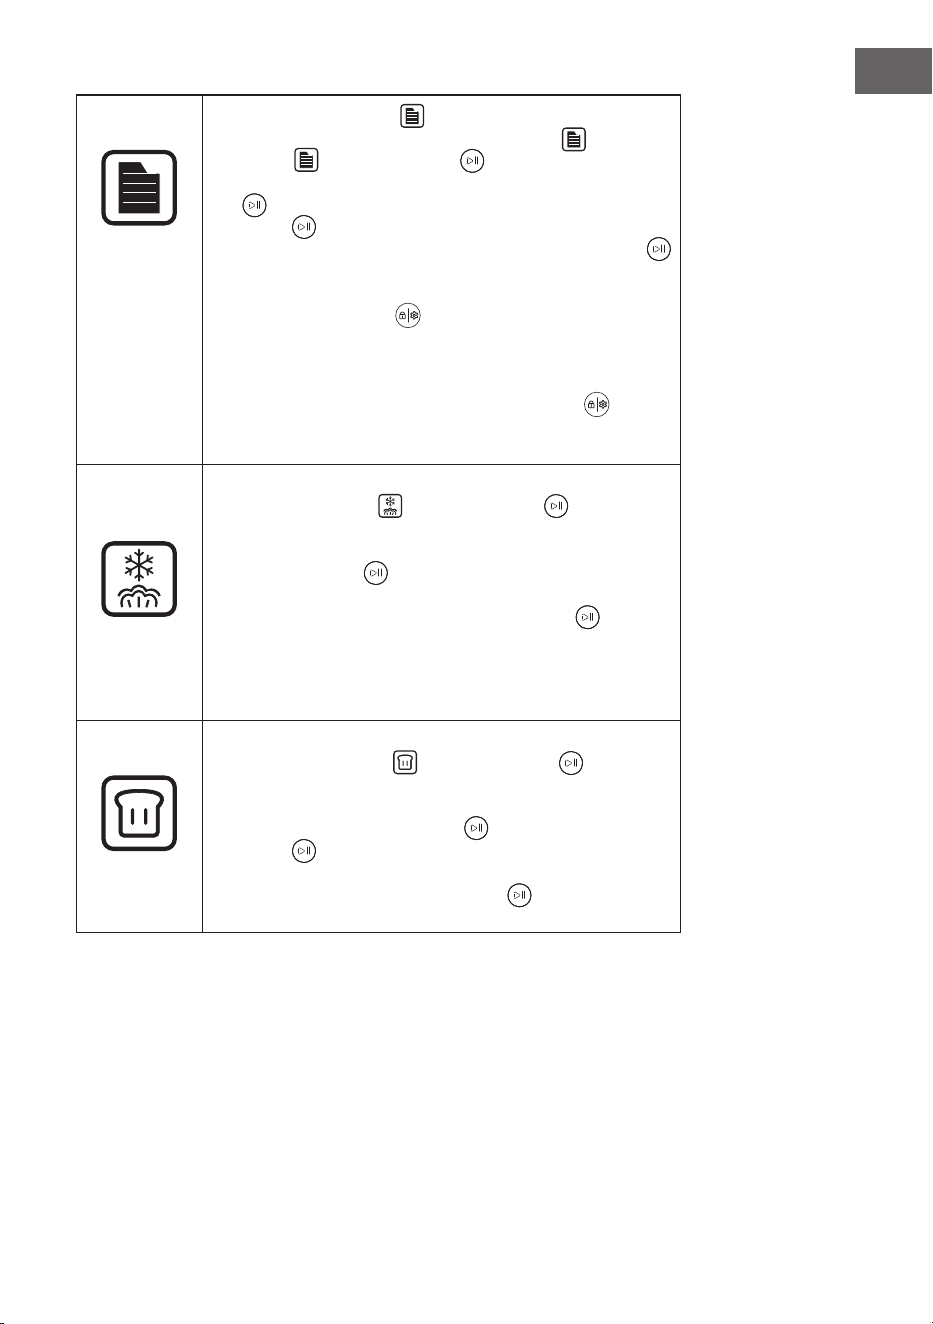
53
FR
Menu
• Avec la touche [menu] , vous pouvez choisir parmi
31recettes. Lorsque vous appuyez sur [Menu] , le voyant
[menu] et [Départ / Pause] clignotent en même temps.
L‘écran LED afche „F-00“. Appuyez sur [Départ / Pause]
pour accéder à la sélection de menu. Tournez [Départ /
Pause] pour afcher les recettes l‘une après l‘autre
(„F-01“, „F-02“ ... „F-31“). Appuyez sur [Départ / Pause]
pour sélectionner une recette.
• Lorsqu‘une recette a été sélectionnée, [Paramètres /
verrouillage parental] s‘allume après le démarrage. Ce
bouton permet d‘ajuster la durée de cuisson en fonction de la
quantité d‘aliments. La durée ne peut être réglée qu‘une seule
fois pour une recette pendant le fonctionnement. L‘éclairage
de la touche [Paramètres / verrouillage parental] s‘éteint
alors et vous ne pouvez plus modier la durée tant que la
cuisson de la recette sélectionnée n‘est pas terminée.
Décon-
gélation
• Lorsque vous sélectionnez la fonction de décongélation, le
voyant [dégivrage] et [Départ / Pause] clignotent.
Appuyez sur [Départ / Pause] et tournez la commande pour
régler une durée entre 5 minutes et 2 heures. Appuyez sur
[Départ / Pause] pour conrmer le réglage de la durée.
Vous pouvez maintenant régler une température entre 50 °C
et 60 °C. Appuyez ensuite sur [Départ / Pause] pour
conrmer. L‘appareil commence maintenant à fonctionner
avec le compte à rebours.
• La durée préréglée est de 20 minutes et la température de
55°C.
Fermentation
• Lorsque vous sélectionnez la fonction „Fermentation“, le
voyant [fermentation] et [Départ / Pause] s‘allument.
La durée préréglée est de 40 minutes et la température de
40°C. Vous pouvez régler une durée entre 5 minutes et
2heures avec [Départ / Pause] . Appuyez sur [Départ/
Pause] pour conrmer le réglage de la durée. Vous
pouvez maintenant régler une température entre 30 °C et
50 °C. Appuyez sur [Départ / Pause] pour conrmer.
L‘appareil commence maintenant à fonctionner.
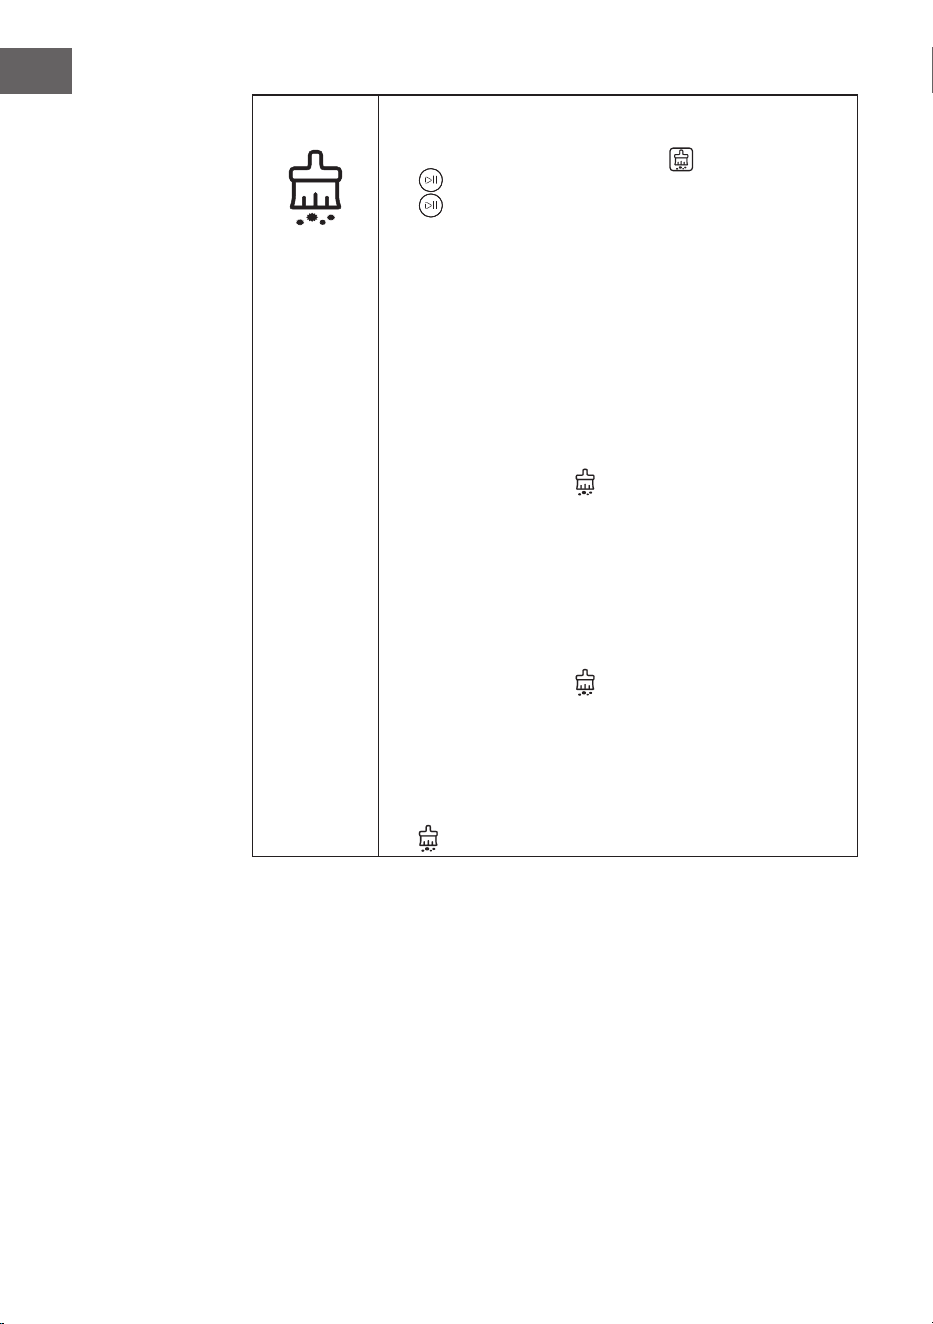
54
FR
Nettoyage
• La fonction de nettoyage sert à éliminer le calcaire après
l‘utilisation du four. Si vous avez sélectionné le programme
„Nettoyage“, le voyant [nettoyage] et [Départ / Pause]
s‘allument. Pour conrmer, appuyez sur [Départ / Pause]
et sélectionnez le mode de nettoyage souhaité „C1“ ou
„C2“.
C-1 : détartrage du générateur de vapeur en 50 minutes
C-2 : 25 minutes et 100 ° C pour nettoyer la cavité du four ou
pour désinfecter les appareils.
Détartrage en mode de nettoyage“C-1“ :
1. Lorsque la durée totale de fonctionnement du tube chauffant
de l‘évaporateur a atteint 100 heures, l‘appareil vous rappelle
que l‘évaporateur doit être détartré (vous pouvez démarrer
automatiquement la fonction de détartrage à tout moment). Le
voyant de [nettoyage] clignote.
2. Préparez la solution détartrante dans un rapport de 1:8
(détartrant : eau). Après l‘avoir mélangée soigneusement,
versez la solution dans le réservoir d‘eau. Le niveau de la
solution détartrante doit être supérieur au repère minimum du
réservoir d‘eau.
3. Lorsqu‘il reste 20 minutes, l‘appareil vous rappelle de retirer le
réservoir d‘eau de l‘appareil, de vider le reste de la solution
de détartrage et de la remplacer par de l‘eau propre. Le
voyant de [nettoyage] clignote et l‘appareil émet plusieurs
bips. Une fois le réservoir d‘eau réinséré, le nettoyage se
poursuit. Lorsqu‘il reste 10 minutes, l‘appareil vous rappelle de
retirer le réservoir d‘eau de l‘appareil et de remplacer l‘eau
qu‘il contient par de l‘eau propre. Une fois le réservoir d‘eau
remis en place, l‘appareil continue le nettoyage. Lorsque le
processus de détartrage est terminé, le témoin de [nettoyage]
s‘allume en permanence.

55
FR
Voyants à l'écran Description de la fonction
Niveau d‘eau
faible
Lorsque vous mettez l‘appareil en marche dans n‘importe
quel programme et qu‘il y a peu ou pas d‘eau dans le
réservoir d‘eau, le four s‘arrête et le voyant de [niveau d‘eau
bas]
.
clignote. L‘appareil émet 10 bips. Tous les boutons
sont désactivés. Une fois le réservoir d‘eau rempli, le four
recommence à fonctionner et la cuisson se poursuit.
.
Préchauffage
Lorsque le voyant [préchauffage] s‘allume, le four
préchauffe. Dès que le processus de préchauffage est terminé,
le voyant s‘éteint.
Fin de programme
Lorsqu‘un programme est terminé, l‘écran afche „END“ et le
voyant s‘allume.
Verrouillage
parental
Lorsque le voyant de [verrouillage parental] s‘allume, cela
signie que le verrouillage parental est activé. Appuyez sur
[Paramètres / Verrouillage parental] pendant 3 secondes
pour désactiver le verrouillage parental. Le voyant s‘éteint.
Nettoyage
Si le voyant de [nettoyage] s‘allume en continu, cela
signie que la machine est en cours de détartrage. Le voyant
de [nettoyage] s‘éteint dès que le détartrage est terminé.
56
FR
AUTRES FONCTIONS
Éclairage
intérieur
1. Pause
• Si l‘appareil est en marche et que vous appuyez sur
[Départ / Pause] , le voyant LED de la durée
et [Départ / Pause] clignotent. La cuisson est
interrompue, le compte à rebours est temporairement
arrêté et l‘écran continue d‘afcher l‘état de
fonctionnement. Appuyez à nouveau sur [Départ / Pause]
pour reprendre la cuisson jusqu‘à la n du compte à
rebours.
• Si vous ouvrez la porte du four pendant la cuisson,
celle-ci s‘interrompt, le compte à rebours est suspendu
et l‘écran continue d‘afcher l‘état de fonctionnement. La
LED de la durée et [Start / Pause] clignotent. Lorsque
vous fermez la porte du four, la cuisson se poursuit
jusqu‘à la n du compte à rebours.
2. Réglage de la durée et de la température
Pendant le processus de cuisson, vous pouvez régler la durée
et la température de cuisson comme suit :
• Lorsque vous appuyez sur [Paramètres / Verrouillage
parental] , les chiffres des minutes clignotent. Réglez
les minutes en tournant [Départ / Pause] et conrmez
en appuyant sur [Départ / Pause] . (Remarque : il
n‘est pas possible de régler les heures.)
• Après avoir réglé les minutes, réglez la température en
tournant [Départ / Pause] . Appuyez sur [Départ /
Pause] pour conrmer votre entrée. Si aucun réglage
de température n‘est nécessaire, vous pouvez également
appuyer sur [Départ / Pause] immédiatement après
avoir réglé les minutes.
• Après avoir sélectionné une recette dans le menu ,
[Paramètres / verrouillage parental] s‘allume au
démarrage. Ce bouton vous permet de régler la durée
de cuisson en fonction de la quantité d‘aliments. L‘heure
ne peut être réglée qu‘une seule fois pour une recette,
puis l‘éclairage de la touche [Paramètres / verrouillage
parental] s‘éteint. Il n‘est pas possible de régler à
nouveau le temps de cuisson.

57
FR
Éclairage
intérieur
• Au démarrage du four, l‘éclairage intérieur
s‘allume pendant 3 minutes puis s‘éteint à nouveau
automatiquement.
• Lorsque la porte du four est ouverte, l‘éclairage intérieur
s‘allume et s‘éteint automatiquement après 3 minutes. Si
vous fermez la porte du four, l‘éclairage intérieur s‘éteint
également après 3 minutes.
• Si vous tournez la commande une fois en mode veille
ou pendant le fonctionnement, l‘éclairage intérieur
s‘allume pendant 3 minutes puis s‘éteint à nouveau
automatiquement.
Ouvrir et fermer
la porte
• Si vous ouvrez la porte du four pendant le
fonctionnement, l‘appareil se met en pause. Dès que vous
fermez à nouveau la porte, le fonctionnement reprend
automatiquement.
Fin de la cuisson
• Lorsque le four a terminé la cuisson, l‘appareil émet
10bips. L‘écran afche „END“ et . Cela signie que
la cuisson ou la recette est terminée.
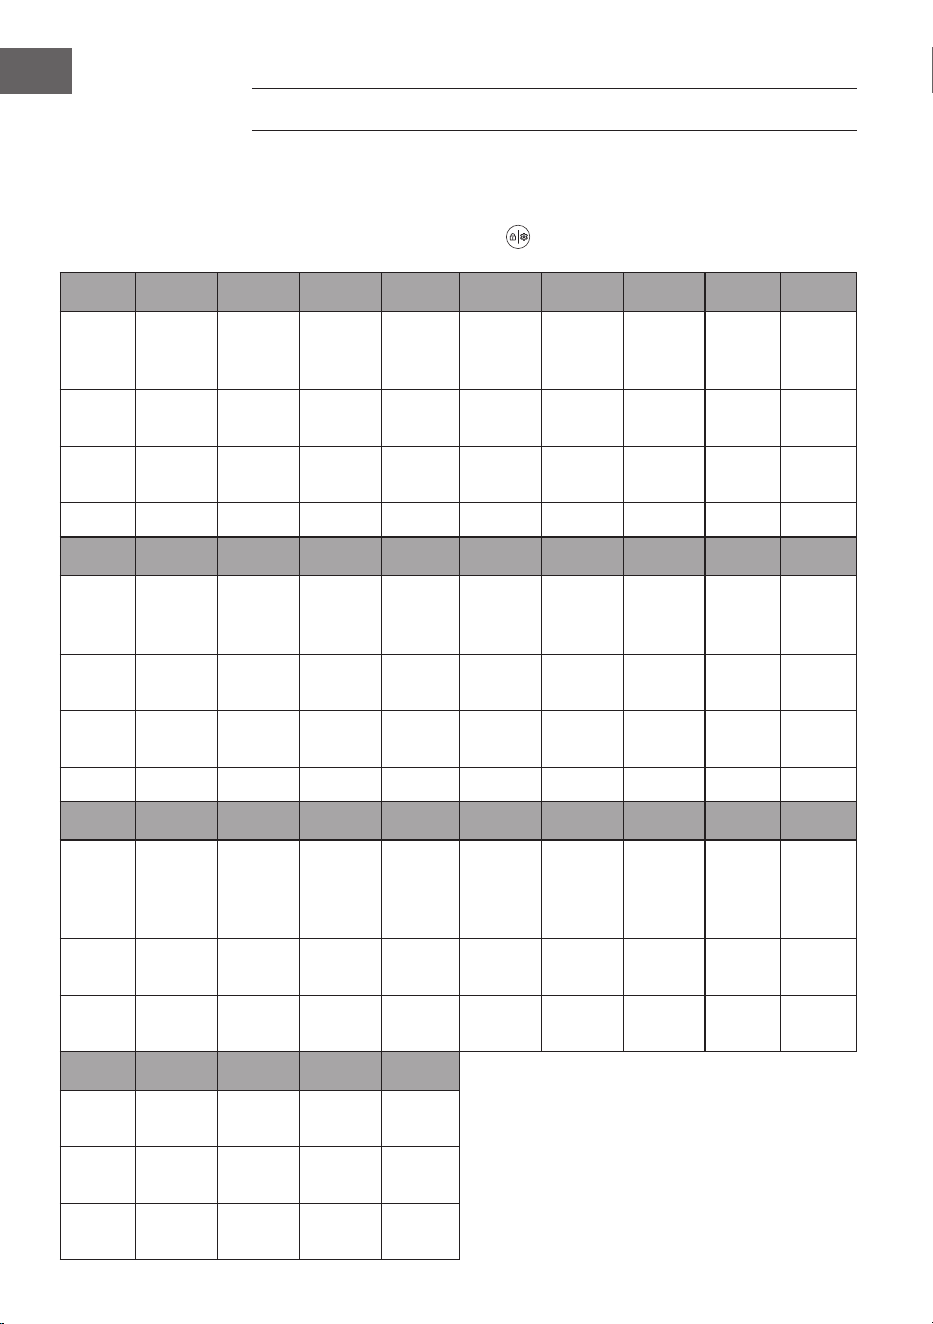
58
FR
MENU (RECETTES)
Les paramètres pour chacun des aliments répertoriés dans le tableau sont fournis à titre
indicatif uniquement. Si vous devez cuire plus d‘aliments ou si les aliments sont placés
sur plusieurs niveaux, vous devez ajuster le temps de cuisson. Réglez la durée avec
[Paramètres / Verrouillage parental] .
Code F-01 F-02 F-03 F-04 F-05 F-06 F-07 F-08 F-09
Aliment
Légu-
mes
vapeur
Riz
vapeur
Poisson
vapeur
Crevet-
tes
vapeur
Crabes
vapeur
Œufs
vapeur
Poulet
vapeur
Papaye
vapeur
Poulet
rôti
Durée
(min)
16 50 20 15 30 18 30 35 45
Temp.
(°C)
100 100 100 100 100 100 100 100 230
Poids (g) 600 200 600 500 800 300 800 400 1000
Code F-10 F - 11 F -12 F -13 F -14 F -15 F -16 F -17 F -18
Aliment
Steak
grillé
Rôti de
mouton
Travers
de porc
rôti
Saumon
rôti
Cuisses
de poulet
rôties
Ailes
poulet
rôties
Maque-
reau
rôti
Frites au
four
Crevet-
tes
rôties
Durée
(min)
13 35 20 22 26 23 20 18 15
Temp
(°C)
230 200 210 210 210 210 220 220 18 0
Poids (g) 600 600 500 400 750 500 600 500 400
Code F-19 F-20 F -21 F-22 F-23 F-24 F-25 F-26 F-27
Aliment
Saucisse
rôtie
Bacon
rôti
Pizza au
four
Mini-
Pizza
Baguette Kouglof
Gâteau
de
fromage
au yaourt
Pâte
feuil-
letée
Biscuits
Durée
(min)
13 11 22 18 16 50 60 32 14
Temp
(°C)
200 200 180 18 0 18 0 15 0 150 180 18 0
Code F-28 F-29 F-30 F -31
Aliment
Gâteau
aux œufs
Amandes
rôties
Noix
torréée
Yaourt
Durée
(min)
22 10 12 480
Temp
(°C)
18 0 140 160 45

59
FR
NETTOYAGE ET ENTRETIEN
• Avant de nettoyer l‘appareil, éteignez-le et débranchez la che de la prise.
• Ne nettoyez pas la surface de l‘appareil avec des outils métalliques ou des produits
abrasifs, car cela pourrait endommager le revêtement.
• Nettoyez régulièrement l‘intérieur du four. Utilisez un chiffon humide pour retirer les
aliments ou les éclaboussures de graisse de l‘intérieur du four. Vous pouvez aussi
utiliser une solution de nettoyage douce pour les saletés tenaces.
• Il est recommandé de remplir le réservoir d‘eau avec de l‘eau potable ou avec de
l‘eau distillée. Si vous utilisez de l‘eau du robinet, une accumulation de calcaire se
produira après une utilisation prolongée de l‘appareil.
• Vériez régulièrement le réservoir d‘eau. Sortez-le horizontalement. Nettoyez-le
et séchez-le avec un chiffon doux. Remettez le réservoir d‘eau dans sa position
d‘origine après le nettoyage.
• Une fois le processus de cuisson terminé, retirez l‘eau restante du réservoir d‘eau.
• Nettoyez régulièrement le joint du four avec un chiffon doux et sec.
• Débranchez le cordon d‘alimentation de la prise, nettoyez tout l‘appareil, videz
le réservoir d‘eau et placez l‘appareil dans un endroit propre et sec si vous ne
comptez pas l‘utiliser pendant une longue période.
• En cas de dysfonctionnement, l‘appareil doit être réparé par le fabricant, le service
après-vente ou une personne de qualication similaire. N‘essayez jamais de le
réparer vous-même.
• Ne nettoyez pas la porte vitrée de l‘appareil avec des produits agressifs ou des
grattoirs métalliques tranchants, car cela pourrait endommager la vitre.
• Avant de nettoyer l‘appareil ou de remplacer l‘ampoule, retirez la che de la prise.
• N‘utilisez pas de nettoyeur vapeur pour nettoyer l‘appareil.
60
FR
RÉSOLUTION DES PROBLÈMES
Problème Cause possible Solution
E01
Erreur du capteur de chaleur
de voûte
Arrêtez l'appareil, ouvrez
la porte du four et laissez
refroidir l'appareil pendant
10 minutes. Redémarrez
l'appareil ou contactez le
service client.
E02
Court-circuit du capteur de
chaleur de voûte
E03
Panne du capteur de
chaleur de sole
E04
Court-circuit du capteur de
chaleur de sole
E05
Panne du capteur de
l'évaporateur
Contactez le service client.
E06
Court-circuit du capteur de
l'évaporateur
Contactez le service client.
L'écran n'afche rien Vériez que la che est bien
branchée
Branchez la che
L'écran est défectueux Adressez-vous à un
professionnel pour contrôle
et réparation
L'éclairage ne s'allume
pas
L'ampoule est défectueuse Remplacez l'ampoule
La douille est défectueuse Adressez-vous à un
professionnel pour contrôle
et réparation
Le ventilateur ne
fonctionne pas
Le ventilateur est défectueux
Les contacts sont
endommagés.
Adressez-vous à un
professionnel pour contrôle
et réparation
Les touches ne
réagissent pas.
Le panneau de commande
est cassé ou le verrouillage
des touches est actif.
Désactivez le verrouillage
des touches ou contactez le
service client.
L'afchage de l'heure
clignote, tous les autres
boutons ne répondent pas.
Vériez qu'il y a
sufsamment d'eau dans le
réservoir d'eau et qu'il est
correctement inséré dans
l'appareil.

61
FR
Problème Cause possible Solution
Pas de vapeur L'admission d'eau est
bloquée
Adressez-vous à un
professionnel pour contrôle
et réparation.
Le chauffage du
vaporisateur est défectueux
L'entrée d'eau est
défectueuse
Le cuiseur vapeur ne
fonctionne pas
La porte est mal fermée Fermez la porte
La fermeture de porte est
défectueuse
Adressez-vous à un
professionnel pour contrôle
et réparation
De la vapeur
s‘échappe du four.
La porte du four n'est pas
bien fermée.
Fermez bien la porte du
four.
Le joint de la porte du
four est mal installé ou
endommagé.
Remplacez le joint de porte
ou contactez le service
client.
Si la pression à l'intérieur
du four est trop élevée,
l'appareil laisse échapper
de la vapeur.
Cela est normal.

62
FR
CONSEILS POUR LE RECYCLAGE
S‘il existe une réglementation pour l‘élimination ou le
recyclage des appareils électriques et électroniques dans
votre pays, ce symbole sur le produit ou sur l‘emballage
indique que cet appareil ne doit pas être jeté avec les
ordures ménagères. Vous devez le déposer dans un point
de collecte pour le recyclage des équipements électriques
et électroniques. La mise au rebut conforme aux règles
protège l‘environnement et la santé de vos semblables des
conséquences négatives. Pour plus d‘informations sur le
recyclage et l‘élimination de ce produit, veuillez contacter
votre autorité locale ou votre service de recyclage des
déchets ménagers.
FABRICANT ET IMPORTATEUR (UK)
Fabricant :
Chal-Tec GmbH, Wallstraße 16, 10179 Berlin, Allemagne.
Importateur pour la Grande Bretagne :
Berlin Brands Group UK Limited
PO Box 42
272 Kensington High Street
London, W8 6ND
United Kingdom

63
ES
Estimado cliente,
Le felicitamos por la adquisición de este producto. Lea
atentamente las siguientes instrucciones y sígalas para evitar
posibles daños. No asumimos ninguna responsabilidad por los
daños causados por el incumplimiento de las instrucciones y el
uso inadecuado. Escanee el siguiente código QR para obtener
acceso a la última guía del usuario y más información sobre el
producto.
ÍNDICE
Ficha técnica del producto (10036173)64
Ficha técnica del producto (10036174)65
Indicaciones de seguridad66
Vista general del aparato68
Indicaciones sobre los niveles69
Panel de control y funciones de los botones70
Indicadores del display y programas71
Otras funciones76
Menu (recetas)78
Limpieza y cuidado79
Resolución de problemas80
Indicaciones sobre la retirada del aparato82
Fabricante e importador (Reino Unido)82
DATOS TÉCNICOS
Número de artículo 10036173 10036174
Suministro eléctrico 220-240 V ~ 50/60 Hz
Potencia 2100-2400 W 1900-2200 W
Potencia del vapor 1100 W 950 W
Capacidad máx. del depósito
de agua
1,45 l 1,45 l
64
ES
FICHA TÉCNICA DEL PRODUCTO (10036173)
Datos según 65/2014
Marca comercial del proveedor: Klarstein
Denominación del modelo del proveedor: 10036173
Índice de eciencia energética (EEI cavidad): 94,1
Clase de eciencia energética: A
Consumo de energía por ciclo para cada cavidad en modo convencional y
en modo ventilación en kWh: 0,64/0,65 kWh
Número de cavidades: 1
Fuentes de calor de la cavidad: Electricidad
Capacidad de la cavidad en litros: 31 L
Datos según 66/2014
Símbolo
Valor Unidad
Identicación del producto
10036173
Tipo de horno
Horno eléctrico
Peso del aparato
M 21, 8 kg
Número de cavidades
1
Fuente de calor de la cavidad (electricidad
o gas)
Electricidad
Capacidad de la cavidad
V 31 L
Consumo de energía (electricidad) al calentar
una carga estándar en la cavidad de un
horno eléctrico durante un ciclo en modo
convencional por cavidad (energía nal
eléctrica)
EC Horno
eléctrico
0,64 kWh/ciclo
Consumo de energía en el calentamiento
de una carga estándar en la cavidad de un
horno eléctrico durante un ciclo en modo
ventilación por cavidad (energía nal
eléctrica)
EC Horno
eléctrico
0,65 kWh/ciclo
Consumo de energía al calentar una carga
estándar en la cavidad de un horno a gas
durante un ciclo en modo convencional por
cavidad (energía nal gas)
Horno a
gas EC
-
MJ/ciclo
kWh/ciclo
(1)
Consumo de energía al calentar una carga
estándar en la cavidad de un horno a gas
durante un ciclo en modo ventilación por
cavidad (energía nal gas)
Horno a
gas EC
-
MJ/ciclo
kWh/ciclo
(1)
Índice de eciencia energética por cavidad
Horno EEI 94,1
(1) 1 kWh/ciclo = 3,6 MJ/ ciclo.
65
ES
FICHA TÉCNICA DEL PRODUCTO (10036174)
Datos según 65/2014
Marca comercial del proveedor: Klarstein
Denominación del modelo del proveedor: 10036174
Índice de eciencia energética (EEI cavidad): 87,7
Clase de eciencia energética: A
Consumo de energía por ciclo para cada cavidad en modo convencional y
en modo ventilación en kWh: 0,59/0,57 kWh
Número de cavidades: 1
Fuentes de calor de la cavidad: Electricidad
Capacidad de la cavidad en litros: 24 L
Datos según 66/2014
Símbolo Valor Unidad
Identicación del producto
10036174
Tipo de horno
Horno eléctrico
Peso del aparato
M 19,5 kg
Número de cavidades
1
Fuente de calor de la cavidad (electricidad
o gas)
Electricidad
Capacidad de la cavidad
V 24 L
Consumo de energía (electricidad) al calentar
una carga estándar en la cavidad de un
horno eléctrico durante un ciclo en modo
convencional por cavidad (energía nal
eléctrica)
EC Horno
eléctrico
0,59 kWh/ciclo
Consumo de energía en el calentamiento
de una carga estándar en la cavidad de un
horno eléctrico durante un ciclo en modo
ventilación por cavidad (energía nal
eléctrica)
EC Horno
eléctrico
0,57 kWh/ciclo
Consumo de energía al calentar una carga
estándar en la cavidad de un horno a gas
durante un ciclo en modo convencional por
cavidad (energía nal gas)
Horno a
gas EC
-
MJ/ciclo
kWh/ciclo
(1)
Consumo de energía al calentar una carga
estándar en la cavidad de un horno a gas
durante un ciclo en modo ventilación por
cavidad (energía nal gas)
Horno a
gas EC
-
MJ/ciclo
kWh/ciclo
(1)
Índice de eciencia energética por cavidad
Horno EEI 87,7
(1) 1 kWh/ciclo = 3,6 MJ/ ciclo.

66
ES
INDICACIONES DE SEGURIDAD
Indicaciones generales
• Nunca limpie la carga con agua, o de lo contrario dañará los componentes
eléctricos.
• No deje que se ltre agua ni otros líquidos al aparato para evitar una descarga
eléctrica.
• Los niños mayores de 8 años y las personas con discapacidades físicas, sensoriales
o psíquicas solamente podrán utilizar el aparato si han sido previamente instruidas
sobre su uso y conocen las indicaciones de seguridad y los riesgos que entraña su
uso.
• Los niños no deben jugar con el aparato.
• Los niños solo podrán limpiar el aparato y realizar labores de mantenimiento bajo
supervisión.
• Antes de utilizar el aparato, compruebe la tensión en la placa técnica del mismo.
Conecte el aparato solamente a tomas de corriente que se adecuen a la tensión
del mismo.
• No utilice el aparato si el cable de alimentación, el enchufe o el propio aparato
están dañados.
• Si el cable de alimentación o el enchufe están dañados, deberán ser sustituidos por
el fabricante, un servicio técnico autorizado o una persona igualmente cualicada.
• No toque el enchufe ni el panel de control con las manos mojadas.
• No coloque el aparato encima o cerca de manteles, cortinas, tapetes u otros
materiales y objetos combustibles.
• Instale el aparato en una supercie seca y plana y deje al menos 10 cm de
distancia alrededor del aparato para que el aire pueda circular correctamente. No
coloque objetos sobre el aparato.
• No deje el aparato en marcha si no se encuentra bajo supervisión.
ATENCIÓN
Existe riesgo de quemaduras. Al abrir la puerta del horno puede salir
vapor caliente. Mantenga una distancia de seguridad evitar
escaldaduras.
• No encaje objetos extraños en el interruptor de la puerta del horno.
• Utilice exclusivamente el sensor de temperatura recomendado para este horno.
• No utilice productos a vapor para la limpieza.
• Asegúrese de que el aparato esté apagado y desconecte el enchufe antes de
sustituir la lámpara para evitar una descarga eléctrica.
• El aparato no debe empotrarse en un armario para evitar que se sobrecaliente.

67
ES
Indicaciones para una utilización segura
ATENCIÓN
Existe riesgo de quemaduras. Durante el uso, el aparato se calentará.
Asegúrese de no tocar los elementos calefactores del interior del horno
y de utilizar guantes de cocina.
• Desconecte el enchufe antes de limpiar el aparato y deje que este se enfríe por
completo.
• No conecte el aparato a tomas de corriente en las que ya se encuentren
conectados otros dispositivos.
• Limpie el cristal de la puerta del horno con un paño húmedo y suave. No utilice
productos abrasivos ni rascadores que puedan arañar la supercie.
• No conecte el aparato a tomas de corriente manejadas por control remoto ni con
temporizador.
• Antes del uso, compruebe que su vajilla sea adecuada para el aparato. Le
recomendamos utilizar recipientes de cristal resistentes al calor o recipientes
cerámicos. Llene el recipiente un máximo de dos tercios de su capacidad.
• No llene en exceso el depósito de agua. Oriéntese por la marca MAX del depósito
cuando lo llene.
• No coloque ningún recipiente en la puerta abierta del horno.
• No caliente alimentos en un recipiente sellado, pues podría explotar. Antes de
calentarlos, traslade los alimentos a un recipiente resistente al calor.
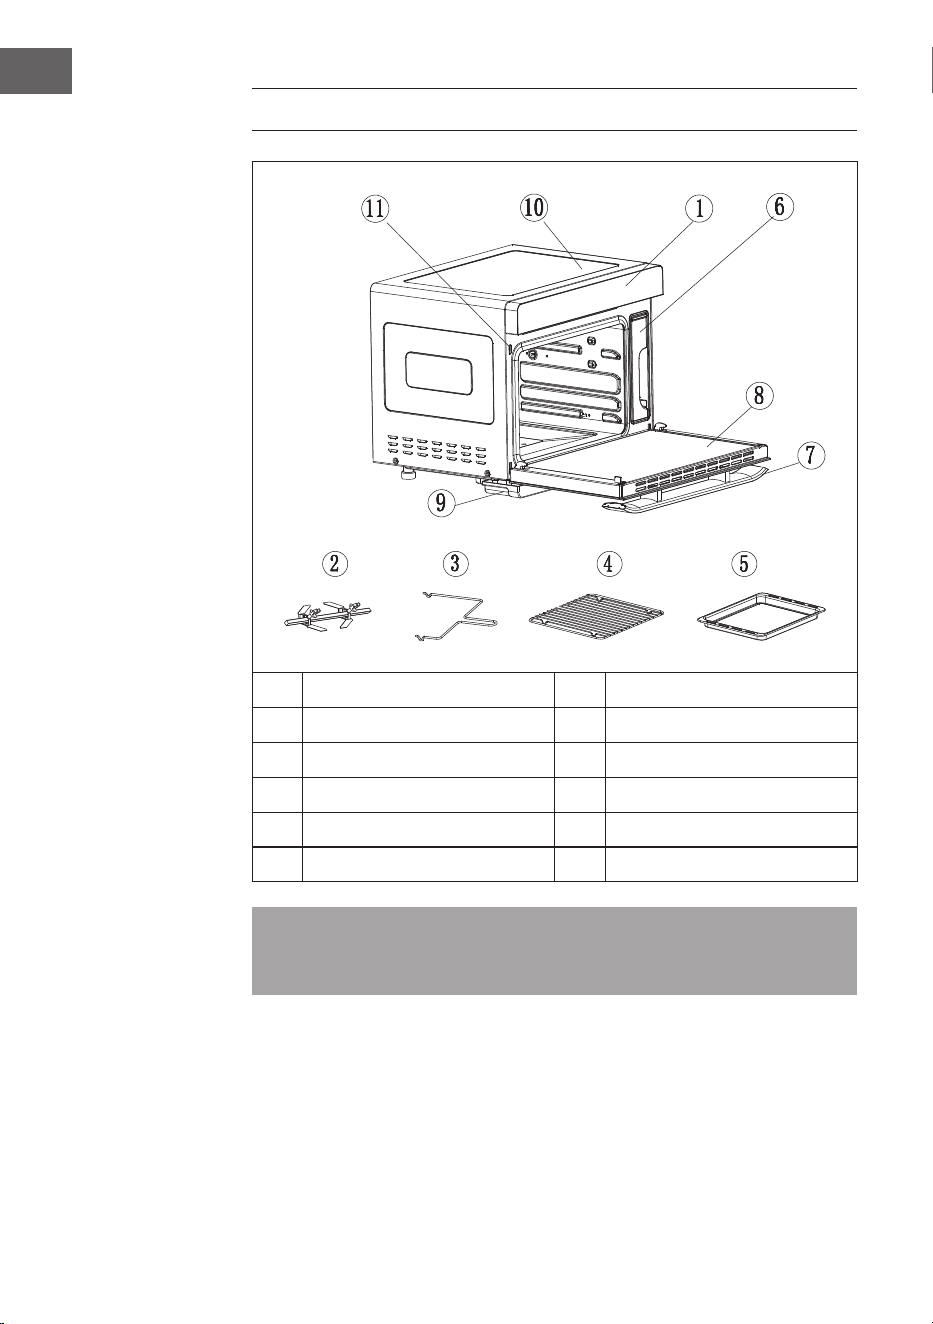
68
ES
VISTA GENERAL DEL APARATO
1
Panel de control
7
Asa
2
Espetón (40 l/36 l)
8
Puerta
3
Asa del espetón (40 l/36 l)
9
Bandeja colectora de agua
4
Rejilla
10
Estructura
5
Bandeja de horneado
11
Interruptor de la puerta
6
Depósito de agua
Nota: Asegúrese de que el nivel del agua del depósito siempre se sitúe por encima
de la marca mínima. Deje el depósito de agua dentro del horno durante todo el
periodo que esté en funcionamiento.

69
ES
INDICACIONES SOBRE LOS NIVELES
Existen cuatro niveles para colocar las bandejas. Seleccione el nivel adecuado según
el plato o la receta que desee preparar. Asegúrese de que el arco de la rejilla se sitúe
hacia abajo y deslícela dentro de la inserción deseada del horno.
1
2
3
4
Arco
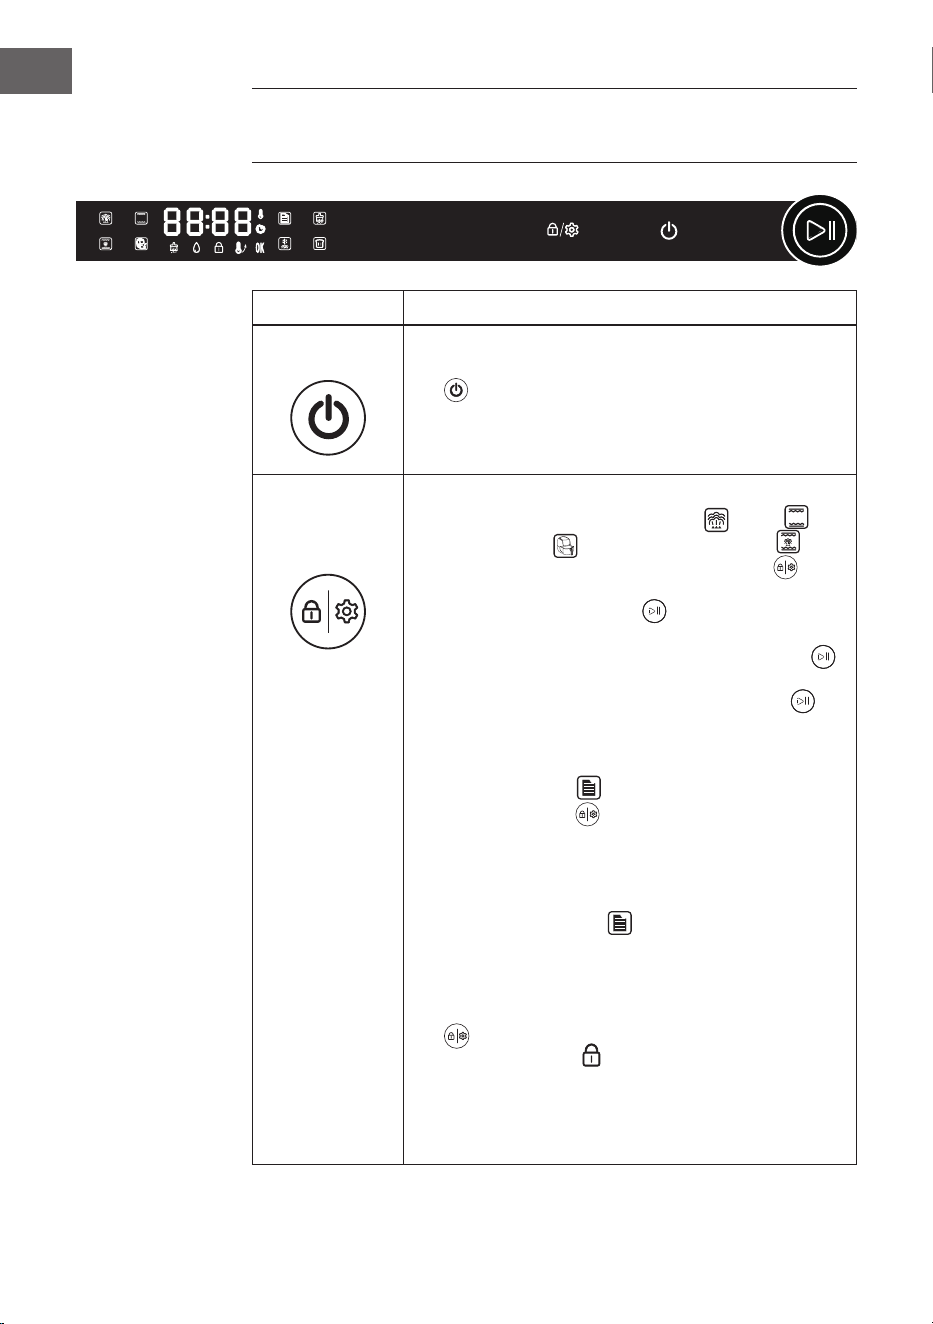
70
ES
PANEL DE CONTROL Y FUNCIONES DE LOS
BOTONES
Teclas Descripción de funciones
On/off
• Después de encenderlo por primera vez, suena un pitido
y se ilumina el indicador luminoso. Pulse el [botón on/off]
para acceder a la selección de funciones.
• Si en 5 minutos no selecciona ninguna función, se
eliminarán todos los ajustes y el aparato regresará al
modo de espera.
Ajustes/
Protección
infantil
1. Ajustes:
• En los programas „Cocinar al vapor“ ,“Asar“ ,
„Freír con aire“ o „Asar y cocinar al vapor“ se
ilumina el [botón de ajustes/protección infantil] .
Si pulsa el botón, parpadean el LED de tiempo y el
[regulador de inicio/pausa] al mismo tiempo. Gire
el regulador para seleccionar la temperatura y el tiempo.
A continuación, pulse el [regulador de inicio/pausa]
para conrmar el ajuste. Si espera demasiado tiempo,
el LED de tiempo y el [regulador de inicio/pausa]
parpadean simultáneamente durante 5 segundos para
conrmar y guardar automáticamente el ajuste.
• Si después de encender el aparato selecciona el
programa „Menú“ , se ilumina el [botón de ajustes/
protección infantil] . Con este botón puede ajustar
el tiempo de cocción correspondiente de la cantidad
de alimentos. Esto solo será posible una vez para cada
receta, a continuación, se apagará el [botón de ajustes/
protección infantil] y no se podrá volver a regular el
tiempo para este modo .
2. Protección infantil:
• La protección infantil se puede activar en todos los
programas. Pulse el [botón ajustes/protección infantil]
(cuando se ilumine) durante 3 segundos. El [indicador
de bloqueo infantil] se ilumina, lo que indica que la
protección infantil está activada. Si vuelve a pulsar el
[botón de ajuste/protección infantil] otros 3 segundos, se
desactivará la protección infantil. Le verrouillage parental
peut être activé dans tous les programmes.
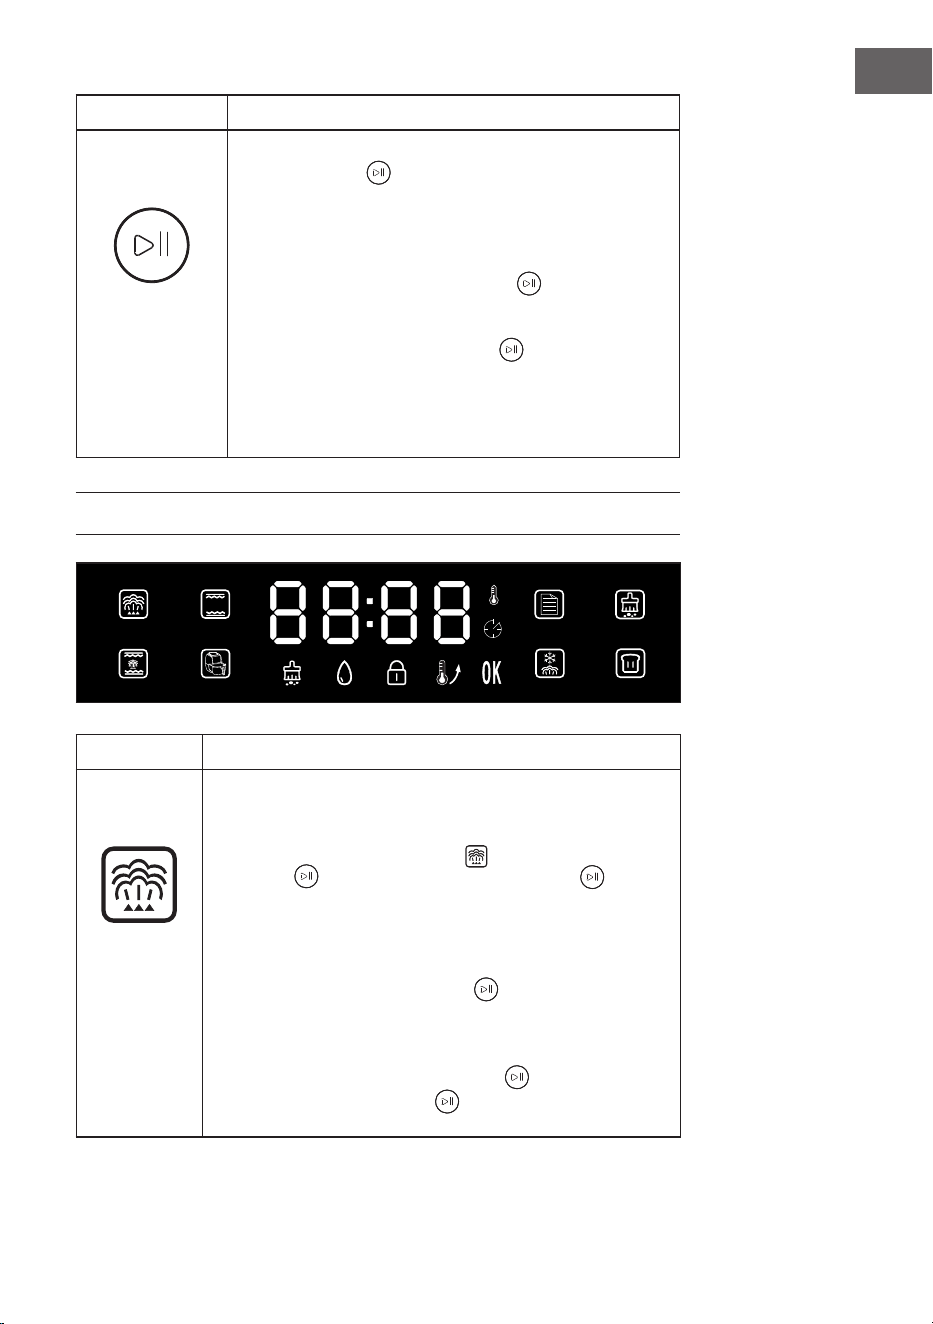
71
ES
Teclas Descripción de funciones
Inicio/Pausa
(Regulador)
• Para iniciar o pausar el aparato, pulse el [regulador de
inicio/pausa] .
• Gire el [regulador de inicio/pausa] para seleccionar uno
de los siguientes programas: „Cocinar al vapor“, „Asar“,
„Asar y cocinar al vapor“, „Freír al aire“, „Menú“,
„Limpieza“, „Descongelar“ o „Fermentar“.
• Gire el [regulador de inicio/pausa] para ajustar el
tiempo y la temperatura en los diferentes programas y
funciones.
• Si el [regulador de inicio/pausa] parpadea, se puede
conrmar o ajustar girando el regulador los ajustes de los
programas seleccionados o funciones.
• Si el aparato está en funcionamiento, se ilumina el
[regulador de pausa/inicio].
INDICADORES DEL DISPLAY Y PROGRAMAS
Programas Descripción de funciones
Cocinar al
vapor
• La función principal es „cocinar al vapor“. El tiempo
predeterminado es de 30 minutos y la temperatura, 100 °C.
• Si selecciona el programa „Cocinar al vapor“, parpadean el
[indicador de cocción al vapor] y el [regulador de inicio/
pausa] . Pulse el [regulador de inicio/pausa] para
conrmar la selección del programa y para acceder al modo
de ajuste.
• Con el regulador, a continuación, se puede regular un
periodo de tiempo comprendido entre 1 minuto y 2 horas.
Pulse el [regulador inicio/pausa] para conrmar los
ajustes de tiempo. Ahora puede realizar los ajustes de
temperatura. Puede seleccionar una temperatura de entre
100°C y 110 °C. Tras ajustar la temperatura, pulse para
conrmar el [regulador inicio/pausa] . Si pulsa de nuevo
el [regulador inicio/pausa] , el aparato se pone en
marcha y comienza la cuenta atrás.
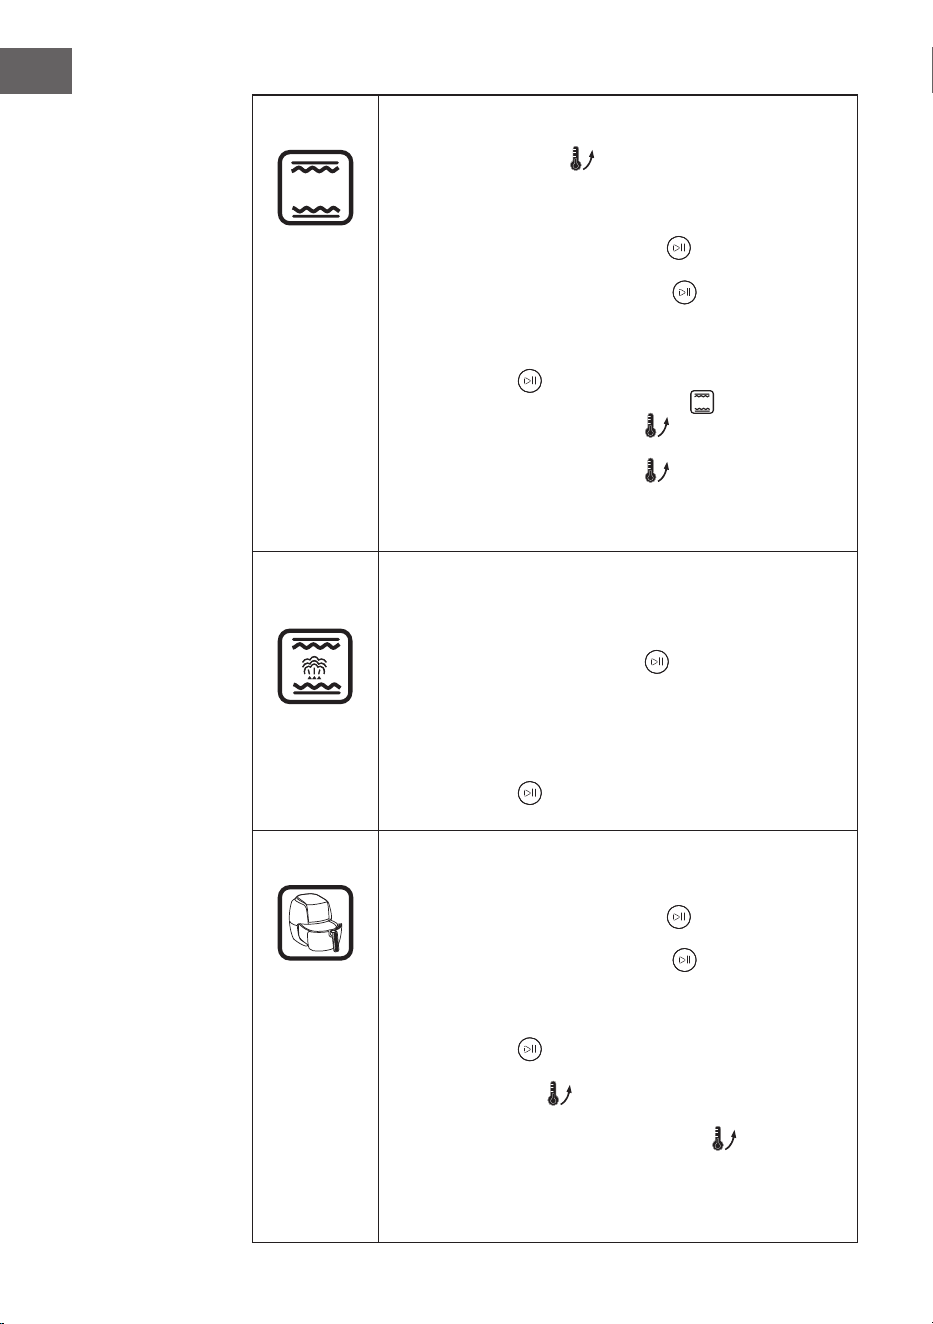
72
ES
Asar
• En el programa „Asar“ se utiliza tanto el calor arriba
como el calor abajo. Una parte del programa es la
función „Precalentar“ . Espere a que haya nalizado el
precalentamiento antes de introducir el alimento en el horno.
El tiempo predeterminado es de 30 minutos y la temperatura,
180 °C.
• Con el [regulador de inicio/pausa] puede regular un
periodo de tiempo comprendido entre 1 minuto y 2 horas.
Pulse el [regulador de inicio/pausa] para conrmar
los ajustes de tiempo. Ahora puede realizar los ajustes de
temperatura. Puede seleccionar una temperatura de entre
100°C y 230 °C. Para conrmar, presione el [regulador
inicio/pausa] . El aparato se pone en marcha.
• Después de iniciar el programa „Asar“ , se ilumina el
[indicador de precalentamiento] . Ahora se precalienta el
horno. En cuanto nalice el precalentamiento, se apaga el
[indicador de precalentamiento] y el aparato parpadea
10 veces para recordarle que debe introducir los alimentos
en el horno. En cuanto nalice el precalentamiento, se inicia
automáticamente la función de asar.
Asar y cocinar
al vapor
• La función principal de este programa es la de asar. Además,
el horno también genera algo de vapor. Así, los alimentos
se cocinarán más rápido sin que se sequen. El tiempo
predeterminado es de 30 minutos y la temperatura, 100°C.
Con el [regulador inicio/pausa] , puede regular un
periodo de tiempo comprendido entre 1 minuto y 2horas.
Pulse el [regulador de inicio/pausa] para conrmar los
ajustes de tiempo. Ahora puede realizar los ajustes de
temperatura. Puede seleccionar una temperatura de entre
120 °C y 230 °C. Para conrmar, presione el [regulador de
inicio/pausa] . El aparato se pone en marcha.
Freír con aire
• En la función de freidora con aire, funciona el elemento de
calefacción trasero con ventilación. El tiempo predeterminado
es de 30 minutos y la temperatura, 180 °C.
• Con el [regulador de inicio/pausa] puede regular un
periodo de tiempo comprendido entre 1 minuto y 2 horas.
Pulse el [regulador de inicio/pausa] para conrmar
los ajustes de tiempo. Ahora puede realizar los ajustes de
temperatura. Puede seleccionar una temperatura de entre
100°C y 230 °C. Para conrmar, presione el [regulador
inicio/pausa] . El aparato se pone en marcha.
• Cuando el aparato se inicia, se ilumina el [indicador de
precalentamiento] . Esto indica que el horno se está
precalentando. En cuanto nalice el precalentamiento, se
apaga el [indicador de precalentamiento] y el aparato
parpadea 10 veces para recordarle que debe introducir
los alimentos en el horno. En cuanto haya nalizado el
precalentamiento, empieza la cuenta atrás de la función de
freidora de aire.
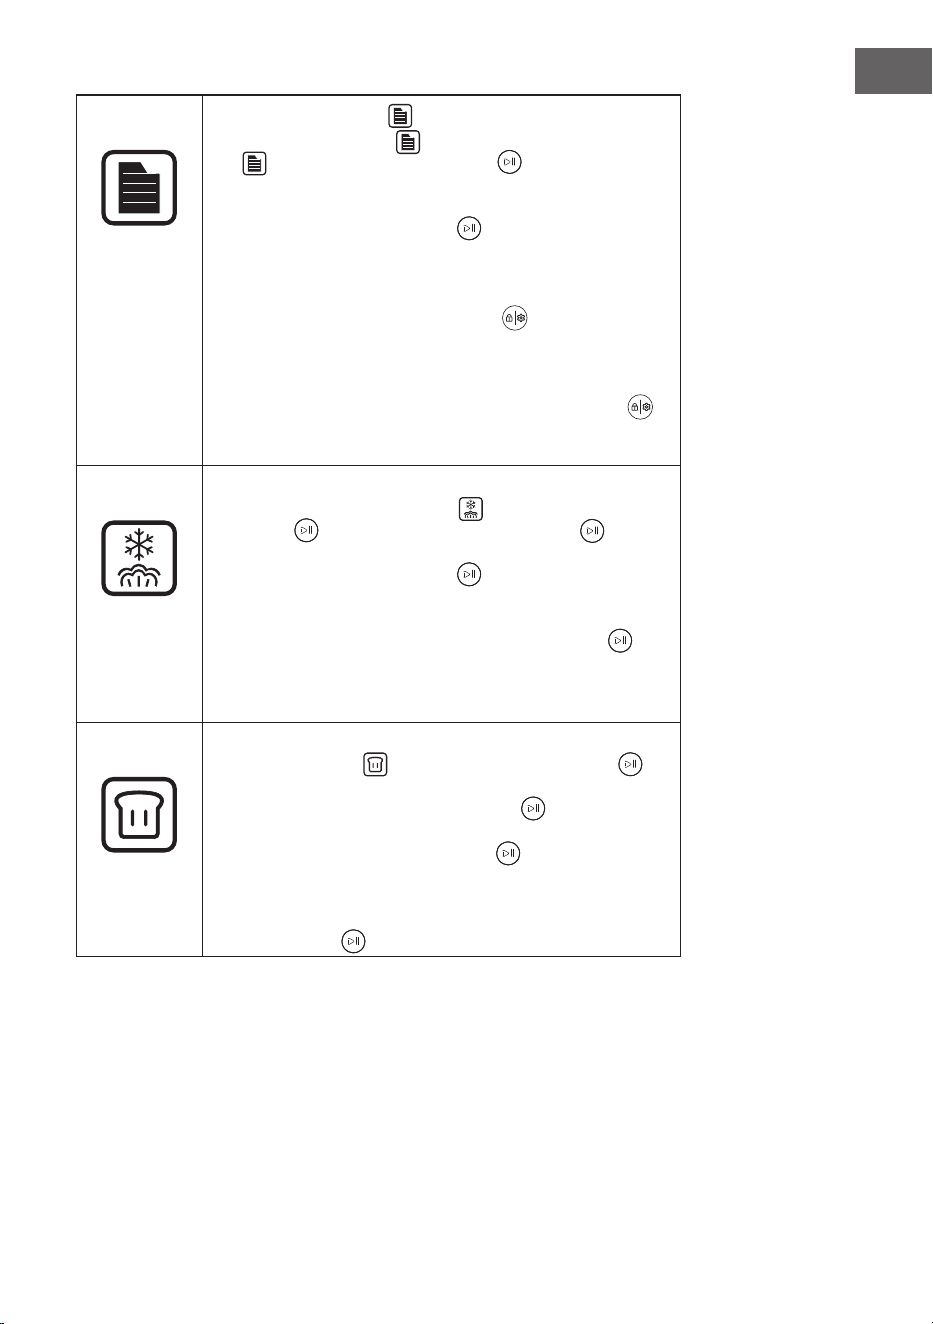
73
ES
Menú
• Con el [botón menú] puede elegir entre 31 recetas. Si
pulsa el [botón menú] , parpadea el [indicador de menú]
y el [regulador de inicio/pausa] simultáneamente.
En la pantalla LED aparece „F-00“. Pulse el [regulador de
inicio/pausa] para acceder a la selección del menú. Pulsando
el [regulador de inicio/pausa] aparecen las recetas
de manera consecutiva („F-01“, „F-02“... „F-31“). Pulse el
[regulador de inicio/pausa] para seleccionar una receta.
• Si ha seleccionado una receta, tras el inicio se ilumina el
[botón de ajustes/protección infantil] . Con este botón
puede ajustar el tiempo de cocción correspondiente de la
cantidad de alimentos. Para cada receta puede el tiempo una
sola vez durante el funcionamiento. A continuación, se apaga
la iluminación del [botón de ajustes/protección infantil]
y el tiempo no se puede ajustar hasta que el proceso de
cocción de la receta seleccionada nalice.
Descongelar
• Si selecciona la función „Descongelar“, parpadean el
[indicador de descongelación] y el [regulador de inicio/
pausa] . Pulse el [regulador de inicio/pausa] y gírelo
para seleccionar un tiempo de entre 5 minutos y 2 horas. Pulse
el [regulador de inicio/pausa] para conrmar los ajustes
de tiempo. Ahora puede realizar los ajustes de temperatura.
Puede seleccionar una temperatura de entre 50 °C y 60 °C.
A continuación, pulse el [regulador de inicio/Pausa] para
conrmar. El aparato se pone en marcha con la cuenta atrás.
• El tiempo predeterminado es de 20 minutos y la temperatura,
55 °C.
Fermentar
• Si selecciona la función „Fermentar“, parpadean el [indicador
de fermentación] y el [regulador de inicio/pausa] . El
tiempo predeterminado es de 40 minutos y la temperatura,
40 °C. Con el [regulador inicio/pausa] , puede regular
un periodo de tiempo comprendido entre 5 minutos y 2 horas.
Pulse el [regulador de inicio/pausa] para conrmar
los ajustes de tiempo. Ahora puede realizar los ajustes de
temperatura. Puede seleccionar una temperatura de entre
30°C y 50 °C. Para conrmar, presione el [regulador de
inicio/pausa] . El aparato se pone en marcha.
74
ES
Limpieza
• La función de limpieza se puede utilizar para eliminar la
cal después de utilizar el horno. Si selecciona el programa
„Limpieza“, parpadean el [indicador de limpieza] y el
[regulador de inicio/pausa] Para conrmar, presione
el [regulador inicio/pausa] y seleccione el modo de
limpieza deseado: „C1“ o „C2“.
C-1 : Eliminar la cal del generador de vapor en 50 minutos.
C-2 : 25 minutos y 100 °C para limpiar la cavidad del horno
o para desinfectar aparatos.
Eliminar la cal en modo limpieza „C-1“:
1. Si se ha alcanzado el tiempo total de funcionamiento del
conducto de calor del evaporador cifrado en 100 horas,
el aparato le recordará que es necesario retirar la cal del
evaporador (la función de descalcicación la puede iniciar
usted automáticamente). El [indicador de limpieza]
parpadea.
2. Prepare la solución de descalcicación en una proporción de
1 : 8 (descalcicador : agua). Agite la solución tras mezclarla
cuidadosamente en el depósito de agua. El nivel de la
solución descalcicante debe situarse por encima de la marca
mínima del depósito.
3. Cuando queden 20 minutos, el aparato le recordará que
debe extraer el depósito de agua, desechar el resto de la
solución descalcicadora y sustituirla por agua limpia. El
[indicador de limpieza] parpadea y el aparato pita varias
veces. Cuando haya introducido de nuevo el depósito, se
continúa con la limpieza. Cuando queden 10 minutos, el
aparato le recordará que debe extraer el depósito de agua,
desechar el resto de agua y sustituirla por agua limpia.
Cuando haya introducido de nuevo el depósito, se continúa
con la limpieza. Cuando el proceso de descalcicación haya
nalizado, se ilumina el [indicador de limpieza] de manera
permanente.

75
ES
Indicadores del
display
Descripción de funciones
Poca agua
Si el aparato se inicia en cualquier programa y hay poca
agua en el depósito, el horno detendrá el funcionamiento y
el [indicador de Poca agua]
.
parpadeará. El aparato pita
10veces. Todos los botones quedan desactivados. Después
de haber rellenado el depósito con agua, el horno reanuda el
funcionamiento y se continúa con el proceso de cocción
.
Precalentar
Si se ilumina el [indicador de precalentamiento] , el horno
se precalienta. En cuanto nalice el proceso de calentamiento,
se apaga el indicador.
Fin de programa
Cuando se naliza el programa, aparece en pantalla „END“
y el indicador se ilumina.
Protección infantil
Si se ilumina el [indicador de protección infantil] , signica
que la función está activada. Pulse el [botón de ajustes/
protección infantil] durante 3 segundos para desactivar
la función.
Limpieza
Si el [indicador de limpieza] se ilumina de manera
continuada, indica que el aparato se está descalcicando.
El [indicador de limpieza] se apaga en cuanto se haya
completado el proceso de descalcicación.
76
ES
OTRAS FUNCIONES
Proceso de
cocción
1. Pausa
• Si el aparato está en funcionamiento y pulsa
[regulador de inicio/pausa] , la luz LED de tiempo
y el [regulador de inicio/pausa] parpadean. El
proceso de cocción se interrumpe, la cuenta atrás se
detiene temporalmente y la pantalla indica el estado
de funcionamiento. Si vuelve a pulsar el [regulador de
inicio/pausa] , se continúa con el proceso de cocción
hasta que la cuenta atrás nalice.
• Si abre la puerta del horno durante el proceso de
cocción, el proceso se interrumpe, la cuenta atrás se
detiene temporalmente y la pantalla indica el estado
de funcionamiento. El LED de tiempo y el [regulador
de inicio/pausa] parpadean. Si vuelve a cerrar la
puerta del horno, se continúa con el proceso de cocción
hasta que la cuenta atrás transcurra.
2. Ajuste de tiempo y temperatura
Durante el proceso de cocción puede ajustar el tiempo de
cocción y la temperatura del siguiente modo:
• Si pulsa el [botón ajustes/protección infantil] ,
parpadean las cifras del indicador de minutos. Ajuste
los minutos girando el [regulador de inicio/pausa] y
conrme la selección pulsando el [regulador de inicio/
pausa] . (Nota: No es posible ajustar las horas).
• Después de congurar los minutos, puede ajustar la
temperatura girando el [regulador de inicio/pausa] .
Para conrmar, presione el [regulador de inicio/pausa]
. Si no es necesario ajustar la temperatura, también
puede pulsar el [regulador de inicio/pausa] para
seleccionar los minutos.
• Después de seleccionar una receta en el menú se
ilumina el [botón de ajustes/protección infantil]
Con este botón puede ajustar el tiempo de cocción
correspondiente de la cantidad de alimentos. Para
cada receta solo se puede ajustar el tiempo una vez y,
a continuación, la iluminación del [botón de ajustes/
protección infantil] se apaga. No es posible volver a
ajustar el tiempo de cocción.

77
ES
Iluminación
interior
• Cuando se ponga en marcha el horno, la iluminación
interior se enciende durante 3 minutos y luego se apaga
automáticamente.
• Cuando se abre la puerta del horno, la iluminación
interior se enciende y se vuelve a apagar
automáticamente transcurridos 3 minutos. Si cierra la
puerta del horno, la iluminación interior se apaga a los
3 minutos.
• Si gira una vez el regulador en modo standby o durante
el funcionamiento, la iluminación interior se enciende
durante 3 minutos y luego se apaga automáticamente.
Cómo abrir y
cerrar la cubierta
• Si abre la puerta del horno durante el funcionamiento,
el aparato se detiene y se pausa. En cuanto vuelva a
cerrar la puerta, se continúa con el funcionamiento
automáticamente.
Fin del proceso
de cocción
• Cuando el horno haya nalizado el proceso de cocción,
el aparato pita 10 veces. En pantalla aparece „END“ y
. Esto signica que el proceso de cocción o la receta
han nalizado.
78
ES
MENU (RECETAS)
Los ajustes que aparecen en la tabla para cada uno de los alimentos deben entenderse
como valores orientativos. Si es necesario cocinar más alimentos o los alimentos se van
a situar a distintos niveles, será necesario ajustar el tiempo de cocción. Ajustes el tiempo
con el [botón de ajustes/protección infantil] .
Código F-01 F-02 F-03 F-04 F-05 F-06 F-07 F-08 F-09
Alimento
Verduras
al vapor
Arroz al
vapor
Pescado
al vapor
Gambas
al vapor
Lango-
stinos al
vapor
Huevos
al vapor
Pollo al
vapor
Papaya
al vapor
Pollo
asado
Tiempo
(min)
16 50 20 15 30 18 30 35 45
Temp
(°C)
100 100 100 100 100 100 100 100 230
Peso (g) 600 200 600 500 800 300 800 400 1000
Código F-10 F - 11 F -12 F -13 F -14 F -15 F -16 F -17 F -18
Alimento
Filete
asado
Cordero
asado
Costillas
asadas
Salmón
asado
Muslo
de pollo
asado
Alitas
de pollo
asadas
Caballa
asada
Patatas
asadas
Gambas
asadas
Tiempo
(min)
13 35 20 22 26 23 20 18 15
Temp
(°C)
230 200 210 210 210 210 220 220 18 0
Peso (g) 600 600 500 400 750 500 600 500 400
Código F -19 F-20 F -21 F-22 F-23 F-24 F-25 F-26 F-27
Alimento
Salchicha
asada
Bacon
asado
Pizza
Mini-
Pizza
Baguette Bizcocho
Tarta de
queso y
yogur
Hojaldre
Gal-
letas
Tiempo
(min)
13 11 22 18 16 50 60 32 14
Temp.
(°C)
200 200 180 180 18 0 150 15 0 18 0 180
Código F-28 F-29 F-30 F-31
Alimento Tortitas
Almen-
dras
tostadas
Nueces
tostadas
Yogur
Tiempo
(min)
22 10 12 480
Temp.
(°C)
18 0 14 0 160 45

79
ES
LIMPIEZA Y CUIDADO
• Apague el aparato y desconecte el enchufe de la toma de corriente antes de
limpiarlo.
• No limpie la supercie del aparato con herramientas metálicas ni productos
abrasivos, pues el recubrimiento podría dañarse.
• Limpie frecuentemente el interior del horno. Retire los alimentos o las salpicaduras
de grasa de la pared interior del horno con un paño húmedo. En caso de suciedad
incrustada, puede utilizarse una solución de limpieza neutra.
• Se recomienda rellenar el depósito de agua con agua dulce o con agua destilada.
Si se utiliza agua corriente, tras una utilización más prolongada del aparato
aparecerán restos de cal.
• Compruebe el depósito de agua regularmente. Extráigalo en posición horizontal.
Límpielo y séquelo con un paño suave. Tras la limpieza, vuelva a colocar el
depósito en su posición inicial.
• Tras nalizar el proceso de cocción, retire los restos de agua del depósito.
• Limpie la junta del horno regularmente con un paño suave y seco.
• Desconecte el enchufe de la toma de corriente, limpie todo el aparato, vacíe el
depósito de agua y coloque el aparato en un lugar fresco y seco si no lo utiliza
durante un periodo de tiempo prolongado.
• En caso de problemas de funcionamiento, el fabricante, el servicio de atención al
cliente o una persona con una cualicación similar se encargará de su reparación.
Nunca intente reparar el aparato por su cuenta.
• No limpie la puerta de cristal con productos de limpieza agresivos ni rascadores
de metal alados, o de lo contrario el cristal podría sufrir daños.
• Antes de limpiar el aparato o de cambiar las bombillas, apáguelo y desconecte el
enchufe de la toma de corriente.
• No utilice un limpiador de vapor para limpiar el aparato.
80
ES
RESOLUCIÓN DE PROBLEMAS
Problema Posible causa Solución propuesta
E01
Fallo en el sensor de calor
arriba
Apague el aparato, abra
la puerta del horno y deje
que el aparato se enfríe
durante 10 minutos. Reinicie
el aparato o póngase en
contacto con el servicio de
atención al cliente.
E02
Cortocircuito en el sensor de
calor arriba
E03
Fallo en el sensor de calor
abajo
E04
Cortocircuito en el sensor de
calor abajo
E05
Fallo en el sensor del
evaporador
Contacte con el servicio de
atención al cliente.
E06
Cortocircuito en el sensor
del evaporador
Contacte con el servicio de
atención al cliente.
En pantalla no
aparece nada.
Compruebe que ha
conectado el enchufe.
Conecte el enchufe a la
toma de corriente.
La pantalla está averiada. Contacte con el servicio de
atención al cliente.
La luz del horno no se
enciende.
La luz del horno está
averiada.
Sustituya la luz o contacte
con el servicio de atención
al cliente.
El portalámparas está
averiado.
Contacte con el servicio de
atención al cliente.
El ventilador no
funciona.
Los contactos están
dañados.
Contacte con el servicio de
atención al cliente.
El ventilador está averiado.
Los botones no
responden.
El panel de control está
averiado o está activada la
protección infantil.
Desactive la protección
infantil o contacte con el
servicio de atención al
cliente.
El indicador de tiempo
parpadea y el resto de
botones no responden.
Asegúrese de que en el
depósito haya suciente
agua y que se haya
colocado correctamente.

81
ES
Problema Posible causa Solución propuesta
No hay vapor El circuito de agua está
bloqueado.
Contacte con una empresa
especializada para que
examine y repare el
aparato.
El sistema de calor del
evaporador está averiado.
La entrada de agua está
dañada.
El aparato no
funciona.
La puerta del horno no se
cierra correctamente.
Cierre la puerta.
El cierre de la puerta está
dañado.
Contacte con una empresa
especializada para que
examine y repare el
aparato.
El vapor sale del
horno.
La puerta del horno no se
cierra correctamente.
Cierre la puerta
correctamente.
La junta de la puerta no está
bien colocada o presenta
daños.
Sustituya la junta de la
puerta o contacte con el
servicio de atención al
cliente.
Si la presión del interior
del horno es demasiado
elevada, el aparato emite
vapor.
Se trata de un fenómeno
normal.
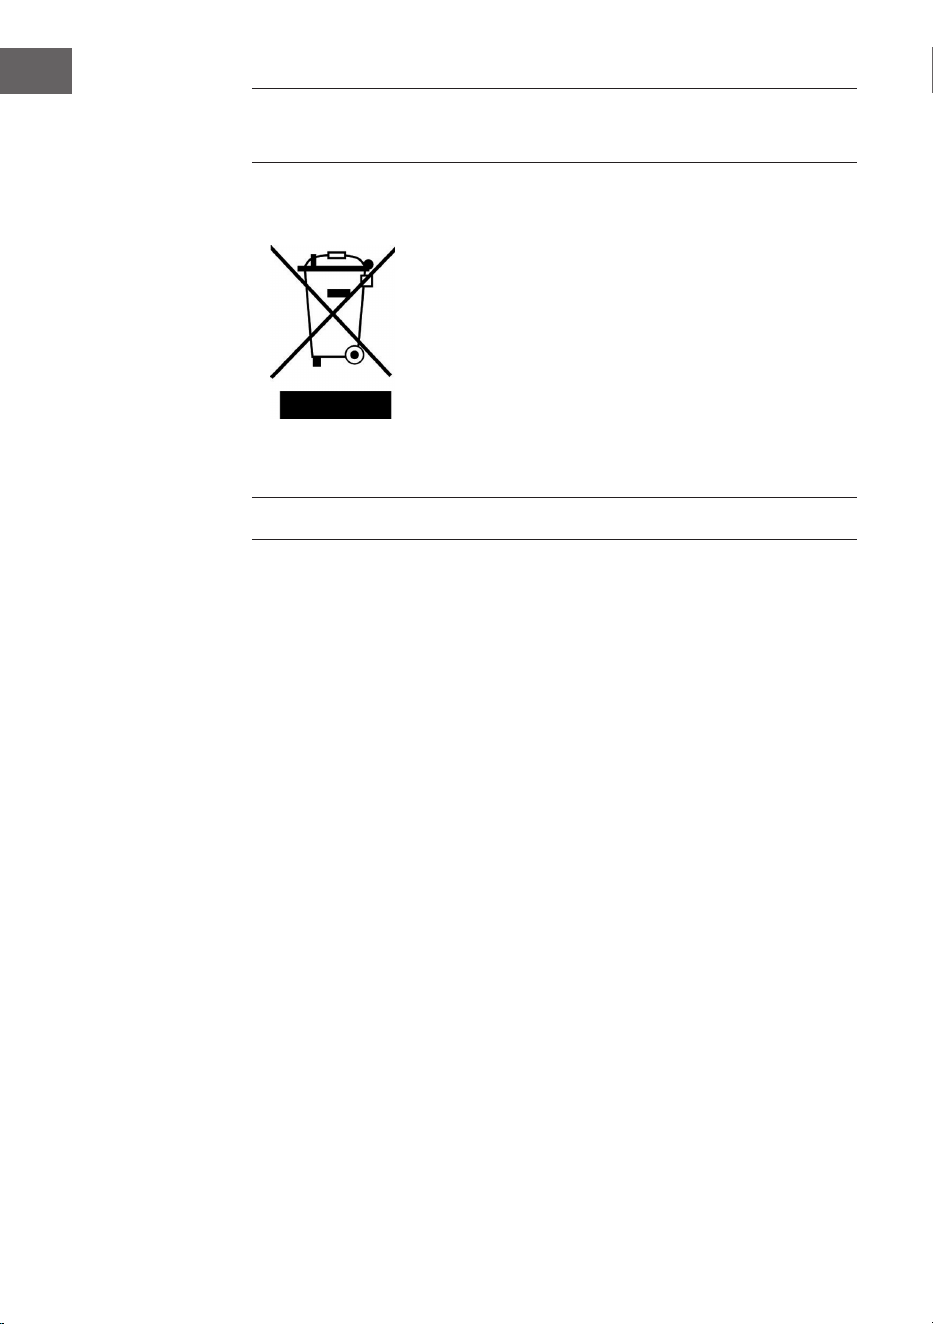
82
ES
INDICACIONES SOBRE LA RETIRADA DEL
APARATO
Si en su país existe una disposición legal relativa a la
eliminación de aparatos eléctricos y electrónicos, este
símbolo estampado en el producto o en el embalaje
advierte que no debe eliminarse como residuo doméstico.
En lugar de ello, debe depositarse en un punto de recogida
de reciclaje de aparatos eléctricos y electrónicos. Una
gestión adecuada de estos residuos previene consecuencias
potencialmente negativas para el medio ambiente y la salud
de las personas. Puede consultar más información sobre el
reciclaje y la eliminación de este producto contactando con
su administración local o con su servicio de recogida de
residuos.
FABRICANTE E IMPORTADOR (REINO UNIDO)
Fabricante:
Chal-Tec GmbH, Wallstraße 16, 10179 Berlín, Alemania.
Importador para Gran Bretaña:
Berlin Brands Group UK Limited
PO Box 42
272 Kensington High Street
London, W8 6ND
United Kingdom

83
IT
Gentile Cliente,
La ringraziamo per aver acquistato il dispositivo. La preghiamo
di leggere attentamente le seguenti istruzioni per l’uso e di
seguirle per evitare possibili danni tecnici. Non ci assumiamo
alcuna responsabilità per danni scaturiti da una mancata
osservazione delle avvertenze di sicurezza e da un uso
improprio del dispositivo. Scansionare il codice QR seguente,
per accedere al manuale d’uso più attuale e per ricevere
informazioni sul prodotto.
INDICE
Dati tecnici83
Scheda dati del prodotto (10036173)84
Scheda dati del prodotto (10036174)85
Avvertenze di sicurezza86
Descrizione del dispositivo88
Informazioni sui ripiani89
Pannello di controllo e tasti funzione90
Indicazioni display e programmi91
Ulteriori funzioni di utilizzo96
Menu (ricette)98
Pulizia e manutenzione99
Correzione degli errori100
Smaltimento102
Produttore e importatore (UK)102
DATI TECNICI
Numero articolo 10036173 10036174
Alimentazione 220-240 V ~ 50/60 Hz
Potenza 2100-2400 W 1900-2200 W
Potenza vapore 1100 W 950 W
Riempimento massimo
serbatoio
1,45 l 1,45 l

84
IT
SCHEDA DATI DEL PRODOTTO (10036173)
Indicazioni secondo 65/2014
Marchio di fabbrica: Klarstein
Codice modello del fornitore: 10036173
Indice di efcienza energetica (EEI cavity): 94,1
Classe di efcienza energetica: A
Consumo energetico per ciclo per ogni vano di cottura in modalità
convenzionale e in modalità di ricircolo in kWh: 0,64/0,65 kWh
Numero dei vani di cottura: 1
Fonte(-i) di calore del vano cottura: corrente elettrica
Volume del vano cottura in litri: 31
Indicazioni secondo 66/2014
Simbolo Valore Unità
Contrassegno dispositivo
10036173
Tipo di forno
Forno elettrico
Dimensioni del dispositivo
M 21, 8 kg
Numero dei vani di cottura
1
Fonte di calore di ogni vano di cottura
(elettricità o gas)
Elettricità
Volume di ogni vano di cottura
V 31 L
Consumo energetico (elettricità) durante il
riscaldamento di carichi standard nel vano
di cottura di un forno elettrico con un ciclo
in modalità convenzionale per ogni vano di
cottura (energia elettrica nale)
EC Forno
elettrico
0,64 kWh/ciclo
Consumo energetico durante il riscaldamento
di carichi standard nel vano di cottura di
un forno elettrico con un ciclo in modalità
di ricircolo aria per ogni vano di cottura
(energia elettrica nale)
EC Forno
elettrico
0,65 kWh/ciclo
Consumo energetico durante il riscaldamento
di carichi standard nel vano di cottura di
un forno a gas con un ciclo in modalità
convenzionale per ogni vano di cottura
(energia del gas nale)
EC Forno a
gas
-
MJ/ciclo
kWh/ciclo
(1)
Consumo energetico durante il riscaldamento
di carichi standard nel vano di cottura di
un forno a gas con un ciclo in modalità di
ricircolo per ogni vano di cottura (energia del
gas nale)
EC Forno a
gas
-
MJ/ciclo
kWh/ciclo
(1)
Indice di efcienza energetica per ogni vano
EEI Forno 94,1
(1) 1 kWh/ciclo = 3,6 MJ/ciclo.

85
IT
SCHEDA DATI DEL PRODOTTO (10036174)
Indicazioni secondo 65/2014
Marchio di fabbrica: Klarstein
Codice modello del fornitore: 10036174
Indice di efcienza energetica (EEI cavity): 87, 7
Classe di efcienza energetica: A
Consumo energetico per ciclo per ogni vano di cottura in modalità
convenzionale e in modalità di ricircolo in kWh: 0,59/0,57 kWh
Numero dei vani di cottura: 1
Fonte(-i) di calore del vano cottura: corrente elettrica
Volume del vano cottura in litri: 24
Indicazioni secondo 66/2014
Simbolo Valore Unità
Contrassegno dispositivo
10036174
Tipo di forno
Forno elettrico
Dimensioni del dispositivo
M 19,5 kg
Numero dei vani di cottura
1
Fonte di calore di ogni vano di cottura
(elettricità o gas)
Elettricità
Volume di ogni vano di cottura
V 24 L
Consumo energetico (elettricità) durante il
riscaldamento di carichi standard nel vano
di cottura di un forno elettrico con un ciclo
in modalità convenzionale per ogni vano di
cottura (energia elettrica nale)
EC Forno
elettrico
0,59 kWh/ciclo
Consumo energetico durante il riscaldamento
di carichi standard nel vano di cottura di
un forno elettrico con un ciclo in modalità
di ricircolo aria per ogni vano di cottura
(energia elettrica nale)
EC Forno
elettrico
0,57 kWh/ciclo
Consumo energetico durante il riscaldamento
di carichi standard nel vano di cottura di
un forno a gas con un ciclo in modalità
convenzionale per ogni vano di cottura
(energia del gas nale)
EC Forno a
gas
-
MJ/ciclo
kWh/ciclo
(1)
Consumo energetico durante il riscaldamento
di carichi standard nel vano di cottura di
un forno a gas con un ciclo in modalità di
ricircolo per ogni vano di cottura (energia del
gas nale)
EC Forno a
gas
-
MJ/ciclo
kWh/ciclo
(1)
Indice di efcienza energetica per ogni vano
EEI Forno 87,7
(1) 1 kWh/ciclo = 3,6 MJ/ ciclo.

86
IT
AVVERTENZE DI SICUREZZA
Avvertenze generiche
• Non lavare mai l’alloggiamento con acqua corrente, in modo da non danneggiare
i componenti elettrici.
• Non lasciar penetrare nel dispositivo acqua o altri liquidi, in modo da evitare
scosse elettriche.
• Bambini a partire da 8 anni, persone con limitate capacità siche e psichiche e
persone con esperienza e conoscenze insufcienti possono utilizzare il dispositivo
solo se sono stati istruiti in precedenza sulle funzioni e sulle procedure di sicurezza
da parte di una persona responsabile del loro controllo e comprendono i rischi
associati.
• Tenere sotto controllo i bambini, in modo che non giochino con il dispositivo.
• I bambini possono pulire e manutenere il dispositivo solo con la dovuta
supervisione.
• Prima di utilizzare il dispositivo, controllare la tensione sulla targhetta. Collegare il
dispositivo solo a prese elettriche con tensione corrispondente.
• Non utilizzare il dispositivo se cavo di alimentazione, spina o dispositivo stesso
sono danneggiati.
• Se cavo o spina sono danneggiati, devono essere sostituiti dal produttore, da
un’azienda autorizzata o da una persona con qualica equivalente.
• Non toccare spina o pannello di controllo con le mani bagnate.
• Non posizionare il prodotto sopra o vicino a tovaglie, tende o altri materiali
inammabili.
• Installare il dispositivo su una supercie piatta e asciutta e lasciare almeno 10 cm di
spazio intorno al dispositivo, per assicurare una sufciente circolazione d’aria. Non
poggiare oggetti sopra al dispositivo.
• Non lasciare senza controllo il dispositivo mentre è in funzione.
ATTENZIONE
Pericolo di ustione! Quando si apre lo sportello del forno può
fuoriuscire vapore bollente. Tenersi a distanza di sicurezza per evitare
ustioni.
• Non inserire corpi estranei nell’interruttore di sicurezza dello sportello del forno.
• Utilizzare solo sonde di temperatura consigliate per questo forno.
• Non utilizzare pulitori a vapore per lavare il dispositivo.
• Assicurarsi che il dispositivo sia spento e la spina staccata prima di sostituire la
lampadina, in modo da evitare scosse elettriche.
• Il dispositivo non può essere incassato in un mobile, altrimenti si surriscalda.

87
IT
Informazioni per un utilizzo sicuro
ATTENZIONE
Pericolo di ustione! Durante l’utilizzo il dispositivo diventa bollente.
Assicurarsi di non toccare gli elementi riscaldanti all’interno del forno e
di utilizzare guanti da forno.
• Prima della pulizia, staccare la spina e far raffreddare completamente il dispositivo.
• Non collegare il dispositivo a prese elettriche a cui sono già collegati altri
elettrodomestici da cucina.
• Pulire lo sportello del forno con un panno morbido inumidito. Non utilizzare
prodotti abrasivi o raschietti metallici, altrimenti si rischia di grafare la supercie.
• Non collegare il dispositivo a timer esterni o a prese di corrente con comando a
distanza.
• Prima dell’utilizzo, assicurarsi che le stoviglie siano adatte a questo tipo di
dispositivo. Consigliamo contenitori in vetro o ceramica termoresistenti. Riempire il
contenitore al massimo per 2/3.
• Non riempire eccessivamente il serbatoio dell’acqua. Fare riferimento al segno
MAX nel serbatoio.
• Non poggiare contenitori sullo sportello aperto.
• Non scaldare alimenti in contenitori sigillati, altrimenti potrebbero esplodere.
Mettere gli alimenti in un contenitore termoresistente prima di scaldarli.

88
IT
DESCRIZIONE DEL DISPOSITIVO
1
Pannello di controllo
7
Maniglia
2
Spiedo (40 l/36 l)
8
Sportello
3
Impugnatura spiedo (40 l/36 l)
9
Vaschetta dell’acqua
4
Griglia
10
Alloggiamento
5
Teglia
11
Interruttore sportello
6
Serbatoio
Nota: assicurarsi che il livello dell’acqua nel serbatoio si trovi sempre sopra
al simbolo di riempimento minimo. Lasciare il serbatoio nel forno durante il
funzionamento del dispositivo.

89
IT
INFORMAZIONI SUI RIPIANI
Ci sono 4 guide per i ripiani. Selezionare il ripiano adatto in base al piatto o alla
ricetta. Assicurarsi che l’archetto sulla griglia sia rivolto verso il basso e inserire la griglia
sulla guida desiderata all’interno del forno.
1
2
3
4
Archetto
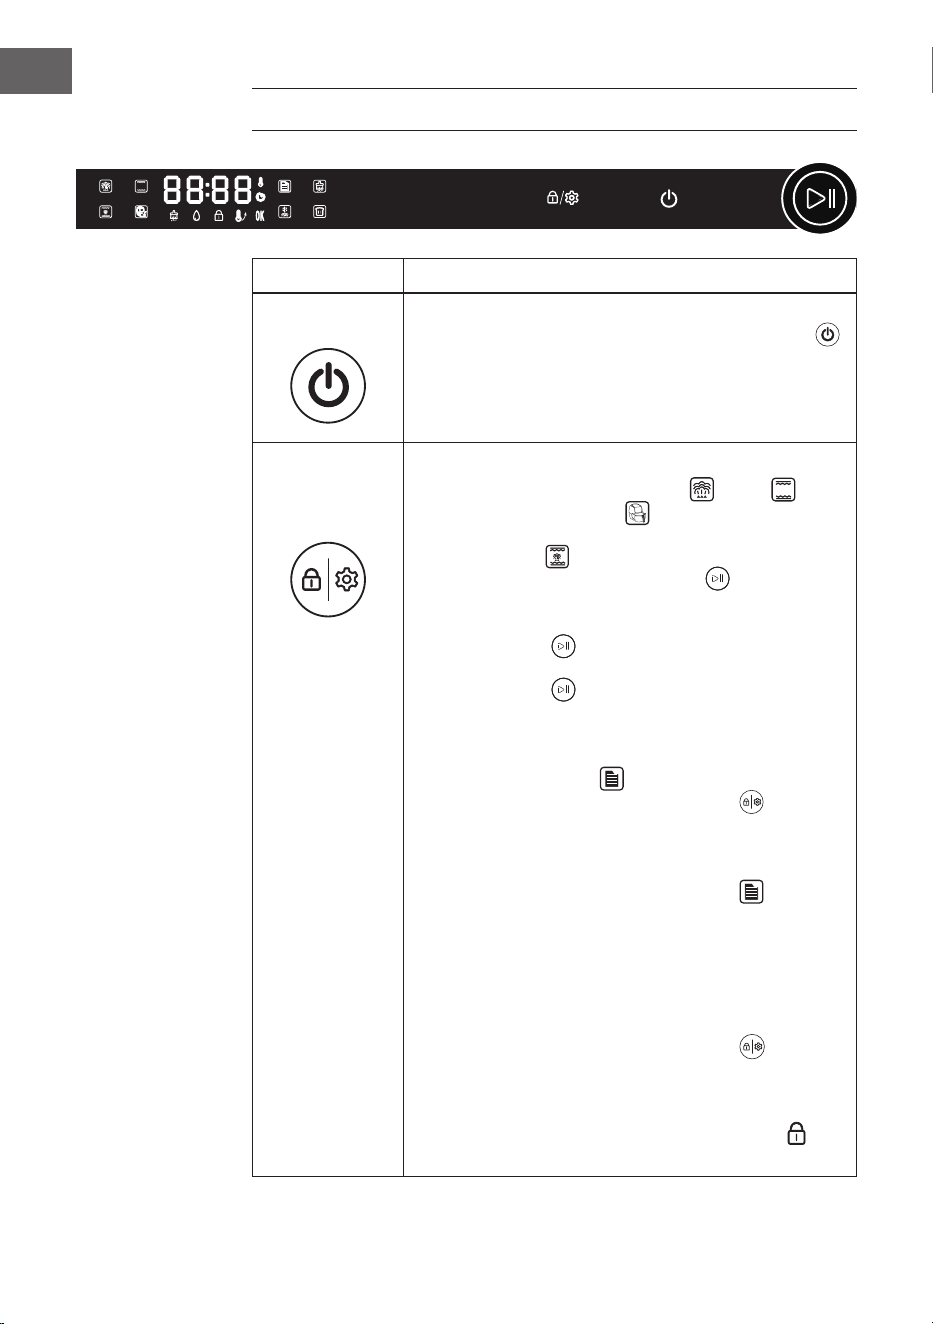
90
IT
PANNELLO DI CONTROLLO E TASTI FUNZIONE
Tasti Descrizione della funzione
On/off
• Dopo il primo avvio viene emesso un segnale acustico e
l’indicazione luminosa si accende. Premere ON/OFF ,
per raggiungere la selezione della funzione.
• Se non viene selezionata alcuna funzione entro 5 minuti,
tutte le impostazioni vengono cancellate e il dispositivo
passa in standby.
Impostazioni/
Sicura per i
bambini
1. Impostazioni:
• Nei programmi “Cottura a vapore” , “Grill” ,
“Friggere con aria calda” o “Grill e cottura a vapore”
SYMBOL si illumina il tasto IMPOSTAZIONI/SICURA
PER BAMBINI . Se si preme il tasto, il LED della
durata e la manopola START/PAUSA lampeggiano
contemporaneamente. Girare la manopola per impostare
temperatura e durata. Premere dunque la manopola
START/PAUSA per confermare l’impostazione. Se si
attende troppo a lungo, il LED della durata e la manopola
START/PAUSA lampeggiano contemporaneamente
per 5 secondi e l’impostazione viene poi automaticamente
confermata e salvata.
• Se dopo l’accensione del dispositivo si seleziona
il programma “Menu” , si illumina il tasto
IMPOSTAZIONI/SICURA PER I BAMBINI . Con
questo tasto è possibile impostare il tempo di cottura in
base alla quantità di alimenti. Questo è possibile una
sola volta per una ricetta. In seguito, si spegne il tasto
IMPOSTAZIONI/SICURA PER I BAMBINI e non è
più possibile impostare la durata per questa modalità
SYMBOL.
2. Sicura per i bambini:
• La sicura per i bambini può essere attivata in
tutti i programmi. Premere per 3 secondi il tasto
IMPOSTAZIONI/SICURA PER I BAMBINI (quando
è illuminato). L’indicazione della SICURA PER I BAMBINI
SYMBOL si illumina, a indicare che la funzione
corrispondente è attiva. Premendo di nuovo per 3 secondi
il tasto IMPOSTAZIONI/SICURA PER I BAMBINI si
disattiva la sicura per i bambini.
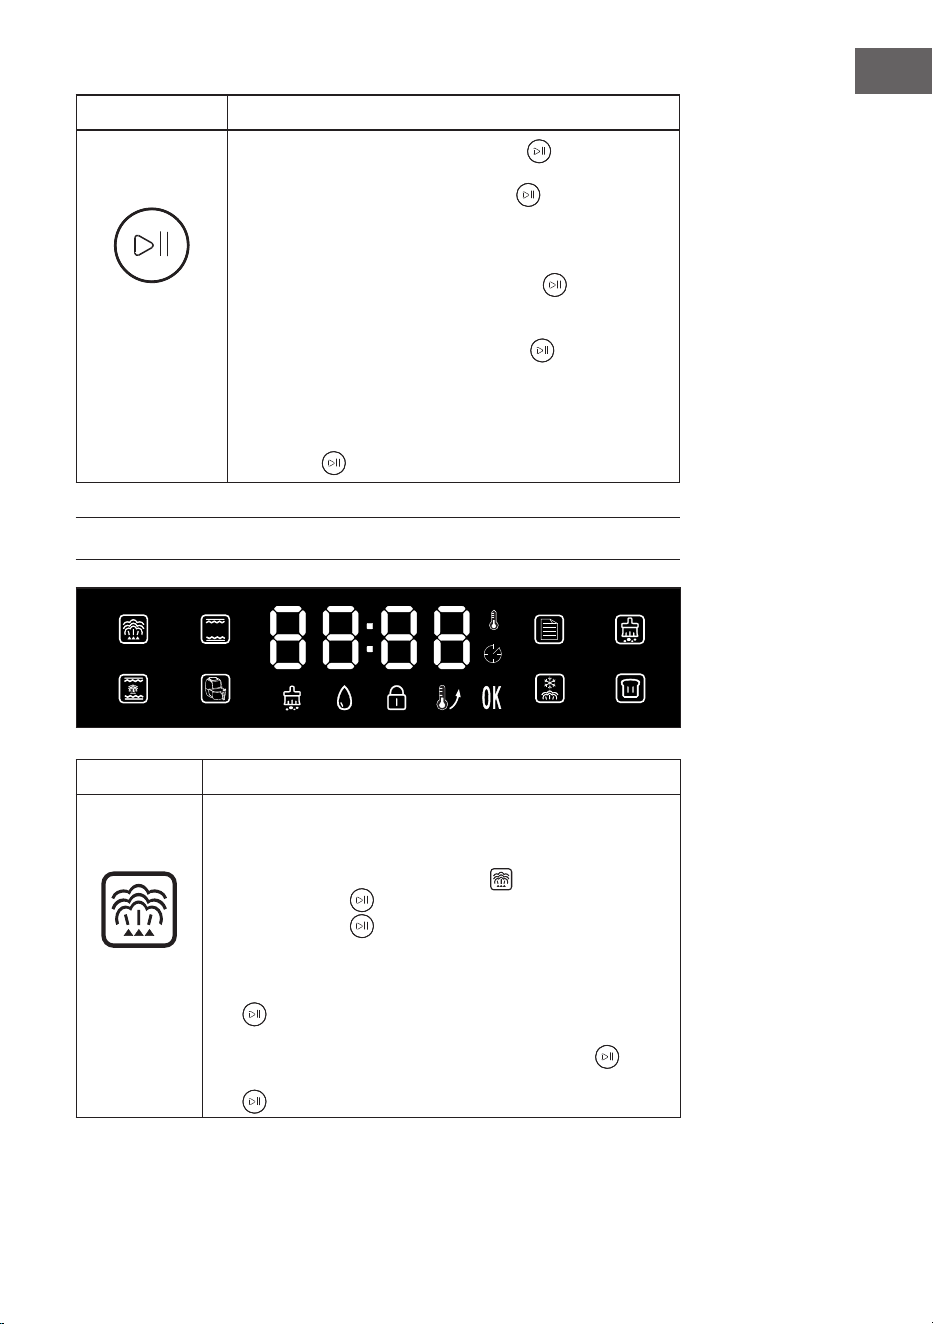
91
IT
Tasti Descrizione della funzione
Start/Pausa
(manopola)
• Premere la manopola START/PAUSA per avviare o
mettere in pausa il dispositivo.
• Girare la manopola START/PAUSA per selezionare
uno dei seguenti programmi: “Cottura a vapore”, “Grill”,
Grill e cottura a vapore”, “Friggere con aria calda”,
“Menu”, “Pulizia”, “Scongelare” o “Fermentare”.
• Girare poi la manopola START/PAUSA per impostare
durata e temperature nei diversi programmi e nelle diverse
funzioni.
• Quando la manopola START/PAUSA lampeggia,
premendo o girando la manopola è possibile confermare
o regolare l’impostazione del programma o della funzione
selezionati.
• Quando il dispositivo è in funzione, la manopola START/
PAUSA è illuminata.
INDICAZIONI DISPLAY E PROGRAMMI
Programmi Descrizione della funzione
Cottura a
vapore
• La funzione principale è “Cottura a vapore”. La durata
predenita è di 30 minuti e la temperatura è di 100 °C.
• Se si seleziona il programma “Cottura a vapore”,
l’indicazione COTTURA A VAPORE e la manopola
START/PAUSA lampeggiano. Premere la manopola
START/PAUSA per confermare la selezione del
programma e raggiungere la modalità di impostazione.
• Con la manopola è dunque possibile impostare una durata
tra 1 minuto e 2 ore. Premere la manopola START/PAUSA
per confermare la durata impostata. È possibile impostare
una temperatura tra 100 e 110 °C. Dopo aver impostato la
temperatura, premere la manopola START/PAUSA per
confermare. Se si preme di nuovo la manopola START/PAUSA
, il dispositivo si avvia e inizia il conto alla rovescia.
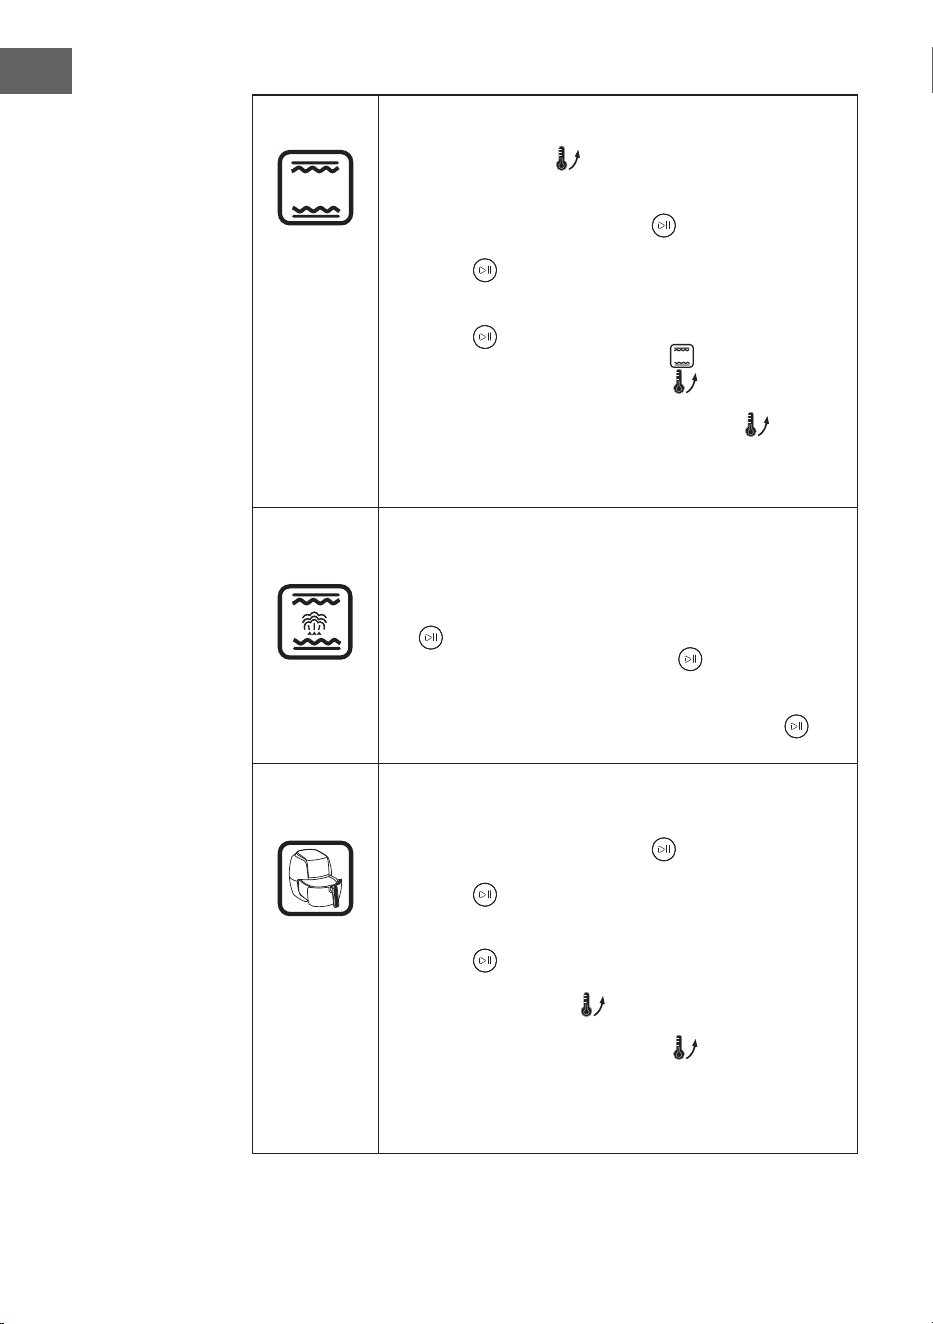
92
IT
Grill
• Nel programma “Grill” vengono utilizzati il calore
dall’alto e dal basso. Parte del programma è la funzione
“Preriscaldamento” . Attendere la conclusione del
preriscaldamento prima di mettere in forno gli alimenti. La
durata predenita è di 30 minuti e la temperatura è di 180 °C.
• Con la manopola START/PAUSA è possibile impostare
una durata tra 1 minuto e 2 ore. Premere la manopola START/
PAUSA per confermare la durata impostata. Ora si passa
all’impostazione della temperatura. È possibile impostare una
temperatura tra 100 e 230 °C. Premere la manopola START/
PAUSA per confermare. Il dispositivo entra in funzione.
• Dopo l’avvio del programma “Grill” , si illumina
l’indicazione PRERISCALDAMENTO . Il forno viene
preriscaldato. Non appena il preriscaldamento è concluso,
scompare l’indicazione PRERISCALDAMENTO e vengono
emessi 10 segnali acustici, per ricordarvi di mettere in forno gli
alimenti. Non appena è terminato il preriscaldamento, viene
attivata automaticamente la funzione Grill.
Grill e cottura
a vapore
• La funzione principale di questo programma è Grill. In
aggiunta al grill, il forno emette anche un po’ di vapore. In
questo modo gli alimenti vengono cotti più rapidamente,
senza seccarsi. La durata predenita è di 30 minuti e la
temperatura è di 180 °C. Con la manopola START/PAUSA
è possibile impostare una durata tra 1 minuto e 2 ore.
Premere la manopola START/PAUSA per confermare
la durata impostata. Ora si passa all’impostazione della
temperatura. È possibile impostare una temperatura tra
120e 230 °C. Premere la manopola START/PAUSA per
confermare. Il dispositivo entra in funzione.
Friggere con
aria calda
• Nella funzione per friggere con aria calda, la ventola
posteriore è attiva in modalità di ricircolo. La durata
predenita è di 30 minuti e la temperatura è di 180 °C.
• Con la manopola START/PAUSA è possibile impostare
una durata tra 1 minuto e 2 ore. Premere la manopola START/
PAUSA per confermare la durata impostata. Ora si passa
all’impostazione della temperatura. È possibile impostare una
temperatura tra 100 e 230 °C. Premere la manopola START/
PAUSA per confermare. Il dispositivo entra in funzione.
• Dopo l’avvio del dispositivo, si illumina l’indicazione
PRERISCALDAMENTO . Il forno viene preriscaldato.
Non appena il preriscaldamento è concluso, scompare
l’indicazione PRERISCALDAMENTO e vengono emessi
10segnali acustici, per ricordarvi di mettere in forno gli
alimenti. Non appena è terminato il preriscaldamento, viene
attivata automaticamente la funzione Friggere con aria calda
e inizia il conto alla rovescia.
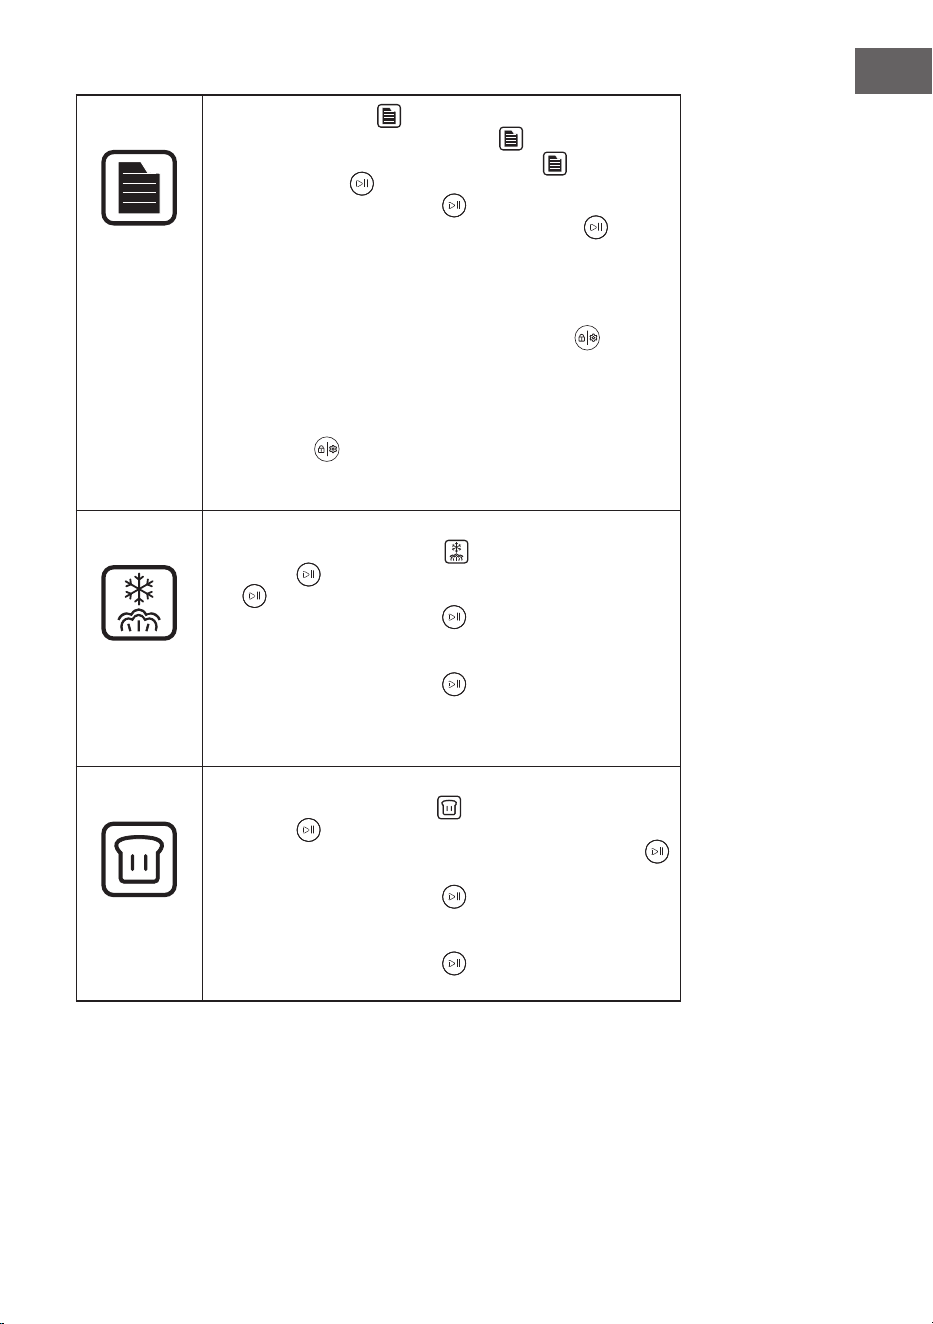
93
IT
Menu
• Con il tasto MENU è possibile selezionare tra
31ricette. Se si preme il tasto MENU , lampeggiano
contemporaneamente l’indicazione MENU e la manopola
START/PAUSA . Sullo schermo compare “F-00”. Premere
la manopola START/PAUSA per raggiungere la selezione
del menu. Ruotando la manopola START/PAUSA
vengono mostrate in successione le ricette (“F-01”, “F-02”…
”F-31”). Premere la manopola START/PAUSA SYMBOL per
selezionare una ricetta.
• Quando si seleziona una ricetta, dopo l’avvio si illumina il
tasto IMPOSTAZIONI/SICURA PER I BAMBINI . Con
questo tasto è possibile regolare la durata di cottura in base
alla quantità di alimenti. Per una ricetta, è possibile impostare
la durata durante il funzionamento una sola volta. In seguito,
l’illuminazione del tasto IMPOSTAZIONI/SICURA PER I
BAMBINI si spegne e non è più possibile regolare la
durata no al termine del procedimento di cottura della ricetta
selezionata.
Scongelare
• Se si seleziona la funzione “Scongelare”, lampeggiano
l’indicazione SCONGELARE e la manopola START/
PAUSA . Premere e ruotare la manopola START/PAUSA
per impostare una durata tra 5 minuti e 2 ore. Premere
la manopola START/PAUSA per confermare la durata
impostata. Ora si passa all’impostazione della temperatura. È
possibile impostare una temperatura tra 50 e 60 °C. Premere
la manopola START/PAUSA per confermare. Il dispositivo
entra in funzione con il conto alla rovescia.
• La durata predenita è di 20 minuti e la temperatura è di
55°C.
Fermentare
• Se si seleziona la funzione “Fermentare”, lampeggiano
l’indicazione FERMENTARE e la manopola START/
PAUSA . La durata predenita è di 40 minuti e la
temperatura è di 40 °C. Con la manopola START/PAUSA
è possibile impostare una durata tra 5 minuti e 2 ore. Premere
la manopola START/PAUSA per confermare la durata
impostata. Ora si passa all’impostazione della temperatura. È
possibile impostare una temperatura tra 30 e 50 °C. Premere
la manopola START/PAUSA per confermare. Il dispositivo
entra in funzione.
94
IT
Pulizia
• La funzione “Pulizia” può essere attivata dopo l’utilizzo del
forno per rimuovere calcare. Se si seleziona il programma
“Pulizia”, si illuminano l’indicazione PULIZIA e la
manopola START/PAUSA . Premere la manopola START/
PAUSA per confermare e selezionare la modalità di
pulizia desiderata tra “C1” e “C2”.
C-1 : rimozione del calcare dal generatore di vapore in
50minuti.
C-2 : 25 minutos y 100 °C para limpiar la cavidad del horno
o para desinfectar aparatos.
Rimozione del calcare in modalità di pulizia “C1”:
1. Se il tempo operativo complessivo del tubo riscaldante
del vaporizzatore ha raggiunto le 100 ore, il dispositivo vi
ricorda della necessità di rimuovere il calcare (la funzione
decalcicante può essere avviata automaticamente in ogni
momento). Lampeggia l’indicazione PULIZIA .
2. Preparare una soluzione decalcicante con un rapporto 1:8
(decalcicante:acqua). Dopo aver miscelato per bene la
soluzione, versarla nel serbatoio. Il livello della soluzione
decalcicante deve trovarsi sopra al segno di riempimento
minimo del serbatoio.
3. Quando restano ancora 20 minuti, il dispositivo vi ricorda
di rimuovere il serbatoio dal dispositivo, per buttare via la
soluzione decalcicante residua e sostituirla con acqua pulita.
L’indicazione PULIZIA lampeggia e vengono emessi
diversi segnali acustici. Dopo aver riposizionato il dispositivo,
il dispositivo procede con la pulizia. Terminata la procedura
di decalcicazione, l’indicazione PULIZIA rimane accesa
costantemente.
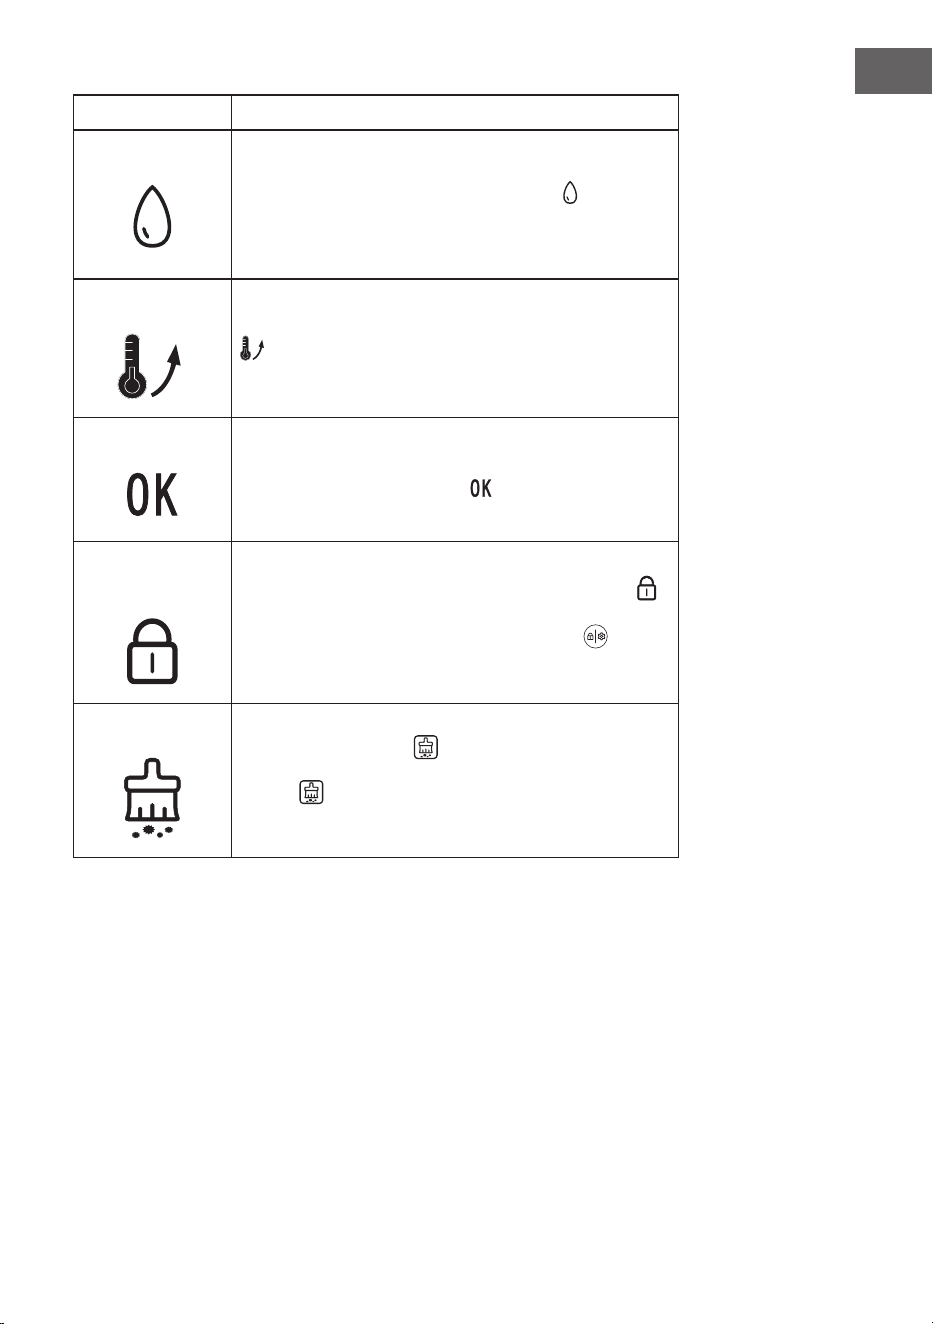
95
IT
Spie del display Descrizione delle funzioni
Poca acqua
Se il dispositivo viene avviato con un programma a piacere e
nel serbatoio non c’è acqua o ce n’è poca, il forno arresta il
funzionamento e l’indicazione POCA ACQUA
.
lampeggia.
Il dispositivo emette 10 segnali acustici. Tutti i tasti sono
disattivati. Dopo aver riempito d’acqua il serbatoio, il forno
riprende il funzionamento e procede con la cottura.
.
Preriscaldamento
Quando si illumina l’indicazione PRERISCALDAMENTO
, il forno inizia a riscaldarsi. Terminata la procedura di
preriscaldamento, l’indicazione si spegne.
Fine del programa
Quando termina un programma, sullo schermo compare
“END” e si illumina l’indicazione .
Sicura per i
bambini
Quando si illumina l’indicazione SICURA PER I BAMBINI ,
signica che tale funzione è attiva. Premere per 3 secondi
il tasto IMPOSTAZIONI/SICURA PER I BAMBINI per
disattivarla e la relativa indicazione si spegne.
Pulizia
Se l’indicazione PULIZIA rimane accesa costantemente,
signica che il dispositivo viene decalcicato. L’indicazione
PULIZIA si spegne non appena il processo di
decalcicazione è terminato.
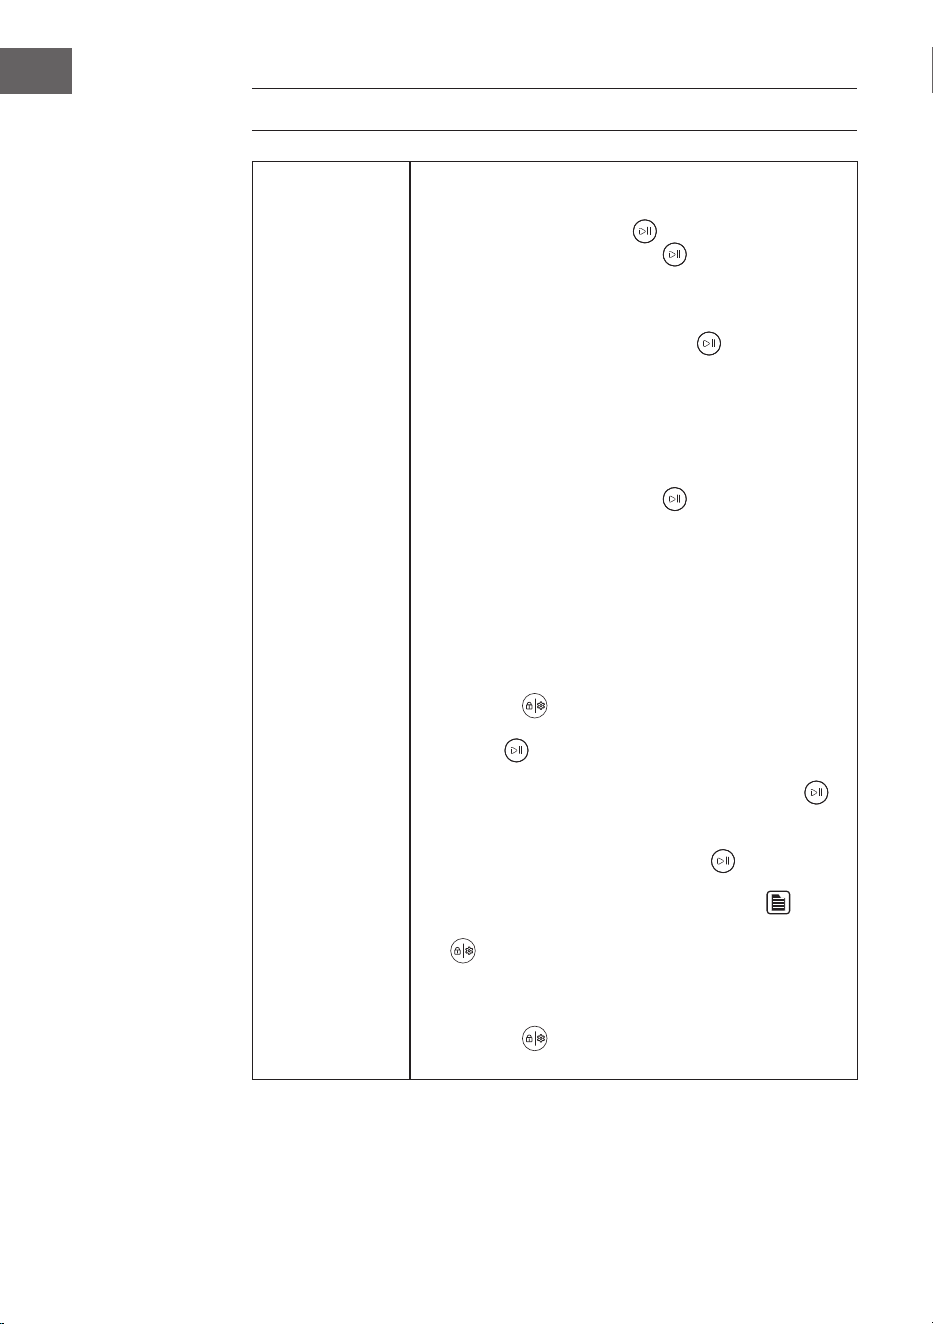
96
IT
ULTERIORI FUNZIONI DI UTILIZZO
Procedimento di
cottura
1. Pausa
• Quando il dispositivo è in funzione e si preme la
manopola START/PAUSA , le spie LED della durata
e la manopola START/PAUSA lampeggiano. Il
procedimento di cottura viene interrotto, il conto alla
rovescia viene fermato temporaneamente e lo schermo
continua a mostrare lo stato operativo. Se si preme di
nuovo la manopola START/PAUSA , viene ripreso il
procedimento di cottura, no allo scadere del conto alla
rovescia.
• Se si apre lo sportello del forno durante il procedimento
di cottura, questo viene interrotto, il conto alla rovescia
viene fermato temporaneamente e lo schermo continua
a mostrare lo stato operativo. Le spie LED della durata
e la manopola START/PAUSA lampeggiano. Se si
richiude lo sportello, viene ripreso il procedimento di
cottura, no allo scadere del conto alla rovescia.
2. Impostazione durata e temperatura
Durante il procedimento di cottura è possibile regolare durata
e temperatura in questo modo:
• Se si preme il tasto IMPOSTAZIONI/SICURA PER I
BAMBINI , lampeggiano i numeri nell’indicazione dei
minuti. Impostare i minuti ruotando la manopola START/
PAUSA e confermare premendo la manopola stessa.
• Dopo aver impostato i minuti, è possibile regolare la
temperatura ruotando la manopola START/PAUSA
e confermare premendo la manopola stessa. Se non è
necessario regolare la temperatura, è possibile anche
premere la manopola START/PAUSA direttamente
dopo aver impostato i minuti.
• Dopo aver selezionato una ricetta nel MENU , si
illumina il tasto IMPOSTAZIONI/SICURA PER I BAMBINI
. Con questo tasto è possibile regolare la durata di
cottura in base alla quantità di alimenti. Per una ricetta è
possibile impostare la durata una sola volta, dopodiché
l’illuminazione del tasto IMPOSTAZIONI/SICURA PER I
BAMBINI si spegne. Non è più possibile una nuova
regolazione della durata di cottura.

97
IT
Illuminazione
interna
• Quando si avvia il forno, l’illuminazione interna è attiva
per 3 minuti e poi si spegne automaticamente.
• Quando si apre lo sportello del forno, l’illuminazione
interna si accende e si spegne poi automaticamente
dopo 3 minuti. Se si chiude lo sportello, l’illuminazione si
spegne dopo 3 minuti.
• Se si ruota la manopola una volta in standby o a
dispositivo in funzione, l’illuminazione si accende per
3minuti e poi si spegne automaticamente.
Aprire e chiudere
lo sportello
• Se si apre lo sportello del forno durante il funzionamento,
il dispositivo entra in pausa. Non appena si richiude
lo sportello, il dispositivo riprende il funzionamento
automaticamente.
Fine del
procedimento di
cottura
• Quando il dispositivo ha terminato la cottura, vengono
emessi 10 segnali acustici. Sullo schermo compare
“END” e . Questo signica che la cottura o la ricetta
sono state portate a termine.
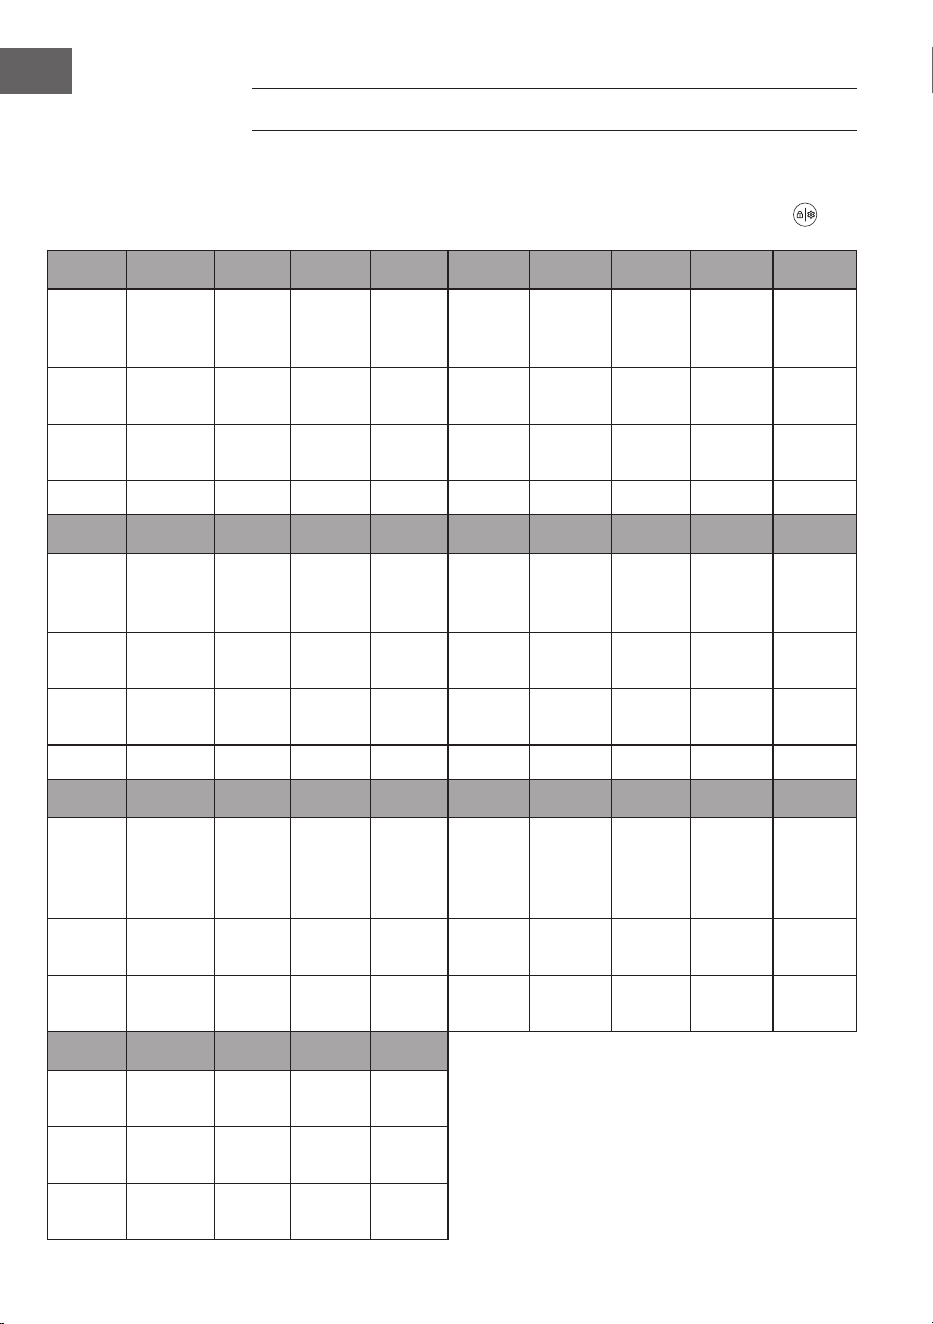
98
IT
MENU (RICETTE)
Le impostazioni elencate nella tabella per i singoli alimenti sono solo indicative. Se
si deve cuocere più cibo o se il cibo è disposto su più livelli, il tempo di cottura deve
essere regolato. Regolare l‘ora con il [Pulsante impostazioni/ blocco bambini] .
Codice F-01 F-02 F-03 F-04 F-05 F-06 F-07 F-08 F-09
Alimento
Verdure
al vapore
Riso al
vapore
Carne al
vapore
Gambe-
retti al
vapore
Granch-
io al
vapore
Uova al
vapore
Pollo al
vapore
Papaya
al
vapore
Pollo
arrosto
Durata
(min.)
16 50 20 15 30 18 30 35 45
Temp.
(°C)
100 100 100 100 100 100 100 100 230
Peso (g) 600 200 600 500 800 300 800 400 1000
Codice F-10 F - 11 F - 12 F -13 F -14 F -15 F -16 F -17 F -18
Alimento
Bistecca
arrosto
Mon-
tone
arrosto
Costo-
lette ar-
rosto
Salmo-
ne
arrosto
Coscia
pollo
arrosto
Ali pollo
arrosto
Sgom-
bro
arrosto
Patatine
Gambe-
retti
arrosto
Tiempo
(min)
13 35 20 22 26 23 20 18 15
Temp
(°C)
230 200 210 210 210 210 220 220 18 0
Peso (g) 600 600 500 400 750 500 600 500 400
Código F -19 F-20 F -21 F-22 F-23 F-24 F-25 F-26 F-27
Alimento
Salsiccia
arrosto
Bacon
arrosto
Pizza
Mini-
Pizza
Baguette
Chiff
on
cake
Torta
formag-
gio e
yogurt
Pasta
sfoglia
Biscot-
ti
Durata
(min)
13 11 22 18 16 50 60 32 14
Temp.
(°C)
200 200 18 0 180 180 15 0 150 18 0 18 0
Codice F-28 F-29 F-30 F -31
Alimento Tortino
Mandor-
le tostate
Noci
tostate
Yogurt
Durata
(min.)
22 10 12 480
Temp.
(°C)
18 0 140 160 45

99
IT
PULIZIA E MANUTENZIONE
• Spegnere il dispositivo e staccare la spina prima di pulire il dispositivo.
• Non pulire la supercie del dispositivo con attrezzi in metallo o prodotti abrasivi,
altrimenti si potrebbe rovinare il rivestimento.
• Pulire il vano interno con regolarità. Se ci sono spruzzi di grasso sulla parete
interna o residui di cibo, rimuoverli con un panno umido. In caso di sporco ostinato,
utilizzare una soluzione detergente delicata.
• Si consiglia di riempire il serbatoio con acqua potabile o acqua distillata. L’utilizzo
di acqua del rubinetto comporta a lungo andare la formazione di residui di
calcare.
• Controllare regolarmente il serbatoio. Toglierlo orizzontalmente. Pulirlo e
asciugarlo con un panno morbido. Riposizionarlo correttamente dopo la pulizia.
• A ne cottura, rimuovere l’acqua che rimane nel serbatoio.
• Pulire regolarmente la guarnizione dello sportello con un panno morbido e
asciutto.
• Se non si utilizza il dispositivo per diverso tempo, staccare la spina, pulire il vano
interno, svuotare il serbatoio e conservare il dispositivo in un luogo pulito e asciutto.
• In caso di malfunzionamento, il dispositivo deve essere riparato dal produttore, dal
servizio di assistenza ai clienti o da una persona con qualica equivalente. Non
cercare in nessun caso di riparare autonomamente il dispositivo.
• Non pulire il vetro dello sportello con raschietti in metallo o prodotti abrasivi,
altrimenti potrebbe rovinarsi.
• Staccare la spina prima di pulire il dispositivo o di sostituire la lampadina.
• Non utilizzare pulitori a vapore per lavare il dispositivo.
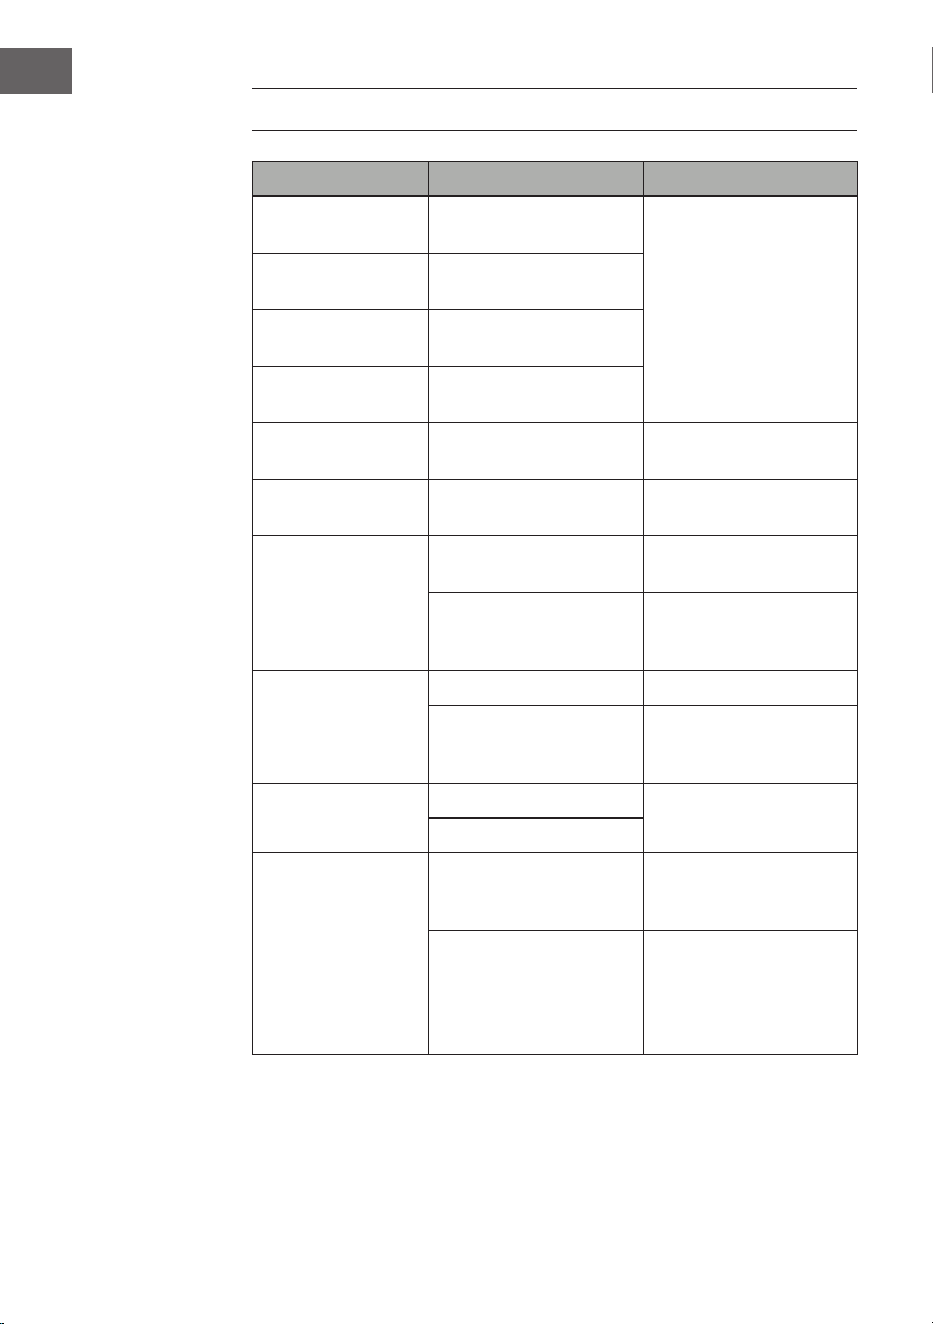
100
IT
CORREZIONE DEGLI ERRORI
Problema Possibile causa Soluzioni
E01
Errore del sensore del calore
dall’alto.
Interrompere il
funzionamento, aprire
lo sportello e lasciar
raffreddare il dispositivo
per 10 minuti. Riavviare
il dispositivo o contattare
il servizio di assistenza ai
clienti.
E02
Cortocircuito del sensore del
calore dall’alto
E03
Errore del sensore del calore
dal basso.
E04
Cortocircuito del sensore del
calore dal basso.
E05
Errore del sensore del
vaporizzatore.
Contattare il servizio di
assistenza ai clienti.
E06
Cortocircuito del sensore del
vaporizzatore.
Contattare il servizio di
assistenza ai clienti.
Il display non mostra
nulla.
Controllare che la spina sia
inserita.
Inserire la spina.
Il display è guasto. Contattare un’azienda
tecnica per controllo e
riparazione.
La lampada non si
accende.
La lampada è guasta. Sostituire la lampadina.
L’attacco della lampadina
è guasto.
Contattare un’azienda
tecnica per controllo e
riparazione.
La ventola non
funziona.
I contatti sono danneggiati. Contattare il servizio di
assistenza ai clienti.
El ventilador está averiado.
I tasti non reagiscono.
Il pannello di controllo è
guasto o è attivo il blocco
dei tasti.
Disattivare il blocco dei tasti
o contattare il servizio di
assistenza ai clienti.
L’indicazione della durata
lampeggia, tutti gli altri tasti
non reagiscono.
Assicurarsi che ci sia acqua
sufciente nel serbatoio
e che il serbatoio sia
posizionato correttamente
nel dispositivo.
101
IT
Problema Possibile causa Soluzioni
Nessun vapore. L’afusso d’acqua è
bloccato.
Contattare il servizio di
assistenza ai clienti.
Il riscaldamento del
vaporizzatore è guasto.
L’ingresso dell’acqua è
guasto.
Il dispositivo non
funziona.
Lo sportello non è chiuso
correttamente.
Chiudere lo sportello.
La chiusura dello sportello è
difettosa.
Contattare il servizio di
assistenza ai clienti.
Vapore fuoriesce dal
forno.
Lo sportello non è chiuso
correttamente.
Chiudere lo sportello.
La guarnizione non è
posizionata correttamente o
è danneggiata.
Sostituire la guarnizione
o contattare il servizio di
assistenza ai clienti.
Se la pressione all’interno
del forno è eccessiva, il
dispositivo rilascia vapore.
È normale.
102
IT
AVVISO DI SMALTIMENTO
Se nel proprio paese si applicano le regolamentazioni
inerenti lo smaltimento di dispositivi elettrici ed elettronici,
questo simbolo sul prodotto o sulla confezione segnala che
questi prodotti non possono essere smaltiti con i riuti normali
e devono essere portati a un punto di raccolta di dispositivi
elettrici ed elettronici. Grazie al corretto smaltimento dei
vecchi dispositivi si tutela il pianeta e la salute delle persone
da possibili conseguenze negative. Informazioni riguardanti il
riciclo e lo smaltimento di questi prodotti si ottengono presso
l’amministrazione locale oppure il servizio di gestione dei
riuti domestici.
PRODUTTORE E IMPORTATORE (UK)
Produttore:
Chal-Tec GmbH, Wallstraße 16, 10179 Berlino, Germania.
Importatore per la Gran Bretagna:
Berlin Brands Group UK Limited
PO Box 42
272 Kensington High Street
London, W8 6ND
United Kingdom

103
NL
Geachte klant,
Gefeliciteerd met de aanschaf van dit apparaat. Lees de hierna
volgende handleiding aandachtig door en volg de instructies
op om schade te voorkomen. Voor schade veroorzaakt door
het niet in acht nemen van de instructies of door onjuist gebruik
nemen wij geen verantwoordelijkheid. Scan de QR code voor
toegang tot de meest actuele gebruikershandleiding en voor
meer informatie over het artikel.
INHOUDSOPGAVE
TECHNISCHE GEGEVENS
Artikelnummer 10036173 10036174
Stroomvoorziening 220-240 V ~ 50/60 Hz
Vermogen 2100-2400 W 1900-2200 W
Vermogen stoomoven 1100 W 950 W
Maximale inhoud watertank 1,45 L 1,45 L
Productinformatieblad (10036173)104
Productinformatieblad (10036174)105
Veiligheidsinstructies106
Overzicht apparaat108
Opmerking over de inschuifmodules109
Controlepaneel en toetsenfuncties110
Weergave display en programma’s111
Overige functies116
Menu (recepten)118
Reiniging en onderhoud119
Probleemoplossingen120
Instructies voor afvoer122
Fabrikant & importeur (UK)122
104
NL
PRODUCTINFORMATIEBLAD (10036173)
Gegevens conform 65/2014
Handelsmerk leverancier: Klarstein
Typeaanduiding leverancier: 10036173
Energie-efciëntie-index (EEI cavity): 94,1
Energie-efciëntieklasse: A
Energieverbruik per cyclus voor elke gaarruimte in conventionele modus en
circulatiemodus in kWh: 0,64/0,65 kWh
Aantal gaarruimtes: 1
Warmtebron(nen) gaarruimte: stroom
Volume gaarruimte (in liter): 31 l
Gegevens conform 66/2014
Symbool Waarde Eenheid
Identicatie model
10036173
Soort oven
Elektrische oven
Massa van het apparaat
M 21, 8 kg
Aantal gaarruimtes
1
Warmtebron per gaarruimte (stroom of gas)
Stroom
Volume per gaarruimte
V 31 L
Energieverbruik (stroom) voor het
verwarmen van een standaard beladen
gaarruimte van een elektrische oven tijdens
een conventionele cyclus per gaarruimte
(elektrische eindenergie)
EC
elektrische
oven
0,64 kWh/cyclus
Energieverbruik voor het verwarmen van
een gaarruimte van een elektrische oven
met standaard belasting tijdens een cyclus
per gaarruimte in de luchtcirculatiemodus
(elektrische eindenergie)
EC
elektrische
oven
0,65 kWh/cyclus
Energieverbruik voor het verwarmen van
een gaarruimte van een elektrische oven
met standaard belasting tijdens een cyclus
per gaarruimte in de conventionele modus
(eindenergie gas)
EC gasoven -
MJ/cyclus
kWh/cyclus
(1)
Energieverbruik voor het verwarmen van
een gaarruimte van een elektrische oven
met standaard belasting tijdens een cyclus
per gaarruimte in de luchtcirculatiemodus
(eindenergie gas)
EC gasoven -
MJ/cyclus
kWh/cyclus
(1)
Energie-efciëntieindex per gaarruimte
EEI oven 94,1
(1) 1 kWh/cyclus = 3,6 MJ/cyclus

105
NL
PRODUCTINFORMATIEBLAD (10036174)
Gegevens conform 65/2014
Handelsmerk leverancier: Klarstein
Typeaanduiding leverancier: 10036174
Energie-efciëntie-index (EEI cavity): 87, 7
Energie-efciëntieklasse: A
Energieverbruik per cyclus voor elke gaarruimte in conventionele modus en
circulatiemodus in kWh: 0,59/0,57 kWh
Aantal gaarruimtes: 1
Warmtebron(nen) gaarruimte: stroom
Volume gaarruimte (in liter): 24 l
Gegevens conform 66/2014
Symbool Waarde Eenheid
Identicatie model
10036174
Soort oven
Elektrische oven
Massa van het apparaat
M 19,5 kg
Aantal gaarruimtes
1
Warmtebron per gaarruimte (stroom of gas)
Stroom
Volume per gaarruimte
V 24 L
Energieverbruik (stroom) voor het
verwarmen van een standaard beladen
gaarruimte van een elektrische oven tijdens
een conventionele cyclus per gaarruimte
(elektrische eindenergie)
EC
elektrische
oven
0,59 kWh/cyclus
Energieverbruik voor het verwarmen van
een gaarruimte van een elektrische oven
met standaard belasting tijdens een cyclus
per gaarruimte in de luchtcirculatiemodus
(elektrische eindenergie)
EC
elektrische
oven
0,57 kWh/cyclus
Energieverbruik voor het verwarmen van
een gaarruimte van een elektrische oven
met standaard belasting tijdens een cyclus
per gaarruimte in de conventionele modus
(eindenergie gas)
EC gasoven -
MJ/cyclus
kWh/cyclus
(1)
Energieverbruik voor het verwarmen van
een gaarruimte van een elektrische oven
met standaard belasting tijdens een cyclus
per gaarruimte in de luchtcirculatiemodus
(eindenergie gas)
EC gasoven -
MJ/cyclus
kWh/cyclus
(1)
Energie-efciëntieindex per gaarruimte
EEI oven 87,7
(1) 1 kWh/cyclus = 3,6 MJ/cyclus

106
NL
VEILIGHEIDSINSTRUCTIES
Algemene instructies
• Was de behuizing nooit onder stromend water om de elektrische componenten niet
te beschadigen.
• Laat geen water of andere vloeistof(fen) in het apparaat binnendringen om een
elektrische schok te voorkomen.
• Kinderen vanaf 8 jaar en personen met een beperkte lichamelijke, sensorische en/
of geestelijke gezondheid mogen het apparaat alleen gebruiken wanneer ze van
tevoren door een voor hen verantwoordelijke persoon uitvoerig met de functies
en veiligheidsinstructies vertrouwd zijn gemaakt en de hieraan verbonden risico's
begrijpen.
• Houdt toezicht op kinderen om te voorkomen dat ze met het apparaat spelen.
• Reiniging en onderhoud mogen niet zonder toezicht door kinderen worden
uitgevoerd.
• Controleer voor gebruik de spanning op het typeplaatje. Sluit het apparaat alleen
aan op stopcontacten waarvan de spanning overeenkomt.
• Gebruik het apparaat niet wanneer de stekker, de stroomkabel of het toestel zelf
beschadigd is.
• Wanneer de stroomkabel of stekker beschadigd is, moet die door de fabrikant,
een geautoriseerd bedrijf of een gelijkwaardig gekwaliceerd persoon worden
vervangen.
• Raak de stekker of het controlepaneel niet met natte handen aan.
• Plaats het artikel niet op of naast tafellakens, gordijnen, vloerkleden en andere
brandbare objecten of materialen.
• Installeer het apparaat op een droge, vlakke ondergrond en laat rondom het
apparaat minimaal 10 cm in alle richtingen vrij zodat de lucht voldoende kan
circuleren. Plaats geen objecten op het apparaat.
• Laat het toestel tijdens gebruik niet zonder toezicht.
LET OP!
Verbrandingsgevaar! Bij het openen van de ovendeur kan hete damp
ontsnappen. Bewaar een veilige afstand om verbranding te
voorkomen.
• Plaats geen vreemde voorwerpen in de veiligheidsschakelaar van de ovendeur.
• Gebruik uitsluitend de voor deze oven aanbevolen temperatuursonde.
• Gebruik voor het reinigen geen stoomreiniger.
• Zorg ervoor dat het apparaat uitgeschakeld is en neem de stekker uit het
stopcontact voordat u de lamp vervangt om een elektrische schok te voorkomen.
• Het apparaat mag niet in een kast ingebouwd worden omdat hij anders oververhit
raakt.

107
NL
Tips voor een veilig gebruik
LET OP
verbrandingsgevaar! Het apparaat wordt heet tijdens het gebruik. Let
erop dat u de verwarmingselementen binnenin de oven niet aanraakt
en gebruik ovenhandschoenen.
• Neem voor het reinigen de stekker uit het stopcontact en laat het apparaat, indien
nodig, volledig afkoelen.
• Sluit het apparaat niet aan op een stopcontact waar al andere keukenapparatuur
op aangesloten is.
• Reinig het raampje in de deur met een zachte, vochtige doek. Gebruik geen
schuurmiddel of metalen schraper die het oppervlakte kunnen beschadigen.
• Sluit het apparaat niet op een externe timer of op een op afstand gestuurd
stopcontact aan.
• Controleer voor gebruik of uw kookgerei geschikt is voor dit toestel. Wij raden
aan hittebestendige glazen of keramische schalen te gebruiken. Vul een schaal
maximaal tot tweederde.
• Doe niet teveel in de watertank. Oriënteert u zich bij het vullen op de MAX
markering op de tank.
• Plaats geen schalen op de geopende deur.
• Verwarm geen levensmiddelen in een verzegelde schaal daar deze vervolgens
kan exploderen. Doe levensmiddelen voor het verwarmen in een hittebestendige
houder.

108
NL
OVERZICHT APPARAAT
1
Controlepaneel
7
Handgreep
2
Draaispies (40 l/36 l)
8
Deur
3
Handvat draaispies (40 l/36 l)
9
Wateropvangbak
4
Grillrooster
10
Behuizing
5
Bakplaat
11
Deurschakelaar
6
Watertank
Tip! Let erop dat de waterstand in de watertank altijd boven de minimale markering
ligt. Laat de watertank de hele tijd in de oven staan als het apparaat in gebruik is.

109
NL
OPMERKING OVER DE INSCHUIFMODULES
Er zijn vier niveaus. Kies het niveau dat past bij het gerecht of recept. Let erop dat de
boog van het grillrooster naar beneden wijst en schuif hem in het gewenste niveau in de
oven.
1
2
3
4
Boog
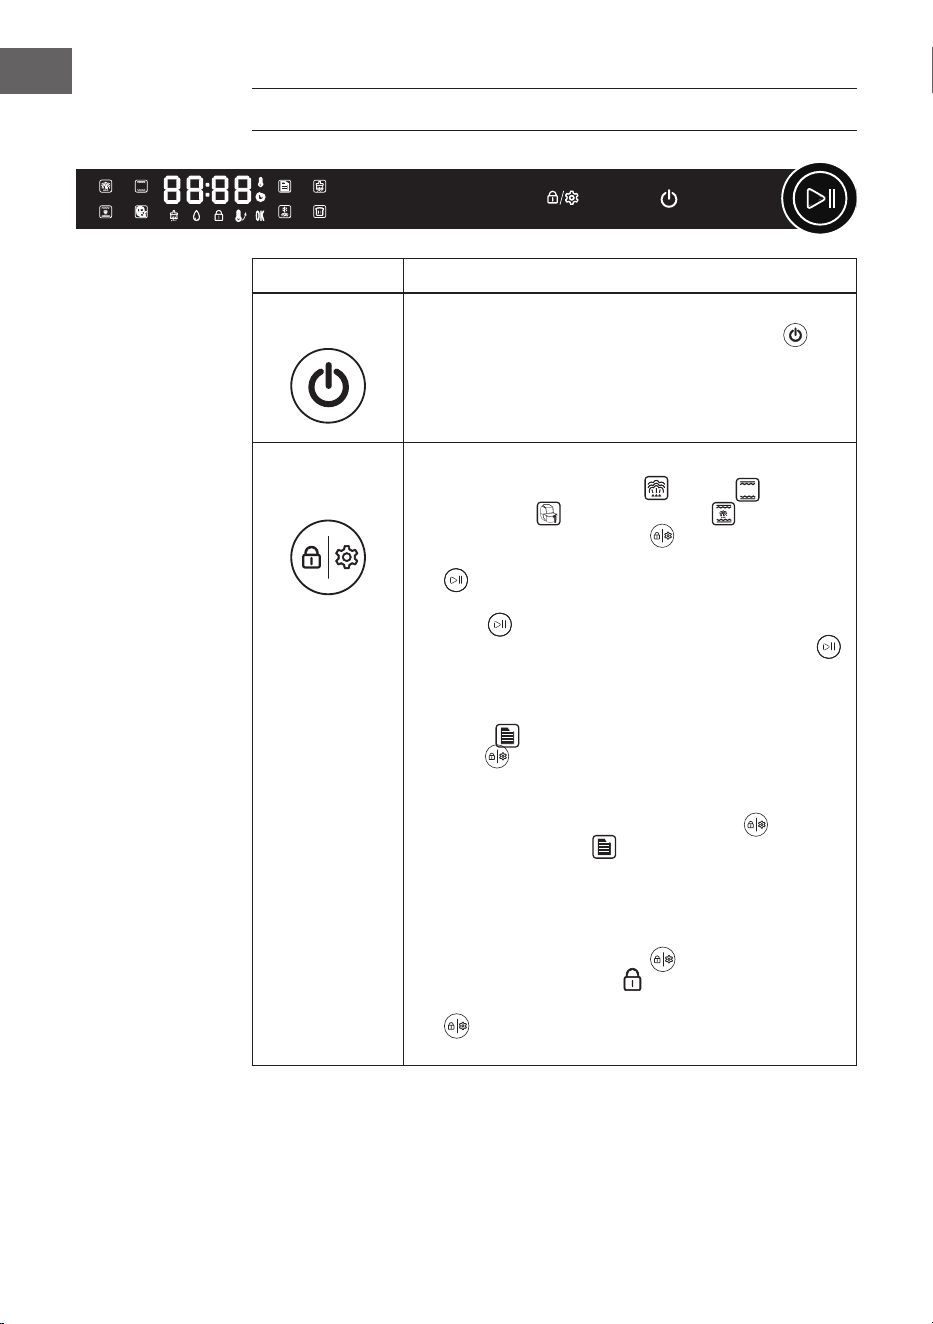
110
NL
CONTROLEPANEEL EN TOETSENFUNCTIES
Toetsen Functiebeschrijving
Aan / Uit
• Na de eerste inschakeling klinkt een pieptoon en de
indicator licht op. Druk nu op de [Aan/ Uit-toets] om
in de functiekeuze terecht te komen.
• Wanneer u binnen 5 minuten geen functie kiest worden
alle instellingen gewist en gaat het apparaat in stand-by
modus.
Instellingen/
Kinderslot
1. Instellingen:
• Bij de programma's 'Stomen' , 'Grillen' ,
'Luchtfrituren' of 'Grillen & Stomen' licht de
[Instellingen/Kinderslot toets] op. Als u de toets
indrukt knipperen de tijd-led en de [Start/Pauze knop]
tegelijk. Draai aan de knop om de temperatuur en
de tijd in te stellen. Druk vervolgens op de [Start/Pauze
knop] om de instelling te bevestigen. Als u te lang
wacht knipperen de tijd-led en de [Start/Pauze knop]
tegelijk gedurende 5 seconden en wordt de instellingen
aansluitend automatisch bevestigd en opgeslagen.
• Als u na het inschakelen van het apparaat het programma
'Menu' kiest, licht de [Instellingen/Kinderslot
toets] op. Met deze toets kan de gaartijd worden
geprogrammeerd in overeenstemming met de hoeveelheid
levensmiddelen. Dit is maar een keer per recept mogelijk,
dan dooft de [Instellingen/Kinderslot toets] en kan de
tijd voor deze modus niet opnieuw worden ingesteld.
2. Kinderslot
• Het kinderslot kan bij alle programma's worden
geactiveerd. Druk gedurende 3 seconden op de
[Instellingen/Kinderslot toets] (wanneer die brandt).
De [Kinderslot weergave] licht op, wat betekent dat het
kinderslot actief is. Als u de [Instellingen/Kinderslot toets]
nogmaals 3 seconden indrukt wordt het kinderslot
uitgeschakeld.
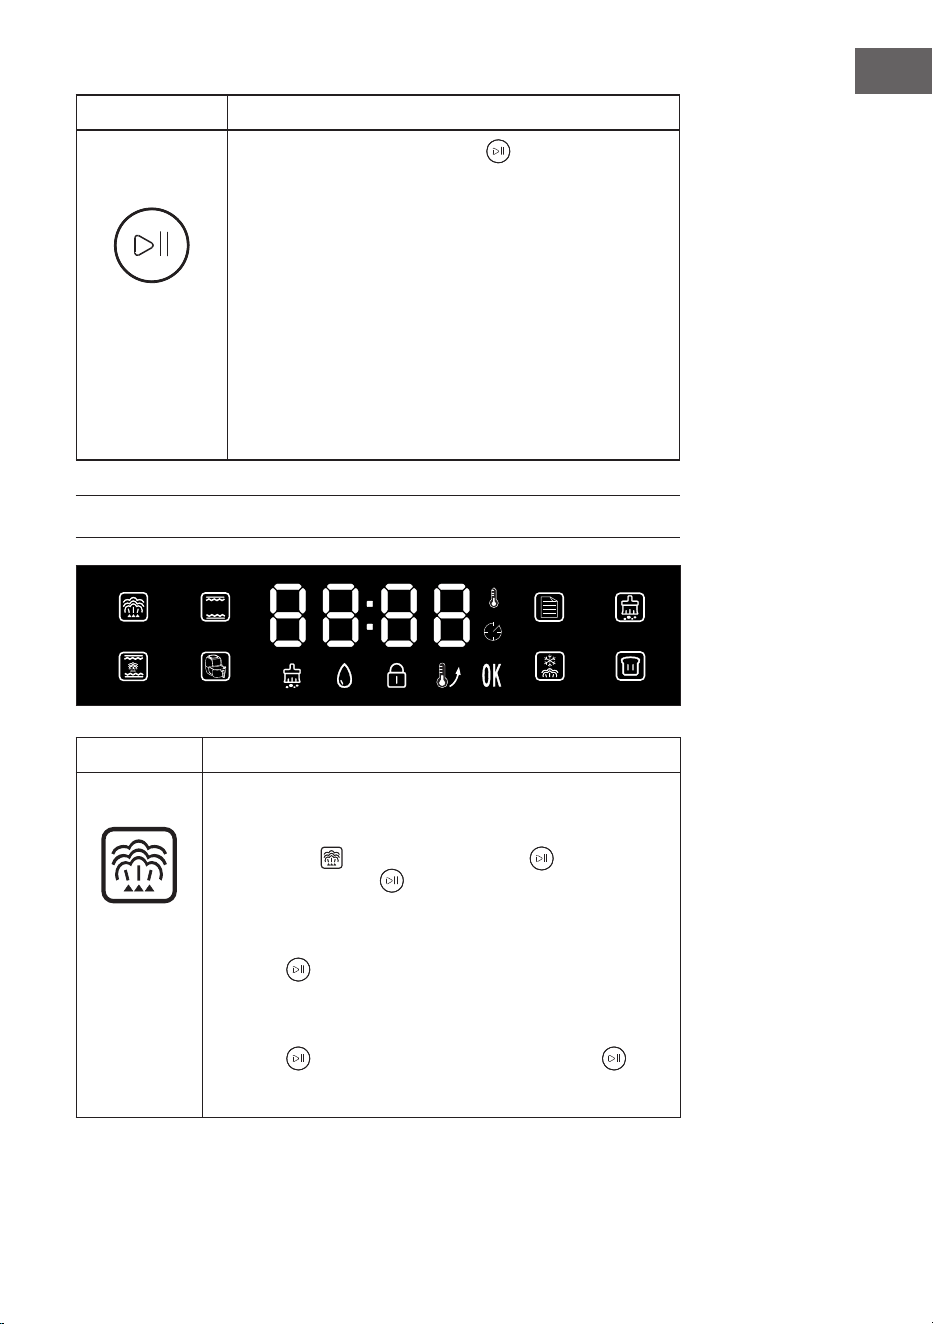
111
NL
Toetsen Functiebeschrijving
Start/ Pauze
(knop)
• Druk op de [Start/Pauze knop] om het apparaat te
starten of te pauzeren.
• Draai de [Start/Pauze knop] om één van de volgende
programma's te selecteren: 'Stomen', 'Grillen', 'Grillen &
Stomen', 'Luchtfrituren', 'Menu', 'Reiniging', 'Ontdooien' of
'Fermenteren'.
• Draai de [Start/Pauze knop] om de tijd en de temperatuur
in de verschillende programma's en functies in te stellen.
• Wanneer de [Start/Pauze knop] knippert kan door
drukken of draaien aan de draaiknop de instelling van het
gekozen programma of de functie worden bevestigd of
aangepast.
• De [Start/Pauze knop] brandt wanneer het apparaat in
gebruik is.
WEERGAVE DISPLAY EN PROGRAMMA'S
Programma's Functiebeschrijving
Stomen
• De primaire functie is 'Stomen'. De voorgeprogrammeerde tijd
is 30 minuten en de temperatuur is 100°C.
• Als u het programma 'Stomen' kiest knippert zowel de [Stomen
weergave] als de [Start/Pauze knop] . Druk op de
[Start/Pauze knop] om de programmakeuze te bevestigen
en in de instellingenmodus terecht te komen.
• Met de knop kan aansluitend een tijd tussen 1 minuut en 2
uren worden ingesteld. Druk vervolgens op de [Start/Pauze
knop] om de instelling van de tijd te bevestigen. U kunt
nu de temperatuurinstelling uitvoeren. Er kan een temperatuur
tussen 100°C en 110 °C worden ingesteld. Druk na het
instellen van de temperatuur ter bevestiging de [Start/Pauze
knop] . Als u opnieuw op de [Start/Pauze knop]
drukt begint het apparaat met zijn taak en de countdown met
aftellen.
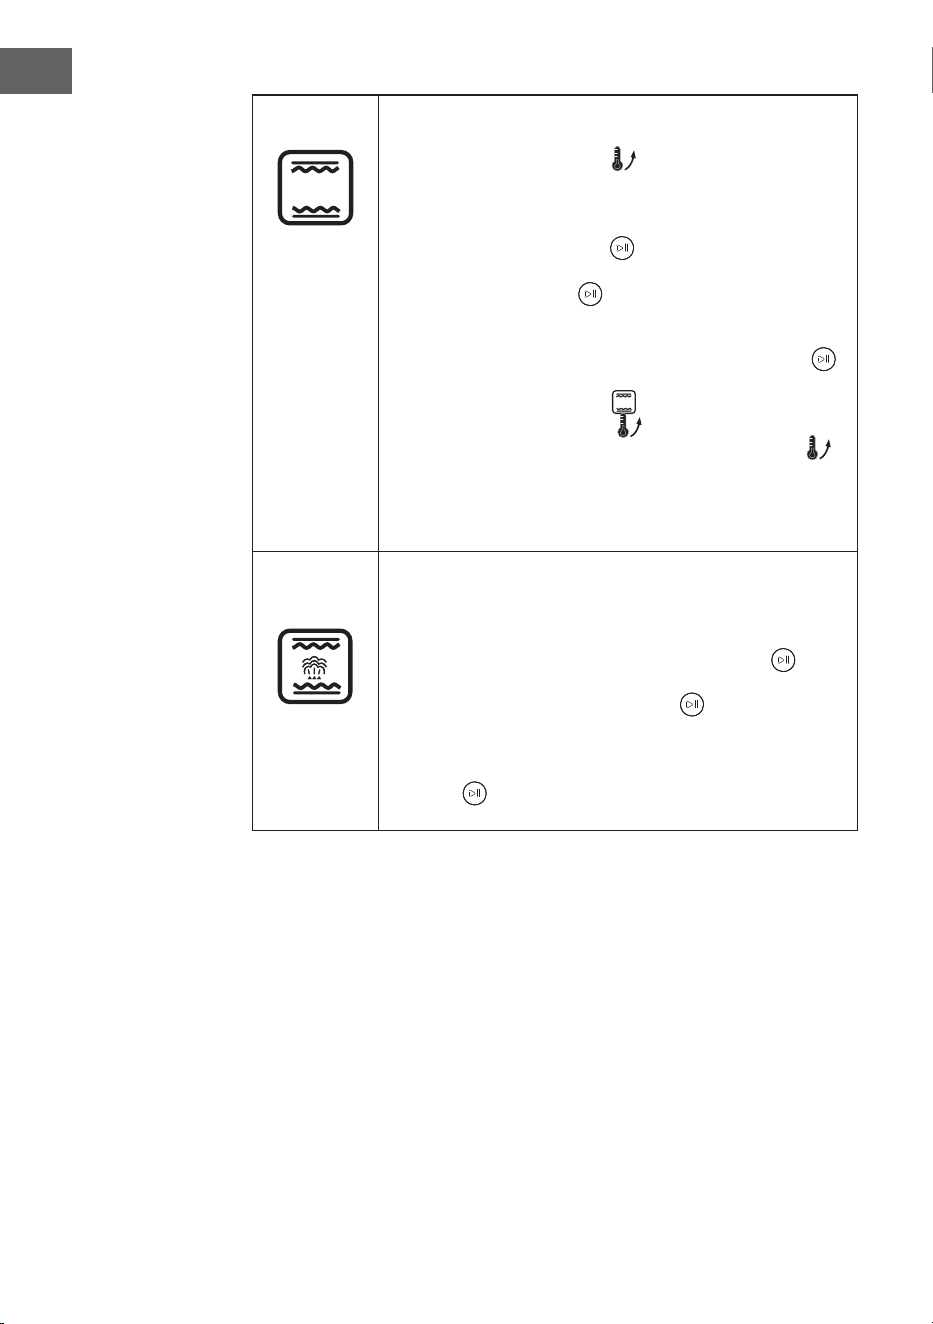
112
NL
Grillen
• In het programma 'Grillen' wordt gebruikt gemaakt van zowel
warmte bovenin als onderin. Een deel van het programma is
de functie 'Voorverwarmen' . Wacht tot het voorverwarmen
klaar is voordat u de levensmiddelen in de oven plaatst. De
voorgeprogrammeerde tijd is 30 minuten en de temperatuur
is 180 °C.
• Met de [Start/Pauze knop] kan een tijdsduur tussen
1 minuut en 2 uren worden ingesteld. Druk vervolgens op
de [Start/Pauze knop] om de instelling van de tijd te
bevestigen. U kunt nu de temperatuurinstelling uitvoeren.
Er kan een temperatuur tussen 100°C en 230 °C worden
ingesteld. Druk ter bevestiging op de [Start/Pauze knop] .
Het apparaat gaat van start.
• Als het programma 'Grillen' gestart is licht de
[Voorverwarmen weergave] op. De oven wordt nu
voorverwarmd. Zodra het voorverwarmen beëindigd is,
dooft de [Voorverwarmen weergave] en piept het apparaat
10 keer om u eraan te herinneren dat u de levensmiddelen in
de oven kunt zetten. Zodra het voorverwarmen klaar is gaat
de grillfunctie automatisch van start.
Grillen &
Stomen
• De primaire functie van dit programma is de grillfunctie.
Aanvullend op de grillfunctie geeft de oven wat stoom af.
Zo worden de levensmiddelen sneller gaar zonder uit te
drogen. De voorgeprogrammeerde tijd is 30 minuten en de
temperatuur is 180 °C. Met de [Start/Pauze knop] kan
een tijdsduur tussen 1 minuut en 2 uren worden ingesteld. Druk
vervolgens op de [Start/Pauze knop] om de instelling
van de tijd te bevestigen. U kunt nu de temperatuurinstelling
uitvoeren. Er kan een temperatuur tussen 120°C en 230 °C
worden ingesteld. Druk ter bevestiging op de [Start/Pauze
knop] . Het apparaat gaat van start.
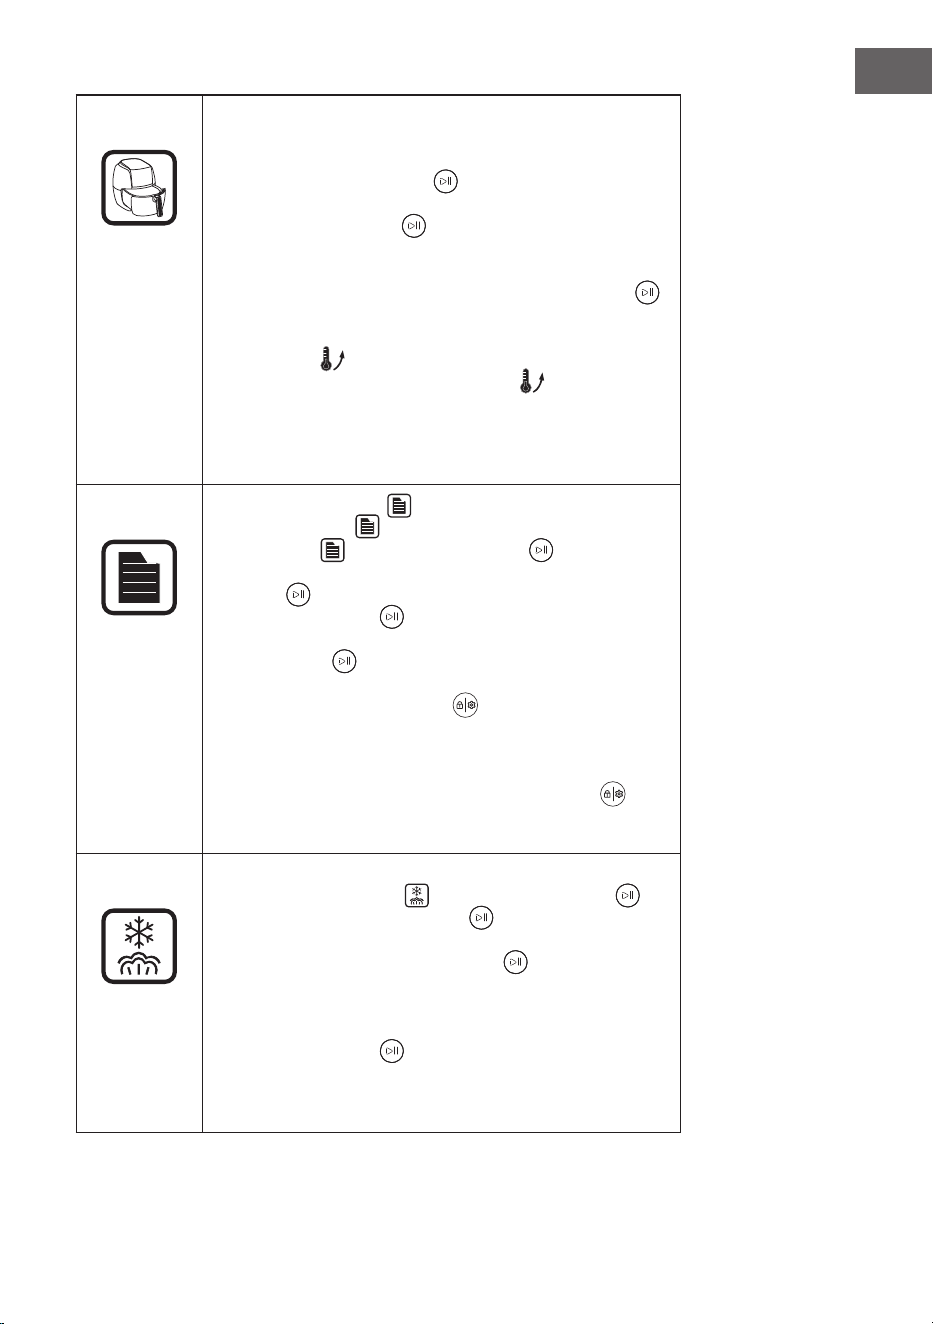
113
NL
Luchtfrituren
• Bij de luchtfrituurfunctie werkt de achterste verwarming met
circulerende lucht. De voorgeprogrammeerde tijd is 30
minuten en de temperatuur is 180 °C.
• Met de [Start/Pauze knop] kan een tijdsduur tussen
1 minuut en 2 uren worden ingesteld. Druk vervolgens op
de [Start/Pauze knop] om de instelling van de tijd te
bevestigen. U kunt nu de temperatuurinstelling uitvoeren.
Er kan een temperatuur tussen 100°C en 230 °C worden
ingesteld. Druk ter bevestiging op de [Start/Pauze knop] .
Het apparaat gaat van start.
• Zodra het apparaat van start gaat licht de [Voorverwarmen
weergave] op. De oven wordt nu voorverwarmd.
Zodra het voorverwarmen beëindigd is, dooft de
[Voorverwarmen weergave] en piept het apparaat 10 keer
om u eraan te herinneren dat u de levensmiddelen in de oven
kunt zetten. Zodra het voorverwarmen afgelopen is, begint
automatisch de countdown van de luchtfrituurfunctie.
Menu
• Met de [Menu toets] kunt u uit 31 recepten kiezen. Als
de [Menu toets] wordt ingedrukt knipperen de [Menu
weergave] en de [Start/Pauze knop] tegelijkertijd.
Op het leddisplay verschijnt 'F-00'. Druk op de [Start/Pauze
knop] om in het menu terecht te komen. Door aan de
[Start/Pauze knop] te draaien worden de recepten na
elkaar weergegeven (F-01, F-02, … F-31). Druk op de [Start/
Pauze knop] om een recept te kiezen.
• Als u een recept gekozen heeft, licht na de start de
[Instellingen/ Kinderslot toets] op. Met deze toets kan
de gaartijd worden geprogrammeerd in overeenstemming
met de hoeveelheid levensmiddelen. Voor een recept kan
de tijd tijdens het gebruik maar eenmaal worden ingesteld.
Aansluitend dooft de [Instellingen/ Kinderslot toets]
en kan de tijd niet nogmaals worden aangepast, tot het
gaarproces van het geselecteerde recept afgelopen is.
Ontdooien
• Als u de functie 'Ontdooien' kiest knippert zowel de
[Ontdooien weergave] als de [Start/Pauze knop]
. Druk op de [Start/Pauze knop] en draai die om
een tijdsduur tussen 5 minuten en 2 uur in te stellen. Druk
vervolgens op de [Start/Pauze knop] om de instelling
van de tijd te bevestigen. U kunt nu de temperatuurinstelling
uitvoeren. Er kan een temperatuur tussen 50°C en 60 °C
worden ingesteld. Druk vervolgens ter bevestiging op de
[Start/Pauze knop] . Het apparaat gaat van start met de
countdown.
• De voorgeprogrammeerde tijd is 20 minuten en de
temperatuur is 55 °C.
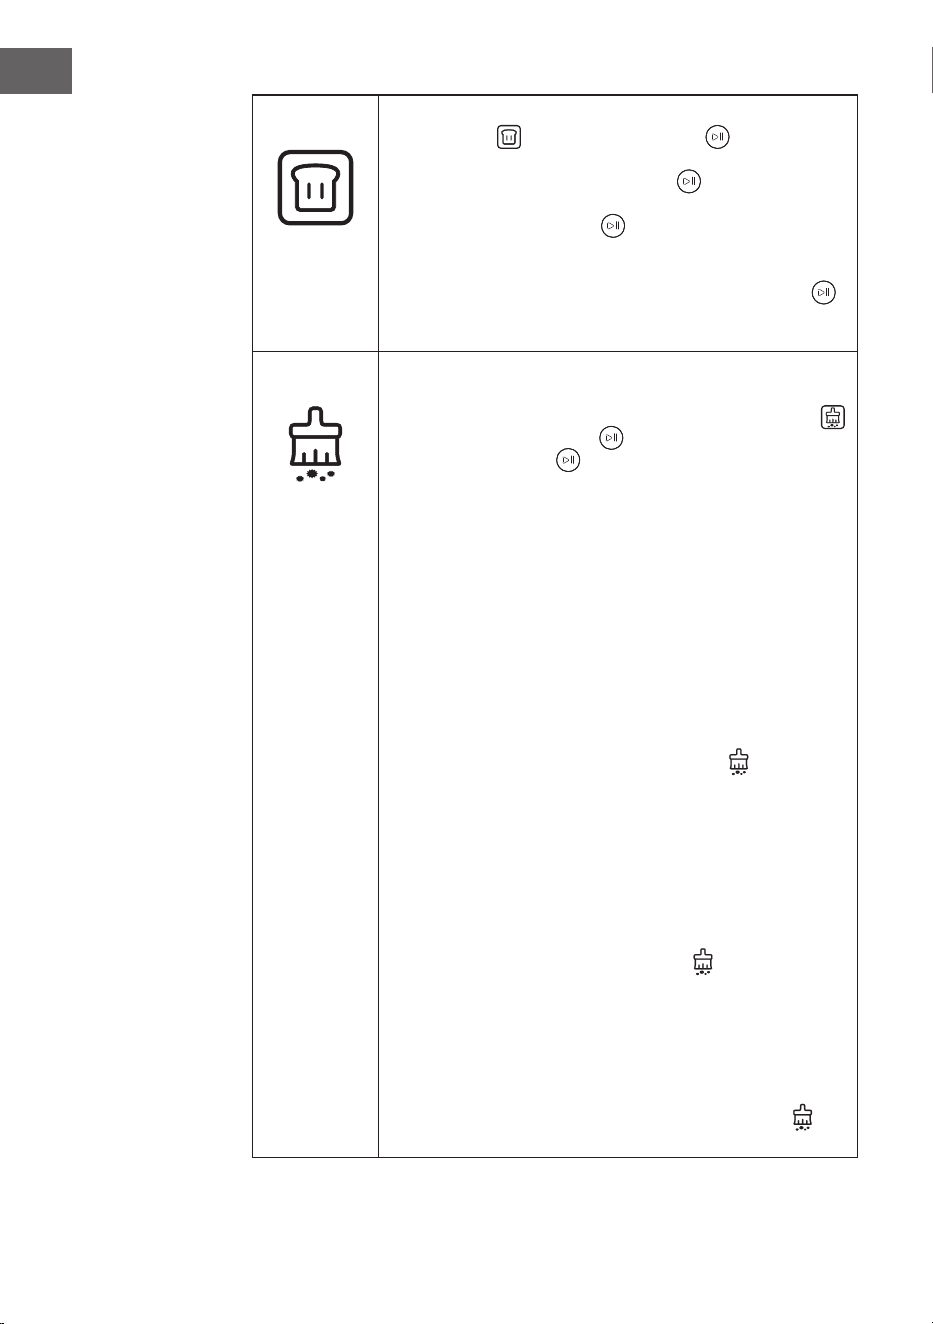
114
NL
Fermenteren
• Als u de 'Fermenteren' functie kiest, lichten de [Fermenteren
weergave] en de [Start/Pauze knop] op. De
voorgeprogrammeerde tijd is 40 minuten en de temperatuur
is 40 °C. Met de [Start/Pauze knop] kan een tijdsduur
tussen 5 minuten en 2 uren worden ingesteld. Druk vervolgens
op de [Start/Pauze knop] om de instelling van de tijd
te bevestigen. U kunt nu de temperatuurinstelling uitvoeren.
Er kan een temperatuur tussen 30°C en 50 °C worden
ingesteld. Druk ter bevestiging op de [Start/Pauze knop] .
Het apparaat gaat van start.
Reiniging
• De reinigingsfunctie kan na gebruik van de oven worden
gebruikt voor het verwijderen van kalk. Als u het programma
'Reiniging' heeft gekozen, lichten de [Reiniging weergave]
en de [Start/Pauze knop] op. Druk ter bevestiging op de
[Start/Pauze knop] en kies de gewenste reinigingsmodus
'C1' of 'C2'.
C-1: Verwijdering van kalk van de stoomgenerator in 50
minuten
C-2: 25 minuten en 100 °C voor het reinigen van de oven of
voor het desinfecteren van apparaten.
Kalkverwijdering in reinigingsmodus C-1:
1. Wanneer de totale bedrijfsduur van de verwarmingsbuis van
de stomer de 100 uur heeft bereikt herinnert het apparaat
u eraan dat de kalk van de stomer moet worden verwijderd
(de ontkalkingsfunctie kan op elk moment automatisch door u
worden opgestart). De [Reiniging weergave] knippert.
2. Bereidt de ontkalkingsoplossing voor met een verhouding
van 1:8 (ontkalkingsmiddel : water). Schudt de oplossing
na zorgvuldig mengen in de watertank. Het niveau van de
ontkalkingsoplossing moet boven de minimale markering van
de watertank liggen.
3. Wanneer er nog 20 minuten over zijn herinnert het apparaat
u eraan de watertank uit het apparaat te halen en de
daarin resterende ontkalkingsoplossing te vervangen door
schoon water. De [Reiniging weergave] knippert en het
apparaat piept meerdere malen. Zodra u de watertank weer
teruggeplaatst heeft gaat de reiniging verder. Wanneer er
nog 10 minuten over zijn herinnert het apparaat u eraan de
watertank uit het apparaat te halen en het aanwezige water
te vervangen door schoon water. Zodra u de watertank weer
teruggeplaatst heeft gaat de reiniging verder. Wanneer de
ontkalking afgesloten is, licht de [Reiniging weergave]
permanent op.
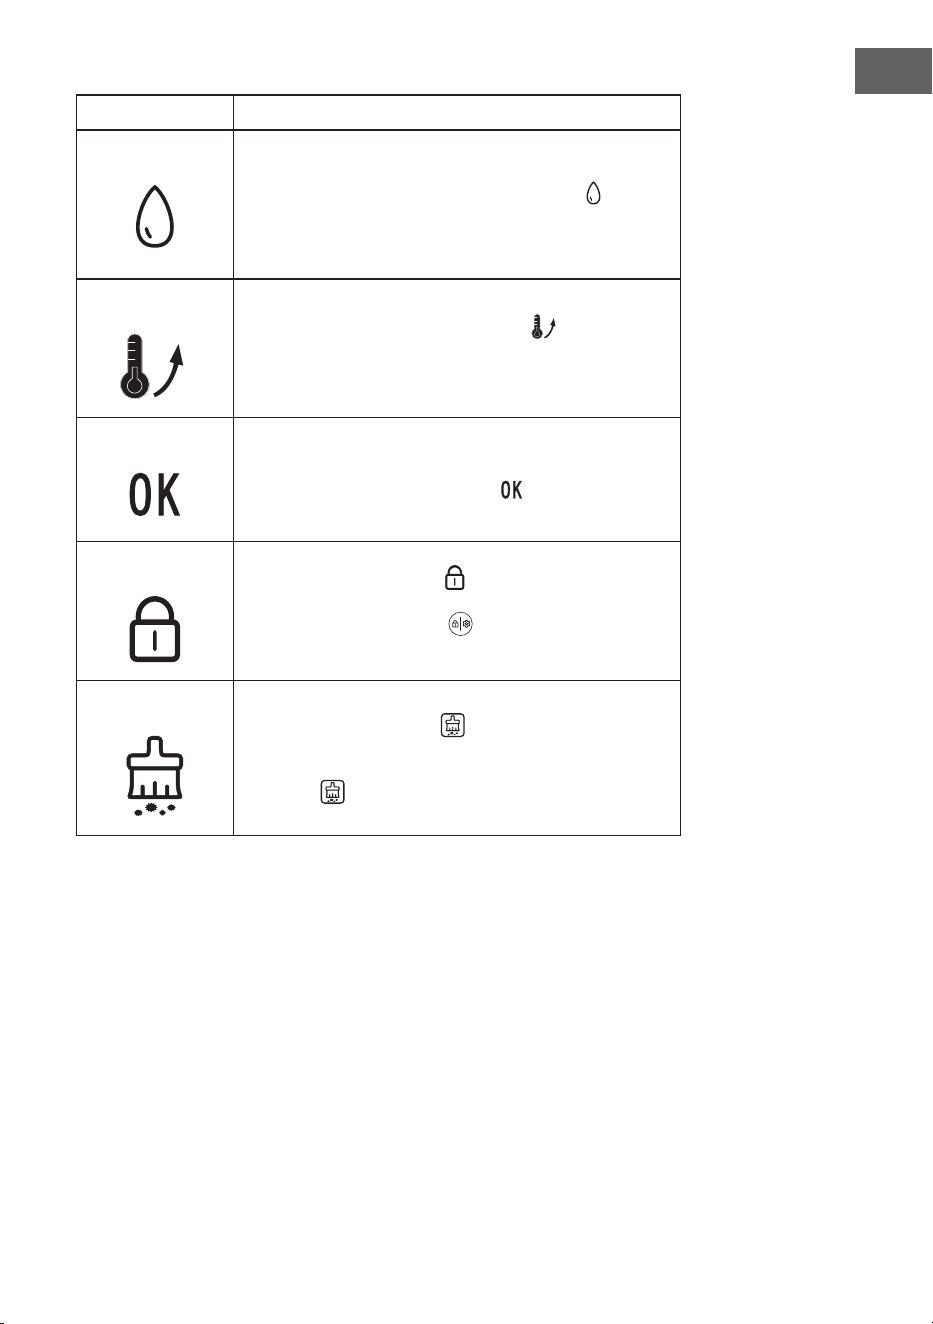
115
NL
Weergave display Functiebeschrijving
Weinig water
Als het apparaat in een willekeurig programma wordt gestart
en er weinig of geen water in de watertank aanwezig is, stopt
de oven en knippert de [Weinig water weergave]
.
. Het
apparaat piept 10 keer. Alle toetsen zijn nu gedeactiveerd.
Pas wanneer u de watertank met water gevuld heeft gaat de
oven weer aan de slag en wordt het gaarproces voortgezet.
.
Voorverwarmen
Wanneer de [Voorverwarmen weergave] oplicht wordt
de oven voorverwarmd. Zodra het proces beëindigd is dooft
de weergave.
Einde programma
Als een programma afgesloten is, wordt op het beeldscherm
'END' weergegeven en de weergave licht op.
Kinderslot
Als de [Kinderslot weergave] oplicht, betekent dat, dat
het kinderslot actief is. Druk gedurende 3seconden op de
[Instellingen/Kinderslot toets] om het kinderslot uit te
schakelen. De weergave dooft.
Reiniging
Als de [Reiniging weergave] continue verlicht is, betekent
dat, dat het apparaat aan het ontkalken is. Wanneer
het ontkalkingsproces afgesloten is, dooft de [Reiniging
weergave] .
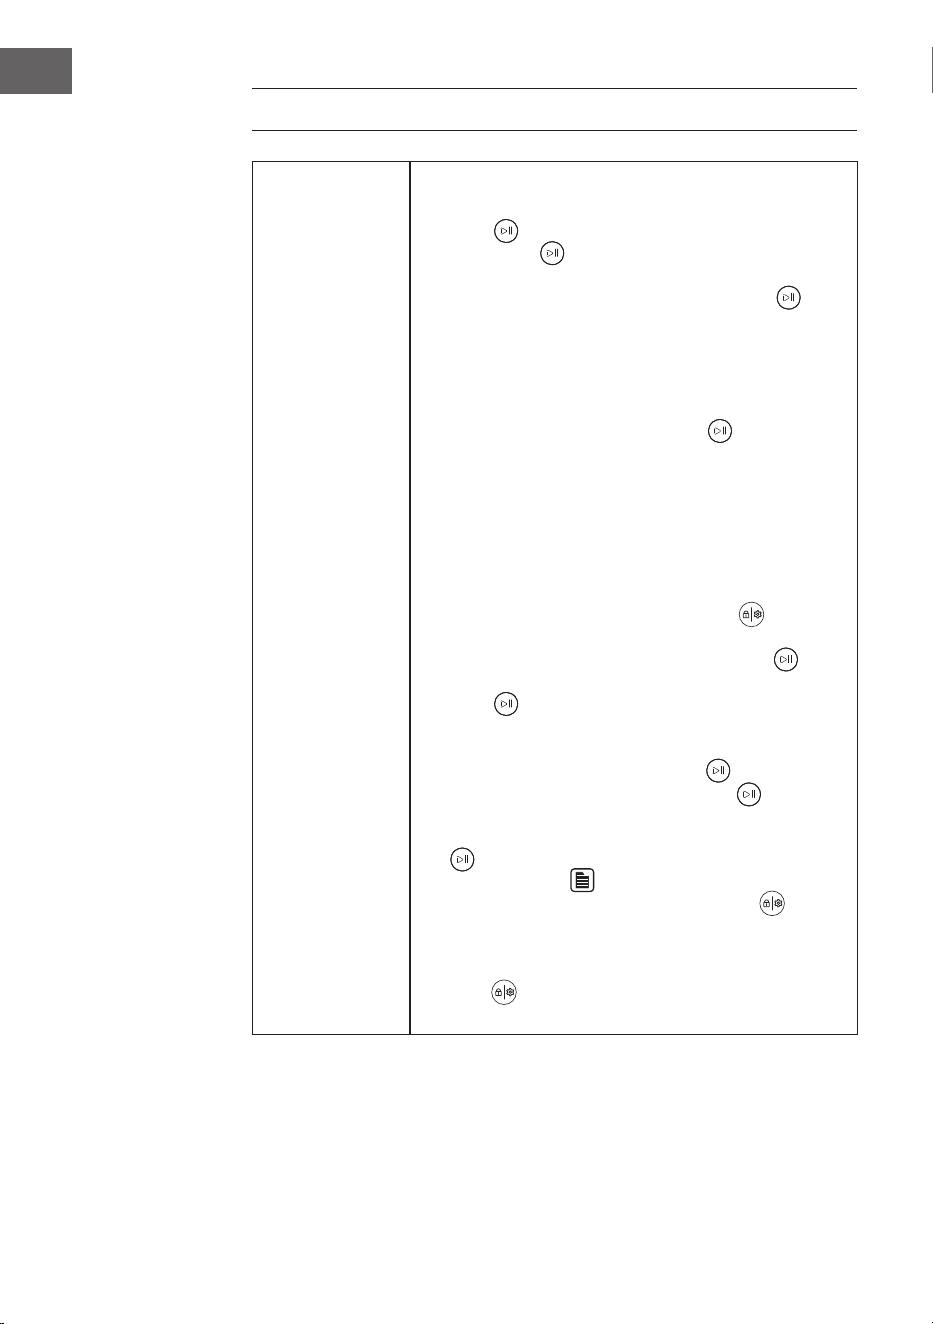
116
NL
OVERIGE FUNCTIES
Gaarproces 1. Pauze
• Als het apparaat in gebruik is en u de [Start/Pauze
knop] indrukt, knipperen het tijd-lampje en de [Start/
Pauze knop] . Het gaarproces wordt onderbroken,
de countdown wordt stopgezet en het display laat de
bedrijfsstatus zien. Als u de [Start/Pauze knop]
opnieuw indrukt wordt het gaarproces voortgezet tot de
countdown afgelopen is.
• Als u de ovendeur tijdens het gaarproces opent wordt
het gaarproces onderbroken, de countdown wordt
stopgezet en het display laat de bedrijfsstatus zien. Het
tijd-lampje en de [Start/Pauze knop] knipperen. Als u
de ovendeur weer sluit wordt het gaarproces voortgezet
totdat de countdown afgelopen is.
2. Instellen van tijd en temperatuur
Tijdens het gaarproces kunt u de tijd en temperatuur als volgt
aanpassen:
• Als u op de [Instellingen/Kinderslot toets] drukt
knipperen de cijfers van de minutenweergave. Stel
de minuten in door aan de [Start/Pauze knop] te
draaien en bevestig uw invoer door op de [Start/Pauze
knop] te drukken. (Let op! Het is niet mogelijk de uren
in te stellen.)
• Na het instellen van de minuten kunt u de temperatuur
instellen door de [Start/Pauze knop] te draaien. Druk
ter bevestiging op de [Start/Pauze knop] . Als een
temperatuuraanpassing niet nodig is, kunt u ook direct na
het instellen van de minuten op de [Start/Pauze knop]
drukken.
• Als u in het menu een recept gekozen heeft, licht
na de start de [Instellingen/ Kinderslot toets] op.
Met deze toets kunt u de gaartijd aanpassen aan de
hoeveelheid levensmiddelen. Dit is maar een keer per
recept mogelijk, dan dooft de [Instellingen/Kinderslot
toets] . De gaartijd opnieuw aanpassen is niet
mogelijk.

117
NL
Interne verlichting
• Als de oven opgestart wordt blijft de interne verlichting
3 minuten lang ingeschakeld en gaat dan automatisch
weer uit.
• Als de ovendeur geopend wordt gaat de interne
verlichting ook aan en gaat vervolgens na 3 minuten
automatisch weer uit. Als u de ovendeur sluit gaat de
interne verlichting ook na 3 minuten weer uit.
• Als u in de stand-by modus of tijdens het gebruik de knop
eenmaal draait, gaat de interne verlichting 3 minuten aan
en gaat vervolgens automatisch weer uit.
Deur openen en
sluiten
• Als u tijdens het gebruik de ovendeur opent, stopt het
apparaat en pauzeert. Zodra u de deur weer sluit gaat
het apparaat automatisch weer verder.
Einde gaarproces
• Als de oven het gaarproces heeft beëindigd, piept het
apparaat 10 keer. Op het beeldscherm wordt 'END'
weergegeven. Dit betekent dat het gaarproces of recept
beëindigd is.
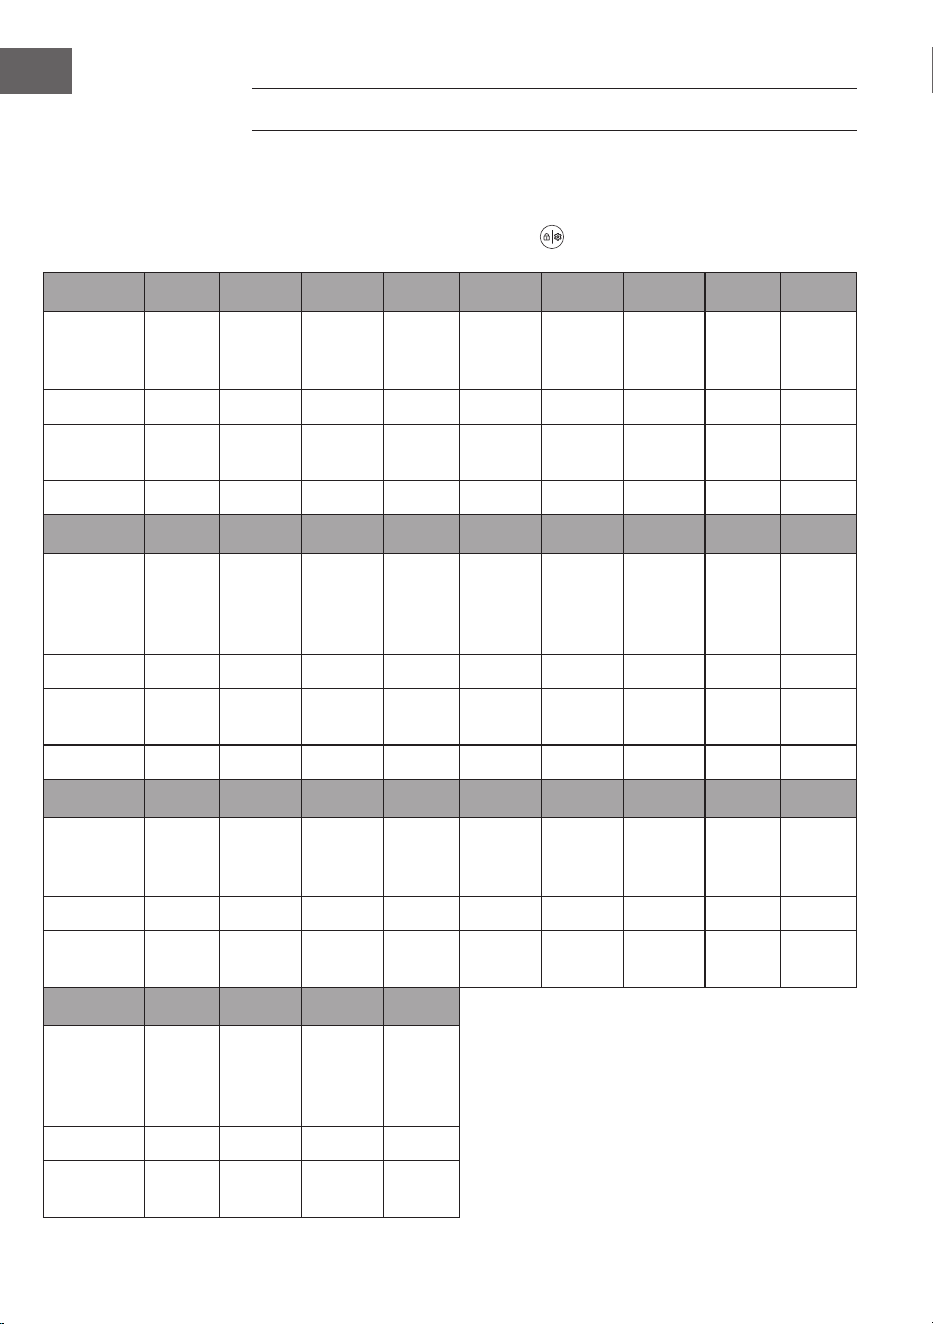
118
NL
MENU (RECEPTEN)
De in de tabel genoemde instellingen voor de individuele levensmiddelen dienen
alleen ter oriëntering. Als u meer levensmiddelen wilt bereiden of er levensmiddelen op
meerdere niveaus worden geplaatst, moet de gaartijd aangepast worden. Pas de tijd
aan met de [Instellingen/Kinderslot toets] .
Code F-01 F-02 F-03 F-04 F-05 F-06 F-07 F-08 F-09
Levensmid-
del
Sto-
men -
Groente
Stomen -
Rijst
Stomen
- Vis
Stomen
- Gar-
nalen
Stomen -
Kreeftjes
Stomen -
Eieren
Stomen -
Kip
Stomen
- Papa-
ja
Roos-
teren
- Kip
Tijd (min) 16 50 20 15 30 18 30 35 45
Temperatuur
(°C)
100 100 100 100 100 100 100 100 230
Gewicht (g) 600 200 600 500 800 300 800 400 1000
Code F-10 F - 11 F -12 F -13 F -14 F -15 F -16 F -17 F -18
Levensmid-
del
Roos-
teren -
Biefstuk
Roos-
teren -
Schaap
Roos-
teren
- Spare-
ribs
Roos-
teren
- Zalm
Roosteren
- Kippen-
bouten
Roosteren
- Kippen-
poten
Roos-
teren -
Makreel
Roos-
teren
- Friet
Roos-
teren
- Gar-
nalen
Tijd (min) 13 35 20 22 26 23 20 18 15
Temperatuur
(°C)
230 200 210 210 210 210 220 220 18 0
Gewicht (g) 600 600 500 400 750 500 600 500 400
Code F-19 F-20 F -21 F-22 F-23 F-24 F-25 F-26 F-27
Levensmid-
del
Roos-
teren -
Worst
Rooste-
ren -
Spek
Rooste-
ren -
Pizza
Mini
pizza
Stok-
brood
Tulband
Yoghurt -
Kwarkt-
aart
Blader-
deeg
Koekjes
Tijd (min) 13 11 22 18 16 50 60 32 14
Temperatuur
(°C)
200 200 180 180 18 0 15 0 150 18 0 18 0
Code F-28 F-29 F-30 F -31
Levensmid-
del
Eierkoe-
ken
Geroos-
terde
amande-
len
Geroos-
terde
walnoten
Yoghurt
maken
Tijd (min) 22 10 12 480
Temperatuur
(°C)
18 0 14 0 160 45

119
NL
REINIGING EN ONDERHOUD
• Voordat u met het reinigen begint schakelt u het apparaat uit en neemt u de stekker
uit het stopcontact.
• Reinig het oppervlak niet met metalen werktuigen of schuurmiddelen, deze kunnen
het apparaat beschadigen.
• Reinig de interne ruimte regelmatig. Verwijder de levensmiddelen of vetspetters aan
de binnenkant van de oven met een vochtige doek. Bij hardnekkige vervuiling kan
een zacht sopje worden gebruikt.
• Het is aan te bevelen om de watertank met drinkwater of gedestilleerd water te
vullen. Leidingwater veroorzaakt na langere tijd kalkresten.
• Controleer ook regelmatig de watertank. Haal hem er horizontaal uit. Maak
hem schoon en droog hem met een zachte doek af. Zet de watertank na het
schoonmaken terug in de oorspronkelijke positie.
• Verwijder na aoop van het gaarproces het resterende water in de tank.
• Reinig het afdichtingsoppervlak van de ovendeur regelmatig met een zachte, droge
doek.
• Neem de stekker uit het stopcontact, reinig het hele apparaat, leeg de watertank
en plaats het apparaat op een schone, droge plaats wanneer u het langere tijd niet
gebruikt.
• Bij een foutmelding moet het apparaat door de fabrikant, diens klantenservice of
door een gelijkwaardig gekwaliceerd persoon worden gerepareerd. Probeer
nooit zelf reparaties uit te voeren.
• Gebruik voor het reinigen nooit agressieve reinigingsmiddelen of scherpe metalen
schrapers omdat het glas hierdoor kan beschadigen.
• Neem altijd de stekker uit het stopcontact voordat u het apparaat schoonmaakt of
de gloeilamp vervangt.
• Gebruik voor het reinigen geen stoomreiniger.
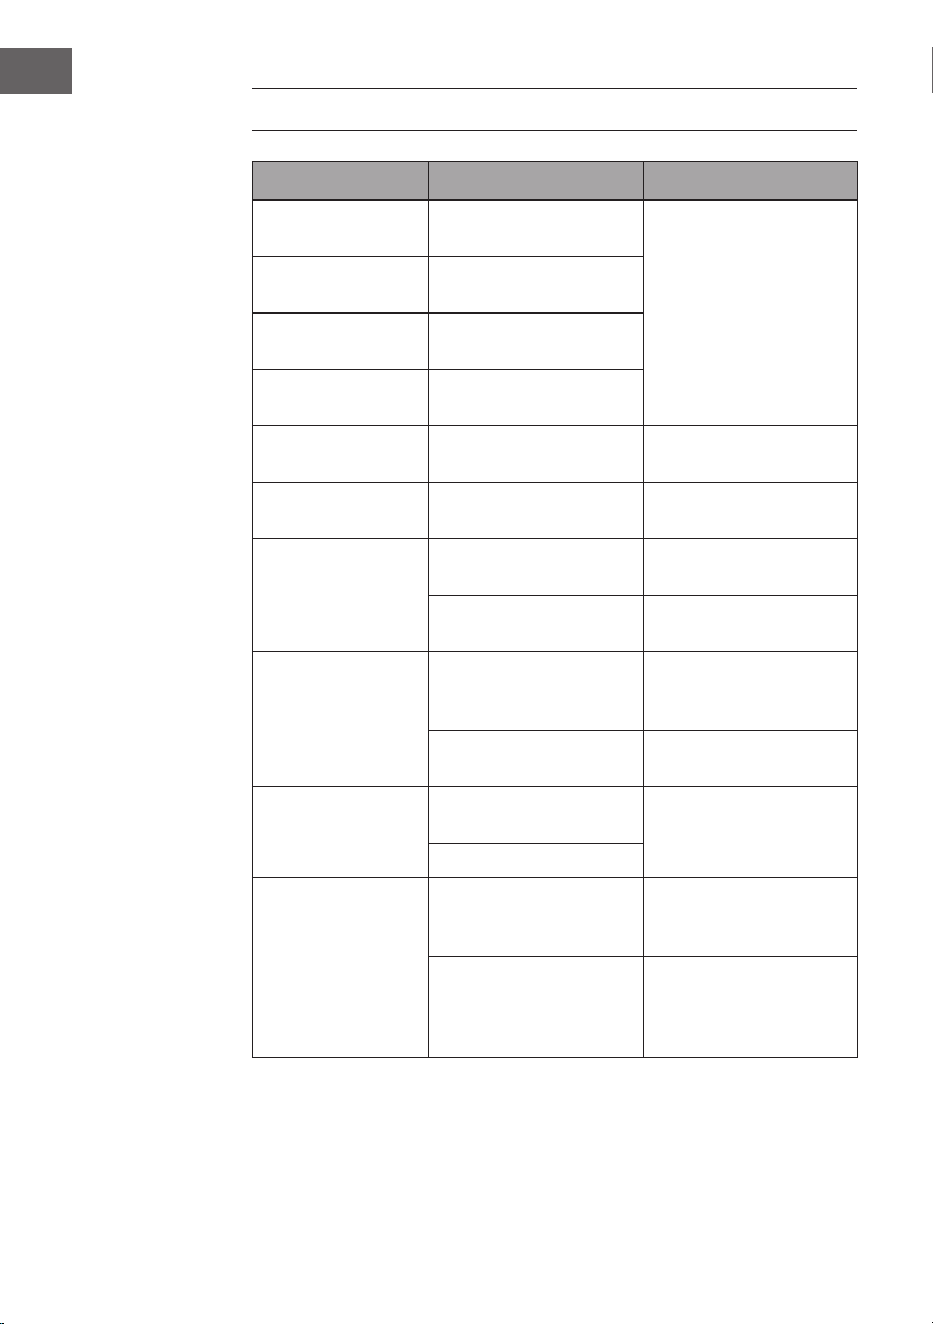
120
NL
PROBLEEMOPLOSSINGEN
Probleem Mogelijke oorzaak Mogelijke oplossing
E01
Fout van de bovenste
hittesensor
Schakel het apparaat
uit, open de deur en laat
het apparaat 10 minuten
afkoelen. Zet het apparaat
nu opnieuw aan of
neem contact op met de
klantenservice.
E02
Kortsluiting van de bovenste
hittesensor.
E03
Fout van de onderste
hittesensor.
E04
Kortsluiting van de onderste
hittesensor.
E05
Fout van de
verdampingssensor.
Neem contact op met de
klantenservice.
E06
Kortsluiting van de
verdampingssensor.
Neem contact op met de
klantenservice.
Op het beeldscherm
wordt niets
weergegeven.
Controleer of de stekker
goed in het stopcontact zit.
Steek de stekker in het
stopcontact.
Het beeldscherm is defect.
Neem contact op met de
klantenservice.
De ovenlamp brandt
niet.
De lamp is defect.
Vervang de lamp of
neem contact op met de
klantenservice.
De tting is defect.
Neem contact op met de
klantenservice.
De ventilator doet het
niet.
De contactpunten zijn
beschadigd.
Neem contact op met de
klantenservice.
De ventilator is defect.
De functietoetsen
reageren niet.
Het controlepaneel is kapot
of de toetsenblokkade is
actief.
Schakel de toetsenblokkade
uit of neem contact op met
de klantenservice.
De tijdweergave knippert,
alle andere toetsen
reageren niet.
Zorg ervoor dat er
voldoende water in de
watertank zit en dat de tank
correct in het apparaat zit.
121
NL
Probleem Mogelijke oorzaak Mogelijke oplossing
Geen stoom
De watertoevoer is
geblokkeerd.
Neem contact op met de
klantenservice.
De verwarming van de
verdamper is defect.
De watertoevoer is defect.
Het apparaat
functioneert niet.
De ovendeur is niet goed
gesloten.
Sluit de ovendeur.
De deurklink is stuk.
Neem contact op met de
klantenservice.
Stoom ontsnapt uit de
oven.
De ovendeur is niet goed
gesloten.
Sluit de deur.
De dichting van de
ovendeur zit niet goed of is
beschadigd.
Vervang de dichting of
neem contact op met de
klantenservice.
Als de druk binnenin de
oven te hoog is, produceert
het apparaat stoom.
Dit is normaal.

122
NL
INSTRUCTIES VOOR AFVOER
Wanneer in uw land een wettelijke regeling geldt voor het
afvoeren van elektrische en elektronische apparaten, wijst dit
symbool, op het product zelf of op de verpakking, erop dat
het betreffende product niet met het huisvuil afgevoerd mag
worden. In plaats daarvan dient het naar een centraal depot
voor het recyclen van elektrische en elektronische apparaten
te worden gebracht Door het afval volgens de voorschriften
weg te gooien beschermt u het milieu en de gezondheid van
uw medemensen tegen negatieve consequenties. Informatie
over recycling en het wegdoen van dit product ontvangt u
van uw gemeente of van uw plaatselijke grondstoffen- en
afvaldienst.
FABRIKANT & IMPORTEUR (UK)
Fabrikant:
Chal-Tec GmbH, Wallstraße 16, 10179 Berlijn, Duitsland.
Importeur voor Groot-Brittannië:
Berlin Brands Group UK Limited
PO Box 42
272 Kensington High Street
London, W8 6ND
United Kingdom