Technical Support and E-Warranty Certificate www.vevor.com/support
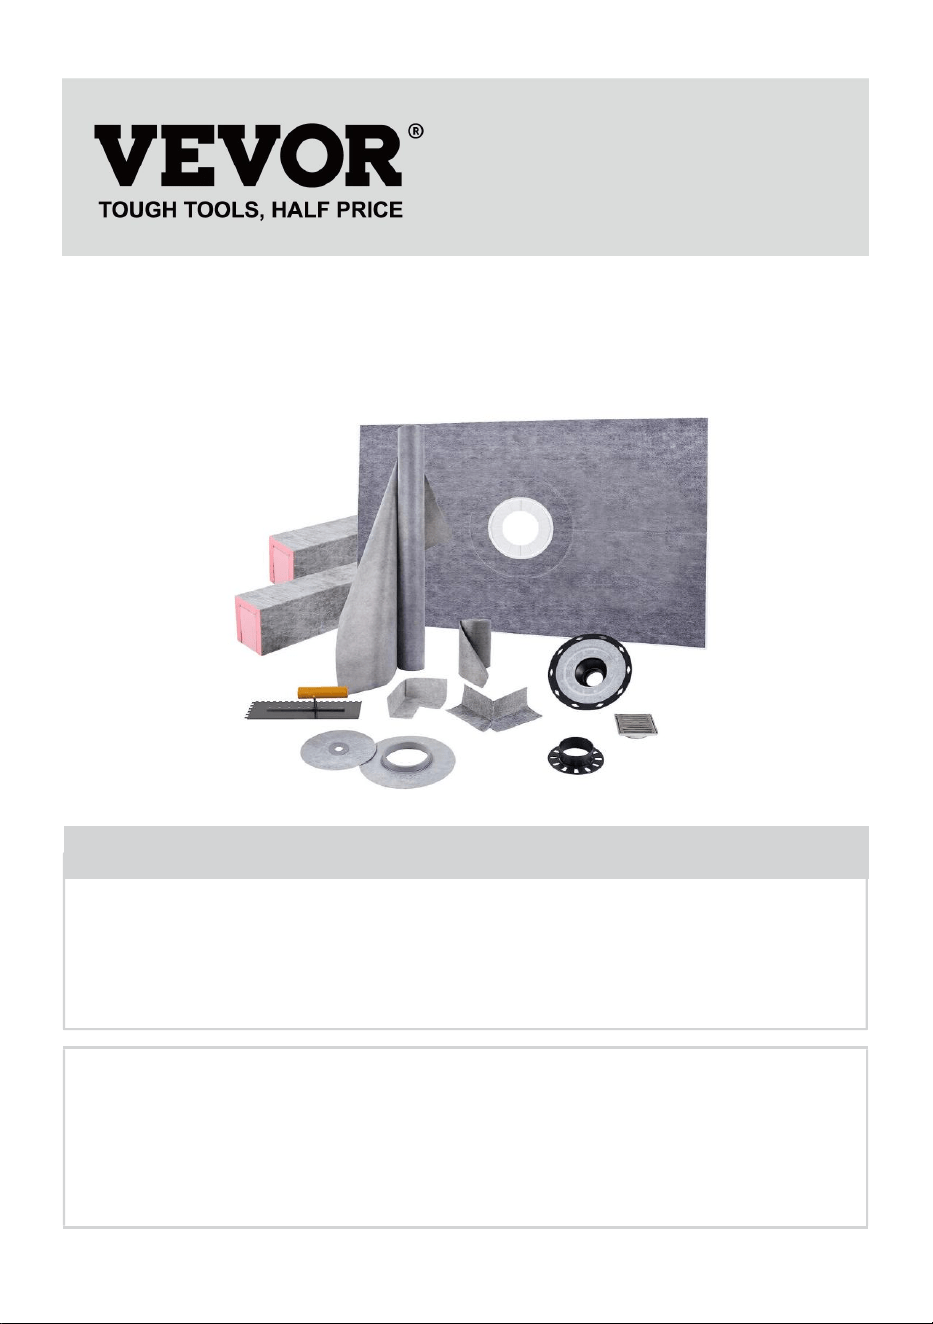
WATERPROOF SHOWER SUBSTRATE
MODEL:
JQ-3860PA/JQ-3860ZA/JQ-3860ZP/JQ3860PP
JQ-4848AJQ-4848P/JQ-4860A/JQ-4860P
JQ-4872A/JQ*4872P/JQ-7272A/JQ-7272P
We continue to be committed to provide you tools with competitive price.
"Save Half", "Half Price" or any other similar expressions used by us only represents an
estimate of savings you might benefit from buying certain tools with us compared to the major
top brands and dose not necessarily mean to cover all categories of tools offered by us. You
are kindly reminded to verify carefully when you are placing an order with us if you are
actually saving half in comparison with the top major brands.
- 1 -
MODEL:JQ-3860PA/JQ-3860ZA/JQ-3860ZP/JQ3860PP
JQ-4848AJQ-4848P/JQ-4860A/JQ-4860P
JQ-4872A/JQ*4872P/JQ-7272A/JQ-7272P
Have product questions? Need technical support? Please feel free to
contact us:
Technical Support and E-Warranty Certificate
www.vevor.com/support
NEED HELP? CONTACT US!
This is the original instruction, please read all manual instructions
carefully before operating. VEVOR reserves a clear interpretation of our
user manual. The appearance of the product shall be subject to the
product you received. Please forgive us that we won't inform you again if
there are any technology or software updates on our product.
WATERPROOF SHOWER
SUBSTRATE

- 2 -
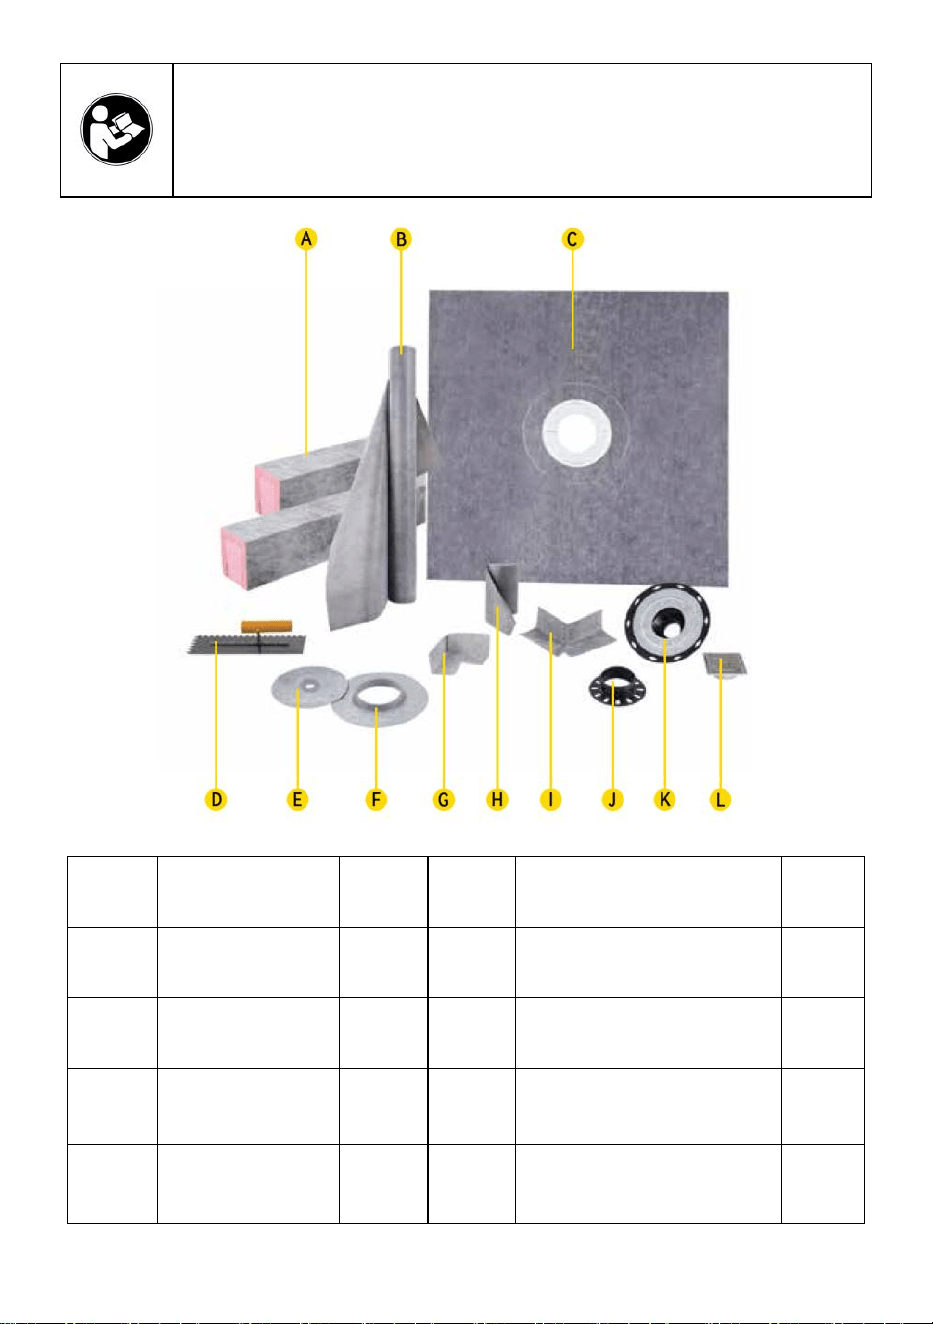
Warning-To reduce the risk of injury, user must read
instructions manual carefully.
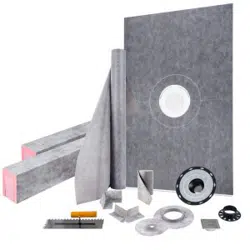
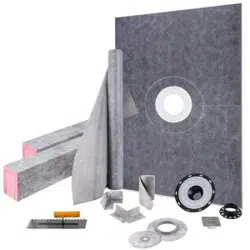
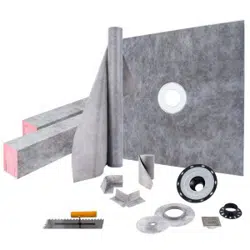
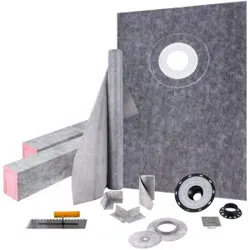
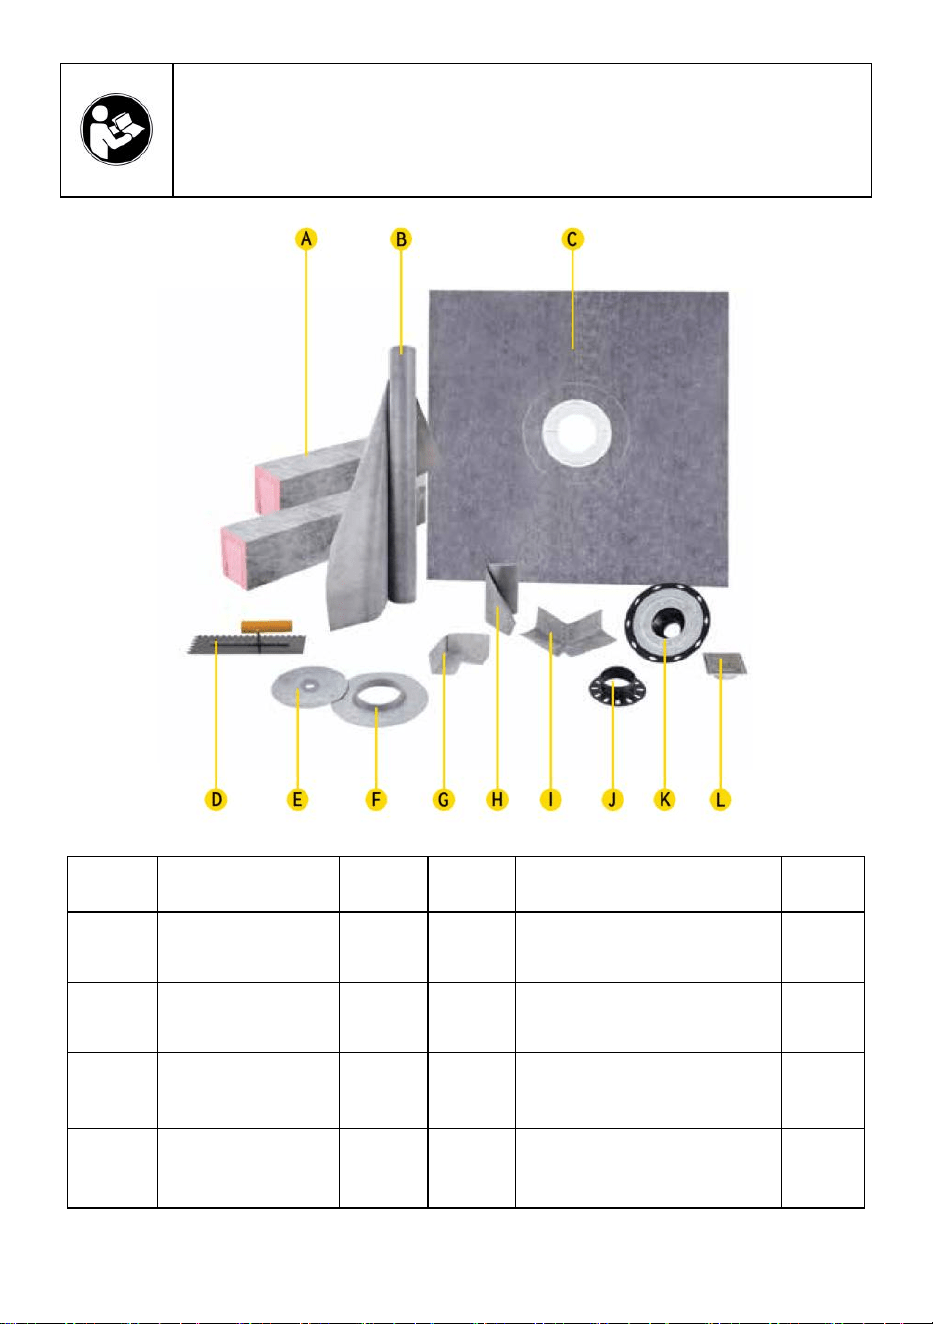
Code
Name
QTY.
Code
Name
QTY.
A
Shower Curb
2
G
Waterproofng Corners
1
4
B
Waterproofng
Membrane
1
H
Waterproofng Strip
1
C
Tray
1
I
Waterproofing
Corners 2
2
D
Trowel
1
J
Drain Adjustment
Ring
1

- 3 -
E
Mixing Valve
Seal
1
K
Bonding Flange
1
F
Pipe Seal
1
L
Drain Grate
1
◆The number of Waterproofng strips (H) of JQ-7272A and JQ-7272P are
2pcs.
Ceramic and stone tiles are durable, easy to maintain, and hygienic,
representing the ideal surface coverings, particularly in wet areas such as
showers and bathtub surrounds.
However, these coverings are not inherently waterproof. They must be
installed in conjunction with a waterproofing system that effectively
manages moisture to protect moisture-sensitive building materials and
control mold growth.
Model
Specification
(inch)
Colour
Flange
Material
Shower Tray
Hole
JQ-3860PA
38*60
Gray
ABS
Offset
JQ-3860ZA
38*60
ABS
Centre
JQ-3860ZP
38*60
PVC
Centre
JQ3860PP
38*60
PVC
Offset
JQ-4848A
48*48
ABS
Centre
JQ-4848P
48*48
PVC
Centre
JQ-4860A
48*60
ABS
Centre
JQ-4860P
48*60
PVC
Centre
JQ-4872A
48*72
ABS
Centre
JQ-4872P
48*72
PVC
Centre
JQ-7272A
72*72
ABS
Centre
JQ-7272P
72*72
PVC
Centre
- 4 -
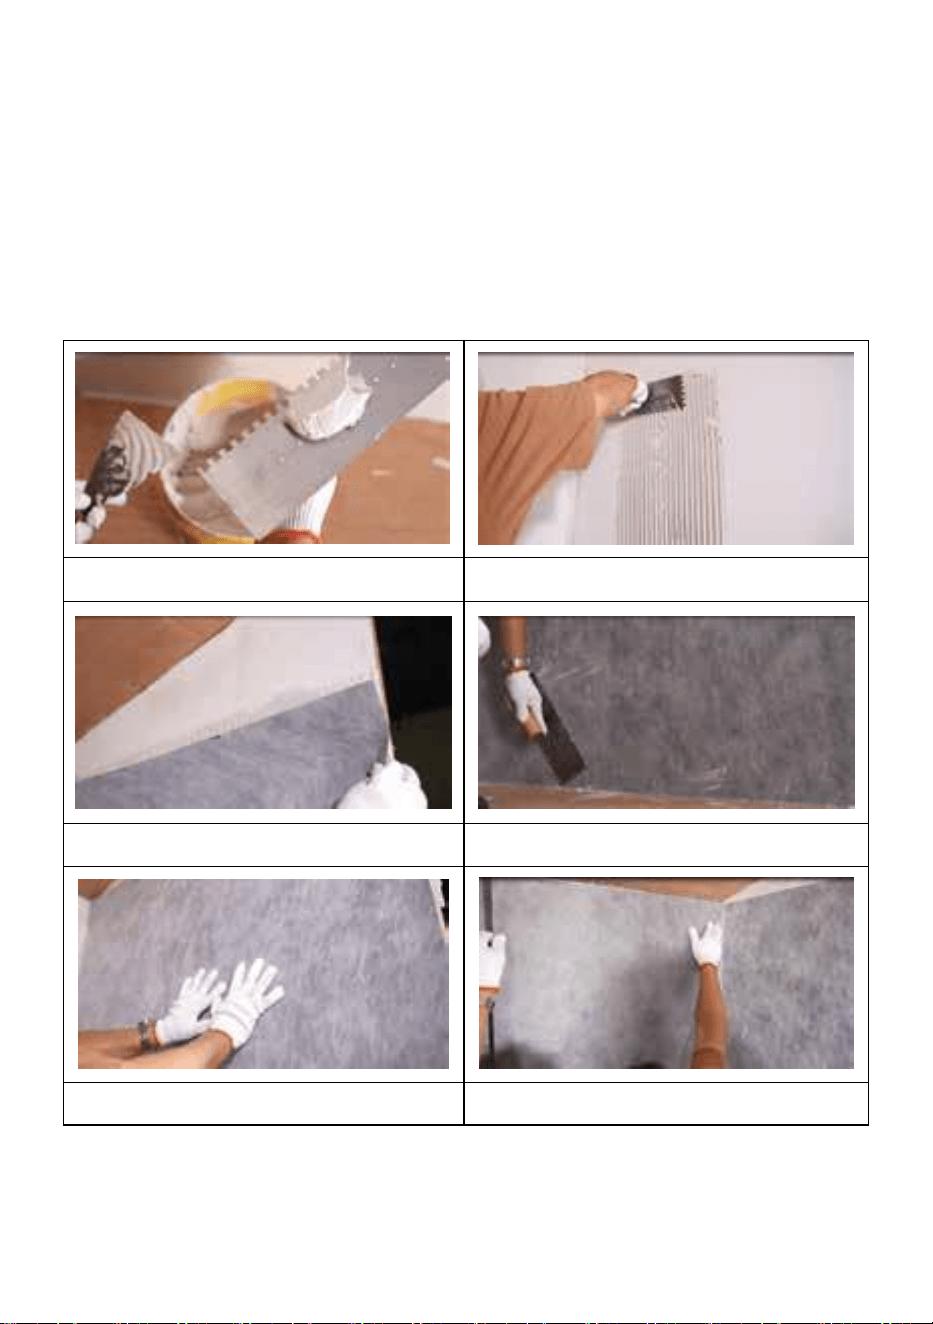
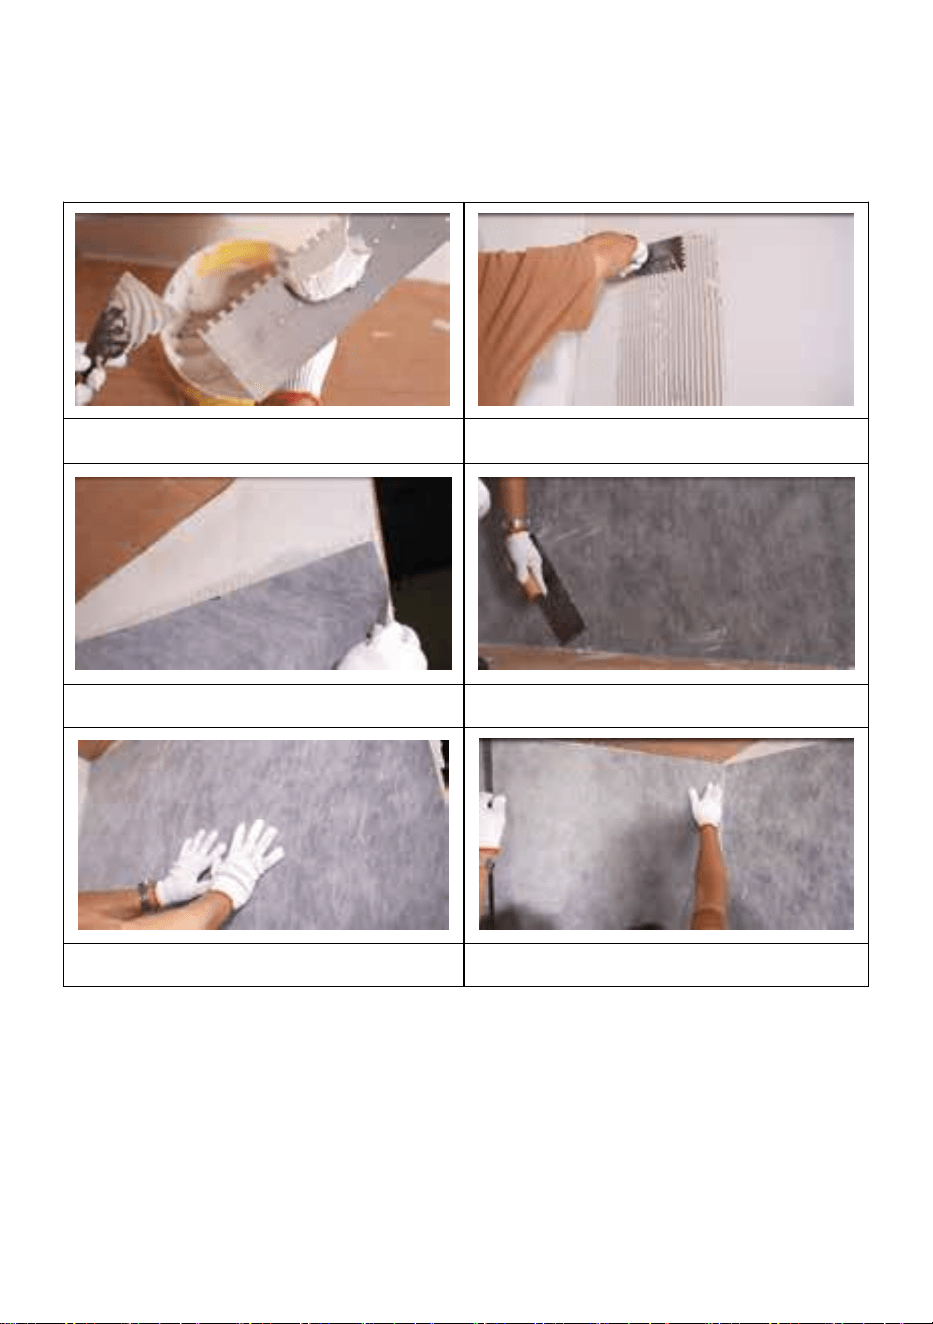
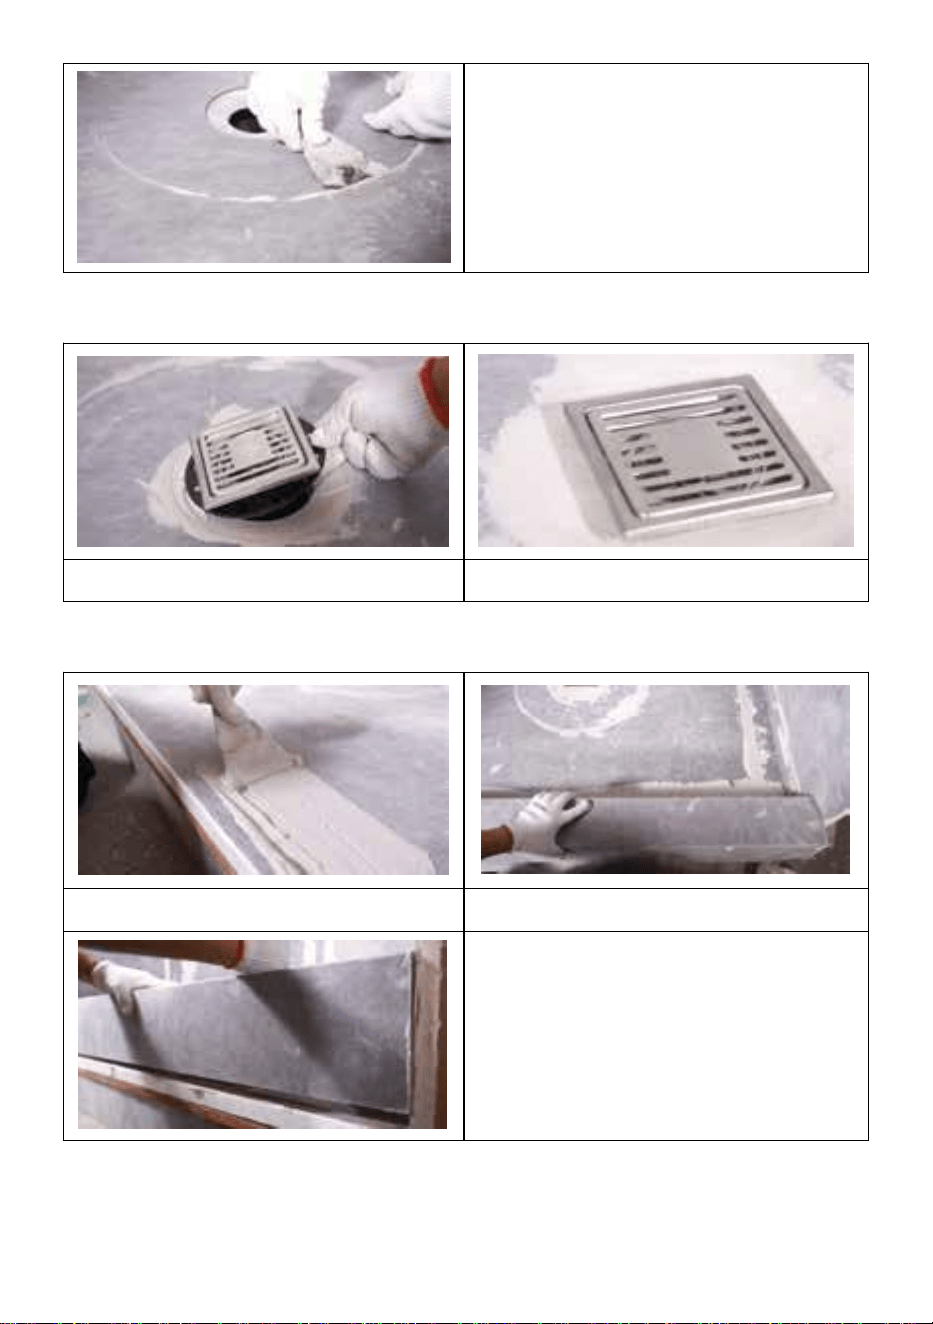
INSTALLATION STEPS
◆Clean any dust or other debris from the surface of the solid backing.
Dampen particularly dry and porous substrates in order to help prevent
premature drying or skinning of the thin-set mortar.
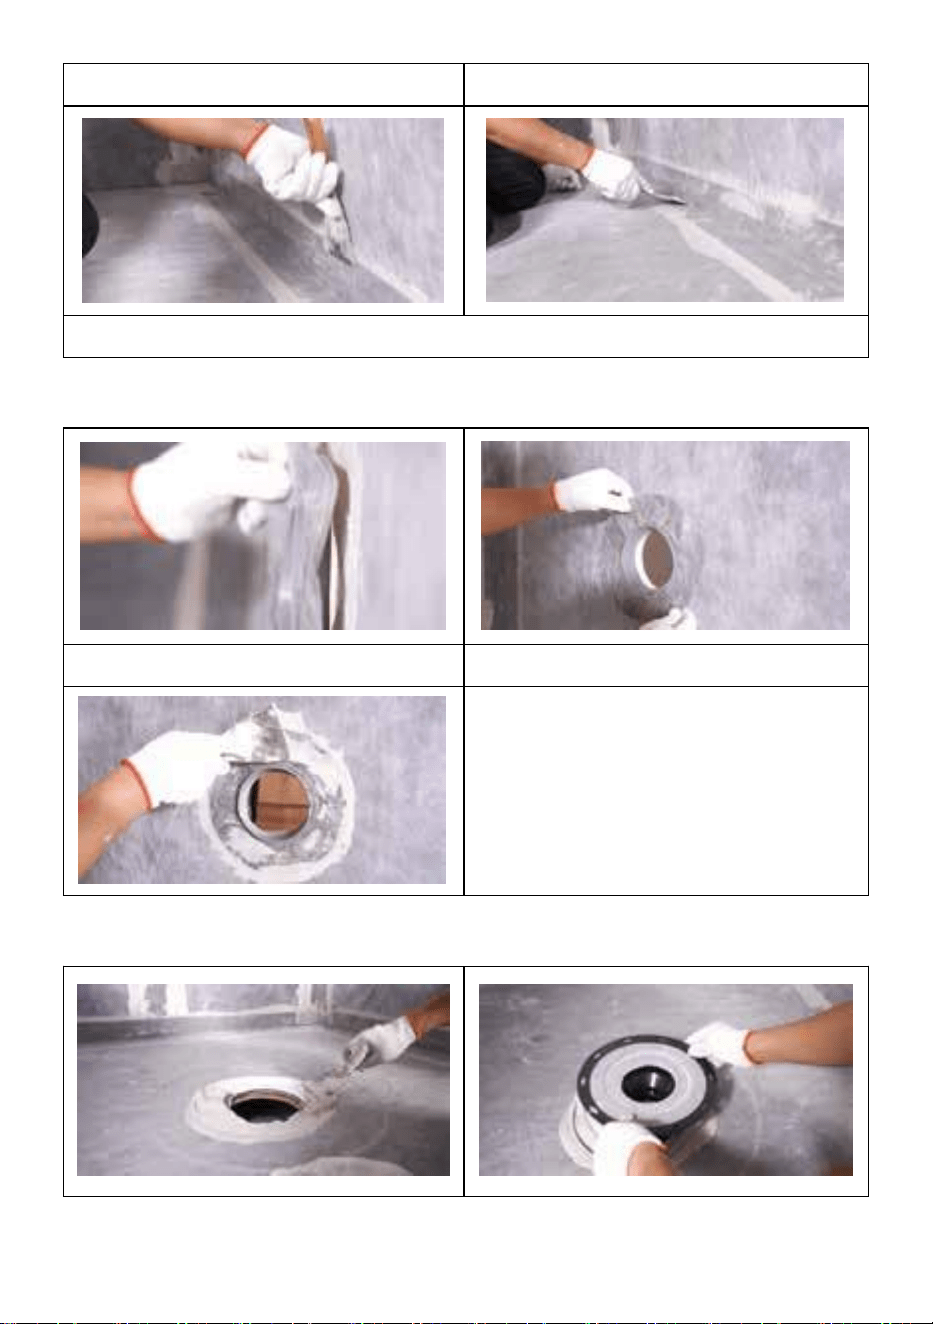
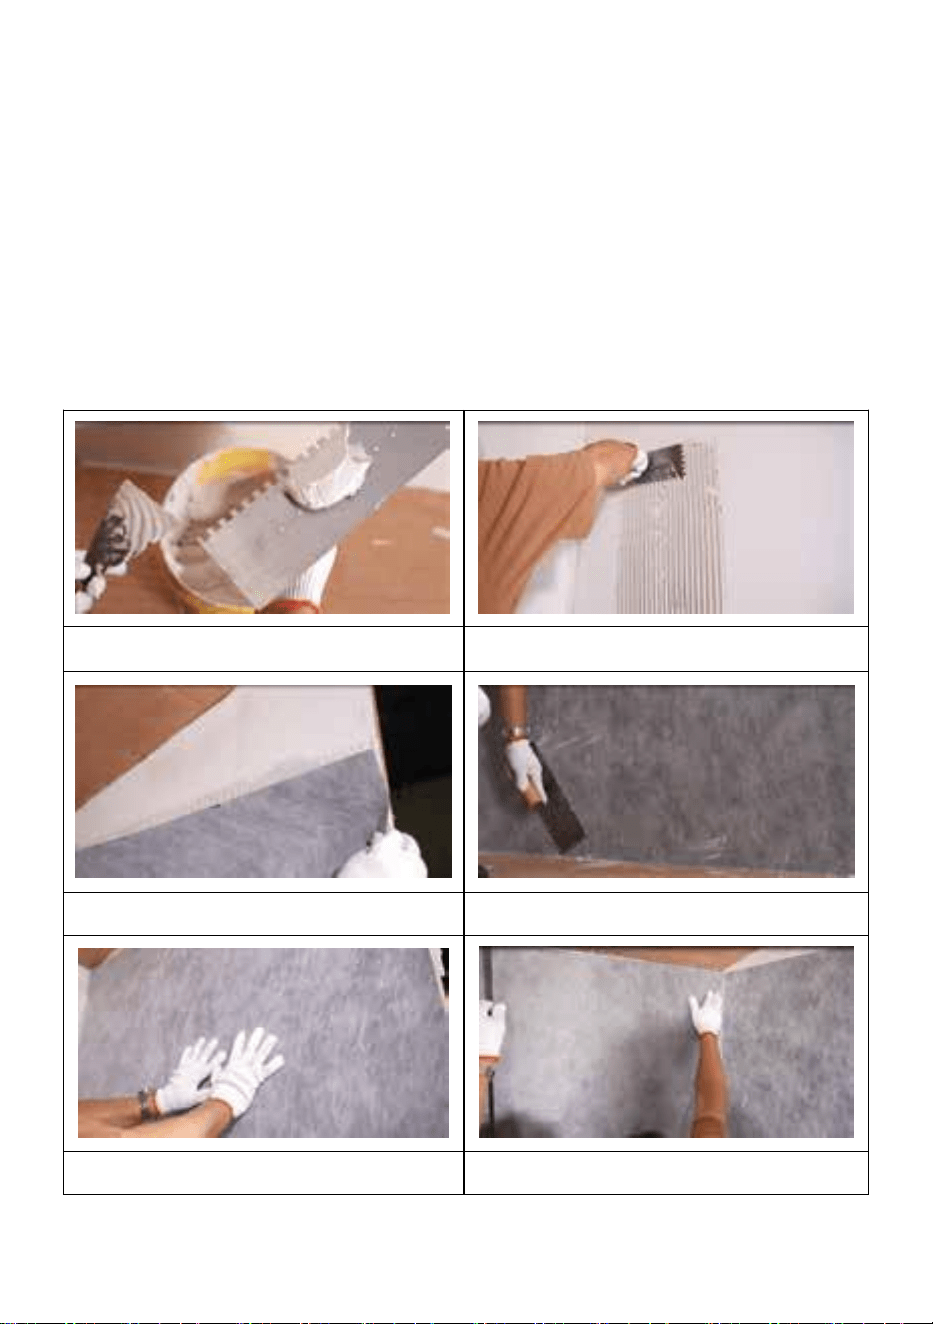
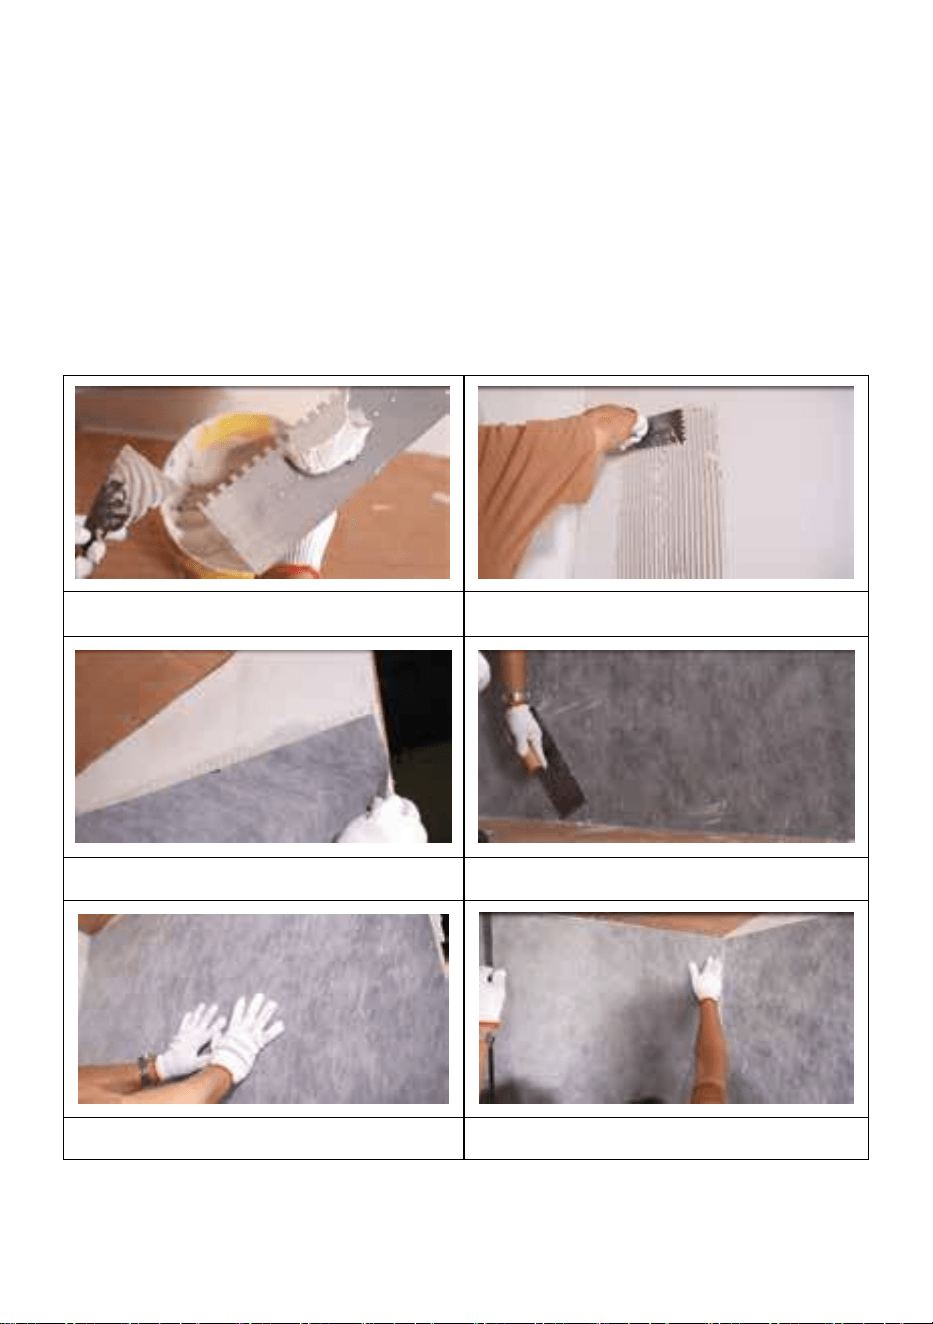
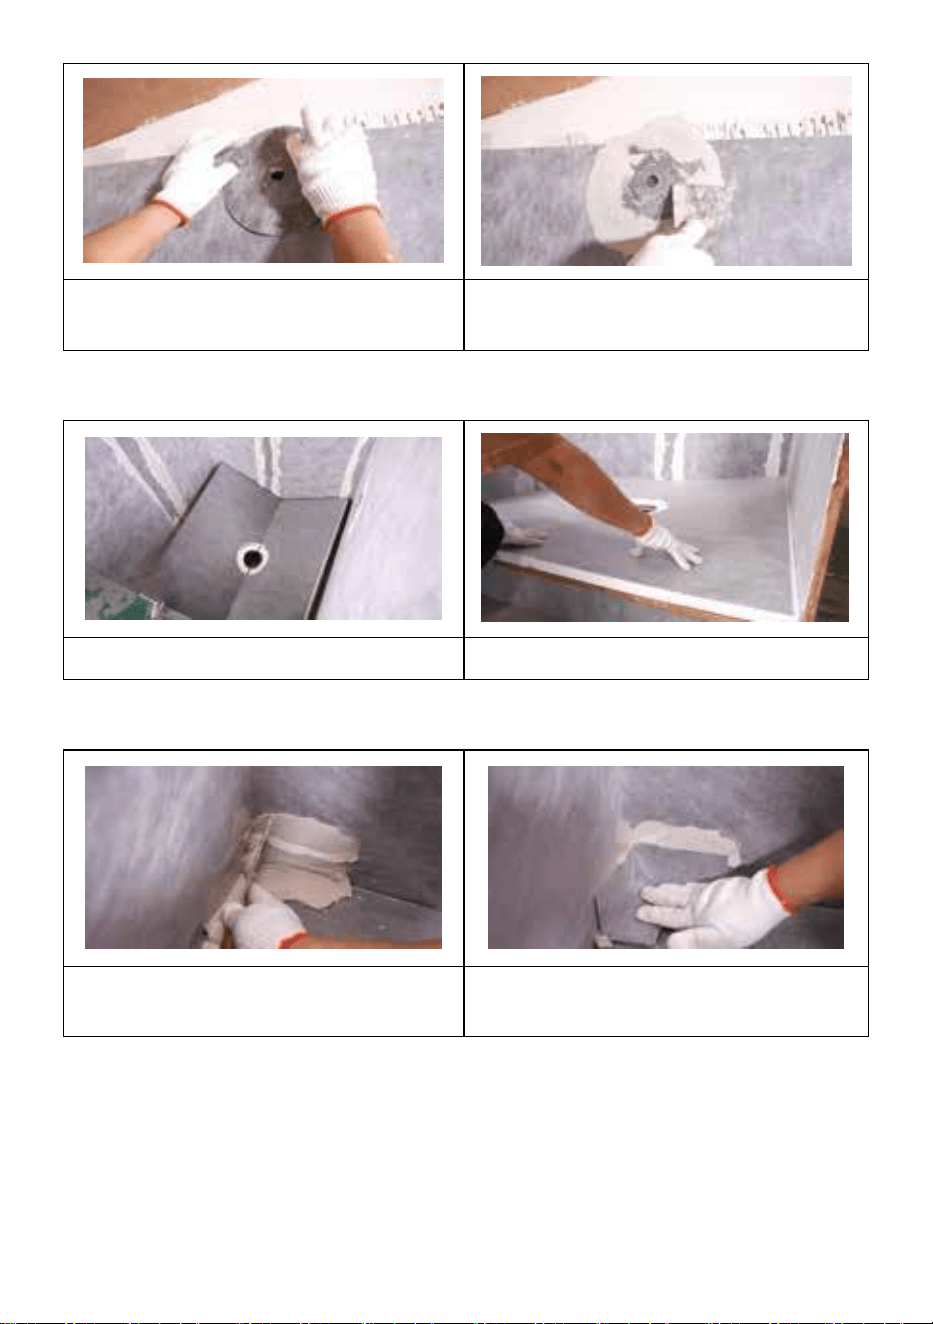
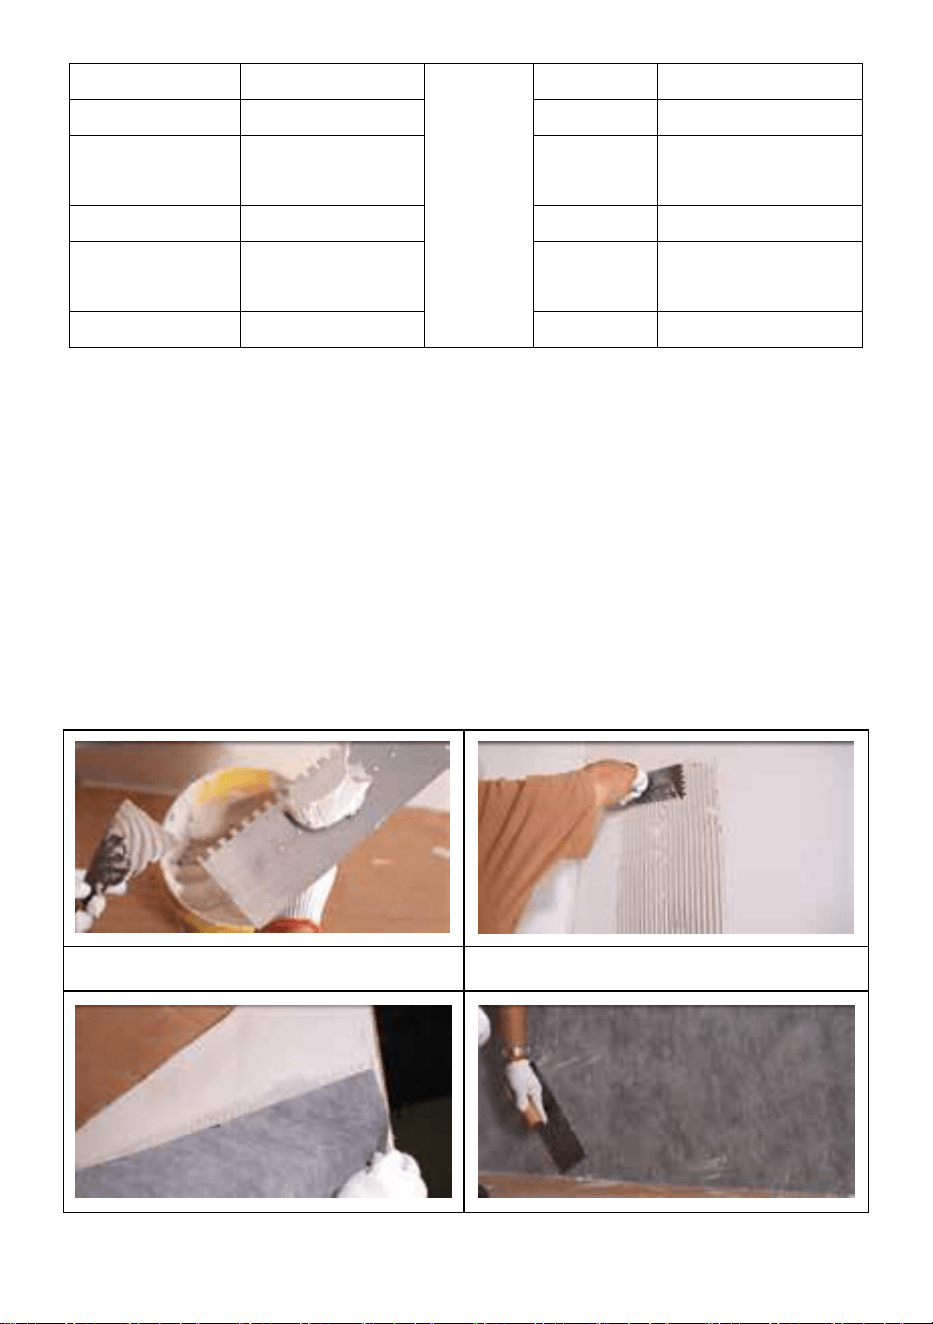
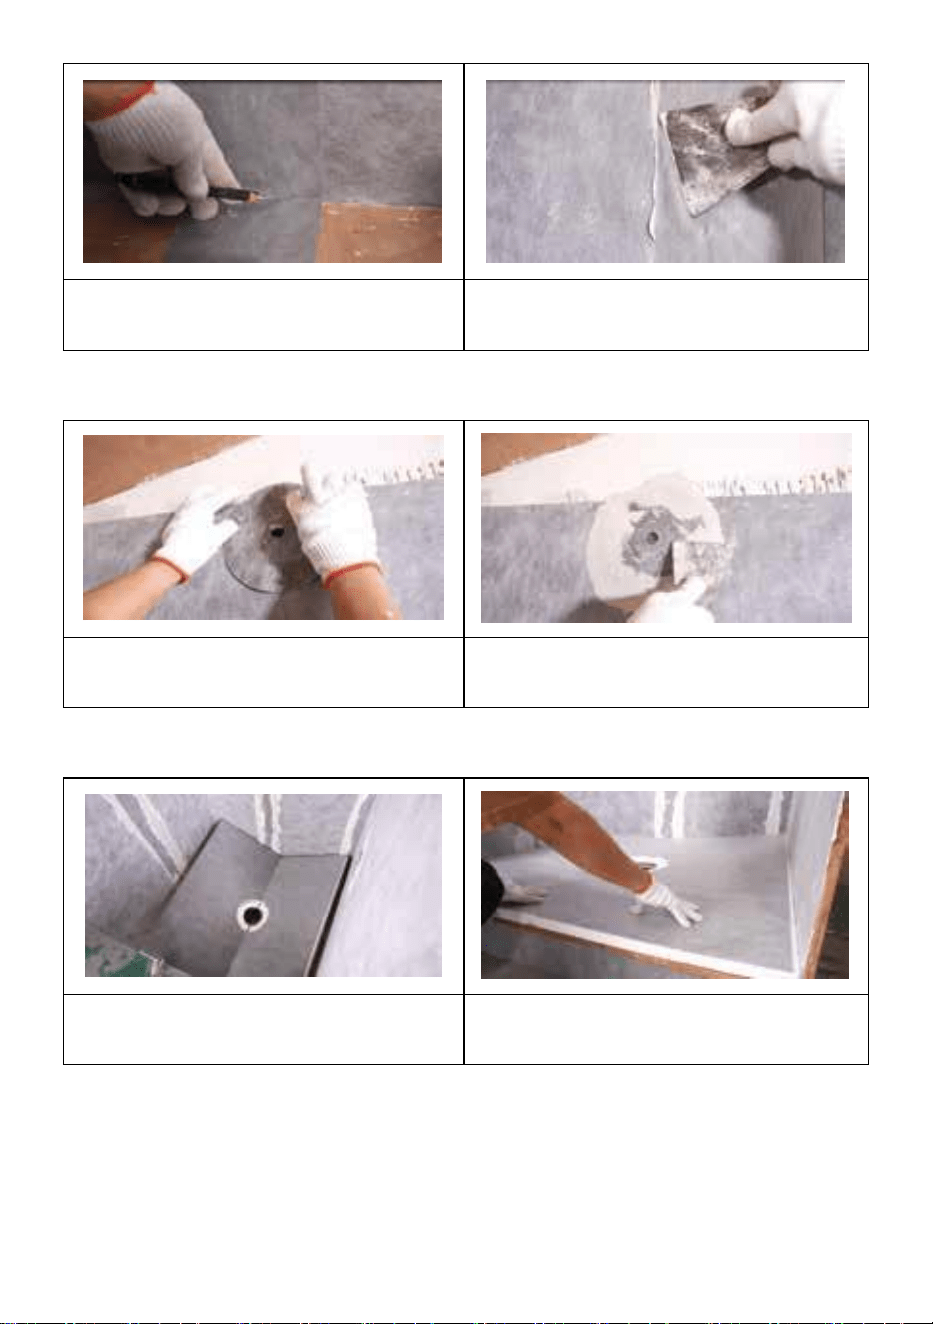
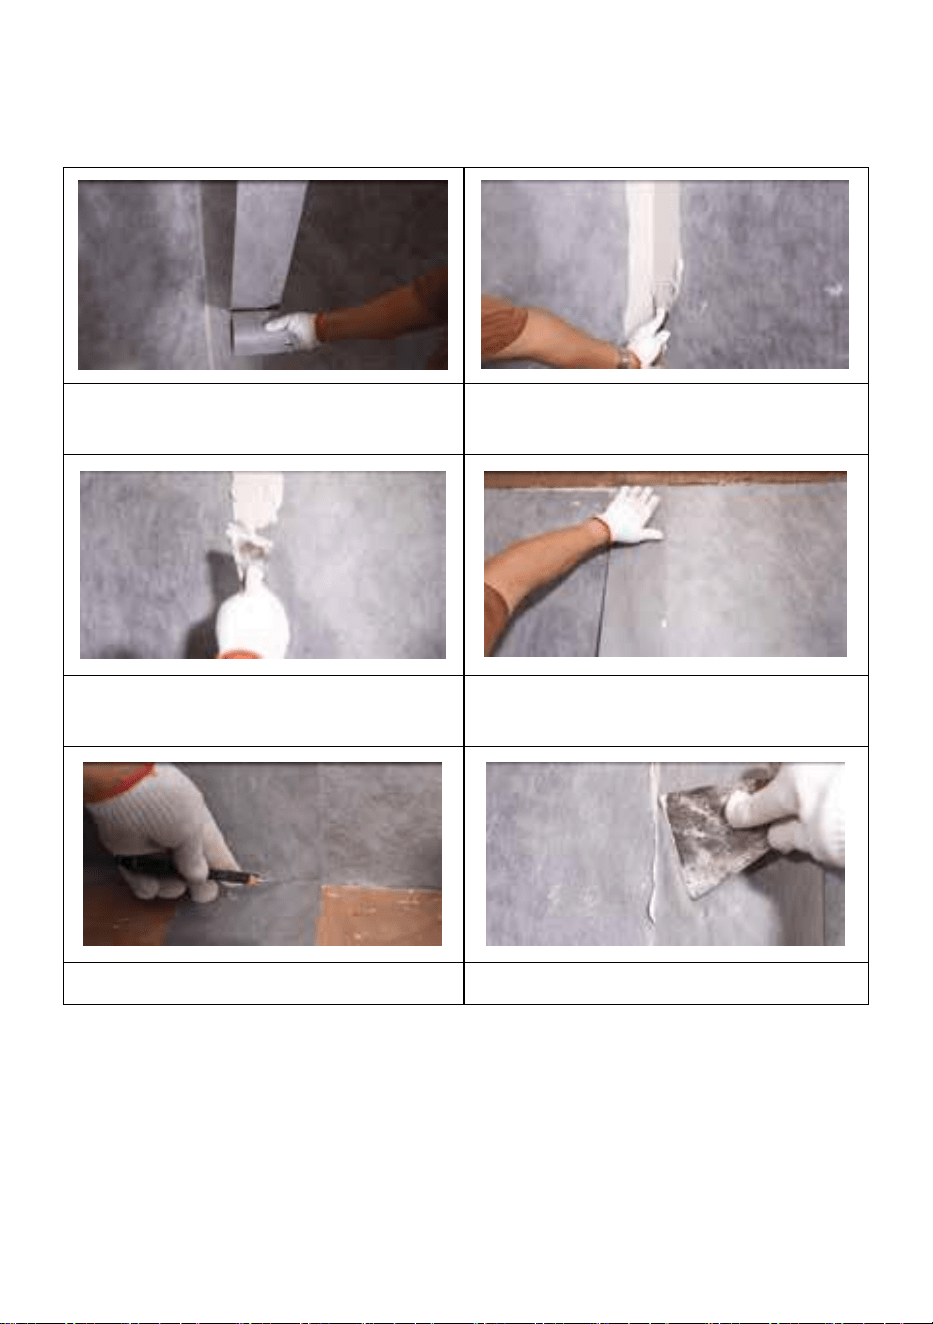
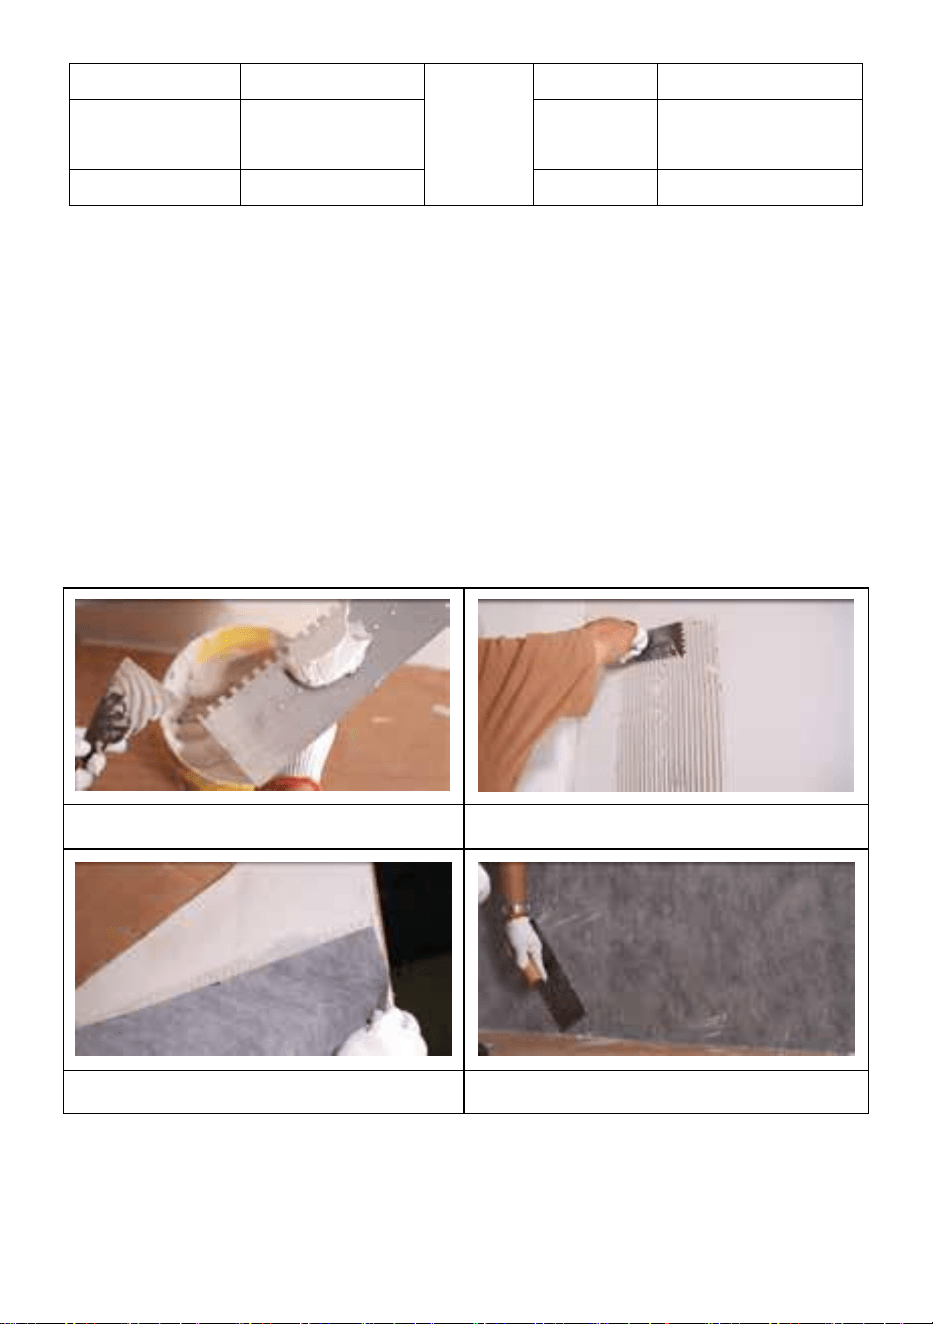
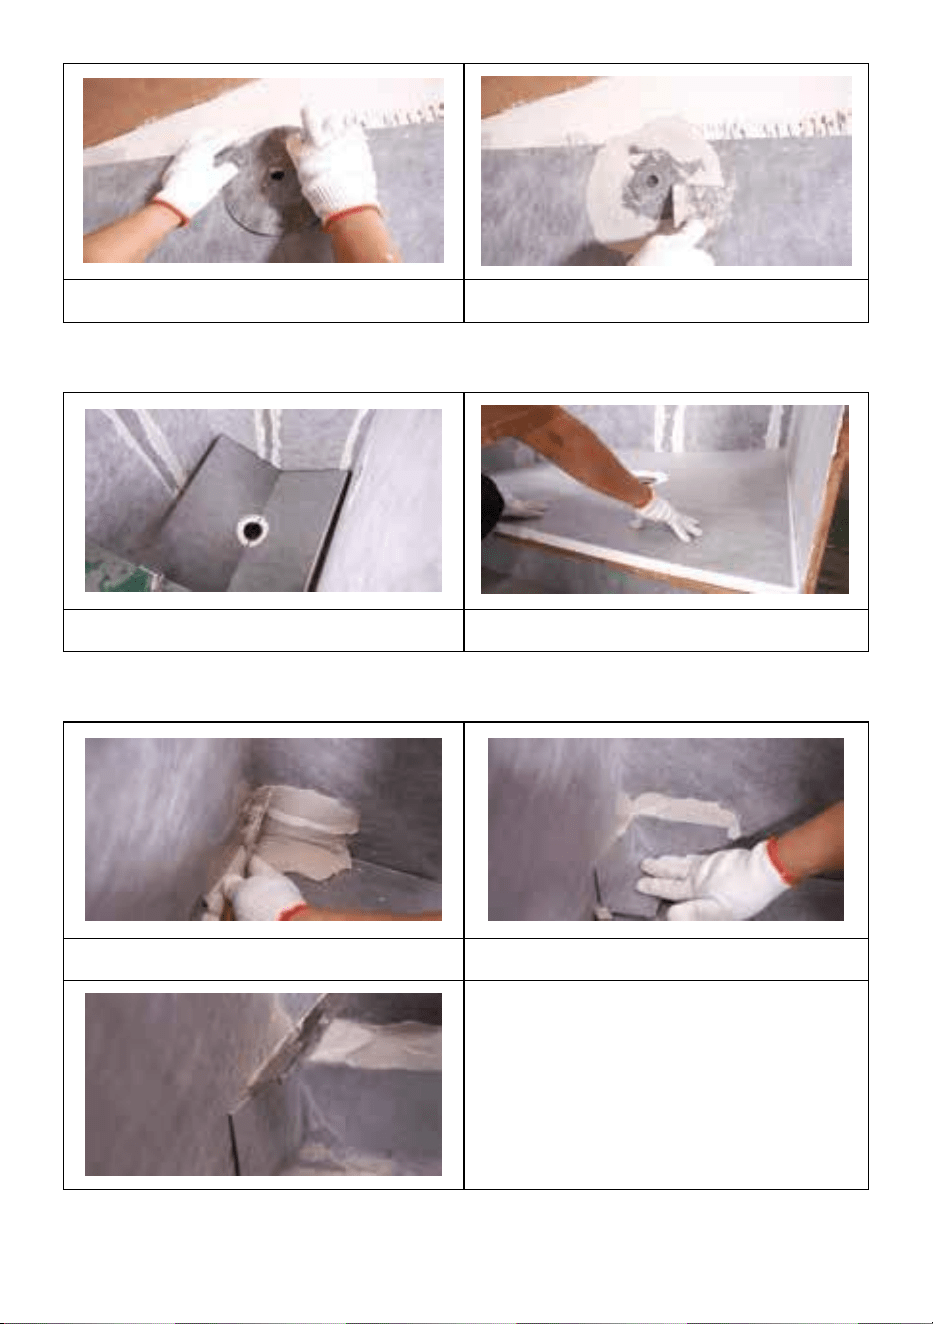
Step 1:
Prepare mortar
Brush the mortar
Cover the membrane
Trim the membrane
Make it even
Finish covering the membrane
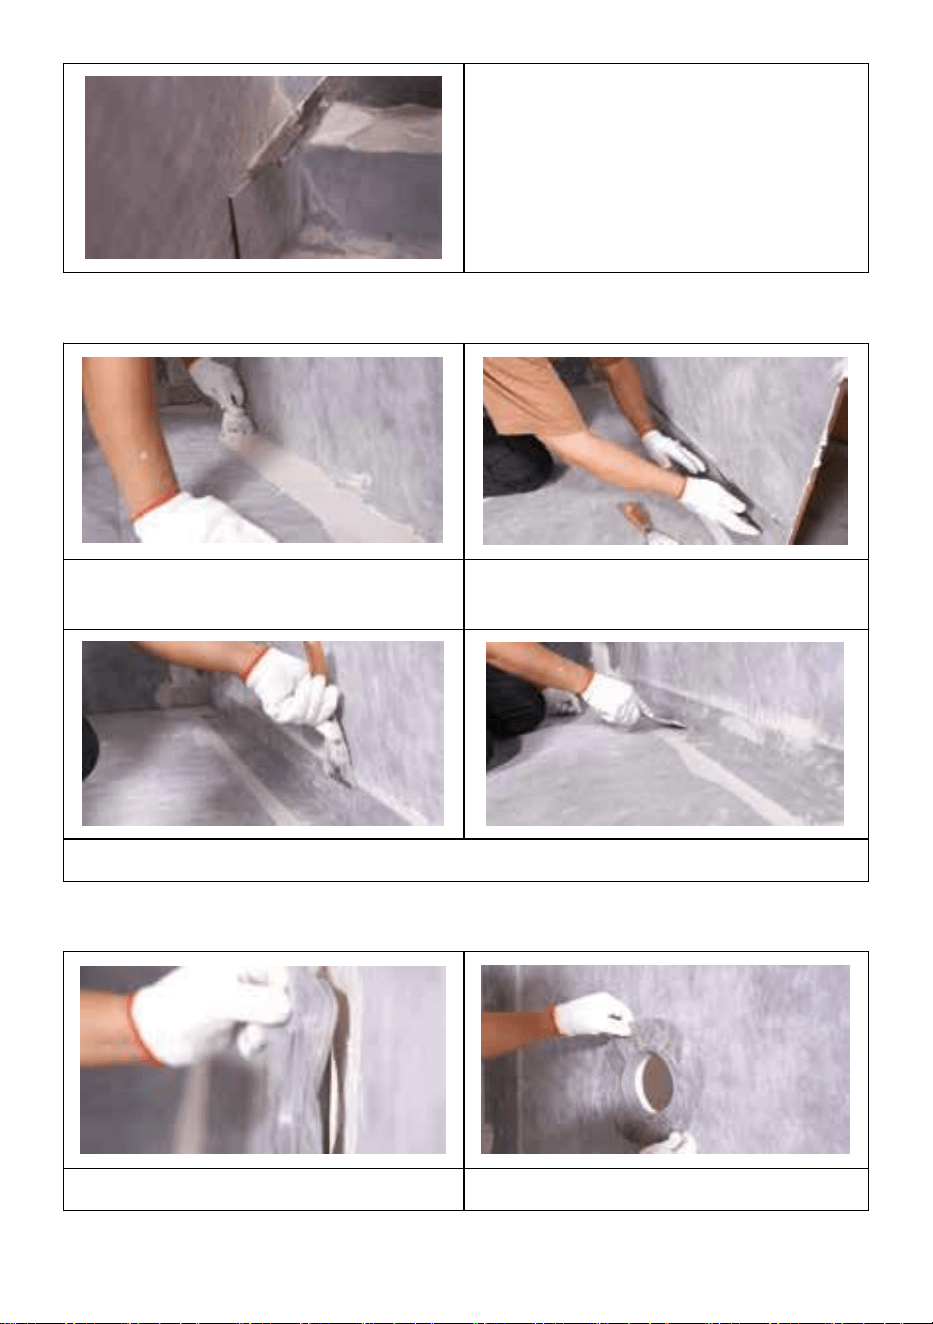
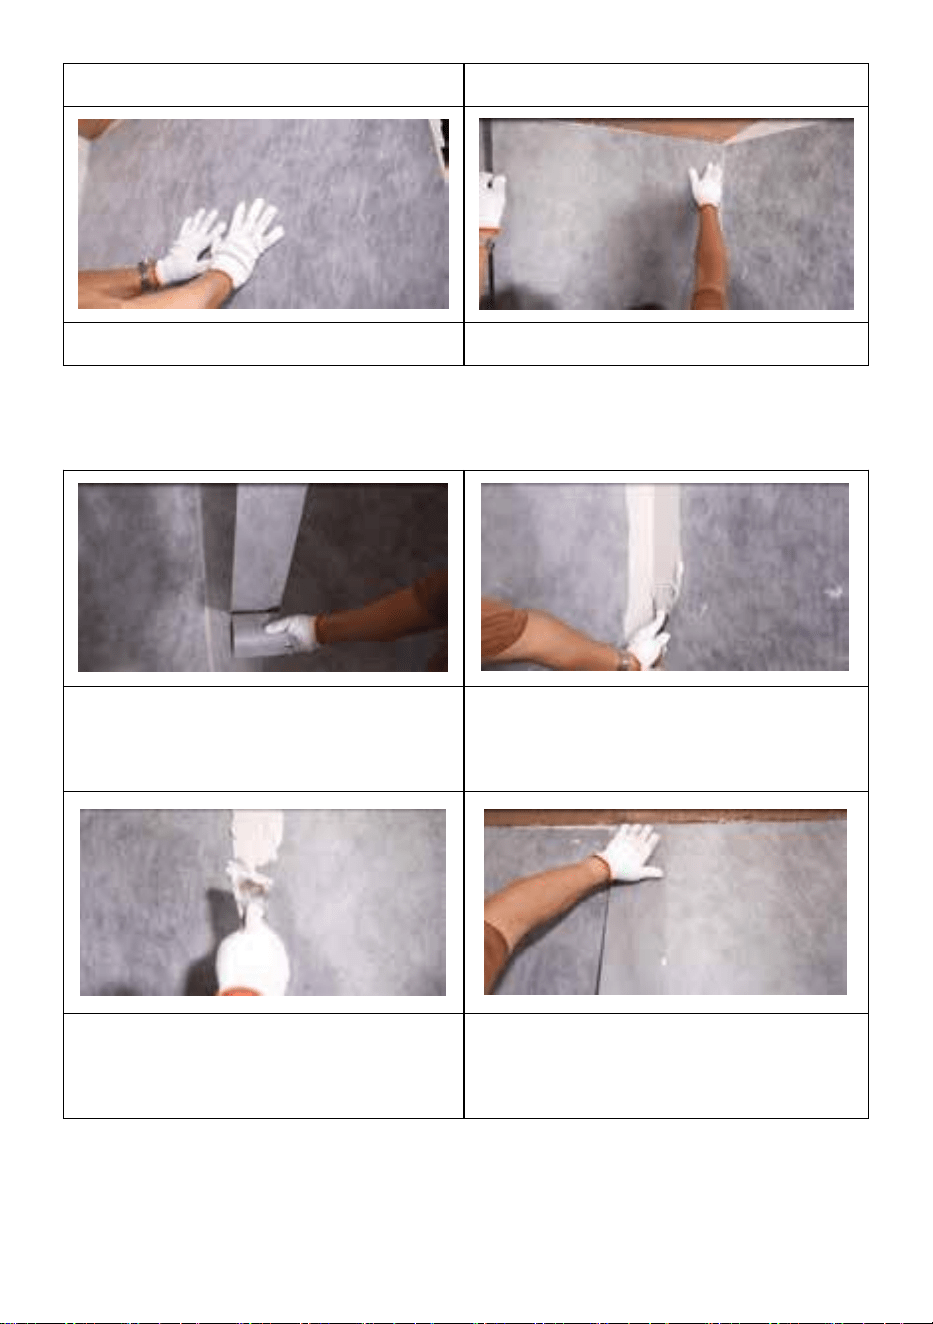
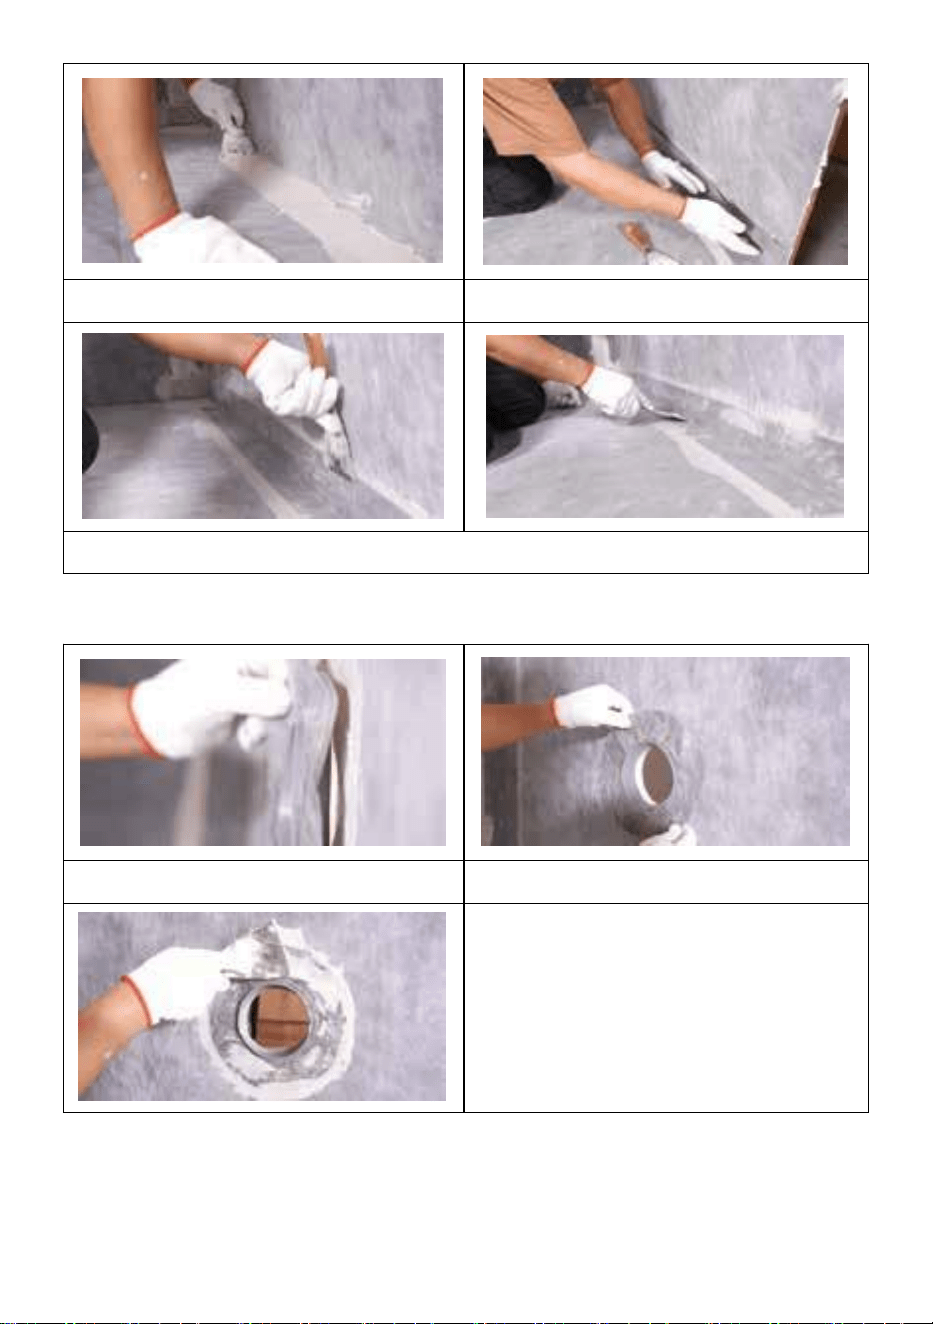
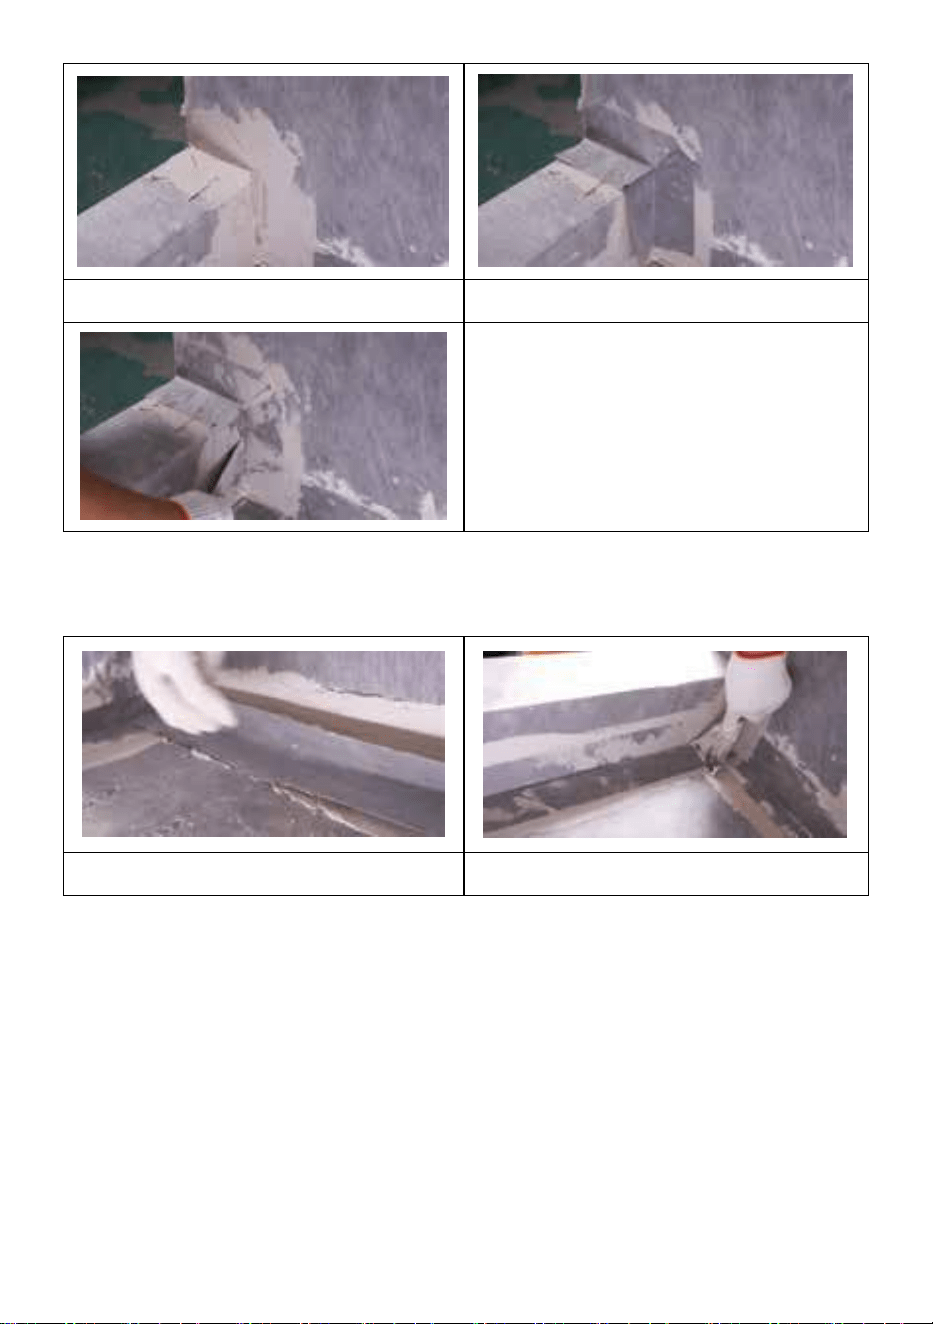
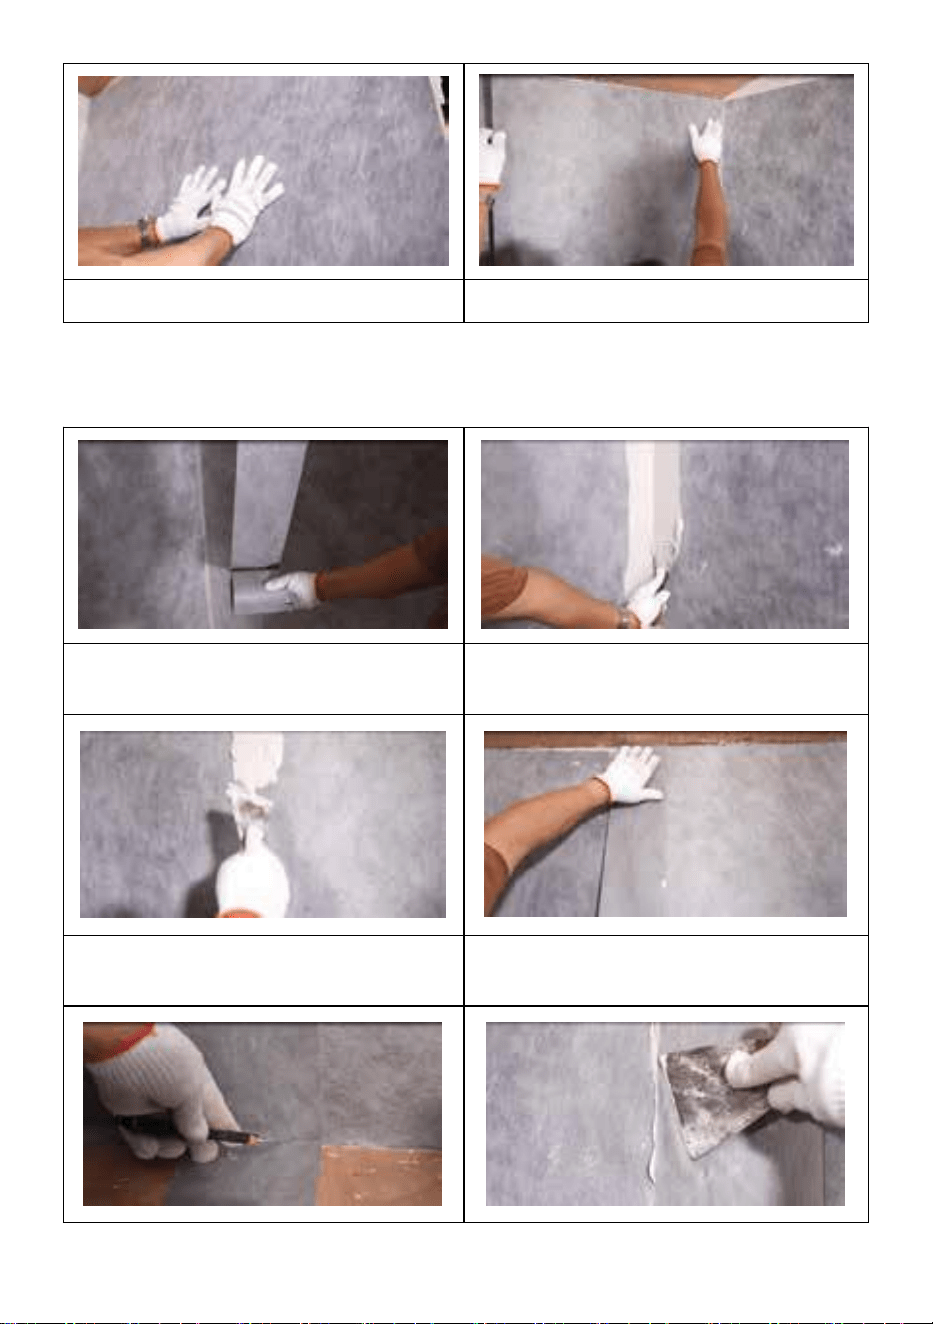
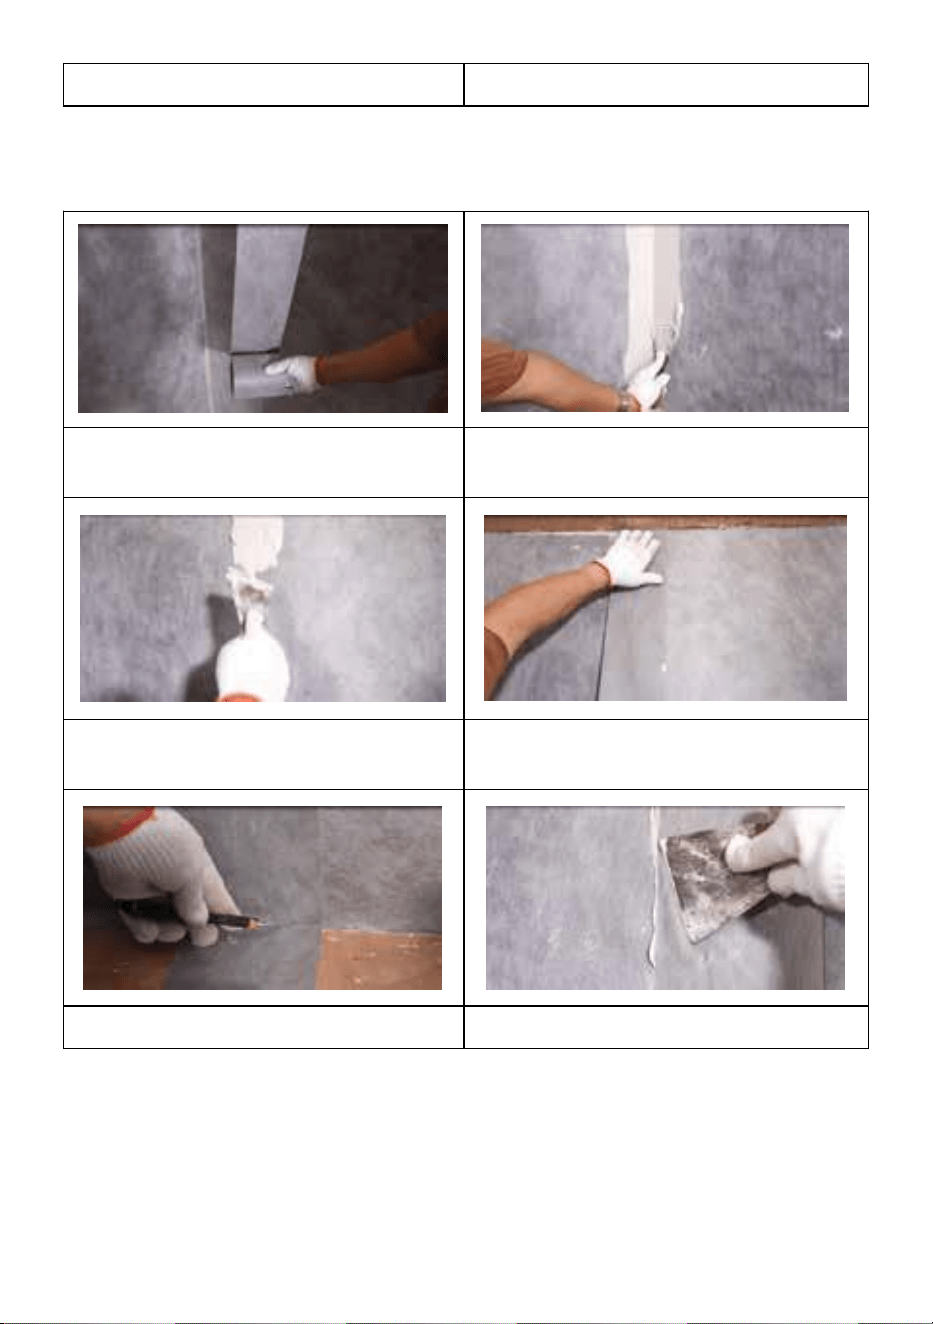
Step 2:
- 5 -
Cover the waterproofing strip on
the corner
Trim the strip
Brush the mortar
Cover the waterproofing strip on
the joint
Trim the strip
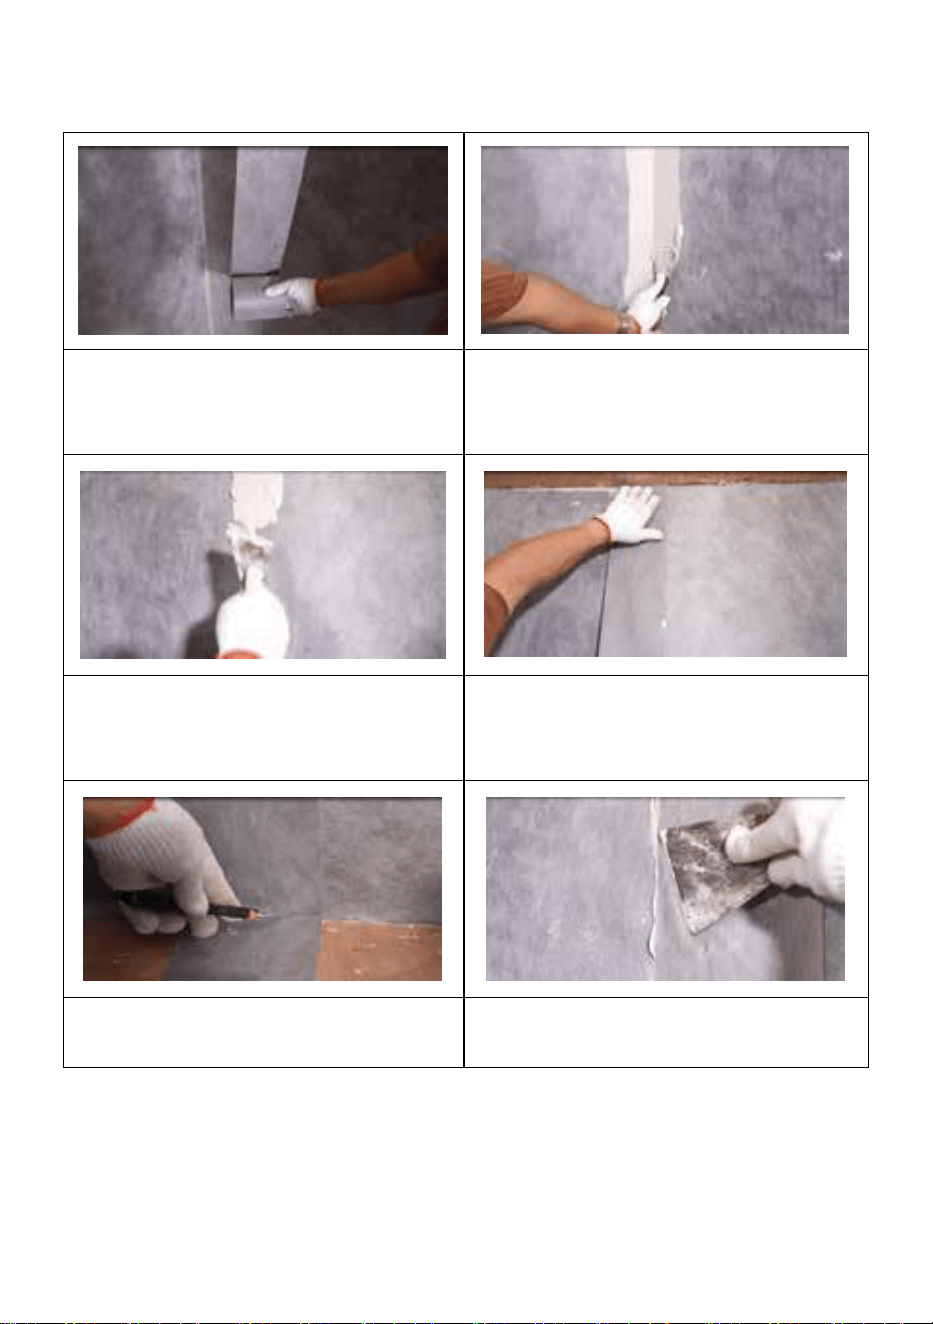
Make the wall surface even
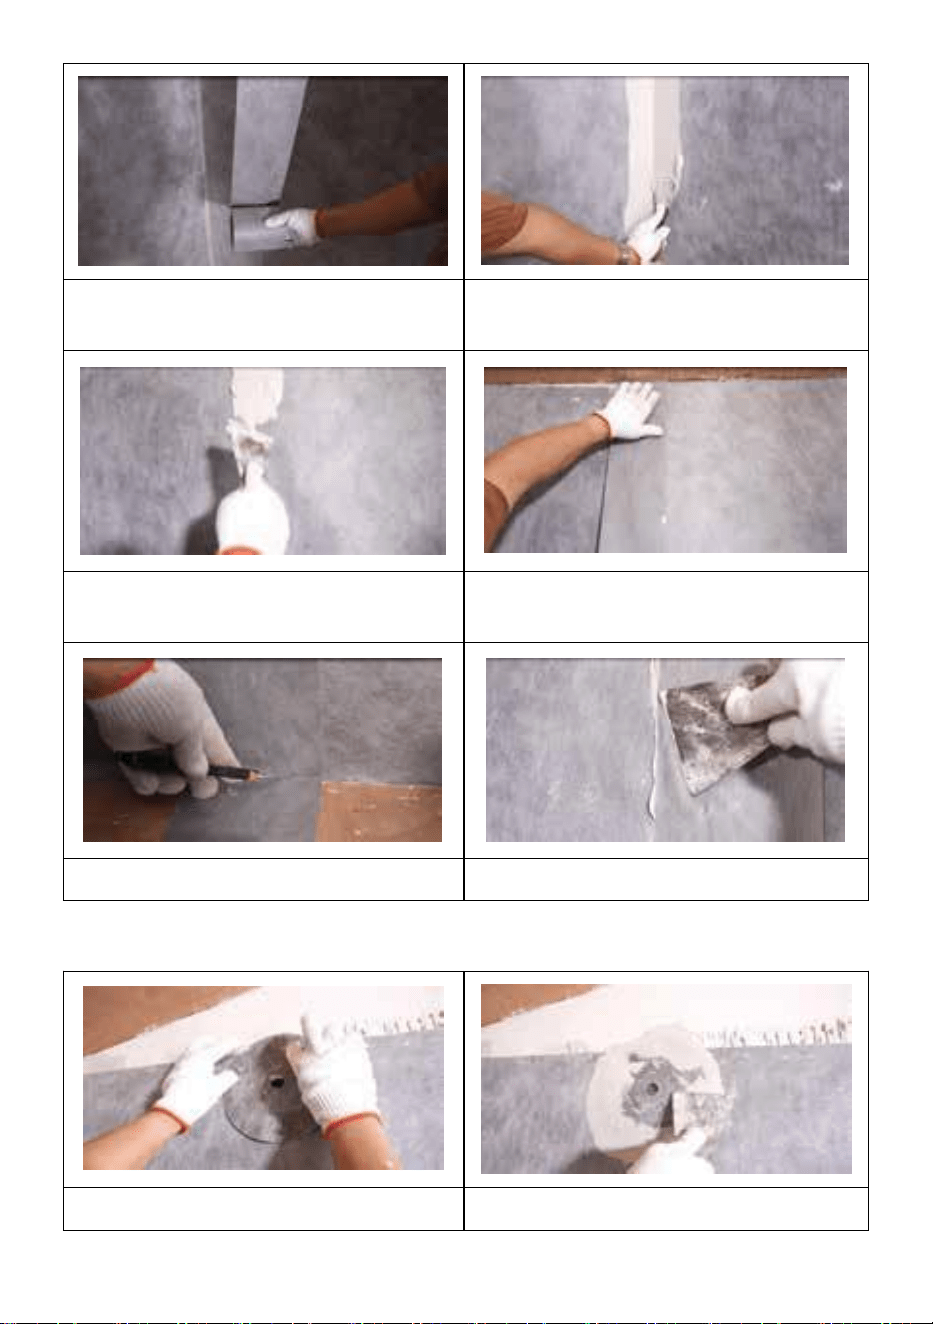
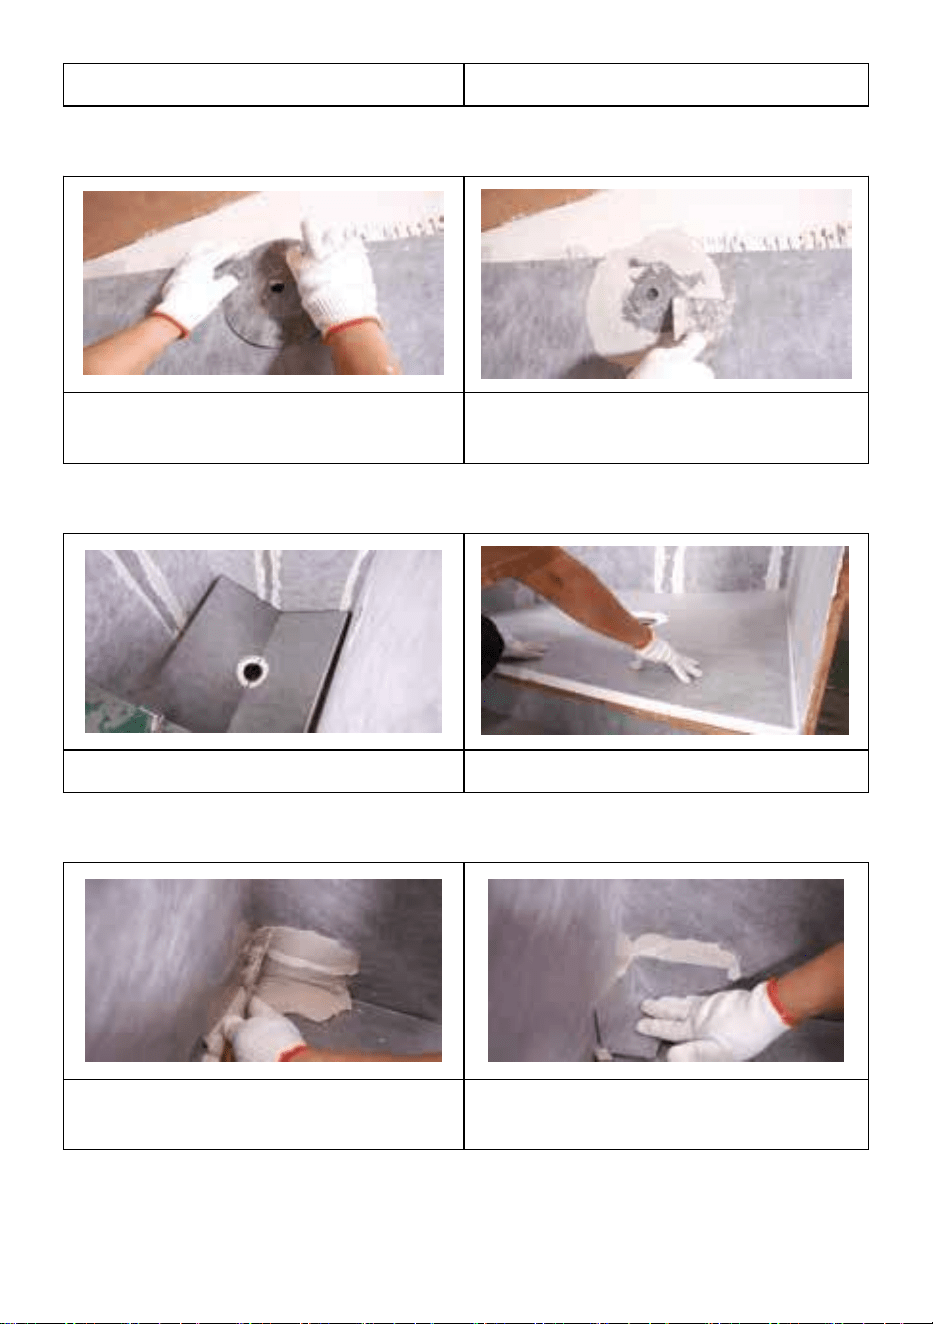
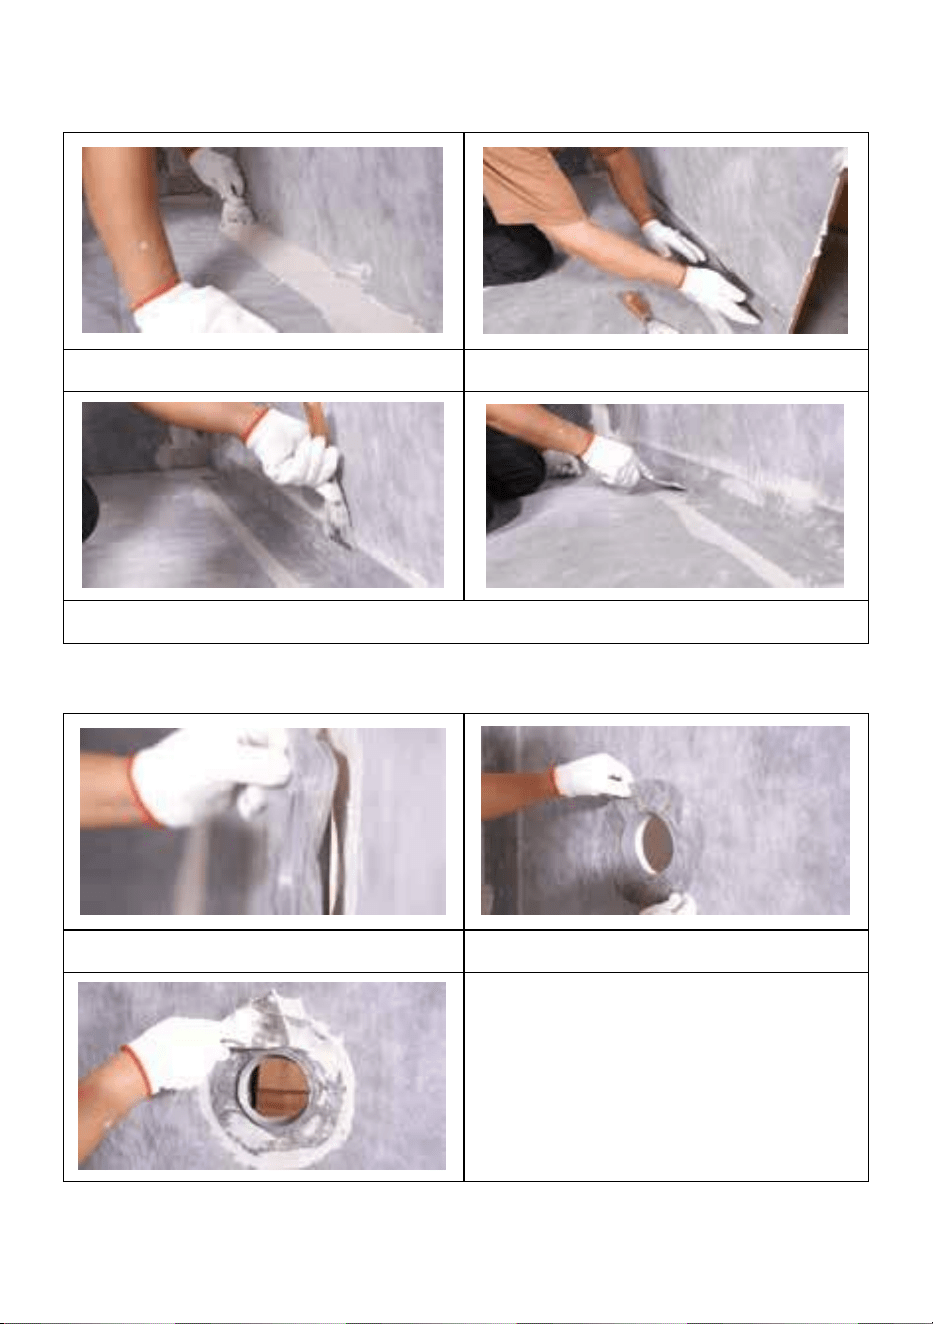
Step 3:
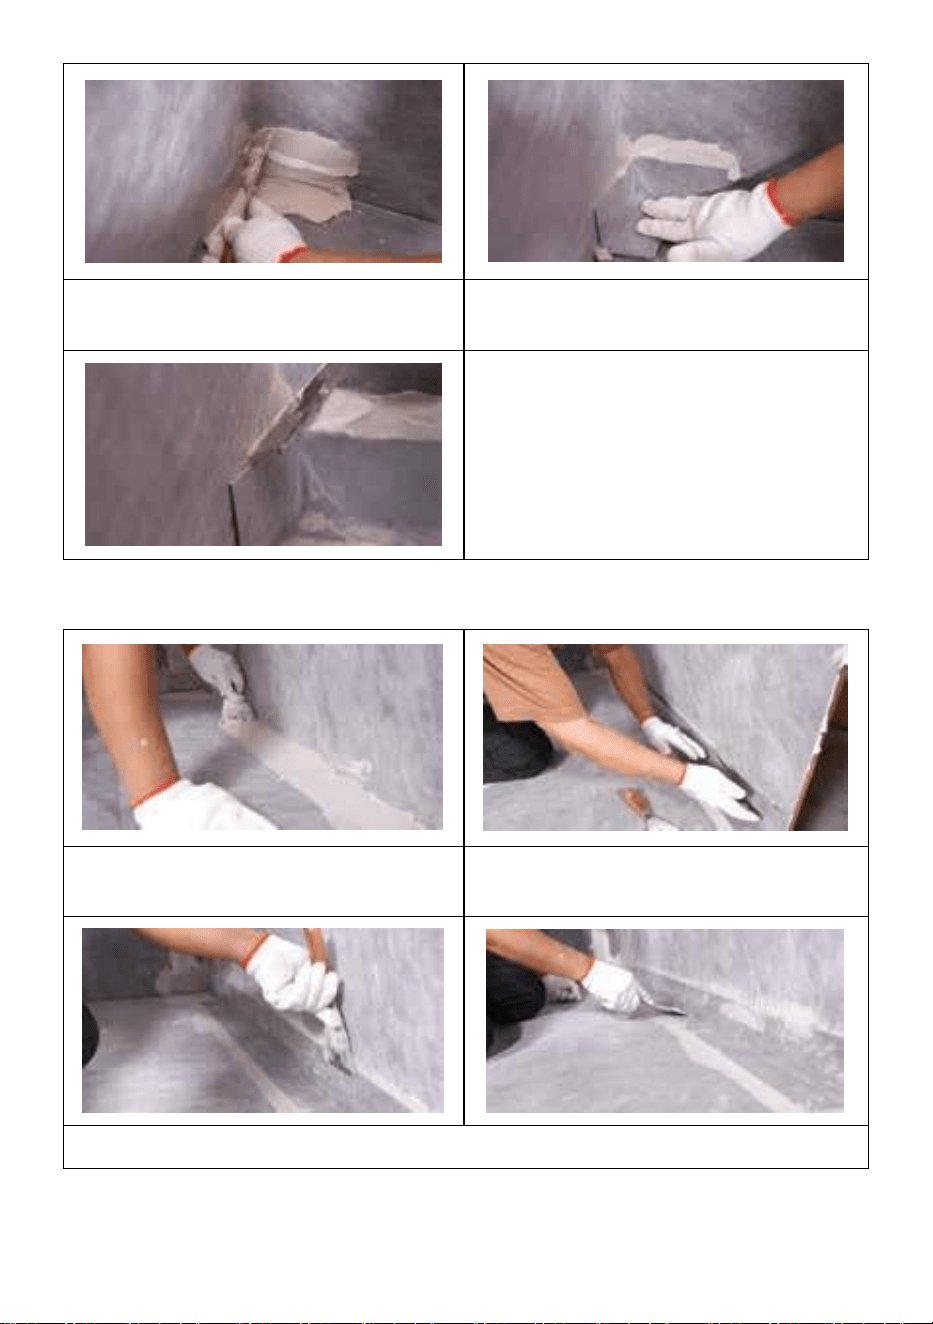
Cover the mixing valve seal
Make the surface even
- 6 -
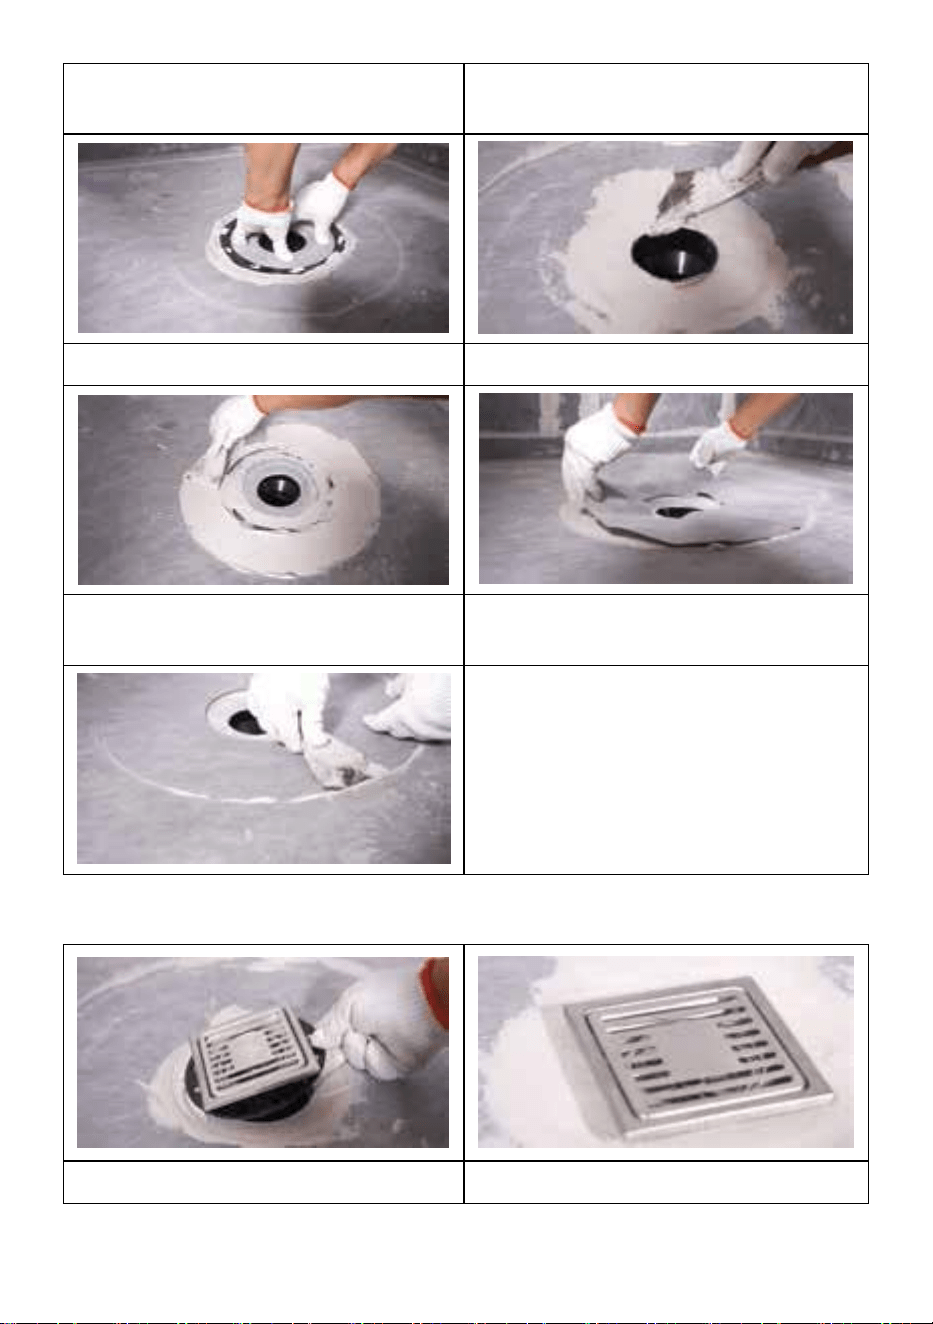
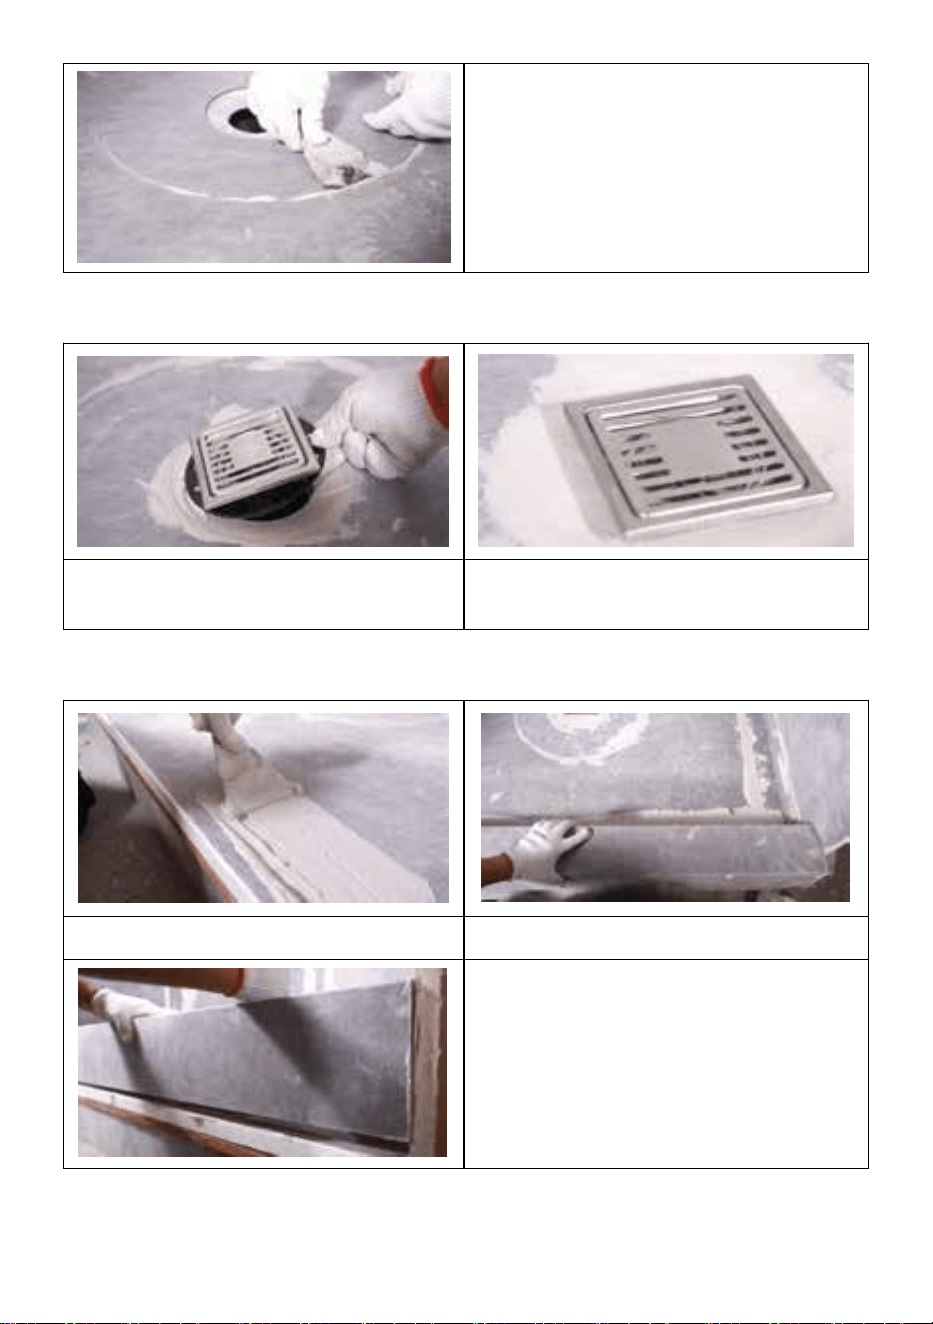
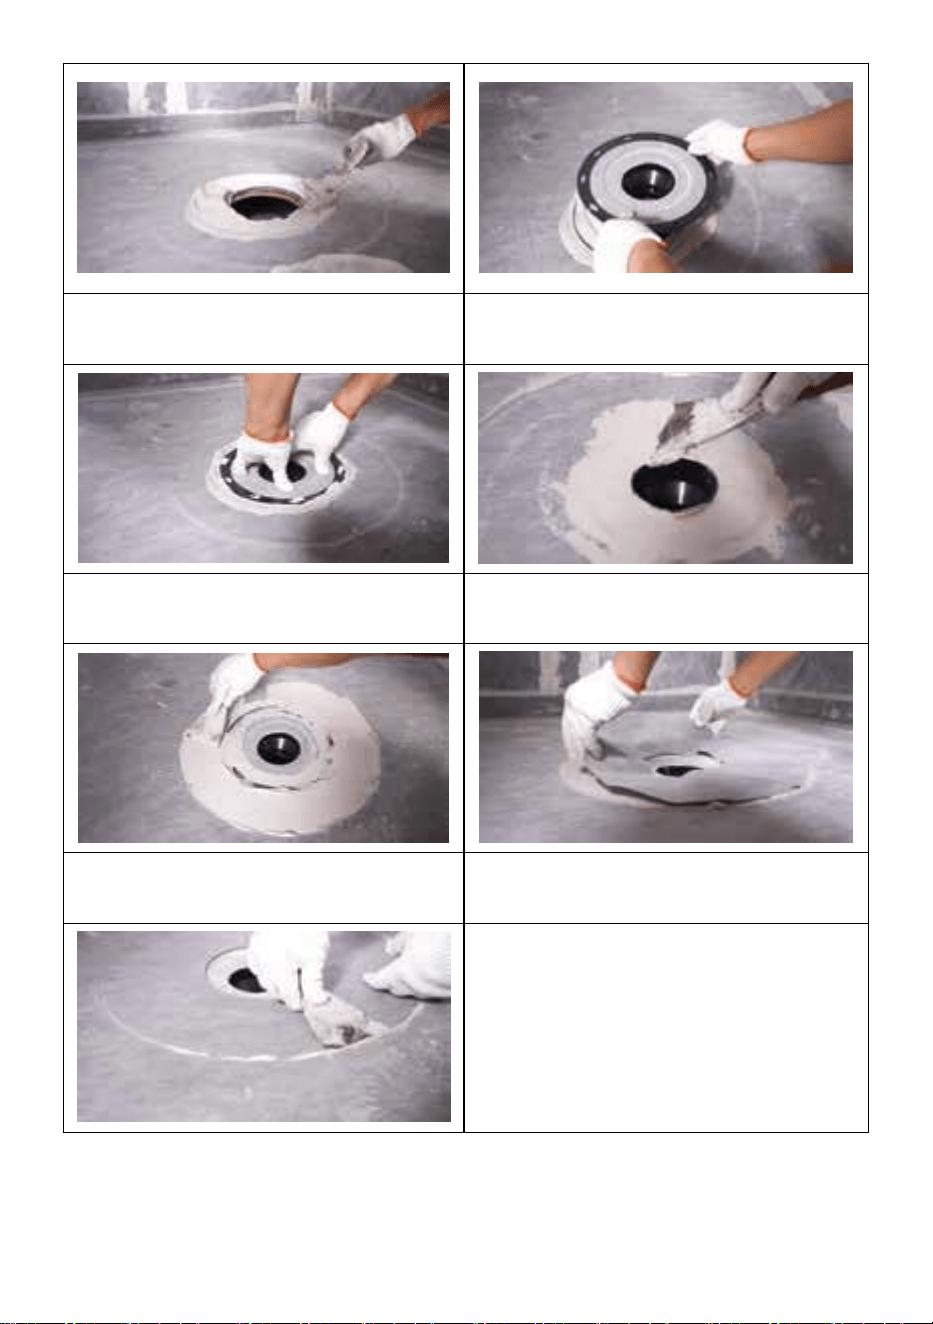
Step 4:
Unfold the tray
Embed the tray in the mortar
Step 5:
Brush the mortar
Install the waterproofing corners 1
Trim the corner
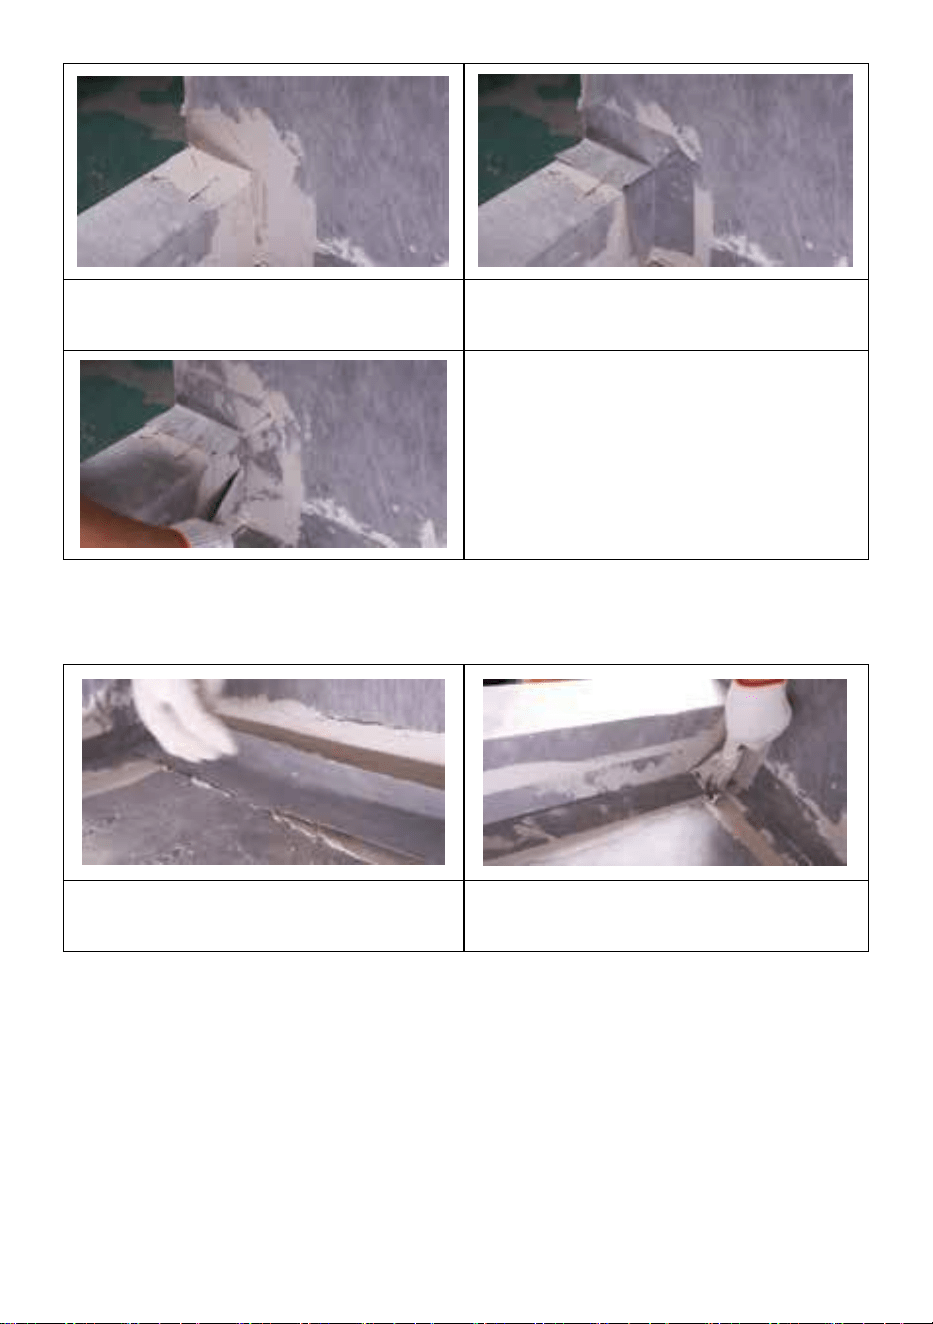
Step 6:
- 7 -
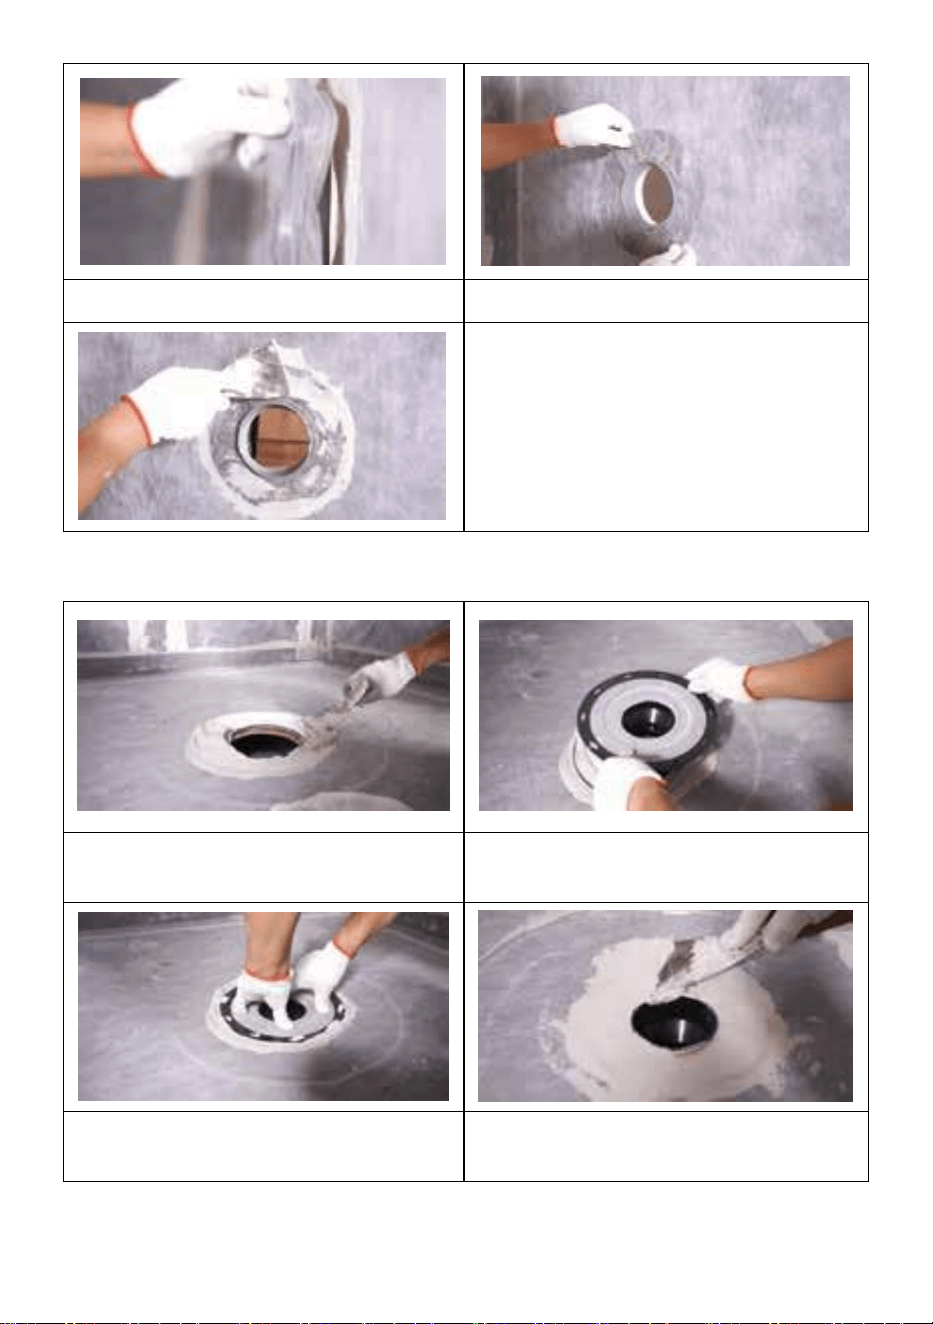
Brush the mortar
Cover the waterproofing strip
Make the surface even
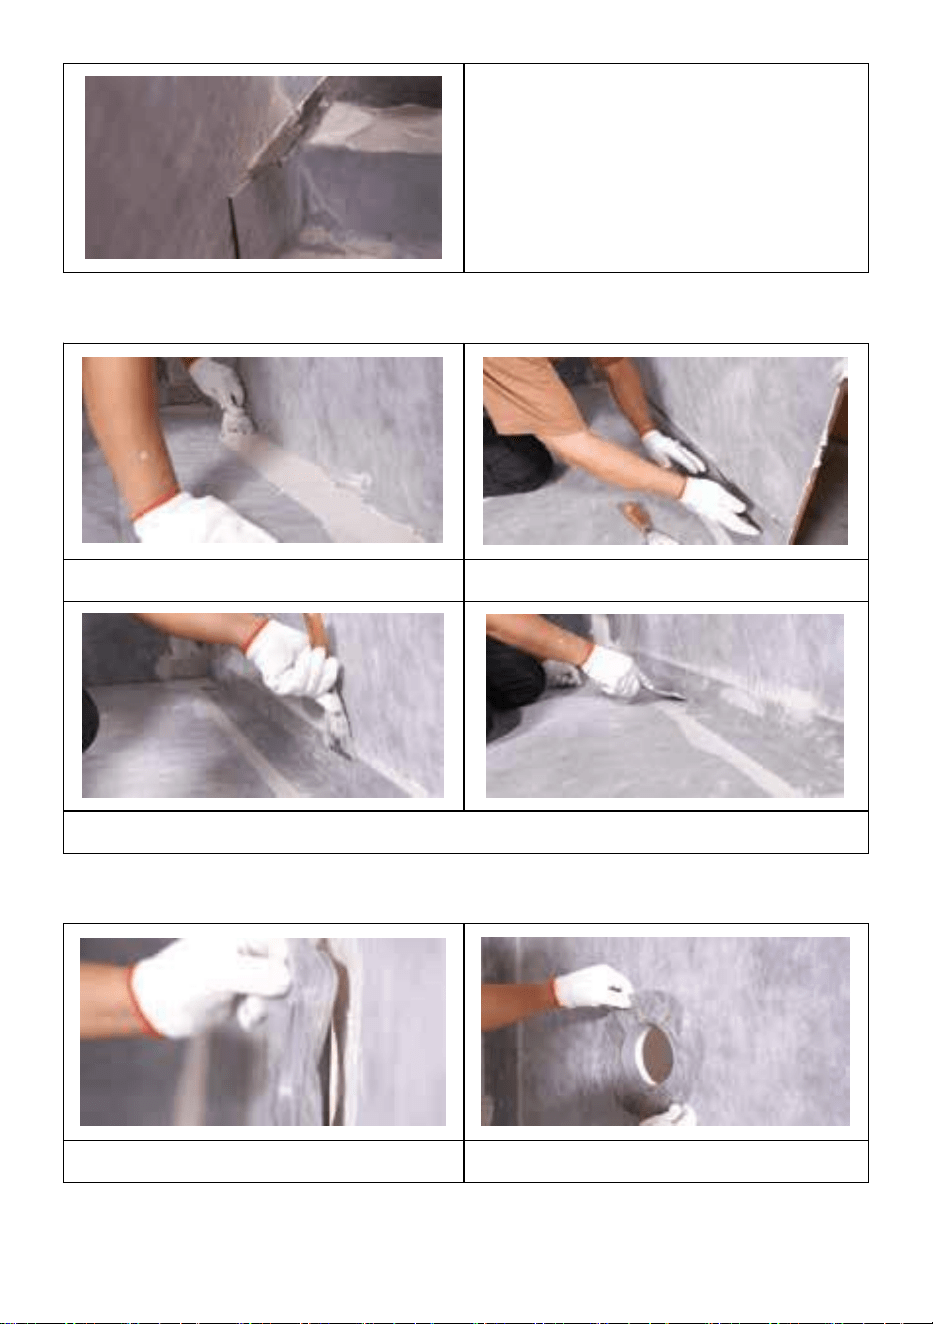
Step 7:
Brush the mortar
Cover the pipe seal
Trim the pipe seal
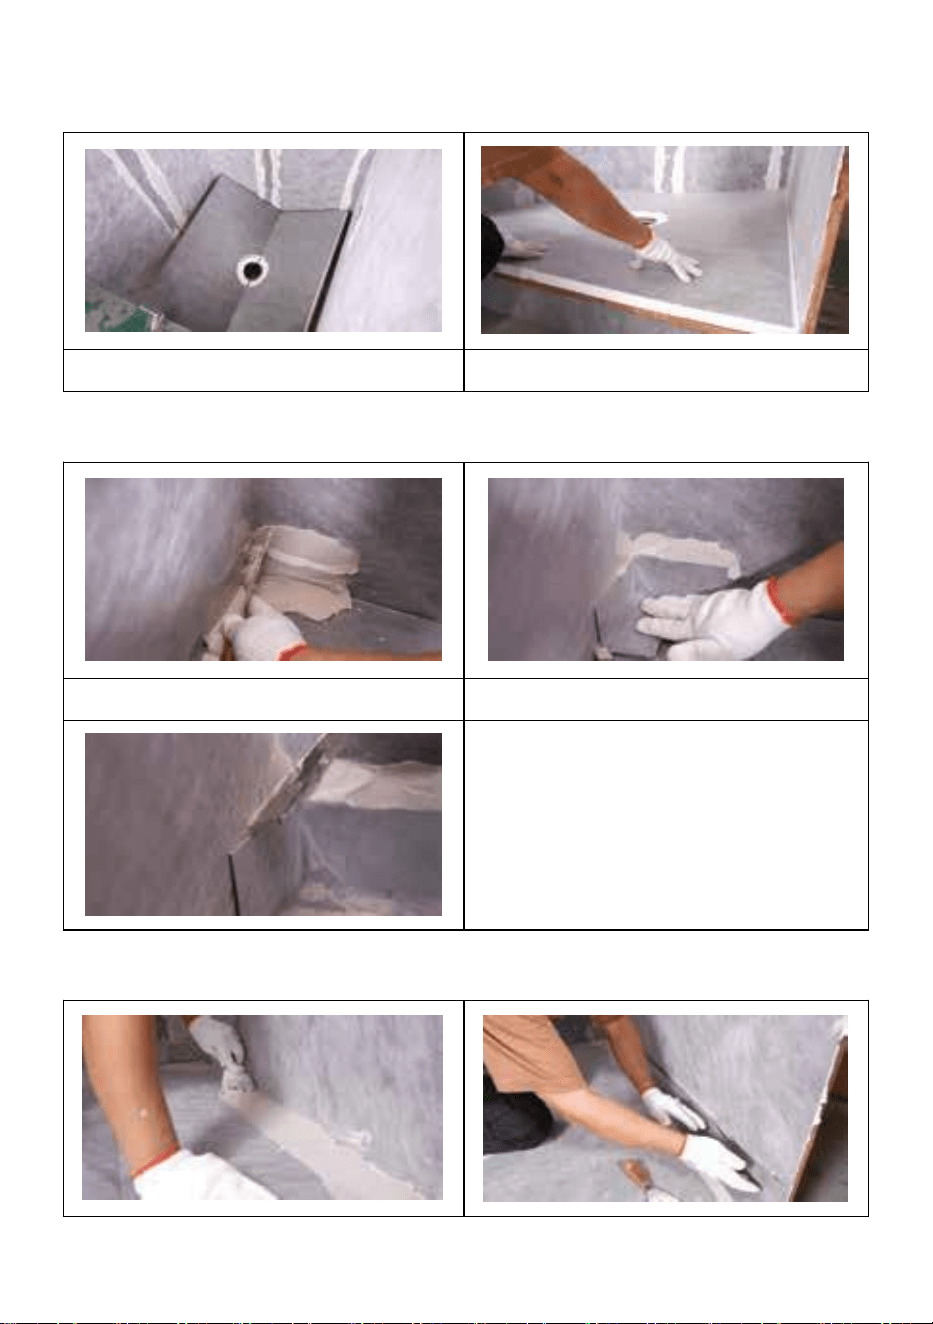
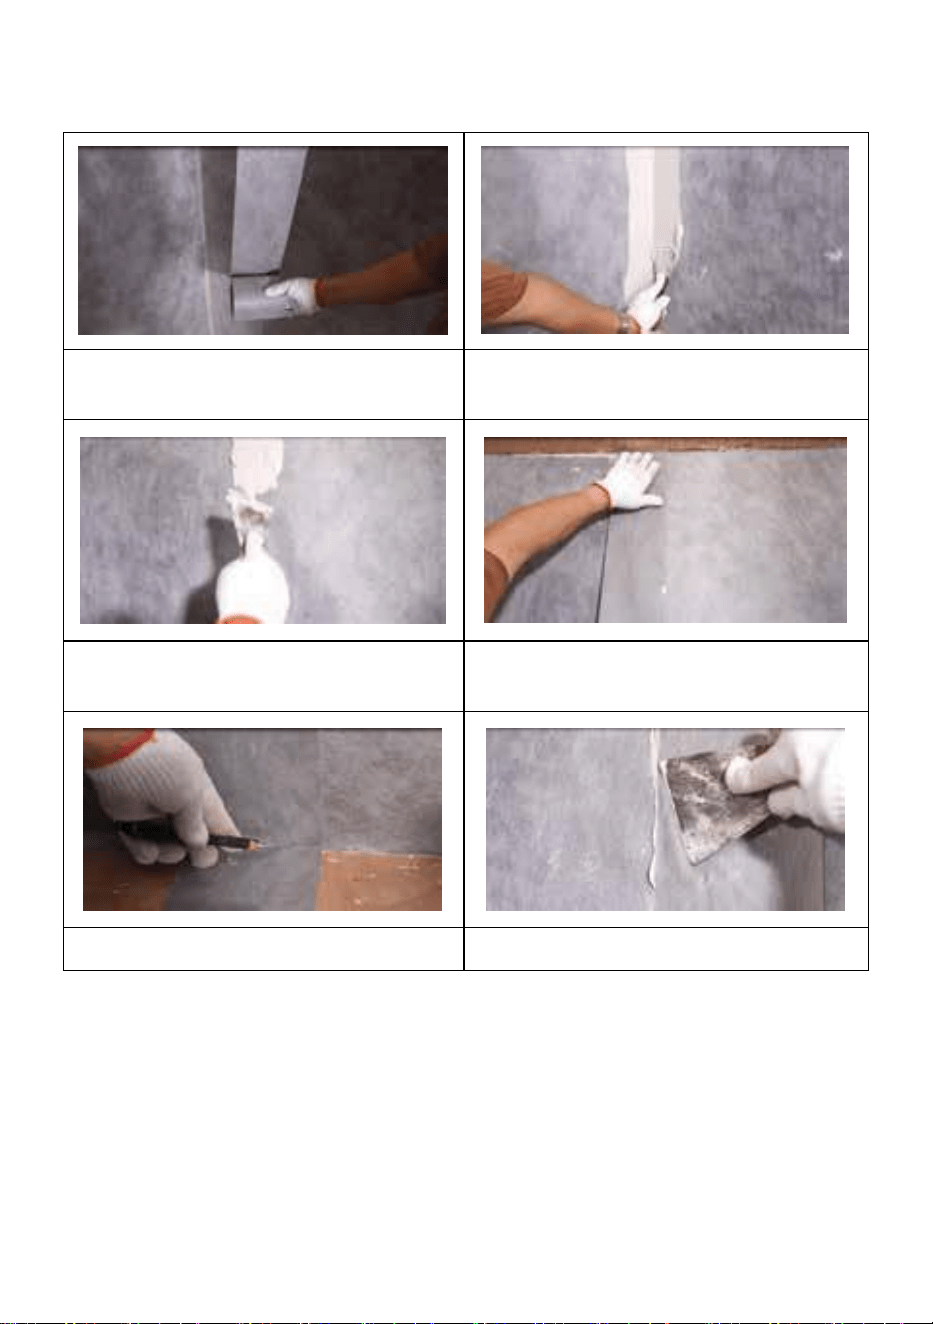
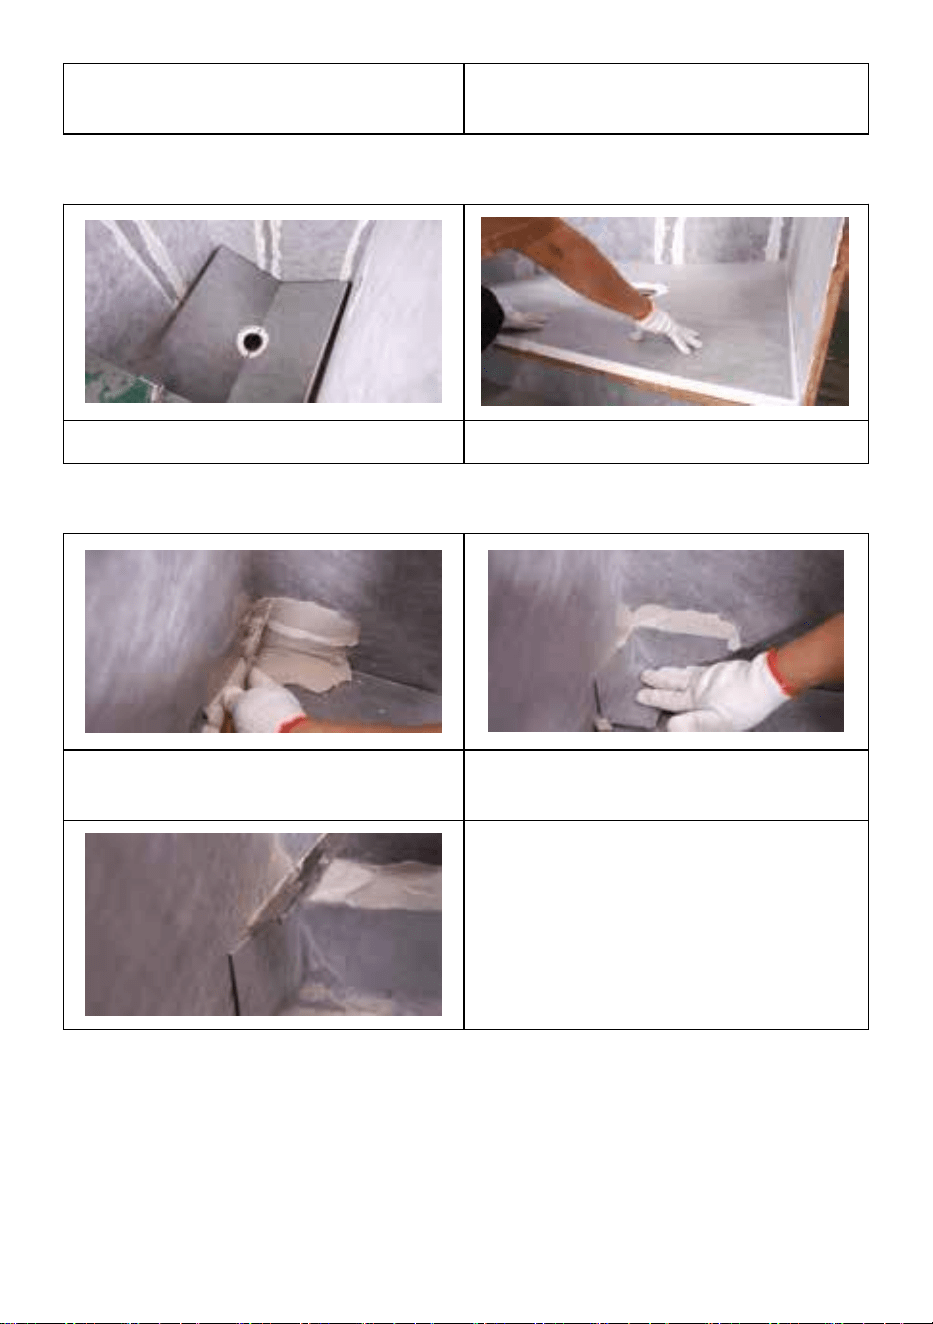
Step 8:
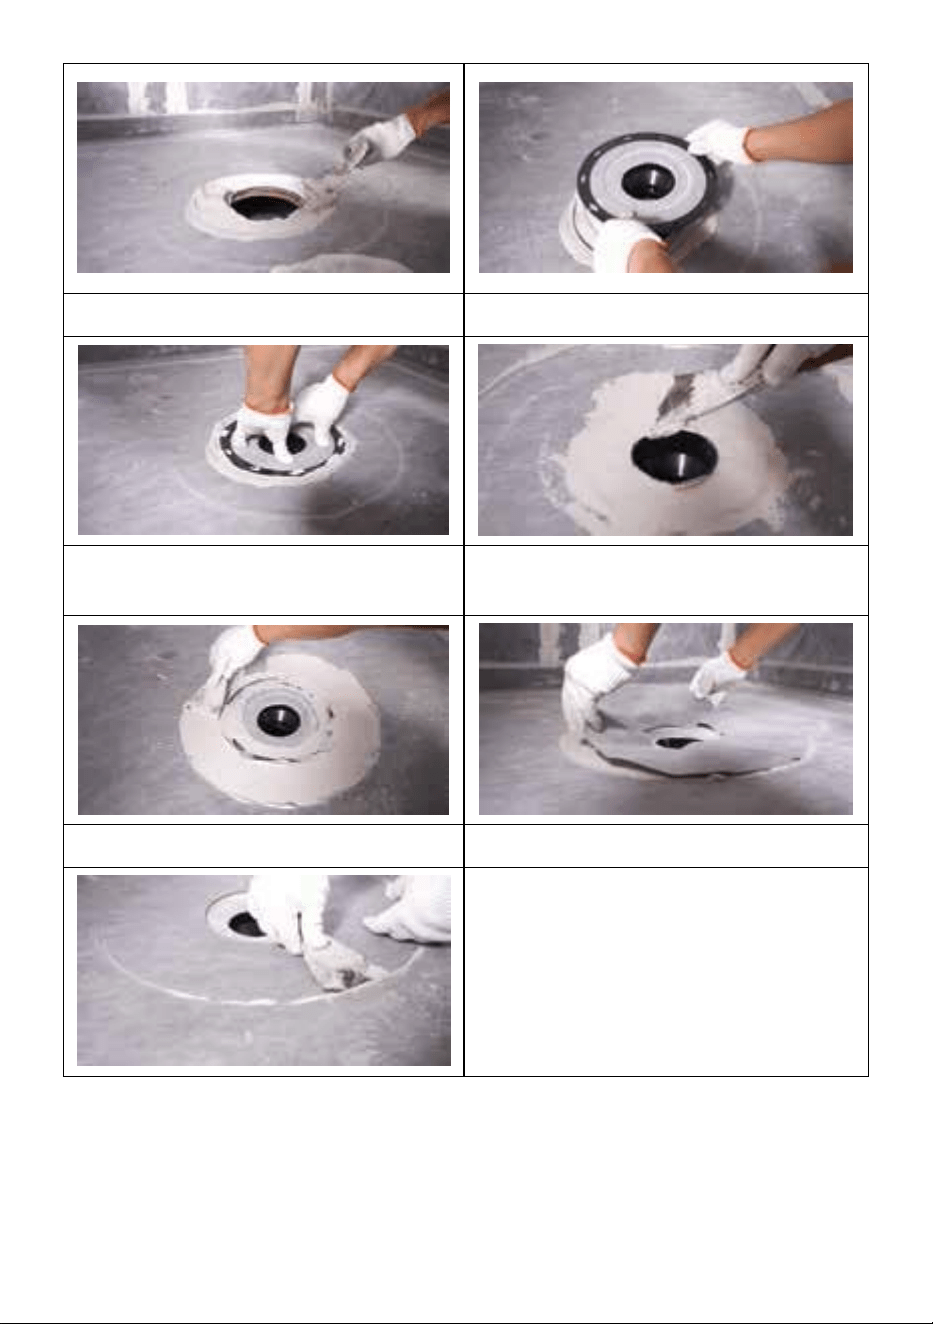
- 8 -
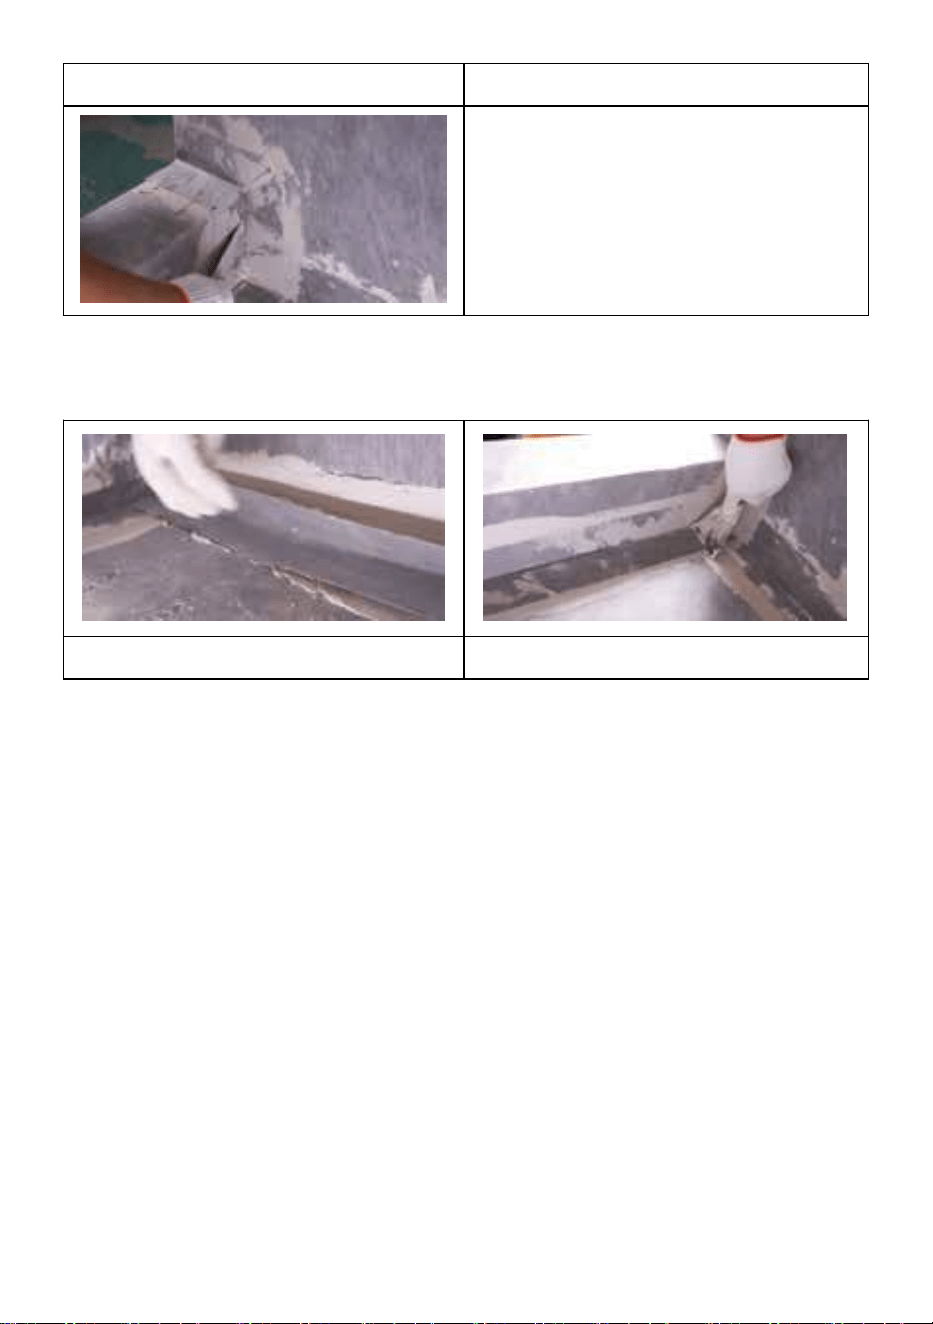
Brush the mortar
Press the bonding flange into the
mortar
Rotate the flange to fix it firmly
Brush the mortar around
Trim the surface
Cover the waterproofing
membrane
Make the surface even
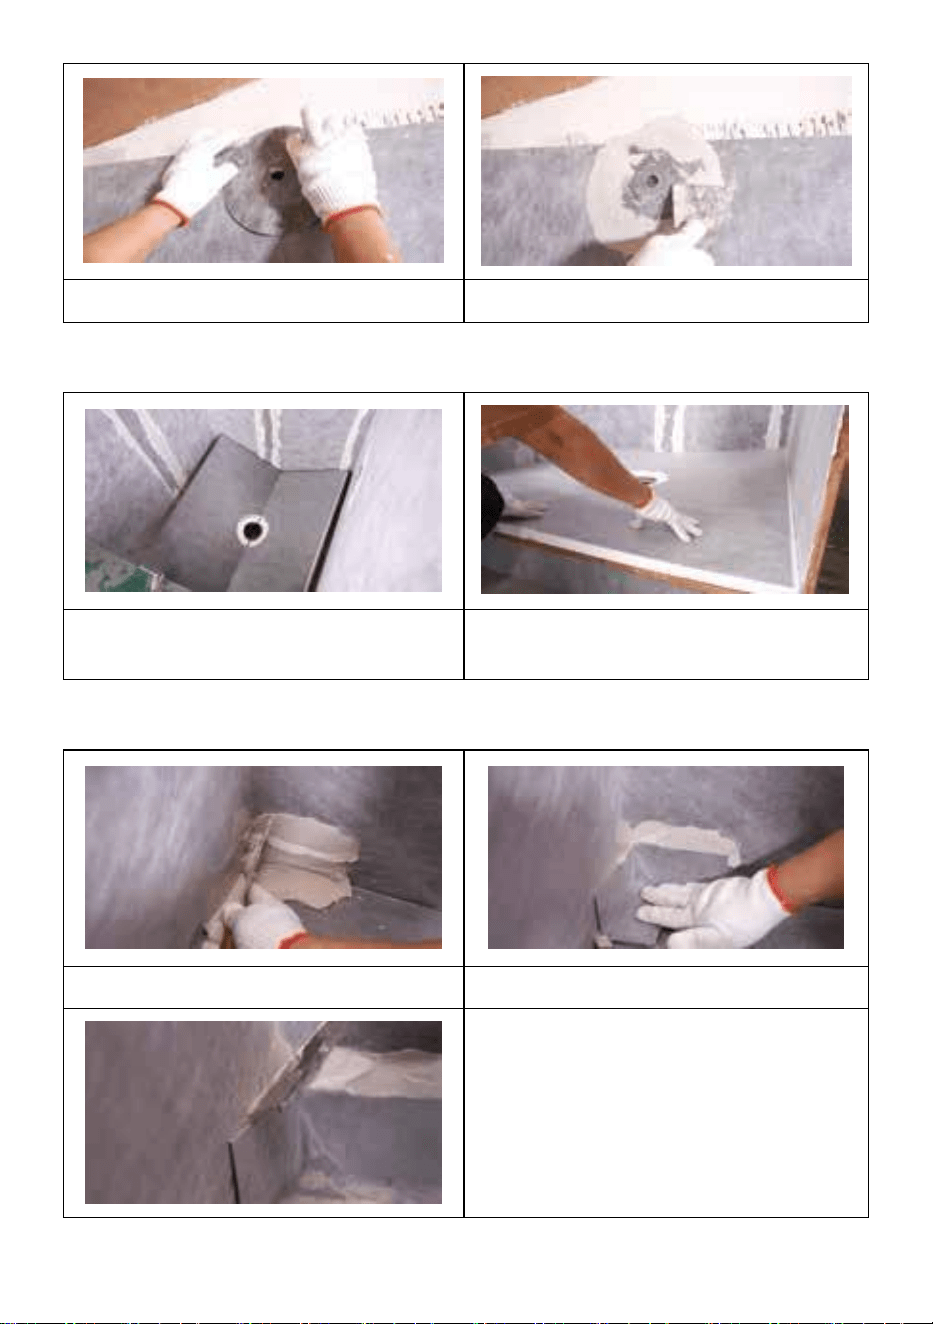
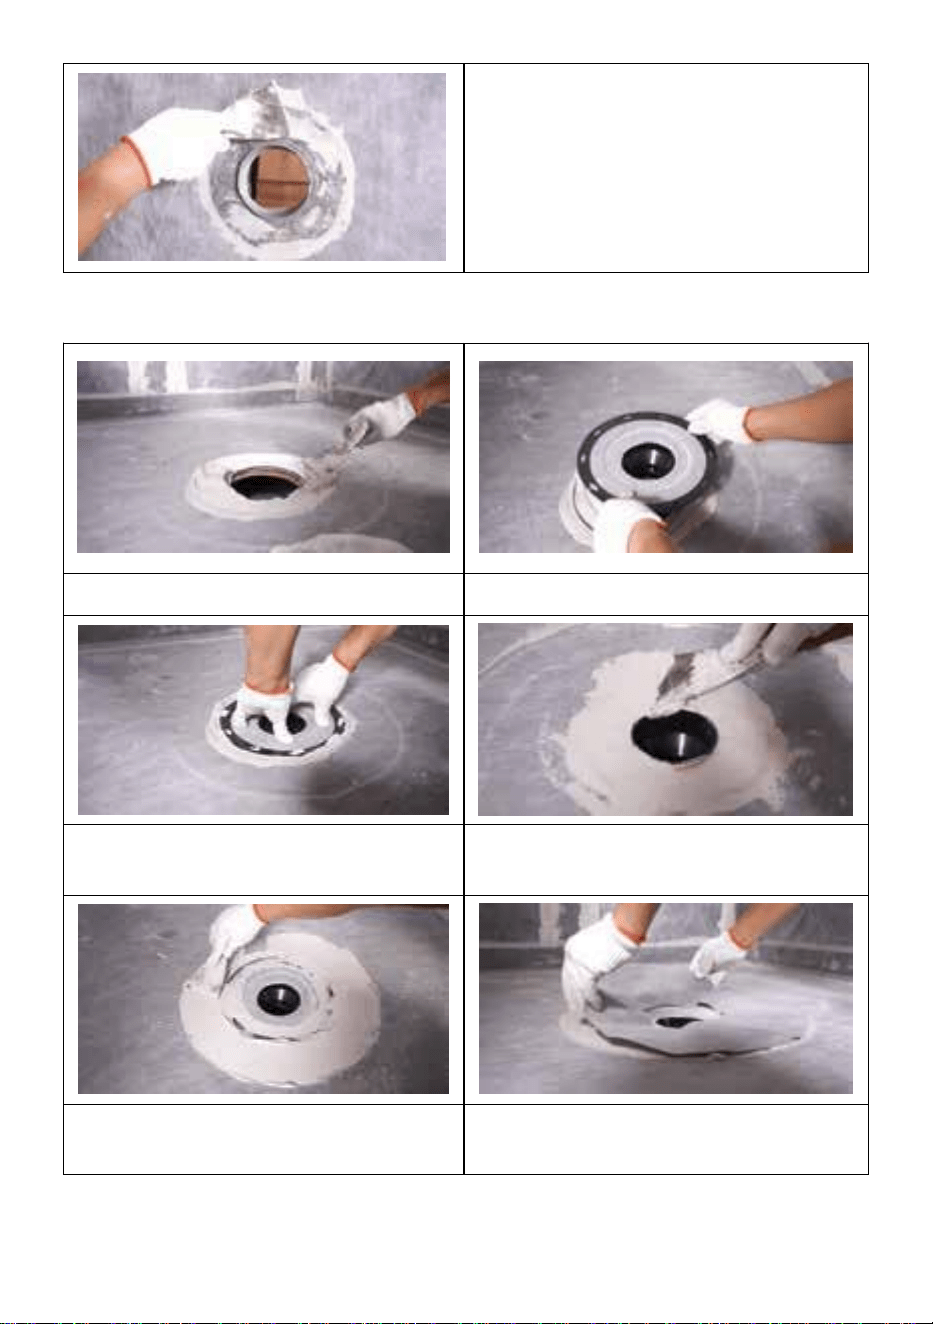
Step 9:
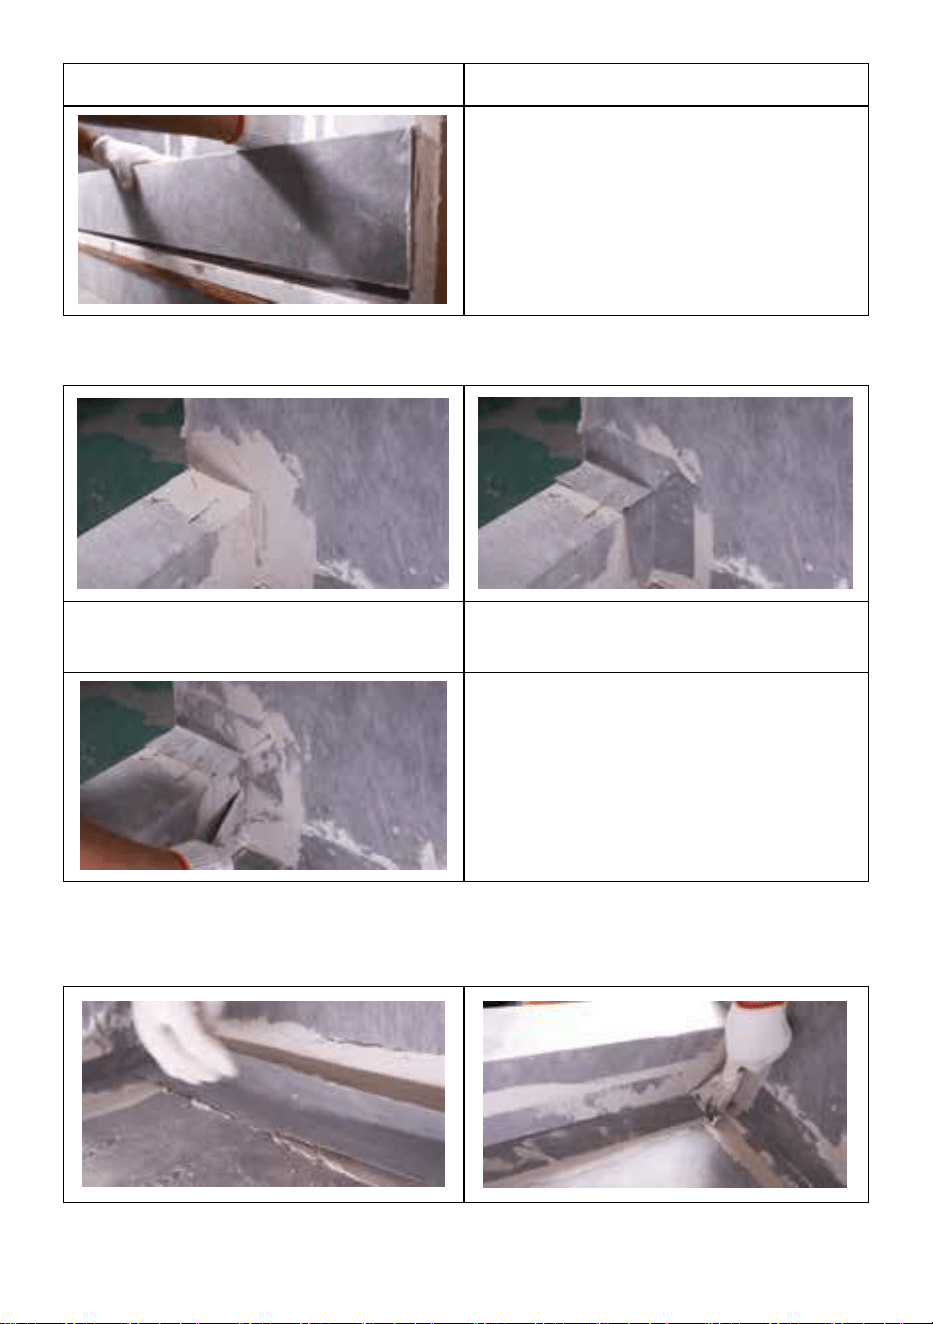
Install the drain adjustment ring
Ensure full coverage
- 9 -
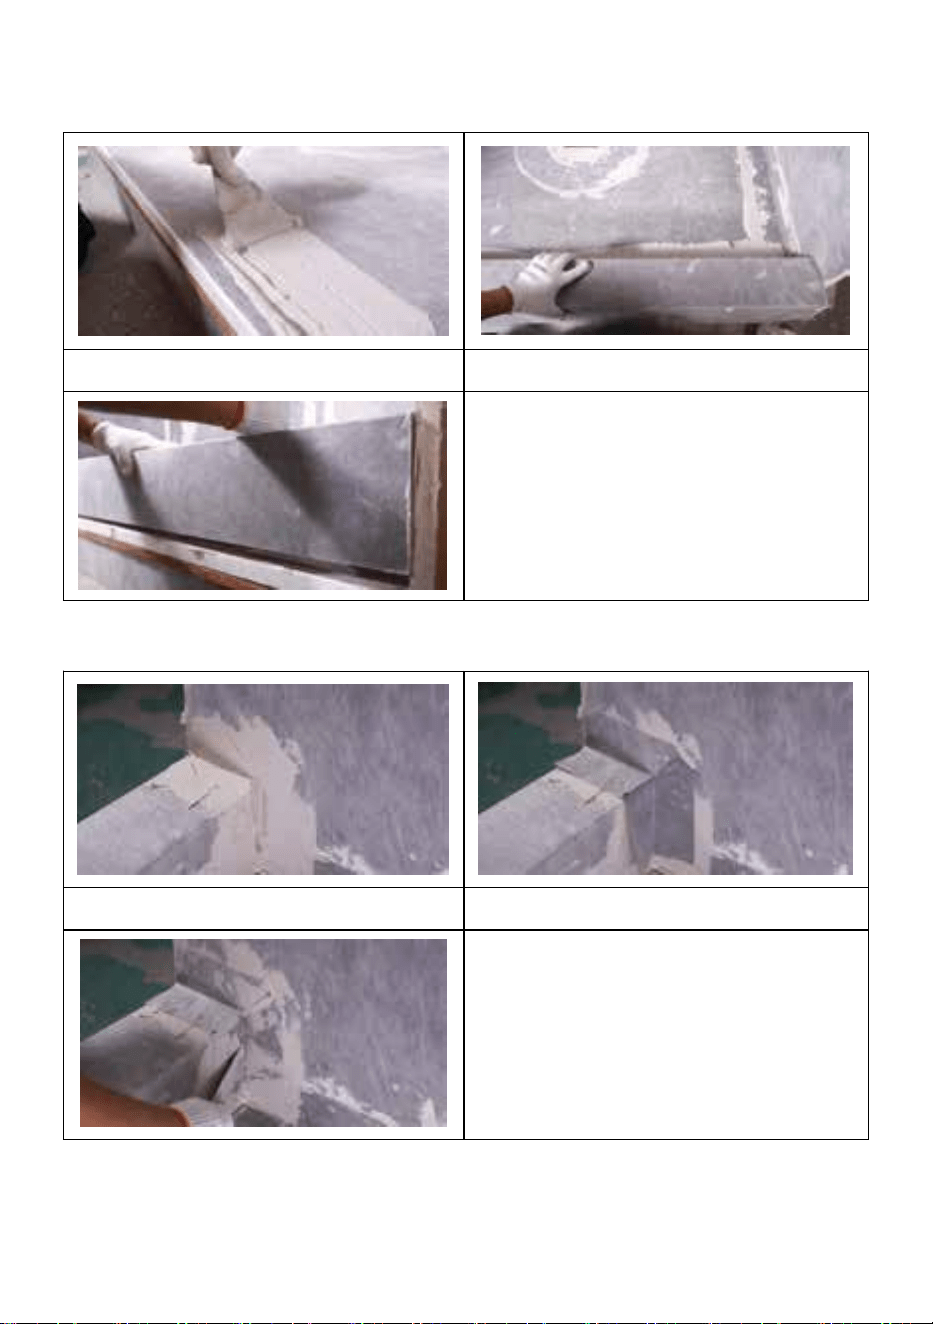
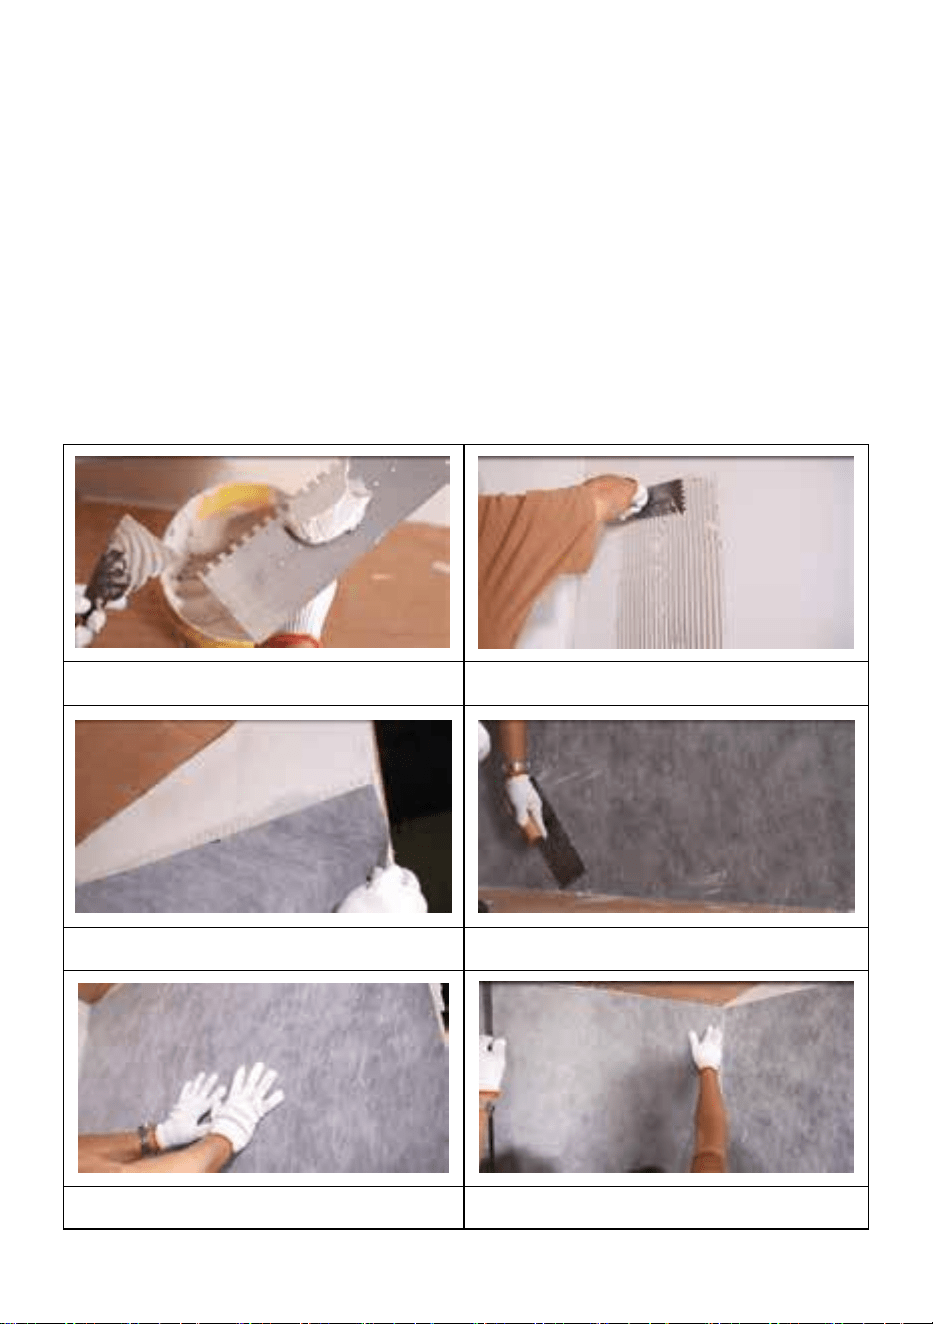
Step 10:
Brush the mortar
Press the curb
Fix the curb firmly
Step 11:
Brush the mortar
Cover the waterproofing corners 2
Trim the corner
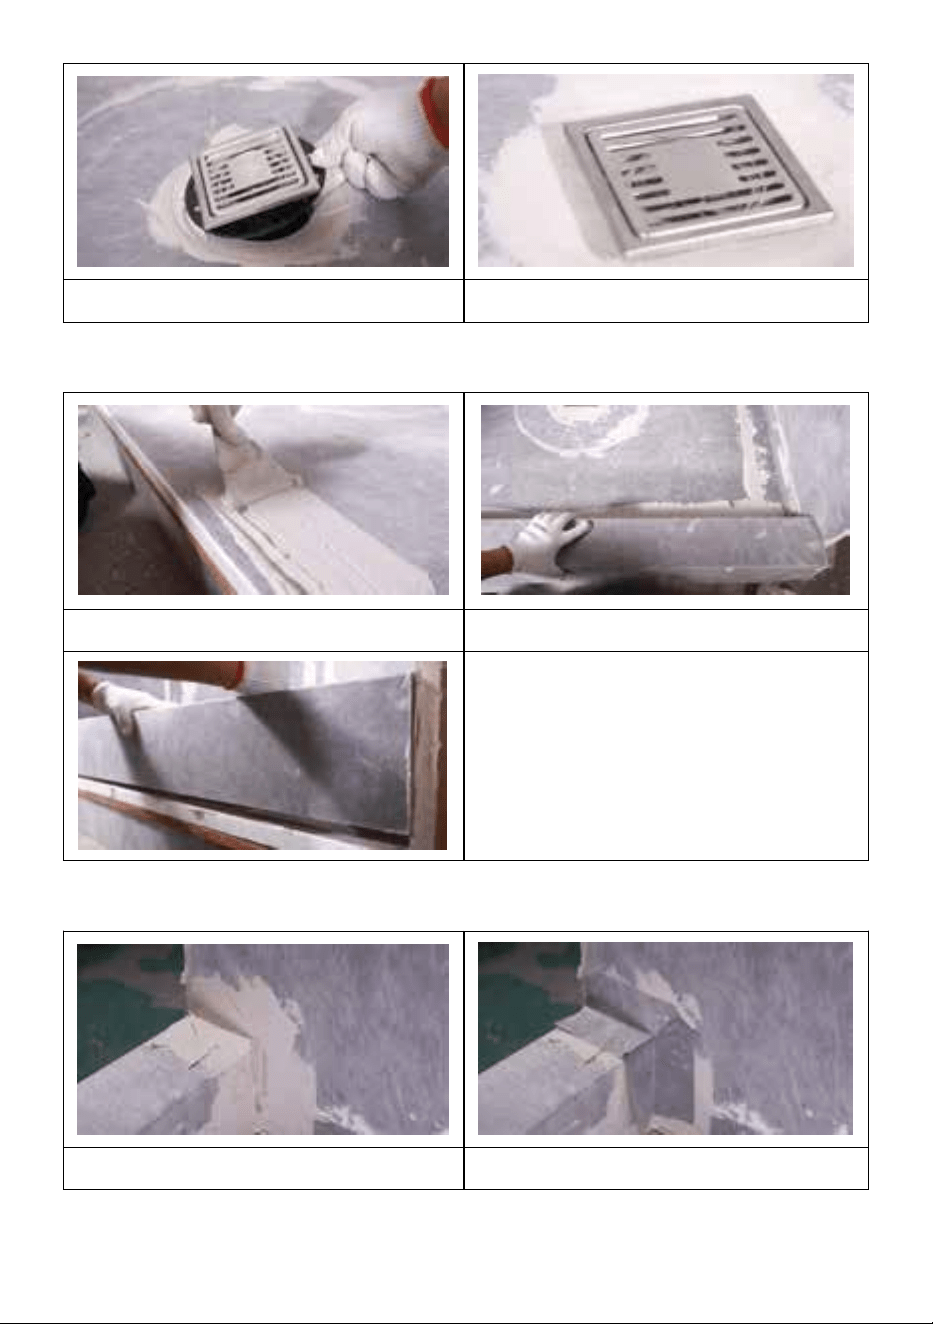
Step 12:
- 10 -
Cover the waterproofing strip
Trim the strip
Installation of waterproof system is completed.
Address
:
Baoshanqu Shuangchenglu 803long 11hao 1602A-1609shi
Shanghai
Imported to AUS: SIHAO PTY LTD, 1 ROKEVA STREETEASTWOOD
NSW 2122 Australia
Imported to USA: Sanven Technology Ltd., Suite 250, 9166 Anaheim
Place, Rancho Cucamonga, CA 91730
REP
UK
Pooledas Group Ltd
Unit 5 Albert Edward House, The Pavilions
Preston, United Kingdom
REP
EC
SHUNSHUN GmbH
Römeräcker 9 Z2021, 76351
Linkenheim-Hochstetten, Germany
Made In China


- 2 -
Technique Assistance et certificat de garantie électronique
www.vevor.com/support
SUBSTRAT DE DOUCHE IMPERMÉABLE
MODÈLE:
JQ-3860PA /JQ-3860ZA/JQ-3860ZP/JQ3860PP
JQ-4848AJQ-4848P/ JQ-4860A /JQ-4860P
JQ-4872A/JQ*4872P/JQ-7272A/JQ-7272P
We continue to be committed to provide you tools with competitive price.
"Save Half", "Half Price" or any other similar expressions used by us only represents an
estimate of savings you might benefit from buying certain tools with us compared to the major
top brands and dose not necessarily mean to cover all categories of tools offered by us. You
are kindly reminded to verify carefully when you are placing an order with us if you are
actually saving half in comparison with the top major brands.

- 3 -

- 1 -
MODÈLE : JQ-3860PA /JQ-3860ZA/JQ-3860ZP/JQ3860PP
JQ-4848AJQ-4848P/ JQ-4860A /JQ-4860P
JQ-4872A/JQ*4872P/JQ-7272A/JQ-7272P
Have product questions? Need technical support? Please feel free to
contact us:
Technical Support and E-Warranty Certificate
www.vevor.com/support
NEED HELP? CONTACT US!
This is the original instruction, please read all manual instructions
carefully before operating. VEVOR reserves a clear interpretation of our
user manual. The appearance of the product shall be subject to the
product you received. Please forgive us that we won't inform you again if
there are any technology or software updates on our product.
WATERPROOF SHOWER
SUBSTRATE
- 2 -
Avertissement : Pour réduire le risque de blessure, l'utilisateur
doit lire attentivement le manuel d'instructions.
Code
Nom
QTÉ.
Code
Nom
QTÉ.
UN
Bordure de
douche
2
g
Coins d'étanchéité 1
4
B
Membrane
d'étanchéité
1
H
Bande d'étanchéité
1
C
Plateau
1
je
Coins d'étanchéité 2
2
D
Truelle
1
J.
Bague de réglage de
vidange
1
- 3 -
E
Joint de vanne
mélangeuse
1
K
Bride de liaison
1
F
Joint de tuyau
1
L
Grille de vidange
1
◆Le nombre de Les bandes d'étanchéité (H) du JQ-7272A et du
JQ-7272P sont 2 pièces.
Les carreaux de céramique et de pierre sont durables, faciles à entretenir
et hygiéniques, représentant le revêtement de surface idéal , en particulier
dans les zones humides telles que les contours de douches et de
baignoires.
Cependant, ces revêtements ne sont pas intrinsèquement étanches. Ils
doivent être installés conjointement avec un système d’étanchéité qui gère
efficacement l’humidité afin de protéger les matériaux de construction
sensibles à l’humidité et de contrôler la croissance des moisissures.
Modèle
Spécification
(pouces)
Couleu
r
Matéria
u de la
bride
Trou pour
receveur de
douche
JQ-3860PA
38*60
Gris
abdos
Compenser
JQ-3860ZA
38*60
abdos
Centre
JQ-3860ZP
38*60
PVC
Centre
JQ3860PP
38*60
PVC
Compenser
JQ-4848A
48*48
abdos
Centre
JQ-4848P
48*48
PVC
Centre
JQ-4860A
48*60
abdos
Centre
JQ-4860P
48*60
PVC
Centre
JQ-4872A
48*72
abdos
Centre
JQ-4872P
48*72
PVC
Centre
JQ-7272A
72*72
abdos
Centre
JQ-7272P
72*72
PVC
Centre
- 4 -
ÉTAPES D'INSTALLATION
◆Nettoyez toute poussière ou autre débris de la surface du support solide.
Humidifier les supports particulièrement secs et poreux afin d'éviter un
séchage prématuré ou un pelage du mortier-colle.
Étape 1:
Préparer le mortier
Badigeonner le mortier
Couvrir la membrane
Couper la membrane
Rendez-le égal
Finir de recouvrir la membrane
- 5 -
Étape 2 :
Recouvrir la bande d'étanchéité
le coin
Coupez la bande
Badigeonner le mortier
Recouvrir la bande d'étanchéité
Le joint
Coupez la bande
Rendre la surface du mur uniforme
Étape 3 :
- 6 -
Couvrir le joint du mitigeur
Rendre la surface uniforme
Étape 4 :
Dépliez le plateau
Encastrer le plateau dans le
mortier
Étape 5 :
Badigeonner le mortier
Installer les coins d'étanchéité 1
Couper le coin

- 7 -
Étape 6 :
Badigeonner le mortier
Couvrir la bande d'étanchéité
Rendre la surface uniforme
Étape 7 :
Badigeonner le mortier
Couvrir le joint du tuyau
Couper le joint du tuyau

- 8 -
Étape 8 :
Badigeonner le mortier
Enfoncer la bride de collage dans
le mortier
Faites pivoter la bride pour la fixer
fermement
Badigeonner le mortier autour
Couper la surface
Couvrir la membrane d'étanchéité
Rendre la surface uniforme
Étape 9 :
- 9 -
Installer la bague de réglage de la
vidange
Assurer une couverture complète
Étape 10 :
Badigeonner le mortier
Appuyez sur le trottoir
Fixez fermement la
bordure
Étape 11 :
Badigeonner le mortier
Couvrir les coins d'étanchéité 2

- 10 -
Couper le coin
Étape 12 :
Couvrir la bande d'étanchéité
Coupez la bande
L'installation du système étanche est terminée.
Adresse : Baoshanqu Shuangchenglu 803long 11hao 1602A-1609shi
Shanghai
Importé en Australie : SIHAO PTY LTD, 1 ROKEVA STREETASTWOOD
NSW 2122 Australie
Importé aux États-Unis : Sanven Technology Ltd., Suite 250, 9166
Anaheim Place, Rancho Cucamonga, CA 91730

- 11 -
REP
UK
Pooledas Group Ltd
Unit 5 Albert Edward House, The Pavilions
Preston, United Kingdom
REP
EC
SHUNSHUN GmbH
Römeräcker 9 Z2021, 76351
Linkenheim-Hochstetten, Germany
Fabriqué en Chine


- 2 -
Technisch Support- und E-Garantie-Zertifikat www.vevor.com/support
WASSERFESTER DUSCHGRUND
MODELL:
JQ-3860PA /JQ-3860ZA/JQ-3860ZP/JQ3860PP
JQ-4848AJQ-4848P / JQ-4860A /JQ-4860P
JQ-4872A/JQ*4872P/JQ-7272A/JQ-7272P
We continue to be committed to provide you tools with competitive price.
"Save Half", "Half Price" or any other similar expressions used by us only represents an
estimate of savings you might benefit from buying certain tools with us compared to the major
top brands and dose not necessarily mean to cover all categories of tools offered by us. You
are kindly reminded to verify carefully when you are placing an order with us if you are
actually saving half in comparison with the top major brands.

- 1 -
MODELL: JQ-3860PA /JQ-3860ZA/JQ-3860ZP/JQ3860PP
JQ-4848AJQ-4848P / JQ-4860A /JQ-4860P
JQ-4872A/JQ*4872P/JQ-7272A/JQ-7272P
Have product questions? Need technical support? Please feel free to
contact us:
Technical Support and E-Warranty Certificate
www.vevor.com/support
NEED HELP? CONTACT US!
This is the original instruction, please read all manual instructions
carefully before operating. VEVOR reserves a clear interpretation of our
user manual. The appearance of the product shall be subject to the
product you received. Please forgive us that we won't inform you again if
there are any technology or software updates on our product.
WATERPROOF SHOWER
SUBSTRATE

- 2 -
Warnung: Um das Verletzungsrisiko zu verringern, muss der
Benutzer die Bedienungsanleitung sorgfältig lesen.
Code
Name
MEN
GE.
Code
Name
MEN
GE.
A
Duschrand
2
G
Wasserdichte Ecken
1
4
B
Wasserdichte
Membran
1
H
Wasserdichter
Streifen
1
C
Tablett
1
ICH
Abdichtung von
Ecken 2
2
D
Kelle
1
J
Abfluss-Einstellring
1

- 3 -
E
Mischventildic
htung
1
K
Klebeflansch
1
F
Rohrdichtung
1
L
Ablaufgitter
1
◆Die Anzahl der Die wasserdichten Streifen (H) von JQ-7272A und
JQ-7272P sind 2 Stück.
Keramik- und Steinfliesen sind langlebig, pflegeleicht und hygienisch und
stellen den idealen Oberflächenbelag insbesondere in Nassbereichen wie
Duschen und Badewannenumrandungen dar.
Allerdings sind diese Beläge nicht grundsätzlich wasserdicht. Sie müssen
in Verbindung mit einem Abdichtungssystem installiert werden, das die
Feuchtigkeit effektiv verwaltet, um feuchtigkeitsempfindliche
Baumaterialien zu schützen und Schimmelbildung zu verhindern.
Modell
Spezifikation
(Zoll)
Farbe
Flansch
material
Loch für
Duschwanne
JQ-3860PA
38*60
Grau
Abs
Versatz
JQ-3860ZA
38*60
Abs
Center
JQ-3860ZP
38*60
PVC
Center
JQ3860PP
38*60
PVC
Versatz
JQ-4848A
48*48
Abs
Center
JQ-4848P
48*48
PVC
Center
JQ-4860A
48*60
Abs
Center
JQ-4860P
48*60
PVC
Center
JQ-4872A
48*72
Abs
Center
JQ-4872P
48*72
PVC
Center
JQ-7272A
72*72
Abs
Center
JQ-7272P
72*72
PVC
Center
- 4 -
INSTALLATIONSSCHRITTE
◆Entfernen Sie Staub und andere Rückstände von der Oberfläche der
festen Unterlage. Befeuchten Sie besonders trockene und poröse
Untergründe, um ein vorzeitiges Austrocknen oder eine Hautbildung des
Dünnbettmörtels zu verhindern.
Schritt 1:
Mörtel vorbereiten
Den Mörtel bestreichen
Decken Sie die Membran ab
Schneiden Sie die Membran ab
Machen Sie es gleichmäßig
Bedecken Sie die Membran fertig
- 5 -
Schritt 2 :
Decken Sie den
Abdichtungsstreifen ab
die Ecke
Schneiden Sie den Streifen ab
Den Mörtel bestreichen
Decken Sie den
Abdichtungsstreifen ab
Der Joint
Schneiden Sie den Streifen ab
Machen Sie die Wandoberfläche
eben
Schritt 3 :
- 6 -
Decken Sie die Dichtung des
Mischventils ab
Machen Sie die Oberfläche eben
Schritt 4 :
Klappen Sie das Fach auf
Die Schale in den Mörtel einbetten
Schritt 5 :
Den Mörtel bestreichen
Installieren Sie die
Abdichtungsecken 1
- 7 -
Schneiden Sie die Ecke ab
Schritt 6 :
Den Mörtel bestreichen
Decken Sie den
Abdichtungsstreifen ab
Machen Sie die Oberfläche eben
Schritt 7 :
Den Mörtel bestreichen
Decken Sie die Rohrdichtung ab

- 8 -
Schneiden Sie die
Rohrdichtung ab
Schritt 8 :
Den Mörtel bestreichen
Den Klebeflansch in den Mörtel
eindrücken
Drehen Sie den Flansch, um ihn
fest zu befestigen
Den Mörtel rundherum bestreichen
Beschneiden Sie die Oberfläche
Decken Sie die Abdichtungsbahn
ab
- 9 -
Machen Sie die Oberfläche eben
Schritt 9 :
Installieren Sie den
Ablaufeinstellring
Sorgen Sie für eine vollständige
Abdeckung
Schritt 10 :
Den Mörtel bestreichen
Drücken Sie auf den Bordstein
Befestigen Sie den
Bordstein fest
Schritt 11 :
- 10 -
Den Mörtel bestreichen
Decken Sie die wasserdichten
Ecken ab 2
Schneiden Sie die Ecke ab
Schritt 12 :
Decken Sie den
Abdichtungsstreifen ab
Schneiden Sie den Streifen ab
Die Installation des wasserdichten Systems ist
abgeschlossen.
Adresse: Baoshanqu Shuangchenglu 803long 11hao 1602A-1609shi
- 11 -
Shanghai
Importiert nach AUS: SIHAO PTY LTD, 1 ROKEVA STREETEASTWOOD
NSW 2122 Australien
In die USA importiert: Sanven Technology Ltd., Suite 250, 9166 Anaheim
Place, Rancho Cucamonga, CA 91730
REP
UK
Pooledas Group Ltd
Unit 5 Albert Edward House, The Pavilions
Preston, United Kingdom
REP
EC
SHUNSHUN GmbH
Römeräcker 9 Z2021, 76351
Linkenheim-Hochstetten, Germany
In China hergestellt


- 2 -
Tecnico Supporto e certificato di garanzia elettronica www.vevor.com/support
SUPPORTO DOCCIA IMPERMEABILE
MODELLO:
JQ-3860PA /JQ-3860ZA/JQ-3860ZP/JQ3860PP
JQ-4848AJQ-4848P / JQ-4860A /JQ-4860P
JQ-4872A/JQ*4872P/JQ-7272A/JQ-7272P
We continue to be committed to provide you tools with competitive price.
"Save Half", "Half Price" or any other similar expressions used by us only represents an
estimate of savings you might benefit from buying certain tools with us compared to the major
top brands and dose not necessarily mean to cover all categories of tools offered by us. You
are kindly reminded to verify carefully when you are placing an order with us if you are
actually saving half in comparison with the top major brands.

- 1 -
MODELLO:JQ-3860PA /JQ-3860ZA/JQ-3860ZP/JQ3860PP
JQ-4848AJQ-4848P / JQ-4860A /JQ-4860P
JQ-4872A/JQ*4872P/JQ-7272A/JQ-7272P
Have product questions? Need technical support? Please feel free to
contact us:
Technical Support and E-Warranty Certificate
www.vevor.com/support
NEED HELP? CONTACT US!
This is the original instruction, please read all manual instructions
carefully before operating. VEVOR reserves a clear interpretation of our
user manual. The appearance of the product shall be subject to the
product you received. Please forgive us that we won't inform you again if
there are any technology or software updates on our product.
WATERPROOF SHOWER
SUBSTRATE

- 2 -
Avvertenza: per ridurre il rischio di lesioni, l'utente deve
leggere attentamente il manuale di istruzioni.
Codi
ce
Nome
QUA
NTIT
À.
Codi
ce
Nome
QUA
NTIT
À.
UN
Cordolo
doccia
2
G
Angoli
impermeabilizzanti 1
4
B
Membrana
impermeabiliz
zante
1
H
Striscia
impermeabilizzante
1
C
Vassoio
1
IO
Angoli
impermeabilizzanti 2
2
- 3 -
D
Cazzuola
1
J
Anello di regolazione
dello scarico
1
E
Guarnizione
della valvola
di
miscelazione
1
K
Flangia di
collegamento
1
F
Guarnizione
del tubo
1
l
Griglia di scarico
1
◆Il numero di Le strisce impermeabili (H) di JQ-7272A e JQ-7272P sono 2
pezzi.
Le piastrelle in ceramica e pietra sono durevoli, di facile manutenzione e
igieniche e rappresentano il rivestimento ideale delle superfici, in
particolare nelle zone umide come docce e bordi vasca.
Tuttavia, questi rivestimenti non sono intrinsecamente impermeabili.
Devono essere installati insieme a un sistema impermeabilizzante che
gestisca efficacemente l'umidità per proteggere i materiali da costruzione
sensibili all'umidità e controllare la crescita della muffa.
Modello
Specifica
(pollici)
Colore
Material
e della
flangia
Foro per piatto
doccia
JQ-3860PA
38*60
Grigio
addomin
ali
Compensare
JQ-3860ZA
38*60
addomin
ali
Centro
JQ-3860ZP
38*60
PVC
Centro
JQ3860PP
38*60
PVC
Compensare
JQ-4848A
48*48
addomin
ali
Centro
JQ-4848P
48*48
PVC
Centro
JQ-4860A
48*60
addomin
Centro
- 4 -
ali
JQ-4860P
48*60
PVC
Centro
JQ-4872A
48*72
addomin
ali
Centro
JQ-4872P
48*72
PVC
Centro
JQ-7272A
72*72
addomin
ali
Centro
JQ-7272P
72*72
PVC
Centro
FASI DI INSTALLAZIONE
◆Rimuovere polvere o altri detriti dalla superficie del supporto solido.
Inumidire i supporti particolarmente asciutti e porosi per evitare un precoce
essiccamento o sfogliamento della malta sottile.
Passo 1:
Preparare la malta
Spennellare la malta
- 5 -
Coprire la membrana
Taglia la membrana
Rendilo uniforme
Finire di coprire la membrana
Passo 2 :
Coprire la striscia
impermeabilizzante
l'angolo
Taglia la striscia
Spennellare la malta
Coprire la striscia
impermeabilizzante
il giunto
- 6 -
Taglia la striscia
Rendere uniforme la superficie del
muro
Passaggio 3 :
Coprire la guarnizione della
valvola miscelatrice
Rendi la superficie uniforme
Passaggio 4 :
Aprire il vassoio
Incorporare la vaschetta nel
mortaio
Passaggio 5 :
- 7 -
Spennellare la malta
Installare gli angoli
impermeabilizzanti 1
Taglia l'angolo
Passaggio 6 :
Spennellare la malta
Coprire la striscia
impermeabilizzante
Rendi la superficie uniforme
Passaggio 7 :
- 8 -
Spennellare la malta
Coprire la guarnizione del tubo
Tagliare la guarnizione del
tubo
Passaggio 8 :
Spennellare la malta
Premere la flangia di incollaggio
nella malta
Ruotare la flangia per fissarla
saldamente
Spennellare la malta

- 9 -
Taglia la superficie
Coprire la membrana
impermeabilizzante
Rendi la superficie uniforme
Passaggio 9 :
Installare l'anello di regolazione
dello scarico
Garantire una copertura completa
Passaggio 10 :
- 10 -
Spennellare la malta
Premi il cordolo
Fissare saldamente il
cordolo
Passaggio 11 :
Spennellare la malta
Coprire gli angoli
dell'impermeabilizzazione 2
Taglia l'angolo
Passaggio 12 :
- 11 -
Coprire la striscia
impermeabilizzante
Taglia la striscia
L'installazione del sistema impermeabile è completata.
Indirizzo: Baoshanqu Shuangchenglu 803long 11hao 1602A-1609shi
Shanghai
Importato in AUS: SIHAO PTY LTD, 1 ROKEVA STREETEASTWOOD
NSW 2122 Australia
Importato negli Stati Uniti: Sanven Technology Ltd., Suite 250, 9166
Anaheim Place, Rancho Cucamonga, CA 91730
REP
UK
Pooledas Group Ltd
Unit 5 Albert Edward House, The Pavilions
Preston, United Kingdom
REP
EC
SHUNSHUN GmbH
Römeräcker 9 Z2021, 76351
Linkenheim-Hochstetten, Germany
Made in China


- 2 -
Técnico Soporte y certificado de garantía electrónica www.vevor.com/support
SUSTRATO DE DUCHA IMPERMEABLE
MODELO:
JQ-3860PA /JQ-3860ZA/JQ-3860ZP/JQ3860PP
JQ-4848AJQ-4848P / JQ-4860A /JQ-4860P
JQ-4872A/JQ*4872P/JQ-7272A/JQ-7272P
We continue to be committed to provide you tools with competitive price.
"Save Half", "Half Price" or any other similar expressions used by us only represents an
estimate of savings you might benefit from buying certain tools with us compared to the major
top brands and dose not necessarily mean to cover all categories of tools offered by us. You
are kindly reminded to verify carefully when you are placing an order with us if you are
actually saving half in comparison with the top major brands.

- 1 -
MODELO: JQ-3860PA /JQ-3860ZA/JQ-3860ZP/JQ3860PP
JQ-4848AJQ-4848P / JQ-4860A /JQ-4860P
JQ-4872A/JQ*4872P/JQ-7272A/JQ-7272P
Have product questions? Need technical support? Please feel free to
contact us:
Technical Support and E-Warranty Certificate
www.vevor.com/support
NEED HELP? CONTACT US!
This is the original instruction, please read all manual instructions
carefully before operating. VEVOR reserves a clear interpretation of our
user manual. The appearance of the product shall be subject to the
product you received. Please forgive us that we won't inform you again if
there are any technology or software updates on our product.
WATERPROOF SHOWER
SUBSTRATE

- 2 -
Advertencia: para reducir el riesgo de lesiones, el usuario
debe leer atentamente el manual de instrucciones.
Códi
go
Nombre
CAN
T.
Códi
go
Nombre
CAN
T.
A
Bordillo de
ducha
2
GRA
MO
Impermeabilización
de Esquinas 1
4
B
Membrana
impermeabiliz
ante
1
h
Tira
impermeabilizante
1
C
Bandeja
1
I
Impermeabilización
de Esquinas 2
2

- 3 -
D
Paleta
1
j
Anillo de ajuste de
drenaje
1
mi
Sello de
válvula
mezcladora
1
k
Brida de unión
1
F
Sello de
tubería
1
l
Rejilla de drenaje
1
◆El número de Las tiras impermeabilizantes (H) de JQ-7272A y JQ-7272P
son de 2 piezas.
Las baldosas de cerámica y piedra son duraderas, fáciles de mantener e
higiénicas, y representan los revestimientos de superficies ideales,
especialmente en zonas húmedas como duchas y bañeras.
Sin embargo, estos revestimientos no son inherentemente impermeables.
Deben instalarse junto con un sistema de impermeabilización que controle
eficazmente la humedad para proteger los materiales de construcción
sensibles a la humedad y controlar el crecimiento de moho.
Modelo
Especificació
n (pulgadas)
Color
Material
de brida
Orificio para
plato de ducha
JQ-3860PA
38*60
Gris
abdomin
ales
Compensar
JQ-3860ZA
38*60
abdomin
ales
Centro
JQ-3860ZP
38*60
CLORU
RO DE
POLIVIN
ILO
Centro
JQ3860PP
38*60
CLORU
RO DE
POLIVIN
Compensar

- 4 -
ILO
JQ-4848A
48*48
abdomin
ales
Centro
JQ-4848P
48*48
CLORU
RO DE
POLIVIN
ILO
Centro
JQ-4860A
48*60
abdomin
ales
Centro
JQ-4860P
48*60
CLORU
RO DE
POLIVIN
ILO
Centro
JQ-4872A
48*72
abdomin
ales
Centro
JQ-4872P
48*72
CLORU
RO DE
POLIVIN
ILO
Centro
JQ-7272A
72*72
abdomin
ales
Centro
JQ-7272P
72*72
CLORU
RO DE
POLIVIN
ILO
Centro
PASOS DE INSTALACIÓN
◆
Limpie el polvo u otros residuos de la superficie del respaldo sólido.
Humedezca los sustratos particularmente secos y porosos para ayudar a
prevenir el secado prematuro o la formación de piel del mortero de capa
- 5 -
delgada.
Paso 1:
preparar mortero
Cepilla el mortero
Cubrir la membrana
Recortar la membrana
hazlo incluso
Terminar de cubrir la membrana.
Paso 2 :
- 6 -
Cubra la tira impermeabilizante
la esquina
Recortar la tira
Cepilla el mortero
Cubra la tira impermeabilizante
la articulación
Recortar la tira
Haga que la superficie de la pared
sea uniforme
Paso 3 :
- 7 -
Cubra el sello de la válvula
mezcladora.
Haz la superficie uniforme
Etapa 4 :
desplegar la bandeja
Incrustar la bandeja en el mortero.
Paso 5 :
Cepilla el mortero
Instalar las esquinas
impermeabilizantes 1
Recortar la esquina
Paso 6 :
- 8 -
Cepilla el mortero
Cubrir la tira impermeabilizante.
Haz la superficie uniforme
Paso 7 :
Cepilla el mortero
Cubra el sello de la tubería
Recortar el sello de la
tubería
Paso 8 :
- 9 -
Cepilla el mortero
Presione la brida de unión en el
mortero.
Gire la brida para fijarla
firmemente.
Cepille el mortero alrededor
Recortar la superficie
Cubrir la membrana
impermeabilizante.
Haz la superficie uniforme
Paso 9 :

- 10 -
Instale el anillo de ajuste del
drenaje.
Garantizar una cobertura total
Paso 10 :
Cepilla el mortero
Presione la acera
Fija el bordillo firmemente
Paso 11 :
Cepilla el mortero
Cubrir las esquinas
- 11 -
impermeabilizantes 2
Recortar la esquina
Paso 12 :
Cubrir la tira impermeabilizante.
Recortar la tira
Se completa la instalación del sistema impermeable.
Dirección: Baoshanqu Shuangchenglu 803long 11hao 1602A-1609shi
Shanghai
Importado a AUS: SIHAO PTY LTD, 1 ROKEVA STREETEASTWOOD
NSW 2122 Australia
Importado a EE. UU.: Sanven Technology Ltd., Suite 250, 9166 Anaheim
Place, Rancho Cucamonga, CA 91730

- 12 -
REP
UK
Pooledas Group Ltd
Unit 5 Albert Edward House, The Pavilions
Preston, United Kingdom
REP
EC
SHUNSHUN GmbH
Römeräcker 9 Z2021, 76351
Linkenheim-Hochstetten, Germany
Hecho en china


- 2 -
Techniczny Certyfikat wsparcia i e-gwarancji www.vevor.com/support
WODOODPORNE PODŁOŻE PRYSZNICOWE
MODEL:
JQ-3860PA /JQ-3860ZA/JQ-3860ZP/JQ3860PP
JQ-4848AJQ-4848P/ JQ-4860A /JQ-4860P
JQ-4872A/JQ*4872P/JQ-7272A/JQ-7272P
We continue to be committed to provide you tools with competitive price.
"Save Half", "Half Price" or any other similar expressions used by us only represents an
estimate of savings you might benefit from buying certain tools with us compared to the major
top brands and dose not necessarily mean to cover all categories of tools offered by us. You
are kindly reminded to verify carefully when you are placing an order with us if you are
actually saving half in comparison with the top major brands.

- 1 -
MODELU:JQ-3860PA /JQ-3860ZA/JQ-3860ZP/JQ3860PP
JQ-4848AJQ-4848P/ JQ-4860A /JQ-4860P
JQ-4872A/JQ*4872P/JQ-7272A/JQ-7272P
Have product questions? Need technical support? Please feel free to
contact us:
Technical Support and E-Warranty Certificate
www.vevor.com/support
NEED HELP? CONTACT US!
This is the original instruction, please read all manual instructions
carefully before operating. VEVOR reserves a clear interpretation of our
user manual. The appearance of the product shall be subject to the
product you received. Please forgive us that we won't inform you again if
there are any technology or software updates on our product.
WATERPROOF SHOWER
SUBSTRATE

- 2 -
Ostrzeżenie — aby zmniejszyć ryzyko obrażeń, użytkownik
musi uważnie przeczytać instrukcję obsługi.
Kod
Nazwa
ILOŚ
Ć.
Kod
Nazwa
ILOŚ
Ć.
A
Krawężnik
prysznicowy
2
G
Wodoodporne
narożniki 1
4
B
Wodoodporna
membrana
1
H
Wodoodporny pasek
1
C
Taca
1
I
Hydroizolacja
narożników 2
2
D
Kielnia
1
J
Pierścień regulacji
spustu
1

- 3 -
mi
Uszczelka
zaworu
mieszającego
1
K
Kołnierz łączący
1
F
Uszczelka
rury
1
L
Ruszt spustowy
1
◆
Liczba Paski wodoodporne (H) JQ -7272A i JQ-7272P to 2 sztuki.
Płytki ceramiczne i kamienne są trwałe, łatwe w utrzymaniu i higieniczne,
stanowią idealne pokrycie powierzchni, szczególnie w obszarach
wilgotnych, takich jak prysznice i obudowy wanien.
Jednakże te pokrycia nie są z natury wodoodporne. Muszą być
instalowane w połączeniu z systemem hydroizolacji, który skutecznie
zarządza wilgocią, aby chronić wrażliwe na wilgoć materiały budowlane i
kontrolować rozwój pleśni.
Model
Specyfikacja
(cale)
Kolor
Materiał
kołnierz
a
Otwór na
brodzik
JQ-3860PA
38*60
Szary
ABS
Zrównoważyć
JQ-3860ZA
38*60
ABS
Centrum
JQ-3860ZP
38*60
PCV
Centrum
JQ3860PP
38*60
PCV
Zrównoważyć
JQ-4848A
48*48
ABS
Centrum
JQ-4848P
48*48
PCV
Centrum
JQ-4860A
48*60
ABS
Centrum
JQ-4860P
48*60
PCV
Centrum
JQ-4872A
48*72
ABS
Centrum
JQ-4872P
48*72
PCV
Centrum
JQ-7272A
72*72
ABS
Centrum
JQ-7272P
72*72
PCV
Centrum
- 4 -
KROKI INSTALACJI
◆Wyczyść powierzchnię stałego podłoża z kurzu i innych zanieczyszczeń.
Szczególnie suche i porowate podłoża należy zwilżyć, aby zapobiec
przedwczesnemu wysychaniu lub tworzeniu się kożucha
cienkowarstwowej zaprawy.
Krok 1:
Przygotuj zaprawę
Posmaruj zaprawę
Przykryj membranę
Przytnij membranę
Zrób to równo
Zakończ zakrywanie membrany
- 5 -
Krok 2 :
Zakryj pasek hydroizolacyjny
róg
Przytnij pasek
Posmaruj zaprawę
Zakryj pasek hydroizolacyjny
staw
Przytnij pasek
Wyrównaj powierzchnię ściany
Krok 3 :

- 6 -
Zakryć uszczelkę zaworu
mieszającego
Wyrównaj powierzchnię
Krok 4 :
Rozłóż tacę
Zanurz tacę w zaprawie
Krok 5 :
Posmaruj zaprawę
Zamontuj narożniki hydroizolacyjne
1

- 7 -
Przytnij róg
Krok 6 :
Posmaruj zaprawę
Zakryj pasek hydroizolacyjny
Wyrównaj powierzchnię
Krok 7 :
Posmaruj zaprawę
Zakryć uszczelkę rury

- 8 -
Przytnij uszczelkę rury
Krok 8 :
Posmaruj zaprawę
Wcisnąć kołnierz łączący w
zaprawę
Obróć kołnierz, aby go mocno
zamocować
Posmaruj zaprawą dookoła
Przytnij powierzchnię
Przykryj membranę
hydroizolacyjną

- 9 -
Wyrównaj powierzchnię
Krok 9 :
Zamontuj pierście
ń
regulacyjny
spustu
Zapewnij pełne pokrycie
Krok 10 :
Posmaruj zaprawę
Naciśnij krawężnik
Mocno zamocuj
krawężnik
Krok 11 :
- 10 -
Posmaruj zaprawę
Zakryj narożniki hydroizolacją 2
Przytnij róg
Krok 12 :
Zakryj pasek hydroizolacyjny
Przytnij pasek
Zakończono montaż systemu wodoodpornego.
Adres: Baoshanqu Shuangchenglu 803long 11hao 1602A-1609shi
Szanghaj
Import do AUS: SIHAO PTY LTD, 1 ROKEVA STREETEASTWOOD NSW
2122 Australia

- 11 -
Import do USA: Sanven Technology Ltd., Suite 250, 9166 Anaheim Place,
Rancho Cucamonga, CA 91730
REP
UK
Pooledas Group Ltd
Unit 5 Albert Edward House, The Pavilions
Preston, United Kingdom
REP
EC
SHUNSHUN GmbH
Römeräcker 9 Z2021, 76351
Linkenheim-Hochstetten, Germany
Wyprodukowano w Chinach


- 2 -
Technisch Ondersteuning en e-garantiecertificaat www.vevor.com/support
WATERDICHT DOUCHESUBSTRAAT
MODEL:
JQ-3860PA /JQ-3860ZA/JQ-3860ZP/JQ3860PP
JQ-4848AJQ-4848P/ JQ-4860A /JQ-4860P
JQ-4872A/JQ*4872P/JQ-7272A/JQ-7272P
We continue to be committed to provide you tools with competitive price.
"Save Half", "Half Price" or any other similar expressions used by us only represents an
estimate of savings you might benefit from buying certain tools with us compared to the major
top brands and dose not necessarily mean to cover all categories of tools offered by us. You
are kindly reminded to verify carefully when you are placing an order with us if you are
actually saving half in comparison with the top major brands.

- 1 -
MODEL:JQ-3860PA /JQ-3860ZA/JQ-3860ZP/JQ3860PP
JQ-4848AJQ-4848P/ JQ-4860A /JQ-4860P
JQ-4872A/JQ*4872P/JQ-7272A/JQ-7272P
Have product questions? Need technical support? Please feel free to
contact us:
Technical Support and E-Warranty Certificate
www.vevor.com/support
NEED HELP? CONTACT US!
This is the original instruction, please read all manual instructions
carefully before operating. VEVOR reserves a clear interpretation of our
user manual. The appearance of the product shall be subject to the
product you received. Please forgive us that we won't inform you again if
there are any technology or software updates on our product.
WATERPROOF SHOWER
SUBSTRATE
- 2 -
Waarschuwing-Om het risico op letsel te verminderen, moet
de gebruiker de handleiding zorgvuldig lezen.
Code
Naam
AAN
TAL.
Code
Naam
AAN
TAL.
A
Doucherand
2
G
Hoeken waterdicht
maken 1
4
B
Waterdicht
membraan
1
H
Waterdichte strip
1
C
Dienblad
1
I
Hoeken waterdicht
maken 2
2
D
Troffel
1
J
Afvoerafstelring
1
- 3 -
E
Mengklepafdic
hting
1
K
Verbindingsflens
1
F
Pijpafdichting
1
L
Afvoerrooster
1
◆Het aantal Waterdichtingsstrips (H) van JQ-7272A en JQ-7272P zijn 2
stuks.
Keramische en stenen tegels zijn duurzaam, gemakkelijk te onderhouden
en hygiënisch en vormen de ideale oppervlaktebedekking, vooral in natte
ruimtes zoals douches en badkuipen.
Deze bekledingen zijn echter niet inherent waterdicht. Ze moeten worden
geïnstalleerd in combinatie met een waterdichtingssysteem dat effectief
vocht beheert om vochtgevoelige bouwmaterialen te beschermen en
schimmelgroei onder controle te houden.
Model
Specificatie
(inch)
Kleur
Flens
materia
al
Douchebakgat
JQ-3860PA
38*60
Grijs
buikspier
en
Offset
JQ-3860ZA
38*60
buikspier
en
centrum
JQ-3860ZP
38*60
PVC
centrum
JQ3860PP
38*60
PVC
Offset
JQ-4848A
48*48
buikspier
en
centrum
JQ-4848P
48*48
PVC
centrum
JQ-4860A
48*60
buikspier
en
centrum
JQ-4860P
48*60
PVC
centrum
JQ-4872A
48*72
buikspier
en
centrum
- 4 -
JQ-4872P
48*72
PVC
centrum
JQ-7272A
72*72
buikspier
en
centrum
JQ-7272P
72*72
PVC
centrum
INSTALLATIESTAPPEN
◆
Verwijder stof en ander vuil van het oppervlak van de stevige achterkant.
Bevochtig vooral droge en poreuze ondergronden om voortijdige uitdroging
of huidverkleuring van de dunbedmortel te helpen voorkomen.
Stap 1:
Mortel voorbereiden
Borstel de mortel
Bedek het membraan
Knip het membraan af
- 5 -
Maak het gelijk
Werk het membraan af
Stap 2 :
Bedek de waterdichtingsstrip
de hoek
Knip de strook af
Borstel de mortel
Bedek de waterdichtingsstrip
het gewricht
- 6 -
Knip de strook af
Maak het muuroppervlak egaal
Stap 3 :
Dek de afdichting van de
mengklep af
Maak het oppervlak egaal
Stap 4 :
Vouw de lade open
Plaats de lade in de mortel
Stap 5 :
Borstel de mortel
Installeer de waterdichtingshoeken
1
- 7 -
Knip de hoek af
Stap 6 :
Borstel de mortel
Bedek de waterdichtingsstrip
Maak het oppervlak egaal
Stap 7 :
Borstel de mortel
Bedek de buisafdichting
- 8 -
Snijd de buisafdichting af
Stap 8 :
Borstel de mortel
Druk de lijmflens in de mortel
Draai de flens om deze stevig vast
te zetten
Borstel de mortel rond
Snijd het oppervlak af
Bedek het
waterdichtingsmembraan
- 9 -
Maak het oppervlak egaal
Stap 9 :
Installeer de afvoerafstelring
Zorg voor volledige dekking
Stap 10 :
Borstel de mortel
Druk op de stoeprand
Zet de stoeprand stevig
vast
Stap 11 :

- 10 -
Borstel de mortel
Bedek de waterdichtingshoeken 2
Knip de hoek af
Stap 12 :
Bedek de waterdichtingsstrip
Knip de strook af
De installatie van het waterdichte systeem is voltooid.
Adres: Baoshanqu Shuangchenglu 803long 11hao 1602A-1609shi
Shanghai
Geïmporteerd naar AUS: SIHAO PTY LTD, 1 ROKEVA
STREETEASTWOOD NSW 2122 Australië

- 11 -
Geïmporteerd naar de VS: Sanven Technology Ltd., Suite 250, 9166
Anaheim Place, Rancho Cucamonga, CA 91730
REP
UK
Pooledas Group Ltd
Unit 5 Albert Edward House, The Pavilions
Preston, United Kingdom
REP
EC
SHUNSHUN GmbH
Römeräcker 9 Z2021, 76351
Linkenheim-Hochstetten, Germany
Gemaakt in China


- 2 -
Teknisk Support och e-garanticertifikat www.vevor.com/support
VATTENTÄTT DUSCHUNDERLAG
MODELL:
JQ-3860PA /JQ-3860ZA/JQ-3860ZP/JQ3860PP
JQ-4848AJQ-4848P/ JQ-4860A /JQ-4860P
JQ-4872A/JQ*4872P/JQ-7272A/JQ-7272P
We continue to be committed to provide you tools with competitive price.
"Save Half", "Half Price" or any other similar expressions used by us only represents an
estimate of savings you might benefit from buying certain tools with us compared to the major
top brands and dose not necessarily mean to cover all categories of tools offered by us. You
are kindly reminded to verify carefully when you are placing an order with us if you are
actually saving half in comparison with the top major brands.

- 1 -
MODELL: JQ-3860PA /JQ-3860ZA/JQ-3860ZP/JQ3860PP
JQ-4848AJQ-4848P/ JQ-4860A /JQ-4860P
JQ-4872A/JQ*4872P/JQ-7272A/JQ-7272P
Have product questions? Need technical support? Please feel free to
contact us:
Technical Support and E-Warranty Certificate
www.vevor.com/support
NEED HELP? CONTACT US!
This is the original instruction, please read all manual instructions
carefully before operating. VEVOR reserves a clear interpretation of our
user manual. The appearance of the product shall be subject to the
product you received. Please forgive us that we won't inform you again if
there are any technology or software updates on our product.
WATERPROOF SHOWER
SUBSTRATE

- 2 -
Varning - För att minska risken för skada måste användaren
läsa instruktionerna noggrant.
Koda
namn
ANT
AL.
Koda
namn
ANT
AL.
A
Duschkant
2
G
Vattentäta hörn 1
4
B
Vattentätande
membran
1
H
Vattentätningsremsa
1
C
Bricka
1
jag
Vattentäta hörn 2
2
D
Murslev
1
J
Avloppsjusteringsring
1

- 3 -
E
Blandningsve
ntiltätning
1
K
Limfläns
1
F
Rörtätning
1
L
Töm gallret
1
◆ Antalet Vattentätningslister (H) av JQ-7272A och JQ-7272P är 2 st.
Keramiska plattor och stenplattor är hållbara, lätta att underhålla och
hygieniska, vilket representerar den idealiska ytbeläggningen, särskilt i
våta utrymmen som duschar och badkar.
Dessa beläggningar är dock inte i sig vattentäta. De måste installeras i
samband med ett vattentätningssystem som effektivt hanterar fukt för att
skydda fuktkänsliga byggmaterial och kontrollera mögeltillväxt.
Modell
Specifikation
(tum)
Färg
Flänsma
terial
Hål för
duschkar
JQ-3860PA
38*60
grå
magmus
kler
Offset
JQ-3860ZA
38*60
magmus
kler
Centrum
JQ-3860ZP
38*60
PVC
Centrum
JQ3860PP
38*60
PVC
Offset
JQ-4848A
48*48
magmus
kler
Centrum
JQ-4848P
48*48
PVC
Centrum
JQ-4860A
48*60
magmus
kler
Centrum
JQ-4860P
48*60
PVC
Centrum
JQ-4872A
48*72
magmus
kler
Centrum
JQ-4872P
48*72
PVC
Centrum
JQ-7272A
72*72
magmus
kler
Centrum
- 4 -
JQ-7272P
72*72
PVC
Centrum
INSTALLATIONSSTEG
◆Ta bort allt damm eller annat skräp från ytan på den fasta baksidan.
Fukta särskilt torra och porösa underlag för att förhindra för tidig torkning
eller avskalning av det tunna bruket.
Steg 1:
Förbered murbruk
Borsta murbruket
Täck membranet
Trimma membranet
- 5 -
Gör det jämnt
Slutför täckning av membranet
Steg 2 :
Täck tätskiktet på
hörnet
Trimma remsan
Borsta murbruket
Täck tätskiktet på
leden
Trimma remsan
Gör väggytan jämn
Steg 3 :
- 6 -
Täck blandningsventilens tätning
Gör ytan jämn
Steg 4 :
Vik ut brickan
Bädda in brickan i murbruket
Steg 5 :
Borsta murbruket
Montera de vattentäta hörnen 1
Trimma hörnet
- 7 -
Steg 6 :
Borsta murbruket
Täck vattentätningsremsan
Gör ytan jämn
Steg 7 :
Borsta murbruket
Täck rörtätningen
Trimma rörtätningen
Steg 8 :
- 8 -
Borsta murbruket
Pressa in limflänsen i murbruket
Vrid flänsen för att fixera den
ordentligt
Borsta murbruket runt
Trimma ytan
Täck vattentätningsmembranet
Gör ytan jämn
Steg 9 :
- 9 -
Montera avloppsjusteringsringen
Säkerställ full täckning
Steg 10 :
Borsta murbruket
Tryck på trottoarkanten
Fixera trottoarkanten
ordentligt
Steg 11 :
Borsta murbruket
Täck vattentätningshörnen 2

- 10 -
Trimma hörnet
Steg 12 :
Täck vattentätningsremsan
Trimma remsan
Installation av vattentätt system är klar.
Adress: Baoshanqu Shuangchenglu 803long 11hao 1602A-1609shi
Shanghai
Importerad till AUS: SIHAO PTY LTD, 1 ROKEVA STREETEASTWOOD
NSW 2122 Australien
Importerad till USA: Sanven Technology Ltd., Suite 250, 9166 Anaheim
Place, Rancho Cucamonga, CA 91730

- 11 -
REP
UK
Pooledas Group Ltd
Unit 5 Albert Edward House, The Pavilions
Preston, United Kingdom
REP
EC
SHUNSHUN GmbH
Römeräcker 9 Z2021, 76351
Linkenheim-Hochstetten, Germany
Tillverkad i Kina