
FRONT Cover
Instruction Manual
Manual de instrucciones
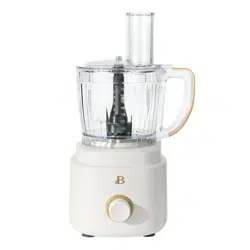
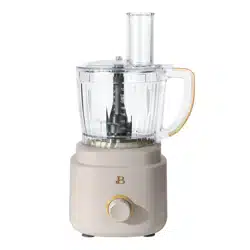
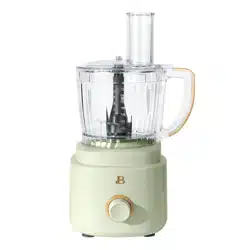
10-Cup Food Processor
with Accessories
Procesador de alimentos de 10 tazas
con accesorios
19665_19674_19675_19676_19677_19678_19679_BTFL_WMUS_10 cup_Food processor_IM_V11_R1.indd 119665_19674_19675_19676_19677_19678_19679_BTFL_WMUS_10 cup_Food processor_IM_V11_R1.indd 1 2024-10-11 12:04 PM2024-10-11 12:04 PM

The kitchen is my family’s happy
place. It’s where we cook and eat
and bake and laugh and share our
most beautiful moments together.
That’s what inspired the creation
of Beautiful, my new collection
of easy-to-use kitchenware that
you’ll want to keep out on your
kitchen counter. So whether
your kitchen has flour all over
the place from a kid's baking
session or you’re throwing an adult
dinner party, I hope every step will
be simple, delicious and beautiful!
www.beautifulbydrew.com
19665_19674_19675_19676_19677_19678_19679_BTFL_WMUS_10 cup_Food processor_IM_V11_R1.indd 219665_19674_19675_19676_19677_19678_19679_BTFL_WMUS_10 cup_Food processor_IM_V11_R1.indd 2 2024-10-11 12:04 PM2024-10-11 12:04 PM

Section 1: Safety
Important Safeguards ............................................ 4-6
Additional Important Safeguards ................................. 6-8
Notes on the Plug ................................................ 7
Notes on the Cord .............................................. 7-8
Plasticizer Warning ............................................... 8
Electric Power .................................................... 8
Section 2: Instructions
Getting To Know Your 10 Cup Food Processor ..................... 6-7
Before Using For The First Time ................................... 8
Assembly Instructions .......................................... 8-10
Operating Instructions ........................................ 10-11
Automatic Thermal Protector ...................................... 11
Food Processing Hints ..........................................11-13
Food Processing Guide ........................................... 13
Attachments for Food Processing ............................... 14-15
User Maintenance Instructions .................................... 15
Care & Cleaning Instructions .................................. 15-16
Storing Instructions ............................................. 16
Warranty ...................................................... 22-23
Table of Contents
19665_19674_19675_19676_19677_19678_19679_BTFL_WMUS_10 cup_Food processor_IM_V11_R1.indd 119665_19674_19675_19676_19677_19678_19679_BTFL_WMUS_10 cup_Food processor_IM_V11_R1.indd 1 2024-10-11 12:04 PM2024-10-11 12:04 PM

Índice
Sección 1: Seguridad
Medidas importantes de seguridad ............................. 25-27
Medidas importantes de seguridad adicionaless ................. 28-29
Notas sobre el enchufe .......................................... 29
Notas sobre el cable ............................................ 29
Advertencia sobre el acabado ................................... 30
Alimentación eléctrica .......................................... 30
Sección 2: Instrucciones
Conozca su procesador de alimentos de 10 tazas .............. 32-33
Antes de usar por primera vez .................................. 34
Instrucciones de montaje ..................................... 34-37
Instrucciones de funcionamiento ................................. 37
Protector térmico automático .................................... 38
Consejos para el procesamiento de alimentos ................. 38-40
Guía para el procesamiento de alimentos ........................ 41
Accesorios para el procesamiento de alimentos .................. 41
Instrucciones de mantenimiento para el usuario .................. 43
Instrucciones de cuidado y limpieza ............................ 43
Instrucciones de almacenamiento ................................. 44
Garantía ...................................................... 45-46
19665_19674_19675_19676_19677_19678_19679_BTFL_WMUS_10 cup_Food processor_IM_V11_R1.indd 219665_19674_19675_19676_19677_19678_19679_BTFL_WMUS_10 cup_Food processor_IM_V11_R1.indd 2 2024-10-11 12:04 PM2024-10-11 12:04 PM
Section 1
Safety
1
19665_19674_19675_19676_19677_19678_19679_BTFL_WMUS_10 cup_Food processor_IM_V11_R1.indd 319665_19674_19675_19676_19677_19678_19679_BTFL_WMUS_10 cup_Food processor_IM_V11_R1.indd 3 2024-10-11 12:04 PM2024-10-11 12:04 PM

4
IMPORTANT SAFEGUARDS
When using electrical appliances, basic safety precautions
should always be followed including the following:
1. READ ALL INSTRUCTIONS.
2. To protect against risk of electrical shock, do not put
cord, plug, or appliance in water or other liquid.
3. Close supervision is necessary when any appliance
is used by or near children. This appliance is not
suitable for use by children. Children should be
supervised to ensure that they do not play with
the appliance.
4. This appliance is not intended for use by persons
(including children) with reduced physical, sensory
or mental capabilities, or lack of experience and
knowledge, unless they are closely supervised and
instructed concerning the use of the appliance by a
person responsible for their safety.
5. Turn the appliance OFF, then unplug from the outlet
when not in use, before assembling or disassembling
parts and before cleaning.
6. To unplug, grasp the plug and pull from the outlet.
Never pull from the power cord.
7. Avoid contacting moving parts. Do not attempt to defeat
any safety interlock mechanisms.
8. Moving parts. Keep fingers out of discharge opening.
19665_19674_19675_19676_19677_19678_19679_BTFL_WMUS_10 cup_Food processor_IM_V11_R1.indd 419665_19674_19675_19676_19677_19678_19679_BTFL_WMUS_10 cup_Food processor_IM_V11_R1.indd 4 2024-10-11 12:04 PM2024-10-11 12:04 PM

5
9. Do not operate any appliance with a damaged cord or
plug or after the appliance malfunctions, or is dropped
or damaged in any manner. Contact consumer service for
examination, repair or adjustment.
10. The use of attachments not recommended or sold by the
manufacturer may cause fire, electric shock or injury.
11. The processing bowl must be properly assembled and in
place before operating the appliance.
12. Do not use outdoors.
13. Do not let cord hang over edge of table or counter.
14. Do not let cord contact any hot surface, including
the stove.
15. To disconnect, turn the speed control dial to OFF.
Then remove plug from wall outlet.
16. Keep hands and utensils away from moving blades or disc
while processing food to reduce the risk of severe
injury to persons or damage to the Food Processor. A
scraper or spatula may be used, but must be used only
when the Food Processor is not running.
17. Blades are sharp. Handle carefully.
18. To reduce the risk of injury, never place processing
blade or disc onto the base without bowl locked to
base. Place processing bowl and then the drive shaft,
properly in place.
19. Be certain lid is securely locked in place before
operating appliance.
20. Never feed food by hand. Always use food pusher.
19665_19674_19675_19676_19677_19678_19679_BTFL_WMUS_10 cup_Food processor_IM_V11_R1.indd 519665_19674_19675_19676_19677_19678_19679_BTFL_WMUS_10 cup_Food processor_IM_V11_R1.indd 5 2024-10-11 12:04 PM2024-10-11 12:04 PM

6
21. Do not attempt to defeat either the base/bowl or the
lid/bowl interlock.
22. Do not fill the bowl above the maximum marked capacity
to avoid risk of injury due to damage to the cover
orbowl.
SAVE THESE
INSTRUCTIONS
FOR HOUSEHOLD
USE ONLY
ADDITIONAL IMPORTANT
SAFEGUARDS
IMPORTANT: To maintain peak performance, do not use your
Food Processor for the following: grinding grain, coffee
beans or hard spices such as nutmeg; slicing frozen meat;
or crushing ice.
1. All users of this appliance must read and
understand this manual before operating or cleaning
this appliance.
2. The cord to this appliance should be plugged into a
120V AC electrical outlet only.
19665_19674_19675_19676_19677_19678_19679_BTFL_WMUS_10 cup_Food processor_IM_V11_R1.indd 619665_19674_19675_19676_19677_19678_19679_BTFL_WMUS_10 cup_Food processor_IM_V11_R1.indd 6 2024-10-11 12:04 PM2024-10-11 12:04 PM

7
3. Do not leave this appliance unattended during use.
4. If this appliance begins to malfunction during use,
immediately turn the speed control dial to OFF to cease
operation and unplug the cord. Do not use or attempt to
repair the malfunctioning appliance.
5. If this appliance falls or accidentally becomes
immersed in water, unplug it immediately. Do not reach
into the water! Do not use this appliance after it has
fallen into or becomes immersed in water.
6. To reduce the risk of injury to persons or property,
never use this appliance in an unstable position.
7. Do not use this appliance for other than its intended use.
NOTES ON THE PLUG
This appliance has a polarized plug (one blade is wider
than the other). To reduce the risk of electric shock, this
plug will fit in a polarized outlet only one way. If the
plug does not fit fully into the outlet, reverse the plug.
If it still does not fit, contact a qualified electrician.
Do not modify the plug in any way.
NOTES ON THE CORD
A. A short power-supply cord (or detachable power-supply
cord) is to be provided to reduce the risk resulting from
becoming entangled in or tripping over a longer cord.
B. Longer detachable power-supply cords or extension cords
are available and may be used if care is exercised in
their use.
19665_19674_19675_19676_19677_19678_19679_BTFL_WMUS_10 cup_Food processor_IM_V11_R1.indd 719665_19674_19675_19676_19677_19678_19679_BTFL_WMUS_10 cup_Food processor_IM_V11_R1.indd 7 2024-10-11 12:04 PM2024-10-11 12:04 PM

8
C. If a long detachable power-supply cord or extension
cord is used:
1. The marked electrical rating of the cord or
extension cord should be at least asgreat as the
electrical rating of the appliance;
2. If the appliance is of the grounded type, the
extension cord should be a grounding-type3-wire
cord; and
3. The longer cord should be arranged so that it does
not drape over thecountertop or table top where
it can be pulled on by children or trippedover
unintentionally.
PLASTICIZER WARNING
CAUTION: To prevent Plasticizers from migrating to the
finish of the counter top or table top or other furniture,
place NON-PLASTIC coasters or place mats between the
appliance and the finish of the counter top or table top.
Failure to do so may cause the finish to darken; permanent
blemishes may occur or stains can appear.
ELECTRIC POWER
If the electrical circuit is overloaded with other
appliances, your appliance may not operate properly. It
should be operated on a separate electrical circuit from
other appliances.
19665_19674_19675_19676_19677_19678_19679_BTFL_WMUS_10 cup_Food processor_IM_V11_R1.indd 819665_19674_19675_19676_19677_19678_19679_BTFL_WMUS_10 cup_Food processor_IM_V11_R1.indd 8 2024-10-11 12:04 PM2024-10-11 12:04 PM
Section 2
Instructions
2
19665_19674_19675_19676_19677_19678_19679_BTFL_WMUS_10 cup_Food processor_IM_V11_R1.indd 919665_19674_19675_19676_19677_19678_19679_BTFL_WMUS_10 cup_Food processor_IM_V11_R1.indd 9 2024-10-11 12:04 PM2024-10-11 12:04 PM
10
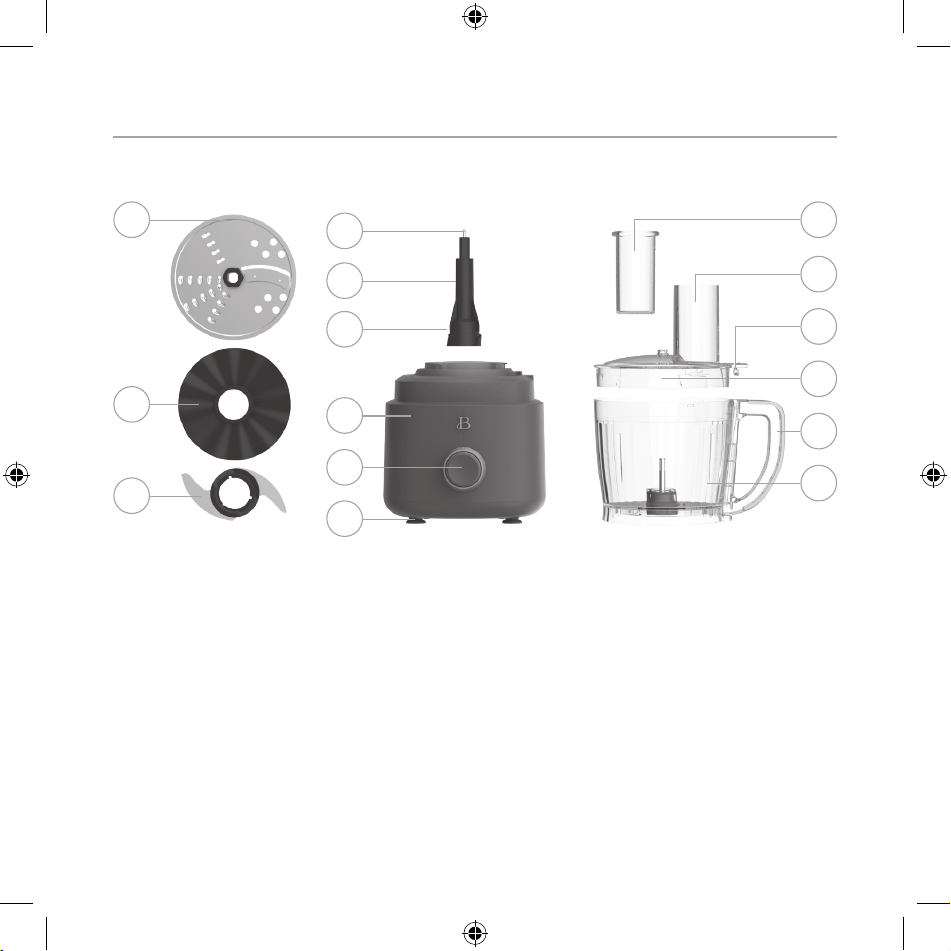
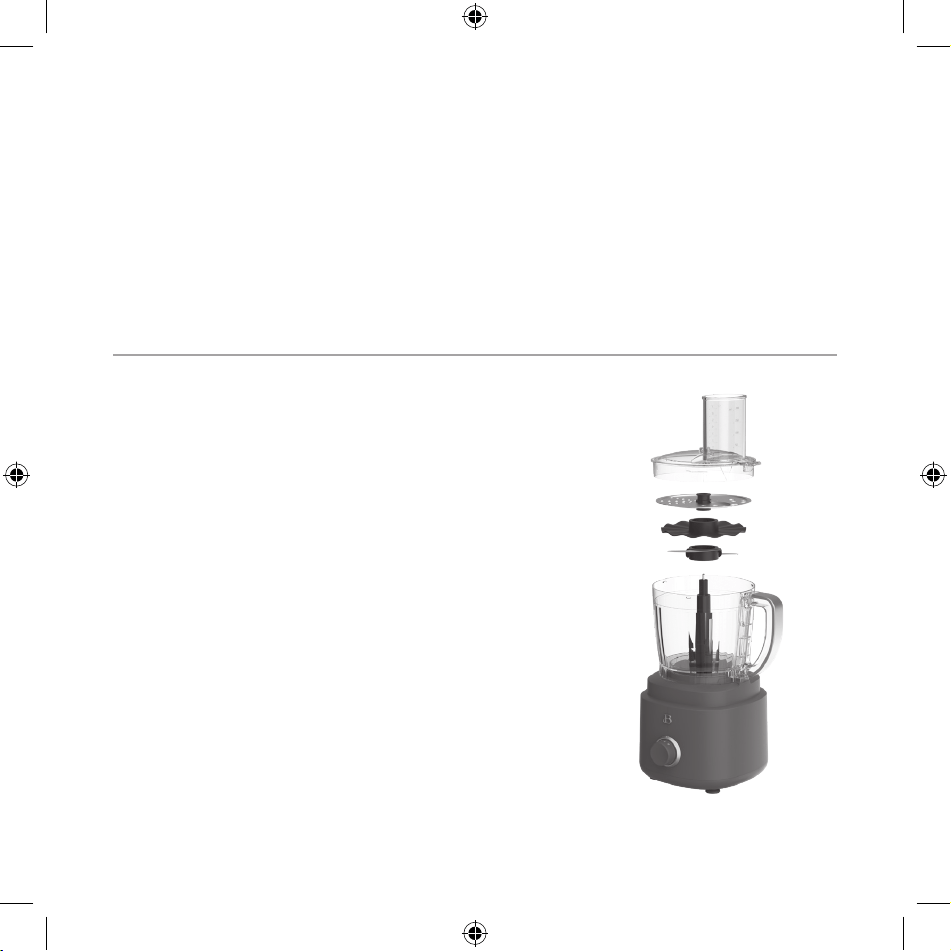
Getting To Know Your 10 Cup Food Processor
Product may vary slightly from illustration
10
11
12
13
14
15
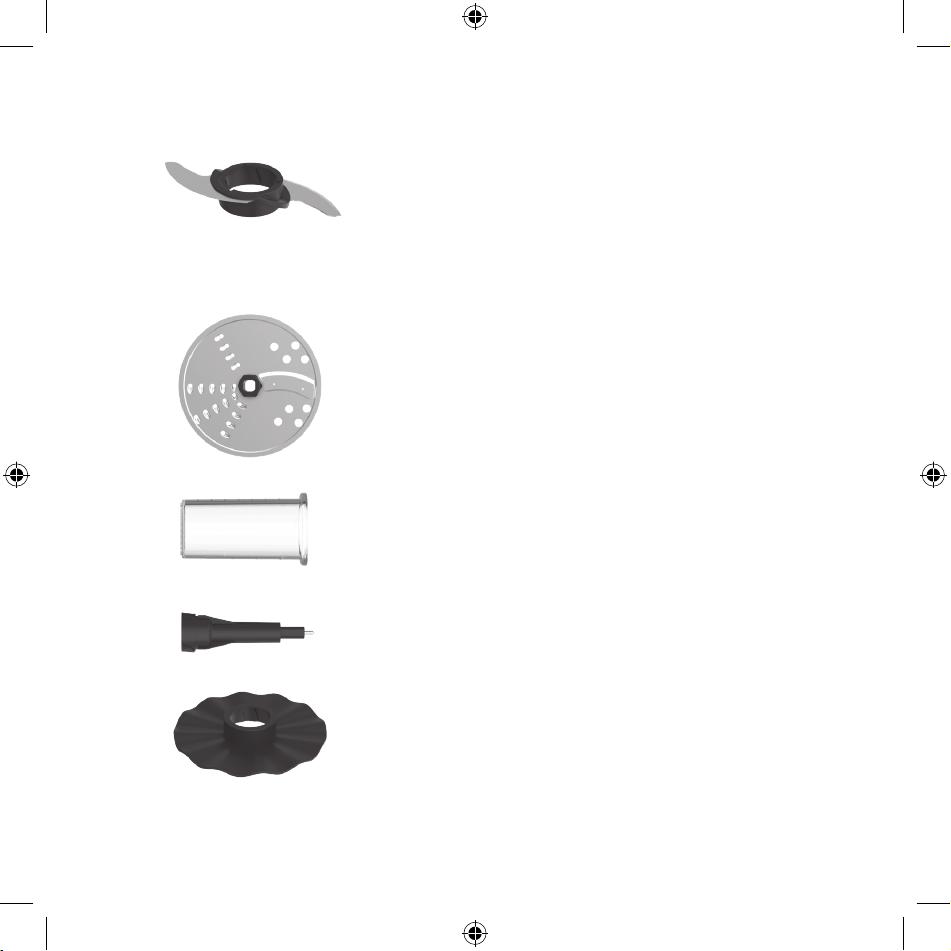
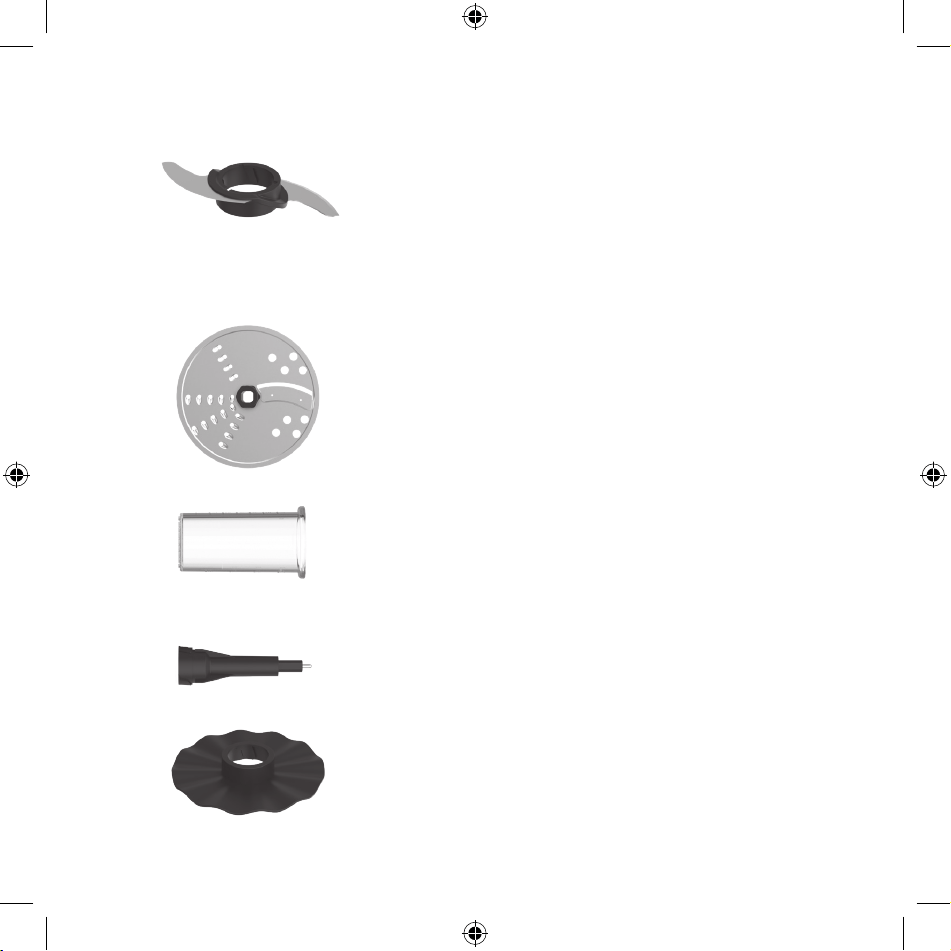
1. Reversible
Slicing/Shredding
Disc
2. Emulsifying Disc
3. Stainless Steel
Processing Blade
(Sabatier Blade)
4. Spindle
5. Drive Shaft
6. Base/Bowl Inter
lock Channel
7. Base
8. Speed Control Dial
9. Nonslip Feet
10. Food Pusher
11. Feed Chute
12. Lid/Bowl Interlock
Channel
13. Lid
14. Work bowl handle
15. 10 cup food
processing
work bowl
1
2
3
4
5
6
8
9
7
19665_19674_19675_19676_19677_19678_19679_BTFL_WMUS_10 cup_Food processor_IM_V11_R1.indd 1019665_19674_19675_19676_19677_19678_19679_BTFL_WMUS_10 cup_Food processor_IM_V11_R1.indd 10 2024-10-11 12:04 PM2024-10-11 12:04 PM
11
Processing Blade (Sabatier Blade)
Stainless steel chopping/mixing/dough blade
designed to chop, mix, blend, knead doughs,
whisk, crumb, and emulsify. Ideal for chopping
raw and cooked meat, grating Parmesan cheese,
cake and pastry making, preparing pate, dips,
pureed soups.
IMPORTANT: The texture of processed foods (such
as grated Parmesan cheese) is determined by
processing speed and time.
Reversible Slicing/Shredding Disc
Install the processing disc with the slicing
blade UP to slice or the shredding blade
UP to shred. Ideal for soft cheeses or hard
vegetables. Easily slice fresh potatoes,
cabbage, cucumber, zucchini, onions, beets,
carrots, radishes.
Simply reverse the blade to shred.
Food Pusher Cup
The food pusher cup can be used to pour small
quantities (up to 7 oz.) of liquids such as oil
or water to thin the processed mixture. When
not in use, the food pusher nests conveniently
inside the top of the feed chute.
Drive Shaft
The drive shaft must be used when assembling
blade or disc for processing.
Emulsifying Disc
The emulsifying disc can be used for making
mayonnaise, whipping cream, vinaigrettes and
for whisking egg whites.
19665_19674_19675_19676_19677_19678_19679_BTFL_WMUS_10 cup_Food processor_IM_V11_R1.indd 1119665_19674_19675_19676_19677_19678_19679_BTFL_WMUS_10 cup_Food processor_IM_V11_R1.indd 11 2024-10-11 12:04 PM2024-10-11 12:04 PM

12
Before Using for the First Time
WARNING: Blade and disc attachments are very sharp. Use extreme care when
handling blades and disc. Failure to do so can result in personal injury.
1. Carefully unpack the Food Processor and remove all packaging materials.
2. Wash the processing bowl, lid with feed chute, food pusher, food pusher
cup, spindle, processing blade, emulsifying disc and reversible slicing/
shredding disc in warm soapy water.
3. Wipe the Food Processor base with a soft, moistened cloth.
WARNING: Never immerse the Food Processor base in water or any
other liquid.
4. Rinse and dry each part thoroughly before use.
Assembly Instructions
Base/Bowl Assembly
1. Before assembling and using the Food Processor, make sure that the power
cord is unplugged.
2. Place the base facing yourself on a dry, level surface.
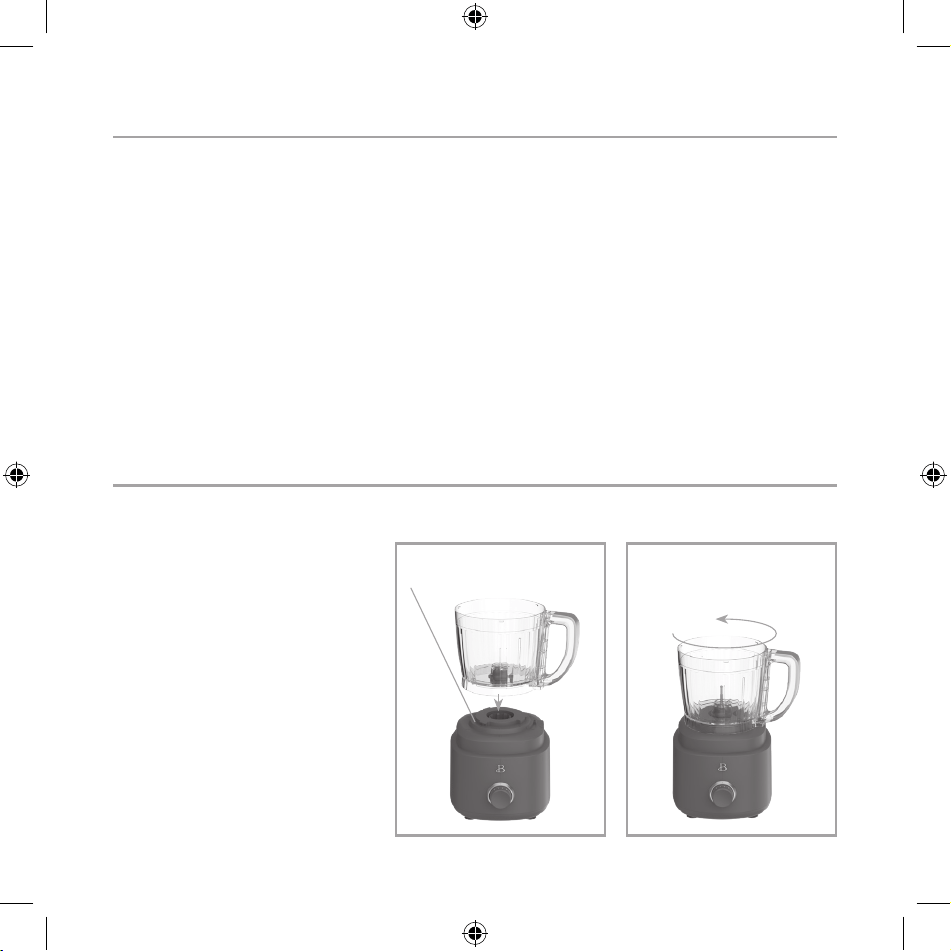
3. Place the processing bowl
onto the base. Position
the handle directly over
the base/bowl interlock
channel. (See Figure 3.)
4. Rotate the handle
counter-clockwise; the
handle will lock onto
the right side as the
base/bowl interlock
engages. (See Figure 4.)
NOTE: If the base/
bowl interlock is not
properly engaged, the
Food Processor will
not operate.
Figure 3 Figure 4
Base/Bowl Interlock
Channel
19665_19674_19675_19676_19677_19678_19679_BTFL_WMUS_10 cup_Food processor_IM_V11_R1.indd 1219665_19674_19675_19676_19677_19678_19679_BTFL_WMUS_10 cup_Food processor_IM_V11_R1.indd 12 2024-10-11 12:04 PM2024-10-11 12:04 PM
13
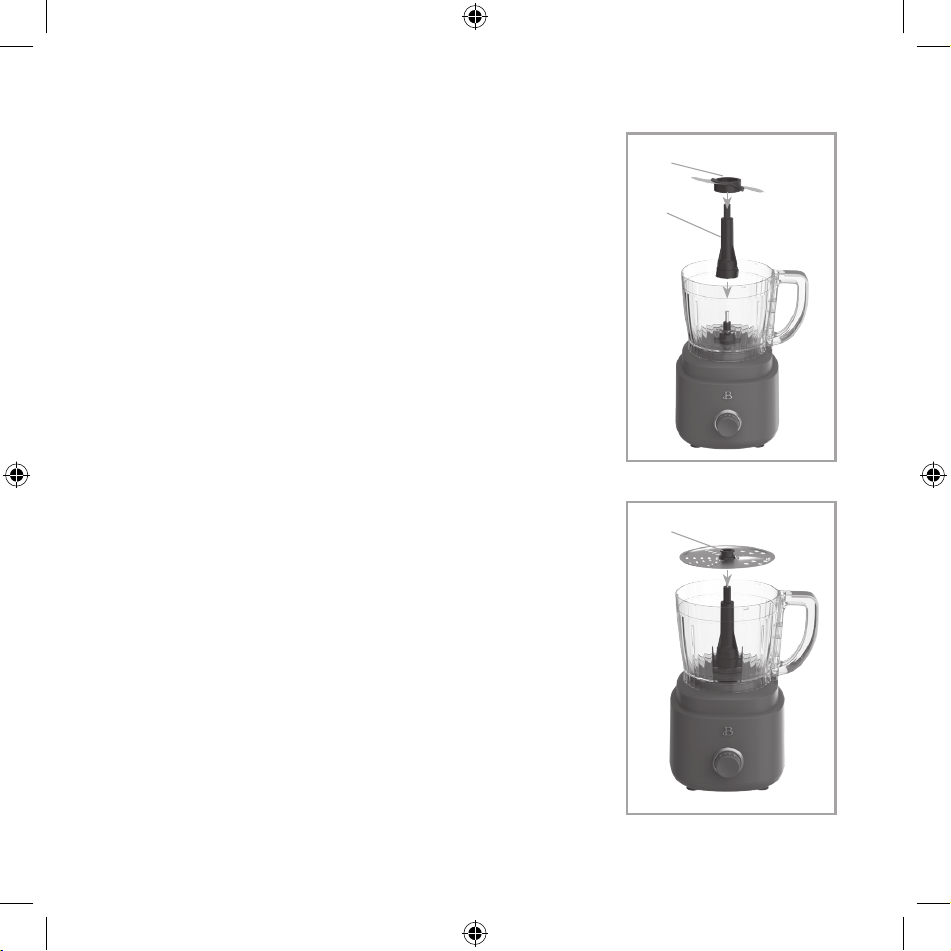
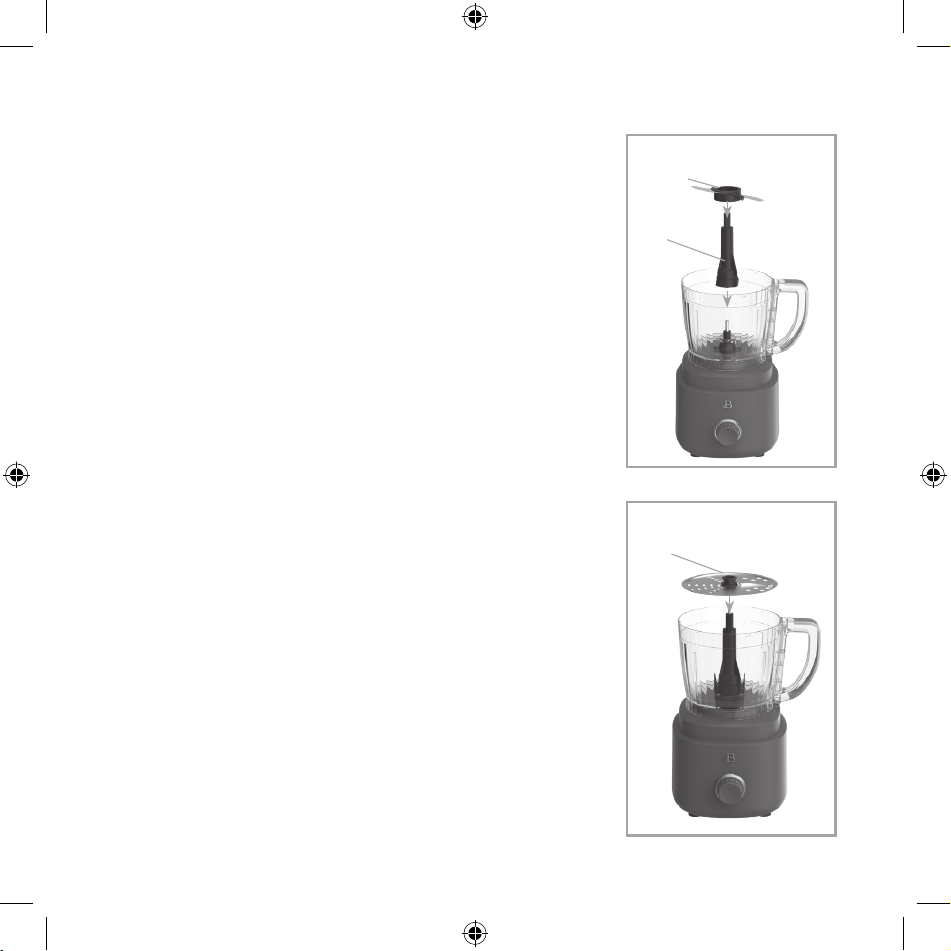
Attaching the Stainless Steel Processing Blade
WARNING: Blade attachment is very sharp. Use extreme
care to always grasp the center hub when handling the
blade. Failure to do so can result in personal injury.
1. Assemble the processing blade by carefully
grasping the plastic ring that holds the blade
together. Insert the spindle through the hole
and turn the blades clockwise to lock.
2. Fit the processing blade’s center hole over the
spindle. (See Figure 5.) Turn the blade until
it drops to the bottom of the processing bowl
and is securely fastened.
3. Place food to be processed into the
processing bowl.
4. Attach and lock the lid following the
Lid Assembly Instructions.
Attaching the Reversible Slicing/Shredding Disc
WARNING: Both sides of this disc are very sharp. Use
extreme care to always grasp the center hub when
handling the disc. Failure to do so can result in
personal injury.
1. Grasping the center hub, hold the disc with the
slicing blade UP to slice. Turn the disc over
with the shredding blade UP to shred.
2. Fit the disc’s center hole over the spindle.
Turn disc until it easily drops down onto the
top of the spindle and is securely fastened.
(See Figure 6.)
3. Attach and lock the lid following
the Instructions.
Figure 5
Center Hub
Spindle
Figure 6
Center Hub
19665_19674_19675_19676_19677_19678_19679_BTFL_WMUS_10 cup_Food processor_IM_V11_R1.indd 1319665_19674_19675_19676_19677_19678_19679_BTFL_WMUS_10 cup_Food processor_IM_V11_R1.indd 13 2024-10-11 12:04 PM2024-10-11 12:04 PM
14
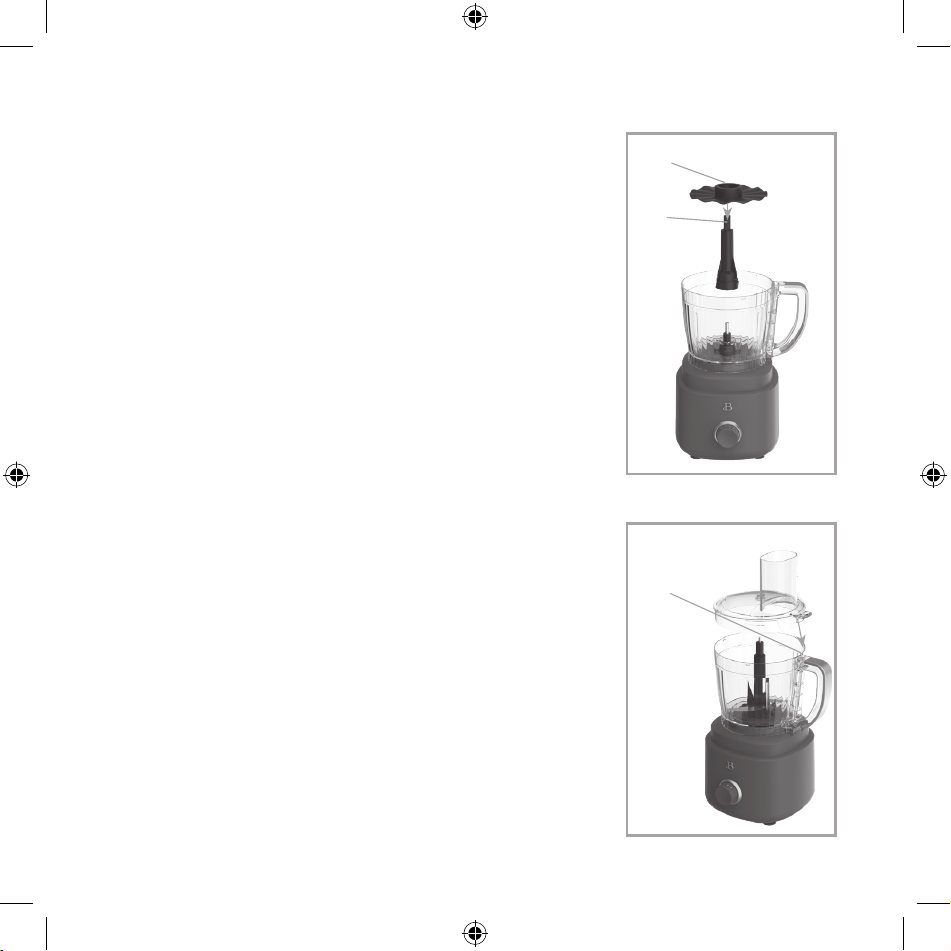
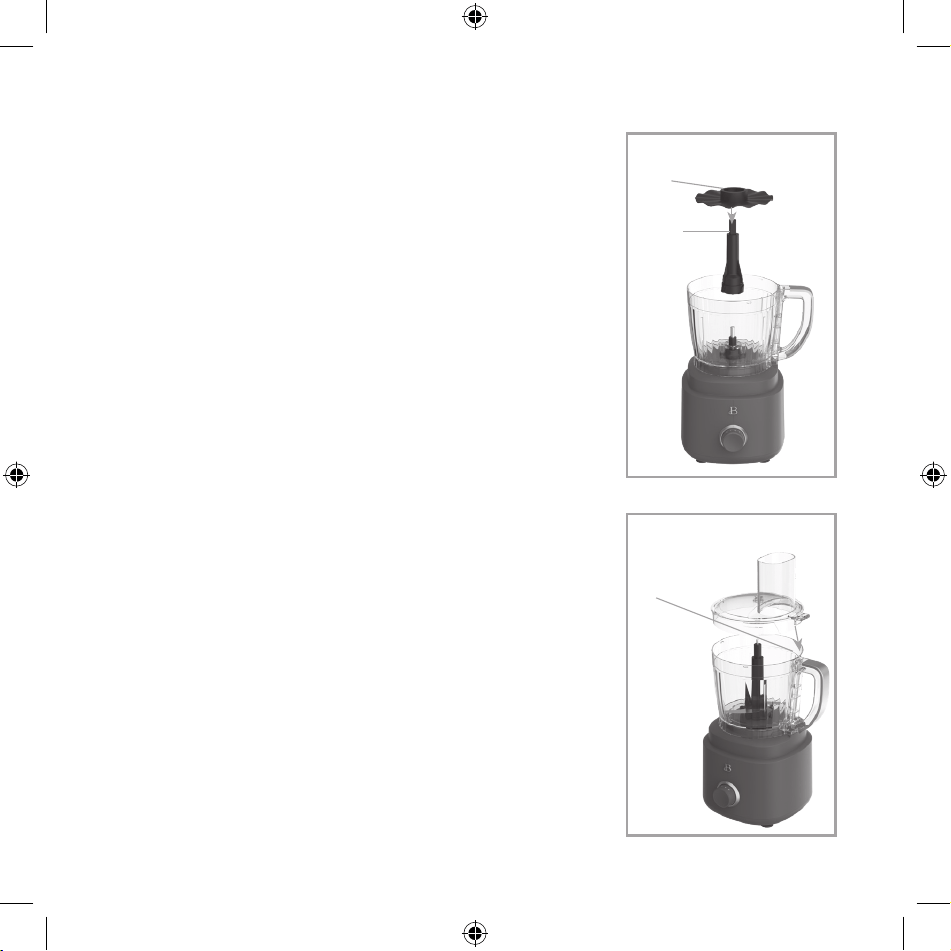
Attaching the Emulsifying Disc
1. Assemble the emulsifying disc by inserting the
spindle through the hole and turning the disc
counterclockwise to lock. (See Figure 7.)
2. Place the spindle in the middle of the
processing bowl, and turn until it is
securely fastened.
3. Place liquids to be emulsied into the
processing bowl.
4. Attach and lock the lid following the
LidAssembly Instructions.
Lid Assembly
1. Align the large tab on the lid to that it sits
slightly directly over the lid/bowl interlock
channel, slightly to the left of the handle.
2. Holding the handle of the processing bowl with
one hand, grip the feed chute with the other
hand and rotate the lid counter-clockwise; an
audible click can be heard as the lid locks
into place. (See Figure 8.)
NOTE: If the lid interlock is not properly
engaged, the Food Processor will not operate.
3. Insert the food pusher into the feed chute.
4. Plug the cord into a 120V AC power outlet.
5. The Food Processor is now ready for use.
Figure 7
Center Hub
Spindle
Figure 8
Lid/Bowl
Interlock
Channel
19665_19674_19675_19676_19677_19678_19679_BTFL_WMUS_10 cup_Food processor_IM_V11_R1.indd 1419665_19674_19675_19676_19677_19678_19679_BTFL_WMUS_10 cup_Food processor_IM_V11_R1.indd 14 2024-10-11 12:04 PM2024-10-11 12:04 PM

15
Operation Instructions
1. Attach and lock the lid following the Lid Assembly Instructions.
2. Add the food pusher to the feed chute before use.
3. Plug the cord into a 120V AC electrical wall outlet.
4. Turn the speed control dial to PULSE or LOW to begin operation.
5. Use LOW speed to prepare doughs and batters. HIGH speed is ideal for
most other chopping, mixing, and processing tasks. Use HIGH or LOW when
slicing/shredding.
NOTE: PULSE will stop when the dial is released.
6. If it becomes necessary to add additional ingredients to the processing
bowl, simply remove the food pusher. Use the food pusher cup provided
to pour small amounts of oil or other liquids through the feed chute
while processing.
CAUTION: Never use ngers or utensils to push food down the feed chute.
Always use the food pusher.
7. Use even, constant pressure on the food pusher to feed food into the
feed chute.
8. For best results, limit food quantity to 5 cups for optimal food
processing performance.
NOTE: When processing multiple ingredients for one recipe, avoid
over-processing foods at the bottom of the bowl by chopping small
batches of each ingredient.
9. When processing is complete, turn the speed control dial to OFF. Unplug
the unit.
10. Grasping the feed chute and the processing bowl handle, rotate the lid
clockwise to unlock. Remove lid.
11. Use the center hub to lift the processing blade or slicing/shredding
disc up and off the spindle.
12. Grasping the processing bowl handle rmly, rotate the bowl clockwise
to unlock. Lift to remove the processing bowl from base. Then remove
the spindle.
13. Use a spatula to carefully remove processed food from the blade and the
processing bowl.
19665_19674_19675_19676_19677_19678_19679_BTFL_WMUS_10 cup_Food processor_IM_V11_R1.indd 1519665_19674_19675_19676_19677_19678_19679_BTFL_WMUS_10 cup_Food processor_IM_V11_R1.indd 15 2024-10-11 12:04 PM2024-10-11 12:04 PM

16
Automatic Thermal Protector
This product is equipped with an Automatic Resettable Thermal Protector to
protect the motor. If he motor shuts down, turn the speed control dial to Off
position. Let the unit rest for approximately 30 minutes. Once the resetting
period has elapsed, turn the speed control dial to the desired setting to
continue processing.
Food Processing Hints
• For best results, do not ll processing bowl to maximum. Limit
liquids to 4 cups/1000 ml. and solids up to 5 cups for optimal food
processingperformance.
• Dough Preparation: Use the processing blade on LOW speed to prepare
doughs and batters.
IMPORTANT: When adding almond extract or avorings to mixtures, avoid
contact with the processing bowl to avoid permanent marking.
• Chop/Mince: Pre-cooked meat should be cut into cubes approximately 1-inch
square before processing.
• Fruits and Vegetables: Before processing fruits and vegetables, clean and
cut into 2-inch x 1-inch pieces.
• Mix: Quantities that can be processed in the processing bowl will vary
depending upon the density of the ingredients being used.
• Adding liquid ingredients: Pour liquid ingredients through the feed chute
in the lid while the Food Processor is in operation. The food pusher cup
is useful when adding small quantities of liquids such as oil or water
to thin the processed mixture.
• Adding dry ingredients: Add dry ingredients such as our directly into
the processing bowl. There is no need to sift ingredients.
NOTE: When processing sauces or semi-liquid ingredients, it may be
necessary to periodically scrape down the processing bowl with a spatula.
• Using the feed chute: The most important factor for successful slicing
and shredding is the way in which the food is packed into the feed
chute. The feed chute should always be packed rmly to allow each piece
of food to support the others.
19665_19674_19675_19676_19677_19678_19679_BTFL_WMUS_10 cup_Food processor_IM_V11_R1.indd 1619665_19674_19675_19676_19677_19678_19679_BTFL_WMUS_10 cup_Food processor_IM_V11_R1.indd 16 2024-10-11 12:04 PM2024-10-11 12:04 PM
17
NOTE: There will always be a small portion of food left unprocessed
between the food pusher and the processing disc.
CAUTION: Never use ngers or utensils to push food down the Feed Chute.
Always use the food pusher.
• Slicing/Shredding: Cut all ingredients to a size that ts comfortably
into the feed chute (no larger than 2-inches x 1-1/2 inches). Pack the
feed chute and, while holding food steady and upright with the food
pusher, press down evenly until all ingredients are sliced or shredded.
Do not use excessive force or you may damage the Food Processor.
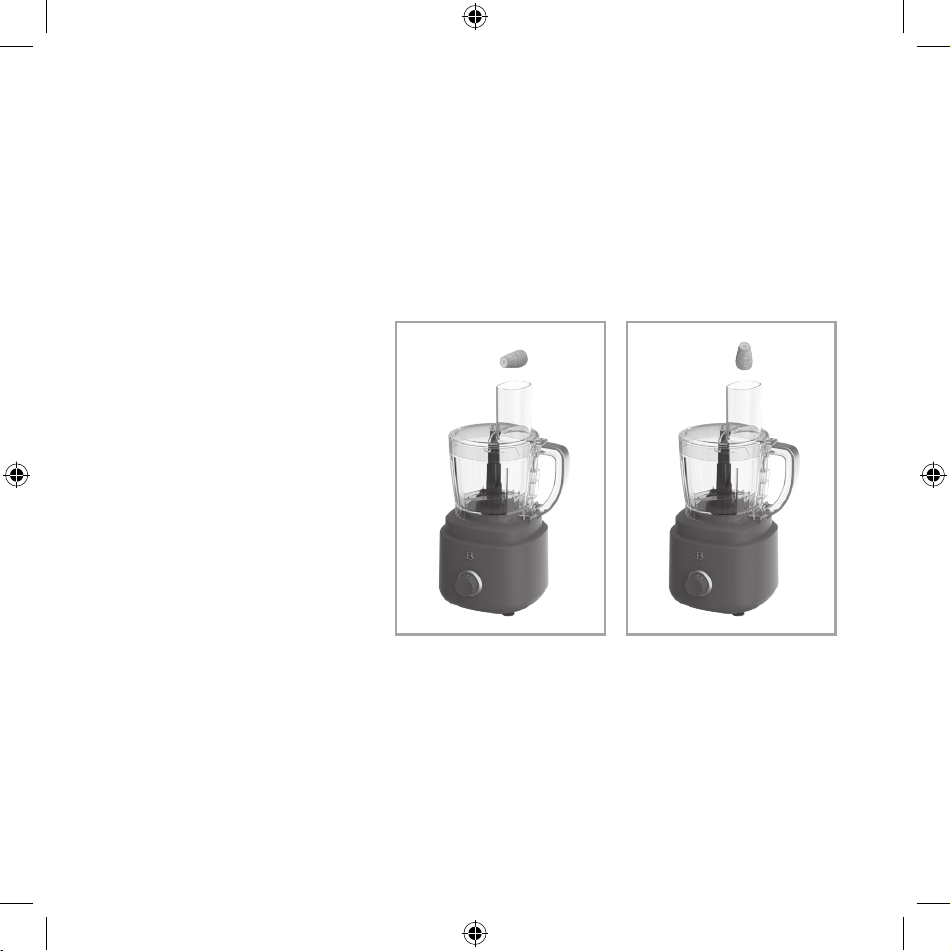
• Long Slices: Pack up to
2-inch wide food items
horizontally in feed
chute. (See Figure 9.)
• Short Slices: Pack food
items vertically in feed
chute. (See Figure 10.)
• Slicing/Shredding: For
best results remember
that softer foods such
as cheese (Cheddar,
mozzarella or Swiss)
should be well chilled
before processing. Harder
foods such as Parmesan or
Romano cheese should be
at room temperature before
grating or shredding.
NOTE: When grating hard foods, do not apply excessive pressure to the
food pusher.
• Emulsifying: The emulsifying disc can be used for making mayonnaise,
whipping cream, vinaigrettes and for whisking egg whites. Place the egg
whites in the work bowl and turn the knob to low, using Pulse for better
results, then high speed until whites are the desired consistency. The
maximum recommended capacity for liquid is 400g and run no longer than
3 minutes at High speed.
Tip: Add a pinch of salt or a few drops of lemon juice for better results.
Figure 9 Figure 10
19665_19674_19675_19676_19677_19678_19679_BTFL_WMUS_10 cup_Food processor_IM_V11_R1.indd 1719665_19674_19675_19676_19677_19678_19679_BTFL_WMUS_10 cup_Food processor_IM_V11_R1.indd 17 2024-10-11 12:04 PM2024-10-11 12:04 PM

18
Food Processing Guide
FOOD PROCESSING BOWL CAPACITY
Pureed/Chopped Meat, Fish, or Seafood 3/4 lb. (12 oz.)
Sliced or Shredded Fruit, Vegetables,
or Cheese
4 - 5 cups
Chopped Fruit, Vegetables, or Cheese 2 cups
Pureed Fruit, Vegetables, or Cheese 3 cups cooked
Liquids: Soups, Salad Dressings,
Sauces, etc.
4 cups
Cake Batter 8-inch cheesecake
1 (15.25 oz.) boxed cake mix
Cookie Dough 2-1/2 dozen average-sized cookies
White Bread 2 cups all-purpose or bread our
Pizza Dough 2 cups all-purpose or bread our
Nut Butter 2 cups nuts
Attachments for Food Processing
Stainless Steel Processing Blade
Push food from sides of processing bowl with spatula when necessary.
NOTE: Grating foods such as cheese or vegetables can be achieved by using the
processing blade. The length of time and processing speed will determine the
final consistency.
19665_19674_19675_19676_19677_19678_19679_BTFL_WMUS_10 cup_Food processor_IM_V11_R1.indd 1819665_19674_19675_19676_19677_19678_19679_BTFL_WMUS_10 cup_Food processor_IM_V11_R1.indd 18 2024-10-11 12:04 PM2024-10-11 12:04 PM

19
FOOD SPEED
Apple PULSE
Breadcrumbs (crumbed) PULSE, then HIGH
Cabbage PULSE or LOW
Carrots PULSE or LOW
Celery PULSE
Crackers (crumbed) PULSE, then HIGH
Dough LOW
Eggs, hard boiled PULSE
Garlic PULSE
Mushrooms PULSE
Onions PULSE
Parmesan, Romano (grated) PULSE, then HIGH
Parsley or other Herbs PULSE or LOW
Peppers PULSE
Potatoes PULSE
Walnuts PULSE
19665_19674_19675_19676_19677_19678_19679_BTFL_WMUS_10 cup_Food processor_IM_V11_R1.indd 1919665_19674_19675_19676_19677_19678_19679_BTFL_WMUS_10 cup_Food processor_IM_V11_R1.indd 19 2024-10-11 12:04 PM2024-10-11 12:04 PM

20
Reversible Slicing/Shredding Disc
NOTE: Cut food to t feed chute.
For best results: Use PULSE, then LOW Speed to process.
FOOD DISC/SIDE
Apple Slicing/Shredding
Carrots Slicing/Shredding
Cheese, soft or semi-soft Cheddar, Mozzarella, Swiss Shredding
Mushrooms Slicing/Shredding
Parmesan, Romano Shredding
Potatoes Slicing/Shredding
Summer Squash/Zucchini Slicing/Shredding
Emulsifying Disc
This useful emulsifying disc can be used for making mayonnaise, whipping cream
and whisking egg whites.
User Maintenance Instructions
This appliance requires little maintenance. It contains no user-serviceable
parts. Any servicing requiring disassembly other than cleaning must be
performed by a qualified appliance repair technician.
Care & Cleaning Instructions
1. Unplug the Food Processor before cleaning.
2. The processing bowl, lid, food pusher, food pusher cup, processing blade
and both discs are top-rack dishwasher-safe, or they may hand washed in
hot soapy water.
WARNING: Blade and disc attachments are very sharp. Use extreme care when
handling blades and disc. Failure to do so can result in personal injury.
19665_19674_19675_19676_19677_19678_19679_BTFL_WMUS_10 cup_Food processor_IM_V11_R1.indd 2019665_19674_19675_19676_19677_19678_19679_BTFL_WMUS_10 cup_Food processor_IM_V11_R1.indd 20 2024-10-11 12:04 PM2024-10-11 12:04 PM
21
PLEASE NOTE: Some foods, essences or avorings may discolor the plastic
processing bowl. This will not harm the plastic or affect the avor of
your food.
3. Add a dab of vegetable oil to a clean kitchen cloth and rub over the
area to remove discoloration.
4. Wipe the Food Processor base with a soft, moistened cloth.
WARNING: Never immerse the Food Processor base in water or any
other liquid.
5. Rinse and dry each part thoroughly before next use.
Storing Instructions
1. Never store the Food Processor while it is wet.
Make sure all parts are clean and dry
before storing.
2. Neatly store all accessories in the bowl for
space saving.
3. Do not put any stress on cord where it enters
unit, as this could cause cord to fray and
break. Wrap cord around cord storage at the
base of the unit.
4. Store appliance in its box or in a clean,
dry place.
19665_19674_19675_19676_19677_19678_19679_BTFL_WMUS_10 cup_Food processor_IM_V11_R1.indd 2119665_19674_19675_19676_19677_19678_19679_BTFL_WMUS_10 cup_Food processor_IM_V11_R1.indd 21 2024-10-11 12:04 PM2024-10-11 12:04 PM

22
Limited Two-Year Warranty
Sensio Inc. dba Made by Gather™
hereby warrants that for a period
of TWO YEARS from the date of
purchase, this product will be free
from mechanical defects in material
and workmanship, and for 90 days in
respect to non-mechanical parts. At
its sole discretion, Sensio Inc. dba
Made by Gather™ will either repair
or replace the product found to be
defective, or issue a refund on the
product during the warranty period.
The warranty is only valid for
the original retail purchaser from
the date of initial retail purchase
and is not transferable.
Keep the original sales receipt,
as proof of purchase isrequired
to obtain warranty validation.
Retail stores selling this product
do not have the right to alter,
modify, or in any way revise the
terms and conditions of the warranty.
Exclusions:
The warranty does not cover normal
wear of parts or damage resulting
from any of thefollowing: negligent
use of the product, use of improper
voltage or current, improper routine
maintenance, use contrary to the
operating instructions, disassembly,
repair, or alteration by anyone
other than qualied Sensio Inc.
dba Made by Gather™ personnel.
Also, the warranty does not cover
Acts of God such as re, oods,
hurricanes, or tornadoes.
Sensio Inc. dba Made by Gather™ shall
not be liable for any incidental or
consequential damages caused by the
breach of any express or implied
warranty. Apart from the extent
prohibited by applicable law, any
implied warranty of merchantability
or tness for a particular purpose
is limited in time to the duration
of the warranty. Some states,
provinces or jurisdictions do not
allow the exclusion or limitation
of incidental or consequential
damages, or limitations on how
long an implied warranty lasts,
and therefore, the above exclusions
or limitations may not apply to you.
The warranty covers specic legal
rights which may vary by state,
province and/or jurisdiction.
19665_19674_19675_19676_19677_19678_19679_BTFL_WMUS_10 cup_Food processor_IM_V11_R1.indd 2219665_19674_19675_19676_19677_19678_19679_BTFL_WMUS_10 cup_Food processor_IM_V11_R1.indd 22 2024-10-11 12:04 PM2024-10-11 12:04 PM

23
How To Obtain Warranty Service
You must contact Customer Service at
our toll-free number: 1-877-775-3564.
A Customer Service Representative
will attempt to resolve warranty
issues over thephone. If the
Customer Service Representative
is unable to resolve the problem,
you will be provided with a case
number and asked to return the
product to Sensio Inc. dba
Made by Gather™ Attach a tag to the
product that includes: your name,
address, daytime contact telephone
number, case number, and description
of the problem.
Also, include a copy of the original
sales receipt. Carefully package
the tagged product with the sales
receipt, and send it (with shipping
and insurance prepaid) to SENSIO
Inc.’s address. Sensio Inc.
dba Made by Gather™ shall bear
no responsibility or liability
for the returned product while
in transit to Sensio Inc.
dba Made by Gather™ Customer
Service Center.
19665_19674_19675_19676_19677_19678_19679_BTFL_WMUS_10 cup_Food processor_IM_V11_R1.indd 2319665_19674_19675_19676_19677_19678_19679_BTFL_WMUS_10 cup_Food processor_IM_V11_R1.indd 23 2024-10-11 12:04 PM2024-10-11 12:04 PM
Sección 1
Seguridad
1
19665_19674_19675_19676_19677_19678_19679_BTFL_WMUS_10 cup_Food processor_IM_V11_R1.indd 2419665_19674_19675_19676_19677_19678_19679_BTFL_WMUS_10 cup_Food processor_IM_V11_R1.indd 24 2024-10-11 12:04 PM2024-10-11 12:04 PM

25
1
MEDIDAS DE SEGURIDAD
IMPORTANTES
Al usar electrodomésticos, se deben tener en cuenta
precauciones de seguridad básicas, como las siguientes:
1. LEA TODAS LAS INSTRUCCIONES.
2. Para protegerse de descargas eléctricas, no sumerja el
cable, los enchufes o el aparato en agua u otro líquido.
3. Es necesaria una estrecha supervisión cuando los niños
utilizan un aparato o si este se utiliza cerca de ellos.
Este aparato no es apto para que lo utilicen los niños.
Se debe supervisar a los niños para asegurarse de que
no jueguen con el aparato.
4. Este aparato no está concebido para ser utilizado
por personas (incluidos niños) con capacidades
físicas, sensoriales o mentales reducidas; o con
falta de experiencia y conocimiento, a menos que
sean supervisados o reciban instrucciones relativas
al uso del aparato por una persona responsable de
suseguridad.
5. Apague el procesador de alimentos y desenchúfelo del
tomacorriente cuando no lo utilice, antes de colocar o
quitar los accesorios y antes de limpiarlo.
6. Para desenchufarlo, sujete el enchufe y jálelo del
tomacorriente. Nunca tire del cable de alimentación.
7. Evite el contacto con las piezas móviles. No intente
anular ningún mecanismo del interbloqueo de seguridad.
19665_19674_19675_19676_19677_19678_19679_BTFL_WMUS_10 cup_Food processor_IM_V11_R1.indd 2519665_19674_19675_19676_19677_19678_19679_BTFL_WMUS_10 cup_Food processor_IM_V11_R1.indd 25 2024-10-11 12:04 PM2024-10-11 12:04 PM

26
8. Piezas en movimiento. Mantenga los dedos alejados de la
abertura de descarga.
9. No utilice un aparato con un cable o enchufe dañados,
después de una avería, después de una caída o si está
dañado de alguna manera. Comuníquese con el Servicio al
Cliente para su revisión, reparación o ajuste.
10. El uso de accesorios no recomendados o vendidos por
el fabricante puede causar incendios, descargas
eléctricas o lesiones.
11. El recipiente de procesamiento debe estar instalado
correctamente en su lugar antes de usar el aparato.
12. No utilizar en exteriores.
13. No deje que el cable cuelgue del borde de la mesa o
delmostrador.
14. No permita que el cable entre en contacto con
superficies calientes, incluyendo la estufa.
15. Para desconectar, gire la perilla de control
de velocidad a OFF. Luego quite el enchufe
del tomacorriente.
16. Mantenga las manos y los utensilios alejados de las
cuchillas o discos en movimiento mientras se procesan
los alimentos para reducir el riesgo de lesiones graves
a las personas o daños al procesador de alimentos.
Puede usar un raspador o una espátula, pero solo cuando
el procesador de alimentos no esté funcionando.
17. Las cuchillas son filosas. Manipúlelas con cuidado.
19665_19674_19675_19676_19677_19678_19679_BTFL_WMUS_10 cup_Food processor_IM_V11_R1.indd 2619665_19674_19675_19676_19677_19678_19679_BTFL_WMUS_10 cup_Food processor_IM_V11_R1.indd 26 2024-10-11 12:04 PM2024-10-11 12:04 PM

27
18. Para reducir el riesgo de lesiones, nunca coloque la
cuchilla o el disco de procesamiento sobre la base sin
que el recipiente esté asegurado a la base. Coloque el
recipiente de procesamiento y luego el eje impulsor,
correctamente en su lugar.
19. Asegúrese de que la tapa esté bien bloqueada en su lugar
antes de hacer funcionar el aparato.
20. Nunca introduzca los alimentos a mano. Utilice siempre
el accesorio de empujar alimentos.
21. No intente eludir los interbloqueos base/recipiente ni
tapa/recipiente.
22. No llene el recipiente por encima de la línea de
capacidad máxima marcada para evitar el riesgo de
lesiones por daños a la tapa o el bol.
GUARDE ESTAS
INSTRUCCIONES
SOLO PARA USO
DOMÉSTICO
19665_19674_19675_19676_19677_19678_19679_BTFL_WMUS_10 cup_Food processor_IM_V11_R1.indd 2719665_19674_19675_19676_19677_19678_19679_BTFL_WMUS_10 cup_Food processor_IM_V11_R1.indd 27 2024-10-11 12:04 PM2024-10-11 12:04 PM

28
MEDIDAS DE SEGURIDAD
IMPORTANTES
ADICIONALES
IMPORTANTE: Para mantener el máximo rendimiento, no
utilice su procesador de alimentos para lo siguiente:
moler granos, moler granos de café o especias duras como
nuez moscada; cortar carne congelada; o triturar hielo.
1. Todos los usuarios de este aparato deben leer y comprender
este manual antes de utilizar o limpiar el aparato.
2. El cable de este aparato se debe enchufar solamente a
un tomacorriente de 120 voltios de CA.
3. No deje este aparato sin supervisión mientras está en uso.
4. Si este aparato comienza a fallar durante el uso, gire
inmediatamente la perilla de control de velocidad a
OFF para detener la operación y desenchufe el cable.
Noutilice ni intente reparar al aparato averiado.
5. Si este aparato cae o por accidente se sumerge en
agua, desenchúfelo inmediatamente. ¡No toque el agua!
Noutilice este aparato si se cayó o se sumergió en agua.
6. Para reducir el riesgo de provocar lesiones a personas
o daños a la propiedad, nunca use este aparato en una
posición inestable.
7. No utilice este aparato para otro uso que no sea
el indicado.
19665_19674_19675_19676_19677_19678_19679_BTFL_WMUS_10 cup_Food processor_IM_V11_R1.indd 2819665_19674_19675_19676_19677_19678_19679_BTFL_WMUS_10 cup_Food processor_IM_V11_R1.indd 28 2024-10-11 12:04 PM2024-10-11 12:04 PM

29
NOTAS SOBRE EL ENCHUFE
Este aparato posee un enchufe polarizado (una clavija es
más ancha que la otra). Para reducir el riesgo de descarga
eléctrica, este enchufe encajará en un tomacorriente
polarizado en un solo sentido. Si el enchufe no entra
completamente en el tomacorriente, gire el enchufe. Si
aun así no encaja, contacte a un técnico electricista
calificado. No modifique el enchufe de ninguna manera.
NOTAS SOBRE EL CABLE
A. Se proporciona un cable de alimentación corto (o un
cable) para reducir el riesgo de enredarse o tropezarse
con un cable largo.
B. Cables de alimentación o cables de extensión más
largos pueden usarse siempre y cuando se tenga cuidado
al usarlos.
C. Si se utiliza un cable eléctrico desconectable largo o
un cable de extensión:
1. La clasificación eléctrica marcada en el cable o
extensión debe ser al menos igual a la clasificación
eléctrica del aparato;
2. Si el aparato es del tipo con conexión a tierra, el
cable de extensión deberá ser un cable de 3 hilos con
conexión a tierra; y
3. El cable más largo debe colocarse de manera que no
cuelgue de una encimera o mesa de donde los niños
pudieran jalarlo o tropezar con él por accidente.
19665_19674_19675_19676_19677_19678_19679_BTFL_WMUS_10 cup_Food processor_IM_V11_R1.indd 2919665_19674_19675_19676_19677_19678_19679_BTFL_WMUS_10 cup_Food processor_IM_V11_R1.indd 29 2024-10-11 12:04 PM2024-10-11 12:04 PM

30
ADVERTENCIA SOBRE EL ACABADO
PRECAUCIÓN: Para evitar que el acabado de la encimera
o de la mesa u otros muebles se dañe, coloque posavasos
o manteles individuales que NO SEAN DE PLÁSTICO entre
el electrodoméstico y el acabado de la encimera o de
la mesa. No hacerlo puede provocar que el acabado se
oscurezca; provocar imperfecciones permanentes o pueden
aparecer manchas.
ALIMENTACIÓN ELÉCTRICA
Si el circuito eléctrico está sobrecargado con otros
aparatos, este aparato podría no funcionar correctamente.
Debe utilizarse en un circuito eléctrico diferente al de
otros electrodomésticos.
19665_19674_19675_19676_19677_19678_19679_BTFL_WMUS_10 cup_Food processor_IM_V11_R1.indd 3019665_19674_19675_19676_19677_19678_19679_BTFL_WMUS_10 cup_Food processor_IM_V11_R1.indd 30 2024-10-11 12:04 PM2024-10-11 12:04 PM

Sección 2
Instrucciones
2
19665_19674_19675_19676_19677_19678_19679_BTFL_WMUS_10 cup_Food processor_IM_V11_R1.indd 3119665_19674_19675_19676_19677_19678_19679_BTFL_WMUS_10 cup_Food processor_IM_V11_R1.indd 31 2024-10-11 12:04 PM2024-10-11 12:04 PM

32
Conozca su procesador de alimentos de 10 tazas
El producto puede diferir ligeramente del que aparece en las ilustraciones
10
11
12
13
14
15
1. Disco de rebanar/
triturar
reversible
2. Disco de
emulsicación
3. Cuchilla de
procesamiento de
acero inoxidable
(cuchillo
Sabatier)
4. Vástago
5. Eje de transmisión
6. Canal de
interbloqueo base/
recipiente
7. Base
8. Selector de
control de
velocidad
9. Patas
antideslizantes
10. Accesorio de
empujar alimentos
11. Tolva de
alimentación
12. Canal de
interbloqueo base/
recipiente
13. Tapa
14. Asa del recipiente
de procesamiento
15. Recipiente con
una capacidad de
procesamiento de
10 tazas
1
2
3
4
5
6
8
9
7
19665_19674_19675_19676_19677_19678_19679_BTFL_WMUS_10 cup_Food processor_IM_V11_R1.indd 3219665_19674_19675_19676_19677_19678_19679_BTFL_WMUS_10 cup_Food processor_IM_V11_R1.indd 32 2024-10-11 12:04 PM2024-10-11 12:04 PM
33
Cuchilla de procesamiento (cuchilla Sabatier)
Cuchilla de acero inoxidable de corte/mezcla/masa
diseñada para cortar, mezclar, licuar, preparar
masa, batir, hacer migajas y emulsificar. Ideal
para cortar carne cruda y cocida, rallar queso
parmesano, preparar tortas y rellenos, preparar
paté, aderezos y salsas hechas puré.
IMPORTANTE: La textura de los alimentos procesados
(como queso parmesano rallado) está determinada
por la velocidad de procesamiento y el tiempo.
Fijación del disco de rebanar/triturar reversible
Instale el disco de procesamiento con la
cuchilla de rebanar hacia ARRIBA para rebanar
o con la cuchilla de triturar hacia ARRIBA para
triturar. Ideal para quesos suaves o verduras
duras. Rebane con facilidad papas, col, pepino,
zucchini, cebollas, betabeles, zanahorias y
rábanosfrescos.
Tan solo invierta la cuchilla para triturar.
Accesorio de empujar alimentos
La taza del accesorio de empujar alimentos se
puede usar para verter pequeñas cantidades de
líquidos (hasta 7 oz.) como aceite o agua para
diluir la mezcla procesada. Cuando no la use, el
accesorio de empujar alimentos se acomoda dentro
de la tolva de alimentación.
Eje de transmisión
Se debe utilizar el eje de transmisión
al ensamblar la cuchilla o el disco para
el procesamiento.
Disco de emulsificación
El disco de emulsificación puede usarse para
preparar mayonesa y vinagretas, y para batir crema
y clara de huevo.
19665_19674_19675_19676_19677_19678_19679_BTFL_WMUS_10 cup_Food processor_IM_V11_R1.indd 3319665_19674_19675_19676_19677_19678_19679_BTFL_WMUS_10 cup_Food processor_IM_V11_R1.indd 33 2024-10-11 12:04 PM2024-10-11 12:04 PM
34
Antes del primer uso
ADVERTENCIA: Los accesorios de las cuchillas y del disco están muy afilados.
Tenga mucho cuidado cuando vaya a manipular las cuchillas y el disco. No hacerlo
puede causar lesiones.
1. Saque el procesador de alimentos con cuidado del empaque y quite todo el
material de embalaje.
2. Lave el recipiente de procesamiento, la tapa con la tolva de
alimentación, el accesorio de empujar alimentos, la taza del accesorio
de empujar alimentos, la cuchilla de procesamiento, el disco de
emulsicación y el accesorio para triturar/rebanar en agua tibia
y detergente.
3. Limpie la base del procesador de alimentos con un paño suave humedecido.
ADVERTENCIA: Nunca sumerja la base del procesador de alimentos en agua
ni en otro líquido.
4. Enjuague y seque bien cada parte antes de usar.
Instrucciones de ensamblaje
Conjunto de la base/recipiente
1. Antes de ensamblar y
usar el procesador de
alimentos, asegúrese
de que el cable de
alimentación esté
desenchufado.
2. Coloque la base frente a
usted sobre una supercie
seca y nivelada.
3. Coloque el recipiente
de procesamiento en la
base. Posicione el asa
directamente sobre el
canal de interbloqueo
base/recipiente.
(Ver Figura 3.)
Figura 3 Figura 4
Canal de interbloqueo
base/recipiente
19665_19674_19675_19676_19677_19678_19679_BTFL_WMUS_10 cup_Food processor_IM_V11_R1.indd 3419665_19674_19675_19676_19677_19678_19679_BTFL_WMUS_10 cup_Food processor_IM_V11_R1.indd 34 2024-10-11 12:04 PM2024-10-11 12:04 PM
35
4. Rote el asa en sentido antihorario; el asa se
bloqueará del lado derecho mientras se conecta
el interbloqueo base/recipiente. (Ver Figura 4.)
NOTA: Si el interbloqueo base/recipiente no
está correctamente enganchado, el procesador de
alimentos no funcionará.
Fijación de la cuchilla de procesamiento de
acero inoxidable
ADVERTENCIA: El accesorio de la cuchilla está muy
afilado. Tenga mucho cuidado y sujete siempre el
centro del cubo cuando vaya a manipular la cuchilla.
No hacerlo puede causar lesiones.
1. Ensamble la hoja de procesamiento tomando con
cuidado el aro de plástico que mantiene la
cuchilla unida. Inserte el vástago a través del
oricio y gire las cuchillas en sentido horario
para bloquear.
2. Encaje el oricio central de la cuchilla de
procesamiento en el vástago. (Ver Figura 5.) Gire
la cuchilla hasta que caiga al fondo del recipiente
de procesamiento y quede jada rmemente.
3. Coloque el alimento que vaya a procesar en el
recipiente de procesamiento.
4. Fije y bloquee la tapa como se indica en las
instrucciones de ensamblaje de la tapa.
Fijación del disco de rebanar/triturar reversible
ADVERTENCIA: Los dos lados del disco están muy
afilados. Tenga mucho cuidado y sujete siempre el cubo
central cuando vaya a manipular el disco. No hacerlo
puede causar lesiones.
1. Para rebanar, mantenga el disco con la cuchilla
de rebanar ARRIBA mientras sujeta el cubo
central. Voltee el disco con la cuchilla de
triturar hacia arriba para triturar.
Figura 5
Vástago
Figura 6
Disco de
Emulsificación
Disco de
Emulsificación
19665_19674_19675_19676_19677_19678_19679_BTFL_WMUS_10 cup_Food processor_IM_V11_R1.indd 3519665_19674_19675_19676_19677_19678_19679_BTFL_WMUS_10 cup_Food processor_IM_V11_R1.indd 35 2024-10-11 12:04 PM2024-10-11 12:04 PM
36
2. Encaje el oricio central del disco en el
vástago. Gire el disco hasta que caiga
fácilmente en la parte superior del vástago y
quede jado rmemente. (Ver Figura 6.)
3. Fije y bloquee la tapa como se indica en
las instrucciones.
Fijar el disco de emulsificación
1. Para ensamblar el disco de emulsicación,
inserte el vástago a través del oricio y
gire las cuchillas en sentido antihorario para
bloquear. (Ver Figura 7.)
2. Coloque el vástago en el medio del recipiente
de procesamiento y gire hasta que esté
bien sujetado.
3. Coloque los líquidos a emulsicar en el
recipiente de procesamiento.
4. Fije y bloquee la tapa como se indica en las
instrucciones de ensamblaje de la tapa.
Ensamblaje de la tapa
1. Alinee la pestaña grande de la tapa de manera
que se asiente directamente sobre el canal de
interbloqueo de la tapa/recipiente, ligeramente
hacia la izquierda del asa.
2. Mientras sujeta el asa del recipiente de
procesamiento con una mano, agarre la tolva de
alimentación con la otra mano y gire la tapa
en sentido antihorario; escuchará un sonido de
clic cuando la tapa se bloquee en su lugar.
(Ver Figura 8.)
NOTA: Si la tapa del interbloqueo de la tapa
no está correctamente enganchado, el procesador
de alimentos no funcionará.
3. Inserte el accesorio para empujar alimentos en
la tolva de alimentación.
Figura 7
Vástago
Figura 8
Canal de
interbloqueo
de la tapa/
recipiente
Disco de
Emulsificación
19665_19674_19675_19676_19677_19678_19679_BTFL_WMUS_10 cup_Food processor_IM_V11_R1.indd 3619665_19674_19675_19676_19677_19678_19679_BTFL_WMUS_10 cup_Food processor_IM_V11_R1.indd 36 2024-10-11 12:04 PM2024-10-11 12:04 PM

37
4. Enchufe el cable de alimentación a un tomacorriente de 120 V CA.
5. El procesador de alimentos ya está listo para usarse.
Instrucciones de funcionamiento
1. Fije y bloquee la tapa como se indica en las instrucciones de ensamblaje
de la tapa.
2. Agregue el accesorio de empujar alimentos en la tolva de alimentación
antes de usar.
3. Enchufe el cable de alimentación a un tomacorriente de 120 V CA.
4. Lleve la perilla de control de velocidad a PULSE o LOW para iniciar
el funcionamiento.
5. Use la velocidad LOW para preparar masas y batidos. La velocidad HIGH
es ideal para la mayoría de las funciones de cortar, mezclar y procesar.
Use las velocidades HIGH o LOW cuando necesite rebanar o triturar.
NOTA: La función PULSE se detendrá al soltar el selector.
6. Si es necesario agregar más ingredientes en el recipiente de
procesamiento, simplemente retire el accesorio para empujar alimentos.
Use la taza de empujar alimentos para verter pequeñas cantidades de
aceite u otros líquidos a través de la tolva de alimentación mientras
procesa los alimentos.
PRECAUCIÓN: Nunca use los dedos o utensilios para empujar los alimentos
por la tolva de alimentación.
Utilice siempre el accesorio de empujar alimentos.
7. Aplique una presión constante y uniforme sobre el accesorio de empujar
alimentos para introducir alimentos en la tolva de alimentación.
8. Para obtener mejores resultados, limite la cantidad de alimento a 5
tazas para obtener un rendimiento óptimo durante el procesamiento de
los alimentos.
NOTA: Al procesar varios ingredientes para una receta, evite procesar en
exceso los alimentos en el fondo del recipiente; corte lotes pequeños de
cada ingrediente.
9. Cuando termine de procesar los alimentos, coloque el selector de control
de velocidad a la posición de apagado (OFF). Desenchufe la unidad.
19665_19674_19675_19676_19677_19678_19679_BTFL_WMUS_10 cup_Food processor_IM_V11_R1.indd 3719665_19674_19675_19676_19677_19678_19679_BTFL_WMUS_10 cup_Food processor_IM_V11_R1.indd 37 2024-10-11 12:04 PM2024-10-11 12:04 PM

38
10. Agarre la tolva de alimentación y el asa del recipiente de procesamiento,
y gire la tapa en sentido horario para desbloquearla. Quite la tapa.
11. Use el cubo central para levantar la cuchilla de procesamiento o el
disco de rebanar/triturar y sacarlo del vástago.
12. Mientras agarra bien el asa del recipiente de procesamiento, gire el
recipiente en sentido horario para desbloquearlo. Levantar para quitar el
bol de procesamiento de la base. Luego retire el vástago.
13. Use una espátula para quitar los alimentos procesados de la cuchilla y
del recipiente de procesamiento.
Protector térmico automático
Este producto cuenta con un protector térmico reajustable automático para
proteger el motor. Si el motor se apaga, gire la perilla de control de velocidad
a OFF. Deje que la unidad descanse durante aproximadamente 30 minutos. Una vez
que pasó el período de restablecimiento, gire la perilla de control de velocidad
al ajuste deseado para seguir procesando.
Consejos para el procesamiento de alimentos
• Para obtener mejores resultados, no llene el bol de procesamiento al
máximo. Para un rendimiento óptimo de procesamiento, limite la cantidad
de líquidos a 4 tazas/1000 ml y la cantidad de sólidos 5 tazas.
• Preparación de la masa: Use la cuchilla de procesamiento en la velocidad
LOW para preparar masas y batidos.
IMPORTANTE: Al agregar extracto de almendra o saborizantes a mezclas,
evite el contacto con el recipiente de procesamiento para evitar que se
marque de forma permanente.
• Cortar/Picar: La carne precocida debe cortarse en cubos de
aproximadamente 1 pulgada cuadrada antes de procesarla.
• Frutas y verduras: Antes de procesar las frutas y verduras, límpielas y
córtelas en trozos de 2 x 1 pulgada.
• Mezclar: Las cantidades que se pueden procesar en el recipiente de
procesamiento variarán dependiendo de la densidad de los ingredientes que
se utilicen.
19665_19674_19675_19676_19677_19678_19679_BTFL_WMUS_10 cup_Food processor_IM_V11_R1.indd 3819665_19674_19675_19676_19677_19678_19679_BTFL_WMUS_10 cup_Food processor_IM_V11_R1.indd 38 2024-10-11 12:04 PM2024-10-11 12:04 PM

39
• Agregar ingredientes líquidos: Vierta los ingredientes líquidos a
través de la tolva de alimentación en la tapa mientras el procesador
de alimentos está en funcionamiento. La taza del accesorio de empujar
alimentos es útil cuando se agregan pequeñas cantidades de líquidos como
aceite o agua para diluir la mezcla procesada.
• Agregar ingredientes secos: Agregue los ingredientes secos como la harina
directamente en el recipiente de procesamiento. No hay necesidad de
ltrar los ingredientes.
NOTA: Al procesar salsas o ingredientes semilíquidos, puede ser necesario
raspar periódicamente el recipiente de procesamiento con la espátula.
• Uso de la tolva de alimentación: El factor más importante para rebanar y
triturar con éxito es la forma en que los alimentos se introducen en la
tolva de alimentación. La tolva de alimentación debe compactarse bien de
forma que no quede espacios entre los trozos de alimentos.
NOTA: Siempre quedarán restos de alimentos sin procesar entre el
accesorio de empujar alimentos y el disco de procesamiento.
PRECAUCIÓN: Nunca use los dedos o utensilios para empujar los alimentos
por la tolva de alimentación. Utilice siempre el accesorio de
empujar alimentos.
• Rebanar/Triturar: Corte todos los ingredientes a un tamaño que se
ajuste holgadamente a la tolva de alimentación (no más de 2 x 1-1/2
pulgadas). Compacta los alimentos en la tolva de alimentación y, en
posición estable y vertical con el accesorio de empujar alimentos ejerza
presión hacia abajo de manera uniforme hasta que todos los ingredientes
estén rebanados o triturados. No use fuerza excesiva o podría dañar el
procesador de alimentos.
• Para trozos largos: Coloque los alimentos de 2 pulgadas horizontalmente
en la tolva de alimentación. (Ver Figura 9.)
• Para trozos pequeños: Coloque los alimentos verticalmente en la tolva de
alimentación. (Ver Figura 10.)
• Rebanar/Triturar: Para obtener los mejores resultados, recuerde que los
alimentos más blandos como el queso (Cheddar, mozzarella o suizo) deben
enfriarse bien antes de procesarlos. Los alimentos más duros, como el
queso parmesano o romano, deben estar a temperatura ambiente antes de
rallarlos o triturarlos.
19665_19674_19675_19676_19677_19678_19679_BTFL_WMUS_10 cup_Food processor_IM_V11_R1.indd 3919665_19674_19675_19676_19677_19678_19679_BTFL_WMUS_10 cup_Food processor_IM_V11_R1.indd 39 2024-10-11 12:04 PM2024-10-11 12:04 PM
40
NOTA: Al rallar queso
duro, no ejerza una
presión excesiva al
accesorio de empujar
alimentos.
• Emulsicar: El disco
de emulsicación puede
usarse para preparar
mayonesa y vinagretas,
y para batir crema y
clara de huevo. Coloque
las claras de huevo en
el recipiente de trabajo
y gire la perilla a
bajo; use Pulse (pulsar)
para obtener mejores
resultados y luego
velocidad alta hasta que
las claras están en la
consistencia deseada. La
capacidad máxima recomendada para líquidos es de 400 g y que no funcione
por más de 3 minutos a velocidad alta.
Consejo: agregue una pizca de sal o unas gotas de jugo de limón para
obtener mejores resultados.
Figura 9 Figura 10
19665_19674_19675_19676_19677_19678_19679_BTFL_WMUS_10 cup_Food processor_IM_V11_R1.indd 4019665_19674_19675_19676_19677_19678_19679_BTFL_WMUS_10 cup_Food processor_IM_V11_R1.indd 40 2024-10-11 12:04 PM2024-10-11 12:04 PM

41
Guía para el procesamiento de alimentos
ALIMENTO CAPACIDAD DEL RECIPIENTE
DE PROCESAMIENTO
Pescado, mariscos o carne hecha
puré/picada
3/4 libras (12 oz)
Verdura, queso o fruta rebanada
o triturada
4-5 tazas
Verdura, queso o fruta cortada 2 tazas
Verdura, queso o fruta hecha puré 3 tazas cocidas
Líquidos: Sopas, aderezos,
salsas, etc.
4 tazas
Masa de torta Cheesecake de 8 pulgadas
1 (15.25 oz.) caja de mezcla
de torta
Masa de galletas 2 docenas y media de galletas de
tamaño promedio
Pan blanco 2 tazas de harina multipropósito
Masa de pizza 2 tazas de harina multipropósito
Manteca de nuez 2 tazas de nueces
Accesorios para el procesamiento de alimentos
Cuchilla de procesamiento de acero inoxidable
Empuje los alimentos de los lados del recipiente de procesamiento con la
espátula de ser necesario.
NOTA: Se puede gratinar alimentos como queso o verduras con la cuchilla de
procesamiento. El tiempo y la velocidad de procesamiento determinará la
consistencia final.
19665_19674_19675_19676_19677_19678_19679_BTFL_WMUS_10 cup_Food processor_IM_V11_R1.indd 4119665_19674_19675_19676_19677_19678_19679_BTFL_WMUS_10 cup_Food processor_IM_V11_R1.indd 41 2024-10-11 12:04 PM2024-10-11 12:04 PM

42
ALIMENTO VELOCIDAD
Manzana PULSE (pulsar)
Migas de pan (migajas) PULSE (pulsar), luego HIGH
(velocidad alta)
Repollo PULSE (pulsar) o LOW (velocidad baja)
Zanahorias PULSE (pulsar) o
LOW (velocidad baja)
Apio PULSE (pulsar)
Galletas (migajas) PULSE (pulsar), luego HIGH
(velocidad alta)
Masa LOW
Huevos hervidos duros PULSE (pulsar)
Ajo PULSE (pulsar)
Hongos PULSE (pulsar)
Cebollas PULSE (pulsar)
Parmesano, romano (rallado) PULSE (pulsar), luego HIGH
(velocidad alta)
Perejil u otras hierbas PULSE (pulsar) o LOW (velocidad baja)
Morrón PULSE (pulsar)
Papas PULSE (pulsar)
Nueces de nogal PULSE (pulsar)
19665_19674_19675_19676_19677_19678_19679_BTFL_WMUS_10 cup_Food processor_IM_V11_R1.indd 4219665_19674_19675_19676_19677_19678_19679_BTFL_WMUS_10 cup_Food processor_IM_V11_R1.indd 42 2024-10-11 12:04 PM2024-10-11 12:04 PM

43
Fijación del disco de rebanar/triturar reversible
NOTA: Cortar los alimentos para que quepan en la tolva de alimentación.
Para obtener mejores resultados: Use PULSE, luego LOW para procesar.
ALIMENTO DISCO/LADO
Manzana Rebanar/Triturar
Zanahorias Rebanar/Triturar
Queso, cheddar suave o semi suave, mozzarella, suizo Triturar
Hongos Rebanar/Triturar
Parmesano, romano Triturar
Papas Rebanar/Triturar
Calabaza de verano/Zucchini Rebanar/Triturar
Disco de emulsificación
El disco de emulsificación puede usarse para preparar mayonesa y vinagretas, y
para batir crema y clara de huevo.
Instrucciones de mantenimiento para el usuario
Este aparato requiere poco mantenimiento. No contiene piezas que el usuario
pueda reparar. Cualquier mantenimiento que requiera desarmarlo, aparte de
la limpieza, debe ser realizado por un técnico calificado en reparación
de electrodomésticos.
Instrucciones de limpieza y cuidado
1. Desenchufe el procesador de alimentos antes de limpiarlo.
2. El recipiente de procesamiento, tapa, accesorio de empujar los alimentos,
taza del accesorio para empujar los alimentos, cuchilla de procesamiento
y ambos discos son aptos para el lavavajillas en la rejilla superior o
se lo puede lavar a mano con agua caliente y jabón.
19665_19674_19675_19676_19677_19678_19679_BTFL_WMUS_10 cup_Food processor_IM_V11_R1.indd 4319665_19674_19675_19676_19677_19678_19679_BTFL_WMUS_10 cup_Food processor_IM_V11_R1.indd 43 2024-10-11 12:04 PM2024-10-11 12:04 PM

44
ADVERTENCIA: Los accesorios de las cuchillas y del disco están muy
alados. Tenga mucho cuidado cuando vaya a manipular las cuchillas y el
disco. No hacerlo puede causar lesiones.
TENGA EN CUENTA: Algunos alimentos, esencias o saborizantes pueden
decolorar el recipiente de procesamiento de plástico. Esto no dañará el
plástico ni afectará el sabor de la comida.
3. Agregue un poco de aceite vegetal a un paño de cocina limpia y frote en
el área para quitar la decoloración.
4. Limpie la base del procesador de alimentos con un paño suave humedecido.
ADVERTENCIA: Nunca sumerja la base del procesador de alimentos en agua
ni en otro líquido.
5. Enjuague y seque bien cada parte antes de usar de nuevo.
Instrucciones de almacenamiento
1. Nunca guarde el procesador de alimentos
mientras esté húmedo. Asegúrese de que todas
las piezas estén limpias y secas antes
de guardarlas.
2. Almacene bien todos los accesorios en el
recipiente para ahorrar espacio.
3. No ejerza presión sobre el cable donde entra
en la unidad, ya que esto podría deshilacharlo
y romperlo. Envuelva el cable alrededor
del almacenamiento del cable en la base de
la unidad.
4. Guarde el aparato en su caja o en un lugar
limpio y seco.
19665_19674_19675_19676_19677_19678_19679_BTFL_WMUS_10 cup_Food processor_IM_V11_R1.indd 4419665_19674_19675_19676_19677_19678_19679_BTFL_WMUS_10 cup_Food processor_IM_V11_R1.indd 44 2024-10-11 12:04 PM2024-10-11 12:04 PM

45
Garantía limitada de dos años
Mediante la presente, Sensio Inc.
dba Made by Gather™. garantiza que,
durante el plazo de DOS AÑOS a partir
de la fecha de compra, este producto
no presentará defectos mecánicos en
el material ni en la mano de obra, y
durante 90 días, no los presentará en
las piezas no mecánicas. A su entera
discreción, Sensio Inc. dba Made by
Gather™ que resulte defectuoso, o
emitirá un reembolso por el producto
durante el plazo de garantía.
Esta garantía es válida únicamente
para el comprador minorista
original a partir de la fecha de
compra minorista inicial y no es
transferible. Conserve el recibo
de compra original, ya que se exige
una prueba de compra para obtener
la validación de la garantía. Las
tiendas minoristas no tienen derecho
a alterar, modicar ni corregir
de ninguna manera los términos y
condiciones de la garantía.
Exclusiones:
La garantía no cubre el desgaste
normal de las piezas ni el daño
ocasionado por cualquiera de las
siguientes causas: uso negligente
del producto, uso de un voltaje o
corriente incorrectos, mantenimiento
de rutina inadecuado, uso
contrario al de las instrucciones
de funcionamiento, desarmado,
reparación o alteración a cargo
de personas que no sean miembros
del personal calicado de Sensio
Inc. dba Made by Gather™ Asimismo,
la garantía no cubre actos de
la naturaleza, como incendios,
inundaciones, huracanes o tornados.
Sensio Inc. dba Made by Gather™
no asumirá responsabilidad por
daños incidentales o resultantes
ocasionados por la violación
de cualquier garantía expresa
o implícita. Salvo en la medida
en que lo prohíban las leyes
aplicables, cualquier garantía
implícita de comerciabilidad o
aptitud para un propósito particular
se limita temporalmente a la
duración de la garantía. Algunos
estados, provincias o jurisdicciones
no permiten la exclusión ni la
limitación de daños incidentales
o resultantes, o limitaciones
sobre la duración de una garantía
implícita y, por lo tanto, es posible
que las exclusiones o limitaciones
mencionadas no le correspondan.
La garantía cubre derechos legales
especícos que pueden variar de
un estado, una provincia o una
jurisdicción a otros.
19665_19674_19675_19676_19677_19678_19679_BTFL_WMUS_10 cup_Food processor_IM_V11_R1.indd 4519665_19674_19675_19676_19677_19678_19679_BTFL_WMUS_10 cup_Food processor_IM_V11_R1.indd 45 2024-10-11 12:04 PM2024-10-11 12:04 PM

46
Cómo obtener el servicio de garantía
Debe comunicarse con el Servicio
de atención al cliente a nuestro
número telefónico gratuito:
1-877-775-3564. Un representante
del Servicio de atención al cliente
intentará resolver los problemas
referidos a la garantía por
teléfono. Si este no puede resolver
el problema, le proporcionarán un
número de caso y le solicitarán que
devuelva el producto a Sensio Inc.
dba Made by Gather™ Adhiera una
etiqueta al producto que incluya:
su nombre, dirección, número
telefónico de contacto durante el
día, número de caso y descripción
del problema. Además, incluya una
copia del recibo de compra original.
Envuelva cuidadosamente el producto
etiquetado con el recibo de compra,
y envíelo (con el envío y el seguro
prepagados) a la dirección de Sensio
Inc. dba Made by Gather™. Sensio
Inc. dba Made by Gather™ no asumirá
obligación ni responsabilidad
alguna por el producto devuelto que
esté en el trayecto hacia el Centro
de servicio al cliente de Sensio
Inc. dba Made by Gather™
19665_19674_19675_19676_19677_19678_19679_BTFL_WMUS_10 cup_Food processor_IM_V11_R1.indd 4619665_19674_19675_19676_19677_19678_19679_BTFL_WMUS_10 cup_Food processor_IM_V11_R1.indd 46 2024-10-11 12:04 PM2024-10-11 12:04 PM

19665_19674_19675_19676_19677_19678_19679_BTFL_WMUS_10 cup_Food processor_IM_V11_R1.indd 4719665_19674_19675_19676_19677_19678_19679_BTFL_WMUS_10 cup_Food processor_IM_V11_R1.indd 47 2024-10-11 12:04 PM2024-10-11 12:04 PM

INSIDE back cover
19665_19674_19675_19676_19677_19678_19679_BTFL_WMUS_10 cup_Food processor_IM_V11_R1.indd 4819665_19674_19675_19676_19677_19678_19679_BTFL_WMUS_10 cup_Food processor_IM_V11_R1.indd 48 2024-10-11 12:04 PM2024-10-11 12:04 PM

INSIDE back cover
19665_19674_19675_19676_19677_19678_19679_BTFL_WMUS_10 cup_Food processor_IM_V11_R1.indd 4919665_19674_19675_19676_19677_19678_19679_BTFL_WMUS_10 cup_Food processor_IM_V11_R1.indd 49 2024-10-11 12:04 PM2024-10-11 12:04 PM

BACK Cover
19665, 19674, 19675, 19676, 19677, 19678, 19679 R1
Sensio Inc.
dba Made by Gather™
New York, NY 10016/USA
www.beautifulbydrew.com
19665_19674_19675_19676_19677_19678_19679_BTFL_WMUS_10 cup_Food processor_IM_V11_R1.indd 5019665_19674_19675_19676_19677_19678_19679_BTFL_WMUS_10 cup_Food processor_IM_V11_R1.indd 50 2024-10-11 12:04 PM2024-10-11 12:04 PM