NEED HELP? CONTACT US!
Have product questions? Need technical support?
Please feel free to contact us:
This is the original instruction, please read all manual instructions carefully before operating.
VEVOR reserves clear interpretation of our user manual. The appearance of the product shall
be subject to the product you received. Please forgive us that we won't inform you again if
Technical Support and E-Warranty Certificate
www.vevor.com/support
there is any technology or software updates on our product.
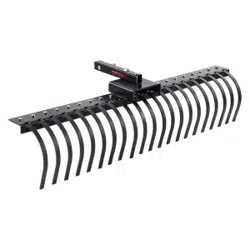
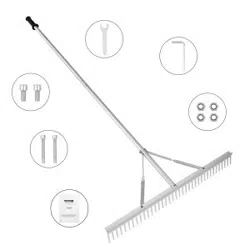
Asphalt Rake
030201
TOUGH TOOLS, HALF PRICE
Important Information:
Please read these instructions thoroughly before use.
Please read these instructions thoroughly before use.
Failure to follow instructions may result in equipment
damage, malfunction, or even injury or death to person-
nel.
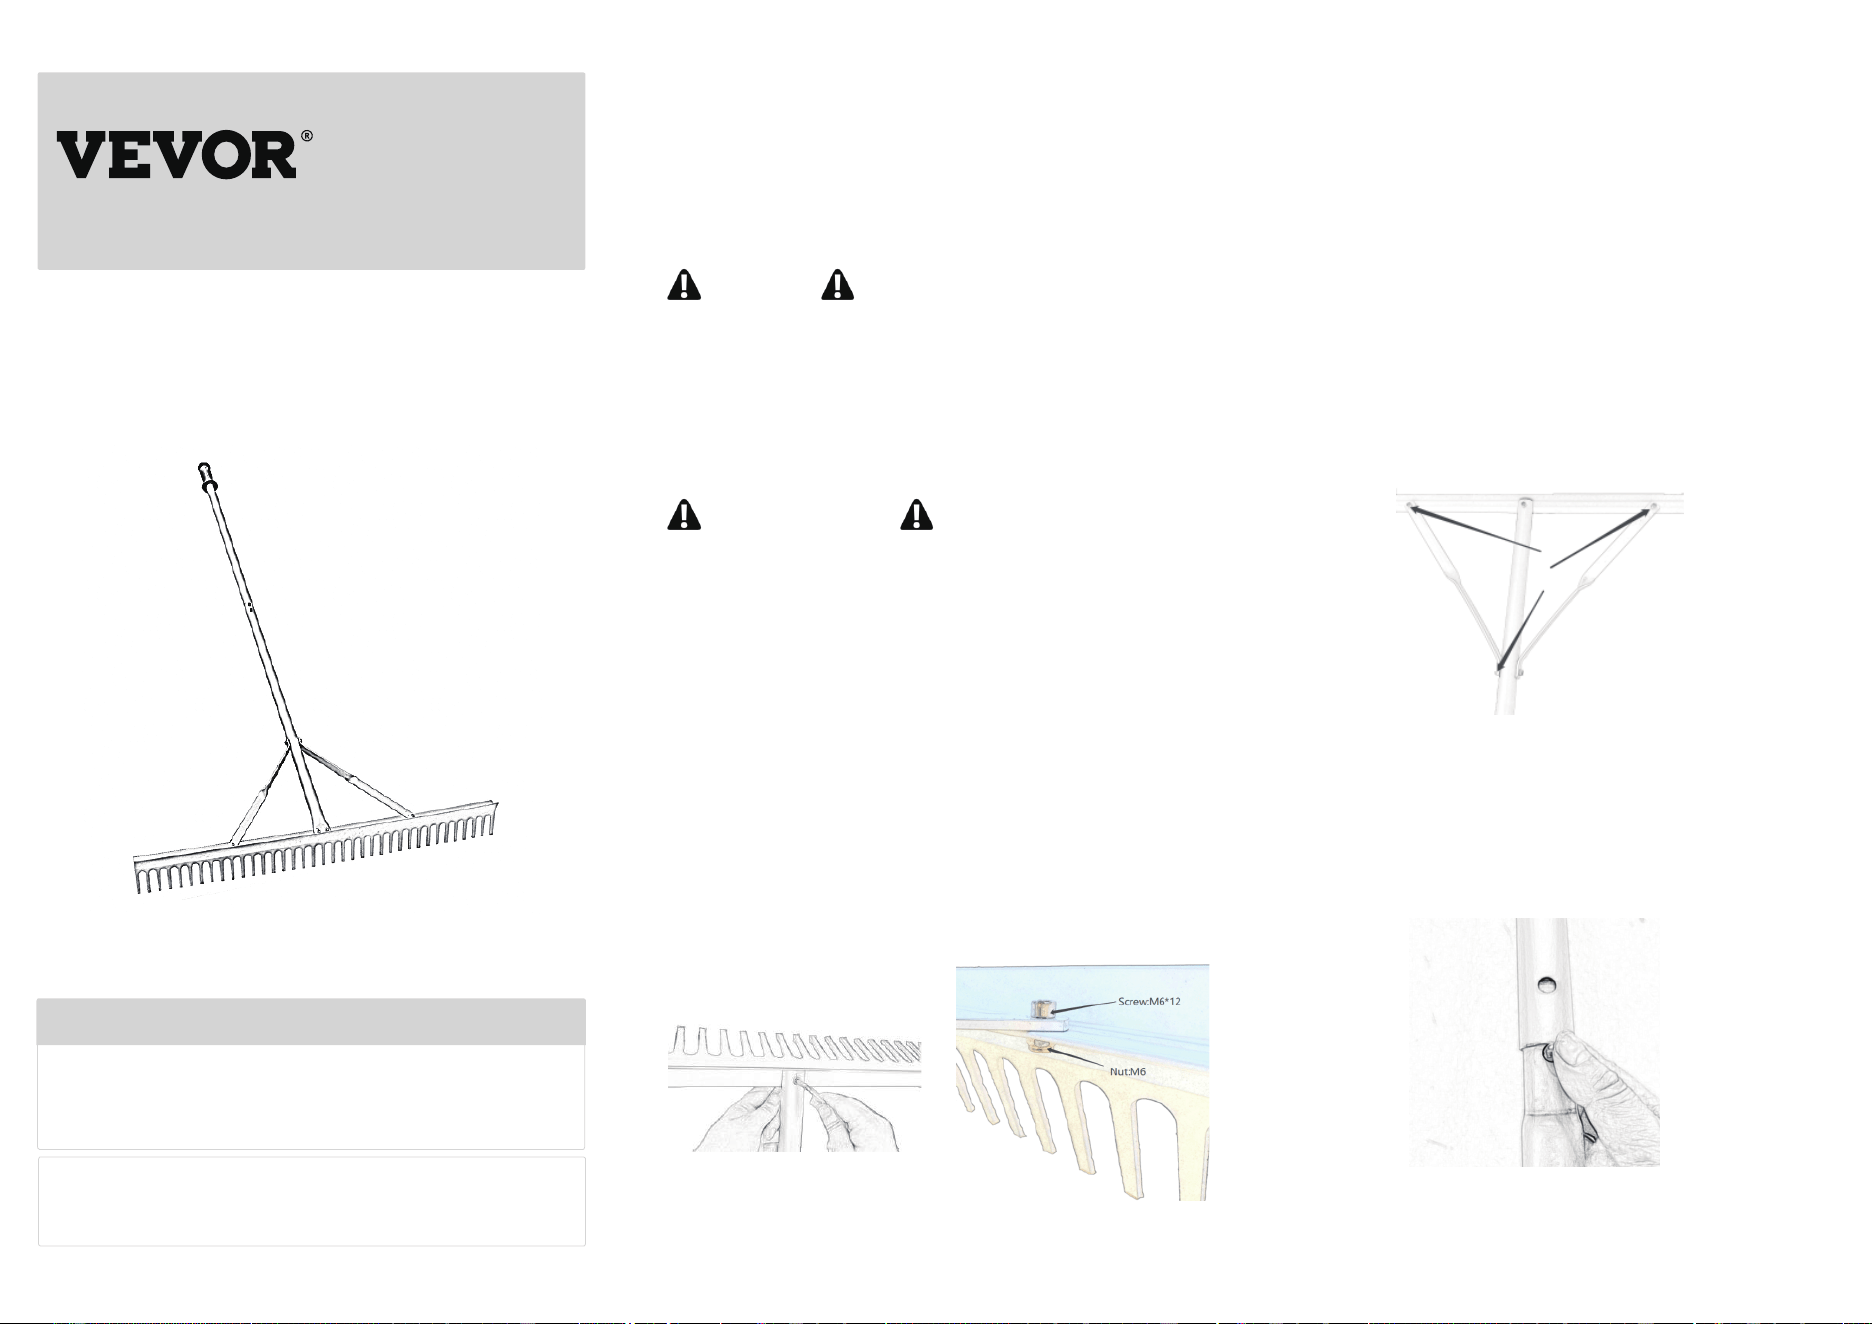
Assembly Instructions
Step 1
The Rake teeth Assembly: The Rake teeth Assembly:
Align the mounting holes in the middle of the rake teeth
and the head of the connecting rod, insert the M6*40
screw, and then use the nut. Note that you do not need
to tighten the nut at this time.
Step 2
Connecting rod Assembly: Align the mounting holes
on both sides of the rake teeth with the mounting holes
on the connecting rod, insert M6*12 screws, and screw
in the nuts. Note that you do not need to tighten the nut
at this time.
Step 3
Connecting rod and Middle Pole Assembly: Align
the mounting hole of the connecting rod and middle
pole, insert M6*40 screws, and screw in the nut.
Step 4
Tighten all screws from step1 to step3
Step 5
Handle Assembly:Press the spring-loaded buttons
on one end of the handle connector and slide it halfway
into one of the handles and rotate it until the buttons
snap into the holes in the handle.
Repeat this process for the other half of the handle.
SAFETY FIRST:
Keep out of reach of children.
Do not use it with children in the immediate area.
IMPORTANT: We are not responsible for equipment
damage or failure, losses, injury, or death resulting from
failure to follow safety precautions, misuse, or abuse of
equipment.
Warning
• The Rake is designed for cutting submerged, partially
emergent, or emergent aquatic vegetation from under-
water. Any other use is strictly prohibited. Before using
the Rake, please read this manual carefully to under-
stand the proper use of the unit.
• The Rake teeth have sharp edges.

TOUGH TOOLS, HALF PRICE
Technical Support and E-Warranty Certificate
www.vevor.com/support
ASPHALT RAKE
Model:CY-SF13
We continue to be committed to provide you tools with competitive price.
"Save Half", "Half Price" or any other similar expressions used by us only
cover all categories of tools offered by us.
represents an estimate of savings you might benefit from buying certain tools
with us compared to the major top brands and does not necessarily mean to
You are kindly reminded to verify carefully when you are placing an order with
us if you are actually saving half in comparison with the top major brands.
Technical Support and E-Warranty Certificate
www.vevor.com/support
Package Include
04
No.
1
2
3
4
5
7
8
9
Name
Rear Grip
Middle Pole
Fixed rod
Allen Key
Allen Wrench
Screw
Screw
Nut
Q'TY
1
1
2
1
1
2
2
4
M6*40
Picture
M6*12
Model No.
Weight
Size
CY-SF13
1.6 kg
75*36"
Package Include

Vousavezdesquestionssurlesproduits?Vousavezbesoind'assistancetechnique?
N'hésitezpasànouscontacter:
www.vevor.com/support
Assistancetechniqueetcertificatdegarantieélectronique
BESOIND'AIDE?CONTACTEZNOUS!
VEVORseréserveledroitd'interpréterclairementnotremanueld'utilisation.L'apparenceduproduitdépenddu
produitquevousavezreçu.Veuilleznousexcuser,nousnevousinformeronsplussidesmisesàjour
technologiquesoulogiciellessontdisponiblessurnotreproduit.
Ils'agitdesinstructionsd'origine,veuillezlireattentivementtouteslesinstructionsdumanuelavantdel'utiliser.
Étape4
Ensemblebielleetpôlecentral:alignezletroudemontagedela
bielleetdupôlecentral,insérezlesvisM6*40etvissezl'écrou.
Montagedelabielle:alignezlestrousdemontagedesdeuxcôtésdes
dentsdurâteauaveclestrousdemontagedelabielle,insérezlesvis
M6*12etvissezlesécrous.Notezquevousn'avezpasbesoindeserrer
l'écrouàcestade.
Étape1
Étape3
Étape2
Lenonrespectdesinstructionspeutentraînerdesdommages
matériels,undysfonctionnement,voiredesblessuresoulamortdu
personnel.
IMPORTANT:Nousnesommespasresponsablesdesdommagesoudes
pannesdel'équipement,despertes,desblessuresoudesdécèsrésultantdu
nonrespectdesprécautionsdesécurité,d'unemauvaiseutilisationoud'un
abusdel'équipement.
Nel'utilisezpasenprésenced'enfantsàproximitéimmédiate.
Veuillezlireattentivementcesinstructionsavantutilisation.
Veuillezlireattentivementcesinstructionsavantutilisation.
Tenirhorsdeportéedesenfants.
Répétezceprocessuspourl’autremoitiédelapoignée.
àuneextrémitéduconnecteurdepoignéeetfaitesleglisseràmichemin
dansl'unedespoignéesetfaitesletournerjusqu'àcequelesboutons
s'enclenchentdanslestrousdelapoignée.
•Lesdentsdurâteauontdesbordstranchants.
Assemblagedelapoignée:appuyezsurlesboutonsàressort
Étape5
•Lerâteauestconçupourcouperlavégétationaquatiquesubmergée,
partiellementémergenteouémergentesousl'eau.Touteautreutilisation
eststrictementinterdite.Avantd'utiliserlerâteau,veuillezlire
attentivementcemanuelpourcomprendrel'utilisationcorrectede
l'appareil.
Serreztouteslesvisdel'étape1àl'étape3
Assemblagedesdentsderâteau:Assemblagedesdentsderâteau:
Alignezlestrousdemontageaumilieudesdentsderâteauetlatêtede
labielle,insérezlavisM6*40,puisutilisezl'écrou.Notezquevous
n'avezpasbesoindeserrerl'écrouàcestade.
OUTILSROBUSTES,MOITIÉPRIX
Râteauàasphalte
LASÉCURITÉAVANTTOUT:
Instructionsdemontage
Avertissement
Informationsimportantes:
0201
03
Machine Translated by Google

«Économisezlamoitié»,«Moitiéprix»outouteautreexpressionsimilaireutiliséepar
nousnereprésentequ'uneestimationdeséconomiesdontvouspourriezbénéficierenachetant
certainsoutilscheznousparrapportauxgrandesmarquesetnesignifiepasnécessairement
couvrirtouteslescatégoriesd'outilsproposésparnous.
Nouscontinuonsànousengageràvousfournirdesoutilsàdesprixcompétitifs.
Nousvousrappelonsdebienvouloirvérifierattentivementlorsquevouspassezunecommande
cheznoussivouséconomisezréellementlamoitiéparrapportauxgrandesmarques.
OUTILSROBUSTES,MOITIÉPRIX
Modèle:CYSF13
Assistancetechniqueetcertificatdegarantie
électroniquewww.vevor.com/support
Assistancetechniqueetcertificatdegarantie
électroniquewww.vevor.com/support
RÂTEAUÀASPHALTE
CléAllen
Image
2
Nom
2
M6*12
1,6kg
Vis
Poignéearrière
CléAllen
Modèlen°
5
2
1
9
Taille
CYSF13
1
Tigefixe
Non.
Vis
4
M6*40
75*36"
4
1
8
Poids
1
2
1
Noix
Pôledumilieu
Q'TÉ
3
7
Contenudupaquet
Contenudupaquet
04
Machine Translated by Google

Nehmen Sie gerne Kontakt mit uns auf:
Sie haben Fragen zu Produkten? Benötigen Sie technischen Support?
Brauchen Sie Hilfe? Kontaktieren Sie uns!
www.vevor.com/support
Technischer Support und E-Garantie-Zertifikat
Asphaltrechen
ROBUSTE WERKZEUGE ZUM HALBEN PREIS
Wiederholen Sie diesen Vorgang für die andere Griffhälfte.
Die Nichtbeachtung der Anweisungen kann zu Geräteschäden,
Fehlfunktionen oder sogar zu Verletzungen bzw. zum Tod des Personals
führen.
WICHTIG: Wir sind nicht verantwortlich für Geräteschäden oder -ausfälle,
Verluste, Verletzungen oder Todesfälle, die auf die Nichtbeachtung von
Sicherheitsvorkehrungen oder auf Missbrauch oder Zweckentfremdung der Geräte
zurückzuführen sind.
Bitte lesen Sie diese Anleitung vor der Verwendung gründlich durch.
Nicht anwenden, wenn sich Kinder in der unmittelbaren Umgebung aufhalten.
Montage der Pleuelstange: Richten Sie die Befestigungslöcher auf
beiden Seiten der Rechenzähne mit den Befestigungslöchern an der
Pleuelstange aus, setzen Sie M6*12-Schrauben ein und schrauben Sie
die Muttern ein. Beachten Sie, dass Sie die Mutter zu diesem Zeitpunkt
nicht festziehen müssen.
Schritt 1
Montage der Verbindungsstange und des Mittelmasts: Richten Sie die
Montagelöcher der Verbindungsstange und des Mittelmasts aus, setzen Sie
die Schrauben M6*40 ein und schrauben Sie die Mutter fest.
Schritt 2
Schritt 3
• Der Rechen ist zum Schneiden von untergetauchter, teilweise auftauchender
oder auftauchender Wasservegetation unter Wasser konzipiert. Jede andere
Verwendung ist strengstens untersagt. Lesen Sie dieses Handbuch vor der
Verwendung des Rechens sorgfältig durch, um die ordnungsgemäße
Verwendung des Geräts zu verstehen.
Schritt 5
Ziehen Sie alle Schrauben von Schritt 1 bis Schritt 3 fest
Die Montage der Rechenzähne: Die Montage der Rechenzähne: Richten Sie
die Befestigungslöcher in der Mitte der Rechenzähne und dem Kopf der
Pleuelstange aus, setzen Sie die M6*40-Schraube ein und verwenden Sie
dann die Mutter. Beachten Sie, dass Sie die Mutter zu diesem Zeitpunkt nicht
festziehen müssen.
Schritt 4
an einem Ende des Griffanschlusses, schieben Sie ihn zur Hälfte in
einen der Griffe und drehen Sie ihn, bis die Knöpfe in die Löcher
im Griff einrasten.
Außerhalb der Reichweite von Kindern aufbewahren.
• Die Rechenzähne haben scharfe Kanten.
Bitte lesen Sie diese Anleitung vor der Verwendung gründlich durch.
Griffmontage: Drücken Sie die gefederten Knöpfe
Warnung
Montageanleitung
SICHERHEIT GEHT VOR:
Wichtige Informationen:
03
01 02
VEVOR behält sich die genaue Auslegung unseres Benutzerhandbuchs vor. Das Erscheinungsbild des Produkts richtet
sich nach dem Produkt, das Sie erhalten haben. Bitte verzeihen Sie uns, dass wir Sie nicht erneut informieren,
wenn es Technologie- oder Software-Updates für unser Produkt gibt.
Dies ist die Originalanleitung. Lesen Sie vor der Inbetriebnahme bitte alle Anweisungen im Handbuch sorgfältig durch.
Machine Translated by Google

„Sparen Sie die Hälfte“, „Halber Preis“ oder andere ähnliche Ausdrücke, die wir verwenden,
stellen lediglich eine Schätzung der Ersparnis dar, die Sie erzielen können, wenn Sie bestimmte
Werkzeuge bei uns im Vergleich zu den großen Top-Marken kaufen, und müssen nicht zwangsläufig
alle von uns angebotenen Werkzeugkategorien abdecken.
Wir sind weiterhin bestrebt, Ihnen Werkzeuge zu wettbewerbsfähigen Preisen anzubieten.
Bitte prüfen Sie bei Ihrer Bestellung bei uns sorgfältig, ob Sie im Vergleich zu den großen Topmarken
tatsächlich die Hälfte sparen.
Modell:CY-SF13
ROBUSTE WERKZEUGE ZUM HALBEN PREIS
Technischer Support und E-Garantie-Zertifikat
www.vevor.com/support
ASPHALTRECHEN
2
5
9
Größe
1
1
4
CY-SF13
Bild
1,6 kg
Name
2
2
M6*12
Hinterer Griff
Inbusschlüssel
Schrauben
Modell Nr.
1
1
2
Gewicht
Mittelpol
Nuss
Inbusschlüssel
7
MENGE
3
NEIN.
Feste Stange
Schrauben
M6*40
75*36"
1
4
8
Paket enthalten
Paket enthalten
04
Technischer Support und E-Garantie-Zertifikat
www.vevor.com/support
Machine Translated by Google

HAI BISOGNO DI AIUTO? CONTATTACI!
Hai domande sui prodotti? Hai bisogno di supporto tecnico?
Non esitate a contattarci:
www.vevor.com/support
Supporto tecnico e certificato di garanzia elettronica
VEVOR si riserva la chiara interpretazione del nostro manuale utente. L'aspetto del prodotto sarà soggetto al prodotto
ricevuto. Vi preghiamo di perdonarci se non vi informeremo di nuovo se ci saranno aggiornamenti tecnologici o
software sul nostro prodotto.
Queste sono le istruzioni originali, leggere attentamente tutte le istruzioni del manuale prima di utilizzare il prodotto.
Rastrello per asfalto
UTENSILI RESISTENTI, A METÀ PREZZO
La mancata osservanza delle istruzioni può causare danni
all'apparecchiatura, malfunzionamenti o persino lesioni o morte del
personale.
IMPORTANTE: non siamo responsabili per eventuali danni o guasti
alle apparecchiature, perdite, lesioni o decessi derivanti dalla mancata
osservanza delle precauzioni di sicurezza, dall'uso improprio o dall'abuso
delle apparecchiature.
Non utilizzarlo in presenza di bambini nelle immediate vicinanze.
Si prega di leggere attentamente le presenti istruzioni prima dell'uso.
Assemblaggio biella: allineare i fori di montaggio su entrambi i lati
dei denti del rastrello con i fori di montaggio sulla biella, inserire le viti
M6*12 e avvitare i dadi. Notare che non è necessario stringere il dado
in questa fase.
Passo 1
Gruppo biella e polo centrale: allineare il foro di montaggio della
biella e del polo centrale, inserire le viti M6*40 e avvitare il dado.
Passo 2
Passo 3
Passo 5
• Il Rake è progettato per tagliare vegetazione acquatica sommersa,
parzialmente emergente o emergente da sott'acqua. Qualsiasi altro
utilizzo è severamente vietato. Prima di utilizzare il Rake, leggere
attentamente questo manuale per comprendere l'uso corretto dell'unità.
Stringere tutte le viti dal passaggio 1 al passaggio 3
Il gruppo dei denti del rastrello: Il gruppo dei denti del rastrello: Allineare
i fori di montaggio al centro dei denti del rastrello e la testa della biella,
inserire la vite M6*40, quindi utilizzare il dado. Notare che non è
necessario stringere il dado in questa fase.
Passo 4
su un'estremità del connettore della maniglia e farlo scorrere per metà
in una delle maniglie, quindi ruotarlo finché i pulsanti non scattano
nei fori della maniglia.
Tenere fuori dalla portata dei bambini.
Si prega di leggere attentamente le presenti istruzioni prima dell'uso.
Ripetere il procedimento per l'altra metà del manico.
• I denti del rastrello hanno bordi affilati.
Montaggio della maniglia: premere i pulsanti a molla
LA SICUREZZA PRIMA DI TUTTO:
Istruzioni di montaggio
Avvertimento
Informazioni importanti:
0201
03
Machine Translated by Google

Modello:CY-SF13
"Risparmia la metà", "Metà prezzo" o altre espressioni simili da noi utilizzate
rappresentano solo una stima del risparmio che potresti ottenere acquistando determinati
utensili da noi rispetto ai principali marchi più prestigiosi e non intendono
necessariamente coprire tutte le categorie di utensili da noi offerti.
Continuiamo a impegnarci per fornirvi strumenti a prezzi competitivi.
Ti ricordiamo gentilmente di verificare attentamente quando effettui un ordine con noi se
stai effettivamente risparmiando la metà rispetto ai marchi più importanti.
UTENSILI RESISTENTI, A METÀ PREZZO
Supporto tecnico e certificato di garanzia
elettronica www.vevor.com/support
Supporto tecnico e certificato di garanzia
elettronica www.vevor.com/support
RASTRELLO PER ASFALTO
4
5
2
8
9
Misurare
Modello CY-SF13
4
1
1
2
Nome
2
Immagine
M6*12
1,6 kg
Impugnatura posteriore
Chiave a brugola
Vite
Modello n.
1
1
2
Peso
QUANTITÀ
3
Noce
Chiave a brugola
7
Polo centrale
75*36"
Asta fissa
NO.
Vite
M6*40
1
Il pacchetto include
Il pacchetto include
04
Machine Translated by Google

HERRAMIENTASRESISTENTESAMITADDEPRECIO
¿NECESITAAYUDA?¡CONTÁCTENOS!
www.vevor.com/support
Soportetécnicoycertificadodegarantíaelectrónica
VEVORsereservaelderechodeinterpretarnuestromanualdeusuario.Laaparienciadelproducto
dependerádelproductoquehayarecibido.Lerogamosquenosdisculpepornoinformarlenuevamente
sihayactualizacionestecnológicasodesoftwareennuestroproducto.
Estassonlasinstruccionesoriginales,leaatentamentetodaslasinstruccionesdelmanualantesdeoperar.
Rastrillodeasfalto
Nodudeenponerseencontactoconnosotros:
¿Tienepreguntassobreelproducto?¿Necesitaasistenciatécnica?
Montajedelabiela:Alineelosorificiosdemontajedeambosladosde
losdientesdelrastrilloconlosorificiosdemontajedelabiela,inserte
lostornillosM6*12yatornillelastuercas.Tengaencuentaquenoes
necesarioajustarlatuercaenestemomento.
Paso1
Conjuntodedientesderastrillo:Conjuntodedientesderastrillo:Alinee
losorificiosdemontajeenelmediodelosdientesderastrilloylacabeza
delabiela,inserteeltornilloM6*40yluegouselatuerca.Tengaen
cuentaquenoesnecesarioajustarlatuercaenestemomento.
Paso4
•Elrastrilloestádiseñadoparacortarvegetaciónacuáticasumergida,
parcialmenteemergenteoemergentebajoelagua.Cualquierotrouso
estáestrictamenteprohibido.Antesdeutilizarelrastrillo,leaatentamente
estemanualparacomprenderelusocorrectodelaunidad.
Paso5
Aprietetodoslostornillosdelpaso1alpaso3
•Losdientesdelrastrillotienenbordesafilados.
Montajedelmango:Presionelosbotonesconresorte
Mantenerfueradelalcancedelosniños.
Leaatentamenteestasinstruccionesantesdeusar.
enunextremodelconectordelmangoydeslícelohastalamitaden
unodelosmangosygírelohastaquelosbotonesencajenenlos
orificiosdelmango.
Leaatentamenteestasinstruccionesantesdeusar.
Noloutiliceconniñoseneláreainmediata.
Repitaesteprocesoparalaotramitaddelmango.
Elincumplimientodelasinstruccionespuedeocasionardañosal
equipo,malfuncionamientooinclusolesionesolamuertedelpersonal.
IMPORTANTE:Noseremosresponsablespordañosofallasdel
equipo,pérdidas,lesionesomuertequeresultendenoseguirlas
precaucionesdeseguridad,malusooabusodelequipo.
Paso3
Paso2
Conjuntodebielayposteintermedio:Alineeelorificiodemontajede
labielayelposteintermedio,insertelostornillosM6*40yatornille
latuerca.
Advertencia
SEGURIDADANTETODO:
Informaciónimportante:
Instruccionesdemontaje
0201
03
Machine Translated by Google

RASTRILLODEASFALTO
Modelo:CYSF13
HERRAMIENTASRESISTENTESAMITADDEPRECIO
Soportetécnicoycertificadodegarantía
electrónicawww.vevor.com/support
Soportetécnicoycertificadodegarantía
electrónicawww.vevor.com/support
"Ahorralamitad","mitaddeprecio"ocualquierotraexpresiónsimilarutilizadapornosotros
solorepresentaunaestimacióndelosahorrosquepodríaobteneralcomprarciertasherramientas
connosotrosencomparaciónconlasprincipalesmarcaslíderesynonecesariamentesignifica
cubrirtodaslascategoríasdeherramientasqueofrecemos.
Seguimoscomprometidosabrindarleherramientasaprecioscompetitivos.
Lerecordamosquecuandorealiceunpedidoconnosotrosdebeverificarcuidadosamentesi
realmenteestáahorrandolamitadencomparaciónconlasprincipalesmarcas.
7
Imagen
1,6kilogramos
Nombre
2
2
M6*12
Tornillo
ModeloNro.
Agarretrasero
llaveallen
2
5
9
1
Tamaño
1
4
No.
Varillafija
Tornillo
M6*40
CYSF13
75*36"
4
8
1
Peso
1
1
2
Polomedio
LlaveAllen
Tuerca
CANTIDAD
3
Elpaqueteincluye
Elpaqueteincluye
04
Machine Translated by Google
WYTRZYMAŁE NARZĘDZIA, POŁOWA CENY
POTRZEBUJESZ POMOCY? SKONTAKTUJ SIĘ Z NAMI!
www.vevor.com/support
Wsparcie techniczne i certyfikat e-gwarancji
To jest oryginalna instrukcja, przed rozpoczęciem użytkowania należy uważnie przeczytać wszystkie instrukcje.
VEVOR zastrzega sobie prawo do jasnej interpretacji naszej instrukcji obsługi. Wygląd produktu będzie zależał od
produktu, który otrzymałeś. Prosimy o wybaczenie, że nie poinformujemy Cię ponownie, jeśli w naszym
produkcie pojawią się jakiekolwiek aktualizacje technologiczne lub oprogramowania.
Grabie do asfaltu
Zapraszamy do kontaktu z nami:
Masz pytania dotyczące produktu? Potrzebujesz wsparcia technicznego?
Montaż korbowodu: Wyrównaj otwory montażowe po obu stronach
zębów grabiących z otworami montażowymi na korbowodzie, włóż
śruby M6*12 i wkręć nakrętki. Pamiętaj, że nie musisz dokręcać nakrętki
w tym momencie.
Krok 1
Montaż zębów grabiących: Montaż zębów grabiących: Wyrównaj
otwory montażowe na środku zębów grabiących i głowicy
korbowodu, włóż śrubę M6*40, a następnie użyj nakrętki. Zwróć
uwagę, że nie musisz dokręcać nakrętki w tym momencie.
Krok 4
• Grabie są przeznaczone do ścinania roślinności wodnej podwodnej,
częściowo wynurzonej lub wynurzonej. Wszelkie inne zastosowania
są surowo zabronione. Przed użyciem grabi należy uważnie
przeczytać tę instrukcję, aby zrozumieć prawidłowe użytkowanie
urządzenia.
Krok 5
Dokręć wszystkie śruby od kroku 1 do kroku 3
• Zęby grabi mają ostre krawędzie.
Montaż uchwytu: Naciśnij przyciski sprężynowe
Przechowywać w miejscu niedostępnym dla dzieci.
Przed użyciem należy dokładnie przeczytać instrukcję.
na jednym końcu łącznika uchwytu i wsuń go do połowy w jeden z
uchwytów, a następnie obróć, aż przyciski wskoczą w otwory w
uchwycie.
Przed użyciem należy dokładnie przeczytać instrukcję.
Nie należy używać urządzenia, gdy w jego pobliżu znajdują się dzieci.
Powtórz ten proces dla drugiej połowy uchwytu.
Nieprzestrzeganie instrukcji może spowodować uszkodzenie sprzętu,
jego nieprawidłowe działanie, a nawet obrażenia ciała lub śmierć
personelu.
WAŻNE: Nie ponosimy odpowiedzialności za uszkodzenia lub
awarie sprzętu, straty, obrażenia lub śmierć wynikające z
nieprzestrzegania środków ostrożności, niewłaściwego użytkowania
lub nadużywania sprzętu.
Krok 3
Krok 2
Montaż korbowodu i środkowego bieguna: Wyrównaj otwór
montażowy korbowodu i środkowego bieguna, włóż śruby
M6*40 i dokręć nakrętkę.
Ostrzeżenie
BEZPIECZEŃSTWO NAJWAŻNIEJSZE:
Ważne informacje:
Instrukcja montażu
03
01 02
Machine Translated by Google

GRABIE DO ASFALTU
Model:CY-SF13
WYTRZYMAŁE NARZĘDZIA, POŁOWA CENY
Wsparcie techniczne i certyfikat gwarancji
elektronicznej www.vevor.com/support
Wsparcie techniczne i certyfikat gwarancji
elektronicznej www.vevor.com/support
Przypominamy, że przy składaniu u nas zamówienia należy dokładnie sprawdzić, czy
faktycznie oszczędzasz połowę ceny w porównaniu z produktami wiodących marek.
Nadal staramy się oferować Państwu narzędzia w konkurencyjnych cenach.
„Oszczędź połowę”, „Połowa ceny” lub inne podobne wyrażenia używane przez nas
stanowią jedynie szacunek oszczędności, jakie możesz uzyskać kupując u nas określone
narzędzia w porównaniu do wiodących marek i niekoniecznie oznaczają, że obejmują
wszystkie kategorie narzędzi oferowanych przez nas.
Klucz imbusowy
Nakrętka
Nazwa
2
2
M6*12
Zdjęcie
1,6 kg
Śruba
Numer modelu
Uchwyt tylny
Klucz imbusowy
2
5
9
Rozmiar
1
4
CY-SF13
1
75*36"
NIE.
Pręt stały
Śruba
M6*40
4
8
1
Waga
1
1
2
ILOŚĆ
3
7
Środkowy biegun
Zawartość pakietu
Zawartość pakietu
04
Machine Translated by Google

HULP NODIG? NEEM CONTACT MET ONS OP!
Heeft u vragen over het product? Heeft u technische ondersteuning nodig?
Neem gerust contact met ons op:
www.vevor.com/support
Technische ondersteuning en e-garantiecertificaat
VEVOR behoudt zich een duidelijke interpretatie van onze gebruikershandleiding voor. Het uiterlijk van het
product is afhankelijk van het product dat u hebt ontvangen. Vergeef ons dat we u niet opnieuw zullen
informeren als er technologie- of software-updates voor ons product zijn.
Dit zijn de originele instructies. Lees de volledige handleiding zorgvuldig door voordat u het product gebruikt.
Asfalthark
ROBUUSTE GEREEDSCHAPPEN, HALVE PRIJS
Stap 5
• De hark is ontworpen voor het snijden van ondergedompelde, gedeeltelijk
boven water komende of boven water komende waterplanten. Elk ander
gebruik is ten strengste verboden. Lees deze handleiding zorgvuldig door
voordat u de hark gebruikt, zodat u het juiste gebruik van het apparaat
begrijpt.
Stap 3
Draai alle schroeven van stap 1 tot en met stap 3 vast
De Rake tanden montage: De Rake tanden montage: Lijn de
montagegaten uit in het midden van de rake tanden en de kop van de
drijfstang, plaats de M6*40 schroef en gebruik dan de moer. Let op dat
u de moer op dit moment niet hoeft vast te draaien.
Stap 4
aan één uiteinde van de handgreepconnector en schuif deze halverwege in
een van de handgrepen en draai deze totdat de knoppen in de gaten in
de handgreep vastklikken.
Buiten bereik van kinderen houden.
Lees deze instructies aandachtig door voordat u het product gebruikt.
Herhaal dit proces voor de andere helft van het handvat.
• De tanden van de hark hebben scherpe randen.
Handgreepmontage: druk op de veerbelaste knoppen
Als u de instructies niet opvolgt, kan dit leiden tot schade aan de
apparatuur, storingen of zelfs letsel of de dood van personeel.
BELANGRIJK: Wij zijn niet aansprakelijk voor schade of storingen aan
apparatuur, verlies, letsel of overlijden als gevolg van het niet naleven van
de veiligheidsmaatregelen, verkeerd gebruik of misbruik van de apparatuur.
Gebruik het niet als er kinderen in de buurt zijn.
Lees deze instructies aandachtig door voordat u het product gebruikt.
Montage van de verbindingsstang: Lijn de bevestigingsgaten aan beide
zijden van de tanden van de hark uit met de bevestigingsgaten op de
verbindingsstang, plaats M6*12 schroeven en schroef de moeren vast. Let
op: u hoeft de moer op dit moment nog niet vast te draaien.
Stap 1
Montage van de verbindingsstang en de middenpaal: Lijn het
montagegat van de verbindingsstang en de middenpaal uit, plaats de
M6*40-schroeven en draai de moer vast.
Stap 2
VEILIGHEID VOOROP:
Montage-instructies
Waarschuwing
Belangrijke informatie:
03
01 02
Machine Translated by Google

Model:CY-SF13
"Bespaar de helft", "halve prijs" of andere soortgelijke uitdrukkingen die wij gebruiken, geven
slechts een schatting van de besparingen die u kunt behalen door bepaalde gereedschappen bij ons
te kopen in vergelijking met de grote topmerken. Dit betekent niet noodzakelijkerwijs dat alle
categorieën gereedschappen die wij aanbieden, hieronder vallen.
Wij streven er voortdurend naar om u gereedschappen tegen concurrerende prijzen te leveren.
Wij willen u erop attenderen dat u bij het plaatsen van een bestelling zorgvuldig moet controleren of u
daadwerkelijk de helft bespaart in vergelijking met de grote topmerken.
ROBUUSTE GEREEDSCHAPPEN, HALVE PRIJS
Technische ondersteuning en e-
garantiecertificaat www.vevor.com/support
Technische ondersteuning en e-
garantiecertificaat www.vevor.com/support
ASFALTHARK
CY-SF13
Vaste staaf
Nee.
Schroef
M6*40
75*36"
1
4
8
1
1
2
Gewicht
Moer
Middenpool
Inbussleutel
AANTAL
3
7
Afbeelding
1,6 kg
2
Naam
2
M6*12
Achtergreep
Allen Key
Schroef
Modelnr.
5
2
9
Maat
1
1
4
Pakket inbegrepen
Pakket inbegrepen
04
Machine Translated by Google

BEHÖVER HJÄLP? KONTAKTA OSS!
TÅRA VERKTYG, HALVA PRISET
Har du produktfrågor? Behöver du teknisk support?
Kontakta oss gärna:
VEVOR reserverar sig för en tydlig tolkning av vår användarmanual. Utseendet på produkten är
beroende av den produkt du fått. Ursäkta oss att vi inte kommer att informera dig igen om det
finns någon teknik eller mjukvaruuppdateringar på vår produkt.
Detta är den ursprungliga instruktionen, läs alla instruktioner noggrant innan du använder den.
• Raken är designad för att klippa nedsänkt, delvis uppkommande
eller framväxande vattenvegetation från under vattnet. All annan
användning är strängt förbjuden. Innan du använder raken, läs
denna bruksanvisning noggrant för att förstå hur enheten
används på rätt sätt.
Steg 3
Steg 2
Dra åt alla skruvar från steg 1 till steg 3
Vevstång och mellanstång: Rikta in monteringshålet för
vevstaken och mellanstången, sätt i M6*40-skruvar och skruva
i muttern.
Montering av vevstake: Rikta in monteringshålen på båda sidor av
spåntänderna med monteringshålen på vevstaken, sätt i M6*12 skruvar
och skruva i muttrarna. Observera att du inte behöver dra åt muttern just
nu.
Steg 1
Använd den inte med barn i närområdet.
Vänligen läs dessa instruktioner noggrant före användning.
VIKTIGT: Vi är inte ansvariga för skador på utrustning eller
fel, förluster, skador eller dödsfall till följd av underlåtenhet att följa
säkerhetsföreskrifter, felaktig användning eller missbruk av
utrustning.
Underlåtenhet att följa instruktionerna kan leda till skada på
utrustningen, felfunktion eller till och med skada eller dödsfall för personal.
• Raketänderna har vassa kanter.
Vänligen läs dessa instruktioner noggrant före användning.
Förvaras utom räckhåll för barn.
Handtagsmontering: Tryck på de fjäderbelastade knapparna
på ena änden av handtagsanslutningen och skjut in den halvvägs i ett av
handtagen och vrid den tills knapparna snäpper in i hålen i handtaget.
Upprepa denna process för den andra halvan av handtaget.
Raketänderna Montering: Raketänderna Montering: Rikta in
monteringshålen i mitten av raketänderna och vevstakens huvud,
sätt i M6*40-skruven och använd sedan muttern. Observera att
du inte behöver dra åt muttern just nu.
Steg 4
Steg 5
www.vevor.com/support
Teknisk support och e-garanticertifikat
Asfaltskratta
SÄKERHET FÖRST:
Monteringsanvisningar
Varning
Viktig information:
0201
03
Machine Translated by Google

Modell: CY-SF13
ASFALTKRÄTTA
"Spara hälften", "halva priset" eller andra liknande uttryck som används av oss
representerar bara en uppskattning av besparingar du kan dra nytta av att köpa vissa
verktyg hos oss jämfört med de stora toppmärkena och betyder inte nödvändigtvis att
täcka alla kategorier av verktyg som erbjuds av oss.
Vi fortsätter att vara engagerade i att ge dig verktyg till konkurrenskraftiga priser.
Du påminns vänligen om att noggrant kontrollera när du gör en beställning hos oss om
du faktiskt sparar hälften i jämförelse med de främsta stora varumärkena.
Teknisk support och e-garanticertifikat
www.vevor.com/support
Bild
ANTAL
3
7
1,6 kg
Mutter
Mellanpol
Allen Wrench
Vikt
1
1
2
4
1
8
75*36"
Fast spö
Inga.
Skruva
M6*40
CY-SF13
1
1
4
9
2
5
Storlek
Skruva
Bakre grepp
Insexnyckel
Modell nr.
2
Namn
2
M6*12
TÅRA VERKTYG, HALVA PRISET
Teknisk support och e-garanticertifikat
www.vevor.com/support
Paketet inkluderar
Paketet inkluderar
04
Machine Translated by Google