L77 User Manual
Thanks for purchasing Digital Voice Recorder.
Customer satisfaction is our top priority. If you have any questions,
please feel free to contact us.
Press button,to return to the main menu. In the menu
options, the PLAY button is the confirm button.
Select and enter the “Recording format” , choose format option
WAV or MP3 and press the PLAY button to confirm setting.
On the main menu interface, press to select the “Settings”
menu.
Press +/- button to select the desired language and press the PLAY
button to confirm.
Sleep timer: Press the +/- button to select the time within 0-99
minutes, and press the PLAY button to confirm. It will automatically
shut down when the time reaches to your setting time.
Brightness: Press the +/- button to adjust the screen brightness.
Backlight timer: Always on/30 seconds /20 seconds/10 seconds
four setting options
When set “Always on”, the device screen will not go off and
increasing the battery drain.
Auto Power off: It will automatically shut down if long time no
operation. You can set 0-30 minutes standby shutdown time
according to your needs.
The disk will be formatted and all data on the device will be erased,
so remember to back up important files before proceeding.
In the main menu, press to select and go to “Settings”,
select “Format device” and press PLAY button to enter. The screen
will display “All data will be deleted. Continue?”, press +/- to select
"Yes" and press "PLAY to confirm formatting, or select “No" to exit.
During formatting, do not press any button, wait for the device to
restart and complete processing.
If this happens, press and hold the PLAY button to shut down the
device, connect the device to the Windows computer, and format
the disk from the computer to the normal state.
Restore to factory settings. If there is confusion when operating the
settings, you can choose to restore the factory settings.
In the main menu, press to select and go to “Music”, then
press PLAY button to play “All songs” in it.
Equalizer
During playback, press M button to enter, and find “Variable Speed
Playback”, you can set the playback speed from -8 to +8, the higher
the number, the faster the playback speed.
During playback, press M button to enter, and find “Bookmarks”
If the screen display ”no voice recordings” or “no songs”. Don’t
worry, you could just go ahead to press REC button to record.
Go to “Recorder” menu -> Rec indicator -> set it OFF, then the
record indicator will not light during recording.
Add bookmark: When playing a recording or music, choose to add
a bookmark to record the current period. Each recording or music
can only add 10 bookmarks.
Go to bookmark: select the added time period, press +/- button to
select the required time, short press "PLAY" button to confirm
playback.
Delete bookmark: select the bookmark to delete, press +/- button to
select the time to delete. Short press "PLAY" button to confirm
deletion.
Note: Bookmarks adding or delete can only be implemented on the
same file or music.
Delete all: delete the contents of the current folder.
All songs: all songs on the disk.
Now playing: Break-point memory function, the link will continue to
play at the last disconnected position.
Delete: delete the currently playing file or the selected file.
It may caused by static shock, like over current charging or
formatting unsuccessfully.
Make sure the recorder switch OFF, and using the usb cable to
connect it with computer like a usb disk, then format the recorder
disk in computer (for mac computer, contact customer support for
tutorials)
How to Rescue:
Please make sure the recorder switch OFF when connecting.
Do not press any buttons of the recorder or perform any operations
on the recorder during connecting.
Yes, it was a removable usb disk after connecting successfully. You
can find the folder in the recorder disk, and then you could copy or
delete or transfer files.
Please try to find another usb cable to try or reboot computer or
find another computer usb socket. If all above methods still not
working, please email us.
View all files on this device.
This option can be set as “Repeat” or “Shuffle”.
Repeat mode: Repeat off / Repeat 1 / Repeat all
During playback, press M button to go into “Play mode”, then select
“Repeat Settings” and enter it to set “Replay Times” and “Replay
Interval”.
During playback, press DEL/A-B Repeat button to set point A of the
song, at this time you can see the screen display letter A-B with
flashing letter B;
And then press DEL/A-B Repeat button again to select point B, at
this time the letter B will be stop flashing, it means point A to point B
has been selected successfully.
Then press PLAY button to repeat play the segment between point
A to point B. Press PLAY button again to exit A-B repeat.
Set it Off, Rock, funk, hip-hop, jazz, classical or techno according to
your needs.
A-B Repeat
Select "Yes" and press PLAY to confirm. The device will begin to
restore factory settings. When it is done, it will show recovery!
Select “Factory settings” and press PLAY button to enter. The
screen will display “Restore factory settings?”, press +/- to select
"Yes" and press "PLAY to confirm restoring, or select “No" to exit.
Insert the audio line-in cable or external microphone into the
external interface, press REC button to start record, and press the
+/- button to select the recording source.
Note: If you are using a MAC computer, please contact our
customer support. Reformatting on a MAC computer requires
different options.
Player information: The device displays the firmware version and
release date.
External microphone: Please keep a distance of about 30cm from
the microphone when recording, so the effect will be better.
Line In: Please adjust the sound of the audio source at medium
level before recording. If the sound of the audio source is too loud,
the sound may be broken.
Adjust according to current usage.
Disk space: the device displays the used space and total space.
Password switch: Password On/Password Off.
Password On: Each time you turn on the recorder or connect to the
computer, you need to enter the password to unlock the device.
Password Set: Enter a 4-digit password. Press +/- to set the
number. Press to switch to next number, press the PLAY
button to confirm setting.
Note:
Note:
Play mode
Time Settings: It can set “Time format” at 12-hours or 24-hours. And
it can “Set time” with hours and minutes by press +/- button to
adjust the digits.
Date settings: It can set date format at “DD MM YYYY / MM DD
YYYY / YYYY MM DD“. And set date with year, month and date by
press +/- button to adjust the digits.
External memory: Select this option when inserting an external
expansion card. All recording files will be stored on the external
expansion memory card.
Note: When there is no expansion card or the expansion card is
removed, the system will automatically default set to the internal
memory.
Internal memory: All recording files will be stored into the internal
memory by default.
Default English: This product supports multiple languages.
VOR ON: After power on, go to “Recorder” menu, find “Track AVR
mode” and enter it, then go into the “AVR on/off” to set the voice
activated recording “on”. Press PLAY button confirm setting.
When AVR mode is ON, press REC button, screen will display VOX
information, it means the device successfully enter voice activated
recording mode.
VOR OFF: Go into the “AVR on/off” to set the voice activated
recording “off”.
Save Recording: Press the REC button again to save the recording
file.
Recording space: when recording, the screen will show how many
hours the device can record.
Repeat Play:During playback, press the A-B repeat button to
repeat play the point A to point B of the audio file.
Next / Previous: press the button.
Short press: click the button.
Long press: Press and hold the button for about 3 seconds.
Delete Recording: 1. Choose the recording files you want to delete
and press the Delete button, then the screen will display delete
option "Delete" or "Delete all"; 2. Press PLAY button to enter the
deletion process, and then press +/- button to select option “Yes” to
confirm deleting or “No” to exit .
Recording: Press the REC button to start recording.
Fast Forward / Rewind: Long press and hold the button.
Play Recording File: Press PLAY button to play the recording file
after recording file saved.
Play Music: On the main menu interface, press the button
to select the music menu, and then press the PLAY button to enter
music mode, then you can press PLAY button to play all music files
on the device.
In the menu option, we can find all the functions of the device.
1) The Operation Guide Explain
2) Recording Interface
1)Basic Operation
2)Important Notice for Using The Device
4)Instructions
3)Don't
1)Insert Battery
2)Download File To Computer 4)How to Record
5)How To Playback Recording
6)How To Fast Forward / Rewind
7)How to Play Music 9)How To Transfer Files
8)How To Delete Recordings
10)External Microphone / MIC
Recording format and bit rate reference list:
Note:
The higher the bit rate, the larger memory space need for
recording file.
1) No Voice Recordings
3) Disk Error
4) Failed to Connect with Computer
5) Can I Delete Recordings From Computer
2) How To Close Record Light
Recordings Library
3)Turn On Voice Recorder
Push the Power ON/OFF switch to
“ON” position to turn on the
device.
Long press and hold PLAY button
for a few seconds to turn on or
turn off (Make sure the power
switch is at “ON” position).
Use the supplied USB cable to
connect the recorder with your
computer, then you could see the
recorder disk in your computer just
like a normal usb disk.
The device is powered by 2pcs
AAA batteries. No need to charge,
please replace batteries if the
battery power out.
Picture shows how to use
external MIC and Line-in
cable:
Plug your external
microphone or Line-in
cable into the MIC Jack,
then press REC button,
the screen will display
the Record Source
option “Line-in” or
“External Mic”.
Press REC button to start
recording.
Press PLAY button to
playback the recording file.
1. Choose the recording files
you want to delete and press
the Delete button, then the
screen will display delete
option "Delete" or "Delete all";
2. Press PLAY button to enter
the deletion process, and
then press +/- button to select
option “Yes” to confirm
deleting or “No” to exit .
Use the supplied USB cable
to connect the recorder with
your computer, then you
could see the recorder disk in
your computer just like a
normal usb disk. Then you
can transfer files between
recorder and computer.
After power on, short press
the button to select the
“Music” menu, and then press
the PLAY button to enter
music mode, then you can
press PLAY button to play all
music files on the device.
Long press and hold the UP
or DOWN button.
Note: Songs are not placed in
the RECORD folder, you can
create a new folder for them.
Press REC button again to
save the recording.
Note: During recording, the
screen will display the
remaining time.
1)Warranty Period
1 year warranty
Product Features
1)Recording Setting
1.1 Recordings Quality
1.2 Voice Activated Recording
1.5 Record Indicator
1.6 Auto Record
2)System Setting
Auto recording on/off:
Auto Record cycle:
3)Play Setting
3.2 Repeat Setting
3.6 Folder View
3.4 Variable Speed Playback
3. 3 Sound Effect Setting
3.5 Bookmark
3.1 Play Music
2.1 Storage
2.2 Language
2.3 Display Settings
2.4 Sleep timer
2.5 Power off
2.7 Tools-Password Setting
2.8 Information
2.9 Format Device
2.10 Factory Setting:
2.11 Insert External
2.12 Technical Parameters
2.6 Date and Time Setting
1.4 Subsection Recording
1.3 Record Monitor
Voice Activated Sensitive Level
At level 1, a very quiet or whisper could activate the
recorder.
At level 7, it need nearly 70db sound to activate the
recorder.
You need to adjust the level and test to get the best
effective, in case of the level number cannot catch the
voice you want or it catch too much whisper or quiet
sound
Recorder will automatically save the recording file at a
selected time length and start a new
recording. Unless you press the REC button in
advance to save.
ON: Go to “Recorder” menu, find “Monitor setting” and
enter it to set monitor recording “ON” or “OFF”. Press
PLAY button confirm setting. You could hear the
recording through earphone during recording.
OFF: Go to “Monitor setting” and set monitor recording
“OFF”
30 Minutes: record each file at 30minutes.
60 Minutes:
record each file at 1 hour.
90 Minutes: record each file at 90minutes.
120 Minutes: record each file at 2 hour.
OFF: Turn off subsection record function.
On: the red indicator flashes during recording
On: Turn on timer recording.
Off: Turn off timer recording.
Once: Only record one time.
Work day: Timed recording is automatically turned on
during working days.
Start time: Set the time when it starts auto recording.
Note: Do not set a password when set auto timing
record.
End time: Set the time when it finish auto recording
The timing recording time is subject to the product
system time. If it needs to be consistent with the local
time, please set the system time first.
Daily: Automatically start timing recording at the same
time every day.
Off: the indicator light does not flash during recording
Note: Normally, we don't recommend you to use voice
activated recording in important meetings. It may miss
some important words due to low voice.
From Level 1 to Level 7:
View all recordings on the devices.
Recording format: WAV/MP3.
In the quick operation guide and basic operation guide, we can
learn how to use the equipment functions in a short time.
Power on: Push the Power ON/OFF switch to “ON” position to turn
on the device. Or press and hold PLAY button for a few seconds to
turn it on (Make sure the power switch is at “ON” position).
The booklet consists of 7 main parts: package information,
warranty, product sketch, quick operation guide, basic operation
guide, menu options, FAQ.
-Our customer support email:baican840@163.com
-Keep this booklet for future reference.
It is suitable for learning and recording more efficiently with A-B
repeat function.
Support MP3, WMA, APE, FLAC, WAV, OGG and other formats
of music files playback.
Built-in speaker and earphone output port.
Powered by 2pcs AAA battery.
It supports MP3 and WAV recording format
High-sensitivity omni-directional microphone recording clear
audio
Password Protection
Please check the volume level when listening to the testing file
on device.
Back up data as frequently as possible.
Always press REC button to save the recording file after finish
each recording.
Keep this manual for future reference.
Recording
Turn ON
Turn OFF
Do not scratch the recorder body.
Do not touch the machine during recording to avoid noise.
When the device is connected to the computer, do not press
any buttons.
It is best to use the product standard data cable to transfer
data, not all USB charging cables can transfer data.
If you forget the password, please enter 18 18 and long press
the return key for 3 seconds to cancel the password.
Do not turn off the power when formatting the device. If,
unfortunately, the design is cut off by mistake, it will show up as
a disk error.
Please do not unplug the data cable directly when formatting
on the computer, which will cause disk errors.
If the password function is turned on, when connecting to the
computer, we need to enter the correct password, otherwise, it
will not be able to connect to the computer.
Do not delete files or format the device unless the files have
been backed up.
Email us your issue, model number or amazon order ID, so we
can reply to you more efficiently.
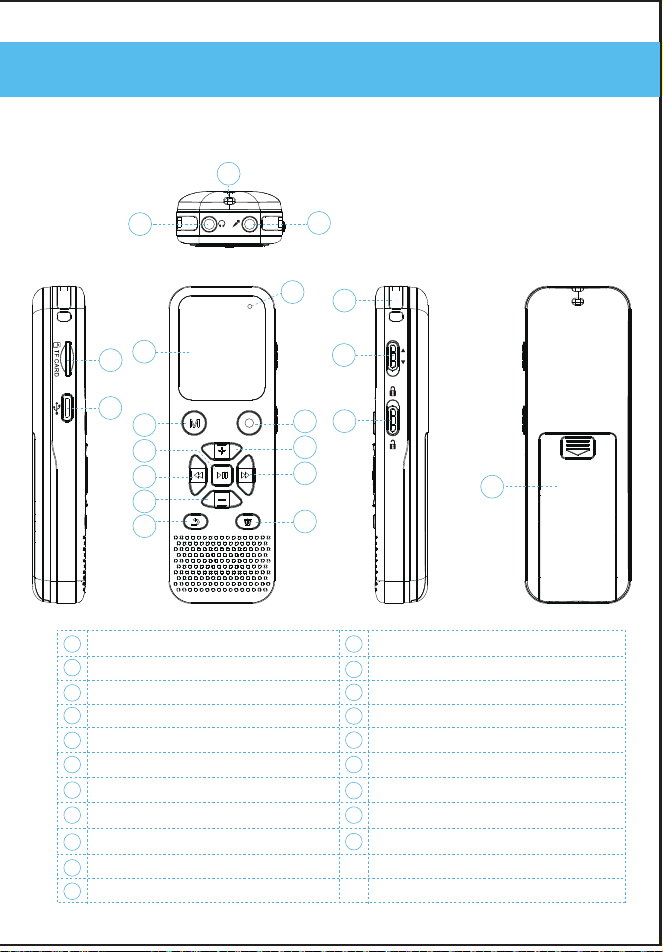
Power ON/OFF Switch
Lock Switch
Built-in Microphone
External Mic Jack
Lanyard Hole
Earphone Jack
Delete/A-B Repeat
Menu Button
Stop/Play/Confirm
Rewind / Previous/Select
Return
TF Card Slot
TFT Screen
REC Button
Vol+/Select
Fast Forward / Next/ Select
Vol-/Select
The Package Information
Package List
Product Sketch
Menu Options
Quick Operation Guide
Basic Operation Guide
Product FAQ
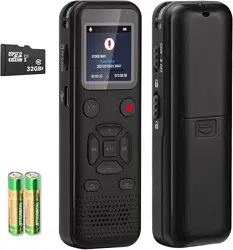
1 x L77 Digital Voice Recorder
1 x Type C Cable (For data transfer)
2 x AAA Batteries
1 x Earphone
1 x 32GB TF Card
ON
O
FF
6
1 12
13
14
15
16
17
TYPE-C Interface
18
Battery Holder
19
Recording Light
20
2
3
4
5
6
7
8
9
10
11
17
7
13
14
15
11
16
8
9
3
20
1
2
19
10
12
18
5
4
NO. Information
Recording Time
Recording Bit Rate
Recording
Recording File Name
Recorded Time
Battery Power
Remaining Space Time
1
2
3
4
5
6
7
Recording Source
8
8
1
Delete
1
1
1
1
2
3
4
1
Vol+
1
Vol-
2
Up
3
Donw
4
Transfer date
1
1
2
2
In the Bebe Rexha
000:00:31 000:03:20
NOR
0001/0001
04
In the Bebe Rexha
000:00:31 000:03:20
NOR
0001/0001
04
In the Bebe Rexha
000:00:31 000:03:20
NOR
0001/0001
04
1
Delect File
1/2
line-in
External MIC
1/2
line-in
External MIC
1/2
line-in
External MIC
512KB WAV
Recording...
20200917002.WAV
00:00:09 074:26:25
Format Bit Rate
16GB/32GB
(Subject to the actual product)
MP3
WAV
512kpbs
768kbps
1024kbps
32kbps
64kpbs
128kbps
192kbps
1536kpbs
72hours
45hours
33hours
1080hours
540hours
290hours
180hours
24hours
Product Size 110*38*19MM
Product Weight
38.3g((No include AAA Battery))
Screen Size 1.1 inch 24.9*14.8 TFT screen
USB Socket
TYPE-C high speed data transmission
Recording Bit
Rate
1536kpbs,1024kbps,768kbps,512kpb---WAV
192kbps,128kpbs,64kbps,32kpbs--MP3
Support System
Windows98 and later versions,XP,
Windows7/8/10 ,Mac
Headphone
Output
Maximum 10mW+ (30Ohm),
Freq20Hz-20K Hz, S/N ratio>90db,
distortion factor 0.05%
Battery
1.5V 2A Alkaline dry battery
Music Playback
Battery Time
16 hours (with earplugs, medium volume,
under full power off)
Maximum Recording
Battery Time
Fully charged, 32kpbs recording can work
for 21 hours
Music Support
Format
MP3/WAV/FLAC/APE/OGG/WMA
Memory
8G/16G/32G (subject to device)
1 2 3 4 5 6 7 8 9 10
1211 13 1514 16 17 18 19 20 21 22
USB
RECORD
1 2 3
ON
OFF
1
2
3
(Built-in / Line In /
External Microphone )
Product Warranty

L77 User Manual
Thanks for purchasing Digital Voice Recorder.
Customer satisfaction is our top priority. If you have any questions,
please feel free to contact us.
Press button,to return to the main menu. In the menu
options, the PLAY button is the confirm button.
Select and enter the “Recording format” , choose format option
WAV or MP3 and press the PLAY button to confirm setting.
On the main menu interface, press to select the “Settings”
menu.
Press +/- button to select the desired language and press the PLAY
button to confirm.
Sleep timer: Press the +/- button to select the time within 0-99
minutes, and press the PLAY button to confirm. It will automatically
shut down when the time reaches to your setting time.
Brightness: Press the +/- button to adjust the screen brightness.
Backlight timer: Always on/30 seconds /20 seconds/10 seconds
four setting options
When set “Always on”, the device screen will not go off and
increasing the battery drain.
Auto Power off: It will automatically shut down if long time no
operation. You can set 0-30 minutes standby shutdown time
according to your needs.
The disk will be formatted and all data on the device will be erased,
so remember to back up important files before proceeding.
In the main menu, press to select and go to “Settings”,
select “Format device” and press PLAY button to enter. The screen
will display “All data will be deleted. Continue?”, press +/- to select
"Yes" and press "PLAY to confirm formatting, or select “No" to exit.
During formatting, do not press any button, wait for the device to
restart and complete processing.
If this happens, press and hold the PLAY button to shut down the
device, connect the device to the Windows computer, and format
the disk from the computer to the normal state.
Restore to factory settings. If there is confusion when operating the
settings, you can choose to restore the factory settings.
In the main menu, press to select and go to “Music”, then
press PLAY button to play “All songs” in it.
Equalizer
During playback, press M button to enter, and find “Variable Speed
Playback”, you can set the playback speed from -8 to +8, the higher
the number, the faster the playback speed.
During playback, press M button to enter, and find “Bookmarks”
If the screen display ”no voice recordings” or “no songs”. Don’t
worry, you could just go ahead to press REC button to record.
Go to “Recorder” menu -> Rec indicator -> set it OFF, then the
record indicator will not light during recording.
Add bookmark: When playing a recording or music, choose to add
a bookmark to record the current period. Each recording or music
can only add 10 bookmarks.
Go to bookmark: select the added time period, press +/- button to
select the required time, short press "PLAY" button to confirm
playback.
Delete bookmark: select the bookmark to delete, press +/- button to
select the time to delete. Short press "PLAY" button to confirm
deletion.
Note: Bookmarks adding or delete can only be implemented on the
same file or music.
Delete all: delete the contents of the current folder.
All songs: all songs on the disk.
Now playing: Break-point memory function, the link will continue to
play at the last disconnected position.
Delete: delete the currently playing file or the selected file.
It may caused by static shock, like over current charging or
formatting unsuccessfully.
Make sure the recorder switch OFF, and using the usb cable to
connect it with computer like a usb disk, then format the recorder
disk in computer (for mac computer, contact customer support for
tutorials)
How to Rescue:
Please make sure the recorder switch OFF when connecting.
Do not press any buttons of the recorder or perform any operations
on the recorder during connecting.
Yes, it was a removable usb disk after connecting successfully. You
can find the folder in the recorder disk, and then you could copy or
delete or transfer files.
Please try to find another usb cable to try or reboot computer or
find another computer usb socket. If all above methods still not
working, please email us.
View all files on this device.
This option can be set as “Repeat” or “Shuffle”.
Repeat mode: Repeat off / Repeat 1 / Repeat all
During playback, press M button to go into “Play mode”, then select
“Repeat Settings” and enter it to set “Replay Times” and “Replay
Interval”.
During playback, press DEL/A-B Repeat button to set point A of the
song, at this time you can see the screen display letter A-B with
flashing letter B;
And then press DEL/A-B Repeat button again to select point B, at
this time the letter B will be stop flashing, it means point A to point B
has been selected successfully.
Then press PLAY button to repeat play the segment between point
A to point B. Press PLAY button again to exit A-B repeat.
Set it Off, Rock, funk, hip-hop, jazz, classical or techno according to
your needs.
A-B Repeat
Select "Yes" and press PLAY to confirm. The device will begin to
restore factory settings. When it is done, it will show recovery!
Select “Factory settings” and press PLAY button to enter. The
screen will display “Restore factory settings?”, press +/- to select
"Yes" and press "PLAY to confirm restoring, or select “No" to exit.
Insert the audio line-in cable or external microphone into the
external interface, press REC button to start record, and press the
+/- button to select the recording source.
Note: If you are using a MAC computer, please contact our
customer support. Reformatting on a MAC computer requires
different options.
Player information: The device displays the firmware version and
release date.
External microphone: Please keep a distance of about 30cm from
the microphone when recording, so the effect will be better.
Line In: Please adjust the sound of the audio source at medium
level before recording. If the sound of the audio source is too loud,
the sound may be broken.
Adjust according to current usage.
Disk space: the device displays the used space and total space.
Password switch: Password On/Password Off.
Password On: Each time you turn on the recorder or connect to the
computer, you need to enter the password to unlock the device.
Password Set: Enter a 4-digit password. Press +/- to set the
number. Press to switch to next number, press the PLAY
button to confirm setting.
Note:
Note:
Play mode
Time Settings: It can set “Time format” at 12-hours or 24-hours. And
it can “Set time” with hours and minutes by press +/- button to
adjust the digits.
Date settings: It can set date format at “DD MM YYYY / MM DD
YYYY / YYYY MM DD“. And set date with year, month and date by
press +/- button to adjust the digits.
External memory: Select this option when inserting an external
expansion card. All recording files will be stored on the external
expansion memory card.
Note: When there is no expansion card or the expansion card is
removed, the system will automatically default set to the internal
memory.
Internal memory: All recording files will be stored into the internal
memory by default.
Default English: This product supports multiple languages.
VOR ON: After power on, go to “Recorder” menu, find “Track AVR
mode” and enter it, then go into the “AVR on/off” to set the voice
activated recording “on”. Press PLAY button confirm setting.
When AVR mode is ON, press REC button, screen will display VOX
information, it means the device successfully enter voice activated
recording mode.
VOR OFF: Go into the “AVR on/off” to set the voice activated
recording “off”.
Save Recording: Press the REC button again to save the recording
file.
Recording space: when recording, the screen will show how many
hours the device can record.
Repeat Play:During playback, press the A-B repeat button to
repeat play the point A to point B of the audio file.
Next / Previous: press the button.
Short press: click the button.
Long press: Press and hold the button for about 3 seconds.
Delete Recording: 1. Choose the recording files you want to delete
and press the Delete button, then the screen will display delete
option "Delete" or "Delete all"; 2. Press PLAY button to enter the
deletion process, and then press +/- button to select option “Yes” to
confirm deleting or “No” to exit .
Recording: Press the REC button to start recording.
Fast Forward / Rewind: Long press and hold the button.
Play Recording File: Press PLAY button to play the recording file
after recording file saved.
Play Music: On the main menu interface, press the button
to select the music menu, and then press the PLAY button to enter
music mode, then you can press PLAY button to play all music files
on the device.
In the menu option, we can find all the functions of the device.
1) The Operation Guide Explain
2) Recording Interface
1)Basic Operation
2)Important Notice for Using The Device
4)Instructions
3)Don't
1)Insert Battery
2)Download File To Computer 4)How to Record
5)How To Playback Recording
6)How To Fast Forward / Rewind
7)How to Play Music 9)How To Transfer Files
8)How To Delete Recordings
10)External Microphone / MIC
Recording format and bit rate reference list:
Note:
The higher the bit rate, the larger memory space need for
recording file.
1) No Voice Recordings
3) Disk Error
4) Failed to Connect with Computer
5) Can I Delete Recordings From Computer
2) How To Close Record Light
Recordings Library
3)Turn On Voice Recorder
Push the Power ON/OFF switch to
“ON” position to turn on the
device.
Long press and hold PLAY button
for a few seconds to turn on or
turn off (Make sure the power
switch is at “ON” position).
Use the supplied USB cable to
connect the recorder with your
computer, then you could see the
recorder disk in your computer just
like a normal usb disk.
The device is powered by 2pcs
AAA batteries. No need to charge,
please replace batteries if the
battery power out.
Picture shows how to use
external MIC and Line-in
cable:
Plug your external
microphone or Line-in
cable into the MIC Jack,
then press REC button,
the screen will display
the Record Source
option “Line-in” or
“External Mic”.
Press REC button to start
recording.
Press PLAY button to
playback the recording file.
1. Choose the recording files
you want to delete and press
the Delete button, then the
screen will display delete
option "Delete" or "Delete all";
2. Press PLAY button to enter
the deletion process, and
then press +/- button to select
option “Yes” to confirm
deleting or “No” to exit .
Use the supplied USB cable
to connect the recorder with
your computer, then you
could see the recorder disk in
your computer just like a
normal usb disk. Then you
can transfer files between
recorder and computer.
After power on, short press
the button to select the
“Music” menu, and then press
the PLAY button to enter
music mode, then you can
press PLAY button to play all
music files on the device.
Long press and hold the UP
or DOWN button.
Note: Songs are not placed in
the RECORD folder, you can
create a new folder for them.
Press REC button again to
save the recording.
Note: During recording, the
screen will display the
remaining time.
1)Warranty Period
1 year warranty
Product Features
1)Recording Setting
1.1 Recordings Quality
1.2 Voice Activated Recording
1.5 Record Indicator
1.6 Auto Record
2)System Setting
Auto recording on/off:
Auto Record cycle:
3)Play Setting
3.2 Repeat Setting
3.6 Folder View
3.4 Variable Speed Playback
3. 3 Sound Effect Setting
3.5 Bookmark
3.1 Play Music
2.1 Storage
2.2 Language
2.3 Display Settings
2.4 Sleep timer
2.5 Power off
2.7 Tools-Password Setting
2.8 Information
2.9 Format Device
2.10 Factory Setting:
2.11 Insert External
2.12 Technical Parameters
2.6 Date and Time Setting
1.4 Subsection Recording
1.3 Record Monitor
Voice Activated Sensitive Level
At level 1, a very quiet or whisper could activate the
recorder.
At level 7, it need nearly 70db sound to activate the
recorder.
You need to adjust the level and test to get the best
effective, in case of the level number cannot catch the
voice you want or it catch too much whisper or quiet
sound
Recorder will automatically save the recording file at a
selected time length and start a new
recording. Unless you press the REC button in
advance to save.
ON: Go to “Recorder” menu, find “Monitor setting” and
enter it to set monitor recording “ON” or “OFF”. Press
PLAY button confirm setting. You could hear the
recording through earphone during recording.
OFF: Go to “Monitor setting” and set monitor recording
“OFF”
30 Minutes: record each file at 30minutes.
60 Minutes:
record each file at 1 hour.
90 Minutes: record each file at 90minutes.
120 Minutes: record each file at 2 hour.
OFF: Turn off subsection record function.
On: the red indicator flashes during recording
On: Turn on timer recording.
Off: Turn off timer recording.
Once: Only record one time.
Work day: Timed recording is automatically turned on
during working days.
Start time: Set the time when it starts auto recording.
Note: Do not set a password when set auto timing
record.
End time: Set the time when it finish auto recording
The timing recording time is subject to the product
system time. If it needs to be consistent with the local
time, please set the system time first.
Daily: Automatically start timing recording at the same
time every day.
Off: the indicator light does not flash during recording
Note: Normally, we don't recommend you to use voice
activated recording in important meetings. It may miss
some important words due to low voice.
From Level 1 to Level 7:
View all recordings on the devices.
Recording format: WAV/MP3.
In the quick operation guide and basic operation guide, we can
learn how to use the equipment functions in a short time.
Power on: Push the Power ON/OFF switch to “ON” position to turn
on the device. Or press and hold PLAY button for a few seconds to
turn it on (Make sure the power switch is at “ON” position).
The booklet consists of 7 main parts: package information,
warranty, product sketch, quick operation guide, basic operation
guide, menu options, FAQ.
-Our customer support email:[email protected]
-Keep this booklet for future reference.
It is suitable for learning and recording more efficiently with A-B
repeat function.
Support MP3, WMA, APE, FLAC, WAV, OGG and other formats
of music files playback.
Built-in speaker and earphone output port.
Powered by 2pcs AAA battery.
It supports MP3 and WAV recording format
High-sensitivity omni-directional microphone recording clear
audio
Password Protection
Please check the volume level when listening to the testing file
on device.
Back up data as frequently as possible.
Always press REC button to save the recording file after finish
each recording.
Keep this manual for future reference.
Recording
Turn ON
Turn OFF
Do not scratch the recorder body.
Do not touch the machine during recording to avoid noise.
When the device is connected to the computer, do not press
any buttons.
It is best to use the product standard data cable to transfer
data, not all USB charging cables can transfer data.
If you forget the password, please enter 18 18 and long press
the return key for 3 seconds to cancel the password.
Do not turn off the power when formatting the device. If,
unfortunately, the design is cut off by mistake, it will show up as
a disk error.
Please do not unplug the data cable directly when formatting
on the computer, which will cause disk errors.
If the password function is turned on, when connecting to the
computer, we need to enter the correct password, otherwise, it
will not be able to connect to the computer.
Do not delete files or format the device unless the files have
been backed up.
Email us your issue, model number or amazon order ID, so we
can reply to you more efficiently.
Power ON/OFF Switch
Lock Switch
Built-in Microphone
External Mic Jack
Lanyard Hole
Earphone Jack
Delete/A-B Repeat
Menu Button
Stop/Play/Confirm
Rewind / Previous/Select
Return
TF Card Slot
TFT Screen
REC Button
Vol+/Select
Fast Forward / Next/ Select
Vol-/Select
The Package Information
Package List
Product Sketch
Menu Options
Quick Operation Guide
Basic Operation Guide
Product FAQ
1 x L77 Digital Voice Recorder
1 x Type C Cable (For data transfer)
2 x AAA Batteries
1 x Earphone
1 x 32GB TF Card
ON
O
FF
6
1 12
13
14
15
16
17
TYPE-C Interface
18
Battery Holder
19
Recording Light
20
2
3
4
5
6
7
8
9
10
11
17
7
13
14
15
11
16
8
9
3
20
1
2
19
10
12
18
5
4
NO. Information
Recording Time
Recording Bit Rate
Recording
Recording File Name
Recorded Time
Battery Power
Remaining Space Time
1
2
3
4
5
6
7
Recording Source
8
8
1
Delete
1
1
1
1
2
3
4
1
Vol+
1
Vol-
2
Up
3
Donw
4
Transfer date
1
1
2
2
In the Bebe Rexha
000:00:31 000:03:20
NOR
0001/0001
04
In the Bebe Rexha
000:00:31 000:03:20
NOR
0001/0001
04
In the Bebe Rexha
000:00:31 000:03:20
NOR
0001/0001
04
1
Delect File
1/2
line-in
External MIC
1/2
line-in
External MIC
1/2
line-in
External MIC
512KB WAV
Recording...
20200917002.WAV
00:00:09 074:26:25
Format Bit Rate
16GB/32GB
(Subject to the actual product)
MP3
WAV
512kpbs
768kbps
1024kbps
32kbps
64kpbs
128kbps
192kbps
1536kpbs
72hours
45hours
33hours
1080hours
540hours
290hours
180hours
24hours
Product Size 110*38*19MM
Product Weight
38.3g((No include AAA Battery))
Screen Size 1.1 inch 24.9*14.8 TFT screen
USB Socket
TYPE-C high speed data transmission
Recording Bit
Rate
1536kpbs,1024kbps,768kbps,512kpb---WAV
192kbps,128kpbs,64kbps,32kpbs--MP3
Support System
Windows98 and later versions,XP,
Windows7/8/10 ,Mac
Headphone
Output
Maximum 10mW+ (30Ohm),
Freq20Hz-20K Hz, S/N ratio>90db,
distortion factor 0.05%
Battery
1.5V 2A Alkaline dry battery
Music Playback
Battery Time
16 hours (with earplugs, medium volume,
under full power off)
Maximum Recording
Battery Time
Fully charged, 32kpbs recording can work
for 21 hours
Music Support
Format
MP3/WAV/FLAC/APE/OGG/WMA
Memory
8G/16G/32G (subject to device)
1 2 3 4 5 6 7 8 9 10
1211 13 1514 16 17 18 19 20 21 22
USB
RECORD
1 2 3
ON
OFF
1
2
3
(Built-in / Line In /
External Microphone )
Product Warranty

L77 User Manual
Thanks for purchasing Digital Voice Recorder.
Customer satisfaction is our top priority. If you have any questions,
please feel free to contact us.
Press button,to return to the main menu. In the menu
options, the PLAY button is the confirm button.
Select and enter the “Recording format” , choose format option
WAV or MP3 and press the PLAY button to confirm setting.
On the main menu interface, press to select the “Settings”
menu.
Press +/- button to select the desired language and press the PLAY
button to confirm.
Sleep timer: Press the +/- button to select the time within 0-99
minutes, and press the PLAY button to confirm. It will automatically
shut down when the time reaches to your setting time.
Brightness: Press the +/- button to adjust the screen brightness.
Backlight timer: Always on/30 seconds /20 seconds/10 seconds
four setting options
When set “Always on”, the device screen will not go off and
increasing the battery drain.
Auto Power off: It will automatically shut down if long time no
operation. You can set 0-30 minutes standby shutdown time
according to your needs.
The disk will be formatted and all data on the device will be erased,
so remember to back up important files before proceeding.
In the main menu, press to select and go to “Settings”,
select “Format device” and press PLAY button to enter. The screen
will display “All data will be deleted. Continue?”, press +/- to select
"Yes" and press "PLAY to confirm formatting, or select “No" to exit.
During formatting, do not press any button, wait for the device to
restart and complete processing.
If this happens, press and hold the PLAY button to shut down the
device, connect the device to the Windows computer, and format
the disk from the computer to the normal state.
Restore to factory settings. If there is confusion when operating the
settings, you can choose to restore the factory settings.
In the main menu, press to select and go to “Music”, then
press PLAY button to play “All songs” in it.
Equalizer
During playback, press M button to enter, and find “Variable Speed
Playback”, you can set the playback speed from -8 to +8, the higher
the number, the faster the playback speed.
During playback, press M button to enter, and find “Bookmarks”
If the screen display ”no voice recordings” or “no songs”. Don’t
worry, you could just go ahead to press REC button to record.
Go to “Recorder” menu -> Rec indicator -> set it OFF, then the
record indicator will not light during recording.
Add bookmark: When playing a recording or music, choose to add
a bookmark to record the current period. Each recording or music
can only add 10 bookmarks.
Go to bookmark: select the added time period, press +/- button to
select the required time, short press "PLAY" button to confirm
playback.
Delete bookmark: select the bookmark to delete, press +/- button to
select the time to delete. Short press "PLAY" button to confirm
deletion.
Note: Bookmarks adding or delete can only be implemented on the
same file or music.
Delete all: delete the contents of the current folder.
All songs: all songs on the disk.
Now playing: Break-point memory function, the link will continue to
play at the last disconnected position.
Delete: delete the currently playing file or the selected file.
It may caused by static shock, like over current charging or
formatting unsuccessfully.
Make sure the recorder switch OFF, and using the usb cable to
connect it with computer like a usb disk, then format the recorder
disk in computer (for mac computer, contact customer support for
tutorials)
How to Rescue:
Please make sure the recorder switch OFF when connecting.
Do not press any buttons of the recorder or perform any operations
on the recorder during connecting.
Yes, it was a removable usb disk after connecting successfully. You
can find the folder in the recorder disk, and then you could copy or
delete or transfer files.
Please try to find another usb cable to try or reboot computer or
find another computer usb socket. If all above methods still not
working, please email us.
View all files on this device.
This option can be set as “Repeat” or “Shuffle”.
Repeat mode: Repeat off / Repeat 1 / Repeat all
During playback, press M button to go into “Play mode”, then select
“Repeat Settings” and enter it to set “Replay Times” and “Replay
Interval”.
During playback, press DEL/A-B Repeat button to set point A of the
song, at this time you can see the screen display letter A-B with
flashing letter B;
And then press DEL/A-B Repeat button again to select point B, at
this time the letter B will be stop flashing, it means point A to point B
has been selected successfully.
Then press PLAY button to repeat play the segment between point
A to point B. Press PLAY button again to exit A-B repeat.
Set it Off, Rock, funk, hip-hop, jazz, classical or techno according to
your needs.
A-B Repeat
Select "Yes" and press PLAY to confirm. The device will begin to
restore factory settings. When it is done, it will show recovery!
Select “Factory settings” and press PLAY button to enter. The
screen will display “Restore factory settings?”, press +/- to select
"Yes" and press "PLAY to confirm restoring, or select “No" to exit.
Insert the audio line-in cable or external microphone into the
external interface, press REC button to start record, and press the
+/- button to select the recording source.
Note: If you are using a MAC computer, please contact our
customer support. Reformatting on a MAC computer requires
different options.
Player information: The device displays the firmware version and
release date.
External microphone: Please keep a distance of about 30cm from
the microphone when recording, so the effect will be better.
Line In: Please adjust the sound of the audio source at medium
level before recording. If the sound of the audio source is too loud,
the sound may be broken.
Adjust according to current usage.
Disk space: the device displays the used space and total space.
Password switch: Password On/Password Off.
Password On: Each time you turn on the recorder or connect to the
computer, you need to enter the password to unlock the device.
Password Set: Enter a 4-digit password. Press +/- to set the
number. Press to switch to next number, press the PLAY
button to confirm setting.
Note:
Note:
Play mode
Time Settings: It can set “Time format” at 12-hours or 24-hours. And
it can “Set time” with hours and minutes by press +/- button to
adjust the digits.
Date settings: It can set date format at “DD MM YYYY / MM DD
YYYY / YYYY MM DD“. And set date with year, month and date by
press +/- button to adjust the digits.
External memory: Select this option when inserting an external
expansion card. All recording files will be stored on the external
expansion memory card.
Note: When there is no expansion card or the expansion card is
removed, the system will automatically default set to the internal
memory.
Internal memory: All recording files will be stored into the internal
memory by default.
Default English: This product supports multiple languages.
VOR ON: After power on, go to “Recorder” menu, find “Track AVR
mode” and enter it, then go into the “AVR on/off” to set the voice
activated recording “on”. Press PLAY button confirm setting.
When AVR mode is ON, press REC button, screen will display VOX
information, it means the device successfully enter voice activated
recording mode.
VOR OFF: Go into the “AVR on/off” to set the voice activated
recording “off”.
Save Recording: Press the REC button again to save the recording
file.
Recording space: when recording, the screen will show how many
hours the device can record.
Repeat Play:During playback, press the A-B repeat button to
repeat play the point A to point B of the audio file.
Next / Previous: press the button.
Short press: click the button.
Long press: Press and hold the button for about 3 seconds.
Delete Recording: 1. Choose the recording files you want to delete
and press the Delete button, then the screen will display delete
option "Delete" or "Delete all"; 2. Press PLAY button to enter the
deletion process, and then press +/- button to select option “Yes” to
confirm deleting or “No” to exit .
Recording: Press the REC button to start recording.
Fast Forward / Rewind: Long press and hold the button.
Play Recording File: Press PLAY button to play the recording file
after recording file saved.
Play Music: On the main menu interface, press the button
to select the music menu, and then press the PLAY button to enter
music mode, then you can press PLAY button to play all music files
on the device.
In the menu option, we can find all the functions of the device.
1) The Operation Guide Explain
2) Recording Interface
1)Basic Operation
2)Important Notice for Using The Device
4)Instructions
3)Don't
1)Insert Battery
2)Download File To Computer 4)How to Record
5)How To Playback Recording
6)How To Fast Forward / Rewind
7)How to Play Music 9)How To Transfer Files
8)How To Delete Recordings
10)External Microphone / MIC
Recording format and bit rate reference list:
Note:
The higher the bit rate, the larger memory space need for
recording file.
1) No Voice Recordings
3) Disk Error
4) Failed to Connect with Computer
5) Can I Delete Recordings From Computer
2) How To Close Record Light
Recordings Library
3)Turn On Voice Recorder
Push the Power ON/OFF switch to
“ON” position to turn on the
device.
Long press and hold PLAY button
for a few seconds to turn on or
turn off (Make sure the power
switch is at “ON” position).
Use the supplied USB cable to
connect the recorder with your
computer, then you could see the
recorder disk in your computer just
like a normal usb disk.
The device is powered by 2pcs
AAA batteries. No need to charge,
please replace batteries if the
battery power out.
Picture shows how to use
external MIC and Line-in
cable:
Plug your external
microphone or Line-in
cable into the MIC Jack,
then press REC button,
the screen will display
the Record Source
option “Line-in” or
“External Mic”.
Press REC button to start
recording.
Press PLAY button to
playback the recording file.
1. Choose the recording files
you want to delete and press
the Delete button, then the
screen will display delete
option "Delete" or "Delete all";
2. Press PLAY button to enter
the deletion process, and
then press +/- button to select
option “Yes” to confirm
deleting or “No” to exit .
Use the supplied USB cable
to connect the recorder with
your computer, then you
could see the recorder disk in
your computer just like a
normal usb disk. Then you
can transfer files between
recorder and computer.
After power on, short press
the button to select the
“Music” menu, and then press
the PLAY button to enter
music mode, then you can
press PLAY button to play all
music files on the device.
Long press and hold the UP
or DOWN button.
Note: Songs are not placed in
the RECORD folder, you can
create a new folder for them.
Press REC button again to
save the recording.
Note: During recording, the
screen will display the
remaining time.
1)Warranty Period
1 year warranty
Product Features
1)Recording Setting
1.1 Recordings Quality
1.2 Voice Activated Recording
1.5 Record Indicator
1.6 Auto Record
2)System Setting
Auto recording on/off:
Auto Record cycle:
3)Play Setting
3.2 Repeat Setting
3.6 Folder View
3.4 Variable Speed Playback
3. 3 Sound Effect Setting
3.5 Bookmark
3.1 Play Music
2.1 Storage
2.2 Language
2.3 Display Settings
2.4 Sleep timer
2.5 Power off
2.7 Tools-Password Setting
2.8 Information
2.9 Format Device
2.10 Factory Setting:
2.11 Insert External
2.12 Technical Parameters
2.6 Date and Time Setting
1.4 Subsection Recording
1.3 Record Monitor
Voice Activated Sensitive Level
At level 1, a very quiet or whisper could activate the
recorder.
At level 7, it need nearly 70db sound to activate the
recorder.
You need to adjust the level and test to get the best
effective, in case of the level number cannot catch the
voice you want or it catch too much whisper or quiet
sound
Recorder will automatically save the recording file at a
selected time length and start a new
recording. Unless you press the REC button in
advance to save.
ON: Go to “Recorder” menu, find “Monitor setting” and
enter it to set monitor recording “ON” or “OFF”. Press
PLAY button confirm setting. You could hear the
recording through earphone during recording.
OFF: Go to “Monitor setting” and set monitor recording
“OFF”
30 Minutes: record each file at 30minutes.
60 Minutes:
record each file at 1 hour.
90 Minutes: record each file at 90minutes.
120 Minutes: record each file at 2 hour.
OFF: Turn off subsection record function.
On: the red indicator flashes during recording
On: Turn on timer recording.
Off: Turn off timer recording.
Once: Only record one time.
Work day: Timed recording is automatically turned on
during working days.
Start time: Set the time when it starts auto recording.
Note: Do not set a password when set auto timing
record.
End time: Set the time when it finish auto recording
The timing recording time is subject to the product
system time. If it needs to be consistent with the local
time, please set the system time first.
Daily: Automatically start timing recording at the same
time every day.
Off: the indicator light does not flash during recording
Note: Normally, we don't recommend you to use voice
activated recording in important meetings. It may miss
some important words due to low voice.
From Level 1 to Level 7:
View all recordings on the devices.
Recording format: WAV/MP3.
In the quick operation guide and basic operation guide, we can
learn how to use the equipment functions in a short time.
Power on: Push the Power ON/OFF switch to “ON” position to turn
on the device. Or press and hold PLAY button for a few seconds to
turn it on (Make sure the power switch is at “ON” position).
The booklet consists of 7 main parts: package information,
warranty, product sketch, quick operation guide, basic operation
guide, menu options, FAQ.
-Our customer support email:baican840@163.com
-Keep this booklet for future reference.
It is suitable for learning and recording more efficiently with A-B
repeat function.
Support MP3, WMA, APE, FLAC, WAV, OGG and other formats
of music files playback.
Built-in speaker and earphone output port.
Powered by 2pcs AAA battery.
It supports MP3 and WAV recording format
High-sensitivity omni-directional microphone recording clear
audio
Password Protection
Please check the volume level when listening to the testing file
on device.
Back up data as frequently as possible.
Always press REC button to save the recording file after finish
each recording.
Keep this manual for future reference.
Recording
Turn ON
Turn OFF
Do not scratch the recorder body.
Do not touch the machine during recording to avoid noise.
When the device is connected to the computer, do not press
any buttons.
It is best to use the product standard data cable to transfer
data, not all USB charging cables can transfer data.
If you forget the password, please enter 18 18 and long press
the return key for 3 seconds to cancel the password.
Do not turn off the power when formatting the device. If,
unfortunately, the design is cut off by mistake, it will show up as
a disk error.
Please do not unplug the data cable directly when formatting
on the computer, which will cause disk errors.
If the password function is turned on, when connecting to the
computer, we need to enter the correct password, otherwise, it
will not be able to connect to the computer.
Do not delete files or format the device unless the files have
been backed up.
Email us your issue, model number or amazon order ID, so we
can reply to you more efficiently.
Power ON/OFF Switch
Lock Switch
Built-in Microphone
External Mic Jack
Lanyard Hole
Earphone Jack
Delete/A-B Repeat
Menu Button
Stop/Play/Confirm
Rewind / Previous/Select
Return
TF Card Slot
TFT Screen
REC Button
Vol+/Select
Fast Forward / Next/ Select
Vol-/Select
The Package Information
Package List
Product Sketch
Menu Options
Quick Operation Guide
Basic Operation Guide
Product FAQ
1 x L77 Digital Voice Recorder
1 x Type C Cable (For data transfer)
2 x AAA Batteries
1 x Earphone
1 x 32GB TF Card
ON
O
FF
6
1 12
13
14
15
16
17
TYPE-C Interface
18
Battery Holder
19
Recording Light
20
2
3
4
5
6
7
8
9
10
11
17
7
13
14
15
11
16
8
9
3
20
1
2
19
10
12
18
5
4
NO. Information
Recording Time
Recording Bit Rate
Recording
Recording File Name
Recorded Time
Battery Power
Remaining Space Time
1
2
3
4
5
6
7
Recording Source
8
8
1
Delete
1
1
1
1
2
3
4
1
Vol+
1
Vol-
2
Up
3
Donw
4
Transfer date
1
1
2
2
In the Bebe Rexha
000:00:31 000:03:20
NOR
0001/0001
04
In the Bebe Rexha
000:00:31 000:03:20
NOR
0001/0001
04
In the Bebe Rexha
000:00:31 000:03:20
NOR
0001/0001
04
1
Delect File
1/2
line-in
External MIC
1/2
line-in
External MIC
1/2
line-in
External MIC
512KB WAV
Recording...
20200917002.WAV
00:00:09 074:26:25
Format Bit Rate
16GB/32GB
(Subject to the actual product)
MP3
WAV
512kpbs
768kbps
1024kbps
32kbps
64kpbs
128kbps
192kbps
1536kpbs
72hours
45hours
33hours
1080hours
540hours
290hours
180hours
24hours
Product Size 110*38*19MM
Product Weight
38.3g((No include AAA Battery))
Screen Size 1.1 inch 24.9*14.8 TFT screen
USB Socket
TYPE-C high speed data transmission
Recording Bit
Rate
1536kpbs,1024kbps,768kbps,512kpb---WAV
192kbps,128kpbs,64kbps,32kpbs--MP3
Support System
Windows98 and later versions,XP,
Windows7/8/10 ,Mac
Headphone
Output
Maximum 10mW+ (30Ohm),
Freq20Hz-20K Hz, S/N ratio>90db,
distortion factor 0.05%
Battery
1.5V 2A Alkaline dry battery
Music Playback
Battery Time
16 hours (with earplugs, medium volume,
under full power off)
Maximum Recording
Battery Time
Fully charged, 32kpbs recording can work
for 21 hours
Music Support
Format
MP3/WAV/FLAC/APE/OGG/WMA
Memory
8G/16G/32G (subject to device)
1 2 3 4 5 6 7 8 9 10
1211 13 1514 16 17 18 19 20 21 22
USB
RECORD
1 2 3
ON
OFF
1
2
3
(Built-in / Line In /
External Microphone )
Product Warranty
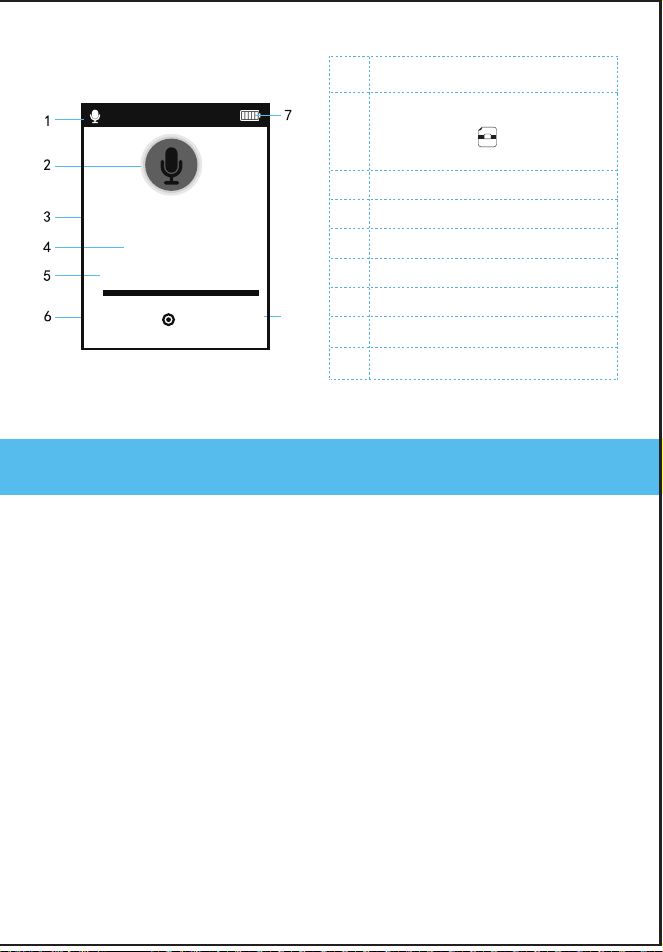
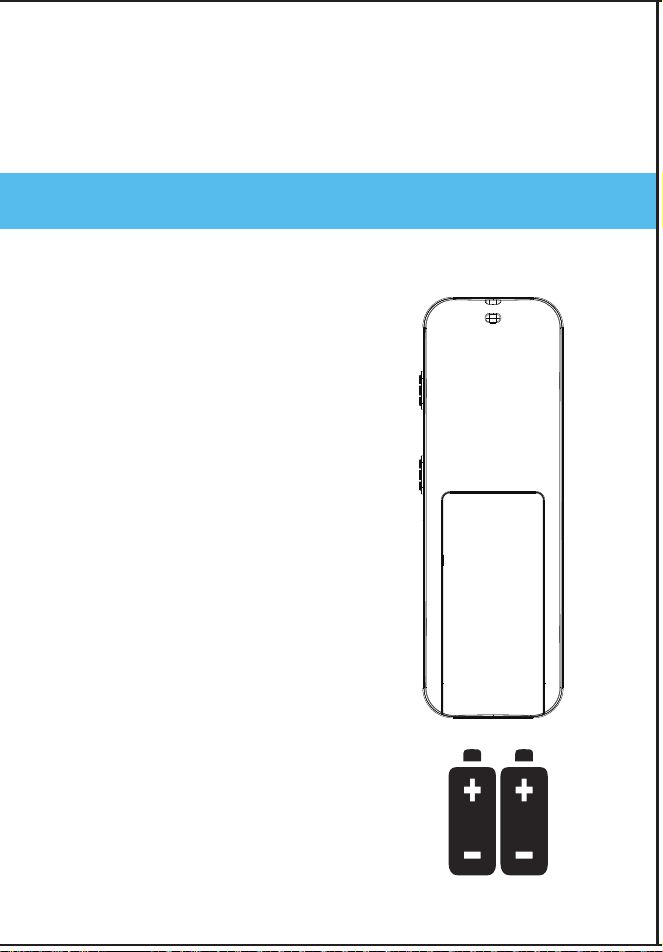
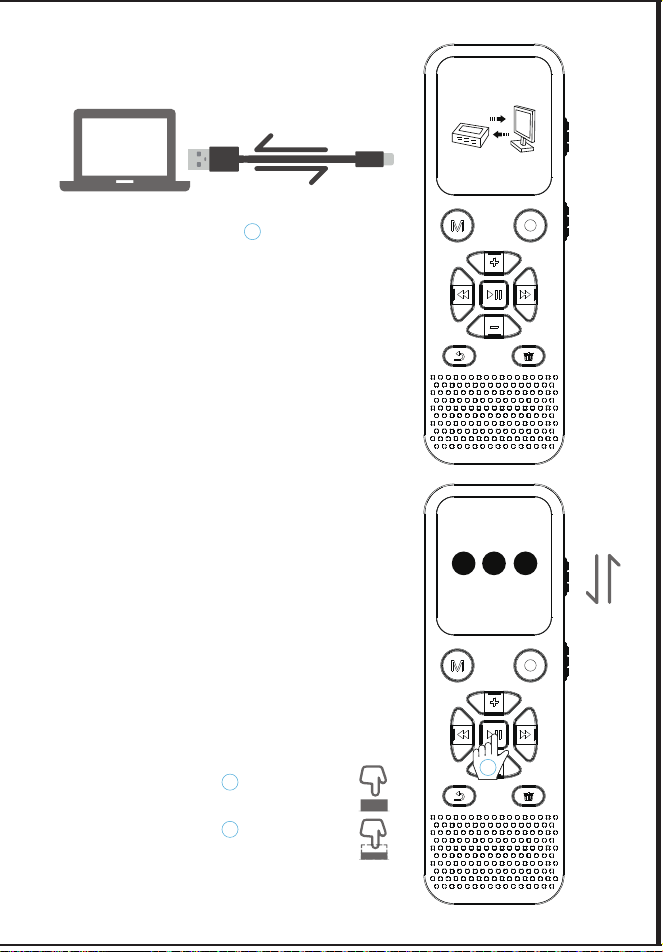
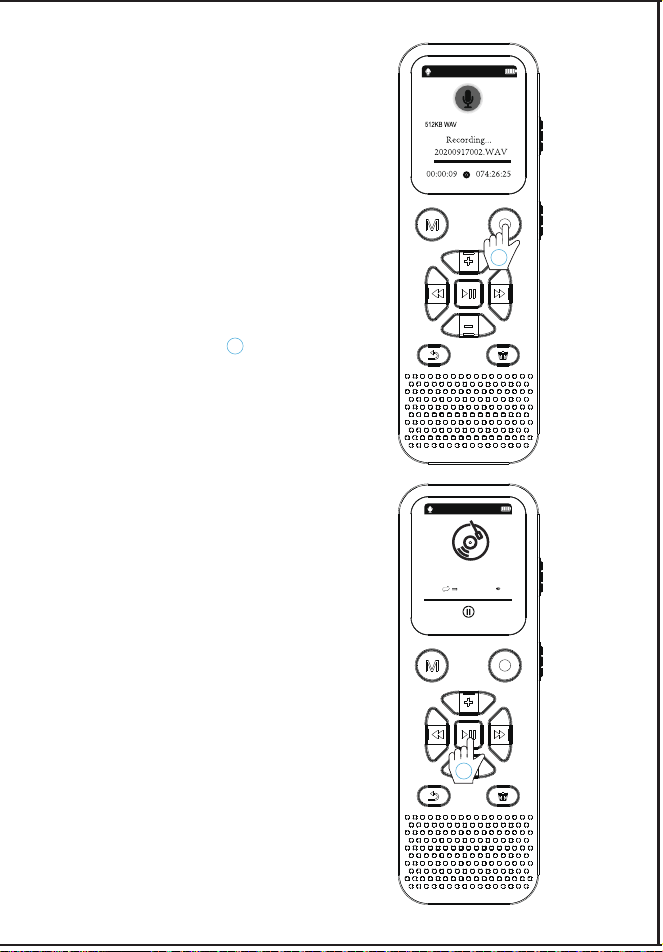
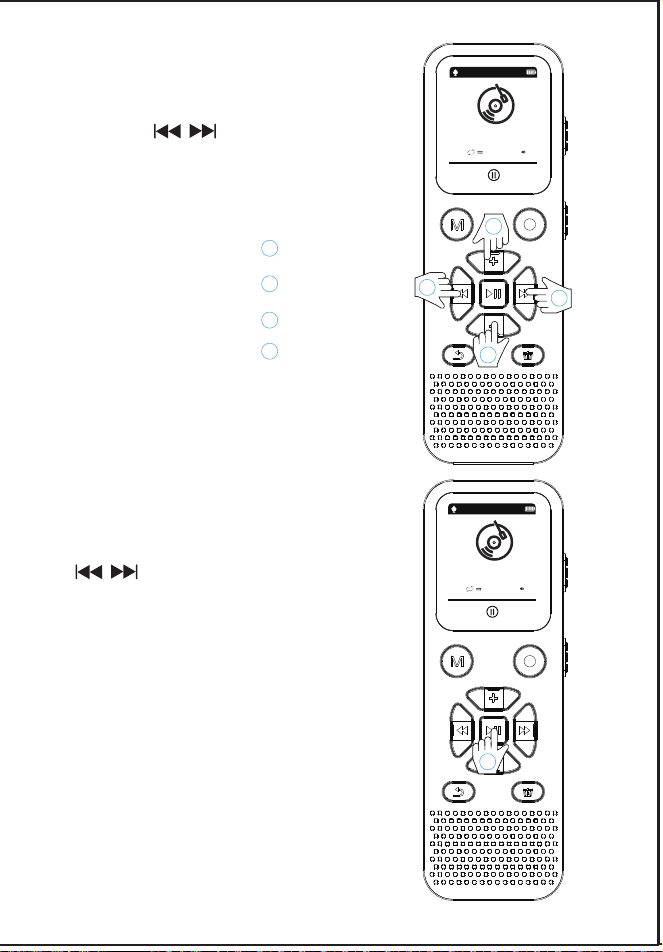
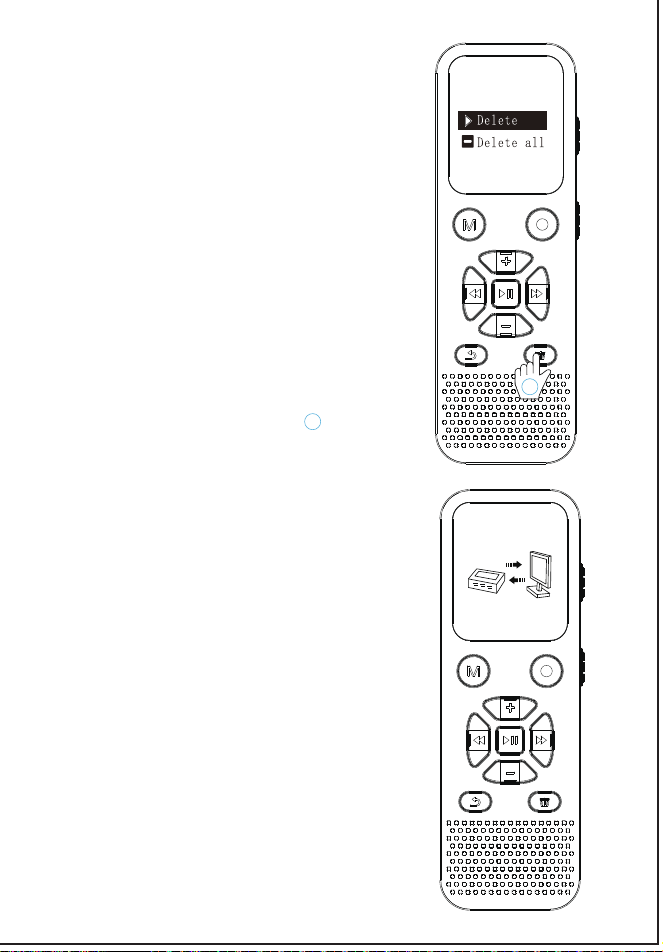
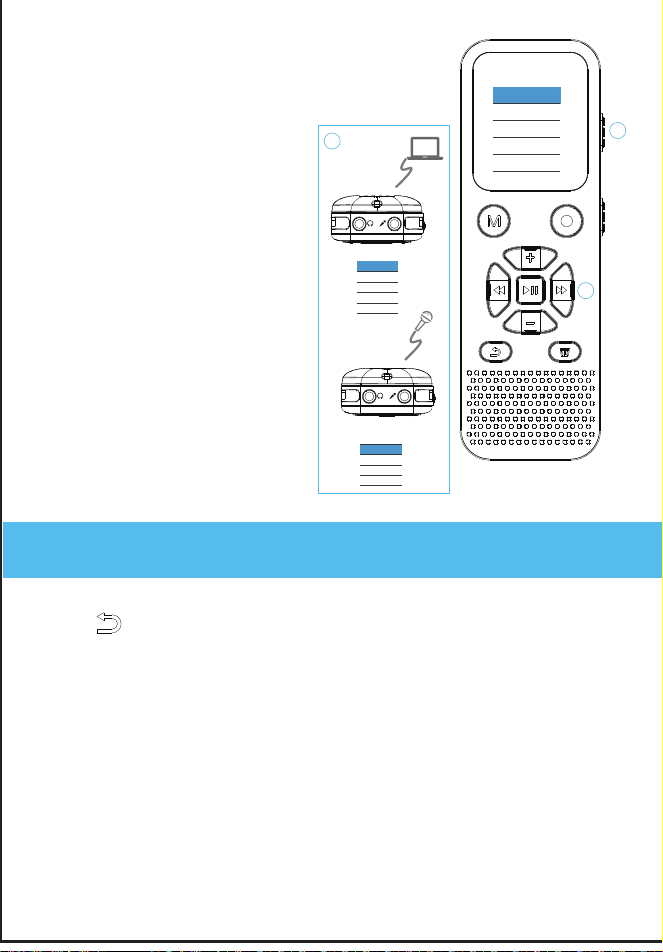
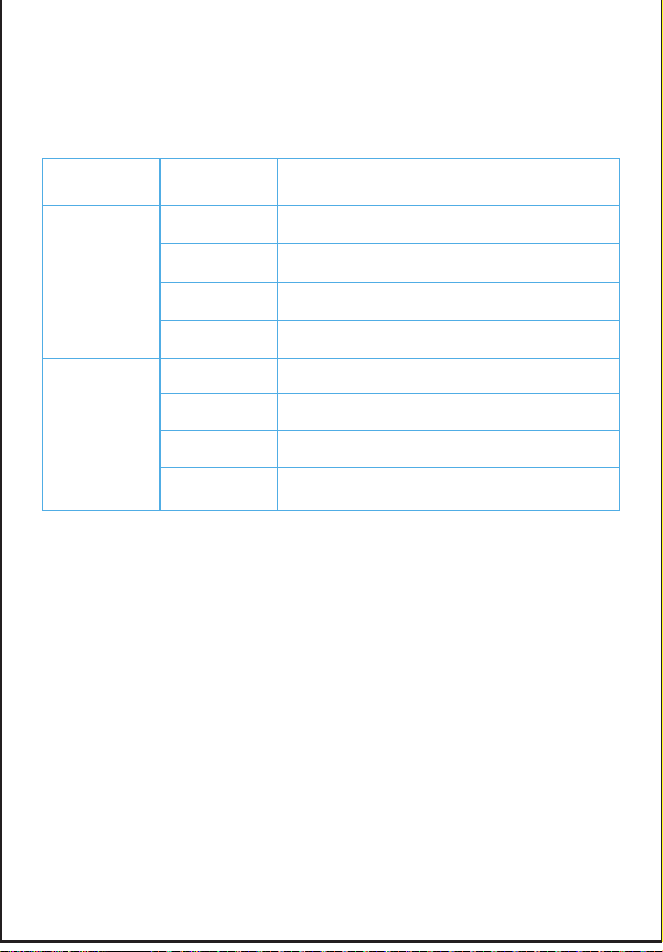
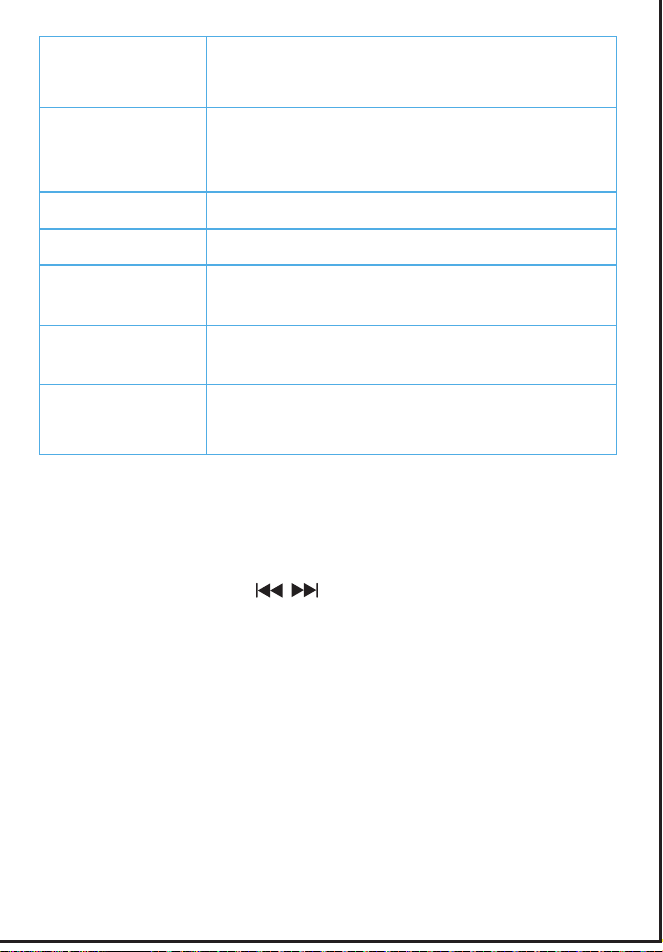