
Poly CCX Business Media Phones with
Microsoft Teams User Guide 9.0.0
SUMMARY
This guide provides the end-user with task-based user information for the featured product.

Legal information
Copyright and license
© 2019, 2024, HP Development Company, L.P. The information contained herein is subject to
change without notice. The only warranties for HP products and services are set forth in the
express warranty statements accompanying such products and services. Nothing herein should be
construed as constituting an additional warranty. HP shall not be liable for technical or editorial
errors or omissions contained herein.
Trademark credits
All third-party trademarks are the property of their respective owners. Bluetooth is a trademark
owned by its proprietor and used by HP Inc. under license.


Open source software used in this product
This product contains open source software. You may receive the open source software from HP
up to three (3) years after the distribution date of the applicable product or software at a charge
not greater than the cost to HP of shipping or distributing the software to you. To receive software
information, as well as the open source software code used in this product, contact HP by email at
ipgoopensourceinfo@hp.com.

Table of contents
Before You Begin 1
Audience, purpose, and required skills 1
Icons used in Poly documentation 1
Documentation Feedback 1
Poly CCX phones model numbers 2
Getting Started with Poly CCX with Teams 3
Product Overview of Poly CCX Business Media Phones 3
CCX Phone Hardware Overview 3
Poly CCX 350 Business Media Phone Hardware 3
Poly CCX 400 Business Media Phones Hardware 6
Poly CCX 500 and CCX 505 Business Media Phone Hardware 7
Poly CCX 600 Business Media Phone Hardware 8
LED Indicators on CCX Phones 10
Teams Screens 10
Wake the Phone 11
Accessibility Features 11
Users Who Are Deaf or Hard of Hearing 11
Users with Limited Mobility 12
Users Who Are Blind, Have Low Vision, or Have Limited Vision 12
Signing In to and Locking Your Phone 13
Signing In to Your Phone 13
Sign In Using the Phone’s Local Interface 13
Sign In Using a Web Browser 13
Sign Out of Your Phone 14
Sign In as a Hot Desk User 14
Locking Your Phone 14
Set a Phone Lock PIN 14
Change your Phone Lock PIN 15
Unlocking Your Phone with a Lock PIN 15
Calling and Conferencing 16
Place a Call 16
Call a Favorite Contact 16
Place an Emergency Call 16
Join a Meeting 16
Add a Contact to Your Favorites Tab 17
Assign a Delegate 17
v

Send a Group Page with the Poly Control Panel 17
Call Application Switching Methods 18
Select an Available Call Application 18
Cycle Through Available Call Applications 18
Poly CCX with Teams Settings 19
Change the Phone Display Language 19
Date & Time 19
Change the Time Format 19
Adjust the Display Backlight 19
Set the Phone Theme to Dark 19
Enable the Screen Saver 20
Adjust the Backlight & Screen Saver Timeout 20
Headset Settings 20
Configure Hookswitch Mode 20
Enable Echo Cancellation 21
Enable Bluetooth 21
Connect a Bluetooth Headset 21
Connecting to a Wireless Network 21
Enable Wi-Fi 21
Connect to a Wireless Network 22
Disconnect from a Wireless Network 22
Remove a Saved Wireless Network 22
Connecting Your Phone to Your Computer with Better Together 22
Connect Your CCX Phone to Your Computer with Better Together 22
USB Audio Mode 23
Computer and Cable Requirements 23
Connect Your Phone to a Computer for USB Audio Mode 24
Enable Accessibility Options 24
Poly CCX EM60 expansion module 25
Poly CCX EM60 expansion module hardware 25
CCX power usage 26
Poly CCX EM60 expansion module power limitations 27
Poly CCX EM60 expansion module line keys 27
Add contacts to the expansion module 27
Upgrading the Software 29
Important update information for PVOS 9.0.0 29
Downgrading PVOS 9.X.X to earlier software versions 30
Information removed and retained after downgrading 30
Updating PVOS 31
Update PVOS using the system web interface 31
Update PVOS using a USB flash drive 31
vi


Before You Begin
This user guide helps you configure Poly settings available on the Poly CCX
business media phone when running Microsoft Teams. You must have a Teams–
enabled Microsoft Office 365 account to access all of the features of your CCX
business media phone with Teams.
This user guide supports the following Poly phones with Teams enabled:
● CCX 350 business media phones
● CCX 400 business media phones
● CCX 500 business media phones
● CCX 505 business media phones
● CCX 600 business media phones
Audience, purpose, and required skills
This guide is intended for beginning users, as well as intermediate and advanced
users, who want to learn how to use the features available with Poly CCX.
Icons used in Poly documentation
This section describes the icons used in Poly documentation and what they mean.
WARNING! Indicates a hazardous situation that, if not avoided, could result in
serious injury or death.
CAUTION: Indicates a hazardous situation that, if not avoided, could result in
minor or moderate injury.
IMPORTANT: Indicates information considered important but not hazard-
related (for example, messages related to property damage). Warns the user that
failure to follow a procedure exactly as described could result in loss of data or in
damage to hardware or software. Also contains essential information to explain a
concept or to complete a task.
NOTE: Contains additional information to emphasize or supplement important
points of the main text.
TIP: Provides helpful hints for completing a task.
Documentation Feedback
We welcome your feedback to improve the quality of Poly documentation.
Before You Begin
1

Please email Documentation Feedback if you have any queries or suggestions
related to this documentation.
Poly CCX phones model numbers
The following table lists the product names and software model numbers for Poly
CCX business media phones. The phone uses software model numbers when
requesting software files and in some networking protocols such as DHCP or
LLDP as an identifier rather than the model name.
Table 1-1 CCX model numbers
Product name Software model number
Poly CCX 350 business media phone 3111-49690-001
Poly CCX 400 business media phone 3111-49700-001
Poly CCX 500 business media phone 3111-49710-001
Poly CCX 505 business media phone 3111-49730-001
Poly CCX 600 business media phone 3111-49770-001
2 Chapter 1 Before You Begin

Getting Started with Poly CCX with Teams
Before you use your Poly CCX with Teams, take a few moments to familiarize
yourself with its features and user interface.
NOTE: As you read this guide, keep in mind that your system administrator
configures certain features or your network environment may determine them.
As a result, some features may not be enabled or may operate differently on your
device. Additionally, the examples and graphics in this guide may not directly
reflect available options or what your device screen displays.
For additional information on using your Poly CCX phone with Teams, see
Microsoft Phones for Teams.
Product Overview of Poly CCX Business Media Phones
Poly CCX business media phones support audio-only conference calls with
Microsoft Teams voice platforms along with point-to-point and bridge calls.
Poly CCX business media phones with Teams features
● Placing, answering, and managing audio calls
● Adjusting call and phone settings
● Viewing, joining, and scheduling meetings (except on CCX 350 business media
phones)
● Checking voicemail messages
● Pairing Bluetooth headsets (CCX 500, CCX 505, and CCX 600 only)
● Connecting to a wireless network (CCX 505 and CCX 600 only)
CCX Phone Hardware Overview
The following topics describe the hardware features for Poly CCX business media
phones.
Poly CCX 350 Business Media Phone Hardware
The following figure displays the hardware features on Poly CCX 350 business
media phones. The table lists each feature numbered in the figure.
Getting Started with Poly CCX with Teams
3
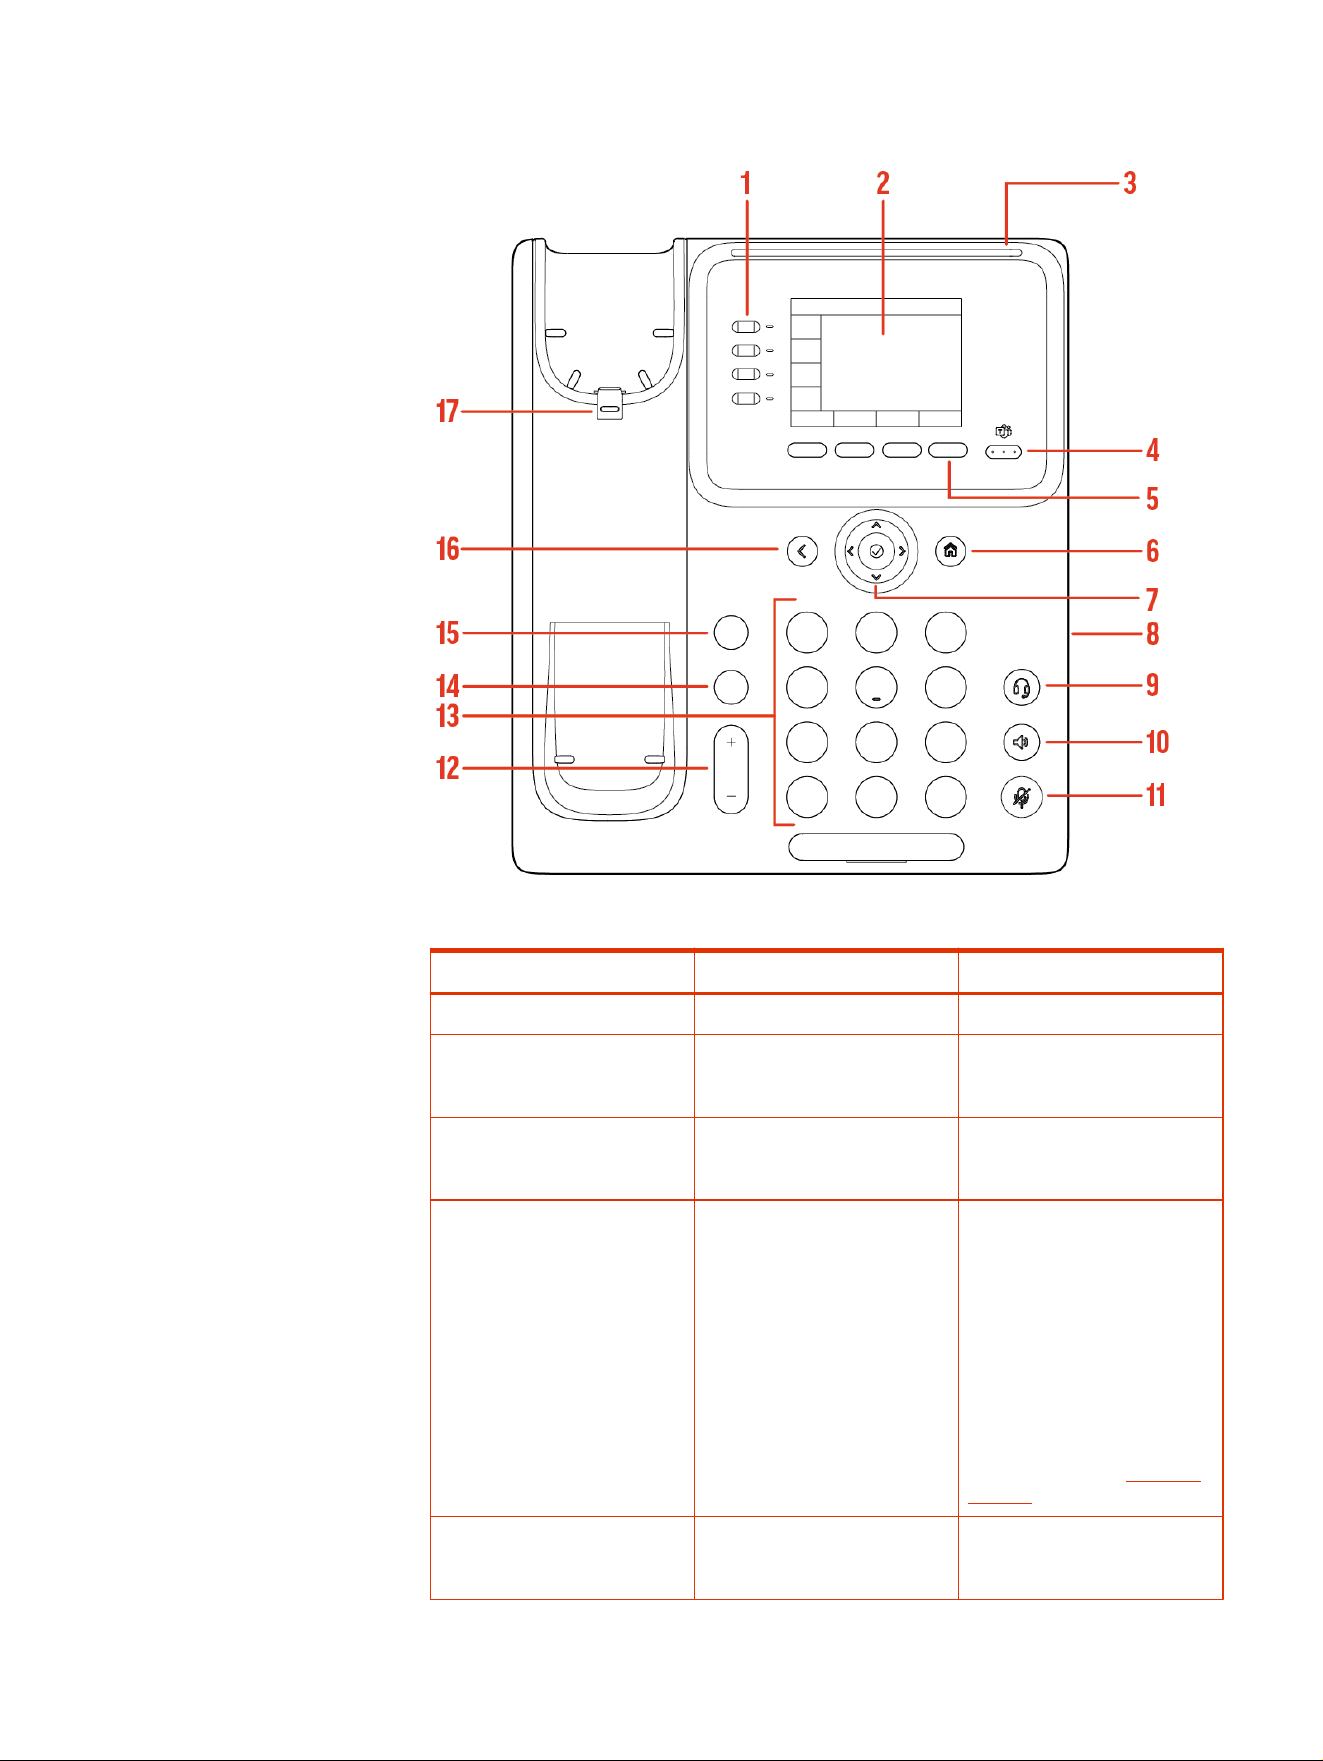
Figure 2-1 Poly CCX 350 phone hardware features
Table 2-1 Poly CCX 350 Phone Hardware Feature Descriptions
Reference Number Feature Feature Description
1 Line keys Reserved for future use.
2 Screen A 2.8" color LCD screen with a
backlight that enables you to
view menu options and data.
3 Message waiting indicator Flashes red to indicate you
have an incoming call or a new
message.
4 Teams key In the Microsoft USB Phone
base profile, returns the Teams
application to your Home
screen. In the Microsoft Teams
base profile, brings the Teams
desktop application to the
foreground.
The Teams key action varies
depending on your current
activity. For information on
the Teams key's context-
aware behavior, see
Microsoft
Support.
5 Softkeys Select context-sensitive
actions that display along the
bottom of the screen.
4 Chapter 2 Getting Started with Poly CCX with Teams

Table 2-1 Poly CCX 350 Phone Hardware Feature Descriptions (continued)
Reference Number Feature Feature Description
6 Home key In the Teams base profile,
opens the Teams Settings
menu when the user is signed
in, or opens the Device Settings
menu when the user is not
signed in.
7 Navigation keys / Select key Scroll through information or
options displayed on the
phone’s screen or select a field
of displayed data.
8 USB port CCX 350 business media
phones include one USB-C port.
Enables you to connect a
headset or to connect the
phone to a computer as a USB
audio device.
9 Headset key Displays when the phone
powers on. The icon glows
green or blue when you
connect and activate a
headset.
10 Speakerphone key Displays when the phone
powers on. The icon glows
green when activated.
11 Mute key Mute or unmute the
microphone during an active
call.
12 Volume keys Adjust the volume of the
handset, headset, speaker, and
ringer.
13 Dialpad keys Enter numbers, letters, and
special characters. Use the
dialpad keys to select menu
items that have index numbers.
14 Transfer key Transfer an active call to a
contact.
15 Hold key Hold an active call or resume a
held call.
16 Back key Return to the last screen.
17 Reversible tab Secures the handset in the
cradle when you position your
phone stand at a high angle. To
secure the handset, remove the
tab, reverse it so the protrusion
points up, and reinsert it.
Position the handset so the
protrusion on the tab fits into
the slot on the handset.
Poly CCX 350 Business Media Phone Hardware 5
Poly CCX 400 Business Media Phones Hardware
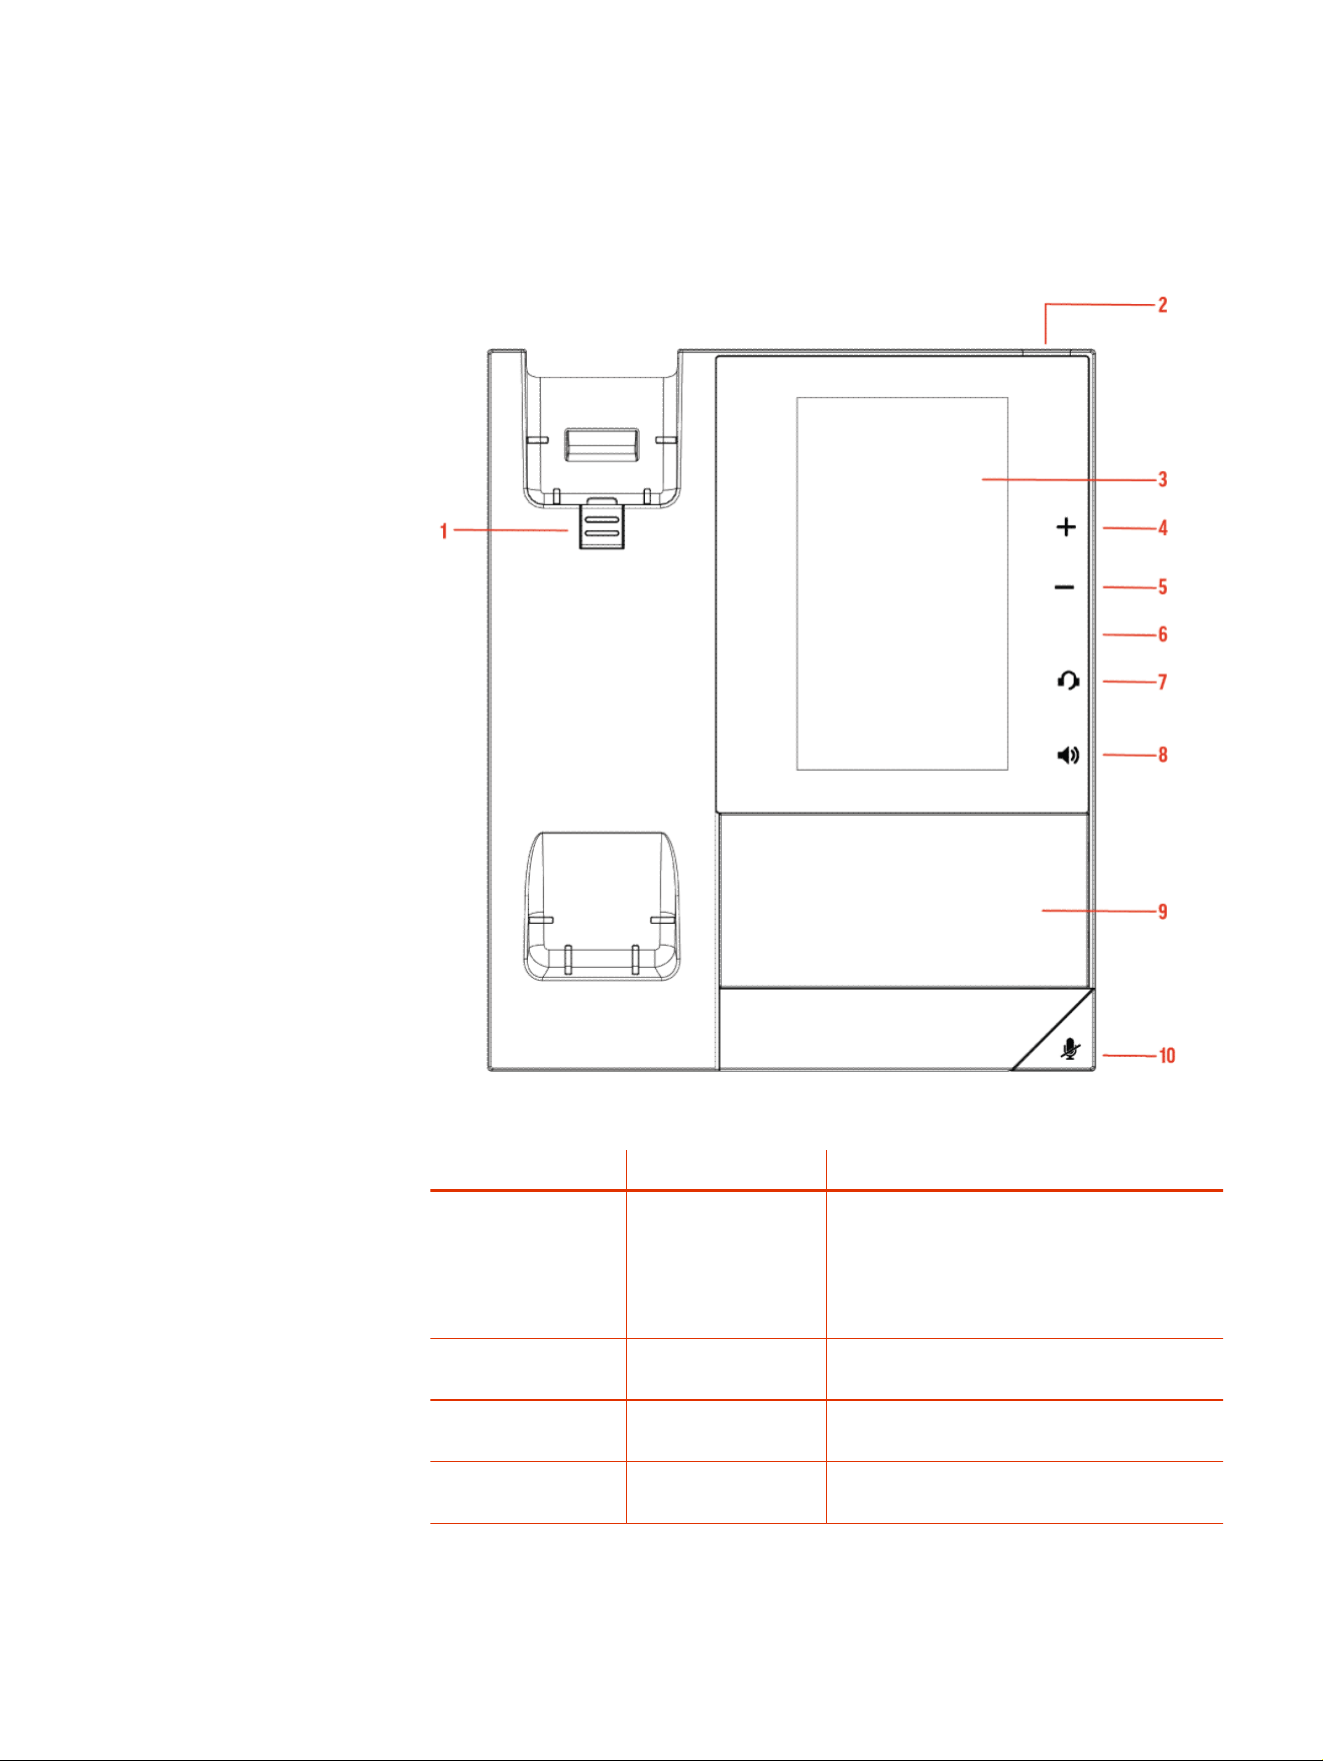
The following figure displays the hardware features on Poly CCX 400 business
media phones. The table lists each feature numbered in the figure.
Figure 2-2 Poly CCX 400 phone hardware features
Table 2-2 Poly CCX 400 Phone Hardware Feature Descriptions
Reference Number Feature Feature Description
1 Reversible tab Secures the handset in the cradle when you
position your phone stand at a high angle. To
secure the handset, remove the tab, reverse it so
the protrusion points up, and reinsert it. Position
the handset so the protrusion on the tab fits into
the slot on the handset.
2 Message waiting
indicator
Flashes red to indicate you have an incoming call
or a new message.
3 Touchscreen Select items and navigate menus on the touch-
sensitive screen.
4, 5 Volume keys Adjust the volume of the handset, headset,
speaker, and ringer.
6 Chapter 2 Getting Started with Poly CCX with Teams
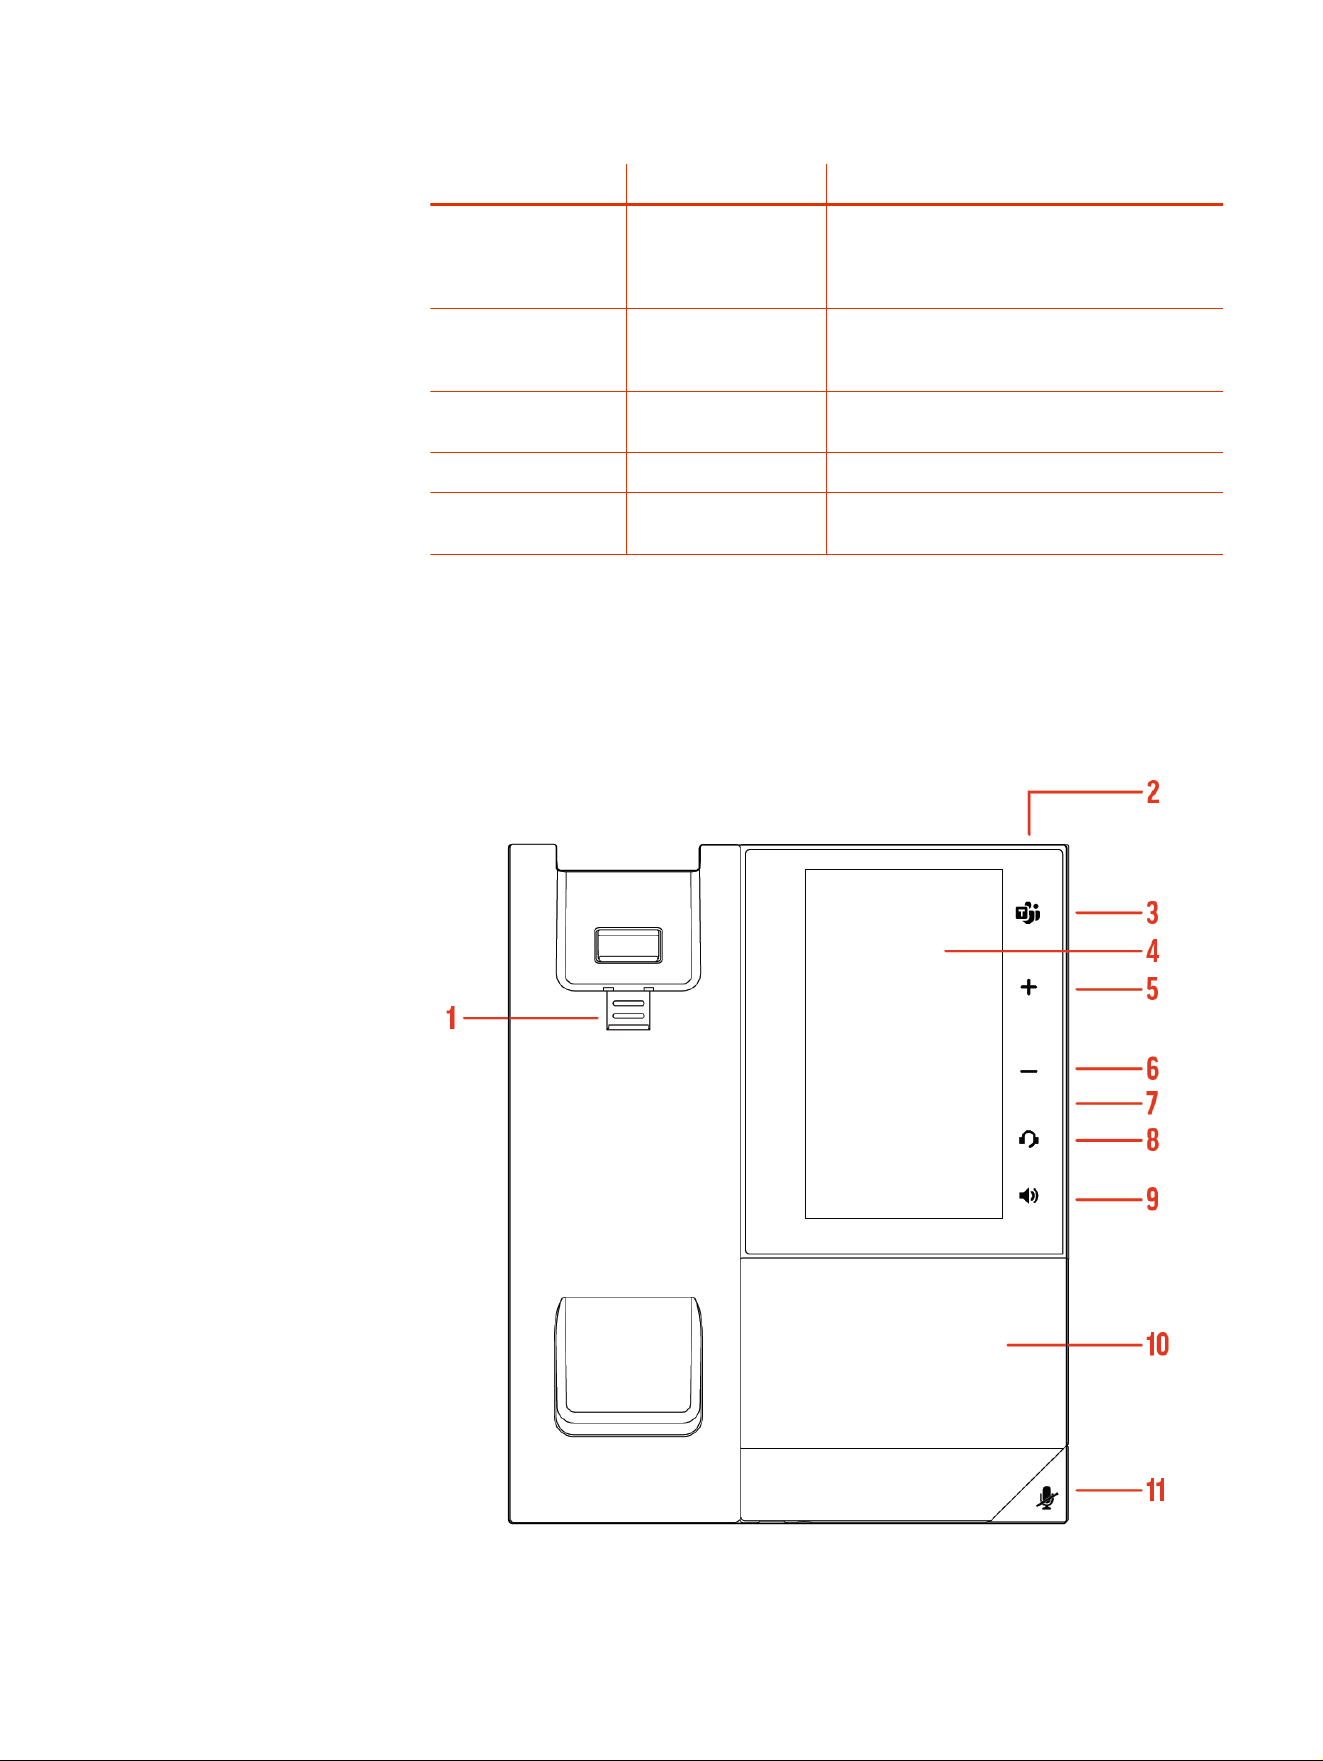
Table 2-2 Poly CCX 400 Phone Hardware Feature Descriptions (continued)
Reference Number Feature Feature Description
6 USB port(s) CCX 400 business media phones include one
USB-A port.
Attach a USB flash drive or USB headset.
7 Headset indicator Displays when the phone is powered on. The
icon glows green or blue when a headset is
connected and activated.
8 Speakerphone
indicator
Displays when the phone is powered on. The icon
glows green when activated.
9 Speaker Provides ringer and speakerphone audio output.
10 Mute key Mute or unmute the microphone during an active
call.
Poly CCX 500 and CCX 505 Business Media Phone Hardware
The following figure displays the hardware features on Poly CCX 500 and CCX 505
business media phones. The table lists each feature numbered in the figure.
Figure 2-3 Poly CCX 500 and CCX 505 phone hardware features
Poly CCX 500 and CCX 505 Business Media Phone Hardware
7

Table 2-3 Poly CCX 500 and CCX 505 Phone Hardware Feature Descriptions
Reference Number Feature Feature Description
1 Reversible tab Secures the handset in the cradle when you
position your phone stand at a high angle. To
secure the handset, remove the tab, reverse it so
the protrusion points up, and reinsert it. Position
the handset so the protrusion on the tab fits into
the slot on the handset.
2 Message waiting
indicator
Flashes red to indicate you have an incoming call
or new messages.
3 Teams button Glows and is active when the phone is set to the
Teams base profile.
Navigates to the Home screen. If the Home
screen is disabled, the button navigates to the
Calls screen.
4 Touchscreen Select items and navigate menus on the touch-
sensitive screen.
5, 6 Volume keys Adjust the volume of the handset, headset,
speaker, and ringer.
7 USB port(s) Poly CCX 500 and CCX 505 phones include one
USB-A port and one USB-C port.
Attach a USB flash drive or USB headset.
8 Headset indicator Displays when the phone is powered on. The
icon glows green or blue when a headset is
connected and activated.
9 Speakerphone
indicator
Displays when the phone is powered on. The icon
glows green when activated.
10 Speaker Provides ringer and speakerphone audio output.
11 Mute key Mute or unmute the microphone during an active
call.
Poly CCX 600 Business Media Phone Hardware
The following figure displays the hardware features on Poly CCX 600 business
media phones. The table lists each feature numbered in the figure.
8
Chapter 2 Getting Started with Poly CCX with Teams
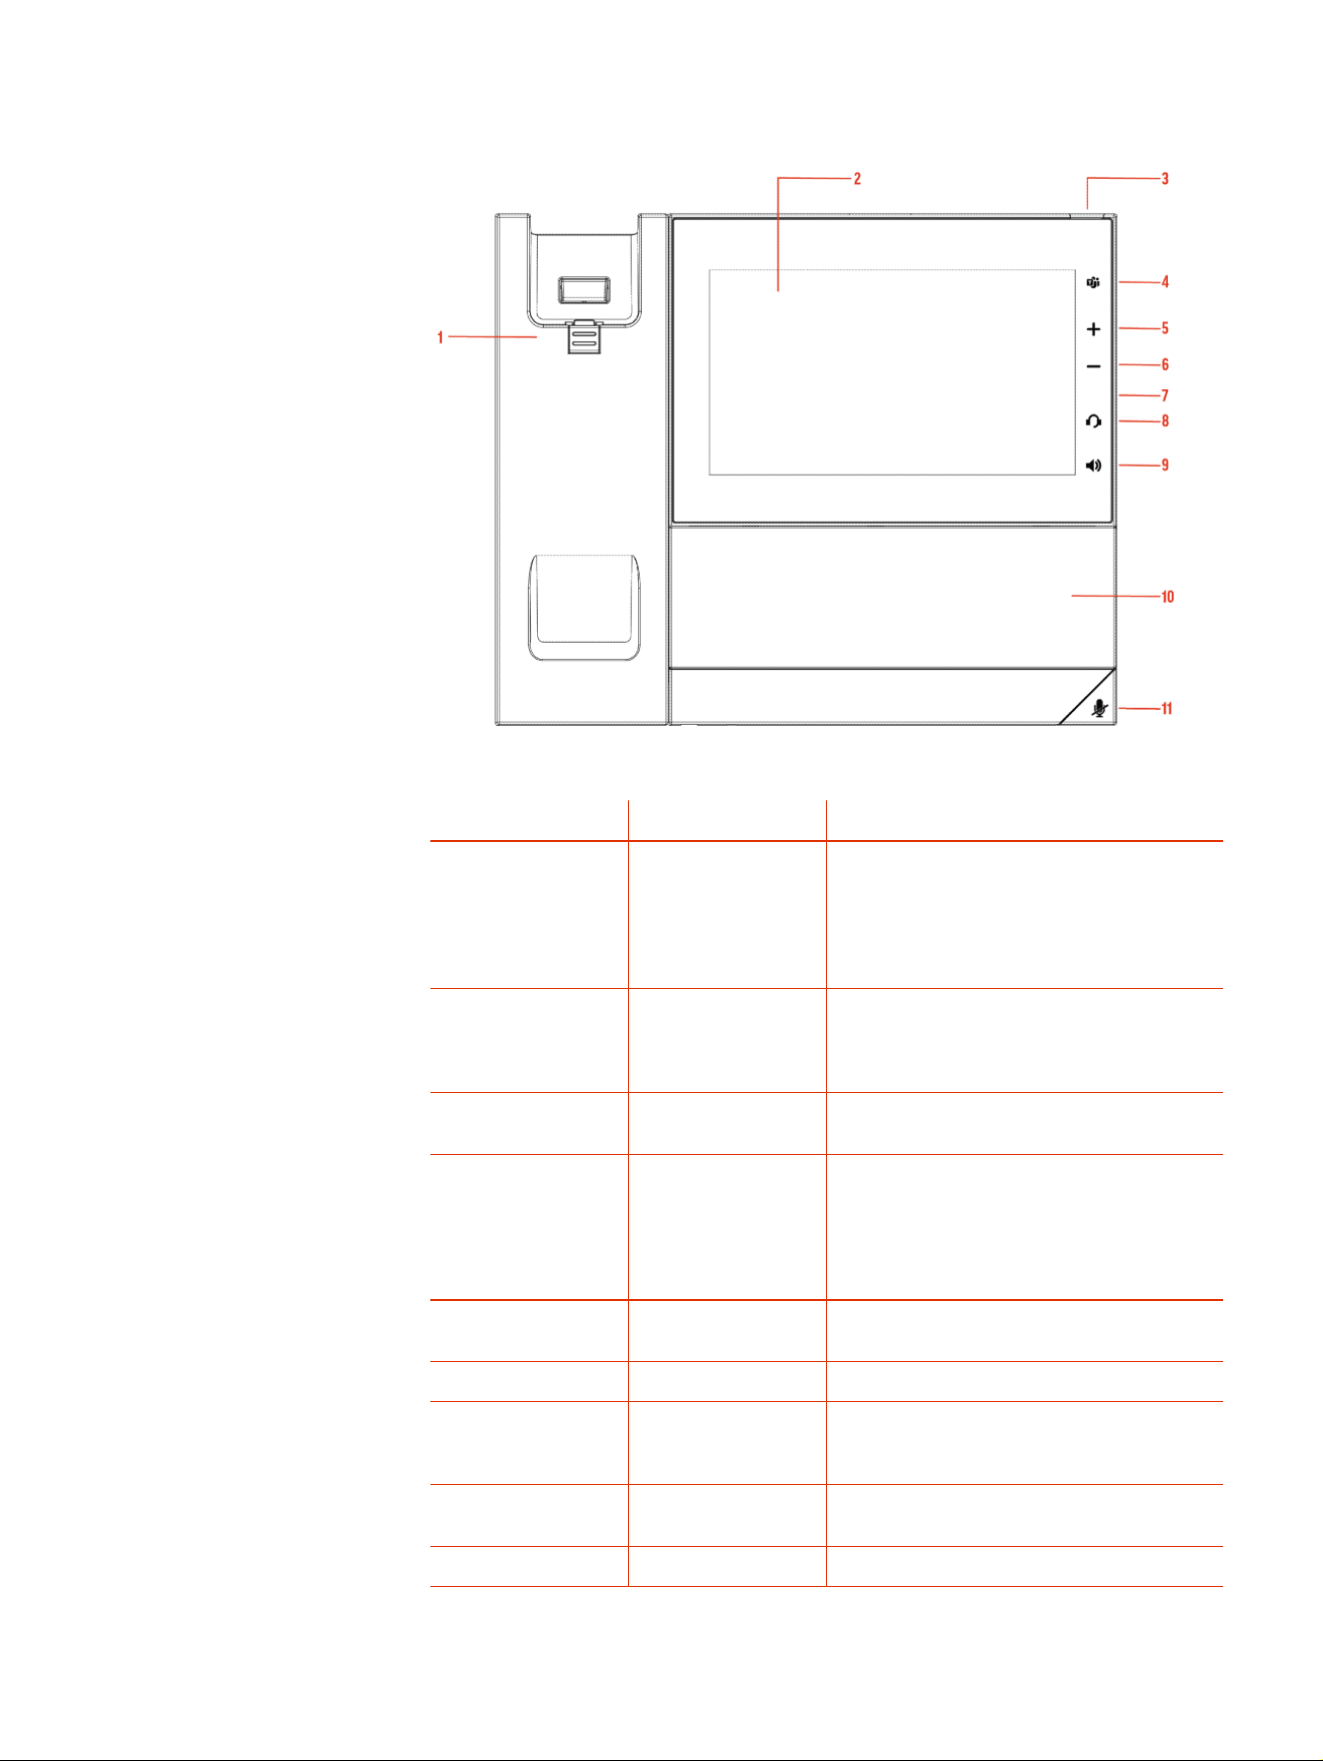
Figure 2-4 Poly CCX 600 phone hardware features
Table 2-4 Poly CCX 600 Phone Hardware Feature Descriptions
Reference Number Feature Feature Description
1 Reversible tab Secures the handset in the cradle when you
position your phone stand at a high angle. To
secure the handset, remove the tab, reverse it so
the protrusion points up, and reinsert it. Position
the handset so the protrusion on the tab fits into
the slot on the handset.
2 Touchscreen Select items and navigate menus on the touch-
sensitive screen. Tap the screen to select and
highlight screen items. To scroll, touch the screen
and swipe your finger up, down, right, or left.
3 Message waiting
indicator
Flashes red to indicate you have an incoming call
or new messages.
4 Teams button Glows and is active when the phone is set to the
Teams base profile.
Navigates to the Home screen. If the Home
screen is disabled, the button navigates to the
Calls screen.
5, 6 Volume keys Adjust the volume of the handset, headset,
speaker, and ringer.
7 USB port(s) One USB-A port and one USB-C port.
8 Headset indicator Displays when the phone is powered on. The
icon glows green or blue when a headset is
connected and activated.
9 Speakerphone
indicator
Displays when the phone is powered on. The icon
glows green when activated.
10 Speaker Provides ringer and speakerphone audio output.
Poly CCX 600 Business Media Phone Hardware 9

Table 2-4 Poly CCX 600 Phone Hardware Feature Descriptions (continued)
Reference Number Feature Feature Description
11 Mute key Mute or unmute the microphone during an active
call.
LED Indicators on CCX Phones
The LEDs on Poly CCX phones indicate phone and accessory states.
Table 2-5 CCX Phones LED Descriptions
LED Color State and Description
Speakerphone Off – Phone is in sleep mode.
White – Speakerphone is off, but the phone is
active.
Green – Speakerphone is on.
Headset Off – Phone is in sleep mode.
White – No headset is active.
Green – An electronic hookswitch (EHS) headset
is connected and activated.
Blue – A USB or Bluetooth headset is connected
and activated.
Mute Off – No call is active.
Red – The phone microphone is muted.
Message Waiting Indicator (MWI) Off – No new messages are available.
Blinking Red – New or unread voicemails are
available, incoming call and missed call.
Teams Screens
Poly CCX phones with Teams include different screens that provide specific
functionality.
You can access the following screens:
●
Home
screen: Access other Teams screens and view notifications for
meetings, missed calls, and voicemail messages.
●
Calls
screen: Speed dial your favorite contacts and view a list of recent calls.
●
Calendar
screen: View your schedule and join meetings.
●
Voicemail
screen: Listen to and manage your voicemail messages.
●
People
screen: Access and manage your Teams contact lists.
NOTE: You can disable the
Home
screen display and notifications in the
Settings menu.
10
Chapter 2 Getting Started with Poly CCX with Teams

Wake the Phone
The phone screen turns off after a set amount of idle time. You can wake the
phone at any time after this happens.
If you have phone lock enabled, you are prompted to input the PIN when you wake
the system.
■
Do one of the following:
● Lift the handset.
● Tap the screen.
● Tap the Bluetooth headset call button.
● Tap the USB headset call button.
Accessibility Features
Poly products include a number of features to accommodate users with
disabilities.
Users Who Are Deaf or Hard of Hearing
Poly phones include features that enable users who are deaf or hard of hearing to
use the phone.
The following table lists the accessibility features for users who are deaf or hard of
hearing.
Table 2-6
Accessibility Features for Users Who Are Deaf or Hard of Hearing
Accessibility Feature Description
Visual message indicators Status and icon indicators let you know when
you have incoming, outgoing, active, or held calls.
Indicators also alert you of the device’s status
and when features are enabled.
Adjustable ringtone and volume You can change the ringtone based on call type
or assign a specific ringtone to a contact. You
can also change the volume of the ringer.
Adjustable call volume While in a call, you can raise or lower the volume
of the device.
Visual notifications Status and icon indicators let you know when
you have incoming, outgoing, active, or held calls.
Indicators also alert you of the device’s status
and when features are enabled.
Electronic hookswitch If you use a headset that supports electronic
hookswitch (EHS), you can use the controls
on your headset to answer and end calls.
Additionally, you may be able to mute calls and
control volume from your headset.
Wake the Phone 11

Table 2-6 Accessibility Features for Users Who Are Deaf or Hard of
Hearing (continued)
Accessibility Feature Description
Hearing aid compatible (HAC) handsets Poly device handsets are Hearing Aid
Compatible (HAC) and have telecoils that
magnetically couple to most forms of wearable
hearing aids per FCC section 508 (compliant to
ADA Section 508 Recommendations: Subpart B
1194.23).
TTY support Poly endpoints support commercial TTY devices
such as Ultratec Superprint and provide
acoustic coupled TTY support.
Users with Limited Mobility
Poly phones include features that enable users with limited mobility to use the
phone.
The following table lists the accessibility features for users with limited mobility.
Table 2-7
Accessibility Features for Users with Limited Mobility
Accessibility Feature Description
Touchscreen The large touchscreen enables you to select, swipe,
and press the screen to perform functions and activate
features.
Built-in speakerphone A built-in speakerphone enables you to hear audio on the
device without having to use a handset or a headset.
Users Who Are Blind, Have Low Vision, or Have Limited Vision
Poly phones include features that enable users who are blind, have low vision, or
have limited vision to use the phone.
The following table lists the accessibility features for users who are blind, have low
vision, or have limited vision.
Table 2-8
Accessibility Features for Users Who Are Blind, Have Low Vision, or Have
Limited Vision
Accessibility Feature Description
Adjustable backlight settings You can change the brightness of the screen by
adjusting backlight intensity settings.
Illuminated feature keys Many feature keys illuminate when activated to
alert you when a feature is enabled.
12 Chapter 2 Getting Started with Poly CCX with Teams

Signing In to and Locking Your Phone
Sign in to your phone and lock your phone for security.
Signing In to Your Phone
Use your Microsoft account credentials to sign in to Teams on your phone.
You can sign in to your phone using one of the following methods:
● User ID: Enter your user credentials.
● Web Sign In: To sign in from a computer, select Sign in from another device,
and use the provided web address and code.
NOTE: You can sign in with only one Microsoft account at a time.
Sign In Using the Phone’s Local Interface
Sign in to Microsoft Teams using the phone’s local interface.
1. Select Sign in.
2. Enter your Microsoft account name and select Next.
3. Enter your Microsoft password and select Sign in.
Sign In Using a Web Browser
Sign in to Microsoft Teams using a web browser.
1. Do one of the following:
● On CCX 350 phones, use the Navigation and Select keys to highlight and
select Refresh code.
● On CCX 400, CCX 500, CCX 505, and CCX 600 phones, select Sign in >
Sign in from another device.
A URL and code display.
2. Enter the URL into a web browser on your computer.
3. Enter the code into the provided Code field.
4. Select your Microsoft account and click Next.
5. Enter your Microsoft password and select Sign in.
Your phone signs in to Teams.
6. On your phone, select Got it.
Signing In to and Locking Your Phone
13

Sign Out of Your Phone
If you sign in to Microsoft Teams on a public phone, sign out after you finish using
the phone.
After you sign out of Microsoft Teams, you can’t make calls or view upcoming
meetings. You must sign back in to Microsoft Teams to use the phone.
1. Go to Menu > Settings.
If the phone uses a Common Area Phone (CAP) account, go to Device
Settings > Advanced.
2. Select Sign out.
3. Select OK.
Sign In as a Hot Desk User
You can sign in to your account as a hot desk user on an unlocked phone already
signed in by another user.
NOTE: CCX 350 phones don't support hot desking.
1. Select Menu > Hot Desk.
2. Enter your email address and select Sign in.
3. Enter your password and select Sign in.
4. To sign out, select Menu > Device Settings > Sign Out.
Locking Your Phone
To limit access to your phone, set a lock PIN.
Consider locking your phone if you want to:
● Prevent unauthorized outgoing calls.
● Prevent people from viewing or modifying phone information, such as your
directory, call lists, or favorites.
When you lock your phone, you can do the following:
● Place outgoing calls to emergency and authorized numbers only
● Answer incoming calls, unless your administrator has set your phone to
require a password to answer calls
● View the browser, if enabled
Set a Phone Lock PIN
To limit access to your phone, set a phone lock PIN. The phone lock is activated
after your phone sits idle for a set amount of time.
14
Chapter 3 Signing In to and Locking Your Phone

NOTE: You can only access the phone lock PIN menu while signed in to
Microsoft Teams.
1. Go to Menu > Settings > Device Settings.
2. Select Phone Lock.
3. Select Enable Phone Lock.
NOTE: Once enabled, you must input your phone lock PIN to disable it.
4. Enter a phone lock PIN in both fields, then select OK.
5. Select Phone Lock Timeout to choose the amount of time the phone sits idle
before locking.
Change your Phone Lock PIN
You can change your phone lock PIN at any time.
NOTE: If you enter the incorrect PIN four times, you are automatically signed
out of Teams and the phone lock becomes disabled.
1. Go to Menu > Settings > Device Settings.
2. Select Phone Lock.
3. Select Change PIN.
4. Enter your current pin and your new PIN, then confirm your new PIN.
5. Select OK.
Unlocking Your Phone with a Lock PIN
If you set a lock PIN, enter the lock PIN to unlock your phone.
NOTE: If you enter the incorrect PIN four times, you are automatically signed
out of Teams and the phone lock becomes disabled.
1. On the phone screen, swipe up.
2. Enter the PIN.
3. Tap the check mark.
Change your Phone Lock PIN
15

Calling and Conferencing
Place calls and join meeting from your CCX phone.
Place a Call
Place a call using the dialpad or by selecting a contact.
1. On the
Calls
screen, select the Make a Call icon.
2. Do one of the following:
● Enter a number on the dialpad and select the Call icon.
● Select the
People
, search for a contact, and select the Call icon next to
the contact’s name.
Call a Favorite Contact
Call a contact from your favorite list on the
Calls
screen.
1. Do one of the following:
● Pick up the headset.
● Press the headset or speakerphone icon on the phone.
● Select the phone icon.
2. From the
Favorites
tab on the
Calls
screen, select a favorite.
Place an Emergency Call
You can place an emergency call from a locked phone.
NOTE: If the phone sign in screen appears, you must first sign in to place an
emergency call.
1. From a locked phone, swipe up on the screen.
2. Do one of the following.
a. Enter an emergency number on the PIN key pad.
b. Select Emergency Call and enter 911, or another approved emergency
number, and select Place call.
Join a Meeting
Join a Teams meeting from the
Calendar
screen.
16
Chapter 4 Calling and Conferencing

1. Go to the Calendar screen.
2. Select a meeting from the list.
3. To the right of the meeting title, select Join.
Add a Contact to Your Favorites Tab
Select contacts and add them to the Favorites tab on the Calls screen.
1. On the
Calls
screen, select the Recent tab.
2. Select a contact and select the star .
Assign a Delegate
Select contacts that can make and receive calls on your behalf.
NOTE: CCX 350 phones don't support delegate assignments.
1. Go to Menu > Settings > Manage delegates.
2. Select Add delegates and search for a contact.
3. Select a contact and choose the delegate settings.
● Make calls
● Receive calls
● Change call and delegate settings
4. To save, select the check mark .
The phone adds the delegate to your delegates list.
Send a Group Page with the Poly Control Panel
Broadcast a page to a configured group paging channel using the Poly Control
Panel.
NOTE: CCX 350 phones don't support group paging.
Your administrator can configure the phone to broadcast pages —one-way audio
announcements—to contacts subscribed to a page group. The phone subscribes
to a maximum of 25 paging groups. By default, your phone subscribes to paging
groups 1, 24, and 25, and you can send and receive pages to those paging
groups. Contact your system administrator to find out which paging group you
are subscribed to.
1. From the top of the system display, swipe down to display the Poly Control
Panel.
2. Optional: Swipe down a second time to expand the panel and display the icon
names.
Add a Contact to Your Favorites Tab
17

3. Select the Group Page icon.
Depending how your administrator configured this feature, you may need to
select a group paging channel.
■
Optional: Select the channel you want to page from the
Group Page List
.
4. Make the page to the group.
The phone immediately broadcasts it to the paging group.
Call Application Switching Methods
Change the active call application on your phone.
NOTE: CCX 350 phones don't support call application switching.
Change call applications using either the Poly Control Panel or cycle between
them using the app switching icon.
If configured by your administrator, you can switch to the Poly OpenSIP call
application to place calls if Teams ever experiences an outage.
Select an Available Call Application
Switch directly to another available call application using the Poly Control Panel.
IMPORTANT: You may not have access to this functionality if your administrator
has disabled the Poly Control Panel.
1. From the top of the system display, swipe down to display the Poly Control
Panel.
2. Optional: Swipe down a second time to expand the panel and display the icon
names.
3. Select the icon of the call application you want to switch to.
Cycle Through Available Call Applications
Cycle through the available call applications using the navigation bar at the
bottom of the phone’s screen.
■
On the navigation bar, select App Switch to switch to another call
application.
18
Chapter 4 Calling and Conferencing

Poly CCX with Teams Settings
You can customize basic settings on the phone, including the display language,
time and date format, and the backlight settings.
Some changes you make apply automatically. However, some settings require you
to select the Back button and then select Save when prompted.
Change the Phone Display Language
You can change the language used for your phone's user interface.
1. Go to Menu > Settings > Device Settings.
2. Select Language and select a language from the list.
Date & Time
Set the date and time by manually selecting a time zone or using a server.
Change the Time Format
Choose a 12-hour or 24-hour time format on your phone.
1. Go to Menu > Settings > Device Settings.
2. Select Date & Time.
3. In the Time Format section, select 12 - Hour or 24 - Hour.
Adjust the Display Backlight
Adjust your phone’s display brightness.
1. Go to Menu > Settings > Device Settings.
2. Select Display.
3. Slide the Backlight slider to the left to lower the brightness or to the right to
increase the brightness.
Set the Phone Theme to Dark
To reduce the brightness of your phone screen, switch to the dark theme.
1. Go to Menu > Settings.
2. Select the Dark Theme toggle.
3. Select Restart.
Poly CCX with Teams Settings
19

Before the phone switches to the dark theme, the Teams splash screen displays
momentarily.
Enable the Screen Saver
Enable the screen saver and choose from the built-in screen saver backgrounds.
The screen saver automatically starts when your phone is idle for a specified
amount of time. You can stop the screen saver at any time by pressing any key or
touching the screen.
1. Go to Menu > Settings > Device Settings.
2. Select Display.
3. Select Screen Saver.
The Screen Saver Background menu appears.
4. To display a list of available screen savers, select Screen Saver Background.
Adjust the Backlight & Screen Saver Timeout
Choose the amount of time your phone sits idle before the screen saver starts or
the phone screen turns off.
1. Go to Menu > Settings > Device Settings.
2. Select Display.
3. Select Backlight & Screen Saver Timeout.
4. Choose an idle time from the list.
Headset Settings
Connect a USB or Bluetooth (if supported on your phone) headset to use as your
audio device for calls.
A dialog window displays to notify you when you successfully connect a headset.
When you use the headset, the phone's headset icon glows.
NOTE: Lifting the handset overrides the headset.
Configure Hookswitch Mode
Configure which hookswitch mode your phone uses. Based on the headset you're
using, this option may enable additional headset control options.
1. Go to Menu > Settings > Device Settings.
2. Select Headset.
3. Select HookSwitch Mode to choose an available mode from the list.
20
Chapter 5 Poly CCX with Teams Settings

Enable Echo Cancellation
Enable echo cancellation to remove echoes that you might experience when using
your headset.
1. Go to Menu > Setting > Device Settings.
2. Select Headset.
3. Select Echo Cancellation.
Enable Bluetooth
Pair and connect a Bluetooth device to your phone.
NOTE: Bluetooth is not available on CCX 350 and CCX 400 phones.
1. Go to Menu > Settings > Device Settings.
2. Select Bluetooth.
3. On the Bluetooth screen, select Bluetooth to enable or disable Bluetooth.
When you enable Bluetooth, the Manage Bluetooth Device option displays.
You can now pair Bluetooth–enabled devices in range.
Connect a Bluetooth Headset
Connect a Bluetooth headset to your phone.
1. Go to Menu > Settings > Device Settings > Bluetooth > Manage Bluetooth
Devices.
2. Select Pair New Device.
3. Select your headset from the Available devices list.
Connecting to a Wireless Network
You can connect your Wi-Fi capable phone to a wireless network.
NOTE: CCX 505 and CCX 600 phones support wireless network connectivity.
Enable Wi-Fi
To connect your phone to a wireless network, enable Wi-Fi.
NOTE: Enabling Wi-Fi reboots your phone.
1. Go to Menu > Settings > Device Settings.
2. Select Wi-Fi.
3. On the Wi-Fi screen, select Wi-Fi.
Your phone reboots.
Enable Echo Cancellation
21

Connect to a Wireless Network
After you enable Wi-Fi on your phone, connect to a wireless network.
Make sure you have the login credentials for the network you want to connect to.
1. Go to Menu > Settings > Device Settings > Wi-Fi > Launch Wi-Fi Settings.
2. Select a wireless network from the list.
3. Enter the required information for the chosen wireless network.
NOTE: The information required for a wireless network depends on the
security settings of the chosen wireless network.
4. Select Connect.
Disconnect from a Wireless Network
To change wireless connections or switch to an Ethernet connection, disconnect
from the current wireless network.
1. Go to Menu > Settings > Device Settings.
2. Select Wi-Fi Menu.
3. Select the connected wireless network SSID from the list.
4. Select Disconnect.
Remove a Saved Wireless Network
Remove any saved wireless network that is no longer necessary.
1. Go to Menu > Settings > Device Settings > Wi-Fi > Launch Wi-Fi Settings.
2. Select the connected wireless network SSID from the list.
3. Select Forget.
Connecting Your Phone to Your Computer with Better Together
You can pair your desktop Teams app to Teams on your phone.
NOTE: For Better Together requirements and limitations, see Phones for
Microsoft Teams.
When you connect your CCX phone with Teams to your computer, your phone
locks and unlocks with your computer.
Connect Your CCX Phone to Your Computer with Better Together
Pair your CCX 500, CCX 505, or CCX 600 Teams desktop app to your phone.
Enable Bluetooth on your CCX phone and your computer.
NOTE: For Better Together requirements and limitations, see Phones for
Microsoft Teams.
22
Chapter 5 Poly CCX with Teams Settings

1. Go to Menu > Manage Devices.
2. Select Find a device.
3. When your phone appears in the list, select Connect.
USB Audio Mode
Use your Poly CCX business media phone in USB audio mode as a USB audio
device on a connected computer.
USB audio mode enables you to do the following:
● Take calls from the computer’s Teams client.
● Use the phone’s local interface to control calls from the computer’s Teams
client.
● Play computer audio through your phone’s speaker.
● Record audio using your phone’s microphone.
Computer and Cable Requirements
CCX business media phones have specific operating system and cable hardware
requirements when connecting to a computer.
Operating system requirements:
● Windows 10 version 1803 or later
● macOS 10.12 or later
USB cable requirements:
● CCX 350 phones: USB-C to USB-C cable to power the phone using USB only,
or USB-A to USB-C cable to power the phone using Power over Ethernet or a
power adapter
● CCX 400 phones: USB-A to USB-A cable (included with the phone)
● CCX 500, CCX 505, and CCX 600 phones: USB-C to USB-A cable
● USB 2.0 or higher cable
NOTE: Poly recommends USB 3.0 for the most reliable connection and
optimal audio quality.
● Use a self-powered USB booster extension cable for connections longer than
2 m (6.6 ft)
NOTE: Don’t use a USB cable meant only for charging devices. Cables meant
for charging devices may lack the necessary hardware to support the data
transmission needed for USB audio mode.
USB Audio Mode
23

Connect Your Phone to a Computer for USB Audio Mode
Connect your CCX phone to a computer and configure it as an external audio
device in USB audio mode.
1. Connect a supported USB cable from the USB port on the side of your phone
to a USB port on your computer.
On CCX 400 phones, use the USB-A port. On CCX 350, CCX 500, CCX 505,
and CCX 600 phones, use the USB-C port.
NOTE: The USB port on your computer must support USB 2.0 or higher.
2. On the computer, configure the phone as an audio output device and an
audio input device.
The process to configure an audio device may vary depending on your
computer’s operating system.
The phone's microphone provides the audio input to your computer. The phone's
speakerphone plays the computer's audio output.
Enable Accessibility Options
Enable the accessibility features on the phone to accommodate users with
disabilities.
1. Go to Menu > Settings > Device Settings.
2. Select Accessibility.
3. To enable or disable accessibility options, select Accessibility Settings.
4. Enable the following options as desired:
● High Contrast Mode: Increases the color contrast in the local interface.
● Large Text: Increases the size of the text in the local interface.
● Color Correction and Correction Mode: Adjusts colors to compensate for
red-green or blue-yellow color blindness.
24
Chapter 5 Poly CCX with Teams Settings
Poly CCX EM60 expansion module
The Poly CCX EM60 expansion module is a console supported on several CCX
business media phones that enables you to add additional lines to your phone.
NOTE: CCX 350, CCX 400, and CCX 500 phones don't support CCX EM60
expansion modules.
Each CCX EM60 expansion module supports the following features:
● 5” color LCD display
● Three pages with twenty line keys each, for a total of sixty Teams contacts with
presence
● Dual-color (red or green) illuminated LEDs for line status information per key
● One USB 2.0 (Type-A) port
● One USB 2.0 (Type-C) port
● Supports one expansion module per CCX phone
IMPORTANT: USB headsets are not supported on CCX EM60 expansion
modules. Bluetooth and RJ-9 headsets are supported.
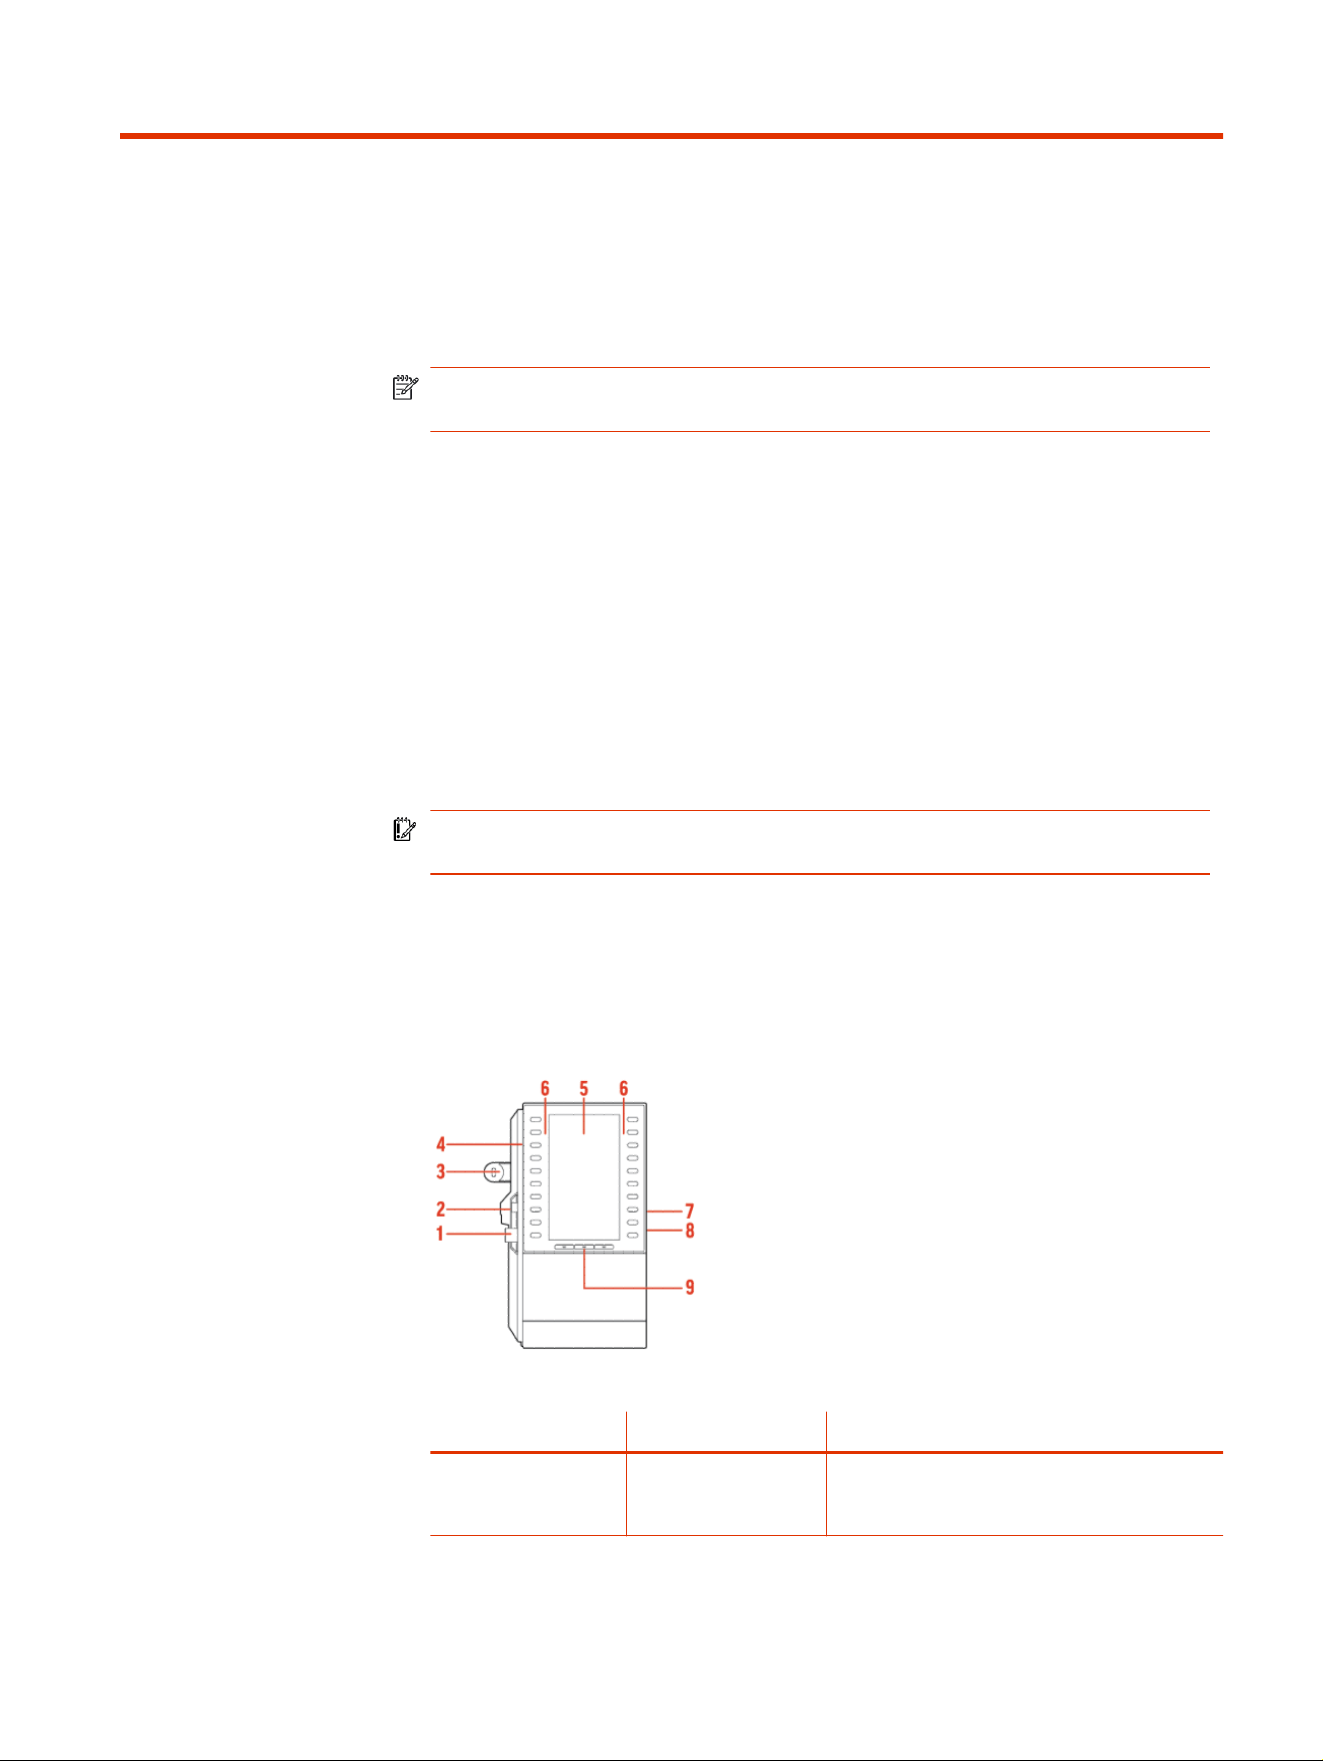
Poly CCX EM60 expansion module hardware
The following figure displays the hardware features on CCX EM60 expansion
modules. The table lists each feature numbered in the figure.
Figure 6-1 Poly CCX EM60 hardware features
Table 6-1
Poly CCX EM60 hardware features reference callouts
Reference Number Feature Feature Description
1 USB-A plug Connects the USB-A plug on the expansion
module into the USB-A port on the side of a CCX
phone
Poly CCX EM60 expansion module 25

Table 6-1 Poly CCX EM60 hardware features reference callouts (continued)
Reference Number Feature Feature Description
2 USB-C plug Connects the USB-C plug on the expansion
module into the USB-C port on the side of a CCX
phone
3 Locking tab Connects the expansion module to a CCX phone
4 Line keys Configured as Teams contacts with presence
5 Color display A 5" color LCD screen with a backlight to view
contacts and speed dials
6 LED indicators Illuminate in green or red to provide line status
information
7 USB-C port The CCX EM60 expansion module includes one
USB-C port reserved for future use
8 USB-A port The CCX EM60 expansion module includes one
USB-A port reserved for future use
9 Page keys Three page keys to manage contacts
IMPORTANT: Ensure that you connect the CCX EM60 expansion module to the
phone correctly by fully inserting the USB-A and USB-C plugs into the USB-A and
USB-C ports on the phone. Use the locking tab to secure the expansion module to
the phone, and use the correct stand to match the phone model.
CCX power usage
CCX business media phones use more power when you connect an expansion
module.
Table 6-2
Power usage without an EM60
Model Idle In Call
CCX 505 2.8 W 8 W
CCX 600 5.8 W 11 W
Table 6-3 Power usage with 1 EM60
Model Idle In Call
CCX 505 5 W 10.2 W
CCX 600 8 W 13.2 W
CCX PoE classes do not change when an EM60 is connected:
● CCX 505: PoE Class 0
● CCX 600: PoE Class 4
The maximum power output from the EM60 USB ports is:
26
Chapter 6 Poly CCX EM60 expansion module
● USB-C: 2.5 W, 0.5 A
● USB-A: 0.5 W, 0.1 A
Poly CCX EM60 expansion module power limitations
Poly recommends using the CCX EM60 external AC adapter (5 VDC/3 A) for all
installations (sold separately).
IMPORTANT: Connect external power to the CCX EM60 expansion module and
not the host CCX phone.
When a power supply isn’t directly connected to the CCX EM60, the following
limitations apply:
● Hardware revisions of CCX 600 phones manufactured before November 2022
(revisions A through O) do not support the use of an EM60.
TIP: You can find the hardware revision number on the white label on the
back of your phone.
● CCX 505 and CCX 600 phones do not provide power to the EM60’s USB-A port
regardless of the CCX’s manufacturing date or revision.
Table 6-4
CCX EM60 power supply part numbers
Part number Part name
86H66AA#ABG Poly Edge E100-450 CCX 350 EM60 Power Supply - 5V/3A-AUST
86H66AA#AC4 Poly Edge E100-450 CCX 350 EM60 Power Supply - 5V/3A-BRZL
86H66AA#ABB Poly Edge E100-450 CCX 350 EM60 Power Supply - 5V/3A-EURO
86H66AA#ACJ Poly Edge E100-450 CCX 350 EM60 Power Supply - 5V/3A-INDIA
86H66AA#ABJ Poly Edge E100-450 CCX 350 EM60 Power Supply - 5V/3A-JPN2
86H66AA#AB1 Poly Edge E100-450 CCX 350 EM60 Power Supply - 5V/3A-KOR
86H66AA#ABM Poly Edge E100-450 CCX 350 EM60 Power Supply - 5V/3A-LTNA
86H66AA#AB2 Poly Edge E100-450 CCX 350 EM60 Power Supply - 5V/3A-PRC
86H66AA#ABU Poly Edge E100-450 CCX 350 EM60 Power Supply - 5V/3A-UK
86H66AA#ABA Poly Edge E100-450 CCX 350 EM60 Power Supply - 5V/3A-US
Poly CCX EM60 expansion module line keys
In the Microsoft Teams base profile, the expansion module line keys display
contacts only, and you manage indexing using the Microsoft Teams application.
Add contacts to the expansion module
In the Microsoft Teams base profile, you can add contacts using your CCX phone
to display on your expansion module.
Poly CCX EM60 expansion module power limitations
27

NOTE: The Microsoft Teams term for an expansion module is sidecar.
1. On your phone, go to People, and then select +.
2. Select Create new group, or select Add from directory, to add a contact to an
existing group.
To add an external number to your contacts, you must have either made a call
to, or received a call from, that number using your phone.
3. From the drop-down menu, select the group that you want to add to the
expansion module, select ⋮, and then select Pin group to sidecar.
28 Chapter 6 Poly CCX EM60 expansion module

Upgrading the Software
The upgrade process varies depending on the software version that is currently
running on your phones and the version that you want to upgrade to.
New software versions may offer only small enhancements to improve the user
experience, or they may be large software upgrades that offer new features.
Important update information for PVOS 9.0.0
For all CCX models this PVOS software release includes a major Android platform
update.
Note the following important information before updating to PVOS 9.0.0:
● Don’t turn off the power during the upgrade process.
● After you upgrade your CCX or phone to PVOS 9.0.0, PVOS 9.0.0 becomes the
new minimum software version. Returning to PVOS software versions earlier
than PVOS 9.0.0 requires the use of a one-time downgrade utility.
● You can upgrade to PVOS 9.0.0 from any earlier PVOS or UC Software version.
● The PVOS 9.0.0 software package contains several upgrade components and
is larger than a typical PVOS release. The total duration of the file download,
installation, and update can take 30 to 60 minutes or longer, depending on
the speed of your network. Most of the upgrade duration is the software
download, which occurs as a background service so you can use your phone
as normal.
● Your device may restart several times during the upgrade.
– Upgrading to PVOS 9.0.0 from versions earlier than PVOS 8.1.4
automatically installs PVOS 8.1.4 first, as it contains resources necessary
to upgrade the OS to Android 12.
– Phones already running PVOS 8.1.4 or later skip the interim step and
upgrade directly to PVOS 9.0.0.
NOTE: Your phone doesn’t restart during an active call. If a call is active
when the phone completes the download of an installation stage, the restart
occurs immediately after the call ends.
● Applicable if upgrading from 8.1.3 or earlier: If a software provisioning server
becomes unreachable after the installation of the first component of the
software package, the phone remains on the interim software package until
the server becomes reachable again. The update attempts to continue after a
restart, a check-sync, or at the next scheduled configuration polling time.
Upgrading the Software
29

Downgrading PVOS 9.X.X to earlier software versions
After you update your Poly CCX phone to PVOS 9.X.X, a downgrade to earlier
software versions requires the use of a one-time downgrade software package
that allows transition from the Android™ 12 OS to the Android 9 OS.
The downgrade package contains two software updates within a single file that
are installed in sequence as follows:
● Your phone downloads the downgrade package and restarts to install an
interim software version that downgrades the Android OS from Android 12 to
Android 9.
● After you install the interim software, your device downloads the second
component of the downgrade package and restarts to complete the
installation of the PVOS 8.1.5 generally available release.
If you want to use a software version other than PVOS 8.1.5, you can now install
that version in the same way that you would install any other PVOS version.
Information removed and retained after downgrading
The downgrade process includes a file system format that removes user data and
most configurations.
Information removed when downgrading
● Microsoft Teams sign-in information
● Zoom phone (CCX)
● Poly Studio X Series video bar pairing
● Paired Bluetooth devices
● Configuration changes made or imported from the system web interface that
are not listed in the retained information list
● Basic configuration settings such as ring tones, power saving, and OpenSIP
speed dials
● SCEP server and client configuration (certificates installed using SCEP are
retained)
● Web proxy information
Information retained when downgrading
● DHCP, DNS, SNTP, IP, Ethernet, and Wi-Fi settings
● LLDP, CDP, and custom VLAN settings
● Syslog settings
● 802.1X settings, Custom CA certificates, device certificates and keys, and TLS
profile settings
30
Chapter 7 Upgrading the Software

● Provisioning server address
● Base profile
● Admin and user passwords
● Settings hosted on your service provider’s provisioning service or the Poly
Lens device management service (recovered once your phone reconnects
after the downgrade)
Updating PVOS
You can update PVOS on a per-phone basis from the phone’s local interface or
through the system web interface.
Update PVOS using the system web interface
Update the phone software using the system web interface.
To update PVOS using the system web interface, see Using the Software Upgrade
Tool in the Web Configuration Utility.
Update PVOS using a USB flash drive
Use a USB flash drive to update the software on your phone.
NOTE: Changes you make using a USB flash drive override the settings you
configure using a centralized provisioning server (if applicable).
1. Do one of the following:
● Format a blank USB 2.0 USB flash drive using FAT32.
● Delete all files from a previously formatted USB flash drive.
2. Download PVOS from Poly Lens.
3. Copy the configuration files that you want to use to the root of the USB flash
drive.
You must copy at least the primary configuration file (000000000000.cfg)
and the product-specific configuration files to the USB flash drive:
● Poly CCX 350: 3111-49690-001.sip.ld
● Poly CCX 400: 3111-49700-001.sip.ld
● Poly CCX 500: 3111-49710-001.sip.ld
● Poly CCX 505: 3111-49730-001.sip.ld
● Poly CCX 600: 3111-49770-001.sip.ld
4. Insert the USB flash drive into the USB port.
The phone detects the flash drive automatically.
Updating PVOS
31

5. Enter the administrator password.
The phone starts the update within 30 seconds of entering the correct
administrator password.
The system may reboot several times during the update. The update is
complete when the indicator lights stop blinking and the
Home
screen
displays.
Update PVOS manually
You can use an USB flash drive to update the software and configure the phone.
When you configure the phone using a USB drive, the configuration on the USB
overrides all previous configurations. When the USB drive is removed, the system
returns to the previous configuration.
1. Download and unzip PVOS to a directory on your provisioning server.
2. On the phone, go to Settings > Advanced, and enter the administrator
password.
3. Go to Network Configuration > Provisioning Server > DHCP Menu > Boot
Server.
4. In the Boot Server menu, choose Static if you are testing or provisioning a few
phones, or choose Option 67 if you are provisioning in a large environment
and want phones to use a boot server defined in DHCP.
If you choose Option 67, skip step 5 and go to step 6.
5. Go back to Provisioning Server and do the following:
● Choose a server type in the Server Type field.
● Enter the server address. For example,
http://server.domain.com/41X or
ftp://ftp.domain.com/41X
● Enter your server user name and server password, if required.
6. Press Back until you are prompted to save your settings.
7. Choose Save Configuration to save your settings.
The phone reboots.
32
Chapter 7 Upgrading the Software

Troubleshooting
If you’re having issues with your Poly phone, try the troubleshooting options and
solutions in the following topics to resolve certain issues.
View Device Information
View device information, such as the IP address, the unique MAC address, and
software and application versions the device is currently running.
■
Go to Settings > Device Settings > About to view the following device
information:
● IP Address
● MAC Address (also called the serial number)
● Firmware Version
● Partner App Version
● Company Portal Version
● Teams Version
● Device Settings Version
● Admin App Version
Testing Phone Hardware
Perform diagnostic tests to troubleshoot your device.
1. Go to Menu > Settings > Device Settings > Diagnostics.
2. Perform the following tests:
Table 8-1
Diagnostic Troubleshooting Tests
Test Option Description
Audio Test the speakerphone, handset, USB
headset, or Bluetooth headset microphone
and speaker.
Network Test the phone’s network connection using
netstat and ping.
Touch Test the phone’s touchscreen by drawing
lines.
LED Test the phone LEDs by blinking LEDs not
currently illuminated.
Display Tests the phone’s display by cycling through
primary and secondary colors.
Troubleshooting 33

Access Microsoft Teams Help
You can access the Microsoft Teams help site through the phone’s local interface
or on the internet.
■
Do one of the following:
● On the phone, go to Menu > Settings > Help.
● In a web browser, go to Microsoft Teams help center.
Enable Logging
Your system administrator may ask you to turn on logging to assist in
troubleshooting. Logging stores information about events that take place on the
phone, such as placing a call.
1. Go to Menu > Settings > Device Settings.
2. Select Debug.
3. On the Debug screen, select Logging.
4. To choose a logging level, select Log Level.
Enable Screen Capture
Your administrator may ask you to enable screen capture for troubleshooting
purposes.
1. Go to Menu > Settings > Device Settings.
2. Select Debug.
3. On the Debug screen, select Screen Capture.
Reboot the Phone
Your system administrator may ask you to reboot the phone to assist in
troubleshooting.
1. Go to Menu > Settings > Device Settings.
2. Select Debug.
3. Select Reboot Phone.
34
Chapter 8 Troubleshooting

Getting help
Poly is now a part of HP. The joining of Poly and HP paves the way for us to create
the hybrid work experiences of the future. Information about Poly products has
transitioned from the Poly Support site to the HP Support site.
The Poly Documentation Library is continuing to host the installation,
configuration/administration, and user guides for Poly products in HTML and PDF
format. In addition, the Poly Documentation Library provides Poly customers with
information about the transition of Poly content from Poly Support to HP Support.
The HP Community provides additional tips and solutions from other HP product
users.
HP Inc. addresses
HP US
HP Inc.
1501 Page Mill Road
Palo Alto 94304, U.S.A.
650-857-1501
HP Germany
HP Deutschland GmbH
HP HQ-TRE
71025 Boeblingen, Germany
HP UK
HP Inc UK Ltd
Regulatory Enquiries, Earley West
300 Thames Valley Park Drive
Reading, RG6 1PT
United Kingdom
Document information
Model ID: CCX 350, CCX 400, CCX 500, CCX 505, CCX 600
Document part number: 3725-13764-004A
Last update: May 2024
Email us at documentation.f[email protected] with queries or suggestions related
to this document.
Getting help
35
