01/23/2008
IMPORTANT
SAFEW
INSTRUCTIONS
W)er
Jswig
rj
el.wtn
at
apliun
e
basir
safttv
prec
auttol
v
should
always
be
followed,
oc
luchng
Itii
folk.
wing
l/ood
all
nctru.
tions
before
using
this
household
sewing
machine
DANGER
To
reduce
the
risk
of
electric
shock:
•
Do
not
leave
sewing
machine
when
plugged
in.
Turn
off
the
switch
and
unplug
from
electric
outlet
the
electric
cord
when
not
in
use
or
before
servicing.
•
Always
unplug
before
relamping.
Replace
bulb
with
same
type
rated
15
Wafts.
WARNING
To
reduce
the
risk
of burns,
fire,
electric
shock,
or
injury
to
person:
•
Do
not
use
outdoors
or
on
wet
surfaces.
•
Do
not
allow
to
used
as
a
toy.
Close
attention
is
necessary
when
used
by
or
near
children.
•
Use
only
as
described
in
this
manual.
Use
only
manufacturer’s
recommended
attach
ments.
•
Do
not
use
with
damaged
cord
or
plug.
If
sewing
machine
is
not
working
as
it
should,
has
been
dropped
or
damaged,
left
outdoors,
or
dropped
in
water;
return
it
to
the
nearest
authorized
delaer
or
service
center
before
using,
examination,
repai
electrical
or
mechanical
adjustment.
•
Never
operate
the
sewing
machine
with
any
air
openings
blocked.
Keep
veniilation
openings
of
sewing
machine
and
foot
controller
free
from
the
accumulation
of
lint,
dust,
and
loose
cloth,
•
Never
drop
or insert
any
objects
into
any
opening.
•
To
disconnect,
turn
the
switch
off,
then
remove
plug
from
outlet.
•
Do
not
unplug
by
pulling
on
cord.
To
unplug,
grasp
the
plug,
not
the
cord.
•
Do
not
operate
where
aerosol
(spray)
products
are
being
used
or
where
oxygen
is
being
administered.
•
Keep
fingers
away
from
all
moving
parts.
Special
care
is
required
around
the
sewing
machine
needle.
•
Always
use
the proper
needle
plate.
The
wrong
plate
can
cause
the
needle
to
break.
•
Do
not
use
bent
needles.
•
Do
not
pull
or
push
the
fabric
while
stitching.
It
may
deflect
the
needle
causing
to
break.
•
Switch
the
sewing
machine
off
when
making
any
adjustments
in
the
needle
area,
such
as
threading
needle,
changing
needle,
threading
bobbin,
or
changing
presser
foot,
and
the
like.
•
Always
unplug
the
sewing
machine
from
electrical
outlet
when
removing
covers,
or
when
making
other
user
servicing
adjustments
mentioned
in
the
instruction
manual.
No
lubrication
by
customer
is
recommended.
•
Keep
your
work
area
well
lighted.
SAVE
THESE
INSTRUCTIONS
For
the
USA
and
Canada:
This
Sewing
Machine
has
a
polarized
plug
(one
blade
wider
than
the
other).
To
reduce
the
risk
of
electric
shock,
this
plug
is
intended
to
fit
in
a
polarized
outlet
only
one
way.
If
the
plug
does
not
fit
fully
in
the
outlet,
reverse
the
plug.
If
it
still
does
not
fit,
contact
a
qualified
electrician
to
install
the proper
outlet.
Do
not
modify
the
plug
in
any
way.
Downloaded from www.ManualsFile.com manuals search engine
01/23/2008
Instrucciones
de
seguridad
onexi6n
eléctrica
Dontrole
que
Ia
mOquina
esté
enchufada
a
a
red
y
lea
las
indicaciones
en
Ia
laca
de
tipo
de
a
máquina
antes
de
enchurfarla
par
primera
vez.
eguridad
Mantener
los
dedos
lejos
de
las
piezas
en
movimiento,
especialmente
en
a
zona
cercana
a
Ia
aguja.
Cuando
no
se
utilice
Ia
mOquina
a
durante
el
mantenimiento
a
madifica
ciones
mecãnicas,
se
recamienda
dejar
Ia
mOquina
desconectada.
Esto
se
efectue
tirando
el
cable
de
alimentaciOn
de
Ia
toma
de
carriente,
s
No
utilizar
Ia
máquina
coma
juguete.
Ponga
atenciOn
especialmente
cuanda
Ia
mãquina
sea
utilizada
por
niños.
Esta
máquina
tiene
un
cable
especial
del
pedal.
Si
el
cable
estuviera
dañado
cambielo
par
otro
cable
del
mismo
tipo.
Este
cable
se
vende
par
los
revende
dares
de
Husqvarna.
El
montaje
del
cable
debe
efectuarse
par
un
especia
lista.
La
máquina
de
coser
debe
utilizarse
segün
las
instrucciones
en
este
manual.
Utilizar
las
bombillas
adecuadas
de
220
V
(tensiOn)
y
15
W
(potencia).
Seguir
estas
instrucciones
ara
los
Estados
Unidos
y
el
Canada:
sta
mOquina
de
caser
tiene
un
enchufe
palarizada
(tripolar).
Para
reducir
el
iesgo
de
choque
eléctrico
este
enchufe
encaja
a
un
enchufe
de
pared
palari
ado
de
uno
sala
manera.
Si
el
enchufe
no
encajara
bien
en
el
enchufe
de
)ared,
de
Ia
vuelta
al
enchufe,
Si
todavia
no
encaja
bien,
cantacte
a
un
?Iectricista
calificado
para
instalar
un
enchufe
apropriado.
No
modifique
de
linguna
manera
el
enchufe.
Downloaded from www.ManualsFile.com manuals search engine
01/23/2008
*m*rnt
2
—
Lkc
Pk
ku.j
way
after
7
te
foot
control,
,jnrw
)lcJ
to
Iho
power
supply
8
ry
troy
S-wing
surface
9
‘4’)t4f)O
10
Inadirig
upper
thread
1
1
Bobbin
winding
12
Threading
lower
thread
13
thread
tension,
Correct
and
incorrect
thread
tension
14
Changing the
needle,
Changing
the
presser
foot
15
Presser
foot
pressure,
Presser
foot
lift
16
Reverse,
Lowering
the
feed
teeth
17
Stitch
selection
18
Stitch
width,
Stitch
length
19
Buttonholes
20
21
Balance
setting
for
buttonhole
21
Sewing
on
buttons
22
Straight
stitch,
Clearance
plate
23
Sewing
zippers........................................
24—25
Reinforced
straight
stitch,,,,,,.,.,,,,
25
Needle
positions,
Zigzag
26
Three-step
zig-zag,
Mending
and
darning
27
Sewing
terry
cloth,
Seam
and
Overcast
28
Hemming
29
Flatlock,
Double
Action
stitch
30
Decorative
Stitches
31
Maintenance
32—33
Fault-finding
34—35
Accessories
36—42
Indice
Instrucciones
de
seguridad
3
Nomenclatura
6
Desembalaje,
Embalaje
después
decoser
7
ConexiOn
del
pedal,
ConexiOn
eléctrica
8
Caja
de
accesorios,
Superficie
de
trabajo
9
Porta-carrete
10
Enhebrado
del
hilo
superior
11
Devanado
de
Ia
canilla,
Devanado
porta-carrete
vetical
12
Enhebrado
del
hilo
inferior
13
TensiOn
del
hilo,
TensiOn
de
los
hilos
correcta
o
incorrecta
14
Cambio
de
Ia
aguja,
Camblo
del
prensatelas
15
PresiOn
del
pie
del
prensatelas,
Palanca
de
elevaciOn
del
prensatelas
16
Marcha
atrds,
Bajada
del
transporte
de
dientes
17
SelecciOn
de
puntada
18
Amplitud
de
puntada,
Longitud
depuntada
19
Ojales
20—21
RegulaciOn
exacta
del
equilibrio
paraojales
21
Costura
de
botones
22
Costura
recta,
Placa
para
costuras
tupidas
23
Cosido
de
cremalleras
24—25
Costura
recta
reforzada
25
PosiciOn
de
Ia
aguja,
Zig-zag
26
Zig-zag
de
tres
pasos,
Remendar
y
zurcir
27
Tejidos
esponjosos,
UniOn
y
sobrehilado
28
Dobladillo
29
Puntada
overlock
triple,
Puntada
de
tricot
30
Costuras
decorativas
31
Mantenimiento
32—33
Posibles
averias
34—35
Accesorios
36—42
Downloaded from www.ManualsFile.com manuals search engine
01/23/2008
For
you
and
your
new
sewing
machine
With
your
new
sewing
machine
you
are
provided
with
this
book
of
instructions.
The
instructions
show
how
your
machine
oper
ates
and
how
to
use
the
machine
to
its
full
ca
pacity
We
recommend
that
you
read
these
in
structions
before
you
begin
to
sew.
We
are
convinced
you
will
be
rewarded
with
many
satisfying
and
inspiring
hours
of
sewing
with
your
new
sewing
machine.
Models
covered
In
this
manual:
S225/225,
S215/215
and
205.
All
models
might
not
be
available
in
all
markets.
Para
Ud
y
su
nueva
máquina
de
coser
Junto
a
Ia
máquina
de
coser
Ud.
recibirá
este
manual
de
instrucciones.
El
manual
de
instrucciones
le
enseñara
como
funciona
Ia
máqui
a
y
como
se
realizan
las
aplicaciones
para
aprove
char
todas
las
posibilidades
de
Ia
máqui
no.
Por
consiguiente,
lea
con
d
tenimiento
esras
instrucciones
antes
de
empezar
a
coser
Estamos
convencidos
de
que
tendrá
mu
chos
momentos
de
satisfacciOn
y
de
ins
piraciOn
con
su
nueva
máquina.
Modelos
liegando
en
esto
manual:
S225/225,
S2
15/215
y
205.
Todos
los
modelos
no
fueran
disponibles
en
todos
mercados.
Downloaded from www.ManualsFile.com manuals search engine
Ui
/Ii/IUU?3
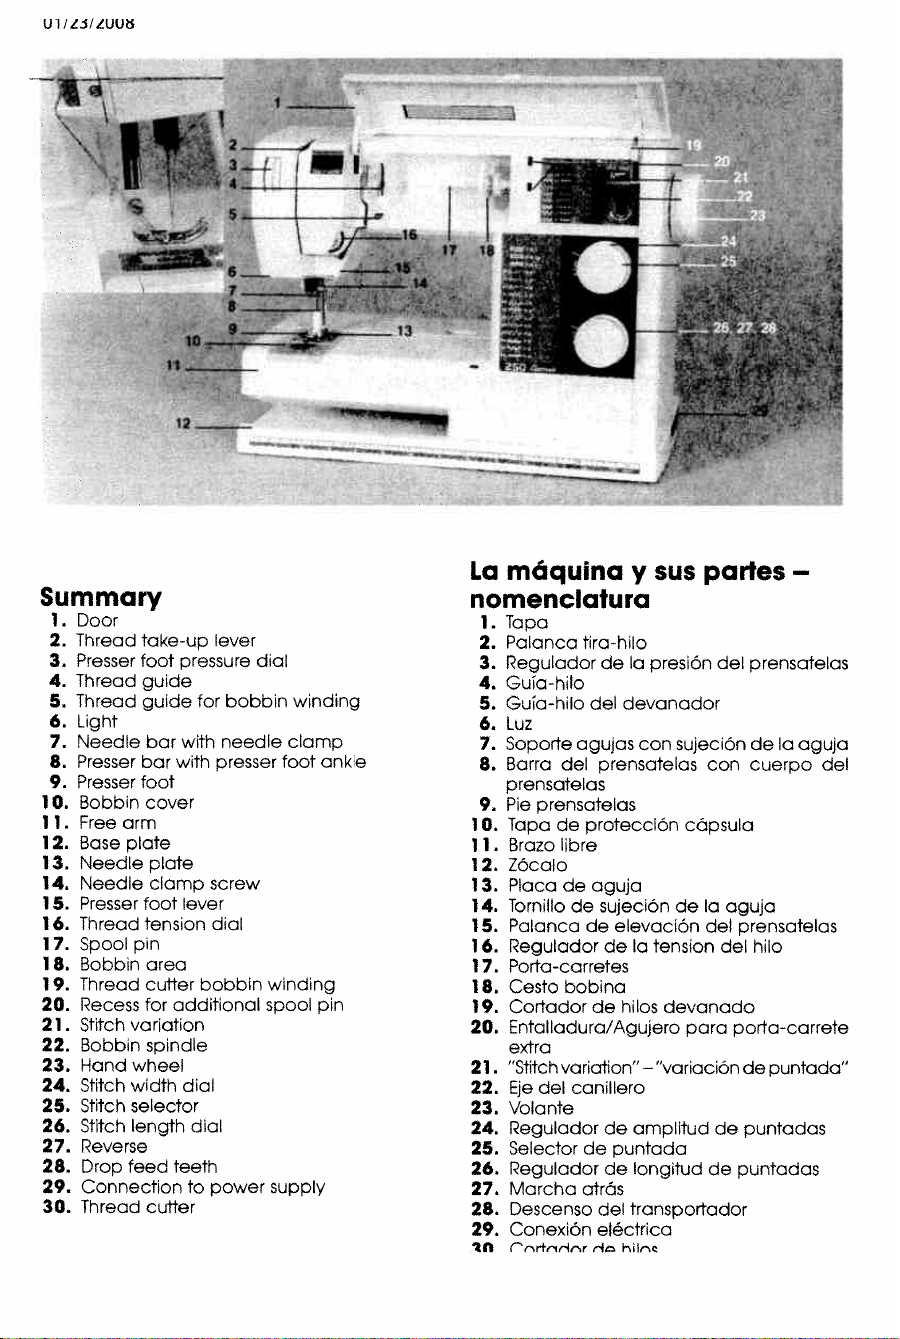
Summary
1.
Door
2.
Thread
take-up
lever
3.
Presser
foot
pressure
dial
4.
Thread
guide
5.
Thread
guide
for
bobbin
winding
6.
Light
7.
Needle
bar
with
needle
clamp
8.
Presser
bar
with
presser
foot
ankle
9.
Presser
foot
10.
Bobbin
cover
11.
Free
arm
12.
Base
plate
13.
Needle
plate
14.
Needle
clamp
screw
15.
Presser
foot
lever
16.
Thread
tension
dal
17.
Spool
pin
18.
Bobbin
area
19.
Thread
cufter
bobbin
winding
20.
Recess
for
addrtional
spool
pin
21.
Stitch
variation
22.
Bobbin
spindle
23.
Hand
wheel
24.
Stitch
width
dal
25.
Stitch
selector
26.
Stitch
length
dial
27.
Reverse
28.
Drop
feed
teeth
29.
Connection
to
power
supply
30.
Thread
cutter
nomenclatura
1.
Tapa
2.
Palanca
tira-hlo
3.
Regulador
de
Ia
presiOn
del
prensatelas
4.
Gula-hilo
5.
Gula-hilo
del
devanador
6.
Luz
7.
Soporte
agujas
con
sujeciOn
de
Ia
aguja
8.
Barra
del
prensatelas
con
cuerpo
del
prensatelas
9.
Pie
prensatelas
10.
Tapa
de
protecciOn
cOpsula
11.
Brazo
libre
12.
ZOcalo
13.
Placadeaguja
14.
Tornillo
de
sujeciOn
de
a
aguja
15.
Palanca
de
elevaciOn
del
prensatelas
16.
Regulador
de
Ia
tension
del
hilo
17.
Porta-carretes
18.
Cesto
bobina
19.
Cortador
de
hilos
devanado
20.
Entalladura/Agujero
para
porta-carrete
extra
21.
“Stitch
variation”
—
“variaciOn
de
puntada”
22.
Eje
del
canillero
23.
Volante
24.
Regulador
de
amplitud
de
puntadas
25.
Selector
de
puntada
26.
Regulador
de
longitud
de
puntadas
27.
Marcha
atrOs
28.
Descenso
del
transportador
29.
ConexiOn
eléctrica
2A
rfrr
r
hIr
C
La
máquina
y
sus
partes
—
Downloaded from www.ManualsFile.com manuals search engine
01/23/2008
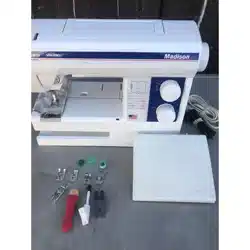
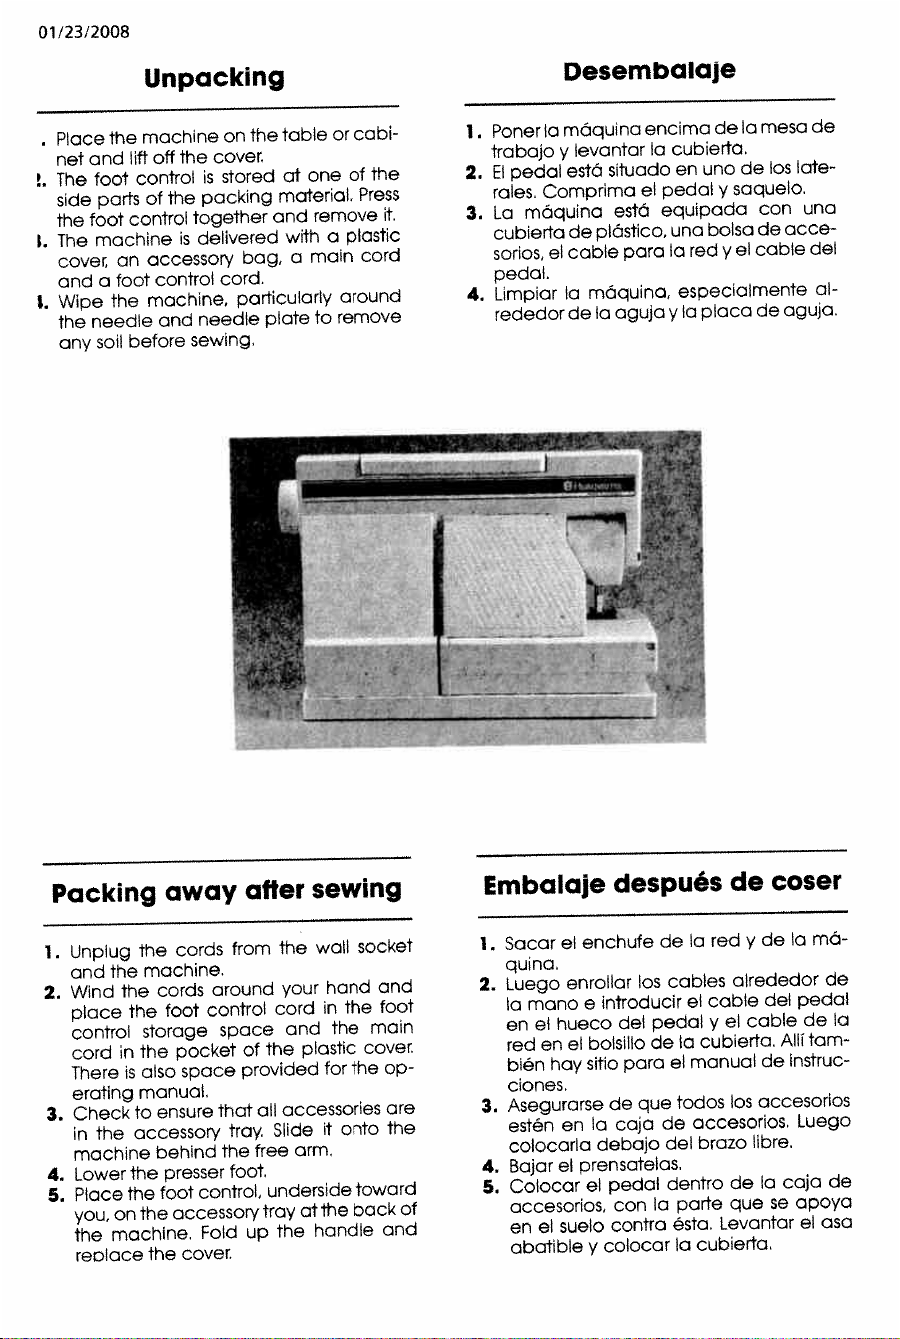
Unpacking
Desembalaje
•
Place
the
machine
on
the
table
or
cabi
net
and
lift
off
the
cover
L
The
foot
control
is
stored
at
one
of
the
side
parts
of
the
packing
material.
Press
the
foot
control
together
and
remove
it.
I.
The
machine
is
delivered
with
a
plastic
cover
an
accessory
bag,
a
main
cord
and
a
foot
control
cord.
L
Wipe
the
machine,
particularly
around
the
needle
and
needle
plate
to
remove
any
soil
before
sewing.
1.
Poner
Ia
máquina
encima
de
Ia
mesa
de
trabajo
y
levantar
Ia
cubierta.
2.
El
pedal
está
situado
en
uno
de
los
late
rales.
Comprima
el
pedal
y
saquelo.
3.
La
máquina
estO
equipada
con
una
cubierta
de
plOstico,
una
bolsa
de
acce
sorios,
el
cable
para
Ia
red
y
el
cable
del
pedal.
4.
Limpiar
Ta
mOquina,
especialmente
al
rededor
de
Ia
aguja
y
Ia
placa
de
aguja.
Packing
away
after
sewing
Embalaje
después
de
coser
1.
Unplug
the
cords
from
the
wall
socket
and
the
machine.
2.
Wind
the
cords
around
your
hand
and
place
the
foot
control
cord
in
the
foot
control
storage
space
and
the
main
cord
in
the
pocket
of
the
plastic
cover
There
is
also
space
provided
for
the
op
erating
manual.
3.
Check
to
ensure
that
all
accessories
are
in
the
accessory
tray
Slide
it
onto
the
machine
behind
the
free
arm.
4.
Lower
the
presser
foot.
5.
Place
the
foot
control,
underside
toward
you,
on
the
accessory
tray
at
the
back
of
the
machine.
Fold
up
the
handle
and
reolace
the
cover
1.
Sacar
el
enchufe
de
Ia
red
y
de
Ia
ma
quina.
2.
Luego
enrollar
los
cables
alrededor
de
Ta
mano
e
introducir
el
cable
del
pedal
en
el
hueco
del
pedal
y
el
cable
de
Ia
red
en
el
bolsillo
de
Ia
cubierta.
AlII
tam
bién
hay
sitio
para
el
manual
de
instruc
clones.
3.
Asegurarse
de
que
todos
los
accesorios
estén
en
Ia
cajo
de
accesorios,
Luego
colocarla
debajo
del
brazo
libre,
4.
Bajar
el
prensatelas.
5.
Colocar
el
pedal
dentro
de
Ia
caja
de
accesorios,
con
Ia
parte
que
se
apoya
en
el
suelo
contra
ésta.
Levantar
el
asa
abatible
y
colocar
Ia
cubierta.
Downloaded from www.ManualsFile.com manuals search engine
01/23/2008
Conexión
del
pedal
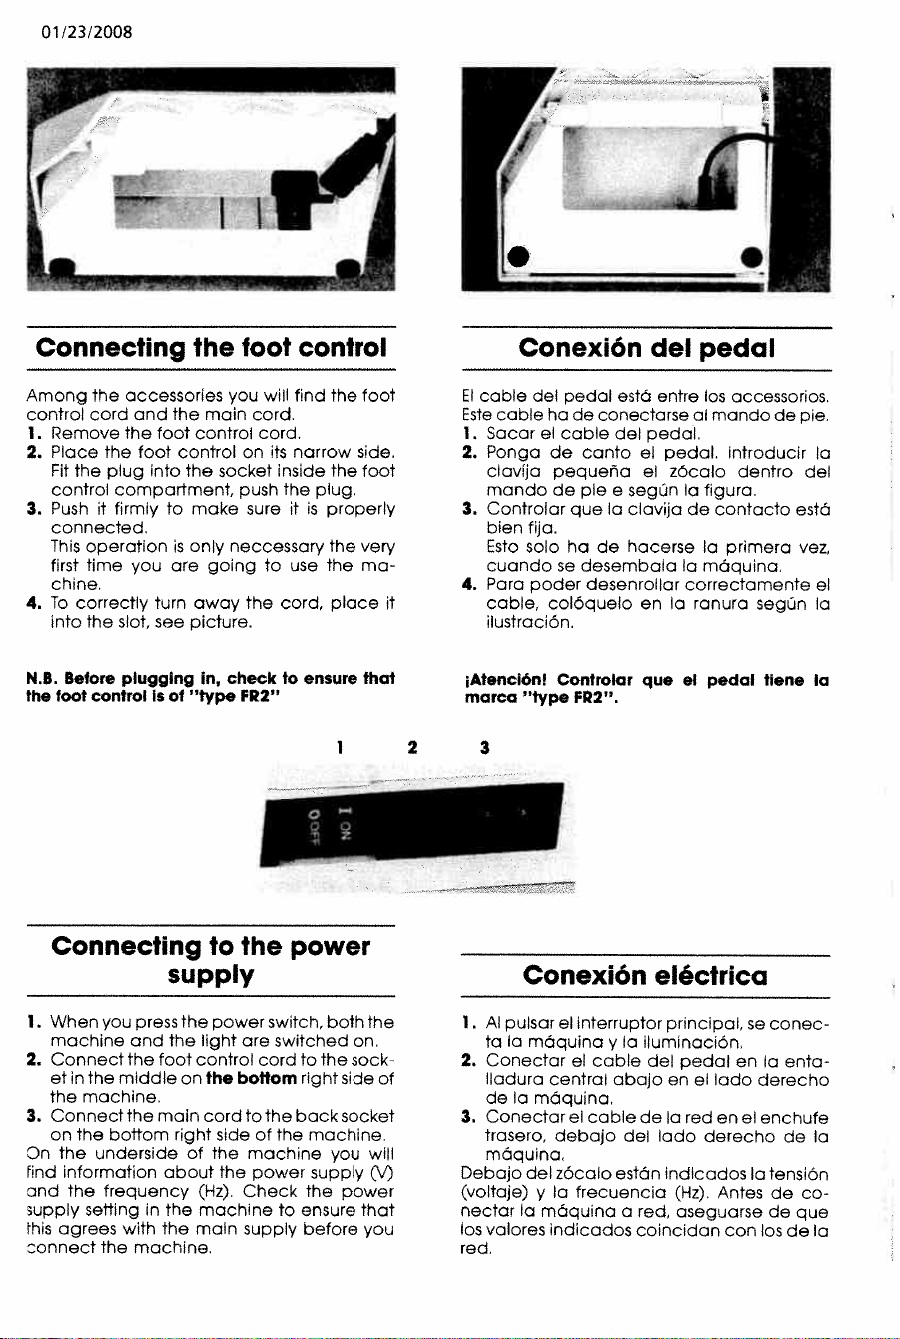
Among
the
accessories
you
will
find
the
foot
control
cord
and
the
main
cord.
1.
Remove
the
foot
control
cord.
2.
Place
the
foot control
on
its
narrow
side.
Fit
the
plug
into
the
socket
inside
the
foot
control
compartment,
push
the
plug.
3.
Push
it
firmly
to
make
sure
it
is
properly
connected.
This
operation
is
only
neccessary
the
very
first
time
you
are
going
to
use
the
ma
chine.
4.
To
correctly
turn
away
the
cord,
place
it
into
the
slot,
see
picture.
N.B.
Before
plugging
in,
check
to
ensure
that
the
foot
control
Is
of
“type
FR2”
El
cable
del
pedal
estO
entre
los
accessorios.
Este
cable
ha
de
conectarse
al
mando
de
pie.
1.
Sacar
el
cable
del
pedal.
2.
Ponga
de
canto
el
pedal.
Introducir
Ia
clavija
pequena
el
zOcalo
dentro
del
mando
de
pie
e
segUn
Ia
figura.
3.
Controlar
que a
clavija
de
contacto
estd
bien
fija.
Esto
solo
ha
de
hacerse
Ia
primera
vez,
cuando
se
desembala
Ia
máquina.
4.
Para
poder
desenrollar
correctamente
el
cable,
coloquelo
en
Ia
ranura
segun
Ia
ilustraciOn.
lAtenclon!
Controlar
que
el
pedal
tlene
Ia
marca
“type
FP2”.
1
2
3
Connecting
to
the
power
supply
Conexión
eléctrica
1.
When
you
press
the
power
switch,
both
the
machine
and
the
light
are
switched
on,
2.
Connect
the
foot control
cord
to
the
sock
et
in
the middle
on
the
boftom
right
side
of
the
machine,
3.
Connect
the
main
cord
to
the
back
socket
on
the
bottom
right
side
of
the
machine
On
the underside
of
the
machine
you
will
rind
information
about
the
power
supply
(V)
and
the
frequency
(Hz)
Check
the
power
supply
setting
in
the
machine
to
ensure
that
Ihis
agrees
with
the
main
supply
before
you
connect
the
machine.
1.
Al
pulsar
el
interruptor
principal,
so
conec
ta
Ia
mdquina
y
Ia
iluminaciOn.
2.
Conectar
el
cable
del
pedal
en
Ia
enta
Iladura
central
abajo
en
el
lado
derecho
de
Ia
mdquina,
3.
Conectar
el
cable
de
Ia
red
en
el
enchufe
trasero,
debojo
del
Iado
derecho
de
ía
mdquina
Debajo
del
zOcalo
estãn
indicados
Ia
tensiOn
(voltaje)
y
Ia
frecuencia
(Hz).
Antes
do
co
nectar
Ia
maquina
a
red,
aseguarse
do
quo
los
valores
indicados
coincidan
con
los
do
ía
red.
I
Connecting
the
toot control
Downloaded from www.ManualsFile.com manuals search engine
01/23/2008
p
Accessory
tray
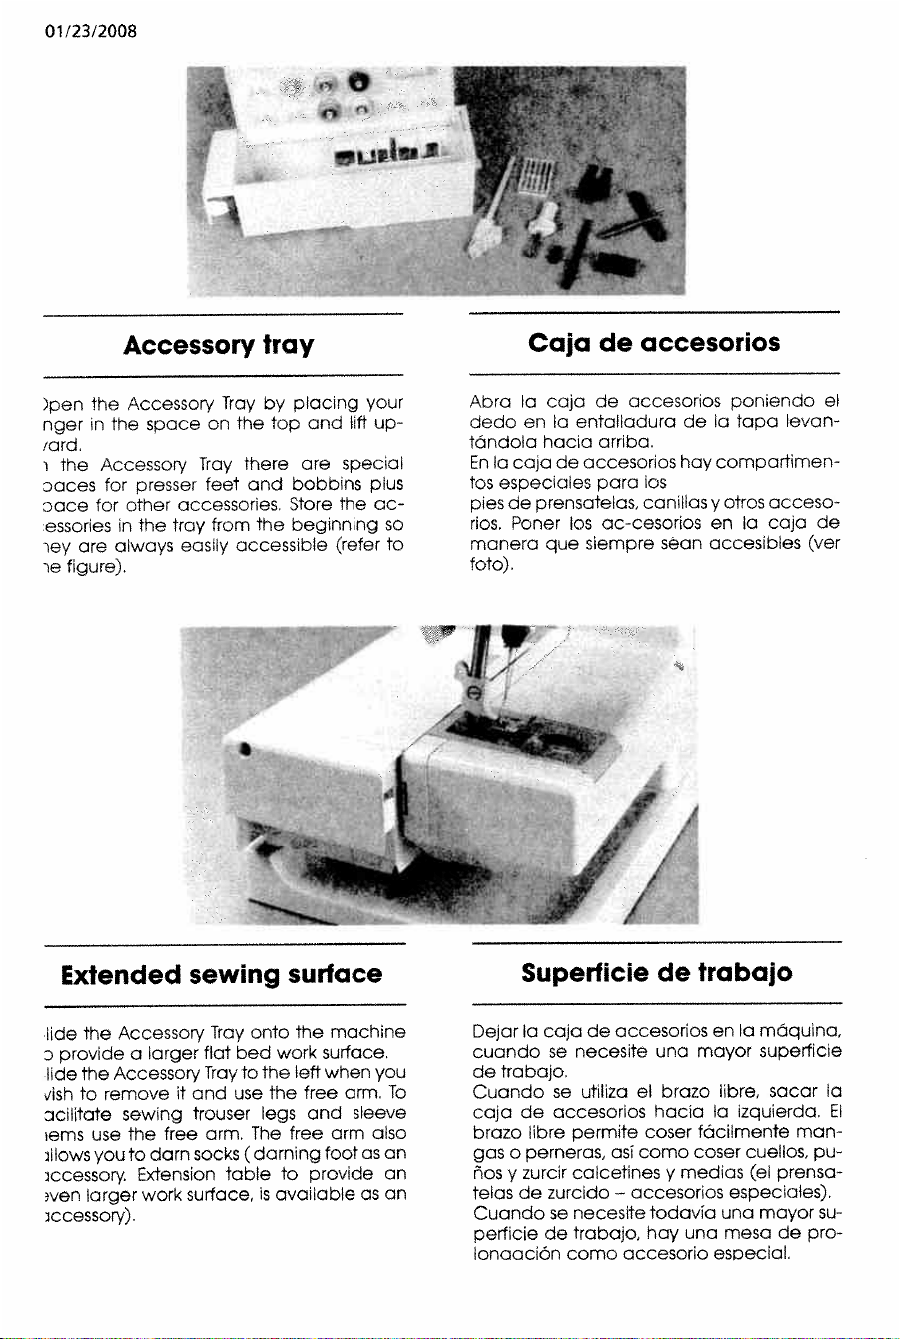
)pen
the
Accessory
Tray
by
placing
your
nger
in
the
space
on
the
top
and
lift
up
lard,
the
Accessory
Tray
there
are
specal
Daces
for
presser
feet
and
bobbins
plus
Dace
for
other
accessories.
Store
the
ac
essories
n
the
tray
from
the
beginning
so
ey
are
a’ways
easty
accessible
(refer
to
e
figure).
Abra
a
caja
de
accesorios
poniendo
el
dedo
en
a
entalladura
de
Ia
tapa
levan
tOndola
haca
arriba.
En
Ia
caja
de
accesorios
hay
compartimen
tos
especiales
para
los
pies
de
prensatelas,
canillas
y
otros
acceso
rios
Poner
los
ac-cesorios
en
Ia
caja
de
manera
que
siempre
sean
accesibies
(ver
foto),
Extended
sewing
surface
4
lide
the
Accessory
Tray
onto
the
machine
D
provide
a
arger
flat
bed
work
surface,
lide
the
Accessory
Tray
to
the
left
when
you
dish
to
remove
it
and
use
the
free
arm.
To
ocilitate
sewing
trouser
legs
and
sleeve
ems
use
the
free
arm.
The
free
arm
also
allows
you
to
darn
socks
(darning
foot
as
an
ccessory.
Extension
table
to
provide
an
?ven
larger
work
surface,
is
available
as
an
ccessory).
Dejar
Ia
caja
de
accesorios
en
Ia
mOquina,
cuando
se
necesite
una
mayor
superficie
de
trabajo.
Cuando
se
utiPza
el
brazo
libre,
sacar
a
caja
de
accesorios
hacia
Ia
izquierda.
El
brazo
libre
permite
coser
fOcilmente
man-
gas
o
perneras,
asi
como
coser
cuellos,
pu
ños
y
zurcir
calcetines
y
medias
(el
prensa
telas
de
zurcido
—
accesorios especiales).
Cuando
se
necesite
todavia
una
mayor
su
perficie
de
trabajo,
hay
una
mesa
de
pro
IonaaciOn
coma
accesorlo
esoecial.
Caja
de
accesorios
4
Superficie
de
trabajo
Downloaded from www.ManualsFile.com manuals search engine
01/23/2008
Spool
pin
Porta-carrete
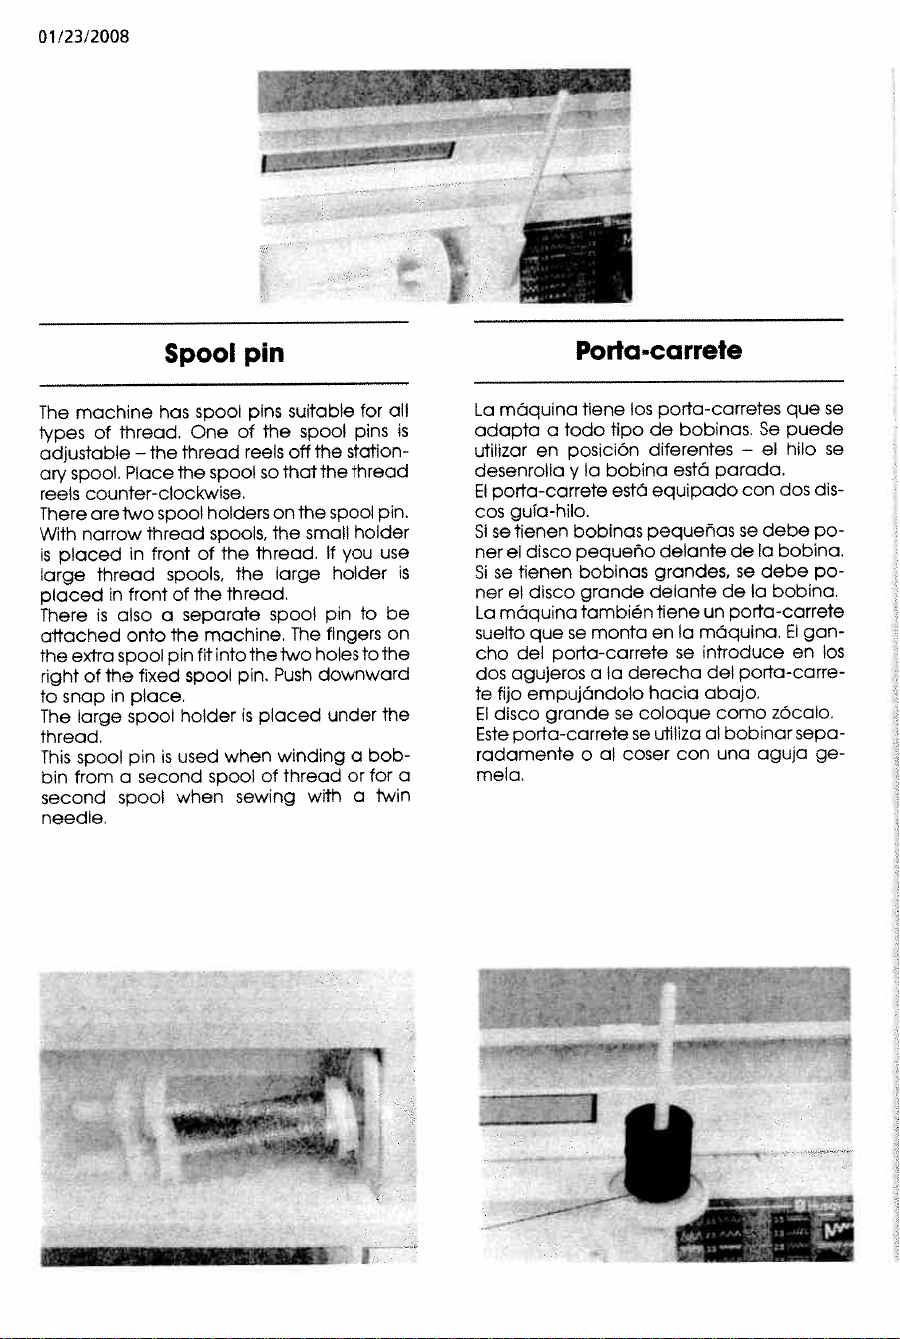
The
machine
has
spool
pins
suitable
for
all
types
of
thread.
One
of
the
spool
pins
is
adjustable
—
the
thread
reels
off
the
station-
or-v
spool.
Place
the
spool
so
that
the
thread
reels
counter-clockwise.
There
are
two
spool
holders
on
the
spool
pin.
With
narrow
thread
spools,
the
small
holder
is
placed
in
front
of
the
thread.
If
you
use
large
thread
spools,
the
large
holder
is
placed
n
front
of
the
thread.
There
is
also
a
separate
spool
pin
to
be
attached
onto
the
machine,
The
fingers
on
the
extra
spool
pin
fit
into
the
two
holes
to
the
right
of
the
fixed
spool
pin.
Push
downward
to
snap
in
place.
The
large
spool
holder
is
placed
under
the
thread.
This
spooi
pin
is
used
when
winding
a
bob
bin
from
a
second
spool
of
thread
or
for
a
second
Spool
when
sewing
with
a
twin
needle
La
mOquina
tiene
los
port
c,-carretes
que
se
adapta
a
todo
tipo
de
bobinas
Se
puede
utilizar
en
posicrón
diferentes
—
el
hilo
se
desenrolla
y
Ia
bobina
está
parada.
El
porta-carrete
estO
equipado
con
dos
dis
cos
guia-hilo.
Si
se
tienen
bobinas
pequenas
se
debe
po
ner
el
disco
pequeno
delante
de
Ia
bobina.
Si
se
tienen
bobinas
grandes,
se
debe
po
ner
el
disco
grande
delante
de
Ia
bobina.
La
mOquina
también
tiene
un
porta-carrete
suelto
que
se
monta
en
Ia
maquina.
El
gan
cho
del
porta-carrete
se
introduce
en
los
dos
agujeros
a
a
derecha
del
porta-carre
te
fijo
empujándolo
hacia
abajo.
El
disco
grande
se
coloque
como
zOcalo.
Este
porta-carrete
se
utiliza
al
bobinar
sepa
radamente
o
ci
coser
con
una
aguja
ge
mela.
.
I
Downloaded from www.ManualsFile.com manuals search engine
01/23/2008
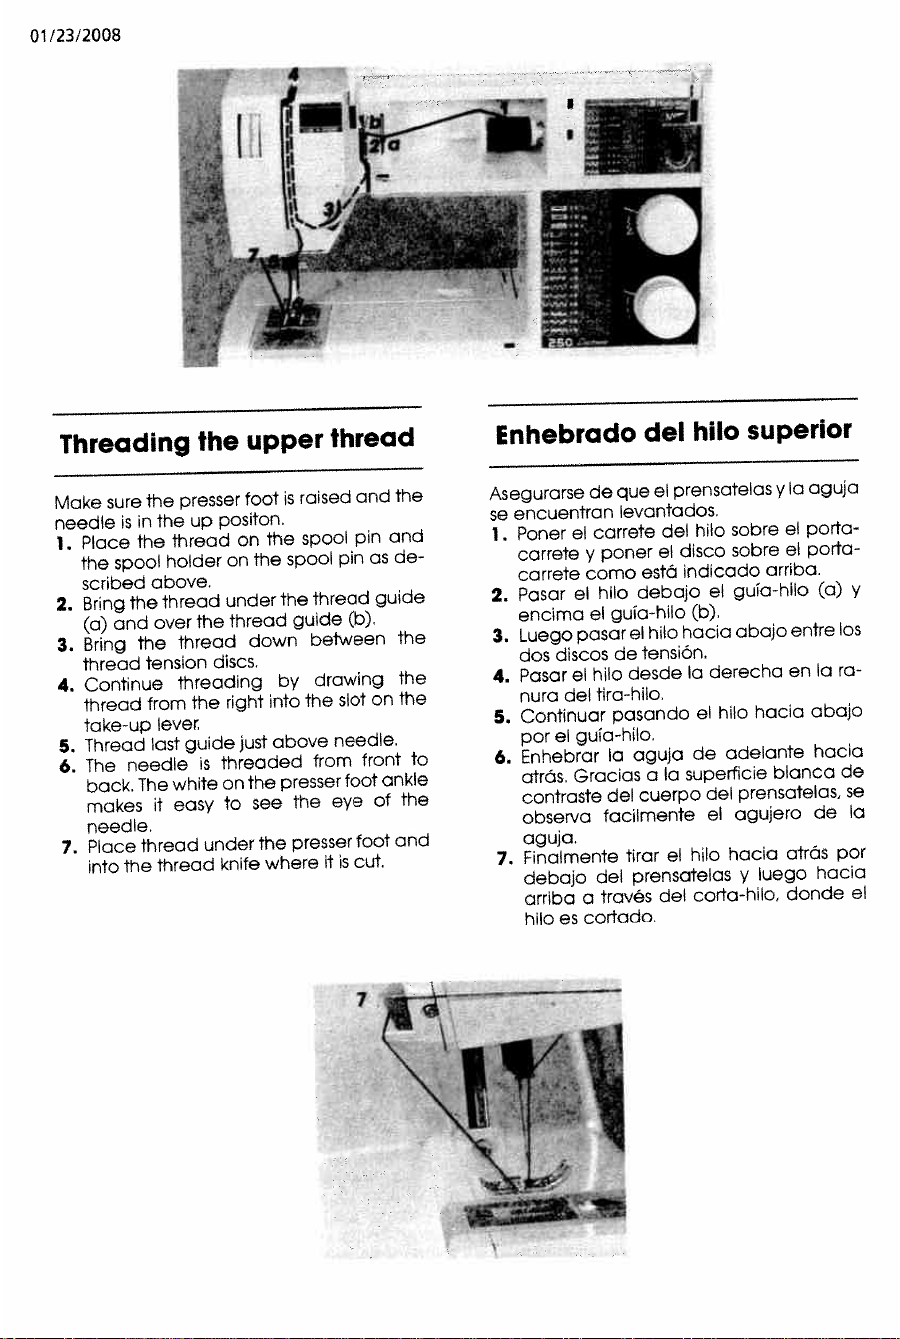
Make
sure
the
presser
foot
is
raised
and
the
needle
is
in
the
up
positon,
1.
Place
the
thread
on
the
spool
pin
and
the
spool
holder
on
the
spool
pin
as
de
scribed
above.
2.
Bring
the
thread
under
the
thread
guide
(a)
and
over
the
thread
guide
(b).
3.
Bring
the
thread
down
beiween
the
thread
tension
discs.
4.
Continue
threading
by
drawing
the
thread
from
the
right
into
the
slot
on
the
take-up
lever
5.
Thread
last
guide
just
above
needle.
6.
The
needle
is
threaded
from
front
to
back.
The
white
on
the
presser
foot
ankle
makes
it
easy
to
see
the
eye
of
the
needle.
7.
Place
thread
under the
presser
foot
and
into
the
thread
knife
where
it
is
cut.
Asegurarse
de
que
el
prensatelas
y
a
aguja
se
encuentran
levantados.
1.
Poner
el
carrete
del
hilo
sobre
el
porta
carrete
y
poner
el
disco
sobre
el
porte
carrete
como
estã
indicado
arriba.
2.
Pasar
el
hilo
debajo
el
gula-hilo
(a)
y
encima
el
gula-hilo
(b).
3.
Luego
pasar
el
hilo
hacia
abajo
entre
los
dos
discos
de
tensiOn.
4.
Pasar
el
hilo
desde
a
derecha
en
Ia
ra
nura
del
tira-hilo,
5.
Continuar
pasando
el
hilo
hocia
abajo
por
el
gula-hilo.
6.
Enhebrar
Ia
aguja
de
adelante
hacia
atrds,
Gracias
a
Ia
superficie
blanca
de
contraste
del
cuerpo
del
prensatelas,
se
observa
facilmente
el
agujero
de
la
aguja.
7.
Finalmente
tirar
el
hilo
hacia
atrOs
por
debajo
del
prensatelas
y
luego
hacia
arriba
a
través
del
corta-hilo,
donde
el
hilo
es
cortado.
4
I
lii
Iii
Threading
the
upper
thread
Enhebrado
del
hilo
superior
Downloaded from www.ManualsFile.com manuals search engine
01/23/2008
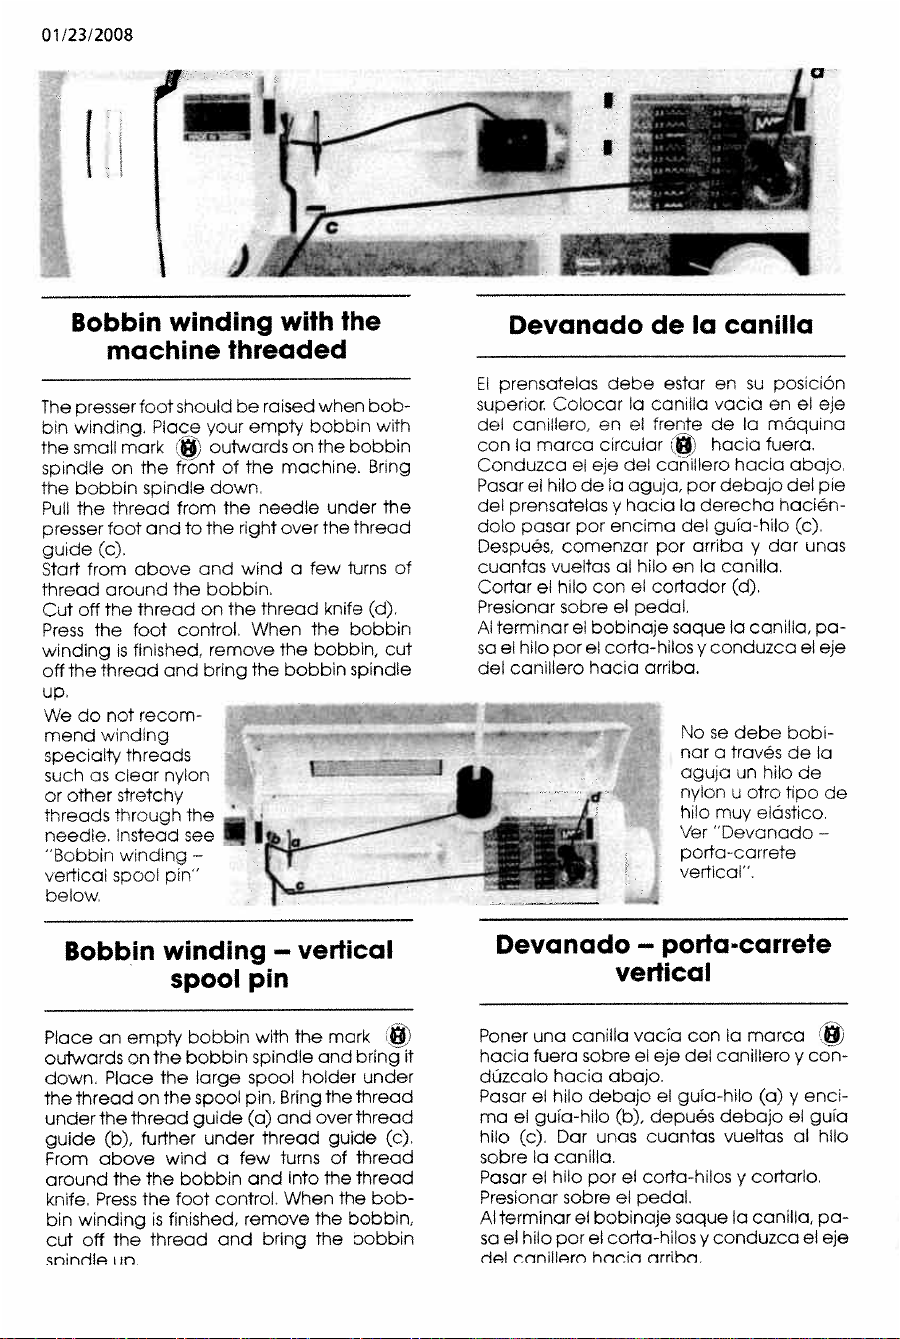
4
Bobbin
winding
with
the
machine
threaded
The
presser
foot
should
be
raised
when
bob
b
n
winding.
Place
your
empty
bobbin
with
the
small
mark
outwards
on
the
bobbin
spindle
on
the
front
of
the
machine.
Bring
the
bobbin
spindle
down.
Pull
the
thread
from
the
needle
under
the
presser
foot
and
to
the
nght
over
the
thread
guide
(c).
Start
from
above
and
wind
a
few
turns
of
thread
around
the
bobbin.
Cut
off
the
thread
on
the
thread
knife
(d).
Press
the
foot
control.
When
the
bobbin
winding
is
finished,
remove
the
bobbin,
cut
off
the
thread
and
bring
the
bobbin
spindle
El
prensateias
debe
estar
en
su
posiciOn
supenor.
Colocar
a
canilla
vacia
en
el
eje
del
canillero
en
el
frente
de
Ia
mOquina
con
Ia
marco
circular
hacia
fuera
Conduzca
ci
eje
del
caniliero
hacia
abajo
Pasar
ci
hilo
de
a
agua,
por
debajo
del
pie
del
prensatelas
y
bacia
a
derecha
hacién
doio
pasar
por
encirna
del
gufa-hilo
(c).
Después,
comenzar
par
arriba
y
dar
unas
cuantas
vueltas
a!
hilo
en
Ia
canilia.
Cortar
ci
hiiO
con
ci
cortador
(d).
Presionar
sobre
el
pedal.
Al
terminar
el
bobinaje
saque
a
canilla,
Pa
so
el
hilo
por
el
corta-hilos
y
conduzca
ci
eje
del
canillero
hacia
arriba.
No
se
debe
bobi
nor
a
través
de
Ia
oguja
un
bib
de
nylor
U
otro
tipo
de
h
o
muy
eldsticc
‘Jer
Devanacio
—
porto-correte
vertical”.
Bobbin
winding
—
vertical
spool
pin
Devanado
—
porta-carrete
vertical
Place
an
empty
bobbin
with
the
mark
‘
outwards
on
the
bobbin
spindle
and
bring
it
down.
Place
the
large
spool
holder
under
the
thread
on
the
spool
pin
Bring
the
thread
under
the
thread
guide
(a)
and
over
thread
guide
(b),
further
under
thread
guide
(c).
From
above
wind
a
few
turns
of
thread
around
the
the
bobbin
and
into
the
thread
knife.
Press
the
foot
control
When
the
bob
bin
winding
is
finished,
remove
the
bobbin,
cut
off
the
thread
and
bring
the
bobbin
nir(-1I
i
in
Poner
una
canilba
vacia
con
Ia
marco
hacia
fuera
sabre
ci
eje
del
canillero
y
con
düzcalo
hacia
abajo.
Pasar
ci
hilo
debajo
ci
guia-hilo
(a)
y
enci
ma
ci
guia-hiio
(b),
depués
debajo
ci
guia
hilo
(c).
Dar
unas
cuanias
vueltas
a!
hilo
sobre
Ia
canilba.
Pasar
el
hilo
por
ci
corta-hilos
y
cortarlo.
Presionar
sobre
ci
pedal
Al
terminar
ci
bobinaje
saque
Ia
canilla,
pa
sa
ci
hilo
por
ci
aorta-bibs
y
conduzca
ci
eje
del
rnnillern
hnin
nrrihn
Devanado
de
Ia
canilla
We
do
not
recom
mend
wndng
specialty
theads
such
as
c
ear
nylon
or
other
stretchy
threads
through
the
needle.
instead
see
“Bobbin
winding
—
vertical
spool
pin”
below
Downloaded from www.ManualsFile.com manuals search engine
01/23/2008
19
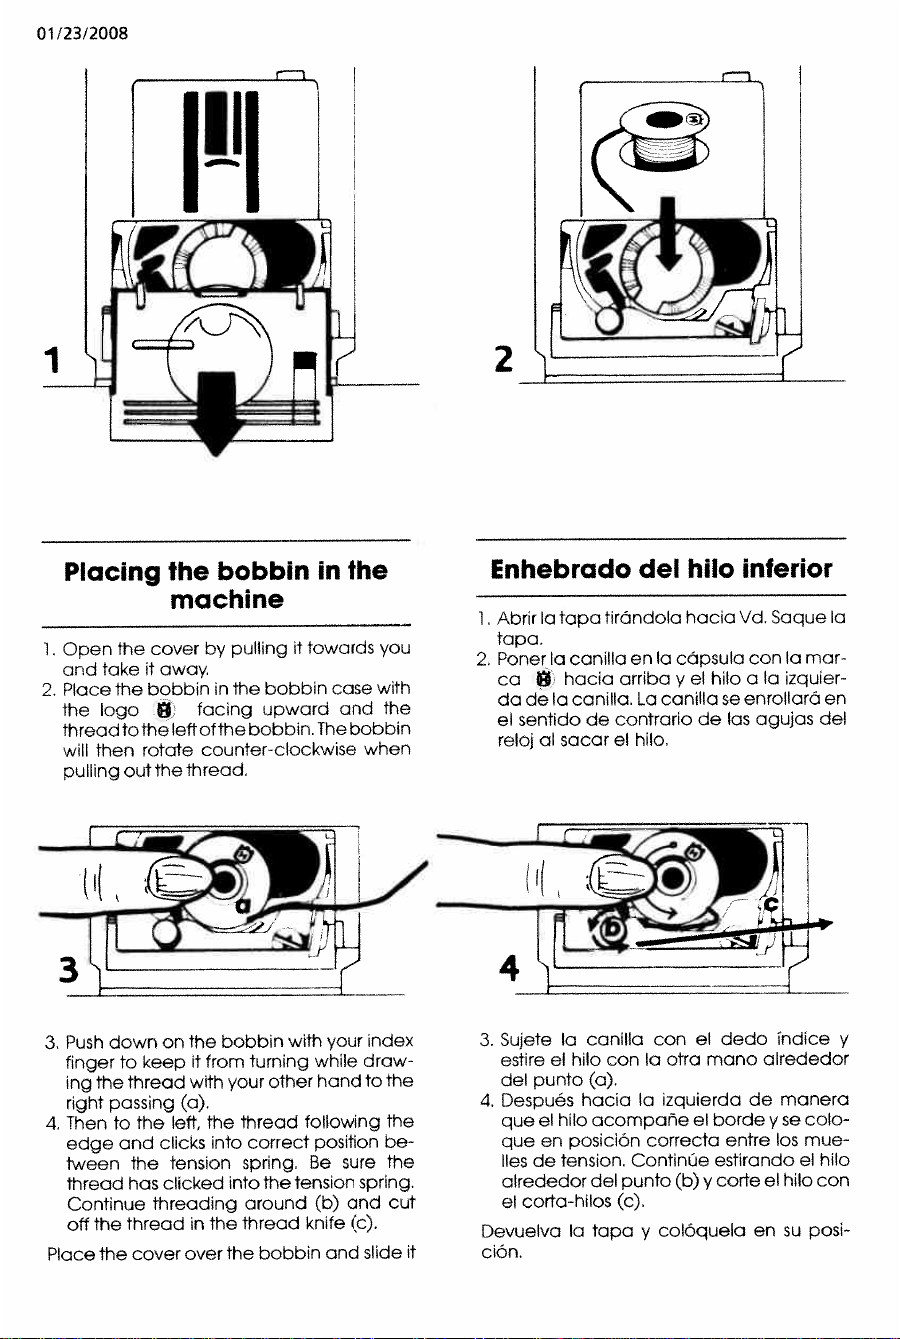
Placing
the
bobbin
in
the
machine
1
Open
the
cover
by
pulling
it
towards
you
and
take
it
away
2.
Place
the
bobbin
in
the
bobbin
case
with
the
logo
facing
upward
and
the
thread
to
the
leftotthe
bobbin.
The
bobbin
will
then
rotate
counterclockwise
when
pulling
out
the
thread.
Enhebrado
del
hilo
inferior
1.
Abrir
Ia
tapa
tirdndola
hacia
Vd.
Saque
Ia
tapa.
2.
Ponerla
canilla
en
Ia
cOpsula
con
lamar
ca
0
hacia
arriba
y
el
hilo
a
Ia
izquier
dade
Ia
canilla.
La
canilla
se
enrollarO
en
el
sentido
de
contrario
de
las
cigujas
del
reloj
al
sacar
el
hilo.
—.-----—
_1_
t
—
,—
—
3.
Push
down
on
the
bobbin
with
your
index
finger
to
keep
it
from
turning
while
draw
ing
the
thread
with
your
other
hand
to
the
right
passing
(a).
4.
Then
to
the
left,
the
thread
following
the
edge
and
clicks
into
correct
position
be
tween
the
tension
spring.
Be
sure
the
thread
has
clicked
into
the
tension
spring.
Continue
Threading
around
(b)
and
cut
off
The
thread
in
the
thread
knife
(c).
3.
Sujete
Ia
canilla
con
el
dedo
Indice
y
estire
el
hilo
con
Ia
otra
mano
alrededor
del
punto
(a).
4.
DespuOs
hacia
Ia
izquierda
de
manera
que
el
hilo
acompane
el
borde
y
se
cob
que
en
posiciOn
correcta
entre
los
mue
lies
de
tension.
ContinUe
estirando
el
hibo
alrededor
del
punto
(b)
y
corte
el
hilo
con
el
corta-hilos
(c).
Devuelva
Ia
tapa
y
colOquela
en
su
posi
dOn.
(
I(
Place
The
cover
over
the
bobbin
and
slide
it
Downloaded from www.ManualsFile.com manuals search engine

01/23/2008
Thread
tension
Tensión
del
hilo
You
can
adjust
the
thread
tension
by
turning
the
dial
which
is
numbered
The
higher
the
number
the
tighter
the
tension.
Normal
thread
tension
is
number
4.
When
sewing
buttonholes
and
decorative
stitches
set
thread
tension
to
number
3.
When
topstiiching
with
a
coarse
thread
in
thick
fabrics,
increase
the
tension
to
7—9.
TambiOn
se
puede
modificar
Ia
tensiOn
del
bib
girando
el
mando
de
regulaciOn
de
Ia
tensiOn
graduado
Cuonto
mOs
alto
a
ciba,
mas
fuerte
Ia
tensiOn
La
cifra
4
corresponde
a
Ia
tensiOn
nor
mal
del
bib
Parc
oiaies
y
otras
costuras
espesas
se
obtiene
una
buena
tensiOn
del
1,110
en
Ia
cifra
3.
Si
ye
a
pespuntear
con
bib
grueso
sobre
material
gruoso.
aumontar
Ia
tensiOn
del
tuba
hasta
Ia
posi
ciOn
7
a
9.
1
2
3
Correct
and
incorrect
thread
tension
Tensión
de
los
hilos
correcta
0
incorrecta
To
understand
the
correct
thread
tension,
sew
a
few
sample
stitches
at
different
set
tings.
1.
Begin
with
a
tension
that
is
too
loose,
i.e.
the
dial
set
at
“1”.
The
lower
thread
will
lie
straight
and
the
upper
thread
wilt
be
drawn
down
on
the
underside
2.
If
you
set
The
dial
at
the
highest
number,
the
opposite
will
occur,
and
the
seam
may
pucker.
3.
The
correct
thread
tension
is
provided
when
the
threads
interlock
in
the
middle
of
both
layers
of
material
or
in
the
case
of
decorative
stitches,
on
the
underside.
Make
a
few
tests
on
a
scrap
piece
of
the
material
you
are
going
to
use
and
check
the
tension.
Para
comprobar
cual
debe
ser
Ic
tension
correc
to
del
bib,
a
mOs
simple
es
realizar
varias
costu
ros,
modificando
en
coda
una
Ia
tensiOn.
1
Comenzar
con
una
ensiOn
muy
fioia,
o
sea,
girar
el
mando
de
regulaciOn
do
a
tensiOn
aproximOndolo
al
“1
‘
Examinar
Ia
costura.
el
bib
nforor
estO
tenso
mientras
el
bib
superior
arruga
el
telido
en
Ia
parte
inferior.
2.
Si
so
sitCia
01
mando
do
rogulaciOn
en
el
nüme
-o
rrOs
alto
so
obte,drO
un
efecto
contrario,
os
decir
el
tejido
so
arrugara.
3.
La
tensiOn
correcta
de
los
bibs
Se
obtiene
cuando
Ia
union
do
los
mismos
so
produce
on
Ia
mifad
do
las
dos
capas
de
telido,
a
bien
en
Ia
porte
inferior
al
coser
costuras
decorativas
Siempre
hacer
una
prueba
en
un
trozo
del
genero
iguab
ci
que
so
dosee
coser
y
controbar
a
tensiOn
do
los
h
los.
Downloaded from www.ManualsFile.com manuals search engine
01/23/2008
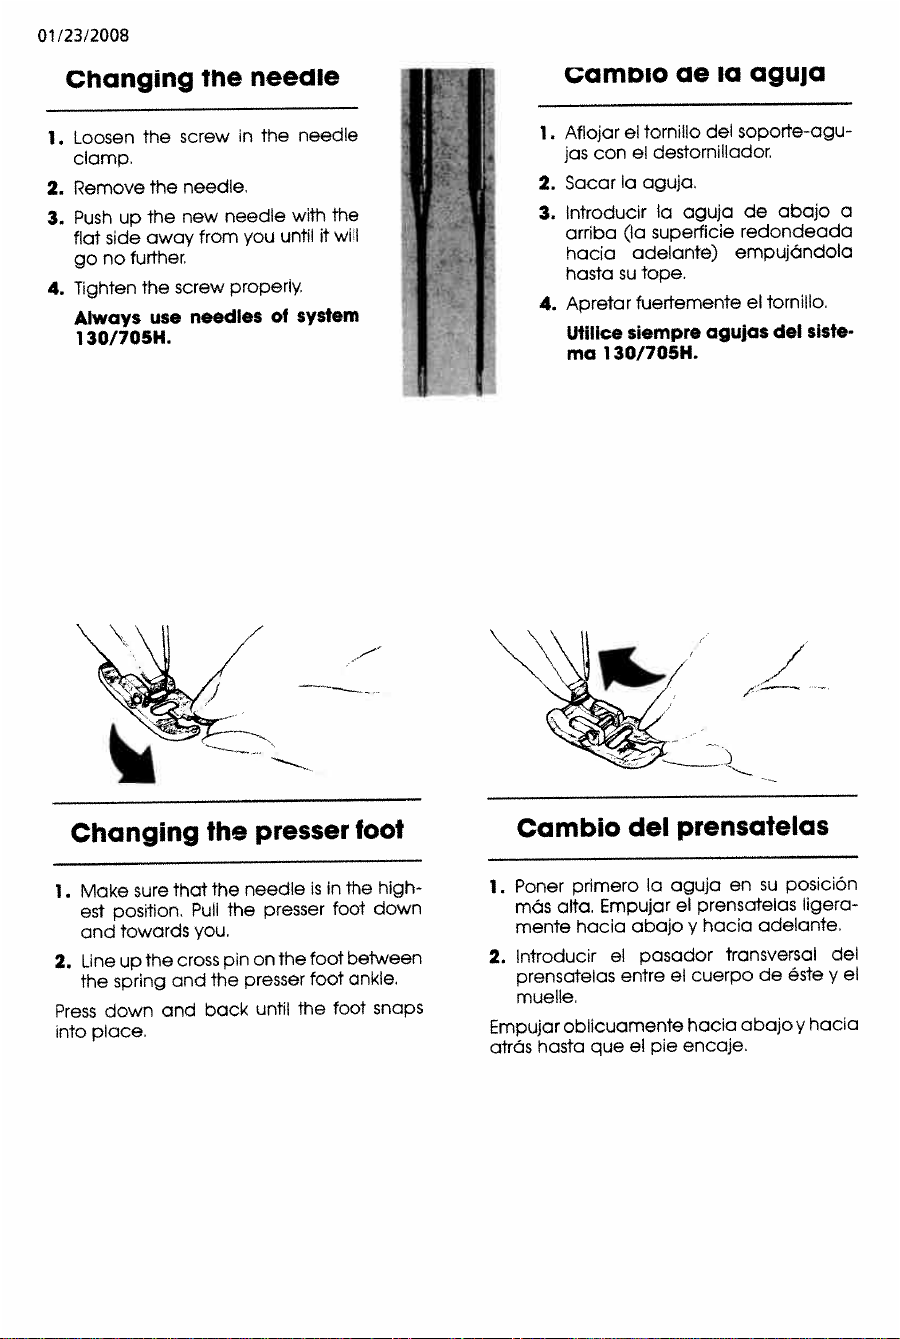
Changing
the
needle
1.
Loosen
the
screw
in
the
needle
clamp.
2.
Remove
the
needle.
3.
Push
up
the
new
needle
with
the
flat
side
away
from
you
until
it
will
go
no
further
4.
Tighten
the
screw
properly.
Always
use
needles
of
system
1
30/705H.
camblo
ae
ia
aguja
1.
Aflojar
el
tornillo
del
soporte-agu
jas
con
el
destornillador
2.
Sacar
a
aguja.
3.
Introducir
Ia
aguja
de
abajo
a
arriba
(Ia
superficie
redondeada
hacia
adelante)
empujandola
hasta
su
tape.
4.
Apretar
fuertemente
el
torn
110,
Utilice
slempre
agujas
del
siste
ma
1301705H.
/
Changing
the
presser
foot
Camblo
del
prensatelas
1.
Make
sure
that
the
needle
is
in
the
high
est
position.
Pull
the
presser
foot
down
and
towards
you.
2.
Line
up
the
cross
pin
on
the
foot
between
the
spring
and
the
presser
foot
ankle.
Press
down
and
back
until
the
foot
snaps
into
place.
1.
Poner
primero
Ia
aguja
en
su
posiciOn
mOs
alta.
Empujar
el
prensatelas
ligera
mente
hacia
abajo
y
hacia
adelante.
2.
lntroducir
el
pasador
transversal
del
prensatelas
entre
el
cuerpo
de
éste
y
el
muelle.
Empujar
oblicuamente
hacia
abajo
y
hacia
atrOs
hasta
que
el
pie
encaje.
Fr
Downloaded from www.ManualsFile.com manuals search engine
01/23/2008
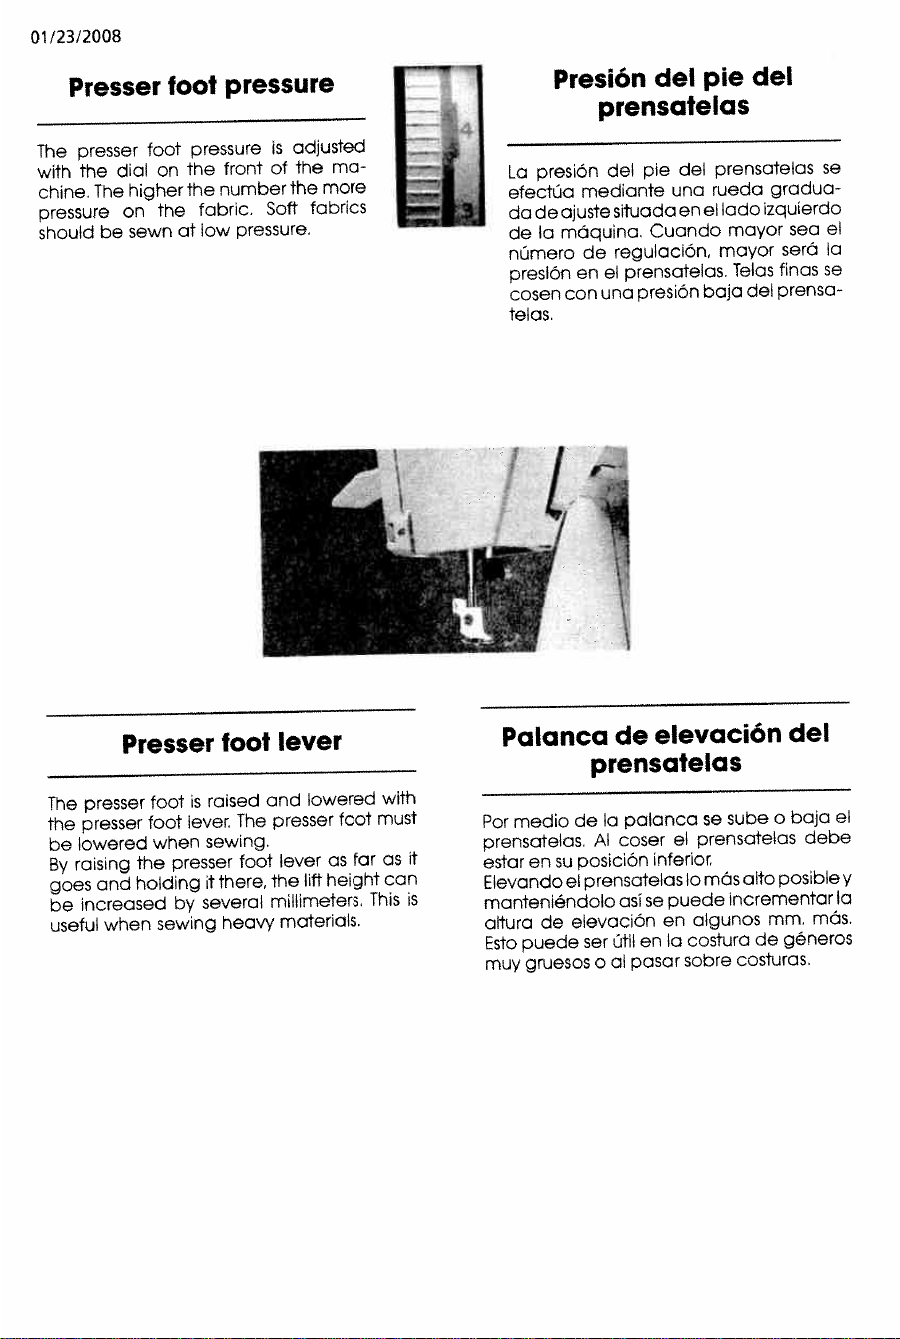
Presser
toot
pressure
r
I
The
presser
foot
pressure
is
adjusted
with
the
dial
on
the
front
of
the
ma
chine,
The
higher
the
number
the
more
pressure
on
the
fabric.
Soft
fabrics
should
be
sewn
at
low
pressure.
Presión
del
pie
del
prensatelas
La
presiOn
del
pie
del
prensatelas
se
efectüo
mediante
una
rueda
gradua
do
de
ajusie
situada
en
el
ado
zquierdo
de
Ia
mOquina.
Cuando
mayor
sea
el
nümero
de
regulaciOn,
mayor
será
a
presiOn
en
el
prensatelas.
Telas
finas
se
cosen
con
una
presiOn
baja
del
prensa
telas.
Presser
toot
lever
Palanca
de
elevación
del
prensatelas
The
presser
foot
is
raised
and
lowered
with
the
presser
foot
lever.
The
presser
foot
must
be
lowered
when
sewing.
By
raisTng
the
presser
foot
lever
as
far
as
ii
goes
and
holding
it
there,
the
lift
height
can
be
increased
by
several
millimeters.
This
is
useful
when
sewing
heavy
materials.
Por
medio
de
Ia
palanca
se
sube
a
baja
el
prensatelas.
Al
coser
el
prensatelas
debe
estar
en
su
posiciOn
inferior
Elevando
el
prensatelas
Ic
mOs
alto
posible
y
manteniéndolo
asi
se
puede
incrementar
a
altura
de
elevaciOn
en
algunos
mm.
mds.
Esto
puede
ser
ütil
en
Ia
costura
de
generos
muy
gruesos
o
al
pasar
sobre
costuras.
Downloaded from www.ManualsFile.com manuals search engine
01/23/2008
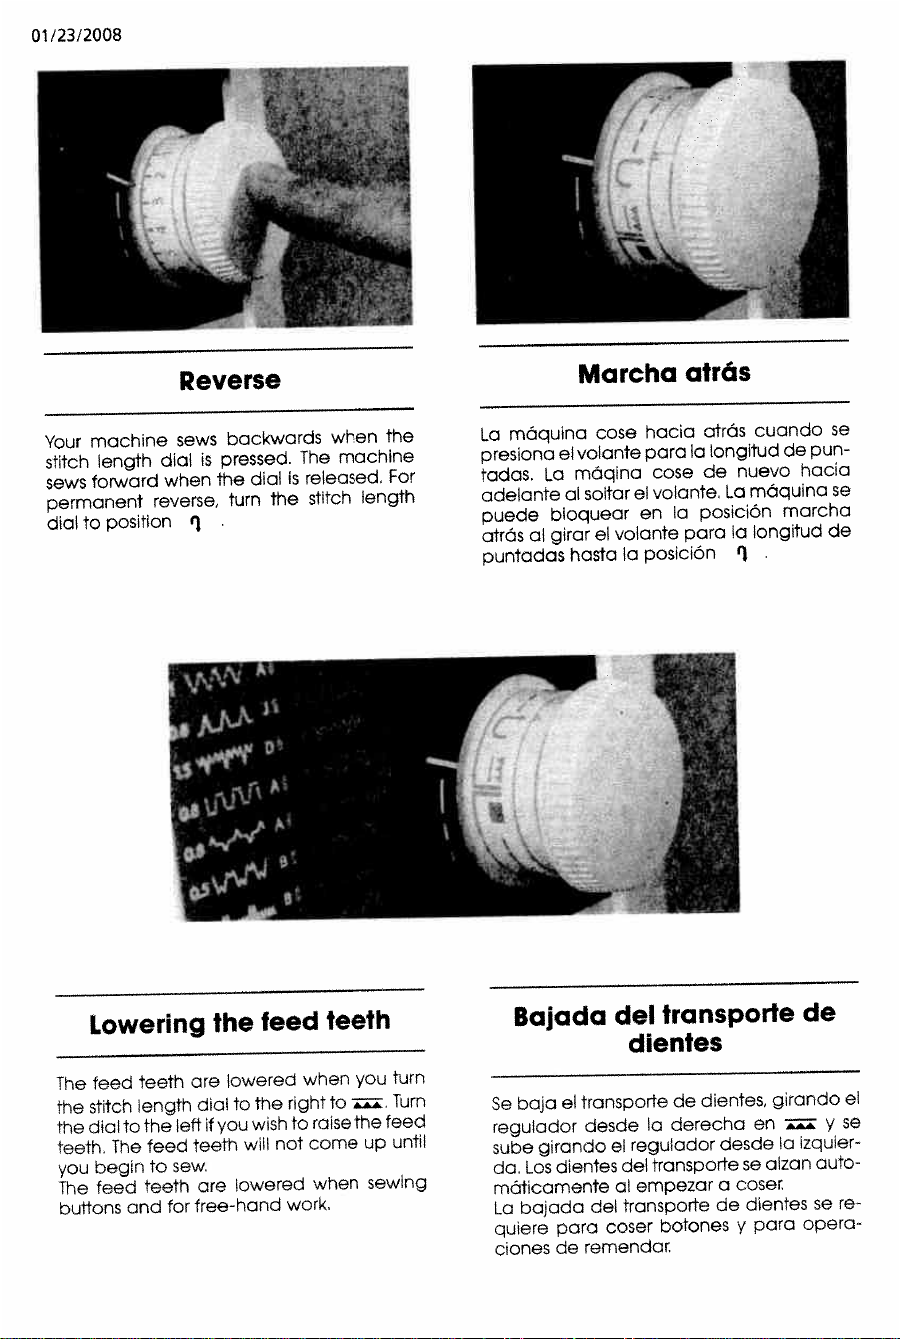
Your
machine
sews
backwards
when
the
stitch
length
dial
is
pressed.
The
machine
sews
forward
when
the
dial
is
released,
For
permanent
reverse,
turn
the
stitch
length
dial
to
position
t
La
maquina
cose
hacia
atrOs
cuando
se
presiona
el
volante
para
Ia
longitud
de
pun
todas,
La
mdqina
cose
de
nuevo
hacia
adelante
al
soltar
el
volante,
La
maquina
so
puede
bloquear
en
a
posiciOn
marcha
atrOs
al
girar
el
volante
para
Ia
longitud
de
puntadas
hasta
Ia
posicion
Lowering
the
feed
teeth
Bajada
del
transporte
de
die
ntes
The
feed
teeth
are
lowered
when
you
turn
the
stitch
length
dial
to
the
right
to
Turn
the
dial
to
the
left
if
you
wish
to
raise
the
feed
teeth,
The
feed
teeth
will
not
come
up
until
you
begin
to
sew,
The
feed
teeth
are
lowered
when
sewing
buttons
and
for
free-hand
work,
Se
baja
el
transporte
de
dientes,
girando
el
regulador
desde
Ia
derecha
en
y
se
sube
girando
el
regulodor
desde
Ia
izquier
do,
Los
dientes
del
transporte
se
aizan
auto
mOticamente
aI
empezar
a
coser
La
bajada
del
transporte
de
dientes
so
re
quiere
para
coser
botones
y
para
opera
clones
de
remendat
Reverse
Marcha
atrás
Downloaded from www.ManualsFile.com manuals search engine
01/23/2008
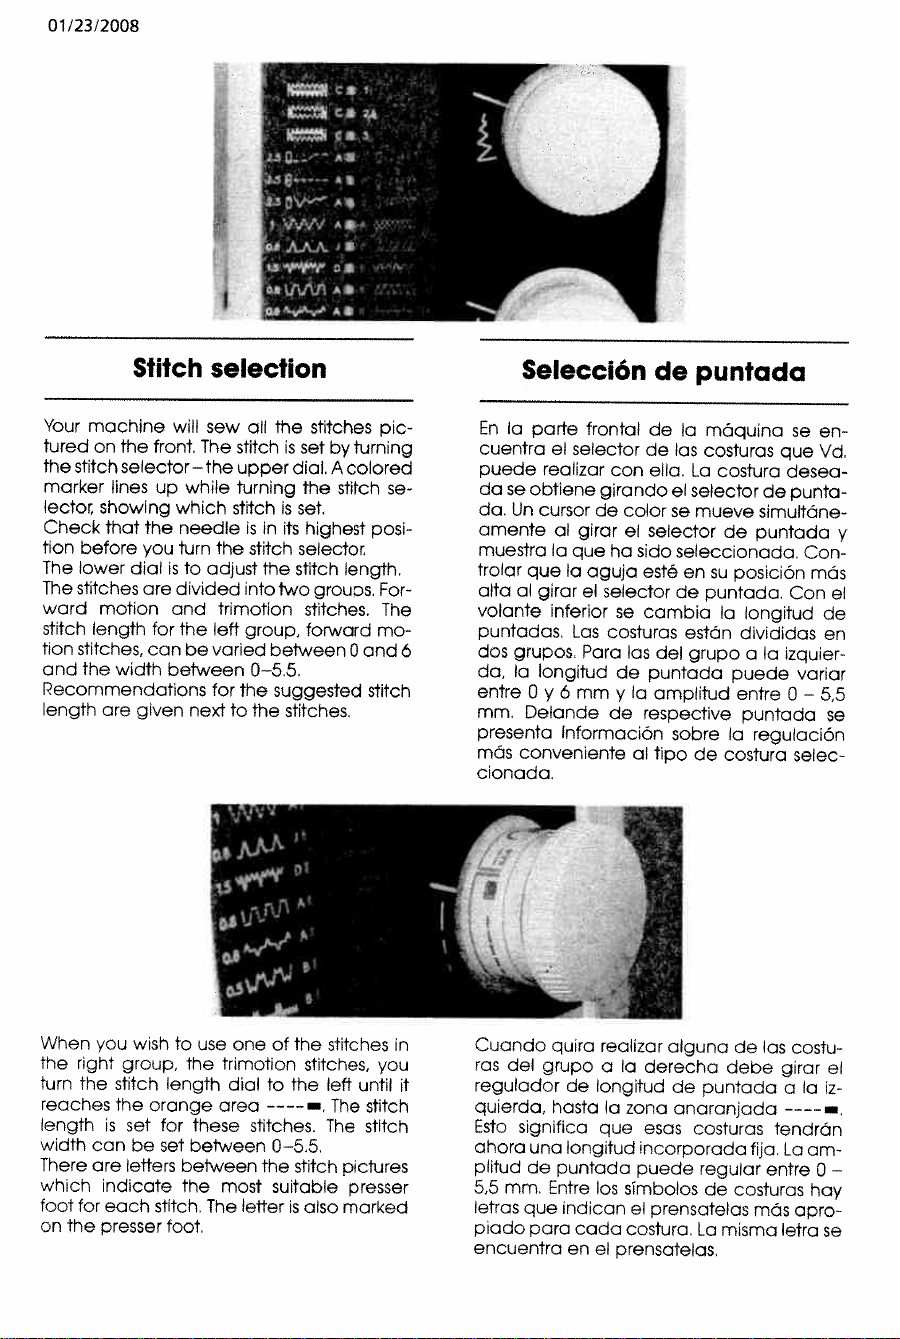
Your
machine
will
sew
all
the
stitches
pic
tured
on
the
front.
The
stitch
is
set
by
turning
the
st[tch
selector—the
upper
dial.
A
colored
marker
lines
up
while
turning
the
stitch
se
lecto
showing
which
stitch
is
set.
Check
that
the
needle
is
in
its
highest
posi
tion
before
you
turn
the
stitch
selector.
The
lower
dial
is
to
adjust
the
stitch
length.
The
stitches
are
divided
into
two
groups.
For
ward
motion
and
trmotion
stitches.
The
stitch
length
for
the
left
group,
forward
mo
tion
stitches,
can
be
varied
between
0
and
6
and
the
width
between
0-5,5.
Recommendations
for
the
suggested
stitch
length
are
given
next
to
the
stitches.
When
you
wish
to
use
one
of
the
stitches
n
the
r
ght
group,
the
trimotion
stitches,
you
turn
the
stitch
length
dial
to
the
left
until
it
reaches
the
orange
area
----
w.
The
stitch
length
is
set
for
these
stitches.
The
stitch
width
can
be
set
between
0—55.
There
are
letters
between
the
stitch
pictures
which
indicate
the
most
suitable
presser
foot
for
each
stitch
The
letter
is
also
marked
on
the
presser
foot.
En
Ia
parte
frontal
de
Ia
moquina
se
en
cuentra
el
selector
de
las
costuras
que
Vd.
puede
realizar
con
ella.
La
costura
desea
da
se
obtiene
girando
ci
selector
de
punta
do.
Un
cursor
do
color
se
mueve
simuttdne
amente
al
girar
el
selector
de
puntada
y
muestra
Ia
que
ha
sido
seleccionada,
Con
trolar
que
Ia
aguja
esté
en
su
posiciOn
mOs
alto
al
girar
el
selector
de
puntada.
Con
el
volante
inferior
se
cambia
Ia
longitud
de
puntadas.
Las
costuras
estOn
divididas
en
dos
grupos.
Paro
las
del
grupo
o
Ia
izquier
do,
Ia
longitud
de
puntada
puede
variar
entre
0
y
6
mm
y
Ia
amplitud
entre
0
—
5,5
mm.
Delande
de
respective
puntada
se
presenta
informaciOn
sobre
Ia
regulaciOn
mOs
conveniente
al
tipo
de
costura
selec
cionada.
Cuando
quira
realizar
alguna
de
ias
costu
ras
del
grupo
a
Ia
derecha
deOe
girar
ci
regulador
de
longitud
de
puntada
a
Ia
z
quierdo,
hosta
Ia
zono
anaranjada
----—.
Esto
significo
quo
esas
costuras
tendrOn
ahora
uno
longitud
incorporada
fija
La
am
plitud
de
puntada
puede
regular
entre
0
—
5,5
mm
Entre
los
sImbolos
de
costuras
hay
Ietras
que
indican
ci
prensatelas
mOs
apro
piodo
para
coda
costuro.
La
misma
letro
so
encuentro
en
el
prensatelas.
Stitch
selection
Selección
de
puntada
Downloaded from www.ManualsFile.com manuals search engine
01/23/2008
Amplitud
de
puntada
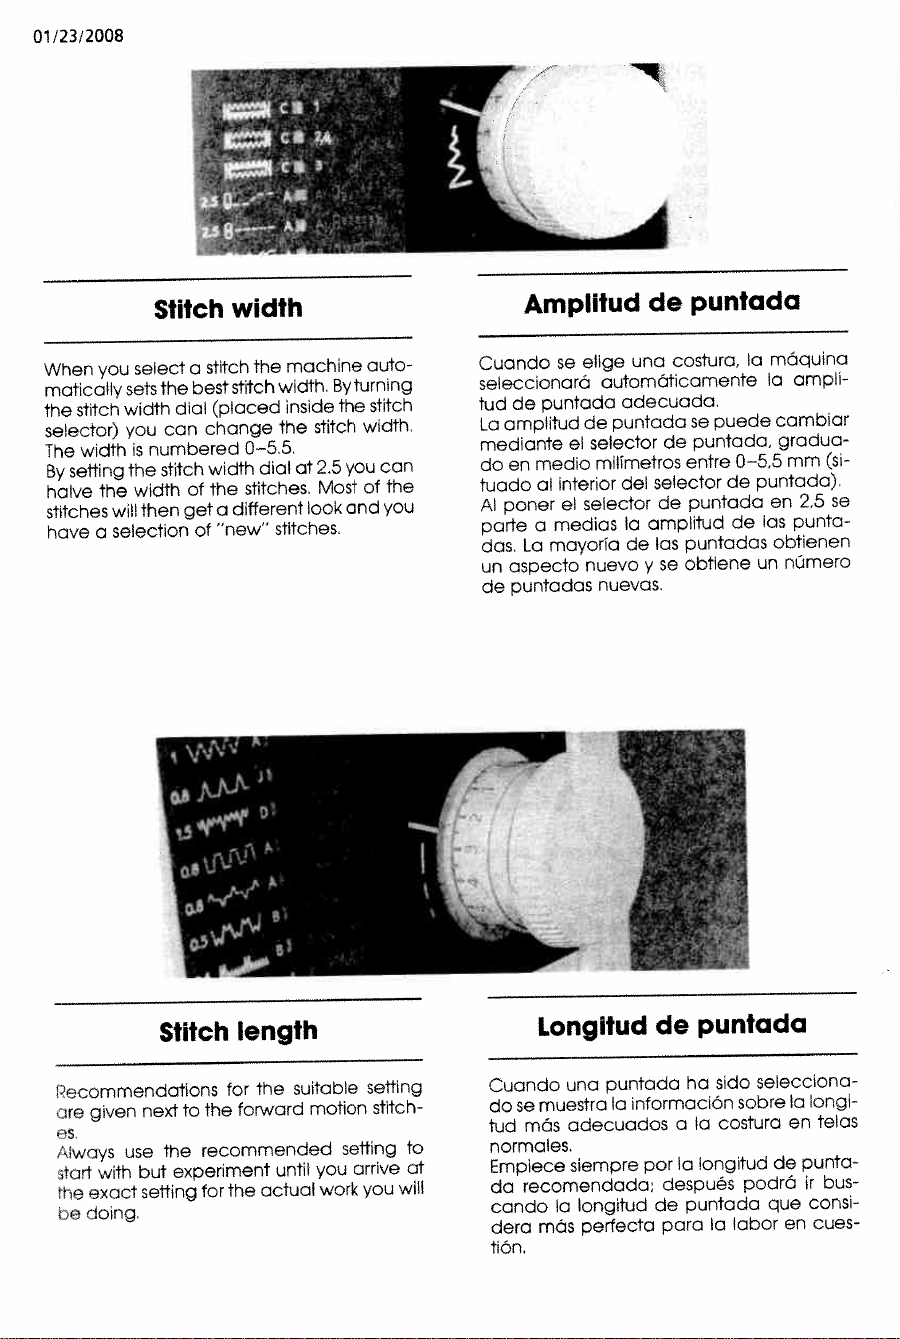
When
you
select
a
stitch
the
machine
auto
matically
sets
the
best
stitch
width,
By
turning
the
stitch
width
dial
(placed
inside
the
stitch
selector)
you
can
change
the
stitch
width.
The
width
is
numbered
0—55.
By
setting
the
stitch
width
dial
at
2.5
you
can
halve
the
width
of
the
stitches,
Most
of
the
stitches
Will
then
get
a
different
look
and
you
have
a
seiection
of
“new’
stitches,
Cuando
se
elige
una
costura,
la
mOquina
seleccionard
automOticamente
Ia
ampli
tud
de
puntada
adecuada.
La
amplitud
de
puntada
se
puede
cambiar
mediante
el
selector
de
puntada,
gradua
do
en
medio
milimetros
entre
0—5,5
mm
(si
tuado
al
interior
del
selector
de
puntada)
Al
poner
el
selector
de
puntada
en
2,5
se
porte
a
medias
a
amplitud
de
las
punta
das.
La
mayorIa
de
las
puntadas
obtienen
un
aspecto
nuevo
y
se
obtiene
un
nUmero
de
puntadas
nuevas.
Recommendations
for
the
suitable
setting
are
given
next
to
the
forward
motion
stitch
Always
use
the
recommended
setting
to
tart
with
but
experiment
until
you
arrive
at
he
exact
setting
for
the
actual
work
you
will
a
doing.
Cuando
una
puntada
ha
sido
selecciona
dose
muestra
Ia
informaciOn
sobre
Ia
longi
tud
mds
adecuados
a
Ia
costura
en
telas
normales.
Empiece
siempre
por
Ia
longitud
de
punta
da
recomendado:
después
podrd
ir
bus
condo
Ia
longitud
de
puntada
que
consi
dora
mOs
perfecta
para
Ia
labor
en
cues
tión,
Stitch
width
Stitch
length
Longitud
de
puntada
Downloaded from www.ManualsFile.com manuals search engine
U
lI/3/LUU
Buttonholes
ujaies
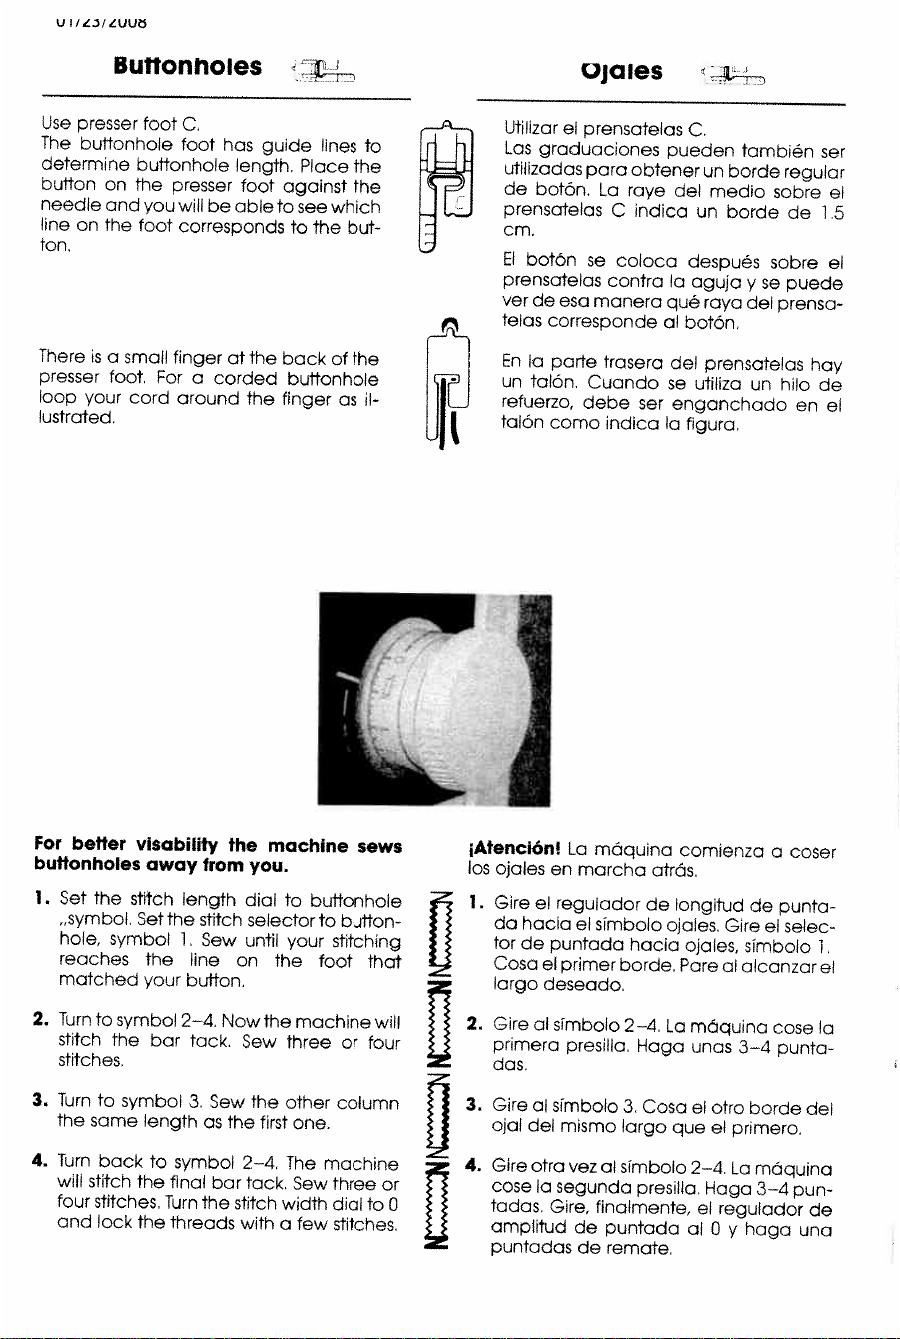
Use
presser
foot
C.
The
buttonhole
foot
has
guide
lines
to
determine
buttonhole
length.
Place
the
button
on
The
presser
foot
against
the
needle
and
you
will
be
able
to
see
which
line
on
the
foot
corresponds
to
the
but
ton.
There
is
a
small
finger
at
the
back
of
the
presser
foot,
For
a
corded
buttonhole
loop
your
cord
around
The
finger
as
il
lustrated.
For
better
visability
the
machine
sews
buttonholes
away
from
you.
1.
Set
the
stitch
length
dial
to
buttonhole
,,symbol.
Set
the
stitch
selector
to
button
hole,
symbol
1.
Sew
until
your
stitching
reaches
the
line
on
the
foot
that
matched
your
button.
2.
Turn
to
symbol
2—4.
Now
the
machine
will
stitch
the
bar
tack.
Sew
three
or
four
sfftches.
3.
Turn
to
symbol
3.
Sew
the
other
column
the
same
length
as
the
first
one.
4.
Turn
back
to
symbol
2—4.
The
machine
will
stitch
the
final
bar
tack.
Sew
three
or
four
stitches.
Turn
the
stitch
width
dial
to
0
and
lock
the
threads
with
a
few
stitches.
Utilizar
el
prensatelas
C.
Las
graduaciones
pueden
también
ser
utilizadas
para
obtener
un
borde
regular
de
botOn.
La
raye
del
media
sabre
ei
prensatelas
C
indica
un
borde
de
1.5
cm.
El
batOn
se
colaca
después
sabre
el
prensatelas
contra
Ia
aguja
y
se
puede
verde
esa
manera
qué
raya
del
prensa
telas
corresponde
al
botOn.
En
Ia
parte
trasera
del
prensatelas
hay
un
talOn.
Cuando
so
utiliza
un
hilo
de
refuerzo,
debe
ser
enganchado
en
el
talOn
coma
indica
Ia
(igura.
1
Atenclón!
La
mOquina
camienza
a
coser
las
ajales
en
marcha
atrás.
1.
Gire
el
reguladar
de
longitud
de
punfa
da
hacia
el
simbalo
ojales.
Gire
el
selec
tar
de
puntada
hacia
ajales,
simbolo
1.
Cosa
el
primer
borde.
Pare
al
alcanzar
el
larga
deseada.
2.
Gire
al
simbala
2—4.
La
mOquina
case
a
primera
presilla.
Haga
unas
3—4
punta
dos.
3.
Gire
al
simbola
3.
Cosa
el
otra
borde
del
ojal
del
mismo
argo
que
el
primero.
4.
Gire
atra
vez
al
simbala
2—4,
La
mOquina
case
Ia
segunda
presilla.
Haga
3—4
pun
tadas.
Gire,
finalmente,
el
reguladar
de
amplilud
de
puntada
al
0
y
haga
una
puntadas
de
remote.
U
0
Downloaded from www.ManualsFile.com manuals search engine

01/23/2008
Balance
setting
for
buttonhole
Regulación
exacta
del
equilibrio
para
ojales
the
machine
is
set
for
sewing
even
button
holes
in
most
fabrics.
Howeve
some
combi
nations
of
fabric,
needle
and
thread
may
cause
some
variations
in
the
columns,
If
this
is
the case,
adjustment
can be
made
by
means
of
a
screw
located
inside
the
stitch
length
dial.
Set
The
stich
length
dial
to
buttonhole
sym
bol.
Remove
the
dial
by
pulling
it
straight
out.
You
will
now
see
The
screw
used
to
adjust
balance.
Use
the
screwdriver
included
with
your
attachments.
Adjust
The
balance
byiuming
the
screw
very
slightly
If
te
left
column
is
tighter
than
The
right
one,
turn
The
screw
slightly
to
the
left
If
the
right
column
is
tighter
than
the
left
one,
turn
the
screw
slightly
to
the
right.
Check
the
buttonhole
after
each
adjustment.
Replace
the
dial
by
fitting
the
ridge
on
the
dial
into
the
slot
(a)
and
then
push
into
place.
La
mdquina
está
regulada
para
poder
co
ser
ojales
uniformes
sobre
Ia
mayorIa
de
los
generos
en
uso.
Sin
embargo,
debido
a
ciertas
combinaciones
entre
género,
aguja
o
hilo,
alguno
diferencia
entre
los
dos
bor
des
del
ojal
podrO
manifestarse.
Siendo
es
te
el
caso,
Vd
puede
ajustarlo
mediante
un
tornillo
que
estd
delante
del
volante
regula
dor
para
Ia
longitud
de
puntadas.
Ajuste
Ia
longitud
do
puntadas
en
el
simbolo
do
ojales.
Retire
el
volante
tirOndolo
hacia
afuera,
Ajuste
ei
equilibrio
con
el
tornillo.
Atención
Haga esto
con
pequenos
movimientos,
Si
el
borde
isquierdo
del
ojal
resul
ta
mãs
tupido
que
el
derecho,
afloje
01
tornillo
un
poco
a
Ia
iz
quierda.
Si 01
borde
derecho
del
ojal
resul
ta
más
tupido
quo
ol
izquierdo,
apriete
el
tornillo
un
poco
a
Ia
derecha.
I
Cuando
coloque
do
nuevo
el
vo
lante,
inserte
el
gorrOn
del
volante
on
su
ranura
(a)
y
apriete.
U
Downloaded from www.ManualsFile.com manuals search engine
01/23/2008
sewing
ounons
i.osTura
ae
ooTones
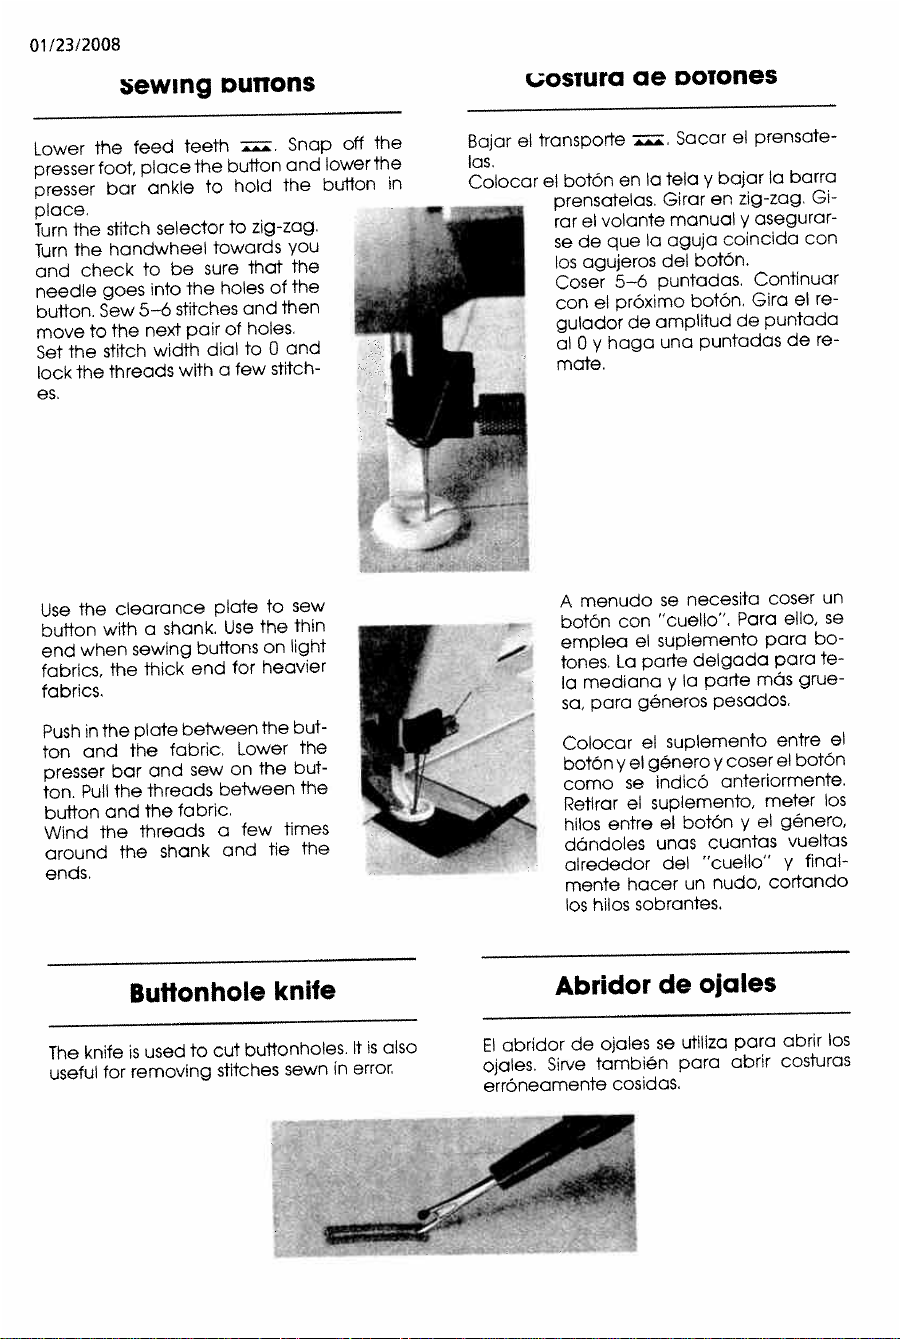
Lower
the
feed
teeth
z.
Snap
off
the
presser
foot,
place
the
button
and
lower
the
presser
bar
ankle
to
hold
the
button
in
place
Turn
the
stitch
selector
to
zig-zag.
Turn
the
handwheel
towards
you
and
check
to
be
sure
that
the
needle
goes
into
the
holes
of
The
button.
Sew
5—o
stitches
and
then
move
to
the
next
pair
of
holes.
Set
the
stitch
width
dial
to
0
and
lock
the
threads
with
a
few
stitch
es.
Use
The
clearance
plate
to
sew
button
with
a
shank.
Use
the
thin
end
when
sewing
buttons
on
light
fabrics,
the
thick
end
for
heavier
fabrics.
Push
in
the
plate
between
the
but
ton
and
the
fabric.
Lower
the
presser
bar
and
sew
on
The
but
ton.
Pull
the
threads
between
the
button
and
the
fabric.
Wind
the
threads
a
few
times
around
the
shank
and
tie
the
ends.
Bajar
el
transporte
Sacar
el
prensate
las.
Colocar
el
batOn
en
Ia
tela
y
bajar
Ia
barra
prensatelas.
Girar
en
zig-zag.
Gi
rar
el
volante
manual
y
asegurar
se
de
que
Ia
aguja
coincida
con
os
agujeros
del
botOn.
Coser
5—6
puntadas.
Continuar
con
el
prOximo
batOn.
Gira
el
re
gulador
de
ampBtud
de
puntada
al
0
y
haga
una
puntadas
de
re
mate,
A
menudo
se
necesita
coser
un
botOn
con
“cuello”
Para
ella,
se
emplea
el
suplemento
para
bo
tones
La
parte
delgada
para
te
Ia
mediana
y
Ia
porte
mOs
grue
sa,
para
gOneros
pesados.
Colocar
el
suplemento
entre
el
botOn
y
el
genera
y
coser
el
batOn
coma
se
indicO
anteriormente.
Retirar
el
suplemento,
meter
los
hilos
entre
el
botOn
y
el
género,
dOndoles
unas
cuantas
vueltas
airededor
del
“cuello”
y
final
mente
hacer
un
nudo,
cortando
los
hilos
sobrantes,
Buttonhole
knife
Abridor
de
ojales
El
abridor
de
ojales
se
utiliza
pora
abrir
los
ojales.
Sirve
tambiOn
para
abrir
costuras
errOneamente
cosidas.
The
knife
is
used
to
cut
buttonholes.
It
is
also
useful
for
removing
stitches
sewn
in
error
—‘
Downloaded from www.ManualsFile.com manuals search engine
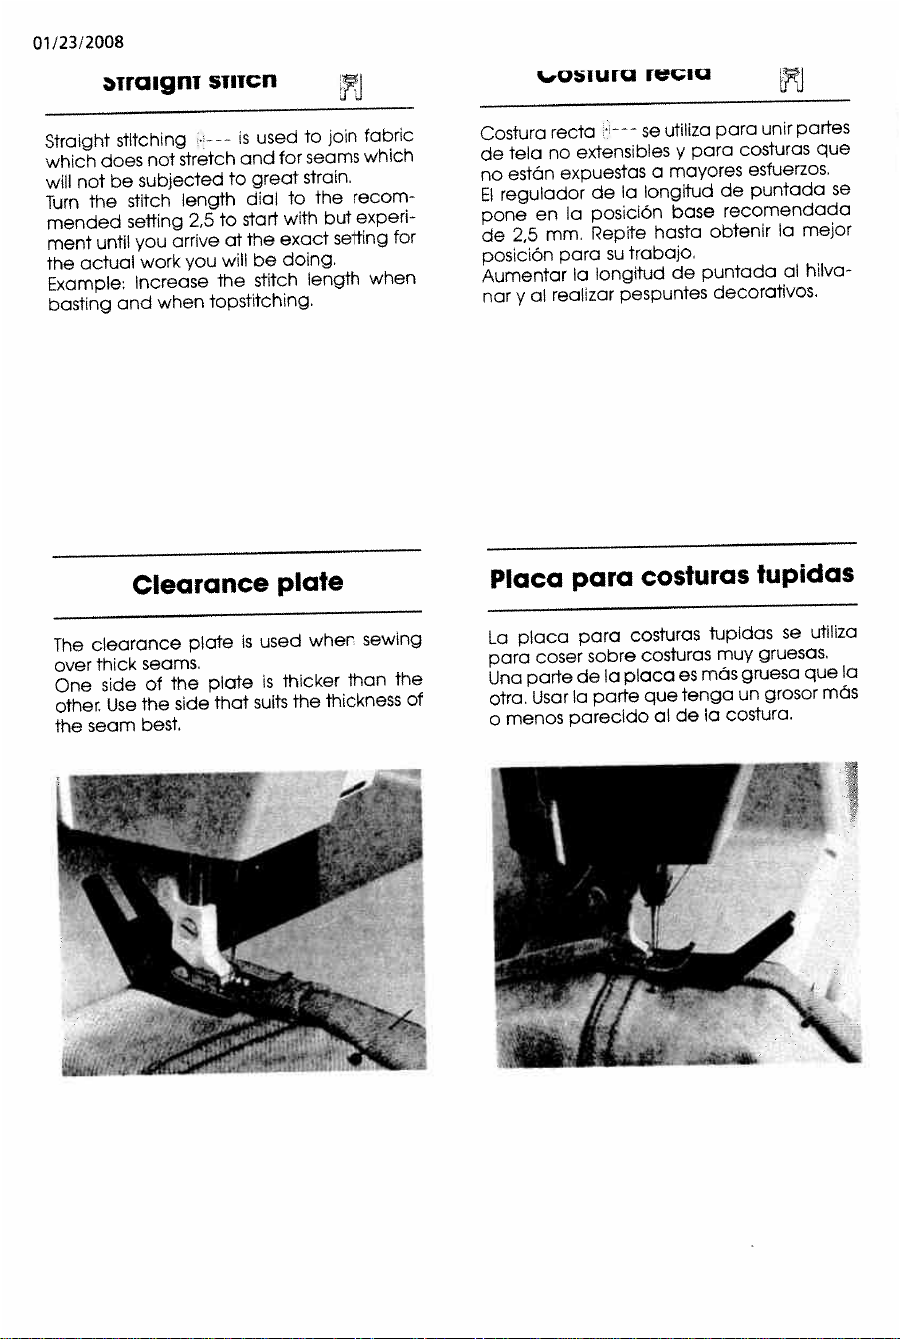
01/23/2008
iraign
STITCfl
,usIuru
rwIu
Straight
stitching
-
-
—
is
used
to
join
fabric
which
does
not
stretch
and
for
seams
which
will
not
be
subjected
to
great
strain,
Turn
the
stitch
length
dial
to
the
recom
mended
setting
2,5
to
start
with
but
experi
ment
until
you
arrive
at
the
exact
setting
for
the
actual
work
you
will
be
doing.
Example:
Increase
the
stitch
length
when
basting
and
when
topstitching.
Costura
recta
---
se
utiliza
para
unirpartes
de
tela
no
extensibles
y
para
costuras
que
no
estOn
expuestas
a
mayores
osfuerzos,
El
regulador
de
Ia
longitud
do
puntada
so
pone
en
Ia
posiciOn
base
recomendada
do
2,5
mm,
Repite
hasta
obtenir
Ia
mejor
posiciOn
para
su
trabajo,
Aumentar
Ia
longitud
do
puntada
al
hilva
nor
y
al
realizar
pespuntes
decorativos,
Clearance
plate
Placa
para
costuras
tupidas
The
clearance
plate
is
used
when
sewing
over
thick
seams.
One
side
of
the
plate
is
thicker
than
the
other
Use
the
side
that
suits
the
thickness
of
the
seam
best,
La
placa
para
costuras
tupidas
so
utiliza
para
coser
sobre
costuras
muy
gruesas,
Una
parte
do
Ia
place
es
mOs
gruesa
que
Ia
otra.
User
a
parte
que
tenga
un
grosor
mds
o
menos
parecido
al
do
Ia
costura,
Downloaded from www.ManualsFile.com manuals search engine
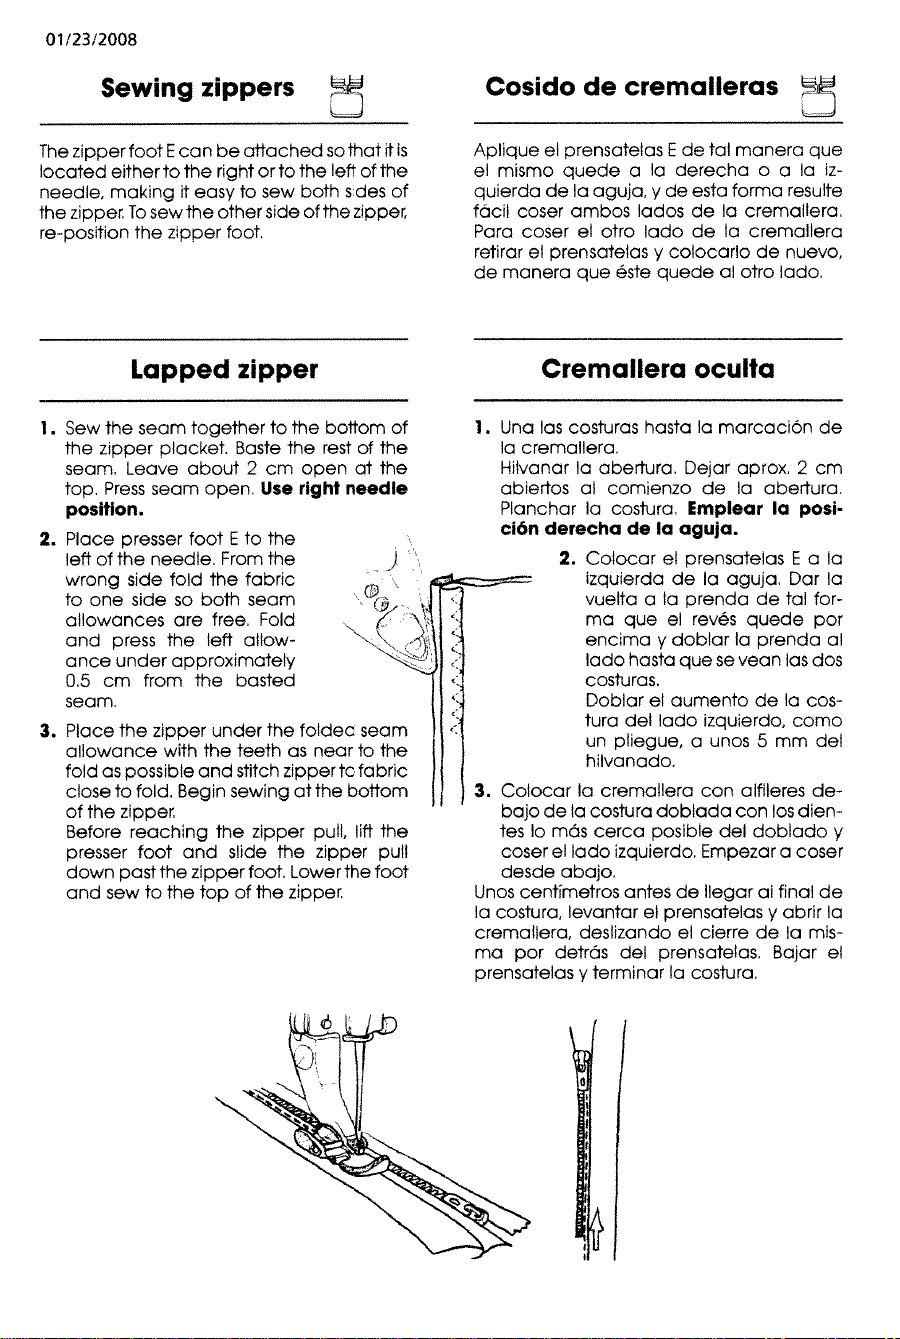
01/23/2008
Sewing
zippers
Cosido
de
cremalleras
The
zipper
foot
E
can be
attached
so
that
it
is
located
either
to
the
right or
to
the
left
of
the
needle,
making
it
easy
to
sew
both
sides
of
the
zipper.
To
sew
the
other
side
of
the
zipper,
re-position
the
zipper
foot.
Aplique
el
prensatelas
E
de
tal
manera
que
el
mismo
quede
a
Ia
derecha
o
a
Ia
iz
quierda
de
Ia
aguja,
y
de
esta
forma
resulte
tacit
coser
ambos
lados
de
Ia
cremallera.
Para
coser
el
otro
ado
de
Ia
cremallera
retirar
el
prensatelas
y
colocarlo
de
nuevo,
de
manera
que
éste
quede
at
otro
ado.
Lapped
zipper
Cremallero
oculto
1.
Sew
the
seam
together
to
the
bottom
of
the
zipper
placket.
Baste
the
rest
of
the
seam.
Leave
about
2
cm
open
at
the
top.
Press
seam
open.
Use
right
needle
position.
2.
Place
presser
foot
E
to
the
left
of
the
needle.
From
the
wrong
side
fold
the
fabric
to
one
side
so
both
seam
allowances
are
free.
Fold
and
press
the
left
allow
ance
under
approximately
0.5
cm
from
the
basted
seam,
3.
Place
the
zip
per
under
the folded
seam
allowance
with
the
teeth
as
near
to
the
fold
as
possible
and
sfitch
zipper
to
fabric
close
to
fold,
Begin
sewing
at
the
bottom
of
the
zipper.
Before
reaching the
zipper
pull,
lift
the
presser
foot
and
slide
the
zipper
pull
down
past
the
zipper
foot.
Lower
the
foot
and
sew
to
the
top
of
the
zipper.
1.
Una
las
costuras
hasta
Ia
marcaciOn
de
Ia
cremallera,
Hilvanar
Ia
abertura,
Dejar
aprox.
2
cm
abiertos
al
comienzo
de
Ia
abertura.
Planchar
a
costura.
Emplear
a
posi
ción
derecha
do
Ia
aguja.
2.
Colocar
el
prensatelas
B
a
Ia
izquierda
de
Ia
aguja.
Dar
Ia
vuelta
a
Ia
prenda
de
tal
for-
ma
que
el
revés
quede
por
encima
y
doblar
Ia
prenda
at
lado
hasta
que
se
vean
las
dos
costuras.
Doblar
el
aumento
de
Ia
cos
tura
del
lado
izquierdo,
como
un
pliegue,
a
unos
5
mm
del
hilvanado.
3.
Colocar
Ia
cremallera
con
alfileres
de
bajo
de
Ia
costura
doblada
con
los
dien
tes
to
mOs
cerca
posible
del
doblado
y
coser
el
ado
izquierdo.
Empezar
a
coser
desde
abajo.
Unos
centimetros
antes
de
Ilegar
at
final
de
Ia
costura,
levantar
el
prensatelas
y
abrir
Ia
cremallera,
deslizando
el
cierre
de
Ia
mis-
ma
por
detrOs
del
prensatelas,
Bajar
el
prensatelas
y
terminar
Ia
costura.
/
C)
j
Downloaded from www.ManualsFile.com manuals search engine
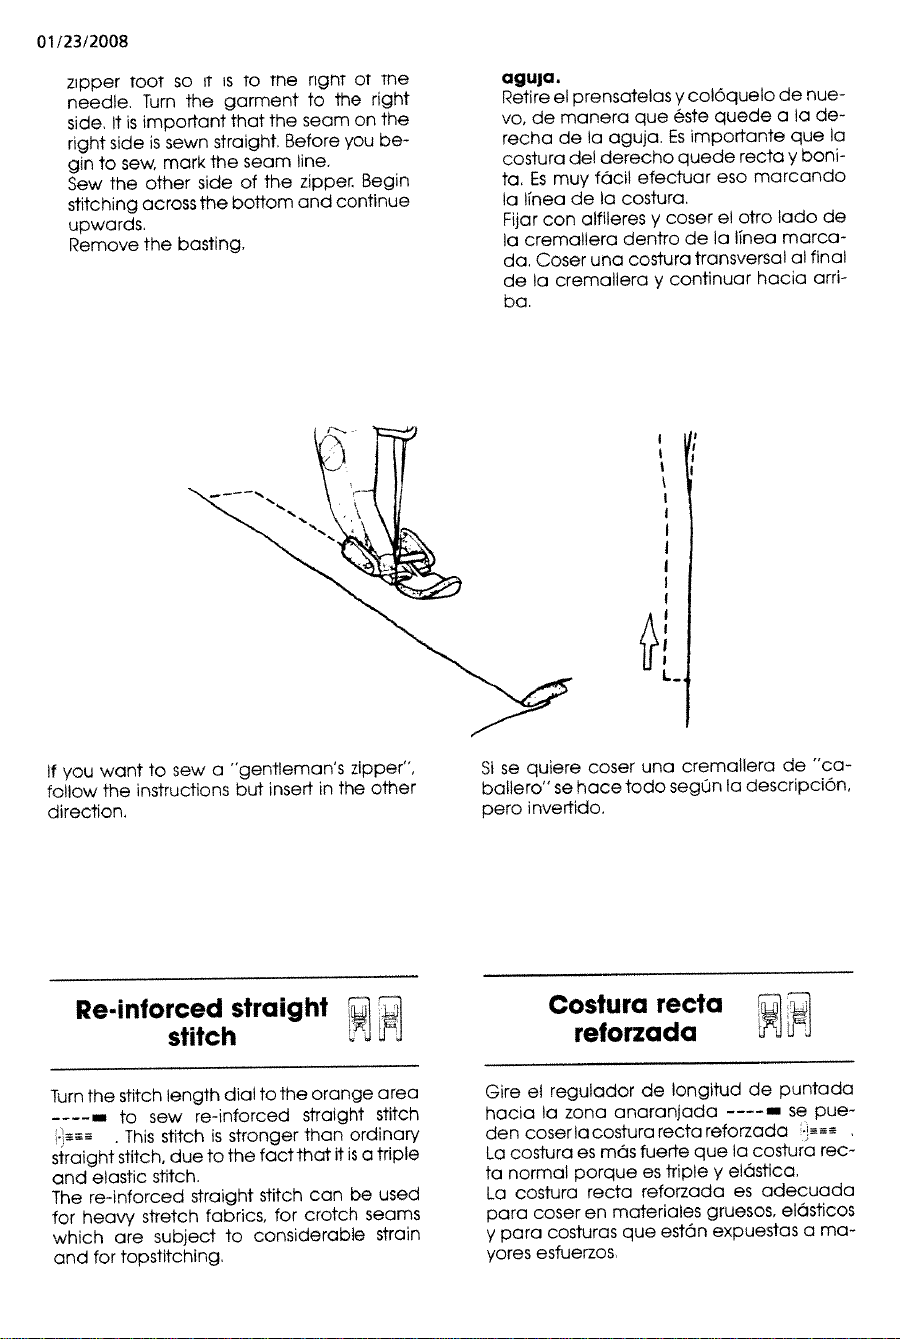
01/23/2008
zipper
toot
so
it
is
to
me
rignt
or
me
needle.
Turn
the
garment
to
the
right
side.
It
is
important
that
the
seam
on
the
right
side
is
sewn
straight.
Before
you
be
gin
to
sew,
mark
the
seam
line.
Sew
the
other
side
of
the
zipper
Begin
stitching
across
the
bottom
and
continue
upwards.
Remove
the
basting.
aguja.
Retire
ci
prensatelas
y
colOquelo
de
nue
vo,
de
manera
que
éste
quede
a
Ia
de
recha
de
a
aguja.
Es
importante
que
a
costura
del
derecho
quede
recta
y
boni
to.
Es
muy
fOcil
efectuar
eso
marcando
Ia
Thea
de
Ia
costura.
Fijar
con
alfileres
y
coser
el
otro
lado
do
a
cremallera
dentro
de
Ia
linea
marco
da,
Coser
una
costura
transversal
al
final
de
Ia
cremallera
y
continuar
hacia
arri
ba.
If
you
want
to
sew
a
“gentleman’s
zipper”,
follow
the
instructions
but
insert
in
the
other
direction.
Si
se
quiere
coser
una
cremallera
de
“ca
ballero”
se
hace
todo
segUn
Ia
descripciOn,
pero
invertido.
Re-inforced
straight
stitch
ui
JJ
Costura
recta
retorzada
Turn
the
stitch
length
dial
to
the
orange
area
to
sew
re-inforced
straight
stitch
This
stitch
is
stronger
than
ordinary
straight
stitch,
due
to
the
fact
that
it
is
a
triple
and
elastic
stitch.
The
re-inforced
straight
stitch
can
be
used
for
heavy
stretch
fabrics,
for
crotch
seams
which
are
subject
to
considerable
strain
and
for
topstitching.
Gire
ci
regulador
de
longitud
de
puntada
hacia
Ia
zona
anaranjada
----—
Se
pue
den
coser
Ia
costura
recta
reforzada
La
costura
es
mOs
fuerte
que
Ia
costura
rec
ta
normal
porque
es
triple
y
elOstica,
La
costura
recta
reforzada
es
adecuada
para
coser
en
materiales
gruesos,
elásticos
y
para
costuras
que
estdn
expuestas
a
ma—
yores
esfuerzos,
Downloaded from www.ManualsFile.com manuals search engine
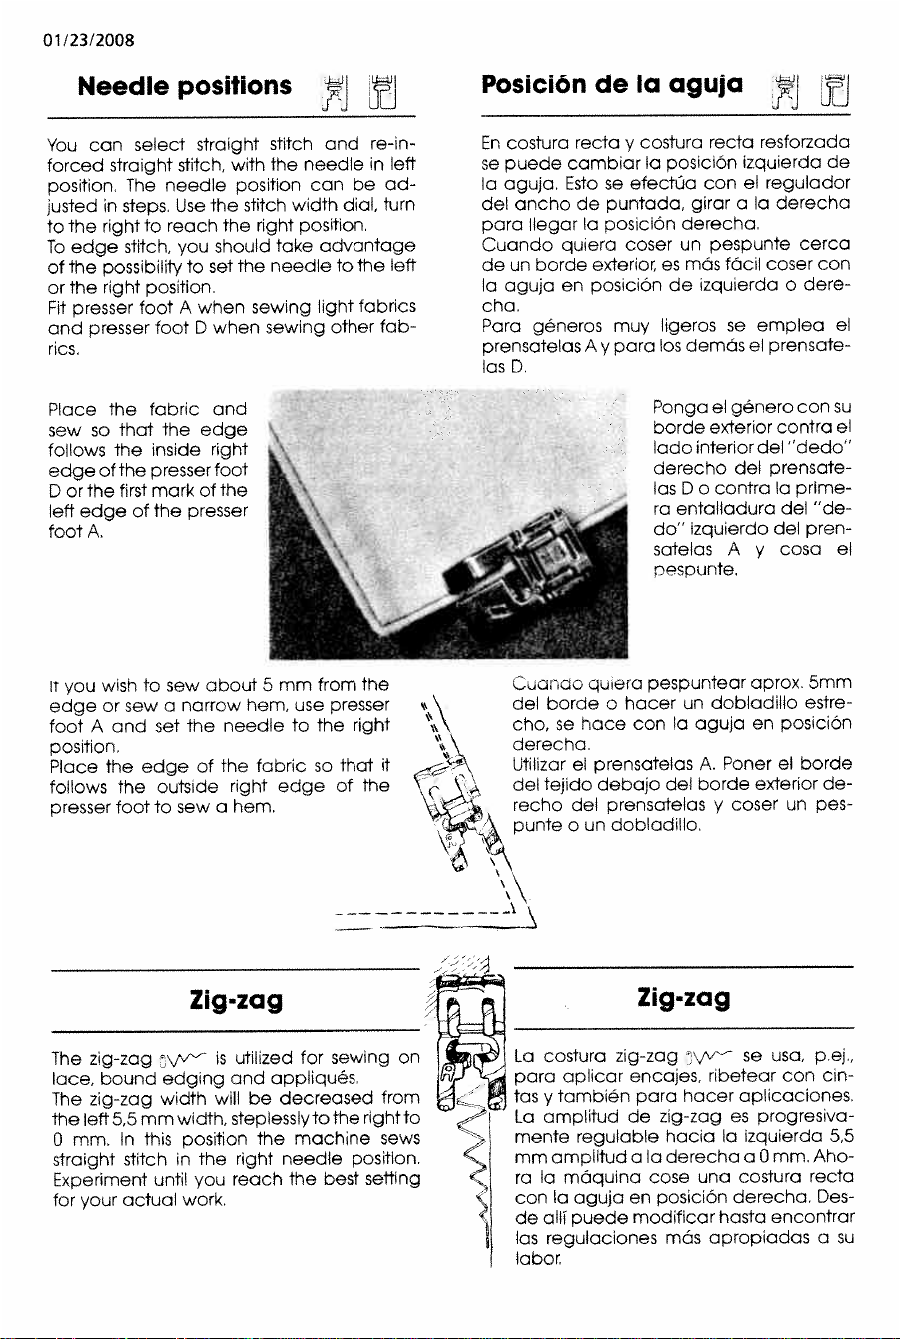
01/23/2008
Needle
positions
pj
j
Posiciön
de
Ia
aguja
,j
jj
You
can
select
straight
stitch
and
re-in-
forced
straight
stitch,
with
the
needle
in
left
position,
The
needle
position
can
be
ad
justed
in
steps.
Use
the
stitch
width
dial,
turn
to
the
right
to
reach
the
right
position,
To
edge
stitch,
you
should
take
advantage
of
the
possibility
to
set
the
needle
to
the
left
or
the
right
position.
Fit
presser
foot
A
when
sewing
light
fabrics
and
presser
foot
D
when
sewing
other
fab
rics.
Place
the
fabric
and
sew
so
that
the
edge
follows
the
inside
right
edge
of
the
presser
foot
D
or
the
first
mark
of
the
left
edge
of
the
presser
footA,
En
costura
recta
y
costura
recta
resforzada
se
puede
cambiar
Ia
posiclOn
izquierda
de
Ia
aguja.
Esto
se
efectSa
con
el
regulador
del
ancho
de
puntada,
girar
a
Ia
derecha
para
Ilegar
Ia
posiciOn
derecha.
Cuando
quiera
coser
un
pespunte
cerca
de
un
borde
exterior,
es
más
fOcil
coser
con
Ia
aguja
en
posiciOn
de
izquierda
o
dere
cha.
Para
géneros
muy
ligeros
se
emplea
el
prensatelas
A
y
para
los
demOs
el
prensate
las
D.
Ponga
el
genera
con
su
borde
exterior
contra
el
lado
interior
del
‘dedo”
derecho
del
prensate
las
D
o
contra
Ia
prime
ra
entalladura
del
“de
do”
izquierdo
del
pren
satelas
A
y
cosa
el
espunte.
Cancio
quiero
pespuntear
aprox.
5mm
del
borde
o
hacer
un
dobladillo
estre
cho,
se
hace
con
Ia
aguja
en
posiciOn
derecha.
Utilizar
ei
prensatelas
A.
Poner
el
borde
del
tejido
debajo
del
borde
exterior
de
recho
del
prensatelas
y
coser
un
pes
punte
a
un
dobladillo.
Zig-zag
The
zig-zag
vv”
is
utilized
for
sewing
on
lace,
bound
edging
and
appliqués.
The
zig-zag
width
will
be
decreased
from
the
left
5,5mm
width,
steplessly
to
the
right
to
0
mm,
In
this
position
the
machine
sews
straight
stitch
in
the
right
needle
position.
Experiment
until
you
reach
the
best
sefting
for
your
actual
work.
Zig-zag
La
costura
zig-zag se
usa,
pej.,
bJ
‘
para
aplicar
encajes,
ribetear
con
cm
tas
y
también
para
hacer
aplicaciones.
La
amplitud
de
zig-zag
es
progresiva
>
mente
regulable
hacia
a
izquierda
5,5
mm
amplitud
a
Ia
derecha
a
0mm.
Aho
C
ra
Ia
mOqumna
cose
una
costura
recta
con
Ia
aguja
en
posiciOn
derecha.
Des
de
alli
puede
modificar
hasta
encontrar
las
regulaciones
mOs
apropiadas a
su
labor.
It
you
wish
to
sew
about
5
mm
from
the
edge
or
sew
a
narrow
hem,
use
presser
\
foot
A
and
set
the
needle
to
the
right
\
position.
Place
the
edge
of
the
fabric
so
that
it
_-\
follows
the
outside
right
edge
of
the
\
-‘
presser
foot
to
sew
a
hem.
Downloaded from www.ManualsFile.com manuals search engine
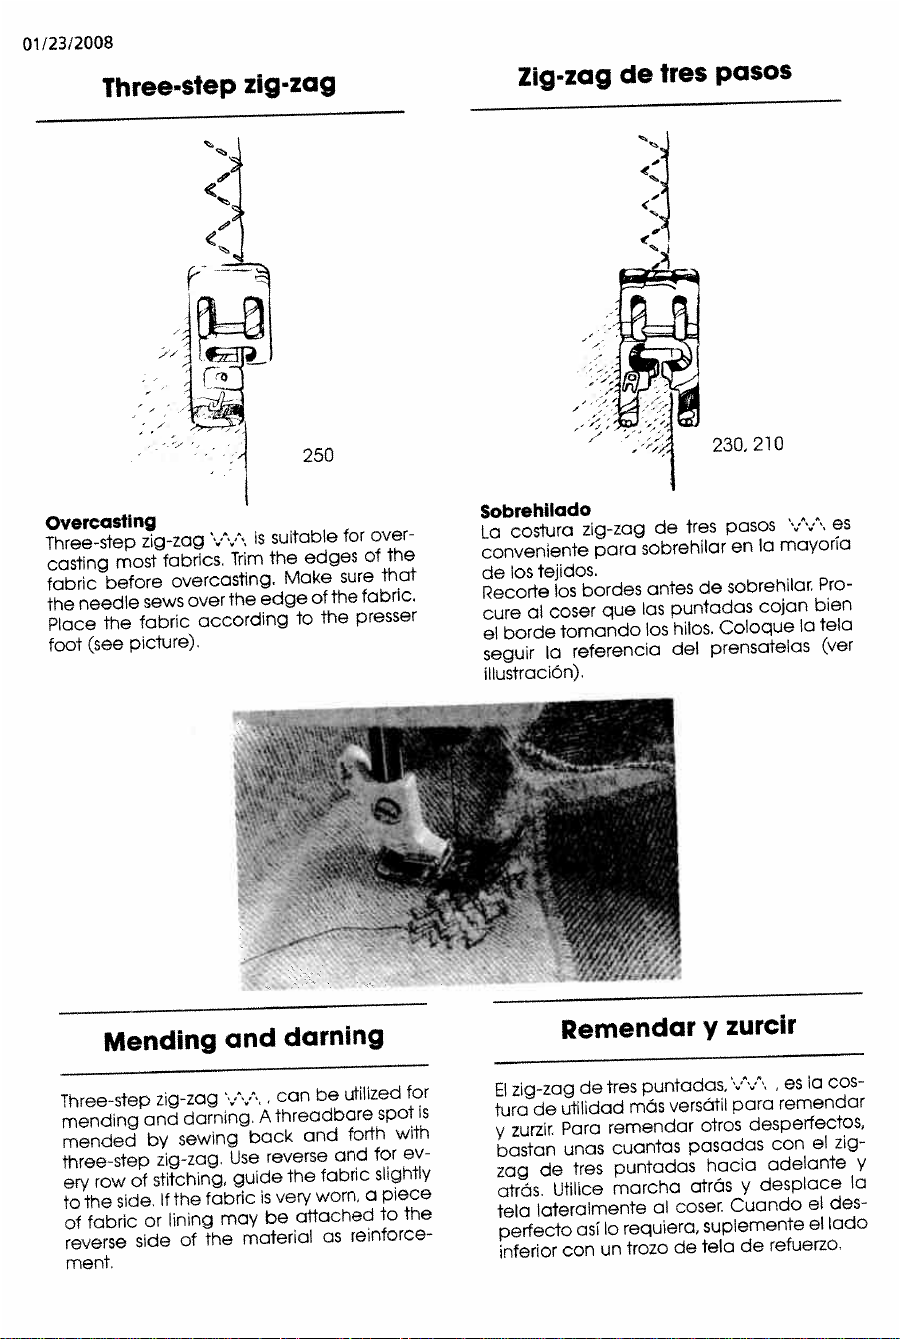
01/23/2008
Three-step
zig-zag
Zig-zag
de
tres
pasos
1
<1
Overcasting
Three-step
zig-zag
‘‘,A
is
suitable
for
over
casting
most
fabrics.
Trim
the
edges
of
the
fabric
before
overcasfing.
Make
sure
that
the
needle
sews
over
the
edge
of
the
fabric.
Place
the
fabric
according
to
the
presser
foot
(see
picture),
Sobrehflado
La
costura
zig-zag
de
tres
pasos
‘vA
es
conveniente
para
sobrehilar
en
a
mayoria
de
los
tejidos.
Recorte
los
bordes
antes
de
sobrehilar.
Pro
cure
al
coser
que
as
puntadas
cojan
bien
el
borde
tomando
los
hilos.
Coloque
Ia
tela
seguir
Ia
referencia
del
prensatelas
(ver
illustraciOn),
Three-step
zig-zag
can
be
utilized
for
mending
and
darning.
A
threadbare
spot
is
mended
by
sewing
back
and
forth
with
three-step
zig-zag
Use
reverse
and
for
ev
ery
row
of
stitching,
guide
the
fabric
slightly
to
the
side.
If
the
fabric
is
very
worn,
a
piece
of
fabric
or
lining
may
be
aftached
to
the
reverse
side
of
the
material
as
reinforce
ment.
El
zig-zag
de
tres
puntadas,
‘v\’’,
,
es
Ia
cos
tura
de
utilidad
mds
versOtil
para
remendar
y
zurzir.
Para
remendar
otros
desperfectos,
boston
unas
cuantas
posados
con
el
zig
zag
de
tres
puntadas
hacia
adelante
y
atrOs.
Utilice
marcha
atrás
y
desplace
Ia
tela
laferalmente
al
coser.
Cuando
el
des
perfecto
asI
10
requiera,
suplemente
el
lado
inferior
con
un
trozo
de
tela
de
refuerzo
c
230,210
250
Mending
and
darning
Pemendar
y
zurcir
Downloaded from www.ManualsFile.com manuals search engine
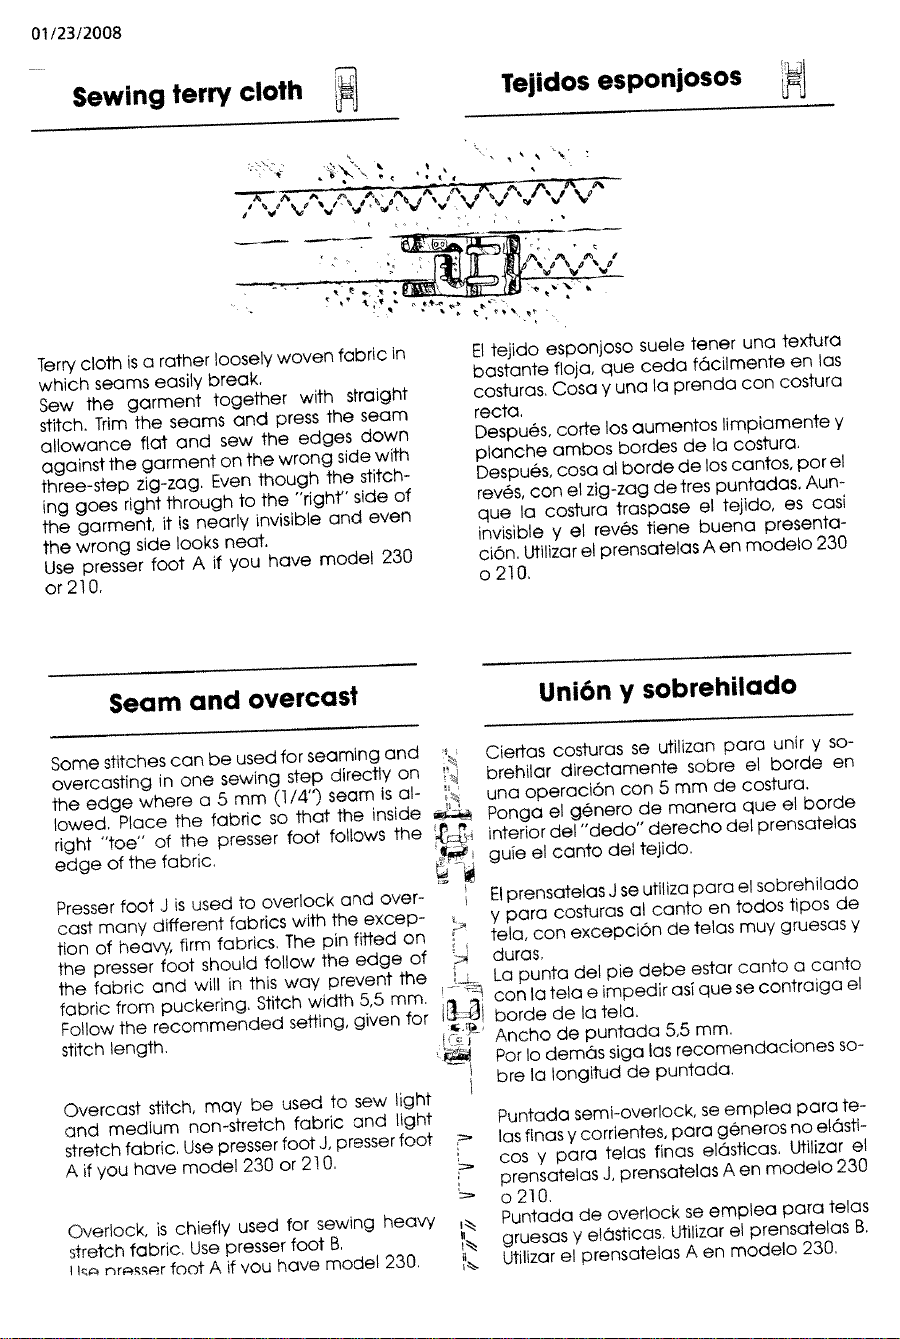
01/23/2008
Sewing
terry
cloth
Tejidos
esponjosos
Terry
cloth
is
a
rather
loosely
woven
fabric
in
which
seams
easily
break,
Sew
the
garment
together
with
straight
stitch.
Trim
the
seams
and
press
the
seam
allowance
flat
and
sew
the
edges
down
against
the
garment
on
the
wrong
side
with
three-step
zig-zag.
Even
though
the
stitch
ing
goes
right
through
to
the
“right”
side
of
the
garment,
it
is
nearly
invisible
and
even
the
wrong
side
looks
neat,
Use
presser
foot
A
if
you
have
model
230
or2lO.
El
tejido
esponjoso
suele
tener
una
textura
bastante
floja,
que
ceda
fOcilmente
en
las
costuras.
Cosa
y
una
Ia
prenda
con
costura
recta.
Después,
corte
los
aumentos
limpiamente
y
planche
ambos
bordes
de
a
costura.
Después,
cosa
al
borde
de
los
cantos,
por
el
revés,
con
el
zig-zag
de
tres
puntadas.
Aun
que
Ia
costura
traspase
el
tejido,
es
casi
invisible
y
el
revés
fiene
buena
presenta
dOn.
Utilizar
el
prensatelas
A
en
modelo
230
0210.
Seam
and
overcast
Union
y
sobrehilado
Some
stitches
can
be
used
for
seaming
and
overcasting
in
one
sewing
step
direcily
on
the
edge
where
a
5
mm
(1/4”)
seam
is
al
lowed
Place
the
fabric
so
that
the
inside
right
“toe”
of
the
presser
foot
follows
the
edge
of
the
fabric
Presser
foot
3
is
used
to
overlock
and
over
cast
many
different
fabrics
with
the
excep
tion
of
heavy
firm
fabrics.
The
pin
fitted
on
the
presser
foot
should
follow
the
edge
of
the
fabric
and
will
in
this
way
prevent
the
fabric
from
puckering.
Stitch
width
5,5
mm
Follow
the
recommended
setting,
given
for
stitch
length.
Overcast
stitch,
may
be
used
to
sew
light
and
medium
non-stretch
fabric
and
light
stretch
fabric.
Use
presser
foot
J,
presser
foot
A
if
you
have
model
230
or
210.
Overlock,
is
chiefly
used
for
sewing
heavy
stretch
fabric.
Use
presser
foot
B.
I
i
nrcsr
foot
A
if
you
have
model
230
Ciertas
costuras
se
utilizan
pora
unir
y
so
brehilar
directamente
sabre
ci
borde
en
una
operaciOn
con
5
mm
do
costura.
Ponga
ci
genera
de
manero
que
ci
borde
interior
del
“dedo”
derecho
del
prensatelas
guie
ci
canto
del
tejido.
El
prensatelas
J
se
utiliza
para
ci
sobrehilado
y
paro
costuras
al
canto
en
todos
tpos
de
tela,
con
excepciOn
de
telas
muy
gruesas
y
duras.
La
punta
del
pie
debe
estar
canto
a
canto
con
a
tela
e
impedir
asi
quo
se
contraga
ci
borde
de
Ia
tela.
Ancho
de
puntada
5,5
mm.
Por
10
demOs
siga
las
recomendaciones
so
bre
a
longitud
de
puntada.
Puntada
semi-overlock,
so
emplea
para
te
las
finas
y
corrientes,
para
generos
no
elOsti
cos
y
para
telas
finas
elOsticas.
Utilizar
ci
prensatelas
3.
prensatelas
A
en
modelo
230
o210.
Puntada
de
overlock
se
emplea
para
telas
gruesas
y
elOsticas
Utilizar
ci
prensatelas
B.
Ufilizar
ci
prensatelas
A
en
moaelo
230.
‘
.
,
‘
-z
d’
‘/
\/
4/
./
‘
b’
\/
\/
z:
z
v
q
Downloaded from www.ManualsFile.com manuals search engine
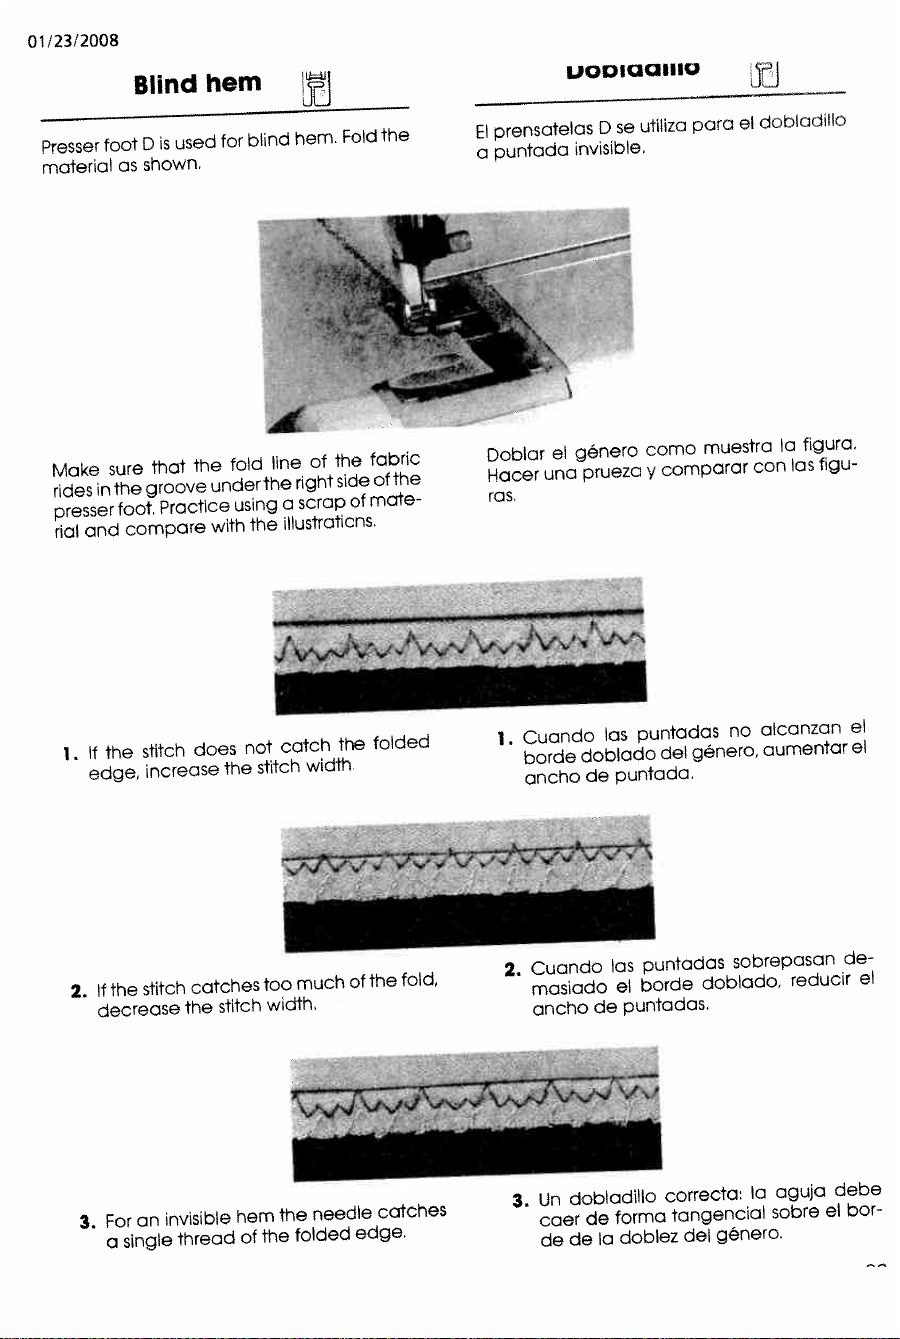
01/23/2008
Bhnd
hem
Li
UQD,UUIIIU
Presser
foot
D
is
used
for
blind
hem.
Fold
the
material
as
shown.
Make
sure
that
the
fold
line
of
the
fabric
rides
in
the
groove
under
the
right
side
of
the
presser
foot.
Practice
using
a
scrap
of
mate
rial
and
compare
with
the
illustrations
El
prensatelas
D
se
utiliza
paro
01
dobladillo
a
puntada
invisible,
Doblar
el
genero
como
muestra
a
figura.
Hacer
una
prueza
y
comparar
con
as
figu
ras,
1.
if
the
stitch
does
not
catch
the
folded
edge,
increase
the
stitch
width.
1.
Cuando
las
puntados
no
alcanzan
el
borde
doblado
del
género,
oumentar
el
ancho
de
puntada.
2.
If
the
stitch
catches
too
much
of
the
fold,
decrease
the
stitch
width.
3.
For
an
invisible
hem
the
needle
catches
a
single
thread
of
the
folded
edge.
2.
Cuando
las
puntadas
sobrepasan
de
masiado
el
borde
doblado,
reducir
el
ancho
de
puntadas.
3.
Un
dobladillo
correcta:
a
aguja
debe
caer
do
forma
tangencial
sobre
el
bor
de
de
Ia
doblez
del
género.
Downloaded from www.ManualsFile.com manuals search engine
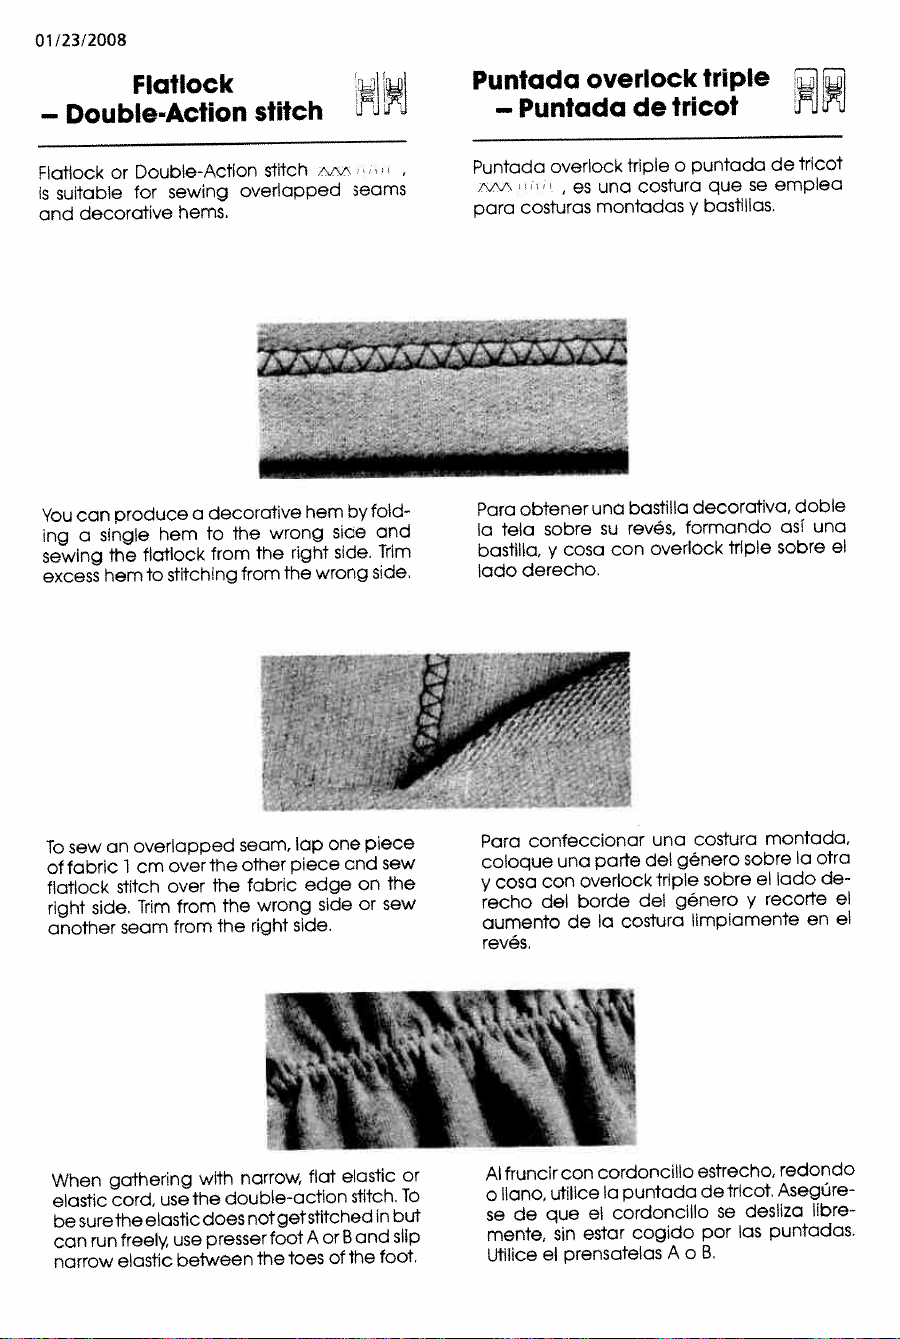
01/23/2008
Flatlock
—
Double-Action
stitch
?i
Puntada
overlock
triple
—
Puntada
de
tricot
ii
Flatlock
or
Double-Action
stitch
w
is
suitable
for
sewing
overlapped
seams
and
decorative
hems,
Puntada
overlock
triple
o
puntada
de
tricot
7W’
,
es
una
costura
que
se
emplea
para
costuras
montadas
y
basifilas.
You
can
produce
a
decorative
hem
by
fold
ing
a
single
hem
to
the
wrong
side
and
sewing
the
flatlock
from
the
right
side.
Trim
excess
hem
to
stitching
from
the
wrong
side.
To
sew
an
overlapped
seam,
lap
one
piece
of
fabric
1
cm
over
the
other
piece
and
sew
flatlock
stitch
over
the
fabric
edge
on
the
right
side.
Trim
from
the
wrong
side
or
sew
another
seam
from
the
right
side.
When
gathering
with
narrow,
flat
elastic
or
elastic
cord,
use
the
double-action
stitch.
To
be
surethe
elastic
does
not
get
stitched
in
but
can
run
freely
use
presser
foot
A
or
B
and
slip
narrow
elastic
between
the
toes
of
the
foot,
Para
obtener
una
bosNIa
decorativa,
doble
Ia
tela
sobre
su
revés,
formando
asi
una
bastilla,
y
cosa
con
overlock
triple
sabre
el
ado
derecho,
Para
confeccionar
una
costura
montada,
coloque
una
parte
del
género
sobre
a
otra
y
cosa
con
overlock
triple
sobre
el
ado
de
recho
del
borde
del
genera
y
recorte
el
aumento
de
Ia
costura
impiamente
en
el
revés,
Al
fruncir
con
cordoncillo
estrecho,
redondo
o
ilano,
utilice
a
puntada
de
tricot,
AsegUre
se
de
que
el
cordoncillo
se
desliza
libre
mente,
sin
estar
cogido
por
las
puntadas.
Ulilice
el
prensatelas
A
o
B.
Downloaded from www.ManualsFile.com manuals search engine
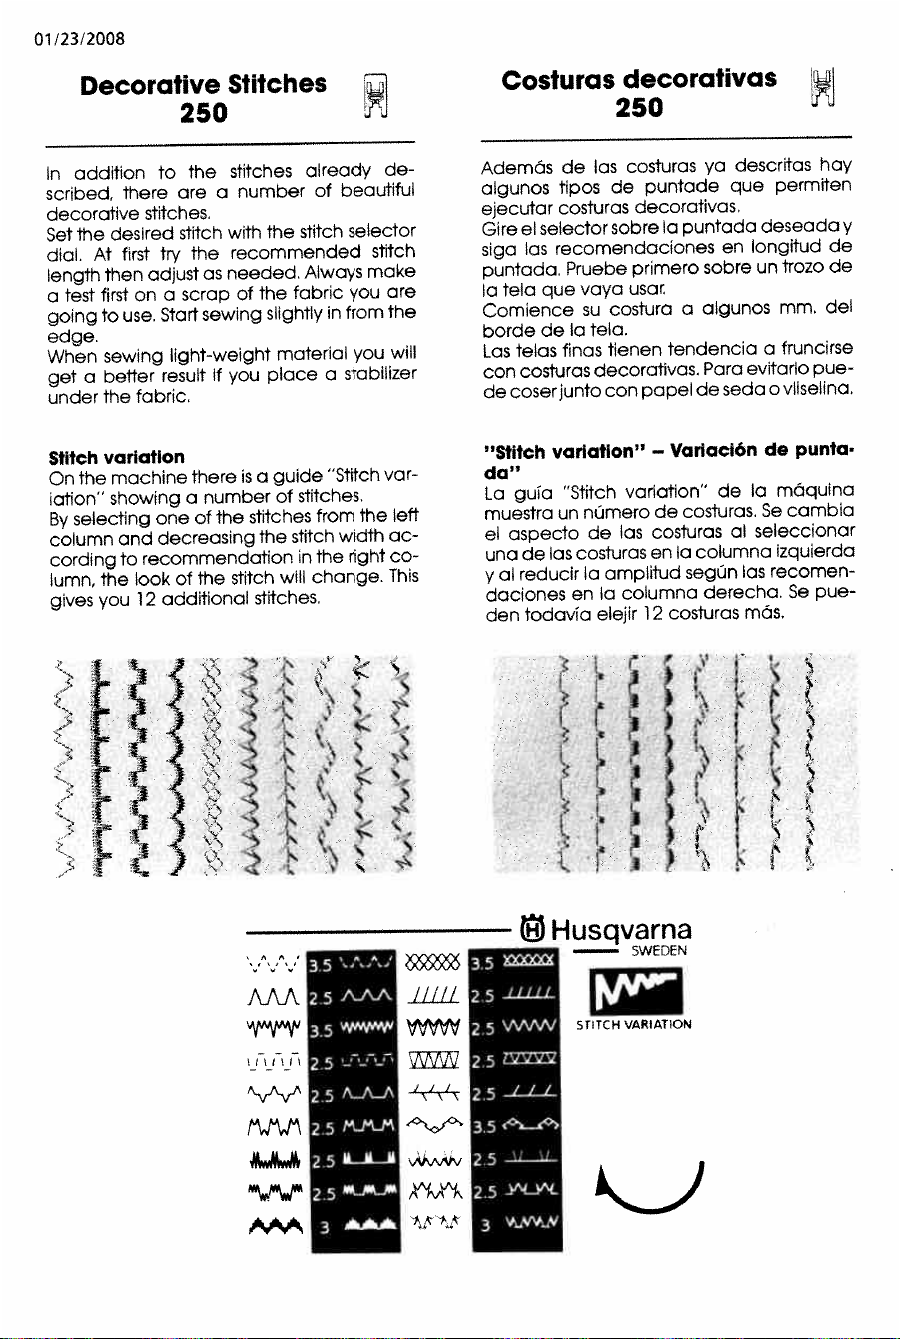
01/23/2008
Decorative
Stitches
250
Costuras
decorativas
250
In
addition
to
the
stitches
already
de
scribed,
there
are
a
number
of
beautiful
decorative
stitches.
Sot
the
desired
stitch
with
the
stitch
selector
dial.
At
first
try
the
recommended
stitch
length
then
adjust
as
needed.
Always
make
a
test
first
on
a
scrap
of
the
fabric
you
are
going
to
use.
Start
sewing
slightly
in
from
the
edge.
When
sewing
light-weight
material
you
will
get
a
better
result
if
you
place
a
stabilizer
under
the
fabric.
Stitch
variation
On
the
machine
there
is
a
guide
“Slitch
var
iation”
showing
a
number
of
stitches.
By
selecting
one
of
the
stitches
from
the
left
column
and
decreasing
the
stitch
width
ac
cording
to
recommendation
in
the
right
co
lumn,
the
look
of
the
stitch
will
change.
This
gives
you
12
additional
stitches.
.,,
‘,
4_
-.
L
)
..
“
,.
!
)
‘
‘
t
:
‘,
.“
‘.
‘.“
r
‘
‘
Además
do
las
costuras
ya
descritas
hay
algunos
tipos
de
puntade
quo
permiten
ejocutor
costuras
decorativas.
Giro
ci
selector
sobre
Ia
puntada
deseada
y
siga
las
recomondacionos
en
longitud
de
puntada.
Pruebe
primero
sobre
un
trozo
do
Ia
tela
que
vaya
usar
Comience
su
costura
a
algunos
mm.
del
bordedelatela.
Las
telas
finas
tienen
tendencia
a
fruncirse
con
costuras
decoralivas,
Paro
evitarlo
pue
do
coser
junto
con
papel
do
soda
ovliselina.
“Stitch
variation”
—
Variaci6n
de
punta’
da”
La
gula
“Stitch
variation”
do
Ia
mOquina
muestra
un
nUmero
de
costuras.
So
cambia
ci
aspocto
de
las
costuras
al
soleccionar
una
do
las
costuras
en
Ia
columna
izquierda
y
al
reducir
Ia
amplilud
segUn
las
recomen
daciones
on
Ia
columna
derocha.
Se
pue
don
todavia
dour
12
costuras
mOs.
1’
‘
‘
I
I
i
;‘
)
:‘
‘I
,
h
I
a
‘
..
‘
‘
I
‘
r
c
a
‘
i
Husqvarna
—
SWEDEN
1
IY
SrITCH
VARATON
cJ
Downloaded from www.ManualsFile.com manuals search engine
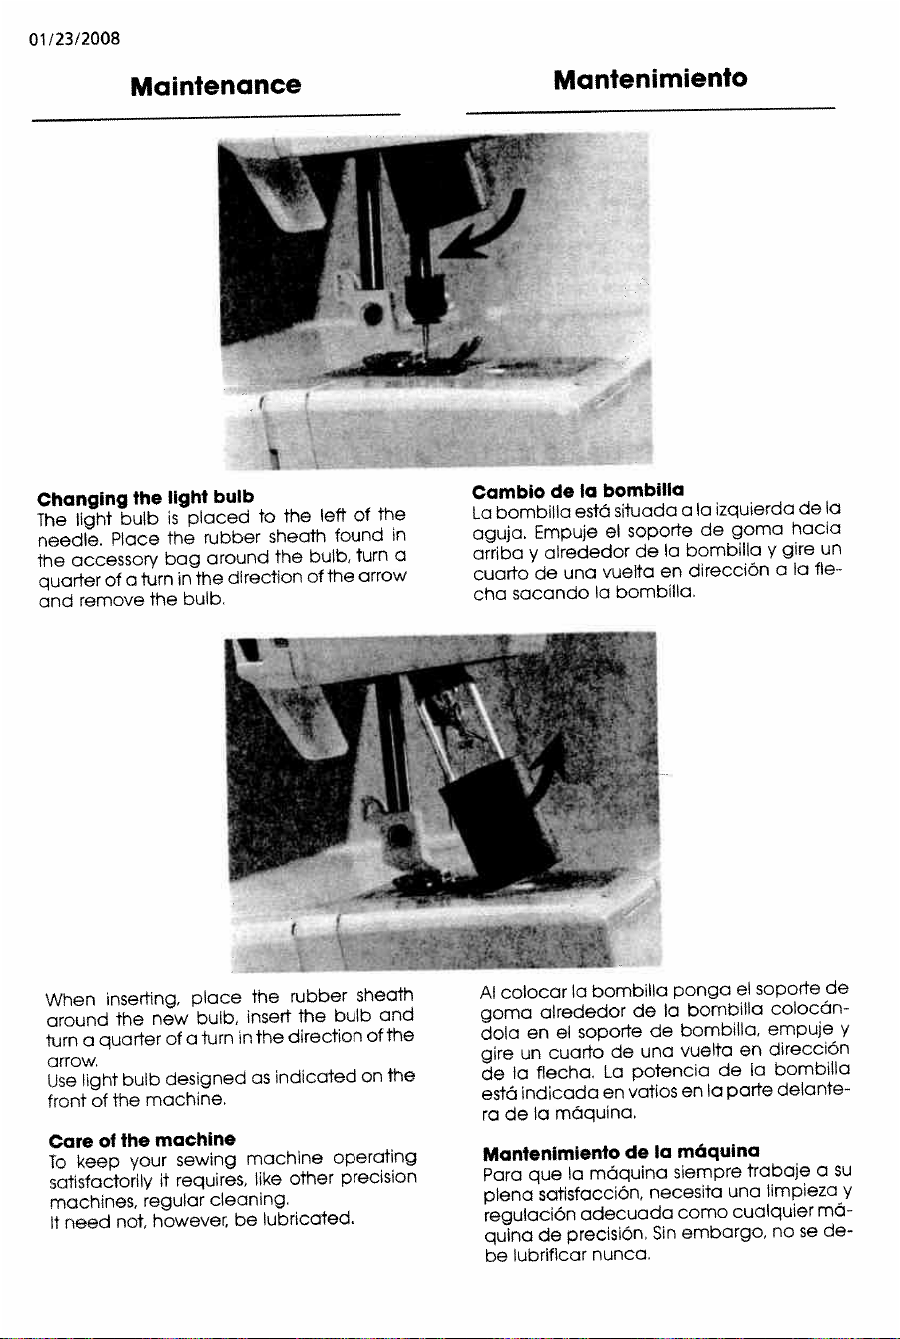
01/23/2008
Maintenance
Mantenimiento
Changing
the
light
bulb
The
light
bulb
is
placed
to
the
left
of
the
needle,
Place
the
rubber
sheath
found
in
the
accessory
bag
around
The
bulb,
turn
a
quarter
of
a
turn
in
the
direction
of
the
arrow
and
remove
the
bulb.
When
inserting,
place
the
rubber
sheath
around
the
new
bulb,
insert
the
bulb
and
turn
a
quarter
of
citurn
in
the
direction
of
the
arrow.
Use
light
bulb
designed
as
indicated
on
the
front
of
the
machine.
Care
ol
the
machine
To
keep
your
sewing
machine
operating
satisfactorily
it
requires,
like
other
precision
machines,
regular
cleaning.
It
need
not,
however,
be
lubricated.
Cambio
do
Ia
bombUla
La
bombilla
estã
situada
a
Ia
zquierda
de
Ia
aguja.
Empuje
el
soporte
de
goma
hacia
arriba
y
airededor
de
a
bombilla
y
gire
un
cuarto
de
una
vuelta
en
direcciOn
a
Ia
fle
cha
sacando
a
bombilla.
Al
colocar
Ia
bombilla
ponga
eI
soporte
de
goma
olrededor
de
Ia
bornbilla
colocán
dola
en
el
soporte
de
bombilla,
empuje
y
gire
un
cuarto
de
una
vuelta
en
direcciOn
de
Ia
flecha.
La
potencia
de
a
bombilla
está
indicada
en
vatios
en
Ia
parte
delante
ra
de
Ia
mOquina.
Mantenimlento
do
Ia
máquina
Para
que
a
máquina
siempre
trabaje
a
su
plena
satisfacciOn,
necesita
una
limpieza
y
regulacion
adecuada
coma
cualquier
ma—
quina
de
precisiOn.
Sin
embargo,
no
se
de
be
lubrificar
nunca.
Downloaded from www.ManualsFile.com manuals search engine
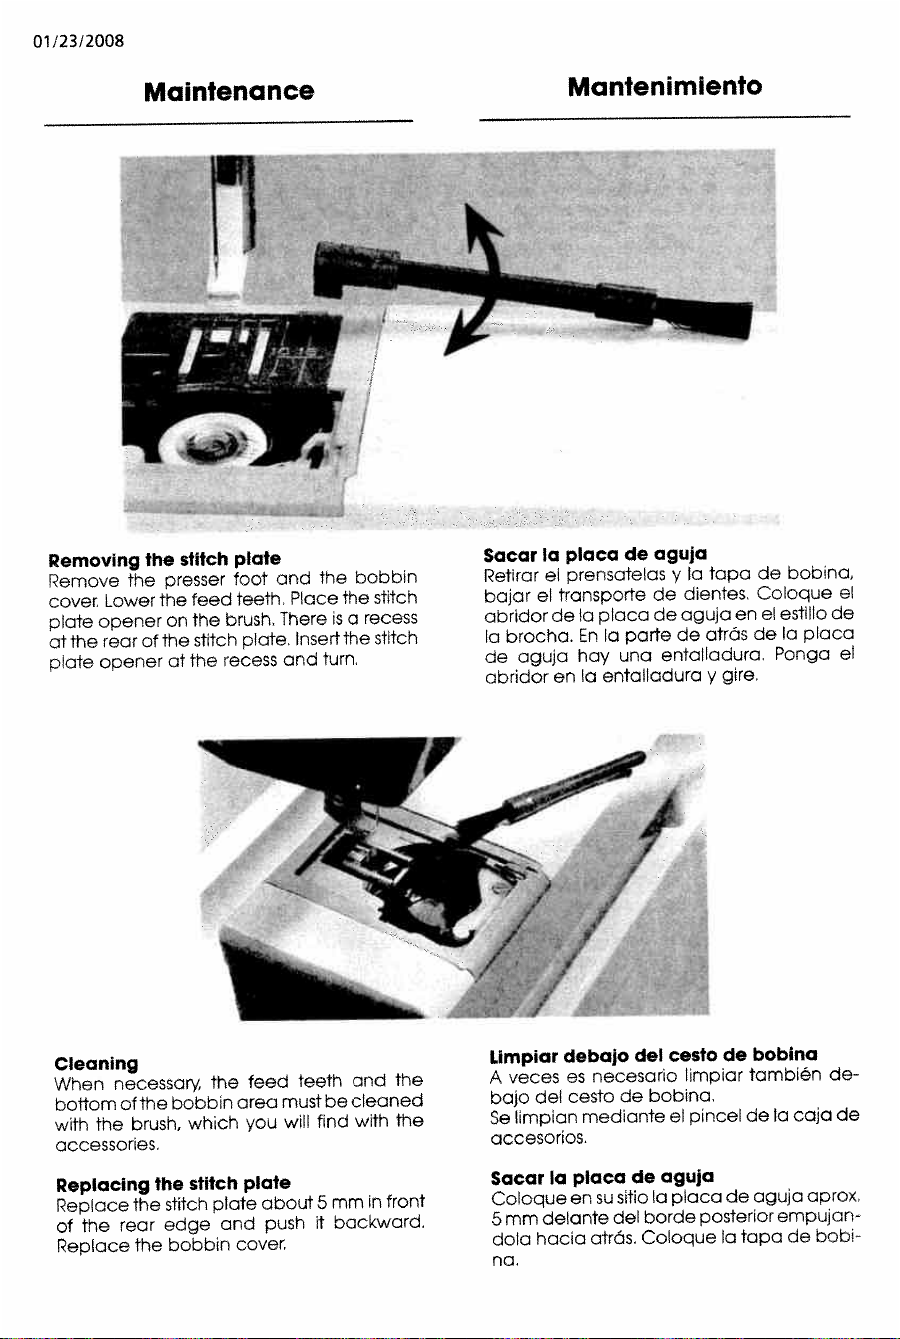
01/23/2008
Maintenance
Mantenimiento
Removing
the
stitch
plate
Remove
the
presser
foot
and
the
bobbin
cover
Lower
the
feed
teeth.
Place
the
stitch
plate
opener
on
the
brush
There
is
a
recess
at
the
rear
of
the
stitch
plate
Insert
the
stitch
plate
opener
at
the
recess
and
turn,
Cleaning
When
necessar
the
feed
teeth
and
the
boftom
of
the
bobbin
area
must
be
cleaned
with
the
brush,
which
you
will
find
with
the
accessories.
Replacing
the
stitch
plate
Replace
the
stitch
plate
about
5
mm
in
front
of
the
rear
edge
and
push
it
backward,
Replace
the
bobbin
cover.
Sacar
Ia
placa
de
aguja
Retirar
ci
prensatelas
y
Ia
tapa
de
bobina,
bajar
ci
transporte
de
dientes.
Coloque
ci
abridor
de
a
placa
de
oguja
en
ci
estillo
de
Ia
brocha.
En
Ia
porte
de
atrãs
de
Ia
placa
de
aguja
hay
una
entalladura.
Ponga
ci
abridor
en
Ia
entalladura
y
gire.
Limpiar
debajo
del
cesto
de
bobina
A
veces
es
necesarlo
limpiar
también
de
bajo
del
cesto
de
bobina,
Se
limpian
mediante
ci
pincel
de
Ia
caja
de
accesorios.
Sacar
Ia
piaca
de
aguja
Coloque
en
su
sitlo
Ia
placa
de
aguja
aprox.
5mm
delonte
del
borde
posterior
empulan
dola
hacia
atrOs.
Coloque
Ia
tapa
de
bobi
no.
Downloaded from www.ManualsFile.com manuals search engine
01/23/2008
Fault-finding
Posibles
averlas
Always
start
by
checking
the
needle
An
important
part
which
needs
to
be
changed
from
time
to
time
is
the
needle.
Always
start
with
a
new
needle
as
soon
as
you
discover
that
a
seam
is
not
what
you
expected,
Test
sew
on
a
scrap
of
the
fabric
you
are
sewing.
Check
that
you
have
chosen
the
correct
needle
and
see
that
it
is
correctly
inserted,
see
page
15.
Unattractive
stitches
The
thread
tension
is
not
correct.
See
page
14.
Make
sure
that
the
thread
is
not
catching.
Certain
thread
spools
are
unsuitable
for
spooling
from
a
horizontal
spool
pin.
Try
in
stead
with
the
vertical
spool
pin.
The
machine
may
be
incorrectly
threaded.
The
correct
threading
is
shown
on
page
11.
Wrong
lower
thread.
It
should
be
of
the
same
thickness
as
the
upper
thread.
The
needle
breaks
You
may
have
helped
the
machine
to
feed
by
pulling
the
fabric,
The
needle
can
strike
against
the
stitch
plate
and
break.
The
upper
thread
breaks
Check
the
thread
spool
to
see
that
it
has
not
caught
in
any
way
The
needle
eye
may
have
sharp
edges
which
cut
the
thread.
If
so,
change
the
nee
dle,
See
page
15.
The
upper
thread
is
incorrectly
threaded.
Seepage
11.
The
upper
thread
may
have
too
much
ten
sion,
Refer
to
page
14.
The
thread
is
knotted.
The
hole
in
the
stitch
plate
may
be
chipped
and
have
sharp
edges.
Slight
damage
to
the
stitch
plate
can
possibly
be
polished
or
filed
but
we
recommend
that
you
replace
it.
The
lower
thread
breaks
The
lower
thread
may
be
incorrectly
thread
ed.
See
page
13.
The
stitch
plate
hole
is
damaged.
See
“Up
per
thread
breaks”.
Controlor
Ia
oguja
La
parte
más
importe
que
hay
que
cambiar
de
vez
en
cuando
es
a
aguja.
Per
Ia
tanto,
cuando
alguna
vez
una
costura
no
sea
sa
tisfactoria,
comprobar
con
una
aguja
nue
va
en
un
trozo
de
tela.
Controlar
que
se
haya
elegido
Ia
aguja
correcta
y
asegurar
se
de
que
Ia
aguja
sea
introducida
hasta
su
tape
y
que
el
tornillo
estO
apretado
correc
tamente,
vóase
Ia
pdg
15.
Puntadas
falsas
La
tensiOn
del
hilo
no
es
correcta,
véase
Ia
p6g.
14.
AsegUrarse
que
el
hilo
no
está
bloqueado.
Ciertos
porta-carretes
no
son
adecuados
para
el
devanado
desde
porta-carretes
horizontales.
Polo
tanto,
comprobar
con
un
porta-carre
to
vertical.
El
enhebrado
no
es
correcto,
verificar
segün
Ia
p6g.
1
1,,
Hilo
inferior
inadecuado.
Este
debe
ser
igual
que
el
superior
Rotura
de
Ia
aguja
Nunca
se
debe
tirar
de
Ia
tela
durante
el
cosido,
porque
Ia
aguja
se
puede
romper
al
tropezar
contra
Ia
placa
de
aguja.
Rotura
del
hilo
superior
Examinar
eI
carrete
del
hilo
y
verificar
si
el
hilo
se
ha
enganchado
en
alguna
parte.
Podri’a
ser
que
el
agujero
do
Ia
aguja
no
estuviera
10
suficiente
bien
pulido.
Cambiar
Ia
aguja,
véase
Ia
p6g.
15.
El
hilo
superior
estO
mal
enhebrado,
véase
Ia
p6g.
11.
La
tensiOn
del
hilo
superior
es
demasiado
fuerte.
Ver
a
“TensiOn
del
hilo”.
p6g.
14.
El
hilo
tiene
nudos.
El
agujero
de
Ia
placa
de
Ia
aguja
so
ha
danado
par
los
continuos
pinchazos
de
a
aguia.
Hay
que
pulir
el
ogujero,
pero
Io
me
jor
es
cambiar
Ia
placa
de
aguja.
Rotura
del
hilo
Inferior
El
hilo
inferior
esid
mal
enhebrado,
ver
a
p6g.
13.
Se
ha
dañado
el
agujero
de
Ia
placa
de
aguja,
ver
arriba.
Downloaded from www.ManualsFile.com manuals search engine
01/23/2008
Ihis
may
be
due
to
poor
quolily
ii
Alhen
sewing
with
cotton
thread,
increase
rho
thread
tension,
the
machine
is
not
correctly
threaded
for
bobbin
winding.
See
page
12.
The
fabric
puckers
The
upper
thread
tension
is
too
tight.
See
page
14
for
correct
thread
tension,
The
machine
does
not
teed
the
fabric
The
stitch
length
is
too
short,
Increase
stitch
length.
The
feed
teeth
may
be
lowered.
Raise
them
by
turning
the
stitch
length
dial
to
the
left.
The
feed
teeth
are
full
of
dust
and
dirt.
Clean
with
the
brush.
See
page
33.
The
seam
Is
too
loose
—
fabric
layers
not
held
together
The
Thread
tension
is
far
too
loose.
Page
14
shows
how
to
adjust
the
thread
tension.
Machine
runs
sluggishly
Dirt
or
lint
has
packed
under
the
needle
plate.
Loosen
the
plate
and
brush
clean
between
the
feed
teeth,
See
page
33.
Dirt
or
lint
has
packed
in
the
hook.
Remove
the
bobbin
and
clean
with
the
brush.
See
page
33,
Expert
assistance
Hove
your
machine
“tuned
up”
regularly
by
your
dealer
If
you
have
followed
the
preceding
points
and
still
do
not
get
satisfactory
results,
you
should
contact
the
dealer
where
you
boughtthe
machine.
Your
dealer
will
always
be
pleased
to
help
you
solve
your
sewing
problems,
When
the
machine
is
being
checked,
it
is
a
great
help
if
it
can
be
test
sewn
under
as
similar
conditions
as
possible
as
when
you
used
it.
Remember
to
take
a
sewing
sample
along
with
you,
preferably
on
the
fabric
and
with
the
thread
you
intend
to
use.
A
sewing
sample
will
often
give
much
better
information
than
words.
del
hilo.
Al
coser
con
un
hilo
de
aigodOn,
aumentar
Ia
tensiOn
del
hilo.
La
mOquino
no
está
correctamente
enhe
brada
para
el
bobinodo,
ver
Ia
p0g.
12.
La
tela
se
frunce
La
tensiOn
del
hilo
superior
es
demasiado
fuerte.
TensiOn
correcto
del
hilo,
ver
Ia
p0g.
14.
No
hay
avance
del
tejido
La
longitud
do
Ia
puntada
Os
demasiado
corto.
Aumentar.
Puede
ser
que
el
transporte
esté
bojodo,
ver
Ia
p0g.
17.
El
transporte
está
lleno
do
pelusilla
y
apres
to.
Limpiarlo
con
un
pincel,
ver
Ia
p0g.
33.
La
costura
resulta
demaslado
floja
—
las
capas
del
tejido
no
estãn
fuertemente
unidas
La
tensiOn
del
hilo
es
demasiado
floja.
Ten
siOn
correcta
del
hilo,
ver
Ia
p0g.
14.
La
máquina
marcho
con
dificultad
Puede
ser
que
haya
acumulado
demasia
do
pelusilla
y
apresto
por
debajo
do
Ia
plo
ca
de
aguja.
Quitar
Ia
placa
do
aguja
y
limpiar
el
dentado
del
transporte
con
una
brocha,
ver
Ia
p0g.
33.
Puede
ser
quo
haya
acumulado
pelusilla
y
apresto
en
el
garfio.
Retirar
Ia
cOpsula
y
limpiarla
con
una
bra
cha,
ver
Ia
p0g.
33.
Asistencla
técnica
Cuando
so
hayan
seguido
todas
las
instruc
clones
mencionadas,
y,
a
pesar
do
ello,
no
so
consigan
resultados
satisfactorios,
pa
nerse
en
contacto
con
el
establecimiento
quo
le
vendiO
Ia
mOquina.
AlIT,
le
atenderOn
gustosamente
con
los
consejos
e
instrucciones
correspondientes.
También
le
aconsejerOn
donde
puede
mandar
Ia
mdquina
para
un
serviclo.
SerIa
de
mucha
utilidad
y
ayuda
para
01
personal
tOcnico
acompanar
a
Ia
mOquina
unas
muestras
del
tejido
e
hilos
utilizados,
como,
asimismo,
una
muestra
del
cosido
defec
tuoso.
Muchas
veces
una
muestra
del
cosido
do
mejor
informaciOn
quo
un
informe
oral.
35
Downloaded from www.ManualsFile.com manuals search engine
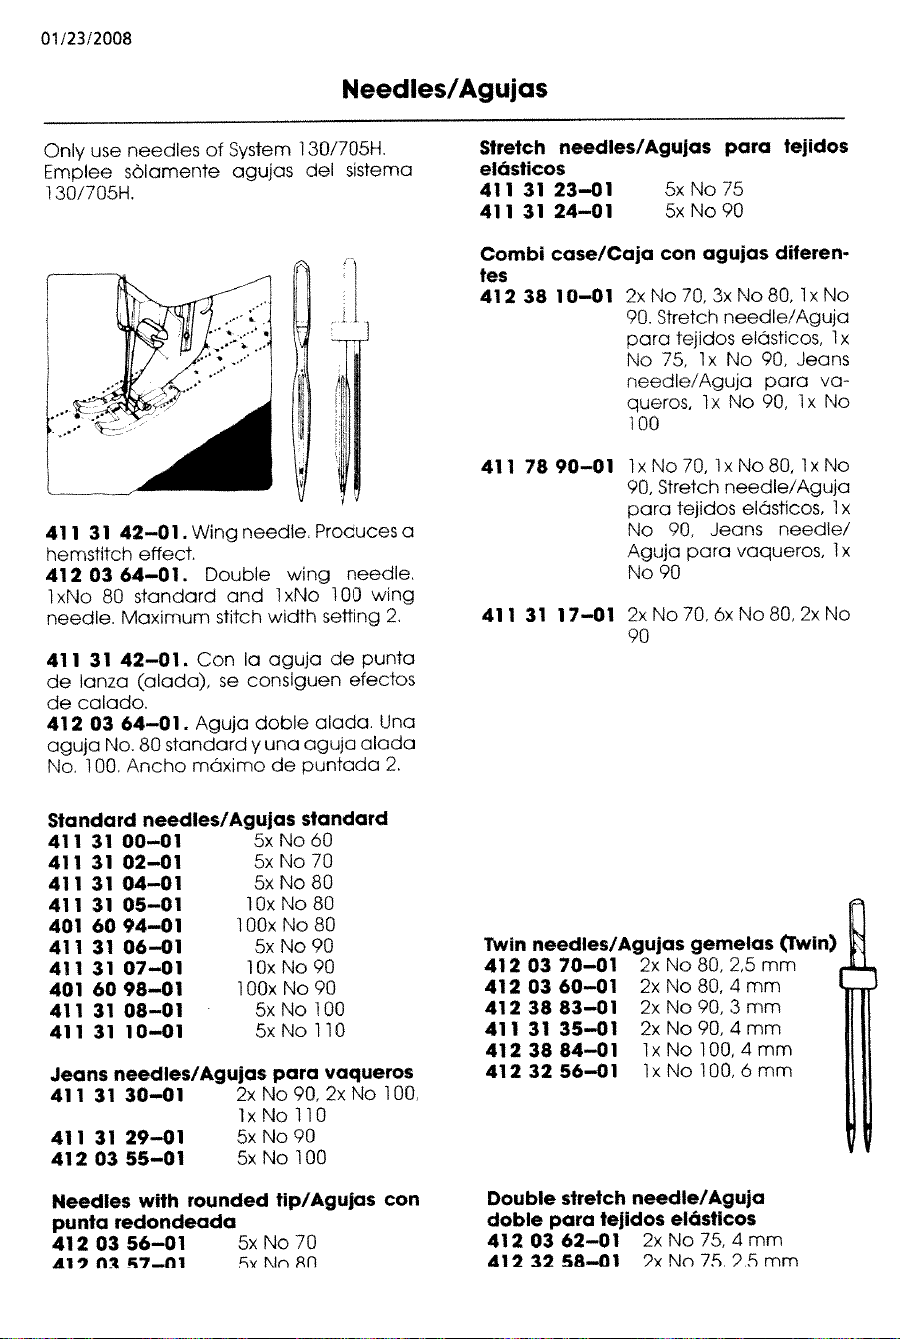
01/23/2008
Needles/Agujas
Only
use
needles
of
System
1
30/705H,
Emplee
sOlamente
agujas
del
sistema
130/7058,
411
31
42—01.Wing
needle.
Proaucesa
hemstitch
effect.
412
03
64—01.
Double
wing
needle.
lxNo
80
standard
and
lxNo
100
wing
needle.
Maximum
stitch
width
setting
2.
411
31
42—01.
Con
a
aguja
de
punta
de
lanza
(alada),
se
consiguen
efectos
de
calado.
412
03
64—01.
Aguja
doble
alada.
Una
aguja
No.80
standard
y
una
aguja
alada
No.
100.
Ancho
mdximo
de
puntada
2.
Standard
needles/Agujas
standard
411
31
00—01
5x
No
60
411
31
02—01
5x
No
70
411
31
04—01
5x
No
80
411
31
05—01
lOx
No
80
401
60
94—01
lOOx
No
80
411
3106—01
5x
No
90
411
31
07—01
lOx
No
90
401
60
98—01
lOOx
No
90
411
3108—01
5xNo
100
411
31
10—01
5xNo
110
Jeans
needles/Agujas
para
vaqueros
411
31
30—01
2x
No
90,
2x
No
100,
1
x
No
110
411
31
29—01
Sx
No
90
4120355—01
5x
No
100
Needles
with
rounded
tip/Agujas
con
punta
redondeada
412
03
56—01
5x
No
70
A19flc7....n1
FSyNo,Rn
Stretch
needles/Agujas
para
tejidos
elásticos
411
31
23—01
5x
No
75
411
31
24—01
5x
No
90
Combi
case/Caja
con
agujas
diteren
2x
No
70,
3x
No
80,
lx
No
90.
Stretch
needle/Aguja
para
tejidos
elOsticos,
lx
No
75,
lx
No
90,
Jeans
needle/Aguja
para
va
queros,
lx
No
90,
lx
No
100
lx
No
70.
lx
No
80,
lxNo
90,
Stretch
needle/Aguja
para
tejidos
elOsticos,
lx
No
90,
Jeans
needle/
Aguja
para
vaqueros,
lx
No
90
411
31
17—01
2xNo7O,óxNo8O,2xNo
90
Twin
needles/Agujas
gemelas
(Twin)
412
03
70—01
2x
No
80,2,5mm
4120360—01
2xNo80,4mm
412
38
83—01
2x
No
90,
3mm
411
31
35—01
2x
No
90,
4
mm
4123884—01
lx
No
100,4mm
4123256—01
lxNol00,ómm
Double
stretch
needle/Aguja
doble
para
tejidos
elâstlcos
4120362—01
2x
No
75,4mm
412
2
Sfi—01
2x
No
75.25mm
tes
412
38
10—01
411
78
90—01
Downloaded from www.ManualsFile.com manuals search engine
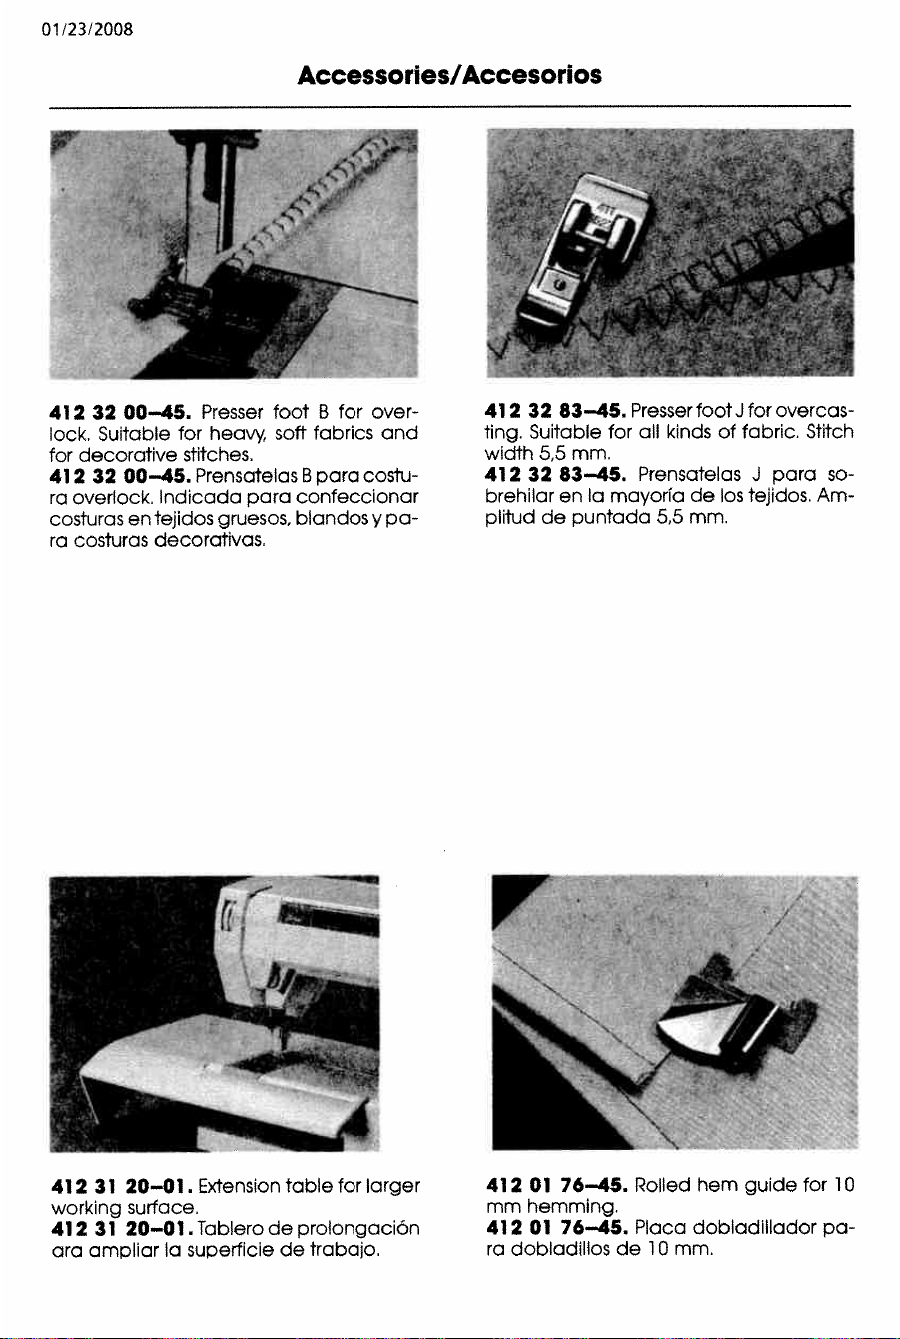
01/23/2008
Accessories/Accesorlos
412
32
00—45.
Presser
foot
B
for
over-
lock.
Suitable
for
heavy
soft
fabrics
and
for
decorative
stitches.
412
32
00—45.
Prensatelas
B
para
coslu
ra
overlock.
Indicada
para
confeccionar
costuras
en
tejidos
gruesos,
blandos
y
pa—
ra
costuras
decoralivas.
41231
20—01.
Extensiontableforlarger
working
surface.
412
31
20—01.
Tablero
de
prolongaciOn
ara
ampliar
Ia
superficie
de
trabajo.
412
32
83—45.
PresserfootJforovercas
ting.
Suitable
for
all
kinds of
fabric.
Stitch
width
5,5
mm,
412
32
83—45.
Prensatelas
J
para
so
brehilar
en
Ia
mayorIa
de
los
tejidos.
Am
plitud
de
puntada
5,5
mm.
412
01
76—45.
Polled
hem
guide
for
10
mm
hemming.
412
01
76—45.
Placa
dobladillador
pa
ra
dobladillos
de
10
mm,
N
‘
-
Downloaded from www.ManualsFile.com manuals search engine
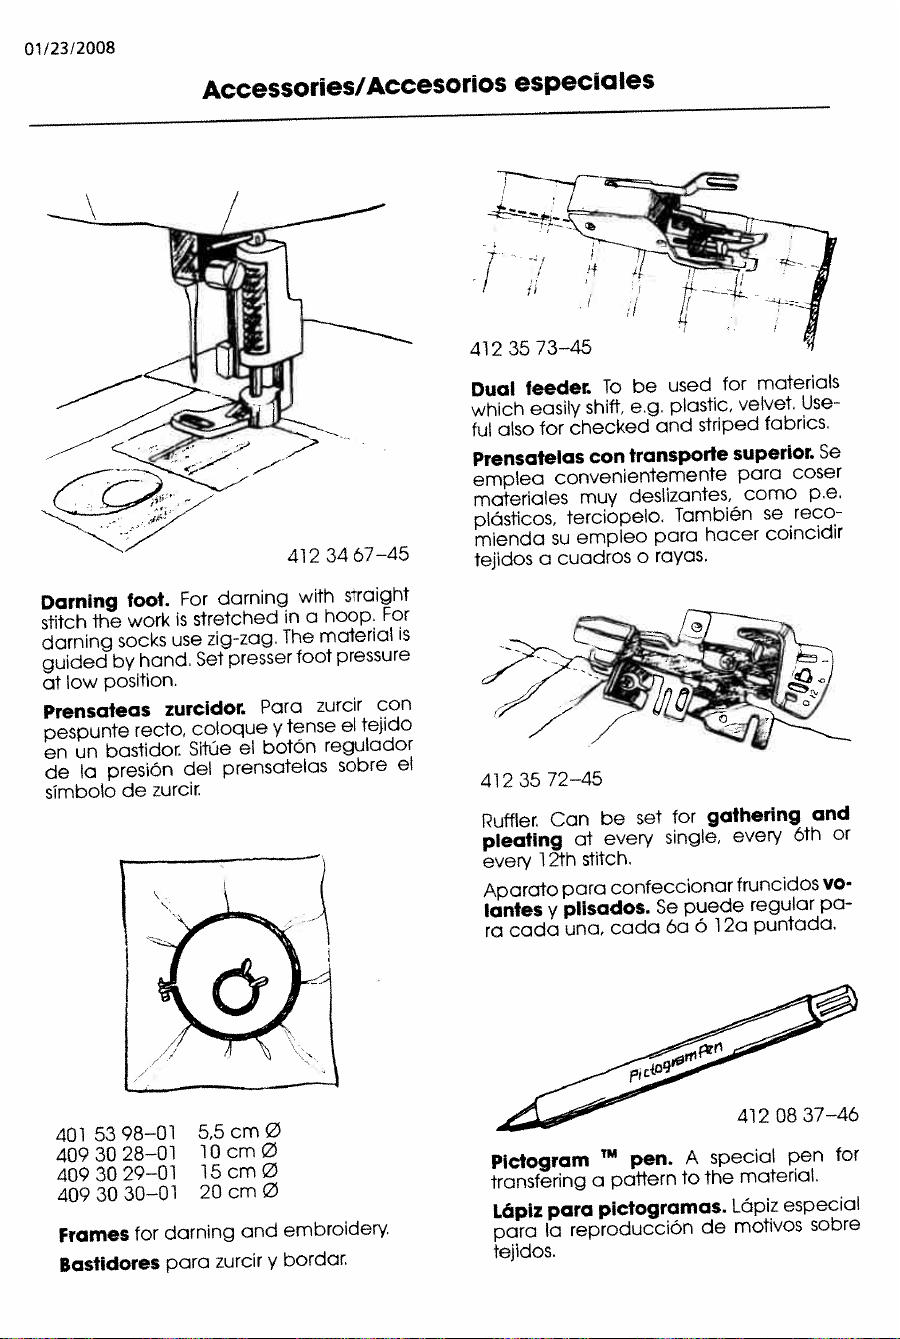
01/23/2008
Accessories/Accesorios
especiales
4123467—45
Darning
foot.
For
darning
with
straight
stitch
the
work
is
stretched
in
a
hoop.
For
darning
socks
use
zig-zag.
The
material
is
guided
by
hand.
Set
presser
foot
pressure
at
low
position.
Prensateas
zurcIdor
Para
zurcir
con
pespunte
recta,
coloque
y
tense
el
tejido
en
un
bastidor
Sitüe
el
botOn
regulador
de
Ia
presion
del
prensatelas
sobre
el
simbolo
de
zurcir
-
-._
41235
73—45
Dual
feeder.
To
be
used
for
materials
which
easily
shift,
e.g.
plastic,
velvet.
Use
ful
also
for
checked
and
striped
fabrics.
Prensatelas
con
transporte
superior.
Se
emplea
convenientemente
para
coser
materiales
muy
deslizantes,
como
p.e.
plOsticos,
terciopelo.
También
se
reco
mienda
su
empleo
para
hacer
coincidir
tejidos
a
cuadros
o
rayas.
4123572—45
Ruffler
Can
be
set
for
gathering
and
pleating
at
every
single,
every
6th
or
every
12th
stitch.
Aparato
para
confeccionar
fruncidos
vo
lantes
y
pilsados.
Se
puede
regular
pa
ra
cada
una,
cada
6a
6
1
2a
puntada.
401
53
98—01
409
30
28—01
409
30
29—0
1
409
30
30—0
1
5,5
cm
0
10cm
0
15cm
0
20cm
0
Frames
for
darning
and
embroidery
Pictogram
‘
pen.
A
special
pen
for
transfering
a
pattern
to
the
material.
Lápiz
para
pictogramas.
LOpiz
especial
para
Ia
reproducciOn
de
motivos
sobre
tejidos.
Bastidores
para
zurcir
y
bordar.
Downloaded from www.ManualsFile.com manuals search engine
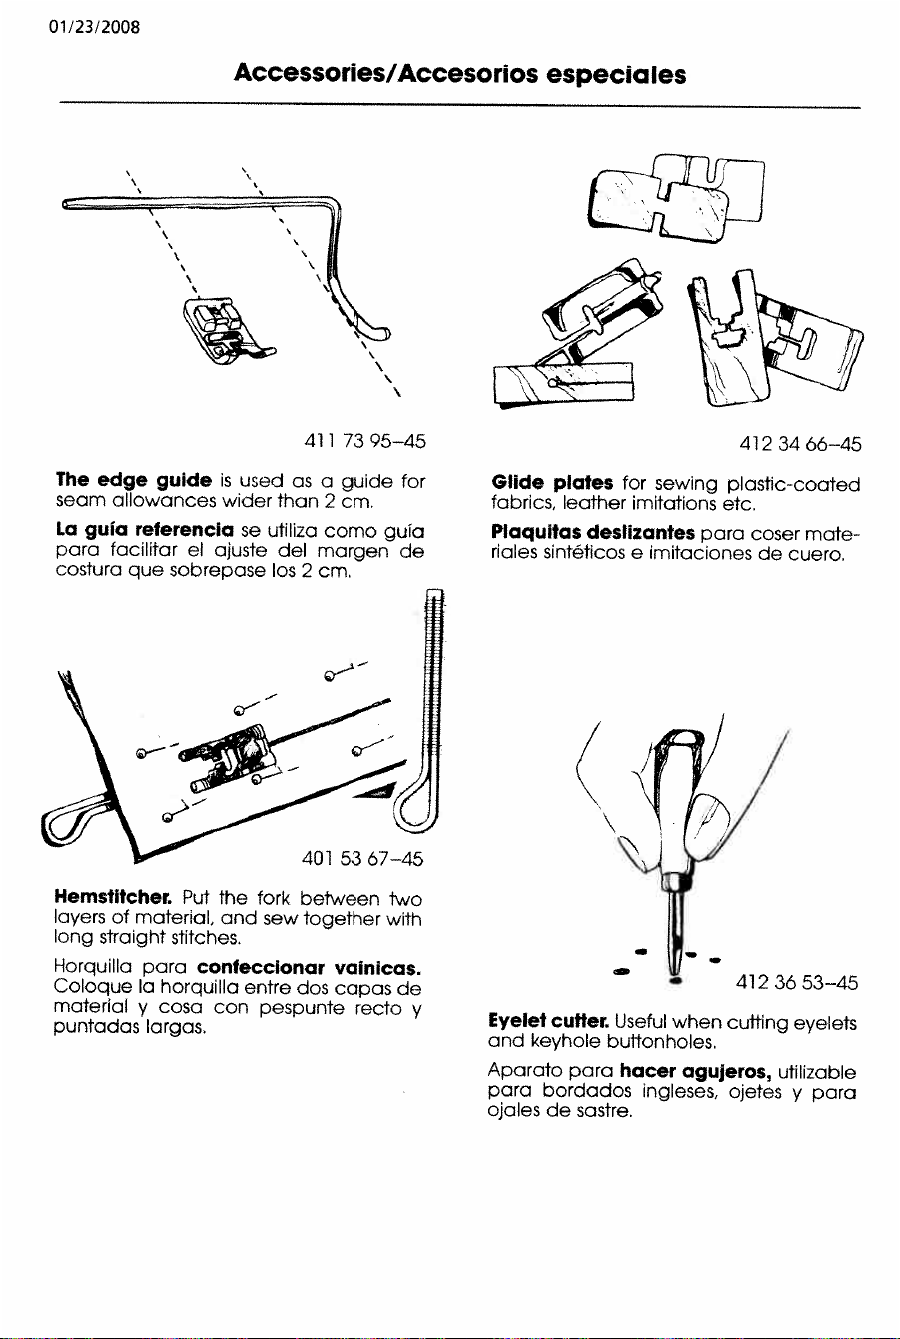
01/23/2008
Accessories/Accesorios
especiales
411
73
95—45
4123466—45
The
edge
guide
is
used
as
a
guide
for
Glide
plates
for
sewing
plastic-coated
seam
allowances
wider
than
2
cm.
fabrics,
leather
imitations
etc.
La
gula
referenda
se
utiliza
como
gula
Plaqultas
deslizantes
para
coser
mate
para
facilitar
el
ajuste
del
margen
de
riales
sintéficos
e
imitaciones
de
cuero.
costura
que
sobrepase
los
2
cm.
401
53
a7—
Hemstitcher.
Put
the
fork
between
two
layers
of
material,
and
sew
together
with
Horquilla
para
conteccionar
vainicas
—
long
straight
stitches.
Coloque
Ia
horquilla
entre
dos
capas
de
412
36
5345
material
y
cosa
con
pespunte
recto
y
puntadas
largas.
Eyelet
cufter.
Useful
when
cutting
eyelets
and
keyhole
buttonholes.
Aparato
para
hacer
agujeros,
utilizable
para
bordados
ingleses,
ojetes
y
para
ojales
de
sastre.
Downloaded from www.ManualsFile.com manuals search engine
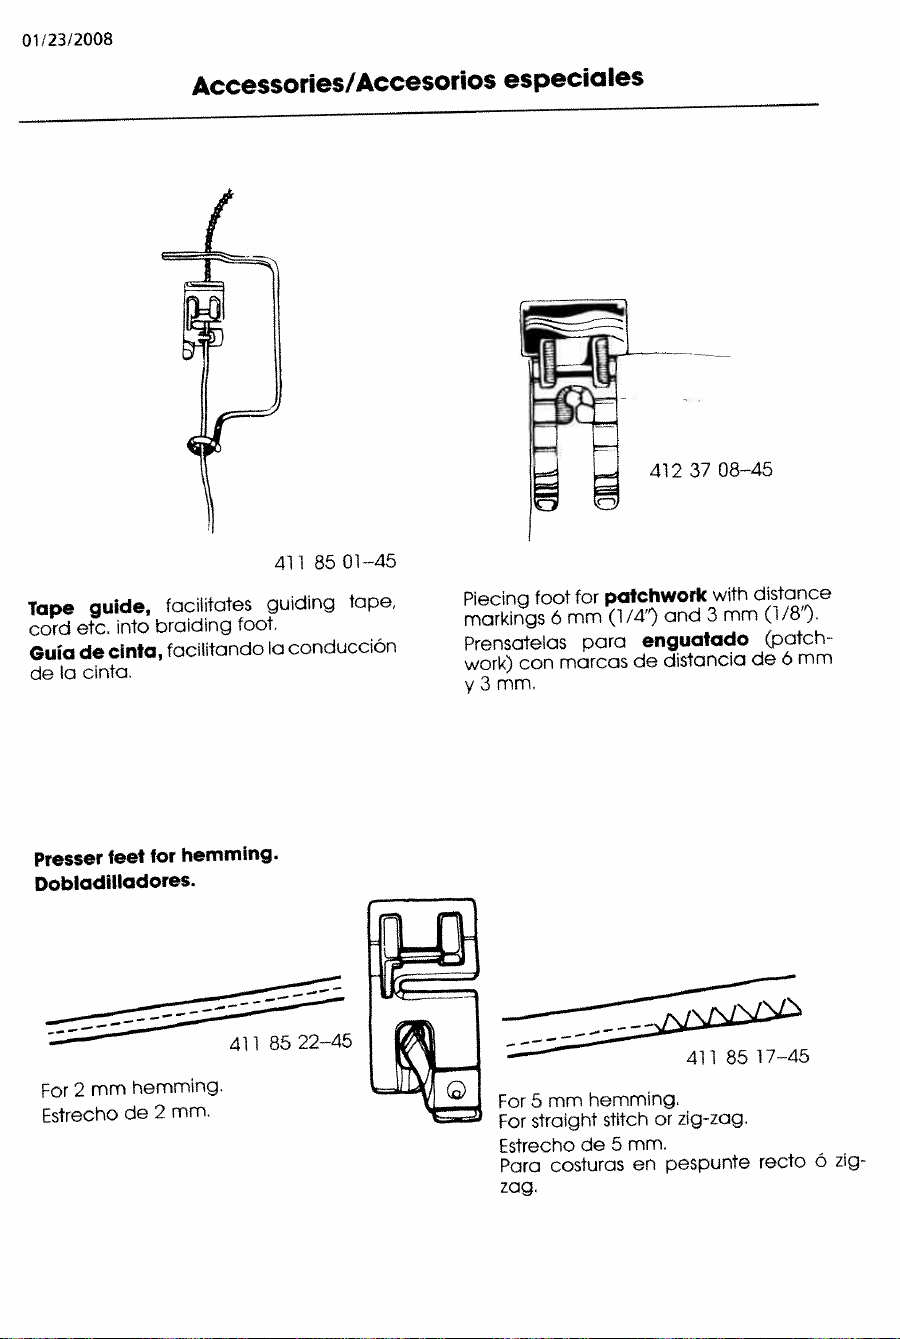
01/23/2008
Accessories/Accesorios
especiales
Th
411
85
01—45
08—45
Tape
guide,
facilitates
guiding
tape,
cord
etc.
into
braiding
toot.
Gula
de
cinta,
facilitando
a
conducciOn
de
a
cinta.
Piecing
foot
for
patchwork
with
distance
markings
6mm
(1/4’)
and
3
mm
(1/8’).
Prensatelas
para
enguatado
(patch
work)
con
marcas
de
distancia
d
6
mm
y
3
mm,
85
17-45
For
5
mm
hemming.
For
straight
stitch
or
zig-zag.
Estrecho
de
5
mm.
Para
costuras
en
pespunte
redo
ô
zig-
Presser
feet
for
hemming.
Dobladifladores.
85
22-45
For
2
mm
hemming.
Estrecho
de
2
mm.
zag.
Downloaded from www.ManualsFile.com manuals search engine
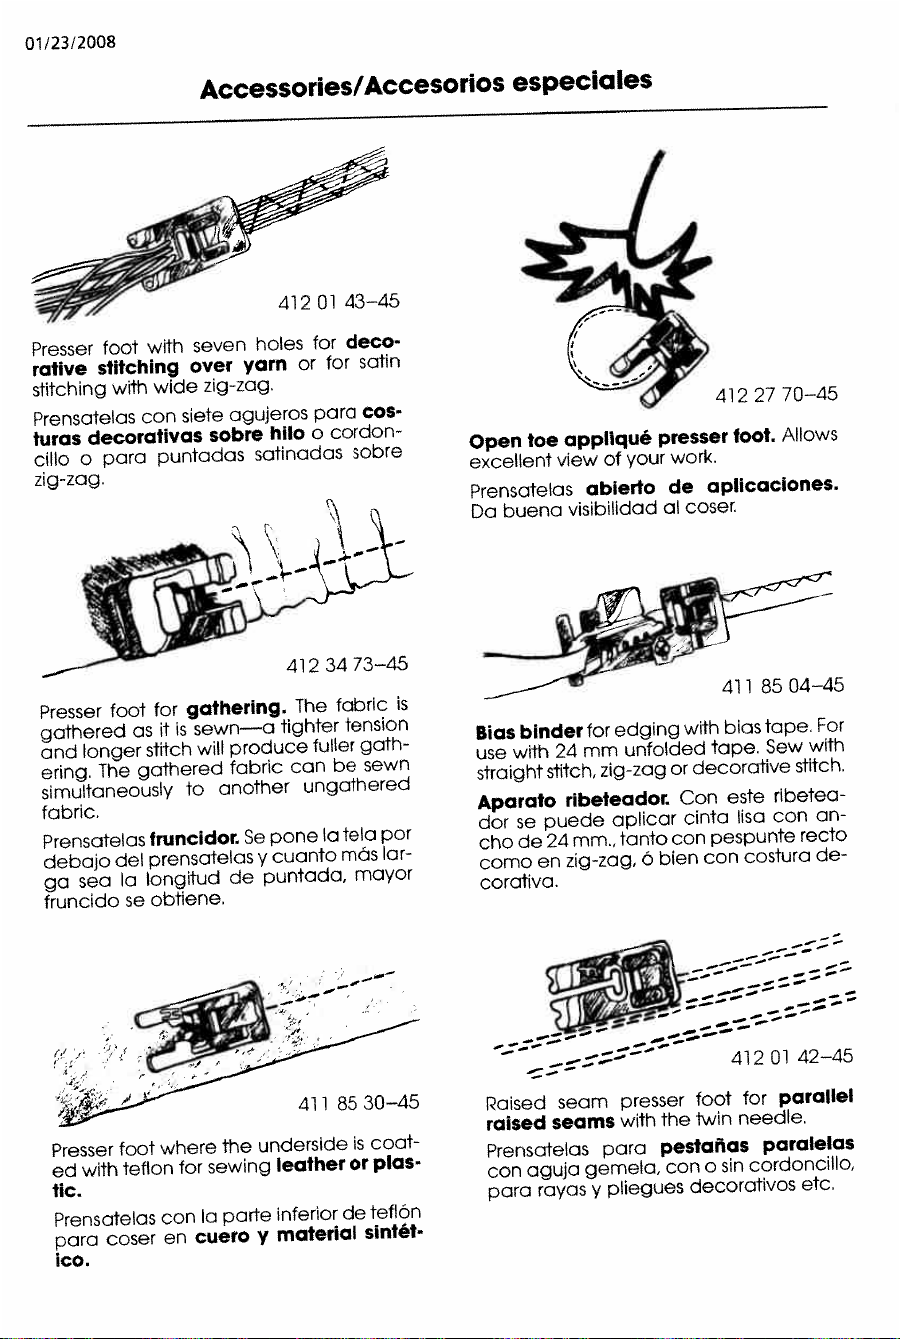
01/23/2008
Accessories/Accesorios
especiales
Presser
foot
with
seven
holes
for
deco
rative
stitching
over
yam
or
for
satin
stitching
with
wide
zig-zag.
Prensatelas
con
siete
agujeros
para
cos
turas
decorativos
sobre
hilo
o
cordon
cub
o
para
puntadas
satinadas
sobre
zig-zag.
412
3473—45
Presser
foot
for
gathering.
The
fabric
is
gathered
as
it
is
sewn—a
tighter
tension
and
longer
stitch
will
produce
fuller
gath
ering.
The
gathered
fabric
can
be
sewn
simultaneously
to
another
ungathered
fabric.
Prensatelas
fruncidor.
Se
pone
Ia
tela
por
debajo
del
prensatelas
y
cuanto
mOs
bar
ga
sea
Ia
longilud
de
punfada,
mayor
fruncido
se
obtiene.
Presser
foot
where
the
underside
is
coat
ed
with
teflon
for
sewing
leather
or
plas
tic.
Prensatelas
con
Ia
parte
inferior
de
teflOn
para
coser
en
cuero
y
material
sintét
‘Co.
27
70—45
Open
toe
appliqué
presser
foot.
Allows
excellent
view
of
your
work.
Prensatelas
abierto
de
apilcaclones.
Da
buena
visibilidad
al
coser
Bias
binder
for
edging
with
bias
tape.
For
use
with
24
mm
unfolded
tape.
Sew
with
straight
stitch,
zig-zag
or
decorative
stitch.
Aparato
ribeteador.
Con
este
ribetea
dor
se
puede
aplicar
cinta
lisa
con
an
cho
de
24mm.,
tanto
con
pespunte
recto
como
en
zig-zag,
0
bien
con
costura
de
corativa.
-
__—
412
Dl
42—45
Raised
seam
presser
foot
for
parallel
raised
seams
with
the
twin
needle.
Prensatelas
para
pestañas
paralelas
con
aguja
gemela,
con
a
sin
cordoncillo,
para
rayas
y
pliegues
decorativos
etc.
Downloaded from www.ManualsFile.com manuals search engine
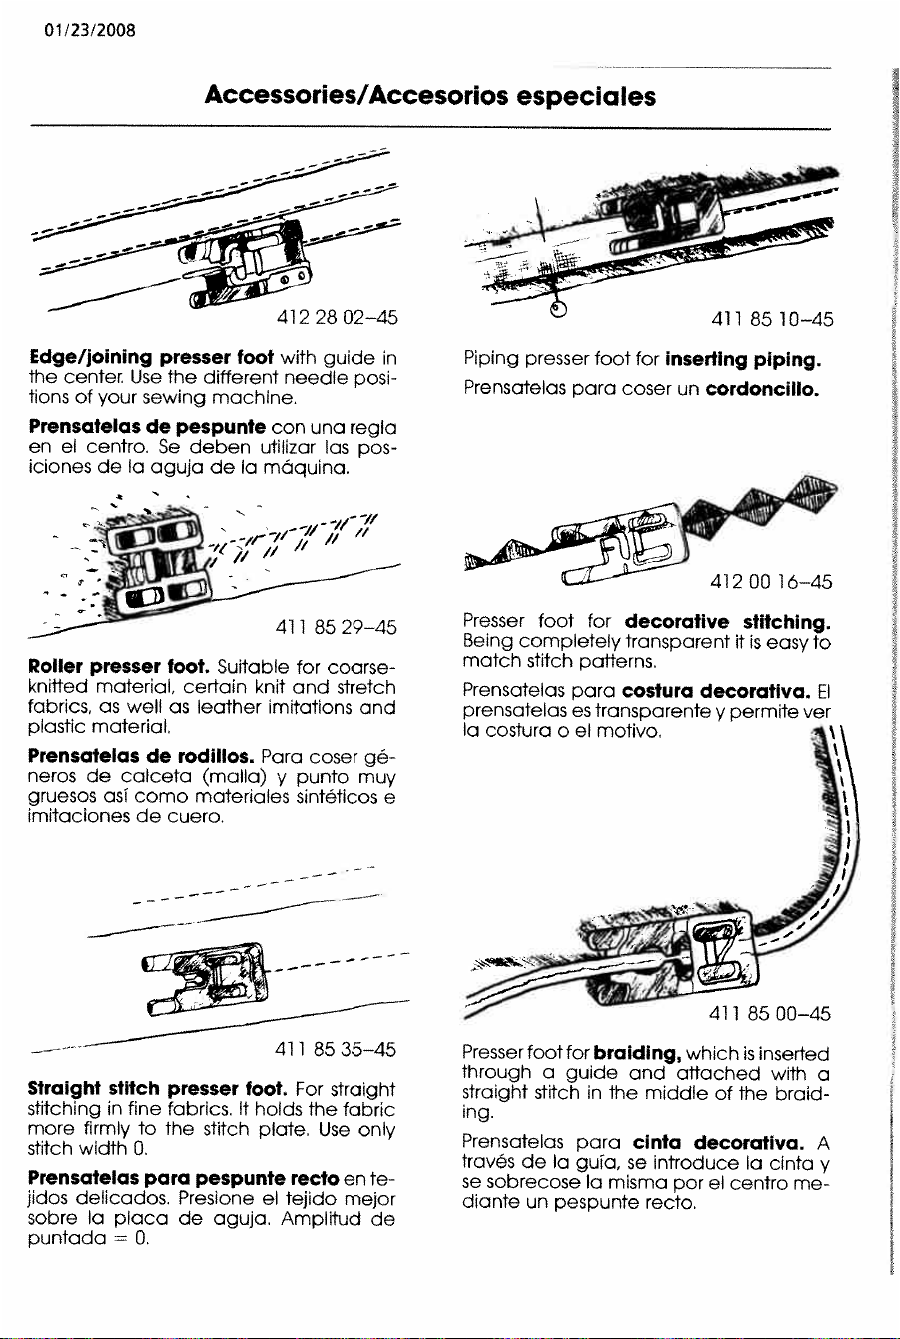
01/23/2008
Accessories/Accesorios
especiaes
Edge/joining
presser
foot
with
guide
in
the
center
Use
the
different
needle
posi
flons
of
your
sewing
machine.
Prensatelas
de
pespunte
con
una
regla
en
el
centro.
Se
deben
utilizar
las
pos
iciones
de
a
aguja
de
Ia
máquina.
Poller
presser
foot.
Suitable
for
coarse
kn[tted
material,
certain
knit
and
stretch
fabrics,
as
well
as
leather
imitations
and
plastic
material,
Prensatelas
de
rodillos.
Para
coser
gé
neros
de calceta
(malla)
y
punto
muy
gruesos
asI
como
materiales
sintéticos
e
imitaciones
de
cuero.
-:85:-45
Straight
stitch
presser
foot.
For
straight
stitching
in
fine
fabrics,
It
holds
the
fabric
more
firmly
to
the
stitch
plate,
Use
only
stitch
width
0.
Prensatelas
para
pespunte
redo
en
te
jidos
delicados,
Presione
el
tejido
mejor
sobre
Ia
placa
de
aguja.
Amplitud
de
puntada
—
0.
Prensatelas
para
coser
un
cordonciuo.
Presser
foot
for
decorative
stitching.
Being
completely
transparent
it
is
easy
to
match
stitch
patterns.
Presser
foot
for
braiding,
which
is
inserted
through
a
guide
and
attached
with
a
straight
stitch
in
the
middle
of
the
braid
ing.
Prensatelas
para
cinta
decorativa.
A
través
de
Ia
gula,
se
introduce
Ia
cinta
y
se
sobrecose
Ia
misma
por
el
centro
me
diante
un
pespunte
recto.
41228
02—45
Piping
presser
foot
for
inserting
piping.
411
85
29—45
41200
16—45
Prensatelas
para
costura
decoratlva.
El
prensatelas
es
transparente
y
permite
ver
Ia
costura
0
el
motivo.
411
85
00—45
Downloaded from www.ManualsFile.com manuals search engine
01/23/2008
We
reserve
the
right
to
change
the
ma
chine
equipment
and
the
assortment
of
accessories
without
prior
notice,
or
make
modifications
to
the
perform
ance
or
design.
Such
modifications
however
will
al
ways
be
to
the
benefit
of
the
user
and
the
product.
Nos
reservamos
ci
derecho
a
modifi
car
Ia
máquina,
el
equipo
6
los
acce
sorios
extras
sin
previo
oviso.
Tales
modificaciones
serãn
siempre
para
beneficio
del
cunsomidor
y
del
pro
ducto.
Downloaded from www.ManualsFile.com manuals search engine
01/23/2008
I
)ectoralion
of
Conformtty
to
EC
directive
r
lhuI
fti
Mac
hinu
n
ts
.iewu4Ii$
awIi
tLIIN
tY
WO
Oiv*dlv*
13/23/EEC,
44rc$v
*91)I##C
arei
9?
CK
Marking
i’wnc
‘
rtf
ute
or
Technical
11*
j*e;dbyJMKO
1tJmt3
1uwn
up
and
maintained
by:
tkjvqu
4WP)U
vkic
hIrlHs
AB
%4)Uttut.flt
H(
Ix
‘
I
t4
Hukvarna
telnphone
lot
+
4636146272
trlefax.
lnt+4636141
185
February
13-
1995
Husqvarna
Sewing
Machines
AB
lngmar
Svensson
Certification
Engineer
Husqvarna
412
46
6—46
I)
C
Husqvarna
SewIng
MacSince
Al
1993.
P,lnled
in
Sweden.
All
righte
receIved.
FllIths
Tryckeri
V6rnamo
1996
Downloaded from www.ManualsFile.com manuals search engine


