
BlazeGrills.com
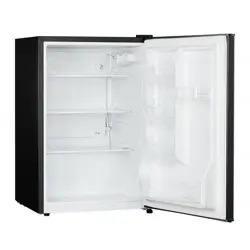
Blaze 20-Inch 4.3 Cu. Ft. Compact Refrigerator
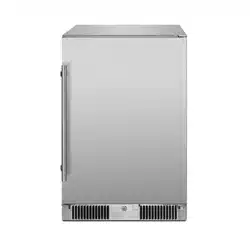
Blaze 20-Inch 4.5 Cu. Ft. Compact Beverage Cooler
USER GUIDE
BLZ-SSRF20-4.3/BLZ-GDBEV20-4.5
SCAN TO REGISTER

2
Blaze 20-Inch 4.3 Cu. Ft. Compact Refrigerator and 4.5 Cu. Ft. Compact Beverage Cooler
BlazeGrills.com
12
13
14
2
8
5
11
3
9
6
4
10
7
Unpacking Your Unit
Controlling Humidity
Operating your cooler
Winter Storage
After Winter Storage
How to Reverse the Door Swing
Care and Maintenance
Warranty
Frequently Asked Questions:
Specifications BLZ-GDBEV20-4.5
Important Safety Instructions
Blaze Introduction and Records
Exploded view BLZ-GDBEV20-4.5
Appliance Specifications BLZ-SSRF20-4.3
General Safety and Installation Warnings
Dimensions and Capacity BLZ-SSRF20-4.3
Dimensions and Capacity BLZ-GDBEV20-4.5
Location and Installing Your appliance
Wiring Diagram and Controle panel
Exploded view BLZ-SSRF20-4.3
Unpacking Unit:
Your Blaze Appliance comes preassembled and
requires very little setup.
Product Inspection: A final inspection of your
product occurs at the factory to ensure a quality prod-
uct is packaged. Please re-check for possible ship-
ping damage immediately after unpacking your appli-
ance. If the appliance is found to have some damage,
contact your dealer immediately as often the ship-
ping carrier will have a time frame to report damage.
Remove all packaging materials, labels and protec-
tive plastic film before you using your appliance and
please save the packaging material if there is shipping
damage. Keep all packaging and document condition
of appliance upon arrival.
Caution: Do not leave the unit under the sun with
the protective film as it will make the film difficult to
remove and/or leave markings on the materials which
are not covered by the warranty.
Before Using Your Unit: Clean the interior surface
with lukewarm water using a soft cloth. Check to be sure
you have all of the following parts:
• 3 Shelves
• 1 Instruction Manual
• Decoration Cover For Lock
• Keys
• Left Hinge
• Left Hinge Screws
• Decoration Cap For Hinge
•
Decoration Cover And Screw For Handle Holes
(BLZ-SSRF20-4.3)
•
Left Bottom Hinge Axis Plate (BLZ-SSRF20-4.3)
Table of Contents:
15
16
17
18
19
20
21

A Special Message to Our
Customers:
Congratulations on your purchase of a Blaze product!
At Blaze, we pride ourselves on creating high-quality,
durable, and innovative outdoor solutions that inspire
memorable experiences and exceed expectations. Our
passion for craftsmanship, performance, and outdoor
living drives everything we do.
This manual provides easy-to-follow instructions
for installing, operating, and maintaining your Blaze
appliance. We recommend reading this manual carefully
before your first use to ensure safety, proper care, and
optimal performance. Your appliance is designed and
built with meticulous attention to detail, using premium
materials and cutting-edge manufacturing processes, so
you can enjoy years of reliable, efficient, and satisfying
use.
We are committed to providing exceptional products
and unparalleled customer service. Your satisfaction
is our top priority, and we stand behind the quality and
workmanship of every Blaze product.
Thank you for choosing Blaze and welcome to our family
of passionate outdoor enthusiasts. We look forward to
being a part of your outdoor adventures and helping
you create cherished memories with family and friends.
Sincerely,
Blaze
MODEL #:
____________________________________________
SERIAL #:
____________________________________________
DATE OF PURCHASE:
____________________________________________
PLACE OF PURCHASE:
____________________________________________
120 Volt/ 1.5 AMP
To the Installer:
Please read these instructions carefully before
installation and give this manual to the owner.
To the Owner:
Keep this manual in a safe place for future
reference
Please Retain for Your
Records:
For your convenience, please record the following
information, which can be found on the data name
plate located on the back top of the fridge, a second
label with the model number and serial number is
located on the box. Please refer to this information
when contacting Blaze or an authorized service agent.
BLZ-SSRF20-4.3/BLZ-GDBEV20-4.5
3
Conforms to ANSI
Z21.58-2022/CSA
1.6-2022
5 year limited warranty, see pg 20 for details.
Lifetime limited warranty for complete warranty
information, product must be registered to validate the
warranty. Terms apply.
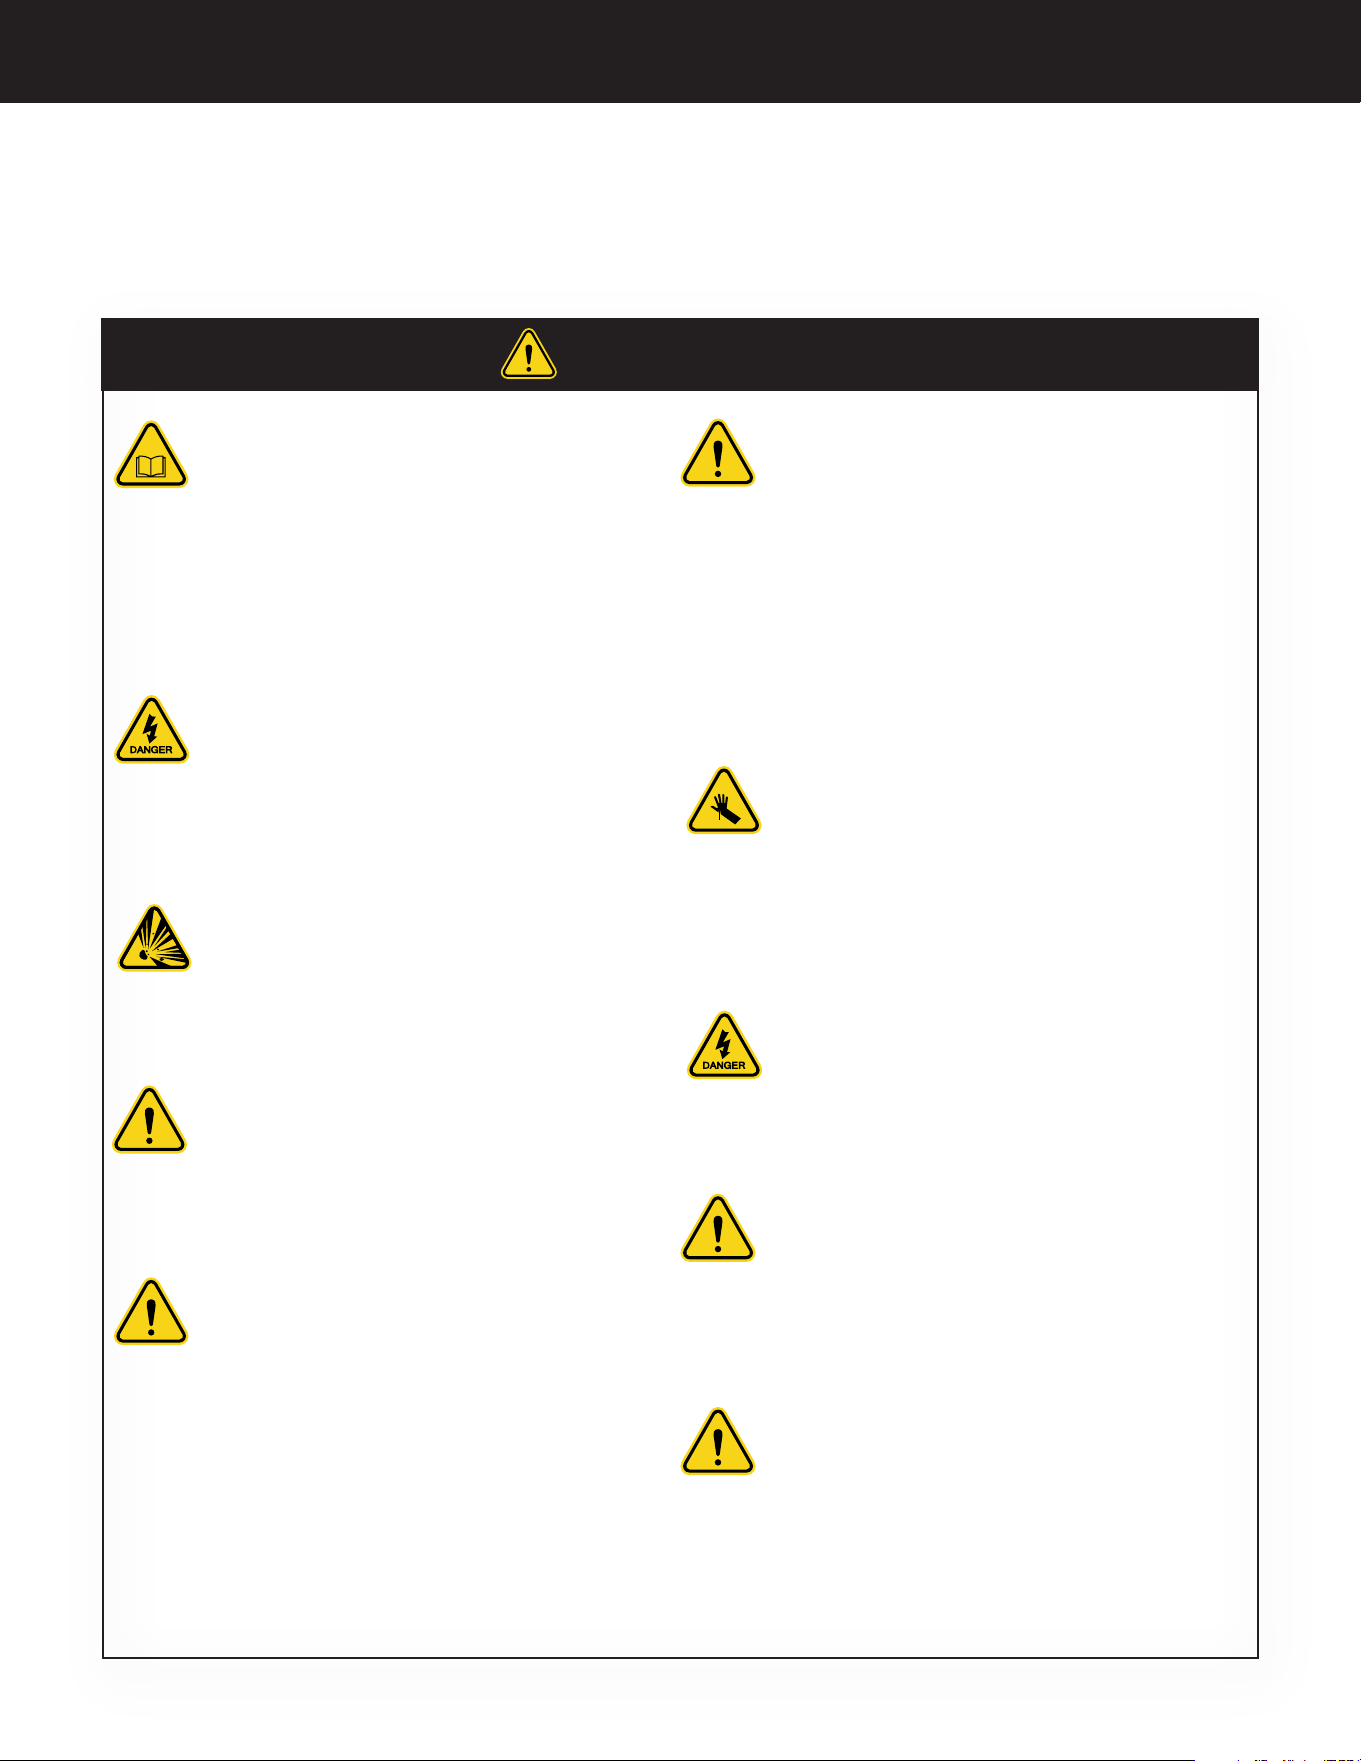
WARNING
4
Blaze 20-Inch 4.3 Cu. Ft. Compact Refrigerator and 4.5 Cu. Ft. Compact Beverage Cooler
BlazeGrills.com
READ INSTRUCTIONS: Please read this
manual carefully and before using your
BLAZE Appliance to ensure proper operation,
installation, servicing and to reduce the
risk of fire, burn hazard and or other
injury. Improper installation and service or
maintenance may cause property damage,
injury or death. Keep this manual handy and
do not operate without reading this manual.
GROUNDING HAZARD: Plug into a grounded
3-prong outlet, do not remove grounding
prong, do not use an adapter, and do not
use an extension cord. If the SUPPLY CORD
is damaged, it must be replaced by the
manufacturer, its service agent or similarly
qualified persons in order to avoid a hazard.
EXPLOSION HAZARD: Never clean
refrigerator parts with flammable fluids.
These fumes can create a fire hazard or
explosion. And do not store or use gasoline
or other flammable vapors and liquids in the
vicinity of this or any other appliance. The
fumes can create a fire hazard or explosion.
RECEPTACLE HAZARD: Only It is
recommended that a separate circuit, serving
only your refrigerator be provided. Use
receptacles that cannot be turned off by a
switch or pull chain.
WEATHER PROTECTION: Positioning and
Shelter: While outdoor refrigerators are
designed to handle the elements, placing
the fridge under a covered area like a
pergola or in an outdoor kitchen structure
can help shield it from direct sunlight, rain,
and snow, which extends the appliance's
life. Temperature Extremes: Outdoor fridges
are built to handle fluctuations in weather,
but extreme conditions e.g., below-freezing
temps) may affect performance. Some fridges
have heaters to handle colder weather,
but others may not operate well if the
temperature drops too low.
General Safety and Installation Warnings
IN MASSACHUSETTS: Make sure the
installation complies with Massachusetts
state building and electrical codes. Outdoor
electrical outlets, especially those exposed to
moisture, must be GFCI (Ground Fault Circuit
Interrupter) protected. A licensed electrician
should install the outlet for safety and code
compliance.Depending on where you live in
Massachusetts, you may need permits to
install certain outdoor appliances. Always
check with your local building department for
any necessary permits and inspections.
HANDLE WITH CARE: It is generally
recommended to keep a refrigerator upright
for at least 24 hours before pluing it in,
especially if it has been transported or tilted
during delivery. This allows the refrigerant
oil, which may have moved during transport,
to settle back into the compressor where it
belongs.
RISK OF ELECTRIC SHOCK: Do not connect
or disconnect the electric plug when your
hands are wet. Unplug the refrigerator
or disconnect power before cleaning or
servicing. Failure to do so can result in
electrical shock or death.
RISK OF CHILD ENTRAPMENT: Before you
throw away your old refrigerator or freezer:
* Take off the doors.
* Leave the shelves in place so that children
may not easily climb inside.
CALIFORNIA PROPOSITION 65 WARNING:
This product can expose you to chemicals
including chromium (hexavalent compound),
which is [are] known to the State of California
to cause cancer [and] [or] [birth defects or other
reproductive harm. For more information go to
www.p65warnings.ca.gov

BLZ-SSRF20-4.3/BLZ-GDBEV20-4.5
5
General
•
Follow local codes: The appliance should be
installed in accordance with local electrical code
requirements. It should also be placed in a location
that is strong enough to support its total weight,
keeping in mind that it will weigh substantially more
when fully loaded than when empty.
• Do not attempt to repair or replace any part of your
refrigerator unless it is specifically recommended in
this manual. All other servicing should be referred
to a qualified technician. Consult repair manual
or owner’s guide before attempting to service this
product. All safety precautions must be followed.
• Before you plug the appliance into a power supply,
be sure to let it stand upright for at least 24 hours
to allow the compressor’s oils to settle.
•
Use two or more people to move and install
refrigerator. Failure to do so can result in back or
other injury.
•
The refrigerator must be installed with all electrical,
water and drain connections in accordance with state
and local codes. A standard electrical supply (115 V
AC only, 60 Hz), properly grounded in accordance
with the National Electrical Code and local codes
and ordinances is required.
•
Do not kink or pinch the power supply cord of
refrigerator.
•
The fuse (or circuit breaker) size should be 15 amps.
•
It is important for the refrigerator to be leveled in
order to work properly. You may need to make several
adjustments to level it.
•
All installation must be in accordance with local
plumbing code requirements.
• Make certain that the lines are not pinched, kinked
or damaged during installations.
• Check for leaks after connection.
• Never allow children to operate, play with or crawl
inside the refrigerator.
Important Safety Instructions
•
Do not use solvent-based cleaning agents of abrasives
on the interior. These cleaners may damage or discolor
the interior.
•
Do not use this apparatus for other than its intended
purpose.
•
To ensure proper ventilation for your refrigerator, the
front of the unit must be completely unobstructed.
Choose a well-ventilated area with temperatures
above 60°F (16°C) and below 90°F (32°C). This unit
must be installed in an area protected from the
element, such as wind, rain, water spray or drips.
• To prevent injuries, do not use accessories that are
not recommended by the manufacturer.
•
Before cleaning the appliance, disconnect power cord.
•
Do not store items of interest to children in cabinets
above the appliance or in the appliance. Children
climbing on the appliance to reach these items could
be seriously injured.
Severe Weather
• Storm and wind resistance: Some states are prone
to nor'easters and coastal storms, particularly in
coastal areas. Consider securing your fridge with
proper anchoring or bracing if it’s free-standing to
prevent it from tipping during high winds. Placing
the fridge in a sheltered area like a covered patio or
outdoor kitchen can also provide some protection
from severe weather.
Coastal considerations (if applicable)
•
Corrosion risks: If you're near the coast, salty air can
lead to corrosion on metal parts. Choose an outdoor
fridge made from 304 or 316 stainless steel, which
are more resistant to corrosion. Even with corrosion-
resistant materials, regular cleaning and maintenance
are essential to prevent rust from developing.
6
Blaze 20-Inch 4.3 Cu. Ft. Compact Refrigerator and 4.5 Cu. Ft. Compact Beverage Cooler
BlazeGrills.com
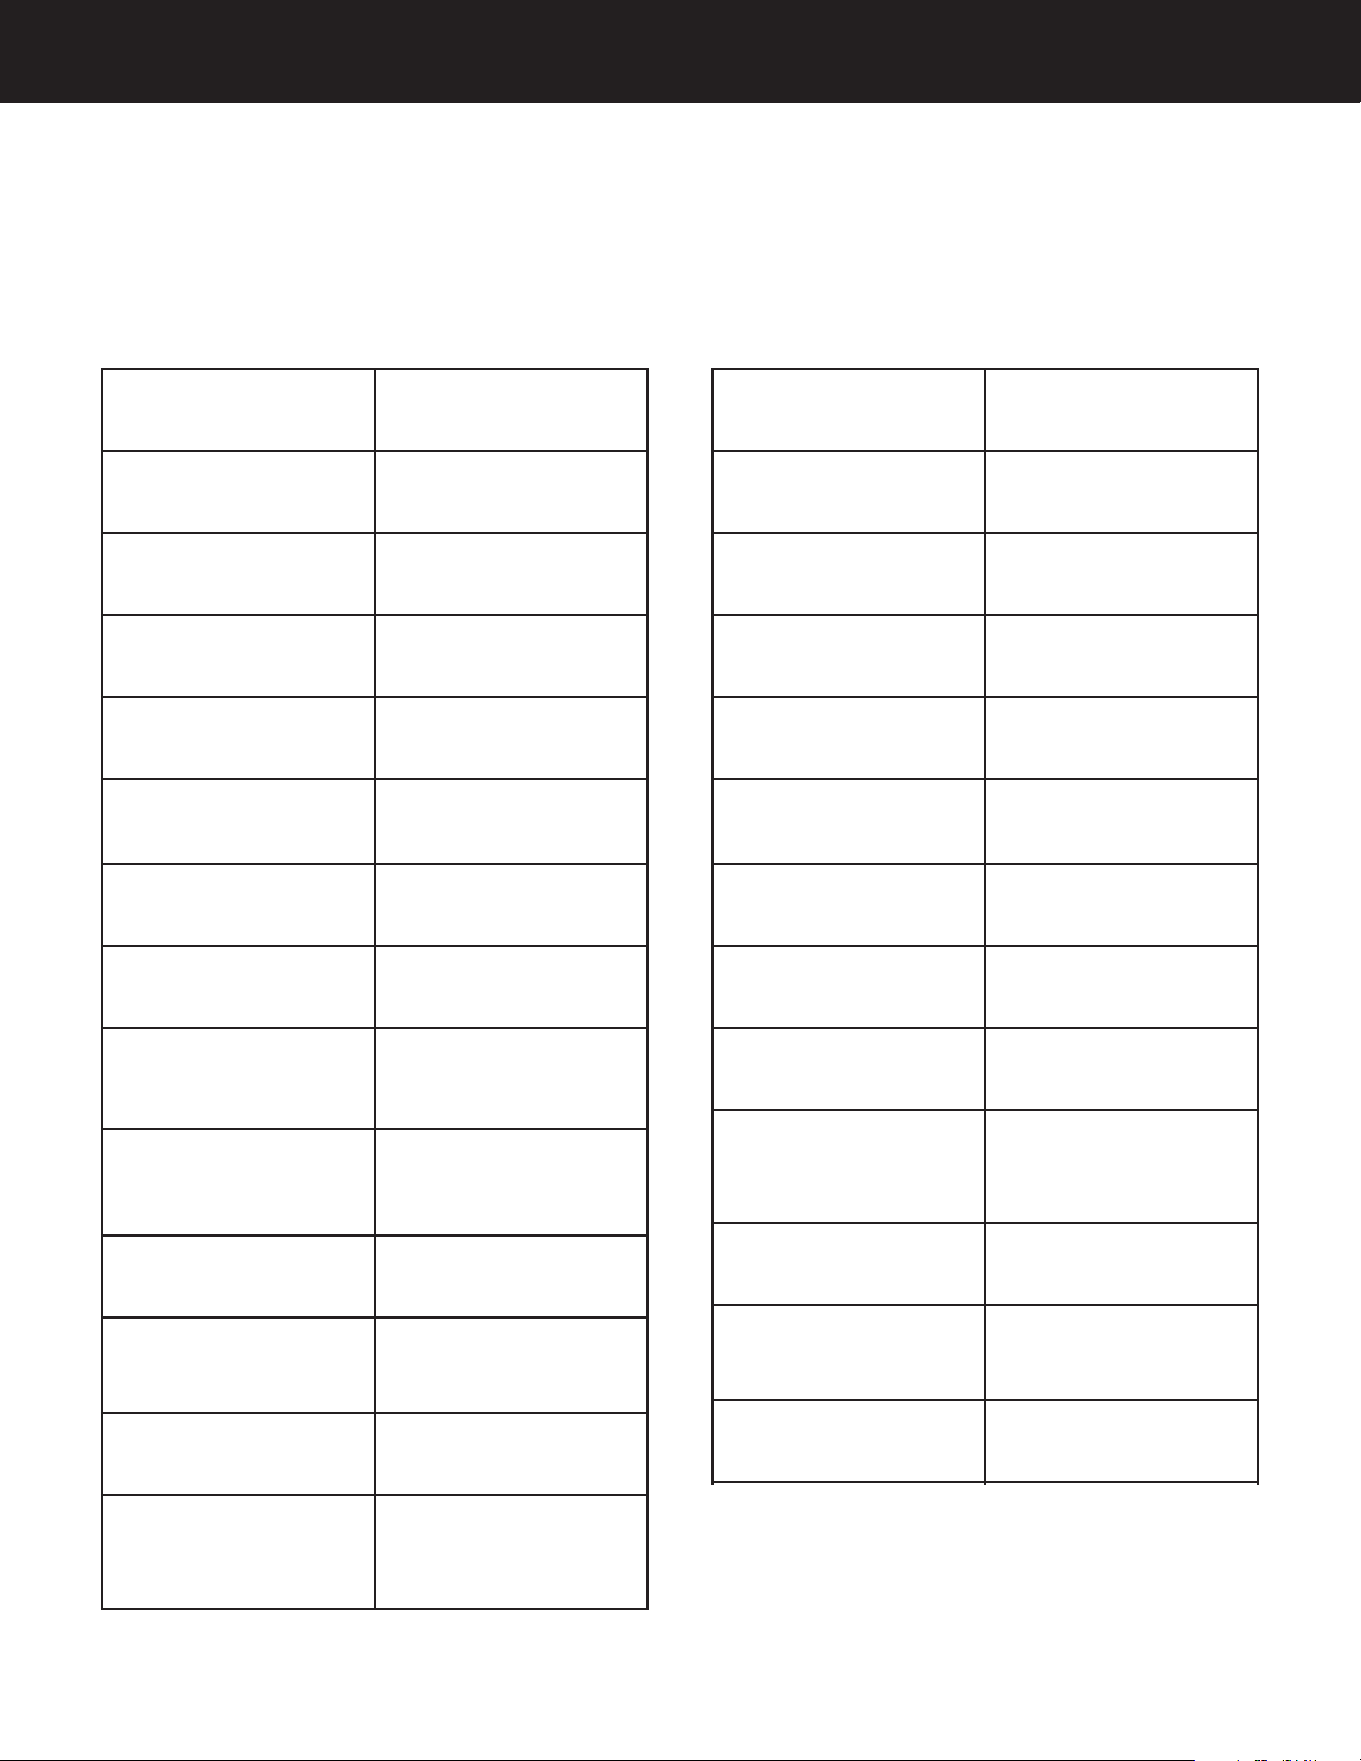
BLZ-SSRF20-4.3 Specifications and Dimensions
Installation Built-in or Free standing
Net volume capacity -
Ture (L/cu.ft)
121L
Rack Type Wire
Door rack 1 capacity 5 cans
Door rack 2 capacity 5 cans
Door rack 3 capacity 3 cans and 1 bottle
Full wire shelf capacity 28 cans
Half wire shelf capacity 12 cans
Bottle loading capacity
(750ml wine bottle/
355ml cans)
111 cans + 1 bottle
Temperature range
refrigerator (ºC/ºF) high/
low
1-10ºC (34-50ºF)
Thermostat White LED
Temperature memory
setting
Yes
Alarm Type (Temp alarm
and door ajar alarm)
Yes
Material 304 stainless steel
exterior cabinet and
white plastic inner liner
Specifications:
Door lock and position 1, Middle of kickplate
Reversible door Yes
Interior light 1 White LED
Leveling legs 4
Refrigerant R600a
Power input @ 115V 115V / 1.5A
Safety certification
agency
CSA (US) household
outdoor rated
Energy effeciency
verification agency
CSA
Energy consumption/
category/Energy Star
Refrigerator, Department
of Energy, EnergyStar
Power cord length 6 feet / 72 inch
Width 520mm / 20 1/2"
Height 840mm / 33 1/8"
Depth 575mm / 22 5/8"
304 stainless steel
exterior cabinet and
white plastic inner liner
BLZ-SSRF20-4.3/BLZ-GDBEV20-4.5
7
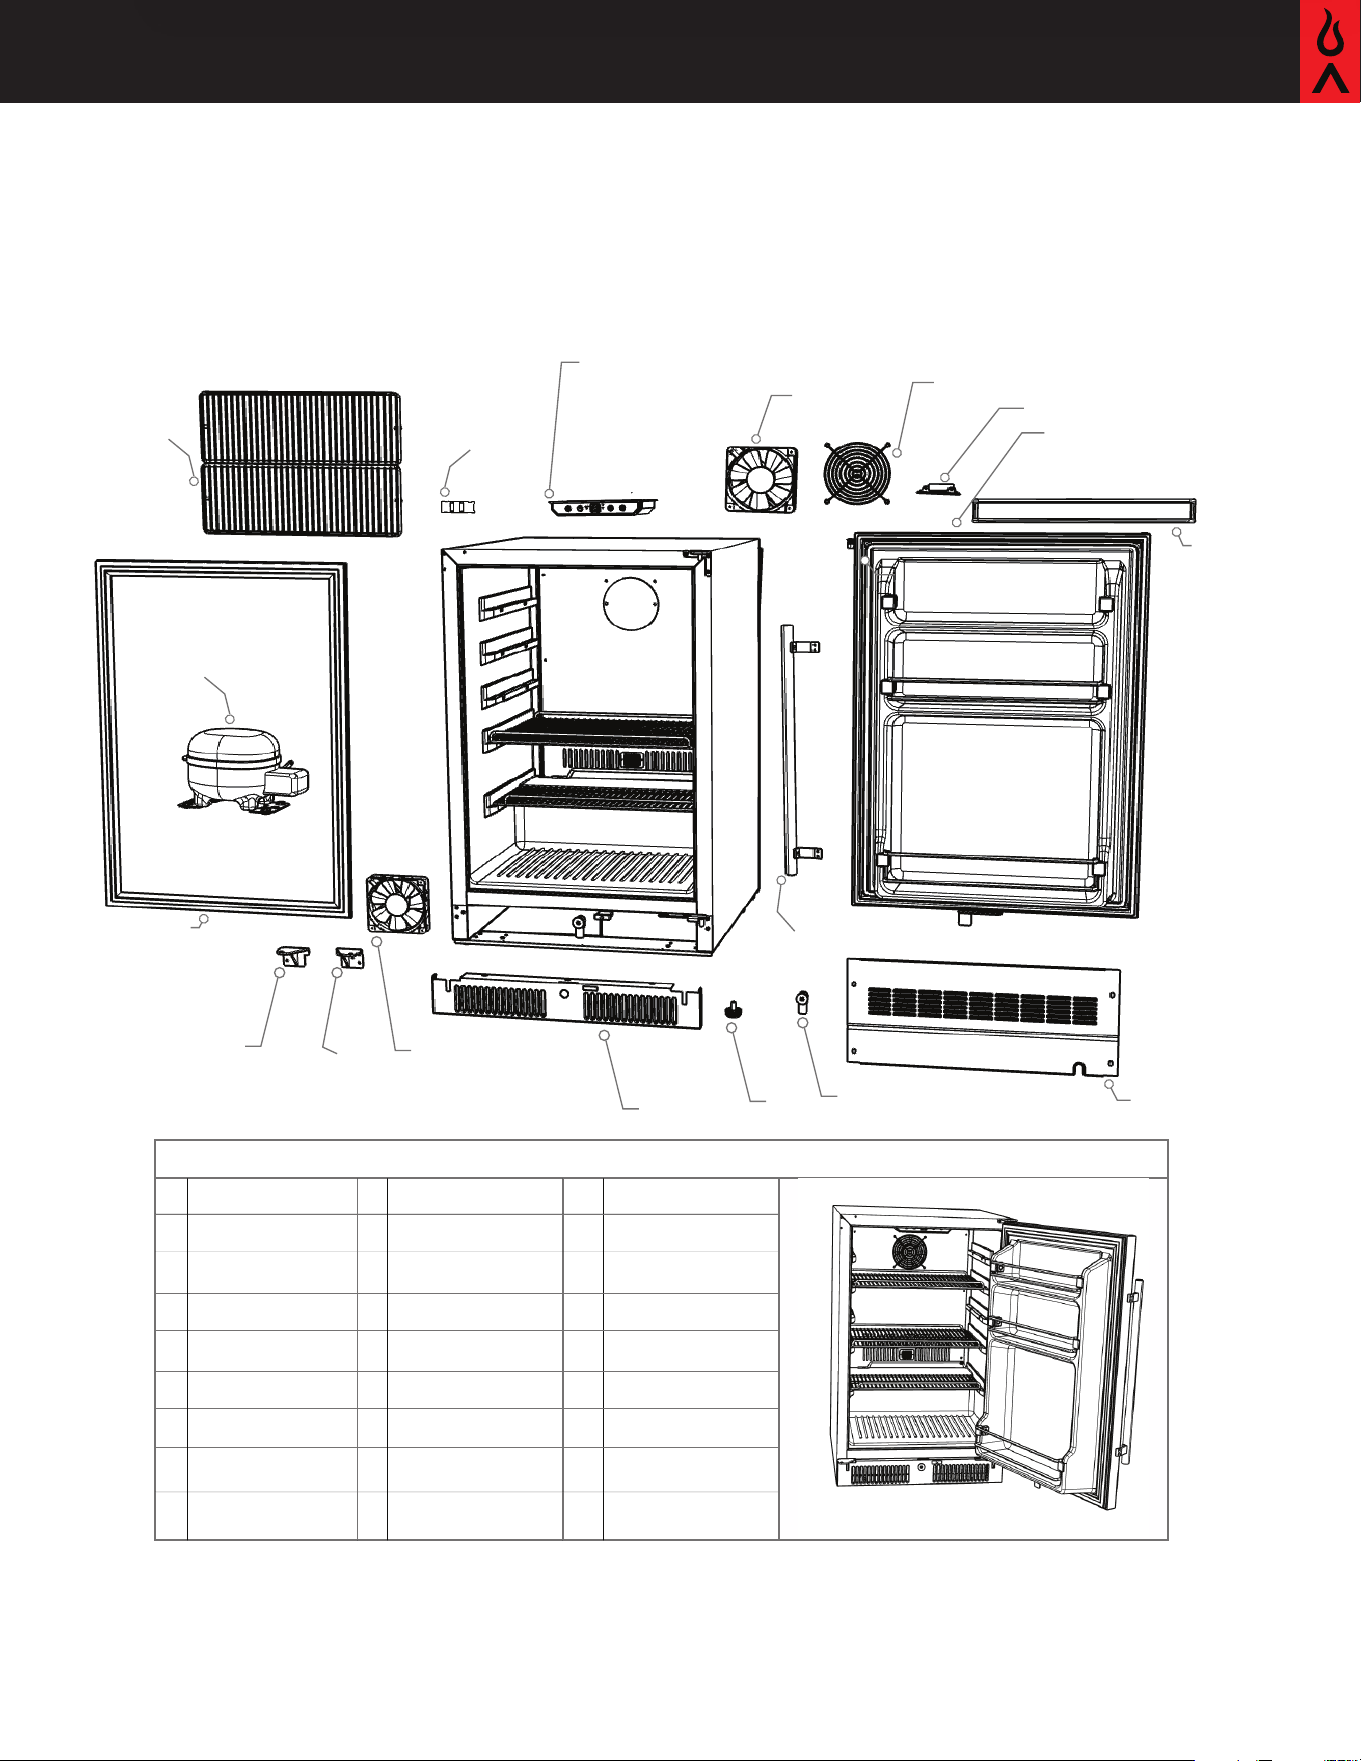
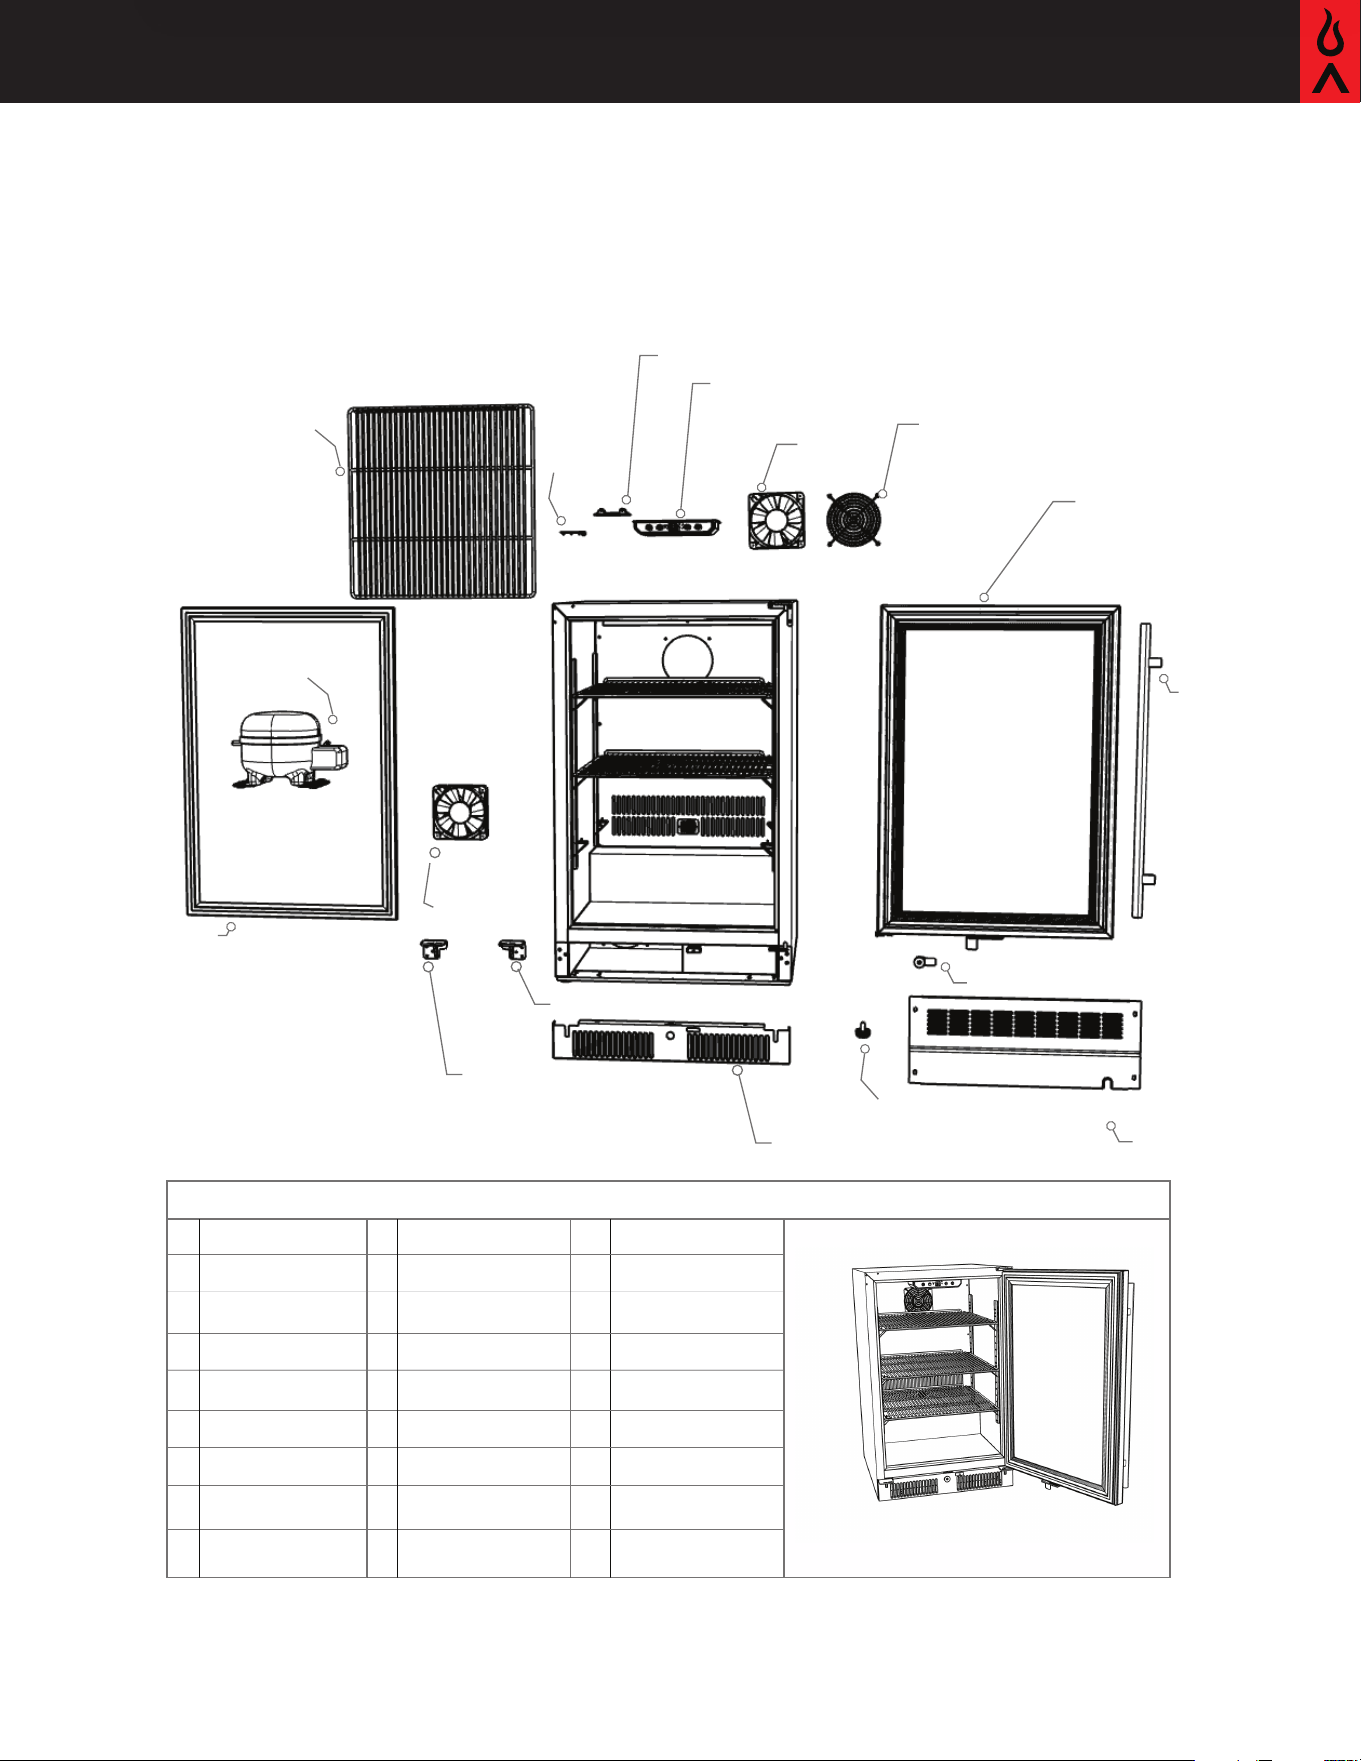
BLZ-SSRF20-4.3 Specifications and Dimensions BLZ-SSRF20-4.3 Exploded View
18. 18BLZ-SSRF20-018
17. BLZ-SSRF20-017
16. BLZ-SSRF20-016
15. BLZ-SSRF20-015
14. BLZ-SSRF20-014
13. 13BLZ-SSRF20-013
BLZ-SSRF20-012
12.
11. BLZ-SSRF20-011
10. BLZ-SSRF20-010
9. BLZ-SSRF20-009
8. 8BLZ-SSRF20-008
7. BLZ-SSRF20-007
6. BLZ-SSRF20-006
5. BLZ-SSRF20-005
BLZ-SSRF20-004
BLZ-SSRF20-003
BLZ-SSRF20-002
BLZ-SSRF20-001
4.
3.
2.
1.
Blaze Part Number: Reference Guide
1.control panel
2. internal fan
3. fan grate
4. light
5. door
6. door rack
7. rear vent panel
8. key
10. foot
11. kickplate
12 . external fan
13. right hinge set
14. left hinge set
15. door gasket
16. compressor
17. shelf
18. relay set
9. door handle
8
Blaze 20-Inch 4.3 Cu. Ft. Compact Refrigerator and 4.5 Cu. Ft. Compact Beverage Cooler
BlazeGrills.com
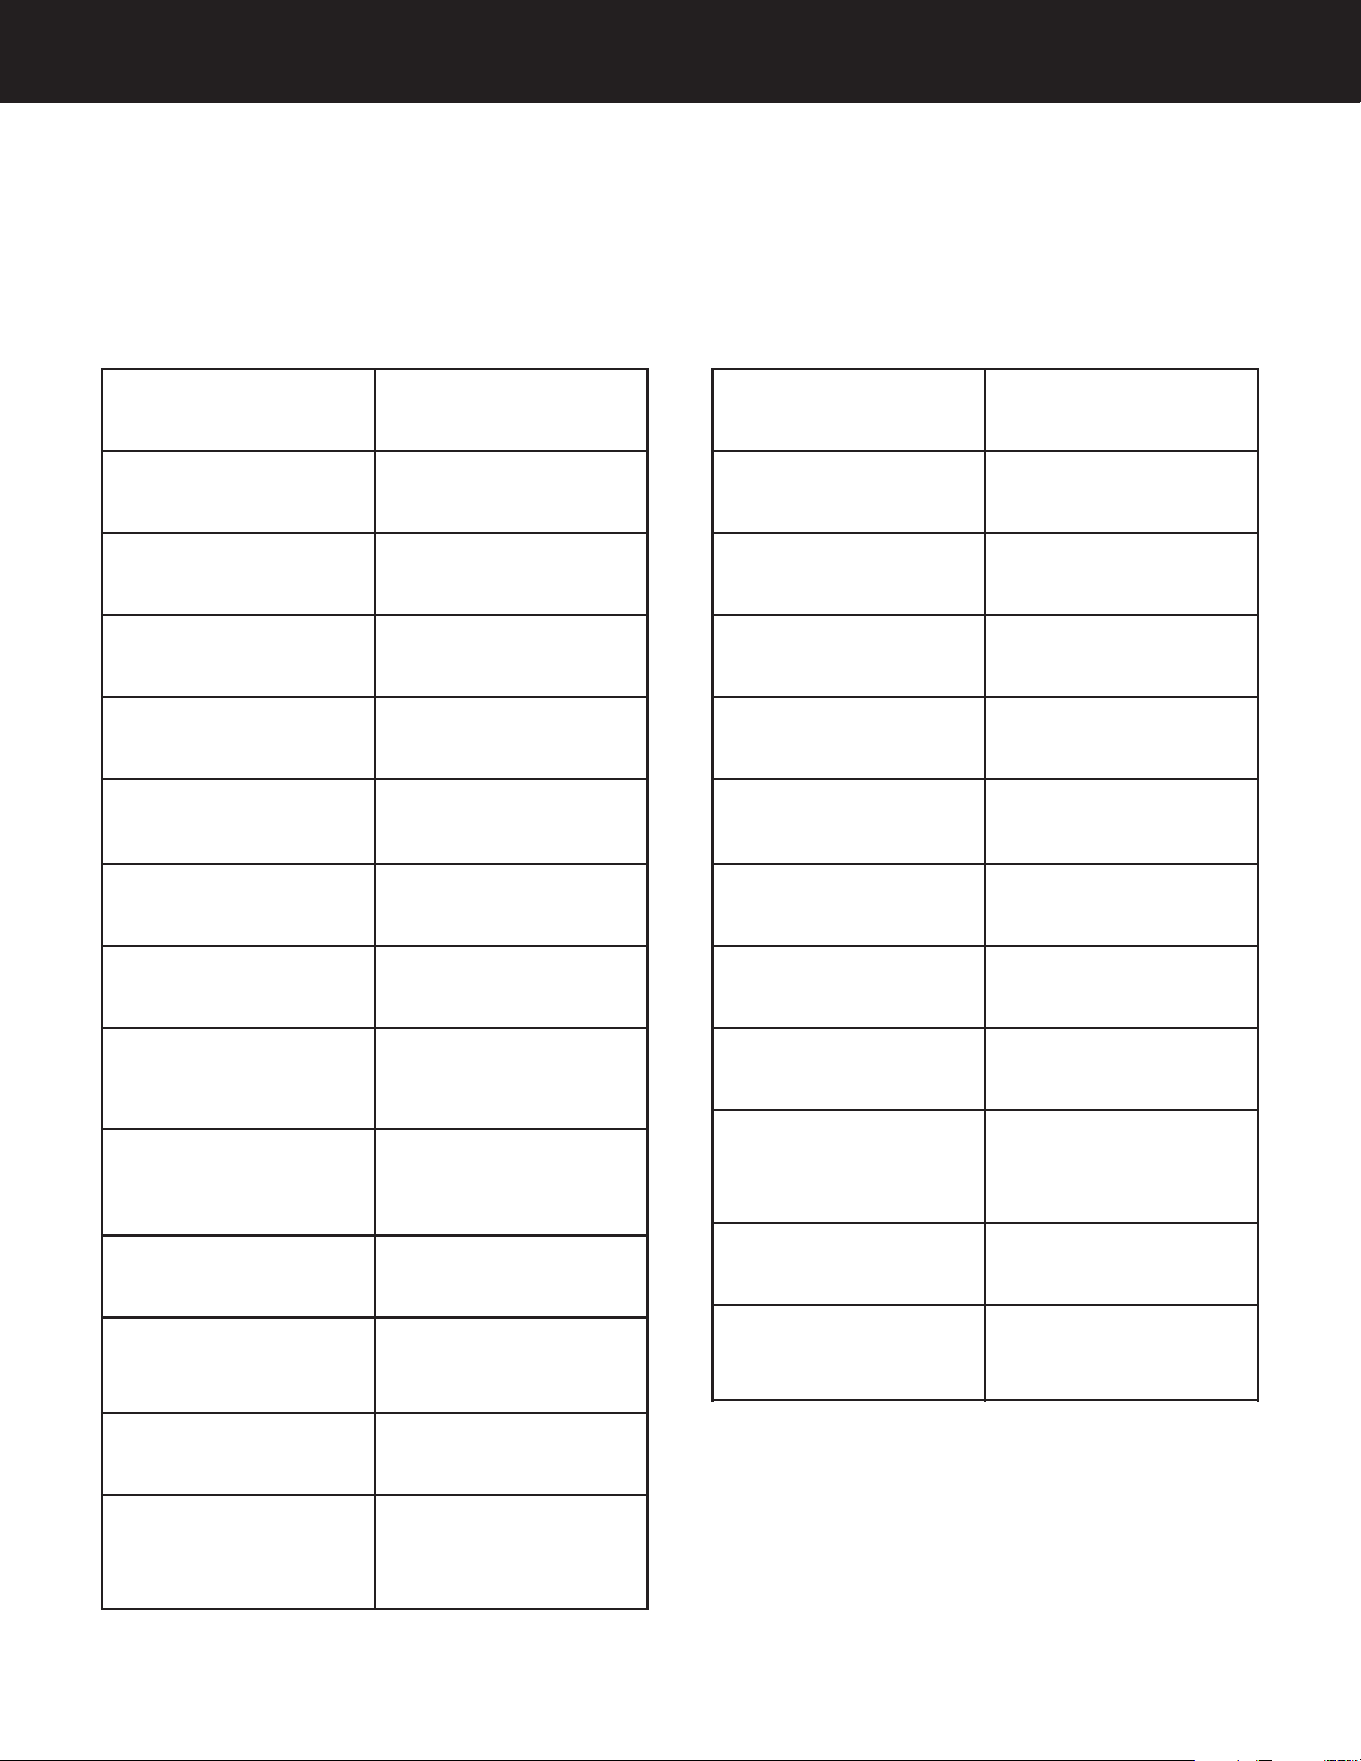
BLZ-GDBEV20-4.5 Specifications and Dimensions
Installation Built-in or Free standing
Net volume capacity -
ture (L/cu.ft)
128L
Rack type N/A
Door rack 1 capacity N/A
Door rack 2 capacity N/A
Door rack 3 capacity N/A
Full wire shelf capacity 39 cans or 7 bottles
Half wire shelf capacity N/A
Bottle loading capacity
(750ml wine bottle/
355ml cans)
147 cans or 30 bottles
Temperature range
refrigerator (ºC/ºF) high/
low
1-20ºC (34-68ºF)
Thermostat White LED
Temperature memory
setting
Yes
Alarm type (temp alarm
and door ajar alarm)
Yes
Material 304 stainless steel
exterior cabinet and
Black metal inner liner”
Specifications:
Door lock and position 1, Middle of kickplate
Reversible door Yes
Interior light 1 White LED
Leveling legs 4
Refrigerant R600a
Power Input @ 115V 115V / 1.5A
Safety certification
agency
CSA (US) household
outdoor rated
Energy effeciency
verification agency
CSA
Power cord length 6 feet / 72 inch
Width 520mm / 20 1/2"
Height 840mm / 33 1/8"
Depth 575mm / 22 5/8"
BLZ-SSRF20-4.3/BLZ-GDBEV20-4.5
9
BLZ-GDBEV20-4.5 Exploded View
17. BLZ-GDBEV20-017
16. BLZ-GDBEV20-016
15. BLZ-GDBEV20-015
14. BLZ-GDBEV20-014
13. BLZ-GDBEV20-013
BLZ-GDBEV20-012
12.
11. BLZ-GDBEV20-011
10. BLZ-GDBEV20-010
9. BLZ-GDBEV20-009
8. BLZ-GDBEV20-008
7. BLZ-GDBEV20-007
6. BLZ-GDBEV20-006
5. BLZ-GDBEV20-005
BLZ-GDBEV20-004
BLZ-GDBEV20-003
BLZ-GDBEV20-002
BLZ-GDBEV20-001
4.
3.
2.
1.
Blaze Part Number: Reference Guide
1.control panel
2. internal fan
3. fan grate
4. door
5. door handel
6. rear vent panel
7. key
9. kickplate
10. right hinge
11 . left hinge
12. external fan
13. door gasket
14. compressor
15. shelf
16. relay set
17. light
8. adjustable foot
10
Blaze 20-Inch 4.3 Cu. Ft. Compact Refrigerator and 4.5 Cu. Ft. Compact Beverage Cooler
BlazeGrills.com
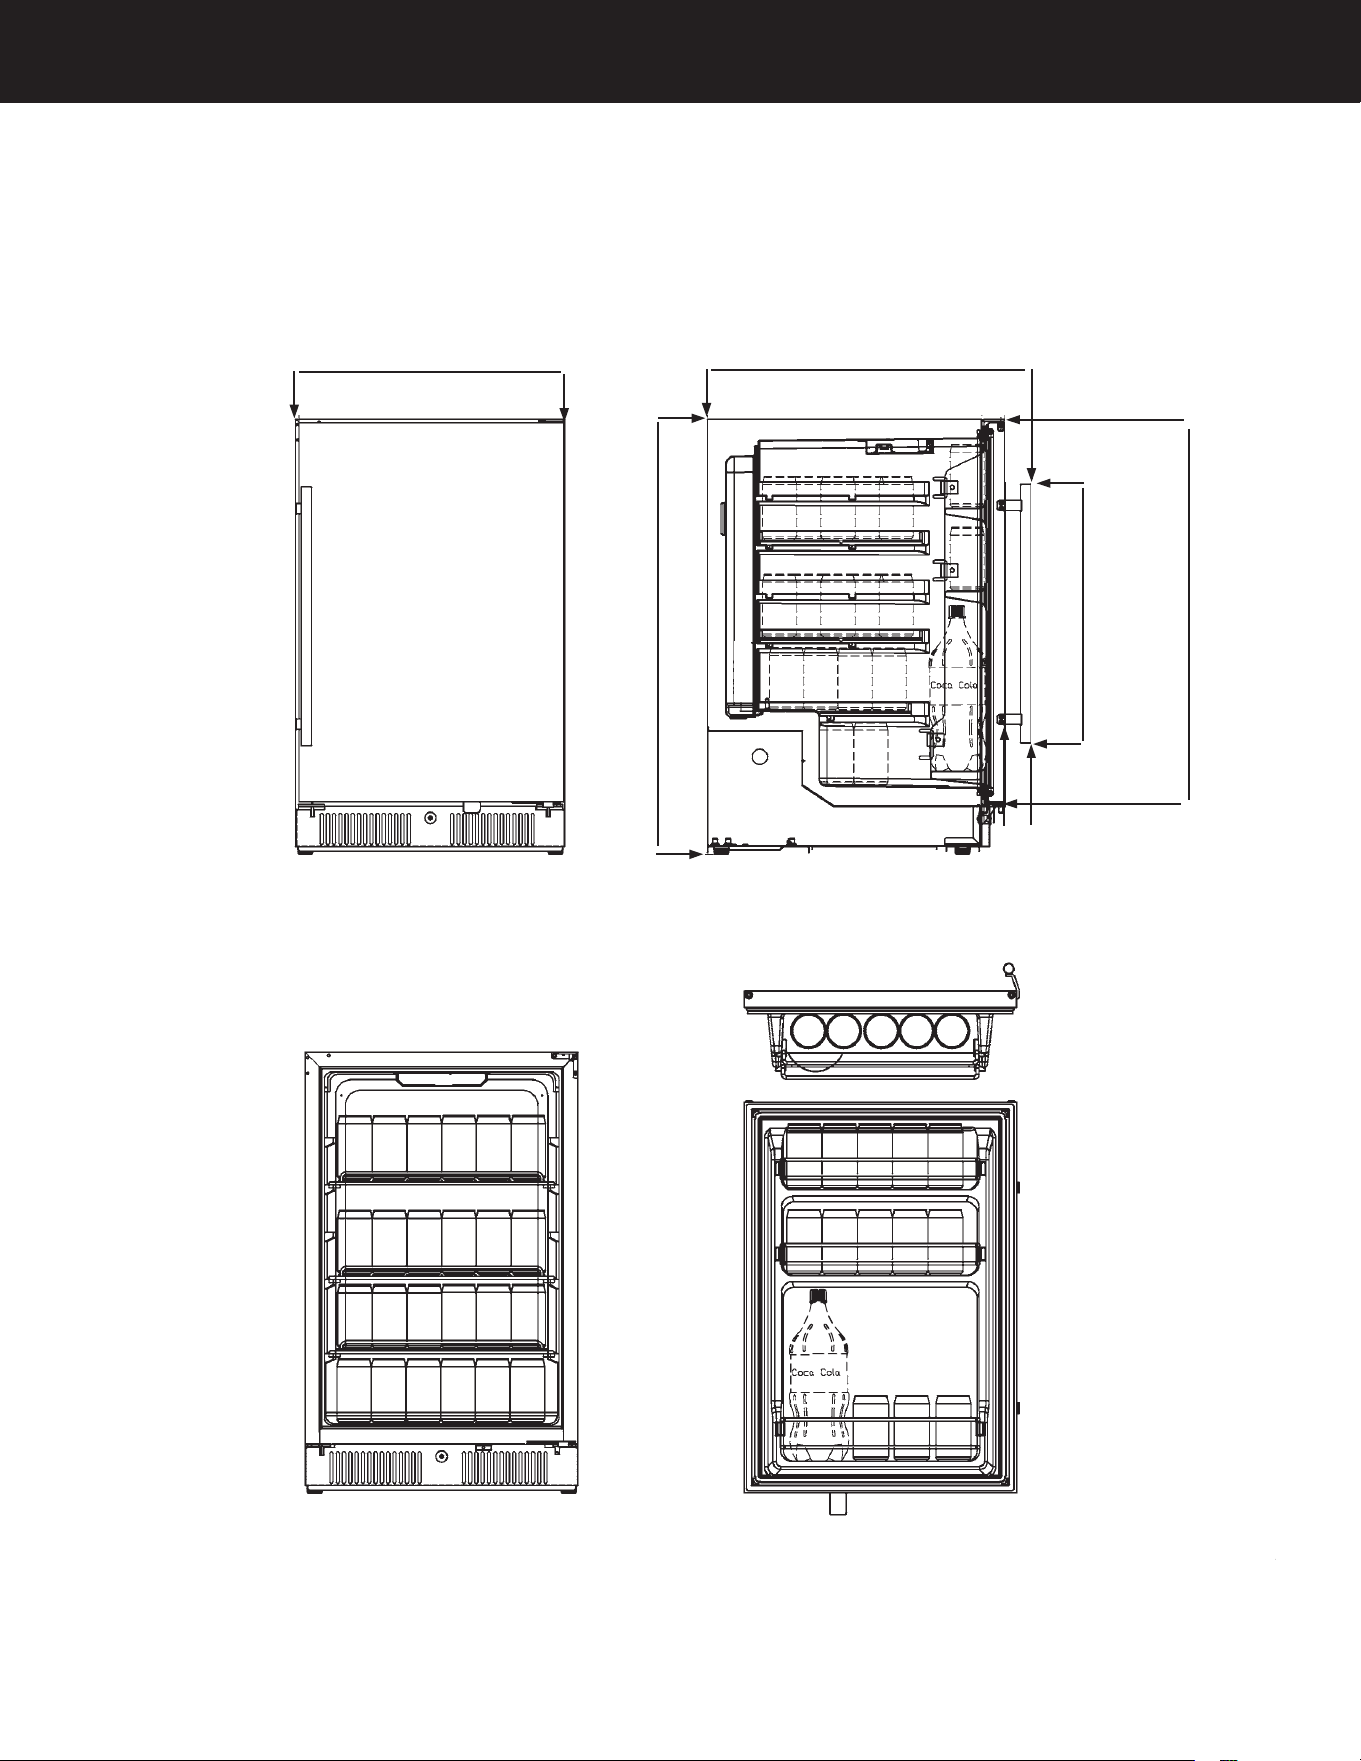
BLZ-SSRF20-4.3 Dimensions and Capacity
51 2"
499 /
73 0 /
840mm / 33 1/8"
825mm / 32 1/2"
78mm / 3 1/8"
20 1/2’’
24 5/8’’
33 1/8’’
19 3/4’’
28 3/4’’
2’’
• O'匕F
O
O
28
一
28
一
2
4
-
12
一
total
92 cnns(Mnx)
Wall
:
'==============
115
DoorSwi
Wall
total
78mm / 3 1/8"
28 Cans
28 Cans
24 Cans
18 Cans
98 Total cans
-
—
5
cans
一
—
5
3
1 bottles
total 13
bottles rnpncity
bevem笭
5 Cans
5 Cans
3 Cans
1 bottle
13 Cans 1 bottle
BLZ-SSRF20-4.3/BLZ-GDBEV20-4.5
11
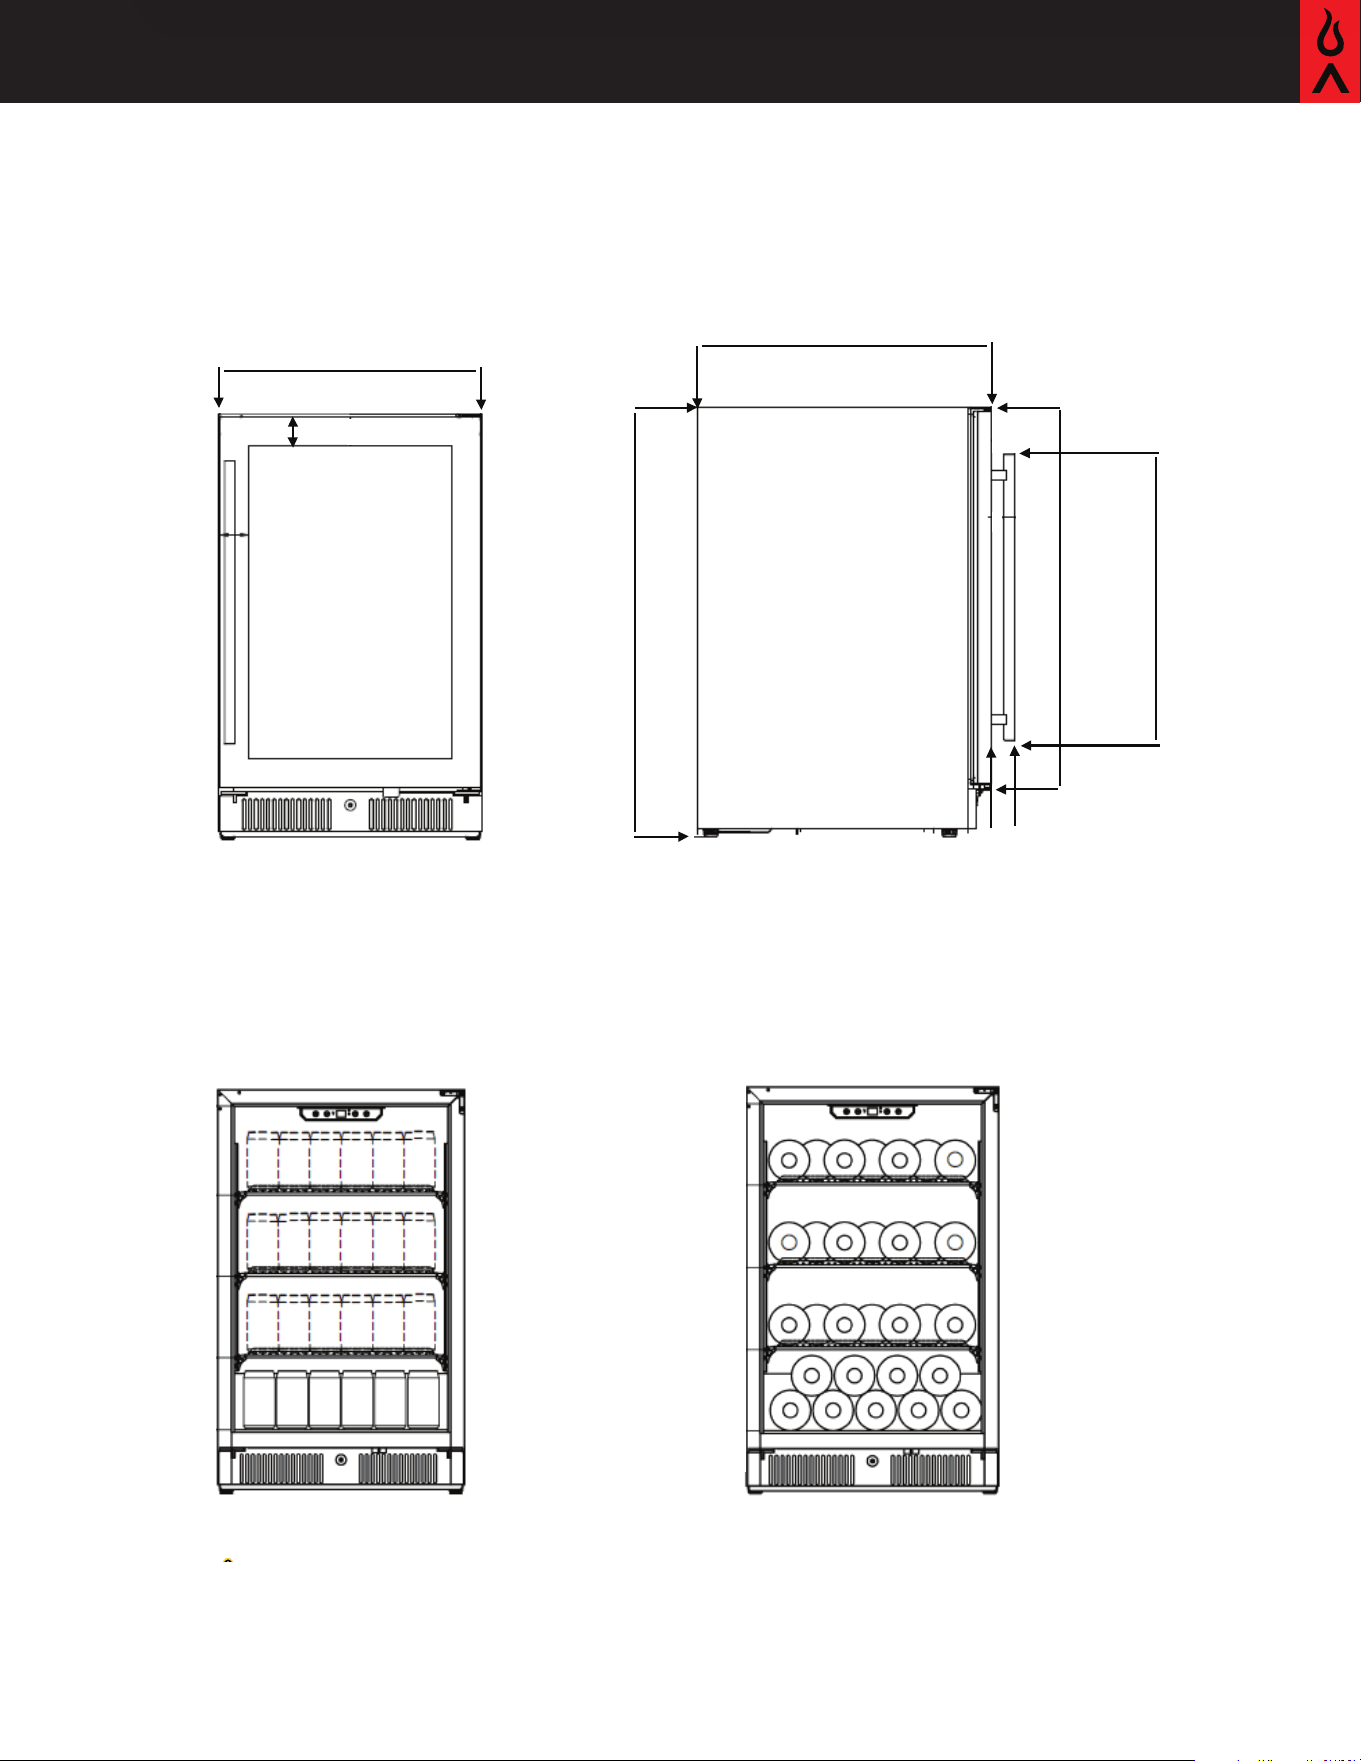
BLZ-GDBEV20-4.5 Dimensions and Capacity
20 1/2’’
2 1/8’’
2 1/8’’
28 3/4’’ 22’’
3/4’’
22 5/8’’
33 1/8’’
39 Cans
39 Cans
39 Cans
30 Cans
147 Total Cans
7 Wine bottles
7 Wine bottles
7 Wine bottles
9 Wine bottles
30 Total wine bottles
12
Blaze 20-Inch 4.3 Cu. Ft. Compact Refrigerator and 4.5 Cu. Ft. Compact Beverage Cooler
BlazeGrills.com
F
R
BLZ-GDBEV-4.5
F
ºC/ºF
R
BLZ-SSRF-4.3
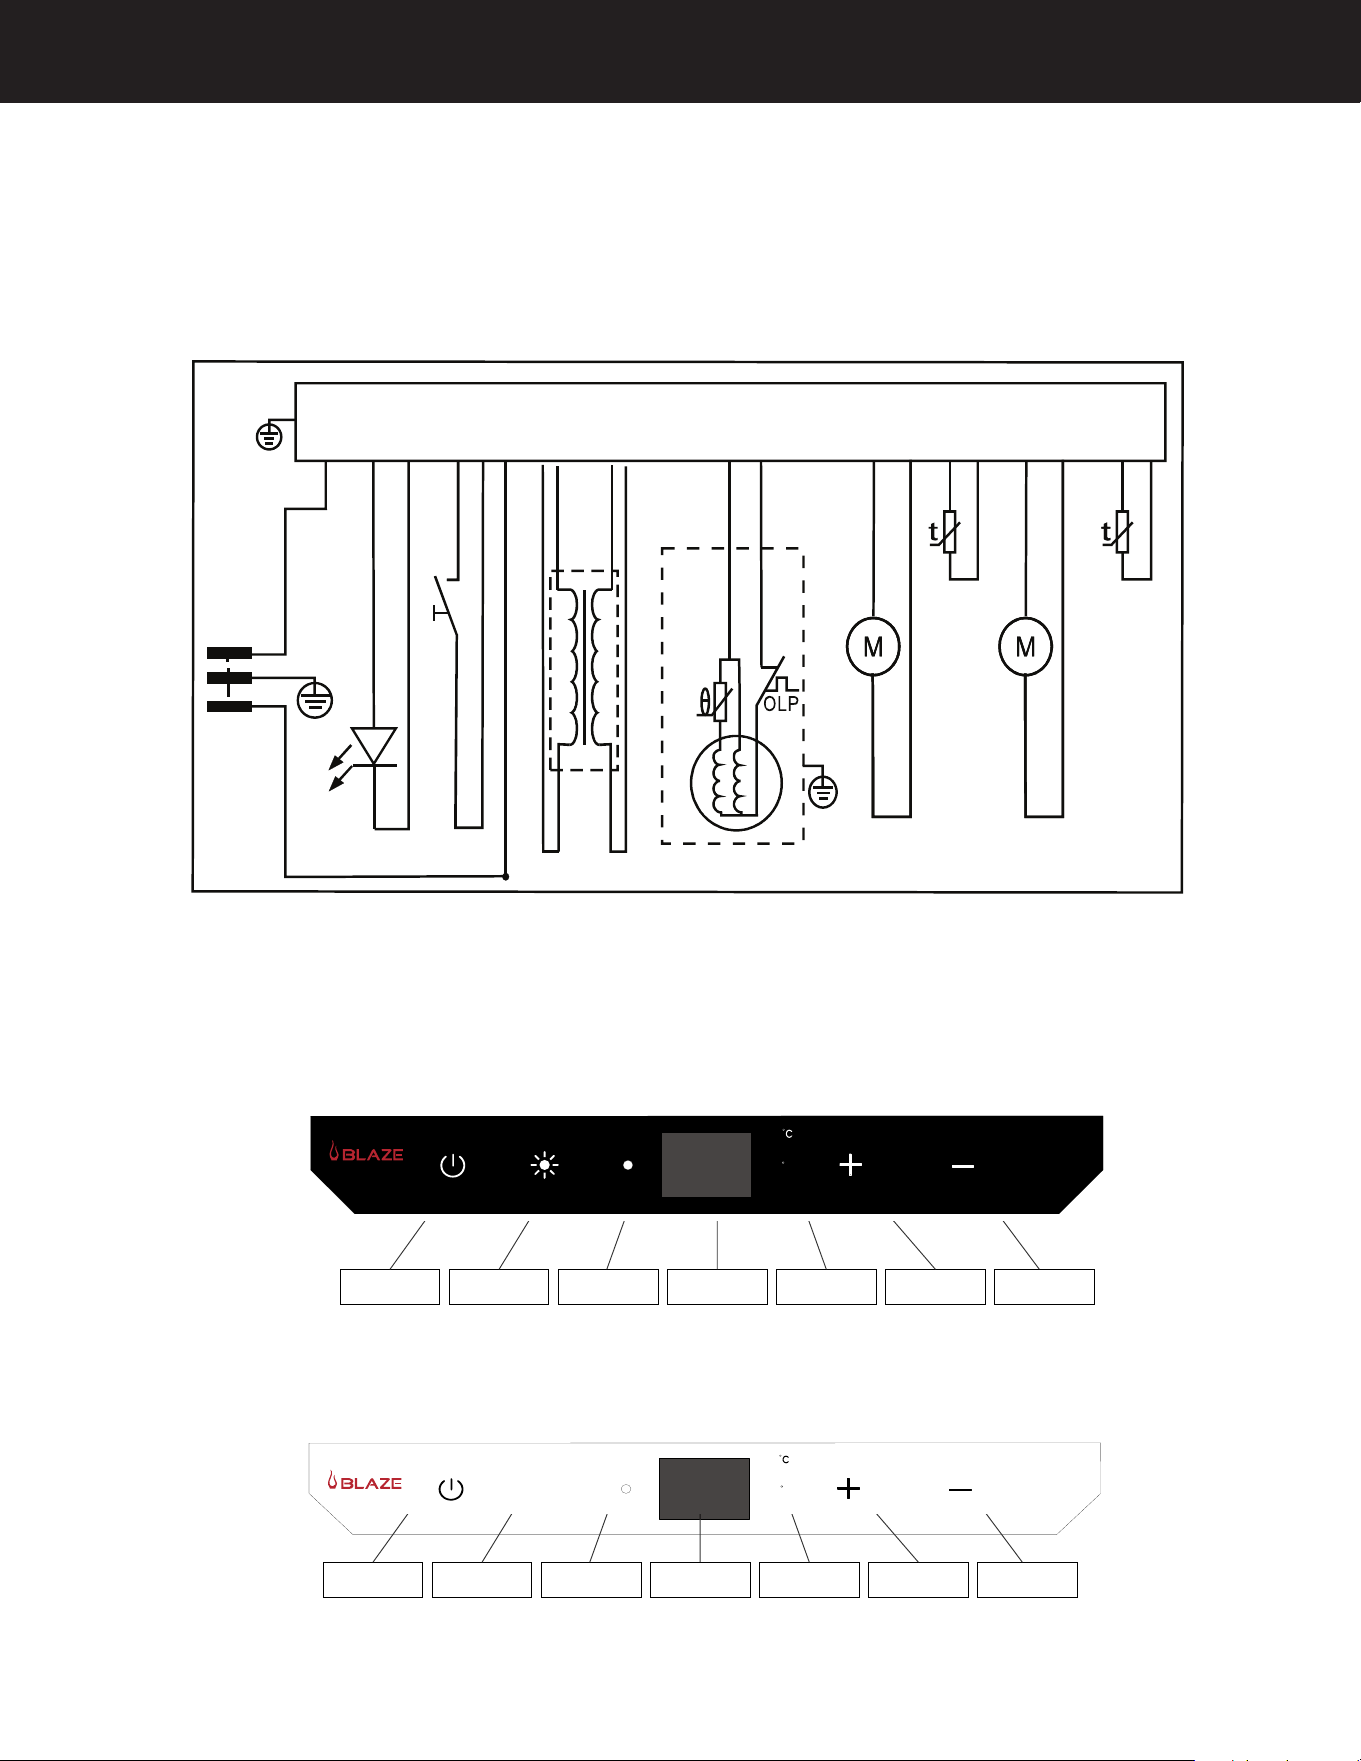
Wiring Diagram
Control Panel
BLZ-SSRF20-4.3 and BLZ-GDBEV20-4.5
F
BLZ-GDBEV-4.1
Power Button Light Button C/F Button C/F Indicator Up ButtonDisplay Down Button
F
BLZ-GDBEV-4.1
Power Button Light Button C/F Button C/F Indicator Up ButtonDisplay Down Button
BLZ-SSRF20-4.3 and BLZ-GDBEV20-4.5
SWITCH
CONTROL PCB
YE/GN
PLUG
YE/GN
IN FAN
SENSOR1
STARTER
OUT FAN
COMPRESSOR
SENSOR2
LIGHT
TRANSFORMER
YE/GN
BLZ-GDBEV20-4.5
BLZ-SSRF20-4.3
Light Button
Running on/off
C/F Button
BLZ-SSRF20-4.3/BLZ-GDBEV20-4.5
13
Location and Installing Your appliance
Installing and setting up your Blaze 20-Inch Refrigerator
is crucial for optimal performance and longevity. Here's
a comprehensive guide to ensure proper installation,
especially in outdoor or varying environments.
Step 1. Unpacking and Initial Preparation
Remove all packaging: Carefully unbox the refrigerator,
removing all interior and exterior packaging materials.
Clean the Unit: Wipe the exterior with a soft, dry cloth and
the interior with a lukewarm wet cloth. Check Included
Parts: Ensure you have 3 shelves, instruction manual,
decoration cover for lock, decoration cap for lock, keys,
left hinge, left hinge screws, and decoration cap for hinge.
Step 2. Choosing the Right Location
Stable Surface: Place the refrigerator on a floor strong
enough to support it when fully loaded. Avoid Direct
Sunlight and Heat: Keep away from direct sunlight
and heat sources like stoves or radiators to prevent
increased electrical consumption. Consider Ambient
Temperature: Avoid extremely cold environments as they
may cause the appliance to perform improperly. Moisture
Considerations: Don't use near water sources like in wet
basements or near sinks.
Step 3. Proper Ventilation and Clearance
Freestanding design: The appliance is designed to be
freestanding. Built-in Requirements: If recessing or
building in, allow at least 2" clearance on sides and top.
Back ventilation: Ensure proper ventilation at the back
for compressor and condenser cooling.
Step 4. Pre-Power Setup
Upright settling: Let the appliance stand upright for
approximately 24 hours before connecting to power to
allow compressor oils to settle. Leveling: Adjust the four
leveling legs at the bottom to ensure the unit is perfectly
level.
Step 5. Electrical Connections
Proper outlet: Use a standard 115 Volt AC /60Hz electrical
outlet with three-prong ground. Grounding Importance:
Never remove or alter the third (ground) prong from
the power cord. Dedicated Circuit: Use a dedicated
circuit matching the appliance's voltage rating. Cord
Management: Secure the cord behind the unit to prevent
accidental injury or disconnection.
Step 6. Powering On and Initial Cooling
First power-up: After pluing in, allow the unit to cool
for 2-3 hours before placing contents inside. Temperature
Setting: Adjust the temperature control to your desired
setting (details not provided in original text).
Step 7. Safety and Compliance
Local codes: Install in accordance with local electrical
code requirements. Professional consultation: Consult a
certified electrician for any power or grounding questions.
Outlet Replacement: If you have a 2-prong outlet, have it
replaced with a grounded 3-prong outlet by a qualified
electrician.
Step 8. Maintenance and Care
Regular inspections: Periodically check the power cord
for damage and replace if frayed or damaged. Cleaning:
Regularly clean the interior and exterior. Door Seal: Check
and maintain the door seal to ensure proper closure and
efficiency.

14
Blaze 20-Inch 4.3 Cu. Ft. Compact Refrigerator and 4.5 Cu. Ft. Compact Beverage Cooler
BlazeGrills.com
BLZ-GDBEV20-4.5
To switch between °C and °F, press and hold both the +
and - buttons for approximately 3 seconds. The display
will change to the desired temperature setting.
1.Internal Lights
BLZ-SSRF20-4.3 has one mode: Automatic Mode
BLZ-GDBEV20-4.5 has two different modes: Display
mode and Automatic Mode
1.Display mode:
The internal lights will stay constantly illuminated whether
the door is open or closed. "Dsplay Mode is a custom/
user-defined function, not a regular daily function."
2.Automatic Mode:
The internal lights will illuminated each time the door is
opened and fade off once the door is closed. This feature
is triered by a sensor located on the front vent,this
sensor allows the refrigerator to recognize when the
door is open or closed.
The default mode is Automatic Mode. To change
between modes, press the Interior Lights button.
Sabbath Mode:
Sabbath mode disables system responses to user-
initiated activities and all external functions,
including lighting, display and audible alarms. The unit
will still maintain internal temperatures and set points.
Although the display will not be visible, the temperature
settings will remain active and preserve the internal
temperature. Sabbath mode will remain active until it is
disabled by the user.
To enable or disable Sabbath mode, press and
hold Power Button and simultaneously
press Temperature Increase Button + twice press
Temperature Increase Button
Functions
Temperature Memory Function
If the power is suddenly lost, the set temperature will
be saved by the unit. Once the power is back on, the
unit will be at the same set temperature.
Door Ajar Alarm
Your unit is equipped with an audible alarm to
alert you when the door has been left open.
If at any time the door has been left open for more than
3 minutes at a time, the alarm will sound and then will
continue to sound until the door is closed completely or
the unit is powered off.
Other Notes
• If the unit is unplued, power lost, or turned off,
you must wait 3 to 5 minutes before restarting the
unit. If you attempt to restart before this time delay,
the unit will not start.
• When you use the unit for the first time or restart
the unit after having been shut off for a long time,
there could be a few degrees variance between
the temperature you select and the one indicated
on the LED readout. This is normal and it is due to
the length of the activation time. Once the unit is
running for a few hours it will automatically adjust.
Operating your cooler

BLZ-SSRF20-4.3/BLZ-GDBEV20-4.5
15
Humidity is only sometimes an issue, depending on the
location of the appliance. If so, these methods can help
control or mitigate humidity.
Controlling humidity in an outdoor refrigerator is
important to ensure optimal performance, prevent mold
and mildew, and keep your food and beverages in good
condition. Here's how to manage humidity effectively,
especially in areas with fluctuating weather conditions.
1. Use a Dehumidifier Pack
Silica gel packs: Place silica gel or other moisture-
absorbing packs inside the fridge to help control moisture
levels. These packs can absorb excess humidity and
prevent condensation from building up inside the fridge.
Rechargeable dehumidifiers: There are small, rechargeable
dehumidifiers designed for use in appliances like fridges.
These can help reduce humidity and protect against
mold and mildew.
2. Maintain Proper Ventilation
Ensure proper airflow: Outdoor fridges should have
proper ventilation to prevent humidity from building up.
Make sure the vents on the back or sides of the fridge
are clear of obstructions. In areas with high humidity,
it’s even more important to have sufficient airflow to
prevent moisture buildup.
Avoid overpacking: Don’t overfill the fridge, as crowded
items can reduce airflow, causing humidity to rise and
condensation to form inside.
3. Keep the Door Sealed
Check the door seal: Make sure the refrigerator door
is closing properly and the seal is intact. If the seal is
damaged, replace it. A faulty seal can let warm, moist air
in, increasing humidity levels inside the fridge.
Limit door opening: Try to minimize how often and how
long you open the fridge door, especially during humid
days. Warm, humid air enters the fridge each time the
door is opened, causing condensation to form.
4. Monitor the Temperature and Humidity
Use a thermometer and hygrometer: Consider placing a
small digital thermometer and hygrometer (to measure
humidity) inside the fridge. This will help you keep track
of both temperature and humidity levels and adjust as
necessary.
Ideal humidity levels: Aim for a relative humidity level
inside the fridge of around 30-50%. If it goes higher,
you may experience moisture buildup, while too low a
humidity level can dry out food.
5. Adjust Temperature Settings
Colder temperatures reduce humidity: If you notice
excessive humidity inside the fridge, try lowering the
temperature slightly. Colder air can hold less moisture, so
reducing the temperature can help reduce condensation.
Avoid freezing: Be careful not to lower the temperature
too much, especially if the outdoor temperature is already
cold, as this can cause food to freeze.
6. Wipe Down Condensation Regularly
Check for moisture buildup: During humid days
or seasonal changes, check the fridge for signs of
condensation on the shelves, walls, and food containers.
Wipe down any moisture with a clean, dry cloth to prevent
mold growth.
Dry the interior after cleaning: Whenever you clean or
wipe down the fridge, make sure it’s completely dry before
closing the door.
7. Sheltered Placement
Keep It under cover: While outdoor fridges are built to
withstand the elements, placing the fridge in a more
sheltered area (like under a pergola or in a covered
outdoor kitchen) can reduce direct exposure to humidity.
This will help minimize the fridge’s interaction with humid
air. By following these steps, you'll be able to manage
humidity in your outdoor fridge, keeping it in top working
condition and preventing moisture-related issues.
Controlling Humidity

16
Blaze 20-Inch 4.3 Cu. Ft. Compact Refrigerator and 4.5 Cu. Ft. Compact Beverage Cooler
BlazeGrills.com
Winter Storage
If you plan to store your outdoor refrigerator for the winter
(rather than leaving it in place), follow these steps to
ensure it’s properly protected and ready to use when
warmer weather returns:
Step 1. Unplug and Power Down
Turn Off the Power: Unplug the refrigerator from the
electrical outlet. If the fridge is hardwired, turn off the
circuit breaker. This prevents any accidental power surges
or running the appliance during cold weather.
Step 2. Empty and Clean the Fridge
Remove All Contents: Take out all food, beverages, and
removable shelves or drawers.
Clean the Interior: Wipe down the interior surfaces with
a mild cleaning solution or a mix of baking soda and
water. Pay extra attention to corners and crevices to
avoid leaving behind any crumbs or spills that could
cause odors or attract pests.
Dry thoroughly: Make sure the fridge is completely dry
before storing. Any remaining moisture can lead to mold
or mildew growth during storage.
Step 3. Clean the Exterior
Wipe down the outside: Clean the exterior with a damp
cloth, and if needed, use a mild detergent to remove
grime or salt (especially if you’re near the coast). Make
sure the fridge is dry before storing.
Check for rust or corrosion: Inspect any metal parts for
rust or corrosion. If you spot any, clean and apply a rust
inhibitor or polish to prevent further damage.
Step 4. Leave the Door Ajar
Prevent odors and mold: Prop the refrigerator door slightly
open during storage to allow airflow inside. This prevents
mold, mildew, and odors from building up. Use a towel
or a door wedge to keep the door ajar.
Step 5. Remove and Store Shelves
Protect removable parts: Remove shelves, trays and store
them separately. Wrapping these in protective material
(like bubble wrap) will prevent them from getting damaged
during the move or storage.
Step 6. Choose a Dry, Safe Storage Location
Indoor storage preferred: If possible, store the fridge in
a dry, temperature-controlled environment like a garage,
basement, or shed. If you're storing it outside, choose a
well-sheltered area (e.g., under a covered patio.)
Avoid freezing temps: Prolonged exposure to freezing
temperatures can damage the internal components of the
fridge. If you're storing it in an unheated space, consider
using a fridge cover with insulation.
Step 7. Prepare for Moving
Secure and protect: If moving the fridge to storage, secure
the door with tape or a bungee cord. Use padding or
blankets to protect the fridge from damage.
Use a Dolly: Refrigerators are heavy and cumbersome
to move, so use a dolly or a hand truck to transport it
safely. Always keep the fridge upright during the move to
prevent refrigerant from shifting within the unit, which
can cause compressor damage.
Step 8. Check Before Reusing in Spring
Inspect the Unit: Before you plug the fridge back in after
winter storage, inspect the interior and exterior for any
signs of damage, mold, or pests. Clean the fridge again
and let it run for a few hours to ensure it's working. If
the fridge has been laid down, make sure you stand it
upright for 24 hours.

BLZ-SSRF20-4.3/BLZ-GDBEV20-4.5
17
After Winter Storage
When spring arrives, it’s time to prepare your outdoor
fridge for use again. Here’s how to ensure it functions
well after winter storage:
Step 1: Inspect for Any Winter Damage
Check the exterior: Look for signs of rust, corrosion, or
weather damage on the fridge's surface. If you used a
cover, remove it and inspect any seals or vents for debris
or moisture that may have accumulated.
Inspect electrical connections: If the fridge was unplued
or the circuit was turned off, ensure that the outlet, plug,
and any other electrical connections are free of moisture
or damage. Make sure the GFCI outlet is functioning
correctly by pressing the test and reset buttons.
Step 2: Clean the Interior Again
Wipe down all surfaces: Even though you cleaned it
before winter, a light cleaning will help remove any dust,
debris, or odors that might have developed. Use a mild
cleaning solution or a baking soda-water mixture.
Check for mold or mildew: Inspect corners and hard-to-
reach areas for any mold or mildew growth. If you spot
any, use a vinegar-water solution to clean the surfaces
thoroughly.
Step 3: Reattach or Reconnect the Water Line (if
applicable)
Reconnect the water line: If your fridge has an ice
maker or water dispenser, reconnect the water line if it
was disconnected during winterization. Make sure it’s
securely attached and check for any leaks.
Flush the Line: After reconnecting, let water flow through
the line for a few minutes to flush out any debris or
buildup that may have accumulated during the winter.
Step 4: Test the Power
Plug in the fridge: Reconnect the fridge to the electrical
outlet or turn the circuit back on if it was hardwired.
Before loading the fridge, give it time to reach the proper
temperature (usually a few hours).
Check for Power Issues: Once powered on, ensure the
compressor is running smoothly, and there are no unusual
noises. Test any lights or fans to make sure they are
functioning correctly.
Step 5: Check Door Seals and Hinges
Test the Door Seal: Ensure that the fridge’s door seal is
still tight and forms a good seal when closed. This helps
the fridge maintain its cooling efficiency. If the seal is
worn, replace it to avoid cooling issues.
Lubricate Hinges (if needed): If the door hinges feel stiff
or make noise, apply a food-safe lubricant to the hinges
to ensure they operate smoothly.
Step 6: Restock the Fridge Slowly
Allow Time for Cooling: Before filling the fridge with food
and beverages, give it time to reach the proper operating
temperature. Restocking the fridge while it’s still warming
up may cause it to work harder and reduce its efficiency.
Monitor the Temperature: Use a thermometer to confirm
that the fridge is cooling to the desired temperature,
usually around 37-40°F (3-4°C).
Step 7: Check and Clean the Condenser Coils
Clean the Coils: The condenser coils (usually located at
the back or bottom of the fridge) can collect dust and
debris over time. Use a brush or vacuum to clean the
coils, which will help the fridge run more efficiently and
extend its lifespan.
Ensure Proper Ventilation: Make sure the area around the
fridge is clear to allow proper air circulation, especially
around the vents and coils. This helps maintain optimal
cooling performance.
Step 8: Monitor Performance for the First Week
Keep an Eye on the Unit: In the first few days of operation,
check the fridge regularly to ensure it’s cooling properly,
there are no leaks, and it’s functioning as expected. Listen
for any unusual sounds or issues with the compressor.
By following these steps, your outdoor refrigerator will be
in top condition and ready for use in the warmer months.
18
Blaze 20-Inch 4.3 Cu. Ft. Compact Refrigerator and 4.5 Cu. Ft. Compact Beverage Cooler
BlazeGrills.com
Tools Required: Phillips head screwdriver.
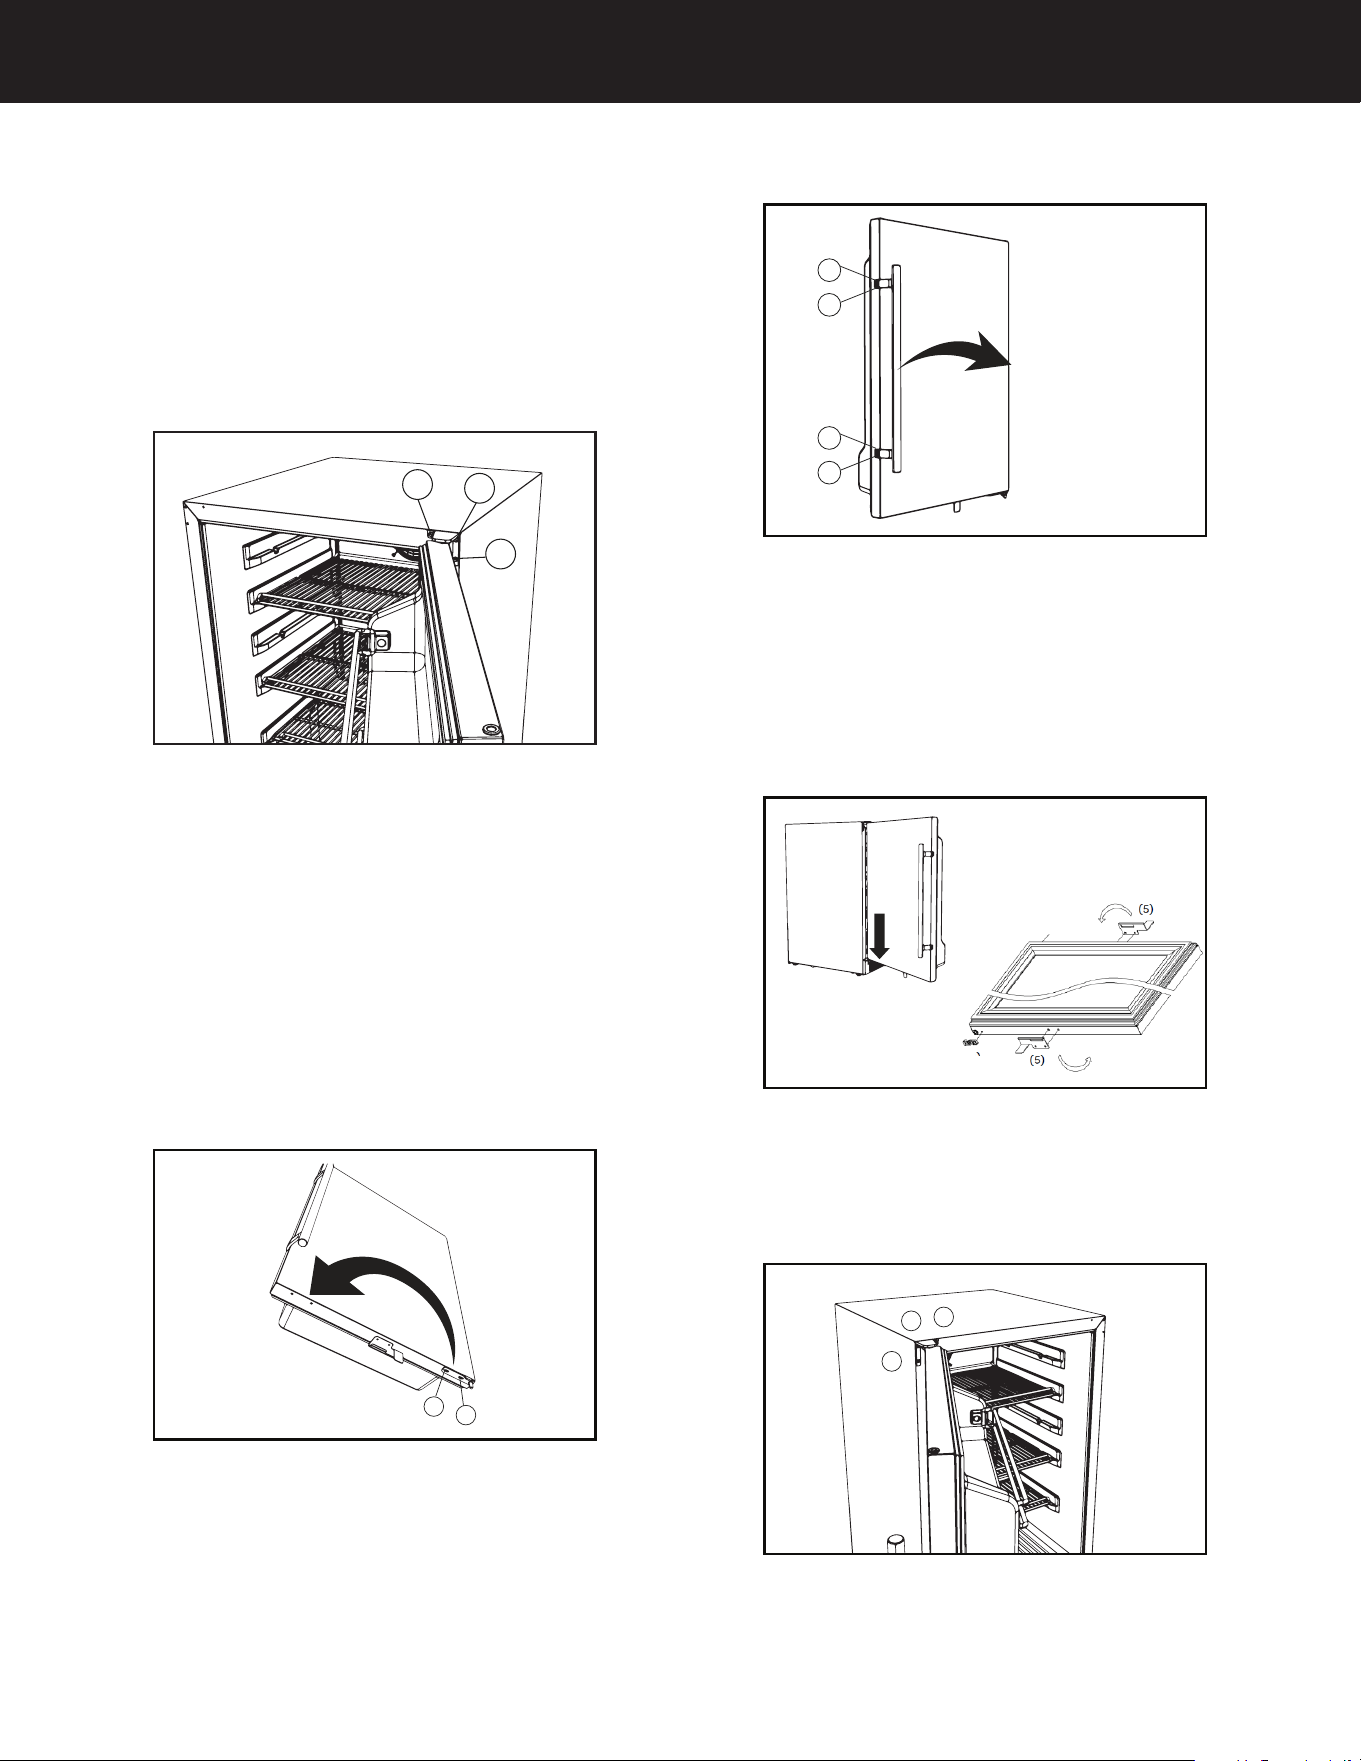
Step 1: Remove Top Right Hinge: Using a helper
locate the top right hinge on the refrigerator. Remove
the 3 screws securing the hinge plate using a screw-
driver. Set the hinge plate and screws aside. It may be
necessary to open or close the door partiality to allow
for access
Step 2: Remove the Door: Carefully lift the door
straight up off the bottom hinge pin. Set the door
aside on a soft, flat surface to prevent scratches.
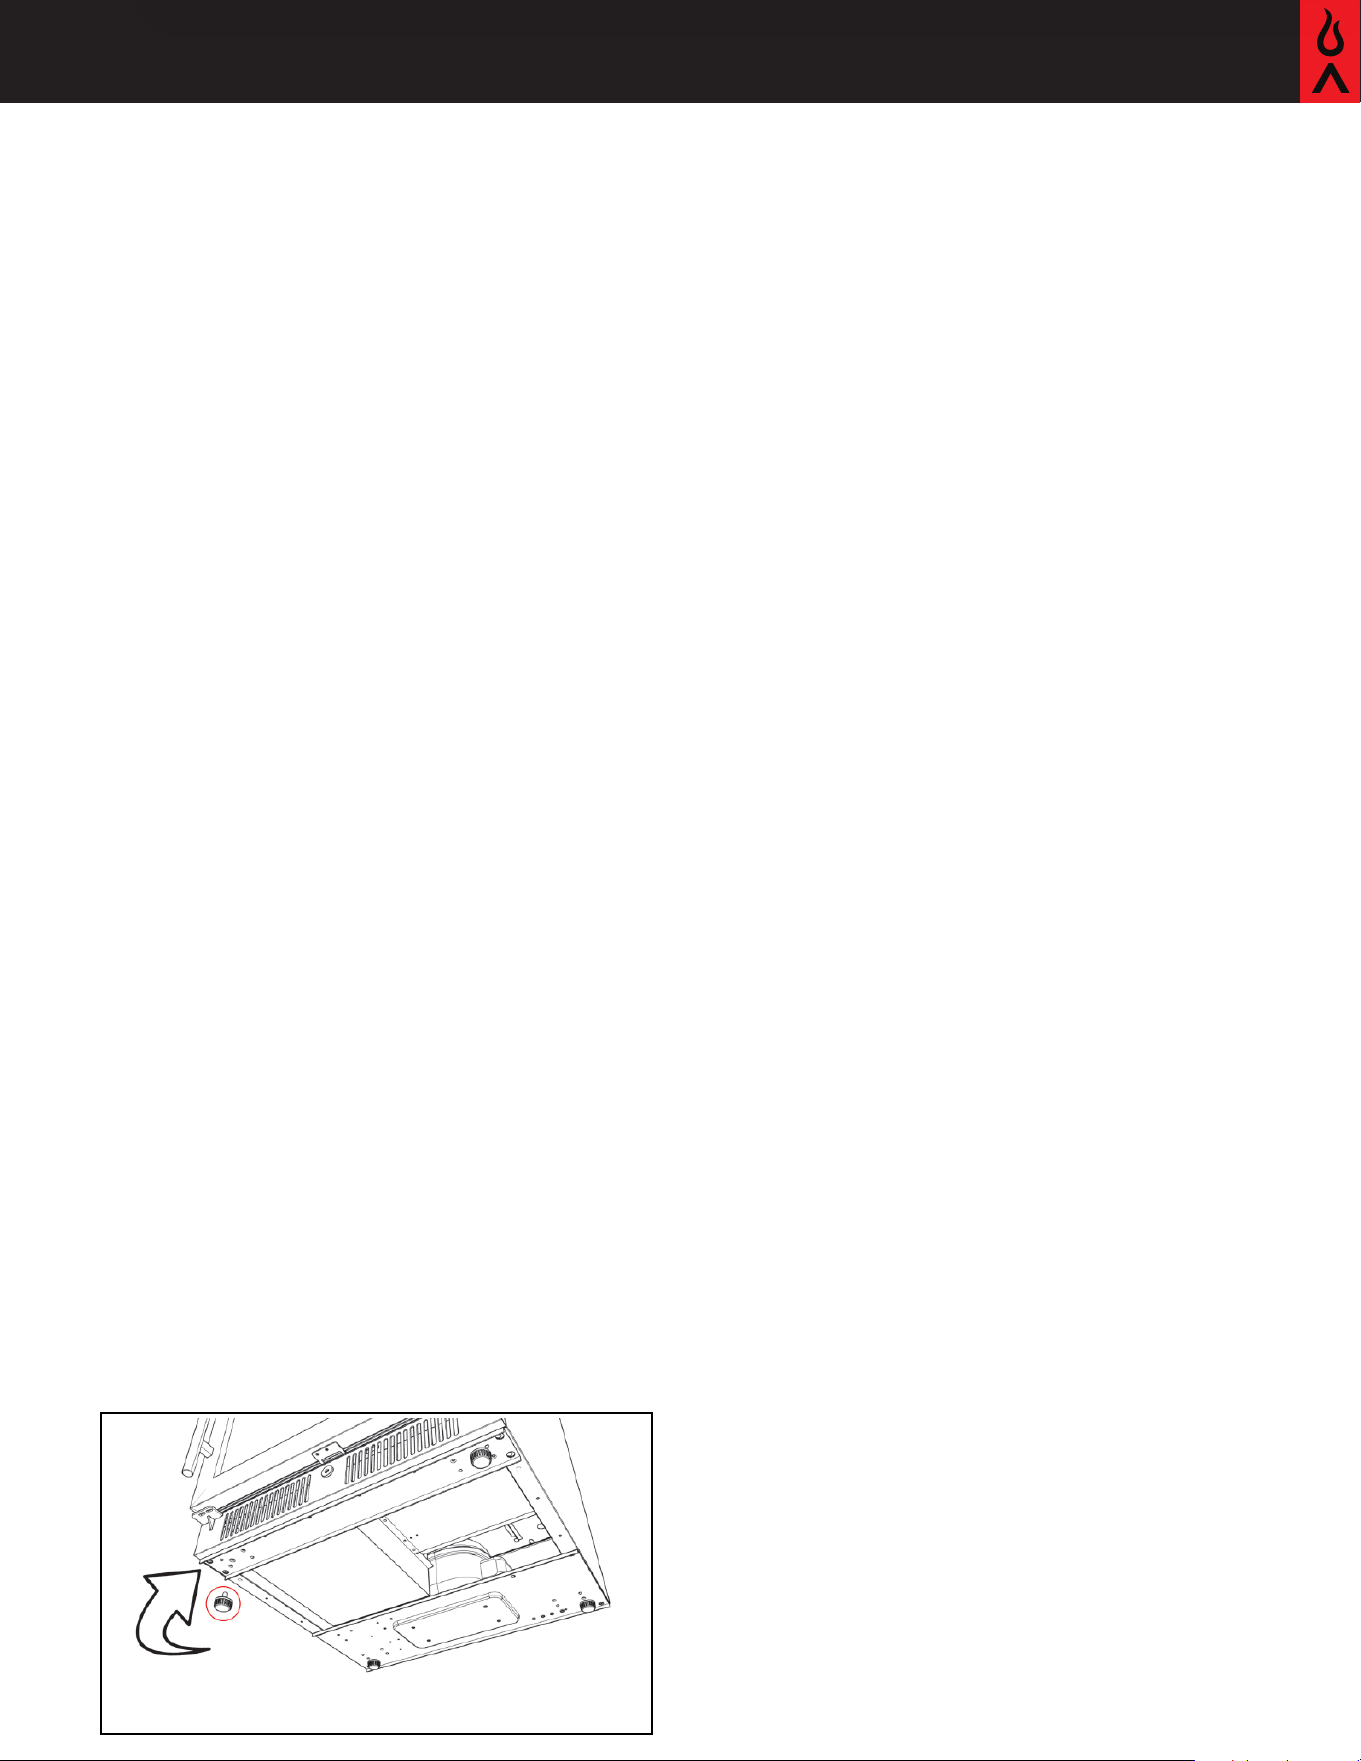
Step 3: Transfer Bottom Hinge Plate: Locate the
bottom hinge plate at the base of the door. Remove
the 2 screws holding the hinge plate. Move the hinge
plate to the opposite side of the door. With the BLZ-
GDBEV20-4.5 this will require flipping the door.
Secure it with the same 2 screws. Screw this through
the metal sticker on the bottom of the fridge door if
you have the BLZ-GDBEV20-4.5.
Step 4: Remove and Reposition Handle: If you have
the BLZ-SSRF20-4.3. Reattach the handle to the
opposite side of the door using the same screws.
1
2
How to Reverse the Door Swing
Step 5: Reattach the Door: Using a helper, care-
fully place the door onto the left bottom hinge pin.
Ensure the door is properly aligned and level. For BLZ-
SSRF-4.3, you need to use the left bottom hinge axis
plate in the accessory bag. For the BLZ-GDBEV20-4.5,
before attaching the door back to the hinges, you must
flip the door‘s ajar sensor to the bottom of the door
and the door stopper to the left bottom of the door.
Step 6: Attach Top Hinge on New Side: Take the top
hinge left plate that shipped with the fridge. Position it
on the top left corner of the refrigerator. Secure it with
the three screws you removed earlier.
Final Check: Open and close the door to ensure it
swings smoothly. Check that the door seal is making
proper contact all around, and the door ajar sensor is
being pushed in before tightening all the screws.
1
2
3
1
2
3
4
1
2
3
Step 4
Step 5
Step 6
Steps 2 & 3

BLZ-SSRF20-4.3/BLZ-GDBEV20-4.5
19
Care and Maintenance
Do not use boiling water to melt any frost, because it
may damage the plastic parts. In addition, never use a
sharp or metallic instrument to remove frost as it may
damage the cooling system and will void the warranty.
We recommend using a plastic scraper. To removed any
ice if necessary.
(A) Cleaning Your Unit:
Turn off the fridge, unplug the unit, and remove the
contents, shelf, and tray.
Wash the inside surfaces with a warm water and baking
soda solution. The solution should be about 2 tablespoons
of baking soda to a quart of water.
Wash the shelf and tray with a mild detergent solution.
The outside of the unit should be cleaned with mild
detergent and warm water.
Squeeze excess water out of the sponge or cloth before
cleaning the area of the controls, or any electrical parts.
Wash the outside cabinet with warm water and mild liquid
detergent. Rinse well and wipe dry with a clean soft cloth.
(B) Power Failure:
Most power failures are corrected within a few hours
and should not affect the temperature of your unit if
you minimize the number of times the door is opened.
If the power is going to be off for a longer period of
time, you need to take the proper steps to protect your
contents.
(C) Vacation Time:
Short vacations: Leave the unit operating during
vacations of less than three weeks.
Long vacations: If the appliance will not be used for
several months, remove all content and unplug the
power cord. Clean and dry the interior thoroughly. To
prevent odor and mold growth, leave the door open
slightly: blocking it open if necessary.
(D) Moving Your Unit:
• Remove all contents.
• Securely tape down all loose items inside your unit.
•
Turn the leveling legs up to the base to avoid damage.
• Tape or a bungee cord the door shut.
•
Be sure the unit stays secure in the upright position
during transportation. Also protect the outside of
unit with a blanket, or similar item.
(E) Energy Saving Tips:
•
The unit should be located in the coolest area of the
room, away from heat producing appliances, and out
of the direct sunlight.
•
Let hot items cool to room temperature before
placing in the unit. Overloading the unit forces the
compressor to run longer.
•
Wipe containers dry before placing them in the unit.
This cuts down on frost build-up inside the unit.
• Unit storage bin should not be lined with aluminum
foil, wax paper, or paper toweling.
•
Liners interfere with cold air circulation, making the
unit less efficient.
•
Organize and label contents to reduce door openings
and extended searches. Remove as many items as
needed at one time, and close the door as soon as
possible.

20
Blaze 20-Inch 4.3 Cu. Ft. Compact Refrigerator and 4.5 Cu. Ft. Compact Beverage Cooler
BlazeGrills.com
Warranty
The express warranties herein are exclusive and in
lieu of all other express warranties. We disclaim and
exclude all other express warranties for the products
and all warranties implied by law, including those of
merchantability and fitness for a particular purpose.
ATTENTION International Customers: Please consult
your selling dealer or distributor for specifics
pertaining to your product warranty and procedure.
Product repair as provided under this warranty is your
exclusive remedy. Manufacturer shall not be liable for
any incidental or consequential damages for breach
of any express or implied warranty on its products.
Some states do not allow the exclusion or limitation
of incidental or consequential damages or limitations
on the duration of implied warranties. As such, these
limitations may not apply to you. This warranty gives
you specific legal rights, and you may have other rights,
which vary from state to state.
This warranty is applicable in the United States and
Canada only.
5-Yr (limited) Warranty: Component
replacement. For five years from the date
of your original purchase of the Products,
we will provide, free of charge, Products or
parts (including LED light bulbs, if appli-
cable) to replace those that failed due
to manufacturing defects subject to the
exclusions and limitations below. In our
sole discretion, we may choose to repair
or replace parts before we elect to replace
the Products.
2-Yr Warranty: Compressor only. For two
years from the date of your original pur-
chase of the Products, we will provide, free
of charge, compressor parts to replace
those that failed due to manufacturing
defects subject to the exclusions and limi-
tations below. We may choose, in our sole
discretion, to repair or replace parts before
we elect to replace the Products.
1-Yr (limited) Full Replacement. Our obliga-
tion under this warranty is limited to repair
or replacement, at our option, of the prod-
uct during the warranty period. The extent
of any liability of the Manufacturer under
this warranty is limited to repair or replace-
ment. This warranty does not cover normal
wear of parts, damage resulting from any
of the following: negligent use or misuse
of the product, use contrary to operating
instructions, or alteration by anyone other
than our factory service center. The war-
ranty period is not extended by such repair
or replacement.
The warranty is for original owners only at the original
site of delivery and cannot be transferred to new
owners. You must retain your sales slip or invoice
as proof of purchase and the original purchase
date. To qualify for warranty service, notify us at the
address or telephone number below within 60 days
of discovering the defect, provide the model and
serial number, and describe the nature of the defect.
Blaze appliances are warrantied for single-family/
residential use only. The warranty does not cover labor
or labor-related charges, shipping & handling costs, or
diagnostic charges. All repair work must be performed by
a qualified professional service person. Work performed
by unqualified persons or incorrect installation will void
the warranty. Repair, and maintenance work should
be performed by an authorized service technician.
Improper maintenance, excessive humidity, chlorine,
fertilizers, lawn pesticides, chemicals, and salt can affect
the Stainless Steel components. For these reasons, the
warranty does NOT cover discoloration, surface rust,
or rust unless there is a loss of structural integrity
or rust-through of the appliance components. This
warranty covers defects in material and workmanship.
Blaze shall not be liable under this or any implied
warranty for incidental or consequential damages.
Blaze’s liability is limited to the purchase price of the
appliance only. Some states do not allow limitations
on the duration of implied warranties or the exclusion
or limitation of incidental or consequential damages.
As such, these limitations may not apply to you. This
warranty gives you specific legal rights, and you may
have other rights, which vary from state to state.
Warranty Service & Replacement Parts: To obtain
warranty service or replacement parts, contact your
authorized selling dealer or Blaze Grills directly. Be
prepared to provide the purchaser's name, model number
and serial number of the appliance, date of purchase,
and a detailed description of the problem. The owner
is responsible for proper installation, normal care and
maintenance, providing proof of purchase upon request,
and making the appliance accessible for service. In the
event of a warranty replacement, all costs associated
with removal, replacement, installation, and shipping
are the responsibility of the appliance owner.
Limitations of Warranty: Our obligation to repair or
replace, at our option, shall be your sole and exclusive
remedy under this warranty. We shall not be liable for
incidental, consequential, or special damages arising
out of or in connection with the use or performance of
the products.
W
A
R
R
A
N
T
Y
N
I
N
E
T
Y
D
A
Y
90
W
A
R
R
A
N
T
Y
O
N
E
Y
E
A
R
1
W
A
R
R
A
N
T
Y
T
H
R
E
E
Y
E
A
R
3
W
A
R
R
A
N
T
Y
F
I
V
E
Y
E
A
R
5
L
I
F
E
T
I
M
E
W
A
R
R
A
N
T
Y

BLZ-SSRF20-4.3/BLZ-GDBEV20-4.5
21
Frequently Asked Questions:
Q: Why is my unit not operating?
A: It could be because the unit is not plued in, the
circuit breaker has tripped or there’s a blown fuse, or
the temperature control is set to the "OFF" position.
Q: Why does the unit turn on and off frequently?
A: This may happen if the room temperature is hotter
than normal, a large number of items have been added
to the unit, the door is opened too often, the door is
not closed completely, the temperature control is not
set correctly, the door gasket does not seal properly,
or if the clearance from other high-heat appliances is
less than 10 inches.
Q: What should I do if the unit is vibrating?
A: Check to ensure that the unit is level.
Q: Why does the unit seem to make too much noise?
A: Some noise, like rattling, may come from the flow
of the refrigerant, which is normal. You may also hear
gurgling sounds as the refrigerant flows, or popping
and crackling noises due to the contraction and
expansion of the inside walls. Additionally, the unit
may not be level.
Q: Why won't the door close properly?
A: The door may not close properly because the unit
is not level, the door was reversed and not properly
installed, the gasket is dirty or bent, or the shelves,
bins, or baskets are out of position.
Please leave these
instructions with the
consumer.
Please read and retain
these instructions for
future reference and
before installation or
operation.
Contact Us:
Blaze
6620 Greenwell Springs Rd
Baton Rouge, LA 70805
Phone: 866-976-9510
customerservice@blazegrills.com
Contact Us:
@Blazegrills
@Blaze_Grills
@BlazeOutdoorProducts